Users Manual, User's Manual MX-B455W, MX-B355W ... - Sharp
838
Functions of the machine and procedures for placing originals and loading paper BEFORE USING THE MACHINE COPIER Using the copy function PRINTER Using the printer function FACSIMILE Using the fax function SCANNER / INTERNET FAX Using the scan / Internet fax function DOCUMENT FILING Storing jobs as files on the hard drive SYSTEM SETTINGS Configuring settings to make the machine easier to use Click to jump to the table of contents of the desired chapter. User's Manual DIGITAL MULTIFUNCTIONAL SYSTEM MODEL: MX-B355W MX-B455W
-
Upload
khangminh22 -
Category
Documents
-
view
2 -
download
0
Transcript of Users Manual, User's Manual MX-B455W, MX-B355W ... - Sharp

Functions of the machine and procedures for placing originals and loading paper
BEFORE USING THE MACHINE
COPIERUsing the copy function
PRINTERUsing the printer function
FACSIMILEUsing the fax function
SCANNER / INTERNET FAXUsing the scan / Internet fax function
DOCUMENT FILINGStoring jobs as files on the harddrive
SYSTEM SETTINGSConfiguring settings to make themachine easier to use
Click to jump to the table of contents of the desired chapter.
User's Manual
DIGITAL MULTIFUNCTIONAL SYSTEM
MODEL: MX-B355WMX-B455W

i
HOW TO USE THIS MANUALClick a button below to move to the page that you wish to view.The following explanation assumes that Adobe Reader XI is being used (Some buttons do not appear in the default state.).
(1) Return to top page button
If an operation does not proceed as expected, click this button to start over again.
(2) Back one page button
Displays the previous page.
(3) Forward one page button
Displays the next page.
(4) Return to previously displayed page button
Displays the page that was displayed before the current page.
(5) Title button
Displays the page of the title indicated by the button.
(6) Contents button
Displays the contents of each chapter.For example, if the current page is part of the printer chapter, the table of contents of the printer chapter appears.
(1) (2) (3) (4)
(6)(5)
If a button does not appear, refer to Adobe Reader Help to display the button.

ii
ABOUT OPERATION MANUALThis manual explains how to use the MX-B355W/MX-B455W digital multifunctional system.
Please note• For information on installing the drivers and software cited in this manual, please refer to the Software Setup Guide.
• For information on your operating system, please refer to your operating system manual or the online Help function.
• The explanations of screens and procedures in a Windows environment are primarily for Windows® 10. The screens may be different depending on the version of the operating system or the software application.
• The explanations of screens and procedures in a Macintosh environment are based on Mac OS X v10.12 in the case of Mac OS X. The screens may be different depending on the version of the operating system or the software application.
• Wherever "MX-xxxx" appears in this manual, please substitute your model name for "xxxx".
• Considerable care has been taken in preparing this manual. If you have any comments or concerns about the manual, please contact your dealer or nearest SHARP Service Department.
• This product has undergone strict quality control and inspection procedures. In the unlikely event that a defect or other problem is discovered, please contact your dealer or nearest SHARP Service Department.
• Aside from instances provided for by law, SHARP is not responsible for failures occurring during the use of the product or its options, or failures due to incorrect operation of the product and its options, or other failures, or for any damage that occurs due to use of the product.
Warning• Reproduction, adaptation or translation of the contents of the manual without prior written permission is prohibited, except as
allowed under copyright laws.
• All information in this manual is subject to change without notice.
Illustrations and the operation panel and touch panel shown in this manualThe peripheral devices are generally optional, however, some models include certain peripheral devices as standard equipment.
The explanations in this manual assume that paper feed units are installed on the MX-B455W.
For some functions and procedures, the explanations assume that devices other than the above are installed.
Icons used in the manualsThe icons in the manuals indicate the following types of information:
The display screens, messages, and key names shown in the manual may differ from those on the actual machine due to product improvements and modifications.
This alerts you to a situation that could result in death or serious personal injury. This alerts you to a situation that could result in personal injury or damage to properties.
This explains how to stop or correct an operation.
This alerts you to a situation where there is a risk of machine damage or failure.
This describes a routine work relevant to setting mode.
This supplements function or operation procedure.
1-1
BEFORE USING THE MACHINE
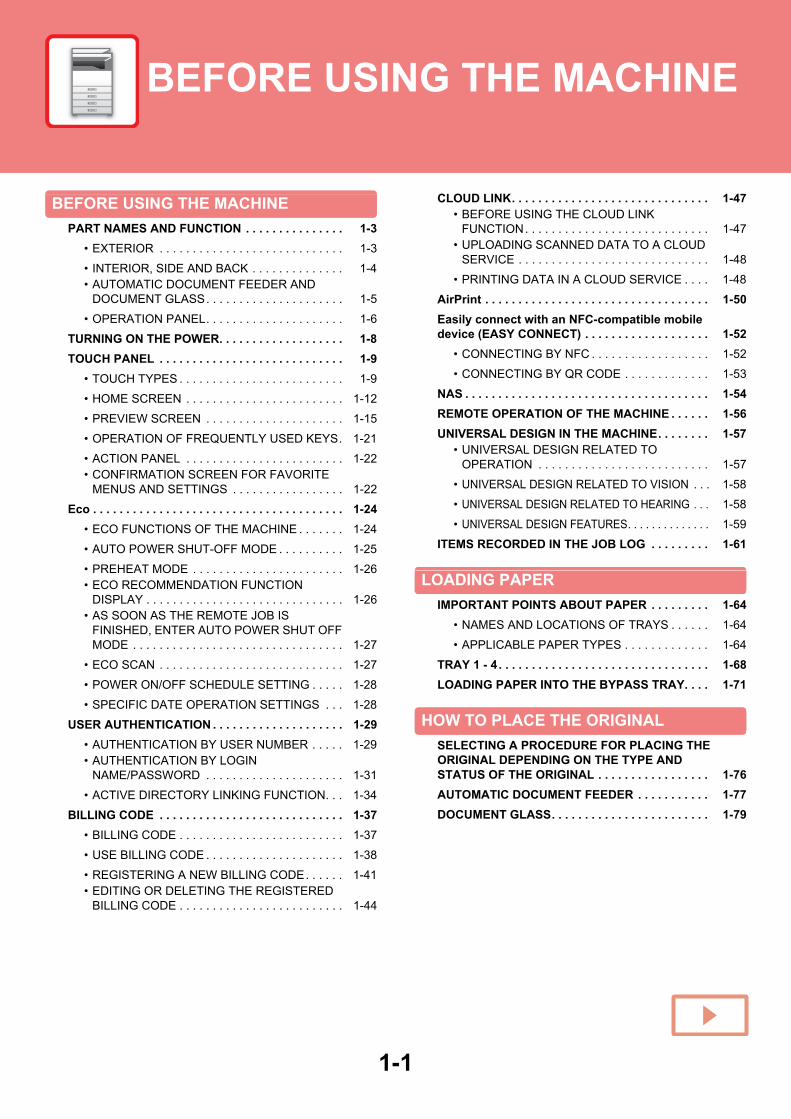
PART NAMES AND FUNCTION . . . . . . . . . . . . . . . 1-3
• EXTERIOR . . . . . . . . . . . . . . . . . . . . . . . . . . . . 1-3
• INTERIOR, SIDE AND BACK . . . . . . . . . . . . . . 1-4• AUTOMATIC DOCUMENT FEEDER AND
DOCUMENT GLASS. . . . . . . . . . . . . . . . . . . . . 1-5
• OPERATION PANEL. . . . . . . . . . . . . . . . . . . . . 1-6
TURNING ON THE POWER. . . . . . . . . . . . . . . . . . . 1-8
TOUCH PANEL . . . . . . . . . . . . . . . . . . . . . . . . . . . . 1-9
• TOUCH TYPES . . . . . . . . . . . . . . . . . . . . . . . . . 1-9
• HOME SCREEN . . . . . . . . . . . . . . . . . . . . . . . . 1-12
• PREVIEW SCREEN . . . . . . . . . . . . . . . . . . . . . 1-15
• OPERATION OF FREQUENTLY USED KEYS. 1-21
• ACTION PANEL . . . . . . . . . . . . . . . . . . . . . . . . 1-22• CONFIRMATION SCREEN FOR FAVORITE
MENUS AND SETTINGS . . . . . . . . . . . . . . . . . 1-22
Eco . . . . . . . . . . . . . . . . . . . . . . . . . . . . . . . . . . . . . . 1-24
• ECO FUNCTIONS OF THE MACHINE . . . . . . . 1-24
• AUTO POWER SHUT-OFF MODE . . . . . . . . . . 1-25
• PREHEAT MODE . . . . . . . . . . . . . . . . . . . . . . . 1-26• ECO RECOMMENDATION FUNCTION
DISPLAY . . . . . . . . . . . . . . . . . . . . . . . . . . . . . . 1-26• AS SOON AS THE REMOTE JOB IS
FINISHED, ENTER AUTO POWER SHUT OFF MODE . . . . . . . . . . . . . . . . . . . . . . . . . . . . . . . . 1-27
• ECO SCAN . . . . . . . . . . . . . . . . . . . . . . . . . . . . 1-27
• POWER ON/OFF SCHEDULE SETTING . . . . . 1-28
• SPECIFIC DATE OPERATION SETTINGS . . . 1-28
USER AUTHENTICATION . . . . . . . . . . . . . . . . . . . . 1-29
• AUTHENTICATION BY USER NUMBER . . . . . 1-29• AUTHENTICATION BY LOGIN
NAME/PASSWORD . . . . . . . . . . . . . . . . . . . . . 1-31
• ACTIVE DIRECTORY LINKING FUNCTION. . . 1-34
BILLING CODE . . . . . . . . . . . . . . . . . . . . . . . . . . . . 1-37
• BILLING CODE . . . . . . . . . . . . . . . . . . . . . . . . . 1-37
• USE BILLING CODE . . . . . . . . . . . . . . . . . . . . . 1-38
• REGISTERING A NEW BILLING CODE. . . . . . 1-41• EDITING OR DELETING THE REGISTERED
BILLING CODE . . . . . . . . . . . . . . . . . . . . . . . . . 1-44
CLOUD LINK. . . . . . . . . . . . . . . . . . . . . . . . . . . . . . 1-47• BEFORE USING THE CLOUD LINK
FUNCTION. . . . . . . . . . . . . . . . . . . . . . . . . . . . 1-47• UPLOADING SCANNED DATA TO A CLOUD
SERVICE . . . . . . . . . . . . . . . . . . . . . . . . . . . . . 1-48
• PRINTING DATA IN A CLOUD SERVICE . . . . 1-48
AirPrint . . . . . . . . . . . . . . . . . . . . . . . . . . . . . . . . . . 1-50
Easily connect with an NFC-compatible mobile device (EASY CONNECT) . . . . . . . . . . . . . . . . . . . 1-52
• CONNECTING BY NFC . . . . . . . . . . . . . . . . . . 1-52
• CONNECTING BY QR CODE . . . . . . . . . . . . . 1-53
NAS . . . . . . . . . . . . . . . . . . . . . . . . . . . . . . . . . . . . . 1-54
REMOTE OPERATION OF THE MACHINE . . . . . . 1-56
UNIVERSAL DESIGN IN THE MACHINE. . . . . . . . 1-57• UNIVERSAL DESIGN RELATED TO
OPERATION . . . . . . . . . . . . . . . . . . . . . . . . . . 1-57
• UNIVERSAL DESIGN RELATED TO VISION . . . 1-58
• UNIVERSAL DESIGN RELATED TO HEARING . . . 1-58
• UNIVERSAL DESIGN FEATURES. . . . . . . . . . . . . . 1-59
ITEMS RECORDED IN THE JOB LOG . . . . . . . . . 1-61
LOADING PAPER
IMPORTANT POINTS ABOUT PAPER . . . . . . . . . 1-64
• NAMES AND LOCATIONS OF TRAYS . . . . . . 1-64
• APPLICABLE PAPER TYPES . . . . . . . . . . . . . 1-64
TRAY 1 - 4 . . . . . . . . . . . . . . . . . . . . . . . . . . . . . . . . 1-68
LOADING PAPER INTO THE BYPASS TRAY. . . . 1-71
HOW TO PLACE THE ORIGINAL
SELECTING A PROCEDURE FOR PLACING THE ORIGINAL DEPENDING ON THE TYPE AND STATUS OF THE ORIGINAL . . . . . . . . . . . . . . . . . 1-76
AUTOMATIC DOCUMENT FEEDER . . . . . . . . . . . 1-77
DOCUMENT GLASS. . . . . . . . . . . . . . . . . . . . . . . . 1-79
BEFORE USING THE MACHINE

1-2
BEFORE USING THE MACHINE
STOPPING/DELETING A JOB, PRIORITY PROCESSING AND CHECKING THE STATUS
TYPES OF JOB STATUS SCREENS . . . . . . . . . . . 1-80
STOPPING/DELETING A JOB IN PROGRESS OR RESERVED . . . . . . . . . . . . . . . . . . . . . . . . . . . . . . . 1-82
PRIORITY PROCESSING OF A RESERVED JOB . 1-83
CHECKING A RESERVED JOB OR THE JOB IN PROGRESS . . . . . . . . . . . . . . . . . . . . . . . . . . . . . . . 1-85
CHECKING COMPLETED JOBS. . . . . . . . . . . . . . . 1-86
READING THE JOB LIST . . . . . . . . . . . . . . . . . . . . 1-87
ADDRESS BOOK
ADDRESS BOOK. . . . . . . . . . . . . . . . . . . . . . . . . . . 1-90
ADDRESS BOOK SCREEN. . . . . . . . . . . . . . . . . . . 1-91
STORING ADDRESSES THROUGH DIRECT ENTRY . . . . . . . . . . . . . . . . . . . . . . . . . . . . . . . . . . . 1-94
STORING ADDRESSES THROUGH GLOBAL ADDRESS SEARCH . . . . . . . . . . . . . . . . . . . . . . . . 1-95
STORING ADDRESSES FROM FAX OR IMAGE SEND LOGS. . . . . . . . . . . . . . . . . . . . . . . . . . . . . . . 1-97
STORING GROUPS . . . . . . . . . . . . . . . . . . . . . . . . . 1-98
EDITING/DELETING ADDRESSES IN ADDRESS BOOK . . . . . . . . . . . . . . . . . . . . . . . . . . . . . . . . . . . . 1-100
SETTING THE SCOPE FOR PUBLICIZING CONTACTS AND GROUPS. . . . . . . . . . . . . . . . . . . 1-102
DELETING THE TRANSMISSION HISTORY . . . . . 1-103
PERIPHERAL DEVICES
PERIPHERAL DEVICES . . . . . . . . . . . . . . . . . . . . . 1-104
INNER FINISHER . . . . . . . . . . . . . . . . . . . . . . . . . . . 1-105
• PART NAMES . . . . . . . . . . . . . . . . . . . . . . . . . . 1-105
• SUPPLIES . . . . . . . . . . . . . . . . . . . . . . . . . . . . . 1-106
• INNER FINISHER MAINTENANCE. . . . . . . . . . 1-106
Sharp OSA . . . . . . . . . . . . . . . . . . . . . . . . . . . . . . . . 1-108
• APPLICATION COMMUNICATION. . . . . . . . . . 1-108
• EXTERNAL ACCOUNT APPLICATION . . . . . . 1-109
REMOVING MISFEEDS
REMOVING MISFEEDS . . . . . . . . . . . . . . . . . . . . . . 1-111
MAINTENANCE
REGULAR MAINTENANCE . . . . . . . . . . . . . . . . . . 1-112• CLEANING THE DOCUMENT GLASS AND
AUTOMATIC DOCUMENT FEEDER. . . . . . . . 1-112
• CLEANING THE BYPASS FEED ROLLER . . . 1-114
• CLEANING THE PAPER FEED ROLLER . . . . 1-114
REPLACEMENT OF TONER CARTRIDGE . . . . . . 1-115
CHARACTER ENTRY
NAMES AND FUNCTIONS OF SOFT KEYBOARD KEYS . . . . . . . . . . . . . . . . . . . . . . . . . . . . . . . . . . . . 1-118

1-3
BEFORE USING THE MACHINE►BEFORE USING THE MACHINE
PART NAMES AND FUNCTIONEXTERIOR
(1) Automatic document feeder
It automatically feeds and scans multiple originals. 2-sided originals can be automatically scanned. For the MX-B455W, both sides of 2-sided originals can be automatically scanned at one time.► AUTOMATIC DOCUMENT FEEDER (page 1-77)
(2) Output tray (exit tray cabinet)Received faxes and printed papers are delivered to this tray.
(3) Operation panelThis panel hosts the [Power] button, [Power Save] button/indicator, error indicator, [Home Screen] button, main power button, data notification indicator and touch panel.Use the touch panel to operate each of these functions. ► OPERATION PANEL (page 1-6)
(4) USB port (A type)This is used to connect a USB device such as a USB memory device to the machine.Supports USB 2.0 (Hi-Speed).If USB memory devices are connected to both the front and back sides, only the USB memory device that was inserted first will be recognized.
(5) Bypass trayUse this tray to feed paper manually.When loading paper, also open the extension tray.► LOADING PAPER INTO THE BYPASS TRAY (page 1-71)
(6) Inner finisher*
This staples paper. ► INNER FINISHER (page 1-105)
(7) Tray 1Store paper in this tray.► TRAY 1 - 4 (page 1-68)
(8) Tray 2 (when a 600-sheet paper feed unit is installed)*
Store paper in this tray.► TRAY 1 - 4 (page 1-68)
(9) Tray 3 (when two 600-sheet paper feed units are installed)*
Store paper in this tray.► TRAY 1 - 4 (page 1-68)
(10) Tray 4 (when three 600-sheet paper feed units are installed)*
Store paper in this tray.► TRAY 1 - 4 (page 1-68)
(11) Front coverOpen this cover to replace a toner cartridge.► REPLACEMENT OF TONER CARTRIDGE (page 1-115)
* Optional
BEFORE USING THE MACHINE
(2) (5)(1)(1) (3) (4)
(7)(6) (8) (9) (10) (11)
MX-B355W

1-4
BEFORE USING THE MACHINE►BEFORE USING THE MACHINE
INTERIOR, SIDE AND BACK
(1) Fusing unit Heat is applied here to fuse the transferred image onto the paper.
(2) Photoconductive drumImages are formed on the photoconductive drum.
(3) LAN connectorConnect the LAN cable to this connector when the machine is used on a network.Use a shielded LAN cable.
(4) USB port (B type)
The machine does not use this connector.
(5) USB port (A type)This is used to connect a USB device such as a USB memory device to the machine.Supports USB 2.0 (Hi-Speed).If USB memory devices are connected to both the front and back sides, only the USB memory device that was inserted first will be recognized.
(6) Toner cartridge
This cartridge contains toner.When the toner in a cartridge runs out, replace with new one.► REPLACEMENT OF TONER CARTRIDGE (page
1-115)
(7) Right side coverOpen this cover to remove a paper misfeed.
(8) Telephone line jack (LINE)When the fax function of the machine is used, the telephone line is connected to this jack.
(9) Extension phone jack (TEL)When the fax function of the machine is used, an extension phone can be connected to this jack.
(10) The main power switchUse this switch to turn on the power for the machine.When using the fax or Internet fax functions, always keep this switch in the “ ” position.► TURNING ON THE POWER (page 1-8)
(11) Power plug
(12) Handle Grasp it when moving the machine.
(6) (7) (12)(8) (9) (10) (11)
(1) (2) (3) (5)(4)
The fusing unit is hot. Take care not to burn yourself when removing a misfeed.
Do not touch or damage the transfer belt.This may cause a defective image.

1-5
BEFORE USING THE MACHINE►BEFORE USING THE MACHINE
AUTOMATIC DOCUMENT FEEDER AND DOCUMENT GLASS
MX-B355W
MX-B455W
(1) Document feeding cover Open this cover to remove an original misfeed.This cover is also opened to clean the paper feed roller.► CLEANING THE PAPER FEED ROLLER (page 1-114)
(2) Original guides These guides help ensure that the original is scanned correctly.Adjust the guides to the width of the original.
(3) Document feeder trayPlace the original.Place the original with the print side facing up.► AUTOMATIC DOCUMENT FEEDER (page 1-77)
(4) Original exit tray The original is discharged to this tray after scanning.
(5) Scanning area Originals placed in the automatic document feeder are scanned here.► CLEANING THE DOCUMENT GLASS AND
AUTOMATIC DOCUMENT FEEDER (page 1-112)
(6) Document glass If you want to scan books or other thick originals that cannot be fed through the automatic document feeder, place them on this glass.► DOCUMENT GLASS (page 1-79)
(7) Paper feed roller This roller rotates to automatically feed the original.
(1) (3) (4)
(7)
(5) (6)(2)
(1) (3) (4)
(7)
(5) (6)(2)

1-6
BEFORE USING THE MACHINE►BEFORE USING THE MACHINE
OPERATION PANELThis section describes the names and functions of the respective parts of the operation panel.
(1) Data notification indicatorThe indicator lights solidly or blinks to indicate the status of a job.► DATA NOTIFICATION INDICATOR AND ERROR
INDICATOR (page 1-7)
(2) Touch panel Messages and keys appear on the touch panel display.Operate the machine by directly tapping the displayed keys.► TOUCH TYPES (page 1-9)
(3) Error indicatorLights solidly or blinks to indicate the status of the error.► DATA NOTIFICATION INDICATOR AND ERROR
INDICATOR (page 1-7)
(4) Main power indicator This lamp lights up when the machine's main power switch is in the “ ” position.Blinks green during the time that the [Power] button does not operate immediately after the main power switch is switched on.► TURNING ON THE POWER (page 1-8)
(5) [Power] button Use this button to turn the machine's power on and off.► TURNING ON THE POWER (page 1-8)
(6) [Power Save] button/indicatorUse this button to set the machine to Sleep mode for energy saving.[Power Save] button blinks when the machine is in Sleep Mode.► AUTO POWER SHUT-OFF MODE (page 1-25)
(7) [Home Screen] key Use this button to display the home screen.► HOME SCREEN (page 1-12)
(1) (2) (3) (4) (5) (6) (7)
[Home Screen] key Use your finger to touch the [Home Screen] key.If you use a pen or other tool to touch the key, it may not operate properly.Risk of malfunctioning if you use with jewelry or other accessories.
You can change the angle of the touch panel.

1-7
BEFORE USING THE MACHINE►BEFORE USING THE MACHINE
DATA NOTIFICATION INDICATOR AND ERROR INDICATORThe data notification indicator and the error indicator lights solidly or blinks to indicate the status of the machine.
Error indicator (red) Data notification indicator (green)
Pattern 1 Pattern 2 Pattern 3
Solidly Errors that do not stop machine operation, such as almost out of toner.
Job in progress, such as paper feeding or output.
Ready state or other state where jobs can be accepted.
An original has been placed in the document feeder
Blinks Errors that stop machine operation, such as misfeeds and out of toner.
A fax is being received
On/Blinking Priority
Blinking Priority Blinking Priority Blinking Priority On Priority
• To set the status indicated by the data notification indicatorIn "Settings (administrator)", select [System Settings] → [Common Settings]→ [Device Control] → [Data Indicator Setting].
• To set the error indicationSet in "Settings (administrator)" →[System Settings] → [Common Settings] → [Device Control] → [Error Light Setting].

1-8
BEFORE USING THE MACHINE►BEFORE USING THE MACHINE
TURNING ON THE POWERThis section describes how to turn on/off the machine's power and how to restart the machine.Operate two power switches: the main power located on the side, and the [Power] button on the operation panel.
Turning on the power• Turn the main power switch to the " " position.• When the main power indicator lights in green, press the [Power] button.
Turning off the powerTurn off the power by pressing the [Power] button, then turn the main power switch to the " " position.
Restart the machineTurn off the power by pressing the [Power] button and then press it again to turn on the power.
• When turning off the main power switch, press the [Power] button on the operation panel and then turn the main power switch to the " " position.In a sudden case of main power outage, turn the power for the machine back on and then turn it off in the correct order.If the machine is left for a long time with the main power having been turned off prior to the [Power] button being turned off, abnormal noises, degraded image quality or other problems may result.
• Turn off both the [Power] button and the main power switch and unplug the power cord if you suspect a machine failure, if there is a bad thunderstorm nearby, or when you are moving the machine.
• When using the fax or Internet fax function, always keep the main power switch in the " " position.
• In order for some settings to take effect, the machine must be restarted. In some states of the machine, restarting with the [Power] button may not make the settings take effect. In this case, turn off the main power switch and then turn it on again.
Main power indicator [Power] button
The main power switch

1-9
BEFORE USING THE MACHINE►BEFORE USING THE MACHINE
TOUCH PANEL
TOUCH TYPESIn addition to tapping, equivalent to conventional touching, the touch panel of the machine can be operated by long touching, flicking and sliding.
Operation types
TappingTouch the panel with your finger and then lift it quickly. Use this method to select a key, tab or check box.
Sliding Slide the scroll bar (with your finger touching the panel) to scroll up and down a list with a large number of items.
Long touching Touch the panel with your finger and hold it for a while.Keep holding (long touching) it on the action panel or characters in the text box to display characters in a balloon.
Double tapping Touch the screen twice. Use this operation to enlarge the image in the preview.
Flicking Flick the panel to scroll a preview image quickly.
Pinch Touch the screen with two fingers and move them toward each other. This is used to reduce the browser and preview display.
Dragging Drag (slide your finger touching the panel in a random direction) to replace a page in the original during preview.
SpreadTouch the screen with two fingers and move them away from each other. This is used to enlarge the browser and preview display.
Sharp OSA
No. of copies 1
Text/Printed Photo
Photo
Text/Photo
3
EasyScan
HDDFile retrieve
Data in Folder
Job Status
Send and Print
Call Eco Program
Store Data Temporarily
LINE PRINTER

1-10
BEFORE USING THE MACHINE►BEFORE USING THE MACHINE
Operation on respective screens
Key (tapping)A. Tap to select an item. The selected key turns into a different color.B. Tap numeric keys to enter numbers.C. Tap to increase or decrease the value. Long touching causes the value to be increased or decreased until you stop
touching.D. Tap to enter a checkmark and enable the setting.E. Tap here to close the screen.
List (tapping, sliding and flicking)A. Tap to select an item. The selected item turns into a different color.B. Slide the bar up and down.
It appears when the item does not fit in the screen.C. Flick the key upwards or downwards. The item scrolls up or down.
Slider (sliding)A. Slide the knob from side to side.
Change Size/Direction.Original
Change Paper Feed TrayPaper Select
2-Sided Copy
Background Adjustment
8½x118½x11
Others
Back
Preview
Start
CA
(A)
(B) (B)
(E)
(C)(D)(C)
Preview
SpeakerStart
WABC
Address
All
FrequentUse
Narrow Down
AllCategory
All
Sending History
Call by Search Number
Print Individual List
Call Search Number
Add New
Send Same Imageas Fax Address
Category 0
Category 1
Category 5
Category 3
Category 2
Category 4
Category 6
CA
(A)
(C) (B)
Back 8½x118½x11
Others
Preview
OriginalChange Size/Direction.
EraseErase Shadow Around
SharpnessAdjust Outline of Image
ExposureSelect Type/Exposure
Start
CA
(A)

1-11
BEFORE USING THE MACHINE►BEFORE USING THE MACHINE
Tab (tapping)A. Tap a tab to switch what is displayed.
Preview screen (Double tapping/ Pinch/ Spread)A. When a preview screen is "pinched", the screen image is reduced. When "spread", the image is enlarged.
When "Double tapping", the image is also enlarged.
8½x118½x11
Preview CA
Others
No. of copies
Skip Blank Page in Original
Copy RatioEnlarge/Reduce Copy
Blank Page Skip
Background Adjustment
2-Sided Copy
Start
216 x 330 216 x 340
216 x 343
8 x 11(A)
1 / 7
Send and Print
Scan Original AgainWithout change Settings
Store Data in FolderFile
Store Data TemporarilyQuick File
Start
CA
(A)

1-12
BEFORE USING THE MACHINE►BEFORE USING THE MACHINE
HOME SCREENPressing the [Home Screen] key on the operation panel displays the home screen on the touch panel. The home screen displays the keys for selecting modes or functions.
For procedures for adding and deleting shortcut keys, see "U/I Customize Guide".
• To set the home screen for each "Favorite Operation Group List":In "Settings (administrator)", select [User Control] → [Favorite Operation Group List] → [Home Screen List].Perform this setting when user authentication is used.
• To display the External Service Connect shortcut keys:You can add shortcut keys for the External Service Connect functions (Google Drive, OneDrive, SharePoint Online, Gmail, Exchange (E-Mail)) to the home screen.These functions can be enabled in the system settings. When a function is enabled in the system settings, you can add a shortcut key for that function to the home screen.External Service Connect settings are configured in "Settings (administrator)" - [System Settings] → [Network Settings] → [External Print Services Settings].
EasyCopy
Tap a mode to change tothat mode.
►Changing modefrom the mode display
(page 1-14)
Select shortcut keys formodes or functions.►Changing mode
from the Homescreen (page 1-14)
Use these keys to selectfunctions that make themachine easier to use.
Displays the machine's status other than the job using icons.► Icon indicating the status of the machine (page
1-13)Displays the job in progress or waiting with text or icon.
Select functions that can be utilized in respective modes.Tap the tab, and the list of function keys is displayed.► ACTION PANEL
(page 1-22)
Switch the pages for displaying shortcut keys.
Displays the time.

1-13
BEFORE USING THE MACHINE►BEFORE USING THE MACHINE
Icon indicating the status of the machine
* Contact your dealer or nearest SHARP Service Department.
Icon Machine status Icon Machine status
Printer data is being processed. A USB device is installed.
Printer data is being printed. The field support system is enabled.
Send data exists. Single-byte alphanumeric character entry
Forward error data exists. A data security kit is installed.
Received data exists. Connecting to the access point (Level 4)
Received confidential fax data exists. Connecting to the access point (Level 3)
Received data is held. Connecting to the access point (Level 2)
Received preview data exists. Connecting to the access point (Level 1)
OSA communication is in progress. Not connected to the access point
Enlarge display mode is enabled. Bad connection of the wireless LAN device in the machine*
Eco mode is enabled. Waiting for the access point
A maintenance notification is issued. A LAN cable is not connected.
Remote operation is in progress.

1-14
BEFORE USING THE MACHINE►BEFORE USING THE MACHINE
CHANGING MODES
Changing mode from the Home screen Changing mode from the mode display
10:15 AM10:15 AM
EasyCopy
Press the [Home Screen] key.
Tap the mode icon.
CAPreview
Copies
Original8½x11
PaperSelect
Tray 1 1 → 1
8½x112-Sided Copy Copy Ratio Staple
100%
Detail
LINE PRINTEREasyCopy
EasyScan
HDDFile retrieve
Sharp OSA Job Status
Off
Start
CAPreview Auto Set
Original8½x11 Address
Address Book Sending History GlobalAddress Search
Scan to HDD/USB
Detail
LINE PRINTEREasyCopy
EasyScan
HDDFile retrieve
Sharp OSA Job Status
StartColorStart
B/W
E-mail Address
Tap on the mode display.
CAPreview Auto Set
OriginalAddress Fax Number Detail
LINE PRINTEREasyCopy
EasyScan
HDDFile retrieve
Sharp OSA Job Status
StartColorStart
Address Book Scan to HDD/USB
8½x11
Select the mode.
Network Folder
Easy Fax
Easy Scan
Easy Copy
Fax E-Mail
FTP/Desktop
Internet Fax
B/W
Tap the key that shows .
Tap for any mode desired.
For procedures for editing the home screen, see "U/I Customize Guide".

1-15
BEFORE USING THE MACHINE►BEFORE USING THE MACHINE
PREVIEW SCREENIn the preview screen, you can view output images or images stored in the machine using the touch panel.
Keys used in the preview screen
* Can also be used in Easy mode.
This changes the mode to edit mode. Pages of the original can be changed, rotated, or deleted.
* This rotates the preview image of whole page in the arrow's direction. The printing result is not rotated.
* This reduces the image.
,
* This displays preview images of respective pages.
* This displays the scroll bar for enlargement/reduction operations. Moving the slider to the left reduces the image, and moving the slider to the right enlarges the image.
This displays thumbnails of preview images.
* This enlarges the image. * This displays pages in a 3D view.
• The display position of an image can be moved by dragging it while it is enlarged.
• To enlarge an image, double-tap it when the preview image is displayed by page.
Start
Preview
ScanAgain
CA Start
Send and Print
Scan Original AgainWithout change Settings
Store Data in FolderFile
Store Data TemporarilyQuick File
CA
In Easy mode In Normal mode

1-16
BEFORE USING THE MACHINE►BEFORE USING THE MACHINE
Deleting a page
1In the preview screen, tap to switch to edit mode.
2Tap the page you want to delete, and tap .
• You can also delete the page by tapping [Delete the Page] on the action panel.
• You can also delete the page by dragging a page to .
• To undo the deletion, tap . To redo the deletion, tap .
3Tap the [Edit End] key.
5
Edit End
Move the Page
Rotate 180 Degrees
Specify Chapter Inserts
Insert Blank Page
Delete the Page
Erase Specified Original AreaErase Specified Range
52 3 41
4
Edit End
Cancel and ReturnSelect the location to move.
21 3 4 5
4
Edit End
Move the Page
Rotate 180 Degrees
Insert Blank Page
Delete the Page
Erase Specified Original AreaErase Specified Range
4321

1-17
BEFORE USING THE MACHINE►BEFORE USING THE MACHINE
Moving a page
Rotating a page
1In the preview screen, tap to switch to edit mode.
2Tap the page you want to move, and drag to move the page.
You can also move the page by tapping [Move the Page] on the action panel and then tap of the destination.
3Tap the [Edit End] key.
1In the preview screen, tap to switch to edit mode.
2Tap the page you want to rotate, and drag or to rotate the page.
You can also rotate the page by tapping [Rotate 180 Degrees] (Copy mode only) or [Rotate 90 Degrees] (Fax and scanner mode only) on the action panel.
3Tap the [Edit End] key.
6
Edit End
4 5321
6
Edit End
4 5321

1-18
BEFORE USING THE MACHINE►BEFORE USING THE MACHINE
Setting chapter insertsWhen N-Up or 2-Sided is specified, you can move a page marked with to the first page.
1In the preview screen, tap to switch to edit mode.
2Tap the page you want to set chapter inserts.
3Tap .
is displayed on the page.
• You can also set chapter inserts by tapping [Specify Chapter Inserts] on the action panel.
• To cancel the Chapter Inserts setting:Tap displayed on the page, or select the page and tap [Cancel Chapter Inserts of Selected Page.] on the action panel.
4Tap the [Edit End] key.
6
Edit End
4 5321
6
Edit End
4 5321

1-19
BEFORE USING THE MACHINE►BEFORE USING THE MACHINE
Inserting a blank page
Deleting part of the original image
1In the preview screen, tap to switch to edit mode.
2Tap , and tap for the location into which you want to insert a blank page.
You can also insert a blank page by tapping [Insert Blank Page] on the action panel.
3Tap the [Edit End] key.
1In the preview screen, tap to switch to edit mode.
2Tap [Erase Specified Range] on the action panel.
4
Edit End
Cancel and ReturnSelect the location to insert blankpage.
4 5321
6
Edit End
Move the Page
Rotate 180 Degrees
Specify Chapter Inserts
Insert Blank Page
Delete the Page
Erase Specified Original AreaErase Specified Range
4 5321

1-20
BEFORE USING THE MACHINE►BEFORE USING THE MACHINE
Changing the settingsTapping the tab on the left of the screen allows you to change the settings.You cannot tap the keys for functions whose settings cannot be changed.
3Follow the on-screen instructions to specify the erase range.Specify the erase range and then tap the [Execute] key.
To delete the image outside the selected range, tap [Reverse Erase Range] on the action panel.
4On the action panel, select [Apply This Erase Position to All Pages.] or [Apply This Erase Position to This Page.].
5As necessary, repeat the steps to specify the erase range and the pages to which it is applied.
6Tap the [Exit] key.
Erase Specified Range
Clear OK
Exit
Specify Range2
Specify Range3
Specify Range4
Height
Start Point
Width
X
Y
53
31
31
97
Height
Start Point
Width
Specify Range2
Specify Range3
Specify Range4
Erase Specified Range
Apply This ErasePosition to This Page.
Reverse Erase Range
Apply This ErasePosition to All Pages.
Erase Specified Range Exit
Specify Range2
Erase Range1
Specify Range3
Specify Range4
1 / 6
8½x11
A4
Start
Color ModeAuto/Mono2
Resolution
200x200dpiFile Format
PDFOriginal
Auto
Others
Address Book
Subject
File Name
Address Touch to input Address
Options
Exposure
CA
Sending History
Quick File
Call Search Number
Check Send/ReceiveStatus
Send Same Imageas Fax Address
Store Data Temporarily
FileStore Data in Folder
Specified by System Settings

1-21
BEFORE USING THE MACHINE►BEFORE USING THE MACHINE
OPERATION OF FREQUENTLY USED KEYS
Numeric keysTap a number to enter it.To clear the entered number, tap the [C] key.
[Start] keyTap to perform a print or send job.
[Cancel Copy] key, [Storing Canceled] key, [Cancel Scan] key, [Sending Canceled] keyTap to stop copying, printing, or transmission.
[CA] key
Tap to cancel all settings and restore the initial status in each mode.
On the address screen, you can enter characters other than numbers, and a different key layout is provided. You can also move the cursor by using the [←] and [→] keys. Tap the [C] key to delete one character to the left of the cursor.
1No. of copies
Start
CA
Cancel Copy
Start
CA

1-22
BEFORE USING THE MACHINE►BEFORE USING THE MACHINE
ACTION PANELRecommended functions are displayed on the action panel when you configure functions in each mode.From the action panel, you can configure functions or combine the configured function with a function displayed on the action panel.If the action panel does not appear, tap the action panel tab.
CONFIRMATION SCREEN FOR FAVORITE MENUS AND SETTINGSWhen you register frequently used functions you have configured for copying or image sending in favorite, you can quickly call them.
Registering a function in Favorite
• The functions displayed on the action panel vary depending on the mode or the functions that have been configured.
• If too many functions have been configured to be displayed on the action panel, you can slide the panel vertically or tap and to view all.
• In enlarge display mode, part of the text on the action panel may not be displayed. To display the whole text, long-touch the partially hidden key or slide the tab of the action panel to the left.
To always display the action panelIn "Settings (administrator)", select [System Settings] → [Common Settings] → [Operation Settings] → [Condition Settings] → [Display Action Panel as default.].
Favorite can be used in normal mode.
1Tap .
2Tap [Edit Favorite] on the action panel.
8½x118½x11
Copy Like A PamphletBooklet
Change Size/Direction.Original
2-Sided Copy
Background Adjustment
EraseClear
Outer Frame
Specify Frame+Center
Reverse erase position ofback face
Up
Down
RightLeft
8½x11
8½x11
8½x11
8½x118½x11
8½x11

1-23
BEFORE USING THE MACHINE►BEFORE USING THE MACHINE
Calling a function from Favorite
Confirmation Screen for SettingsYou can display a list of configured functions and check them.On the initial screen of each mode, tapping displays the setting confirmation screen.
3Tap the [Register Key] key.Administrator rights are required.
4Tap the key for the function you want to register.
1Tap .
2Tap the key for the function you want to call.
• Favorites can be registered or edited only by authenticated users and administrators.
• Unauthenticated users can call and use the favorites registered by administrators.Settings for calling Favorites and permitting/prohibiting editing can be configured in [User Control] → [Authority Group] in "Settings (administrator)".
• To edit favorites, tap and then tap [Edit Favorite] on the action panel.
8½x11
8½x11
8½x11
8½x118½x11
8½x11
Erase
Favorite
Edit Favorite
Shift to Icon Mode
8½x118½x11
8½x14
8½x11
8½x118½x11
8½x11
8½x11
Plain 1
Register Current SettingsProgram Registration

1-24
BEFORE USING THE MACHINE►BEFORE USING THE MACHINE
Eco
ECO FUNCTIONS OF THE MACHINEThese functions help save power consumption by managing operations of sections prone to high power consumption. The machine provides two power-saving modes.
In addition to these two modes, using the following functions in conjunction helps reduce even more power consumption.
Mode SettingsThe eco function settings are set in a batch. "Custom" and "Eco" are available.Setting values applied by each mode is as follows.
Each Energy Save settings in System Setting is not applied when Eco mode is used.
Function Description Page
AUTO POWER SHUT-OFF MODE
If no operations take place, this mode will turn off the power to the operation panel and the fusing unit, and makes the machine wait in the lowest power consumption state.Although the power-saving rate is higher, the wakeup time is longer.
1-25
PREHEAT MODE This mode lowers the temperature of the fusing unit and makes the machine wait in low power consumption state.Compared to Auto Power Shut-Off Timer, the power-saving rate is lower, but the wakeup time is shorter.
1-26
Function Description Page
ECO RECOMMENDATION FUNCTION DISPLAY
Shows recommended copy/print settings for copy, document filing reprint, and direct print.
1-26
AS SOON AS THE REMOTE JOB IS FINISHED, ENTER AUTO POWER SHUT OFF MODE
The machine returns from Auto Power Shut-Off and enters Auto Power Shut-Off mode as soon as printing is completed.
1-27
ECO SCAN The machine is operated with the fusing unit turned off for non-printing operations (that do not use the fusing unit) such as fax and image transmission.
1-27
POWER ON/OFF SCHEDULE SETTING
Use this function to set the times for turning the power on and off to reduce power consumption.
1-28
SPECIFIC DATE OPERATION SETTINGS
When you must have the machine perform exceptionally many print jobs or other special operation on a certain day, you can specify the day as a "Specific Date" and define an energy saving pattern only for that day.
1-28
Toner Save Mode This mode is used to reduce toner consumption. 7-163
Sleep Mode Power Level Select whether priority is given to power saving or wakeup time. 7-161
Function Custom Eco
Preheat Mode Setting 1min. 1min.
Turn off Panel Display during pre-heat mode
On On
Auto Power Shut-Off Timer Fix transition time.: 1min. Fix transition time.: 1min.
As soon as the remote job is finished, enter Auto power shut off mode.
On On
Sleep Mode Power Level Low Power Low Power
Eco Scan On On (All Modes Except Copy)

1-25
BEFORE USING THE MACHINE►BEFORE USING THE MACHINE
AUTO POWER SHUT-OFF MODEThis mode turns off the power to the operation panel and the fusing unit, and makes the machine wait in the lowest power consumption state.Auto Power Shut-Off Timer will activate when the set duration of time elapses in waiting status without executing a job.Compared to preheat mode, the power-saving rate is considerably higher but the wakeup time is longer.
The [Power Save] button blinks when the machine is in Auto Power Shut-Off Timer.
Auto Power Shut-Off Timer is also activated by pressing the [Power Save] button while the [Power Save] button is not lit.This mode is cleared when print data is being received, fax data is being output, or when the [Power Save] button is pressed while it is blinking.
A message appears 15 seconds before Auto Power Shut-Off Mode is entered.To close the message and continue normal operation, tap the [Continue] button.The message appears again 15 seconds before the end of the extension of normal operation time.If no action is taken within 15 seconds after the message appears, the machine enters auto power shutoff mode.
To set mode settings"Settings (administrator)" → select [System Settings] → [Energy Save] → [Eco Setting] → [Mode Setting].
To set Auto Power Shut-Off Timer:In "Settings (administrator)", select [System Settings] → [Energy Save] → [Eco Setting] → [Auto Power Shut-Off].
To set display of the message:In "Settings (administrator)", select [System Settings] → [Energy Save] → [Eco Setting] → [Display Message When Extending Transition Time to Preheat/Auto Power Shut-Off Mode].
[Power Save] button/indicator

1-26
BEFORE USING THE MACHINE►BEFORE USING THE MACHINE
PREHEAT MODEThis mode lowers the temperature of the fusing unit and makes the machine wait in low power consumption state.Preheat mode will activate when the set duration of time elapses in waiting status without executing a job.Compared to Auto Power Shut-Off Mode, the amount of energy saved is less and the wakeup time is shorter.In the preheat mode, the [Home Screen] key is lit and the light goes off for the touch panel and the [Power Save] button.The touch panel is cleared when it is tapped or the [Home Screen] button is pressed.
A message appears 15 seconds before Preheat Mode is entered.To close the message and continue normal operation, tap the [Continue] button.If no action is taken within 15 seconds after the message appears, the machine enters preheat mode.
ECO RECOMMENDATION FUNCTION DISPLAYShows recommended copy/print settings for copy, document filing reprint, and direct print.
CopyingWhen you change to copy mode (normal mode), the settings recommended for copy mode appear.Recommended settings: 2-Sided Copy, N-Up, and Image Orientation
Document filing printWhen you tap the [Choose Print Settings] in the action panel on the file list screen of document filing, the settings recommended for this mode appear.Recommended settings: 2-Sided Print, and N-Up.
Direct printWhen you tap the [Choose Print Settings] in the action panel on the file list screen of direct print, the settings recommended for this mode appear.Recommended settings: 2-Sided Print, and N-Up.
To set preheat mode:"Settings (administrator)" → select [System Settings] → [Energy Save] → [Eco Setting] → [Preheat Mode Setting].
To set display of the message:In "Settings (administrator)", select [System Settings] → [Energy Save] → [Eco Setting] → [Display Message When Extending Transition Time to Preheat/Auto Power Shut-Off Mode].

1-27
BEFORE USING THE MACHINE►BEFORE USING THE MACHINE
AS SOON AS THE REMOTE JOB IS FINISHED, ENTER AUTO POWER SHUT OFF MODEPrinting or outputting received fax data in Auto Power Shut-Off Timer turns on the power, and then the machine returns to Auto Power Shut-Off Mode immediately after completing the print job.
ECO SCANNon-print jobs such as sending a scanned original are performed with the fusing unit turned off.
To set "As soon as the remote job is finished, enter Auto power shut off mode.":In "Settings (administrator)", select [System Settings] → [Energy Save] → [Eco Setting] → [As soon as the remote job is finished, enter Auto power shut off mode.]
To set Eco scan:"Settings (administrator)" → select [System Settings] → [Energy Save] → [Eco Setting] → [Eco Scan Setting] .
1
LL
H
L
Printed
Sleep mode Print Sleep mode
Fusing unit is turned off
Fusing unit is turned on
Fusing unit is turned off
1
L
L
L
H
Fusing unit is turned off
Image SendDocument Filing
Copy
Fusing unit is turned on
Fusing unit is turned off
Sleep mode

1-28
BEFORE USING THE MACHINE►BEFORE USING THE MACHINE
POWER ON/OFF SCHEDULE SETTINGUse this function to set the times for turning the power on and off for the machine to reduce power consumption.
SPECIFIC DATE OPERATION SETTINGSWhen you must have the machine perform exceptionally many print jobs or other special operation on a certain day, you can specify the day as a "Specific Date" and define an energy saving pattern only for that day.
Setting Power ON/OFF Scheduling FunctionIn "Settings", select [System Settings] → [Energy Save] → [Power ON/OFF Schedule Setting].
To specify operation for the specific date:"Settings (administrator)" select [System Settings] → [Energy Save] → [Specific Date Operation Settings].
9:00
12:0013:00
18:00
ON
ON
OFF
OFF
OFF
Start time
Lunch break
Finish time

1-29
BEFORE USING THE MACHINE►BEFORE USING THE MACHINE
USER AUTHENTICATIONUser authentication restricts the use of the machine to users that have been registered. The functions that each user is allowed to use can be specified, allowing the machine to be customized to meet the needs of your workplace.When the administrator of the machine has enabled user authentication, each user must log in to use the machine. There are different types of user authentication, and each type has a different login method.For more information, see the explanations of the login methods.► AUTHENTICATION BY USER NUMBER (page 1-29)► AUTHENTICATION BY LOGIN NAME/PASSWORD (page 1-31)
AUTHENTICATION BY USER NUMBERThe following procedure is used to log in using a user number received from the administrator of the machine.When starting the machine, the login screen appears.
When controlled by user number
If "A Warning when Login Fails" is enabled in the system settings, the operation panel will be locked for five minutes if an incorrect user number is entered three times in a row.Contact the machine administrator to check the user number assigned for you.
1
4 5 6
2
0
3
C
User Authentication
Please input user number.
CA
Admin Login
OK
7 8 9

1-30
BEFORE USING THE MACHINE►BEFORE USING THE MACHINE
1Enter your user number (5 to 8 digits) using the numeric keys.Each entered digit will be displayed as " ".
2Tap the [OK] key.If the entered user number is authenticated, the number of remaining pages that the user can copy or scan is displayed.When a limitation is set for the number of pages that a user can use, the use count for the user that has logged in is displayed.
• To limit the number of pages that a user can use:In "Settings (administrator)", select [User Control] → [Pages Limit Group].
• To hide the number of pages that can be used after login:In "Settings (administrator)", disable [User Control] → [Default Settings] → [Display Usage Status after Login].
• To change the message display time:In "Settings" (administrator)", select [System Settings] → [Common Settings] → [Operation Settings] → [Condition Settings] → [Message Time Setting].
When the user number is an 8-digit number, this step is not necessary. Login takes place automatically after the user number is entered.
3When you have finished using the machine and are ready to log out, tap [Logout].
1
4 5 6
2
0
3
7 8 9
C
User Authentication
Please input user number.
CA
Admin Login
OK
(1)
(2)
LogoutAdmin
LINE PRINTERJob StatusEasy
ScanHDDFile retrieve
8½x11 8½x11
1-31
BEFORE USING THE MACHINE►BEFORE USING THE MACHINE
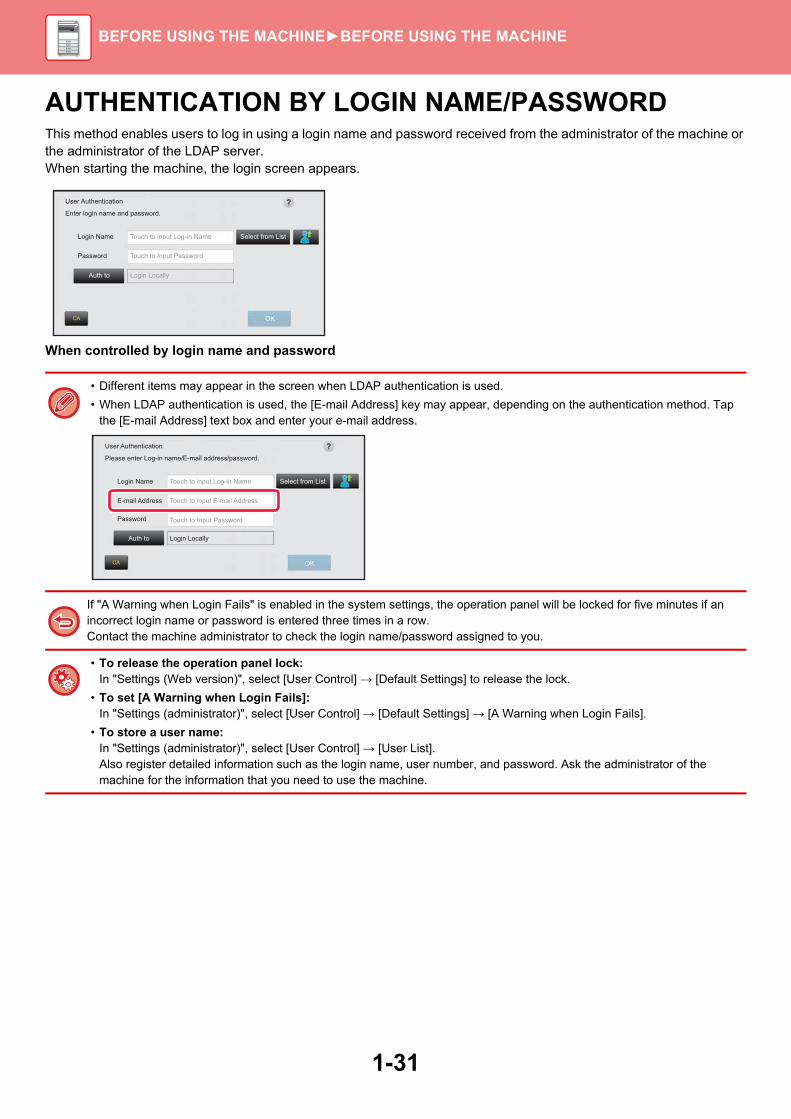
AUTHENTICATION BY LOGIN NAME/PASSWORDThis method enables users to log in using a login name and password received from the administrator of the machine or the administrator of the LDAP server.When starting the machine, the login screen appears.
When controlled by login name and password
• Different items may appear in the screen when LDAP authentication is used.
• When LDAP authentication is used, the [E-mail Address] key may appear, depending on the authentication method. Tap the [E-mail Address] text box and enter your e-mail address.
If "A Warning when Login Fails" is enabled in the system settings, the operation panel will be locked for five minutes if an incorrect login name or password is entered three times in a row.Contact the machine administrator to check the login name/password assigned to you.
• To release the operation panel lock:In "Settings (Web version)", select [User Control] → [Default Settings] to release the lock.
• To set [A Warning when Login Fails]:In "Settings (administrator)", select [User Control] → [Default Settings] → [A Warning when Login Fails].
• To store a user name:In "Settings (administrator)", select [User Control] → [User List].Also register detailed information such as the login name, user number, and password. Ask the administrator of the machine for the information that you need to use the machine.
User Authentication
Enter login name and password.
Login Name
Password
Touch to input Log-in Name
Touch to Input Password
Login Locally
CA
Select from List
OK
Auth to
CA OK
User Authentication
Select from ListLogin Name
E-mail Address
Touch to input Log-in Name
Touch to input E-mail Address
Password
Auth to
Touch to Input Password
Login Locally
Please enter Log-in name/E-mail address/password.

1-32
BEFORE USING THE MACHINE►BEFORE USING THE MACHINE
1Enter the login name.Entering using the soft keyboardIf user name registration has not been performed in setting mode, a user only using LDAP authentication should tap the [Login Name] text box and enter the login name using the soft keyboard.Selecting from a list Tap the [Select from List] key and select a user name from the User List screen.
LDAP authentication can be used when the administrator of the server provides LDAP service on the LAN (local area network).
2Enter the password.Enter the password from the soft keyboard.If you are logging in to an LDAP server, enter the password that is stored with your LDAP server login name.Each entered character will be displayed as " ". After entering the password, tap the [OK] key.When authentication is by LDAP server and you have different passwords stored in "User List" and in the LDAP server, use the password stored in the LDAP server.
To have the user name and password registered:In "Settings (administrator)", select [User Control] → [User List].
When registering the LDAP server, change the information for [Auth to] as required.
• When selecting from the User List screen:The LDAP server you are connecting to has been registered upon user registration, and so the target server to which authentication should be directed appears when the login name is selected.Go to step 3.
• When entering from the soft keyboard:Tap [Auth to] and select the LDAP server to log in.
User Authentication
Enter login name and password.
Login Name
Password
Touch to input Log-in Name
Touch to Input Password
Login Locally
CA OK
Select from List
Auth to
User Authentication
Enter login name and password.
Login Name
Password
Touch to input Log-in Name
Touch to Input Password
Login Locally
CA OK
Select from List
Auth to

1-33
BEFORE USING THE MACHINE►BEFORE USING THE MACHINE
3Tap the [OK] key.If the entered login name and password are authenticated, the number of remaining pages that the user can copy or scan is displayed.
When a limitation is set for the number of pages that a user can use, the use count for the user that has logged in is displayed.
• To limit the number of pages that a user can use:In "Settings (administrator)", select [User Control] → [Pages Limit Group].
• To hide the number of pages that can be used after login:In "Settings (administrator)", disable [User Control] → [Default Settings] → [Display Usage Status after Login].
• To change the message display time:In "Settings" (administrator)", select [System Settings] → [Common Settings] → [Operation Settings] → [Condition Settings] → [Message Time Setting].
4When you have finished using the machine and are ready to log out,tap [Logout].
User Authentication
Enter login name and password.
Login Name
Password
Login Locally
CA OK
Select from List
Auth to
Exposure
Address Book
Auto
Original
Mixed Size Orig.
ResolutionSuper Fine
Job Build
Original Count
Slow Scan Mode
Address Fax Number
Others
Preview
SpeakerStart
Scan Size
Auto Auto
reception memory
100%Send Size
Sending History
Check Send/ReceiveStatus
Call Search Number
Call ProgramCall Registered settings
Direct TX
Verification Stamp
CA
Usage status : used/remaining pagesScanner(B&W) : 00,000,000/--,---,---Scanner(Color) : 00,000,000/--,---,---Internet Fax : 00,000,000/--,---,---Fax : 00,000,000/--,---,---
100%
8½x11 8½x11
Exposure
Address Book
Auto
Original
Mixed Size Orig.
ResolutionSuper Fine
Job Build
Original Count
Slow Scan Mode
Address Fax Number
LogoutAdmin
LINE PRINTERJob Status
Others
Preview
SpeakerStart
Scan Size
Auto Auto
reception memory 100%
100%Send Size
Sending History
Call Search Number
Call ProgramCall Registered settings
Direct TX
Verification Stamp
Send Same Imageas Fax Address
EasyScan
HDDFile retrieve
CA
8½x11 8½x11

1-34
BEFORE USING THE MACHINE►BEFORE USING THE MACHINE
ACTIVE DIRECTORY LINKING FUNCTIONYou can join the Active Directory domain (AD domain) of the machine, and easily perform user management on the network.On a network that does not have Active Directory enabled, you must perform network device authentication for each device.For this reason, one user must have multiple domain names and passwords.When you join an AD domain, you only need to be authenticated once. After you are authenticated, the Active Directory server automatically authenticates network devices. You can log in to multiple devices on the network with a single domain name and password.
Joining an AD domainTo have the machine join an AD domain, set the authentication destination to [Active Directory] in "Settings (administrator)" - [User Control]→[Default Settings]→[Authentication Server Settings].
Registering the machine in an AD domainWhen you join an AD domain, the machine is registered as a printer in the AD domain. Enter the machine information in setting mode.
Device name of the machineIn "Settings (administrator)", select [System Settings] → [Network Settings] → [Network Name Setting] → [Device Name].
Domain name of the machineIn "Settings (administrator)", select [System Settings] → [Network Settings] → [Active Directory Settings] → [Domain Name].
Machine user name and passwordIn "Settings (administrator)", select [System Settings] → [Network Settings] → [Active Directory Settings] → [Device Registration Account].
DNS domain nameIn "Settings (administrator)", select [System Settings] → [Network Settings] → [Services Settings] → [DNS] → [Domain Name].
When the authentication destination is set to Active Directory, the Kerberos setting cannot be used.

1-35
BEFORE USING THE MACHINE►BEFORE USING THE MACHINE
User authentication in the AD domainThe following methods can be used for user authentication in the AD domain.
1. Authentication by manual entry on the machinePerform authentication using the touch panel of the machine. For the authentication method, refer to "AUTHENTICATION BY LOGIN NAME/PASSWORD (page 1-31)".Configure the following setting in "Settings (administrator)".Disable "Settings (administrator)"→[User Control]→[Default Settings]→[Use IC Card for Authentication].
2. Login by IC card (Quick Mode)Use the card ID registered in an IC card to perform AD domain authentication.When you first perform authentication, you must enter your password. After that you can perform authentication with just your IC card.
3. Login by IC card (security card)Use the card ID registered in an IC card to perform AD domain authentication.You must always enter your password when you perform authentication using an IC card.Enable "Settings (administrator)"→[User Control]→[Default Settings]→[Use IC Card for Authentication].Disable "Settings (administrator)"→[User Control]→[Default Settings]→[Cache Password for Authentication].
If you change your password on the Active Directory server, your initially entered password information will be reset and you will need to enter your password again.Configure the following settings in "Settings (administrator)".Enable "Settings (administrator)"→[User Control]→[Default Settings]→[Use IC Card for Authentication].Enable "Settings (administrator)"→[User Control]→[Default Settings]→[Cache Password for Authentication].
• You can use both AD domain authentication users and users set on the machine. In this case, the authentication destination is set when logging in.
• When an AD domain authentication user reserves a job and logs out before the job is executed, the user information is temporarily stored in the machine and the reserved job is executed.

1-36
BEFORE USING THE MACHINE►BEFORE USING THE MACHINE
Functions that can be used by linking with Active Directory
User accessible network foldersWhen a user who has logged in to the AD domain accesses a network folder from the machine, the user can only access a folder for which he has permission.Shared folderWhen a logged in user taps the [Browse] key for a shared folder address, only folders for which the user has permission are displayed.Document filingWhen a logged in user taps [Select File from Network Folder to Print] on the action panel in document filing and then taps [Refer to Folders on Network], only folders for which the user has permission are displayed.
Home DirectoryScan to Home DirectoryWhen scanning, a logged in user can use his Home Directory property that is set in the AD domain to send the scanned file to that folder.To use this function, enable "Settings (administrator)"→[System Settings]→[Image Send Settings]→[Scan Settings]→[Default Address]→[Apply Home Directory of The User for Login].Shared folderIn the shared folder address, the path of the logged in user's Home Directory is automatically entered in [Path Input to Folder]. The folder that appears after the [Browse] key is tapped is the user's Home Directory.
Print from Home DirectoryThe logged in user's Home Directory property that is set in the AD domain can be used to set the print folder for printing to the Home Directory.Shared folderWhen the user taps [Select File from Network Folder to Print] on the action panel in document filing and then taps [Refer to Folders on Network], the folder that appears is the user's Home Directory.
E-MailScan to E-MailA logged in user can use his mail property set in the AD domain to send a scanned image to himself by e-mail.To apply the e-mail address of the logged-in user set in the AD domain, tap [Find My Address] which appears on the action panel when e-mail is sent, or enable [Apply E-mail address of the user for login.] in "Settings (administrator)" → [System Settings] → [Image Send Settings] → [Scan Settings] → [Default Address].
If the Active Directory server cannot be accessed, the [Path Input to Folder] field will be blank, and when the [Browse] key is tapped, the search results of the entire network will appear.
• When authentication information is stored in the address book and the user sends a file by specifying an address in the address book, the file is sent according to the user's permissions in the address book. If authentication information is not stored in the address book, the file is sent according to the logged in user's authentication permissions.
• In AD domain authentication mode, a file can be sent to a shared folder using the logged in user's authentication permissions. In this case, a user name and password cannot be entered manually.

1-37
BEFORE USING THE MACHINE►BEFORE USING THE MACHINE
BILLING CODE
BILLING CODEA billing code, which is added to a recorded job log when a printing or sending job has been executed, is used to perform billing processing.Billing codes are classified into two types: main code and sub code. A billing code is recorded in the job log when it is entered and a print or send job is executed.Summing up the amounts by Billing Code based on the job logs will facilitate the subsequent operations, for instance, when making combined billings.
Types of billing codes
Enable use of billing codeTo enable use of the billing code, select "Settings (administrator)" → [User Control] → [Billing Code] → [Administration Settings], then set [Use Billing Code] to [Enable].
Collecting billing codesIn "Settings (Web version)", select [System Settings] → [System Control] → [Job Log] → [Job Log Operation], and click [Save] button to download the job logs. Then sum up the data by classifying and arranging the stored job logs.
Type Description
Main Code Used to categorize the results of the executed print and send jobs to enable efficient management. For example, you can assign a code by customer and collect cost information by customer from job logs.Code example: Issue of company A
Sub Code Available when the main code alone is not sufficient to enable management of billing codes. For example, you can assign monthly cost information to a sub code and collect the total monthly cost information of all customers when the customer name is assigned to the main code.Code example: Issue of September, 2017
Default Code Automatically assigned when the main code or sub code has not been specified.
DCBA
Registering billing codes
Assigning a billing code and executing the job
Recording a billing code in the job log
Billing by code
Collecting job logs

1-38
BEFORE USING THE MACHINE►BEFORE USING THE MACHINE
USE BILLING CODEIf the use of billing code is enabled in "Settings (administrator)", the billing code entry window is displayed at the time of mode transition (at the time of printing/sending in document filing mode).Enter the main code or sub code as required.
Specifying a billing code againTo change the specified billing code to another one, tap [Switch Billing Code.] on the action panel.When the billing code entry window is displayed, select a new billing code.
Select a billing code from the listSelect the desired billing code from the list of registered billing codes.You need to register billing codes in advance.► REGISTERING A NEW BILLING CODE (page 1-41)
• To enable use of the billing codeSelect "Settings (administrator)" → [User Control] → [Billing Code] → [Administration Settings], then set [Use Billing Code] to [Enable].
• To retain the specified billing code at the time of mode transitionSelect "Settings (administrator)" → [User Control] → [Billing Code] → [Administration Settings], then set the [Remember Billing Code Between Modes] check box to . This eliminates the need to enter billing codes at each mode transition.
You can assign billing codes to reprinting/resending of target files and sending of print jobs from "Settings (Web version)" → [Document Operations].
1When the billing code entry window is displayed, tap the [Select from List] key of the main code.
When not specifying a billing codeTap the [Bypass Billing Code] key.
To select the previously used billing code (at the time of user authentication) Tap [Use Previously-Used Billing Code] on the action panel at the time of user authentication; this displays the main code and sub code the authenticated user has entered previously.
Billing Code
Please enter Billing Code.
Main Code
Sub Code
AAAA
AAAA
Select from List
Select from List
Bypass Billing Code OKCA
1-39
BEFORE USING THE MACHINE►BEFORE USING THE MACHINE
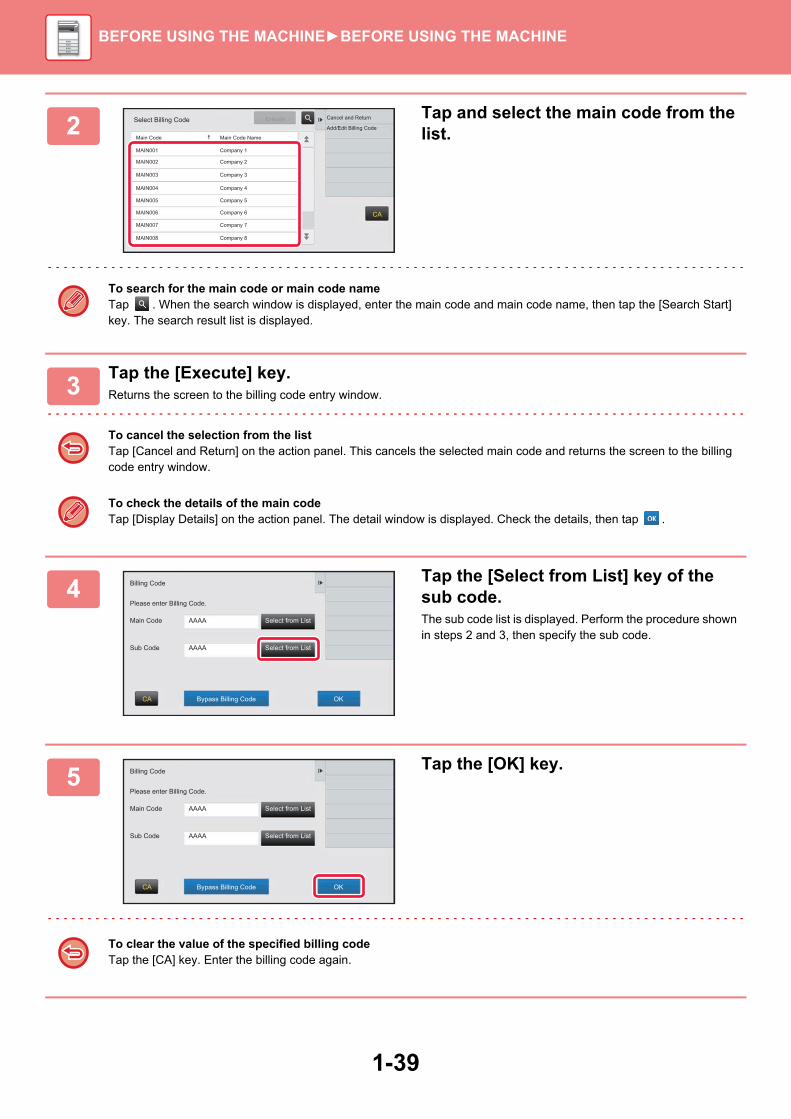
2Tap and select the main code from the list.
To search for the main code or main code nameTap . When the search window is displayed, enter the main code and main code name, then tap the [Search Start] key. The search result list is displayed.
3Tap the [Execute] key.Returns the screen to the billing code entry window.
To cancel the selection from the listTap [Cancel and Return] on the action panel. This cancels the selected main code and returns the screen to the billing code entry window.
To check the details of the main codeTap [Display Details] on the action panel. The detail window is displayed. Check the details, then tap .
4Tap the [Select from List] key of the sub code.The sub code list is displayed. Perform the procedure shown in steps 2 and 3, then specify the sub code.
5Tap the [OK] key.
To clear the value of the specified billing codeTap the [CA] key. Enter the billing code again.
CA
Cancel and Return
Main Code Main Code Name
MAIN001 Company 1
MAIN002 Company 2
MAIN003 Company 3
MAIN004 Company 4
MAIN005 Company 5
MAIN006 Company 6
MAIN007 Company 7
MAIN008 Company 8
Add/Edit Billing Code
ExecuteSelect Billing Code
Billing Code
Main Code
Sub Code
AAAA
AAAA
Select from List
Select from List
Bypass Billing Code OKCA
Please enter Billing Code.
Billing Code
Main Code
Sub Code
AAAA
AAAA
Select from List
Select from List
Bypass Billing Code OKCA
Please enter Billing Code.

1-40
BEFORE USING THE MACHINE►BEFORE USING THE MACHINE
Directly entering a billing code
1When the billing code entry window is displayed, tap the box in [Main Code], then enter the main code.Specify the code using up to 32 single-byte characters.
When not specifying a billing codeTap the [Bypass Billing Code] key. The use code is set to the main code.
2Tap the box of [Sub Code], then enter the sub code.Specify the code using up to 32 single-byte characters.
3Tap the [OK] key.
To clear the value of the specified billing codeTap the [CA] key. Enter the billing code again.
Billing Code
Main Code
Sub Code
AAAA
AAAA
Select from List
Select from List
Bypass Billing Code OKCA
Please enter Billing Code.
Billing Code
Main Code
Sub Code
AAAA
AAAA
Select from List
Select from List
Bypass Billing Code OKCA
Please enter Billing Code.
Billing Code
Main Code
Sub Code
AAAA
AAAA
Select from List
Select from List
Bypass Billing Code OKCA
Please enter Billing Code.

1-41
BEFORE USING THE MACHINE►BEFORE USING THE MACHINE
REGISTERING A NEW BILLING CODERegister a new billing code.A billing code can be registered not only from the billing code entry window but also from "Settings".
Shared range of billing codeThe registered billing codes can only be shared in the specified group at the time of user authentication.If the shared range is not specified, the registered billing codes are shared by all users.
To register a billing code from Setting ModeSelect "Settings" → [User Control] → [Billing Code] → [Main Code List] or [Sub Code List]. Register a main code in [Main Code List], and a sub code in [Sub Code List].
A total of up to 2000 main and sub codes can be registered.
To register a user groupIn "Settings (administrator)", select [User Control] → [Organization /Group List].
1When the billing code entry window is displayed, tap [Select from List] of the main code.To register a new sub code, tap the [Select from List] key of the sub code.The subsequent steps are the same as the main code.
2Tap [Add/Edit Billing Code] on the action panel
Billing Code
Please enter Billing Code.
Main Code
Sub Code
AAAA
AAAA
Select from List
Select from List
Bypass Billing Code OKCA
CA
Cancel and Return
Main Code Main Code Name
MAIN001 Company 1
MAIN002 Company 2
MAIN003 Company 3
MAIN004 Company 4
MAIN005 Company 5
MAIN006 Company 6
MAIN007 Company 7
MAIN008 Company 8
Add/Edit Billing Code
ExecuteSelect Billing Code

1-42
BEFORE USING THE MACHINE►BEFORE USING THE MACHINE
3Tap [Add New] on the action panel.
To return to the billing code selection windowTap .
4Tap the box of [Main Code], then type in the main code.Specify the code using up to 32 single-byte characters.
5Tap the box of [Main Code Name], then type in the main code name.Specify the code name using up to 32 double- or single-byte characters.
6If necessary, select the share range of billing code.Public to All: Registers the billing code as a public code for all users who use the machine.Specify target public address: Limits the share range of billing code to be registered only to the specified group. Up to eight groups can be specified as a public destination.
For details on how to specify a public destination, refer to "Shared range of billing code (page 1-41)".
The public destination of a billing code is not displayed if user authentication is not performed. The mode is automatically set to [Public to All].
CA
Main Code Main Code Name
Main Code Registration Add New
CA
Main Code
Main Code Name
Main Code Registration Cancel and Return
End Registration
RegisterNext Billing Code.
(4)
(5)
CA
Main Code
Main Code Name
Available to Public to All
Specify target public address
Main Code Registration Cancel and Return
End Registration
RegisterNext Billing Code.

1-43
BEFORE USING THE MACHINE►BEFORE USING THE MACHINE
7Tap and select a group as a public destinationUp to eight groups can be specified. After the settings are completed, tap .
To cancel the settingTap [Clear] on the action panel. This cancels the registered public destination and returns the screen to the previous window.
8To continuously register other billing codes, tap [Register Next Billing Code.].Execute steps 4 to 7 to register the main code.
To cancel the registrationTap [Cancel and Return] on the action panel. This cancels all the registered billing codes and returns the screen to the previous window.
9Tap [End Registration] on the action panel.This finalizes the registration and returns the screen to the previous window. Tap to finish the registration procedure.
To return to the billing code entry windowTap the [CA] key.
CA
Organization /Group List
Group 1
Group 2
Group 3
Group 4
Group 5
Group 6
Group 7
Group 8
ClearDesignate Public Address (Selected:1/32)

1-44
BEFORE USING THE MACHINE►BEFORE USING THE MACHINE
EDITING OR DELETING THE REGISTERED BILLING CODEYou can change or delete the registered billing code.The billing code can also be edited or deleted from "Settings".
Editing a billing code
To edit or register a billing code from Setting modeSelect "Settings" → [User Control] → [Billing Code] → [Main Code List] or [Sub Code List]. Edit or register a main code in [Main Code List], and a sub code in [Sub Code List].
1When the billing code entry window is displayed, tap the [Select from List] key of the main code.To register a new sub code, tap the [Select from List] key of the sub code.The subsequent steps are the same as the main code.
2Tap [Add/Edit Billing Code] on the action panel.
3Tap and select the main code to be edited, then tap [Edit] on the action panel.
To return to the billing code selection windowTap .
Billing Code
Please enter Billing Code.
Main Code
Sub Code
AAAA
AAAA
Select from List
Select from List
Bypass Billing Code OKCA
CA
Cancel and Return
Main Code Main Code Name
MAIN001 Company 1
MAIN002 Company 2
MAIN003 Company 3
MAIN004 Company 4
MAIN005 Company 5
MAIN006 Company 6
MAIN007 Company 7
MAIN008 Company 8
Add/Edit Billing Code
ExecuteSelect Billing Code
CA
Add New
Main Code Main Code Name
MAIN001 Company 1
MAIN002 Company 2
MAIN003 Company 3
MAIN004 Company 4
MAIN005 Company 5
MAIN006 Company 6
MAIN007 Company 7
MAIN008 Company 8
Edit
Delete
Main Code Registration

1-45
BEFORE USING THE MACHINE►BEFORE USING THE MACHINE
4Edit the main code as required.For information on how to correct the code, refer to steps 4 to 7 in "REGISTERING A NEW BILLING CODE (page 1-41)".
5Tap [End Registration] on the action panel.This finalizes the registration and returns the screen to the previous window. Tap to finish the registration procedure.
To return to the billing code entry windowTap the [CA] key.
CA
Main Code
Main Code Name
Public to All
Specify target public address
Main Code Registration Cancel and Return
End Registration
RegisterNext Billing Code.
Available to
AAAA
AAAA

1-46
BEFORE USING THE MACHINE►BEFORE USING THE MACHINE
Deleting a billing code
1When the billing code entry window is displayed, tap the [Select from List] key of the main code.To delete a sub code, tap the [Select from List] key of the sub code.The subsequent steps are the same as the main code.
2Tap [Add/Edit Billing Code] on the action panel.
3Tap and select the main code to be deleted, then tap [Delete] on the action panel.
To return to the billing code selection windowTap .
4When the confirmation message appears, tap the [Delete] key.
Billing Code
Please enter Billing Code.
Main Code
Sub Code
AAAA
AAAA
Select from List
Select from List
Bypass Billing Code OKCA
CA
Cancel and Return
Main Code Main Code Name
MAIN001 Company 1
MAIN002 Company 2
MAIN003 Company 3
MAIN004 Company 4
MAIN005 Company 5
MAIN006 Company 6
MAIN007 Company 7
MAIN008 Company 8
Add/Edit Billing Code
ExecuteSelect Billing Code
CA
Add New
Main Code Main Code Name
MAIN001 Company 1
MAIN002 Company 2
MAIN003 Company 3
MAIN004 Company 4
MAIN005 Company 5
MAIN006 Company 6
MAIN007 Company 7
MAIN008 Company 8
Edit
Delete
Main Code Registration
1-47
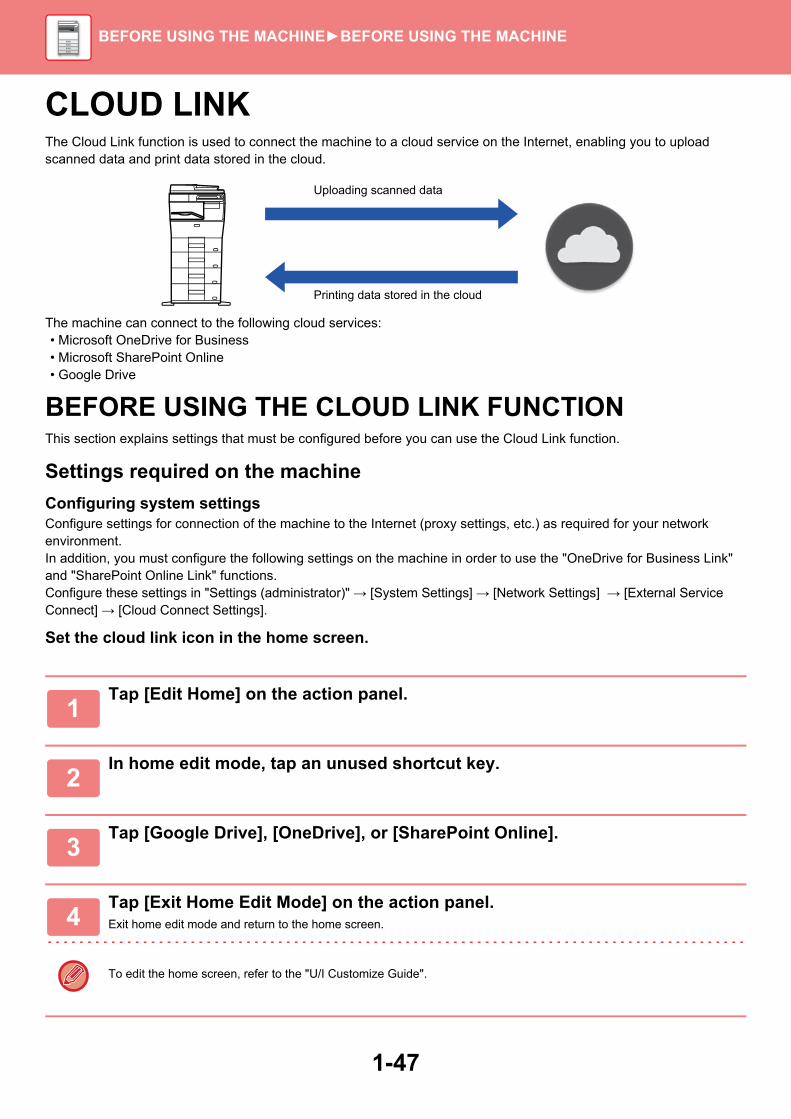
BEFORE USING THE MACHINE►BEFORE USING THE MACHINE
CLOUD LINKThe Cloud Link function is used to connect the machine to a cloud service on the Internet, enabling you to upload scanned data and print data stored in the cloud.
The machine can connect to the following cloud services:• Microsoft OneDrive for Business• Microsoft SharePoint Online• Google Drive
BEFORE USING THE CLOUD LINK FUNCTIONThis section explains settings that must be configured before you can use the Cloud Link function.
Settings required on the machine
Configuring system settingsConfigure settings for connection of the machine to the Internet (proxy settings, etc.) as required for your network environment.In addition, you must configure the following settings on the machine in order to use the "OneDrive for Business Link" and "SharePoint Online Link" functions.Configure these settings in "Settings (administrator)" → [System Settings] → [Network Settings] → [External Service Connect] → [Cloud Connect Settings].
Set the cloud link icon in the home screen.
1Tap [Edit Home] on the action panel.
2In home edit mode, tap an unused shortcut key.
3Tap [Google Drive], [OneDrive], or [SharePoint Online].
4Tap [Exit Home Edit Mode] on the action panel.Exit home edit mode and return to the home screen.
To edit the home screen, refer to the "U/I Customize Guide".
Printing data stored in the cloud
Uploading scanned data

1-48
BEFORE USING THE MACHINE►BEFORE USING THE MACHINE
UPLOADING SCANNED DATA TO A CLOUD SERVICEThis section explains how to upload data scanned on the machine to a cloud service.
PRINTING DATA IN A CLOUD SERVICEThis section explains how to use the machine to print data in a cloud service.
1Tap [Google Drive], [OneDrive], or [SharePoint Online] in the home screen.• The login screen of the selected cloud service appears.• When user authentication is enabled on the machine, the login screen will not appear after the first time you
successfully log in to the cloud service.
When using OneDrive or SharePoint Online, you can only login using your standard Office 365 user account for ID/password authentication.
2Enter your user account information for the cloud service.A screen for selecting tasks appears.
3Tap the [Scan a document] key.• The scan settings screen appears.• Specify a "File Name", "Address", and "Upload Data Scan Settings".
4Execute Scan or Preview.
1Tap [Google Drive], [OneDrive], or [SharePoint Online] in the home screen.• The login screen of the selected cloud service appears.• When user authentication is enabled on the machine, the login screen will not appear after the first time you
successfully log in to the cloud service.
When using OneDrive or SharePoint Online, you can only login using your standard Office 365 user account for ID/password authentication.
2Enter your user account information for the cloud service.A screen for selecting tasks appears.

1-49
BEFORE USING THE MACHINE►BEFORE USING THE MACHINE
Cautions when using the Cloud Link function• Print results using the Cloud Link function may not have the same quality as print results using other print methods
(printer driver, etc.).The contents of some files may cause incorrect printing or prevent printing.
• It may not be possible to use some or all Cloud Link functions in some countries or regions where the machine is used.
• It may not be possible to use the Cloud Link function in some network environments. Even when the Cloud Link function can be used, processing may require a longer time or may be interrupted.
• We do not extend any guarantees regarding the continuity or connection stability of the Cloud Link function.With the exception of instances provided for by law, we bear absolutely no responsibility for any damages or loss suffered by the customer due to the above.
DirectOffice™ is a product of CSR Imaging US, LP.DirectOffice™ is a trademark of CSR Imaging US, LP, registered in the United States and other countries, used with permission.
3Tap the [Print a document] key.• The file selection screen appears.• Tap the [Narrow Down] key to filter files by file extension. Select the file extension you want to use to filter the files.• Select the file and tap the [Choose Print Settings] key to display the print settings screen.
File formats that can be printed are DDOCX, PPTX, XLSX, PDF, XPS, RTF, and TXT.
4Execute printing

1-50
BEFORE USING THE MACHINE►BEFORE USING THE MACHINE
AirPrintThe procedure for printing or sending a file on the machine using AirPrint is explained here.
Before using AirPrintTo use AirPrint on OS X, you must first register the machine's information in your device.Advance settings are not necessary to use AirPrint on iOS.Enable AirPrint in the machine's settings, and also enable AirPrint on your device.
(1) Click [Printers & Scanners] ([Print & Scan]) in System Preferences.
(2) Click the [+] button.
(3) Select the name of the machine from the list, select [AirPrint] from the drivers, and click [Add].Setup starts, and the machine can be used with AirPrint.
Using AirPrint to printThe printing procedure depends on the application. The procedure for printing a Web page viewed in the iOS version of Safari is explained below as an example.
(1) Open the page that you want to print in Safari.Use the commands in Safari to open the page you want to print.
(2) Tap .
(3) Tap [Print].The menu appears. Tap [Print].
(4) Select the printer.AirPrint compatible printers on the same network as the device are shown. Select the machine.
(5) Select print settings and tap [Print].Set the number of copies and other settings as needed and tap [Print].
To enable AirPrint In "Settings (administrator)", select [System Settings] → [Network Settings] → [External Print Services Settings] → [AirPrint Settings].
• When you send the print job with a PIN code from your device, the print job is saved in the main folder of document filing.
• The screen that appears varies depending on your OS version.
• The functions that can be used when printing with AirPrint vary depending on the OS and the application.
• To print with AirPrint when the machine’s user authentication function is used, enable [Enable IPP Authentication Except for Printer Driver] in "Settings (Administrator)" → [System Settings] → [User Control] → [Default Settings].

1-51
BEFORE USING THE MACHINE►BEFORE USING THE MACHINE
Using AirPrint to send a faxYou can send a file created in an AirPrint compatible application by fax via the machine.The sending procedure depends on the application. Refer to the manual for the application to send a file by fax. The procedure for transmission in OS X is explained as an example.
(1) Open the file you want to send.
(2) Select [Print] from [File] in the application.
(3) Select the machine - fax in [Printer].
(4) Enter the fax number in the address. When finished selecting settings, click [Fax].Fax transmission starts.
Using AirPrint to send a scanned documentYou can scan a document on the machine using an AirPrint-compatible application, and send the scanned document to a device.The sending procedure depends on the application.Refer to the manual for the application to send a scanned document. The procedure for scanning in OS X is explained here as an example.
(1) Place the original.
(2) Click [Printers & Scanners] ([Print & Scan]) in System Preferences.
(3) Select the machine from the "Printer" list, click [Scan], and click [Open Scanner].
(4) When you have finished selecting settings, click [Scan].Scanning starts.
AirPrint and the AirPrint logo are trademarks of Apple Inc.
• AirPrint can be used to send a fax even when [Disable PC-Fax Transmission] is enabled.
• Fax jobs sent using AirPrint are managed in the same way as resend jobs in Document Filing.
• To send a fax with AirPrint when the machine’s user authentication function is used, enable [Enable IPP Authentication Except for Printer Driver] in "Settings (Administrator)" → [System Settings] → [User Control] → [Default Settings].
• To send a document using AirPrint, the machine must be in one of the following states:
• Login screen displayed, home screen displayed, brightness adjustment screen displayed, display language being set, home being edited, custom display pattern being set, home screen text color being changed, administrator password being entered for home edit / custom display pattern setting / home screen text color change, login name / password being entered, numbers being entered for authentication by number, login user being selected, authentication destination being selected
• When the machine's user authentication function is used, an image scanned with AirPrint is treated as an invalid user job.

1-52
BEFORE USING THE MACHINE►BEFORE USING THE MACHINE
EASILY CONNECT WITH AN NFC-COMPATIBLE MOBILE DEVICE(EASY CONNECT)You can connect an NFC card reader to the machine to easily connect to a smartphone or other mobile device.By installing the dedicated application in the mobile device in advance, the application will start automatically after the device connects to the machine, allowing you to print immediately.You can also connect by displaying a QR code on the machine's touch panel and scanning the code with a mobile device that has a dedicated application installed.
CONNECTING BY NFCYou can easily connect a mobile device to the machine by holding it to the NFC card reader.In addition, by installing the dedicated application on your mobile device, the application will automatically start when the device connects to the machine, allowing you to send data and print to the machine right away.Configure settings on the machine in advance to enable use of an NFC and wireless LAN.
• Make sure that the mobile device’s Wi-Fi function and NFC function are turned on in advance.
• For NFC card readers and dedicated applications that can be used, consult your dealer or nearest SHARP Service Department.
• For information on connecting the NFC card reader to the machine, refer to the manual for the NFC card reader.
This function may not support depending on the Android version of your device.
1Hold your mobile device to the NFC card reader
If the machine is in the auto power shutoff state, holding your mobile device to the NFC card reader will wake the machine. However, if [Sleep Mode] is set to [Energy Saving Priority], you must wake the machine manually.
2Connecting to the Machine from a Mobile DeviceThe machine and mobile device automatically start the connection.If the dedicated application is not installed, your mobile device will automatically connect to the Google PlayTM site and download the dedicated application.If the dedicated application is installed on your mobile device, it will start.You can print and scan from the application.
If the connection is not successful, try the following:
• Move the mobile device slowly over the NFC touch point area.
• If a case is attached to the mobile device, remove the case.

1-53
BEFORE USING THE MACHINE►BEFORE USING THE MACHINE
CONNECTING BY QR CODEYou can connect by displaying the QR code on the machine's touch panel and then having your mobile device (with the dedicated application already installed) read the QR code.The machine sends the information required for connection to the mobile device, and the information is saved. No settings are required on the mobile device, and setup is quickly accomplished.Configure settings on the machine in advance to enable connection by QR code.
This function can be used on an Android device and on an iOS device.
1Tap the [Easy Connect (QR code)] key in the home screen.The QR code appears on the touch panel.In advance, enable QR codes in [Easy Connection Setting] in Settings (administrator), and enable display of the [Easy Connect (QR code)] key in [Home Screen Settings].
2Start the dedicated application on your mobile device
3Read the QR code on the touch panel with your mobile device
The QR code is the machine's connection information. This information is saved on your mobile device. You can also set an external access point as the connection destination.
• To use Easy ConnectConfigure in "Settings (administrator)" - [System Settings] - [Network Settings] - [Easy Connection Setting].
• To Show the [Easy Connect (QR code)] key in the home screenConfigure in "Settings (administrator)" - [System Settings] - [Home Screen Settings] - [Condition Settings] - [Home Screen Registration].

1-54
BEFORE USING THE MACHINE►BEFORE USING THE MACHINE
NASNAS (Network Attached Storage) is a storage device that is connected to the network.You can use part of the machine’s hard drive area as a simple file server to save files and browse saved files.
Folder structureThe folder structure is as follows.
• root• public: Area for storing PDF files for PC browsing that have been created using the document filing function.• shared: Area where you can freely create folders.• faxreceive: Area for storing received data using the received data HDD storage function.
To use NAS
• Set the folder that you want to allow to be used to [Allow] in "Settings (administrator)" - [System Settings] → [Network Settings] → [Public Folder / NAS Setting]. (The factory default setting is "Allow".)
• Set the NBT/WINS setting of the server port to [Valid] in "Settings (administrator)" - [System Settings] → [Security Settings] → [Port Control]. (The factory default setting is "Invalid".)
root public
shared
faxreceive

1-55
BEFORE USING THE MACHINE►BEFORE USING THE MACHINE
Saving files in NAS / browsing NAS files
1You can save data that you need to the machine’s hard disk, and view the data on your computer.Document scanned on the machineIn document filing, tap the [Create PDF for PC Browsing] checkbox so that it is selected , and copy to the public folder to save the data.►Creating PDF for PC browsing (page 6-13)Received fax dataConfigure "Settings (administrator)" - [System Settings] → [Image Send Settings] → [Inbound Routing (Forwarding/Storing) Settings] → [Inbound Routing (Storage) Settings].►SAVING RECEIVED FAXES TO THE MACHINE'S HARD DISK (INBOUND ROUTING) (page 4-64)
2Using as a file server / browsing saved files.To use this, open any folder screen on your computer and enter the IP address of the machine after "\\" in the address bar (example: \\192.168.1.28).
• Access restrictions are set for each folder, so you must enter the login name and password of the administrator account or of a user account that has been registered in the machine.
• The maximum size per file is 2 GB.

1-56
BEFORE USING THE MACHINE►BEFORE USING THE MACHINE
REMOTE OPERATION OF THE MACHINERemotely operate the machine on your computer.You can operate the machine from the same panel as the machine's operation panel that is displayed on your PC, with the same feel as operating in front of the machine.
The remote operation function can only be used on one computer at a time.Before you can use the remote operation function, the following preparation is required.• In "Settings (administrator)", select [System Settings] → [Common Settings] → [Operation Settings] → [Condition
Settings] → [Remote Operation Settings] → [Remote Software Operation] and select [Allow] for [Operational Authority].• Connect the machine to the network.• Install a VNC application software (recommended VNC software: RealVNC) in your computer.
After the preparation is completed, follow the operation described below to set up the function.
Example: RealVNC
1Start the VNC viewer, enter the IP address of the machine in the "VNC Server" entry box, and click the [Connect] button.
Check with the administrator of the machine for its IP address.
2Follow the message on the operation panel of the machine to permit the connection.When the machine is connected to a VNC application software, appears on the system bar of the machine's touch panel.If you wish to disconnect, exit the VNC application software or tap .
Use the operation panel in the same way as you would on the machine. However, you cannot enter values in series by continuously clicking the key.
8½x118½x118½x118½x11
8½x118½x11
8½x11
8½x118½x11
Operate the machine using your computer screen.
Your computer
Network
Operation panel
The machine

1-57
BEFORE USING THE MACHINE►BEFORE USING THE MACHINE
UNIVERSAL DESIGN IN THE MACHINEThe structure of the machine and the software are designed to allow all people to use the machine with ease.
UNIVERSAL DESIGN RELATED TO OPERATION
Adjustment of operation panel angleThe angle of the entire operation panel can be adjusted to enable use even when seated.
Grip handle on paper traysThe grip-type handles allow easy use from above or below. By simply placing your hand on a handle and gently pulling forward, a tray can be withdrawn. The trays can be manipulated in a natural manner.
Changing of key response timeThe response time of the keys can be changed as needed. In "Settings" (administrator)", select [System Settings] → [Common Settings] → [Operation Settings] → [Condition Settings] → [Key Operation Setting].
• Time for Accepting Key EntryThis setting determines how long a key in the touch panel must be tapped until the key input is registered. The time can be set from 0 to 2 seconds in increments of 0.5 seconds.By lengthening the time setting, key input can be prevented when a key is tapped accidentally. Keep in mind, however, that when a longer setting is selected more care is required when tapping keys to ensure that key input is registered.
• Disable Auto Key RepeatThis is used to disable key repeat.Key repeat causes a setting to change continuously not only each time the key is tapped but while a key is tapped.
• Long-touch Detection TimeSelect a time when a long key touch is detected.
• Double Tap Speed IntervalSelect an interval when a double tap is detected.

1-58
BEFORE USING THE MACHINE►BEFORE USING THE MACHINE
Confirmation of placement of original in document feederYou can use the data notification indicator to check if an original has been correctly placed in the auto document feeder.Select "Settings (administrator)" → [System Settings] → [Common Settings] → [Device Control] → [Data Indicator Setting], then set to [Pattern 3].
UNIVERSAL DESIGN RELATED TO VISION
Changing of text sizeThe size of the text on the touch panel can be changed. When the text on the touch panel is small and difficult to read, the text can be enlarged.In "Settings" (administrator)", select [System Settings] → [Common Settings] → [Operation Settings] → [Condition Settings] → [Enlarge Display Mode].
• Enlarge Display ModeDisplays large characters on the screen.
appears in the system area when Enlarge Display Mode is enabled.
UNIVERSAL DESIGN RELATED TO HEARING
Audible alert sounds when changing settingsWhen moving through copy ratio or exposure settings, the user is alerted by an audible sound at the default setting (copy ratio 100%, exposure 3). In "Settings (administrator)", select [System Settings] → [Common Settings] → [Operation Settings] → [Condition Settings] → [Keys Touch Sound] and [Make Key Touch Sound at Default Setting].
• Keys Touch SoundControls the key touch sound level, or turns the sound off. You can also have three peeps sound at initial values when setting the ratio in copy mode or when adjusting the exposure in any mode.
• Make Key Touch Sound at Default SettingWhen you specify the exposure in the exposure adjustment screen of each mode, a bleep sounds three times when the reference value is reached.
Screen in which setting is effective Initial value
Ratio setting screen in base screen of copy mode Ratio 100%
Exposure setting screen in base screen of copy mode Exposure level: 3 (medium)
Exposure adjustment screen in base screen of fax, Internet fax, and network scanner modes
Exposure adjustment screen for Scan to HDD in document filing mode
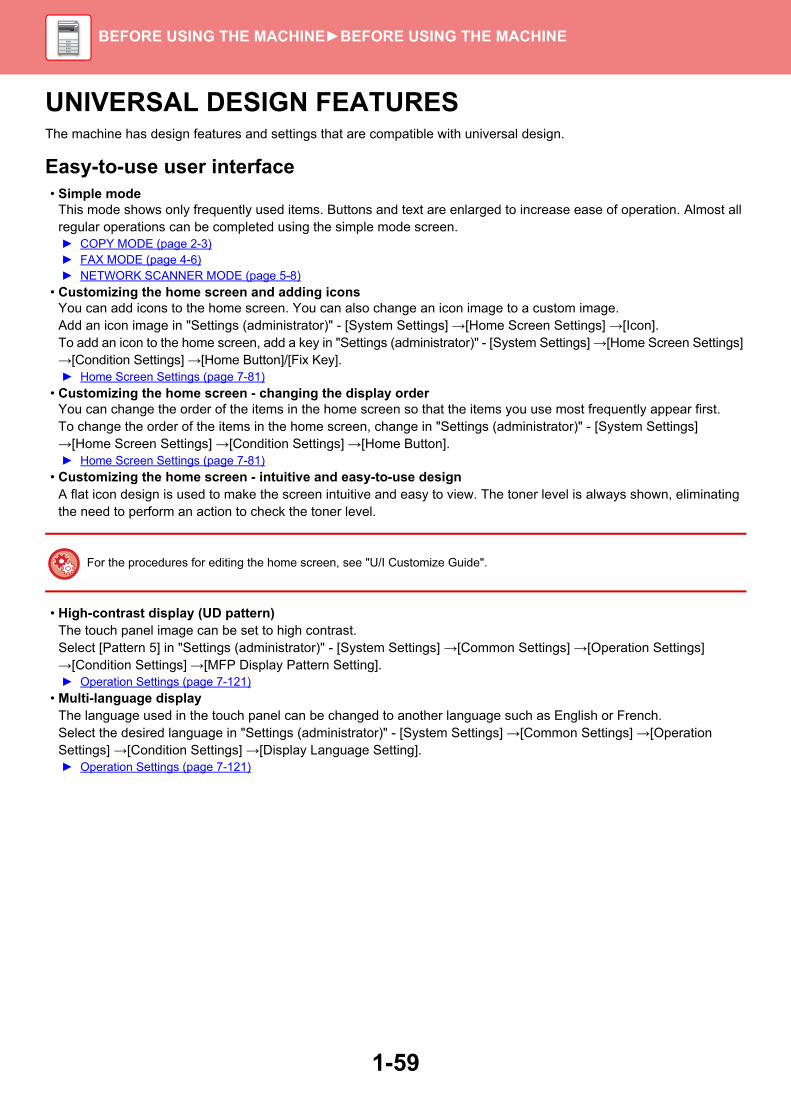
1-59
BEFORE USING THE MACHINE►BEFORE USING THE MACHINE
UNIVERSAL DESIGN FEATURESThe machine has design features and settings that are compatible with universal design.
Easy-to-use user interface• Simple mode
This mode shows only frequently used items. Buttons and text are enlarged to increase ease of operation. Almost all regular operations can be completed using the simple mode screen.► COPY MODE (page 2-3)► FAX MODE (page 4-6)► NETWORK SCANNER MODE (page 5-8)
• Customizing the home screen and adding iconsYou can add icons to the home screen. You can also change an icon image to a custom image.Add an icon image in "Settings (administrator)" - [System Settings] →[Home Screen Settings] →[Icon].To add an icon to the home screen, add a key in "Settings (administrator)" - [System Settings] →[Home Screen Settings] →[Condition Settings] →[Home Button]/[Fix Key].► Home Screen Settings (page 7-81)
• Customizing the home screen - changing the display orderYou can change the order of the items in the home screen so that the items you use most frequently appear first.To change the order of the items in the home screen, change in "Settings (administrator)" - [System Settings] →[Home Screen Settings] →[Condition Settings] →[Home Button].► Home Screen Settings (page 7-81)
• Customizing the home screen - intuitive and easy-to-use designA flat icon design is used to make the screen intuitive and easy to view. The toner level is always shown, eliminating the need to perform an action to check the toner level.
• High-contrast display (UD pattern)The touch panel image can be set to high contrast.Select [Pattern 5] in "Settings (administrator)" - [System Settings] →[Common Settings] →[Operation Settings] →[Condition Settings] →[MFP Display Pattern Setting].► Operation Settings (page 7-121)
• Multi-language displayThe language used in the touch panel can be changed to another language such as English or French.Select the desired language in "Settings (administrator)" - [System Settings] →[Common Settings] →[Operation Settings] →[Condition Settings] →[Display Language Setting].► Operation Settings (page 7-121)
For the procedures for editing the home screen, see "U/I Customize Guide".

1-60
BEFORE USING THE MACHINE►BEFORE USING THE MACHINE
Intuitive operation• Quick-view operation guide
Touch the [Operation Guide] key in the home screen on the touch panel to display the operation guide. The operation guide provides simple explanations of how to use the machine.
• Easy operation by storing programsThe program function lets you store groups of settings for copying, fax, and other functions. By storing groups of settings that you frequently use, you can easily select those settings.► PROGRAMS (page 2-113)► STORING FAX OPERATIONS (PROGRAM) (page 4-68)► STORING SCAN OPERATIONS (PROGRAM) (page 5-67)
• Remote operationYou can display the machine's touch panel on a computer on the same network to operate the machine from the computer. You can show how to use the machine on a computer, and people who have difficulty using the touch panel can operate the machine from a computer.► REMOTE OPERATION OF THE MACHINE (page 1-56)
Easier operation at the machine• Darkened output tray color
Output tray colors are darkened to make it easy to distinguish the tray to which a job has been output.• On right side of operation panel
Located on the right side of the operation panel, this allows smooth removal of paper without interfering with the output tray.
Simple toner replacement• Toner box can be opened with one hand
The box that contains a toner cartridge can be easily opened with one hand.

1-61
BEFORE USING THE MACHINE►BEFORE USING THE MACHINE
ITEMS RECORDED IN THE JOB LOGThe machine records the performed jobs in the job log.The main information recorded in the job log is described below.
• To make it easy to total the usage counts of differently configured machines, the items recorded in the job log are fixed, regardless of what peripheral devices are installed or the objective of the recording.
• In some cases, job information may not be correctly recorded, such as when a power failure occurs during a job.
No. Item name Description
1 Main items Job ID The job ID is recorded. Job IDs appear in the log as consecutive numbers up to a maximum of 999999, after which the count resets to 1.
2 Account Job ID The job ID used in the Sharp OSA is recorded.
3 Job Mode The job mode type, such as copy or print is recorded.
4 Computer Name The name of the computer that sent a print job is recorded.*
5 User Name The user name when the user authentication function is used is recorded.
6 Login Name The login name when the user authentication function is used is recorded.
7 Card ID The card ID when it is used for an authentication process is recorded.
8 Number of Card Issuance The number of times the card has been issued is written in an SSFC IC card is recorded.
9 Main Code Main Code is recorded.
10 Sub Code Sub Code is recorded.
11 Starting Date & Time The date and time the job was started are recorded.
12 Completing Date & Time The date and time the job was completed are recorded.
13 Black & White Total Count For a print job, the total count is recorded. For a send job, the number of transmitted black & white pages is recorded. When a broadcast transmission is summarized, the total number of pages is recorded. For a scan to HDD job, the number of stored black & white pages is recorded.
14 Full Color Total Count The total number of pages in a send job that have been printed using a full color is recorded.
15 Count according to size Counts by original/paper size in color mode and black & white mode are recorded.
16 Number of sheets according to size
The number of pages is logged by paper size.
17 Invalid Paper Count The invalid sheet count is recorded.
18 Number of Reserved Sets Number of specified sets or reserved destinations is recorded.
19 Number of Completed Sets Number of completed sets or number of destinations to which transmission was successfully completed is recorded.

1-62
BEFORE USING THE MACHINE►BEFORE USING THE MACHINE
20 Main items Number of Reserved Pages Number of reserved original pages of a copy, print, scan job, or other job is recorded.
21 Number of Completed Pages Number of completed pages of a set is recorded.
22 Result The result of a job is recorded.
23 Error Cause When an error occurs during a job, the cause of the error is recorded.
24 Print Job Related Item Output The output mode of a printed job is recorded.
25 Staple The status of stapling is recorded.
26 Staple Count The staple count is recorded.
27 Printer Tone The tone used for a print job is recorded.
28 Image Send Related Item Address Address of an image send job is recorded.
29 Sender Name Sender name of an image send job is recorded.
30 Sender Address Sender address of an image send job is recorded.
31 Transmission Type Transmission type of an image send job is recorded.
32 Administrative Serial Number
Administrative serial number of an image send job is recorded.
33 Broadcast number Broadcast number of an image send job is recorded.
34 Entry Order Reservation order for broadcast transmission of an image send job is recorded. This is used to link communication and printing when recording multi polling jobs.
35 File Format File format of an image send job or scan to HDD job is recorded.
36 Sign Records whether or not an electronic signature is used in e-mail transmission.
37 Encry. Records whether or not encryption is used for e-mail transmission.
38 Compression Mode/Compression Ratio
Compression mode and compression ratio of the file of an image send job or scan to HDD job is recorded.
39 Communication Time The communication time of image send jobs is recorded.
40 Fax No. The stored sender's number is recorded.
41 Document Filing Related Item
Document Filing Status of document filing is recorded.
42 Storing Mode Document filing storing mode is recorded.
43 Common Functionality Color Setting Color mode selected by user is recorded.
44 Special Modes Special modes selected when the job was executed is recorded.
45 File Name The stored file name is recorded.*
46 Data Size [KB] The size of a file is recorded.
No. Item name Description

1-63
BEFORE USING THE MACHINE►BEFORE USING THE MACHINE
* In some environments this is not recorded.
47 Detailed Items Original Size Size of scanned original is recorded. For a document filing print job, the paper size of the file is recorded.
48 Original Type Original type (text, printed photo, etc.) set in the exposure settings screen is recorded.
49 Original Count Number of scanned original sheets is recorded.
50 Paper Size For a print job, the paper size is recorded. For a send job, the transmitted paper size is recorded. For a Scan to HDD job, the paper size of the stored file is recorded.
51 Paper Type The paper type used for printing is recorded.
52 Paper Property The paper property specified in "Paper Type" is recorded.
53 Duplex Setup The duplex setting is recorded.
54 Resolution The scanning resolution is recorded.
55 Machine Item Model Name The model name of the machine is recorded.
56 Unit Serial Number The serial number of the machine is recorded.
57 Name The name of the machine that is set in the Web pages is recorded.
58 Machine Location The installation location of the machine that is set in the Web pages is recorded.
59 Machine ID Record the Machine ID entered by the service technician.
No. Item name Description

1-64
BEFORE USING THE MACHINE►LOADING PAPER
IMPORTANT POINTS ABOUT PAPER
NAMES AND LOCATIONS OF TRAYS
APPLICABLE PAPER TYPESThis section describes paper types that can be used and those that cannot be used.All types of paper other than plain paper are referred to as special media.
LOADING PAPER
• Various types of paper are commercially available, some of which cannot be used on the machine.Before using any paper, consult the dealer or nearest SHARP Service Department.
• The image quality and toner fusibility of paper may change due to ambient conditions, operating conditions, and paper characteristics, resulting in image quality inferior to that of Sharp standard paper.Before using any paper, consult the dealer or nearest SHARP Service Department.
• The use of non-recommended or non-usable paper may result in skewed feeding, misfeeds, poor toner fusing (the toner does not adhere to the paper well and can be rubbed off), or machine failure.
• The use of non-recommended paper may result in misfeeds or poor image quality. Before using non-recommended paper, check whether printing can be performed properly.
Tray 1
Tray 2(when a 600-sheet paper feed unit is installed)
Bypass tray
Tray 3(when two 600-sheet paper feed units are
installed)
Tray 4(when three 600-sheet paper feed units
are installed)

1-65
BEFORE USING THE MACHINE►LOADING PAPER
Useable paper
Specifications of plain paper, heavy paper and thin paper
Specifications of paper that can be used for two-sided printing
Plain PaperPlain Paper 1 16 lbs. bond to 24 lbs. bond (60 g/m2 to 89 g/m2)
Plain Paper 2 24 lbs. bond to 28 lbs. bond (90 g/m2 to 105 g/m2)
Heavy paperHeavy paper 1 28 lbs. bond to 65 lbs. cover (106 g/m2 to 176 g/m2)
Heavy paper 2 65 lbs. cover to 80 lbs. cover (177 g/m2 to 220 g/m2)
Thin paper 13 lbs to 16 lbs (55 g/m2 to 59 g/m2)
• For paper specifications, see the specifications in the "Start Guide".
• Recycled paper, colored paper and pre-punched paper must meet the same specifications as plain paper.Before using any paper, consult the dealer or nearest SHARP Service Department.
• If the paper that was output is significantly curled, remove the paper from the cassette, turn the paper over so it is face down, and resume use.
Paper Type Plain, Recycled, Color, Letter Head, Pre-Printed, Punched
Paper Size 8-1/2" x 14", 8-1/2" x 13-1/2", 8-1/2" x 13-2/5", 8-1/2" x 13", 8-1/2" x 11", 5-1/2" x 8-1/2", A4, B5, A5

1-66
BEFORE USING THE MACHINE►LOADING PAPER
Types of paper that can be set in each tray
*1 when a 600-sheet paper feed unit is installed*2 when two 600-sheet paper feed units are installed*3 when three 600-sheet paper feed units are installed*4 "Plain Paper 1" is plain paper 16 to 24 lbs. bond (60 to 89 g/m2), "Plain Paper 2" is plain paper 24 to 28 lbs. bond
(90 to 105 g/m2).*5 "Heavy Paper 1" is heavy paper up to 65 lbs. cover (176 g/m2), "Heavy Paper 2" is heavy paper up to 80 lbs. cover
(220 g/m2).
• For detailed information on the sizes and types of paper that can be loaded into each tray of the machine, see "SPECIFICATIONS" in the "Start Guide" and "Paper Tray Settings (page 7-118)".
• Recycled paper, colored paper and pre-punched paper must meet the same specifications as plain paper.Before using any paper, consult the dealer or nearest SHARP Service Department.
Tray 1 Tray 2*1
Tray 3*2
Tray 4*3
Bypass tray
Plain Paper 1*4 Permitted Permitted Permitted
Plain Paper 2*4 Permitted Permitted Permitted
Heavy Paper 1*5 - Permitted Permitted
Heavy Paper 2*5 - Permitted Permitted
Thin Paper - Permitted Permitted
Pre-Printed Permitted Permitted Permitted
Recycle Paper Permitted Permitted Permitted
Letter Head Permitted Permitted Permitted
Pre-Punched Permitted Permitted Permitted
Color Permitted Permitted Permitted
Labels - - Permitted
Glossy Paper - - Permitted
Transparency - - Permitted
Envelope - - Permitted

1-67
BEFORE USING THE MACHINE►LOADING PAPER
Setting orientation of the print sideThe setting orientation varies for the print side of paper, depending on the tray used. For "Letter Head" and "Pre-Printed", set the paper in the reverse orientation. Place with the print side facing the direction indicated below.
Paper that cannot be used• Embossed paper• Tab paper• Special media for an ink jet printer
(fine paper, glossy paper, glossy film, etc.)• Carbon paper or thermal paper• Pasted paper• Paper with clips• Paper with fold marks• Torn paper• Oil-feed transparency film• Thin paper less than 15 lbs (55 g/m2)• Heavy paper as thick as 80lbs. cover (220 g/m2) over• Irregularly shaped paper• Stapled paper• Damp paper• Curled paper• Paper whose print side or reverse side has been already printed on by another printer or multifunction device.• Paper with a wave-like pattern due to moisture absorption• Paper with creases• Paper with dust
Non-recommended paper• Iron-on transfer paper• Perforated paper
Tray In normal status With letter head or pre-printed paper set
Trays 1 - 4 Facing up Facing down
Bypass Facing down Facing up
When [Disabling of Duplex] is set for "Letter Head" or "Pre-Printed", set the print side in the same orientation as for the ordinary operation.
To set [Disabling of Duplex]:In "Settings (administrator)", select [System Settings] → [Common Settings] → [Device Control] → [Disabling of Duplex].

1-68
BEFORE USING THE MACHINE►LOADING PAPER
TRAY 1 - 4 A maximum of 500 sheets of paper from size 5-1/2" x 8-1/2" to 8-1/2" x 11" (A6 to A4) can be loaded into tray 1. (150 sheets when the paper is A6)A maximum of 600 sheets of paper from size 5-1/2" x 8-1/2" to 8-1/2" x 14" (A5 to A4) can be loaded into trays 2 to 4.
If you loaded paper of a different type or size from the paper previously loaded, be sure to check the settings in "Settings (administrator)". Incorrect setting affects automatic paper selection action. It may cause print failure, printing on paper of a wrong size or type or paper misfeeds.
Do not place heavy objects on the tray or press down on the tray.
To check the type and size of paper:[Tray Settings] in the home screen or in "Settings", select [Status] → [Machine Identification] → [Paper Input Tray Status] → [Paper Tray Settings].To set the type and size of paper:Set this in [Tray Settings] in the home screen or in “Settings” - [System Settings]→[Common Settings]→[Paper Settings]→[Paper Tray Settings].
1Tray 1
Tray 2 - 4
Pull out the paper tray.Gently pull the tray out until it stops.To load paper, go to step 3. To load a different size of paper, go to the next step.
When using the tray 1, push the center of the pressure plate down until it locks into place.
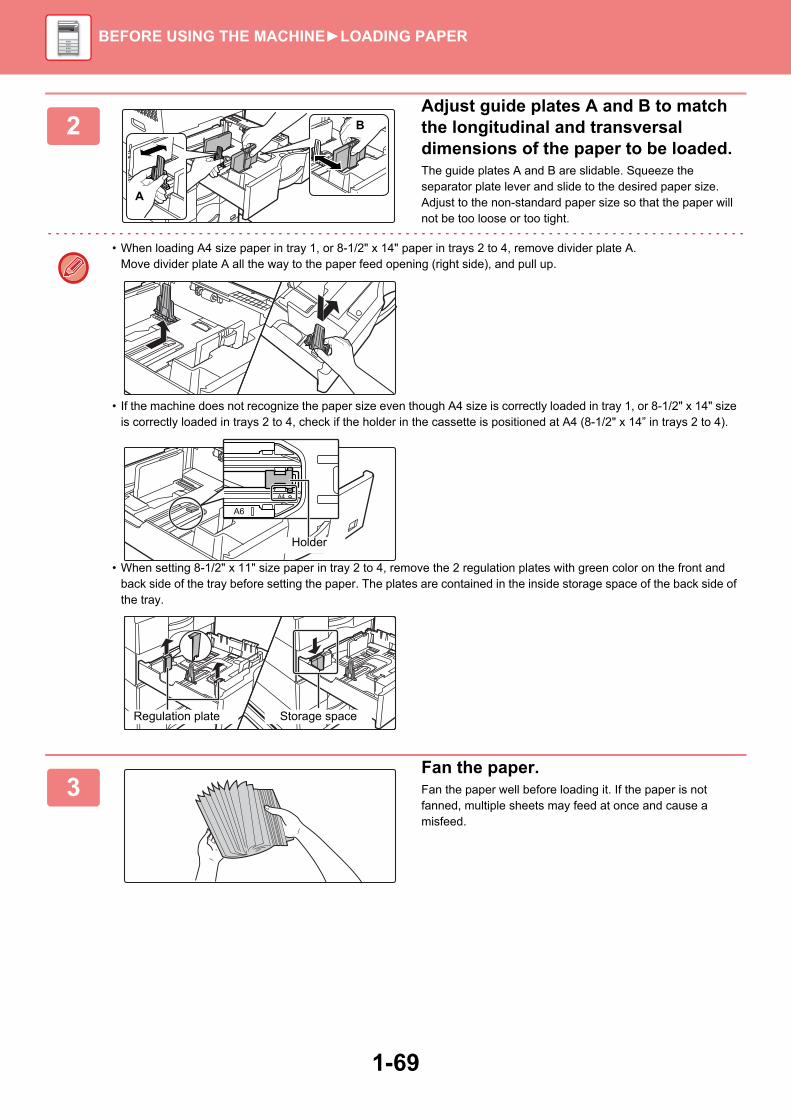
1-69
BEFORE USING THE MACHINE►LOADING PAPER
2Adjust guide plates A and B to match the longitudinal and transversal dimensions of the paper to be loaded.The guide plates A and B are slidable. Squeeze the separator plate lever and slide to the desired paper size.Adjust to the non-standard paper size so that the paper will not be too loose or too tight.
• When loading A4 size paper in tray 1, or 8-1/2" x 14" paper in trays 2 to 4, remove divider plate A.Move divider plate A all the way to the paper feed opening (right side), and pull up.
• If the machine does not recognize the paper size even though A4 size is correctly loaded in tray 1, or 8-1/2" x 14" size is correctly loaded in trays 2 to 4, check if the holder in the cassette is positioned at A4 (8-1/2" x 14” in trays 2 to 4).
• When setting 8-1/2" x 11" size paper in tray 2 to 4, remove the 2 regulation plates with green color on the front and back side of the tray before setting the paper. The plates are contained in the inside storage space of the back side of the tray.
3Fan the paper.Fan the paper well before loading it. If the paper is not fanned, multiple sheets may feed at once and cause a misfeed.
A
B
A6
A4
Holder
Storage spaceRegulation plate

1-70
BEFORE USING THE MACHINE►LOADING PAPER
4Insert the paper into the tray.Load the paper with the print side facing up. The stack must not be higher than the indicator line (Tray 1: maximum of 500 sheets (Maximum of 150 sheets of A6 paper), trays 2 to 4: maximum of 600 sheets).
• If a paper misfeed occurs, turn the paper over and/or around, and reload.
• If the paper is curled, fix the curl before loading the paper.
• Adjust the divider plate so that there is no gap between the paper and divider plate.
• Do not add paper.
• Do not load the paper as shown below.
5Gently push the paper tray into the machine.Push the tray firmly all the way into the machine slowly.Forcefully inserting the paper may cause skewed feeding and paper misfeeds.

1-71
BEFORE USING THE MACHINE►LOADING PAPER
LOADING PAPER INTO THE BYPASS TRAYUse the bypass tray for printing on plain paper, envelopes, label sheets, and other special media.Up to 50 sheets of paper can be loaded (Heavy paper weighing between 28 lbs. bond and 80 lbs. cover: 20 sheets, envelope: 10 sheets) for continuous printing, just like operation using other trays.
How to place the originalLoad paper in landscape orientation.
Inserting transparency film
Loading envelopesWhen inserting envelopes in the bypass tray, place them aligned to the left side in the orientation shown below.Only the front side of envelopes can be printed or copied on. Place the front side facing down.Fold the flap and make a sharp crease at the fold.
• When using plain paper other than Sharp standard paper or special media other than SHARP-recommended transparency film, glossy paper, or when printing on the reverse side of paper that has been printed on one side, load paper one sheet at a time. Loading more than one sheet at a time will cause misfeeds.
• Before loading paper, straighten any curling in the paper.
• When adding paper, remove any paper remaining in the bypass tray, combine it with the paper to be added, and reload as a single stack. If paper is added without removing the remaining paper, a misfeed may result. Loading more sheets than the specified number of sheets or the limit may cause paper misfeeds.
• After loading paper in the bypass tray, always check the paper type and size.
• Use SHARP-recommended transparency film.
• When loading multiple sheets of transparency film into the bypass tray, fan the sheets several times before loading.
• When printing on transparency film, remove each sheet as it is printed and output from the machine. Allowing sheets to stack in the output tray may result in curling.

1-72
BEFORE USING THE MACHINE►LOADING PAPER
Important points when using envelopes• Do not print on both sides of an envelope. This may result in misfeeds or poor print quality.• Restrictions apply to some types of envelopes. For more information, consult a qualified service technician.• Some operating environments may cause creasing, smudging, misfeeds, poor toner fusing, or machine failure.• Fold the flap of the envelope and make a sharp crease at the fold. A misfeed may occur if the flap is up.• Do not use the following envelopes:
• Those with a metal piece, a plastic hook or a ribbon hook• Those with a string for closing• Those with a window• Those with a lining• Those with an uneven surface, finished with titling or emboss• Duplex envelopes or those with adhesive or other synthetic material for sealing• Hand-made envelopes• Those containing air inside• Those damaged with a crease, fold mark or tear
• Envelopes with the corner gluing position on the back not aligned with the corner edge should not be used as it may cause creasing.
• Print quality is not guaranteed in the area 13/32" (10 mm) around the edges of the envelope.• Print quality is not guaranteed on parts of envelopes where there is a large step-like change of thickness, such as on
four-layer parts or parts less than three layers.• Print quality is not guaranteed on envelopes having peel off flaps for sealing the envelopes.
Important points when using label sheets• For more information, consult the dealer or nearest SHARP Service Department.• Some labels may have to be loaded into the bypass tray in the specified orientation. Follow such instructions.
If a form is already printed on the labels, and the print images and the preprinted form do not line up, adjust the application or printer driver settings to rotate the print images.
• Do not use the following types of label sheets.• Label sheets without an adhesive copy or label copy• Label sheets with adhesive exposed• Label sheets with a specified feeding direction that is not supported by the machine• A label sheet that has already been fed or has some labels removed• Label sheets consisting of multiple sheets• Label sheets that do not support laser printing• Label sheets that cannot withstand heat• Label sheets that have perforations in the backing paper• Label sheets with slits in the backing paper• Non-standard label sheets • Label sheets with adhesive that has deteriorated due to prolonged storage or otherwise• Label sheets with cutouts that expose the backing paper• Curled or otherwise deformed label sheets• Torn or creased label sheets
Can be used
Cannot be used

1-73
BEFORE USING THE MACHINE►LOADING PAPER
Fusing unit pressure adjusting leversIn some cases damage to the envelopes or smudging may occur even if envelopes within the specifications are used. This problem may be alleviated by shifting the fusing unit pressure adjusting levers from their "normal pressure position" to the "lower pressure position". Follow the procedure on the this page.
1Open out the right side cover.Gently open the cover.
2Move the fusing unit pressure adjusting levers (two) to the lower pressure position as shown.
3Close the right side cover.
4Return the lever to the normal position when finished feeding envelopes.
AB
Normal position
Lower pressure position
A B

1-74
BEFORE USING THE MACHINE►LOADING PAPER
Loading paper
Be sure to return the levers to the "normal pressure position" before printing or copying on paper other than envelopes. Otherwise, fusing problems, paper misfeeds, or equipment failure may occur.
The fusing unit is hot. Take care not to burn yourself when operating the fusing unit pressure adjusting levers.
1Open the bypass tray and the extension tray.
Do not place heavy objects on the bypass tray or press down on the tray.
2Push the center of the pressure plate down until it locks into place.
3Load the paper with the print side facing down.Insert the paper along the bypass tray guides all the way into the bypass tray until it stops slowly. Inserting the paper with excessive force may cause the leading edge to fold back. Inserting the paper too loosely may cause skewed feeding or misfeeds.The paper must not exceed the maximum number of sheets and must not be higher than the indicator line.

1-75
BEFORE USING THE MACHINE►LOADING PAPER
4Set the bypass tray guides correctly to the width of the paper.Adjust the bypass tray guides so that they slightly contact the loaded paper.
For "Letter Head" and "Pre-Printed", set the paper with the print side up. However, when [Disabling of Duplex] is enabled, set the print side in the same orientation as in the regular mode (facing down).
• Do not forcefully push in paper that you are loading. This may cause misfeeds.
• If the bypass tray guides are set wider than the paper, move the bypass tray guides in until they correctly fit the width of the paper. If the bypass guides are set too wide, the paper may skew or be creased.
To display the paper tray settings when paper is detected in the bypass trayIn "Settings", select [System Settings] → [Common Settings] → [Paper Settings] → [Paper Tray Settings] → [Display Paper Tray Settings when bypass tray detects paper.].

1-76
BEFORE USING THE MACHINE►HOW TO PLACE THE ORIGINAL
SELECTING A PROCEDURE FOR PLACING THE ORIGINAL DEPENDING ON THE TYPE AND STATUS OF THE ORIGINALPlace the original in the automatic document feeder. Depending the type and status of the original, use the document glass. Follow the instructions to select the method for placing the original.To place it in the automatic document feeder, see "AUTOMATIC DOCUMENT FEEDER (page 1-77)".
HOW TO PLACE THE ORIGINAL

1-77
BEFORE USING THE MACHINE►HOW TO PLACE THE ORIGINAL
AUTOMATIC DOCUMENT FEEDERThis section explains how to place originals in the automatic document feeder.
• Place originals of different sizes together, if needed, in the automatic document feeder. In that case, use the "Others" function in each mode to set [Mixed Size Original].
• Before inserting originals into the document feeder tray, be sure to remove any staples or paper clips.
• If originals have damp spots due to correction fluid, ink or paste up glue, wait until the originals are dry before making copies. Otherwise the interior of the machine or the document glass may be soiled.
• Do not use the following originals. Original misfeeds and smudges may result.Transparency film or other transparent material for backup copy, tracing paper, carbon paper, thermal paper or originals printed with thermal transfer ink ribbon should not be fed through the document feeder. Originals to be fed through the feeder should not be damaged, crumpled, folded, loosely pasted together, or have cut-out holes. Originals with multiple punched holes other than two-hole or three-hole punched paper may not feed correctly.
• The condition, material, shape, or fabrication method of some business cards may prevent correct feeding or scanning.
• When using originals with two or three holes, place them so that the punched edge is at a position away from the feed slot of the document feeder tray. Specify the orientation of the original using [Original].
• For a thin original (9 lbs. to 14 lbs. (35 g/m2 - 49 g/m2)), use [Slow Scan Mode] in the "Others". For this type, 2-sided scanning is disabled. (MX-B455W only)
5-1/2" x 8-1/2" (A5)
8-1/2" x 11" (A4)
Hole positionsFeed slot

1-78
BEFORE USING THE MACHINE►HOW TO PLACE THE ORIGINAL
Allowed original sizes
When the original is a non-standard size, see the appropriate explanation below for the mode you are using.► COPIER: "SELECTING THE ORIENTATION AND SIZE OF THE ORIGINAL (page 2-29)"► FAX: "SPECIFYING THE ORIGINAL SCAN SIZE USING NUMERIC VALUES (page 4-44)"► IMAGE SEND: "SPECIFYING THE ORIGINAL SCAN SIZE USING NUMERIC VALUES (page 5-50)"
Allowed original weights
When using the MX-B455WTo scan originals from 9 to 13- lbs Bond (35 to 49g/m2), use "Slow Scan Mode" in the "Others" function. Scanning without using "Slow Scan Mode" may result in original misfeeds.When "Slow Scan Mode" is selected, automatic 2-sided scanning is not possible.*The MX-B355W cannot scan thin paper.
Minimum original size Maximum original size
Standard size5-1/2" (longitudinal) × 8-1/2" (transversal)105 mm (longitudinal) × 148 mm, or A6Non-standard size(Minimum size that can be specified manually)4-1/4" (longitudinal) × 5-1/2" (transversal)105 mm (longitudinal) × 140 mm (transversal)Business card2" (longitudinal) x 3-1/2" (transversal)51 mm (longitudinal) x 89 mm (transversal)
Standard size8-1/2" (longitudinal) × 14" (transversal)210 mm (longitudinal) × 297 mm (transversal) or A4Non-standard size(Maximum size that can be specified manually)Copy mode:8-1/2" (longitudinal) × 14" (transversal)216 mm (longitudinal) × 356 mm (transversal)image send mode:8-1/2" (longitudinal) × 19-5/8" (transversal)216 mm (longitudinal) × 500 mm (transversal)
MX-B355W1-sided scanning: 13 to 28 lbs Bond (50 to 105 g/m2)2-sided scanning: 13 to 28 lbs Bond (50 to 105 g/m2)Business card: 0.1 to 0.2 mm
MX-B455W1-sided scanning: 9 to 32 lbs Bond (35 to 128 g/m2)2-sided scanning: 13 to 32 lbs Bond (50 to 128 g/m2)Business card: 0.1 to 0.2 mm
1 Make sure that there is no original on the document glass.
2Place the original.MX-B355W: Up to 50 sheets can be inserted.
Business card:Up to 25 sheets can be inserted.
MX-B455W: Up to 100 sheets can be inserted.Business card:Up to 25 sheets can be inserted.
After scanning is finished on the automatic document feeder, remove originals from the original exit tray.
Align the edges evenly and face them up
Insert to the end
Fit to the Original Size
Below the indicator line

1-79
BEFORE USING THE MACHINE►HOW TO PLACE THE ORIGINAL
DOCUMENT GLASSThis section describes the steps for setting the original on the document glass.
Allowed original sizes
When the original is a non-standard size, see the appropriate explanation below for the mode you are using.► COPIER: "SELECTING THE ORIENTATION AND SIZE OF THE ORIGINAL (page 2-29)"► FAX: "SPECIFYING THE ORIGINAL SCAN SIZE USING NUMERIC VALUES (page 4-44)"► IMAGE SEND: "SPECIFYING THE ORIGINAL SCAN SIZE USING NUMERIC VALUES (page 5-50)"
• Close the automatic document feeder slowly. Abruptly closing the automatic document feeder may damage it.
• Take care that your fingers are not pinched when closing the automatic document feeder.
Maximum original size
Standard size8-1/2" (longitudinal) x 14" (transversal)210 mm (longitudinal) x 297 mm (transversal) or A4Non-standard size8-1/2" (longitudinal) x 14" (transversal)216 mm (longitudinal) x 356 mm (transversal)
1Open the automatic document feeder.
2Load the paper with the print side facing down.Place the original face down and align the top left corner of the original with back left (at the tip of the mark ) of the document glass.
3Close the automatic document feeder.After placing the original, close the automatic document feeder. If the unit is left open, parts outside of the original will be copied in black, causing excessive use of toner.
If originals have damp spots due to correction fluid, ink or paste up glue, wait until the originals are dry before making copies. Otherwise the interior of the machine or the document glass may be soiled.
X
Y
Mark
Document glass scale

1-80
BEFORE USING THE MACHINE►STOPPING/DELETING A JOB, PRIORITY PROCESSING AND CHECKING THE STATUS
TYPES OF JOB STATUS SCREENSWhen you tap the job status display, the job status screen appears. Tap it again to return to the previous mode.The job status screen is divided into the following four tabs, enabling you to select a job list by tapping a desired tab.
• PrintLists print jobs such as copying, printing from a PC, USB direct print, and printing for faxed or other received data.
• ScanLists send jobs of converted images for e-mail messages and FTP/Desktop send jobs.
• FaxLists fax send jobs using a telephone line.
• Internet FaxLists fax send jobs using internet.
On each tab, jobs are classified into three groups.Jobs move among the lists according to the processing status, from [Spool], [Job Queue] and [Complete], in that order.To switch the job list display to the display by processing status, tap the [Spool], [Job Queue] or [Complete] key as desired.
STOPPING/DELETING A JOB, PRIORITY PROCESSING AND CHECKING THE STATUS
The background of the job status display changes as follows:
• Green: Job in progress
• Yellow: Warming up/waiting
• Red: Waiting for error clearing
To prohibit the display and changing of job information of other users when user authentication is enabledSelect "Settings (administrator)" → [User Control] → [Default Settings] → [Include Job Status in user authentication] → [Disable display/change of other users' information in the job status] check box to .
Job Queue
Complete
Spool
Internet FaxFaxScanPrint
Job Job Queue Progress / Sets Status
Encrypt PDF
Spooling
User_1_User_1_User ---/0004
---/0004User_2_User_2_User
Back
Job Status BackLINE PRINTER
10:15 AM10:15 AM
Volume
EasyCopy
Job Queue
Complete
Spool
Job Job Queue Progress / Sets Status
Encrypt PDF
Spooling
User_1_User_1_User ---/0004
---/0004User_2_User_2_User
BackInternet FaxFaxScanPrint

1-81
BEFORE USING THE MACHINE►STOPPING/DELETING A JOB, PRIORITY PROCESSING AND CHECKING THE STATUS
• Spool list (Only displayed when a print-from computer job is received) Lists print jobs up to the transfer to the machine from a computer. The jobs move to the Job Queue list after the transfer is completed.If you printed an encrypted PDF file by direct print, enter the password from here to print the file.► PRINTING AN ENCRYPTED PDF FILE (page 3-78)
• Job Queue list Lists jobs in progress and in the queue for copying, printing from a computer and printing of received fax. This list also displays jobs in progress and in the queue for sending fax data or sending image data converted on the machine. The jobs move to the Complete list after printing or sending is completed.
• Complete list Lists jobs through with copying, printing or sending.

1-82
BEFORE USING THE MACHINE►STOPPING/DELETING A JOB, PRIORITY PROCESSING AND CHECKING THE STATUS
STOPPING/DELETING A JOB IN PROGRESS OR RESERVED
1Tap the job status display and tap the tab for the job that you wish to stop or delete.
2Tap the [Job Queue] key.
When you wish to stop a print job being sent from the computer, tap the [Spool] key.
3Tap the job that you wish to stop or delete, and then tap [Stop/Delete] on the action panel.When a screen appears that allows you to confirm that you do want to stop the job, tap the [Cancel] key.
If the machine runs out of paper during a copy or print job, you can cancel the job from the job status screen.To delete more than one job, operate the check box for [Enter Multi Selection Mode] on the action panel so that it looks like .
• Printing of a received fax or Internet fax cannot be stopped.
• A job set for transfer in "FORWARDING RECEIVED DATA TO PRESET DESTINATIONS (INBOUND ROUTING SETTINGS) (page 4-60)" cannot be canceled.
Job Queue
Complete
Internet FaxFaxScan
Job Address Set Time Status
Print Image SendingActivity Report
Back
0000/0002 OK0000/000110:45 07/07Broadcast004
Pages

1-83
BEFORE USING THE MACHINE►STOPPING/DELETING A JOB, PRIORITY PROCESSING AND CHECKING THE STATUS
PRIORITY PROCESSING OF A RESERVED JOBThis function gives priority to processing of copied, faxed or image send jobs arising later to jobs already in a queue for printing or sending.
Priority processing operation varies, as follows, depending on the job type.
• Job on the print tabThe job currently in progress is suspended to let the priority job make interruption.
• Job on the scanner/fax/Internet fax tabThe priority job is moved directly under the job currently in progress.
1 Tap the job status display and tap the job for priority processing.
2Tap the [Job Queue] key.
3Tap the job for priority processing and then tap [Change Job Priority] on the action panel.
Print Scan Fax Internet Fax
Spool
Complete
Job Queue
Check Details ofSelected Job
Change Job Priority
Stop/Delete
Enter MultiSelection Mode
Back
Job Job Queue Progress / Sets Status StartTime
Copy
Copy
Copy
Copy
Copy
Copy
Copy
Copy
Copy
0100/0100
0000/0001
0000/0001
0000/0001
0000/0001
0000/0001
0000/0001
0000/0001
Paper Empty
Waiting
Waiting
Waiting
Waiting
Waiting
Waiting
Waiting
Waiting
---
Calculating
Calculating
Calculating
Calculating
Calculating
Calculating
Calculating
Calculating0000/0001

1-84
BEFORE USING THE MACHINE►STOPPING/DELETING A JOB, PRIORITY PROCESSING AND CHECKING THE STATUS
Changing the job orderIf there is a job in progress, an interrupt job can be performed, or a job can be moved down in the queue to change the job order. Tap the key of the job you want to move, and tap the "Priority Change" key.
• key
Moves the selected job to the top of the queue. The current job will be interrupted and the selected job starts.
• key
Moves the selected job up one position. When the second job from the top is selected, tapping this key interrupts the current job and starts the selected job.
• key
Moves the selected job down one position.
• key
Moves the selected job to the bottom of the queue.
Scanner job with a timer settingWhen a scanner job with a timer setting is selected, tapping the order change keys moves the job as follows.
• key
The timer setting is canceled and the job moves to the position after the job in progress (second from top).
• key
The timer setting is canceled and the job moves to the lowest position in the queue (if there are 3 jobs, the 4th position)
• , key
These keys cannot be used.
The jobs below cannot be moved.Job currently in progress, interrupt copy jobs, list print jobs, and jobs when Passing Prohibited is set in the system settings.
Internet FaxFaxScanPrint
Job Queue
Complete
Spool
Priority ChangeJob Job Queue Progress / Sets Status Start
Time
Copy
Copy
0100/0100
0000/0001
Paper Empty
Waiting
---
Calculating

1-85
BEFORE USING THE MACHINE►STOPPING/DELETING A JOB, PRIORITY PROCESSING AND CHECKING THE STATUS
In print tab, you can switch the display in the "Job Queue" screen between the number of printed copies and remaining copies to be printed for each job.
CHECKING A RESERVED JOB OR THE JOB IN PROGRESS
To switch the display between the numbers of printed copies and remaining copies to be printed for each job:In "Settings (administrator)", select [System Settings] → [Common Settings] → [Operation Settings] → [Condition Settings] → [Switch the Number of Sets to be Displayed for Job Status].
1Tap the job status display and tap the tab for the job whose contents you wish to check.
2Tap the [Job Queue] key.
3Tap the job whose contents you wish to check and then tap [Check Details of Selected Job] on the action panel.
• Different job contents appear in different modes.
• For information on the icons displayed on the job keys or the messages displayed in "Status", see "READING THE JOB LIST (page 1-87)".
Job Queue
Complete
Spool
Priority Change
Internet FaxFaxScanPrint
Job Job Queue Progress / Sets Status StartTime
Copy 0100/0100 Paper Empty ---
Print Scan Fax Internet Fax
Spool
Complete
Job Queue
Reselect Paper
Check Details ofSelected Job
Change Job Priority
Stop/Delete
Enter MultiSelection Mode
Back
Job Job Queue Progress / Sets Status StartTime
Copy
Copy
Copy
Copy
Copy
Copy
Copy
Copy
Copy
0100/0100
0000/0001
0000/0001
0000/0001
0000/0001
0000/0001
0000/0001
0000/0001
Paper Empty
Waiting
Waiting
Waiting
Waiting
Waiting
Waiting
Waiting
Waiting
---
Calculating
Calculating
Calculating
Calculating
Calculating
Calculating
Calculating
Calculating0000/0001
(1)
(2)

1-86
BEFORE USING THE MACHINE►STOPPING/DELETING A JOB, PRIORITY PROCESSING AND CHECKING THE STATUS
CHECKING COMPLETED JOBS
1Tap the job status display and tap the tab for the job whose contents you wish to check.
2 Tap the [Complete] key.
3Tap the job whose contents you wish to check and then tap [Check Details of Selected Job] on the action panel.Jobs you can check are displayed as keys so that you can tap them.• Different job contents appear in different modes.• For information on the icons displayed on the job keys or
the messages displayed in "Status", see "READING THE JOB LIST (page 1-87)".
Priority Change
Job Queue
Complete
Spool
Internet FaxFaxScanPrint
Job Job Queue Progress / Sets Status StartTime
Copy 0100/0100 Paper Empty ---(1)
(2)
Job Complete Set Time Number of Prints Status
Job Queue
Complete
Spool
Check Details ofSelected JobSend
Choose Print Settings
Back
Copy
Copy
Copy
Copy
Copy
Copy
Copy
Copy
Copy
OK
OK
OK
OK
OK
OK
OK
OK
OK
0001/0001
0001/0001
0001/0001
0001/0001
0001/0001
0001/0001
0001/0001
0001/0001
0001/0001
13:43 06/22
13:33 06/22
13:33 06/22
13:33 06/22
13:33 06/22
00:00 05/05
00:00 05/05
00:00 05/05
00:00 05/05
Internet FaxFaxScanPrint

1-87
BEFORE USING THE MACHINE►STOPPING/DELETING A JOB, PRIORITY PROCESSING AND CHECKING THE STATUS
READING THE JOB LISTThe meaning of each job icon and message displayed in "Status" is as follows:
Icons indicating the job type
* This appears in a multi-mode broadcast job.
Print job (RGB/CMYK) Copy job
Scan to E-mail job Scan to FTP job
Scan to Network Folder job Scan to Desktop job
Fax transmission job Fax reception job
PC-Fax transmission job Internet fax transmission job (Including Direct SMTP)
PC-I-Fax transmission job Scan to HDD file print job
Internet fax reception job (Including Direct SMTP)
Broadcast job* Inbound routing job
Tandem print job OSA Scan Job

1-88
BEFORE USING THE MACHINE►STOPPING/DELETING A JOB, PRIORITY PROCESSING AND CHECKING THE STATUS
Messages displayed in "Status"Job in progress
Reserved job
Display Status
"Printing" Print job in progress
"Copying" Copy job in progress
"Connecting" Connecting
"Sending" Sending
"Receiving" Receiving
"Processing" Processing
"Tel" Speaking with the other party using an extension telephone
"Stopped" The job has been stopped
"Toner Empty" Toner Empty
"Paper Empty" Paper Empty
"Paper Jam" Paper jam
"Waiting" Waiting
"Warming up" Warming up
"Limit" Having reached the account limit
"Report wait" Transmission confirmation reception timeout
"Error" An error occurred while the job was being executed
Display Status
"Waiting" The job is waiting to be executed
"Retry Mode" The job is being retried due to a communication error or other problem
"Report Wait" Waiting for confirmation of Internet fax transmission
A day and time is displayed Timer transmission job (the specified time is displayed)

1-89
BEFORE USING THE MACHINE►STOPPING/DELETING A JOB, PRIORITY PROCESSING AND CHECKING THE STATUS
Completed job
* If the receiving machine is a SHARP machine, the receiving machine will return "dispatched" if the fax was received normally, or "processed" if reception failed.When delivery confirmation is set for Internet Fax, the disposition feeld value indicated on the delivery confirmation return e-mail appears.
Display Status
"OK" Normal termination
"Send OK" Transmission was completed.
"NG Ck Line" Fax line cable is not connected
"In Memory" Reception completed but the fax has not been printed.
The received data (each page) has not been printed or forwarded. (The received data has not been deleted.)
"Received" Printed received fax data.
The fax has been received.
The received data (each file) was stored.
"Forward OK" The received data/received data (each file) has been forwarded.
"FAST" FAST transmission completed.
"Stopped" The job was stopped.
"Delete" Deleted received data in the image check screen.
"Number of successful transmission destinations/Total destinations OK"
Completion of a broadcast transmission, serial polling, or inbound routing operation.
If transmission to 3 destinations was successful out of a total of 5, "003/005 OK" will appear.
"No Response" An error occurred because there was no response from the destination.
"Busy" An error occurred because the other party was busy.
"Received" E-mail other than Internet fax received
"Rejected" A fax was sent from a party that has been blocked by the anti junk fax function.
"NGxxxxxx" Transmission/reception was not successful because a communication error occurred (a 6-digit error code appears in xxxxxx.)
"Error" An error occurred while the job was being executed.
"displayed"* Displayed at the receiving machine when delivery confirmation is set
"dispatched"* Forwarded elsewhere before being displayed at the receiving machine when delivery confirmation is set
"processed"* Processed without being displayed at receiving machine when delivery confirmation is set
"deleted"* Message deleted at receiving machine when delivery confirmation is set
"denied"* Receiving machine refused to notify sending machine of message processing content when delivery confirmation is set
"failed"* An abnormal condition occurred when delivery confirmation is set

1-90
BEFORE USING THE MACHINE►ADDRESS BOOK
ADDRESS BOOK"Contacts" and "Group" can be stored in the address book.For a contact, more than one address can be stored, including fax, e-mail, Internet fax and direct SMTP addresses.Registering addresses stored as "Contacts" as well as directly entered addresses as "Group" enables you to easily send messages to multiple destinations simply by specifying a group.
ADDRESS BOOK
• Up to 2000 entries in all can be stored for "Contacts" and "Group".
• The address book can store up to 6000 addresses.
• One "Contacts" can store up to 500 addresses.
• One "Group" can store up to 500 addresses.
• A group that combines direct SMTP with other sending methods cannot be used for transmission.
Address Book
Contact: Mr. Yamada
Address 1
Address 2
Address 1
Address 2
Address 3
Contact: Mr. Suzuki
Address 1
Address 2
Address 3
Address 4
yamada@□□□□.□□□
06-1234-1234
suzuki@□□□□.□□□
\\suzuki_smb
192.168.0.XXX
yamada@□□□□.□□□
suzuki@□□□□.□□□
yoshida@□□□□.□□□
\\X-PJ_smb
Group address: X-project members

1-91
BEFORE USING THE MACHINE►ADDRESS BOOK
ADDRESS BOOK SCREENTo display the address book, tap the [Address Book] key on the base screen in image send mode such as fax, e-mail, or Internet fax. You can also display it by tapping the [Address Book] icon in the home screen. "Contacts" and "Group" registered are enabled for alphabetical search and selected condition-based advanced search.
Selecting "Contacts" or "Group"Tap a "Contacts" or "Group", and the tapped "Contacts" or "Group" is selected.After selection, tap .To add "Contacts" and "Group", refer to the following.► STORING ADDRESSES THROUGH DIRECT ENTRY (page 1-94)► STORING ADDRESSES THROUGH GLOBAL ADDRESS SEARCH (page 1-95)► STORING ADDRESSES FROM FAX OR IMAGE SEND LOGS (page 1-97)► STORING GROUPS (page 1-98)
• When the [Address Book] key is tapped on the e-mail base screen, groups and contacts having e-mail addresses are displayed.
• If user authentication is enabled, registered contacts can be shared within a specified group or stored as personal contacts that only you are allowed to access.► SETTING THE SCOPE FOR PUBLICIZING CONTACTS AND GROUPS (page 1-102)
• You can tap the [Find My Address] key while logging in and select your e-mail address from the user list. This is convenient when you want to send an e-mail to yourself.► Disabling of Find My Address (page 7-95)
Preview
Sending History
Print Individual List
Call by Search Number
StartSpeaker
A
D
G
J
M
P
W
Add New
Direct TX
Send Same Imageas Fax Address
FrequentUse Fax
Narrow Down
AllCategory
Sort
Address
BBB
AAA
CCC
ABC
T
CA
Preview
Sending History
Call by Search Number
Global Address Search
StartSpeaker
A
D
G
J
M
P
T
W
Add New
Direct TX
Send Same Imageas Fax Address
FrequentUse Fax
Narrow Down
AllCategory
Sort
Address
BBB
AAA
CCC
CCC
DDD
DDD
ABC
CA
One touch keys of"Contacts"
One touch keys of "Group"
[Frequent Use] key
[Category] key [Narrow Down] key

1-92
BEFORE USING THE MACHINE►ADDRESS BOOK
Narrowing by frequent Use Tap the [Frequent Use] key and select an address in the screen that appears.Addresses registered as "Frequent Use" addresses are shown.
Narrowing by categoryTap the [Category] key to select a category on the screen that appears.The "Contacts" and "Group" in the selected category appear on a list.The narrowed-down condition is displayed under the [Category] key.
Narrowing by job typeTap the [Narrow Down] key to select a job on the screen that appears.To narrow by "Group", tap the [Group] key.The "Contacts" and "Group" for the selected job appear on a list.The narrowed-down condition is displayed under the [Narrow Down] key.
Preview
Sending History
Call by Search Number
Global Address Search
StartSpeaker
A
D
G
J
M
P
T
W
Add New
Direct TX
Send Same Imageas Fax Address
FrequentUse Fax
Narrow Down
AllCategory
Sort
Address
BBB
AAA
CCC
CCC
DDD
DDD
ABC
CA
Preview
StartSpeaker
Sending History
Print Individual List
Call by Search Number
Add New
Direct TX
Send Same Imageas Fax Address
WFrequentUse Fax
Narrow Down
AllCategory
Sort
Address
B
B
A
A
C
ABC
Fax
Category 4
Category 0
Category 5
Category 6
Category 3
Category 2
Category 1
CA
Preview
Sending History
Print Individual List
Call by Search Number
StartSpeaker
A
W
Add New
Direct TX
Send Same Imageas Fax Address
FrequentUse Fax
Narrow Down
AllCategory
Sort
Address
BBB
CCC
AAA
CCC
ABC
All
FTP/Desktop
Network Folder
Internet Fax
Fax
Group
BBB
CCCCCC
BBB
AAA
CA
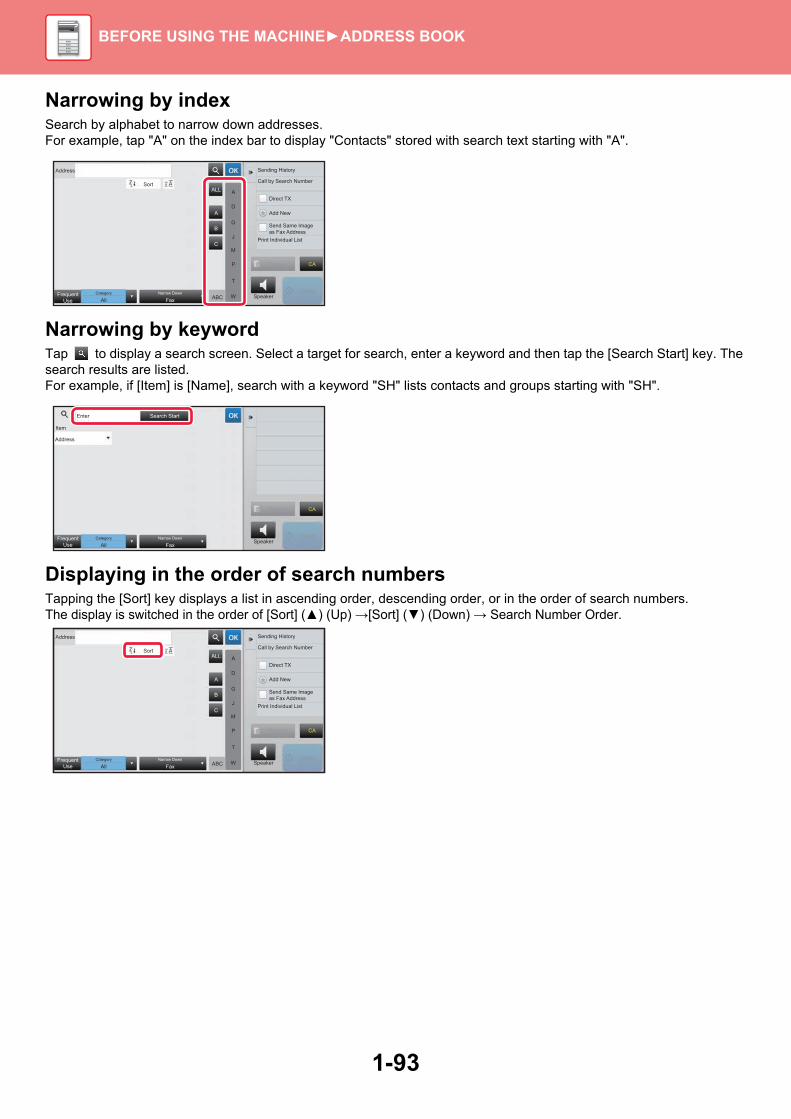
1-93
BEFORE USING THE MACHINE►ADDRESS BOOK
Narrowing by indexSearch by alphabet to narrow down addresses.For example, tap "A" on the index bar to display "Contacts" stored with search text starting with "A".
Narrowing by keywordTap to display a search screen. Select a target for search, enter a keyword and then tap the [Search Start] key. The search results are listed.For example, if [Item] is [Name], search with a keyword "SH" lists contacts and groups starting with "SH".
Displaying in the order of search numbersTapping the [Sort] key displays a list in ascending order, descending order, or in the order of search numbers.The display is switched in the order of [Sort] (▲) (Up) →[Sort] (▼) (Down) → Search Number Order.
Preview
StartSpeaker
Sending History
Print Individual List
A
D
G
J
M
P
WFrequentUse Fax
Narrow Down
AllCategory
Sort
Address
ABC
T
Call by Search Number
Add New
Direct TX
Send Same Imageas Fax Address
ALL
A
B
C
CA
Preview
StartSpeakerFrequent
Use FaxNarrow Down
AllCategory
EnterInitials
Search Start
Address
Item
CA
Preview
StartSpeaker
Sending History
Print Individual List
A
D
G
J
M
P
WFrequentUse Fax
Narrow Down
AllCategory
Sort
Address
ABC
T
Call by Search Number
Add New
Direct TX
Send Same Imageas Fax Address
ALL
A
B
C
CA
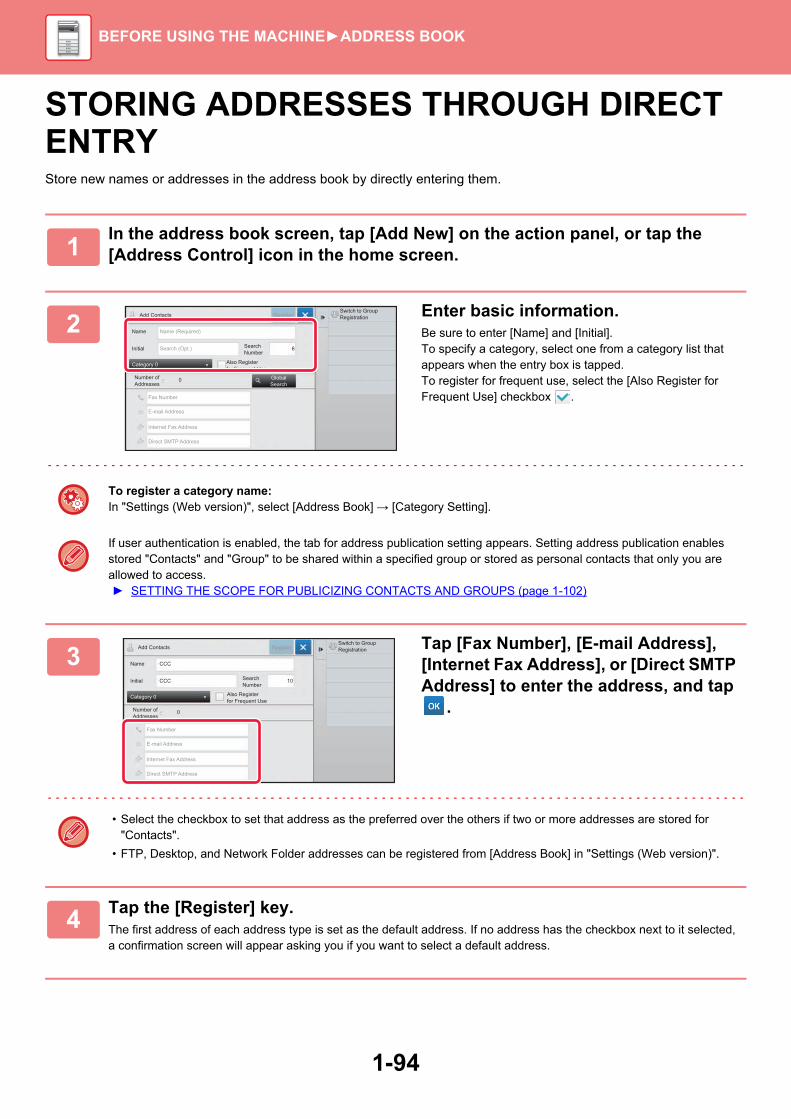
1-94
BEFORE USING THE MACHINE►ADDRESS BOOK
STORING ADDRESSES THROUGH DIRECT ENTRYStore new names or addresses in the address book by directly entering them.
1In the address book screen, tap [Add New] on the action panel, or tap the [Address Control] icon in the home screen.
2Enter basic information.Be sure to enter [Name] and [Initial].To specify a category, select one from a category list that appears when the entry box is tapped.To register for frequent use, select the [Also Register for Frequent Use] checkbox .
To register a category name:In "Settings (Web version)", select [Address Book] → [Category Setting].
If user authentication is enabled, the tab for address publication setting appears. Setting address publication enables stored "Contacts" and "Group" to be shared within a specified group or stored as personal contacts that only you are allowed to access.► SETTING THE SCOPE FOR PUBLICIZING CONTACTS AND GROUPS (page 1-102)
3Tap [Fax Number], [E-mail Address], [Internet Fax Address], or [Direct SMTP Address] to enter the address, and tap
.
• Select the checkbox to set that address as the preferred over the others if two or more addresses are stored for "Contacts".
• FTP, Desktop, and Network Folder addresses can be registered from [Address Book] in "Settings (Web version)".
4Tap the [Register] key.The first address of each address type is set as the default address. If no address has the checkbox next to it selected, a confirmation screen will appear asking you if you want to select a default address.
Name
Initial
Category 0
Number ofAddresses
Name (Required)
Search (Opt.)
Fax Number
E-mail Address
Internet Fax Address
Direct SMTP Address
Add Contacts
6
GlobalSearch
Also Registerfor Frequent Use
0
Switch to GroupRegistrationRegister
Search Number
Name
Initial
Category 0
Number ofAddresses
Fax Number
E-mail Address
Internet Fax Address
Add Contacts
10
Also Registerfor Frequent Use
0
Switch to GroupRegistrationRegister
CCC
CCC Search Number
Direct SMTP Address

1-95
BEFORE USING THE MACHINE►ADDRESS BOOK
STORING ADDRESSES THROUGH GLOBAL ADDRESS SEARCHStore the results of searching the global address book as new addresses in the address book.
Global address search requires an LDAP server.
1In the address book screen, tap [Add New] on the action panel, or tap the [Address Control] icon in the home screen.
2Enter basic information.Be sure to enter [Name] and [Initial].To specify a category, select one from a category list that appears when the entry box is tapped.To register for frequent use, select the [Also Register for Frequent Use] checkbox .
To register a category name:In "Settings (Web version)", select [Address Book] → [Category Setting].
If user authentication is enabled, the tab for address publication setting appears. Setting address publication enables stored "Contacts" and "Group" to be shared within a specified group or stored as personal contacts that only you are allowed to access.► SETTING THE SCOPE FOR PUBLICIZING CONTACTS AND GROUPS (page 1-102)
3Tap the [Global Search] key.
4Select the server from the list of servers.If an authentication screen appears, enter your user name and password, and tap the [OK] key.► AUTHENTICATION BY LOGIN NAME/PASSWORD
(page 1-31)After selecting a server, tap .
Switch to GroupRegistration
Name
Initial
Category 0
Number ofAddresses
Search Number
Fax Number
E-mail Address
Internet Fax Address
Add Contacts
10
Also Registerfor Frequent Use
0
Register
GlobalSearch
Name (Required)
Search (Opt.)
Direct SMTP Address
Cancel and ReturnSearch StartEnter
Initials
Search Start

1-96
BEFORE USING THE MACHINE►ADDRESS BOOK
5Tap the entry field to enter the search condition and then tap the [Search Start] key. To change the search target, tap for [Item]. You can select [Name] or [Address].
6Select one address from the search result list, and tap the key.
To check address information, select the address and tap the [Confirm Registered Information] key.
7Tap the [Register] key.The first address of each address type is set as the default address. If no address has the checkbox next to it selected, a confirmation screen will appear asking you if you want to select a default address.
Cancel and ReturnSearch StartEnterInitials
Enter Initial and press Enter key ofexternal keyboard or [Start Search] button.
TargetItem
Name

1-97
BEFORE USING THE MACHINE►ADDRESS BOOK
STORING ADDRESSES FROM FAX OR IMAGE SEND LOGSAs a new registration, add an address you have entered via fax or image send operations to the address book.
FTP and desktop addresses cannot be stored in the address book from transmission logs.
1In fax or image send mode, tap [Sending History] on the action panel.
2Select one address you want to register in the address book from the send logs, and then tap [New Registration with Address Book] on the action panel.
When you tap [Additional Registration with Address Book] on the action panel, you can add the address to a contact stored in the address book.
3Enter basic information.Be sure to enter [Name] and [Initial].To specify a category, select one from a category list that appears when the entry box is tapped.To register for frequent use, select the [Also Register for Frequent Use] checkbox .
If user authentication is enabled, the tab for address publication setting appears. Setting address publication enables stored "Contacts" and "Group" to be shared within a specified group or stored as personal contacts that only you are allowed to access.► SETTING THE SCOPE FOR PUBLICIZING CONTACTS AND GROUPS (page 1-102)
To register a category name:In "Settings (Web version)", select [Address Book] → [Category Setting].
4Tap the [Register] key.The address is registered in the address book and the transmission log screen is restored.The first address of each address type is set as the default address. If no address has the checkbox next to it selected, a confirmation screen will appear asking you if you want to select a default address.
Preview CA
Start
New Registrationwith Address Book
Additional Registrationwith Address BookDelete the SelectedHistoryDelete All Histories
Sending History
Sending History
Direct EntryAAA
Direct EntryCCC
Direct EntryBBB
Name
Initial
BBB
BBB
Category 0
Number ofAddresses
Search Number
Add Contacts
16
Also Registerfor Frequent Use
1
Switch to GroupRegistrationRegister
BBB BBB

1-98
BEFORE USING THE MACHINE►ADDRESS BOOK
STORING GROUPSRegister "Group" by selecting addresses from those already stored as "Contacts". In this case of registration, only reference to addresses already stored takes place, and so, the total number of registered addresses (maximum 6000) in the address book does not increase. You can also directly enter a new address for a "Group".
5Tap the [OK] key.
1In the address book screen, tap [Add New] on the action panel, or tap the [Address Control] icon in the home screen.
2Enter the basic information, and tap [Switch to Group Registration] on the action panel.
3 Tap the [Address Book] key.
To directly enter a new address for a "Group", tap [Fax Number], [E-mail Address], [Internet Fax Address], or [Direct SMTP Address].
4In the contact list, tap the "Contacts" that includes the address you want to add to the "Group", and tap [Display Registered Information] on the action panel.
Name
Initial
Category 0
Number ofAddresses
Name (Required)
Fax Number
E-mail Address
Internet Fax Address
Add Contacts
6
Also Registerfor Frequent Use
0
Switch to GroupRegistrationRegister
Search Number
Search (Opt.)
Direct SMTP Address
Name
Initial
Category 0
Number ofAddresses
Name (Required)
Fax Number
E-mail Address
Internet Fax Address
Add Contacts
6
Also Registerfor Frequent Use
0
Register
Call Search Number
Address Book
Search Number
Search (Opt.)
Direct SMTP Address
Switch to ContactsRegistration
FrequentUse
Select From Address Book
FaxNarrow Down
AllCategory
ABC
A
D
G
J
M
P
T
W
Sort
Cancel and Return
Display RegisteredInformation
AAA
AAA
CCC
DDD
CCC

1-99
BEFORE USING THE MACHINE►ADDRESS BOOK
5Tap the address to be registered in the "Group", and then tap the key.You can select more than one address.
6Repeat steps 3 through 5 to register addresses. After address registration is completed, tap key.
7Tap the [Register] key.
Preview
Start
Registered Address
Info.
2
CCC
123
CA

1-100
BEFORE USING THE MACHINE►ADDRESS BOOK
EDITING/DELETING ADDRESSES IN ADDRESS BOOKYou can edit or delete "Contacts" or "Group" information stored in the address book as well as addresses listed under "Contacts" and "Group".
Editing/deleting contacts and groups
1In the address book screen, select a contact or group you wish to edit, and tap [Edit] on the action panel.To delete a "Contacts" or "Group", tap [Delete] on the action panel.
• For editing, you can only select one "Contacts" or "Group" at a time.
• For deleting, you can select more than one "Contacts" or "Group" at a time.
• If you have logged in as the administrator, you can delete all addresses stored in the address book by using the [Delete All] that appears on the action panel.
2 Editing a "Contacts" or "Group"• You can change basic information such as names and
categories and also you can add addresses.► STORING ADDRESSES THROUGH DIRECT
ENTRY (page 1-94)► STORING ADDRESSES THROUGH GLOBAL
ADDRESS SEARCH (page 1-95)► STORING ADDRESSES FROM FAX OR IMAGE
SEND LOGS (page 1-97)► STORING GROUPS (page 1-98)
• You can change the publicity scope.► SETTING THE SCOPE FOR PUBLICIZING
CONTACTS AND GROUPS (page 1-102)
Name
Initial
Category 0
Number ofAddresses
Add Contacts
6A
AAA
Also Registerfor Frequent Use
0
Register
Search Number
Detail
Fax E-mail Internet Fax Direct SMTPAdd
123456789

1-101
BEFORE USING THE MACHINE►ADDRESS BOOK
Editing/deleting addresses
1Select a contact or group you wish to edit, and tap [Edit] on the action panel. In the address book screen, select the contact or group that has the address you want to edit, and tap [Edit] on the action panel.Only one contact or group can be selected. If more than one is selected, the [Edit] key does not appear.
2Tap the address display in the list of addresses.To delete an address, tap the key.
• To edit or delete, you can only select one address at a time.
• To check address information, tap the [Detail] key.
You cannot edit or delete an address for a job in a job queue.
3Edit an address.After editing, tap the [Register] key.
You can only edit addresses in the network folder on the edit screen. (The Add New screen cannot be displayed.)
Name CCC
Initial CCC
Category 0
Number ofAddresses
Add Contacts
5
GlobalSearch
Also Registerfor Frequent Use
2
Register
Detail
Detail
123
Fax E-mail Internet Fax Direct SMTPAdd
Search Number
Name CCC
Initial CCC
Category 0
Number ofAddresses
Add Contacts
5
GlobalSearch
Also Registerfor Frequent Use
2
Register
Detail
Detail
123
Fax E-mail Internet Fax Direct SMTPAdd
Search Number

1-102
BEFORE USING THE MACHINE►ADDRESS BOOK
SETTING THE SCOPE FOR PUBLICIZING CONTACTS AND GROUPS"Contacts" and "Group" stored in the address book can be shared within a specified group or stored as personal contacts that only you are allowed to access. If no publicity scope is specified, stored "Contacts" and "Group" are publicized to all users.
User authentication is required to set the scope for publicizing "Contacts" and "Group".
Scope for publicizing addresses
Description
Publicized to all "Contacts" and "Group" are published to all users of the machine.
User "Contacts" and "Group" are published only to the user. Registered addresses are preferentially displayed as "Personal Contacts" in the user's address book.
User Group Publication of "Contacts" and "Group" is limited to the specified group. Up to eight groups per "Contacts" or "Group" can be set as the publicity scope.
1In the address registration screen, tap [Restrict Public Address of The Contacts] on the action panel.
2Tap the [Designate Public Address] key.
3Tap [User] or [Group] and specify who the address is made public to.After the settings are completed, tap .
Name ABC
Initial ABC
Category 0
Number ofAddresses
Search Number
Add Contacts
10
Also Registerfor Frequent Use
1
Register
Detail123456
Fax E-mail Internet Fax Direct SMTPAdd
Restrict Public Addressof The Contacts
Public Address Setting
Public to All
Designate Public Address.
Call by User Number
A
D
G
J
M
P
WUser Group FaxIndex
Sort
Designate Public Address. Clear
User1
tianne
User1
tianne
ABC
T

1-103
BEFORE USING THE MACHINE►ADDRESS BOOK
DELETING THE TRANSMISSION HISTORYYou can delete the fax or image send transmission history.
Deleting a selected history
Deleting all transmission histories
If you have logged in as the administrator, select any user name desired from the user list.
To register a user:In "Settings (administrator)", select [User Control] → [User Control] → [User List] → [User Registration].
The transmission history is deleted in normal mode.
1 Tap the history you want to delete.
2 In the transmission log screen, tap [Delete the Selected History] on the action panel.
3 The message "Delete the selected history?" will appear, tap the [Delete] key.The selected transmission log is deleted.
1 In the transmission log screen, tap [Delete All Histories] on the action panel.
2 The message "Delete all histories?" will appear, tap the [Delete All] key.All transmission logs are to be deleted.

1-104
BEFORE USING THE MACHINE►PERIPHERAL DEVICES
PERIPHERAL DEVICESPeripheral devices can be installed on the machine to increase its range of functionality.The peripheral devices are generally optional. However, some models include certain peripheral devices as standard equipment.
(As of September, 2017)
PERIPHERAL DEVICES
Product name Product number
Description
600-sheet paper feed unit MX-CS14 Additional tray. A maximum of 600 sheets of paper can be loaded into the tray. Up to three paper feed units can be installed.
High stand MX-DS22 This is an additional dedicated stand. This can be installed when a 600-sheet paper feed unit is not installed, or when only one is installed. The stand has legs to prevent toppling.
Low stand MX-DS23 This is an additional dedicated stand. The stand has legs to prevent toppling.
Inner finisher MX-FN32 Output device that enables the use of the staple function and offset function.
Barcode font kit MX-PF10 Adds barcode fonts to the machine.
Internet fax expansion kit MX-FWX1 Enables Internet Fax.
Application integration module MX-AMX1 The application integration module can be combined with the network scanner function to append a metadata file to a scanned image file.
Sharpdesk 1 license kit MX-USX1 This software enables integrated management of documents and computer files.
Sharpdesk 5 license kit MX-USX5
Sharpdesk 10 license kit MX-USX10
Sharpdesk 50 license kit MX-USX50
Sharpdesk 100 license kit MX-USXA0

1-105
BEFORE USING THE MACHINE►PERIPHERAL DEVICES
INNER FINISHERThis device outputs sorted paper while staggering each set of paper. As needed, it staples each set.
PART NAMESThe following describes the parts that appear when the finisher is open.
(1) Output trayStapled and offset output is delivered to this tray.The tray is slidable. To print on large paper, extend the tray.
(2) Front cover Open this cover to remove a paper misfeed, replace staples, or remove a staple jam.
(3) Staple case This holds the staple cartridge.Pull the case out to replace the staple cartridge, or remove a staple jam.
(4) Staple case release lever Use this lever to remove the staple case.
(5) Lever Use this lever to move the finisher.
(1) (4) (3)
(2) (5)
Exercise caution when you turn on the power and when printing take place, as the output tray may move up and down.

1-106
BEFORE USING THE MACHINE►PERIPHERAL DEVICES
SUPPLIESThe finisher requires the following staple cartridge:Staple cartridge (approx. 5000 staples per cartridge x three cartridges)MX-SCX1
INNER FINISHER MAINTENANCEWhen the staple cartridge runs out of staples, a message will appear in the operation panel. Follow the operation procedure to replace the staple cartridge.
Replacement the staple cartridge
1Open the finisher front cover.
2Push lever and move the finisher.
3Lower the staple case release lever and remove the staple case.Pull the staple case out to the right.

1-107
BEFORE USING THE MACHINE►PERIPHERAL DEVICES
4Remove the empty staple cartridge from the staple case.
5Insert a new staple cartridge into the staple case as shown.Push the staple cartridge in until it clicks into place.
6Push the staple case.Push the staple case in until it clicks into place.
7Return the finisher to the first position.
8Close the finisher front cover.
Make a proof copy in staple sort function to verify that stapling takes place correctly.

1-108
BEFORE USING THE MACHINE►PERIPHERAL DEVICES
Sharp OSASharp OSA (Open Systems Architecture) is an architecture that directly links the machine to software applications for work (external applications) over a network.When you use a machine that supports Sharp OSA, you can link controls on the operation panel and device functions such as scan send to external applications.
APPLICATION COMMUNICATIONThis module enables you to link the machine with a scanner application and other standard applications. Set a standard application in "Settings (administrator)" and "Sharp OSA".
To set a standard application in "Settings (administrator)":In "Settings (administrator)", select [System Settings] → [Sharp OSA Settings] → [Standard Application Settings].
1Tap the [Sharp OSA] key in the Home screen.If no standard applications have been stored, the key cannot be tapped.
2Select a standard application.If two or more standard applications have been stored, the screen for selecting a standard application will appear. Tap the standard application that you wish to use.If only one standard application has been stored, connection to the standard application will begin.
3Connect the machine to the standard application.The message "Connecting to the external application." appears while the machine communicates with the standard application.
10:15 AM
EasyCopy
Select External Application
CLOUD PORTAL
Exit
Mynumber_top_new

1-109
BEFORE USING THE MACHINE►PERIPHERAL DEVICES
EXTERNAL ACCOUNT APPLICATIONThe external account module enables you to use an "external account application" for centralized account management of an MFP on a network.
An "external account application" can be used in "external authentication mode" or "external count mode".When "external authentication mode" is used, the login screen is retrieved from the application when the machine is started. When a job ends, a job notification screen is sent to the application for counts by authenticated user. When "external count mode" is used, the login screen is not displayed when the machine is started. Only a job result notification is sent to the application. User authentication by the external account application cannot be used. However, the external account application can be used in combination with the internal account function.
External account application setupAfter setting an external application in "Settings (administrator)", restart the machine to enable the setting.To restart the machine, see "TURNING ON THE POWER (page 1-8)".
Operation in external account modeThe following describes operation in the two modes for using an external account application.
External authentication modeWhen the machine is powered on in external authentication mode, the machine accesses the external account application and displays the login screen. The login screen also appears when the [Call] key is tapped to run a job in the job status complete screen. (The login screen does not appear if the user has already logged in by the normal method.)Tap the job status display while the login screen is displayed, and the Job Status screen appears. To return to the previous screen, tap a mode select key.
If login fails:If the login screen fails to appear or the application does not operate correctly, the machine may also stop operating correctly. In that case, terminate external account mode forcibly.
To set up the external account application:In "Settings (administrator)", select [System Settings] → [Sharp OSA Settings] → [External Accounting Application Settings].
To enable the external authentication mode:In "Settings (administrator)", select [System Settings] → [Sharp OSA Settings] → [External Accounting Application Settings] and enable the [External Account Control] setting.
• The user control function of the machine cannot be used in external authentication mode.However, "User Registration", "User Count Display", "User Count Reset", "User Information Print", and "The Number of User Name Displayed Setting" can be used.
• The mode select key cannot be used while the login screen appears.
To forcibly terminate the external account mode:In "Settings (Web version)", select [System Settings] → [Sharp OSA Settings] → [External Accounting Application Settings].If termination in Setting mode (Web version) fails, terminate it forcibly on the operation panel of the machine.In "Settings", select [System Settings] → [Sharp OSA Settings] and change the setting for [External Accounting Application Settings] and then restart the machine. To restart the machine, see "TURNING ON THE POWER (page 1-8)".

1-110
BEFORE USING THE MACHINE►PERIPHERAL DEVICES
External count modeUnlike in external authentication mode, when the machine is started in "external count mode", the login screen of the external account application is not displayed after the machine has started up. Only the job result is sent to the external account application.External count mode can be used together with the user control function of the machine. (External count mode can also be used when the user control function is disabled.)
To enable the external count mode:In "Settings (administrator)", select [System Settings] → [Sharp OSA Settings] → [External Accounting Application Settings] and enable the [External Account Control] setting alone.

1-111
BEFORE USING THE MACHINE►REMOVING MISFEEDS
REMOVING MISFEEDSIf a paper misfeed occurs, the "Paper Jam" message will appear in the touch panel and printing and scanning will stop.In this event, tap the [Check how to remove misfeeds] key in the touch panel.When the key is tapped, instructions for removing the misfeed will appear. Follow the instructions. When the misfeed is cleared, the message will automatically disappear.
REMOVING MISFEEDS
• The fusing unit and paper output area are hot.
• When removing a misfeed, do not touch the fusing unit. You may burn yourself.
Fusing unit

1-112
BEFORE USING THE MACHINE►MAINTENANCE
This section explains how to clean the machine, and replace the toner cartridge.
REGULAR MAINTENANCETo ensure that the machine continues to provide top quality performance, periodically clean the machine.
CLEANING THE DOCUMENT GLASS AND AUTOMATIC DOCUMENT FEEDERIf the document glass or document backplate sheet becomes dirty, the dirt will appear as dirty spots, colored lines, or white lines in the scanned image. Keep these parts clean at all times.Wipe the parts with a clean, soft cloth.If necessary, moisten the cloth with water or a small amount of neutral detergent. After that, wipe with a clean dry cloth.Examples of lines in the image
Document glass Document backplate sheet
MAINTENANCE
Do not use a flammable spray to clean the machine. If gas from the spray comes in contact with hot electrical components or the fusing unit inside the machine, fire or electrical shock may result.
• Do not use thinner, benzene, or similar volatile cleaning agents to clean the machine. These may degrade or discolor the housing.
• Use a soft cloth to gently wipe off dirt from the area on the operation panel with a mirror-like finish (shown at right). If you use a stiff cloth or rub hard, the surface may be damaged.
The area with a mirror-like finish is the area that is
Black lines White lines

1-113
BEFORE USING THE MACHINE►MAINTENANCE
SCANNING AREAIf black lines or white lines appear in images scanned using the automatic document feeder, clean the scanning area (the thin long glass next to the document glass).MX-B455W
1Open the automatic document feeder and remove the glass cleaner.
2Clean the document scanning area on the document glass with the glass cleaner.
3Clean the document scanning area in the automatic document feeder with the glass cleaner.
(1) Open the document feeder cover.
(2) Open the document feeder tray.
(3) Clean the scanning area in the automatic document feeder.
(4) Close the document feeder tray.
(5) Close the document feeder cover.
4Replace the glass cleaner.
(1) (2)
(3)
(5) (4)

1-114
BEFORE USING THE MACHINE►MAINTENANCE
MX-B355W
CLEANING THE BYPASS FEED ROLLERIf paper misfeeds frequently occur when feeding envelopes or heavy paper through the bypass tray, wipe the surface of the feed roller with a clean soft cloth moistened with water or a neutral detergent.
CLEANING THE PAPER FEED ROLLERIf lines or other dirt appear on the scanned original when the automatic document feeder is used, wipe the surface of the roller with a clean soft cloth moistened with water or a neutral detergent.
1Open the automatic document feeder and clean the document scanning area on the document glass with the soft cloth.

1-115
BEFORE USING THE MACHINE►MAINTENANCE
REPLACEMENT OF TONER CARTRIDGEAlways replace the toner cartridge after the "Change the toner cartridge." message appears. You should keep one set of replacement toner cartridges on hand so that you can replace a toner cartridge immediately when toner runs out.
Replacement message
When this message appears, prepare a toner cartridge for replacement.
If you continue printing, the following message appears.When this message appears, prepare a toner cartridge for replacement and replace it.In this state, printing is possible.However, this message does not appear during printing.
If you continue to use the machine, the following message will appear when the toner runs out.
Once the machine enters this status, printing cannot be carried out until the toner cartridge is replaced.
Toner Low (Do not replace cartridgeuntil requested)
Change the toner cartridge.
OK
Ready to scan for copy.(Change the toner cartridge.)
Change the toner cartridge.

1-116
BEFORE USING THE MACHINE►MAINTENANCE
1Open the front cover.
2Pull the toner cartridge toward you.Gently pull out the toner cartridge horizontally. If the cartridge is pulled out abruptly, toner may spill out.
Hold the toner cartridge with both hands as shown and slowly pull it out of the machine.
3Take out a new toner cartridge from its package and shake it horizontally five or six times.
4Slowly insert the new toner cartridge on the level.
5Press in firmly until you hear a "click" sound.

1-117
BEFORE USING THE MACHINE►MAINTENANCE
6Close the front cover.After the toner cartridge is replaced, the machine automatically enters image adjustment mode. Do not open the front cover while this is occurring.
• Do not throw a toner cartridge into a fire. Toner may fly and cause burns.
• Store toner cartridges out of reach of small children.
• If a toner cartridge is stored upright, the toner may harden and become unusable. Always store toner cartridges on their side.
• If a toner cartridge other than a SHARP-recommended toner cartridge is used, the machine may not attain full quality and performance and there is a risk of damage to the machine. Be sure to use a SHARP-recommended toner cartridge.
• Depending on your conditions of use, the color may become light or the image blurred.
• Your service technician will collect used toner cartridges.
• To view the approximate amount of toner remaining (indicated in %), hold down the [Home Screen] key during printing or in standby mode. When the percentage falls to "25-0%", keep a toner cartridge for replacement purposes before toner runs out.
• When toner runs out while the home screen is displayed, the "Toner Empty" message appears in the upper right corner of the screen.

1-118
BEFORE USING THE MACHINE►CHARACTER ENTRY
NAMES AND FUNCTIONS OF SOFT KEYBOARD KEYSDisplay the soft keyboard to register the name of a file, program, folder or user.
CHARACTER ENTRY
The soft keyboard shown here is an image for your reference. Different keys may be enabled depending on the actual situation and condition under which you enter characters.
If "External Keyboard" is selected in "Settings" → [System Settings] → [Common Settings] → [Keyboard Settings] → [Default Keyboard Setting] → [Set Keyboard Priority], the soft keyboard will not appear.
To register words:In "Settings (administrator)", select [System Settings] → [Common Settings] → [Keyboard Settings] → [Soft Keyboard Template Setting].
Subject Cancel OK
SpacePre-set Message AltGrKeyboard-
Select
Shift
Caps Enter
Characters Symbols.com .net .org .info.biz http://
Displays the entered text.
Retrieves the stored words.Use "Settings" to store words.
Tap a key to enter text.The key types vary depending
on the selected entry mode.
Switches the key layout.
Use this to retrieve a previously stored subject for e-mail or pre-set text.
Converts the entered characters. The [Space] key inserts a space between words if there are no characters specified to be converted.
Exits the soft keyboard.
Finalizes the entered characters and exits the soft keyboard.
Deletes one character to the left.
Temporarily fixes the converted characters or inserts a line break.
Used to move the cursor or to change the range of the specified conversion target.
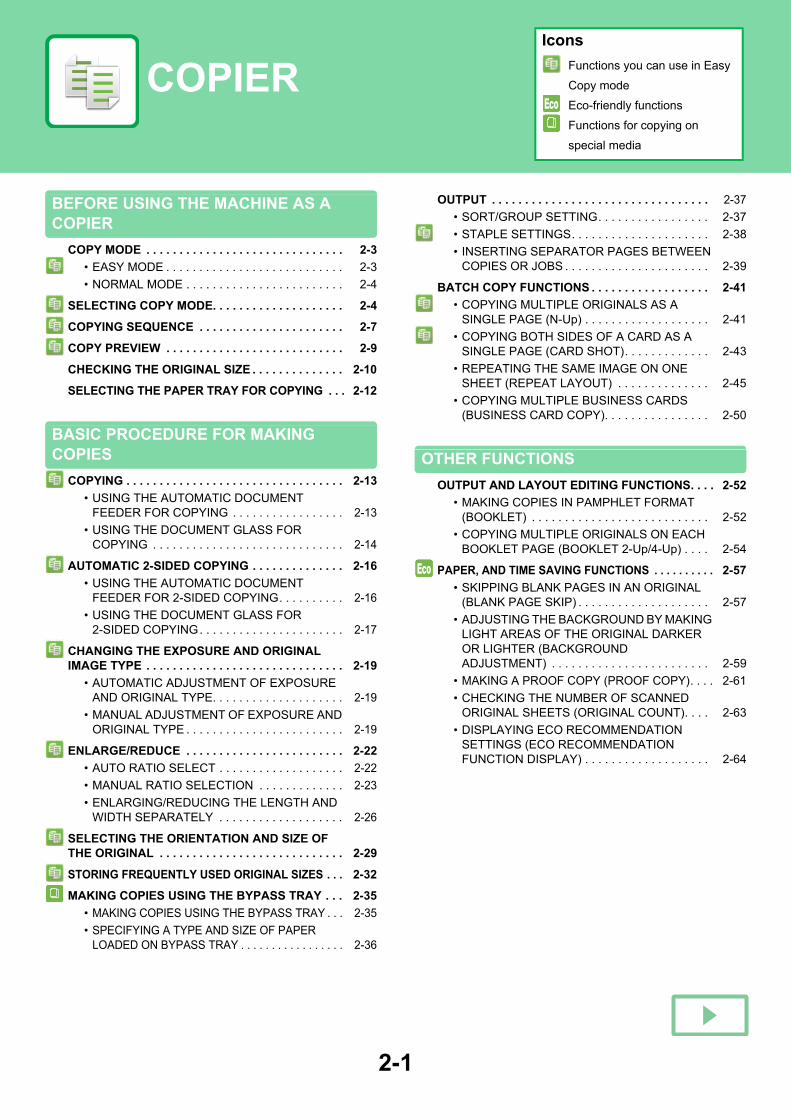
2-1
BEFORE USING THE MACHINE AS A COPIER
COPY MODE . . . . . . . . . . . . . . . . . . . . . . . . . . . . . . 2-3
• EASY MODE . . . . . . . . . . . . . . . . . . . . . . . . . . . 2-3
• NORMAL MODE . . . . . . . . . . . . . . . . . . . . . . . . 2-4
SELECTING COPY MODE. . . . . . . . . . . . . . . . . . . . 2-4
COPYING SEQUENCE . . . . . . . . . . . . . . . . . . . . . . 2-7
COPY PREVIEW . . . . . . . . . . . . . . . . . . . . . . . . . . . 2-9
CHECKING THE ORIGINAL SIZE . . . . . . . . . . . . . . 2-10
SELECTING THE PAPER TRAY FOR COPYING . . . 2-12
BASIC PROCEDURE FOR MAKING COPIES
COPYING . . . . . . . . . . . . . . . . . . . . . . . . . . . . . . . . . 2-13
• USING THE AUTOMATIC DOCUMENT FEEDER FOR COPYING . . . . . . . . . . . . . . . . . 2-13
• USING THE DOCUMENT GLASS FOR COPYING . . . . . . . . . . . . . . . . . . . . . . . . . . . . . 2-14
AUTOMATIC 2-SIDED COPYING . . . . . . . . . . . . . . 2-16
• USING THE AUTOMATIC DOCUMENT FEEDER FOR 2-SIDED COPYING. . . . . . . . . . 2-16
• USING THE DOCUMENT GLASS FOR 2-SIDED COPYING. . . . . . . . . . . . . . . . . . . . . . 2-17
CHANGING THE EXPOSURE AND ORIGINAL IMAGE TYPE . . . . . . . . . . . . . . . . . . . . . . . . . . . . . . 2-19
• AUTOMATIC ADJUSTMENT OF EXPOSURE AND ORIGINAL TYPE. . . . . . . . . . . . . . . . . . . . 2-19
• MANUAL ADJUSTMENT OF EXPOSURE AND ORIGINAL TYPE . . . . . . . . . . . . . . . . . . . . . . . . 2-19
ENLARGE/REDUCE . . . . . . . . . . . . . . . . . . . . . . . . 2-22
• AUTO RATIO SELECT . . . . . . . . . . . . . . . . . . . 2-22
• MANUAL RATIO SELECTION . . . . . . . . . . . . . 2-23
• ENLARGING/REDUCING THE LENGTH AND WIDTH SEPARATELY . . . . . . . . . . . . . . . . . . . 2-26
SELECTING THE ORIENTATION AND SIZE OF THE ORIGINAL . . . . . . . . . . . . . . . . . . . . . . . . . . . . 2-29
STORING FREQUENTLY USED ORIGINAL SIZES . . . 2-32
MAKING COPIES USING THE BYPASS TRAY . . . 2-35
• MAKING COPIES USING THE BYPASS TRAY . . . 2-35
• SPECIFYING A TYPE AND SIZE OF PAPER LOADED ON BYPASS TRAY . . . . . . . . . . . . . . . . . 2-36
OUTPUT . . . . . . . . . . . . . . . . . . . . . . . . . . . . . . . . . 2-37
• SORT/GROUP SETTING. . . . . . . . . . . . . . . . . 2-37
• STAPLE SETTINGS. . . . . . . . . . . . . . . . . . . . . 2-38
• INSERTING SEPARATOR PAGES BETWEEN COPIES OR JOBS . . . . . . . . . . . . . . . . . . . . . . 2-39
BATCH COPY FUNCTIONS . . . . . . . . . . . . . . . . . . 2-41
• COPYING MULTIPLE ORIGINALS AS A SINGLE PAGE (N-Up) . . . . . . . . . . . . . . . . . . . 2-41
• COPYING BOTH SIDES OF A CARD AS A SINGLE PAGE (CARD SHOT). . . . . . . . . . . . . 2-43
• REPEATING THE SAME IMAGE ON ONE SHEET (REPEAT LAYOUT) . . . . . . . . . . . . . . 2-45
• COPYING MULTIPLE BUSINESS CARDS (BUSINESS CARD COPY). . . . . . . . . . . . . . . . 2-50
OTHER FUNCTIONS
OUTPUT AND LAYOUT EDITING FUNCTIONS. . . . 2-52
• MAKING COPIES IN PAMPHLET FORMAT (BOOKLET) . . . . . . . . . . . . . . . . . . . . . . . . . . . 2-52
• COPYING MULTIPLE ORIGINALS ON EACH BOOKLET PAGE (BOOKLET 2-Up/4-Up) . . . . 2-54
PAPER, AND TIME SAVING FUNCTIONS . . . . . . . . . . 2-57
• SKIPPING BLANK PAGES IN AN ORIGINAL (BLANK PAGE SKIP) . . . . . . . . . . . . . . . . . . . . 2-57
• ADJUSTING THE BACKGROUND BY MAKING LIGHT AREAS OF THE ORIGINAL DARKER OR LIGHTER (BACKGROUND ADJUSTMENT) . . . . . . . . . . . . . . . . . . . . . . . . 2-59
• MAKING A PROOF COPY (PROOF COPY). . . . 2-61
• CHECKING THE NUMBER OF SCANNED ORIGINAL SHEETS (ORIGINAL COUNT). . . . 2-63
• DISPLAYING ECO RECOMMENDATION SETTINGS (ECO RECOMMENDATION FUNCTION DISPLAY) . . . . . . . . . . . . . . . . . . . 2-64
Eco
COPIERIcons
Functions you can use in Easy
Copy mode
Eco-friendly functions
Functions for copying on
special media
Eco

2-2
COPIER
SECURITY REINFORCEMENT FUNCTIONS . . . . . 2-65
• PADDING UNAUTHORIZED COPY PREVENTION DATA (HIDDEN PATTERN PRINT). . . . . . . . . . . . . . . . . . . . . . . . . . . . . . . . 2-65
• FORCIBLY PRINTING TRACEABLE INFORMATION (TRACKING INFORMATION PRINT). . . . . . . . . . . . . . . . . . . . . . . . . . . . . . . . 2-67
OUTPUT POSITION AND MARGIN ADJUSTMENT FUNCTIONS . . . . . . . . . . . . . . . . . . . . . . . . . . . . . . . 2-68
• ADDING MARGINS (MARGIN SHIFT) . . . . . . . 2-68
• ERASING PERIPHERAL SHADOWS FOR COPYING (ERASE). . . . . . . . . . . . . . . . . . . . . . 2-70
• COPYING IN THE CENTER OF THE PAPER (CENTERING) . . . . . . . . . . . . . . . . . . . . . . . . . . 2-72
• SPECIFYING A PAPER POSITION (POSITION IMAGE) . . . . . . . . . . . . . . . . . . . . . . . . . . . . . . . 2-73
SCANNING FUNCTIONS. . . . . . . . . . . . . . . . . . . . . 2-75
• COLLECTIVELY SCANNING A LARGE NUMBER OF ORIGINALS (JOB BUILD). . . . . . 2-75
• SCANNING ORIGINALS OF DIFFERENT SIZES (MIXED SIZE ORIGINAL) . . . . . . . . . . . 2-78
• SCANNING THIN ORIGINALS (SLOW SCAN MODE). . . . . . . . . . . . . . . . . . . . . . . . . . . . . . . . 2-80
• ADJUSTING RESOLUTION WHEN SCANNING (RESOLUTION) . . . . . . . . . . . . . . . 2-81
TEXT AND IMAGE ADDITION FUNCTIONS. . . . . . 2-82
• PRINTING DATES, PAGE NUMBERS, AND WATERMARKS (STAMP) . . . . . . . . . . . . . . . . . 2-82
• ADDING A REGISTERED IMAGE TO AN ORIGINAL (CUSTOM IMAGE) . . . . . . . . . . . . . 2-85
• INSERTING COVERS IN COPIES (COVERS/INSERTS). . . . . . . . . . . . . . . . . . . . . 2-88
• INSERTING INSERTION SHEETS IN COPIES (COVERS/INSERTS). . . . . . . . . . . . . . . . . . . . . 2-96
• CHECKING, EDITING, AND DELETING THE PAGE LAYOUT OF COVERS AND INSERTION SHEETS (PAGE LAYOUT). . . . . . 2-100
• INSERTING INSERTION SHEETS IN BETWEEN TRANSPARENCY FILMS (TRANSPARENCY INSERTS) . . . . . . . . . . . . . 2-101
FUNCTIONS FOR SPECIFIC USES . . . . . . . . . . . . 2-103
• COPYING WITH MIRROR IMAGE (MIRROR IMAGE) . . . . . . . . . . . . . . . . . . . . . . . . . . . . . . . 2-103
OUTPUT AND DENSITY ADJUSTMENT FUNCTIONS . . . . . . . . . . . . . . . . . . . . . . . . . . . . . . . 2-104
• REVERSING WHITE AND BLACK IN A COPY (B/W REVERSE) . . . . . . . . . . . . . . . . . . . . . . . . 2-104
• EASY ADJUSTMENT OF THE IMAGE QUALITY (QUICK IMAGE QUALITY ADJUSTMENT) . . . . . . . . . . . . . . . . . . . . . . . . . 2-105
• ADJUSTING THE SHARPNESS OF AN IMAGE (SHARPNESS) . . . . . . . . . . . . . . . . . . . . . . . . h2-106
• THE ADJUST DENSITY AREA FOR COPY (GRAY BALANCE) . . . . . . . . . . . . . . . . . . . . . . . . . . . . . . . .2-107
CONVENIENT COPY FUNCTIONS
INTERRUPT COPY . . . . . . . . . . . . . . . . . . . . . . . . . 2-108
SEND DATA WHILE COPYING . . . . . . . . . . . . . . . 2-110
COPY JOBS . . . . . . . . . . . . . . . . . . . . . . . . . . . . . . 2-112
PROGRAMS . . . . . . . . . . . . . . . . . . . . . . . . . . . . . . 2-113
• STORING A PROGRAM . . . . . . . . . . . . . . . . . 2-113
• RETRIEVING A PROGRAM. . . . . . . . . . . . . . . 2-116
• DELETING AND RENAMING A PROGRAM . . . 2-117

2-3
COPIER►BEFORE USING THE MACHINE AS A COPIER
COPY MODEThere are two modes for copying: easy mode and normal mode.Easy mode is limited to frequently used functions that allow you to smoothly perform most copy jobs.If you need to select detailed settings or special functions, use normal mode. All functions can be used in normal mode.
EASY MODEEasy mode makes it easy to select basic settings for copying.
You can select these functions in easy mode.• Paper Select ►page 2-12• 2-Sided Copy ►page 2-16• Copy Ratio ►page 2-22• Staple ►page 2-38, ►page 2-38
• Original ►page 2-29• Exposure ►page 2-19• N-Up ►page 2-41• Card Shot ►page 2-43
BEFORE USING THE MACHINE AS A COPIER
CAPreview
Copies
Staple Copy Ratio2-Sided CopyPaperSelect
8½x11
Tray 1 1 → 1
100%
DetailOriginal8½x11
Off
Start1
Select function to be set up.
Change the function display.
Starts copying.
Enter the number of copies.Scans the original and shows a preview image.► PREVIEW SCREEN (page 1-15)
Change to normal mode.► NORMAL MODE
(page 2-4)
Reset all settings.
When you set the original size manually, the size you set appears.► SELECTING THE
ORIENTATION AND SIZE OF THE ORIGINAL (page 2-29)
1st screen
2nd screen
CAPreview
Copies
N-UpExposureOriginal
Auto Off
DetailOriginal8½x11
Start
Select function to be set up.
To select a function in easy modeIn "Settings (administrator)", select [System Settings] → [Common Settings] → [Operation Settings] → [Easy Mode Settings] → [Easy Copy]

2-4
COPIER►BEFORE USING THE MACHINE AS A COPIER
NORMAL MODENormal mode lets you select any function setting that can be used for copying.
SELECTING COPY MODEFollow the steps below to change from the Home Screen or each mode to copy mode.
Changing modes from the Home ScreenTap a mode icon to switch from the home screen to that mode.
Shift to Easy ModeTap the [Easy Copy] mode icon.
Shift to Normal ModeTap the [Copy] mode icon.
The displayed contents of the above screen will vary depending on the devices installed.
8½x11
8½x118½x11
8½x118½x11
8½x11
Enter the number of copies.
Displays the functions that can be utilized in copy mode.
Scans the original and shows a preview image.► PREVIEW SCREEN
(page 1-15)Reset all settings.
Starts copying.
Indicates the presence or absence of an original and the size of paper loaded in each tray. Tap to open the paper select screen.
Display keys other than the function keys indicated above.
Setting keys used for copying.
Check the current settings.
Displays the list of function keys. Frequently used [Others], programs, and other settings can be registered.
10:15 AM
Job Status
EasyCopy
Job Status
FaxE-MailCopy
LINE PRINTERJob Status
Sharp OSA
EasyCopy
EasyScan
HDDFile retrieve Sharp OSA
OperationGuide
EnlargeDisplay Mode
Settings Total Count LCD ControlToner Quantity Bk
10:15 AM

2-5
COPIER►BEFORE USING THE MACHINE AS A COPIER
Changing mode from each modeTo switch from any of the modes, tap the mode display.
Shift to Easy Mode
1Tap [Easy Copy].The initial screen of easy copy is displayed.
If the easy mode icon appears, tap the icon.
Address Book GlobalAddress Search
Scan to HDD/USB
CAPreview Auto Set
Original8½x11 Address E-mail Address Detail
B/WStart
ColorStart
Sending History
LINE PRINTEREasyCopy
EasyScan
HDDFile retrieve Sharp OSA Job Status
8½x118½x11
Job Status

2-6
COPIER►BEFORE USING THE MACHINE AS A COPIER
Shift to Normal Mode
1Tap on the mode display.
2Tap the [Copy] key.The initial copy mode screen is displayed.
To switch from the base screen of easy mode, tap the [Detail] key and then tap the [Yes] key in the confirmation screen.
8½x11
Job Status
8½x11 8½x11
8½x118½x11
Select the mode.
Fax E-Mail
Network Folder
HDDFile retrieve
FTP/Desktop
Internet Fax
Copy
Sharp OSA
Job Status
OriginalDetail
StapleCopy Ratio2-Sided CopyPaperSelect
8½x11
Tray 1 1 → 1100% Off
CAPreview
Copies
LINE PRINTEREasyCopy
EasyScan
HDDFile retrieve Sharp OSA Job Status
Start1
8½x11

2-7
COPIER►BEFORE USING THE MACHINE AS A COPIER
COPYING SEQUENCEThis section explains the basic procedure for copying. Select settings in the order shown below to ensure that the copy operation takes place smoothly.For detailed procedures for selecting the settings, see the explanation of each setting in this chapter.
1Switch to copy mode.► SELECTING COPY MODE (page 2-4)
2Place the original.Place the original in the document feeder tray of the automatic document feeder, or on the document glass.► AUTOMATIC DOCUMENT FEEDER (page 1-77)► DOCUMENT GLASS (page 1-79)
3Select functions.Specify the original scan size, exposure, resolution, etc.Tap the [Original] key and specify the orientation of the original to have the orientation be correctly recognized.► Specifying the orientation of the original (page 2-29)
If necessary, you can refer to the following functions for the setting.
In Easy mode In Normal mode
• Paper Select ►page 2-12• 2-Sided Copy ►page 2-16• Copy Ratio ►page 2-22• Staple ►page 2-38, ►page 2-38• Original ►page 2-29• Exposure ►page 2-19• N-Up ►page 2-41• Card Shot ►page 2-43
• Original ►page 2-29• Paper Select ►page 2-12• 2-Sided Copy ►page 2-16• Copy Ratio ►page 2-22• Exposure ►page 2-19• Sort/Group ►page 2-37• Others ►page 2-52
OriginalDetail
StapleCopy Ratio2-Sided CopyPaperSelect
8½x11
Tray 1 1 → 1100% Off
Preview StartCopiesCA 1
8½x11
B5
8½x11
8½x11
8½x11
8½x11
8½x11
8½x11

2-8
COPIER►BEFORE USING THE MACHINE AS A COPIER
4Scan the original.Tap the [Preview] key to scan the original.
In Easy mode In Normal mode
• To make 2-sided copies, configure the 2-sided copy settings before scanning the original.► AUTOMATIC 2-SIDED COPYING (page 2-16)
• When not checking the preview image, tap the [Start] key to start copying.
5Check the preview image.Display the preview image of the scanned original.In the preview screen, you can check the settings.► COPY PREVIEW (page 2-9)
In Easy mode In Normal mode
OriginalDetail
StapleCopy Ratio2-Sided CopyPaperSelect
8½x11
Tray 1 1 → 1100% Off
CAPreview
Copies Start1
8½x11
8½x11
B5
8½x11
8½x11
8½x11
8½x11
8½x11
Preview
ScanAgain
CA Start
1
1/7
8½x11

2-9
COPIER►BEFORE USING THE MACHINE AS A COPIER
COPY PREVIEWYou can tap the [Preview] key before scanning the original to check a preview of the scanned image.► PREVIEW SCREEN (page 1-15)
6Tap the [Start] key to start copying.When making only one set of copies, you do not need to specify the number of copies.
• To cancel all settings, tap the [CA] key.When the [CA] key is tapped, all settings selected to that point are cleared and you will return to the base screen.
• To cancel copying, tap the [Cancel Copy] key.
• To make two or more sets of copies:Tap the copies display key to specify the number of copies.
• In normal mode, you can tap [File] or [Quick File] on the action panel before starting the copy job to save the scanned original as a file. ► QUICK FILE (page 6-9)► FILE (page 6-10)
In normal modePreview lets you check the image while adjusting settings, so you can see what the result will be. You can drag a preview image to change pages, and rotate or delete the image.
► MANUAL ADJUSTMENT OF EXPOSURE AND ORIGINAL TYPE (page 2-19)
OriginalDetail
StapleCopy Ratio2-Sided CopyPaperSelect
8½x11
Tray 1 1 → 1100% Off
CAPreview Start1Copies
8½x11
8½x11
In Easy mode In Normal mode
Preview
ScanAgain
CA Start
1
1/7
8½x11
In Easy mode In Normal mode

2-10
COPIER►BEFORE USING THE MACHINE AS A COPIER
CHECKING THE ORIGINAL SIZEFor the procedure for specifying the original size, refer to "SELECTING THE ORIENTATION AND SIZE OF THE ORIGINAL
(page 2-29)".
Easy modeCheck the original size in the upper left corner of the screen.If you did not set the original size manually, the original size set in “Default Original Size Settings” in the System Settings (administrator) appears.If you set the original size manually, the size you set appears.When you place the original in the automatic document feeder, the original icon appears next to the original size.
Normal modeCheck the original size in the [Original] key display.If you did not set the original size manually, the original size set in “Default Original Size Settings” in the System Settings (administrator) appears.When you place the original in the automatic document feeder, the original icon appears above the automatic document feeder.
OriginalDetail
StapleCopy Ratio2-Sided CopyPaperSelect
8½x11
Tray 1 1 → 1100% Off
PreviewCopiesCA Start1
8½x11
8½x11
8½x11
B58½x11
8½x11
8½x11
8½x11

2-11
COPIER►BEFORE USING THE MACHINE AS A COPIER
Orientation of placed originalPlace the original as shown below.If you place the original in an incorrect orientation, it may result in stapling at an unexpected position. On "Preview Screen", view the image orientation or preview image.► COPY PREVIEW (page 2-9)
Document glass Document feeder tray
Set the orientation of the image to ensure that the orientation of the placed original is correctly recognized.For information on the orientation of the original, see "Specifying the orientation of the original (page 2-29)".
abc
abc

2-12
COPIER►BEFORE USING THE MACHINE AS A COPIER
SELECTING THE PAPER TRAY FOR COPYINGThe machine is set to automatically select the tray with the size of paper that is the same as the set original size. (Auto Paper Select).If the original size cannot be detected correctly because it is a non-standard size or when you want to change the paper size for copying, you can select the paper tray manually.
If the selected tray runs out of paper during a copy job and there is another tray that has the same size and type of paper, that tray will be automatically selected and the copy job will continue.
To change the initially selected tray:In "Settings (administrator)", select [System Settings] → [Copy Settings] → [Initial Status Settings] → [Paper Tray].
1Tap the [Paper Select] key.► COPYING SEQUENCE (page 2-7)
2Tap the required tray key.After the settings are completed, tap .
In Easy mode In Normal mode
• When the bypass tray is selected, specify the paper type and size based on the paper loaded into the bypass tray.
• In normal mode, you can also open the [Paper Select] screen by tapping the machine image on the base screen.
To automatically select the tray, tap the [CA] key. When the [CA] key is tapped, all settings selected to that point are cleared and you will return to the base screen.
8½x11
8½x11
8½x11
8½x11
8½x11
8½x11 8½x11
8½x11
8½x11
8½x11
8½x11

2-13
COPIER►BASIC PROCEDURE FOR MAKING COPIES
This section explains how to select settings from the base screen of easy mode.► SELECTING COPY MODE (page 2-4)
COPYING
USING THE AUTOMATIC DOCUMENT FEEDER FOR COPYING
BASIC PROCEDURE FOR MAKING COPIES
1Place the original in the document feeder tray of the automatic document feeder.► AUTOMATIC DOCUMENT FEEDER (page 1-77)
2Check the paper (tray) you want to use for copying, and tap the keys for any other settings you want to select.• Paper Select ►page 2-12• 2-Sided Copy ►page 2-16• Copy Ratio ►page 2-22• Staple ►page 2-38, ►page 2-38• Original ►page 2-29• Exposure ►page 2-19• N-Up ►page 2-41• Card Shot ►page 2-43
3Tap the [Preview] key.► PREVIEW SCREEN (page 1-15)
1
Original8½x11 Detail
StapleCopy Ratio2-Sided CopyPaperSelect
8½x11
Tray 1 1 → 1100% Off
PreviewCopiesCA Start

2-14
COPIER►BASIC PROCEDURE FOR MAKING COPIES
USING THE DOCUMENT GLASS FOR COPYING
4Tap the [Start] key to start copying.When making only one set of copies, you do not need to specify the number of copies.
To make two or more sets of copies:Tap the number of copies key to specify the number of copies.
1Place the original on the document glass.► DOCUMENT GLASS (page 1-79)
2Check the paper (tray) you want to use for copying, and tap the keys for any other settings you want to select.• Paper Select ►page 2-12• 2-Sided Copy ►page 2-16• Copy Ratio ►page 2-22• Staple ►page 2-38, ►page 2-38• Original ►page 2-29• Exposure ►page 2-19• N-Up ►page 2-41• Card Shot ►page 2-43
3Tap the [Preview] key.► PREVIEW SCREEN (page 1-15)
OriginalDetail
StapleCopy Ratio2-Sided CopyPaperSelect
8½x11
Tray 1 1 → 1100% Off
CAPreview
Copies Start1
8½x11
1
Original8½x11 Detail
StapleCopy Ratio2-Sided CopyPaperSelect
8½x11
Tray 1 1 → 1100% Off
PreviewCopiesCA Start

2-15
COPIER►BASIC PROCEDURE FOR MAKING COPIES
4Tap the [Start] key to start copying.When making only one set of copies, you do not need to specify the number of copies.
To make two or more sets of copies:Tap the number of copies key to specify the number of copies.
OriginalDetail
StapleCopy Ratio2-Sided CopyPaperSelect
8½x11
Tray 1 1 → 1100% Off
CAPreview
Copies Start1
8½x11

2-16
COPIER►BASIC PROCEDURE FOR MAKING COPIES
AUTOMATIC 2-SIDED COPYING
USING THE AUTOMATIC DOCUMENT FEEDER FOR 2-SIDED COPYING
• To make 2-sided copies, configure the 2-sided copy settings before scanning the original.
• Dual-side copy helps to save paper.
1Place the original in the document feeder tray of the automatic document feeder.► AUTOMATIC DOCUMENT FEEDER (page 1-77)
2Tap the [2-Sided Copy] key.► COPYING SEQUENCE (page 2-7)
3Select 2-sided copy mode.(1) Select the 2-sided copy type.(2) When the original is set to "2-Sided", select "Tablet" or
"Book" in "Original Binding".(3) When the output is set to "2-Sided", select "Tablet" or
"Book" in "Output Binding".(4) After the settings are completed, tap .
4Check the paper (tray) you want to use for copying, and tap the keys for any other settings you want to select.Tap the [Original] key and specify the orientation of the original to have the orientation be correctly recognized.► Specifying the orientation of the original (page 2-29)
• Paper Select ►page 2-12• Copy Ratio ►page 2-22• Staple ►page 2-38, ►page 2-38• Original ►page 2-29• Exposure ►page 2-19• N-Up ►page 2-41• Card Shot ►page 2-43
Originals Copies
Automatic 2-sided copying of 1-sided originals
Originals Copies Originals Copies
Automatic 2-sided copying of 2-sided originals
1-sided copying of 2-sided originals
CAPreview
Copies
2-Sided Copy
Original Binding Output Binding
Tablet
1 → 2
TabletBookBook
2 → 12 → 21 → 1
Start1
(1)
(2) (3)
(4)

2-17
COPIER►BASIC PROCEDURE FOR MAKING COPIES
USING THE DOCUMENT GLASS FOR 2-SIDED COPYING
5Tap the [Preview] key.
6Tap the [Start] key to start copying.
Dual-side copy helps to save paper.
To change the default 2-sided copy mode:In "Settings (administrator)", select [System Settings] → [Copy Settings] → [Initial Status Settings] → [2-Sided Copy].
1Place the original on the document glass.► DOCUMENT GLASS (page 1-79)
2Tap the [2-Sided Copy] key.► COPYING SEQUENCE (page 2-7)
3Select the 2-sided copy mode.(1) Tap the [1 → 2] key.(2) When the output is set to "2-Sided", select "Tablet" or
"Book" in "Output Binding".(3) After the settings are completed, tap .
The [2 → 2] key and [1 → 2] key cannot be used when copying from the document glass.
Originals copy
Automatic 2-sided copying of 1-sided originals
CA PreviewCopies
2-Sided Copy
Output Binding
1 → 2
TabletBook
2 → 12 → 21 → 1
Start1
(3)
(1)
(2)

2-18
COPIER►BASIC PROCEDURE FOR MAKING COPIES
4Check the paper (tray) you want to use for copying, and tap the keys for any other settings you want to select.Tap the [Original] key and specify the orientation of the original to have the orientation be correctly recognized.► Specifying the orientation of the original (page 2-29)
• Paper Select ►page 2-12• Copy Ratio ►page 2-22• Staple ►page 2-38, ►page 2-38• Original ►page 2-29• Exposure ►page 2-19• N-Up ►page 2-41• Card Shot ►page 2-43
5Tap the [Start] key.
6Set the next original, and tap the [Start] key to scan the original.Tap the same key you tapped in step 5.
Repeat this step until all originals have been scanned.
7Tap the [Read-End] key to start copying.
OriginalDetail
StapleCopy Ratio2-Sided CopyPaperSelect
8½x11
Tray 1 1 → 2100% Off
PreviewCopiesCA Start1
8½x11
StaplePaperSelect
8½x11
Tray 1Off
Copies
Read-End
Place next original. Press [Start].When finished, press [Read-End].
CA
OriginalDetail
Start1
8½x11

2-19
COPIER►BASIC PROCEDURE FOR MAKING COPIES
CHANGING THE EXPOSURE AND ORIGINAL IMAGE TYPE
AUTOMATIC ADJUSTMENT OF EXPOSURE AND ORIGINAL TYPEAutomatic exposure adjustment operates by default to automatically adjust the exposure level and original type as appropriate for the original being copied. ([Auto] is displayed.)
MANUAL ADJUSTMENT OF EXPOSURE AND ORIGINAL TYPEThis section explains how to select the original type depending on the original to be copied or manually adjust the exposure.
• To change the default exposure:In "Settings (administrator)", select [System Settings] → [Copy Settings] → [Initial Status Settings] → [Exposure Type].
• To adjust the exposure level when [Auto] is used for the copy exposure:In "Settings (administrator)", select [System Settings] → [Image Quality Adjustment] → [Copy Image Quality] → [Density Adjustment when [Auto] is selected for Exposure].
To change the default exposure:In "Settings (administrator)", select [System Settings] → [Copy Settings] → [Initial Status Settings] → [Exposure Type].
1Tap the [Exposure] key.► COPY MODE (page 2-3)
Original8½x11 Detail
Exposure
CAPreview
Copies
Original N-Up
OffAuto
Start

2-20
COPIER►BASIC PROCEDURE FOR MAKING COPIES
2Tap or slide the slider to adjust the copy exposure.After the adjustment, tap .This completes the procedure in easy mode.
3To select more detailed settings, tap the [Detail] key to switch to normal mode.► Changing mode from each mode (page 2-5)
4Tap the [Exposure] key.
5Tap the required original image type key to specify the original type.Tap the key matching the original.
Original image type select keys• Text ............................Use this mode for regular text documents.• Text/Printed Photo .....This mode provides the best balance for copying an original which contains both text and
printed photographs, such as a magazine or catalogue.• Text/Photo..................This mode provides the best balance for copying an original which contains both text and
photographs, such as a text document with a photo pasted on.• Printed Photo .............This mode is best for copying printed photographs, such as photos in a magazine or catalogue.• Photo..........................Use this mode to copy photos.• Map ............................This mode is best for copying the light color shading and fine text found on most maps.• Light Original ..............Use this mode for originals with light pencil writing.
• When using a copy or printed page from the machine as an original:When using a copy or printed page from the machine as an original, tap the [Copy of Copy] checkbox so that appears.[Copy of Copy] is available when [Auto], [Text], [Printed Photo], or [Text/Printed Photo] is selected as the original image type.
• When you want to make fluorescent marker parts more visibleWhen using a page with highlitd lines as an original, tap the [Copy Original with Highlighted Lines] checkbox so that
appears.
CAPreview
Copies
Exposure
Auto Manual
Lighten Darken
Start1
1
38½x11

2-21
COPIER►BASIC PROCEDURE FOR MAKING COPIES
6Tap or slide the slider to adjust the copy exposure.If you adjust the exposure with the original type selected to [Auto], the original image type is automatically selected to [Text/Printed Photo].After the adjustment, tap .
Guidelines for the exposure level when [Text] is selected for "Exposure/Original Type" 1 to 2: Dark originals such as a newspaper3: Normal density originals 4 to 5: Originals written in pencil or light colored text
8½x11

2-22
COPIER►BASIC PROCEDURE FOR MAKING COPIES
ENLARGE/REDUCEAUTO RATIO SELECTThis section explains how to automatically select the appropriate ratio to meet the paper size when manually changing the paper tray to make a copy on paper that has a size different from the original.
For a non-standard size original, the size must be entered in order to use Auto Image.
To change the default ratio:In "Settings (administrator)", select [System Settings] → [Copy Settings] → [Initial Status Settings] → [Copy Ratio].
1Select the paper tray, and place the original.Place the original in the document feeder tray of the automatic document feeder, or on the document glass.► SELECTING THE PAPER TRAY FOR COPYING (page 2-12)► AUTOMATIC DOCUMENT FEEDER (page 1-77)► DOCUMENT GLASS (page 1-79)
2Tap the [Copy Ratio] key.► COPY MODE (page 2-3)
3Tap the [Auto Image] key.An enlargement/reduction ratio appropriate for the set original size and selected paper size is automatically selected.The automatically selected ratio will appear in the ratio display.
• To cancel the Auto Ratio Selection setting:Tap [Auto Image] to deselect it.
• To return the ratio to 100%:Tap the [100%] key.
5½x8½
8½x11
8½x11
5½x8½
5½x8½
8½x11
8½x11
5½x8½

2-23
COPIER►BASIC PROCEDURE FOR MAKING COPIES
MANUAL RATIO SELECTIONThis section explains how to specify any ratio when making a copy on paper that has a size different from the original or changing the image size for copying.
The following three methods can be used to specify the ratio.
Using the preset ratio keySpecify any ratio by combination of preset ratio key, for which the enlargement and reduction ratio values are pre-registered between the frequently used standard sizes, with the zoom key, which allows you to adjust the ratio in 1% units like .Up to two ratio values can be added to preset ratio keys, respectively for enlargement and reduction.
Specifying the paper sizeSpecify the paper sizes of the original and output to automatically obtain the appropriate ratio.
Specifying the image dimensionsSpecify the image sizes of the original and output to automatically obtain the appropriate ratio.To make a copy with the same ratio between the vertical and horizontal sizes, enter either one of the vertical and horizontal sizes.
When the automatic document feeder is used, the vertical and horizontal ratio selection ranges are both between 25% to 200%.
To return the ratio to 100%:Tap the [100%] key.
To add any ratio as a preset ratio:In "Settings (administrator)", select [System Settings] → [Copy Settings] → [Condition Settings] → [Add or Change Extra Preset Ratios]. To select the added preset ratio, tap the [Other Ratio] key.
64%
Original size: 8-1/2" × 11" Copy size: 5-1/2" × 8-1/2"
150%
Image size: 90mm Output size: 135mm

2-24
COPIER►BASIC PROCEDURE FOR MAKING COPIES
Using the preset ratio key
Specifying the paper size
1Tap the [Copy Ratio] key.► COPY MODE (page 2-3)
2Tap to set the ratio.After the settings are completed, tap .Check that a paper size suitable for the ratio is selected.
• If you tap the [Slightly Reduce (3% Reduction)] key, the ratio will be set lower than the specified one by 3%.
In normal mode
• There are two setting screens. Use the [Other Ratio] key to switch between the screens.
• To quickly set the area, first specify a value close to the desired value by the numeric keys, then adjust it with .
• Up to two frequently used ratio values can be added to the preset ratio key, respectively for enlargement and reduction.► Copy Settings (page 7-83)
To cancel all settings:Tap the [CA] key.
1Tap the [Copy Ratio] key.► COPY MODE (page 2-3)
2Specify the original size (paper size of the loaded original) and the copy size (paper size of the copy output). After the settings are completed, tap .
To cancel all settings:Tap the [CA] key.
PreviewCopies
Auto Image
Slightly Reduce(3% Reduction)
Original
Paper
By Paper Size
100( 25~200 )
%
CA
Copy Ratio
Start1
5½x8½
8½x11
8½x11
5½x8½
CAPreview
Copies
Auto Image
Slightly Reduce(3% Reduction)
Original
Paper
By Paper Size
Copy Ratio
100( 25~200 )
%
Start1
5½x8½
8½x11
8½x11
5½x8½

2-25
COPIER►BASIC PROCEDURE FOR MAKING COPIES
Specifying the image dimensions
1Tap the [Detail] key to change to normal mode.► Changing mode from each mode (page 2-5)
2Tap the [Copy Ratio] key.
3Tap the [by Size] key of the [Zoom] tab.
4Specify the image size (dimensions of the image to be enlarged or reduced) and the output size (dimensions of the enlarged and reduced images).Tap the area of image size and output size, and enter the sizes using the numeric keys.After the settings are completed, tap .
• If you have entered an incorrect size:Tap the [C] key, and then enter the correct size.
• To cancel all settings:Tap the [CA] key.
8½x11
Start
Preview
2-Sided Copy
Background Adjustment
Change Paper Feed TrayPaper SelectChange Size/Direction.Original
Slightly Reduce(3% Reduction)
Others
by Size
The copy ratio is calculated from specified sizes.Enter the image size and the finished size.
Copy RatioSource Output
Input Input 0inch inch
1No. of copies
CA
%
Copy Ratio
8½x11

2-26
COPIER►BASIC PROCEDURE FOR MAKING COPIES
ENLARGING/REDUCING THE LENGTH AND WIDTH SEPARATELYThis section explains how to individually specify the horizontal and vertical copy ratios.
When 50% is selected for the horizontal ratio and 70% is selected for the vertical ratio
The following two methods can be used to specify the ratio.
Using the preset ratio keySpecify any ratio by combination of preset ratio key, which is pre-registered, with the key, which allows you to adjust the ratio in 1% units.
Specifying the image dimensionsSpecify the image sizes of the original and output to automatically obtain the appropriate ratio.Enter the vertical and horizontal sizes.
Using the preset ratio key
When the automatic document feeder is used, the vertical and horizontal ratio selection ranges are both between 25% to 200%.
To cancel the XY zoom setting:Tap the [Zoom] tab or the [CA] key.
1Tap the [Detail] key to change to normal mode.► Changing mode from each mode (page 2-5)
2Tap the [Copy Ratio] key, and then tap the [XY Zoom] tab.
50%
70%

2-27
COPIER►BASIC PROCEDURE FOR MAKING COPIES
Specifying the image dimensions
3Tap the [X] key, and set the X (horizontal) ratio.
• To quickly set the ratio, first specify a value close to the desired one, then adjust it with .
• Tap each area of the X (horizontal) and Y (vertical) directions, and enter the sizes using the numeric keys.
4Tap the [Y] key, and set the Y (vertical) ratio in the same way as the [X] key.After the settings are completed, tap .Check that a paper size suitable for the ratio is selected.
1Tap the [Detail] key to change to normal mode.► Changing mode from each mode (page 2-5)
2Tap the [Copy Ratio] key, and then tap the [XY Zoom] tab.
3Tap the [by Size] key.
8½x11
8½x11 Start
Preview
Others
2-Sided Copy
Background Adjustment
Change Paper Feed TrayPaper Select
Change Size/Direction.Original1No. of copies
CA

2-28
COPIER►BASIC PROCEDURE FOR MAKING COPIES
4Specify the X and Y dimensions of the image size and those of the output size.Check that a paper size suitable for the ratio is selected.After the settings are completed, tap .
Tap the image size and output size areas, and enter the sizes using the numeric keys.
• If you have entered an incorrect size:Tap the [C] key on the numeric keys that appears when you tap the entry area, and set to the correct size.
• To cancel all settings:Tap the [CA] key.
8½x11
8½x11Start
Preview
2-Sided Copy
Background Adjustment
Change Paper Feed TrayPaper Select
Change Size/Direction.Original
Others
Copy Ratio
by Size
The copy ratio is calculated from specified sizes.Enter the image size and the finished size.
Copy RatioSource Output
Input Input 0
0
inch inch
Input Inputinch inch
1No. of copies
CA

2-29
COPIER►BASIC PROCEDURE FOR MAKING COPIES
SELECTING THE ORIENTATION AND SIZE OF THE ORIGINALThe paper size that appears in the [Original] key is the paper size that is set in "Default Original Size Settings" in the system settings (administrator). To change the original size to a different size from the size shown in the [Original] key, touch the [Original] key and set the original size.Set the orientation of the image to ensure that the orientation of the placed original is correctly recognized.
Specifying the orientation of the originalBy specifying the starting side (top or left side) of the placed original, the orientation of the original will be correctly recognized.Finishing position settings and N-Up layout settings are specified using the recognized orientation.
Specifying the orientation and size of an inch-size original
Set the orientation and size of the original before scanning the original.
1Tap the [Original] key to set the orientation of the original.► COPY MODE (page 2-3)
2Tap the [Size] tab.
3Specifying the size of an original(1)Tap the [AB] key for an AB original size.
Tap the [Inch] key for an inch original size.(2)Tap the appropriate original size key.
After the settings are completed, tap the key.
4Tap the appropriate original size key.
CAPreview
Copies
SizeImageOrientation
Start
Original
8½x11
Preview
8½x11
8½x118½x11
Preview
Others
No. of copies
Skip Blank Page in Original
Copy RatioEnlarge/Reduce Copy
Blank Page Skip
Background Adjustment
2-Sided Copy
Start
1
CA
5 ½x8 ½ 8 ½x138 ½x11
8 ½x148 ½x13 2/5
8½x11
In Easy mode In Normal mode
8½x11 8½x135½x8½
8½x148½x13½
(1) (2)

2-30
COPIER►BASIC PROCEDURE FOR MAKING COPIES
Specifying the orientation and size of an AB-size original
1Tap the [Original] key to set the orientation of the original.► COPY MODE (page 2-3)
2Tap the [Detail] key to change to normal mode.► Changing mode from each mode (page 2-5)
3Tap the [Original] key.
4Tap the [AB] tab.
5Tap the appropriate original size key.After the settings are completed, tap .
8½x118½x11
Preview
Others
Skip Blank Page in Original
Copy RatioEnlarge/Reduce Copy
Blank Page Skip
Background Adjustment
2-Sided Copy
Start
1No. of copies
CA
216 x 330 216 x 340
216 x 343
8½x11

2-31
COPIER►BASIC PROCEDURE FOR MAKING COPIES
Specifying the orientation and size of a non-standard size originals
1Tap the [Original] key to set the orientation of the original.► COPY MODE (page 2-3)
2Tap the [Detail] key to change to normal mode.► Changing mode from each mode (page 2-5)
3Tap the [Original] key.
4Tap the [Direct Entry] tab.
5Specify the original size.
• Tap the areas displaying width and height sizes respectively, and enter the sizes using the numeric keys.
• It is convenient to use to finely adjust the entered size.
6Tap the [Execute] key.On the base screen, check that the specified size is displayed on the [Original] key.After the settings are completed, tap .
8½x11
8½x11
Preview
Others
No. of copies
Skip Blank Page in Original
Copy RatioEnlarge/Reduce Copy
Blank Page Skip
Background Adjustment
2-Sided Copy
Start
X
Y
1
CA
8½x11
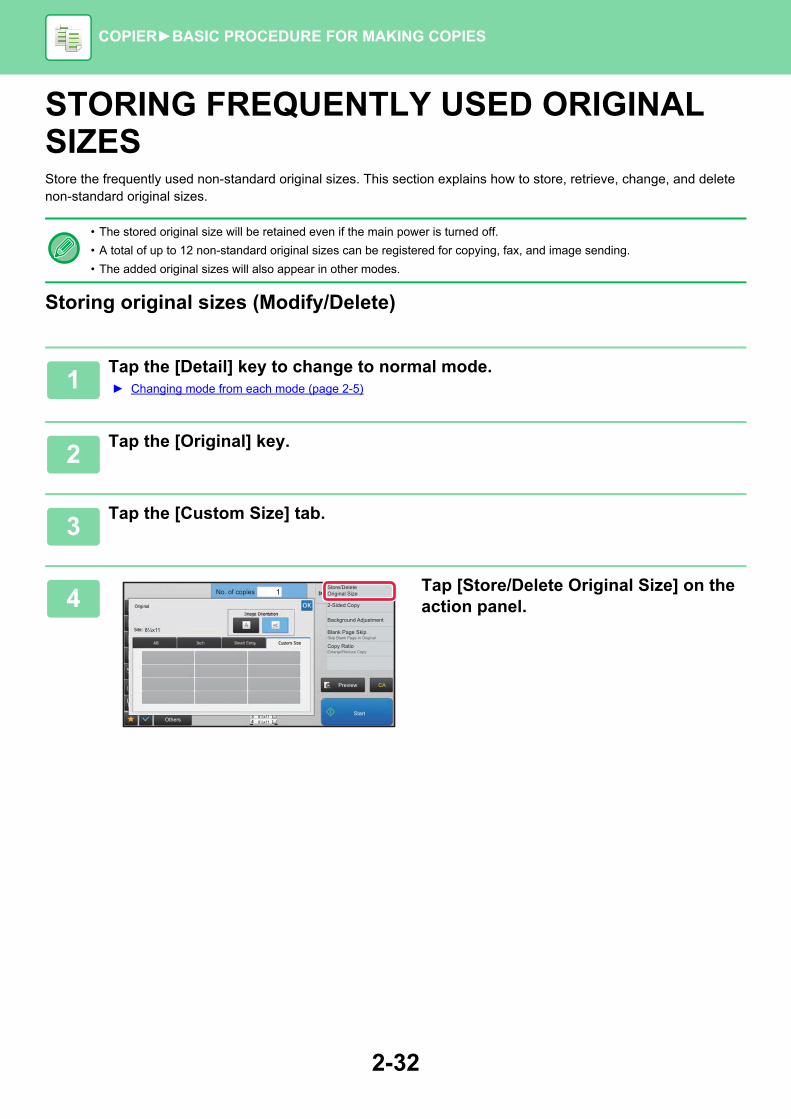
2-32
COPIER►BASIC PROCEDURE FOR MAKING COPIES
STORING FREQUENTLY USED ORIGINAL SIZESStore the frequently used non-standard original sizes. This section explains how to store, retrieve, change, and delete non-standard original sizes.
Storing original sizes (Modify/Delete)
• The stored original size will be retained even if the main power is turned off.
• A total of up to 12 non-standard original sizes can be registered for copying, fax, and image sending.
• The added original sizes will also appear in other modes.
1Tap the [Detail] key to change to normal mode.► Changing mode from each mode (page 2-5)
2Tap the [Original] key.
3Tap the [Custom Size] tab.
4Tap [Store/Delete Original Size] on the action panel.
8½x118½x11
Preview
Others
No. of copies
Skip Blank Page in Original
Copy RatioEnlarge/Reduce Copy
Blank Page Skip
Background Adjustment
2-Sided Copy
Store/DeleteOriginal Size
Start
1
CA
8½x11

2-33
COPIER►BASIC PROCEDURE FOR MAKING COPIES
5Tap a key ( ) for storing a custom original size.Tap a key that does not show a size.
To modify or delete a previously stored key:Tap the key that you want to modify or delete. The following screen will appear.• To modify the key, tap the [Modify] key and go to the next step.• To delete the key, tap the [Delete] key. Make sure that the original size has been cleared and tap the key.
6Specify the original size.Tap the areas displaying width and height sizes respectively, and enter the sizes using the numeric keys.
It is convenient to use to finely adjust the entered size.
7Tap the [Execute] keyAfter the settings are completed, tap the key, and check that the key of the size stored on the original screen is added properly. After you have checked it, tap .
To cancel the operation:Tap the [CA] key.
8½x118½x11
Preview
Store/Delete
Select the size key to store/deletethe custom original size.
Others
Skip Blank Page in Original
Copy RatioEnlarge/Reduce Copy
Blank Page Skip
Background Adjustment
2-Sided Copy
Start
1No. of copies
CA
Original
Preview CA
Store/Delete
Select the size key to store/deletethe custom original size.
Others
Skip Blank Page in Original
Copy RatioEnlarge/Reduce Copy
Blank Page Skip
Background Adjustment
2-Sided Copy
Start
X420 Y297
A custom size has already been stored
Delete ModifyCancel
Original
Preview CA
Store/Delete
Select the size key to store/deletethe custom original size.
Others
Skip Blank Page in Original
Copy RatioEnlarge/Reduce Copy
Blank Page Skip
Background Adjustment
2-Sided Copy
Start
X17 Y11
A custom size has already been storedin this location.
Delete ModifyCancel
Original
8½x118½x11
8½x118½x11
Preview
Start
No. of copies 1
Skip Blank Page in Original
Copy RatioEnlarge/Reduce Copy
Blank Page Skip
Background Adjustment
2-Sided Copy
Others
CA
11
17

2-34
COPIER►BASIC PROCEDURE FOR MAKING COPIES
Retrieving a stored original size
1Tap the [Detail] key to change to normal mode.► Changing mode from each mode (page 2-5)
2Tap the [Original] key.
3Tap the [Custom Size] tab.
4Tap the key of the original size that you wish to retrieve.After selecting the key of the original size, tap the key.On the base screen, check that the specified size is displayed on the [Original] key.
To cancel the operationTap the [CA] key.
8½x118½x11
Preview
Others
No. of copies
Skip Blank Page in Original
Copy RatioEnlarge/Reduce Copy
Blank Page Skip
Background Adjustment
2-Sided Copy
Store/DeleteOriginal Size
Start
1
CA
8½x11

2-35
COPIER►BASIC PROCEDURE FOR MAKING COPIES
MAKING COPIES USING THE BYPASS TRAYMAKING COPIES USING THE BYPASS TRAYIn addition to plain paper, the bypass tray allows you to make copies on transparency film, envelopes, and other special media.
For detailed information on paper that can be loaded into the bypass tray, see "APPLICABLE PAPER TYPES (page 1-64)". For precautions on loading paper into the bypass tray, see "LOADING PAPER INTO THE BYPASS TRAY (page 1-71)".
1Load paper into the bypass tray.► LOADING PAPER INTO THE BYPASS TRAY (page 1-71)
When you load paper in the bypass tray, the current bypass tray paper type and size appear. To change the paper type or size, tap the [Change] key.For the settings, refer to "SPECIFYING A TYPE AND SIZE OF PAPER LOADED ON BYPASS TRAY (page 2-36)".If paper is already loaded in the bypass tray and you want to change the tray to be used to the bypass tray, go to step 2.
2Tap the [Paper Select] key, and tap the bypass tray key.The bypass tray key shows the previously loaded paper size and type.If the paper type and size are okay, go to the next step.If you need to change the paper type or size setting to match the paper placed in the bypass tray, change as explained in "SPECIFYING A TYPE AND SIZE OF PAPER LOADED ON BYPASS TRAY (page 2-36)".► SELECTING THE PAPER TRAY FOR COPYING (page 2-12)
3Place the original.Place the original in the document feeder tray of the automatic document feeder, or on the document glass.► AUTOMATIC DOCUMENT FEEDER (page 1-77)► DOCUMENT GLASS (page 1-79)
4Tap the [Start] key to start copying.
EasyCopy
Current Bypass Tray Settingsare as follows.
Type:
Tap [Change] to change current papersetting and select other paper types.
Change OK
Size: 8½x11
Plain Paper 1(60 - 79 g/m2)
Settings Volume

2-36
COPIER►BASIC PROCEDURE FOR MAKING COPIES
SPECIFYING A TYPE AND SIZE OF PAPER LOADED ON BYPASS TRAY
1Tap the [Paper Select] key, and tap the bypass tray key.► SELECTING THE PAPER TRAY FOR COPYING (page 2-12)
2Tap the [Type and Size] key, and tap the key that meets the type of the loaded paper.
3Tap the [Type and Size] key, and select the size and type of the paper.Tap [Direct Entry] key to enter a numeric value for the size of the loaded paper.After the settings are completed, tap .
To directly enter a paper size Tap the [inch] key to set a paper size in inches, or tap the [AB] key to set it in millimeters.After you have entered the paper size using the key, tap the [Execute] key.
8½x11
8½x11
8½x11
8½x118½x11
Type and Size
PreviewStartCopiesCA
Plain 18½x11
X
1

2-37
COPIER►BASIC PROCEDURE FOR MAKING COPIES
OUTPUT
SORT/GROUP SETTINGThis section explains how to select the sorting method when outputting the scanned original.
AutoEnables the sort mode when the original is placed in the automatic document feeder, and enables the group mode when the original is placed on the document glass.
Sort Sorts the scanned original on a set basis, and outputs them.
Group Groups the scanned original on a page basis, and outputs them.
1Tap the [Detail] key to change to normal mode.► Changing mode from each mode (page 2-5)
Tap the [Original] key and specify the orientation of the original to have the orientation be correctly recognized.► Specifying the orientation of the original (page 2-29)
2Tap the [Sort/Group] key.
3Select the sorting method.After the settings are completed, tap .
If an inner finisher is installed, you can select the offset output checkbox to have each set of output be offset from the previous set to enable easy removal from the output tray.
Originals
When 5 is set for the number of copies
Finished
Originals Finished
When 5 is set for the number of copies

2-38
COPIER►BASIC PROCEDURE FOR MAKING COPIES
STAPLE SETTINGSSpecify whether or not the set of output will be stapled.
Staple ON (excluding booklet)
Original Orientation Staple Staple Position
- OFF Does not staple.
Portrait orientation
ON
Landscape orientation
You can view staple positions on the "PREVIEW SCREEN (page 1-15)". Text will be printed at the preset size regardless of the copy ratio or paper size setting.
An inner finisher is required to use the staple function.
1Tap the [Staple] key.► COPY MODE (page 2-3)
Tap the [Original] key and specify the orientation of the original to have the orientation be correctly recognized.► Specifying the orientation of the original (page 2-29)
2Make sure the staple icon appears.
In normal modeA checkmark appears on the staple icon.
8½x11
8½x11

2-39
COPIER►BASIC PROCEDURE FOR MAKING COPIES
INSERTING SEPARATOR PAGES BETWEEN COPIES OR JOBSThis function inserts separator pages between each set of copies or between each job. When you insert separator pages between sets of copies, you can specify whether to insert the separator page before or after each set. You can also specify the number of copies that makes one set. When you insert separator pages between jobs, you can specify whether to insert a separator page before or after each job.
Separator page insertion examplesIn the following examples, four copies of a two-page original are output. Inserting a separator page before each set of two copies
Inserting a separator page after each set of two copies
Inserting separator pages before and after a job
• When this function is combined with Sort/Group and Staple, Sort/Group and Staple/Punch are not applied to the separator pages.
• When used in combination with the offset function, a separator page is never offset by itself; the separator page is always offset together with the set of output.
1Tap the [Detail] key to change to normal mode.► Changing mode from each mode (page 2-5)
Tap the [Original] key and specify the orientation of the original to have the orientation be correctly recognized.► Specifying the orientation of the original (page 2-29)
2Tap the [Others] key, and tap the [Separator Page] key.
1 12 2 1 2 1 2
Insert before each set Insert before each set
1 12 2 1 2 1 2
Insert after each set Insert after each set
1 12 2 1 2 1 2
Insert Before Job Insert After Job

2-40
COPIER►BASIC PROCEDURE FOR MAKING COPIES
3Specify the separator page insertion mode.• To insert separator pages between sets of copies, set the
[Insert Top of Sets] or [Insert End of Sets] checkbox to . Next, tap to specify the number of copies in
each set.• To insert separator pages between jobs, set the [Insert
Before Job] or [Insert After Job] checkbox to .• After the settings are completed, tap .
To change the separator page tray:Tap the [Paper Tray] key to display the tray selection screen. Tap the separator page tray in the tray selection screen. For more information, see "SELECTING THE PAPER TRAY FOR COPYING (page 2-12)"
To cancel the separator page insertion setting:Clear the checkmark for separator page insertion mode.
8½x11

2-41
COPIER►BASIC PROCEDURE FOR MAKING COPIES
BATCH COPY FUNCTIONS
COPYING MULTIPLE ORIGINALS AS A SINGLE PAGE (N-Up)This function copies multiple original pages onto a single sheet of paper in a uniform layout.Select 2-Up to copy two original pages onto one sheet, 4-Up to copy four original pages onto one sheet, or 8-Up to copy eight original pages onto one sheet.This function is convenient when you wish to present multiple pages in a compact format, or show a view of all pages in a document.
2-Up copying 4-Up copying
When inserting a cover sheet, select Cover Setting to copy only a front sheet to one page and collectively copy the second and subsequent pages.
1Tap the [Detail] key to change to normal mode.► Changing mode from each mode (page 2-5)
2Place the original.Place the original in the document feeder tray of the automatic document feeder, or on the document glass.► AUTOMATIC DOCUMENT FEEDER (page 1-77)► DOCUMENT GLASS (page 1-79)
When using the document glass to scan multiple original pages, change the original and tap the [Start] key.
3Tap the [N-Up] key► COPY MODE (page 2-3)
Tap the [Original] key and specify the orientation of the original to have the orientation be correctly recognized.► Specifying the orientation of the original (page 2-29)
BA A B
DCBA A B
C D

2-42
COPIER►BASIC PROCEDURE FOR MAKING COPIES
4 Tap the [Others] key, and tap the [N-Up] key.
5Tap the number of originals you want to copy collectively, and select the layout key.
6Tap [Border], and select the border.A line can be inserted between pages arranged on a sheet.After the settings are completed, tap twice, and [Back] keys in sequence.
• To cancel the N-Up setting:Tap the [Off] key.
• To cancel all settings:Tap the [CA] key.
7Tap the [Start] key to start copying.
8½x11
8½x11
8½x11
Preview
BackStart
N-UpSelect Original Type to Arrange in 1 Page.
Others
Shift Position to Have Margin
BookletCopy Like A Pamphlet
Margin Shift
Insert Covers/InsertsCovers/Inserts
2-Sided Copy
Off
2-Up
4-Up
8-Up
Layout
Border Off
Original
CA

2-43
COPIER►BASIC PROCEDURE FOR MAKING COPIES
COPYING BOTH SIDES OF A CARD AS A SINGLE PAGE (CARD SHOT)This function copies the front and reverse sides of a card on one sheet, not on separate sheets.This function is convenient for making copies for identification purposes and helps save paper.
To change the default original size and layout during Card Shot:In "Settings (administrator)", select [System Settings] → [Copy Settings] → [Condition Settings] → [Card Shot Settings].
1Tap the [Card Shot] key.► COPY MODE (page 2-3)
2Select the paper to be used for card shot.Set a paper by referring to the "SELECTING THE PAPER TRAY FOR COPYING (page 2-12)".
3Tap the [Others] key, and then tap the [Card Shot] key.
Back
Front
Example of a portrait copy Example of a landscape copy

2-44
COPIER►BASIC PROCEDURE FOR MAKING COPIES
4Tap the [On] key, and specify the original size as required.
• Tap the areas displaying width and height sizes respectively, and enter the sizes using the numeric keys.
• To quickly set the size, first specify a value close to the desired ratio value by the numeric keys, then adjust it by tapping .
• When you set the [Adjust to Paper Size] checkbox to , the original is enlarged or reduced with the ratio appropriate to the original size.
To cancel the Card Shot settings:Tap the [Off] key.
5Place a card face down on the document glass, and tap the[Start] key.► DOCUMENT GLASS (page 1-79)
6Place a card face up on the document glass, and tap the [Start] key to scan the reverse side.
• Copy settings cannot be changed when scanning additional pages.• To cancel all settings:
Tap the [CA] key.
7 Tap the [Read-End] key to start copying.
8½x11
8½x11

2-45
COPIER►BASIC PROCEDURE FOR MAKING COPIES
REPEATING THE SAME IMAGE ON ONE SHEET (REPEAT LAYOUT)This function copies multiple same original images on one sheet.You can set any of the following three types of repeat copy.
Repeat method Description
Auto RepeatThe maximum repeat count to copy images on a sheet is calculated automatically according to the original size, paper size, and copy ratio being selected from the base screen.
Fixed RepeatWhen you select a repeat count, original size, and paper size to copy images on a sheet, the copy ratio is calculated automatically and the original is copied.
Photo Repeat
This function repeatedly copies on 8-1/2" x 11" (A4) papers without changing the copy ratio of the photo size original. You can select any of the following five types of original size:• E/L Size, Postcard (Up to 3" x 5" (148 mm x 105 mm))• Up to 5" x 7" (100 mm x 150 mm)• Card (Up to 2-1/2" x 4" (70 mm x 100 mm))• ID Photo (Up to 2-1/2" x 2-1/2" (65 mm x 70 mm))• Card (Up to 2-1/8" x 2-5/8" (57 mm x 100 mm))
* Reduction will be 95%.
• Repeat Layout must be specified before scanning the original.
• If the copy ratio automatically obtained in [Fixed Repeat] exceeds 25 to 400% (using document glass) or 25 to 200% (using automatic document feeder), it will result in an error. Select the number of faces to repeat again.
• Always place an original on the document glass for photo repeating.
• Repeat Layout can be combined with Staple.
• This function cannot be combined with Mixed Size Original or 2-Sided Copy.
• Photo Repeat cannot be combined with Image Orientation.

2-46
COPIER►BASIC PROCEDURE FOR MAKING COPIES
Copy by automatically calculating the repeat count (Auto Repeat)
1Place the original.Place the original in the document feeder tray of the automatic document feeder, or on the document glass.► AUTOMATIC DOCUMENT FEEDER (page 1-77)► DOCUMENT GLASS (page 1-79)
2Tap the [Detail] key to change to normal mode.► Changing mode from each mode (page 2-5)
3Tap the [Others] key, and then tap the [Repeat Layout] key.
4 Tap the [Auto Repeat] key.
5Check the repeat faces which have been calculated automatically.Change the original size, paper size, or copy ratio by tapping the respective [Original], [Paper Select], or [Copy Ratio] key when necessary.► SELECTING THE ORIENTATION AND SIZE OF THE
ORIGINAL (page 2-29)► MANUAL RATIO SELECTION (page 2-23)► SELECTING THE PAPER TRAY FOR COPYING (page
2-12)
Set so that there are one or more repeat faces.
6Specify the repeat partition line.After the settings are completed, tap and [Back] keys in sequence.
• To cancel the Auto Repeat setting:Tap the [Off] key.
• To cancel all settings:Tap the [CA] key.
8½x118½x11
8½x11
Preview
BackStart
Repeat LayoutAuto Layout of Repeat Face Based on Original, Paper Size and Ratio.
Others
Off
Fixed Repeat
Photo Repeat
Auto Repeat
ExposureSelect Type/Exposure
Background Adjustment
Change Size/Direction.Original
Paper Select
Original
Current Setting
8½x11
8½x11
100%
OffParting Line
Copy RatioCA
RepeatNumber
1
Preview
BackStart
Repeat Layout
Others
Off
Fixed Repeat
Photo Repeat
Auto Repeat
ExposureSelect Type/Exposure
Background Adjustment
Change Size/Direction.Original
Paper Select
Copy Ratio
Original
Current Setting
Parting Line
100%
Off
CA
Auto Layout of Repeat Face Based on Original, Paper Size and Ratio.
8½x11
8½x11 RepeatNumber
1
8½x11
8½x11

2-47
COPIER►BASIC PROCEDURE FOR MAKING COPIES
Copy by specifying a repeat count (Fixed Repeat)
7 Tap the [Start] key to start copying.
1Place the original.Place the original in the document feeder tray of the automatic document feeder, or on the document glass.► AUTOMATIC DOCUMENT FEEDER (page 1-77)► DOCUMENT GLASS (page 1-79)
2Tap the [Detail] key to change to normal mode.► Changing mode from each mode (page 2-5)
3Tap the [Others] key, and then tap the [Repeat Layout] key.
4Tap the [Fixed Repeat] key.
5Tap the [Original] and [Paper Select] keys to select an original size and a paper size, respectively.► SELECTING THE ORIENTATION AND SIZE OF THE ORIGINAL (page 2-29)► SELECTING THE PAPER TRAY FOR COPYING (page 2-12)

2-48
COPIER►BASIC PROCEDURE FOR MAKING COPIES
Repeat a photo size original in actual size (Photo Repeat)
6Tap [No. of Faces] to set a repeat count.After the settings are completed, tap .The automatic calculation result is shown as the copy ratio.
If the calculated copy ratio exceeds the range from 25% to 400% (using document glass) or 25 to 200% (using automatic document feeder), an error occurs.
7Specify the repeat partition line.After the settings are completed, tap and [Back] keys in sequence.
• To cancel the fixed repeat setting:Tap the [Off] key.
• To cancel all settings:Tap the [CA] key.
8Tap the [Start] key to start copying.
1Tap the [Detail] key to change to normal mode.► Changing mode from each mode (page 2-5)
2Tap the [Others] key, and then tap the [Repeat Layout] key.
3Tap the [Photo Repeat] key.
4Place the original on the document glass.
8½x11
Preview
BackStart
Repeat Layout
No. of Faces
Others
ExposureSelect Type/Exposure
Background Adjustment
Change Size/Direction.Original
4 Repeat
2 Repeat
8 Repeat
16 Repeat CA

2-49
COPIER►BASIC PROCEDURE FOR MAKING COPIES
5Tap the [Original] key and select an original size.When you tap the original size key, the original direction is indicated in the "How To Set". Place the original to meet the displayed orientation.After the settings are completed, tap .
• To cancel the photo repeat setting:Tap the [Off] key.
• To cancel all settings:Tap the [CA] key.
6Tap the [Start] key to start copying.

2-50
COPIER►BASIC PROCEDURE FOR MAKING COPIES
COPYING MULTIPLE BUSINESS CARDS(BUSINESS CARD COPY)
Business Card Copy can be used to copy up to 8 business cards on one sheet of paper.This function can be used when you want to create the list of business cards, and when you want to file business cards.
1Tap the [Detail] key to change to normal mode.► Changing mode from each mode (page 2-5)
2Place a business card, and select the paper to be used to copy the card.• Refer to "SELECTING THE PAPER TRAY FOR
COPYING (page 2-12)" to select the paper.
For original placement orientations and copy results, see
"Copy results of 8-Sheet Layouts (page 2-51)"
3Tap the [Others] key, and then tap the [Business Card Copy] key.
4 Specify settings for Business Card Copy.(1) Specify the number of business cards to
be copied and touch the [1-Sheet Layout] key or the [2-Sheet Layout] or the [8-Sheet Layout] key.When the [8-Sheet Layout] key is selected, A4 (8-1/2" x 11") size paper will be automatically selected.
(2) When [8-Sheet Layout] is selected, select the desired layout from "Layout".
After the settings are completed, tap and [Back] keys in sequence.
1-Sheet Layout 8-Sheet Layout2-Sheet Layout
8½x11
ExposureSelect Type/Exposure
Background Adjustment
Change Size/Direction.Original
(1) (2)
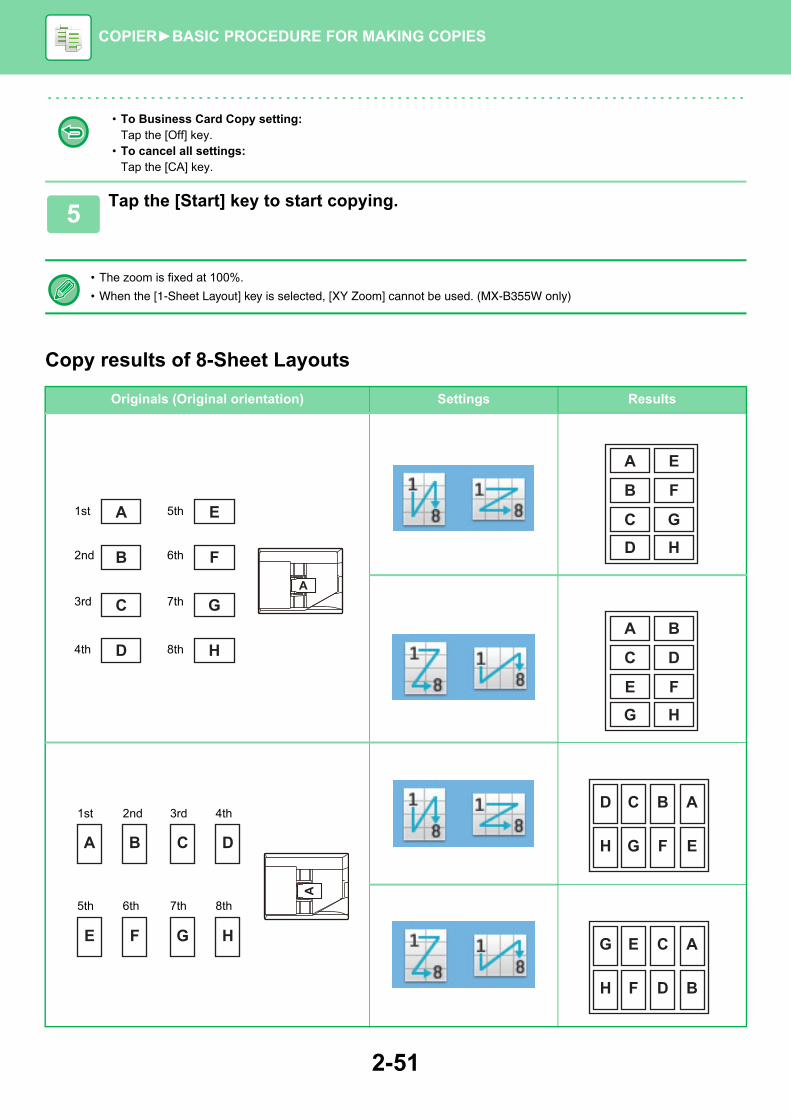
2-51
COPIER►BASIC PROCEDURE FOR MAKING COPIES
Copy results of 8-Sheet Layouts
• To Business Card Copy setting:Tap the [Off] key.
• To cancel all settings:Tap the [CA] key.
5Tap the [Start] key to start copying.
• The zoom is fixed at 100%.
• When the [1-Sheet Layout] key is selected, [XY Zoom] cannot be used. (MX-B355W only)
Originals (Original orientation) Settings Results
A
B
C
D
E
F
G
H
A
1st
2nd
3rd
4th
5th
6th
7th
8th
A
B
C
D
E
F
G
H
A B
C D
E F
G H
A B C D
E F G H
A
1st 2nd 3rd 4th
5th 6th 7th 8th
ABCD
EFGH
A
B
C
D
E
F
G
H

2-52
COPIER►OTHER FUNCTIONS
Other functions are set from the base screen of normal mode.► SELECTING COPY MODE (page 2-4)
OUTPUT AND LAYOUT EDITING FUNCTIONS
MAKING COPIES IN PAMPHLET FORMAT (BOOKLET)Copies made by "Booklet" can be folded at the center to create a booklet.This function is convenient for arranging copies into an attractive booklet or pamphlet.
Booklet copy using 8 original pages
Binding side
OTHER FUNCTIONS
Other functions cannot be selected in easy mode.
When Booklet is selected, 2-sided copying mode is automatically selected. When settings are selected that prevent 2-sided copying, the booklet function cannot be used.
765
432
72
53
7
54
Originals Staple to create a booklet
72 753
54 7
27
5 3
45
Left Binding Right Binding

2-53
COPIER►OTHER FUNCTIONS
1Place the original.Place the original in the document feeder tray of the automatic document feeder, or on the document glass.► AUTOMATIC DOCUMENT FEEDER (page 1-77)► DOCUMENT GLASS (page 1-79)
If the originals are 2-sided, place them in the document feeder tray.
2Tap the [Others] key and then the [Booklet] key.
3Select the binding edge.
To cancel the booklet setting:Tap the [Off] key.
4Tap the [1-Sided], [2-Sided Booklet] or [2-Sided Tablet] key as appropriate for the original.When not inserting a cover, go to step 6.
5When inserting a cover, tap the [Cover Setting] key, and tap the [On] key.After the settings are completed, tap and [Back] keys in sequence.
To change the cover input tray:Tap the [Paper Tray] key to display the tray selection screen.Tap the cover input tray on the tray selection screen.For more information, see "SELECTING THE PAPER TRAY FOR COPYING (page 2-12)".
• If the cover will be copied on, label sheets, transparency film cannot be used.
• To cancel all settings:Tap the [CA] key.
6Tap the [Start] key to start copying.
8½x118½x11
Preview
Booklet
Others
Select Output Binding Edge.
Others
Change Size/Direction.Original
Change Paper Feed TrayPaper Select
Start
Off
Right Binding
Left Binding/Tablet
2-Sided Booklet
1-Sided
2-Sided Tablet
Cover Setting
EraseErase Shadow Around
Put Multiple Pages in A PageN-Up
Select Original Type.
CA

2-54
COPIER►OTHER FUNCTIONS
COPYING MULTIPLE ORIGINALS ON EACH BOOKLET PAGE (BOOKLET 2-Up/4-Up)This function copies two or four original pages equally on one page of pamphlet copy paper.This function is convenient for arranging minimum number of copies into an attractive booklet or pamphlet format.
• The following paper sizes and number of sheets are available for booklet 2-Up or 4-Up.Paper size: A4, A5, B5, 216x330 mm, 216×340 mm, 216×343 mm, 16K, 5-1/2"×8-1/2", 8-1/2"×11", 8-1/2"×13",
8-1/2"×13-1/2", 8-1/2"×14"
• Scan the originals in order from the first page to the last page. The order of copying will be automatically adjusted by the machine.Eight or 16 original pages will be copied onto each sheet of paper. Blank pages will be automatically produced at the end if the number of original pages is not a multiple of eight.
1Place the original.Place the original in the document feeder tray of the automatic document feeder, or on the document glass.► AUTOMATIC DOCUMENT FEEDER (page 1-77)► DOCUMENT GLASS (page 1-79)
If the originals are 2-sided, place them in the document feeder tray.
2 Tap the [Others] key, and then tap the [Booklet] key.
3 Select the binding edge.
To cancel the booklet setting:Tap the [Off] key.
8
144
3
76
54
32
1514
1312
11109
108
97
Originals Booklet 2-Up

2-55
COPIER►OTHER FUNCTIONS
4Tap the [1-Sided], [2-Sided Booklet] or [2-Sided Tablet] key as appropriate for the original.When not inserting a cover, go to step 6.
5 When inserting a cover, tap the [Cover Setting] key, and tap the [On] key.
• To change the cover input tray:Tap the [Paper Tray] key to display the tray selection screen.Tap the cover input tray on the tray selection screen.For more information, see "SELECTING THE PAPER TRAY FOR COPYING (page 2-12)".
• To make a copy on a cover sheet, check the [Make Copy on Cover (Duplex)] box so that appears.
• If the cover will be copied on, label sheets, transparency film cannot be used.
• To cancel all settings:Tap the [CA] key.
6 Tap [N-Up] on the action panel.
7Tap the key of the N-Up sheets you wish to use.If needed, the images will be rotated.
To cancel the N-Up settingTap the [Off] key.
8 Select the layout.
8½x118½x11
Preview
Others
Others
Change Size/Direction.Original
Start
Off
Right Binding
1-Sided
Cover Setting
EraseErase Shadow Around
Put Multiple Pages in A PageN-Up
Change Paper Feed TrayPaper Select
Select Original Type.
CA
Booklet
Select Output Binding Edge.
Left Binding/Tablet
2-Sided Booklet
2-Sided Tablet

2-56
COPIER►OTHER FUNCTIONS
9Tap [Border], and select the border.A line can be inserted between pages arranged on a sheet.After the settings are completed, tap twice, and [Back] keys in sequence.
To cancel all settings:Tap the [CA] key.
10Tap the [Start] key to start copying.
11x178½x11
8½x11

2-57
COPIER►OTHER FUNCTIONS
PAPER, AND TIME SAVING FUNCTIONS
SKIPPING BLANK PAGES IN AN ORIGINAL (BLANK PAGE SKIP)If the scanned original contains blank pages, this function skips them to copy only non-blank pages.The machine detects blank pages, enabling you to skip useless copies without checking an original.
• If an original of which one side is blank is scanned, blank pages are skipped for 2-sided copying.
• Depending on the original, some pages that are not blank may be detected as blank pages and thus not being copied, and some pages that are blank may not be detected as blank and thus copied.
1Place the original.Place the original in the document feeder tray of the automatic document feeder, or on the document glass.► AUTOMATIC DOCUMENT FEEDER (page 1-77)► DOCUMENT GLASS (page 1-79)
2 Tap the [Others] key, and tap the [Blank Page Skip] key.
Blank page
Copy
The blank pages are not copied.

2-58
COPIER►OTHER FUNCTIONS
3Tap the [Skip Blank Page] or [Skip Blank and Back Shadow] key.After the settings are completed, tap and [Back] keys in sequence.
To cancel all settings:Tap the [CA] key.
4Tap the [Start] key.
5Check the confirmation message, and tap the [Execute] key to start copying.On the confirmation screen, the number of scanned original sheets appears in (A), the number of scanned sides in (B), and the number of copies excluding blank pages in (C).For example, if five original sheets that include two blank pages are scanned by duplex scanning, (A) will show "5", (B) will show "10", and (C) will show "8".
8½x11
8½x11
Blank Page Skip
Off
Skip Blank Page
Skip Blank and Back Shadow
A4
100%
Auto
Cancel Execute
5 pages of original havebeen scanned. (P.10)Copy 8 pages of originals.Execute the job?
8½x11
8½x11
8½x11
8½x11
8½x11
(A)(C) (B)

2-59
COPIER►OTHER FUNCTIONS
ADJUSTING THE BACKGROUND BY MAKING LIGHT AREAS OF THE ORIGINAL DARKER OR LIGHTER (BACKGROUND ADJUSTMENT)You can adjust the background by making light areas of the original darker or lighter.
You must select Background Adjustment before scanning the original.
1Tap the [Others] key, and tap the [Background Adjustment] key.
2Tap or move the slider to set the value.After the settings are completed, tap and [Back] keys in sequence.
To cancel the Background Adjustment setting:Tap the [Off] key.
Adjust light areas in this way.
Level [+]
[+] makes the background darker. [-] makes the background lighter.
Level [-]
8½x118½x11
Background Adjustment
Adjust Original Background Darkness.
Off
On
Touch [+] darken background.Touch [-] erase background.

2-60
COPIER►OTHER FUNCTIONS
3Place the original.Place the original in the document feeder tray of the automatic document feeder, or on the document glass.► AUTOMATIC DOCUMENT FEEDER (page 1-77)► DOCUMENT GLASS (page 1-79)
To cancel all settings:Tap the [CA] key.
4Tap the [Start] key to start copying.
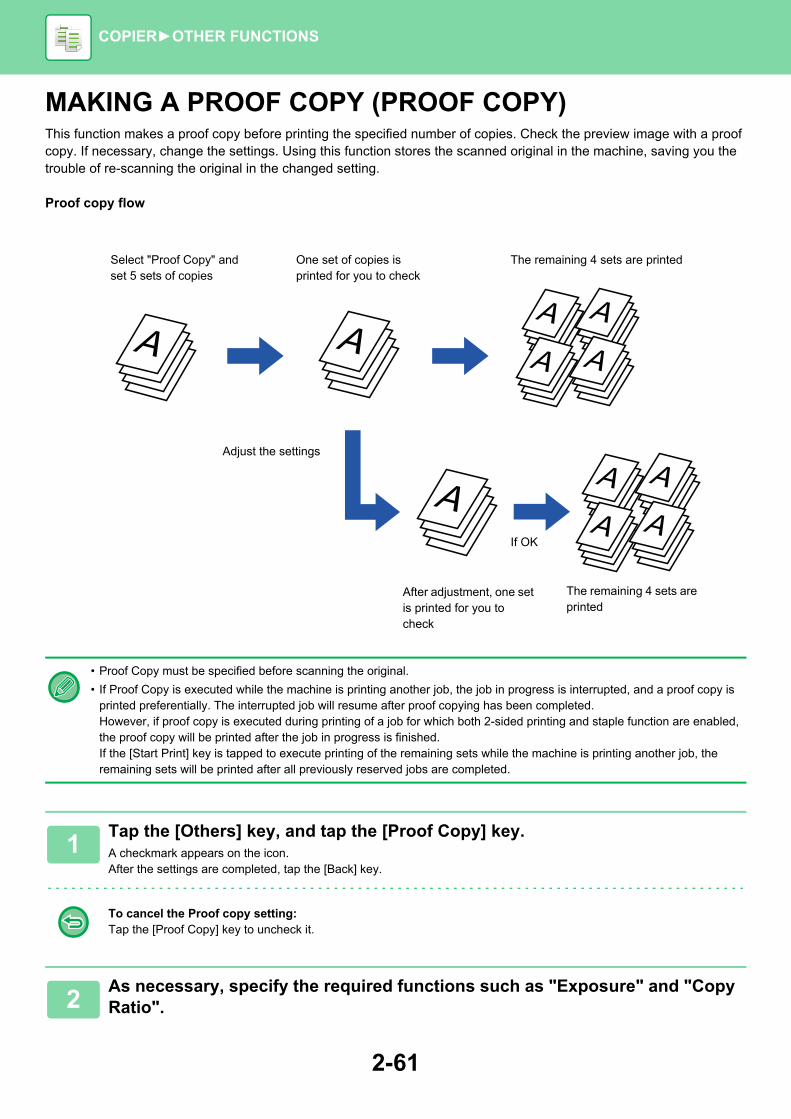
2-61
COPIER►OTHER FUNCTIONS
MAKING A PROOF COPY (PROOF COPY)This function makes a proof copy before printing the specified number of copies. Check the preview image with a proof copy. If necessary, change the settings. Using this function stores the scanned original in the machine, saving you the trouble of re-scanning the original in the changed setting.
Proof copy flow
• Proof Copy must be specified before scanning the original.
• If Proof Copy is executed while the machine is printing another job, the job in progress is interrupted, and a proof copy is printed preferentially. The interrupted job will resume after proof copying has been completed.However, if proof copy is executed during printing of a job for which both 2-sided printing and staple function are enabled, the proof copy will be printed after the job in progress is finished.If the [Start Print] key is tapped to execute printing of the remaining sets while the machine is printing another job, the remaining sets will be printed after all previously reserved jobs are completed.
1Tap the [Others] key, and tap the [Proof Copy] key.A checkmark appears on the icon.After the settings are completed, tap the [Back] key.
To cancel the Proof copy setting:Tap the [Proof Copy] key to uncheck it.
2As necessary, specify the required functions such as "Exposure" and "Copy Ratio".
AAAA
AAAA
AAAAAAAA AAAA
AAAA AAAA
AAAA AAAA
AAAA AAAA
One set of copies is printed for you to check
Select "Proof Copy" and set 5 sets of copies
The remaining 4 sets are printed
Adjust the settings
The remaining 4 sets are printed
After adjustment, one set is printed for you to check
If OK

2-62
COPIER►OTHER FUNCTIONS
3Place the original.Place the original in the document feeder tray of the automatic document feeder, or on the document glass.► AUTOMATIC DOCUMENT FEEDER (page 1-77)► DOCUMENT GLASS (page 1-79)
To cancel all settings:Tap the [CA] key.
4Set the number of copies (number of sets) using the numeric keys.
Up to 9999 copies (sets) can be set.
If an incorrect number of copies is setTap the [C] key, and enter the correct number.
5Tap the [Start] key.Make only one set of copies.
8½x11
8½x11
8½x11
8½x11
8½x11
8½x11

2-63
COPIER►OTHER FUNCTIONS
CHECKING THE NUMBER OF SCANNED ORIGINAL SHEETS (ORIGINAL COUNT)This function counts the number of scanned original sheets, and displays the result before making a copy.By allowing you to check the number of original sheets that were scanned, this helps reduce the occurrence of copy mistakes.
6Check the copy result. If no problem is found, tap the [Start Print] key.As necessary, change the settings and repeat proof copying until you are satisfied with the copy result.
You can also change the number of copies. To change the number of copies, use the numeric keys.
• In Proof Copy, unavailable function keys are not displayed.
• Some available functions may be restricted.
• To cancel all settings:Tap the [CA] key.
7 Tap the [Start] key.
• The count result is displayed with the number of scanned original sheets, not the number of scanned original pages. For example, when 2-sided copying is performed using one original, the number "1" will appear to indicate that one original sheet was scanned, not "2" to indicate the front-side page and the reverse side page.
• Original Count must be specified before scanning the original.
1Tap the [Others] key, and tap the [Original Count] key.A checkmark appears on the icon.After the settings are completed, tap the [Back] key.
To cancel the Original Count setting:Tap the [Original Count] key to uncheck it.
2Place the original in the document feeder tray of the automatic document feeder.► AUTOMATIC DOCUMENT FEEDER (page 1-77)
Register Current SettingsProgram Registration
Adjust Print Position
Press [Start Print] to continue.To make a proof copy again,press [Proof Copy].
8½x11
8½x11
8½x11
8½x11
8½x11
8½x11

2-64
COPIER►OTHER FUNCTIONS
DISPLAYING ECO RECOMMENDATION SETTINGS (ECO RECOMMENDATION FUNCTION DISPLAY)When the base screen of normal mode is displayed, eco recommendation settings appear.
The displayed functions are as follows.• 2-Sided Copy ►page 2-16• N-Up ►page 2-41
• Image Orientation ►page 2-29
3 Tap the [Start] key.
4Check the number of original sheets.The number that is displayed is the number of scanned original sheets, not the number of scanned original pages. For example, when 2-sided copying is performed using one original, the number "1" will appear to indicate that one original sheet was scanned, not "2" to indicate the front-side page and the reverse side page.
If the displayed number of original sheets is different from the actual number of sheetsTap the [Cancel] key to stop the job.
5 Tap the [OK] key to start copying.
If this function is combined with [Job Build], the count result is displayed after the [Read-End] key has been tapped.
This function does not operate in easy mode.
To use the eco recommendation function display:"Settings (administrator)" → [System Settings] → [Energy Save] → [Eco Setting] → [Eco Recommendation Function Display].
Start
Program Registration
Call Eco Program
8½x11
Register Current Settings
8½x11
8½x11
8½x11
8½x11
Cancel OK
1 pages of originalhave been scanned.Copy the scanned data?

2-65
COPIER►OTHER FUNCTIONS
SECURITY REINFORCEMENT FUNCTIONS
PADDING UNAUTHORIZED COPY PREVENTION DATA (HIDDEN PATTERN PRINT)Characters to prevent unauthorized copying such as pre-set or customized text are placed as invisible characters in a background pattern.When an output sheet with a pattern print is copied, the hidden characters will appear.
• "Hidden Pattern Print" is a function provided for the purpose of deterring unauthorized copying. It does not guarantee the prevention of information leakage.
• Text may not be completely hidden on an output sheet with a hidden pattern print under certain machine conditions. In such a case, adjust the contrast by selecting the [Hidden Pattern Print Setting] from the "Settings (administrator)".
• When copying an output sheet with a hidden pattern print, the hidden pattern may not emerge depending on settings other than "Hidden Pattern Print".
• The hidden pattern may not emerge on copies with certain types of devices or under certain setting conditions used to copy an output sheet with a hidden pattern print.
To set a Hidden Pattern Print:In "Settings (administrator)", select [System Settings] → [Security Settings] → [Hidden Pattern Print Setting].
1Place the original.Place the original in the document feeder tray of the automatic document feeder, or on the document glass.► AUTOMATIC DOCUMENT FEEDER (page 1-77)► DOCUMENT GLASS (page 1-79)
2Tap the [Others] key, and tap the [Hidden Pattern Print] key.
ABCD
ABCD
DO’NOT COPY
DO’NOT COPYABCD

2-66
COPIER►OTHER FUNCTIONS
3Tap the [On] key, and specify each item in the [Default Settings] tab as required.
We recommend you to select the [Positive] option for the "Method".
4Specify each item in the [Print Contents Setting] tab as required.To specify print settings, you can select the required one from pre-set text or use the soft keyboard. You can also print serial number and account job ID.After the settings are completed, tap and [Back] keys in sequence.
• To cancel the Hidden Pattern Print setting:Tap the [Off] key.
• Tapping the [Function Rev.] key displays the settings of the [Print Contents Setting] tab.
• The hidden pattern print preview may slightly differ from the actual pattern and exposure as the preview is used for simple pattern color checking.
• To cancel all settings:Tap the [CA] key.
5Tap the [Start] key to start copying.
8½x11
8½x11
Hidden Pattern Print
Off
On
Function Rev.
Default Settings Print Contents Setting
Standard
0°
48point
Standard
Pattern 1
Exposure
Font Size
Angle
Font Style
Camouflage Pattern
PositiveMethod
8½x11
8½x11
Hidden Pattern Print
Preview
Off
On
Function Rev.
Default Settings Print Contents Setting
Pre-Set Word DO NOT COPY
Not
Input
Pre-Set Text
Direct Entry
Serial Number
Account Job ID
Login Name/User Number

2-67
COPIER►OTHER FUNCTIONS
FORCIBLY PRINTING TRACEABLE INFORMATION (TRACKING INFORMATION PRINT)This function forcibly prints the pre-specified traceable information to prevent an unauthorized copy.
• If this function is specified together with another image compositing function, trace information is printed at the top.
• Trace information is printed at the top or bottom outside an image frame.
• The information added at printing or the preview image of the account job ID and date/time are displayed as shown below.Account job ID: 00000Date/time: MM/DD/YYYY hh:mm
To configure print settings:In "Settings (administrator)", select [System Settings] → [Security Settings] → [Tracking Information Print] → [Tracking Information Print Setting].
Originals
Trace information area

2-68
COPIER►OTHER FUNCTIONS
OUTPUT POSITION AND MARGIN ADJUSTMENT FUNCTIONS
ADDING MARGINS (MARGIN SHIFT)This function shifts the copy image right, left or down to adjust the margin.This is convenient when you wish to bind the copies with a string or in a binder.Shifting the image to the right so the copies can be bound at the left edge
Margin Shift
1 1
Not using the Margin Shift
Using the Margin Shift
The punch holes cut off part of the image
The image is moved to allow space for the holes so the image is not cut off.
1 1
To change the default margin shift setting:In "Settings (administrator)", select [System Settings] → [Copy Settings] → [Condition Settings] → [Initial Margin Shift Setting].
1Place the original.Place the original in the document feeder tray of the automatic document feeder, or on the document glass.► AUTOMATIC DOCUMENT FEEDER (page 1-77)► DOCUMENT GLASS (page 1-79)
2Tap the [Others] key, and tap the [Margin Shift] key.
Right
Down
Left

2-69
COPIER►OTHER FUNCTIONS
3Tap the image shift direction.
4Sets a margin shift width.Tap the numeric value display indicating the margin shift area on the front side or reverse side, and enter the area using the numeric keys.After the settings are completed, tap and [Back] keys in sequence.
If you set the [Adjust 2nd pg value to 1st.] checkbox to , goes out and you can set sides 1 and 2 separately.
• To cancel the margin shift setting:Tap the [Off] key.
• To cancel all settings:Tap the [CA] key.
5Tap the [Start] key to start copying.
8½x11
8½x11

2-70
COPIER►OTHER FUNCTIONS
ERASING PERIPHERAL SHADOWS FOR COPYING (ERASE)The erase function is used to erase shadows around the edges of copies that occur when copying thick originals or books.When a thick book is copied
Erase modes
Shadows appear here
Not using the Erase Using the Erase
Shadows appear on the copy
Shadows do not appear on the copy
• If a ratio setting is used in combination with an erase setting, the erase width will change according to the selected ratio. If the erase width setting is 1" (20 mm) and the image is reduced to 50%, the erase width will be 1/2" (10 mm).
• This function erases the parts of the image where shadows tend to form, but does not detect shadows and erase only the shadows.
• When Erase is selected, the orientation of the original is automatically set to portrait.
To change the default erase width setting:In "Settings (administrator)", select [System Settings] → [Copy Settings] → [Condition Settings] → [Erase Width Adjustment].The factory default setting is 1/2" (10 mm). The changed setting is also applied to the Setting mode selection of [System Settings] → [Image Send Settings] → [Common Settings] → [Condition Settings] → [Erase Width Adjustment].
1Place the original.Place the original in the document feeder tray of the automatic document feeder, or on the document glass.► AUTOMATIC DOCUMENT FEEDER (page 1-77)► DOCUMENT GLASS (page 1-79)
2Tap the [Others] key, and tap the [Erase] key.
Outer Frame Erase Center Erase Edge + Center Erase Side Erase

2-71
COPIER►OTHER FUNCTIONS
3Tap the checkbox of the edge that you wish to erase, and specify the erase position.Check that he tapped checkbox is set to .If the [Outer Frame] key is tapped, the [Up], [Down], [Left], and [Right] checkboxes are set to .If the [Specify Frame+Center] key is tapped, all the checkboxes are set to .
Specify the erase edge on the reverse side when erasing edges of one to three sides of Up, Down, Left, and Right on the front side to scan a 2-sided original.
• If the [Reverse erase position of back face] checkbox is set to , the edge in the position opposite to the erased edge on the front side will be erased.
• If the [Reverse erase position of back face] checkbox is set to , the edge in the same position as on the front side will be erased.
4Specify the erase width.Tap the numeric value display indicating the margin shift area on the front side or reverse side, and enter the area using the numeric keys.After the settings are completed, tap and [Back] keys in sequence.
To quickly set the area, first specify a value close to the desired value by the numeric keys, then adjust it with .
• To cancel the erase setting:Tap the [Clear] key.
• To cancel all settings:Tap the [CA] key.
5Tap the [Start] key to start copying.
8½x11
8½x11
Erase
Up
Down
RightLeftReverse erase position ofback face
Outer Frame
Specify Frame+Center
Clear

2-72
COPIER►OTHER FUNCTIONS
COPYING IN THE CENTER OF THE PAPER (CENTERING)This function centers the copied image on the paper.This lets you place the image in the center of the paper when the original size is smaller than the paper size or when the image is reduced.
Not using the centering function Using the centering function
Centering must be specified before scanning the original.
• When the original size or the paper size is displayed as a special size, this function cannot be used.
• This function cannot be used in combination with an enlargement setting. If enlargement of 101% or more is selected, the enlargement is automatically returned to 100%.
1Tap the [Others] key, and tap the [Centering] key.A checkmark appears on the icon.After the settings are completed, tap the [Back] key.
• To cancel the centering setting:Tap the [Centering] key to clear the checkmark.
• To cancel all settings:Tap the [CA] key.
2Tap the [Start] key to start copying.
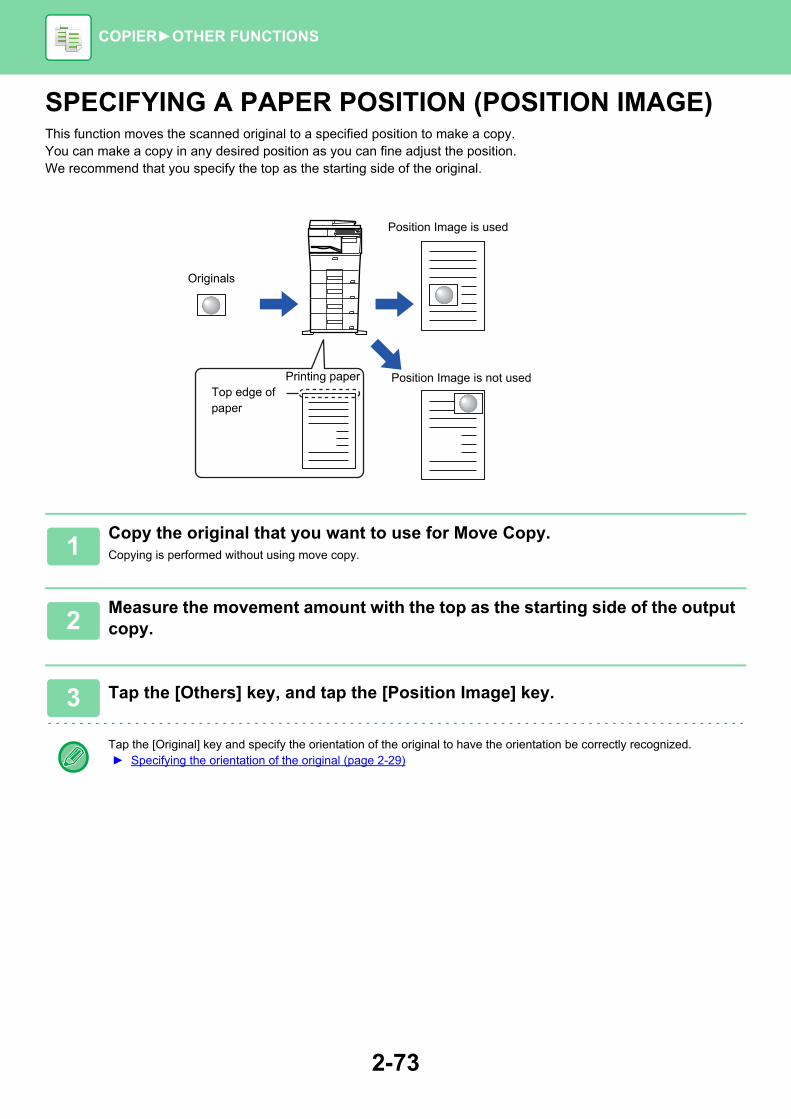
2-73
COPIER►OTHER FUNCTIONS
SPECIFYING A PAPER POSITION (POSITION IMAGE)This function moves the scanned original to a specified position to make a copy.You can make a copy in any desired position as you can fine adjust the position.We recommend that you specify the top as the starting side of the original.
1Copy the original that you want to use for Move Copy.Copying is performed without using move copy.
2Measure the movement amount with the top as the starting side of the output copy.
3 Tap the [Others] key, and tap the [Position Image] key.
Tap the [Original] key and specify the orientation of the original to have the orientation be correctly recognized.► Specifying the orientation of the original (page 2-29)
Originals
Printing paper
Position Image is used
Position Image is not usedTop edge of paper

2-74
COPIER►OTHER FUNCTIONS
4Sets a movement distance.Tap the area indicating the movement distance on the front or reverse side, and enter the distance using numeric keys.After the settings are completed, tap and [Back] keys in sequence.
• To quickly set the area, first specify a value close to the desired value by the numeric keys, then adjust it with .
• If you set the [Adjust 2nd pg value to 1st.] checkbox to , goes out and you can set sides 1 and 2 separately.
• If you want to copy in the horizontal orientation, specify "Left" as the starting side of the original.Even if you copied in the horizontal orientation, setting the starting side of the original to the top enables measurement of the movement distance in the same way as in the vertical orientation.
To cancel the Position Image setting:Tap the [Clear] key.
5Place the original.Place the original in the document feeder tray of the automatic document feeder, or on the document glass.► AUTOMATIC DOCUMENT FEEDER (page 1-77)► DOCUMENT GLASS (page 1-79)
To cancel all settings:Tap the [CA] key.
6Tap the [Start] key to start copying.
Others
Position ImagePlease designate print start position.
Preview
StartBack
Change Size/Direction.Original
2-Sided Copy
Clear
Side2Side1
Adjust 2nd pg value to 1st.
0 0
00 Y
( -17~17 )inch
( -17~17 )inch
( -11~11 )inch
( -11~11 )inch
Erase Shadow AroundErase
X
Y
CA
8½x11
8½x11

2-75
COPIER►OTHER FUNCTIONS
SCANNING FUNCTIONS
COLLECTIVELY SCANNING A LARGE NUMBER OF ORIGINALS (JOB BUILD)This function divides the originals into sets and feeds each set through the automatic document feeder one set at a time when copying a very large number of originals. This saves you the trouble of sorting the copies.When scanning originals that are separated into sets, scan the set that has the first page first.The individual copy settings can be configured for each set of originals to be scanned separately.Up to 100 sets of originals can be scanned for one job.
Copying in job build mode
• You must select Job Build mode before scanning the original.
• If you needed to change all original settings, change before scanning the original.
• If the Quick File Folder of document filing mode is full, copying in job build mode will be impeded. Delete unnecessary files from the Quick File Folder.
The Job Build mode cannot be combined with other functions.
• Card shot
• Repeat Layout
1Tap the [Others] key, and tap the [Job Build] key.A checkmark appears on the icon.After the settings are completed, tap the [Back] key.
To cancel the job build settingTap the [Job Build] key to uncheck it.
1
1
1
101
1
Originals Scan the originals in several sets.

2-76
COPIER►OTHER FUNCTIONS
2Change settings as needed.
3Place the original in the document feeder tray of the automatic document feeder, and tap the [Start] key to scan the first original.Insert the originals all the way into the document feeder tray. Originals can be stacked up to the indicator line.► AUTOMATIC DOCUMENT FEEDER (page 1-77)
4Place the next set of originals and tap the [Start] key.Repeat this step until all originals have been scanned.
• To change copy settings for each set of originals, tap the [Change Setting] key. For more information, see "Changing the copy settings for each set of originals (page 2-77).
• If you tap the [Preview] key, you cannot scan additional pages.
5Repeat until all pages have been scanned and check the preview image in the preview screen.
To cancel all settings:Tap the [CA] key.
6Tap the [Read-End] key to start copying.
Indicator line
Auto
Auto
A4
Auto
100%
8½x11
8½x11
8½x11
8½x11
8½x11
Auto
A4
100%
A4
Change Setting
Place next original.Press [Start] to scan original.
[Change Setting]:Change setting of next original.[Preview]:Finish scan and display preview.
Preview Read-End

2-77
COPIER►OTHER FUNCTIONS
Changing the copy settings for each set of originalsAs necessary, change copy settings for each set of originals.Perform the steps below before scanning the next set of originals in step 4 of "Copying in job build mode (page 2-75)".
A [Separator Page] setting cannot be changed for the second and later sets.
1Tap the [Change Setting] key.
2Change copy settings.
3Place the next set of originals and tap the [Start] key.Repeat this step until all originals have been scanned.

2-78
COPIER►OTHER FUNCTIONS
SCANNING ORIGINALS OF DIFFERENT SIZES(MIXED SIZE ORIGINAL)This feature copies originals in different sizes at the same time even when 5-1/2" x 8-1/2" (A5) size originals are mixed with 8-1/2" x 11" (A4) size originals.When mixed size original is combined with auto ratio selection, the ratio is adjusted individually for each original according to the selected paper size, enabling printing on a uniform paper size.
When mixed size original is combined with auto ratio selection (Auto ratio selection and 8-1/2" x 11" (A4) are selected)
Mixed Size Original must be specified before scanning the original.
To set the machine to always scan mixed originals
• In "Settings (administrator)", select [System Settings] → [Common Settings] → [Device Control] → [Original Feeding Mode].
• Output, N-Up, and other functions will have the same settings as the first page.
Originals Copy
8-1/2" x 11" (A4)
5-1/2" x 8-1/2" (A5)
8-1/2" x 11" (A4)
5-1/2" x 8-1/2" (A5)
Originals Copy
8-1/2" x 11" (A4)
5-1/2" x 8-1/2" (A5)
An 5-1/2" x 8-1/2" (A5) size original is enlarged to 8-1/2" x 11" (A4) size for printing.
8-1/2" x 11" (A4)
8-1/2" x 11" (A4)

2-79
COPIER►OTHER FUNCTIONS
1Tap the [Others] key, and tap the [Mixed Size Original] key.A checkmark appears on the icon.
After the settings are completed, tap the [Back] key.
To cancel slow scan mode:Tap the [Slow Scan Mode] key to clear the checkmark.
2Place the original face up on the document glass.Orient the originals so that the widths match.
3Tap the [Start] key to start copying.
A4 A5
8-1/2" x 11"(A4)
Place the originals in alignment with the guides.
5-1/2" x 8-1/2" (A5)

2-80
COPIER►OTHER FUNCTIONS
SCANNING THIN ORIGINALS (SLOW SCAN MODE)(MX-B455W only)When you wish to scan thin originals using the automatic document feeder, you can use this function, which helps prevent thin originals from misfeeding.
Slow Scan Mode must be specified before scanning the original.
The "2-Sided→2-Sided" and "2-Sided→1-Sided" modes of automatic 2-sided copying cannot be used.
To always scan the original in the slow scan mode:In "Settings (administrator)", select [System Settings] → [Common Settings] → [Device Control] → [Original Feeding Mode].
1Tap the [Others] key, and tap the [Slow Scan Mode] key.A checkmark appears on the icon.After the settings are completed, tap the [Back] key.
To cancel slow scan mode:Tap the [Slow Scan Mode] key to clear the checkmark.
2Place the original in the document feeder tray of the automatic document feeder.► AUTOMATIC DOCUMENT FEEDER (page 1-77)
If the originals are inserted with too much force, they may crumple and misfeed.
3Tap the [Start] key to start copying.
DCBA
DCB
A

2-81
COPIER►OTHER FUNCTIONS
ADJUSTING RESOLUTION WHEN SCANNING (RESOLUTION)This function adjusts the resolution when scanning the original, enabling the high-quality output or speed-priority output according to the application.
• Resolution must be specified before scanning the original.
• The resolution setting is applied when making a full-size copy.
1Tap the [Others] key, and tap the [Scan Resolution] key.
2Select the resolution.The resolution can be set to both the document feeder and document glass.After the settings are completed, tap and [Back] keys in sequence.
3Place the original.Place the original in the document feeder tray of the automatic document feeder, or on the document glass.► AUTOMATIC DOCUMENT FEEDER (page 1-77)► DOCUMENT GLASS (page 1-79)
4Tap the [Start] key to start copying.
8½x11
8½x11
Others
Preview
StartBack
Change Size/Direction.Original
ExposureSelect Type/Exposure
Toner SaveReduce Toner Consumption
Background Adjustment
Erase Shadow AroundErase
CA

2-82
COPIER►OTHER FUNCTIONS
TEXT AND IMAGE ADDITION FUNCTIONS
PRINTING DATES, PAGE NUMBERS, AND WATERMARKS (STAMP)This function prints information such as the "Date" or "Stamp", which is not shown on the original, on copies. You can print the following six types of information.• Date• Page No.• Stamp• Copies• Text• Watermark
For the stamp or watermark, you can print text such as "CONFIDENTIAL" or "PRIORITY". You can print pre-set text or any characters as the text.Each of the items above can be printed on the header or footer of each sheet.
When [Stamp] is combined with other functions:
• If the selected stamp content of one position overlaps the stamp content of another position, priority will be given in the following order: watermark, right side, left side, center. Content that is hidden due to overlapping will not be printed.
• Text will be printed at the preset size regardless of the copy ratio or paper size setting.
• Text will be printed at the preset exposure regardless of the exposure setting.
• Depending on the size of the paper, some printed content may be cut off or shifted out of position.
Combined function name Print operation
Margin Shift Together with the image, the stamp content is shifted the amount of the margin width.
Centering Unlike a copy image that moves, the image will be printed in the position set in the stamp.
Card Shot Stamp items are printed for each copy sheet.
N-Up Stamp items are printed for each original page.
Booklet Stamp items are printed for each page when compiling.
Covers/InsertsUse the stamp settings to select whether or not the item is printed on inserted covers and inserts.
Confidential
Specification2015.12
5/45
DRAFT

2-83
COPIER►OTHER FUNCTIONS
1Place the original.Place the original in the document feeder tray of the automatic document feeder, or on the document glass.► AUTOMATIC DOCUMENT FEEDER (page 1-77)► DOCUMENT GLASS (page 1-79)
2Tap the [Others] key, and tap the [Stamp] key.
3Tap a tab to be printed, and tap the format.The format of the [Text] tab can be entered using pre-set text or soft keyboard.► Setting using the [Text] tab (page 2-84)
When you tap the tab, the display tab is switched.
4Tap a key of the desired print position.Tap any of [1] to [6] keys.
• Tapping the [Detail] key allows you to configure setting for each setting position.
• Tapping the [Layout] key allows you to check the printing position or detailed settings.
• To cancel the text settings:Tap the [Cancel All] key.
• To cancel all settings:Tap the [CA] key.
5Tap the [Start] key to start copying.
8½x11
8½x11
Others
Stamp
Preview
StartBack
Change Size/Direction.Original
Combine Registered ImagesCustom Image
Prevent Unauthorized CopyPattern Print
2-Sided Copy
Put Multiple Pages in A PageN-Up
Date Page No. Stamp
Detail Layout
Off
YYYY/MM/DD
MM/DD/YYYY
DD/MM/YYYY
MM DD, YYYY
1
4 5 6
32
Cancel All
CA

2-84
COPIER►OTHER FUNCTIONS
Setting using the [Text] tabTap the [Direct Entry] key in the [Text] tab to display the soft keyboard.Use the soft keyboard to enter any characters.
Selecting the format from pre-set textTapping the [Pre-Set Text] key allows you to select the required one of the registered formats for printing.Tapping the [Store/Delete] key allows you to edit, delete, or store pre-set text.
8½x118½x11
Stamp
Copies Text Watermark
Detail Layout
Off
Pre-Set Text
Direct Entry
1
4 5 6
32
Cancel All
8½x11
8½x11

2-85
COPIER►OTHER FUNCTIONS
ADDING A REGISTERED IMAGE TO AN ORIGINAL (CUSTOM IMAGE)This function adds an image registered in the machine to an original to make a copy.Following are two types of custom images.• Custom stamp (Stamp image)
• Custom watermark (Stamp image with gray-scale watermark)
The combination with other functions is described in the table below.
Combined function Custom image operations
Margin Shift Shifts in the same way as for an original image.
Erase Makes a stamp copy as normal.
Booklet Makes a stamp copy as normal.
Job Build Makes a stamp copy as normal.
Covers/Inserts Based on the custom image setting.
Separator Page Printing does not take place on separator pages.
Transparency Inserts Makes a stamp copy as normal.
N-Up Makes a stamp copy by sheet.
Card Shot Makes a stamp copy by sheet.
Business Card Copy Makes Business Card Copy by sheet.
Mirror Image Makes a stamp copy as normal without mirror image reverse.
B/W Reverse
Prints an image as normal without B/W reverse. However, the following condition is set when printed on a dark background.Custom stamp: Printed in whiteCustom watermark: Printed without being whitened
Centering Makes a stamp copy as normal without centering.
Stamp Makes a stamp copy on the Stamp menu.
Hidden Pattern Print Makes a stamp copy under a pattern print.
MEMO
MEMO
Confidential

2-86
COPIER►OTHER FUNCTIONS
Tracking Information Print Makes a stamp copy under a tracking information print.
Repeat Layout Cannot be combined.
Position Image Prints an image at the original position regardless of the Position Image setting.
• An image must be registered in advance from the printer driver to the machine.► REGISTERING A CUSTOM IMAGE (page 3-48)
• A custom stamp image is copied by sheet, not by original. If N-Up is enabled, user stamps are copied for each set of pages.
• A custom stamp image is copied with the registered size. The size remains unchanged even when the copy ratio is enlarged or reduced.
• A different custom image cannot be specified for each page.
• If an image runs off of the specified paper depending on the registered size or position, the excess will not be copied.
1Place the original.Place the original in the document feeder tray of the automatic document feeder, or on the document glass.► AUTOMATIC DOCUMENT FEEDER (page 1-77)► DOCUMENT GLASS (page 1-79)
2Tap the [Others] key, and tap the [Custom Image] key.
3Tap the [Custom Stamp] or [Custom Watermark] key.
4Tap the [Image] key to select an image.Select the required thumbnail image(s) from the available selection.
5Set [Print Page] or [Print Position].After the settings are completed, tap and [Back] keys in sequence.
• To cancel the custom image setting:Tap the [Off] key.
• To cancel all settings:Tap the [CA] key.
Combined function Custom image operations
8½x11
8½x11
Custom Image
Select Image to Operate.
Off Image
Print Page
Print Position
Angle
CustomStamp
CustomWatermark
Print on cover/insert when
0°
First Page
Not
X: 0 mmY: 0 mm
(3)
(4)
(5)

2-87
COPIER►OTHER FUNCTIONS
For settings related to custom stamp and custom water mark, see the following table.For custom stamp
For custom watermark
6Tap the [Start] key to start copying.
Print Page Specify a page(s) for stamp copy. First Page or All Pages
Print Position Specify a position for stamp copy.
Print Angle Specify the corner of the image. 0 degrees, -90 degrees, 90 degrees, or 180 degrees
Print PatternSpecify the image watermark print pattern.Transparent: Makes an original image transparent for stamp copy.Overlap: Hides a watermark added to an original image for stamp copy.
Exposure Select the exposure of a watermark from nine levels.
Print PageSpecify a page(s) for stamp copy.First Page or All Pages
Print Position Specify a position for stamp copy.
Print Angle Specify the corner of the image. 0 degrees, -90 degrees, 90 degrees, or 180 degrees

2-88
COPIER►OTHER FUNCTIONS
INSERTING COVERS IN COPIES (COVERS/INSERTS)This function inserts a different type of paper into the pages corresponding to the front and back covers of a copy job.It is helpful when you want to change cover paper to make resources look better.Configure insertion sheet settings if needed.
Copying on a front cover and inserting together with a back cover
Cover inserting examplesThe following shows the copy results when front and back covers are inserted into six 1-sided original pages or three 2-sided original pages in the four copy modes below.1-sided copying of 1-sided originals
• To insert insertion sheets, see "INSERTING INSERTION SHEETS IN COPIES (COVERS/INSERTS) (page 2-96)".
• For N-Up, the layout is based on the first page and excludes covers.
Setting conditions for each coverResulting copies
Front Cover Back Cover
Not copied Not copied
Inserts cover sheets at the beginning and end of copies.
1-sided copy Not copied
Makes a 1-sided copy on the first original page for front cover, and inserts a back cover at the end of copies.
2-sided copy Not copied
Makes a 2-sided copy on the first and second original pages for front cover, and inserts a back cover at the end of copies.
5
4
2 3 4 51
3
2
1
Front cover paper Back cover paper Copy
Back Cover
Front Cover
21 3 64 5
1 2 3 64 5
1 2 3 64 5

2-89
COPIER►OTHER FUNCTIONS
2-sided copying of 1-sided originals
Not copied 1-sided copy
Inserts a front cover at the beginning of copies, and makes a 1-sided copy on the sixth original page for back cover.
Not copied 2-sided copy
Inserts a front cover at the beginning of copies, and makes a 2-sided copy on the fifth and sixth original pages for back cover.
1-sided copy 1-sided copy
Makes a 1-sided copy on the first original page for front cover, and also makes a 1-sided copy on the sixth original page for back cover.
1-sided copy 2-sided copy
Makes a 1-sided copy on the first original page for front cover, and also makes a 2-sided copy on the fifth and sixth original pages for back cover.
2-sided copy 1-sided copy
Makes a 2-sided copy on the first and second original pages for front cover, and also makes a 1-sided copy on the sixth original page for back cover.
2-sided copy 2-sided copy
Makes a 2-sided copy on the first and second original pages for front cover, and also makes a 2-sided copy on the fifth and sixth original pages for back cover.
Setting conditions for each coverResulting copies
Front Cover Back Cover
Not copied Not copied
Inserts cover sheets at the beginning and end of copies.
Setting conditions for each coverResulting copies
Front Cover Back Cover
621 3 4 5
6521 3 4
1 2 3 4 5 6
1 2 3 4 65
61 2 3 4 5
1 2 653 4
3 41 2 5 6

2-90
COPIER►OTHER FUNCTIONS
1-sided copy Not copied
Makes a 1-sided copy on the first original page for front cover, and also makes a 1-sided copy on the sixth original page. Inserts cover sheets at the end of copies.
2-sided copy Not copied
Makes a 2-sided copy on the first and second original pages for front cover, and inserts a back cover at the end of copies.
Not copied 1-sided copy
Inserts a front cover at the beginning of copies, and makes a 1-sided copy on the sixth original page for back cover. A 1-sided copy is made on the fifth original page.
Not copied 2-sided copy
Inserts a front cover at the beginning of copies, and makes a 2-sided copy on the fifth and sixth original pages for back cover.
1-sided copy 1-sided copy
Makes a 1-sided copy on the first original page for front cover, and also makes a 1-sided copy on the sixth original page for back cover.
1-sided copy 2-sided copy
Makes a 1-sided copy on the first original page for front cover, and also makes a 2-sided copy on the fifth and sixth original pages for back cover.
2-sided copy 1-sided copy
Makes a 2-sided copy on the first and second original pages for front cover, and also makes a 1-sided copy on the sixth original page for back cover. A 1-sided copy is made on the fifth original page.
Setting conditions for each coverResulting copies
Front Cover Back Cover
5 62 31 6
3 4 5 61 2
3 41 2 5 6
653 41 2
5 62 31 6
2 31 654
3 41 2 5 6

2-91
COPIER►OTHER FUNCTIONS
1-sided copying of 2-sided originals
2-sided copy 2-sided copy
Makes a 2-sided copy on the first and second original pages for front cover, and also makes a 2-sided copy on the fifth and sixth original pages for back cover.
Setting conditions for each coverResulting copies
Front Cover Back Cover
Not copied Not copied
Inserts cover sheets at the beginning and end of copies.
1-sided copy Not copied
Makes a 1-sided copy on the first original page for front cover, and inserts a back cover at the end of copies.
2-sided copy Not copied
Makes a 2-sided copy on the first and second original pages for front cover, and inserts a back cover at the end of copies.
Not copied 1-sided copy
Inserts a front cover at the beginning of copies, and makes a 1-sided copy on the sixth original page for back cover.
Not copied 2-sided copy
Inserts a front cover at the beginning of copies, and makes a 2-sided copy on the fifth and sixth original pages for back cover.
1-sided copy 1-sided copy
Makes a 1-sided copy on the first original page for front cover, and also makes a 1-sided copy on the sixth original page for back cover.
Setting conditions for each coverResulting copies
Front Cover Back Cover
3 41 2 65
21 3 4 5 6
2 3 45 61
3 4 5 61 2
21 3 4 5 6
21 3 4 65
2 3 4 51 6

2-92
COPIER►OTHER FUNCTIONS
1-sided copy 2-sided copy
Makes a 1-sided copy on the first original page for front cover, and also makes a 2-sided copy on the sixth original page for back cover.
2-sided copy 1-sided copy
Makes a 2-sided copy on the first and second original pages for front cover, and also makes a 1-sided copy on the sixth original page for back cover.
2-sided copy 2-sided copy
Makes a 2-sided copy on the first and second original pages for front cover, and also makes a 2-sided copy on the fifth and sixth original pages for back cover.
Setting conditions for each coverResulting copies
Front Cover Back Cover
2 3 41 65
3 4 51 2 6
3 41 2 65

2-93
COPIER►OTHER FUNCTIONS
2-sided copying of 2-sided originals
Setting conditions for each coverResulting copies
Front Cover Back Cover
Not copied Not copied
Inserts cover sheets at the beginning and end of copies.
1-sided copy Not copied
Makes a 1-sided copy on the first original page for front cover, and inserts a back cover at the end of copies.* The second original page is not copied.
2-sided copy Not copied
Makes a 2-sided copy on the first and second original pages for front cover, and inserts a back cover at the end of copies.
Not copied 1-sided copy
Inserts a front cover at the beginning of copies, and makes a 1-sided copy on the sixth original page for back cover.* The fifth original page is not copied.
Not copied 2-sided copy
Inserts a front cover at the beginning of copies, and makes a 2-sided copy on the fifth and sixth original pages for back cover.
1-sided copy 1-sided copy
Makes a 1-sided copy on the first original page for front cover, and also makes a 1-sided copy on the sixth original page for back cover. The second and the fifth original pages are not copied.
1-sided copy 2-sided copy
Makes a 1-sided copy on the first original page for front cover, and also makes a 2-sided copy on the fifth and sixth original pages for back cover.* The second original page is not copied.
3 41 2 5 6
3 41 5 6
3 41 2 5 6
3 41 2 6
3 41 2 65
3 41 6
3 41 65

2-94
COPIER►OTHER FUNCTIONS
2-sided copy 1-sided copy
Makes a 2-sided copy on the first and second original pages for front cover, and also makes a 1-sided copy on the sixth original page for back cover.* The fifth original page is not copied.
2-sided copy 2-sided copy
Makes a 2-sided copy on the first and second original pages for front cover, and also makes a 2-sided copy on the fifth and sixth original pages for back cover.
• Before using the covers/inserts function, load insertion sheets in the tray.
• When selecting the covers/inserts function, place the originals in the document feeder tray, select 1-sided or 2-sided copying, and select the number of copies and any other desired copy settings. When these settings have been completed, perform the procedure to select covers/inserts.
• One sheet can be inserted for each of front and back covers.
• When performing 2-sided copying of 2-sided originals, an insertion sheet cannot be inserted between the front and reverse sides of an original.
• This setting is not available when the "Covers/Inserts" is disabled in "Settings".
1Place the original in the document feeder tray of the automatic document feeder.► AUTOMATIC DOCUMENT FEEDER (page 1-77)
2Tap the [Others] key, and then tap the [Covers/Inserts] key.
3Tap the [Front Cover] key, and then tap the [On] key.When inserting a back cover, tap the [Back Cover] tab, and then tap the [On] key.
Setting conditions for each coverResulting copies
Front Cover Back Cover
3 4 61 2
3 41 2 65
8½x11
8½x11
Insertion SheetBack CoverFront Cover
Page LayoutPaper TraySettings
Cancel All
On
Off
Change
Bypass
Plain 1Make No Copy
Covers/Inserts

2-95
COPIER►OTHER FUNCTIONS
4Tap the [Change] key.
5Configure copy setting of a front cover sheet.When only inserting a cover, tap the [Make No Copy] key.If you selected the [2-Sided Copy] key, tap the [Book] or [Tablet] key for the front cover binding.After the settings are completed, tap and [Back] keys in sequence.
To change the cover input tray:Tap the [Paper Tray Settings] key to display the input tray setting screen. On the input tray setting screen, tap the [Paper Tray] key of [Front Cover] or [Back Cover].For more information, see "SELECTING THE PAPER TRAY FOR COPYING (page 2-12)".
• If the cover will be copied on, label sheets, transparency film cannot be used.
• To cancel cover sheet insertion:Tap the [Off] key.
• To cancel the front cover, back cover, and insertion sheet settings at the same time:Tap the [Cancel All] key.
• To cancel all settings:Tap the [CA] key.
6Tap the [Start] key to start copying.
8½x11
8½x11
Back CoverFront Cover
Page LayoutPaper TraySettings
Cancel All
On
Off
Change
Bypass
Make No CopyPlain 1
Covers/Inserts
Insertion Sheet
8½x11
8½x11
Front Cover Setting
Paper Tray
BypassSimplex
Make No Copy
2-Sided Copy
Print on Front Cover
Plain 1

2-96
COPIER►OTHER FUNCTIONS
INSERTING INSERTION SHEETS IN COPIES (COVERS/INSERTS)This function inserts a sheet of paper into a specific page as an insertion sheet.There are two types of insertion sheets. Insertion positions can be specified.Insert covers if needed.
Example: Insert A after page 3 and insert B after page 5.
Sheet inserting examplesThe following examples show the copy results when insertion sheets are inserted into six 1-sided originals or three 2-sided originals using two copy modes.
1-sided original copying
When inserting covers, see "INSERTING COVERS IN COPIES (COVERS/INSERTS) (page 2-88)".
Insertion sheet
setting conditions
Resulting copies
Insert an insertion sheet in 1-sided copy mode. Insert an insertion sheet in 2-sided copy mode.
Not copied
Inserts an insertion sheet between the second and third pages of copies.
1-sided copy
Makes a 1-sided copy of the third original page on an insertion sheet.
6
54
2 3 4 5 61
321
1
Originals
Insert A
Insert B
Copy
21 3 4 5 6 1 2 3 4 5 6
21 43 5 6 1 2 5 6 63 4

2-97
COPIER►OTHER FUNCTIONS
2-sided original copying
2-sided copy
Makes a 2-sided copy of the third and fourth original pages on an insertion sheet.
Insertion sheet
setting conditions
Resulting copies
Insert an insertion sheet in 1-sided copy mode. Insert an insertion sheet in 2-sided copy mode.
Not copied
Inserts an insertion sheet between the second and third pages of copies.
1-sided copy
Makes a 1-sided copy of the third original page on an insertion sheet.
* The fourth original page is not copied.
2-sided copy
Makes a 2-sided copy of the third and fourth original pages on an insertion sheet.
• Before using the covers/inserts function, load insertion sheets in the tray.
• When selecting the covers/inserts function, place the originals in the document feeder tray, select 1-sided or 2-sided copying, and select the number of copies and any other desired copy settings. When these settings have been completed, perform the procedure to select covers/inserts.
• The insertion sheet size must be the same as the copy size.
• Up to 100 insertion sheets can be inserted.
• The document glass is not available for this function.
• Take care that two insertion sheets cannot be inserted into the same page.
• When performing 2-sided copying of 2-sided originals, an insertion sheet cannot be inserted between the front and reverse sides of an original.
• This setting is not available when the covers/inserts function is disabled in "Settings (administrator)".
Insertion sheet
setting conditions
Resulting copies
Insert an insertion sheet in 1-sided copy mode. Insert an insertion sheet in 2-sided copy mode.
21 3 4 5 6 1 2 3 4 5 6
21 3 4 5 6 1 2 3 4 5 6
21 43 5 6 1 2 5 63
21 3 4 5 6 1 2 3 4 5 6

2-98
COPIER►OTHER FUNCTIONS
1Place the original in the document feeder tray of the automatic document feeder.► AUTOMATIC DOCUMENT FEEDER (page 1-77)
2Tap the [Others] key, and then tap the [Covers/Inserts] key.
3Tap the [Insertion Sheet] tab.
4Tap the [Insertion Type A] key, and tap the insert page display key.The Insertion Type B to Type H settings are the same as the Insertion Type A settings.
5Enter the number of the page you want to insert a sheet into using numeric keys, and then tap the [Enter] key.The total number of insertion sheets is displayed at the side of [Enter] key. Repeat these steps for the number of insertion sheets.After the settings are completed, tap and [Back] keys in sequence.
• If you have entered an incorrect insert page number:Tap the [Page Layout] key and change the page.► CHECKING, EDITING, AND DELETING THE PAGE LAYOUT OF COVERS AND INSERTION SHEETS (PAGE
LAYOUT) (page 2-100)
• To cancel insertion sheets:Tap the [Cancel All] key.
6Tap the [Change] key.
8½x11
8½x11
Insertion SheetBack CoverFront Cover
Page LayoutPaper TraySettings
Cancel All
Insertion Type C Change
Specify Page to Insert and Press Enter
Bypass
Make No Copy
Before Back Cover
Enter1 Total :0Insertion
Plain 1
Insertion Type A
Insertion Type B
Covers/Inserts
8½x11
8½x11
Insertion SheetBack CoverFront Cover
Page LayoutPaper TraySettings
Cancel All
Insertion Type C
Insertion Type A
Insertion Type B
Change
Specify Page to Insert and Press Enter
Bypass
Make No Copy
Before Back Cover
Enter1 Total :1Insertion
Plain 1
Covers/Inserts

2-99
COPIER►OTHER FUNCTIONS
7When only inserting insertion sheet A, tap the [Make No Copy] key.When making a copy on insertion sheet A, tap the [Simplex] or [2-Sided Copy] key.If you selected [2-Sided Copy], tap the [Book] key or [Tablet] key for the insert sheet binding. After the settings are completed, tap .
To change an insertion sheet:Tap the [Paper Tray] key, and select the tray with insertion sheets loaded.
• When copying on both sides of an insertion sheet, you cannot use label sheets, transparency films for insertion.
• To cancel all settings:Tap the [CA] key.
8Tap the [Start] key to start copying.
8½x11
8½x11
Insertion Type A
Paper Tray
BypassPlain 1 Simplex
Make No Copy
2-Sided Copy
Tab Copy
Copy on Insert A

2-100
COPIER►OTHER FUNCTIONS
CHECKING, EDITING, AND DELETING THE PAGE LAYOUT OF COVERS AND INSERTION SHEETS(PAGE LAYOUT)
The editing contents are different between the registered covers and insertion sheets as shown below.
• For the "Cover Sheet", you can change settings such as the paper type, copy/do not copy, 1-Sided, and 2-Sided.
• For "Insert Sheet", you can change only the page number you want to insert an insert sheet into.
1 Tap the [Others] key, and then tap the [Covers/Inserts] key.
2Tap the [Page Layout] key.
If the settings for the covers or insertion sheets are not configured, the [Page Layout] key is disabled.
3Check the page layout.To exit this job after checking the page layout, tap the key.To edit or delete, tap the required key. When deleting, tap the [Delete] key. When editing, tap the [Modify] key.When setting consecutive insertion of different types of inserts at the same page, you can tap [Replace Order of Inserts] on the action panel to change the order.
4Change cover or insertion sheet settings.For the cover, you can change the copy mode.You can change the page number you want to insert an insert sheet into.After the settings are completed, tap the key multiple times to return to the [Others] screen. Then, tap the [Back] key.
B48½x148½x11
8½x11
8½x11
8½x11
Covers/Inserts
Page Layout
Make No Copy
Make No Copy
Make No Copy
Make No Copy
Make No Copy
Front Cover
-
-
<1
<1
<1
Insertion Type A
Insertion Type B
Insertion Type C
Back Cover
Cancel All

2-101
COPIER►OTHER FUNCTIONS
INSERTING INSERTION SHEETS IN BETWEEN TRANSPARENCY FILMS (TRANSPARENCY INSERTS)When copying on transparency film, the sheets may stick together due to static electricity.The transparency inserts function can be used to automatically insert a sheet of paper between each sheet of transparency film, making the sheets easy to handle.It is also possible to copy on insertion sheets.
When performing 2-sided copying, only "2-Sided→1-Sided" mode can be used.
• The number of copies cannot be selected in this mode.
• Transparency film must be loaded in the bypass tray.
1Place the transparency film face down in the bypass tray, and load transparency film sheets.After loading the transparency film, configure the bypass tray settings.► MAKING COPIES USING THE BYPASS TRAY (page
2-35)
2Place the original.Place the original in the document feeder tray of the automatic document feeder, or on the document glass.► AUTOMATIC DOCUMENT FEEDER (page 1-77)► DOCUMENT GLASS (page 1-79)
3 Tap the [Others] key, and then tap the [Transparency Inserts] key.
CBAInserts

2-102
COPIER►OTHER FUNCTIONS
4Tap the [On] key.When making a copy on insertion sheets, tap the [Also Make Copy on Inserts] checkbox to set to .After the settings are completed, tap and [Back] keys in sequence.
• To cancel the transparency inserts setting:Tap the [Off] key.
• To cancel all settings:Tap the [CA] key.
5Tap the [Start] key to start copying.
8½x1411x17
8½x118½x11
Others
Preview
StartBack
Off
On
Also Make Copy on Inserts
Transparency Inserts
Inserts Paper Tray
Tray 1
8½x11Plain 1
Put Multiple Pages in A PageN-Up
Change Size/Direction.Original
Shift Position to Have MarginMargin Shift
CA

2-103
COPIER►OTHER FUNCTIONS
FUNCTIONS FOR SPECIFIC USES
COPYING WITH MIRROR IMAGE (MIRROR IMAGE)This function makes copies by inverting the original into a mirror image.
Specify the Mirror Image before scanning an original.
1Tap the [Others] key, and tap the [Mirror Image] key.A checkmark appears on the icon.After the settings are completed, tap the [Back] key.
To cancel the mirror image setting:Tap the [Mirror Image] key to uncheck it.
2Place the original.Place the original in the document feeder tray of the automatic document feeder, or on the document glass.► AUTOMATIC DOCUMENT FEEDER (page 1-77)► DOCUMENT GLASS (page 1-79)
3Tap the [Start] key to start copying.
Originals Mirror image copy

2-104
COPIER►OTHER FUNCTIONS
OUTPUT AND DENSITY ADJUSTMENT FUNCTIONS
REVERSING WHITE AND BLACK IN A COPY (B/W REVERSE)This function reverses black and white in a copy to create a negative image. This function can only be used for black and white copying.Originals with large black areas (which use a large amount of toner) can be copied using Black/White Reverse to reduce toner consumption.
• B/W Reverse must be specified before scanning the original.
• When this function is selected, the "Exposure/Original Type" setting for exposure adjustment automatically changes to "Text".
1Tap the [Others] key, and tap the [B/W Reverse] key.A checkmark appears on the icon.After the settings are completed, tap the [Back] key.
To cancel the B/W reverse setting:Tap the [B/W Reverse] key to uncheck it.
2Place the original.Place the original in the document feeder tray of the automatic document feeder, or on the document glass.► AUTOMATIC DOCUMENT FEEDER (page 1-77)► DOCUMENT GLASS (page 1-79)
To cancel all settings:Tap the [CA] key.
3Tap the [Start] key to start copying.
Originals B/W reverse copy

2-105
COPIER►OTHER FUNCTIONS
EASY ADJUSTMENT OF THE IMAGE QUALITY(QUICK IMAGE QUALITY ADJUSTMENT)You can easily adjust the density and outlines of images and text.
You must select Quick Image Quality Adjustment before scanning the original.
1Tap the [Others] key, and tap the [Quick Image Quality Adjustment] key.
2Tap or slide the slider to adjust the image quality.After the settings are completed, tap and [Back] keys in sequence.
To cancel the quick image quality adjustment setting:Tap the [Off] key.
3Place the original.Place the original in the document feeder tray of the automatic document feeder, or on the document glass.► AUTOMATIC DOCUMENT FEEDER (page 1-77)► DOCUMENT GLASS (page 1-79)
To cancel all settings:Tap the [CA] key.
4Tap the [Start] key to start copying.
8½x11
8½x11
Quick Image Quality AdjustmentAdjust Thickness and Outline.
Off
OnSmooth Sharp
Touch [+] to sharpen and [-] to smoothenoverall color tone and outline.
1 2 3

2-106
COPIER►OTHER FUNCTIONS
ADJUSTING THE SHARPNESS OF AN IMAGE (SHARPNESS)This function adjusts the sharpness to make a sharper or softer image.
Sharpness must be specified before scanning the original.
1Tap the [Others] key, and tap the [Sharpness] key.
2Tap or slide the slider to adjust the sharpness.Select [More Sharp] for sharper outlines, or [Less Sharp] for softer outlines.After the settings are completed, tap and [Back] keys in sequence.
To cancel the sharpness setting:Tap the [Off] key.
3Place the original.Place the original in the document feeder tray of the automatic document feeder, or on the document glass.
► AUTOMATIC DOCUMENT FEEDER (page 1-77)► DOCUMENT GLASS (page 1-79)
To cancel all settings:Tap the [CA] key.
4Tap the [Start] key to start copying.
Softer
Sharper
8½x11
8½x11
Sharpness
Off
OnMore Sharp
1 2 3
Less Sharp

2-107
COPIER►OTHER FUNCTIONS
THE ADJUST DENSITY AREA FOR COPY (GRAY BALANCE)You can adjust the tone and density of copies.The density is divided into three ranges, and you can adjust the density of each range.If needed, you can also adjust all three density ranges at once.
Gray Balance must be specified before scanning the original.
To change the default gray balance setting:Change the setting in "Settings (administrator)" → [System Settings] → [Image Quality Adjustment] → [Copy Image Quality]→ [Gray Balance].
1Tap the [Others] key, and tap the [Gray Balance] key.
2Tap the key or slide the slider to adjust the gray balance.• To adjust each range, set the [Set in a Batch] checkbox to .
• To adjust a slider individually with the keys, tap the slider you want to adjust and tap the keys.
To return the gray balance of the current tab to the default balance:Tap the [Reset] key.The values of all gradations currently being adjusted will return to their default gray balance values.The default settings are the values set in "Settings (administrator)" → [System Settings] → [Image Quality Adjustment] → [Copy Image Quality]→ [Gray Balance].
3Place the original.Place the original in the document feeder tray of the automatic document feeder, or on the document glass.► AUTOMATIC DOCUMENT FEEDER (page 1-77)► DOCUMENT GLASS (page 1-79)
4Tap the [Start] key to start copying.
Black+
L M H
8½x11
8½x11

2-108
COPIER►CONVENIENT COPY FUNCTIONS
INTERRUPT COPYThis function suspends a job in progress, and preferentially prints the original specified with interrupt copy.When you need to make an urgent copy and the machine is busy with a long copy run or other job, use interrupt copy.
CONVENIENT COPY FUNCTIONS
• The [Interrupt] key does not appear while an original is being scanned.
• Depending on the settings of the job in progress, the [Interrupt] key may not appear.
• Interrupt copy cannot be used in combination with the following functions:Job Build, Card Shot, Original Count, Proof Copy, Preview Setting.
• If you use the document glass for interrupt copy, you cannot select the booklet, covers/inserts function, or N-Up setting.If any of these functions are necessary, use the automatic document feeder.
1Tap the [Interrupt] key.The interrupt mode screen appears.
If user authentication is specified:Tap the [Interrupt] key to display the user authentication screen. Enter the login name and password to perform user authentication.
2Place the original.Place the original in the document feeder tray of the automatic document feeder, or on the document glass. ► AUTOMATIC DOCUMENT FEEDER (page 1-77)► DOCUMENT GLASS (page 1-79)
3Configure copy settings.
To cancel interrupt copy, tap the [Cancel] key.
8½x11
8½x11
8½x11
8½x11
8½x11
Copy InterruptLINE PRINTER Cancel
PrintJob Status
Tray 1
8½x11

2-109
COPIER►CONVENIENT COPY FUNCTIONS
4Tap the [Start] key to start interrupt copying. When the interrupt copy job is completed, the interrupted job will resume.
The interrupt copy function does not display the preview of the scanned original.

2-110
COPIER►CONVENIENT COPY FUNCTIONS
SEND DATA WHILE COPYINGThis function allows you to send a fax while making a copy, send an e-mail with an image attached, or save data in the network folder.
You need to store the destination in the address book in advance. ► ADDRESS BOOK (page 1-90)
The fax and image send transmission starts after the copy, and the settings same as the copy are used for transmission.However, the same results as the copy may not be provided by some functions.
1Tap the [Detail] key to change to normal mode.► Changing mode from each mode (page 2-5)
2Tap [Send and Print] on the action panel.
3Select a recipient from the address book.► ADDRESS BOOK SCREEN (page 1-91)
After you have selected the recipient, tap the [Enter Address] key.
• You cannot use the soft keyboard to enter an address. If you cannot find the recipient in the address book, enter it in the address book.
• An Internet Fax address cannot be selected.
4Place the original.Place the original in the document feeder tray of the automatic document feeder, or on the document glass.► AUTOMATIC DOCUMENT FEEDER (page 1-77)► DOCUMENT GLASS (page 1-79)
1
8½x11
8½x11
8½x11
8½x11
8½x11
8½x11
Cancel and Return
A
D
G
J
M
P
W
Add New
FrequentUse All
Narrow Down
AllCategory
Sort
BBB
AAA
CCC
AAA
CCC
ABC
T
BBB
Address
CA

2-111
COPIER►CONVENIENT COPY FUNCTIONS
5Set each copy item as required.These copy settings are used for fax transmission. However, some settings may be unavailable depending on the function.
You can preview the scanned original by tapping the [Preview] key.
6Tap the [Start] key to start copying.After the copy, the transmission starts.
After the copy, you cannot preview the settings before transmission.

2-112
COPIER►CONVENIENT COPY FUNCTIONS
COPY JOBSWhen you tap the job status display, jobs are displayed in a list. To check the status of a copy job, tap the [Print] tab.When you wish to stop or delete jobs or to perform priority processing, read the following items:
► STOPPING/DELETING A JOB IN PROGRESS OR RESERVED (page 1-82)► PRIORITY PROCESSING OF A RESERVED JOB (page 1-83)► CHECKING A RESERVED JOB OR THE JOB IN PROGRESS (page 1-85)► CHECKING COMPLETED JOBS (page 1-86)
8½x11
8½x11
8½x11
8½x11
8½x11
8½x11

2-113
COPIER►CONVENIENT COPY FUNCTIONS
PROGRAMSPrograms are set from the base screen of normal mode.► SELECTING COPY MODE (page 2-4)
STORING A PROGRAMThis function collectively stores copy settings as one program. The stored program can be retrieved using an easy operation.For information about how to retrieve a program, see "RETRIEVING A PROGRAM (page 2-116)".
For example, suppose 8-1/2" x 11" (A4) size CAD drawings are copied once a month for archive purposes using the following settings:• The 8-1/2" x 11" (A4) size CAD drawings are reduced to 5-1/2" x 8-1/2"(A5) size.• To reduce paper use by half, 2-sided copying is used.• To close by file, perform margin copy.
Programs cannot be stored in easy mode.
When a job program is not stored When a job program is stored
Set reduction from 5-1/2" x 8-1/2"(A5) to 8-1/2" x 11" (A4)
Change the exposure setting.
Set 2-sided copying.
Set margins.
Tap the [Start] key.
Retrieve the stored program.
Tap the [Start] key.
Considerable time is required to copy the drawings each month because the above settings must be selected.In addition, mistakes are occasionally made when selecting the settings, so some copies must be redone.
The settings are stored in a program, so they can be selected by the touch of a key. This is simple and takes no time.In addition, the settings are all stored so there are no chances for mistakes, and thus no need to redo copies due to setting mistakes.
8-1/2" x 11" (A4) size CAD drawings
Copy

2-114
COPIER►CONVENIENT COPY FUNCTIONS
• Up to 48 programs can be stored.
• Program settings remains registered even when the main power has been turned off.
• A program can also be stored in the home screen or favorite as a shortcut; therefore, it is helpful when retrieving it.
1Specify the copy function to be stored.
In the base screen, display [Program Registration] on the action panel.
2Tap [Program Registration] on the action panel.
3Tap an unused key. A key with a program stored is displayed in color. Tap a key with no program stored.
If you do not set a name for the program, a serial number will be automatically assigned as the name.
4Set a name for the program and tap the [OK] key. A registration completion message appears.
8½x11
8½x11
Space AltGrKeyboard Select
Shift
Caps Enter
SymbolsCharacters
Program Name OKCancel

2-115
COPIER►CONVENIENT COPY FUNCTIONS
5Select whether or not the program will be added to the home screen or the favorites. To specify print settings, you can select the required one from pre-set text or use the soft keyboard. You can also print serial number and account job ID.When you have completed the settings, tap and the [Back] keys in sequence.
• If user authentication is enabled, the shortcut key for the program is registered in the user's home screen or favorite.
• If user authentication is disabled, the administrator password entry screen appears. When the administrator password is entered, the registration is completed.
The number of copies cannot be stored.
8½x11
01
03
05
07 08
1009
Cancel Registration Register forHome
Register forFavorite
Program registration is completed.At the same time, it can be registeredfor Favorite or Home to useas shortcut. Do you register?

2-116
COPIER►CONVENIENT COPY FUNCTIONS
RETRIEVING A PROGRAMThe preset program and ID copy are registered in the program.
ID Card CopyYou can copy the front and back sides of ID card onto a page through this function.This function is a program that uses the card scan function.
1Tap [Call Program] on the action panel.
2Tap the key of the program you want to retrieve.
You can select a program key and tap [Register in Favorite] or [Register for Home] on the action panel to register a shortcut key for the selected program in the favorite or home screen.
The original size and layout can be changed in the card scan default settings.For the procedure, refer to “COPYING BOTH SIDES OF A CARD AS A SINGLE PAGE (CARD SHOT) (page 2-43)".
Front
Back
Originals
Set Horizontally Set Vertically
Copies

2-117
COPIER►CONVENIENT COPY FUNCTIONS
DELETING AND RENAMING A PROGRAMThis section explains how to delete copy settings in a program and rename a program.
Deleting a program
Renaming a program
• A program that is already stored cannot be deleted.
• When "Settings (administrator)" - [System Settings] → [Common Settings] → [Enable/Disable Settings] → [Disabling of Registration/Deletion of Program] is selected, a registered program cannot be deleted or renamed.
1Tap [Call Program] on the action panel.
2Tap [Delete] on the action panel.
3Tap the key of the program you want to delete, and tap [Delete].
1Tap [Call Program] on the action panel.
2Tap [Change Name] on the action panel.
3Tap the key of the required program, and rename the program. Then tap the [OK] key.After the settings are completed, tap .
8½x11
8½x11

3-1
PRINTER FUNCTION OF THE MACHINE
PRINTING IN A WINDOWS ENVIRONMENT
BASIC PRINTING PROCEDURE. . . . . . . . . . . . . . . 3-4
• PRINTER DRIVER SETTINGS SCREEN / REFERRING TO HELP . . . . . . . . . . . . . . . . . . . . . 3-6
• SELECTING THE PAPER. . . . . . . . . . . . . . . . . 3-7
• PRINTING ON ENVELOPES . . . . . . . . . . . . . . 3-8
PRINTING WHEN THE USER AUTHENTICATION FUNCTION IS ENABLED. . . . . . . . . . . . . . . . . . . . . 3-9
FREQUENTLY USED FUNCTIONS. . . . . . . . . . . . . 3-11
• SAVING SETTINGS AT THE TIME OF PRINTING . . . . . . . . . . . . . . . . . . . . . . . . . . . . . 3-11
• USING SAVED SETTINGS . . . . . . . . . . . . . . . . 3-12
• CHANGING THE PRINTER DRIVER DEFAULT SETTINGS. . . . . . . . . . . . . . . . . . . . . . . . . . . . . 3-12
PRINTING IN A Mac OS ENVIRONMENT
BASIC PRINTING PROCEDURE. . . . . . . . . . . . . . . 3-14
• SELECTING THE PAPER. . . . . . . . . . . . . . . . . 3-15
• PRINTING ON ENVELOPES . . . . . . . . . . . . . . 3-16
PRINTING WHEN THE USER AUTHENTICATION FUNCTION IS ENABLED. . . . . . . . . . . . . . . . . . . . . 3-17
FREQUENTLY USED FUNCTIONS
SELECTING THE RESOLUTION. . . . . . . . . . . . . . . 3-19
2-SIDED PRINTING . . . . . . . . . . . . . . . . . . . . . . . . . 3-20
FITTING THE PRINT IMAGE TO THE PAPER . . . . 3-21
PRINTING MULTIPLE PAGES ON ONE PAGE . . . 3-23
PRINTING WHILE SKIPPING BLANK PAGES. . . . 3-25
STAPLING OUTPUT . . . . . . . . . . . . . . . . . . . . . . . . 3-26
Eco
EcoEco
CONVENIENT PRINTING FUNCTIONS
CONVENIENT FUNCTIONS FOR CREATING PAMPHLETS AND POSTERS . . . . . . . . . . . . . . . . 3-28
• CREATE A PAMPHLET (BOOKLET). . . . . . . . 3-28
• PRINTING WITH MARGIN SHIFT SETTING (MARGIN). . . . . . . . . . . . . . . . . . . . . . . . . . . . . 3-30
• CREATE A LARGE POSTER (POSTER PRINTING) . . . . . . . . . . . . . . . . . . . . . . . . . . . . 3-32
FUNCTIONS TO ADJUST THE SIZE AND ORIENTATION OF THE IMAGE . . . . . . . . . . . . . . . 3-33
• ADJUST PRINT POSITION ON ODD AND EVEN PAGES SEPARATELY (PRINT POSITION) . . . . . . . . . . . . . . . . . . . . . . . . . . . . 3-33
• ROTATING THE PRINT IMAGE 180 DEGREES (ROTATE 180 DEGREES) . . . . . . 3-34
• ENLARGING/REDUCING THE PRINT IMAGE (ZOOM SETTING/ENLARGE OR REDUCE) . . . 3-35
• ADJUST THE LINE THICKNESS (WIDTH) . . . 3-37
• PRINT A MIRROR-IMAGE (MIRROR-IMAGE REVERSE/VISUAL EFFECTS) . . . . . . . . . . . . 3-40
IMAGE ADJUSTING FUNCTION . . . . . . . . . . . . . . 3-41
• ADJUST THE BRIGHTNESS AND CONTRAST OF THE IMAGE (IMAGE ADJUSTMENT) . . . . 3-41
• PRINTING FAINT TEXT AND LINES IN BLACK (TEXT TO BLACK/VECTOR TO BLACK) . . . . 3-42
• SELECTING IMAGE SETTINGS TO MATCH THE IMAGE TYPE . . . . . . . . . . . . . . . . . . . . . . 3-43
FUNCTIONS TO COMBINE TEXT AND IMAGES. . . 3-45
• ADDING A WATERMARK TO PRINTED PAGES (WATERMARK) . . . . . . . . . . . . . . . . . 3-45
• PRINTING AN IMAGE OVER THE PRINT DATA (IMAGE STAMP) . . . . . . . . . . . . . . . . . . 3-47
• REGISTERING A CUSTOM IMAGE . . . . . . . . 3-48
• OVERLAY A FIXED FORM ON THE PRINT DATA (OVERLAYS) . . . . . . . . . . . . . . . . . . . . . 3-49
• ADDING THE NUMBER OF COPIES (COPIES STAMP) . . . . . . . . . . . . . . . . . . . . . . . . . . . . . . . . 3-51
PRINTERIcons
Eco-friendly functions
Functions for printing on special
media
Eco

3-2
PRINTER
PRINT FUNCTIONS FOR SPECIAL PURPOSES. . . 3-52
• PRINTING SPECIFIC PAGES ON DIFFERENT PAPER (DIFFERENT PAPER) . . . . . . . . . . . . . 3-52
• ADDING INSERTS WHEN PRINTING ON TRANSPARENCY FILM (TRANSPARENCY INSERTS) . . . . . . . . . . . . . . . . . . . . . . . . . . . . . 3-54
• INSERTING SEPARATOR PAGES BETWEEN JOBS OR COPIES . . . . . . . . . . . . . . . . . . . . . . 3-56
• PRINTING A CARBON COPY (CARBON COPY) . . . . . . . . . . . . . . . . . . . . . . . . . . . . . . . . 3-57
• TWO-SIDED PRINTING WITH SPECIFIC PAGES PRINTED ON THE FRONT SIDE (CHAPTER INSERTS). . . . . . . . . . . . . . . . . . . . 3-58
• INSERT PRESET DATA BEFORE OR AFTER EACH PAGE (PAGE INTERLEAVE) . . . . . . . . . 3-59
• PRINT THE SAME IMAGE IN TILE PATTERN (REPEAT PRINT) . . . . . . . . . . . . . . . . . . . . . . . 3-60
• PRINTING PATTERN DATA (HIDDEN PATTERN PRINT) . . . . . . . . . . . . . . . . . . . . . . . 3-61
• CHANGING THE RENDERING METHOD AND PRINTING JPEG IMAGES (USE DRIVER TO RENDER JPEGS) . . . . . . . . . . . . . . . . . . . . . . . 3-62
• MAXIMIZING THE PRINT AREA ON THE PAPER (PRINT AREA) . . . . . . . . . . . . . . . . . . . 3-63
CONVENIENT PRINTER FUNCTIONS . . . . . . . . . . 3-64
• USING TWO MACHINES TO PRINT A LARGE PRINT JOB (TANDEM PRINT) . . . . . . . . . . . . . 3-64
• SAVING AND USING PRINT FILES (DOCUMENT FILING). . . . . . . . . . . . . . . . . . . . 3-66
• AUTOMATICALLY PRINT ALL STORED DATA. . . 3-68
• PRINTING AND SENDING SIMULTANEOUSLY . . . . . . . . . . . . . . . . . . . . . 3-69
PRINTING WITHOUT THE PRINTER DRIVER
EXTENSION OF PRINTABLE FILES. . . . . . . . . . . . 3-70
DIRECTLY PRINTING A FILE ON AN FTP SERVER . . . . . . . . . . . . . . . . . . . . . . . . . . . . . . . . . . 3-70
DIRECTLY PRINTING A FILE IN USB MEMORY. . . 3-72
DIRECTLY PRINTING A FILE IN A NETWORK FOLDER . . . . . . . . . . . . . . . . . . . . . . . . . . . . . . . . . . 3-73
DIRECTLY PRINTING FROM A COMPUTER . . . . . 3-76
• SUBMIT PRINT JOB . . . . . . . . . . . . . . . . . . . . . 3-76
• FTP PRINT . . . . . . . . . . . . . . . . . . . . . . . . . . . . 3-76
• E-MAIL PRINT. . . . . . . . . . . . . . . . . . . . . . . . . . 3-76
PRINTER JOBS
CHECKING THE PRINT STATUS . . . . . . . . . . . . . 3-78
PRINTING AN ENCRYPTED PDF FILE . . . . . . . . . 3-78
CHANGING TO ANOTHER PAPER SIZE AND PRINTING WHEN PAPER RUNS OUT. . . . . . . . . . 3-79
APPENDIX
PRINTER DRIVER SPECIFICATIONS LIST. . . . . . 3-80
SPECIFYING A BILLING CODE USING THE PRINTER DRIVER. . . . . . . . . . . . . . . . . . . . . . . . . . 3-83
AUTHENTICATION BY SINGLE SIGN-ON . . . . . . 3-85
PRINTING BY GOOGLE CLOUD PRINT . . . . . . . . 3-86

3-3
PRINTER►PRINTER FUNCTION OF THE MACHINE
To enable printing from your computer, a printer driver must be installed.See the table below to determine which printer driver to use in your environment.
Windows environment
Mac OS Environment
PRINTER FUNCTION OF THE MACHINE
Printer driver type
PCL6The machine support the Hewlett-Packard PCL6 printer control languages.
PS• This printer driver supports the PostScript® 3™ page description language developed by Adobe Systems Incorporated.• If it is desired to use the Windows standard PS printer driver, the PPD driver must be used.
• To install the printer driver and configure settings in a Windows environment, see the Software Setup Guide.
• The User's Manual mainly uses PCL6 printer driver screens to explain how to print in a Windows environment. The printer driver screens may differ slightly depending on the printer driver you are using.
Printer driver type
PSPS This printer driver supports the PostScript® 3™ page description language developed by Adobe Systems Incorporated and uses a PPD file.
To install the printer driver and configure settings in a Mac OS environment, see the Software Setup Guide.

3-4
PRINTER►PRINTING IN A WINDOWS ENVIRONMENT
BASIC PRINTING PROCEDUREThe following example explains how to print a document from "WordPad", which is a standard accessory application in Windows.
PRINTING IN A WINDOWS ENVIRONMENT
• The menu used to execute printing may vary depending on the application.
• The button that is used to open the printer driver properties window (usually [Property] or [Preferences]) may vary depending on the application.
• The machine name that normally appears in the [Printer] menu is [MX-xxxx]. ("xxxx" is a sequence of characters that varies depending on the machine model.)
1Select [Print] from the [File] menu of WordPad.
2Select the printer driver for the machine and click the [Preferences] button.The button that is used to open the printer driver properties window (usually [Property] or [Preferences]) may vary depending on the application.

3-5
PRINTER►PRINTING IN A WINDOWS ENVIRONMENT
3Select print settings.
(1) Click the [Main] tab.
(2) Select the original size.• You can register up to seven user-defined sizes in
the menu. To store an original size, select [Custom Paper] or one of [User1] to [User7] from the menu, and click the [OK] button.
• To select settings on other tabs, click the desired tab and then select the settings.► PRINTER DRIVER SETTINGS SCREEN /
REFERRING TO HELP (page 3-6)• If an original size larger than the largest paper size
that the machine supports is set, select the paper size for printing in “Output Size”.
• If an "Output Size" different from the "Original Size" is selected, the print image will be adjusted to match the selected paper size.
(3) Click the [OK] button.
4Click the [Print] button.Printing begins.
(2)
(3)
(1)

3-6
PRINTER►PRINTING IN A WINDOWS ENVIRONMENT
PRINTER DRIVER SETTINGS SCREEN / REFERRING TO HELPThe printer driver settings screen consists of 9 tabs. Click a tab to select the settings on that tab.You can check information on each of the settings in the Help screen. Click the [Help] button at the bottom right of the screen.
(1) Tabs: Click to change the tabs shown.•[Main]: Frequently used functions are grouped on this tab. The settings are also on other tabs,
and each setting on this tab is linked to the corresponding setting on the other tab.•[Paper Source]: Set the size and type of paper used for printing, and the paper tray.•[Finishing]: Select a finishing function such as stapling.•[Layout]: Select functions related to the layout such as two-sided printing and booklet.•[Job Handling]: Set Document Filing and user authentication.•[Inserts]: Select insertion functions such as covers and inserts.•[Stamp]: Select the watermark or stamp function.•[Image Quality]: Select various image quality settings.•[Detailed Settings]: Select tandem print and other detailed print settings.
(2) Favorites
Settings configured on each tab at the time of printing can be saved as Favorite.►FREQUENTLY USED FUNCTIONS (page 3-11)
(3) [Defaults]Return the settings on the currently selected tab to their default state.
(4) Setup Items
Displays the settings on each tab.
(5) Information icon( )
Some restrictions exist on the combinations of settings that can be selected in the printer driver properties window. When a restriction exists on a selected setting, an information icon ( ) will appear next to the setting. Click the icon to view an explanation of the restriction.
(2)
(1)
(3)
(4)
(5)
(6)
(7)
(8)

3-7
PRINTER►PRINTING IN A WINDOWS ENVIRONMENT
(6) Print imageThis lets you visually check how the current settings affect the print image. Finishing settings is indicated by icons.
(7) Machine imageThis shows the options that are installed on the machine, and the paper trays and output trays that are used.
(8) [Help] button
Displays the Help window of the printer driver.
SELECTING THE PAPERBefore printing, check the paper sizes, paper types, and paper remaining in the machine's trays. To check the most recent tray information, click the [Tray Status] button in the [Paper Source] tab.The "Output Size" setting and the "Paper Tray" setting are related as follows:
• When "Paper Tray" is set to [Auto Select]The tray that contains paper of the size and type selected in "Output Size" and "Paper Type" is automatically selected.
• When "Paper Tray" is set to any setting other than [Auto Select]The specified tray is used for printing regardless of the "Output Size" setting.When you have set "Paper Type" to [Bypass Tray], be sure to select "Paper Type". Check the paper type that is set for the bypass tray of the machine, check that paper of that type is actually loaded into the bypass tray, and then select the appropriate paper type.
• When "Paper Type" is set to [Auto Select]A tray with plain paper or recycled paper of the size specified in "Output Size" is automatically selected. (The factory default setting is plain paper only.)
• When "Paper Type" is set to anything other than [Auto Select]A tray with the specified type of paper and the size specified in "Output Size" is used for printing.
• Help can be displayed for a setting by clicking the setting and pressing the [F1] key.
• You can click the button in the upper right corner of the settings screen and then click a setting to show Help for that setting in a sub-window.
Special media such as envelopes can also be placed in the bypass tray.For the procedure for loading paper in the bypass tray, see "LOADING PAPER INTO THE BYPASS TRAY (page 1-71)".
When [Enable Detected Paper Size in Bypass Tray] (disabled by factory default) or [Enable Selected Paper Type in Bypass Tray] (enabled by factory default), which you can reach by selecting [System Settings] in "Settings (administrator)" → [Printer Settings] → [Condition Settings] → [Bypass Tray Settings] is enabled, printing will not take place if the paper size or paper type specified in the printer driver is different from the paper size or paper type specified in the settings of the bypass tray.
To exclude the bypass tray from the trays that can be selected when [Auto Select] is selected:In "Settings (administrator)", select [System Settings] → [Printer Settings] → [Condition Settings] → [Bypass Tray Settings] → [Exclude Bypass-Tray from Auto Paper Select].If special media are frequently loaded in the bypass tray, it is recommended that this setting be enabled.
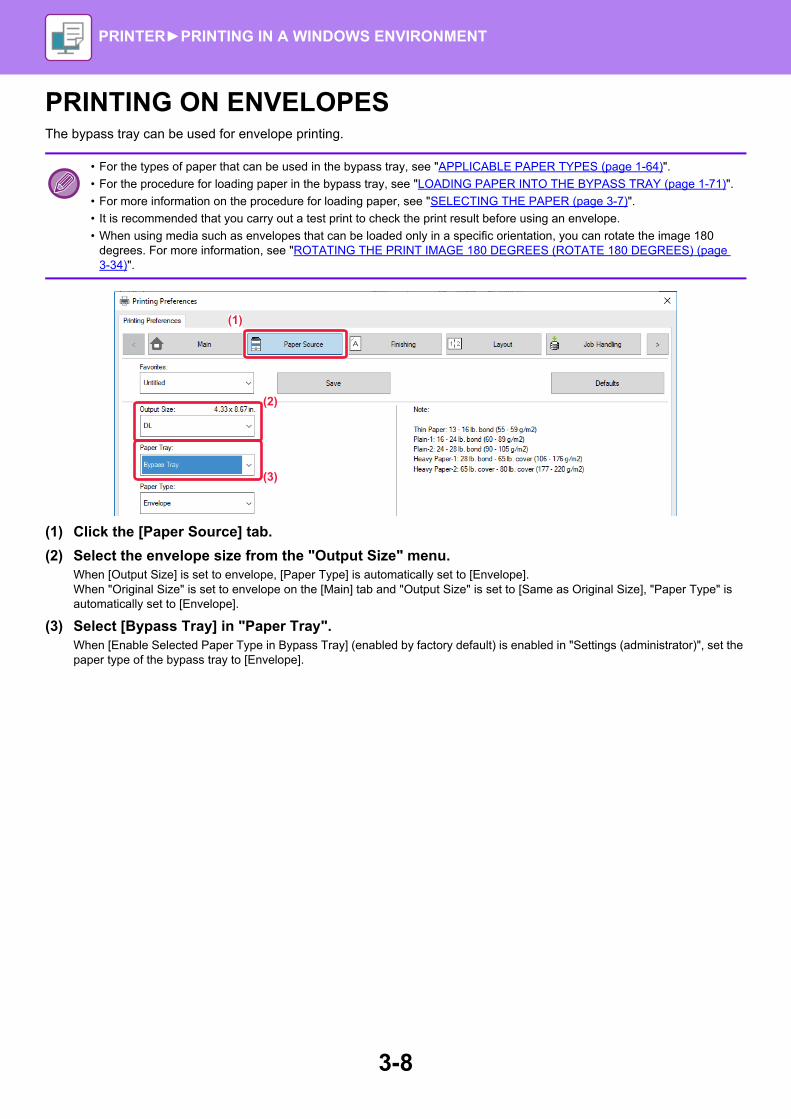
3-8
PRINTER►PRINTING IN A WINDOWS ENVIRONMENT
PRINTING ON ENVELOPESThe bypass tray can be used for envelope printing.
(1) Click the [Paper Source] tab.
(2) Select the envelope size from the "Output Size" menu.When [Output Size] is set to envelope, [Paper Type] is automatically set to [Envelope].When "Original Size" is set to envelope on the [Main] tab and "Output Size" is set to [Same as Original Size], "Paper Type" is automatically set to [Envelope].
(3) Select [Bypass Tray] in "Paper Tray".When [Enable Selected Paper Type in Bypass Tray] (enabled by factory default) is enabled in "Settings (administrator)", set the paper type of the bypass tray to [Envelope].
• For the types of paper that can be used in the bypass tray, see "APPLICABLE PAPER TYPES (page 1-64)".
• For the procedure for loading paper in the bypass tray, see "LOADING PAPER INTO THE BYPASS TRAY (page 1-71)".
• For more information on the procedure for loading paper, see "SELECTING THE PAPER (page 3-7)".
• It is recommended that you carry out a test print to check the print result before using an envelope.
• When using media such as envelopes that can be loaded only in a specific orientation, you can rotate the image 180 degrees. For more information, see "ROTATING THE PRINT IMAGE 180 DEGREES (ROTATE 180 DEGREES) (page 3-34)".
(1)
(2)
(3)

3-9
PRINTER►PRINTING IN A WINDOWS ENVIRONMENT
PRINTING WHEN THE USER AUTHENTICATION FUNCTION IS ENABLEDThe user information (such as login name and password) that must be entered varies depending on the authentication method being used, so check with the administrator of the machine before printing.
• If you have configured "Printing Policy" on the [Configuration] tab so that user authentication is always performed, users are required to be authenticated for each print job. This is done by entering authentication information in a dialog box that appears each time printing is performed.
• The machine's user authentication function cannot be used when the PPD driver* is installed and the Windows standard PS printer driver is used.For this reason, the machine can be configured to prohibit users from executing printing unless their user information is stored in the machine.
* The PPD driver enables the machine to print using the Windows standard PS printer driver.
To prohibit printing by users whose user information is not stored in the machine:In "Settings (administrator)", select [User Control] → [Default Settings] → [Disable Printing by Invalid User].
1In the printer driver properties window of the application, select the printer driver of the machine and click the [Preferences] button.The button that is used to open the printer driver properties window (usually [Property] or [Preferences]) may vary depending on the application.

3-10
PRINTER►PRINTING IN A WINDOWS ENVIRONMENT
2 Enter your user information.
(1) Click the [Job Handling] tab.
(2) Enter your user information.• When authentication is performed by login name,
select [Login Name] and enter your login name. • When authentication is performed by login
name/password, click [Login Name/Password] and enter your login name and password. Enter the password using 1 to 32 characters.
• When the machine's authentication destination is Active Directory, [Single Sign-on] can be selected. For information on single sign-on, refer to "AUTHENTICATION BY SINGLE SIGN-ON (page 3-85)".
• When authentication is performed by user number, select [User Number] and enter your 5 to 8 digit user number.
(3) Enter the user name and job name as necessary.• Click the [User Name] checkbox, and enter your user
name using up to 32 characters. The entered user name will appear on the touch panel of the machine. If you do not enter a user name, your PC login name will appear.
• Click the [Job Name] checkbox, and enter a job name using up to 30 characters. The entered job name will appear as a file name on the touch panel of the machine. If you do not enter a job name, the file name set in the application will appear.
• To have a confirmation window appear before printing starts, select the [Auto Job Control Review] checkbox.
(4) Click the [OK] button to execute printing.
Authentication by Single Sign-on requires that Active Directory authentication be performed on the machine and your computer. This can only be used when your computer is running Windows.
(2)
(1)
(3)
(4)

3-11
PRINTER►PRINTING IN A WINDOWS ENVIRONMENT
FREQUENTLY USED FUNCTIONS
SAVING SETTINGS AT THE TIME OF PRINTINGSettings configured on each of the tabs at the time of printing can be saved as Favorite. Saving frequently used settings or complex settings under an assigned name makes it easy to select those settings the next time you need to use them.Settings can be saved from any tab of the printer driver properties window. Settings configured on each tab are listed at the time of saving, allowing you to check the settings as you save them.
Deleting saved settingsIn step 2 of "USING SAVED SETTINGS (page 3-12)", select the user settings that you want to delete and click the [Delete] button.
1Select the machine's printer driver from the print window of the application, and click the [Preferences] button.
The button that is used to open the printer driver properties window (usually [Property] or [Preferences]) may vary depending on the application.
2Register Print Settings.
(1) Configure the print settings on each tab.
(2) Click the [Save] button.
3Check and save the settings.
(1) Check the displayed settings.
(2) Enter a name for the settings using up to 20 characters.
(3) Click the [OK] button.
(2)
(1)
(2)
(1)
(3)

3-12
PRINTER►PRINTING IN A WINDOWS ENVIRONMENT
USING SAVED SETTINGSYou can specify the saved favorites through just one click to apply frequently used settings or complicated settings to your printing.
CHANGING THE PRINTER DRIVER DEFAULT SETTINGSYou can change the default settings of the printer driver.Changes you have made in the printer driver properties window when you execute printing from the application are returned to the default settings specified here when you exit the application.
Unavailable favorites are not displayed according to the current option configuration.If you set default favorite to non-executable favorites, opening the printer settings will display "This Favorite is not available on current configuration setting." message will be displayed, and clicking [Yes] will change the default to the default value.
1Select the machine's printer driver from the print window of the application, and click the [Preferences] button.
The button that is used to open the printer driver properties window (usually [Property] or [Preferences]) may vary depending on the application.
2Select favorite settings.
(1) Select the favorite settings you want to use.
(2) Click the [OK] button.
3Start printing.
1Click the [Start] button, select [Settings] → [Device] → [Devices and Printers].
In Windows 8.1/Windows Server 2012, right-click the [Start] button, select [Control Panel] → [View devices and printers] (or [Devices and Printers]).In Windows 7/Windows Server 2008, click the [Start] button, select [Devices and Printers].
(1)
(2)

3-13
PRINTER►PRINTING IN A WINDOWS ENVIRONMENT
2Right-click the printer driver icon of the machine and select [Printing preferences].
3Configure the settings and click the [OK] button.For explanations of the settings, see printer driver Help.

3-14
PRINTER►PRINTING IN A Mac OS ENVIRONMENT
BASIC PRINTING PROCEDUREThe following example explains how to print a document from the standard accessory application "TextEdit" in Mac OS X.
PRINTING IN A Mac OS ENVIRONMENT
• To install the printer driver and configure settings in a Mac OS environment, see the Software Setup Guide.
• The menu used to execute printing may vary depending on the application.
1Select [Page Setup] from the [File] menu and select the printer.If the printer drivers appear as a list, select the name of the printer driver to be used from the list.
2Select paper settings.
(1) Make sure that the correct printer is selected.
(2) Select paper settings.Paper size, paper orientation, and enlarge/reduce settings can be selected.
(3) Click the [OK] button.
3Select [Print] from the [File] menu.
MX-xxxxMX-xxMX-xxMMMMXMX-xxMX-xxMXMXXXXX-xXX-xxXMX-xx-MX-xxX-xxxxMMMX-xxMX-xxMXMMXXXXXXXX-xxxxxMMX xxMMMMMMXXMXXXX xxxxxxMMMMMMMMMXXXMXXX xxxxxxxX xxxMMMMMMMMXX xxxxxxxxxxxMXMMMMMMMXXXX xxxxxxxxxMMXMMMMMMMMXXXXXXX x-xxxxxMMMMMMMMXMXXXXXXX-xxxxxxxxxMMXMMMXXXXXMX-xxxxxxxxxxxMMMMMMMXXXXXXX--xxxxxxxxxxxMMMMXXXXXX xxxxxxxxxxxxxxxxxxxxxxxxxxxxxxxxxxxxxxxxxxxxxxxxxxxxxxxxxxxxxxxxxxxxxxxxxxxxxxxxxxxxxxxxxxxxxxxxxxxxxxxxxxxxxxxxxxxxxxx
(1)
(2)
(3)

3-15
PRINTER►PRINTING IN A Mac OS ENVIRONMENT
SELECTING THE PAPERThis section explains the [Paper Feed] settings in the print settings window.• When [Auto Select] is selected:
A tray that is set for plain or recycled paper (only plain paper in the factory default setting) of the size specified in "Paper Size" on the page setup screen is automatically selected.
• When a paper tray is specified:The specified tray is used for printing regardless of the "Paper Size" setting on the page setup screen.For the bypass tray, also specify the paper type. Check that the paper type that is set for the bypass tray of the machine, check that paper of that type is actually loaded into the bypass tray, and then select the appropriate bypass tray (paper type).
• When a paper type is specified:A tray with the specified type of paper and the size specified in "Paper Size" on the page setup screen is used for printing.
4Select print settings.
(1) Make sure that the correct printer is selected.
(2) Select an item from the menu and configure the settings as needed.
(3) Click the [Print] button.
Special media such as envelopes can also be placed in the bypass tray.For the procedure for loading paper in the bypass tray, see "LOADING PAPER INTO THE BYPASS TRAY (page 1-71)".
When [Enable Detected Paper Size in Bypass Tray] (disabled by factory default) or [Enable Selected Paper Type in Bypass Tray] (enabled by factory default), which you can reach by selecting [System Settings] in "Settings (administrator)" → [Printer Settings] → [Condition Settings] → [Bypass Tray Settings] is enabled, printing will not take place if the paper size or paper type specified in the printer driver is different from the paper size or paper type specified in the settings of the bypass tray.
To exclude the bypass tray from the trays that can be selected when [Auto Select] is selected:In "Settings (administrator)", select [System Settings] → [Printer Settings] → [Condition Settings] → [Bypass Tray Settings] → [Exclude Bypass-Tray from Auto Paper Select].
(1)
(2)
(3)
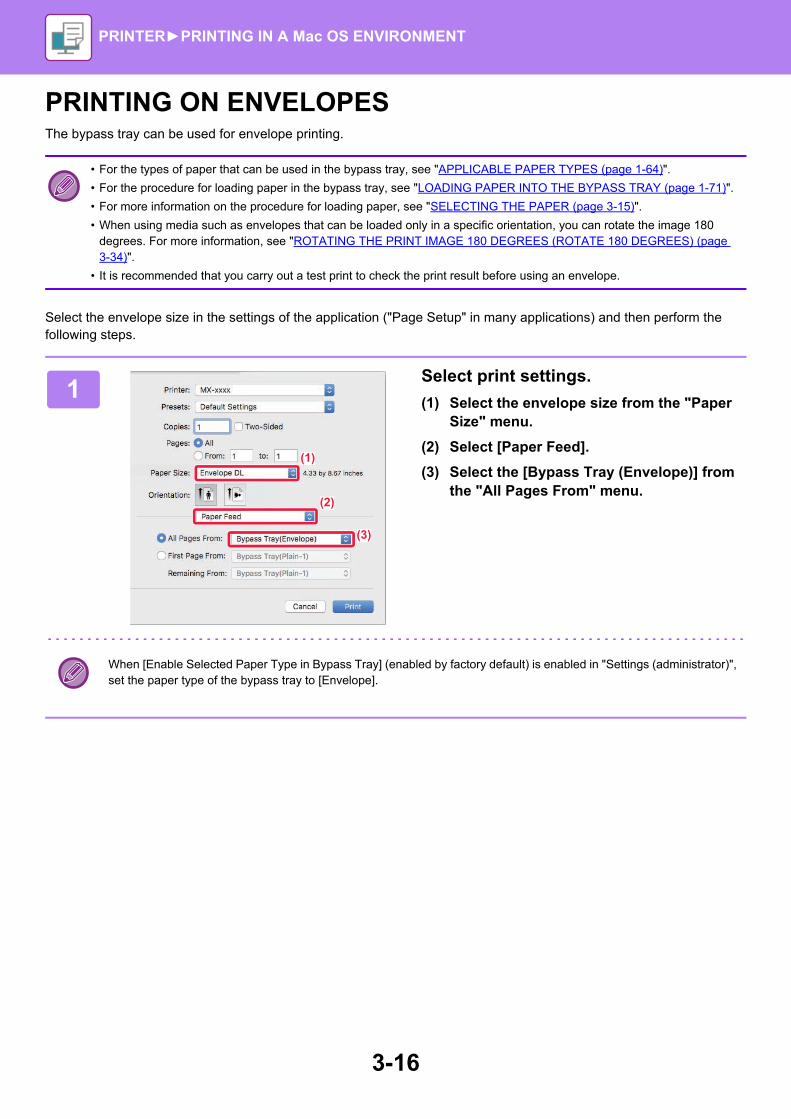
3-16
PRINTER►PRINTING IN A Mac OS ENVIRONMENT
PRINTING ON ENVELOPESThe bypass tray can be used for envelope printing.
Select the envelope size in the settings of the application ("Page Setup" in many applications) and then perform the following steps.
• For the types of paper that can be used in the bypass tray, see "APPLICABLE PAPER TYPES (page 1-64)".
• For the procedure for loading paper in the bypass tray, see "LOADING PAPER INTO THE BYPASS TRAY (page 1-71)".
• For more information on the procedure for loading paper, see "SELECTING THE PAPER (page 3-15)".
• When using media such as envelopes that can be loaded only in a specific orientation, you can rotate the image 180 degrees. For more information, see "ROTATING THE PRINT IMAGE 180 DEGREES (ROTATE 180 DEGREES) (page 3-34)".
• It is recommended that you carry out a test print to check the print result before using an envelope.
1Select print settings.
(1) Select the envelope size from the "Paper Size" menu.
(2) Select [Paper Feed].
(3) Select the [Bypass Tray (Envelope)] from the "All Pages From" menu.
When [Enable Selected Paper Type in Bypass Tray] (enabled by factory default) is enabled in "Settings (administrator)", set the paper type of the bypass tray to [Envelope].
(2)
(1)
(3)

3-17
PRINTER►PRINTING IN A Mac OS ENVIRONMENT
PRINTING WHEN THE USER AUTHENTICATION FUNCTION IS ENABLEDThe user information (such as login name and password) that must be entered varies depending on the authentication method being used, so check with the administrator of the machine before printing.
The menu used to execute printing may vary depending on the application.
To prohibit printing by users whose user information is not stored in the machine:In "Settings (administrator)", select [User Control] → [Default Settings] → [Disable Printing by Invalid User].
1In the application, select [Print] from the [File] menu.
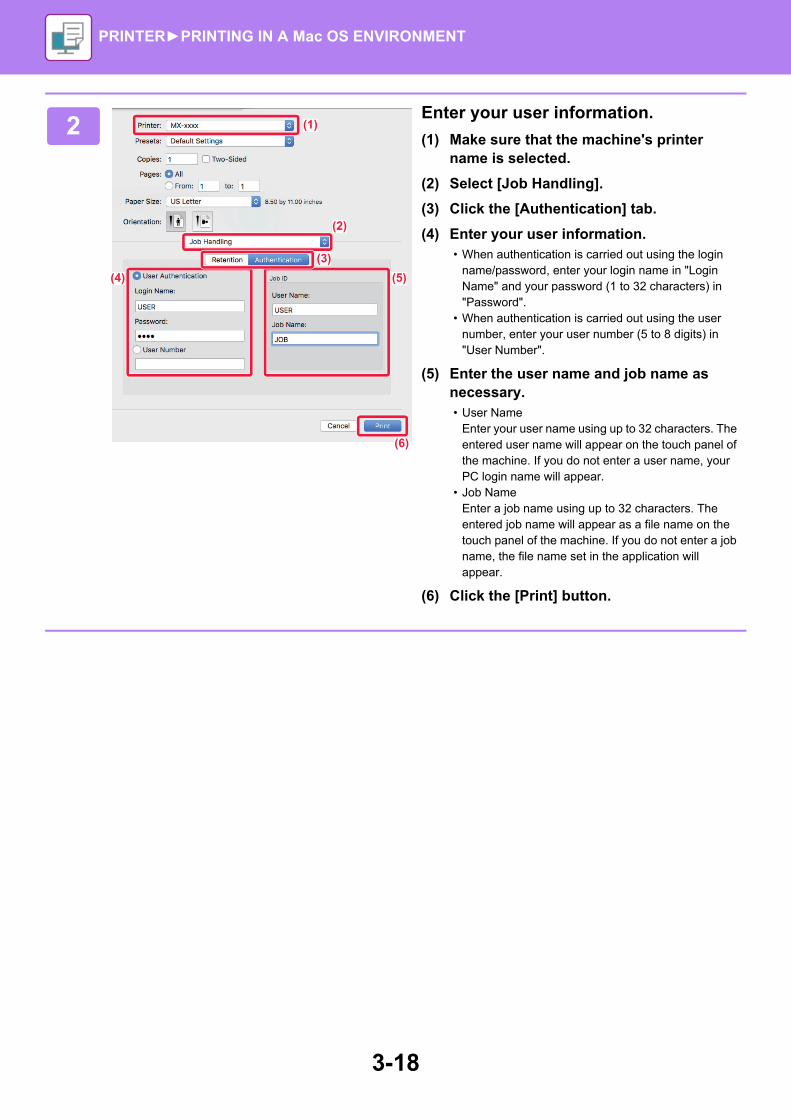
3-18
PRINTER►PRINTING IN A Mac OS ENVIRONMENT
2Enter your user information.
(1) Make sure that the machine's printer name is selected.
(2) Select [Job Handling].
(3) Click the [Authentication] tab.
(4) Enter your user information.• When authentication is carried out using the login
name/password, enter your login name in "Login Name" and your password (1 to 32 characters) in "Password".
• When authentication is carried out using the user number, enter your user number (5 to 8 digits) in "User Number".
(5) Enter the user name and job name as necessary.• User Name
Enter your user name using up to 32 characters. The entered user name will appear on the touch panel of the machine. If you do not enter a user name, your PC login name will appear.
• Job NameEnter a job name using up to 32 characters. The entered job name will appear as a file name on the touch panel of the machine. If you do not enter a job name, the file name set in the application will appear.
(6) Click the [Print] button.
(3)(4)
(1)
(2)
(5)
(6)

3-19
PRINTER►FREQUENTLY USED FUNCTIONS
SELECTING THE RESOLUTIONThe following two selections are available for "Print Mode" (resolution):
(1) Click the [Image Quality] tab.
(2) Select "Print Mode".
(1) Select [Printer Features] and then select [Advanced2].
(2) Select "Print Mode".
FREQUENTLY USED FUNCTIONS
600 dpi This mode is suitable for printing data such as regular text or a table.
600 dpi (High Quality) The print quality of photos and text are high.
Windows
Mac OS
(2)
(1)
(1)
(2)

3-20
PRINTER►FREQUENTLY USED FUNCTIONS
2-SIDED PRINTINGThe machine can print on both sides of the paper. This function is useful for many purposes, and is particularly convenient when you want to create a simple pamphlet. 2-sided printing also helps conserve paper.
(1) Click the [Main] tab.
(2) Select the paper orientation.
(3) Select [Long Edge] or [Short Edge].
Paper orientation
Print results
Portrait
Long Edge Short Edge
Landscape
Short Edge Long Edge
The pages are printed so that they can be bound at the left or right side.
The pages are printed so that they can be bound at the top.
Windows
If necessary, you can select the method of implementing 2-sided printing. Click the [Other Settings] button on the [Detailed Settings] tab, and select the mode from "Duplex Style".
(2)
(3)
(1)

3-21
PRINTER►FREQUENTLY USED FUNCTIONS
(1) Select [Layout].
(2) Select [Long-Edge binding] or [Short-Edge binding].
FITTING THE PRINT IMAGE TO THE PAPERThis function automatically enlarges or reduces the print image to match the size of the paper loaded in the machine.This function is convenient when enlarging an Invoice or A5 size document to letter or A4 size to make it easier to view, or when printing a document on paper that is different in size from the original document.
The following example explains how to print an Invoice (or A5) size document on a letter (or A4) size paper.
Mac OS
If A0, A1 or A2 size is selected in "Original Size", A4 (or Letter) is automatically selected in "Output Size".
(2)
(1)
Invoice (A5)
Letter (A4)

3-22
PRINTER►FREQUENTLY USED FUNCTIONS
(1) Click the [Main] tab.
(2) Select the original size from [Original Size] (for example: Invoice).
(3) Select the actual paper size to be used for printing from [Output Size] (for example: Letter).If the output size is larger than the original size, the printed image will be automatically enlarged.
(1) Check the paper size for the print image (for example: Invoice).
(2) Select [Paper Handling].
(3) Select [Scale to fit paper size].
(4) Select the actual paper size to be used for printing (for example: Letter).
Windows
Mac OS
(2)
(1)
(3)
(2)
(1)
(3)
(4)

3-23
PRINTER►FREQUENTLY USED FUNCTIONS
PRINTING MULTIPLE PAGES ON ONE PAGEThis function reduces the print image and prints multiple pages on a single sheet of paper. You can print only the first page in the original size and print multiple reduced pages on the subsequent sheets.For example, when [2-Up] (2 pages per sheet) or [4-Up] (4 pages per sheet) is selected, the following print results will be obtained, depending on the selected page order.This is convenient when you want to print multiple images such as photos on a single sheet of paper, and when you want to conserve paper. When used in combination with 2-sided printing, this function saves more paper.
N-Up(Pages per sheet)
Print results
Left to Right Right to LeftTop To Bottom(When the print orientation is landscape)
2-Up(2 pages per sheet)
N-Up(Pages per sheet)
Right, and Down Down, and Right Left, and Down Down, and Left
4-Up(4 pages per sheet)
• [N-Up] that can be set on the [Layout] tab can also be set on the [Main] tab. ("Order" can only be set in the [Layout] tab.)
• Note the following when printing multiple pages on one sheet:
• The page orders for 6-Up, 8-Up, 9-Up, and 16-Up are the same as for 4-Up.
• In a Windows environment, the page order can be viewed in the print image in the printer driver properties window.
• In a Mac OS environment, the page orders are displayed as selections.
• In a Mac OS environment, the number of pages that can be printed on a single sheet is 2, 4, 6, 9, or 16. Printing 8 pages on one sheet is not supported.
• For information on the "Repeat" function, see "PRINT THE SAME IMAGE IN TILE PATTERN (REPEAT PRINT) (page 3-60)".
The function for printing only the first page normally can only be used in the PCL6 printer driver.

3-24
PRINTER►FREQUENTLY USED FUNCTIONS
(1) Click the [Layout] tab.
(2) Select the number of pages per sheet.
(3) Select the order of the pages.
(4) If you wish to print borderlines, click the [Border] checkbox so that the checkmark appears.• To print the first page normally (as a cover), select the [N-Up with cover] checkbox ( ). (PCL6 only)• When [100% N-Up] is selected ( ) for jobs such as N-Up copying of two A5 size pages onto one A4 sheet, the pages will be
printed at the full size of the original. If you select [Border] at this time, only the border will be printed.
(1) Select [Layout].
(2) Select the number of pages per sheet.
(3) Select the order of the pages.
(4) If you wish to print borderlines, select the desired type of borderline.
Windows
Mac OS
(3)
(1)
(2)
(4)
(2)
(1)
(3)
(4)

3-25
PRINTER►FREQUENTLY USED FUNCTIONS
PRINTING WHILE SKIPPING BLANK PAGESIf the scanned original contains blank pages, the blank pages are skipped during printing. The machine detects blank pages and does not print them. This eliminates unnecessary printing without you having to check for blank pages before printing.
(1) Click the [Detailed Settings] tab.
(2) Select [On] in [Disable Blank Page Print].
This function is available in a Windows environment.
• Depending on the state of the original, some pages that are not blank may be detected as blank pages and thus not being printed, or some pages that are blank may not be detected as blank and thus printed.
• In N-Up Print, blank pages are not excluded and are printed.
Windows
Blank page
Do not print blank pages
(2)
(1)
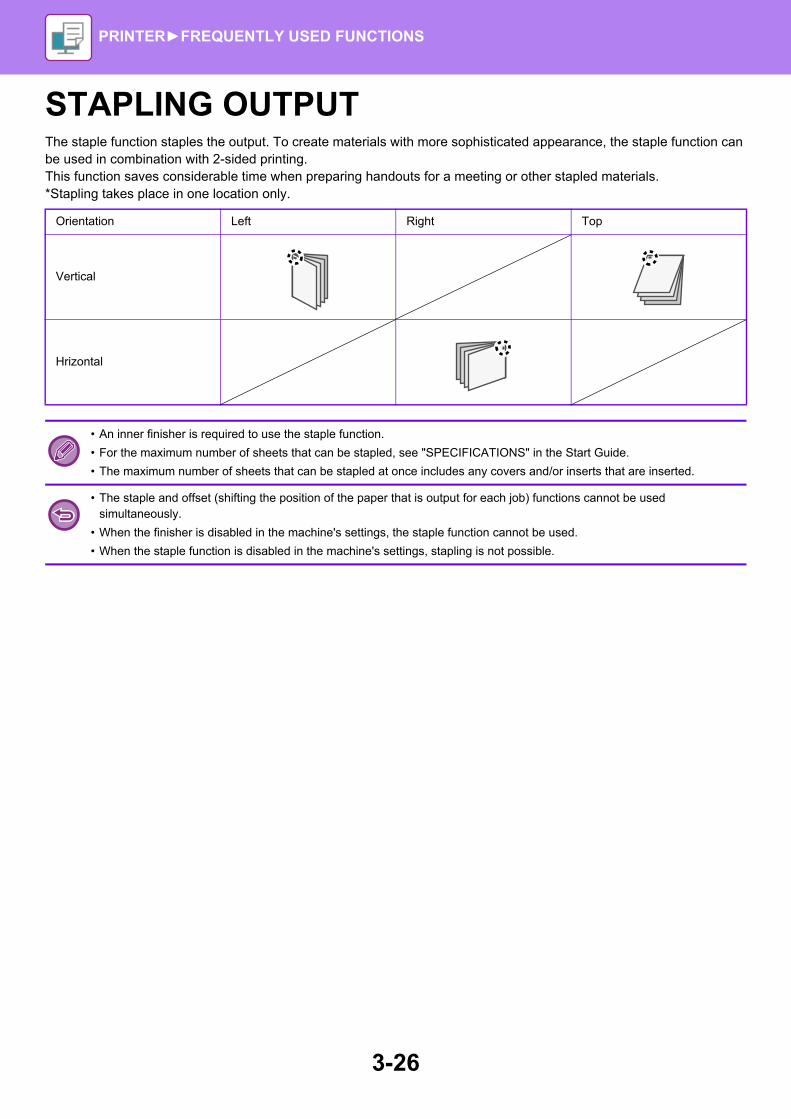
3-26
PRINTER►FREQUENTLY USED FUNCTIONS
STAPLING OUTPUTThe staple function staples the output. To create materials with more sophisticated appearance, the staple function can be used in combination with 2-sided printing.This function saves considerable time when preparing handouts for a meeting or other stapled materials.*Stapling takes place in one location only.
Orientation Left Right Top
Vertical
Hrizontal
• An inner finisher is required to use the staple function.
• For the maximum number of sheets that can be stapled, see "SPECIFICATIONS" in the Start Guide.
• The maximum number of sheets that can be stapled at once includes any covers and/or inserts that are inserted.
• The staple and offset (shifting the position of the paper that is output for each job) functions cannot be used simultaneously.
• When the finisher is disabled in the machine's settings, the staple function cannot be used.
• When the staple function is disabled in the machine's settings, stapling is not possible.
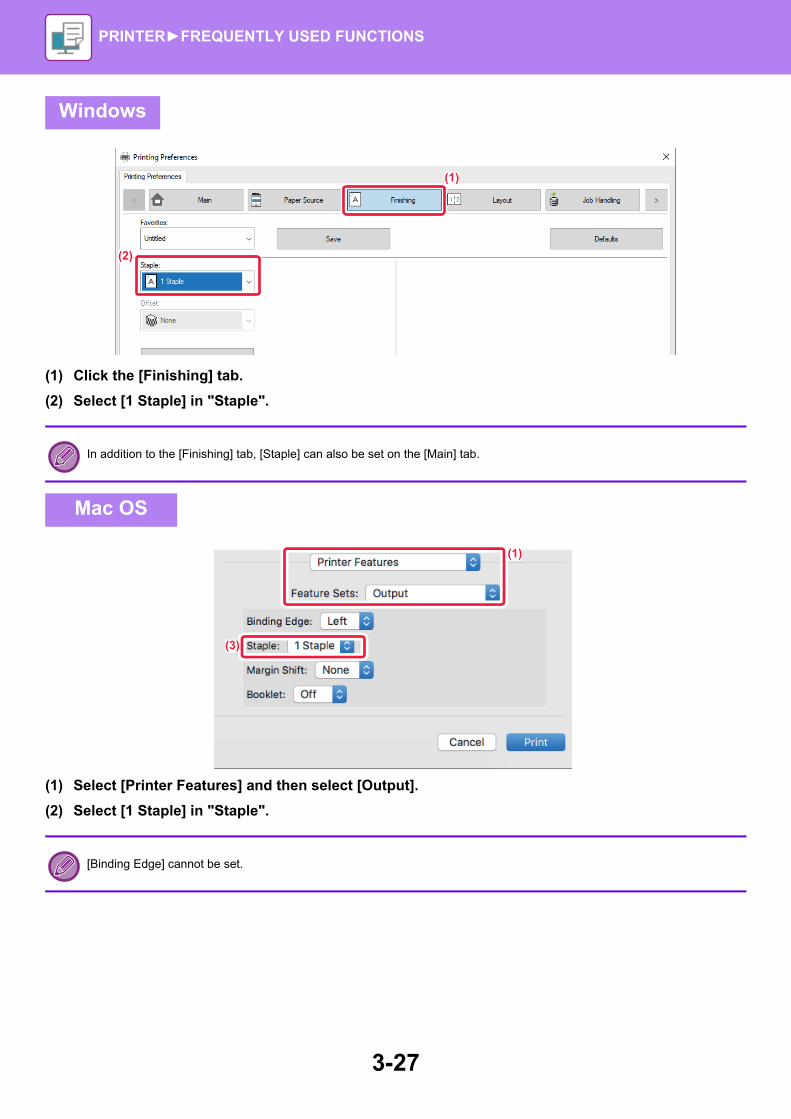
3-27
PRINTER►FREQUENTLY USED FUNCTIONS
(1) Click the [Finishing] tab.
(2) Select [1 Staple] in "Staple".
(1) Select [Printer Features] and then select [Output].
(2) Select [1 Staple] in "Staple".
Windows
In addition to the [Finishing] tab, [Staple] can also be set on the [Main] tab.
Mac OS
[Binding Edge] cannot be set.
(2)
(1)
(3)
(1)

3-28
PRINTER►CONVENIENT PRINTING FUNCTIONS
CONVENIENT FUNCTIONS FOR CREATING PAMPHLETS AND POSTERS
CREATE A PAMPHLET (BOOKLET)The pamphlet function prints on the front and back of each sheet of paper so that the sheets can be folded and bound to create a pamphlet.
(1) Click the [Layout] tab.(2) Select [Standard] in "Booklet".
The printed image will be enlarged or reduced to fit the paper selected in "Output Size".
(3) Select the specified output size and the binding edge.
CONVENIENT PRINTING FUNCTIONS
Windows
(2)
(1)
(3)

3-29
PRINTER►CONVENIENT PRINTING FUNCTIONS
(1) Select [Printer Features] and then select [Output].
(2) Select "Binding Edge".
(3) Select [Off] or [2-Up].
Mac OS
(2)
(3)
(1)

3-30
PRINTER►CONVENIENT PRINTING FUNCTIONS
PRINTING WITH MARGIN SHIFT SETTING (MARGIN)This function shifts the print image to increase the margin at the left, the right, or the top of the paper.
By shifting the image, the part of the image that is outside the print area will not be printed.
(1) Click the [Layout] tab.
(2) Click the [Print Position] button.
(3) Select [Margin Shift].
(4) Select the shift width.Select from the "Margin Shift" menu. If you wish to configure another numeric setting, select the setting and click buttons or directly enter the number.
Windows
(2)
(1)
(3) (4)

3-31
PRINTER►CONVENIENT PRINTING FUNCTIONS
(1) Select [Printer Features] and then select [Output].
(2) Select "Binding Edge".
(3) Select "Margin Shift".
Mac OS
(2)
(3)
(1)
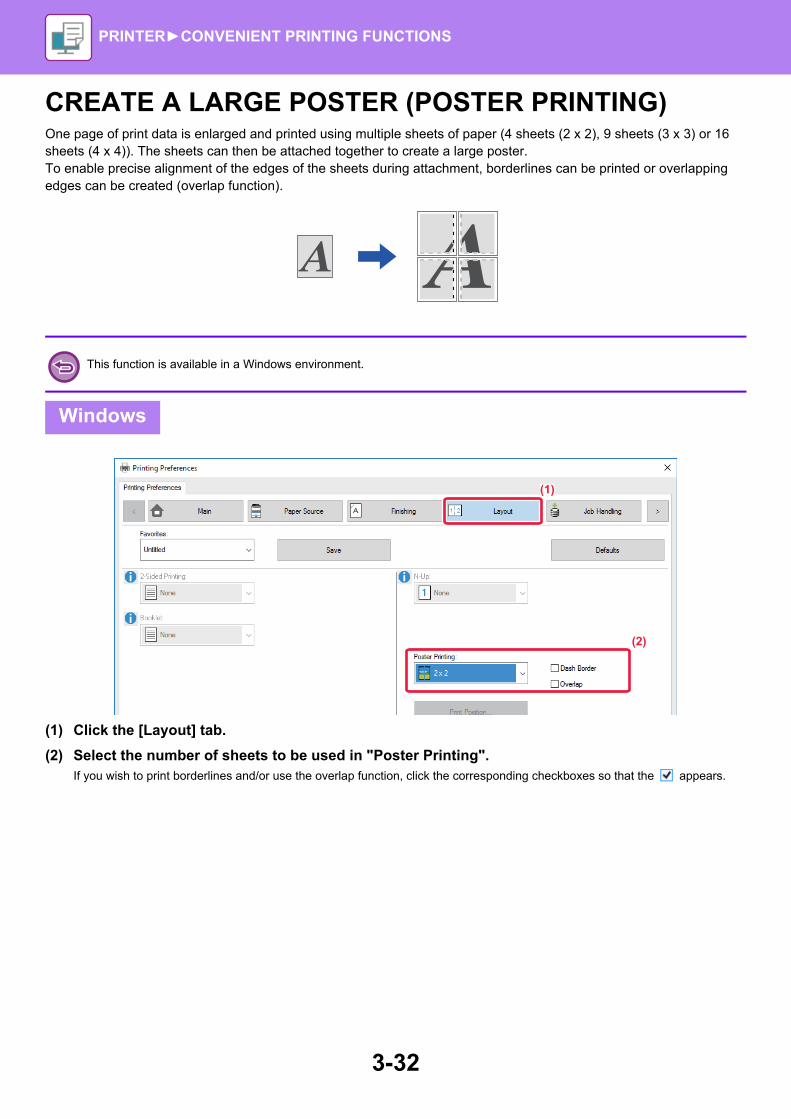
3-32
PRINTER►CONVENIENT PRINTING FUNCTIONS
CREATE A LARGE POSTER (POSTER PRINTING)One page of print data is enlarged and printed using multiple sheets of paper (4 sheets (2 x 2), 9 sheets (3 x 3) or 16 sheets (4 x 4)). The sheets can then be attached together to create a large poster.To enable precise alignment of the edges of the sheets during attachment, borderlines can be printed or overlapping edges can be created (overlap function).
(1) Click the [Layout] tab.
(2) Select the number of sheets to be used in "Poster Printing".If you wish to print borderlines and/or use the overlap function, click the corresponding checkboxes so that the appears.
This function is available in a Windows environment.
Windows
(2)
(1)

3-33
PRINTER►CONVENIENT PRINTING FUNCTIONS
FUNCTIONS TO ADJUST THE SIZE AND ORIENTATION OF THE IMAGE
ADJUST PRINT POSITION ON ODD AND EVEN PAGES SEPARATELY (PRINT POSITION)This function sets different print positions (margins) separately for odd and even pages and prints the pages.
(1) Click the [Layout] tab.
(2) Click the [Print Position] button.
(3) Select [Custom].
(4) Set the amount of shifting of the print position for odd-numbered pages and even-numbered pages.
(5) Click the [OK] button.
This function is available in a Windows environment.
Windows
(2)
(1)
(3)(4)
(5)

3-34
PRINTER►CONVENIENT PRINTING FUNCTIONS
ROTATING THE PRINT IMAGE 180 DEGREES (ROTATE 180 DEGREES)This feature rotates the image 180 degrees so that it can be printed correctly on paper that can be loaded in only one orientation (such as envelopes or paper with punch holes).
(1) Click the [Main] tab.
(2) Select [Portrait (Rotated)] or [Landscape (Rotated)] in "Orientation".
(1) Select [Layout]
(2) Select the [Reverse page orientation] checkbox so that appears.
Windows
Mac OS
ABCD
ABCD
(1)
(2)
(2)
(1)

3-35
PRINTER►CONVENIENT PRINTING FUNCTIONS
ENLARGING/REDUCING THE PRINT IMAGE (ZOOM SETTING/ENLARGE OR REDUCE)This function enlarges or reduces the image to a selected percentage.This allows you to enlarge a small image or add margins to the paper by slightly reducing an image.
(1) Click the [Main] tab.
(2) Click the [Zoom] checkbox so that appears, and click the [Settings] button.
(3) Enter the percentage.By clicking the button, you can specify the value in increments of 1%. In addition, select [Upper Left] or [Center] for the base point on the paper.
(4) Click the [OK] button.
When using the PS printer driver (Windows), you can set the width and length percentages separately to change the proportions of the image.
Windows
(2)
(1)
(3)
(4)

3-36
PRINTER►CONVENIENT PRINTING FUNCTIONS
(1) Select [Page Setup] from the [File] menu and enter the ratio (%).
(2) Click the [OK] button.
Mac OS
(2)
(1)

3-37
PRINTER►CONVENIENT PRINTING FUNCTIONS
ADJUST THE LINE THICKNESS (WIDTH)
Adjusting line widths used in data such as CADThis function increases the thickness of the entire line when the print lines are not clear in CAD or other special applications.When the data includes lines of varying widths, you can print all lines at the minimum width as necessary.
(1) Click the [Image Quality] tab.
(2) Click the [Line Width] button.
(3) Set the line thickness and click the [OK] button.
• This function is available in a Windows environment.
• This function can be used when the PCL6 printer driver is used.
• When printing from an application that processes lines as raster graphics, line widths cannot be adjusted.
Windows
• The units of line-width adjustment can be set to "Fixed Width" or "Ratio".Select from the "Unit" menu.
• To print all line data in the minimum line width, click the [Minimum Line Width] checkbox.
(2)
(1)
(3)

3-38
PRINTER►CONVENIENT PRINTING FUNCTIONS
Thickening fine lines in ExcelWhen fine border lines in Excel do not print correctly, you can make the lines thicker.
(1) Click the [Detailed Settings] tab.(2) Click the [Other Settings] button.(3) Select the [Thicken Fine Lines] checkbox ( ).
• This function is available in a Windows environment.
• This function can be used when the PCL6 printer driver is used.
• Normally this setting is not necessary.
Windows
(2)
(1)
(3)

3-39
PRINTER►CONVENIENT PRINTING FUNCTIONS
Adjusting the thickness of text and linesYou can make text and lines thicker or thinner. You can also make edges smoother or sharper.
(1) Click the [Detailed Settings] tab.(2) Click the [Other Settings] button.(3) Specify the settings.
This function is available in a Windows environment.
Windows
Item Description
Text/Line control Text You can make characters and text thicker or thinner.
Graphics
Text+Graphics
Text+Graphics+Photo
Text/Line Knockout control
Text You can make knockout text and lines thicker.
Text+Graphics
Image Enhancement Text You can make the edges of text and graphics smoother or sharper.
Text+Graphics
Text+knockout text
Text+Graphics+knockout text
Text+Graphics+knockout
(2)
(1)
(3)

3-40
PRINTER►CONVENIENT PRINTING FUNCTIONS
PRINT A MIRROR-IMAGE (MIRROR-IMAGE REVERSE/VISUAL EFFECTS)The image is reversed to create a mirror image.This function is conveniently used to print a design for a woodblock print or other printing medium.
(1) Click the [Detailed Settings] tab.(2) If you wish to reverse the image horizontally, select [Horizontal]. If you wish to reverse the image
vertically, select [Vertical].
(1) Select [Layout].(2) Select the [Flip horizontally] checkbox ( ).
In a Windows environment, this function is only available when using the PS printer driver.
Windows
Mac OS
BB
(2)
(1)
(2)
(1)

3-41
PRINTER►CONVENIENT PRINTING FUNCTIONS
IMAGE ADJUSTING FUNCTION
ADJUST THE BRIGHTNESS AND CONTRAST OF THE IMAGE (IMAGE ADJUSTMENT)This function adjusts the brightness and contrast in the print settings when a photo or other image is printed.This function makes simple corrections even if image editing software is not installed on your computer.
(1) Click the [Image Quality] tab.
(2) Click the [Image Adjustment] button.
(3) To adjust objects (text, graphics, photos) individually, select the [Adjust at each object] checkbox ( ) and select the object.
(4) Drag the slide bar or click buttons to adjust the image.
This function is available in a Windows environment.
Windows
(2)
(1)
(3)
(4)

3-42
PRINTER►CONVENIENT PRINTING FUNCTIONS
PRINTING FAINT TEXT AND LINES IN BLACK (TEXT TO BLACK/VECTOR TO BLACK)When printing a color image in grayscale, text and lines that are drawn in faint colors are printed in black. This function allows you to bring out color text and lines that are faint and difficult to see when printed in grayscale.
(1) Click the [Image Quality] tab.
(2) Select the [Text To Black] checkbox and/or the [Vector To Black] checkbox so that appears.• When [Text To Black] is selected, all text other than white text is printed in black.• When [Vector To Black] is selected, all vector graphics other than white lines and areas are printed in black.
• Raster data such as bitmap images cannot be adjusted.
• This function is available in a Windows environment.
Windows
ABCD ABCD
(2)
(1)

3-43
PRINTER►CONVENIENT PRINTING FUNCTIONS
SELECTING IMAGE SETTINGS TO MATCH THE IMAGE TYPEPreset settings are available in the machine's printer driver for various uses.
The following color management settings are available.
(1) Click the [Image Quality] tab.
(2) Specify the settings.
Graphics mode Select the graphics mode from "Raster" or "Vector".
Bitmap compression The data compression ratio of bitmap is set. If the ratio is higher, the image quality becomes lower.
Screening Select the screening to modify the image to suit specific preferences, according to the appropriate image processing method.
Sharpness This setting creates a sharper image with clear outlines, or smooths the image for a softer effect.
Smoothing Resolution enhancement techniques (RETs) are used to smoothen the outlines of images.This setting processes the image to increase the resolution and smooth jagged image borders.
Windows
(1)
(2)

3-44
PRINTER►CONVENIENT PRINTING FUNCTIONS
(1) Select [Printer Features].
(2) Click the [Advanced2] tab.
(3) Specify the settings.
Mac OS
(2)
(1)
(3)
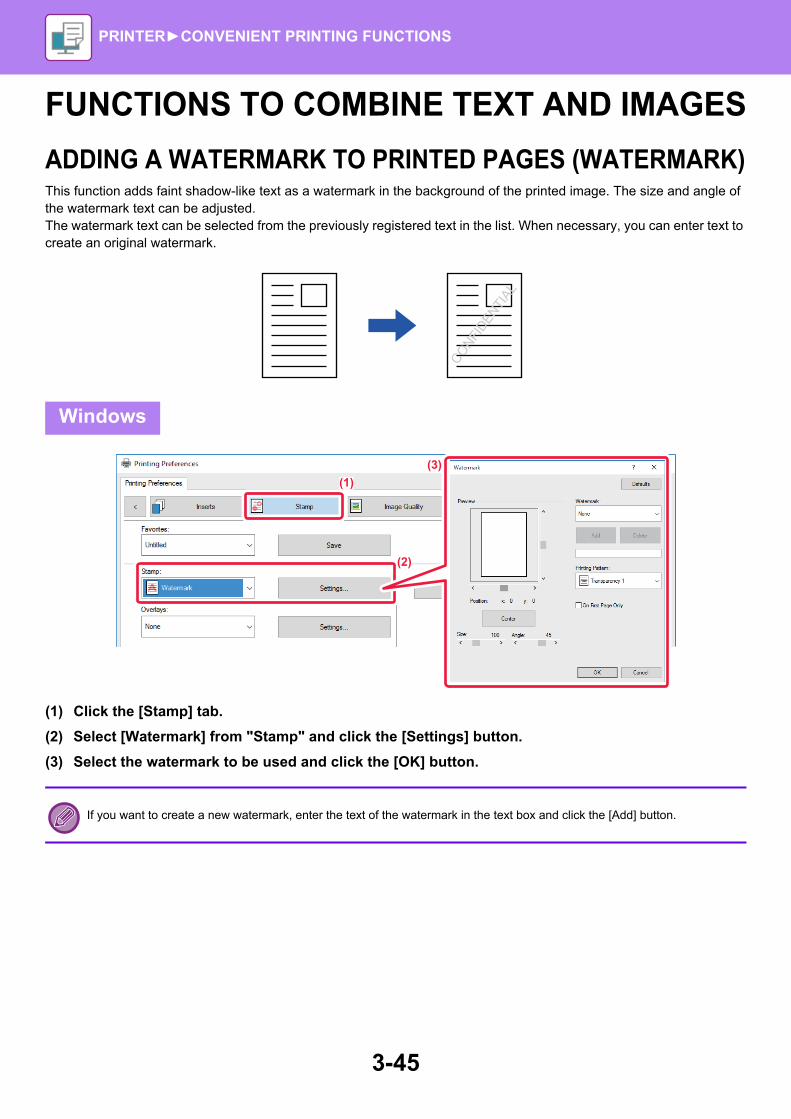
3-45
PRINTER►CONVENIENT PRINTING FUNCTIONS
FUNCTIONS TO COMBINE TEXT AND IMAGES
ADDING A WATERMARK TO PRINTED PAGES (WATERMARK)This function adds faint shadow-like text as a watermark in the background of the printed image. The size and angle of the watermark text can be adjusted.The watermark text can be selected from the previously registered text in the list. When necessary, you can enter text to create an original watermark.
(1) Click the [Stamp] tab.
(2) Select [Watermark] from "Stamp" and click the [Settings] button.
(3) Select the watermark to be used and click the [OK] button.
Windows
If you want to create a new watermark, enter the text of the watermark in the text box and click the [Add] button.
CONFIDEN
TIAL
(2)
(1)(3)
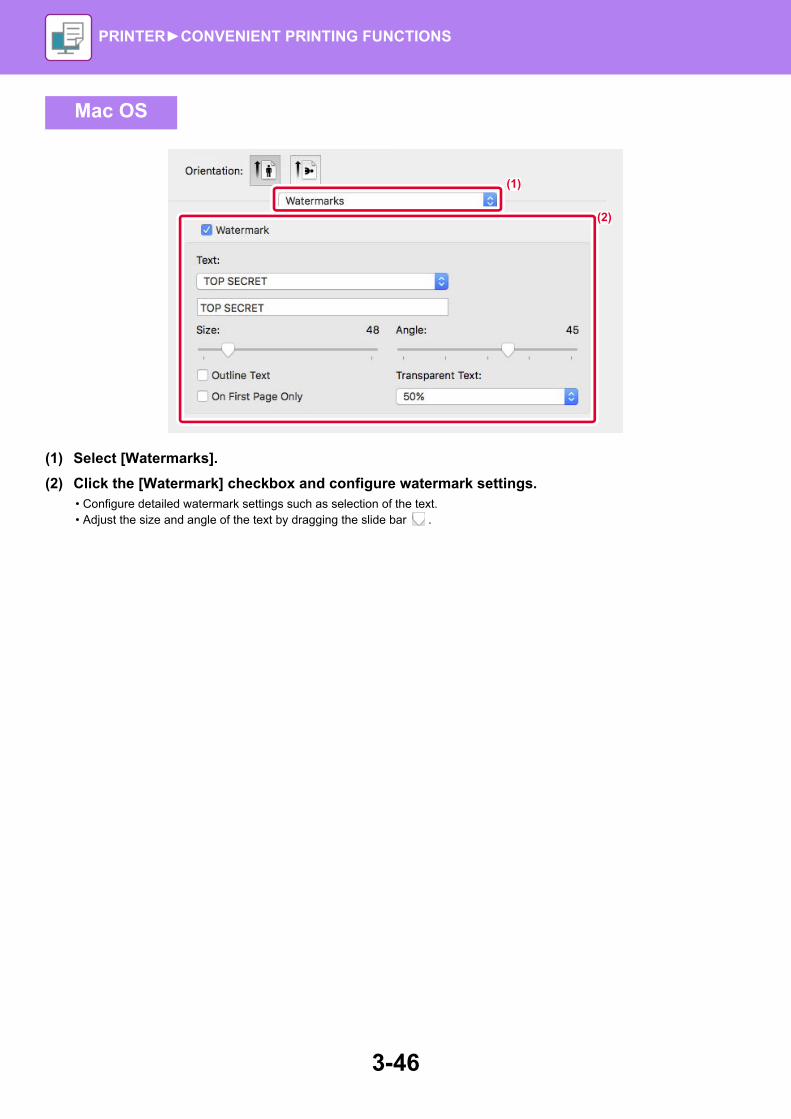
3-46
PRINTER►CONVENIENT PRINTING FUNCTIONS
(1) Select [Watermarks].
(2) Click the [Watermark] checkbox and configure watermark settings.• Configure detailed watermark settings such as selection of the text.• Adjust the size and angle of the text by dragging the slide bar .
Mac OS
(2)
(1)

3-47
PRINTER►CONVENIENT PRINTING FUNCTIONS
PRINTING AN IMAGE OVER THE PRINT DATA (IMAGE STAMP)This function prints a bitmap or JPEG image stored on your PC over the print data.This function prints a frequently used image or an icon of your own creation as if it is stamped on the print data. The size, position, and angle of the image can be adjusted.
(1) Click the [Stamp] tab.
(2) Select [Image Stamp] from "Stamp" and click the [Settings] button.
(3) Select the image stamp to be used, and click the [OK] button.• If an image stamp has already been stored, it can be selected from the menu.• If you have not stored an image stamp, click the [Image File], select the file you wish to use for the image stamp, and click the
[Add] button.
This function is available in a Windows environment.
Windows
MEMO
MEMO
(2)
(1)
(3)

3-48
PRINTER►CONVENIENT PRINTING FUNCTIONS
REGISTERING A CUSTOM IMAGEThis function registers images used as custom images from the printer driver to the machine.
(1) Click the [Detailed Settings] tab.
(2) Click the [Custom Image Registration] button.
(3) Select the registration type and name of the custom image.When [Custom stamp] is selected in "Registered Type", non-transparent stamp image is registered. When [Custom watermark] is selected, transparent watermark image is registered.
• This function is available in a Windows environment.
• This function can be used when the PCL6 printer driver is used.
To prohibit the registration of custom images:In "Settings (administrator)", select [System Settings] → [Common Settings] → [Enable/Disable Settings] → [Disabling Registration of Custom Image] and configure the setting.
Windows
If you have attempted to store multiple pages of data, only the first page will be stored.
(2)
(1)(3)

3-49
PRINTER►CONVENIENT PRINTING FUNCTIONS
OVERLAY A FIXED FORM ON THE PRINT DATA (OVERLAYS)This function overlays data on a fixed form you have prepared.By creating table rulings or a decorative frame in an application different from that of the text file and registering the data as an overlay file, an attractive print result can be easily obtained without the need for complex manipulations.
Creating an overlay file
(1) Open the driver properties window from the application that is used for creating overlay data.
(2) Click the [Stamp] tab.
(3) Click the [Settings] button.
(4) Click the [New] button and specify the name and folder to be used for the overlay file that you wish to create.The file will be created when the settings are completed and printing is started.
This function is available in a Windows environment.
Windows
XXXX
XXX 1 100XXXX 10 150XXX 0 120XXXX 10 250
XXXX
XXX 1 100XXXX 10 150XXX 0 120XXXX 10 250
(3)
(2)
(4)

3-50
PRINTER►CONVENIENT PRINTING FUNCTIONS
Printing with an overlay file
(1) Open the driver properties window from the application that is used for printing with an overlay file.
(2) Click the [Stamp] tab.
(3) Select an overlay file.A previously created or stored overlay file can be selected from the menu.
• When printing is started, a confirmation message will appear. The overlay file will not be created until the [Yes] button is clicked.
• When you click the [Open] button, the existing overlay file is registered.
(3)
(2)

3-51
PRINTER►CONVENIENT PRINTING FUNCTIONS
ADDING THE NUMBER OF COPIES (COPIES STAMP)You can add the number of copies to the header or footer of the print data. You can also set a copies number and print position.
(1) Click the [Stamp] tab.
(2) Click the [Copies Stamp] button.
(3) Select the settings, and click the [OK] button.
This function is available in a Windows environment.
(2)
(1)
(3)

3-52
PRINTER►CONVENIENT PRINTING FUNCTIONS
PRINT FUNCTIONS FOR SPECIAL PURPOSES
PRINTING SPECIFIC PAGES ON DIFFERENT PAPER (DIFFERENT PAPER)In a Windows environmentThe front and back covers and specified pages of a document are printed on paper that is different from the other pages.Use this function when you wish to print the front and back covers on heavy paper, or insert colored paper or a different paper type at specified pages.As necessary, paper can be inserted as insertion sheets where nothing is printed.
In a Mac OS environmentThe front and back covers are printed using paper that is different from the other pages. This function can be used, for example, when you want to print only the front cover and last page on thick paper.
(1) Click the [Inserts] tab.
(2) Select [Covers/Inserts] from [Inserts Option], and click the [Settings] button.
(3) Select the paper insertion settings.
Windows
5
4
3
2
1
(2)
(1)(3)

3-53
PRINTER►CONVENIENT PRINTING FUNCTIONS
• Select the insertion position, paper source, and printing method from the corresponding menus.• Click the [Add] button and your settings will appear in "Information".• When you have finished selecting settings, click the [Save] button in "Favorites" to save the settings.
(1) Select [Printer Features].
(2) Select [Covers].
(3) Select the cover insertion settings.Select the print setting, paper tray, and paper type for the front and back covers.
• When [Bypass Tray] is selected in "Paper Tray", be sure to select the "Paper Type" and load that type of paper in the bypass tray.
• When [Other Page] is selected for "Insert Position", specify the insert position by directly entering a page number. When "Printing Method" is set to [2-Sided Printing], the specified page and the next page after it will be printed on the front and reverse side of the paper, and thus an insert setting at a page printed on the reverse side will not be effective.
Mac OS
(2)
(1)
(3)

3-54
PRINTER►CONVENIENT PRINTING FUNCTIONS
ADDING INSERTS WHEN PRINTING ON TRANSPARENCY FILM (TRANSPARENCY INSERTS)When transparency film is used for printing, this function prevents the sheets of transparency film from sticking together by inserting a sheet of paper between each sheet of film. As necessary, the same content as that printed on each sheet of transparency film is also printed on the corresponding sheet of inserted paper.
(1) Click the [Inserts] tab.
(2) Select [Transparency Inserts] and click the [Settings] button.Select the print setting, paper tray, and paper type for the front and back covers.
(3) Select the transparency insert settings.When the [Printed] checkbox is selected to set to , the same content as that printed on the transparency film is also printed on the insert. Select the paper source and type if needed.
Windows
Set the paper type of the bypass tray to [Transparency] and load transparency film into the bypass tray.
CBA
(2)
(1)
(3)

3-55
PRINTER►CONVENIENT PRINTING FUNCTIONS
(1) Select [Printer Features].
(2) Select [Transparency Inserts] in "Feature Sets".
(3) Select the transparency insert settings.When [On (Printed)] is selected from "Transparency Inserts", the same content as that printed on the transparency film is also printed on the insert. Select the paper source and type if needed.
Mac OS
Set the paper type of the bypass tray to [Transparency] and load transparency film into the bypass tray.
(2)
(1)
(3)

3-56
PRINTER►CONVENIENT PRINTING FUNCTIONS
INSERTING SEPARATOR PAGES BETWEEN JOBS OR COPIESYou can insert separator pages between jobs or the specified number of copies.
(1) Click the [Finishing] tab.
(2) Click the [Separator Page] button.
(3) Changing the settings• Select the paper tray and paper type from "Paper Selection", and specify the separator page position in "Insert Position".• To add a separator page each time printing of the set number of copies is completed, select [Per Copies] in "Insert Position".• For example, if you are printing 10 copies and you select "5", a separator page will be added after the 5th copy and after the
10th copy.
This function is available in a Windows environment.
Windows
When the bypass tray is selected, be sure to select the "Paper Type".
32
1
32
1
3
2
1
3
2
1
Job 1 Job 2
Job 2
Job 1
(2)
(3)
(1)

3-57
PRINTER►CONVENIENT PRINTING FUNCTIONS
PRINTING A CARBON COPY (CARBON COPY)This function prints an additional copy of the print image on paper that is of the same size but from a different paper tray.For example, if carbon copy print is selected when plain paper is loaded into tray 1 and colored paper is loaded into tray 2, a print result similar to a carbon copy slip is obtained with a single selection of the print command. If plain paper is loaded into tray 1 and recycled paper is loaded into tray 2 as necessary, selecting Carbon Copy simultaneously prints one copy for presentation and one copy as a duplicate.
(1) Click the [Inserts] tab.
(2) Select [Carbon Copy] from "Inserts Option"and click the [Settings] button.
(3) Select the tray for the first copy from "Top Copy", and then select the tray for the carbon copy from "Carbon Copy".
This function is available in a Windows environment.
Windows
AAA
A
(2)
(1)
(3)

3-58
PRINTER►CONVENIENT PRINTING FUNCTIONS
TWO-SIDED PRINTING WITH SPECIFIC PAGES PRINTED ON THE FRONT SIDE (CHAPTER INSERTS)This function prints specific pages on the front side of the paper.When you specify a page (such as a chapter cover page) to be printed on the front side of the paper, it is printed on the front side of the next sheet even if it would normally be printed on the reverse side of the paper.
Example: When pages 4 and 8 are specified as page settings. (Back is blank)
(1) Click the [Layout] tab.
(2) Select the 2-Sided Printing. For information on the "2-Sided Printing" setting, see "2-SIDED PRINTING (page 3-20)".
(3) Enter the page numbers of the initial pages of the chapters, separating the numbers with commas.
• This function is available in a Windows environment.
• This function can be used when the PCL6 printer driver is used.
Windows
(2) (3)
(1)

3-59
PRINTER►CONVENIENT PRINTING FUNCTIONS
INSERT PRESET DATA BEFORE OR AFTER EACH PAGE (PAGE INTERLEAVE)This function inserts a preset data item into every page during printing.You can easily create documents with opened page spread that is made up of text on the left-hand page and a memo space on the right-hand page.
(1) Click the [Stamp] tab.
(2) Click the [Settings] button.
(3) Select [Page Interleave] from the "Printing Method".
(4) Set the overlay data to be inserted and set its insertion position.
• This function is available in a Windows environment.
• This function can be used when the PCL6 printer driver is used.
Windows
You have to create page data to be inserted in advance.For the procedure for creating page data, see "Creating an overlay file (page 3-49)" in "OVERLAY A FIXED FORM ON THE PRINT DATA (OVERLAYS) (page 3-49)".
Pre-set data
(2)
(1)
(3) (4)

3-60
PRINTER►CONVENIENT PRINTING FUNCTIONS
PRINT THE SAME IMAGE IN TILE PATTERN (REPEAT PRINT)This function prints the same image in tile pattern on a sheet. This is useful for producing name cards and stickers.
(1) Click the [Main] tab.
(2) Select the repeat count in "N-Up".
• This function is available in a Windows environment.
• This function can be used when the PCL6 printer driver is used.
Windows
(2)
(1)

3-61
PRINTER►CONVENIENT PRINTING FUNCTIONS
PRINTING PATTERN DATA (HIDDEN PATTERN PRINT)This function prints pattern data such as "DO NOT COPY" behind the print data.If paper with pattern data is duplicated, the pattern data emerges in the background, which will help to prevent information from being leaked through unauthorized document copying.
(1) Click the [Stamp] tab.
(2) Click the [Hidden Pattern] button.
(3) Configure the settings for hidden pattern printing and click the [OK] button.
• This function is available in a Windows environment.
• This function can be used when the PCL6 printer driver is used.
Windows
• "Hidden Pattern" is a function provided for the purpose of deterring unauthorized printing. It does not guarantee the prevention of information leakage.
• Text may not be completely hidden on an output sheet with a pattern print under certain machine conditions. In "Settings (administrator)", select [Security Settings] → [Hidden Pattern Print Setting] → [Contrast] if this is the case.
• The hidden pattern may not emerge on copies with certain types of devices or under certain setting conditions used to copy an output sheet with a pattern print.
ABCD
ABCD
DO’NOT COPY
DO’NOT COPYABCD
(2)
(1) (3)

3-62
PRINTER►CONVENIENT PRINTING FUNCTIONS
CHANGING THE RENDERING METHOD AND PRINTING JPEG IMAGES (USE DRIVER TO RENDER JPEGS)In some situations, a document containing a JPEG image may not be printed correctly. This can be solved by changing the way the JPEG image is rendered.When you print an original containing JPEG images, this function allows you to select whether the images are rendered in the printer driver or the machine.
(1) Click the [Detailed Settings] tab.
(2) Click the [Other Settings] button.
(3) Click the [Use driver to render JPEGs] checkbox so that appears.
(4) Click the [OK] button.
• This function is available in a Windows environment.
• When images are rendered in the printer driver, it may take time until the printing is completed.
Windows
(2)
(1)
(3)
(4)

3-63
PRINTER►CONVENIENT PRINTING FUNCTIONS
MAXIMIZING THE PRINT AREA ON THE PAPER (PRINT AREA)By maximizing the print area, you can print on the full paper size.
(1) Click the [Detailed Settings] tab.(2) Click the [Other Settings] button.
(3) Select [Maximum] from the "Printable Area".
(4) Click the [OK] button.
This function is available in a Windows environment.
Even when the print area is maximized, edges may be cut off.
Windows
(2)
(1)
(3)
(4)

3-64
PRINTER►CONVENIENT PRINTING FUNCTIONS
CONVENIENT PRINTER FUNCTIONS
USING TWO MACHINES TO PRINT A LARGE PRINT JOB (TANDEM PRINT)To use this function, two machines that can perform tandem printing are required.Two machines connected to the same network are used to run a large print job in parallel. This function reduces the printing time when you handle a large number of prints.
To use the tandem print function, the IP address of the client machine must be registered in the printer driver.
• In a Windows environment, this is accomplished automatically by clicking the [Auto Configuration] button on the [Configuration] tab of the printer driver.
• In Mac OS 10.6 to 10.8, this is accomplished automatically by clicking the [Update] button (or [Tandem Settings] button) on the "Tandem Print" screen. In Mac OS 10.9, enter the IP address of the client machine.
This function cannot be used in Mac OS X 10.10 or later.
Example: Printing four sets of copies
2 sets of copies
2 sets of copies

3-65
PRINTER►CONVENIENT PRINTING FUNCTIONS
(1) Click the [Detailed Settings] tab.(2) Select [On] in "Tandem Print".
(1) Select [Tandem Print].
(2) Click the [Tandem Print] checkbox so that appears.
Windows
The tandem print function can be used only when the printer driver has been installed using "Custom Installation" with [LPR Direct Print (Specify Address/Auto Search)] selected and with the [Yes] checkbox selected for "Do you want to use Tandem Print function?".
Mac OS
To use the tandem print function, you must select the protocol to be used as instructed in the message that appears when you add the printer driver in the "Printer Setup Utility".
(2)
(1)
(2)
(1)

3-66
PRINTER►CONVENIENT PRINTING FUNCTIONS
SAVING AND USING PRINT FILES (DOCUMENT FILING)This function stores a print job as a file on the machine's hard drive, allowing the job to be printed from the touch panel when needed. The location for storing a file can be selected to prevent the file from being mixed together with files of other users.• Hold Only
This setting is used to hold a print job on the machine's hard drive without printing it.• Hold After Print
This setting is used to hold a print job on the machine's hard drive after it is printed.• Sample Print
When a print job is sent to the machine, only the first set of copies is printed. After checking the contents of the first set of copies, you can print the remaining sets from the operation panel of the machine. This prevents the occurrence of excessive misprints.
(1) Click the [Job Handling] tab.
(2) Select the function from the "Document Filing".
(3) Select the folder for storing the file in “Stored to”.To enter a password (5 to 8 digit number), click the [PIN Code] checkbox so that the checkmark appears.To create a public PDF for PC browsing, select the [Create PDF for PC Browsing] checkbox ( ).
• For the procedure for printing files stored on the machine's hard drive, see "FILE PRINTING (page 6-22)" in "Document Filing".
• When printing from a PC, you can set a password (5 to 8 digits) to maintain the confidentiality of information in a stored file.When a password is set, the password must be entered to print data.
• [Document Filing] that can be set on the [Job Handling] tab can also be set on the [Main] tab.
Windows
HDD
(2)
(1)
(3)

3-67
PRINTER►CONVENIENT PRINTING FUNCTIONS
(1) Select [Job Handling].
(2) Select [Retention].
(3) Select how to save the print data in "Document Filing".After you have entered a password (a 5 to 8-digit number), click the button to lock the password. This allows you to readily set the same password the next time you use it.
(4) Select the folder to store the file in "Stored To".If you selected [Custom Folder], enter the name of the custom folder where you want to save the file.
• When [Quick File] is selected, "Document Filing" will be set to [Hold After Print].
• When [Quick File] is selected, the password entered in "Document Filing" is cleared.
• If necessary, you can select the data format from CMYK and RGB for data to be stored in the machine. Click the [Other Settings] button on the [Detailed Settings] tab and select the format from "Rip Style".
• To store a file in a custom folder, you must first create the custom folder using [Document Operations] in "Settings (administrator)" → [Document Filing]. If you have set a password for the custom folder, enter the password (5 to 8 digit number) in "PIN Code" on the stored to screen.
If you have configured to always use the force document filing function in "Printing Policy" on the [Configuration] tab, [None] is disappeared from the "Document Filing" menu.
Mac OS
• When [Quick File] is selected, "Document Filing" will be set to [Hold After Print].
• When [Quick File] is selected, the password entered in "Document Filing" is cleared.
• If necessary, you can select the data format from CMYK and RGB for data to be stored in the machine. Select [Advanced1] in [Printer Features 1] and select the format from "Rip Style".
• To store a file in a custom folder, you must first create the custom folder using [Document Operations] in "Settings (administrator)" → [Document Filing]. If you have set a password for the custom folder, enter the password (5 to 8 digit number) in "PIN Code" on the folder selection screen.
(2)(1)
(3) (4)

3-68
PRINTER►CONVENIENT PRINTING FUNCTIONS
AUTOMATICALLY PRINT ALL STORED DATAWhen user authentication is enabled on the machine, all document filing (stored) print jobs of the user who logs in are automatically printed. After all jobs are printed, the stored jobs are deleted.
(1) Select [Job Handling].At the time of document filing print, in addition to the user authentication information, enter the user name stored in the machine in "User Name" in the printer driver.
(2) A confirmation prompt will appear. Tap the [OK] key.The print files stored in the quick file folder, main folder, and custom folder will be printed automatically and then deleted.
To use the Print All function, the following steps are necessary:
• In "Settings (administrator)", select [User Control] → [Default Settings] and enable [Automatically print stored jobs after login].
• When executing document filing print, in addition to the user authentication information, enter the user name stored in the machine in "User Name" of "Default Job ID" in the printer driver.► Using this function in a Windows environment: PRINTING IN A WINDOWS ENVIRONMENT (page 3-4)► Using this function in a Mac OS environment: PRINTING IN A Mac OS ENVIRONMENT (page 3-14)
Files with a password and files that are protected by the document filing function of the machine will not be printed. Files in a folder (excluding My Folder) that has a password will also not be printed.

3-69
PRINTER►CONVENIENT PRINTING FUNCTIONS
PRINTING AND SENDING SIMULTANEOUSLYThis function prints data created in an application from the machine and simultaneously sends the data to the addresses stored in the machine.This function allows you to complete two tasks, printing and sending, with one operation from the printer driver.
(1) Click the [Job Handling] tab.
(2) Click the [Print and Send] button.
(3) Select the [Print and Send] checkbox so that appears.
(4) Click the [Get Address Book] button.
(5) From the "Address Book" list, select the address to which you wish to send the data, and click the [Add] button to add the address to the "Destination" list.• If you wish to send the data to all addresses, click the [Add All] button.• To delete an address from the "Destination" list, select the address and click the [Delete] button. If you wish to delete all
addresses, click the [Delete All] button.
(6) Click the [OK] button. The printer driver settings are applied to sending settings.
• Addresses must be stored in advance in the machine. For more information, see "ADDRESS BOOK (page 1-90)".
• You must complete the preparatory steps for using each sending function of the machine. For more information, see the explanation of each sending function.
• This function is available in a Windows environment.
• This function can be used when the PCL6 printer driver is used.
• You cannot print and send data simultaneously when [System Settings] in "Settings (administrator)" → [Printer Settings] → [Condition Settings] → [Disabling sending while printing] is selected.
Windows
• Up to 50 destinations can be specified.
• Data cannot be sent to an Internet Fax address.
(2)
(1)
(3)
(4)(5)
(6)

3-70
PRINTER►PRINTING WITHOUT THE PRINTER DRIVER
EXTENSION OF PRINTABLE FILESWhen you do not have the printer driver installed on your PC, or when the application used to open a file that you wish to print is not available, you can print directly to the machine without using the printer driver.The file types (and corresponding extensions) that can be printed directly are shown below.
DIRECTLY PRINTING A FILE ON AN FTP SERVERWhen an FTP server is configured, you can directly select and print files on the FTP server from the touch panel of the machine. This function eliminates the need for downloading the files from the FTP server to your PC and sending print jobs from the PC to the machine.
PRINTING WITHOUT THE PRINTER DRIVER
File Type TIFF JPEG PNG PCL PS
PDF, Encrypt PDF,
Compact PDF, PDF/A, Compact PDF/A
DOCX, XLSX, PPTX
Extension tiff, tifjpeg, jpg, jpe, jfif
pngpcl, prn, txt
ps, prn pdfdocx, xlsx, pptx
Some files may not print correctly even if shown in the above table.
To configure an FTP server:In "Settings (administrator)", select [System Settings] → [Printer Settings] → [Direct Print Settings (FTP)]. (Administrator rights are required.) Up to 20 FTP servers can be configured.
When you select a PDF file that has a password, you must enter the password in the job status screen to begin printing.► PRINTING AN ENCRYPTED PDF FILE (page 3-78)
1Tap the [HDD File retrieve] key.

3-71
PRINTER►PRINTING WITHOUT THE PRINTER DRIVER
DirectOffice™ is a product of CSR Imaging US, LP.DirectOffice™ is a trademark of CSR Imaging US, LP, registered in the United States and other countries, used with permission.
2Tap the [Select File from FTP to Print] key on the action panel.
3Tap the key of the FTP server that you wish to access.When a server is selected, entry of a user name and password may be necessary. Enter your user name and password, and tap the [Enter] key.
4Tap the key of the file that you wish to print, and tap the [Choose Print Settings] key on the action panel.• When printing multiple files, tap the keys of the files you wish to print, and tap the [Print] key on the action panel.• The icon appears to the left of keys of files that can be printed.• The icon is displayed to the left of keys of folders on the FTP server. To display a folder or a file in a folder, tap this
key.
• A total of 100 keys of files and folders can be displayed.
• Tap to move up one folder level.
• When you move down a folder level by tapping a folder key, appears.Tap this key to return to the file or folder name selection screen.
• Tap to switch to thumbnails.
• Tap the [File or Folder Name] key to change the order of the files and folders displayed on the screen. Each time the key is tapped, the order changes between ascending and descending.
5Select the print conditions.• If you have selected multiple files in step 4, you can select only the number of prints.• If you selected a PS or PCL file that includes print conditions in step 4, the print conditions in the file will be given
priority.
6Tap the [Start] key.Printing begins after the selected file is downloaded.
Main Folder
Folder Select
Quick File Folder
Scan to HDD
Scan to ExternalMemory DeviceSelect File fromFTP to PrintSelect File fromUSB Memory to PrintSelect File fromNetwork Folder to Print
CA

3-72
PRINTER►PRINTING WITHOUT THE PRINTER DRIVER
DIRECTLY PRINTING A FILE IN USB MEMORYFiles in a USB memory device connected to the machine are printed from the operation panel of the machine without using the printer driver.When the printer driver of the machine is not installed on your PC, you can copy a file into a commercially available USB memory device and connect the device to the machine to print the file directly.
• Use a FAT32 USB memory device with a capacity of no more than 32 GB.
• Printing from a USB memory device is not possible when [System Settings] in "Settings (administrator)" → [Printer Settings] → [Condition Settings] → [Disabling of USB Memory Direct Print] is selected.
When you select a PDF file that has a password, enter the password in the job status screen to begin printing.► PRINTING AN ENCRYPTED PDF FILE (page 3-78)
1Connect the USB memory device to the machine.
2When the screen for selecting the action appears, tap [Print from external memory device (USB)].If the screen does not appear, follow the steps below.
(1) Tap the [HDD File retrieve] key.
(2) Tap the [Select File from USB Memory to Print] key on the action panel.
3Tap the key of the file that you wish to print, and tap the [Choose Print Settings] key on the action panel.• When printing multiple files, tap the keys of the files you wish to print, and tap the [Print] key on the action panel.• The icon appears to the left of keys of files that can be printed.• The icon is displayed to the left of keys of folders in the USB memory device. To display a folder or a file in a
folder, tap this key.
• A total of 100 keys of files and folders can be displayed.
• Tap to move up one folder level.
• When you move down a folder level by tapping a folder key, appears.Tap this key to return to the file or folder name selection screen.
• Tap to switch to thumbnails.
• Tap the [File or Folder Name] key to change the order of the files and folders displayed on the screen. Each time the key is tapped, the order changes between ascending and descending.
EasyCopy
Print from externalmemory device (USB)
Scan to ExternalMemory Device
Perform Detail Setting
External memory device (USB) is connected.
Volume
10:15 AM

3-73
PRINTER►PRINTING WITHOUT THE PRINTER DRIVER
DIRECTLY PRINTING A FILE IN A NETWORK FOLDERYou can specify and print a file in a network folder from the touch panel of the machine.Even if the network folder is not registered, you can access the network folder by directly entering or referring to the path to the folder in the workgroup.
Printing a file in the network folder you have configured in the machine's settings
4Select the print conditions.• If you have selected multiple files in step 3, you can select only the number of prints.• If you selected a PS or PCL file that includes print conditions in step 3, the print conditions in the file will be given
priority.
5Tap the [Start] key.• Printing begins after the selected file is transferred.
6Remove the USB memory device from the machine.
To register a network folder:In "Settings (administrator)", select [System Settings] → [Printer Settings] → [Direct Print Settings (Network Folder)]. (Administrator rights are required.) Up to 20 network folders can be registered.
Printing from a network folder is not possible when [System Settings] in "Settings (administrator)" → [Printer Settings] → [Condition Settings] → [Disabling of Network Folder Direct Print] is selected.
When you select a PDF file that has a password, you must enter the password in the job status screen to begin printing.► PRINTING AN ENCRYPTED PDF FILE (page 3-78)
1Tap the [HDD File retrieve] key.
2 Tap the [Select File from Network Folder to Print] key on the action panel.

3-74
PRINTER►PRINTING WITHOUT THE PRINTER DRIVER
3Tap the [Open Registered Network Folder.] key on the action panel and tap the network folder that you wish to access.If a screen appears prompting you to enter a user name and password, check with your server administrator and enter the appropriate user name and password.
• When you tap the [Direct Input of Folder Path] key, a screen appears to allow direct input of the network folder path. For more information, see "Entering the network folder path directly (page 3-75)".
• When you select the workgroup, server, and network folder in sequence, you can access the network folder. For more information, see "Referring to the network folder path (page 3-75)".
4Tap the key of the file that you wish to print, and tap the [Choose Print Settings] key on the action panel.• When printing multiple files, tap the keys of the files you wish to print, and tap [Print] on the action panel.• The icon appears to the left of keys of files that can be printed.• The icon is displayed to the left of keys of folders in the network folder. To display a folder or a file in a folder, tap
this key.
• A total of 100 keys of files and folders can be displayed.
• Tap to move up one folder level.
• To return to the network folder selection screen, tap .
• Tap to switch to thumbnails.
• Tap the [File or Folder Name] key to change the order of the files and folders displayed on the screen. Each time the key is tapped, the order changes between ascending and descending.
5Select the print conditions.• If you have selected multiple files in step 4, you can select only the number of prints.• If you selected a PS or PCL file that includes print conditions in step 4, the print conditions in the file will be given
priority.
6Tap the [Start] key.Printing begins after the selected file is transferred.

3-75
PRINTER►PRINTING WITHOUT THE PRINTER DRIVER
Entering the network folder path directly
Referring to the network folder path
1Tap [Direct Input of Folder Path] in step 3 of "Printing a file in the network folder you have configured in the machine's settings (page 3-73) ".
2Enter the path to the folder, user name and password.Access the network folder.For the procedure for printing, see steps 4 to 6 of "Printing a file in the network folder you have configured in the machine's settings".
1Tap the key of the workgroup that you wish to access in step 3 of "Printing a file in the network folder you have configured in the machine's settings (page 3-73)".
2Tap the key of the server or computer that you wish to access.If a screen appears prompting you to enter a user name and password, check with your server administrator and enter the appropriate user name and password.
3Tap the key of the network folder that you wish to access.Access the network folder.For the procedure for printing, see steps 4 to 6 of "Printing a file in the network folder you have configured in the machine's settings (page 3-73)".
• Tap the icon and enter a keyword to search for a workgroup, server, or network folder. To enter text, see "NAMES AND FUNCTIONS OF SOFT KEYBOARD KEYS (page 1-118)".
• Up to 100 workgroups, 100 servers, and 100 network folders are displayed.
• Tap to move up one folder level.
• To return to the workgroup selection screen, tap .
Direct Input ofFolder PathOpen RegisteredNetwork Folder.Refer to Folderson Network
Path Inputto Folder
Direct Input of Path
User Name
Password
OK
CA
Direct Input ofFolder PathOpen RegisteredNetwork Folder.
Workgroup Name
Workgroup
WorkGroup1
WorkGroup2
WorkGroup3
WorkGroup4
WorkGroup5
WorkGroup6
CA

3-76
PRINTER►PRINTING WITHOUT THE PRINTER DRIVER
DIRECTLY PRINTING FROM A COMPUTER
SUBMIT PRINT JOBBy selecting [Document Operations] → [Submit Print Job] from "Settings (Web version)" and specifying a file, you can directly print the file without using the printer driver.In addition to a file on your PC, this procedure can be used to print any file that can be accessed from your PC, such as a file on another PC connected to the same network.For the procedure for accessing the "Settings (Web version)", see "SETTING MODE (page 7-3)".
FTP PRINTYou can print a file from your PC by simply dragging and dropping the file onto the FTP server of the machine.
Performing FTP printType "ftp://" and then the IP address of the machine in the address bar of your PC's Web browser as shown below.Example: ftp://192.168.1.28Drag and drop the file that you wish to print onto the "lp" folder that appears in your Web browser. Printing of the file automatically begins.
E-MAIL PRINTIf you configure your e-mail account in the machine, the machine periodically checks your mail server and automatically prints received e-mail attachments without using the printer driver.
• If you selected a PS or PCL file that includes print conditions, the print conditions in the file will be given priority.
• When user authentication is enabled in the settings of the machine, the print function may be restricted. For more information, ask your administrator.
To perform FTP print:In "Settings (administrator)", select [System Settings] → [Printer Settings] → [Print Setting from PC/Mobile Terminal], set [FTP Print] to [Enable], and then configure the port number. (Administrator rights are required.)
• If you selected a PS or PCL file that includes print conditions, the print conditions in the file will be given priority.
• When user authentication is enabled in the settings of the machine, the print function may be restricted. For more information, ask your administrator.
To perform e-mail print:In "Settings (administrator)", select [System Settings] → [Printer Settings] → [E-mail Print Settings], and register your e-mail account. (Administrator rights are required.)

3-77
PRINTER►PRINTING WITHOUT THE PRINTER DRIVER
Performing e-mail printUsing your PC's e-mail software, specify the e-mail address of the machine in "Address" and send e-mail attached with a file to be printed.Control commands can be entered in the message of the e-mail to specify the number of copies and print format.Commands are entered in the format "command name = value" as shown in the example to the right.
As an example, the control commands include the following:
*1 Enabled only when an inner finisher is installed.*2 Can be omitted except when authentication is by user number.*3 Only enabled when either "Document Filing" or "Quick File" is "ON". When both are "ON", this is disabled.
Function Command name Values
Copies COPIES 1 to 9999
Staple*1 STAPLEOPTION NONE, ONE
Collate COLLATE OFF, ON
2-sided Print DUPLEX TOP, LEFT, RIGHT, OFF
Account Number*2 ACCOUNTNUMBER Number (5 to 8 digits)
File Format LANGUAGEPCL, PCLXL, POSTSCRIPT, PDF, TIFF, JPG, DOCX, XLSX, PPTX, PNG
Paper PAPERPaper that can be used (LETTER, A4, or others)
Document Filing*3FILE OFF, ON
FOLDERNAME Up to 28 characters
Quick File*3 QUICKFILE OFF, ON
Fit Page FITIMAGETOPAGE OFF, ON
Print Glossy MEDIATYPE GLOSSY
Print Pages PRINTPAGES 1-2,5,9-
• The mail text must be in a text format. If entered in Rich Text format (HTML), the commands will have no effect.• If you enter "Config" in the mail text, a list of control commands is returned.• If nothing is entered in the body text (message) of the e-mail, printing will take place according to the settings configured in
"Settings (administrator)." → [System Settings] → [Printer Settings] → [Initial Status Settings]. If you selected a PS or PCL file that includes print conditions, the print conditions in the file will be given priority.
• Enter a file type only when you wish to specify the page-description language. Normally there is no need to enter a file type.
COPIES=2DUPLEX=LEFTACCOUNTNUMBER=11111PAPER=A4

3-78
PRINTER►PRINTER JOBS
CHECKING THE PRINT STATUSWhen you tap the job status display, jobs are displayed in a list. To check the status of a printer job, tap the [Print] tab.When you wish to stop or delete jobs or to perform priority processing, read the following items:• STOPPING/DELETING A JOB IN PROGRESS OR RESERVED (page 1-82)• PRIORITY PROCESSING OF A RESERVED JOB (page 1-83)• CHECKING A RESERVED JOB OR THE JOB IN PROGRESS (page 1-85)• CHECKING COMPLETED JOBS (page 1-86)
PRINTING AN ENCRYPTED PDF FILEPDF encryption is used to protect a PDF file by requiring the entry of a password to print or edit the file.To directly print an encrypted PDF file on an FTP server or in a USB memory device, etc. connected to the machine, reset the password and begin printing.
(1) Tap the Job status display and tap the [Print] tab.
(2) Tap the [Spool] key.When the list contains an encrypted PDF file, a message is displayed to indicate that an encrypted PDF file exists.
(3) Tap the print job key for the encrypted PDF file.
(4) Tap the [Enter Password for Encrypt PDF.] key on the action panel.
(5) Enter the password (32 characters or less) and tap the [Yes] key.
PRINTER JOBS
• To print an encrypted PDF file using the printer driver, enter the password when opening the file on your PC.
• Printing is not possible if you do not know the password for the encrypted PDF file.
• Encrypted PDF versions that can be directly printed are 1.6 (Adobe® Acrobat® 7.0) and earlier.
You cannot select multiple encrypted PDF files.
When both a master password and a user password (which is used to open the file) have been set, enter the master password.
Job Queue
Complete
Spool
Internet FaxFaxScanPrint
Job Job Queue Progress / Sets Status
Encrypt PDF
Spooling
User_1_User_1_User ---/0004
---/0004User_2_User_2_User
Back

3-79
PRINTER►PRINTER JOBS
CHANGING TO ANOTHER PAPER SIZE AND PRINTING WHEN PAPER RUNS OUTIf printing stops because the machine ran out of paper, or if the size of paper specified in the printer driver is not loaded in the machine, a message will appear in the touch panel.Printing will begin automatically when paper is loaded in the machine. If paper of the desired size is not immediately available, you can use paper that is set in a different tray.
(1) Tap the job status display.
(2) Tap the key of the job for which "Paper Empty" appeared.
(3) Tap the [Reselect Paper] key on the action panel.
(4) Tap the key for the tray containing the paper that you wish to use, and tap .
If you changed to a different paper size, printing may not take place correctly; for example part of the text or image may run off the paper.

3-80
PRINTER►APPENDIX
PRINTER DRIVER SPECIFICATIONS LISTFor information on the setting items, refer to printer driver Help.PRINTER DRIVER SETTINGS SCREEN / REFERRING TO HELP (page 3-6)
APPENDIX
Function PCL6 PS Windows PPD*1
Mac OS PPD*1
Tab (Windows)
Item Page
Main
Copies - 1 - 9999 1 - 9999 1 - 9999 1 - 9999
Collate - Yes Yes Yes Yes
Original Size 3-4 Yes Yes Yes Yes
Output Size 3-4 Yes Yes Yes Yes
Orientation 3-34 Yes Yes Yes Yes
Adjust to Paper Size 3-21 Yes Yes No Yes
Zoom 3-35 Yes*2 Yes Yes*2 Yes*2
2-Sided 3-20 Yes Yes Yes Yes
N-Up 3-23 2, 4, 6, 8, 9, 16 2, 4, 6, 8, 9, 16 2, 4, 6, 9,16 2, 4, 6, 9,16
Staple *3 3-26 Yes Yes Yes Yes
Document Filing 3-66 Yes Yes No Yes
Color Mode - - - - -
Paper Source
Output Size 3-4 Yes Yes Yes Yes
Paper Tray 3-7 Yes Yes Yes Yes
Paper Type 3-7 Yes Yes Yes Yes
Tray Status 3-7 Yes Yes No No
Finishing
Staple *3 3-26 Yes Yes Yes Yes
Punch - - - - -
Fold - - - - -
Offset - Yes Yes Yes Yes
Output - - - - -
Separator Page 3-56 Yes Yes No No

3-81
PRINTER►APPENDIX
Layout
2-Sided 3-20 Yes Yes Yes Yes
Chapter Inserts 3-58 Yes No No No
Booklet 3-28 Yes Yes Yes Yes
N-Up
Page No. 3-23 2, 4, 6, 8, 9, 16 2, 4, 6, 8, 9, 16 2, 4, 6, 9,16 2, 4, 6, 9,16
Repeat 3-60 Yes No No No
Order 3-23 Yes Yes No Yes
Border 3-23 Yes Yes No Yes
N-Up with cover
3-23 Yes No No No
100% N-Up 3-23 Yes Yes No No
Poster Printing 3-32 Yes Yes No No
Print Position
Margin Shift 3-300 inch to 1.2 inch (10mm to 30mm)
0 inch to 1.2 inch (10mm to 30mm)
Yes Yes
Tab Shift - No No No No
Custom 3-33 Yes Yes No No
Job Handling
Print Release - Yes Yes No Yes
Document Filing 3-66 Yes Yes No Yes
Create PDF for PC Browsing 3-66 Yes No No No
Print and Send 3-69 Yes No No No
Notify Job End - Yes Yes No No
Authentication 3-9 Yes Yes No Yes
Inserts
Covers/Inserts 3-52 Yes Yes Yes*4 Yes*4
Transparency Inserts 3-54 Yes Yes No Yes
Carbon Copy 3-57 Yes Yes No No
Tab Paper - - - - -
Stamp
Watermark 3-45 Yes Yes Yes Yes
Image Stamp 3-47 Yes Yes No No
Overlay 3-49 Yes Yes No No
Hidden Pattern 3-61 Yes No No No
Copies Stamp 3-51 Yes No No No
Image Quality
Print Mode 3-19 Yes Yes Yes Yes
Graphics Mode - Yes No No No
Bitmap Compression - Yes Yes No No
Sharpness 3-43 Yes Yes Yes Yes
Screening 3-43 Yes Yes Yes Yes
Smoothing 3-43 Yes Yes No Yes
Text To Black 3-42 Yes Yes No No
Function PCL6 PS Windows PPD*1
Mac OS PPD*1
Tab (Windows)
Item Page

3-82
PRINTER►APPENDIX
*1 The specifications of each function in Windows PPD and Mac OS PPD vary depending on the operating system version and the application.
*2 The horizontal and vertical proportion cannot be set separately.*3 If an inner finisher is installed.*4 Only covers can be inserted.*5 This setting may not operate in some applications and operating systems.*6 This function cannot be used in Mac OS X 10.10 or later.
Image Quality
Vector To Black 3-42 Yes Yes No No
Toner Save *5 - Yes Yes Yes Yes
Color Mode - No No No No
Image Type - No No No No
Advanced Color - No No No No
Image Adjustment 3-41 Yes Yes No No
Font - Yes Yes No No
Line Width 3-37 Yes No No No
Boldness Adjustment - Yes Yes Yes Yes
Detailed Settings
Mirror Image 3-40 No Yes Yes Yes
PS Error Information - No Yes Yes No
PS Pass-Through - No Yes No No
Job Compression - No Yes No No
Tandem Print 3-64 Yes Yes No Yes*6
Disable Blank Page Print 3-25 Yes Yes No No
Custom Image Registration 3-48 Yes No No No
Other Settings
• Input Resolution - Yes Yes No No
• Shade Pattern - Yes No No No
• Spool Data Format - Yes Yes No No
• Printable Area 3-63 Yes Yes No No
• Rip Style 3-66 Yes Yes No Yes
• Duplex Style 3-20 Yes Yes No No
• CMYK Image Enhancement - No Yes No No
• Job Name Shortening - Yes Yes No No
• Use driver to render JPEGs 3-62 Yes Yes No No
• Expand - No No No No
• Thicken Fine Lines 3-38 Yes No No No
• Fine Text - Yes Yes Yes Yes
• Fine Edge - No No No No
• Text/Line control 3-39 Yes Yes No No
• Text/Line knockout control 3-39 Yes Yes No No
• Photo Image - Yes Yes Yes Yes
• Image Enhancement 3-39 Yes Yes Yes Yes
Function PCL6 PS Windows PPD*1
Mac OS PPD*1
Tab (Windows)
Item Page

3-83
PRINTER►APPENDIX
SPECIFYING A BILLING CODE USING THE PRINTER DRIVERYou can enter a billing code using the printer of the machine.For an overview of a billing code, refer to "BILLING CODE (page 1-37)".
Enable billing codeThis setting is required only in the Windows environment. (Always usable under Mac OS environment)
1Click the [Start] button, select [Settings] → [Device] → [Devices and Printers].
In Windows 8.1/Windows Server 2012, right-click the [Start] button, select [Control Panel] → [View devices and printers] (or [Devices and Printers]).In Windows 7/Windows Server 2008, click the [Start] button, select [Devices and Printers].
2Right-click the printer driver icon of the machine and select [Printer Properties].
3Specify a billing code
(1) Click the [Configuration] tab.
(2) Click the [Printing Policy] button.
(3) Set the [Billing Code] check box to ,
(4) Click the [OK] button.(2)
(1)
(3)(4)

3-84
PRINTER►APPENDIX
When printing starts, the billing code setting screen appears.Enter the main code and sub code, and click the [OK] button.To retain the specified billing code, set [Always Use This Billing Code] to .
(1) Select [Billing Code].
(2) Enter the main code and sub code.
Windows
• You can click [Get Billing Code] to get the machine's billing code list and select the billing code from the list.
• If [Use Billing Code] is set to "Disable" in "Settings (administrator)" - [Billing Code Setting] - [Administration Settings], the entered billing code is disabled and is not recorded in the job log.
• If you have started printing without specifying a billing code, a use code is recorded in the job log.
Mac OS
(2)
(1)

3-85
PRINTER►APPENDIX
AUTHENTICATION BY SINGLE SIGN-ONWhen the user authentication is used, you must enter your user name and password to print from a printer driver.The Single Sign-on function can be used when Active Directory authentication is used on both the machine and the computer.When you use this function and print from the printer driver, the print job is sent to the machine using the authentication information that you used to log in to the computer. This allows easy printing of jobs from the printer driver without the need to enter your user name or password each time you print when user authentication is enabled.
SettingsActive Directory must be enabled on the machine in advance. For information on Active Directory, refer to "ACTIVE DIRECTORY LINKING FUNCTION (page 1-34)". After enabling Active Directory, configure the settings below in the printer driver.
(1) Click the [Start] button, select [Settings] → [Device] → [Devices and Printers].In Windows 8.1/Windows Server 2012, right-click the [Start] button, select [Control Panel] → [View devices and printers] (or[Devices and Printers]).In Windows 7/Windows Server 2008, click the [Start] button, select [Devices and Printers].
(2) Right-click the machine's printer driver icon and select [Printer Properties].The printer properties appear.
(3) Click the [Configuration] tab.
(4) Set the [Single Sign-on] checkbox to .
Authentication OptionFor the authentication method, refer to "PRINTING WHEN THE USER AUTHENTICATION FUNCTION IS ENABLED (page 3-9)".
(1) Click the [Job Handling] tab.
(2) In [Authentication], select [Single Sign-on].
Authentication by Single Sign-on requires that Active Directory authentication be performed on the machine and your computer. This can only be used when your computer is running Windows.
• Single Sign-on authentication is also possible from the Job Handling dialog box and the User Authentication dialog box.
• When Single Sign-on is enabled, [Print and Send] cannot be used.
• If you logged in to the machine in advance before using Single Sign-on, you will have the permissions of the user account you used to log in.If you use Single Sign-on without logging in to the machine, the user permissions will be those of "User".This may limit the functions that you can use.
• If Single Sign-on is used without logging in to the machine, the user name in the job log will be the name set by printer driver. If the user name is not set by printer driver, the user name in the job log will be the computer login name.
(2)
(1)

3-86
PRINTER►APPENDIX
PRINTING BY GOOGLE CLOUD PRINTGoogle Cloud Print is a printing service that lets you print a file in a PC, mobile device, or other client via the Cloud server operated by Google LLC on a printer that is connected to Cloud server.Configure settings for connection of the machine to the Internet (proxy settings, etc.) as required for your network environment.The procedure for printing by Google Cloud Print is explained here.Before using this function, you must first create a Google account.
Settings on the machineBefore using this function, configure the settings below in "Settings (administrator)".• If the machine's user authentication function is enabled, turn off "Settings (administrator)" - [User Control] - [Default
Settings] - [Disable Printing by Invalid User].• If user authentication is enabled in the Sharp OSA application, allow printing by invalid users in the application.• Configure the following settings in "Settings (administrator)"→[System Settings]→[Network Settings] so that they
match the settings in Google Cloud Print.• IP address, subnet mask, default gateway• IP address of DNS server• Proxy server settings• Configure the machine settings in the Google Cloud Print settings. For the Google Cloud Print settings, refer to
"Google Cloud Print Settings (page 7-140)".
Cloud server
Send a file
Mobile device
Send a file Print

3-87
PRINTER►APPENDIX
Print settingsYou can print from an application that supports Google Cloud Print.Functions that can be enabled from the application are as follows.
* Can be used when an inner finisher is installed.
Item Description
2-Sided Print None, Book, Tablet
Orientation Portrait, Landscape
Copies 1-999
Resolution 600x600
Fit Page On, Off
Page Select -
Paper SizeA4, A5, B4, B5, Legal, Letter, Invoice, Executive, Foolscap, 8 1/2 x 13 2/5, 216 x 343, 16K
Paper Tray Varies depending on the machine configuration
Print per Unit On, Off
Staple* On, Off
• Google Cloud Print uses the XMPP (5222) port or HTTPS (443) port for communication.Check the settings for restriction of access from the Internet, the machine administrator password, and mDNS as needed.
• In some cases the print quality using Google Cloud Print may not be the same as the print quality using other print methods (printer driver, etc.). The content of some files may not print correctly or may not be printable.
• In some countries and regions, the machine may not be able to use some or all of the Google Cloud Print connection functions.
• In some network environments, the machine may not be able to use the Google Cloud Print connection functions, or printing may be slow or may stop before the job is completed.
• Sharp Corporation does not in any way guarantee the continuity or stability of Google Cloud Print connection functions. With the exception of instances provided for by law, Sharp Corporation bears no responsibility for any damages or loss due to the customer’s use of these functions.
4-1
BEFORE USING THE MACHINE AS A FAX
BEFORE USING THE MACHINE AS A FAX. . . . . . 4-4
FAX MODE . . . . . . . . . . . . . . . . . . . . . . . . . . . . . . . . 4-6
• EASY MODE . . . . . . . . . . . . . . . . . . . . . . . . . . . 4-6
• NORMAL MODE . . . . . . . . . . . . . . . . . . . . . . . . 4-7
SELECTING FAX MODE . . . . . . . . . . . . . . . . . . . . . 4-7
FAX TRANSMISSION SEQUENCE . . . . . . . . . . . . . 4-9
ENTERING DESTINATIONS
ENTERING DESTINATIONS . . . . . . . . . . . . . . . . . . 4-11
• ENTERING A DESTINATION NUMBER USING THE NUMERIC KEYS . . . . . . . . . . . . . . . . . . . . 4-11
• RETRIEVING A DESTINATION FROM AN ADDRESS BOOK . . . . . . . . . . . . . . . . . . . . . . . 4-12
• THE SELECTED DESTINATIONS . . . . . . . . . . 4-14
• USING A SEARCH NUMBER TO RETRIEVE A DESTINATION. . . . . . . . . . . . . . . . . . . . . . . . . . 4-15
• RETRIEVING A DESTINATION FROM A GLOBAL ADDRESS BOOK. . . . . . . . . . . . . . . . 4-16
• USING A TRANSMISSION LOG TO RESEND . . . 4-18
• SENDING BY CHAIN DIALING. . . . . . . . . . . . . 4-20
BASIC TRANSMISSION METHODS
BASIC TRANSMISSION METHODS . . . . . . . . . . . . 4-21
• FAX TRANSMISSION METHODS . . . . . . . . . . 4-21
• ORIGINAL ORIENTATION . . . . . . . . . . . . . . . . 4-23
• AUTOMATIC REDUCTION OF THE TRANSMITTED IMAGE. . . . . . . . . . . . . . . . . . . 4-24
• TRANSMITTABLE ORIGINAL SIZES . . . . . . . . 4-24
• WHEN THE LINE IS BUSY . . . . . . . . . . . . . . . . 4-25
• WHEN THE LINE IS BUSY . . . . . . . . . . . . . . . . 4-25
• WHEN A COMMUNICATION ERROR OCCURS . . . . . . . . . . . . . . . . . . . . . . . . . . . . . . 4-25
• FAX DEST. CONFIRMATION MODE . . . . . . . . 4-26
• CHECKING THE IMAGE TO BE TRANSMITTED . . . . . . . . . . . . . . . . . . . . . . . . . 4-27
FAX TRANSMISSION METHODS . . . . . . . . . . . . . . 4-27
• USING THE AUTOMATIC DOCUMENT FEEDER FOR TRANSMISSION . . . . . . . . . . . . 4-27
• USING THE AUTOMATIC DOCUMENT FEEDER FOR FAXING IN DIRECT TX MODE . . . . . . . . . . 4-28
• USING THE DOCUMENT GLASS FOR TRANSMISSION . . . . . . . . . . . . . . . . . . . . . . . 4-30
• USING THE DOCUMENT GLASS TO SEND A FAX IN DIRECT TX MODE . . . . . . . . . . . . . . . 4-32
• TRANSMISSION USING THE SPEAKER . . . . 4-34
• SENDING THE SAME FAX TO MULTIPLE DESTINATIONS (BROADCAST TRANSMISSION). . . . . . . . . . . . . . . . . . . . . . . 4-35
• RESENDING TO UNSUCCESSFUL BROADCAST TRANSMISSION DESTINATIONS. . . . . . . . . . . . . . . . . . . . . . . . 4-37
• SENDING A FAX DIRECTLY FROM A COMPUTER (PC-Fax) . . . . . . . . . . . . . . . . . . . 4-39
DELETING A TRANSMISSION LOG . . . . . . . . . . . 4-40
SET THE SCANNING OF THE ORIGINALS . . . . . 4-42
• AUTOMATICALLY SCANNING BOTH SIDES OF AN ORIGINAL (2-Sided Original) . . . . . . . . 4-42
• SPECIFYING THE ORIGINAL SCAN SIZE IN PAPER SIZE . . . . . . . . . . . . . . . . . . . . . . . . . . 4-43
• SPECIFYING THE ORIGINAL SCAN SIZE IN PAPER SIZE . . . . . . . . . . . . . . . . . . . . . . . . . . 4-43
• SPECIFYING THE ORIGINAL SCAN SIZE USING NUMERIC VALUES . . . . . . . . . . . . . . . 4-44
• STORING FREQUENTLY USED ORIGINAL SIZES . . . . . . . . . . . . . . . . . . . . . . . . . . . . . . . . 4-45
• SPECIFYING THE SEND SIZE OF THE IMAGE . . . . . . . . . . . . . . . . . . . . . . . . . . . . . . . 4-48
• CHANGING THE EXPOSURE. . . . . . . . . . . . . 4-50
• CHANGING THE RESOLUTION . . . . . . . . . . . 4-51
FAX RECEPTION
RECEIVING A FAX . . . . . . . . . . . . . . . . . . . . . . . . . 4-52
• RECEIVING A FAX AUTOMATICALLY . . . . . . 4-52
• RECEIVING A FAX MANUALLY . . . . . . . . . . . 4-54
PRINTING RECEIVED DATA . . . . . . . . . . . . . . . . . 4-55
• PRINTING A PIN CODE-PROTECTED FAX (Hold setting for received data print) . . . . . . . . 4-55
• PRINTING RECEIVED DATA AT A SPECIFIED TIME. . . . . . . . . . . . . . . . . . . . . . . . . . . . . . . . . 4-56
• CHECKING THE IMAGE BEFORE PRINTING. . . 4-57
FORWARDING RECEIVED DATA . . . . . . . . . . . . . 4-59
• FORWARDING RECEIVED FAXES (FAX DATA FORWARD) . . . . . . . . . . . . . . . . . . . . . . 4-59
FACSIMILEIcons
Functions you can use in Easy
Fax mode

4-2
FACSIMILE
• FORWARDING RECEIVED DATA TO PRESET DESTINATIONS (INBOUND ROUTING SETTINGS) . . . . . . . . . . . . . . . . . . . . . . . . . . . . 4-60
• SAVING RECEIVED FAXES TO THE MACHINE'S HARD DISK (INBOUND ROUTING). . . . . . . . . . . . . . . . . . . . . . . . . . . . . 4-64
• FORWARDING RECEIVED DATA MANUALLY . . . 4-65
SAVING RECEIVED DATA . . . . . . . . . . . . . . . . . . . 4-67
OTHERS FUNCTION
STORING FAX OPERATIONS (PROGRAM). . . . . . 4-68
SENDING ORIGINALS COLLECTIVELY . . . . . . . . 4-70
• SENDING TWO PAGES AS A SINGLE PAGE (N-UP) . . . . . . . . . . . . . . . . . . . . . . . . . . . . . . . . 4-70
• SENDING BOTH SIDES OF A CARD AS A SINGLE PAGE (CARD SHOT) . . . . . . . . . . . . . 4-72
• SENDING A LARGE NUMBER OF PAGES (JOB BUILD) . . . . . . . . . . . . . . . . . . . . . . . . . . . 4-74
• SENDING ORIGINALS OF DIFFERENT SIZES (MIXED SIZE ORIGINAL) . . . . . . . . . . . . . . . . . 4-76
SCANNING ORIGINALS . . . . . . . . . . . . . . . . . . . . . 4-78
• ERASING PERIPHERAL SHADOWS ON THE IMAGE (ERASE) . . . . . . . . . . . . . . . . . . . . . . . . 4-78
• SENDING A THIN ORIGINAL (SLOW SCAN MODE). . . . . . . . . . . . . . . . . . . . . . . . . . . . . . . . 4-80
• CHECKING THE NUMBER OF SCANNED ORIGINAL SHEETS BEFORE TRANSMISSION (ORIGINAL COUNT) . . . . . . . 4-82
OPERATING FAX TRANSMISSION AND RECEPTION REMOTELY . . . . . . . . . . . . . . . . . . . . 4-84
• CALLING A FAX MACHINE AND INITIATING RECEPTION (POLLING). . . . . . . . . . . . . . . . . . 4-84
• INITIATING POLLING RECEPTION MANUALLY . . . . . . . . . . . . . . . . . . . . . . . . . . . . 4-86
SENDER-RELATED FEATURES. . . . . . . . . . . . . . . 4-87
• ADDING YOUR SENDER INFORMATION TO FAXES (FAX OWN NUMBER SENDING). . . . . 4-87
• TEMPORARILY CHANGING THE SENDER INFORMATION (OWN NAME SELECT) . . . . . . 4-88
ASSUMING A SPECIFIC USAGE. . . . . . . . . . . . . . 4-90
• SPECIFYING THE TIME FOR COMMUNICATION . . . . . . . . . . . . . . . . . . . . . 4-90
• CHANGING THE PRINT SETTINGS FOR THE TRANSACTION REPORT (TRANSACTION REPORT) . . . . . . . . . . . . . . . . . . . . . . . . . . . . . 4-92
POLLING MEMORY FUNCTIONS . . . . . . . . . . . . . 4-94
• SENDING A FAX WHEN ANOTHER MACHINE POLLS YOUR MACHINE (POLLING MEMORY) . . 4-94
• RESTRICTING POLLING ACCESS (POLLING SECURITY SETTING) . . . . . . . . . . . . . . . . . . . 4-94
• SCANNING A DOCUMENT INTO POLLING MEMORY . . . . . . . . . . . . . . . . . . . . . . . . . . . . . 4-95
• CHECKING THE DOCUMENT IN THE PUBLIC BOX . . . . . . . . . . . . . . . . . . . . . . . . . . . . . . . . . 4-96
• DELETING A DOCUMENT FROM THE PUBLIC BOX . . . . . . . . . . . . . . . . . . . . . . . . . . 4-97
PERFORMING F-CODE COMMUNICATION
F-CODE COMMUNICATION. . . . . . . . . . . . . . . . . . 4-98
• F-CODE COMMUNICATION . . . . . . . . . . . . . . 4-98
• CREATING MEMORY BOXES IN THE MACHINE FOR F-CODE COMMUNICATION. . . 4-99
• F-CODE DIALING . . . . . . . . . . . . . . . . . . . . . . 4-100
• F-CODE CONFIDENTIAL TRANSMISSION. . . . 4-100
• CONFIDENTIAL TRANSMISSION USING F-CODES . . . . . . . . . . . . . . . . . . . . . . . . . . . . . 4-101
• CHECKING FAXES RECEIVED BY F-CODE CONFIDENTIAL RECEPTION . . . . . . . . . . . . . 4-102
• POLLING RECEPTION USING F-CODES . . . 4-103
• SCANNING A DOCUMENT INTO A MEMORY BOX FOR F-CODE POLLING TRANSMISSION. . . 4-105
• CHECKING THE DOCUMENT IN THE F-CODE MEMORY POLLING BOX . . . . . . . . . 4-107
• DELETING A DOCUMENT STORED FOR F-CODE POLLING TRANSMISSION. . . . . . . . 4-108
• RELAY REQUEST TRANSMISSION USING F-CODES . . . . . . . . . . . . . . . . . . . . . . . . . . . . . 4-109
• RELAY BROADCAST TRANSMISSION USING F-CODES . . . . . . . . . . . . . . . . . . . . . . . . . . . . . 4-111

4-3
FACSIMILE
USING AN EXTERNAL TELEPHONE
CONNECTING AN EXTERNAL TELEPHONE . . . . 4-112
• CONNECTING AN EXTENSION TELEPHONE . . . 4-112
• RECEIVING A FAX AFTER ANSWERING A CALL ON THE EXTENSION TELEPHONE (REMOTE RECEPTION). . . . . . . . . . . . . . . . . . 4-113
• MAKING AND RECEIVING PHONE CALLS . . . 4-113
CHECK THE COMMUNICATION STATUS
FAX JOBS . . . . . . . . . . . . . . . . . . . . . . . . . . . . . . . . 4-114
COMPLETED FAX TRANSMISSION/RECEPTION JOBS . . . . . . . . . . . . . . . . . . . . . . . . . . . . . . . . . . . . 4-114
CHECKING IMAGE SENDING ACTIVITIES . . . . . . 4-115
• PRINTING IMAGE SENDING ACTIVITY REPORTS . . . . . . . . . . . . . . . . . . . . . . . . . . . . . 4-115
• INFORMATION APPEARING IN THE RESULT COLUMN . . . . . . . . . . . . . . . . . . . . . . . . . . . . . . 4-115

4-4
FACSIMILE►BEFORE USING THE MACHINE AS A FAX
BEFORE USING THE MACHINE AS A FAXTo use the machine as a facsimile, connect the telephone line, and set the telephone line type.
BEFORE USING THE MACHINE AS A FAX
The facsimile expansion kit is required in order to make use of fax functionality.
1Connecting to the telephone line.Insert the plug on one end of the telephone line cord into the telephone line jack (LINE) of the machine as shown, and insert the other plug into a wall telephone jack.* Be sure to use the attached telephone line cord.
If the connection cable is not properly connected, "Sending has failed. Please check network connection." will appear when you attempt to send a fax. Properly connect the connection cable.
2Make sure the main power switch is in the " " position.When the main power indicator is lit up, the main power is in the " " position. If the main power indicator is not lit up, turn the main power switch to the " " position and press the [POWER] button on the operation panel.*If the fax function will be used, and in particular if reception or timer transmission will take place at night, always keep the main power switch in the " " position.
Clicks
Telephone line jack (Line)
Clicks
Main power indicator [Power] button
Main power switch

4-5
FACSIMILE►BEFORE USING THE MACHINE AS A FAX
Storing destination addresses for each scan mode in the address bookWhen using fax, it is convenient to previously store addresses in the address book.For how to use the address books and how to store addresses, see the following item.► ADDRESS BOOK (page 1-90)► STORING ADDRESSES THROUGH DIRECT ENTRY (page 1-94)► STORING ADDRESSES THROUGH GLOBAL ADDRESS SEARCH (page 1-95)► STORING ADDRESSES FROM FAX OR IMAGE SEND LOGS (page 1-97)► STORING GROUPS (page 1-98)
If the fax function will be used, and in particular if reception or timer transmission will take place at night, do not turn the main power off.
3Setting the telephone line type.The machine's dial mode setting must be set to match the type of telephone line you are using.* If the setting is incorrect, it may result in dialing failures or cause calls to be made to the wrong destination.
• If you want to set the type of telephone line automaticallyIn "Settings (administrator)", select [System Settings] → [Image Send Settings] → [Fax Settings] → [Default Settings] → [Dial Mode Setting], and tap the [Auto Select] key.
• If necessary, you can set the type of telephone line manually.
4Checking the date and time.Verify that the correct date and time are set in the machine.
To set the date and time of the machine:In "Settings", select [System Settings] → [Common Settings] → [Clock Adjust].
If [Disabling of Clock Adjustment] has been enabled, the date and time cannot be modified.In "Settings (administrator)", select [System Settings] → [Common Settings] → [Enable/Disable Settings] → [Operation Settings] → [Disabling of Clock Adjustment], and cancel the adjustment disabling setting.
5Storing the sender fax number.Store a sender name in [Sender Name] and a fax number in [Fax No.]. Be sure to configure this information, as it is required for communication.
To store the sender's name and address:In "Settings (administrator)", select [System Settings] → [Image Send Settings] → [Common Settings] → [Own Number and Name Set] → [Sender Data Registration].

4-6
FACSIMILE►BEFORE USING THE MACHINE AS A FAX
FAX MODEFax mode has two modes: easy mode and normal mode.Easy mode is limited to frequently used functions that allow you to smoothly perform most fax jobs.If you need to select detailed settings or special functions, use normal mode. All functions can be used in normal mode.
EASY MODEEasy mode makes it easy to select basic settings for fax.
You can select these functions in easy mode.•Original ►page 4-42•Exposure ►page 4-50
•Resolution ►page 4-51
8½x11
OriginalAddress Fax Number Detail
CAPreview
Start
Address Book Sending History Direct Entry
Tap this key to display the numeric keys.
Change the function display.
Immediately starts sending a fax.
Scans the original for preview.
► PREVIEW SCREEN (page 1-15)
Change to normal mode.
► NORMAL MODE (page 4-7)
Reset the address and settings.
Display the specified original size.► SPECIFYING THE
ORIGINAL SCAN SIZE IN PAPER SIZE (page 4-43)
► SPECIFYING THE ORIGINAL SCAN SIZE USING NUMERIC VALUES (page 4-44)
1st screen
2nd screen
8½x11
OriginalAddress Fax Number Detail
CAPreview
Start
Original Exposure Resolution
Auto Standard8½x11
Select function to be set up.
Select an address.
To select a function in easy modeIn "Settings", select [System Settings] → [Common Settings] → [Operation Settings] → [Easy Mode Settings] → [Easy Fax]

4-7
FACSIMILE►BEFORE USING THE MACHINE AS A FAX
NORMAL MODENormal mode lets you select any function setting that can be used for fax.
SELECTING FAX MODEYou can select the fax mode from the Home Screen or from each operation mode as follows:
Changing modes from the Home ScreenTo select a mode, tap the icon for the mode in the home screen.
Shift to Easy ModeTap the [Easy Fax] mode icon
Shift to Normal Mode.Tap the [Fax] mode icon
8½x11 8½x11
Tap to display the numeric keys. Enter Fax No.Finds an address.
Displays functions available in fax mode.
Scans the original for preview.► PREVIEW
SCREEN (page 1-15)
Reset the address and settings.
Immediately starts sending a fax.
Used to display theaddress book andenter a destination.
Used to changefax settings.
Check the currentsettings. Displays the list of keys
other than the function keys indicated above.
Displays the sizes of the original and the data to send.
Connects a linebefore startingsending a fax.
Displays the list offunction keys.
Frequently used[Others], programs,
and other settingscan be registered.
EasyCopy
Fax
10:15 AM
CopySharp OSA E-Mail
OperationGuide
EnlargeDisplay Mode
Settings Total Count LCD Control Job StatusToner Quantity Bk

4-8
FACSIMILE►BEFORE USING THE MACHINE AS A FAX
Changing mode from each modeTo change from one mode to another, tap the mode display.
1Tap on the mode display.
2Tap the [Easy Fax] or [Fax] key.The initial screen of the selected mode is displayed.
To change to normal mode from the initial screen of easy fax mode, tap the [Detail] key and tap the [Yes] key in the confirmation screen.
8½x11
8½x11
8½x118½x11
8½x118½x11
8½x118½x11
8½x118½x11
Select the mode.
Network Folder
Fax E-Mail
FTP/Desktop
Internet Fax
Easy Fax
Easy Scan
Easy Copy
CAPreview
Start
Original
8½x11 Address Fax Number
Address Book Direct Entry
Detail
LINE PRINTEREasyScan
HDDFile retrieve Sharp OSA Job Status
Sending History

4-9
FACSIMILE►BEFORE USING THE MACHINE AS A FAX
FAX TRANSMISSION SEQUENCEThis section explains the basic steps for sending a fax.
1Place the original.Place the original in the document feeder tray of the automatic document feeder, or on the document glass.► AUTOMATIC DOCUMENT FEEDER (page 1-77)► DOCUMENT GLASS (page 1-79)
2Enter the destination fax number.Tap the numeric keys to enter the destination number directly, or search and retrieve the address book or number.
In Easy mode In Normal mode
• ENTERING A DESTINATION NUMBER USING THE NUMERIC KEYS ►page 4-11
• RETRIEVING A DESTINATION FROM AN ADDRESS BOOK ►page 4-12
• USING A TRANSMISSION LOG TO RESEND ►page 4-18
• ENTERING A DESTINATION NUMBER USING THE NUMERIC KEYS ►page 4-11
• RETRIEVING A DESTINATION FROM AN ADDRESS BOOK ►page 4-12
• USING A SEARCH NUMBER TO RETRIEVE A DESTINATION ►page 4-15
• RETRIEVING A DESTINATION FROM A GLOBAL ADDRESS BOOK ►page 4-16
• USING A TRANSMISSION LOG TO RESEND ►page 4-18
CAPreview
Start
Original
8½x11 Address Fax Number
Address Book Direct Entry
Detail
Sending History
8½x11 8½x11

4-10
FACSIMILE►BEFORE USING THE MACHINE AS A FAX
3Configure the settings.Specify the original scan size, exposure, resolution, etc.If necessary, you can refer to the following functions for the setting.
In Easy mode In Normal mode
• Scanning Originals ►page 4-78• Changing the Exposure ►page 4-50• Changing the Resolution ►page 4-51
• Sending Originals Collectively ►page 4-70• Scanning Originals ►page 4-78• Automatically Scanning Both Sides Of an Original
(2-sided Original) ►page 4-42• AUTO DETECTION ►page 4-43• Specifying the Original Scan Size Using Numeric Values ►page 4-44
• Specifying the Send Size of the Image ►page 4-48• Changing the Exposure ►page 4-50• Changing the Resolution ►page 4-51• Sending a large Number of Pages (Job Build) ►page 4-74• Sending a Thin Original (Slow Scan Mode) ►page 4-80• Sending Originals of Different Sizes (Mixed Size Original) ►page 4-76
• Checking the Number of Scanned Original Sheets Before Transmission (Original Count) ►page 4-82
• Others ►page 4-68
4Send the original.Tap the [Start] key.
• To check a preview of a scanned image, tap the [Preview] key before tapping the [Start] key.• When the original is placed on the document glass:
• When sending a fax normally (memory transmission) Repeat the steps for placing and scanning the originals the same number of times as there are originals. Afterscanning all originals, tap the [Read-End] key.
• When sending a fax in direct transmission modeMulti-page originals cannot be scanned in direct transmission mode. Tap the [Start] key to start transmission.
• In normal mode, if you tap [File] or [Quick File] on the action panel before starting fax transmission, you can save the scanned original as data.► QUICK FILE (page 6-9)► FILE (page 6-10)
PreviewStart
OriginalAddress Fax Number Detail
CA
Original Exposure Resolution
Auto Standard
8½x11
8½x11
8½x11 8½x11
4-11
FACSIMILE►ENTERING DESTINATIONS
This section explains how to enter a destination from the initial screen of easy mode.► SELECTING FAX MODE (page 4-7)
ENTERING DESTINATIONS
ENTERING A DESTINATION NUMBER USING THE NUMERIC KEYS
Entering a Pause Between Digits of the NumberEnter a pause after the number used to dial out from a PBX (for example, after "0"), or after the country code when dialing an international number.
ENTERING DESTINATIONS
1Tap the [Direct Entry] key or [Fax Number] to enter the destination fax number.If you want to specify multiple destinations, tap and enter the next fax number.If you enter an incorrect number, tap the [C] key to delete the number and re-enter.
1Tap the [Pause] key.A hyphen "-" is entered when the [Pause] key is tapped once.
If you want to enter a pause between digits of the number:Enter a pause after the number used to dial out from a PBX (for example, after "0"), or after the country code when dialing an international number.The [Pause] key appears on the numeric keys when the destination fax number is entered.A hyphen "-" is entered when the [Pause] key is tapped once.
To set the length of pause:In "Settings", select [System Settings] → [Image Send Settings] → [Fax Settings] → [Default Settings] → [Pause Time Setting].
CAPreview
Start
Original
8½x11 Address Fax Number
Address Book Direct Entry
Detail
Sending History

4-12
FACSIMILE►ENTERING DESTINATIONS
RETRIEVING A DESTINATION FROM AN ADDRESS BOOKA destination fax number is retrieved by simply tapping the one-touch key of that destination on the address book screen. (One-touch dialing)
It is also possible to store multiple fax numbers in a one-touch key, allowing you to retrieve all the numbers by simply tapping the key. This dialing method is convenient when you wish to send a fax to (or poll) multiple fax destinations.When destinations of other scan modes are stored in addition to fax destinations, an icon indicating the mode appears together with the name of the destination in each one-touch key.
• For information on the address book, see "ADDRESS BOOK (page 1-90)".
• For the procedure for storing an address in the address book, see "STORING ADDRESSES THROUGH DIRECT ENTRY (page 1-94)", "STORING ADDRESSES THROUGH GLOBAL ADDRESS SEARCH (page 1-95)", "STORING ADDRESSES FROM FAX OR IMAGE SEND LOGS (page 1-97)", "STORING GROUPS (page 1-98)".
Fax
Scan to E-mail
Internet Fax (Direct SMTP)
Scan to FTP
Scan to Network Folder
Scan to Desktop
Group key with multiple destinations
1Tap the [Address Book] key.
CAPreview
Start
Original
8½x11Address Fax Number
Address Book Direct Entry
Detail
Sending History

4-13
FACSIMILE►ENTERING DESTINATIONS
2Tap a one-touch key of contact or group that includes the fax destination.• The destinations displayed on the list can be narrowed
with frequent use, categories, indexes, and keywords. (In normal mode, you can narrow down the destinations by job type.)
• Tapping [Sort] allows you to change the order of destinations displayed in the list.
• When adding a destination, tap another one-touch key.
• If two or more destinations are selected or specified, the total number of addresses appears next to address.
• Even if only a single destination is selected, the number of addresses appears when the destination is a contact or group in which multiple addresses are stored.
For more information, see "ADDRESS BOOK SCREEN (page 1-91)".
• If you select an incorrect destination:Tap the key again to cancel the selection.
• To cancel a selected destinationSelect the destination you want to cancel in the destination list screen, and tap the [Delete] key.
• To select a destination from the transmission log, tap the [Sending History] key.► USING A TRANSMISSION LOG TO RESEND (page 4-18)
• To check the entered destinations, tap the [Address Review] key. ► THE SELECTED DESTINATIONS (page 4-14)
• The destination for transmission can be selected by tapping a stored destination.
• If an address that you do not have permission to use is included in the addresses, a message will appear when you press the [Start] key. To send only to the permitted addresses, press the [OK] key and then the [Enter for send] key.
In normal mode
• Tap the one-touch key, and then tap [Display Registered Information] on the action panel to display the detailed information.
• To retrieve a destination by using a search number, tap [Call Search Number] on the action panel.► USING A TRANSMISSION LOG TO RESEND (page 4-18)
• To retrieve a destination from a global address book, tap [Global Address Search] on the action panel.► RETRIEVING A DESTINATION FROM A GLOBAL ADDRESS BOOK (page 4-16)
To send to an address in other than the current modeIn "Settings (administrator)", remove the checkmark from [System Settings] → [Image Send Settings] → [Common Settings] → [Condition Settings] → [Address Book Default Selection] → [Apply Addresses of Sending Modes Only].
Address
Sort
AAA AAAA
D
J
M
P
W
BBB BBB
CCC CCC
DDD DDD
EEE EEE
FFF FFF
CA
FrequentUse
CategoryAll
Original
Auto
Start

4-14
FACSIMILE►ENTERING DESTINATIONS
THE SELECTED DESTINATIONSWhen multiple destinations have been selected, you can display and check the destinations. You can also delete a destination (cancel selection of the destination) if necessary.
DELETING SPECIFIED DESTINATIONSSelect the address and tap the [Delete] key.
1Tap the [All Destinations] key.
2Confirm the destination.After the confirmation is completed, tap .
• To confirm detailed information such as the type or name of the specified destination, tap the one-touch key of the target destination, and then tap the [Info.] key.
• If an address that you do not have permission to use is included, a prohibition mark will appear on the address.
If you placed the original on the document glass and tapped the [Start] key, you cannot delete an address when changing settings.
CAPreview
Start
Original
8½x11Address AAA AAA
Address Book Direct Entry
Detail1 +
Sending History
CA
Original
Auto
Start
All Destinations
AAA AAA 1-1234567890
CA
Original
Auto
Start
All Destinations
Delete Info.
AAA AAA 1-1234567890

4-15
FACSIMILE►ENTERING DESTINATIONS
USING A SEARCH NUMBER TO RETRIEVE A DESTINATIONThe search number can be used to specify a destination stored in an address book.
1Tap the [Detail] key to change to normal mode.► Changing mode from each mode (page 4-8)
2Tap [Call Search Number] on the action panel.
3Enter a search number (4 digits) using the numeric keys and tap .When the search number is entered, the stored address is retrieved and specified as a destination.
If an incorrect search number is entered:Tap the [C] key to clear the number and enter the correct number.
• The search number is programmed when the destination is stored in the address book.
• If you do not know the search number, tap [Print Individual List] on the action panel to print and check the address list.
• When entering search numbers such as "0001" and "0011", "0" can be omitted. For example to enter "0001", enter "1" and tap .
8½x11 8½x11
8½x11 8½x11
1234

4-16
FACSIMILE►ENTERING DESTINATIONS
RETRIEVING A DESTINATION FROM A GLOBAL ADDRESS BOOKIf an LDAP server is configured in the setting mode (Web version), you can search for the desired destination in the global address book and obtain the fax number when performing a fax transmission.You can also add a retrieved address to the address book. However, addresses of the FTP/Desktop transmission cannot be stored from the machine.
1In the base screen or address book screen, tap [Global Address Search] on the action panel.
2Tap [Target] and tap the LDAP server to be used.• If an authentication screen for the LDAP server appears,
enter your user name and password.
• If only one LDAP server has been stored, it is not necessary to take step 2. In this case, start from step 3.
After the settings are completed, tap .
3Tap of [Item], and select an item to be searched from [Name/Address].
How to search Enter the search characters (maximum of 64 characters). The system will look for names starting with the entered letters.An asterisk can be used as follows:
XXX : Names beginning with "XXX"XXX : Names that end with "XXX"XXX : Names containing "XXX"
AA XX : Names that start with "AA" and end with "XX".
8½x11 8½x11
EnterInitials
Target
Search Start
SpeakerStart
CAPreview
EnterInitials
Item
Enter Initial and press Enter key ofexternal keyboard or [Start Search] button.
Name
Target
Search Start
SpeakerStart
CAPreview

4-17
FACSIMILE►ENTERING DESTINATIONS
4Enter a keyword and tap the [Search Start] key.When you tap the keyword entry box, the soft keyboard appears.The search results will appear after a brief interval.
• If no destination is found:Tap the [Search Again] key.
• To continuously add other destination.Tap the destination.
To check the destination information:Tap the one-touch key of the target destination, and then tap the [Info.] key. Tap to close the address information screen.When you select the destination and tap the [New Registration with Address Book] on the action panel, the destination can be stored in the address book. This is convenient if you have entered a destination directly.
CA
EnterInitials Search Start
SpeakerStart
Item
Enter Initial and press Enter key ofexternal keyboard or [Start Search] button.
Name
Target
Preview

4-18
FACSIMILE►ENTERING DESTINATIONS
USING A TRANSMISSION LOG TO RESENDSelect a destination from a transmission log and resend the data.The destinations of the most recent 50 transmissions by fax, Scan to E-mail, and/or Internet fax are stored. One of these can be selected to resend to that destination. The destinations of the FTP/Desktop transmission and Scan to Network Folder are also shown in the transmission log.In normal mode, you can also add an address in a transmission history to the address book. This is a convenient way to store the fax numbers and addresses of destinations that were manually entered. However, addresses of the Network Folder transmission cannot be stored from the machine.
• If numeric keys were tapped during the previous transmission, the number may not be redialed correctly.
• The fax addresses below are not stored as addresses for which resend is possible.• One-touch key for a contact in which multiple destinations are stored.• Group destinations• Broadcasting destinations
1In Easy mode Tap the [Sending History] key.
In Normal mode In the base screen or address book screen, tap [Sending History] on the action panel.
CAPreview
Start
Original
8½x11Address Fax Number
Address Book Direct Entry
Detail
Sending History
8½x11 8½x11

4-19
FACSIMILE►ENTERING DESTINATIONS
2Tap the key of the fax destination that you wish to redial.The last 50 addresses used for transmission are displayed.
To cancel the resend setting:Tap the highlighted key.
In normal mode
• To add an address to the address book, select the address and tap [New Registration with Address Book] or [Additional Registration with Address Book] on the action panel.
• You can select an address and tap [Delete the Selected History] or [Delete All Histories] on the action panel to delete one or all histories.
SpeakerStart
Sending History Delete All Histories
Select Address to Send Again.
AAA AAA1472580369
3692580147BBB BBB
2580147369CCC CCC
1234567890Direct Entry
0987654321Direct Entry CAPreview

4-20
FACSIMILE►ENTERING DESTINATIONS
SENDING BY CHAIN DIALINGNumber sequences entered using the numeric keys and/or one-touch keys can be linked together with pauses and dialed as a single number.For example when dialing an international number, tap the [Pause] key between the identification number of an international telephone service company (e.g., "001") and the country code (e.g., "81" for Japan) to insert a pause for smoother line connection.The time (in seconds) set in [Pause Time Setting] of "Settings (administrator)" defines the length of pause.On the screen, a hyphen "-" indicates a pause.If two seconds are set in [Pause Time Setting], tapping the [Pause] key three times enters pauses for 6 seconds.
Example: Using chain dialing to dial an international number
• Addresses that can be selected are addresses that only have one fax address saved.
• After entering the number with the numeric keys, tap the [Pause] key to enter the next number with the numeric keys, or tap the [Chain Dial] key on the action panel to select an address from the address book.
• After selecting the address from the address book, select [Chain Dial Combine with Direct Input] on the action panel to enter the next number with the numeric keys, or [Chain Dial Combine with Address Book] to select an address from the address book.
To set the length of pause:In "Settings", select [System Settings] → [Image Send Settings] → [Fax Settings] → [Default Settings] → [Pause Time Setting].
1 pausePause
010 1 212 xxxxxx
00
Numeric keys Address book one-touch key
Country code of USA
Area code of New York City
Telephone number of other machine

4-21
FACSIMILE►BASIC TRANSMISSION METHODS
This section explains how to enter a destination from the initial screen of easy mode.► SELECTING FAX MODE (page 4-7)
BASIC TRANSMISSION METHODS
FAX TRANSMISSION METHODSThe methods that can be used to send a fax from the machine are described below. Select the method that best suits your needs.
To fax a large number of sheet originals:Use the automatic document feeder.The originals will be scanned into memory and then transmitted (memory transmission).When multiple original sheets are placed in line idle state, they will be sent in sequence from the scanned page in parallel with the scanning process (Quick On Line Sending).If transmission cannot begin immediately because the line is in use, all pages will be scanned and stored in memory.► USING THE AUTOMATIC DOCUMENT FEEDER FOR TRANSMISSION (page 4-27)
Storing a fax jobIf transmission cannot begin immediately because the line is in use, all pages will be scanned and stored in memory. If you want to attempt to send a fax while another job is in progress, you can store the fax job. To check the stored fax job, display the job status screen.► FAX JOBS (page 4-114)
BASIC TRANSMISSION METHODS
• If memory becomes full while the first original page is being scanned, transmission will stop.
• When the transmission is finished, the scanned original pages are cleared from memory. However, when the document filing function is used, the transmitted fax is stored.► QUICK FILE (page 6-9)► FILE (page 6-10)
• If Job Build is enabled, you can select the automatic document feeder or the document glass to scan the original. This sending method may not be available depending on the function.► SENDING A LARGE NUMBER OF PAGES (JOB BUILD) (page 4-74)
1111111111
1111111111
Transmission

4-22
FACSIMILE►BASIC TRANSMISSION METHODS
To fax thick originals or pages of a book:Place the original on the document glass.► USING THE DOCUMENT GLASS FOR TRANSMISSION (page 4-30)
If you wish to send a fax ahead of other previously reserved fax transmissions:Send the fax in direct transmission mode. The original is transmitted directly to the receiving fax machine without being scanned into memory.When direct transmission mode is used, transmission will begin as soon as the transmission in progress is completed (ahead of any previously reserved transmissions).Tap [Direct TX] on the action panel to send a fax.► USING THE AUTOMATIC DOCUMENT FEEDER FOR FAXING IN DIRECT TX MODE (page 4-28)► USING THE DOCUMENT GLASS TO SEND A FAX IN DIRECT TX MODE (page 4-32)
In the following situations, the transmission will be automatically reserved (memory transmission)
• When the line is busy or a communication error occurs and automatic resending is enabled.► WHEN A COMMUNICATION ERROR OCCURS (page 4-25)
• The line of the machine will be busy if another fax is being sent, received, or if the machine is in the busy state.
• Another fax transmission was reserved ahead of your fax.
• One of the following functions is being used for transmission.
• Broadcast transmission, F-code transmission, Timer transmission, N-Up, Card Shot, Job Build, Original Count
• The document glass is being used (except when the speaker is being used to dial).
To disable the Quick On Line Sending setting:In "Settings", select [System Settings] → [Image Send Settings] → [Fax Settings] → [Send Settings] → [Quick On Line Sending].If you disable this setting, transmission will not begin until all pages have been scanned. Note that this setting does not apply to manual transmission.
• Quick On Line Sending is not available when a fax is being sent from the document glass.
• When the document glass is used, multiple original pages cannot be scanned at a time. In this case, the original pages can be separated into multiple times of scanning.
When transmission in direct transmission mode ends, the mode automatically changes back to memory transmission mode.
In direct transmission mode, the [Preview] key cannot be used for transmission.
11
11Transmission

4-23
FACSIMILE►BASIC TRANSMISSION METHODS
ORIGINAL ORIENTATIONWhen an 5-1/2" x 8-1/2" (A5) original is placed, the image is automatically rotated 90 degrees and transmitted in vertical orientation (Rotation Sending).
Rotation sending is not available for originals with 8-1/2" x 11" (A4) size.
To cancel the rotation sending setting:In "Settings (administrator)", select [System Settings] → [Image Send Settings] → [Fax Settings] → [Send Settings] → [Rotation Sending Setting].If this setting is disabled, the original will be transmitted in the orientation in which it is placed.Because of this, some receiving machines may reduce the received data.
When an original is placed in horizontal orientation
Rotated to Vertical orientation
Image is transmitted in vertical orientation.
Send

4-24
FACSIMILE►BASIC TRANSMISSION METHODS
AUTOMATIC REDUCTION OF THE TRANSMITTED IMAGEIf the width of the transmitted image is larger than the width of the paper in the receiving machine, the image will be automatically reduced to fit the receiving machine's paper width.
TRANSMITTABLE ORIGINAL SIZESThe following original sizes can be transmitted.
A long original can be transmitted.
To cancel the Auto Reduction Sending setting:In "Settings", select [System Settings] → [Image Send Settings] → [Fax Settings] → [Send Settings] → [Auto Reduction Sending Setting].If this setting is disabled, the image will be sent at full size and part of the image may be cut off.
Minimum original size Maximum original size
Using the automatic document feeder4-1/4" (height) x 5-1/2" (width) (105 mm (height) x 140 mm (width))
8-1/2" (height) x 19-5/8" (width) (216 mm (height) x 500 mm (width))
Using the document glass -8-1/2" (height) x 14" (width) (216 mm (height) x 356 mm (width))

4-25
FACSIMILE►BASIC TRANSMISSION METHODS
WHEN THE LINE IS BUSYIf the line is busy when you send a fax, transmission will be attempted again automatically after a preset interval. This function only operates in memory transmission mode. In direct transmission mode or manual transmission mode, the transmission will be canceled. Wait for a brief period and then try sending the fax again.
WHEN A COMMUNICATION ERROR OCCURSIf a communication error occurs or the other fax machine does not answer the call within a preset period of time, transmission will automatically be attempted again after a preset interval. This function only operates in memory transmission mode.
To cancel transmission:Do so from the job status screen.► STOPPING/DELETING A JOB IN PROGRESS OR RESERVED (page 1-82)
To set the number of recall attempts and the interval between attempts when the connection cannot be established because the line is busy, or for other reasons:In "Settings (administrator)", select [System Settings] → [Image Send Settings] → [Fax Settings] → [Send Settings] → [Recall in Case of Line Busy].The factory default setting is two attempts at 3-minute intervals.
In direct transmission mode, transmission will not automatically be attempted again
To cancel transmission:Do so from the job status screen.► STOPPING/DELETING A JOB IN PROGRESS OR RESERVED (page 1-82)
To set the number of recall attempts and the interval between attempts when a transmission fails due to an error:In "Settings (administrator)", select [System Settings] → [Image Send Settings] → [Fax Settings] → [Send Settings] → [Recall in Case of Communication Error].The factory default setting is two attempts at 3-minute intervals.

4-26
FACSIMILE►BASIC TRANSMISSION METHODS
FAX DEST. CONFIRMATION MODEThis mode displays a destination confirmation message when a fax is sent to prevent accidental transmission to the wrong destination. Set it in setting mode. If a fax is sent while this function is enabled, an address confirmation message will appear when the [Start] key is tapped.The message that appears will vary depending on the method used to specify the destination.
Destination specified by one-touch key/search number/global address searchTap the [Start] key to display all destinations in the destination confirmation screen. Check that the destinations are correct, and tap the [Enter for send] key to start scanning of the original.If the destination is not correct, tap the [OK] key and select the destination again.
Destination specified using the numeric keysTap the [Start] key to display the confirmation message.Tap the [OK] key, re-enter the destination using the numeric keys, and tap the [Enter Address] key.If the re-entered destination is correct, scanning will begin.If the re-entered destination is not correct, a message will appear. Tap the [OK] key and re-enter the destination. If an incorrect address is entered three times for confirmation, all the previous settings are canceled, and you will return to the base screen.
When a fax that was selected from the Sending History has been resentA confirmation screen is displayed based on the method used to specify the destination during the previous transmission.
After tapping the [Speaker] key while "Fax Dest. Confirmation Mode" is enabled, the destination cannot be specified using the numeric keys, one-touch key, [Call Search Number] key, or [Sending History] key. However, it is possible to send through a telephone.
• To display the destination confirmation message prior to fax transmission:In "Settings", select [System Settings] → [Image Send Settings] → [Fax Settings] → [Default Settings] → [Fax Dest. Confirmation Mode].
• To disable fax broadcast when Fax Dest. Confirmation Mode is enabled:In "Settings", select [System Settings] → [Image Send Settings] → [Fax Settings] → [Send Settings] → [Disable Fax Broadcasting].
• You can select multiple one-touch keys for contacts or groups including fax destinations.
• Before tapping the [Enter for send] key, you can change scan or other settings.
• You can use the numeric keys to enter fax numbers serially. In that case, tap to enter the destination fax number to be added.
• If the [Sub Address] key was tapped to enter a sub-address and passcode, the fax number must be re-entered during confirmation. After re-entering the fax number, tap the [Sub Address] key and enter the sub-address and passcode.
• If chain dialing was used, tap the [Pause] key to enter "-" during confirmation.
• Before tapping the [Enter for send] key, you can change scan or other settings.
4-27
FACSIMILE►BASIC TRANSMISSION METHODS
CHECKING THE IMAGE TO BE TRANSMITTEDCheck the image that will be sent in the touch panel before transmission.You can tap the [Preview] key and then scan the original to check a preview of the scanned image. As you can adjust the exposure and resolution to scan the original while checking it in the preview screen, you can send a better quality original to the destination.► PREVIEW SCREEN (page 1-15)
The settings and functions that can be changed while and after an image is scanned for preview are as follows:Exposure, Send Size, 2-Sided Booklet/Tablet, Resolution, Erase, N-Up, File, Quick File, Timer, Own Name Select, and Transaction Report.
FAX TRANSMISSION METHODS
USING THE AUTOMATIC DOCUMENT FEEDER FOR TRANSMISSIONStoring scanned originals in machine's memory before transmitting them is called "Memory TX".This section explains how to scan the original through the automatic document feeder and send the data by the memory transmission function.
• Depending on the size of the transmission data, part of the preview image may not appear in the preview screen in the touch panel.
• The preview function is not available when the original size is set to Long Size.
• To fax a thick original or other original that cannot be placed in the automatic document feeder, open the automatic document feeder and place the original on the document glass.
• If there is a fax job in progress when the transmission operation is performed, the fax is transmitted when the job in progress is finished.
• If the memory becomes full while the originals are being scanned, a message will appear and scanning will stop. When Quick On Line Sending is enabled for transmission, the scanned originals are sent.
• To disable the Quick On Line Sending setting:In "Settings (administrator)", select [System Settings] → [Image Send Settings] → [Fax Settings] → [Send Settings] → [Quick On Line Sending].If you disable this setting, memory transmission will not begin until all pages have been scanned.
• To set the scan complete sound:In "Settings (administrator)", select [System Settings] → [Image Send Settings] → [Common Settings] → [Condition Settings] → [Scan Complete Sound Setting].
1Place the original in the document feeder tray of the automatic document feeder.► AUTOMATIC DOCUMENT FEEDER (page 1-77)
2Specify the destination fax number.• Entering a destination number using the numeric keys►page 4-11• Retrieving a destination from an address book►page 4-12• Using a search number to retrieve a destination►page 4-15• Retrieving a destination from a global address book►page 4-16• Using a transmission log to resend►page 4-18

4-28
FACSIMILE►BASIC TRANSMISSION METHODS
USING THE AUTOMATIC DOCUMENT FEEDER FOR FAXING IN DIRECT TX MODESending a scanned original without saving it in the machine's memory is called "Direct TX".This section explains how to scan the original through the automatic document feeder and directly send it.
3Tap the [Start] key to begin transmission.When scanning is completed, the machine beeps.
• Tap the [Preview] key to check the preview of an image before sending a fax. For more information, see "CHECKING THE IMAGE TO BE TRANSMITTED (page 4-27)".
• When all originals have been scanned, "Job stored." will be displayed together with a job control number. This number is recorded in the transaction report and image sending activity report and can be used to check fax jobs.► PRINTING IMAGE SENDING ACTIVITY REPORTS (page 4-115)
To cancel scanning the original:Tap the [Cancel Scan] key.
To fax a thick original or other original that cannot be placed in the automatic document feeder, open the automatic document feeder and place the original on the document glass.
• The following functions cannot be used with direct transmission:Timer Transmission, N-Up, Card Shot, Job Build, Polling Memory, Original Count, File, Quick File, Memory Box, Poling, 2-Sided Scan, Search Global Address Book
• Resending will not take place when a direct transmission is not successful due to a communication error or other reason.
• If a fax transmission is already in progress when the direct transmission operation is performed, the direct transmission will wait until the previous transmission is finished. When the previous transmission is completed, the direct transmission will begin.
• While the direct transmission is waiting, the job status display can be tapped to display the job status screen. No other operations are possible.► FAX JOBS (page 4-114)
• The [Preview] key cannot be used for transmission.
1Tap the [Detail] key to change to normal mode.► Changing mode from each mode (page 4-8)
2Place the original in the document feeder tray of the automatic document feeder.► AUTOMATIC DOCUMENT FEEDER (page 1-77)

4-29
FACSIMILE►BASIC TRANSMISSION METHODS
3Specify the destination fax number, and tap [Direct TX] on the action panel.
4Specify the destination fax number.• Entering a destination number using the numeric keys ►page 4-11• Retrieving a destination from an address book ►page 4-12• Using a search number to retrieve a destination ►page 4-15• Using a transmission log to resend ►page 4-18
• Only one destination can be specified. A one-touch key in which multiple destinations are stored cannot be used.
• The destination cannot be retrieved from a global address book.
5Tap the [Start] key to begin transmission.
If a fax transmission is already in progress when the direct transmission operation is performed, the direct transmission will wait until the previous transmission is finished. When the previous transmission is completed, the direct transmission will begin.While the direct transmission is waiting, you can only check the job status.► TYPES OF JOB STATUS SCREENS (page 1-80)
To cancel scanning the original:Tap the [Cancel Scan] key.
8½x11 8½x11

4-30
FACSIMILE►BASIC TRANSMISSION METHODS
USING THE DOCUMENT GLASS FOR TRANSMISSIONStoring scanned originals in machine's memory before transmitting them is called "Memory TX".This section explains how to scan the original placed on the document glass and send the data by the memory transmission function.
• If a fax is being received when the transmission operation is performed, the transmission will be reserved and transmission will take place after fax reception is completed.
• If the memory becomes full while the originals are being scanned, a message will appear and transmission will be canceled.
1Place the original on the document glass.► DOCUMENT GLASS (page 1-79)
When faxing a multi-page original, scan each page in order starting from the first page.
2Specify the destination fax number.• Entering a destination number using the numeric keys ►page 4-11• Retrieving a destination from an address book ►page 4-12• Using a search number to retrieve a destination ►page 4-15• Retrieving a destination from a global address book ►page 4-16• Using a transmission log to resend ►page 4-18
3Tap the [Start] key to begin transmission.When scanning is completed, the machine beeps.
4If you have another page to scan, change pages and then tap the [Start] key.Repeat until all originals have been scanned.
If no action is taken for one minute, scanning automatically ends and the transmission is reserved.

4-31
FACSIMILE►BASIC TRANSMISSION METHODS
5Tap the [Read-End] key.A beep sounds.Open the automatic document feeder and remove the original.
To cancel scanning:Tap the [CA] key before the [Read-End] key is tapped.
• When all originals have been scanned, "Job stored." will be displayed together with a job control number.This number can be used to locate the job in the Transaction Report or in the Image Sending Activity Report.► PRINTING IMAGE SENDING ACTIVITY REPORTS (page 4-115)
• If no action is taken for one minute after the confirmation screen is displayed, scanning automatically ends and the transmission is reserved.
• The [Change Setting] key can be tapped, if necessary, to change the exposure, resolution, scan size, and send size for each original page scanned. However, when "N-Up" or "Card Shot" is selected in Others, only the exposure can be changed when scanning an even-numbered original page.
To cancel transmission:Tap the [CA] key before the [Read-End] key is tapped.
CAPreview
Start
8½x11 Address Fax Number
Address BookHistory Direct Entry Original
Auto
DetailOriginal Place next original. (Pg.No.1)
Press [Start].When finished, press [Read-End].
Change Setting Read-End

4-32
FACSIMILE►BASIC TRANSMISSION METHODS
USING THE DOCUMENT GLASS TO SEND A FAX IN DIRECT TX MODESending a scanned original without saving it in the machine's memory is called "Direct TX".This section explains how to scan the original placed on the document glass and directly send data.When sending a fax from the document glass in direct transmission mode, only one page can be transmitted.
• The following functions cannot be used with direct transmission:Timer Transmission, N-Up, Card Shot, Job Build, Polling Memory, Original Count, File, Quick File, Memory Box, Poling, 2-Sided Scan, Search Global Address Book
• Resending will not take place when a direct transmission is not successful due to a communication error or other reason.
• If a fax transmission is already in progress when the direct transmission operation is performed, the direct transmission will wait until the previous transmission is finished. When the previous transmission is completed, the direct transmission will begin.
• While the direct transmission is waiting, the job status display can be tapped to display the job status screen. No other operations are possible.► FAX JOBS (page 4-114)
• The [Preview] key cannot be used for transmission.
1Tap the [Detail] key to change to normal mode.► Changing mode from each mode (page 4-8)
2Place the original on the document glass.► DOCUMENT GLASS (page 1-79)
When faxing a multi-page original, scan each page in order starting from the first page.
3Specify the destination fax number, and tap [Direct TX] on the action panel.
8½x11 8½x11

4-33
FACSIMILE►BASIC TRANSMISSION METHODS
4Specify the destination fax number.• Entering a destination number using the numeric keys ►page 4-11• Retrieving a destination from an address book ►page 4-12• Using a search number to retrieve a destination ►page 4-15• Using a transmission log to resend ►page 4-18
• Only one destination can be specified. A one-touch key in which multiple destinations are stored cannot be used.
• The destination cannot be retrieved from a global address book.
5Tap the [Start] key to begin transmission.When the line has been connected to the destination, scanning of the original starts.
If a fax transmission is already in progress when the direct transmission operation is performed, the direct transmission will wait until the previous transmission is finished. When the previous transmission is completed, the direct transmission will begin.While the direct transmission is waiting, you can only check the job status.► TYPES OF JOB STATUS SCREENS (page 1-80)
To cancel scanning the original:Tap the [Cancel Scan] key.

4-34
FACSIMILE►BASIC TRANSMISSION METHODS
TRANSMISSION USING THE SPEAKERWhen the speaker is used to dial, the fax is sent after the number is dialed and the connection is established.
• If a person answers, you will be able to hear his or her voice, but you will not be able to speak.
• When the speaker is used, transmission takes place without scanning the original into memory.
• A destination that includes an F-code (sub-address and passcode) cannot be used.
• A one-touch key that has multiple destinations or has a non-fax destination cannot be used.
• In speaker mode, the [Preview] key cannot be used for transmission.
1Tap the [Detail] key to change to normal mode.► Changing mode from each mode (page 4-8)
2Place the original.Place the original in the document feeder tray of the automatic document feeder, or on the document glass.► AUTOMATIC DOCUMENT FEEDER (page 1-77)► DOCUMENT GLASS (page 1-79)
3Tap the [Speaker] key.When the connection is established, you will hear the dial tone through the machine's speaker.
Tapping allows you to use the slider or keys to adjust the volume of the speaker.
4Specify the destination fax number.• Entering a destination number using the numeric keys ►page 4-11• Retrieving a destination from an address book ►page 4-12• Using a search number to retrieve a destination ►page 4-15• Using a transmission log to resend ►page 4-18
A one-touch key in which multiple destinations are stored cannot be used.
5 When the connection is made, tap the [Start] key to begin transmission.
To cancel transmission:To stop transmission, tap the [Sending Canceled] key. To stop communication, tap the [Speaker] key.
CA
8½x11 8½x11

4-35
FACSIMILE►BASIC TRANSMISSION METHODS
SENDING THE SAME FAX TO MULTIPLE DESTINATIONS (BROADCAST TRANSMISSION)You can send a fax to multiple destinations in a single operation when, for example, sending a report to branch offices in different regions. This function is called "Broadcasting".One operation allows you to send data to up to 500 destinations, including the reserved send jobs. (For example, if broadcast transmission jobs with 450 destinations are already reserved, data can be broadcasted to up to 50 destinations.)
It is convenient to store destinations you frequently use for broadcast transmission as contacts or groups. A maximum of 500 destinations can be stored in one contact.For broadcast transmission, the contact or group key can be simply tapped to retrieve multiple fax numbers.You can also send faxes with the one-touch key by setting the [Set as Default used] checkbox to when addresses are registered. If you wish to temporarily remove a destination from the stored addresses, open the detail confirmation screen and remove the destination in the screen.► ADDRESS BOOK (page 1-90)► STORING ADDRESSES THROUGH DIRECT ENTRY (page 1-94)► STORING ADDRESSES THROUGH GLOBAL ADDRESS SEARCH (page 1-95)► STORING ADDRESSES FROM FAX OR IMAGE SEND LOGS (page 1-97)► STORING GROUPS (page 1-98)
When a one-touch key is used to dial, the number of fax numbers that are dialed is the number of destinations that are stored in the one-touch key. When a one-touch key that has 10 destinations is used, 10 fax numbers are dialed.
When the checkbox of "Settings (administrator)" -[System Settings] → [Image Send Settings] → [Common Settings] → [Default Settings] →[Address Book Default Selection] → [Apply Addresses of Sending Modes Only] is selected (factory default setting), the fax is only sent to those destinations that are for fax among the destinations that are set to [Set as Default used]. If the checkmark is removed , the fax can be sent to destinations of other modes.
• Broadcast transmission is available only for memory transmission.
• If this function is combined with "Timer Transmission", broadcast transmission can be performed at any time, such as at night.A broadcast transmission can also be used in combination with other convenient functions.
• Even if a color original is being used, it will be sent to fax and Internet fax destinations in black and white. A long original is also sent in black and white.
• If you wish to send the same image as fax to all destinations, tap [Send Same Image as Fax Address] on the action panel.
• When Scan to E-mail and Internet Fax destinations are included, the send width for Scan to E-mail and Internet Fax will be the same as the send width for fax.
• Direct SMTP addresses cannot be included in a transmission.
Originals
Send

4-36
FACSIMILE►BASIC TRANSMISSION METHODS
1Place the original.Place the original in the document feeder tray of the automatic document feeder, or on the document glass.► AUTOMATIC DOCUMENT FEEDER (page 1-77)► DOCUMENT GLASS (page 1-79)
2Specify all destinations.• Entering a destination number using the numeric keys ►page 4-11• Retrieving a destination from an address book ►page 4-12• Using a search number to retrieve a destination ►page 4-15• Retrieving a destination from a global address book ►page 4-16• Using a transmission log to resend ►page 4-18
After entering a destination using the numeric keys, if you wish to enter another destination using the numeric keys, tap before entering the next destination. can be omitted before or after a destination entered using a one-touch key.
If "Be sure to press Next Address Key ([+]) before selecting the next address." is enabled in setting mode, tap before specifying the next destination.
3Tap the [All Destinations] key.
4Confirm the destination.
To cancel a specified destination:Select the address you want to cancel in the address list screen, and tap the [Delete] key.
CAPreview
Start
Original
8½x11Address AAA AAA
Address Book Sending History Direct Entry
Detail1 +
CA
Original
Auto
Start
All Destinations
AAA AAA 1-1234567890
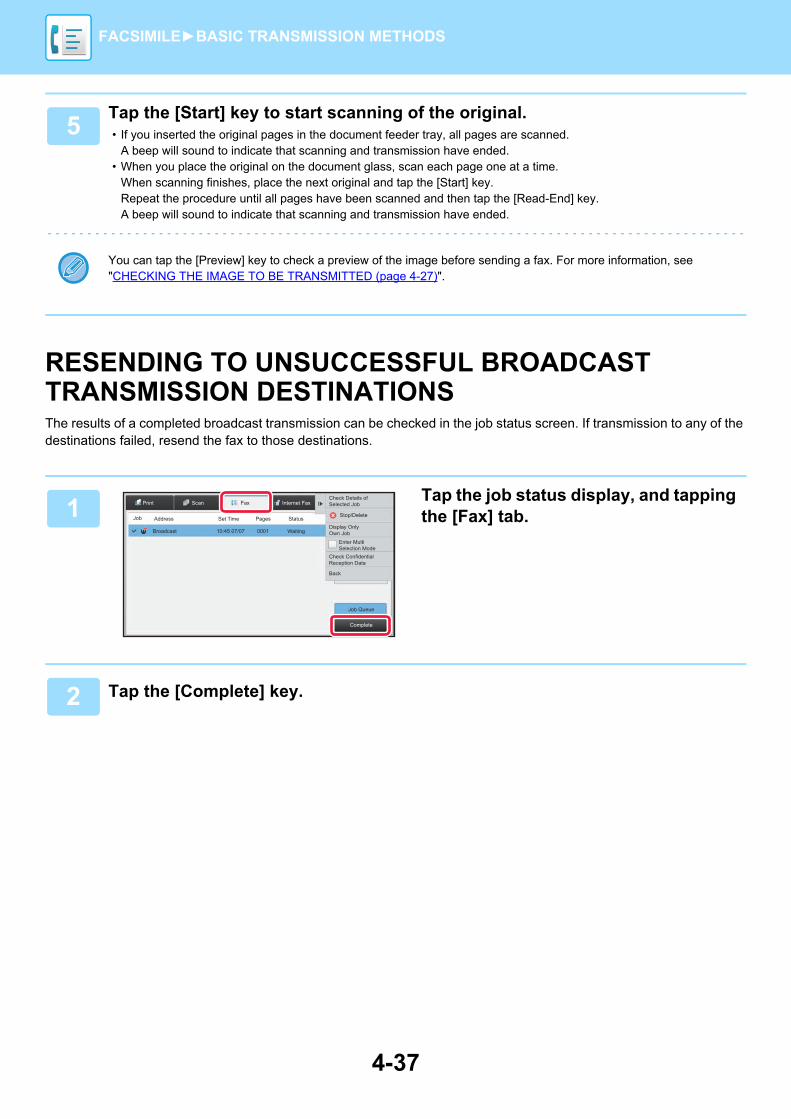
4-37
FACSIMILE►BASIC TRANSMISSION METHODS
RESENDING TO UNSUCCESSFUL BROADCAST TRANSMISSION DESTINATIONSThe results of a completed broadcast transmission can be checked in the job status screen. If transmission to any of the destinations failed, resend the fax to those destinations.
5Tap the [Start] key to start scanning of the original.• If you inserted the original pages in the document feeder tray, all pages are scanned.
A beep will sound to indicate that scanning and transmission have ended.• When you place the original on the document glass, scan each page one at a time.
When scanning finishes, place the next original and tap the [Start] key.Repeat the procedure until all pages have been scanned and then tap the [Read-End] key.A beep will sound to indicate that scanning and transmission have ended.
You can tap the [Preview] key to check a preview of the image before sending a fax. For more information, see "CHECKING THE IMAGE TO BE TRANSMITTED (page 4-27)".
1Tap the job status display, and tapping the [Fax] tab.
2 Tap the [Complete] key.
Job Queue
Complete
Internet FaxFaxScan
Job Address Set Time StatusPages
PrintCheck Details ofSelected Job
Stop/Delete
Enter MultiSelection Mode
Display OnlyOwn Job
Check ConfidentialReception Data
Back
Waiting000110:45 07/07Broadcast

4-38
FACSIMILE►BASIC TRANSMISSION METHODS
3After tapping the key of the completed broadcast transmission, tap [Check Details of Selected Job] on the action panel.
If the broadcast transmission included destinations of different modes, the same broadcast transmission key will appear in each of those modes.
4After tapping the [Failed] tab, tap [Resend to All Addresses Which Failed in Sending] on the action panel to resend the image.
The steps to follow after [Resend to All Addresses Which Failed in Sending] is tapped differ depending on whether or not the document filing function is used.
• Using document filing:You will return to the document filing resend screen with the unsuccessful destinations entered. Perform the document filing resend procedure. (There is no need to re-scan the original.)If the job was stored in a confidential folder or was stored as confidential file, a password entry screen will appear after you tap the [Retry] key. Enter the password.
• Not using document filing:You will return to the base screen with the unsuccessful destinations entered. Place the original and perform the steps of the broadcast transmission.
Job Queue
Complete
Internet FaxFaxScan
Job Address Set Time StatusPages
PrintCheck Details ofSelected Job
Back000110:50 07/07
0001/0005 OK
0001/0005 OK
0001/0005 OK
Busy
0002/000210:45 07/07Broadcast001
0002/000210:40 07/07
0002/000210:35 07/07
Broadcast003
27
Busy0002/000210:30 07/0727
Busy0002/000210:25 07/0727
Busy0002/000210:20 07/0727
Busy0002/000210:15 07/0727
Busy0002/000210:10 07/0727
Print Image SendingActivity Report

4-39
FACSIMILE►BASIC TRANSMISSION METHODS
SENDING A FAX DIRECTLY FROM A COMPUTER (PC-Fax)A file on a computer can be sent via the machine as a fax (PC-Fax function). Faxes are sent using the PC-Fax function in the same way that documents are printed. Select the PC-Fax driver as the printer driver for your computer and then select the Print command in the application. Image data for transmission will be created and sent as a fax.By using the "Log Viewer" application, faxes can be sent using the transmission log displayed in the Log Viewer.
For the procedures for using this function, see the PC-Fax driver Help.
• To use the PC-Fax function, the PC-Fax driver must be installed. For more information, see the Software Setup Guide.
• This function can only be used on a Windows® computer.
Only transmission is available for this function. Faxes cannot be received by your computer.
PC-I-Fax Send
Log Viewer Re-send faxes using the transmission log

4-40
FACSIMILE►BASIC TRANSMISSION METHODS
DELETING A TRANSMISSION LOGYou can check transmission logs from the action panel of each image send mode.You can delete an address selected in a transmission log, or delete all addresses.
Delete the Selected History
1Tap the [Detail] key to change to normal mode.► Changing mode from each mode (page 4-8)
2Tap [Sending History] on the action panel.The transmission log appears.
3Select the address you want to delete.
4Tap [Delete the Selected History] on the action panel.A message appears prompting you to confirm the deletion.
5Tap the [Delete] key.
8½x11 8½x11
Start
Sending History New Registrationwith Address BookAdditional Registrationwith Address BookDelete the SelectedHistory
Delete All Histories
Select Address to Send Again.
AAA AAA1-1234567890
3692580147BBB BBB
2580147369CCC CCC
1234567890Direct Entry
0987654321Direct Entry CAPreview
Preview
Start
Sending History New Registrationwith Address BookAdditional Registrationwith Address BookDelete the SelectedHistory
Delete All Histories
Select Address to Send Again.
AAA AAA1-1234567890
3692580147BBB BBB
2580147369CCC CCC
1234567890Direct Entry
0987654321Direct Entry CA
Delete the selected history?
Cancel Delete

4-41
FACSIMILE►BASIC TRANSMISSION METHODS
Delete All Histories
1Tap the [Detail] key to change to normal mode.► Changing mode from each mode (page 4-8)
2Tap [Sending History] on the action panel.The transmission log appears.
3Tap [Delete All Histories] on the action panel.A message appears prompting you to confirm the deletion.
4Tap the [Delete All] key.
8½x11 8½x11
SpeakerStart
Sending History Delete All Histories
Select Address to Send Again.
AAA AAA1472580369
3692580147BBB BBB
2580147369CCC CCC
1234567890Direct Entry
0987654321Direct Entry CAPreview
Delete all histories?
Cancel Delete All
SpeakerStart
Sending History Delete All Histories
Select Address to Send Again.
AAA AAA1472580369
3692580147BBB BBB
2580147369CCC CCC
1234567890Direct Entry
0987654321Direct Entry CAPreview

4-42
FACSIMILE►BASIC TRANSMISSION METHODS
SET THE SCANNING OF THE ORIGINALSAUTOMATICALLY SCANNING BOTH SIDES OF AN ORIGINAL (2-Sided Original)The automatic document feeder will automatically scan both sides of the document.
• 2-sided scanning is not possible when direct transmission or speaker transmission is performed.• On the MX-B355W, duplex scanning is not possible when originals of mixed width are scanned.• You cannot use 2-sided scanning when the original size is set to Long Size.
2-sided scanning automatically turns off after transmission has ended.
1Tap the [Original] key, and tap the [Book] key or [Tablet] key.See the figure on the left to check the binding edge of the original and select the key to be tapped.
In normal mode, tap the [2-Sided Booklet] key or [2-Sided Tablet] key.
2Tap the [Image Orientation] key with the same orientation as the placed original.If this setting is not correct, a suitable image may not be transmitted.After the settings are completed, tap .
To cancel 2-sided scanning:Tap the [1-Sided] key.In normal mode, tap the [2-Sided Booklet] key or the [2-Sided Tablet] key that has been forcibly displayed and cancel the display.
2-Sided Original Two pages are sent as a single page (N-Up)
Send
A
CG
A BE F
J
L K L
E
Book Tablet
OriginalImageOrientation
Duplex Setup
1-Sided Book Tablet
PreviewCA Start
8½x11

4-43
FACSIMILE►BASIC TRANSMISSION METHODS
SPECIFYING THE ORIGINAL SCAN SIZE IN PAPER SIZEIf you placed originals of size other than the original size specified in "Default Original Size Settings", specify the original size manually.
When [Long Size] is selected, the 2-sided scanning setting and send size cannot be changed.The image is sent in Mono2 only.
1Tap the [Original] key.
2Tap the [Size] key.
3Tap the appropriate original size key.After the settings are completed, tap .
• If you are sending a long original, tap the [Long Size] key.Use the automatic document feeder to scan a long original. The maximum width that can be scanned is 19-5/8" (500 mm) (the maximum height is 8-1/2" (216 mm)).► TRANSMITTABLE ORIGINAL SIZES (page 4-24)
OriginalImageOrientation
Duplex Setup
1-Sided Book Tablet
PreviewCA Start
8½x11
8½x14
5½x8½ 8½x118½x132/5
8½x13Long Size

4-44
FACSIMILE►BASIC TRANSMISSION METHODS
SPECIFYING THE ORIGINAL SCAN SIZE USING NUMERIC VALUESWhen scanning a non-standard size original such as a postcard, specify the original size by numeric values after placing the original. The width can be from 1" to 14" (25 mm to 356 mm), and the height can be from 1" to 8-1/2" (25 mm to 216 mm).
When the scan size is specified by numeric values, the send size cannot be specified.
1Tap the [Detail] key to change to normal mode.► Changing mode from each mode (page 4-8)
2Tap the [Original] key.
3Tap the [Scan Size] key.
4Tap the [Direct Entry] key, and enter the scan size.• Tap the areas displaying width and height sizes
respectively, and enter the sizes using the numeric keys.• It is convenient to use to finely adjust the entered
size.
5Tap the [Enter] key.After the settings are completed, tap twice.On the base screen, check that the specified size is displayed on the [Original] key.
To cancel the specified size settings: Tap the [Auto] key.
8½x11 8½x11
8½x11

4-45
FACSIMILE►BASIC TRANSMISSION METHODS
STORING FREQUENTLY USED ORIGINAL SIZESStore the frequently used non-standard original sizes. This section explains how to store, retrieve, change, and delete non-standard original sizes.
Storing original sizes (Modify/Delete)
• The stored original size will be retained even if the main power is turned off.
• A total of up to 12 non-standard original sizes can be registered for copying, fax, and image sending.
• The added original sizes will also appear in other modes.
1Tap the [Detail] key to change to normal mode.► Changing mode from each mode (page 4-8)
2Tap the [Original] key.
3Tap the [Scan Size] key and tap the [Custom Size] tab.
4Tap [Store/Delete] key.
8½x11

4-46
FACSIMILE►BASIC TRANSMISSION METHODS
5Tap a key ( ) for storing a custom original size.Tap a key that does not show a size.
To modify or delete a previously stored key:Tap the key that you want to modify or delete. The following screen will appear.• To modify the key, tap the [Modify] key and go to the next step.• To delete the key, tap the [Delete] key. Make sure that the original size has been cleared and tap the key.
6Specify the original size.Tap the areas displaying width and height sizes respectively, and enter the sizes using the numeric keys.
It is convenient to use to finely adjust the entered size.
7Tap the [Execute] key.Tap the key, and check that the key of the size stored on the Scan Size screen is added properly. After you have checked it, tap .
To cancel the operation:Tap the [CA] key.
Scan SizeStore/Delete
Select the size key to store/deletethe custom original size.
X11 Y8-
Address Book
Othersreception memory 100%
SpeakerStart
CAPreview
Put Multiple Pages in A Page
Slow Scan ModeScan Thin Paper Original
N-UpA custom size has already been storedin this location.
Delete ModifyCancel

4-47
FACSIMILE►BASIC TRANSMISSION METHODS
Retrieving a stored original size
1Tap the [Detail] key to change to normal mode.► Changing mode from each mode (page 4-8)
2Tap the [Original] key.
3Tap the [Scan Size] key and tap the [Custom Size] tab.
4Tap the key of the original size that you wish to retrieve.After selecting the key of the original size, tap the key.Check that the specified size is displayed on the scan size screen.
To cancel the operationTap the [CA] key.

4-48
FACSIMILE►BASIC TRANSMISSION METHODS
SPECIFYING THE SEND SIZE OF THE IMAGETap this key to specify the send size as a paper size. If the specified send size is larger than the scan size, the image will be enlarged. If the specified send size is smaller than the scan size, the image will be reduced.
The send size cannot be specified when [Long Size] is selected for the scan size, or when the scan size is specified by numeric values.
1Tap the [Detail] key to change to normal mode.► Changing mode from each mode (page 4-8)
2Tap the [Original] key.
3Tap the [Send Size] key.
4Tap the desired send size key.After the settings are completed, tap .
Depending on the paper size specified for the "Scan Size", it may not be possible to select some sizes for the "Send Size". You cannot tap size keys that are unavailable for the "Send Size".
100%
CA
8½x11 8½x11
5½x8½ 8½x11
8½x132/5
8½x13
11x17
8½x11
8½x14

4-49
FACSIMILE►BASIC TRANSMISSION METHODS
5Tap the [Image Orientation] key with the same orientation as the placed original.If this setting is not correct, a suitable image may not be transmitted.After the settings are completed, tap .
To configure the default setting of image orientation:Select [System Settings] → [Image Send Settings] → [Common Settings] → [Condition Settings] → [Image Orientation] in "Settings (administrator)".
The ratio used for reduction or enlargement of the original will appear between the "Scan Size" and the "Send Size".
100%
8½x11 8½x11

4-50
FACSIMILE►BASIC TRANSMISSION METHODS
CHANGING THE EXPOSUREThe exposure can be changed to suit the darkness of the original.
Exposure settings
When using the automatic document feeder, the exposure setting cannot be changed once scanning has begun. (However, when "Job Build" or "Preview Setting" in "Others" is used, the exposure can be changed each time a new set of originals is inserted.)
Exposure Suggestion
Auto This setting automatically adjusts the exposure for light and dark parts of the original.
Manual 1-2 Select this setting when the original consists of dark text.
3 Select this setting for a normal original (neither dark nor light).
4-5 Select this setting when the original consists of light text.
1After tapping the [Exposure] key, tap the [Manual] key.
2Adjust the exposure with the slider or
.After the adjustment, tap .
When [Auto] is selected, the exposure will be set to "3".
Exposure
Auto
Lighten
1 2 3 4 5
Darken
Specify density of image to send.
Manual
PreviewCA Start

4-51
FACSIMILE►BASIC TRANSMISSION METHODS
CHANGING THE RESOLUTIONThe resolution can be specified to match the characteristics of the original, such as text or photo, the size of the text, and the darkness of the image.Resolution settings
Resolution Suggestion
Standard Select this setting when your original consists of normal-sized text (like the text in this manual).
Fine Select this setting when your original has small text or diagrams with fine lines.The original will be scanned at twice the resolution of the [Standard] setting.
Super Fine Select this setting when your original has intricate pictures or diagrams.A higher-quality image will be produced than with the [Fine] setting.
Ultra Fine Select this setting when your original has intricate pictures or diagrams.This setting gives the best image quality. However, transmission will take longer than with the other settings.
Half Tone Select this setting when your original is a photograph or has gradations of color (such as a color original).This setting will produce a clearer image than [Fine], [Super Fine], or [Ultra Fine] used alone.Halftone cannot be selected when [Standard] is used.
• When using the automatic document feeder, the resolution setting cannot be changed once scanning has begun. (However, when "Job Build" or "Preview Setting" in "Others" is used, the resolution can be changed each time a new set of originals is inserted.)
• When a fax is sent at [Ultra Fine], [Super Fine], or [Fine] resolution, a lower resolution will be used if the receiving machine does not have that resolution.
1Tap the [Resolution] key.
2Tap the key of the desired resolution.When your original is a photograph or has gradations of color (such as a color original), and you wish to produce a clearer image than [Fine], [Super Fine], or [Ultra Fine] used alone, set the [Half Tone] checkbox to . Halftone cannot be selected when [Standard] is used.After the settings are completed, tap .
Original
Fine
Half Tone(Original with shades of color)
Standard Super Fine Ultra Fine
PreviewCA Start

4-52
FACSIMILE►FAX RECEPTION
This section explains how to enter a destination from the initial screen of easy mode.► SELECTING FAX MODE (page 4-7)
RECEIVING A FAX
RECEIVING A FAX AUTOMATICALLYWhen the reception mode is set to "Auto Reception", the machine will receive and print faxes automatically.
FAX RECEPTION
• When fax reception is in progress, it is possible to reserve a transmission by performing the transmission in memory transmission mode.► FAX TRANSMISSION METHODS (page 4-21)
• The Data Notification indicator blinks from the start of fax reception until printing is completed.
• To print received faxes, make sure that the required paper is loaded into the machine's paper trays. It is not necessary to load 8-1/2" x 11" (A4) paper and 5-1/2" x 8-1/2" (B5) paper in both the vertical ( ) and horizontal ( ) orientations. Differences in orientation are automatically adjusted when faxes are received.When a fax smaller than 8-1/2" x 11" (A4) size is received, the size of the paper used for printing will vary depending on the orientation (vertical or horizontal) in which the sender placed the original.
• If a print job such as the copy or printer function has already been executed when printing the received data, the first reserved job is printed before the received data.
• Received faxes will not be printed when the machine cannot print due to an error condition such as out of paper, out of toner, or a paper misfeed. The faxes will be printed automatically when the error condition is cleared. (If the paper has run out, add paper and tap on the touch panel.)
• You can check current fax reception mode in the system area at the top of the screen.
To switch between auto reception and manual reception modes:Select [System Settings] in "Settings (administrator)" → [Image Send Settings] → [Fax Data Receive/Forward (Manual)] → [Fax Settings] → [Receive Settings].
1The machine rings and fax reception begins automatically.When reception begins, the Data Notification indicator blinks.A beep sounds when reception ends.
Beep

4-53
FACSIMILE►FAX RECEPTION
How to check the fax reception mode You can check current fax reception mode in the system area at the top of the screen.
2The faxes are printed automatically.When printing ends, the Data Notification indicator turns off.
If a PIN Code entry screen appears:A PIN Code is registered to print the received fax data. When the correct PIN Code is entered, the received fax is printed.► PRINTING A PIN CODE-PROTECTED FAX (Hold setting for received data print) (page 4-55)
System Information
Check FaxReception Image
Check ConfidentialReceived Data
Check Error Box Release HeldReceived Data
TerminateRemote Operation
Fax Receive
Event Information Maintenance Information Toner Remaining
Select External Application Exit

4-54
FACSIMILE►FAX RECEPTION
RECEIVING A FAX MANUALLYA fax can be received manually using the touch panel (manually).
• When answering the telephone by tapping the [Speaker] key, you will be able to hear the voice of the caller, but you will not be able to speak.
• You can receive a fax after answering a call on an extension telephone. Remote reception can also be used to receive a fax.► RECEIVING A FAX AFTER ANSWERING A CALL ON THE EXTENSION TELEPHONE (REMOTE RECEPTION)
(page 4-113)
To switch between auto reception and manual reception modes:Select [System Settings] in "Settings (administrator)" → [Image Send Settings] → [Fax Data Receive/Forward (Manual)] → [Fax Settings] → [Receive Settings].
1When the machine rings, tap the [Detail] key to change to normal mode, and tap the [Speaker] key.When the [Speaker] key is tapped, the [Receive] and appears.► Changing mode from each mode (page 4-8)
• To adjust the speaker volume, tap the key and adjust with the slider or keys.
• If the received fax data remains unprinted, it will cause the fax memory to fill up, which may prevent some faxes from being received. When using this function, you should print the received data as soon as possible without leaving it in the fax memory.You can view the remaining fax memory capacity on the fax mode base screen.
2Tap the [Receive] key to receive a fax.When printing ends, the Data Notification indicator turns off.
Receive
SpeakerStart
CA
8½x11 8½x11

4-55
FACSIMILE►FAX RECEPTION
PRINTING RECEIVED DATA
PRINTING A PIN CODE-PROTECTED FAX (Hold setting for received data print)Enable this setting to have faxes received and stored in memory without being printed. To print the faxes, a PIN Code must be entered. When this function is used, a PIN Code entry screen appears in the touch panel when a fax is received.
Important points when using this functionIf the received fax data is not printed or deleted, the fax memory will run low, and the machine will not be able to receive any faxes. When using this function, you should print the received data as soon as possible without leaving it in the fax memory.You can view the remaining fax memory capacity on the fax mode base screen.When little space remains in the fax memory, "Manual receive is disabled. Due to out of memory." appears on the touch panel.
When the previously programmed 4-digit PIN Code is entered using the numeric keys, printing begins.When the [Cancel] key is tapped, the PIN Code entry screen closes. It will reappear when you tap or change modes. The data in memory key will blink in the touch panel.
To enable the hold setting for received data print:In "Settings (administrator)", select [System Settings] → [Image Send Settings] → [Common Settings] → [Condition Settings] → [Hold Setting for Received Data Print].
• The received faxes will be stored in memory regardless of whether they are received automatically or manually.
• When the received data is transferred to other machine, data stored in memory is also transferred. At that time, the same PIN Code entry screen will appear as for printing. Forwarding will not take place unless the PIN Code is entered.
To display the received data list screen after entering the PIN Code:In "Settings (administrator)", select [System Settings] → [Image Send Settings] → [Common Settings] → [Condition Settings] → [Preview Setting] → [Received Data Image Check Setting].
Exposure
50%
Space
Address
Auto
Received data is stored.Enter PIN code via the 10-key.
Cancel
8½x118½x11

4-56
FACSIMILE►FAX RECEPTION
PRINTING RECEIVED DATA AT A SPECIFIED TIMEYou can start printing the received data at a specified time.For stress-free printing, you should avoid printing large numbers of pages at peak times during the day, and when you do not urgently need to print.
• The printed data is automatically deleted from memory.
• If the power is turned off at the specified time, printing will start at the timing when the power is turned on.
• This function can be used when "Settings (administrator)" - [System Settings] → [Image Send Settings] → [Common Settings] → [Condition Settings] → [Preview Setting] → [Received Data Image Check Setting] is enabled.
If Hold Setting for Received Data Print is enabled, this function is not available.
• To print received data at the specified time:In "Settings", select [System Settings] → [Image Send Settings] → [Common Settings] → [Condition Settings] → [Time Specified Output of Received Data].
• To disable the hold setting for received data print:In "Settings (administrator)", disable this function using [System Settings] → [Image Send Settings] → [Common Settings] → [Condition Settings] → [Hold Setting for Received Data Print].
Set to print data received during the day at 20:00
At 20:00, printing begins automatically
Prints

4-57
FACSIMILE►FAX RECEPTION
CHECKING THE IMAGE BEFORE PRINTINGCheck the image of received data on the touch panel before printing.This function can be used when "Settings (administrator)" - [System Settings] → [Image Send Settings] → [Common Settings] → [Condition Settings] → [Preview Setting] → [Received Data Image Check Setting] is enabled*.* The factory default setting is disabled.
Important points when using this functionIf the received fax data is not printed or deleted, the fax memory will run low, and the machine will not be able to receive any faxes. When using this function, you should print the received data as soon as possible without leaving it in the fax memory.You can view the remaining fax memory capacity on the fax mode base screen.When data is received, is shown at the top of the screen.
Depending on the size of the received data, part of the check image on the touch panel may not appear.The received data list can be also shown in the job status screen that appears when you tap the job status display.The received data can be forwarded, deleted, or saved from the received data list.► FORWARDING RECEIVED DATA MANUALLY (page 4-65)► SAVING RECEIVED DATA (page 4-67)
1In the System Information, tap the [Event Information] tab and tap the [Check Fax Reception Image] key.The received data is listed.
You can also display the received data list by tapping the job status display and tapping [Check Received Data] on the action panel of Job Status screen.
8½x118½x11
System Information
Check FaxReception Image
Check ConfidentialReceived Data
Check Error BoxRelease HeldReceived Data
TerminateRemote Operation
Fax Receive
Event Information Maintenance Information Toner Remaining
Select External Application Exit

4-58
FACSIMILE►FAX RECEPTION
2Tap the key of the received data you wish to check, and tap [Check Image] on the action panel.Displays the received data image.
• Tap to show a list of received data. The list view or thumbnails view can be changed depending on the setting mode.
• To delete a received image, tap [Delete] on the action panel.
• To transfer the selected received image, tap [Forward to Other Address] on the action panel. ► FORWARDING RECEIVED DATA MANUALLY (page 4-65)
• To save the selected received image, tap [File] on the action panel.► SAVING RECEIVED DATA (page 4-67)
• To store the sender fax number as a number for "Allow/Reject Number Setting", tap [Register as Junk Fax] on the action panel and, in the confirmation message screen, tap the [OK] key.Specify a sender fax number as a number for "Allow/Reject Number Setting" by selecting, in "Settings (administrator)", select [System Settings] → [Image Send Settings] → [Fax Settings] → [Receive Settings] → [Allow/Reject Number Setting].
3Tap the image you wish to print, and tap the [Print] on the action panel.The machine starts printing the image.
• [Select All Page]: Selects all displayed images.
• [Release All Page]: Cancels all images that have been selected by "Select All Page".
• / : Use these keys to enlarge or reduce an image.
• / : Rotates image counterclockwise or clockwise.
• A preview image is an image for the touch panel. It will differ from the actual print result.
• Tap [Erase Specified Range] on the action panel to delete unwanted area of the image. Specify the image area you wish to delete in the Erase Specified Range screen.
• To forward the selected image, tap [Forward to Other Address]on the action panel.► FORWARDING RECEIVED DATA MANUALLY (page 4-65)
• To save the selected received image, tap [File] on the action panel.► SAVING RECEIVED DATA (page 4-67)
Forward to Other Address
Check Image
PrintAll Received DataReceived Data List
Cancel All
Delete
FileStore Data in Folder
Forward to Other Address
Return to ReceivedData List
Select Image to Operate.
Delete
File
Erase Specified Range
SelectAll Page

4-59
FACSIMILE►FAX RECEPTION
FORWARDING RECEIVED DATA
FORWARDING RECEIVED FAXES (FAX DATA FORWARD)When the machine cannot print because it is out of paper or out of toner, received faxes can be forwarded to another previously stored fax machine. Store a recipient by selecting [Set the Telephone Number for Data Forwarding (page 7-178)] in Setting mode.When printing ends, the Data Notification indicator turns off.This function is convenient in an office or work area that has two or more telephone lines and another fax machine is connected to a different line than the machine.
• If some pages of a fax that is being forwarded were successfully printed, only those pages that were not printed will be forwarded.
• A forwarded fax becomes a fax transmission job. If transmission does not take place because the transmission was canceled or an error occurred, the fax will be held in memory until it can be printed.
• All faxes received are forwarded. Note, however, that faxes received and stored in an F-code confidential memory box cannot be forwarded.
• If a PIN Code entry screen appears after tapping the [OK] key, "Hold Setting for Received Data Print" has been enabled. Enter the PIN Code using the numeric keys to begin forwarding.► PRINTING A PIN CODE-PROTECTED FAX (Hold setting for received data print) (page 4-55)
1Make sure that the Data Notification indicator is blinking, and tap the [Settings] key in the home screen.
2Tap the [System Settings] → [Image Send Settings] → [Fax Data Receive/Forward (Manual)] key.
The machine Printing does not take place
Received Data
Forward
Forward Destination
Prints
EasyCopy

4-60
FACSIMILE►FAX RECEPTION
FORWARDING RECEIVED DATA TO PRESET DESTINATIONS (INBOUND ROUTING SETTINGS)You can have received faxes automatically forwarded to a fax address, Internet fax address, e-mail address, file server address, desktop address, or network folder address. Received data can be forwarded to the specified destinations without being printed.
Configure all forwarding settings for received faxes in setting mode (Web version). For the procedure for accessing the setting mode (Web version), see Quick Start Guide.The following explanation assumes that the setting mode (Web version) has been accessed with administrator rights.
3Tap the [Execute] key in [Forward Received Data] to begin forwarding.
If a PIN Code entry screen appears, the "Hold Setting for Received Data Print" has been enabled. Enter the PIN Code using the numeric keys to begin forwarding.► PRINTING A PIN CODE-PROTECTED FAX (Hold setting for received data print) (page 4-55)
Whether or not to forward data for each forwarding table can be quickly set. In "Settings (administrator)" - [System Settings] → [Image Send Settings] → [Inbound Routing (Forwarding/Storing) Settings] → [Administration Settings] → [Inbound Routing], tap [Enable]/[Disable] for each forwarding table that appears.
• This function cannot be used for faxes received by confidential reception.
• When faxes forwarded using this function are printed at the forwarding destination, the date and time of reception cannot be printed on the faxes. ("Receiving Date & Time Print" is disabled.)
• The received data is not forwarded to a hyperlink destination that is registered in the specified address.
• A direct SMTP address cannot be specified as a forwarding destination.
1 In "Settings (Web version)", click [System Settings] → [Image Send Settings] → [Inbound Routing (Forwarding/Storing) Settings] → [Administration Settings].
The machine
Forward
Received Data

4-61
FACSIMILE►FAX RECEPTION
2 In "Inbound Routing", select [Enable] and click the [Submit] button.
Users without administrator rights can be prohibited from storing, editing, and deleting forwarding tables in this screen, and from specifying which table is used. To do so, set the checkboxes for the following items to .
• Disable Registration of Forward Table
• Disable Change/Delete of Forward Table
• Disabling of Forward Condition ChangeSpecify in [Print Style Setting] whether or not to have the machine to print the faxes to forward when inbound routing is enabled. After the settings are completed, be sure to click the [Submit] button.
• [Always Print]: Always prints received data before forwarding the data.
• [Print at Error]: Prints received data only when an error prevents forwarding.
• [Save Only at Error]: Saves received data only when an error prevents forwarding. For the saved data, the error address can be confirmed and the data can be resent. From the [Scan] or [Fax] tab in the job status screen, tap [Check Error Box] on the action panel.
3 Click [Sender Address Registration] in the [Inbound Routing (Forwarding/Storing) Settings] menu in the "Settings (Web version)".
4 Enter the sender address or fax number in "Internet Fax Address" or "Fax Number" as appropriate, and click the [Add to List] button.The entered address will be added to the "Address to be Entered" list. Enter the address directly (maximum of 1500 characters) or select the address from a global address book by clicking the [Global Address Search] button. To store multiple sender addresses or fax numbers, repeat these steps.
• If you wish to have only faxes from specified addresses forwarded, store the desired sender addresses. Send addresses stored here can be selected from a list when you store a forwarding table.
• A maximum of 500 sender numbers/addresses can be stored.
• To delete an entered address, select the address in "Address to be Entered" and click the [Delete] button.
5 When you have finished adding addresses, click the [Submit] button.
6 Click [Inbound Routing Settings] in the [Inbound Routing (Forwarding/Storing) Settings] in the "Settings (Web version)" menu and click the [Add] button.
7 Enter a "Table Name".

4-62
FACSIMILE►FAX RECEPTION
8 Select the sender whose faxes will be forwarded.• To forward all received data, select [Forward All Received Data].
• To forward only data received from specific senders, select [Forward received data from specified senders only.]. To forward all data except data from specific senders, select [Forward all received data except that from specified senders.]. Then, select the appropriate senders from the list and click the [Add] button.
When selecting senders from the "Sender Address Setting" list, you can use the [Shift] key or the [Ctrl] key on your keyboard to select multiple senders.
9 Select the forwarding conditions.• To always forward received data, select [Always Forward].
• To specify a day and time on which received data will be forwarded, select [Forward received data only on specified days.] and select the checkbox of the desired day of the week. To specify a time, select the [Set Forwarding Time] checkbox ( ) and specify the time.
Up to three forwarding day and time settings can be set for one forwarding table, and a forwarding destination can be set for each set time. To configure these settings, use the [Forward Condition] tabs to access each setting.
10 Select the file format.The format can be set separately for each forwarding address (for each of forwarding addresses 1, 2, and 3 in the table).
• Images forwarded in TIFF format may not be displayed correctly in some recipient environments. In this event, change the file format to PDF.
• If the Internet fax address is selected as a recipient, data is forwarded in TIFF regardless of the specified format.
• If a fax number is selected as a recipient, the file format is ignored.
11 Select the recipient from the address book.You can specify multiple registered addresses or telephone numbers from the address book of the machine.Up to 1,000 recipients can be registered for Recipients 1, 2, and 3 in total.When you select the recipients from the address book, up to 400 recipients can be registered for network folder, FTP/Desktop, Internet fax, and fax.
A direct SMTP address cannot be specified as a forwarding destination.
12 Enter a recipient directly and specify the recipient.• Specify this information if necessary.
• Enter an e-mail address, an Internet fax address, or a fax number directly and tap the [Add] key.
• When you specify an e-mail address or a fax number, you can use the global address search.
• When you specify a fax number, also specify the international correspondence mode.
• When enter the recipients directly, up to 100 recipients can be registered for e-mail address, network folder, FTP/Desktop, Internet fax, and fax.

4-63
FACSIMILE►FAX RECEPTION
13 Click [Submit].
14 Click [Inbound Routing Settings] in the [Inbound Routing (Forwarding/Storing) Settings] in "Settings (Web version)".
15 From the forwarding table, select [Forward to All Forward Destinations] or [Forward based on Forward Condition].
16 From the forwarding table, select [Always Forward] or [Forward received data only on specified days.].The forwarding permission settings that appear here are linked to the forwarding conditions set in step 9.If you wish to use different forwarding conditions than those set in step 9, set the forwarding permission settings.
• To use the inbound routing function, enable the forwarding tables that you wish to use from among the stored tables.
• To delete a forwarding table, click the checkbox next to the table name so that it is selected ( ) and click [Delete].
17 Click [Submit].

4-64
FACSIMILE►FAX RECEPTION
SAVING RECEIVED FAXES TO THE MACHINE'S HARD DISK (INBOUND ROUTING)Received faxes can be saved to the machine's hard disk. Saved faxes can be viewed on a computer.Set PDF, TIFF (multi) or TIFF (signal) for the saved Internet faxes.You can also receive notification of the storage result or storage folder by E-mail.Received faxes are saved in the following directory:\\MFP\faxreceive
How to save received faxes to the hard disk
• Up to 500 files can be stored in one folder as received data.
• The "faxreceive" folder contains files of "Settings for HDD Storing of Received Data".
• The folder is automatically created.
• The file name for received data can be set in "File Name Setting" in "Settings for HDD Storing of Received Data" in "Inbound Routing (Storage) Settings".
1 In "Settings (administrator)", click [System Settings] → [Network Settings] → [Public Folder / NAS Setting]. (Administrator rights required.)
2 Select [Allowed] in "faxreceive:Use of Storage" and click the [Submit] button.
The machine
Received Data
View

4-65
FACSIMILE►FAX RECEPTION
Settings for saving received faxes to the hard disk
FORWARDING RECEIVED DATA MANUALLYReceived faxes can be forwarded manually after receipt.This function is available when [System Settings] → [Image Send Settings] → [Common Settings] → [Condition Settings] → [Preview Setting] → [Received Data Image Check Setting] is enabled* in "Settings (administrator)".* The factory default setting is disabled.
When data is received, is shown at the top of the screen.
1 In "Settings (administrator)", click [System Settings] → [Image Send Settings] → [Inbound Routing (Forwarding/Storing) Settings] → [Inbound Routing (Storage) Settings] (administrator rights are required).
• Data that can be saved are received faxes and received Internet faxes. Confidential reception and polling reception faxes cannot be saved.
• Depending on the setting, received faxes that cannot be saved because of the file number limit or other reason are either printed or saved in the inbound routing error box.
1In the System Information, tap the [Event Information] tab and tap the [Check Fax Reception Image] key.The received data is listed.
You can also display the received data list by tapping the job status display and tapping [Check Received Data] on the action panel of Job Status screen.
System Information
Check FaxReception Image
Check ConfidentialReceived Data
Check Error BoxRelease HeldReceived Data
TerminateRemote Operation
Fax Receive
Event Information Maintenance Information Toner Remaining
Select External Application Exit

4-66
FACSIMILE►FAX RECEPTION
2Tap the key of the received data you wish to forward, and tap [Forward to Other Address].• Tap to show a list of received data. The list view or
thumbnails view can be changed depending on the setting mode.
• Multiple sets of received data can be selected.
• When you select a single received data only, you can tap [Check Image] on the action panel and check the image on the preview screen.
• To store the sender fax number as a number for "Allow/Reject Number Setting", tap [Register as Junk Fax] on the action panel and, in the confirmation message screen, tap the [Store] key.
• Specify a sender fax number as a number for "Allow/Reject Number Setting" by selecting, in "Settings (administrator)", select [System Settings] → [Image Send Settings] → [Fax Settings] → [Receive Settings] → [Allow/Reject Number Setting].
3Select the destination from the Address Book screen, and tap the [Start] key.
Forward to Other Address
Check Image
PrintAll Received DataReceived Data List
Cancel All
Delete
FileStore Data in Folder

4-67
FACSIMILE►FAX RECEPTION
SAVING RECEIVED DATAYou can save received faxes in the document filing folder.This function is available when [System Settings] → [Image Send Settings] → [Common Settings] → [Condition Settings] → [Preview Setting] → [Received Data Image Check Setting] is enabled* in "Settings (administrator)".* The factory default setting is disabled.
When data is received, is shown at the top of the screen.
1In the System Information, tap the [Event Information] tab and tap the [Check Fax Reception Image] key.The received data is listed.
You can also display the received data list by tapping the job status display and tapping [Check Received Data] on the action panel of Job Status screen.
2Tap the key of the received data you wish to save, and tap [File] on the action panel.• Tap to show a list of received data. The list view or
thumbnails view can be changed depending on the setting mode.
• Multiple sets of received data can be selected.
• When you select a single received data only, you can tap [Check Image] on the action panel and check the image on the preview screen.
• To store the sender fax number as a number for "Allow/Reject Number Setting", tap [Register as Junk Fax] on the action panel and, in the confirmation message screen, tap the [Store] key.Specify a sender fax number as a number for "Allow/Reject Number Setting" by selecting, in "Settings (administrator)", select [System Settings] → [Image Send Settings] → [Fax Settings] → [Receive Settings] → [Allow/Reject Number Setting].
3Set the file information, and tap the [Save] key.
Store
Received data in the memory Stored in the document filing folder
System Information
Check FaxReception Image
Check ConfidentialReceived Data
Check Error BoxRelease HeldReceived Data
TerminateRemote Operation
Fax Receive
Event Information Maintenance Information Toner Remaining
Select External Application Exit
Forward to Other Address
Check Image
PrintAll Received DataReceived Data List
Cancel All
Delete
FileStore Data in Folder

4-68
FACSIMILE►OTHERS FUNCTION
This section explains how to enter a destination from the initial screen of normal mode.► SELECTING FAX MODE (page 4-7)
STORING FAX OPERATIONS (PROGRAM)This function collectively stores various settings as one program. The stored program can be retrieved using an easy operation.For example, suppose that the same 8-1/2" x 11" (A4) size documents are distributed to branch offices in various regions once a month.
(1)The same documents are faxed to each branch office(2)To save paper, two document pages are faxed as a single page(3)Smudges on the edges of the documents are erased before transmission
OTHERS FUNCTION
When a job program is not stored When a job program is stored
Enter the fax number for each branch.
Specify N-Up.
Specify Erase.
Tap the [Start] key.Scan and send the original.
Call the registered program.
Tap the [Start] key.Scan and send the original.
Considerable time is required to send the documents each month because the above settings must be selected.In addition, mistakes are occasionally made when selecting the settings.
When a program is stored, settings are selected with ease by simply tapping the key of the program.In addition, transmission takes place according to the stored settings so there are no chances for mistakes.
To configure a program:Tap [Program Registration] that appears on the action panel when you operate any mode screens.
1 2
1 2
1 2
8-1/2" x 11" (A4) size documents to be distributed
Fax received by recipients.

4-69
FACSIMILE►OTHERS FUNCTION
• The settings stored in a program will be retained even after the program is used for transmission. The same settings can be used repeatedly for transmission.
• The following contents cannot be stored in programs:
• Tapping the [Speaker] key, Quick File, File, page move and unspecified erase during preview, Metadata Entry, SendSettings, and Own Name Select.
• Up to 48 programs can be stored.
• Up to 500 destinations can be stored in one program.
• A program in which sub addresses and passcodes are specified as an F-code destination records all sub addresses and passcodes.
1Place the original.According to the function stored in the program, place the original in the document feeder tray of the automatic document feeder, or on the document glass.► AUTOMATIC DOCUMENT FEEDER (page 1-77)► DOCUMENT GLASS (page 1-79)
2Tap [Call Program] on the action panel.
3Tap the desired program key.
4Configure additional settings as required.
Some settings cannot be added depending on the contents of the called program.
5Tap the [Start] key to start scanning of the original.If you inserted the original pages in the document feeder tray, all pages are scanned.When you place the original on the document glass, scan each page one at a time.After you have scanned the last original, tap the [Read-End] key.A beep will sound to indicate that scanning and transmission have ended.
You can tap the [Preview] key to check a preview of the image before sending a fax. For more information, see "CHECKING THE IMAGE TO BE TRANSMITTED (page 4-27)".
Call ProgramCall registered settings when touched.
Program1
Pre-Setting Program
03
01
03
0505
0707
0909
02
04
02
04
0606
0808
1010
Others
Address Fax Number
Delete
Register in Favorite
Register for Home
Change Name
reception memory 100%Speaker
Start
CA
Address Book
Preview

4-70
FACSIMILE►OTHERS FUNCTION
SENDING ORIGINALS COLLECTIVELY
SENDING TWO PAGES AS A SINGLE PAGE (N-UP)Reduce two original pages to the equal size and sent them as a single page. This function is convenient when you have a large number of original pages and wish to reduce the number of pages sent.For the standard size (8-1/2" x 11" (A4), 5-1/2" x 8-1/2" (B5 or A5) or A6), original pages are scanned from both the single pass feeder and document glass.
• Transmission is not possible at a size smaller than the original size.
• The N-Up is only available for originals with 8-1/2" x 11" (A4), 5-1/2" x 8-1/2" (B5 or A5) or A6 size.
• This function cannot be used in direct transmission mode or when the speaker is used to dial.
• When the scan size of the original is specified by numeric values, this function cannot be used.
• This function cannot be used together with Card Shot.
1Place the original.Place the original in the document feeder tray of the automatic document feeder, or on the document glass.► AUTOMATIC DOCUMENT FEEDER (page 1-77)► DOCUMENT GLASS (page 1-79)
2Enter the destination fax number.• Entering a destination number using the numeric keys►page 4-11• Retrieving a destination from an address book►page 4-12• Using a search number to retrieve a destination►page 4-15• Retrieving a destination from a global address book►page 4-16• Using a transmission log to resend►page 4-18
1 2
1 2
1 2
1
2
Portrait-oriented originals
Landscape-oriented originals
Send
Send
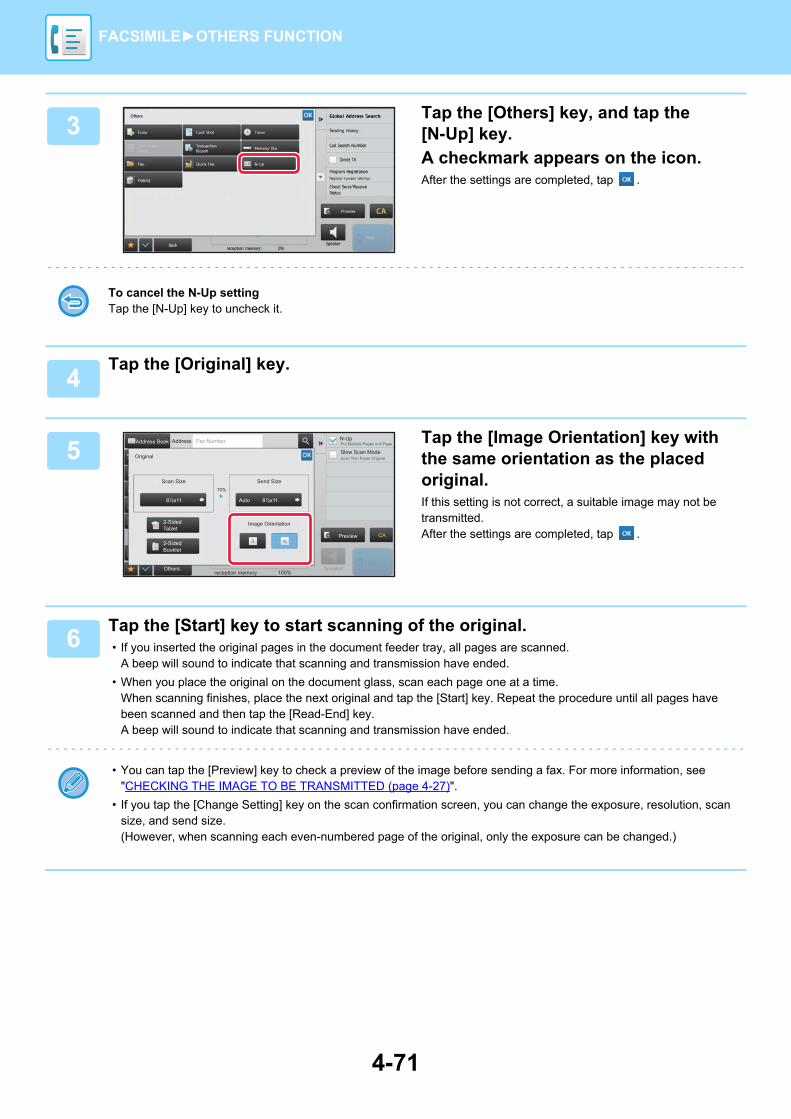
4-71
FACSIMILE►OTHERS FUNCTION
3Tap the [Others] key, and tap the [N-Up] key.A checkmark appears on the icon.After the settings are completed, tap .
To cancel the N-Up settingTap the [N-Up] key to uncheck it.
4Tap the [Original] key.
5Tap the [Image Orientation] key with the same orientation as the placed original.If this setting is not correct, a suitable image may not be transmitted.After the settings are completed, tap .
6Tap the [Start] key to start scanning of the original.• If you inserted the original pages in the document feeder tray, all pages are scanned.
A beep will sound to indicate that scanning and transmission have ended.
• When you place the original on the document glass, scan each page one at a time.When scanning finishes, place the next original and tap the [Start] key. Repeat the procedure until all pages have been scanned and then tap the [Read-End] key.A beep will sound to indicate that scanning and transmission have ended.
• You can tap the [Preview] key to check a preview of the image before sending a fax. For more information, see "CHECKING THE IMAGE TO BE TRANSMITTED (page 4-27)".
• If you tap the [Change Setting] key on the scan confirmation screen, you can change the exposure, resolution, scan size, and send size.(However, when scanning each even-numbered page of the original, only the exposure can be changed.)
Others
Address Fax Number
reception memory 100%Speaker
Start
Put Multiple Pages in A Page
Slow Scan ModeScan Thin Paper OriginalOriginal
2-SidedTablet
2-SidedBooklet
Auto
Scan Size Send Size
Image Orientation
70%
CA
Address Book
Preview
8½x11 8½x11
N-Up

4-72
FACSIMILE►OTHERS FUNCTION
SENDING BOTH SIDES OF A CARD AS A SINGLE PAGE (CARD SHOT)Send the front and reverse sides of a card as a single page, without the need to send each side separately.
When using this function, the original must be placed on the document glass.
• If the original size is larger than the send size, it will result in a sending failure. Check the original size once more, and specify it again.
• The ratio cannot be specified and "Rotation Sending Setting" cannot be selected.
• This function cannot be used in direct transmission mode or when the speaker is used to dial.
1Place a card face down on the document glass.► DOCUMENT GLASS (page 1-79)
2Enter the destination fax number.• Entering a destination number using the numeric keys ►page 4-11• Retrieving a destination from an address book ►page 4-12• Using a search number to retrieve a destination ►page 4-15• Retrieving a destination from a global address book ►page 4-16• Using a transmission log to resend ►page 4-18
3Tap the [Others] key, and tap the [Card Shot] key.
Transmitted imageOriginals
FrontSend
Example of an 8-1/2" x 11" (A4) size Sscan transmission
Back

4-73
FACSIMILE►OTHERS FUNCTION
4Tap the [On] key, and specify the original size as required.After the settings are completed, tap and [Back] keys in sequence.
• Tap the areas displaying width and height sizes respectively, and enter the sizes using the numeric keys.
• To quickly set the size, first specify a value close to the desired ratio value by the numeric keys, then adjust it by tapping .
• To enlarge or reduce the images to fit the paper based on the entered original size, set the [Fit to Send Size] checkbox to .
• After selecting Card Shot, tap the [Original] key in the base screen to change the original scan size or the send size. In this case, the screen of this step appears when you tap the scan size key. For the procedure for setting the send size, see "SPECIFYING THE SEND SIZE OF THE IMAGE (page 4-48)".
• To cancel the specified size settings, tap the [Reset] key.
To cancel the Card Shot settingsTap the [Off] key.
5Tap the [Start] key, and scan the front side.
6Place a card face up on the document glass, and tap the [Start] key to scan the reverse side.
Before scanning the back of the card, tap the [Change Setting] key on the touch panel to change the exposure.
7Tap the [Read-End] key.
If you will continue by scanning the front of the card, you can tap the [Change Setting] key to change the exposure, resolution, scan size, and send size.
8½x11

4-74
FACSIMILE►OTHERS FUNCTION
SENDING A LARGE NUMBER OF PAGES (JOB BUILD)This function lets you separate an original consisting of numerous pages into sets, scan each set using the automatic document feeder, and transmit the pages in a single transmission. You can also send a fax by placing originals in both the automatic document feeder and on the document glass. Use this function when there are more original pages than can be placed at once in the automatic document feeder. When scanning originals that are separated into sets, scan the set that has the first page first. The settings that you select for the first set can be used for all remaining sets.
This function is not available for Quick On Line Sending, manual transmission, Direct TX, or transmission using the speaker.
• If you are going to change all original settings, select the settings before scanning the original.
• Up to 999 pages can be scanned. Note that when the memory is being used for other jobs, fewer pages can be scanned.
• If the memory becomes full during scanning, a message will appear and the transmission will be canceled.
• The scan settings can be changed for each set of originals.
1Place the original in the document feeder tray of the automatic document feeder.Insert the originals all the way into the document feeder tray. Originals can be stacked up to the indicator line.Originals can also be placed on the document glass.► AUTOMATIC DOCUMENT FEEDER (page 1-77)
2Enter the destination fax number.• Entering a destination number using the numeric keys ►page 4-11• Retrieving a destination from an address book ►page 4-12• Using a search number to retrieve a destination ►page 4-15• Retrieving a destination from a global address book ►page 4-16• Using a transmission log to resend ►page 4-18
11
101
1
Originals
Originals are scanned in separate sets.
Indicator line

4-75
FACSIMILE►OTHERS FUNCTION
3Tap the [Job Build] key.A checkmark appears on the icon.
To cancel the job build settingTap the [Job Build] key to uncheck it.
4Change settings as needed.
5Tap the [Start] key to scan the first original page.
6Place the next set of originals and tap the [Start] key.Repeat this step until all originals have been scanned.
• If needed, tap [Change Setting] before tapping the [Start] key, and change the original scan settings and send settings for the next original. The setting changes will be applied to the next job.
• If you tap the [Preview] key, you cannot scan additional pages.
To cancel scanning:Tap the [CA] key. All settings including scanned data will be cleared.
7Tap the [Read-End] key.
If no action is taken for one minute after the confirmation screen appears, scanning automatically ends and the transmission is reserved.
To change the time until transmission takes place automatically:Select "Settings (administrator)" - [System Settings] → [Image Send Settings] → [Common Settings] → [Condition Settings] → [Job Auto Start Time During Scanning].
8½x11 8½x11

4-76
FACSIMILE►OTHERS FUNCTION
SENDING ORIGINALS OF DIFFERENT SIZES (MIXED SIZE ORIGINAL)This feature lets you scan and transmit originals of different sizes at the same time; for example, 5-1/2" x 8-1/2" (A5)size originals mixed together with 8-1/2" x 11" (A4) size originals. When scanning the originals, the machineautomatically detects the size of each original.
• When Mixed Size Original is selected, an original scan size cannot be specified.
• Rotate cannot be used when Mixed Size Original is enabled.
1Place originals in the automatic document feeder.Orient the originals so that the widths match.► AUTOMATIC DOCUMENT FEEDER (page 1-77)
2Enter the destination fax number.• Entering a destination number using the numeric keys ►page 4-11• Retrieving a destination from an address book ►page 4-12• Using a search number to retrieve a destination ►page 4-15• Retrieving a destination from a global address book ►page 4-16• Using a transmission log to resend ►page 4-18
3Tap the [Mixed Size Orig.] key.A checkmark appears on the icon.
8-1/2" x 11"
5-1/2" x 8-1/2"8-1/2" x 11"
5-1/2" x 8-1/2"
A4 A5
Place the originals in alignment with the guides.
8-1/2" x 11" (A4)
5-1/2" x 8-1/2" (A5)
8½x11 8½x11

4-77
FACSIMILE►OTHERS FUNCTION
To cancel the mixed size original settingTap the [Mixed Size Orig.] key to uncheck it.
4Tap the [Start] key to start scanning of the original.
Tap the [Preview] key to check the preview of an image before sending a fax.For more information, see "CHECKING THE IMAGE TO BE TRANSMITTED (page 4-27)". However, settings for this function cannot be changed in the preview screen.

4-78
FACSIMILE►OTHERS FUNCTION
SCANNING ORIGINALS
ERASING PERIPHERAL SHADOWS ON THE IMAGE (ERASE)This function erases the parts of the image where shadows tend to form, but does not detect shadows and erase only the shadows.Scanning a thick book
Erase modes
Shadows appear here
Not using the erase function
Using the erase function
Shadows appear in the image. No shadows appear.
If a ratio setting is used in combination with an erase setting, the erase width will change according to the selected ratio. This function erases the parts of the image where shadows tend to form, but does not detect shadows and erase only the shadows.For example, if you set an erase width of 1/2" (10 mm) and reduce the image to 70% before transmission, the erase width will be reduced to 3/8" (7 mm).
To change the default erase width setting:Select [System Settings] → [Image Send Settings] → [Common Settings] → [Condition Settings] → [Erase Width Adjustment].The width can be set from 0" to 1" (0 mm to 20 mm). The factory default setting is 1/2" (10 mm). The setting changed here will apply to [System Settings] → [Copy Settings] → [Condition Settings] → [Erase Width Adjustment] in "Settings".
1Place the original.Place the original in the document feeder tray of the automatic document feeder, or on the document glass.► AUTOMATIC DOCUMENT FEEDER (page 1-77)► DOCUMENT GLASS (page 1-79)
Edge Erase Center Erase Edge + Center Erase Side Erase

4-79
FACSIMILE►OTHERS FUNCTION
2Enter the destination fax number.• Entering a destination number using the numeric keys ►page 4-11• Retrieving a destination from an address book ►page 4-12• Using a search number to retrieve a destination ►page 4-15• Retrieving a destination from a global address book ►page 4-16• Using a transmission log to resend ►page 4-18
3Tap the [Others] key, and tap the [Erase] key.
4Tap the checkbox of the edge that you wish to erase, and specify the erase position.Check that he tapped checkbox is set to . If the [Specify Frame] key is tapped, the [Up], [Down], [Left], and [Right] checkboxes are set to . If the [Specify Frame+Center] key is tapped, all the checkboxes are set to .
Specify the erase edge on the reverse side when erasing edges of one to three sides of Up, Down, Left, and Right on the front side to scan a 2-sided original.
• If the [Reverse erase position of back face] checkbox is set to , the edge in the position opposite to the erased edge on the front side will be erased.
• If the [Reverse erase position of back face] checkbox is set to , the edge in the same position as on the front side will be erased.
5Specify the erase width.After the settings are completed, tap and [Back] keys in sequence.
• Tap the numeric value display indicating the margin shift area on the front side or reverse side, and enter the area using the numeric keys.
• To quickly set the area, first specify a value close to the desired value by the numeric keys, then adjust it with .
To cancel the erase setting:Tap the [Clear] key.
6Tap the [Start] key to start scanning of the original.• A beep will sound to indicate that scanning and transmission have ended.
• When you place the original on the document glass, scan each page one at a time.When scanning finishes, place the next original and tap the [Start] key.
• Repeat the procedure until all pages have been scanned and then tap the [Read-End] key.
You can tap the [Preview] key to check a preview of the image before sending a fax. For more information, see "CHECKING THE IMAGE TO BE TRANSMITTED (page 4-27)". However, settings for this function cannot be changed in the preview screen.
Back
Clear
Others
Reverse erase position ofback face
Up
Down
1/2 1/2
Left Right
Center Outer Frame(0 ~ 1)inch
(0 ~ 1)inch
ExposureSpecify Send Exposure
ResolutionChange Original Resolution
N-UpPut Multiple Pages in A Page
reception memory 100%Speaker
Start
Erase
Outer Frame
Specify Frame+Center
CAPreview

4-80
FACSIMILE►OTHERS FUNCTION
SENDING A THIN ORIGINAL (SLOW SCAN MODE)Use this function when you wish to scan thin originals using the automatic document feeder. This function helps prevent thin originals from misfeeding.
When slow scan mode is selected, 2-sided scanning is not possible.
1Place the original in the document feeder tray of the automatic document feeder.► AUTOMATIC DOCUMENT FEEDER (page 1-77)
Adjust the original guides slowly.
If the originals are inserted with too much force, they may crumple and misfeed.
2Enter the destination fax number.• Entering a destination number using the numeric keys ►page 4-11• Retrieving a destination from an address book ►page 4-12• Using a search number to retrieve a destination ►page 4-15• Retrieving a destination from a global address book ►page 4-16• Using a transmission log to resend ►page 4-18
DCBA
DCB
A

4-81
FACSIMILE►OTHERS FUNCTION
3Tap the [Slow Scan Mode] key.A checkmark appears on the icon.
To cancel the slow scan mode settingTap the [Slow Scan Mode] key to uncheck it.
4Tap the [Start] key to start scanning of the original.A beep will sound to indicate that scanning and transmission have ended.
Tap the [Preview] key to check the preview of an image before sending a fax. For more information, see "CHECKING THE IMAGE TO BE TRANSMITTED (page 4-27)". However, settings for this function cannot be changed in the preview screen.
8½x11 8½x11

4-82
FACSIMILE►OTHERS FUNCTION
CHECKING THE NUMBER OF SCANNED ORIGINAL SHEETS BEFORE TRANSMISSION (ORIGINAL COUNT)Count the number of scanned original sheets and display the count before transmission.Checking the number of scanned original sheets before transmission helps prevent transmission mistakes.
The count result is displayed with the number of scanned original sheets, not the number of scanned original pages.For example, when a 2-sided original is transmitted, the number "1" will appear to indicate that one original sheet is transmitted, not "2" to indicate the front-side page and the reverse side page.
1Place originals in the automatic document feeder.► AUTOMATIC DOCUMENT FEEDER (page 1-77)
2Enter the destination fax number.• Entering a destination number using the numeric keys ►page 4-11• Retrieving a destination from an address book ►page 4-12• Using a search number to retrieve a destination ►page 4-15• Retrieving a destination from a global address book ►page 4-16• Using a transmission log to resend ►page 4-18
3Tap the [Original Count] key.A checkmark appears on the icon.
To cancel the original count setting:Tap the [Original Count] key to uncheck it.
4Tap the [Start] key to start scanning of the original.
Tap the [Preview] key to check the preview of an image before sending a fax. For more information, see "CHECKING THE IMAGE TO BE TRANSMITTED (page 4-27)". However, settings for this function cannot be changed in the preview screen.
8½x11 8½x11

4-83
FACSIMILE►OTHERS FUNCTION
5When scanning is completed, check the number of original sheets.The number that is displayed is the number of scanned original sheets, not the number of scanned original pages. For example, when 2-sided copying is performed using one original, the number "1" will appear to indicate that one original sheet was scanned, not "2" to indicate the front-side page and the reverse side page.
6Tap the [OK] key to start transmission.
If this function is combined with [Job Build], the count result is displayed after the [Read-End] key has been tapped.
If the displayed number of original sheets is different from the actual number of sheets:Tap the [Cancel] key and then tap the [OK] key in the message screen to clear all scanned data. Scan settings and destination settings will not be cleared. Insert the original sheets in the document feeder tray again and tap the [Start] key to re-scan.
0pages of original (Pg.No.1)have been scanned.Send the scanned data?"
Cancel OK
8½x11 8½x11

4-84
FACSIMILE►OTHERS FUNCTION
OPERATING FAX TRANSMISSION AND RECEPTION REMOTELY
CALLING A FAX MACHINE AND INITIATING RECEPTION (POLLING)When you connect to another machine and receive a document from it, this is called "Polling".The document reception from another machine is called "Polling Reception".You can enter multiple destination numbers. When you enter multiple destination numbers, the document is received by polling in the sequence you have entered the destination numbers.Document reception by polling from multiple machines is called "Serial Polling".
Use the manual polling reception when you must start polling after listening to a recorded greeting, such as when using a fax information service.
• Make sure there is no original in the machine when using the polling reception function.
• The function can only be used when the other machine is Super G3 or G3 compatible and has a polling function.
• The receiving machine bears the expense (phone charges) of the polling reception.
• If necessary, this function can be combined with the timer transmission to perform the polling reception at any time such as at night or when you are not present. (Only one timer polling reception can be set.)
(1) Requests fax transmission Memory Box
Send
(3) The fax is received. (2) The prepared document is transmitted.

4-85
FACSIMILE►OTHERS FUNCTION
1Enter the destination fax number.• Entering a destination number using the numeric keys ►page 4-11• Retrieving a destination from an address book ►page 4-12• Using a search number to retrieve a destination ►page 4-15• Retrieving a destination from a global address book ►page 4-16• Using a transmission log to resend ►page 4-18
• Multiple fax numbers can be entered (maximum of 500).
• Polling will take place in the order that the multiple fax numbers were entered.Document reception by polling from multiple machines is called "Serial Polling".
• To enter multiple fax numbers, tap after entering a fax number and enter the next fax number.
• In this procedure, one-touch keys that have a sub-address and passcode cannot be used.
• A one-touch key in which an address other than fax number is stored cannot be used.
2Tap the [Others] key, and tap the [Polling] key.A checkmark appears on the icon.After the settings are completed, tap the [Back] key.
To cancel the Polling setting:Tap the [Polling] key to clear the checkmark.
3Tap the [Start] key to initiate fax reception.Your machine will call the other machine and initiate reception of the fax.

4-86
FACSIMILE►OTHERS FUNCTION
INITIATING POLLING RECEPTION MANUALLYUse the manual polling reception when you must start polling after listening to a recorded greeting, such as when using a fax information service.
• Make sure there is no original in the machine when using the polling reception function.
• This function cannot be used to poll multiple machines (serial polling).
• The function can only be used when the other machine is Super G3 or G3 compatible and has a polling function.
The receiving machine bears the expense (phone charges) of the polling reception.
1Tap the [Speaker] key.You will hear the dial tone through the machine's speaker.
2Enter the destination fax number.• Entering a destination number using the numeric keys ►page 4-11• Retrieving a destination from an address book ►page 4-12• Using a search number to retrieve a destination ►page 4-15• Retrieving a destination from a global address book ►page 4-16• Using a transmission log to resend ►page 4-18
One-touch key for a contact or group in which multiple destinations are stored, and one-touch key for which an address other than fax number is stored cannot be used.
After tapping the [Speaker] key, you can tap the [Speaker Volume] key to adjust the volume of the speaker.
3Tap the [Others] key, and tap the [Polling] key to receive originals (data).A checkmark appears on the icon.
To cancel the Polling setting:Tap the [Polling] key to clear the checkmark.
8½x11 8½x11

4-87
FACSIMILE►OTHERS FUNCTION
SENDER-RELATED FEATURESADDING YOUR SENDER INFORMATION TO FAXES (FAX OWN NUMBER SENDING)Your sender information (date, time, sender name, sender fax number or destination name, number of pages) is automatically added to the top of each fax page you transmit.
Example of the sender information printed
(1) Date, time: The date and time of transmission. (2) Sender name: The sender name programmed in the machine. (3) Sender fax number or destination name (one-touch key name) (4) Page numbers: Page number/total pages
If destination name is set to be attached and the destination is not specified using a one-touch key, this information is not added to the fax and not printed.
• To set the date and time:In "Settings", select [System Settings] → [Common Settings] → [Clock Adjust].
• To store a sender name and sender fax number:In "Settings (administrator)", select [System Settings] → [Image Send Settings] → [Common Settings] → [Own Name and Destination Set] → [Own Number and Name Set] → [Sender Data Registration].• When you use the Own Number Setting, always configure this information.
• To add the number of pages to be transmitted:In "Settings", select [System Settings] → [Image Send Settings] → [Fax Settings] → [Send Settings] → [Printing Page Number at Receiver].Page numbers appear in the format "page number/total pages". Only the page number is printed when "Manual Transmission" or "Quick On Line Sending" is used.
• To select a sender fax number or destination:In "Settings", select [System Settings] → [Image Send Settings] → [Fax Settings] → [Send Settings] → [Sender Destination Name Switch].
Outside scanned image (factory default setting)
The transmitted image length will be length of sender information + length of original image. When the fax is printed by the receiving machine, it may be reduced or divided onto two pages.
The sender information is printed inside the original image, and thus the transmitted image length is the length of the original. Note that the sender information will overlap part of the original image (the overlapped part of the original image will not appear).
Load
Sender information
Originals
Sender informationOriginals
2017/08/08/Tue. 15:00 AAAAA FAX No.: 0123456789 P.001/001
(1) (2) (3) (4)

4-88
FACSIMILE►OTHERS FUNCTION
TEMPORARILY CHANGING THE SENDER INFORMATION (OWN NAME SELECT)You can temporarily change sender information to be used in the own number sending by selecting from data stored separately.
The function is released when the transmission with the changed sender information ends.
To store the sender information to be used for Own Name Select function:In "Settings (administrator)", select [System Settings] → [Image Send Settings] → [Common Settings] → [Own Name and Destination Set] → [Own Number and Name Set] → [Sender Data Registration].
1Place the original.Place the original in the document feeder tray of the automatic document feeder, or on the document glass.► AUTOMATIC DOCUMENT FEEDER (page 1-77)► DOCUMENT GLASS (page 1-79)
2Enter the destination fax number.• Entering a destination number using the numeric keys ►page 4-11• Retrieving a destination from an address book ►page 4-12• Using a search number to retrieve a destination ►page 4-15• Retrieving a destination from a global address book ►page 4-16• Using a transmission log to resend ►page 4-18
3Tap the [Others] key, and tap the [Own Name Select] key.
4Tap the sender information key to specify the sender information.After the settings are completed, tap and [Back] keys in sequence.
To cancel the sender information setting:Tap the [Clear] key.
Back
Clear
Others
reception memory 100%Speaker
Start
Own NameSelect
AAA AAA
BBB BBB
CCC CCC
CAPreview

4-89
FACSIMILE►OTHERS FUNCTION
5Tap the [Start] key to start scanning of the original.• If you inserted the original pages in the document feeder tray, all pages are scanned.
• A beep will sound to indicate that scanning and transmission have ended.
• When you place the original on the document glass, scan each page one at a time.
• When scanning finishes, place the next original and tap the [Start] key. Repeat until all pages have been scanned and then tap the [Read-End] key.
A beep will sound to indicate that transmission has ended.
You can tap the [Preview] key to check a preview of the image before sending a fax. For more information, see "CHECKING THE IMAGE TO BE TRANSMITTED (page 4-27)". However, settings for this function cannot be changed in the preview screen.

4-90
FACSIMILE►OTHERS FUNCTION
ASSUMING A SPECIFIC USAGE
SPECIFYING THE TIME FOR COMMUNICATIONSpecify a time at which a transmission or broadcast transmission will automatically take place. Transmission begins automatically at the specified time.This function is helpful when you wish to perform reserved, broadcast or other transmissions during your absence or at night or other times when telephone rates are low. A timer setting can also be specified for polling reception to receive a fax when you are not present.
• When a timer transmission is set, keep the main power switch " ". Transmission will not take place if the status is " " at the specified time.
• When performing a timer transmission, you must scan the original into memory when you set up the transmission. It is not possible to leave the document in the document feeder tray or on the document glass and have it scanned at the reserved time of transmission.
• Up to 100 timer transmissions can be stored at once.
• This function cannot be used in direct transmission mode or when the speaker is used to dial.
• If another transmission is in progress when the specified time arrives, the timer operation will begin after that transmission is finished.
• Only one timer polling operation can be stored at once. To receive data from multiple destinations by polling, specify Timer for serial polling.
• Settings selected for a timer transmission (exposure, resolution, other functions, etc.) are automatically cleared after the transmission is finished. (However, when the document filing function is used, the scanned original and settings are stored in the built-in hard drive.)
• If a job scheduled for timer transmission is given priority on the job status screen, the timer will be canceled. The transmission will begin as soon as the job in progress is completed.► PRIORITY PROCESSING OF A RESERVED JOB (page 1-83)
• The time can be specified up to a week in advance.
• Other operations can be performed after a timer transmission is set up.
• A timer transmission can be deleted in the job status screen.
1Place the original.Place the original in the document feeder tray of the automatic document feeder, or on the document glass.► AUTOMATIC DOCUMENT FEEDER (page 1-77)► DOCUMENT GLASS (page 1-79)
During the day configure the setting to transmit data at 20:00.
At 20:00, the transmission begins automatically

4-91
FACSIMILE►OTHERS FUNCTION
2Enter the destination fax number.• Entering a destination number using the numeric keys ►page 4-11• Retrieving a destination from an address book ►page 4-12• Using a search number to retrieve a destination ►page 4-15• Retrieving a destination from a global address book ►page 4-16• Using a transmission log to resend ►page 4-18
3Tap the [Others] key, and tap the [Timer] key.
4Tap the [On] key.
5Specify the date.
6Specify the time (hour and minute) in 24-hour format.After the settings are completed, tap and [Back] keys in sequence.
• Tap the areas displaying the hour and minute respectively, and enter the values using the numeric keys.
• It is convenient to use to finely adjust the time.
• The setting will show the current time. If the time is not correct, press the [CA] key to cancel the operation. Correct the time in setting mode and then perform the timer transmission procedure.► BEFORE USING THE MACHINE AS A FAX (page 4-4)
To cancel the Timer Transmission settings:Tap the [Off] key.
To set the date and time of the machine:In "Settings", select [System Settings] → [Common Settings] → [Clock Adjust].If [Disabling of Clock Adjustment] has been enabled, the date and time cannot be modified. In this case, select [System Settings] in "Settings (administrator)" and select [Common Settings] → [Enable/Disable Settings] to disable the [Disabling of Clock Adjustment] setting.
Back
Monday
Wednesday
Friday
Today
Tuesday
Thursday
Saturday
Sunday
Others
FileStore Data in Folder
Quick FileStore Data Temporarily
PollingReceive Other's Original
Start
Timer
Off
On
Tue08/08/2017
11 10
CAPreview
reception memory: 100%Speaker

4-92
FACSIMILE►OTHERS FUNCTION
CHANGING THE PRINT SETTINGS FOR THE TRANSACTION REPORT (TRANSACTION REPORT)A transaction report is automatically printed out to alert you when a transmission fails or when a broadcast transmission is performed.The transaction report contains a description of the transmission (date, start time, name of destination, time required, number of pages, result, etc.).► INFORMATION APPEARING IN THE RESULT COLUMN (page 4-115)
7Tap the [Start] key to start scanning of the original.• If you inserted the original pages in the document feeder tray, all pages are scanned.
A beep will sound to indicate that scanning has ended, and the machine stands by for transmission.
• When you place the original on the document glass, scan each page one at a time.When scanning finishes, place the next original and tap the [Start] key. Repeat until all pages have been scanned and then tap the [Read-End] key.A beep will sound to indicate that scanning has ended, and the machine stands by for transmission.
You can tap the [Preview] key to check a preview of the image before sending a fax. For more information, see "CHECKING THE IMAGE TO BE TRANSMITTED (page 4-27)". However, settings for this function cannot be changed in the preview screen.
The original is scanned into memory. The original cannot be scanned at a specified time.
• Transaction reports are printed based on conditions set in "Settings"; however, you can temporarily select different conditions for a transmission.
• For a broadcast transmission, changes to the transaction report print conditions apply to all destinations.
To set the printing conditions of transaction report:In "Settings (administrator)", select [System Settings] → [Image Send Settings] → [Fax Settings] → [Default Settings] → [Transaction Report Print Select Setting].
1Place the original.Place the original in the document feeder tray of the automatic document feeder, or on the document glass.► AUTOMATIC DOCUMENT FEEDER (page 1-77)► DOCUMENT GLASS (page 1-79)
2Enter the destination fax number.• Entering a destination number using the numeric keys ►page 4-11• Retrieving a destination from an address book ►page 4-12• Using a search number to retrieve a destination ►page 4-15• Retrieving a destination from a global address book ►page 4-16• Using a transmission log to resend ►page 4-18

4-93
FACSIMILE►OTHERS FUNCTION
Original image in transaction reportWhen [Print Original Image] is enabled, the first page of the transmitted original is printed on the same sheet as the transaction report. The original image is reduced to allow it to fit on the sheet. If the vertical scanning length (X direction) of the original is longer than 432 mm (17-1/64"), the part that exceeds 432 mm (17-1/64") may be cut off.
3Tap the [Others] key, and tap the [Transaction Report] key.
4Tap the key of the print settings.After the settings are completed, tap and [Back] keys in sequence.
To cancel the transaction report setting:Tap the [Do not Print] key.
• The print conditions for a transaction report are as follows:
•"Always Print": A transaction report is printed no matter whether the transmission succeeds or fails.
•"Print at Error": A transaction report is printed when transmission fails.
•"Do not Print": Do not print a transaction report.
• Set the [Print Original Image] checkbox to to include the first page of the transmitted original in the transaction report.
• Even if the [Print Original Image] checkbox is , the original cannot be printed when speaker dialing, manual transmission, direct transmission, polling reception, or F-code transmission is used.
5Tap the [Start] key to start scanning of the original.• If you inserted the original pages in the document feeder tray, all pages are scanned.
• A beep will sound to indicate that scanning and transmission have ended.
• When you place the original on the document glass, scan each page one at a time.
• When scanning finishes, place the next original and tap the [Start] key. Repeat until all pages have been scanned and then tap the [Read-End] key.A beep will sound to indicate that transmission has ended.
You can tap the [Preview] key to check a preview of the image before sending a fax. For more information, see "CHECKING THE IMAGE TO BE TRANSMITTED (page 4-27)". However, settings for this function cannot be changed in the preview screen.
Back
Do not Print
Always Print
Print at Error
Others
reception memory 100%Speaker
Start
TransactionReport
Print Original ImageCAPreview

4-94
FACSIMILE►OTHERS FUNCTION
POLLING MEMORY FUNCTIONS
SENDING A FAX WHEN ANOTHER MACHINE POLLS YOUR MACHINE (POLLING MEMORY)Sending a document that has been scanned into memory when another machine polls your machine is called "Polling Memory". Prior to polling, the document that will be faxed to the other machine must be scanned into a polling memory box.
► SCANNING A DOCUMENT INTO POLLING MEMORY (page 4-95)
This function can only be used when the other machine is Super G3 or G3 compatible and has a polling function.
RESTRICTING POLLING ACCESS (POLLING SECURITY SETTING)The following explains "Polling Security Setting", a feature restricting other machines that can use polling memory.When a machine requests fax transmission, you can only allow the machine to use polling memory if its programmed sender fax number matches a fax number stored in your machine as a polling passcode number. This function is called "Polling Security Setting".To use this function, first store polling passcode numbers (the sender fax numbers programmed in the other machines) in settings mode of the machine, and then enable the polling security setting.
The polling security setting can be enabled for up to 10 other machines.
To set the polling security:In "Settings (administrator)", select [System Settings] → [Image Send Settings] → [Fax Settings] → [Polling Setting] → [Set Fax Polling Security].
Polling memory box
(1) Requests fax transmission
(2) The document in the memory box is transmitted.
Send
(3) The fax is received.

4-95
FACSIMILE►OTHERS FUNCTION
SCANNING A DOCUMENT INTO POLLING MEMORYFollow these steps to scan a document into the memory box for polling transmission (Public Box).
If another document remains in the memory box (Public Box), the newly scanned document is added to the previous document. In this case, the number of polling times will be the number set for the newly scanned document.
1Place the original.Place the original in the document feeder tray of the automatic document feeder, or on the document glass.► AUTOMATIC DOCUMENT FEEDER (page 1-77)► DOCUMENT GLASS (page 1-79)
2Select settings for the original to be scanned and other functions.
You cannot set the Program, Timer, Transaction Report, Polling, and Document Filing.
3Tap the [Others] key, and tap the [Memory Box] key.
4Tap the [Polling Memory] tab.
5Tap the [Public Box] key from the folder list.
6Tap [Change Number of Times] on the action panel.
7Tap the [Once] key or [Unlimited] key to specify the number of times.To repeat transmitting an original, tap the [Unlimited] key.After the settings are completed, tap and .
Back
Confidential Polling Memory
Folder Name
Public Box
Times
Once
reception memory8½x11 8½x11
100%
Start
CA

4-96
FACSIMILE►OTHERS FUNCTION
CHECKING THE DOCUMENT IN THE PUBLIC BOXYou can check the document stored in the machine's memory box (public box) for memory polling.
8Tap the [Start] key to start scanning of the original.• A preview of the image will appear in the touch panel when the original is scanned.
• If you inserted the original pages in the document feeder tray, all pages are scanned.
• When you place the original on the document glass, scan each page one at a time.When scanning finishes, place the next original and tap the [Start] key. Repeat the procedure until all pages have been scanned and then tap the [Read-End] key.
1Tap the [Others] key, and tap the [Memory Box] key.
2Tap the [Polling Memory] tab.
3Tap the [Public Box] key from the folder list.
When a document is not stored in the Public Box, the [Public Box] key is grayed out.
4Tap [Check Image] on the action panel to check the document. To print the document, tap [Print] on the action panel.

4-97
FACSIMILE►OTHERS FUNCTION
DELETING A DOCUMENT FROM THE PUBLIC BOXDelete a document from the memory box (public box) when it is no longer required.
1Tap the [Others] key, and tap the [Memory Box] key.
2Tap the [Polling Memory] tab.
3Tap the [Public Box] key from the folder list.
4Tap [Empty out Box] on the action panel.
If you tap [Check Image] on the action panel, you can check the image on the touch panel before it is erased.
5Tap the [Yes] key.• The document is deleted and you return to the screen of step 2.
• If you tap [Check Image] on the action panel, you can check the image on the touch panel before it is erased.
To cancel the document deletion:Tap the [No] key.

4-98
FACSIMILE►PERFORMING F-CODE COMMUNICATION
This section explains how to enter a destination from the initial screen of normal mode.► SELECTING FAX MODE (page 4-7)
F-CODE COMMUNICATIONF-CODE COMMUNICATIONThis function allows the machine to communicate with other machines that also support F-code.It enables exchange of confidential documents (confidential communication), retrieval (polling) and distribution (polling memory) of information, distribution of information to multiple destinations (relay broadcast transmission) with other machines that support F-code communication. An F-code* is specified in each communication, enabling a higher level of security.* F-code is a communication function based on the G3 standard of the ITU-T.
PERFORMING F-CODE COMMUNICATION
The ITU-T is a United Nations organization that establishes communications standards. It is a department of the International Telecommunication Union (ITU), which coordinates global telecommunications networks and services.
Fax number of other machine
Sub Address: AAAAAAAAPasscode: XXXXXXXX
F-code
The fax is received in the memory box specified by the F-code.
Memory box of F-code communication
Box Name: BBBBSub Address: AAAAAAAAPasscode: XXXXXXXX

4-99
FACSIMILE►PERFORMING F-CODE COMMUNICATION
How F-codes workA fax that is transmitted with an F-code is received in the memory box of F-code communication in the receiving machine specified by the F-code (sub-address and passcode). If the F-code sent by the transmitting machine does not match the F-code in the receiving machine, reception will not take place.The products of other manufacturers may use different terms for "Sub Address" and "Passcode". If you need to contact the operator of another machine regarding sub-addresses and passcodes, refer to the terms used by the ITU-T in the table below.
CREATING MEMORY BOXES IN THE MACHINE FOR F-CODE COMMUNICATIONBefore the F-code communication function can be used, special memory boxes must be created in "Settings".Set the box name and F-code (sub-address and passcode) in each memory box, and store them.After you have created a memory box, notify the other party of F-code communication of the sub-address and passcode of the box.
To use the following F-code communication functions, F-code memory boxes must be created in your machine.• F-code confidential reception• F-code polling memory• F-code relay broadcast transmission
To use the following F-code communication functions, F-code memory boxes must be created in the other machine.• F-CODE CONFIDENTIAL TRANSMISSION• F-code polling reception• F-code relay request transmission
The machine ITU-T
F-code polling memory box F-code confidential box F-code relay broadcasting function
Sub Address SEP SUB SUB
Passcode PWD SID SID
An F-code consists of a sub-address and passcode, and cannot be longer than 20 digits.
To create F-code memory boxes:Create in "Settings" - [System Settings] → [Image Send Settings] → [Fax Settings] → [F-Code Memory Box].
Memory Box
• Memory Box Name• Sub Address• Passcode• Recipient (only for F-code relay
broadcast transmission)• Print PIN
(only for F-code confidential reception)

4-100
FACSIMILE►PERFORMING F-CODE COMMUNICATION
F-CODE DIALINGWhen performing an F-code operation, the F-code (sub-address and passcode) is appended to the fax number that is dialed. Check the F-code (sub-address and passcode) stored in the memory box in the other machine before you perform an F-code transmission. It is convenient to store an F-code (sub-address and passcode) together with the fax number in a one-touch key or group key.
To use the following F-code communication functions, your machine must dial the other machine.• F-CODE CONFIDENTIAL TRANSMISSION• F-code polling reception• F-code relay request transmission
To use the following F-code communication functions, the other machine must dial your machine.• F-code confidential reception• F-code polling memory• F-code relay broadcast transmission
F-CODE CONFIDENTIAL TRANSMISSIONBy sending a fax to an F-code memory box (confidential) stored in the receiving machine (your machine or the other machine), the sender can direct the transmission specifically to the user of the box.This is convenient for sending sensitive documents that you do not wish people other than the recipient to see, or when the receiving machine is shared by multiple departments.To print an F-code confidential fax, the PIN Code must be entered.► CHECKING FAXES RECEIVED BY F-CODE CONFIDENTIAL RECEPTION (page 4-102)
If the destination machine does not have a passcode configured in the F-code, do not enter a passcode when dialing that machine.
Communication using the F-code (sub-address and passcode) is not available when dialing using a speaker or manual transmission.
To store and edit one-touch keys and group keys:Select [Address Book] in "Settings".
The F-code (sub-address and passcode) of the memory box to be used should be verified by the sender and the recipient before the fax is sent.
To create F-code memory boxes:Create in "Settings (administrator)" - [System Settings] → [Image Send Settings] → [Fax Settings] → [F-Code Memory Box].

4-101
FACSIMILE►PERFORMING F-CODE COMMUNICATION
CONFIDENTIAL TRANSMISSION USING F-CODESSend a fax to a destination fax number after adding the F-code (sub-address and passcode).
If necessary, the F-code confidential transmission can be used in combination with a broadcast transmission or timer transmission. It is convenient to store this function in a program.
The F-code confidential transmission cannot be registered as a "Favorite" item.
1Place the original.Place the original in the document feeder tray of the automatic document feeder, or on the document glass.► AUTOMATIC DOCUMENT FEEDER (page 1-77)► DOCUMENT GLASS (page 1-79)
2Specify the destination.(1)Tap the [Direct Entry] key.(2)Enter the destination line number using the numeric keys.(3)Tap the [Sub Address] key.
Symbol "/" is entered.(4)Enter the sub-address using the numeric keys.(5)Tap the [Passcode] key.
Symbol "/" is entered.(6)Enter the passcode using the numeric keys.
• If the sub-address and passcode are already registered, you can select a one-touch key as well.
• If the passcode is omitted for the memory box of destination machine, you can skip Steps (4) and (5).
3Tap the [Start] key.Scanning of the original starts.
• If you inserted the original pages in the document feeder tray, all pages are scanned.A beep will sound to indicate that scanning and transmission have ended.
• When you place the original on the document glass, scan each page one at a time.When scanning finishes, place the next original and tap the [Start] key. Repeat until all pages have been scanned and then tap the [Read-End] key.A beep will sound to indicate that transmission has ended.
You can tap the [Preview] key to check a preview of the image before sending a fax. For more information, see "CHECKING THE IMAGE TO BE TRANSMITTED (page 4-27)". However, settings for this function cannot be changed in the preview screen.

4-102
FACSIMILE►PERFORMING F-CODE COMMUNICATION
CHECKING FAXES RECEIVED BY F-CODE CONFIDENTIAL RECEPTIONWhen an F-code confidential fax received, the fax is stored in the memory box specified by the F-code. To check received faxes, enter the PIN Code.
• Confidential faxes are automatically given priority in the print job queue.
• The fax is automatically cleared from the memory box after being printed.
To print transaction report automatically when an F-code confidential fax is received:In "Settings", select [System Settings] → [Image Send Settings] → [Fax Settings] → [Default Settings] → [Transaction Report Print Select Setting] → [Confidential Reception].
If you forget the PIN Code: There is no way to use the machine to check a PIN Code that has been specified. Exercise care not to forget the PIN Code. Should you forget or need to verify the PIN Code, contact your dealer or nearest SHARP Service Department.
1The machine rings and the fax is received.A beep sounds when reception ends.
2Tap the [Others] key, and tap the [Memory Box] key.
3From the [Confidential] tab.
4Tap the key of the memory box containing the confidential fax." " appears in the keys of memory boxes that have received faxes. The keys of memory boxes that have not received faxes are grayed out and cannot be tapped.
5Enter the PIN Code using the numeric keys.
Take care to enter the correct PIN Code. If you make a mistake, a message will appear and you will return to the entry screen. You can tap the [Cancel] key to return to step 4.
50%
100%
Auto
8½x11 8½x11
Received data is stored.Enter PIN code via the 10-key.
Cancel

4-103
FACSIMILE►PERFORMING F-CODE COMMUNICATION
POLLING RECEPTION USING F-CODESThis function enables your machine to call another machine and initiate reception of a fax stored in an F-code memory box (polling memory) in the other machine. During the polling operation, your machine must correctly specify the F-code (sub-address and passcode) configured in the other machine. Otherwise, polling reception will not take place.
6Tap the key of the received data you wish to check, and tap [Check Image] on the action panel.Displays the received data image.To print the document, tap [Print] on the action panel.
• Verify the F-code (sub-address and passcode) of the memory box in the other machine before you perform F-code polling reception.
• The receiving machine bears the telephone charges of the transmission.
• If necessary, use the F-code polling reception in combination with a broadcast transmission or timer transmission. Only one polling reception with a timer setting can be stored at a time.► SPECIFYING THE TIME FOR COMMUNICATION (page 4-90)
• Polling multiple machines (serial polling) is not possible.
• Make sure there is no original in the machine when using the F-code for the polling reception function.
• The polling reception using the F-code cannot be registered as a "Favorite" item.
Forward to Other Address
Check Image
PrintAll Received DataReceived Data List
Cancel All
Delete
FileStore Data in Folder
Sender Received Date Status
Not Checked10:45 07/07
Transmission request (Polling) using an F-code
Sub Address: AAAAAAAAPasscode: XXXXXXXX
The machine
Send
Receiving machine F-code polling memory box
Box Name: BBBBSub Address: AAAAAAAAPasscode: XXXXXXXX

4-104
FACSIMILE►PERFORMING F-CODE COMMUNICATION
1Tap the [Others] key, and tap the [Polling] key.A checkmark appears on the icon.After the settings are completed, tap the [Back] key.
To cancel the Polling setting:Tap the [Polling] key to clear the checkmark.
2Specify the destination.(1)Enter the destination line number using the numeric keys.(2)Tap the [Sub Address] key.
Symbol "/" is entered.(3)Enter the sub-address using the numeric keys.(4)Tap the [Passcode] key.
Symbol "/" is entered.(5)Enter the passcode using the numeric keys.
• If the sub-address and passcode are already registered, you can select a one-touch key as well.
• If the passcode is omitted for the memory box of destination machine, you can skip Steps (4) and (5).
3Tap the [Start] key.Your machine will call the other machine and initiate reception of the fax.
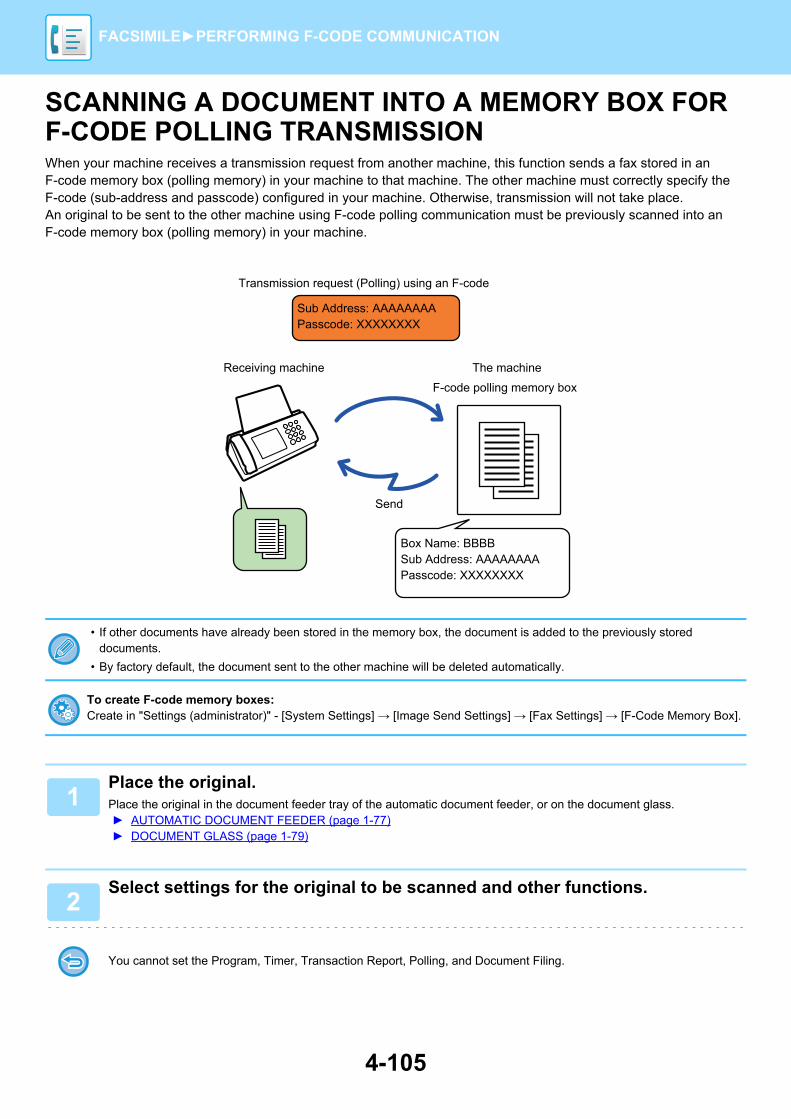
4-105
FACSIMILE►PERFORMING F-CODE COMMUNICATION
SCANNING A DOCUMENT INTO A MEMORY BOX FOR F-CODE POLLING TRANSMISSIONWhen your machine receives a transmission request from another machine, this function sends a fax stored in an F-code memory box (polling memory) in your machine to that machine. The other machine must correctly specify the F-code (sub-address and passcode) configured in your machine. Otherwise, transmission will not take place.An original to be sent to the other machine using F-code polling communication must be previously scanned into an F-code memory box (polling memory) in your machine.
• If other documents have already been stored in the memory box, the document is added to the previously stored documents.
• By factory default, the document sent to the other machine will be deleted automatically.
To create F-code memory boxes:Create in "Settings (administrator)" - [System Settings] → [Image Send Settings] → [Fax Settings] → [F-Code Memory Box].
1Place the original.Place the original in the document feeder tray of the automatic document feeder, or on the document glass.► AUTOMATIC DOCUMENT FEEDER (page 1-77)► DOCUMENT GLASS (page 1-79)
2Select settings for the original to be scanned and other functions.
You cannot set the Program, Timer, Transaction Report, Polling, and Document Filing.
Receiving machine
Transmission request (Polling) using an F-code
Sub Address: AAAAAAAAPasscode: XXXXXXXX
Send
The machine
F-code polling memory box
Box Name: BBBBSub Address: AAAAAAAAPasscode: XXXXXXXX

4-106
FACSIMILE►PERFORMING F-CODE COMMUNICATION
3Tap the [Others] key, and tap the [Memory Box] key.
4Tap the [Polling Memory] tab.
5Tap the folder of the F-code memory polling box.
6Tap [Change Number of Times] on the action panel, and set the polling times.To erase the original after its transmission, tap the [Once] key. To repeat transmitting an original, tap the [Unlimited] key. Change the settings as necessary.After the settings are completed, tap , and [Back] keys.
7Tap the [Start] key.Scanning of the original starts.
• If you inserted the original pages in the document feeder tray, all pages are scanned.
• When you place the original on the document glass, scan each page one at a time.
• When scanning finishes, place the next original and tap the [Start] key.Repeat until all pages have been scanned and then tap the [Read-End] key.
You can tap the [Preview] key to check a preview of the image before sending a fax. For more information, see "CHECKING THE IMAGE TO BE TRANSMITTED (page 4-27)". However, settings for this function cannot be changed in the preview screen.
Back
Confidential Polling Memory
Folder Name
Public Box
Times
Once
reception memory 100%
Start
Change Number of Times
CA
8½x11 8½x11

4-107
FACSIMILE►PERFORMING F-CODE COMMUNICATION
CHECKING THE DOCUMENT IN THE F-CODE MEMORY POLLING BOXYou can check the document stored in the F-code memory polling box.
A document in a memory box cannot be printed while the document is being transmitted. By factory default, the document sent to the other machine will be deleted automatically.
1Tap the [Others] key, and tap the [Memory Box] key.
2Tap the [Polling Memory] tab.
3Tap the folder of the F-code memory polling box.
4Tap [Check Image] on the action panel.To print the document, tap the [Print] key.
Back
Confidential Sender NumberRegister This Functionin Favorite
Change Number of TimesFolder Name
Public Box
Times
Unlimited
Polling Memory Unlimited
Polling Memory Once
Polling Memory Once
Switch Billing Code.
reception memory 100%
CA
Start

4-108
FACSIMILE►PERFORMING F-CODE COMMUNICATION
DELETING A DOCUMENT STORED FOR F-CODE POLLING TRANSMISSIONDelete the document stored in an F-code memory polling box in order to be able to store a new document.
No original can be deleted from the memory box during communication.
1Tap the [Others] key, and tap the [Memory Box] key.
2Tap the [Polling Memory] tab.
3Tap the folder of the F-code memory polling box.
4Tap [Empty out Box] on the action panel.If you tap [Check Image] on the action panel, you can check the image on the touch panel before it is erased.
5Tap the [Yes] key.The document is deleted, and you return to Step 2.
To cancel the document deletion:Tap the [No] key.

4-109
FACSIMILE►PERFORMING F-CODE COMMUNICATION
RELAY REQUEST TRANSMISSION USING F-CODESThis function sends a fax to an F-code relay broadcast memory box in another machine and have that machine relay the fax to multiple destination machines.When the destination machines are far from your machine, sending the fax to a relay machine that is close to the destination machines can help reduce telephone charges. A relay request transmission can be used in combination with the timer transmission function to further reduce cost.► SPECIFYING THE TIME FOR COMMUNICATION (page 4-90)
• F-code (sub-address and passcode) and the destination in the F-code relay broadcast memory box of the recipient machine should be verified by the recipient in advance.
• Before using this function, program the destination machines in the F-code relay broadcast memory box in the relay machine.
• It is not necessary for the destination machines to support F-code communication.
• Your machine (the machine that requests a relay broadcast transmission) only bears the cost of sending the fax to the relay machine. The relay machine bears the cost of sending the fax to each of the destination machines.
• If necessary, this function can be used in combination with a broadcast transmission or timer transmission. It is convenient to store this function in a program.
When faxes forwarded using this function are printed at the forwarding destination, the date and time of reception cannot be printed on the faxes. ("Receiving Date & Time Print" is disabled.)
To create F-code memory boxes:Create in "Settings (administrator)" - [System Settings] → [Image Send Settings] → [Fax Settings] → [F-Code Memory Box].
1Place the original.Place the original in the document feeder tray of the automatic document feeder, or on the document glass.► AUTOMATIC DOCUMENT FEEDER (page 1-77)► DOCUMENT GLASS (page 1-79)
The machine
F-code relay broadcast transmission
Sub Address: AAAAAAAAPasscode: XXXXXXXX
Receiving machineF-code relay broadcast memory box
Send
The fax is transmitted in sequence to the end receiving machines registered in the F-code relay broadcast memory box.
Forward Destination
Box Name: BBBBSub Address: AAAAAAAAPasscode: XXXXXXXX
Receiving machines are programed in this box

4-110
FACSIMILE►PERFORMING F-CODE COMMUNICATION
2Specify the destination.• Entering a destination number using the numeric keys►page 4-11• Retrieving a destination from an address book►page 4-12• Using a search number to retrieve a destination►page 4-15• Retrieving a destination from a global address book►page 4-16• Using a transmission log to resend►page 4-18
If the sub-address and passcode are stored in the one-touch key, it is not necessary to take steps 3 to 6. Go to step 7.
3Tap the [Sub Address] key.Enter "/".
4Enter the sub-address using the numeric keys.
5Tap the [Passcode] key.Enter "/".
6Enter the passcode using the numeric keys.
If a passcode has been omitted in the memory box of the destination machine, it is not necessary to take steps 5 and 6.
7Tap the [Start] key.Scanning begins.
• If you inserted the original pages in the document feeder tray, all pages are scanned.A beep will sound to indicate that scanning and transmission have ended.
• When you place the original on the document glass, scan each page one at a time.When scanning finishes, place the next original and tap the [Start] key. Repeat until all pages have been scanned and then tap the [Read-End] key.A beep will sound to indicate that scanning and transmission have ended.When the relay machine receives the fax, it will automatically transfer the fax to the destination machines programmed in the memory box.
When you use the automatic document feeder to scan an original, you can tap the [Preview] key to check a preview of the image before sending a fax. For more information, see "CHECKING THE IMAGE TO BE TRANSMITTED (page 4-27)".

4-111
FACSIMILE►PERFORMING F-CODE COMMUNICATION
RELAY BROADCAST TRANSMISSION USING F-CODESWhen your machine receives an F-code relay request transmission, the fax is received and stored in an F-code relay broadcast memory box in your machine.Your machine then relays the fax to each of the destination machines programmed in the memory box. Transmission to the destination machine takes place automatically.
• Prior to carrying out the operation, inform the requesting party, who you will communicate with using F-code relay request transmission, of the sub-address and passcode of the F-code relay broadcast memory box in your machine.
• Program the destination machines in the F-code relay broadcast memory box when you create the box in your machine.► CREATING MEMORY BOXES IN THE MACHINE FOR F-CODE COMMUNICATION (page 4-99)
• It is not necessary for the destination machines to support F-code communication.
• The machine that requests a relay broadcast transmission only bears the cost of sending the fax to your machine (the relay machine). Your machine bears the cost of sending the fax to each of the destination machines.
• If both direct SMTP and other sending methods are added to the forwarding destinations, transmission will not take place.
When faxes forwarded using this function are printed at the forwarding destination, the date and time of reception cannot be printed on the faxes. ("Receiving Date & Time Print" is disabled.)
The machine
F-code relay broadcast transmission
Sub Address: AAAAAAAAPasscode: XXXXXXXX
Receiving machineF-code relay broadcast memory box
Send
Forward Destination
Box Name: BBBBSub Address: AAAAAAAAPasscode: XXXXXXXXReceiving machines are programed in this box
The fax is transmitted in sequence to the end receiving machines registered in the F-code relay broadcast memory box.

4-112
FACSIMILE►USING AN EXTERNAL TELEPHONE
CONNECTING AN EXTERNAL TELEPHONE
CONNECTING AN EXTENSION TELEPHONEYou can connect an existing telephone to the machine.The telephone can be used for voice calls and to start fax reception on the machine. Connect the extension telephone as shown below. After connecting an extension telephone, configure the "External Telephone Setting" in setting mode (administrator).
USING AN EXTERNAL TELEPHONE
Enable the "Tel/Fax Auto Change" function. This is useful as the telephone or fax operation is selected automatically according to the calling.
• You cannot send a fax from your telephone.
• You can connect a telephone with a modular cable plug to your machine. Also, use the two-wire cable for telephone connection. If another type of cable is used, the telephone may not operate normally.
• If the plug on the telephone line cord does not fit into the jack on your extension phone, contact your dealer or nearest SHARP Service Department.
Extension telephone jack
Click! Existing extension telephone (example)
Click!

4-113
FACSIMILE►USING AN EXTERNAL TELEPHONE
RECEIVING A FAX AFTER ANSWERING A CALL ON THE EXTENSION TELEPHONE (REMOTE RECEPTION)Follow the steps below if you need to start fax reception after answering a call and speaking on the extension telephone.Dial [5], [*] and [*] buttons of the external telephone.If you are using a pulse line, set the extension to send tone signals.
MAKING AND RECEIVING PHONE CALLSYou can make and receive calls like normal on your extension phone. A phone call can also be made by dialing on the machine.
• To receive a fax after answering a call on the extension telephone:Set "Settings (administrator)" - [System Settings] → [Image Send Settings] → [Fax Data Receive/Forward (Manual)] → [Fax Settings] → [Receive Settings] to [Manual Reception].
• To change the number to receive faxes:In "Settings", select [System Settings] → [Image Send Settings] → [Fax Settings] → [Default Settings] → [Remote Reception Number Setting].
1While the machine is ringing, pick up the receiver to speak.
2Signal the machine to start fax reception.Press from the extension telephone.
3Replace the receiver.The machine beeps when reception ends.

4-114
FACSIMILE►CHECK THE COMMUNICATION STATUS
FAX JOBSWhen you tap the job status display, jobs are displayed in a list. To confirm the fax job status, tap the mode display and select the fax.When you wish to stop or delete jobs or to perform priority processing, read the following items:
► STOPPING/DELETING A JOB IN PROGRESS OR RESERVED (page 1-82)► PRIORITY PROCESSING OF A RESERVED JOB (page 1-83)► CHECKING A RESERVED JOB OR THE JOB IN PROGRESS (page 1-85)► CHECKING COMPLETED JOBS (page 1-86)
COMPLETED FAX TRANSMISSION/RECEPTION JOBSA usual transmission job moves to the job list when transmission is completed. Then the status field displays "Send OK". However, received faxes, timer transmission faxes, retries, fax forwarding, and other fax jobs are displayed in the job status screen as follows:
Fax reception jobsWhen a fax is being received, the status field displays "Receiving" in the job queue list.When reception is completed, the job moves to the completed job list and the status field displays "In Memory". After the fax is printed, the status changes to "Received".
Timer transmission jobsA timer transmission job appears at the end of the job queue list until the specified time is reached.Transmission begins at the specified time. When transmission is completed, the job moves to the completed job list and the status field displays "Send OK".
CHECK THE COMMUNICATION STATUS
Fax jobs include reception, timer transmission, and data forwarding as well as usual transmission. For information on jobs in fax mode, see "COMPLETED FAX TRANSMISSION/RECEPTION JOBS (page 4-114)".
Job Queue
Complete
Internet FaxFaxScan
Job Address Set Time StatusPages
PrintCheck Details ofSelected Job
Stop/Delete
Enter MultiSelection Mode
Display OnlyOwn Job
Check ConfidentialReception Data
Back
Waiting000110:45 07/07Broadcast
The mode display

4-115
FACSIMILE►CHECK THE COMMUNICATION STATUS
Retry jobsA retry job appears at the end of the job queue list.Transmission of the retry job starts according to the [Recall in Case of Line Busy] setting in "Settings". When the transmission is completed, the retry job moves to the completed job list and the status changes to "Send OK".
Reception jobs when the inbound routing settings are enabledWhen the inbound routing settings are enabled, reception jobs are handled as follows depending on the print setting.► FORWARDING RECEIVED DATA TO PRESET DESTINATIONS (INBOUND ROUTING SETTINGS) (page 4-60)
Received data is not printedWhen a data is being received, "Receiving" appears in the job queue list. When the reception is completed, the status changes to "Waiting".
Received fax is printedWhen reception is completed, the status field displays "In Memory" in the completed job list. After the fax is printed, the status changes to "Received". Then a job is added for which the status field displays "Waiting" in the job queue list. When forwarding the received fax is completed, the field changes to "Forward OK".
CHECKING IMAGE SENDING ACTIVITIES
PRINTING IMAGE SENDING ACTIVITY REPORTSYou can have the machine print a log of recent image sending activity (date, name of other party, time required, result, etc.). The Image Sending Activity Report contains useful information such as the types of errors that occurred.The most recent 200 transactions are included in the report.You can have the machine print the Image Sending Activity Report each time the number of transactions reaches 201, or at a specified time (once a day only).
INFORMATION APPEARING IN THE RESULT COLUMNError types and other information are printed in the result column of transaction and activity reports. When a transaction or activity report is printed, check the result of the transaction in the result column and take action as needed.
The contents of the Image Sending Activity Report are erased when the report is printed, and thus it cannot be reprinted.
To configure the image sending activity report:In "Settings", select [System Settings] → [Image Send Settings] → [Fax Settings] → [Default Settings] → [Activity Report Print Select Setting].

4-116
FACSIMILE►CHECK THE COMMUNICATION STATUS
Examples of messages that are printed in the result column
Print Page Description
Yes The transaction was completed normally.
G3 Communication took place in G3 mode.
ECM Communication took place in G3 ECM mode.
SG3 Communication took place in Super G3 mode.
Forward The received data was forwarded.
No Response No response from the receiving party.
Busy Transmission was not possible because the other party was already using the line.
No The transmission was canceled while in progress.
MEMORY OVER The memory became full during quick on-line transmission.
FULL The memory became full during reception.
LENGTH OVER The transmitted fax was over 59" (1.5 m) long and therefore could not be received.
ORIGINAL ERROR Direct transmission or manual transmission was not successful because a misfeed occurred.
PASS# NG The connection was broken because the polling passcode was not correct.
NO RX POLL The machine that was polled does not have a polling function.
RX POLL FAILThe other machine refused the polling operation, or your machine broke the connection when polled because no data was in memory.
NO F-CODE POLLThe other machine refused an F-code polling operation, or your machine broke the connection when polled because no data was in its F-code memory polling box.
RX POLL# NGThe connection was broken because the sub-address for F-code polling memory was not valid.
F POLL PASS# NG The connection was broken because the passcode for F-code polling memory was not valid.
BOX NO. NGYour machine broke the connection because the specified sub-address for an F-code memory box does not exist.
F PASS# NGYour machine broke the connection because the other machine sent an incorrect passcode for F-code communication.
RX NO F-CODE POLLF-code polling was attempted, however, the other machine did not have an F-code polling memory box.
NO F FUNCF-code communication was attempted, however, the other machine does not support F-code communication.
NO F-CODEF-code communication was refused by the other machine because of an incorrect sub-address or other reason.
M. BOX: [xxxxxx] ******
Data was received and stored in a confidential or relay broadcast memory box, or data was sent from a memory polling box.The name of the memory box appears in [xxxxxx], and the type of F-code operation (relay request reception, polling memory transmission, or confidential reception) appears in ******.
FAIL xx (xxxx)The transaction failed due to a communication error.First 2 digits of communication error number: Error code from 00 to 99.Last 4 digits of communication error number: Code for use by service technicians.
Rejected A fax was sent from a party from which reception is blocked.
5-1
BEFORE USING THE MACHINE AS A NETWORK SCANNER
BEFORE USING THE MACHINE AS A NETWORK SCANNER FUNCTION. . . . . . . . . . . . . . . . . . . . . . . 5-4
• USES OF THE NETWORK SCANNER. . . . . . . 5-4• BEFORE USING THE NETWORK SCANNER . . . 5-5• STORING DESTINATIONS FOR SCAN TO
DESKTOP . . . . . . . . . . . . . . . . . . . . . . . . . . . . . 5-7• BEFORE SENDING TO A DIRECT SMTP
ADDRESS . . . . . . . . . . . . . . . . . . . . . . . . . . . . . 5-7
NETWORK SCANNER MODE. . . . . . . . . . . . . . . . . 5-8
• EASY MODE . . . . . . . . . . . . . . . . . . . . . . . . . . . 5-8
• NORMAL MODE . . . . . . . . . . . . . . . . . . . . . . . . 5-9
SELECTING NETWORK SCANNER MODE . . . . . . 5-9
IMAGE SEND SEQUENCE . . . . . . . . . . . . . . . . . . . 5-12
ORIGINAL SIZE . . . . . . . . . . . . . . . . . . . . . . . . . . . . 5-14• TRANSMITTABLE ORIGINAL SIZES . . . . . . . . 5-14
ENTERING DESTINATIONS
ENTERING DESTINATIONS . . . . . . . . . . . . . . . . . . 5-15• RETRIEVING A DESTINATION FROM AN
ADDRESS BOOK . . . . . . . . . . . . . . . . . . . . . . . 5-15
• MY ADDRESS. . . . . . . . . . . . . . . . . . . . . . . . . . 5-17• VIEWING A LIST OF THE SELECTED
DESTINATIONS . . . . . . . . . . . . . . . . . . . . . . . . 5-18• USING A SEARCH NUMBER TO RETRIEVE A
DESTINATION. . . . . . . . . . . . . . . . . . . . . . . . . . 5-19
• ENTERING AN ADDRESS MANUALLY . . . . . . 5-20
• SPECIFYING A NETWORK FOLDER. . . . . . . . 5-21• RETRIEVING A DESTINATION FROM A
GLOBAL ADDRESS BOOK. . . . . . . . . . . . . . . . 5-22
• USING A TRANSMISSION LOG TO RESEND . . . 5-24• SENDING ONLY THE URL OF A SCANNED FILE
TO A SCAN DESTINATION. . . . . . . . . . . . . . . . . . 5-26
TRANSMITTING AN IMAGE
TRANSMITTING AN IMAGE . . . . . . . . . . . . . . . . . . 5-29
• SENDING AN IMAGE IN SCAN MODE . . . . . . 5-29• CHANGING THE SUBJECT, FILE NAME,
REPLY-TO, AND BODY TEXT AT THE TIME OF SCAN TRANSMISSION . . . . . . . . . . . . . . . 5-32
• SENDING A FAX IN INTERNET FAX MODE. . . 5-35
• CHANGING THE SUBJECT, FILE NAME, AND BODY TEXT AT THE TIME OF INTERNET FAX TRANSMISSION . . . . . . . . . . . . . . . . . . . 5-37
• SENDING THE SAME IMAGE TO MULTIPLE DESTINATIONS (BROADCAST TRANSMISSION). . . . . . . . . . . . . . . . . . . . . . . 5-40
• SETTING MODES WHEN MULTIPLE TYPES OF ADDRESSES ARE INCLUDED IN A BROADCAST TRANSMISSION. . . . . . . . . . . . 5-42
• RESENDING TO UNSUCCESSFUL BROADCAST TRANSMISSION DESTINATIONS. . . . . . . . . . . . . . . . . . . . . . . . 5-44
• SENDING AN INTERNET FAX FROM A PC (PC-I-FAX) . . . . . . . . . . . . . . . . . . . . . . . . . . . . 5-46
IMAGE SETTINGS . . . . . . . . . . . . . . . . . . . . . . . . . 5-47• AUTOMATICALLY SCANNING BOTH SIDES
OF AN ORIGINAL (2-SIDED ORIGINAL). . . . . 5-47• SCAN SIZE AND SEND SIZE
(ENLARGE/REDUCE) . . . . . . . . . . . . . . . . . . . 5-48• SPECIFYING THE ORIGINAL SCAN SIZE IN
PAPER SIZE . . . . . . . . . . . . . . . . . . . . . . . . . . 5-49• SPECIFYING THE ORIGINAL SCAN SIZE
USING NUMERIC VALUES . . . . . . . . . . . . . . . 5-50• STORING FREQUENTLY USED ORIGINAL
SIZES . . . . . . . . . . . . . . . . . . . . . . . . . . . . . . . . 5-51• SPECIFYING THE SEND SIZE OF THE
IMAGE . . . . . . . . . . . . . . . . . . . . . . . . . . . . . . . 5-54• CHANGING THE EXPOSURE AND ORIGINAL
IMAGE TYPE . . . . . . . . . . . . . . . . . . . . . . . . . . 5-56
• CHANGING THE RESOLUTION . . . . . . . . . . . 5-58• CHANGING FORMAT IN SCAN OR DATA
ENTRY MODE . . . . . . . . . . . . . . . . . . . . . . . . . 5-59• CHANGING FORMAT IN INTERNET FAX
MODE. . . . . . . . . . . . . . . . . . . . . . . . . . . . . . . . 5-64
• CHANGING COLOR MODE. . . . . . . . . . . . . . . 5-64• SETTING SCAN SETTINGS
AUTOMATICALLY (Auto Set) . . . . . . . . . . . . . 5-66
CHECKING THE IMAGE TO BE TRANSMITTED . . . 5-66
SCANNER/INTERNET FAX
Icons
Functions you can use in Easy
Scan mode

5-2
SCANNER/INTERNET FAX
OTHER FUNCTIONS
STORING SCAN OPERATIONS (PROGRAM) . . . . 5-67
SCANNING AND SENDING ORIGINALS COLLECTIVELY. . . . . . . . . . . . . . . . . . . . . . . . . . . . 5-70
• SENDING TWO PAGES AS A SINGLE PAGE (N-Up) . . . 5-70• SCANNING ORIGINALS OF DIFFERENT
SIZES (MIXED SIZE ORIGINAL) . . . . . . . . . . . 5-72• SCANNING BOTH SIDES OF A CARD ONTO
A SINGLE PAGE (CARD SHOT). . . . . . . . . . . . 5-74• SCANNING BOTH SIDES OF A CARD ONTO A
SINGLE PAGE (CARD SHOT (MULTI)) . . . . . . . . . . . 5-76• SCANNING A BUSINESS CARD, READING
THE TEXT STRING, CREATING A FILE, AND SENDING THE FILE (BUSINESS CARD SCAN) 5-82
• SCANNING MULTIPLE PHOTOS AT ONCE TO INDIVIDUAL FILES (Image Crop) . . . . . . . . . . . . . . . . 5-87
• SCANNING MANY ORIGINALS AT ONCE (JOB BUILD) . . . . . . . . . . . . . . . . . . . . . . . . . . . . . . . . . . . . . 5-89
ADJUSTING COLORS AND SHADING. . . . . . . . . . 5-91• ADJUSTING THE BACKGROUND BY MAKING
LIGHT AREAS OF THE ORIGINAL DARKER OR LIGHTER (BACKGROUND ADJUSTMENT) . . . . 5-91
• ADDING CONTRAST TO THE SCANNED ORIGINAL BEFORE TRANSMISSION (CONTRAST). . . . . . . . . 5-93
• ENHANCING THE OUTLINE OF THE SCANNED ORIGINAL BEFORE TRANSMISSION (SHARPNESS) . . . . . . . . . . . 5-95
• REMOVING CHROMATIC COLORS FROM THE SCANNED ORIGINAL BEFORE TRANSMISSION (DROP OUT COLOR) . . . . . . 5-97
• ADJUSTING RED/GREEN/BLUE (RGB Adjust) . . . 5-99
SCANNING ORIGINALS . . . . . . . . . . . . . . . . . . . . . 5-101• ERASING PERIPHERAL SHADOWS ON THE
IMAGE (ERASE) . . . . . . . . . . . . . . . . . . . . . . . . 5-101
• SCANNING A THIN ORIGINAL (SLOW SCAN MODE) . . . 5-104• ELIMINATING BLANK PAGES FROM A
TRANSMISSION (BLANK PAGE SKIP) . . . . . . 5-106• CHECKING THE NUMBER OF SCANNED
ORIGINAL SHEETS BEFORE TRANSMISSION (ORIGINAL COUNT) . . . . . . . 5-108
SPECIFIC FUNCTIONS . . . . . . . . . . . . . . . . . . . . . 5-110• ADDING YOUR SENDER INFORMATION TO
FAXES (I-FAX OWN ADDRESS SEND) . . . . . 5-110• CHANGING THE PRINT SETTINGS FOR THE
TRANSACTION REPORT (TRANSACTION REPORT) . . . 5-111• STARTING A TRANSMISSION AT A
SPECIFIED TIME (TIMER TRANSMISSION) . . . 5-113• ADDING A SIGNATURE WHEN SENDING AN
IMAGE (ELECTRONIC SIGNATURE) . . . . . . . 5-116• ENCRYPTING THE TRANSMITTED DATA
(ENCRYPTION) . . . . . . . . . . . . . . . . . . . . . . . . 5-118
SENDING A SCANNED DOCUMENT BY GMAIL OR EXCHANGE . . . . . . . . . . . . . . . . . . . . . . . . . . . 5-120
• GMAIL LINK FUNCTION . . . . . . . . . . . . . . . . . 5-120• EXCHANGE LINK FUNCTION. . . . . . . . . . . . . 5-122• SETTINGS SCREEN . . . . . . . . . . . . . . . . . . . . 5-124
INTERNET FAX RECEPTION FUNCTIONS
CHECKING THE INTERNET FAX ACTIVITY LOG . . . 5-127• PRINTING IMAGE SENDING ACTIVITY
REPORTS . . . . . . . . . . . . . . . . . . . . . . . . . . . . 5-127• INFORMATION APPEARING IN THE RESULT
COLUMN . . . . . . . . . . . . . . . . . . . . . . . . . . . . . 5-128
RECEIVING INTERNET FAXES . . . . . . . . . . . . . . . 5-129• RECEIVING INTERNET FAXES
AUTOMATICALLY . . . . . . . . . . . . . . . . . . . . . . 5-129• RECEIVING INTERNET FAXES MANUALLY . . . 5-129
PRINTING RECEIVED DATA . . . . . . . . . . . . . . . . . 5-130• PRINTING A PIN CODE-PROTECTED FAX
(Hold setting for received data print) . . . . . . . . 5-130• PRINTING RECEIVED DATA AT A SPECIFIED
TIME. . . . . . . . . . . . . . . . . . . . . . . . . . . . . . . . . 5-131• CHECKING THE IMAGE BEFORE PRINTING . . . . 5-132
FORWARDING RECEIVED DATA . . . . . . . . . . . . . 5-134• FORWARDING RECEIVED INTERNET FAX
DATA (FAX DATA FORWARD) . . . . . . . . . . . . 5-134• FORWARDING RECEIVED DATA TO PRESET
DESTINATIONS (INBOUND ROUTING SETTINGS) . . . . . . . . . . . . . . . . . . . . . . . . . . . 5-135
• SAVING RECEIVED FAXES TO THE MACHINE'S HARD DISK (INBOUND ROUTING) . . . . . . . . . . . . . . . . . . . . . . . . . . . . 5-138
• FORWARDING RECEIVED DATA MANUALLY . . . 5-140
SAVING RECEIVED DATA. . . . . . . . . . . . . . . . . . . 5-141

5-3
SCANNER/INTERNET FAX
CHECKING THE STATUS OF TRANSMISSION/RECEPTION JOBS
IMAGE SEND JOBS . . . . . . . . . . . . . . . . . . . . . . . . 5-142
COMPLETED TRANSMISSION/RECEPTION JOBS . . . . . . . . . . . . . . . . . . . . . . . . . . . . . . . . . . . . 5-143
SCANNING FROM A COMPUTER (PC Scan Mode)
BASIC SCANNING PROCEDURE. . . . . . . . . . . . . . 5-144
METADATA DELIVERY
PREPARATIONS FOR METADATA DELIVERY. . . 5-149• METADATA DELIVERY (DATA ENTRY) . . . . . 5-149• SETTINGS REQUIRED IN THE SETTING
MODE (WEB VERSION) . . . . . . . . . . . . . . . . . . 5-150• METADATA DELIVERY USING SCAN TO
DESKTOP . . . . . . . . . . . . . . . . . . . . . . . . . . . . . 5-150
TRANSMITTING METADATA . . . . . . . . . . . . . . . . . 5-151• TRANSMITTING METADATA . . . . . . . . . . . . . . 5-151• METADATA FIELDS . . . . . . . . . . . . . . . . . . . . . 5-152

5-4
SCANNER/INTERNET FAX►BEFORE USING THE MACHINE AS A NETWORK SCANNER
BEFORE USING THE MACHINE AS A NETWORK SCANNER FUNCTION
USES OF THE NETWORK SCANNERThe network scanner allows you to create an image file from the original data scanned by the machine, and send the file over a network to a PC, FTP server, or other destinations. If necessary, it scans the original using a TWAIN-compliant application on your PC.The network scanner function provides the following scanning modes.
Scanner modeThe scanner function of the machine sends a scanned original as described below based on the specification of the destination.• Scan to E-mail
You can send a scanned file as an e-mail attachment. You can also save the file to the machine's hard disk and send only a URL link (without attaching the file) that allows the recipient to download the file.
• Scan to FTPThe scanned file is sent to a specified folder of an FTP server.When the file is sent, it is also possible to send an e-mail to a previously stored e-mail address to inform the recipient of the location of the file.
• Scan to DesktopThe scanned file is sent to a specified folder on your computer.For information on Scan to Desktop, consult your dealer.
• Scan to Network FolderThe scanned file is sent to a network folder on a Windows PC on the same network as the machine.When the file is sent, it is also possible to send an e-mail to a previously stored e-mail address to inform the recipient of the location of the file.
For the operating procedure, see "SENDING AN IMAGE IN SCAN MODE (page 5-29)".
Internet fax modeThe scanned file is sent as an Internet fax. Internet faxes are received if necessary.The machine supports Direct SMTP, which lets you directly send Internet faxes within your company without using a mail server.
For the operating procedure, see "SENDING A FAX IN INTERNET FAX MODE (page 5-35)".
BEFORE USING THE MACHINE AS A NETWORK SCANNER
To use the Internet fax function, the Internet fax expansion kit must be installed.

5-5
SCANNER/INTERNET FAX►BEFORE USING THE MACHINE AS A NETWORK SCANNER
Data entry modeIn data entry mode, information entered using the touch panel or automatically generated by the machine is sent to a directory on an FTP server or an application on a PC as a metadata file in XML format.
For the operating procedure, see "TRANSMITTING METADATA (page 5-151)".
BEFORE USING THE NETWORK SCANNERTo use the machine as a network scanner, you must store sender information, configure server settings, store destinations in the address book, and perform other required operations.
Installing the application integration module is required to use the metadata delivery function.The application integration module can be combined with the network scanner to append a metadata file to a scanned image file.Metadata is information about a file, how it is to be processed, and its relation to other objects.
1Make sure the main power switch is in the " " position.When the main power indicator is lit up, the main power is in the " " position. If the main power indicator is not lit up, turn the main power switch to the " " position and press the [POWER] button on the operation panel.*If the fax function will be used, and in particular if reception or timer transmission will take place at night, always keep the main power switch in the " " position.
2Check the date and time.Verify that the correct date and time are set in the machine.
To set the date and time of the machine:In "Settings", select [System Settings] → [Common Settings] → [Clock Adjust].
If [Disabling of Clock Adjustment] has been enabled, the date and time cannot be modified.Select [System Settings] in "Settings (administrator)" → [Common Settings] → [Enable/Disable Settings] → [Operation Settings] to disable the [Disabling of Clock Adjustment] setting.
[Power] buttonMain power indicator
Main power switch

5-6
SCANNER/INTERNET FAX►BEFORE USING THE MACHINE AS A NETWORK SCANNER
3Store the sender information.Before using Scan to E-mail:Store a default sender name in "Sender Name" and a reply e-mail address in "Reply E-mail Address".
To store the sender's name and e-mail address that are used when a sender is not selected:In "Settings (administrator)", select [System Settings] → [Image Send Settings] → [Scan Settings] → [Condition Settings] → [Default Reply.Address Set].Before using Internet fax:Store a sender name in "Sender Name" and a sender Internet fax address in "Own Address".To store the sender's name and address:In "Settings (administrator)", select [System Settings] → [Image Send Settings] → [Common Settings] → [Own Number and Name Set] → [Sender Data Registration].
4Configure settings required in the setting mode.Configure server settings, default settings for the network scanner, and settings for Internet Fax.
• To configure server settings:In "Settings (administrator)", select [System Settings] → [Network Settings] → [Services Settings]. (Administrator rights are required.)
• To configure basic settings for the network scanner:In "Settings (administrator)", select [System Settings] → [Image Send Settings] → [Scan Settings]. (Administrator rights are required.)
• To configure settings for Internet Fax:In "Settings (administrator)", select [System Settings] → [Image Send Settings] and then configure options in [Internet Fax Settings]. (Administrator rights are required.)
5Store the destination addresses for each scan mode in the address book.You can send an image by directly entering an address when using Scan to Image. It is convenient to previously store addresses in the address book.Up to 6000 addresses can be stored in the address book. For information on the address book, see "ADDRESS BOOK".For how to use the address books and how to store addresses, see the following item.► RETRIEVING A DESTINATION FROM AN ADDRESS BOOK (page 5-15)► VIEWING A LIST OF THE SELECTED DESTINATIONS (page 5-18)► USING A SEARCH NUMBER TO RETRIEVE A DESTINATION (page 5-19)► ENTERING AN ADDRESS MANUALLY (page 5-20)► SPECIFYING A NETWORK FOLDER (page 5-21)► RETRIEVING A DESTINATION FROM A GLOBAL ADDRESS BOOK (page 5-22)► USING A TRANSMISSION LOG TO RESEND (page 5-24)

5-7
SCANNER/INTERNET FAX►BEFORE USING THE MACHINE AS A NETWORK SCANNER
STORING DESTINATIONS FOR SCAN TO DESKTOPTo store your computer in the machine as a destination for Scan to Desktop, Network Scanner Tool must be installed.To scan an image to your computer, Network Scanner Tool must be running on your computer.
BEFORE SENDING TO A DIRECT SMTP ADDRESSThe machine supports Direct SMTP, which lets you directly send Internet faxes within your company without using a mail server.For the procedure for storing the Direct SMTP address in the address book, see "STORING ADDRESSES THROUGH DIRECT ENTRY (page 1-94)", "STORING ADDRESSES THROUGH GLOBAL ADDRESS SEARCH (page 1-95)" or "STORING GROUPS (page 1-98)". Stored Direct SMTP addresses are included in the address book for Internet fax mode.
If the destination is busy:If the destination is busy, the machine will wait briefly and then automatically resend.
When a communication error occurs:If a communication error occurs or the other fax machine does not answer the call within a preset period of time, transmission will automatically be attempted again after a preset interval.
To install Network Scanner Tool, see the "Shapdesk Installation Guide". When a standard installation is performed, Network Scanner Tool is installed with Sharpdesk.
To cancel transmission:Do so from the job status screen.► STOPPING/DELETING A JOB IN PROGRESS OR RESERVED (page 1-82)
To set the number of recall attempts and the interval between attempts when the connection cannot be established because the line is busy, or for other reasons:In "Settings (administrator)", select [System Settings] → [Image Send Settings] → [Internet Fax Settings] → [Send Setting] → [Recall in Case of Line Busy].The factory default setting is two attempts at 3-minute intervals.
To cancel transmission:Do so from the job status screen.► STOPPING/DELETING A JOB IN PROGRESS OR RESERVED (page 1-82)
To set the number of recall attempts and the interval between attempts when a transmission fails due to an error:In "Settings (administrator)", select [System Settings] → [Image Send Settings] → [Internet Fax Settings] → [Send Setting] → [Recall in Case of Communication Error].The factory default setting is two attempts at 3-minute intervals.

5-8
SCANNER/INTERNET FAX►BEFORE USING THE MACHINE AS A NETWORK SCANNER
NETWORK SCANNER MODENetwork scanner mode has two modes: easy mode and normal mode.Easy mode is limited to frequently used functions that allow you to smoothly perform most image send jobs.If you need to select detailed settings or special functions, use normal mode. All functions can be used in normal mode.
EASY MODEEasy mode makes it easy to select basic settings for network scanner mode.
You can select these functions in easy mode.•Original ►page 5-56•Resolution ►page 5-58
•File Format ►page 5-59•Blank Page Skip ►page 5-106
Address Book GlobalAddress Search
Scan to HDD/USB
CAPreview Auto Set
Original Address E-mail Address Detail
B/WStart
ColorStart
Sending History
8½x11
Tap to display the soft keyboard.
Change the function display.
Starts black and white or color transmission.Automatically set the original placement
orientation, resolution, and skipping of blank pages.
Scans the original and shows a preview image.► PREVIEW SCREEN (page 1-15)
Change to normal mode.► NORMAL MODE
(page 5-9)
Reset the addressand settings.
Display the specifiedoriginal size.
► SPECIFYING THE ORIGINAL SCAN SIZE IN PAPER SIZE (page 5-49)
► SPECIFYING THE ORIGINAL SCAN SIZE USING NUMERIC VALUES (page 5-50)
1st screen
2nd screen
Original
8½x11 200x200dpi PDF
PDFOff
Resolution File Format Blank PageSkip
CAPreview Auto Set
Original Address E-mail Address Detail
B/WStart
ColorStart
8½x11
Select the function you want to use.
Set an address.
To select a function in easy modeIn "Settings (administrator)", select [System Settings] → [Common Settings] → [Operation Settings] → [Easy Mode Settings] → [Easy Scan]

5-9
SCANNER/INTERNET FAX►BEFORE USING THE MACHINE AS A NETWORK SCANNER
NORMAL MODENormal mode lets you select any function setting that can be used for network scanner.This section explains the keys on a base screen, taking as an example the E-mail base screen. Several methods are available in the Image Send mode, including Scan to E-mail and Scan to FTP. The base screen layout slightly differs depending on how image is sent.
SELECTING NETWORK SCANNER MODEYou can select the network scanner mode from the Home Screen or from each operation mode as follows:
Changing modes from the Home ScreenTap a mode icon to switch from the home screen to that mode.
Shift to Easy ModeTap the [Easy Scan] mode icon.
Shift to Normal ModeTap the [E-Mail], [FTP/Desktop], [Network Folder] or [Internet Fax] mode icon.
8½x11 8½x11
Tap to display the soft keyboard. Enter subject, file name, and other items.
Searches for the address.
Displays the functions that can be used in image send mode.
Scans the original and shows a preview image.► PREVIEW SCREEN
(page 1-15)Reset the address and settings.
Transmission will start immediately.
Displays the address box to enter addresses.
Setting keys used for image send operations.
Check the current settings. Displays keys other than
the function keys indicated above.
Displays the sizes of the original and the data to send.
Enter reply address and body text.
Displays the list of function keys. Frequently used [Others], programs, and other settings can be registered.
EasyCopy
OperationGuide
EnlargeDisplay Mode
Settings Total Count LCD Control Job StatusOperationGuide
EnlargeDisplay Mode
Settings Total Count LCD Control Job StatusToner Quantity Bk
10:15 10:15 AM
To use the Internet fax function, the Internet fax expansion kit must be installed.
Job Status
E-MailSharp OSA FaxCopy
10:15 10:15 10:15 AM
OperationGuide
EnlargeDisplay Mode
Settings Total Count LCD ControlToner Quantity Bk

5-10
SCANNER/INTERNET FAX►BEFORE USING THE MACHINE AS A NETWORK SCANNER
Changing mode from each modeTap the mode display to switch from each mode.
Shift to Easy Mode
1Tap [Easy Scan].The initial easy scan screen is displayed.
8½x11
8½x11
8½x11
8½x118½x11
8½x11

5-11
SCANNER/INTERNET FAX►BEFORE USING THE MACHINE AS A NETWORK SCANNER
Shift to Normal Mode
1Tap on the mode display.
2Tap the [E-Mail], [FTP/Desktop], [Network Folder] or [Internet Fax] key. The initial screen of the selected mode is displayed.
To switch from the base screen of easy mode, tap the [Detail] key and then tap the [Yes] key in the confirmation screen.
8½x11
8½x11
8½x11
8½x118½x11
8½x11
PreviewPlain
A4
A4
100%
Auto
Auto
Auto
100%
Select the mode.
Network Folder
Easy Fax
Easy Scan
Easy Copy
Fax E-Mail
FTP/Desktop
Internet Fax
8½x11
8½x11
8½x11
8½x11
CAPreview Auto Set
B/WStart
ColorStart
OriginalAddress Detail
Address Book Sending History Scan to HDD/USB
GlobalAddress Search
E-mail Address8½x11

5-12
SCANNER/INTERNET FAX►BEFORE USING THE MACHINE AS A NETWORK SCANNER
IMAGE SEND SEQUENCEFirst, to place the machine in a desired image send mode, tap the appropriate icon in the Home screen.► CHANGING MODES (page 1-14)
1Place the original.Place the original in the document feeder tray of the automatic document feeder, or on the document glass.► AUTOMATIC DOCUMENT FEEDER (page 1-77)► DOCUMENT GLASS (page 1-79)
2Enter the destination.Tap the address key to directly enter the destination, or search and retrieve the address book or destination.
In Easy mode In Normal mode
► ENTERING AN ADDRESS MANUALLY (page 5-20)► RETRIEVING A DESTINATION FROM AN
ADDRESS BOOK (page 5-15)► USING A TRANSMISSION LOG TO RESEND (page
5-24)► RETRIEVING A DESTINATION FROM A GLOBAL
ADDRESS BOOK (page 5-22)
► ENTERING AN ADDRESS MANUALLY (page 5-20)► RETRIEVING A DESTINATION FROM AN ADDRESS
BOOK (page 5-15)► USING A SEARCH NUMBER TO RETRIEVE A
DESTINATION (page 5-19)► RETRIEVING A DESTINATION FROM A GLOBAL
ADDRESS BOOK (page 5-22)► USING A TRANSMISSION LOG TO RESEND (page
5-24)► VIEWING A LIST OF THE SELECTED DESTINATIONS
(page 5-18)► SPECIFYING A NETWORK FOLDER (page 5-21)
OriginalAddress Detail
ColorStartSpaceFile Format AltGrKeyboard Select
Shift
Caps
Characters Symbols
Cancel OK
.com .net .org .co.jp .biz .ne.jp
8½x11
CA
SpaceFile Format AltGrKeyboard Select
Shift
Caps
Characters Symbols
Cancel OKE-Mail
Subject
Address
#
.biz .info http://
Sending History
Global Address Search
.com .net .org

5-13
SCANNER/INTERNET FAX►BEFORE USING THE MACHINE AS A NETWORK SCANNER
3Select functions.Specify the original scan size, exposure, file format, and other items.If necessary, you can refer to the following functions for the setting.
In Easy mode In Normal mode
► AUTOMATICALLY SCANNING BOTH SIDES OF AN ORIGINAL (2-SIDED ORIGINAL) (page 5-47)
► CHANGING THE RESOLUTION (page 5-58)► CHANGING FORMAT IN SCAN OR DATA ENTRY
MODE (page 5-59)► ELIMINATING BLANK PAGES FROM A
TRANSMISSION (BLANK PAGE SKIP) (page 5-106)
► SCANNING AND SENDING ORIGINALS COLLECTIVELY (page 5-70)
► ADJUSTING COLORS AND SHADING (page 5-91)► SCANNING ORIGINALS (page 5-101)► AUTOMATICALLY SCANNING BOTH SIDES OF AN
ORIGINAL (2-SIDED ORIGINAL) (page 5-47)► SCAN SIZE AND SEND SIZE (ENLARGE/REDUCE)
(page 5-48)► SPECIFYING THE ORIGINAL SCAN SIZE IN PAPER
SIZE (page 5-49)► SPECIFYING THE ORIGINAL SCAN SIZE USING
NUMERIC VALUES (page 5-50)► SPECIFYING THE SEND SIZE OF THE IMAGE (page
5-54)► CHANGING THE EXPOSURE AND ORIGINAL IMAGE
TYPE (page 5-56)► CHANGING THE RESOLUTION (page 5-58)► CHANGING FORMAT IN SCAN OR DATA ENTRY
MODE (page 5-59)► CHANGING FORMAT IN INTERNET FAX MODE (page
5-64)► CHANGING COLOR MODE (page 5-64)
4Send the original.Tap the [B/W Start] or [Color Start] key ([Start] key in normal mode).
• You can tap the [Preview] key before tapping the [B/W Start] key or the [Color Start] key (the [Start] key in normal mode) to check a preview of the image.
• When the original is placed on the document glass, repeat the placing original and transmission procedures until all originals have been sent. After scanning all originals, tap the [Read-End] key.
• In normal mode, if you tap the [File] or [Quick File] on the action panel before sending image, you can save the scanned original as data.► USING DOCUMENT FILING IN EACH MODE (page 6-7)
CAPreview
OriginalAddress E-mail Address Detail
StartColorStart
Original
8½x11 200x200dpiPDF
PDFOff
Resolution File Format Blank PageSkip
Auto SetB/W
8½x11
8½x11 8½x11

5-14
SCANNER/INTERNET FAX►BEFORE USING THE MACHINE AS A NETWORK SCANNER
ORIGINAL SIZE
TRANSMITTABLE ORIGINAL SIZESThe following original sizes can be transmitted
*A long original can be transmitted.
Minimum original size Maximum original size
Using the automatic document feeder4-1/4" (height) x 5-1/2" (width) (105 mm (height) x 140 mm (width))
8-1/2" (height) x 19-5/8" (width) (216 mm (height) x 500 mm* (width)
Using the document glass -8-1/2" (height) x 14" (width)(216 mm (height) x 356 mm* (width)

5-15
SCANNER/INTERNET FAX►ENTERING DESTINATIONS
ENTERING DESTINATIONS
RETRIEVING A DESTINATION FROM AN ADDRESS BOOKIn the address book screen, simply tap the one-touch key of a registered destination to retrieve the destination.If necessary, store multiple destinations in a one-touch key. Tapping the key will retrieve all the stored destinations.The address book screen shows all destinations used in each mode. Each one-touch key shows the name of the destination and an icon indicating the mode used for the destination.
• For information on the address book, see "ADDRESS BOOK (page 1-90)".• For the procedure for storing the destinations in the address book, see "STORING ADDRESSES THROUGH DIRECT
ENTRY (page 1-94)", "STORING ADDRESSES THROUGH GLOBAL ADDRESS SEARCH (page 1-95)",and "STORING GROUPS (page 1-98)".
ENTERING DESTINATIONS
Fax
Scan to E-mail
Internet Fax
Direct SMTP
Scan to FTP
Scan to Network Folder
Scan to Desktop
Group key with multiple destinations
1Tap the [Address Book] key.
In Easy mode In Normal mode
CAPreview Auto Set
B/WStart
ColorStart
OriginalAddress
Address Book Sending HistoryScan to HDD/
USBGlobal
Address Search
DetailE-mail Address8½x11
8½x11 8½x11

5-16
SCANNER/INTERNET FAX►ENTERING DESTINATIONS
2Tap the one-touch key of contact or group that has a destination.• The destinations displayed on the list can be narrowed
with categories, frequent use, indexes, and keywords. (In normal mode you can narrow down by job type.)
• Tapping the [Sort] key allows you to change the order of destinations displayed in the list.
• When adding a destination, tap another one-touch key.
• If two or more destinations are selected or specified, the total number of addresses appears next to address.
• Even if only a single destination is selected, the number of addresses appears when the destination is a contact or group in which multiple addresses are stored.
For more information, see "ADDRESS BOOK SCREEN (page 1-91)".
If you select an incorrect destination:Tap the key again to cancel the selection.
• To select a destination from the transmission log, tap the [Sending History] key.► USING A TRANSMISSION LOG TO RESEND (page 5-24)
• To check the entered destinations, tap the [Address Review] key. ► VIEWING A LIST OF THE SELECTED DESTINATIONS (page 5-18)
• The destination for transmission can be selected by tapping a stored destination.
• If an address that you do not have permission to use is included in the addresses, a message will appear when you press the [Start] key. To send only to the permitted addresses, press the [OK] key and then the [Enter for send] key.
In Normal mode
• Tap the one-touch key, and then tap [Display Registered Information] on the action panel to display the detailed information screen.
• To retrieve a destination by using a search number, tap [Call Search Number] on the action panel.► USING A TRANSMISSION LOG TO RESEND (page 5-24)
• To retrieve a destination from a global address book, tap [Global Address Search] on the action panel.► RETRIEVING A DESTINATION FROM A GLOBAL ADDRESS BOOK (page 5-22)
To cancel a specified destination:Select the address you want to cancel in the address list screen, and tap the [Delete] key.
To enable transmission to addresses of modes other than the current mode:Remove the checkmark from [System Settings] → [Image Send Settings] → [Common Settings] → [Condition Settings] → [Address Book Default Selection] → [Apply Addresses of Sending Modes Only] in "Settings (administrator)".
FrequentUse
Address
E-mailNarrow Down
AllCategory
ABC
A
D
G
J
M
P
T
W
Sort
Call Search Number
Add New
Send Same Imageas Fax Address
AAA
BBB
CCC
Preview
Start
CA
Sending History
Send Destination Link
Global Address Search

5-17
SCANNER/INTERNET FAX►ENTERING DESTINATIONS
MY ADDRESSMy Address is the user's own e-mail address, and is the e-mail address that has been registered in the user list.My Address can be used when login by login name / password is enabled in user authentication.Use this address when you want to send a scanned image to your own e-mail address.In E-mail mode, [Find My Address] appears on the action panel to let you immediately find and use My Address.When you use the address book in E-mail mode, the [Find My Address] button also appears at the top of the user list for easy access from the address book.
• My Address cannot be used in the following instances:
• When address search from the user list is prohibited in the system settings
• When user authentication is disabled, or is only by user number
• When [Apply E-mail address of the user for login.] is enabled in [Default Address]
• When the e-mail address of the logged in user has not been registered
• After the [Next Address] key is pressed when [Be sure to press Next Address Key ([+]) before selecting the next address.] is enabled in System Settings - [Image Send Settings]→[Common Settings]→[Condition Settings]
• When [S/MIME Settings]→[Disable sending to the addresses which cannot be encrypted.] is enabled in the security settings
• You can register [Find My Address] in the home screen. This is convenient when you frequently use My Address.

5-18
SCANNER/INTERNET FAX►ENTERING DESTINATIONS
VIEWING A LIST OF THE SELECTED DESTINATIONSWhen multiple destinations have been selected, you can display and check the destinations. You can also delete a destination from the list (cancel selection of the destination).
Deleting Specified DestinationsIn step 2 of "VIEWING A LIST OF THE SELECTED DESTINATIONS", select the destination and tap the [Delete] key.
1Tap the [Address Review] key.
In Easy mode In Normal mode
2Confirm the destination.After the confirmation is completed, tap .
To confirm detailed information such as the type or name of the specified destination, tap the one-touch key of the target destination, and then tap the [Info.] key.In normal mode, you can change the delivery type (To/Cc/Bcc). Tap the address and then tap [Change to To], [Change to Cc], or [Change to Bcc] on the action panel.
If you placed the original on the document glass and tapped the [Start] key, you cannot delete an address when changing settings.
CAPreview Auto Set
OriginalAddress Detail
B/WStart
ColorStart
Address Book Sending History GlobalAddress Search
Scan to HDD/USB
1 +8½x11
8½x11 8½x11
To Cc
Address Review
AAA
CCC
123
test@test.□□□
Preview
Start
CA
To Cc Delete Info.
All Destinations Change to Cc
AAA
CCC
123
test@test.□□□
Preview
Start
CA

5-19
SCANNER/INTERNET FAX►ENTERING DESTINATIONS
USING A SEARCH NUMBER TO RETRIEVE A DESTINATIONThe search number can be used to specify a destination stored in an address book.
1Tap the [Detail] key to change to normal mode.► Changing mode from each mode (page 5-10)
2Tap [Call Search Number] on the action panel.
3Enter a search number (4 digits) using the numeric keys and tap .When the search number is entered, the stored address is retrieved and specified as a destination.
If an incorrect search number is entered:Tap the [C] key to clear the number and enter the correct number.
• The search number is programmed when the destination is stored in the address book.
• If you do not know the search number, tap [Print Individual List] on the action panel to print and check the address list.
• When entering search numbers such as "0001" and "0011", "0" can be omitted. For example to enter "0001", enter "1" and tap the [OK] key.
8½x11 8½x11
8½x11 8½x11
1 2 3
4 5 6
7 8
0
9

5-20
SCANNER/INTERNET FAX►ENTERING DESTINATIONS
ENTERING AN ADDRESS MANUALLY
1In the base screen of a mode, tap [Text Box].On the base screen of Internet Fax, tap [Text Box] to display the screen you want to select the address type. Tap either the [Internet Fax] or [Direct SMTP] key.In easy mode, only the e-mail addresses can be entered.
In Easy mode In Normal mode
2Enter the destination address on the soft keyboard that appears.• In data entry mode, select the mode of the destination,
and enter the destination address.• For Scan to Network Folder mode, the network folder
entry screen appears. See "SPECIFYING A NETWORK FOLDER (page 5-21)".
• After entering the destination address, tap the [OK] key to close the soft keyboard.
To enter text, see "NAMES AND FUNCTIONS OF SOFT KEYBOARD KEYS (page 1-118)" in the "BEFORE USING THE MACHINE".
• You can select [Bcc] if [Image Send Settings] → [Scan Settings] → [Default Settings] → [Bcc Setting] → [Enable Bcc] is enabled in [System Settings].
• In Internet Fax mode, the transmission confirmation request setting screen will appear if [System Settings] - [Image Send Settings] → [Internet Fax Settings] → [Send Setting] → [I-Fax Reception Report On/Off Setting] is enabled. To request confirmation, tap the [Set] key. To cancel, tap the [Cancel] key. (When Direct SMTP is used, transmission confirmation is not performed.)
CAPreview Auto Set
OriginalAddress E-mail Address Detail
B/WStart
ColorStart
Address Book GlobalAddress Search
Scan to HDD/USBSending History
8½x11
8½x11 8½x11
OriginalAddress Detail
ColorStartSpaceFile Format AltGrKeyboard Select
Shift
Caps
Characters Symbols
Cancel OK
.com .net .org .co.jp .biz .ne.jp
8½x11
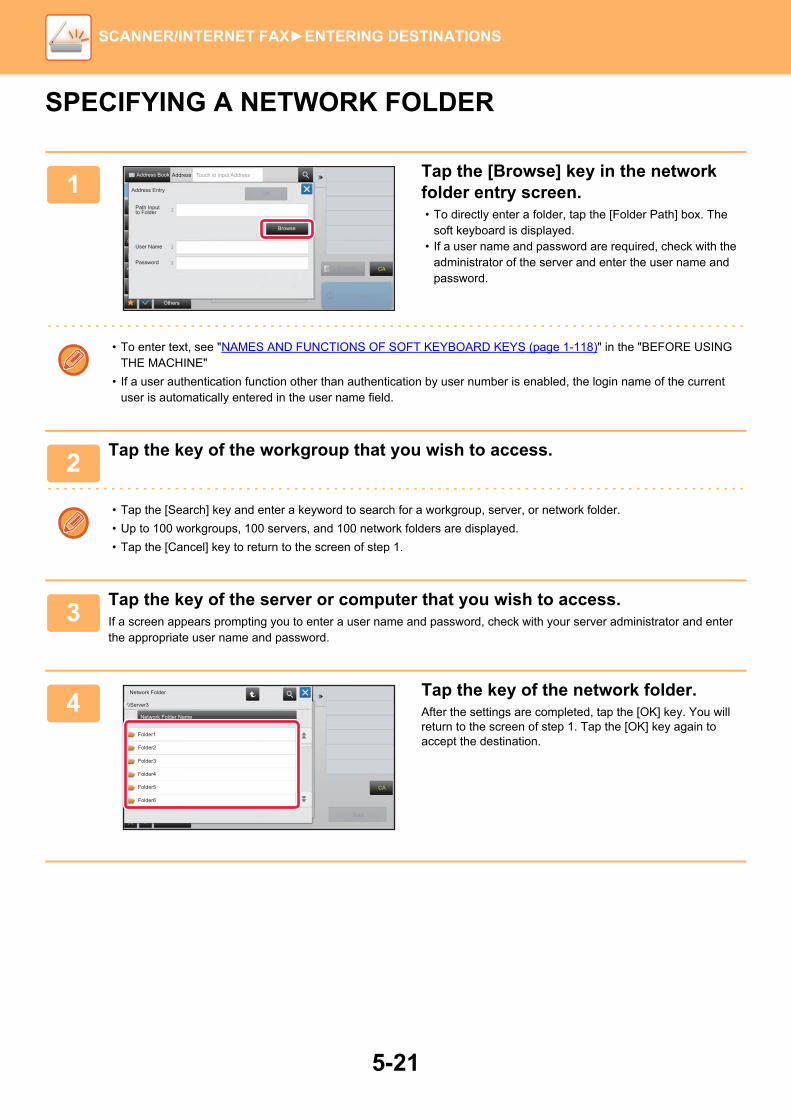
5-21
SCANNER/INTERNET FAX►ENTERING DESTINATIONS
SPECIFYING A NETWORK FOLDER
1Tap the [Browse] key in the network folder entry screen.• To directly enter a folder, tap the [Folder Path] box. The
soft keyboard is displayed.• If a user name and password are required, check with the
administrator of the server and enter the user name and password.
• To enter text, see "NAMES AND FUNCTIONS OF SOFT KEYBOARD KEYS (page 1-118)" in the "BEFORE USING THE MACHINE"
• If a user authentication function other than authentication by user number is enabled, the login name of the current user is automatically entered in the user name field.
2Tap the key of the workgroup that you wish to access.
• Tap the [Search] key and enter a keyword to search for a workgroup, server, or network folder.
• Up to 100 workgroups, 100 servers, and 100 network folders are displayed.
• Tap the [Cancel] key to return to the screen of step 1.
3Tap the key of the server or computer that you wish to access.If a screen appears prompting you to enter a user name and password, check with your server administrator and enter the appropriate user name and password.
4Tap the key of the network folder.After the settings are completed, tap the [OK] key. You will return to the screen of step 1. Tap the [OK] key again to accept the destination.
Preview
StartOthers
Address Book
Address Entry
Path Inputto Folder
User Name
Password
Address Touch to input Address
Browse
OK
CA
Start
Network Folder
Network Folder Name
Browse
\\Server3
Folder1
Folder2
Folder3
Folder4
Folder5
Folder6
CA

5-22
SCANNER/INTERNET FAX►ENTERING DESTINATIONS
RETRIEVING A DESTINATION FROM A GLOBAL ADDRESS BOOKWhen an LDAP server is configured in the "Settings (Web version)", look up an address in a global address book and retrieve the destination address for Scan to E-mail or Internet fax transmission (excluding Direct SMTP addresses).In normal mode, you can add an address retrieved by searching to the address book. However, addresses of the FTP/Desktop transmission cannot be stored from the machine.
1In Easy mode Tap the [Global Address Search] key.
In Normal mode In the base screen or address book screen, tap [Global Address Search] on the action panel.
2Tap [Destination] and tap the LDAP server to be used.• If an authentication screen for the LDAP server
appears, enter your user name and password.• If only one LDAP server has been stored, it is not
necessary to take step 2. In this case, start from step 3.
CAPreview Auto Set
OriginalAddress E-mail Address Detail
StartColorStart
Address Book Sending History GlobalAddress Search
Scan to HDD/USB
B/W
8½x11
8½x11 8½x11
Preview
EnterInitials
Target
Start
Search Start
CA

5-23
SCANNER/INTERNET FAX►ENTERING DESTINATIONS
3Tap of [Item], and select an item to be searched from [Name] or [Address].
How to search Enter the search characters (maximum of 64 characters). The system will look for names starting with the entered letters.An asterisk is used as follows:
XXX : Names beginning with "XXX"XXX : Names that end with "XXX"XXX : Names containing "XXX"
AA XX : Names that start with "AA" and end with "XX".
4Enter a keyword and tap the [Search Start] key.When you tap the keyword entry box, the soft keyboard appears.The search results will appear after a brief interval.
• If no destination is found:Tap the [Search Again] key to add more search letters.
• To continuously add other destination.Tap the destination.
To check the destination information:Tap the one-touch key of the target destination, and then tap the [Info.] key. Tap to close the address information screen.In normal mode, you can select an address and tap [New Registration with Address Book] on the action panel to add the address to the address book. This is convenient if you have entered a destination directly.
CA
StartColorStart
Scan to HDD/USB
EnterInitials
Item
Name
Enter Initial and press Enter key ofexternal keyboard or [Start Search] button.
Search Start
Target
B/W
CA
StartColorStart
EnterInitials
Item
Name
Enter Initial and press Enter key ofexternal keyboard or [Start Search] button.
Target
Search Start
B/W
Scan to HDD/USB
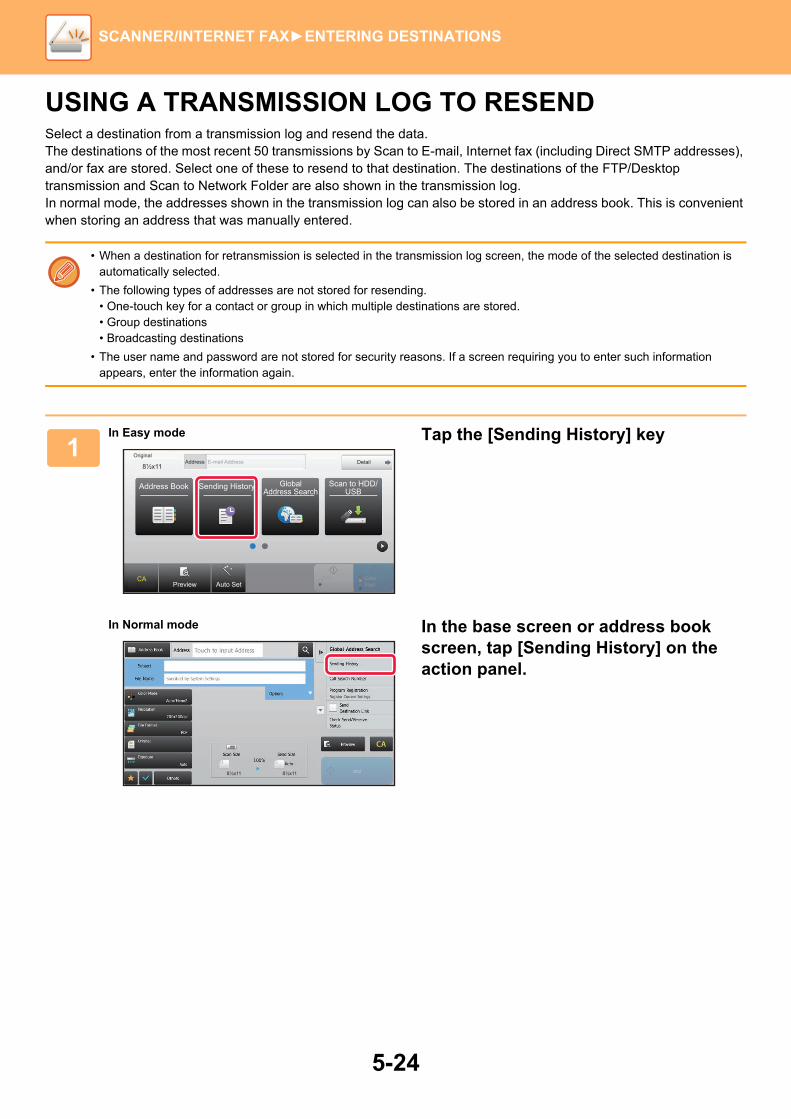
5-24
SCANNER/INTERNET FAX►ENTERING DESTINATIONS
USING A TRANSMISSION LOG TO RESENDSelect a destination from a transmission log and resend the data.The destinations of the most recent 50 transmissions by Scan to E-mail, Internet fax (including Direct SMTP addresses), and/or fax are stored. Select one of these to resend to that destination. The destinations of the FTP/Desktop transmission and Scan to Network Folder are also shown in the transmission log.In normal mode, the addresses shown in the transmission log can also be stored in an address book. This is convenient when storing an address that was manually entered.
• When a destination for retransmission is selected in the transmission log screen, the mode of the selected destination is automatically selected.
• The following types of addresses are not stored for resending.• One-touch key for a contact or group in which multiple destinations are stored.• Group destinations• Broadcasting destinations
• The user name and password are not stored for security reasons. If a screen requiring you to enter such information appears, enter the information again.
1In Easy mode Tap the [Sending History] key
In Normal mode In the base screen or address book screen, tap [Sending History] on the action panel.
CAPreview Auto Set
OriginalAddress E-mail Address Detail
B/WStart
ColorStart
Address Book Sending History GlobalAddress Search
Scan to HDD/USB
8½x11
8½x11 8½x11

5-25
SCANNER/INTERNET FAX►ENTERING DESTINATIONS
2Tap the key of the destination to resend.The last 50 addresses used for transmission are displayed.If a screen requiring you to enter the user name and password appears, enter the information.
To cancel the resend setting:Tap the highlighted key.
In normal mode, you can select an address and tap [New Registration with Address Book] on the action panel to add the address to the address book. This is convenient if you have entered a destination directly.
Preview
Start
CA
Sending History Delete All Histories
Select Address to Send Again.
Direct Entry123
Direct Entry456
Direct Entry789

5-26
SCANNER/INTERNET FAX►ENTERING DESTINATIONS
SENDING ONLY THE URL OF A SCANNED FILE TO A SCAN DESTINATIONWhen using Scan to E-mail, some originals and/or scan settings may result in a large file.When the file is large, there is a risk that the e-mail server may reject the file and it will not be sent.This function saves the scanned file on the machine's hard disk, and sends an e-mail providing only the file's URL information to the recipient.This function helps reduce the load on the e-mail server and prevents non-delivery of scanned files caused by the e-mail server.Upon receiving the e-mail, the recipient can use the URL in the e-mail to download the scanned file.
When the scanned file is too large
HDD
Scanned file
Sending the file as an e-mail attachment
The attachment is too large and the e-mail server rejects the e-mail
Sending fails
DestinationE-mail server
Scanned file
Save to the machine's hard disk
Send the URL of the save location by e-mail
DestinationE-mail server
The e-mail arrives at the destination
The recipient uses the URL in the e-mail to download the scanned file
Scan to E-mail
Sending only a URL to the recipient

5-27
SCANNER/INTERNET FAX►ENTERING DESTINATIONS
Sending only a URL to the recipient
Using simple modeWhen [Enable Send Destination Link as Default] is enabled in the settings (administrator), the scanned data is saved in the machine's hard disk, and URL information is sent to the e-mail destination. When disabled, scanned data is sent by regular Scan to E-mail. This function enable/disable cannot be changed in the simple mode screen.
Using normal mode[Send Destination Link] appears on the action panel of the home screen of Scan to E-mail. By selecting this checkbox
, you can use this function.
Number of URLs createdOne URL is created per file to be downloaded.Using [One Page per File]Multiple scanned files will be created and saved at once, and a URL will be created for each file and sent to the recipient.Using [Programmed]Files will be created and saved in a format that varies by recipient, and a URL will be created for each file. A URL will be sent to each recipient for the file in the format for that recipient.
• To use this function, [Send Destination Link Settings] must be enabled in the System Settings (administrator).
• This function cannot be used in combination with metadata transmission or resending from document filing.
• Scanned files are saved in the standard folder area.
• Scanned files cannot be browsed by a method other than downloading.
• Scanned files cannot be manually deleted, and are retained for the save period set in the System Settings. However, scanned files will be deleted if Clear All Memory or Initialize Private Data/Data in Machine is executed, or you move to Advanced Security Settings.
• When all destinations in a broadcast transmission are e-mail addresses, URL information is sent to all destinations.If the file format of the saved scan data is the same for all destinations, the same URL will be sent. If the file format varies by destination, separate URLs will be sent.
• If the transmission includes recipients for different jobs (Scan to FTP, Scan to Desktop, etc.), transmission will take place by sending only a URL to the recipient to any e-mail addresses, while the scanned file will be sent directly in the normal way to recipients for other jobs.
• When [Document Administration Function] is enabled in the System Settings (administrator), the scanned file will be sent directly to the administrator, not by URL.
• Even when [Send Destination Link Settings] is disabled in the System Settings (administrator), the URL can be accessed and the scanned file downloaded during the file save period.
• The scanned file will be saved even if a send data limit is set in the System Settings (administrator) and the file exceeds the limit. The scanned file will be saved as a single file even if [If the E-mail attachment(s) exceed maximum size, it will be sent in multiple files.] is enabled in the System Settings (administrator) and the file exceeds the limit.If there is a job other than a Scan to E-mail job in a broadcast transmission and the scanned file exceeds the [Maximum Size of Data Attachments (FTP/Desktop/Network Folder)] setting, transmission will not be possible.
8½x11 8½x11

5-28
SCANNER/INTERNET FAX►ENTERING DESTINATIONS
• To use this functionConfigure in "Settings (administrator)" - [System Settings] - [Image Send Settings] - [Scan Settings] - [Condition Settings] - [Send Destination Link Settings].
• To always use this function in simple modeConfigure in "Settings (administrator)" - [System Settings] - [Image Send Settings] - [Scan Settings] - [Condition Settings] - [Send Destination Link Settings] - [Enable Send Destination Link as Default].When this function is enabled and e-mail is sent in normal mode, the [Send Destination Link] checkbox in the action panel is always .
• Save period for scanned files saved using this functionConfigure in "Settings (administrator)" - [System Settings] - [Image Send Settings] - [Scan Settings] - [Condition Settings] - [Send Destination Link Settings] - [File Retention Period].
• Protecting the URL by SSLConfigure in "Settings (administrator)" - [System Settings] - [Image Send Settings] - [Scan Settings] - [Condition Settings] - [Send Destination Link Settings] - [Enable SSL].

5-29
SCANNER/INTERNET FAX►TRANSMITTING AN IMAGE
TRANSMITTING AN IMAGE
SENDING AN IMAGE IN SCAN MODEAn image can be sent in scan mode (Scan to E-mail, Scan to FTP, Scan to Desktop, and Scan to Network Folder).
TRANSMITTING AN IMAGE
• If the memory becomes full while the originals are being scanned, a message will appear and scanning will stop.
• When performing Scan to E-mail, take care not to send a file that is too large. In particular, multi-page files tend to be large. When sending a multi-page file or other large file, it may be necessary to reduce the number of scanned pages or reduce the send size.
1Place the original.Place the original in the document feeder tray of the automatic document feeder, or on the document glass.► AUTOMATIC DOCUMENT FEEDER (page 1-77)► DOCUMENT GLASS (page 1-79)
• When placing the originals, orient them as shown below.
When sending 8-1/2" x 11" (A4) and 5-1/2" x 8-1/2" (A5) sizes using mixed originals, place the 5-1/2" x 8-1/2" (A5) size in the vertical orientation so that the width is the same as A4 size.
1
1
abc
abc
Document feeder trayPlace the original face up.
Document glassPlace the original face down and align the corner with the tip of the mark in the top left corner of the document glass scale.
Originals
Portrait orientation*
Landscape orientation*

5-30
SCANNER/INTERNET FAX►TRANSMITTING AN IMAGE
2Specify the destination.► RETRIEVING A DESTINATION FROM AN ADDRESS BOOK (page 5-15)► VIEWING A LIST OF THE SELECTED DESTINATIONS (page 5-18)► USING A SEARCH NUMBER TO RETRIEVE A DESTINATION (page 5-19)► ENTERING AN ADDRESS MANUALLY (page 5-20)► SPECIFYING A NETWORK FOLDER (page 5-21)► RETRIEVING A DESTINATION FROM A GLOBAL ADDRESS BOOK (page 5-22)► USING A TRANSMISSION LOG TO RESEND (page 5-24)
The icon on the key indicates the type of destination stored in the key.Scan to E-mailScan to FTPScan to Network FolderScan to Desktop
• After a one-touch key is tapped, if the screen is changed without tapping , the destination of the tapped key is automatically specified.
• When performing Scan to E-mail, you can also send Cc or Bcc copies to other destinations. Tap the [Address Review] key to select destinations.► VIEWING A LIST OF THE SELECTED DESTINATIONS (page 5-18)
• Multiple destinations can be specified.
• To change [Subject], [File Name], [Reply-To], or [Body Text] in normal mode, tap a target entry box, or tap [Options].► CHANGING THE SUBJECT, FILE NAME, REPLY-TO, AND BODY TEXT AT THE TIME OF SCAN
TRANSMISSION (page 5-32)
3Tap the [Original] key.
4Tap the appropriate orientation key.Specify the orientation of the original placed in step 1.After the settings are completed, tap .
• You can change exposure, resolution, file format, color mode, and other settings.► AUTOMATICALLY SCANNING BOTH SIDES OF AN ORIGINAL (2-SIDED ORIGINAL) (page 5-47)► SCAN SIZE AND SEND SIZE (ENLARGE/REDUCE) (page 5-48)► CHANGING THE EXPOSURE AND ORIGINAL IMAGE TYPE (page 5-56)► CHANGING THE RESOLUTION (page 5-58)► CHANGING FORMAT IN SCAN OR DATA ENTRY MODE (page 5-59)► CHANGING COLOR MODE (page 5-64)
• Tapping the [Others] key allows you to configure various functions, for example, collectively sending two original pages as one sheet or original pages with different sizes.
8½x118½x11

5-31
SCANNER/INTERNET FAX►TRANSMITTING AN IMAGE
5Tap the [B/W Start] or [Color Start] key to start scanning of the original.• If the original was inserted in the document feeder tray, a beep will sound when scanning is completed and
transmission will take place.• If the original is placed on the document glass, the [Read-End] key appears in the touch panel. If the original is only
one page, go to step 7. To scan more pages, go to step 6.
• You can tap the [Preview] key to check a preview of the image before sending an image. For more information, see "CHECKING THE IMAGE TO BE TRANSMITTED (page 5-66)".
• If the file format is set to [PDF/Encry.], [PDF/Encry./Bk Letter Emphasis], [PDF/Encry./Compact], or [PDF/Encry./Compact/U-Fine], you will be prompted to enter the password when you tap the [B/W Start] or [Color Start] key. Tap the password entry box to open the keyboard screen, enter a password using a maximum of 32 characters, and tap the [OK] and [Send] key in sequence. The recipient must use the password entered here to open the Encrypt PDF file.To cancel Encrypt PDF, tap the [Cancel] key. The format settings screen will appear to let you change the file type.Select a new file type and tap the [B/W Start] or [Color Start] key to begin transmission.
6If the original was placed on the document glass, replace it with the next original and tap the [B/W Start] or [Color Start] key. Repeat until all originals have been scanned.
7Tap the [Read-End] key.A beep will sound to indicate that the operation is completed.
• If no action is taken for one minute after the confirmation screen is displayed, scanning automatically ends and the transmission is reserved.
• Tap the [Change Setting] key to change the exposure, resolution, scan size, and send size for each original page scanned. However, when "Card Shot" is selected in Others, change only the exposure when scanning an even-numbered original page.
• When Scan to E-mail and Internet Fax destinations are included, the send width for Scan to E-mail and Internet Fax will be the same as the send width for fax.
To change the time until transmission takes place automatically:Select "Settings (administrator)" - [System Settings] → [Image Send Settings] → [Common Settings] → [Condition Settings] → [Job Auto Start Time During Scanning].

5-32
SCANNER/INTERNET FAX►TRANSMITTING AN IMAGE
CHANGING THE SUBJECT, FILE NAME, REPLY-TO, AND BODY TEXT AT THE TIME OF SCAN TRANSMISSIONChange the subject, file name, reply-to, and body text when performing a scan transmission. If necessary, directly enter the text.
• When performing Scan to FTP, Scan to Desktop, or Scan to Network Folder, only the file name is used.
• If the subject or file name is not changed, the settings in [System Settings] → [Image Send Settings] → [Scan Settings] → [Administration Settings] in "Settings (administrator)" are used.
• If the reply-to address is not changed, the settings in [System Settings] → [Image Send Settings] → [Scan Settings] → [Condition Settings] → [Default Reply.Address Set] in "Settings (administrator)" are used.If this is not configured, the reply address configured in [Network Settings] → [Services Settings] → [SMTP] → [Sender Address] in the "Settings" is used. (Administrator rights are required.)
• To configure the candidates for the subject, file name, and body text, select [System Settings] → [Image Send Settings] → [Scan Settings] in "Settings (administrator)".
• To enter text, see "NAMES AND FUNCTIONS OF SOFT KEYBOARD KEYS (page 1-118)" in the "BEFORE USING THE MACHINE"
1Tap the [Detail] key to change to normal mode.► Changing mode from each mode (page 5-10)
2To change the subject, tap the [Subject] entry box.
3Tap a pre-set text key.After the settings are completed, tap .
To cancel the selection of the subject: Tap the [Clear] key.
If you wish to directly enter the text, tap the [Direct Entry] key to open the soft keyboard.Enter the text and tap the [OK] key.
8½x11 8½x11
AAA
BBB
CCC
DDD
EEE
No.1
No.2
No.3
No.4
No.5
AAA
BBB
CCC
DDD
EEE
No.1
No.2
No.3
No.4
No.5
Subject
Direct Entry
Clear
AAA
BBB
CCC
DDD
EEE

5-33
SCANNER/INTERNET FAX►TRANSMITTING AN IMAGE
4To change the file name, tap the [File Name] entry box.After the settings are completed, tap .• Tap the key of the file name from the list.• To directly enter the file name, tap the [Direct Entry] key.• A prompt is displayed in the file name. The prompt is
changed according to the settings.If the settings are not changed, "Following the System Settings" is displayed.When [File Name Auto Extraction] in [OCR Setting] is enabled "File Name Auto Extraction" is displayed.
When scanning to a shared folder, if you set a file name that is the same as an existing file name in the shared folder, the file name will be changed to prevent overwriting of the existing file.
5 Tap [Options].
6To change the reply address, tap the [Reply-To] entry box.
If user authentication is being used, the information of the user that logged in will be applied, and thus the reply address cannot be changed.
7Tap the key that you wish to use for the reply address.After the settings are completed, tap .• You can select addresses from the user list in the same
way as you would select the reply address. You can also tap [Global Address Search] on the action panel to specify a user stored in the global address book as the reply address.
• Tapping [Direct Entry] on the action panel allows you to directly enter the e-mail address.
• Selecting the [Add 'Reply to' to Cc] checkbox to adds a reply address to the Cc address.
8½x11 8½x11
8½x11 8½x11
Reply to
User Name
AllNarrow Down by Index
ABC
A
D
G
J
M
P
T
W
Sort
Call by User Number
Direct Entry
User1User1
tiannetianne
Preview
Start
CA
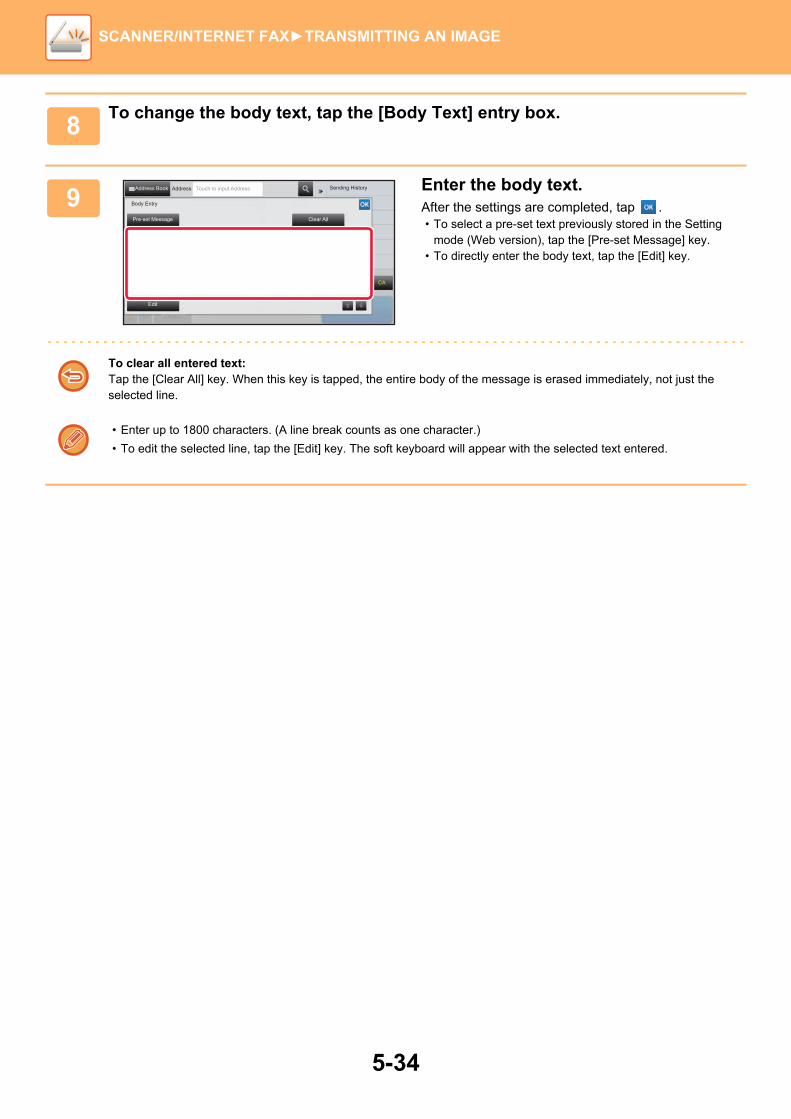
5-34
SCANNER/INTERNET FAX►TRANSMITTING AN IMAGE
8To change the body text, tap the [Body Text] entry box.
9Enter the body text.After the settings are completed, tap .• To select a pre-set text previously stored in the Setting
mode (Web version), tap the [Pre-set Message] key.• To directly enter the body text, tap the [Edit] key.
To clear all entered text: Tap the [Clear All] key. When this key is tapped, the entire body of the message is erased immediately, not just the selected line.
• Enter up to 1800 characters. (A line break counts as one character.)
• To edit the selected line, tap the [Edit] key. The soft keyboard will appear with the selected text entered.
Address Book
Body Entry
Address Touch to input Address
Clear AllPre-set Message
Edit
Sending History
Others
CA

5-35
SCANNER/INTERNET FAX►TRANSMITTING AN IMAGE
SENDING A FAX IN INTERNET FAX MODETransmits a fax in Internet Fax mode. This procedure can also be used to perform a direct transmission by Direct SMTP.
• If the memory becomes full while the originals are being scanned, a message will appear and scanning will stop.
• When all originals have been scanned, the message "Job stored." will be displayed together with a job control number. If necessary, use this number to locate the job in the Transaction Report or in the Image Sending Activity Report.If the job is a broadcast transmission, this number will also appear in the key of the job in the job status screen. For this reason, it is advisable to make a note of the number so that you can check the result easily.
• Mail Footer Registration: The specified text is automatically appended to the end of the body text of e-mail. This is convenient when you wish to append pre-set text such as a corporate policy. To enter the text to append, select [System Settings] → [Image Send Settings] → [Scan Settings] → [Administration Settings] → [Mail Footer Registration] in "Settings (administrator)". (Administrator rights are required.)Enter up to 900 characters. (The appended text is not included in the maximum number of characters that can be entered in the e-mail body.)To specify whether or not to append text, select [System Settings] → [Image Send Settings] → [Scan Settings] → [Administration Settings] → [Add a Footer Automatically to the Mail Message Body] in "Settings".
If a default address has been configured using "Settings" →[System Settings] → [Image Send Settings] → [Scan Settings] → [Default Address] → [Default Address Setting], the mode cannot be changed, or the destination cannot be changed or added.To switch to Internet fax mode, tap the [Cancel] key in the touch panel and then perform the transmission procedure.
1Place the original.Place the original in the document feeder tray of the automatic document feeder, or on the document glass.► AUTOMATIC DOCUMENT FEEDER (page 1-77)► DOCUMENT GLASS (page 1-79)
Rotation sending5-1/2" x 8-1/2"(A5) or B5 size original will be rotated 90 degrees and transmitted as an 5-1/2" x 8-1/2"(A5) or B5 image in portrait orientation.(Rotation sending is not available for originals with 5-1/2" x 8-1/2" (B5 or A5) size.)
2Tap the mode display to switch to the initial screen of Internet Fax mode.► SELECTING NETWORK SCANNER MODE (page 5-9)
3Specify the destination.► RETRIEVING A DESTINATION FROM AN ADDRESS BOOK (page 5-15)► VIEWING A LIST OF THE SELECTED DESTINATIONS (page 5-18)► USING A SEARCH NUMBER TO RETRIEVE A DESTINATION (page 5-19)► ENTERING AN ADDRESS MANUALLY (page 5-20)► SPECIFYING A NETWORK FOLDER (page 5-21)► RETRIEVING A DESTINATION FROM A GLOBAL ADDRESS BOOK (page 5-22)► USING A TRANSMISSION LOG TO RESEND (page 5-24)
The icon of appears in one-touch keys in which Internet fax addresses are stored.
When an original is placed in horizontal
orientation
Rotated to vertical orientation
Image is transmitted in vertical orientation.
Send

5-36
SCANNER/INTERNET FAX►TRANSMITTING AN IMAGE
To change [Subject], [File Name], or [Body Text], tap the [Others] key and tap the [Send Settings] key.► CHANGING THE SUBJECT, FILE NAME, AND BODY TEXT AT THE TIME OF INTERNET FAX TRANSMISSION
(page 5-37)
4Tap the [Original] key.
• Set the density, resolution, and format in [System Settings]→[Image Send Settings]→[Internet Fax Settings]→[Default Settings] in "Settings (administrator)".
• Tapping the [Others] key allows you to configure various functions, for example, collectively sending two original pages as one sheet or original pages with different sizes.
5Tap the appropriate orientation key.After the settings are completed, tap .
6 Tap the [Start] key to start scanning of the original.• If the original is placed on the document glass, the [Read-End] key appears in the touch panel.
If the original is only one page, go to step 8. To scan more pages, go to the next step.• If the original was inserted in the document feeder tray, a beep will sound when scanning is completed and
transmission will take place.
You can tap the [Preview] key to check a preview of the image before sending an image. For more information, see "CHECKING THE IMAGE TO BE TRANSMITTED (page 5-66)".
7If the original was placed on the document glass, replace it with the next original and tap the [Start] key.Repeat until all originals have been scanned.
Preview
Start
CA
8½x11 8½x11
Receive

5-37
SCANNER/INTERNET FAX►TRANSMITTING AN IMAGE
CHANGING THE SUBJECT, FILE NAME, AND BODY TEXT AT THE TIME OF INTERNET FAX TRANSMISSIONChange the subject, file name, and body text when performing an Internet fax transmission. If necessary, directly enter the text. Configure a file name, and other settings for an Internet fax using the Send Settings of the other functions.
8Tap the [Read-End] key.A beep will sound to indicate that the operation is completed.Open the automatic document feeder and remove the original.
• If no action is taken for one minute after the confirmation screen is displayed, scanning automatically ends and the transmission is reserved.
• Tap the [Change Setting] key to change the exposure, resolution, scan size, and send size for each original page scanned.However, when "N-Up" or "Card Shot" is selected in Others, only change the exposure when scanning an even-numbered original page.
• If the subject and file name are not changed, the settings in the Setting mode (Web version) are used.
• To configure the candidates for the subject, file name, and body text, click [System Settings] → [Image Send Settings] → [Scan Settings] in "Settings (administrator)".
• To enter text, see "NAMES AND FUNCTIONS OF SOFT KEYBOARD KEYS (page 1-118)" in the "BEFORE USING THE MACHINE".
1Tap the mode display to switch to the initial screen of Internet Fax mode.► SELECTING NETWORK SCANNER MODE (page 5-9)
2Tap the [Send Settings] key.
3To change the subject, tap the [Subject] entry box.
8½x11 8½x11
StartReceive
Preview
Backreception memory : 0%
Others
Send Settings
Subject
File Name
Body TextCA

5-38
SCANNER/INTERNET FAX►TRANSMITTING AN IMAGE
4Tap a pre-set text key.
To cancel the selection of the subject:Tap the [Clear] key.
If you wish to directly enter the text, tap the [Direct Entry] key to open the soft keyboard. Enter the subject and tap the [OK] key.
5To change the file name, tap the [File Name] entry box.
6Tap a pre-set text key.After the settings are completed, tap .
• To store the pre-set text for the file name, select [System Settings] in "Settings" → [Image Send Settings] → [Scan Settings] → [File Name Settings].
• If you wish to directly enter the text, tap the [Direct Entry] key to display the soft keyboard. Enter the file name and tap the [OK] key.
To cancel the selection of the file name:Tap the [Clear] key.
7To change the body text, tap the [Body Text] entry box.
AAANo.1
BBB
CCC
DDD
EEE
No.2
No.3
No.4
No.5
StartReceive
Preview
Back reception memory:: 100%
Others
Subject
Direct Entry
Clear
CA
AAA
BBB
CCC
DDD
EEE
No.1
No.2
No.3
No.4
No.5
Preview
StartOthers
Address Book Address Touch to input Address
Direct Entry
ClearFile Name
CA
Receivereception memory: 100%

5-39
SCANNER/INTERNET FAX►TRANSMITTING AN IMAGE
8Enter the body text.After the settings are completed, tap .
• To select a pre-set text previously stored in the Setting mode (Web version), tap the [Pre-set Message] key.
• To directly enter the body text, tap the [Edit] key.
To clear all entered text:Tap the [Clear All] key. When this key is tapped, the entire body of the message is erased immediately, not just the selected line.
• Enter up to 1800 characters. (A line break counts as one character.)Use to select on a line basis.
• To edit the selected line, tap the [Edit] key. The soft keyboard will appear with the selected text entered.
Body Entry
Others
Clear AllPre-set Message
Edit
Back Receivereception memory 0%
CA

5-40
SCANNER/INTERNET FAX►TRANSMITTING AN IMAGE
SENDING THE SAME IMAGE TO MULTIPLE DESTINATIONS (BROADCAST TRANSMISSION)Send the same scanned image to multiple scan, Internet fax, and fax mode destinations in a single operation.One operation allows you to send data to up to 500 destinations, including the reserved send jobs. (For example, if broadcast transmission jobs with 450 destinations are already reserved, data can be broadcasted to up to 50 destinations.)
It is convenient to store destinations you frequently use for broadcast transmission as contacts or groups.A maximum of 500 destinations can be stored in one contact.For broadcast transmission, the contact or group key can be simply tapped to retrieve multiple fax numbers.You can also send faxes with the one-touch key by setting the [Set as Default used] checkbox to when addresses are registered. If you wish to temporarily remove a destination from the stored addresses, open the detail confirmation screen and remove the destination in the screen.► STORING ADDRESSES THROUGH DIRECT ENTRY (page 1-94)► STORING ADDRESSES THROUGH GLOBAL ADDRESS SEARCH (page 1-95)► USING A TRANSMISSION LOG TO RESEND (page 5-24)► STORING GROUPS (page 1-98)
• When the checkbox of "Settings (administrator)" -[System Settings] → [Image Send Settings] → [Common Settings] → [Condition Settings] → [Address Book Default Selection] → [Apply Addresses of Sending Modes Only] is set to (factory default setting), the image is only sent to those destinations among the destinations that are set to [Set as Default used] which are for the currently selected mode. If the checkmark is removed , the image can also be sent to destinations of other modes.
• When broadcast transmission includes Internet Fax addresses, the document is sent in black and white to all addresses.
• When Internet Fax mode addresses are included in broadcast transmission addresses, the image data is converted and sent as image data for Internet Fax. Even when scanned in color, the image data is converted to Internet Fax black and white binary and sent to addresses such as e-mail addresses.
• If you wish to send the same image as fax to all destinations in normal mode, tap [Send Same Image as Fax Address] on the action panel. This cannot be selected when Internet Fax is included in the destinations.
• When Scan to E-mail and Internet Fax destinations are included, the send width for Scan to E-mail and Internet Fax will be the same as the send width for fax.
• Broadcast transmission is not possible to both direct SMTP addresses and other types of addresses.
A transmission is performed, ignoring hyperlinks with Scan to FTP and Scan to Network Folder addresses.
To register destinations in a contact or group:In the address book screen, tap [Add New] on the action panel, or tap the [Address Control] icon in the home screen. For more information, see "STORING ADDRESSES THROUGH DIRECT ENTRY (page 1-94),"STORING ADDRESSES THROUGH GLOBAL ADDRESS SEARCH (page 1-95)", "USING A TRANSMISSION LOG TO RESEND (page 5-24)", or "STORING GROUPS (page 1-98)".
Originals
Transmission
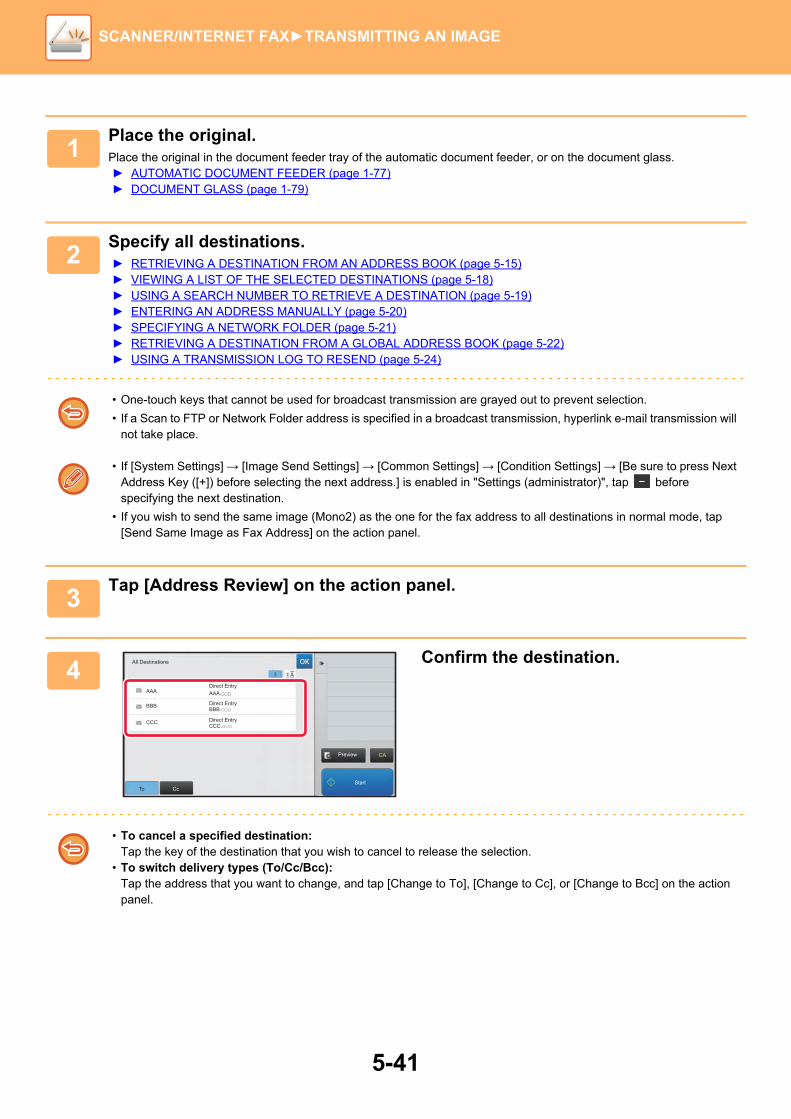
5-41
SCANNER/INTERNET FAX►TRANSMITTING AN IMAGE
1Place the original.Place the original in the document feeder tray of the automatic document feeder, or on the document glass.► AUTOMATIC DOCUMENT FEEDER (page 1-77)► DOCUMENT GLASS (page 1-79)
2Specify all destinations.► RETRIEVING A DESTINATION FROM AN ADDRESS BOOK (page 5-15)► VIEWING A LIST OF THE SELECTED DESTINATIONS (page 5-18)► USING A SEARCH NUMBER TO RETRIEVE A DESTINATION (page 5-19)► ENTERING AN ADDRESS MANUALLY (page 5-20)► SPECIFYING A NETWORK FOLDER (page 5-21)► RETRIEVING A DESTINATION FROM A GLOBAL ADDRESS BOOK (page 5-22)► USING A TRANSMISSION LOG TO RESEND (page 5-24)
• One-touch keys that cannot be used for broadcast transmission are grayed out to prevent selection.
• If a Scan to FTP or Network Folder address is specified in a broadcast transmission, hyperlink e-mail transmission will not take place.
• If [System Settings] → [Image Send Settings] → [Common Settings] → [Condition Settings] → [Be sure to press Next Address Key ([+]) before selecting the next address.] is enabled in "Settings (administrator)", tap before specifying the next destination.
• If you wish to send the same image (Mono2) as the one for the fax address to all destinations in normal mode, tap [Send Same Image as Fax Address] on the action panel.
3Tap [Address Review] on the action panel.
4Confirm the destination.
• To cancel a specified destination:Tap the key of the destination that you wish to cancel to release the selection.
• To switch delivery types (To/Cc/Bcc):Tap the address that you want to change, and tap [Change to To], [Change to Cc], or [Change to Bcc] on the action panel.
To CcStart
Preview
All Destinations
AAA
BBB
CCC
Direct EntryAAA.□□□
BBB.□□□
CCC.□□□
Direct Entry
Direct Entry
CA

5-42
SCANNER/INTERNET FAX►TRANSMITTING AN IMAGE
SETTING MODES WHEN MULTIPLE TYPES OF ADDRESSES ARE INCLUDED IN A BROADCAST TRANSMISSIONThis section explains settings you should bear in mind if multiple types of addresses are included in a broadcast transmission.When a broadcast transmission includes a mix of several types of addresses (such as scan mode and Internet Fax mode destinations), its settings are enabled for all addresses regardless of which mode screen is used to configure them. Note the following exceptions:
When Internet Fax addresses are not include
5Tap the [B/W Start] or [Color Start] key ([Start] key in normal mode) to start scanning of the original.• If you inserted the original pages in the document feeder tray, all pages are scanned.
A beep will sound to indicate that scanning and transmission have ended.
• When you place the original on the document glass, scan each page at a time.When scanning finishes, place the next original and tap the [B/W Start] or [Color Start] key ([Start] key in normal mode). Repeat until all pages have been scanned and then tap the [Read-End] key.A beep will sound to indicate that transmission has ended.
You can tap the [Preview] key to check a preview of the image before sending an image. For more information, see "CHECKING THE IMAGE TO BE TRANSMITTED (page 5-66)".
File format (file compression mode)
The compression mode set with [System Settings] → [Image Send Settings] → [Scan Settings] → [Condition Settings] → [Compression Mode at Broadcasting] in "Settings (administrator)" is used for all destinations.
Color mode
When the color mode setting is [Full Color] in scan mode, the image will be sent in Mono2 to fax addresses and in color to scan addresses.To send the image in Mono2 to all addresses, tap [Send Same Image as Fax Address] on the action panel in normal mode.
Original Count An address of a mode in which the number of original sheets are specified, if it exists, is enabled.
Scan file size
If a broadcast transmission is performed that includes destinations for which an attachment size limit has been set using [Maximum Size of E-mail Attachments] or [Maximum Size of Data Attachments (FTP/Desktop/Network Folder)] (in "Settings (administrator)", select [System Settings] → [Image Send Settings] → [Scan Settings] → [Condition Settings]), the limit will also apply to destinations for which a limit is not set.
N-Up This mode is available only for Fax. It is linked to a mode with an appropriate function.
Drop Out color This mode is available for Scanner and Data entry. It is linked to a mode with an appropriate function.
RGBThis mode is available for Scanner, Network Folder, and FTP/Desktop. It is linked to a mode with an appropriate function.

5-43
SCANNER/INTERNET FAX►TRANSMITTING AN IMAGE
When Internet Fax addresses are includedWhen Internet Fax addresses are included in the destinations, the following restrictions apply.
Color Mode Fixed at black & white binary.
File format (filecompression mode)
Fixed at TIFF.
Original Transmission will take place to all addresses using the same image width as Internet Fax.
Background Adjustment
Cannot be set.
Blank Page Skip
Drop Out color
Contrast
Sharpness
RGB
Sign
Encrypt
Multicrop
Business Card Scan
Image Crop
Broadcast transmission is not possible to both direct SMTP addresses and other types of addresses.

5-44
SCANNER/INTERNET FAX►TRANSMITTING AN IMAGE
RESENDING TO UNSUCCESSFUL BROADCAST TRANSMISSION DESTINATIONSThe results of a completed broadcast transmission can be checked in the job status screen. If transmission to any of the destinations failed, resend the image to those destinations.
1Tap the job status display.
2Tap the [Scan] tab or [Internet Fax] tab, and tap the [Complete] key.
If the broadcast transmission included destinations of different modes, the same broadcast transmission key will appear in each of those modes.
3After tapping the key of the completed broadcast transmission, tap [Check Details of Selected Job] on the action panel.
Job Queue
Complete
Internet FaxFaxScanPrint
Job Address Set Time Pages Status
Enter MultiSelection Mode
Back
Job Queue
Complete
Internet FaxFaxScan
Job Address Set Time StatusPrint Image SendingActivity Report
Check Details ofSelected Job
Back0000/0002 OK
0000/0001
0000/000110:45 07/07
10:30 07/07
10:12 07/07
10:03 07/07
NG800000
NG800000
NG800000
0000/0001
0000/0001
bbb@bbb.□□□
ccc@ccc.□□□
ddd@ddd.□□□
Broadcast004
Pages

5-45
SCANNER/INTERNET FAX►TRANSMITTING AN IMAGE
4After tapping the [Failed] tab, tap [Resend to All Addresses Which Failed in Sending] on the action panel to resend the image.
The steps to follow after [Resend to All Addresses Which Failed in Sending] is tapped differ depending on whether or not document filing is used.
• Using document filing:You will return to the document filing resend screen with the unsuccessful destinations entered.Perform the document filing resend procedure. (There is no need to re-scan the original.)
• Not using document filing:You will return to the base screen with the unsuccessful destinations entered. Place the original and perform the steps of the broadcast transmission.
All DestinationsFailed
Details Resend to All AddressesWhich Failed in Sending
Back
Address
aaa@aaa.□□□
bbb@bbb.□□□
001
002
Number: StatusStart Time
10:05 07/07
10:05 07/07

5-46
SCANNER/INTERNET FAX►TRANSMITTING AN IMAGE
SENDING AN INTERNET FAX FROM A PC (PC-I-FAX)A file on a computer can be sent via the machine as a fax (PC-I Fax function).Faxes are sent using the PC-I Fax function in the same way that documents are printed. Select the PC-Fax driver as the printer driver for your computer and then select the Print command in the application. Image data for transmission will be created and sent as an Internet fax.By using the "Log Viewer" application, Internet faxes can be sent using the transmission log displayed in the Log Viewer.For the procedures for using this function, see the PC-Fax driver Help.
• To send an Internet fax using the PC-I-Fax function, the PC-Fax driver must be installed and then updated using the CD-ROM that accompanies the Internet fax expansion kit.For more information, see the Software Setup Guide.
• This function can only be used on a Windows computer.
This function is available for transmission. Internet faxes received on the machine cannot be received to a computer that is connected to the machine.
PC-i-Fax Send
Log Viewer Re-send faxes using the transmission log

5-47
SCANNER/INTERNET FAX►TRANSMITTING AN IMAGE
IMAGE SETTINGS
AUTOMATICALLY SCANNING BOTH SIDES OF AN ORIGINAL (2-SIDED ORIGINAL)The automatic document feeder is used to automatically scan both sides of an original.
The settings on 2-sided scanning are cleared when transmission has completed.
• You cannot use 2-Sided scanning when the original size is set to Long Size.
• On the MX-B355W, duplex scanning is not possible when originals of mixed width are scanned.
1After tapping the [Original] key, tap the [Book] or [Tablet] key.See the figure on the left to check the binding edge of the original and select the key to be tapped.
In normal mode, tap the [2-Sided Tablet] or [2-Sided Book] key.
2Tap the [Image Orientation] key with the same orientation as the placed original.If this setting is not correct, a suitable image may not be transmitted.After the settings are completed, tap .
To cancel 2-sided scanning:Tap the [1-Sided] key.In normal mode, tap the [2-Sided Tablet] key or the [2-Sided Book] key that has been forcibly displayed and cancel the display.
2-Sided Original
Scan transmission
Front and reverse sides are scanned
A
CG
A BE F
J
L K L
E
Book Tablet
CAPreview Auto Set
B/WStart
ColourStart
Original ImageOrientation
Duplex Setup
1-Sided Book Tablet
8½x11

5-48
SCANNER/INTERNET FAX►TRANSMITTING AN IMAGE
SCAN SIZE AND SEND SIZE (ENLARGE/REDUCE)Place the originals and set the original size.In normal mode, the size of the set original is indicated as the "Scan Size", and the size to be transmitted is indicated as the "Send Size".
In the above screen, the scan size (the placed original) is 8-1/2" x 11" (A4) and the send size is auto. For example, if the scan size is 8-1/2" x 11" (A4) and the send size is 5-1/2" x 8-1/2" (B5), the image will be reduced before transmission.
8½x11 8½x11
Scan Size
A4
"Send Size" is set to 5-1/2" x 8-1/2" (B5)
Transmission
The image is reduced to 5-1/2" x 8-1/2" (B5) before transmission

5-49
SCANNER/INTERNET FAX►TRANSMITTING AN IMAGE
SPECIFYING THE ORIGINAL SCAN SIZE IN PAPER SIZEIf you placed originals of size other than the original size specified in "Default Original Size Settings", specify the original size manually.
When [Long Size] is selected, the 2-sided scanning setting and send size cannot be changed.The image is sent in Mono2 only.
1After tapping the [Original] key, tap the [Size] key.
2Tap the appropriate original size key.After the settings are completed, tap .
If you are sending a long original, tap the [Long Size] key.Use the automatic document feeder to scan a long original. The maximum width that can be scanned is 19-5/8" (500 mm) (the maximum height is 8-1/2" (216 mm)).► TRANSMITTABLE ORIGINAL SIZES (page 5-14)
CAPreview Auto Set
B/WStart
ColourStart
Original ImageOrientation
Duplex Setup
1-Sided Book Tablet
8½x11
Others
5½ x 8½ 8½ x 11
8½ x 14 Long Size
8½ x 13
8½ x 132/5

5-50
SCANNER/INTERNET FAX►TRANSMITTING AN IMAGE
SPECIFYING THE ORIGINAL SCAN SIZE USING NUMERIC VALUESWhen scanning a non-standard size original such as a card or postcard, specify the original size using numeric values after placing the original.The width can be from 1" to 14" (25 mm to 356 mm), and the height can be from 1" to 8-1/2" (25 mm to 216 mm).
When the scan size is specified by numeric values, the send size cannot be specified.
1Tap the [Detail] key to change to normal mode.► Changing mode from each mode (page 5-10)
2Tap the [Original] key.
3After tapping the "Scan Size" key, tap the [Direct Entry] key.
4Specify the original size.
• Tap the areas displaying width and height sizes respectively, and enter the sizes using the numeric keys.
• It is convenient to use to finely adjust the entered size.
5Tap the [Execute] key.After the settings are completed, tap twice.On the base screen, check that the specified size is displayed on the [Original] key.
To cancel the specified size settings: Tap the [Auto] key.
8½ x 11
14

5-51
SCANNER/INTERNET FAX►TRANSMITTING AN IMAGE
STORING FREQUENTLY USED ORIGINAL SIZESStore the frequently used non-standard original sizes. This section explains how to store, retrieve, change, and delete non-standard original sizes.
Storing original sizes (Modify/Delete)
• The stored original size will be retained even if the main power is turned off.
• A total of up to 12 non-standard original sizes can be registered for copying, fax, and image sending.
• The added original sizes will also appear in other modes.
1Tap the [Detail] key to change to normal mode.► Changing mode from each mode (page 5-10)
2Tap the [Original] key.
3Tap the [Scan Size] key and tap the [Custom Size] tab.
4Tap [Store/Delete] key.
Auto
Direct EntryInchAB Custom Size
AddressAddress Book Touch to input Address
Skip Blank Page in OriginalBlank Page Skip
Scan Thin Paper OriginalSlow Scan Mode
Background Adjustment
Color Mode
Adjust Outline of ImageSharpness
Preview
Start
CA
Others
Scan Size
Store/Delete8½ x 11
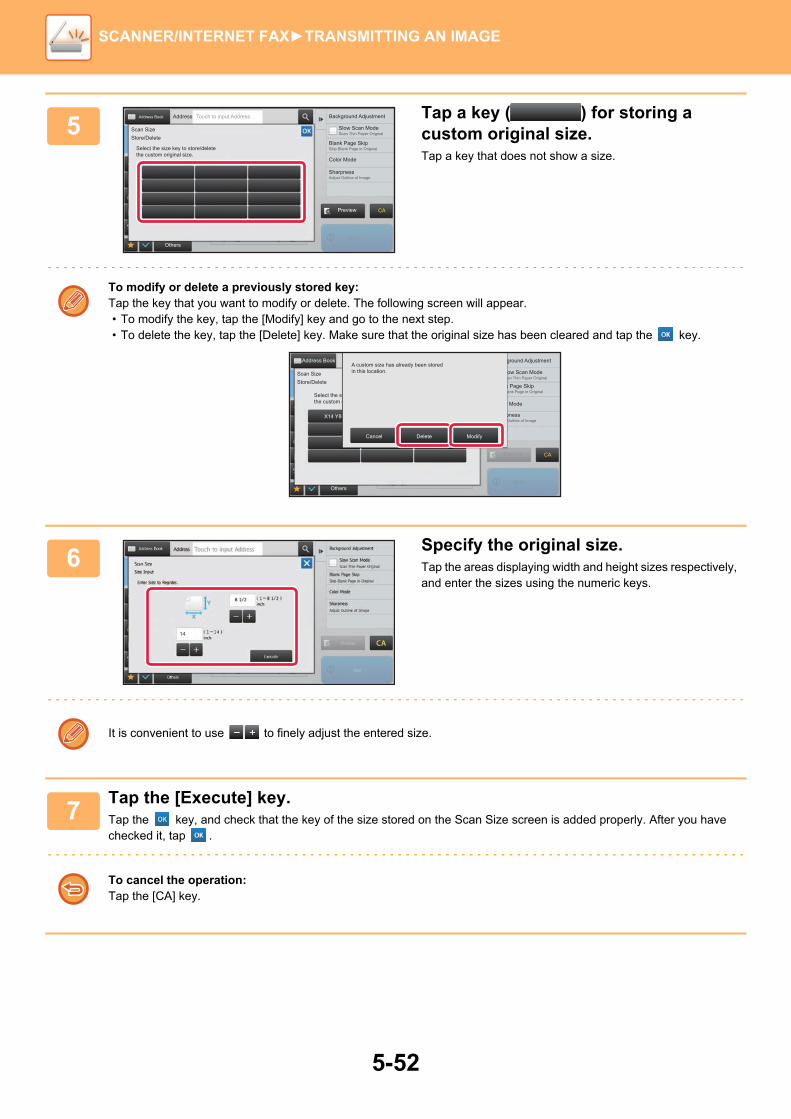
5-52
SCANNER/INTERNET FAX►TRANSMITTING AN IMAGE
5Tap a key ( ) for storing a custom original size.Tap a key that does not show a size.
To modify or delete a previously stored key:Tap the key that you want to modify or delete. The following screen will appear.• To modify the key, tap the [Modify] key and go to the next step.• To delete the key, tap the [Delete] key. Make sure that the original size has been cleared and tap the key.
6Specify the original size.Tap the areas displaying width and height sizes respectively, and enter the sizes using the numeric keys.
It is convenient to use to finely adjust the entered size.
7Tap the [Execute] key.Tap the key, and check that the key of the size stored on the Scan Size screen is added properly. After you have checked it, tap .
To cancel the operation:Tap the [CA] key.
Address Touch to input Address
Skip Blank Page in OriginalBlank Page Skip
Scan Thin Paper OriginalSlow Scan Mode
Background Adjustment
Color Mode
Adjust Outline of ImageSharpness
Preview
Start
CA
Others
Scan SizeStore/Delete
Select the size key to store/deletethe custom original size.
Address Book
Skip Blank Page in OriginalBlank Page Skip
Scan Thin Paper OriginalSlow Scan Mode
Background Adjustment
Color Mode
Adjust Outline of ImageSharpness
Scan SizeStore/Delete
Select the size key to store/deletethe custom original size.
X14 Y8-
Preview
Start
CA
Address Book
Others
A custom size has already been storedin this location.
Delete ModifyCancel
14

5-53
SCANNER/INTERNET FAX►TRANSMITTING AN IMAGE
Retrieving a stored original size
1Tap the [Detail] key to change to normal mode.► Changing mode from each mode (page 5-10)
2Tap the [Original] key.
3Tap the [Scan Size] key and tap the [Custom Size] tab.
4Tap the key of the original size that you wish to retrieve.After selecting the key of the original size, tap the key.Check that the specified size is displayed on the Scan Size screen.
To cancel the operationTap the [CA] key.
Address Touch to input Address
Skip Blank Page in OriginalBlank Page Skip
Scan Thin Paper OriginalSlow Scan Mode
Background Adjustment
Adjust Outline of ImageSharpness
Preview
Start
CA
Others
Store/DeleteAuto
Scan Size
Direct EntryInchAB Custom Size
X14 Y8-½
Color Mode
Address Book
8½ x 11Size:

5-54
SCANNER/INTERNET FAX►TRANSMITTING AN IMAGE
SPECIFYING THE SEND SIZE OF THE IMAGETap this key to specify the send size as a paper size. If the specified send size is larger than the scan size, the image will be enlarged. If the specified send size is smaller than the scan size, the image will be reduced.
• The send size cannot be specified when [Long Size] is selected for the scan size, or when the scan size is specified by numeric values.
• The send size cannot be specified when [TIFF-S] is selected for the format in Internet fax mode. (The send size is fixed at 8-1/2" x 11" (A4).)
1Tap the [Detail] key to change to normal mode.► Changing mode from each mode (page 5-10)
2Tap the [Original] key.
3Tap the [Send Size] key.
4Tap the desired send size key.After the settings are completed, tap .
Depending on the paper size specified for the "Scan Size", it may not be possible to select some sizes for the "Send Size". You cannot tap size keys that are unavailable for the "Send Size".
5½ x 8½ 8½ x 11
8½ x 11
8½ x 14
8½ x 13
8½ x 132/5 11 x 17

5-55
SCANNER/INTERNET FAX►TRANSMITTING AN IMAGE
5Tap the [Image Orientation] key with the same orientation as the original image.If this setting is not correct, a suitable image may not be transmitted. After the settings are completed, tap .
To configure the default setting of image orientation, select [System Settings] → [Image Send Settings] → [Common Settings] → [Condition Settings] → [Image Orientation] in "Settings (administrator)".
The ratio used for reduction or enlargement of the original will appear between the "Scan Size" and the "Send Size".
8½x11 8½x11
5-56
SCANNER/INTERNET FAX►TRANSMITTING AN IMAGE
CHANGING THE EXPOSURE AND ORIGINAL IMAGE TYPEOptimum scanning is ensured by selecting exposure and original image type based on the original.
Exposure settings
How to select the original type (Scan mode, Data entry mode)
• When using the document glass to scan multiple original pages, change the exposure setting each time you change pages.
• The contrast for Internet Fax mode is set in the system settings.► Internet Fax Settings (page 7-101)
When using the automatic document feeder, the exposure setting cannot be changed once scanning has begun. (If "Job Build" is used in Others, change the exposure each time a new set of originals is inserted.)
Exposure Suggestion
Auto This setting automatically adjusts the exposure for light and dark parts of the original.
Manual 1-2 Select this setting when the original consists of dark text.
3 Select this setting for a normal original (neither dark nor light).
4-5 Select this setting when the original consists of light text.
Setup Items Description
Auto The original image type is automatically selected to match the original.
Manual Text/Printed Photo
This mode provides the best balance for scanning an original which contains both text and printed photographs, such as a magazine or catalogue.
Text/Photo This mode provides the best balance for scanning an original which contains both text and photographs, such as a text document with a photo pasted on.
Text Use this mode for regular text documents.
Photo Use this mode to scan photos.
Printed Photo This mode is best for scanning printed photographs, such as photos in a magazine or catalogue.
Map This mode is best for copying maps with light color shading and fine text.

5-57
SCANNER/INTERNET FAX►TRANSMITTING AN IMAGE
In Scan mode or Data entry mode
1Tap the [Detail] key to change to normal mode.► Changing mode from each mode (page 5-10)
2Tap the [Exposure] key.
3Tap the key assigned to the original type you wish to set based on the original type.
4Tap to adjust the exposure.After the settings are completed, tap .
When [Auto] is selected, changing the exposure sets the original image type to [Text/Printed Photo] automatically.
Preview
StartOthers
Background Adjustment
Color Mode
Select File FormatFile Format
Change Sending ResolutionResolution
Skip Blank Page in OriginalBlank Page Skip
AddressAddress Book Touch to input Address
E-mail/ExposureSpecify density of image to send.
Auto
Manual
TextText/Prtd.Photo Text/Photo
Printed Photo Photo Map
3 51
CA

5-58
SCANNER/INTERNET FAX►TRANSMITTING AN IMAGE
CHANGING THE RESOLUTIONSpecify the resolution setting.
How to select the resolutionFor normal text originals, 200 x 200 dpi produces an image that is sufficiently legible.For photos and illustrations, a high resolution setting (600 x 600 dpi, etc.) will produce a sharp image.However, a high resolution setting will result in a large file, and if the file is too large, transmission may not be possible. In this event, reduce the number of pages scanned or take other measures to decrease the file size.► CHANGING FORMAT IN SCAN OR DATA ENTRY MODE (page 5-59)► CHANGING FORMAT IN INTERNET FAX MODE (page 5-64)► SPECIFYING THE SEND SIZE OF THE IMAGE (page 5-54)
When using the automatic document feeder, the resolution setting cannot be changed after scanning has begun. (However, when "Job Build" is used in Others, change the resolution each time a new set of originals is inserted.)
• When using the document glass to scan multiple original pages, change the resolution setting each time you change pages.
• The resolution for Internet Fax mode is set in the system settings.► Internet Fax Settings (page 7-101)
1Tap the [Detail] key to change to normal mode.► Changing mode from each mode (page 5-10)
2Tap the [Resolution] key.
3Tap the key of the desired resolution.After the settings are completed, tap .
• This cannot be selected when Internet Fax addresses are included.
• If there is a mix of destinations in different modes, tap to switch modes to set the resolution in each mode.However, FTP/Desktop and Network Folder are set to the same mode.
• If you set the file format to [Compact PDF] in [Format], or the compression ratio to [Bk Letter Emphasis], the resolution is set to [300x300dpi].
Preview
Others
AddressAddress Book Touch to input Address
Resolution
Start
100x100dpi
150x150dpi
200x200dpi
300x300dpi
400x400dpi
600x600dpi
E-mailColor Mode
Background Adjustment
Skip Blank Page in Original
Specify density of image to send.Exposure
Select File FormatFile Format
CA
Blank Page Skip

5-59
SCANNER/INTERNET FAX►TRANSMITTING AN IMAGE
CHANGING FORMAT IN SCAN OR DATA ENTRY MODEChange the file format (file type and compression mode/compression ratio) for sending a scanned image at the time of transmission. In addition, if the scanned originals are divided into separate files, the number of pages per file can be changed.
File format combinations
* When PDF (including encrypted and high compression) is selected for the file format, Flate Compression can be used to reduce the file size.
The file type of [B/W] mode and the file type of [Color/Grayscale] mode are linked. The file type cannot be set separately for each.(When [JPEG] is selected for [Color/Grayscale] mode, [TIFF] is automatically selected for [B/W] mode.)
[Color/Grayscale] tab [B/W] tab
PDF* PDF*
Compact PDF* PDF*
Compact PDF (Ultra Fine)* PDF*
PDF/A-1a* PDF/A-1a*
PDF/A-1b* PDF/A-1b*
PDF/A* PDF/A*
Compact PDF/A-1a* PDF/A-1a*
Compact PDF/A-1b* PDF/A-1b*
Compact PDF/A* PDF/A*
Compact PDF/A-1a (Ultra Fine)* PDF/A-1a*
Compact PDF/A-1b (Ultra Fine)* PDF/A-1b*
Compact PDF/A (Ultra Fine)* PDF/A*
Encrypt PDF* Encrypt PDF*
Encrypt/Compact PDF* Encrypt PDF*
Encrypt/Compact PDF (Ultra Fine)* Encrypt PDF*
TIFF TIFF
JPEG TIFF
XPS XPS
TXT(UTF-8) TXT(UTF-8)
RTF RTF
DOCX DOCX
XLSX XLSX
PPTX PPTX

5-60
SCANNER/INTERNET FAX►TRANSMITTING AN IMAGE
Flate CompressionAfter compressing a PDF file by JPEG compression, this function compresses the file by lossless compression to further reduce the file size by a small amount. When the data contains significant solid color, this increases the effectiveness of compression.When sending a PDF file, Flate Compression enables greater reduction of the file size than conventional methods.If the recipient's PDF viewer does not support Flate Compression, the recipient may not be able to view the PDF file. In this case, Flate Compression can be disabled.
• The file format for sending a scanned image is specified when the destination is stored in a one-touch key; however, you can change the format at the time of transmission.
• If [PDF/Encry.] is specified for the file format, the password entry screen appears when scanning. Enter a password with up to 32 characters.
Note the following when [PDF/High] is specified in the [Color/Grayscale] file format.• When broadcasting to an address with [PDF/High] specified, all files for the scanner will be sent as Compact PDF files.• When broadcasting to an address with [PDF/High] and [PDF/Compact/U-Fine] specified, all files for the scanner will be
sent as Compact PDF (Ultra Fine) files.• If [PDF/High] is specified, the resolution cannot be changed in the scanner mode. The resolution is set to 300 x 300 dpi.• If [PDF/High] is set when a resolution setting has been specified in scanner (or other) mode, the resolution setting will be
canceled and the Compact PDF resolution will be used for transmission.• When [PDF/High] is selected, [Resolution] cannot be changed while waiting for the next original or in [Change Setting] in
the job build settings.• If [PDF/High] is set when an original type setting has been specified in scanner (or other) mode, [Photo] will change to
[Text/Photo] and [Map] will change to [Text/Printed Photo].• The condition of the original may prevent the OCR function from correctly recognizing some characters and graphics, and
omissions or incorrect recognition of characters may result.• The OCR function is not guaranteed to completely reproduce all characters, graphics, or other contents of a scanned original.
To enable Flate CompressionEnable or disable Flate Compression in [System Settings] → [Image Send Settings] → [Scan Settings] → [Condition Settings] → [PDF Compression Options] in "Settings (administrator)".
1Tap the [File Format] key.If you are in data input mode, start from step 5.
2Tap the [Color/Grayscale] or [B/W] key.
• The format setting for [B/W] mode is the file format with the [B/W Start] key is tapped.
• The format setting for [Color/Grayscale] mode is the file format with the [Color Start] key is tapped.
• When [Color/Grayscale] mode is selected, the [Compact] and [U-Fine] checkboxes appear. To suppress image quality deterioration and reduce the data size of a file to be transmitted, select Compact PDF. Select [U-Fine] only when you select Compact PDF.

5-61
SCANNER/INTERNET FAX►TRANSMITTING AN IMAGE
3Tap the key of the desired file type.After the settings are completed, tap .
When the [B/W] key is selected When the [Color/Grayscale] key is selected
4(Only when [PDF] or [PDF/A-1a] is selected) To enable OCR, select the [OCR] checkbox ( ) and tap [OCR Setting].After the settings are completed, tap ( ).
• When "Long Size" is selected for the original, [OCR] cannot be used.
• Select the scanning language in the language settings. The following languages can be selected.Japanese, English, Spanish, French, German, Italian, Dutch, Swedish, Norwegian, Finnish, Danish, Hungarian, Czech, Polish, Russian, Greek, Portuguese, Turkish, Slovak, Catalan, Chinese, Traditional Chinese, Korean.
• When [RTF], [DOCX], [XLSX], or [PPTX] is selected for the file format, you can set the font of the output text.
• When the [Detect Image Direction] checkbox is selected ( ), the orientation of the original is detected and the image is rotated before transmission.
• When the [File Name Auto Extraction] checkbox is selected ( ), the text string that is read from the file is included in the file name. If a file name is set, the set file name will be used for transmission.
• You can set the accuracy of OCR in [OCR Accuracy]. Select from [Auto] or [Priority Text]. When [Priority Text] is selected, the character reading accuracy is raised before scanning. When [Priority Text] is selected, accuracy in diagram and table areas may be degraded. Only change the setting when you particularly want to increase the accuracy of text areas.
CAPreview Auto Set
B/WStart
ColorStart
B/W
Prog.
PDF/A-1bPDF/A-1a
PPTXXLSX
XPS
DOCX
TXT(UTF-8)RTF
TIFF
File Format
CAPreview Auto Set
B/WStart
ColorStart
Color/Grayscale
Prog.
PDF/A-1bPDF/A-1a
PPTXXLSX
XPS
DOCX
TXT(UTF-8)RTF
TIFF JPEG
File Format
English
Auto
Format
Language:
Font: OCR Accuracy:
Detect ImageDirectionFile Name Auto Extraction
CAPreview
B/WStart StartAuto Set
Color

5-62
SCANNER/INTERNET FAX►TRANSMITTING AN IMAGE
5To select more detailed settings, tap the [Detail] key to switch to normal mode.► Changing mode from each mode (page 5-10)
6Tap the [File Format] key.
7Tap the [Color/Grayscale] or [B/W] tab and select the format mode for scanning.
• The format setting for [B/W] mode is the file format with the color mode set to [Mono2].
• The format setting for [Color/Grayscale] mode is the file format with the color mode set to [Full Color] or [Grayscale].
8Tap the key of the desired file type.
When the [B/W] key is selected When the [Color/Grayscale] key is selected
When [Color/Grayscale] mode is selected, the [Compact] and [U-Fine] checkboxes appear. To suppress image quality deterioration and reduce the data size of a file to be transmitted, select Compact PDF. Select [U-Fine] only when you select Compact PDF.
9Tap the [Compression Mode] key or [Compression Ratio] key.
10Tap the Compression key or Compression Ratio key.
When the [B/W] key is selected When the [Color/Grayscale] key is selected
• [Bk Letter Emphasis] in the [Color/Grayscale] tab is a file format that reduces the data size while suppressing deterioration of black text.
• Tap when you have completed the settings.
Start
Preview
AddressAddress Book Touch to input Address
Color/Grayscale B/W
Programmed Compression ModeMMR (G4)
TIFF XPS
PDF PDF/A-1b
Encry.
Specified Pages per File
Processing time is dependenton the format.
File FormatE-mail
1
Color Mode
Background Adjustment
Skip Blank Page in OriginalBlank Page Skip
Specify density of image to send.Exposure
Change Sending ResolutionResolution
Others
CA
PDF/A-1a
TXT(UTF-8) RTF
XLSXDOCX PPTX
OCR
OCR Setting
Start
JPEG
Compact
U-Fine
Preview
AddressAddress Book Touch to input Address
Color/Grayscale B/W
Programmed Compression RatioMiddle
TIFF XPS
PDF PDF/A-1b
Encry. OCR
Specified Pages per File
Processing time is dependenton the format.
File FormatE-mail
1
Color Mode
Background Adjustment
Skip Blank Page in OriginalBlank Page Skip
Specify density of image to send.Exposure
Change Sending ResolutionResolution
Others
CA
PDF/A-1a
TXT(UTF-8) RTF
XLSXDOCX PPTX
OCR Setting
Start
Processing time is dependenton the format.
Preview
Color Mode
AddressAddress Book Touch to input Address
File FormatE-mail
MMR (G4)
MH (G3)
None
Compression Mode
Others
Background Adjustment
Skip Blank Page in OriginalBlank Page Skip
Specify Send ExposureExposure
Change Sending ResolutionResolution
CA
Start
Processing time is dependenton the format.
Preview
Color Mode
AddressAddress Book Touch to input Address
File Format
Compression Ratio
Bk Letter Emphasis
High
Middle
Low
Others
Background Adjustment
Skip Blank Page in OriginalBlank Page Skip
Specify Send ExposureExposure
Change Sending ResolutionResolution
CA

5-63
SCANNER/INTERNET FAX►TRANSMITTING AN IMAGE
11To change the number of pages per file, set the [Specified Pages per File] checkbox to , and use numeric keys to specify the number of pages per file.
• When the [Specified Pages per File] checkbox is , one file is created for each of the number of pages at the right. When the checkmark is removed, one file is created for all pages.
• When [Specified Pages per File] is selected, consecutive numbers are added to the created file names.
• When [JPEG] is selected for the file type, one file is created for each page. For this reason, the [Specified Pages per File] checkbox does not appear.

5-64
SCANNER/INTERNET FAX►TRANSMITTING AN IMAGE
CHANGING FORMAT IN INTERNET FAX MODEThe format for Internet Fax mode is set in the system settings.► Internet Fax Settings (page 7-101)
CHANGING COLOR MODEChange the color mode used to scan the original.In Easy modeTap the [B/W Start] or [Color Start] key when scanning the original.
In Normal mode
To set the settings used when each key is tapped, select "Settings (Web version)" - [System Settings]→ [Image Send Settings] → [Scan Settings] → [Initial Status Settings] → [Easy Scan Settings].
Mode Scanning method
Auto The machine detects whether the original is color or black and white and automatically selects full color or black and white (Mono2 or Grayscale) scanning.
Full Color The original is scanned in full color. This mode is best for full color originals such as catalogues.
Mono2 Colors in the original are scanned as black or white. This mode is best for text-only originals.
Grayscale The colors in the original are scanned in black and white as shades of gray (grayscale).
This function cannot be used in Internet fax mode.
1Tap the [Detail] key to switch to the normal mode.► Changing mode from each mode (page 5-10)
2Tap the [Color Mode] key.
3Tap the key of the desired color mode for the original.
If there is a mix of destinations in different send modes, tap to select a send mode (E-mail, DeskTop/FTP or Data Entry) to set the color mode for each mode.
AddressAddress Book Touch to input Address
Color ModeE-mail
Select B/W Modeat Color Auto Select
Change Sending ResolutionResolution
Others
Preview
Start
Erase Shadow AroundErase
Skip Blank Page in OriginalBlank Page SkipSelect File FormatFile Format
Auto
Full Color
Grayscale
Mono2
Grayscale
Mono2
CA

5-65
SCANNER/INTERNET FAX►TRANSMITTING AN IMAGE
4Tap the [Grayscale] or [Mono2] key to set the B/W mode for automatic color selection.Specify whether Mono2 or grayscale is used when scanning black and white originals. Note that if the file format is set to JPEG, scanning will take place in grayscale.After the settings are completed, tap .
The B/W mode can be set only when the [Auto] key is selected in the color mode setting (step 3).

5-66
SCANNER/INTERNET FAX►TRANSMITTING AN IMAGE
SETTING SCAN SETTINGS AUTOMATICALLY (Auto Set) To automatically set scan settings appropriate for the original, tap the [Auto Set] key in the base screen of Easy Mode.
The following functions are set automatically.• Image Orientation• Resolution• Blank Page Skip
Each function setting value/parameter can be changed in setting mode.
CHECKING THE IMAGE TO BE TRANSMITTEDCheck the image that will be sent in the touch panel before transmission.You can tap the [Preview] key to check a preview of the image before sending an image. As you can adjust the exposure and resolution to scan the original while checking it in the preview screen, you can send a better quality original to the destination.
• When "Auto Set" is enabled, grayed out functions cannot be enabled.
• When an Internet Fax address is selected, "Auto Set" cannot be enabled.
To change the "Auto Set" setting, use "Settings (administrator)" - [System Settings] → [Image Send Settings] → [Scan Settings] → [Condition Settings] → [Auto Scan Setting].
• Depending on the size of the transmission data, part of the preview image may not appear in the preview screen in the touch panel.
• The preview function is not available when the original size is set to Long Size.
CAPreview
OriginalAddress E-mail Address Detail
StartColorStart
Original
2-Sided Auto PDF
PDFAuto
Resolution File Format Blank PageSkip
Auto SetB/W
8½x11

5-67
SCANNER/INTERNET FAX►OTHER FUNCTIONS
STORING SCAN OPERATIONS (PROGRAM)This function collectively stores various settings as one program. The stored program can be retrieved using an easy operation.For example, suppose 8-1/2" x 11" (A4) size documents are scanned into a file and sent to each branch office once a month.• The same documents are sent to each branch office• Each page of a bound document is successively transmitted• Smudges on the edges of the documents are erased before transmission
OTHER FUNCTIONS
When a job program is not stored When a job program is stored
Enter the address of each branch office. Tap the key of a stored program.
Specify Erase. Tap the [Start] key.
Scan and send the original.
Tap the [Start] key.
Scan and send the original.
Considerable time is required to send the documents each month because the above settings must be selected.In addition, mistakes are occasionally made when selecting the settings.
When a program is stored, settings are selected with ease by simply tapping the key of the program. In addition, transmission takes place based on the stored settings so there are no chances for mistakes.
To configure a program:Tap [Program Registration - Register Current Settings] on the action panel that appears when you operate any mode screens.
1 2
1 2
1 2
A4 (8-1/2" x 11") size documents to be distributed
Fax received by recipients.

5-68
SCANNER/INTERNET FAX►OTHER FUNCTIONS
• The settings stored in a program will be retained even after the program is used for transmission. The same settings can be used repeatedly for transmission.
• The following contents cannot be stored in programs:• Tapping of the [Speaker] key• Quick File• File• Page changes and unspecified erases during preview• Metadata Settings• Send Settings• Own Name• Sign E-mail• Encrypt E-mail
• Up to 48 programs can be stored.• Up to 500 destinations can be stored in one program.• A program in which sub addresses and passcodes are specified as an F-code destination records all sub addresses and
passcodes.
This function cannot be used in data entry mode.
1Tap the [Detail] key to switch to the normal mode.► Changing mode from each mode (page 5-10)
2Place the original and tap [Call Program] on the action panel.According to the function stored in the program, place the original in the document feeder tray of the automatic document feeder, or on the document glass.► AUTOMATIC DOCUMENT FEEDER (page 1-77)► DOCUMENT GLASS (page 1-79)
3 Tap the desired program key.
4Configure additional settings if needed.
Some settings cannot be added depending on the contents of the called program.
AddressAddress Book Touch to input Address
Call ProgramRegistered setting is called when touched.
Pre-Setting Program
Program 1
03
05
07
09
03
01
05
07
09
02
04
06
08
10
02
04
06
08
10
Others
Preview
Start
Change Name
Delete
Register in Favorite
Register for Home
CA

5-69
SCANNER/INTERNET FAX►OTHER FUNCTIONS
5Tap the [Start] key to start scanning of the original.• A beep will sound to indicate that scanning and transmission have ended.• When you place the original on the document glass, scan each page one at a time.
When scanning finishes, place the next original and tap the [Start] key.Repeat until all pages have been scanned and then tap the [Read-End] key.
You can tap the [Preview] key to check a preview of the image before sending an image. For more information, see "CHECKING THE IMAGE TO BE TRANSMITTED (page 5-66)".

5-70
SCANNER/INTERNET FAX►OTHER FUNCTIONS
SCANNING AND SENDING ORIGINALS COLLECTIVELY
SENDING TWO PAGES AS A SINGLE PAGE (N-Up)Reduce two original pages to the equal size and sent them as a single page. This function is convenient when you have a large number of original pages and wish to reduce the number of pages sent.For the standard size (8-1/2" x 11" (A4), 5-1/2" x 8-1/2" (B5 or A5 or A6), original pages are scanned from both the single pass feeder and document glass.
• This function cannot be used in scan mode or data entry mode.
• The N-Up is only available for originals with 8-1/2" × 11" (A4), 5-1/2" × 8-1/2" (B5 or A5) or A6 size.
• Transmission is not possible at a size smaller than the original size.
• When the scan size of the original is specified by numeric values, this function cannot be used.
• This function cannot be used together with Card Shot.
1Place the original.Place the original in the document feeder tray of the automatic document feeder, or on the document glass.► AUTOMATIC DOCUMENT FEEDER (page 1-77)► DOCUMENT GLASS (page 1-79)
1 2
1 2
1 2
1
2
Original in portrait orientation
Original in landscape orientation
Transmission
Transmission
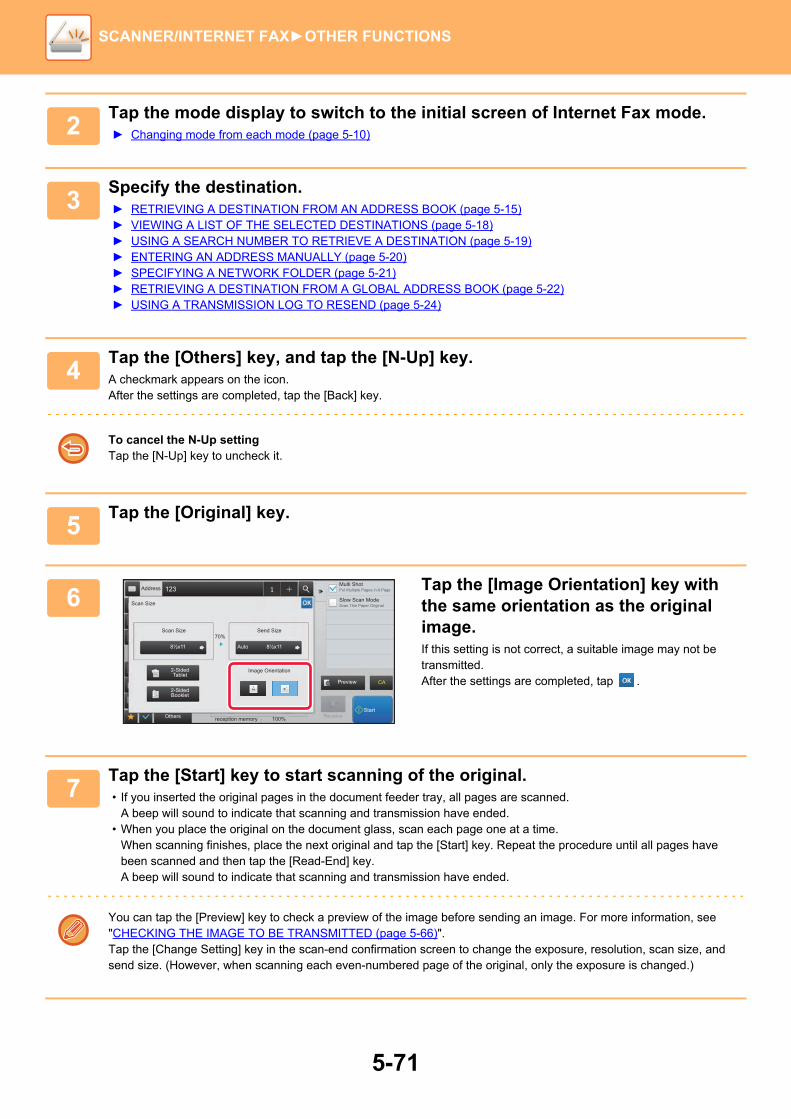
5-71
SCANNER/INTERNET FAX►OTHER FUNCTIONS
2Tap the mode display to switch to the initial screen of Internet Fax mode.► Changing mode from each mode (page 5-10)
3Specify the destination.► RETRIEVING A DESTINATION FROM AN ADDRESS BOOK (page 5-15)► VIEWING A LIST OF THE SELECTED DESTINATIONS (page 5-18)► USING A SEARCH NUMBER TO RETRIEVE A DESTINATION (page 5-19)► ENTERING AN ADDRESS MANUALLY (page 5-20)► SPECIFYING A NETWORK FOLDER (page 5-21)► RETRIEVING A DESTINATION FROM A GLOBAL ADDRESS BOOK (page 5-22)► USING A TRANSMISSION LOG TO RESEND (page 5-24)
4Tap the [Others] key, and tap the [N-Up] key.A checkmark appears on the icon.After the settings are completed, tap the [Back] key.
To cancel the N-Up settingTap the [N-Up] key to uncheck it.
5Tap the [Original] key.
6Tap the [Image Orientation] key with the same orientation as the original image.If this setting is not correct, a suitable image may not be transmitted.After the settings are completed, tap .
7Tap the [Start] key to start scanning of the original.• If you inserted the original pages in the document feeder tray, all pages are scanned.
A beep will sound to indicate that scanning and transmission have ended.• When you place the original on the document glass, scan each page one at a time.
When scanning finishes, place the next original and tap the [Start] key. Repeat the procedure until all pages have been scanned and then tap the [Read-End] key.A beep will sound to indicate that scanning and transmission have ended.
You can tap the [Preview] key to check a preview of the image before sending an image. For more information, see "CHECKING THE IMAGE TO BE TRANSMITTED (page 5-66)".Tap the [Change Setting] key in the scan-end confirmation screen to change the exposure, resolution, scan size, and send size. (However, when scanning each even-numbered page of the original, only the exposure is changed.)
Preview
Others ReceiveStart
reception memory
Scan Thin Paper OriginalSlow Scan Mode
Put Multiple Pages in A PageMulti Shot
Scan Size
Scan Size Send Size
Image Orientation
Auto
2-SidedTablet
2-SidedBooklet
70%
CA
100%
8½x11 8½x11
Address 123

5-72
SCANNER/INTERNET FAX►OTHER FUNCTIONS
SCANNING ORIGINALS OF DIFFERENT SIZES (MIXED SIZE ORIGINAL)This feature lets you scan and transmit originals of different sizes at the same time; for example, 5-1/2" x 8-1/2" (A5)size originals mixed together with 8-1/2" x 11" (A4) size originals. When scanning the originals, the machineautomatically detects the size of each original.
• On the MX-B355W, two sided scanning cannot be used when scanning originals of mixed width as in the above.
• When Mixed Size Original is selected, an original scan size cannot be specified.
• After the original scan size has been selected, Mixed Size Original cannot be specified.
• Rotate cannot be used when Mixed Size Original is enabled.
1Place the original in the document feeder tray of the automatic document feeder.Insert the originals with the corners aligned together in the far left corner of the document feeder tray.► AUTOMATIC DOCUMENT FEEDER (page 1-77)
2Tap the mode display to switch to the initial screen of each mode.► Changing mode from each mode (page 5-10)
3Specify the destination.► RETRIEVING A DESTINATION FROM AN ADDRESS BOOK (page 5-15)► VIEWING A LIST OF THE SELECTED DESTINATIONS (page 5-18)► USING A SEARCH NUMBER TO RETRIEVE A DESTINATION (page 5-19)► ENTERING AN ADDRESS MANUALLY (page 5-20)► SPECIFYING A NETWORK FOLDER (page 5-21)► RETRIEVING A DESTINATION FROM A GLOBAL ADDRESS BOOK (page 5-22)► USING A TRANSMISSION LOG TO RESEND (page 5-24)
4Tap the [Mixed Size Original] key. Otherwise, tap the [Others] key, and tap the [Mixed Size Original] key.A checkmark appears on the icon.After the settings are completed, tap the [Back] key.
8-1/2" x 11"
5-1/2" x 8-1/2"8-1/2" x 11"
5-1/2" x 8-1/2"
8" x 11"(A4)
5-1/2" x 8-1/2"(A5)
Place the originals in alignment with the guides.
8-1/2" x 11" (A4)5-1/2" x 8-1/2"(A5)

5-73
SCANNER/INTERNET FAX►OTHER FUNCTIONS
For mixed size originals, set "Original" to "Auto".
To cancel the mixed size original settingTap the [Mixed Size Original] key to uncheck it.
5Tap the [Start] key to start scanning of the original.A beep will sound to indicate that scanning and transmission have ended.
Tap the [Preview] key to check the preview of an image before sending a fax. For more information, see "CHECKING THE IMAGE TO BE TRANSMITTED (page 5-66)". However, settings for this function cannot be changed in the preview screen.

5-74
SCANNER/INTERNET FAX►OTHER FUNCTIONS
SCANNING BOTH SIDES OF A CARD ONTO A SINGLE PAGE (CARD SHOT)Send the front and reverse sides of a card as a single page, without the need to send each side separately.
• If the scan size is larger than the send size, it will result in a sending failure.
• The ratio cannot be specified and "Rotation Sending Setting" cannot be selected.
1Place a card face down on the document glass.► DOCUMENT GLASS (page 1-79)
2Tap the mode display to switch to the initial screen of each mode.► Changing mode from each mode (page 5-10)
3Specify the destination.► RETRIEVING A DESTINATION FROM AN ADDRESS BOOK (page 5-15)► VIEWING A LIST OF THE SELECTED DESTINATIONS (page 5-18)► USING A SEARCH NUMBER TO RETRIEVE A DESTINATION (page 5-19)► ENTERING AN ADDRESS MANUALLY (page 5-20)► SPECIFYING A NETWORK FOLDER (page 5-21)► RETRIEVING A DESTINATION FROM A GLOBAL ADDRESS BOOK (page 5-22)► USING A TRANSMISSION LOG TO RESEND (page 5-24)
4Tap the [Others] key, and tap the [Card Shot] key.
Originals
TransmissionFront
Back
Transmitted image
Example of an 8-1/2" x 11" (A4) size portrait scan transmission
Example of an 8-1/2" x 11" (A4) size landscape scan transmission

5-75
SCANNER/INTERNET FAX►OTHER FUNCTIONS
5Tap the [On] key, and specify the original size as required.After the settings are completed, tap and [Back] keys in sequence.
• Tap the areas displaying width and height sizes respectively, and enter the sizes using the numeric keys.
• To quickly set the size, first specify a value close to the desired ratio value by the numeric keys, then tap [-] or [+] for adjustment.
• To enlarge or reduce the images to fit the paper based on the entered original size, tap the [Fit to Send Size] key.
• After selecting Card Shot, tap the [Original] key in the base screen to change the original scan size or the send size. In this case, the screen of this step appears when you tap the scan size key. For the procedure for setting the send size, see "SPECIFYING THE SEND SIZE OF THE IMAGE (page 5-54)".
To cancel the Card Shot settingsTap the [Off] key.
6Tap the [Start] key, and scan the front side.
7Place a card face up on the document glass, and tap the [Start] key to scan the reverse side.
Before scanning the back of the card, tap the [Change Setting] key on the touch panel to change the exposure.
8Tap the [Read-End] key.
If you will continue by scanning the front of the card, you can tap the [Change Setting] key to change the exposure, resolution, scan size, and send size.
8 x 11

5-76
SCANNER/INTERNET FAX►OTHER FUNCTIONS
SCANNING BOTH SIDES OF A CARD ONTO A SINGLE PAGE (CARD SHOT (MULTI))Scan multiple cards at once and send with the fronts and backs associated.
• If the scan size is larger than the send size, it will result in a sending failure.
• The ratio cannot be specified and "Rotation Sending Setting" cannot be selected.
• When Card Shot (Multi) is enabled, Original Count is automatically set.
1Place a card face down on the document glass.► DOCUMENT GLASS (page 1-79)
You can scan up to 4 cards at once.The ▲ marks at the top and bottom and sides of the document glass indicate the center of the document glass. Place the originals in the centers of the areas created by dividing the document glass into quarters.For scan position details and originals, refer to Original scanning (page 5-79).
2Tap the mode display to switch to the initial screen of each mode.► Changing mode from each mode (page 5-10)
A B
C D
A B C D
A B C D
A B C D
Original glass
1st (Front)
Transmitted image
2nd (Back)
Multi-page format such as TIFF or PDF (PDF in this case)
Test_0001.pdf Test_0002.pdf Test_0003.pdf Test_0004.pdf
1st
2nd
Front
Back
JPEG
2
4
1
3
Area 2 Area 3 Area 4
One file is created from each image scanned in each area. (In the example, four PDF files with two pages per file are created.)
Test_0001(1).jpeg
Test_0001(2).jpeg
Test_0002(1).jpeg
Test_0002(2).jpeg
Test_0003(1).jpeg
Test_0003(2).jpeg
Test_0004(1).jpeg
Test_0004(2).jpeg
Files are created of the images scanned in each area, with the fronts and backs separated. (In the example, eight JPEG files are created.)
Front
Back
Area 2 Area 3 Area 4Area 1
Area 1

5-77
SCANNER/INTERNET FAX►OTHER FUNCTIONS
3Specify the destination.► RETRIEVING A DESTINATION FROM AN ADDRESS BOOK (page 5-15)► VIEWING A LIST OF THE SELECTED DESTINATIONS (page 5-18)► USING A SEARCH NUMBER TO RETRIEVE A DESTINATION (page 5-19)► ENTERING AN ADDRESS MANUALLY (page 5-20)► SPECIFYING A NETWORK FOLDER (page 5-21)► RETRIEVING A DESTINATION FROM A GLOBAL ADDRESS BOOK (page 5-22)► USING A TRANSMISSION LOG TO RESEND (page 5-24)
4Tap the [Others] key, and tap the [Card Shot (Multi)] key.
5Tap the [On] key.After the settings are completed, tap and [Back] keys in sequence.
To cancel the Card Shot settingsTap the [Off] key.
6Tap the [Start] key, and scan the front side.
• To change the image quality / resolution and exposure settings, tap the [Change Setting] key on the touch panel.
• If you only want to send the front, tap the [Read-End] key that appears on the touch panel. The front side of the original will be sent.
7Place a card face up on the document glass, and tap the [Start] key to scan the reverse side.
A B
C D

5-78
SCANNER/INTERNET FAX►OTHER FUNCTIONS
• When you turn the card over to scan the back, place the card in the same position as when you scanned the front.
• If a scanning error occurs when scanning the back due to the placement of the original or otherwise, a message will appear on the touch panel. To send only the front, tap the [OK] key. To discard the initially scanned front data and return to the base screen, tap the [Cancel] key.
8Tap the [OK] key.
• Restrictions when Card Shot (Multi) is enabledThe following restrictions apply when Card Shot (Multi) is enabled. Restricted items may change automatically.
• Address: If an Internet Fax address is added, Card Shot (Multi) will be disabled.
• Resolution: 600 x 600 dpi is automatically set. The setting can be changed.
• Scan size / send size: Only auto can be used..
• Two-sided original: Only one-sided original is enabled.
• Image Orientation: Cannot be used. (Each cropped original is corrected to the orientation that is least skewed.)
• Format: PDF/A-1a, TXT (UTF-8), RTF, DOCX, XLSX and PPTX cannot be used. High-compression/high-resolution PDF (including PDF/A-1b) cannot be used.
• Compression mode / compression ratio: Black text emphasis cannot be used.
• One file per page: Enabled when a checkmark appears. “2” when one-sided original is selected. (“3” or higher cannot be entered.)
• The following functions cannot be used at the same time as Card Shot (Multi).Job Build, Slow Scan Mode, Mixed Size Original, Erase, Card Shot, Blank Page Skip, File, Quick File, Preview, Business Card Scan, Image Crop, Multicrop
• When the Card Shot (Multi) setting is canceled, the following items retain the setting changes that were made when Card Shot (Multi) was enabled. Resolution, Scan Size, Send Size, 2-Sided Original, File Type, OCR, Compression Mode/Compression Ratio, Specified Pages per File
• When the Card Shot (Multi) setting is canceled, the Original Count setting remains available.
• Some originals may not extract to a file correctly.

5-79
SCANNER/INTERNET FAX►OTHER FUNCTIONS
Original scanning• The detectable area that can be scanned in one area is 118 mm (vertical) x 188 mm (horizontal).• An original size of 86 mm x 45 mm can be scanned.
• If a card touches a margin line, a scanning error will occur and the card in that area will not be detected.• If multiple cards are placed in one area, a scanning area will occur and the cards in that area will not be detected.• The outline of a thin card or a card with faint colors may not be detected correctly and scanning may fail.
1 2
3 4
A is the length from the end of the document glass to the center line.B is the length of the detectable area.
Detectable area Margin line
A:108 mm
B:118 mm
A:178 mm
B:188 mm10 mm
10 mm
Document glass
1 2
3 4
1 2
3 4
A BA
BC
1 2
3 4
AB
1 2
3 4
A B
1 2
3 4
AB
Pattern 1Original A: In the regular position and is detected.Original B: Is within the margin lines of area 2, so is detected as an original in area 2.Original C: Placed in areas 1, 2, and 4, but is within the margin lines of area 3 so is detected as an original in area 3.Pattern 2Originals A and B are placed in area 1 in a detectable state, but neither is detected because they are treated as multiple originals in one area.Pattern 3Original A: In the regular position and is detected.Original B: In area 2, but is not detected because it touches the margin line.Pattern 4Original A: In the regular position and is detected.Original B: Not detected because it does not fit into either area.Pattern 5Originals A and B cannot be detected because both are placed in area 1, or they are detected as a single original because they are too close to each other.
Margin lines of 2 Margin lines of 1
Margin lines of 4 Margin lines of 3
Pattern 1
Pattern 2
Pattern 3
Pattern 5
Pattern 4

5-80
SCANNER/INTERNET FAX►OTHER FUNCTIONS
SIMULTANEOUSLY SCANNING MULTIPLE CARDS, RECEIPTS OR OTHER SMALL ORIGINALS TO INDIVIDUAL FILES (MULTICROP)This function automatically crops and scans multiple cards, receipts, or other small originals placed on the document glass to individual files.
• This function can be used with Scan to E-mail, Scan to FTP/Desktop, Scan to Network Folder, and Save to External Memory Device.
• The e-mail will be sent without being divided if System Settings - [Image Send Settings]→[Scan Settings]→[Condition Settings]→[If the E-mail attachment(s) exceed maximum size, it will be sent in multiple files.] is enabled and [Maximum Size of E-mail Attachments(E-Mail)] is set. If the transmitted e-mail exceeds the limit, a send error occurs.
1Place the multiple originals that you want to scan on the document glass.► DOCUMENT GLASS (page 1-79)
Cautions when placing the originals
• Up to 25 originals can be placed at once.
• Separate the originals by at least 5 mm.
• Available originals sizes are 40 to 216 mm in height and 40 to 356 mm in width.
• If the shape of an original is not square or rectangular, the original may not be cropped correctly.
2Keep the auto document feeder open, not closed.If you scan the originals with the auto document feeder closed, it will not be possible to detect the outlines of the originals and scanning will fail. Always use this function with the auto document feeder open. If a light source such as an electric light shines onto the originals during scanning, cropping may not be successful. Adjust the angle of the automatic document feeder so that the light source does not affect the image.
Do not look directly at the light during scanning.

5-81
SCANNER/INTERNET FAX►OTHER FUNCTIONS
3Tap the mode display and change to the base screen of the desired mode.► Changing mode from each mode (page 5-10)
4Specify the destination.► RETRIEVING A DESTINATION FROM AN ADDRESS BOOK (page 5-15)► VIEWING A LIST OF THE SELECTED DESTINATIONS (page 5-18)► USING A SEARCH NUMBER TO RETRIEVE A DESTINATION (page 5-19)► ENTERING AN ADDRESS MANUALLY (page 5-20)► SPECIFYING A NETWORK FOLDER (page 5-21)► RETRIEVING A DESTINATION FROM A GLOBAL ADDRESS BOOK (page 5-22)► USING A TRANSMISSION LOG TO RESEND (page 5-24)
5Tap the [Others] key, and tap the [Multicrop] key.A checkmark appears on the icon. When you have completed the setting, tap the [Back] key.
When original count is enabled, the number of scanned originals will appear during scanning.
To cancel the multicrop settingTap the [Multicrop] key to remove the checkmark.
6Tap the [Start] key to start scanning the originals.When scanning is completed, place the next originals and tap the [Start] key.Repeat the above step until you have scanned all originals, and then tap the [Read-End] key.When transmission is completed, a beep sounds.
• Restrictions when multicrop is enabledThe following restrictions apply when multicrop is enabled. Restricted items may change automatically in some cases.
• Scan size / send size: Only auto can be used.
• Two-sided original: Only one-sided original is enabled.
• Image Orientation: Cannot be used. (Each cropped original is corrected to the orientation that is least skewed.)
• Format: High compression and ultra-fine cannot be used.
• Compression / compression format: Black text emphasis cannot be used.
• One file per page: Cannot be set when the checkmark is enabled and the number is "1".
• The following functions cannot be used at the same time as multicrop. Job Build, Slow Scan Mode, Mixed Size Original, Erase, Card Shot, Blank Page Skip, File, Quick File, Preview, Business Card Scan, Image Crop, Card Shot (Multi)
• When the Multicrop setting is canceled, the following items retain the setting changes that occurred when Multicrop was enabled. Resolution, Scan Size, Send Size, 2-Sided Original, File Type, OCR, Compression Mode/Compression Ratio, Specified Pages per File
• Depending on the original, it may not be extracted to the file correctly.

5-82
SCANNER/INTERNET FAX►OTHER FUNCTIONS
SCANNING A BUSINESS CARD, READING THE TEXT STRING, CREATING A FILE, AND SENDING THE FILE (BUSINESS CARD SCAN)You can scan a business card, extract the name and telephone number from the text string read by OCR, and create and send a vCard or other file. You can also send only the scanned card image.
For the information that can be extracted and output from a scanned business card, refer to the table below.
This function can be used with Scan to E-mail, Scan to FTP/Desktop, Scan to Network Folder, and Save to External Memory Device.The e-mail will be sent without being divided if System Settings - [Image Send Settings]→[Scan Settings]→[Condition Settings]→[If the E-mail attachment(s) exceed maximum size, it will be sent in multiple files.] is enabled and [Maximum Size of E-mail Attachments(E-Mail)] is set. If the transmitted e-mail exceeds the limit, a send error occurs.
Item Description
Name The name is extracted.
Kana When the language is set to Japanese, you can convert the name to kana.
Pinyin When the language is set to Chinese, you can convert the name to pinyin.
Postal code The postal code is extracted.
Address The address is extracted.
Company/group name The company/organization name is extracted.
Department The department is extracted.
Job title The position is extracted.
Telephone numberThe telephone number is extracted.Up to five.
Fax numberThe fax number is extracted.Up to five.
URLThe URL is extracted.Up to five.
E-mail address The E-mail address is extracted.
Other Other is used if none of the above apply.
Send vCard fileorCSV file

5-83
SCANNER/INTERNET FAX►OTHER FUNCTIONS
1Place the card you want to scan in the document tray of the automatic document feeder, or on the document glass.► AUTOMATIC DOCUMENT FEEDER (page 1-77)► DOCUMENT GLASS (page 1-79)
Cautions when placing business cards
• (Using automatic document feeder) Up to 12 business cards can be placed at once.
• (Using automatic document feeder) Separate the business cards by at least 5 mm.
• Supported card sizes are as follows:
• Automatic document feeder:51 x 89 mm to 55 x 91 mm.Document Glass:45 x 85 mm to 110 x 110 mm.
• If the shape of a business card is not square or rectangular, the business card may not be cropped correctly.
• (Using automatic document feeder) Place the business cards with the top side of the cards at the far side of the document glass as shown. If the cards are placed in the wrong orientation, it will not be possible to read the cards correctly.
2(Using automatic document feeder) Keep the auto document feeder open, not closed.If you scan the business cards with the auto document feeder closed, it will not be possible to detect the outlines of the business cards and scanning will fail. Always use this function with the auto document feeder open. If a light source such as an electric light shines onto the originals during scanning, cropping may not be successful. Adjust the angle of the automatic document feeder so that the light source does not affect the image.
Do not look directly at the light during scanning.
3Tap the mode display and change to the base screen of the desired mode.► Changing mode from each mode (page 5-10)
Top side Far side

5-84
SCANNER/INTERNET FAX►OTHER FUNCTIONS
4Specify the destination.► RETRIEVING A DESTINATION FROM AN ADDRESS BOOK (page 5-15)► VIEWING A LIST OF THE SELECTED DESTINATIONS (page 5-18)► USING A SEARCH NUMBER TO RETRIEVE A DESTINATION (page 5-19)► ENTERING AN ADDRESS MANUALLY (page 5-20)► SPECIFYING A NETWORK FOLDER (page 5-21)► RETRIEVING A DESTINATION FROM A GLOBAL ADDRESS BOOK (page 5-22)► USING A TRANSMISSION LOG TO RESEND (page 5-24)
5Tap the [Others] key, and tap the [Business Card Scan] key.
6Change settings as needed.When you have completed the settings, tap the key and then the [Back] key.
• If original count is enabled, the number of scanned originals will appear during scanning.
• Change the language setting to match the language used on the business card. For the language settings, refer to "CHANGING FORMAT IN SCAN OR DATA ENTRY MODE (page 5-59)".
• To use the full name as the file name, enable [Use Full Name on Card as the File Name].
• You can only send using the file format shown in [Image]: [File Format of the Image]. (This is linked to the file format selected in the format setting screen.)You can only send using the file format selected in [Card Information]: [File Format of Card Info].[Image and Card Info]: Send using the two file formats above.► CHANGING FORMAT IN SCAN OR DATA ENTRY MODE (page 5-59)".
To cancel the business card scan settingTap the [Off] key.
Preview
Start
CA

5-85
SCANNER/INTERNET FAX►OTHER FUNCTIONS
7Tap the [Start] key to start scanning the originals.When scanning is completed, place the next group of originals and tap the [Start] key.Repeat the above step until you have scanned all originals, and then tap the [Read-End] key.When transmission is completed, a beep sounds.The image of the scanned business card is sent together with the VCard or CSV file set in File Format.
• When scanning card informationLimitations apply to the following items when card information is scanned. Restricted items may change automatically in some cases.
• Resolution: When [Card Information] or [Image and Card Info] is selected, only 300 x 300 and 400 x 400 dpi can be used.
• Send size: Only auto can be used.
• Two-sided original: This is only enabled when the automatic document feeder is used.
• Image Orientation: This cannot be used when [Card Information] is selected. (Each cropped original is corrected to the orientation that is least skewed.)
• Format: High compression and ultra-fine cannot be used.
• Compression / compression format: Black text emphasis cannot be used.
• One file per page: Cannot be set when the checkmark is enabled and the number is "1".
• The following functions cannot be used at the same time as multicrop. Job Build, Slow Scan Mode, Mixed Size Original, Erase, Card Shot, Blank Page Skip, File, Quick File, Preview, Multicrop, Image Crop, Card Shot (Multi)
• When the Business Card Scan setting is canceled, the following items retain the setting changes that occurred when Business Card Scan was enabled. Resolution, Scan Size, Send Size, 2-Sided Original, File Type, OCR, Compression Mode/Compression Ratio, Specified Pages per File
• Depending on the business card, it may not be extracted to the file correctly.

5-86
SCANNER/INTERNET FAX►OTHER FUNCTIONS
File namesThe user can assign any file name to a file.When [Use Full Name on Card as the File Name] is enabled, the name on a scanned business card can be assigned as the file name.If you do not set a file name, the machine will assign an automatically generated file name.
File name rulesFile names are assigned as follows in each setting.
Setting File File name Description
User entry vCard User_0001.vcfUser_0002.vcf
The name entered by the user ("User" in this case) is inserted at the beginning of the file name.
CSV User.csv
Scanned image User_0001.jpgUser_0002.jpg
File name auto extraction
vCard AAAAAA_0001.vcfAAAAAA_0002.vcfBBBBBB_0001.vcfUntitled_0001.vcfUntitled _0002.vcf
Example: The names read from business cards are "AAAAAA", "BBBBB"When there are cards with the same first and last name such as "AAAAAA", the number at the end is a serial number. If the name could not be read, the file name is "Untitled". If there are multiple untitled files, the number at the end is a serial number.
CSV AAAAAA_0001.csv
Scanned image AAAAAA_0001.jpgAAAAAA_0002.jpgBBBBBB_0001.jpgUntitled _0001.jpgUntitled _0002.jpg
Automatic generation vCard MXxxxx_yyyyyy_zzzzzz_0001.vcfMXxxxx_yyyyyy_zzzzzz_0002.vcf
"xxxx" is the model name,"yyyyyy" is the scan date, and "zzzzzz" is the scan time.
CSV MXxxxx_yyyyyy_zzzzzz_0001.csv
Scanned image MXxxxx_yyyyyy_zzzzzz_0001.jpgMXxxxx_yyyyyy_zzzzzz_0002.jpg
If the user sets a file name when file name auto extraction is enabled, the user's file name is given priority.

5-87
SCANNER/INTERNET FAX►OTHER FUNCTIONS
SCANNING MULTIPLE PHOTOS AT ONCE TO INDIVIDUAL FILES(Image Crop)This function automatically scans photographs placed on the document glass to individual files.
This function can be used with Scan to E-mail, Scan to FTP/Desktop, Scan to Network Folder, and Save to External Memory Device.Settings (administrator) -"Image Send Settings"→"Scan Settings"→"Condition Settings"→"If the E-mail attachment(s) exceed maximum size, it will be sent in multiple files." is not applied.If the transmitted e-mail exceeds the limit, a send error will occur.
1Place the multiple originals that you want to scan on the document glass.► DOCUMENT GLASS (page 1-79)
Cautions when placing the originals
• Up to 25 originals can be placed at once.
• Separate the originals by at least 5 mm.
• Available originals sizes are 40 to 216 mm in height and 40 to 356 mm in width.
• If the shape of an original is not square or rectangular, the original may not be cropped correctly.
• The top and bottom of each original cannot be distinguished automatically, so take care to orient the originals appropriately.
2Close the automatic document feeder.The scanning method is different from multi-crop. Close the automatic document feeder.
3Tap the mode display and change to the home screen of the desired mode.► Changing mode from each mode (page 5-10)

5-88
SCANNER/INTERNET FAX►OTHER FUNCTIONS
4Specify the destination.► RETRIEVING A DESTINATION FROM AN ADDRESS BOOK (page 5-15)► VIEWING A LIST OF THE SELECTED DESTINATIONS (page 5-18)► USING A SEARCH NUMBER TO RETRIEVE A DESTINATION (page 5-19)► ENTERING AN ADDRESS MANUALLY (page 5-20)► SPECIFYING A NETWORK FOLDER (page 5-21)► RETRIEVING A DESTINATION FROM A GLOBAL ADDRESS BOOK (page 5-22)► USING A TRANSMISSION LOG TO RESEND (page 5-24)
5Tap the [Others] key, and tap the [Image Crop] key.A checkmark appears on the icon. After the settings are completed, tap the [Back] key.
When original count is enabled, the number of scanned originals will appear during scanning.
To cancel the image crop settingTap the [Image Crop] key to remove the checkmark.
6Tap the [Start] key to start scanning the originals.When scanning is completed, place the next group of originals and tap the [Start] key.Repeat the above step until you have scanned all originals, and then tap the [Read-End] key.When transmission is completed, a beep sounds.
• Restrictions when image crop is enabledThe following restrictions apply when image crop is enabled. Restricted items may change automatically in some cases.
•Scan size / send size: Only auto can be used.
•Two-sided original: Only one-sided original is enabled.
•Image Orientation: Cannot be used. (Each cropped original is corrected to the orientation that is least skewed.)
•Format: High compression and ultra-fine cannot be used.
•Compression / compression format: Black text emphasis cannot be used.
•One file per page: Cannot be set when the checkmark is enabled and the number is "1".
•The following functions cannot be used at the same time as image crop.Job Build, Slow Scan Mode, Mixed Size Original, Erase, Card Shot, Blank Page Skip, File, Quick File, Preview, Multicrop Business Card Scan, Card Shot (Multi)
• When the image crop setting is canceled, the following items retain the setting changes that occurred when image crop was enabled.Resolution, Scan Size, Send Size, 2-Sided Original, File Type, OCR, Compression Mode/Compression Ratio, Specified Pages per File
• Depending on the photo, it may not be extracted to the file correctly.

5-89
SCANNER/INTERNET FAX►OTHER FUNCTIONS
SCANNING MANY ORIGINALS AT ONCE (JOB BUILD)This function lets you separate an original consisting of numerous pages into sets, scan each set using the automatic document feeder, and transmit the pages in a single transmission. You can also send a fax by placing originals in both the automatic document feeder and on the document glass.Use this function when there are more original pages than can be placed at once in the automatic document feeder.When scanning originals that are separated into sets, scan the set that has the first page first.The settings that you select for the first set can be used for all remaining sets.
• Up to 9999 (excluding Internet Fax) pages can be scanned.Note that when the memory is being used for other jobs, fewer pages can be scanned.
• If the memory becomes full during scanning, a message will appear and the transmission will be canceled.
• The scan settings can be changed for each set of originals.
1Place originals in the automatic document feeder.Insert the originals all the way into the document feeder tray. Originals can be stacked up to the indicator line.► AUTOMATIC DOCUMENT FEEDER (page 1-77)
2Tap the mode display to switch to the initial screen of each mode.► Changing mode from each mode (page 5-10)
3Specify the destination.► RETRIEVING A DESTINATION FROM AN ADDRESS BOOK (page 5-15)► VIEWING A LIST OF THE SELECTED DESTINATIONS (page 5-18)► USING A SEARCH NUMBER TO RETRIEVE A DESTINATION (page 5-19)► ENTERING AN ADDRESS MANUALLY (page 5-20)► SPECIFYING A NETWORK FOLDER (page 5-21)► RETRIEVING A DESTINATION FROM A GLOBAL ADDRESS BOOK (page 5-22)► USING A TRANSMISSION LOG TO RESEND (page 5-24)
11
101
1
OriginalsOriginals
Originals are scanned in separate sets.
Indicator line

5-90
SCANNER/INTERNET FAX►OTHER FUNCTIONS
4Tap the [Job Build] key.A checkmark appears on the icon.
If you are performing Scan to E-mail, tap the [Others] key and then tap the [Job Build] key.
To cancel the job build setting:Tap the [Job Build] key to uncheck it.
5Change settings as needed.
6Tap the [Start] key to scan the first original page.
7Place the next set of originals and tap the [Start] key.Repeat until all originals have been scanned.
• If needed, tap [Change Setting] before tapping the [Start] key, and change the original scan settings and send settings for the next original. The setting changes will be applied to the next job.
• If you tap the [Preview] key, you cannot scan additional pages.
To cancel scanning:Tap the [CA] key. All the settings including scanned data will be cleared.
8 Tap the [Read-End] key.

5-91
SCANNER/INTERNET FAX►OTHER FUNCTIONS
ADJUSTING COLORS AND SHADING
ADJUSTING THE BACKGROUND BY MAKING LIGHT AREAS OF THE ORIGINAL DARKER OR LIGHTER (BACKGROUND ADJUSTMENT)You can adjust the background by making light areas of the original darker or lighter.
This function cannot be used in Internet fax mode.
1Place the original.Place the original in the document feeder tray of the automatic document feeder, or on the document glass.► AUTOMATIC DOCUMENT FEEDER (page 1-77)► DOCUMENT GLASS (page 1-79)
2Tap the mode display to switch to the initial screen of each mode.► Changing mode from each mode (page 5-10)
3Specify the destination.► RETRIEVING A DESTINATION FROM AN ADDRESS BOOK (page 5-15)► VIEWING A LIST OF THE SELECTED DESTINATIONS (page 5-18)► USING A SEARCH NUMBER TO RETRIEVE A DESTINATION (page 5-19)► ENTERING AN ADDRESS MANUALLY (page 5-20)► SPECIFYING A NETWORK FOLDER (page 5-21)► RETRIEVING A DESTINATION FROM A GLOBAL ADDRESS BOOK (page 5-22)► USING A TRANSMISSION LOG TO RESEND (page 5-24)
Adjust light areas in this way.
Level [+]
Level [-]
[+] makes the background darker. [-] makes the background lighter.

5-92
SCANNER/INTERNET FAX►OTHER FUNCTIONS
4Tap the [Others] key, and tap the [Background Adjustment] key.
5Tap or slide the slider to adjust the range to be suppressed.After the settings are completed, tap and [Back] key in sequence.
To cancel the background adjustment setting:Tap the [Off] key.
6Tap the [Start] key to start scanning of the original.• If you inserted the original pages in the document feeder tray, all pages are scanned.
A beep will sound to indicate that scanning and transmission have ended.• When you place the original on the document glass, scan each page one at a time.
When scanning finishes, place the next original and tap the [Start] key.A beep will sound to indicate that transmission has ended.
• You can tap the [Preview] key to check a preview of the image before sending an image. For more information, see "CHECKING THE IMAGE TO BE TRANSMITTED (page 5-66)". However, settings for this function cannot be changed in the preview screen.
• When the color mode setting is [Mono2], the background adjustment function will not operate.
Preview
StartBack
Others
Color Mode
Background AdjustmentAdjust Original Background Darkness.
Touch [+] darken background.Touch [-] erase background.
Off
On
Adjust Outline of ImageSharpness
Adjust Contrast of ImageContrast
Select File FormatFile Format
-3 0 3
CA

5-93
SCANNER/INTERNET FAX►OTHER FUNCTIONS
ADDING CONTRAST TO THE SCANNED ORIGINAL BEFORE TRANSMISSION (CONTRAST)
This function cannot be used in Internet fax mode.
1Place the original.Place the original in the document feeder tray of the automatic document feeder, or on the document glass.► AUTOMATIC DOCUMENT FEEDER (page 1-77)► DOCUMENT GLASS (page 1-79)
2Tap the mode display to switch to the initial screen of each mode.► Changing mode from each mode (page 5-10)
3Specify the destination.► RETRIEVING A DESTINATION FROM AN ADDRESS BOOK (page 5-15)► VIEWING A LIST OF THE SELECTED DESTINATIONS (page 5-18)► USING A SEARCH NUMBER TO RETRIEVE A DESTINATION (page 5-19)► ENTERING AN ADDRESS MANUALLY (page 5-20)► SPECIFYING A NETWORK FOLDER (page 5-21)► RETRIEVING A DESTINATION FROM A GLOBAL ADDRESS BOOK (page 5-22)► USING A TRANSMISSION LOG TO RESEND (page 5-24)
4Tap the [Others] key, and tap the [Contrast] key.
Blurry original Contrast is added for a clear image.

5-94
SCANNER/INTERNET FAX►OTHER FUNCTIONS
5Tap or slide the slider to adjust the contrast level.After the settings are completed, tap and [Back] keys in sequence.
To cancel the contrast settings:Tap the [Off] key.
6Tap the [Start] key to start scanning of the original.• If you inserted the original pages in the document feeder tray, all pages are scanned.
A beep will sound to indicate that scanning and transmission have ended.• When you place the original on the document glass, scan each page one at a time.
When scanning finishes, place the next original and tap the [Start] key. Repeat the procedure until all pages have been scanned and then tap the [Read-End] key.A beep will sound to indicate that scanning and transmission have ended.
You can tap the [Preview] key to check a preview of the image before sending an image. For more information, see "CHECKING THE IMAGE TO BE TRANSMITTED (page 5-66)". However, settings for this function cannot be changed in the preview screen.
Preview
StartBack
Others
Color Mode
Contrast
Off
On
Specify density of image to send.Exposure
1 2 3 54
Adjust Outline of ImageSharpness
Change Sending ResolutionResolution
Low High
CA

5-95
SCANNER/INTERNET FAX►OTHER FUNCTIONS
ENHANCING THE OUTLINE OF THE SCANNED ORIGINAL BEFORE TRANSMISSION (SHARPNESS)
This function cannot be used in Internet fax mode.
1Place the original.Place the original in the document feeder tray of the automatic document feeder, or on the document glass.► AUTOMATIC DOCUMENT FEEDER (page 1-77)► DOCUMENT GLASS (page 1-79)
2Tap the mode display to switch to the initial screen of each mode.► Changing mode from each mode (page 5-10)
3Specify the destination.► RETRIEVING A DESTINATION FROM AN ADDRESS BOOK (page 5-15)► VIEWING A LIST OF THE SELECTED DESTINATIONS (page 5-18)► USING A SEARCH NUMBER TO RETRIEVE A DESTINATION (page 5-19)► ENTERING AN ADDRESS MANUALLY (page 5-20)► SPECIFYING A NETWORK FOLDER (page 5-21)► RETRIEVING A DESTINATION FROM A GLOBAL ADDRESS BOOK (page 5-22)► USING A TRANSMISSION LOG TO RESEND (page 5-24)
4Tap the [Others] key, and tap the [Sharpness] key.
Blurry outlined original
Enhance the outline before transmitting.

5-96
SCANNER/INTERNET FAX►OTHER FUNCTIONS
5Tap or slide the slider to adjust the sharpness.After the settings are completed, tap and [Back] keys in sequence.
To cancel the sharpness setting:Tap the [Off] key.
6Tap the [Start] key to start scanning of the original.• If you inserted the original pages in the document feeder tray, all pages are scanned.
A beep will sound to indicate that scanning and transmission have ended.• When you place the original on the document glass, scan each page one at a time.
When scanning finishes, place the next original and tap the [Start] key. Repeat the procedure until all pages have been scanned and then tap the [Read-End] key.A beep will sound to indicate that scanning and transmission have ended.
You can tap the [Preview] key to check a preview of the image before sending an image. For more information, see "CHECKING THE IMAGE TO BE TRANSMITTED (page 5-66)". However, settings for this function cannot be changed in the preview screen.
Preview
StartBack
Others
Color Mode
Sharpness
Off
On
Specify density of image to send.Exposure
1 2 3 54
Adjust Contrast of ImageContrast
Change Sending ResolutionResolution
Less Sharp More Sharp
CA

5-97
SCANNER/INTERNET FAX►OTHER FUNCTIONS
REMOVING CHROMATIC COLORS FROM THE SCANNED ORIGINAL BEFORE TRANSMISSION (DROP OUT COLOR)
This function cannot be used in Internet fax mode.
1Place the original.Place the original in the document feeder tray of the automatic document feeder, or on the document glass.► AUTOMATIC DOCUMENT FEEDER (page 1-77)► DOCUMENT GLASS (page 1-79)
2Tap the mode display to switch to the initial screen of each mode.► Changing mode from each mode (page 5-10)
3Specify the destination.► RETRIEVING A DESTINATION FROM AN ADDRESS BOOK (page 5-15)► VIEWING A LIST OF THE SELECTED DESTINATIONS (page 5-18)► USING A SEARCH NUMBER TO RETRIEVE A DESTINATION (page 5-19)► ENTERING AN ADDRESS MANUALLY (page 5-20)► SPECIFYING A NETWORK FOLDER (page 5-21)► RETRIEVING A DESTINATION FROM A GLOBAL ADDRESS BOOK (page 5-22)► USING A TRANSMISSION LOG TO RESEND (page 5-24)
4Tap the [Others] key, and then tap the [Drop Out Color] key.A checkmark appears on the icon.After the settings are completed, tap the [Back] key.
To cancel the drop out color settingTap the [Drop Out Color] key to uncheck it.
5-98
SCANNER/INTERNET FAX►OTHER FUNCTIONS
5Tap the [Start] key to start scanning of the original.• If you inserted the original pages in the document feeder tray, all pages are scanned.
A beep will sound to indicate that scanning and transmission have ended.• When you place the original on the document glass, scan each page one at a time.
When scanning finishes, place the next original and tap the [Start] key. Repeat the procedure until all pages have been scanned and then tap the [Read-End] key.A beep will sound to indicate that scanning and transmission have ended.
You can tap the [Preview] key to check a preview of the image before sending an image. For more information, see "CHECKING THE IMAGE TO BE TRANSMITTED (page 5-66)".Tap the [Change Setting] key in the scan-end confirmation screen to change the exposure, resolution, scan size, and send size. (However, when scanning each even-numbered page of the original, only the exposure can be changed.)

5-99
SCANNER/INTERNET FAX►OTHER FUNCTIONS
ADJUSTING RED/GREEN/BLUE (RGB Adjust)This function heightens or lightens any one of the three color components R (red), G (green), and B (blue).
1Place the original.Place the original in the document feeder tray of the automatic document feeder, or on the document glass.► AUTOMATIC DOCUMENT FEEDER (page 1-77)► DOCUMENT GLASS (page 1-79)
2Tap the mode display to switch to the initial screen of each mode.► Changing mode from each mode (page 5-10)
3Specify the destination.► RETRIEVING A DESTINATION FROM AN ADDRESS BOOK (page 5-15)► VIEWING A LIST OF THE SELECTED DESTINATIONS (page 5-18)► USING A SEARCH NUMBER TO RETRIEVE A DESTINATION (page 5-19)► ENTERING AN ADDRESS MANUALLY (page 5-20)► SPECIFYING A NETWORK FOLDER (page 5-21)► RETRIEVING A DESTINATION FROM A GLOBAL ADDRESS BOOK (page 5-22)► USING A TRANSMISSION LOG TO RESEND (page 5-24)
4Tap the [Others] key, and tap the [RGB Adjust] key.
5Tap of the color you want to adjust or slide the slider to adjust the coloring.After the settings are completed, tap and [Back] keys in sequence.
To cancel the RGB Adjust setting:Tap the [Off] key.
R (Red)+
G (Green)+
B (Blue)+
Preview
StartBack
Others
CA
Color Mode
RGB AdjustThis setting is only applied to color jobs.
Off
On
Specify density of image to send.Exposure
-2 -1 0 21
-2 -1 0 21
-2 -1 0 21
R
G
B
Touch [+] to darken and [-] to lighten selected color tone.

5-100
SCANNER/INTERNET FAX►OTHER FUNCTIONS
6Tap the [Start] key to start scanning of the original.• If you inserted the original pages in the document feeder tray, all pages are scanned.
A beep will sound to indicate that scanning and transmission have ended.• When you place the original on the document glass, scan each page one at a time.
When scanning finishes, place the next original and tap the [Start] key. Repeat the procedure until all pages have been scanned and then tap the [Read-End] key.A beep will sound to indicate that scanning and transmission have ended.
You can tap the [Preview] key to check a preview of the image before sending an image. For more information, see "CHECKING THE IMAGE TO BE TRANSMITTED (page 5-66)".Tap the [Change Setting] key in the scan-end confirmation screen to change the exposure, resolution, scan size, and send size. (However, when scanning each even-numbered page of the original, only the exposure can be changed.)

5-101
SCANNER/INTERNET FAX►OTHER FUNCTIONS
SCANNING ORIGINALS
ERASING PERIPHERAL SHADOWS ON THE IMAGE (ERASE)When scanning thick originals or books, erase any peripheral shadows that may be produced on the image.
Scanning a thick book
Erase modes
Shadows appear here
Not using the erase function
Using the erase function
Shadows appear in the image.
No shadows appear.
• This function erases the parts of the image where shadows tend to form, but does not detect shadows and erase only the shadows.
• If a ratio setting is used in combination with an erase setting, the erase width will change according to the selected ratio.For example, if you set an erase width of 1/2" (10 mm) and reduce the image to 70% before scanning it, the erase width will be reduced to 3/8" (7 mm).
• When the erase setting is selected, the image orientation will be forcibly portrait.
To change the default erase width setting:In "Settings (administrator)", select [System Settings] → [Image Send Settings] → [Common Settings] → [Condition Settings] → [Erase Width Adjustment].The width can be set from 0" to 1" (0 mm to 20 mm). The factory default setting is 1/2" (10 mm). The setting changed here will apply to [System Settings] → [Copy Settings] → [Condition Settings] → [Erase Width Adjustment] in "Settings".
Outer Frame Erase Side EraseCenter Erase Edge + Center Erase

5-102
SCANNER/INTERNET FAX►OTHER FUNCTIONS
1Place the original.Place the original in the document feeder tray of the automatic document feeder, or on the document glass.► AUTOMATIC DOCUMENT FEEDER (page 1-77)► DOCUMENT GLASS (page 1-79)
2Tap the mode display to switch to the initial screen of each mode.► Changing mode from each mode (page 5-10)
3Specify the destination.► RETRIEVING A DESTINATION FROM AN ADDRESS BOOK (page 5-15)► VIEWING A LIST OF THE SELECTED DESTINATIONS (page 5-18)► USING A SEARCH NUMBER TO RETRIEVE A DESTINATION (page 5-19)► ENTERING AN ADDRESS MANUALLY (page 5-20)► SPECIFYING A NETWORK FOLDER (page 5-21)► RETRIEVING A DESTINATION FROM A GLOBAL ADDRESS BOOK (page 5-22)► USING A TRANSMISSION LOG TO RESEND (page 5-24)
4Tap the [Others] key, and tap the [Erase] key.
5Tap the checkbox of the edge that you wish to erase, and specify the erase position.Check that the tapped checkbox is set to .If the [Specify Frame] key is tapped, the [Up], [Down], [Left], and [Right] checkboxes are set to .If the [Specify Frame+Center] key is tapped, all the checkboxes are set to .
Specify the erase edge on the reverse side when erasing edges of one to three sides of Up, Down, Left, and Right on the front side to scan a 2-sided original.
• If the [Reverse Erase Position of The Back Face] checkbox is set to , the edge in the position opposite to the erased edge on the front side will be erased.
• If the [Reverse Erase Position of The Back Face] checkbox is set to , the edge in the same position as on the front side will be erased.
Preview CA
Start

5-103
SCANNER/INTERNET FAX►OTHER FUNCTIONS
6Specify the erase width.After the settings are completed, tap and [Back] keys in sequence.
• Tap the numeric value display indicating the margin shift area on the front side or reverse side, and enter the area using the numeric keys.
• To quickly set the area, first specify a value close to the desired value by the numeric keys, then adjust it with .
To cancel the erase setting:Tap the [Clear] key.
7Tap the [Start] key to start scanning of the original.• If you inserted the original pages in the document feeder tray, all pages are scanned.
A beep will sound to indicate that scanning and transmission have ended.• When you place the original on the document glass, scan each page one at a time.
When scanning finishes, place the next original and tap the [Start] key.Repeat until all pages have been scanned and then tap the [Read-End] key.A beep will sound to indicate that transmission has ended.
You can tap the [Preview] key to check a preview of the image before sending an image. For more information, see "CHECKING THE IMAGE TO BE TRANSMITTED (page 5-66)".

5-104
SCANNER/INTERNET FAX►OTHER FUNCTIONS
SCANNING A THIN ORIGINAL (SLOW SCAN MODE)Use this function when you wish to scan thin originals using the automatic document feeder. This function helps prevent thin originals from misfeeding.
When slow scan mode is selected, 2-sided scanning is not possible.
1Place the original in the document feeder tray of the automatic document feeder.Adjust the original guides slowly.► AUTOMATIC DOCUMENT FEEDER (page 1-77)
If the originals are inserted with too much force, they may crumple and misfeed.
2Tap the mode display to switch to the initial screen of each mode.► Changing mode from each mode (page 5-10)
3Specify the destination.► RETRIEVING A DESTINATION FROM AN ADDRESS BOOK (page 5-15)► VIEWING A LIST OF THE SELECTED DESTINATIONS (page 5-18)► USING A SEARCH NUMBER TO RETRIEVE A DESTINATION (page 5-19)► ENTERING AN ADDRESS MANUALLY (page 5-20)► SPECIFYING A NETWORK FOLDER (page 5-21)► RETRIEVING A DESTINATION FROM A GLOBAL ADDRESS BOOK (page 5-22)► USING A TRANSMISSION LOG TO RESEND (page 5-24)
DCBA
DCB
A

5-105
SCANNER/INTERNET FAX►OTHER FUNCTIONS
4Tap the [Others] key, and tap the [Slow Scan Mode] key.A checkmark appears on the icon.After the settings are completed, tap the [Back] key.
To cancel the slow scan Mode settingTap the [Slow Scan Mode] key to uncheck it.
5Tap the [Start] key to start scanning of the original.A beep will sound to indicate that scanning and transmission have ended.
Tap the [Preview] key to check the preview of an image before sending a fax. For more information, see "CHECKING THE IMAGE TO BE TRANSMITTED (page 5-66)". However, settings for this function cannot be changed in the preview screen.
Preview CA
Start8½x11 8½x11

5-106
SCANNER/INTERNET FAX►OTHER FUNCTIONS
ELIMINATING BLANK PAGES FROM A TRANSMISSION (BLANK PAGE SKIP)If the scanned original contains blank pages, this function skips them to send only non-blank pages.The machine detects blank pages, enabling you to skip useless blank sheets without checking an original.
• If an original of which one side is blank is scanned, blank pages are skipped for 2-sided sending.
• In a broadcast transmission to destinations including fax and Internet fax destinations, this function is applied to scan mode destinations only.
• Depending on the original, some pages that are not blank may be detected as blank pages and thus not being sent, and some pages that are blank may not be detected as blank and thus sent.
• This function cannot be used in Internet fax mode.
• If the [Send Same Image as Fax Address] key is tapped, this function is canceled if a fax address is specified for the destination.
1Place the original.Place the original in the document feeder tray of the automatic document feeder, or on the document glass.► AUTOMATIC DOCUMENT FEEDER (page 1-77)► DOCUMENT GLASS (page 1-79)
2Tap the mode display to switch to the initial screen of each mode.► Changing mode from each mode (page 5-10)
3Specify the destination.► RETRIEVING A DESTINATION FROM AN ADDRESS BOOK (page 5-15)► VIEWING A LIST OF THE SELECTED DESTINATIONS (page 5-18)► USING A SEARCH NUMBER TO RETRIEVE A DESTINATION (page 5-19)► ENTERING AN ADDRESS MANUALLY (page 5-20)► SPECIFYING A NETWORK FOLDER (page 5-21)► RETRIEVING A DESTINATION FROM A GLOBAL ADDRESS BOOK (page 5-22)► USING A TRANSMISSION LOG TO RESEND (page 5-24)
Blank page
Do not transmit blank pages.
Transmission

5-107
SCANNER/INTERNET FAX►OTHER FUNCTIONS
4Tap the [Others] key, and tap the [Blank Page Skip] key.
5Tap the [Skip Blank Page] or [Skip Blank and Back Shadow] key.After the settings are completed, tap and [Back] keys in sequence.
To cancel the Blank Page Skip setting:Tap the [Off] key.
6Tap the [Start] key to start scanning of the original.A beep will sound to indicate that scanning has ended.
Tap the [Preview] key to check the preview of an image before sending a fax. For more information, see "CHECKING THE IMAGE TO BE TRANSMITTED (page 5-66)".
7When scanning ends, check the number of original sheets and the number of sheets to be sent and tap the [OK] key to start transmission.• When Job Build mode is used, the confirmation message
will appear after the [Start] key is tapped.• On the confirmation screen, the number of scanned
original sheets appears in (A), the number of scanned sides in (B), and the number of sheets to be sent excluding blank pages in (C).For example, if five original sheets that include two blank pages are scanned by duplex scanning, (A) will show "5", (B) will show "10", and (C) will show "8".
If this step is not performed within one minute after the above confirmation screen appears, the scanned image and settings will be cleared and the base screen will reappear.Scanning will not be completed automatically and the image will not be reserved for transmission.
Preview
Start
CA
5 pages of original have (P.8)been scanned. 10 sheets of originalwill be Perform the job?
Cancel OK
8½x11 8½x11
(A)(C) (B)
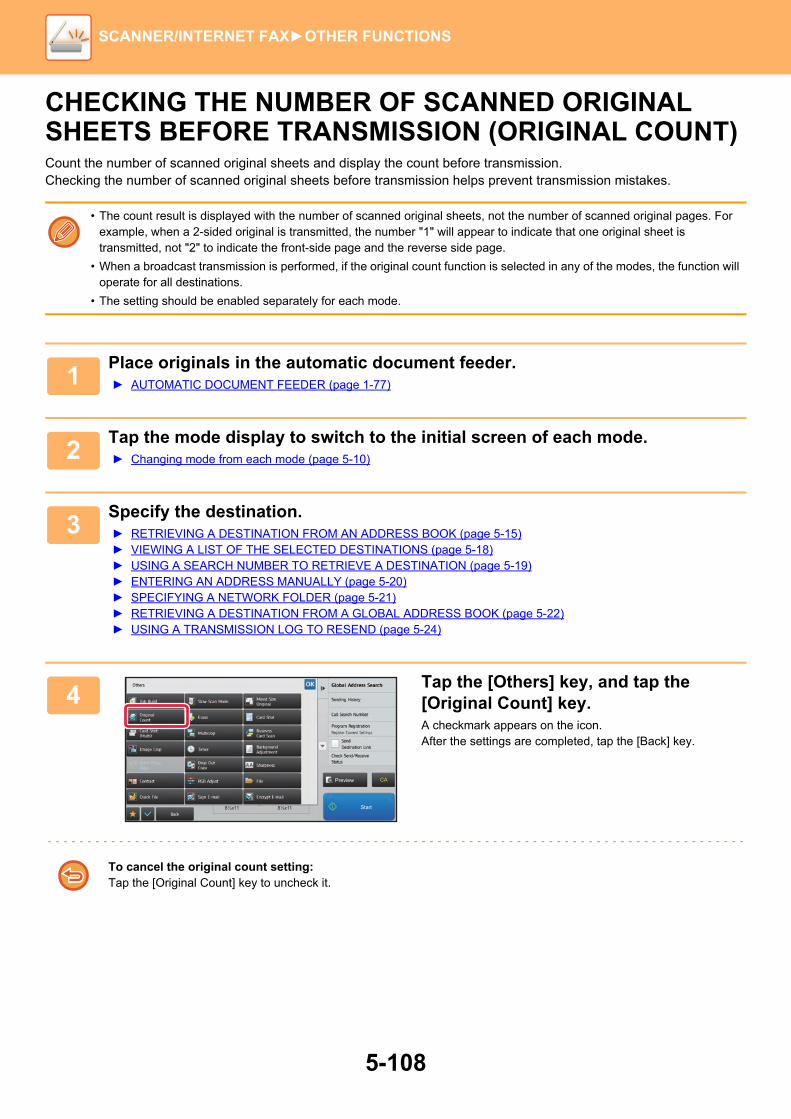
5-108
SCANNER/INTERNET FAX►OTHER FUNCTIONS
CHECKING THE NUMBER OF SCANNED ORIGINAL SHEETS BEFORE TRANSMISSION (ORIGINAL COUNT)Count the number of scanned original sheets and display the count before transmission.Checking the number of scanned original sheets before transmission helps prevent transmission mistakes.
• The count result is displayed with the number of scanned original sheets, not the number of scanned original pages. For example, when a 2-sided original is transmitted, the number "1" will appear to indicate that one original sheet is transmitted, not "2" to indicate the front-side page and the reverse side page.
• When a broadcast transmission is performed, if the original count function is selected in any of the modes, the function will operate for all destinations.
• The setting should be enabled separately for each mode.
1Place originals in the automatic document feeder.► AUTOMATIC DOCUMENT FEEDER (page 1-77)
2Tap the mode display to switch to the initial screen of each mode.► Changing mode from each mode (page 5-10)
3Specify the destination.► RETRIEVING A DESTINATION FROM AN ADDRESS BOOK (page 5-15)► VIEWING A LIST OF THE SELECTED DESTINATIONS (page 5-18)► USING A SEARCH NUMBER TO RETRIEVE A DESTINATION (page 5-19)► ENTERING AN ADDRESS MANUALLY (page 5-20)► SPECIFYING A NETWORK FOLDER (page 5-21)► RETRIEVING A DESTINATION FROM A GLOBAL ADDRESS BOOK (page 5-22)► USING A TRANSMISSION LOG TO RESEND (page 5-24)
4Tap the [Others] key, and tap the [Original Count] key.A checkmark appears on the icon.After the settings are completed, tap the [Back] key.
To cancel the original count setting:Tap the [Original Count] key to uncheck it.
Preview
Start
CA
8½x11 8½x11

5-109
SCANNER/INTERNET FAX►OTHER FUNCTIONS
5Tap the [Start] key to start scanning of the original.A beep will sound to indicate that scanning has ended.
Tap the [Preview] key to check the preview of an image before sending a fax. For more information, see "CHECKING THE IMAGE TO BE TRANSMITTED (page 5-66)". However, settings for this function cannot be changed in the preview screen.
6Check the number of original sheets.The number that is displayed is the number of scanned original sheets, not the number of scanned original pages. For example, when 2-sided copying is performed using one original, the number "1" will appear to indicate that one original sheet was scanned, not "2" to indicate the front-side page and the reverse side page.
7Tap the [OK] key to start transmission.
If this function is combined with [Job Build], the count result is displayed after the [Read-End] key has been tapped.If this step is not performed within one minute after the above confirmation screen appears, the scanned image and settings will be cleared and the base screen will reappear. Scanning will not be completed automatically and the image will not be reserved for transmission.
If the displayed number of original sheets is different from the actual number of sheets:Tap the [Cancel] key and then tap the [OK] key in the message screen to clear all scanned data. Scan settings and destination settings will not be cleared. Insert the original sheets in the document feeder tray again and tap the [Start] key to re-scan.
8½x11 8½x11
1 pages of original (Pg.No.2)have been scanned.Send the scanned data?
Cancel OK

5-110
SCANNER/INTERNET FAX►OTHER FUNCTIONS
SPECIFIC FUNCTIONS
ADDING YOUR SENDER INFORMATION TO FAXES (I-FAX OWN ADDRESS SEND)Your sender information (date, time, sender name, sender address, number of pages) is automatically added to the top of the file you transmit.
Example of the sender information printed (1) Date, time: The date and time of transmission. (2) Sender name: The sender name programmed in the machine. (3) Source Address. (4) Page numbers: Page number/total pages.
This function cannot be used in scan mode or data entry mode.
• Storing and setting sender informationDate, time: In "Settings", select [System Settings] → [Common Settings] → [Clock Adjust].Sender name, sender address: In "Settings (administrator)", select [System Settings] → [Image Send Settings] → [Common Settings] → [Own Number and Name Set] → [Sender Data Registration]. If you intend to use the I-Fax Own Address Send function, be sure to configure this information.Page numbers: Select whether or not to include page numbers using [System Settings] → [Image Send Settings] → [Internet Fax Settings] → [Send Setting] → [Printing Page Number at Receiver] in "Settings (administrator)".
• Position of sender informationThe sender information is printed at the top of the scanned image data. This makes the transmission data longer than the scan size, so it may be reduced or divided onto two pages when printed by the receiving machine.
(1) (2) (3) (4)
Tuesday, August 8, 2017, 15:00 AAAAA Fax Number: 0123456789 P.001 / 001

5-111
SCANNER/INTERNET FAX►OTHER FUNCTIONS
CHANGING THE PRINT SETTINGS FOR THE TRANSACTION REPORT (TRANSACTION REPORT)A transaction report is automatically printed out to alert you when an Internet fax transmission fails or when a broadcast transmission is performed.The transaction report contains a description of the transmission (date, start time, name of destination, time required, number of pages, result, etc.).► INFORMATION APPEARING IN THE RESULT COLUMN (page 5-128)
Transaction reports are printed based on conditions set in the setting mode. Select different conditions for a transmission as required.
This function cannot be used in scan mode or data entry mode.
For a broadcast transmission, changes to the transaction report print conditions apply to all destinations.
1Place the original.Place the original in the document feeder tray of the automatic document feeder, or on the document glass.► AUTOMATIC DOCUMENT FEEDER (page 1-77)► DOCUMENT GLASS (page 1-79)
2Tap the mode display to switch to the initial screen of Internet Fax mode.► Changing mode from each mode (page 5-10)
3Specify the destination.► RETRIEVING A DESTINATION FROM AN ADDRESS BOOK (page 5-15)► VIEWING A LIST OF THE SELECTED DESTINATIONS (page 5-18)► USING A SEARCH NUMBER TO RETRIEVE A DESTINATION (page 5-19)► ENTERING AN ADDRESS MANUALLY (page 5-20)► SPECIFYING A NETWORK FOLDER (page 5-21)► RETRIEVING A DESTINATION FROM A GLOBAL ADDRESS BOOK (page 5-22)► USING A TRANSMISSION LOG TO RESEND (page 5-24)
4Tap the [Others] key, and tap the [Transaction Report] key.

5-112
SCANNER/INTERNET FAX►OTHER FUNCTIONS
Original image in transaction reportWhen [Print Original Image] is enabled, the first page of the transmitted original is printed on the same sheet as the transaction report. The original image is reduced to allow it to fit on the sheet. If the vertical scanning length (X direction) of the original is longer than 432 mm (17-1/64"), the part that exceeds 432 mm (17-1/64") may be cut off.
5Tap the key of the print settings.After the settings are completed, tap and [Back] keys in sequence.
To cancel the transaction report settings:Tap the [Do not Print] key.
• The print conditions for a transaction report are as follows:
• "Always Print": A transaction report is printed no matter whether the transmission succeeds or fails.
• "Print at Error": A transaction report is printed when transmission fails.
• "Do not Print": Do not print a transaction report.
• Set the [Print Original Image] checkbox to to include part of the transmitted original in the transaction report.
6Tap the [Start] key to start scanning of the original.• If you inserted the original pages in the document feeder tray, all pages are scanned.
A beep will sound to indicate that scanning and transmission have ended.• When you place the original on the document glass, scan each page one at a time.
When scanning finishes, place the next original and tap the [Start] key. Repeat the procedure until all pages have been scanned and then tap the [Read-End] key.A beep will sound to indicate that scanning and transmission have ended.
You can tap the [Preview] key to check a preview of the image before sending an image. For more information, see "CHECKING THE IMAGE TO BE TRANSMITTED (page 5-66)".
reception memory 0%
CAPreview
ReceiveStart

5-113
SCANNER/INTERNET FAX►OTHER FUNCTIONS
STARTING A TRANSMISSION AT A SPECIFIED TIME (TIMER TRANSMISSION)Specify a time at which a transmission or broadcast transmission will automatically take place. Transmission begins automatically at the specified time.This function is helpful when you wish to perform reserved, broadcast or other transmissions during your absence or at night or other times when telephone rates are low.
• When a timer transmission is set, keep the main power switch in the " " position. If the main power switch is in the " " position at the specified time, transmission will not take place.
• When performing a timer transmission, you must scan the original into memory when you set up the transmission. It is not possible to leave the document in the document feeder tray or on the document glass and have it scanned at the reserved time of transmission.
• Up to 100 timer transmissions can be stored at once.
• Settings selected for a timer transmission (exposure, resolution, and other functions) are automatically cleared after the transmission is finished. (However, when the document filing function is used, the scanned original image and settings are stored in the built-in hard drive.)
• If another transmission is in progress when the specified time arrives, the timer transmission will begin after that transmission is finished.
• If a job scheduled for timer transmission is given priority on the job status screen, the timer will be canceled. The transmission will begin as soon as the job in progress is completed.► PRIORITY PROCESSING OF A RESERVED JOB (page 1-83)
• The time can be specified up to a week in advance.
• After the timer transmission settings are specified, start the transmission in the same way as other functions.
• A timer transmission can be deleted in the job status screen.
1Place the original.Place the original in the document feeder tray of the automatic document feeder, or on the document glass.► AUTOMATIC DOCUMENT FEEDER (page 1-77)► DOCUMENT GLASS (page 1-79)
2Tap the mode display to switch to the initial screen of each mode.► Changing mode from each mode (page 5-10)
During the day, configure the setting to transmit received data at 20:00.
At 20:00, the transmission begins automatically.

5-114
SCANNER/INTERNET FAX►OTHER FUNCTIONS
3Specify the destination.► RETRIEVING A DESTINATION FROM AN ADDRESS BOOK (page 5-15)► VIEWING A LIST OF THE SELECTED DESTINATIONS (page 5-18)► USING A SEARCH NUMBER TO RETRIEVE A DESTINATION (page 5-19)► ENTERING AN ADDRESS MANUALLY (page 5-20)► SPECIFYING A NETWORK FOLDER (page 5-21)► RETRIEVING A DESTINATION FROM A GLOBAL ADDRESS BOOK (page 5-22)► USING A TRANSMISSION LOG TO RESEND (page 5-24)
4Tap the [Others] key, and tap the [Timer] key.
5Tap [On] key.
6Specify the date.
7Specify the time (hour and minute) in 24-hour format.After the settings are completed, tap and [Back] keys in sequence.
• Tap the areas displaying the hour and minute respectively, and enter the values using the numeric keys.
• It is convenient to use to finely adjust the time.
• The setting will show the current time. If the time is not correct, press the [CA] key to cancel the operation. Correct the time in setting mode and then perform the timer transmission procedure. ► BEFORE USING THE MACHINE AS A NETWORK SCANNER FUNCTION (page 5-4)
To cancel the Timer Transmission settings:Tap the [Off] key.
To set the date and time of the machine:In "Settings", select [System Settings] → [Common Settings] → [Clock Adjust].If [Disabling of Clock Adjustment] has been enabled, the date and time cannot be modified. Select [System Settings] in "Settings (administrator)" and select [System Settings] → [Common Settings] → [Enable/Disable Settings] to disable the [Disabling of Clock Adjustment] setting.
Preview
StartBack
Others
CA
Timer
Off
On
Store Data in FolderFile
Receive Other's OriginalPolling
Store Data TemporarilyQuick File
08/08/2017 Tue
10 15
Today
Monday
Wednesday
Friday
Sunday
Tuesday
Thursday
Saturday

5-115
SCANNER/INTERNET FAX►OTHER FUNCTIONS
8Tap the [Start] key to start scanning of the original.• If you inserted the original pages in the document feeder tray, all pages are scanned.
A beep will sound to indicate that scanning has ended, and the machine stands by for transmission.• When you place the original on the document glass, scan each page one at a time.
When scanning finishes, place the next original and tap the [Start] key.Repeat until all pages have been scanned and then tap the [Read-End] key.A beep will sound to indicate that scanning has ended, and the machine stands by for transmission.
You can tap the [Preview] key to check a preview of the image before sending an image. For more information, see "CHECKING THE IMAGE TO BE TRANSMITTED (page 5-66)".
The original is scanned into memory. The original cannot be scanned at a specified time.

5-116
SCANNER/INTERNET FAX►OTHER FUNCTIONS
ADDING A SIGNATURE WHEN SENDING AN IMAGE (ELECTRONIC SIGNATURE)You can add a signature when sending a scanned image. This allows the recipient to check your sender information in the electronic signature.
This function is available for Scan to E-mail.
To add an electronic signature to a scanned image
• In "Settings (administrator)", select [System Settings] → [Security Settings] → [S/MIME Settings] → [Condition Settings].
• When [Select at Sending] is selected in "Sign E-mail" in "Settings (administrator)", you can specify whether or not an electronic signature is added each time you send an image. When [Always Enable] is selected, the setting cannot be changed.
1Place the original.Place the original in the document feeder tray of the automatic document feeder, or on the document glass.► AUTOMATIC DOCUMENT FEEDER (page 1-77)► DOCUMENT GLASS (page 1-79)
2Tap the mode display to switch to the initial screen of E-mail mode.► Changing mode from each mode (page 5-10)
3Specify the destination.► RETRIEVING A DESTINATION FROM AN ADDRESS BOOK (page 5-15)► VIEWING A LIST OF THE SELECTED DESTINATIONS (page 5-18)► USING A SEARCH NUMBER TO RETRIEVE A DESTINATION (page 5-19)► ENTERING AN ADDRESS MANUALLY (page 5-20)► SPECIFYING A NETWORK FOLDER (page 5-21)► RETRIEVING A DESTINATION FROM A GLOBAL ADDRESS BOOK (page 5-22)► USING A TRANSMISSION LOG TO RESEND (page 5-24)
4Tap the [Others] key, and tap the [Sign E-mail] key.A checkmark appears on the icon.After the settings are completed, tap the [Back] key.
To cancel the sign E-mail settingTap the [Sign E-mail] key to uncheck it.
Preview
Start
CA
8½x11 8½x11

5-117
SCANNER/INTERNET FAX►OTHER FUNCTIONS
5Tap the [Start] key to start scanning of the original.• If you inserted the original pages in the document feeder tray, all pages are scanned.
A beep will sound to indicate that scanning and transmission have ended.• When you place the original on the document glass, scan each page one at a time.
When scanning finishes, place the next original and tap the [Start] key. Repeat the procedure until all pages have been scanned and then tap the [Read-End] key.A beep will sound to indicate that scanning and transmission have ended.
You can tap the [Preview] key to check a preview of the image before sending an image. For more information, see "CHECKING THE IMAGE TO BE TRANSMITTED (page 5-66)".

5-118
SCANNER/INTERNET FAX►OTHER FUNCTIONS
ENCRYPTING THE TRANSMITTED DATA (ENCRYPTION)You can encrypt the transmitted data to strengthen security.
This function is available for Scan to E-mail.
To encrypt transmitted data
• In "Settings (administrator)", select [System Settings] → [Security Settings] → [S/MIME Settings] → [Condition Settings].
• When [Select at Sending] is selected in "Encrypt E-mail" in "Settings (administrator)", you can specify whether or not the data is encrypted each time you send an image. When [Always Enable] is selected, the setting cannot be changed.
1Place the original.Place the original in the document feeder tray of the automatic document feeder, or on the document glass.► AUTOMATIC DOCUMENT FEEDER (page 1-77)► DOCUMENT GLASS (page 1-79)
2Tap the mode display to switch to the initial screen of E-mail mode.► Changing mode from each mode (page 5-10)
3Specify the destination.► RETRIEVING A DESTINATION FROM AN ADDRESS BOOK (page 5-15)► VIEWING A LIST OF THE SELECTED DESTINATIONS (page 5-18)► USING A SEARCH NUMBER TO RETRIEVE A DESTINATION (page 5-19)► RETRIEVING A DESTINATION FROM A GLOBAL ADDRESS BOOK (page 5-22)
• Data encryption is not possible when the address is directly entered.
• Encrypted data can only be sent to an address for which you have registered a user certificate. Register a user certificate for the address in "Settings (Web version)" - [Address Book] → [E-mail] → "User Certificate". Only one E-mail address can be registered for an address that has a user certificate.
• If the "Disable sending to the addresses which cannot be encrypted." checkbox is ( ) in "Settings (administrator)" - [System Settings] → [Security Settings] → [S/MIME Settings] → [Condition Settings] → [Encryption Settings], addresses without a user certificate cannot be selected. When the checkmark is removed ( ), the data is sent without encryption.
4Tap the [Others] key, and tap the [Encrypt E-mail] key.A checkmark appears on the icon.After the settings are completed, tap the [Back] key.
To cancel the encryption settingTap the [Encrypt E-mail] key to remove the checkmark.
Preview
Start
CA
8½x11 8½x11

5-119
SCANNER/INTERNET FAX►OTHER FUNCTIONS
5Tap the [Start] key to start scanning of the original.• If you inserted the original pages in the document feeder tray, all pages are scanned.
A beep will sound to indicate that scanning and transmission have ended.• When you place the original on the document glass, scan each page one at a time.
When scanning finishes, place the next original and tap the [Start] key. Repeat the procedure until all pages have been scanned and then tap the [Read-End] key.A beep will sound to indicate that scanning and transmission have ended.
You can tap the [Preview] key to check a preview of the image before sending an image. For more information, see "CHECKING THE IMAGE TO BE TRANSMITTED (page 5-66)".

5-120
SCANNER/INTERNET FAX►OTHER FUNCTIONS
SENDING A SCANNED DOCUMENT BY GMAIL OR EXCHANGEYou can send e-mail from the machine using Gmail or Exchange.
GMAIL LINK FUNCTIONGmail Connector is a function for sending scanned documents by e-mail via the Gmail server using a Google account.To use Gmail Connector, you must log in using an account that has a Gmail address in the format "***@Gmail.com".
Before using Gmail link functionThis section explains settings that must be configured before you can use Gmail link function.
Settings required on the machine
System settingsEnable the "Gmail" setting in "Settings (Administrator)" → [System Settings] → [Network Settings] → [External Service Connect] → [E-mail Connect Settings].
Add the Gmail icon to the home screen
1Tap [Edit Home] on the action panel.
2In home edit mode, tap an unused shortcut key.
3Tap the [Gmail] key.
Sending a scanned document by Gmail or Exchange

5-121
SCANNER/INTERNET FAX►OTHER FUNCTIONS
Sending a scanned document by Gmail link functionThe steps for scanning a document on the machine and sending the scanned image by Gmail are explained below.
4Tap [Exit Home Edit Mode] on the action panel.You will exit home edit mode and return to the home screen.
To edit the home screen, refer to "U/I Customize Guide".
1Tap the [Gmail] key in the home screen.The Gmail login screen appears.
2Enter your Google account information.The settings screen appears.
3Select the address of the recipient and scan settings.For the address and scan settings, refer to "SETTINGS SCREEN (page 5-124)".
4To view a preview of the scanned image, tap the [Preview] key.
5Tap the [Start] key.The sent e-mail is managed in “Sent Mail” of Gmail.
5-122
SCANNER/INTERNET FAX►OTHER FUNCTIONS
EXCHANGE LINK FUNCTIONThe Exchange Connect function uses Exchange Server and Exchange Online provided by Microsoft to send scanned files by e-mail.You can connect to "Microsoft Exchange Server 2010/2013" or "Exchange Online (Cloud Service)".
Before using Exchange link functionThis section explains the settings that must be configured before you can use Exchange link function.
Settings required on the machine
System settingsTo connect to Exchange Server:Enter the host name (FQDN) of the Exchange server in “Hostname” of "Settings (Administrator)" → [System Settings] → [Network Settings] → [External Service Connect] → [E-mail Connect Settings]→[Exchange].To connect to Exchange Online:Select "Use Exchange Online" in Settings (administrator) -"System Settings"→"Network Settings"→"External Service Connect"→"E-mail Connect Settings"→"Exchange".
Add the Exchange Connector icon to the home screen
1Tap [Edit Home] on the action panel.
2In home edit mode, tap an unused shortcut key.
3Tap the [Exchange (E-Mail)] key.
4Tap [Exit Home Edit Mode] on the action panel.Exit home edit mode and return to the home screen.
To edit the home screen, refer to "U/I Customize Guide".
5-123
SCANNER/INTERNET FAX►OTHER FUNCTIONS
Sending a scanned document by ExchangeThe steps for scanning a document on the machine and sending the scanned image by Exchange are explained below.
1Tap the [Exchange (E-Mail)] key in the home screen.The Exchange login screen appears.
2Enter the user name and password used to connect to the Exchange server or the Exchange Online.The settings screen appears.
3Select the address of the recipient and scan settings.For the address and scan settings, refer to "SETTINGS SCREEN (page 5-124)".
4To view a preview of the scanned image, tap the [Preview] key.
5Tap the [Start] key.The sent e-mail is managed in “Sent Mail” of Exchange.

5-124
SCANNER/INTERNET FAX►OTHER FUNCTIONS
SETTINGS SCREENThis section explains the settings screen of Gmail link function and Exchange link function.You can use this screen to enter recipient settings, the e-mail subject, a message, and the name of the file to be attached. You can also change the account used to log in and select advanced scan settings.
Recipient settingsEnter the desired recipient addresses in the To, Cc, and Bcc text boxes.To enter multiple addresses, separate the addresses by commas. You can also search for addresses in the address book.
Search screenYou can tap next to the To, Cc, and Bcc text boxes to search for a saved address.Enter the text you want to find in the text box and tap [Search Start]. A list of the addresses that begin with the entered text will appear. You can select multiple addresses from the list.When searching for an address, you can switch between the regular address book and a global address book.To search again, enter the text you want to find in the text box and tap [Search Again].
Checking an addressYou can tap the [Address List] key to show the list of addresses to be used.You can check the addresses in To, Cc, and Bcc.You can also remove addresses from the list. To remove an address, select the address and tap the [Delete] key.
Subject, message, and file name settingsEnter a subject for the e-mail, a message, and the file name of the scanned image to be attached.
Changing the login accountYou can change the account currently used for login to a different account.Tap the [Switch Accounts] key to open the Gmail or Exchange login screen, and enter the user name and password of the account that you want to use.
When a contact is selected in the list, no additional contacts can be directly entered.
When an address is entered in To, Cc, or Bcc, appears. To cancel all addresses that are displayed, tap .

5-125
SCANNER/INTERNET FAX►OTHER FUNCTIONS
Scan settingsTo select advanced scan settings, tap the [Detail] key.
Details screenThe scan settings below can be selected.Details and restrictions on each setting can be found on the indicated pages. Refer to these pages as needed.
Setting Description Page
Color Mode Auto, Mono2, Grayscale, Full Color 5-64
Resolution 100x100dpi, 150x150dpi, 200x200dpi, 300x300dpi, 400x400dpi, 600x600dpi 5-58
Format
[Color/Grayscale] tabFormat
PDF, Compact PDF, Compact PDF (Ultra Fine), PDF/A-1a, PDF/A-1b, PDF/A, Compact PDF/A-1a, Compact PDF/A-1b, Compact PDF/A, Compact PDF/A-1a (Ultra Fine), Compact PDF/A-1b (Ultra Fine), Compact PDF/A (Ultra Fine), Encrypt PDF, Encrypt/Compact PDF, Encrypt/Compact PDF (Ultra Fine), TIFF, JPEG, XPS, TXT(UTF-8), RTF, DOCX, XLSX, PPTX
OCR SettingsLanguage Setting, Font, Detect Image Direction, File Name Auto Extraction, OCR Accuracy
Compression RatioLow, Middle, High, Bk Letter Emphasis
[B/W] tabFormat
PDF, PDF/A-1a, PDF/A-1b, PDF/A, Encrypt PDF, TIFF, XPS, TXT(UTF-8), RTF, DOCX, XLSX, PPTX
OCR SettingsLanguage Setting, Font, Detect Image Direction, File Name Auto Extraction, OCR Accuracy
Compression ModeNone, MH (G3), MMR (G4)
5-59
Original
Scan Size[AB] tab
A6, A5, B5, A4, 216 x 330, 216 x 340, 216 x 343, 16K, Long Size[Inch] tab
5-1/2" x 8-1/2", 8-1/2" x 13", 8-1/2" x 13-2/5", 8-1/2" x 13-1/2", 8-1/2" x 11", 8-1/2" x 14", Long Size
Image OrientationPortrait, LandscapeDuplex Setup1-Sided, Book, Tablet
5-47
Job Build Enabled, Disabled 5-89
Blank Page Skip Off, Skip Blank Page, Skip Blank and Back Shadow 5-106

5-126
SCANNER/INTERNET FAX►OTHER FUNCTIONS
Gmail is a trademark of Google LLC.
• E-mail that is sent may be limited by the settings and specifications of the Gmail or Exchange server.
• In some network environments, the machine may not be able to use the Gmail or Exchange connection functions, or sending may be slow or may stop before the job is completed.
• Sharp Corporation does not in any way guarantee the continuity or stability of Gmail or Exchange connection functions.With the exception of instances provided for by law, Sharp Corporation bears no responsibility for any damages or loss due to the customer’s use of these functions.

5-127
SCANNER/INTERNET FAX►INTERNET FAX RECEPTION FUNCTIONS
CHECKING THE INTERNET FAX ACTIVITY LOG
PRINTING IMAGE SENDING ACTIVITY REPORTSPrint a log of recent image sending activities (date, name of destination, time required, result, and other items).The Image Sending Activity Report contains information that is useful in dealing with problems, such as the types of errors that occurred.The most recent 200 transactions are included in the report.You can have the machine print the Image Sending Activity Report each time the number of transactions reaches 201, or at a specified time (once a day only).
INTERNET FAX RECEPTION FUNCTIONS
The contents of the Image Sending Activity Report are erased when the report is printed, and thus it cannot be reprinted.
To configure the image sending activity report:In "Settings", select [System Settings] → [Image Send Settings] → [Internet Fax Settings] → [Default Settings] → [Activity Report Print Select Setting].

5-128
SCANNER/INTERNET FAX►INTERNET FAX RECEPTION FUNCTIONS
INFORMATION APPEARING IN THE RESULT COLUMNError types and other information are printed in the result column of transaction and activity reports. When a transaction or activity report is printed, check the result of the transaction in the result column and take action as needed.
Examples of messages that are printed in the result column
* If the receiving machine is a SHARP machine, the receiving machine will return "dispatched" if the fax was received normally, or "processed" if reception failed.When delivery confirmation is set for Internet Fax, the disposition feeld value indicated on the delivery confirmation return e-mail appears.
Print Page Description
OK The transaction was completed normally.
Cancel A transmission was stopped while in progress, or a reserved transmission job was canceled.
FULL The memory became full during reception.
Rejected An Internet fax was sent from a party that is blocked.
Report Wait Transmission confirmation was enabled, but transmission confirmation was not received within the set time.
NG LIMIT Transmission was not possible because the file size exceeded the machine's file size limit setting.
E-mail An e-mail was received, however, the attached file was not a TIFF-F file or there was no attached file, and thus printing was not possible.
FAIL xx (xxxx) The transaction failed due to a communication error.First 2 digits of communication error number: Error code from 00 to 99.Last 4 digits of communication error number: Code for use by service technicians.
displayed* Displayed at the receiving machine when delivery confirmation is set.
dispatched* Forwarded elsewhere before being displayed at the receiving machine when delivery confirmation is set.
processed* Processed without being displayed at receiving machine when delivery confirmation is set.
deleted* Message deleted at receiving machine when delivery confirmation is set.
denied* Receiving machine refused to notify sending machine of message processing content when delivery confirmation is set.
failed* An abnormal condition occurred when delivery confirmation is set.

5-129
SCANNER/INTERNET FAX►INTERNET FAX RECEPTION FUNCTIONS
RECEIVING INTERNET FAXES
RECEIVING INTERNET FAXES AUTOMATICALLYThe Internet fax function periodically connects to the mail server (POP3 server) and checks whether or not Internet faxes have been received. When faxes have been received, the faxes are automatically retrieved and printed.In the default setting, this function checks for reception once every five minutes.
RECEIVING INTERNET FAXES MANUALLYIf the interval for checking for received faxes is somewhat long and you wish to check immediately, you can manually initiate reception.
Tap the [Receive] key to connect to the mail server and retrieve received faxes.
• If faxes will be received at night, keep the main power switch of the machine in the " " position.
• If the machine is out of paper or there is no paper that matches the size of the received fax, a message will appear in the touch panel. Follow the instructions in the message to load an appropriate size of paper.
• You can print the received Internet fax data at the specified time.► PRINTING RECEIVED DATA AT A SPECIFIED TIME (page 5-131)
• You can print the received Internet fax data when a password has been entered.► PRINTING A PIN CODE-PROTECTED FAX (Hold setting for received data print) (page 5-130)
• You can print, forward, or save the received Internet fax data after checking it.► CHECKING THE IMAGE BEFORE PRINTING (page 5-132)► FORWARDING RECEIVED DATA MANUALLY (page 5-140)► SAVING RECEIVED DATA (page 5-141)
1The machine rings and fax reception begins automatically.A beep sounds when reception ends.
2The fax is automatically printed.
The [Receive] key can be tapped only when POP3 server settings are configured in the Setting mode (administrator).
8½x11 8½x11

5-130
SCANNER/INTERNET FAX►INTERNET FAX RECEPTION FUNCTIONS
PRINTING RECEIVED DATA
PRINTING A PIN CODE-PROTECTED FAX (Hold setting for received data print)Enable this setting to have faxes received and stored in memory without being printed. To print the faxes, a PIN Code must be entered.When this function is used, a PIN Code entry screen appears in the touch panel when a fax is received.
When the previously programmed 4-digit PIN Code is entered using the numeric keys, printing begins.When the [Cancel] key is tapped, the PIN Code entry screen closes; however, the data in memory key will blink in the touch panel. The PIN Code entry screen will reappear when you tap the blinking key or change modes.
To enable the hold setting for received data print:In "Settings (administrator)", select [System Settings] → [Image Send Settings] → [Common Settings] → [Condition Settings] → [Hold Setting for Received Data Print].
• To display the received data list screen after entering the PIN Code:In "Settings", select [System Settings] → [Common Settings] → [Operation Settings] → [Condition Settings] → [Preview Setting] → [Received Data Image Check Setting].
• To transfer received data to another machine:In "Settings (administrator)", select [System Settings] → [Image Send Settings] → [Inbound Routing (Forwarding/Storing) Settings].
You can check the received data image on the touch panel before printing.► CHECKING THE IMAGE BEFORE PRINTING (page 5-132)
• The received faxes will be stored in memory regardless of whether they are received automatically or manually.
• When the received data is transferred to another machine, data stored in memory is also transferred. At that time, the same PIN Code entry screen will appear as for printing. Forwarding will not take place unless the PIN Code is entered.

5-131
SCANNER/INTERNET FAX►INTERNET FAX RECEPTION FUNCTIONS
PRINTING RECEIVED DATA AT A SPECIFIED TIMEPrint received data at a specified time.For stress-free printing, you should avoid printing large numbers of pages at peak times during the day, and when you do not urgently need to print.
• The printed data is automatically deleted from memory.
• If the power is turned off at the specified time, printing will start at the timing when the power is turned on.
• This function can be specified when the Received Data Image Check Setting is enabled.
If Hold Setting for Received Data Print is enabled, this function cannot be used.
• To print received data at the specified time:In "Settings", select [System Settings] → [Image Send Settings] → [Common Settings] → [Condition Settings] → [Time Specified Output of Received Data].
• To disable the hold setting for received data print:In "Settings (administrator)", disable this function using [System Settings] → [Image Send Settings] → [Common Settings] → [Condition Settings] → [Hold Setting for Received Data Print].
During the day, configure the setting to print received data at 20:00.
At 20:00, printing starts automatically.

5-132
SCANNER/INTERNET FAX►INTERNET FAX RECEPTION FUNCTIONS
CHECKING THE IMAGE BEFORE PRINTINGCheck the image of received data on the touch panel before printing.This function is available when [System Settings] → [Image Send Settings] → [Common Settings] → [Condition Settings] → [Preview Setting] → [Received Data Image Check Setting] is enabled* in "Settings (administrator)".* The factory default setting is disabled.
When data is received, is shown at the top of the screen.
Depending on the size of the received data, part of the check image on the touch panel may not appear.
The received data list can also be shown in the job status screen that appears when you tap the job status display. The received data can be forwarded, deleted, or saved from Received Data List.► FORWARDING RECEIVED DATA MANUALLY (page 5-140)► SAVING RECEIVED DATA (page 5-141)
1In the System Information, tap the [Event Information] tab and tap the [Check Fax Reception Image] key.The received data is listed.
You can also display the received data list by tapping the job status display and tapping [Check Received Data] on the action panel of Job Status screen.
2Tap the key of the received data you wish to check, and tap [Check Image] on the action panel.Displays the received data image.
• Tap to show thumbnails of received images (Thumbnail screen). The list view or thumbnails view can be changed depending on the setting mode.
• To delete a received image, tap [Delete] on the action panel.
• To transfer the selected received image, tap [Forward to Other Address] on the action panel.► FORWARDING RECEIVED DATA MANUALLY (page 5-140)
• To save the selected received image, tap the [File] key.► SAVING RECEIVED DATA (page 5-141)
System Information
Check FaxReception Image
Check ConfidentialReceived Data
Check Error Box Release HeldReceived Data
TerminateRemote Operation
Fax Receive
Event Information Maintenance Information Toner Remaining
Select External Application Exit
Forward to Other Address
Check Image
PrintAll Received DataReceived Data List
Cancel All
Delete
FileStore Data in Folder

5-133
SCANNER/INTERNET FAX►INTERNET FAX RECEPTION FUNCTIONS
3Tap the image you wish to print, and tap [Print] on the action panel.The machine starts printing the image.• [Select All Page]: Selects all displayed images.• [Release All Page]: Cancels all images that have been
selected by "Select All Page".• / : Use these keys to enlarge or reduce an image.• / : Rotates image counterclockwise or clockwise.
• A preview image is an image for the touch panel. It will differ from the actual print result.
• Tap [Erase Specified Range] on the action panel to delete unwanted area of the image. Specify the image area you wish to delete in the Erase Specified Range screen.
• To forward the selected image, tap the [Forward to Other Address] on the action panel.► FORWARDING RECEIVED DATA MANUALLY (page 5-140)
• To save the selected image, tap the [File] key.► SAVING RECEIVED DATA (page 5-141)
Forward to Other Address
Return to ReceivedData List
Select Image to Operate.
Delete
File
Erase Specified Range
SelectAll Page

5-134
SCANNER/INTERNET FAX►INTERNET FAX RECEPTION FUNCTIONS
FORWARDING RECEIVED DATA
FORWARDING RECEIVED INTERNET FAX DATA (FAX DATA FORWARD)When the machine cannot print because it is out of paper or out of toner, received Internet faxes are forwarded to another previously registered Internet fax address (including direct SMTP).
• Forwarding is not possible if no faxes were received or a forwarding fax number is not programmed.
• If some pages of a fax that is being forwarded were successfully printed, only those pages that were not printed will be forwarded.
• If forwarding was not successful because the transmission was canceled or a communication error occurred, the faxes that were to be forwarded will return to the print queue on the machine.
• If a PIN Code entry screen appears after tapping the [OK] key, "Hold Setting for Received Data Print" has been enabled. Enter the PIN Code using the numeric keys to begin forwarding.► PRINTING A PIN CODE-PROTECTED FAX (Hold setting for received data print) (page 5-130)
1Tap the [Settings] key on the Home screen.
2Select the [System Settings] key and tap the [Image Send Settings] key.
3Tap the [Fax Data Receive/Forward (Manual)] key.
4To start forwarding, tap the [Execute] key of "Forward Received Data" in "I-Fax Settings".

5-135
SCANNER/INTERNET FAX►INTERNET FAX RECEPTION FUNCTIONS
FORWARDING RECEIVED DATA TO PRESET DESTINATIONS (INBOUND ROUTING SETTINGS)Received Internet faxes are automatically forwarded to a fax destination number, an Internet fax address, an e-mail address, a file server address, a desktop address, or a network folder address.Received data can be forwarded to the specified destinations without being printed.
In setting mode (Web version), configure the inbound routing settings. For the procedure for accessing the setting mode (Web version), see Start Guide.The following explanation assumes that the setting mode (Web version) has been accessed with administrator rights.
Whether or not to forward data for each forwarding table can be quickly set.In "Settings (administrator)", select [Image Send Settings] → [Inbound Routing (Forwarding/Storing) Settings] → [Administration Settings] → [Inbound Routing], and tap [Enable]/[Disable] on the displayed forwarding table to switch the settings.
• When faxes forwarded using this function are printed at the forwarding destination, the date and time of reception cannot be printed on the faxes. ("Receiving Date & Time Print" is disabled.)
• The received data is not forwarded to a hyperlink destination that is registered in the specified address.
• A direct SMTP address cannot be specified as a forwarding destination.
1In "Settings (Web version)", click [System Settings] → [Image Send Settings] → [Inbound Routing (Forwarding/Storing) Settings] → [Administration Settings].
2In "Inbound Routing", select [Enable] and click the [Submit] button.
Users without administrator rights can be prohibited from storing, editing, and deleting forwarding tables in this screen, and from specifying which table is used. To do so, set the checkboxes for the following items to .
• Disable Registration of Forward Table
• Disable Change/Delete of Forward Table
• Disabling of Forward Condition ChangeSpecify in [Print Style Setting] whether or not to have the machine to print the faxes to forward when inbound routing is enabled. After the settings are completed, be sure to click the [Submit] button.
• [Always Print]: Always prints received data before forwarding the data.
• [Print at Error]: Prints received data only when an error prevents forwarding.
• [Save Only at Error]: Saves received data only when an error prevents forwarding. For the saved data, the error address can be confirmed and the data can be resent.
Received Data
Forwarding

5-136
SCANNER/INTERNET FAX►INTERNET FAX RECEPTION FUNCTIONS
3Click [Sender Address Registration] in the [Inbound Routing (Forwarding/Storing) Settings] menu in the "Settings (Web version)".
4Enter the sender address or fax number in "Internet Fax Address" or "Fax Number" as appropriate, and click the [Add to List] button.The sender address or number you entered will be added to the "Address to be Entered" list.
• Enter the address directly (maximum of 1500 characters) or select the address from a global address book by clicking the [Global Address Search] button.
• To store multiple sender addresses or fax numbers, repeat these steps.
• If you wish to have only faxes from specified addresses forwarded, store the desired sender addresses.Send addresses stored here can be selected from a list when you store a forwarding table.
• A maximum of 500 sender numbers/addresses can be stored.
• To delete an entered address, select the address in "Address to be Entered" and click the [Delete] button.
5When you have finished adding addresses, click the [Submit] button.
6Click [Inbound Routing Settings] in the "Inbound Routing (Forwarding/Storing) Settings" menu in the "Settings (Web version)" menu and click the [Add] button.
7Enter a "Table Name".
A maximum of 50 forwarding tables can be stored.
8Select the sender whose faxes will be forwarded. • To forward all received data, select [Forward All Received Data].• To forward only data received from specific senders, select [Forward received data from specified senders only.]. To
forward all data except data from specific senders, select [Forward all received data except that from specified senders.]. Select the appropriate senders from the list and click the [Add] button.
When selecting senders from the "Sender Number/Address Setting" list, you can use the [Shift] key or the [Ctrl] key on your keyboard to select multiple senders.

5-137
SCANNER/INTERNET FAX►INTERNET FAX RECEPTION FUNCTIONS
9Select the forwarding conditions.• To always forward received data, select [Always Forward].• To specify a day and time on which received data will be forwarded, select [Forward received data only on specified
days.] and select the checkbox ( ) of the desired day of the week. To specify a time, select the [Set Forwarding Time] checkbox ( ) and specify the time.
Up to three forwarding day and time settings can be set for one forwarding table, and a forwarding destination can be set for each set time. To configure these settings, use the [Forward Condition] tabs to access each setting.
10Select the file format.The format can be set separately for each forwarding address (for each of forwarding addresses 1, 2, and 3 in the table).
• Images forwarded in TIFF format may not be displayed correctly in some recipient environments.In this event, change the file format to PDF.
• If the Internet fax address is selected as a recipient, data is forwarded in TIFF regardless of the specified format.
• If a fax number is selected as a recipient, the file format is ignored.
11Select the recipient from the address book.You can specify multiple registered addresses or telephone numbers from the address book of the machine.Up to 1,000 recipients can be registered for Recipients 1, 2, and 3 in total. When you select the recipients from the address book, up to 400 recipients can be registered for network folder, FTP/Desktop, Internet fax, and fax.
A direct SMTP address cannot be specified as a forwarding destination.
12Enter a recipient directly and specify the recipient.• Specify this information if necessary.• Enter an E-mail address, an Internet fax address, or a fax number directly and tap the [Add to forwarding destinations]
key.• When you specify an E-mail address or a fax number, you can use the global address search.• When you specify a fax number, also specify the sending line and international correspondence mode.• When enter the recipients directly, up to 100 recipients can be registered for E-mail address, network folder,
FTP/Desktop, Internet fax, and fax.
13Click [Submit].
14Click [Inbound Routing Settings] in the "Inbound Routing (Forwarding/Storing) Settings" menu in the "Settings (Web version)" menu.
15From the forwarding table, select [Forward to All Forward Destinations] or [Forward based on Forward Condition].

5-138
SCANNER/INTERNET FAX►INTERNET FAX RECEPTION FUNCTIONS
SAVING RECEIVED FAXES TO THE MACHINE'S HARD DISK (INBOUND ROUTING)Received faxes can be saved to the machine's hard disk. Saved faxes can be viewed on a computer.Set PDF, TIFF (multi) or TIFF (signal) for the saved Internet faxes.You can also receive notification of the storage result or storage folder by E-mail.Received faxes are saved in the following directory:\\MFP\faxreceive
16Select [Always Forward] or [Forward received data only on specified days.] from the forwarding table.The forwarding permission settings that appear here are linked to the forwarding conditions set in step 9.If you wish to use different forwarding conditions than those set in step 9, set the forwarding permission settings.
• To use the inbound routing function, enable the forwarding tables that you wish to use from among the stored tables.
• To delete a forwarding table, click the checkbox next to the table name so that it is selected ( ) and click [Delete].
17Click [Submit].
• Up to 500 files can be stored in one folder as received data.
• The "faxreceive" folder contains files of "Settings for HDD Storing of Received Data".
• The folder is automatically created.
• The folder name is automatically assigned based on the setting of "Settings for HDD Storing of Received Data" in the received data save settings.
The machine
Received Data
View

5-139
SCANNER/INTERNET FAX►INTERNET FAX RECEPTION FUNCTIONS
How to save received faxes to the hard disk
Settings for saving received faxes to the hard disk
1In "Settings (administrator)", click [System Settings] → [Network Settings] → [Public Folder / NAS Setting]. (Administrator rights required.)
2Select [Allowed] in "faxreceive:Use of Storage" and click the [Submit] button.
1In Setting mode (administrator), click [System Settings] →[Image Send Settings] → [Inbound Routing (Forwarding/Storing) Settings]→ [Inbound Routing (Storage) Settings] → [Settings for HDD Storing of Received Data]. (Administrator rights required.)
• Data that can be saved are received faxes and received Internet faxes. Confidential reception and polling reception faxes cannot be saved.
• Depending on the setting, received faxes that cannot be saved because of the file number limit or other reason are either printed or saved in the inbound routing error box.

5-140
SCANNER/INTERNET FAX►INTERNET FAX RECEPTION FUNCTIONS
FORWARDING RECEIVED DATA MANUALLYReceived faxes can be forwarded manually after receipt.This function is available when [System Settings] → [Image Send Settings] → [Common Settings] → [Condition Settings] → [Preview Setting] → [Received Data Image Check Setting] is enabled* in "Settings (administrator)".* The factory default setting is disabled.When data is received, is shown at the top of the screen.
1In the System Information, tap the [Event Information] tab and tap the [Check Fax Reception Image] key.The received data is listed.
You can also display the received data list by tapping the job status display and tapping [Check Received Data] on the action panel of Job Status screen.
2Tap the key of the received data you wish to forward, and tap [Forward to Other Address].• Tap to show thumbnails of received images
(Thumbnail screen). The list view or thumbnails view can be changed depending on the setting mode.
• Multiple sets of received data can be selected.
When you select a single received data only, you can tap [Check Image] on the action panel and check the image on the preview screen.
3Select the destination from the Address Book screen, and tap the [Start] key.
System Information
Check FaxReception Image
Check ConfidentialReceived Data
Check Error Box Release HeldReceived Data
TerminateRemote Operation
Fax Receive
Event Information Maintenance Information Toner Remaining
Select External Application Exit
Forward to Other Address
Check Image
PrintAll Received DataReceived Data List
Cancel All
Delete
FileStore Data in Folder

5-141
SCANNER/INTERNET FAX►INTERNET FAX RECEPTION FUNCTIONS
SAVING RECEIVED DATASave received faxes in the document filing folder.This function is available when [System Settings] → [Image Send Settings] → [Common Settings] → [Condition Settings] → [Preview Setting] → [Received Data Image Check Setting] is enabled* in "Settings (administrator)".* The factory default setting is disabled.
When data is received, is shown at the top of the screen.
1In the System Information, tap the [Event Information] tab and tap the [Check Fax Reception Image] key.The received data is listed.
You can also display the received data list by tapping the job status display and tapping [Check Received Data] on the action panel of Job Status screen.
2Tap the key of the received data you wish to save, and tap [File] on the action panel.• Tap to show thumbnails of received images
(Thumbnail screen). The list view or thumbnails view can be changed depending on the setting mode.
• Multiple sets of received data can be selected.
When you select a single received data only, you can tap [Check Image] on the action panel and check the image on the preview screen.
3Set the file information, and tap the [Save] key.
Received data inside the memory
Save in the document filing folder
Save
System Information
Check FaxReception Image
Check ConfidentialReceived Data
Check Error Box Release HeldReceived Data
TerminateRemote Operation
Fax Receive
Event Information Maintenance Information Toner Remaining
Select External Application Exit
Forward to Other Address
Check Image
PrintAll Received DataReceived Data List
Cancel All
Delete
FileStore Data in Folder

5-142
SCANNER/INTERNET FAX►CHECKING THE STATUS OF TRANSMISSION/RECEPTION JOBS
IMAGE SEND JOBSWhen you tap the job status display, jobs are displayed in a list. To check the status of a scanner mode job, select the [Scan] tab. To check the status of an Internet fax job, select the [Internet Fax] tab.When you wish to stop or delete jobs or to perform priority processing, see the following items:► STOPPING/DELETING A JOB IN PROGRESS OR RESERVED (page 1-82)► PRIORITY PROCESSING OF A RESERVED JOB (page 1-83)► CHECKING A RESERVED JOB OR THE JOB IN PROGRESS (page 1-85)► CHECKING COMPLETED JOBS (page 1-86)
CHECKING THE STATUS OF TRANSMISSION/RECEPTION JOBS
Image send jobs include reception, timer transmission, and data forwarding as well as usual transmission. For the Image Send job operations, see "COMPLETED TRANSMISSION/RECEPTION JOBS (page 5-143)".
Job Status BackLINE PRINTER
Job Queue
Complete
Internet FaxFaxScan
Job Address Set Time Status
Print Image SendingActivity Report
Back
Broadcast
Pages
0010/0010 OK0001/000110:45 07/07

5-143
SCANNER/INTERNET FAX►CHECKING THE STATUS OF TRANSMISSION/RECEPTION JOBS
COMPLETED TRANSMISSION/RECEPTION JOBSA usual transmission job moves to the job list when transmission is completed. Then the status field displays "Send OK". However, Internet Fax jobs such as reception, timer transmission, retries, and forwarding are displayed in the job status screen as follows:
Reception jobDuring Internet Fax receiving, the status field displays "Receiving" in the job queue list. When reception is completed, the job moves to the completed job list and the status field displays "In Memory". After Internet Fax printing is completed, the status changes to "Received".
Timer transmission jobsA timer transmission job appears at the end of the job queue list until the specified time is reached.Transmission begins at the specified time. When transmission is completed, the job moves to the completed job list and the status field displays "Send OK".
Internet Fax transmission job with reception report request specifiedAn Internet Fax transmission job with a reception report request specified, excluding a direct SMTP transmission job, is placed into the standby state at the bottom of the Job Queue screen after a transmission has been completed. "Report Wait" appears in the status field.The screen changes to the completion screen when a reception report e-mail has been received from the destination.
Reception jobs when the inbound routing settings are enabledWhen the inbound routing settings are enabled, reception jobs are handled as follows depending on the print setting.► FORWARDING RECEIVED DATA TO PRESET DESTINATIONS (INBOUND ROUTING SETTINGS) (page 5-135)
Received data is not printedWhen a data is being received, "Receiving" appears in the job queue list. When the reception is completed, the status changes to "Waiting".Received Internet fax is printedWhen reception is completed, the status field displays "In Memory" in the completed job list. After the fax is printed, the status changes to "Received". Then a job is added for which the status field displays "Waiting" in the job queue list. When forwarding the received fax is completed, the field changes to "Forward OK".

5-144
SCANNER/INTERNET FAX►SCANNING FROM A COMPUTER (PC Scan Mode)
BASIC SCANNING PROCEDUREYou can install the scanner driver on your computer and use a TWAIN* compliant application to scan an image using your computer.Scanning from your computer is most useful for scanning a single original such as a photo, particularly when you want to adjust scan settings as you scan. By contrast, scanning at the machine is most useful for continuous scanning of multiple originals.* An interface standard used for scanners and other image input devices. When the scanner driver is installed on your
computer, you can use any TWAIN-compliant application to scan an image.
As an example, the procedure for scanning from the "Sharpdesk" application is explained below.
[At the machine]
SCANNING FROM A COMPUTER (PC Scan Mode)
• For the procedures for installing the scanner driver and configuring settings, see the Software Setup Guide.
• This function cannot be used when it has been disabled using "Disable Scan Function" in the system settings (administrator).
• The procedures for selecting the scanner driver and starting scanning vary depending on the TWAIN-compliant application. For more information, see the manual for the application or Help.
• When a large image is scanned at high resolution, the amount of data will be very large and scanning will take a long time. Be sure to select appropriate scan settings for the original (text, photo, etc.).
• A print job cannot be printed while remote PC scan is in progress. The print job will print when remote PC scan ends.
• Remote PC scan cannot be performed while a print job is in progress.
1Place the original.Place the original face up in the document feeder tray, or face down on the document glass.

5-145
SCANNER/INTERNET FAX►SCANNING FROM A COMPUTER (PC Scan Mode)
[At your computer]
2Tap the [PC Scan] mode icon to switch to PC Scan mode.If the [PC Scan] mode icon does not appear, tap to move the screen.
When PC scan mode is selected, only the [Exit] key displayed in the touch panel can be used on the machine; no other keys can be used.
3Start the TWAIN-compliant application on your computer and select [Select Scanner] from the [File] menu.
4Select the scanner driver of the machine.
(1) Select [SHARP MFP TWAIN V].
(2) Click the [Select] button.
5Select [Acquire Image] from the [File] menu.The scanner driver opens.
PC Scan
OperationGuide
EnlargeDisplay Mode
Settings Total Count LCD Control Job StatusToner Quantity Bk
10:15 AM

5-146
SCANNER/INTERNET FAX►SCANNING FROM A COMPUTER (PC Scan Mode)
6Preview the image.
(1) Select the location where the original is placed."Scanning Position" menu:• If the original is a one-sided original and is placed in
the document feeder tray, select [SPF(Simplex)].• If the original is a 2-sided original and is placed in the
document feeder tray, select [SPF(Duplex - Book)] or [SPF(Duplex - Tablet)] depending on whether the original is a book-style or tablet-style original. In addition, select [Left edge is fed first] or [Top edge is fed first] depending on the orientation of the original.
(2) Select scan settings."Scanning Mode" menu:Switch between the "Preset" screen and the "Custom Settings" screen. In the "Preset" screen, select "Web Pages", "Photo", "FAX" or "OCR" depending on the original type and your scanning purpose.If you wish to change the initial settings of any of the four buttons or select the resolution or other advanced settings, change to the "Custom Settings" screen."Image Area" menu:Select the scan area. If "Auto" is selected, the set original size will be scanned. You can also set the scanning area in the preview window with your mouse.
(3) Click the [Preview] button.The preview image will appear in the scanner driver.If you are not satisfied with the preview image, repeat (2) and (3).If the [Zoom Preview] checkbox is selected before the [Preview] button is clicked, the selected area will be enlarged in the preview window. If the checkmark is removed, the preview image will return to normal. Note that if SPF is selected in the "Scanning Position" menu, the [Zoom Preview] function cannot be used.
• For further information on the scan settings, click the button in the preview image screen of step 7 to open scanner driver Help.
• If the [Preview] button is clicked when scanning from the document feeder tray, only one original page will be scanned for the preview image. If you wish to include that original in the scan, return it to the document feeder tray.
(1) (3)(2)

5-147
SCANNER/INTERNET FAX►SCANNING FROM A COMPUTER (PC Scan Mode)
7Select scanning settings while viewing the image.[Rotate] button:Each time this button is clicked, the preview image rotates 90 degrees. This lets you change the orientation of the image without picking up and placing the original again. The image file will be created using the orientation that appears in the preview window.[Image Size] button:Click this button to specify the scan area by entering numerical values. Pixels, mm, or inches can be selected for the units of the numerical values. If a scanning area has already been specified, the entered numbers will change the area relative to the top left corner of the specified area.
button:When a preview image is displayed and a scanning area is not specified, you can click the button to automatically set the scanning area to the entire preview image.
• For further information on the scan settings, click button to open scanner driver Help.
• If the originals are placed in the document feeder tray, only the top page will be previewed. The top page will be delivered to the original exit tray. Be sure to return the previewed page to the document feeder tray before previewing again or scanning.
8Click the [Scan] button.Scanning begins. The image appears in your application.Assign a file name to the scanned image and save it as appropriate in the software application you are using.

5-148
SCANNER/INTERNET FAX►SCANNING FROM A COMPUTER (PC Scan Mode)
[At the machine]
9Tap the [Exit] key.
10Tap the [Yes] key.
PC Scan
This machine is in the PC scan mode.Do not remove the original.
Scanner IP address: 0.0.0.0.0
Exit
OperationGuide
EnlargeDisplay Mode
Settings Total Count LCD Control Job StatusToner Quantity Bk
10:15 AM
PC Scan
PC scan in progress.Finish PC scan mode?
YesNo
OperationGuide
EnlargeDisplay Mode
Settings Total Count LCD Control Job StatusToner Quantity Bk
10:15 AM

5-149
SCANNER/INTERNET FAX►METADATA DELIVERY
PREPARATIONS FOR METADATA DELIVERY
METADATA DELIVERY (DATA ENTRY)When the application integration module kit is installed, metadata (data indicating the attributes of the image file and how it is to be processed) is generated based on pre-stored information and transmitted separately from an image file that is generated for sending a scanned image. The metadata file is created in XML format. By linking the metadata with applications such as document management software, a workflow application, or an encryption server, a sophisticated document solution environment can be built. Using the application integration module kit, information on a generated image file can be entered at the touch panel and transmitted along with the image as an XML file.
METADATA DELIVERY
Server
Fax server, document management software, workflow application, and encryption server, etc.
Scan to Desktop
Scan to E-mailScan to FTPScan to Network Folder
Metadata(XML file)Image file
Client Computer that Uses Network Scanner Tool

5-150
SCANNER/INTERNET FAX►METADATA DELIVERY
SETTINGS REQUIRED IN THE SETTING MODE(WEB VERSION)To configure the settings related to metadata, select [System Settings] → [Image Send Settings] → [Metadata Settings] → [Metadata Entry] in "Settings (administrator)". (Administrator rights are required.) Enable metadata delivery.
Storing Metadata SetsStore the items (the metadata set) to write to the XML file that will be generated during scanning. Up to 10 metadata items can be configured in a metadata set. A stored metadata set can be selected at the time of transmission.
Addresses specified in "Address Type Allowing Metadata Entry" when a metadata set is stored can be selected as transmission destinations at the time of transmission using one-touch keys, manual entry, or a global address book search. (Addresses for which metadata entry is not allowed cannot be specified as transmission destinations.)
METADATA DELIVERY USING SCAN TO DESKTOPWhen Network Scanner Tool is used in its factory default configuration, a file will be generated with a new file name on the PC. When Network Scanner Tool is used as a means of sending a metadata file to a third party application, this setting must be disabled to allow cross referencing between the image file and XML file by means of the file name generated by the computer. (When setting the file name in [Options▼], to ensure that an existing file on the PC is not overwritten by a transmitted file of the same name, be sure to configure the file name so that name duplication will not occur; for example, by including a unique extension (the date, etc.) in the generated file name. If the file name setting is left blank, the machine will automatically generate a unique file name.)
It is recommended that you use Network Scanner Tool to receive metadata. For information on the license agreement and how to use the CD-ROM that accompanies the application integration module, see the separate "Sharpdesk license kit" manual. Using third party applicationsVarious types of third party applications exist. Some applications can start automatically from Network Scanner Tool and some cannot. When the auto-run function of an application is enabled, Network Scanner Tool will start the application with the ".exe" command using the image file name as a parameter. For example, when Network Scanner Tool is set to start application "APP.EXE", the "APP.EXE IMG.TIF" command is applied. If a file was specified to receive metadata, the metadata file name cannot be specified at the same time using the command to start the application directly. (However, the metadata file is stored in the same folder as IMG.TIF in the computer.)

5-151
SCANNER/INTERNET FAX►METADATA DELIVERY
TRANSMITTING METADATA
TRANSMITTING METADATASelect a metadata set, enter each item, and perform metadata delivery.
Metadata delivery is performed using the document filing function. The [Data Entry] tab appears in the transmission settings screen of document filing mode to allow metadata delivery.In addition, perform metadata delivery using document filing in [Metadata Entry] in "Settings (Web version)."
• In data entry mode, configure metadata settings to perform metadata delivery.To perform transmission without sending metadata, switch the screen from data entry mode to a different mode and then perform transmission.
• When metadata settings have been configured or an address is specified in data entry mode, it will not be possible to switch to another mode.
• Before configuring metadata settings, specify addresses in all available modes. After metadata settings have been configured, specify only addresses in modes that are allowed in the selected metadata.
1Tap the [Data Entry] icon on the [Home Screen], and tap [Metadata Set].
If a specific metadata set has been specified as the default set, go to step 3.
If no metadata sets have been stored, Metadata Entry is unavailable. Store metadata set in the setting mode (Web version) before performing transmission.
2Tap the key for the desired metadata set.
3The keys of the items stored in the metadata set will appear. Tap the key of the item that you wish to enter.
4Tap the key of the value that you wish to enter, and tap the [OK] key. To directly enter the metadata value, tap the [Direct Entry] key. On the soft keyboard screen that appears, tap the [OK] key. You will return to the screen shown in step 3.After the settings are completed, tap .
To cancel the selection of the metadata value:Tap the [Clear] key.
5Configure image or other settings, and perform the scan send procedure. • Configure job detail settings and then start transmission using the same operations as in other modes.• When directly entering an address, tap [Touch to input Address] to display the screen for selecting an address type. If
the address type such as E-mail, Internet Fax, Fax, Network Folder, or Direct SMTP is selected, the address type entry screen appears.

5-152
SCANNER/INTERNET FAX►METADATA DELIVERY
METADATA FIELDSThe following three types of metadata are included in the XML file that is transmitted.• Data automatically generated by the machine
These data are always included in the XML file and are automatically stored on your PC.• Previously defined fields
These fields are automatically recognized by the machine and assigned to appropriate XML tags. These fields can be selected, and can only be included in the XML file if they are enabled in the setting mode (Web version).• User defined fields
Custom fields are added to the XML file. These fields can be selected and are defined in the setting mode (Web version).If a defined metadata field is one of the following fields, a message will appear informing you that the field cannot be filled in. Enter appropriate information in the related items of the send settings.
Name entered in metadata fields
Description Where entered
formName Name of the user who sent the job. If the name is not entered as metadata, the sender name determined by the usual rules for determining the sender name will be applied as metadata.
[Reply-To](sender name of selected sender)
replyTo E-mail address to which the transmission result will be sent.
[Reply-To](E-mail address of selected sender)
documentSubject Job name appearing in the E-mail "Subject" line, or job name on the fax cover sheet. When the user enters a [Subject] in the send settings screen in the touch panel, the entered value is applied as metadata.
[Subject](Blank until a value is set in the send settings screen.)
fileName Enter the file name of the image to be sent. [File Name](Only when the [Allow Custom Filenames] checkbox is selected in the metadata entry screen in the setting mode (Web version)) (Blank until a value is set in the send settings screen.)

6-1
DOCUMENT FILING
DOCUMENT FILING. . . . . . . . . . . . . . . . . . . . . . . . . 6-2
• TYPES OF DOCUMENT FILING. . . . . . . . . . . . 6-3
• BEFORE USING SCAN TO HDD IN DOCUMENT FILING . . . . . . . . . . . . . . . . . . . . . 6-3
• IMPORTANT POINTS WHEN USING DOCUMENT FILING . . . . . . . . . . . . . . . . . . . . . 6-6
• USING DOCUMENT FILING IN EACH MODE . . . 6-7
BASE SCREEN OF DOCUMENT FILING MODE . . . 6-8
SAVING FILES WITH DOCUMENT FILING
FILING WHILE USING ANOTHER MODE. . . . . . . . 6-9
• QUICK FILE. . . . . . . . . . . . . . . . . . . . . . . . . . . . 6-9
• FILE . . . . . . . . . . . . . . . . . . . . . . . . . . . . . . . . . . 6-10
SAVING DOCUMENT DATA ONLY (SCAN TO HDD) . . . . . . . . . . . . . . . . . . . . . . . . . . . . . . . . . . . . . 6-14
• SAVE ON HDD . . . . . . . . . . . . . . . . . . . . . . . . . 6-14
• SAVE IN EXTERNAL MEMORY DEVICE. . . . . 6-16
USING STORED FILES
SEQUENCE FOR USING A STORED FILE. . . . . . . 6-20
FILE SELECTION SCREEN. . . . . . . . . . . . . . . . . . . 6-21
SELECTING A FILE TO RETRIEVE . . . . . . . . . . . . 6-22
FILE PRINTING . . . . . . . . . . . . . . . . . . . . . . . . . . . . 6-22
MULTI-FILE PRINTING . . . . . . . . . . . . . . . . . . . . . . 6-24
• MULTI-FILE PRINTING. . . . . . . . . . . . . . . . . . . 6-24
• BATCH PRINTING . . . . . . . . . . . . . . . . . . . . . . 6-25
FILE TRANSMISSION . . . . . . . . . . . . . . . . . . . . . . . 6-26
FILE MOVING. . . . . . . . . . . . . . . . . . . . . . . . . . . . . . 6-27
DELETE FILE . . . . . . . . . . . . . . . . . . . . . . . . . . . . . . 6-28
FILE IMAGE CHECKING . . . . . . . . . . . . . . . . . . . . . 6-30
FILE MERGING . . . . . . . . . . . . . . . . . . . . . . . . . . . . 6-31
RETRIEVING AND USING A FILE FROM THE JOB STATUS SCREEN . . . . . . . . . . . . . . . . . . . . . . . . . . 6-32
FILE SEARCH AND RETRIEVAL . . . . . . . . . . . . . . 6-33
PRINTING AN EXTERNAL FILE . . . . . . . . . . . . . . . 6-35
DOCUMENT FILINGIcons
Functions that you can use with
Easy Scan

6-2
DOCUMENT FILING►DOCUMENT FILING
DOCUMENT FILINGThis function saves the original scanned on the machine, transmitted fax image, or print data from a computer on the hard drive of the machine or an external memory device as data.The stored files can be printed or transmitted as required. Editing of the stored files, for example combining, is also possible.
Uses of document filingUsing the document filing function allows you to additionally print out conference material with the same settings, or print out ledger sheets used for routine tasks as required.
DOCUMENT FILING
A PDF file created for PC browsing can be displayed or printed on a computer.
Additionally printing out conference material with the same settings
Printing out ledger sheets as required
Copying
File Store
Edit
Reuse
Transmission
External memory device
Fax
Image send
Printer Hard disk
Download
Your computer
1
Scanning is not necessary.
Settings are stored together with original data.
No settings are necessary. Printing only
1
Daily report
Business trip application
Printing only
Vacation application

6-3
DOCUMENT FILING►DOCUMENT FILING
TYPES OF DOCUMENT FILINGThere are the following ways to save a file using document filing: [Quick File] and [File] in copy mode or image send mode, and [Scan to HDD] and [Scan to External Memory Device] in document filing mode.
BEFORE USING SCAN TO HDD IN DOCUMENT FILING
Folder typesThree types of folders are used to store files on the hard drive using the document filing function.Folders on the hard drive
Quick File FolderDocuments scanned using [Quick File] on the action panel are stored in this folder. A user name and file name are automatically assigned to each job.
Main FolderScanned documents are stored in this folder.When you store a job in the Main folder, you can specify a previously stored user name and assign a file name.A password (5 to 32 characters) can also be set when storing a file ("Confidential" save) as required.
Custom FolderFolders with custom names are stored inside this folder.Scanned documents are stored in the stored folder.Like the Main folder, a custom folder allows you to specify a previously stored user name and assign a file name when storing a job.Passwords (PIN code: 5 to 8 digits number) can be established for custom folders and for files saved in custom folders.
Quick File
As a copy, image send, or other job is performed, this function saves the document data to the hard drive. Use this function when you want to quickly and easily store document data without specifying a file name or other information. The stored file can also be used by other people. Do not use this method to save files that you do not want others to use.
File
As a copy, image send, or other job is performed, this function saves the document data to the hard drive. Unlike Quick File, various types of information can be appended to the file when the file is saved to enable efficient file management. A password can also be established.
Scan to HDDThis function scans an original and stores it to the hard drive. Like File, various types of information can be appended.
Scan to External Memory Device
This function scans an original and stores it in an external memory device such as a USB memory device. Like File, various types of information can be appended.
A maximum of 1000 custom folders can be created on the hard drive.
Quick File Folder
Main Folder Custom Folder

6-4
DOCUMENT FILING►DOCUMENT FILING
Convenient items to storeWhen storing a job using [File] in copy mode or image send mode, or [Scan to HDD] in document filing mode, it is convenient to store the items below. These settings are not required when storing a job using [Quick File].
User NameThis is necessary if you will be assigning a user name to stored files. A user name is also used as a search condition when searching for a file.
Custom FolderThe Main folder is initially available as a location for storing files by [File] and [File Store]. Store a custom folder and specify it as a location for storing files. Specify a password for the user folder as required. Enter the PIN Code to use the folder.
My FolderA previously created custom folder can be selected as "My Folder", or a new folder created as "My Folder". When "My Folder" has been configured and user authentication is used, "My Folder" will always be selected as the destination of [File] and [File Store].
• To store a custom folder for document filing:On the Web page, select "Settings (administrator)" → [Document Operations] → [Document Filing] → [Custom Folder].On the machine, select "Settings (administrator)" → [System Settings] → [Document Filing Settings] → [Document Filing Control] → [Custom Folder].
• To store a user name and specify a folder as "My Folder":In "Settings (administrator)", select [User Control] → [User List].

6-5
DOCUMENT FILING►DOCUMENT FILING
Approximate number of pages and files that can be stored
Combined total number of pages and total number of files that can be stored in custom folders and in the Main folder
Number of pages and number of files that can be stored in the Quick File folder
* The indicated numbers are guidelines for the number of pages that can be stored when all pages are full color, and when all pages are black & white.
Copying in sort mode uses the same memory area as the main folder and custom folder. For this reason, when too much data has been stored in the main folder and custom folder, it may not be possible to perform a large copy job using sort mode. Delete unnecessary files from the main folder and custom folder.
The original types above are examples to make the explanation easier to understand. The actual number of pages and number of files that can be stored will vary depending on the contents of the original images and the settings when the files are stored.
Examples of original types Number of pages* Number of files
Full color original(Text and photo example)
Size: A4
Max. 5700
Max. 3000
Black & white original(Text)
Size: A4
Max. 13000
Examples of original types Number of pages* Number of files
Full color original(Text and photo example)
Size: A4
Max. 700
Max. 1000
Black & white original(Text)
Size: A4
Max. 2000

6-6
DOCUMENT FILING►DOCUMENT FILING
Information added to filesWhen saving a file using "File", add the following information to distinguish it from other files.
IMPORTANT POINTS WHEN USING DOCUMENT FILING• Files stored using [Quick File] are provided with the "Sharing" property that can be accessed by any person for output
and sending. Therefore, do not store sensitive documents or documents that you do not want to be used by others using the [Quick File] function.
• When saving a file with [File], you can save it with the "Confidential" property. Set a password for a "Confidential" file to prevent the file from being used by other people. Exercise care to prevent other people from obtaining the password.
• The property of a stored "Confidential" file can be changed to "Sharing" by "Property Change" as required. Do not store sensitive documents or documents that you do not want to be used by others.
• Except in cases provided for by law, SHARP Corporation bears no responsibility for any damages that result from the disclosure of sensitive information due to manipulation by a third party of any data saved using the Quick File function or File function, or incorrect operation of the Quick File function or File function by the operator who saves the data.
User Name The user name is required to enter a file ownership and other information. The user name must be registered in advance.
File Name Names a file.
Stored to Specifies a folder to store files.
Property Sharing Any user can display and operate files having the "Sharing" property.
Protect Once "Protect" is set, its file cannot be edited, moved, and deleted. No password setting is required.
Confidential You can set a password (5 to 32 characters) for file protection.
• The above information cannot be specified when a file is saved with Quick File.
• When you select [Create Downloadable File] in Scan to HDD and save as a confidential file, the properties cannot be changed.
To store a user name:In "Settings (administrator)", select [User Control] → [User List].
User Name: Name1File Name: Meeting handoutPassword: 12345678
"Meeting minutes" folder

6-7
DOCUMENT FILING►DOCUMENT FILING
USING DOCUMENT FILING IN EACH MODETo use Document Filing, select the action panel for each mode.To save data simultaneously with a copy or fax, tap [File] or [Quick File] on the action panel in each mode.
To use Document Filing from the beginning, select the action panel in the Document Filing mode. Tap any one of the keys to scan and save the original.
• [File] and [Quick File] These keys may not appear on the action panel depending on the mode or settings. In this case, tap [Others] on the base screen in each mode, and then tap [Quick File] or [File].
• Using document filing in print mode To use document filing in print mode, select document filing in the printer driver. For details on document filing, see "SAVING AND USING PRINT FILES (DOCUMENT FILING) (page 3-66)" in "PRINTER".
• Using document filing in PC-Fax/PC-I-Fax mode To use document filing in PC-Fax or PC-I-Fax mode, select document filing settings in the PC-Fax driver. For more information, see Help in the PC-Fax driver.
8½x11
8½x11
8½x11
8½x11
8½x11
8½x11
Scan to HDD
Scan to ExternalMemory DeviceSelect File fromFTP to PrintSelect File fromUSB Memory to Print
Main Folder
AAA BBB
CCC DDD
EEE FFF
GGG HHH
III III JJJ
KKK LLL
Quick File Folder
Folder Select
Select File fromNetwork Folder to Print
CA

6-8
DOCUMENT FILING►DOCUMENT FILING
BASE SCREEN OF DOCUMENT FILING MODE
Scan to HDD
Scan to ExternalMemory Device
Select File fromFTP to Print
Select File fromUSB Memory to Print
AAA BBB
CCC DDD
EEE FFF
GGG HHH
III III JJJ
KKK LLL
Main Folder Quick File Folder
My FolderFolder Select
Select File fromNetwork Folder to Print
CA
Use to save originals to be shared among users.
The folder for the registered user.
Displayed during user authentication. Tap this key to open the logged-in user's personal screen.
Resets all settings.
Displays the functions available in document filing mode.
Use to search for a file in a folder.
Use to save a file temporarily.
Displays the usage status of the machine's built-in hard disk drive. Tap the key to display details.
Switch the custom folder order between ascending and descending.
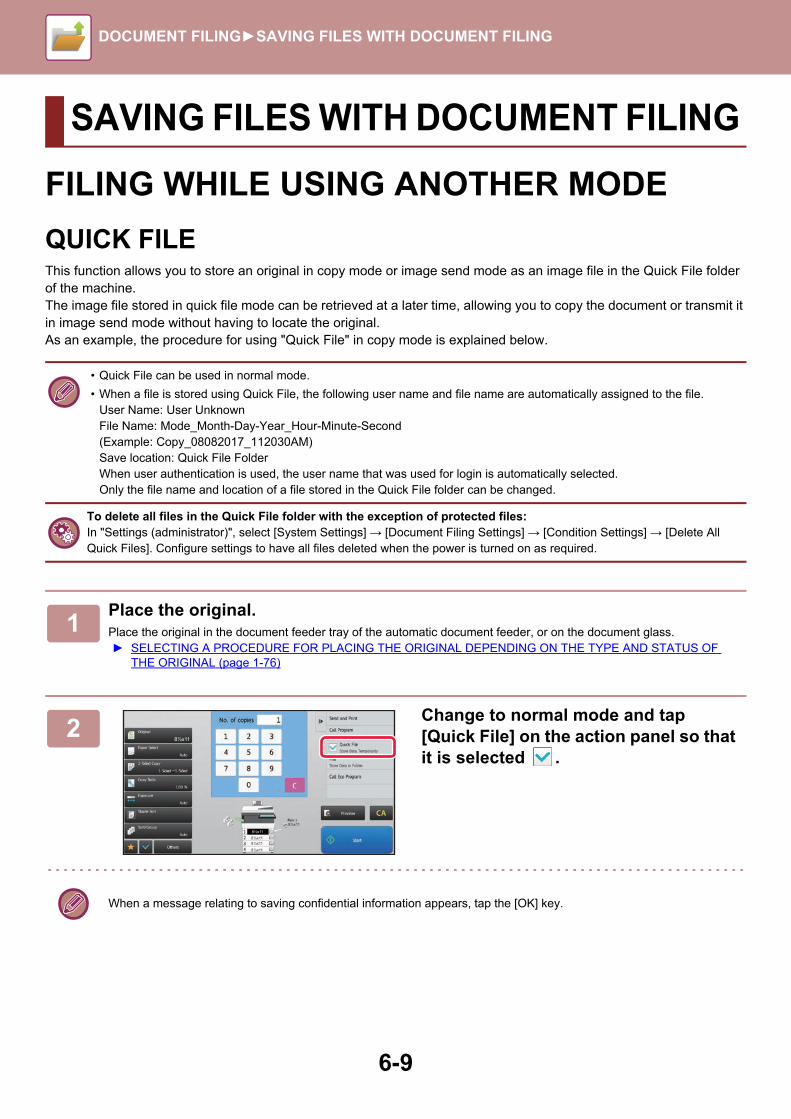
6-9
DOCUMENT FILING►SAVING FILES WITH DOCUMENT FILING
FILING WHILE USING ANOTHER MODE
QUICK FILEThis function allows you to store an original in copy mode or image send mode as an image file in the Quick File folder of the machine.The image file stored in quick file mode can be retrieved at a later time, allowing you to copy the document or transmit it in image send mode without having to locate the original.As an example, the procedure for using "Quick File" in copy mode is explained below.
SAVING FILES WITH DOCUMENT FILING
• Quick File can be used in normal mode.
• When a file is stored using Quick File, the following user name and file name are automatically assigned to the file.User Name: User UnknownFile Name: Mode_Month-Day-Year_Hour-Minute-Second (Example: Copy_08082017_112030AM)Save location: Quick File FolderWhen user authentication is used, the user name that was used for login is automatically selected.Only the file name and location of a file stored in the Quick File folder can be changed.
To delete all files in the Quick File folder with the exception of protected files:In "Settings (administrator)", select [System Settings] → [Document Filing Settings] → [Condition Settings] → [Delete All Quick Files]. Configure settings to have all files deleted when the power is turned on as required.
1Place the original.Place the original in the document feeder tray of the automatic document feeder, or on the document glass.► SELECTING A PROCEDURE FOR PLACING THE ORIGINAL DEPENDING ON THE TYPE AND STATUS OF
THE ORIGINAL (page 1-76)
2Change to normal mode and tap [Quick File] on the action panel so that it is selected .
When a message relating to saving confidential information appears, tap the [OK] key.
8½x11
8½x118½x11
8½x11
8½x11
8½x11

6-10
DOCUMENT FILING►SAVING FILES WITH DOCUMENT FILING
FILETapping the [File] key of the document filing function when printing or transmitting an original in each mode allows you to store the original in the Main folder or stored Custom folder as a file simultaneously with printing or transmission. The stored file can be retrieved at a later time, allowing you to recopy or resend the original without having to locate it.As an example, the procedure for using "File" in copy mode is explained below.
3Start a copy or image sending.When the function is executed, the image data of the original is stored in the Quick File folder.
To prevent accidental saving of the file, the message "The scanned data is stored in the quick file folder." appears for 6 seconds (default setting) after the [Start] key is tapped.To change the message display time, in "Settings (administrator)" → [System Settings] → [Common Settings] → [Operation Settings] → [Condition Settings] → [Message Time Setting].
To cancel Quick File:Tap [Quick File] to enable .
• File can be used in normal mode.
• When a file is stored using File without appending file information, the following user name and file name are automatically assigned to the file.User Name: User UnknownFile Name: Mode_Month-Day-Year_Hour-Minute-Second (Example: Copy_08082017_112030AM)Save location: Main Folder
1Place the original.Place the original in the document feeder tray of the automatic document feeder, or on the document glass.► SELECTING A PROCEDURE FOR PLACING THE ORIGINAL DEPENDING ON THE TYPE AND STATUS OF
THE ORIGINAL (page 1-76)
There are also cases where settings are required to be made before a preview is carried out.

6-11
DOCUMENT FILING►SAVING FILES WITH DOCUMENT FILING
2Change to normal mode and tap [File] on the action panel to specify the file information.To select the user name, file name, folder, and property setting, see "File Information (page 6-12)".To save on the HDD:► Changing the property (page 6-12)► Specifying a user name (page 6-13)► Assigning a file name (page 6-13)► Specifying the folder (page 6-13)► Creating PDF for PC browsing (page 6-13)
To save in an external memory device:► Assigning a file name (page 6-13)► Specifying the folder (page 6-13)► Creating PDF for PC browsing (page 6-13)
After configuring the above settings, you will return to this screen. Go to the next step.If you do not wish to assign a user name or other information to the file, go to the next step.
3Tap .You will return to the base screen of copy mode.
4Select copy settings and then tap the [Start] key.• Simultaneously with starting copy, the original is stored as a file.
The selected copy settings are also saved.• For the procedure for placing the original, see "SELECTING A PROCEDURE FOR PLACING THE ORIGINAL
DEPENDING ON THE TYPE AND STATUS OF THE ORIGINAL (page 1-76)".
8½x11
8½x11
Start
CAPreview
On
Off
File Information
Sharing
User Name
Create PDF for PC Browsing
File Name
Stored to Main Folder
User Unknown
Password
Copy_08082017_134725

6-12
DOCUMENT FILING►SAVING FILES WITH DOCUMENT FILING
File InformationThe procedure for detail settings is described below.Specifying a property, user name, file name, and folder makes it easier to manage and search for a file. In addition, when [Confidential] is selected for Property and a password is established, other people will not be able to view the file without permission.
Changing the propertyA protect setting can be selected for files saved with the document filing function. This prevents a file from being moved, or automatically or manually deleted.Three properties are available for saved files: "Sharing", "Protect", and "Confidential". When saved with the "Sharing" property, a file is not protected. When saved with the "Protect" or "Confidential" property, a file is protected.Files saved to the Quick File folder are all saved as "Sharing" files. When a file is saved to the Main folder or a custom folder, "Sharing", "Protect" or "Confidential" can be selected.
Sharing A "Sharing" file can be changed to "Protect" or "Confidential" using "Property Change" in the Job Settings.
Protect"Protect" does not require setting of a password, but prevents a file from being moved, deleted or edited. A password cannot be established.
ConfidentialTo protect a "Confidential" file, a password is set. (The password must be entered to retrieve the file.) When a file is saved in encrypted PDF format, the file property is automatically set to "Confidential".
Restrictions on changing the property
• A file that is set to "Sharing" can be changed to "Protect" or "Confidential" as required. However, a "Sharing" file that is saved in the Quick File folder can only be changed to "Protect".
• A file that is set to "Protect" can be changed to "Sharing" or "Confidential" as required. However, a "Protect" file that is saved in the Quick File folder can only be changed to "Sharing".
• A file that is saved in the Quick File folder cannot be changed to "Confidential". If the file is moved to the Main folder or a custom folder, the property can be changed to "Confidential".
• Two properties cannot be selected for a single file.
1Select [Property] in the File Information screen.
2When you have selected [Confidential], enter a password (5 to 32 characters).Every time you enter one digit, " " is displayed.

6-13
DOCUMENT FILING►SAVING FILES WITH DOCUMENT FILING
Specifying a user name
Assigning a file nameA file name can be assigned to the file.
Specifying the folderSpecify the folder for storing the file.
Creating PDF for PC browsingTap the [Create PDF for PC Browsing] checkbox to , and a public PDF for PC browsing will be created when the file is saved.
1Tap the [User Name] text box.When user authentication is used, the user name that was used for login is automatically selected. In this case, this step is not necessary.
The user name must first be stored by selecting [User Control] in "Settings (administrator)" →[User List].
2Tap the key of the user name.Alternatively, you can select a user name by tapping the [Call with Registration Number] key and entering the user number.The user number must be first set by selecting [User Control] in "Settings (administrator)" →[User List].
3Tap .The system goes back to the screen of step 1 to display the selected user name.
1Tap the [File Name] text box and enter the file name.Enter a file name using up to 30 characters.
File Name
• If a file name that already exists is specified, a tilde and a serial number are added after the file name and this file is saved as a different file. The file name is not case-sensitive.For example, if the "test.txt" file already exists and you specify the "TEST.TXT" file, the file will be saved as "TEST.TXT~1" file.
• If the length of the file name exceeds the limit, excess characters will be omitted and a serial number will be added to the end of the file name.
1Tap the [Stored to] text box.If a user name with a "My Folder" setting is selected, "My Folder" of that user will automatically be selected.
2Tap the key of the folder where you want to store the file, and tap .If a password has been set for the folder, a password entry screen appears. Enter the password (5 to 8 digits number) using the numeric keys and tap the .

6-14
DOCUMENT FILING►SAVING FILES WITH DOCUMENT FILING
SAVING DOCUMENT DATA ONLY (SCAN TO HDD)
SAVE ON HDD
Storing from Easy Scan
1Tap the [Easy Scan] key on the Home screen.
2Tap [Scan to HDD/USB].
3Place the original.Place the original in the document feeder tray of the automatic document feeder, or on the document glass.► AUTOMATIC DOCUMENT FEEDER (page 1-77)► DOCUMENT GLASS (page 1-79)
4Tap [Scan to HDD].
You can tap the [Auto Set] key to automatically set appropriate scan settings for the original.► SETTING SCAN SETTINGS AUTOMATICALLY (Auto Set) (page 5-66)
5To select settings, tap the key of each desired setting.► IMAGE SEND SEQUENCE (page 5-12)
6Tap the [Color Start] or [B/W Start] key to start scanning.A beep will sound to indicate that scanning and file store have ended.
EasyCopy
CAPreview Auto Set
B/WStart
ColorStart
Scan toUSB
Scan to HDD
Scan to HDD/USB

6-15
DOCUMENT FILING►SAVING FILES WITH DOCUMENT FILING
Storing from Document Filing
1Tap the [HDD File retrieve] key on the Home screen.
2Tap [Scan to HDD] on the action panel.
3Place the original.Place the original in the document feeder tray of the automatic document feeder, or on the document glass.► AUTOMATIC DOCUMENT FEEDER (page 1-77)► DOCUMENT GLASS (page 1-79)
4Check the file name and save location, and tap keys for any settings you want to select.
• When the [Create Downloadable File] checkbox is ( ), the [File Format] key is grayed out and cannot be used. You will not be able to download scan data in the specified format from the Web page.
• For original scan settings, see the explanation of the copy or image send mode.
• If the original is 2-sided, be sure to tap the [Original] key and then tap the [2-Sided Tablet] key or the [2-Sided Book] key as appropriate for the original.
• To set a user name, file attribute, or password, tap [Options].
• When a file is created with [Create Downloadable File] disabled, this setting cannot be enabled later.
5Tap the [Start] key to start scanning.A beep will sound to indicate that scanning and file store have ended.
8½x11 8½x11

6-16
DOCUMENT FILING►SAVING FILES WITH DOCUMENT FILING
SAVE IN EXTERNAL MEMORY DEVICE
Storing from Easy Scan
1Tap the [Easy Scan] key on the Home screen.
2Tap [Scan to HDD/USB].
3Place the original.Place the original in the document feeder tray of the automatic document feeder, or on the document glass.► AUTOMATIC DOCUMENT FEEDER (page 1-77)► DOCUMENT GLASS (page 1-79)
4Tap [Scan to USB].
You can tap the [Auto Set] key to automatically set appropriate scan settings for the original.► SETTING SCAN SETTINGS AUTOMATICALLY (Auto Set) (page 5-66)
5To select settings, tap the key of each desired setting.► IMAGE SEND SEQUENCE (page 5-12)
6Tap the [Color Start] or [B/W Start] key to start scanning.A beep will sound to indicate that scanning and file store have ended.
EasyCopy
CAPreview Auto Set
B/WStart
ColorStart
Scan toUSB
Scan to HDD
Scan to HDD/USB
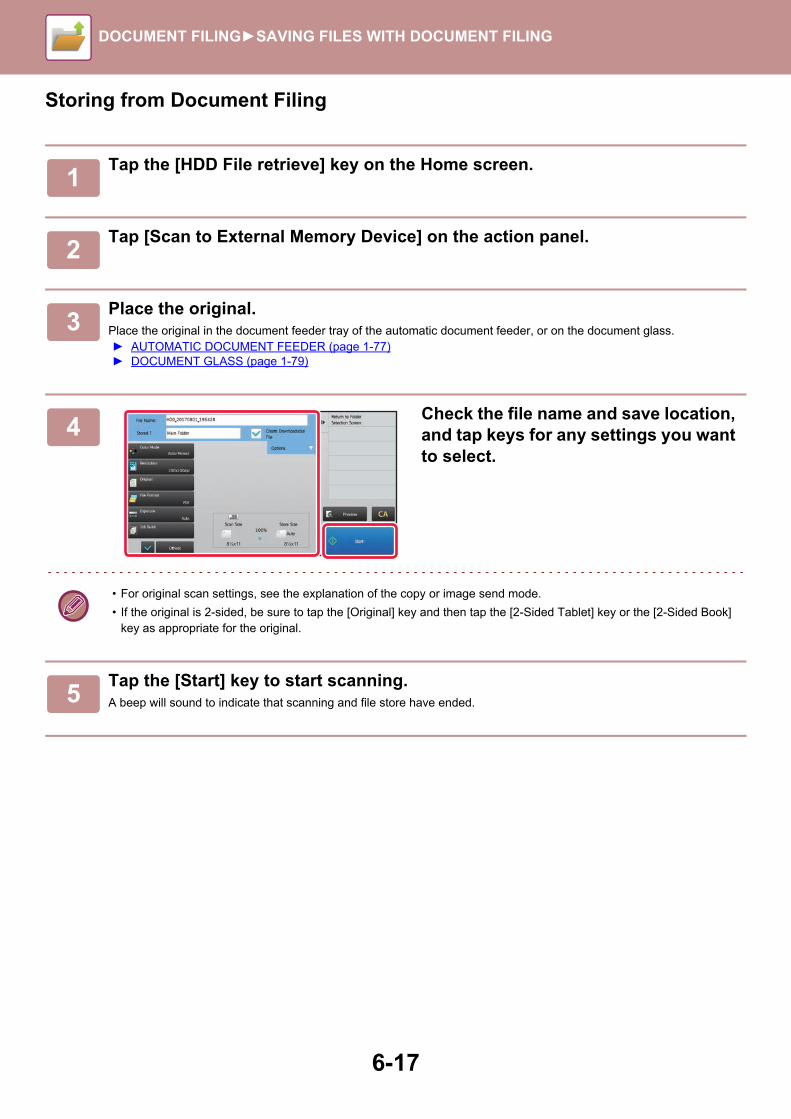
6-17
DOCUMENT FILING►SAVING FILES WITH DOCUMENT FILING
Storing from Document Filing
1Tap the [HDD File retrieve] key on the Home screen.
2Tap [Scan to External Memory Device] on the action panel.
3Place the original.Place the original in the document feeder tray of the automatic document feeder, or on the document glass.► AUTOMATIC DOCUMENT FEEDER (page 1-77)► DOCUMENT GLASS (page 1-79)
4Check the file name and save location, and tap keys for any settings you want to select.
• For original scan settings, see the explanation of the copy or image send mode.
• If the original is 2-sided, be sure to tap the [Original] key and then tap the [2-Sided Tablet] key or the [2-Sided Book] key as appropriate for the original.
5Tap the [Start] key to start scanning.A beep will sound to indicate that scanning and file store have ended.
8½x11 8½x11

6-18
DOCUMENT FILING►SAVING FILES WITH DOCUMENT FILING
Scan to USB memory device
1Connect the USB memory device to the machine.
2When a screen for selecting the action appears, tap [Scan to External Memory Device].• To select detailed settings in normal mode, select the
[Perform Detail Setting] checkbox .► NETWORK SCANNER MODE (page 5-8)
If the machine/device save screen is open, this screen will not appear.
3Tap the [Color Start] key or [B/W Start] key.To check a preview of a document, tap the [Preview] key.► PREVIEW SCREEN (page 1-15)
4After scanning all originals, tap the [Read-End] key.
When you scan the original using the automatic document feeder, this screen does not appear.
Job Status
EasyCopy Perform Detail Setting
10:15 AM
Print from externalmemory device (USB)
Scan to ExternalMemory Device
External memory device (USB) is connected.
CAPreview Auto Set
Original
8½x11Address External Memory Device Detail
B/WStart
ColorStart
Address Book History GlobalAddress Search
Scan to HDD/USB
Address Book Scan to HDD/USB
CAPreview Auto Set
OriginalDetail
B/WStart
ColorStart
Place next original. (Pg.No.1)Press [Start].When finished, press [Read-End].
Change Setting Read-End
8½x11

6-19
DOCUMENT FILING►SAVING FILES WITH DOCUMENT FILING
5Check the [Sending data has been completed.] message, and remove the USB memory device from the machine.

6-20
DOCUMENT FILING►USING STORED FILES
SEQUENCE FOR USING A STORED FILEThe screens and procedures differ depending on whether or not user authentication is enabled.The sequence for using a stored file depending on the situation is explained.For information on user authentication procedures, see "USER AUTHENTICATION (page 1-29)". For information on enabling user authentication and storing user names, see "USER CONTROL (page 7-60)".
USING STORED FILES
Also in setting mode (Web version), you can use document filing. In setting mode (Web version), click [Document Operations] → [Document Filing], and then click the folder that contains the file you wish to use.You can also check a preview of a stored file in setting mode (Web version).
1Switch to document filing mode.► CHANGING MODES (page 1-14)
2Select the file that you wish to retrieve.When the folder is selected, the files in the folder will appear. Select the file that you wish to retrieve.Select a file from the thumbnail images of the stored files.► FILE SELECTION SCREEN (page 6-21)► SELECTING A FILE TO RETRIEVE (page 6-22)
Retrieve a file using the search function.► FILE SEARCH AND RETRIEVAL (page 6-33)
3Select an operation item.Select the desired operation and configure settings.► FILE SELECTION SCREEN (page 6-21)► FILE PRINTING (page 6-22)► FILE TRANSMISSION (page 6-26)► FILE MOVING (page 6-27)► DELETE FILE (page 6-28)► FILE IMAGE CHECKING (page 6-30)► FILE MERGING (page 6-31)
When retention is selected on the printer, reset items that cannot be set for retention do not appear.
CA
Select All Batch Print
All Files
Delete
Main Folder
File Name User Name
User Unknown 08/08/2017
User Unknown 08/08/2017
User Unknown 08/08/2017
User Unknown 08/08/2017
User Unknown 08/08/2017
User Unknown 08/08/2017
User Unknown 08/08/2017
Date
Select File fromFTP to Print
Select File fromUSB Memory to Print
Select File fromNetwork Folder to PrintCopy_08082017_112030
Copy_08082017_112100
Copy_08082017_112130
Copy_08082017_112200
Copy_08082017_112230
Copy_08082017_112300
Copy_08082017_112330
Print Now
CA
Select All Batch Print
All Files
Delete
Main Folder
File Name User Name
User Unknown 08/08/2017
User Unknown 08/08/2017
User Unknown 08/08/2017
User Unknown 08/08/2017
User Unknown 08/08/2017
User Unknown 08/08/2017
User Unknown 08/08/2017
Date
Choose Print Settings
Move
Check Image
See Detail Information
Print and Deletethe Data
Copy_08082017_112030
Copy_08082017_112100
Copy_08082017_112130
Copy_08082017_112200
Copy_08082017_112230
Copy_08082017_112300
Copy_08082017_112330
Print Now

6-21
DOCUMENT FILING►USING STORED FILES
FILE SELECTION SCREENThe file selection screen can be displayed in "List" format or "Thumbnail" format to display thumbnail images of files.
List display mode
Thumbnail display mode
CA
Select All Batch Print
All Files
DeletePrint Now
Main Folder
File Name User Name
User Unknown 08/08/2017
User Unknown 08/08/2017
User Unknown 08/08/2017
User Unknown 08/08/2017
User Unknown 08/08/2017
User Unknown 08/08/2017
User Unknown 08/08/2017
Date
Choose Print Settings
Move
Check Image
See Detail Information
Print and Deletethe Data
Copy_08082017_112030
Copy_08082017_112100
Copy_08082017_112130
Copy_08082017_112200
Copy_08082017_112230
Copy_08082017_112300
Copy_08082017_112330
Switch the file key displayed for each job type.
Search for a file saved in a folder.
Displays the functions that can be used.
Reset all settings.
Return to the base screen of document filing mode.
Displays the saved files.
Tap this key to display the usage status of the machine's built-in hard disk drive.
Select or clear all files. Tapping this key switches the key display mode between [Select All] and [Cancel All].
Start printing immediately.
Switch the file display mode between list and thumbnail.
CA
Select All Batch Print
All Files
Delete
Choose Print Settings
Move
Check Image
See Detail Information
Print and Deletethe Data
Main Folder
Print Now
Copy_08082017_112030
Copy_08082017_112100
Copy_08082017_112130
Copy_08082017_112200
Copy_08082017_112230
Copy_08082017_112300
Copy_08082017_112330
Copy_08082017_112400
Switch the file display mode between list and thumbnail.
Displays thumbnails of the saved files.

6-22
DOCUMENT FILING►USING STORED FILES
SELECTING A FILE TO RETRIEVE
FILE PRINTINGA file stored using document filing can be retrieved and printed when needed. The settings used when the file was stored are also stored, and thus the file can be printed again using those settings. The file can also be modified before printing by changing the print settings.
1Tap the [HDD File retrieve] key.When user authentication is enabled and "My Folder" is configured by selecting [User Control] in "Settings (administrator)" → [User List], the custom folder specified as "My Folder" opens.
2Tap the key of the folder that contains the desired file.If the folder with a PIN Code is tapped, a PIN Code entry screen will appear.Enter the PIN Code (5 to 8 digits number) using the numeric keys and tap the .
3Tap the key of the desired file.If the folder with a PIN Code is tapped, a PIN Code entry screen will appear.Enter the PIN Code (5 to 32 characters) and tap the .
• Tap the [Print Now] key to printed out the file with the settings used for its storage.
• Tap the [Filter by Job] key to display the keys of a particular mode such as copy or scanner mode, enabling quick data search.
• Tap the [File Name] key, the [User Name] key, or the [Date] key to change the order of display of the files.
• Select [User Control] in "Settings (administrator)" → [Authority Group List]. Then, in authority group setting for the users who are currently logged in, select [Job Settings] → [Document Filing] and enable [Display only the Files of Logged-in Users] to display only files stored by the users who are currently logged in.
• Print settings that are changed by re-manipulation of the file cannot be saved.
• The printing speed may be somewhat slow depending on the resolution and exposure mode settings of the stored file.
• When retention is selected on the printer, reset items that cannot be set for retention do not appear.
Scan to HDD
Scan to ExternalMemory DeviceSelect File fromFTP to PrintSelect File fromUSB Memory to Print
Main Folder Quick File Folder
Folder Select
Select File fromNetwork Folder to Print
CA
AAA BBB
CCC DDD
EEE FFF
GGG HHH
III III JJJ
KKK LLL

6-23
DOCUMENT FILING►USING STORED FILES
Quick printingPrints a file with the various settings used when it was saved. Select a file and tap the [Print Now] key.To delete data after printing, set the [Print and Delete the Data] checkbox to .
Changing settings before printingAfter selecting the desired file, follow the steps below.► SELECTING A FILE TO RETRIEVE (page 6-22)
1Tap [Choose Print Settings] on the action panel.
2Change the print settings.
3Select the [Delete] checkbox when needed.
4Tap the [Start] key.The file will be printed.
CA
Select All Batch Print
All Files
Delete
Main Folder
File Name User Name
User Unknown 08/08/2017
User Unknown 08/08/2017
User Unknown 08/08/2017
User Unknown 08/08/2017
User Unknown 08/08/2017
User Unknown 08/08/2017
User Unknown 08/08/2017
Date
Choose Print Settings
Move
Check Image
See Detail Information
Print and Deletethe Data
Print Now
Copy_08082017_112030
Copy_08082017_112100
Copy_08082017_112130
Copy_08082017_112200
Copy_08082017_112230
Copy_08082017_112300
Copy_08082017_112330

6-24
DOCUMENT FILING►USING STORED FILES
MULTI-FILE PRINTING
MULTI-FILE PRINTING
1Select the keys of the multiple files that you wish to print.
• Confidential files cannot be printed simultaneously with other files.
• A file in the currently selected folder cannot be selected simultaneously with a file in a different folder.
• If the job type is changed with the By Job Display key or the screen is changed by being tapped while a file is selected, the selection of the file will be canceled.
2Tap [Print] on the action panel.
3When not printing with the number of copies at data saving, tap the [Apply the Number from Stored Setting of Each Job.] checkbox to set to .When printing with the number of copies at data saving without specifying copies, go to step 5.
4Use to specify the number of copies.As required, directly tap the numeric value display key and change the value using the numeric keys.
5To delete the file after printing, tap the [Delete] checkbox to set to .
6Tap the [OK] key to start printing.

6-25
DOCUMENT FILING►USING STORED FILES
BATCH PRINTING
1Tap the [Batch Print] key.
2Tap the [User Name] text box.
3Select the user name.After selecting the user name, tap .
If you have selected [System Settings] in "Settings (administrator)" → [Document Filing Settings] → [Condition Settings] → [Batch Print Settings] and disabled the [Selection of [All Users] is not allowed.] checkbox and [Selection of [User Unknown] is not allowed.] checkbox, select the [All Users] key and [User Unknown] key.If you tap the [All Users] key, all files in the folder (the files of all users) are selected.If you tap the [User Unknown] key, all files in the folder with no user name specified are selected.
4If a password has been established, tap the [Password] key.Enter the password (5 to 32 characters) and tap . Only files that have the same password will be selected.If you do not wish to enter a password, go to the next step.
5When not printing with the number of copies at data saving, tap the [Apply the Number from Stored Setting of Each Job.] checkbox to set to .When printing with the number of copies at data saving, go to step 7.
6Use to specify the number of copies.As required, directly tap the numeric value display key and change the value using the numeric keys.
7To automatically delete the file after printing, tap the [Delete] key.
CADelete
Start
Return to FileSelection ScreenBatch Print
Main Folder
User Name
Password
Change Print Number
PrintOrder
Apply the Number from Stored Setting ofEach Job.
All Files
Date (Dsc.)
( 1~9999 )

6-26
DOCUMENT FILING►USING STORED FILES
FILE TRANSMISSIONThe settings used when the file was stored with document filing are stored, and thus the file can be transmitted using those settings. If needed, you can also change the transmission settings to modify the retrieved file.After selecting the desired file, follow the steps below.► SELECTING A FILE TO RETRIEVE (page 6-22)
8Tap the [Start] key to start printing.If there are no files that match the search conditions, you will return to the file list screen.
It [Delete the Data] on the action panel is tapped, all files that match the current search conditions will be deleted.
• A file saved in black and white or grayscale cannot be transmitted in color.
• A stored print job cannot be transmitted.
• These transmission methods require installation of the corresponding options.
• If any of the following other modes were included in the saved file, the file cannot be transmitted."Stamp", "Photo Repeat" for copying.
• If any of the following other modes were included in the saved file, the file can be transmitted, but other functions cannot be executed."Margin Shift", "Transparency Inserts", "Stamp", "Centering"
• Depending on the reduction or enlargement ratio used when storing a file, it may not be possible to send the stored file using a selected resolution setting. In this event, try changing the resolution.However, when sending a stored file by Internet fax, transmission may not be possible even if the resolution is changed.
• Files saved in other than Internet Fax mode cannot be sent to an Internet Fax address.
1Tap [Send] on the action panel.
2Select settings for sending.
3Tap the [Start] key.

6-27
DOCUMENT FILING►USING STORED FILES
FILE MOVINGChanges the file storage location. (The file is moved to another folder.)
After selecting the desired file, follow the steps below.► SELECTING A FILE TO RETRIEVE (page 6-22)
A file whose property is "Protect" cannot be moved. To move a protected file, change its property to "Sharing" or "Confidential".
1Tap [Move] on the action panel.
2Tap the [Move to:] key.
• A file cannot be moved to the Quick File folder.
• To change the file name, tap the [File Name] key.
3Tap the key of the folder to which you want to move the file.If the folder with a password is tapped, a password entry screen will appear.Enter the password (5 to 8 digits number) using the numeric keys and tap the .
When multiple files are moved, file names cannot be changed.
4Tap the [Move] key.
CA
Select All Batch Print
All Files
Delete
Main Folder
File Name User Name
User Unknown 08/08/2017
User Unknown 08/08/2017
User Unknown 08/08/2017
User Unknown 08/08/2017
User Unknown 08/08/2017
User Unknown 08/08/2017
User Unknown 08/08/2017
Date
Choose Print Settings
Move
Check Image
See Detail Information
Print and Deletethe Data
Print Now
Copy_08082017_112030
Copy_08082017_112100
Copy_08082017_112130
Copy_08082017_112200
Copy_08082017_112230
Copy_08082017_112300
Copy_08082017_112330
CA
Move
Return to FileSelection ScreenMove File
File Name AAA
Move to:
Auto ColorAAA AAA 8½x11

6-28
DOCUMENT FILING►USING STORED FILES
DELETE FILEStored files that are no longer required can be deleted.
After selecting the desired file, follow the steps below.► SELECTING A FILE TO RETRIEVE (page 6-22)
A file whose property is "Protect" cannot be deleted. To delete a protected file, change its property to "Sharing" or "Confidential".
1Tap the [Delete] key.
2Check the file and then tap the [Yes] key.
CA
Select All Batch Print
All Files
Delete
Main Folder
File Name User Name
08/08/2017
08/08/2017
08/08/2017
08/08/2017
08/08/2017
08/08/2017
08/08/2017
Date
Choose Print Settings
Move
Check Image
See Detail Information
Print and Deletethe Data
Print Now
Copy_08082017_112030
Copy_08082017_112100
Copy_08082017_112130
Copy_08082017_112200
Copy_08082017_112230
Copy_08082017_112300
Copy_08082017_112330
User Unknown
User Unknown
User Unknown
User Unknown
User Unknown
User Unknown
User Unknown
Print and Deletethe Data
CA
Select All Batch Print Delete
Main Folder
File Name
08/08/2017
08/08/2017
Choose Print Settings
Move
Check Image
See Detail Information
Print Now
Copy_08082017_112030AM
Copy_08082017_112100AM
Copy_08082017_112130AM
Copy_08082017_112200AM
Copy_08082017_112230AM
Copy_08082017_112300AM
Copy_08082017_112330AM
No Yes
Delete the file data?
User Unknown
User Unknown

6-29
DOCUMENT FILING►USING STORED FILES
Automatic Deletion of FileYou can have document filing data in specified folders automatically deleted by specifying the folders and the time. Periodic deletion of files stored in the machine helps to prevent the disclosure of sensitive information and frees space on the hard drive.
When [Delete by Schedule] is selected, you can select every day, every week, or every month for the deletion cycle, and set a scheduled time for each.
When [Delete at Specified Time after Specified Days Have Elapsed] is selected, you can select 1 to 7 days, 10 days, 20 days, or 30 days for the number of elapsed days, and set a scheduled time for each.Example: Delete the data in the Quick File folder at 9:00 AM 1 day from now.
File Name Stored Date Deletion date and time
Document A 08/08/2017 2:22AM 08/10/2017 9:00AM
Document B 08/08/2017 11:59PM 08/10/2017 9:00AM
Document C 08/09/2017 0:01AM 08/11/2017 9:00AM
• To automatically delete document filing data periodically:In "Settings (administrator)", select [System Settings] → [Document Filing Settings] → [Automatic Deletion of File Settings].
• To check the set deletion cycle:In "Settings (administrator)", select [Status] → [List Print] → [List for Administrator], and print a list of the administrator settings including document filing settings.
• To check information on the folders selected for file deletion:In "Settings", select [Status] → [List for User] → [Document Filing Folder List] and print a list of the folders of document filing.
When you specify automatic deletion of document filing data takes place periodically, all files in the specified folders will be deleted when the set time arrives. Exercise care not to store files that you wish to keep in folders specified for file deletion.

6-30
DOCUMENT FILING►USING STORED FILES
FILE IMAGE CHECKING
After selecting the desired file, follow the steps below.► SELECTING A FILE TO RETRIEVE (page 6-22)
• Depending on the size of the image, part of the image may be clipped off in the image check screen on the touch panel.
• A preview image is an image for display on the touch panel. It will differ from the actual print result.
• The image check screen does not appear when multiple files are selected.
1Tap [Check Image] on the action panel.
2Check the image of the file.
Auto ColorUser Unknown Return to FileSelection Screen8½x11HDD_08082017_112030
8½x11 8½x11 8½x11
1 2 3 4 5
5
Displays file information.
Displays file preview images.
Enlarge or reduce the preview screen.
Displays the total page count.
Displays the page number.
Rotate the preview screen in increments of 90 degrees.
CA
Select All Batch Print
All Files
Delete
Main Folder
File Name User Name
08/08/2017
08/08/2017
08/08/2017
08/08/2017
08/08/2017
08/08/2017
08/08/2017
Date
Choose Print Settings
Move
Check Image
See Detail Information
Print Now
Copy_08082017_112030
Copy_08082017_112100
Copy_08082017_112130
Copy_08082017_112200
Copy_08082017_112230
Copy_08082017_112300
Copy_08082017_112330
User Unknown
User Unknown
User Unknown
User Unknown
User Unknown
User Unknown
User Unknown
Print and Deletethe Data
Auto ColorUser Unknown Return to FileSelection Screen
8½x11HDD_08082017_112030
8½x11 8½x11 8½x11
1 2 3 4 5
5

6-31
DOCUMENT FILING►USING STORED FILES
FILE MERGINGYou can combine files that have been saved by Document Filing.
After selecting two desired files, follow the steps below.► SELECTING A FILE TO RETRIEVE (page 6-22)
• If you have only selected a single file, the [Combine File] key is not displayed.
• The file name is a combination of "the first file name", "a tilde (~)", and "Serial No.". As required, change the file name at a later time.
• The files are joined in the selected order.
1Tap [Combine File] on the action panel.
2Append file information.To select the user name, file name, folder, and property setting, see "File Information (page 6-12)".► Changing the property (page 6-12)► Specifying a user name (page 6-13)► Assigning a file name (page 6-13)► Specifying the folder (page 6-13)► Creating PDF for PC browsing (page 6-13)
To delete the original file, select the [Delete Original File] checkbox.
3Tap the [Execute] key.Combining of files starts, and after the processing is finished, the "Combining complete" message appears.
To cancel the operationTap the [CA] key. Note that the operation cannot be canceled when the original file is being deleted after the files are combined.
CA
Select All Batch Print
All Files
Delete
Main Folder
File Name User Name
08/08/2017
08/08/2017
08/08/2017
08/08/2017
08/08/2017
08/08/2017
08/08/2017
Date
Move
Combine File
Print and Deletethe Data
Print Now
Copy_08082017_112030
Copy_08082017_112100
Copy_08082017_112130
Copy_08082017_112200
Copy_08082017_112230
Copy_08082017_112300
Copy_08082017_112330
User Unknown
User Unknown
User Unknown
User Unknown
User Unknown
User Unknown
User Unknown

6-32
DOCUMENT FILING►USING STORED FILES
RETRIEVING AND USING A FILE FROM THE JOB STATUS SCREENFiles stored using File and Quick File appear as keys in the job status complete screen.This is convenient when you need to quickly print the saved data of a copy job or quickly send a saved fax to another destination.
1Tap the job status display.
2Tap the tab with a file to be retrieved, and tap the [Complete] key.
3Tap the key of the desired file from the completed job.A file that has been processed by Quick File or File can be selected for a job in the retrieve operation.
4Tap [Send] or [Choose Print Settings] on the action panel.► FILE TRANSMISSION (page 6-26)► FILE PRINTING (page 6-22)
To view detailed information on a file, select the file, and then tap [Check Details of Selected Job] on the action panel.

6-33
DOCUMENT FILING►USING STORED FILES
FILE SEARCH AND RETRIEVALWhen there are many stored files, it may take some time to locate a file. The search function of document filing mode can be used to find a file quickly.Searching is possible even when you only know part of the file name or folder name. As required, a folder can also be specified as a search range.Example: Only part of a file name is known: "Conference"
1To search for a specific folder, tap its key.
If the folder with a password is tapped, a password entry screen will appear. Enter the password (5 to 8 digits number) using the numeric keys.
2Tap .
Hard disk
Personal use
Quick File
forconference
Standard
Regularconference
Text 1
Reports Graph for conference When you search by
entering "Conference"···
Graph for conference
Regular conference
for conference
You can find all folders and files that contain the word "Conference".
Search result
Scan to HDD
Scan to ExternalMemory DeviceSelect File fromFTP to PrintSelect File fromUSB Memory to Print
Main Folder Quick File Folder
Folder Select
Select File fromNetwork Folder to Print
CA
AAA BBB
CCC DDD
EEE FFF
GGG HHH
III III JJJ
KKK LLL

6-34
DOCUMENT FILING►USING STORED FILES
3Select search conditions.Tap each text box and set the search condition.To search for the current folder, set the [Search Just Within the Folder] checkbox to .
[User Name]Search using the user name.Select a user on the user selection screen that appears, and then tap .[Login Name]Search using the login name.Enter the login name on the soft keyboard that appears and tap the [OK] key.[File or Folder Name]Search using the file name or folder name.Enter the file name or folder name on the soft keyboard that appears and tap the [OK] key.[PIN Code/Password]Search for files that have a password set.Enter the password with the soft keyboard that appears, and tap the [OK] key.[Date]Search using the date when the file was created.When you have selected [Today] or [Date Set], set the time and date.
4Tap the [Search Start] key.A list of the files that match your search conditions will appear. Select the desired file from the list. The job settings screen will appear.To return to the base screen of document filing mode, tap the [CA] key.To return to the file search screen, tap the [Search Again] key.
• When you search using [File or Folder Name], custom folders that match the search characters will also appear in the list. When a folder key is tapped, a list of the files in the folder appears. Tap the desired file in the list.
• Also in setting mode (Web version), you can use the file search function. Click [Document Operations] in "Settings (Web version)" →[Document Filing] → [Search].
CA
All FilesMain Folder
Search
User Name
Login Name
Date
Search Just Within the Folder Search Start
File or Folder Name
PIN Code/Password
Select File fromFTP to PrintSelect File fromUSB Memory to Print
Select File fromNetwork Folder to Print
Print Now

6-35
DOCUMENT FILING►USING STORED FILES
PRINTING AN EXTERNAL FILEA file stored in the FTP server, USB memory device, or network folder of a PC can be printed. The file can also be modified before printing by changing the print settings.On the action panel, tap [Select File from FTP to Print], [Select File from USB Memory to Print] or [Select File from Network Folder to Print].For more information, see "PRINTING WITHOUT THE PRINTER DRIVER (page 3-70)".

7-1
SETTING MODE
SETTING MODE LIST
SETTING MODE LIST . . . . . . . . . . . . . . . . . . . . . . . 7-5
• Status. . . . . . . . . . . . . . . . . . . . . . . . . . . . . . . . . 7-5
• Address Book . . . . . . . . . . . . . . . . . . . . . . . . . . 7-5
• Document Operations . . . . . . . . . . . . . . . . . . . . 7-6
• User Control. . . . . . . . . . . . . . . . . . . . . . . . . . . . 7-6
• System Settings. . . . . . . . . . . . . . . . . . . . . . . . . 7-9
STATUS
Status . . . . . . . . . . . . . . . . . . . . . . . . . . . . . . . . . . . . 7-49
• Machine Identification . . . . . . . . . . . . . . . . . . . . 7-49
• Total Count . . . . . . . . . . . . . . . . . . . . . . . . . . . . 7-50
• Device Status. . . . . . . . . . . . . . . . . . . . . . . . . . . 7-50
• Network Status . . . . . . . . . . . . . . . . . . . . . . . . . 7-51
• Firmware Version. . . . . . . . . . . . . . . . . . . . . . . . 7-52
• Power Reset . . . . . . . . . . . . . . . . . . . . . . . . . . . 7-52
• Data List. . . . . . . . . . . . . . . . . . . . . . . . . . . . . . . 7-52
ADDRESS BOOK
Address Book . . . . . . . . . . . . . . . . . . . . . . . . . . . . . 7-54
• Category Setting . . . . . . . . . . . . . . . . . . . . . . . . 7-56
DOCUMENT OPERATIONS
Document Operations. . . . . . . . . . . . . . . . . . . . . . . 7-57
• Document Filing. . . . . . . . . . . . . . . . . . . . . . . . . 7-57
• Submit Print Job . . . . . . . . . . . . . . . . . . . . . . . . 7-59
USER CONTROL
User Control . . . . . . . . . . . . . . . . . . . . . . . . . . . . . . 7-60
• User List. . . . . . . . . . . . . . . . . . . . . . . . . . . . . . . 7-60
• Custom Index. . . . . . . . . . . . . . . . . . . . . . . . . . . 7-63
• Organization /Group List . . . . . . . . . . . . . . . . . . 7-63
• Default Settings . . . . . . . . . . . . . . . . . . . . . . . . . 7-63
• Pages Limit Group. . . . . . . . . . . . . . . . . . . . . . . 7-69
• Machine Page Limit Setting. . . . . . . . . . . . . . . . 7-69
• Authority Group . . . . . . . . . . . . . . . . . . . . . . . . . 7-70
• Favorite Operation Group . . . . . . . . . . . . . . . . . 7-74
• User Count. . . . . . . . . . . . . . . . . . . . . . . . . . . . . 7-76
• Billing Code Setting . . . . . . . . . . . . . . . . . . . . . 7-78
• Card Setting . . . . . . . . . . . . . . . . . . . . . . . . . . . 7-80
SYSTEM SETTINGS
Home Screen Settings. . . . . . . . . . . . . . . . . . . . . . 7-81
• Condition Settings . . . . . . . . . . . . . . . . . . . . . . 7-81
• Icon. . . . . . . . . . . . . . . . . . . . . . . . . . . . . . . . . . 7-81
• Background Image . . . . . . . . . . . . . . . . . . . . . . 7-82
• Home Screen Registration . . . . . . . . . . . . . . . . 7-82
Copy Settings. . . . . . . . . . . . . . . . . . . . . . . . . . . . . 7-83
• Condition Settings . . . . . . . . . . . . . . . . . . . . . . 7-83
• Initial Status Settings . . . . . . . . . . . . . . . . . . . . 7-85
• Text /Image Printing . . . . . . . . . . . . . . . . . . . . . 7-85
Printer Settings . . . . . . . . . . . . . . . . . . . . . . . . . . . 7-86
• Condition Settings . . . . . . . . . . . . . . . . . . . . . . 7-86
• Interface Settings . . . . . . . . . . . . . . . . . . . . . . . 7-87
• Initial Status Settings . . . . . . . . . . . . . . . . . . . . 7-88
• PCL Settings. . . . . . . . . . . . . . . . . . . . . . . . . . . 7-89
• PostScript Settings . . . . . . . . . . . . . . . . . . . . . . 7-89
• OOXML Settings. . . . . . . . . . . . . . . . . . . . . . . . 7-89
• Print Release Settings . . . . . . . . . . . . . . . . . . . 7-89
• E-mail Print Settings . . . . . . . . . . . . . . . . . . . . . 7-89
• Direct Print Settings (FTP) . . . . . . . . . . . . . . . . 7-90
• Direct Print Settings (Network Folder) . . . . . . . 7-91
• Print Setting from PC/Mobile Terminal . . . . . . . 7-91
Image Send Settings . . . . . . . . . . . . . . . . . . . . . . . 7-92
• Common Settings. . . . . . . . . . . . . . . . . . . . . . . 7-92
• Scan Settings . . . . . . . . . . . . . . . . . . . . . . . . . . 7-96
• Internet Fax Settings . . . . . . . . . . . . . . . . . . . . 7-101
• Fax Data Receive/Forward (Manual) . . . . . . . . 7-107
• Inbound Routing (Forwarding/Storing) Settings. . . . 7-108
• Inbound Routing (Storage) Settings . . . . . . . . . 7-110
• Metadata Settings. . . . . . . . . . . . . . . . . . . . . . . 7-111
Document Filing Settings . . . . . . . . . . . . . . . . . . . 7-112
• Condition Settings . . . . . . . . . . . . . . . . . . . . . . 7-112
• Document Filing Control . . . . . . . . . . . . . . . . . . 7-114
• Automatic Deletion of File Settings. . . . . . . . . . 7-114
Sharp OSA Settings. . . . . . . . . . . . . . . . . . . . . . . . 7-115
• Condition Settings . . . . . . . . . . . . . . . . . . . . . . 7-115
• Standard Application Settings . . . . . . . . . . . . . 7-115
• Receiving Application Setting . . . . . . . . . . . . . . 7-116
• External Accounting Application Settings. . . . . 7-116
• Embedded Application Settings . . . . . . . . . . . . 7-117
• Polling Setting. . . . . . . . . . . . . . . . . . . . . . . . . . 7-117
SYSTEM SETTINGS

7-2
SYSTEM SETTINGS
Common Settings . . . . . . . . . . . . . . . . . . . . . . . . . . 7-118
• Paper Settings . . . . . . . . . . . . . . . . . . . . . . . . . . 7-118
• Paper Type Registration . . . . . . . . . . . . . . . . . . 7-120
• Operation Settings. . . . . . . . . . . . . . . . . . . . . . . 7-121
• Keyboard Settings . . . . . . . . . . . . . . . . . . . . . . . 7-124
• Device Control . . . . . . . . . . . . . . . . . . . . . . . . . . 7-125
• Enable/Disable Settings. . . . . . . . . . . . . . . . . . . 7-127
• Machine Identification Settings . . . . . . . . . . . . . 7-130
• Clock Adjust. . . . . . . . . . . . . . . . . . . . . . . . . . . . 7-131
• Product Key . . . . . . . . . . . . . . . . . . . . . . . . . . . . 7-132
• Custom Link Setting. . . . . . . . . . . . . . . . . . . . . . 7-132
Network Settings. . . . . . . . . . . . . . . . . . . . . . . . . . . 7-133
• Quick Settings . . . . . . . . . . . . . . . . . . . . . . . . . . 7-133
• Network Name Setting. . . . . . . . . . . . . . . . . . . . 7-136
• Protocol Settings . . . . . . . . . . . . . . . . . . . . . . . . 7-136
• Services Settings. . . . . . . . . . . . . . . . . . . . . . . . 7-137
• Print Port Settings . . . . . . . . . . . . . . . . . . . . . . . 7-140
• External Print Services Settings . . . . . . . . . . . . 7-140
• External Service Connect . . . . . . . . . . . . . . . . . 7-142
• LDAP Settings . . . . . . . . . . . . . . . . . . . . . . . . . . 7-143
• Active Directory Settings . . . . . . . . . . . . . . . . . . 7-145
• Public Folder / NAS Setting . . . . . . . . . . . . . . . . 7-145
• Proxy Setting . . . . . . . . . . . . . . . . . . . . . . . . . . . 7-146
• Wireless Settings. . . . . . . . . . . . . . . . . . . . . . . . 7-146
• Easy Connection Setting . . . . . . . . . . . . . . . . . . 7-148
• Device Web Page Setting . . . . . . . . . . . . . . . . . 7-149
Security Settings. . . . . . . . . . . . . . . . . . . . . . . . . . . 7-150
• Password Change . . . . . . . . . . . . . . . . . . . . . . . 7-150
• Change Password . . . . . . . . . . . . . . . . . . . . . . . 7-150
• Port Control . . . . . . . . . . . . . . . . . . . . . . . . . . . . 7-150
• Filter Setting. . . . . . . . . . . . . . . . . . . . . . . . . . . . 7-151
• SSL Settings . . . . . . . . . . . . . . . . . . . . . . . . . . . 7-151
• S/MIME Settings . . . . . . . . . . . . . . . . . . . . . . . . 7-152
• IPsec Settings . . . . . . . . . . . . . . . . . . . . . . . . . . 7-153
• IEEE802.1X Setting. . . . . . . . . . . . . . . . . . . . . . 7-154
• Security Control . . . . . . . . . . . . . . . . . . . . . . . . . 7-155
• Document Administration Function . . . . . . . . . . 7-155
• Hidden Pattern Print Setting . . . . . . . . . . . . . . . 7-156
• Tracking Information Print . . . . . . . . . . . . . . . . . 7-157
Energy Save . . . . . . . . . . . . . . . . . . . . . . . . . . . . . . 7-158
• Eco Setting . . . . . . . . . . . . . . . . . . . . . . . . . . . . 7-158
• Eco Scan Setting . . . . . . . . . . . . . . . . . . . . . . . . 7-161
• Energy Saving Pattern List . . . . . . . . . . . . . . . . 7-161
• Specific Date Operation Settings. . . . . . . . . . . . 7-162
• Power ON/OFF Schedule Setting . . . . . . . . . . . 7-163
• Toner Save Mode . . . . . . . . . . . . . . . . . . . . . . . 7-163
System Control . . . . . . . . . . . . . . . . . . . . . . . . . . . 7-164
• Job Log. . . . . . . . . . . . . . . . . . . . . . . . . . . . . . . 7-164
• Data Import/Export (CSV Format) . . . . . . . . . . 7-164
• Storage Backup . . . . . . . . . . . . . . . . . . . . . . . . 7-164
• Device Cloning . . . . . . . . . . . . . . . . . . . . . . . . . 7-165
• Address Book Forward. . . . . . . . . . . . . . . . . . . 7-165
• Filing Data Backup . . . . . . . . . . . . . . . . . . . . . . 7-165
• Storing/Calling of System Settings . . . . . . . . . . 7-166
• Reset Settings . . . . . . . . . . . . . . . . . . . . . . . . . 7-166
• Optimization of Hard Disk. . . . . . . . . . . . . . . . . 7-166
• E-mail Alert and Status. . . . . . . . . . . . . . . . . . . 7-167
Image Quality Adjustment. . . . . . . . . . . . . . . . . . . 7-168
• Collective Adjustment . . . . . . . . . . . . . . . . . . . . 7-168
• Copy Image Quality . . . . . . . . . . . . . . . . . . . . . 7-169
• Print Image Quality . . . . . . . . . . . . . . . . . . . . . . 7-169
• Scan Image Quality . . . . . . . . . . . . . . . . . . . . . 7-170
• Common Functions . . . . . . . . . . . . . . . . . . . . . 7-170
Initial Installation Settings . . . . . . . . . . . . . . . . . . 7-171
SETTING MODE FOR FAX
Image Send Settings . . . . . . . . . . . . . . . . . . . . . . . 7-174
• Fax Settings . . . . . . . . . . . . . . . . . . . . . . . . . . . 7-174
• F-Code Memory Box . . . . . . . . . . . . . . . . . . . . 7-180
• Fax Data Receive/Forward (Manual) . . . . . . . . 7-181

7-3
SYSTEM SETTINGS►SETTING MODE
"Settings" allows management of various functions that will make it easier to use the machine, such as default registration for each function, network connection setting, and log check of operation status.Setting mode can also be selected using the Web browser by accessing the machine from a PC connected to the same network as the machine.
Displaying the setting mode on the machine
SETTING MODE
• Administrator passwordTo maintain security, the machine administrator should promptly change the password after the machine is purchased. (For the default administrator password, see Start Guide.) To change the password, see "Change Password (page 7-150)".* To ensure a high level of security, change the password at regular intervals.
For fax settings, see "SETTING MODE FOR FAX (page 7-172)".
1Tap the [Settings] key.Tap the [Settings] key on the home screen.The setting mode screen appears on the touch panel.The setting menu appears at the top of the displayed screen.Tap the setting in the menu that you want to configure.For details of the settings, see the explanation for each item.
2On the upper tab, tap the item that you want to set.The setting menu appears on the left side of the displayed screen.Tap the setting in the menu that you want to configure.When you tap the [System Settings] tab, item keys appear on the screen.When you tap the key of an item, a setting item menu appears.(When you tap the [Image Send Settings] key, further item keys appear.)
• To quit the setting mode, tap the [Cancel] key in the upper right corner of the screen.
• For details on login procedures when user authentication is enabled, see "USER AUTHENTICATION (page 1-29)".
EasyCopy
10:15 AM
Bk
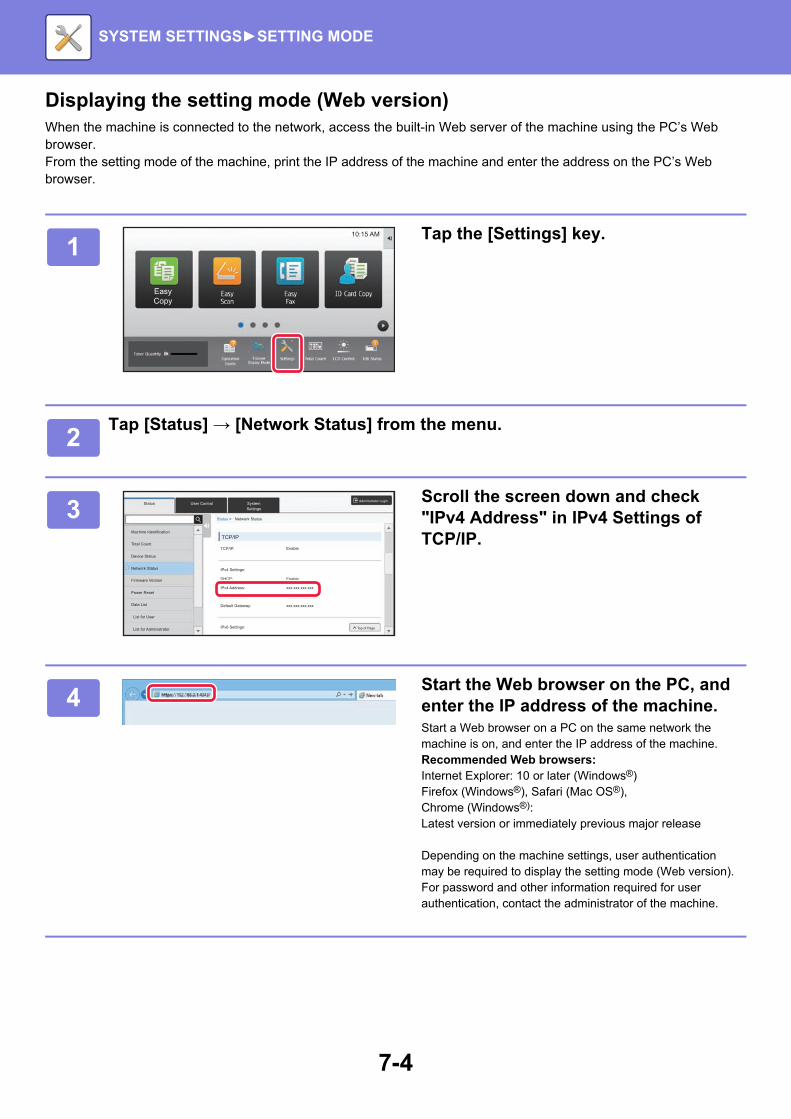
7-4
SYSTEM SETTINGS►SETTING MODE
Displaying the setting mode (Web version)When the machine is connected to the network, access the built-in Web server of the machine using the PC’s Web browser.From the setting mode of the machine, print the IP address of the machine and enter the address on the PC’s Web browser.
1Tap the [Settings] key.
2Tap [Status] → [Network Status] from the menu.
3Scroll the screen down and check "IPv4 Address" in IPv4 Settings of TCP/IP.
4Start the Web browser on the PC, and enter the IP address of the machine.Start a Web browser on a PC on the same network the machine is on, and enter the IP address of the machine. Recommended Web browsers:Internet Explorer: 10 or later (Windows®)Firefox (Windows®), Safari (Mac OS®),Chrome (Windows®):Latest version or immediately previous major release
Depending on the machine settings, user authentication may be required to display the setting mode (Web version). For password and other information required for user authentication, contact the administrator of the machine.
EasyCopy
10:15 AM
Bk
Status
Machine Identification
Total Count
Device Status
Network Status
Firmware Version
Power Reset
Data List
List for User
List for Administrator
User Control
TCP/IP
TCP/IP:
IPv4 Settings:
IPv6 Settings:
DHCP:
IPv4 Address:
Subnet Mask:
Default Gateway:
Enable
Administrator Login
Top of Page
Enable
xxx.xxx.xxx.xxx
xxx.xxx.xxx.xxx
xxx.xxx.xxx.xxx
System Settings
Status > Network Status

7-5
SYSTEM SETTINGS►SETTING MODE LIST
SETTING MODE LISTThe following is a list of setting mode items, factory default settings and restrictions for each item.
StatusU: General user; A: System administrator/Administrator
* Some settings can only be configured by the administrator.
Address BookU: General user; A: System administrator/Administrator
*1 This setting is configured in setting mode on the web page.*2 Set the Category Setting in System Settings→Image Send Settings→Common Settings→Category Setting of the machine's
setting mode.
SETTING MODE LIST
• Depending on the machine specifications and peripheral devices installed, it may not be possible to use some settings.
• Some setting items can only be configured on the Web page.
Setup Items Factory default setting U A
■ Status (page 7-49)
● Machine Identification (page 7-49) – Yes* Yes
● Total Count (page 7-50) – Yes Yes
● Device Status (page 7-50) – Yes Yes
● Network Status (page 7-51) – Yes Yes
● Firmware Version (page 7-52) – No Yes
● Power Reset (page 7-52) – No Yes
● Data List (page 7-52) – Yes Yes
List for User – Yes Yes
List for Administrator – No Yes
Setup Items Factory default setting U A
■ Address Book (page 7-54)
● Address Book (page 7-54)*1 – Yes Yes
● Category Setting (page 7-56)*2 – Yes Yes

7-6
SYSTEM SETTINGS►SETTING MODE LIST
Document OperationsU: General user; A: System administrator/Administrator
*1 This setting is configured in setting mode on the web page.*2 Set the Category Setting in System Settings→Document Filing Settings→Document Filing Control of the machine's setting mode.*3 This appears when My Folder is set.
User ControlU: General user; A: System administrator/Administrator
Setup Items Factory default setting U A
■ Document Operations (page 7-57)*1
● Document Filing (page 7-57) Yes Yes
Main Folder – Yes Yes
Quick File Folder – Yes Yes
Custom Folder*2 – Yes Yes
My Folder*3 – Yes Yes
Search – Yes Yes
File Batch Print – Yes Yes
● Submit Print Job (page 7-59) – Yes Yes
Setup Items Factory default setting U A
■ User Control (page 7-60)
● User List (page 7-60) – No Yes
● Custom Index (page 7-63) – No Yes
● Organization /Group List (page 7-63) – No Yes
● Default Settings (page 7-63) No Yes
User Authentication Disabled No Yes
Authentication Server Settings Local No Yes
Default Network Authentication Server Setting*1 Not Set No Yes
Perform network server access control Disabled No Yes
Authentication Method Setting Authenticate a User by Login Name and Password
No Yes
Device Account Mode Setting No Yes
Device Account Mode Disabled No Yes
Allow Login by Different User Disabled No Yes
Login User – No Yes
Cache User Information Enabled No Yes
Cache Period Unlimited No Yes
Cache Password for Authentication Enabled No Yes

7-7
SYSTEM SETTINGS►SETTING MODE LIST
Store user authentication information for External Connect Enabled No Yes
Card Setting No Yes
Use IC Card for Authentication Disabled No Yes
Request Password at IC Card Authentication Only Card Authentication Approved
No Yes
Automatic Logout with a Card Disabled No Yes
Authentication Method Setting Disabled No Yes
Actions when the Limit of Pages for Output Jobs*2 Job is Completed even when the Limit of Pages is Reached
No Yes
A Warning when Login Fails*2 Disabled No Yes
Disabling of Printing by Invalid User*2 Disabled No Yes
Allow Remote Scanner Using Before Login. Disabled No Yes
Automatically print stored jobs after login Disabled No Yes
Display Usage Status after Login*2 Enabled No Yes
Login Name Display Display login name No Yes
Include Job Status in user authentication Disabled No Yes
Disable display/change of other users' information in the job status
DisabledNo Yes
Automatic Logout Setting Enabled (60sec.) No Yes
Case sensitivity of login name is enabled. Enabled No Yes
Apply login name to the user name of network folder Enabled No Yes
Edit Help Display of Login Screen – No Yes
User Information Print User List No Yes
Reset Counter After Sending E-mail Status Disabled No Yes
● Pages Limit Group (page 7-69) – No Yes
● Machine Page Limit Setting (page 7-69) – No Yes
● Authority Group (page 7-70) – No Yes
● Favorite Operation Group (page 7-74) – No Yes
Favorite Operation Group List – No Yes
Favorite Key List*3 – No Yes
Home Screen List – No Yes
● User Count (page 7-76) No Yes
View User Count – No Yes
Save User Count*3 – No Yes
● Billing Code Setting (page 7-78) No Yes
Administration Settings – No Yes
Use Billing Code Disabled No Yes
Setup Items Factory default setting U A

7-8
SYSTEM SETTINGS►SETTING MODE LIST
*1 Appears when [LDAP] is set in "Authentication Settings".*2 Appears when "Settings (administrator)" - [Sharp OSA Settings] → [External Accounting Application Settings] →
[Set Authentication Server (Server 1)] is enabled.*3 This setting is configured in setting mode on the web page.*4 This setting is configured in setting mode on the machine.
Default Code Setting Default Code No Yes
Remember Billing Code Between Modes Disabled No Yes
Disable Change of Billing Code Disabled No Yes
Apply Default Code when Billing Code not entered Disabled No Yes
Disable Billing Code for Selected Applications No Yes
• Sharp OSA All Invalid No Yes
Billing Code Display Name Setting No Yes
• Main Code Display Name Default No Yes
• Sub Code Display Name Default No Yes
Main Code List – No Yes
Sub Code List – No Yes
● Card Setting (page 7-80) No Yes
Card Area Setting (page 7-80) No Yes
Check System Code only in FeliCa User Area mode Disabled No Yes
Check Facility Code in HID mode Disabled No Yes
Importing from the setup file – No Yes
Card Scan Test*4 Disabled No Yes
Card Type / Card Reader Settings (page 7-80) No Yes
Card Type / Card Reader 200 No Yes
Card Reader Device Registration*4 200 No Yes
Setup Items Factory default setting U A

7-9
SYSTEM SETTINGS►SETTING MODE LIST
System Settings
Home Screen SettingsU: General user; A: System administrator/Administrator
* In the machine's setting mode, this can be set with a USB memory device connected.
Copy SettingsU: General user; A: System administrator/Administrator
Setup Items Factory default setting U A
● Home Screen Settings (page 7-81)
Condition Settings – No Yes
Icon* – No Yes
Background Image* – No Yes
Setup Items Factory default setting U A
● Copy Settings (page 7-83)
Condition Settings No Yes
Add or Change Extra Preset Ratios – No Yes
Setting a Maximum Number of Copies 9999 No Yes
Initial Margin Shift Setting No Yes
• Side 1 1/2" (10mm) No Yes
• Side 2 1/2" (10mm) No Yes
Erase Width Adjustment No Yes
• Edge Clearance Width 1/2" (10mm) No Yes
• Center Clearance Width 1/2" (10mm) No Yes
InitialN-Up Setting Off No Yes
• Layout Left to Right/Right, and Down No Yes
• Border No Print No Yes
Card Shot Settings No Yes
• Original Size X: 3-3/8" (86 mm), Y: 2-1/8" (54 mm)
No Yes
• Fit to Page Disabled No Yes
• Layout Set Vertically: No Yes
Disabling of Registration/Deletion of Program Disabled No Yes
Disabling of Bypass-Tray in Duplex Copy Disabled No Yes
Disabling of Auto Paper Selection Disabled No Yes
Auto Selection Setting of Tray that is Supplied the Paper
DisabledNo Yes
Disabling Registration of Custom Image Disabled No Yes

7-10
SYSTEM SETTINGS►SETTING MODE LIST
* When an inner finisher is installed
Disabling sending while copying Disabled No Yes
High Quality Scan from Document Feeder Disabled No Yes
Quick Scan from Document Glass Disabled No Yes
Auto Clear Before Copy Execution Also Disabled No Yes
Initial Status Settings No Yes
Image Orientation Landscape No Yes
Paper Tray Varies depending on the machine configuration
No Yes
Exposure Type Auto No Yes
• Copy of Copy Disabled No Yes
Copy Ratio 100% No Yes
• Select magnification automatically according to paper size, when paper tray is selected.
DisabledNo Yes
2-Sided Copy 1-Sided→1-Sided No Yes
Original Binding Book No Yes
Output Binding Book No Yes
Output Tray Varies depending on the machine configuration
No Yes
Offset Enabled No Yes
Separator Page No Yes
• Insert Before Job Disabled No Yes
• Insert After Job Disabled No Yes
Staple Sort* 1 Staple No Yes
Text /Image Printing No Yes
Text Settings (Stamp) – No Yes
Custom Stamp – No Yes
Custom Watermark – No Yes
Setup Items Factory default setting U A
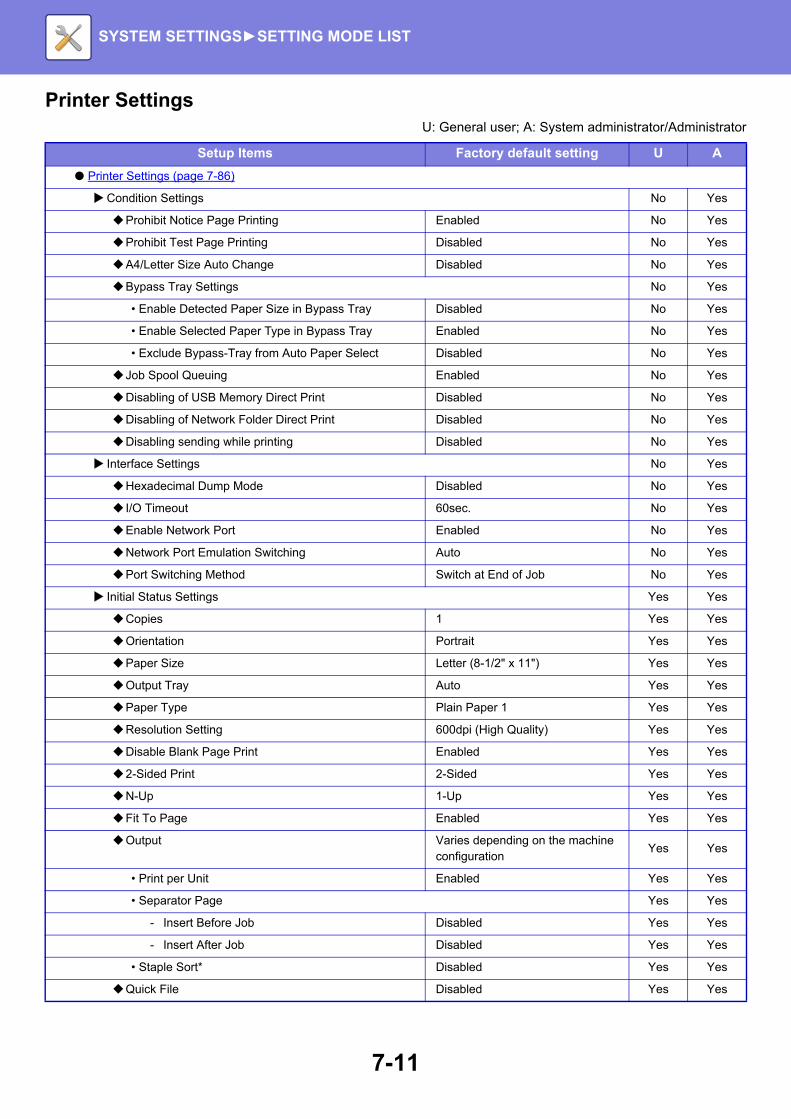
7-11
SYSTEM SETTINGS►SETTING MODE LIST
Printer SettingsU: General user; A: System administrator/Administrator
Setup Items Factory default setting U A
● Printer Settings (page 7-86)
Condition Settings No Yes
Prohibit Notice Page Printing Enabled No Yes
Prohibit Test Page Printing Disabled No Yes
A4/Letter Size Auto Change Disabled No Yes
Bypass Tray Settings No Yes
• Enable Detected Paper Size in Bypass Tray Disabled No Yes
• Enable Selected Paper Type in Bypass Tray Enabled No Yes
• Exclude Bypass-Tray from Auto Paper Select Disabled No Yes
Job Spool Queuing Enabled No Yes
Disabling of USB Memory Direct Print Disabled No Yes
Disabling of Network Folder Direct Print Disabled No Yes
Disabling sending while printing Disabled No Yes
Interface Settings No Yes
Hexadecimal Dump Mode Disabled No Yes
I/O Timeout 60sec. No Yes
Enable Network Port Enabled No Yes
Network Port Emulation Switching Auto No Yes
Port Switching Method Switch at End of Job No Yes
Initial Status Settings Yes Yes
Copies 1 Yes Yes
Orientation Portrait Yes Yes
Paper Size Letter (8-1/2" x 11") Yes Yes
Output Tray Auto Yes Yes
Paper Type Plain Paper 1 Yes Yes
Resolution Setting 600dpi (High Quality) Yes Yes
Disable Blank Page Print Enabled Yes Yes
2-Sided Print 2-Sided Yes Yes
N-Up 1-Up Yes Yes
Fit To Page Enabled Yes Yes
Output Varies depending on the machine configuration
Yes Yes
• Print per Unit Enabled Yes Yes
• Separator Page Yes Yes
- Insert Before Job Disabled Yes Yes
- Insert After Job Disabled Yes Yes
• Staple Sort* Disabled Yes Yes
Quick File Disabled Yes Yes

7-12
SYSTEM SETTINGS►SETTING MODE LIST
* When an inner finisher is installed
PCL Settings Yes Yes
PCL Symbol Set Setting PC-8 Yes Yes
PCL Font Setting Internal Font, 0: Courier Yes Yes
PCL Line Feed Code 0.CR=CR; LF=LF; FF=FF Yes Yes
Wide A4 Disabled Yes Yes
PostScript Settings Yes Yes
Screen Settings Standard Yes Yes
Print PS Errors Disabled Yes Yes
Binary Processing Disabled Yes Yes
OOXML Settings Yes Yes
Print What Selected Sheet Yes Yes
Print Release Settings For information about each of the print release settings, see "Print Release Settings Guide".
No Yes
E-mail Print Settings No Yes
E-mail Print Disabled No Yes
POP3 Server – No Yes
Port Number 110 No Yes
POP Authentication Disabled No Yes
User Name – No Yes
Password – No Yes
• Change Password Disabled No Yes
Check Interval 5 minutes No Yes
Enable SSL Disabled No Yes
Connection Test – No Yes
Direct Print Settings (FTP) No Yes
Direct Print Settings (Network Folder) – No Yes
Print Setting from PC/Mobile Terminal No Yes
FTP Print Enabled No Yes
Port Number 21 No Yes
Setup Items Factory default setting U A

7-13
SYSTEM SETTINGS►SETTING MODE LIST
Image Send Settings
Common SettingsU: General user; A: System administrator/Administrator
Setup Items Factory default setting U A
● Common Settings (page 7-92)
Condition Settings No Yes
Hold settings for a while after scanning has been completed
DisabledNo Yes
Job Auto Start Time During Scanning 60sec. No Yes
Default Display Setting Fax No Yes
Address Book Default Selection No Yes
• Higher priority is given to the display of address book.
DisabledNo Yes
• Apply Addresses of Sending Modes Only Enabled No Yes
Category Displayed as Default None No Yes
Display all address type regardless of the mode being displayed currently.
DisabledNo Yes
Enlarge Address Book Enabled No Yes
Image Orientation Horizontal No Yes
Preview Setting No Yes
• Received Data Image Check Setting Disabled No Yes
• Default List/Thumbnail Display No Yes
- Fax/I-Fax Reception Data* Thumbnail No Yes
Default Exposure Settings Auto No Yes
Default Original Image Type Text No Yes
Sending the same image sent in Fax mode* Disabled No Yes
Be sure to press Next Address Key ([+]) before selecting the next address.
DisabledNo Yes
Scan Complete Sound Setting Middle No Yes
Disable Switching of Display Order Disabled No Yes
Hold Setting for Received Data Print Disabled No Yes
Erase Width Adjustment No Yes
• Edge Clearance Width 1/2" (10mm) No Yes
• Center Clearance Width 1/2" (10mm) No Yes
Time Specified Output of Received Data Disabled No Yes
Enable/Disable Settings No Yes
Settings to Disable Registration No Yes
• Disable Registering Destination from Operation Panel
All InvalidNo Yes
• Disable Registering Destination on Web Page All Invalid No Yes
• Disable Registration/Delection of All Program Items Disabled No Yes

7-14
SYSTEM SETTINGS►SETTING MODE LIST
* When an internet fax expansion kit is installed
Scan Settings
• Disable Registration of Memory Box All Invalid No Yes
• Disable Destination Registration Using Global Address Search
All InvalidNo Yes
• Disable Registration Using Network Scanner Tool Disabled No Yes
• Disabling of Forwarding via Network Disabled No Yes
Settings to Disable Transmission No Yes
• Disable [Resend] on Fax/Image Send Mode* Disabled No Yes
• Disable Selection from Address Book All Invalid No Yes
• Disable Direct Entry All Invalid No Yes
• Disabling of PC Scan Disabled No Yes
• Disable Storing to External Memory Device Disabled No Yes
• Disable PC-I-Fax Transmission* Disabled No Yes
• Disable PC-Fax Transmission Disabled No Yes
• Disabling of Find My Address Disabled No Yes
Own Name and Destination Set No Yes
Sender Data Registration No Yes
• Sender Name – No Yes
• Sender Fax Number – No Yes
• I-Fax Own Address* – No Yes
Registration of Own Name Select – No Yes
Setup Items Factory default setting U A
● Scan Settings (page 7-96)
Scan Settings No Yes
Initial Status Settings No Yes
• Default Color Mode Settings No Yes
- Scanner Common Auto: Mono2 No Yes
+ Disable Change of B/W Setting in Auto Mode
DisabledNo Yes
- E-mail Auto: Mono2 No Yes
+ Disable Change of B/W Setting in Auto Mode
DisabledNo Yes
• Initial File Format Setting No Yes
Setup Items Factory default setting U A

7-15
SYSTEM SETTINGS►SETTING MODE LIST
- Scanner Common No Yes
+ File Type PDF No Yes
+ OCR Disabled No Yes
+ Black & White Compression Mode: MMR (G4) No Yes
+ Color/Grayscale Compression Ratio: Medium No Yes
+ Bk Letter Emphasis Disabled No Yes
+ Specified Pages per File Disabled No Yes
- OCR Setting No Yes
+ Font Western Languages: Arial No Yes
Japanese: MS Gothic No Yes
Chinese: SimSun No Yes
Traditional Chinese: MingLiU No Yes
Korean: Dotum No Yes
+ Detect Image Direction Enabled No Yes
+ File Name Extraction Disabled No Yes
- E-mail No Yes
+ File Type PDF No Yes
+ OCR Disabled No Yes
+ Black & White Compression Mode: MMR (G4) No Yes
+ Color/Grayscale Compression Ratio: Medium No Yes
+ Bk Letter Emphasis Disabled No Yes
+ Specified Pages per File Disabled No Yes
- OCR Setting No Yes
+ Font Western Languages: Arial No Yes
Japanese: MS Gothic No Yes
Chinese: SimSun No Yes
Traditional Chinese: MingLiU No Yes
Korean: Dotum No Yes
+ Detect Image Direction Enabled No Yes
+ File Name Extraction Disabled No Yes
• Easy Scan Settings No Yes
- Color Auto No Yes
- B/W Mono2 No Yes
• Resolution Setting No Yes
- Scan No Yes
+ Apply the Resolution Set when Stored Disabled No Yes
+ (No item) 200x200dpi No Yes
- E-mail No Yes
+ Apply the Resolution Set when Stored Disabled No Yes
Setup Items Factory default setting U A

7-16
SYSTEM SETTINGS►SETTING MODE LIST
+ (No item) 200x200dpi No Yes
Condition Settings No Yes
• Default Reply.Address Set – No Yes
• PDF Compression Options No Yes
- Flate Compression Enabled No Yes
• Compression Mode at Broadcasting No Yes
- Black & White MH (G3) No Yes
- Color/Grayscale Medium No Yes
+ Bk Letter Emphasis Disabled No Yes
• Send Destination Link Settings Enabled No Yes
- Enable Send Destination Link as Default Disabled No Yes
- File Retention Period 4 hour No Yes
- Enable SSL Enabled No Yes
• Maximum Size of E-mail Attachments(E-Mail) Unlimited No Yes
- If the E-mail attachment(s) exceed maximum size, it will be sent in multiple files.
DisabledNo Yes
• Maximum Size of Data Attachments(FTP/Desktop/Network Folder)
UnlimitedNo Yes
• Bcc Setting No Yes
- Enable Bcc Disabled No Yes
- Display Bcc Address on the Job Status Screen Disabled No Yes
• Auto Scan Setting Disabled No Yes
- Set Image Orientation Automatically Enabled, 2-Sided No Yes
- Set Resolution Automatically Enabled No Yes
- Blank Page Skip Enabled, Skip Blank Page No Yes
• Disable Scan Function No Yes
- PC Scan Disabled No Yes
Default Address Disabled No Yes
• Add Selected Select From Address Book No Yes
- Index All Destinations No Yes
- Display Items 10 No Yes
- Allow cancel of the first entered address Disabled No Yes
Setup Items Factory default setting U A
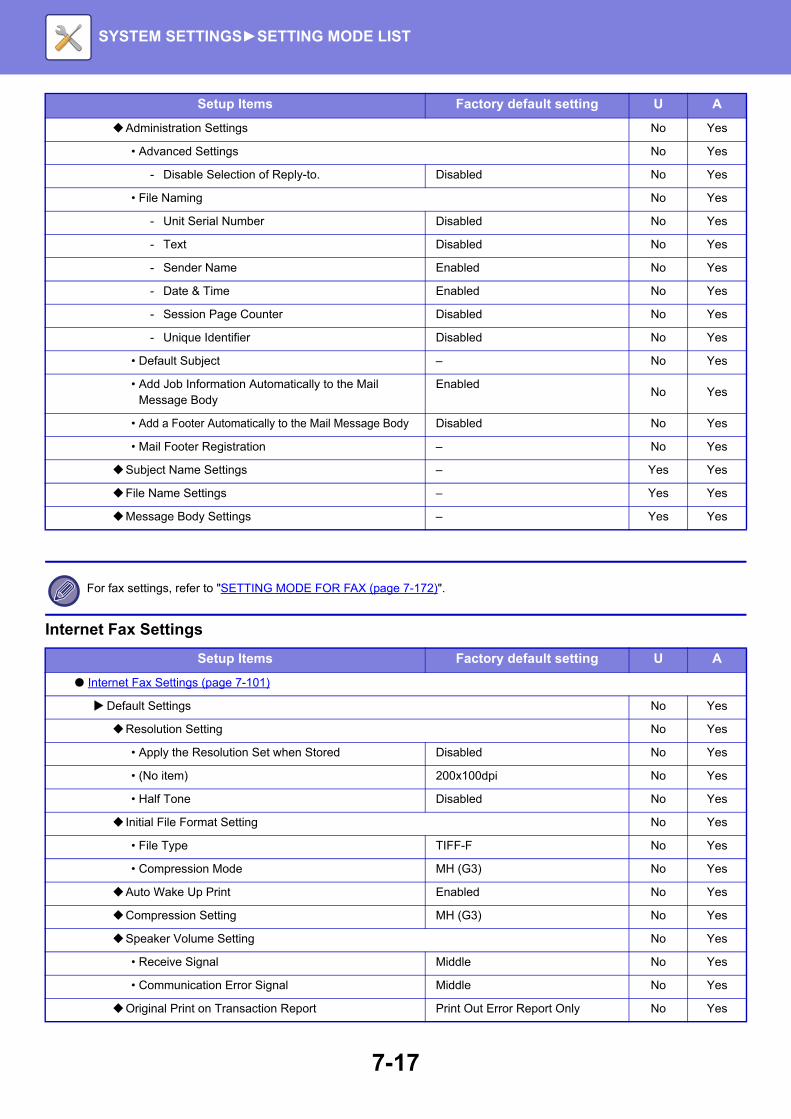
7-17
SYSTEM SETTINGS►SETTING MODE LIST
Internet Fax Settings
Administration Settings No Yes
• Advanced Settings No Yes
- Disable Selection of Reply-to. Disabled No Yes
• File Naming No Yes
- Unit Serial Number Disabled No Yes
- Text Disabled No Yes
- Sender Name Enabled No Yes
- Date & Time Enabled No Yes
- Session Page Counter Disabled No Yes
- Unique Identifier Disabled No Yes
• Default Subject – No Yes
• Add Job Information Automatically to the Mail Message Body
EnabledNo Yes
• Add a Footer Automatically to the Mail Message Body Disabled No Yes
• Mail Footer Registration – No Yes
Subject Name Settings – Yes Yes
File Name Settings – Yes Yes
Message Body Settings – Yes Yes
For fax settings, refer to "SETTING MODE FOR FAX (page 7-172)".
Setup Items Factory default setting U A
● Internet Fax Settings (page 7-101)
Default Settings No Yes
Resolution Setting No Yes
• Apply the Resolution Set when Stored Disabled No Yes
• (No item) 200x100dpi No Yes
• Half Tone Disabled No Yes
Initial File Format Setting No Yes
• File Type TIFF-F No Yes
• Compression Mode MH (G3) No Yes
Auto Wake Up Print Enabled No Yes
Compression Setting MH (G3) No Yes
Speaker Volume Setting No Yes
• Receive Signal Middle No Yes
• Communication Error Signal Middle No Yes
Original Print on Transaction Report Print Out Error Report Only No Yes
Setup Items Factory default setting U A

7-18
SYSTEM SETTINGS►SETTING MODE LIST
Transaction Report Print Select Setting No Yes
• Single Sending Print Out Error Report Only No Yes
• Broadcasting Print Out All Report No Yes
• Receiving No Printed Report No Yes
Activity Report Print Select Setting No Yes
• Auto Print at Memory Full Disabled No Yes
• Print Daily at Designated Time Disabled No Yes
• Body Text Print Select Setting Disabled No Yes
Send Setting No Yes
I-Fax Reception Report On/Off Setting Disabled No Yes
I-Fax Reception Report Request Timeout Setting 1 Hour No Yes
Number of Resend Times at Reception Error 2 Time(s) No Yes
Maximum Size of E-mail Attachments Unlimited No Yes
Rotation Sending Setting All Enabled No Yes
Default Own Number Sending Enabled No Yes
Printing Page Number at Receiver Enabled No Yes
Recall in Case of Line Busy No Yes
• Number of Times to Recall When Line is Busy 2 Time(s) No Yes
• Interval to Wait Between Recall Attempts (min.) When Line is Busy
3 Time(s)No Yes
Recall in Case of Communication Error No Yes
• Number of Times to Recall in Case of Error 2 Time(s) No Yes
• Interval to Wait Between Recall Attempts (min.) in Case of Error
3 Time(s)No Yes
Receive Settings No Yes
Auto Receive Reduce Setting Enabled No Yes
2-Sided Printing of Received Data Disabled No Yes
Set Address for Data Forwarding No Yes
• Forwarding to – No Yes
• Direct SMTP Disabled No Yes
• Add Hostname or IP Address. Disabled No Yes
• Hostname or IP Address – No Yes
Receiving Date & Time Print Disabled No Yes
POP3 Communication Timeout 60sec. No Yes
Reception Check Interval Setting 5 Minute No Yes
Received Data Print Size Settings No Yes
• Print All Pages with A4 Enabled No Yes
Allow/Reject Mail or Domain Name Setting No Yes
• Allow/Reject Mail or Domain Name Setting All Invalid No Yes
• Add New – No Yes
Setup Items Factory default setting U A

7-19
SYSTEM SETTINGS►SETTING MODE LIST
* When an internet fax expansion kit is installed
Fax Data Receive/Forward (Manual)
* When an internet fax expansion kit is installed
Server Settings No Yes
Receive Settings No Yes
• Internet Fax Receive Enabled No Yes
• POP3 Server – No Yes
• Port Number 110 No Yes
• POP Authentication Disabled No Yes
• User Name – No Yes
• Password – No Yes
- Change Password Disabled No Yes
• POP3 Communication Timeout 60sec. No Yes
• Reception Check Interval Setting 5 minutes No Yes
• Enable SSL Disable No Yes
Default Settings No Yes
• I-Fax Own Name and Address Set No Yes
- Set I-Fax Own Name – No Yes
- Own Address – No Yes
• Direct SMTP Setting No Yes
- Port Number (Receive) 25 No Yes
- Timeout 300 seconds No Yes
- Port Number (Send) 25 No Yes
- Timeout 300 seconds No Yes
Setup Items Factory default setting U A
● Fax Data Receive/Forward (Manual) (page 7-107)
Fax Settings See "Fax Data Receive/Forward (Manual) (page 7-181)".
Yes Yes
Internet Fax Settings* Yes Yes
Reception Start – Yes Yes
Manual Reception Key in Initial Screen Enabled Yes Yes
Forward Received Data – Yes Yes
Setup Items Factory default setting U A

7-20
SYSTEM SETTINGS►SETTING MODE LIST
Inbound Routing (Forwarding/Storing) Settings
Setup Items Factory default setting U A
● Inbound Routing (Forwarding/Storing) Settings (page 7-108)
Inbound Routing Settings – Yes Yes
Table Registration – Yes Yes
Sender Settings for Received Data Yes Yes
• Receive Line Select Yes Yes
- Internet Fax Enabled Yes Yes
- Fax Enabled Yes Yes
• Sender Address Setting Forward All Received Data Yes Yes
Forwarding Destination Settings for Received Data Yes Yes
• Forward Condition 1 to 3 Yes Yes
- Forward Condition No Forwarding Yes Yes
- Day of the Week All Invalid Yes Yes
- Set Forwarding Time Disabled Yes Yes
- Start Time 00 Hour 00 Minute Yes Yes
- Completing Time 00 Hour 00 Minute Yes Yes
- Format for Forwarding TIFF(Multi) Yes Yes
Sender Address Registration – Yes Yes
Administration Settings No Yes
Inbound Routing Settings No Yes
• Inbound Routing Disabled No Yes
• Disable Registration of Forward Table Disabled No Yes
• Disable Change/Delete of Forward Table Disabled No Yes
• Disabling of Forward Condition Change Disabled No Yes
• Print Style Setting Print at Error No Yes
File Name Setting No Yes
• Preset of Character No Yes
- Character 1, 2 – No Yes
- File Naming No Yes
+ No.1 Sender Name No Yes
+ No.2 Date & Time No Yes
+ No.3 None No Yes
+ No.4 None No Yes
+ No.5 None No Yes
+ No.6 None No Yes
+ No.7 None No Yes
+ If received from a contact registered in the address book, sender's name is changed to contact's name.
DisabledNo Yes

7-21
SYSTEM SETTINGS►SETTING MODE LIST
Metadata Settings
Inbound Routing (Storage) Settings No Yes
Settings for HDD Storing of Received Data No Yes
• Auto Storing of Received Data in HDD Disabled No Yes
• Specifying Data to be Stored No Yes
- Fax Disabled No Yes
- Internet Fax Disabled No Yes
• Specifying Stored Folder – No Yes
- Sort Received Faxes by Date in Folders Disabled No Yes
• File Format PDF No Yes
• Print Style Setting Print Only at Storage Error No Yes
File Name Setting No Yes
• Preset of Character No Yes
- Character 1, 2 – No Yes
- File Naming No Yes
+ No.1 Sender Name No Yes
+ No.2 Date & Time No Yes
+ No.3 None No Yes
+ No.4 None No Yes
+ No.5 None No Yes
+ No.6 None No Yes
+ No.7 None No Yes
+ If received from a contact registered in the address book, sender's name is changed to contact's name.
DisabledNo Yes
Setting of Result Notification Address at Storing No Yes
• Reception Notification Settings Disabled No Yes
• Address of Notification Destination – No Yes
• Direct Entry – No Yes
Setup Items Factory default setting U A
● Metadata Settings (page 7-111)
Metadata Settings No Yes
Metadata Set Disabled No Yes
Metadata Set List – No Yes
Setup Items Factory default setting U A

7-22
SYSTEM SETTINGS►SETTING MODE LIST
Document Filing SettingsU: General user; A: System administrator/Administrator
Setup Items Factory default setting U A
● Document Filing Settings (page 7-112)
Condition Settings No Yes
Default Mode Settings Sharing Mode No Yes
Sort Method Setting Date No Yes
Administrator Authority Setting No Yes
• Delete File Disabled No Yes
• Delete Folder Disabled No Yes
• Change PIN Code/Password Disabled No Yes
Delete All Quick Files No Yes
• Delete – No Yes
• Delete quick files at power up.(Protected files excluded)
EnabledNo Yes
Image Orientation Landscape No Yes
Default Color Mode Settings Auto, Mono2 No Yes
Disable Change of B/W Setting in Auto Mode Disabled No Yes
Default Exposure Settings Auto No Yes
Default Original Image Type Text No Yes
Initial Resolution Settings 200x200dpi No Yes
Scan Complete Sound Setting Middle No Yes
Disable Text/Stamp functions for Reprinting Disabled No Yes
Batch Print Settings No Yes
• Selection of [All Users] is not allowed. Enabled No Yes
• Selection of [User Unknown] is not allowed. Enabled No Yes
• Print Order Date (Dsc.) No Yes
Erase Width Adjustment No Yes
• Edge Clearance Width 1/2" (10mm) No Yes
• Center Clearance Width 1/2" (10mm) No Yes
Card Shot Settings No Yes
• Original Size X: 3-3/8" (86 mm), Y: 2-1/8" (54 mm)
No Yes
• Fit to Store Size Disabled No Yes
Setting of store/delete after file print Store No Yes
Default Setting of PDF Format for PC Browsing No Yes
B/W No Yes
• Compression Mode MMR (G4) No Yes

7-23
SYSTEM SETTINGS►SETTING MODE LIST
Color/Grayscale No Yes
• Compression Ratio Medium No Yes
Copies Disabled No Yes
• Apply the resolution at job execution Disabled No Yes
• Resolution 200×200dpi No Yes
Printer Disabled No Yes
• Apply the resolution at job execution Disabled No Yes
• Resolution 200×200dpi No Yes
Scan to Disabled No Yes
• Apply the resolution at job execution Disabled No Yes
• Resolution 200×200dpi No Yes
Internet Fax*1 Disabled No Yes
• Apply the resolution at job execution Disabled No Yes
• Resolution 200×100dpi No Yes
Fax Disabled No Yes
• Apply the resolution at job execution Disabled No Yes
• Resolution Standard No Yes
Scan to HDD Enabled No Yes
• Apply the resolution at job execution Disabled No Yes
• Resolution 200×200dpi No Yes
Document Output Options No Yes
Print No Yes
• Copies Enabled No Yes
• Printer Enabled No Yes
• Scan Send Disabled No Yes
• Internet Fax Send(Incl. PC-I-Fax) Disabled No Yes
• Fax Send(Incl. PC-Fax) Disabled No Yes
• Scan to HDD Enabled No Yes
Scan Send No Yes
• Copies Disabled No Yes
• Printer Disabled No Yes
• Scan Send Enabled No Yes
• Internet Fax Send(Incl. PC-I-Fax) Disabled No Yes
• Fax Send(Incl. PC-Fax) Disabled No Yes
• Scan to HDD Enabled No Yes
Internet Fax Send*1 No Yes
Setup Items Factory default setting U A

7-24
SYSTEM SETTINGS►SETTING MODE LIST
*1 When an internet fax expansion kit is installed
• Internet Fax Send(Incl. PC-I-Fax) Enabled No Yes
Fax Send No Yes
• Copies Disabled No Yes
• Printer Disabled No Yes
• Scan Send Disabled No Yes
• Internet Fax Send(Incl. PC-I-Fax) Disabled No Yes
• Fax Send(Incl. PC-Fax) Enabled No Yes
• Scan to HDD Disabled No Yes
Document Filing Control*2 – No Yes
Automatic Deletion of File Settings All Invalid No Yes
Setup Items Factory default setting U A

7-25
SYSTEM SETTINGS►SETTING MODE LIST
Sharp OSA SettingsU: General user; A: System administrator/Administrator
Setup Items Factory default setting U A
● Sharp OSA Settings (page 7-115)
Condition Settings*1 No Yes
Cookie Setting – No Yes
Delete Cookie – No Yes
Standard Application Settings – No Yes
Receiving Application Setting No Yes
Forward to Application Disabled No Yes
Application Name – No Yes
Address for Web Service – No Yes
Timeout 20 seconds No Yes
Communication Error Notification No Yes
• E-mail Address – No Yes
• Body Text – No Yes
• Connection Test – No Yes
External Accounting Application Settings No Yes
External Account Control Disabled No Yes
Set Authentication Server (Server 1) No Yes
• Server 1-4 Disabled No Yes
- Application Name – No Yes
- Address for Application UI*2 – No Yes
- Address for Web Service – No Yes
- Timeout 20 seconds No Yes
- Browser*2 HTML Browser n2.0 No Yes
- Extended Platform Disabled No Yes
- Data Size*2 Wide-SVGA No Yes
- Find My Address*2 – No Yes
- Target*2 LDAP No Yes
Communication Error Notification No Yes
• E-mail Address – No Yes
• Body Text – No Yes
Embedded Application Settings – No Yes
Polling Setting No Yes
Server 1 - Server 2 Disabled No Yes
• Polling Address – No Yes

7-26
SYSTEM SETTINGS►SETTING MODE LIST
*1 This setting is configured in setting mode on the machine.*2 This setting can be set in Server 1.
Common SettingsU: General user; A: System administrator/Administrator
• Check Interval 1min. No Yes
• Timeout 20 seconds No Yes
Setup Items Factory default setting U A
● Common Settings (page 7-118)
Paper Settings Yes Yes
Paper Tray Settings Yes Yes
• Auto Switching of Tray Enabled Yes Yes
• Display Paper Tray Settings when bypass tray detects paper.
Enabled Yes Yes
• Tray 1 Plain 1, Auto-Inch (Auto-AB) Yes Yes
• Tray 2*1
Plain 1, Auto-Inch (Auto-AB)
Yes Yes
• Tray 3*1 Yes Yes
• Tray 4*1 Yes Yes
• Bypass Tray Plain 1, A4 (8-1/2" x 11") Yes Yes
Custom Size Registration (Bypass) Custom 1 to 7Size Input-InchX=297mm (11") Y=210mm (8-1/2")
Yes Yes
Paper Type Registration – Yes Yes
Operation Settings No Yes
Condition Settings No Yes
• Enlarge Display Mode Disabled No Yes
• Message Time Setting 6 sec. No Yes
• Language Setting American English No Yes
• Default Display Setting Home Screen No Yes
• Display Favorite Menus as Default Disabled No Yes
• Display Action Panel as default. Enabled No Yes
• Icon is displayed when network cable is not connected.
EnabledNo Yes
• Display Confirmation Dialog when job is canceled. Disabled No Yes
• Switch the Number of Sets to be Displayed for Job Status
ProgressNo Yes
• Alignment Order of 10-Key Ascending order from upper left No Yes
Setup Items Factory default setting U A

7-27
SYSTEM SETTINGS►SETTING MODE LIST
• Setting Display from Main Unit No Yes
- Display Current Path Enabled No Yes
- Enable link of current path Enabled No Yes
• MFP Display Pattern Setting Pattern 1 No Yes
• Key Operation Setting No Yes
- Keys Touch Sound Middle No Yes
- Make Key Touch Sound at Default Setting Disabled No Yes
- Auto Clear Setting 60sec. No Yes
+ Cancel Timer Disabled No Yes
- Key Operation Setting : Time for Accepting Key Entry
0.0 secondsNo Yes
+ Disable Auto Key Repeat Disabled No Yes
- Time for Accepting Key Entry of Long Touch 0.5 seconds No Yes
- Double Tap Interval Setting 0.5 seconds No Yes
• Disabling of Job Priority Operation Disabled No Yes
• Disabling of Bypass Printing Disabled No Yes
• Disabling of Covers/Inserts Mode Disabled No Yes
• Disable Printing of Operation Manual from the Operation Panel
DisabledNo Yes
• Initial Original Count Setting All Invalid No Yes
• Preview Setting No Yes
- Received Data Image Check Setting Disabled No Yes
- Default List/Thumbnail Display No Yes
+ Fax/I-Fax Reception Data Thumbnail No Yes
+ File Retrieve of Main Folder/Quick File Folder
ListNo Yes
+ File Retrieve of Custom Folder List No Yes
+ File Retrieve of Direct Print List No Yes
• Remote Operation Settings No Yes
- Remote Software Operation No Yes
+ Operational Authority Prohibited No Yes
+ View Password Entry Screen Display in Both PC and MFP No Yes
- Operation from Specified PC No Yes
+ Operational Authority Prohibited No Yes
+ Hostname or IP Address of PC – No Yes
+ View Password Entry Screen Display in Both PC and MFP No Yes
Setup Items Factory default setting U A

7-28
SYSTEM SETTINGS►SETTING MODE LIST
- Operation by User who Has Password No Yes
+ Operational Authority Prohibited No Yes
+ View Password Entry Screen Display in Both PC and MFP No Yes
Easy Mode Settings – No Yes
Favorite Key Setting – No Yes
Mode Key Display Setting No Yes
• Modes to Display – No Yes
• Display Mode Keys on Home Enabled No Yes
Keyboard Settings No Yes
Default Keyboard Setting No Yes
• Keyboard Select English (US) No Yes
• Set Keyboard Priority External Keyboard No Yes
Soft Keyboard Template Setting – No Yes
Device Control No Yes
AB/Inch Type Setting Inch No Yes
Default Original Size Settings 8-1/2" x 11" No Yes
Paper Type for Auto Paper Selection Plain 1: Enabled, Plain 2: Enabled, Recycled: Disabled
No Yes
Plain Paper Compatibility Settings Plain 1 No Yes
Detect Standard in Auto Color Mode 3 (Normal) No Yes
Data Indicator Setting Pattern 1 No Yes
• Status Indicator will blink if data is received Enabled No Yes
• Error Light Setting Light & Blink No Yes
Plain Paper Weight Settings No Yes
• Paper Weight 16 to 23 lbs. (60 to 89g/m2 ) No Yes
Data List One Sided No Yes
Disabling of Duplex Disabled No Yes
Disabling of Offset Disabled No Yes
Disabling of Stapler*2 Disabled No Yes
Disabling of Document Feeder Disabled No Yes
Disabling of Optional Paper Feed Unit*1 Disabled No Yes
Disabling of Tray Settings Disabled No Yes
Disabling of Finisher*2 Disabled No Yes
Enable/Disable Settings No Yes
User Control No Yes
• Disabling of Printing by Invalid User Disabled No Yes
Setup Items Factory default setting U A

7-29
SYSTEM SETTINGS►SETTING MODE LIST
Copy Function Settings No Yes
• Disabling of Registration/Deletion of Program Disabled No Yes
• Disabling of Bypass-Tray in Duplex Copy Disabled No Yes
• Disabling of Auto Paper Selection Disabled No Yes
• Disabling Registration of Custom Image Disabled No Yes
• Disabling sending while copying Disabled No Yes
Printer Settings No Yes
• Prohibit Notice Page Printing Enabled No Yes
• Prohibit Test Page Printing Disabled No Yes
• Exclude Bypass-Tray from Auto Paper Select Disabled No Yes
• Disabling of USB Memory Direct Print Disabled No Yes
• Disabling of Network Folder Direct Print Disabled No Yes
• Disabling sending while printing Disabled No Yes
• Disable Blank Page Print Disabled No Yes
Image Send Settings No Yes
• Disable Switching of Display Order Disabled No Yes
• Disable Fax Broadcasting Disabled No Yes
• Disable Scan Function All Invalid No Yes
• Settings to Disable Registration No Yes
- Disable Registering Destination from Operation Panel
All InvalidNo Yes
- Disable Registering Destination on Web Page All Invalid No Yes
- Disabling of Registration/Deletion of Program Disabled No Yes
- Disable Registration of Memory Box All Invalid No Yes
- Disable Destination Registration Using Global Address Search
All InvalidNo Yes
- Disable Registration Using Network Scanner Tool
DisabledNo Yes
- Disabling of Forwarding via Network Disabled No Yes
• Settings to Disable Transmission No Yes
- Disable [Resend] on Fax/Image Send Mode Disabled No Yes
- Disable Selection from Address Book All Invalid No Yes
- Disable Direct Entry All Invalid No Yes
- Disable PC-I-Fax Transmission*3 Disabled No Yes
- Disable PC-Fax Transmission Disabled No Yes
- Disabling of Find My Address Disabled No Yes
Document Filing Settings No Yes
• Disable Text/Stamp functions for Reprinting Disabled No Yes
Setup Items Factory default setting U A

7-30
SYSTEM SETTINGS►SETTING MODE LIST
• Batch Print Settings No Yes
- Selection of [All Users] is not allowed. Enabled No Yes
- Selection of [User Unknown] is not allowed. Enabled No Yes
Operation Settings No Yes
• Cancel Auto Clear Timer Disabled No Yes
• Disabling of Job Priority Operation Disabled No Yes
• Disabling of Bypass Printing Disabled No Yes
• Disable Auto Key Repeat Disabled No Yes
• Disabling of Clock Adjustment Disabled No Yes
• Disabling of Covers/Inserts Mode Disabled No Yes
• Disable Printing of Operation Manual from the Operation Panel
DisabledNo Yes
Device Control No Yes
• Disabling of Document Feeder Disabled No Yes
• Disabling of Duplex Disabled No Yes
• Disabling of Optional Paper Feed Unit Disabled No Yes
• Disabling of Tray Settings Disabled No Yes
• Disabling of Finisher*2 Disabled No Yes
• Disabling of Offset Disabled No Yes
• Disabling of Stapler*2 Disabled No Yes
Security Settings No Yes
• Hidden Pattern Print Setting No Yes
- Disable Direct Entry Disabled No Yes
Machine Identification Settings – No Yes
Clock Adjust No Yes
Clock Adjust No Yes
• Current Date – No Yes
• Specify Time Zone – No Yes
• Date&Time Settings – No Yes
• Synchronize with Internet Time Server Disabled No Yes
Daylight Saving Time Setting Disabled No Yes
Date Format No Yes
• Current Setting – No Yes
• Format [MM/DD/YYYY], [/], [Last], [12-Hour]
No Yes
Product Key No Yes
Serial Number – No Yes
Font Kit for Barcode – No Yes
Setup Items Factory default setting U A

7-31
SYSTEM SETTINGS►SETTING MODE LIST
*1 When 600-sheet paper feed unit(s) is/are installed*2 When an inner finisher is installed*3 When an internet fax expansion kit is installed*4 When an application integration module is installed*5 When an application communication module is installed*6 When an external account module is installed
Internet Fax Expansion Kit*3 – No Yes
Application Integration Module*4vg – No Yes
Application communication module*5 – No Yes
External Account Module*6 – No Yes
Custom Links – No Yes
Setup Items Factory default setting U A

7-32
SYSTEM SETTINGS►SETTING MODE LIST
Network SettingsU: General user; A: System administrator/Administrator
Setup Items Factory default setting U A
● Network Settings (page 7-133)
Quick Settings No Yes
Wireless Settings No Yes
• Connection Type Wired+Wireless (Access Point Mode)
No Yes
IPv4 Settings No Yes
• DHCP Enabled No Yes
• IPv4 Address – No Yes
• Subnet Mask – No Yes
• Default Gateway – No Yes
Network Name Settings No Yes
• Device Name – No Yes
• Domain Name – No Yes
DNS Settings No Yes
• Primary Server – No Yes
• Secondary Server – No Yes
• Domain Name – No Yes
SMTP Settings No Yes
• Primary Server – No Yes
• Sender Name – No Yes
• Sender Address – No Yes
• Enable SSL – No Yes
• SMTP Authentication – No Yes
• User Name – No Yes
• Password – No Yes
- Change Password – No Yes
• Connection Test – No Yes
LDAP Settings No Yes
• Name – No Yes
• Search Root – No Yes
• LDAP Server – No Yes
• User Name – No Yes
• Password – No Yes
- Change Password – No Yes
• Authentication Type – No Yes

7-33
SYSTEM SETTINGS►SETTING MODE LIST
• KDC Server – No Yes
• Realm – No Yes
• Enable SSL – No Yes
• Connection Test – No Yes
Public Folder / NAS Setting No Yes
• public No Yes
- Use of Storage Allowed No Yes
• shared No Yes
- Use of Storage Allowed No Yes
• faxreceive No Yes
- Use of Storage Allowed No Yes
Network Name Setting No Yes
Device Name – No Yes
Domain Name – No Yes
Comment – No Yes
Protocol Settings No Yes
IPv4 Settings No Yes
• DHCP Enabled No Yes
• IPv4 Address – No Yes
• Subnet Mask – No Yes
• Default Gateway – No Yes
IPv6 Settings No Yes
• IPv6 Enabled No Yes
• DHCPv6 Enabled No Yes
• Manual Address / Prefix Length – No Yes
• Default Gateway – No Yes
MTU Settings No Yes
• MTU 1500 No Yes
SMB Settings No Yes
• Use SMB1.0 Enabled No Yes
• Use SMB2.0 Enabled No Yes
• Use SMB2.1 Enabled No Yes
• Use SMB3.0 Enabled No Yes
Ping Command No Yes
• IPv4 – No Yes
• IPv6 – No Yes
Services Settings No Yes
Setup Items Factory default setting U A

7-34
SYSTEM SETTINGS►SETTING MODE LIST
DNS – No Yes
• DNS Settings – No Yes
- IPv4 Settings – No Yes
- Primary Server – No Yes
- Secondary Server – No Yes
- IPv6 Settings – No Yes
- Primary Server – No Yes
- Secondary Server – No Yes
- Timeout 2 seconds No Yes
- Domain Name – No Yes
- DNS Update Disabled No Yes
- Update Interval 3 minutes No Yes
SMTP – No Yes
• SMTP Settings – No Yes
- Primary Server – No Yes
- Secondary Server – No Yes
- Port Number 25 No Yes
- Timeout 20 seconds No Yes
- Sender Name – No Yes
- Sender Address – No Yes
- Enable SSL Disabled No Yes
- SMTP Authentication Disabled No Yes
- User Name – No Yes
- Password – No Yes
- POP before SMTP Disabled No Yes
- Connection Test – No Yes
Kerberos – No Yes
• Kerberos Authentication Settings – No Yes
- KDC Server – No Yes
- Port Number 88 No Yes
- Realm – No Yes
SNTP – No Yes
• SNTP Settings – No Yes
- SNTP – No Yes
- SNTP Server – No Yes
- Port Number 123 No Yes
- Timeout 5 seconds No Yes
Setup Items Factory default setting U A

7-35
SYSTEM SETTINGS►SETTING MODE LIST
- Synchronous Interval 6 hours No Yes
- Synchronize Upon Start Disabled No Yes
- Synchronize Now – No Yes
mDNS – No Yes
• mDNS Settings – No Yes
- mDNS Enabled No Yes
- Service Name Model Name (Serial Number) No Yes
- Domain Name Model Name-Serial Number-.Local
No Yes
- Highest Priority Service LPD No Yes
SNMP – No Yes
• SNMP v1 Settings – No Yes
- SNMP v1 Settings Enabled No Yes
- Access Method Read-write Access No Yes
- GET Community public No Yes
- SET Community – No Yes
+ Change SET Community Disabled No Yes
- TRAP Community public No Yes
- TRAP Target Address – No Yes
• SNMP v3 Settings Disabled No Yes
- SNMP v3 Settings – No Yes
- User Name – No Yes
- Authentication Key – No Yes
- Privacy Key – No Yes
- Context Name – No Yes
WINS – No Yes
• WINS Settings – No Yes
- Primary Server – No Yes
- Secondary Server – No Yes
- Scope ID – No Yes
Print Port Settings No Yes
LPD No Yes
• LPD Settings No Yes
- LPD Enabled No Yes
- Timeout 90 seconds No Yes
- Use Banner Disabled No Yes
RAW No Yes
Setup Items Factory default setting U A

7-36
SYSTEM SETTINGS►SETTING MODE LIST
• Raw Print Settings No Yes
- Raw Print Enabled No Yes
- Port Number 9100 No Yes
- Timeout 90 seconds No Yes
- Use Bidirectional Disabled No Yes
WSD No Yes
• WSD Settings No Yes
- WSD Print Disabled No Yes
- Use Multicast Discovery Enabled No Yes
External Print Services Settings No Yes
Google Cloud Print Settings No Yes
• Google Cloud Print Disabled No Yes
• Status – No Yes
- Always Retain Prints – No Yes
• E-mail – No Yes
• Device Name – No Yes
• Register with Google Cloud Print – No Yes
• Delete from Google Cloud Print – No Yes
• Registration URL/QR code – No Yes
AirPrint Settings No Yes
• AirPrint (Print) Enabled No Yes
• AirPrint (Scan) Enabled No Yes
• AirPrint (Fax Send) Enabled No Yes
• mDNS Enabled No Yes
• IPP Enabled No Yes
• IPP-SSL Enabled No Yes
• Service Name – No Yes
• Machine Location – No Yes
• geo URI (RFC 5870) geo: No Yes
External Service Connect No Yes
Cloud Connect Settings No Yes
• Office 365 No Yes
- Domain Name – No Yes
- SharePoint Online No Yes
+ Site URL – No Yes
Setup Items Factory default setting U A

7-37
SYSTEM SETTINGS►SETTING MODE LIST
• Google Drive No Yes
- Google Drive Disabled No Yes
E-mail Connect Settings No Yes
• Use Exchange Online Enabled No Yes
- Hostname – No Yes
• Gmail No Yes
- Gmail Disabled No Yes
LDAP Settings No Yes
LDAP Settings – No Yes
Global Address Books List – No Yes
Active Directory Settings No Yes
Domain Name – No Yes
Search Attribute: cn No Yes
Linkage with User Control Function – No Yes
• Pages Limit Group pagelimit No Yes
• Authority Group authority No Yes
• Favorite Operation Group favorite No Yes
• My Folder myfolder No Yes
Public Folder / NAS Setting No Yes
public No Yes
• Use of Storage Allowed No Yes
shared No Yes
• Use of Storage Allowed No Yes
faxreceive No Yes
• Use of Storage Allowed No Yes
Proxy Setting No Yes
Proxy Setting Disabled No Yes
Proxy Server Address – No Yes
User Name – No Yes
Password – No Yes
• Change Password – No Yes
Port Number 8080 No Yes
Address without Using Proxy – No Yes
Wireless Settings – No Yes
Easy Connection Setting - No Yes
Setup Items Factory default setting U A

7-38
SYSTEM SETTINGS►SETTING MODE LIST
Device Web Page Setting No Yes
HTTP Access Settings No Yes
• Number of Users who can Log-in at the Same Time 32 No Yes
• Auto Logout Time 60 minutes No Yes
View Login User – No Yes
Logout All Users – No Yes
Setup Items Factory default setting U A

7-39
SYSTEM SETTINGS►SETTING MODE LIST
Security SettingsU: General user; A: System administrator/Administrator
Setup Items Factory default setting U A
● Security Settings (page 7-150)
Password Change – No Yes
Restrict Device Web Page Access Via Password Disabled No Yes
User Password No Yes
• Change Password Disabled No Yes
• Protect Settings by Password Disabled No Yes
Administrator Password No Yes
• Change Password Disabled No Yes
Port Control No Yes
Server Port No Yes
• HTTP Enabled No Yes
- Port Number 80 No Yes
• HTTPS Enabled No Yes
- Port Number 443 No Yes
• FTP Print Enabled No Yes
- Port Number 21 No Yes
• Raw Print Enabled No Yes
- Port Number 9100 No Yes
• LPD Enabled No Yes
- Port Number 515 No Yes
• IPP Enabled No Yes
- Port Number 631 No Yes
• IPP-SSL Disabled No Yes
- Port Number 443 No Yes
• PC Scan Enabled No Yes
- Port Number 52000 No Yes
• Remote Operation Panel Enabled No Yes
- Port Number 5900 No Yes
• SNMPD Enabled No Yes
- Port Number 161 No Yes
• NBT/WINS Disabled No Yes
• SMTP Enabled No Yes
• WSD Enabled No Yes
• Print Release Enabled No Yes

7-40
SYSTEM SETTINGS►SETTING MODE LIST
- Port Number 53000 No Yes
• Sharp OSA (Expansion Platform) No Yes
- HTTPS Enabled No Yes
+ Port Number 10080 No Yes
- HTTPS Enabled No Yes
+ Port Number 10443 No Yes
Client Port No Yes
• HTTP Enabled No Yes
• HTTPS Enabled No Yes
• FTP Enabled No Yes
• FTPS Enabled No Yes
• SMTP Enabled No Yes
• SMTP-SSL Enabled No Yes
• POP3 Enabled No Yes
• POP3-SSL Enabled No Yes
• SNMP-TRAP Enabled No Yes
- Port Number 162 No Yes
• Notify Job End Enabled No Yes
• LDAP Enabled No Yes
• LDAP-SSL Enabled No Yes
• SMB/WINS Enabled No Yes
• SNTP Disabled No Yes
• mDNS Enabled No Yes
• Data Backup Send Enabled No Yes
• Print Release Enabled No Yes
• XMPP Disabled No Yes
Filter Setting Disabled No Yes
Filter Disabled No Yes
IP Address Filter Settings No Yes
• Filter Mode Allowed No Yes
• Filter Address 1-4 No Yes
- Start IP Address 0.0.0.0 No Yes
- End IP Address 0.0.0.0 No Yes
MAC Address Filter Settings No Yes
• Filter Address 1-10 000000000000 No Yes
SSL Settings No Yes
Setup Items Factory default setting U A

7-41
SYSTEM SETTINGS►SETTING MODE LIST
Condition Settings No Yes
• Setting of SSL No Yes
- Server Port No Yes
+ HTTPS Enabled No Yes
+ IPP-SSL Disabled No Yes
+ Redirect HTTP to HTTPS in Device Web Page Access
DisabledNo Yes
- Client Port No Yes
+ HTTPS Enabled No Yes
+ FTPS Enabled No Yes
+ SMTP-SSL Enabled No Yes
+ POP3-SSL Enabled No Yes
+ LDAP-SSL Enabled No Yes
+ syslog-SSL Enabled No Yes
- Level of Encryption Low No Yes
• Device Certificate – No Yes
- Certificate Status – No Yes
- Export Certificate and Private Key – No Yes
• Make of Certificate Signing Request(CSR) – No Yes
S/MIME Settings No Yes
Condition Settings No Yes
• S/MIME Settings Disabled No Yes
• Device Certificate No Yes
- Certificate Status – No Yes
• Sign Settings No Yes
- Sign E-mail Always Enable No Yes
- Signature Algorithm SHA-1 No Yes
• Encryption Settings No Yes
- Encrypt E-mail Always Enable No Yes
- Encrypt AES-128 No Yes
- Disable sending to the addresses which cannot be encrypted.
DisabledNo Yes
Make of Certificate Signing Request(CSR) – No Yes
IPsec Settings No Yes
Condition Settings No Yes
• IPsec Settings Disabled No Yes
• IKEv1 Settings No No
Setup Items Factory default setting U A

7-42
SYSTEM SETTINGS►SETTING MODE LIST
- Pre-Shared Key – No Yes
- SA Lifetime (time) 28800 seconds No Yes
- SA Lifetime (size) 28800KB No Yes
- IKE Lifetime 30sec. No Yes
• IPsec Rules – No Yes
IEEE802.1X Setting No Yes
Condition Settings No Yes
• IEEE802.1X Authentication (Wired) Disabled No Yes
• EAP Authentication Method EAP-TLS No Yes
• EAP User Name – No Yes
• Password – No Yes
- Change Password Disabled No Yes
• Server Authentication Enabled No Yes
• EAP Timeout 10 seconds No Yes
• Number of EAP Retries 3 times No Yes
• Device Certificate No Yes
- Certificate Status – No Yes
- CA Certificate Status – No Yes
Make of Certificate Signing Request(CSR) – No Yes
Security Control No Yes
Restrict Print Jobs other than the current Print Hold Job
DisabledNo Yes
Restrict Operation Force Retention No Yes
Reject Requests from External Sites Enabled No Yes
Document Administration Function No Yes
Forwarding Destination Settings (Send Data) No Yes
• Forward Send Data Disabled No Yes
• E-mail – No Yes
• Network Folder – No Yes
• FTP – No Yes
• Desktop – No Yes
• File Format TIFF(Multi) No Yes
Forwarding Destination Settings (Received Data) No Yes
• Forward Received Data Disabled No Yes
• E-mail – No Yes
• FTP – No Yes
Setup Items Factory default setting U A

7-43
SYSTEM SETTINGS►SETTING MODE LIST
• Desktop – No Yes
• File Format TIFF(Multi) No Yes
Hidden Pattern Print Setting No Yes
Initial Status Settings No Yes
• Default Settings No Yes
- Hidden Pattern Print Setting All Invalid No Yes
- Exposure Standard No Yes
- Size 48 points No Yes
- Angle 0° No Yes
- Font Style Standard No Yes
- Camouflage Pattern Pattern 1 No Yes
- Print Method Positive No Yes
• Print Contents Setting No Yes
- Pre-Set Word Enabled, DO NOT COPY No Yes
- Unit Serial Number Disabled No Yes
- Account Job ID Disabled No Yes
- Login Name/User Number Disabled No Yes
- Control No. Disabled No Yes
- Date/Time Disabled No Yes
- Disable Direct Entry Disabled No Yes
Contrast No Yes
• Hidden Pattern Print No Yes
- Black 5 No Yes
Custom Text Registration – No Yes
Tracking Information Print – No Yes
Tracking Information Print Setting Disabled No Yes
Print Information No Yes
• Unit Serial Number Enabled No Yes
• Text Disabled No Yes
• Account Job ID Enabled No Yes
• Login Name/User Number Enabled No Yes
• Date/Time Enabled No Yes
Print Position No Yes
• Vertical position No Yes
- Print Upper Side of Paper Disabled No Yes
- Print Lower Side of Paper Enabled No Yes
Setup Items Factory default setting U A
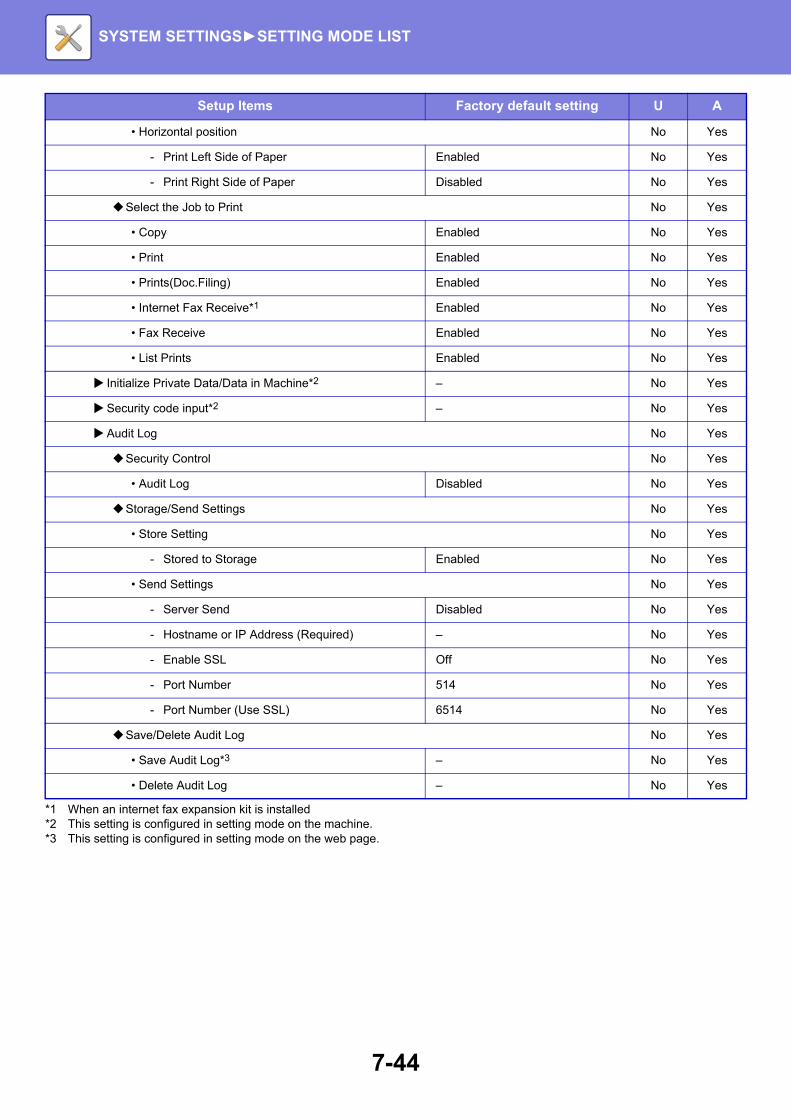
7-44
SYSTEM SETTINGS►SETTING MODE LIST
*1 When an internet fax expansion kit is installed*2 This setting is configured in setting mode on the machine.*3 This setting is configured in setting mode on the web page.
• Horizontal position No Yes
- Print Left Side of Paper Enabled No Yes
- Print Right Side of Paper Disabled No Yes
Select the Job to Print No Yes
• Copy Enabled No Yes
• Print Enabled No Yes
• Prints(Doc.Filing) Enabled No Yes
• Internet Fax Receive*1 Enabled No Yes
• Fax Receive Enabled No Yes
• List Prints Enabled No Yes
Initialize Private Data/Data in Machine*2 – No Yes
Security code input*2 – No Yes
Audit Log No Yes
Security Control No Yes
• Audit Log Disabled No Yes
Storage/Send Settings No Yes
• Store Setting No Yes
- Stored to Storage Enabled No Yes
• Send Settings No Yes
- Server Send Disabled No Yes
- Hostname or IP Address (Required) – No Yes
- Enable SSL Off No Yes
- Port Number 514 No Yes
- Port Number (Use SSL) 6514 No Yes
Save/Delete Audit Log No Yes
• Save Audit Log*3 – No Yes
• Delete Audit Log – No Yes
Setup Items Factory default setting U A

7-45
SYSTEM SETTINGS►SETTING MODE LIST
Energy SaveU: General user; A: System administrator/Administrator
Setup Items Factory default setting U A
● Energy Save (page 7-158)
Eco Setting No Yes
Eco Recommendation Function Display Disabled No Yes
Display Message When Extending Transition Time to Preheat/Auto Power Shut-Off Mode
DisabledNo Yes
Mode Setting Custom No Yes
Preheat Mode Setting 1min. No Yes
• Turn off Panel Display during pre-heat mode Enabled No Yes
Auto Power Shut-Off Enabled No Yes
As soon as the remote job is finished, enter Auto power shut off mode.
EnabledNo Yes
Fix transition time. Enabled No Yes
• Auto Power Shut-Off Timer 1min. No Yes
Change transition time by time of day. Auto No Yes
Sleep Mode Power Level Low Power No Yes
Eco Scan Setting No Yes
Eco Scan Setting Enabled No Yes
• Home Screen Disabled No Yes
• Copy Disabled No Yes
Image Send All Enabled No Yes
Document Filing All Enabled No Yes
System Settings Enabled No Yes
Sharp OSA All Enabled No Yes
Energy Saving Pattern List No Yes
Automatic Update Pattern – No Yes
Original Eco Pattern – No Yes
Specific Date Operation Settings – No Yes
Power ON/OFF Schedule Setting – No Yes
Toner Save Mode All Invalid No Yes

7-46
SYSTEM SETTINGS►SETTING MODE LIST
System ControlU: General user; A: System administrator/Administrator
* This setting is configured in setting mode on the machine.
Setup Items Factory default setting U A
● System Control (page 7-164)
Job Log No Yes
Job Log Operation – No Yes
• Job Log – No Yes
• Save Job Log No Yes
- The Number of Job Log to Notify by E-mail 50000 No Yes
• Delete Job Log – No Yes
View Job Log – No Yes
Data Import/Export (CSV Format) – No Yes
Storage Backup – No Yes
Device Cloning – No Yes
Address Book Forward* – No Yes
Filing Data Backup – No Yes
Storing/Calling of System Settings No Yes
Store Current Configuration – No Yes
Restore Configuration – No Yes
Reset Settings No Yes
Restore Factory Defaults – No Yes
Reset the NIC – No Yes
Optimization of a Hard Disk* No Yes
Optimization of a Hard Disk – No Yes
E-mail Alert and Status No Yes
Status Message – No Yes
Alerts Message – No Yes

7-47
SYSTEM SETTINGS►SETTING MODE LIST
Image Quality AdjustmentU: General user; A: System administrator/Administrator
* This setting is configured in setting mode on the machine.
Setup Items Factory default setting U A
● Image Quality Adjustment (page 7-168)
Collective Adjustment No Yes
Fusing Cleaning Mode* – No Yes
Black Letter/Black Line Width Adjustment 0 No Yes
Black Streak Reduction Disabled No Yes
Display warning message for black streaks detection. Disabled No Yes
Copy Image Quality No Yes
Quick Image Quality Adjustment 2 No Yes
Gray Balance All 0 No Yes
Density Adjustment when [Auto] is selected for Exposure
Document Glass, Document Feeder: 5 (Normal)
No Yes
Sharpness 2 No Yes
Image Quality Priority No Yes
• Auto 0 No Yes
• Text/Prtd.Photo 0 No Yes
Print Image Quality No Yes
Quick Image Quality Adjustment 2 No Yes
Gray Balance All 0 No Yes
Exposure Adjustment 3 (Normal) No Yes
Line Thickness 5 No Yes
Scan Image Quality No Yes
RGB Adjust All 0 No Yes
Sharpness 3 (Normal) No Yes
Contrast 3 (Normal) No Yes
Common Functions* – No Yes
Auto Gray Calibration (for Copy) – No Yes
Auto Gray Calibration (for Print) – No Yes
Copy Calibration by Screen – No Yes
Printer Calibration by Screen – No Yes

7-48
SYSTEM SETTINGS►SETTING MODE LIST
Initial Installation SettingsU: General user; A: System administrator/Administrator
Setup Items Factory default setting U A
● Initial Installation Settings
Condition Settings No Yes
Name – No Yes
Machine Code – No Yes
Machine Location – No Yes
Memo – No Yes
Clock Adjust – No Yes
• Current Date – No Yes
• Specify Time Zone – No Yes
• Date&Time Settings – No Yes
• Synchronize with Internet Time Server Disabled No Yes
Daylight Saving Time Setting – No Yes
Preheat Mode Setting 1min. No Yes
• Turn off Panel Display during pre-heat mode Enabled No Yes
Auto Power Shut-Off Enabled No Yes
• Fix transition time. Enabled No Yes
Display Message When Extending Transition Time to Preheat/Auto Power Shut-Off Mode
DisabledNo Yes
Sleep Mode Power Level Low Power No Yes
Network Quick Settings – No Yes
Paper Tray Settings – No Yes
Product Key – No Yes

7-49
SYSTEM SETTINGS►STATUS
Status
Machine IdentificationThe Machine Identification displays the system information of the machine.It displays the model name, current status, and machine location.
STATUS
Item Description
[Update] key Updates the information displayed.
Unit Serial Number Indicates the serial number of the machine.
NameIf [Name] is not set, [Not Set] appears.When you tap the [Not Set] key, the [Machine Identification] screen appears.
Model Name Displays the standard model name of the machine.
Machine LocationThe information entered in the [Machine Location] item in [Machine Identification] appears.If no name has been set, [Not Set] appears.
Current Status
Displays the current status of the machine.If two or more errors occur at the same time, only one status is displayed according to the priority order.The errors and machine conditions are displayed in the following priority order.• Printer Error• Account Limit• Incorrect Paper• Overdue service maintenance• Paper jammed• Marker supply missing• No toner• Cover open• The paper is not available.• Input tray empty• Specified input tray missing• Specified output tray full• Offline• Printer Warning• Toner low• Paper low• Input tray missing• Output Tray Full• Output tray near full• Near to overdue service maintenance• Ready• Auto power shut-off• Warming Up• Busy
Memo
Displays text that the administrator entered.If you have logged in as an administrator, you can enter a memo.If no name has been set, [Not Set] appears.When you tap the [Not Set] key, the Machine Identification screen appears.

7-50
SYSTEM SETTINGS►STATUS
Total CountThis function shows the page count in each mode.
Device StatusThis screen shows the device status.
Supply StatusDisplays the current status of supplies.
If staples are installed, their status is displayed.
Paper Input Tray Status Displays the current status of the paper trays installed in the machine.
[Reboot the MFP] keyDisplays the restart screen.(Administrator rights are required.)
[Enter the Power Save Mode] keyDisplays the power save mode screen.(Administrator rights are required.)
• Pages printed directly from the machine such as list prints are included in the "Other Prints" count.
• The items displayed (or printed) will vary depending on the machine specifications and peripheral devices installed.
• Before printing the number of pages used, select "Settings (administrator)" → [Status] → [Data List] → [List for Administrator].
• In All Sending Address List, the following items are handled by 2-sided printing on an item basis.
• Individual List• Group List
Item Description
[Update] button Updates the information displayed.
Paper Input Tray Status Displays the current status of the paper trays installed in the machine.
Output Tray Status Displays the current status of the output tray installed in the machine.
Supply StatusDisplays the current status of supplies.
If staples are installed, their status is displayed.
Device Configuration Displays the information of options installed in the machine.
HDD Status Displays the usage status of the hard disk drive.
Item Description

7-51
SYSTEM SETTINGS►STATUS
Network StatusThe Network Status screen shows the general status information and the statuses relevant to, TCP/IP, DNS, and WINS protocols.
Item Description
General
Displays the information common to the network. • Connection Type: Displays the network connection type.• Link Status: Displays the data transfer rate of the NIC and cable
information.• Duplex Mode: Displays the duplex mode of the NIC.• Hardware Address: Displays the MAC address of the NIC.• Device Name: Displays the device name.• Domain Name: Displays the domain name.• Reception Level (Max. 100): Displays the reception level of the wireless LAN.
(When connected to a wireless network)
TCP/IP
Displays the current status of the TCP/IP protocol.• TCP/IP: Shows use of TCP/IP.• IPv4 Settings: Displays the IPv4 protocol settings.
•DHCP: Selects whether or not the IP address is obtained from the DHCP server.•IPv4 Address: Displays the IPv4 address to which the notification is sent.•Subnet Mask: Displays the current subnet mask.•Default Gateway: Displays the current default gateway.
• IPv6 Settings: Displays the IPv6 status. •IPv6: Displays whether IPv6 is enabled.•DHCPv6: Displays the status of the DHCPv6 server.•Manual Address: Displays the IPv6 address that has been manually specified.•Default Gateway: Displays the current default gateway.•Link-Local Address: Displays the link-local address.•Stateless Address 1: Displays the stateless address.•Stateless Address 2: Displays the stateless address.•Stateful Address: Displays the stateful address.
DNS
Displays the status of the DNS server. • IPv4 Settings:
•Primary Server: Displays the current IP address of the primary DNS server.•Secondary Server: Displays the current IP address of the secondary DNS server.
• IPv6 Settings: •Primary Server: Displays the current IP address of the primary DNS server.•Secondary Server: Displays the current IP address of the secondary DNS server.•Domain Name: Displays the current domain name of the DNS server.
WINS
Displays the status of the WINS server. • Primary Server: Displays the current IP address of the primary WINS
server.• Secondary Server: Displays the current IP address of the secondary WINS
server.• Primary Server (DHCP): Displays the current IP address of the primary WINS
server (DHCP).• Secondary Server (DHCP): Displays the current IP address of the secondary WINS
server (DHCP).• Scope ID: Displays the current WINS scope ID.• Scope ID (DHCP): Displays the current WINS scope ID (DHCP).

7-52
SYSTEM SETTINGS►STATUS
Firmware VersionShows the firmware version of the machine as a list.
Power ResetThe Power Reset screen enables you to restart the machine or enter the power save mode.
Data ListLists showing the settings and information registered in the machine can be printed.
List for User
This function requires administrator rights.
Item Description
Reboot the MFPReboots the machine.Tapping the [Execute] key opens the Restart screen, and then tapping the [Execute] key again restarts the machine.
Enter the Power Save ModeShifts the machine to power save mode.Tap the [Execute] key to open the power save mode screen.
The two-sided or one-sided list printing setting is determined by Device Control - Data List - 1-Sided/2-Sided.
List name Description
Machine Status ListThis list shows information needed by regular users, such as hardware statuses, software statuses, printer environment settings, and paper tray settings.
Printer Test Page
This is used to print the PCL Symbol Set List, various font lists, and the NIC page (network interface settings, etc.).• PCL Symbol Set List• PCL Internal Font List• PCL Extended Font List• PS Font List• NIC Page
Sending Address List
Lists can be printed of various addresses stored in the machine. • Individual List• Group List• Memory Box List
Document Filing Folder List This shows the folder names for document filing.

7-53
SYSTEM SETTINGS►STATUS
List for AdministratorYou can print out the lists and reports that only the administrator can refer to.When using "Image Sending Activity Report (Internet Fax)" in Image Sending Activity Report (Auto), select "Settings" → [System Settings] → [Image Send Settings] → [Internet Fax Settings] → [Receive Settings] → [2-Sided Printing of Received Data], enabling you to specify 1-sided or 2-sided printing.When using "Image Sending Activity Report (Fax)" in Image Sending Activity Report (Auto), select "Settings" → [System Settings] → [Image Send Settings] → [Fax Settings] → [Receive Settings] → [2-Sided Printing of Received Data], enabling you to specify 1-sided or 2-sided printing.• Home Screen List• Copy Settings List• Printer Settings List• Image Send Settings
• Metadata Set List• Common Settings List• Scan Settings List• Fax Settings List• I-Fax Settings List*
• Document Filing Settings List• Sharp OSA Settings List
CommonLists of the administrator settings for the following modes can be printed. • Paper Settings List• Machine Identification Settings List• Operation Settings List• Keyboard Settings List• Device Control List
Network Settings• Network Settings List
Security Settings• Security Settings List
Energy Save Setting• Energy Save List
Image Quality Adjustment• Image Quality Adjustment List
Image Sending Activity ReportThe following Image Sending Activity Reports can each be separately printed. • Image Sending Activity Report (Fax)*
• Image Sending Activity Report (Scan)• Image Sending Activity Report (Internet Fax)*
Data Receive/Forward ListThe following lists showing reception settings and forwarding settings can be printed. • Allow/Reject Number List• Allow/Reject Mail & Domain Name List• Inbound Routing List• Document Admin List
* This can be used when the corresponding peripheral device is installed.
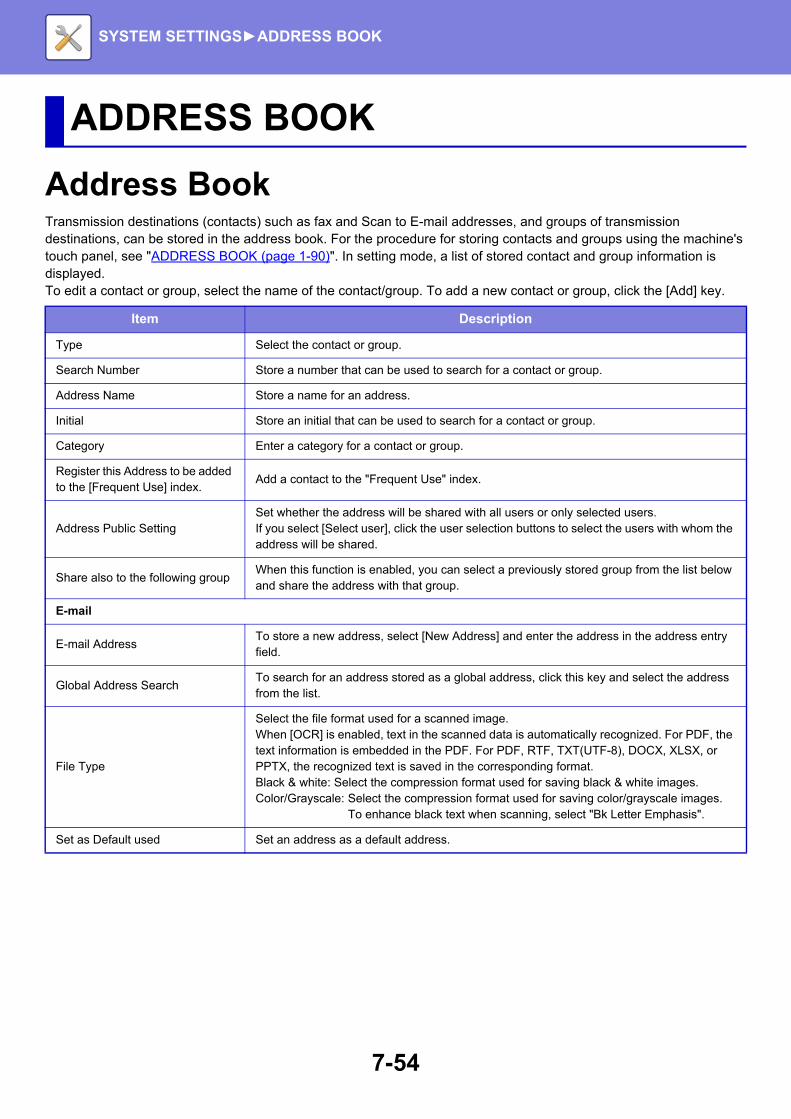
7-54
SYSTEM SETTINGS►ADDRESS BOOK
Address BookTransmission destinations (contacts) such as fax and Scan to E-mail addresses, and groups of transmission destinations, can be stored in the address book. For the procedure for storing contacts and groups using the machine's touch panel, see "ADDRESS BOOK (page 1-90)". In setting mode, a list of stored contact and group information is displayed.To edit a contact or group, select the name of the contact/group. To add a new contact or group, click the [Add] key.
ADDRESS BOOK
Item Description
Type Select the contact or group.
Search Number Store a number that can be used to search for a contact or group.
Address Name Store a name for an address.
Initial Store an initial that can be used to search for a contact or group.
Category Enter a category for a contact or group.
Register this Address to be added to the [Frequent Use] index.
Add a contact to the "Frequent Use" index.
Address Public SettingSet whether the address will be shared with all users or only selected users.If you select [Select user], click the user selection buttons to select the users with whom the address will be shared.
Share also to the following groupWhen this function is enabled, you can select a previously stored group from the list below and share the address with that group.
E-mail AddressTo store a new address, select [New Address] and enter the address in the address entry field.
Global Address SearchTo search for an address stored as a global address, click this key and select the address from the list.
File Type
Select the file format used for a scanned image.When [OCR] is enabled, text in the scanned data is automatically recognized. For PDF, the text information is embedded in the PDF. For PDF, RTF, TXT(UTF-8), DOCX, XLSX, or PPTX, the recognized text is saved in the corresponding format.Black & white: Select the compression format used for saving black & white images.Color/Grayscale: Select the compression format used for saving color/grayscale images.
To enhance black text when scanning, select "Bk Letter Emphasis".
Set as Default used Set an address as a default address.

7-55
SYSTEM SETTINGS►ADDRESS BOOK
Fax
Fax NumberTo store a new fax number, select [New Address] and enter the fax number in the fax number entry field.
Global Address SearchTo search for a fax number stored as a global address, click this key and select the fax number from the list.
Transmission Mode Select the communication speed and International Correspondence Mode.
Set as Default used Set an address as a default address.
Internet Fax
Internet Fax AddressTo store a new address, select [New Address] and enter the address in the address entry field.
Global Address SearchTo search for an address stored as a global address, click this key and select the address from the list.
Compression Mode Set the compression format used for transmitted images.
Request Internet Fax Reception Report
Select whether or not you wish to receive a reception report by e-mail after transmission is completed.
Set as Default used Set an address as a default address.
Direct SMTP
Direct SMTP AddressTo store a new address, select [New Address] and enter the address in the address entry field.
Add Hostname or IP Address.
When the receiving machine is set to only receive e-mail from specific addresses, enter the specified specific e-mail address in the [Direct SMTP Address] text box. Select the "Add Hostname or IP Address." checkbox and enter the host name or IP address of the receiving machine in the [Hostname or IP Address] text box.Example: When the e-mail address of the receiving machine is "user@sample_domain.com" and the IPv4 address is "192.168.123.45"Enter "user@sample_domain.com" in the [Direct SMTP Address] text box and enter "192.168.123.45" in the [Hostname or IP Address] text box.
Compression Mode Set the compression format used for transmitted images.
Set as Default used Set an address as a default address.
FTP
FTP AddressTo add a new address, select [New Address] and enter the address in [Hostname or IP Address].
File Type
Select the file format used for a scanned image. When [OCR] is enabled, text in the scanned data is automatically recognized. For PDF, the text information is embedded in the PDF. For PDF, RTF, TXT(UTF-8), DOCX, XLSX, or PPTX, the recognized text is saved in the corresponding format.Black & white: Select the compression format used for saving black & white images.Color/Grayscale: Select the compression format used for saving color/grayscale images.
To enhance black text when scanning, select "Bk Letter Emphasis".
Directory Specify a directory in the FTP server to be used for transmission.
User Name Enter a user name in the FTP server to be used for transmission.
Password Enter the password associated with the entered user name.
Enable SSL Use SSL to encrypt data before transmission.
Item Description

7-56
SYSTEM SETTINGS►ADDRESS BOOK
Category SettingA category can be renamed for greater ease of use.Delete the previously entered characters and enter a new name (up to 127 characters). The factory default names are "Category 1" to "Category 32".
Use PASV mode Send data to an FTP server in PASV mode.
Enable Hyperlink to FTP server to be e-mailed
When sending data to an FTP server, send the data to the e-mail address that is specified in the hyperlink to the FTP server.
Set as Default used Set an address as a default address.
Desktop
Desktop DestinationTo add a new address, select [New Address] and enter the address in [Hostname or IP Address].
Please enter Port Number. Enter the port of the destination computer.
Process Directory Specify the directory to which the data is be to sent.
File Type
Select the file format used for a scanned image. When [OCR] is enabled, text in the scanned data is automatically recognized. For PDF, the text information is embedded in the PDF. For PDF, RTF, TXT(UTF-8), DOCX, XLSX, or PPTX, the recognized text is saved in the corresponding format.Black & white: Select the compression format used for saving black & white images.Color/Grayscale: Select the compression format used for saving color/grayscale images.
To enhance black text when scanning, select "Bk Letter Emphasis".
User Name Enter a user name in the computer to be used for transmission.
Password Enter the password associated with the entered user name.
Enable SSL Use SSL to encrypt data before transmission.
Set as Default used Set an address as a default address.
Network Folder
Network Folder Path To store a new path, select [New Address] and enter the path in the path entry field.
User Name Enter a user name in the computer to be used for transmission.
Password Enter the password associated with the entered user name.
File Type
Select the file format used for a scanned image. When [OCR] is enabled, text in the scanned data is automatically recognized. For PDF, the text information is embedded in the PDF. For PDF, RTF, TXT(UTF-8), DOCX, XLSX, or PPTX, the recognized text is saved in the corresponding format.Black & white: Select the compression format used for saving black & white images.Color/Grayscale: Select the compression format used for saving color/grayscale images.
To enhance black text when scanning, select "Bk Letter Emphasis".
Enable Hyperlink to Network Folder to be e-mailed
When sending data to a shared folder, send the data to the e-mail address that is specified in the hyperlink to the shared folder.
Set as Default used Set an address as a default address.
Item Description
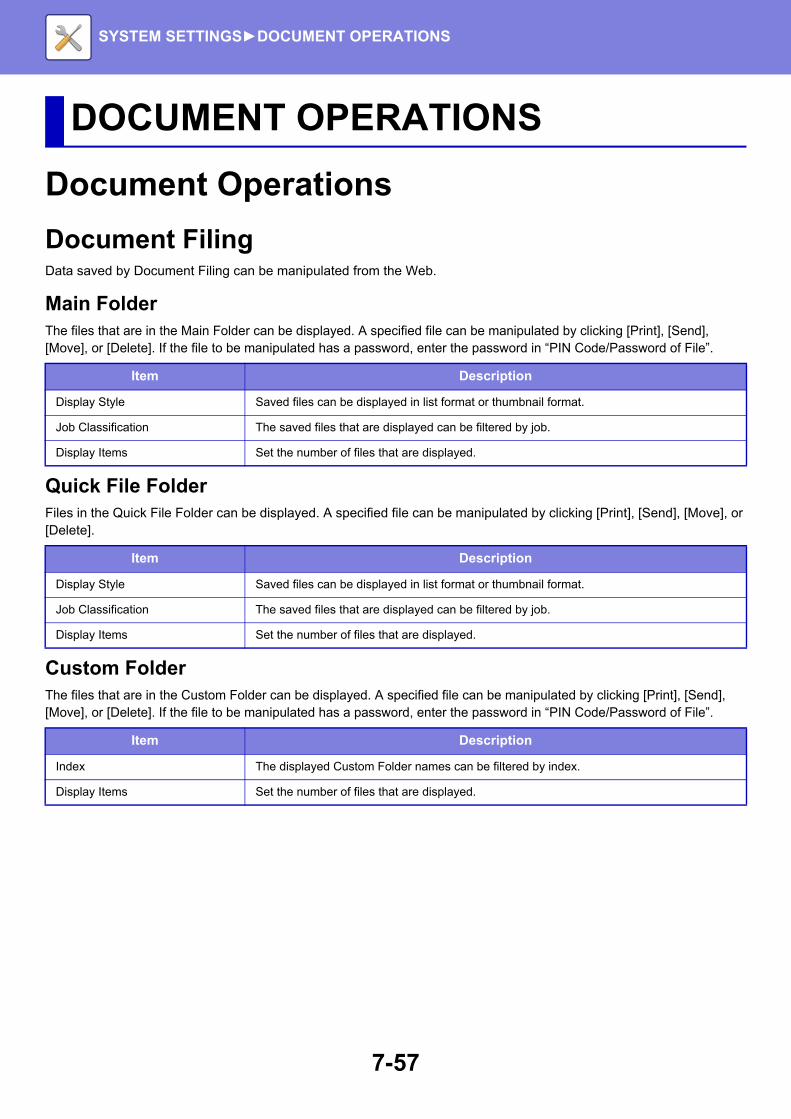
7-57
SYSTEM SETTINGS►DOCUMENT OPERATIONS
Document Operations
Document FilingData saved by Document Filing can be manipulated from the Web.
Main FolderThe files that are in the Main Folder can be displayed. A specified file can be manipulated by clicking [Print], [Send], [Move], or [Delete]. If the file to be manipulated has a password, enter the password in “PIN Code/Password of File”.
Quick File FolderFiles in the Quick File Folder can be displayed. A specified file can be manipulated by clicking [Print], [Send], [Move], or [Delete].
Custom FolderThe files that are in the Custom Folder can be displayed. A specified file can be manipulated by clicking [Print], [Send], [Move], or [Delete]. If the file to be manipulated has a password, enter the password in “PIN Code/Password of File”.
DOCUMENT OPERATIONS
Item Description
Display Style Saved files can be displayed in list format or thumbnail format.
Job Classification The saved files that are displayed can be filtered by job.
Display Items Set the number of files that are displayed.
Item Description
Display Style Saved files can be displayed in list format or thumbnail format.
Job Classification The saved files that are displayed can be filtered by job.
Display Items Set the number of files that are displayed.
Item Description
Index The displayed Custom Folder names can be filtered by index.
Display Items Set the number of files that are displayed.

7-58
SYSTEM SETTINGS►DOCUMENT OPERATIONS
SearchUse these settings to enter search conditions. A specified file can be manipulated by clicking [Print], [Send], [Move], or [Delete]. If the file to be manipulated has a password, enter the password in “PIN Code/Password of File”.
Search ResultUse these settings to enter search conditions. A specified file can be manipulated by clicking [Print], [Send], [Move], or [Delete]. If the file to be manipulated has a password, enter the password in “PIN Code/Password of File”.
File Batch PrintMultiple files can be printed at once by batch printing. Search for the files using search conditions, and then select multiple files from the displayed search results.If you want to use the number of copies set when each file was saved by Document Filing, select “Apply the Number of Copies Stored in Each File”. If you want to set a different number of copies, enter the desired number in “Enter the Number”. Click [Print] to print the file. To have the file deleted after printing, select the “Print and Delete the Data” checkbox.
Item Description
User Name Enter the user name. (Up to 32 characters)
Select from User List Click the [Setup] button and search for users from the list.
Login Name Set the number of files that are displayed.
Search Folder Set the folder.
File Name Enter a file name. (Up to 30 characters)
PIN Code/Password of File Enter the password that is set for the file (5 to 32 digits).
Stored Date Set the date and time the file was saved.
Item Description
Display Style The files that were found can be displayed in list format or thumbnail format.
Job Classification The found files can be filtered by job.
Display Items Set the number of files that are displayed.
Item Description
Search Condition
User Name Enter the user name. (Up to 32 characters)
Select from User List Click the [Setup] button and search for users from the list.
Search Folder Set the folder.
File Name Enter a file name. (Up to 30 characters)
PIN Code/Password of File Enter the password that is set for the file. (5 to 32 digits)
Search Result
Job Classification The found files can be filtered by job.
Billing Code
Main CodeSelect this checkbox, and then enter the main code.(32 characters or less)
Sub CodeSelect this checkbox, and then enter the sub code.(32 characters or less)

7-59
SYSTEM SETTINGS►DOCUMENT OPERATIONS
Submit Print JobYou can print a file on your computer.Files that can be printed are PDF, TIFF, JPEG, PCL, PS, XPS, DOCX, PPTX, and XLSX files with extensions pdf, tif, tiff, jpeg, jpg, jpe, jfif, pcl, ps, xps, docx, pptx, and xlsx. Available only if the MFP supports PostScript.Enter the password for the encrypted PDF data on Spool Queue of the Job Status screen.
Print SettingsSelect print settings. Select the file you want to print in “Select File”, select settings, and then click [Print].
DirectOffice™ is a product of CSR Imaging US, LP.DirectOffice™ is a trademark of CSR Imaging US, LP, registered in the United States and other countries, used with permission.
Item Description
Copies Set the number of copies to be printed.
Paper Size Set the print size.
Orientation Select portrait or landscape for the print orientation.
2-Sided Print Select one-sided printing, two-sided printing (booklet), or two-sided printing (tablet).
Output If printing by set, select the “Print per Unit” checkbox.
Staple Select staple settings.
Separator PageSelect to insert separator pages. Specify whether separator pages are to be added in front of or behind each set. Select the paper tray with the paper you want to use from the paper trays.
Fit To Page Print with the file expanded to the full paper size.
Print WhatSelect whether blank sheets are to be deleted or the entire book is to be printed when printing an Excel file.
Output Tray Select the output tray for the print job.
Quick File Save the print data in the Quick File Folder of the machine.
Print Glossy Select this checkbox if the print job will be printed on glossy paper.
Billing Code Select the checkbox of the Billing Code to assign, and then enter the billing code.

7-60
SYSTEM SETTINGS►USER CONTROL
User Control
User ListThis is used to store, edit, and delete users when user authentication is enabled. • [Add] key
Adds a new user.• [Delete All Users] key
Deletes all registered users. (Excluding users stored as factory default.) Only the administrator of the machine can use this function.
• [Delete All Auto-registered users] keyDeletes all auto-registered users.► Users auto-registered (page 7-65)
• [Delete Your Information for External Connect] keyDelete the External Connect cache used by the selected user. [Store user authentication information for External Connect] must be enabled to use this function.
• [Delete All Information for External Connect] keyOnly the administrator of the machine can perform this action. Delete all External Connect caches. [Store user authentication information for External Connect] must be enabled to use this function.
• User ListThis shows the users stored as factory default and the currently stored users. An asterisk [*] appears in front of the user name of auto-registered users.When you select a user name, the user edit or delete screen appears.
Storing a userWhen you tap the [Add] key, the registration screen appears. Up to 1000 groups can be registered.For information on the settings, see "Settings (page 7-62)".
Editing and deleting a userWhen you select a user from the list, the user edit/delete screen appears.For information on the settings, see "Settings (page 7-62)".A user can be deleted using the [Delete] key.
USER CONTROL
The [Vender] and [Vender2] options are displayed only when the vender is connected.
• If the login authentication with a Fixed User is set, the "Delete All Users" option cannot be used.
• Users stored as factory default cannot be deleted.

7-61
SYSTEM SETTINGS►USER CONTROL
Users stored as factory defaultThe following users are stored in the machine at the factory.• Administrator: The administrator account of the machine, stored as factory default.• System Administrator: The account for system maintenance, stored as factory default. This account cannot
execute jobs.• User: This is used when network authentication is used and a login name that is not stored in the
machine is entered directly. (This cannot be selected from the login user screen.)• Device Account: An account to which the color prohibited authority is granted.• Other User: This is used when a print job is executed using invalid user information. (This cannot be
selected from the login user screen.) For settings related to each of the users, see the following table.
*1 Items that can be changed *2 For detailed information, see "Authority Group (page 7-70)".
User Name AdminSystem Administrator
Users Device Account Other User
Login Name admin sysadmin usersdeviceaccount
Other
PIN Code/Password(See "Start Guide.")*1
sysadmin*1 users*1 deviceaccount*1
–
My Folder No Main Folder No Main Folder No
Authentication Server Settings
Login Locally –
Pages Limit Group Unlimited*1
Authority Group*2 AdminSystem Administrator Authority*1
User*1 User*1 Guest*1
Favorite Operation Group
Following the System Settings*1
Default Billing Code Not Set*1

7-62
SYSTEM SETTINGS►USER CONTROL
Settings
*1 It is not displayed when "User Number" is selected for the authentication method. *2 It is displayed when "User Number" is selected for the authentication method.*3 Not required when network authentication is used, as the password stored in the LDAP server is used.
Item Description
User NameStore a user name consisting of up to 255 characters. This user name is used as the key name in the authentication screen, the user name for document filing, and the sender name.
Apply User Name to Log-in Name.*1
Select this to enter the entered user name in the login name.
Initial (Optional)This determines where the user name will appear in the user list. Enter a maximum of 10 characters for the initials.
IndexSelect a custom index to be stored. The custom index names are the same as those used in the address book.
User Number*2 Enter a user number in 5 to 8 digits.
Login Name*1 Enter the login name that is used when authentication by login name and password is enabled (up to 255 characters). (The login name must be unique.)
Password*1, 3Enter the password, consisting of 1 to 255 characters, that is used for user authentication by login name and password (the password is optional).After entering the password, enter once again in "Password (for confirmation)".
E-mail AddressEnter the e-mail address that is used in the sender list and for LDAP authentication (up to 255 characters).
Home Directory Path Enter a maximum of 127 full-width/half-width characters for the home directory path.
Use Login Name for User Authentication
Set whether or not the login name for user authentication will be the same as the user name for home directory path authentication.
User Name Enter a maximum of 127 full-width/half-width characters for the user name for home directory path authentication.
Password Enter a maximum of 255 numeric digits for the password for home directory path authentication.
Authentication Settings*1 Select either [Login Locally], [Network Authentication] (when LDAP is enabled) or [Active Directory] (when Active Directory is enabled) for authentication.
Authentication ServerWhen the [Network Authentication] is selected, select the server to be used for user authentication from the LDAP server list that is stored using Setting mode (Web version).
Organization/GroupSet a group to which the user belongs.Up to 8 groups can be assigned.
Pages Limit GroupSpecify the page limit for the user by selecting one of the stored page limit groups. The factory default setting is [Unlimited].For more information, see "Pages Limit Group (page 7-69)".
Authority GroupSpecify the user authority by selecting one of the stored authority groups. The factory default setting is [User].For more information, see "Authority Group (page 7-70)".
Favorite Operation GroupThe favorite operation group is displayed when the user logs in. The factory default setting is [Following the System Settings].To change the settings, select [User Control] in Setting mode (Web version).
Default Billing CodeSet the Main Code and Sub Code when the user logs in.The factory default setting is [Not Set].
My FolderStore a folder to be used for document filing as the dedicate user folder (or My Folder). A stored folder can be selected, or you can create and specify a new folder.

7-63
SYSTEM SETTINGS►USER CONTROL
Custom IndexYou can change the custom index name.Tap the custom index name on the list to edit it.Delete the previously entered characters and enter a new name (up to 127 characters).
Organization /Group ListThis is used to store user groups.Tap each group name to enter them directly.
Default Settings
User AuthenticationThis setting enables or disables user authentication and specifies the authentication method.When the user authentication is enabled, each user of the machine is registered. When a user logs in, the separate authentication settings apply to the user. This function allows greater control of security and cost management than that on previous machines.Even if user information is not stored on the machine, you can directly enter the user information stored in an LDAP server to log in the machine if necessary. In this case, the authentication information of the "User" being stored as factory default applies to the login user. For more information, see "Users stored as factory default (page 7-61)".
User AuthenticationWhen [User Authentication] is enabled, the authentication screen appears before an operation is carried out in any mode except the job status screen*.Log in as an already registered user.After logging in, you can move freely through the modes.*The login screen appears when a document filing file is used or when a broadcast transmission is reattempted from the job status screen.
Authentication Server SettingsSet the location where user authentication is to be enabled.Login Locally: User authentication by the machine.LDAP: User authentication by LDAP server.Active Directory: User authentication by Active Directory.
Default Network Authentication Server SettingUse this to set the default network authentication server.When you log into Setting mode (Web version) or send a print job to the machine using user information that is not registered in the machine, the authentication server is not known. This setting is used to select one of the LDAP servers registered in the machine as the authentication server.
• For the procedure for storing users, see "User List (page 7-60)".
• For details on login procedures when user authentication is enabled, see "USER AUTHENTICATION (page 1-29)".
When login is performed by network authentication using user information that is not registered in the machine, the login user will be the "User" registered as factory default. For more information, see "Users stored as factory default (page 7-61)".

7-64
SYSTEM SETTINGS►USER CONTROL
Perform network server access controlRegister the access control information for page count limits, authorities, and favorite operations can be registered on a network server in advance. By using this network server for network authentication, perform the user authentication based on the registered access control information.Use this function when user authentication is performed by network authentication using an LDAP server or a directory service (Active Directory, etc.).Before using this function, configure settings for authentication by network server, obtain control numbers for the "Pages Limit Group", "Authority Group", "Favorite Operation Group", and "My Folder" (including base settings for each group), and associate these with the control numbers registered in the machine.
To use this function, add the properties associated with "Pages Limit Group", "Authority Group", "Favorite Operation Group", and "My Folder" to the directory information of the network server used for user authentication.The property information is indicated below. Settings previously stored in the machine cannot be changed.
Rename the properties that the machine obtains from the LDAP server as follows. In "Settings", select [Network Settings] → [LDAP Settings]. From the Global Address Book setting screen that is displayed, select [Linkage with User Control Function] and then select [Pages Limit Group], [Authority Group], [Favorite Operation Group] and [My Folder].
The [Pages Limit Group], [Authority Group], and [Favorite Operation Group] information that is registered in each machine determines the authority and settings that the user is actually granted. To use this function to ensure that users are granted the same authority and settings on any machine, register the [Pages Limit Group], [Authority Group], and [Favorite Operation Group] information with the same authority so that they will be registered in each machine using the same registration numbers.
For [My Folder], register the folder having the same name in [Custom Folder] in each machine.The directory information of the network server that is used cannot be changed from the machine. Consult the administrator of the network server.
If 1000 users have already been manually registered, login will not be possible. Please delete old or unused user name. Consult the administrator of the machine.
Property Name of property in factory default state
Setting
Pages Limit Group pagelimit
Registration number of Pages Limit Group registered in the machine, or a group name previously registered in the machine.Unlimited: unlimited
Authority Group authority
Registration number of Authority Group registered in the machine, or a group name previously registered in the machine.Admin: adminUser: userGuest: guest
Favorite Operation Group favorite
Registration number of Favorite Operation Group registered in the machine, or a group name previously registered in the machine.Following the System Settings: systemsettings
My Folder myfolder
Folder name of user folder stored in the machine.Do not enter if the default folder is specified.

7-65
SYSTEM SETTINGS►USER CONTROL
Users auto-registeredWhen you log in by network authentication, your user information is automatically registered in the machine.The information stored is as follows:
* If the user name cannot be acquired by network authentication, the first 16 characters of the text string used as the login name for network authentication is applied.
Authentication Method SettingThis selects the authentication method. When using user authentication, be sure to configure this setting first. The items to be configured for users stored after setting the user authentication method vary depending on the selected authentication method. Authenticate a User by Login Name and PasswordStandard authentication method using a login name and password. Authenticate a User by Login Name, Password and E-mail AddressThis authentication also checks the e-mail address, in addition to the login name and password of the user. Authenticate a User by User Number OnlyUse this option for simple authentication if you skip the network authentication.
• If Access Control is enabled and the access control information cannot be acquired from the authentication server, user authentication will not be possible.
• If a user that is registered in the machine is authenticated by network authentication, the user registration settings in the machine will be given priority for the page count limit group, authority group, favorite operations group, and my folder.
• If the access control obtained from the server is not registered in the machine, the factory default user authority will be applied.
• When this function is not enabled and a user is authenticated by network authentication as a non-registered user, the factory default user authority will be applied.
Item Description
User Name This information is acquired from the authentication server.*
Initial 1
Index User1
Card ID –
PIN Code/Password –
Authentication Server Settings –
Authentication Server Network Authentication
E-mail Address
When Access Control is enabled, this information is acquired from the authentication server.
My Folder
Pages Limit Group
Authority Group
Favorite Operation Group
• The login screen will vary depending on the authentication method that is selected.For details, see "USER AUTHENTICATION (page 1-29)".
• When "Authenticate a User by User Number Only" is selected for the authentication method, network authentication cannot be used.

7-66
SYSTEM SETTINGS►USER CONTROL
Device Account Mode SettingA specific user can be registered as an auto login user. When this option is enabled, the registered user can log in the machine automatically.This function can eliminate each login procedure on the authentication screen and apply the selected user settings (such as network authentication and favorite operations). As an example, this enables uses such as "authentication for copying only".Also, you can temporarily log in as a user other than the auto login user, and operate the machine with the privileges of this user. To allow other users to log in temporarily when [Device Account Mode] is enabled, select [Allow Login by Different User].
Login UserThis setting is used to select the auto login user when auto user login is enabled.
Cache User InformationSet whether or not automatically registered users are created. Externally authenticated users in Sharp OSA can also be automatically registered.
Cache PeriodSelect the cache period for user information. To set the cache period, [Cache User Information] must be enabled.
Cache Password for AuthenticationSet whether or not password information is retained as cache information when a user is cached.
Store user authentication information for External ConnectSet whether or not authentication information for connection to the cloud is retained as cache information.When this setting is enabled, the authentication information of a successfully authenticated user is retained to enable smooth authentication when the user subsequently logs in.When this setting is disabled, the previously retained cloud connection authentication information of all users is deleted and authentication information is no longer retained.
Card SettingUse IC Card for AuthenticationUse these settings for authentication and for use of a HID or other IC card.
Request Password at IC Card AuthenticationThis can be enabled when "Authentication Settings" is "Active Directory" and "Use IC Card for Authentication" is enabled. When enabled, a password must be entered each time authentication is performed by IC card. When disabled, a password is entered the 1st time the user logs in by IC card, and the password information is sent to the Active Directory server. When the user subsequently logs in, the password can be omitted.
Automatic Logout with a CardAt the point that the IC card is removed from the IC card reader/writer, the user is logged out. (The user can also log out by tapping the [Logout] key.)
Authentication Method SettingSet the authentication method for IC cards.
• If you have logged in as the Auto Login user, and if you have failed automatic login due to some reasons or if you do not have the administrator's privileges, you cannot use the general setting modes or Setting mode. In that case, the administrator should tap the [Admin Password] key on the Setting mode screen and log in again.
• To log in as a user other than a fixed user when [Allow Login by Different User] is enabled, tap the [Logout] key to cancel the fixed user login state. When the user authentication screen appears, log in as the desired user again. After you have used the machine, tap the [Logout] key to log out as the current user.

7-67
SYSTEM SETTINGS►USER CONTROL
Actions when the Limit of Pages for Output JobsThis setting determines whether or not a job will be completed if the page limit is reached while the job is in progress.The following settings can be configured.• Job is Completed even when the Limit of Pages is Reached• Job is Stopped when the Limit of Pages is Reached• After reaching to the page limit, cancel the job and delete the job during receiving
A Warning when Login FailsWhen entering passwords, including administrator passwords, during user authentication, the number of incorrect password attempts is counted, and if the number of attempts reaches the specified number (three), the user account is locked, and the user is blocked from making any more attempts at authenticating their account until a period of five minutes has elapsed.The number of incorrect entries made is counted separately for each user, and the count is reset when the correct password is entered. This prevents an unauthorized person from attempting to guess a password. (The number of failed login attempts is retained even if the power is turned off.)
Disabling of Printing by Invalid UserPrinting by users whose information is not stored in the machine, such as printing without entering valid user information in the printer driver or printing of a file on an FTP server in Setting mode (Web version), can be prohibited.
Allow Remote Scanner Using Before Login.This setting specifies whether scanning can be performed by remote operation before a user has logged in.
Automatically print stored jobs after loginWhen retention is enabled in the printer driver and print data has been spooled to the machine, you can have the spooled print data automatically print out when the user who enabled retention logs in.
Display Usage Status after LoginWhen user authentication is enabled, this setting specifies whether or not to display the page counts of a user when the user logs in.
Login Name DisplayWhen user authentication is enabled, select whether the login name is shown or asterisks are shown.
Include Job Status in user authenticationWhen user authentication is enabled, this setting specifies whether or not to include the job status in user authentication.
• Lockout only applies to the user who failed to login, not all users. Even if one user is locked out, the other users can still log in.
• When LDAP or Active Directory network authentication is used, lockout is executed by the server, not the machine. Select appropriate lockout settings on the server.
• If the same user has been locked out, the [Release Operation Lock Status] key is displayed in the "User Registration" screen for that user. An administrator can tap this key to carry out a manual clear.
Item Description
Display login name Show the login name.
Display Login Name with Asterisk " ". Hide the login name with asterisks.

7-68
SYSTEM SETTINGS►USER CONTROL
Automatic Logout SettingWhen user authentication is enabled, this setting specifies whether or not to enable automatic logout.The time until logout can be specified up to 240 seconds in increments of 10 seconds.
Case sensitivity of login name is enabled.Set whether or not to make login names used at the time of user authentication case sensitive. If the checkbox is set to
, login names with identical spelling but different cases (upper and lower) will be identified as different login names. Therefore, login names with identical spelling but different cases will be authenticated as user names of different users. If the checkbox is set to , case sensitivity for login names is disabled. Therefore, identically spelled user names with upper and lower case character differences will be authenticated as the user name of the same user.
Apply login name to the user name of network folderApply login name to the user name of network folder
Edit Help Display of Login ScreenSettings you have created here is displayed on the login screen.
User Information PrintPrints the following item lists.• User List• List of Number of Pages Used• Page Limit Group List*
• Authority Group List• Favorite Operation Group List*
• All User Information PrintSelect each item and tap the [Print] key to print it out.* Cannot be printed when no groups are stored.
Reset Counter After Sending E-mail StatusAfter E-mail Status has been sent, the counter is reset.This only appears when E-mail Status is enabled.
Enable IPP Authentication Except for Printer DriverEnable IPP authentication for other than the printer driver.
If the selected checkbox is changed to , and identical user names with only upper and lower case character differences exist, the user names that have already been registered are identified as user names of different users.
• To specify [One Sided] or [Two Sided] printing in List Print, select "Settings" → [System Settings] → [Common Settings] → [Device Control] → [List Prints].
• In All User Information Print, the following items are handled by 2-sided printing on an item basis.•User List•List of Number of Pages Used•Page Limit Group List•Favorite Operation Group List

7-69
SYSTEM SETTINGS►USER CONTROL
Pages Limit GroupThis is used to register the page limit settings in advance for each group.The page limit for each user is specified by selecting one of these registered groups when the user is registered.• [Add] key
Use this to add a new group.• List
This shows the currently stored groups. Selecting a group name displays the edit screen for that group.
Storing page limit groupsWhen you tap the [Add] key, the registration screen appears. Up to 20 groups can be registered.For information on the settings, see "Settings (page 7-69)".
Editing a page limit groupSelecting a group from the list displays the edit screen for that group.For information on the settings, see "Settings (page 7-69)".To return a group to the factory default state, set "Select the Group Name to be the Registration Model" to "Unlimited" on the edit screen.
Settings
Machine Page Limit SettingSets the page limit for the machine.
Settings
Item Description
Group Name Store a name of group (up to 32 characters).
Select the Group Name to be the Registration Model
Select one of the previously stored groups for use as a template for the new group. When selected, the settings of this group are applied.
Function Names The name of the functions that can be configured is displayed. Set a limit for each function.
Page Limit
When [Prohibited] is selected for a mode, input from the mode is prohibited.When [Unlimited] is selected for a mode, there is no limit to the number of pages that can be input/output in that mode.When [Limited] is selected, enter a page limit (1 to 99999999 pages).
Item Description
Function Names The name of the functions that can be configured is displayed. Set a limit for each function.
Page Limit
When [Prohibited] is selected for a mode, input from the mode is prohibited.When [Unlimited] is selected for a mode, there is no limit to the number of pages that can be input/output in that mode.When [Limited] is selected, enter a page limit (1 to 99999999 pages).

7-70
SYSTEM SETTINGS►USER CONTROL
Authority GroupThis is used to store the settings relevant to user authorities in advance for each group. The authority of each user is specified by selecting one of these registered groups when the user is registered.• [Add] key
Use this to add a new group.• List
This shows the currently stored groups. Selecting a group name displays the edit screen for that group.
Storing authority groupsWhen you tap the [Add] key, the registration screen appears. Up to 20 groups can be registered.For detailed information about each of the settings, see the following table.
Editing an authority groupSelecting a group from the list displays the edit screen for that group. For detailed information about each of the settings, see the following table.To return a group to the factory default state, select the group from the list and select any of options [Return to the Administrator Authority], [Return to the system administrator authority.], [Return to the User Authority], [Return to the Guest Authority], [Return to the color prohibited authority.] and [Return to the scanner prohibited authority.].Tapping the [Execute] key resets the group status to the factory default.
Item Description
Group Name Store a name of group (up to 32 characters).
Select the Group Name to be the Registration Model
Select one of the previously stored groups for use as a template for the new group. When selected, the settings of this group are applied.
The factory default groups and their settings are shown below.
Admin System Administrator
User Guest Scanner Prohibited Authority
Copy
Approval Setting Allowed Prohibited Allowed Allowed Allowed
Special Modes Usage Allowed Prohibited Allowed Prohibited Allowed
Sending while copying Allowed Allowed Allowed Allowed Allowed
Approval Setting to Use Toner Save Mode
No Toner Save
No Toner Save
No Toner Save
No Toner Save
No Toner Save
Creation of PDF for PC Browsing Allowed Prohibited Allowed Allowed Allowed
Printer
Approval Setting Allowed Prohibited Allowed Allowed Allowed
FTP Pull Print Allowed Prohibited Allowed Prohibited Allowed
USB Memory Direct Print Allowed Prohibited Allowed Prohibited Allowed
Network Folder Pull Print Allowed Prohibited Allowed Prohibited Allowed
Sending while printing Allowed Allowed Allowed Allowed Allowed
Creation of PDF for PC Browsing Allowed Prohibited Allowed Allowed Allowed
Approval Setting to Use Toner Save Mode
No Toner Save
No Toner Save
No Toner Save
No Toner Save
No Toner Save

7-71
SYSTEM SETTINGS►USER CONTROL
Image Send
Approval Settings for Each Mode
• E-mail• FTP• Desktop• Network Folder• Scan to Ext.Memory Dev.• PC Scan• Internet Fax Send• PC-I-Fax Send• Fax Send• PC-Fax Send
All allowed All prohibited All allowed All allowed All prohibited
Color Scan Allowed Prohibited Allowed Prohibited Allowed
Special Modes Usage Allowed Prohibited Allowed Prohibited Allowed
Registration/Deletion of Program Allowed Prohibited Allowed Prohibited Allowed
Creation of PDF for PC Browsing Allowed Prohibited Allowed Allowed Allowed
Access to Fax Data Allowed Allowed Allowed Allowed Allowed
Approval Setting for Addressing
• Approval Setting for Direct Entry
• Approval Setting to Use a Local Address Book
• Approval Settings to Use a Global Address Book
All allowed All allowed All allowed All allowed All allowed
Document Filing
Scan to HDD
Color Scan Allowed Prohibited AllowedOnly Black & White Allowed
Allowed
Special Modes Usage Allowed Prohibited Allowed Prohibited Allowed
Creating Downloadable File Allowed Prohibited Allowed Allowed Allowed
Prints (Document Filing)
Approval Setting Allowed Prohibited Allowed Allowed Allowed
Special Modes Usage Allowed Prohibited Allowed Prohibited Allowed
Document Filing Image Check
Apprpval Setting Allowed Prohibited Allowed Prohibited Allowed
Display only the Files of Logged-in Users
Prohibited Prohibited Prohibited Prohibited Prohibited
Item Description

7-72
SYSTEM SETTINGS►USER CONTROL
SharpOSA
Approval Setting to Use a Sharp OSA
Allowed Prohibited Allowed Allowed Allowed
Common Functions
Approval Settings for 2-Sided Print
All allowed All allowed All allowed All allowed All allowed
Change Billing Code Allowed Allowed Allowed Allowed Allowed
Output Approval Settings All allowed All prohibited All allowed All prohibited All allowed
Machine Settings
Machine Settings
Total Count Allowed Allowed Allowed Prohibited Allowed
Device / Network Status Allowed Allowed Allowed Prohibited Allowed
Power Reset Allowed Allowed Prohibited Prohibited Prohibited
List for User Allowed Allowed Allowed Prohibited Allowed
List for Administrator Allowed Allowed Prohibited Prohibited Prohibited
Address Registration Allowed Allowed Allowed Prohibited Allowed
Document Filing Folder Registration
Allowed Allowed Allowed Prohibited Allowed
User Control (Admin) Allowed Allowed Prohibited Prohibited Prohibited
User Control (User) Allowed Allowed Allowed Prohibited Allowed
Home Screen Settings Allowed Allowed Prohibited Prohibited Prohibited
Copy Function Settings Allowed Allowed Prohibited Prohibited Prohibited
Printer Settings (Admin) Allowed Allowed Prohibited Prohibited Prohibited
Printer Settings (User) Allowed Allowed Allowed Prohibited Allowed
Image Send Settings > Common Settings
Allowed Allowed Prohibited Prohibited Prohibited
Scan Settings Allowed Allowed Prohibited Prohibited Prohibited
Fax Settings Allowed Allowed Prohibited Prohibited Prohibited
I-Fax Settings Allowed Allowed Prohibited Prohibited Prohibited
Fax Data Receive/Forward (Manual)
Allowed Allowed Allowed Prohibited Allowed
Inbound Routing (Forwarding/Storing) Settings (Admin)
Allowed Allowed Prohibited Prohibited Prohibited
Inbound Routing (Forwarding/Storing) Settings (User)
Allowed Allowed Allowed Prohibited Allowed
Metadata Entry Allowed Allowed Prohibited Prohibited Prohibited
Document Filing Settings Allowed* Allowed* Prohibited Prohibited Prohibited
Item Description

7-73
SYSTEM SETTINGS►USER CONTROL
* For information on each setting, see the setting mode list.
Sharp OSA Settings Allowed Allowed Prohibited Prohibited Prohibited
Paper Settings (Bypass Tray Excluded)
Allowed Allowed Allowed Prohibited Allowed
Paper Settings (Bypass Tray) Allowed Allowed Allowed Prohibited Allowed
Operation Settings Allowed Allowed Prohibited Prohibited Prohibited
Keyboard Settings Allowed Allowed Prohibited Prohibited Prohibited
Device Control Allowed Allowed Prohibited Prohibited Prohibited
Machine Identification Settings Allowed Allowed Prohibited Prohibited Prohibited
Clock Allowed Allowed Prohibited Prohibited Prohibited
Product Key Allowed Allowed Prohibited Prohibited Prohibited
Custom Link Setting Allowed Allowed Prohibited Prohibited Prohibited
Network Settings Allowed Allowed Prohibited Prohibited Prohibited
Security Settings Allowed Allowed Prohibited Prohibited Prohibited
Energy Save Allowed Allowed Prohibited Prohibited Prohibited
System Control Allowed Allowed Prohibited Prohibited Prohibited
Image Quality Adjustment Allowed Allowed Prohibited Prohibited Prohibited
Operation Manual Download Allowed Allowed Allowed Allowed Allowed
Shortcut Page Setting Allowed Allowed Prohibited Prohibited Prohibited
Depending on the machine specifications and peripheral devices installed, it may not be possible to use some settings.
Item Description

7-74
SYSTEM SETTINGS►USER CONTROL
Favorite Operation Group
Favorite Operation Group ListThe preferred operation environment can be set for each group. For example, a user who speaks a different language would normally have to change the display language each time he or she uses the machine; however, by registering the language in a favorite operation group in advance, the language is automatically selected when the user logs in.
Adding/editing a groupTap the [Add] key to display the favorite operation group registration screen.Tap a group name to display the registration screen for that favorite operation group. You can edit the group in this screen.
Settings
• Depending on the machine specifications and peripheral devices installed, it may not be possible to use some settings.
• This setting can only be configured in Setting mode (Web version). It cannot be configured in the touch panel of the machine.
Item Description
Group Name Store a name of group (up to 32 characters).
Select the Group Name to be the Registration Model
Select one of the previously stored groups for use as a template for the new group. When selected, the settings of this group are applied.
Copy
Initial Status SettingsSelect settings for Image Orientation, Paper Tray, Exposure Type, Copy Ratio, 2-Sided, Original Binding, Output Binding, Output, Offset, and Separator Page.
Image Send
Initial Status SettingsSelect settings for Image Orientation, Exposure, Resolution, Color Mode, File Format, and Original Image Type. Select settings for Specified Pages per File, and Fax Sender Name.
Document Filing
Image Orientation Specify the image orientation.
Initial Status Settings Select settings for Color Mode, Exposure, Original Image Type, and Resolution.
System Settings
Enlarge Display Mode Turn this option ON to display large characters on the Setting mode screen.
AB/Inch Type SettingThe numbers and units of the default settings and input ranges that appear in the setting screens can be switched between inches and AB sizes.
Cancel Detection at Document Glass
Original size detection on the document glass can be disabled. When this is done, all originals placed on the document glass are treated as special size originals.
Language Setting Select the display language.
Switch the Number of Sets to be Displayed for Job Status
Select whether to display the number of progress sets or remaining sets as the job status.
Key Operation Setting Set the key input time and Auto Key Repeat setting.
Time for Accepting Key Entry of Long Touch
Select a time when a long key touch is detected.
Double Tap Interval Setting Select an interval when a double tap is detected.
Keys Touch Sound Set the sound made when keys are touched.

7-75
SYSTEM SETTINGS►USER CONTROL
Returning a favorite operation group to "Unlimited"To return a selected favorite operation group to the factory default state, select the checkbox ( ) to the left of "No." and tap the [Return to the Defaults] key.
Favorite Key ListAssign shortcut keys to frequently used functions.They will be displayed in the base screen of each mode.
Settings
Keyboard Select Set the language that appears on the keyboard.
MFP Display Pattern Setting Select the color pattern used in the touch panel.
Automatically print stored jobs after login
When retention is enabled in the printer driver and print data has been spooled to the machine, the spooled print data is automatically printed out when the user who enabled retention logs in.
Favorite Key SettingSelect to use System Settings or use the registered Favorite key settings for performing Favorite Key Setting.
Home Screen SettingsSelect to use System Settings or use the stored home screen settings for performing Home Screen Settings.
Preview Setting: Default List/Thumbnail Display
Fax/I-Fax Reception DataSelect whether the default display format of the received fax/I-Fax list screen is list or thumbnails.
File Retrieve of Main Folder/Quick File Folder
Select whether the default display format of the document filing main folder and temporary folder screens is list or thumbnails.
File Retrieve of Custom FolderSelect whether the default display format of the document filing custom folder screen is list or thumbnails.
File Retrieve of Direct PrintSelect whether the default state of the file list screen for direct print shows the folders as a list or as thumbnails.
Item Description
Key NameEnter a maximum of 20 characters for the favorite key name.(Up to 20 full-width characters can be entered, but only 10 will be shown on the key.)
Function Menu/Program/Others
Select the function that you wish to assign to the favorite key. The functions that can be selected vary by mode.
No Display Enable this setting to not show favorite keys.
Item Description

7-76
SYSTEM SETTINGS►USER CONTROL
Home Screen ListHome screen settings must be previously stored. Select a home screen when registering Favorite Operation Group List.
User CountThis displays the total number of pages printed by each user.
• [Select All] keyThis selects all users.
• [Clear Checked] keyThis clears all selections.
• [Show] keyThis shows the counts of the selected user.
• [Clear Count] keyUse this to reset the counts of the selected user.
• User ListThis shows the users stored as factory default and the currently stored users. When you select a user name, the user is selected.
View User CountWhen you select a user and tap the [Show] key, this user count is displayed.
Item Description
Name Enter a maximum of 32 characters for the home screen name.
Select the Group Name to be the Registration Model
Select one of the previously stored home screens as a template for the new home screen. When selected, the settings of this home screen are applied.
Change Home Screen Name Enter a home screen name to change the existing name.
Template Select a layout pattern of the registered key.
Key Layout of the Screen The layout of the keys in the home screen is displayed.
Change Text Color On Home Screen
Set the color of the text in the scroll area, fixed area, and clock.
Home Button Registers the function to use for the selected key number.
Fix KeyRegisters the function to use for the selected key number. This button is displayed on all pages of the home screen.
Display Toner Quantity Select this to display the toner level in the fixed area.
Item Description
Next Displays the next user (in the order of the registration numbers).
Previous Displays the previous user (in the order of the registration numbers).
Show CountsDisplays the counts and the number of pages remaining of the selected user for each function.
Page Limit The page limit set for the user appears in parentheses below the count.
If peripheral devices are not mounted, their count is not displayed.

7-77
SYSTEM SETTINGS►USER CONTROL
Resetting user countsSelect a user in the setting screen and tap the [Clear Count] key. A count reset screen for that user will appear.The reset screen will vary depending on whether a single user or multiple users were selected. The items displayed in each case are described in the table below.
When a single user is selected
When multiple users are selected
Save User CountClicking the [Save] button saves the user count information as a data file.To delete the user count information in the machine, click the checkbox next to the "Save and Delete the Data" so that it is selected and click the [Save] button.
Item Description
Next Displays the next user (in the order of the registration numbers).
Previous Displays the previous user (in the order of the registration numbers).
Show CountsDisplays the counts and the number of pages remaining of the selected user for each function.
Clear Count Reset the count of the selected item to "0".
Clear All Count Clears all counts of the selected user to zero (0).
Item Description
Show CountsDisplays the counts and the number of pages remaining of the selected user for each function.
Clear Count Reset the count of the selected item to "0".
Clear All Count Clears all counts of the selected user to zero (0).
This setting can only be configured in Setting mode (Web version). It cannot be configured in the touch panel of the machine.

7-78
SYSTEM SETTINGS►USER CONTROL
Billing Code Setting
Administration SettingsChange the billing code setting.
Use Billing CodeSwitch whether to enable or disable a billing code.
Default Code SettingA use code is automatically assigned when no billing code is entered. Specify the code using up to 32 single-byte characters.
Remember Billing Code Between ModesIf this function is enabled, the billing code entry window is not displayed at the time of mode transition.
Disable Change of Billing CodeIf this function is enabled, you cannot register, edit, or delete a billing code.In addition, you cannot directly type in a billing code in the billing code entry window.
Apply Default Code when Billing Code not enteredIf this function is enabled, a use code is always set while you are logging in with device account.
Disable Billing Code for Selected ApplicationsThe billing code entry window is displayed when the external application that is set to enable is started.The following settings can be configured.• Application Name registered as Standard Application
Billing Code Display Name SettingYou can change the main code or sub code name displayed in the billing code entry window or billing code selection window.
Main Code ListYou can display a list of main codes to search for, register, correct, or delete a main code.• [Search] key
Searches for a main code.• [Add] key
Adds a new main code.• List
Displays a list of registered main codes. Selecting each main code displays the window to correct the main code.• [Delete] key
Set the check box on the left of each main code to , then tap the [Delete] key; the selected main code is deleted.
Register a main codeWhen you tap the [Add] key, the registration screen appears. A total of up to 2,000 main and sub codes can be registered.For information on the settings, see "Settings (page 7-79)".After the setting has been completed, tap the [Submit and Register Next] key; you can continuously register the next main code. To end the registration process, tap the [Submit] key.
Correct a main codeSelecting a main code from the list displays the window to correct the main code.For information on the settings, see "Settings (page 7-79)".After the setting has been completed, tap the [Submit] key; you can apply the corrected contents and complete processing.

7-79
SYSTEM SETTINGS►USER CONTROL
Search for a main codeEnter the main code and main code name, then tap the [Search] key; the search result is displayed.
Settings
Sub Code ListYou can display a list of sub codes to search for, register, correct, or delete a sub code.• [Search] key
Searches for a sub code.• [Add] key
Adds a new sub code.• List
Displays a list of registered sub codes. Selecting each sub code displays the window to correct the sub code.• [Delete] key
Set the check box on the left of each sub code to , then tap the [Delete] key; the selected sub code is deleted.
Register a sub codeWhen you tap the [Add] key, the registration screen appears. A total of up to 2,000 main and sub codes can be registered.For information on the settings, see "Settings (page 7-80)".After the setting has been completed, tap the [Next] key; you can continuously register the next sub code. To end the registration process, tap the [Submit] key.
Correct a sub codeSelecting a sub code from the list displays the window to correct the sub code.For information on the settings, see "Settings (page 7-80)".After the setting has been completed, tap the [Submit] key; you can apply the corrected contents and complete processing.
Item Description
Main Code Enter the main code. Specify the code using up to 32 single-byte characters.
Main Code NameEnter the main code. Specify the code name using up to 32 double- or single-byte characters.
Available to
The registered billing codes can only be shared in the specified group. When not specifying a public destination, select [All Users].When specifying a public destination, select [Designate Public Address.], then specify a group to share the billing code.
To register a group for specifying a public destinationIn "Settings (administrator)", select [User Control] → [Organization /Group List].

7-80
SYSTEM SETTINGS►USER CONTROL
Search for a sub codeEnter the sub code and sub code name, then tap the [Search] key; the search result is displayed.
Settings
Card Setting
Card Area SettingThe data check during card reading can be set.
Settings
Card Type / Card Reader SettingsUse these settings for authentication and for use of a HID or other IC card.
Settings
Item Description
Sub Code Enter the sub code. Specify the code using up to 32 single-byte characters.
Sub Code NameEnter the sub code. Specify the code name using up to 32 double- or single-byte characters.
Available to
The registered billing codes can only be shared in the specified group. When not specifying a public destination, select [All Users].When specifying a public destination, select [Designate Public Address.], then specify a group to share the billing code.
To register a group for specifying a public destinationIn "Settings (administrator)", select [User Control] → [Organization /Group List].
Item Description
Check System Code only in FeliCa User Area mode
Check the System Code only in FeliCa User Area mode.
Check Facility Code in HID mode Checks the facility code of a HID card.
Facility CodeEnters the facility code of a HID card. When you tap the [Store] key, the facility code is stored.
Importing from the setup fileWhen you enter the configuration file name and tap the [Execute] key, the card area settings are read from the configuration file. If you tap the [Clear] key, all files that match the current search conditions are deleted.
Item Description
Card Type / Card Reader Enter the card type and card reader information.

7-81
SYSTEM SETTINGS►SYSTEM SETTINGS
Home Screen SettingsYou can change the layout, icons, and background of the machine's home screen.
Condition Settings
IconUse this setting to register a key icon.
SYSTEM SETTINGS
Item Description
TemplateYou can change the layout of the keys by selecting a pattern saved in advance. The [Key Layout of the Screen] image changes as you make selections.
Change Text Color On Home Screen
Set the color of the text in the scroll area, fixed area, and clock.
Home Screen ListThe order of arrangement of the shortcut keys in the home screen is indicated by the "No.", and the displayed keys appear in the home button column. To edit the home buttons, click the Home Button item.
Fixed area listSet the keys (fixed keys) that appear in the fixed area below the home buttons. The order of arrangement of the keys is indicated by the "No.", and the keys appear in the fixed key column. To edit the fixed keys, click the Fix Key item.
Display Toner Quantity Select this to display the toner level in the fixed area.
Item Description
Icon list
Use this setting to register icons for home screen shortcut keys.The image files of shortcut key icons are registered in a list. To register an image, click an image file registered in "Name" or "Not Set". The icon registration screen appears. Register the desired image.Image formats that can be registered are JPEG, GIF, PNG (jpeg, jpg, jpe, jfif, gif, png).The maximum image file size that can be registered is 50 KB.
To configure this setting on the machine, insert the USB memory device that contains the image into the machine.

7-82
SYSTEM SETTINGS►SYSTEM SETTINGS
Background ImageUse this setting to register a background image.
Home Screen RegistrationYou can click a home button in the home screen list to change the settings of the home button.Select the function that you want to assign to the button. If you select [None], a home button will no longer appear in that location. To register a key name, select [Custom] and enter the name (maximum 28 characters).To change the image of a home button, register the desired icon in advance using [Icon], and then select the image with [Select File].
Item Description
Background image list
Image files such as a background images are registered in the registered image list.To register an image, click a name with a registered image or an unused name. The background image registration screen will appear. Register the desired image. The formats of images that can be registered are JPEG, GIF, and PNG (jpeg, jpg, jpe, jfif, gif, png).The maximum file size for a background image is 640 MB.
To configure this setting on the machine, insert the USB memory device that contains the image into the machine.

7-83
SYSTEM SETTINGS►SYSTEM SETTINGS
Copy Settings
Condition SettingsThe following settings are related to copying.Default settings selected with these settings apply to all functions of the machine (not just the copy function).
Add or Change Extra Preset RatiosAdd two enlargement preset ratio values (101% to 400%) and two reduction preset ratio values (25% to 99%).Also, you can change the preset ratio if necessary.
Setting a Maximum Number of CopiesThis is used to set the maximum number that can be entered for the number of copies (number of continuous copies). Any number from 1 to 9999 can be specified.
Initial Margin Shift SettingThis is used to set the default margin shift amount. Specify a value from 0" (0 mm) to 2" (50 mm) in increments of 1/8" (3 mm) for both the front and reverse sides.
Erase Width AdjustmentThis is used to set the default erase width for erase function. Specify a value from 0" (0 mm) to 1" (25 mm) in increments of 1/8" (3 mm) for both edge erase and center erase.
InitialN-Up SettingSet the default state for N-Up. Select the page layout for N-Up, whether or not borders are added, and if added, whether the borders are solid lines or dotted lines.
Card Shot SettingsThis is used to set the default original size for the card shot function. Specify a value from 1" (25 mm) to 8-1/2" (216 mm) in increments of 1/8" (3 mm) for both the X (horizontal) and Y (vertical) dimensions of the original.
Fit to PageEnable this setting to have the [Fit to Page] key always appear in the card shot screen.
LayoutSelect the direction the card for Card Shot from "Set Vertically" or "Set Horizontally".
Disabling of Registration/Deletion of ProgramThis is used to prohibit the deletion and change of copy settings stored in job programs.
Preset ratios other than added preset ratios cannot be changed.

7-84
SYSTEM SETTINGS►SYSTEM SETTINGS
Disabling of Bypass-Tray in Duplex CopyDisables the use of the bypass tray when making 2-sided copies.The bypass tray is often used to feed label sheets, transparency film, and other special media for which 2-sided copying is prohibited. If a sheet of one of these special media enters the reversing unit, a misfeed or damage to the unit may result. If special media for which 2-sided copying is prohibited is often used, it is recommended that you enable this setting.
Disabling of Auto Paper SelectionDisables the Auto Paper Selection function.When this setting is enabled, automatic selection of paper that is the same size as the original on the document glass or in the automatic document feeder does not take place.
Auto Selection Setting of Tray that is Supplied the PaperWhen this setting is enabled and paper is loaded into a tray while the machine is on standby in copy mode, that tray is automatically selected.
Disabling Registration of Custom ImageDisables storage of a custom image.
Disabling sending while copyingDisables the Image Send function during copy.
High Quality Scan from Document FeederThe resolution for copying using the automatic document feeder can be changed from 600 x 400 dpi to 600 x 600 dpi (high quality mode).When high quality mode is used, fine print and thin lines are reproduced with greater clarity, however, the scanning speed is slower.
Quick Scan from Document GlassThe resolution for copying using the document glass can be changed from 600 x 600 dpi to 600 x 400 dpi (high speed mode).When high speed mode is selected, the first copy time is quicker, however, the copy image is not as clear.
Auto Clear Before Copy Execution AlsoEnables the Auto Clear function during copy even when a copy job is not completed. This protects the machine from being held due to the incomplete copy job.
When high quality mode is not selected, the following conditions must be satisfied in order to scan at 600 x 400 dpi and attain the fastest speed.
• The copy ratio must be set to 100%.
• Do not select a special mode that will change the ratio.
• [Copy of Copy] must not be enabled.
When high quality mode is not selected, the following conditions must be satisfied in order to scan at 600 x 400 dpi and attain the fastest speed.
• The copy ratio must be set to 100%.
• Do not select a special mode that will change the ratio.
• [Copy of Copy] must not be enabled.

7-85
SYSTEM SETTINGS►SYSTEM SETTINGS
Initial Status SettingsThe following settings are related to copying.Initial Status Settings selected with these settings apply to all functions of the machine (not just the copy function). The copier settings are reset to the initial state when the [Power] button is turned on, when the [CA] key is tapped, or when the auto clear interval has elapsed. These settings are used to change the default settings for copy mode.The following settings can be changed:
Text /Image Printing
Text Settings (Stamp)You can add fixed text used in the [Stamp] in [Others] of copying.
Custom StampYou can set an image to be used in [Custom Stamp] in [Custom Image] of [Others] for copying.
Custom WatermarkYou can set an image to be used in [Custom Watermark] in [Custom Image] of [Others] for copying.
Item Description
Image Orientation Specify the original orientation.
Paper Tray Specify the paper tray that is selected by default.
Exposure Type Configure default exposure mode settings.
Copy Ratio Specify the copy ratio that is selected by default.
2-Sided Copy
Configure the 2-sided mode settings that are selected by default. If this setting is used to change the default setting for the duplex function to any setting other than "1-Side to 1-Side" and the duplex function or automatic document feeder fails or is disabled, the setting will revert to "1-Side to 1-Side".
Original Binding Set the original binding in 2-Sided copy.
Output Binding Set the output binding in 2-Sided copy.
Output Set the print output method that are selected by default.
Staple Configure staple settings
Separator PageSeparator pages can be inserted before or after jobs. Set the paper tray used for the separator pages.
Factory defaults This returns all items to the factory default settings.

7-86
SYSTEM SETTINGS►SYSTEM SETTINGS
Printer SettingsSettings related to the printer function can be configured.
Condition SettingsPrinter condition settings are described below.
Prohibit Notice Page PrintingDisables to print a notice page.
Prohibit Test Page PrintingDisables to print the test page.When this setting is enabled, [Status] → [Data List] → [List for User] → [Printer Test Page] in "Settings" cannot be used to print test pages.
A4/Letter Size Auto ChangeWhen printing an 8-1/2" x 11" (letter) size image, this setting allows A4 size paper to be used if 8-1/2" x 11" size paper is not loaded.
Bypass Tray Settings
Enable Detected Paper Size in Bypass TrayThis is used to prohibit printing when the paper size specified for a print job is different from the paper size inserted in the bypass tray.
Enable Selected Paper Type in Bypass TrayThis is used to prohibit printing when the paper size specified for a print job is different from the paper size inserted in the bypass tray.
Exclude Bypass-Tray from Auto Paper SelectWhen [Auto] is selected for paper type selection, the bypass tray is excluded from the trays that can be selected. This is recommended when special paper is often placed in the bypass tray.
Job Spool QueuingWhen this function is enabled, received print jobs are displayed in the spool queue of the job status screen. The jobs are moved to the job queue after they have been analyzed by the machine.Multiple jobs that have not yet been analyzed appear in the spool queue.When this function is disabled, received print jobs are displayed in the job queue instead of being displayed in the spool queue. However, when an encrypted PDF job is printed, the job appears in the spool queue.
Disabling of USB Memory Direct PrintDisables the function for directly printing of a file in a USB memory device.
Disabling of Network Folder Direct PrintDisables the direct printing from a network folder.
Disabling sending while printingDisables the Image Send function during printing.

7-87
SYSTEM SETTINGS►SYSTEM SETTINGS
Interface SettingsSettings related to the printer function can be configured. These settings are used to control and monitor data transmitted to the USB port or network port of the machine.
Hexadecimal Dump ModeThis function is used to print the print data from a computer in hexadecimal format together with the corresponding ASCII text. This mode allows you to check whether or not print data from the PC is being transmitted to the printer correctly.Example of a hexadecimal dump
I/O TimeoutThe I/O timeout can be set to any number of seconds from 1 to 999.The I/O timeout function temporarily breaks the connection if the set duration of time elapses without any data being received by the port. After the connection is broken, the port is set to auto selection or the next print job is begun.
Enable Network PortEnables printing from the network port.
Network Port Emulation SwitchingThis setting is used to select the emulated printer language when the machine is connected by a network port.The following settings can be configured.• Auto• PostScript• PCL
Port Switching MethodSelects when port switching takes place.
Switch at End of JobThe port changes to auto selection when printing ends.
Switch after I/O TimeoutWhen the time set in "I/O Timeout" elapses, the port changes to Auto Selection.
Unless printer errors occur frequently, it is recommended that you use the factory default setting "Auto".

7-88
SYSTEM SETTINGS►SYSTEM SETTINGS
Initial Status SettingsIf you print data in an environment where the printer driver is not used (that is, if you print data using the MS-DOS system or if you print data using the PC that does not have the provided printer driver installed), set the detailed printing conditions. (However, the "Disable Blank Page Print" function will be effective even when the PCL printer driver is used.)
Settings
*1 Paper sizes that can be used with this function are 8-1/2" x 14", 8-1/2" x 11", and A4. (This function may not take effect with some print methods.)
*2 Can be selected when 2-Up is selected.*3 Can be selected when 4-Up/8-Up is selected.*4 Only effective when printing PDF, JPEG, and TIFF files.*5 When the inner finisher is installed.
Setup Items Description
Copies 1 - 9999 sets
Orientation• Portrait• Landscape
Paper Size Set the default paper size.
Output Tray Set the default delivery tray.
Paper Type Set the default paper type.
Resolution Setting• 600dpi• 600dpi (High Quality)
Disable Blank Page Print• (Enabled)• (Disabled)
2-Sided Print• 1-Sided• 2-Sided(Book)• 2-Sided(Tablet)
N-Up Print*1
• 1-Up• 2-Up• 4-Up• 8-Up
Layout• Left to Right*2
• Right to Left*2
• Right, and Down*3
• Down, and Right*3
• Left, and Down*3
• Down, and Left*3
Fit To Page*4 • (Use Fit to Page)• (Do not use Fit to Page)
Output• (Use Print per Unit)• (Do not use Print per Unit)• Staple Sort*5: None, 1 Staple
Separator Page• Insert Before Job Paper Tray• Insert After Job Paper Tray
Quick File• (Disabled)• (Enabled)

7-89
SYSTEM SETTINGS►SYSTEM SETTINGS
PCL SettingsThis is used to set the symbol sets, fonts, and line feed code used in a PCL environment.
Settings
PostScript SettingsWhen an error occurs during PostScript printing, these settings determine whether or not an error notice is printed and whether or not the PostScript data is received in binary format.
OOXML SettingsTo print an Excel file by direct print, select a sheet (with the part to be printed selected) or the entire book.
Print Release SettingsSelect this option to use the E-mail printing. For detailed information, see "Print Release Settings Guide".
E-mail Print SettingsSelect this option to use the E-mail printing.
Setup Items Settings Setting
PCL Symbol Set Setting Specify the symbol set used for printing. • Select from 35 items.
PCL Font Setting Select a font used for printing.
• Internal Font• Extended Font• (List of internal fonts when
extended fonts are not installed.)
PCL Line Feed CodeThis setting is used to select how the printer responds when a line feed command is received.
• 0.CR=CR; LF=LF; FF=FF• 1.CR=CR+LF;
LF=LF;FF=FF• 2.CR=CR; LF=CR+LF;
FF=CR+FF• 3.CR=CR+LF; LF=CR+LF;
FF=CR+FF
Wide A4When this is enabled, 80 characters per line are printed on the 8-1/2" x 11" (A4) size paper using a 10-pitch font. (When this setting is disabled, up to 78 characters are printed per line.)
• (Enabled)• (Disabled)
Setup Items Settings Setting
Screen Settings Configure image settings for PostScript.
Standard, Text/Photo, Text, Photo, Dot (High Line Number), Dot (Low Line Number)
Print PS ErrorsWhen a PS (PostScript) error occurs during PostScript printing, this setting determines whether or not an error notice is printed.
(Enabled)(Disabled)
Binary Processing Configure image settings for PostScript.(Enabled)(Disabled)

7-90
SYSTEM SETTINGS►SYSTEM SETTINGS
E-mail PrintSet whether or not E-mail print is performed.
POP3 ServerSet the POP3 server used for E-mail.
Port NumberSet the port number of the E-mail server.
POP AuthenticationSet this to perform POP authentication for E-mail.
User NameSet the E-mail user name.
PasswordSet the password used for E-mail.
Check IntervalSet the automatic e-mail check frequency (polling interval).
Enable SSLUse when SSL is used.
Direct Print Settings (FTP)Configure these settings if you will be printing files on an FTP server by direct print.A list of available FTP servers is shown. To add an FTP server, click the [Add] button and configure the settings.
FTP Server RegistrationConfigure FTP server settings.
NameSet the name to be used for direct print.
FTP ServerSet the name of the FTP server.
DirectorySet the directory of the FTP server that has the files.

7-91
SYSTEM SETTINGS►SYSTEM SETTINGS
User NameSet the user name used to log in to the FTP server.
PasswordSet the password used to log in to the FTP server.
Enable SSLSet to enable SSL.
Use PASV modeSet to use PASV mode.
Direct Print Settings (Network Folder)Configure these settings if you will be printing files on a network folder by direct print.A list of available network folders is shown. To add a network folder, click the [Add] button and configure the settings.
Registration of Network FolderConfigure network folder settings.
NameSet the name to be used for direct print.
Folder PathSet the folder path that has the files.
User NameSet the user name used to log in to the network folder.
PasswordSet the password used to log in to the network folder.
Print Setting from PC/Mobile TerminalConfigure these settings to print files on a computer or mobile terminal by direct print.
FTP PrintSpecify whether or not FTP print settings are used for direct print.
Port NumberEnter the port number used for direct print.

7-92
SYSTEM SETTINGS►SYSTEM SETTINGS
Image Send Settings
Common SettingsSettings related to the image send function (E-mail, Internet fax, etc.) can be configured.
The operation settings below apply to all image send functions.
Condition Settings
Hold settings for a while after scanning has been completedUse this setting to hold the settings after scanning is completed (until Auto Clear Mode activates).
Job Auto Start Time During ScanningSet the time at which transmission is automatically started even if the original is still being scanned.
Default Display SettingWhen resending by document filing or recalling by saved program settings that do not include an address, select from the following 6 types of base screens that appear.• E-Mail• Network Folder• FTP/Desktop• Internet Fax• Fax• Data Entry
Address Book Default SelectionHigher priority is given to the display of address book.If image send mode is enabled, the Address Book is displayed in place of the initial screen of this mode.
Apply Addresses of Sending Modes OnlyWhen an address is selected from the address book, only the addresses displayed in narrowing mode are applied.
Category Displayed as DefaultSelect a category to be displayed with the default.• None• Frequent Use• Categories 1 to 32
Display all address type regardless of the mode being displayed currently.Displays all destinations regardless of the displayed mode when this setting is enabled.
Enlarge Address BookAn enlarged address book list appears.
Image OrientationSets the default image orientation.
For an explanation of settings related to the fax function, see "Image Send Settings (page 7-174)"
In "Settings", if a default address has been configured by selecting [System Settings] → [Image Send Settings] → [Scan Settings] → [Default Address] → [Default Address Setting], the [Higher priority is given to the display of address book.] function cannot be used.

7-93
SYSTEM SETTINGS►SYSTEM SETTINGS
Preview Setting
Received Data Image Check SettingSelect whether or not a preview of received faxes and Internet faxes is shown. This is displayed when a facsimile expansion kit or Internet fax expansion kit is installed.
Default List/Thumbnail DisplayFax/I-Fax Reception Data: Select whether the default display format of the received fax/I-Fax list screen is list or
thumbnails.
Default Exposure SettingsThis is used to set the default exposure settings for scanning a document in image send mode. Select [Auto] or [Manual]. If you select [Manual], set the exposure to one of 5 levels.
Default Original Image TypeSelect the original type beforehand to enable scanning at a resolution suitable for the original (only in scan mode and USB memory device scan mode).The following settings can be configured. • Text/Printed Photo• Text/Photo• Text• Photo• Printed Photo• Map
Sending the same image sent in Fax modeThis is used to enable or disable the default setting. Enable this when sending by broadcast transmission in Fax and other modes and you want to send the same image in all modes. If this function is disabled, an image specified with each Scan Setting is sent to E-mail, FTP, Desktop, and Network Folder. When an Internet Fax address is included in the addresses, the same image is sent regardless of this setting.
Be sure to press Next Address Key ([+]) before selecting the next address.Set whether or not the Next Address ([+]) key must be pressed before an address is added for a multi-address job such as broadcast transmission.
Scan Complete Sound SettingSets the scan complete sound to be heard when an original is scanned.
Disable Switching of Display OrderDisables to change the order of display (search number order, ascending, descending).Once set, the display sequence is not changed. The display order will remain fixed at the order that is in effect when this setting is enabled.
Hold Setting for Received Data PrintThis function holds received faxes and Internet faxes in memory without printing them. The faxes can be printed by entering a password (factory default setting: 0000) with the numeric keys. PasswordWhen [Hold Setting for Received Data Print] is enabled, enter the password (4-digit number).
When the exposure is set to [Auto], a default original type cannot be selected.
These settings can only be configured when there is no received data in the machine memory (excluding data in a confidential or relay broadcast memory box).

7-94
SYSTEM SETTINGS►SYSTEM SETTINGS
Erase Width AdjustmentThis is used to set the default erase width for erase function. Specify a value from 0" (0 mm) to 1" (25 mm) in increments of 1/8" (3 mm) for both edge erase and center erase.
Time Specified Output of Received DataThis function is available when the Received Data Image Check Setting is enabled. * This is displayed when a facsimile expansion kit or Internet fax expansion kit is installed.If "Time Specified Output of Received Data" is set to , this setting is grayed out.If "Change Password" or "Hold Setting for Received Data Print" is set to , the password entry field is grayed out.
Enable/Disable Settings
Settings to Disable RegistrationStoring from the machine, storing from Setting mode (Web version), and storing from the PC can each be separately prohibited.
Disable Registering Destination from Operation PanelDisables address control from the machine.Configure the setting for each of the following items:• Group (Direct Entry)• Group (Address Book)
Select All: Selects all items.Clear Checked: Clears all selections.
Disable Registering Destination on Web PageDisables to store the destination from Setting mode (Web version).Configure the setting for each of the following items:• Group (Direct Entry)• Group (Address Book)• Contacts
Select All: Selects all items.Clear Checked: Clears all selections.
Disable Registration/Delection of All Program ItemsThis is used to prohibit the deletion and changing of image send settings stored in job programs.
Disable Registration of Memory BoxDisables all types of memory box registration.Configure the setting for each of the following items:Polling Memory, Confidential, Relay Broadcast (Direct Entry), Relay Broadcast (Address Book)
Disable Destination Registration Using Global Address SearchThis disables address control from the global address search.Configure the setting for each of the following items:E-mail, Internet Fax, Fax
Disable Registration Using Network Scanner ToolThis disables address control from the Network Scanner Tools.Use this option to suppress to store data of another machine through Inbound Routing of address book.
Disabling of Forwarding via NetworkThis prohibits inbound routing.

7-95
SYSTEM SETTINGS►SYSTEM SETTINGS
Settings to Disable TransmissionThese settings are used to disable the following transmission operations.
Disable [Resend] on Fax/Image Send ModeThis setting disables the [Resend] key in the base screen of image send mode.
Disable Selection from Address BookDisables the selection of destinations from the address book.Even if [Disable Selection from Address Book] is set, an address that was selected from the address book and sent to can be selected from the transmission history.Configure the setting for each of the following items:• E-Mail• FTP• Desktop• Network Folder• Internet Fax (Including Direct SMTP)• Fax
Select All: Selects all items.Clear Checked: Clears all selections.
Disable Direct EntryDisables the direct entry of destination address and others.Even if [Disable Direct Entry] is set, an address that was selected from the address book and sent to can be selected from the transmission history.Configure the setting for each of the following items:• E-Mail• Network Folder• Internet Fax (Including Direct SMTP)• Fax
Select All: Selects all items.Clear Checked: Clears all selections.
Disabling of PC ScanThis prohibits PC Scan transmission.
Disable Storing to External Memory DeviceDisables to store to the external memory device.
Disable PC-I-Fax TransmissionThis prohibits PC-I-Fax transmission.
Disable PC-Fax TransmissionThis prohibits PC-Fax transmission.
Disabling of Find My AddressThis prohibits Find My Address.
Own Name and Destination SetStores the Internet-Fax or Fax sender information.
Sender Data RegistrationUse this to store the sender name for fax and Internet fax, the sender fax number, and the sender address for Internet fax. The stored sender name and sender fax number or Internet sender address will be printed at the top of the received fax. Sender NameEnter the sender name. A maximum of 20 characters can be entered for the sender name. Sender Fax NumberSets the sender fax number.To insert a pause between digits of the number, tap the [-] key.To insert a space between digits of the number, tap the [Space] key. I-Fax Own AddressEnter a default sender address (maximum of 56 characters).

7-96
SYSTEM SETTINGS►SYSTEM SETTINGS
Registration of Own Name SelectStores the sender name used in "Own Name Select " of another function. Up to 18 sender names can be stored. Add NewStore a sender name. A maximum of 20 characters can be stored. After entering a sender name, tap the [Store] key.The lowest unused registration number from 01 to 18 will be automatically assigned to the sender name. This number cannot be changed. Sender Name ListDisplays a list of stored sender names.When you select a sender name, it is deleted.
Scan SettingsSettings related to the image send function (E-Mail, FTP/Desktop, etc.) can be configured.
Initial Status SettingsThe following settings are related to the scanner.
Default Color Mode SettingsSelect a default color mode setting for both color and black & white in e-mail address, network folder, FTP and Desktop. Specify "Scanner Common" unless E-mail is specified. SettingsAuto (Mono2, Grayscale*), Full Color, Grayscale, Mono2 * When scanning a black and white original with the color mode set to [Auto] Disable Change of B/W Setting in Auto Mode: Disables black & white settings from the base screen when the color
mode is set to Auto.
Initial File Format SettingSpecify the initial file format for sending a file in E-mail, Network Folder, FTP, or Desktop mode. Specify "Scanner Common" unless E-mail is specified. PDF, PDF/A-1a, PDF/A-1b, TIFF, JPEG*1, Compact PDF*2, Compact PDF (Ultra Fine)*2, Compact PDF/A-1a*3, Compact PDF/A-1a (Ultra Fine)*3, Compact PDF/A-1b*4, Compact PDF/A-1b (Ultra Fine)*4, Encrypt PDF, Encry./Compact PDF*5, Encrypt/Compact PDF (Ultra Fine)*5, XPS, RTF, TXT(UTF-8), DOCX, XLSX, PPTX, *1 When [Black & White] is selected, the format is [TIFF].*2 When [Black & White] is selected, the format is [PDF].*3 When [Black & White] is selected, the format is [PDF/A-1a].*4 When [Black & White] is selected, the format is [PDF/A-1b].*5 When [Black & White] is selected, the format is [Encrypt PDF].OCRWhen the file format is PDF, characters in a scanned image are recognized and added to the PDF as text information.Black & WhiteCompression Mode: None, MH (G3), MMR (G4) Color/GrayscaleData compression ratio: Low, Medium, High.Bk Letter EmphasisSpecified Pages per FileGenerates a separate file for each scanned page when multiple pages are scanned.If this setting is enabled, a number of pages per file can be specified. OCR SettingConfigure the settings that are required for OCR.
For an explanation of settings related to the fax function, see "Image Send Settings (page 7-174)"

7-97
SYSTEM SETTINGS►SYSTEM SETTINGS
FontSet the font used for each recognized character language.Detect Image DirectionThe orientation of the scanned original is automatically detected.File Name ExtractionExtract the file name.Specified Pages per FileGenerates a separate file for each scanned page when multiple pages are scanned.If this setting is enabled, a number of pages per file can be specified.
Page No.Any number of pages can be specified as the number of pages per file. This setting can be used if [Specified Pages per File] is enabled.
Easy Scan SettingsSet the default color mode for Easy Scan.Set [Color] for when the Color Start key is tapped, and [Black & White] for when the B/W Start key is tapped.
Resolution SettingThe following settings are available for the default resolutions of common scan, E-mail, Internet fax, and fax mode.Scanner Common100 X 100 dpi, 150 X 150 dpi, 200 X 200 dpi,300 X 300 dpi, 400 X 400 dpi, 600 X 600 dpiE-mail100 X 100 dpi, 150 X 150 dpi, 200 X 200 dpi,300 X 300 dpi, 400 X 400 dpi, 600 X 600 dpi
Condition Settings
Default Reply.Address SetThe information stored here is used if you do not specify [Reply to] in the send settings when performing Scan to E-mail.
PDF Compression OptionsFlate CompressionWhen sending a PDF file, you can compress the file by Flate Compression to reduce the file size.
Compression Mode at BroadcastingSelects the compression mode for broadcasting using Scan to E-mail or Internet fax. The compression mode set here is used for all destinations regardless of their individual compression mode settings. Black & WhiteMH (G3), MMR (G4) Color/GrayscaleLow, Medium, HighBk Letter Emphasis
When [JPEG] is selected for the file type, [Specified Pages per File] cannot be selected.
Setup Items Setting
ColorAutoFull Color
Black & WhiteGrayscaleMono2

7-98
SYSTEM SETTINGS►SYSTEM SETTINGS
Send Destination Link SettingsEnable this to send only the URL of scanned data to the destination.Enable Send Destination Link as DefaultEnable this to always send only the URL of scanned data to the destination. When this function is enabled and you are in simple mode, only the URL is sent to the e-mail address. When normal mode is used, the [Send Destination Link] checkbox is always in the action panel that appears in the home screen of Scan to E-mail.File Retention PeriodSet the save period for scanned data saved in the machine when sending only the URL to the destination. When this period elapses, the files are automatically deleted.Enable SSLUse this to protect files using SSL transmission.
Maximum Size of E-mail Attachments(E-Mail)To prevent the transmission of excessively large image files by Scan to E-mail, a file size limit can be set from 1 MB to 10 MB in increments of 1 MB. If the total size of the image files created by scanning the original exceeds the limit, the image files are discarded.If you do not wish to set a limit, select [Unlimited].
If the E-mail attachment(s) exceed maximum size, it will be sent in multiple files.If an E-mail attachment exceeds the maximum size, it will be sent in multiple files. If one of the divided files exceeds the maximum size, it will be sent with the resolution automatically lowered.When sending files in JPEG format, only one file is attached to one e-mail, regardless of the file size.If a file scanned in TXT(UTF-8), RTF, DOCX, XLSX, or PPTX format exceeds the file size limit, the file will be discarded without being sent even if this setting is selected.
Maximum Size of Data Attachments(FTP/Desktop/Network Folder) A limit can be set for the size of files that can be sent by Scan to FTP, Scan to Desktop, and Scan to Network Folder. Limits that can be selected are 50 MB, 150 MB, and 300 MB. If the total size of the image files created by scanning the original exceeds the limit, the image files are discarded.If you do not wish to set a limit, select [Unlimited].
Bcc SettingEnable BccEnable this setting if you wish to use Bcc delivery. Displays the [Bcc] key on the image send address book screen. Display Bcc Address on the Job Status ScreenDisplays Bcc addresses on the job status screen and address list tab.
This setting is linked to "Maximum Size of E-mail Attachments (page 7-103)" of the Internet fax settings.
• When a file scanned to a format other than TXT(UTF-8), RTF, DOCX, XLSX, or PPTX exceeds the size limit, this function reduces the data size below the limit by lowering the resolution or other means, and thereby enables sending without canceling the data.
• When Multicrop, Image Crop, Send Destination Link and Card Shot are used, the scanned data is not divided.
• If the e-mail exceeds the set size limit, a send error occurs.
During broadcasting that includes both e-mail and Internet fax destinations, the limit set in "Maximum Size of E-mail Attachments(E-Mail) (page 7-98) " precedes.

7-99
SYSTEM SETTINGS►SYSTEM SETTINGS
Auto Scan SettingConfigure auto scan setting.Set Image Orientation AutomaticallyThe orientation of placed originals can be automatically detected. Set whether the original is scanned by one-sided scanning or two-sided scanning.Set Resolution AutomaticallyYou can have the machine automatically set the resolution.Blank Page SkipSet whether or not blank original pages are automatically skipped during scanning.
Disable Scan FunctionSpecify this to disable remote PC scanning and storing to external memory device.
Default Address
Default Address SettingA default address can be stored that makes it possible to transmit by simply pressing the [Color Start] key or the [B/W Start] key without specifying an address. If [Apply E-mail address of the user for login.] is selected, the E-mail address ofthe login user is set as the default destination. When [Apply Home Directory of The User for Login] is selected, thedefault address is the home directory of the user that logged in.When the user logs in by internal authentication (authentication by the machine), the home directory setting of the userthat logged in is configured in "User Registration" in "User List" in "User Control". When the user logs in by externalauthentication (network authentication), the home directory setting is configured in "Global Address Book Settings" in"LDAP Settings" in "Network Settings".
Add SelectedSelect an address that is to be used by default.
Apply E-mail address of the user for login.The E-mail address of the login user is set as the default address.Select [Allow cancel of the first entered address] based on your intended use.
Apply Home Directory of The User for LoginThe home directory of the login user is set as the default address.Select [Allow cancel of the first entered address] based on your intended use.
Allow cancel of the first entered addressYou can cancel the E-mail address of the login user that is entered automatically. To cancel, tap the [x] button next to the address entry field.When this setting is disabled, selection of an address other than the entered default address is prohibited.
Select From Address Book• To display your desired address book, narrow the search by alphabet or category with the list of [Index]. You can
select the number of addresses that are to be displayed at a time with [Display Items].• When you select the desired address name and tap the [Store] key, the selected address can be selected for the
default address.
Only a single default address can be set for Scan to E-mail, Scan to FTP, Scan to Desktop, and Scan to Network Folder.
If an e-mail address is not set for the logged-in user, scanner transmission cannot be used.

7-100
SYSTEM SETTINGS►SYSTEM SETTINGS
Administration Settings
Advanced SettingsDisable Selection of Reply-to.Prohibit select of transmission destinations.
File NamingYou can select the information included in the name of scanned files.Unit Serial NumberYou can add the machine's serial number to the file name.TextYou can add any text to the file name. (Up to 64 characters)Sender NameYou can add the sender's name to the file name.Date & TimeYou can add the date and time of transmission to the file name.Session Page CounterYou can add counter information to the file name.Unique IdentifierAn ID number can be created for each file and added to the file name.Note: To prevent duplicate file names, select Date or Unique Identifier.
Default SubjectSet a maximum of 80 full-width/half-width characters for the default subject for E-mail and Internet Fax transmission.
Add Job Information Automatically to the Mail Message BodyYou can automatically add job information to the body message of e-mail.
Add a Footer Automatically to the Mail Message BodyYou can add any text as a footer to the body message of e-mail.
Mail Footer RegistrationWhen [Add a Footer Automatically to the Mail Message Body] is enabled, set a maximum of 900 full-width/half-width characters for the footer.
Subject Name SettingsYou can save a preset subject for transmitted files. Click the [Add] key and set a maximum of 80 full-width/half-width characters for the subject.
File Name SettingsYou can save a preset file name for transmitted files. Click the [Add] key and set a maximum of 80 full-width/half-width characters for the file name.
Message Body SettingsYou can save a preset e-mail subject and body message (fixed text). Click the [Add] key and set a maximum of 80 full-width/half-width characters for the subject, and a maximum of 1800 full-width/half-width characters for the body message (fixed text).

7-101
SYSTEM SETTINGS►SYSTEM SETTINGS
Internet Fax SettingsSettings related to the image send function (Internet fax, Direct SMTP, etc.) can be configured.
Default SettingsConfigures the default settings for Internet fax.
Resolution SettingApply the Resolution Set when StoredYou can apply the resolution setting that was set when the file was saved to transmission of the file.Resolution SettingSet the resolution used for file transmission.Half ToneEnable half-tones.
Auto Wake Up PrintWhen the [Power] button is "Off" (but the main power switch is "On") and an Internet fax is received, this function activates the machine and prints the fax.When this function is disabled, received Internet faxes are not printed until the ([Power] button) is switched "On".
Initial File Format SettingFile TypeThis is used to set the file type for Internet fax transmission.The following settings can be configured.• TIFF-S• TIFF-F
If one of the following functions is set, the image will be sent in TIFF-F format even if TIFF-S is set.• Mixed Size Orig.• Dual Page Scan• Book Divide• Card Shot• N-Up
Compression ModeThis is used to set the compression mode for Internet fax transmission.The following settings can be configured. • MH (G3)• MMR (G4)
Speaker Volume SettingAdjusts the volume of fax receive signals and communication error signals heard through the speaker.A fax receive signal sounds after the machine checks the mail server and retrieves received faxes. A communication error signal sounds when a delivery failed e-mail is received from the destination Internet fax machine.
For an explanation of settings related to the fax function, see "Image Send Settings (page 7-174)".These settings can be configured when the Internet fax expansion kit is installed.
[MMR (G4)] cannot be selected when [File Type] is set to [TIFF-S].

7-102
SYSTEM SETTINGS►SYSTEM SETTINGS
Original Print on Transaction ReportWhen a transaction report is printed, this is used to print part of the first page of the transmitted original on the transaction report. Select one of the settings below. • Always Print• Print at Error• Do not Print
This setting will not be effective if the next "Transaction Report Print Select Setting (page 7-102)" is set to "Do not Print".
Transaction Report Print Select SettingSelects whether or not a transaction report will be printed, and if printed, the condition for being printed. Select a setting for each of the following operations: Single Sending• Always Print• Print Out Error Report Only• Do not Print
Broadcasting• Always Print• Print Out Error Report Only• Do not Print
Receiving• Always Print• Print at Error• Do not Print
When a transaction report is printed, this is used to print part of the first page of the transmitted original on the transaction report. For more information, see "Original Print on Transaction Report (page 7-102)".
Activity Report Print Select SettingPrints the Image Sending Activity Report stored in the machine memory periodically.The Image Sending Activity Report can be set to print each time the number of transactions reaches 200, or at a specified time (once a day only). (The settings can be simultaneously enabled.)
Body Text Print Select SettingImage files attached to Internet faxes are normally printed. This setting can be enabled to also have the e-mail body text (subject and message) printed.This setting also applies to printing of the body text of e-mail messages without file attachments.
• If you only select the "Print Daily at Designated Time" setting and the number of recorded transactions reaches 200 before the specified time, each new transaction will delete the oldest transaction (the oldest transaction will not be printed).
• The Transaction Report can be printed out manually as needed.See "List for Administrator (page 7-53)" .
A maximum of 5 pages of body text can be printed.

7-103
SYSTEM SETTINGS►SYSTEM SETTINGS
Send SettingThese settings are used to configure the settings for Internet fax.
I-Fax Reception Report On/Off SettingThis setting is used to request a reception report when an Internet fax is sent.
I-Fax Reception Report Request Timeout SettingThe duration of time that the machine will wait for a reception report from the destination machine can be set by any number from 1 hour to 240 hours in increments of 1 minute.
Number of Resend Times at Reception ErrorThe number of resend attempts when an error message is received from an I-Fax recipient can be set to any number from 0 to 15.
Maximum Size of E-mail AttachmentsTo prevent the transmission of excessively large image files by Internet fax, a file size limit can be set from 1 MB to 10 MB in increments of 1 MB. If the total size of the image files created by scanning the original exceeds the limit, the image files are discarded.If you do not wish to set a limit, select [Unlimited].
Rotation Sending SettingWhen transmitting an image that is one of the following sizes, this function rotates the image 90 degrees counterclockwise. (The setting can be configured separately for each size.) 5-1/2" x 8-1/2", B5, A5
Default Own Number SendingYou can include the date and your sender information (sender name and address) at the top of the page when the receiving machine prints an image that you send.
Printing Page Number at ReceiverWhen the transmitted image is printed by the receiving machine, the page number can be added to the top of each printed page.
Recall in Case of Line Busy(This setting is only effective for Direct SMTP transmission.)This setting sets the number of recall attempts and the interval between recall attempts when a transmission is not successful due to the line being busy or other reason.Number of Times to Recall When Line is BusyThis setting specifies whether or not recalling is performed when the line is busy.During recalling, you can set the number of recall attempts.Any number from 0 to 15 can be selected. Interval to Wait Between Recall Attempts (min.) When Line is BusyThe interval between recall attempts can be set. Any number of minutes from 1 to 15 can be selected.
This setting is only effective when "I-Fax Reception Report On/Off Setting (page 7-103)" is enabled.
This setting is only effective when "I-Fax Reception Report On/Off Setting (page 7-103)" is enabled.
This setting is linked to "Maximum Size of E-mail Attachments(E-Mail) (page 7-98)" in Scan Settings.

7-104
SYSTEM SETTINGS►SYSTEM SETTINGS
Recall in Case of Communication Error(This setting is only effective for Direct SMTP transmission.)This determines how many times the machine will automatically attempt the call again if a fax transmission fails due to a communication error. Number of Times to Recall in Case of ErrorSpecify how many times the machine will attempt the call again when a communication error occurs.During recalling, you can set the number of recall attempts.Any number from 0 to 15 can be selected. Interval to Wait Between Recall Attempts (min.) in Case of ErrorThe interval between recall attempts can be set. Any number of minutes from 1 to 15 can be selected.
Receive SettingsConfigures the settings for Internet fax.
Auto Receive Reduce SettingWhen a fax is received that includes printed information such as the sender's name and address, the received image is slightly larger than the standard size. This setting is used to automatically reduce the image to fit the standard size.
2-Sided Printing of Received DataThis is used to have received faxes printed on both sides of the paper.When this setting is enabled and a fax consisting of 2 or more pages is received (the pages must be the same size), the pages are printed on both sides of the paper.
Set Address for Data ForwardingWhen the machine cannot print a received fax, the fax can be forwarded to another machine. This setting is used to configure the address of the other machine. Forwarding toEnter the forwarding address (maximum of 64 characters).Direct SMTPSelect this to enable forwarding when direct SMTP is used. Add Hostname or IP Address. Select this to separately enter a host name or IP address. Hostname or IP AddressUse this setting when "Add Hostname or IP Address." is enabled. Enter the host name or IP address (maximum of 64 characters).
Letter Size RX Reduce PrintWhen a fax is received, this function reduces the fax to Letter (8-1/2" x 11") size.
• If Auto Receive Reduce is disabled, the edges of the image outside the standard size will be cut off.However, the image will be clearer because it will be printed at the same size as the original.
• Standard sizes are sizes such as 8-1/2" x 11" and 8-1/2" x 5-1/2" (A4 and B5).
Multiple forwarding addresses cannot be stored.
When this setting is enabled, Letter (8-1/2" x 11") size faxes are also reduced.

7-105
SYSTEM SETTINGS►SYSTEM SETTINGS
Receiving Date & Time PrintEnable this setting to have the date and time of reception printed.Select [Inside the Received Image] or [Outside the Received Image] for the position where the date and time is printed.When [Inside the Received Image] is selected, the date and time of reception is printed on the received image.When [Outside the Received Image] is selected, the received image is reduced and the date and time of reception is printed in the blank area that results.
POP3 Communication Timeout SettingThe duration of time the machine waits until stopping reception can be set from 30 to 300 seconds in increments of 30 seconds if no response is received from the mail server (POP3 server).
Reception Check Interval SettingSpecifies an interval at which the machine automatically checks the mail server (POP3 server) for received Internet faxes. The interval can be set from 0 minutes to 8 hours in increments of 1 minute.If 0 hours 0 minutes is specified, the machine does not automatically check the mail server for received Internet faxes.
Received Data Print Size SettingsSet 8-1/2" x 11" (A4) size as the paper size that is always used for printing of received Internet faxes.
Allow/Reject Mail or Domain Name SettingAllows or refuses a reception from specified addresses/domains.
The [Outside the Received Image] cannot be selected for the reception date and time print setting if "Auto Receive Reduce Setting (page 7-104)" is not enabled.
The machine also checks the mail server (POP3 server) for received Internet faxes when the main power is switched on. (Except when 0 hours 0 minutes is specified.)
Item Settings
Item Reception from the stored address/domain is not allowed.
Allow Reception Reception from the stored address/domain is allowed.
All Invalid All Invalid
Add New
Adds a new address or domain (maximum of 50) from which reception is to be rejected or allowed.Enter the address/domain (maximum of 64 characters) and tap the [Store] key.If the first character of the entry is not "@", the entry is identified as an address. If the first character is "@", the entry is identified as a domain. ([email protected].□□□ is treated as an address, and @xx.xxx.□□□ is treated as a domain. ) Storing an address specifies only that address. Storing a domain specifies all addresses that include that domain.
Registered address or domain listDisplays a list of the stored addresses and domains. An address or domain can be deleted from the list when selected.
When there are no stored anti junk mail addresses or domains, only the [Add New] key can be selected.

7-106
SYSTEM SETTINGS►SYSTEM SETTINGS
Server Settings
Receive SettingsInternet Fax ReceiveSet whether or not Internet Fax reception is performed.POP3 ServerEnter a maximum of 127 half-width characters for the name of the POP3 server to be used.Port NumberSpecify the port number of the POP3 server to be used.POP AuthenticationSet to use POP authentication.User NameEnter a maximum of 64 characters for the user name used to access the server.PasswordEnter a maximum of 32 characters for the password used to access the server.POP3 Communication TimeoutSet a timeout for communication to the POP3 server. Reception Check Interval SettingEnter an acknowledge cycle to the POP3 server. Enable SSLUse SSL to encrypt data before transmission.
Default SettingsOwn Number and Name Set
Set I-Fax Own NameEnter a maximum of 20 full-width/half-width characters for the sender name for Internet Fax transmission.Source AddressEnter a maximum of 56 half-width characters for the sender address for Internet Fax transmission.
Direct SMTP SettingPort Number (Receive), Port Number (Send)Specify the port number used for transmission and reception by direct SMTP.TimeoutSet the wait time until transmission or reception is canceled when a response is not received from the server during direct SMTP transmission/reception.

7-107
SYSTEM SETTINGS►SYSTEM SETTINGS
Fax Data Receive/Forward (Manual)
Internet Fax SettingsThese settings can be configured when the Internet fax expansion kit is installed.
Reception StartTap this key to immediately connect to your mail server (POP3 server) and check for received Internet faxes. If you have received Internet faxes, the faxes will be retrieved and printed.
Manual Reception Key in Initial ScreenThis displays the [Internet Fax Manual Reception] key in the base screen of Internet fax mode.
Forward Received DataWhen the machine cannot print because it is out of paper or out of toner, received faxes can be forwarded to another Internet fax machine.
To cancel forwarding Tap the job status display and cancel fax forwarding in the similar way as for a transmission job. Forwarding is not possible if no faxes were received or a forwarding fax number is not programmed.
• For an explanation of settings related to the fax function, see "Fax Data Receive/Forward (Manual) (page 7-181)".
• To enable "Reception Start", the POP3 server settings must be configured. See [Application Settings] in "Settings" → [Internet Fax Settings].
• To register a forwarding address, see "Set Address for Data Forwarding (page 7-104)" in "Settings".
• If forwarding was not successful because the transmission was canceled or a communication error occurred, the faxes that were to be forwarded will return to the print queue on the machine.
• If the initial pages of a fax were successfully printed, only those pages that were not printed will be forwarded.
• If you select [System Settings] in "Settings" → [IImage Send Settings] → [Operation Settings] → [Default Settings] and if "Hold Setting for Received Data Print" is enabled, you are prompted to enter a password. Enter the correct password using numeric keys.

7-108
SYSTEM SETTINGS►SYSTEM SETTINGS
Inbound Routing (Forwarding/Storing) Settings
Inbound Routing SettingsThe fax and Internet fax received data can be forwarded according to the stored forwarding table.When this function is enabled, you can also have the received Internet faxes forwarded to a specified e-mail address without printing them.
Table RegistrationYou can store or edit the data forwarding table that has the received data forward settings.Up to 50 data forwarding tables can be stored.A single forwarding table can store up to 500 sets of sender number and source address combinations.Up to 1000 destinations can be stored in all data forwarding tables combined.Up to 100 destinations of FTP/Desktop/Network Folder data can be stored.
Sender Address RegistrationStores new sender number or address to be used for inbound routing.
List name Settings
Table Name Enter a forward table name.
Receive Line Select Selects a data receive line.
Sender Address Setting
Select the sender facsimile number or the Internet fax address.
Before you select a sender number or address, store the destination number or address.
To forward all received data, select [Forward All Received Data].
Forward Condition 1/2/3
You can set the forwarding date and destination.• Forward Condition: Set the data forwarding conditions.• Day of the Week: Select a day of week to start data forwarding.• Start Time: Set a time to start data forwarding.• Completing Time: Set a time to end the data forwarding.• Format for Forwarding: Select a format of forwarding data.
Forwarding Destination ListLists the addresses that can be set as the destination. Select a destination by setting it to
.
Add (Selecting from Address Book)
Open the address book and enter a forwarding destination.
Add (Direct Entry) Enter the destination name directly.
Delete Deletes the selected address.
List name Settings
Address to be Entered Displays the entered sender number or address.
Fax NumberEnter a facsimile number to be stored as the sender. When you enter multiple sender numbers, separate them by a semicolon (;) or a comma (,). When you tap the [Global Address Search] key, the global address search screen appears.
Internet Fax AddressEnter an Internet fax address to be stored as the sender. When you enter multiple sender numbers, separate them by a semicolon (;) or a comma (,). When you tap the [Global Address Search] key, the global address search screen appears.
Delete Deletes the selected sender number or address.
Add to List Adds the entered sender number to the list.

7-109
SYSTEM SETTINGS►SYSTEM SETTINGS
Administration SettingsStores the administration settings to be used for inbound routing.
List name Settings
Disable Registration of Forward Table
Disables the registration of forward table.
Disable Change/Delete of Forward Table
Disables a change of forward table.
Disabling of Forward Condition Change
Disables a change of data forwarding conditions.
Disable Temporal Forward Setting from Operation Panel
Disables a temporal data forward setting from the machine.
Print Style SettingSets a print style of received data.If you have selected the [Always Print] or [Save Only at Error] option, enter a file name.
Preset of Character
Set the characters added to the file name when a file is saved.When "Character 1" and "Character 2" are set in "File Naming No. 1 to No. 7", the set characters are added to the file name.Enter up to 64 full-width/half-width characters.
File NamingNo.1 - No.7
Set the information included in the file name when saving a file.
If received from a contact registered in the address book, sender's name is changed to contact's name.
When the sender of the data is stored in the address book, the sender information is changed to the name stored in the address book.
1Enable the [Inbound Routing] function.Tap the [Administration Settings] from the menu.Enable the [Inbound Routing] function from the setting screen.
2Store the sender number or address. Tap the [Sender Number /Address Registration] from the menu.Enter the destination number or address that you wish to store.
If you wish to forward all received data, you need not store the sender number and address separately.
3Store a forwarding table. Tap the [Inbound Routing Settings] from the menu.Tap the [Add] key on the displayed screen.When the [Table Registration] screen appears, store the forwarding table.
4Enable the stored forwarding table. Tap the [Inbound Routing Settings] from the menu.Set the forwarding table name that you wish to enable to .To specify forwarding conditions, select [Forward based on the Conditions of Forward Destination 1-3], and also select [Always Forward] or [Forward on Selected Day & Time]. If you have selected the [Forward on Selected Day & Time] option, you can set the forwarding date and time in advance.

7-110
SYSTEM SETTINGS►SYSTEM SETTINGS
Inbound Routing (Storage) Settings
Settings for HDD Storing of Received DataAn external account application can be added and controlled. Configure settings for saving received faxes to the hard disk.
Item Settings
Auto Storing of Received Data in HDD
Set whether received faxes are saved to the hard disk.
Specifying Data to be Stored Select which received faxes are saved. Select from faxes and Internet Fax.
Specifying Stored FolderSpecify the folder in which received faxes are saved. Enter a folder name no longer than 32 full-width/half-width characters.
Sort Received Faxes by Date in Folders
Configure settings to have date folders created and received faxes saved to the folders by date.
File Format Select the file format for inbound routing.
Print Style Setting
Configure print settings for received faxes.• Save and print: Save received faxes to hard disk, and also print.• Only print when save error occurs: Print received fax when save fails.• Save in inbound routing error box when save fails: When save fails, save the fax in the
inbound routing error box.
Preset of CharacterSet the characters added to the file name when a file is saved. When "Character 1" and "Character 2" are set in "File Naming No. 1 to No. 7", the set characters are added to the file name. Enter up to 64 full-width/half-width characters.
File NamingNo.1 to No.7
Set the information included in the file name when saving a file.
If received from a contact registered in the address book, sender's name is changed to contact's name.
When Sender name of "File Naming" is enabled, you can change the sender name to a name in the address book.
Reception Notification Settings Set whether notification is sent by e-mail when a fax is received.
Address of Notification Destination
Shows the address to which the notification is sent.
Direct EntryEnter the notification address. Enter a maximum of 1500 half-width characters for the address.
Global Addr. Search Select the address from the global addresses.
Add to ListAn address directly entered or found by global address search is saved as the notification address.

7-111
SYSTEM SETTINGS►SYSTEM SETTINGS
Metadata SettingsIf the Application Integration Kit is installed, you can control the metadata to be used in other applications.The stored metadata is displayed on the metadata settings page. You can add a metadata, and edit or delete an existing metadata. • [Add] key
Adds a new metadata set.• List
Lists the currently stored metadata sets.
Metadata DeliveryEnables or disables the metadata delivery function.
Metadata Set RegistrationWhen you tap the [Add] key, the registration screen appears. Up to 10 items can be stored.For information on the settings, see "Settings (page 7-111)".
Edit or Delete Metadata SetWhen you tap a title on the list, the edit screen appears for that metadata set.Tap the [Delete] key to delete the metadata set.
Settings
Item Settings
Metadata Set Name Enter a metadata name.
Metadata Destination Select a destination where you wish to send the image and metadata.
Allow Custom FilenamesEnable or disable to edit the name of image file and XML file to be sent by the metadata send job.
Address Type Allowing Metadata Entry
Set the destination information to be used for metadata transmission.
Name Enter a metadata name to be displayed on the touch panel.
XML Tag Name XML Tag Name
Entry Type
• Direct entry: Allows direct entry of each metadata from the soft keyboard or the numeric keypad.
• Metadata list: Allows a selection of metadata from the previously entered data list. You must enter optional values for metadata selection in the input area. Entries must be separated by semicolons or commas. Each option can be comprised of up to 70 characters.
• Initial entry by default: Uses a default value as the first value of the entered metadata list.
Include MFP Extended Scan Settings in XML File.
When the machine generates metadata automatically, the "metadataSetName", "userLoginId" (if user authentication is used), "pageSize", and "imageMode" are added to the metadata.
To Be Used as Default The current metadata set is used as the default.

7-112
SYSTEM SETTINGS►SYSTEM SETTINGS
Document Filing SettingsCondition SettingsDocument filing settings are described below.Select [Document Filing Settings] to configure the settings.
Default Mode SettingsSpecifies which mode, Sharing or Confidential, is used as the default mode when storing a file.When [Confidential Mode] is selected, the [Confidential] checkbox is set to on the information screen for filing.
Sort Method SettingSelects an order of display files stored in the Main Folder, Custom Folder, and Quick File Folder. Select one of the following settings: • File Name• User Name• Date
Administrator Authority SettingFor files and user folders that have a password, this setting allows the administrator password to be entered instead of the password when accessing the file or folder.Also, you can change the preset ratio if necessary.
Delete All Quick FilesDeletes all files from the Quick File folder except for protected files. DeleteTap this key to start deletion of all files immediately. Delete quick files at power up. (Protected files excluded)This is used to automatically delete all files in the Quick File Folder (with the exception of protected files) when the [Power] button is turned "On".
Image OrientationChanges the image orientation.
Default Color Mode SettingsSelects the default settings for black & white and color when Scan to HDD is used.The following settings can be configured. • Auto• Full Color• Grayscale• Mono2
Disable Change of B/W Setting in Auto ModeThis setting disables selection of B/W settings from the base screen when the color mode is set to Auto.
Default Exposure SettingsDefault exposure settings for document filing can be configured.Select [Auto] or [Manual].If you select [Manual], set the exposure to one of 5 levels.
The condition of the machine may prevent deletion in some cases.

7-113
SYSTEM SETTINGS►SYSTEM SETTINGS
Default Original Image TypeSelect the original type beforehand to enable scanning at a resolution suitable for the original.The following settings can be configured.• Text/Printed Photo• Text/Photo• Text• Photo• Printed Photo• Map
Initial Resolution SettingOne of the following resolutions can be selected for the default resolution for transmission. • 100x100dpi• 150x150dpi• 200x200dpi• 300x300dpi• 400x400dpi• 600x600dpi
Scan Complete Sound SettingAdjusts the volume of the beep that sounds when scanning ends. The beep can also be turned off.
Disable Text/Stamp functions for ReprintingWhen a stored file is retrieved and printed, the printing functions are disabled.This function prevents an inconsistency of the date between the original data and output data and others.
Batch Print SettingsSet whether or not the [All Users] key and the [User Unknown] key are prohibited in the user name selection screen when printing all files, whether files are sorted by date in newest or oldest order, and whether file names are sorted in ascending or descending order.
Erase Width AdjustmentThis is used to set the default erase width for erase function.Specify a value from 0" (0 mm) to 1" (25 mm) in increments of 1/8" (3 mm) for both edge erase and center erase.
Card Shot SettingsThis is used to set the default original size for the card shot function.Specify a value from 1" (25 mm) to 8-1/2" (216 mm) in increments of 1/8" (3 mm) for both the X (horizontal) and Y (vertical) dimensions of the original.
Fit to Store SizeAlways displays the [Fit to Store Size] key on the card shot screen.
Setting of store/delete after file printSelect whether or not to save or delete a file after printing.
Default Setting of PDF Format for PC BrowsingYou can set the initial file format of public PDF or the file for download which is created during execution of each job.
B/W: Compression ModeNone, MH (G3), MMR (G4)
Color / Grayscale: Compression RatioLow, Medium, High
Settings during each job executionWhen each of copy, printer, scanner, Internet fax, fax, or stored scan data is executed, you can specify to create a public PDF and to set the resolution of public PDF.
When the exposure is set to [Auto], a default original type cannot be selected.

7-114
SYSTEM SETTINGS►SYSTEM SETTINGS
Document Output OptionsThe use of a stored file can be allowed or prohibited by operation type and by the mode from which the file was stored.
Document Filing ControlThe registration method is the same as for a custom folder.
► Custom Folder (page 7-57)
Automatic Deletion of File SettingsDocument filing settings are described below. Tap the [Document Filing Settings] key to configure the settings. Time and folder settings can be configured to have files in specified folders (stored by document filing) automatically deleted at a specified time. Up to 3 settings can be stored to be automatically deleted.The procedure for using this function is as follows:(1) Select [Setting 1], [Setting 2], or [Setting 3].(2) Set the time and date for automatic deletion.(3) Select the desired folder.(4) Specify whether or not protected files and confidential files are to be deleted.(5) Enable the stored settings.
Delete NowWhen this is executed with a folder selected, all files in the folder will be immediately deleted regardless of the date and time setting.
Execute Auto Delete Setting at Auto Power Shut-Off(If this is not selected, the files will be deleted after the machine wakes from auto power shutoff mode.)Execute Auto Deletion even if Auto Power Shut-Off is enabled. When the checkbox is not selected ( ), the files will be deleted after the machine wakes from auto power shutoff mode.
The items that appear will vary depending on the functions that have been added to the machine.
Item Settings
Copy For each mode, select whether or not copying of stored files is allowed.
Print For each mode, select whether or not printing of stored files is allowed.
Scan Send For each mode, select whether or not fax transmission of stored files is allowed.
Internet Fax Send(Incl. PC-I-Fax) Select whether or not I-Fax transmission of stored files is allowed.
Fax Send(Incl. PC-Fax) For each mode, select whether or not fax transmission of stored files is allowed.
Scan to HDD For each mode, select whether or not stored files is allowed.
Item Settings
Schedule
Select an automatic deletion cycle.• Every Day: Auto deletion every day at the specified time.• Every Week: Auto deletion at the specified time on the specified day of the week.• Every Month: Auto deletion at the specified time on the specified day of the month.
FoldersTo select the folder separately, select [Folder Select] and select the desired folder. To select all folders, including the folder currently being created, select [All Folders (Including folders registered hereafter)].
Delete Protected File Enable this setting to include protected files in the deletion.
Delete Confidential File Enable this setting to include confidential files in the deletion.

7-115
SYSTEM SETTINGS►SYSTEM SETTINGS
Sharp OSA Settings
Condition Settings
Cookie SettingSpecify how application cookies are handled when using an application in Sharp OSA.When "Hold Cookie" is selected, the machine holds cookies that are used in an application.When "Not hold Cookie" is selected, cookies are not held when an application is used.
Delete CookieDelete cookies held by the machine.
Standard Application SettingsThe standard application settings can be added and controlled. • [Add] key
Adds a new standard application.• List
Lists the currently stored standard applications.
Store Standard Application When you tap the [Add] key, the registration screen appears. Up to 16 items can be stored.For information on the settings, see the following table.
Edit or Delete Standard ApplicationWhen you tap an application name on the list, the edit screen appears for that standard application.Tap the [Delete] key to delete the standard application.
Settings
* These functions can be set only in the Web page.
Item Settings
Application Name Enter an application name.
Address for Application UI Set an IP address of the application or a network name to control the UI of the machine.
Timeout Enter a timeout. The default setting is 20 seconds.
Browser Select the Web browser type.
Extended Platform Set this option to use the expansion platform.
Data Size Set the screen size of application.
Use Custom Icon* Select whether or not custom icon is used.
File Name* Reports file name.
Select File* Please enter File Name.

7-116
SYSTEM SETTINGS►SYSTEM SETTINGS
Receiving Application SettingThe Fax or I-Fax Receive functions can be set in the Sharp OSA applications.
Settings
External Accounting Application SettingsAn external account application can be added and controlled. Set the server name where you have installed the external accounting application.
* This setting can be set in Server 1.
Item Settings
Forward to Application The Fax or I-Fax message reception can be controlled by Sharp OSA applications.
Application Name Enter the application name to receive.
Address for Web Service Enter the Web service address.
Timeout Enter a timeout. The default setting is 20 seconds.
E-mail AddressEnter the address to which a notification e-mail is sent when an application connection error occurs.
Body Text Enter the body message that appears in the notification e-mail for connection errors.
Connection Test To test the connection to the application, click the [Execute] button.
Item Settings
External Account ControlEnable the totalling function by the external accounting application.If enabled, always enter the application name or Web service address.
Set Authentication Server (Server 1)
If the server is set, the external authentication mode is selected. Any access to the MFP is controlled by the application that you set on this page. If set, always enter the application name, application UI address, or Web service address of server 1.If not set, the external totalling mode is selected.
Server 1-4 Set to enable each of the servers.
Application Name Enter an application name.
Address for Application UI* Enter the URL of the login screen to be accessed first when the machine is turned on.
Address for Web ServiceEnter the URL of the server or computer which sends commands and events by XML/SOAP protocol.
Timeout Enter a timeout. The default setting is 20 seconds.
Browser* Select the Web browser type.
Extended Platform Set this option to use the expansion platform.
Data Size* Set the screen size of application.
Find My Address* This item is only displayed and cannot be set.
Target*This setting determines whether the machine's user list or the LDAP server is searched when you perform a "My Address" search with Sharp OSA external authentication in use.
Communication Error Notification
E-mail AddressEnter the address to which a notification e-mail is sent when an application connection error occurs.
Body Text Enter the body message that appears in the notification e-mail for connection errors.

7-117
SYSTEM SETTINGS►SYSTEM SETTINGS
Embedded Application SettingsStore and manage “embedded applications” that are installed in the machine. • [Add] key
Adds a new embedded application.• List
Lists the currently installed embedded applications.
Install Embedded Application When you tap the [Add] key, the registration screen appears. Up to 16 items can be installed.
Store Embedded ApplicationBy storing an already installed embedded application in “standard application”, the application can be used. Select the application name checkbox and tap the [Add Standard Applications] key.
Delete Embedded Application Tap an application name in the list to display the information of that standard application.After checking the information, delete the standard application with the [Delete] key.
Polling SettingWhen linked to an external application, you can store and manage addresses in order to use a service that uses a polling function.
• When installing from the operation panel of the machine, the files in the USB memory connected to the machine are installed. When installing from the Web page, the files in the computer are installed.
• The maximum area of the hard disk that applications can use is 2 GB. If previously installed applications are already using 2 GB of area, a new application cannot be installed.
Item Settings
Server 1 - Server 2 Set to enable each of the servers.
Polling Address Enter the URL of the server or computer that the machine will poll.
Check Interval Enter the check interval for the server. The default is 1 minute.
Timeout Set the timeout time. The default setting is 20 seconds.

7-118
SYSTEM SETTINGS►SYSTEM SETTINGS
Common Settings
Paper Settings
Paper Tray SettingsPaper tray and paper type settings are explained in this section. These settings specify the paper type, paper size, and functions allowed for each paper tray.When [Paper Tray Settings] is selected, a list appears showing the trays and the current settings. Auto Switching of TrayWhen a tray runs out of paper during printing, this determines whether or not another tray with the same size and type of paper is automatically selected and printing continues. Display Paper Tray Settings when bypass tray detects paper.You can have the paper tray settings appear automatically when paper is detected in the bypass tray.Settings of each trayWhen the [Change] key is tapped, the corresponding setting screen appears.The following settings can be configured.
List name Description
Type
Select a type of paper to be loaded into the tray. The paper types that can be selected vary by paper tray. For more information, see "Tray Settings (page 7-119)".To user type setup, see "Paper Type Registration (page 7-120)".
Size
Select the paper size from the list. The paper sizes that can be selected vary by tray. The sizes that can be selected may also be restricted by the paper type selected above. For more information, see "Tray Settings (page 7-119)". If the desired size does not appear in the list, select [Custom Size] and directly enter the size (only for the bypass tray). For more information, see "Tray Settings (page 7-119)".
Sending Address List
Select the modes that can be used. If there is a function that you do not wish to be used with the selected tray, disable the function.When the "Type" is other than plain paper, recycled paper, colored paper, or a user type, [Fax] and [Internet Fax] cannot be selected.
• If the paper size specified here is different from the size of paper that is loaded into a tray, a problem or misfeed may occur when printing.
• To change the paper size in a tray, see "LOADING PAPER (page 1-64)".
• Paper properties such as "Fixed Paper Side" are automatically set when the paper type is selected. The paper tray properties cannot be changed in this screen.
• If [System Settings] in "Settings" → [Common Settings] → [Device Control] → [Disabling of Tray Settings] is selected, the tray settings (except for the bypass tray) cannot be configured.
• Tray settings can only be changed in setting mode of the machine.
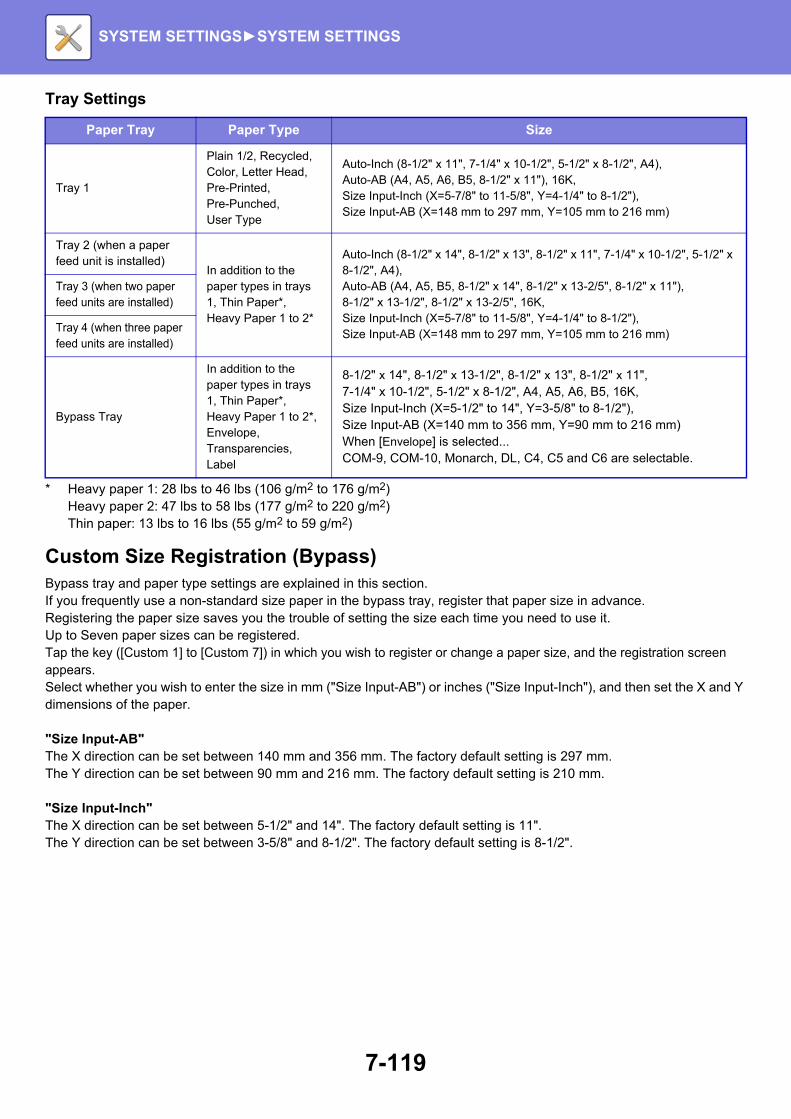
7-119
SYSTEM SETTINGS►SYSTEM SETTINGS
Tray Settings
* Heavy paper 1: 28 lbs to 46 lbs (106 g/m2 to 176 g/m2)Heavy paper 2: 47 lbs to 58 lbs (177 g/m2 to 220 g/m2)Thin paper: 13 lbs to 16 lbs (55 g/m2 to 59 g/m2)
Custom Size Registration (Bypass)Bypass tray and paper type settings are explained in this section. If you frequently use a non-standard size paper in the bypass tray, register that paper size in advance.Registering the paper size saves you the trouble of setting the size each time you need to use it.Up to Seven paper sizes can be registered.Tap the key ([Custom 1] to [Custom 7]) in which you wish to register or change a paper size, and the registration screen appears. Select whether you wish to enter the size in mm ("Size Input-AB") or inches ("Size Input-Inch"), and then set the X and Y dimensions of the paper.
"Size Input-AB"The X direction can be set between 140 mm and 356 mm. The factory default setting is 297 mm.The Y direction can be set between 90 mm and 216 mm. The factory default setting is 210 mm.
"Size Input-Inch"The X direction can be set between 5-1/2" and 14". The factory default setting is 11".The Y direction can be set between 3-5/8" and 8-1/2". The factory default setting is 8-1/2".
Paper Tray Paper Type Size
Tray 1
Plain 1/2, Recycled, Color, Letter Head, Pre-Printed, Pre-Punched,User Type
Auto-Inch (8-1/2" x 11", 7-1/4" x 10-1/2", 5-1/2" x 8-1/2", A4),Auto-AB (A4, A5, A6, B5, 8-1/2" x 11"), 16K,Size Input-Inch (X=5-7/8" to 11-5/8", Y=4-1/4" to 8-1/2"), Size Input-AB (X=148 mm to 297 mm, Y=105 mm to 216 mm)
Tray 2 (when a paper feed unit is installed)
In addition to the paper types in trays 1, Thin Paper*, Heavy Paper 1 to 2*
Auto-Inch (8-1/2" x 14", 8-1/2" x 13", 8-1/2" x 11", 7-1/4" x 10-1/2", 5-1/2" x 8-1/2", A4), Auto-AB (A4, A5, B5, 8-1/2" x 14", 8-1/2" x 13-2/5", 8-1/2" x 11"),8-1/2" x 13-1/2", 8-1/2" x 13-2/5", 16K,Size Input-Inch (X=5-7/8" to 11-5/8", Y=4-1/4" to 8-1/2"), Size Input-AB (X=148 mm to 297 mm, Y=105 mm to 216 mm)
Tray 3 (when two paper feed units are installed)
Tray 4 (when three paper feed units are installed)
Bypass Tray
In addition to the paper types in trays 1, Thin Paper*, Heavy Paper 1 to 2*, Envelope, Transparencies, Label
8-1/2" x 14", 8-1/2" x 13-1/2", 8-1/2" x 13", 8-1/2" x 11",7-1/4" x 10-1/2", 5-1/2" x 8-1/2", A4, A5, A6, B5, 16K,Size Input-Inch (X=5-1/2" to 14", Y=3-5/8" to 8-1/2"), Size Input-AB (X=140 mm to 356 mm, Y=90 mm to 216 mm)When [Envelope] is selected...COM-9, COM-10, Monarch, DL, C4, C5 and C6 are selectable.

7-120
SYSTEM SETTINGS►SYSTEM SETTINGS
Paper Type RegistrationStore a paper type when the desired paper type does not appear as a selection or when you wish to create a new set of paper properties.Up to 7 paper types can be registered.
List name Description
Type NameRegister any name. The factory default names are "User Type 1" to "User Type 7".
Fixed Paper Side Use this setting when paper with a front and reverse side is used.
Disable Duplex Use this setting when paper loaded cannot be used for 2-sided printing.
Disable Reverse Use this setting when using paper that cannot be reversed.
Disable Staple Use this setting when paper used cannot be stapled.
The settings that can be selected vary depending on the peripheral devices installed.

7-121
SYSTEM SETTINGS►SYSTEM SETTINGS
Operation Settings
Condition Settings
Enlarge Display ModeDisplays large characters on the screen.
appears in the system area when Large Character Mode is enabled.
Message Time SettingThe duration of time that messages appear in the touch panel (the time until a message is automatically cleared) can be set to any number of seconds from 1 to 12.
Language SettingThe language that appears in the touch panel can be changed to any language.
Default Display SettingSet the screen that appears after auto clear and login.You can select from Easy Copy, Copy, Easy Scan, E-mail, Network Folder, FTP/Desktop, Easy Fax, Internet Fax, Fax, Print Release, Data Entry, Address Book, Address Book (Easy Scan), Address Book (Easy Fax), Document Filing, Home Screen, Exchange (E-Mail), Gmail, or the Sharp OSA Screen.
Display Favorite Menus as DefaultYou can specify to display the "Favorite" first during mode selection.
Display Action Panel as default.Specify whether or not to display with the action panel on the screen.
Icon is displayed when LAN cable is not connected.Show an icon when a LAN cable is not connected.
Display Confirmation Dialog when job is canceled.Show a confirmation dialog box when a job is canceled.
Switch the Number of Sets to be Displayed for Job StatusSet whether the remaining number of sets or the final number of sets is shown in the job status.
Alignment Order of 10-KeySet whether the numeric keys are arranged in ascending order with "1" in the upper left corner, or "1" in the lower left corner.
Setting Display from Main UnitSelect settings for the path information of the setting destination displayed when setting mode is set on the machine.Display Current PathSet whether or not the current setting items are shown in the path information.Enable link of current pathSet whether the link at the top is enabled.
MFP Display Pattern SettingSet the background color of the touch panel. Each time you change patterns, the touch panel image at the bottom of the screen changes.
When user authentication is enabled and a display language is specified in the favorite operation group, that setting is given priority.

7-122
SYSTEM SETTINGS►SYSTEM SETTINGS
Key Operation SettingKeys Touch SoundControls the key touch sound level, or turns the sound off.
Make Key Touch Sound at Default SettingWhen you specify the exposure in the exposure adjustment screen of each mode, a bleep sounds three times when the reference value is reached.
Auto Clear SettingThe time until Auto Clear activates can be set to any number of seconds from 10 to 240 in increments of 10 seconds.If the machine is not used for the duration of time set here, the auto clear function will clear any settings that have been selected and return the screen to the base screen of copy mode or the job status screen.
Cancel TimerThis is used to disable the auto clear function.
Key Operation SettingTime for Accepting Key EntryThis setting determines how long a key in the touch panel must be tapped until the key input is registered. The time can be set from 0 to 2 seconds in increments of 0.5 seconds.By lengthening the time setting, key input can be prevented when a key is tapped accidentally. Keep in mind, however, that when a longer setting is selected more care is required when tapping keys to ensure that key input is registered. Disable Auto Key RepeatThis is used to disable key repeat.Key repeat causes a setting to change continuously not only each time the key is tapped but while a key is tapped.
Time for Accepting Key Entry of Long TouchSelect a time when a long key touch is detected. Double Tap Interval SettingSelect an interval when a double tap is detected.
Disabling of Job Priority OperationThe job priority function can be disabled. When this is done, the [Priority] key will not appear in the job status screen.
Disabling of Bypass PrintingThis setting is used to disable bypass printing (printing other jobs ahead of a job that has been stopped* because the paper required for the job is not available in any of the trays).* This does not include cases where the paper ran out during the job.
Disabling of Covers/Inserts ModeDisables the use of the covers and inserts function.
Disable Printing of Operation Manual from the Operation PanelPrinting the manual from the operation guide embedded in the machine is prohibited.
Screen in which setting is effective Initial value
Ratio setting screen in base screen of copy mode Ratio 100%
Exposure setting screen in base screen of copy mode
Exposure level: 3 (medium)Exposure adjustment screen in base screen of fax, Internet fax, and network scanner modes
Exposure adjustment screen for Scan to HDD in document filing mode

7-123
SYSTEM SETTINGS►SYSTEM SETTINGS
Initial Original Count SettingSpecifies whether or not "Original Count" in Others is enabled for each function. Copy • Copy
Image Send• Scan to• Internet Fax• Fax• Data Entry
Document Filing• Scan to HDD
Preview SettingReceived Data Image Check SettingSelect whether or not a preview of received faxes and Internet faxes is shown. This is displayed when a facsimile expansion kit or Internet fax expansion kit is installed. Default List/Thumbnail Display• Fax/I-Fax Reception Data: Select whether the default display format of the received fax/I-Fax
list screen is list or thumbnails.• File Retrieve of Main Folder/Quick File Folder: Select whether the default display format of the document filing main
folder and temporary folder screens is list or thumbnails.• File Retrieve of Custom Folder: Select whether the default display format of the document filing
custom folder screen is list or thumbnails.• File Retrieve of Direct Print Select whether the default state of the folder screen for direct print
shows the folders as a list or as thumbnails.
Remote Operation SettingsConfigure settings required for remote operation of the machine from a PC connected to the same network.
Remote Software Operation• Operational Authority: This is used when remote software is used to operate the machine remotely.• View Password Entry Screen: When operating the machine by remote control using the remote software, the
password entry screen will appear on both the computer and the machine, or on only the computer.
Operation from Specified PC• Operational Authority: This is used to allow remote operation of the machine using the specified PC.• Hostname or IP Address of PC: Enter the host name or IP address of the PC to be connected to the machine.• View Password Entry Screen: When operating the machine by remote control using the remote software, the
password entry screen will appear on both the computer and the machine, or on only the computer.
Operation by User who Has Password• Operational Authority: This is used to allow a user who has a password to operate the machine
remotely. For information on the password, consult your service technician.• View Password Entry Screen: When operating the machine by remote control using the remote software, the
password entry screen will appear on both the computer and the machine, or on only the computer.

7-124
SYSTEM SETTINGS►SYSTEM SETTINGS
Easy Mode SettingsSet the items that can be selected in Easy Copy and other Easy modes.The items appear will appear in order on the screen starting from the item that is set in No. 1.Items that can be set in Easy CopyPaper Select, 2-Sided Copy, Copy Ratio, Staple, Image Orientation, Exposure and N-Up, Card ShotItems that can be set in Easy ScanAddress Book, History, Global Address Search, Scan to HDD/USB, Original, Resolution, File Format, Blank Page Skip and Card Shot.Items that can be set in Easy FaxAddress Book, History, Direct Entry, Original, Exposure, Resolution and Sending Line.
Favorite Key SettingSet the information that appears when favorite keys are tapped in normal mode.Click the Copy, Scan, Internet Fax, Fax, and Data Entry tabs to configure settings for the favorite key screens shown in each of the normal modes.Favorite Key NumberSets the favorite key number.The items appear will appear in order on the screen starting from the item that is set in No. 1.Key NameEnter a maximum of 20 characters for the favorite key name.Function MenuTo set functions such as "Other Functions", select the functions from the pull-down menu.Job ProgramsTo set a program, select one of the preset programs from the program list.Not DisplayYou can hide a set key in the favorite key screen.
Mode Key Display SettingConfigure settings for the display of mode keys at the top of the screen.Modes to DisplaySelect the mode keys that you want to display.Display Mode Keys on HomeYou can enable display of the mode keys in the home screen as well.
Keyboard Settings
Default Keyboard SettingConfigure settings for the keyboard used for entry on the text.
Keyboard SelectChange the key layout and display according to the set language.
Set Keyboard PriorityWhen an external keyboard is connected, set whether the external keyboard or the keyboard shown on the touch panel (soft keyboard) is given priority.
Soft Keyboard Template SettingRegister a text that you frequently use when entering an address or domain name in advance. Enter a maximum of 16 characters.
The items that can be set vary depending on the peripheral devices that are installed.

7-125
SYSTEM SETTINGS►SYSTEM SETTINGS
Device ControlVarious devices mounted on the machine can be set.
AB/Inch Type SettingThe numbers and units of the default settings and input ranges that appear in the setting screens can be switched between inches and AB sizes.
Default Original Size SettingsSpecify this setting when a particular original size is frequently used. The setting will appear in the [Original] key.Specifying this setting allows the original size setting to be omitted.
Original Feeding ModeThe following original feeding modes can be set to operate by default in copy, image send, and scan to HDD. When a mode is frequently used, this saves you from having to select the mode in another mode each time you need to use it.• Mixed Size Doc. Same Width• Slow Scan Mode• Blank Page Skip*
* Excluding fax mode and Internet fax mode.
Paper Type for Auto Paper SelectionThe paper types* that the Auto Paper Selection function will select can be specified. Select one of the following settings: • Plain 1• Plain 2• Recycled
The Auto Paper Selection function will not select any paper types other than the paper types specified with this setting. * The paper type set for each paper tray by selecting [System Settings] in "Settings" → [Paper Tray Settings].
Plain Paper Compatibility SettingsSet the weight of the plain paper that is regularly used. Select from Plain Paper 1 or Plain Paper 2.The weight of Plain Paper 1 is 16 to 24 lbs bond (60 to 89 g/m2). The weight of Plain Paper 2 is 24 to 28 lbs bond (90 to105 g/m2). Check the weight of the plain paper that you regularly use, and set accordingly.
Detect Standard in Auto Color ModeWhen the color mode is set to auto in scanner mode, the discrimination point for detecting whether originals are color or black and white can be set to one of 5 levels. When set to [Closer to B/W], the originals are easier to recognize as black and white. When set to [Closer color], the originals are easier to recognize as black and white.
Data Indicator SettingSet the operation of the fax reception / data indicator light. For details, refer to "DATA NOTIFICATION INDICATOR AND ERROR INDICATOR (page 1-7)".Status Indicator will blink if data is receivedSet whether or not the fax reception / data indicator light blinks when a fax has been received.Error Light SettingSet the operation of the error indicator light. For details, refer to "DATA NOTIFICATION INDICATOR AND ERROR INDICATOR (page 1-7)".

7-126
SYSTEM SETTINGS►SYSTEM SETTINGS
Plain Paper Weight SettingsThese are used to control the toner fusing temperature according to the weight of the paper.These settings apply to plain paper, recycled paper, punched paper, pre-printed paper, letterhead paper, colored paper, and user type paper.You can select "16 to 23 lbs." or "23+ to 28 lbs." ("60g/m2 to 89g/m2" or "90g/m2 to 105g/m2").
Data ListTo specify [One Sided] or [Two Sided] printing in Data List.
Disabling of DuplexThis is used to disable 2-sided printing, such as when the duplex module malfunctions.
Disabling of OffsetDisable offset output.
Disabling of Document FeederUse this setting to prohibit the use of the automatic document feeder, such as when the feeder malfunctions. (When the setting is enabled, scanning is still possible using the document glass.)
Disabling of Optional Paper Feed UnitThis setting is used to disable the optional paper feed unit, such as when it malfunctions.
Disabling of Tray SettingsThis setting is used to prohibit tray settings (except for the bypass tray).
Disabling of FinisherThis setting is used to prohibit the use of inner finisher, such as when it malfunctions.
Disabling of StaplerThis setting is used to prohibit the use of staple, such as when the staple of inner finisher malfunctions.
This can only be set on the machine's operation panel.Be sure to use only paper that is in the same weight range as the weight range set here. Do not mix plain or other paper that is outside the range with the paper in the tray.When settings are changed, the changes will take effect after the machine is restarted. To restart the machine, see "TURNING ON THE POWER (page 1-8)".

7-127
SYSTEM SETTINGS►SYSTEM SETTINGS
Enable/Disable SettingsThe following settings enables or disables certain functions.
User Control
Disable Printing by Invalid UserPrinting by users whose information is not stored in the machine, such as printing without entering valid user information in the printer driver or printing of a file on an FTP server in Setting mode (Web version), can be prohibited.
Copy Function Settings
Disabling of Registration/Deletion of ProgramThis is used to prohibit the deletion and changing of copy settings stored in job programs.
Disabling of Bypass-Tray in Duplex CopyDisables the use of the bypass tray when making 2-sided copies.The bypass tray is often used to feed label sheets, transparency film, and other special media for which 2-sided copying is prohibited. If a sheet of one of these special media enters the reversing unit, a misfeed or damage to the unit may result. If special media for which 2-sided copying is prohibited is often used, it is recommended that you enable this setting.
Disabling of Auto Paper SelectionDisables the Auto Paper Selection function.When this setting is enabled, automatic selection of paper that is the same size as the original on the document glass or in the automatic document feeder does not take place.
Disabling Registration of Custom ImageDisables storage of a custom image.
Disabling sending while copyingDisables the Image Send function during copy.
Printer Settings
Prohibit Notice Page PrintingDisables to print a notice page.
Prohibit Test Page PrintingDisables to print the test page.When this setting is enabled, [Status] →[Data List] → [List for User] → [Printer Test Page] in "Settings" cannot be used to print test pages.
Exclude Bypass-Tray from Auto Paper SelectWhen [Auto] is selected for paper type selection, the bypass tray is excluded from the trays that can be selected. This is recommended when special paper is often placed in the bypass tray.
Disabling of USB Memory Direct PrintDisables the function for directly printing of a file in a USB memory device.
Disabling of Network Folder Direct PrintDisables the direct printing from a network folder.
Disabling sending while printingDisables the Image Send function during printing.
Disable Blank Page PrintDisables to print a blank page.

7-128
SYSTEM SETTINGS►SYSTEM SETTINGS
Image Send Settings
Disable Switching of Display OrderDisables a change of display sequence (search number order, ascending, descending) in the address book and others.If set, the display is not sorted even when you tap the tab on the address book screen.The currently selected display order will be the order that is used after the setting is selected.
Disable Fax BroadcastingDisables the facsimile broadcasting.
Disable Scan FunctionSpecify this to disable remote PC scanning and storing to external memory device.
Settings to Disable RegistrationDisable Registering Destination from Operation PanelDisables address control from the machine.Configure the setting for each of the following items:• Group (Direct Entry)• Group (Address Book)• Contacts
Select All: Selects all items.Clear Checked: Clears all selections.
Disable Registering Destination on Web PageDisables to store the destination from Setting mode (Web version).Configure the setting for each of the following items: • Group (Direct Entry)• Group (Address Book)• Contacts
Select All: Selects all items.Clear Checked: Clears all selections.
Disable Registration/Delection of All Program ItemsDisables the use of address book when a program is stored.
Disable Registration of Memory BoxDisables all types of memory box registration.Configure the setting for each of the following items:Polling Memory, Confidential, Relay Broadcast (Direct Entry), Relay Broadcast (Address Book)
Disable Destination Registration Using Global Address SearchThis disables address control from the global address search.Configure the setting for each of the following items:E-mail, Internet Fax, Fax
Disable Registration Using Network Scanner ToolThis disables address control from the Network Scanner Tools.
Disabling of Forwarding via NetworkThis prohibits inbound routing.

7-129
SYSTEM SETTINGS►SYSTEM SETTINGS
Settings to Disable TransmissionThese settings are used to disable the following transmission operations.
Disable [Resend] on Fax/Image Send ModeThis setting disables the [Resend] key in the base screen of image send mode.
Disable Selection from Address BookDisables the selection of destinations from the address book.Even if [Disable Selection from Address Book] is set, an address that was selected from the address book and sent to can be selected from the transmission history. Configure the setting for each of the following items: • E-mail• FTP• Internet Fax (Including Direct SMTP)• Fax• Desktop• Network Folder
Select All: Selects all items.Clear Checked: Clears all selections.
Disable Direct EntryDisables the direct entry of destination address and others.Even if [Disable Direct Entry] is set, an address that was selected from the address book and sent to can be selected from the transmission history. Configure the setting for each of the following items: • E-mail• Network Folder• Internet Fax (Including Direct SMTP)• Fax
Select All: Selects all items.Clear Checked: Clears all selections.
Disabling of PC ScanProhibit remote PC scan.
Disable Storing to External Memory DeviceProhibit saving to an external memory device.
Disable PC-I-Fax TransmissionThis prohibits PC-I-Fax transmission.
Disable PC-Fax TransmissionThis prohibits PC-Fax transmission.
Disabling of Find My AddressThis prohibits Find My Address.
Document Filing Settings
Disable Text/Stamp functions for ReprintingWhen a stored file is retrieved and printed, the printing functions are disabled.This function prevents an inconsistency of the date between the original data and output data and others.
Batch Print SettingsWhen files are printed by batch printing, you can prohibit selection of the [All Users] key and [User Unknown] key in the user selection screen, and set whether the file order is by date from the newest date or oldest date, or by file name in ascending order or descending order.
The Enable/Disable Settings control the same parameters as the enable/disable settings in other settings. The settings are linked together (changing one setting changes the other).

7-130
SYSTEM SETTINGS►SYSTEM SETTINGS
Operation Settings
Cancel Auto Clear TimerDisables the Auto Clear mode.
Disabling of Job Priority OperationThe job priority function can be disabled. If disabled, the [Priority] key is not shown on the job status screen.
Disabling of Bypass PrintingDisables bypass printing (printing other jobs ahead of a job that has been stopped* because the paper required for the job is not in any of the trays).* This option is ignored when paper runs out during the job.
Disable Auto Key RepeatDisables the Auto Key Repeat function.
Disabling of Clock AdjustmentDisables the date and time from being changed.
Disabling of Covers/Inserts ModeDisables the use of the covers and inserts function.
Disable Printing of Operation Manual from the Operation PanelPrinting the manual from the operation guide embedded in the machine is prohibited.
Device Control
Disabling of Document FeederUse this setting to prohibit the use of the automatic document feeder, such as when the feeder malfunctions. (When the setting is enabled, scanning is still possible using the document glass.)
Disabling of DuplexThis is used to disable 2-sided printing, such as when the duplex module malfunctions.
Disabling of Optional Paper Feed UnitThis setting is used to disable the optional paper feed unit, such as when it malfunctions.
Disabling of Tray SettingsThis setting is used to disable the optional paper drawer, such as when it malfunctions.
Disabling of FinisherThis setting is used to prohibit the use of inner finisher, such as when it malfunctions.
Disabling of OffsetDisable offset output.
Disabling of StaplerThis setting is used to prohibit the use of staple, such as when the staple of inner finisher malfunctions.
Security SettingsThis setting is used to set the security enhancement functions.
Hidden Pattern Print SettingDisables the direct entry of background pattern and others.
Machine Identification SettingsEnter a name or code to identify the machine.

7-131
SYSTEM SETTINGS►SYSTEM SETTINGS
Clock AdjustThis is the first and basic setting for operating the machine. Use this to set the date and time in the machine's built-in clock.
Daylight Saving Time SettingThis is the first and basic setting for operating the machine. Enable daylight saving time.
If [System Settings] in "Settings (administrator)" → [Common Settings] → [Enable/Disable Settings] → [Disabling of Clock Adjustment] is enabled, the date and time cannot be set.
Item Description
Specify Time ZoneIf your region is ahead of GMT (Greenwich Mean Time), select [+]. If your region is behind GMT, select [-]. Next, specify the time difference between your region and GMT in hours and minutes. (Example: If your region is Japan, + 9 hours 00 minutes.)
Date&Time Settings Select and set the year, month, day, hour, and minute.
Synchronize with Internet Time Server
This can be used when the machine is connected to the Internet. The machine's time is automatically adjusted to the time of an Internet time server.
If [System Settings] in "Settings (administrator)" → [Common Settings] → [Enable/Disable Settings] → [Disabling of Clock Adjustment] is enabled, the date and time cannot be set.
Item Description
Daylight Saving Time SettingSelect whether or not the Daylight Saving Time Setting is enabled. If disabled, the following settings will not be possible.
Select Setting TypeSpecify whether the starting and ending day of daylight saving time are to be set using the day of the week or the date.
Start Time
Set the starting time of daylight saving time. If you selected "Day of the Week" in "Select Setting Type", set the starting week of daylight saving time and then the starting day. If you selected "Date" in "Select Setting Type", set the starting date. Set the hour and minute and the UTC (Coordinated Universal Time) setting.
End Time Set the ending time of daylight saving time in the same way as you set the starting time.
Adjustment Time Set the time to be adjusted when daylight saving time begins.

7-132
SYSTEM SETTINGS►SYSTEM SETTINGS
Date FormatThis is the first and basic setting for operating the machine. The format used to print the date on lists and other output can be changed.
Product KeyYou must enter the machine product key to use the following advanced functions.
Serial NumberThis displays the serial number that is required to obtain the product key.
Font Kit for BarcodeEnter the product key of the barcode font kit.
Internet Fax Expansion KitEnter the product key of the Internet Fax Expansion Kit.
Application Integration ModuleEnter the product key of the Application Integration Module.
Custom Link SettingThe stored Web addresses can be displayed in the display area of the setting menu.Click a custom link to jump to the website of the stored address.
If [System Settings] in "Settings (administrator)" → [Common Settings] → [Enable/Disable Settings] → [Disabling of Clock Adjustment] is enabled, the date and time cannot be set.
Item Description
Current Setting The current time appears in the format set in Date Format.
Format Set the order of display of the year, month, and day (YYYY/MM/DD).
Separator Select one of three symbols or a blank space for the separator used in the date.
Day-Name Position Select whether the day name appears before or after the date.
Time DisplaySelect 12-hour format or 24-hour format for the time.24-Hour Display: 00:00 to 23:5912-Hour Display: 00:00 AM to 11:59 AM/00:00 PM to 11:59 PM
• It may not be possible to use some settings, depending on the peripheral devices installed.
• For the product key to be entered, contact your dealer.

7-133
SYSTEM SETTINGS►SYSTEM SETTINGS
Network SettingsQuick SettingsSelect the minimum required settings for the machine connection to the network.
Wireless Settings
Connection TypeUse this setting to switch between [Wired Only], [Wired+Wireless (Access Point Mode)] or [Wireless (Infrastructure Mode)].
Keep Wireless Access Point activatedThis can only be enabled when "Connection Type" is "Wired+Wireless (Access Point Mode)".If disabled, the NFC card reader must be touched to the mobile device or the [Easy Connect (QR code)] key must be tapped in the home screen to enable wireless LAN. When one of the conditions below occurs, the wireless LAN connection is automatically canceled.• When auto clear or auto power shutoff is performed on the machine.• When there is no connection to the access point for a certain period of time.
When "Wireless (Infrastructure Mode)" is selected in "Connection Type"Access Point SearchClick this to search access points. When the search results are displayed, select the access point to use and click [OK]. [SSID], [Security Type], and [Encry.] are automatically applied. SSIDEnter an SSID using up to 32 characters.Security TypeSelect a security type.Encry.Select an encryption type.Security KeyEnter a security key.
Show Security KeyIf it is set to ON, the security key appears.
IPv4 SettingsWhen using the machine on a TCP/IP (IPv4) network, use this setting to configure the IP address of the machine.
DHCPUse this setting to have the IP address obtained automatically using DHCP (Dynamic Host Configuration Protocol)/BOOTP (Bootstrap Protocol). When this setting is enabled, it is not necessary to manually enter an IP address.
Security Type Security Key
• WEP• WPA/WPA2-mixed Personal• WPA/WPA2-mixed Enterprise• WPA2 Personal• WPA2 Enterprise
WEP64bit: 5 characters or 10-digit hexadecimal numberWEP128bit: 13 characters or 26-digit hexadecimal numberWPA/WPA2: 8 to 63 characters or 64-digit hexadecimal number
• If DHCP/BOOTP is used, the IP address assigned to the machine may change automatically. If the IP address changes, printing will not be possible.
• If the machine is used on a TCP/IP network, be sure to enable the "TCP/IP (page 7-136)" below.

7-134
SYSTEM SETTINGS►SYSTEM SETTINGS
IPv4 AddressEnter the IP address of the machine.
Subnet MaskEnter the IP subnet mask.
Default GatewayEnter the default gateway address.
DNS Settings
Primary ServerEnter the IP address of primary DNS server.
Secondary ServerEnter the IP address of secondary DNS server.
Domain NameEnter the domain name where the selected DNS server exists.
SMTP Settings
Primary ServerEnter the IP address or the host name of the primary SMTP server.
Sender NameEnter the sender name.
Sender AddressIf data transmission has failed, the undelivered e-mail may be returned from the server. Enter an e-mail address (a single address only) to receive such undelivered mails. Usually, enter the e-mail address of system administrator.
Enable SSLIf is selected, the SMTP-over-TLS encryption communication can be used by STARTTLS command.This requires the server to support the STARTTLS command.To allow SSL communication, set the "Port Number" to the same port number as the normal SMTP.
SMTP AuthenticationIf is set, the SMTP server authentication is carried out.
User NameEnter the user name.
PasswordEnter the password.
Change PasswordTo change the password, set .
Connection TestTap the [Execute] button to test the connection to the SMTP server.

7-135
SYSTEM SETTINGS►SYSTEM SETTINGS
LDAP Settings
NameEnter the address book name.
Search RootEnters the search defaults to search for a specific area of the LDAP directory information tree.Example: o = ABC, ou = NY, cn = Everyone Entries must be separated from each other by semicolons or commas.
LDAP ServerEnter the IP address or host name of the LDAP server.
User NameEnter the account name for LDAP setting.
PasswordEnter the password. Change PasswordTo change the password, set .
Authentication TypeSelect the authentication server from the drop-down list.
KDC ServerEnter the IP address or host name of the Kerberos authentication server.
RealmEnter the Kerberos realm.
Allow selection on operation panel.Specify whether or not enable the global address to be selected on the operation panel of the machine.
Authenticate a User in Global Address SearchSelect whether or not authenticate a user when a global address is searched for.
Enable SSLIf is set, the SSL encryption communication is enabled.
Connection TestTap the [Execute] button to test the connection to the LDAP server.
Public Folder / NAS SettingSet each option to [Prohibited] if the storage is not used.
When settings are changed, the changes will take effect after the machine is restarted. To restart the machine, see "TURNING ON THE POWER (page 1-8)".

7-136
SYSTEM SETTINGS►SYSTEM SETTINGS
Network Name Setting Device NameEnter a device name.
Domain NameEnter the domain name.
CommentEnter a comment.
Protocol SettingsSelect the general network settings. The TCP/IP information can be set.
TCP/IP
IPv4 SettingsWhen using the machine on a TCP/IP (IPv4) network, use this setting to configure the IP address of the machine. DHCPUse this setting to have the IP address obtained automatically using DHCP (Dynamic Host Configuration Protocol) v6. When this setting is enabled, it is not necessary to manually enter an IP address.
IPv4 AddressEnter the IP address of the machine. Subnet MaskEnter the IP subnet mask. Default GatewayEnter the default gateway address.
IPv6 SettingsWhen using the machine on a TCP/IP (IPv6) network, use this setting to configure the IP address of the machine. IPv6Enable this setting. DHCPv6Use this setting to have the IP address obtained automatically using DHCP (Dynamic Host Configuration Protocol) v6. When this setting is enabled, it is not necessary to manually enter an IP address. Manual Address / Prefix LengthEnter the IP address and the prefix length (0 to 128) of the machine. Default GatewayEnter the default gateway address.
MTU SettingsSet the maximum data size that can be forwarded.
If DHCP/BOOTP is used, the IP address assigned to the machine may change automatically. If the IP address changes, printing will not be possible.
• If DHCPv6 is used, the IP address assigned to the machine may change automatically. If the IP address changes, printing will not be possible.
• In an IPv6 environment, the machine can use LPD or IPP protocol.

7-137
SYSTEM SETTINGS►SYSTEM SETTINGS
SMB SettingsSet the version of SMB protocol that is used for functions such as Scan to Network Folder.Use this setting to connect to a device that cannot automatically change the SMB protocol version, or when there is a problem in the connection with another device due to different versions.Set the version to SMB2.0, SMB2.1, or SMB3.0.
Ping CommandChecks if the machine can communicate with the PC of the network.Specify the IP address of the desired PC and tap the [Execute] key. A message indicating a response by the PC or not is displayed.
Services SettingsSelect the general network settings. Select the DNS, SMTP, Kerberos authentication, SNTP, mDNS, SNMP, and WINS settings.
DNS
DNS SettingsIPv4 Settings
Primary ServerEnter the IP address of primary DNS server. Secondary ServerEnter the IP address of secondary DNS server.
IPv6 SettingsPrimary ServerEnter the IP address of primary DNS server. Secondary ServerEnter the IP address of secondary DNS server. TimeoutEnter a timeout. The default setting is 2 seconds.This time is used until the connection to the DNS server is established according to the standard specifications. Domain NameEnter the domain name where the selected DNS server exists. DNS UpdateSet this option to use the dynamic updating of DNS server. Update IntervalEnter an interval to update the DNS server.
SMTP
SMTP SettingsPrimary ServerEnter the IP address or the host name of the primary SMTP server. Secondary ServerEnter the IP address or the host name of the secondary SMTP server. Port NumberEnter a port number. The default setting is port 25.
• One of the settings is SMB1.0, however, this is always enabled and cannot be disabled.
• When a version is disabled, version settings higher than that version are all disabled. When a version is enabled, all version settings lower than that version are enabled.

7-138
SYSTEM SETTINGS►SYSTEM SETTINGS
TimeoutEnter a timeout. The default setting is 20 seconds. This value is used for connection to the SMTP server and for data transmission according to the e-mail system specifications. Sender NameEnter a maximum of 20 full-width/half-width characters for the sender name.Sender AddressEnter a maximum of 64 half-width characters for the sender address.Enable SSLIf the SSL is enabled, the SMTP-over-TLS encryption communication can be used by STARTTLS command.This requires the server to support the STARTTLS command.To allow SSL communication, set the "Port Number" to the same port number as the normal SMTP. SMTP AuthenticationCarries out the SMTP server authentication.If you use the Kerberos authentication, set the KDC server, port number, and realm on the Kerberos authentication settings page. User NameEnter the user name. PasswordEnter the password.To change the password, set [Change Password] to . POP before SMTPIf is set, you are authenticated to the POP server before using the SMTP communication.• POP3 Server: Enter the IP address or the host name of the secondary SMTP server.• Port Number: Enter the POP3 port number for POP before SMTP communication. The default setting is port 110.• POP Authentication: If is set, the authentication protocol (including APOP) is used for authentication to the POP3
server.• User Name: Enter the user name for POP before SMTP communication.• Password: Enter the password required for POP before SMTP communication. To change the password, set [Change
Password] to .• Enable SSL: If set to , the POP over SSL communication or the POP over TLS communication by STLS command
is enabled.This requires the server to support the POP over SSL communication or the STLS command. To allow SSL communication, set the "Port Number" to the POP over SSL communication port number.To allow POP over TLS communication, set the "Port Number" to the same port number as for the normal POP3 communication.
Connection TestTap the [Execute] button to test the connection to the SMTP server.
Kerberos
Kerberos Authentication SettingsKDC ServerEnter the IP address or host name of the Kerberos authentication server. Port NumberEnter the port number of the Kerberos authentication server. The default setting is port 88. RealmEnter the Kerberos realm.
SNTP
SNTP SettingsSNTPSet this option to use the SNTP protocol. SNTP ServerEnter the IP address or host name of the SNTP server.

7-139
SYSTEM SETTINGS►SYSTEM SETTINGS
Port NumberEnter a port number. The default setting is port 123. TimeoutEnter a timeout. The default setting is 5 seconds. Synchronous IntervalEnter an interval to synchronize to the SNTP server. Synchronize Upon StartTo establish synchronization during machine startup, set to . Synchronize NowWhen tapped, the machine is synchronized with the SNTP server time.
mDNS
mDNS SettingsmDNSSet this option to use the mDNS settings. Service NameEnter a service name. Domain NameDisplay the domain name. Highest Priority ServiceSelect a service you use with the priority.
SNMP
SNMP v1 SettingsSNMP v1 SettingsSet this option to use the SNMPv1 settings. Access MethodSet an access method. GET CommunityEnter the GET community name to fetch the device information using SNMP. SET CommunityEnter the SET community name required for SNMP setting. Change SET CommunityTo change the SET community, set . TRAP CommunityEnter the community name to be used for the SNMP TRAP sent from the device. TRAP Target AddressEnter the IP address of the destination computer for SNMP TRAP communication.
SNMP v3 SettingsSNMP v3 SettingsSet this option to use the SNMPv3 settings. User NameEnter the user name. Authentication KeyEnter the authentication key. Privacy KeyEnter the privacy key. Context NameDisplay the context name.

7-140
SYSTEM SETTINGS►SYSTEM SETTINGS
WINS
WINS SettingsPrimary ServerEnter the IP address of primary WINS server. Secondary ServerEnter the IP address of secondary WINS server. Scope IDEnter the scope ID.
Print Port Settings
LPDEnter a profile expiring date.
LPD SettingsLPDSet this option to use LPD. TimeoutEnter a timeout. The default setting is 90 seconds. Use BannerSet this option to use the banner. The default setting is "Invalid".
RAW
Raw Print SettingsRaw PrintSet this option to use RAW printing. The default setting is "Valid". Port NumberEnter a port number. The default setting is port 9100. TimeoutEnter a timeout. The default setting is 90 seconds. Use BidirectionalTo use bidirectional communication, set to .
WSD
WSD SettingsWSD PrintSet this option to use WSD printing. Use Multicast DiscoverySet this option to use multicast discovery.
External Print Services Settings
Google Cloud Print Settings
Google Cloud Print
Status"Not Set", "Registering", "Registered", or "Offline" will appear.Specify whether or not Google Cloud Print is used.

7-141
SYSTEM SETTINGS►SYSTEM SETTINGS
Always Retain PrintsThe retention print function can be enabled in Google Cloud Print.When this setting is enabled, Google Cloud Print jobs are saved in the "Main Folder" of the document filing function of the machine.When this setting is disabled, the machine starts printing immediately after it receives a Google Cloud Print job.
E-mailThis shows the e-mail address of the Google account of the administrator who registered the machine in Google Cloud Print.
Device NameSet the device name that appears on the client device.This setting is the same as the device name on the machine information page of the status.
Register with Google Cloud PrintThis appears when the "Status" is "Not Set".Tap this key to show the registration information on the operation panel.Open the Web browser on your device and go to the URL that is displayed.When the Google account login page appears in your Web browser, enter the Google account information of the administrator of the machine.Follow the instructions that appear after you log in to complete the registration procedure for the machine.When you have successfully completed registration, the “Status” changes to “Registered”.
Delete from Google Cloud PrintThis appears when the "Status" is "Registered".Tap this key to delete the machine's information from the Cloud server, and the Google Cloud Print settings from the machine.
Registration URL/QR codeThis appears when the "Status" is "Registering".Directly enter the URL for registration in the client device, or scan the QR code and access the registration page.When you complete final registration on the registration page, you will be able to use Google Cloud Print.
Complete the registration procedure within 10 minutes after the registration information is shown. If you fail to complete registration within this time, the status will change from “Registering” back to “Not Set”.

7-142
SYSTEM SETTINGS►SYSTEM SETTINGS
AirPrint Settings
AirPrint (Print), AirPrint (Scan), AirPrint (Fax Send)Select these settings to use the AirPrint functions.
mDNSEnable or disable mDNS. When mDNS is disabled, the machine will not appear in the list of printers when AirPrint is used to print.This setting is linked to [Network Settings] → [Services Settings] → [mDNS Settings] → [mDNS] in "Settings (administrator)".
IPPSpecify whether or not the IPP port of the machine is enabled. This setting is linked to [Security Settings] → [Port Control] → [IPP] in "Settings (administrator)".
IPP-SSLSpecify whether or not the IPP-SSL port of the machine is enabled. This setting is linked to [Security Settings] → [Port Control] → [IPP-SSL] in "Settings (administrator)".
Service NameSet the name of the printer that appears in the application when AirPrint is used.This setting is linked to [Network Settings] → [Services Settings] → [mDNS Settings] → [Service Name] in "Settings (administrator)".
Machine LocationEnter the machine installation location information that is sent to the application when AirPrint is used.This setting is linked to Machine Information Page in Setting mode.
geo URI (RFC 5870)Enter the geographic location of the machine.Enter the location information in the format specified by the geo URI standard.
External Service Connect
Cloud Connect Settings
Office 365Domain NameSet this when using the OneDrive for Business Link / SharePoint Online Link function.Enter your Office 365 domain name (the ***** part of ******.onmicrosoft.com).
SharePoint OnlineSite URLTo connect to a subsite or site collection of the SharePoint Online server, enter the URL.
Google DriveGoogle DriveSpecify whether or not the Google Drive is enabled.

7-143
SYSTEM SETTINGS►SYSTEM SETTINGS
E-mail Connect Settings
ExchangeUse Exchange OnlineTo connect to Exchange Online, set this to .
HostnameEnter the host name (FQDN) of the Exchange server.
GmailGmailTo enable Gmail, select using the Enable/Disable pull-down.
LDAP SettingsThe following explains the LDAP settings.When you tap the [Store] key, the LDAP settings are updated with your entries.The default address book is set to .
AddTap the [Add] key for addition.
DeleteTo delete an item, select it and tap the [Delete] key.

7-144
SYSTEM SETTINGS►SYSTEM SETTINGS
Settings
Setup Items Setting
Name Enter the address book name.
Search RootEnters the search defaults to search for a specific area of the LDAP directory information tree.Example: o = ABC, ou = NY, cn = EveryoneEntries must be separated from each other by semicolons or commas.
LDAP Server Enter the IP address or host name of the LDAP server.
Server Type Select the Default or Custom from the service type list. The default setting is Default.
User Identity Attribute Set the user ID property. The default setting is "uid".
Search Attribute Set the LDAP search property. The default setting is "cn".
Obtain E-mail address from Set the e-mail address search. The default setting is "mail".
Obtain Internet Fax address from Set the Internet Fax address search. The default setting is "mail".
Obtain Fax number from Set the fax number search. The default setting is "facsimileTelephoneNumber".
Public Key Search Sets the open key search. The default setting is "userCertificate".
Pages Limit Group Set the Storing Page Limit Group Search. The default setting is "pagelimit".
Authority Group Set the Storing Authority Group Search. The default setting is "authority".
Favorite Operation Group Set the Favorite Operation Group Search. The default setting is "favorite".
My Folder Set the My Folder Search. The default setting is "myfolder".
Card ID Sets the card ID search. The default setting is "cardid".
Custom Property 1-10 Enter each custom property.
Port Number Enter a port number. The default setting is port 389.
Timeout Enter a timeout. The default setting is 5 seconds.
User Name Enter the account name for LDAP setting.
PasswordEnter the password.To change the password, set [Change Password] to .
Authentication Type Select the authentication server from the drop-down list.
Bind Prefix Set the Bind prefix. The default setting is "uid".
Server UsageSet the server application.Set the address book and user authentication.
Applicable Destination Type Select the applicable destination type from E-mail Address, Fax Number, and Internet Fax.
Allow selection on operation panel.
Specify whether or not enable the global address to be selected on the operation panel of the machine.
To Be Used as Default Specify whether or not to use the selected global address as default.
Authenticate a User in Global Address Search
Select whether or not authenticate a user when a global address is searched for.
Enable SSL Enables the SSL encryption communication.
Connection Test Tap the [Execute] button, and the connection test is executed and its result is displayed.
When settings are changed, the changes will take effect after the machine is restarted. To restart the machine, see "TURNING ON THE POWER (page 1-8)".

7-145
SYSTEM SETTINGS►SYSTEM SETTINGS
Active Directory SettingsDomain NameEnter the domain name.
Search Attribute:Set the lookup attribute. The default setting is cn.
Linkage with User Control FunctionPages Limit GroupEnter to set a page limit group. The default setting is pagelimit.Authority GroupEnter to set an authority group. The default setting is authority.Favorite Operation GroupEnter to set a favorite operation group. The default setting is favorite.My FolderEnter to set My Folder. The default setting is myfolder.
Device Registration AccountUser NameEnter the user name to be used.PasswordEnter a password.
Public Folder / NAS SettingThe "public", "shared" and "faxreceive" folders of the MFP can be accessed as network folders from a network PC.
Settings
Item Settings
publicWhen [Use of Storage] is set to [Allow], the PDF files for PC viewing in the "public" folder can be accessed.
shared If the [Use of Storage] is set to [Allow], you can use the "shared" folder as a network folder.
faxreceiveIf the [Use of Storage] in set to [Allow], you can use the "faxreceive" folder as a fax/Internet fax received data. The "faxreceive" folder contains files of "Inbound Routing (HDD Storage) Settings".

7-146
SYSTEM SETTINGS►SYSTEM SETTINGS
Proxy SettingAccess the network through a proxy server.
Settings
Wireless SettingsIt provides access to a network via a wireless LAN.Clicking the [Submit] button stores the settings.
Connection TypeUse this setting to switch between [Wired Only], [Wired+Wireless (Access Point Mode)] or [Wireless (Infrastructure Mode)].
Keep Wireless Access Point activatedThis can only be enabled when "Connection Type" is "Wired+Wireless (Access Point Mode)".If disabled, the NFC card reader must be touched to the mobile device or the [Easy Connect (QR code)] key must be tapped in the home screen to enable wireless LAN. When one of the conditions below occurs, the wireless LAN connection is automatically canceled.• When auto clear or auto power shutoff is performed on the machine.• When there is no connection to the access point for a certain period of time.
Current SettingShows settings, such as the SSID of a wireless LAN and security type. If the wireless LAN is disabled, "--" appears.
Current Wireless StatusThis shows reception levels (Max. 100) of the wireless LAN and IP addresses.
Show Wireless Setting ScreenClick the [Setup] button.In the Wireless Setting screen, you can configure the SSID of a wireless LAN, Security Type, Encry., and Security Key.
Item Description
Proxy Setting Set whether proxy settings are used.
Proxy Server Address Enter the proxy server address.
User Name Enter a user name to access the proxy server.
Password Enter a password to allow access to the proxy server.
Port Number Enter the proxy server port number.
Address without Using Proxy
Specify exception addresses for a proxy that is used in the external service connect function, Google Cloud Print and Sharp OSA.[Entry method]1) Can be set using a host name or an IP address.2) When using a host name, you can use a wildcard (*) at the beginning of the domain
name.(Example: "*example.□□□" (equivalent to "example.□□□", "sub.example.□□□", "subexample.□□□", etc.)
3) When using an IP address, you can use a wildcard (*) at the end of the address.(Example: "10*" (equivalent to 100.nnn.nnn.nnn to 109.nnn.nnn.nnn)If the Sharp OSA application using "HTML Browser 3.5" is set to an exception address, rule (3) cannot be used.
4) You can use a separator (semicolon (;)) to enter multiple addresses.(Example: "99.99.99.99;example.□□□")
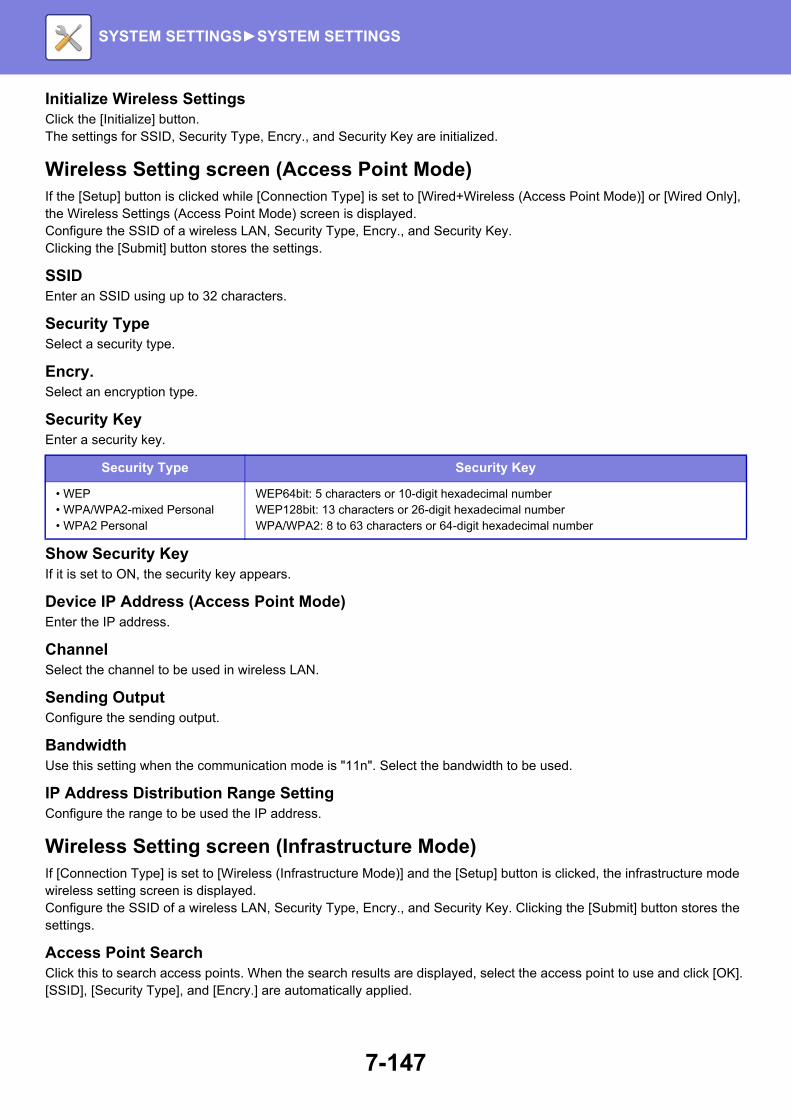
7-147
SYSTEM SETTINGS►SYSTEM SETTINGS
Initialize Wireless SettingsClick the [Initialize] button.The settings for SSID, Security Type, Encry., and Security Key are initialized.
Wireless Setting screen (Access Point Mode)If the [Setup] button is clicked while [Connection Type] is set to [Wired+Wireless (Access Point Mode)] or [Wired Only], the Wireless Settings (Access Point Mode) screen is displayed.Configure the SSID of a wireless LAN, Security Type, Encry., and Security Key.Clicking the [Submit] button stores the settings.
SSIDEnter an SSID using up to 32 characters.
Security TypeSelect a security type.
Encry.Select an encryption type.
Security KeyEnter a security key.
Show Security KeyIf it is set to ON, the security key appears.
Device IP Address (Access Point Mode)Enter the IP address.
ChannelSelect the channel to be used in wireless LAN.
Sending OutputConfigure the sending output.
BandwidthUse this setting when the communication mode is "11n". Select the bandwidth to be used.
IP Address Distribution Range SettingConfigure the range to be used the IP address.
Wireless Setting screen (Infrastructure Mode)If [Connection Type] is set to [Wireless (Infrastructure Mode)] and the [Setup] button is clicked, the infrastructure mode wireless setting screen is displayed. Configure the SSID of a wireless LAN, Security Type, Encry., and Security Key. Clicking the [Submit] button stores the settings.
Access Point SearchClick this to search access points. When the search results are displayed, select the access point to use and click [OK]. [SSID], [Security Type], and [Encry.] are automatically applied.
Security Type Security Key
• WEP• WPA/WPA2-mixed Personal• WPA2 Personal
WEP64bit: 5 characters or 10-digit hexadecimal numberWEP128bit: 13 characters or 26-digit hexadecimal numberWPA/WPA2: 8 to 63 characters or 64-digit hexadecimal number

7-148
SYSTEM SETTINGS►SYSTEM SETTINGS
SSIDEnter an SSID using up to 32 characters.
Security TypeSelect a security type.
Encry.Select an encryption type.
Security KeyEnter a security key.
Show Security KeyIf it is set to ON, the security key appears.
Easy Connection Setting
NFCThis appears when an NFC card reader is connected. Enable this setting to connect to mobile devices using an NFC card reader.
QR codeYou can install the dedicated application in a mobile device in advance, and scan the displayed QR code to send and save the connection settings to the mobile device.
DestinationSet the connection destination for connection by NFC card reader, or the connection destination associated with the QR code.To connect to the machine, select [Connect with the machine]. The information required to connect to the machine is saved in the application.To connect to a destination other than the machine, select [Connect with the following access point].To set manually, obtain the network information of the connection destination in advance.When [Connect with the following access point] is selected, configure the following settings.
Access Point SearchClick this to search access points. When the search results appear, select the access point to be used and click [OK].[SSID] of the selected access point, [Security Type], and [Encry.] are automatically applied.
NameEnter the access point name.
SSIDEnter an SSID using up to 32 characters.
Security Type Security Key
• WEP• WPA/WPA2-mixed Personal• WPA/WPA2-mixed Enterprise• WPA2 Personal• WPA2 Enterprise
WEP64bit: 5 characters or 10-digit hexadecimal numberWEP128bit: 13 characters or 26-digit hexadecimal numberWPA/WPA2: 8 to 63 characters or 64-digit hexadecimal number

7-149
SYSTEM SETTINGS►SYSTEM SETTINGS
Security TypeSelect a security type.
Encry.Select an encryption type.
Security KeyEnter a security key.
Show Security KeyIf it is set to ON, the security key appears.
Device Web Page SettingThe following explains the access settings to Setting mode (Web version).
Number of Users who can Log-in at the Same TimeEnter a number of users who can access Setting mode (Web version) simultaneously.
Auto Logout TimeEnter a time to automatically log out when no communication continues with the machine.
View Login UserThe user or users who have logged in this machine are displayed.
Current Login UserThe currently logged in users are displayed.
Logout All UsersThe current login users are logged out.
Security Type Security Key
• WEP• WPA/WPA2-mixed
Personal• WPA2 Personal
WEP64bit: 5 characters or 10-digit hexadecimal numberWEP128bit: 13 characters or 26-digit hexadecimal numberWPA/WPA2: 8 to 63 characters or 64-digit hexadecimal number
When settings are changed, the changes will take effect after the machine is restarted. To restart the machine, see "TURNING ON THE POWER (page 1-8)".
When settings are changed, the changes will take effect after the machine is restarted. To restart the machine, see "TURNING ON THE POWER (page 1-8)".

7-150
SYSTEM SETTINGS►SYSTEM SETTINGS
Security Settings
Password ChangeRestrict Device Web Page Access Via PasswordUse this setting to display the login screen and require login in order to access the Web server.
Change PasswordThe administrator password can be changed.When changing the password, be sure to remember the new password.(It is recommended that you periodically change the administrator password.)
Enter a password consisting of 5 to 32 characters, and tap the [Store] key.Your setting is made valid only when the machine is turned On again.• The user-level authentication password is required to add, edit or delete the destination. When you log on, enter
"users" as the user name. Then, enter the user password that you have registered with this option.The administrator-level authentication password is required to select all settings and the same functions as those available with the user-level password. When you log on, enter "admin" as the user name. Then, enter the administrator password that you have registered with this option.
• If you tap the [Store] key without entering a password, the previously set value is assumed. Password protection is enabled by default.
Port ControlEnable or disable main system ports, set the port numbers, and tap the [Store] key.The following ports can be configured.
When settings are changed, the changes will take effect after the machine is restarted. To restart the machine, see "TURNING ON THE POWER (page 1-8)".
In the factory default state, the user password must be entered.(For the default password, see "Start Guide".)
Server Port Client Port
• HTTP
• HTTPS
• FTP Print
• Raw Print
• LPD
• IPP
• IPP-SSL
• PC Scan
• Remote Operation Panel
• SNMPD
• NBT/WINS
• SMTP
• BMLinkS
• WSD
• Print Release
• Sharp OSA (Expansion Platform)
• HTTP• HTTPS
• HTTP
• HTTPS
• FTP
• FTPS
• SMTP
• SMTP-SSL
• POP3
• POP3-SSL
• SNMP-TRAP
• Notify Job End
• LDAP
• LDAP-SSL
• SMB/WINS
• SNTP
• mDNS
• Data Backup (Send)
• Print Release
• XMPP

7-151
SYSTEM SETTINGS►SYSTEM SETTINGS
Filter SettingYou can set the filter by an IP or MAC address to prevent an unauthorized access to the machine via a network.Set the IP or MAC address filter and tap the [Store] key.
IP Address Filter SettingsThis option sets an IP address.You can specify whether to allow or prohibit access to the machine from the IP address you set.
MAC Address Filter SettingsThis option sets a MAC address.It allows access to the machine from the MAC address you set.
SSL SettingsSSL can be used for data transmission over a network.SSL is a protocol that enables the encryption of information communicated over a network. Encrypting data makes it possible to transmit and receive sensitive information safely.Data encryption can be set by the following protocols.
Server Port• HTTPS: Apply SSL encryption to HTTP communication.• IPP-SSL: Apply SSL encryption to IPP communication.• Redirect HTTP to HTTPS in Setting mode (Web version) Access:
When this setting is enabled, all communication that attempts to access the machine by HTTP is redirected to HTTPS.
Client Port• HTTPS: Apply SSL encryption to HTTP communication.• FTPS: Apply SSL encryption to FTP communication.• SMTP-SSL: Apply SSL encryption to SMTP communication.• POP3-SSL: Apply SSL encryption to POP3 communication.• LDAP-SSL: Apply SSL encryption to LDAP communication.
Level of EncryptionThe encryption strength can be set to one of three levels.
Device CertificateCertificate StatusShows the status of the certificate required for transmission using SSL. To install a certificate, click [Install].Export Certificate and Private KeyWhen a certificate is installed, you can export the certificate.
Make of Certificate Signing Request(CSR)Enter the information below and click the [Execute] key to create a Certificate Signing Request (CSR).Common Name (Required)Enter the name to be used.OrganizationEnter the name of the organization.Organizational UnitEnter the name of the unit within the organization.City/LocalityEnter the city or locality.State/ProvinceEnter the state or province.

7-152
SYSTEM SETTINGS►SYSTEM SETTINGS
Country/Region (Required)Enter the country code.Key Length of CertificateEnter the key length of the certificate.Certificate Signing Request (CSR)When you create a certificate signing request (CSR) with [Make of Certificate Signing Request(CSR)], the content of the certificate signing request (CSR) appears.
S/MIME Settings
Condition SettingsSet whether S/MIME is used for transmission.
Device CertificateCertificate StatusShows the status of the certificate required for transmission using S/MIME. To install a certificate, click [Install].
Sign SettingsSign E-mailEnable "Sign E-mail" to use a signature.Signature AlgorithmSet the algorithm for the signature.
Encryption SettingsSign E-mailEnable "Sign E-mail" to use a signature.EncryptEnable encryption.Disable sending to the addresses which cannot be encrypted.Prohibit transmission to addresses that cannot be encrypted.
Make of Certificate Signing Request(CSR)Enter the information below and click the [Execute] key to create a Certificate Signing Request (CSR).Common Name (Required)Enter the name to be used.OrganizationEnter the name of the organization.Organizational UnitEnter the name of the unit within the organization.City/LocalityEnter the city or locality.State/ProvinceEnter the state or province.Country/Region (Required)Enter the country code.Sender Address (Required)Enter the address of the sender.Key Length of CertificateEnter the key length of the certificate.Certificate Signing Request (CSR)When you create a certificate signing request (CSR) with [Make of Certificate Signing Request(CSR)], the content of the certificate signing request (CSR) appears.

7-153
SYSTEM SETTINGS►SYSTEM SETTINGS
IPsec SettingsIPsec can be used for data transmission/reception on a network.When IPsec is used, data can be sent and received safely without the need to configure settings for IP packet encryption in a Web browser or other higher-level application.When enabling this settings, take the following notes. • It may take some time to reflect on the machine settings, and you cannot connect to the machine during this time.• If the Setting mode (Web version) settings are not correctly selected, connection to the machine may not be allowed,
or the settings may not allow printing, scanning, or Setting mode (Web version) display. In this case, deselect this setting and change the System Settings (on Web pages).
Condition Settings
IPsec SettingsSpecify whether or not IPsec is used for transmission.
IKEv1 SettingsPre-Shared KeyEnter the Pre-Shared Key to be used for IKEv1.SA Lifetime (time)Set the SA lifetime.SA Lifetime (size)Set the SA lifetime size.IKE LifetimeSet the IKE lifetime.
IPsec RulesThe registered IPsec rules are displayed.To add a new rule, click the [Add] key.To delete a rule, select the rule you want to delete and click the [Delete] key.
IPsec Rule RegistrationRule NameEnter a name for the IPsec rule.PrioritySet the priority level.Select the Rule Name to be the Registration ModelIf there is a previously registered rule that is similar to the rule you want to create, you can create the new rule based on the registered rule.Device AddressSet the type of IP address to be used on the machine and the port number (for IPv6, set the port number / prefix length).Client AddressSet the destination IP address type and port number (for IPv6, set the port number / prefix length).Communication TypeSet the communication type used for IPsec.ProtocolSet the protocol to be used.Filter ModeSet the filter to be used for IPsec.IPsec EncryptionConfigure settings for the authentication method used for IPsec.ESPSelect to use ESP authentication.Allow Communication not using ESPSpecify whether or not communication that does not use ESP is allowed.

7-154
SYSTEM SETTINGS►SYSTEM SETTINGS
AHSelect to use AH authentication.Allow Communication not using AHSpecify whether or not communication that does not use AH is allowed.
IEEE802.1X SettingIEEE802.1X can be used to authenticate a user to allow use of the machine.IEEE802.1X protocol defines port-based authentication for both wired and wireless networks.Use IEEE802.1X authentication to allow only authenticated devices to use network, and protect against network abuse by third parties.You can enable or disable IEEE802.1X authentication with this setting. The IEEE802.1X details can be set with Setting mode (Web version). Depending on the Web page settings, connection to the machine may not be allowed, or the settings may not allow printing, scanning, or Setting mode (Web version) display. In this case, deselect this setting and change the Setting mode (Web version) settings.
Condition Settings
IEEE802.1X AuthenticationSet whether IEEE802.1X authentication is used.
EAP Authentication MethodSet the EAP authentication method in IEEE802.1X.
EAP User NameEnter a maximum of 64 full-width/half-width characters for the EAP user name used for authentication.
PasswordEnter a maximum of 64 half-width characters for the EAP password used for authentication.
Server AuthenticationSet whether server authentication is used.
EAP TimeoutSet the EAP Timeout.
Number of EAP RetriesSet the number of EPS re-access times when transmission fails.
Device CertificateCertificate StatusShows the status of the certificate required for transmission using IEEE802.1X. To install a certificate, click [Install].CA Certificate StatusShows the status of the CA certificate required for transmission using IEEE802.1X. To install a certificate, click [Install].
Make of Certificate Signing Request(CSR)Enter the information below and click the [Execute] key to create a Certificate Signing Request (CSR).Common Name (Required)Enter the name to be used.OrganizationEnter the name of the organization.Organizational UnitEnter the name of the unit within the organization.City/LocalityEnter the city or locality.

7-155
SYSTEM SETTINGS►SYSTEM SETTINGS
State/ProvinceEnter the state or province.Country/Region (Required)Enter the country code.Key Length of CertificateEnter the key length of the certificate.Certificate Signing Request (CSR)When you create a certificate signing request (CSR) with [Make of Certificate Signing Request(CSR)], the content of the certificate signing request (CSR) appears.
Security Control
Restrict Print Jobs other than the current Print Hold JobYou can select settings to cancel print jobs that are not print hold jobs, or force all print jobs to be held. When [Restrict Print Jobs other than the current Print Hold Job] is turned ON, the settings below can be selected.
Reject Requests from External SitesYou can reject the request from external sites.
Document Administration FunctionAll of the transmitted image data (sent or received by facsimile or e-mail transfer) can be forwarded to any destination.
Item Settings
Force RetentionThis setting forcibly sets all print jobs as print hold jobs, even jobs for which print hold is not selected.
Disable Job Prohibit all print jobs other than print hold jobs.
List name Settings
Forwarding Destination Settings (Send Data)
Forward Send Data Set a destination to forward the send data.
E-mail/Network Folder/FTP/Desktop
Select a forwarding type of the send or received image data. When determined, select the destination from the address book.You can enter an e-mail directly.• Format: Select a format for data forwarding.
Clear Setting Releases the destination settings.
File Format Select the file format for inbound routing.
Forwarding Destination Settings (Received Data)
Forward Received Data Set a destination to forward the received data.
E-mail/Network Folder/FTP/Desktop
Select a forwarding type of the send or received image data. When determined, select the destination from the address book.You can enter an e-mail directly.• Format: Select a format for data forwarding.
Clear Setting Releases the destination settings.
File Format Select the file format for inbound routing.

7-156
SYSTEM SETTINGS►SYSTEM SETTINGS
Hidden Pattern Print SettingSelect Hidden Pattern Print Setting.The hidden pattern print function is effective at preventing unauthorized copying as the specified text emerges in the background on output sheets.
Initial Status Settings
Default Settings
Print Contents Setting
Item Settings
Hidden Pattern Print Setting A pattern print can be printed with this settings.
Exposure Select an exposure.
Font Size Select a font size.
Angle Select a character angle.
Font Style Select the standard or italic character settings.
Camouflage Pattern Set a camouflage pattern.
Print MethodSelect a character display pattern.• Positive• Negative
Item Settings
Pre-Set Word
Allows you to select a preset character string.The following character strings can be selected.• DO NOT COPY, Copy Ban, Internal Use Only, Handle with Care, CONFIDENTIAL, Copy
Invalid, IMPORTANT, COPY
Fixed Phrase
Select a stored preset character string.This setting is ignored if [Direct Entry] is enabled.• DO NOT COPY, Copy Ban, Internal Use Only, Handle with Care, CONFIDENTIAL, Copy
Invalid, IMPORTANT, COPY
Information PrintingEnables simultaneous printing of the following information sets.• Serial number, account job ID, login name/user number, number of copy control, date
and time
Disable Direct EntryDirectly enters the user name.This setting is ignored if [Pre-set Text] is enabled.

7-157
SYSTEM SETTINGS►SYSTEM SETTINGS
ContrastSet a character contrast.The black, magenta, and cyan can be set in any of 9 levels.
Custom Text RegistrationStores the user-created print characters. Up to 30 characters can be stored.
Tracking Information PrintPrints the tracking information at the top or bottom of output pages when copy or print job is executed.
Audit LogLogs are created and saved for various events relating to security functions and settings.Audit logs are created and saved in English. However, setting values such as filenames which are input from external sources are saved as-is.Audit logs which have been saved in the internal storage can be exported by an administrator to a PC as TSV files.You can select either the internal storage or an external server as the destination for saving audit logs.
Audit Log"Audit Log" can be carried out as follows.In "Settings (administrator)", select [System Settings] → [Security Settings] → [Audit Log]Select "Security Control", "Storage/Send Settings" or "Save/Delete Audit Log".
Storage/Send Settings"Storage/Send Settings" can be carried as follows.In "Settings (administrator)", select [System Settings] → [Security Settings] → [Audit Log]→ [Storage/Send Settings]Then make the storage and transmission settings.
Save/Delete Audit Log"Save/Delete Audit Log" can be carried out as follows.In "Settings (administrator)", select [System Settings] → [Security Settings] → [Audit Log]→ [Save/Delete Audit Log]Select "Save Audit Log" or "Delete Audit Log".
Item Settings
Tracking Information Print Setting Set this option to print the tracking information.
Print InformationThe following information can be printed. • Serial number, characters, account job ID, login name/user number, date and time
Position Set a print position on each page.
Select the Job to Print Set a job to print the tracking information.
When the space for saving audit logs internally becomes full, the logs are overwritten starting from the oldest ones.
"Save Audit Log" can only be carried out from the web page.

7-158
SYSTEM SETTINGS►SYSTEM SETTINGS
Energy Save
Eco SettingThe machine's power consumption can be reduced by Eco Mode setting. Although each function setting can be changed separately, the machine has the "Custom" and "Eco Mode" to allow simultaneous changing of settings.
Eco Recommendation Function DisplayYou can display eco-recommended functions such as two-sided printing and N-Up during copying, document filing print, and direct print.Setting values applied by each mode is as follows.
Display Message When Extending Transition Time to Preheat/Auto Power Shut-Off ModeSet whether a message is displayed 15 seconds before Preheat Mode or Auto Power Shutoff Mode is entered.
Mode Setting
Energy Save Custom Mode Eco Mode
Eco Scan OnOn(All Modes Except Copy)
Auto Power Shut-Off Timer Fix transition time.: 1min. Fix transition time.: 1min.
As soon as the remote job is finished, enter Auto power shut off mode.
On On
Preheat Mode Setting 1min. 1min.
Turn off Panel Display during pre-heat mode On On
Each Energy Save settings in System Settings is not applied when Custom/Eco mode is used.
Item Settings
Custom Mode Allows easy machine operation with reduced power consumption.
Eco Mode Minimizes the machine's power consumption.

7-159
SYSTEM SETTINGS►SYSTEM SETTINGS
Preheat Mode SettingSet the number of minutes until preheat mode activates. Set a number from 1 to 120 in increments of 1 minute.Preheat Mode will activate when the set duration of time elapses after printing ends and no further operations are performed. This function reduces your power costs, and at the same time helps conserve natural resources and reduce pollution.Select the time that best suits the needs of your workplace.The panel display can be turned Off in the Preheat mode.
Turn off Panel Display during pre-heat modeSet whether the lights on the operation panel turn off in preheat mode.
Auto Power Shut-OffWhen the machine is idle for the set time after printing, it enters auto power shutoff mode. In this mode, the machine waits on standby using a minimum amount of power.Use this setting to specify whether auto power shutoff is used.
As soon as the remote job is finished, enter Auto power shut off mode.This function works in Auto Power Shut-Off mode. When the machine completes a print job received from the PC or outputs received fax data, the machine immediately returns to the Auto Power Shut-Off mode.
Fix transition time.The Auto Power-Off transition time is fixed.When this setting is enabled, the [Change transition time by time of day.] option is disabled.
Preheat mode cannot be disabled.
If the Auto Power-Off is disabled, the time you have set here is disabled.

7-160
SYSTEM SETTINGS►SYSTEM SETTINGS
Change transition time by time of day.This function controls the transition to Auto Power Shut-Off mode optimally for each time period by analyzing the use of the machine based on job logs obtained during a 4-week period.When this setting is enabled, the [Fix transition time.] option is disabled.
Transition to Energy Saving and Auto Power Shut-Off modes
* Factory default setting
AutomaticThis function controls the power optimally for each time period by analyzing the use of machine based on job logs obtained during a certain time period.
ManualYou can set a pattern for each time band.The machine already has the 3-pattern template. The Energy Save pattern can be added to the "Original Eco Patterns 1 to 4". Three-pattern template
• The image transfer control settings are not changed.
• This does not link to the Power On/Off Scheduling. If both of them are enabled, the Power On/Off Scheduling settings precede.
• Pages are counted for each paper size separately.
• When the power supply of the machine was off, there was no job during this time.
Pattern Transition time Average outputs per hour *
Mode1 (Job Start Priority1)
After 1 hour 700 or more
Mode2 (Job Start Priority2)
After 30 minutes 150 to 699
Mode3 (Energy Saving Priority1)
After 5 minutes 40 to 149
Mode4 (Energy Saving Priority2)
After the minimum time period Up to 39
Sleep Mode Power Level
Low Power: The machine switches to the power saving mode, but it takes some time to recover.
Fast Wake Up: Compared with Low Power, the power value rises by a certain degree, but it results in faster recovery.
–
If the machine does not have the 4-week job log information, the machine enters the template2 (Mode3 (Energy Saving Priority1) between 8:00 and 18:00 hours). Then after that, it enters Mode4 (Energy Saving Priority2).
Template Pattern Description of mode
Template 1All Day "Energy Save Priority2"
The machine runs in the "Mode4 (Energy Saving Priority2)" all the time.
Template 28:00-18:00 "Energy Save Priority1"
The machine runs in "Mode3 (Energy Saving Priority1)" between 8:00 and 18:00, and in "Mode4 (Energy Saving Priority2)" at other times.
Template 38:00-18:00 "Job Start Priority1"
The machine runs in "Mode1 (Job Start Priority1)" between 8:00 and 18:00, and in "Mode4 (Energy Saving Priority2)" at other times.

7-161
SYSTEM SETTINGS►SYSTEM SETTINGS
Sleep Mode Power LevelLow Power: The machine switches to the power saving mode, but it takes some time to recover.Fast Wake Up: Compared with Low Power, the power value rises by a certain degree, but it results in faster recovery.
Eco Scan SettingEco Scan Setting is used to execute a non-print operation such as image sending and scan to HDD while the fusing unit is turned Off.Set "Eco Scan Setting" to , and select a mode or screen in which to enable Eco Scan Setting. The following modes and screens can be set.• Home Screen• Copy• Image Send• Document Filing• System Settings• Sharp OSA• Manual Finishing
Energy Saving Pattern ListThis function analyzes machine usage and controls entry into auto power shutoff mode based on frequency of use.If you want to manage machine power by using an energy saving pattern list, select [Manual] in [System Settings] - [Eco Setting] - [Change transition time by time of day.], and select an Automatic Update Pattern from the pull-down list or one of Original Eco Patterns 1 to 4.To automatically analyze machine usage and update the pattern as needed, set Automatic Update Pattern.
Edit PatternSet the Original Eco Pattern.
Item Description
Change Pattern Name To change the pattern name, enter the desired name.
Pattern to Be ModeledSelect the stored pattern that you want to base the new pattern on. To copy the settings of a selected pattern, select [Copy the selected pattern.].
Energy Save SettingSet time periods for machine modes. Select a mode from 1 to 4, and select a day of the week, start time, and end time.
Day of the WeekSet the day of week on which you want to enable the mode selected in the Energy Save Setting.
Start Time/Completing TimeSet the period of time during which you want to enable the mode selected in the Energy Save Setting.

7-162
SYSTEM SETTINGS►SYSTEM SETTINGS
Specific Date Operation SettingsYou can configure a day on which you have high-output printing or want to perform a special operation as the "specific date" and set a specific energy saving pattern only for that specific date.
"Specific Date" tabA period of up to 7 days can be set for Specific Date. Set the specific date, energy saving pattern to be applied, and the operation that takes place if the specific date falls on a non-work day.
"Pattern" tabThis tab is used to configure the details of an energy saving pattern.
"Holiday" tabSpecify a holiday. The day you specified as the holiday will not be a specific date.
The specific date operation is performed on the day configured as the specific date regardless of the setting on Auto Power-Off transition time (enabled or disabled).
Item Description
Date SettingConfigure the date on which you want to operate the machine with a specific pattern.Select a day between 1 and 31 in Every Month or from End of Every Month.
Applied Energy Saving OperationSelect an energy saving pattern you want to apply.Use the "Pattern" tab (page 7-162) to specify the details of the energy saving pattern.
Operation for HolidayConfigure how the machine operates if the preset specific date falls on a holiday.Use the "Holiday" tab (page 7-162) to specify the day as the holiday.
• If a specific date that is initially specified coincides with the one that is moved because it falls on a holiday, the setting for the former takes precedence.
• If specific dates of the same dates are configured, they are used in ascending order between 1 and 7 (specific date numbers).
Item Description
Energy Save Operation Select a specific date pattern you want to specify.
Change Pattern Name Enter a pattern name when you want to change the name of a specific date pattern.
Pattern to Be Modeled Select a source pattern when you create a pattern using a stored or preset pattern.
Add new schedule. Add a schedule.
Item Description
Holiday ListWhen you tap this option, the dates and days of the week for the holidays you have set for two years.
Day of Week Use this option to specify a holiday using a day of the week.
Set PeriodUse this to specify a holiday using a date."Final Registered Time" shows when the holiday that is stored with Set Period was stored.

7-163
SYSTEM SETTINGS►SYSTEM SETTINGS
Power ON/OFF Schedule SettingThe machine operator panel can be turned On or Off at a preset time. Up to three (3) patterns can be set. The "Setting 1", "Setting 2" and "Setting 3" are executed in this sequence if set at the same day of week or at the same clock time.
Toner Save ModeThis mode is used to reduce toner consumption.Toner consumption can be set for each print job of "Copy", "Printer", and "Prints (Document Filing)".Toner consumption can be selected from three levels. • Toner Save1 (Toner Consumption: Much)• Toner Save2 (Toner Consumption: Middle)• Toner Save3 (Toner Consumption: Little)
• The scheduling function does not support the power management settings in the Preheat Mode and Auto Power Shut-Off Mode.
• The preset power-off time is subject to the following restrictions:
• If the machine is running due to the current job execution or other reasons, the machine is turned off only after the job has finished.
• The machine cannot receive printer jobs.
• The machine can receive output jobs, such as received fax data outputs.
• If the Time Specified Output of Received Data setting is enabled, they are output next time the machine is turned on.
• If the power management setting is also enabled, the Power On/Off Scheduling settings precede.
• If the same time is specified, settings are applied in the order of "Setting 1", "Setting 2", and "Setting 3".
• The power is not turned off in the following cases:
• "Power Up Auto Clear" is in progress.
• While the optimization of the hard disk is in progress or while a restart is in progress after the setting mode has been changed.
• The preset power on/off time is within one minute from when the setting is accepted.

7-164
SYSTEM SETTINGS►SYSTEM SETTINGS
System Control
Job Log
Job Log OperationDeletes or stores log of a job executed on the machine.Set the number of jobs for [The Number of Job Log to Notify by E-mail] and click [Store].Tap the [Delete] key to delete the job log.
View Job LogViews log of a job executed on the machine.Select a view item and period, and tap the [Show] key.
Data Import/Export (CSV Format)You can import or export data.
Export SettingsExport Settings TypeSelect the data to be exported from the address book or registered user information. Once you have selected the data, click the [Execute] key. The data will be exported in CSV format.
Import SettingsImport settings from fileYou can import data that was exported in CSV format into the machine.
Storage BackupAddress book information and user information stored in the machine can be saved to and retrieved from a USB memory device. To use the machine to manipulate a file, first insert the USB memory device in the machine. If you need to select settings on the Web page, use your computer to manipulate the file.
ExportExports data.
ImportImports data into the machine.
You can save the job log by selecting the [Job Log] in Setting mode (Web version).
7-165
SYSTEM SETTINGS►SYSTEM SETTINGS
Device CloningSaves the machine setting information in XML format and copies the information to another machine.This function saves you the trouble of repeatedly configuring the same settings in multiple machines. To use the machine to manipulate a file, first insert the USB memory device in the machine. If you need to select settings on the Web page, use your computer to manipulate the file.
ExportExports data.
ImportImports data into the machine.
Address Book ForwardForward the data stored in the address book of the machine to another machine.To forward the address book contents, enter the IP address of the destination machine and the password of the administrator of that machine, and tap the [Execute] key.
Filing Data BackupYou can back up a file saved with Document Filing, and restore a backed up file to the machine.
Export SettingsSelect the folder you want to back up and click [Execute]. The files are saved to your computer.
Import SettingsYou can restore a file to the machine that was saved with “Export Settings”. Enter a maximum of 200 characters for the path of the saved file in “Import settings from file”, and click [Execute].
• For models that can be imported, consult your dealer.
• The following data is not copied when device cloning is performed:
• List print and fax forwarding items. • Count and device status display items. • IP address of the machine, device name, administrator password, sender names for image send, and other information
that is specific to the machine. • The settings specific to each hardware such as screen contrast
Use setting mode (Web) to create backups of filed data.
Item Description
Index The displayed Folder names can be filtered by index.
Display Items Set the number of files that are displayed.
7-166
SYSTEM SETTINGS►SYSTEM SETTINGS
Storing/Calling of System SettingsYou can reset the current Setting mode settings to the previously stored settings or to the factory default settings.
Store Current ConfigurationStores the currently configured Setting mode in the machine memory.The stored settings will be retained even if the [Power] button is turned off. To retrieve the stored settings, use "Restore Configuration" below.
Items not stored• Network Settings: These are not stored as unexpected settings may cause damage to the network.• Product Keys: Product Keys are not stored as reissue of keys may be necessary.
Restore ConfigurationRestores the settings stored with "Store Current Configuration". The current settings are replaced by the retrieved settings.
Reset Settings
Restore Factory DefaultsRestores the current settings (you have selected in Setting mode) to the factory default settings. If you wish to create a record of the current settings before restoring, print the current settings by selecting [Status] in "Settings (administrator)" → [Data List] → [List for Administrator]".
Reset the NICThis returns all "Network Settings" to the factory default settings.
Optimization of Hard DiskVarious devices mounted on the machine can be set.This function optimizes the hard drive of the machine by defragmenting data. If a job is in progress, a message will appear and optimization will not begin until the job is finished. During optimization, the following operations are not possible: • Access to Setting mode (Web version), and reception of print data• Use of keys on the operation panel• Turning off the power with the main power switch of the machine.• Auto Power Shut-Off
When optimization is completed, the machine will automatically restart.
When settings are changed, the changes will take effect after the machine is restarted. To restart the machine, see "TURNING ON THE POWER (page 1-8)".
When the document filing function is frequently used and output of files seems somewhat slow, optimizing the hard drive may improve performance.

7-167
SYSTEM SETTINGS►SYSTEM SETTINGS
E-mail Alert and Status
Status MessageSelects the Standard E-mail Status function or Advanced E-mail Status function settings.The E-mail Status function can periodically transmit the machine status information to the stored address.
StandardSets the E-mail status address list 1, E-mail status address list 2, and E-mail status dealer address list separately.
AdvancedBi-directional status message Select whether or not bi-directional messages are enabled.
Alerts MessageSelects the E-mail Alert function settings.The E-mail Alert function can report a trouble of the machine to the administrator or dealer using e-mail.Sets the E-mail Alert Message List 1, E-mail Alert Message List 2, and Dealer E-mail Alert Message List separately.
E-mail AddressEnter the destination E-mail address for alert message transmission. You can enter multiple addresses by separating them by a semicolon or comma.Example: aaa@xxxxx.□□□; bbb@xxxxx.□□□A report will be sent by e-mail in the following situations.Jam, Toner Low, Toner Empty, Paper Empty, Service Request, PM Request, Waste Toner Almost Full, Waste Toner Full, Job Log Full
Item Description
E-mail AddressEnter the destination e-mail address for transmission of machine status information. When you enter multiple addresses, separate them by a semicolon (;) or a comma (,).
Send Now When tapped, the status message is sent to the destination of the e-mail address list.
Send on Schedule 1 If checked as , an E-mail is sent periodically according to the preset schedule.
Send on Schedule 2 If checked as , an E-mail is sent periodically according to the preset schedule.
Time Schedule Select a schedule to send E-mails.
Item Description
POP3 Server Enter the IP address or host name of the POP3 server.
Port Number Enter the port number of the POP3 server. The default setting is port 110.
POP Authentication The authentication protocol (including APOP) is used for authentication to the POP3 server.
User NameEnter the user name. The special user account is required for bi-directional e-mail status transmission.
PasswordEnter the password.To change the password, set [Change Password] to .
Check Interval Enter the polling interval for the POP3 server. The default setting is five minutes.
Enable SSL
Allows the POP over SSL communication or the POP over TLS communication by STLS command.This requires the server to support the POP over SSL communication or the STLS command. To allow SSL communication, set the "Port Number" to the POP over SSL communication port number.To allow POP over TLS communication, set the "Port Number" to the same port number as for the normal POP3 communication.
Connection Test Tap the [Execute] button to test the connection to the POP3 server.

7-168
SYSTEM SETTINGS►SYSTEM SETTINGS
Image Quality Adjustment
Collective AdjustmentVarious devices mounted on the machine can be set.
Fusing Cleaning ModeUse this function to clean the machine's fusing unit when dots or other dirt appear on the printed side of the paper. When this function is executed, "V" printed paper is output and the fusing unit is cleaned.
Black Letter/Black Line Width AdjustmentAdjust black text and the width of black lines. After using this function to perform adjustment, perform [System Settings] - [Common Functions] - [Auto Gray Calibration (for Copy)], [Auto Gray Calibration (for Print)].
Black Streak ReductionSpecify to use the black streak reduction or not.The black streak reduction can be used for Scan Original, Copy, Image Send, and Scan to HDD functions.If the black streak reduction is enabled, select any of the following options.• Treat Thin Black Streaks: Use this setting to make thin black streaks less apparent. (Low level)• Normal: Use this setting to make black streaks less apparent. (Medium level)• Treat Up to Thick Black Streaks: Use this setting to make thick black streaks less apparent. (High level)
Display warning message for black streaks detection.Set this option to display a warning message when black streaks are detected by the document feeder.
Fusing Cleaning Mode in [Collective Adjustment], all Common Functions, and removal of a toner cartridge can only be executed in setting mode on the machine.
If improvement is not noticed after the first time you use the function, try executing the function again.
Increasing the level of black streak treatment may result in faint text and poor reproduction of lines.

7-169
SYSTEM SETTINGS►SYSTEM SETTINGS
Copy Image Quality
Quick Image Quality AdjustmentYou can easily perform copy quality adjustment in the default state.You can change the default setting ([2]) to [1 (Smooth)] or [3 (Sharp)].
Gray BalanceYou can adjust the gradation, and density of copies.The density is divided into 3 ranges and you can adjust the level.
Density Adjustment when [Auto] is selected for ExposureConfigure settings for copying when [Auto] is selected for the copy exposure. The exposure can be adjusted separately for copying using the document glass and copying using the auto document feeder.
SharpnessYou can make copy images in the default state sharper or softer.
Image Quality PrioritySpecify image quality priority. Set this for the auto copy exposure and text / printed photo settings.
Print Image Quality
Quick Image Quality AdjustmentPerform quick adjustment of print quality.You can change the default setting ([2]) to [1 (Smooth)] or [3 (Sharp)].
Gray BalanceYou can adjust the tone and density of printing.You can adjust the gradation, and density of printing.The density is divided into 3 ranges and you can adjust the level.
Exposure AdjustmentSet the density of printing.
Line ThicknessWhen lines do not print correctly in special applications such as CAD, you can make lines thicker.

7-170
SYSTEM SETTINGS►SYSTEM SETTINGS
Scan Image Quality
RGB AdjustSet the color tone (RGB) for scanning.
SharpnessUse this setting to obtain a sharp image when scanning an original.
ContrastYou can adjust the contrast of scanned images.
Common Functions
Auto Gray Calibration (for Copy)
Auto Gray Calibration (for Print)
Copy Calibration by Screen
Printer Calibration by ScreenPerforms automatic grayscale correction.For copying, adjust with [Auto Gray Calibration (for Copy)]. For printing, adjust with [Auto Gray Calibration (for Print)]. You can use [Copy Calibration by Screen] and [Printer Calibration by Screen] to perform even higher precision adjustment of each mode.The machine prints a test patch, the test patch is scanned, and the grayscale is automatically corrected.After the [Execute] key is tapped and a test patch is printed, a message appears prompting you to begin automatic calibration.Follow the instructions in the message to perform gray adjustment.
If the grayscale is still off after performing Auto Gray Calibration, repeating Auto Gray Calibration once again may improve the grayscale.

7-171
SYSTEM SETTINGS►SYSTEM SETTINGS
Initial Installation SettingsThis groups together the items that were set initially when the machine was installed. The initial installation setting items are the same as the regular setting items that have the same name. For information on a setting item, see the explanation of the regular item.
Item Description
Condition Settings
Name
System Settings - Common Settings - Machine Identification Settings (page 7-130)Machine Code
Machine Location
Memo
Clock Adjust System Settings - Common Settings - Clock Adjust (page 7-131)
Daylight Saving Time Setting System Settings - Common Settings - Clock Adjust (page 7-131)
Preheat Mode Setting
System Settings - Energy Save - Eco Setting (page 7-158)
Auto Power Shut-Off
Display Message When Extending Transition Time to Preheat/Auto Power Shut-Off Mode
Sleep Mode Power Level
Network Quick Settings System Settings - Network Settings - Quick Settings (page 7-133)
Tray Settings System Settings - Common Settings - Paper Settings- Paper Tray Settings (page 7-118)
Product Key System Settings - Common Settings - Product Key (page 7-132)

7-172
SYSTEM SETTINGS►SETTING MODE FOR FAX
The following lists the Setting mode for fax and factory default settings.
System SettingsU: General user; A: System administrator/Administrator
SETTING MODE FOR FAX
Depending on the machine specifications and peripheral devices installed, it may not be possible to use some settings.
Setup Items Factory default setting U A
■ System Settings
● Image Send Settings (page 7-174) No Yes
Fax Settings No Yes
Default Settings No Yes
• Resolution Setting No Yes
- Apply the Resolution Set when Stored Disabled No Yes
+ (No item) Standard No Yes
• Dial Mode Setting Tone No Yes
• Auto Wake Up Print Enabled No Yes
• Pause Time Setting 2 seconds No Yes
• Fax Dest. Confirmation Mode Disabled No Yes
• Speaker Settings No Yes
- Speaker Volume: 5 No Yes
- Ringer Volume Volume: 2 No Yes
- Line Monitor Volume: No Sound No Yes
- Fax Receive Complete Signal Volume: 2; Tone Pattern: 3Transmission Complete Sound Time Setting: 3 sec.
No Yes
- Fax Send Complete Signal Volume: 2; Tone Pattern: 3Transmission Complete Sound Time Setting: 3 sec.
No Yes
- Fax Communication Error Signal Volume: 2; Tone Pattern: 3Transmission Complete Sound Time Setting: Every 0.3 seconds
No Yes
• Remote Reception Number Setting 5 No Yes
• Original Print on Transaction Report Print Out Error Report Only No Yes
• Transaction Report Print Select Setting No Yes
- Single Sending Print Out Error Report Only No Yes
- Broadcasting Print Out All Report No Yes
- Receiving No Printed Report No Yes

7-173
SYSTEM SETTINGS►SETTING MODE FOR FAX
- Confidential Reception Print Out Notice Page No Yes
• Activity Report Print Select Setting No Yes
- Auto Print at Memory Full Disabled No Yes
- Print Daily at Designated Time Disabled No Yes
• ECM Enabled No Yes
• Digital Line Network Disabled No Yes
• Distinctive Ring Detection Off No Yes
Send Settings No Yes
• Auto Reduction Sending Setting Enabled No Yes
• Rotation Sending Setting All Enabled No Yes
• Quick On Line Sending Enabled No Yes
• Printing Page Number at Receiver Enabled No Yes
• Sender Destination Name Switch Fax No. No Yes
• Date/Own Number Print Position Setting Outside the Original Image No Yes
• Recall in Case of Line Busy Recall. Times: 2, Interval: 3 minutes
No Yes
• Recall in Case of Communication Error Recall. Times: 1, Interval: 3 minutes
No Yes
• Disable Fax Broadcasting Disabled No Yes
Receive Settings No Yes
• Number of Calls in Auto Reception 2 times No Yes
• 2-Sided Printing of Received Data Disabled No Yes
• Auto Receive Reduce Setting Enabled No Yes
• Print Style Setting Auto Size Select No Yes
• Set the Telephone Number for Data Forwarding – No Yes
- Forwarding Address Number Setting – No Yes
- Receiving Date & Time Print Disabled No Yes
• Number of Prints 1 No Yes
- Paper Size 8-1/2 x 11 No Yes
Allow/Reject Number Setting No Yes
• Allow/Reject Number Setting All Invalid No Yes
• Add New – No Yes
Setup Items Factory default setting U A

7-174
SYSTEM SETTINGS►SETTING MODE FOR FAX
*1 When an inner finisher is installed.*2 When the number of copies is set.
Image Send Settings
Fax SettingsYou can select the image send settings of fax functions.
Default SettingsThe fax settings can be enabled or disabled to suit the needs of your workplace.
Resolution SettingYou can select the resolution setting for faxes.Apply the Resolution Set when StoredSelect this to use the resolution at which the fax was sent.If you do not select [Apply the Resolution Set when Stored], the image will be stored at the resolution specified in the pull-down menu.
Dial Mode SettingSelect the appropriate setting for your telephone line type.
Auto Wake Up PrintWhen the [Power] button is "Off" (but the main power switch is "On") and a fax is received, this function activates the machine and prints the fax.When this function is disabled, received faxes are not printed until the [Power] button is switched "On".
Pause Time SettingChanges the length of pauses inserted in fax numbers.If a hyphen (-) is entered when dialing or storing a fax number, a pause of 2 seconds is inserted.It can be set between 1 and 15 seconds, in every second.
Fax Dest. Confirmation ModeThis setting specifies whether or not a destination verification message is displayed when sending a fax in order to prevent accidental transmission to the wrong destination.
Polling Setting No Yes
• Set Fax Polling Security Enabled No Yes
F-Code Memory Box – Yes Yes
● Fax Data Receive/Forward (Manual) (page 7-181) Yes Yes
Fax Settings Yes Yes
Receive Settings Auto Reception Yes Yes
Multiple Set Print*2 Disabled Yes Yes
Staple Disabled Yes Yes
Forward Received Data – Yes Yes
Setup Items Factory default setting U A

7-175
SYSTEM SETTINGS►SETTING MODE FOR FAX
Speaker SettingsUse these settings to set the sound heard from the speaker for the Speaker, Ringer Volume, Line Monitor, Fax Receive Complete Signal, Fax Send Complete Signal, and Fax Communication Error Signal. For the Fax Receive Complete Signal, the Fax Send Complete Signal, and the Fax Communication Error Signal, the Tone Pattern and Transmission Complete Sound Time Setting can be selected in addition to the volume. Check on Setup SoundsChecks the selected tone pattern and volume.
Remote Reception Number SettingYou can set the machine to the fax reception mode by entering a one-digit number from the connected extension telephone and by tapping the key. This one-digit number is called the Remote Reception number, and it can be between 0 and 9.
Original Print on Transaction ReportSelect one of the actions below for printing of part of the first page of the sent fax on the transaction report that is printed when memory transmission is performed.• Print Out All Report• Print Out Error Report Only• No Printed Report
This setting will not be effective if the next "Activity Report Print Select Setting (page 7-176)" setting is set to "Do not Print".
Transaction Report Print Select SettingSelects whether or not a transaction report will be printed, and if printed, the condition for being printed. Select a setting for each of the following operations: Single Sending• Print Out All Report• Print Out Error Report Only• No Printed Report
Broadcasting• Print Out All Report• Print Out Error Report Only• No Printed Report
Receiving• Print Out All Report• Print Out Error Report Only• No Printed Report
Confidential Reception• Print Out Notice Page• No Printed Report
When a transaction report is printed, this is used to print part of the first page of the transmitted original on the transaction report. For more information, see "Original Print on Transaction Report (page 7-102)".
Even if a print setting is enabled for "Receiving", a transaction report will not be printed if you receive from a number that is rejected with the "F-Code Memory Box (page 7-180)".

7-176
SYSTEM SETTINGS►SETTING MODE FOR FAX
Activity Report Print Select SettingYou can set the machine to periodically print the activity report that is stored in memory.The Image Sending Activity Report can be set to print each time the number of transactions reaches 200, or at a specified time (once a day only). (The settings can be simultaneously enabled.)
ECMWhen you send a fax, noise on the line may occasionally cause distortion of the image. You can enable ECM (Error Correction Mode) to automatically resend only the part of the image that was distorted.
Digital Line NetworkWhen this setting is enabled, the send level will be 15 dB or less when you connect to a digital line.
Distinctive Ring DetectionIf multiple telephone numbers have been assigned to your telephone line, the number called can be identified by its ringing pattern. By using one number for voice calls and another number for faxes, you can tell which type of call you are receiving by the ringing pattern. You can set your machine to automatically receive faxes when your fax number is called by setting the pattern that corresponds to your fax number.
Send SettingsSettings for fax transmission can be configured.
Auto Reduction Sending SettingThis setting is used to have the size of transmitted faxes automatically reduced to match the size of the paper in the receiving machine.If the setting is disabled, faxes are sent at full size. Because the size is not adjusted to match the size of the printing paper, part of the received fax may be cut off.
Rotation Sending SettingWhen transmitting an image that is one of the following sizes, this function rotates the image 90 degrees counterclockwise. (The setting can be configured separately for each size.)5-1/2" x 8-1/2", B5, A5
Quick On Line SendingWhen this setting is enabled, the machine starts transmitting a fax as soon as the first page is scanned.Transmission takes place at the same time as the remaining pages are being scanned.
Printing Page Number at ReceiverWhen the transmitted image is printed by the receiving machine, the page number can be added to the top of each printed page.
Sender Destination Name SwitchAllows you to change the destination name and sender fax number if necessary.
• If you only select the "Print Daily at Designated Time" setting and the number of recorded transactions reaches 200 before the specified time, each new transaction will delete the oldest transaction (the oldest transaction will not be printed).
• The Transaction Report can be printed out manually as needed. For more information, see "List for Administrator (page 7-53)".
If the receiving machine is a Super G3 machine, ECM will always operate, regardless of this setting.

7-177
SYSTEM SETTINGS►SETTING MODE FOR FAX
Date/Own Number Print Position SettingThis setting determines the position of the date and sender information printed at the top of faxes by the receiving machine. To have the information printed outside the transmitted document image, tap the [Outside the Original Image] key. To have the information printed inside the document image, tap the [Inside the Original Image] key.For more information on the print position, see "ADDING YOUR SENDER INFORMATION TO FAXES (FAX OWN NUMBER SENDING) (page 4-87)" in "FAX".
Recall in Case of Line BusyThis program is used to set the number of recall attempts and the interval between recall attempts when a transmission is not successful due to the line being busy or other reason. Number of Times to Recall When Line is BusyThis setting specifies whether or not recalling is performed when the line is busy. During recalling, you can set the number of recall attempts. Any number from 1 to 15 can be selected. Interval to Wait Between Recall Attempts (min.) When Line is BusyThe interval between recall attempts can be set. Any number of minutes from 1 to 15 can be selected.
Recall in Case of Communication ErrorThis determines how many times the machine will automatically attempt the call again if a fax transmission fails due to a communication error. Number of Times to Recall in Case of ErrorSpecify how many times the machine will attempt the call again when a communication error occurs. During recalling, you can set the number of recall attempts. Any number from 1 to 15 can be selected. Interval to Wait Between Recall Attempts (min.) in Case of ErrorThe interval between recall attempts can be set. Any number of minutes from 1 to 15 can be selected.
Disable Fax BroadcastingDisables facsimile broadcasting.
Receive SettingsSettings for fax transmission can be configured.
Number of Calls in Auto ReceptionAllows you to set a number of ringing tones to sound (between 0 and 15 times) until the auto receiving facsimile starts automatic fax reception.
2-Sided Printing of Received DataThis is used to have received faxes printed on both sides of the paper.When this setting is enabled and a fax consisting of 2 or more pages is received (the pages must be the same size), the pages are printed on both sides of the paper.
When this setting is enabled, note that the machine will not attempt the call again when manual transmission or direct transmission is used.
When this setting is enabled, note that the machine will not attempt the call again when manual transmission or direct transmission is used.
If you select "0" for the number of rings, the machine will immediately answer and begin fax reception without ringing in auto reception mode.

7-178
SYSTEM SETTINGS►SETTING MODE FOR FAX
Auto Receive Reduce SettingWhen a fax is received that includes printed information such as the sender's name and address, the received image is slightly larger than the standard size. This setting is used to automatically reduce the image to fit the standard size.
Print Style SettingThis setting determines the paper selection condition when printing received faxes. Select one of the two conditions below. Print Actual Size Cut off EnabledEach received image is printed at full size. If necessary, the image is divided onto multiple sheets of paper. Auto Size SelectEach received image is printed at full size when possible. When not possible, the image is automatically reduced before printing.
Set the Telephone Number for Data ForwardingWhen a problem prevents the machine from printing a received fax, the received fax can be forwarded to another fax machine. This setting is used to program the fax number of the destination fax machine. Only one forwarding fax number can be programmed (maximum of 64 digits).To insert a pause between digits of the number, tap the [-] key.If you wish to specify an F-code confidential memory box in the destination machine, tap the [/] key after entering the fax number and enter the F-code (sub-address and passcode).
Receiving Date & Time PrintEnable this setting to have the date and time of reception printed.Select [Inside the Received Image] or [Outside the Received Image] for the position where the date and time is printed.When [Inside the Received Image] is selected, the date and time of reception is printed on the received image.When [Outside the Received Image] is selected, the received image is reduced and the date and time of reception is printed in the blank area that results.
Fax Output SettingsThese settings are used to select the number of copies and output tray for received faxes.Number of PrintsSet the number of copies of received faxes that are printed to any number from 1 to 99.
• If Auto Receive Reduce is disabled, the edges of the image outside the standard size will be cut off. However, the image will be clearer because it will be printed at the same size as the original.
• Standard sizes are sizes such as 8-1/2" x 11" and 8-1/2" x 5-1/2" (A4 and B5).
The [Outside the Received Image] cannot be selected for the reception date and time print setting if "Auto Receive Reduce Setting (page 7-178)" is not enabled.
This setting can only be used when the [Multiple Set Print] and [Staple] checkboxes are selected .The maximum number of sheets that can be stapled is 30.
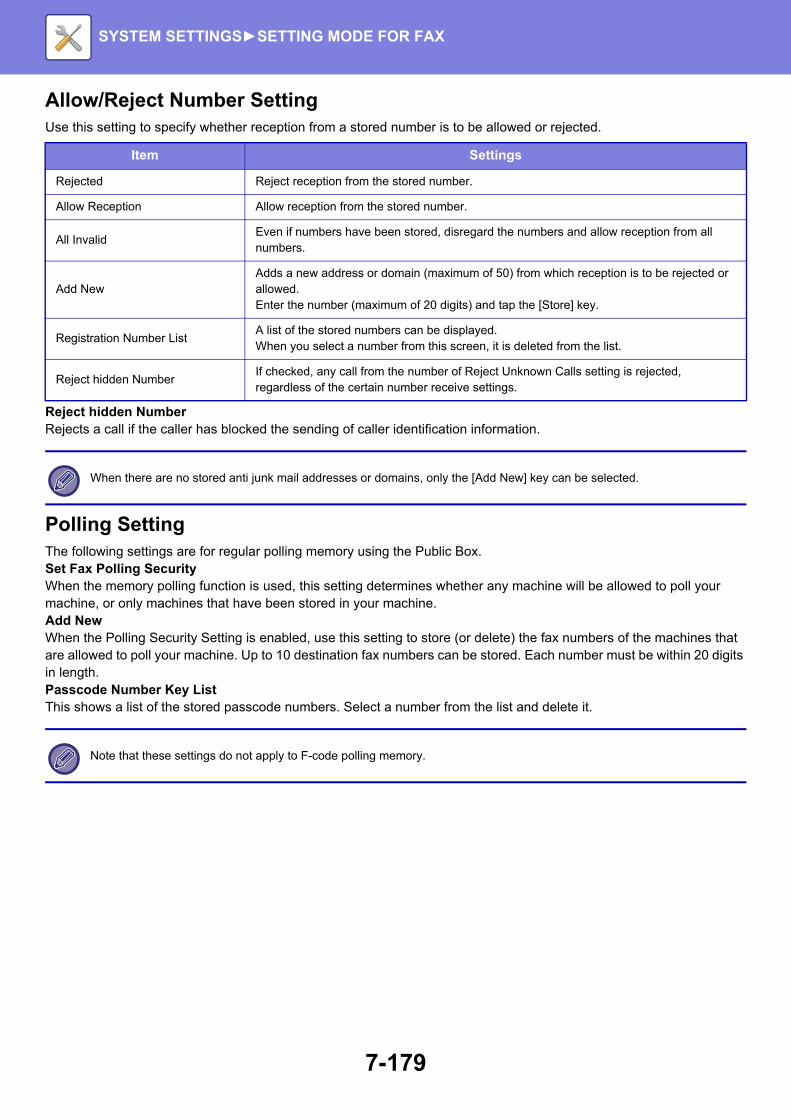
7-179
SYSTEM SETTINGS►SETTING MODE FOR FAX
Allow/Reject Number SettingUse this setting to specify whether reception from a stored number is to be allowed or rejected.
Reject hidden NumberRejects a call if the caller has blocked the sending of caller identification information.
Polling SettingThe following settings are for regular polling memory using the Public Box. Set Fax Polling SecurityWhen the memory polling function is used, this setting determines whether any machine will be allowed to poll your machine, or only machines that have been stored in your machine. Add NewWhen the Polling Security Setting is enabled, use this setting to store (or delete) the fax numbers of the machines that are allowed to poll your machine. Up to 10 destination fax numbers can be stored. Each number must be within 20 digits in length. Passcode Number Key ListThis shows a list of the stored passcode numbers. Select a number from the list and delete it.
Item Settings
Rejected Reject reception from the stored number.
Allow Reception Allow reception from the stored number.
All InvalidEven if numbers have been stored, disregard the numbers and allow reception from all numbers.
Add NewAdds a new address or domain (maximum of 50) from which reception is to be rejected or allowed.Enter the number (maximum of 20 digits) and tap the [Store] key.
Registration Number ListA list of the stored numbers can be displayed.When you select a number from this screen, it is deleted from the list.
Reject hidden NumberIf checked, any call from the number of Reject Unknown Calls setting is rejected, regardless of the certain number receive settings.
When there are no stored anti junk mail addresses or domains, only the [Add New] key can be selected.
Note that these settings do not apply to F-code polling memory.

7-180
SYSTEM SETTINGS►SETTING MODE FOR FAX
F-Code Memory BoxThis section explains how to store memory boxes for various types of F-code communication.
Storing a memory boxWhen you tap the [Add New] key, the registration screen appears. Up to 100 F-code memory boxes can be stored for all functions (polling memory, confidential, and relay broadcast).
Editing and deleting a memory boxWhen you select a memory box from the list, the edit screen appears for the box.For information on the settings, see the following table.Tap the [Delete] key to delete the memory box.
Settings
Item Settings
Items common to all types
Box Type
Select the type of box.• Polling Memory: Store a memory box for F-code polling memory. The sub-address and
passcode that you store in the memory box are necessary for the other machine to poll the machine (request transmission) using F-code communication.
• Confidential: Store a memory box for F-code confidential communication. In addition, store a "Print PIN" in the memory box to print faxes received by confidential reception. The sub-address and passcode that you program in the memory box are necessary for the other machine to send a fax to the machine by F-code confidential transmission.
• Relay Broadcast: Store a memory box for F-code relay broadcast transmission.Up to 30 destinations can be stored to forward the received data. The sub-address and passcode that you program in the memory box are necessary for the other machine to send a fax to the machine by F-code relay request transmission.
Memory Box Name Enter a name (maximum of 18 characters) for the memory box.
Sub Address / PasscodeEnter a sub-address and passcode. A maximum of 20 digits can be entered for each sub-address and passcode.Separate a sub-address and passcode by a slash ("/").
Items displayed when storing a confidential memory box
Print PIN Set a "Print PIN" for confidential reception. Enter a 4-digit number.
Items displayed when storing a relay broadcast memory box
Forward Destination
Select the end recipients of the relay broadcast.• Select the recipients from the address book.• Select Forward Address from the Address: Select an address from the address book.• Destination Entry: An address that is not stored in the address book can be
directly entered. Enter the address in the same way as when storing an address for a mode.
• When programming a new memory box, a sub-address that is already programmed for another box cannot be used. However, the same passcode can be used for more than one memory box.
• [ ] and [#] cannot be used in a sub-address.
• A passcode can be omitted.
• Do not forget the Print PIN. In the event that you forget the Print PIN or need to verify the Print PIN, contact your dealer or nearest SHARP Service Department.

7-181
SYSTEM SETTINGS►SETTING MODE FOR FAX
Fax Data Receive/Forward (Manual)This section explains settings for fax reception and forwarding.
Fax Settings
Item Settings
Receive Settings
Set the fax reception method. Auto Reception: When a call comes in, the machine rings and then automatically begins fax reception. • Auto Reception:
When a call comes in, the machine rings and then automatically begins fax reception.
• Manual Reception:Used when an existing extension telephone is connected to the machine. You can answer to a phone call first, and then receive a fax by manual operation.
Multiple Set PrintSpecify whether or not two or more copies of received faxes will be printed. The number of copies can be set with the "Fax Output Settings".
Staple Specify whether or not stapling is performed. (Only when a finisher is installed)
Forward Received DataWhen the machine cannot print because it is out of paper or out of toner, received faxes can be forwarded to another previously stored fax machine.
• If there is no forwarding data or if the destination is not registered, no data is forwarded.
• If "Hold Setting for Received Data Print (page 7-93)" is enabled, you are prompted to enter a password. Enter the correct password using numeric keys.
• If some pages of a fax that is being forwarded were successfully printed, only those pages that were not printed will be forwarded.
• A forwarded fax becomes a fax transmission job. If transmission does not take place because the transmission was canceled or an error occurred, the fax will be held in memory until it can be printed.
• All faxes received are forwarded. Note that the received data stored in the F-code confidential memory box is not forwarded.
• For destination number registration, see "Set the Telephone Number for Data Forwarding (page 7-178)".

LICENSE INFORMATION
Information on the Software License for This Product
Software compositionThe software included in this product is comprised of various software components whose individual copyrights are held by SHARP or by third parties.
Software developed by SHARP and open source softwareThe copyrights for the software components and various relevant documents included with this product that were developed or written by SHARP are owned by SHARP and are protected by the Copyright Act, international treaties, and other relevant laws. This product also makes use of freely distributed software and software components whose copyrights are held by third parties. These include software components covered by a GNU General Public License (hereafter GPL), a GNU Lesser General Public License (hereafter LGPL) or other license agreement.
Obtaining source codeSome of the open source software licensors require the distributor to provide the source code with the executable software components. GPL and LGPL include similar requirements. For information on obtaining the source code for the open source software and for obtaining the GPL, LGPL, and other license agreement information, visit the following website:http://sharp-world.com/products/copier/source/download/index.htmlWe are unable to answer any questions about the source code for the open source software. The source code for the software components whose copyrights are held by SHARP is not distributed.
Software Copyrights
Copyright (c) 2000 Carnegie Mellon University. All rights reserved.Redistribution and use in source and binary forms, with or without modification, are permitted provided that the following conditions are met:
1.Redistributions of source code must retain the above copyright notice, this list of conditions and the following disclaimer.
2.Redistributions in binary form must reproduce the above copyright notice, this list of conditions and the following disclaimer in the documentation and/or other materials provided with the distribution.
3.The name "Carnegie Mellon University" must not be used to endorse or promote products derived from this software without prior written permission. For permission or any other legal details, please contact Office of Technology Transfer Carnegie Mellon University 5000 Forbes Avenue Pittsburgh, PA 15213-3890 (412) 268-4387, fax: (412) [email protected]
4.Redistributions of any form whatsoever must retain the following acknowledgment:"This product includes software developed by Computing Services at Carnegie Mellon University (http://www.cmu.edu/computing/)."
CARNEGIE MELLON UNIVERSITY DISCLAIMS ALL WARRANTIES WITH REGARD TO THIS SOFTWARE, INCLUDING ALL IMPLIED WARRANTIES OF MERCHANTABILITY AND FITNESS, IN NO EVENT SHALL CARNEGIE MELLON UNIVERSITY BE LIABLE FOR ANY SPECIAL, INDIRECT OR CONSEQUENTIAL DAMAGES OR ANY DAMAGES WHATSOEVER RESULTING FROM LOSS OF USE, DATA OR PROFITS, WHETHER IN AN ACTION OF CONTRACT, NEGLIGENCE OR OTHER TORTIOUS ACTION, ARISING OUT OF OR IN CONNECTION WITH THE USE OR PERFORMANCE OF THIS SOFTWARE.

Copyright (c) 1995 - 2008 Kungliga Tekniska Högskolan (Royal Institute of Technology, Stockholm, Sweden). All rights reserved.All rights reserved. Export of this software from the United States of America may require a specific license from the United States Government. It is the responsibility of any person or organization contemplating export to obtain such a license before exporting.
WITHIN THAT CONSTRAINT, permission to use, copy, modify, and distribute this software and its documentation for any purpose and without fee is hereby granted, provided that the above copyright notice appear in all copies and that both that copyright notice and this permission notice appear in supporting documentation, and that the name of M.I.T. not be used in advertising or publicity pertaining to distribution of the software without specific, written prior permission. Furthermore if you modify this software you must label your software as modified software and not distribute it in such a fashion that it might be confused with the original MIT software. M.I.T. makes no representations about the suitability of this software for any purpose. It is provided "as is" without express or implied warranty.
THIS SOFTWARE IS PROVIDED "AS IS" AND WITHOUT ANY EXPRESS OR IMPLIED WARRANTIES, INCLUDING, WITHOUT LIMITATION, THE IMPLIED WARRANTIES OF MERCHANTIBILITY AND FITNESS FOR A PARTICULAR PURPOSE.
Individual source code files are copyright MIT, Cygnus Support, OpenVision, Oracle, Sun Soft, FundsXpress, and others.
Project Athena, Athena, Athena MUSE, Discuss, Hesiod, Kerberos, Moira, and Zephyr are trademarks of the Massachusetts Institute of Technology (MIT). No commercial use of these trademarks may be made without prior written permission of MIT.
"Commercial use" means use of a name in a product or other for-profit manner. It does NOT prevent a commercial firm from referring to the MIT trademarks in order to convey information (although in doing so, recognition of their trademark status should be given).
OpenSSL License---------------
Copyright (c) 1998-2004 The OpenSSL Project. All rights reserved.Redistribution and use in source and binary forms, with or without modification, are permitted provided that the following conditions are met:
1.Redistributions of source code must retain the above copyright notice, this list of conditions and the following disclaimer.
2.Redistributions in binary form must reproduce the above copyright notice, this list of conditions and the following disclaimer in the documentation and/or other materials provided with the distribution.
3.All advertising materials mentioning features or use of this software must display the following acknowledgment: "This product includes software developed by the OpenSSL Project for use in the OpenSSL Toolkit. (http://www.openssl.org/)"
4.The names "OpenSSL Toolkit" and "OpenSSL Project" must not be used to endorse or promote products derived from this software without prior written permission. For written permission, please contact [email protected].
5.Products derived from this software may not be called "OpenSSL" nor may "OpenSSL" appear in their names without prior written permission of the OpenSSL Project.
6.Redistributions of any form whatsoever must retain the following acknowledgment: "This product includes software developed by the OpenSSL Project for use in the OpenSSL Toolkit. (http://www.openssl.org/)"

THIS SOFTWARE IS PROVIDED BY THE OpenSSL PROJECT "AS IS" AND ANY EXPRESSED OR IMPLIED WARRANTIES, INCLUDING, BUT NOT LIMITED TO, THE IMPLIED WARRANTIES OF MERCHANTABILITY AND FITNESS FOR A PARTICULAR PURPOSE ARE DISCLAIMED. IN NO EVENT SHALL THE OpenSSL PROJECT OR ITS CONTRIBUTORS BE LIABLE FOR ANY DIRECT, INDIRECT, INCIDENTAL, SPECIAL, EXEMPLARY, OR CONSEQUENTIAL DAMAGES (INCLUDING, BUT NOT LIMITED TO, PROCUREMENT OF SUBSTITUTE GOODS OR SERVICES; LOSS OF USE, DATA, OR PROFITS; OR BUSINESS INTERRUPTION) HOWEVER CAUSED AND ON ANY THEORY OF LIABILITY, WHETHER IN CONTRACT, STRICT LIABILITY, OR TORT (INCLUDING NEGLIGENCE OR OTHERWISE) ARISING IN ANY WAY OUT OF THE USE OF THIS SOFTWARE, EVEN IF ADVISED OF THE POSSIBILITY OF SUCH DAMAGE.
This product includes cryptographic software written by Eric Young ([email protected]). This product includes software written by Tim Hudson ([email protected]).
Original SSLeay License---------------
Copyright (C) 1995-1998 Eric Young ([email protected]) All rights reserved.This package is an SSL implementation written by Eric Young ([email protected]). The implementation was written so as to conform with Netscapes SSL.
This library is free for commercial and non-commercial use as long as the following conditions are aheared to. The following conditions apply to all code found in this distribution, be it the RC4, RSA,lhash, DES, etc., code; not just the SSL code. The SSL documentation included with this distribution is covered by the same copyright terms except that the holder is Tim Hudson ([email protected]).
Copyright remains Eric Young's, and as such any Copyright notices in the code are not to be removed. If this package is used in a product, Eric Young should be given attribution as the author of the parts of the library used. This can be in the form of a textual message at program startup or in documentation (online or textual) provided with the package.
Redistribution and use in source and binary forms, with or without modification, are permitted provided that the following conditions are met:
1.Redistributions of source code must retain the copyright notice, this list of conditions and the following disclaimer.
2.Redistributions in binary form must reproduce the above copyright notice, this list of conditions and the following disclaimer in the documentation and/or other materials provided with the distribution.
3.All advertising materials mentioning features or use of this software must display the following acknowledgement: "This product includes cryptographic software written by Eric Young ([email protected])" The word 'cryptographic' can be left out if the rouines from the library being used are not cryptographic related :-).
4.If you include any Windows specific code (or a derivative thereof) from the apps directory (application code) you must include an acknowledgement: "This product includes software written by Tim Hudson ([email protected])"
THIS SOFTWARE IS PROVIDED BY ERIC YOUNG "AS IS" AND ANY EXPRESS OR IMPLIED WARRANTIES, INCLUDING, BUT NOT LIMITED TO, THE IMPLIED WARRANTIES OF MERCHANTABILITY AND FITNESS FOR A PARTICULAR PURPOSE ARE DISCLAIMED. IN NO EVENT SHALL THE AUTHOR OR CONTRIBUTORS BE LIABLE FOR ANY DIRECT, INDIRECT, INCIDENTAL, SPECIAL, EXEMPLARY, OR CONSEQUENTIAL DAMAGES (INCLUDING, BUT NOT LIMITED TO, PROCUREMENT OF SUBSTITUTE GOODS OR SERVICES; LOSS OF USE, DATA, OR PROFITS; OR BUSINESS INTERRUPTION) HOWEVER CAUSED AND ON ANY THEORY OF LIABILITY, WHETHER IN CONTRACT, STRICT LIABILITY, OR TORT (INCLUDING NEGLIGENCE OR OTHERWISE) ARISING IN ANY WAY OUT OF THE USE OF THIS SOFTWARE, EVEN IF ADVISED OF THE POSSIBILITY OF SUCH DAMAGE.

The licence and distribution terms for any publically available version orderivative of this code cannot be changed. i.e. this code cannot simply becopied and put under another distribution licence [including the GNU Public Licence.]
D3DES License---------------
Copyright (c) 1988,1989,1990,1991,1992 by Richard Outerbridge. (GEnie : OUTER; CIS : [71755,204]) Graven Imagery, 1992.
GNU GENERAL PUBLIC LICENSEVersion 2, June 1991
Copyright (C) 1989, 1991 Free Software Foundation, Inc., 51 Franklin Street, Fifth Floor, Boston, MA 02110-1301 USA Everyone is permitted to copy and distribute verbatim copies of this license document, but changing it is not allowed.
Preamble
The licenses for most software are designed to take away your freedom to share and change it. By contrast, the GNU General Public License is intended to guarantee your freedom to share and change free software--to make sure the software is free for all its users. This General Public License applies to most of the Free Software Foundation's software and to any other program whose authors commit to using it. (Some other Free Software Foundation software is covered by the GNU Lesser General Public License instead.) You can apply it to your programs, too.
When we speak of free software, we are referring to freedom, not price. Our General Public Licenses are designed to make sure that you have the freedom to distribute copies of free software (and charge for this service if you wish), that you receive source code or can get it if you want it, that you can change the software or use pieces of it in new free programs; and that you know you can do these things.
To protect your rights, we need to make restrictions that forbid anyone to deny you these rights or to ask you to surrender the rights. These restrictions translate to certain responsibilities for you if you distribute copies of the software, or if you modify it.
For example, if you distribute copies of such a program, whether gratis or for a fee, you must give the recipients all the rights that you have. You must make sure that they, too, receive or can get the source code. And you must show them these terms so they know their rights.
We protect your rights with two steps: (1) copyright the software, and (2) offer you this license which gives you legal permission to copy, distribute and/or modify the software.
Also, for each author's protection and ours, we want to make certain that everyone understands that there is no warranty for this free software. If the software is modified by someone else and passed on, we want its recipients to know that what they have is not the original, so that any problems introduced by others will not reflect on the original authors' reputations.

Finally, any free program is threatened constantly by software patents. We wish to avoid the danger that redistributors of a free program will individually obtain patent licenses, in effect making the program proprietary. To prevent this, we have made it clear that any patent must be licensed for everyone's free use or not licensed at all.
The precise terms and conditions for copying, distribution and modification follow.
GNU GENERAL PUBLIC LICENSE TERMS AND CONDITIONS FOR COPYING, DISTRIBUTION AND MODIFICATION
0. This License applies to any program or other work which contains a notice placed by the copyright holder saying it may be distributed under the terms of this General Public License. The "Program", below, refers to any such program or work, and a "work based on the Program" means either the Program or any derivative work under copyright law: that is to say, a work containing the Program or a portion of it, either verbatim or with modifications and/or translated into another language. (Hereinafter, translation is included without limitation in the term "modification".) Each licensee is addressed as "you".
Activities other than copying, distribution and modification are not covered by this License; they are outside its scope. The act of running the Program is not restricted, and the output from the Program is covered only if its contents constitute a work based on the Program (independent of having been made by running the Program). Whether that is true depends on what the Program does.
1. You may copy and distribute verbatim copies of the Program's source code as you receive it, in any medium, provided that you conspicuously and appropriately publish on each copy an appropriate copyright notice and disclaimer of warranty; keep intact all the notices that refer to this License and to the absence of any warranty; and give any other recipients of the Program a copy of this License along with the Program.
You may charge a fee for the physical act of transferring a copy, and you may at your option offer warranty protection in exchange for a fee.
2. You may modify your copy or copies of the Program or any portion of it, thus forming a work based on the Program, and copy and distribute such modifications or work under the terms of Section 1 above, provided that you also meet all of these conditions:
a) You must cause the modified files to carry prominent notices stating that you changed the files and the date of any change.
b) You must cause any work that you distribute or publish, that in whole or in part contains or is derived from the Program or any part thereof, to be licensed as a whole at no charge to all third parties under the terms of this License.
c) If the modified program normally reads commands interactively when run, you must cause it, when started running for such interactive use in the most ordinary way, to print or display an announcement including an appropriate copyright notice and a notice that there is no warranty (or else, saying that you provide a warranty) and that users may redistribute the program under these conditions, and telling the user how to view a copy of this License. (Exception: if the Program itself is interactive but does not normally print such an announcement, your work based on the Program is not required to print an announcement.)
These requirements apply to the modified work as a whole. If identifiable sections of that work are not derived from the Program, and can be reasonably considered independent and separate works in themselves, then this License, and its terms, do not apply to those sections when you distribute them as separate works. But when you distribute the same

sections as part of a whole which is a work based on the Program, the distribution of the whole must be on the terms of this License, whose permissions for other licensees extend to the entire whole, and thus to each and every part regardless of who wrote it.
Thus, it is not the intent of this section to claim rights or contest your rights to work written entirely by you; rather, the intent is to exercise the right to control the distribution of derivative or collective works based on the Program.
In addition, mere aggregation of another work not based on the Program with the Program (or with a work based on the Program) on a volume of a storage or distribution medium does not bring the other work under the scope of this License.
3. You may copy and distribute the Program (or a work based on it, under Section 2) in object code or executable form under the terms of Sections 1 and 2 above provided that you also do one of the following:
a) Accompany it with the complete corresponding machine-readable source code, which must be distributed under the terms of Sections 1 and 2 above on a medium customarily used for software interchange; or,
b) Accompany it with a written offer, valid for at least three years, to give any third party, for a charge no more than your cost of physically performing source distribution, a complete machine-readable copy of the corresponding source code, to be distributed under the terms of Sections 1 and 2 above on a medium customarily used for software interchange; or,
c) Accompany it with the information you received as to the offer to distribute corresponding source code. (This alternative is allowed only for noncommercial distribution and only if you received the program in object code or executable form with such an offer, in accord with Subsection b above.)
The source code for a work means the preferred form of the work for making modifications to it. For an executable work, complete source code means all the source code for all modules it contains, plus any associated interface definition files, plus the scripts used to control compilation and installation of the executable. However, as a special exception, the source code distributed need not include anything that is normally distributed (in either source or binary form) with the major components (compiler, kernel, and so on) of the operating system on which the executable runs, unless that component itself accompanies the executable.
If distribution of executable or object code is made by offering access to copy from a designated place, then offering equivalent access to copy the source code from the same place counts as distribution of the source code, even though third parties are not compelled to copy the source along with the object code.
4. You may not copy, modify, sublicense, or distribute the Program except as expressly provided under this License. Any attempt otherwise to copy, modify, sublicense or distribute the Program is void, and will automatically terminate your rights under this License. However, parties who have received copies, or rights, from you under this License will not have their licenses terminated so long as such parties remain in full compliance.
5. You are not required to accept this License, since you have not signed it. However, nothing else grants you permission to modify or distribute the Program or its derivative works. These actions are prohibited by law if you do not accept this License. Therefore, by modifying or distributing the Program (or any work based on the Program), you indicate your acceptance of this License to do so, and all its terms and conditions for copying, distributing or modifying the Program or works based on it.
6. Each time you redistribute the Program (or any work based on the Program), the recipient automatically receives a license from the original licensor to copy, distribute or modify the Program subject to these terms and conditions. You

may not impose any further restrictions on the recipients' exercise of the rights granted herein. You are not responsible for enforcing compliance by third parties to this License.
7. If, as a consequence of a court judgment or allegation of patent infringement or for any other reason (not limited to patent issues), conditions are imposed on you (whether by court order, agreement or otherwise) that contradict the conditions of this License, they do not excuse you from the conditions of this License. If you cannot distribute so as to satisfy simultaneously your obligations under this License and any other pertinent obligations, then as a consequence you may not distribute the Program at all. For example, if a patent license would not permit royalty-free redistribution of the Program by all those who receive copies directly or indirectly through you, then the only way you could satisfy both it and this License would be to refrain entirely from distribution of the Program.
If any portion of this section is held invalid or unenforceable under any particular circumstance, the balance of the section is intended to apply and the section as a whole is intended to apply in other circumstances.
It is not the purpose of this section to induce you to infringe any patents or other property right claims or to contest validity of any such claims; this section has the sole purpose of protecting the integrity of the free software distribution system, which is implemented by public license practices. Many people have made generous contributions to the wide range of software distributed through that system in reliance on consistent application of that system; it is up to the author/donor to decide if he or she is willing to distribute software through any other system and a licensee cannot impose that choice.
This section is intended to make thoroughly clear what is believed to be a consequence of the rest of this License.
8. If the distribution and/or use of the Program is restricted in certain countries either by patents or by copyrighted interfaces, the original copyright holder who places the Program under this License may add an explicit geographical distribution limitation excluding those countries, so that distribution is permitted only in or among countries not thus excluded. In such case, this License incorporates the limitation as if written in the body of this License.
9. The Free Software Foundation may publish revised and/or new versions of the General Public License from time to time. Such new versions will be similar in spirit to the present version, but may differ in detail to address new problems or concerns.
Each version is given a distinguishing version number. If the Program specifies a version number of this License which applies to it and "any later version", you have the option of following the terms and conditions either of that version or of any later version published by the Free Software Foundation. If the Program does not specify a version number of this License, you may choose any version ever published by the Free Software Foundation.
10. If you wish to incorporate parts of the Program into other free programs whose distribution conditions are different, write to the author to ask for permission. For software which is copyrighted by the Free Software Foundation, write to the Free Software Foundation; we sometimes make exceptions for this. Our decision will be guided by the two goals of preserving the free status of all derivatives of our free software and of promoting the sharing and reuse of software generally.
NO WARRANTY
11. BECAUSE THE PROGRAM IS LICENSED FREE OF CHARGE, THERE IS NO WARRANTY FOR THE PROGRAM, TO THE EXTENT PERMITTED BY APPLICABLE LAW. EXCEPT WHEN OTHERWISE STATED IN WRITING THE COPYRIGHT HOLDERS AND/OR OTHER PARTIES PROVIDE THE PROGRAM "AS IS" WITHOUT WARRANTY OF ANY KIND, EITHER EXPRESSED OR IMPLIED, INCLUDING, BUT NOT LIMITED TO, THE IMPLIED WARRANTIES OF MERCHANTABILITY AND FITNESS FOR A PARTICULAR PURPOSE. THE ENTIRE RISK AS TO

THE QUALITY AND PERFORMANCE OF THE PROGRAM IS WITH YOU. SHOULD THE PROGRAM PROVE DEFECTIVE, YOU ASSUME THE COST OF ALL NECESSARY SERVICING, REPAIR OR CORRECTION.
12. IN NO EVENT UNLESS REQUIRED BY APPLICABLE LAW OR AGREED TO IN WRITING WILL ANY COPYRIGHT HOLDER, OR ANY OTHER PARTY WHO MAY MODIFY AND/OR REDISTRIBUTE THE PROGRAM AS PERMITTED ABOVE, BE LIABLE TO YOU FOR DAMAGES, INCLUDING ANY GENERAL, SPECIAL, INCIDENTAL OR CONSEQUENTIAL DAMAGES ARISING OUT OF THE USE OR INABILITY TO USE THE PROGRAM (INCLUDING BUT NOT LIMITED TO LOSS OF DATA OR DATA BEING RENDERED INACCURATE OR LOSSES SUSTAINED BY YOU OR THIRD PARTIES OR A FAILURE OF THE PROGRAM TO OPERATE WITH ANY OTHER PROGRAMS), EVEN IF SUCH HOLDER OR OTHER PARTY HAS BEEN ADVISED OF THE POSSIBILITY OF SUCH DAMAGES.
END OF TERMS AND CONDITIONS
How to Apply These Terms to Your New Programs
If you develop a new program, and you want it to be of the greatest possible use to the public, the best way to achieve this is to make it free software which everyone can redistribute and change under these terms.
To do so, attach the following notices to the program. It is safest to attach them to the start of each source file to most effectively convey the exclusion of warranty; and each file should have at least the "copyright" line and a pointer to where the full notice is found.
<one line to give the program's name and a brief idea of what it does.> Copyright (C) <year> <name of author>
This program is free software; you can redistribute it and/or modify it under the terms of the GNU General Public License as published by the Free Software Foundation; either version 2 of the License, or (at your option) any later version.
This program is distributed in the hope that it will be useful, but WITHOUT ANY WARRANTY; without even the implied warranty of MERCHANTABILITY or FITNESS FOR A PARTICULAR PURPOSE. See the GNU General Public License for more details.
You should have received a copy of the GNU General Public License along with this program; if not, write to the Free Software Foundation, Inc., 51 Franklin Street, Fifth Floor, Boston, MA 02110-1301 USA.
Also add information on how to contact you by electronic and paper mail.
If the program is interactive, make it output a short notice like this when it starts in an interactive mode:
Gnomovision version 69, Copyright (C) year name of author Gnomovision comes with ABSOLUTELY NO WARRANTY; for details type `show w'. This is free software, and you are welcome to redistribute it under certain conditions; type `show c' for details.
The hypothetical commands `show w' and `show c' should show the appropriate parts of the General Public License. Of course, the commands you use may be called something other than `show w' and `show c'; they could even be mouse-clicks or menu items--whatever suits your program.

You should also get your employer (if you work as a programmer) or your school, if any, to sign a "copyright disclaimer" for the program, if necessary. Here is a sample; alter the names:
Yoyodyne, Inc., hereby disclaims all copyright interest in the program `Gnomovision' (which makes passes at compilers) written by James Hacker.
<signature of Ty Coon>, 1 April 1989 Ty Coon, President of Vice
This General Public License does not permit incorporating your program into proprietary programs. If your program is a subroutine library, you may consider it more useful to permit linking proprietary applications with the library. If this is what you want to do, use the GNU Lesser General Public License instead of this License.
GNU LESSER GENERAL PUBLIC LICENSE
Version 2.1, February 1999
Copyright (C) 1991, 1999 Free Software Foundation, Inc. 51 Franklin Street, Fifth Floor, Boston, MA 02110-1301 USA Everyone is permitted to copy and distribute verbatim copies of this license document, but changing it is not allowed.
[This is the first released version of the Lesser GPL. It also counts as the successor of the GNU Library Public License, version 2, hence the version number 2.1.]
Preamble
The licenses for most software are designed to take away your freedom to share and change it. By contrast, the GNU General Public Licenses are intended to guarantee your freedom to share and change free software--to make sure the software is free for all its users.
This license, the Lesser General Public License, applies to some specially designated software packages--typically libraries--of the Free Software Foundation and other authors who decide to use it. You can use it too, but we suggest you first think carefully about whether this license or the ordinary General Public License is the better strategy to use in any particular case, based on the explanations below.
When we speak of free software, we are referring to freedom of use, not price. Our General Public Licenses are designed to make sure that you have the freedom to distribute copies of free software (and charge for this service if you wish); that you receive source code or can get it if you want it; that you can change the software and use pieces of it in new free programs; and that you are informed that you can do these things.
To protect your rights, we need to make restrictions that forbid distributors to deny you these rights or to ask you to surrender these rights. These restrictions translate to certain responsibilities for you if you distribute copies of the library or if you modify it.
For example, if you distribute copies of the library, whether gratis or for a fee, you must give the recipients all the rights that we gave you. You must make sure that they, too, receive or can get the source code. If you link other code with the

library, you must provide complete object files to the recipients, so that they can relink them with the library after making changes to the library and recompiling it. And you must show them these terms so they know their rights.
We protect your rights with a two-step method: (1) we copyright the library, and (2) we offer you this license, which gives you legal permission to copy, distribute and/or modify the library.
To protect each distributor, we want to make it very clear that there is no warranty for the free library. Also, if the library is modified by someone else and passed on, the recipients should know that what they have is not the original version, so that the original author's reputation will not be affected by problems that might be introduced by others.
Finally, software patents pose a constant threat to the existence of any free program. We wish to make sure that a company cannot effectively restrict the users of a free program by obtaining a restrictive license from a patent holder. Therefore, we insist that any patent license obtained for a version of the library must be consistent with the full freedom of use specified in this license.
Most GNU software, including some libraries, is covered by the ordinary GNU General Public License. This license, the GNU Lesser General Public License, applies to certain designated libraries, and is quite different from the ordinary General Public License. We use this license for certain libraries in order to permit linking those libraries into non-free programs.
When a program is linked with a library, whether statically or using a shared library, the combination of the two is legally speaking a combined work, a derivative of the original library. The ordinary General Public License therefore permits such linking only if the entire combination fits its criteria of freedom. The Lesser General Public License permits more lax criteria for linking other code with the library.
We call this license the "Lesser" General Public License because it does Less to protect the user's freedom than the ordinary General Public License. It also provides other free software developers Less of an advantage over competing non-free programs. These disadvantages are the reason we use the ordinary General Public License for many libraries. However, the Lesser license provides advantages in certain special circumstances.
For example, on rare occasions, there may be a special need to encourage the widest possible use of a certain library, so that it becomes a de-facto standard. To achieve this, non-free programs must be allowed to use the library. A more frequent case is that a free library does the same job as widely used non-free libraries. In this case, there is little to gain by limiting the free library to free software only, so we use the Lesser General Public License.
In other cases, permission to use a particular library in non-free programs enables a greater number of people to use a large body of free software. For example, permission to use the GNU C Library in non-free programs enables many more people to use the whole GNU operating system, as well as its variant, the GNU/Linux operating system.
Although the Lesser General Public License is Less protective of the users' freedom, it does ensure that the user of a program that is linked with the Library has the freedom and the wherewithal to run that program using a modified version of the Library.

The precise terms and conditions for copying, distribution and modification follow. Pay close attention to the difference between a "work based on the library" and a "work that uses the library". The former contains code derived from the library, whereas the latter must be combined with the library in order to run.
GNU LESSER GENERAL PUBLIC LICENSE TERMS AND CONDITIONS FOR COPYING, DISTRIBUTION AND MODIFICATION
0. This License Agreement applies to any software library or other program which contains a notice placed by the copyright holder or other authorized party saying it may be distributed under the terms of this Lesser General Public License (also called "this License"). Each licensee is addressed as "you".
A "library" means a collection of software functions and/or data prepared so as to be conveniently linked with application programs (which use some of those functions and data) to form executables.
The "Library", below, refers to any such software library or work which has been distributed under these terms. A "work based on the Library" means either the Library or any derivative work under copyright law: that is to say, a work containing the Library or a portion of it, either verbatim or with modifications and/or translated straightforwardly into another language. (Hereinafter, translation is included without limitation in the term "modification".)
"Source code" for a work means the preferred form of the work for making modifications to it. For a library, complete source code means all the source code for all modules it contains, plus any associated interface definition files, plus the scripts used to control compilation and installation of the library.
Activities other than copying, distribution and modification are not covered by this License; they are outside its scope. The act of running a program using the Library is not restricted, and output from such a program is covered only if its contents constitute a work based on the Library (independent of the use of the Library in a tool for writing it). Whether that is true depends on what the Library does and what the program that uses the Library does.
1. You may copy and distribute verbatim copies of the Library's complete source code as you receive it, in any medium, provided that you conspicuously and appropriately publish on each copy an appropriate copyright notice and disclaimer of warranty; keep intact all the notices that refer to this License and to the absence of any warranty; and distribute a copy of this License along with the Library.
You may charge a fee for the physical act of transferring a copy, and you may at your option offer warranty protection in exchange for a fee.
2. You may modify your copy or copies of the Library or any portion of it, thus forming a work based on the Library, and copy and distribute such modifications or work under the terms of Section 1 above, provided that you also meet all of these conditions:
a) The modified work must itself be a software library.
b) You must cause the files modified to carry prominent notices stating that you changed the files and the date of any change.

c) You must cause the whole of the work to be licensed at no charge to all third parties under the terms of this License.
d) If a facility in the modified Library refers to a function or a table of data to be supplied by an application program that uses the facility, other than as an argument passed when the facility is invoked, then you must make a good faith effort to ensure that, in the event an application does not supply such function or table, the facility still operates, and performs whatever part of its purpose remains meaningful.
(For example, a function in a library to compute square roots has a purpose that is entirely well-defined independent of the application. Therefore, Subsection 2d requires that any application-supplied function or table used by this function must be optional: if the application does not supply it, the square root function must still compute square roots.)
These requirements apply to the modified work as a whole. If identifiable sections of that work are not derived from the Library, and can be reasonably considered independent and separate works in themselves, then this License, and its terms, do not apply to those sections when you distribute them as separate works. But when you distribute the same sections as part of a whole which is a work based on the Library, the distribution of the whole must be on the terms of this License, whose permissions for other licensees extend to the entire whole, and thus to each and every part regardless of who wrote it.
Thus, it is not the intent of this section to claim rights or contest your rights to work written entirely by you; rather, the intent is to exercise the right to control the distribution of derivative or collective works based on the Library.
In addition, mere aggregation of another work not based on the Library with the Library (or with a work based on the Library) on a volume of a storage or distribution medium does not bring the other work under the scope of this License.
3. You may opt to apply the terms of the ordinary GNU General Public License instead of this License to a given copy of the Library. To do this, you must alter all the notices that refer to this License, so that they refer to the ordinary GNU General Public License, version 2, instead of to this License. (If a newer version than version 2 of the ordinary GNU General Public License has appeared, then you can specify that version instead if you wish.) Do not make any other change in these notices.
Once this change is made in a given copy, it is irreversible for that copy, so the ordinary GNU General Public License applies to all subsequent copies and derivative works made from that copy.
This option is useful when you wish to copy part of the code of the Library into a program that is not a library.
4. You may copy and distribute the Library (or a portion or derivative of it, under Section 2) in object code or executable form under the terms of Sections 1 and 2 above provided that you accompany it with the complete corresponding machine-readable source code, which must be distributed under the terms of Sections 1 and 2 above on a medium customarily used for software interchange.
If distribution of object code is made by offering access to copy from a designated place, then offering equivalent access to copy the source code from the same place satisfies the requirement to distribute the source code, even though third parties are not compelled to copy the source along with the object code.
5. A program that contains no derivative of any portion of the Library, but is designed to work with the Library by being compiled or linked with it, is called a "work that uses the Library". Such a work, in isolation, is not a derivative work of the Library, and therefore falls outside the scope of this License.

However, linking a "work that uses the Library" with the Library creates an executable that is a derivative of the Library (because it contains portions of the Library), rather than a "work that uses the library". The executable is therefore covered by this License. Section 6 states terms for distribution of such executables.
When a "work that uses the Library" uses material from a header file that is part of the Library, the object code for the work may be a derivative work of the Library even though the source code is not. Whether this is true is especially significant if the work can be linked without the Library, or if the work is itself a library. The threshold for this to be true is not precisely defined by law.
If such an object file uses only numerical parameters, data structure layouts and accessors, and small macros and small inline functions (ten lines or less in length), then the use of the object file is unrestricted, regardless of whether it is legally a derivative work. (Executables containing this object code plus portions of the Library will still fall under Section 6.)
Otherwise, if the work is a derivative of the Library, you may distribute the object code for the work under the terms of Section 6. Any executables containing that work also fall under Section 6, whether or not they are linked directly with the Library itself.
6. As an exception to the Sections above, you may also combine or link a "work that uses the Library" with the Library to produce a work containing portions of the Library, and distribute that work under terms of your choice, provided that the terms permit modification of the work for the customer's own use and reverse engineering for debugging such modifications.
You must give prominent notice with each copy of the work that the Library is used in it and that the Library and its use are covered by this License. You must supply a copy of this License. If the work during execution displays copyright notices, you must include the copyright notice for the Library among them, as well as a reference directing the user to the copy of this License. Also, you must do one of these things:
a) Accompany the work with the complete corresponding machine-readable source code for the Library including whatever changes were used in the work (which must be distributed under Sections 1 and 2 above); and, if the work is an executable linked with the Library, with the complete machine-readable "work that uses the Library", as object code and/or source code, so that the user can modify the Library and then relink to produce a modified executable containing the modified Library. (It is understood that the user who changes the contents of definitions files in the Library will not necessarily be able to recompile the application to use the modified definitions.)
b) Use a suitable shared library mechanism for linking with the Library. A suitable mechanism is one that (1) uses at run time a copy of the library already present on the user's computer system, rather than copying library functions into the executable, and (2) will operate properly with a modified version of the library, if the user installs one, as long as the modified version is interface-compatible with the version that the work was made with.
c) Accompany the work with a written offer, valid for at least three years, to give the same user the materials specified in Subsection 6a, above, for a charge no more than the cost of performing this distribution.
d) If distribution of the work is made by offering access to copy from a designated place, offer equivalent access to copy the above specified materials from the same place.
e) Verify that the user has already received a copy of these materials or that you have already sent this user a copy.

For an executable, the required form of the "work that uses the Library" must include any data and utility programs needed for reproducing the executable from it. However, as a special exception, the materials to be distributed need not include anything that is normally distributed (in either source or binary form) with the major components (compiler, kernel, and so on) of the operating system on which the executable runs, unless that component itself accompanies the executable.
It may happen that this requirement contradicts the license restrictions of other proprietary libraries that do not normally accompany the operating system. Such a contradiction means you cannot use both them and the Library together in an executable that you distribute.
7. You may place library facilities that are a work based on the Library side-by-side in a single library together with other library facilities not covered by this License, and distribute such a combined library, provided that the separate distribution of the work based on the Library and of the other library facilities is otherwise permitted, and provided that you do these two things:
a) Accompany the combined library with a copy of the same work based on the Library, uncombined with any other library facilities. This must be distributed under the terms of the Sections above.
b) Give prominent notice with the combined library of the fact that part of it is a work based on the Library, and explaining where to find the accompanying uncombined form of the same work.
8. You may not copy, modify, sublicense, link with, or distribute the Library except as expressly provided under this License. Any attempt otherwise to copy, modify, sublicense, link with, or distribute the Library is void, and will automatically terminate your rights under this License. However, parties who have received copies, or rights, from you under this License will not have their licenses terminated so long as such parties remain in full compliance.
9. You are not required to accept this License, since you have not signed it. However, nothing else grants you permission to modify or distribute the Library or its derivative works. These actions are prohibited by law if you do not accept this License. Therefore, by modifying or distributing the Library (or any work based on the Library), you indicate your acceptance of this License to do so, and all its terms and conditions for copying, distributing or modifying the Library or works based on it.
10. Each time you redistribute the Library (or any work based on the Library), the recipient automatically receives a license from the original licensor to copy, distribute, link with or modify the Library subject to these terms and conditions. You may not impose any further restrictions on the recipients' exercise of the rights granted herein. You are not responsible for enforcing compliance by third parties with this License.
11. If, as a consequence of a court judgment or allegation of patent infringement or for any other reason (not limited to patent issues), conditions are imposed on you (whether by court order, agreement or otherwise) that contradict the conditions of this License, they do not excuse you from the conditions of this License. If you cannot distribute so as to satisfy simultaneously your obligations under this License and any other pertinent obligations, then as a consequence you may not distribute the Library at all. For example, if a patent license would not permit royalty-free redistribution of the Library by all those who receive copies directly or indirectly through you, then the only way you could satisfy both it and this License would be to refrain entirely from distribution of the Library.

If any portion of this section is held invalid or unenforceable under any particular circumstance, the balance of the section is intended to apply, and the section as a whole is intended to apply in other circumstances.
It is not the purpose of this section to induce you to infringe any patents or other property right claims or to contest validity of any such claims; this section has the sole purpose of protecting the integrity of the free software distribution system which is implemented by public license practices. Many people have made generous contributions to the wide range of software distributed through that system in reliance on consistent application of that system; it is up to the author/donor to decide if he or she is willing to distribute software through any other system and a licensee cannot impose that choice.
This section is intended to make thoroughly clear what is believed to be a consequence of the rest of this License.
12. If the distribution and/or use of the Library is restricted in certain countries either by patents or by copyrighted interfaces, the original copyright holder who places the Library under this License may add an explicit geographical distribution limitation excluding those countries, so that distribution is permitted only in or among countries not thus excluded. In such case, this License incorporates the limitation as if written in the body of this License.
13. The Free Software Foundation may publish revised and/or new versions of the Lesser General Public License from time to time. Such new versions will be similar in spirit to the present version, but may differ in detail to address new problems or concerns.
Each version is given a distinguishing version number. If the Library specifies a version number of this License which applies to it and "any later version", you have the option of following the terms and conditions either of that version or of any later version published by the Free Software Foundation. If the Library does not specify a license version number, you may choose any version ever published by the Free Software Foundation.
14. If you wish to incorporate parts of the Library into other free programs whose distribution conditions are incompatible with these, write to the author to ask for permission. For software which is copyrighted by the Free Software Foundation, write to the Free Software Foundation; we sometimes make exceptions for this. Our decision will be guided by the two goals of preserving the free status of all derivatives of our free software and of promoting the sharing and reuse of software generally.
NO WARRANTY
15. BECAUSE THE LIBRARY IS LICENSED FREE OF CHARGE, THERE IS NO WARRANTY FOR THE LIBRARY, TO THE EXTENT PERMITTED BY APPLICABLE LAW. EXCEPT WHEN OTHERWISE STATED IN WRITING THE COPYRIGHT HOLDERS AND/OR OTHER PARTIES PROVIDE THE LIBRARY "AS IS" WITHOUT WARRANTY OF ANY KIND, EITHER EXPRESSED OR IMPLIED, INCLUDING, BUT NOT LIMITED TO, THE IMPLIED WARRANTIES OF MERCHANTABILITY AND FITNESS FOR A PARTICULAR PURPOSE. THE ENTIRE RISK AS TO THE QUALITY AND PERFORMANCE OF THE LIBRARY IS WITH YOU. SHOULD THE LIBRARY PROVE DEFECTIVE, YOU ASSUME THE COST OF ALL NECESSARY SERVICING, REPAIR OR CORRECTION.
16. IN NO EVENT UNLESS REQUIRED BY APPLICABLE LAW OR AGREED TO IN WRITING WILL ANY COPYRIGHT HOLDER, OR ANY OTHER PARTY WHO MAY MODIFY AND/OR REDISTRIBUTE THE LIBRARY AS PERMITTED ABOVE, BE LIABLE TO YOU FOR DAMAGES, INCLUDING ANY GENERAL, SPECIAL, INCIDENTAL OR CONSEQUENTIAL DAMAGES ARISING OUT OF THE USE OR INABILITY TO USE THE LIBRARY (INCLUDING BUT NOT LIMITED TO LOSS OF DATA OR DATA BEING RENDERED INACCURATE OR LOSSES SUSTAINED BY

YOU OR THIRD PARTIES OR A FAILURE OF THE LIBRARY TO OPERATE WITH ANY OTHER SOFTWARE), EVEN IF SUCH HOLDER OR OTHER PARTY HAS BEEN ADVISED OF THE POSSIBILITY OF SUCH DAMAGES.
END OF TERMS AND CONDITIONS
How to Apply These Terms to Your New Libraries
If you develop a new library, and you want it to be of the greatest possible use to the public, we recommend making it free software that everyone can redistribute and change. You can do so by permitting redistribution under these terms (or, alternatively, under the terms of the ordinary General Public License).
To apply these terms, attach the following notices to the library. It is safest to attach them to the start of each source file to most effectively convey the exclusion of warranty; and each file should have at least the "copyright" line and a pointer to where the full notice is found.
<one line to give the library's name and a brief idea of what it does.> Copyright (C) <year> <name of author>
This library is free software; you can redistribute it and/or modify it under the terms of the GNU Lesser General Public License as published by the Free Software Foundation; either version 2.1 of the License, or (at your option) any later version.
This library is distributed in the hope that it will be useful, but WITHOUT ANY WARRANTY; without even the implied warranty of MERCHANTABILITY or FITNESS FOR A PARTICULAR PURPOSE. See the GNU Lesser General Public License for more details.
You should have received a copy of the GNU Lesser General Public License along with this library; if not, write to the Free Software Foundation, Inc., 51 Franklin Street, Fifth Floor, Boston, MA 02110-1301 USA
Also add information on how to contact you by electronic and paper mail.
You should also get your employer (if you work as a programmer) or your school, if any, to sign a "copyright disclaimer" for the library, if necessary. Here is a sample; alter the names:
Yoyodyne, Inc., hereby disclaims all copyright interest in the library `Frob' (a library for tweaking knobs) written by James Random Hacker.
<signature of Ty Coon>, 1 April 1990 Ty Coon, President of Vice
That's all there is to it!

GNU GENERAL PUBLIC LICENSE
Version 3, 29 June 2007
Copyright (C) 2007 Free Software Foundation, Inc. <http://fsf.org/>Everyone is permitted to copy and distribute verbatim copies of this license document, but changing it is not allowed.
Preamble
The GNU General Public License is a free, copyleft license for software and other kinds of works.
The licenses for most software and other practical works are designed to take away your freedom to share and change the works. By contrast, the GNU General Public License is intended to guarantee your freedom to share and change all versions of a program--to make sure it remains free software for all its users. We, the Free Software Foundation, use the GNU General Public License for most of our software; it applies also to any other work released this way by its authors. You can apply it to your programs, too.
When we speak of free software, we are referring to freedom, not price. Our General Public Licenses are designed to make sure that you have the freedom to distribute copies of free software (and charge for them if you wish), that you receive source code or can get it if you want it, that you can change the software or use pieces of it in new free programs, and that you know you can do these things.
To protect your rights, we need to prevent others from denying you these rights or asking you to surrender the rights. Therefore, you have certain responsibilities if you distribute copies of the software, or if you modify it: responsibilities to respect the freedom of others.
For example, if you distribute copies of such a program, whether gratis or for a fee, you must pass on to the recipients the same freedoms that you received. You must make sure that they, too, receive or can get the source code. And you must show them these terms so they know their rights.
Developers that use the GNU GPL protect your rights with two steps:(1) assert copyright on the software, and (2) offer you this License giving you legal permission to copy, distribute and/or
modify it.
For the developers' and authors' protection, the GPL clearly explains that there is no warranty for this free software. For both users' and authors' sake, the GPL requires that modified versions be marked as changed, so that their problems will not be attributed erroneously to authors of previous versions.
Some devices are designed to deny users access to install or run modified versions of the software inside them, although the manufacturer can do so. This is fundamentally incompatible with the aim of protecting users' freedom to change the software. The systematic pattern of such abuse occurs in the area of products for individuals to use, which is precisely where it is most unacceptable. Therefore, we have designed this version of the GPL to prohibit the practice for those products. If such problems arise substantially in other domains, we stand ready to extend this provision to those domains in future versions of the GPL, as needed to protect the freedom of users.
Finally, every program is threatened constantly by software patents. States should not allow patents to restrict development and use of software on general-purpose computers, but in those that do, we wish to avoid the special danger that patents applied to a free program could make it effectively proprietary. To prevent this, the GPL assures that patents cannot be used to render the program non-free.
The precise terms and conditions for copying, distribution and modification follow.
TERMS AND CONDITIONS
0. Definitions.

"This License" refers to version 3 of the GNU General Public License.
"Copyright" also means copyright-like laws that apply to other kinds of works, such as semiconductor masks.
"The Program" refers to any copyrightable work licensed under this License. Each licensee is addressed as "you". "Licensees" and "recipients" may be individuals or organizations.
To "modify" a work means to copy from or adapt all or part of the work in a fashion requiring copyright permission, other than the making of an exact copy. The resulting work is called a "modified version" of the earlier work or a work "based on" the earlier work.
A "covered work" means either the unmodified Program or a work based on the Program.
To "propagate" a work means to do anything with it that, without permission, would make you directly or secondarily liable for infringement under applicable copyright law, except executing it on a computer or modifying a private copy. Propagation includes copying, distribution (with or without modification), making available to the public, and in some countries other activities as well.
To "convey" a work means any kind of propagation that enables other parties to make or receive copies. Mere interaction with a user through a computer network, with no transfer of a copy, is not conveying.
An interactive user interface displays "Appropriate Legal Notices" to the extent that it includes a convenient and prominently visible feature that (1) displays an appropriate copyright notice, and (2) tells the user that there is no warranty for the work (except to the extent that warranties are provided), that licensees may convey the work under this License, and how to view a copy of this License. If the interface presents a list of user commands or options, such as a menu, a prominent item in the list meets this criterion.
1. Source Code.
The "source code" for a work means the preferred form of the work for making modifications to it. "Object code" means any non-source form of a work.
A "Standard Interface" means an interface that either is an official standard defined by a recognized standards body, or, in the case of interfaces specified for a particular programming language, one that is widely used among developers working in that language.
The "System Libraries" of an executable work include anything, other than the work as a whole, that (a) is included in the normal form of packaging a Major Component, but which is not part of that Major Component, and (b) serves only to enable use of the work with that Major Component, or to implement a Standard Interface for which an implementation is available to the public in source code form. A "Major Component", in this context, means a major essential component (kernel, window system, and so on) of the specific operating system (if any) on which the executable work runs, or a compiler used to produce the work, or an object code interpreter used to run it.
The "Corresponding Source" for a work in object code form means all the source code needed to generate, install, and (for an executable work) run the object code and to modify the work, including scripts to control those activities. However, it does not include the work's System Libraries, or general-purpose tools or generally available free programs which are used unmodified in performing those activities but which are not part of the work. For example, Corresponding Source includes interface definition files associated with source files for the work, and the source code for shared libraries and dynamically linked subprograms that the work is specifically designed to require, such as by intimate data communication or control flow between those subprograms and other parts of the work.
The Corresponding Source need not include anything that users can regenerate automatically from other parts of the Corresponding Source.

The Corresponding Source for a work in source code form is that same work.
2. Basic Permissions.
All rights granted under this License are granted for the term of copyright on the Program, and are irrevocable provided the stated conditions are met. This License explicitly affirms your unlimited permission to run the unmodified Program. The output from running a covered work is covered by this License only if the output, given its content, constitutes a covered work. This License acknowledges your rights of fair use or other equivalent, as provided by copyright law.
You may make, run and propagate covered works that you do not convey, without conditions so long as your license otherwise remains in force. You may convey covered works to others for the sole purpose of having them make modifications exclusively for you, or provide you with facilities for running those works, provided that you comply with the terms of this License in conveying all material for which you do not control copyright. Those thus making or running the covered works for you must do so exclusively on your behalf, under your direction and control, on terms that prohibit them from making any copies of your copyrighted material outside their relationship with you.
Conveying under any other circumstances is permitted solely under the conditions stated below. Sublicensing is not allowed; section 10 makes it unnecessary.
3. Protecting Users' Legal Rights From Anti-Circumvention Law.
No covered work shall be deemed part of an effective technological measure under any applicable law fulfilling obligations under article 11 of the WIPO copyright treaty adopted on 20 December 1996, or similar laws prohibiting or restricting circumvention of such measures.
When you convey a covered work, you waive any legal power to forbid circumvention of technological measures to the extent such circumvention is effected by exercising rights under this License with respect to the covered work, and you disclaim any intention to limit operation or modification of the work as a means of enforcing, against the work's users, your or third parties' legal rights to forbid circumvention of technological measures.
4. Conveying Verbatim Copies.
You may convey verbatim copies of the Program's source code as you receive it, in any medium, provided that you conspicuously and appropriately publish on each copy an appropriate copyright notice; keep intact all notices stating that this License and any non-permissive terms added in accord with section 7 apply to the code; keep intact all notices of the absence of any warranty; and give all recipients a copy of this License along with the Program.
You may charge any price or no price for each copy that you convey, and you may offer support or warranty protection for a fee.
5. Conveying Modified Source Versions.
You may convey a work based on the Program, or the modifications to produce it from the Program, in the form of source code under the terms of section 4, provided that you also meet all of these conditions:
a) The work must carry prominent notices stating that you modified it, and giving a relevant date.
b) The work must carry prominent notices stating that it is released under this License and any conditions added under section
7. This requirement modifies the requirement in section 4 to "keep intact all notices".
c) You must license the entire work, as a whole, under this License to anyone who comes into possession of a copy. This License will therefore apply, along with any applicable section 7 additional terms, to the whole of the work, and all its parts, regardless of how they are packaged. This License gives no permission to license the work in any other way, but it does not invalidate such permission if you have separately received it.

d) If the work has interactive user interfaces, each must display Appropriate Legal Notices; however, if the Program has interactive interfaces that do not display Appropriate Legal Notices, your work need not make them do so.
A compilation of a covered work with other separate and independent works, which are not by their nature extensions of the covered work, and which are not combined with it such as to form a larger program, in or on a volume of a storage or distribution medium, is called an "aggregate" if the compilation and its resulting copyright are not used to limit the access or legal rights of the compilation's users beyond what the individual works permit. Inclusion of a covered work in an aggregate does not cause this License to apply to the other parts of the aggregate.
6. Conveying Non-Source Forms.
You may convey a covered work in object code form under the terms of sections 4 and 5, provided that you also convey the machine-readable Corresponding Source under the terms of this License, in one of these ways:
a) Convey the object code in, or embodied in, a physical product (including a physical distribution medium), accompanied by the Corresponding Source fixed on a durable physical medium customarily used for software interchange.
b) Convey the object code in, or embodied in, a physical product (including a physical distribution medium), accompanied by a written offer, valid for at least three years and valid for as long as you offer spare parts or customer support for that product model, to give anyone who possesses the object code either (1) a copy of the Corresponding Source for all the software in the product that is covered by this License, on a durable physical medium customarily used for software interchange, for a price no more than your reasonable cost of physically performing this conveying of source, or (2) access to copy the Corresponding Source from a network server at no charge.
c) Convey individual copies of the object code with a copy of the written offer to provide the Corresponding Source. This alternative is allowed only occasionally and noncommercially, and only if you received the object code with such an offer, in accord with subsection 6b.
d) Convey the object code by offering access from a designated place (gratis or for a charge), and offer equivalent access to the Corresponding Source in the same way through the same place at no further charge. You need not require recipients to copy the Corresponding Source along with the object code. If the place to copy the object code is a network server, the Corresponding Source may be on a different server (operated by you or a third party) that supports equivalent copying facilities, provided you maintain clear directions next to the object code saying where to find the Corresponding Source. Regardless of what server hosts the Corresponding Source, you remain obligated to ensure that it is available for as long as needed to satisfy these requirements.
e) Convey the object code using peer-to-peer transmission, provided you inform other peers where the object code and Corresponding Source of the work are being offered to the general public at no charge under subsection 6d.
A separable portion of the object code, whose source code is excluded from the Corresponding Source as a System Library, need not be included in conveying the object code work.
A "User Product" is either (1) a "consumer product", which means any tangible personal property which is normally used for personal, family, or household purposes, or (2) anything designed or sold for incorporation into a dwelling. In determining whether a product is a consumer product, doubtful cases shall be resolved in favor of coverage. For a particular product received by a particular user, "normally used" refers to a typical or common use of that class of product, regardless of the status of the particular user or of the way in which the particular user actually uses, or expects or is expected to use, the product. A product is a consumer product regardless of whether the product has substantial commercial, industrial or non-consumer uses, unless such uses represent the only significant mode of use of the product.
"Installation Information" for a User Product means any methods, procedures, authorization keys, or other information required to install and execute modified versions of a covered work in that User Product from a modified version of its

Corresponding Source. The information must suffice to ensure that the continued functioning of the modified object code is in no case prevented or interfered with solely because modification has been made.
If you convey an object code work under this section in, or with, or specifically for use in, a User Product, and the conveying occurs as part of a transaction in which the right of possession and use of the User Product is transferred to the recipient in perpetuity or for a fixed term (regardless of how the transaction is characterized), the Corresponding Source conveyed under this section must be accompanied by the Installation Information. But this requirement does not apply if neither you nor any third party retains the ability to install modified object code on the User Product (for example, the work has been installed in ROM).
The requirement to provide Installation Information does not include a requirement to continue to provide support service, warranty, or updates for a work that has been modified or installed by the recipient, or for the User Product in which it has been modified or installed. Access to a network may be denied when the modification itself materially and adversely affects the operation of the network or violates the rules and protocols for communication across the network.
Corresponding Source conveyed, and Installation Information provided, in accord with this section must be in a format that is publicly documented (and with an implementation available to the public in source code form), and must require no special password or key for unpacking, reading or copying.
7. Additional Terms.
"Additional permissions" are terms that supplement the terms of this License by making exceptions from one or more of its conditions. Additional permissions that are applicable to the entire Program shall be treated as though they were included in this License, to the extent that they are valid under applicable law. If additional permissions apply only to part of the Program, that part may be used separately under those permissions, but the entire Program remains governed by this License without regard to the additional permissions.
When you convey a copy of a covered work, you may at your option remove any additional permissions from that copy, or from any part of it. (Additional permissions may be written to require their own removal in certain cases when you modify the work.) You may place additional permissions on material, added by you to a covered work, for which you have or can give appropriate copyright permission.
Notwithstanding any other provision of this License, for material you add to a covered work, you may (if authorized by the copyright holders of that material) supplement the terms of this License with terms:
a) Disclaiming warranty or limiting liability differently from the terms of sections 15 and 16 of this License; or
b) Requiring preservation of specified reasonable legal notices or author attributions in that material or in the Appropriate Legal Notices displayed by works containing it; or
c) Prohibiting misrepresentation of the origin of that material, or requiring that modified versions of such material be marked in reasonable ways as different from the original version; or
d) Limiting the use for publicity purposes of names of licensors or authors of the material; or
e) Declining to grant rights under trademark law for use of some trade names, trademarks, or service marks; or
f) Requiring indemnification of licensors and authors of that material by anyone who conveys the material (or modified versions of it) with contractual assumptions of liability to the recipient, for any liability that these contractual assumptions directly impose on those licensors and authors.
All other non-permissive additional terms are considered "further restrictions" within the meaning of section 10. If the Program as you received it, or any part of it, contains a notice stating that it is governed by this License along with a term that is a further restriction, you may remove that term. If a license document contains a further restriction but permits

relicensing or conveying under this License, you may add to a covered work material governed by the terms of that license document, provided that the further restriction does not survive such relicensing or conveying.
If you add terms to a covered work in accord with this section, you must place, in the relevant source files, a statement of the additional terms that apply to those files, or a notice indicating where to find the applicable terms.
Additional terms, permissive or non-permissive, may be stated in the form of a separately written license, or stated as exceptions; the above requirements apply either way.
8. Termination.
You may not propagate or modify a covered work except as expressly provided under this License. Any attempt otherwise to propagate or modify it is void, and will automatically terminate your rights under this License (including any patent licenses granted under the third paragraph of section 11).
However, if you cease all violation of this License, then your license from a particular copyright holder is reinstated (a) provisionally, unless and until the copyright holder explicitly and finally terminates your license, and (b) permanently, if the copyright holder fails to notify you of the violation by some reasonable means prior to 60 days after the cessation.
Moreover, your license from a particular copyright holder is reinstated permanently if the copyright holder notifies you of the violation by some reasonable means, this is the first time you have received notice of violation of this License (for any work) from that copyright holder, and you cure the violation prior to 30 days after your receipt of the notice.
Termination of your rights under this section does not terminate the licenses of parties who have received copies or rights from you under this License. If your rights have been terminated and not permanently reinstated, you do not qualify to receive new licenses for the same material under section 10.
9. Acceptance Not Required for Having Copies.
You are not required to accept this License in order to receive or run a copy of the Program. Ancillary propagation of a covered work occurring solely as a consequence of using peer-to-peer transmission to receive a copy likewise does not require acceptance. However, nothing other than this License grants you permission to propagate or modify any covered work. These actions infringe copyright if you do not accept this License. Therefore, by modifying or propagating a covered work, you indicate your acceptance of this License to do so.
10. Automatic Licensing of Downstream Recipients.
Each time you convey a covered work, the recipient automatically receives a license from the original licensors, to run, modify and propagate that work, subject to this License. You are not responsible for enforcing compliance by third parties with this License.
An "entity transaction" is a transaction transferring control of an organization, or substantially all assets of one, or subdividing an organization, or merging organizations. If propagation of a covered work results from an entity transaction, each party to that transaction who receives a copy of the work also receives whatever licenses to the work the party's predecessor in interest had or could give under the previous paragraph, plus a right to possession of the Corresponding Source of the work from the predecessor in interest, if the predecessor has it or can get it with reasonable efforts.
You may not impose any further restrictions on the exercise of the rights granted or affirmed under this License. For example, you may not impose a license fee, royalty, or other charge for exercise of rights granted under this License, and you may not initiate litigation (including a cross-claim or counterclaim in a lawsuit) alleging that any patent claim is infringed by making, using, selling, offering for sale, or importing the Program or any portion of it.
11. Patents.

A "contributor" is a copyright holder who authorizes use under this License of the Program or a work on which the Program is based. The work thus licensed is called the contributor's "contributor version".
A contributor's "essential patent claims" are all patent claims owned or controlled by the contributor, whether already acquired or hereafter acquired, that would be infringed by some manner, permitted by this License, of making, using, or selling its contributor version, but do not include claims that would be infringed only as a consequence of further modification of the contributor version. For purposes of this definition, "control" includes the right to grant patent sublicenses in a manner consistent with the requirements of this License.
Each contributor grants you a non-exclusive, worldwide, royalty-free patent license under the contributor's essential patent claims, to make, use, sell, offer for sale, import and otherwise run, modify and propagate the contents of its contributor version.
In the following three paragraphs, a "patent license" is any express agreement or commitment, however denominated, not to enforce a patent (such as an express permission to practice a patent or covenant not to sue for patent infringement). To "grant" such a patent license to a party means to make such an agreement or commitment not to enforce a patent against the party.
If you convey a covered work, knowingly relying on a patent license, and the Corresponding Source of the work is not available for anyone to copy, free of charge and under the terms of this License, through a publicly available network server or other readily accessible means, then you must either (1) cause the Corresponding Source to be so available, or (2) arrange to deprive yourself of the benefit of the patent license for this particular work, or (3) arrange, in a manner consistent with the requirements of this License, to extend the patent license to downstream recipients. "Knowingly relying" means you have actual knowledge that, but for the patent license, your conveying the covered work in a country, or your recipient's use of the covered work in a country, would infringe one or more identifiable patents in that country that you have reason to believe are valid.
If, pursuant to or in connection with a single transaction or arrangement, you convey, or propagate by procuring conveyance of, a covered work, and grant a patent license to some of the parties receiving the covered work authorizing them to use, propagate, modify or convey a specific copy of the covered work, then the patent license you grant is automatically extended to all recipients of the covered work and works based on it.
A patent license is "discriminatory" if it does not include within the scope of its coverage, prohibits the exercise of, or is conditioned on the non-exercise of one or more of the rights that are specifically granted under this License. You may not convey a covered work if you are a party to an arrangement with a third party that is in the business of distributing software, under which you make payment to the third party based on the extent of your activity of conveying the work, and under which the third party grants, to any of the parties who would receive the covered work from you, a discriminatory patent license (a) in connection with copies of the covered work conveyed by you (or copies made from those copies), or (b) primarily for and in connection with specific products or compilations that contain the covered work, unless you entered into that arrangement, or that patent license was granted, prior to 28 March 2007.
Nothing in this License shall be construed as excluding or limiting any implied license or other defenses to infringement that may otherwise be available to you under applicable patent law.
12. No Surrender of Others' Freedom.
If conditions are imposed on you (whether by court order, agreement or otherwise) that contradict the conditions of this License, they do not excuse you from the conditions of this License. If you cannot convey a covered work so as to satisfy simultaneously your obligations under this License and any other pertinent obligations, then as a consequence you may not convey it at all. For example, if you agree to terms that obligate you to collect a royalty for further conveying from those to whom you convey the Program, the only way you could satisfy both those terms and this License would be to refrain entirely from conveying the Program.
13. Use with the GNU Affero General Public License.

Notwithstanding any other provision of this License, you have permission to link or combine any covered work with a work licensed under version 3 of the GNU Affero General Public License into a single combined work, and to convey the resulting work. The terms of this License will continue to apply to the part which is the covered work, but the special requirements of the GNU Affero General Public License, section 13, concerning interaction through a network will apply to the combination as such.
14. Revised Versions of this License.
The Free Software Foundation may publish revised and/or new versions of the GNU General Public License from time to time. Such new versions will be similar in spirit to the present version, but may differ in detail to address new problems or concerns.
Each version is given a distinguishing version number. If the Program specifies that a certain numbered version of the GNU General Public License "or any later version" applies to it, you have the option of following the terms and conditions either of that numbered version or of any later version published by the Free Software Foundation. If the Program does not specify a version number of the GNU General Public License, you may choose any version ever published by the Free Software Foundation.
If the Program specifies that a proxy can decide which future versions of the GNU General Public License can be used, that proxy's public statement of acceptance of a version permanently authorizes you to choose that version for the Program.
Later license versions may give you additional or different permissions. However, no additional obligations are imposed on any author or copyright holder as a result of your choosing to follow a later version.
15. Disclaimer of Warranty.
THERE IS NO WARRANTY FOR THE PROGRAM, TO THE EXTENT PERMITTED BY APPLICABLE LAW. EXCEPT WHEN OTHERWISE STATED IN WRITING THE COPYRIGHT HOLDERS AND/OR OTHER PARTIES PROVIDE THE PROGRAM "AS IS" WITHOUT WARRANTY OF ANY KIND, EITHER EXPRESSED OR IMPLIED, INCLUDING, BUT NOT LIMITED TO, THE IMPLIED WARRANTIES OF MERCHANTABILITY AND FITNESS FOR A PARTICULAR PURPOSE. THE ENTIRE RISK AS TO THE QUALITY AND PERFORMANCE OF THE PROGRAM IS WITH YOU. SHOULD THE PROGRAM PROVE DEFECTIVE, YOU ASSUME THE COST OF ALL NECESSARY SERVICING, REPAIR OR CORRECTION.
16. Limitation of Liability.
IN NO EVENT UNLESS REQUIRED BY APPLICABLE LAW OR AGREED TO IN WRITING WILL ANY COPYRIGHT HOLDER, OR ANY OTHER PARTY WHO MODIFIES AND/OR CONVEYS THE PROGRAM AS PERMITTED ABOVE, BE LIABLE TO YOU FOR DAMAGES, INCLUDING ANY GENERAL, SPECIAL, INCIDENTAL OR CONSEQUENTIAL DAMAGES ARISING OUT OF THE USE OR INABILITY TO USE THE PROGRAM (INCLUDING BUT NOT LIMITED TO LOSS OF DATA OR DATA BEING RENDERED INACCURATE OR LOSSES SUSTAINED BY YOU OR THIRD PARTIES OR A FAILURE OF THE PROGRAM TO OPERATE WITH ANY OTHER PROGRAMS), EVEN IF SUCH HOLDER OR OTHER PARTY HAS BEEN ADVISED OF THE POSSIBILITY OF SUCH DAMAGES.
17. Interpretation of Sections 15 and 16.
If the disclaimer of warranty and limitation of liability provided above cannot be given local legal effect according to their terms, reviewing courts shall apply local law that most closely approximates an absolute waiver of all civil liability in connection with the Program, unless a warranty or assumption of liability accompanies a copy of the Program in return for a fee.

END OF TERMS AND CONDITIONS
How to Apply These Terms to Your New Programs
If you develop a new program, and you want it to be of the greatest possible use to the public, the best way to achieve this is to make it free software which everyone can redistribute and change under these terms.
To do so, attach the following notices to the program. It is safest to attach them to the start of each source file to most effectively state the exclusion of warranty; and each file should have at least the "copyright" line and a pointer to where the full notice is found.
<one line to give the program's name and a brief idea of what it does.> Copyright (C) <year> <name of author>
This program is free software: you can redistribute it and/or modify it under the terms of the GNU General Public License as published by the Free Software Foundation, either version 3 of the License, or (at your option) any later version.
This program is distributed in the hope that it will be useful, but WITHOUT ANY WARRANTY; without even the implied warranty of MERCHANTABILITY or FITNESS FOR A PARTICULAR PURPOSE. See the GNU General Public License for more details.
You should have received a copy of the GNU General Public License along with this program. If not, see <http://www.gnu.org/licenses/>.
Also add information on how to contact you by electronic and paper mail.
If the program does terminal interaction, make it output a short notice like this when it starts in an interactive mode:
<program> Copyright (C) <year> <name of author> This program comes with ABSOLUTELY NO WARRANTY; for details type `show w'. This is free software, and you are welcome to redistribute it under certain conditions; type `show c' for details.
The hypothetical commands `show w' and `show c' should show the appropriate parts of the General Public License. Of course, your program's commands might be different; for a GUI interface, you would use an "about box".
You should also get your employer (if you work as a programmer) or school, if any, to sign a "copyright disclaimer" for the program, if necessary.
For more information on this, and how to apply and follow the GNU GPL, see <http://www.gnu.org/licenses/>.
The GNU General Public License does not permit incorporating your program into proprietary programs. If your program is a subroutine library, you may consider it more useful to permit linking proprietary applications with the library. If this is what you want to do, use the GNU Lesser General Public License instead of this License. But first, please read
<http://www.gnu.org/philosophy/why-not-lgpl.html>.

---------------------------------------------------------------------------libtiff---------------------------------------------------------------------------Copyright (c) 1988-1997 Sam LefflerCopyright (c) 1991-1997 Silicon Graphics, Inc.
Permission to use, copy, modify, distribute, and sell this software and its documentation for any purpose is hereby granted without fee, provided that (i) the above copyright notices and this permission notice appear in all copies of the software and related documentation, and (ii) the names of Sam Leffler and Silicon Graphics may not be used in any advertising or publicity relating to the software without the specific, prior written permission of Sam Leffler and Silicon Graphics.
THE SOFTWARE IS PROVIDED "AS-IS" AND WITHOUT WARRANTY OF ANY KIND, EXPRESS, IMPLIED OR OTHERWISE, INCLUDING WITHOUT LIMITATION, ANY WARRANTY OF MERCHANTABILITY OR FITNESS FOR A PARTICULAR PURPOSE.
IN NO EVENT SHALL SAM LEFFLER OR SILICON GRAPHICS BE LIABLE FOR ANY SPECIAL, INCIDENTAL, INDIRECT OR CONSEQUENTIAL DAMAGES OF ANY KIND, OR ANY DAMAGES WHATSOEVER RESULTING FROM LOSS OF USE, DATA OR PROFITS, WHETHER OR NOT ADVISED OF THE POSSIBILITY OF DAMAGE, AND ON ANY THEORY OF LIABILITY, ARISING OUT OF OR IN CONNECTION WITH THE USE OR PERFORMANCE OF THIS SOFTWARE.
--------------------------------------------------------------------------libjpeg--------------------------------------------------------------------------This software is based in part on the work of the Independent JPEG Group.
SOFTWARE LICENSEPLEASE READ THIS LICENSE CAREFULLY BEFORE USING THE SOFTWARE. BY USING THE SOFTWARE, YOU ARE AGREEING TO BE BOUND BY THE TERMS OF THIS LICENSE.
1. LicenseThe application, demonstration, system and other software accompanying this License, whether on disk, in read only memory, or on any other media (the "Software") and related documentation are licensed to you by SHARP. You own the disk on which the Software is recorded but SHARP and/or SHARP's Licensors retain title to the Software and related documentation. This License allows you to use the Software on one or more computers connected to a single printer and make one copy of the Software in machine-readable form for backup purposes only. You must reproduce on such copy the SHARP copyright notice, the copyright notice of SHARP’s Licensors and any other proprietary legends of SHARP and/or its Licensors that were on the original copy of the Software. You may also transfer all your license rights in the Software, the backup copy of the Software, the related documentation and a copy of this License to another party, provided the other party reads and agrees to the terms and conditions of this License.
2. Restrictions The Software contains copyrighted material, trade secrets and other proprietary material which is owned by SHARP and/or its Licensors and in order to protect them you may not decompile, reverse engineer, disassemble or otherwise reduce the Software to a human-perceivable form. You may not modify, network, rent, lease, loan, distribute or create derivative works based upon the Software in whole or in part. You may not electronically transmit the Software from one computer to another or over a network.
3. TerminationThis license is effective until terminated. You may terminate this License at any time by destroying the Software and related documentation and all copies thereof. This License will terminate immediately without notice from SHARP and/or SHARP’s Licensors if you fail to comply with any provision of this License. Upon termination you must destroy the Software and related documentation and all copies thereof.
4. Export Law AssurancesYou agree and certify that neither the Software nor any other technical data received from SHARP, nor the direct product thereof, will be exported outside the United States except as authorized and as permitted by the laws and regulations of the United States. If the Software has been rightfully obtained by you outside of the United States, you agree that you will not re-export the Software nor any other technical data received from SHARP, nor the direct product thereof, except as permitted by the laws and regulations of the United states and the laws and the regulation of the jurisdiction in which you obtained the Software.
5. Government End UsersIf you are acquiring the Software on behalf of any unit or agency of the United States Government, the following provisions apply. The Government agrees:
(i) if the Software is supplied to the Department of Defense (DoD), the Software is classified as "Commercial Computer Software" and the Government is acquiring only "restricted rights" in the Software and its documentation as that term is defined in Clause 252.227-7013 (c)(1) (Oct., 1988) of the DFARS; and
(ii) if the Software is supplied to any unit or agency of the United States Government other than DoD, the Software is classified as "Commercial" that term is defined at 48 C.F.R. 2.101 and as "Commercial Computer Software" that term is defined in 48 C.F.R. 12.212, and the Government's rights in the Software and its documentation will be as defined in Clause 52.227-19 (c)(2) of the FAR or, in the case of NASA, in Clause 18-52.227-86 (d) of the NASA Supplement to the FAR.

6. Limited Warranty on Media.SHARP warrants the disks on which the Software is recorded to be free from defects in materials and workmanship under normal use for a period of ninety (90) days from the date of purchase as evidenced by a copy of the receipt. The entire liability of SHARP and/or its Licensors and your exclusive remedy will be replacement of the disk which fails to meet the limited warranty provided by this Clause 6. A disk will be replaced when it is returned to SHARP or a SHARP authorized representative with a copy of the receipt. SHARP will have no responsibility to replace a disk damaged by accident, abuse or misapplication.ANY IMPLIED WARRANTIES ON THE DISKS, INCLUDING THE IMPLIED WARRANTIES OF MERCHANTABILITY AND FITNESS FOR A PARTICULAR PURPOSE, ARE LIMITED IN DURATION TO NINETY (90) DAYS FROM THE DATE OF DELIVERY. THIS WARRANTY GIVES YOU SPECIFIC LEGAL RIGHTS, AND YOU MAY ALSO HAVE OTHER RIGHTS WHICH VARY FROM JURISDICTION TO JURISDICTION.
7. Disclaimer of Warranty on SoftwareYou expressly acknowledge and agree that use of the Software is at your sole risk. The Software and related documentation are provided "AS IS" and without warranty of any kind and SHARP and SHARP's Licensor(s) (for the purpose of provisions 6 and 7, SHARP and SHARP's Licensor(s) shall be collectively referred to as "SHARP") EXPRESSLY DISCLAIM ALL WARRANTIES, EXPRESS OR IMPLIED, INCLUDING, BUT NOT LIMITED TO, THE IMPLIED WARRANTIES OF MERCHANTABILITY AND FITNESS FOR A PARTICULAR PURPOSE. SHARP DOES NOT WARRANT THAT THE FUNCTIONS CONTAINED IN THE SOFTWARE WILL MEET YOUR REQUIREMENTS, OR THAT THE OPERATION OF THE SOFTWARE WILL BE UNINTERRUPTED OR ERROR-FREE, OR THAT DEFECTS IN THE SOFTWARE WILL BE CORRECTED. FURTHERMORE, SHARP DOES NOT WARRANT OR MAKE ANY REPRESENTATIONS REGARDING THE USE OR THE RESULTS OF THE USE OF THE SOFTWARE OR RELATED DOCUMENTATION IN TERMS OF THEIR CORRECTNESS, ACCURACY, RELIABILITY, OR OTHERWISE. NO ORAL OR WRITTEN INFORMATION OR ADVICE GIVEN BY SHARP OR A SHARP AUTHORIZED REPRESENTATIVE SHALL CREATE A WARRANTY OR IN ANY WAY INCREASE THE SCOPE OF THIS WARRANTY. SHOULD THE SOFTWARE PROVE DEFECTIVE, YOU (AND NOT SHARP OR A SHARP AUTHORIZED REPRESENTATIVE) ASSUME THE ENTIRE COST OF ALL NECESSARY SERVICING, REPAIR OR CORRECTION, SOME JURISDICTIONS DO NOT ALLOW THE EXCLUSION OF IMPLIED WARRANTIES, SO THE ABOVE EXCLUSION MAY NOT APPLY TO YOU.
8. Limitation of LiabilityUNDER NO CIRCUMSTANCES INCLUDING NEGLIGENCE, SHALL SHARP BE LIABLE FOR ANY INCIDENTAL, SPECIAL OR CONSEQUENTIAL DAMAGES THAT RESULT FROM THE USE OR INABILITY TO USE THE SOFTWARE OR RELATED DOCUMENTATION, EVEN IF SHARP OR A SHARP AUTHORIZED REPRESENTATIVE HAS BEEN ADVISED OF THE POSSIBILITY OF SUCH DAMAGES. SOME JURISDICTIONS DO NOT ALLOW THE LIMITATION OR EXCLUSION OF LIABILITY FOR INCIDENTAL OR CONSEQUENTIAL DAMAGES SO THE ABOVE LIMITATION OR EXCLUSION MAY NOT APPLY TO YOU. In no event shall SHARP's total liability to you for all damages, losses, and causes of action (whether in contract, tort (including negligence) or otherwise) exceed the amount paid by you for the Software.
9. Controlling Law and SeverabilityFor a portion of the Software related with Apple Macintosh and Microsoft Windows, this license shall be governed by and construed in accordance with the laws of the state of California and Washington, respectively. If for any reason a court of competent jurisdiction finds any provision of this License, or portion thereof, to be unenforceable, that provision of the License shall be enforced to the maximum extent permissible so as to effect the intent of the parties, and the remainder of this License shall continue in full force and effect.
10. Complete AgreementThis License constitutes the entire agreement between the parties with respect to the use of the Software and related documentation, and supersedes all prior or contemporaneous understandings or agreements, written or oral, regarding such subject matter. No amendment to or modification of this License will be binding unless in writing and signed by a duly authorized representative of SHARP.

2018E-US2