


Android in Action, Third Edition - Inspirit
662
MANNING W. Frank Ableson Robi Sen Chris King C. Enrique Ortiz THIRD EDITION IN ACTION www.it-ebooks.info
-
Upload
khangminh22 -
Category
Documents
-
view
0 -
download
0
Transcript of Android in Action, Third Edition - Inspirit
M A N N I N G
W. Frank AblesonRobi Sen
Chris KingC. Enrique Ortiz
THIRD EDITIONIN ACTION
www.it-ebooks.info
Android in ActionThird Edition
W. FRANK ABLESONROBI SEN
CHRIS KINGC. ENRIQUE ORTIZ
M A N N I N GSHELTER ISLAND
www.it-ebooks.info

For online information and ordering of this and other Manning books, please visitwww.manning.com. The publisher offers discounts on this book when ordered in quantity. For more information, please contact
Special Sales DepartmentManning Publications Co.20 Baldwin RoadPO Box 261Shelter Island, NY 11964Email: [email protected]
©2012 by Manning Publications Co. All rights reserved.
No part of this publication may be reproduced, stored in a retrieval system, or transmitted, in any form or by means electronic, mechanical, photocopying, or otherwise, without prior written permission of the publisher.
Many of the designations used by manufacturers and sellers to distinguish their products are claimed as trademarks. Where those designations appear in the book, and Manning Publications was aware of a trademark claim, the designations have been printed in initial caps or all caps.
Recognizing the importance of preserving what has been written, it is Manning’s policy to have the books we publish printed on acid-free paper, and we exert our best efforts to that end. Recognizing also our responsibility to conserve the resources of our planet, Manning booksare printed on paper that is at least 15 percent recycled and processed without the use of elemental chlorine.
Manning Publications Co. Development editor: Troy Mott20 Baldwin Road Copyeditors: Benjamin Berg, Tiffany TaylorPO Box 261 Typesetter: Dottie MarsicoShelter Island, NY 11964 Cover designer: Marija Tudor
ISBN 9781617290503Printed in the United States of America1 2 3 4 5 6 7 8 9 10 – MAL – 16 15 14 13 12 11
www.it-ebooks.info
brief contentsPART 1 WHAT IS ANDROID? THE BIG PICTURE............................1
1 ■ Introducing Android 3
2 ■ Android’s development environment 33
PART 2 EXERCISING THE ANDROID SDK ..................................63
3 ■ User interfaces 65
4 ■ Intents and Services 102
5 ■ Storing and retrieving data 130
6 ■ Networking and web services 160
7 ■ Telephony 188
8 ■ Notifications and alarms 206
9 ■ Graphics and animation 226
10 ■ Multimedia 260
11 ■ Location, location, location 284
PART 3 ANDROID APPLICATIONS ............................................309
12 ■ Putting Android to work in a field service application 311
13 ■ Building Android applications in C 356
v
www.it-ebooks.info
BRIEF CONTENTSvi
PART 4 THE MATURING PLATFORM ........................................383
14 ■ Bluetooth and sensors 385
15 ■ Integration 405
16 ■ Android web development 439
17 ■ AppWidgets 472
18 ■ Localization 509
19 ■ Android Native Development Kit 524
20 ■ Activity fragments 545
21 ■ Android 3.0 action bar 560
22 ■ Drag-and-drop 579
www.it-ebooks.info
contentspreface xixacknowledgments xxiabout this book xxiiiabout the cover illustration xxviii
PART 1 WHAT IS ANDROID? THE BIG PICTURE...................1
1 Introducing Android 31.1 The Android platform 41.2 Understanding the Android market 5
Mobile operators 5 ■ Android vs. the feature phones 6Android vs. the smartphones 7 ■ Android vs. itself 8Licensing Android 9
1.3 The layers of Android 10Building on the Linux kernel 11 ■ Running in the Dalvik VM 12
1.4 The Intent of Android development 13Empowering intuitive UIs 13 ■ Intents and how they work 14
1.5 Four kinds of Android components 17Activity 17 ■ Service 18 ■ BroadcastReceiver 19ContentProvider 22
vii
www.it-ebooks.info
CONTENTSviii
1.6 Understanding the AndroidManifest.xml file 241.7 Mapping applications to processes 261.8 Creating an Android application 261.9 Android 3.0 for tablets and smartphones 30
Why develop for Android tablets? 30 ■ What’s new in the Android 3.0 Honeycomb platform? 31
1.10 Summary 32
2 Android’s development environment 332.1 Introducing the Android SDK 34
Core Android packages 35 ■ Optional packages 36
2.2 Exploring the development environment 36The Java perspective 37 ■ The DDMS perspective 39Command-line tools 42
2.3 Building an Android application in Eclipse 45The Android Project Wizard 45 ■ Android sample application code 46 ■ Packaging the application 52
2.4 Using the Android emulator 53Setting up the emulated environment 54 ■ Testing your application in the emulator 58
2.5 Debugging your application 592.6 Summary 61
PART 2 EXERCISING THE ANDROID SDK .........................63
3 User interfaces 653.1 Creating the Activity 66
Creating an Activity class 68 ■ XML vs. programmatic layouts 69 ■ Exploring the Activity lifecycle 72 ■ The server connection 73
3.2 Working with views 75Exploring common views 76 ■ Using a ListView 78Multitasking with Handler and Message 82 ■ Creating custom views 83 ■ Understanding layout 86 ■ Handling focus 88Grasping events 89
www.it-ebooks.info
CONTENTS ix
3.3 Using resources 90Supported resource types 90 ■ Referencing resources in Java 91 ■ Defining views and layouts through XML resources 93 ■ Externalizing values 95 ■ Providing animations 98
3.4 Exploring the AndroidManifest file 993.5 Summary 101
4 Intents and Services 1024.1 Serving up RestaurantFinder with Intent 103
Defining Intents 103 ■ Implicit and explicit invocation 104Adding external links to RestaurantFinder 105 ■ Finding your way with Intent 107 ■ Taking advantage of Android-provided activities 109
4.2 Checking the weather with a custom URI 110Offering a custom URI 110 ■ Inspecting a custom URI 112
4.3 Checking the weather with broadcast receivers 114Broadcasting Intent 114 ■ Creating a receiver 115
4.4 Building a background weather service 1164.5 Communicating with the WeatherAlertService
from other apps 120Android Interface Definition Language 120 ■ Binder and Parcelable 122 ■ Exposing a remote interface 123Binding to a Service 124 ■ Starting vs. binding 127Service lifecycle 128
4.6 Summary 129
5 Storing and retrieving data 1305.1 Using preferences 131
Working with SharedPreferences 131 ■ Preference access permissions 134
5.2 Using the filesystem 137Creating files 137 ■ Accessing files 138 ■ Files as raw resources 139 ■ XML file resources 140 ■ External storage via an SD card 142
5.3 Persisting data to a database 145Building and accessing a database 146 ■ Using the sqlite3 tool 150
www.it-ebooks.info
CONTENTSx
5.4 Working with ContentProvider classes 151Using an existing ContentProvider 151 ■ Creating a ContentProvider 152
5.5 Summary 159
6 Networking and web services 1606.1 An overview of networking 162
Networking basics 162 ■ Clients and servers 164
6.2 Checking the network status 1656.3 Communicating with a server socket 1666.4 Working with HTTP 169
Simple HTTP and java.net 170 ■ Robust HTTP with HttpClient 171 ■ Creating an HTTP and HTTPS helper 173
6.5 Web services 179POX: putting it together with HTTP and XML 180REST 182 ■ To SOAP or not to SOAP, that is the question 185
6.6 Summary 186
7 Telephony 1887.1 Exploring telephony background and terms 189
Understanding GSM 190 ■ Understanding CDMA 190
7.2 Phone or not? 1917.3 Accessing telephony information 192
Retrieving telephony properties 192 ■ Obtaining phone state information 195
7.4 Interacting with the phone 196Using Intents to make calls 196 ■ Using phone number–related utilities 198 ■ Intercepting outbound calls 200
7.5 Working with messaging: SMS 200Sending SMS messages 201 ■ Receiving SMS messages 204
7.6 Summary 205
8 Notifications and alarms 2068.1 Introducing Toast 207
www.it-ebooks.info
CONTENTS xi
8.2 Placing your Toast message 2098.3 Making a custom Toast view 2108.4 Introducing notifications 212
The Notification class 212 ■ Notifying a user with a simple button press 214
8.5 Making a custom notification view 2168.6 Introducing alarms 219
Creating a simple alarm example 220 ■ Using notifications with alarms 222
8.7 Summary 225
9 Graphics and animation 2269.1 Drawing graphics in Android 227
Drawing with XML 228 ■ Exploring XML drawable shapes 230
9.2 Creating animations with Android’s Graphics API 231Android’s frame-by-frame animation 232 ■ Programmatically creating an animation 234
9.3 Introducing OpenGL for Embedded Systems 238Creating an OpenGL context 239 ■ Drawing a rectangle with OpenGL ES 243 ■ Three-dimensional shapes and surfaces with OpenGL ES 245
9.4 Introducing RenderScript for Android 250RenderScript advantages and disadvantages 251 ■ Building a RenderScript application 252
9.5 Summary 258
10 Multimedia 26010.1 Introduction to multimedia and Stagefright 261
Stagefright overview 261
10.2 Playing audio 26310.3 Playing video 26410.4 Capturing media 266
Understanding the camera 267 ■ Capturing audio 272Recording video 276
10.5 Summary 282
www.it-ebooks.info
CONTENTSxii
11 Location, location, location 28411.1 Simulating your location within the emulator 286
Sending in your coordinates with the DDMS tool 286 ■ The GPS Exchange Format 288 ■ The Google Earth Keyhole Markup Language 289
11.2 Using LocationManager and LocationProvider 292Accessing location data with LocationManager 292Using a LocationProvider 294 ■ Receiving location updates with LocationListener 296
11.3 Working with maps 298Extending MapActivity 299 ■ Using a MapView 299Placing data on a map with an Overlay 302
11.4 Converting places and addresses with Geocoder 30511.5 Summary 307
PART 3 ANDROID APPLICATIONS ...................................309
12 Putting Android to work in a field service application 31112.1 Designing a real-world Android application 312
Core requirements of the application 313 ■ Managing the data 314 ■ Application architecture and integration 315
12.2 Mapping out the application flow 316Mapping out the field service application 316 ■ List of source files 318 ■ Field service application’s AndroidManifest.xml 320
12.3 Application source code 320Splash Activity 320 ■ Preferences used by the FieldService Activity 322 ■ Implementing the FieldService Activity 324Settings 325 ■ Managing job data 327
12.4 Source code for managing jobs 334RefreshJobs 335 ■ Managing jobs: the ManageJobs Activity 338Working with a job with the ShowJob Activity 341 ■ Capturing a signature with the CloseJob Activity 345
12.5 Server code 351Dispatcher user interface 352 ■ Database 352 ■ PHP dispatcher code 353 ■ PHP mobile integration code 354
12.6 Summary 355
www.it-ebooks.info
CONTENTS xiii
13 Building Android applications in C 35613.1 Building Android apps without the SDK 357
The C compiler and linker tools 357 ■ Building a Hello World application 358 ■ Installing and running the application 360C application build script 362
13.2 Solving the problem with dynamic linking 362Android system libraries 363 ■ Building a dynamically linked application 364 ■ exit() vs. return() 367 ■ Startup code 368
13.3 What time is it? The DayTime Server 370DayTime Server application 370 ■ daytime.c 371 ■ The SQLite database 373 ■ Building and running the DayTime Server 376
13.4 Daytime Client 378Activity 378 ■ Socket client 379 ■ Testing the Daytime Client 380
13.5 Summary 380
PART 4 THE MATURING PLATFORM .............................. 383
14 Bluetooth and sensors 38514.1 Exploring Android’s Bluetooth capabilities 386
Replacing cables 387 ■ Primary and secondary roles and sockets 387 ■ Trusting a device 388 ■ Connecting to a remote device 390 ■ Capturing Bluetooth events 392Bluetooth permissions 393
14.2 Interacting with the SensorManager 393Types of sensors 394 ■ Reading sensor values 395Enabling and disabling sensors 396
14.3 Building the SenseBot application 397User interface 398 ■ Interpreting sensor values 400Driving the robot 401 ■ Communication with the robot 402
14.4 Summary 403
15 Integration 40515.1 Understanding the Android contact model 406
Choosing open-ended records 406 ■ Dealing with multiple accounts 408 ■ Unifying a local view from diverse remote stores 410 ■ Sharing the playground 411
www.it-ebooks.info
CONTENTSxiv
15.2 Getting started with LinkedIn 41115.3 Managing contacts 413
Leveraging the built-in Contacts app 413 ■ Requesting operations from your app 416 ■ Directly reading and modifying the contacts database 417 ■ Adding contacts 418
15.4 Keeping it together 421The dream of sync 421 ■ Defining accounts 422 ■ Telling secrets: The AccountManager service 423
15.5 Creating a LinkedIn account 424Not friendly to mobile 424 ■ Authenticating to LinkedIn 425
15.6 Synchronizing to the backend with SyncAdapter 432The synchronizing lifecycle 432 ■ Synchronizing LinkedIn data 432
15.7 Wrapping up: LinkedIn in action 435Finalizing the LinkedIn project 435 ■ Troubleshooting tips 436Moving on 437
15.8 Summary 437
16 Android web development 43916.1 What’s Android web development? 440
Introducing WebKit 440 ■ Examining the architectural options 441
16.2 Optimizing web applications for Android 442Designing with mobile in mind 442 ■ Adding the viewport tag 444 ■ Selectively loading content 446 ■ Interrogating the user agent 446 ■ The media query 447 ■ Considering a made-for-mobile application 448
16.3 Storing data directly in the browser 449Setting things up 450 ■ Examining the code 451 ■ The user interface 451 ■ Opening the database 453 ■ Unpacking the transaction function 454 ■ Inserting and deleting rows 456Testing the application with WebKit tools 457
16.4 Building a hybrid application 458Examining the browser control 458 ■ Wiring up the control 459Implementing the JavaScript handler 461 ■ Accessing the code from JavaScript 463 ■ Digging into the JavaScript 463Security matters 465 ■ Implementing a WebViewClient 466Augmenting the browser 466 ■ Detecting navigation events 467Implementing the WebChromeClient 470
16.5 Summary 471
www.it-ebooks.info
CONTENTS xv
17 AppWidgets 47217.1 Introducing the AppWidget 473
What’s an AppWidget? 473 ■ AppWidget deployment strategies 475
17.2 Introducing SiteMonitor 476Benefits of SiteMonitor 476 ■ The user experience 477
17.3 SiteMonitor application architecture 480Bird’s-eye view of the application 480 ■ File by file 482
17.4 AppWidget data handling 483
17.5 Implementing the AppWidgetProvider 487AppWidgetProvider method inventory 487 ■ Implementing SiteMonitorWidgetImpl 488 ■ Handling zombie widgets 490
17.6 Displaying an AppWidget with RemoteViews 491Working with RemoteViews 491 ■ UpdateOneWidget explained 492
17.7 Configuring an instance of the AppWidget 494AppWidget metadata 495 ■ Working with Intent data 496Confirming widget creation 497
17.8 Updating the AppWidget 498Comparing services to alarms 499 ■ Triggering the update 500Updating the widgets, finally! 502
17.9 Tying it all together with AndroidManifest.xml 506
17.10 Summary 507
18 Localization 50918.1 The need for localization 510
18.2 Exploring locales 511
18.3 Strategies for localizing an application 512Identifying target locales and data 512 ■ Identifying and managing strings 513 ■ Drawables and layouts 515Dates, times, numbers, and currencies 516 ■ Working with the translation team 517
18.4 Leveraging Android resource capabilities 518More than locale 518 ■ Assigning strings in resources 518
18.5 Localizing in Java code 520
18.6 Formatting localized strings 521
www.it-ebooks.info
CONTENTSxvi
18.7 Obstacles to localization 52218.8 Summary 523
19 Android Native Development Kit 52419.1 Introducing the NDK 525
Uses for the NDK 525 ■ Looking at the NDK 526
19.2 Building an application with the NDK 527Demonstrating the completed application 528 ■ Examining the project structure 529
19.3 Building the JNI library 530Understanding JNI 530 ■ Implementing the library 531Compiling the JNI library 536
19.4 Building the user interface 537User interface layout 537 ■ Taking a photo 539 ■ Finding the edges 541
19.5 Integrating the NDK into Eclipse 54219.6 Summary 544
20 Activity fragments 54520.1 Fragment lifecyle 54620.2 Creating fragments and fragment layouts 548
Create the fragment subclass 548 ■ Defining a fragment layout 551 ■ Include the fragment within the activity 552
20.3 Background fragments 55320.4 The fragment manager 55520.5 Fragment transactions 55520.6 Fragment back stack 55620.7 The Android Compatibility Package 55720.8 Summary 558
21 Android 3.0 action bar 56021.1 Introducing the action bar 56121.2 Overview of the ActionBar classes 56221.3 Action bar display options 563
Application name and icon 564 ■ Navigation modes 565
www.it-ebooks.info
CONTENTS xvii
21.4 Action items 570The application icon as an action item 573 ■ Action views 574
21.5 Removing, showing, and hiding the action bar 57521.6 Action bar styling 57521.7 Summary 578
22 Drag-and-drop 57922.1 The drag-and-drop classes 58022.2 Drag-and-drop operations 58122.3 The shadow builder 58322.4 Drag events 58522.5 Starting drag operations 58622.6 Listening for drag-and-drop events 58722.7 Responding to drag-start operations 58822.8 Handling drop operations 58922.9 Summary 590
appendix A Installing the Android SDK 591appendix B Publishing applications 601
index 613
www.it-ebooks.info

prefaceThe idea of a writing a book about Android development can be somewhat futile attimes, considering the pace at which Android continues to expand, morph, andchange. What started out as a book project a few years ago has now become a series ofupdates to the original work with the page count nearly double the original project—and that after making hard decisions about what to leave out of the book to make sureit gets published.
This update to Android in Action represents our latest effort to provide coverageon important Android development topics, namely the expansion into the tabletspace with Android 3.x as well as advances in mobile graphics and media such asRenderScript.
Although there have been many off-brand and name-brand tablet offerings pop-ping up over time, the Android development team has taken the step of adding tablet-specific capabilities to the SDK under the banner of 3.0. True to form, 3.0 was quicklyupdated, so we generally refer to the tablet-specific features as 3.x; and before long Iam sure Android 4.x will be out with a super-set of features.
Like many things in life, the only constant is change, but by now we’re somewhataccustomed to the rapid-fire environment of Android development. To that end, wehave ensured that all of the applications in the book work with Android 3.x. The new-est chapters covering tablet-specific content (20–22) require the 3.x SDK, whereas theremaining chapters are compatible with the 2.x SDK versions. If you plan to write appli-cation software for Android, you simply need to steel yourself for navigating the multi-ple version game. It is at once a strength and a challenge of the Android ecosystem.
xix
www.it-ebooks.info
PREFACExx
The third edition was written by Frank Ableson, Robi Sen, Chris King, and new-comer C. Enrique Ortiz, aka CEO. To borrow a line from the air-travel industry, “Weknow you have a choice when it comes to Android development books, so thank youfor learning and collaborating with us.”
FRANK ABLESON
www.it-ebooks.info
acknowledgmentsWriting a third edition of Android in Action feels somewhat like the old saying aboutweddings: “Something old, something new…” The deadlines for the third edition didnot become any easier as at last count there are still only 24 hours in the day. And asfor something new—it seems as though Android’s pace of innovation is continuing tomatch its adoption rate by mobile users around the globe. Like the two earlier edi-tions, Android in Action, Third Edition represents a collaboration between a number ofcontributors. I had the privilege of working again with Robi Sen and Chris King, whoworked with me on the second edition. C. Enrique Ortiz joined us to contribute thetablet content. Once again the talented team at Manning have labored to bring aboutthis edition.
In particular, we’d like to acknowledge and thank everyone at Manning. First,thanks to Troy Mott, our acquisition and development editor, who has been involvedin every aspect of now three editions of this project—congratulations, Troy, on yourhat-trick! Bob Herbstman did all the big and little things to bring the project together;Mary Piergies skillfully piloted the team through the harrowing production process;and Marjan Bace, our publisher, showed an attention to detail at once challenging,beneficial, and appreciated.
Once the writing was finished, the next round of work began. Special thanks needto go to Benjamin Berg, who performed the preproduction editing pass; Tiffany Tay-lor, who did the second copyediting pass and helped us bring the final pieces of theproject together; and finally Dottie Marsico, who handled the actual layout of thepages. It’s sometimes hard to envision the final product when looking at edits uponedits in MS Word, but Dottie’s magic made the product you hold in your hands. Next,
xxi
www.it-ebooks.info
ACKNOWLEDGMENTSxxii
we would like to thank Candace Gillhoolley for her efforts in getting the word outabout the book. Thanks to each of you for your special contribution to this project.
And special thanks to the reviewers who read our revised manuscript at differenttimes during its development: Steve Prior, Matthew Johnson, Julian Harty, DavidStrong, Loïc Simon, Al Scherer, Gabor Paller, and Pieter Kuijpers; and to JérômeBâton for his careful technical review of the final manuscript during production.
Last, we want to thank the thoughtful and encouraging MEAP subscribers who pro-vided feedback along the way; the book is better thanks to your contributions.
FRANK ABLESON
I would like to thank my coauthors: Robi Sen, a real pro who has been involved in thisproject from the beginning; Chris King, who has proven to be rock-solid in terms ofboth technical capability and reliability; and newcomer C. Enrique Ortiz (CEO), whohas injected energy and enthusiasm into the Third Edition. Of course, through eachiteration of this project, Troy Mott has led the way: managing the process, coaxing usat times, and delivering every time. Bob Herbstman has contributed invaluably to thefinished product and is likely tired of cleaning up after my writing and amateurishgraphics after all of these years. Special thanks to Bob for re-creating many illustra-tions. Thanks also to the production team at Manning Publications who have onceagain delivered an excellent work. Thanks also to Candace Gillhoolley for continuedsupport with books and promotions to support speaking events and conferences—always aiding my last-minute requests. Last and most important, I would like to thankNikki and company at the Ableson household for unconditional support. Praise be toGod, another version is complete!
CHRIS KING
I am deeply grateful to Troy Mott, Frank, Robi, and Enrique for being such a pleasureto collaborate with as we drove toward the latest incarnation of this book. I also appre-ciate all the work done by the reviewers and editors from Manning, and also the dedi-cated readers of previous editions who contributed suggestions at the Author Onlineforums. Special thanks go to Eric Tamo and Zac White for their support and relentlessgood cheer. Finally, my love to my family: Charles, Karen, Patrick, Kathryn, andAndrew.
ROBI SEN
I would like to thank Troy Mott and the team—and everyone at Manning Publica-tions—for their hard work making this book something worth reading. I would like tothank my coauthors, Frank and Chris, who were great to work with and very under-standing when I was the one holding things up. I would also like to thank C. EnriqueOrtiz for his contributions. Finally, I would like to dedicate my efforts on this book tomy brother Neel, who passed away while we were wrapping up the book.
C. ENRIQUE ORTIZ
To my parents, family, friends, and colleagues, who influence my work and make itexciting.
www.it-ebooks.info
about this bookAndroid in Action, Third Edition is a revision and update of, you guessed it, the SecondEdition, published in January 2011. This third edition adds new content related toAndroid’s push into the tablet space as well as enhancements to various sub-systemswithin the Android platform. Like its predecessors, this book covers important begin-ner topics such as “What is Android?” and installing and using the development envi-ronment. We then advance to practical working examples of core programming topicsany developer will be happy to have at the ready on the reference shelf. The remain-ing chapters present detailed example applications covering advanced topics, includ-ing a complete field-service application, localization, and material on Android webapplications, Bluetooth, sensors, AppWidgets, and integration adapters. We eveninclude two chapters on writing applications in C—one for the native side of Androidand one using the more generally accepted method of employing the Android NativeDevelopment Kit. Brand-new content covering tablet programming is found in chap-ters 20 through 22. Chapters 20–22 specifically require Android SDK 3.0 and beyond,whereas the balance of the book is compatible with 2.x versions of Android.
Although you can read the book from start to finish, you can also consider it a fewbooks in one. If you’re new to Android, focus first on chapter 1, appendix A, and thenchapter 2. With that foundation, you can work your way through chapters 3–12. Chap-ters 13 and on are more in-depth in nature and can be read independently of the oth-ers. Chapters 20–22 focuses on important topics related to Android 3.0 and tablets.
Who should read this book?We wrote this book for professional programmers and hobbyists alike. Many of theconcepts can be absorbed without specific Java language knowledge, although you’ll
xxiii
www.it-ebooks.info
ABOUT THIS BOOKxxiv
obtain the most value if you have Java programming skills—Android application pro-gramming requires them. If you have C, C++, or C# programming knowledge, you’llbe able to follow the examples.
Prior Eclipse experience is helpful, but not required. A number of good resourcesare available on Java and Eclipse to augment the content of this book.
RoadmapThis book is divided into four parts. Part 1 contains introductory material about theplatform and development environment. Part 2 takes a close look at the fundamentalskills required for building Android applications. Part 3 presents a larger-scope appli-cation and a Native C Android application. Part 4 explores features added to theAndroid platform, providing examples of using the capable Android platform to cre-ate innovative mobile applications.
Part 1: The essentials
Part 1 introduces the Android platform, including its architecture and setting up thedevelopment environment.
Chapter 1 delves into the background and positioning of the Android platform,including comparisons to other popular platforms such as BlackBerry, iPhone, andWindows Mobile. After an introduction to the platform, the balance of the first chap-ter introduces the high-level architecture of Android applications and the operatingsystem environment.
Chapter 2 takes you on a step-by-step development exercise, teaching you the ropesof using the Android development environment, including the key tools and conceptsfor building an application. If you’ve never used Eclipse or have never written anAndroid application, this chapter will prepare you for the next part of the book.
Part 2: The programming environment
Part 2 includes an extensive survey of fundamental programming topics in theAndroid environment.
Chapter 3 covers the fundamental Android UI components, including View andLayout. We also review the Activity in more detail. These are the basic buildingblocks of screens and applications on the Android platform. Along the way, we alsotouch on other basic concepts such as accessing external resources, responding toevents, and the lifecycle of an Android application.
Chapter 4 expands on the concepts you learned in chapter 3. We delve into theAndroid Intent to demonstrate interaction between screens, activities, and entireapplications. We also introduce and use the Service framework, which allows forongoing background processes.
Chapter 5 incorporates methods and strategies for storing and retrieving datalocally. The chapter examines use of the filesystem, databases, the SD card, andAndroid-specific storage entities such as the SharedPreferences and ContentProvider
www.it-ebooks.info

ABOUT THIS BOOK xxv
classes. This chapter begins combining fundamental concepts with more real-worlddetails, such as handling application state, using a database for persistent storage, andworking with SQLite.
Chapter 6 deals with storing and retrieving data over the network. Here we includea networking primer before delving into using raw networking concepts such as sock-ets on Android. From there, we progress to using HTTP, and even explore web services(such as REST and SOAP).
Chapter 7 covers telephony on the Android platform. We touch on basics such asoriginating and receiving phone calls, as well as more involved topics such as identify-ing cell towers and sending or receiving SMS messages.
Chapter 8 looks at how to work with notifications and alarms. In this chapter, welook at how to notify users of various events such as receiving a SMS message, as well ashow to manage and set alarms.
Chapter 9 deals with the basics of Android’s Graphics API and more advanced con-cepts such as working with the OpenGL ES library for creating sophisticated 2D and3D graphics. We also touch on animation as well as Android’s new graphics systemsRenderScript.
Chapter 10 looks at Android’s support for multimedia; we cover both playingmultimedia as well as using the camera and microphone to record your own multi-media files.
Chapter 11 introduces location-based services as we look at an example that com-bines many of the concepts from the earlier parts of the book in a mapping applica-tion. You’ll learn about using the mapping APIs on Android, including differentlocation providers and properties that are available, how to build and manipulate map-related screens, and how to work with location-related concepts within the emulator.
Part 3: Bringing it all together
Part 3 contains two chapters, both of which build on knowledge you gained earlier inthe text, with a focus on bringing a larger application to fruition.
Chapter 12 demonstrates an end-to-end field service application. The applicationincludes server communications, persistent storage, multiple Activity navigationmenus, and signature capture.
Chapter 13 explores the world of native C language applications. The Android SDKis limited to the Java language, although native applications can be written forAndroid. This chapter walks you through examples of building C language applica-tions for Android, including the use of built-in libraries and TCP socket communica-tions as a Java application connects to your C application. This chapter is useful fordevelopers targeting solutions beyond carrier-subsidized, locked-down cell phones.
Part 4: The maturing platform
Part 4 contains nine new chapters, each of which represents a more advanced devel-opment topic.
www.it-ebooks.info

ABOUT THIS BOOKxxvi
Chapter 14 demonstrates the use of both Bluetooth communication and process-ing sensor data. The sample application accompanying the chapter, SenseBot, permitsthe user to drive a LEGO Mindstorms robot with their Android phone.
Chapter 15 explores the Android contact database and demonstrates integratingwith an external data source. In particular, this application brings Android into thesocial-networking scene by integrating with the popular LinkedIn professional net-working service.
Chapter 16 explores the world of web development. Android’s browser is based onthe open source WebKit engine and brings desktop-like capability to this mobilebrowser. This chapter equips you to bring attractive and capable web applications toAndroid.
Chapter 17 brings the home screen of your Android application to life by showingyou how to build an application that presents its user interface as an AppWidget. Inaddition to AppWidgets, this chapter demonstrates BroadcastReceiver, Service, andAlarms.
Chapter 18 takes a real-world look at localizing an existing application.Chapter 12’s Field Service application is modified to support multiple languages.Chapter 18’s version of the Field Service application contains support for both Eng-lish and Spanish.
Chapter 19 reaches into Android’s open source foundation by using a popularedge-detection image-processing algorithm. The Sobel Edge Detection algorithm iswritten in C and compiled into a native library. The sample application snaps a picturewith the Android camera and then uses this C algorithm to find the edges in the photo.
Chapter 20 covers Android Fragments, a new application component that wasintroduced with Android 3.0. Fragments provide more granular application controlthan working only with Activitys alone.
Chapter 21 explores the action bar. Also introduced with Android 3.0, the actionbar provides a consistent look-and-feel for the application title, icon, actions, andmenu options.
Chapter 22 introduces the new drag-and-drop API, also introduced withAndroid 3.0. The drag-and-drop API allows for touch-based, interactive operations: forexample, to move or copy data across views by visually selecting data from one viewand dropping it onto another view on the screen. Another example is to trigger appli-cation actions: for example, image sharing by dragging an image from an image gal-lery view onto a sharing view.
Appendixes
The appendixes contain additional information that didn’t fit with the flow of the maintext. Appendix A is a step-by-step guide to installing the development environment.This appendix, along with chapter 2, provides all the information you need to build anAndroid application. Appendix B demonstrates how to prepare and submit an applica-tion for the Android Market—an important topic for anyone looking to sell an appli-cation commercially.
www.it-ebooks.info
ABOUT THIS BOOK xxvii
Code conventions and downloadsAll source code in the book is in a fixed-width font like this, which sets it off fromthe surrounding text. In many listings, the code is annotated to point out the key con-cepts, and numbered bullets are sometimes used in the text to provide additionalinformation about the code. We have tried to format the code so that it fits within theavailable page space in the book by adding line breaks and using indentation care-fully. Sometimes, however, very long lines include line-continuation markers.
Source code for all the working examples is available from www.manning.com/AndroidinActionThirdEdition or www.manning.com/ableson3. A Readme.txt file isprovided in the root folder and also in each chapter folder; the files provide details onhow to install and run the code. Code examples appear throughout this book. Longerlistings appear under clear listing headers, whereas shorter listings appear betweenlines of text.
Software requirementsDeveloping applications for Android may be done from the Windows XP/Vista/7environment, a Mac OS X (Intel only) environment, or a Linux environment. Appen-dix A includes a detailed description of setting up the Eclipse environment along withthe Android Developer Tools plug-in for Eclipse.
A note about the graphicsMany of the original graphics from the first edition, Unlocking Android, have beenreused in the second and third editions of the book. Although the title was changed toAndroid in Action during the writing of the second edition, we kept the original booktitle in our graphics and sample applications.
Author OnlinePurchase of Android in Action, Third Edition includes free access to a private web forumrun by Manning Publications where you can make comments about the book, asktechnical questions, and receive help from the authors and from other users. Toaccess the forum and subscribe to it, point your web browser to www.manning.com/AndroidinActionThirdEdition or www.manning.com/ableson3. This page providesinformation on how to get on the forum once you’re registered, what kind of help isavailable, and the rules of conduct on the forum.
Manning’s commitment to our readers is to provide a venue where a meaningfuldialog between individual readers and between readers and the authors can takeplace. It’s not a commitment to any specific amount of participation on the part of theauthors, whose contribution to the AO remains voluntary (and unpaid). We suggestyou try asking the authors some challenging questions lest their interest stray!
The Author Online forum and the archives of previous discussions will be accessi-ble from the publisher’s website as long as the book is in print.
www.it-ebooks.info
about the cover illustrationThe illustration on the cover of Android in Action, Third Edition is taken from a Frenchbook of dress customs, Encyclopédie des Voyages by J. G. St. Saveur, published in 1796.Travel for pleasure was a relatively new phenomenon at the time and illustratedguides such as this one were popular, introducing both the tourist as well as the arm-chair traveler to the inhabitants of other regions of the world, as well as to theregional costumes and uniforms of France.
The diversity of the drawings in the Encyclopédie des Voyages speaks vividly of theuniqueness and individuality of the world’s countries and regions just 200 years ago.This was a time when the dress codes of two regions separated by a few dozen milesidentified people uniquely as belonging to one or the other, and when members of asocial class or a trade or a tribe could be easily distinguished by what they were wear-ing. This was also a time when people were fascinated by foreign lands and farawayplaces, even though they could not travel to these exotic destinations themselves.
Dress codes have changed since then and the diversity by region and tribe, so richat the time, has faded away. It is now often hard to tell the inhabitant of one continentfrom another. Perhaps, trying to view it optimistically, we have traded a world of cul-tural and visual diversity for a more varied personal life. Or a more varied and interest-ing intellectual and technical life.
We at Manning celebrate the inventiveness, the initiative, and the fun of the com-puter business with book covers based on native and tribal costumes from two centu-ries ago brought back to life by the pictures from this travel guide.
xxviii
www.it-ebooks.info
Part 1
What is Android?The big picture
Android has become a market-moving technology platform—not justbecause of the functionality available in the platform but because of how theplatform has come to market. Part 1 of this book brings you into the picture as adeveloper of the open source Android platform. We begin with a look at theAndroid platform and the impact it has on each of the major stakeholders in themobile marketplace (chapter 1). We then bring you on board to developingapplications for Android with a hands-on tour of the Android development envi-ronment (chapter 2).
www.it-ebooks.info
Introducing Android
You’ve heard about Android. You’ve read about Android. Now it’s time to beginunlocking Android.
Android is a software platform that’s revolutionizing the global cell phone mar-ket. It’s the first open source mobile application platform that’s moved the needlein major mobile markets around the globe. When you’re examining Android,there are a number of technical and market-related dimensions to consider. Thisfirst section introduces the platform and provides context to help you better under-stand Android and where it fits in the global cell phone scene. Moreover, Androidhas eclipsed the cell phone market, and with the release of Android 3.X has begunmaking inroads into the tablet market as well. This book focuses on using SDKsfrom 2.0 to 3.X.
Android is primarily a Google effort, in collaboration with the Open HandsetAlliance. Open Handset Alliance is an alliance of dozens of organizations commit-ted to bringing a “better” and more “open” mobile phone to market. Considered a
This chapter covers Exploring Android, the open source phone and
tabtet platform
Android Intents, the way things work
Sample application
3
www.it-ebooks.info
4 CHAPTER 1 Introducing Android
novelty at first by some, Android has grown to become a market-changing player in afew short years, earning both respect and derision alike from peers in the industry.
This chapter introduces Android—what it is, and, equally important, what it’s not.After reading this chapter, you’ll understand how Android is constructed, how it com-pares with other offerings in the market, and what its foundational technologies are,plus you’ll get a preview of Android application architecture. More specifically, thischapter takes a look at the Android platform and its relationship to the popular Linuxoperating system, the Java programming language, and the runtime environmentknown as the Dalvik virtual machine (VM).
Java programming skills are helpful throughout the book, but this chapter is moreabout setting the stage than about coding specifics. One coding element introducedin this chapter is the Intent class. Having a good understanding of and comfort levelwith the Intent class is essential for working with the Android platform.
In addition to Intent, this chapter introduces the four main application compo-nents: Activity, Service, ContentProvider, and BroadcastReceiver. The chapterconcludes with a simple Android application to get you started quickly.
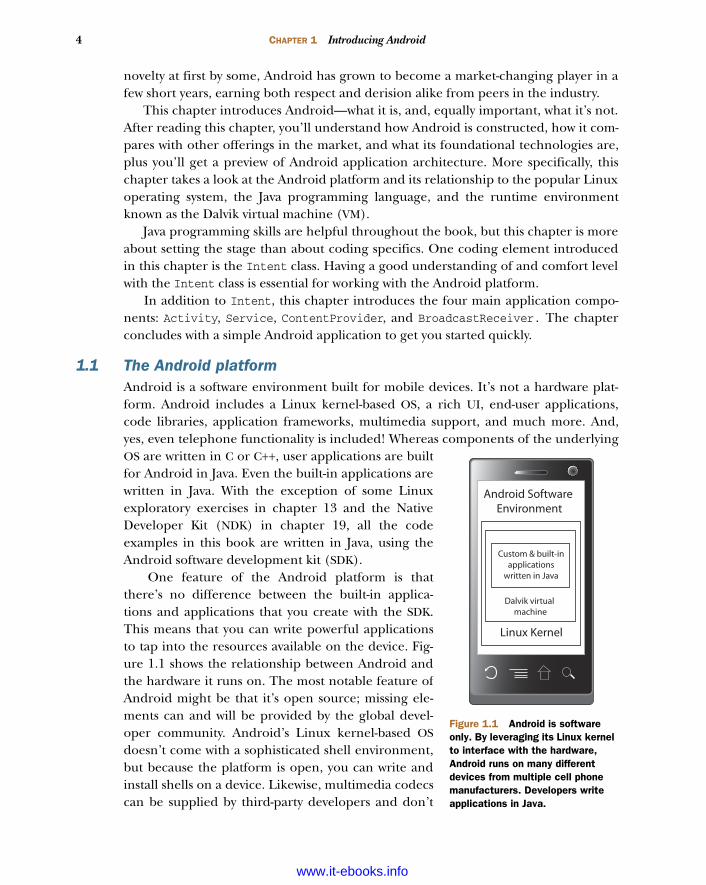
1.1 The Android platformAndroid is a software environment built for mobile devices. It’s not a hardware plat-form. Android includes a Linux kernel-based OS, a rich UI, end-user applications,code libraries, application frameworks, multimedia support, and much more. And,yes, even telephone functionality is included! Whereas components of the underlyingOS are written in C or C++, user applications are builtfor Android in Java. Even the built-in applications arewritten in Java. With the exception of some Linuxexploratory exercises in chapter 13 and the NativeDeveloper Kit (NDK) in chapter 19, all the codeexamples in this book are written in Java, using theAndroid software development kit (SDK).
One feature of the Android platform is thatthere’s no difference between the built-in applica-tions and applications that you create with the SDK.This means that you can write powerful applicationsto tap into the resources available on the device. Fig-ure 1.1 shows the relationship between Android andthe hardware it runs on. The most notable feature ofAndroid might be that it’s open source; missing ele-ments can and will be provided by the global devel-oper community. Android’s Linux kernel-based OSdoesn’t come with a sophisticated shell environment,but because the platform is open, you can write andinstall shells on a device. Likewise, multimedia codecscan be supplied by third-party developers and don’t
Android Software Environment
Custom & built-inapplications
written in Java
Linux Kernel
Dalvik virtual machine
Figure 1.1 Android is software only. By leveraging its Linux kernel to interface with the hardware, Android runs on many different devices from multiple cell phone manufacturers. Developers write applications in Java.
www.it-ebooks.info

5Understanding the Android market
need to rely on Google or anyone else to provide new functionality. That’s the powerof an open source platform brought to the mobile market.
PLATFORM VS. DEVICE Throughout this book, wherever code must be testedor exercised on a device, a software-based emulator is typically employed. Anexception is in chapter 14 where Bluetooth and Sensors are exercised. Seechapter 2 for information on how to set up and use the Android emulator.
The term platform refers to Android itself—the software—including all thebinaries, code libraries, and tool chains. This book focuses on the Androidplatform; the Android emulators available in the SDK are simply componentsof the Android platform.
With all of that as a backdrop, creating a successful mobile platform is clearly a non-trivial task involving numerous players. Android is an ambitious undertaking, even forGoogle, a company of seemingly boundless resources and moxie—and they’re gettingthe job done. Within a span of three years, Android has seen numerous major soft-ware releases, the release of multiple handsets across most major mobile carriers inthe global market, and most recently the introduction of Android-powered tablets.
Now that you’ve got an introduction to what Android is, let’s look at the why andwhere of Android to provide some context and set the perspective for Android’s intro-duction to the marketplace. After that, it’s on to exploring the platform itself!
1.2 Understanding the Android marketAndroid promises to have something for everyone. It aims to support a variety of hard-ware devices, not just high-end ones typically associated with expensive smartphones.Of course, Android users will enjoy improved performance on a more powerfuldevice, considering that it sports a comprehensive set of computing features. But howwell can Android scale up and down to a variety of markets and gain market and mindshare? How quickly can the smartphone market become the standard? Some folks arestill clinging to phone-only devices, even though smartphones are growing rapidly invirtually every demographic. Let’s look at Android from the perspective of a few exist-ing players in the marketplace. When you’re talking about the cellular market, theplace to start is at the top, with the carriers, or as they’re sometimes referred to, themobile operators.
1.2.1 Mobile operators
Mobile operators (the cell phone companies such as AT&T and Verizon) are in thebusiness, first and foremost, of selling subscriptions to their services. Shareholderswant a return on their investment, and it’s hard to imagine an industry where there’s alarger investment than in a network that spans such broad geographic territory. Tothe mobile operator, cell phones are simultaneously a conduit for services, a drug toentice subscribers, and an annoyance to support and lock down.
Some mobile operators are embracing Android as a platform to drive new data ser-vices across the excess capacity operators have built into their networks. Data services
www.it-ebooks.info
6 CHAPTER 1 Introducing Android
represent high-premium services and high-margin revenues for the operator. IfAndroid can help drive those revenues for the mobile operator, all the better.
Other mobile operators feel threatened by Google and the potential of “free wire-less,” driven by advertising revenues and an upheaval of the market. Another challengefor mobile operators is that they want the final say on what services are enabled acrosstheir networks. Historically, handset manufacturers complain that their devices arehandicapped and don’t exercise all the features designed into them because mobileoperators lack the capability or willingness to support those features. An encouragingsign is that there are mobile operators involved in the Open Handset Alliance.
Let’s move on to a comparison of Android and existing cell phones on the markettoday.
1.2.2 Android vs. the feature phones
The majority of cell phones on the market continue to be consumer flip phones andfeature phones—phones that aren’t smartphones.1 These phones are the ones consum-ers get when they walk into the retailer and ask what can be had for free. These con-sumers are the “I just want a phone” customers. Their primary interest is a phone forvoice communications, an address book, and increasingly, texting. They might evenwant a camera. Many of these phones have addi-tional capabilities such as mobile web browsing,but because of relatively poor user experience,these features aren’t employed heavily. The oneexception is text messaging, which is a dominantapplication no matter the classification of device.Another increasingly in-demand category is loca-tion-based services, which typically use the GlobalPositioning System (GPS).
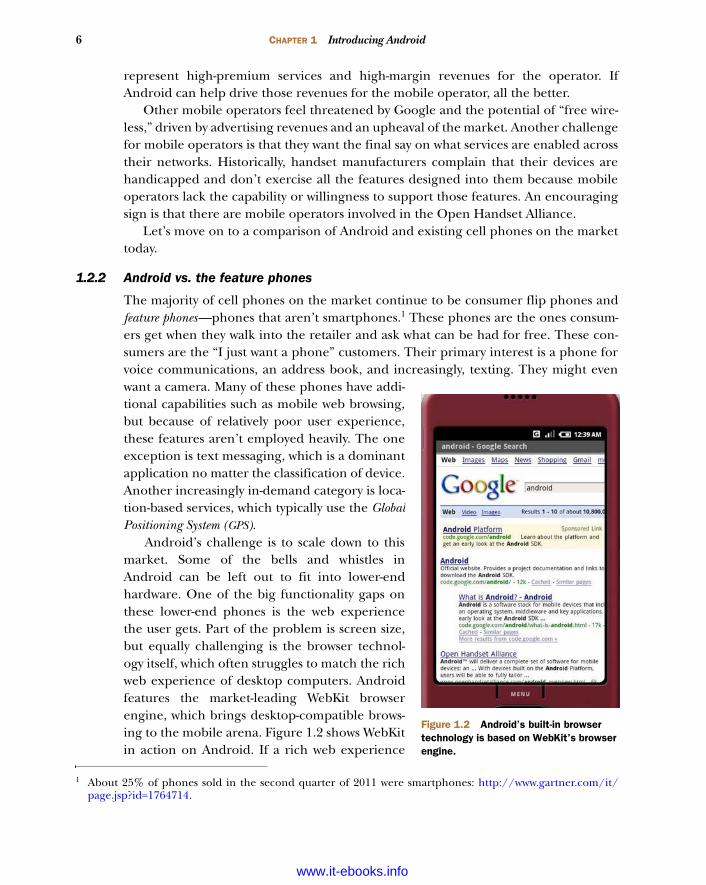
Android’s challenge is to scale down to thismarket. Some of the bells and whistles inAndroid can be left out to fit into lower-endhardware. One of the big functionality gaps onthese lower-end phones is the web experiencethe user gets. Part of the problem is screen size,but equally challenging is the browser technol-ogy itself, which often struggles to match the richweb experience of desktop computers. Androidfeatures the market-leading WebKit browserengine, which brings desktop-compatible brows-ing to the mobile arena. Figure 1.2 shows WebKitin action on Android. If a rich web experience
1 About 25% of phones sold in the second quarter of 2011 were smartphones: http://www.gartner.com/it/page.jsp?id=1764714.
Figure 1.2 Android’s built-in browser technology is based on WebKit’s browser engine.
www.it-ebooks.info
7Understanding the Android market
can be effectively scaled down to feature phone class hardware, it would go a long waytoward penetrating this end of the market. Chapter 16 takes a close look at using webdevelopment skills for creating Android applications.
WEBKIT The WebKit (www.webkit.org) browser engine is an open sourceproject that powers the browser found in Macs (Safari) and is the enginebehind Mobile Safari, which is the browser on the iPhone. It’s not a stretch tosay that the browser experience is one of a few features that made the iPhonepopular out of the gate, so its inclusion in Android is a strong plus forAndroid’s architecture.
Software at the lower end of the market generally falls into one of two camps:
Qualcomm’s BREW environment—BREW stands for Binary Runtime Environmentfor Wireless. For a high-volume example of BREW technology, consider Veri-zon’s Get It Now-capable devices, which run on this platform. The challenge forsoftware developers who want to gain access to this market is that the bar to getan application on this platform is high, because everything is managed by themobile operator, with expensive testing and revenue-sharing fee structures. Theupside to this platform is that the mobile operator collects the money and dis-burses it to the developer after the sale, and often these sales recur monthly.Just about everything else is a challenge to the software developer. Android’sopen application environment is more accessible than BREW.
Java ME, or Java Platform, Micro Edition—A popular platform for this class ofdevice. The barrier to entry is much lower for software developers. Java MEdevelopers will find a same-but-different environment in Android. Android isn’tstrictly a Java ME-compatible platform, but the Java programming environmentfound in Android is a plus for Java ME developers. There are some projectsunderway to create a bridge environment, with the aim of enabling Java MEapplications to be compiled and run for Android. Gaming, a better browser,and anything to do with texting or social applications present fertile territoryfor Android at this end of the market.
Although the majority of cell phones sold worldwide are not considered smartphones,the popularity of Android (and other capable platforms) has increased demand forhigher-function devices. That’s what we’re going to discuss next.
1.2.3 Android vs. the smartphones
Let’s start by naming the major smartphone players: Symbian (big outside NorthAmerica), BlackBerry from Research in Motion, iPhone from Apple, Windows(Mobile, SmartPhone, and now Phone 7), and of course, the increasingly popularAndroid platform.
One of the major concerns of the smartphone market is whether a platform cansynchronize data and access Enterprise Information Systems for corporate users.Device-management tools are also an important factor in the enterprise market. The
www.it-ebooks.info
8 CHAPTER 1 Introducing Android
browser experience is better than with the lower-end phones, mainly because of largerdisplays and more intuitive input methods, such as a touch screen, touch pad, slide-out keyboard, or jog dial.
Android’s opportunity in this market is to provide a device and software that peo-ple want. For all the applications available for the iPhone, working with Apple can bea challenge; if the core device doesn’t suit your needs, there’s little room to maneuverbecause of the limited models available and historical carrier exclusivity. Now thatemail, calendaring, and contacts can sync with Microsoft Exchange, the corporateenvironment is more accessible, but Android will continue to fight the battle of scal-ing the Enterprise walls. Later Android releases have added improved support for theMicrosoft Exchange platform, though third-party solutions still out-perform the built-in offerings. BlackBerry is dominant because of its intuitive email capabilities, and theMicrosoft platforms are compelling because of tight integration to the desktop experi-ence and overall familiarity for Windows users. iPhone has surprisingly good integra-tion with Microsoft Exchange—for Android to compete in this arena, it mustmaintain parity with iPhone on Enterprise support.
You’ve seen how Android stacks up next to feature phones and smartphones. Next,we’ll see whether Android, the open source mobile platform, can succeed as an opensource project.
1.2.4 Android vs. itself
Android will likely always be an open source project, but to succeed in the mobile mar-ket, it must sell millions of units and stay fresh. Even though Google briefly entered thedevice fray with its Nexus One and Nexus S phones, it’s not a hardware company. His-torically, Android-powered devices have been brought to market by others such asHTC, Samsung, and Motorola, to name the larger players. Starting in mid-2011, Googlebegan to further flex its muscles with the acquisition of Motorola’s mobile businessdivision. Speculation has it that Google’s primary interest is in Motorola’s patent port-folio, because the intellectual property scene has heated up considerably. A secondaryreason may be to acquire the Motorola Xoom platform as Android continues to reachbeyond cell phones into tablets and beyond.
When a manufacturer creates an Android-powered device, they start with theAndroid Open Source Platform (AOSP) and then extend it to meet their need to dif-ferentiate their offerings. Android isn’t the first open source phone, but it’s the firstfrom a player with the market-moving weight of Google leading the charge. This mar-ket leadership position has translated to impressive unit sales across multiple manu-facturers and markets around the globe. With a multitude of devices on the market,can Android keep the long-anticipated fragmentation from eroding consumer andinvestor confidence?
Open source is a double-edged sword. On one hand, the power of many talentedpeople and companies working around the globe and around the clock to deliverdesirable features is a force to be reckoned with, particularly in comparison with a tra-ditional, commercial approach to software development. This topic has become trite
www.it-ebooks.info
9Understanding the Android market
because the benefits of open source development are well documented. On the otherhand, how far will the competing manufacturers extend and potentially split Android?Depending on your perspective, the variety of Android offerings is a welcome alterna-tive to a more monolithic iPhone device platform where consumers have few choicesavailable.
Another challenge for Android is that the licensing model of open source codeused in commercial offerings can be sticky. Some software licenses are more restrictivethan others, and some of those restrictions pose a challenge to the open source label.At the same time, Android licensees need to protect their investment, so licensing isan important topic for the commercialization of Android.
1.2.5 Licensing Android
Android is released under two different open source licenses. The Linux kernel isreleased under the GNU General Public License (GPL) as is required for anyone licensingthe open source OS kernel. The Android platform, excluding the kernel, is licensedunder the Apache Software License (ASL). Although both licensing models are opensource–oriented, the major difference is that the Apache license is considered friend-lier toward commercial use. Some open source purists might find fault with anythingbut complete openness, source-code sharing, and noncommercialization; the ASLattempts to balance the goals of open source with commercial market forces. So farthere has been only one notable licensing hiccup impacting the Android mod com-munity, and that had more to do with the gray area of full system images than with amanufacturer’s use of Android on a mainstream product release. Currently, Androidis facing intellectual property challenges; both Microsoft and Apple are bringing liti-gation against Motorola and HTC for the manufacturer’s Android-based handsets.
The high-level, market-oriented portion of the book has now concluded! Theremainder of this book is focused on Android application development. Any technicaldiscussion of a software environment must include a review of the layers that composethe environment, sometimes referred to as a stack because of the layer-upon-layer con-struction. Next up is a high-level breakdown of the components of the Android stack.
Selling applicationsA mobile platform is ultimately valuable only if there are applications to use and enjoyon that platform. To that end, the topic of buying and selling applications for Androidis important and gives us an opportunity to highlight a key difference between Androidand the iPhone. The Apple App Store contains software titles for the iPhone—lots ofthem. But Apple’s somewhat draconian grip on the iPhone software market requiresthat all applications be sold through its venue. Although Apple’s digital rights man-agement (DRM) is the envy of the market, this approach can pose a challenging envi-ronment for software developers who might prefer to make their application availablethrough multiple distribution channels.
www.it-ebooks.info
10 CHAPTER 1 Introducing Android
1.3 The layers of AndroidThe Android stack includes an impressive array of features for mobile applications. Infact, looking at the architecture alone, without the context of Android being a plat-form designed for mobile environments, it would be easy to confuse Android with ageneral computing environment. All the major components of a computing platformare there. Here’s a quick rundown of prominent components of the Android stack:
A Linux kernel that provides a foundational hardware abstraction layer, as well ascore services such as process, memory, and filesystem management. The kernelis where hardware-specific drivers are implemented—capabilities such as Wi-Fiand Bluetooth are here. The Android stack is designed to be flexible, withmany optional components that largely rely on the availability of specific hard-ware on a given device. These components include features such as touchscreens, cameras, GPS receivers, and accelerometers.
Prominent code libraries, including the following:• Browser technology from WebKit, the same open source engine powering
Mac’s Safari and the iPhone’s Mobile Safari browser. WebKit has become thede facto standard for most mobile platforms.
• Database support via SQLite, an easy-to-use SQL database.• Advanced graphics support, including 2D, 3D, animation from Scalable
Games Language (SGL), and OpenGL ES.• Audio and video media support from PacketVideo’s OpenCORE, and
Google’s own Stagefright media framework.• Secure Sockets Layer (SSL) capabilities from the Apache project.
An array of managers that provide services for• Activities and views• Windows• Location-based services• Telephony• Resources
(continued)Contrast Apple’s approach to application distribution with the freedom Androiddevelopers enjoy to ship applications via traditional venues such as freeware andshareware, and commercially through various marketplaces, including their ownwebsite! For software publishers who want the focus of an on-device shopping expe-rience, Google has launched and continues to mature the Android Market. For soft-ware developers who already have titles for other platforms such as WindowsMobile, Palm, and BlackBerry, traditional software markets such as Handango(www.Handango.com) also support selling Android applications. Handango and itsilk are important outlets; consumers new to Android will likely visit sites such asHandango because that might be where they first purchased one of their favoriteapplications for their prior device.
www.it-ebooks.info
11The layers of Android
The Android runtime, which provides• Core Java packages for a nearly full-featured Java programming environ-
ment. Note that this isn’t a Java ME environment.• The Dalvik VM, which employs services of the Linux-based kernel to provide an
environment to host Android applications.
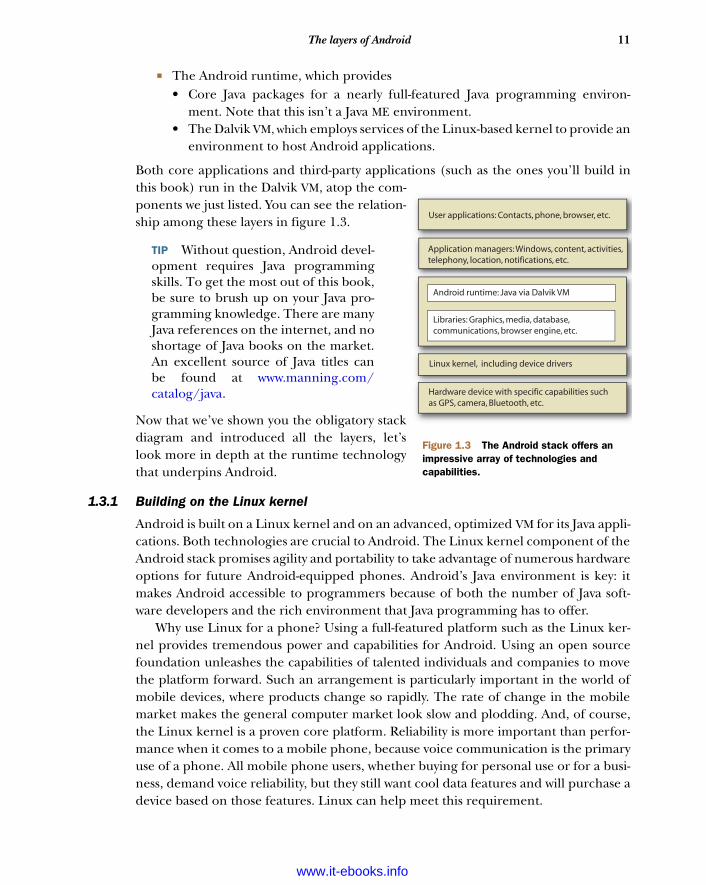
Both core applications and third-party applications (such as the ones you’ll build inthis book) run in the Dalvik VM, atop the com-ponents we just listed. You can see the relation-ship among these layers in figure 1.3.
TIP Without question, Android devel-opment requires Java programmingskills. To get the most out of this book,be sure to brush up on your Java pro-gramming knowledge. There are manyJava references on the internet, and noshortage of Java books on the market.An excellent source of Java titles canbe found at www.manning.com/catalog/java.
Now that we’ve shown you the obligatory stackdiagram and introduced all the layers, let’slook more in depth at the runtime technologythat underpins Android.
1.3.1 Building on the Linux kernel
Android is built on a Linux kernel and on an advanced, optimized VM for its Java appli-cations. Both technologies are crucial to Android. The Linux kernel component of theAndroid stack promises agility and portability to take advantage of numerous hardwareoptions for future Android-equipped phones. Android’s Java environment is key: itmakes Android accessible to programmers because of both the number of Java soft-ware developers and the rich environment that Java programming has to offer.
Why use Linux for a phone? Using a full-featured platform such as the Linux ker-nel provides tremendous power and capabilities for Android. Using an open sourcefoundation unleashes the capabilities of talented individuals and companies to movethe platform forward. Such an arrangement is particularly important in the world ofmobile devices, where products change so rapidly. The rate of change in the mobilemarket makes the general computer market look slow and plodding. And, of course,the Linux kernel is a proven core platform. Reliability is more important than perfor-mance when it comes to a mobile phone, because voice communication is the primaryuse of a phone. All mobile phone users, whether buying for personal use or for a busi-ness, demand voice reliability, but they still want cool data features and will purchase adevice based on those features. Linux can help meet this requirement.
User applications: Contacts, phone, browser, etc.
Application managers: Windows, content, activities,telephony, location, notifications, etc.
Android runtime: Java via Dalvik VM
Libraries: Graphics, media, database, communications, browser engine, etc.
Linux kernel, including device drivers
Hardware device with specific capabilities suchas GPS, camera, Bluetooth, etc.
Figure 1.3 The Android stack offers an impressive array of technologies and capabilities.
www.it-ebooks.info
12 CHAPTER 1 Introducing Android
Speaking to the rapid rate of phone turnover and accessories hitting the market,another advantage of using Linux as the foundation of the Android platform stack isthat it provides a hardware abstraction layer; the upper levels remain unchangeddespite changes in the underlying hardware. Of course, good coding practicesdemand that user applications fail gracefully in the event a resource isn’t available,such as a camera not being present in a particular handset model. As new accessoriesappear on the market, drivers can be written at the Linux level to provide support, justas on other Linux platforms. This architecture is already demonstrating its value;Android devices are already available on distinct hardware platforms. HTC, Motorola,and others have released Android-based devices built on their respective hardwareplatforms. User applications, as well as core Android applications, are written in Javaand are compiled into byte codes. Byte codes are interpreted at runtime by an inter-preter known as a virtual machine (VM).
1.3.2 Running in the Dalvik VM
The Dalvik VM is an example of the need for efficiency, the desire for a rich program-ming environment, and even some intellectual property constraints, colliding, withinnovation as the result. Android’s Java environment provides a rich application plat-form and is accessible because of the popularity of Java itself. Also, application perfor-mance, particularly in a low-memory setting such as you find in a mobile phone, isparamount for the mobile market. But this isn’t the only issue at hand.
Android isn’t a Java ME platform. Without commenting on whether this is ultimatelygood or bad for Android, there are other forces at play here. There’s the matter of JavaVM licensing from Oracle. From a high level, Android’s code environment is Java.Applications are written in Java, which is compiled to Java byte codes and subsequentlytranslated to a similar but different representation called dex files. These files are logi-cally equivalent to Java byte codes, but they permit Android to run its applications in itsown VM that’s both (arguably) free from Oracle’s licensing clutches and an open plat-form upon which Google, and potentially the open source community, can improve asnecessary. Android is facing litigation challenges from Oracle about the use of Java.
NOTE From the mobile application developer’s perspective, Android is a Javaenvironment, but the runtime isn’t strictly a Java VM. This accounts for theincompatibilities between Android and proper Java environments and librar-ies. If you have a code library that you want to reuse, your best bet is to assumethat your code is nearly source compatible, attempt to compile it into an Androidproject, and then determine how close you are to having usable code.
The important things to know about the Dalvik VM are that Android applications runinside it and that it relies on the Linux kernel for services such as process, memory,and filesystem management.
Now that we’ve discussed the foundational technologies in Android, it’s time tofocus on Android application development. The remainder of this chapter discusseshigh-level Android application architecture and introduces a simple Android
www.it-ebooks.info
13The Intent of Android development
application. If you’re not comfortable or ready to begin coding, you might want tojump to chapter 2, where we introduce the development environment step-by-step.
1.4 The Intent of Android developmentLet’s jump into the fray of Android development, focus on an important componentof the Android platform, and expand to take a broader view of how Android applica-tions are constructed.
An important and recurring theme of Android development is the Intent. AnIntent in Android describes what you want to do. An Intent might look like “I wantto look up a contact record” or “Please launch this website” or “Show the order confir-mation screen.” Intents are important because they not only facilitate navigation inan innovative way, as we’ll discuss next, but also represent the most important aspectof Android coding. Understand the Intent and you’ll understand Android.
NOTE Instructions for setting up the Eclipse development environment are inappendix A. This environment is used for all Java examples in this book. Chap-ter 2 goes into more detail on setting up and using the development tools.
The code examples in this chapter are primarily for illustrative purposes.We reference and introduce classes without necessarily naming specific Javapackages. Subsequent chapters take a more rigorous approach to introducingAndroid-specific packages and classes.
Next, we’ll look at the foundational information about why Intents are important,and then we’ll describe how Intents work. Beyond the introduction of the Intent,the remainder of this chapter describes the major elements of Android applicationdevelopment, leading up to and including the first complete Android application thatyou’ll develop.
1.4.1 Empowering intuitive UIs
The power of Android’s application framework lies in the way it brings a web mindsetto mobile applications. This doesn’t mean the platform has only a powerful browserand is limited to clever JavaScript and server-side resources, but rather it goes to thecore of how the Android platform works and how users interact with the mobiledevice. The power of the internet is that everything is just a click away. Those clicks areknown as Uniform Resource Locators (URLs), or alternatively, Uniform Resource Identifiers(URIs). Using effective URIs permits easy and quick access to the information usersneed and want every day. “Send me the link” says it all.
Beyond being an effective way to get access to data, why is this URI topic important,and what does it have to do with Intents? The answer is nontechnical but crucial: theway a mobile user navigates on the platform is crucial to its commercial success. Plat-forms that replicate the desktop experience on a mobile device are acceptable to onlya small percentage of hardcore power users. Deep menus and multiple taps and clicksare generally not well received in the mobile market. The mobile application, morethan in any other market, demands intuitive ease of use. A consumer might buy a
www.it-ebooks.info
14 CHAPTER 1 Introducing Android
device based on cool features that were enumerated in the marketing materials, butthat same consumer is unlikely to even touch the instruction manual. A UI’s usabilityis highly correlated with its market penetration. UIs are also a reflection of the plat-form’s data access model, so if the navigation and data models are clean and intuitive,the UI will follow suit.
Now we’re going to introduce Intents and IntentFilters, Android’s innovativenavigation and triggering mechanisms.
1.4.2 Intents and how they work
Intents and IntentFilters bring the “click it” paradigm to the core of mobile appli-cation use (and development) for the Android platform:
An Intent is a declaration of need. It’s made up of a number of pieces of infor-mation that describe the desired action or service. We’re going to examine therequested action and, generically, the data that accompanies the requestedaction.
An IntentFilter is a declaration of capability and interest in offering assis-tance to those in need. It can be generic or specific with respect to whichIntents it offers to service.
The action attribute of an Intent is typically a verb: for example VIEW, PICK, or EDIT. Anumber of built-in Intent actions are defined as members of the Intent class, butapplication developers can create new actions as well. To view a piece of information,an application employs the following Intent action:
android.content.Intent.ACTION_VIEW
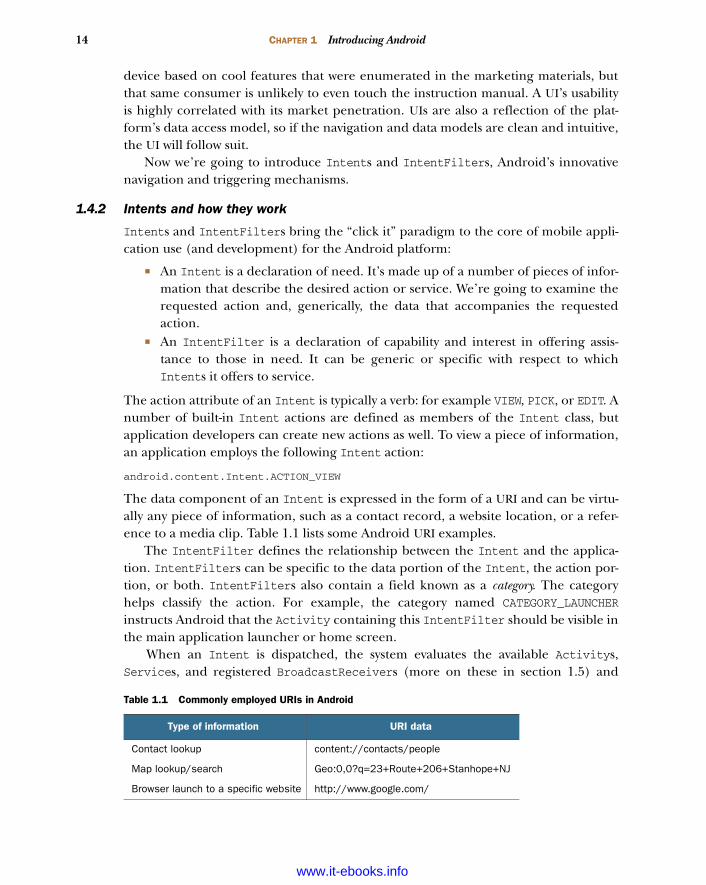
The data component of an Intent is expressed in the form of a URI and can be virtu-ally any piece of information, such as a contact record, a website location, or a refer-ence to a media clip. Table 1.1 lists some Android URI examples.
The IntentFilter defines the relationship between the Intent and the applica-tion. IntentFilters can be specific to the data portion of the Intent, the action por-tion, or both. IntentFilters also contain a field known as a category. The categoryhelps classify the action. For example, the category named CATEGORY_LAUNCHERinstructs Android that the Activity containing this IntentFilter should be visible inthe main application launcher or home screen.
When an Intent is dispatched, the system evaluates the available Activitys,Services, and registered BroadcastReceivers (more on these in section 1.5) and
Table 1.1 Commonly employed URIs in Android
Type of information URI data
Contact lookup content://contacts/people
Map lookup/search Geo:0,0?q=23+Route+206+Stanhope+NJ
Browser launch to a specific website http://www.google.com/
www.it-ebooks.info
15The Intent of Android development
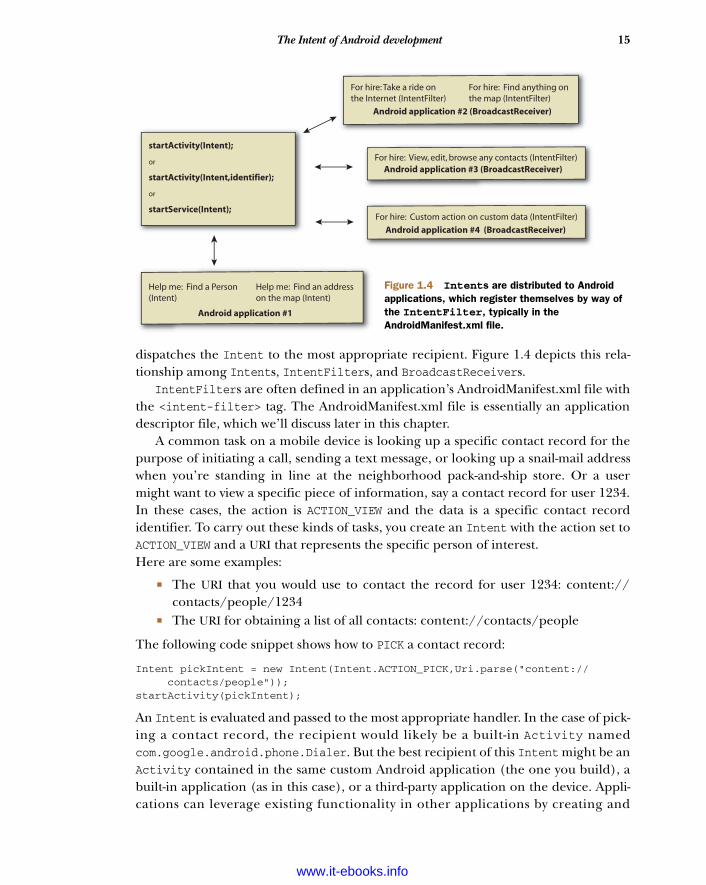
dispatches the Intent to the most appropriate recipient. Figure 1.4 depicts this rela-tionship among Intents, IntentFilters, and BroadcastReceivers.
IntentFilters are often defined in an application’s AndroidManifest.xml file withthe <intent-filter> tag. The AndroidManifest.xml file is essentially an applicationdescriptor file, which we’ll discuss later in this chapter.
A common task on a mobile device is looking up a specific contact record for thepurpose of initiating a call, sending a text message, or looking up a snail-mail addresswhen you’re standing in line at the neighborhood pack-and-ship store. Or a usermight want to view a specific piece of information, say a contact record for user 1234.In these cases, the action is ACTION_VIEW and the data is a specific contact recordidentifier. To carry out these kinds of tasks, you create an Intent with the action set toACTION_VIEW and a URI that represents the specific person of interest.Here are some examples:
The URI that you would use to contact the record for user 1234: content://contacts/people/1234
The URI for obtaining a list of all contacts: content://contacts/people
The following code snippet shows how to PICK a contact record:
Intent pickIntent = new Intent(Intent.ACTION_PICK,Uri.parse("content://contacts/people"));
startActivity(pickIntent);
An Intent is evaluated and passed to the most appropriate handler. In the case of pick-ing a contact record, the recipient would likely be a built-in Activity namedcom.google.android.phone.Dialer. But the best recipient of this Intent might be anActivity contained in the same custom Android application (the one you build), abuilt-in application (as in this case), or a third-party application on the device. Appli-cations can leverage existing functionality in other applications by creating and
startActivity(Intent);
or
startActivity(Intent,identifier);
or
startService(Intent);
Help me: Find a Person(Intent)
Android application #1
Help me: Find an addresson the map (Intent)
For hire: Take a ride on the Internet (IntentFilter)
Android application #2 (BroadcastReceiver)
For hire: Find anything on the map (IntentFilter)
For hire: View, edit, browse any contacts (IntentFilter)Android application #3 (BroadcastReceiver)
For hire: Custom action on custom data (IntentFilter)
Android application #4 (BroadcastReceiver)
Figure 1.4 Intents are distributed to Android applications, which register themselves by way of the IntentFilter, typically in the AndroidManifest.xml file.
www.it-ebooks.info
16 CHAPTER 1 Introducing Android
dispatching an Intent that requests existing code to handle the Intent rather thanwriting code from scratch. One of the great benefits of employing Intents in this man-ner is that the same UIs get used frequently, creating familiarity for the user. This is par-ticularly important for mobile platforms where the user is often neither tech-savvy nor interested inlearning multiple ways to accomplish the same task, such as looking up a contact on the phone.
The Intents we’ve discussed thus far are known as implicit Intents, which rely onthe IntentFilter and the Android environment to dispatch the Intent to theappropriate recipient. Another kind of Intent is the explicit Intent, where you canspecify the exact class that you want to handle the Intent. Specifying the exact class ishelpful when you know exactly which Activity you want to handle the Intent andyou don’t want to leave anything to chance in terms of what code is executed. To cre-ate an explicit Intent, use the overloaded Intent constructor, which takes a class asan argument:
public void onClick(View v) { try { startActivityForResult(new Intent(v.getContext(),RefreshJobs.class),0); } catch (Exception e) { . . . }}
These examples show how an Androiddeveloper creates an Intent and asks forit to be handled. Similarly, an Androidapplication can be deployed with anIntentFilter, indicating that itresponds to Intents that were alreadydefined on the system, thereby publish-ing new functionality for the platform.This facet alone should bring joy toindependent software vendors (ISVs)who’ve made a living by offering bettercontact managers and to-do list manage-ment software titles for other mobileplatforms.
Intent resolution, or dispatching,takes place at runtime, as opposed towhen the application is compiled. Youcan add specific Intent-handling fea-tures to a device, which might providean upgraded or more desirable set offunctionality than the original shippingsoftware. This runtime dispatching isalso referred to as late binding.
The power and the complexity of IntentsIt’s not hard to imagine that an abso-lutely unique user experience is possi-ble with Android because of the varietyof Activitys with specific Intent-Filters that are installed on any givendevice. It’s architecturally feasible toupgrade various aspects of an Androidinstallation to provide sophisticatedfunctionality and customization.Though this might be a desirable char-acteristic for the user, it can be trou-blesome for someone providing techsupport who has to navigate a numberof components and applications totroubleshoot a problem.
Because of the potential for addedcomplexity, this approach of ad hocsystem patching to upgrade specificfunctionality should be entertainedcautiously and with your eyes wideopen to the potential pitfalls associ-ated with this approach.
www.it-ebooks.info

17Four kinds of Android components
Thus far, this discussion of Intents has focused on the variety of Intents that causeUI elements to be displayed. Other Intents are more event-driven than task-oriented,as our earlier contact record example described. For example, you also use the Intentclass to notify applications that a text message has arrived. Intents are a central ele-ment to Android; we’ll revisit them on more than one occasion.
Now that we’ve explained Intents as the catalyst for navigation and event flow onAndroid, let’s jump to a broader view and discuss the Android application lifecycleand the key components that make Android tick. The Intent will come into betterfocus as we further explore Android throughout this book.
1.5 Four kinds of Android componentsLet’s build on your knowledge of the Intent and IntentFilter classes and explorethe four primary components of Android applications, as well as their relation to theAndroid process model. We’ll include code snippets to provide a taste of Androidapplication development. We’re going to leave more in-depth examples and discus-sion for later chapters.
NOTE A particular Android application might not contain all of these ele-ments but will have at least one of these elements, and could have all of them.
1.5.1 Activity
An application might have a UI, but it doesn’t have to have one. If it has a UI, it’ll haveat least one Activity.
The easiest way to think of an Android Activity is to relate it to a visible screen,because more often than not there’s a one-to-one relationship between an Activityand a UI screen. This relationship is similar to that of a controller in the MVC paradigm.
Android applications often contain more than one Activity. Each Activity dis-plays a UI and responds to system- and user-initiated events. The Activity employsone or more Views to present the actual UI elements to the user. The Activity class isextended by user classes, as shown in the following listing.
package com.msi.manning.chapter1;import android.app.Activity;import android.os.Bundle;public class Activity1 extends Activity { @Override public void onCreate(Bundle savedInstanceState){ super.onCreate(savedInstanceState); setContentView(R.layout.main); }}
The Activity class is part of the android.app Java package, found in the Androidruntime. The Android runtime is deployed in the android.jar file. The class
Listing 1.1 A basic Activity in an Android application
www.it-ebooks.info
18 CHAPTER 1 Introducing Android
Activity1 extends the class Activity, which we’ll examine in detail in chapter 3.One of the primary tasks an Activity performs is displaying UI elements, which areimplemented as Views and are typically defined in XML layout files. Chapter 3 goesinto more detail on Views and Resources.
Moving from one Activity to another is accomplished with the startActivity()method or the startActivityForResult() method when you want a synchronouscall/result paradigm. The argument to these methods is an instance of an Intent.
The Activity represents a visible application component within Android. Withassistance from the View class, which we’ll cover in chapter 3, the Activity is the mostcommonly employed Android application component. Android 3.0 introduced a newkind of application component, the Fragment. Fragments, which are related to Activ-itys and have their own life cycle, provide more granular application control thanActivitys. Fragments are covered in Chapter 20. The next topic of interest is the Ser-vice, which runs in the background and doesn’t generally present a direct UI.
1.5.2 Service
If an application is to have a long lifecycle, it’s often best to put it into a Service. Forexample, a background data-synchronization utility should be implemented as aService. A best practice is to launch Services on a periodic or as-needed basis, trig-gered by a system alarm, and then have the Service terminate when its task is complete.
Like the Activity, a Service is a class in the Android runtime that you shouldextend, as shown in the following listing. This example extends a Service and period-ically publishes an informative message to the Android log.
package com.msi.manning.chapter1;import android.app.Service;import android.content.Intent;import android.os.IBinder;import android.util.Log;public class Service1 extends Service implements Runnable {public static final String tag = "service1"; private int counter = 0;
Listing 1.2 A simple example of an Android Service
You say Intent; I say IntentThe Intent class is used in similar sounding but very different scenarios.
Some Intents are used to assist in navigating from one Activity to the next,such as the example given earlier of viewing a contact record. Activities are the tar-gets of these kinds of Intents, which are used with the startActivity andstartActivityForResult methods.
Also, a Service can be started by passing an Intent to the startService method.
BroadcastReceivers receive Intents when responding to system-wide events,such as a ringing phone or an incoming text message.
Extend Service classB
www.it-ebooks.info
19Four kinds of Android components
@Override protected void onCreate() { super.onCreate(); Thread aThread = new Thread (this); aThread.start(); } public void run() { while (true) { try { Log.i(tag,"service1 firing : # " + counter++); Thread.sleep(10000); } catch(Exception ee) { Log.e(tag,ee.getMessage()); } } }
@Overridepublic IBinder onBind(Intent intent) {return null;}
}
This example requires that the package android.app.Service be imported. Thispackage contains the Service class. This example also demonstrates Android’s log-ging mechanism android.util.Log, which is useful for debugging purposes. (Manyexamples in this book include using the logging facility. We’ll discuss logging in moredepth in chapter 2.) The Service1 class B extends the Service class. This classimplements the Runnable interface to perform its main task on a separate thread. TheonCreate method C of the Service class permits the application to perform initial-ization-type tasks. We’re going to talk about the onBind() method D in further detailin chapter 4, when we’ll explore the topic of interprocess communication in general.
Services are started with the startService(Intent) method of the abstractContext class. Note that, again, the Intent is used to initiate a desired result on theplatform.
Now that the application has a UI in an Activity and a means to have a back-ground task via an instance of a Service, it’s time to explore the BroadcastReceiver,another form of Android application that’s dedicated to processing Intents.
1.5.3 BroadcastReceiver
If an application wants to receive and respond to a global event, such as a ringingphone or an incoming text message, it must register as a BroadcastReceiver. Anapplication registers to receive Intents in one of the following ways:
The application can implement a <receiver> element in the Android-Manfest.xml file, which describes the BroadcastReceiver’s class name andenumerates its IntentFilters. Remember, the IntentFilter is a descriptor ofthe Intent an application wants to process. If the receiver is registered in theAndroidManifest.xml file, the application doesn’t need to be running in order
InitializationC
Handle binding request
D
www.it-ebooks.info

20 CHAPTER 1 Introducing Android
to be triggered. When the event occurs, the application is started automaticallyupon notification of the triggering event. Thankfully, all this housekeeping ismanaged by the Android OS itself.
An application can register at runtime via the Context class’s register-Receiver method.
Like Services, BroadcastReceivers don’t have a UI. Even more important, the coderunning in the onReceive method of a BroadcastReceiver should make no assump-tions about persistence or long-running operations. If the BroadcastReceiverrequires more than a trivial amount of code execution, it’s recommended that thecode initiate a request to a Service to complete the requested functionality becausethe Service application component is designed for longer-running operationswhereas the BroadcastReceiver is meant for responding to various triggers.
NOTE The familiar Intent class is used in triggering BroadcastReceivers.The parameters will differ, depending on whether you’re starting anActivity, a Service, or a BroadcastReceiver, but it’s the same Intent classthat’s used throughout the Android platform.
A BroadcastReceiver implements the abstract method onReceive to process incom-ing Intents. The arguments to the method are a Context and an Intent. The methodreturns void, but a handful of methods are useful for passing back results, includingsetResult, which passes back to the invoker an integer return code, a String returnvalue, and a Bundle value, which can contain any number of objects.
The following listing is an example of a BroadcastReceiver triggering uponreceipt of an incoming text message.
package com.msi.manning.unlockingandroid;import android.content.Context;import android.content.Intent;import android.util.Log;import.android.content.BroadcastReceiverpublic class MySMSMailBox extends BroadcastReceiver {public static final String tag = "MySMSMailBox";@Overridepublic void onReceive(Context context, Intent intent) { Log.i(tag,"onReceive"); if (intent.getAction().equals("android.provider.Telephony.SMS_RECEIVED")) { Log.i(tag,"Found our Event!"); }}
We need to discuss a few items in this listing. The class MySMSMailBox extends theBroadcastReceiver class. This subclass approach is the most straightforward way toemploy a BroadcastReceiver. (Note the class name MySMSMailBox; it’ll be used in theAndroidManifest.xml file, shown in listing 1.4.) The tag variable B is used in
Listing 1.3 A sample BroadcastReceiver
Tag usedin logging
B
Check Intent’s action
C
www.it-ebooks.info
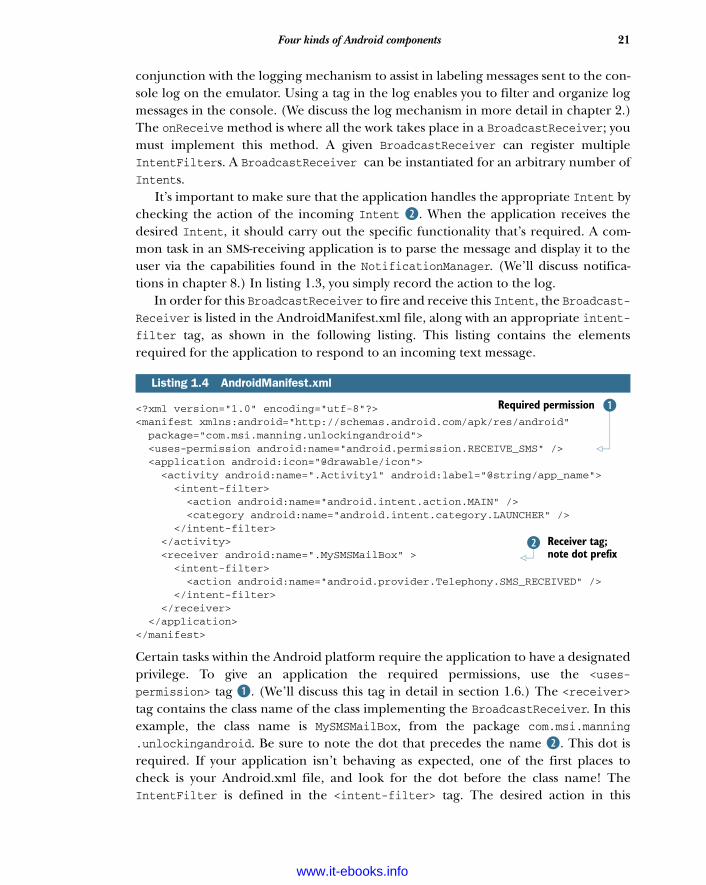
21Four kinds of Android components
conjunction with the logging mechanism to assist in labeling messages sent to the con-sole log on the emulator. Using a tag in the log enables you to filter and organize logmessages in the console. (We discuss the log mechanism in more detail in chapter 2.)The onReceive method is where all the work takes place in a BroadcastReceiver; youmust implement this method. A given BroadcastReceiver can register multipleIntentFilters. A BroadcastReceiver can be instantiated for an arbitrary number ofIntents.
It’s important to make sure that the application handles the appropriate Intent bychecking the action of the incoming Intent C. When the application receives thedesired Intent, it should carry out the specific functionality that’s required. A com-mon task in an SMS-receiving application is to parse the message and display it to theuser via the capabilities found in the NotificationManager. (We’ll discuss notifica-tions in chapter 8.) In listing 1.3, you simply record the action to the log.
In order for this BroadcastReceiver to fire and receive this Intent, the Broadcast-Receiver is listed in the AndroidManifest.xml file, along with an appropriate intent-filter tag, as shown in the following listing. This listing contains the elementsrequired for the application to respond to an incoming text message.
<?xml version="1.0" encoding="utf-8"?><manifest xmlns:android="http://schemas.android.com/apk/res/android" package="com.msi.manning.unlockingandroid"> <uses-permission android:name="android.permission.RECEIVE_SMS" /> <application android:icon="@drawable/icon"> <activity android:name=".Activity1" android:label="@string/app_name"> <intent-filter> <action android:name="android.intent.action.MAIN" /> <category android:name="android.intent.category.LAUNCHER" /> </intent-filter> </activity> <receiver android:name=".MySMSMailBox" > <intent-filter> <action android:name="android.provider.Telephony.SMS_RECEIVED" /> </intent-filter> </receiver> </application></manifest>
Certain tasks within the Android platform require the application to have a designatedprivilege. To give an application the required permissions, use the <uses-
permission> tag B. (We’ll discuss this tag in detail in section 1.6.) The <receiver>tag contains the class name of the class implementing the BroadcastReceiver. In thisexample, the class name is MySMSMailBox, from the package com.msi.manning.unlockingandroid. Be sure to note the dot that precedes the name C. This dot isrequired. If your application isn’t behaving as expected, one of the first places tocheck is your Android.xml file, and look for the dot before the class name! TheIntentFilter is defined in the <intent-filter> tag. The desired action in this
Listing 1.4 AndroidManifest.xml
BRequired permission
Receiver tag; note dot prefix
C
www.it-ebooks.info
22 CHAPTER 1 Introducing Android
example is android.provider.Telephony.SMS_RECEIVED. The Android SDK containsthe available actions for the standard Intents. Also, remember that user applicationscan define their own Intents, as well as listen for them.
Now that we’ve introduced Intents and the Android classes that process or handleIntents, it’s time to explore the next major Android application topic: the Content-Provider, Android’s preferred data-publishing mechanism.
1.5.4 ContentProvider
If an application manages data and needs to expose that data to other applicationsrunning in the Android environment, you should consider a ContentProvider. If anapplication component (Activity, Service, or BroadcastReceiver) needs to accessdata from another application, the component accesses the other application’sContentProvider. The ContentProvider implements a standard set of methods topermit an application to access a data store. The access might be for read or writeoperations, or for both. A ContentProvider can provide data to an Activity orService in the same containing application, as well as to an Activity or Service con-tained in other applications.
A ContentProvider can use any form of data-storage mechanism available on theAndroid platform, including files, SQLite databases, or even a memory-based hashmap if data persistence isn’t required. The ContentProvider is a data layer that pro-vides data abstraction for its clients and centralizing storage and retrieval routines in asingle place.
Sharing files or databases directly is discouraged on the Android platform, and isenforced by the underlying Linux security system, which prevents ad hoc file accessfrom one application space to another without explicitly granted permissions.Data stored in a ContentProvider can be traditional data types, such as integers andstrings. Content providers can also manage binary data, such as image data. Whenbinary data is retrieved, the suggested best practice is to return a string representingthe filename that contains the binary data. If a filename is returned as part of aContentProvider query, the application shouldn’t access the file directly; you should
Testing SMSThe emulator has a built-in set of tools for manipulating certain telephony behaviorto simulate a variety of conditions, such as in-network and out-of-network coverageand placing phone calls.
To send an SMS message to the emulator, telnet to port 5554 (the port numbermight vary on your system), which will connect to the emulator, and issue the follow-ing command at the prompt:sms send <sender's phone number> <body of text message>
To learn more about available commands, type help at the prompt.
We’ll discuss these tools in more detail in chapter 2.
www.it-ebooks.info
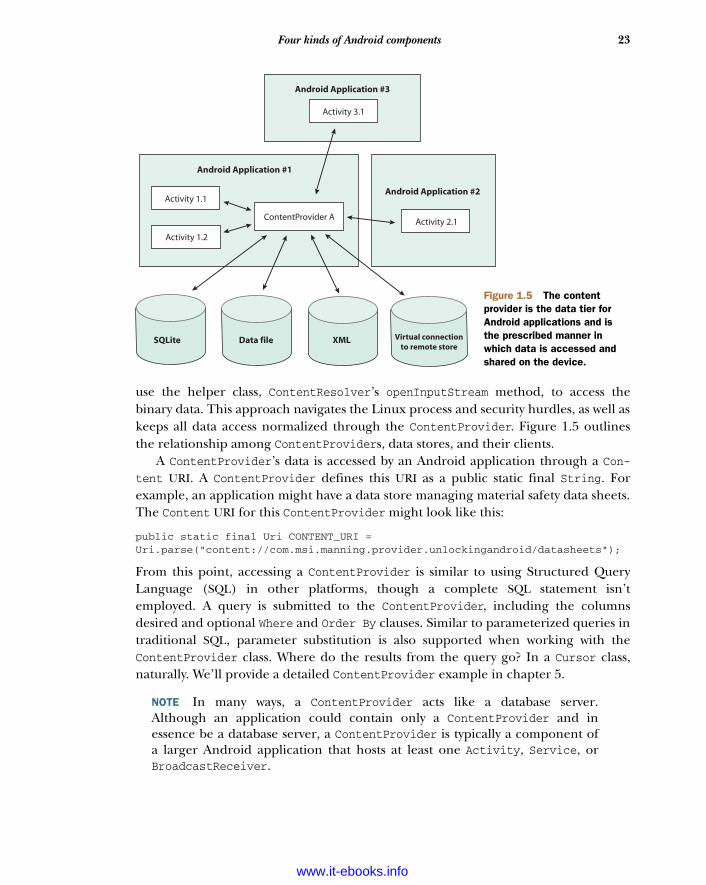
23Four kinds of Android components
use the helper class, ContentResolver’s openInputStream method, to access thebinary data. This approach navigates the Linux process and security hurdles, as well askeeps all data access normalized through the ContentProvider. Figure 1.5 outlinesthe relationship among ContentProviders, data stores, and their clients.
A ContentProvider’s data is accessed by an Android application through a Con-tent URI. A ContentProvider defines this URI as a public static final String. Forexample, an application might have a data store managing material safety data sheets.The Content URI for this ContentProvider might look like this:
public static final Uri CONTENT_URI = Uri.parse("content://com.msi.manning.provider.unlockingandroid/datasheets");
From this point, accessing a ContentProvider is similar to using Structured QueryLanguage (SQL) in other platforms, though a complete SQL statement isn’temployed. A query is submitted to the ContentProvider, including the columnsdesired and optional Where and Order By clauses. Similar to parameterized queries intraditional SQL, parameter substitution is also supported when working with theContentProvider class. Where do the results from the query go? In a Cursor class,naturally. We’ll provide a detailed ContentProvider example in chapter 5.
NOTE In many ways, a ContentProvider acts like a database server.Although an application could contain only a ContentProvider and inessence be a database server, a ContentProvider is typically a component ofa larger Android application that hosts at least one Activity, Service, orBroadcastReceiver.
Android Application #1
Activity 1.1
SQLite
Activity 1.2
Data file XML Virtual connectionto remote store
ContentProvider A
Android Application #3
Activity 3.1
Android Application #2
Activity 2.1
Figure 1.5 The content provider is the data tier for Android applications and is the prescribed manner in which data is accessed and shared on the device.
www.it-ebooks.info
24 CHAPTER 1 Introducing Android
This concludes our brief introduction to the major Android application classes. Gain-ing an understanding of these classes and how they work together is an importantaspect of Android development. Getting application components to work togethercan be a daunting task. For example, have you ever had a piece of software that justdidn’t work properly on your computer? Perhaps you copied it from another devel-oper or downloaded it from the internet and didn’t install it properly. Every softwareproject can encounter environment-related concerns, though they vary by platform.For example, when you’re connecting to a remote resource such as a database serveror FTP server, which username and password should you use? What about the librariesyou need to run your application? All these topics are related to software deployment.
Before we discuss anything else related to deployment or getting an Androidapplication to run, we need to discuss the Android file named AndroidManifest.xml,which ties together the necessary pieces to run an Android application on a device. Aone-to-one relationship exists between an Android application and its Android-Manifest.xml file.
1.6 Understanding the AndroidManifest.xml fileIn the preceding sections, we introduced the common elements of an Android appli-cation. A fundamental fact of Android development is that an Android applicationcontains at least one Activity, Service, BroadcastReceiver, or ContentProvider.Some of these elements advertise the Intents they’re interested in processing via theIntentFilter mechanism. All these pieces of information need to be tied togetherfor an Android application to execute. The glue mechanism for this task of definingrelationships is the AndroidManifest.xml file.
The AndroidManifest.xml file exists in the root of an application directory andcontains all the design-time relationships of a specific application and Intents.AndroidManfest.xml files act as deployment descriptors for Android applications. Thefollowing listing is an example of a simple AndroidManifest.xml file.
<?xml version="1.0" encoding="utf-8"?><manifest xmlns:android="http://schemas.android.com/apk/res/android" package="com.msi.manning.unlockingandroid"> <application android:icon="@drawable/icon"> <activity android:name=".Activity1" android:label="@string/app_name"> <intent-filter> <action android:name="android.intent.action.MAIN" /> <category android:name="android.intent.category.LAUNCHER" /> </intent-filter> </activity> </application></manifest>
Looking at this simple AndroidManifest.xml file, you see that the manifest elementcontains the obligatory namespace, as well as the Java package name containing thisapplication. This application contains a single Activity, with the class name
Listing 1.5 AndroidManifest.xml file for a basic Android application
www.it-ebooks.info

25Understanding the AndroidManifest.xml file
Activity1. Note also the @string syntax. Anytime an @ symbol is used in an AndroidMani-fest.xml file, it references information stored inone of the resource files. In this case, the labelattribute is obtained from the string resourceidentified as app_name. (We discuss resourcesin further detail later in chapter 3.) This appli-cation’s lone Activity contains a singleIntentFilter definition. The IntentFilterused here is the most common IntentFilterseen in Android applications. The actionandroid.intent.action.MAIN indicates thatthis is an entry point to the application. Thecategory android.intent.category.LAUNCHERplaces this Activity in the launcher window, asshown in figure 1.6. It’s possible to have multi-ple Activity elements in a manifest file (andthereby an application), with zero or more ofthem visible in the launcher window.
In addition to the elements used in the sam-ple manifest file shown in listing 1.5, othercommon tags are as follows:
The <service> tag represents a Service.The attributes of the <service> taginclude its class and label. A Servicemight also include the <intent-filter>tag.
The <receiver> tag represents aBroadcastReceiver, which might havean explicit <intent-filter> tag.
The <uses-permission> tag tells Android that this application requires certainsecurity privileges. For example, if an application requires access to the contactson a device, it requires the following tag in its AndroidManifest.xml file:<uses-permission android:name="android.permission.READ_CONTACTS" />
We’ll revisit the AndroidManifest.xml file a number of times throughout the bookbecause we need to add more details about certain elements and specific codingscenarios.
Now that you have a basic understanding of the Android application and theAndroidManifest.xml file, which describes its components, it’s time to discuss howand where an Android application executes. To do that, we need to talk about therelationship between an Android application and its Linux and Dalvik VM runtime.
Figure 1.6 Applications are listed in the launcher based on their IntentFilter. In this example, the application Where Do You Live is available in the LAUNCHER category.
www.it-ebooks.info
26 CHAPTER 1 Introducing Android
1.7 Mapping applications to processesAndroid applications each run in a single Linux process. Android relies on Linux forprocess management, and the application itself runs in an instance of the Dalvik VM.The OS might need to unload, or even kill, an application from time to time to accom-modate resource allocation demands. The system uses a hierarchy or sequence toselect the victim during a resource shortage. In general, the system follows these rules:
Visible, running activities have top priority. Visible, nonrunning activities are important, because they’re recently paused
and are likely to be resumed shortly. Running services are next in priority. The most likely candidates for termination are processes that are empty
(loaded perhaps for performance-caching purposes) or processes that havedormant Activitys.
Let’s apply some of what you’ve learned by building your first Android application.
1.8 Creating an Android applicationLet’s look at a simple Android application consisting of a single Activity, with oneView. The Activity collects data (a street address) and creates an Intent to find thisaddress. The Intent is ultimately dispatched to Google Maps. Figure 1.7 is a screenshot of the application running on the emulator. The name of the application isWhere Do You Live.
As we previously stated, the AndroidManifest.xml file contains the descriptors forthe application components of the application. This application contains a singleActivity named AWhereDoYouLive. The application’s AndroidManifest.xml file isshown in the following listing.
<?xml version="1.0" encoding="utf-8"?><manifest xmlns:android="http://schemas.android.com/apk/res/android" package="com.msi.manning.unlockingandroid"> <application android:icon="@drawable/icon"> <activity android:name=".AWhereDoYouLive"
Listing 1.6 AndroidManifest.xml for the Where Do You Live application
ps -aThe Linux environment is complete, including process management. You can launchand kill applications directly from the shell on the Android platform, but this is adeveloper’s debugging task, not something the average Android handset user islikely to carry out. It’s nice to have this option for troubleshooting application issues.It’s a relatively recent phenomenon to be able to touch the metal of a mobile phonein this way. For more in-depth exploration of the Linux foundations of Android, seechapter 13.
www.it-ebooks.info

27Creating an Android application
android:label="@string/app_name"> <intent-filter> <action android:name="android.intent.action.MAIN" /> <category android:name="android.intent.category.LAUNCHER" /> </intent-filter> </activity> </application><uses-permission android:name="android.permission.INTERNET" /></manifest>
The sole Activity is implemented in the file AWhereDoYouLive.java, shown in thefollowing listing.
package com.msi.manning.unlockingandroid;// imports omitted for brevitypublic class AWhereDoYouLive extends Activity { @Override public void onCreate(Bundle icicle) {
Listing 1.7 Implementing the Android Activity in AWhereDoYouLive.java
Figure 1.7 This Android application demonstrates a simple Activity and an Intent.
www.it-ebooks.info
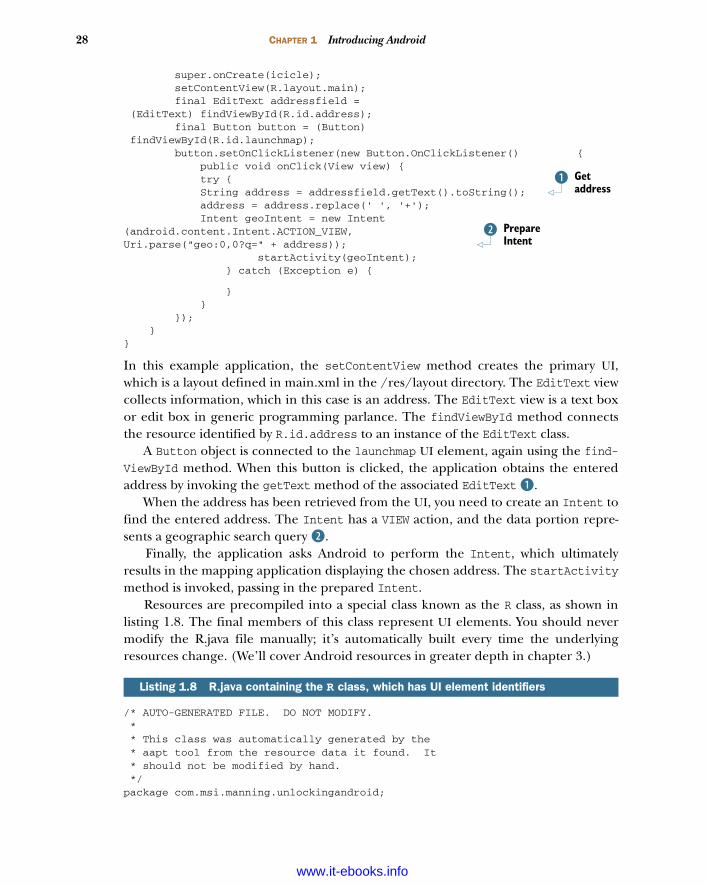
28 CHAPTER 1 Introducing Android
super.onCreate(icicle); setContentView(R.layout.main); final EditText addressfield = (EditText) findViewById(R.id.address); final Button button = (Button) findViewById(R.id.launchmap); button.setOnClickListener(new Button.OnClickListener() { public void onClick(View view) { try { String address = addressfield.getText().toString(); address = address.replace(' ', '+'); Intent geoIntent = new Intent(android.content.Intent.ACTION_VIEW,Uri.parse("geo:0,0?q=" + address)); startActivity(geoIntent); } catch (Exception e) {
} } }); }}
In this example application, the setContentView method creates the primary UI,which is a layout defined in main.xml in the /res/layout directory. The EditText viewcollects information, which in this case is an address. The EditText view is a text boxor edit box in generic programming parlance. The findViewById method connectsthe resource identified by R.id.address to an instance of the EditText class.
A Button object is connected to the launchmap UI element, again using the find-ViewById method. When this button is clicked, the application obtains the enteredaddress by invoking the getText method of the associated EditText B.
When the address has been retrieved from the UI, you need to create an Intent tofind the entered address. The Intent has a VIEW action, and the data portion repre-sents a geographic search query C.
Finally, the application asks Android to perform the Intent, which ultimatelyresults in the mapping application displaying the chosen address. The startActivitymethod is invoked, passing in the prepared Intent.
Resources are precompiled into a special class known as the R class, as shown inlisting 1.8. The final members of this class represent UI elements. You should nevermodify the R.java file manually; it’s automatically built every time the underlyingresources change. (We’ll cover Android resources in greater depth in chapter 3.)
/* AUTO-GENERATED FILE. DO NOT MODIFY. * * This class was automatically generated by the * aapt tool from the resource data it found. It * should not be modified by hand. */package com.msi.manning.unlockingandroid;
Listing 1.8 R.java containing the R class, which has UI element identifiers
B Get address
C Prepare Intent
www.it-ebooks.info
29Creating an Android application
public final class R { public static final class attr { } public static final class drawable { public static final int icon=0x7f020000; } public static final class id { public static final int address=0x7f050000; public static final int launchmap=0x7f050001; } public static final class layout { public static final int main=0x7f030000; } public static final class string { public static final int app_name=0x7f040000; }}
Figure 1.7 shows the sample application in action. Someone looked up the address ofthe White House; the result shows the White House pinpointed on the map.
The primary screen of this application is defined as a LinearLayout view, as shownin the following listing. It’s a single layout containing one label, one text-entry ele-ment, and one button control.
<?xml version="1.0" encoding="utf-8"?><LinearLayout xmlns:android="http://schemas.android.com/apk/res/android" android:orientation="vertical" android:layout_width="fill_parent" android:layout_height="fill_parent" ><TextView android:layout_width="wrap_content" android:layout_height="wrap_content" android:text="Please enter your home address." /><EditText android:id="@+id/address" android:layout_width="fill_parent" android:layout_height="wrap_content" android:autoText="true"/><Button android:id="@+id/launchmap" android:layout_width="wrap_content" android:layout_height="wrap_content" android:text="Show Map" /> <TextView android:layout_width="wrap_content" android:layout_height="wrap_content" android:text="Unlocking Android, Chapter 1." /></LinearLayout>
Listing 1.9 Main.xml defining the UI elements for the sample application
ID assignment for EditText
B
ID assignment for Button
C
www.it-ebooks.info
30 CHAPTER 1 Introducing Android
Note the use of the @ symbol in this resource’s id attribute B and C. This symbolcauses the appropriate entries to be made in the R class via the automatically gener-ated R.java file. These R class members are used in the calls to findViewById(), asshown in listing 1.7, to tie the UI elements to an instance of the appropriate class.
A strings file and icon round out the resources in this simple application. Thestrings.xml file for this application is shown in the following listing. This file is used tolocalize string content.
<?xml version="1.0" encoding="utf-8"?><resources> <string name="app_name">Where Do You Live</string></resources>
As you’ve seen, an Android application has a few moving pieces—though the compo-nents themselves are rather straightforward and easy to stitch together. As we progressthrough the book, we’ll introduce additional sample applications step-by-step as wecover each of the major elements of Android development activities.
1.9 Android 3.0 for tablets and smartphonesAndroid 3.0 was originally introduced for tablets. But what makes the tablet different?It’s the richer and more interactive application user experience that tablets provide. Thisuser experience is driven by the tablet’s form factor (larger screen), ease of handling,media-rich and graphical capabilities, content and application distribution support,computing power, and, as in the case of smartphones, connectivity, including offlinesupport.
This new form factor opens the door to new application verticals such as eHealth,where ease of use and privacy issues are of primary importance, and content mediadistribution where content protection via DRM will play an important role.
The tablet form factor also introduces new challenges to Android developers—challenges related to UI design and development considerations not found whendeveloping for smartphones. The larger form factor encourages touch interactionand navigation using one or both hands, and layout design that takes full advantage oflandscape versus portrait. And because tablets are now part of the mobile platformfamily, application compatibility and portability across smartphones and tablets is animportant consideration for mobile developers.
Android 3.0 isn’t limited to tablets and applies to smartphones as well, but on asmaller scale. Everything in this chapter also applies to smartphones, once Android3.0 is ported across the different platforms.
1.9.1 Why develop for Android tablets?
Mobile developers already have to deal with many different kinds of mobile platforms:iOS, mobile web, Android (and its different versions), BlackBerry, Windows Phone,
Listing 1.10 strings.xml
www.it-ebooks.info
31Android 3.0 for tablets and smartphones
Web OS, and so on. This can be overwhelming, so it’s important to focus on theplatforms that matter to you and your customers—in other words, the platforms withgreater return on investment.
The tablet space is not only growing, but is expected to be massive. Driven by iOSand Android tablets, a recent 2011 Yankee Report puts total tablet device sales in theUSA alone at $7 billion.2 Tablets will play a major role in both the consumer and enter-prise spaces. The opportunities for tablet application development seem endless.
According to Gartner, 17.6 million tablets were sold in 2010, and it anticipates asignificant increase with sales jumping to 69.5 million tablets in 2011. The firm’s ana-lysts anticipate in 2015 nearly 300 million devices could be sold.3
Tablets will be a predominate mobile platform that must be considered by anydeveloper who is serious about developing for mobile.
1.9.2 What’s new in the Android 3.0 Honeycomb platform?
The new Android 3.0 platform provides all the elements for tablet application devel-opment. Android 3.0 introduces a number of UI enhancements that improve overallapplication usage experience on tablets. These include a new holographic theme, anew global notification bar, an application-specific action bar, a redesigned keyboard,and text selection with cut/paste capabilities. New connectivity features for Bluetoothand USB are provided, as well as updates to a number of the standard applicationssuch as the browser, camera, and email. Because tablets are expected to play a majorrole in the Enterprise and businesses, new policy-management support has been intro-duced as well.
From the developer perspective, the changes introduced by Android 3.0 are exten-sive with additions and changes to many existing Java packages and three new Javapackages:
Animation (android.animation) Digital Rights Management (DRM, android.drm) High-performance 3D graphics (android.renderscript)
The changes to the other existing Java packages touch many aspects of the AndroidAPI layer, including the following:
Activitys and Fragments The Action bar Drag and drop Custom notifications Loaders Bluetooth
2 www.yankeegroup.com/ResearchDocument.do?id=553903 http://mng.bz/680r
www.it-ebooks.info

32 CHAPTER 1 Introducing Android
This book will cover the major aspects of tablet development using Android 3.0, start-ing with Activitys and Fragments. Although we’ll focus on tablets, note that GoogleTV is Android 3.1–based, meaning that most of the content covered here is also appli-cable to Google TV.
1.10 SummaryThis chapter introduced the Android platform and briefly touched on market posi-tioning, including what Android is up against in the rapidly changing and highly com-petitive mobile marketplace. In a few years, the Android SDK has been announced,released, and updated numerous times. And that’s just the software. Major devicemanufacturers have now signed on to the Android platform and have brought capa-ble devices to market, including a privately labeled device from Google itself. Add tothat the patent wars unfolding between the major mobile players, and the stakes con-tinue to rise—and Android’s future continues to brighten.
In this chapter, we examined the Android stack and discussed its relationship withLinux and Java. With Linux at its core, Android is a formidable platform, especiallyfor the mobile space where it’s initially targeted. Although Android development isdone in the Java programming language, the runtime is executed in the Dalvik VM, asan alternative to the Java VM from Oracle. Regardless of the VM, Java coding skills arean important aspect of Android development.
We also examined the Android SDK’s Intent class. The Intent is what makesAndroid tick. It’s responsible for how events flow and which code handles them. Itprovides a mechanism for delivering specific functionality to the platform, enablingthird-party developers to deliver innovative solutions and products for Android. Weintroduced all the main application classes of Activity, Service, ContentProvider,and BroadcastReceiver, with a simple code snippet example for each. Each of theseapplication classes use Intents in a slightly different manner, but the core facility ofusing Intents to control application behavior enables the innovative and flexibleAndroid environment. Intents and their relationship with these application classeswill be unpacked and unlocked as we progress through this book.
The AndroidManifest.xml descriptor file ties all the details together for anAndroid application. It includes all the information necessary for the application torun, what Intents it can handle, and what permissions the application requires.Throughout this book, the AndroidManifest.xml file will be a familiar companion aswe add and explain new elements.
Finally, this chapter provided a taste of Android application development with asimple example tying a simple UI, an Intent, and Google Maps into one seamless anduseful experience. This example is, of course, just scratching the surface of whatAndroid can do. The next chapter takes a deeper look into the Android SDK so thatyou can learn more about the toolbox we’ll use to unlock Android.
www.it-ebooks.info
Android’s developmentenvironment
Building upon the foundational information presented in the first chapter, we pickup the pace by introducing the Android development environment used to con-struct the applications in the balance of the book. If you haven’t installed the devel-opment tools, refer to appendix A for a step-by-step guide to downloading andinstalling the tools.
This chapter introduces the Android development tool chain and the softwaretools required to build Android applications, and serves as your hands-on guide tocreating, testing, and even debugging applications. When you’ve completed thischapter, you’ll be familiar with using Eclipse and the Android Development Tools(ADT) plug-in for Eclipse, navigating the Android SDK, running Android
This chapter covers Introducing the Android SDK
Exploring the development environment
Building an Android application in Eclipse
Debugging applications in the Android emulator
33
www.it-ebooks.info
34 CHAPTER 2 Android’s development environment
applications in the emulator, and stepping line-by-line through a sample applicationthat you’ll construct in this chapter: a simple tip calculator.
Android developers spend a significant amount of time working with the Androidemulator to debug their applications. This chapter goes into detail about creating andbuilding projects, defining Android virtual devices (emulators), setting up run config-urations, and running and debugging applications on an instance of the Androidemulator. If you’ve never constructed an Android application, please don’t skip thischapter; mastering the basics demonstrated here will aide your learning throughoutthe rest of the book.
When embracing a new platform, the first task for a developer is gaining an under-standing of the SDK and its components. Let’s start by examining the core compo-nents of the Android SDK and then transition into using the SDK’s tools to build anddebug an application.
2.1 Introducing the Android SDKThe Android SDK is a freely available download from the Android website. The firstthing you should do before going any further in this chapter is make sure you have theAndroid SDK installed, along with Eclipse and the Android plug-in for Eclipse, alsoknown as the Android Development Tools, or simply as the ADT. The Android SDK isrequired to build Android applications, and Eclipse is the preferred development envi-ronment for this book. You can download the Android SDK from http://developer.android.com/sdk/index.html.
TIP The Android download page has instructions for installing the SDK, oryou can refer to appendix A of this book for detailed information on install-ing the required development tools.
As in any development environment, becoming familiar with the class structures ishelpful, so having the documentation at hand as a reference is a good idea. TheAndroid SDK includes HTML-based documentation, which primarily consists ofJavadoc-formatted pages that describe the available packages and classes. TheAndroid SDK documentation is in the /doc directory under your SDK installation.Because of the rapidly changing nature of this platform, you might want to keep aneye out for any changes to the SDK. The most up-to-date Android SDK documentationis available at http://developer.android.com/reference/packages.html.
Android’s Java environment can be broken down into a handful of key sections.When you understand the contents in each of these sections, the Javadoc referencematerial that ships with the SDK becomes a real tool and not just a pile of seeminglyunrelated material. You might recall that Android isn’t a strictly Java ME software envi-ronment, but there’s some commonality between the Android platforms and otherJava development platforms. The next few sections review some of the Java packages(core and optional) in the Android SDK and where you can use them. The remainingchapters provide a deeper look into using many of these programming topics.
www.it-ebooks.info
35Introducing the Android SDK
2.1.1 Core Android packages
If you’ve ever developed in Java, you’ll recognize many familiar Java packages for corefunctionality. These packages provide basic computational support for things such asstring management, input/output controls, math, and more. The following list con-tains some of the Java packages included in the Android SDK:
java.lang—Core Java language classes java.io—Input/output capabilities java.net—Network connections java.text—Text-handling utilities java.math—Math and number-manipulation classes javax.net—Network classes javax.security—Security-related classes javax.xml—DOM-based XML classes org.apache.*—HTTP-related classes org.xml—SAX-based XML classes
Additional Java classes are also included. Generally speaking, this book won’t focusmuch on the core Java packages listed here, because our primary concern is Androiddevelopment. With that in mind, let’s look at the Android-specific functionality foundin the Android SDK.
Android-specific packages are easy to identify because they start with android inthe package name. Some of the more important packages are as follows:
android.app—Android application model access android.bluetooth—Android’s Bluetooth functionality android.content—Accessing and publishing data in Android android.net—Contains the Uri class, used for accessing content android.gesture—Creating, recognizing, loading, and saving gestures android.graphics—Graphics primitives android.location—Location-based services (such as GPS) android.opengl—OpenGL classes android.os—System-level access to the Android environment android.provider—ContentProvider-related classes android.telephony—Telephony capability access, including support for both
Code Division Multiple Access (CDMA) and Global System for Mobile commu-nication (GSM) devices
android.text—Text layout android.util—Collection of utilities for logging and text manipulation,
including XML
android.view—UI elements android.webkit—Browser functionality android.widget—More UI elements
www.it-ebooks.info

36 CHAPTER 2 Android’s development environment
Some of these packages are core to Android application development, includingandroid.app, android.view, and android.content. Other packages are used to vary-ing degrees, depending on the type of applications that you’re constructing.
2.1.2 Optional packages
Not every Android device has the same hardware and mobile connectivity capabilities,so you can consider some elements of the Android SDK as optional. Some devices sup-port these features, and others don’t. It’s important that an application degrade grace-fully if a feature isn’t available on a specific handset. Java packages that you should payspecial attention to include those that rely on specific, underlying hardware and net-work characteristics, such as location-based services (including GPS) and wireless tech-nologies such as Bluetooth and Wi-Fi (802.11).
This quick introduction to the Android SDK’s programming interfaces is justthat—quick and at-a-glance. Upcoming chapters go into the class libraries in furtherdetail, exercising specific classes as you learn about various topics such as UIs, graph-ics, location-based services, telephony, and more. For now, the focus is on the toolsrequired to compile and run (or build) Android applications.
Before you build an Android application, let’s examine how the Android SDK andits components fit into the Eclipse environment.
2.2 Exploring the development environmentAfter you install the Android SDK and the ADT plug-in for Eclipse, you’re ready toexplore the development environment. Figure 2.1 depicts the typical Android devel-opment environment, including both real hardware and the useful Android emulator.Although Eclipse isn’t the exclusive tool required for Android development, it canplay a big role in Android development, not only because it provides a rich Java com-pilation and debugging environment, but also because with the ADT plug-in, you canmanage and control virtually all aspects of testing your Android applications directlyfrom the Eclipse IDE.
The following list describes key features of the Eclipse environment as it pertainsto Android application development:
A rich Java development environment, including Java source compilation, classauto-completion, and integrated Javadoc
Source-level debugging AVD management and launch The Dalvik Debug Monitor Server (DDMS) Thread and heap views Emulator filesystem management Data and voice network control Emulator control System and application logging
Eclipse supports the concept of perspectives, where the layout of the screen has a set ofrelated windows and tools. The windows and tools included in an Eclipse perspective
www.it-ebooks.info

37Exploring the development environment
are known as views. When developing Androidapplications, there are two Eclipse perspectivesof primary interest: the Java perspective andthe DDMS perspective. Beyond those two, theDebug perspective is also available and usefulwhen you’re debugging an Android applica-tion; we’ll talk about the Debug perspective insection 2.5. To switch between the availableperspectives in Eclipse, use the Open Perspec-tive menu, under the Window menu in theEclipse IDE.
Let’s examine the features of the Java andDDMS perspectives and how you can leveragethem for Android development.
2.2.1 The Java perspective
The Java perspective is where you’ll spendmost of your time while developing Androidapplications. The Java perspective boasts anumber of convenient views for assisting in thedevelopment process. The Package Explorerview allows you to see the Java projects in yourEclipse workspace. Figure 2.2 shows the Pack-age Explorer listing some of the sample proj-ects for this book.
Eclipse open source IDE
Coding
Debugging
Android Development Tools (plug-in)
SDK
Emulator profile configuration
Emulator launch
Process & file system viewing
Log viewing
SDK documentation
File transfer tools
GSM simulation tester
Command-line tools
Multiple skins
Network connectivity options
Android emulator
Integrated with Eclipse viaAndroid Development Toolsplug-in
Physical phone hardware
Android device
Development environment (laptop)
Figure 2.1The development environment for building Android applications, including the popular open source Eclipse IDE
Figure 2.2 The Package Explorer allows you to browse the elements of your Android projects.
www.it-ebooks.info
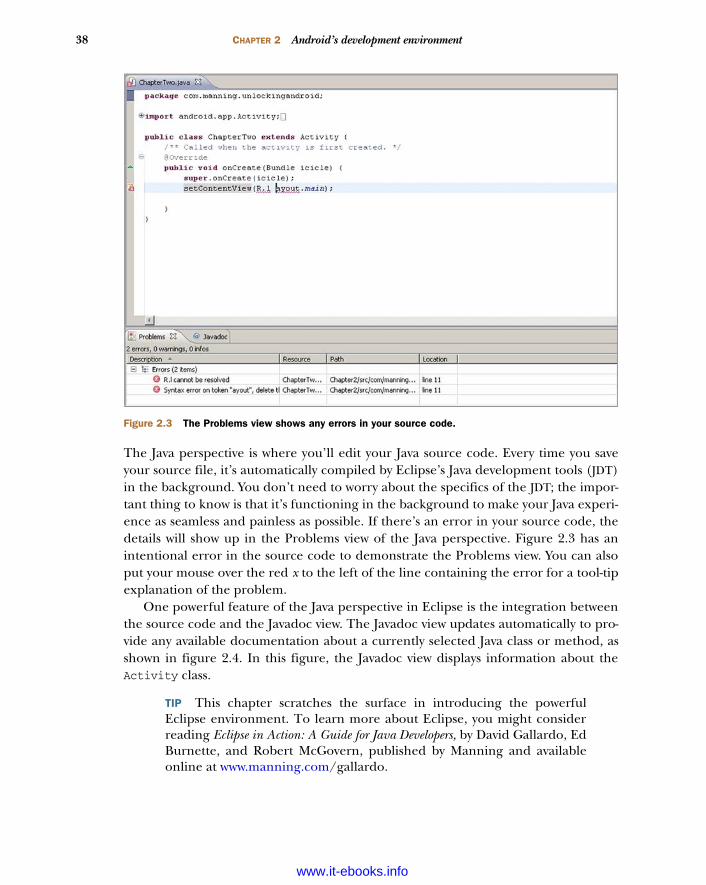
38 CHAPTER 2 Android’s development environment
The Java perspective is where you’ll edit your Java source code. Every time you saveyour source file, it’s automatically compiled by Eclipse’s Java development tools (JDT)in the background. You don’t need to worry about the specifics of the JDT; the impor-tant thing to know is that it’s functioning in the background to make your Java experi-ence as seamless and painless as possible. If there’s an error in your source code, thedetails will show up in the Problems view of the Java perspective. Figure 2.3 has anintentional error in the source code to demonstrate the Problems view. You can alsoput your mouse over the red x to the left of the line containing the error for a tool-tipexplanation of the problem.
One powerful feature of the Java perspective in Eclipse is the integration betweenthe source code and the Javadoc view. The Javadoc view updates automatically to pro-vide any available documentation about a currently selected Java class or method, asshown in figure 2.4. In this figure, the Javadoc view displays information about theActivity class.
TIP This chapter scratches the surface in introducing the powerfulEclipse environment. To learn more about Eclipse, you might considerreading Eclipse in Action: A Guide for Java Developers, by David Gallardo, EdBurnette, and Robert McGovern, published by Manning and availableonline at www.manning.com/gallardo.
Figure 2.3 The Problems view shows any errors in your source code.
www.it-ebooks.info

39Exploring the development environment
It’s easy to get the views in the current perspective into a layout that isn’t what youreally want. If this occurs, you have a couple of choices to restore the perspective to amore useful state. You can use the Show View menu under the Window menu to dis-play a specific view or you can select the Reset Perspective menu to restore the per-spective to its default settings.
In addition to the JDT, which compiles Java source files, the ADT automaticallycompiles Android-specific files such as layout and resource files. You’ll learn moreabout the underlying tools later in this chapter and again in chapter 3, but now it’stime to have a look at the Android-specific perspective in the DDMS.
2.2.2 The DDMS perspective
The DDMS perspective provides a dashboard-like view into the heart of a runningAndroid device or, in this example, a running Android emulator. Figure 2.5 shows theemulator running the chapter 2 sample application.
We’ll walk through the details of the application, including how to build the appli-cation and how to start it running in the Android emulator, but first let’s see whatthere is to learn from the DDMS with regard to our discussion about the tools availablefor Android development.
Figure 2.4 The Javadoc view provides context-sensitive documentation, in this case for the Activity class.
www.it-ebooks.info
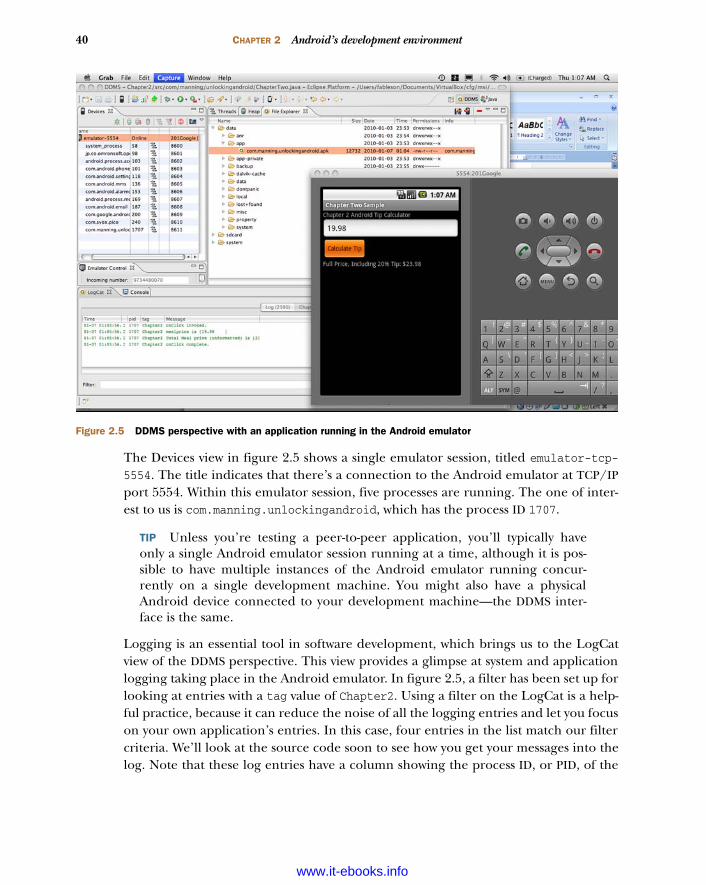
40 CHAPTER 2 Android’s development environment
The Devices view in figure 2.5 shows a single emulator session, titled emulator-tcp-5554. The title indicates that there’s a connection to the Android emulator at TCP/IPport 5554. Within this emulator session, five processes are running. The one of inter-est to us is com.manning.unlockingandroid, which has the process ID 1707.
TIP Unless you’re testing a peer-to-peer application, you’ll typically haveonly a single Android emulator session running at a time, although it is pos-sible to have multiple instances of the Android emulator running concur-rently on a single development machine. You might also have a physicalAndroid device connected to your development machine—the DDMS inter-face is the same.
Logging is an essential tool in software development, which brings us to the LogCatview of the DDMS perspective. This view provides a glimpse at system and applicationlogging taking place in the Android emulator. In figure 2.5, a filter has been set up forlooking at entries with a tag value of Chapter2. Using a filter on the LogCat is a help-ful practice, because it can reduce the noise of all the logging entries and let you focuson your own application’s entries. In this case, four entries in the list match our filtercriteria. We’ll look at the source code soon to see how you get your messages into thelog. Note that these log entries have a column showing the process ID, or PID, of the
Figure 2.5 DDMS perspective with an application running in the Android emulator
www.it-ebooks.info
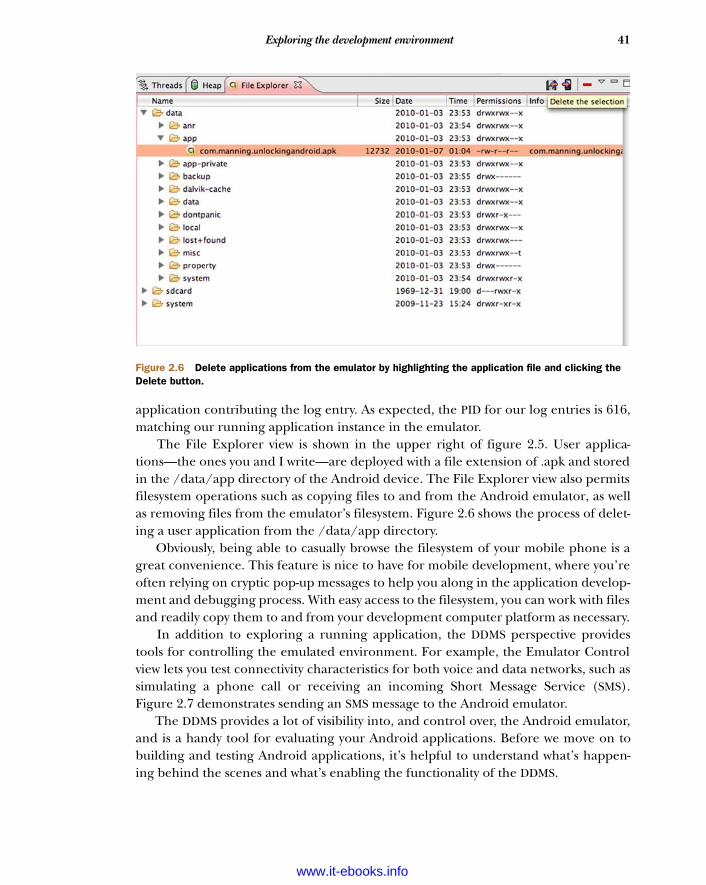
41Exploring the development environment
application contributing the log entry. As expected, the PID for our log entries is 616,matching our running application instance in the emulator.
The File Explorer view is shown in the upper right of figure 2.5. User applica-tions—the ones you and I write—are deployed with a file extension of .apk and storedin the /data/app directory of the Android device. The File Explorer view also permitsfilesystem operations such as copying files to and from the Android emulator, as wellas removing files from the emulator’s filesystem. Figure 2.6 shows the process of delet-ing a user application from the /data/app directory.
Obviously, being able to casually browse the filesystem of your mobile phone is agreat convenience. This feature is nice to have for mobile development, where you’reoften relying on cryptic pop-up messages to help you along in the application develop-ment and debugging process. With easy access to the filesystem, you can work with filesand readily copy them to and from your development computer platform as necessary.
In addition to exploring a running application, the DDMS perspective providestools for controlling the emulated environment. For example, the Emulator Controlview lets you test connectivity characteristics for both voice and data networks, such assimulating a phone call or receiving an incoming Short Message Service (SMS).Figure 2.7 demonstrates sending an SMS message to the Android emulator.
The DDMS provides a lot of visibility into, and control over, the Android emulator,and is a handy tool for evaluating your Android applications. Before we move on tobuilding and testing Android applications, it’s helpful to understand what’s happen-ing behind the scenes and what’s enabling the functionality of the DDMS.
Figure 2.6 Delete applications from the emulator by highlighting the application file and clicking the Delete button.
www.it-ebooks.info
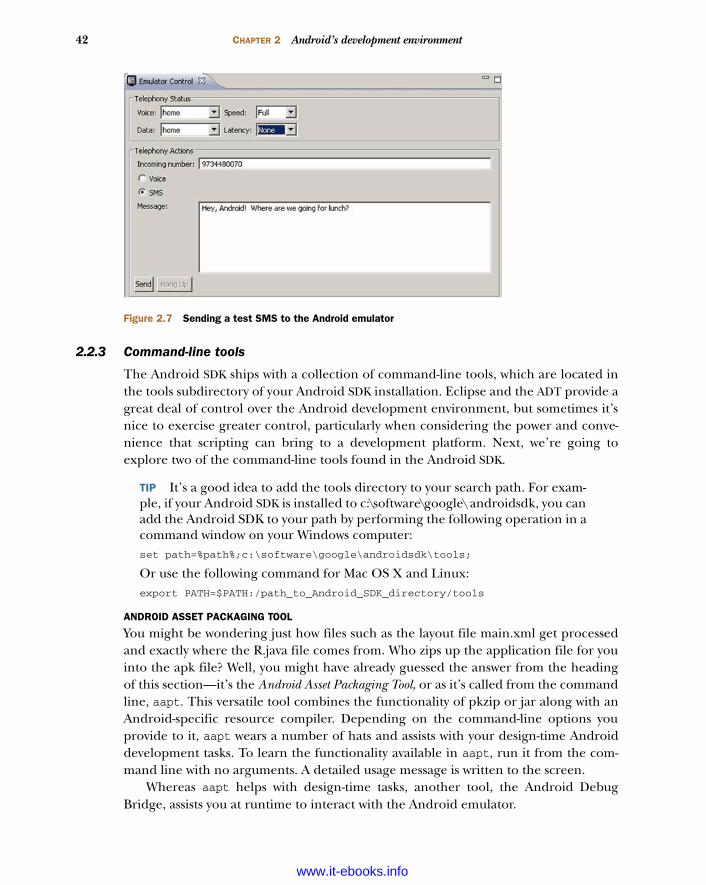
42 CHAPTER 2 Android’s development environment
2.2.3 Command-line tools
The Android SDK ships with a collection of command-line tools, which are located inthe tools subdirectory of your Android SDK installation. Eclipse and the ADT provide agreat deal of control over the Android development environment, but sometimes it’snice to exercise greater control, particularly when considering the power and conve-nience that scripting can bring to a development platform. Next, we’re going toexplore two of the command-line tools found in the Android SDK.
TIP It’s a good idea to add the tools directory to your search path. For exam-ple, if your Android SDK is installed to c:\software\google\ androidsdk, you canadd the Android SDK to your path by performing the following operation in acommand window on your Windows computer:set path=%path%;c:\software\google\androidsdk\tools;
Or use the following command for Mac OS X and Linux:export PATH=$PATH:/path_to_Android_SDK_directory/tools
ANDROID ASSET PACKAGING TOOL
You might be wondering just how files such as the layout file main.xml get processedand exactly where the R.java file comes from. Who zips up the application file for youinto the apk file? Well, you might have already guessed the answer from the headingof this section—it’s the Android Asset Packaging Tool, or as it’s called from the commandline, aapt. This versatile tool combines the functionality of pkzip or jar along with anAndroid-specific resource compiler. Depending on the command-line options youprovide to it, aapt wears a number of hats and assists with your design-time Androiddevelopment tasks. To learn the functionality available in aapt, run it from the com-mand line with no arguments. A detailed usage message is written to the screen.
Whereas aapt helps with design-time tasks, another tool, the Android DebugBridge, assists you at runtime to interact with the Android emulator.
Figure 2.7 Sending a test SMS to the Android emulator
www.it-ebooks.info

43Exploring the development environment
ANDROID DEBUG BRIDGE
The Android Debug Bridge (adb) utility permits you to interact with the Android emula-tor directly from the command line or script. Have you ever wished you could navigatethe filesystem on your smartphone? Now you can with adb! It works as a client/serverTCP-based application. Although a couple of background processes run on the devel-opment machine and the emulator to enable your functionality, the important thingto understand is that when you run adb, you get access to a running instance of theAndroid emulator. Here are a couple of examples of using adb. First, let’s look to see ifyou have any available Android emulator sessions running:
adb devices<return>
This command returns a list of available Android emulators; figure 2.8 demonstratesadb locating two running emulator sessions.
Let’s connect to the first Android emulator session and see if your application isinstalled. You connect to a device or emulator with the syntax adb shell. You wouldconnect this way if you had a single Android emulator session active, but because twoemulators are running, you need to specify the serial number, or identifier, to connectto the appropriate session:
adb –s "serialnumber" shell
Figure 2.9 shows off the Android filesystem and demonstrates looking for a specificinstalled application, namely the chapter2 sample application, which you’ll build insection 2.3.
Using the shell can be handy when you want to remove a specific file from theemulator’s filesystem, kill a process, or generally interact with the operating environ-ment of the Android emulator. If you download an application from the internet, forexample, you can use the adb command to install the application:
adb [-s serialnumber] shell install someapplication.apk
This command installs the application named someapplication to the Android emu-lator. The file is copied to the /data/app directory and is accessible from the Androidapplication launcher. Similarly, if you want to remove an application, you can run adbto remove an application from the Android emulator. If you want to remove the
Figure 2.8 The adb tool provides interaction at runtime with the Android emulator.
www.it-ebooks.info
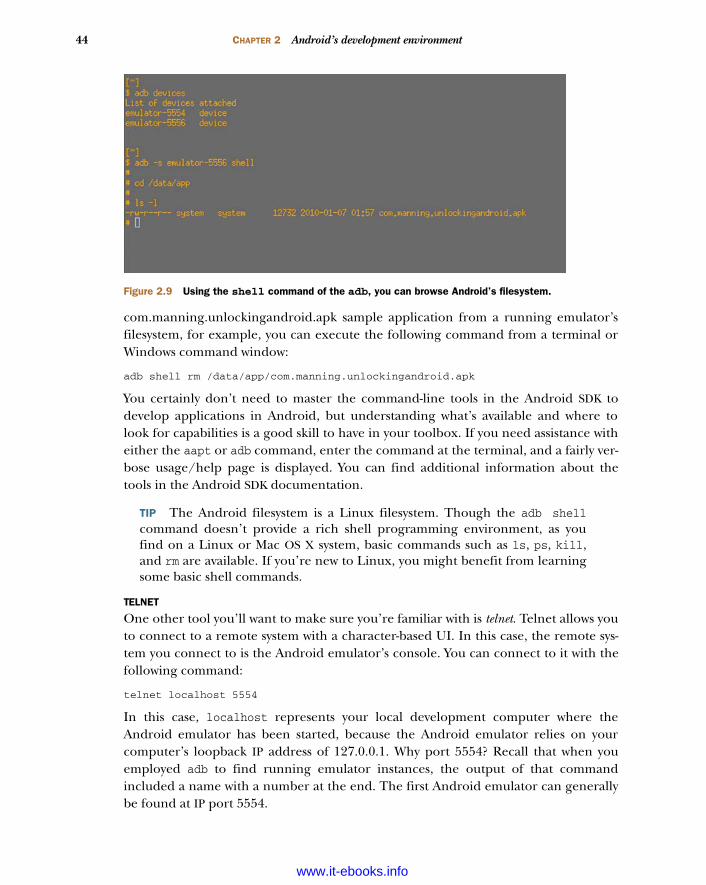
44 CHAPTER 2 Android’s development environment
com.manning.unlockingandroid.apk sample application from a running emulator’sfilesystem, for example, you can execute the following command from a terminal orWindows command window:
adb shell rm /data/app/com.manning.unlockingandroid.apk
You certainly don’t need to master the command-line tools in the Android SDK todevelop applications in Android, but understanding what’s available and where tolook for capabilities is a good skill to have in your toolbox. If you need assistance witheither the aapt or adb command, enter the command at the terminal, and a fairly ver-bose usage/help page is displayed. You can find additional information about thetools in the Android SDK documentation.
TIP The Android filesystem is a Linux filesystem. Though the adb shellcommand doesn’t provide a rich shell programming environment, as youfind on a Linux or Mac OS X system, basic commands such as ls, ps, kill,and rm are available. If you’re new to Linux, you might benefit from learningsome basic shell commands.
TELNET
One other tool you’ll want to make sure you’re familiar with is telnet. Telnet allows youto connect to a remote system with a character-based UI. In this case, the remote sys-tem you connect to is the Android emulator’s console. You can connect to it with thefollowing command:
telnet localhost 5554
In this case, localhost represents your local development computer where theAndroid emulator has been started, because the Android emulator relies on yourcomputer’s loopback IP address of 127.0.0.1. Why port 5554? Recall that when youemployed adb to find running emulator instances, the output of that commandincluded a name with a number at the end. The first Android emulator can generallybe found at IP port 5554.
Figure 2.9 Using the shell command of the adb, you can browse Android’s filesystem.
www.it-ebooks.info
45Building an Android application in Eclipse
NOTE In early versions of the Android SDK, the emulator ran at port 5555and the Android console—where you could connect via Telnet—ran at 5554,or one number less than the number shown in DDMS. If you’re having diffi-culty identifying which port number to connect on, be sure to run netstaton your development machine to assist in finding the port number. Note thata physical device listens at port 5037.
Using a telnet connection to the emulator provides a command-line means for config-uring the emulator while it’s running and for testing telephony features such as callsand text messages.
So far you’ve learned about the Eclipse environment and some of the command-line elements of the Android tool chain. At this point, it’s time to create your ownAndroid application to exercise this development environment.
2.3 Building an Android application in EclipseEclipse provides a comprehensive environment for Android developers to create appli-cations. In this section, we’ll demonstrate how to build a basic Android application,step by step. You’ll learn how to define a simple UI, provide code logic to support it,and create the deployment file used by all Android applications: AndroidManifest.xml.The goal in this section is to get a simple application under your belt. We’ll leave morecomplex applications for later chapters; our focus is on exercising the developmenttools and providing a concise yet complete reference.
Building an Android application isn’t much different from creating other types ofJava applications in the Eclipse IDE. It all starts with choosing File > New and selectingan Android application as the build target.
Like many development environments, Eclipse provides a wizard interface to easethe task of creating a new application. You’ll use the Android Project Wizard to get offto a quick start in building an Android application.
2.3.1 The Android Project Wizard
The most straightforward manner to create an Android application is to use theAndroid Project Wizard, which is part of the ADT plug-in. The wizard provides a sim-ple means to define the Eclipse project name and location, the Activity name corre-sponding to the main UI class, and a name for the application. Also of importance isthe Java package name under which the application is created. After you create anapplication, it’s easy to add new classes to the project.
NOTE In this example, you’ll create a brand-new project in the Eclipse work-space. You can use this same wizard to import source code from anotherdeveloper, such as the sample code for this book. Note also that the specificscreens have changed over time as the Android tools mature. If you’re follow-ing along and have a question about this chapter, be sure to post a questionon the Manning Author forum for this book, available online at http://manning.com/ableson3.
www.it-ebooks.info
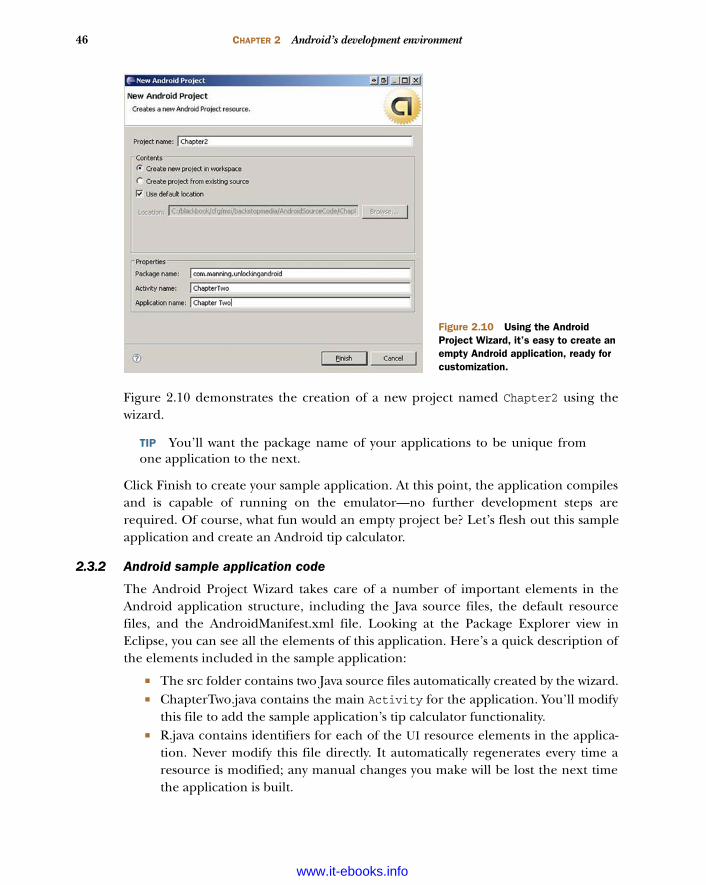
46 CHAPTER 2 Android’s development environment
Figure 2.10 demonstrates the creation of a new project named Chapter2 using thewizard.
TIP You’ll want the package name of your applications to be unique fromone application to the next.
Click Finish to create your sample application. At this point, the application compilesand is capable of running on the emulator—no further development steps arerequired. Of course, what fun would an empty project be? Let’s flesh out this sampleapplication and create an Android tip calculator.
2.3.2 Android sample application code
The Android Project Wizard takes care of a number of important elements in theAndroid application structure, including the Java source files, the default resourcefiles, and the AndroidManifest.xml file. Looking at the Package Explorer view inEclipse, you can see all the elements of this application. Here’s a quick description ofthe elements included in the sample application:
The src folder contains two Java source files automatically created by the wizard. ChapterTwo.java contains the main Activity for the application. You’ll modify
this file to add the sample application’s tip calculator functionality. R.java contains identifiers for each of the UI resource elements in the applica-
tion. Never modify this file directly. It automatically regenerates every time aresource is modified; any manual changes you make will be lost the next timethe application is built.
Figure 2.10 Using the Android Project Wizard, it’s easy to create an empty Android application, ready for customization.
www.it-ebooks.info
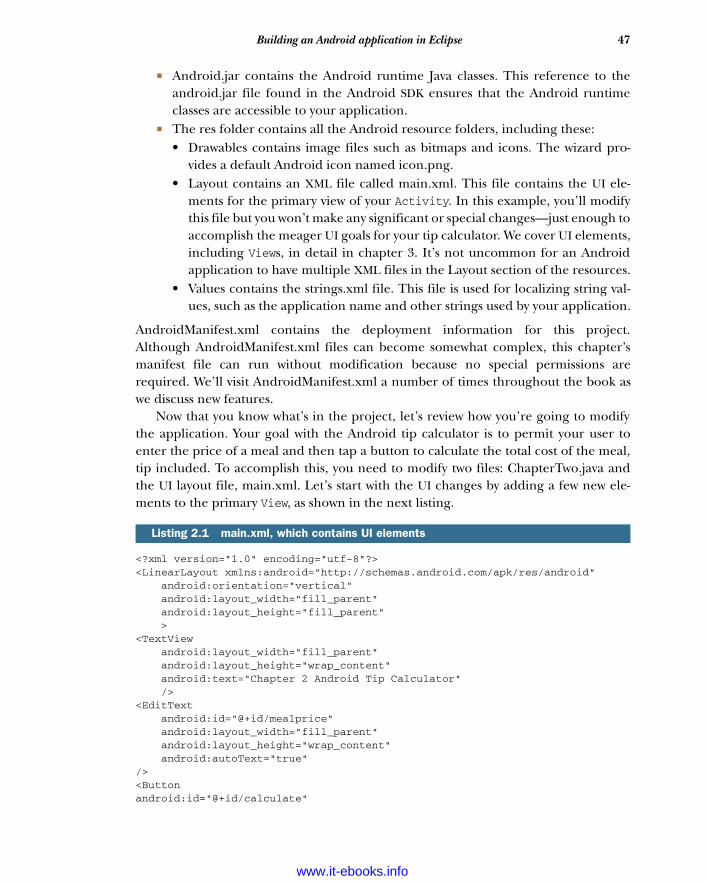
47Building an Android application in Eclipse
Android.jar contains the Android runtime Java classes. This reference to theandroid.jar file found in the Android SDK ensures that the Android runtimeclasses are accessible to your application.
The res folder contains all the Android resource folders, including these:• Drawables contains image files such as bitmaps and icons. The wizard pro-
vides a default Android icon named icon.png.• Layout contains an XML file called main.xml. This file contains the UI ele-
ments for the primary view of your Activity. In this example, you’ll modifythis file but you won’t make any significant or special changes—just enough toaccomplish the meager UI goals for your tip calculator. We cover UI elements,including Views, in detail in chapter 3. It’s not uncommon for an Androidapplication to have multiple XML files in the Layout section of the resources.
• Values contains the strings.xml file. This file is used for localizing string val-ues, such as the application name and other strings used by your application.
AndroidManifest.xml contains the deployment information for this project.Although AndroidManifest.xml files can become somewhat complex, this chapter’smanifest file can run without modification because no special permissions arerequired. We’ll visit AndroidManifest.xml a number of times throughout the book aswe discuss new features.
Now that you know what’s in the project, let’s review how you’re going to modifythe application. Your goal with the Android tip calculator is to permit your user toenter the price of a meal and then tap a button to calculate the total cost of the meal,tip included. To accomplish this, you need to modify two files: ChapterTwo.java andthe UI layout file, main.xml. Let’s start with the UI changes by adding a few new ele-ments to the primary View, as shown in the next listing.
<?xml version="1.0" encoding="utf-8"?><LinearLayout xmlns:android="http://schemas.android.com/apk/res/android" android:orientation="vertical" android:layout_width="fill_parent" android:layout_height="fill_parent" ><TextView android:layout_width="fill_parent" android:layout_height="wrap_content" android:text="Chapter 2 Android Tip Calculator" /><EditText android:id="@+id/mealprice" android:layout_width="fill_parent" android:layout_height="wrap_content" android:autoText="true"/><Buttonandroid:id="@+id/calculate"
Listing 2.1 main.xml, which contains UI elements
www.it-ebooks.info

48 CHAPTER 2 Android’s development environment
android:layout_width="wrap_content" android:layout_height="wrap_content" android:text="Calculate Tip" /> <TextView android:id="@+id/answer" android:layout_width="fill_parent" android:layout_height="wrap_content" android:text="" /> </LinearLayout>
The layout for this application is straightforward. The overall layout is a vertical, linearlayout with only four elements; all the UI controls, or widgets, are going to be in a verti-cal arrangement. A number of layouts are available for Android UI design, which we’lldiscuss in greater detail in chapter 3.
A static TextView displays the title of the application. An EditText collects theprice of the meal for this tip calculator application. The EditText element has anattribute of type android:id, with a value of mealprice. When a UI element containsthe android:id attribute, it permits you to manipulate this element from your code.When the project is built, each element defined in the layout file containing theandroid:id attribute receives a corresponding identifier in the automatically gener-ated R.java class file. This identifying value is used in the findViewById method,shown in listing 2.2. If a UI element is static, such as the TextView, and doesn’t need tobe set or read from our application code, the android:id attribute isn’t required.
A button named calculate is added to the view. Note that this element also hasan android:id attribute because you need to capture click events from this UI ele-ment. A TextView named answer is provided for displaying the total cost, includingtip. Again, this element has an id because you’ll need to update it during runtime.
When you save the file main.xml, it’s processed by the ADT plug-in, compiling theresources and generating an updated R.java file. Try it for yourself. Modify one of theid values in the main.xml file, save the file, and open R.java to have a look at the con-stants generated there. Remember not to modify the R.java file directly, because if youdo, all your changes will be lost! If you conduct this experiment, be sure to change thevalues back as they’re shown in listing 2.1 to make sure the rest of the project will com-pile as it should. Provided you haven’t introduced any syntactical errors into yourmain.xml file, your UI file is complete.
NOTE This example is simple, so we jumped right into the XML file to definethe UI elements. The ADT also contains an increasingly sophisticated GUI lay-out tool. With each release of the ADT, these tools have become more andmore usable; early versions were, well, early.
Double-click the main.xml file to launch the layout in a graphical form. At the bottomof the file you can switch between the Layout view and the XML view. Figure 2.11shows the Layout tool.
www.it-ebooks.info
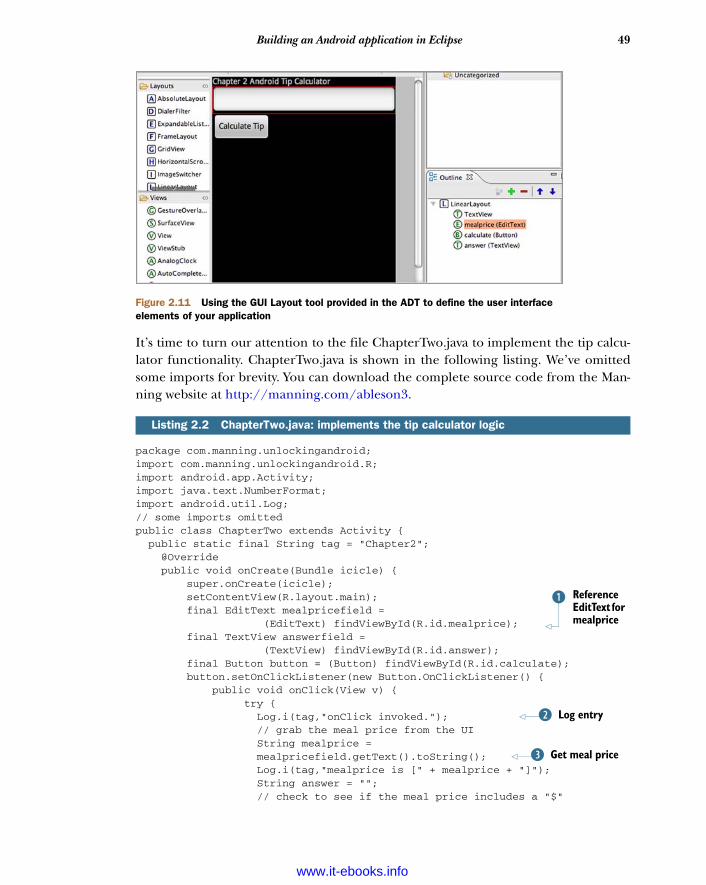
49Building an Android application in Eclipse
It’s time to turn our attention to the file ChapterTwo.java to implement the tip calcu-lator functionality. ChapterTwo.java is shown in the following listing. We’ve omittedsome imports for brevity. You can download the complete source code from the Man-ning website at http://manning.com/ableson3.
package com.manning.unlockingandroid;import com.manning.unlockingandroid.R;import android.app.Activity;import java.text.NumberFormat;import android.util.Log;// some imports omittedpublic class ChapterTwo extends Activity { public static final String tag = "Chapter2"; @Override public void onCreate(Bundle icicle) { super.onCreate(icicle); setContentView(R.layout.main); final EditText mealpricefield = (EditText) findViewById(R.id.mealprice); final TextView answerfield = (TextView) findViewById(R.id.answer); final Button button = (Button) findViewById(R.id.calculate); button.setOnClickListener(new Button.OnClickListener() { public void onClick(View v) { try { Log.i(tag,"onClick invoked."); // grab the meal price from the UI String mealprice = mealpricefield.getText().toString(); Log.i(tag,"mealprice is [" + mealprice + "]"); String answer = ""; // check to see if the meal price includes a "$"
Listing 2.2 ChapterTwo.java: implements the tip calculator logic
Figure 2.11 Using the GUI Layout tool provided in the ADT to define the user interface elements of your application
Reference EditText for mealprice
B
Log entryC
Get meal priceD
www.it-ebooks.info
50 CHAPTER 2 Android’s development environment
if (mealprice.indexOf("$") == -1) { mealprice = "$" + mealprice; } float fmp = 0.0F; // get currency formatter NumberFormat nf = java.text.NumberFormat.getCurrencyInstance(); // grab the input meal price fmp = nf.parse(mealprice).floatValue(); // let's give a nice tip -> 20% fmp *= 1.2; Log.i(tag,"Total Meal Price (unformatted) is [" + fmp + "]"); // format our result answer = "Full Price, Including 20% Tip: " + nf.format(fmp); answerfield.setText(answer); Log.i(tag,"onClick complete."); } catch (java.text.ParseException pe) { Log.i(tag,"Parse exception caught"); answerfield.setText("Failed to parse amount?"); } catch (Exception e) { Log.e(tag,"Failed to Calculate Tip:" + e.getMessage()); e.printStackTrace(); answerfield.setText(e.getMessage()); } } }); }}
Let’s examine this sample application. Like all but the most trivial Java applications,this class contains a statement identifying which package it belongs to: com.manning.unlockingandroid. This line containing the package name was generated by theProject Wizard.
You import the com.manning.unlockingandroid.R class to gain access to the defi-nitions used by the UI. This step isn’t required, because the R class is part of the sameapplication package, but it’s helpful to include this import because it makes your codeeasier to follow. Newcomers to Android always ask how the identifiers in the R class aregenerated. The short answer is that they’re generated automatically by the ADT! Alsonote that you’ll learn about some built-in UI elements in the R class later in the bookas part of sample applications.
Though a number of imports are necessary to resolve class names in use, most ofthe import statements have been omitted from listing 2.2 for the sake of brevity. Oneimport that’s shown contains the definition for the java.text.NumberFormat class,which is used to format and parse currency values.
Another import shown is for the android.util.Log class, which is employed tomake entries to the log. Calling static methods of the Log class adds entries to the log.You can view entries in the log via the LogCat view of the DDMS perspective. Whenmaking entries to the log, it’s helpful to put a consistent identifier on a group of
Display full price, including tip
E
Catch parse errorF
www.it-ebooks.info
51Building an Android application in Eclipse
related entries using a common string, commonly referred to as the tag. You can filteron this string value so you don’t have to sift through a mountain of LogCat entries tofind your few debugging or informational messages.
Now let’s go through the code in listing 2.2. You connect the UI element contain-ing mealprice to a class-level variable of type EditText B by calling the findView-ById() method and passing in the identifier for the mealprice, as defined by theautomatically generated R class, found in R.java. With this reference, you can accessthe user’s input and manipulate the meal price data as entered by the user. Similarly,you connect the UI element for displaying the calculated answer back to the user,again by calling the findViewById() method.
To know when to calculate the tip amount, you need to obtain a reference to theButton so you can add an event listener. You want to know when the button has beenclicked. You accomplish this by adding a new OnClickListener() method namedonClick.
When the onClick() method is invoked, you add the first of a few log entries usingthe static i() method of the Log class C. This method adds an entry to the log with anInformation classification. The Log class contains methods for adding entries to thelog for different levels, including Verbose, Debug, Information, Warning, and Error.You can also filter the LogCat based on these levels, in addition to filtering on the pro-cess ID and tag value.
Now that you have a reference to the mealprice UI element, you can obtain thetext entered by the user with the getText() method of the EditText class D. Inpreparation for formatting the full meal price, you obtain a reference to the staticcurrency formatter.
Let’s be somewhat generous and offer a 20 percent tip. Then, using the formatter,let’s format the full meal cost, including tip. Next, using the setText() method of theTextView UI element named answerfield, you update the UI to tell the user the totalmeal cost E.
Because this code might have a problem with improperly formatted data, it’s agood practice to put code logic into try/catch blocks so that the application behaveswhen the unexpected occurs f.
Additional boilerplate files are in this sample project, but in this chapter we’reconcerned only with modifying the application enough to get basic, custom function-ality working. You’ll notice that as soon as you save your source files, the Eclipse IDEcompiles the project in the background. If there are any errors, they’re listed in theProblems view of the Java perspective; they’re also marked in the left margin with asmall red x to draw your attention to them.
TIP Using the command-line tools found in the Android SDK, you cancreate batch builds of your applications without using the IDE. This approachis useful for software shops with a specific configuration-managementfunction and a desire to conduct automated builds. In addition to theAndroid-specific build tools found under the tools subdirectory of your
www.it-ebooks.info
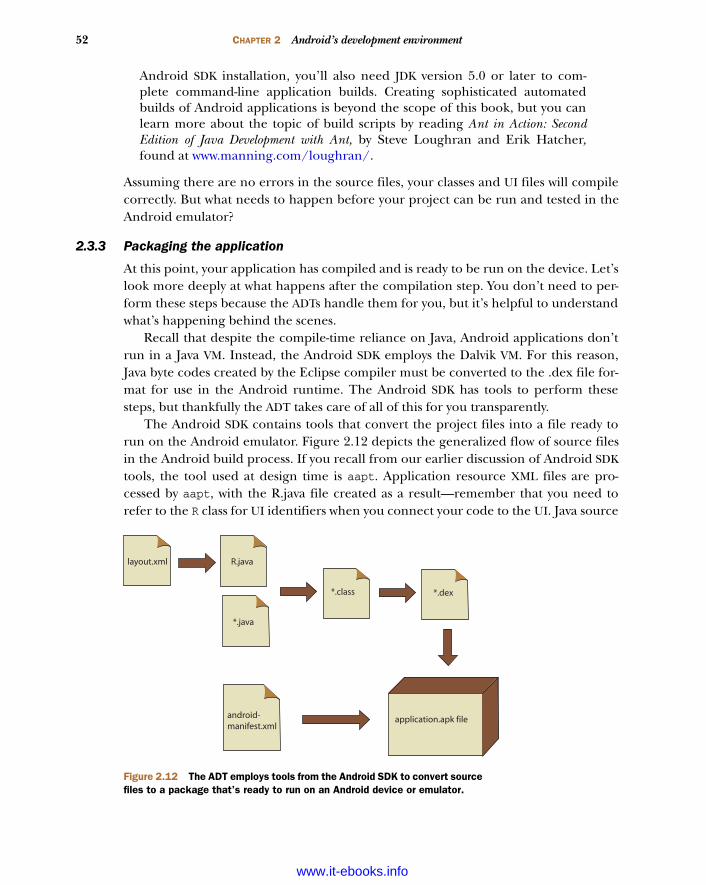
52 CHAPTER 2 Android’s development environment
Android SDK installation, you’ll also need JDK version 5.0 or later to com-plete command-line application builds. Creating sophisticated automatedbuilds of Android applications is beyond the scope of this book, but you canlearn more about the topic of build scripts by reading Ant in Action: SecondEdition of Java Development with Ant, by Steve Loughran and Erik Hatcher,found at www.manning.com/loughran/.
Assuming there are no errors in the source files, your classes and UI files will compilecorrectly. But what needs to happen before your project can be run and tested in theAndroid emulator?
2.3.3 Packaging the application
At this point, your application has compiled and is ready to be run on the device. Let’slook more deeply at what happens after the compilation step. You don’t need to per-form these steps because the ADTs handle them for you, but it’s helpful to understandwhat’s happening behind the scenes.
Recall that despite the compile-time reliance on Java, Android applications don’trun in a Java VM. Instead, the Android SDK employs the Dalvik VM. For this reason,Java byte codes created by the Eclipse compiler must be converted to the .dex file for-mat for use in the Android runtime. The Android SDK has tools to perform thesesteps, but thankfully the ADT takes care of all of this for you transparently.
The Android SDK contains tools that convert the project files into a file ready torun on the Android emulator. Figure 2.12 depicts the generalized flow of source filesin the Android build process. If you recall from our earlier discussion of Android SDKtools, the tool used at design time is aapt. Application resource XML files are pro-cessed by aapt, with the R.java file created as a result—remember that you need torefer to the R class for UI identifiers when you connect your code to the UI. Java source
layout.xml R.java
*.java
*.class *.dex
application.apk fileandroid-manifest.xml
Figure 2.12 The ADT employs tools from the Android SDK to convert source files to a package that’s ready to run on an Android device or emulator.
www.it-ebooks.info
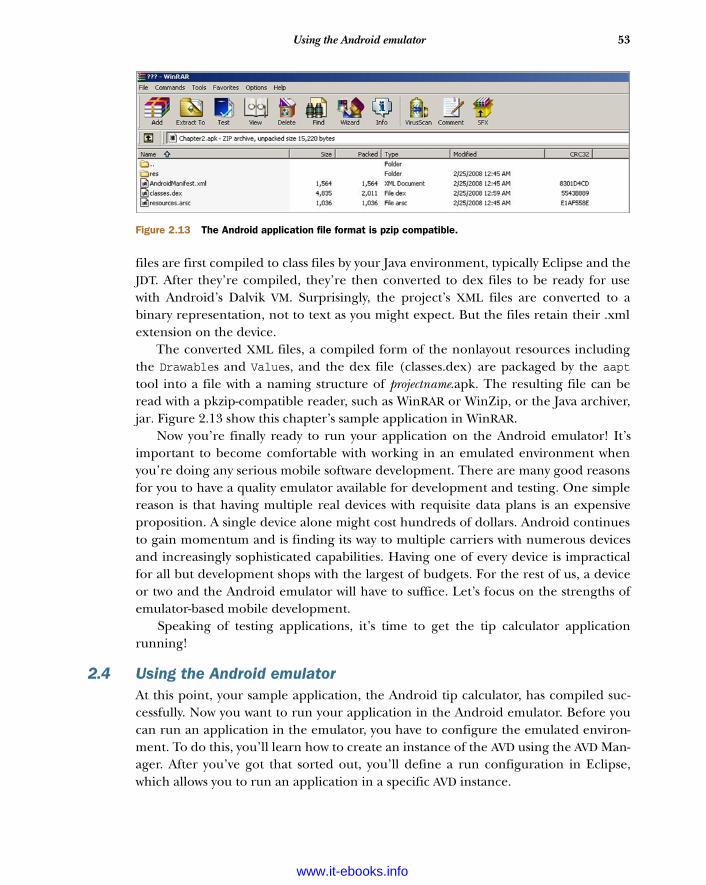
53Using the Android emulator
files are first compiled to class files by your Java environment, typically Eclipse and theJDT. After they’re compiled, they’re then converted to dex files to be ready for usewith Android’s Dalvik VM. Surprisingly, the project’s XML files are converted to abinary representation, not to text as you might expect. But the files retain their .xmlextension on the device.
The converted XML files, a compiled form of the nonlayout resources includingthe Drawables and Values, and the dex file (classes.dex) are packaged by the aapttool into a file with a naming structure of projectname.apk. The resulting file can beread with a pkzip-compatible reader, such as WinRAR or WinZip, or the Java archiver,jar. Figure 2.13 show this chapter’s sample application in WinRAR.
Now you’re finally ready to run your application on the Android emulator! It’simportant to become comfortable with working in an emulated environment whenyou’re doing any serious mobile software development. There are many good reasonsfor you to have a quality emulator available for development and testing. One simplereason is that having multiple real devices with requisite data plans is an expensiveproposition. A single device alone might cost hundreds of dollars. Android continuesto gain momentum and is finding its way to multiple carriers with numerous devicesand increasingly sophisticated capabilities. Having one of every device is impracticalfor all but development shops with the largest of budgets. For the rest of us, a deviceor two and the Android emulator will have to suffice. Let’s focus on the strengths ofemulator-based mobile development.
Speaking of testing applications, it’s time to get the tip calculator applicationrunning!
2.4 Using the Android emulatorAt this point, your sample application, the Android tip calculator, has compiled suc-cessfully. Now you want to run your application in the Android emulator. Before youcan run an application in the emulator, you have to configure the emulated environ-ment. To do this, you’ll learn how to create an instance of the AVD using the AVD Man-ager. After you’ve got that sorted out, you’ll define a run configuration in Eclipse,which allows you to run an application in a specific AVD instance.
Figure 2.13 The Android application file format is pzip compatible.
www.it-ebooks.info
54 CHAPTER 2 Android’s development environment
TIP If you’ve had any trouble building the sample application, now would bea good time to go back and clear up any syntax errors that are preventing theapplication from building. In Eclipse, you can easily see errors becausethey’re marked with a red x next to the project source file and on the offend-ing lines. If you continue to have errors, make sure that your build environ-ment is set up correctly. Refer to appendix A of this book for details onconfiguring the build environment.
2.4.1 Setting up the emulated environment
Setting up your emulator environment can be broken down into two logical steps.The first is to create an instance of the AVD via the AVD Manager. The second is todefine a run configuration in Eclipse, which permits you to run your application in aspecific AVD instance. Let’s start with the AVD Manager.
MANAGING AVDS
Starting with version 1.6 of the Android SDK, developers have a greater degree of con-trol over the emulated Android environment than in previous releases. The SDK andAVD Manager permit developers to download the specific platforms of interest. Forexample, you might be targeting devices running version 1.5 and 2.2 of the Androidplatform, but you might want to add to that list as new versions become available. Fig-ure 2.14 shows the SDK and AVD Manager with a few packages installed.
Emulator vs. simulatorYou might hear the words emulator and simulator thrown about interchangeably.Although they have a similar purpose—testing applications without the requirementof real hardware—those words should be used with care.
A simulator tool works by creating a testing environment that behaves as close to100 percent in the same manner as the real environment, but it’s just an approxima-tion of the real platform. This doesn’t mean that the code targeted for a simulator willrun on a real device, because it’s compatible only at the source-code level. Simulatorcode is often written to be run as a software program running on a desktop computerwith Windows DLLs or Linux libraries that mimic the application programming inter-faces (APIs) available on the real device. In the build environment, you typically selectthe CPU type for a target, and that’s often x86/Simulator.
In an emulated environment, the target of your projects is compatible at the binarylevel. The code you write works on an emulator as well as the real device. Of course,some aspects of the environment differ in terms of how certain functions are imple-mented on an emulator. For example, a network connection on an emulator runsthrough your development machine’s network interface card, whereas the networkconnection on a real phone runs over the wireless connection such as a GPRS, EDGE,or EVDO network. Emulators are preferred because they more reliably prepare you torun your code on real devices. Fortunately, the environment available to Androiddevelopers is an emulator, not a simulator.
www.it-ebooks.info
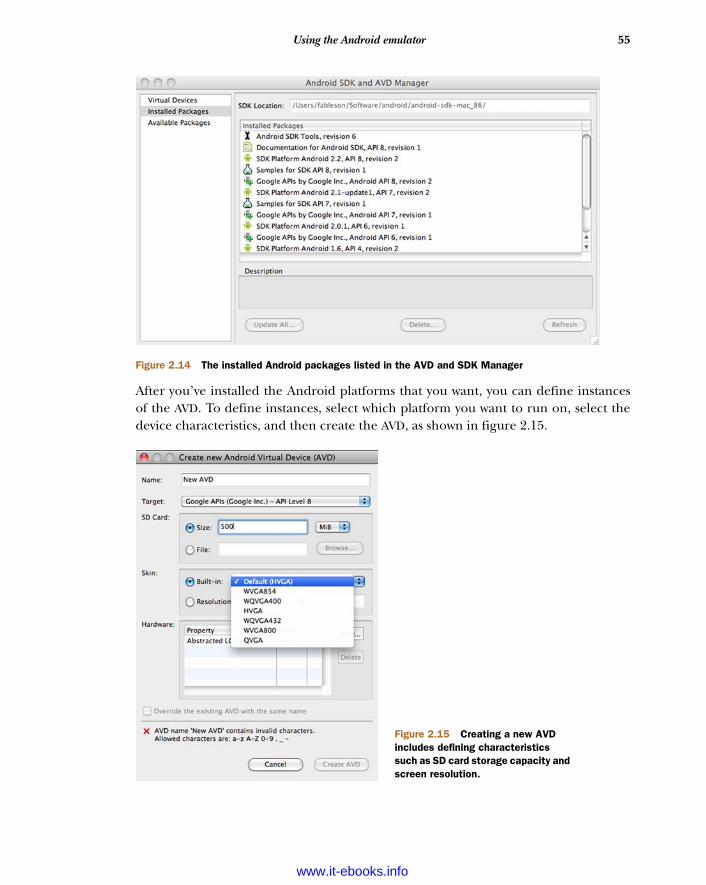
55Using the Android emulator
After you’ve installed the Android platforms that you want, you can define instancesof the AVD. To define instances, select which platform you want to run on, select thedevice characteristics, and then create the AVD, as shown in figure 2.15.
Figure 2.14 The installed Android packages listed in the AVD and SDK Manager
Figure 2.15 Creating a new AVD includes defining characteristics such as SD card storage capacity and screen resolution.
www.it-ebooks.info
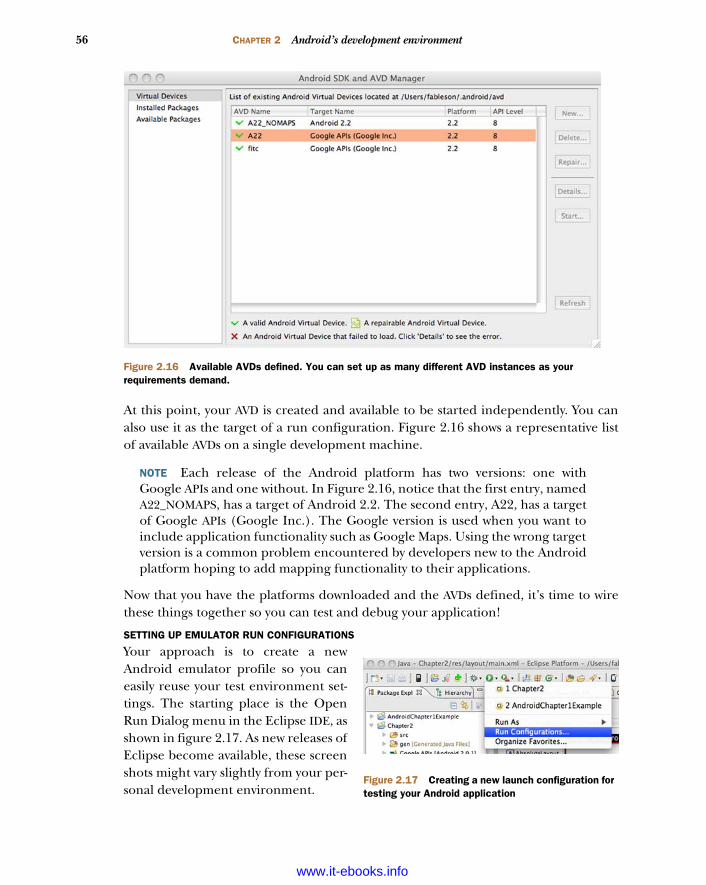
56 CHAPTER 2 Android’s development environment
At this point, your AVD is created and available to be started independently. You canalso use it as the target of a run configuration. Figure 2.16 shows a representative listof available AVDs on a single development machine.
NOTE Each release of the Android platform has two versions: one withGoogle APIs and one without. In Figure 2.16, notice that the first entry, namedA22_NOMAPS, has a target of Android 2.2. The second entry, A22, has a targetof Google APIs (Google Inc.). The Google version is used when you want toinclude application functionality such as Google Maps. Using the wrong targetversion is a common problem encountered by developers new to the Androidplatform hoping to add mapping functionality to their applications.
Now that you have the platforms downloaded and the AVDs defined, it’s time to wirethese things together so you can test and debug your application!
SETTING UP EMULATOR RUN CONFIGURATIONS
Your approach is to create a newAndroid emulator profile so you caneasily reuse your test environment set-tings. The starting place is the OpenRun Dialog menu in the Eclipse IDE, asshown in figure 2.17. As new releases ofEclipse become available, these screenshots might vary slightly from your per-sonal development environment.
Figure 2.16 Available AVDs defined. You can set up as many different AVD instances as your requirements demand.
Figure 2.17 Creating a new launch configuration for testing your Android application
www.it-ebooks.info
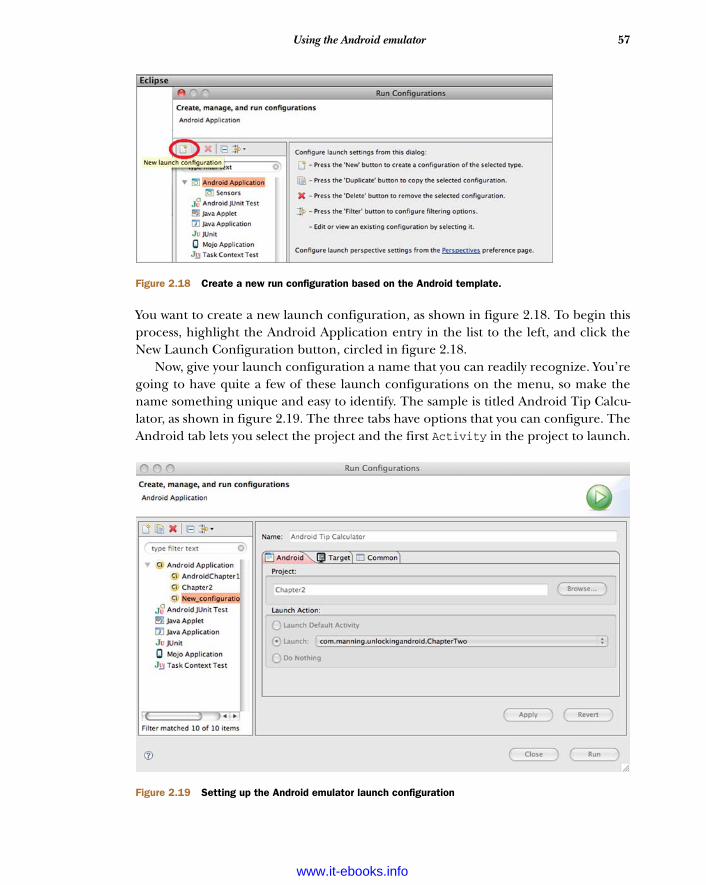
57Using the Android emulator
You want to create a new launch configuration, as shown in figure 2.18. To begin thisprocess, highlight the Android Application entry in the list to the left, and click theNew Launch Configuration button, circled in figure 2.18.
Now, give your launch configuration a name that you can readily recognize. You’regoing to have quite a few of these launch configurations on the menu, so make thename something unique and easy to identify. The sample is titled Android Tip Calcu-lator, as shown in figure 2.19. The three tabs have options that you can configure. TheAndroid tab lets you select the project and the first Activity in the project to launch.
Figure 2.18 Create a new run configuration based on the Android template.
Figure 2.19 Setting up the Android emulator launch configuration
www.it-ebooks.info

58 CHAPTER 2 Android’s development environment
Use the next tab to select the AVD and network characteristics that you want, as shownin figure 2.20. Additionally, command-line parameters might be passed to the emula-tor to customize its behavior. For example, you might want to add the parameterwipe-data to erase the device’s persistent storage prior to running your applicationeach time the emulator is launched. To see the available command-line options avail-able, run the Android emulator from a command or terminal window with the optionemulator –help.
Use the third tab to put this configuration on the Favorites menu in the EclipseIDE for easy access, as shown in figure 2.21. You can select Run, Debug, or both. Let’schoose both for this example, because it makes for easier launching when you want totest or debug the application.
Now that you’ve defined your AVD and created a run configuration in Eclipse, youcan test your application in the Android emulator environment.
2.4.2 Testing your application in the emulator
You’re finally ready to start the Android emulator to test your tip calculator applica-tion. Select the new launch configuration from the Favorites menu, as shown infigure 2.22.
If the AVD that you choose is already running, the ADT attempts to install the appli-cation directly; otherwise, the ADT must first start the AVD and then install the applica-tion. If the application was already running, it’s terminated and the new versionreplaces the existing copy within the Android storage system.
Figure 2.20 Selecting the AVD to host the application and specify launch parameters
www.it-ebooks.info

59Debugging your application
At this point, the Android tip calculator should be running in the Android emulator!Go ahead; test it! But wait, what if there’s a problem with the code but you’re not surewhere? It’s time to briefly look at debugging an Android application.
2.5 Debugging your applicationDebugging an application is a skill no pro-grammer can survive without. Fortunately,debugging an Android application is straight-forward under Eclipse. The first step to takeis to switch to the Debug perspective in theEclipse IDE. Remember, you switch from oneperspective to another by using the OpenPerspective submenu found under the Win-dow menu.
Figure 2.21 Adding the run configuration to the toolbar menu
Figure 2.22 Starting this chapter’s sample application, an Android tip calculator
www.it-ebooks.info

60 CHAPTER 2 Android’s development environment
Starting an Android application for debugging is as simple as running the application.Instead of selecting the application from the Favorites Run menu, use the FavoritesDebug menu instead. This menu item has a picture of an insect (that is, a bug).Remember, when you set up the launch configuration, you added this configurationto both the Run and the Favorites Debug menus.
The Debug perspective gives you debugging capabilities similar to other develop-ment environments, including the ability to single-step into, or over, method calls,and to peer into variables to examine their value. You can set breakpoints by double-clicking in the left margin on the line of interest. Figure 2.23 shows how to stepthrough the Android tip calculator project. The figure also shows the resulting valuesdisplayed in the LogCat view. Note that the full meal price, including tip, isn’t dis-played on the Android emulator yet, because that line hasn’t yet been reached.
Now that we’ve gone through the complete cycle of building an Androidapplication and you have a good foundational understanding of using the AndroidADT, you’re ready to move on to digging in and unlocking Android application devel-opment by learning about each of the fundamental aspects of building Androidapplications.
Figure 2.23 The Debug perspective permits you to step line-by-line through an Android application.
www.it-ebooks.info
61Summary
2.6 SummaryThis chapter introduced the Android SDK and offered a glance at the Android SDK’sJava packages to get you familiar with the contents of the SDK from a class library per-spective. We introduced the key development tools for Android application develop-ment, including the Eclipse IDE and the ADT plug-in, as well as some of the behind-the-scenes tools available in the SDK.
While you were building the Android tip calculator, this chapter’s sample applica-tion, you had the opportunity to navigate between the relevant perspectives in theEclipse IDE. You used the Java perspective to develop your application, and both theDDMS perspective and the Debug perspective to interact with the Android emulatorwhile your application was running. A working knowledge of the Eclipse IDE’s per-spectives will be helpful as you progress to build the sample applications and study thedevelopment topics in the remainder of this book.
We discussed the Android emulator and some of its fundamental permutationsand characteristics. Employing the Android emulator is a good practice because ofthe benefits of using emulation for testing and validating mobile software applicationsin a consistent and cost-effective manner.
From here, the book moves on to dive deeper into the core elements of theAndroid SDK and Android application development. The next chapter continues thisjourney with a discussion of the fundamentals of the Android UI.
www.it-ebooks.info

Part 2
Exercisingthe Android SDK
The Android SDK provides a rich set of functionality, enabling developers tocreate a wide range of applications. In part 2 we systematically examine themajor portions of the Android SDK, including practical examples in each chap-ter. We start with a look at the application lifecycle and user interfaces (chapter3), graduating to Intents and Services (chapter 4). No platform discussion iscomplete without a thorough examination of the available persistence and stor-age methods (chapter 5), and in today’s connected world, we can’t overlookcore networking and web services skills (chapter 6). Because the Android plat-form is a telephone, among other things, we look at the telephony capabilities ofthe platform (chapter 7). Next we move on to notifications and alarms (chapter8). Android graphics and animation are covered (chapter 9) as well as multime-dia (chapter 10). Part 2 concludes with a look at the location-based services avail-able to the Android developer (chapter 11).
www.it-ebooks.info
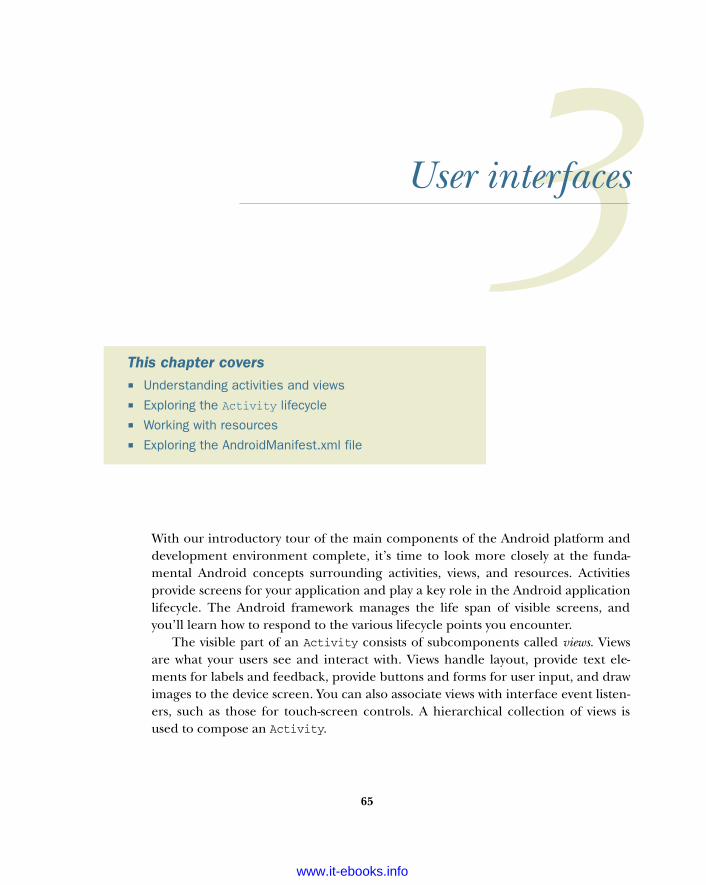
User interfaces
With our introductory tour of the main components of the Android platform anddevelopment environment complete, it’s time to look more closely at the funda-mental Android concepts surrounding activities, views, and resources. Activitiesprovide screens for your application and play a key role in the Android applicationlifecycle. The Android framework manages the life span of visible screens, andyou’ll learn how to respond to the various lifecycle points you encounter.
The visible part of an Activity consists of subcomponents called views. Viewsare what your users see and interact with. Views handle layout, provide text ele-ments for labels and feedback, provide buttons and forms for user input, and drawimages to the device screen. You can also associate views with interface event listen-ers, such as those for touch-screen controls. A hierarchical collection of views isused to compose an Activity.
This chapter covers Understanding activities and views
Exploring the Activity lifecycle
Working with resources
Exploring the AndroidManifest.xml file
65
www.it-ebooks.info
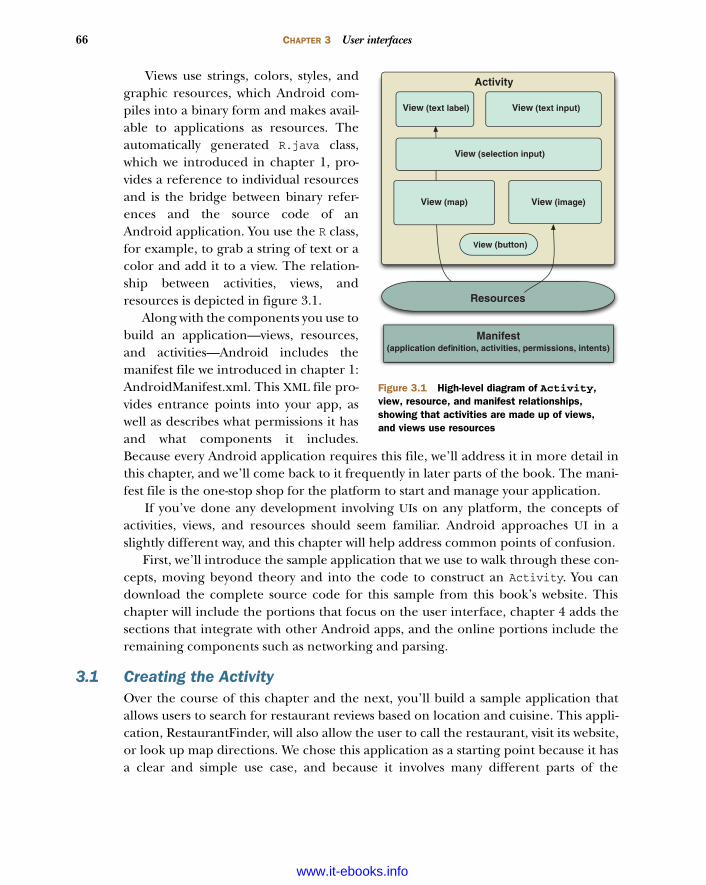
66 CHAPTER 3 User interfaces
Views use strings, colors, styles, andgraphic resources, which Android com-piles into a binary form and makes avail-able to applications as resources. Theautomatically generated R.java class,which we introduced in chapter 1, pro-vides a reference to individual resourcesand is the bridge between binary refer-ences and the source code of anAndroid application. You use the R class,for example, to grab a string of text or acolor and add it to a view. The relation-ship between activities, views, andresources is depicted in figure 3.1.
Along with the components you use tobuild an application—views, resources,and activities—Android includes themanifest file we introduced in chapter 1:AndroidManifest.xml. This XML file pro-vides entrance points into your app, aswell as describes what permissions it hasand what components it includes.Because every Android application requires this file, we’ll address it in more detail inthis chapter, and we’ll come back to it frequently in later parts of the book. The mani-fest file is the one-stop shop for the platform to start and manage your application.
If you’ve done any development involving UIs on any platform, the concepts ofactivities, views, and resources should seem familiar. Android approaches UI in aslightly different way, and this chapter will help address common points of confusion.
First, we’ll introduce the sample application that we use to walk through these con-cepts, moving beyond theory and into the code to construct an Activity. You candownload the complete source code for this sample from this book’s website. Thischapter will include the portions that focus on the user interface, chapter 4 adds thesections that integrate with other Android apps, and the online portions include theremaining components such as networking and parsing.
3.1 Creating the ActivityOver the course of this chapter and the next, you’ll build a sample application thatallows users to search for restaurant reviews based on location and cuisine. This appli-cation, RestaurantFinder, will also allow the user to call the restaurant, visit its website,or look up map directions. We chose this application as a starting point because it hasa clear and simple use case, and because it involves many different parts of the
Activity
View (text input)
View (image)
View (selection input)
View (map)
View (text label)
View (button)
Resources
Manifest (application definition, activities, permissions, intents)
Figure 3.1 High-level diagram of Activity, view, resource, and manifest relationships, showing that activities are made up of views, and views use resources
www.it-ebooks.info
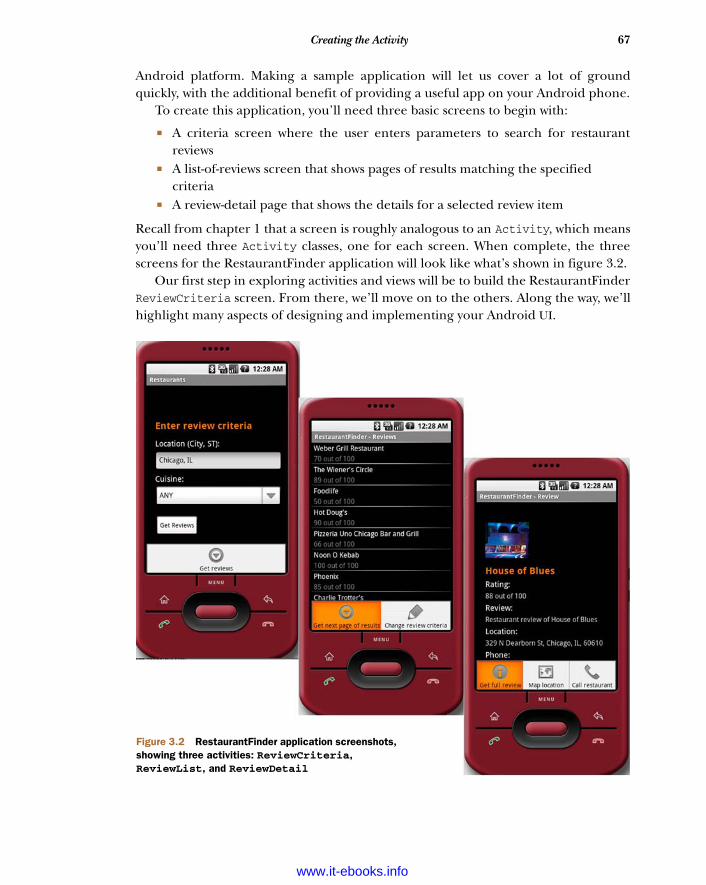
67Creating the Activity
Android platform. Making a sample application will let us cover a lot of groundquickly, with the additional benefit of providing a useful app on your Android phone.
To create this application, you’ll need three basic screens to begin with:
A criteria screen where the user enters parameters to search for restaurantreviews
A list-of-reviews screen that shows pages of results matching the specified criteria
A review-detail page that shows the details for a selected review item
Recall from chapter 1 that a screen is roughly analogous to an Activity, which meansyou’ll need three Activity classes, one for each screen. When complete, the threescreens for the RestaurantFinder application will look like what’s shown in figure 3.2.
Our first step in exploring activities and views will be to build the RestaurantFinderReviewCriteria screen. From there, we’ll move on to the others. Along the way, we’llhighlight many aspects of designing and implementing your Android UI.
Figure 3.2 RestaurantFinder application screenshots, showing three activities: ReviewCriteria, ReviewList, and ReviewDetail
www.it-ebooks.info
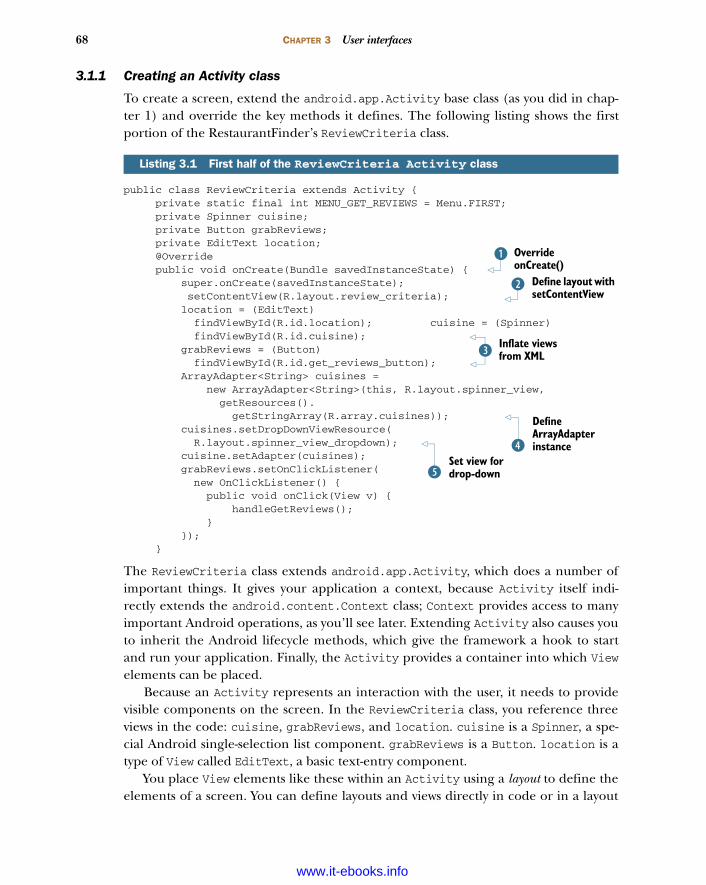
68 CHAPTER 3 User interfaces
3.1.1 Creating an Activity class
To create a screen, extend the android.app.Activity base class (as you did in chap-ter 1) and override the key methods it defines. The following listing shows the firstportion of the RestaurantFinder’s ReviewCriteria class.
public class ReviewCriteria extends Activity { private static final int MENU_GET_REVIEWS = Menu.FIRST; private Spinner cuisine; private Button grabReviews; private EditText location; @Override public void onCreate(Bundle savedInstanceState) { super.onCreate(savedInstanceState); setContentView(R.layout.review_criteria); location = (EditText) findViewById(R.id.location); cuisine = (Spinner) findViewById(R.id.cuisine); grabReviews = (Button) findViewById(R.id.get_reviews_button); ArrayAdapter<String> cuisines = new ArrayAdapter<String>(this, R.layout.spinner_view, getResources(). getStringArray(R.array.cuisines)); cuisines.setDropDownViewResource( R.layout.spinner_view_dropdown); cuisine.setAdapter(cuisines); grabReviews.setOnClickListener( new OnClickListener() { public void onClick(View v) { handleGetReviews(); } }); }
The ReviewCriteria class extends android.app.Activity, which does a number ofimportant things. It gives your application a context, because Activity itself indi-rectly extends the android.content.Context class; Context provides access to manyimportant Android operations, as you’ll see later. Extending Activity also causes youto inherit the Android lifecycle methods, which give the framework a hook to startand run your application. Finally, the Activity provides a container into which Viewelements can be placed.
Because an Activity represents an interaction with the user, it needs to providevisible components on the screen. In the ReviewCriteria class, you reference threeviews in the code: cuisine, grabReviews, and location. cuisine is a Spinner, a spe-cial Android single-selection list component. grabReviews is a Button. location is atype of View called EditText, a basic text-entry component.
You place View elements like these within an Activity using a layout to define theelements of a screen. You can define layouts and views directly in code or in a layout
Listing 3.1 First half of the ReviewCriteria Activity class
Override onCreate()
B
Define layout with setContentView
C
Inflate views from XMLD
Define ArrayAdapter instanceE
Set view for drop-downF
www.it-ebooks.info
69Creating the Activity
XML resource file. You’ll learn more about views and layouts as we progress throughthis section.
After an Activity is started, the Android application lifecycle rules take over andthe onCreate() method is invoked B. This method is one of a series of important life-cycle methods the Activity class provides. Every Activity overrides onCreate(),where component initialization steps are invoked.
Inside the onCreate() method, you’ll typically invoke setContentView() to dis-play the content from an XML layout file C. An XML layout file defines View objects,organized into a hierarchical tree structure. After they’re defined in relation to theparent layout, each view can then be inflated at runtime.
3.1.2 XML vs. programmatic layouts
Android provides APIs that allow you to manage your layout through Java code insteadof XML. Although this approach may be more familiar and comfortable for develop-ers from other mobile platforms, you should generally avoid it. XML layouts tend to bemuch easier to read, understand, and maintain, and they nicely enforce separation ofyour app’s UI from its logic.
Views that need some runtime manipulation, such as binding to data, can then bereferenced in code and cast to their respective subtypes D. Views that are static—those you don’t need to interact with or update at runtime, such as labels—don’t needto be referenced in code at all. These views automatically show up on the screenbecause they’re part of the layout as defined in the XML. For example, the screen-shots in figure 3.1 show two labels in the ReviewCriteria screen as well as the threeinputs we’ve already discussed. These labels aren’t present in the code; they’redefined in the review_criteria.xml file that’s associated with this Activity. You’ll seethis layout file when we discuss XML-defined resources.
The next area of interest in ReviewCriteria Activity is binding data to the selectlist views, the Spinner objects. Android provides an adapter concept used to link viewswith an underlying data source. An adapter is a collection handler that returns eachitem in the collection as a View. Android provides many basic adapters: ListAdapter,ArrayAdapter, GalleryAdapter, CursorAdapter, and more. You can also easily createyour own adapter, a technique you’ll use when we discuss creating custom views in sec-tion 3.2. Here, we’re using an ArrayAdapter that’s populated with Context (this), aView element defined in an XML resource file, and an array representing the data.Note that the underlying data source for the array is also defined as a resource in XML
E—which you’ll learn more about in section 3.3. When we create the ArrayAdapter,we define the View to be used for the element shown in the Spinner before it’sselected by the user. After it’s selected, it must provide a different visual interface—this is the view defined in the drop-down F. After we define the adapter and its viewelements, we set it in the Spinner object.
The last thing this initial Activity demonstrates is our first explicit use of eventhandling. UI elements support many types of events, many of which you’ll learn about
www.it-ebooks.info
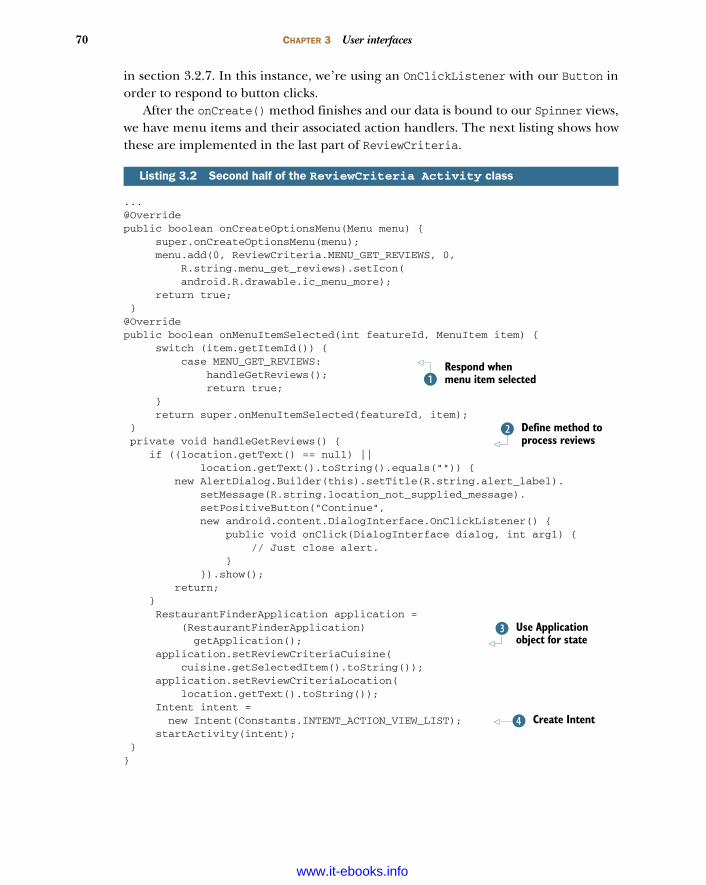
70 CHAPTER 3 User interfaces
in section 3.2.7. In this instance, we’re using an OnClickListener with our Button inorder to respond to button clicks.
After the onCreate() method finishes and our data is bound to our Spinner views,we have menu items and their associated action handlers. The next listing shows howthese are implemented in the last part of ReviewCriteria.
...@Overridepublic boolean onCreateOptionsMenu(Menu menu) { super.onCreateOptionsMenu(menu); menu.add(0, ReviewCriteria.MENU_GET_REVIEWS, 0, R.string.menu_get_reviews).setIcon( android.R.drawable.ic_menu_more); return true; }@Overridepublic boolean onMenuItemSelected(int featureId, MenuItem item) { switch (item.getItemId()) { case MENU_GET_REVIEWS: handleGetReviews(); return true; } return super.onMenuItemSelected(featureId, item); } private void handleGetReviews() { if ((location.getText() == null) || location.getText().toString().equals("")) { new AlertDialog.Builder(this).setTitle(R.string.alert_label). setMessage(R.string.location_not_supplied_message). setPositiveButton("Continue", new android.content.DialogInterface.OnClickListener() { public void onClick(DialogInterface dialog, int arg1) { // Just close alert. } }).show(); return; } RestaurantFinderApplication application = (RestaurantFinderApplication) getApplication(); application.setReviewCriteriaCuisine( cuisine.getSelectedItem().toString()); application.setReviewCriteriaLocation( location.getText().toString()); Intent intent = new Intent(Constants.INTENT_ACTION_VIEW_LIST); startActivity(intent); }}
Listing 3.2 Second half of the ReviewCriteria Activity class
Respond when menu item selectedB
Define method to process reviews
C
Use Application object for state
D
Create IntentE
www.it-ebooks.info
71Creating the Activity
The menu items at the bottom of the Activity screens in figure 3.2 were all createdusing the onCreateOptionsMenu() method. Here, we use the Menu class’s add()method to create a single MenuItem element. We pass a group ID, an ID, a sequence/order, and a text resource reference as parameters to create the menu item. We alsoassign an icon to the menu item with the setIcon method. The text and the image areexternalized from the code, using Android’s programmer-defined resources. TheMenuItem we’ve added duplicates the functionality of the onscreen Button, so we usethe same text value for the label: Get reviews.
In addition to creating the menu item, we need to perform an action when theMenuItem is selected. We do this in the onMenuItemSelected() event method B,where we parse the ID of the multiple possible menu items with a switch statement.When the MENU_GET_REVIEWS item is selected, we invoke the handleGetReviews()method C.
USING THE MENU VS. ONSCREEN BUTTONS
We’ve chosen to use the Menu here, in addition to the onscreen buttons. When decid-ing whether to use buttons, a menu, or both, you need to consider whether the Menu,which is invoked by pressing the Menu button on the device and tapping a selection(button and a tap), is appropriate for what you’re doing, or whether an onscreen but-ton (single tap) is more appropriate. Generally, onscreen buttons should be tied to UIelements, such as a button that clears search form input, and menu items should beused for broader actions such as creating, saving, or deleting.
We check for valid input and use an AlertDialog to warn users about problemswith the location they entered. Along with generally demonstrating the use of Alert-Dialog, this demonstrates how a button can be made to respond to a click event withan OnClickListener(). Here, the Android framework automatically dismisses thepop-up, so no extra code is required in the listener.
THE BUILDER PATTERN
You might have noticed the use of the Builder pattern, where we add parameters tothe AlertDialog we created. In this approach, each of the methods invoked, such asAlertDialog.setMessage() and AlertDialog.setTitle(), returns a reference toitself (this), which means we can continue chaining method calls. This approachavoids either using an extra-long constructor with many parameters or repeating theclass reference throughout the code. Intents also use this handy pattern; it’s some-thing you’ll see frequently in Android.
After passing validation, this method stores the user’s selection state in theApplication object D and prepares to call the next screen. We’ve moved this logicinto its own method because we’re using it from multiple places—both from ouronscreen Button and our MenuItem.
The Application object is used internally by Android for many purposes, and itcan be extended, as we’ve done with RestaurantFinderApplication. You can findthe source of this class online. To store global state information, RestaurantFinder-Application defines a few member variables in JavaBean style. We reference this
www.it-ebooks.info
72 CHAPTER 3 User interfaces
object from other activities to retrieve the information we’re storing here. Objects canbe passed back and forth between activities in several ways; using Application is justone of them.
After we store the criteria state, we fire off an action in the form of an AndroidIntent e. We touched on Intents in chapter 1, and we’ll delve into them further inthe next chapter; here, we ask another Activity to respond to the user’s selection ofa menu item by calling startActivity(intent).
With that, we’ve covered a good deal of material and you’ve completed Review-Criteria, your first Activity. Now that this class is fully implemented, we’ll take acloser look at the Android Activity lifecycle and how it relates to processes on theplatform.
3.1.3 Exploring the Activity lifecycle
Every process running on the Android platform is placed on a stack. When you use anActivity in the foreground, the system process that hosts that Activity is placed atthe top of the stack, and the previous process (the one hosting whatever Activity waspreviously in the foreground) is moved down one notch. This concept is a key point tounderstand. Android tries to keep processes running as long as it can, but it can’tkeep every process running forever because system resources are finite. What happenswhen memory starts to run low or the CPU gets too busy?
HOW PROCESSES AND ACTIVITIES RELATE
When the Android platform decides it needs to reclaim resources, it goes through aseries of steps to prune processes and the activities they host. It decides which ones toget rid of based on a simple set of priorities:
The process hosting the foreground Activity is the most important. Any process hosting a visible-but-not-foreground Activity comes next in terms
of importance (for example, a full-screen app that’s visible behind an app run-ning in a pop-up window).
After that comes any process hosting a background Activity. Any process not hosting any Activity (or Service or BroadcastReceiver) is
known as an empty process and is thus first in line to be killed.
A useful tool for development and debugging, especially in the context of processpriority, is the adb tool, which you first met in chapter 2. You can see the state of allthe running processes in an Android device or emulator by issuing the followingcommand:
adb shell dumpsys activity
This command outputs a lot of information about all the running processes, includingthe package name, PID, foreground or background status, current priority, and more.
All Activity classes must be able to handle being stopped and shut down at anytime. Remember, a user can and will change directions at any time. They mightreceive a phone call or an incoming SMS message, causing them to bounce around
www.it-ebooks.info
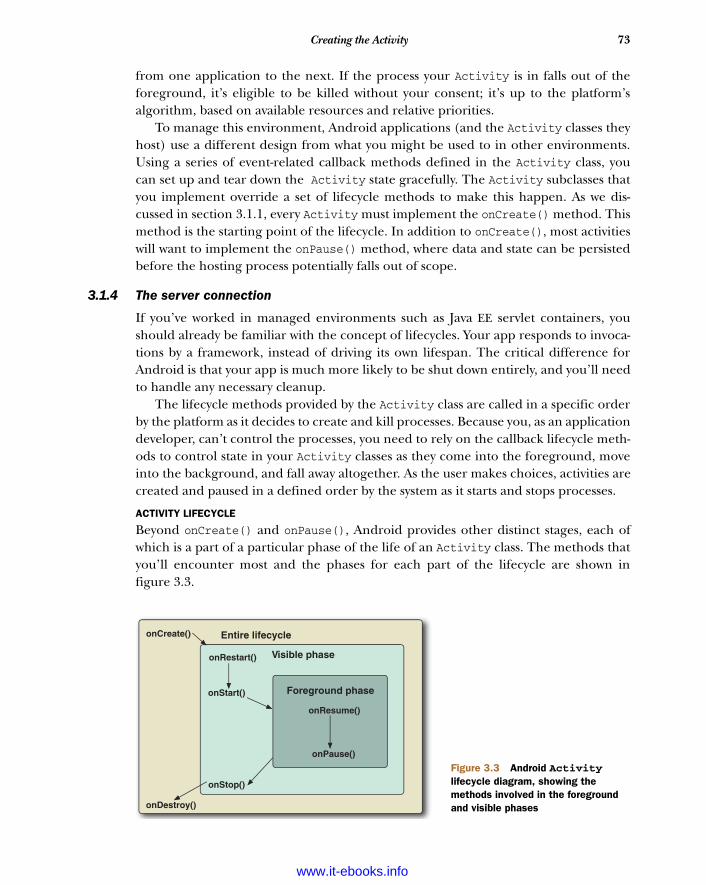
73Creating the Activity
from one application to the next. If the process your Activity is in falls out of theforeground, it’s eligible to be killed without your consent; it’s up to the platform’salgorithm, based on available resources and relative priorities.
To manage this environment, Android applications (and the Activity classes theyhost) use a different design from what you might be used to in other environments.Using a series of event-related callback methods defined in the Activity class, youcan set up and tear down the Activity state gracefully. The Activity subclasses thatyou implement override a set of lifecycle methods to make this happen. As we dis-cussed in section 3.1.1, every Activity must implement the onCreate() method. Thismethod is the starting point of the lifecycle. In addition to onCreate(), most activitieswill want to implement the onPause() method, where data and state can be persistedbefore the hosting process potentially falls out of scope.
3.1.4 The server connection
If you’ve worked in managed environments such as Java EE servlet containers, youshould already be familiar with the concept of lifecycles. Your app responds to invoca-tions by a framework, instead of driving its own lifespan. The critical difference forAndroid is that your app is much more likely to be shut down entirely, and you’ll needto handle any necessary cleanup.
The lifecycle methods provided by the Activity class are called in a specific orderby the platform as it decides to create and kill processes. Because you, as an applicationdeveloper, can’t control the processes, you need to rely on the callback lifecycle meth-ods to control state in your Activity classes as they come into the foreground, moveinto the background, and fall away altogether. As the user makes choices, activities arecreated and paused in a defined order by the system as it starts and stops processes.
ACTIVITY LIFECYCLE
Beyond onCreate() and onPause(), Android provides other distinct stages, each ofwhich is a part of a particular phase of the life of an Activity class. The methods thatyou’ll encounter most and the phases for each part of the lifecycle are shown infigure 3.3.
onCreate()
onStart()
onDestroy()
onRestart()
onResume()
onStop()
onPause()
Foreground phase
Visible phase
Entire lifecycle
Figure 3.3 Android Activitylifecycle diagram, showing the methods involved in the foreground and visible phases
www.it-ebooks.info

74 CHAPTER 3 User interfaces
Each of the Android lifecycle methods has a distinct purpose, and each happensduring one of the following phases:
In the foreground phase, the Activity is viewable on the screen and is on top ofeverything else (when the user is interacting with the Activity to perform atask).
In the visible phase, the Activity is on the screen, but it might not be on top andinteracting with the user (when a dialog or floating window is on top of theActivity, for example).
The entire lifecycle phase refers to the methods that might be called when theapplication isn’t on the screen, before it’s created, and after it’s gone (prior tobeing shut down).
Table 3.1 provides more information about the lifecycle phases and outlines the mainhigh-level methods on the Activity class.
Beyond the main high-level lifecycle methods outlined in table 3.1, additional, finer-grained methods are available. You don’t typically need methods such as onPost-Create() and onPostResume(), but be aware that they exist if you need that level ofcontrol. See the Activity documentation for full method details.
As for the main lifecycle methods that you’ll use the majority of the time, it’simportant to know that onPause() is your last opportunity to clean up and save stateinformation. The processes that host your Activity classes won’t be killed by the plat-form until after the onPause() method has completed, but they might be killed there-
Table 3.1 Android Activity main lifecycle methods and their purposes
Method Purpose
onCreate() Called when the Activity is created. Setup is done here. Also provides access to any previously stored state in the form of a Bundle, which can be used to restore what the user was doing before this Activity was destroyed.
onRestart() Called if the Activity is being restarted, if it’s still in the stack, rather than starting new.
onStart() Called when the Activity is becoming visible on the screen to the user.
onResume() Called when the Activity starts interacting with the user. (This method is always called, whether starting or restarting.)
onPause() Called when the Activity is pausing or reclaiming CPU and other resources. This method is where you should save state information so that when an Activity is restarted, it can start from the same state it was in when it quit.
onStop() Called to stop the Activity and transition it to a nonvisible phase and subse-quent lifecycle events.
onDestroy() Called when an Activity is being completely removed from system memory. This method is called either because onFinish() is directly invoked or because the system decides to stop the Activity to free up resources.
www.it-ebooks.info
75Working with views
after. The system will attempt to run through all of the lifecycle methods every time,but if resources have grown critically low, the processes that are hosting activitieswhich are beyond the onPause() method might be killed at any point. Any time yourActivity is moved to the background, onPause() is called. Before your Activity iscompletely removed, onDestroy() is called, although it might not be invoked in allcircumstances. You should save persistent state in onPause(). We’ll discuss how to savedata in chapter 5.
Managing activities with lifecycle events allows Android to do the heavy lifting, decid-ing when things come into and out of scope, relieving applications of the decision-making burden, and ensuring a level playing field for applications. This is a key aspectof the platform that varies somewhat from many other application-development envi-ronments. To build robust and responsive Android applications, you need to pay care-ful attention to the lifecycle.
Now that you have some background about the Activity lifecycle and you’ve cre-ated your first screen, we’ll take a longer look at the various views that Android offers.
3.2 Working with viewsViews are the building blocks of Android application’s UI. Activities contain views, andView classes represent elements on the screen and are responsible for interacting withusers through events.
Every Android screen contains a hierarchical tree of View elements. These viewscome in a variety of shapes and sizes. Many of the views you’ll need on a day-to-day basisare provided as part of the platform—text elements, input elements, images, buttons,and the like. In addition, you can create your own composite views and custom viewswhen the need arises. You can place views into an Activity (and thus on the screen)either directly in code or by using an XML resource that’s later inflated at runtime.
Instance stateIn addition to persistent state, you should be familiar with one more scenario:instance state. Instance state refers to the state of the UI itself. For example, instancestate refers to the current selection of any buttons, lists, text boxes, and so on,whereas persistent state refers to data that you expect to remain after the phonereboots.
The onSaveInstanceState() method is called when an Activity might bedestroyed, so that at a future time the interface state can be restored. This methodis used transparently by the platform to handle the view state processing in the vastmajority of cases; you don’t need to concern yourself with it under most circum-stances. Nevertheless, it’s important to know that it’s there and that the Bundle itsaves is handed back to the onCreate() method when an Activity is restored—as savedInstanceState in most code examples. If you need to customize the viewstate, you can do so by overriding this method, but don’t confuse this with the morecommon general lifecycle methods.
www.it-ebooks.info
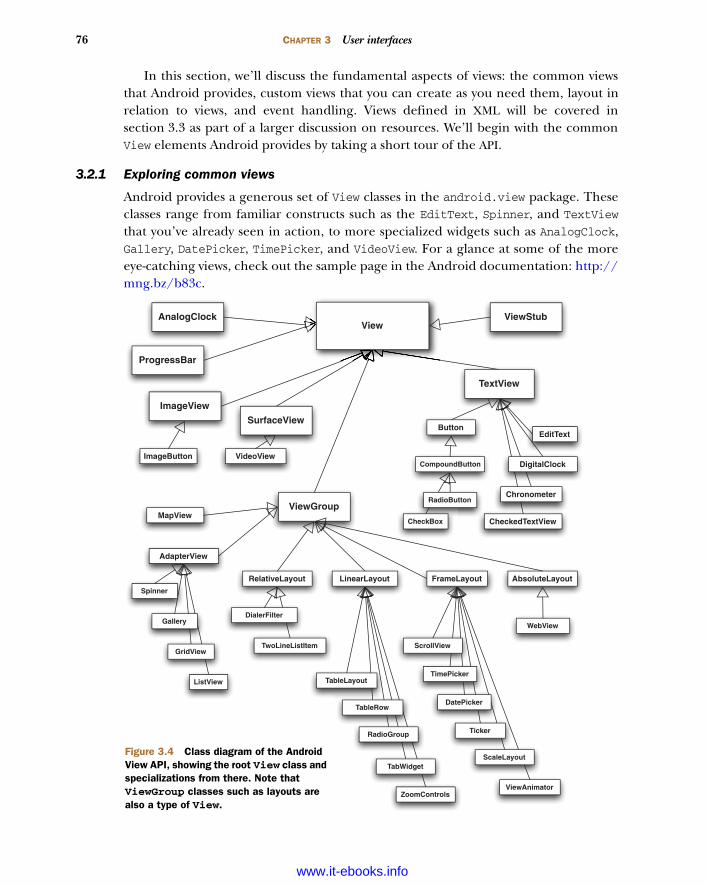
76 CHAPTER 3 User interfaces
In this section, we’ll discuss the fundamental aspects of views: the common viewsthat Android provides, custom views that you can create as you need them, layout inrelation to views, and event handling. Views defined in XML will be covered insection 3.3 as part of a larger discussion on resources. We’ll begin with the commonView elements Android provides by taking a short tour of the API.
3.2.1 Exploring common views
Android provides a generous set of View classes in the android.view package. Theseclasses range from familiar constructs such as the EditText, Spinner, and TextViewthat you’ve already seen in action, to more specialized widgets such as AnalogClock,Gallery, DatePicker, TimePicker, and VideoView. For a glance at some of the moreeye-catching views, check out the sample page in the Android documentation: http://mng.bz/b83c.
ViewAnalogClock
MapView
ImageView
ProgressBar
SurfaceView
TextView
ViewGroup
AbsoluteLayoutFrameLayoutLinearLayout
AdapterView
RelativeLayout
RadioGroup
TableLayout
TabWidget
DatePicker
TimePicker
ScaleLayout
Ticker
ScrollView
ListView
GridView
Spinner
GalleryWebView
DialerFilter
TwoLineListItem
ButtonEditText
DigitalClock
CheckBox
RadioButton
CompoundButtonImageButton
ViewAnimator
Chronometer
VideoView
ViewStub
CheckedTextView
TableRow
ZoomControls
Figure 3.4 Class diagram of the Android View API, showing the root View class and specializations from there. Note that ViewGroup classes such as layouts are also a type of View.
www.it-ebooks.info

77Working with views
The class diagram in figure 3.4 provides a high-level snapshot of what the overall ViewAPI looks like. This diagram shows how the specializations fan out and includes many,but not all, of the View-derived classes.
As is evident from the diagram in figure 3.4, View is the base class for many classes.ViewGroup is a special subclass of View related to layout, as are other elements such asthe commonly used TextView. All UI classes are derived from the View class, includingthe layout classes (which extend ViewGroup).
Of course, everything that extends View has access to the base class methods.These methods allow you to perform important UI-related operations such as settingthe background, minimum height and width, padding, layout parameters, and event-related attributes. Table 3.2 lists some of the methods available in the root View class.Beyond the base class, each View subclass typically adds a host of refined methods tofurther manipulate its respective state, such as what’s shown for TextView in table 3.3.
Table 3.2 A subset of methods in the base Android View API
Method Purpose
setBackgroundColor(int color) Set the background color
setBackgroundDrawable(Drawable d) Set the background drawable (such as an image or gradient)
setClickable(boolean c) Set whether element is clickable
setFocusable(boolean f) Set whether element is focusable
setLayoutParams(ViewGroup.LayoutParams l) Set parameters for layout (posi-tion, size, and more)
setMinimumHeight(int minHeight) Set the minimum height (parent can override)
setMinimumWidth(int minWidth) Set the minimum width (parent can override)
setOnClickListener(OnClickListener l) Set listener to fire when click event occurs
setOnFocusChangeListener(OnFocusChangeListener l) Set listener to fire when focus event occurs
setPadding(int left, int right, int top, int bottom)
Set the padding
Table 3.3 More View methods for the TextView subclass
Method Purpose
setGravity(int gravity) Set alignment gravity: top, bottom, left, right, and more
setHeight(int height) Set height dimension
setText(CharSequence text) Set text to display in TextView
www.it-ebooks.info

78 CHAPTER 3 User interfaces
The View base class and the methods specific to TextView combine to give you exten-sive control over how an application can manipulate an instance of TextView. Forexample, you can set layout, padding, focus, events, gravity, height, width, colors, andso on. These methods can be invoked in code or set at design time when defining a UIlayout in XML, as we’ll introduce in section 3.3.
Each View element you use has its own unique API; for details on all the methods,see the Android Javadocs at http://mng.bz/82Qy.
When you couple the wide array of classes with the rich set of methods availablefrom the base View class on down, the Android View API can seem intimidating.Thankfully, despite this initial impression, many of the concepts involved quicklybecome evident; and their use becomes more intuitive as you move from view to view,because they’re ultimately just specializations of the same base class. When you getfamiliar with working with View classes, learning to use a new view becomes intuitiveand natural.
Although the RestaurantFinder application won’t use many of the views listed inour whirlwind tour here, they’re still useful to know about. We’ll use many of them inlater examples throughout the book.
The next thing we’ll focus on is a bit more detail concerning one of the most com-mon nontrivial View elements—the ListView component.
3.2.2 Using a ListView
On the RestaurantFinder application’s ReviewList Activity, shown in figure 3.2, youcan see a view that’s different from the simple user inputs and labels we’ve used up tothis point—this screen presents a scrollable list of choices for the user to pick from.
This Activity uses a ListView component to display a list of review data that’sobtained from calling a mock web service for restaurant reviews. We make an HTTPcall by appending the user’s criteria to the mock web service’s URL. We then parse theresults with the Simple API for XML (SAX) and create a List of reviews. Neither thedetails of XML parsing nor the use of the network itself is of much concern to ushere—rather we’ll focus on the views employed to represent the data returned fromthe web service call. The resulting List will be used to populate our screen’s list ofitems to choose from.
The code in the following listing shows how to create and use a ListView to pres-ent to the user the List of reviews within an Activity.
setTypeFace(TypeFace face) Set typeface
setWidth(int width) Set width dimension
Table 3.3 More View methods for the TextView subclass (continued)
Method Purpose
www.it-ebooks.info
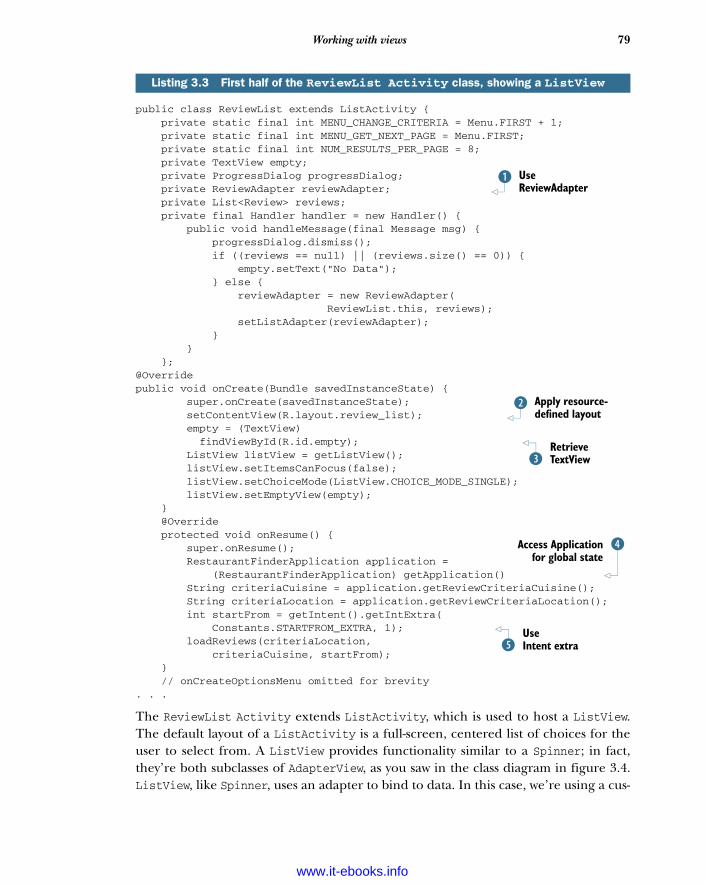
79Working with views
public class ReviewList extends ListActivity { private static final int MENU_CHANGE_CRITERIA = Menu.FIRST + 1; private static final int MENU_GET_NEXT_PAGE = Menu.FIRST; private static final int NUM_RESULTS_PER_PAGE = 8; private TextView empty; private ProgressDialog progressDialog; private ReviewAdapter reviewAdapter; private List<Review> reviews; private final Handler handler = new Handler() { public void handleMessage(final Message msg) { progressDialog.dismiss(); if ((reviews == null) || (reviews.size() == 0)) { empty.setText("No Data"); } else { reviewAdapter = new ReviewAdapter( ReviewList.this, reviews); setListAdapter(reviewAdapter); } } }; @Overridepublic void onCreate(Bundle savedInstanceState) { super.onCreate(savedInstanceState); setContentView(R.layout.review_list); empty = (TextView) findViewById(R.id.empty); ListView listView = getListView(); listView.setItemsCanFocus(false); listView.setChoiceMode(ListView.CHOICE_MODE_SINGLE); listView.setEmptyView(empty); } @Override protected void onResume() { super.onResume(); RestaurantFinderApplication application = (RestaurantFinderApplication) getApplication() String criteriaCuisine = application.getReviewCriteriaCuisine(); String criteriaLocation = application.getReviewCriteriaLocation(); int startFrom = getIntent().getIntExtra( Constants.STARTFROM_EXTRA, 1); loadReviews(criteriaLocation, criteriaCuisine, startFrom); } // onCreateOptionsMenu omitted for brevity. . .
The ReviewList Activity extends ListActivity, which is used to host a ListView.The default layout of a ListActivity is a full-screen, centered list of choices for theuser to select from. A ListView provides functionality similar to a Spinner; in fact,they’re both subclasses of AdapterView, as you saw in the class diagram in figure 3.4.ListView, like Spinner, uses an adapter to bind to data. In this case, we’re using a cus-
Listing 3.3 First half of the ReviewList Activity class, showing a ListView
Use ReviewAdapter
b
Apply resource-defined layout
c
Retrieve TextViewd
eAccess Applicationfor global state
Use Intent extraf
www.it-ebooks.info
80 CHAPTER 3 User interfaces
tom ReviewAdapter class B. You’ll learn more about ReviewAdapter in the next sec-tion, when we discuss custom views. For now, note that we’re using a custom adapterfor our ListView, and we use a List of Review objects to populate the adapter.
Because we don’t yet have the data to populate the list, which we’ll get from a webservice call in another thread, we need to include a handler to allow for fetching dataand updating the UI to occur in separate steps. Don’t worry too much about theseconcepts here; they’ll make more sense when we look at the second half of Review-List in listing 3.4.
After we declare our ListView and its data, we move on to the typical onCreate()tasks you’ve already seen, including using a layout defined in an XML file c. This issignificant with respect to ListActivity because a ListView with the ID name list isrequired if you want to customize the layout, as we’ve done. Note that the ID isdefined in the layout XML file; we’ll cover that in section 3.3.3. If you don’t provide alayout, you can still use ListActivity and ListView, but you get the system defaultconfiguration. We also look up a UI element that’s used to display the message No Datain the event that our List of reviews is empty d. We set several specific properties onthe ListView, using its customization methods: we make the list items selectable, allowa single selection at a time, and provide the view to display for an empty list.
After we set up the View elements that are needed for the Activity, we get the cri-teria to make our web service call from the Review object, which we previously placedin the Application back in the ReviewCriteria Activity e. Here we also use anIntent extra to store a primitive int for page number f. We pass all the criteria data(criteriaLocation, criteriaCuisine, and startFrom) into the loadReviews()method, which makes our web service call to populate the data list. This method, andseveral others that show how we deal with items in the list being clicked, are shownhere in the second half of the ReviewList class.
. . . @Override public boolean onMenuItemSelected(int featureId, MenuItem item) { Intent intent = null; switch (item.getItemId()) { case MENU_GET_NEXT_PAGE: intent = new Intent(Constants.INTENT_ACTION_VIEW_LIST); intent.putExtra(Constants.STARTFROM_EXTRA, getIntent().getIntExtra(Constants.STARTFROM_EXTRA, 1) + ReviewList.NUM_RESULTS_PER_PAGE); startActivity(intent); return true; case MENU_CHANGE_CRITERIA: intent = new Intent(this, ReviewCriteria.class); startActivity(intent); return true; } return super.onMenuItemSelected(featureId, item);
Listing 3.4 Second half of the ReviewList Activity class
Increment startFrom Intent extra
b
www.it-ebooks.info
81Working with views
} @Override protected void onListItemClick(ListView l, View v, int position, long id) { RestaurantFinderApplication application = (RestaurantFinderApplication) getApplication(); application.setCurrentReview(reviews.get(position)); Intent intent = new Intent(Constants.INTENT_ACTION_VIEW_DETAIL); intent.putExtra(Constants.STARTFROM_EXTRA, getIntent().getIntExtra( Constants.STARTFROM_EXTRA, 1)); startActivity(intent); } private void loadReviews(String location, String cuisine, int startFrom) { final ReviewFetcher rf = new ReviewFetcher(location, cuisine, "ALL", startFrom, ReviewList.NUM_RESULTS_PER_PAGE); progressDialog = ProgressDialog.show(this, " Working...", " Retrieving reviews", true, false); new Thread() { public void run() { reviews = rf.getReviews(); handler.sendEmptyMessage(0); } }.start(); }}
This Activity has a menu item that allows the user to access the next page of resultsor change the list criteria. To support this, we must implement the onMenuItem-Selected() method. When the MENU_GET_NEXT_PAGE menu item is selected, we definea new Intent to reload the screen with an incremented startFrom value, with someassistance from the Intent class’s getExtras() and putExtras() methods B.
After the menu-related methods comes the method onListItemClick(). Androidinvokes this method when a user clicks one of the list items in a ListView. We use theclicked item’s ordinal position to reference the particular Review item the userselected, and we set this into the Application for later use in the ReviewDetailActivity (which we’ll begin to implement in section 3.3) c. After we have the dataset, we then call the next Activity, including the startFrom extra.
In the ReviewList class, we have the loadReviews() method d. This method issignificant for several reasons. First, it sets up the ReviewFetcher class instance, whichinitiates a call to the mock web service over the network to retrieve a List of Reviewobjects. Then it invokes the ProgressDialog.show() method to show the user we’reretrieving data e. Finally, it sets up a new thread f, within which the ReviewFetcheris used, and the earlier handler you saw in the first half of ReviewList is sent an emptymessage. If you refer to listing 3.3, which is when the handler was established, you cansee where we dismiss the ProgressDialog when the message is received, populate theadapter our ListView is using, and call setListAdapter() to update the UI. The set-ListAdapter() method iterates the adapter and displays a returned view for every
Set state in Application
c
d
CreateloadReviews
method
Show ProgressDialogeMake web
service callF
www.it-ebooks.info

82 CHAPTER 3 User interfaces
item. With the Activity configured and the handler ready to update the adapter withdata, we now have a second screen in our application.
Next, we’ll explore some details regarding handlers and multithreaded apps.These concepts aren’t view-specific but are worth a small detour at this point, becauseyou’ll want to use these classes when you’re trying to perform tasks related to retriev-ing and manipulating data that the UI needs—a common design pattern for buildingAndroid applications.
3.2.3 Multitasking with Handler and Message
Handler helps you manage messaging and scheduling operations for Android. Thisclass allows you to queue tasks to be run on different threads and to schedule tasksusing Message and Runnable objects.
The Android platform monitors the responsiveness of applications and kills thosethat are considered nonresponsive. An Application Not Responding (ANR) event occurswhen no response is received to a user input for five seconds. When a user interactswith your application by touching the screen or pressing a key, your application mustrespond. Not every operation in your code must complete within five seconds, but themain UI thread does need to respond within that time frame. To keep the main UIthread snappy, any long-running tasks, such as retrieving data over the network, read-ing a large amount of data from a database, or performing complicated or time-consuming calculations, should be performed in a separate thread, apart from themain UI thread.
Getting tasks into a separate thread andgetting results back to the main UI thread iswhere Handler and related classes comeinto play. When a handler is created, it’sassociated with a Looper. A Looper is a classthat contains a MessageQueue and that pro-cesses Message or Runnable objects that aresent via the handler.
When we used a handler in listings 3.3and 3.4, we created a handler with a no-argument constructor. With this approach,the handler is automatically associated withthe Looper of the currently running thread,typically the main UI thread. The main UIthread, which is created by the process ofthe running application, is an instance ofHandlerThread. A HandlerThread is anAndroid Thread specialization that providesa Looper. The key parts involved in thisarrangement are depicted in figure 3.5.
MainUIThread (HandlerThread)
Looper
MessageQueue
Handler myHandler = new Handler() { public void handleMessage (Message m) { updateUIHere(); }};
new Thread() { public void run() { doStuff(); Message m = myHandler.obtainMessage(); Bundle b = new Bundle(); b.putString("key", "value"); m.setData(b); myHandler.sendMessage(m); }}.start();
Figure 3.5 Using the Handler class with separate threads, and the relationship among HandlerThread, Looper, and MessageQueue
www.it-ebooks.info
83Working with views
When you’re implementing a handler, you’ll need to provide a handle-Message(Message m) method. When you create a new thread, you can then call oneof several sendMessage methods on Handler from within that thread’s run method, asour examples and figure 3.5 demonstrate. Calling sendMessage() puts your messageon the MessageQueue, which the Looper services.
Along with sending messages into handlers, you can also send Runnable objectsdirectly, and you can schedule things to be run at different times in the future. Yousend messages and you post runnables. Each of these concepts supports methods suchas sendEmptyMessage(int what), which we’ve already used, and its counterpartssendEmptyMessageAtTime(int what, long time) and sendEmptyMessageDelayed(intwhat, long delay). After your Message is in the queue, Android will deliver it eitheras soon as possible or according to the requested time that you indicated.
You’ll see more of Handler and Message in other examples throughout the book,and we’ll cover more detail in some instances, but the main point to remember whenyou see these classes is that they’re used to communicate between threads and forscheduling.
Getting back to our RestaurantFinder application and more view-oriented topics,we next need to elaborate on the ReviewAdapter used by our RestaurantFinder’sReviewList screen after it’s populated with data from a Message. This adapter returnsa custom View object for each data element it processes.
3.2.4 Creating custom views
Although the views that are provided with Android will suffice for many apps, theremight be situations where you prefer a custom view to display your own object in aunique way.
In the ReviewList screen, we used an adapter of type ReviewAdapter to back ourListView. This custom adapter contains a custom View object, ReviewListView. AReviewListView is what our ReviewList Activity displays for every row of data itcontains. The adapter and view are shown in the following listing.
public class ReviewAdapter extends BaseAdapter { private final Context context; private final List<Review> reviews; public ReviewAdapter(Context context, List<Review> reviews) { this.context = context; this.reviews = reviews; } @Override public int getCount() { return reviews.size(); } @Override public Object getItem(int position) { return reviews.get(position);
Listing 3.5 ReviewAdapter and inner ReviewListView classes
Override basic adapter
b
www.it-ebooks.info
84 CHAPTER 3 User interfaces
} @Override public long getItemId(int position) { return position; } @Override
public View getView(int position, View convertView, ViewGroup parent) { Review review = reviews.get(position); if (convertView == null || !(convertView instanceof ReviewListView)) { return new ReviewListView(context, review.name, review.rating); } ReviewListView view = (ReviewListView)convertView; view.setName(review.name); view.setRating(review.rating); return view; } private final class ReviewListView extends LinearLayout { private TextView name; private TextView rating; public ReviewListView( Context context, String itemName, String itemRating) { super(context); setOrientation(LinearLayout.VERTICAL); LinearLayout.LayoutParams params = new LinearLayout.LayoutParams( ViewGroup.LayoutParams.WRAP_CONTENT, ViewGroup.LayoutParams.WRAP_CONTENT); params.setMargins(5, 3, 5, 0); name = new TextView(context); name.setText(itemName); name.setTextSize(16f); name.setTextColor(Color.WHITE); addView(name, params); rating = new TextView(context); rating.setText(itemRating); rating.setTextSize(16f); rating.setTextColor(Color.GRAY); addView(rating, params); } public void setName(String itemName) { name.setText(itemName); } public void setRating(String itemRating) { rating.setText(itemRating); } }}
Override basic adapter
B
Override adapter getView
c
Define custom inner view class
d
Set layout in code
e
Add TextView to tree
f
www.it-ebooks.info
85Working with views
The first thing to note in ReviewAdapter is that it extends BaseAdapter. BaseAdapteris an Adapter implementation that provides basic event-handling support. Adapteritself is an interface in the android.widget package and provides a way to bind data toa View with some common methods. This is often used with collections of data, as yousaw with Spinner and ArrayAdapter in listing 3.1. Another common use is with aCursorAdapter, which returns results from a database (something you’ll see inchapter 5). Here we’re creating our own adapter because we want it to return a cus-tom view.
Our ReviewAdapter class accepts and stores two parameters in the constructor.This class goes on to implement the required Adapter interface methods that return acount, an item, and an ID; we use the ordinal position in the collection as the ID B.The next Adapter method to implement is the most important: getView(). Theadapter returns any view we create for a particular item in the collection of data thatit’s supporting. Within this method, we get a particular Review object based on theposition/ID. The UI framework might call getView() multiple times for a given item;for example, the UI may need to make multiple layout passes in order to determinehow items will fit inside. The framework might provide an old view that we may beable to recycle for this item; doing so helps avoid wasted allocations. If there isn’t avalid older view, we create an instance of a custom ReviewListView object to return asthe view c.
ReviewListView itself is an inner class inside ReviewAdapter; we never use itexcept to return a view from ReviewAdapter d. Within it, you see an example of set-ting layout and view details in code, rather than relying on their definition in XML. Inthis listing, we set the orientation, parameters, and margin for our layout e. Next,we populate the simple TextView objects that will be children of our new view andrepresent data. When these are set up via code, we add them to the parent container,which is in this case our custom class ReviewListView f. This is where the data bind-ing happens—the bridge to the view from data. Another important thing to noteabout this is that we’ve created not only a custom view, but also a composite one.We’re using simple existing View objects in a particular layout to construct a new typeof reusable view, which shows the detail of a selected Review object on screen, asdepicted in figure 3.2.
Our custom ReviewListView object is intentionally fairly simple. In many cases,you’ll be able to create custom views by combining existing views in this manner. Analternative approach is to extend the View class itself. If you extend View, you canimplement core methods as desired, and you have access to the lifecycle methods of aView, such as onMeasure(), onLayout(), onDraw(), and onVisibilityChanged(). Youshould rarely need to go to these lengths; for most apps, you can achieve your desiredUI by combining preexisting View components, as we’ve done here.
Now that you’ve seen how you get the data for your reviews and what the adapterand custom view look like, let’s take a closer look at a few more aspects of views,including layout.
www.it-ebooks.info
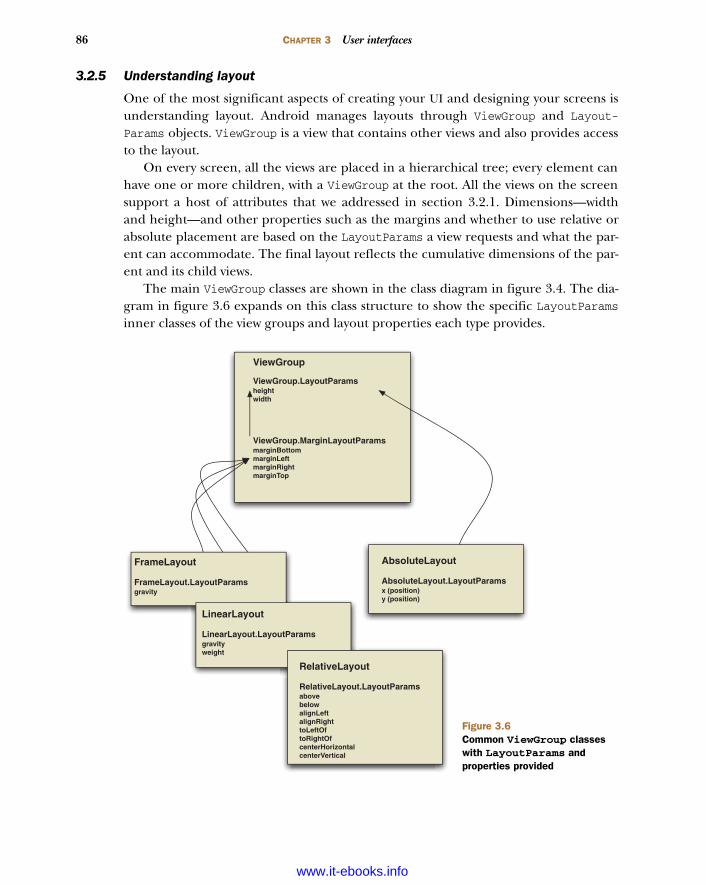
86 CHAPTER 3 User interfaces
3.2.5 Understanding layout
One of the most significant aspects of creating your UI and designing your screens isunderstanding layout. Android manages layouts through ViewGroup and Layout-Params objects. ViewGroup is a view that contains other views and also provides accessto the layout.
On every screen, all the views are placed in a hierarchical tree; every element canhave one or more children, with a ViewGroup at the root. All the views on the screensupport a host of attributes that we addressed in section 3.2.1. Dimensions—widthand height—and other properties such as the margins and whether to use relative orabsolute placement are based on the LayoutParams a view requests and what the par-ent can accommodate. The final layout reflects the cumulative dimensions of the par-ent and its child views.
The main ViewGroup classes are shown in the class diagram in figure 3.4. The dia-gram in figure 3.6 expands on this class structure to show the specific LayoutParamsinner classes of the view groups and layout properties each type provides.
AbsoluteLayout
AbsoluteLayout.LayoutParamsx (position)y (position)
FrameLayout
FrameLayout.LayoutParamsgravity
LinearLayout
LinearLayout.LayoutParamsgravityweight
ViewGroup
RelativeLayout RelativeLayout.LayoutParamsabovebelowalignLeftalignRighttoLeftOftoRightOfcenterHorizontalcenterVertical
ViewGroup.MarginLayoutParamsmarginBottommarginLeftmarginRightmarginTop
ViewGroup.LayoutParamsheightwidth
Figure 3.6Common ViewGroup classes with LayoutParams and properties provided
www.it-ebooks.info
87Working with views
As figure 3.6 shows, the base ViewGroup.LayoutParams class supports height andwidth. From there, an AbsoluteLayout type with AbsoluteLayout.LayoutParamsallows you to specify the exact x and y coordinates of the child View objects placedwithin. You should generally avoid the AbsoluteLayout because it prevents layoutsfrom looking good on larger or smaller screen resolutions.
As an alternative to AbsoluteLayout, you can use the FrameLayout, Linear-Layout, and RelativeLayout subtypes, all of which support variations of Layout-Params that are derived from ViewGroup.MarginLayoutParams. A FrameLayoutframes one child element, such as an image. A FrameLayout supports multiple chil-dren, but all the items are pinned to the top left—they’ll overlap each other in astack. A LinearLayout aligns child elements in either a horizontal or a vertical line.Recall that we used a LinearLayout in our ReviewListView in listing 3.5. There wecreated our view and its LayoutParams directly in code. Also, in our previousActivity examples, we used a RelativeLayout in our XML layout files that wasinflated into our code. A RelativeLayout specifies child elements relative to eachother: above, below, toLeftOf, and so on.
To summarize, the container is a ViewGroup, and a ViewGroup supports a particulartype of LayoutParams. Child View elements are then added to the container and mustfit into the layout specified by their parents. Even though a child view needs to layitself out based on its parents’ LayoutParams, it can also specify a different layout forits own children. This flexibility allows you to construct just about any type of screenyou want.
The dimensions for a given view are dictated by the LayoutParms of its parent—sofor each dimension of the layout of a view, you must define one of the following threevalues:
An exact number (unit required) FILL_PARENT
WRAP_CONTENT
The FILL_PARENT constant means “take up as much space in that dimension as theparent does (subtracting padding).” WRAP_CONTENT means “take up only as muchspace as is needed for the provided content (adding padding).” A child view requestsa size, and the parent makes a decision on how to position the child view on thescreen. The child makes a request, and the parent makes the decision.
Child elements do keep track of what size they’re initially asked to be, in case lay-out is recalculated when things are added or removed, but they can’t force a particu-lar size. Because of this, View elements have two sets of dimensions: the size and widththey want to take up (getMeasuredWidth() and getMeasuredHeight()) and theactual size they end up after a parent’s decision (getWidth() and getHeight()). Lay-out is a two-step process: first, measurements are taken during the measure pass, andsubsequently, the items are placed to the screen during the layout pass, using the asso-ciated LayoutParams. Components are drawn to the screen in the order in which
www.it-ebooks.info

88 CHAPTER 3 User interfaces
they’re found in the layout tree: parents first, then children. Note that parent viewsend up behind children if they overlap in positioning.
Layout is a big part of understanding screen design with Android. Along with plac-ing your View elements on the screen, you need to have a good grasp of focus andevent handling in order to build effective applications.
FRAGMENTATION
Android 3.0 has introduced a new concept, the fragment, which lies somewherebetween a view and an Activity. A fragment defines a reusable user interface chunkwith its own lifecycle. Fragments are most useful if you wish to present multiple“screens” at once on a larger device such as a tablet. For example, in the Restaurant-Finder, you could represent the ReviewCriteria in one fragment, the ReviewList inanother, and the ReviewDetail in a third. A smartphone would display one fragmentat a time, but on a tablet, you could show the list of reviews in one pane and theselected review’s detail in another pane. Fragments are more complicated than stan-dard views, but in the long run they can reduce overall maintenance in your code byletting you keep a single codebase that supports significantly different user interfaces.
3.2.6 Handling focus
Focus is like a game of tag; one and only one component on the screen is “it” at anygiven time. Although a particular screen can have many different windows and wid-gets, only one has the current focus and can respond to user input. An event, such asmovement of a stylus or finger, a tap, or a keyboard press, might trigger the focus toshift to another component.
In Android, focus is handled for you by the platform a majority of the time. Whena user selects an Activity, it’s invoked and the focus is set to the foreground View.Internal Android algorithms then determine where the focus should go next based onevents taking place in the applications. Events might include buttons being clicked,menus being selected, or services returning callbacks. You can override the defaultbehavior and provide hints about where specifically you want the focus to go using thefollowing View class methods or their counterparts in XML:
nextFocusDown()
nextFocusLeft()
nextFocusRight()
nextFocusUp()
Views can also indicate a particular focus type, DEFAULT_FOCUS or WEAK_FOCUS, to setthe priority of focus to either themselves (default) or their descendants (weak). Inaddition to hints, such as UP, DOWN, and WEAK, you can use the View.requestFocus()method directly, if you need to, to indicate that focus should be set to a particular viewat a given time. Manipulating the focus manually should be the exception rather thanthe rule—the platform logic generally does what you’d expect (and more important,what the user expects). Your application’s behavior should be mindful of how otherAndroid applications behave and should act accordingly.
www.it-ebooks.info

89Working with views
Focus changes based on event-handling logic using the OnFocusChangeListenerobject and related setOnFocusChangedListener() method. This brings us to thetopic of event handling.
3.2.7 Grasping events
Events are used to change the focus and for many other actions. We’ve already imple-mented several onClickListener() methods for buttons in listing 3.2. ThoseOnClickListener instances were connected to button presses. They indicated eventsthat said, “Hey, somebody pressed me.” Focus events go through this same processwhen announcing or responding to OnFocusChange events.
Events have two halves: the component raising the event and the component (orcomponents) that respond to the event. These two halves are variously known asObservable and Observer in design-pattern terms, or sometimes subject and observer. Fig-ure 3.7 is a class diagram of the relationships in this pattern.
An Observable component provides a way for Observer instances to register.When an event occurs, the Observable notifies all the Observers that something hastaken place. The Observers can then respond to that notification however they see fit.Interfaces are typically used for the various types of events in a particular API. AnAndroid Button represents this as follows:
Observable—Button.setOnClickListener(OnClickListener listener)
Observer—listener.onClick(View v)
This pattern affects Android View items, because many things are Observable andallow other components to attach and listen for events. For example, most of the Viewclass methods that begin with on are related to events: onFocusChanged(),onSizeChanged(), onLayout(), onTouchEvent(), and the like.
Events occur both within the UI and all over the platform. For example, when anincoming phone call occurs or a GPS-based location changes based on physical move-ment, many different reactions can occur. More than one component might want to benotified when the phone rings or when the location changes—not just the one you’reworking on—and this list of Observers isn’t necessarily limited to UI-oriented objects.
registerObserver() : voidunregisterObserver(): voidnotifyObserver(): void
observerCollection : Collection<Observer> (Listeners)Observable (Source)
notify() : void
Observer (Listener)
ObserverImplObserveableImpl
*0..1
For observer in observerCollection:
notifyObserver()
Figure 3.7 A class diagram depicting the Observer design pattern. Each Observablecomponent has zero to many Observers, which can be notified of changes when necessary.
www.it-ebooks.info
90 CHAPTER 3 User interfaces
Views support events on many levels. When an interface event occurs, such as auser pressing a button, scrolling, or selecting a portion of a window, the event is dis-patched to the appropriate view. Click events, keyboard events, touch events, andfocus events represent the kinds of events you’ll primarily deal with in the UI.
Remember that Android’s user interface is single-threaded. If you call a methodon a view, you need to be on the UI thread. Recall that this is why we used a handler inlisting 3.3—to get data outside the UI thread and to notify the UI thread to update theview after the data was retrieved. The data was sent back to the handler as a Messagevia the setMessage() event.
Our coverage of events in general and how they relate to layout rounds out themajority of our discussion of views, but we still have one notable related concept todiscuss—resources. In the next section, we’ll address all the aspects of resources,including XML-defined views.
3.3 Using resourcesYou’ve already seen several examples of resources throughout the book. We’ll nowexplore them in detail and implement the third and final Activity in Restaurant-Finder—the ReviewDetail screen.
When you begin working with Android, you’ll quickly notice many references to aclass named R. This class was introduced in chapter 1, and we’ve used it in our previ-ous Activity examples in this chapter. Android automatically generates this class foreach of your projects to provide access to resources. Resources are noncode items thatthe platform automatically includes in your project.
To begin looking at resources, we’ll first explore the various available types, andthen we’ll demonstrate examples of each type of resource.
3.3.1 Supported resource types
Each Android project’s resources are located in the res directory. Not every projectwill use every type, but any resource must fit one of the available types:
res/anim—XML representations of frame-by-frame animations res/drawable—Graphics such as PNG and JPG images, stretchable nine-patch
images, and gradients res/layout—XML representations of View object hierarchies res/values—XML representations of strings, colors, styles, dimensions, and
arrays res/xml—User-defined XML files that are compiled into a compact binary rep-
resentation res/raw—Arbitrary and uncompiled files
Resources are treated specially in Android because they’re typically compiled into anefficient binary type, with the noted exceptions of items that are already binary andthe raw type, which isn’t compiled. Animations, layouts and views, string and color
www.it-ebooks.info
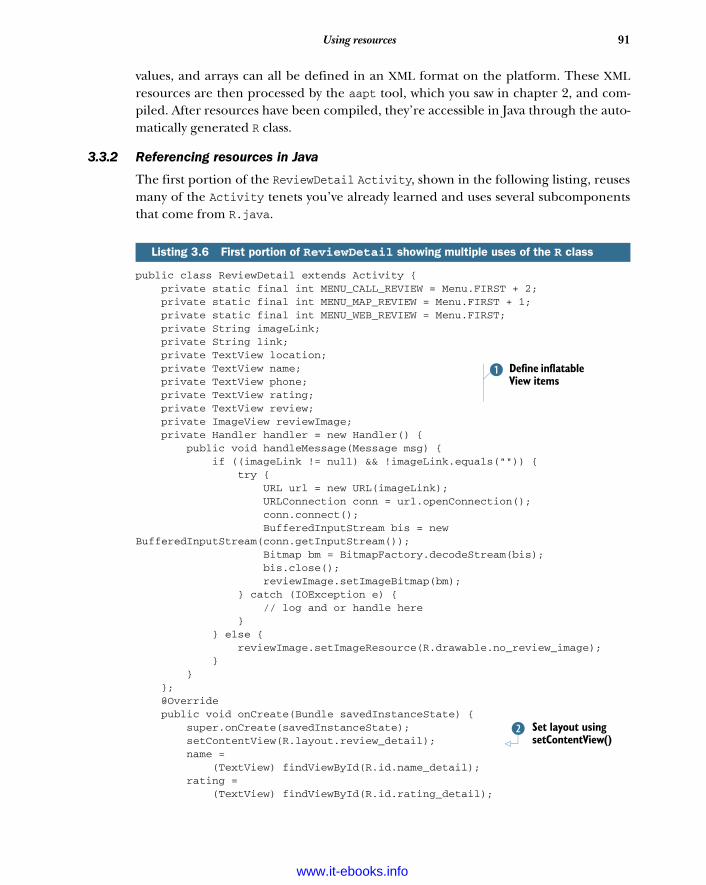
91Using resources
values, and arrays can all be defined in an XML format on the platform. These XMLresources are then processed by the aapt tool, which you saw in chapter 2, and com-piled. After resources have been compiled, they’re accessible in Java through the auto-matically generated R class.
3.3.2 Referencing resources in Java
The first portion of the ReviewDetail Activity, shown in the following listing, reusesmany of the Activity tenets you’ve already learned and uses several subcomponentsthat come from R.java.
public class ReviewDetail extends Activity { private static final int MENU_CALL_REVIEW = Menu.FIRST + 2; private static final int MENU_MAP_REVIEW = Menu.FIRST + 1; private static final int MENU_WEB_REVIEW = Menu.FIRST; private String imageLink; private String link; private TextView location; private TextView name; private TextView phone; private TextView rating; private TextView review; private ImageView reviewImage; private Handler handler = new Handler() { public void handleMessage(Message msg) { if ((imageLink != null) && !imageLink.equals("")) { try { URL url = new URL(imageLink); URLConnection conn = url.openConnection(); conn.connect(); BufferedInputStream bis = new BufferedInputStream(conn.getInputStream()); Bitmap bm = BitmapFactory.decodeStream(bis); bis.close(); reviewImage.setImageBitmap(bm); } catch (IOException e) { // log and or handle here } } else { reviewImage.setImageResource(R.drawable.no_review_image); } } }; @Override public void onCreate(Bundle savedInstanceState) { super.onCreate(savedInstanceState); setContentView(R.layout.review_detail); name = (TextView) findViewById(R.id.name_detail); rating = (TextView) findViewById(R.id.rating_detail);
Listing 3.6 First portion of ReviewDetail showing multiple uses of the R class
Define inflatable View items
b
Set layout using setContentView()
c
www.it-ebooks.info
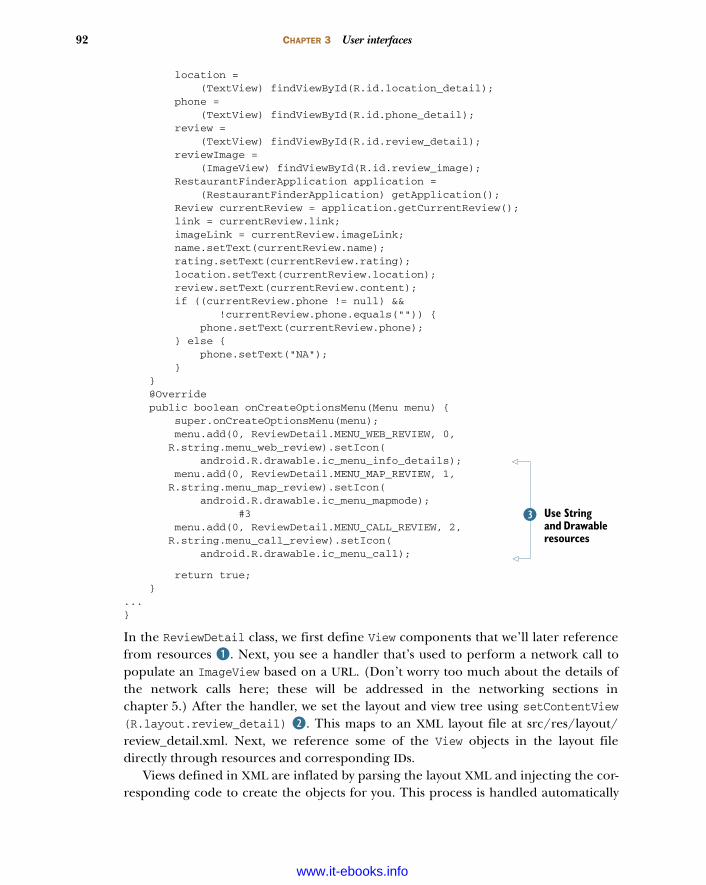
92 CHAPTER 3 User interfaces
location = (TextView) findViewById(R.id.location_detail); phone = (TextView) findViewById(R.id.phone_detail); review = (TextView) findViewById(R.id.review_detail); reviewImage = (ImageView) findViewById(R.id.review_image); RestaurantFinderApplication application = (RestaurantFinderApplication) getApplication(); Review currentReview = application.getCurrentReview(); link = currentReview.link; imageLink = currentReview.imageLink; name.setText(currentReview.name); rating.setText(currentReview.rating); location.setText(currentReview.location); review.setText(currentReview.content); if ((currentReview.phone != null) && !currentReview.phone.equals("")) { phone.setText(currentReview.phone); } else { phone.setText("NA"); } } @Override public boolean onCreateOptionsMenu(Menu menu) { super.onCreateOptionsMenu(menu); menu.add(0, ReviewDetail.MENU_WEB_REVIEW, 0, R.string.menu_web_review).setIcon( android.R.drawable.ic_menu_info_details); menu.add(0, ReviewDetail.MENU_MAP_REVIEW, 1, R.string.menu_map_review).setIcon( android.R.drawable.ic_menu_mapmode); #3 menu.add(0, ReviewDetail.MENU_CALL_REVIEW, 2, R.string.menu_call_review).setIcon( android.R.drawable.ic_menu_call);
return true; }...}
In the ReviewDetail class, we first define View components that we’ll later referencefrom resources B. Next, you see a handler that’s used to perform a network call topopulate an ImageView based on a URL. (Don’t worry too much about the details ofthe network calls here; these will be addressed in the networking sections inchapter 5.) After the handler, we set the layout and view tree using setContentView(R.layout.review_detail) c. This maps to an XML layout file at src/res/layout/review_detail.xml. Next, we reference some of the View objects in the layout filedirectly through resources and corresponding IDs.
Views defined in XML are inflated by parsing the layout XML and injecting the cor-responding code to create the objects for you. This process is handled automatically
Use String and Drawable resources
d
www.it-ebooks.info
93Using resources
by the platform. All the View and LayoutParams methods we’ve discussed have coun-terpart attributes in the XML format. This inflation approach is one of the mostimportant aspects of view-related resources, and it makes them convenient to use andreuse. We’ll examine the layout file we’re referring to here and the specific views itcontains more closely in the next section.
You reference resources in code, as we’ve been doing here, using the automaticallygenerated R class. The R class is made up of static inner classes (one for each resourcetype) that hold references to all of your resources in the form of an int value. Thisvalue is a constant pointer to an object file, by way of a resource table that’s containedin a special file which is created by the aapt tool and used by the R.java file.
The last reference to resources in listing 3.6 shows the creation of our menuitems d. For each of these, we reference a String for text from our own localresources, and we also assign an icon from the android.R.drawable resourcesnamespace. You can qualify resources in this way and reuse the platform drawables,which provides stock icons, images, borders, backgrounds, and so on. You’ll likelywant to customize much of your own applications and provide your own drawableresources. Note that the platform provides resources if you need them, and they’rearguably the better choice in terms of consistency for the user, particularly if you’recalling out to well-defined actions as we are here: map, phone call, and web page.
We’ll cover how all the different resource types are handled in the next several sec-tions. The first types of resources we’ll look at more closely are layouts and views.
3.3.3 Defining views and layouts through XML resources
As we’ve noted in several earlier sections, views and layouts are often defined in XMLrather than in Java code. Defining views and layouts as resources in this way makesthem easier to work with, because they’re decoupled from the code and in some casesreusable in across different screens.
View resource files are placed in the res/layout source directory. The root of theseXML files is usually one of the ViewGroup layout subclasses we’ve already discussed:RelativeLayout, LinearLayout, FrameLayout, and so on. Within these root elementsare child XML elements that form the view/layout tree.
Resources in the res/layout directory don’t have to be complete layouts. For exam-ple, you can define a single TextView in a layout file the same way you might define anentire tree starting from an AbsoluteLayout. More often, you might create a compos-ite view that contains several interior View components. You might use this approachwhen a particularly configured view is used in multiple areas of your application. Bydefining it as a standalone resource, you can maintain it more readily over the lifetimeof your project.
You can have as many XML layout/view files as you need, all defined in the res/layout directory. Each view is then referenced in code, based on the type and ID. Ourlayout file for the ReviewDetail screen—review_detail.xml, shown in the followinglisting—is referenced in the Activity code as R.layout.review_detail, which is apointer to the RelativeLayout parent View object in the file.
www.it-ebooks.info
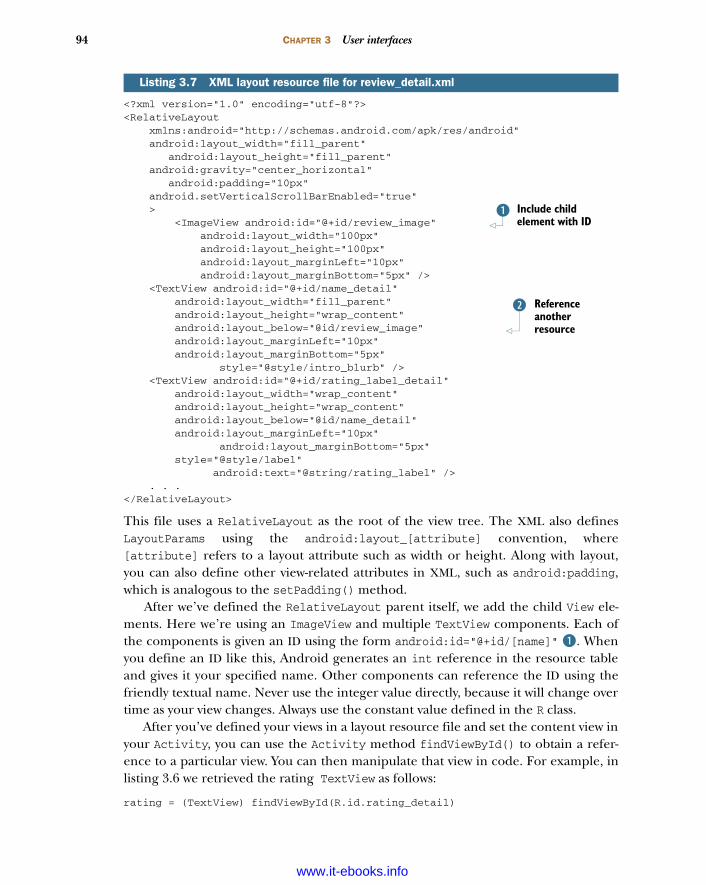
94 CHAPTER 3 User interfaces
<?xml version="1.0" encoding="utf-8"?><RelativeLayout xmlns:android="http://schemas.android.com/apk/res/android" android:layout_width="fill_parent" android:layout_height="fill_parent" android:gravity="center_horizontal" android:padding="10px" android.setVerticalScrollBarEnabled="true" > <ImageView android:id="@+id/review_image" android:layout_width="100px" android:layout_height="100px" android:layout_marginLeft="10px" android:layout_marginBottom="5px" /> <TextView android:id="@+id/name_detail" android:layout_width="fill_parent" android:layout_height="wrap_content" android:layout_below="@id/review_image" android:layout_marginLeft="10px" android:layout_marginBottom="5px" style="@style/intro_blurb" /> <TextView android:id="@+id/rating_label_detail" android:layout_width="wrap_content" android:layout_height="wrap_content" android:layout_below="@id/name_detail" android:layout_marginLeft="10px" android:layout_marginBottom="5px" style="@style/label" android:text="@string/rating_label" /> . . . </RelativeLayout>
This file uses a RelativeLayout as the root of the view tree. The XML also definesLayoutParams using the android:layout_[attribute] convention, where[attribute] refers to a layout attribute such as width or height. Along with layout,you can also define other view-related attributes in XML, such as android:padding,which is analogous to the setPadding() method.
After we’ve defined the RelativeLayout parent itself, we add the child View ele-ments. Here we’re using an ImageView and multiple TextView components. Each ofthe components is given an ID using the form android:id="@+id/[name]" B. Whenyou define an ID like this, Android generates an int reference in the resource tableand gives it your specified name. Other components can reference the ID using thefriendly textual name. Never use the integer value directly, because it will change overtime as your view changes. Always use the constant value defined in the R class.
After you’ve defined your views in a layout resource file and set the content view inyour Activity, you can use the Activity method findViewById() to obtain a refer-ence to a particular view. You can then manipulate that view in code. For example, inlisting 3.6 we retrieved the rating TextView as follows:
rating = (TextView) findViewById(R.id.rating_detail)
Listing 3.7 XML layout resource file for review_detail.xml
Include child element with ID
b
Reference another resource
c
www.it-ebooks.info
95Using resources
This provides access to the rating_detail element. XML can define all the properties for a view, including the layout. Because we’re
using a RelativeLayout, we use attributes that place one view relative to another, suchas below or toRightOf. To accomplish relative placement, we use theandroid:layout_below="@id/[name]" syntax c. The @id syntax lets you referenceother resource items from within a current resource file. Using this approach, you canreference other elements defined in the file you’re currently working on or other ele-ments defined in other resource files.
Some of our views represent labels that are shown on the screen as-is and aren’tmanipulated in code, such as rating_label_detail. Others we’ll populate at run-time, such as name_detail; these views don’t have a text value set. We do know the textfor labels, which we’ll apply with references to externalized strings.
You use the same syntax for styles, using the form style="@style/[stylename]".Strings, styles, and colors are themselves defined as resources in another type ofresource file.
3.3.4 Externalizing values
It’s common practice in the programming world to externalize string literals fromcode. In Java, you usually use a ResourceBundle or a properties file to externalize val-ues. Externalizing references to strings in this way allows the value of a component tobe stored and updated separately from the component itself, away from code.
Android includes support for values resources that are subdivided into severalgroups: animations, arrays, styles, strings, dimensions, and colors. Each of these itemsis defined in a specific XML format and made available in code as references from theR class, just like layouts, views, and drawables. We use externalized strings in theRestaurantFinder application, as shown in the following listing for strings.xml.
<?xml version="1.0" encoding="utf-8"?><resources> <string name="app_name_criteria">RestaurantFinder – Criteria</string> <string name="app_name_reviews">RestaurantFinder - Reviews</string> <string name="app_name_review">RestaurantFinder - Review</string> <string name="app_short_name">Restaurants</string> <string name="menu_get_reviews">Get reviews</string> <string name="menu_web_review">Get full review</string> <string name="menu_map_review">Map location</string> <string name="menu_call_review">Call restaurant</string> <string name="menu_change_criteria">Change review criteria</string> <string name="menu_get_next_page">Get next page of results</string> <string name="intro_blurb_criteria">Enter review criteria</string> <string name="intro_blurb_detail">Review details</string> . . . </resources>
This file uses a <string> element with a name attribute for each string value we define.We used this file for the application name, menu buttons, labels, and alert validation
Listing 3.8 Externalized strings for the RestaurantFinder application, strings.xml
www.it-ebooks.info
96 CHAPTER 3 User interfaces
messages. This format is known as simple value in Android terminology. This file isplaced in source at the res/values/strings.xml location. In addition to strings, you candefine colors and dimensions the same way.
Dimensions are placed in dimens.xml and defined with the <dimen> element:<dimen name=dimen_name>dimen_value</dimen>. Dimensions can be expressed inany of the following units:
Pixels (px) indicate the actual number of pixels on a screen. You should gener-ally avoid using this unit, because it might make your UI look tiny on a high-resolution screen or huge on a low-resolution screen.
Inches (in) determine the physical amount of space the item will occupy. Again,use caution; one inch looks big on a handset but tiny on a tablet.
Millimeters (mm) are the metric counterpart to inches. Density-independent pixels (dp) will scale automatically based on the pixel density
(dots per inch, or dpi) of the screen; you should try to use this unit for mostitems.
Scaled pixels (sp) are similar to dp but also take into account the user’s preferredtext size. Developers should try to use sp to describe text sizes.
Colors are defined in colors.xml and are declared with the <color> element: <colorname=color_name>#color_value</color>. Color values are expressed using RedGreen Blue triplet values in hexadecimal format, as in HTML. For example, solid blueis #0000ff. Color and dimension files are also placed in the res/values source location.
Although we haven’t defined separate colors and dimensions for the Restaurant-Finder application, we’re using several styles, which we referenced in listing 3.7. Thestyle definitions are shown in the following listing. Unlike the string, dimension, andcolor resource files, which use a simplistic value structure, the style resource file has amore complex structure, including specific attributes from the android: namespace.
<?xml version="1.0" encoding="utf-8"?><resources> <style name="intro_blurb"> <item name="android:textSize">22sp</item> <item name="android:textColor">#ee7620</item> <item name="android:textStyle">bold</item> </style> <style name="label"> <item name="android:textSize">18sp</item> <item name="android:textColor">#ffffff</item> </style> <style name="edit_text"> <item name="android:textSize">16sp</item> <item name="android:textColor">#000000</item> </style> . . .</resources>
Listing 3.9 Values resource defining reusable styles, styles.xml
www.it-ebooks.info
97Using resources
The Android styles approach is similar in concept to using Cascading Style Sheets (CSS)with HTML. You define styles in styles.xml and then reference them from otherresources or code. Each <style> element has one or more <item> children thatdefine a single setting. Styles consist of the various view settings: dimensions, colors,margins, and such. They’re helpful because they facilitate easy reuse and the ability tomake changes in one place that are applied throughout your app. Styles are applied inlayout XML files by associating a style name with a particular View component, such asstyle="@style/intro_blurb". Note that in this case, style isn’t prefixed with theandroid: namespace; it’s a custom local style, not one provided by the platform.
Styles can be taken one step further and used as themes. Whereas a style refers to aset of attributes applied to a single View element, themes refer to a set of attributesbeing applied to an entire screen. Themes can be defined in the same <style> and<item> structure as styles are. To apply a theme, you associate a style with an entireActivity, such as android:theme="@android:style/[stylename]".
Along with styles and themes, Android supports a specific XML structure for defin-ing arrays as a resource. You can place arrays in res/values/arrays.xml and use them todefine collections of constant values, such as the cuisines we used to pass to ourArrayAdapter back in listing 3.1. The following listing shows an example of definingthese arrays in XML.
<?xml version="1.0" encoding="utf-8"?><resources> <array name="cuisines"> <item>ANY</item> <item>American</item> <item>Barbeque</item> <item>Chinese</item> <item>French</item> <item>German</item> <item>Indian</item> <item>Italian</item> <item>Mexican</item> <item>Thai</item> <item>Vegetarian</item> <item>Kosher</item> </array></resources>
Array resources use an <array> element with a name attribute and include any num-ber of <item> child elements to define each array member. You can access arrays incode using the syntax shown in listing 3.1: String[] ratings = getResources().getStringArray(R.array.ratings).
Android resources can also support raw files and XML. Using the res/raw and res/xml directories, respectively, you can package these file types with your applicationand access them through either Resources.openRawResource(int id) or Resources.getXml(int id).
Listing 3.10 Arrays.xml used for defining cuisines and ratings
www.it-ebooks.info
98 CHAPTER 3 User interfaces
The last type of resource to examine is the most complex one: the animationresource.
3.3.5 Providing animations
Animations are more complicated than other Android resources, but they’re also themost visually impressive. Android allows you to define animations that can rotate,fade, move, or stretch graphics or text. Although you don’t want to go overboard witha constantly blinking animated shovel, an initial splash or occasional subtle animatedeffect can enhance your UI.
Animation XML files go into the res/anim source directory. As with layouts, youreference the respective animation you want by name/ID. Android supports fourtypes of animations:
<alpha>—Defines fading, from 0.0 to 1.0 (0.0 being transparent) <scale>—Defines sizing, x and y (1.0 being no change) <translate>—Defines motion, x and y (percentage or absolute) <rotate>—Defines rotation, pivot from x and y (degrees)
In addition, Android provides several attributes that can be used with any animationtype:
duration—Time for the animation to complete, in milliseconds startOffset—Offset start time, in milliseconds interpolator—Used to define a velocity curve for speed of animation
The following listing shows a simple animation that you can use to scale a view.
<?xml version="1.0" encoding="utf-8"?><scale xmlns:android="http://schemas.android.com/apk/res/android" android:fromXScale="0.5" android:toXScale="2.0" android:fromYScale="0.5" android:toYScale="2.0" android:pivotX="50%" android:pivotY="50%" android:startOffset="700" android:duration="400" android:fillBefore="false" />
In code, you can reference and use this animation with any View object (TextView, forexample) as follows:
view.startAnimation(AnimationUtils.loadAnimation(this, R.anim.scaler));
This will scale the View element up in size on both the x and y axes. Although we don’thave any animations in the RestaurantFinder sample application by default, to see thisanimation work, you can add the startAnimation() method to any View element inthe code and reload the application.
Listing 3.11 Example of an animation defined in an XML resource, scaler.xml
www.it-ebooks.info
99Exploring the AndroidManifest file
Animations can come in handy, so you should be aware of them. We’ll cover ani-mations and other graphics topics in greater detail in chapter 9.
With our journey through Android resources now complete, we’re going toaddress the final aspect of RestaurantFinder that we need to cover: the Android-Manifest.xml manifest file, which is required for every Android application.
3.4 Exploring the AndroidManifest fileAs you learned in chapter 1, Android requires a manifest file for every application—AndroidManifest.xml. This file, located in the root directory of the project source,describes the application context and any supported activities, services, broadcastreceivers, or content providers, as well as the requested permissions for the applica-tion. You’ll learn more about services, Intents, and BroadcastReceivers in chapter 4and about content providers in chapter 5. For now, the manifest file for ourRestaurantFinder sample application, as shown in the following listing, contains onlythe <application> itself, an <activity> element for each screen, and several <uses-permission> elements.
<?xml version="1.0" encoding="utf-8"?><manifest xmlns:android="http://schemas.android.com/apk/res/android"> <application android:icon="@drawable/restaurant_icon_trans" android:label="@string/app_short_name" android:name="RestaurantFinderApplication" android:allowClearUserData="true" android:theme="@android:style/Theme.Black"> <activity android:name="ReviewCriteria" android:label="@string/app_short_name"> <intent-filter> <action android:name="android.intent.action.MAIN" /> <category android:name="android.intent.category.LAUNCHER" /> </intent-filter> </activity> <activity android:name="ReviewList" android:label="@string/app_name_reviews"> <intent-filter> <category android:name="android.intent.category.DEFAULT" /> <action android:name="com.msi.manning.restaurant.VIEW_LIST" /> </intent-filter> </activity> <activity android:name="ReviewDetail" android:label="@string/app_name_review"> <intent-filter> <category android:name="android.intent.category.DEFAULT" /> <action
Listing 3.12 RestaurantFinder AndroidManifest.xml file
Define ReviewCriteria Activity
b
c
DefineMAIN LAUNCHER
Intent filter
www.it-ebooks.info
100 CHAPTER 3 User interfaces
android:name="com.msi.manning.restaurant.VIEW_DETAIL" /> </intent-filter> </activity> </application> <uses-permission android:name="android.permission.CALL_PHONE" /> <uses-permission android:name="android.permission.INTERNET" /> <uses-sdk android:minSdkVersion="3" android:targetSdkVersion="9"></uses-sdk> <supports-screens largeScreens="false" xlargeScreens="false" anyDensity="false" /> </manifest>
In the RestaurantFinder descriptor file, you first see the root <manifest> element dec-laration, which includes the application’s package declaration and the Androidnamespace. Then you see the <application> element with both the name and iconattributes defined. You don’t need to include the name attribute here unless you wantto extend the default Android Application object to provide some global state toyour application. We took this approach so we could access the Application instanceto store the current Review object. The icon is also optional; if you don’t specify one, asystem default will represent your application on the main menu. We highly recom-mended that you provide an attractive icon for your application to make it stand out.
After the application is defined, you see the child <activity> elements within.These elements define each Activity the application supports B. As we noted whenwe discussed activities in general, one Activity in every application is defined as theentry point for the application; this Activity has the <intent-filter> action MAINand category LAUNCHER designation c. This tells the Android platform how to start anapplication from the Launcher, meaning this Activity will be placed in the mainmenu on the device.
After the ReviewCriteria Activity, you see another <activity> designation forReviewList. This Activity also includes an <intent-filter>, but for our own action,com.msi.manning.restaurant.VIEW_LIST. This tells the platform that this Activityshould be invoked for that Intent. Next, the <uses-permission> elements tell theplatform that this application needs the CALL_PHONE and INTERNET permissions.
The <uses-sdk> element has grown increasingly important as Android hasevolved. This element lets Android’s build tools recognize which version of the SDKyou intend to build with. If you want to access advanced features, either in your codeor in the manifest itself, you must set a targetSdkVersion that supports those fea-tures. Using targetSdkVersion will usually restrict your app to only run on deviceswith that version or higher; if you want to allow running on earlier devices, you can seta lower minSdkVersion. When setting minSdkVersion, make sure that you test on thatversion of device, and in particular verify that you don’t call any APIs that weren’t pres-ent in that SDK—doing so will crash your app. In this example, we’re setting target-SdkVersion to 9 so we can access the xlargeScreens property that was added in thatSDK revision; because we don’t call any APIs that were defined after Android 1.5, wecan safely leave minSdkVersion at 3.
www.it-ebooks.info
101Summary
Finally, <supports-screens> provides some instructions to Android that tell it howto display our UI. By default, Android won’t try to stretch your app to fit very largescreens; as a result, apps that looked good when running on smartphones might looktiny when running on a tablet. By setting xlargeScreeens="false", we’re tellingAndroid that we don’t offer any custom support for larger screens. This will causeAndroid to run our app in screen-compatibility mode, automatically scaling up thesize of our screens to fill a tablet or other large device.
The RestaurantFinder sample application uses a fairly basic manifest file with threeactivities and a series of Intents. Wrapping up the description of the manifest filecompletes our discussion of views, activities, resources, and working with UIs inAndroid.
3.5 SummaryA big part of the Android platform revolves around the UI and the concepts of activi-ties and views. In this chapter, we explored these concepts in detail and worked on asample application to demonstrate them. In relation to activities, we addressed theconcepts and methods involved, and we covered the all-important lifecycle events theplatform uses to manage them. Moving on to views, we looked at common and customtypes, attributes that define layout and appearance, and focus and events.
In addition, we examined how Android handles various types of resources, fromsimple strings to more involved animations. We also explored the Android-Manifest.xml application descriptor and saw how it brings all these componentstogether to define an Android application.
This chapter has given you a good foundation for general Android UI develop-ment. Now we need to go deeper into the Intent and BroadcastReceiver classes,which form the communication layer that Android activities and other componentsrely on. We’ll cover these items, along with longer-running Service processes and theAndroid interprocess communication (IPC) system involving the Binder, in chapter 4,where you’ll also complete the RestaurantFinder application.
www.it-ebooks.info
Intents and Services
You’ve already created some interesting applications that didn’t require mucheffort to build. In this chapter, we’ll dig deeper into the use of Intent objects andrelated classes to accomplish tasks. We’ll expand the RestaurantFinder applicationfrom chapter 3, and show you how an Intent can carry you from one Activity toanother and easily link into outside applications. Next, you’ll create a new weather-reporting application to demonstrate how Android handles background processesthrough a Service. We’ll wrap up the chapter with an example of using the AndroidInterface Definition Language (AIDL) to make different applications communicatewith one another.
We introduced the Intent in chapter 1. An Intent describes something youwant to do, which might be as vague as “Do whatever is appropriate for this URL” oras specific as “Purchase a flight from San Jose to Chicago for $400.” You saw several
This chapter covers Asking other programs to do work for you with Intents
Advertising your capabilities with intent filters
Eavesdropping on other apps with broadcast receivers
Building Services to provide long-lived background processing
Offering APIs to external applications through AIDL
102
www.it-ebooks.info

103Serving up RestaurantFinder with Intent
examples of working with Intent objects in chapter 3. In this chapter, we’ll look moreclosely at the contents of an Intent and how it matches with an IntentFilter. TheRestaurantFinder app will use these concepts to display a variety of screens.
After you complete the RestaurantFinder application, we’ll move on to Weather-Reporter. WeatherReporter will use the Yahoo! Weather API to retrieve weather dataand alerts and show them to the user. Along the way, you’ll see how an Intent canrequest work outside your UI by using a BroadcastReceiver and a Service. ABroadcastReceiver catches broadcasts sent to any number of interested receivers.Services also begin with an Intent but work in background processes rather thanUI screens.
Finally, we’ll examine the mechanism for making interprocess communication(IPC) possible using Binder objects and AIDL. Android provides a high-performanceway for different processes to pass messages among themselves.
All these mechanisms require the use of Intent objects, so we’ll begin by lookingat the details of this class.
4.1 Serving up RestaurantFinder with IntentThe mobile Android architecture looks a lot like the service-oriented architecture(SOA) that’s common in server development. Each Activity can make an Intent callto get something done without knowing exactly who’ll receive that Intent. Develop-ers usually don’t care how a particular task gets performed, only that it’s completed totheir requirements. As you complete the RestaurantFinder application, you’ll see thatyou can request sophisticated tasks while remaining vague about how those tasksshould get done.
Intent requests are late binding; they’re mapped and routed to a component thatcan handle a specified task at runtime rather than at build or compile time. OneActivity tells the platform, “I need a map of Langtry, TX, US,” and another compo-nent returns the result. With this approach, individual components are decoupledand can be modified, enhanced, and maintained without requiring changes to alarger application or system.
Let’s look at how to define an Intent in code, how to invoke an Intent within anActivity, and how Android resolves Intent routing with IntentFilter classes. Thenwe’ll talk about Intents that anyone can use because they’re built into the platform.
4.1.1 Defining Intents
Suppose that you want to call a restaurant to make a reservation. When you’re craftingan Intent for this, you need to include two critical pieces of information. An action isa verb describing what you want to do—in this case, make a phone call. Data is a noundescribing the particular thing to request—in this case, the phone number. Youdescribe the data with a Uri object, which we’ll describe more thoroughly in the nextsection. You can also optionally populate the Intent with other information that fur-ther describes how to handle the request. Table 4.1 lists all the components of anIntent object.
www.it-ebooks.info
104 CHAPTER 4 Intents and Services
Intent definitions typically express a combination of action, data, and other attri-butes, such as category. You combine enough information to describe the task youwant done. Android uses the information you provide to resolve which class shouldfulfill the request.
4.1.2 Implicit and explicit invocation
Android’s loose coupling allows you to write applications that make vague requests.An implicit Intent invocation happens when the platform determines which compo-nent should run the Intent. In our example of making a phone call, we don’t carewhether the user has the native Android dialer or has installed a third-party dialingapp; we only care that the call gets made. We’ll let Android resolve the Intent usingthe action, data, and category we defined. We’ll explore this resolution process indetail in the next section.
Other times, you want to use an Intent to accomplish some work, but you want tomake sure that you handle it yourself. When you open a review in RestaurantFinder,you don’t want a third party to intercept that request and show its own review instead.In an explicit Intent invocation, your code directly specifies which componentshould handle the Intent. You perform an explicit invocation by specifying either thereceiver’s Class or its ComponentName. The ComponentName provides the fully qualifiedclass name, consisting of a String for the package and a String for the class.
To explicitly invoke an Intent, you can use the following form: Intent(Contextctx, Class cls). With this approach, you can short-circuit all the Android Intent-resolution wiring and directly pass in an Activity class reference to handle theIntent. Although this approach is convenient and fast, it also introduces tight cou-pling that might be a disadvantage later if you want to start using a different Activity.
Table 4.1 Intent data and descriptions
Intent attribute Description
Action Fully qualified String indicating the action (for example,android.intent.action.DIAL)
Category Describes where and how the Intent can be used, such as from the main Android menu or from the browser
Component Specifies an explicit package and class to use for the Intent, instead of infer-ring from action, type, and categories
Data Data to work with, expressed as a URI (for example, content://contacts/1)
Extras Extra data to pass to the Intent in the form of a Bundle
Type Specifies an explicit MIME type, such as text/plain or vnd.android.cursor.item/email_v2
www.it-ebooks.info
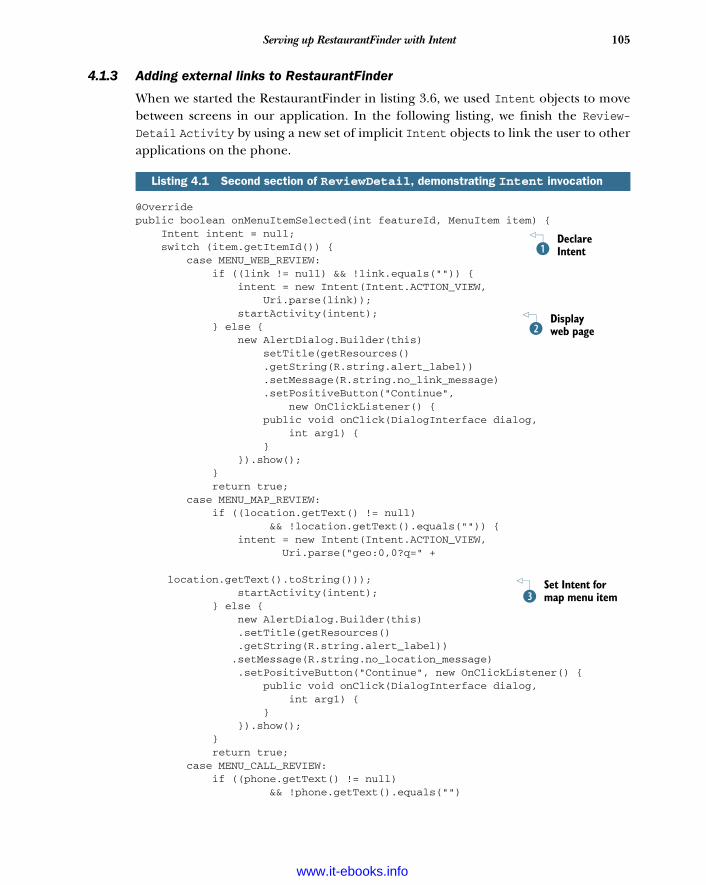
105Serving up RestaurantFinder with Intent
4.1.3 Adding external links to RestaurantFinder
When we started the RestaurantFinder in listing 3.6, we used Intent objects to movebetween screens in our application. In the following listing, we finish the Review-Detail Activity by using a new set of implicit Intent objects to link the user to otherapplications on the phone.
@Overridepublic boolean onMenuItemSelected(int featureId, MenuItem item) { Intent intent = null; switch (item.getItemId()) { case MENU_WEB_REVIEW: if ((link != null) && !link.equals("")) { intent = new Intent(Intent.ACTION_VIEW, Uri.parse(link)); startActivity(intent); } else { new AlertDialog.Builder(this) setTitle(getResources() .getString(R.string.alert_label)) .setMessage(R.string.no_link_message) .setPositiveButton("Continue", new OnClickListener() { public void onClick(DialogInterface dialog, int arg1) { } }).show(); } return true; case MENU_MAP_REVIEW: if ((location.getText() != null) && !location.getText().equals("")) { intent = new Intent(Intent.ACTION_VIEW, Uri.parse("geo:0,0?q=" +
location.getText().toString())); startActivity(intent); } else { new AlertDialog.Builder(this) .setTitle(getResources() .getString(R.string.alert_label)) .setMessage(R.string.no_location_message) .setPositiveButton("Continue", new OnClickListener() { public void onClick(DialogInterface dialog, int arg1) { } }).show(); } return true; case MENU_CALL_REVIEW: if ((phone.getText() != null) && !phone.getText().equals("")
Listing 4.1 Second section of ReviewDetail, demonstrating Intent invocation
Declare IntentB
Display web pageC
Set Intent for map menu itemD
www.it-ebooks.info
106 CHAPTER 4 Intents and Services
&& !phone.getText().equals("NA")) { String phoneString = parsePhone(phone.getText().toString()); intent = new Intent(Intent.ACTION_CALL, Uri.parse("tel:" + phoneString)); startActivity(intent); } else { new AlertDialog.Builder(this) .setTitle(getResources() .getString(R.string.alert_label)) .setMessage(R.string.no_phone_message) .setPositiveButton("Continue", new OnClickListener() { public void onClick(DialogInterface dialog, int arg1) { } }).show(); } return true; } return super.onMenuItemSelected(featureId, item); } private String parsePhone(final String phone) { String parsed = phone; parsed = parsed.replaceAll("\\D", ""); parsed = parsed.replaceAll("\\s", ""); return parsed.trim(); }
The Review model object contains the address and phone number for a restaurant anda link to a full online review. Using ReviewDetail Activity, the user can open themenu and choose to display a map with directions to the restaurant, call the restaurant,or view the full review in a web browser. To allow all of these actions to take place,ReviewDetail launches built-in Android applications through implicit Intent calls.
In our new code, we initialize an Intent class instance B so it can be used later bythe menu cases. If the user selects the MENU_WEB_REVIEW menu button, we create anew instance of the Intent variable by passing in an action and data. For the action,we use the String constant Intent.ACTION_VIEW, which has the valueandroid.app.action.VIEW. You can use either the constant or the value, but stickingto constants helps ensure that you don’t mistype the name. Other common actionsare Intent.ACTION_EDIT, Intent.ACTION_INSERT, and Intent.ACTION_DELETE.
For the data component of the Intent, we use Uri.parse(link) to create a URI.We’ll look at Uri in more detail in the next section; for now, just know that this allowsthe correct component to answer the startActivity(Intent i) request C and ren-der the resource identified by the URI. We don’t directly declare any particularActivity or Service for the Intent; we simply say we want to view http://somehost/somepath. Android’s late-binding mechanism will interpret this request at runtime,most likely by launching the device’s built-in browser.
ReviewDetail also handles the MENU_MAP_REVIEW menu item. We initialize theIntent to use Intent.ACTION_VIEW again, but this time with a different type of URI:
Set Intent for call menu itemE
www.it-ebooks.info
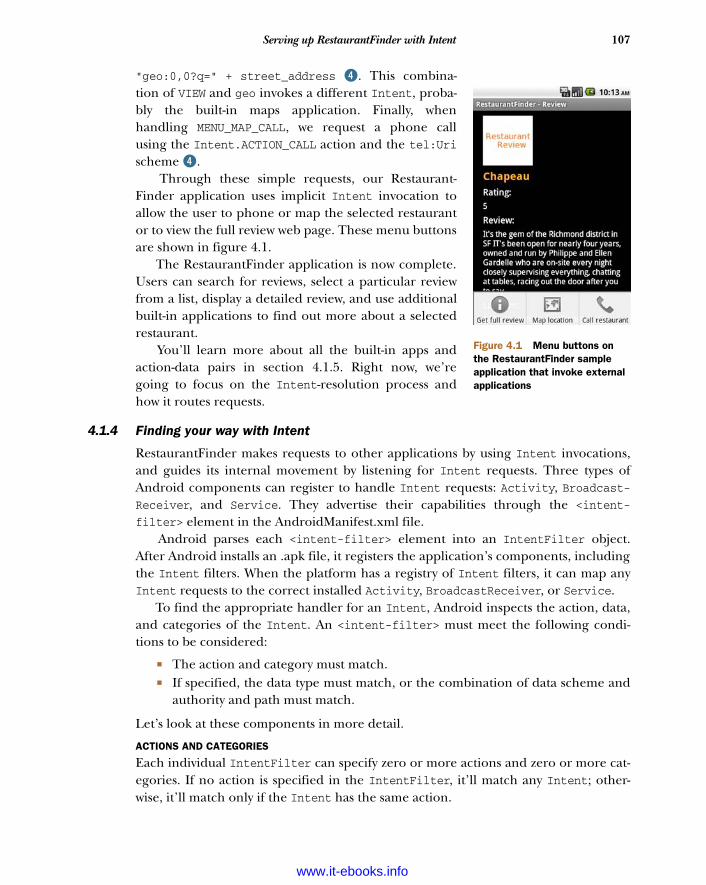
107Serving up RestaurantFinder with Intent
"geo:0,0?q=" + street_address E. This combina-tion of VIEW and geo invokes a different Intent, proba-bly the built-in maps application. Finally, whenhandling MENU_MAP_CALL, we request a phone callusing the Intent.ACTION_CALL action and the tel:Urischeme E.
Through these simple requests, our Restaurant-Finder application uses implicit Intent invocation toallow the user to phone or map the selected restaurantor to view the full review web page. These menu buttonsare shown in figure 4.1.
The RestaurantFinder application is now complete.Users can search for reviews, select a particular reviewfrom a list, display a detailed review, and use additionalbuilt-in applications to find out more about a selectedrestaurant.
You’ll learn more about all the built-in apps andaction-data pairs in section 4.1.5. Right now, we’regoing to focus on the Intent-resolution process andhow it routes requests.
4.1.4 Finding your way with Intent
RestaurantFinder makes requests to other applications by using Intent invocations,and guides its internal movement by listening for Intent requests. Three types ofAndroid components can register to handle Intent requests: Activity, Broadcast-Receiver, and Service. They advertise their capabilities through the <intent-filter> element in the AndroidManifest.xml file.
Android parses each <intent-filter> element into an IntentFilter object.After Android installs an .apk file, it registers the application’s components, includingthe Intent filters. When the platform has a registry of Intent filters, it can map anyIntent requests to the correct installed Activity, BroadcastReceiver, or Service.
To find the appropriate handler for an Intent, Android inspects the action, data,and categories of the Intent. An <intent-filter> must meet the following condi-tions to be considered:
The action and category must match. If specified, the data type must match, or the combination of data scheme and
authority and path must match.
Let’s look at these components in more detail.
ACTIONS AND CATEGORIES
Each individual IntentFilter can specify zero or more actions and zero or more cat-egories. If no action is specified in the IntentFilter, it’ll match any Intent; other-wise, it’ll match only if the Intent has the same action.
Figure 4.1 Menu buttons on the RestaurantFinder sample application that invoke external applications
www.it-ebooks.info
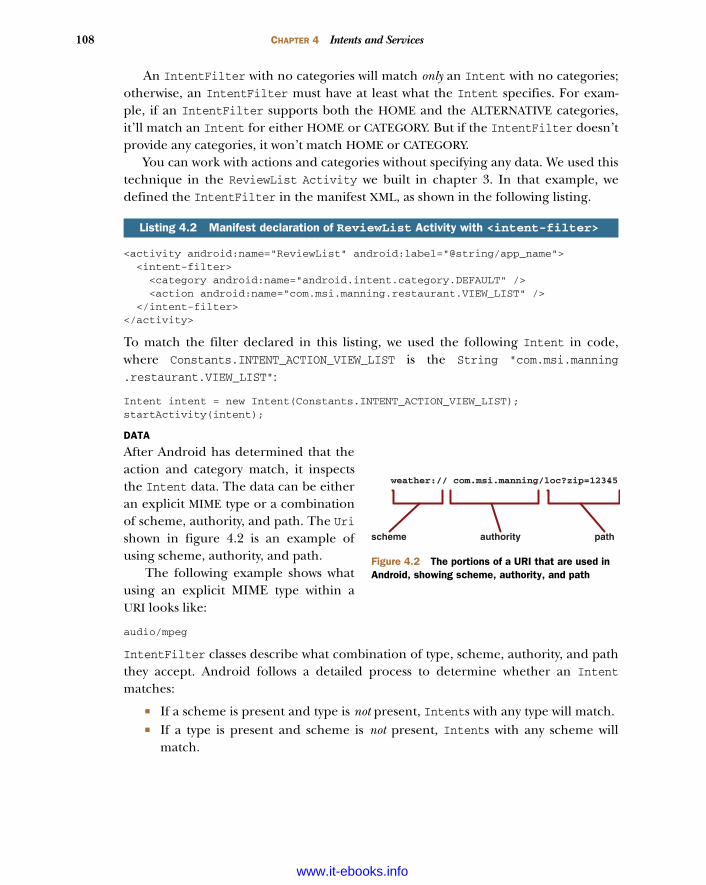
108 CHAPTER 4 Intents and Services
An IntentFilter with no categories will match only an Intent with no categories;otherwise, an IntentFilter must have at least what the Intent specifies. For exam-ple, if an IntentFilter supports both the HOME and the ALTERNATIVE categories,it’ll match an Intent for either HOME or CATEGORY. But if the IntentFilter doesn’tprovide any categories, it won’t match HOME or CATEGORY.
You can work with actions and categories without specifying any data. We used thistechnique in the ReviewList Activity we built in chapter 3. In that example, wedefined the IntentFilter in the manifest XML, as shown in the following listing.
<activity android:name="ReviewList" android:label="@string/app_name"> <intent-filter> <category android:name="android.intent.category.DEFAULT" /> <action android:name="com.msi.manning.restaurant.VIEW_LIST" /> </intent-filter></activity>
To match the filter declared in this listing, we used the following Intent in code,where Constants.INTENT_ACTION_VIEW_LIST is the String "com.msi.manning
.restaurant.VIEW_LIST":
Intent intent = new Intent(Constants.INTENT_ACTION_VIEW_LIST);startActivity(intent);
DATA
After Android has determined that theaction and category match, it inspectsthe Intent data. The data can be eitheran explicit MIME type or a combinationof scheme, authority, and path. The Urishown in figure 4.2 is an example ofusing scheme, authority, and path.
The following example shows whatusing an explicit MIME type within aURI looks like:
audio/mpeg
IntentFilter classes describe what combination of type, scheme, authority, and paththey accept. Android follows a detailed process to determine whether an Intentmatches:
If a scheme is present and type is not present, Intents with any type will match. If a type is present and scheme is not present, Intents with any scheme will
match.
Listing 4.2 Manifest declaration of ReviewList Activity with <intent-filter>
weather:// com.msi.manning/loc?zip=12345
scheme authority path
Figure 4.2 The portions of a URI that are used in Android, showing scheme, authority, and path
www.it-ebooks.info
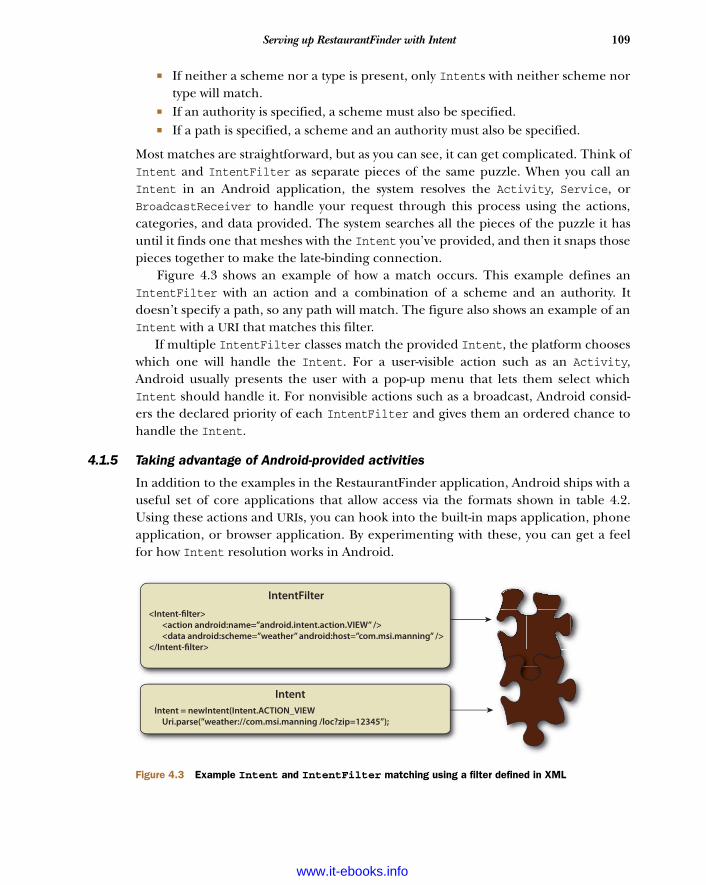
109Serving up RestaurantFinder with Intent
If neither a scheme nor a type is present, only Intents with neither scheme nortype will match.
If an authority is specified, a scheme must also be specified. If a path is specified, a scheme and an authority must also be specified.
Most matches are straightforward, but as you can see, it can get complicated. Think ofIntent and IntentFilter as separate pieces of the same puzzle. When you call anIntent in an Android application, the system resolves the Activity, Service, orBroadcastReceiver to handle your request through this process using the actions,categories, and data provided. The system searches all the pieces of the puzzle it hasuntil it finds one that meshes with the Intent you’ve provided, and then it snaps thosepieces together to make the late-binding connection.
Figure 4.3 shows an example of how a match occurs. This example defines anIntentFilter with an action and a combination of a scheme and an authority. Itdoesn’t specify a path, so any path will match. The figure also shows an example of anIntent with a URI that matches this filter.
If multiple IntentFilter classes match the provided Intent, the platform chooseswhich one will handle the Intent. For a user-visible action such as an Activity,Android usually presents the user with a pop-up menu that lets them select whichIntent should handle it. For nonvisible actions such as a broadcast, Android consid-ers the declared priority of each IntentFilter and gives them an ordered chance tohandle the Intent.
4.1.5 Taking advantage of Android-provided activities
In addition to the examples in the RestaurantFinder application, Android ships with auseful set of core applications that allow access via the formats shown in table 4.2.Using these actions and URIs, you can hook into the built-in maps application, phoneapplication, or browser application. By experimenting with these, you can get a feelfor how Intent resolution works in Android.
IntentFilter
<Intent-filter>
<action android:name=”android.intent.action.VIEW” />
<data android:scheme=”weather” android:host=”com.msi.manning” />
</Intent-filter>
Intent
Intent = newIntent(Intent.ACTION_VIEW
Uri.parse(”weather://com.msi.manning /loc?zip=12345”);
Figure 4.3 Example Intent and IntentFilter matching using a filter defined in XML
www.it-ebooks.info
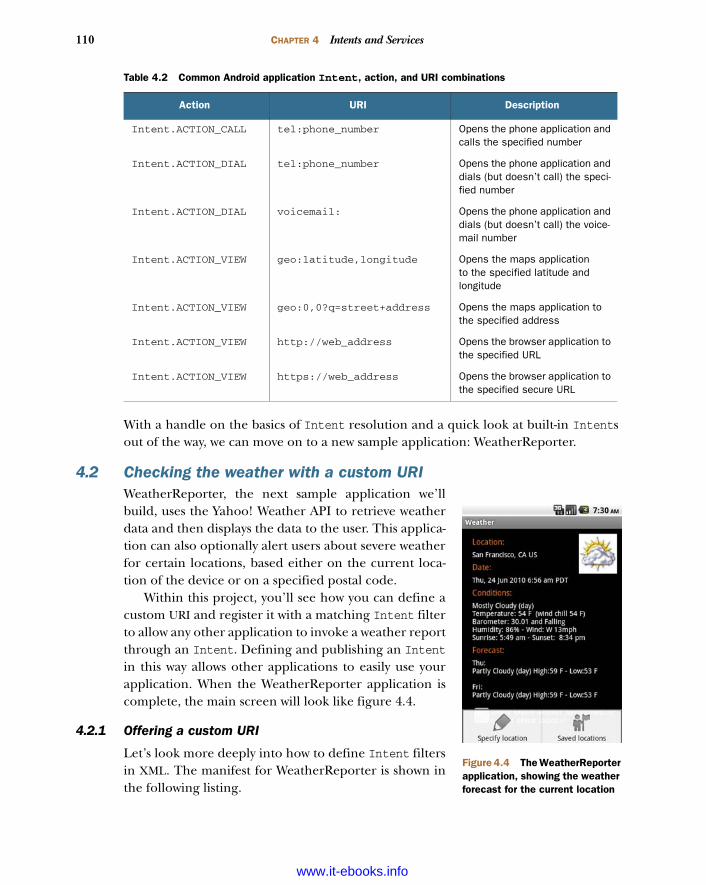
110 CHAPTER 4 Intents and Services
With a handle on the basics of Intent resolution and a quick look at built-in Intentsout of the way, we can move on to a new sample application: WeatherReporter.
4.2 Checking the weather with a custom URIWeatherReporter, the next sample application we’llbuild, uses the Yahoo! Weather API to retrieve weatherdata and then displays the data to the user. This applica-tion can also optionally alert users about severe weatherfor certain locations, based either on the current loca-tion of the device or on a specified postal code.
Within this project, you’ll see how you can define acustom URI and register it with a matching Intent filterto allow any other application to invoke a weather reportthrough an Intent. Defining and publishing an Intentin this way allows other applications to easily use yourapplication. When the WeatherReporter application iscomplete, the main screen will look like figure 4.4.
4.2.1 Offering a custom URI
Let’s look more deeply into how to define Intent filtersin XML. The manifest for WeatherReporter is shown inthe following listing.
Table 4.2 Common Android application Intent, action, and URI combinations
Action URI Description
Intent.ACTION_CALL tel:phone_number Opens the phone application and calls the specified number
Intent.ACTION_DIAL tel:phone_number Opens the phone application and dials (but doesn’t call) the speci-fied number
Intent.ACTION_DIAL voicemail: Opens the phone application and dials (but doesn’t call) the voice-mail number
Intent.ACTION_VIEW geo:latitude,longitude Opens the maps application to the specified latitude and longitude
Intent.ACTION_VIEW geo:0,0?q=street+address Opens the maps application to the specified address
Intent.ACTION_VIEW http://web_address Opens the browser application to the specified URL
Intent.ACTION_VIEW https://web_address Opens the browser application to the specified secure URL
Figure 4.4 The WeatherReporter application, showing the weather forecast for the current location
www.it-ebooks.info
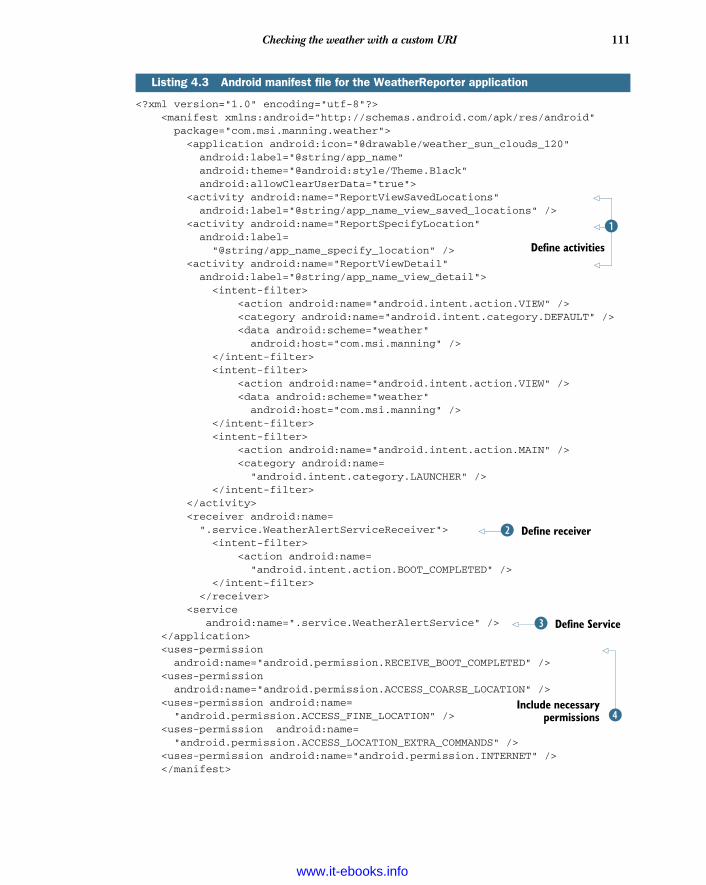
111Checking the weather with a custom URI
<?xml version="1.0" encoding="utf-8"?> <manifest xmlns:android="http://schemas.android.com/apk/res/android" package="com.msi.manning.weather"> <application android:icon="@drawable/weather_sun_clouds_120" android:label="@string/app_name" android:theme="@android:style/Theme.Black" android:allowClearUserData="true"> <activity android:name="ReportViewSavedLocations" android:label="@string/app_name_view_saved_locations" /> <activity android:name="ReportSpecifyLocation" android:label= "@string/app_name_specify_location" /> <activity android:name="ReportViewDetail" android:label="@string/app_name_view_detail"> <intent-filter> <action android:name="android.intent.action.VIEW" /> <category android:name="android.intent.category.DEFAULT" /> <data android:scheme="weather" android:host="com.msi.manning" /> </intent-filter> <intent-filter> <action android:name="android.intent.action.VIEW" /> <data android:scheme="weather" android:host="com.msi.manning" /> </intent-filter> <intent-filter> <action android:name="android.intent.action.MAIN" /> <category android:name= "android.intent.category.LAUNCHER" /> </intent-filter> </activity> <receiver android:name= ".service.WeatherAlertServiceReceiver"> <intent-filter> <action android:name= "android.intent.action.BOOT_COMPLETED" /> </intent-filter> </receiver> <service android:name=".service.WeatherAlertService" /> </application> <uses-permission android:name="android.permission.RECEIVE_BOOT_COMPLETED" /> <uses-permission android:name="android.permission.ACCESS_COARSE_LOCATION" /> <uses-permission android:name= "android.permission.ACCESS_FINE_LOCATION" /> <uses-permission android:name= "android.permission.ACCESS_LOCATION_EXTRA_COMMANDS" /> <uses-permission android:name="android.permission.INTERNET" /> </manifest>
Listing 4.3 Android manifest file for the WeatherReporter application
B
Define activities
Define receiverC
Define ServiceD
EInclude necessary
permissions
www.it-ebooks.info
112 CHAPTER 4 Intents and Services
In the WeatherReporter manifest, we define three activities B. The first two don’tinclude an <intent-filter>, so they can only be explicitly invoked from within thisapplication. The ReportViewDetail Activity has multiple <intent-filter> tagsdefined for it, including one denoting it as the MAIN LAUNCHER and one with theweather://com.msi.manning scheme and authority. Our application supports thiscustom URI to provide weather access.
You can use any combination of scheme, authority, and path, as shown in listing4.3, or you can use an explicit MIME type. You’ll find out more about MIME types andhow they’re processed in chapter 5, where we’ll look at data sources and use anAndroid concept known as a ContentProvider.
After we define these activities, we use the <receiver> element in the manifest fileto refer to a BroadcastReceiver class C. We’ll examine BroadcastReceiver moreclosely in section 4.3, but for now know that an <intent-filter> associates thisreceiver with an Intent—in this case, for the BOOT_COMPLETED action. This filter tellsthe platform to invoke the WeatherAlertServiceReceiver class after it completes thebootup sequence.
We also define a Service D. You’ll see how this Service is built, and how it pollsfor severe weather alerts in the background, in section 4.3. Finally, our manifestincludes a set of required permissions E.
4.2.2 Inspecting a custom URI
With the foundation for our sample application in place via the manifest, Android willlaunch WeatherReporter when it encounters a request that uses our custom URI. Asusual, it’ll invoke the onStart() method of the main Activity WeatherReporter willuse. The following listing shows our implementation, where we parse data from theURI and use it to display a weather report.
@Overridepublic void onStart() { super.onStart(); dbHelper = new DBHelper(this); deviceZip = WeatherAlertService.deviceLocationZIP; if ((getIntent().getData() != null) && (getIntent().getData().getEncodedQuery() != null) && (getIntent().getData().getEncodedQuery().length() > 8)) { String queryString = getIntent().getData().getEncodedQuery(); reportZip = queryString.substring(4, 9); useDeviceLocation = false; } else { reportZip = deviceZip; useDeviceLocation = true; } savedLocation = dbHelper.get(reportZip); deviceAlertEnabledLocation = dbHelper.get(DBHelper.DEVICE_ALERT_ENABLED_ZIP);
Listing 4.4 onStart() method of the ReportViewDetail Activity
Create database helper
B Get device location postal code
C
www.it-ebooks.info
113Checking the weather with a custom URI
if (useDeviceLocation) { currentCheck.setText(R.string.view_checkbox_current); if (deviceAlertEnabledLocation != null) { currentCheck.setChecked(true); } else { currentCheck.setChecked(false); } } else { currentCheck.setText(R.string.view_checkbox_specific); if (savedLocation != null) { if (savedLocation.alertenabled == 1) { currentCheck.setChecked(true); } else { currentCheck.setChecked(false); } } } loadReport(reportZip);}
You can get the complete ReportViewDetail Activity from the source code down-load for this chapter. In the onStart() method shown in this listing, we focus on pars-ing data from the URI passed in as part of the Intent that invokes the Activity.
First, we establish a database helper object B. This object will be used to query alocal SQLite database that stores user-specified location data. We’ll show more abouthow data is handled, and the details of this helper class, in chapter 5.
In this method, we also obtain the postal code of the current device location froma LocationManager in the WeatherAlertService class C. We want to use the locationof the device as the default weather report location. As the user travels with thephone, this location will automatically update. We’ll cover location and Location-Manager in chapter 11.
After obtaining the device location, we move on to the key aspect of obtaining URIdata from an Intent. We check whether our Intent provided specific data; if so, weparse the URI passed in to obtain the queryString and embedded postal code to usefor the user’s specified location. If this location is present, we use it; if not, we defaultto the device location postal code.
After determining the postal code to use, we set the status of the check box thatindicates whether to enable alerts D. We have two kinds of alerts: one for the devicelocation and another for the user’s specified saved locations.
Finally, we call the loadReport() method, which makes the call to the Yahoo!Weather API to obtain data; then we use a Handler to send a Message to update theneeded UI View elements.
Remember that this Activity registered in the manifest to receive weather://com.msi.manning Intents. Any application can invoke this Activity without knowingany details other than the URI. This separation of responsibilities enables late binding.After invocation, we check the URI to see what our caller wanted.
You’ve now seen the manifest and pertinent details of the main Activity class forthe WeatherReporter application we’ll build in the next few sections. We’ve also
DSet status of alert-enabled check box
www.it-ebooks.info
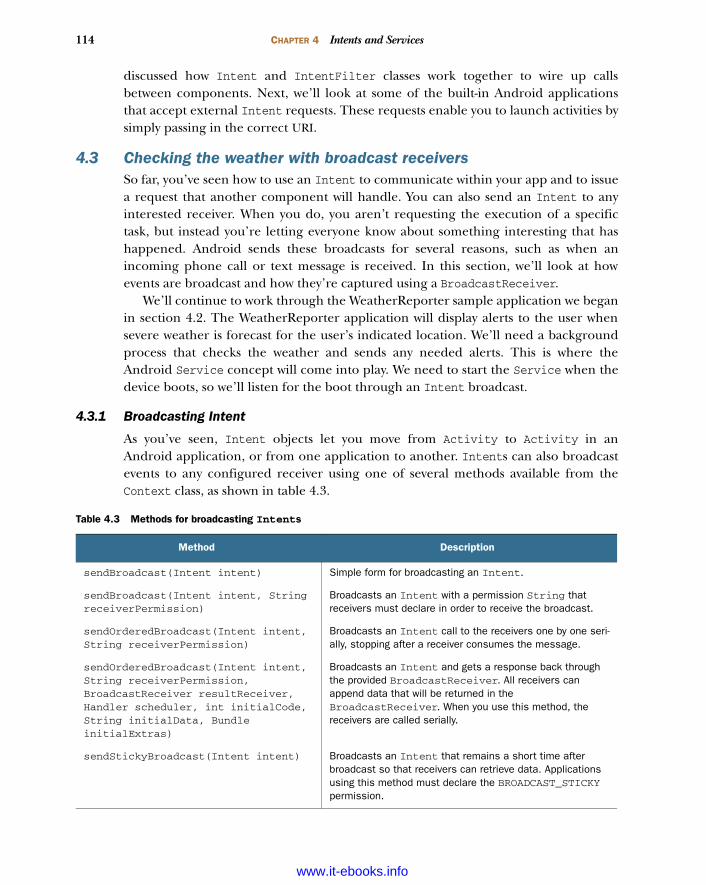
114 CHAPTER 4 Intents and Services
discussed how Intent and IntentFilter classes work together to wire up callsbetween components. Next, we’ll look at some of the built-in Android applicationsthat accept external Intent requests. These requests enable you to launch activities bysimply passing in the correct URI.
4.3 Checking the weather with broadcast receiversSo far, you’ve seen how to use an Intent to communicate within your app and to issuea request that another component will handle. You can also send an Intent to anyinterested receiver. When you do, you aren’t requesting the execution of a specifictask, but instead you’re letting everyone know about something interesting that hashappened. Android sends these broadcasts for several reasons, such as when anincoming phone call or text message is received. In this section, we’ll look at howevents are broadcast and how they’re captured using a BroadcastReceiver.
We’ll continue to work through the WeatherReporter sample application we beganin section 4.2. The WeatherReporter application will display alerts to the user whensevere weather is forecast for the user’s indicated location. We’ll need a backgroundprocess that checks the weather and sends any needed alerts. This is where theAndroid Service concept will come into play. We need to start the Service when thedevice boots, so we’ll listen for the boot through an Intent broadcast.
4.3.1 Broadcasting Intent
As you’ve seen, Intent objects let you move from Activity to Activity in anAndroid application, or from one application to another. Intents can also broadcastevents to any configured receiver using one of several methods available from theContext class, as shown in table 4.3.
Table 4.3 Methods for broadcasting Intents
Method Description
sendBroadcast(Intent intent) Simple form for broadcasting an Intent.
sendBroadcast(Intent intent, String receiverPermission)
Broadcasts an Intent with a permission String that receivers must declare in order to receive the broadcast.
sendOrderedBroadcast(Intent intent, String receiverPermission)
Broadcasts an Intent call to the receivers one by one seri-ally, stopping after a receiver consumes the message.
sendOrderedBroadcast(Intent intent, String receiverPermission, BroadcastReceiver resultReceiver, Handler scheduler, int initialCode, String initialData, Bundle initialExtras)
Broadcasts an Intent and gets a response back through the provided BroadcastReceiver. All receivers can append data that will be returned in the BroadcastReceiver. When you use this method, the receivers are called serially.
sendStickyBroadcast(Intent intent) Broadcasts an Intent that remains a short time after broadcast so that receivers can retrieve data. Applications using this method must declare the BROADCAST_STICKYpermission.
www.it-ebooks.info
115Checking the weather with broadcast receivers
When you broadcast Intents, you send an event into the background. A broadcastIntent doesn’t invoke an Activity, so your current screen usually remains in theforeground.
You can also optionally specify a permission when you broadcast an Intent. Onlyreceivers that have declared that permission will receive the broadcast; all others willremain unaware of it. You can use this mechanism to ensure that only certain trustedapplications can listen in on what your app does. You can review permission declara-tions in chapter 1.
Broadcasting an Intent is fairly straightforward; you use the Context object tosend it, and interested receivers catch it. Android provides a set of platform-relatedIntent broadcasts that use this approach. In certain situations, such as when the timezone on the platform changes, when the device completes booting, or when a packageis added or removed, the system broadcasts an event using an Intent. Table 4.4 showssome of the specific Intent broadcasts the platform provides.
To register to receive an Intent broadcast, you implement a BroadcastReceiver.You’ll make your own implementation to catch the platform-provided BOOT_COMPLETEDIntent to start the weather alert service.
4.3.2 Creating a receiver
Because the weather alert Service you’re going to create should always run in thebackground, you need a way to start it when the platform boots. To do this, you’ll cre-ate a BroadcastReceiver that listens for the BOOT_COMPLETED Intent broadcast.
The BroadcastReceiver base class provides a series of methods that let you getand set a result code, result data (in the form of a String), and an extra Bundle. Italso defines a lifecycle-related method to run when the appropriate Intent isreceived.
You can associate a BroadcastReceiver with an IntentFilter in code or in themanifest XML file. We declared this for the WeatherReporter manifest in listing 4.3,where we associated the BOOT_COMPLETED broadcast with the WeatherAlertService-Receiver class. This class is shown in the following listing.
Table 4.4 Broadcast actions provided by the Android platform
Action Description
ACTION_BATTERY_CHANGED Sent when the battery charge level or charging state changes
ACTION_BOOT_COMPLETED Sent when the platform completes booting
ACTION_PACKAGE_ADDED Sent when a package is added to the platform
ACTION_PACKAGE_REMOVED Sent when a package is removed from the platform
ACTION_TIME_CHANGED Sent when the user changes the time on the device
ACTION_TIME_TICK Sent every minute to indicate that time is ticking
ACTION_TIMEZONE_CHANGED Sent when the user changes the time
www.it-ebooks.info
116 CHAPTER 4 Intents and Services
public class WeatherAlertServiceReceiver extends BroadcastReceiver { @Override public void onReceive(Context context, Intent intent) { if (intent.getAction().equals(Intent.ACTION_BOOT_COMPLETED)) { context.startService(new Intent(context, WeatherAlertService.class)); } }}
When you create your own Intent broadcast receiver, you extend the Broadcast-Receiver class and implement the abstract onReceive(Context c, Intent i) method.In our implementation, we start the WeatherAlertService. This Service class, whichwe’ll create next, is started using the Context.startService(Intent i, Bundle b)method.
Keep in mind that receiver class instances have a short and focused lifecycle. Aftercompleting the onReceive(Context c, Intent i) method, the instance and processthat invoked the receiver are no longer needed and might be killed by the system. Forthis reason, you can’t perform any asynchronous operations in a BroadcastReceiver,such as starting a thread or showing a dialog. Instead, you can start a Service, as we’vedone in listing 4.5, and use it to do work.
Our receiver has started the WeatherAlertService, which will run in the back-ground and warn users of severe weather in the forecast with a Notification-basedalert. Let’s look more deeply into the concept of an Android Service.
4.4 Building a background weather serviceIn a basic Android application, you create Activityclasses and move from screen to screen using Intentcalls, as we’ve done in previous chapters. This approachworks for the canonical Android screen-to-screen fore-ground application, but it doesn’t work for cases likeours where we want to always listen for changes in theweather, even if the user doesn’t currently have our appopen. For this, we need a Service.
In this section, we’ll implement the Weather-AlertService we launched in listing 4.4. This Servicesends an alert to the user when it learns of severeweather in a specified location. This alert will displayover any application, in the form of a Notification, ifsevere weather is detected. Figure 4.5 shows the notifi-cation we’ll send.
A background task is typically a process that doesn’tinvolve direct user interaction or any type of UI. This
Listing 4.5 WeatherAlertServiceReceiver BroadcastReceiver class
Figure 4.5 Warning from a background application about severe weather
www.it-ebooks.info
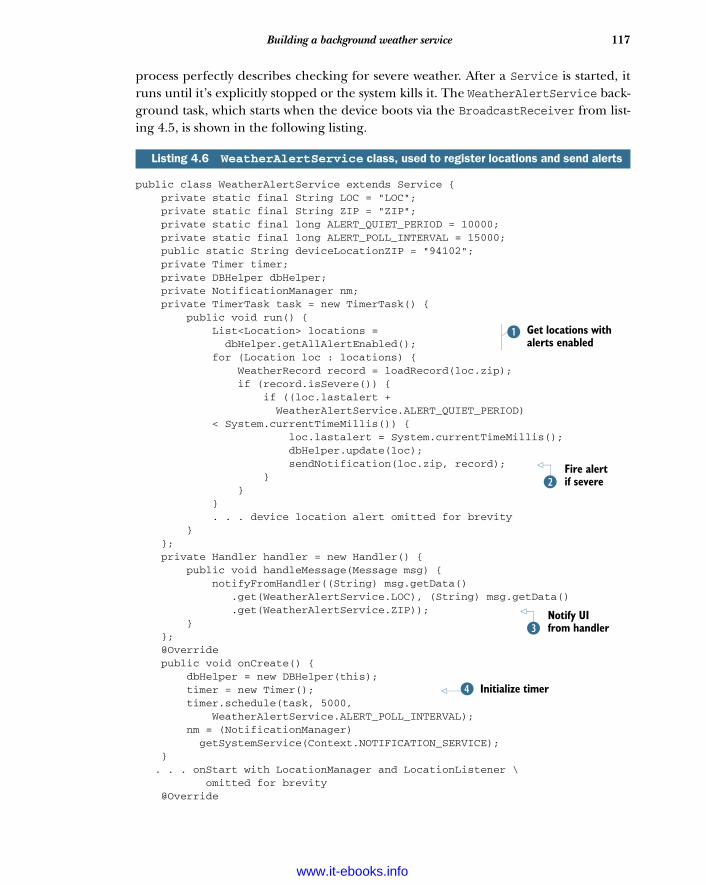
117Building a background weather service
process perfectly describes checking for severe weather. After a Service is started, itruns until it’s explicitly stopped or the system kills it. The WeatherAlertService back-ground task, which starts when the device boots via the BroadcastReceiver from list-ing 4.5, is shown in the following listing.
public class WeatherAlertService extends Service { private static final String LOC = "LOC"; private static final String ZIP = "ZIP"; private static final long ALERT_QUIET_PERIOD = 10000; private static final long ALERT_POLL_INTERVAL = 15000; public static String deviceLocationZIP = "94102"; private Timer timer; private DBHelper dbHelper; private NotificationManager nm; private TimerTask task = new TimerTask() { public void run() { List<Location> locations = dbHelper.getAllAlertEnabled(); for (Location loc : locations) { WeatherRecord record = loadRecord(loc.zip); if (record.isSevere()) { if ((loc.lastalert + WeatherAlertService.ALERT_QUIET_PERIOD) < System.currentTimeMillis()) { loc.lastalert = System.currentTimeMillis(); dbHelper.update(loc); sendNotification(loc.zip, record); } } } . . . device location alert omitted for brevity } }; private Handler handler = new Handler() { public void handleMessage(Message msg) { notifyFromHandler((String) msg.getData() .get(WeatherAlertService.LOC), (String) msg.getData() .get(WeatherAlertService.ZIP)); } }; @Override public void onCreate() { dbHelper = new DBHelper(this); timer = new Timer(); timer.schedule(task, 5000, WeatherAlertService.ALERT_POLL_INTERVAL); nm = (NotificationManager) getSystemService(Context.NOTIFICATION_SERVICE); } . . . onStart with LocationManager and LocationListener \ omitted for brevity @Override
Listing 4.6 WeatherAlertService class, used to register locations and send alerts
Get locations with alerts enabled
B
Fire alert if severeC
Notify UI from handlerD
Initialize timerE
www.it-ebooks.info
118 CHAPTER 4 Intents and Services
public void onDestroy() { super.onDestroy(); dbHelper.cleanup(); } @Override public IBinder onBind(Intent intent) { return null; } protected WeatherRecord loadRecord(String zip) { final YWeatherFetcher ywh = new YWeatherFetcher(zip, true); return ywh.getWeather(); } private void sendNotification(String zip, WeatherRecord record) { Message message = Message.obtain(); Bundle bundle = new Bundle(); bundle.putString(WeatherAlertService.ZIP, zip); bundle.putString(WeatherAlertService.LOC, record.getCity() + ", " + record.getRegion()); message.setData(bundle); handler.sendMessage(message); } private void notifyFromHandler(String location, String zip) { Uri uri = Uri.parse("weather://com.msi.manning/loc?zip=" + zip); Intent intent = new Intent(Intent.ACTION_VIEW, uri); PendingIntent pendingIntent = PendingIntent.getActivity(this, Intent.FLAG_ACTIVITY_NEW_TASK, intent,PendingIntent.FLAG_ONE_SHOT); final Notification n = new Notification(R.drawable.severe_weather_24, "Severe Weather Alert!", System.currentTimeMillis()); n.setLatestEventInfo(this, "Severe Weather Alert!", location, pendingIntent); nm.notify(Integer.parseInt(zip), n); }}
WeatherAlertService extends Service. We create a Service in a way that’s similar tohow we’ve created activities and broadcast receivers: extend the base class, implementthe abstract methods, and override the lifecycle methods as needed.
After the initial class declaration, we define several member variables. First comeconstants that describe our intervals for polling for severe weather and a quiet period.We’ve set a low threshold for polling during development—severe weather alerts willspam the emulator often because of this setting. In production, we’d limit this tocheck every few hours.
Next, our TimerTask variable will let us periodically poll the weather. Each timethe task runs, it gets all the user’s saved locations through a database call B. We’llexamine the specifics of using an Android database in chapter 5.
Clean up database connection
F
Display actionable notification
G
www.it-ebooks.info
119Building a background weather service
When we have the saved locations, we parse each one and load the weather report.If the report shows severe weather in the forecast, we update the time of the last alertfield and call a helper method to initiate sending a Notification C. After we processthe user’s saved locations, we get the device’s alert location from the database using apostal code designation. If the user has requested alerts for their current location, werepeat the process of polling and sending an alert for the device’s current location aswell. You can see more details on Android location-related facilities in chapter 11.
After defining our TimerTask, we create a Handler member variable. This variablewill receive a Message object that’s fired from a non-UI thread. In this case, afterreceiving the Message, our Handler calls a helper method that instantiates and dis-plays a Notification D.
Next, we override the Service lifecycle methods, starting with onCreate(). Herecomes the meat of our Service: a Timer E that we configure to repeatedly fire. Foras long as the Service continues to run, the timer will allow us to update weatherinformation. After onCreate(), you see onDestroy(), where we clean up our databaseconnection F. Service classes provide these lifecycle methods so you can controlhow resources are allocated and deallocated, similar to Activity classes.
After the lifecycle-related methods, we implement the required onBind() method.This method returns an IBinder, which other components that call into Servicemethods will use for communication. WeatherAlertService performs only a back-ground task; it doesn’t support binding, and so it returns a null for onBind. We’ll addbinding and interprocess communication (IPC) in section 4.5.
Next, we implement our helper methods. First, loadRecord() calls out to theYahoo! Weather API via YWeatherFetcher. (We’ll cover networking tasks, similar tothose this class performs, in chapter 6.) Then sendNotification configures aMessage with location details to activate the Handler we declared earlier. Last of all,you see the notifyFromHandler() method. This method fires off a Notification withIntent objects that will call back into the WeatherReporter Activity if the user clicksthe Notification G.
A warning about long-running ServicesOur sample application starts a Service and leaves it running in the background.This Service is designed to have a minimal footprint, but Android best practices dis-courage long-running Services. Services that run continually and constantly usethe network or perform CPU-intensive tasks will eat up the device’s battery life andmight slow down other operations. Even worse, because they run in the background,users won’t know what applications are to blame for their device’s poor performance.
The OS will eventually kill running Services if it needs to acquire additional memory,but otherwise it won’t interfere with poorly designed Services. If your use case nolonger requires the Service, you should stop it. If you do require a long-runningService, you might want to give users the option of whether to use it.
www.it-ebooks.info
120 CHAPTER 4 Intents and Services
Now that we’ve discussed the purpose of Services and you’ve created a Serviceclass and started one via a BroadcastReceiver, we can start looking at how otherdevelopers can interact with your Service.
4.5 Communicating with the WeatherAlertService from other appsIn Android, each application runs within its own process. Other applications can’tdirectly call methods on your weather alert service, because the applications are in dif-ferent sandboxes. You’ve already seen how applications can invoke one another byusing an Intent. Suppose, though, that you wanted to learn something specific from aparticular application, like check the weather in a particular region. This type of gran-ular information isn’t readily available through simple Intent communication, butfortunately Android provides a new solution: IPC through a bound service.
We’ll illustrate bound services by expanding the weather alert with a remotableinterface using AIDL, and then we’ll connect to that interface through a proxy thatwe’ll expose using a new Service. Along the way, we’ll explore the IBinder andBinder classes Android uses to pass messages and types during IPC.
4.5.1 Android Interface Definition Language
If you want to allow other developers to use your weather features, you need to givethem information about the methods you provide, but you might not want to shareyour application’s source code. Android lets you specify your IPC features by using aninterface definition language (IDL) to create AIDL files. These files generate a Javainterface and an inner Stub class that you can use to create a remotely accessibleobject, and that your consumers can use to invoke your methods.
AIDL files allow you to define your package, imports, and methods with returntypes and parameters. Our weather AIDL, which we place in the same package as the.java files, is shown in the following listing.
package com.msi.manning.weather;interface IWeatherReporter{ String getWeatherFor(in String zip); void addLocation(in String zip, in String city, in String region);}
You define the package and interface in AIDL as you would in a regular Java file. Simi-larly, if you require any imports, you’d list them above the interface declaration. Whenyou define methods, you must specify a directional tag for all nonprimitive types. Thepossible directions are in, out, and inout. The platform uses this directional tag togenerate the necessary code for marshaling and unmarshaling instances of your inter-face across IPC boundaries.
Listing 4.7 IWeatherReporter.aidl remote IDL file
www.it-ebooks.info

121Communicating with the WeatherAlertService from other apps
Our interface IWeatherReporter includes methods to look up the current weatherfrom the Service, or to add a new location to the Service. Other developers could usethese features to provide other front-end applications that use our back-end service.
Only certain types of data are allowed in AIDL, as shown in table 4.5. Types thatrequire an import must always list that import, even if they’re in the same package asyour .aidl file.
After you’ve defined your interface methods with return types and parameters, youthen invoke the aidl tool included in your Android SDK installation to generate a Javainterface that represents your AIDL specification. If you use the Eclipse plug-in, it’llautomatically invoke the aidl tool for you, placing the generated files in the appropri-ate package in your project’s gen folder.
The interface generated through AIDL includes an inner static abstract classnamed Stub, which extends Binder and implements the outer class interface. ThisStub class represents the local side of your remotable interface. Stub also includes anasInterface(IBinder binder) method that returns a remote version of yourinterface type. Callers can use this method to get a handle to the remote object anduse it to invoke remote methods. The AIDL process generates a Proxy class (anotherinner class, this time inside Stub) that connects all these components and returns tocallers from the asInterface() method. Figure 4.6 depicts this IPC local/remoterelationship.
After all the required files are generated, create a concrete class that extends fromStub and implements your interface. Then, expose this interface to callers through aService. We’ll be doing that soon, but first, let’s take a quick look under the hoodand see how these generated files work.
Table 4.5 Android IDL allowed types
Type Description Import required
Java primitives boolean, byte, short, int, float, double, long, char.
No
String java.lang.String. No
CharSequence java.lang.CharSequence. No
List Can be generic; all types used in collection must be allowed by IDL. Ultimately provided as an ArrayList.
No
Map Can be generic, all types used in collection must be one allowed by IDL. Ultimately provided as a HashMap.
No
Other AIDL interfaces Any other AIDL-generated interface type. Yes
Parcelable objects Objects that implement the Android Parcelable inter-face, described in section 4.5.2.
Yes
www.it-ebooks.info
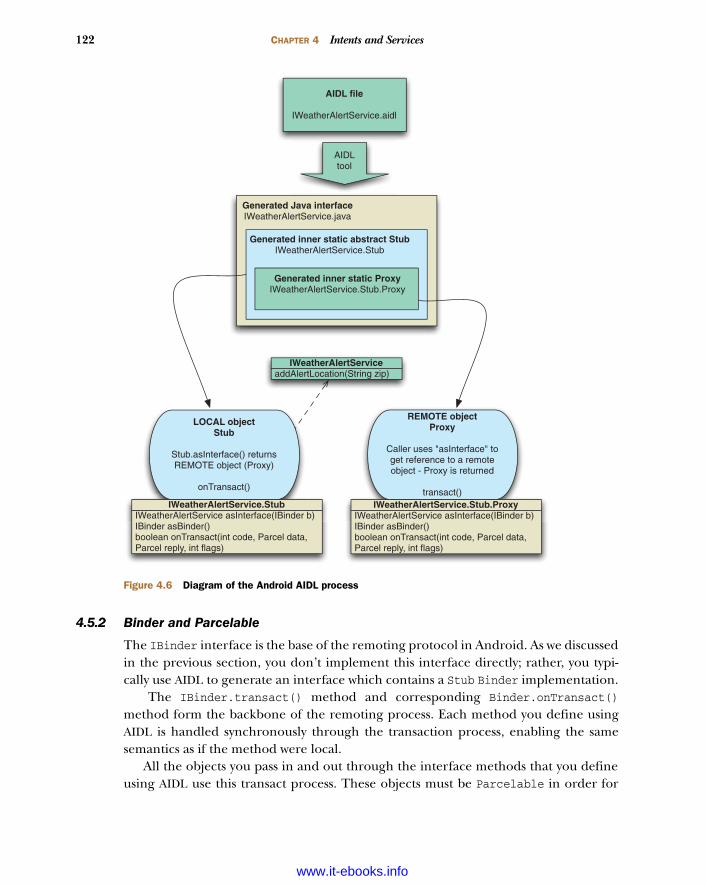
122 CHAPTER 4 Intents and Services
4.5.2 Binder and Parcelable
The IBinder interface is the base of the remoting protocol in Android. As we discussedin the previous section, you don’t implement this interface directly; rather, you typi-cally use AIDL to generate an interface which contains a Stub Binder implementation.
The IBinder.transact() method and corresponding Binder.onTransact()method form the backbone of the remoting process. Each method you define usingAIDL is handled synchronously through the transaction process, enabling the samesemantics as if the method were local.
All the objects you pass in and out through the interface methods that you defineusing AIDL use this transact process. These objects must be Parcelable in order for
AIDL file
IWeatherAlertService.aidl
AIDL tool
Generated Java interfaceIWeatherAlertService.java
Generated inner static abstract StubIWeatherAlertService.Stub
Generated inner static ProxyIWeatherAlertService.Stub.Proxy
IWeatherAlertService asInterface(IBinder b)IBinder asBinder()boolean onTransact(int code, Parcel data, Parcel reply, int flags)
IWeatherAlertService.StubIWeatherAlertService asInterface(IBinder b)IBinder asBinder()boolean onTransact(int code, Parcel data, Parcel reply, int flags)
IWeatherAlertService.Stub.Proxy
addAlertLocation(String zip)IWeatherAlertService
LOCAL objectStub
Stub.asInterface() returns REMOTE object (Proxy)
onTransact()
REMOTE objectProxy
Caller uses "asInterface" to get reference to a remote object - Proxy is returned
transact()
Figure 4.6 Diagram of the Android AIDL process
www.it-ebooks.info
123Communicating with the WeatherAlertService from other apps
you to place them inside a Parcel and move them across the local/remote processbarrier in the Binder transaction methods.
The only time you need to worry about something being Parcelable is when youwant to send a custom object through Android IPC. If you use only the default allow-able types in your interface definition files—primitives, String, CharSequence, List,and Map—AIDL automatically handles everything.
The Android documentation describes what methods you need to implement tocreate a Parcelable class. Remember to create an .aidl file for each Parcelableinterface. These .aidl files are different from those you use to define Binder classesthemselves; these shouldn’t be generated from the aidl tool.
CAUTION When you’re considering creating your own Parcelable types,make sure you actually need them. Passing complex objects across theIPC boundary in an embedded environment is expensive and tedious;you should avoid doing it, if possible.
4.5.3 Exposing a remote interface
Now that you’ve defined the features you want to expose from the weather app, youneed to implement that functionality and make it available to external callers.Android calls this publishing the interface.
To publish a remote interface, you create a class that extends Service and returnsan IBinder through the onBind(Intent intent) method. Clients will use thatIBinder to access a particular remote object. As we discussed in section 4.5.2, you canuse the AIDL-generated Stub class, which itself extends Binder, to extend from andreturn an implementation of a remotable interface. This process is shown in the fol-lowing listing, where we implement and publish the IWeatherReporter service we cre-ated in the previous section.
public class WeatherReporterService extends WeatherAlertService { private final class WeatherReporter extends IWeatherReporter.Stub { public String getWeatherFor(String zip) throws RemoteException { WeatherRecord record = loadRecord(zip); return record.getCondition().getDisplay(); } public void addLocation(String zip, String city, String region) throws RemoteException { DBHelper db = new DBHelper(WeatherReporterService.this); Location location = new Location(); location.alertenabled = 0; location.lastalert = 0; location.zip = zip; location.city = city; location.region = region; db.insert(location); }
Listing 4.8 Implementing a weather service that publishes a remotable object
B
Implementremote
interface
www.it-ebooks.info
124 CHAPTER 4 Intents and Services
}; public IBinder onBind(Intent intent) { return new WeatherReporter(); }}
Our concrete instance of the generated AIDL Java interface must return an IBinder toany caller that binds to this Service. We create an implementation by extending theStub class that the aidl tool generated B. Recall that this Stub class implements theAIDL interface and extends Binder. After we’ve defined our IBinder, we can createand return it from the onBind() method C.
Within the stub itself, we write whatever code is necessary to provide the featuresadvertised by our interface. You can access any other classes within your application. Inthis example, our Service has extended WeatherAlertService so we can more easilyaccess the weather functions we’ve already written, such as the loadRecord() method.
You’ll need to define this new WeatherReporterService in your application’s man-ifest, in the same way you define any other Service. If you want to bind to the Serviceonly from within your own application, no other steps are necessary. But if you want toallow binding from another application, you must provide some extra informationwithin AndroidManifest.xml, as shown in the following listing.
<service android:name=".service.WeatherReporterService" android:exported="true"> <intent-filter> <action android:name= "com.msi.manning.weather.IWeatherReporter"/> </intent-filter></service>
To allow external applications to find our Service, we instruct Android to export thisService declaration. Exporting the declaration allows other applications to launchthe Service, a prerequisite for binding with it. The actual launch will happen throughan <intent-filter> that we define. In this example, the caller must know the fullname of the action, but any <intent-filter> we discussed earlier in the chapter canbe substituted, such as filtering by scheme or by type.
Now that you’ve seen how a caller can get a reference to a remotable object, we’llfinish that connection by binding to a Service from an Activity.
4.5.4 Binding to a Service
Let’s switch hats and pretend that, instead of writing a weather service, we’re anothercompany that wants to integrate weather functions into our own app. Our app will letthe user enter a ZIP code and either look up the current weather for that location orsave it to the WeatherReporter application’s list of saved locations. We’ve received the.aidl file and learned the name of the Service. We generate our own interface from
Listing 4.9 Exporting a Service for other applications to access
Return IBinder representing remotable object
C
www.it-ebooks.info
125Communicating with the WeatherAlertService from other apps
that .aidl file, but before we can call the remote methods, we’ll need to first bind withthe Service.
When an Activity class binds to a Service using the Context.bindService(Intent i, ServiceConnection connection, int flags) method, the Service-Connection object that you pass in will send several callbacks from the Service backto the Activity. The callback onServiceConnected(ComponentName className,
IBinder binder) lets you know when the binding process completes. The platformautomatically injects the IBinder returned from the Service’s onBind() method intothis callback, where you can save it for future calls. The following listing shows anActivity that binds to our weather-reporting service and invokes remote methods onit. You can see the complete source code for this project in the chapter downloads.
package com.msi.manning.weatherchecker;. . . Imports omitted for brevitypublic class WeatherChecker extends Activity { private IWeatherReporter reporter; private boolean bound; private EditText zipEntry; private Handler uiHandler; private ServiceConnection connection = new ServiceConnection() { public void onServiceConnected (ComponentName name, IBinder service) { reporter = IWeatherReporter.Stub. asInterface(service); Toast.makeText(WeatherChecker.this, "Connected to Service", Toast.LENGTH_SHORT).show(); bound = true; } public void onServiceDisconnected (ComponentName name) { reporter = null; Toast.makeText(WeatherChecker.this, "Disconnected from Service", Toast.LENGTH_SHORT).show(); bound = false; } };. . . onCreate method omitted for brevity public void checkWeather(View caller) { final String zipCode = zipEntry.getText().toString(); if (zipCode != null && zipCode.length() == 5) { new Thread() { public void run() { try { final String currentWeather = reporter.getWeatherFor(zipCode); uiHandler.post(new Runnable() { public void run() { Toast.makeText(WeatherChecker.this, currentWeather, Toast.LENGTH_LONG).show();
Listing 4.10 Binding to a Service within an Activity
Use generated interface
B
Define ServiceConnection behavior
C
Retrieve remotely callable interface D
Don’t block UI thread
Invoke remote methodE
Show feedback on UI thread
www.it-ebooks.info

126 CHAPTER 4 Intents and Services
} }); } catch (DeadObjectException e) { e.printStackTrace(); } catch (RemoteException e) { e.printStackTrace(); } catch (Exception e) { e.printStackTrace(); } } }.start(); } } public void saveLocation(View caller) { final String zipCode = zipEntry.getText().toString(); if (zipCode != null && zipCode.length() == 5) { new Thread() { public void run() { try { reporter.addLocation(zipCode, "", ""); uiHandler.post(new Runnable() { public void run() { Toast.makeText( WeatherChecker.this, R.string.saved, Toast.LENGTH_LONG).show(); } }); } catch (DeadObjectException e) { e.printStackTrace(); } catch (RemoteException e) { e.printStackTrace(); } catch (Exception e) { e.printStackTrace(); } } }.start(); } } public void onStart() { super.onStart(); if (!bound) { bindService(new Intent (IWeatherReporter.class.getName()), connection, Context.BIND_AUTO_CREATE); } } public void onPause() { super.onPause(); if (bound){ bound = false; unbindService(connection); } }}
Don’t block UI thread
Show feedback on UI thread
Start binding to Service
F
www.it-ebooks.info
127Communicating with the WeatherAlertService from other apps
In order to use the remotable IWeatherReporter we defined in AIDL, we declare avariable with this type B. We also define a boolean to keep track of the current stateof the binding. Keeping track of the current state will prevent us from rebinding tothe Service if our application is suspended and resumed.
We use the ServiceConnection object C to bind and unbind using Context meth-ods. After a Service is bound, the platform notifies us through the onService-Connected callback. This callback returns the remote IBinder reference, which weassign to the remotable type D so we can invoke it later. Next, a similar onService-Disconnected callback will fire when a Service is unbound.
After we’ve established a connection, we can use the AIDL-generated interface toperform the operations it defines E. When we call getWeatherFor (or later, add-Location), Android will dispatch our invocation across the process boundary, wherethe Service we created in listing 4.8 will execute the methods. The return values willbe sent back across the process boundary and arrive as shown at E. This sequence cantake a long time, so you should avoid calling remote methods from the UI thread.
In onStart(), we establish the binding using bindService() F; later, inonPause(), we use unbindService(). The system can choose to clean up a Servicethat’s been bound but not started. You should always unbind an unused Service sothe device can reclaim its resources and perform better. Let’s look more closely at thedifference between starting and binding a Service.
4.5.5 Starting vs. binding
Services serve two purposes in Android, and you can use them in two different ways:
Starting—Context.startService(Intent service, Bundle b)
Binding—Context.bindService(Intent service, ServiceConnection c,
int flag)
Starting a Service tells the platform to launch it in the background and keep it run-ning, without any particular connection to any other Activity or application. Youused the WeatherAlertService in this manner to run in the background and issuesevere weather alerts.
Binding to a Service, as you did with WeatherReporterService, gave you a handleto a remote object, which let you call the Service’s exported methods from anActivity. Because every Android application runs in its own process, using a boundService lets you pass data between processes.
The actual process of marshaling and unmarshaling remotable objects across pro-cess boundaries is complicated. Fortunately, you don’t have to deal with all the inter-nals, because Android handles the complexity through AIDL. Instead, you can stick toa simple recipe that will enable you to create and use remotable objects:
1 Define your interface using AIDL, in the form of a .aidl file; see listing 4.7.2 Generate a Java interface for the .aidl file. This happens automatically in
Eclipse.
www.it-ebooks.info
128 CHAPTER 4 Intents and Services
3 Extend from the generated Stub class and implement your interface methods;see listing 4.8.
4 Expose your interface to clients through a Service and the Service
onBind(Intent i) method; see listing 4.8.5 If you want to make your Service available to other applications, export it in
your manifest; see listing 4.9.6 Client applications will bind to your Service with a ServiceConnection to get a
handle to the remotable object; see listing 4.10.
As we discussed earlier in the chapter, Services running in the background can havea detrimental impact on overall device performance. To mitigate these problems,Android enforces a special lifecycle for Services, which we’re going to discuss now.
4.5.6 Service lifecycle
You want the weather-alerting Service to constantly lurk in the background, lettingyou know of potential dangers. On the other hand, you want the weather-reportingService to run only while another application actually needs it. Services follow theirown well-defined process phases, similar to those followed by an Activity or anApplication. A Service will follow a different lifecycle, depending on whether youstart it, bind it, or both.
SERVICE-STARTED LIFECYCLE
If you start a Service by calling Context.startService(Intent service, Bundle b),as shown in listing 4.5, it runs in the background whether or not anything binds to it.If the Service hasn’t been created, the Service onCreate() method is called. TheonStart(int id, Bundle args) method is called each time someone tries to start theService, regardless of whether it’s already running. Additional instances of theService won’t be created.
The Service will continue to run in the background until someone explicitly stopsit with the Context.stopService() method or when the Service calls its ownstopSelf() method. You should also keep in mind that the platform might killServices if resources are running low, so your application needs to be able to reactaccordingly. You can choose to restart the Service automatically, fall back to a morelimited feature set without it, or take some other appropriate action.
SERVICE-BOUND LIFECYCLE
If an Activity binds a Service by calling Context.bindService(Intent service,ServiceConnection connection, int flags), as shown in listing 4.10, it’ll run as longas the connection is open. An Activity establishes the connection using the Contextand is also responsible for closing it.
When a Service is only bound in this manner and not also started, its onCreate()method is invoked, but onStart(int id, Bundle args) is not used. In these cases, theplatform can stop and clean up the Service after it’s unbound.
www.it-ebooks.info
129Summary
SERVICE-STARTED AND SERVICE-BOUND LIFECYCLE
If a Service is both started and bound, it’ll keep running in the background, muchlike in the started lifecycle. In this case, both onStart(int id, Bundle args) andonCreate() are called.
CLEANING UP WHEN A SERVICE STOPS
When a Service stops, its onDestroy() method is invoked. Inside onDestroy(), everyService should perform final cleanup, stopping any spawned threads, terminatingnetwork connections, stopping Services it had started, and so on.
And that’s it! From birth to death, from invocation to dismissal, you’ve learnedhow to wrangle Android Services. They might seem complex, but they offerextremely powerful capabilities that can go far beyond what a single foregroundedapplication can offer.
4.6 SummaryIn this chapter, we covered a broad swath of Android territory. We first focused on theIntent component, seeing how it works, how it resolves using IntentFilter objects,and how to take advantage of built-in platform-provided Intent handlers. We alsolooked at the differences between explicit Intent invocation and implicit Intentinvocation, and the reasons you might choose one type over another. Along the way,you completed the RestaurantFinder sample application, and with just a bit morecode, you drastically expanded the usefulness of that app by tapping into preloadedAndroid applications.
After we covered the Intent class, we moved on to a new sample application,WeatherReporter. You saw how a BroadcastReceiver could respond to notificationssent by the platform or other applications. You used the receiver to listen for a bootevent and start the Service. The Service sends notification alerts from the back-ground when it learns of severe weather events. You also saw another flavor ofService, one that provides communication between different processes. Our otherweather service offered an API that third-party developers could use to take advantageof the low-level network and storage capabilities of the weather application. We cov-ered the difference between starting and binding Services, and you saw the movingparts behind the Android IPC system, which uses the AIDL to standardize communica-tion between applications.
By seeing all these components interact in several complete examples, you nowunderstand the fundamentals behind Android Intents and Services. In the nextchapter, you’ll see how to make Services and other applications more useful by usingpersistent storage. We’ll look at the various options Android provides for retrievingand storing data, including preferences, the file system, databases, and how to create acustom ContentProvider.
www.it-ebooks.info
Storing andretrieving data
Android provides several ways to store and share data, including access to the file-system, a local relational database through SQLite, and a preferences system thatallows you to store simple key/value pairs within applications. In this chapter, we’llstart with preferences and you’ll create a small sample application to exercise thoseconcepts. From there, you’ll create another sample application to examine usingthe filesystem to store data, both internal to the application and external using theplatform’s Secure Digital (SD) card support. You’ll also see how to create andaccess a database.
Beyond the basics, Android also allows applications to share data through aclever URI-based approach called a ContentProvider. This technique combinesseveral other Android concepts, such as the URI-based style of intents and the
This chapter covers Storing and retrieving data with SharedPreferences
Using the filesystem
Working with a SQLite database
Accessing and building a ContentProvider
130
www.it-ebooks.info
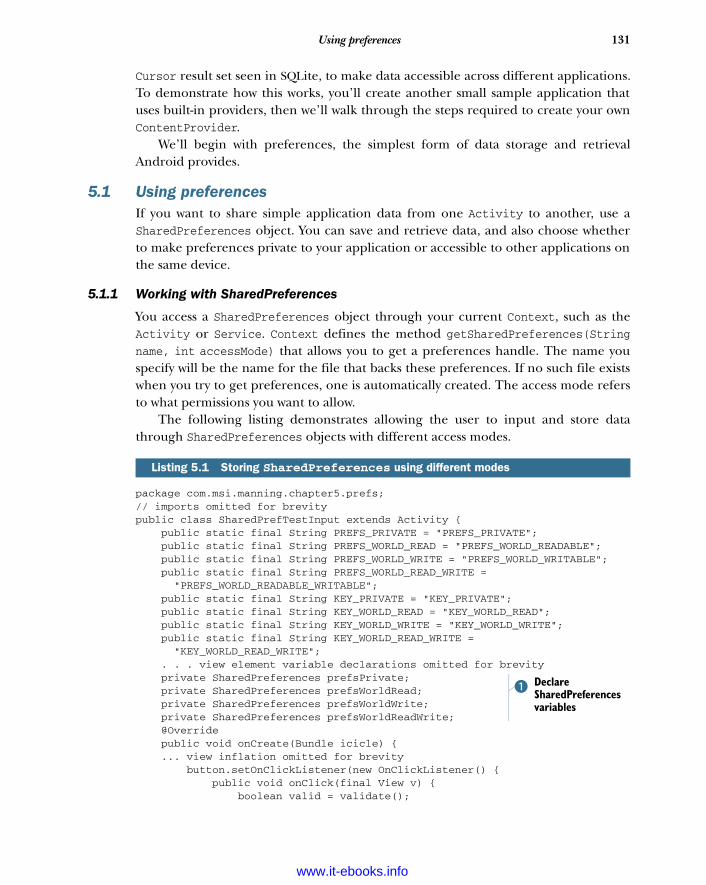
131Using preferences
Cursor result set seen in SQLite, to make data accessible across different applications.To demonstrate how this works, you’ll create another small sample application thatuses built-in providers, then we’ll walk through the steps required to create your ownContentProvider.
We’ll begin with preferences, the simplest form of data storage and retrievalAndroid provides.
5.1 Using preferencesIf you want to share simple application data from one Activity to another, use aSharedPreferences object. You can save and retrieve data, and also choose whetherto make preferences private to your application or accessible to other applications onthe same device.
5.1.1 Working with SharedPreferences
You access a SharedPreferences object through your current Context, such as theActivity or Service. Context defines the method getSharedPreferences(Stringname, int accessMode) that allows you to get a preferences handle. The name youspecify will be the name for the file that backs these preferences. If no such file existswhen you try to get preferences, one is automatically created. The access mode refersto what permissions you want to allow.
The following listing demonstrates allowing the user to input and store datathrough SharedPreferences objects with different access modes.
package com.msi.manning.chapter5.prefs;// imports omitted for brevitypublic class SharedPrefTestInput extends Activity { public static final String PREFS_PRIVATE = "PREFS_PRIVATE"; public static final String PREFS_WORLD_READ = "PREFS_WORLD_READABLE"; public static final String PREFS_WORLD_WRITE = "PREFS_WORLD_WRITABLE"; public static final String PREFS_WORLD_READ_WRITE = "PREFS_WORLD_READABLE_WRITABLE"; public static final String KEY_PRIVATE = "KEY_PRIVATE"; public static final String KEY_WORLD_READ = "KEY_WORLD_READ"; public static final String KEY_WORLD_WRITE = "KEY_WORLD_WRITE"; public static final String KEY_WORLD_READ_WRITE = "KEY_WORLD_READ_WRITE"; . . . view element variable declarations omitted for brevity private SharedPreferences prefsPrivate; private SharedPreferences prefsWorldRead; private SharedPreferences prefsWorldWrite; private SharedPreferences prefsWorldReadWrite; @Override public void onCreate(Bundle icicle) { ... view inflation omitted for brevity button.setOnClickListener(new OnClickListener() { public void onClick(final View v) { boolean valid = validate();
Listing 5.1 Storing SharedPreferences using different modes
Declare SharedPreferences variables
B
www.it-ebooks.info
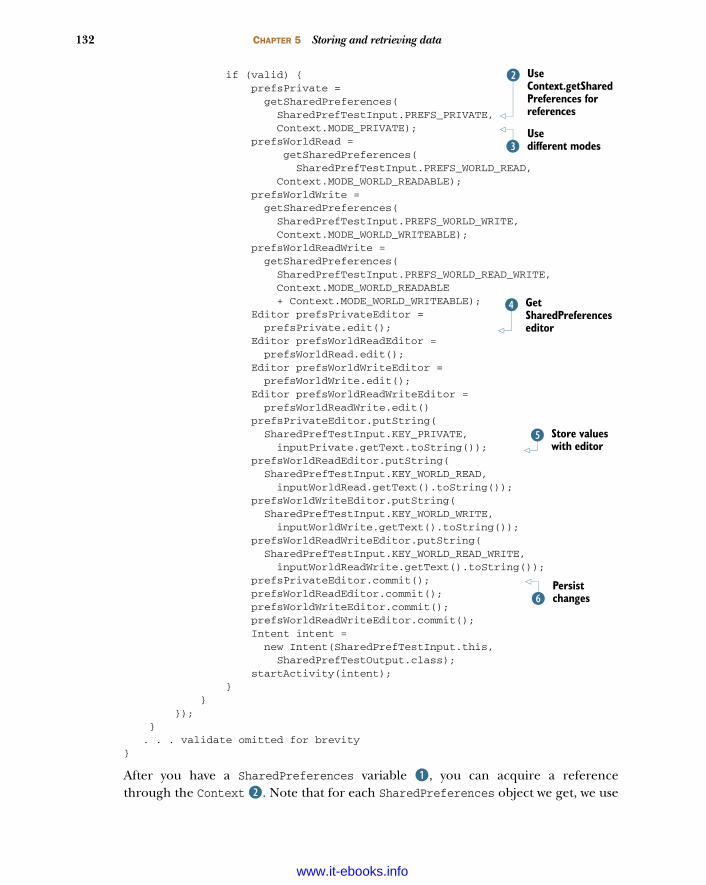
132 CHAPTER 5 Storing and retrieving data
if (valid) { prefsPrivate = getSharedPreferences( SharedPrefTestInput.PREFS_PRIVATE, Context.MODE_PRIVATE); prefsWorldRead = getSharedPreferences( SharedPrefTestInput.PREFS_WORLD_READ, Context.MODE_WORLD_READABLE); prefsWorldWrite = getSharedPreferences( SharedPrefTestInput.PREFS_WORLD_WRITE, Context.MODE_WORLD_WRITEABLE); prefsWorldReadWrite = getSharedPreferences( SharedPrefTestInput.PREFS_WORLD_READ_WRITE, Context.MODE_WORLD_READABLE + Context.MODE_WORLD_WRITEABLE); Editor prefsPrivateEditor = prefsPrivate.edit(); Editor prefsWorldReadEditor = prefsWorldRead.edit(); Editor prefsWorldWriteEditor = prefsWorldWrite.edit(); Editor prefsWorldReadWriteEditor = prefsWorldReadWrite.edit() prefsPrivateEditor.putString( SharedPrefTestInput.KEY_PRIVATE, inputPrivate.getText.toString()); prefsWorldReadEditor.putString( SharedPrefTestInput.KEY_WORLD_READ, inputWorldRead.getText().toString()); prefsWorldWriteEditor.putString( SharedPrefTestInput.KEY_WORLD_WRITE, inputWorldWrite.getText().toString()); prefsWorldReadWriteEditor.putString( SharedPrefTestInput.KEY_WORLD_READ_WRITE, inputWorldReadWrite.getText().toString()); prefsPrivateEditor.commit(); prefsWorldReadEditor.commit(); prefsWorldWriteEditor.commit(); prefsWorldReadWriteEditor.commit(); Intent intent = new Intent(SharedPrefTestInput.this, SharedPrefTestOutput.class); startActivity(intent); } } }); } . . . validate omitted for brevity}
After you have a SharedPreferences variable B, you can acquire a referencethrough the Context C. Note that for each SharedPreferences object we get, we use
Use Context.getSharedPreferences for references
C
Use different modesD
Get SharedPreferences editor
E
Store values with editor
F
Persist changesG
www.it-ebooks.info
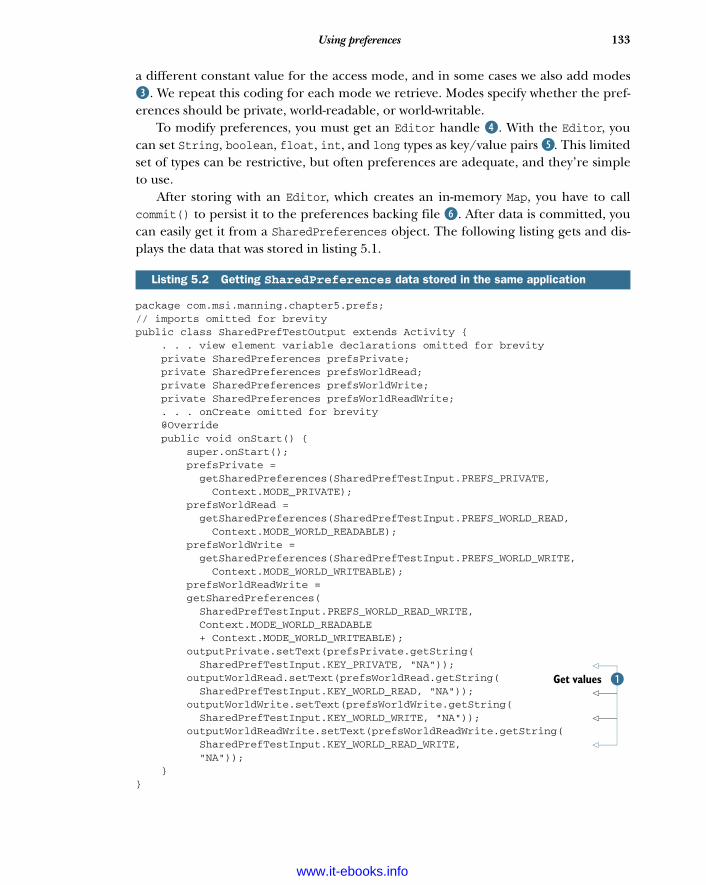
133Using preferences
a different constant value for the access mode, and in some cases we also add modesD. We repeat this coding for each mode we retrieve. Modes specify whether the pref-erences should be private, world-readable, or world-writable.
To modify preferences, you must get an Editor handle E. With the Editor, youcan set String, boolean, float, int, and long types as key/value pairs F. This limitedset of types can be restrictive, but often preferences are adequate, and they’re simpleto use.
After storing with an Editor, which creates an in-memory Map, you have to callcommit() to persist it to the preferences backing file G. After data is committed, youcan easily get it from a SharedPreferences object. The following listing gets and dis-plays the data that was stored in listing 5.1.
package com.msi.manning.chapter5.prefs;// imports omitted for brevitypublic class SharedPrefTestOutput extends Activity { . . . view element variable declarations omitted for brevity private SharedPreferences prefsPrivate; private SharedPreferences prefsWorldRead; private SharedPreferences prefsWorldWrite; private SharedPreferences prefsWorldReadWrite; . . . onCreate omitted for brevity @Override public void onStart() { super.onStart(); prefsPrivate = getSharedPreferences(SharedPrefTestInput.PREFS_PRIVATE, Context.MODE_PRIVATE); prefsWorldRead = getSharedPreferences(SharedPrefTestInput.PREFS_WORLD_READ, Context.MODE_WORLD_READABLE); prefsWorldWrite = getSharedPreferences(SharedPrefTestInput.PREFS_WORLD_WRITE, Context.MODE_WORLD_WRITEABLE); prefsWorldReadWrite = getSharedPreferences( SharedPrefTestInput.PREFS_WORLD_READ_WRITE, Context.MODE_WORLD_READABLE + Context.MODE_WORLD_WRITEABLE); outputPrivate.setText(prefsPrivate.getString( SharedPrefTestInput.KEY_PRIVATE, "NA")); outputWorldRead.setText(prefsWorldRead.getString( SharedPrefTestInput.KEY_WORLD_READ, "NA")); outputWorldWrite.setText(prefsWorldWrite.getString( SharedPrefTestInput.KEY_WORLD_WRITE, "NA")); outputWorldReadWrite.setText(prefsWorldReadWrite.getString( SharedPrefTestInput.KEY_WORLD_READ_WRITE, "NA")); }}
Listing 5.2 Getting SharedPreferences data stored in the same application
BGet values
www.it-ebooks.info
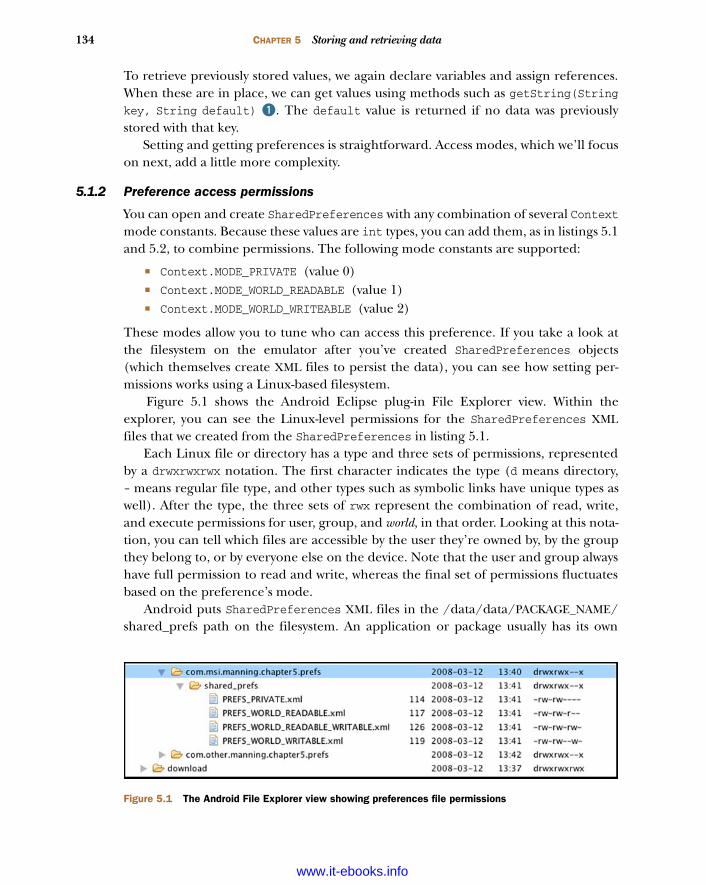
134 CHAPTER 5 Storing and retrieving data
To retrieve previously stored values, we again declare variables and assign references.When these are in place, we can get values using methods such as getString(Stringkey, String default) B. The default value is returned if no data was previouslystored with that key.
Setting and getting preferences is straightforward. Access modes, which we’ll focuson next, add a little more complexity.
5.1.2 Preference access permissions
You can open and create SharedPreferences with any combination of several Contextmode constants. Because these values are int types, you can add them, as in listings 5.1and 5.2, to combine permissions. The following mode constants are supported:
Context.MODE_PRIVATE (value 0) Context.MODE_WORLD_READABLE (value 1) Context.MODE_WORLD_WRITEABLE (value 2)
These modes allow you to tune who can access this preference. If you take a look atthe filesystem on the emulator after you’ve created SharedPreferences objects(which themselves create XML files to persist the data), you can see how setting per-missions works using a Linux-based filesystem.
Figure 5.1 shows the Android Eclipse plug-in File Explorer view. Within theexplorer, you can see the Linux-level permissions for the SharedPreferences XMLfiles that we created from the SharedPreferences in listing 5.1.
Each Linux file or directory has a type and three sets of permissions, representedby a drwxrwxrwx notation. The first character indicates the type (d means directory,- means regular file type, and other types such as symbolic links have unique types aswell). After the type, the three sets of rwx represent the combination of read, write,and execute permissions for user, group, and world, in that order. Looking at this nota-tion, you can tell which files are accessible by the user they’re owned by, by the groupthey belong to, or by everyone else on the device. Note that the user and group alwayshave full permission to read and write, whereas the final set of permissions fluctuatesbased on the preference’s mode.
Android puts SharedPreferences XML files in the /data/data/PACKAGE_NAME/shared_prefs path on the filesystem. An application or package usually has its own
Figure 5.1 The Android File Explorer view showing preferences file permissions
www.it-ebooks.info
135Using preferences
user ID. When an application creates files, including SharedPreferences, they’reowned by that application’s user ID. To allow other applications to access these files,you have to set the world permissions, as shown in figure 5.1.
If you want to access another application’s files, you must know the starting path.The path comes from the Context. To get files from another application, you have toknow and use that application’s Context. Android doesn’t officially condone sharingpreferences across multiple applications; in practice, apps should use a content pro-vider to share this kind of data. Even so, looking at SharedPreferences does show theunderlying data storage models in Android. The following listing shows how to get theSharedPreferences we set in listing 5.1 again, this time from a different application(different .apk and different package).
package com.other.manning.chapter5.prefs;. . . imports omitted for brevitypublic class SharedPrefTestOtherOutput extends Activity { . . . constants and variable declarations omitted for brevity . . . onCreate omitted for brevity @Override public void onStart() { super.onStart(); Context otherAppsContext = null; try { otherAppsContext = createPackageContext("com.msi.manning.chapter5.prefs", Context.MODE_WORLD_WRITEABLE); } catch (NameNotFoundException e) { // log and/or handle } prefsPrivate = otherAppsContext.getSharedPreferences( SharedPrefTestOtherOutput.PREFS_PRIVATE, 0); prefsWorldRead = otherAppsContext.getSharedPreferences( SharedPrefTestOtherOutput.PREFS_WORLD_READ, 0); prefsWorldWrite = otherAppsContext.getSharedPreferences( SharedPrefTestOtherOutput.PREFS_WORLD_WRITE, 0); prefsWorldReadWrite = otherAppsContext.getSharedPreferences( SharedPrefTestOtherOutput.PREFS_WORLD_READ_WRITE, 0); outputPrivate.setText(
Listing 5.3 Getting SharedPreferences data stored in a different application
Directories with the world x permissionIn Android, each package directory is created with the world x permission. This per-mission means anyone can search and list the files in the directory, which meansthat Android packages have directory-level access to one another’s files. From there,file-level access determines file permissions.
Use different packageB
Get another application’s contextC
Use otherAppsContextD
www.it-ebooks.info
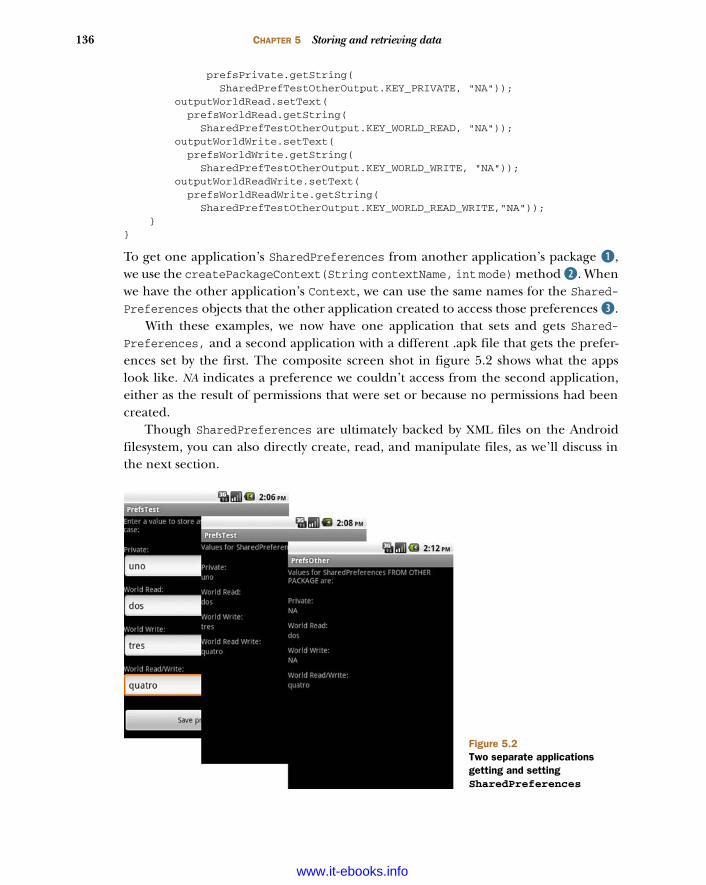
136 CHAPTER 5 Storing and retrieving data
prefsPrivate.getString( SharedPrefTestOtherOutput.KEY_PRIVATE, "NA")); outputWorldRead.setText( prefsWorldRead.getString( SharedPrefTestOtherOutput.KEY_WORLD_READ, "NA")); outputWorldWrite.setText( prefsWorldWrite.getString( SharedPrefTestOtherOutput.KEY_WORLD_WRITE, "NA")); outputWorldReadWrite.setText( prefsWorldReadWrite.getString( SharedPrefTestOtherOutput.KEY_WORLD_READ_WRITE,"NA")); }}
To get one application’s SharedPreferences from another application’s package B,we use the createPackageContext(String contextName, int mode) method C. Whenwe have the other application’s Context, we can use the same names for the Shared-Preferences objects that the other application created to access those preferences D.
With these examples, we now have one application that sets and gets Shared-Preferences, and a second application with a different .apk file that gets the prefer-ences set by the first. The composite screen shot in figure 5.2 shows what the appslook like. NA indicates a preference we couldn’t access from the second application,either as the result of permissions that were set or because no permissions had beencreated.
Though SharedPreferences are ultimately backed by XML files on the Androidfilesystem, you can also directly create, read, and manipulate files, as we’ll discuss inthe next section.
Figure 5.2Two separate applications getting and setting SharedPreferences
www.it-ebooks.info
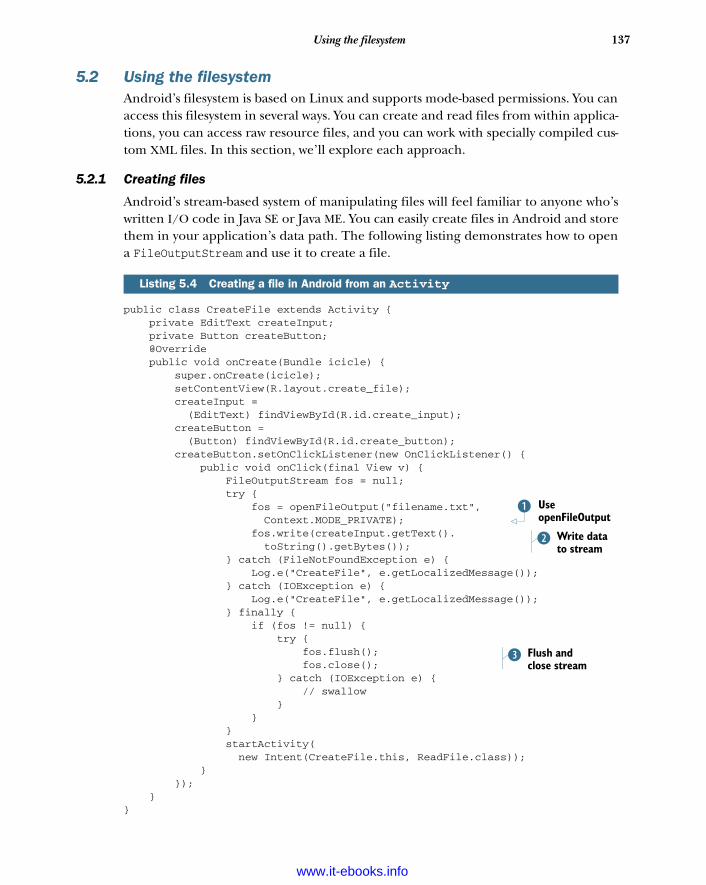
137Using the filesystem
5.2 Using the filesystemAndroid’s filesystem is based on Linux and supports mode-based permissions. You canaccess this filesystem in several ways. You can create and read files from within applica-tions, you can access raw resource files, and you can work with specially compiled cus-tom XML files. In this section, we’ll explore each approach.
5.2.1 Creating files
Android’s stream-based system of manipulating files will feel familiar to anyone who’swritten I/O code in Java SE or Java ME. You can easily create files in Android and storethem in your application’s data path. The following listing demonstrates how to opena FileOutputStream and use it to create a file.
public class CreateFile extends Activity { private EditText createInput; private Button createButton; @Override public void onCreate(Bundle icicle) { super.onCreate(icicle); setContentView(R.layout.create_file); createInput = (EditText) findViewById(R.id.create_input); createButton = (Button) findViewById(R.id.create_button); createButton.setOnClickListener(new OnClickListener() { public void onClick(final View v) { FileOutputStream fos = null; try { fos = openFileOutput("filename.txt", Context.MODE_PRIVATE); fos.write(createInput.getText(). toString().getBytes()); } catch (FileNotFoundException e) { Log.e("CreateFile", e.getLocalizedMessage()); } catch (IOException e) { Log.e("CreateFile", e.getLocalizedMessage()); } finally { if (fos != null) { try { fos.flush(); fos.close(); } catch (IOException e) { // swallow } } } startActivity( new Intent(CreateFile.this, ReadFile.class)); } }); }}
Listing 5.4 Creating a file in Android from an Activity
Use openFileOutput
B
Write data to stream
C
Flush and close stream
D
www.it-ebooks.info

138 CHAPTER 5 Storing and retrieving data
Android provides a convenience method on Context to get a FileOutputStream—namely openFileOutput(String name, int mode) B. Using this method, you can cre-ate a stream to a file. That file will ultimately be stored at the data/data/[PACKAGE_NAME]/files/file.name path on the platform. After you have the stream,you can write to it as you would with typical Java C. After you’re finished with astream, you should flush and close it to clean up D.
Reading from a file within an application context (within the package path of theapplication) is also simple; in the next section we’ll show you how.
5.2.2 Accessing files
Similar to openFileOutput(), the Context also has a convenience openFileInput()method. You can use this method to access a file on the filesystem and read it in, asshown in the following listing.
public class ReadFile extends Activity { private TextView readOutput; private Button gotoReadResource; @Override public void onCreate(Bundle icicle) { super.onCreate(icicle); setContentView(R.layout.read_file); readOutput = (TextView) findViewById(R.id.read_output); FileInputStream fis = null; try { fis = openFileInput("filename.txt"); byte[] reader = new byte[fis.available()]; while (fis.read(reader) != -1) {} readOutput.setText(new String(reader)); } catch (IOException e) { Log.e("ReadFile", e.getMessage(), e); } finally { if (fis != null) { try { fis.close(); } catch (IOException e) { // swallow } } } . . . goto next Activity via startActivity omitted for brevity }}
For input, you use openFileInput(String name, int mode) to get the stream B, andthen read the file into a byte array as with standard Java C. Afterward, close thestream properly to avoid hanging on to resources.
With openFileOutput and openFileInput, you can write to and read from any filewithin the files directory of the application package you’re working in. Also, as we
Listing 5.5 Accessing an existing file in Android from an Activity
Use openFileInput for stream
B
Read data from streamC
www.it-ebooks.info
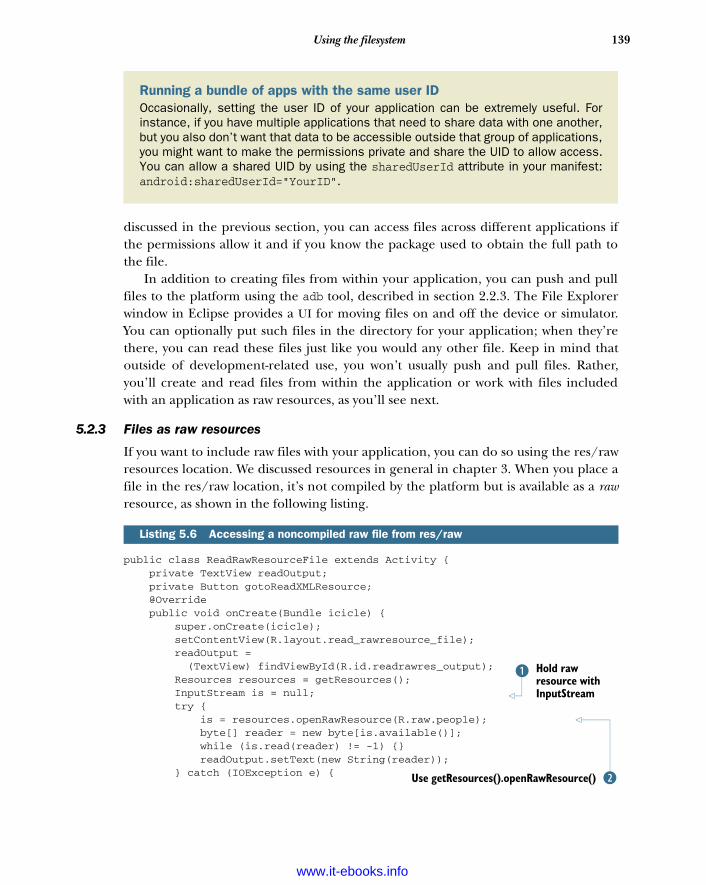
139Using the filesystem
discussed in the previous section, you can access files across different applications ifthe permissions allow it and if you know the package used to obtain the full path tothe file.
In addition to creating files from within your application, you can push and pullfiles to the platform using the adb tool, described in section 2.2.3. The File Explorerwindow in Eclipse provides a UI for moving files on and off the device or simulator.You can optionally put such files in the directory for your application; when they’rethere, you can read these files just like you would any other file. Keep in mind thatoutside of development-related use, you won’t usually push and pull files. Rather,you’ll create and read files from within the application or work with files includedwith an application as raw resources, as you’ll see next.
5.2.3 Files as raw resources
If you want to include raw files with your application, you can do so using the res/rawresources location. We discussed resources in general in chapter 3. When you place afile in the res/raw location, it’s not compiled by the platform but is available as a rawresource, as shown in the following listing.
public class ReadRawResourceFile extends Activity { private TextView readOutput; private Button gotoReadXMLResource; @Override public void onCreate(Bundle icicle) { super.onCreate(icicle); setContentView(R.layout.read_rawresource_file); readOutput = (TextView) findViewById(R.id.readrawres_output); Resources resources = getResources(); InputStream is = null; try { is = resources.openRawResource(R.raw.people); byte[] reader = new byte[is.available()]; while (is.read(reader) != -1) {} readOutput.setText(new String(reader)); } catch (IOException e) {
Listing 5.6 Accessing a noncompiled raw file from res/raw
Running a bundle of apps with the same user IDOccasionally, setting the user ID of your application can be extremely useful. Forinstance, if you have multiple applications that need to share data with one another,but you also don’t want that data to be accessible outside that group of applications,you might want to make the permissions private and share the UID to allow access.You can allow a shared UID by using the sharedUserId attribute in your manifest:android:sharedUserId="YourID".
Hold raw resource with InputStream
B
CUse getResources().openRawResource()
www.it-ebooks.info
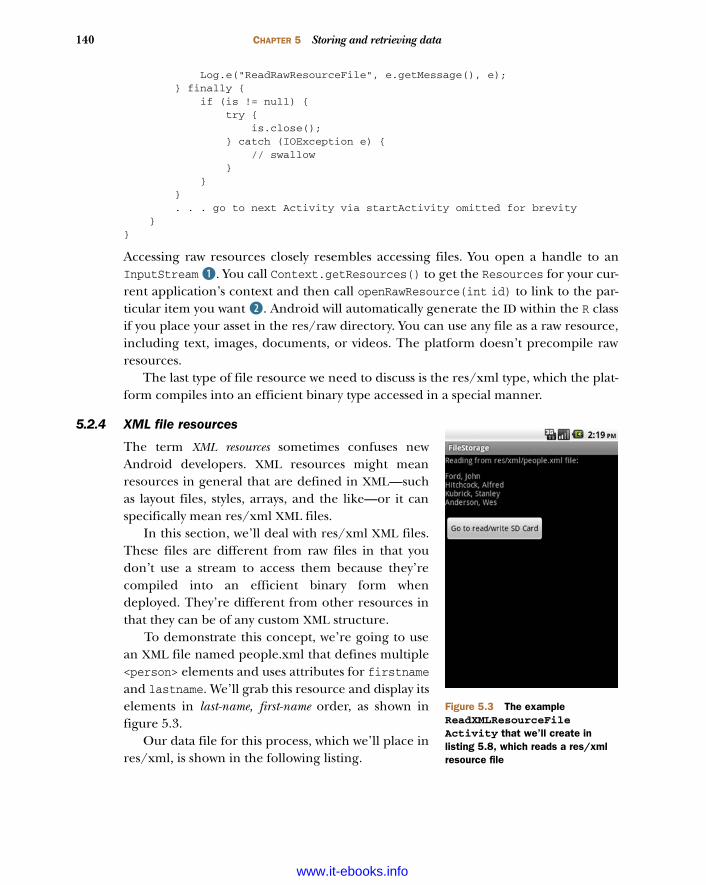
140 CHAPTER 5 Storing and retrieving data
Log.e("ReadRawResourceFile", e.getMessage(), e); } finally { if (is != null) { try { is.close(); } catch (IOException e) { // swallow } } } . . . go to next Activity via startActivity omitted for brevity }}
Accessing raw resources closely resembles accessing files. You open a handle to anInputStream B. You call Context.getResources() to get the Resources for your cur-rent application’s context and then call openRawResource(int id) to link to the par-ticular item you want C. Android will automatically generate the ID within the R classif you place your asset in the res/raw directory. You can use any file as a raw resource,including text, images, documents, or videos. The platform doesn’t precompile rawresources.
The last type of file resource we need to discuss is the res/xml type, which the plat-form compiles into an efficient binary type accessed in a special manner.
5.2.4 XML file resources
The term XML resources sometimes confuses newAndroid developers. XML resources might meanresources in general that are defined in XML—suchas layout files, styles, arrays, and the like—or it canspecifically mean res/xml XML files.
In this section, we’ll deal with res/xml XML files.These files are different from raw files in that youdon’t use a stream to access them because they’recompiled into an efficient binary form whendeployed. They’re different from other resources inthat they can be of any custom XML structure.
To demonstrate this concept, we’re going to usean XML file named people.xml that defines multiple<person> elements and uses attributes for firstnameand lastname. We’ll grab this resource and display itselements in last-name, first-name order, as shown infigure 5.3.
Our data file for this process, which we’ll place inres/xml, is shown in the following listing.
Figure 5.3 The example ReadXMLResourceFileActivity that we’ll create in listing 5.8, which reads a res/xml resource file
www.it-ebooks.info

141Using the filesystem
<people> <person firstname="John" lastname="Ford" /> <person firstname="Alfred" lastname="Hitchcock" /> <person firstname="Stanley" lastname="Kubrick" /> <person firstname="Wes" lastname="Anderson" /></people>
If you’re using Eclipse, it’ll automatically detect a file in the res/xml path and compileit into a resource asset. You can then access this asset in code by parsing its binaryXML, as shown in the following listing.
public class ReadXMLResourceFile extends Activity { private TextView readOutput; @Override public void onCreate(Bundle icicle) { super.onCreate(icicle); setContentView(R.layout.read_xmlresource_file); readOutput = (TextView) findViewById(R.id.readxmlres_output); XmlPullParser parser = getResources().getXml(R.xml.people); StringBuffer sb = new StringBuffer(); try { while (parser.next() != XmlPullParser.END_DOCUMENT) { String name = parser.getName(); String first = null; String last = null; if ((name != null) && name.equals("person")) { int size = parser.getAttributeCount(); for (int i = 0; i < size; i++) { String attrName = parser.getAttributeName(i); String attrValue = parser.getAttributeValue(i); if ((attrName != null) && attrName.equals("firstname")) { first = attrValue; } else if ((attrName != null) && attrName.equals("lastname")) { last = attrValue; } } if ((first != null) && (last != null)) { sb.append(last + ", " + first + "\n"); } } } readOutput.setText(sb.toString()); } catch (Exception e) { Log.e(“ReadXMLResourceFile”, e.getMessage(), e); }
Listing 5.7 A custom XML file included in res/xml
Listing 5.8 Accessing a compiled XML resource from res/xml
Parse XML with XMLPullParser
B
CWalk XML tree
DGet attributeCountfor element
Get attribute name and valueE
www.it-ebooks.info
142 CHAPTER 5 Storing and retrieving data
. . . goto next Activity via startActivity omitted for brevity }}
To process a binary XML resource, you use an XmlPullParser B. This class supportsSAX-style tree traversal. The parser provides an event type for each element it encoun-ters, such as DOCDECL, COMMENT, START_DOCUMENT, START_TAG, END_TAG, END_DOCUMENT,and so on. By using the next() method, you can retrieve the current event type valueand compare it to event constants in the class C. Each element encountered has aname, a text value, and an optional set of attributes. You can examine the documentcontents by getting the attributeCount D for each item and grabbing each nameand value E. SAX is covered in more detail in chapter 13.
In addition to local file storage on the device filesystem, you have another optionthat’s more appropriate for certain types of content: writing to an external SD cardfilesystem.
5.2.5 External storage via an SD card
One of the advantages the Android platform provides over some other smartphones isthat it offers access to an available SD flash memory card. Not every Android devicewill necessarily have an SD card, but almost all do, and the platform provides an easyway for you to use it.
All applications can read data stored on the SD card. If you want to write data here,you’ll need to include the following permission in your AndroidManifest.xml:
<uses-permission android:name= "android.permission.WRITE_EXTERNAL_STORAGE" />
Failing to declare this permission will cause write attempts to the SD card to fail. Generally, you should use the SD card if you use large files such as images and
video, or if you don’t need to have permanent secure access to certain files. On theother hand, for permanent application-specialized data, you should use the internalfilesystem.
The SD card is removable, and SD card support on most devices (including Android-powered devices) supports the File Allocation Table (FAT) filesystem. The SD carddoesn’t have the access modes and permissions that come from the Linux filesystem.
SD cards and the emulatorTo work with an SD card image in the Android emulator, you’ll first need to use themksdcard tool provided to set up your SD image file (you’ll find this executable in thetools directory of the SDK). After you’ve created the file, you’ll need to start the emu-lator with the -sdcard <path_to_file> option in order to have the SD imagemounted. Alternately, use the Android SDK Manager to create a new virtual deviceand select the option to create a new SD card.
www.it-ebooks.info
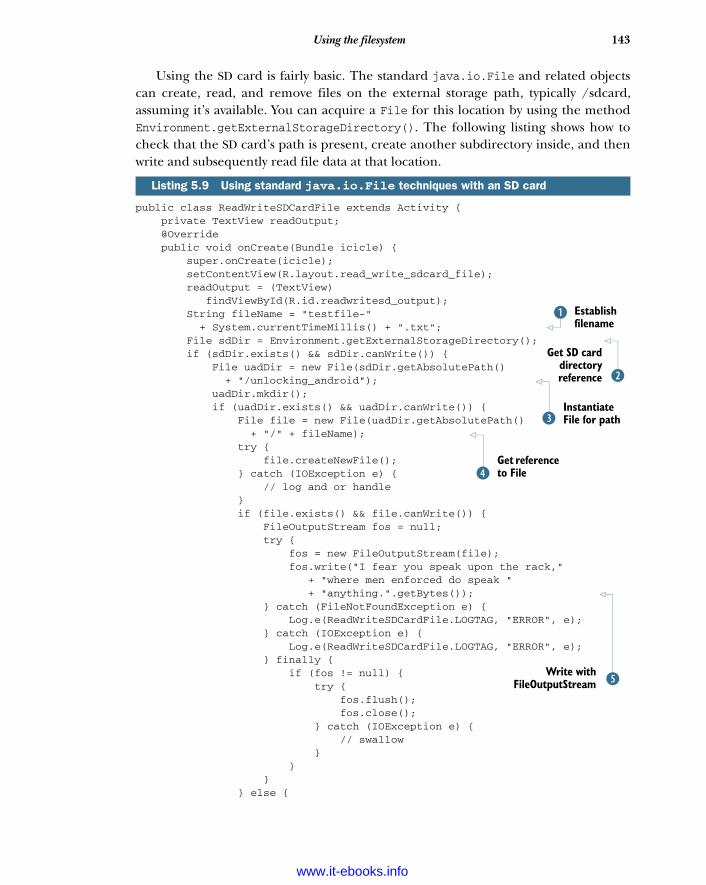
143Using the filesystem
Using the SD card is fairly basic. The standard java.io.File and related objectscan create, read, and remove files on the external storage path, typically /sdcard,assuming it’s available. You can acquire a File for this location by using the methodEnvironment.getExternalStorageDirectory(). The following listing shows how tocheck that the SD card’s path is present, create another subdirectory inside, and thenwrite and subsequently read file data at that location.
public class ReadWriteSDCardFile extends Activity { private TextView readOutput; @Override public void onCreate(Bundle icicle) { super.onCreate(icicle); setContentView(R.layout.read_write_sdcard_file); readOutput = (TextView) findViewById(R.id.readwritesd_output); String fileName = "testfile-" + System.currentTimeMillis() + ".txt"; File sdDir = Environment.getExternalStorageDirectory(); if (sdDir.exists() && sdDir.canWrite()) { File uadDir = new File(sdDir.getAbsolutePath() + "/unlocking_android"); uadDir.mkdir(); if (uadDir.exists() && uadDir.canWrite()) { File file = new File(uadDir.getAbsolutePath() + "/" + fileName); try { file.createNewFile(); } catch (IOException e) { // log and or handle } if (file.exists() && file.canWrite()) { FileOutputStream fos = null; try { fos = new FileOutputStream(file); fos.write("I fear you speak upon the rack," + "where men enforced do speak " + "anything.".getBytes()); } catch (FileNotFoundException e) { Log.e(ReadWriteSDCardFile.LOGTAG, "ERROR", e); } catch (IOException e) { Log.e(ReadWriteSDCardFile.LOGTAG, "ERROR", e); } finally { if (fos != null) { try { fos.flush(); fos.close(); } catch (IOException e) { // swallow } } } } else {
Listing 5.9 Using standard java.io.File techniques with an SD card
Establish filename
B
C
Get SD carddirectoryreference
Instantiate File for pathD
Get reference to FileE
FWrite with
FileOutputStream
www.it-ebooks.info
144 CHAPTER 5 Storing and retrieving data
// log and or handle - error writing to file } } else { // log and or handle - // unable to write to /sdcard/unlocking_android } } else { Log.e("ReadWriteSDCardFile.LOGTAG", "ERROR /sdcard path not available (did you create " + " an SD image with the mksdcard tool," + " and start emulator with -sdcard " + <path_to_file> option?"); } File rFile = new File("/sdcard/unlocking_android/" + fileName); if (rFile.exists() && rFile.canRead()) { FileInputStream fis = null; try { fis = new FileInputStream(rFile); byte[] reader = new byte[fis.available()]; while (fis.read(reader) != -1) { } readOutput.setText(new String(reader)); } catch (IOException e) { // log and or handle } finally { if (fis != null) { try { fis.close(); } catch (IOException e) { // swallow } } } } else { readOutput.setText( "Unable to read/write sdcard file, see logcat output"); } }}
We first define a name for the file to create B. In this example, we append a time-stamp to create a unique name each time this example application runs. After wehave the filename, we create a File object reference to the removable storage direc-tory C. From there, we create a File reference to a new subdirectory, /sdcard/unlocking_android D. The File object can represent both files and directories.After we have the subdirectory reference, we call mkdir() to create it if it doesn’talready exist.
With our directory structure in place, we follow a similar pattern to create theactual file. We instantiate a reference File object E and then call createFile() tocreate a file on the filesystem. When we have the File and know it exists and thatwe’re allowed to write to it, we use a FileOutputStream to write data into the file F.
GUse new File
object for reading
Read with FileInputStreamH
www.it-ebooks.info
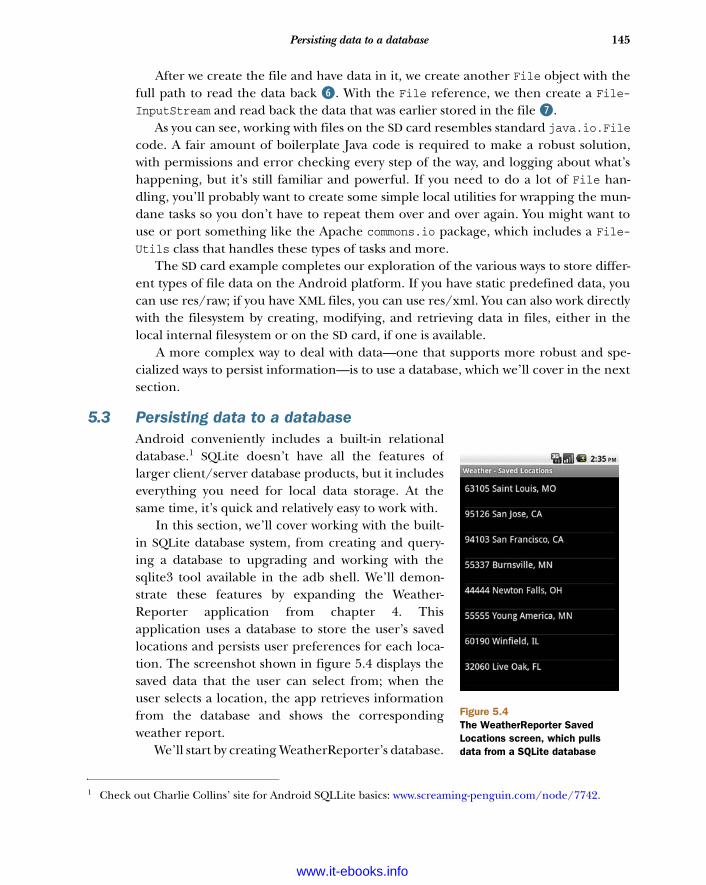
145Persisting data to a database
After we create the file and have data in it, we create another File object with thefull path to read the data back G. With the File reference, we then create a File-InputStream and read back the data that was earlier stored in the file H.
As you can see, working with files on the SD card resembles standard java.io.Filecode. A fair amount of boilerplate Java code is required to make a robust solution,with permissions and error checking every step of the way, and logging about what’shappening, but it’s still familiar and powerful. If you need to do a lot of File han-dling, you’ll probably want to create some simple local utilities for wrapping the mun-dane tasks so you don’t have to repeat them over and over again. You might want touse or port something like the Apache commons.io package, which includes a File-Utils class that handles these types of tasks and more.
The SD card example completes our exploration of the various ways to store differ-ent types of file data on the Android platform. If you have static predefined data, youcan use res/raw; if you have XML files, you can use res/xml. You can also work directlywith the filesystem by creating, modifying, and retrieving data in files, either in thelocal internal filesystem or on the SD card, if one is available.
A more complex way to deal with data—one that supports more robust and spe-cialized ways to persist information—is to use a database, which we’ll cover in the nextsection.
5.3 Persisting data to a databaseAndroid conveniently includes a built-in relationaldatabase.1 SQLite doesn’t have all the features oflarger client/server database products, but it includeseverything you need for local data storage. At thesame time, it’s quick and relatively easy to work with.
In this section, we’ll cover working with the built-in SQLite database system, from creating and query-ing a database to upgrading and working with thesqlite3 tool available in the adb shell. We’ll demon-strate these features by expanding the Weather-Reporter application from chapter 4. Thisapplication uses a database to store the user’s savedlocations and persists user preferences for each loca-tion. The screenshot shown in figure 5.4 displays thesaved data that the user can select from; when theuser selects a location, the app retrieves informationfrom the database and shows the correspondingweather report.
We’ll start by creating WeatherReporter’s database.
1 Check out Charlie Collins’ site for Android SQLLite basics: www.screaming-penguin.com/node/7742.
Figure 5.4The WeatherReporter Saved Locations screen, which pulls data from a SQLite database
www.it-ebooks.info
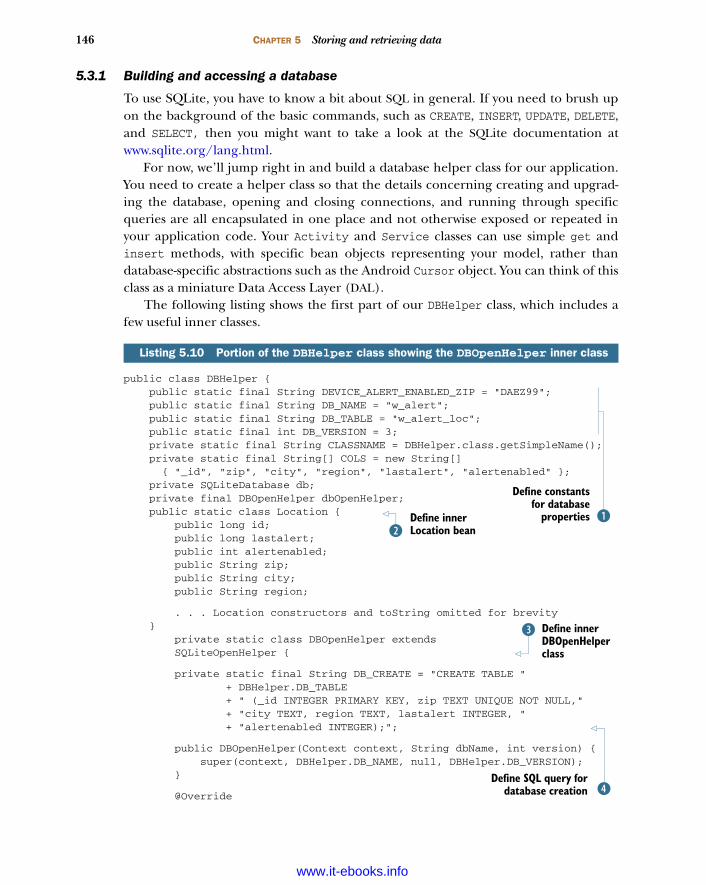
146 CHAPTER 5 Storing and retrieving data
5.3.1 Building and accessing a database
To use SQLite, you have to know a bit about SQL in general. If you need to brush upon the background of the basic commands, such as CREATE, INSERT, UPDATE, DELETE,and SELECT, then you might want to take a look at the SQLite documentation atwww.sqlite.org/lang.html.
For now, we’ll jump right in and build a database helper class for our application.You need to create a helper class so that the details concerning creating and upgrad-ing the database, opening and closing connections, and running through specificqueries are all encapsulated in one place and not otherwise exposed or repeated inyour application code. Your Activity and Service classes can use simple get andinsert methods, with specific bean objects representing your model, rather thandatabase-specific abstractions such as the Android Cursor object. You can think of thisclass as a miniature Data Access Layer (DAL).
The following listing shows the first part of our DBHelper class, which includes afew useful inner classes.
public class DBHelper { public static final String DEVICE_ALERT_ENABLED_ZIP = "DAEZ99"; public static final String DB_NAME = "w_alert"; public static final String DB_TABLE = "w_alert_loc"; public static final int DB_VERSION = 3; private static final String CLASSNAME = DBHelper.class.getSimpleName(); private static final String[] COLS = new String[] { "_id", "zip", "city", "region", "lastalert", "alertenabled" }; private SQLiteDatabase db; private final DBOpenHelper dbOpenHelper; public static class Location { public long id; public long lastalert; public int alertenabled; public String zip; public String city; public String region;
. . . Location constructors and toString omitted for brevity } private static class DBOpenHelper extends SQLiteOpenHelper {
private static final String DB_CREATE = "CREATE TABLE " + DBHelper.DB_TABLE + " (_id INTEGER PRIMARY KEY, zip TEXT UNIQUE NOT NULL," + "city TEXT, region TEXT, lastalert INTEGER, " + "alertenabled INTEGER);";
public DBOpenHelper(Context context, String dbName, int version) { super(context, DBHelper.DB_NAME, null, DBHelper.DB_VERSION); }
@Override
Listing 5.10 Portion of the DBHelper class showing the DBOpenHelper inner class
B
Define constantsfor database
propertiesDefine inner Location beanC
Define inner DBOpenHelper class
D
EDefine SQL query for
database creation
www.it-ebooks.info
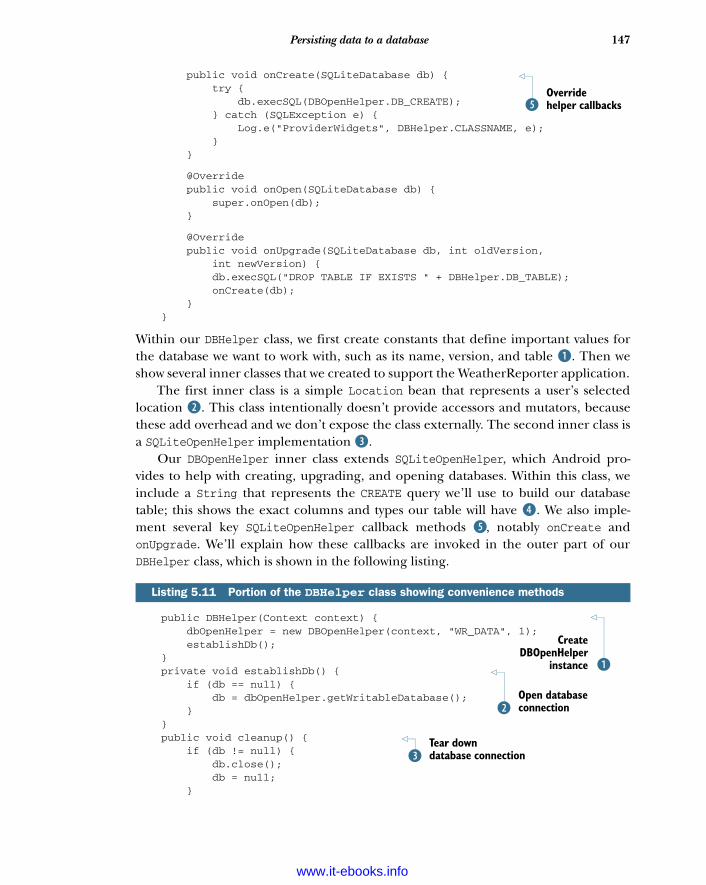
147Persisting data to a database
public void onCreate(SQLiteDatabase db) { try { db.execSQL(DBOpenHelper.DB_CREATE); } catch (SQLException e) { Log.e("ProviderWidgets", DBHelper.CLASSNAME, e); } }
@Override public void onOpen(SQLiteDatabase db) { super.onOpen(db); }
@Override public void onUpgrade(SQLiteDatabase db, int oldVersion, int newVersion) { db.execSQL("DROP TABLE IF EXISTS " + DBHelper.DB_TABLE); onCreate(db); } }
Within our DBHelper class, we first create constants that define important values forthe database we want to work with, such as its name, version, and table B. Then weshow several inner classes that we created to support the WeatherReporter application.
The first inner class is a simple Location bean that represents a user’s selectedlocation C. This class intentionally doesn’t provide accessors and mutators, becausethese add overhead and we don’t expose the class externally. The second inner class isa SQLiteOpenHelper implementation D.
Our DBOpenHelper inner class extends SQLiteOpenHelper, which Android pro-vides to help with creating, upgrading, and opening databases. Within this class, weinclude a String that represents the CREATE query we’ll use to build our databasetable; this shows the exact columns and types our table will have E. We also imple-ment several key SQLiteOpenHelper callback methods F, notably onCreate andonUpgrade. We’ll explain how these callbacks are invoked in the outer part of ourDBHelper class, which is shown in the following listing.
public DBHelper(Context context) { dbOpenHelper = new DBOpenHelper(context, "WR_DATA", 1); establishDb(); } private void establishDb() { if (db == null) { db = dbOpenHelper.getWritableDatabase(); } } public void cleanup() { if (db != null) { db.close(); db = null; }
Listing 5.11 Portion of the DBHelper class showing convenience methods
Override helper callbacksF
B
CreateDBOpenHelper
instance
Open database connectionC
Tear down database connectionD
www.it-ebooks.info
148 CHAPTER 5 Storing and retrieving data
} public void insert(Location location) { ContentValues values = new ContentValues(); values.put("zip", location.zip); values.put("city", location.city); values.put("region", location.region); values.put("lastalert", location.lastalert); values.put("alertenabled", location.alertenabled); db.insert(DBHelper.DB_TABLE, null, values); } public void update(Location location) { ContentValues values = new ContentValues(); values.put("zip", location.zip); values.put("city", location.city); values.put("region", location.region); values.put("lastalert", location.lastalert); values.put("alertenabled", location.alertenabled); db.update(DBHelper.DB_TABLE, values, "_id=" + location.id, null); } public void delete(long id) { db.delete(DBHelper.DB_TABLE, "_id=" + id, null); } public void delete(String zip) { db.delete(DBHelper.DB_TABLE, "zip='" + zip + "'", null); } public Location get(String zip) { Cursor c = null; Location location = null; try { c = db.query(true, DBHelper.DB_TABLE, DBHelper.COLS, "zip = '" + zip + "'", null, null, null, null, null); if (c.getCount() > 0) { c.moveToFirst(); location = new Location(); location.id = c.getLong(0); location.zip = c.getString(1); location.city = c.getString(2); location.region = c.getString(3); location.lastalert = c.getLong(4); location.alertenabled = c.getInt(5); } } catch (SQLException e) { Log.v("ProviderWidgets", DBHelper.CLASSNAME, e); } finally { if (c != null && !c.isClosed()) { c.close(); } } return location; } public List<Location> getAll() { ArrayList<Location> ret = new ArrayList<Location>(); Cursor c = null; try {
EProvideconvenience
insert, update,delete, get
Provide additional get methods
F
www.it-ebooks.info
149Persisting data to a database
c = db.query(DBHelper.DB_TABLE, DBHelper.COLS, null, null, null, null, null); int numRows = c.getCount(); c.moveToFirst(); for (int i = 0; i < numRows; ++i) { Location location = new Location(); location.id = c.getLong(0); location.zip = c.getString(1); location.city = c.getString(2); location.region = c.getString(3); location.lastalert = c.getLong(4); location.alertenabled = c.getInt(5); if (!location.zip.equals (DBHelper.DEVICE_ALERT_ENABLED_ZIP)){ ret.add(location); } c.moveToNext(); } } catch (SQLException e) { Log.v("ProviderWidgets", DBHelper.CLASSNAME, e); } finally { if (c != null && !c.isClosed()) { c.close(); } } return ret; } . . . getAllAlertEnabled omitted for brevity}
Our DBHelper class contains a member-level variable reference to a SQLiteDatabaseobject, as you saw in listing 5.10. We use this object as a workhorse to open databaseconnections, to execute SQL statements, and more.
In the constructor, we instantiate the DBOpenHelper inner class from the first partof the DBHelper class listing B. Inside the establishDb method, we use dbOpen-Helper to call openDatabase with the current Context, database name, and databaseversion C. db is established as an instance of SQLiteDatabase through DBOpenHelper.
Although you can also just open a database connection directly on your own, usingthe open helper in this way invokes the provided callbacks and makes the process eas-ier. With this technique, when you try to open your database connection, it’s automat-ically created, upgraded, or just returned, through your DBOpenHelper. Though usinga DBOpenHelper requires a few extra steps up front, it’s extremely handy when youneed to modify your table structure. You can simply increment the database’s versionnumber and take appropriate action in the onUpgrade callback.
Callers can invoke the cleanup method D when they pause, in order to close con-nections and free up resources.
After the cleanup method, we include the raw SQL convenience methods thatencapsulate our helper’s operations. In this class, we have methods to insert, update,delete, and get data E. We also have a few additional specialized get and getAll
www.it-ebooks.info
150 CHAPTER 5 Storing and retrieving data
methods F. Within these methods, you can see how to use the db object to run que-ries. The SQLiteDatabase class itself has many convenience methods, such as insert,update, and delete, and it provides direct query access that returns a Cursor over aresult set.
You can usually get a lot of mileage and utility from basic uses of the SQLiteData-base class. The final aspect for us to explore is the sqlite3 tool, which you can use tomanipulate data outside your application.
5.3.2 Using the sqlite3 tool
When you create a database for an application in Android, it creates files for that data-base on the device in the /data/data/[PACKAGE_NAME]/database/db.name location.These files are SQLite proprietary, but you can manipulate, dump, restore, and workwith your databases through these files in the adb shell by using the sqlite3 tool.
DATA PERMISSIONS Most devices lock down the data directory and will notallow you to browse their content using standalone tools. Use sqlite3 in theemulator or on a phone with firmware that allows you to access the /data/data directory.
You can access this tool by issuing the following commands on the command line.Remember to use your own package name; here we use the package name for theWeatherReporter sample application:
cd [ANDROID_HOME]/toolsadb shellsqlite3 /data/data/com.msi.manning.chapter4/databases/w_alert.db
When you’re in the shell and see the # prompt, you can then issue sqlite3 commands.Type .help to get started; if you need more help, see the tool’s documentation atwww.sqlite.org/sqlite.html. Using the tool, you can issue basic commands, such asSELECT or INSERT, or you can go further and CREATE or ALTER tables. Use this tool toexplore, troubleshoot, and .dump and .load data. As with many command-line SQLtools, it takes some time to get used to the format, but it’s the best way to back up orload your data. Keep in mind that this tool is available only through the developmentshell; it’s not something you can use to load a real application with data.
Now that we’ve shown you how to use the SQLite support provided in Android, youcan do everything from creating and accessing tables to investigating databases with
Databases are application privateUnlike the SharedPreferences you saw earlier, you can’t make a databaseWORLD_READABLE. Each database is accessible only by the package in which it wascreated. If you need to pass data across processes, you can use AIDL/Binder (as inchapter 4) or create a ContentProvider (as we’ll discuss in section 5.4), but youcan’t use a database directly across the process/package boundary.
www.it-ebooks.info
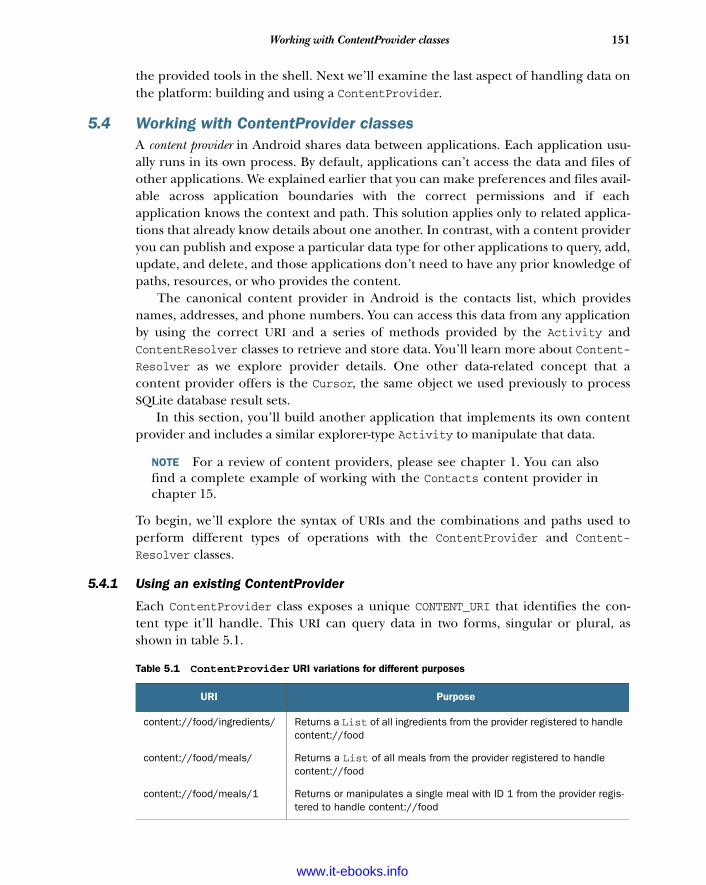
151Working with ContentProvider classes
the provided tools in the shell. Next we’ll examine the last aspect of handling data onthe platform: building and using a ContentProvider.
5.4 Working with ContentProvider classesA content provider in Android shares data between applications. Each application usu-ally runs in its own process. By default, applications can’t access the data and files ofother applications. We explained earlier that you can make preferences and files avail-able across application boundaries with the correct permissions and if eachapplication knows the context and path. This solution applies only to related applica-tions that already know details about one another. In contrast, with a content provideryou can publish and expose a particular data type for other applications to query, add,update, and delete, and those applications don’t need to have any prior knowledge ofpaths, resources, or who provides the content.
The canonical content provider in Android is the contacts list, which providesnames, addresses, and phone numbers. You can access this data from any applicationby using the correct URI and a series of methods provided by the Activity andContentResolver classes to retrieve and store data. You’ll learn more about Content-Resolver as we explore provider details. One other data-related concept that acontent provider offers is the Cursor, the same object we used previously to processSQLite database result sets.
In this section, you’ll build another application that implements its own contentprovider and includes a similar explorer-type Activity to manipulate that data.
NOTE For a review of content providers, please see chapter 1. You can alsofind a complete example of working with the Contacts content provider inchapter 15.
To begin, we’ll explore the syntax of URIs and the combinations and paths used toperform different types of operations with the ContentProvider and Content-Resolver classes.
5.4.1 Using an existing ContentProvider
Each ContentProvider class exposes a unique CONTENT_URI that identifies the con-tent type it’ll handle. This URI can query data in two forms, singular or plural, asshown in table 5.1.
Table 5.1 ContentProvider URI variations for different purposes
URI Purpose
content://food/ingredients/ Returns a List of all ingredients from the provider registered to handle content://food
content://food/meals/ Returns a List of all meals from the provider registered to handle content://food
content://food/meals/1 Returns or manipulates a single meal with ID 1 from the provider regis-tered to handle content://food
www.it-ebooks.info
152 CHAPTER 5 Storing and retrieving data
A provider can offer as many types of data as it likes. By using these formats, yourapplication can either iterate through all the content offered by a provider or retrievea specific datum of interest.
The Activity class has a managedQuery() method that makes calls into registeredContentProvider classes. When you create your own content provider in section 5.4.2,we’ll show you how a provider is registered with the platform. Each provider isrequired to advertise the CONTENT_URI it supports. To query the contacts provider, youhave to know this URI and then get a Cursor by calling managedQuery(). When youhave the Cursor, you can use it, as we showed you in listing 5.11.
A ContentProvider typically supplies all the details of the URI and the types it sup-ports as constants in a class. In the android.provider package, you can find classesthat correspond to built-in Android content providers, such as the MediaStore. Theseclasses have nested inner classes that represent types of data, such as Audio andImages. Within those classes are additional inner classes, with constants that representfields or columns of data for each type. The values you need to query and manipulatedata come from the inner classes for each type.
For additional information, see the android.provider package in the Javadocs,which lists all the built-in providers. Now that we’ve covered a bit about using a pro-vider, we’ll look at the other side of the coin—creating a content provider.
5.4.2 Creating a ContentProvider
In this section, you’ll build a provider that handles data responsibilities for a genericWidget object you’ll define. This simple object includes a name, type, and category; ina real application, you could represent any type of data.
Managed CursorTo obtain a Cursor reference, you can also use the managedQuery method of theActivity class. The Activity automatically cleans up any managed Cursorobjects when your Activity pauses and restarts them when it starts. If you just needto retrieve data within an Activity, you’ll want to use a managed Cursor, asopposed to a ContentResolver.
What if the content changes after the fact?When you use a ContentProvider to make a query, you get only the current stateof the data. The data could change after your call, so how do you stay up to date? Toreceive notifications when a Cursor changes, you can use the ContentObserverAPI. ContentObserver supports a set of callbacks that trigger when data changes.The Cursor class provides register() and unregister() methods for Content-Observer objects.
www.it-ebooks.info
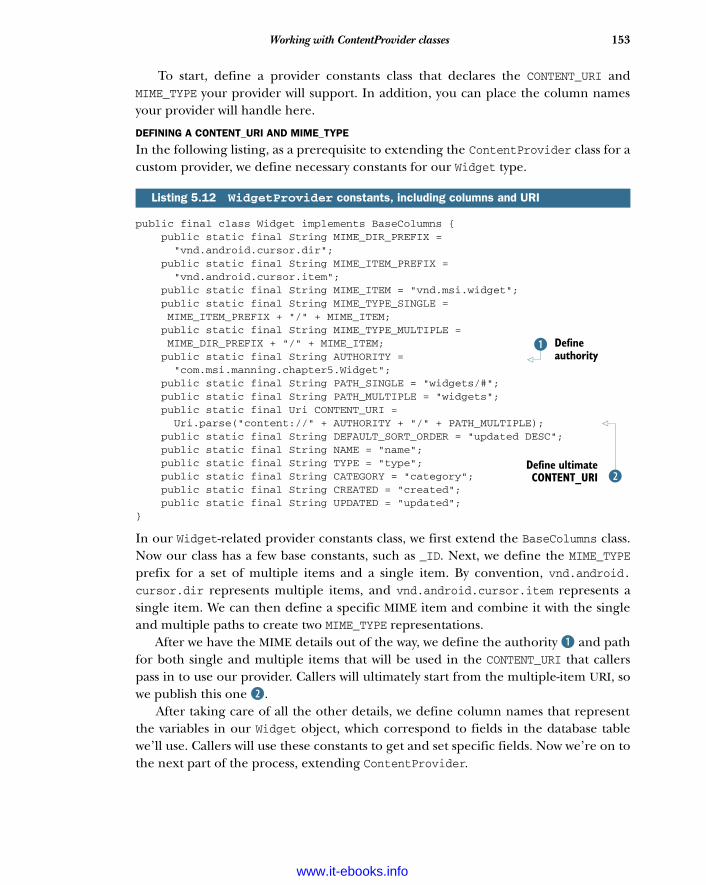
153Working with ContentProvider classes
To start, define a provider constants class that declares the CONTENT_URI andMIME_TYPE your provider will support. In addition, you can place the column namesyour provider will handle here.
DEFINING A CONTENT_URI AND MIME_TYPE
In the following listing, as a prerequisite to extending the ContentProvider class for acustom provider, we define necessary constants for our Widget type.
public final class Widget implements BaseColumns { public static final String MIME_DIR_PREFIX = "vnd.android.cursor.dir"; public static final String MIME_ITEM_PREFIX = "vnd.android.cursor.item"; public static final String MIME_ITEM = "vnd.msi.widget"; public static final String MIME_TYPE_SINGLE = MIME_ITEM_PREFIX + "/" + MIME_ITEM; public static final String MIME_TYPE_MULTIPLE = MIME_DIR_PREFIX + "/" + MIME_ITEM; public static final String AUTHORITY = "com.msi.manning.chapter5.Widget"; public static final String PATH_SINGLE = "widgets/#"; public static final String PATH_MULTIPLE = "widgets"; public static final Uri CONTENT_URI = Uri.parse("content://" + AUTHORITY + "/" + PATH_MULTIPLE); public static final String DEFAULT_SORT_ORDER = "updated DESC"; public static final String NAME = "name"; public static final String TYPE = "type"; public static final String CATEGORY = "category"; public static final String CREATED = "created"; public static final String UPDATED = "updated";}
In our Widget-related provider constants class, we first extend the BaseColumns class.Now our class has a few base constants, such as _ID. Next, we define the MIME_TYPEprefix for a set of multiple items and a single item. By convention, vnd.android.cursor.dir represents multiple items, and vnd.android.cursor.item represents asingle item. We can then define a specific MIME item and combine it with the singleand multiple paths to create two MIME_TYPE representations.
After we have the MIME details out of the way, we define the authority B and pathfor both single and multiple items that will be used in the CONTENT_URI that callerspass in to use our provider. Callers will ultimately start from the multiple-item URI, sowe publish this one C.
After taking care of all the other details, we define column names that representthe variables in our Widget object, which correspond to fields in the database tablewe’ll use. Callers will use these constants to get and set specific fields. Now we’re on tothe next part of the process, extending ContentProvider.
Listing 5.12 WidgetProvider constants, including columns and URI
Define authority
B
Define ultimateCONTENT_URI C
www.it-ebooks.info

154 CHAPTER 5 Storing and retrieving data
EXTENDING CONTENTPROVIDER
The following listing shows the beginning of our ContentProvider implementationclass, WidgetProvider. In this part of the class, we do some housekeeping relating tothe database we’ll use and the URI we’re supporting.
public class WidgetProvider extends ContentProvider { private static final String CLASSNAME = WidgetProvider.class.getSimpleName(); private static final int WIDGETS = 1; private static final int WIDGET = 2; public static final String DB_NAME = "widgets_db"; public static final String DB_TABLE = "widget"; public static final int DB_VERSION = 1; private static UriMatcher URI_MATCHER = null; private static HashMap<String, String> PROJECTION_MAP; private SQLiteDatabase db; static { WidgetProvider.URI_MATCHER = new UriMatcher(UriMatcher.NO_MATCH); WidgetProvider.URI_MATCHER.addURI(Widget.AUTHORITY, Widget.PATH_MULTIPLE, WidgetProvider.WIDGETS); WidgetProvider.URI_MATCHER.addURI(Widget.AUTHORITY, Widget.PATH_SINGLE, WidgetProvider.WIDGET); WidgetProvider.PROJECTION_MAP = new HashMap<String, String>(); WidgetProvider.PROJECTION_MAP.put(BaseColumns._ID, "_id"); WidgetProvider.PROJECTION_MAP.put(Widget.NAME, "name"); WidgetProvider.PROJECTION_MAP.put(Widget.TYPE, "type"); WidgetProvider.PROJECTION_MAP.put(Widget.CATEGORY, "category"); WidgetProvider.PROJECTION_MAP.put(Widget.CREATED, "created"); WidgetProvider.PROJECTION_MAP.put(Widget.UPDATED, "updated"); } private static class DBOpenHelper extends SQLiteOpenHelper { private static final String DB_CREATE = "CREATE TABLE " + WidgetProvider.DB_TABLE + " (_id INTEGER PRIMARY KEY, name TEXT UNIQUE NOT NULL," + "type TEXT, category TEXT, updated INTEGER, created" + "INTEGER);"; public DBOpenHelper(Context context) { super(context, WidgetProvider.DB_NAME, null, WidgetProvider.DB_VERSION); } @Override public void onCreate(SQLiteDatabase db) { try { db.execSQL(DBOpenHelper.DB_CREATE); } catch (SQLException e) { // log and or handle } } @Override public void onOpen(SQLiteDatabase db) { }
Listing 5.13 The first portion of the WidgetProvider ContentProvider
Define database constants
B
Use SQLiteDatabase reference
C
DCreate and
open database
www.it-ebooks.info
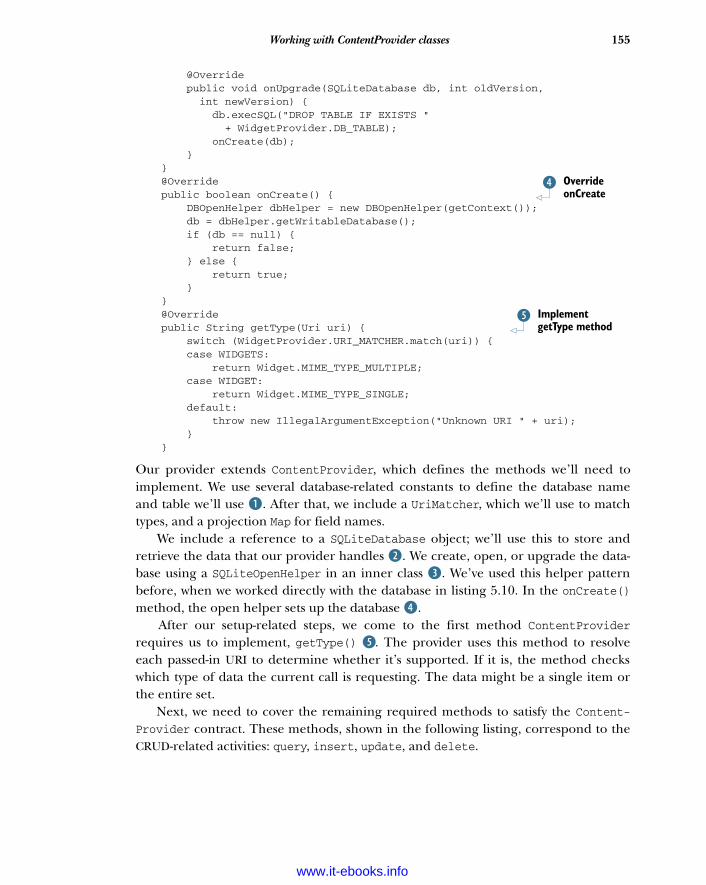
155Working with ContentProvider classes
@Override public void onUpgrade(SQLiteDatabase db, int oldVersion, int newVersion) { db.execSQL("DROP TABLE IF EXISTS " + WidgetProvider.DB_TABLE); onCreate(db); } } @Override public boolean onCreate() { DBOpenHelper dbHelper = new DBOpenHelper(getContext()); db = dbHelper.getWritableDatabase(); if (db == null) { return false; } else { return true; } } @Override public String getType(Uri uri) { switch (WidgetProvider.URI_MATCHER.match(uri)) { case WIDGETS: return Widget.MIME_TYPE_MULTIPLE; case WIDGET: return Widget.MIME_TYPE_SINGLE; default: throw new IllegalArgumentException("Unknown URI " + uri); } }
Our provider extends ContentProvider, which defines the methods we’ll need toimplement. We use several database-related constants to define the database nameand table we’ll use B. After that, we include a UriMatcher, which we’ll use to matchtypes, and a projection Map for field names.
We include a reference to a SQLiteDatabase object; we’ll use this to store andretrieve the data that our provider handles C. We create, open, or upgrade the data-base using a SQLiteOpenHelper in an inner class D. We’ve used this helper patternbefore, when we worked directly with the database in listing 5.10. In the onCreate()method, the open helper sets up the database E.
After our setup-related steps, we come to the first method ContentProviderrequires us to implement, getType() F. The provider uses this method to resolveeach passed-in URI to determine whether it’s supported. If it is, the method checkswhich type of data the current call is requesting. The data might be a single item orthe entire set.
Next, we need to cover the remaining required methods to satisfy the Content-Provider contract. These methods, shown in the following listing, correspond to theCRUD-related activities: query, insert, update, and delete.
Override onCreate
E
Implement getType method
F
www.it-ebooks.info
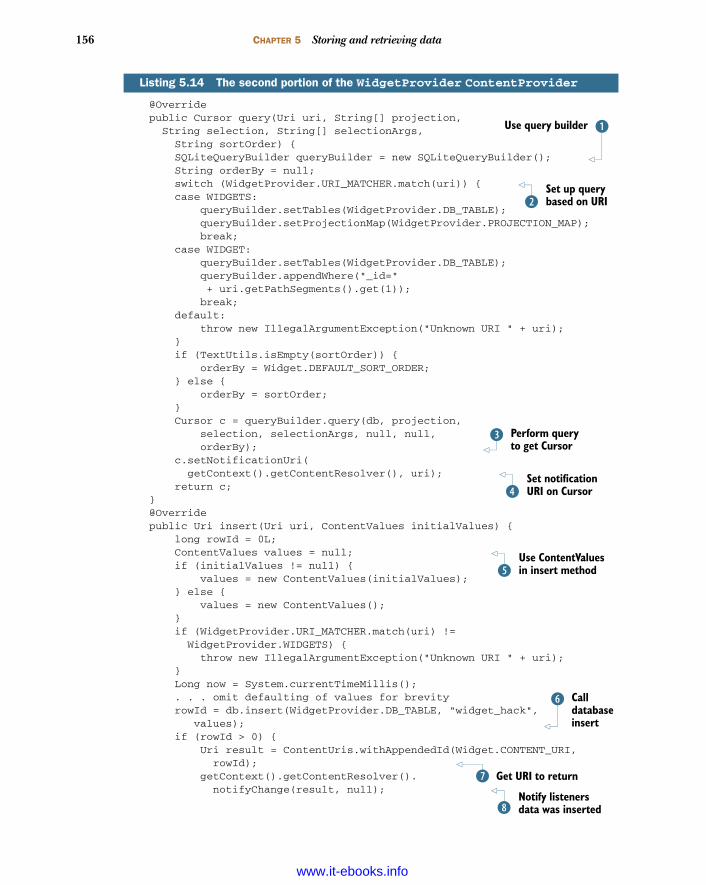
156 CHAPTER 5 Storing and retrieving data
@Override public Cursor query(Uri uri, String[] projection, String selection, String[] selectionArgs, String sortOrder) { SQLiteQueryBuilder queryBuilder = new SQLiteQueryBuilder(); String orderBy = null; switch (WidgetProvider.URI_MATCHER.match(uri)) { case WIDGETS: queryBuilder.setTables(WidgetProvider.DB_TABLE); queryBuilder.setProjectionMap(WidgetProvider.PROJECTION_MAP); break; case WIDGET: queryBuilder.setTables(WidgetProvider.DB_TABLE); queryBuilder.appendWhere("_id=" + uri.getPathSegments().get(1)); break; default: throw new IllegalArgumentException("Unknown URI " + uri); } if (TextUtils.isEmpty(sortOrder)) { orderBy = Widget.DEFAULT_SORT_ORDER; } else { orderBy = sortOrder; } Cursor c = queryBuilder.query(db, projection, selection, selectionArgs, null, null, orderBy); c.setNotificationUri( getContext().getContentResolver(), uri); return c; } @Override public Uri insert(Uri uri, ContentValues initialValues) { long rowId = 0L; ContentValues values = null; if (initialValues != null) { values = new ContentValues(initialValues); } else { values = new ContentValues(); } if (WidgetProvider.URI_MATCHER.match(uri) != WidgetProvider.WIDGETS) { throw new IllegalArgumentException("Unknown URI " + uri); } Long now = System.currentTimeMillis(); . . . omit defaulting of values for brevity rowId = db.insert(WidgetProvider.DB_TABLE, "widget_hack", values); if (rowId > 0) { Uri result = ContentUris.withAppendedId(Widget.CONTENT_URI, rowId); getContext().getContentResolver(). notifyChange(result, null);
Listing 5.14 The second portion of the WidgetProvider ContentProvider
BUse query builder
Set up query based on URIC
Perform query to get Cursor
D
Set notification URI on CursorE
Use ContentValues in insert methodF
Call database insert
G
Get URI to returnHNotify listeners data was insertedI
www.it-ebooks.info
157Working with ContentProvider classes
return result; } throw new SQLException("Failed to insert row into " + uri); } @Override public int update(Uri uri, ContentValues values, String selection, String[] selectionArgs) { int count = 0; switch (WidgetProvider.URI_MATCHER.match(uri)) { case WIDGETS: count = db.update(WidgetProvider.DB_TABLE, values, selection, selectionArgs); break; case WIDGET: String segment = uri.getPathSegments().get(1); String where = ""; if (!TextUtils.isEmpty(selection)) { where = " AND (" + selection + ")"; } count = db.update(WidgetProvider.DB_TABLE, values, "_id=" + segment + where, selectionArgs); break; default: throw new IllegalArgumentException("Unknown URI " + uri); } getContext().getContentResolver().notifyChange(uri, null); return count; } @Override public int delete( Uri uri, String selection, String[] selectionArgs) { int count; switch (WidgetProvider.URI_MATCHER.match(uri)) { case WIDGETS: count = db.delete(WidgetProvider.DB_TABLE, selection, selectionArgs); break; case WIDGET: String segment = uri.getPathSegments().get(1); String where = ""; if (!TextUtils.isEmpty(selection)) { where = " AND (" + selection + ")"; } count = db.delete(WidgetProvider.DB_TABLE, "_id=" + segment + where, selectionArgs); break; default: throw new IllegalArgumentException("Unknown URI " + uri); } getContext().getContentResolver().notifyChange(uri, null); return count; }}
The last part of our WidgetProvider class shows how to implement the Content-Provider methods. First, we use a SQLQueryBuilder inside the query() method to
Provide update methodJ
Provide delete method
1)
www.it-ebooks.info

158 CHAPTER 5 Storing and retrieving data
append the projection map passed in B and any SQL clauses, along with the correctURI based on our matcher C, before we make the actual query and get a handle on aCursor to return D.
At the end of the query() method, we use the setNotificationUri() method towatch the returned URI for changes E. This event-based mechanism keeps track ofwhen Cursor data items change, regardless of who changes them.
Next, you see the insert() method, where we validate the passed-in Content-Values object and populate it with default values, if the values aren’t present F. Afterwe have the values, we call the database insert() method G and get the resultingURI to return with the appended ID of the new record H. After the insert is complete,we use another notification system, this time for ContentResolver. Because we’vemade a data change, we inform the ContentResolver what happened so that any reg-istered listeners can be updated I.
After completing the insert() method, we come to the update() J anddelete() 1) methods. These methods repeat many of the previous concepts. First,they match the URI passed in to a single element or the set, and then they call therespective update() and delete() methods on the database object. Again, at the endof these methods, we notify listeners that the data has changed.
Implementing the needed provider methods completes our class. After we registerthis provider with the platform, any application can use it to query, insert, update, ordelete data. Registration occurs in the application manifest, which we’ll look at next.
PROVIDER MANIFESTS
Content providers must be defined in an application manifest file and installed on theplatform so the platform can learn that they’re available and what data types theyoffer. The following listing shows the manifest for our provider.
<?xml version="1.0" encoding="utf-8"?><manifest xmlns:android="http://schemas.android.com/apk/res/android" package="com.msi.manning.chapter5.widget"> <application android:icon="@drawable/icon" android:label="@string/app_short_name"> <activity android:name=".WidgetExplorer" android:label="@string/app_name"> <intent-filter> <action android:name="android.intent.action.MAIN" /> <category android:name= "android.intent.category.LAUNCHER" /> </intent-filter> </activity> <provider android:name="WidgetProvider" android:authorities= "com.msi.manning.chapter5.Widget" /> </application></manifest>
Listing 5.15 WidgetProvider AndroidManifest.xml file
Declare provider’s authority
B
www.it-ebooks.info

159Summary
The <provider> element B defines the class that implements the provider and associ-ates a particular authority with that class.
A completed project that supports inserting, retrieving, updating, and deletingrecords rounds out our exploration of using and building ContentProvider classes.And with that, we’ve also now demonstrated the ways to locally store and retrieve dataon the Android platform.
5.5 SummaryFrom a simple SharedPreferences mechanism to file storage, databases, and finallythe concept of a content provider, Android provides myriad ways for applications toretrieve and store data.
As we discussed in this chapter, several storage types can share data across applica-tion and process boundaries, and several can’t. You can create SharedPreferenceswith a permissions mode, allowing the flexibility to keep things private, or to sharedata globally with read-only or read-write permissions. The filesystem provides moreflexible and powerful data storage for a single application.
Android also provides a relational database system based on SQLite. Use this light-weight, speedy, and capable system for local data persistence within a single applica-tion. To share data, you can still use a database, but you need to expose an interfacethrough a content provider. Providers expose data types and operations through aURI-based approach.
In this chapter, we examined each of the data paths available to an Android appli-cation. You built several small, focused sample applications to use preferences and thefilesystem, and you expanded the WeatherReporter sample application that you beganin the last chapter. This Android application uses a SQLite database to access and per-sist data. You also built your own custom content provider from the ground up.
To expand your Android horizons beyond data, we’ll move on to general network-ing in the next chapter. We’ll cover networking basics and the networking APIsAndroid provides. We’ll also expand on the data concepts we’ve covered in this chap-ter to use the network itself as a data source.
Additional ContentProvider manifest propertiesThe properties of a content provider can configure several important settings beyondthe basics, such as specific permissions, initialization order, multiprocess capability,and more. Though most ContentProvider implementations won’t need to delve intothese details, you should still keep them in mind. For complete and up-to-date Con-tentProvider properties, see the SDK documentation.
www.it-ebooks.info

Networking andweb services
With the ubiquity of high-speed networking, mobile devices are now expected toperform many of the same data-rich functions of traditional computers such asemail, providing web access, and the like. Furthermore, because mobile phonesoffer such items as GPS, microphones, CDMA/GSM, built in cameras, accelerome-ters, and many others, user demand for applications that leverage all the features ofthe phone continues to increase.
You can build interesting applications with the open Intent- and Service-basedapproach you learned about in previous chapters. That approach combines built-in(or custom) intents, such as fully capable web browsing, with access to hardwarecomponents, such as a 3D graphics subsystem, a GPS receiver, a camera, removablestorage, and more. This combination of open platform, hardware capability, soft-ware architecture, and access to network data makes Android compelling.
This chapter covers Networking basics
Determining network status
Using the network to retrieve and store data
Working with web services
160
www.it-ebooks.info
161
This doesn’t mean that the voice network isn’t important—we’ll cover telephonyexplicitly in chapter 7—but we admit that voice is a commodity—and data is what we’llfocus on when talking about the network.
Android provides access to networking in several ways, including mobile InternetProtocol (IP), Wi-Fi, and Bluetooth. It also provides some open and closed source third-party implementations of other networking standards such as ZigBee and WorldwideInteroperability for Microwave Access (WiMAX). In this chapter, though, we’ll concen-trate on getting your Android applications to communicate using IP network data,using several different approaches. We’ll cover a bit of networking background, andthen we’ll deal with Android specifics as we explore communication with the networkusing sockets and higher-level protocols such as Hypertext Transfer Protocol (HTTP).
Android provides a portion of the java.net package and the org.apache.http-client package to support basic networking. Other related packages, such asandroid.net, address internal networking details and general connectivity properties.You’ll encounter all these packages as we progress though networking scenarios inthis chapter.
In terms of connectivity properties, we’ll look at using the ConnectivityManagerclass to determine when the network connection is active and what type of connectionit is: mobile or Wi-Fi. From there, we’ll use the network in various ways with sampleapplications.
One caveat to this networking chapter is that we won’t dig into the details concern-ing the Android Wi-Fi or Bluetooth APIs. Bluetooth is an important technology forclose-range wireless networking between devices, but it isn’t available in the Androidemulator (see chapter 14 for more on Bluetooth). On the other hand, Wi-Fi has a goodexisting API but also doesn’t have an emulation layer. Because the emulator doesn’t dis-tinguish the type of network you’re using and doesn’t know anything about eitherBluetooth or Wi-Fi, and because we think the importance lies more in how you use thenetwork, we aren’t going to cover these APIs. If you want more information on the Wi-Fi APIs, please see the Android documentation (http://code.google.com/android/reference/android/net/wifi/package-summary.html).
The aptly named sample application for this chapter, NetworkExplorer, will look atways to communicate with the network in Android and will include some handy utili-ties. Ultimately, this application will have multiple screens that exercise different net-working techniques, as shown in figure 6.1.
After we cover general IP networking with regard to Android, we’ll discuss turningthe server side into a more robust API itself by using web services. On this topic, we’llwork with plain old XML over HTTP (POX) and Representational State Transfer (REST).We’ll also discuss the Simple Object Access Protocol (SOAP). We’ll address the pros andcons of the various approaches and why you might want to choose one method overanother for an Android client.
Before we delve into the details of networked Android applications, we’ll beginwith an overview of networking basics. If you’re already well versed in general
www.it-ebooks.info
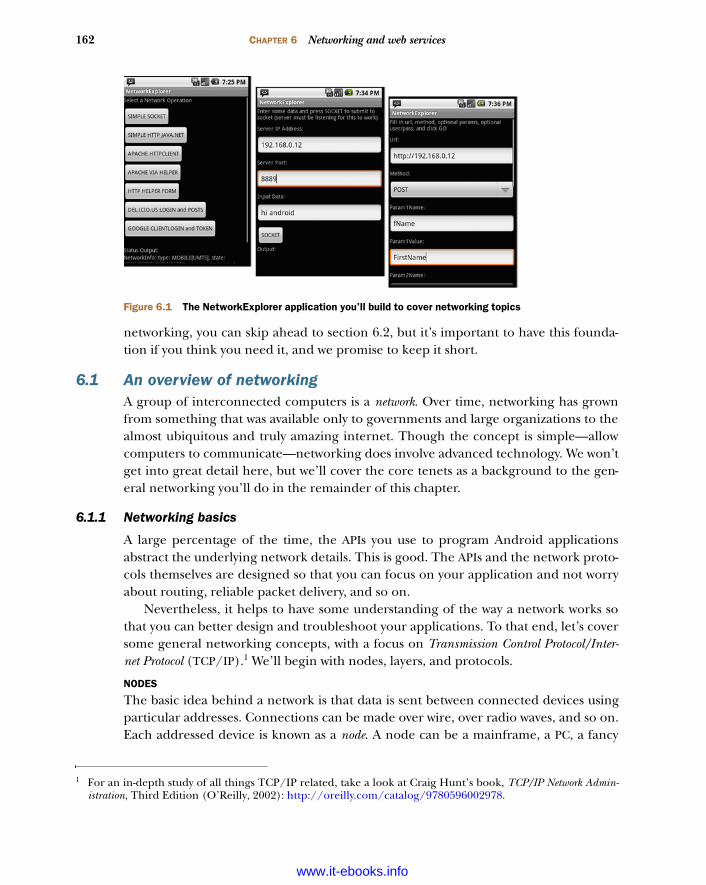
162 CHAPTER 6 Networking and web services
networking, you can skip ahead to section 6.2, but it’s important to have this founda-tion if you think you need it, and we promise to keep it short.
6.1 An overview of networkingA group of interconnected computers is a network. Over time, networking has grownfrom something that was available only to governments and large organizations to thealmost ubiquitous and truly amazing internet. Though the concept is simple—allowcomputers to communicate—networking does involve advanced technology. We won’tget into great detail here, but we’ll cover the core tenets as a background to the gen-eral networking you’ll do in the remainder of this chapter.
6.1.1 Networking basics
A large percentage of the time, the APIs you use to program Android applicationsabstract the underlying network details. This is good. The APIs and the network proto-cols themselves are designed so that you can focus on your application and not worryabout routing, reliable packet delivery, and so on.
Nevertheless, it helps to have some understanding of the way a network works sothat you can better design and troubleshoot your applications. To that end, let’s coversome general networking concepts, with a focus on Transmission Control Protocol/Inter-net Protocol (TCP/IP).1 We’ll begin with nodes, layers, and protocols.
NODES
The basic idea behind a network is that data is sent between connected devices usingparticular addresses. Connections can be made over wire, over radio waves, and so on.Each addressed device is known as a node. A node can be a mainframe, a PC, a fancy
1 For an in-depth study of all things TCP/IP related, take a look at Craig Hunt’s book, TCP/IP Network Admin-istration, Third Edition (O’Reilly, 2002): http://oreilly.com/catalog/9780596002978.
Figure 6.1 The NetworkExplorer application you’ll build to cover networking topics
www.it-ebooks.info

163An overview of networking
toaster, or any other device with a network stack and connectivity, such as an Android-enabled handheld.
LAYERS AND PROTOCOLS
Protocols are a predefined and agreed-upon set of rules for communication. Protocolsare often layered on top of one another because they handle different levels ofresponsibility. The following list describes the main layers of the TCP/IP stack, whichis used for the majority of web traffic and with Android:
Link Layer—Physical device address resolution protocols such as ARP and RARP
Internet Layer —IP itself, which has multiple versions, the ping protocol, andICMP, among others
Transport Layer—Different types of delivery protocols such as TCP and UDP Application Layer—Familiar protocols such as HTTP, FTP, SMTP, IMAP, POP, DNS,
SSH, and SOAP
Layers are an abstraction of the different levels of a network protocol stack. The low-est level, the Link Layer, is concerned with physical devices and physical addresses.The next level, the Internet Layer, is concerned with addressing and general datadetails. After that, the Transport Layer is concerned with delivery details. And, finally,the top-level Application Layer protocols, which make use of the stack beneath them,are application-specific for sending files or email or viewing web pages.
IP
IP is in charge of the addressing system and delivering data in small chunks calledpackets. Packets, known in IP terms as datagrams, define how much data can go in eachchunk, where the boundaries for payload versus header information are, and thelike. IP addresses tell where each packet is from (its source) and where it’s going (itsdestination).
IP addresses come in different sizes, depending on the version of the protocolbeing used, but by far the most common at present is the 32-bit address. 32-bit IPaddresses (TCP/IP version 4, or IPv4) are typically written using a decimal notationthat separates the 32 bits into four sections, each representing 8 bits (an octet), suchas 74.125.45.100.
Certain IP address classes have special roles and meaning. For example, 127 alwaysidentifies a loopback2 or local address on every machine; this class doesn’t communi-cate with any other devices (it can be used internally, on a single machine only).Addresses that begin with 10 or 192 aren’t routable, meaning they can communicatewith other devices on the same local network segment but can’t connect to other seg-ments. Every address on a particular network segment must be unique, or collisionscan occur and it gets ugly.
2 The TCP/IP Guide provides further explanation of datagrams and loopbacks: www.tcpipguide.com/index.htm.
www.it-ebooks.info
164 CHAPTER 6 Networking and web services
The routing of packets on an IP network—how packets traverse the network andgo from one segment to another—is handled by routers. Routers speak to each otherusing IP addresses and other IP-related information.
TCP AND UDP
TCP and UDP (User Datagram Protocol) are different delivery protocols that are com-monly used with TCP/IP. TCP is reliable, and UDP is fire and forget. What does thatmean? It means that TCP includes extra data to guarantee the order of packets and tosend back an acknowledgment when a packet is received. The common analogy is cer-tified mail: the sender gets a receipt that shows the letter was delivered and signed for,and therefore knows the recipient got the message. UDP, on the other hand, doesn’tprovide any ordering or acknowledgment. It’s more like a regular letter: it’s cheaperand faster to send, but you basically just hope the recipient gets it.
APPLICATION PROTOCOLS
After a packet is sent and delivered, an application takes over. For example, to send anemail message, Simple Mail Transfer Protocol (SMTP) defines a rigorous set of proce-dures that have to take place. You have to say hello in a particular way and introduceyourself; then you have to supply from and to information, followed by a messagebody in a particular format. Similarly, HTTP defines the set of rules for the internet—which methods are allowed (GET, POST, PUT, DELETE) and how the overall request/response system works between a client and a server.
When you’re working with Android (and Java-related APIs in general), you typi-cally don’t need to delve into the details of any of the lower-level protocols, but youmight need to know the major differences we’ve outlined here for troubleshooting.You should also be well-versed in IP addressing, know a bit more about clients andservers, and understand how connections are established using ports.
6.1.2 Clients and servers
Anyone who’s ever used a web browser is familiar with the client/server computingmodel. Data, in one format or another, is stored on a centralized, powerful server. Cli-ents then connect to that server using a designated protocol, such as HTTP, to retrievethe data and work with it.
This pattern is, of course, much older than the web, and it has been applied toeverything from completely dumb terminals that connect to mainframes to moderndesktop applications that connect to a server for only a portion of their purpose. Agood example is iTunes, which is primarily a media organizer and player, but also hasa store where customers can connect to the server to get new content. In any case, theconcept is the same: the client makes a type of request to the server, and the serverresponds. This model is the same one that the majority of Android applications (atleast those that use a server side at all) generally follow. Android applications typicallyend up as the client.
www.it-ebooks.info

165Checking the network status
In order to handle many client requests that are often for different purposes andthat come in nearly simultaneously to a single IP address, modern server operating sys-tems use the concept of ports. Ports aren’t physical; they’re a representation of a par-ticular area of the computer’s memory. A server can listen on multiple designatedports at a single address: for example, one port for sending email, one port for webtraffic, two ports for file transfer, and so on. Every computer with an IP address alsosupports a range of thousands of ports to enable multiple conversations to happen atthe same time.
Ports are divided into three ranges:
Well-known ports—0 through 1023 Registered ports—1024 through 49151 Dynamic and/or private ports—49152 through 65535
The well-known ports are all published and are just that—well known. HTTP is port 80(and HTTP Secure, or HTTPS, is port 443), FTP is ports 20 (control) and 21 (data),SSH is port 22, SMTP is port 25, and so on.
Beyond the well-known ports, the registered ports are still controlled and pub-lished, but for more specific purposes. Often these ports are used for a particularapplication or company; for example, MySQL is port 3306 (by default). For a com-plete list of well-known and registered ports, see the Internet Corporation forAssigned Names and Numbers (ICANN) port-numbers document: www.iana.org/assignments/port-numbers.
The dynamic or private ports are intentionally unregistered because they’re usedby the TCP/IP stack to facilitate communication. These ports are dynamically regis-tered on each computer and used in the conversation. Dynamic port 49500, for exam-ple, might be used to handle sending a request to a web server and dealing with theresponse. When the conversation is over, the port is reclaimed and can be reusedlocally for any other data transfer.
Clients and servers communicate as nodes with addresses, using ports, on a net-work that supports various protocols. The protocols Android uses are based on the IPnetwork the platform is designed to participate in and involve the TCP/IP family.Before you can build a full-on client/server Android application using the network,you need to handle the prerequisite task of determining the state of the connection.
6.2 Checking the network statusAndroid provides a host of utilities that determine the device configuration and thestatus of various services, including the network. You’ll typically use theConnectivityManager class to determine whether network connectivity exists and toget notifications of network changes. The following listing, which is a portion of themain Activity in the NetworkExplorer application, demonstrates basic usage of theConnectivityManager.
www.it-ebooks.info
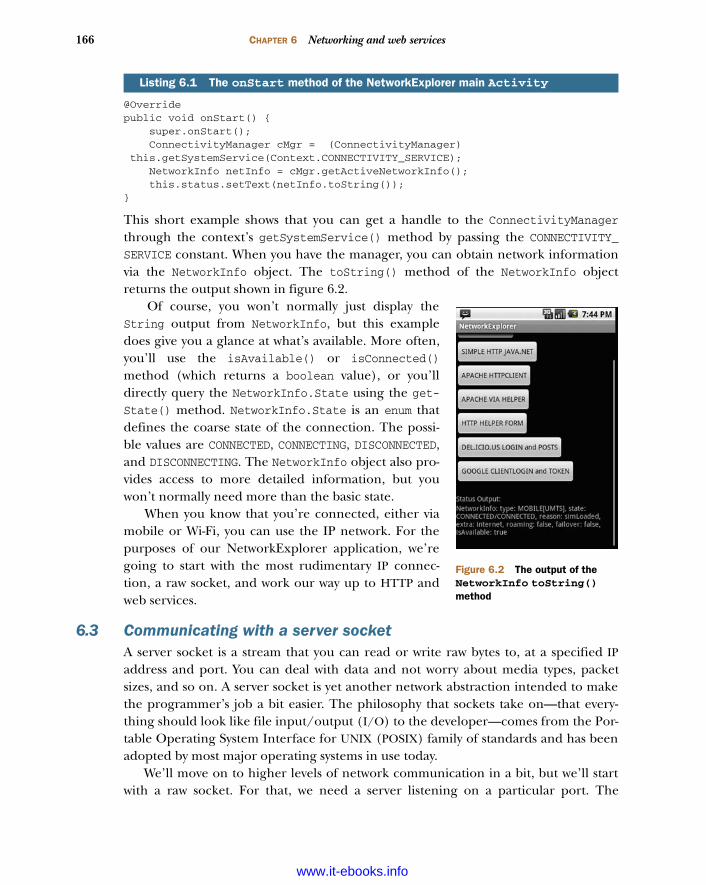
166 CHAPTER 6 Networking and web services
@Overridepublic void onStart() { super.onStart(); ConnectivityManager cMgr = (ConnectivityManager) this.getSystemService(Context.CONNECTIVITY_SERVICE); NetworkInfo netInfo = cMgr.getActiveNetworkInfo(); this.status.setText(netInfo.toString()); }
This short example shows that you can get a handle to the ConnectivityManagerthrough the context’s getSystemService() method by passing the CONNECTIVITY_SERVICE constant. When you have the manager, you can obtain network informationvia the NetworkInfo object. The toString() method of the NetworkInfo objectreturns the output shown in figure 6.2.
Of course, you won’t normally just display theString output from NetworkInfo, but this exampledoes give you a glance at what’s available. More often,you’ll use the isAvailable() or isConnected()
method (which returns a boolean value), or you’lldirectly query the NetworkInfo.State using the get-State() method. NetworkInfo.State is an enum thatdefines the coarse state of the connection. The possi-ble values are CONNECTED, CONNECTING, DISCONNECTED,and DISCONNECTING. The NetworkInfo object also pro-vides access to more detailed information, but youwon’t normally need more than the basic state.
When you know that you’re connected, either viamobile or Wi-Fi, you can use the IP network. For thepurposes of our NetworkExplorer application, we’regoing to start with the most rudimentary IP connec-tion, a raw socket, and work our way up to HTTP andweb services.
6.3 Communicating with a server socketA server socket is a stream that you can read or write raw bytes to, at a specified IPaddress and port. You can deal with data and not worry about media types, packetsizes, and so on. A server socket is yet another network abstraction intended to makethe programmer’s job a bit easier. The philosophy that sockets take on—that every-thing should look like file input/output (I/O) to the developer—comes from the Por-table Operating System Interface for UNIX (POSIX) family of standards and has beenadopted by most major operating systems in use today.
We’ll move on to higher levels of network communication in a bit, but we’ll startwith a raw socket. For that, we need a server listening on a particular port. The
Listing 6.1 The onStart method of the NetworkExplorer main Activity
Figure 6.2 The output of the NetworkInfo toString()method
www.it-ebooks.info
167Communicating with a server socket
EchoServer code shown in the next listing fits the bill. This example isn’t an Android-specific class; rather, it’s an oversimplified server that can run on any host machinewith Java. We’ll connect to it later from an Android client.
public final class EchoServer extends Thread { private static final int PORT = 8889; private EchoServer() {} public static void main(String args[]) { EchoServer echoServer = new EchoServer(); if (echoServer != null) { echoServer.start(); } } public void run() { try { ServerSocket server = new ServerSocket(PORT, 1); while (true) { Socket client = server.accept(); System.out.println("Client connected"); while (true) { BufferedReader reader = new BufferedReader(new InputStreamReader( client.getInputStream())); System.out.println("Read from client"); String textLine = reader.readLine() + "\n"; if (textLine.equalsIgnoreCase("EXIT\n")) { System.out.println("EXIT invoked, closing client"); break; } BufferedWriter writer = new BufferedWriter( new OutputStreamWriter( client.getOutputStream())); System.out.println("Echo input to client"); writer.write("ECHO from server: " + textLine, 0, textLine.length() + 18); writer.flush(); } client.close(); } } catch (IOException e) { System.err.println(e); } }}
The EchoServer class we’re using is fairly basic Java I/O. It extends Thread and imple-ments run, so that each client that connects can be handled in its own context. Thenwe use a ServerSocket B to listen on a defined port. Each client is then an imple-mentation of a Socket. The client input is fed into a BufferedReader that each line isread from C. The only special consideration this simple server has is that if the input
Listing 6.2 A simple echo server for demonstrating socket usage
BUsejava.net.ServerSocket
CRead input withBufferedReader
DEXIT, break
the loop
www.it-ebooks.info
168 CHAPTER 6 Networking and web services
is EXIT, it breaks the loops and exits D. If the input doesn’t prompt an exit, the serverechoes the input back to the client’s OuputStream with a BufferedWriter.
This example is a good, albeit intentionally basic, representation of what a serverdoes. It handles input, usually in a separate thread, and then responds to the client,based on the input. To try out this server before using Android, you can telnet to thespecified port (after the server is running, of course) and type some input; if all iswell, it will echo the output.
To run the server, you need to invoke it locally with Java. The server has a mainmethod, so it’ll run on its own; start it from the command line or from your IDE. Beaware that when you connect to a server from the emulator (this one or any other),you need to connect to the IP address of the host you run the server process on, notthe loopback (not 127.0.0.1). The emulator thinks of itself as 127.0.0.1, so use thenonloopback address of the server host when you attempt to connect from Android.(You can find out the IP address of the machine you’re on from the command line byentering ifconfig on Linux or Mac and ipconfig on Windows.)
The client portion of this example is where NetworkExplorer itself begins, with thecallSocket() method of the SimpleSocket Activity, shown in the next listing.
public class SimpleSocket extends Activity { . . . View variable declarations omitted for brevity @Override public void onCreate(final Bundle icicle) { super.onCreate(icicle); this.setContentView(R.layout.simple_socket); . . . View inflation omitted for brevity this.socketButton.setOnClickListener(new OnClickListener() { public void onClick(final View v) { socketOutput.setText(""); String output = callSocket( ipAddress.getText().toString(), port.getText().toString(), socketInput.getText().toString()); socketOutput.setText(output); } }); } private String callSocket(String ip, String port, String socketData) { Socket socket = null; BufferedWriter writer = null; BufferedReader reader = null; String output = null; try { socket = new Socket(ip, Integer.parseInt(port)); writer = new BufferedWriter( new OutputStreamWriter( socket.getOutputStream()));
reader = new BufferedReader(
Listing 6.3 An Android client invoking a raw socket server resource, the echo server
Use callSocket method
B
Create client Socket
C
www.it-ebooks.info
169Working with HTTP
new InputStreamReader( socket.getInputStream()));
String input = socketData; writer.write(input + "\n", 0, input.length() + 1); writer.flush(); output = reader.readLine();
this.socketOutput.setText(output); // send EXIT and close writer.write("EXIT\n", 0, 5); writer.flush(); . . . catches and reader, writer, and socket closes omitted for brevity . . . onCreate omitted for brevity return output; }
In this listing, we use the onCreate() method to call a private helper callSocket()method B and set the output to a TextView. Within the callSocket() method, wecreate a socket to represent the client side of our connection C, and we establish awriter for the input and a reader for the output. With the housekeeping taken care of,we then write to the socket D, which communicates with the server, and get the out-put value to return E.
A socket is probably the lowest-level networking usage in Android you’ll encounter.Using a raw socket, though abstracted a great deal, still leaves many of the details upto you, especially the server-side details of threading and queuing. Although youmight run up against situations in which you either have to use a raw socket (theserver side is already built) or elect to use one for one reason or another, higher-levelsolutions such as leveraging HTTP usually have decided advantages.
6.4 Working with HTTPAs we discussed in the previous section, you can use a raw socket to transfer IP data toand from a server with Android. This approach is an important one to be aware of sothat you know you have that option and understand a bit about the underlying details.Nevertheless, you might want to avoid this technique when possible, and instead takeadvantage of existing server products to send your data. The most common way to dothis is to use a web server and HTTP.
Now we’re going to take a look at making HTTP requests from an Android clientand sending them to an HTTP server. We’ll let the HTTP server handle all the socketdetails, and we’ll focus on our client Android application.
The HTTP protocol itself is fairly involved. If you’re unfamiliar with it or want thecomplete details, information is readily available via Requests for Comments (RFCs)(such as for version 1.1: www.w3.org/Protocols/rfc2616/rfc2616.html). The shortstory is that the protocol is stateless and involves several different methods that allowusers to make requests to servers, and those servers return responses. The entire webis, of course, based on HTTP. Beyond the most basic concepts, there are ways to passdata into and out of requests and responses and to authenticate with servers. Here
Write to socketD
Get socket outputE
www.it-ebooks.info
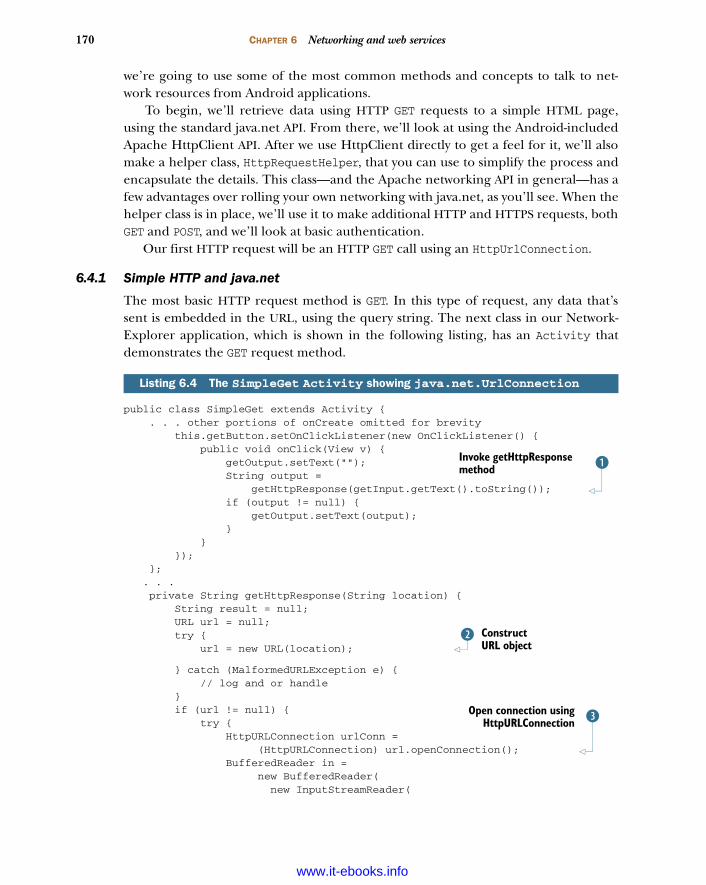
170 CHAPTER 6 Networking and web services
we’re going to use some of the most common methods and concepts to talk to net-work resources from Android applications.
To begin, we’ll retrieve data using HTTP GET requests to a simple HTML page,using the standard java.net API. From there, we’ll look at using the Android-includedApache HttpClient API. After we use HttpClient directly to get a feel for it, we’ll alsomake a helper class, HttpRequestHelper, that you can use to simplify the process andencapsulate the details. This class—and the Apache networking API in general—has afew advantages over rolling your own networking with java.net, as you’ll see. When thehelper class is in place, we’ll use it to make additional HTTP and HTTPS requests, bothGET and POST, and we’ll look at basic authentication.
Our first HTTP request will be an HTTP GET call using an HttpUrlConnection.
6.4.1 Simple HTTP and java.net
The most basic HTTP request method is GET. In this type of request, any data that’ssent is embedded in the URL, using the query string. The next class in our Network-Explorer application, which is shown in the following listing, has an Activity thatdemonstrates the GET request method.
public class SimpleGet extends Activity { . . . other portions of onCreate omitted for brevity this.getButton.setOnClickListener(new OnClickListener() { public void onClick(View v) { getOutput.setText(""); String output = getHttpResponse(getInput.getText().toString()); if (output != null) { getOutput.setText(output); } } }); }; . . . private String getHttpResponse(String location) { String result = null; URL url = null; try { url = new URL(location);
} catch (MalformedURLException e) { // log and or handle } if (url != null) { try { HttpURLConnection urlConn = (HttpURLConnection) url.openConnection(); BufferedReader in = new BufferedReader( new InputStreamReader(
Listing 6.4 The SimpleGet Activity showing java.net.UrlConnection
BInvoke getHttpResponse method
Construct URL object
C
DOpen connection using
HttpURLConnection
www.it-ebooks.info
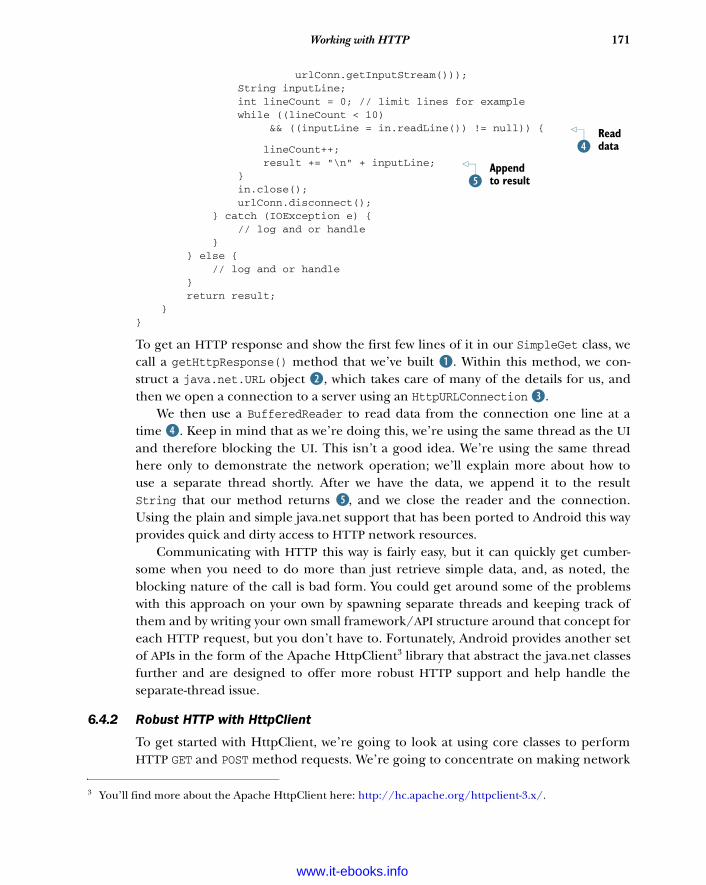
171Working with HTTP
urlConn.getInputStream())); String inputLine; int lineCount = 0; // limit lines for example while ((lineCount < 10) && ((inputLine = in.readLine()) != null)) {
lineCount++; result += "\n" + inputLine; } in.close(); urlConn.disconnect(); } catch (IOException e) { // log and or handle } } else { // log and or handle } return result; }}
To get an HTTP response and show the first few lines of it in our SimpleGet class, wecall a getHttpResponse() method that we’ve built B. Within this method, we con-struct a java.net.URL object C, which takes care of many of the details for us, andthen we open a connection to a server using an HttpURLConnection D.
We then use a BufferedReader to read data from the connection one line at atime E. Keep in mind that as we’re doing this, we’re using the same thread as the UIand therefore blocking the UI. This isn’t a good idea. We’re using the same threadhere only to demonstrate the network operation; we’ll explain more about how touse a separate thread shortly. After we have the data, we append it to the resultString that our method returns F, and we close the reader and the connection.Using the plain and simple java.net support that has been ported to Android this wayprovides quick and dirty access to HTTP network resources.
Communicating with HTTP this way is fairly easy, but it can quickly get cumber-some when you need to do more than just retrieve simple data, and, as noted, theblocking nature of the call is bad form. You could get around some of the problemswith this approach on your own by spawning separate threads and keeping track ofthem and by writing your own small framework/API structure around that concept foreach HTTP request, but you don’t have to. Fortunately, Android provides another setof APIs in the form of the Apache HttpClient3 library that abstract the java.net classesfurther and are designed to offer more robust HTTP support and help handle theseparate-thread issue.
6.4.2 Robust HTTP with HttpClient
To get started with HttpClient, we’re going to look at using core classes to performHTTP GET and POST method requests. We’re going to concentrate on making network
3 You’ll find more about the Apache HttpClient here: http://hc.apache.org/httpclient-3.x/.
Read dataE
Append to resultF
www.it-ebooks.info
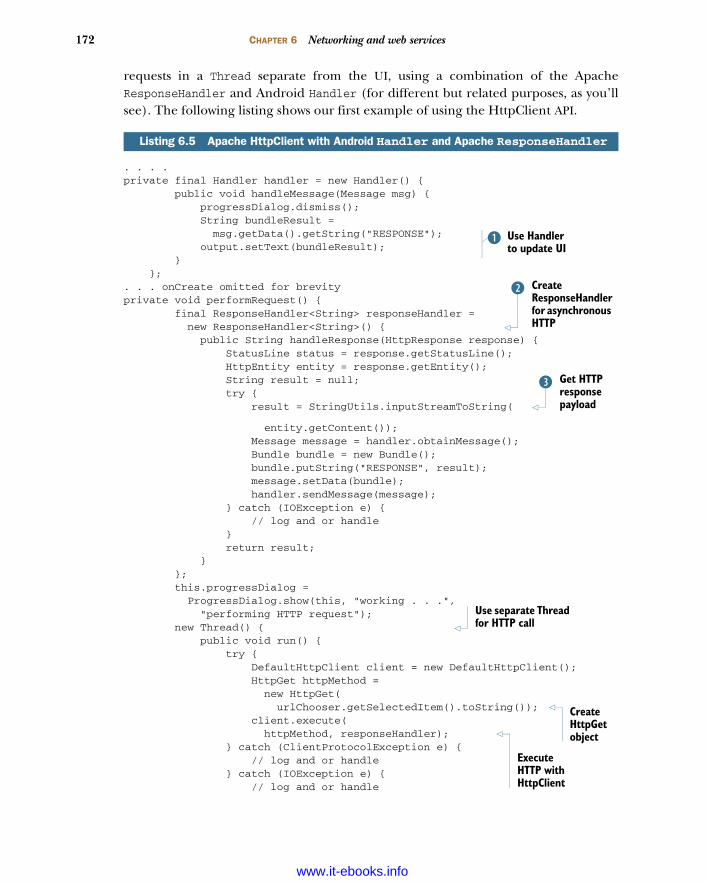
172 CHAPTER 6 Networking and web services
requests in a Thread separate from the UI, using a combination of the ApacheResponseHandler and Android Handler (for different but related purposes, as you’llsee). The following listing shows our first example of using the HttpClient API.
. . . .private final Handler handler = new Handler() { public void handleMessage(Message msg) { progressDialog.dismiss(); String bundleResult = msg.getData().getString("RESPONSE"); output.setText(bundleResult); } };. . . onCreate omitted for brevityprivate void performRequest() { final ResponseHandler<String> responseHandler = new ResponseHandler<String>() { public String handleResponse(HttpResponse response) { StatusLine status = response.getStatusLine(); HttpEntity entity = response.getEntity(); String result = null; try { result = StringUtils.inputStreamToString(
entity.getContent()); Message message = handler.obtainMessage(); Bundle bundle = new Bundle(); bundle.putString("RESPONSE", result); message.setData(bundle); handler.sendMessage(message); } catch (IOException e) { // log and or handle } return result; } }; this.progressDialog = ProgressDialog.show(this, "working . . .", "performing HTTP request"); new Thread() { public void run() { try { DefaultHttpClient client = new DefaultHttpClient(); HttpGet httpMethod = new HttpGet( urlChooser.getSelectedItem().toString()); client.execute( httpMethod, responseHandler); } catch (ClientProtocolException e) { // log and or handle } catch (IOException e) { // log and or handle
Listing 6.5 Apache HttpClient with Android Handler and Apache ResponseHandler
Use Handler to update UI
B
Create ResponseHandler for asynchronous HTTP
C
Get HTTP response payload
D
Use separate Thread for HTTP call
Create HttpGet object
Execute HTTP with HttpClient
www.it-ebooks.info
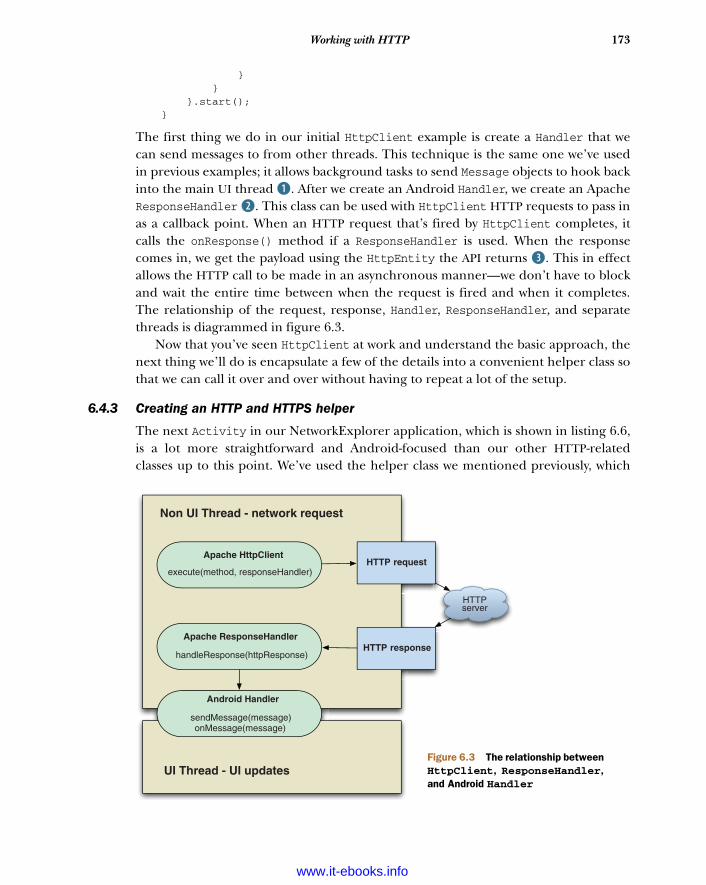
173Working with HTTP
} } }.start(); }
The first thing we do in our initial HttpClient example is create a Handler that wecan send messages to from other threads. This technique is the same one we’ve usedin previous examples; it allows background tasks to send Message objects to hook backinto the main UI thread B. After we create an Android Handler, we create an ApacheResponseHandler C. This class can be used with HttpClient HTTP requests to pass inas a callback point. When an HTTP request that’s fired by HttpClient completes, itcalls the onResponse() method if a ResponseHandler is used. When the responsecomes in, we get the payload using the HttpEntity the API returns D. This in effectallows the HTTP call to be made in an asynchronous manner—we don’t have to blockand wait the entire time between when the request is fired and when it completes.The relationship of the request, response, Handler, ResponseHandler, and separatethreads is diagrammed in figure 6.3.
Now that you’ve seen HttpClient at work and understand the basic approach, thenext thing we’ll do is encapsulate a few of the details into a convenient helper class sothat we can call it over and over without having to repeat a lot of the setup.
6.4.3 Creating an HTTP and HTTPS helper
The next Activity in our NetworkExplorer application, which is shown in listing 6.6,is a lot more straightforward and Android-focused than our other HTTP-relatedclasses up to this point. We’ve used the helper class we mentioned previously, which
Apache HttpClient
execute(method, responseHandler)HTTP request
HTTP response
HTTPserver
Apache ResponseHandler
handleResponse(httpResponse)
Android Handler
sendMessage(message)onMessage(message)
Non UI Thread - network request
UI Thread - UI updatesFigure 6.3 The relationship between HttpClient, ResponseHandler, and Android Handler
www.it-ebooks.info
174 CHAPTER 6 Networking and web services
hides some of the complexity. We’ll examine the helper class itself after we look at thisfirst class that uses it.
public class ApacheHTTPViaHelper extends Activity { . . . other member variables omitted for brevity private final Handler handler = new Handler() { public void handleMessage(Message msg) { progressDialog.dismiss(); String bundleResult = msg.getData().getString("RESPONSE"); output.setText(bundleResult);
} }; @Override public void onCreate(final Bundle icicle) { super.onCreate(icicle); . . . view inflation and setup omitted for brevity this.button.setOnClickListener(new OnClickListener() { public void onClick(final View v) { output.setText(""); performRequest( urlChooser.getSelectedItem().toString()); } }); }; . . . onPause omitted for brevity private void performRequest(String url) { final ResponseHandler<String> responseHandler = HTTPRequestHelper.getResponseHandlerInstance( this.handler);
this.progressDialog = ProgressDialog.show(this, "working . . .", "performing HTTP request"); new Thread() { public void run() { HTTPRequestHelper helper = new HTTPRequestHelper(responseHandler); helper.performGet(url, null, null, null); } }.start(); }}
The first thing we do in this class is create another Handler. From within it, we updatea UI TextView based on data in the Message. Further on in the code, in theonCreate() method, we call a local performRequest() method when the Go button isclicked, and we pass a selected String representing a URL B.
Inside the performRequest() method, we use a static convenience method to returnan HttpClient ResponseHandler, passing in the Android Handler that it’ll use C. We’llexamine the helper class next to get a look at exactly how this works, but the importantpart for now is that the ResponseHandler is created for us by the static method. With the
Listing 6.6 Using Apache HttpClient via a custom HttpRequestHelper
BCall localperformRequest
Get ResponseHandler from RequestHelperC
Instantiate RequestHelper with ResponseHandler
D
www.it-ebooks.info
175Working with HTTP
ResponseHandler instance taken care of, we instantiate an HttpRequestHelperinstance D and use it to make a simple HTTP GET call (passing in only the String URL).Similar to what happened in listing 6.5, when the request completes, the Response-Handler fires the onResponse() method, and our Handler is sent a Message, complet-ing the process.
The example Activity in listing 6.6 is fairly clean and simple, and it’s asynchronousand doesn’t block the UI thread. The heavy lifting is taken care of by HttpClient itselfand by the setup our custom HttpRequestHelper makes possible. The first part of theall-important HttpRequestHelper, which we’ll explore in three listings (listings 6.7, 6.8,and 6.9), is shown next.
public class HTTPRequestHelper { private static final int POST_TYPE = 1; private static final int GET_TYPE = 2; private static final String CONTENT_TYPE = "Content-Type"; public static final String MIME_FORM_ENCODED = "application/x-www-form-urlencoded"; public static final String MIME_TEXT_PLAIN = "text/plain"; private final ResponseHandler<String> responseHandler; public HTTPRequestHelper(ResponseHandler<String> responseHandler) { this.responseHandler = responseHandler; } public void performGet(String url, String user, String pass, final Map<String, String> additionalHeaders) { performRequest(null, url, user, pass, additionalHeaders, null, HTTPRequestHelper.GET_TYPE); } public void performPost(String contentType, String url, String user, String pass, Map<String, String> additionalHeaders, Map<String, String> params) {
performRequest(contentType, url, user, pass, additionalHeaders, params, HTTPRequestHelper.POST_TYPE); } public void performPost(String url, String user, String pass, Map<String, String> additionalHeaders, Map<String, String> params) { performRequest(HTTPRequestHelper.MIME_FORM_ENCODED, url, user, pass, additionalHeaders, params, HTTPRequestHelper.POST_TYPE); } private void performRequest( String contentType, String url, String user, String pass, Map<String, String> headers, Map<String, String> params, int requestType) {
Listing 6.7 The first part of the HttpRequestHelper class
BRequireResponseHandler
to construct
Provide simple GET methodC
Provide simple POST methods
D
Handle combinations in private method
E
www.it-ebooks.info
176 CHAPTER 6 Networking and web services
DefaultHttpClient client = new DefaultHttpClient(); if ((user != null) && (pass != null)) { client.getCredentialsProvider().setCredentials( AuthScope.ANY, new UsernamePasswordCredentials(user, pass)); } final Map<String, String> sendHeaders = new HashMap<String, String>(); if ((headers != null) && (headers.size() > 0)) { sendHeaders.putAll(headers); } if (requestType == HTTPRequestHelper.POST_TYPE) { sendHeaders.put(HTTPRequestHelper.CONTENT_TYPE, contentType); } if (sendHeaders.size() > 0) { client.addRequestInterceptor( new HttpRequestInterceptor() {
public void process( final HttpRequest request, final HttpContext context) throws HttpException, IOException { for (String key : sendHeaders.keySet()) { if (!request.containsHeader(key)) { request.addHeader(key, sendHeaders.get(key)); } } } }); } . . . POST and GET execution in listing 6.8 }
The first thing of note in the HttpRequestHelper class is that a ResponseHandler isrequired to be passed in as part of the constructor B. This ResponseHandler will beused when the HttpClient request is ultimately invoked. After the constructor, yousee a public HTTP GET-related method C and several different public HTTP POST-related methods D. Each of these methods is a wrapper around the private perform-Request() method that can handle all the HTTP options E. The performRequest()method supports a content-type header value, URL, username, password, Map of addi-tional headers, similar Map of request parameters, and request method type.
Inside the performRequest() method, a DefaultHttpClient is instantiated. Next,we check whether the user and pass method parameters are present; if they are, weset the request credentials with a UsernamePasswordCredentials type (HttpClientsupports several types of credentials; see the Javadocs for details). At the same time aswe set the credentials, we also set an AuthScope. The scope represents which server,port, authentication realm, and authentication scheme the supplied credentials areapplicable for.
You can set any of the HttpClient parameters as finely or coarsely grained as youwant; we’re using the default ANY scope that matches anything. What we notably
Use Interceptor for request headers
F
www.it-ebooks.info
177Working with HTTP
haven’t set in all of this is the specific authentication scheme to use. HttpClient sup-ports various schemes, including basic authentication, digest authentication, and aWindows-specific NT Lan Manager (NTLM) scheme. Basic authentication (simpleusername/password challenge from the server) is the default. Also, if you need to,you can use a preemptive form login for form-based authentication—submit the formyou need, get the token or session ID, and set default credentials.
After the security is out of the way, we use an HttpRequestInterceptor to addHTTP headers F. Headers are name/value pairs, so adding the headers is pretty easy.After we have all of the properties that apply regardless of our request method type,we then add additional settings that are specific to the method. The following listing,the second part of our helper class, shows the POST- and GET-specific settings and theexecute method.
. . . if (requestType == HTTPRequestHelper.POST_TYPE) { HttpPost method = new HttpPost(url);
List<NameValuePair> nvps = null; if ((params != null) && (params.size() > 0)) { nvps = new ArrayList<NameValuePair>(); for (String key : params.keySet()) { nvps.add(new BasicNameValuePair(key, params.get(key)));
} } if (nvps != null) { try { method.setEntity( new UrlEncodedFormEntity(nvps, HTTP.UTF_8)); } catch (UnsupportedEncodingException e) { // log and or handle } } execute(client, method); } else if (requestType == HTTPRequestHelper.GET_TYPE) { HttpGet method = new HttpGet(url); execute(client, method); } . . . private void execute(HttpClient client, HttpRequestBase method) { BasicHttpResponse errorResponse = new BasicHttpResponse( new ProtocolVersion("HTTP_ERROR", 1, 1), 500, "ERROR");
try { client.execute(method, this.responseHandler); } catch (Exception e) { errorResponse.setReasonPhrase(e.getMessage());
Listing 6.8 The second part of the HttpRequestHelper class
Create HttpPost object
B
Add name/value parametersC
Call execute method
D
Set up an error handler
E
www.it-ebooks.info
178 CHAPTER 6 Networking and web services
try { this.responseHandler.handleResponse(errorResponse); } catch (Exception ex) { // log and or handle } } }
When the specified request is a POST type, we create an HttpPost object to deal with itB. Then we add POST request parameters, which are another set of name/value pairsand are built with the BasicNameValuePair object C. After adding the parameters,we’re ready to perform the request, which we do with our local private execute()method using the method object and the client D.
Our execute() method sets up an error response handler (we want to return aresponse, error or not, so we set this up just in case) E and wraps the HttpClientexecute() method, which requires a method object (either POST or GET in our case,pre-established) and a ResponseHandler as input. If we don’t get an exception whenwe invoke HttpClient execute(), all is well and the response details are placed intothe ResponseHandler. If we do get an exception, we populate the error handler andpass it through to the ResponseHandler.
We call the local private execute() method with the established details for either aPOST or a GET request. The GET method is handled similarly to the POST, but we don’tset parameters (with GET requests, we expect parameters encoded in the URL itself).Right now, our class supports only POST and GET, which cover 98 percent of therequests we generally need, but it could easily be expanded to support other HTTPmethod types.
The final part of the request helper class, shown in the following listing, takes usback to the first example (listing 6.7), which used the helper. Listing 6.9 outlines exactlywhat the convenience getResponseHandlerInstance() method returns (constructingour helper requires a ResponseHandler, and this method returns a default one).
public static ResponseHandler<String> getResponseHandlerInstance(final Handler handler) { final ResponseHandler<String> responseHandler = new ResponseHandler<String>() { public String handleResponse(final HttpResponse response) { Message message = handler.obtainMessage(); Bundle bundle = new Bundle(); StatusLine status = response.getStatusLine(); HttpEntity entity = response.getEntity(); String result = null; if (entity != null) { try { result = StringUtils.inputStreamToString( entity.getContent()); bundle.putString( "RESPONSE", result);
Listing 6.9 The final part of the HttpRequestHelper class
Require Handler parameterB
CGet responsecontent as String
Put result value into Bundle
www.it-ebooks.info
179Web services
message.setData(bundle); handler.sendMessage(message);
} catch (IOException e) { bundle.putString(" RESPONSE", "Error - " + e.getMessage()); message.setData(bundle); handler.sendMessage(message); } } else { bundle.putString("RESPONSE", "Error - " + response.getStatusLine().getReasonPhrase()); message.setData(bundle); handler.sendMessage(message);
} return result; } }; return responseHandler; }}
As we discuss the getResponseHandlerInstance() method of our helper, we shouldnote that although we find it helpful, it’s entirely optional. You can still use the helperclass without using this method. To do so, construct your own ResponseHandler andpass it in to the helper constructor, which is a perfectly plausible case. The get-ResponseHandlerInstance() method builds a convenient default ResponseHandlerthat hooks in a Handler via a parameter B and parses the response as a String C. Theresponse String is sent back to the caller using the Handler, Bundle, and Message pat-tern we’ve seen used time and time again to pass messages between threads in ourAndroid screens.
With the gory HttpRequestHelper details out of the way, and having alreadyexplored basic usage, we’ll next turn to more involved uses of this class in the contextof web service calls.
6.5 Web servicesThe term web services means many different things, depending on the source and theaudience. To some, it’s a nebulous marketing term that’s never pinned down; to oth-ers, it’s a rigid and specific set of protocols and standards. We’re going to tackle it as ageneral concept, without defining it in depth, but not leaving it entirely undefinedeither.
Web services are a means of exposing an API over a technology-neutral networkendpoint. They’re a means to call a remote method or operation that’s not tied to aspecific platform or vendor and get a result. By this definition, POX over the networkis included; so are REST and SOAP—and so is any other method of exposing opera-tions and data on the wire in a neutral manner.
Set Bundle as data into Message
Send Message via Handler
www.it-ebooks.info
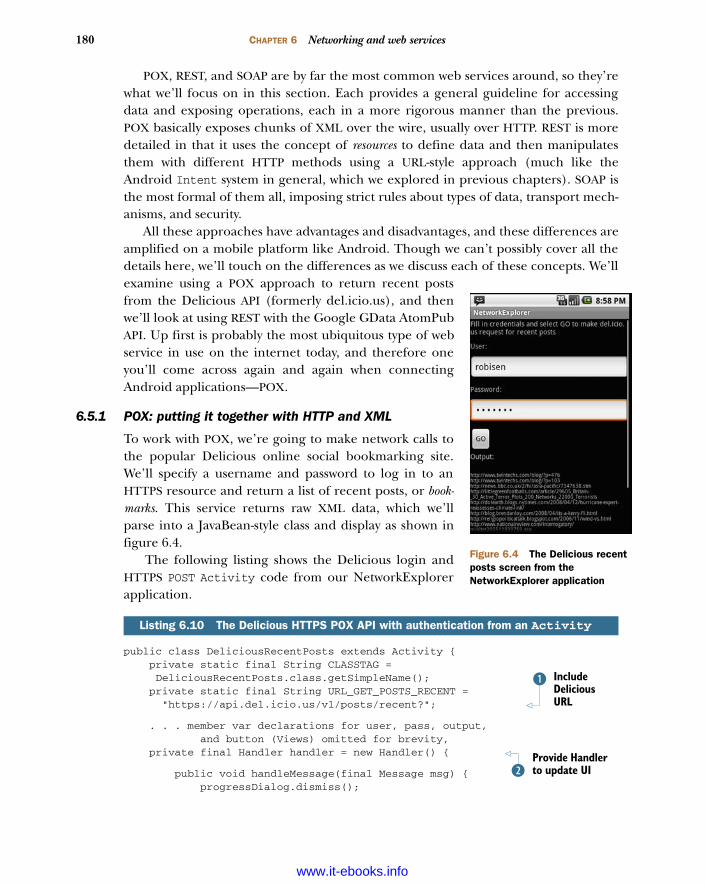
180 CHAPTER 6 Networking and web services
POX, REST, and SOAP are by far the most common web services around, so they’rewhat we’ll focus on in this section. Each provides a general guideline for accessingdata and exposing operations, each in a more rigorous manner than the previous.POX basically exposes chunks of XML over the wire, usually over HTTP. REST is moredetailed in that it uses the concept of resources to define data and then manipulatesthem with different HTTP methods using a URL-style approach (much like theAndroid Intent system in general, which we explored in previous chapters). SOAP isthe most formal of them all, imposing strict rules about types of data, transport mech-anisms, and security.
All these approaches have advantages and disadvantages, and these differences areamplified on a mobile platform like Android. Though we can’t possibly cover all thedetails here, we’ll touch on the differences as we discuss each of these concepts. We’llexamine using a POX approach to return recent postsfrom the Delicious API (formerly del.icio.us), and thenwe’ll look at using REST with the Google GData AtomPubAPI. Up first is probably the most ubiquitous type of webservice in use on the internet today, and therefore oneyou’ll come across again and again when connectingAndroid applications—POX.
6.5.1 POX: putting it together with HTTP and XML
To work with POX, we’re going to make network calls tothe popular Delicious online social bookmarking site.We’ll specify a username and password to log in to anHTTPS resource and return a list of recent posts, or book-marks. This service returns raw XML data, which we’llparse into a JavaBean-style class and display as shown infigure 6.4.
The following listing shows the Delicious login andHTTPS POST Activity code from our NetworkExplorerapplication.
public class DeliciousRecentPosts extends Activity { private static final String CLASSTAG =
DeliciousRecentPosts.class.getSimpleName(); private static final String URL_GET_POSTS_RECENT = "https://api.del.icio.us/v1/posts/recent?";
. . . member var declarations for user, pass, output, and button (Views) omitted for brevity, private final Handler handler = new Handler() {
public void handleMessage(final Message msg) { progressDialog.dismiss();
Listing 6.10 The Delicious HTTPS POX API with authentication from an Activity
Include Delicious URL
B
Provide Handler to update UIC
Figure 6.4 The Delicious recent posts screen from the NetworkExplorer application
www.it-ebooks.info
181Web services
String bundleResult = msg.getData().getString("RESPONSE"); output.setText(parseXMLResult(bundleResult)); } }; @Override public void onCreate(final Bundle icicle) { super.onCreate(icicle); this.setContentView(R.layout.delicious_posts); . . . inflate views omitted for brevity this.button.setOnClickListener(new OnClickListener() { public void onClick(final View v) { output.setText(""); performRequest(user.getText().toString(), pass.getText().toString()); } }); }; . . . onPause omitted for brevity private void performRequest(String user, String pass) { this.progressDialog = ProgressDialog.show(this, "working . . .", "performing HTTP post to del.icio.us"); final ResponseHandler<String> responseHandler = HTTPRequestHelper.getResponseHandlerInstance(this.handler); new Thread() { public void run() { HTTPRequestHelper helper = new HTTPRequestHelper(responseHandler); helper.performPost(URL_GET_POSTS_RECENT, user, pass, null, null);
} }.start(); } private String parseXMLResult(String xmlString) { StringBuilder result = new StringBuilder(); try { SAXParserFactory spf = SAXParserFactory.newInstance(); SAXParser sp = spf.newSAXParser(); XMLReader xr = sp.getXMLReader(); DeliciousHandler handler = new DeliciousHandler(); xr.setContentHandler(handler); xr.parse(new InputSource(new StringReader(xmlString))); List<DeliciousPost> posts = handler.getPosts(); for (DeliciousPost p : posts) { result.append("\n" + p.getHref()); } } catch (Exception e) { // log and or handle } return result.toString(); }
To use a POX service, we need to know a bit about it, beginning with the URL end-point B. To call the Delicious service, we again use a Handler to update the UI C,and we use the HttpRequestHelper we previously built and walked through in the last
Pass credentials to performRequestD
Use helper for HTTP
E
Parse XML String result
F
www.it-ebooks.info

182 CHAPTER 6 Networking and web services
section. Again in this example, we have many fewer lines of code than if we didn’t usethe helper—lines of code we’d likely be repeating in different Activity classes. Withthe helper instantiated, we call the performRequest() method with a username andpassword D. This method, via the helper, will log in to Delicious and return an XMLchunk representing the most recently bookmarked items E.
To turn the raw XML into useful types, we then also include a parseXMLResult()method F. Parsing XML is a subject in its own right, and we’ll cover it in more detailin chapter 13, but the short takeaway with this method is that we walk the XML struc-ture with a parser and return our own DeliciousPost data beans for each record.That’s it—that’s using POX to read data over HTTPS.
Building on the addition of XML to HTTP, above and beyond POX, is the RESTarchitectural principle, which we’ll explore next.
6.5.2 REST
While we look at REST, we’ll also try to pull in another useful concept in terms ofAndroid development: working with the various Google GData APIs (http://code.google.com/apis/gdata/). We used the GData APIs for our RestaurantFinderreview information in chapter 3, but there we didn’t authenticate, and we didn’t getinto the details of networking or REST. In this section, we’ll uncover the details as weperform two distinct tasks: authenticate and retrieve a Google ClientLogin token andretrieve the Google Contacts data for a specified user. Keep in mind that as we workwith the GData APIs in any capacity, we’ll be using a REST-style API.
The main REST concepts are that you specify resources in a URI form and youuse different protocol methods to perform different actions. The Atom PublishingProtocol (AtomPub) defines a REST-style protocol, and the GData APIs are an imple-mentation of AtomPub (with some Google extensions). As we noted earlier, theentire Intent approach of the Android platform is a lot like REST. A URI such ascontent://contacts/1 is in the REST style. It includes a path that identifies the typeof data and a particular resource (contact number 1).
That URI doesn’t say what to do with contact 1, though. In REST terms, that’swhere the method of the protocol comes into the picture. For HTTP purposes, RESTuses various methods to perform different tasks: POST (create, update, or in specialcases, delete), GET (read), PUT (create, replace), and DELETE (delete). True HTTPREST implementations use all the HTTP method types and resources to construct APIs.
In the real world, you’ll find few true REST implementations. It’s much more com-mon to see a REST-style API. This kind of API doesn’t typically use the HTTP DELETEmethod (many servers, proxies, and so on, have trouble with DELETE) and overloadsthe more common GET and POST methods with different URLs for different tasks (byencoding a bit about what’s to be done in the URL, or as a header or parameter, ratherthan relying strictly on the method). In fact, though many people refer to the GDataAPIs as REST, they’re technically only REST-like, not true REST. That’s not necessarily abad thing; the idea is ease of use of the API rather than pattern purity. All in all, RESTis a popular architecture or style because it’s simple, yet powerful.
www.it-ebooks.info
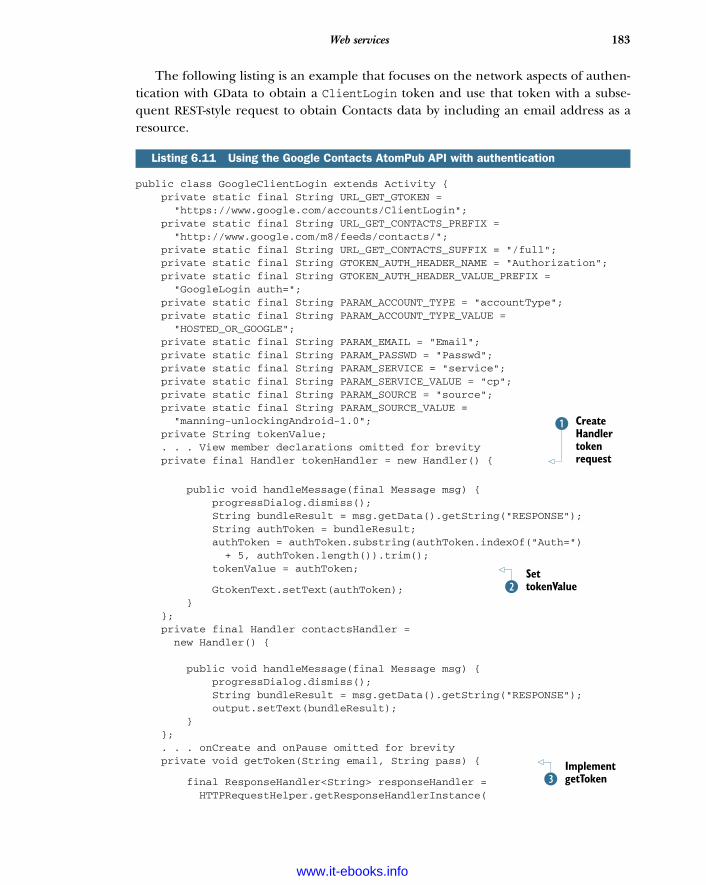
183Web services
The following listing is an example that focuses on the network aspects of authen-tication with GData to obtain a ClientLogin token and use that token with a subse-quent REST-style request to obtain Contacts data by including an email address as aresource.
public class GoogleClientLogin extends Activity { private static final String URL_GET_GTOKEN = "https://www.google.com/accounts/ClientLogin"; private static final String URL_GET_CONTACTS_PREFIX = "http://www.google.com/m8/feeds/contacts/"; private static final String URL_GET_CONTACTS_SUFFIX = "/full"; private static final String GTOKEN_AUTH_HEADER_NAME = "Authorization"; private static final String GTOKEN_AUTH_HEADER_VALUE_PREFIX = "GoogleLogin auth="; private static final String PARAM_ACCOUNT_TYPE = "accountType"; private static final String PARAM_ACCOUNT_TYPE_VALUE = "HOSTED_OR_GOOGLE"; private static final String PARAM_EMAIL = "Email"; private static final String PARAM_PASSWD = "Passwd"; private static final String PARAM_SERVICE = "service"; private static final String PARAM_SERVICE_VALUE = "cp"; private static final String PARAM_SOURCE = "source"; private static final String PARAM_SOURCE_VALUE = "manning-unlockingAndroid-1.0"; private String tokenValue; . . . View member declarations omitted for brevity private final Handler tokenHandler = new Handler() {
public void handleMessage(final Message msg) { progressDialog.dismiss(); String bundleResult = msg.getData().getString("RESPONSE"); String authToken = bundleResult; authToken = authToken.substring(authToken.indexOf("Auth=") + 5, authToken.length()).trim(); tokenValue = authToken;
GtokenText.setText(authToken); } }; private final Handler contactsHandler = new Handler() { public void handleMessage(final Message msg) { progressDialog.dismiss(); String bundleResult = msg.getData().getString("RESPONSE"); output.setText(bundleResult); } }; . . . onCreate and onPause omitted for brevity private void getToken(String email, String pass) {
final ResponseHandler<String> responseHandler = HTTPRequestHelper.getResponseHandlerInstance(
Listing 6.11 Using the Google Contacts AtomPub API with authentication
Create Handler token request
B
Set tokenValueC
Implement getTokenD
www.it-ebooks.info
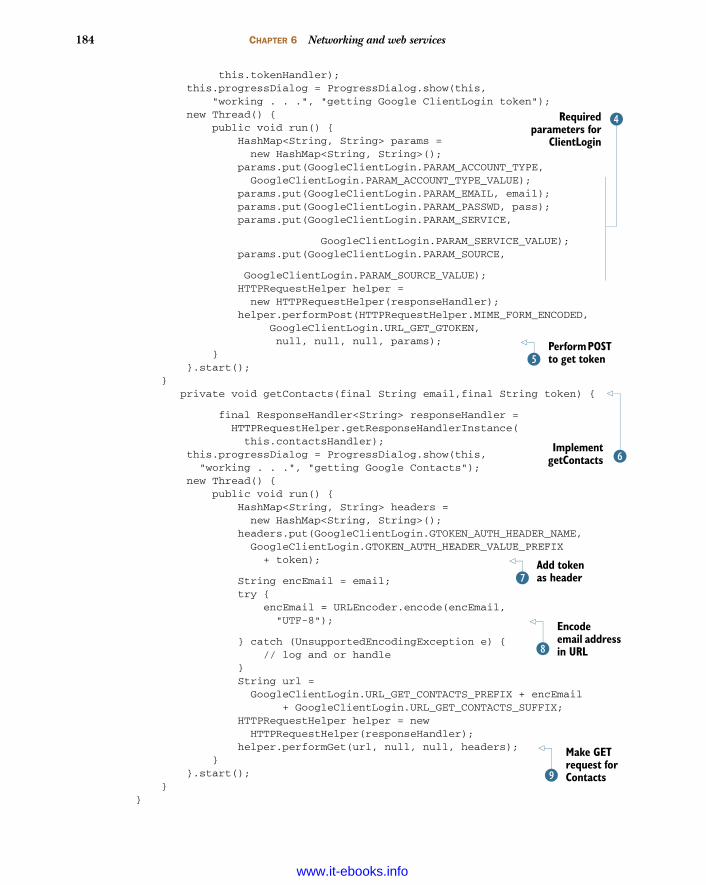
184 CHAPTER 6 Networking and web services
this.tokenHandler); this.progressDialog = ProgressDialog.show(this, "working . . .", "getting Google ClientLogin token"); new Thread() { public void run() { HashMap<String, String> params = new HashMap<String, String>(); params.put(GoogleClientLogin.PARAM_ACCOUNT_TYPE, GoogleClientLogin.PARAM_ACCOUNT_TYPE_VALUE); params.put(GoogleClientLogin.PARAM_EMAIL, email); params.put(GoogleClientLogin.PARAM_PASSWD, pass); params.put(GoogleClientLogin.PARAM_SERVICE,
GoogleClientLogin.PARAM_SERVICE_VALUE); params.put(GoogleClientLogin.PARAM_SOURCE,
GoogleClientLogin.PARAM_SOURCE_VALUE); HTTPRequestHelper helper = new HTTPRequestHelper(responseHandler); helper.performPost(HTTPRequestHelper.MIME_FORM_ENCODED, GoogleClientLogin.URL_GET_GTOKEN, null, null, null, params); } }.start(); } private void getContacts(final String email,final String token) {
final ResponseHandler<String> responseHandler = HTTPRequestHelper.getResponseHandlerInstance( this.contactsHandler); this.progressDialog = ProgressDialog.show(this, "working . . .", "getting Google Contacts"); new Thread() { public void run() { HashMap<String, String> headers = new HashMap<String, String>(); headers.put(GoogleClientLogin.GTOKEN_AUTH_HEADER_NAME, GoogleClientLogin.GTOKEN_AUTH_HEADER_VALUE_PREFIX + token);
String encEmail = email; try { encEmail = URLEncoder.encode(encEmail, "UTF-8");
} catch (UnsupportedEncodingException e) { // log and or handle } String url = GoogleClientLogin.URL_GET_CONTACTS_PREFIX + encEmail + GoogleClientLogin.URL_GET_CONTACTS_SUFFIX; HTTPRequestHelper helper = new HTTPRequestHelper(responseHandler); helper.performGet(url, null, null, headers); } }.start(); }}
ERequiredparameters for
ClientLogin
Perform POSTto get tokenF
GImplement
getContacts
Add token as headerH
Encode email address in URLI
Make GET request for ContactsJ
www.it-ebooks.info
185Web services
After a host of constants that represent various String values we’ll use with the GDataservices, we have several Handler instances in this class, beginning with a token-Handler B. This handler updates a UI TextView when it receives a message, like simi-lar examples you saw previously, and updates a non-UI member tokenValue variablethat other portions of our code will use C. The next Handler we have is the contacts-Handler that will be used to update the UI after the contacts request.
Beyond the handlers, we have the getToken() method D. This method includesall the required parameters for obtaining a ClientLogin token from the GData serv-ers (http://code.google.com/apis/gdata/auth.html) E. After the setup to obtain thetoken, we make a POST request via the request helper F.
After the token details are taken care of, we have the getContacts() method G.This method uses the token obtained via the previous method as a header H. Afteryou have the token, you can cache it and use it with all subsequent requests; you don’tneed to obtain the token every time. Next, we encode the email address portion of theContacts API URL I, and we make a GET request for the data—again using theHttpRequestHelper J.
With this approach, we’re making several network calls (one as HTTPS to get thetoken and another as HTTP to get data) using our previously defined helper class.When the results are returned from the GData API, we parse the XML block andupdate the UI.
Now that we’ve explored some REST-style networking, the last thing we need to discusswith regard to HTTP and Android is SOAP. This topic comes up frequently in discus-sions of networking mobile devices, but sometimes the forest gets in the way of thetrees in terms of framing the real question.
6.5.3 To SOAP or not to SOAP, that is the question
SOAP is a powerful protocol that has many uses. We would be remiss if we didn’t atleast mention that though it’s possible to use SOAP on a small, embedded device suchas a smartphone, regardless of the platform, it’s not recommended. The questionwithin the limited resources environment Android inhabits is really more one ofshould it be done rather than can it be done.
Some experienced developers, who might have been using SOAP for years onother devices, might disagree. The things that make SOAP great are its support forstrong types (via XML Schema), its support for transactions, its security and
GData ClientLogin and CAPTCHAThough we included a working ClientLogin example in listing 6.11, we also skippedover an important part—CAPTCHA. Google might optionally require a CAPTCHA with theClientLogin approach. To fully support ClientLogin, you need to handle thatresponse and display the CAPTCHA to the user, and then resend a token request withthe CAPTCHA value that the user entered. For details, see the GData documentation.
www.it-ebooks.info

186 CHAPTER 6 Networking and web services
encryption, its support for message orchestration and choreography, and all therelated WS-* standards. These things are invaluable in many server-oriented comput-ing environments, whether or not they involve the enterprise. They also add a greatdeal of overhead, especially on a small, embedded device. In fact, in many situationswhere people use SOAP on embedded devices, they often don’t bother with theadvanced features—and they use plain XML with the overhead of an envelope at theend of the day anyway. On an embedded device, you often get better performance,and a simpler design, by using a REST- or POX-style architecture and avoiding the over-head of SOAP.
Even with the increased overhead, it makes sense in some situations to investigateusing SOAP directly with Android. When you need to talk to existing SOAP servicesthat you have no control over, SOAP might make sense. Also, if you already have J2MEclients for existing SOAP services, you might be able to port those in a limited set ofcases. Both these approaches make it easier only on you, the developer; they haveeither no effect or a negative one in terms of performance on the user. Even whenyou’re working with existing SOAP services, remember that you can often write a POX-or REST-style proxy for SOAP services on the server side and call that from Android,rather than use SOAP directly from Android.
If you feel like SOAP is still the right choice, you can use one of several ports of thekSOAP toolkit (http://ksoap2.sourceforge.net/), which is specially designed for SOAPon an embedded Java device. Keep in mind that even the kSOAP documentationstates, “SOAP introduces some significant overhead for web services that may be prob-lematic for mobile devices. If you have full control over the client and the server, aREST-based architecture may be more adequate.” In addition, you might be able towrite your own parser for simple SOAP services that don’t use fancy SOAP features andjust use a POX approach that includes the SOAP XML portions you require (you canalways roll your own, even with SOAP).
All in all, to our minds the answer to the question is to not use SOAP on Android,even though you can. Our discussion of SOAP, even though we don’t advocate it,rounds out our more general web services discussion, and that wraps up our network-ing coverage.
6.6 SummaryIn this chapter, we started with a brief background of basic networking concepts, fromnodes and addresses to layers and protocols. With that general background in place,we covered details about how to obtain network status information and showed severaldifferent ways to work with the IP networking capabilities of the platform.
In terms of networking, we looked at using basic sockets and the java.net pack-age. Then we also examined the included Apache HttpClient API. HTTP is one of themost common—and most important—networking resources available to the Androidplatform. Using HttpClient, we covered a lot of territory in terms of different requesttypes, parameters, headers, authentication, and more. Beyond basic HTTP, we also
www.it-ebooks.info

187Summary
explored POX and REST, and we discussed a bit of SOAP—all of which use HTTP as thetransport mechanism.
Now that we’ve covered a good deal of the networking possibilities, and hopefullygiven you at least a glint of an idea of what you can do with server-side APIs and inte-gration with Android, we’re going to turn to another important part of the Androidworld—telephony.
www.it-ebooks.info
Telephony
People use Android devices to surf the web, download and store data, access net-works, find location information, and use many types of applications. Android caneven make phone calls.
Android phones support dialing numbers, receiving calls, sending and receiv-ing text and multimedia messages, and other related telephony services. In contrastto other smartphone platforms, all these items are accessible to developers throughsimple-to-use APIs and built-in applications. You can easily leverage Android’s tele-phony support into your own applications.
In this chapter, we’ll discuss telephony in general and cover terms related tomobile devices. We’ll move on to basic Android telephony packages, which handlecalls using built-in Intent actions, and more advanced operations via theTelephonyManager and PhoneStateListener classes. The Intent actions can initi-ate basic phone calls in your applications. TelephonyManager doesn’t make phonecalls directly but is used to retrieve all kinds of telephony-related data, such as the
This chapter covers Making and receiving phone calls
Capturing call-related events
Obtaining phone and service information
Using SMS
188
www.it-ebooks.info
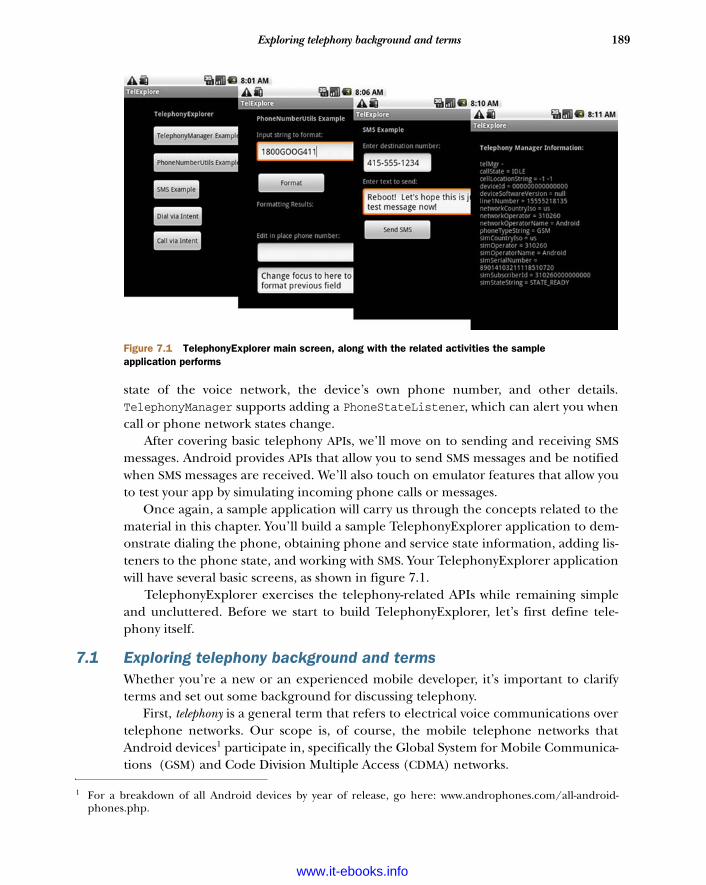
189Exploring telephony background and terms
state of the voice network, the device’s own phone number, and other details.TelephonyManager supports adding a PhoneStateListener, which can alert you whencall or phone network states change.
After covering basic telephony APIs, we’ll move on to sending and receiving SMSmessages. Android provides APIs that allow you to send SMS messages and be notifiedwhen SMS messages are received. We’ll also touch on emulator features that allow youto test your app by simulating incoming phone calls or messages.
Once again, a sample application will carry us through the concepts related to thematerial in this chapter. You’ll build a sample TelephonyExplorer application to dem-onstrate dialing the phone, obtaining phone and service state information, adding lis-teners to the phone state, and working with SMS. Your TelephonyExplorer applicationwill have several basic screens, as shown in figure 7.1.
TelephonyExplorer exercises the telephony-related APIs while remaining simpleand uncluttered. Before we start to build TelephonyExplorer, let’s first define tele-phony itself.
7.1 Exploring telephony background and termsWhether you’re a new or an experienced mobile developer, it’s important to clarifyterms and set out some background for discussing telephony.
First, telephony is a general term that refers to electrical voice communications overtelephone networks. Our scope is, of course, the mobile telephone networks thatAndroid devices1 participate in, specifically the Global System for Mobile Communica-tions (GSM) and Code Division Multiple Access (CDMA) networks.
1 For a breakdown of all Android devices by year of release, go here: www.androphones.com/all-android-phones.php.
Figure 7.1 TelephonyExplorer main screen, along with the related activities the sample application performs
www.it-ebooks.info
190 CHAPTER 7 Telephony
GSM and CDMA are cellular telephone networks. Devices communicate over radiowaves and specified frequencies using cell towers. The standards must define a fewimportant things, such as identities for devices and cells, along with all the rules formaking communications possible.
7.1.1 Understanding GSM
We won’t delve into the underlying details of the networks, but it’s important to knowsome key facts. GSM is based on Time Division Multiple Access (TDMA), a technologythat slices time into smaller chunks to allow multiple callers to share the same fre-quency range. GSM was the first network that the Android stack supported for voicecalls; it’s ubiquitous in Europe and very common in North America. GSM devices useSubscriber Identity Module (SIM) cards to store important network and user settings.
A SIM card is a small, removable, secure smart card. Every device that operates on aGSM network has specific unique identifiers, which are stored on the SIM card or onthe device itself:
Integrated Circuit Card Identifier (ICCID)—Identifies a SIM card; also known as aSIM Serial Number, or SSN.
International Mobile Equipment Identity (IMEI)—Identifies a physical device. TheIMEI number is usually printed underneath the battery.
International Mobile Subscriber Identity (IMSI)—Identifies a subscriber (and thenetwork that subscriber is on).
Location Area Identity (LAI)—Identifies the region within a provider networkthat’s occupied by the device.
Authentication key (Ki)—A 128-bit key used to authenticate a SIM card on a pro-vider network.
GSM uses these identification numbers and keys to validate and authenticate a SIMcard, the device holding it, and the subscriber on the network and across networks.
Along with storing unique identifiers and authentication keys, SIM cards often storeuser contacts and SMS messages. Users can easily move their SIM card to a new deviceand carry along contact and message data. Currently, the Android platform handlesthe SIM interaction, and developers can get read-only access via the telephony APIs.
7.1.2 Understanding CDMA
The primary rival to GSM technology is CDMA, which uses a different underlyingtechnology that’s based on using different encodings to allow multiple callers to sharethe same frequency range. CDMA is widespread in the Unites States and common insome Asian countries.
Unlike GSM phones, CDMA devices don’t have a SIM card or other removable mod-ule. Instead, certain identifiers are burned into the device, and the carrier must main-tain the link between each device and its subscriber. CDMA devices have a separate setof unique identifiers:
www.it-ebooks.info
191Phone or not?
Mobile Equipment Identifier (MEID)—Identifies a physical device. This number isusually printed under the battery and is available from within device menus. Itcorresponds to GSM’s IMEI.
Electronic Serial Number (ESN)—The predecessor to the MEID, this number isshorter and identifies a physical device.
Pseudo Electronic Serial Number (pESN)—A hardware identifier, derived from theMEID, that’s compatible with the older ESN standard. The ESN supply wasexhausted several years ago, so pESNs provide a bridge for legacy applicationsbuilt around ESN. A pESN always starts with 0x80 in hex format or 128 in deci-mal format.
Unlike GSM phones, which allow users to switch devices by swapping out SIM cards,CDMA phones require you to contact your carrier if you want to transfer an account toa new device. This process is often called an ESN swap or ESN change. Some carriersmake this easy, and others make it difficult. If you’ll be working on CDMA devices,learning how to do this with your carrier can save you thousands of dollars in sub-scriber fees.
NOTE A few devices, sometimes called world phones, support both CDMAand GSM. These devices often have two separate radios and an optionalSIM card. Currently, such devices operate only on one network or theother at any given time. Additionally, these devices are often restricted tousing only particular carriers or technologies in particular countries. Yougenerally don’t need to do anything special to support these devices, butbe aware that certain phones might appear to change their network tech-nology from time to time.
Fortunately, few applications need to deal with the arcana of GSM and CDMA technol-ogy. In most cases, you only need to know that your program is running on a devicethat in turn is running on a mobile network. You can leverage that network to makecalls and inspect the device to find unique identifiers. You can locate this sort of infor-mation by using the TelephonyManager class.
7.2 Phone or not?Starting with version 2.1 of the Android OS, devices no longer need to support tele-phony features. Expect more and more non-phone devices to reach the market, suchas set-top boxes, auto devices, and certain tablets. If you want to reach the largest pos-sible market with your app, you should include telephony features but fail gracefully ifthey’re not available. If your application makes sense only when running on a phone,go ahead and use any phone features you require.
If your application requires telephony to function, you should add the followingdeclaration to your AndroidManifest.xml:
<uses-feature android:name="android.hardware.telephony" android:required="true"/>
www.it-ebooks.info
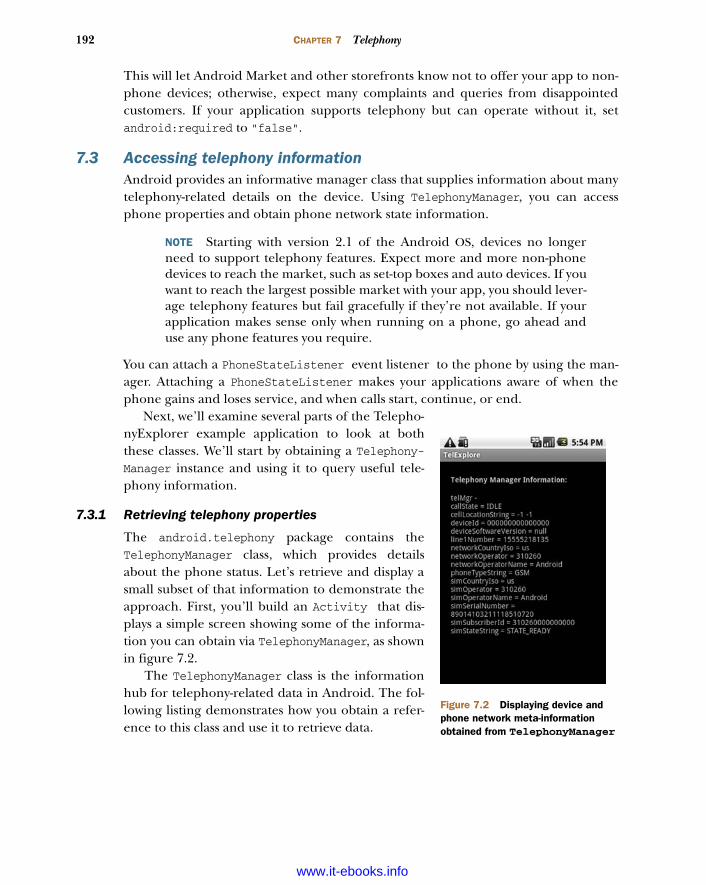
192 CHAPTER 7 Telephony
This will let Android Market and other storefronts know not to offer your app to non-phone devices; otherwise, expect many complaints and queries from disappointedcustomers. If your application supports telephony but can operate without it, setandroid:required to "false".
7.3 Accessing telephony informationAndroid provides an informative manager class that supplies information about manytelephony-related details on the device. Using TelephonyManager, you can accessphone properties and obtain phone network state information.
NOTE Starting with version 2.1 of the Android OS, devices no longerneed to support telephony features. Expect more and more non-phonedevices to reach the market, such as set-top boxes and auto devices. If youwant to reach the largest possible market with your app, you should lever-age telephony features but fail gracefully if they’re not available. If yourapplication makes sense only when running on a phone, go ahead anduse any phone features you require.
You can attach a PhoneStateListener event listener to the phone by using the man-ager. Attaching a PhoneStateListener makes your applications aware of when thephone gains and loses service, and when calls start, continue, or end.
Next, we’ll examine several parts of the Telepho-nyExplorer example application to look at boththese classes. We’ll start by obtaining a Telephony-Manager instance and using it to query useful tele-phony information.
7.3.1 Retrieving telephony properties
The android.telephony package contains theTelephonyManager class, which provides detailsabout the phone status. Let’s retrieve and display asmall subset of that information to demonstrate theapproach. First, you’ll build an Activity that dis-plays a simple screen showing some of the informa-tion you can obtain via TelephonyManager, as shownin figure 7.2.
The TelephonyManager class is the informationhub for telephony-related data in Android. The fol-lowing listing demonstrates how you obtain a refer-ence to this class and use it to retrieve data.
Figure 7.2 Displaying device and phone network meta-information obtained from TelephonyManager
www.it-ebooks.info
193Accessing telephony information
// . . . start of class omitted for brevity final TelephonyManager telMgr = (TelephonyManager) getSystemService( Context.TELEPHONY_SERVICE);// . . . onCreate method and others omitted for brevity public String getTelephonyOverview( TelephonyManager telMgr) { String callStateString = "NA"; int callState = telMgr.getCallState(); switch (callState) { case TelephonyManager.CALL_STATE_IDLE: callStateString = "IDLE"; break; case TelephonyManager.CALL_STATE_OFFHOOK: callStateString = "OFFHOOK"; break; case TelephonyManager.CALL_STATE_RINGING: callStateString = "RINGING"; break; }
CellLocation cellLocation = (CellLocation)telMgr.getCellLocation(); String cellLocationString = null; if (cellLocation instanceof GsmCellLocation) { cellLocationString = ((GsmCellLocation)cellLocation).getLac() + " " + ((GsmCellLocation)cellLocation).getCid(); } else if (cellLocation instanceof CdmaCellLocation) { cellLocationString = ((CdmaCellLocation)cellLocation). getBaseStationLatitude() + " " + ((CdmaCellLocation)cellLocation).getBaseStationLongitude(); } String deviceId = telMgr.getDeviceId(); String deviceSoftwareVersion = telMgr.getDeviceSoftwareVersion(); String line1Number = telMgr.getLine1Number(); String networkCountryIso = telMgr.getNetworkCountryIso(); String networkOperator = telMgr.getNetworkOperator(); String networkOperatorName = telMgr.getNetworkOperatorName();
String phoneTypeString = "NA"; int phoneType = telMgr.getPhoneType(); switch (phoneType) { case TelephonyManager.PHONE_TYPE_GSM: phoneTypeString = "GSM"; break; case TelephonyManager.PHONE_TYPE_CDMA: phoneTypeString = "CDMA"; break; case TelephonyManager.PHONE_TYPE_NONE: phoneTypeString = "NONE";
Listing 7.1 Obtaining a TelephonyManager reference and using it to retrieve data
Get TelephonyManager from Context
B
Implement information helper method
C
Obtain call state informationD
Get device informationE
www.it-ebooks.info
194 CHAPTER 7 Telephony
break; }
String simCountryIso = telMgr.getSimCountryIso(); String simOperator = telMgr.getSimOperator(); String simOperatorName = telMgr.getSimOperatorName(); String simSerialNumber = telMgr.getSimSerialNumber(); String simSubscriberId = telMgr.getSubscriberId(); String simStateString = "NA"; int simState = telMgr.getSimState(); switch (simState) { case TelephonyManager.SIM_STATE_ABSENT: simStateString = "ABSENT"; break; case TelephonyManager.SIM_STATE_NETWORK_LOCKED: simStateString = "NETWORK_LOCKED"; break; // . . . other SIM states omitted for brevity }
StringBuilder sb = new StringBuilder(); sb.append("telMgr - "); sb.append(" \ncallState = " + callStateString); // . . . remainder of appends omitted for brevity return sb.toString(); }
We use the current Context, through the getSystemService method with a constant,to obtain an instance of the TelephonyManager class B. After you have the manager,you can use it as needed. In this case, we create a helper method to get data from themanager and return it as a String that we later display on the screen C.
The manager allows you to access phone state data, such as whether a call is inprogress D, the device ID and software version E, the phone number registered tothe current user/SIM, and other SIM details, such as the subscriber ID (IMSI) and thecurrent SIM state. TelephonyManager offers even more properties; see the Javadocs forcomplete details.
NOTE Methods generally return null if they don’t apply to a particulardevice; for example, getSimOperatorName() returns null for CDMAphones. If you want to know in advance what type of device you’re work-ing with, try using the method getPhoneType().
For this class to work, you must set the READ_PHONE_STATE permission in the manifest.Without it, security exceptions will be thrown when you try to read data from the man-ager. Phone-related permissions are consolidated in table 7.1.
In addition to providing telephony-related information, including metadata aboutthe device, network, and subscriber, TelephonyManager allows you to attach a Phone-StateListener, which we’ll describe in the next section.
www.it-ebooks.info

195Accessing telephony information
7.3.2 Obtaining phone state information
A phone can be in any one of several conditions. The primary phone states includeidle (waiting), in a call, or initiating a call. When you’re building applications on amobile device, sometimes you not only need to know the current phone state, but youalso want to know when the state changes.
In these cases, you can attach a listener to the phone and subscribe to receive noti-fications of published changes. With Android, you use a PhoneStateListener, whichattaches to the phone through TelephonyManager. The following listing demonstratesa sample usage of both these classes.
@Override public void onStart() { super.onStart(); final TelephonyManager telMgr = (TelephonyManager) getSystemService( Context.TELEPHONY_SERVICE); PhoneStateListener phoneStateListener = new PhoneStateListener() {
public void onCallStateChanged( int state, String incomingNumber) { telMgrOutput.setText(getTelephonyOverview(telMgr)); } }; telMgr.listen(phoneStateListener, PhoneStateListener.LISTEN_CALL_STATE); String telephonyOverview = getTelephonyOverview(telMgr); telMgrOutput.setText(telephonyOverview); }
To start working with a PhoneStateListener, you need to acquire an instance ofTelephonyManager. PhoneStateListener itself is an interface, so you need to createan implementation, including the required onCallStateChanged() method. Whenyou have a valid PhoneStateListener instance, you attach it by assigning it to themanager with the listen() method.
Listing 7.2 shows how to listen for any PhoneStateListener.LISTEN_CALL_STATEchange in the phone state. This constant value comes from a list of available states thatare in PhoneStateListener class. You can use a single value when assigning a listenerwith the listen() method, as demonstrated in listing 7.2, or you can combine multi-ple values to listen for multiple states.
If a call state change does occur, it triggers the action defined in the onCallState-Changed() method of your PhoneStateListener. In this example, we reset the detailson the screen using the getTelephonyOverview() method from listing 7.1. You canfilter this method further, based on the passed-in int state.
To see the values in this example change while you’re working with the emulator,you can use the SDK tools to send incoming calls or text messages and change the
Listing 7.2 Attaching a PhoneStateListener via the TelephonyManager
www.it-ebooks.info
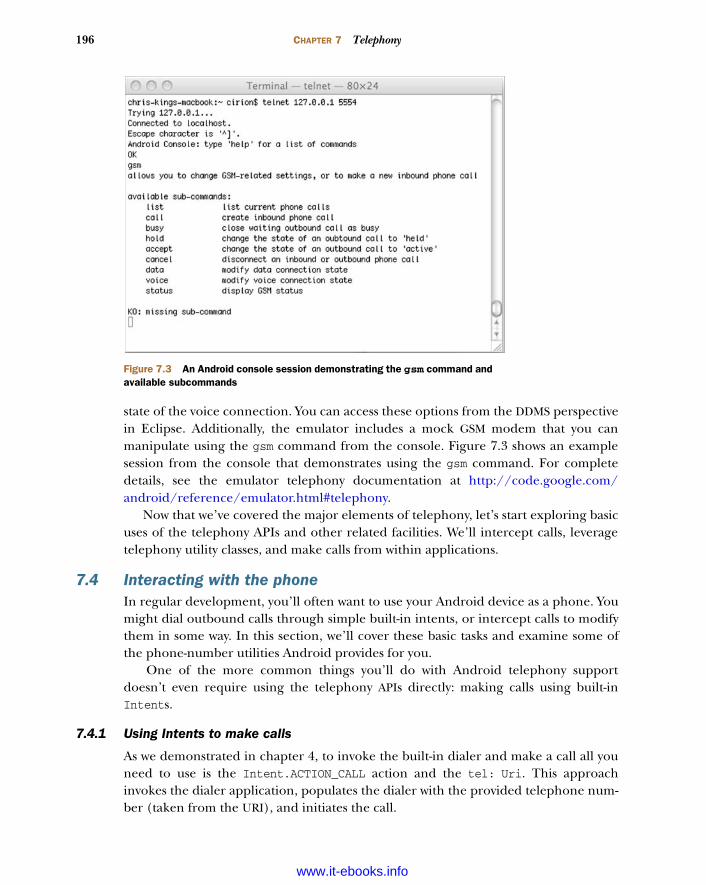
196 CHAPTER 7 Telephony
state of the voice connection. You can access these options from the DDMS perspectivein Eclipse. Additionally, the emulator includes a mock GSM modem that you canmanipulate using the gsm command from the console. Figure 7.3 shows an examplesession from the console that demonstrates using the gsm command. For completedetails, see the emulator telephony documentation at http://code.google.com/android/reference/emulator.html#telephony.
Now that we’ve covered the major elements of telephony, let’s start exploring basicuses of the telephony APIs and other related facilities. We’ll intercept calls, leveragetelephony utility classes, and make calls from within applications.
7.4 Interacting with the phoneIn regular development, you’ll often want to use your Android device as a phone. Youmight dial outbound calls through simple built-in intents, or intercept calls to modifythem in some way. In this section, we’ll cover these basic tasks and examine some ofthe phone-number utilities Android provides for you.
One of the more common things you’ll do with Android telephony supportdoesn’t even require using the telephony APIs directly: making calls using built-inIntents.
7.4.1 Using Intents to make calls
As we demonstrated in chapter 4, to invoke the built-in dialer and make a call all youneed to use is the Intent.ACTION_CALL action and the tel: Uri. This approachinvokes the dialer application, populates the dialer with the provided telephone num-ber (taken from the URI), and initiates the call.
Figure 7.3 An Android console session demonstrating the gsm command and available subcommands
www.it-ebooks.info
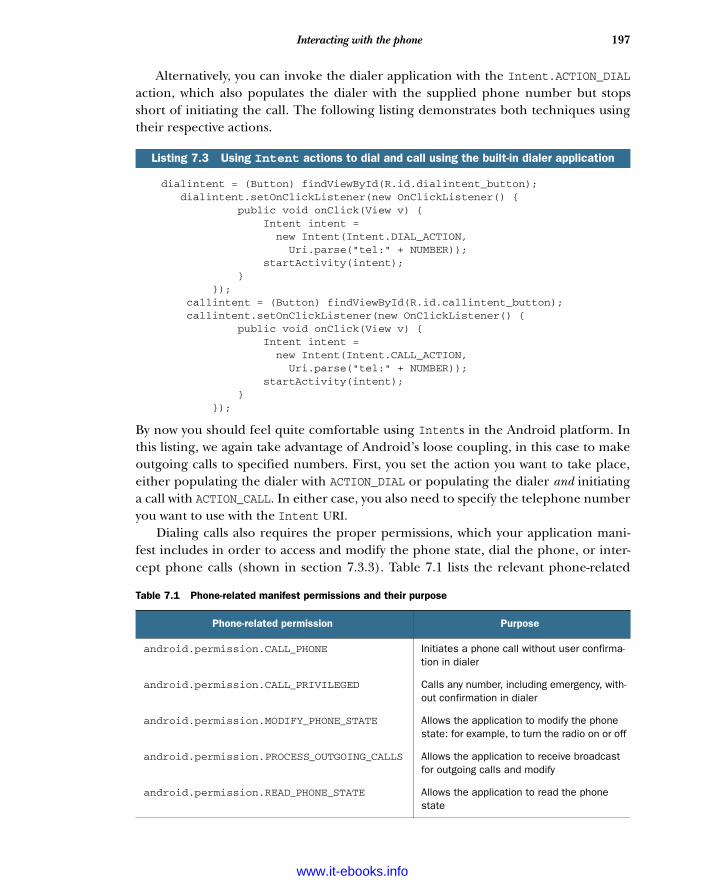
197Interacting with the phone
Alternatively, you can invoke the dialer application with the Intent.ACTION_DIALaction, which also populates the dialer with the supplied phone number but stopsshort of initiating the call. The following listing demonstrates both techniques usingtheir respective actions.
dialintent = (Button) findViewById(R.id.dialintent_button); dialintent.setOnClickListener(new OnClickListener() { public void onClick(View v) { Intent intent = new Intent(Intent.DIAL_ACTION, Uri.parse("tel:" + NUMBER)); startActivity(intent); } }); callintent = (Button) findViewById(R.id.callintent_button); callintent.setOnClickListener(new OnClickListener() { public void onClick(View v) { Intent intent = new Intent(Intent.CALL_ACTION, Uri.parse("tel:" + NUMBER)); startActivity(intent); } });
By now you should feel quite comfortable using Intents in the Android platform. Inthis listing, we again take advantage of Android’s loose coupling, in this case to makeoutgoing calls to specified numbers. First, you set the action you want to take place,either populating the dialer with ACTION_DIAL or populating the dialer and initiatinga call with ACTION_CALL. In either case, you also need to specify the telephone numberyou want to use with the Intent URI.
Dialing calls also requires the proper permissions, which your application mani-fest includes in order to access and modify the phone state, dial the phone, or inter-cept phone calls (shown in section 7.3.3). Table 7.1 lists the relevant phone-related
Listing 7.3 Using Intent actions to dial and call using the built-in dialer application
Table 7.1 Phone-related manifest permissions and their purpose
Phone-related permission Purpose
android.permission.CALL_PHONE Initiates a phone call without user confirma-tion in dialer
android.permission.CALL_PRIVILEGED Calls any number, including emergency, with-out confirmation in dialer
android.permission.MODIFY_PHONE_STATE Allows the application to modify the phone state: for example, to turn the radio on or off
android.permission.PROCESS_OUTGOING_CALLS Allows the application to receive broadcast for outgoing calls and modify
android.permission.READ_PHONE_STATE Allows the application to read the phone state
www.it-ebooks.info
198 CHAPTER 7 Telephony
permissions and their purposes. For more detailed information, see the security sec-tion of the Android documentation at http://code.google.com/android/devel/security.html.
Android makes dialing simple with built-in handling via Intents and the dialerapplication. The PhoneNumberUtils class, which you can use to parse and validatephone number strings, helps simplify dialing even more, while keeping numbershuman-readable.
7.4.2 Using phone number–related utilities
Applications running on mobile devices that support telephony deal with a lot ofString formatting for phone numbers. Fortunately, the Android SDK provides ahandy utility class that helps to mitigate the risks associated with this task and stan-dardize the numbers you use—PhoneNumberUtils.
The PhoneNumberUtils class parses String data into phone numbers, transformsalphabetical keypad digits into numbers, and determines other properties of phonenumbers. The following listing shows an example of using this class.
// Imports omitted for brevity private TextView pnOutput; private EditText pnInput; private EditText pnInPlaceInput; private Button pnFormat;// Other instance variables and methods omitted for brevity pnFormat.setOnClickListener(new OnClickListener() { public void onClick(View v) { String phoneNumber = PhoneNumberUtils.formatNumber( pnInput.getText().toString());
phoneNumber = PhoneNumberUtils.convertKeypadLettersToDigits( pnInput.getText().toString());
StringBuilder result = new StringBuilder(); result.append(phoneNumber); result.append("\nisGlobal - " + PhoneNumberUtils.isGlobalPhoneNumber(phoneNumber)); result.append("\nisEmergency - " + PhoneNumberUtils.isEmergencyNumber(phoneNumber)); result.append("\ncompare to 415-555-1234 - " + PhoneNumberUtils.compare(phoneNumber, "415-555-1234")); pnOutput.setText(result.toString()); pnInput.setText(""); }});
The PhoneNumberUtils class offers several static helper methods for parsing phonenumbers, including the useful formatNumber. This method takes a single String asinput and uses the default locale settings to return a formatted phone number B.Additional methods format a number using a locale you specify, parse different
Listing 7.4 Working with the PhoneNumberUtils class
Format as phone number
B
Convert alpha characters to digitsC
Compare to another number
D
www.it-ebooks.info
199Interacting with the phone
segments of a number, and so on. Parsing a number can be combined with anotherhelpful method, convertKeypadLettersToDigits(), to convert any alphabetic keypadletter characters into digits c. The conversion method won’t work unless it alreadyrecognizes the format of a phone number, so you should run the format method first.
Along with these basic methods, you can also check properties of a number string,such as whether the number is global and whether it represents an emergency call. Thecompare() method lets you see whether a given number matches another number D,which is useful for user-entered numbers that might include dashes or dots.
NOTE Android defines a global number as any string that contains one ormore digits; it can optionally be prefixed with a + symbol, and can option-ally contain dots or dashes. Even strings like 3 and +4-2 are consideredglobal numbers. Android makes no guarantee that a phone can even dialsuch a number; this utility simply provides a basic check for whethersomething that looks like it could be a phone number in some country.
You can also format a phone number with the overloaded formatNumber() method.This method is useful for any Editable, such as the common EditText (or TextView).This method updates the provided Editable in-place, as shown in the following listing.
pnInPlaceInput.setOnFocusChangeListener( new OnFocusChangeListener() { public void onFocusChange(View v, boolean hasFocus) { if (v.equals(pnInPlaceInput) && (!hasFocus)) { PhoneNumberUtils.formatNumber( pnInPlaceInput.getText(), PhoneNumberUtils.FORMAT_NANP); } } });
The in-place editor can be combined with a dynamic update using various techniques.You can make the update happen automatically when the focus changes from aphone-number field. The in-place edit does not provide the keypad alphabetic charac-ter-to-number conversion automatically. To ensure that the conversion occurs, we’veimplemented an OnFocusChangeListener. Inside the onFocusChange() method,which filters for the correct View item, we call the formatNumber() overload, passingin the respective Editable and the formatting style we want to use. NANP stands forNorth American Numbering Plan, which includes an optional country and area codeand a 7-digit local phone number.
NOTE PhoneNumberUtils also defines a Japanese formatting plan andmight add others in the future.
Now that you can use the phone number utilities and make calls, we can move on tothe more challenging and interesting task of call interception.
Listing 7.5 Using in-place Editable View formatting via PhoneNumberUtils
www.it-ebooks.info
200 CHAPTER 7 Telephony
7.4.3 Intercepting outbound calls
Imagine writing an application that catches outgoing calls and decorates or abortsthem, based on certain criteria. The following listing shows how to perform this typeof interception.
public class OutgoingCallReceiver extends BroadcastReceiver { public static final String ABORT_PHONE_NUMBER = "1231231234"; @Override public void onReceive(Context context, Intent intent) { if (intent.getAction().equals( Intent.ACTION_NEW_OUTGOING_CALL)) { String phoneNumber = intent.getExtras().getString(Intent.EXTRA_PHONE_NUMBER); if ((phoneNumber != null) && phoneNumber.equals( OutgoingCallReceiver.ABORT_PHONE_NUMBER)) { Toast.makeText(context, "NEW_OUTGOING_CALL intercepted to number " + "123-123-1234 - aborting call", Toast.LENGTH_LONG).show(); abortBroadcast(); } } }}
Our interception class starts by extending BroadcastReceiver. The new subclassimplements the onReceive() method B. Within this method, we filter on the Intentaction we want C, and then we get the Intent data using the phone number key. Ifthe phone number matches, we send a Toast alert to the UI and abort the outgoingcall by calling the abortBroadcast() method.
Beyond dialing out, formatting numbers, and intercepting calls, Android also pro-vides support for sending and receiving SMS. Managing SMS can seem daunting butprovides significant rewards, so we’re going to focus on it for the rest of the chapter.
7.5 Working with messaging: SMSMobile devices use the Short Message Service (SMS), a hugely popular and importantmeans of communication, to send simple text messages with small amounts of data.Android includes a built-in SMS application that allows users to send, view, and replyto SMS messages. Along with the built-in user-facing apps and the related ContentPro-vider for interacting with the default text-messaging app, the SDK provides APIs fordevelopers to send and receive messages programmatically.
Because Android now supplies an excellent built-in SMS message application, youmight wonder why anyone would bother building another one. The Android marketsells several superior third-party SMS messaging applications, but SMS can do a lotmore than text your contacts. For example, you could build an application that, upon
Listing 7.6 Catching and aborting an outgoing call
Override onReceiveB
Filter Intent for actionC
www.it-ebooks.info
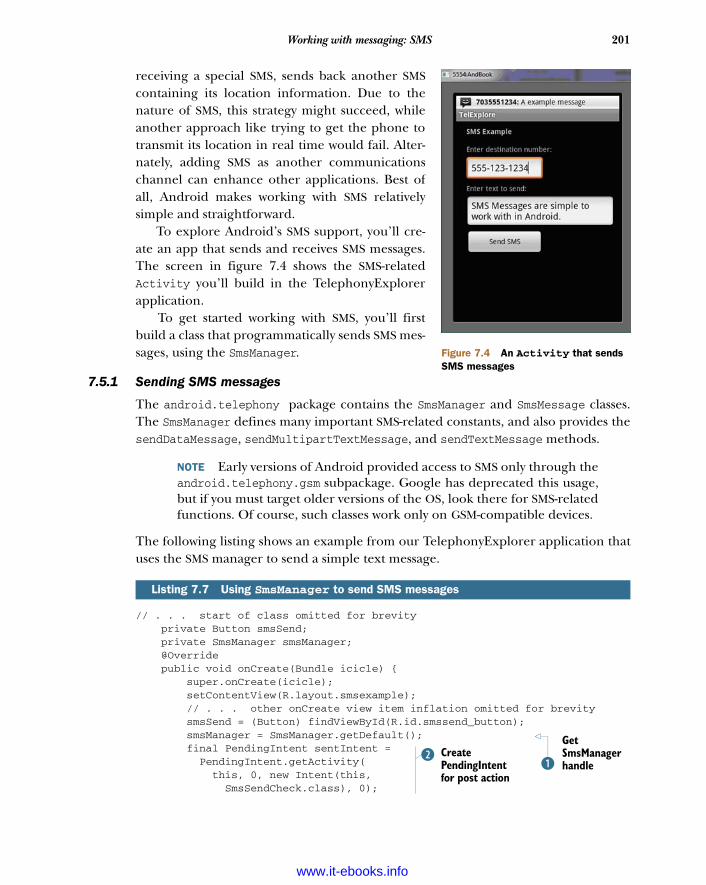
201Working with messaging: SMS
receiving a special SMS, sends back another SMScontaining its location information. Due to thenature of SMS, this strategy might succeed, whileanother approach like trying to get the phone totransmit its location in real time would fail. Alter-nately, adding SMS as another communicationschannel can enhance other applications. Best ofall, Android makes working with SMS relativelysimple and straightforward.
To explore Android’s SMS support, you’ll cre-ate an app that sends and receives SMS messages.The screen in figure 7.4 shows the SMS-relatedActivity you’ll build in the TelephonyExplorerapplication.
To get started working with SMS, you’ll firstbuild a class that programmatically sends SMS mes-sages, using the SmsManager.
7.5.1 Sending SMS messages
The android.telephony package contains the SmsManager and SmsMessage classes.The SmsManager defines many important SMS-related constants, and also provides thesendDataMessage, sendMultipartTextMessage, and sendTextMessage methods.
NOTE Early versions of Android provided access to SMS only through theandroid.telephony.gsm subpackage. Google has deprecated this usage,but if you must target older versions of the OS, look there for SMS-relatedfunctions. Of course, such classes work only on GSM-compatible devices.
The following listing shows an example from our TelephonyExplorer application thatuses the SMS manager to send a simple text message.
// . . . start of class omitted for brevity private Button smsSend; private SmsManager smsManager; @Override public void onCreate(Bundle icicle) { super.onCreate(icicle); setContentView(R.layout.smsexample); // . . . other onCreate view item inflation omitted for brevity smsSend = (Button) findViewById(R.id.smssend_button); smsManager = SmsManager.getDefault(); final PendingIntent sentIntent = PendingIntent.getActivity( this, 0, new Intent(this, SmsSendCheck.class), 0);
Listing 7.7 Using SmsManager to send SMS messages
Get SmsManager handleB
Create PendingIntent for post action
C
Figure 7.4 An Activity that sends SMS messages
www.it-ebooks.info
202 CHAPTER 7 Telephony
smsSend.setOnClickListener(new OnClickListener() { public void onClick(View v) { String dest = smsInputDest.getText().toString(); if (PhoneNumberUtils. isWellFormedSmsAddress(dest)) { smsManager.sendTextMessage( smsInputDest.getText().toString, null, smsInputText.getText().toString(), sentIntent, null); Toast.makeText(SmsExample.this, "SMS message sent", Toast.LENGTH_LONG).show(); } else { Toast.makeText(SmsExample.this, "SMS destination invalid - try again", Toast.LENGTH_LONG).show(); } } }); }
Before doing anything with SMS messages, we must obtain an instance of the SmsMan-ager with the static getDefault() method B. The manager will also send the mes-sage later. Before we can send the message, we need to create a PendingIntent toprovide to the send method.
A PendingIntent can specify an Activity, a Broadcast, or a Service that itrequires. In our case, we use the getActivity() method, which requests an Activity,and then we specify the context, a request code (not used for this case), the Intent toexecute, and additional flags C. The flags indicate whether the system should create anew instance of the referenced Activity (or Broadcast or Service), if one doesn’talready exist.
Next, we check that the destination address is valid for SMS D, and we send themessage using the manager’s sendTextMessage() method.
This send method takes several parameters. The following snippet shows the signa-ture of this method:
sendDataMessage(String destinationAddress, String scAddress, short destinationPort, byte[] data, PendingIntent sentIntent, PendingIntent deliveryIntent)
Check that destination is validD
What is a PendingIntent?A PendingIntent specifies an action to take in the future. It lets you pass a futureIntent to another application and allow that application to execute that Intent asif it had the same permissions as your application, whether or not your application isstill around when the Intent is eventually invoked. A PendingIntent provides ameans for applications to work, even after their process exits. It’s important to notethat even after the application that created the PendingIntent has been killed, thatIntent can still run.
www.it-ebooks.info

203Working with messaging: SMS
The method requires the following parameters:
destinationAddress—The phone number to receive the message. scAddress—The messaging center address on the network. You should almost
always leave this as null, which uses the default. destinationPort—The port number for the recipient handset. data—The payload of the message. sentIntent—The PendingIntent instance that’s fired when the message is suc-
cessfully sent. deliveryIntent—The PendingIntent instance that’s fired when the message is
successfully received.
NOTE GSM phones generally support receiving SMS messages to a partic-ular port, but CDMA phones generally don’t. Historically, port-directedSMS messages have allowed text messages to be delivered to a particularapplication. Modern phones support better solutions; in particular, if youcan use a server for your application, consider using Android Cloud toDevice Messaging (C2DM)2 for Android phones with software version 2.2or later.
Much like the phone permissions listed in table 7.1, SMS-related tasks also requiremanifest permissions. SMS permissions are shown in table 7.2.
The AndroidManifest.xml file for the TelephonyExplorer application contains thesepermissions:
<uses-permission android:name="android.permission.RECEIVE_SMS" /><uses-permission android:name="android.permission.READ_SMS" /><uses-permission android:name="android.permission.WRITE_SMS" /><uses-permission android:name="android.permission.SEND_SMS" />
Along with sending text and data messages via SmsManager, you can create an SMSBroadcastReceiver to receive incoming SMS messages.
2 Read Wei Huang’s detailed article for more about C2DM: http://android-developers.blogspot.com/2010/05/android-cloud-to-device-messaging.html.
Table 7.2 SMS-related manifest permissions and their purpose
Phone-related permission Purpose
android.permission.READ_SMS Allows the application to read SMS messages
android.permission.RECEIVE_SMS Allows the application to monitor incoming SMS messages
android.permission.SEND_SMS Allows the application to send SMS messages
android.permission.WRITE_SMS Writes SMS messages to the built-in SMS provider (not related to sending messages directly)
www.it-ebooks.info
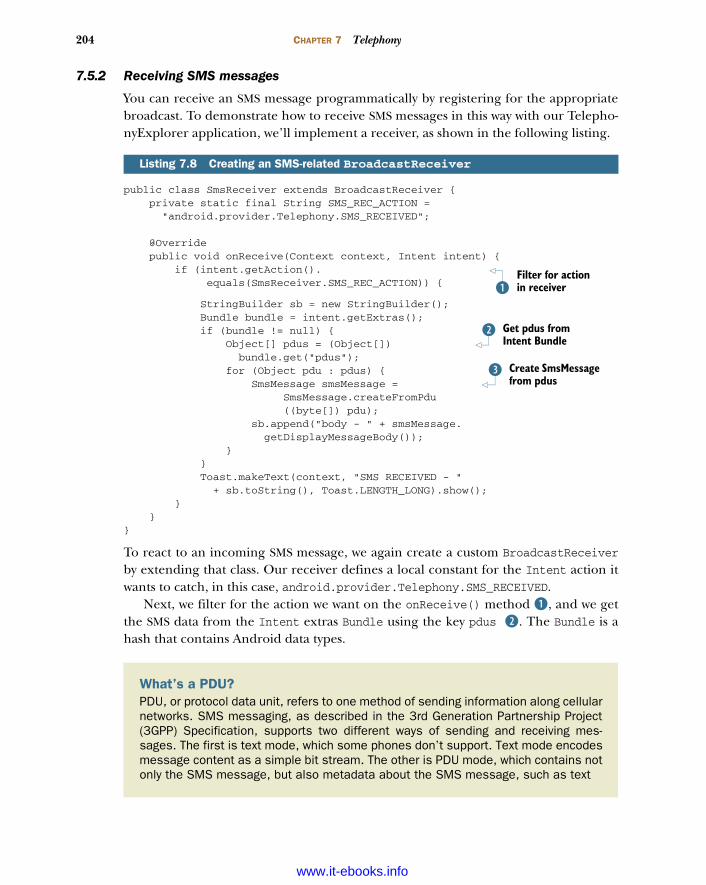
204 CHAPTER 7 Telephony
7.5.2 Receiving SMS messages
You can receive an SMS message programmatically by registering for the appropriatebroadcast. To demonstrate how to receive SMS messages in this way with our Telepho-nyExplorer application, we’ll implement a receiver, as shown in the following listing.
public class SmsReceiver extends BroadcastReceiver { private static final String SMS_REC_ACTION = "android.provider.Telephony.SMS_RECEIVED"; @Override public void onReceive(Context context, Intent intent) { if (intent.getAction(). equals(SmsReceiver.SMS_REC_ACTION)) {
StringBuilder sb = new StringBuilder(); Bundle bundle = intent.getExtras(); if (bundle != null) { Object[] pdus = (Object[]) bundle.get("pdus"); for (Object pdu : pdus) { SmsMessage smsMessage = SmsMessage.createFromPdu ((byte[]) pdu); sb.append("body - " + smsMessage. getDisplayMessageBody()); } } Toast.makeText(context, "SMS RECEIVED - " + sb.toString(), Toast.LENGTH_LONG).show(); } }}
To react to an incoming SMS message, we again create a custom BroadcastReceiverby extending that class. Our receiver defines a local constant for the Intent action itwants to catch, in this case, android.provider.Telephony.SMS_RECEIVED.
Next, we filter for the action we want on the onReceive() method B, and we getthe SMS data from the Intent extras Bundle using the key pdus C. The Bundle is ahash that contains Android data types.
Listing 7.8 Creating an SMS-related BroadcastReceiver
Filter for action in receiverB
Get pdus from Intent Bundle
C
Create SmsMessage from pdus
D
What’s a PDU?PDU, or protocol data unit, refers to one method of sending information along cellularnetworks. SMS messaging, as described in the 3rd Generation Partnership Project(3GPP) Specification, supports two different ways of sending and receiving mes-sages. The first is text mode, which some phones don’t support. Text mode encodesmessage content as a simple bit stream. The other is PDU mode, which contains notonly the SMS message, but also metadata about the SMS message, such as text
www.it-ebooks.info
205Summary
For every pdu Object that we receive, we need to construct an SmsMessage by castingthe data to a byte array D. After this conversion, we can use the methods in that class,such as getDisplayMessageBody().
NOTE If you run the example shown in listing 7.8, you’ll see that eventhough the receiver does properly report the message, the message stillarrives in the user’s inbox. Some applications might process specific mes-sages themselves and prevent the user from ever seeing them; for example,you might implement a play-by-SMS chess program that uses text messagesto report the other players’ moves. To consume the incoming SMS mes-sage, call abortBroadcast from within your onReceive() method. Notethat your receiver must have a priority level higher than that of the inbox.Also, certain versions of the Android OS don’t honor this request, so teston your target devices if this behavior is important to your app.
Congratulations! Now that you’ve learned how to send SMS messages programmati-cally, set permissions appropriately, and receive and work with incoming SMS mes-sages, you can incorporate useful SMS features into your application.
7.6 SummaryOur trip through the Android telephony-related APIs covered several important topics.After a brief overview of some telephony terms, we examined Android-specific APIs.
You accessed telephony information with the TelephonyManager, including deviceand SIM card data and phone state. From there, we addressed hooking in a Phone-StateListener to react to phone state changes.
Besides retrieving data, you also learned how to dial the phone using built-inintents and actions, intercept outgoing phone calls, and format numbers with thePhoneNumberUtils class. After we covered standard voice usages, we looked at how tosend and receive SMS messages using the SmsManager and SmsMessage classes.
In the next chapter, we’ll turn to the specifics of interacting with notifications andalerts on the Android platform. We’ll also revisit SMS, and you’ll learn how to notifyusers of events, such as an incoming SMS, by putting messages in the status bar, flash-ing a light, or even making the phone vibrate.
(Continued)encoding, the sender, SMS service center address, and much more. To access thismetadata, mobile SMS applications almost always use PDUs to encode the contentsof a SMS message. For more information about PDUs and the metadata they provide,refer to the specification titled “Technical Realization of the Short Message Service(SMS)” which you can find at www.3gpp.org/ftp/Specs/html-info/23040.htm. Thisdocument, part of the 3GPP TS 23.040 Specification, is extremely technical but willhelp you with developing more sophisticated SMS applications.
www.it-ebooks.info
Notifications and alarms
Today’s cell phones and tablets are expected to be not only phones but personalassistants, cameras, music and video players, and instant-messaging clients, as wellas to do just about everything else a computer might do. With all these applicationsrunning on phones and tablets, applications need a way to notify users to get theirattention or to take some sort of action, whether in response to an SMS, a newvoicemail, or an alarm reminding them of a new appointment. With Android 3.1Google has updated notifications, refined them, and made them richer. These noti-fications will be part of the next version of Android, currently code-named “icecream sandwich,” which will run on handsets as well.
In this chapter, we’re going to look at how to use the Android Broadcast-Receiver and the AlarmManager to notify users of these sorts of events. First, we’lldiscuss how to display quick, unobtrusive, and nonpersistent messages called
This chapter covers Building an SMS notification application
Working with Toasts
Working with the NotificationManager
Using alarms and the AlarmManager
Setting an alarm
206
www.it-ebooks.info
207Introducing Toast
Toasts, based on an event. Second, we’ll talk about how to create persistent messages,LED flashes, phone vibrations, and other events to alert the user. These events arecalled notifications. Finally, we’ll look at how to trigger events by making alarm eventsthrough the AlarmManager. Before we go too deeply into how notifications work, let’sfirst create a simple example application.
8.1 Introducing ToastFor this example, you’ll create a simple interface that has two buttons that pop up amessage, called a Toast, on the screen. A Toast is a simple, nonpersistent messagedesigned to alert the user of an event. Toasts are a great way to let a user know that acall is coming in, an SMS or email has arrived, or some other event has just happened.Toasts are designed to take up minimal space, allowing the user to continue to inter-act with the system without having to stop what they’re doing. Toasts, after poppingup, fade away without user intervention. A Toast is different from a message, such as astatus bar notification, which persists even when a phone is turned off or until the userselects the notification or the Clear Notification button.
First let’s define a simple layout.
<?xml version="1.0" encoding="utf-8"?><LinearLayout xmlns:android="http://schemas.android.com/apk/res/android" android:orientation="vertical" android:layout_width="fill_parent" android:layout_height="fill_parent" >
<TextView android:layout_width="fill_parent" android:layout_height="wrap_content" android:text="@string/hello" /><Button android:id="@+id/button_short" android:layout_width="wrap_content" android:layout_height="wrap_content" android:text="Short Message" android:layout_x="50px" android:layout_y="200px" /><Button android:id="@+id/button_long" android:text="Long Message" android:layout_width="wrap_content" android:layout_height="wrap_content" android:layout_x="150px" android:layout_y="200px" />
</LinearLayout>
Next let’s create the Activity that will display the Toast messages.
Listing 8.1 Main.xml
www.it-ebooks.info
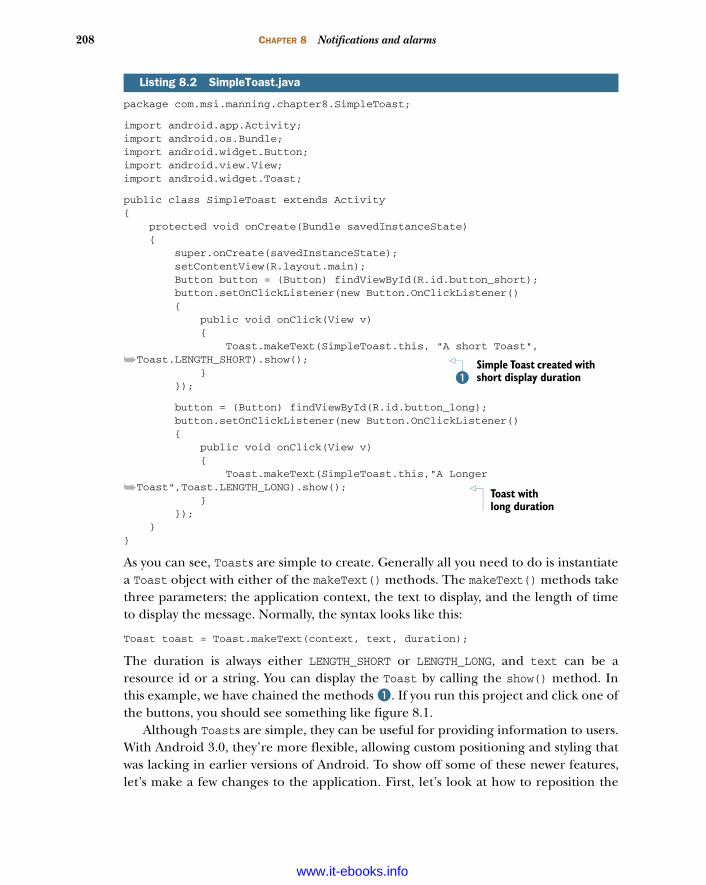
208 CHAPTER 8 Notifications and alarms
package com.msi.manning.chapter8.SimpleToast;
import android.app.Activity;import android.os.Bundle;import android.widget.Button;import android.view.View;import android.widget.Toast;
public class SimpleToast extends Activity{ protected void onCreate(Bundle savedInstanceState) { super.onCreate(savedInstanceState); setContentView(R.layout.main); Button button = (Button) findViewById(R.id.button_short); button.setOnClickListener(new Button.OnClickListener() { public void onClick(View v) { Toast.makeText(SimpleToast.this, "A short Toast",
➥Toast.LENGTH_SHORT).show(); } });
button = (Button) findViewById(R.id.button_long); button.setOnClickListener(new Button.OnClickListener() { public void onClick(View v) { Toast.makeText(SimpleToast.this,"A Longer
➥Toast",Toast.LENGTH_LONG).show(); } }); }}
As you can see, Toasts are simple to create. Generally all you need to do is instantiatea Toast object with either of the makeText() methods. The makeText() methods takethree parameters: the application context, the text to display, and the length of timeto display the message. Normally, the syntax looks like this:
Toast toast = Toast.makeText(context, text, duration);
The duration is always either LENGTH_SHORT or LENGTH_LONG, and text can be aresource id or a string. You can display the Toast by calling the show() method. Inthis example, we have chained the methods B. If you run this project and click one ofthe buttons, you should see something like figure 8.1.
Although Toasts are simple, they can be useful for providing information to users.With Android 3.0, they’re more flexible, allowing custom positioning and styling thatwas lacking in earlier versions of Android. To show off some of these newer features,let’s make a few changes to the application. First, let’s look at how to reposition the
Listing 8.2 SimpleToast.java
Simple Toast created with short display durationB
Toast with long duration
www.it-ebooks.info

209Placing your Toast message
Toast message so that instead of appearing in the default position, it shows in eitherthe upper-right corner or the lower-left corner.
8.2 Placing your Toast messageWe want to display our short message in the upper-right corner. To do that, we can useone of the Toast’s other methods: setGravity(). The setGravity() method allowsyou to define exactly where you would like a Toast message to appear. It takes threeparameters: the Gravity constant, an x-position offset, and a y-position offset. Thesyntax looks like this:
toast.setGravity(Gravity.TOP|Gravity.LEFT, 0, 0);
To use it in the example code, change the first Toast from
Toast.makeText(SimpleToast.this, "A short Toast", Toast.LENGTH_SHORT).show();
to
Toast toast = Toast.makeText(SimpleToast.this, "A short Toast", Toast.LENGTH_SHORT);
toast.setGravity(Gravity.TOP|Gravity.RIGHT, 0, 0); toast.show();
If you run this code, you should now see the Toast message in the upper-right cornerof your device, as shown in figure 8.2.
Figure 8.1 Simple example of a Toast message on a Xoom tablet
www.it-ebooks.info
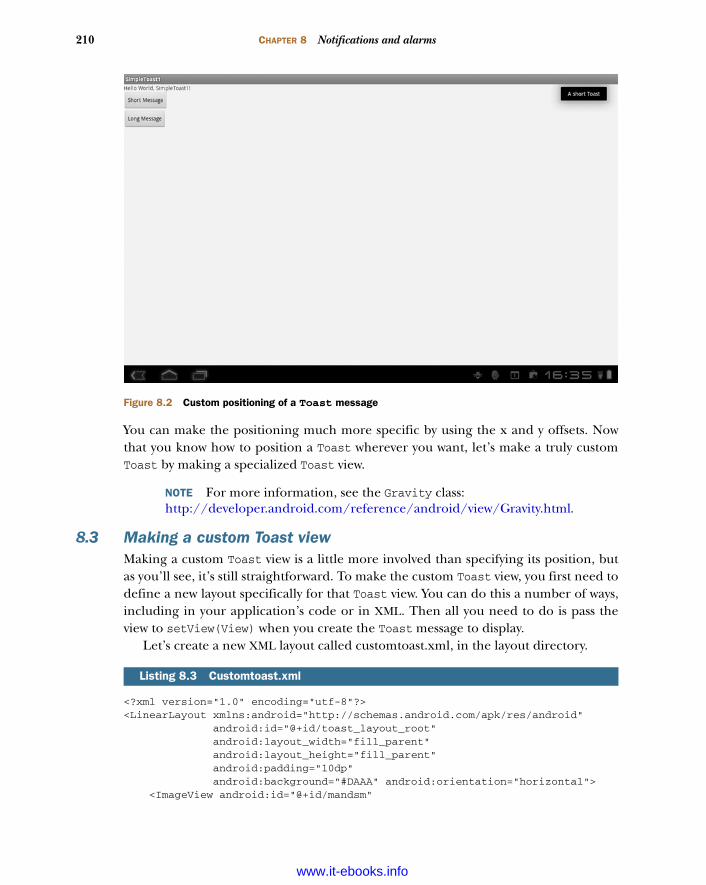
210 CHAPTER 8 Notifications and alarms
You can make the positioning much more specific by using the x and y offsets. Nowthat you know how to position a Toast wherever you want, let’s make a truly customToast by making a specialized Toast view.
NOTE For more information, see the Gravity class: http://developer.android.com/reference/android/view/Gravity.html.
8.3 Making a custom Toast viewMaking a custom Toast view is a little more involved than specifying its position, butas you’ll see, it’s still straightforward. To make the custom Toast view, you first need todefine a new layout specifically for that Toast view. You can do this a number of ways,including in your application’s code or in XML. Then all you need to do is pass theview to setView(View) when you create the Toast message to display.
Let’s create a new XML layout called customtoast.xml, in the layout directory.
<?xml version="1.0" encoding="utf-8"?><LinearLayout xmlns:android="http://schemas.android.com/apk/res/android" android:id="@+id/toast_layout_root" android:layout_width="fill_parent" android:layout_height="fill_parent" android:padding="10dp" android:background="#DAAA" android:orientation="horizontal"> <ImageView android:id="@+id/mandsm"
Listing 8.3 Customtoast.xml
Figure 8.2 Custom positioning of a Toast message
www.it-ebooks.info
211Making a custom Toast view
android:layout_width="wrap_content" android:layout_height="fill_parent" android:layout_marginRight="10dp" /> <TextView android:id="@+id/text" android:layout_width="wrap_content" android:layout_height="fill_parent" android:textColor="#FFFF" /></LinearLayout>
As you can see, this is a simple layout. We define an ImageView to present a graphicand a TextView to replace our need to use the makeText() method.
Now we need to change the application code. For this example, we’ll only changethe first Toast message to use the custom view. Assuming you’re editing our originalcode, you can change the code in the first onClick() method to look like the followlisting.
protected void onCreate(Bundle savedInstanceState) { super.onCreate(savedInstanceState); setContentView(R.layout.main); LayoutInflater inflater = getLayoutInflater(); final View layout = inflater.inflate(R.layout.customtoast, (ViewGroup) findViewById(R.id.toast_layout_root));
ImageView image = (ImageView) layout.findViewById(R.id.mandsm); image.setImageResource(R.drawable.mandsm); TextView text = (TextView) layout.findViewById(R.id.text); text.setText("Short custom message");
Button button = (Button) findViewById(R.id.button_short); button.setOnClickListener(new Button.OnClickListener() { public void onClick(View v) { Toast toast = new Toast(getApplicationContext()); toast.setGravity(Gravity.TOP|Gravity.RIGHT, 200, 200); toast.setDuration(Toast.LENGTH_LONG); toast.setView(layout); toast.show(); } });
We use several classes and methods that you should be familiar with from earlier chap-ters. The getLayoutInflater() method retrieves the LayoutInflater to instantiatethe customtoast layout XML B. Then we use the inflater to inflate the XML C. Nextwe set the ImageView and the TextView, from the custom layout, and after that we cre-ate a Toast. Note that we don’t use makeText() when we create the Toast, becausewe’ve defined a custom TextView and ImageView D.
Listing 8.4 Modified application code
Instantiate layout XMLB
Inflate XMLC
Hold new Toast viewD
www.it-ebooks.info
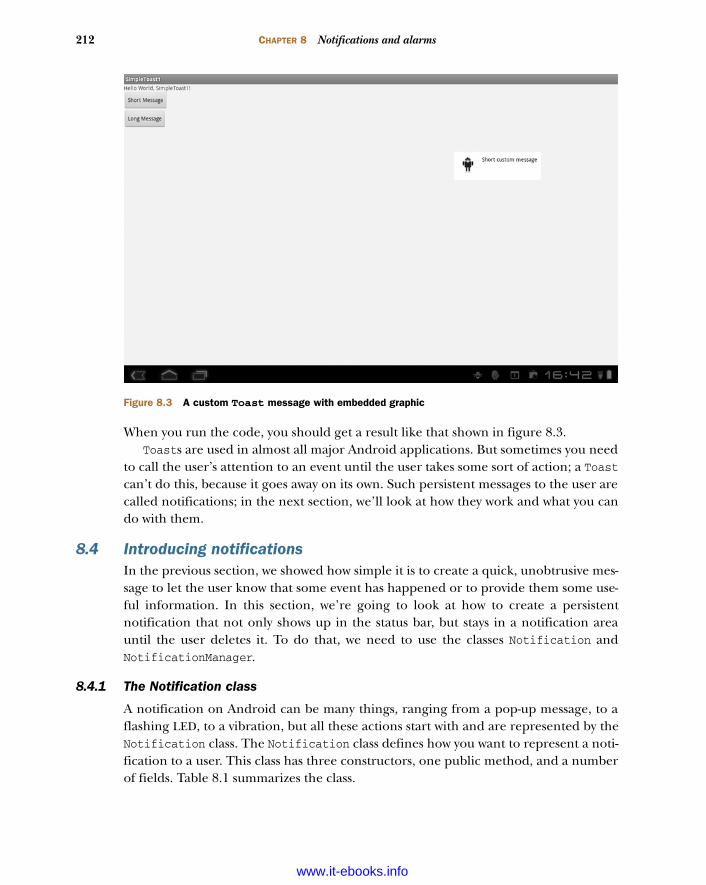
212 CHAPTER 8 Notifications and alarms
When you run the code, you should get a result like that shown in figure 8.3.Toasts are used in almost all major Android applications. But sometimes you need
to call the user’s attention to an event until the user takes some sort of action; a Toastcan’t do this, because it goes away on its own. Such persistent messages to the user arecalled notifications; in the next section, we’ll look at how they work and what you cando with them.
8.4 Introducing notificationsIn the previous section, we showed how simple it is to create a quick, unobtrusive mes-sage to let the user know that some event has happened or to provide them some use-ful information. In this section, we’re going to look at how to create a persistentnotification that not only shows up in the status bar, but stays in a notification areauntil the user deletes it. To do that, we need to use the classes Notification andNotificationManager.
8.4.1 The Notification class
A notification on Android can be many things, ranging from a pop-up message, to aflashing LED, to a vibration, but all these actions start with and are represented by theNotification class. The Notification class defines how you want to represent a noti-fication to a user. This class has three constructors, one public method, and a numberof fields. Table 8.1 summarizes the class.
Figure 8.3 A custom Toast message with embedded graphic
www.it-ebooks.info

213Introducing notifications
As you can see, the Notification class has numerous fields; it has to describe everyway you can notify a user. The NotificationManager class, though, is required inorder to use the Notification class, because it’s the system service that executes andmanages notifications. Using a notification follows these steps:
Table 8.1 Notification fields
Access Type Method Description
public int audioStreamType Stream type to use when playing a sound
public RemoteViews contentView View to display when the statusBar-Icon is selected in the status bar
public PendingIntent contentIntent Intent to execute when the icon is clicked
public int defaults Defines which values should be taken from defaults
public int deleteIntent Intent to execute when the user clicks the Clear All Notifications button
public flags Places all flags in the flag fields as bits
public PendingIntent fullScreenIntent Intent to launch instead of posting the notifi-cation in status bar
public int icon Resource ID of a drawable to use as the icon in the status bar
public Int iconLevel Level of an icon in the status bar
public bitmap largeIcon Bitmap that may be bigger than the bounds of the panel
public int ledARGB Color of the LED notification
public int ledOffMS Number of milliseconds for the LED to be off between flashes
public int ledOnMS Number of milliseconds for the LED to be on for each flash
public Int number Number of events represented by this notification
public ContentURI sound Sound to play
public CharSequence tickerText Text to scroll across the screen when this item is added to the status bar
public RemoteViews tickerView View shown by the ticker notification in the sta-tus bar
public long[] vibrate Vibration pattern to use
public long when Timestamp for the notification
www.it-ebooks.info
214 CHAPTER 8 Notifications and alarms
NotificationManager myNotificationManager;private static final int NOTIFICATION_ID = 1;myNotificationManager =
➥(NotificationManager)getSystemService(Context.NOTIFICATION_SERVICE);
Here we set up a NotificationManager and instantiate it. Next we use the Notification.Builder to set Notification objects such as the
message icon for the notification, the title, and much more. The Notification.Builder provides a much simpler mechanism for building notifications than in pre-vious versions of Android:
Notification.Builder builder = new Notification.Builder(this);builder.setTicker("Message to Show when Notification pops up");builder.setContentTitle ("Title of Message");builder.setSmallIcon(R.drawable.icon);builder.setContentText("- Message for the User -");
Intent notificationIntent = new Intent(this, SimpleNotification.class);PendingIntent contentIntent = PendingIntent.getActivity(this, 0,
➥notificationIntent, 0);builder.setContentIntent(contentIntent);
Next we create PendingIntent for the Builder. You must create a PendingIntent forall notifications.
Finally, to send the notification, all you have to do is use the notify() method andsupply the Notification ID as well as the builder:
myNotificationManager.notify(NOTIFICATION_ID, builder.getNotification());
Here the notify() method wakes up a thread that performs the notification task youhave defined. You can use either an Activity or a Service to trigger the notification,but generally you’ll want to use a Service because a Service can trigger a notificationin the background regardless of whether it’s the active application at the time.
8.4.2 Notifying a user with a simple button press
Based on the previous example, let’s make a simple interface with two buttons: onethat will trigger the notification and one that will clear it. Make a new project, and firstdefine the layout in main.xml as in the following listing.
<?xml version="1.0" encoding="utf-8"?><LinearLayout xmlns:android="http://schemas.android.com/apk/res/android" android:orientation="vertical" android:layout_width="fill_parent" android:layout_height="fill_parent" ><TextView android:layout_width="fill_parent" android:layout_height="wrap_content" android:text="@string/hello" /><Button android:id="@+id/button_cn"
Listing 8.5 main.xml
www.it-ebooks.info
215Introducing notifications
android:layout_width="wrap_content" android:layout_height="wrap_content" android:text="Create Notification" android:layout_x="50px" android:layout_y="200px" /><Button android:id="@+id/button_dn" android:text="Clear Notification" android:layout_width="wrap_content" android:layout_height="wrap_content" android:layout_x="150px" android:layout_y="200px" /> </LinearLayout>
Now that we have our layout, let’s create the Activity that will trigger the notification.(We’re using an Activity in this example for simplicity’s sake.) Make an Activitycalled SimpleNotification, as shown in the following listing.
public class SimpleNotification extends Activity{ NotificationManager myNotificationManager; private static final int NOTIFICATION_ID = 1;
public void onCreate(Bundle savedInstanceState) { super.onCreate(savedInstanceState); setContentView(R.layout.main); Button myGen = (Button)findViewById(R.id.button_cn); myGen.setOnClickListener(myGenOnClickListener); Button myClear = (Button)findViewById(R.id.button_dn); myClear.setOnClickListener(myClearOnClickListener);}
private void GenerateNotification(){
myNotificationManager =
➥(NotificationManager)getSystemService(Context.NOTIFICATION_SERVICE); Notification.Builder builder = new Notification.Builder(this); builder.setContentTitle ("Attention Please!"); builder.setTicker("*** Notification ***"); builder.setSmallIcon(R.drawable.notand); builder.setContentText("- Message for the User -");
Intent notificationIntent =
➥new Intent(this, SimpleNotification.class); PendingIntent contentIntent = PendingIntent.getActivity(this, 0,
➥notificationIntent, 0); builder.setContentIntent(contentIntent);
myNotificationManager.notify(NOTIFICATION_ID,
➥builder.getNotification());}
Button.OnClickListener myGenOnClickListener = new Button.OnClickListener(){
Listing 8.6 SimpleNotification.java
BGet reference toNotificationManager
CSet up new
Notification.Builder
Set up Intent and PendingIntent
D
www.it-ebooks.info
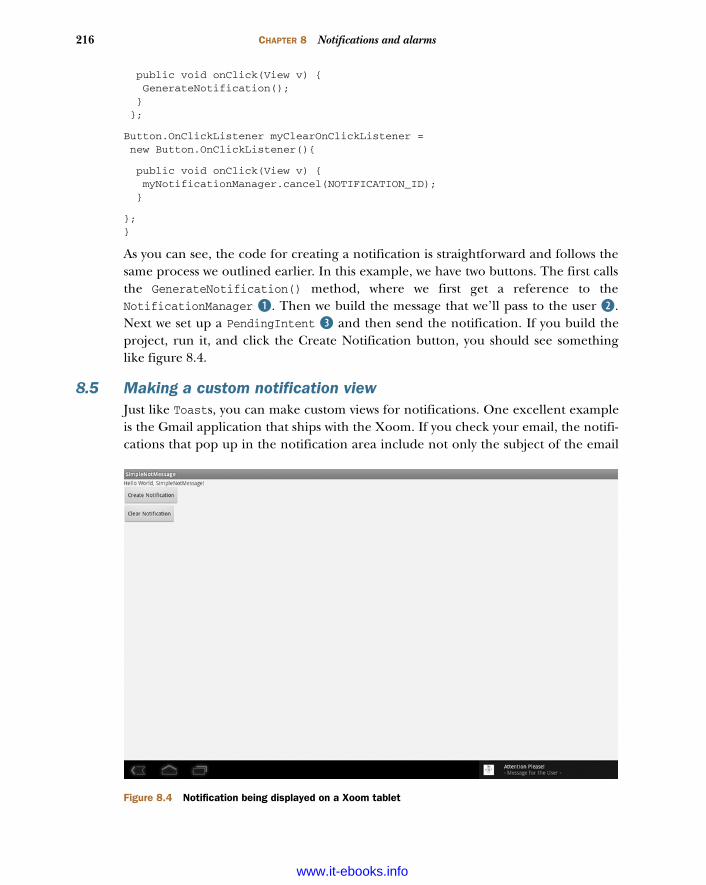
216 CHAPTER 8 Notifications and alarms
public void onClick(View v) { GenerateNotification(); } };
Button.OnClickListener myClearOnClickListener = new Button.OnClickListener(){
public void onClick(View v) { myNotificationManager.cancel(NOTIFICATION_ID); }
};}
As you can see, the code for creating a notification is straightforward and follows thesame process we outlined earlier. In this example, we have two buttons. The first callsthe GenerateNotification() method, where we first get a reference to theNotificationManager B. Then we build the message that we’ll pass to the user C.Next we set up a PendingIntent D and then send the notification. If you build theproject, run it, and click the Create Notification button, you should see somethinglike figure 8.4.
8.5 Making a custom notification viewJust like Toasts, you can make custom views for notifications. One excellent exampleis the Gmail application that ships with the Xoom. If you check your email, the notifi-cations that pop up in the notification area include not only the subject of the email
Figure 8.4 Notification being displayed on a Xoom tablet
www.it-ebooks.info

217Making a custom notification view
but, if available, the image associated with the person. Much as you do with Toasts, tocreate a custom view for a Notification you need to first define a layout either in theapplication code or in XML. For this example, we’ll use XML. In the example, createthe customnotification.xml file in your layout directory.
<?xml version="1.0" encoding="utf-8"?><LinearLayout xmlns:android="http://schemas.android.com/apk/res/android" android:layout_width="match_parent" android:layout_height="match_parent" android:background="#000" android:orientation="horizontal"> > <ImageView android:id="@+id/avatar" android:layout_width="wrap_content" android:layout_height="fill_parent" android:layout_marginRight="10dp" /> <TextView android:id="@+id/text" android:layout_width="wrap_content" android:layout_height="fill_parent" android:textColor="#FFF" /> <TextView android:id="@+id/textTicker" android:layout_width="wrap_content" android:layout_height="fill_parent" android:textColor="#FFF" /></LinearLayout>
Now we’ll change the application code somewhat from the previous notificationexample, to use the new custom layout.
private void GenerateNotification(){
String contenttitle = "Attention Please!"; String contenttext = "- Message for the User -" ;
RemoteViews layout = new RemoteViews(getPackageName(),
➥R.layout.customnotification); layout.setTextViewText(R.id.text, contenttitle); layout.setTextViewText(R.id.textTicker, contenttext); layout.setImageViewResource(R.id.avatar, R.drawable.mandsm);
myNotificationManager =
➥(NotificationManager)getSystemService(Context.NOTIFICATION_SERVICE); Notification.Builder builder = new Notification.Builder(this); builder.setContentTitle (contenttitle); builder.setTicker("*** Notification ***"); builder.setSmallIcon(R.drawable.notand); builder.setContentText(contenttext);
builder.setContent(layout);
Listing 8.7 customnotification.xml
Listing 8.8 SimpleNotification.java
Define image and text for layout
B
Pass RemoteViews reference to Notification.Builder
C
www.it-ebooks.info
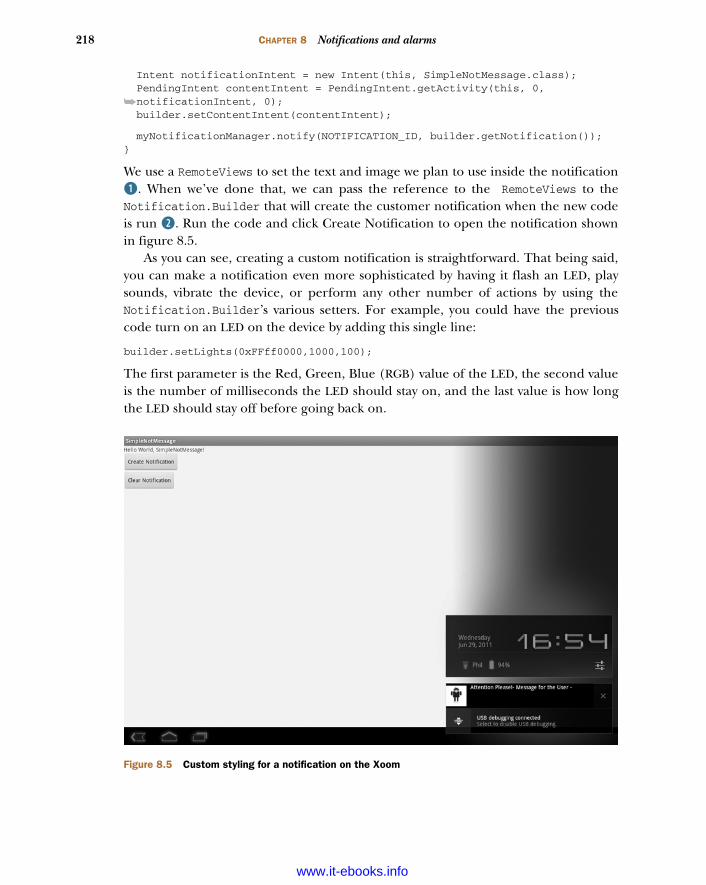
218 CHAPTER 8 Notifications and alarms
Intent notificationIntent = new Intent(this, SimpleNotMessage.class); PendingIntent contentIntent = PendingIntent.getActivity(this, 0,
➥notificationIntent, 0); builder.setContentIntent(contentIntent);
myNotificationManager.notify(NOTIFICATION_ID, builder.getNotification());}
We use a RemoteViews to set the text and image we plan to use inside the notificationB. When we’ve done that, we can pass the reference to the RemoteViews to theNotification.Builder that will create the customer notification when the new codeis run C. Run the code and click Create Notification to open the notification shownin figure 8.5.
As you can see, creating a custom notification is straightforward. That being said,you can make a notification even more sophisticated by having it flash an LED, playsounds, vibrate the device, or perform any other number of actions by using theNotification.Builder’s various setters. For example, you could have the previouscode turn on an LED on the device by adding this single line:
builder.setLights(0xFFff0000,1000,100);
The first parameter is the Red, Green, Blue (RGB) value of the LED, the second valueis the number of milliseconds the LED should stay on, and the last value is how longthe LED should stay off before going back on.
Figure 8.5 Custom styling for a notification on the Xoom
www.it-ebooks.info
219Introducing alarms
You could also add sound to a notification using the Notification.Builder likethis:
builder.setSound(Uri.parse("File///sdcard/music/Travis-Sing.mp3"));
There are also numerous other options. For now, we’ll move on and look at alarms inAndroid 3.0.
8.6 Introducing alarmsIn Android, alarms allow you to schedule your application to run at some point in thefuture. Alarms can be used for a wide range of applications, from notifying a user ofan appointment to something more sophisticated, such as having an application start,checking for software updates, and then shutting down. An alarm works by register-ing an Intent with the alarm; at the scheduled time, the alarm broadcasts theIntent. Android automatically starts the targeted application, even if the Androidhandset is asleep.
Android manages all alarms somewhat as it manages the NotificationManager—via an AlarmManager class. The AlarmManager has the methods described table 8.2.
You retrieve the AlarmManager indirectly (as you do the NotificationManager), byusing Context.getSystemService(Context.ALARM_SERVICE).
Setting alarms is easy, like most things in Android. In the next example, you’ll cre-ate a simple application that sets an alarm when a button is clicked. When the alarmis triggered, it will pass back a simple Toast to inform you that the alarm has beenfired.
Table 8.2 AlarmManager public methods
Returns Method description
void cancel(PendingIntent intent) Remove alarms with matching Intent.
void set(int type, long triggerAtTime, PendingIntent operation)
Set an alarm.
void setInexactRepeating(int type, long triggerAtTime, long interval, PendingIntent operation)
Repeating alarm that has inex-act trigger requirements.
void setRepeating(int type, long triggerAtTime, long interval, PendingIntent operation)
Set a repeating alarm.
void setTime(long milliseconds) Set the time for an alarm.
void setTimeZone(String TimeZone) Set the time zone for the alarm.
www.it-ebooks.info

220 CHAPTER 8 Notifications and alarms
8.6.1 Creating a simple alarm example
In this next example, you’ll create an Android project called SimpleAlarm that hasthe package name com.msi.manning.chapter8.simpleAlarm, the application nameSimpleAlarm, and the Activity name GenerateAlarm. This project uses anotheropen source icon, which you can find at www.manning.com/ableson3/ or in thedownload for this chapter. Change the name of the icon to clock, and add it to theres/drawable directory of the project when you create it.
Next, edit the AndroidManifest.xml file to have a receiver (you’ll create that soon)called AlarmReceiver, as shown in the following listing.
<?xml version="1.0" encoding="utf-8"?><manifest xmlns:android="http://schemas.android.com/apk/res/android" package="com.msi.manning.chapter8.simpleAlarm"> <uses-sdk android:minSdkVersion="11"></uses-sdk> <application android:icon="@drawable/clock"> <activity android:name=".GenerateAlarm" android:label="@string/app_name"> <intent-filter> <action android:name="android.intent.action.MAIN" /> <category android:name="android.intent.category.LAUNCHER" /> </intent-filter> </activity> <receiver android:name=".AlarmReceiver" android:process=":remote"
➥/> </application></manifest>
Next, edit the string.xml file in the values directory, and add two new strings:
<string name="set_alarm_text">Set Alarm</string><string name="alarm_message">Alarm Fired</string>
You’ll use this as the value of the button in the layout. Next, edit the main.xml file toadd a new button to the layout:
<Button android:id="@+id/set_alarm_button"android:layout_width="wrap_content" android:layout_height="wrap_content" android:text="@string/set_alarm_text"><requestFocus /></Button>
You’re ready to create a new class that will act as the Receiver for the notification thealarm will generate, as shown in the following listing. In this case, you’ll generate aToast-style notification to let the user know the alarms have been triggered. This classwaits for the alarm to broadcast to the AlarmReceiver and then generates the Toast.
Listing 8.9 AndroidManifest.xml
www.it-ebooks.info
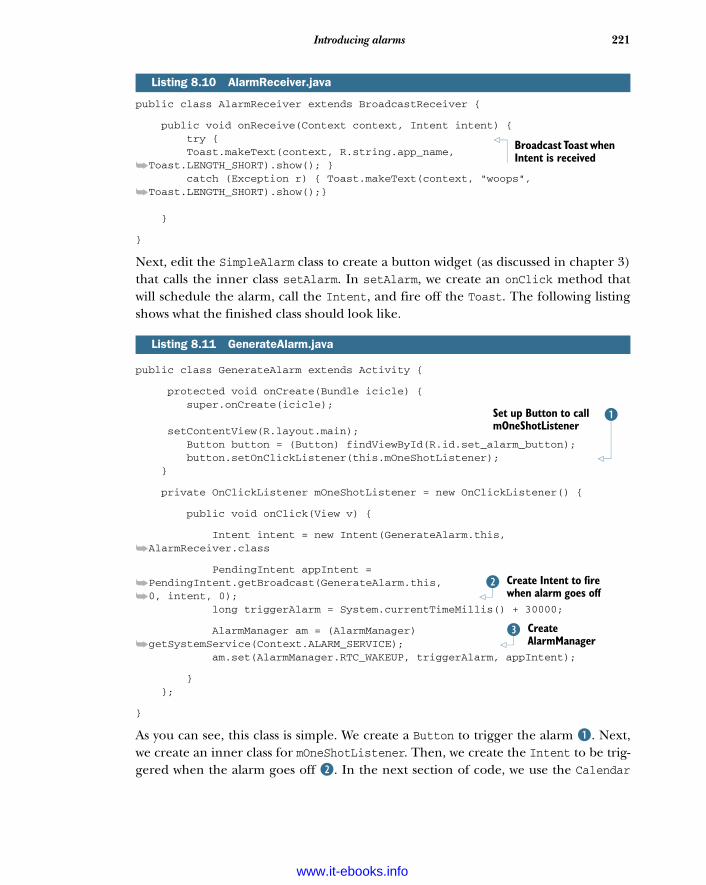
221Introducing alarms
public class AlarmReceiver extends BroadcastReceiver {
public void onReceive(Context context, Intent intent) { try { Toast.makeText(context, R.string.app_name,
➥Toast.LENGTH_SHORT).show(); } catch (Exception r) { Toast.makeText(context, "woops",
➥Toast.LENGTH_SHORT).show();} }
}
Next, edit the SimpleAlarm class to create a button widget (as discussed in chapter 3)that calls the inner class setAlarm. In setAlarm, we create an onClick method thatwill schedule the alarm, call the Intent, and fire off the Toast. The following listingshows what the finished class should look like.
public class GenerateAlarm extends Activity {
protected void onCreate(Bundle icicle) { super.onCreate(icicle);
setContentView(R.layout.main); Button button = (Button) findViewById(R.id.set_alarm_button); button.setOnClickListener(this.mOneShotListener); }
private OnClickListener mOneShotListener = new OnClickListener() {
public void onClick(View v) {
Intent intent = new Intent(GenerateAlarm.this,
➥AlarmReceiver.class
PendingIntent appIntent =
➥PendingIntent.getBroadcast(GenerateAlarm.this,
➥0, intent, 0); long triggerAlarm = System.currentTimeMillis() + 30000;
AlarmManager am = (AlarmManager)
➥getSystemService(Context.ALARM_SERVICE); am.set(AlarmManager.RTC_WAKEUP, triggerAlarm, appIntent);
} };
}
As you can see, this class is simple. We create a Button to trigger the alarm B. Next,we create an inner class for mOneShotListener. Then, we create the Intent to be trig-gered when the alarm goes off C. In the next section of code, we use the Calendar
Listing 8.10 AlarmReceiver.java
Listing 8.11 GenerateAlarm.java
Broadcast Toast when Intent is received
Set up Button to call mOneShotListener
B
Create Intent to fire when alarm goes off
C
Create AlarmManager
D
www.it-ebooks.info

222 CHAPTER 8 Notifications and alarms
class to help calculate the number of milliseconds from the time the button is clicked,which we’ll use to set the alarm.
Now we’ve done everything necessary to create and set the alarm. We create theAlarmManager D and then call its set() method to set the alarm. To see a little moredetail of what’s going on in the application, look at these lines of code:
AlarmManager am = (AlarmManager) getSystemService(Context.ALARM_SERVICE); am.set(AlarmManager.RTC_WAKEUP, triggerAlarm, appIntent);
These lines are where we create and set the alarm by first using getSystemService()to create the AlarmManager. The first parameter we pass to the set() method isRTC_WAKEUP, which is an integer representing the alarm type we want to set. TheAlarmManager currently supports four alarm types, as shown in table 8.3.
You can use multiple types of alarms, depending on your requirements. RTC_WAKEUP,for example, sets the alarm time in milliseconds; when the alarm goes off, it’ll wakethe device from sleep mode for you, as opposed to RTC, which won’t.
The next parameter we pass to the method is the time, in milliseconds, for whenwe want the alarm to be triggered. We do this with the following snippet by adding thenumber of milliseconds to the current time:
long triggerAlarm = System.currentTimeMillis() + 30000
The last parameter is the Intent to which we want to broadcast, which is the Intent-Receiver. Now, build the application and run it.
Clicking the Set Alarm button sets the alarm; after 30 seconds, you should seesomething like figure 8.6, displaying the Toast message.
8.6.2 Using notifications with alarms
Creating an alarm is pretty easy in Android, but what might make more sense wouldbe for that alarm to trigger a notification in the status bar. To do that, you need to adda NotificationManager and generate a Notification. We’ve created a new method
Table 8.3 AlarmManager alarm types
Type Description
ELAPSED_REALTIME Alarm time in SystemClock.elapsedRealtime() (time since boot, including sleep).
ELAPSED_REALTIME_WAKEUP Alarm time in SystemClock.elapsedRealtime() (time since boot, including sleep). This will wake up the device when it goes off.
RTC Alarm time in System.currentTimeMillis() (wall clock time in UTC).
RTC_WAKEUP Alarm time in System.currentTimeMillis() (wall clock time in UTC). This will wake up the device when it goes off.
www.it-ebooks.info
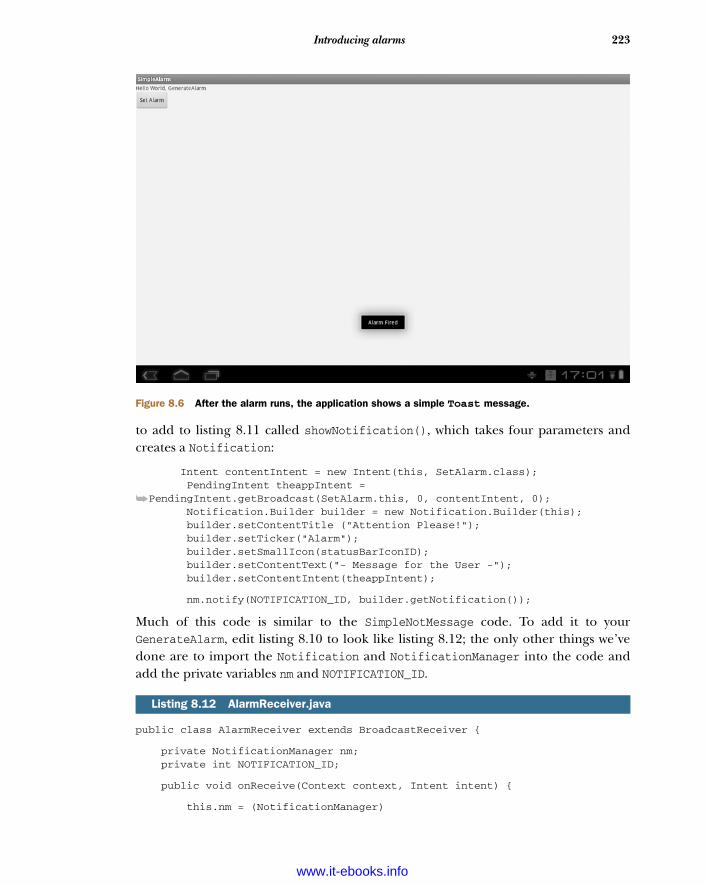
223Introducing alarms
to add to listing 8.11 called showNotification(), which takes four parameters andcreates a Notification:
Intent contentIntent = new Intent(this, SetAlarm.class); PendingIntent theappIntent =
➥PendingIntent.getBroadcast(SetAlarm.this, 0, contentIntent, 0); Notification.Builder builder = new Notification.Builder(this); builder.setContentTitle ("Attention Please!"); builder.setTicker("Alarm"); builder.setSmallIcon(statusBarIconID); builder.setContentText("- Message for the User -"); builder.setContentIntent(theappIntent);
nm.notify(NOTIFICATION_ID, builder.getNotification());
Much of this code is similar to the SimpleNotMessage code. To add it to yourGenerateAlarm, edit listing 8.10 to look like listing 8.12; the only other things we’vedone are to import the Notification and NotificationManager into the code andadd the private variables nm and NOTIFICATION_ID.
public class AlarmReceiver extends BroadcastReceiver {
private NotificationManager nm; private int NOTIFICATION_ID;
public void onReceive(Context context, Intent intent) {
this.nm = (NotificationManager)
Listing 8.12 AlarmReceiver.java
Figure 8.6 After the alarm runs, the application shows a simple Toast message.
www.it-ebooks.info
224 CHAPTER 8 Notifications and alarms
➥context.getSystemService(Context.NOTIFICATION_SERVICE);
Intent contentIntent = new Intent(context, AlarmReceiver.class); PendingIntent theappIntent = PendingIntent.getBroadcast(context, 0,
➥contentIntent, 0);
Notification.Builder builder =
➥new Notification.Builder(context); builder.setContentTitle ("Attention Please!"); builder.setTicker("Alarm"); builder.setSmallIcon(R.drawable.alarm); builder.setContentText("- Message for the User -"); builder.setContentIntent(theappIntent); nm.notify(NOTIFICATION_ID, builder.getNotification()); abortBroadcast(); }
}
Now edit GenerateAlarm.java so it looks like listing 8.13.
}public class GenerateAlarm extends Activity {
Toast mToast; protected void onCreate(Bundle icicle) { super.onCreate(icicle); setContentView(R.layout.main); Button button = (Button) findViewById(R.id.set_alarm_button); button.setOnClickListener(this.mOneShotListener); }
private OnClickListener mOneShotListener = new OnClickListener() { public void onClick(View v) { Intent intent = new Intent(GenerateAlarm.this,
➥AlarmReceiver.class); PendingIntent appIntent =
➥PendingIntent.getBroadcast(GenerateAlarm.this, 0, intent, 0); Calendar calendar = Calendar.getInstance(); calendar.setTimeInMillis(System.currentTimeMillis()); calendar.add(Calendar.SECOND, 30); AlarmManager am = (AlarmManager)
➥getSystemService(Context.ALARM_SERVICE); am.set(AlarmManager.RTC_WAKEUP, calendar.getTimeInMillis(),
➥appIntent); NotificationManager nm = (NotificationManager)
➥getSystemService(Context.NOTIFICATION_SERVICE); nm.cancel(R.string.app_name); Toast.makeText(GenerateAlarm.this,
➥"alarm fired wait 30 seconds", Toast.LENGTH_SHORT).show(); } };}
If you run the code and click Set Alarm, you should see the alarm notification in thestatus bar as shown in figure 8.7. You could easily edit this code to take parameters fortime and date, have it show different Intents when the icons are clicked, and so on.
Listing 8.13 GenerateAlarm.java
Build notification
www.it-ebooks.info
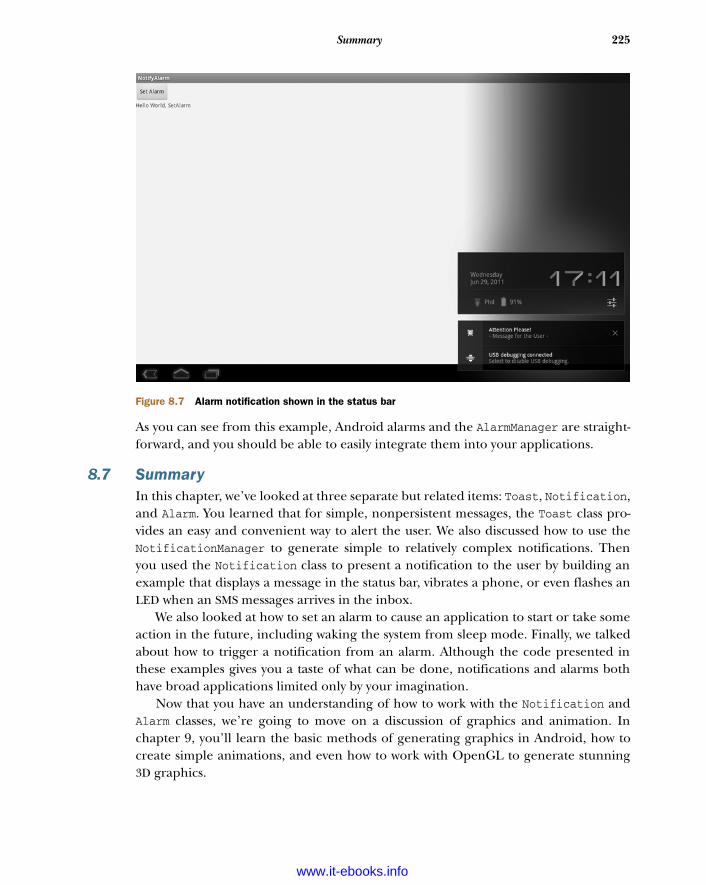
225Summary
As you can see from this example, Android alarms and the AlarmManager are straight-forward, and you should be able to easily integrate them into your applications.
8.7 SummaryIn this chapter, we’ve looked at three separate but related items: Toast, Notification,and Alarm. You learned that for simple, nonpersistent messages, the Toast class pro-vides an easy and convenient way to alert the user. We also discussed how to use theNotificationManager to generate simple to relatively complex notifications. Thenyou used the Notification class to present a notification to the user by building anexample that displays a message in the status bar, vibrates a phone, or even flashes anLED when an SMS messages arrives in the inbox.
We also looked at how to set an alarm to cause an application to start or take someaction in the future, including waking the system from sleep mode. Finally, we talkedabout how to trigger a notification from an alarm. Although the code presented inthese examples gives you a taste of what can be done, notifications and alarms bothhave broad applications limited only by your imagination.
Now that you have an understanding of how to work with the Notification andAlarm classes, we’re going to move on a discussion of graphics and animation. Inchapter 9, you’ll learn the basic methods of generating graphics in Android, how tocreate simple animations, and even how to work with OpenGL to generate stunning3D graphics.
Figure 8.7 Alarm notification shown in the status bar
www.it-ebooks.info
Graphics and animation
By now, you should’ve picked up on the fact that it’s much easier to developAndroid applications than it is to use other mobile application platforms. This easeof use is especially apparent when you’re creating visually appealing UIs and meta-phors, but there’s a limit to what you can do with typical Android UI elements(such as those we discussed in chapter 3). In this chapter, we’ll look at how to cre-ate graphics using Android’s Graphics API, discuss how to develop animations, andexplore Android’s support for the OpenGL standard, as well as introduce you toAndroid’s new cross-platform, high-performance graphics language RenderScript.(To see examples of what you can do with Android’s graphics platform, go towww.omnigsoft.com/Android/ADC/readme.html.)
First, we’re going to show you how to draw simple shapes using the Android 2DGraphics API, using Java and then XML to describe 2D shapes. Next, we’ll look atmaking simple animations using Java and the Graphics API to move pixels around,and then using XML to perform a frame-by-frame animation. After that we’ll exam-ine Android’s support of the OpenGL ES API, make a simple shape, and then make
This chapter covers Drawing graphics in Android
Applying the basics of OpenGL for embedded systems (ES)
Animating with Android
226
www.it-ebooks.info
227Drawing graphics in Android
a more complex, rotating, three-dimensional shape. Finally we’ll introduce Render-Script, a low-level, C-derived, native language that allows developers to take advantageof multicore systems and graphics accelerators to make more performant, visuallyintensive applications.
If you’ve ever worked with graphics in Java, you’ll likely find the Graphics API andhow graphics work in Android familiar. If you’ve worked with OpenGL, you’ll findAndroid’s implementation of OpenGL ES reasonably straightforward. You mustremember, though, that cell phones, tablets, and other mobile devices don’t have thegraphical processing power of a desktop. Regardless of your experience, you’ll findthe Android Graphics API both powerful and rich, allowing you to accomplish evensome of the most complex graphical tasks.
NOTE You can find more information on the differences betweenOpenGL and OpenGL ES to help you determine the level of effort inporting code at the Khronos website. For example, the OpenGL ES 1.5specification at http://mng.bz/qapb provides information on differ-ences between OpenGL and OpenGL ES.
9.1 Drawing graphics in AndroidIn this section, we’ll cover Android’s graphical capabilities and show you examples ofhow to make simple 2D shapes. We’ll be applying the android.graphics package (seehttp://mng.bz/CIFJ), which provides all the low-level classes you need to creategraphics. The graphics package supports such things as bitmaps (which hold pixels),canvases (what your draw calls draw on), primitives (such as rectangles and text), andpaints (which you use to add color and styling). Although these aren’t the only graph-ics packages, they’re the main ones you’ll use in most applications. Generally, you useJava to call the Graphics API to create complex graphics.
To demonstrate the basics of drawing a shape with Java and the Graphics API, let’slook at a simple example in the following listing, where we’ll draw a rectangle.
package com.msi.manning.chapter9.SimpleShape; public class SimpleShape extends Activity { @Override protected void onCreate(Bundle icicle) { super.onCreate(icicle); setContentView(new SimpleView(this)); } private static class SimpleView extends View { private ShapeDrawable mDrawable = new ShapeDrawable(); public SimpleView(Context context) { super(context); setFocusable(true); this.mDrawable = new ShapeDrawable(new RectShape()); this.mDrawable.getPaint().setColor(0xFFFF0000);
Listing 9.1 simpleshape.java
Create new ShapeDrawable to hold Drawable
B
Set up ViewC
Create Rectangle, assign to mDrawable
D
www.it-ebooks.info
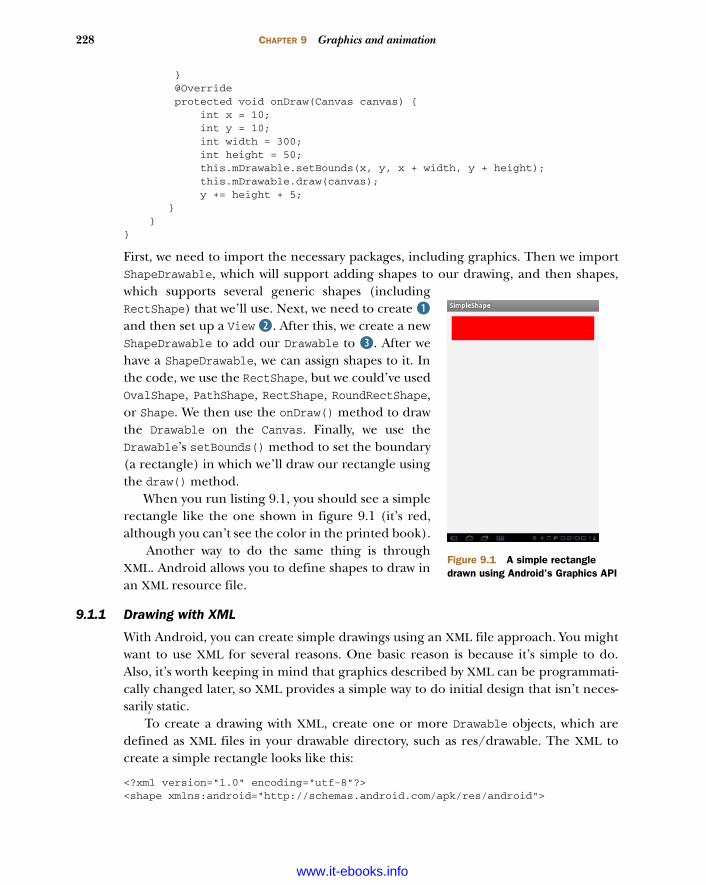
228 CHAPTER 9 Graphics and animation
} @Override protected void onDraw(Canvas canvas) { int x = 10; int y = 10; int width = 300; int height = 50; this.mDrawable.setBounds(x, y, x + width, y + height); this.mDrawable.draw(canvas); y += height + 5; } }}
First, we need to import the necessary packages, including graphics. Then we importShapeDrawable, which will support adding shapes to our drawing, and then shapes,which supports several generic shapes (includingRectShape) that we’ll use. Next, we need to create Band then set up a View C. After this, we create a newShapeDrawable to add our Drawable to D. After wehave a ShapeDrawable, we can assign shapes to it. Inthe code, we use the RectShape, but we could’ve usedOvalShape, PathShape, RectShape, RoundRectShape,or Shape. We then use the onDraw() method to drawthe Drawable on the Canvas. Finally, we use theDrawable’s setBounds() method to set the boundary(a rectangle) in which we’ll draw our rectangle usingthe draw() method.
When you run listing 9.1, you should see a simplerectangle like the one shown in figure 9.1 (it’s red,although you can’t see the color in the printed book).
Another way to do the same thing is throughXML. Android allows you to define shapes to draw inan XML resource file.
9.1.1 Drawing with XML
With Android, you can create simple drawings using an XML file approach. You mightwant to use XML for several reasons. One basic reason is because it’s simple to do.Also, it’s worth keeping in mind that graphics described by XML can be programmati-cally changed later, so XML provides a simple way to do initial design that isn’t neces-sarily static.
To create a drawing with XML, create one or more Drawable objects, which aredefined as XML files in your drawable directory, such as res/drawable. The XML tocreate a simple rectangle looks like this:
<?xml version="1.0" encoding="utf-8"?><shape xmlns:android="http://schemas.android.com/apk/res/android">
Figure 9.1 A simple rectangle drawn using Android’s Graphics API
www.it-ebooks.info
229Drawing graphics in Android
<solid android:color="#FF0000FF"/></shape>
With Android XML drawable shapes, the default is a rectangle, but you can choose adifferent shape by using the type tag and selecting the value oval, rectangle, line,or arc. To use your XML shape, you need to reference it in a layout, as shown inlisting 9.2. The layout resides in res/layout.
<?xml version="1.0" encoding="utf-8"?><ScrollView xmlns:android="http://schemas.android.com/apk/res/android" android:layout_width="fill_parent" android:layout_height="wrap_content"> <LinearLayout android:orientation="vertical" android:layout_width="fill_parent" android:layout_height="wrap_content"> <ImageView android:layout_width="fill_parent" android:layout_height="50dip" android:src="@drawable/simplerectangle" /> </LinearLayout></ScrollView>
All you need to do is create a simple Activity and place the UI in a ContentView, asfollows:
public class XMLDraw extends Activity { @Override public void onCreate(Bundle icicle) { super.onCreate(icicle); setContentView(R.layout.xmldrawable); }}
Listing 9.2 xmllayout.xml
ARGB color valuesAndroid uses of Alpha, Red, Green, Blue (ARGB) values common in the softwareindustry for defining color values throughout the Android API. In RGB, colors aredefined as ints made up of four bytes: red, green, and blue, plus an alpha. Each valuecan be a number from 0 to 255 that is converted to hexadecimal (hex). The alphaindicates the level of transparency from 0 to 255.
For example, to create a transparent yellow, we might start with an alpha of 50.2%transparency, where the hex value is 0x80: this is 128, which is 50.2% of 255. Toget yellow, we need red plus green. The number 255 in hex for red and green is FF.No blue is needed, so its value is 00. Thus a transparent yellow is 80FFFF00. Thismay seem confusing, but numerous ARGB color charts are available that show thehexadecimal values of a multitude of colors.
www.it-ebooks.info
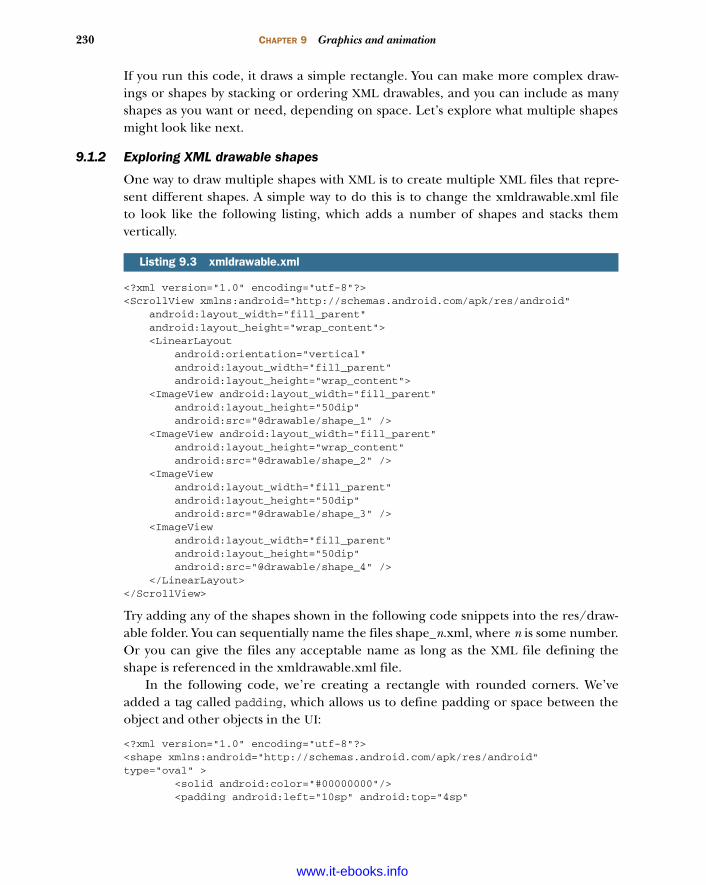
230 CHAPTER 9 Graphics and animation
If you run this code, it draws a simple rectangle. You can make more complex draw-ings or shapes by stacking or ordering XML drawables, and you can include as manyshapes as you want or need, depending on space. Let’s explore what multiple shapesmight look like next.
9.1.2 Exploring XML drawable shapes
One way to draw multiple shapes with XML is to create multiple XML files that repre-sent different shapes. A simple way to do this is to change the xmldrawable.xml fileto look like the following listing, which adds a number of shapes and stacks themvertically.
<?xml version="1.0" encoding="utf-8"?><ScrollView xmlns:android="http://schemas.android.com/apk/res/android" android:layout_width="fill_parent" android:layout_height="wrap_content"> <LinearLayout android:orientation="vertical" android:layout_width="fill_parent" android:layout_height="wrap_content"> <ImageView android:layout_width="fill_parent" android:layout_height="50dip" android:src="@drawable/shape_1" /> <ImageView android:layout_width="fill_parent" android:layout_height="wrap_content" android:src="@drawable/shape_2" /> <ImageView android:layout_width="fill_parent" android:layout_height="50dip" android:src="@drawable/shape_3" /> <ImageView android:layout_width="fill_parent" android:layout_height="50dip" android:src="@drawable/shape_4" /> </LinearLayout></ScrollView>
Try adding any of the shapes shown in the following code snippets into the res/draw-able folder. You can sequentially name the files shape_n.xml, where n is some number.Or you can give the files any acceptable name as long as the XML file defining theshape is referenced in the xmldrawable.xml file.
In the following code, we’re creating a rectangle with rounded corners. We’veadded a tag called padding, which allows us to define padding or space between theobject and other objects in the UI:
<?xml version="1.0" encoding="utf-8"?><shape xmlns:android="http://schemas.android.com/apk/res/android"type="oval" > <solid android:color="#00000000"/> <padding android:left="10sp" android:top="4sp"
Listing 9.3 xmldrawable.xml
www.it-ebooks.info

231Creating animations with Android’s Graphics API
android:right="10sp" android:bottom="4sp" /> <stroke android:width="1dp" android:color="#FFFFFFFF"/></shape>
We’re also using the stroke tag, which allows us to define the style of the line thatmakes up the border of the oval, as shown here:
<?xml version="1.0" encoding="utf-8"?><shape xmlns:android="http://schemas.android.com/apk/res/android"> <solid android:color="#FF0000FF"/> <stroke android:width="4dp" android:color="#FFFFFFFF" android:dashWidth="1dp" android:dashGap="2dp" /> <padding android:left="7dp" android:top="7dp" android:right="7dp" android:bottom="7dp" /> <corners android:radius="4dp" /></shape>
The next snippet introduces the corners tag, which allows us to make rounded cor-ners with the attribute android:radius:
<?xml version="1.0" encoding="utf-8"?><shape xmlns:android="http://schemas.android.com/apk/res/android" type="oval"> <gradient android:startColor="#FFFF0000" android:endColor="#80FF00FF" android:angle="270"/> <padding android:left="7dp" android:top="7dp" android:right="7dp" android:bottom="7dp" /> <corners android:radius="8dp" /></shape>
Finally, we create a shape of the type line with a size tag using the android:heightattribute, which allows us to describe the number of pixels used on the vertical to sizethe line:
<?xml version="1.0" encoding="utf-8"?><shape xmlns:android="http://schemas.android.com/apk/res/android"type="line" > <solid android:color="#FFFFFFFF"/> <stroke android:width="1dp" android:color="#FFFFFFFF" android:dashWidth="1dp" android:dashGap="2dp" /> <padding android:left="1dp" android:top="25dp" android:right="1dp" android:bottom="25dp" /> <size android:height="23dp" /></shape>
If you run this code, you should see something like figure 9.2. As you can see, Android provides the ability for developers to programmatically
draw anything they need. In the next section, we’ll look at what you can draw withAndroid’s animation capabilities.
9.2 Creating animations with Android’s Graphics APIIf a picture says a thousand words, then an animation must speak volumes. Androidsupports multiple methods of creating animation, including through XML, as you saw
www.it-ebooks.info
232 CHAPTER 9 Graphics and animation
in chapter 3; via Android’s XML frame-by-frame animations using the Android Graph-ics API; and via Android’s support for OpenGL ES. In this section, you’ll create a sim-ple animation of a bouncing ball using Android’s frame-by-frame animation.
9.2.1 Android’s frame-by-frame animation
Android allows you to create simple animations by showing a set of images one afteranother to give the illusion of movement, much like stop-motion film. Android setseach frame image as a drawable resource; the images are then shown one after theother in the background of a View. To use this feature, you define a set of resources inan XML file and then call AnimationDrawable.start().
To demonstrate this method for creating an animation, you need to download thisproject from the Manning website (www.manning.com/ableson3) so you’ll have theimages. The images for this exercise are six representations of a ball bouncing. Next,create a project called XMLanimation, and create a new directory called /anim underthe /res resources directory. Place all the images for this example in res/drawable.Then, create an XML file called Simple_animation.xml that contains the code shownin the following listing.
<?xml version="1.0" encoding="utf-8"?> <animation-list xmlns:android="http://schemas.android.com/apk/res/android" id="selected" android:oneshot="false">
Listing 9.4 Simple_animation.xml
Figure 9.2 Various shapes drawn using XML
www.it-ebooks.info
233Creating animations with Android’s Graphics API
<item android:drawable="@drawable/ball1" android:duration="50" /> <item android:drawable="@drawable/ball2" android:duration="50" /> <item android:drawable="@drawable/ball3" android:duration="50" /> <item android:drawable="@drawable/ball4" android:duration="50" /> <item android:drawable="@drawable/ball5" android:duration="50" /> <item android:drawable="@drawable/ball6" android:duration="50" /> </animation-list>
The XML file defines the list of images to be displayed for the animation. The XML<animation-list> tag contains the tags for two attributes: drawable, which describesthe path to the image, and duration, which describes the length of time to show theimage, in nanoseconds.
Now, edit the main.xml file to look like the following listing.
<?xml version="1.0" encoding="utf-8"?><LinearLayout xmlns:android="http://schemas.android.com/apk/res/android" android:orientation="vertical" android:layout_width="fill_parent" android:layout_height="fill_parent" > <ImageView android:id="@+id/simple_anim" android:layout_width="wrap_content" android:layout_height="wrap_content" android:gravity="center" android:layout_centerHorizontal="true" /> <TextView android:layout_width="fill_parent" android:layout_height="wrap_content" android:text="Hello World, XMLAnimation" /></LinearLayout>
All we’ve done to the file is added an ImageView tag that sets up the layout for theImageView. Finally, create the code to run the animation, as follows.
public class XMLAnimation extends Activity { @Override public void onCreate(Bundle icicle) { super.onCreate(icicle); setContentView(R.layout.main); ImageView img = (ImageView)findViewById(R.id.simple_anim); img. setBackgroundResource(R.anim.simple_animation); MyAnimationRoutine mar = new MyAnimationRoutine(); MyAnimationRoutine2 mar2 = new MyAnimationRoutine2(); Timer t = new Timer(false);
Listing 9.5 main.xml
Listing 9.6 xmlanimation.java
Bind resources to ImageView
Call subclasses to start and stop animation
www.it-ebooks.info
234 CHAPTER 9 Graphics and animation
t.schedule(mar, 100); Timer t2 = new Timer(false); t2.schedule(mar2, 5000); } class MyAnimationRoutine extends TimerTask { @Override public void run() { ImageView img = (ImageView) findViewById(R.id.simple_anim); AnimationDrawable frameAnimation = (AnimationDrawable) img.getBackground(); frameAnimation.start(); } } class MyAnimationRoutine2 extends TimerTask { @Override public void run() { ImageView img = (ImageView) findViewById(R.id.simple_anim); AnimationDrawable frameAnimation = (AnimationDrawable) img.getBackground(); frameAnimation.stop(); } }}
Listing 9.6 may be slightly confusing because we’ve used the TimerTask classes.Because we can’t control the animation from within the OnCreate() method, weneed to create two such subclasses to call AnimationDrawable’s start() and stop()methods, respectively. The first subclass, MyAnimationRoutine, extends TimerTask Band calls the frameAnimation.start() method for the AnimationDrawable bound tothe ImageView background. If you run the project now, you should see somethinglike figure 9.3.
As you can see, creating an Animation with XML in Android is pretty simple. Youcan make animations that are reasonably complex, as you would with any stop-motion-type movie; but to create more sophisticated animations programmatically, you needto use Android’s 2D and 3D graphics abilities. In the next section, we’ll show you howto do just that.
9.2.2 Programmatically creating an animation
In the previous section, you used Android’s frame-by-frame animation capabilities toshow a series of images in a loop that gives the impression of movement. In this sec-tion, you’ll programmatically animate a globe so that it moves around the screen.
To create this animation, you’ll animate a graphics file (a PNG file) with a ball thatappears to be bouncing around inside the Android viewing window. You’ll create aThread in which the animation will run and a Handler that will help communicateback to the program messages that reflect the changes in the state of the animation.You’ll use this same approach in section 9.3 when we talk about OpenGL ES. You’llfind that this approach is useful for creating most complex graphics applications andanimations.
Allow wait time before starting animation
B
www.it-ebooks.info
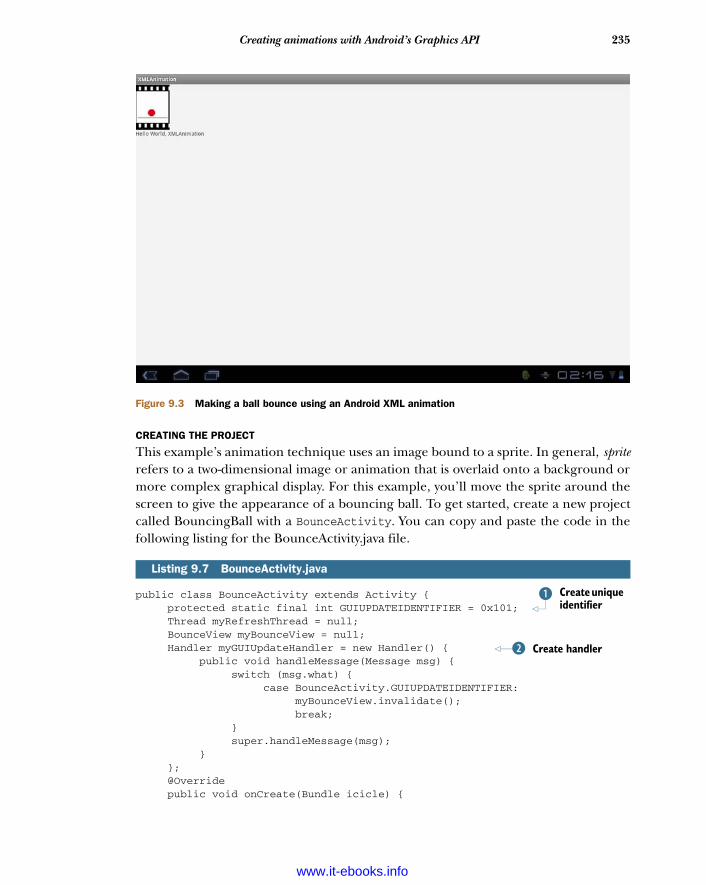
235Creating animations with Android’s Graphics API
CREATING THE PROJECT
This example’s animation technique uses an image bound to a sprite. In general, spriterefers to a two-dimensional image or animation that is overlaid onto a background ormore complex graphical display. For this example, you’ll move the sprite around thescreen to give the appearance of a bouncing ball. To get started, create a new projectcalled BouncingBall with a BounceActivity. You can copy and paste the code in thefollowing listing for the BounceActivity.java file.
public class BounceActivity extends Activity { protected static final int GUIUPDATEIDENTIFIER = 0x101; Thread myRefreshThread = null; BounceView myBounceView = null; Handler myGUIUpdateHandler = new Handler() { public void handleMessage(Message msg) { switch (msg.what) { case BounceActivity.GUIUPDATEIDENTIFIER: myBounceView.invalidate(); break; } super.handleMessage(msg); } }; @Override public void onCreate(Bundle icicle) {
Listing 9.7 BounceActivity.java
Figure 9.3 Making a ball bounce using an Android XML animation
Create unique identifier
B
Create handlerC
www.it-ebooks.info
236 CHAPTER 9 Graphics and animation
super.onCreate(icicle); this.requestWindowFeature(Window.FEATURE_NO_TITLE); this.myBounceView = new BounceView(this); this.setContentView(this.myBounceView); new Thread(new RefreshRunner()).start(); } class RefreshRunner implements Runnable { public void run() { while (!Thread.currentThread().isInterrupted()) { Message message = new Message(); message.what = BounceActivity.GUIUPDATEIDENTIFIER; BounceActivity.this.myGUIUpdateHandler.sendMessage(message); try { Thread.sleep(100); } catch (InterruptedException e) { Thread.currentThread().interrupt(); } } } }}
First we import the Handler and Message classes, and then we create a unique identi-fier to allow us to send a message back to our program to update the View in the mainthread. We need to send a message telling the main thread to update the View eachtime the child thread has finished drawing the ball. Because different messages can bethrown by the system, we need to guarantee the uniqueness of our message to ourhandler by creating a unique identifier called GUIUPDATEIDENTIFIER B. Next, we cre-ate the Handler that will process our messages to update the main View C. A Handlerallows us to send and process Message classes and Runnable objects associated with athread’s message queue.
Handlers are associated with a single thread and its message queue, but their meth-ods can be called from any thread. Thus we can use the Handler to allow objects run-ning in another thread to communicate changes in state back to the thread thatspawned them, or vice versa.
NOTE For more information about handling long-running requests inyour applications, see http://mng.bz/K0H4.
We set up a View D and create the new thread. Finally, we create a RefreshRunnerinner class implementing Runnable that will run unless something interrupts thethread, at which point a message is sent to the Handler to call BounceView’s invali-date() method E. The invalidate() method invalidates the View and forces arefresh.
You’ve got your new project. Now you need to create the code that will performthe animation and create a View.
Create viewD
Run animationE
www.it-ebooks.info
237Creating animations with Android’s Graphics API
MAKING ANIMATION HAPPEN
The example uses an image of a globe, which you can obtain from www.manning.com/ableson3. (Alternatively, you can use any PNG file you’d like.) You’ll also havethe Android logo as a background; it’s included with the source code downloads.Make sure to drop the images into res/drawable/.
Next, create a Java file called BounceView, using the code from the following listing.
public class BounceView extends View { protected Drawable mySprite; protected Point mySpritePos = new Point(0,0); protected enum HorizontalDirection {LEFT, RIGHT} ; protected enum VerticalDirection {UP, DOWN} ; protected HorizontalDirection myXDirection = HorizontalDirection.RIGHT; protected VerticalDirection myYDirection = VerticalDirection.UP; public BounceView(Context context) { super(context);this.setBackground(this.getResources().getDrawable(R.drawable.android));this.mySprite = this.getResources().getDrawable(R.drawable.world); } @Override protected void onDraw(Canvas canvas) {this.mySprite.setBounds(this.mySpritePos.x, this.mySpritePos.y, this.mySpritePos.x + 50, this.mySpritePos.y + 50); if (mySpritePos.x >= this.getWidth() – mySprite.getBounds().width()) { this.myXDirection = HorizontalDirection.LEFT; } else if (mySpritePos.x <= 0) { this.myXDirection = HorizontalDirection.RIGHT; } if (mySpritePos.y >= this.getHeight() – mySprite.getBounds().height()) { this.myYDirection = VerticalDirection.UP; } else if (mySpritePos.y <= 0) { this.myYDirection = VerticalDirection.DOWN; } if (this.myXDirection == HorizontalDirection.RIGHT) { this.mySpritePos.x += 10; } else { this.mySpritePos.x -= 10; } if (this.myYDirection == VerticalDirection.DOWN) { this.mySpritePos.y += 10; } else { this.mySpritePos.y -= 10; } this.mySprite.draw(canvas); }}
Listing 9.8 BounceView.java
Get image file and map to spriteB
Set bounds of globe
C
Move ball left or right, up or down
D
Check if ball is trying to leave screen
E
www.it-ebooks.info
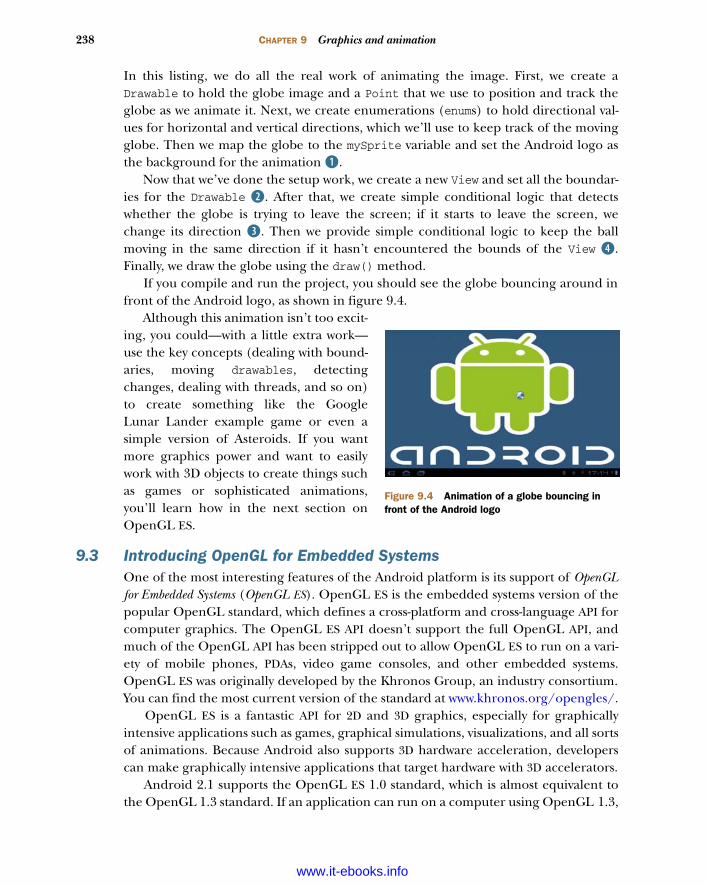
238 CHAPTER 9 Graphics and animation
In this listing, we do all the real work of animating the image. First, we create aDrawable to hold the globe image and a Point that we use to position and track theglobe as we animate it. Next, we create enumerations (enums) to hold directional val-ues for horizontal and vertical directions, which we’ll use to keep track of the movingglobe. Then we map the globe to the mySprite variable and set the Android logo asthe background for the animation B.
Now that we’ve done the setup work, we create a new View and set all the boundar-ies for the Drawable C. After that, we create simple conditional logic that detectswhether the globe is trying to leave the screen; if it starts to leave the screen, wechange its direction D. Then we provide simple conditional logic to keep the ballmoving in the same direction if it hasn’t encountered the bounds of the View E.Finally, we draw the globe using the draw() method.
If you compile and run the project, you should see the globe bouncing around infront of the Android logo, as shown in figure 9.4.
Although this animation isn’t too excit-ing, you could—with a little extra work—use the key concepts (dealing with bound-aries, moving drawables, detectingchanges, dealing with threads, and so on)to create something like the GoogleLunar Lander example game or even asimple version of Asteroids. If you wantmore graphics power and want to easilywork with 3D objects to create things suchas games or sophisticated animations,you’ll learn how in the next section onOpenGL ES.
9.3 Introducing OpenGL for Embedded SystemsOne of the most interesting features of the Android platform is its support of OpenGLfor Embedded Systems (OpenGL ES). OpenGL ES is the embedded systems version of thepopular OpenGL standard, which defines a cross-platform and cross-language API forcomputer graphics. The OpenGL ES API doesn’t support the full OpenGL API, andmuch of the OpenGL API has been stripped out to allow OpenGL ES to run on a vari-ety of mobile phones, PDAs, video game consoles, and other embedded systems.OpenGL ES was originally developed by the Khronos Group, an industry consortium.You can find the most current version of the standard at www.khronos.org/opengles/.
OpenGL ES is a fantastic API for 2D and 3D graphics, especially for graphicallyintensive applications such as games, graphical simulations, visualizations, and all sortsof animations. Because Android also supports 3D hardware acceleration, developerscan make graphically intensive applications that target hardware with 3D accelerators.
Android 2.1 supports the OpenGL ES 1.0 standard, which is almost equivalent tothe OpenGL 1.3 standard. If an application can run on a computer using OpenGL 1.3,
Figure 9.4 Animation of a globe bouncing in front of the Android logo
www.it-ebooks.info
239Introducing OpenGL for Embedded Systems
it should be possible to run it on Android after light modification, but you need to con-sider the hardware specifications of your Android handset. Although Android offerssupport for hardware acceleration, some handsets and devices running Android havehad performance issues with OpenGL ES in the past. Before you embark on a projectusing OpenGL, consider the hardware you’re targeting and do extensive testing tomake sure that you don’t overwhelm your hardware with OpenGL graphics.
Because OpenGL and OpenGL ES are such broad topics, with entire books dedi-cated to them, we’ll cover only the basics of working with OpenGL ES and Android.For a much deeper exploration of OpenGL ES, check out the specification and theOpenGL ES tutorial at http://mng.bz/0tdm. After reading this section on Androidsupport for OpenGL ES, you should have enough information to follow a more in-depth discussion of OpenGL ES, and you should be able to port your code from otherlanguages (such as the tutorial examples) into the Android framework. If you alreadyknow OpenGL or OpenGL ES, then the OpenGL commands will be familiar; concen-trate on the specifics of working with OpenGL on Android.
NOTE For another good OpenGL resource from Silicon Graphics seewww.glprogramming.com/red/index.html.
9.3.1 Creating an OpenGL context
Keeping in mind the comments we made in the introduction to this section, let’sapply the basics of OpenGL ES to create an OpenGLContext and a Window to draw in.Much of this task will seem overly complex compared to Android’s Graphics API. Thegood news is that you have to do this setup work only once.
NOTE Much of the material covered here will require further detailedexplanation if you aren’t already experienced with OpenGL. For moreinformation, we suggest that you refer directly to the documentationfrom OpenGL at www.opengl.org/.
You’ll use the general processes outlined in the following sections to work withOpenGL ES in Android:
1 Create a custom View subclass.2 Get a handle to an OpenGLContext, which provides access to Android’s OpenGL
ES functionality.3 In the View’s onDraw() method, use the handle to the GL object and then use
its methods to perform any GL functions.
Following these basic steps, first you’ll create a class that uses Android to create ablank surface to draw on. In section 9.3.2, you’ll use OpenGL ES commands to draw asquare and an animated cube on the surface. To start, open a new project calledOpenGLSquare and create an Activity called OpenGLSquare, as shown in the follow-ing listing.
www.it-ebooks.info
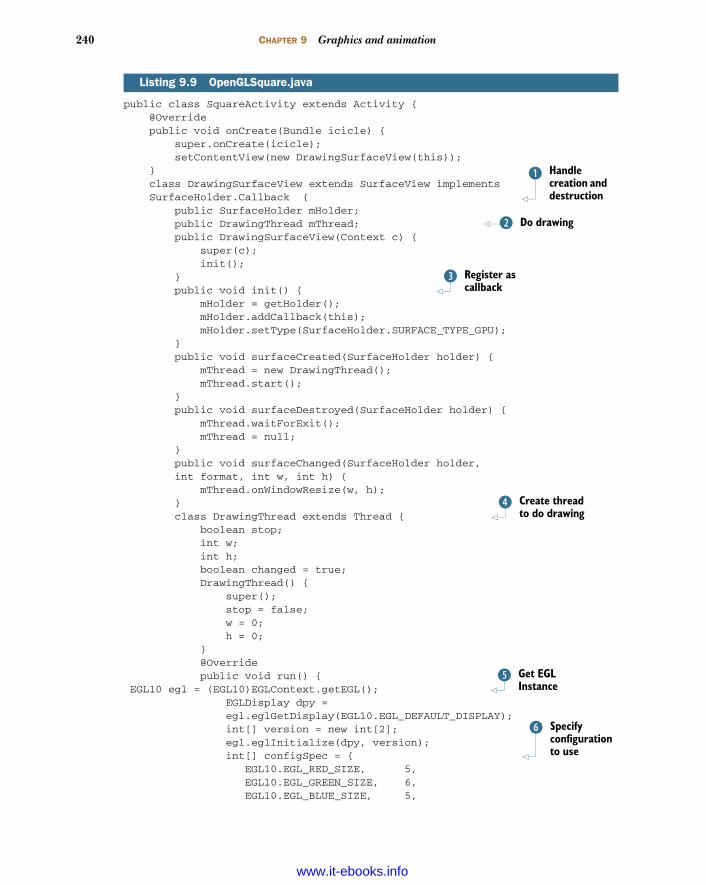
240 CHAPTER 9 Graphics and animation
public class SquareActivity extends Activity { @Override public void onCreate(Bundle icicle) { super.onCreate(icicle); setContentView(new DrawingSurfaceView(this)); } class DrawingSurfaceView extends SurfaceView implements SurfaceHolder.Callback { public SurfaceHolder mHolder; public DrawingThread mThread; public DrawingSurfaceView(Context c) { super(c); init(); } public void init() { mHolder = getHolder(); mHolder.addCallback(this); mHolder.setType(SurfaceHolder.SURFACE_TYPE_GPU); } public void surfaceCreated(SurfaceHolder holder) { mThread = new DrawingThread(); mThread.start(); } public void surfaceDestroyed(SurfaceHolder holder) { mThread.waitForExit(); mThread = null; } public void surfaceChanged(SurfaceHolder holder, int format, int w, int h) { mThread.onWindowResize(w, h); } class DrawingThread extends Thread { boolean stop; int w; int h; boolean changed = true; DrawingThread() { super(); stop = false; w = 0; h = 0; } @Override public void run() { EGL10 egl = (EGL10)EGLContext.getEGL(); EGLDisplay dpy = egl.eglGetDisplay(EGL10.EGL_DEFAULT_DISPLAY); int[] version = new int[2]; egl.eglInitialize(dpy, version); int[] configSpec = { EGL10.EGL_RED_SIZE, 5, EGL10.EGL_GREEN_SIZE, 6, EGL10.EGL_BLUE_SIZE, 5,
Listing 9.9 OpenGLSquare.java
Handle creation and destruction
B
Do drawingC
Register as callback
D
Create thread to do drawing
E
Get EGL Instance
F
Specify configuration to use
G
www.it-ebooks.info
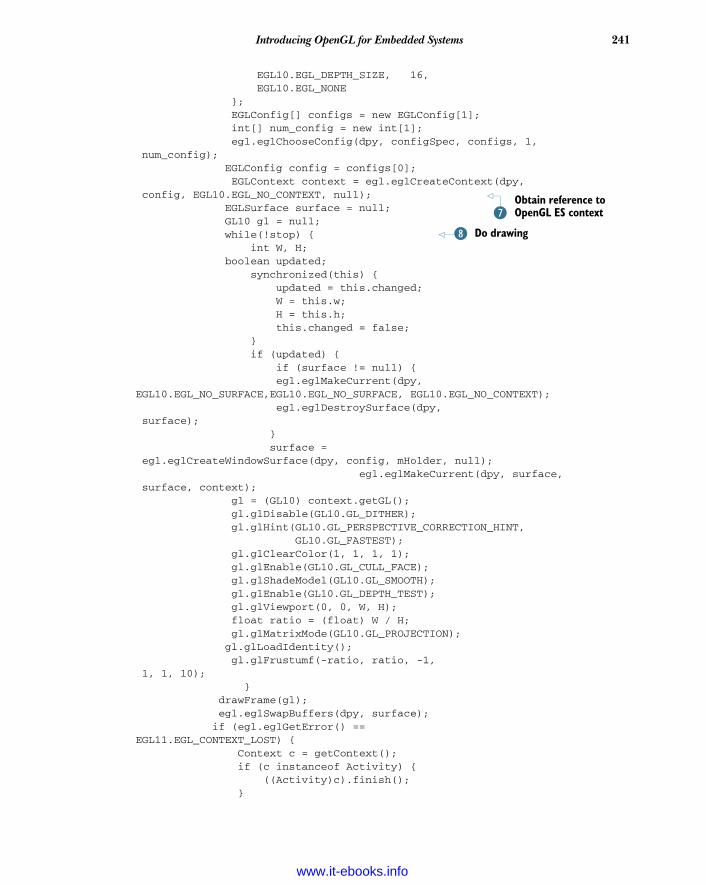
241Introducing OpenGL for Embedded Systems
EGL10.EGL_DEPTH_SIZE, 16, EGL10.EGL_NONE }; EGLConfig[] configs = new EGLConfig[1]; int[] num_config = new int[1]; egl.eglChooseConfig(dpy, configSpec, configs, 1, num_config); EGLConfig config = configs[0]; EGLContext context = egl.eglCreateContext(dpy, config, EGL10.EGL_NO_CONTEXT, null); EGLSurface surface = null; GL10 gl = null; while(!stop) { int W, H; boolean updated; synchronized(this) { updated = this.changed; W = this.w; H = this.h; this.changed = false; } if (updated) { if (surface != null) { egl.eglMakeCurrent(dpy,EGL10.EGL_NO_SURFACE,EGL10.EGL_NO_SURFACE, EGL10.EGL_NO_CONTEXT); egl.eglDestroySurface(dpy, surface); } surface = egl.eglCreateWindowSurface(dpy, config, mHolder, null); egl.eglMakeCurrent(dpy, surface, surface, context); gl = (GL10) context.getGL(); gl.glDisable(GL10.GL_DITHER); gl.glHint(GL10.GL_PERSPECTIVE_CORRECTION_HINT, GL10.GL_FASTEST); gl.glClearColor(1, 1, 1, 1); gl.glEnable(GL10.GL_CULL_FACE); gl.glShadeModel(GL10.GL_SMOOTH); gl.glEnable(GL10.GL_DEPTH_TEST); gl.glViewport(0, 0, W, H); float ratio = (float) W / H; gl.glMatrixMode(GL10.GL_PROJECTION); gl.glLoadIdentity(); gl.glFrustumf(-ratio, ratio, -1, 1, 1, 10); } drawFrame(gl); egl.eglSwapBuffers(dpy, surface); if (egl.eglGetError() == EGL11.EGL_CONTEXT_LOST) { Context c = getContext(); if (c instanceof Activity) { ((Activity)c).finish(); }
Obtain reference to OpenGL ES contextH
Do drawingI
www.it-ebooks.info
242 CHAPTER 9 Graphics and animation
} } egl.eglMakeCurrent(dpy, EGL10.EGL_NO_SURFACE, EGL10.EGL_NO_SURFACE, EGL10.EGL_NO_CONTEXT); egl.eglDestroySurface(dpy, surface); egl.eglDestroyContext(dpy, context); egl.eglTerminate(dpy); } public void onWindowResize(int w, int h) { synchronized(this) { this.w = w; this.h = h; this.changed = true; } } public void waitForExit() { this.stop = true; try { join(); } catch (InterruptedException ex) { } } private void drawFrame(GL10 gl) { // do whatever drawing here. } } }}
Listing 9.9 generates an empty black screen. Everything in this listing is code you needto draw and manage any OpenGL ES visualization. First, we import all our neededclasses. Then we implement an inner class, which will handle everything about manag-ing a surface: creating it, changing it, or deleting it. We extend the class SurfaceViewand implement the SurfaceHolder interface, which allows us to get information backfrom Android when the surface changes, such as when someone resizes it B. WithAndroid, all this has to be done asynchronously; you can’t manage surfaces directly.
Next, we create a thread to do the drawing C and create an init() method thatuses the SurfaceView class’s getHolder() method to get access to the SurfaceViewand add a callback to it via the addCallBack() method D. Now we can implementsurfaceCreated(), surfaceChanged(), and surfaceDestroyed(), which are all meth-ods of the Callback class and are fired on the appropriate condition of change in theSurface’s state.
When all the Callback methods are implemented, we create a thread to do thedrawing E. Before we can draw anything, though, we need to create an OpenGL EScontext F and create a handler to the Surface G so that we can use the OpenGLcontext’s method to act on the surface via the handle H. Now we can finally drawsomething, although in the drawFrame() method I we aren’t doing anything.
If you were to run the code right now, all you’d get would be an empty window; butwhat we’ve generated so far will appear in some form or another in any OpenGL ES
www.it-ebooks.info
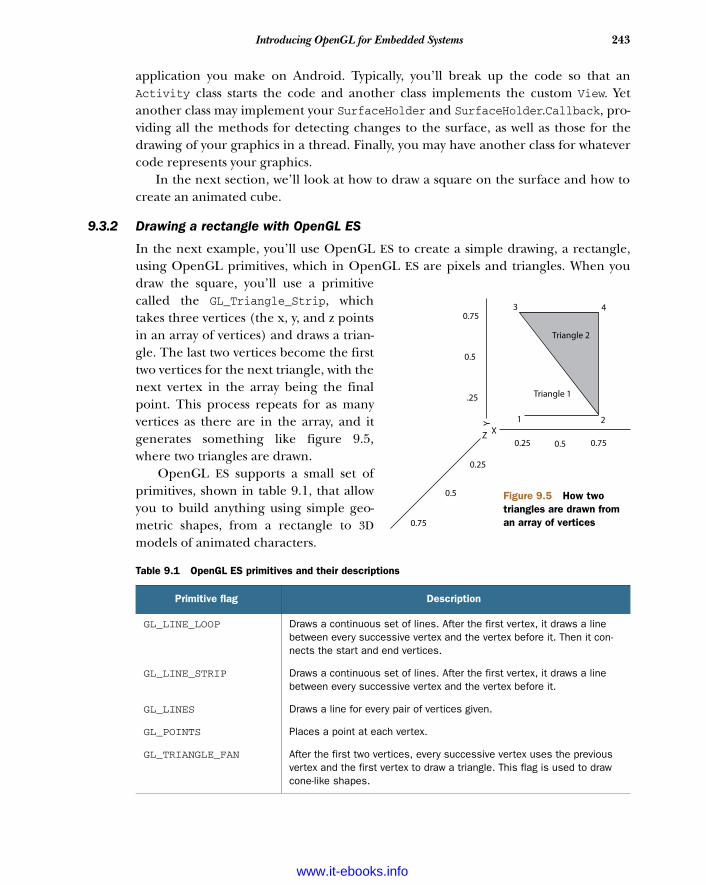
243Introducing OpenGL for Embedded Systems
application you make on Android. Typically, you’ll break up the code so that anActivity class starts the code and another class implements the custom View. Yetanother class may implement your SurfaceHolder and SurfaceHolder.Callback, pro-viding all the methods for detecting changes to the surface, as well as those for thedrawing of your graphics in a thread. Finally, you may have another class for whatevercode represents your graphics.
In the next section, we’ll look at how to draw a square on the surface and how tocreate an animated cube.
9.3.2 Drawing a rectangle with OpenGL ES
In the next example, you’ll use OpenGL ES to create a simple drawing, a rectangle,using OpenGL primitives, which in OpenGL ES are pixels and triangles. When youdraw the square, you’ll use a primitivecalled the GL_Triangle_Strip, whichtakes three vertices (the x, y, and z pointsin an array of vertices) and draws a trian-gle. The last two vertices become the firsttwo vertices for the next triangle, with thenext vertex in the array being the finalpoint. This process repeats for as manyvertices as there are in the array, and itgenerates something like figure 9.5,where two triangles are drawn.
OpenGL ES supports a small set ofprimitives, shown in table 9.1, that allowyou to build anything using simple geo-metric shapes, from a rectangle to 3Dmodels of animated characters.
Table 9.1 OpenGL ES primitives and their descriptions
Primitive flag Description
GL_LINE_LOOP Draws a continuous set of lines. After the first vertex, it draws a line between every successive vertex and the vertex before it. Then it con-nects the start and end vertices.
GL_LINE_STRIP Draws a continuous set of lines. After the first vertex, it draws a line between every successive vertex and the vertex before it.
GL_LINES Draws a line for every pair of vertices given.
GL_POINTS Places a point at each vertex.
GL_TRIANGLE_FAN After the first two vertices, every successive vertex uses the previous vertex and the first vertex to draw a triangle. This flag is used to draw cone-like shapes.
Triangle 2
Triangle 1
3 4
21
0.75
0.5
.25
Z X
Y
0.25 0.5 0.75
0.25
0.5
0.75
Figure 9.5 How two triangles are drawn from an array of vertices
www.it-ebooks.info
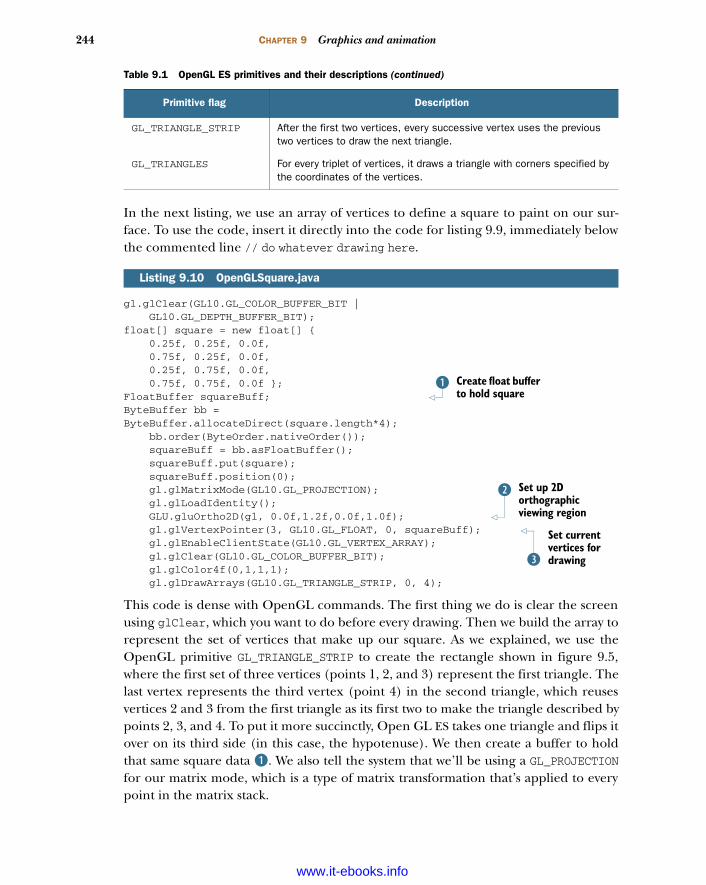
244 CHAPTER 9 Graphics and animation
In the next listing, we use an array of vertices to define a square to paint on our sur-face. To use the code, insert it directly into the code for listing 9.9, immediately belowthe commented line // do whatever drawing here.
gl.glClear(GL10.GL_COLOR_BUFFER_BIT | GL10.GL_DEPTH_BUFFER_BIT);float[] square = new float[] { 0.25f, 0.25f, 0.0f, 0.75f, 0.25f, 0.0f, 0.25f, 0.75f, 0.0f, 0.75f, 0.75f, 0.0f };FloatBuffer squareBuff;ByteBuffer bb = ByteBuffer.allocateDirect(square.length*4); bb.order(ByteOrder.nativeOrder()); squareBuff = bb.asFloatBuffer(); squareBuff.put(square); squareBuff.position(0); gl.glMatrixMode(GL10.GL_PROJECTION); gl.glLoadIdentity(); GLU.gluOrtho2D(gl, 0.0f,1.2f,0.0f,1.0f); gl.glVertexPointer(3, GL10.GL_FLOAT, 0, squareBuff); gl.glEnableClientState(GL10.GL_VERTEX_ARRAY); gl.glClear(GL10.GL_COLOR_BUFFER_BIT); gl.glColor4f(0,1,1,1); gl.glDrawArrays(GL10.GL_TRIANGLE_STRIP, 0, 4);
This code is dense with OpenGL commands. The first thing we do is clear the screenusing glClear, which you want to do before every drawing. Then we build the array torepresent the set of vertices that make up our square. As we explained, we use theOpenGL primitive GL_TRIANGLE_STRIP to create the rectangle shown in figure 9.5,where the first set of three vertices (points 1, 2, and 3) represent the first triangle. Thelast vertex represents the third vertex (point 4) in the second triangle, which reusesvertices 2 and 3 from the first triangle as its first two to make the triangle described bypoints 2, 3, and 4. To put it more succinctly, Open GL ES takes one triangle and flips itover on its third side (in this case, the hypotenuse). We then create a buffer to holdthat same square data B. We also tell the system that we’ll be using a GL_PROJECTIONfor our matrix mode, which is a type of matrix transformation that’s applied to everypoint in the matrix stack.
GL_TRIANGLE_STRIP After the first two vertices, every successive vertex uses the previous two vertices to draw the next triangle.
GL_TRIANGLES For every triplet of vertices, it draws a triangle with corners specified by the coordinates of the vertices.
Listing 9.10 OpenGLSquare.java
Table 9.1 OpenGL ES primitives and their descriptions (continued)
Primitive flag Description
Create float buffer to hold square
B
Set up 2D orthographic viewing region
C
Set current vertices for drawingD
www.it-ebooks.info
245Introducing OpenGL for Embedded Systems
The next things we do are more related to setup. We load the identity matrix andthen use the gluOrtho2D(GL10 gl, float left, float right, float bottom, floattop) command to set the clipping planes that are mapped to the lower-left and upper-right corners of the window C.
Now we’re ready to start drawing the image. First, we use the glVertex-Pointer(int size, int type, int stride, pointer to array) method, which indi-cates the location of vertices for the triangle strip. The method has four attributes:size, type, stride, and pointer. The size attribute specifies the number of coordi-nates per vertex (for example, a 2D shape might ignore the z axis and use only twocoordinates per vertex), type defines the data type to be used (GL_BYTE, GL_SHORT,GL_FLOAT, and so on) D, stride specifies the offset between consecutive vertices (howmany unused values exist between the end of the current vertex and the beginning ofthe next), and pointer is a reference to the array. Although most drawing in OpenGLES is performed by using various forms of arrays such as the vertex array, they’re alldisabled by default to save system resources. To enable them, we use the OpenGLcommand glEnableClientState(array type), which accepts an array type; in thiscase, the type is GL_VERTEX_ARRAY.
Finally, we use the glDrawArrays function to render our arrays into the OpenGLprimitives and create our simple drawing. The glDrawArrays(mode, first, count)function has three attributes: mode indicates which primitive to render, such asGL_TRIANGLE_STRIP; first is the starting index into the array, which we set to 0because we want it to render all the vertices in the array; and count specifies the num-ber of indices to be rendered, which in this case is 4.
If you run the code, you should see a simple blue rectangle on a white surface, asshown in figure 9.6. It isn’t particularly exciting, but you’ll need most of the code youused for this example for any OpenGL project.
There you have it—your first graphic in OpenGL ES. Next, we’re going to dosomething way more interesting. In the next example, you’ll create a 3D cube with dif-ferent colors on each side and then rotate it in space.
9.3.3 Three-dimensional shapes and surfaces with OpenGL ES
In this section, you’ll use much of the code from the previous example, but you’llextend it to create a 3D cube that rotates. We’ll examine how to introduce perspectiveto your graphics to give the illusion of depth.
Depth works in OpenGL by using a depth buffer, which contains a depth value forevery pixel, in the range 0 to 1. The value represents the perceived distance betweenobjects and your viewpoint; when two objects’ depth values are compared, the valuecloser to 0 will appear in front on the screen. To use depth in your program, you needto first enable the depth buffer by passing GL_DEPTH_TEST to the glEnable() method.Next, you use glDepthFunc() to define how values are compared. For this example,you’ll use GL_LEQUAL, defined in table 9.2, which tells the system to show objects with alower depth value in front of other objects.
www.it-ebooks.info
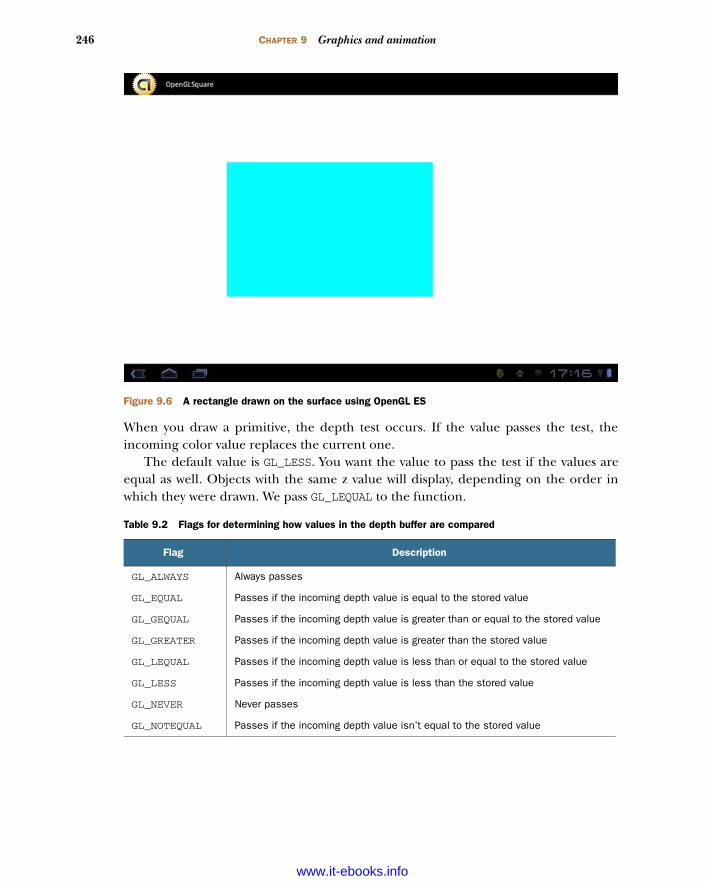
246 CHAPTER 9 Graphics and animation
When you draw a primitive, the depth test occurs. If the value passes the test, theincoming color value replaces the current one.
The default value is GL_LESS. You want the value to pass the test if the values areequal as well. Objects with the same z value will display, depending on the order inwhich they were drawn. We pass GL_LEQUAL to the function.
Table 9.2 Flags for determining how values in the depth buffer are compared
Flag Description
GL_ALWAYS Always passes
GL_EQUAL Passes if the incoming depth value is equal to the stored value
GL_GEQUAL Passes if the incoming depth value is greater than or equal to the stored value
GL_GREATER Passes if the incoming depth value is greater than the stored value
GL_LEQUAL Passes if the incoming depth value is less than or equal to the stored value
GL_LESS Passes if the incoming depth value is less than the stored value
GL_NEVER Never passes
GL_NOTEQUAL Passes if the incoming depth value isn’t equal to the stored value
Figure 9.6 A rectangle drawn on the surface using OpenGL ES
www.it-ebooks.info

247Introducing OpenGL for Embedded Systems
One important part of maintaining the illusion of depth is providing perspective. InOpenGL, a typical perspective is represented by a viewpoint with near and far clippingplanes and top, bottom, left, and right planes, where objects that are closer to the farplane appear smaller, as in figure 9.7.
OpenGL ES provides a function called gluPerspective(GL10 gl, float fovy,float aspect, float zNear, float zFar) with five parameters (see table 9.3) that letsyou easily create perspective.
To demonstrate depth and perspective, you’re going to create a project calledOpenGLCube. Copy and paste the code from listing 9.11 into OpenGLCubeActivity.
Now add two new variables to your code, shown in the following listing, right at thebeginning of the DrawSurfaceView inner class.
class DrawingSurfaceView extends SurfaceView implements SurfaceHolder.Callback { public SurfaceHolder mHolder; float xrot = 0.0f; float yrot = 0.0f;
We’ll use the xrot and yrot variables later in the code to govern the rotation of thecube.
Next, just before the method, add a new method called makeFloatBuffer(), as inthe following listing.
Table 9.3 Parameters for the gluPerspective function
Parameter Description
aspect Aspect ratio that determines the field of view in the x direction. The aspect ratio is the ratio of x (width) to y (height).
fovy Field of view angle in the y direction, in degrees.
gl GL10 interface.
zFar Distance from the viewer to the far clipping plane. This value is always positive.
zNear Distance from the viewer to the near clipping plane. This value is always positive.
Listing 9.11 OpenGLCubeActivity.java
Viewpoint
L
T
B
N
FR
Figure 9.7 In OpenGL, a perspective is made up of a viewpoint and near (N), far (F), left (L), right (R), top (T), and bottom (B) clipping planes.
www.it-ebooks.info
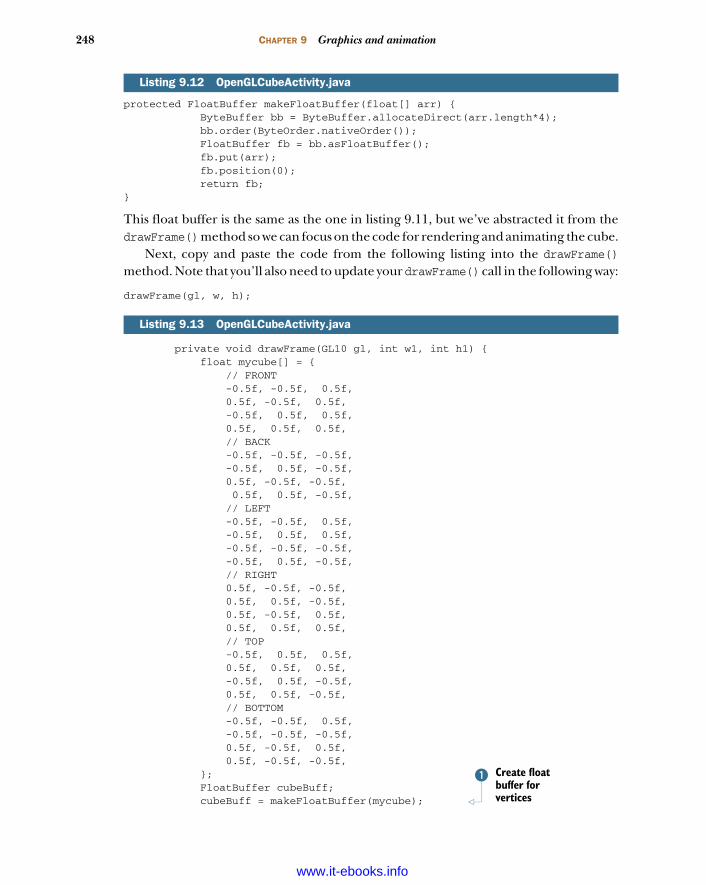
248 CHAPTER 9 Graphics and animation
protected FloatBuffer makeFloatBuffer(float[] arr) { ByteBuffer bb = ByteBuffer.allocateDirect(arr.length*4); bb.order(ByteOrder.nativeOrder()); FloatBuffer fb = bb.asFloatBuffer(); fb.put(arr); fb.position(0); return fb;}
This float buffer is the same as the one in listing 9.11, but we’ve abstracted it from thedrawFrame() method so we can focus on the code for rendering and animating the cube.
Next, copy and paste the code from the following listing into the drawFrame()method. Note that you’ll also need to update your drawFrame() call in the following way:
drawFrame(gl, w, h);
private void drawFrame(GL10 gl, int w1, int h1) { float mycube[] = { // FRONT -0.5f, -0.5f, 0.5f, 0.5f, -0.5f, 0.5f, -0.5f, 0.5f, 0.5f, 0.5f, 0.5f, 0.5f, // BACK -0.5f, -0.5f, -0.5f, -0.5f, 0.5f, -0.5f, 0.5f, -0.5f, -0.5f, 0.5f, 0.5f, -0.5f, // LEFT -0.5f, -0.5f, 0.5f, -0.5f, 0.5f, 0.5f, -0.5f, -0.5f, -0.5f, -0.5f, 0.5f, -0.5f, // RIGHT 0.5f, -0.5f, -0.5f, 0.5f, 0.5f, -0.5f, 0.5f, -0.5f, 0.5f, 0.5f, 0.5f, 0.5f, // TOP -0.5f, 0.5f, 0.5f, 0.5f, 0.5f, 0.5f, -0.5f, 0.5f, -0.5f, 0.5f, 0.5f, -0.5f, // BOTTOM -0.5f, -0.5f, 0.5f, -0.5f, -0.5f, -0.5f, 0.5f, -0.5f, 0.5f, 0.5f, -0.5f, -0.5f, }; FloatBuffer cubeBuff; cubeBuff = makeFloatBuffer(mycube);
Listing 9.12 OpenGLCubeActivity.java
Listing 9.13 OpenGLCubeActivity.java
Create float buffer for vertices
B
www.it-ebooks.info
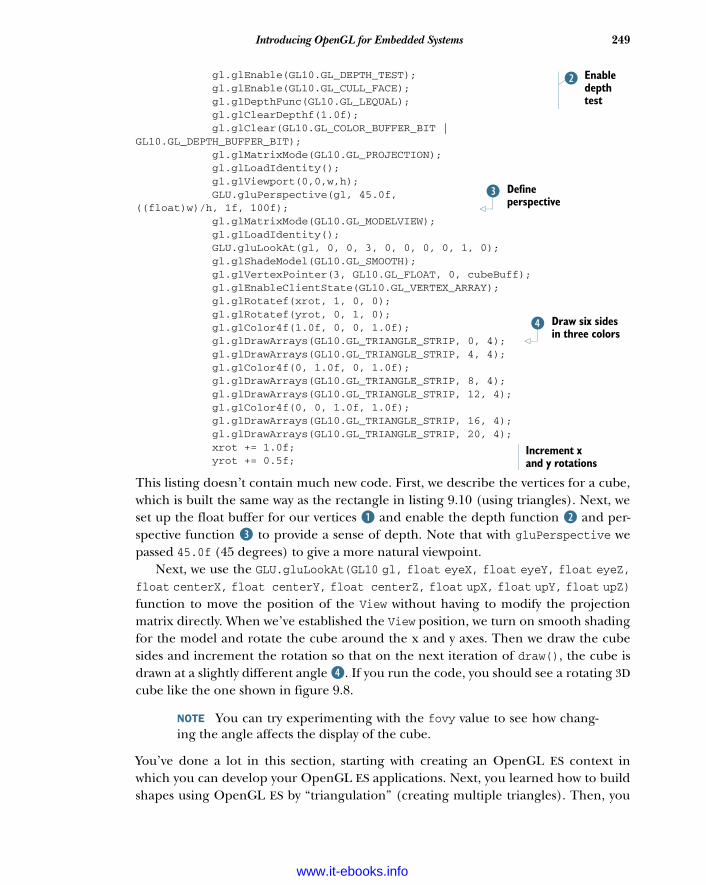
249Introducing OpenGL for Embedded Systems
gl.glEnable(GL10.GL_DEPTH_TEST); gl.glEnable(GL10.GL_CULL_FACE); gl.glDepthFunc(GL10.GL_LEQUAL); gl.glClearDepthf(1.0f); gl.glClear(GL10.GL_COLOR_BUFFER_BIT | GL10.GL_DEPTH_BUFFER_BIT); gl.glMatrixMode(GL10.GL_PROJECTION); gl.glLoadIdentity(); gl.glViewport(0,0,w,h); GLU.gluPerspective(gl, 45.0f, ((float)w)/h, 1f, 100f); gl.glMatrixMode(GL10.GL_MODELVIEW); gl.glLoadIdentity(); GLU.gluLookAt(gl, 0, 0, 3, 0, 0, 0, 0, 1, 0); gl.glShadeModel(GL10.GL_SMOOTH); gl.glVertexPointer(3, GL10.GL_FLOAT, 0, cubeBuff); gl.glEnableClientState(GL10.GL_VERTEX_ARRAY); gl.glRotatef(xrot, 1, 0, 0); gl.glRotatef(yrot, 0, 1, 0); gl.glColor4f(1.0f, 0, 0, 1.0f); gl.glDrawArrays(GL10.GL_TRIANGLE_STRIP, 0, 4); gl.glDrawArrays(GL10.GL_TRIANGLE_STRIP, 4, 4); gl.glColor4f(0, 1.0f, 0, 1.0f); gl.glDrawArrays(GL10.GL_TRIANGLE_STRIP, 8, 4); gl.glDrawArrays(GL10.GL_TRIANGLE_STRIP, 12, 4); gl.glColor4f(0, 0, 1.0f, 1.0f); gl.glDrawArrays(GL10.GL_TRIANGLE_STRIP, 16, 4); gl.glDrawArrays(GL10.GL_TRIANGLE_STRIP, 20, 4); xrot += 1.0f; yrot += 0.5f;
This listing doesn’t contain much new code. First, we describe the vertices for a cube,which is built the same way as the rectangle in listing 9.10 (using triangles). Next, weset up the float buffer for our vertices B and enable the depth function C and per-spective function D to provide a sense of depth. Note that with gluPerspective wepassed 45.0f (45 degrees) to give a more natural viewpoint.
Next, we use the GLU.gluLookAt(GL10 gl, float eyeX, float eyeY, float eyeZ,float centerX, float centerY, float centerZ, float upX, float upY, float upZ)function to move the position of the View without having to modify the projectionmatrix directly. When we’ve established the View position, we turn on smooth shadingfor the model and rotate the cube around the x and y axes. Then we draw the cubesides and increment the rotation so that on the next iteration of draw(), the cube isdrawn at a slightly different angle E. If you run the code, you should see a rotating 3Dcube like the one shown in figure 9.8.
NOTE You can try experimenting with the fovy value to see how chang-ing the angle affects the display of the cube.
You’ve done a lot in this section, starting with creating an OpenGL ES context inwhich you can develop your OpenGL ES applications. Next, you learned how to buildshapes using OpenGL ES by “triangulation” (creating multiple triangles). Then, you
Enable depth test
C
Define perspective
D
Draw six sides in three colors
E
Increment x and y rotations
www.it-ebooks.info

250 CHAPTER 9 Graphics and animation
learned how to realize this in three dimensions while incorporating it into a simpleexample. You accomplished much of this without diving deep into OpenGL ES, whichis definitely nontrivial, but the good news is that if you’re serious about doing 3Dgraphics on Android, it’s definitely possible.
With the addition of RenderScript, introduced in the next section of this chapter,developers can write code that is designed to use native code on specific hardware,allowing for much better performance of applications that are heavily dependent onprocessing power (such as Open GL applications). Because Android provides excel-lent support for OpenGL ES, you can find plenty of tutorials and references on theinternet or at your local bookstore.
Now, let’s look at how to use RenderScript to develop complex, rich, and high-per-formance graphical application that let you take advantage of the latest mobile hard-ware platforms that run multicore processors with dedicated graphics accelerators.
9.4 Introducing RenderScript for AndroidRenderScript is a new API in Android that is focused on helping developers who needextremely high performance for graphics and computationally intensive operations.RenderScript isn’t completely new to Android 3.0+; it’s been part of earlier versions in2.0 but not publicly available. As of Android 3, RenderScript has come to the fore asthe tool of choice for graphically intensive games and applications such as live wallpa-pers, the new video carousel, and Google’s e-book reader on the Xoom. In this sec-tion, we’ll look at how RenderScript fits into the Android architecture, how to build aRenderScript application, and when and where to use RenderScript.
Figure 9.8 A 3D cube rotating in space
www.it-ebooks.info

251Introducing RenderScript for Android
RenderScript in many ways is a new paradigm for the Android platform. AlthoughAndroid uses Java syntax and a virtual machine for developing applications, Render-Script is based on C99, a modern dialect of the C language. Furthermore, Render-Script is compiled down to native code on each device at runtime but is controlled byhigher-level APIs running in the Android VM. This allows Android via RenderScript toprovide developers a way to develop optimized high-performance code that is crossplatform. This may seem extremely attractive, and many developers may be keen towrite most of their applications in RenderScript, but RenderScript doesn’t replace orsubsume development of Android apps in Java. There are both pros and cons to work-ing with RenderScript.
9.4.1 RenderScript advantages and disadvantages
As already discussed, the first advantage of using RenderScript is that it’s a lower-levellanguage offering higher performance. Second, it allows Android apps to more easilyuse multicore CPUs as well as graphical processing units (GPUs). RenderScript, bydesign, at runtime selects the best-performance approach to running its code. Thisincludes running the code across multiple CPUs; running some simpler tasks on GPUs;or, in some cases where no special hardware is present, running on just one CPU.
RenderScript offers fantastic performance and cross-platform compatibility with-out the need to target specific devices or create your own complex architectures forcross-platform compatibility. RenderScript is best for two types of applications andonly has APIs to support those two types of applications: graphical applications andcomputationally intensive applications. Many applications that use Android’s imple-mentation of OpenGL are good candidates to target for RenderScript.
The first major drawback of RenderScript is that it uses C99. Although there isnothing wrong with C99, it breaks the Java style paradigm that most Android develop-ers are comfortable with. To be truly comfortable developing RenderScript applica-tions, you should also be comfortable with C, a lower-level language when comparedto Java.
Second, and perhaps most important, RenderScript applications are inherentlymore complex and difficult to develop than regular Android applications. In part thisis because you’re developing in two different languages, Java and C; but in addition,RenderScript by its nature is very hard to debug—at times frustratingly so, unless youhave a strong understanding of both your application and the hardware it’s runningon. For example, if you have a multicore platform with a GPU, your code may be runon either the CPUs or the GPU, reducing your ability to spot issues. Also be aware thatmost RenderScript applications won’t run in the emulator, forcing you to debug onhardware as well.
Finally, you’ll find that you have a lot more bugs, because RenderScript is in C,the current Android Development Tools (ADT) application for Eclipses doesn’t sup-port the various extensions for it, and RenderScript applications tend to be morecomplex than regular Android applications. But you shouldn’t avoid developing in
www.it-ebooks.info

252 CHAPTER 9 Graphics and animation
RenderScript, nor should you overuse it as opposed to the standard Android APIs andJava syntax. Rather, you should look to use RenderScript in applications that aregraphically intensive or computationally intensive.
Let’s try building a RenderScript application.
9.4.2 Building a RenderScript application
Building a RenderScript application is a bit more complicated than developing a nor-mal Android application. You lay out your application in a similar manner, but keep inmind that you’ll be also developing RenderScript files, with the .rs file extension,alongside your .java files. Your normal .java application files then call the Render-Script code as needed; when you build your project, you’ll see the .rs files built intobytecode with the same name as the RenderScript file but with the .bc extensionunder the raw folder. For example, if you had a RenderScript file called Helloworld.rsunder src, you’d see a Helloworld.bc file when your application was built.
NOTE We won’t be covering the C or C99 language; we assume you knowC. If you don’t know C, you’ll need to reference another resource such asManning’s C# in Depth, 2nd edition, by John Skeet.
For your RenderScript application, you’re going to use the ADT’s built-in Androidproject wizard to create a RenderScript project from built-in sample applications. Todo so, first create a new project using the ADT, but instead of selecting Create NewProject in Workspace, select Create Project from Existing Sample, as shown infigure 9.9. Make sure you’ve selected API level of 11 or Android 3.0, and select thesample RenderScript > Fountain from the Samples drop-down list. Click OK.
Eclipse now builds the RenderScript application. Expand the application in theEclipse Package Explorer, as shown in figure 9.10. There are several things to notehere before we go over each file. First, note the RenderScript file with the extension.rs. This is a file written in C. This file does all the real graphics work, and the other.java files provide the higher-level calls to APIs to set up a View, manage inputs, and thelike. This file is compiled when the project is built into bytecode, which you can seewhen you expand the raw directory.
Figure 9.9 Using the ADT to build a sample RenderScript application
www.it-ebooks.info
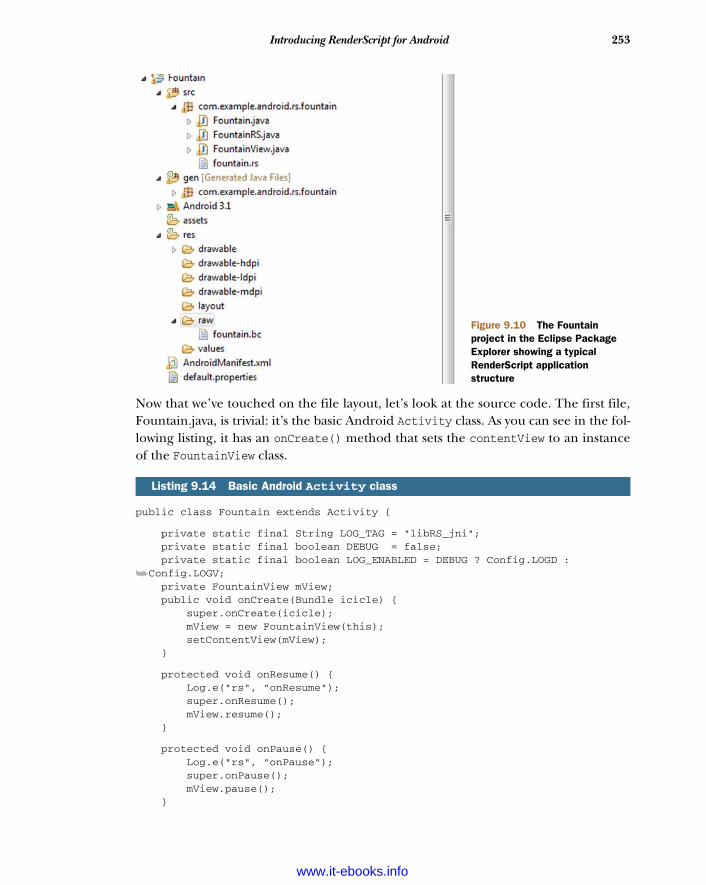
253Introducing RenderScript for Android
Now that we’ve touched on the file layout, let’s look at the source code. The first file,Fountain.java, is trivial: it’s the basic Android Activity class. As you can see in the fol-lowing listing, it has an onCreate() method that sets the contentView to an instanceof the FountainView class.
public class Fountain extends Activity {
private static final String LOG_TAG = "libRS_jni"; private static final boolean DEBUG = false; private static final boolean LOG_ENABLED = DEBUG ? Config.LOGD :
➥Config.LOGV; private FountainView mView; public void onCreate(Bundle icicle) { super.onCreate(icicle); mView = new FountainView(this); setContentView(mView); }
protected void onResume() { Log.e("rs", "onResume"); super.onResume(); mView.resume(); }
protected void onPause() { Log.e("rs", "onPause"); super.onPause(); mView.pause(); }
Listing 9.14 Basic Android Activity class
Figure 9.10 The Fountain project in the Eclipse Package Explorer showing a typical RenderScript application structure
www.it-ebooks.info
254 CHAPTER 9 Graphics and animation
static void log(String message) { if (LOG_ENABLED) { Log.v(LOG_TAG, message); } }}
The FountainView.java file introduces a new type of Android View, the RSSurface-View, as you can see in the next listing. This class represents the SurfaceView onwhich your RenderScript code will draw its graphics.
public class FountainView extends RSSurfaceView {
public FountainView(Context context) { super(context); }
private RenderScriptGL mRS; private FountainRS mRender;
public void surfaceChanged(SurfaceHolder holder, int format, int w,
➥int h) { super.surfaceChanged(holder, format, w, h); if (mRS == null) { RenderScriptGL.SurfaceConfig sc = new
➥RenderScriptGL.SurfaceConfig(); mRS = createRenderScriptGL(sc); mRS.setSurface(holder, w, h); mRender = new FountainRS(); mRender.init(mRS, getResources(), w, h); } }
protected void onDetachedFromWindow() { if (mRS != null) { mRS = null; destroyRenderScriptGL(); } }
public boolean onTouchEvent(MotionEvent ev) { int act = ev.getActionMasked(); if (act == ev.ACTION_UP) { mRender.newTouchPosition(0, 0, 0, ev.getPointerId(0)); return false; } else if (act == MotionEvent.ACTION_POINTER_UP) { int pointerIndex = ev.getActionIndex(); int pointerId = ev.getPointerId(pointerIndex); mRender.newTouchPosition(0, 0, 0, pointerId); } int count = ev.getHistorySize(); int pcount = ev.getPointerCount();
for (int p=0; p < pcount; p++) {
Listing 9.15 RSSurfaceView
Create new RenderScript
B
Create the FountainRS classC
Handle touch eventsD
www.it-ebooks.info
255Introducing RenderScript for Android
int id = ev.getPointerId(p); mRender.newTouchPosition(ev.getX(p), ev.getY(p), ev.getPressure(p), id);
for (int i=0; i < count; i++) { mRender.newTouchPosition(ev.getHistoricalX(p, i), ev.getHistoricalY(p, i), ev.getHistoricalPressure(p, i), id); } } return true; }}
If you look at the listing, you’ll notice in the surfacedChanged() method a new Ren-derScript class as well as a FountainRS class B. The code
RenderScriptGL.SurfaceConfig sc = new RenderScriptGL.SurfaceConfig(); mRS = createRenderScriptGL(sc);
is important in that it not only creates a RenderScriptGL object that contains the sur-face our graphics go into, but the SurfaceConfig class allows us to set all the majorproperties for the drawing surface (such as depth). The FountainRS class is importantin that it acts as a renderer for the FountainView C SurfaceView as well as controlsthe actual RenderScript. One of the other important things this FountainView classdoes is handle touch events with the onTouchEvent() method and pass these events tothe RenderScript D.
The next class we’ll look at is FountainRS, shown in the following listing.
public class FountainRS { public static final int PART_COUNT = 50000;
public FountainRS() { } private Resources mRes; private RenderScriptGL mRS; private ScriptC_fountain mScript; public void init(RenderScriptGL rs, Resources res,
➥int width, int height) { mRS = rs; mRes = res; ProgramFragmentFixedFunction.Builder pfb = new
ProgramFragmentFixedFunction.Builder(rs); pfb.setVaryingColor(true); rs.bindProgramFragment(pfb.create()); ScriptField_Point points =
➥new ScriptField_Point(mRS, PART_COUNT); Mesh.AllocationBuilder smb = new Mesh.AllocationBuilder(mRS); smb.addVertexAllocation(points.getAllocation());
Listing 9.16 FountainRS class
Bind ScriptC_fountain classB
www.it-ebooks.info
256 CHAPTER 9 Graphics and animation
smb.addIndexSetType(Mesh.Primitive.POINT); Mesh sm = smb.create();
mScript = new ScriptC_fountain(mRS, mRes, R.raw.fountain); mScript.set_partMesh(sm); mScript.bind_point(points); mRS.bindRootScript(mScript); }
boolean holdingColor[] = new boolean[10]; public void newTouchPosition(float x, float y,
➥float pressure, int id) { if (id >= holdingColor.length) { return; } int rate = (int)(pressure * pressure * 500.f); if (rate > 500) { rate = 500; } if (rate > 0) { mScript.invoke_addParticles(rate, x, y, id, !holdingColor[id]); holdingColor[id] = true; } else { holdingColor[id] = false; }
}}
When developing a graphical RenderScript application, you’ll have a class calledClassNameRS that acts as a communication channel between your RenderScript fileand the rest of the Android application. (RenderScript compute projects don’t have afile like this.) The FountainRS class interacts with the RenderScript code in foun-tain.rs via interfaces exposed by ScriptC_fountain, a class generated by the ADTwhen you build the project and found in the gen folder. The ScriptC_fountain classbinds to the RenderScript bytecode so the RenderScriptGL context knows which Ren-derScript to bind to B. This may sound somewhat complicated, and it is, but the ADTor Android tooling manages most of this for you.
Finally, let’s look at the C code in fountain.rs, shown in listing 9.17. The first thingyou’ll notice is how simple it is. The code draws a simple cascade of points whose cen-ter is the point touched on the screen. It’s important to note that all the methods tocapture the information about where the user presses are captured, handled, andpassed down to this class via the higher-level .java classes already discussed, and thatfountain.rs is solely focused on drawing.
#pragma version(1)#pragma rs java_package_name(com.example.android.rs.fountain)#pragma stateFragment(parent)#include "rs_graphics.rsh"
static int newPart = 0;
Listing 9.17 C code in fountain.rs
Required pragmadirectives class
www.it-ebooks.info
257Introducing RenderScript for Android
rs_mesh partMesh;
typedef struct __attribute__((packed, aligned(4))) Point { float2 delta; float2 position; uchar4 color;} Point_t;Point_t *point;
int root() { float dt = min(rsGetDt(), 0.1f); rsgClearColor(0.f, 0.f, 0.f, 1.f); const float height = rsgGetHeight(); const int size = rsAllocationGetDimX(rsGetAllocation(point)); float dy2 = dt * (10.f); Point_t *p = point; for (int ct=0; ct < size; ct++) { p->delta.y += dy2; p->position += p->delta; if ((p->position.y > height) && (p->delta.y > 0)) { p->delta.y *= -0.3f; } p++; }
rsgDrawMesh(partMesh); return 1;}
static float4 partColor[10];void addParticles(int rate, float x, float y, int index, bool newColor){ if (newColor) { partColor[index].x = rsRand(0.5f, 1.0f); partColor[index].y = rsRand(1.0f); partColor[index].z = rsRand(1.0f); } float rMax = ((float)rate) * 0.02f; int size = rsAllocationGetDimX(rsGetAllocation(point)); uchar4 c = rsPackColorTo8888(partColor[index]);
Point_t * np = &point[newPart]; float2 p = {x, y}; while (rate--) { float angle = rsRand(3.14f * 2.f); float len = rsRand(rMax); np->delta.x = len * sin(angle); np->delta.y = len * cos(angle); np->position = p; np->color = c; newPart++; np++; if (newPart >= size) { newPart = 0; np = &point[newPart]; } }}
www.it-ebooks.info
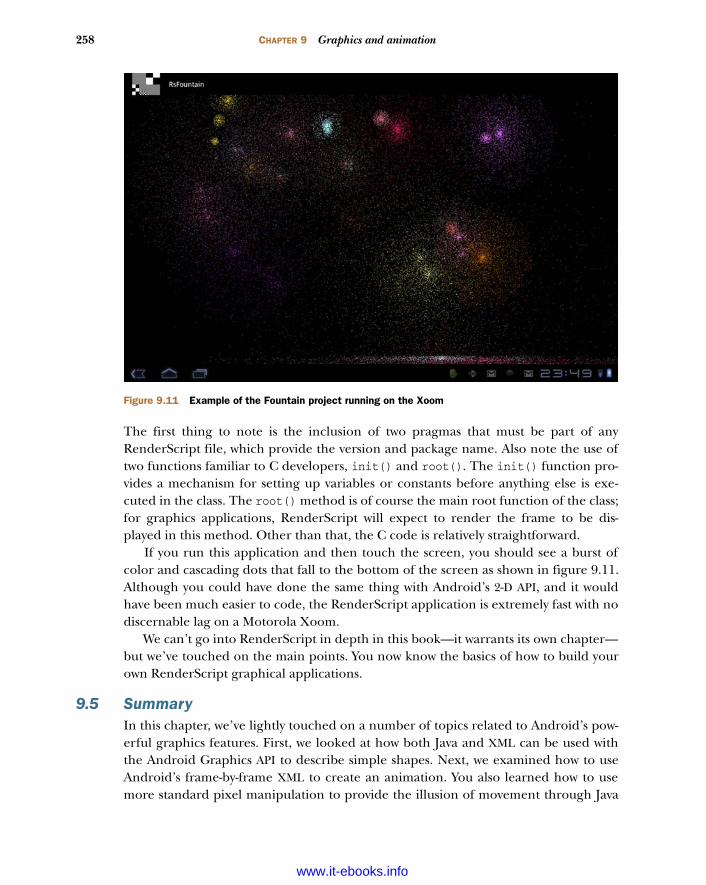
258 CHAPTER 9 Graphics and animation
The first thing to note is the inclusion of two pragmas that must be part of anyRenderScript file, which provide the version and package name. Also note the use oftwo functions familiar to C developers, init() and root(). The init() function pro-vides a mechanism for setting up variables or constants before anything else is exe-cuted in the class. The root() method is of course the main root function of the class;for graphics applications, RenderScript will expect to render the frame to be dis-played in this method. Other than that, the C code is relatively straightforward.
If you run this application and then touch the screen, you should see a burst ofcolor and cascading dots that fall to the bottom of the screen as shown in figure 9.11.Although you could have done the same thing with Android’s 2-D API, and it wouldhave been much easier to code, the RenderScript application is extremely fast with nodiscernable lag on a Motorola Xoom.
We can’t go into RenderScript in depth in this book—it warrants its own chapter—but we’ve touched on the main points. You now know the basics of how to build yourown RenderScript graphical applications.
9.5 SummaryIn this chapter, we’ve lightly touched on a number of topics related to Android’s pow-erful graphics features. First, we looked at how both Java and XML can be used withthe Android Graphics API to describe simple shapes. Next, we examined how to useAndroid’s frame-by-frame XML to create an animation. You also learned how to usemore standard pixel manipulation to provide the illusion of movement through Java
Figure 9.11 Example of the Fountain project running on the Xoom
www.it-ebooks.info
259Summary
and the Graphics API. Finally, we delved into Android’s support of OpenGL ES. Welooked at how to create an OpenGL ES context, and then we built a shape in that con-text as well as a 3D animated cube. Finally, we took a high-level look at a RenderScriptapplication and discussed how the RenderScript system works inside Android.
Graphics and visualizations are large and complex topics that can easily fill a book.But because Android uses open and well-defined standards and supports an excellentAPI for graphics, it should be easy for you to use Android’s documentation, API, andother resources, such as Manning’s Java 3D Programming by Daniel Selman, to developanything from a new drawing program to complex games.
In the next chapter, we’ll move from graphics to working with multimedia. We’llexplore working with audio and video to lay the groundwork for making rich multi-media applications.
www.it-ebooks.info
Multimedia
Today, people use cell phones for almost everything but phone calls, from instantmessaging to surfing the web to listening to music and even to watching live stream-ing TV. Nowadays, a cell phone needs to support multimedia to be considered ausable device. In this chapter, we’re going to look at how you can use Android toplay audio files, watch video, take pictures, and even record sound and video.
As of Android 2.0, Google decided to phase out the OpenCORE system forAndroid’s multimedia needs and move to a new multimedia system called Stage-fright. As of Android 2.3, Stagefright has subsumed OpenCORE and become itsreplacement. That being said, most of Android’s interaction with media isabstracted through the MediaPlayer API, hiding the specific implementation ofStagefright, versus OpenCORE in older versions of Android. What this means to youis that by considering which core media formats you wish to support and by carefullydeveloping your application, it’s possible to create applications that will work onAndroid 2.3 and up as well as older versions of Android that use OpenCORE.
This chapter covers Playing audio and video
Controlling the camera
Recording audio
Recording video
260
www.it-ebooks.info
261Introduction to multimedia and Stagefright
In this chapter, we’ll be looking at Stagefright’s multimedia architecture and fea-tures. Moving on from architecture, we’ll explore how to use Stagefright via Android’sMediaPlayer API.
10.1 Introduction to multimedia and StagefrightBecause the foundation of Android’s multimedia platform is Google’s new media plat-form Stagefright, we’re going to review Stagefright’s architecture and services. Stage-fright, as of now, supports the following core media files, services, and features:
Interfaces for third-party and hardware media codecs, input and outputdevices, and content policies
Media playback, streaming, downloading, and progressive playback, includingthird-Generation Partnership Program (3GPP), Moving Picture Experts Group 4(MPEG-4), Advanced Audio Coding (AAC), and Moving Picture Experts Group(MPEG) Audio Layer 3 (MP3) containers
Network protocols including RTSP (TRP, SDP), HTTP progressive streaming, andHTTP live streaming.
Video and image encoders and decoders, including MPEG-4, International Tele-communication Union H.263 video standard (H.263), Advanced Video Coding(AVC H.264), and the Joint Photographic Experts Group (JPEG)
Speech codecs, including Adaptive Multi-Rate audio codecs AMR-NB and AMR-WB
Audio codecs, including MP3, AAC, and AAC+, and more Media recording, including 3GPP, VP8, MPEG-4, and JPEG
Video telephony based on the 3GPP video conferencing standard 324-M
Stagefright provides all this functionality in a well-laid-out set of services, shown infigure 10.1.
NOTE Different API versions, such as 3.0 on the Xoom, may not supportall the listed media formats. To check which formats are supported, seehttp://developer.android.com/guide/appendix/media-formats.html.
10.1.1 Stagefright overview
Stagefright has a much simpler internal implementation than OpenCORE. In figure10.1, you can see a rough outline of how the MediaPlayer works with Stagefright inter-nally. Essentially Stagefright works as follows:
MediaExtractor retrieves track data and corresponding metadata from the filesystem or HTTP stream.
AudioPlayer is responsible for playing audio as well as managing timing forA/V synchronization for audio.
Depending on which codec is picked, a local or remote render is created forvideo play. The system clock is used as the time base for video-only playback.
www.it-ebooks.info
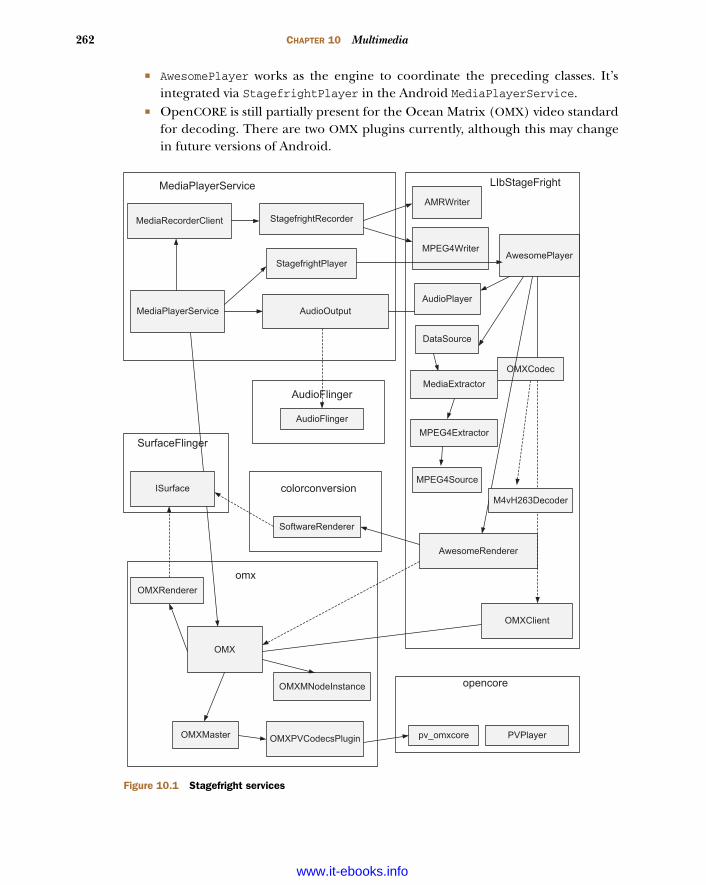
262 CHAPTER 10 Multimedia
AwesomePlayer works as the engine to coordinate the preceding classes. It’sintegrated via StagefrightPlayer in the Android MediaPlayerService.
OpenCORE is still partially present for the Ocean Matrix (OMX) video standardfor decoding. There are two OMX plugins currently, although this may changein future versions of Android.
Figure 10.1 Stagefright services
www.it-ebooks.info
263Playing audio
In the next section, we’ll dive in and use the Android API, and thus Stagefright, to playaudio files.
10.2 Playing audioProbably the most basic need for multimedia on a cell phone is the ability to playaudio files, whether new ringtones, MP3s, or quick audio notes. Android’s Media-Player is easy to use. At a high level, all you need to do to play an MP3 file is followthese steps:
1 Put the MP3 in the res/raw directory in a project (note that you can also use aURI to access files on the network or via the internet).
2 Create a new instance of the MediaPlayer, and reference the MP3 by callingMediaPlayer.create().
3 Call the MediaPlayer methods prepare() and start().
Let’s work through an example to demonstrate how simple this task is. First, create anew project called MediaPlayerExample, with an Activity called MediaPlayer-Activity. Now, create a new folder under res/ called raw; you’ll store your MP3s inthis folder. For this example, we’ll use a ringtone for the game Halo 3, which you candownload from the Android in Action Google code site at http://code.google.com/p/android-in-action/, or you can use your own MP3. Download the Halo 3 themesong and any other MP3s you fancy, and put them in the raw directory. Next, create asimple Button for the music player, as shown in the following listing.
<?xml version="1.0" encoding="utf-8"?><LinearLayout xmlns:android="http://schemas.android.com/apk/res/android" android:orientation="vertical" android:layout_width="fill_parent" android:layout_height="fill_parent" ><TextView android:layout_width="fill_parent" android:layout_height="wrap_content" android:text="Simple Media Player" />
<Button android:id="@+id/playsong" android:layout_width="fill_parent" android:layout_height="wrap_content" android:text="Halo 3 Theme Song" /> </LinearLayout>
Next, fill out the MediaPlayerActivity class, as shown in the following listing.
Listing 10.1 main.xml for MediaPlayer example
www.it-ebooks.info
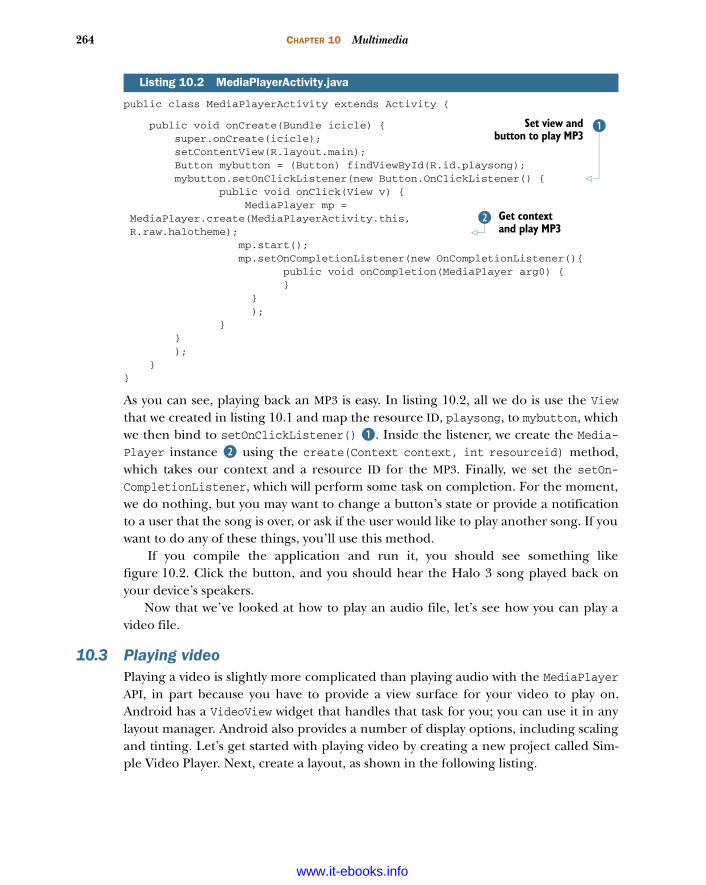
264 CHAPTER 10 Multimedia
public class MediaPlayerActivity extends Activity {
public void onCreate(Bundle icicle) { super.onCreate(icicle); setContentView(R.layout.main); Button mybutton = (Button) findViewById(R.id.playsong); mybutton.setOnClickListener(new Button.OnClickListener() { public void onClick(View v) { MediaPlayer mp = MediaPlayer.create(MediaPlayerActivity.this, R.raw.halotheme); mp.start(); mp.setOnCompletionListener(new OnCompletionListener(){ public void onCompletion(MediaPlayer arg0) { } } ); } } ); }}
As you can see, playing back an MP3 is easy. In listing 10.2, all we do is use the Viewthat we created in listing 10.1 and map the resource ID, playsong, to mybutton, whichwe then bind to setOnClickListener() B. Inside the listener, we create the Media-Player instance C using the create(Context context, int resourceid) method,which takes our context and a resource ID for the MP3. Finally, we set the setOn-CompletionListener, which will perform some task on completion. For the moment,we do nothing, but you may want to change a button’s state or provide a notificationto a user that the song is over, or ask if the user would like to play another song. If youwant to do any of these things, you’ll use this method.
If you compile the application and run it, you should see something likefigure 10.2. Click the button, and you should hear the Halo 3 song played back onyour device’s speakers.
Now that we’ve looked at how to play an audio file, let’s see how you can play avideo file.
10.3 Playing videoPlaying a video is slightly more complicated than playing audio with the MediaPlayerAPI, in part because you have to provide a view surface for your video to play on.Android has a VideoView widget that handles that task for you; you can use it in anylayout manager. Android also provides a number of display options, including scalingand tinting. Let’s get started with playing video by creating a new project called Sim-ple Video Player. Next, create a layout, as shown in the following listing.
Listing 10.2 MediaPlayerActivity.java
BSet view andbutton to play MP3
Get context and play MP3
C
www.it-ebooks.info
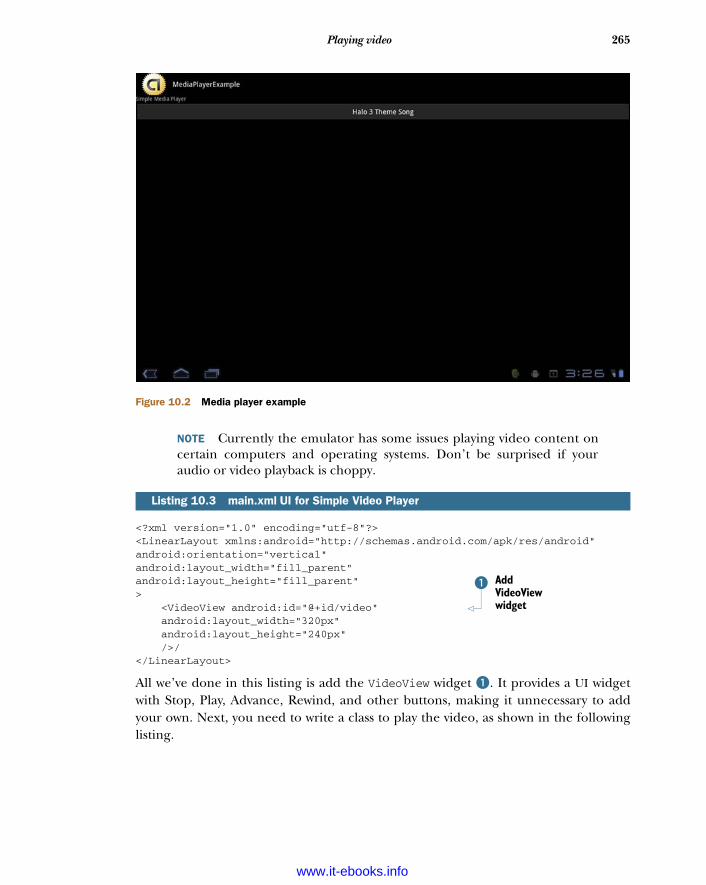
265Playing video
NOTE Currently the emulator has some issues playing video content oncertain computers and operating systems. Don’t be surprised if youraudio or video playback is choppy.
<?xml version="1.0" encoding="utf-8"?><LinearLayout xmlns:android="http://schemas.android.com/apk/res/android"android:orientation="vertical"android:layout_width="fill_parent"android:layout_height="fill_parent"> <VideoView android:id="@+id/video" android:layout_width="320px" android:layout_height="240px" />/</LinearLayout>
All we’ve done in this listing is add the VideoView widget B. It provides a UI widgetwith Stop, Play, Advance, Rewind, and other buttons, making it unnecessary to addyour own. Next, you need to write a class to play the video, as shown in the followinglisting.
Listing 10.3 main.xml UI for Simple Video Player
Figure 10.2 Media player example
Add VideoView widget
B
www.it-ebooks.info
266 CHAPTER 10 Multimedia
public class SimpleVideo extends Activity { private VideoView myVideo; private MediaController mc; public void onCreate(Bundle icicle) { super.onCreate(icicle); getWindow().setFormat(PixelFormat.TRANSLUCENT); setContentView(R.layout.main); myVideo = (VideoView) findViewById(R.id.video); File pathToTest= new File
➥(Environment.getExternalFileDirectory(),"test.mp4");mc = new MediaController(this); mc.setMediaPlayer(myVideo); myVideo.setMediaController(mc); myVideo.requestFocus(); }}
In this listing, we first create a translucent window, which is necessary for the Surface-View B. Next, we reference the VideoView as a container for playing the video anduse its setVideoPath() method to have it look at an SD card (using the approvedEnvironment API for this purpose) for our test MP4. Finally, we set up the Media-Controller and use the setMediaController() method to perform a callback to theVideoView to notify it when our video is finished playing.
Before you can run this application, you’ll need to either use the ADB to push avideo onto your Android 3.0 device or create one that you’ll reference in the set-VideoPath() method. You can download this project from the book’s source coderepository, which includes a number of short, license-free videos you can use for test-ing. When the videos are on your device’s SD card, run the application and touch thescreen where the movie will play in the upper-left corner. Doing so will cause the con-trols to appear. Push Play, and you should see something like figure 10.3.
As you can see, the VideoView and MediaPlayer classes simplify working with videofiles. Something you’ll need to pay attention to when working with video files is thatthe emulator and physical devices will react differently with very large media files.
Now that you’ve seen how simple it is to play media using Android’s MediaPlayerAPI, let’s look at how you can use a phone’s built-in camera or microphone to captureimages or audio.
10.4 Capturing mediaUsing your cell phone to take pictures, record memos, film short videos, and so on,are features that are expected of any such device. In this section, we’ll look at how tocapture media from the microphone and camera, and also how to write these files tothe SD card.
To get started, let’s examine how to use the Android Camera class to captureimages and save them to a file.
Listing 10.4 SimpleVideo.java
Create translucent window
B
www.it-ebooks.info

267Capturing media
10.4.1 Understanding the camera
An important feature of modern cell phones is their ability to take pictures or videousing a built-in camera. Some phones even support using the camera’s microphone tocapture audio. Android, of course, supports all three features and provides a variety ofways to interact with the camera. In this section, we’ll look at how to interact with thecamera and take photographs.
You’ll be creating a new project called SimpleCamera to demonstrate how to con-nect to a phone’s camera to capture images. For this project, you’ll use the Cameraclass (http://mng.bz/E244) to tie the emulator’s (or phone’s) camera to a View. Mostof the code that you’ll create for this project deals with showing the input from thecamera, but the main work for taking a picture is done by a single method calledtakePicture(Camera.ShutterCallback shutter, Camera.PictureCallback raw,
Camera.PictureCallback jpeg), which has three callbacks that allow you to controlhow a picture is taken.
Before we get any further into the Camera class and how to use the camera, let’screate the project. You’ll be creating two classes; because the main class is long, we’llbreak it into two sections. When you create the project, you’ll need to add the CAMERAand WRITE_EXTERNALSTORAGE permissions to the manifest, like this:
<uses-permission android:name="android.permission.CAMERA" /> <uses-permission android:name=
➥"android.permission.WRITE_EXTERNAL_STORAGE" />
Both permissions are essentially self explanatory.
Figure 10.3 Video and associated player controls in VideoView
www.it-ebooks.info
268 CHAPTER 10 Multimedia
NOTE The Android emulator doesn’t allow you to connect to cameradevices, such as a webcam, on your computer; all your pictures will dis-play a chessboard. You can connect to a web camera and get live imagesand video, but doing so requires some hacking. You can find an excellentexample of how to do this at Tom Gibara’s website, where he has an opensource project for obtaining live images from a webcam: www.tomgibara.com/android/camera-source. It’s possible that in later versions of theSDK, the emulator will support connections to cameras on the hardwarethe emulator is running on.
Now, create the example’s layout, as shown in the following listing.
<?xml version="1.0" encoding="utf-8"?><LinearLayout xmlns:android="http://schemas.android.com/apk/res/android" android:layout_width="fill_parent" android:layout_height="fill_parent" android:orientation="vertical"> <SurfaceView android:id="@+id/surface" android:layout_width="fill_parent" android:layout_height="10dip" android:layout_weight="1"> </SurfaceView> <Button android:id="@+id/pictureButton"
➥android:layout_width="fill_parent" android:layout_height="wrap_content" android:text=
➥"Take Picture" android:enabled="true" />
</LinearLayout>
The next listing shows the first part of CameraExample.java.
public class SimpleCamera extends Activity implements
➥SurfaceHolder.Callback {
private Camera camera; private boolean isPreviewRunning = false; private SimpleDateFormat timeStampFormat =
➥new SimpleDateFormat("yyyyMMddHHmmssSS"); private static final String TAG = "camera"; private SurfaceView surfaceView; private SurfaceHolder surfaceHolder; private Uri targetResource = Media.EXTERNAL_CONTENT_URI;
public void onCreate(Bundle icicle) { super.onCreate(icicle); Log.e(getClass().getSimpleName(), "onCreate"); getWindow().setFormat(PixelFormat.TRANSLUCENT); setContentView(R.layout.main); this.surfaceView = (SurfaceView) findViewById(R.id.surface); this.surfaceHolder = this.surfaceView.getHolder(); this.surfaceHolder.addCallback(this);
Listing 10.5 Main.xml for SimpleCamera
Listing 10.6 CameraExample.java
www.it-ebooks.info
269Capturing media
this.surfaceHolder.setType(SurfaceHolder.
➥SURFACE_TYPE_PUSH_BUFFERS);
Button takePicture = (Button) findViewById(R.id.pictureButton);
takePicture.setOnClickListener(new OnClickListener() { public void onClick(View view) { try { takePicture();
} catch (Exception e) { Log.e(TAG, e.toString()); e.printStackTrace(); } } });
}
public boolean onCreateOptionsMenu(android.view.Menu menu) { MenuItem item = menu.add(0, 0, 0, "View Pictures"); item.setOnMenuItemClickListener(new
➥MenuItem.OnMenuItemClickListener() {
public boolean onMenuItemClick(MenuItem item) { Intent intent = new Intent(Intent.ACTION_VIEW,
➥SimpleCamera.this.targetResource); startActivity(intent); return true; } }); return true; }
protected void onRestoreInstanceState(Bundle savedInstanceState) { super.onRestoreInstanceState(savedInstanceState); }
Camera.PictureCallback mPictureCallbackRaw =
➥new Camera.PictureCallback() {
public void onPictureTaken(byte[] data, Camera c) { SimpleCamera.this.camera.startPreview(); } };
Camera.ShutterCallback mShutterCallback =
➥new Camera.ShutterCallback() {
public void onShutter() { } }; };
This listing is straightforward. First, we set variables for managing a SurfaceView andthen set up the View. Next, we create a menu and menu option that will float over thesurface when the user clicks the Menu button on the phone while the application isrunning B. Doing so will open Android’s picture browser and let the user view thephotos on the camera. Next, we create the first PictureCallback, which is called
Create menu to Android’s Photo GalleryB
Create PictureCallback
C
Create ShutterCallback
D
www.it-ebooks.info

270 CHAPTER 10 Multimedia
when a picture is first taken C. This first callback captures the PictureCallback’sonly method, onPictureTaken(byte[] data, Camera camera), to grab the raw imagedata directly from the camera. Next, we create a ShutterCallback, which can be usedwith its onShutter() method, to play a sound; here we don’t call the onShutter()method D.
We’ll continue with CameraExample.java in the next listing.
public boolean takePicture() { ImageCaptureCallback camDemo = null;
try { String filename = this.timeStampFormat.format(new Date()); ContentValues values = new ContentValues(); values.put(MediaColumns.TITLE, filename); values.put(ImageColumns.DESCRIPTION, "Image from Xoom"); Uri uri = getContentResolver().insert(Media.EXTERNAL_CONTENT_URI, values); camDemo = new ImageCaptureCallback(getContentResolver().openOutputStream(uri)); } catch (Exception ex) {
}
this.camera.takePicture(this.mShutterCallback, this.mPictureCallbackRaw, camDemo); return true;
}
protected void onResume() { Log.e(getClass().getSimpleName(), "onResume"); super.onResume(); }
protected void onSaveInstanceState(Bundle outState) { super.onSaveInstanceState(outState); }
protected void onStop() { super.onStop(); }
public void surfaceChanged(SurfaceHolder holder, int format, int w, int h) { if (this.isPreviewRunning) { this.camera.stopPreview(); } Camera.Parameters p = this.camera.getParameters(); p.setPreviewSize(w, h); this.camera.setParameters(p); try {
Listing 10.7 CameraExample.java, continued
Call method to take pictureB Set up required
information for camera to capture image
C
Take pictureD
www.it-ebooks.info
271Capturing media
this.camera.setPreviewDisplay(holder); } catch (IOException e) { e.printStackTrace(); } this.camera.startPreview(); this.isPreviewRunning = true; }
public void surfaceCreated(SurfaceHolder holder) { this.camera = Camera.open(); }
public void surfaceDestroyed(SurfaceHolder holder) { this.camera.stopPreview(); this.isPreviewRunning = false; this.camera.release(); }}
This listing is more complicated than listing 10.5. Much of the code is about manag-ing the surface for the camera preview. The first line is the start of an implementationof the method takePicture() B, which checks to see whether the Take Picture but-ton was clicked. If it was, we set up the creation of a file; and by using the Image-CaptureCallback (which we’ll define in listing 10.7), we create an Outputstream towhich we write our image data C, including not only the image but the filename andother metadata. Next, we call the method takePicture() and pass to it the three call-backs mShutterCallback, mPictureCallbackRaw, and camDemo. mPictureCallback-Raw is the raw image, and camDemo writes the image to a file on the SD card D, as youcan see in the following listing.
public class ImageCaptureCallback implements PictureCallback { private OutputStream filoutputStream; public ImageCaptureCallback(OutputStream filoutputStream) { this.filoutputStream = filoutputStream; } public void onPictureTaken(byte[] data, Camera camera) { try { this.filoutputStream.write(data); this.filoutputStream.flush(); this.filoutputStream.close(); } catch(Exception ex) { ex.printStackTrace(); } }}
Here, the class implements the PictureCallback interface and provides two meth-ods. The constructor creates a stream to write data to, and the second method,onPictureTaken(), takes binary data and writes to the SD card as a JPEG.
Listing 10.8 ImageCaptureCallback.java
www.it-ebooks.info
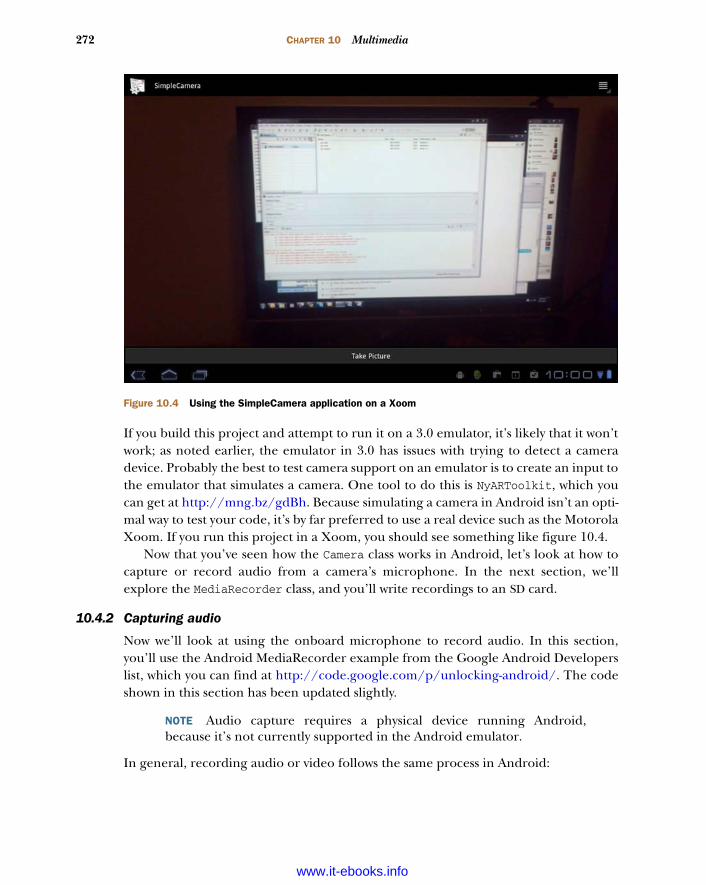
272 CHAPTER 10 Multimedia
If you build this project and attempt to run it on a 3.0 emulator, it’s likely that it won’twork; as noted earlier, the emulator in 3.0 has issues with trying to detect a cameradevice. Probably the best to test camera support on an emulator is to create an input tothe emulator that simulates a camera. One tool to do this is NyARToolkit, which youcan get at http://mng.bz/gdBh. Because simulating a camera in Android isn’t an opti-mal way to test your code, it’s by far preferred to use a real device such as the MotorolaXoom. If you run this project in a Xoom, you should see something like figure 10.4.
Now that you’ve seen how the Camera class works in Android, let’s look at how tocapture or record audio from a camera’s microphone. In the next section, we’llexplore the MediaRecorder class, and you’ll write recordings to an SD card.
10.4.2 Capturing audio
Now we’ll look at using the onboard microphone to record audio. In this section,you’ll use the Android MediaRecorder example from the Google Android Developerslist, which you can find at http://code.google.com/p/unlocking-android/. The codeshown in this section has been updated slightly.
NOTE Audio capture requires a physical device running Android,because it’s not currently supported in the Android emulator.
In general, recording audio or video follows the same process in Android:
Figure 10.4 Using the SimpleCamera application on a Xoom
www.it-ebooks.info
273Capturing media
1 Create an instance of android.media.MediaRecorder.2 Create an instance of android.content.ContentValues, and add properties
such as TITLE, TIMESTAMP, and the all-important MIME_TYPE.3 Create a file path for the data to go to, using android.content.Content-
Resolver.4 To set a preview display on a view surface, use MediaRecorder.setPreview-
Display().5 Set the source for audio, using MediaRecorder.setAudioSource().6 Set the output file format, using MediaRecorder.setOutputFormat().7 Set your encoding for audio, using MediaRecorder.setAudioEncoder().8 Use prepare() and start() to prepare and start your recordings.9 Use stop() and release() to gracefully stop and clean up your recording
process.
Although recording media isn’t especially complex, you may notice that it’s moreinvolved than playing it. To understand how to use the MediaRecorder class, we’ll lookat an application. To begin, create a new project called SoundRecordingDemo. Next,edit the AndroidManifest.xml file and add the following:
<uses-permission android:name="android.permission.RECORD_AUDIO" /><uses-permission android:name="android.permission.WRITE_EXTERNAL_STORAGE"/>
This code will allow the application to record the audio files and play them. Next, cre-ate the class shown in the following listing.
public class SoundRecordingDemo extends Activity {
MediaRecorder mRecorder; File mSampleFile = null; static final String SAMPLE_PREFIX = "recording"; static final String SAMPLE_EXTENSION = ".3gpp"; private static final String OUTPUT_FILE = "/sdcard/audiooutput.3gpp"; private static final String TAG = "SoundRecordingDemo";
public void onCreate(Bundle savedInstanceState) { super.onCreate(savedInstanceState); setContentView(R.layout.main); this.mRecorder = new MediaRecorder();
Button startRecording = (Button) findViewById(R.id.startrecording); Button stopRecording = (Button) findViewById(R.id.stoprecording);
startRecording.setOnClickListener(new View.OnClickListener() { public void onClick(View v) { startRecording(); } });
stopRecording.setOnClickListener(new View.OnClickListener() { public void onClick(View v) {
Listing 10.9 SoundRecordingdemo.java
www.it-ebooks.info
274 CHAPTER 10 Multimedia
stopRecording(); addToDB(); }
}); }
protected void addToDB() { ContentValues values = new ContentValues(3); long current = System.currentTimeMillis();
values.put(MediaColumns.TITLE, "test_audio"); values.put(MediaColumns.DATE_ADDED, (int) (current / 1000)); values.put(MediaColumns.MIME_TYPE, "audio/3gpp"); values.put(MediaColumns.DATA, OUTPUT_FILE); ContentResolver contentResolver = getContentResolver();
Uri base = MediaStore.Audio.Media.EXTERNAL_CONTENT_URI; Uri newUri = contentResolver.insert(base, values);
sendBroadcast(new Intent(Intent.ACTION_MEDIA_SCANNER_SCAN_FILE, newUri)); }
protected void startRecording() { this.mRecorder = new MediaRecorder(); this.mRecorder.setAudioSource(MediaRecorder.AudioSource.MIC); this.mRecorder.setOutputFormat(MediaRecorder.OutputFormat.THREE_GPP); this.mRecorder.setAudioEncoder(MediaRecorder.AudioEncoder.AMR_NB); this.mRecorder.setOutputFile(OUTPUT_FILE); try { this.mRecorder.prepare(); } catch (IllegalStateException e1) { // TODO Auto-generated catch block e1.printStackTrace(); } catch (IOException e1) { // TODO Auto-generated catch block e1.printStackTrace(); } this.mRecorder.start();
if (this.mSampleFile == null) { File sampleDir = Environment.getExternalStorageDirectory();
try { this.mSampleFile = File.createTempFile(SoundRecordingDemo.SAMPLE_PREFIX, SoundRecordingDemo.SAMPLE_EXTENSION, sampleDir); } catch (IOException e) { Log.e(SoundRecordingDemo.TAG, "sdcard access error"); return; } } }
protected void stopRecording() { this.mRecorder.stop(); this.mRecorder.release(); }}}
BSet metadatafor audio
Notify music player new audio file createdC
Start recording file D
Stop recording and release MediaRecorderE
www.it-ebooks.info
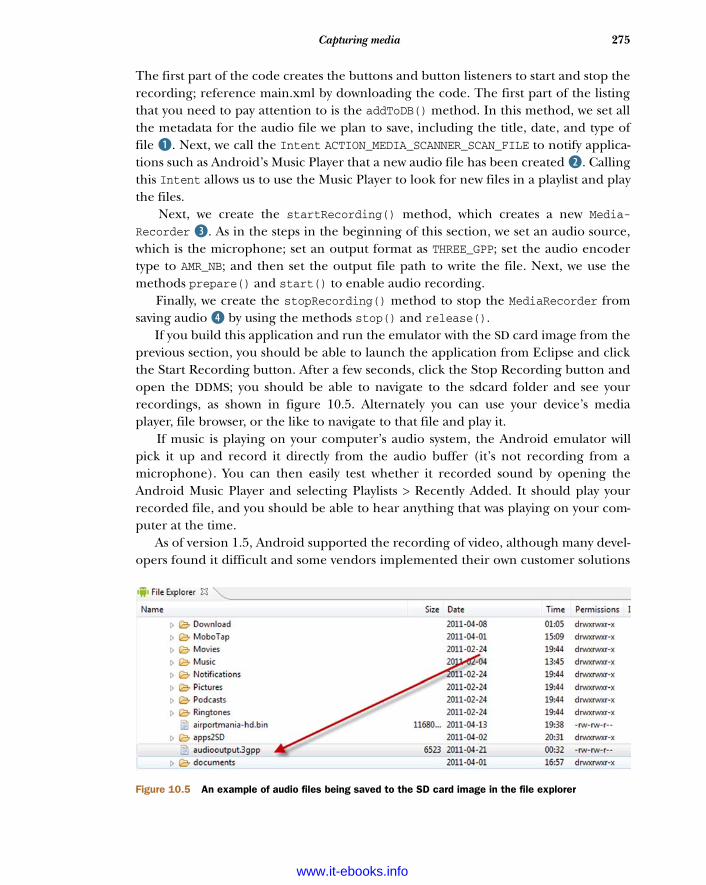
275Capturing media
The first part of the code creates the buttons and button listeners to start and stop therecording; reference main.xml by downloading the code. The first part of the listingthat you need to pay attention to is the addToDB() method. In this method, we set allthe metadata for the audio file we plan to save, including the title, date, and type offile B. Next, we call the Intent ACTION_MEDIA_SCANNER_SCAN_FILE to notify applica-tions such as Android’s Music Player that a new audio file has been created C. Callingthis Intent allows us to use the Music Player to look for new files in a playlist and playthe files.
Next, we create the startRecording() method, which creates a new Media-Recorder D. As in the steps in the beginning of this section, we set an audio source,which is the microphone; set an output format as THREE_GPP; set the audio encodertype to AMR_NB; and then set the output file path to write the file. Next, we use themethods prepare() and start() to enable audio recording.
Finally, we create the stopRecording() method to stop the MediaRecorder fromsaving audio E by using the methods stop() and release().
If you build this application and run the emulator with the SD card image from theprevious section, you should be able to launch the application from Eclipse and clickthe Start Recording button. After a few seconds, click the Stop Recording button andopen the DDMS; you should be able to navigate to the sdcard folder and see yourrecordings, as shown in figure 10.5. Alternately you can use your device’s mediaplayer, file browser, or the like to navigate to that file and play it.
If music is playing on your computer’s audio system, the Android emulator willpick it up and record it directly from the audio buffer (it’s not recording from amicrophone). You can then easily test whether it recorded sound by opening theAndroid Music Player and selecting Playlists > Recently Added. It should play yourrecorded file, and you should be able to hear anything that was playing on your com-puter at the time.
As of version 1.5, Android supported the recording of video, although many devel-opers found it difficult and some vendors implemented their own customer solutions
Figure 10.5 An example of audio files being saved to the SD card image in the file explorer
www.it-ebooks.info

276 CHAPTER 10 Multimedia
to support video recording. With the releases of Android 2.0 to Android 3.1, video hasbecome far easier to work with, both for playing as well as recording. You’ll see howmuch easier in the next section about using the MediaRecorder class to write a simpleapplication for recording video.
10.4.3 Recording video
Video recording on Android is no more difficult than recording audio, with theexception that you have a few different fields. But there’s one important difference—unlike with recording audio data, Android requires you to first preview a video feedbefore you can record it by passing it a surface object, much as we did with the cameraapplication earlier in this chapter. It’s worth repeating this point because whenAndroid started supporting video recording, many developers found themselvesunable to record video: you must always provide a surface object. This may be awk-ward for some applications, but it’s currently required in Android up to 2.2 and up.
Also, as with recording audio, you have to provide several permissions to Android soyou can record video. The new one is RECORD_VIDEO, which lets you use the camera torecord video. The other permissions are CAMERA, RECORD_AUDIO, andWRITE_EXTERNAL_STORAGE, as shown in the following listing. Go ahead and set up a newproject called VideoCam, and use the permissions in this AndroidManifest.xml file.
<?xml version="1.0" encoding="utf-8"?><manifest xmlns:android="http://schemas.android.com/apk/res/android" package="com.msi.manning.chapter10.VideoCam" android:versionCode="1" android:versionName="1.0"> <application android:icon="@drawable/icon" android:label="@string/app_name"> <activity android:name=".VideoCam" android:label="@string/app_name"> <intent-filter> <action android:name="android.intent.action.MAIN" /> <category android:name="android.intent.category.LAUNCHER" /> </intent-filter> </activity> </application> <uses-permission android:name="android.permission.CAMERA"></uses-permission> <uses-permission android:name="android.permission.RECORD_AUDIO"></uses-permission> <uses-permission android:name="android.permission.RECORD_VIDEO"></uses-permission> <uses-permission android:name="android.permission.WRITE_EXTERNAL_STORAGE" /> <uses-feature android:name="android.hardware.camera" /></manifest>
Listing 10.10 AndroidManifest.xml
www.it-ebooks.info
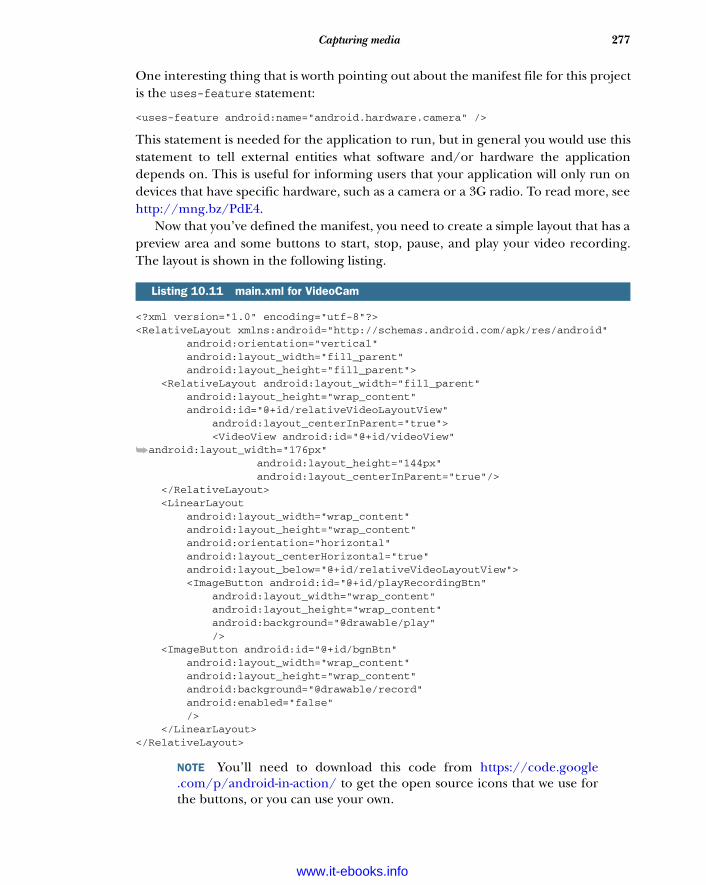
277Capturing media
One interesting thing that is worth pointing out about the manifest file for this projectis the uses-feature statement:
<uses-feature android:name="android.hardware.camera" />
This statement is needed for the application to run, but in general you would use thisstatement to tell external entities what software and/or hardware the applicationdepends on. This is useful for informing users that your application will only run ondevices that have specific hardware, such as a camera or a 3G radio. To read more, seehttp://mng.bz/PdE4.
Now that you’ve defined the manifest, you need to create a simple layout that has apreview area and some buttons to start, stop, pause, and play your video recording.The layout is shown in the following listing.
<?xml version="1.0" encoding="utf-8"?><RelativeLayout xmlns:android="http://schemas.android.com/apk/res/android" android:orientation="vertical" android:layout_width="fill_parent" android:layout_height="fill_parent"> <RelativeLayout android:layout_width="fill_parent" android:layout_height="wrap_content" android:id="@+id/relativeVideoLayoutView" android:layout_centerInParent="true"> <VideoView android:id="@+id/videoView"
➥android:layout_width="176px" android:layout_height="144px" android:layout_centerInParent="true"/> </RelativeLayout> <LinearLayout android:layout_width="wrap_content" android:layout_height="wrap_content" android:orientation="horizontal" android:layout_centerHorizontal="true" android:layout_below="@+id/relativeVideoLayoutView"> <ImageButton android:id="@+id/playRecordingBtn" android:layout_width="wrap_content" android:layout_height="wrap_content" android:background="@drawable/play" /> <ImageButton android:id="@+id/bgnBtn" android:layout_width="wrap_content" android:layout_height="wrap_content" android:background="@drawable/record" android:enabled="false" /> </LinearLayout> </RelativeLayout>
NOTE You’ll need to download this code from https://code.google.com/p/android-in-action/ to get the open source icons that we use forthe buttons, or you can use your own.
Listing 10.11 main.xml for VideoCam
www.it-ebooks.info

278 CHAPTER 10 Multimedia
Video recording follows a set of steps that are similar to those for audio recording:
1 Create an instance of android.media.MediaRecorder.2 Set up a VideoView.3 To set a preview display on a View surface, use MediaRecorder.setPreview-
Display().4 Set the source for audio using MediaRecorder.setAudioSource(). 5 Set the source for video using MediaRecorder.setVideoSource().6 Set the encoding for audio using MediaRecorder.setAudioEncoder().7 Set the encoding for video using MediaRecorder.setVideoEncoder().8 Set the output file format using MediaRecorder.setOutputFormat().9 Set the video size using setVideoSize(). (At the time this book was written,
there was a bug in setVideoSize() that limited it to 320 by 240.)10 Set the video frame rate, using setVideoFrameRate().11 Use prepare() and start() to prepare and start your recordings.12 Use stop() and release() to gracefully stop and clean up the recording
process.
As you can see, using video is similar to using audio. Let’s finish the example by usingthe code in the following listing.
public class VideoCam extends Activity implements SurfaceHolder.Callback { private MediaRecorder recorder = null; private static final String OUTPUT_FILE = "/sdcard/uatestvideo.mp4"; private static final String TAG = "RecordVideo"; private VideoView videoView = null; private ImageButton startBtn = null; private ImageButton playRecordingBtn = null; private Boolean playing = false; private Boolean recording = false; public void onCreate(Bundle savedInstanceState) { super.onCreate(savedInstanceState); setContentView(R.layout.main); startBtn = (ImageButton) findViewById(R.id.bgnBtn); playRecordingBtn = (ImageButton) findViewById(R.id.playRecordingBtn); videoView = (VideoView)this.findViewById(R.id.videoView); final SurfaceHolder holder = videoView.getHolder(); holder.addCallback(this); holder.setType(SurfaceHolder.SURFACE_TYPE_PUSH_BUFFERS); startBtn.setOnClickListener(new OnClickListener() { public void onClick(View view) { if(!VideoCam.this.recording & !VideoCam.this.playing) { try { beginRecording(holder);
Listing 10.12 VideoCam.java
www.it-ebooks.info
279Capturing media
playing=false; recording=true; startBtn.setBackgroundResource(R.drawable.stop); } catch (Exception e) { Log.e(TAG, e.toString()); e.printStackTrace(); } } else if(VideoCam.this.recording) { try { stopRecording(); playing = false; recording= false; startBtn.setBackgroundResource(R.drawable.play); }catch (Exception e) { Log.e(TAG, e.toString()); e.printStackTrace(); } } } }); playRecordingBtn.setOnClickListener(new OnClickListener() { public void onClick(View view) { if(!VideoCam.this.playing & !VideoCam.this.recording) { try { playRecording(); VideoCam.this.playing=true; VideoCam.this.recording=false; playRecordingBtn.setBackgroundResource(R.drawable.stop); } catch (Exception e) { Log.e(TAG, e.toString()); e.printStackTrace(); } } else if(VideoCam.this.playing) { try { stopPlayingRecording(); VideoCam.this.playing = false; VideoCam.this.recording= false; playRecordingBtn.setBackgroundResource(R.drawable.play); }catch (Exception e) { Log.e(TAG, e.toString()); e.printStackTrace(); } } }
www.it-ebooks.info
280 CHAPTER 10 Multimedia
}); } public void surfaceCreated(SurfaceHolder holder) { startBtn.setEnabled(true); } public void surfaceDestroyed(SurfaceHolder holder) { } public void surfaceChanged(SurfaceHolder holder, int format, int width, int height) { Log.v(TAG, "Width x Height = " + width + "x" + height); } private void playRecording() { MediaController mc = new MediaController(this); videoView.setMediaController(mc); videoView.setVideoPath(OUTPUT_FILE); videoView.start(); } private void stopPlayingRecording() { videoView.stopPlayback(); } private void stopRecording() throws Exception { if (recorder != null) { recorder.stop(); } } protected void onDestroy() { super.onDestroy(); if (recorder != null) { recorder.release(); } } private void beginRecording(SurfaceHolder holder) throws Exception { if(recorder!=null) { recorder.stop(); recorder.release(); } File outFile = new File(OUTPUT_FILE); if(outFile.exists()) { outFile.delete(); } try { recorder = new MediaRecorder(); recorder.setVideoSource(MediaRecorder.VideoSource.CAMERA); recorder.setAudioSource(MediaRecorder.AudioSource.MIC); recorder.setOutputFormat(MediaRecorder.OutputFormat.MPEG_4); recorder.setVideoSize(320, 240); recorder.setVideoFrameRate(15); recorder.setVideoEncoder(MediaRecorder.VideoEncoder.MPEG_4_SP); recorder.setAudioEncoder(MediaRecorder.AudioEncoder.AMR_NB); recorder.setMaxDuration(20000); recorder.setPreviewDisplay(holder.getSurface()); recorder.setOutputFile(OUTPUT_FILE); recorder.prepare();
www.it-ebooks.info
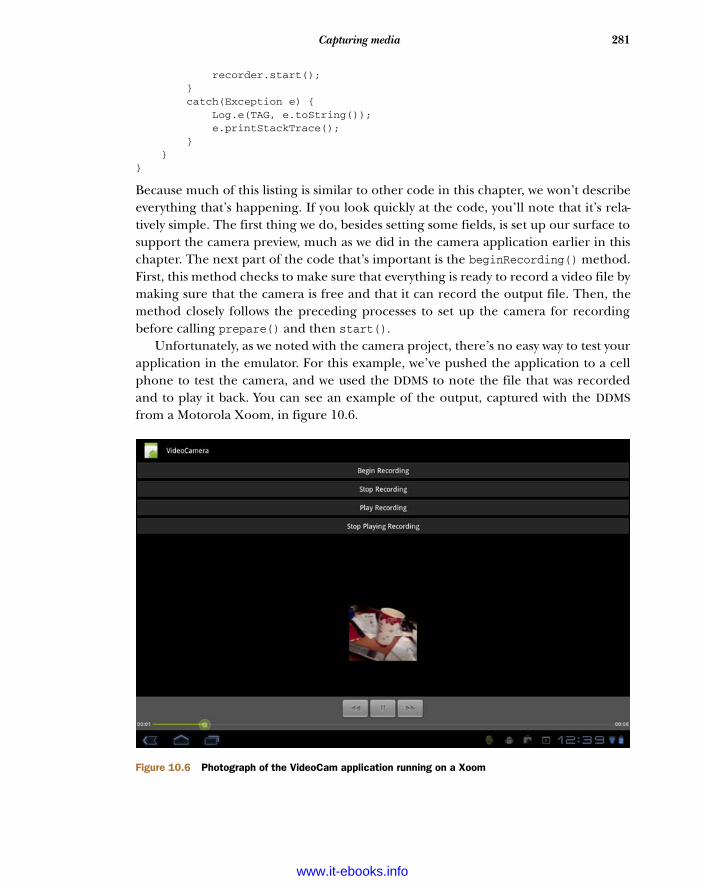
281Capturing media
recorder.start(); } catch(Exception e) { Log.e(TAG, e.toString()); e.printStackTrace(); } }}
Because much of this listing is similar to other code in this chapter, we won’t describeeverything that’s happening. If you look quickly at the code, you’ll note that it’s rela-tively simple. The first thing we do, besides setting some fields, is set up our surface tosupport the camera preview, much as we did in the camera application earlier in thischapter. The next part of the code that’s important is the beginRecording() method.First, this method checks to make sure that everything is ready to record a video file bymaking sure that the camera is free and that it can record the output file. Then, themethod closely follows the preceding processes to set up the camera for recordingbefore calling prepare() and then start().
Unfortunately, as we noted with the camera project, there’s no easy way to test yourapplication in the emulator. For this example, we’ve pushed the application to a cellphone to test the camera, and we used the DDMS to note the file that was recordedand to play it back. You can see an example of the output, captured with the DDMSfrom a Motorola Xoom, in figure 10.6.
Figure 10.6 Photograph of the VideoCam application running on a Xoom
www.it-ebooks.info
282 CHAPTER 10 Multimedia
SUPPORT FOR MULTIPLE CAMERAS
As of Android 2.3, Android supports multiple cameras. For example, the MotorolaXoom has a front-facing camera and a back-facing camera to support applications likevideo conferencing. For this reason, Android now supports multiple new API calls forthe Camera class to help developers support multiple cameras.
The Camera.CameraInfo class stores the device’s camera orientation. Currently itsupports CAMERA_FACING_BACK and CAMERA_FACING_FRONT. You can use this class toessentially auto-discover which camera is which, as in the following code snippet:
numberOfCameras = Camera.getNumberOfCameras();CameraInfo cameraInfo = new CameraInfo(); for (int i = 0; i < numberOfCameras; i++) { Camera.getCameraInfo(i, cameraInfo); if (cameraInfo.facing == CameraInfo.CAMERA_FACING_BACK) { defaultCameraId = i; } }
Other new camera-related methods include getNumberOfCameras() and getCamera-Info(). If you look at the previous code snippet, you can see how these methods canbe used to query an application for the number of cameras available and find the cam-era an application needs.
Another new method, get(), allows you to programmatically retrieve informationabout a specific camera as a CamcorderProfile. This lets your applications be moreflexible because they can get information about a device’s capabilities, and you have towrite less code targeting certain hardware platforms. Android 3.0 includes a number ofother new methods related to cameras, so be sure to review the Camera API at http://mng.bz/v1sw. That being said, if you wish to work with cameras, you’ll most likely haveto work directly with the hardware on which you wish to run your applications.
DEBUGGING VIDEO APPS
Without a device to test on, you’ll have major difficulties debugging your video appli-cations. This is especially true with the Android SDK emulator for Xoom-like tablets,which is difficult to use due to its extremely poor performance. If you decide todevelop a video application, we strongly suggest that you not only obtain an Androiddevice to test on, but also test every physical device that you hope your application willrun on. Although Android applications that record data from sensors can be difficultto work with on the emulator, they’re relatively straightforward to code—but you needto use a physical Android device to test.
10.5 SummaryIn this chapter, we looked at how the Android SDK supports multimedia and how youcan play, save, and record video and audio. We also discussed various features theAndroid MediaPlayer offers developers, from a built-in video player to wide supportfor formats, encodings, and standards.
www.it-ebooks.info
283Summary
We explained how to interact with other hardware devices attached to the phone,such as a microphone and camera. You used the MediaRecorder application to recordaudio and video and then save it to the SD card.
The most consistent characteristic of multimedia programming with Android isthat things are changing and maturing! Multimedia support has moved from Open-CORE to Stagefright as of Android 3.0. Writing multimedia applications requires youto conduct a bit more work directly on the hardware you wish an application to workon, because the emulated environments don’t adequately replicate the hardwarecapabilities of the handsets. Despite this potential speed bump in the developmentprocess, Android currently offers everything you need to create rich and compellingmedia applications.
In the next chapter, you’ll learn how to use Android’s location services to interactwith GPS and maps. By mixing in what you’ve learned in this chapter, you’ll be able tocreate your own GPS application that not only provides voice direction, but alsoresponds to voice commands.
www.it-ebooks.info
Location,location, location
Accurate location awareness makes a mobile device more powerful. Combininglocation awareness with network data can change the world—and Android shineshere. Other platforms have gained similar abilities in recent years, but Androidexcels with its easy-to-use and popular location API framework based on GoogleMaps.
From direct network queries to triangulation with cell towers and even satellitepositioning via GPS, an Android-powered device has access to different types ofLocationProvider classes that allow access to location data. Various providers sup-ply a mix of location-related metrics, including latitude and longitude, speed, bear-ing, and altitude.
This chapter covers Working with LocationProvider and LocationManager
Testing location in the emulator
Receiving location alerts with LocationListener
Drawing with MapActivity and MapView
Looking up addresses with the Geocoder
284
www.it-ebooks.info
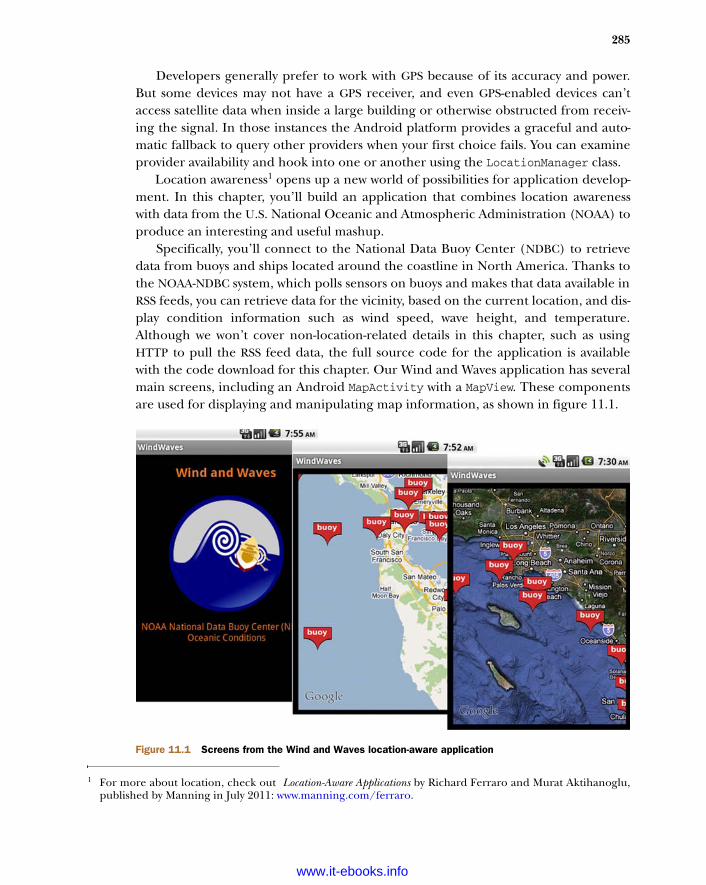
285
Developers generally prefer to work with GPS because of its accuracy and power.But some devices may not have a GPS receiver, and even GPS-enabled devices can’taccess satellite data when inside a large building or otherwise obstructed from receiv-ing the signal. In those instances the Android platform provides a graceful and auto-matic fallback to query other providers when your first choice fails. You can examineprovider availability and hook into one or another using the LocationManager class.
Location awareness1 opens up a new world of possibilities for application develop-ment. In this chapter, you’ll build an application that combines location awarenesswith data from the U.S. National Oceanic and Atmospheric Administration (NOAA) toproduce an interesting and useful mashup.
Specifically, you’ll connect to the National Data Buoy Center (NDBC) to retrievedata from buoys and ships located around the coastline in North America. Thanks tothe NOAA-NDBC system, which polls sensors on buoys and makes that data available inRSS feeds, you can retrieve data for the vicinity, based on the current location, and dis-play condition information such as wind speed, wave height, and temperature.Although we won’t cover non-location-related details in this chapter, such as usingHTTP to pull the RSS feed data, the full source code for the application is availablewith the code download for this chapter. Our Wind and Waves application has severalmain screens, including an Android MapActivity with a MapView. These componentsare used for displaying and manipulating map information, as shown in figure 11.1.
1 For more about location, check out Location-Aware Applications by Richard Ferraro and Murat Aktihanoglu,published by Manning in July 2011: www.manning.com/ferraro.
Figure 11.1 Screens from the Wind and Waves location-aware application
www.it-ebooks.info
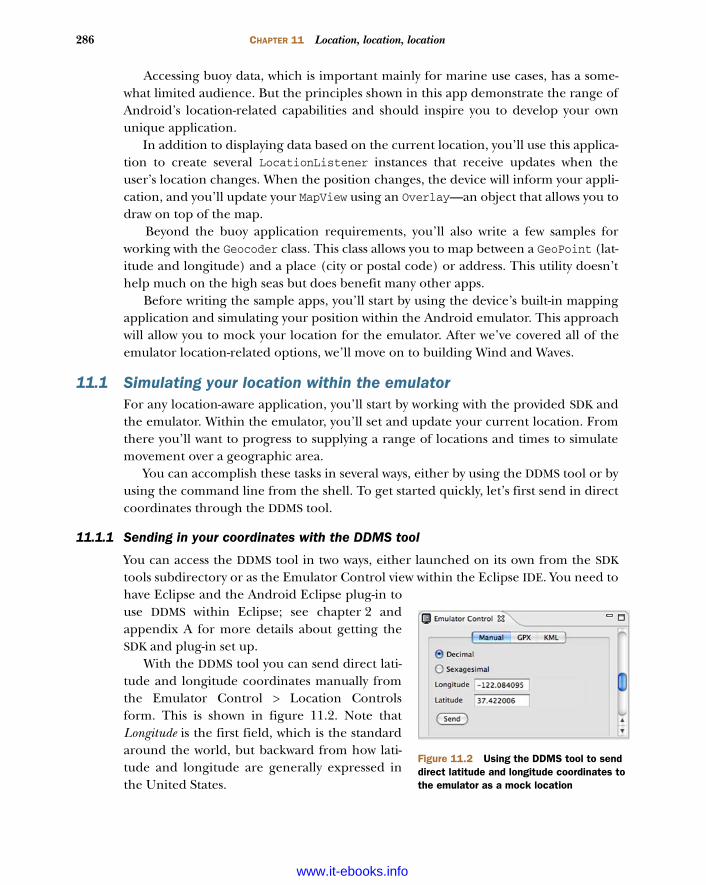
286 CHAPTER 11 Location, location, location
Accessing buoy data, which is important mainly for marine use cases, has a some-what limited audience. But the principles shown in this app demonstrate the range ofAndroid’s location-related capabilities and should inspire you to develop your ownunique application.
In addition to displaying data based on the current location, you’ll use this applica-tion to create several LocationListener instances that receive updates when theuser’s location changes. When the position changes, the device will inform your appli-cation, and you’ll update your MapView using an Overlay—an object that allows you todraw on top of the map.
Beyond the buoy application requirements, you’ll also write a few samples forworking with the Geocoder class. This class allows you to map between a GeoPoint (lat-itude and longitude) and a place (city or postal code) or address. This utility doesn’thelp much on the high seas but does benefit many other apps.
Before writing the sample apps, you’ll start by using the device’s built-in mappingapplication and simulating your position within the Android emulator. This approachwill allow you to mock your location for the emulator. After we’ve covered all of theemulator location-related options, we’ll move on to building Wind and Waves.
11.1 Simulating your location within the emulatorFor any location-aware application, you’ll start by working with the provided SDK andthe emulator. Within the emulator, you’ll set and update your current location. Fromthere you’ll want to progress to supplying a range of locations and times to simulatemovement over a geographic area.
You can accomplish these tasks in several ways, either by using the DDMS tool or byusing the command line from the shell. To get started quickly, let’s first send in directcoordinates through the DDMS tool.
11.1.1 Sending in your coordinates with the DDMS tool
You can access the DDMS tool in two ways, either launched on its own from the SDKtools subdirectory or as the Emulator Control view within the Eclipse IDE. You need tohave Eclipse and the Android Eclipse plug-in touse DDMS within Eclipse; see chapter 2 andappendix A for more details about getting theSDK and plug-in set up.
With the DDMS tool you can send direct lati-tude and longitude coordinates manually fromthe Emulator Control > Location Controlsform. This is shown in figure 11.2. Note thatLongitude is the first field, which is the standardaround the world, but backward from how lati-tude and longitude are generally expressed inthe United States.
Figure 11.2 Using the DDMS tool to send direct latitude and longitude coordinates to the emulator as a mock location
www.it-ebooks.info
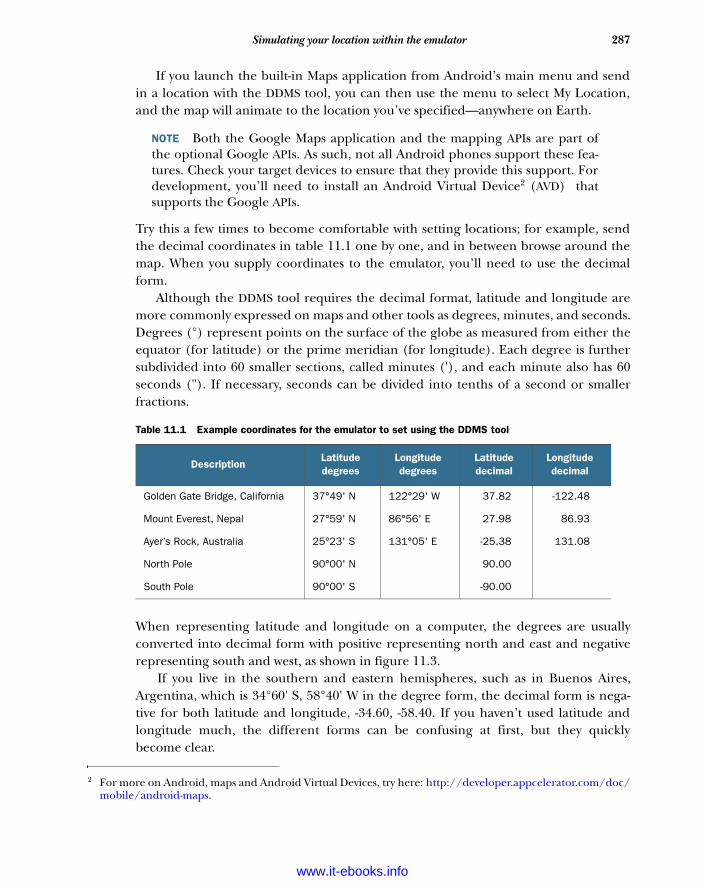
287Simulating your location within the emulator
If you launch the built-in Maps application from Android’s main menu and sendin a location with the DDMS tool, you can then use the menu to select My Location,and the map will animate to the location you’ve specified—anywhere on Earth.
NOTE Both the Google Maps application and the mapping APIs are part ofthe optional Google APIs. As such, not all Android phones support these fea-tures. Check your target devices to ensure that they provide this support. Fordevelopment, you’ll need to install an Android Virtual Device2 (AVD) thatsupports the Google APIs.
Try this a few times to become comfortable with setting locations; for example, sendthe decimal coordinates in table 11.1 one by one, and in between browse around themap. When you supply coordinates to the emulator, you’ll need to use the decimalform.
Although the DDMS tool requires the decimal format, latitude and longitude aremore commonly expressed on maps and other tools as degrees, minutes, and seconds.Degrees (°) represent points on the surface of the globe as measured from either theequator (for latitude) or the prime meridian (for longitude). Each degree is furthersubdivided into 60 smaller sections, called minutes ('), and each minute also has 60seconds ("). If necessary, seconds can be divided into tenths of a second or smallerfractions.
When representing latitude and longitude on a computer, the degrees are usuallyconverted into decimal form with positive representing north and east and negativerepresenting south and west, as shown in figure 11.3.
If you live in the southern and eastern hemispheres, such as in Buenos Aires,Argentina, which is 34°60' S, 58°40' W in the degree form, the decimal form is nega-tive for both latitude and longitude, -34.60, -58.40. If you haven’t used latitude andlongitude much, the different forms can be confusing at first, but they quicklybecome clear.
2 For more on Android, maps and Android Virtual Devices, try here: http://developer.appcelerator.com/doc/mobile/android-maps.
Table 11.1 Example coordinates for the emulator to set using the DDMS tool
DescriptionLatitude degrees
Longitude degrees
Latitude decimal
Longitude decimal
Golden Gate Bridge, California 37°49' N 122°29' W 37.82 -122.48
Mount Everest, Nepal 27°59' N 86°56' E 27.98 86.93
Ayer’s Rock, Australia 25°23' S 131°05' E -25.38 131.08
North Pole 90°00' N 90.00
South Pole 90°00' S -90.00
www.it-ebooks.info
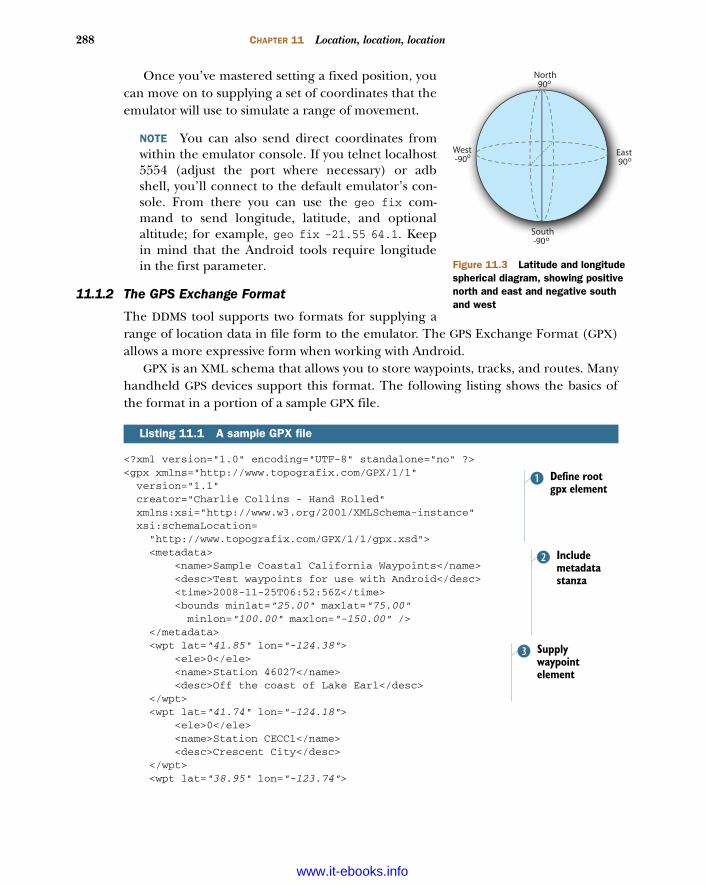
288 CHAPTER 11 Location, location, location
Once you’ve mastered setting a fixed position, youcan move on to supplying a set of coordinates that theemulator will use to simulate a range of movement.
NOTE You can also send direct coordinates fromwithin the emulator console. If you telnet localhost5554 (adjust the port where necessary) or adbshell, you’ll connect to the default emulator’s con-sole. From there you can use the geo fix com-mand to send longitude, latitude, and optionalaltitude; for example, geo fix -21.55 64.1. Keepin mind that the Android tools require longitudein the first parameter.
11.1.2 The GPS Exchange Format
The DDMS tool supports two formats for supplying arange of location data in file form to the emulator. The GPS Exchange Format (GPX)allows a more expressive form when working with Android.
GPX is an XML schema that allows you to store waypoints, tracks, and routes. Manyhandheld GPS devices support this format. The following listing shows the basics ofthe format in a portion of a sample GPX file.
<?xml version="1.0" encoding="UTF-8" standalone="no" ?><gpx xmlns="http://www.topografix.com/GPX/1/1" version="1.1" creator="Charlie Collins - Hand Rolled" xmlns:xsi="http://www.w3.org/2001/XMLSchema-instance" xsi:schemaLocation= "http://www.topografix.com/GPX/1/1/gpx.xsd"> <metadata> <name>Sample Coastal California Waypoints</name> <desc>Test waypoints for use with Android</desc> <time>2008-11-25T06:52:56Z</time> <bounds minlat="25.00" maxlat="75.00" minlon="100.00" maxlon="-150.00" /> </metadata> <wpt lat="41.85" lon="-124.38"> <ele>0</ele> <name>Station 46027</name> <desc>Off the coast of Lake Earl</desc> </wpt> <wpt lat="41.74" lon="-124.18"> <ele>0</ele> <name>Station CECC1</name> <desc>Crescent City</desc> </wpt> <wpt lat="38.95" lon="-123.74">
Listing 11.1 A sample GPX file
Define root gpx element
B
Include metadata stanza
c
Supply waypoint element
D
oEast 90
South -90
North 90
West -90
o
o
o
Figure 11.3 Latitude and longitude spherical diagram, showing positive north and east and negative south and west
www.it-ebooks.info
289Simulating your location within the emulator
<ele>0</ele> <name>Station PTAC1</name> <desc>Point Arena Lighthouse</desc> </wpt> . . . remainder of wpts omitted for brevity<trk>
<name>Example Track</name> <desc>A fine track with trkpts.</desc> <trkseg> <trkpt lat="41.85" lon="-124.38"> <ele>0</ele> <time>2008-10-15T06:00:00Z</time> </trkpt> <trkpt lat="41.74" lon="-124.18"> <ele>0</ele> <time>2008-10-15T06:01:00Z</time> </trkpt> <trkpt lat="38.95" lon="-123.74"> <ele>0</ele> <time>2008-10-15T06:02:00Z</time> </trkpt> . . . remainder of trkpts omitted for brevity </trkseg> </trk></gpx>
A GPX file requires the correct XML namespace in the root gpx element B. Withinits body, the file includes metadata C and individual waypoints D. Waypoints arenamed locations at a particular latitude and longitude. Along with individual way-points, a GPX file supports related route information in the form of tracks E, whichcan be subdivided further into track segments F. Each track segment is made up oftrack points. Finally, each track point G contains a waypoint with an additional point-in-time property.
When working with a GPX file in the DDMS tool, you can use two different modes,as figure 11.4 reveals. The top half of the GPX box lists individual waypoints; when youclick one, that individual location is sent to the emulator. In the bottom half of theGPX box, all the tracks are displayed. Tracks can be “played” forward and backward tosimulate movement. As the track reaches each track point, based on the time itdefines, it sends those coordinates to the emulator. You can modify the speed for thisplayback via the Speed button.
GPX is simple and extremely useful when working with mock location informationfor your Android applications, but it’s not the only file format supported. The DDMStool also supports a format called KML.
11.1.3 The Google Earth Keyhole Markup Language
The second format that the Android DDMS tool supports for sending a range of mocklocation information to the emulator is the Keyhole Markup Language (KML). KML wasoriginally a proprietary format created by a company named Keyhole. After Google
Supply track element
E
Use track segment
F
Provide specific point
G
www.it-ebooks.info
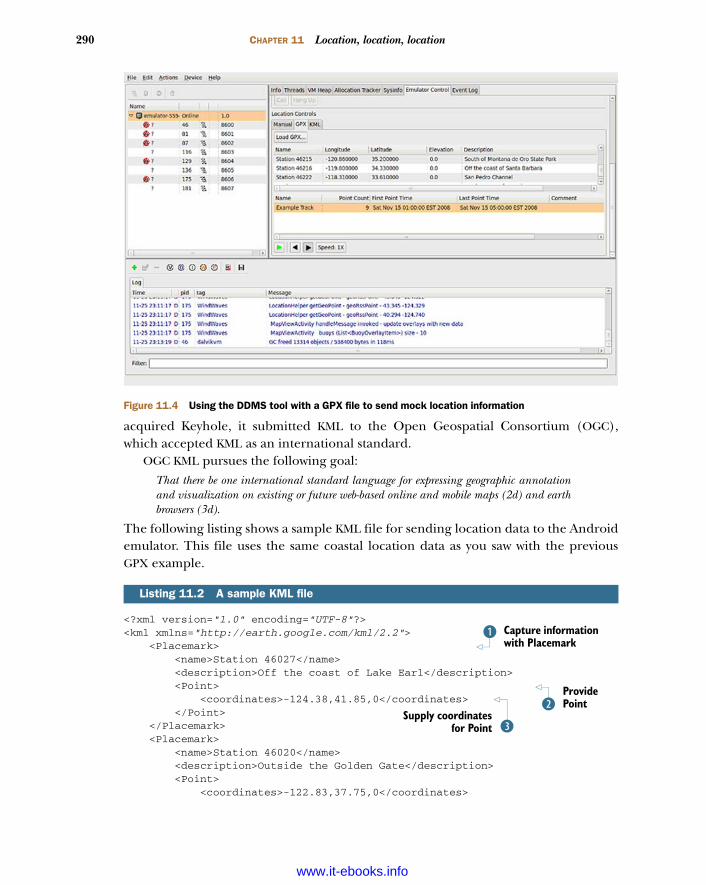
290 CHAPTER 11 Location, location, location
acquired Keyhole, it submitted KML to the Open Geospatial Consortium (OGC),which accepted KML as an international standard.
OGC KML pursues the following goal:That there be one international standard language for expressing geographic annotationand visualization on existing or future web-based online and mobile maps (2d) and earthbrowsers (3d).
The following listing shows a sample KML file for sending location data to the Androidemulator. This file uses the same coastal location data as you saw with the previousGPX example.
<?xml version="1.0" encoding="UTF-8"?><kml xmlns="http://earth.google.com/kml/2.2"> <Placemark> <name>Station 46027</name> <description>Off the coast of Lake Earl</description> <Point> <coordinates>-124.38,41.85,0</coordinates> </Point> </Placemark> <Placemark> <name>Station 46020</name> <description>Outside the Golden Gate</description> <Point> <coordinates>-122.83,37.75,0</coordinates>
Listing 11.2 A sample KML file
Figure 11.4 Using the DDMS tool with a GPX file to send mock location information
Capture information with Placemark
B
Provide PointC
DSupply coordinates
for Point
www.it-ebooks.info
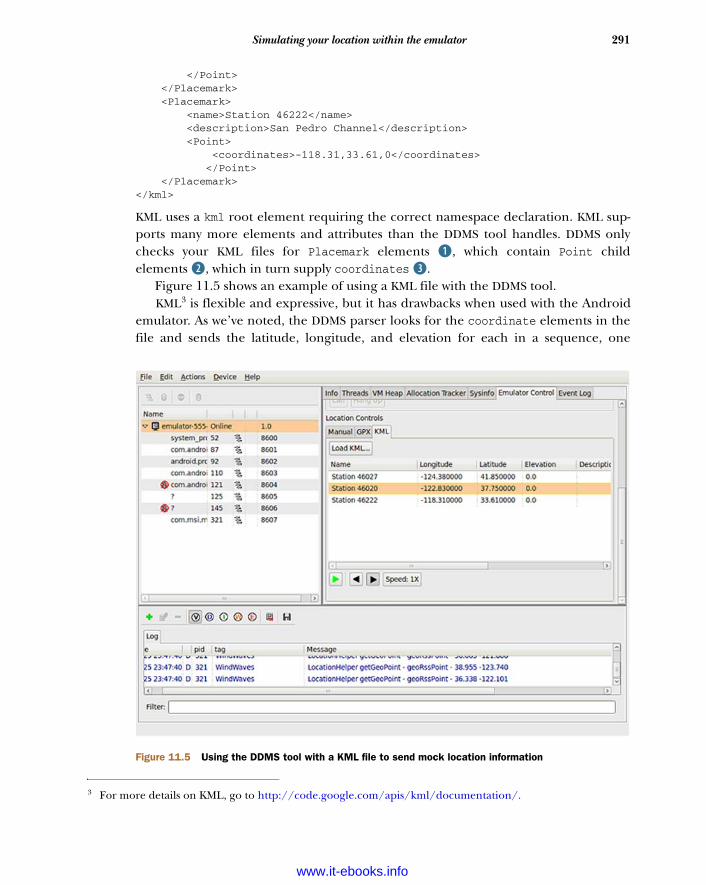
291Simulating your location within the emulator
</Point> </Placemark> <Placemark> <name>Station 46222</name> <description>San Pedro Channel</description> <Point> <coordinates>-118.31,33.61,0</coordinates> </Point> </Placemark></kml>
KML uses a kml root element requiring the correct namespace declaration. KML sup-ports many more elements and attributes than the DDMS tool handles. DDMS onlychecks your KML files for Placemark elements B, which contain Point childelements C, which in turn supply coordinates D.
Figure 11.5 shows an example of using a KML file with the DDMS tool.KML3 is flexible and expressive, but it has drawbacks when used with the Android
emulator. As we’ve noted, the DDMS parser looks for the coordinate elements in thefile and sends the latitude, longitude, and elevation for each in a sequence, one
3 For more details on KML, go to http://code.google.com/apis/kml/documentation/.
Figure 11.5 Using the DDMS tool with a KML file to send mock location information
www.it-ebooks.info
292 CHAPTER 11 Location, location, location
Placemark per second. Timing and other advanced features of KML aren’t yet sup-ported by DDMS. Because of this, we find it more valuable at present to use GPX as adebugging and testing format, because it supports detailed timing.
KML is still important; it’s an international standard and will continue to gain trac-tion. Also, KML is an important format for other Google applications, so you mayencounter it more frequently in other contexts than GPX. For example, you could cre-ate a KML route using Google Earth, and then later use it in your emulator to simulatemovement.
Now that you know how to send mock location information to the emulator in var-ious formats, you can step out of the built-in Maps application and start creating yourown programs that rely on location.
11.2 Using LocationManager and LocationProviderWhen building location-aware applications on the Android platform, you’ll mostoften use several key classes. A LocationProvider provides location data using severalmetrics, and you can access providers through a LocationManager.
LocationManager allows you to attach a LocationListener that receives updateswhen the device location changes. LocationManager also can directly fire an Intentbased on the proximity to a specified latitude and longitude. You can always retrievethe last-known Location directly from the manager.
The Location class is a Java bean that represents all the location data availablefrom a particular snapshot in time. Depending on the provider used to populate it, aLocation may or may not have all the possible data present; for example, it might notinclude speed or altitude.
To get your Wind and Waves sample application started and to grasp the relatedconcepts, you first need to master the LocationManager.
11.2.1 Accessing location data with LocationManager
LocationManager lets you retrieve location-related data on Android. Before you cancheck which providers are available or query the last-known Location, you need toacquire the manager from the system service. The following listing demonstrates thistask and includes a portion of the MapViewActivity that will drive our Wind andWaves application.
public class MapViewActivity extends MapActivity { private static final int MENU_SET_SATELLITE = 1; private static final int MENU_SET_MAP = 2; private static final int MENU_BUOYS_FROM_MAP_CENTER = 3; private static final int MENU_BACK_TO_LAST_LOCATION = 4; . . . Handler and LocationListeners omitted here for brevity - shown in later listings private MapController mapController; private LocationManager locationManager;
Listing 11.3 Start of MapViewActivity
Extend MapActivityB
Define LocationManager
C
www.it-ebooks.info
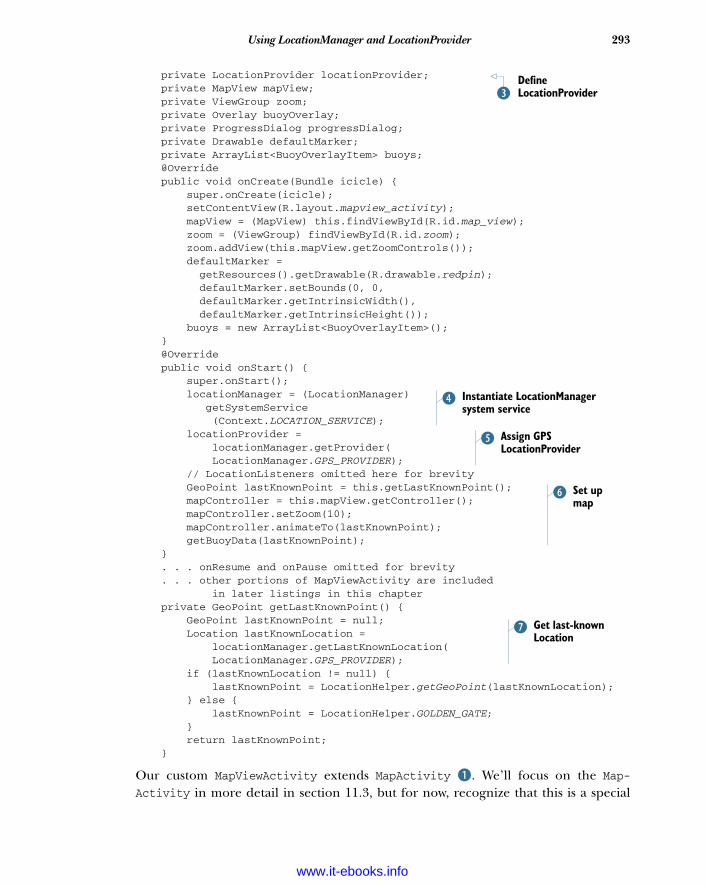
293Using LocationManager and LocationProvider
private LocationProvider locationProvider; private MapView mapView; private ViewGroup zoom; private Overlay buoyOverlay; private ProgressDialog progressDialog; private Drawable defaultMarker; private ArrayList<BuoyOverlayItem> buoys; @Override public void onCreate(Bundle icicle) { super.onCreate(icicle); setContentView(R.layout.mapview_activity); mapView = (MapView) this.findViewById(R.id.map_view); zoom = (ViewGroup) findViewById(R.id.zoom); zoom.addView(this.mapView.getZoomControls()); defaultMarker = getResources().getDrawable(R.drawable.redpin); defaultMarker.setBounds(0, 0, defaultMarker.getIntrinsicWidth(), defaultMarker.getIntrinsicHeight()); buoys = new ArrayList<BuoyOverlayItem>(); } @Override public void onStart() { super.onStart(); locationManager = (LocationManager) getSystemService (Context.LOCATION_SERVICE); locationProvider = locationManager.getProvider( LocationManager.GPS_PROVIDER); // LocationListeners omitted here for brevity GeoPoint lastKnownPoint = this.getLastKnownPoint(); mapController = this.mapView.getController(); mapController.setZoom(10); mapController.animateTo(lastKnownPoint); getBuoyData(lastKnownPoint); } . . . onResume and onPause omitted for brevity . . . other portions of MapViewActivity are included in later listings in this chapter private GeoPoint getLastKnownPoint() { GeoPoint lastKnownPoint = null; Location lastKnownLocation = locationManager.getLastKnownLocation( LocationManager.GPS_PROVIDER); if (lastKnownLocation != null) { lastKnownPoint = LocationHelper.getGeoPoint(lastKnownLocation); } else { lastKnownPoint = LocationHelper.GOLDEN_GATE; } return lastKnownPoint; }
Our custom MapViewActivity extends MapActivity B. We’ll focus on the Map-Activity in more detail in section 11.3, but for now, recognize that this is a special
Define LocationProviderD
Instantiate LocationManager system service
E
Assign GPS LocationProvider
F
Set up map
G
Get last-known Location
H
www.it-ebooks.info
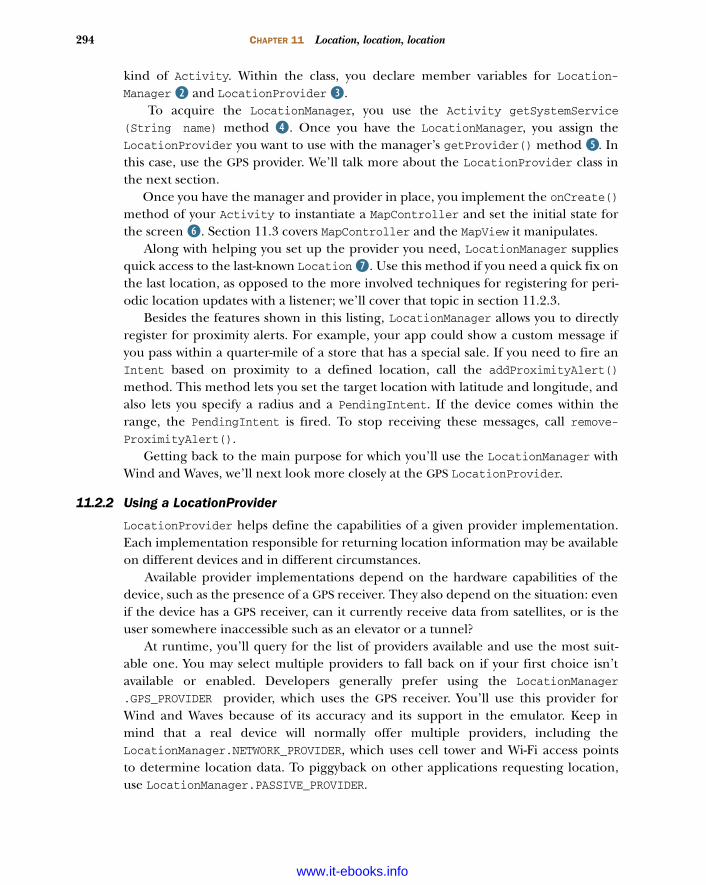
294 CHAPTER 11 Location, location, location
kind of Activity. Within the class, you declare member variables for Location-Manager C and LocationProvider D.
To acquire the LocationManager, you use the Activity getSystemService(String name) method E. Once you have the LocationManager, you assign theLocationProvider you want to use with the manager’s getProvider() method F. Inthis case, use the GPS provider. We’ll talk more about the LocationProvider class inthe next section.
Once you have the manager and provider in place, you implement the onCreate()method of your Activity to instantiate a MapController and set the initial state forthe screen G. Section 11.3 covers MapController and the MapView it manipulates.
Along with helping you set up the provider you need, LocationManager suppliesquick access to the last-known Location H. Use this method if you need a quick fix onthe last location, as opposed to the more involved techniques for registering for peri-odic location updates with a listener; we’ll cover that topic in section 11.2.3.
Besides the features shown in this listing, LocationManager allows you to directlyregister for proximity alerts. For example, your app could show a custom message ifyou pass within a quarter-mile of a store that has a special sale. If you need to fire anIntent based on proximity to a defined location, call the addProximityAlert()method. This method lets you set the target location with latitude and longitude, andalso lets you specify a radius and a PendingIntent. If the device comes within therange, the PendingIntent is fired. To stop receiving these messages, call remove-ProximityAlert().
Getting back to the main purpose for which you’ll use the LocationManager withWind and Waves, we’ll next look more closely at the GPS LocationProvider.
11.2.2 Using a LocationProvider
LocationProvider helps define the capabilities of a given provider implementation.Each implementation responsible for returning location information may be availableon different devices and in different circumstances.
Available provider implementations depend on the hardware capabilities of thedevice, such as the presence of a GPS receiver. They also depend on the situation: evenif the device has a GPS receiver, can it currently receive data from satellites, or is theuser somewhere inaccessible such as an elevator or a tunnel?
At runtime, you’ll query for the list of providers available and use the most suit-able one. You may select multiple providers to fall back on if your first choice isn’tavailable or enabled. Developers generally prefer using the LocationManager
.GPS_PROVIDER provider, which uses the GPS receiver. You’ll use this provider forWind and Waves because of its accuracy and its support in the emulator. Keep inmind that a real device will normally offer multiple providers, including theLocationManager.NETWORK_PROVIDER, which uses cell tower and Wi-Fi access pointsto determine location data. To piggyback on other applications requesting location,use LocationManager.PASSIVE_PROVIDER.
www.it-ebooks.info

295Using LocationManager and LocationProvider
In listing 11.3, we showed how you can obtain the GPS provider directly using thegetProvider(String name) method. Table 11.2 provides alternatives to this approachof directly accessing a particular provider.
Different providers may support different location-related metrics and have differentcosts or capabilities. The Criteria class helps define what each provider instance canhandle. Available metrics are latitude and longitude, speed, bearing, altitude, cost,and power requirements.
Remember to set the appropriate Android permissions. Your manifest needs toinclude location-related permissions for the providers you want to use. The followinglisting shows the Wind and Waves manifest XML file, which includes both COARSE- andFINE-grained location-related permissions.
<?xml version="1.0" encoding="utf-8"?><manifest xmlns:android="http://schemas.android.com/apk/res/android" package="com.msi.manning.windwaves"> <application android:icon="@drawable/wave_45" android:label="@string/app_name" android:theme="@android:style/Theme.Black”> <activity android:name="StartActivity" android:label="@string/app_name"> <intent-filter> <action android:name="android.intent.action.MAIN" /> <category android:name="android.intent.category.LAUNCHER" /> </intent-filter> </activity> <activity android:name="MapViewActivity" /> <activity android:name="BuoyDetailActivity" /> <uses-library android:name="com.google.android.maps" />
Table 11.2 Methods for obtaining a LocationProvider reference
LocationProvider code snippet Description
List<String> providers = locationManager.getAllProviders();
Get all of the providers registered on the device.
List<String> enabledProviders = locationManager.getAllProviders(true);
Get all of the currently enabled providers.
locationProvider = locationManager.getProviders(true).get(0);
A shortcut to get the first enabled pro-vider, regardless of type.
locationProvider = locationManager.getBestProvider( myCriteria, true);
An example of getting a LocationProvider using a particular Criteria argument. You can create a Criteria instance and specify whether bearing, altitude, cost, and other metrics are required.
Listing 11.4 A manifest file showing COARSE and FINE location-related permissions
www.it-ebooks.info
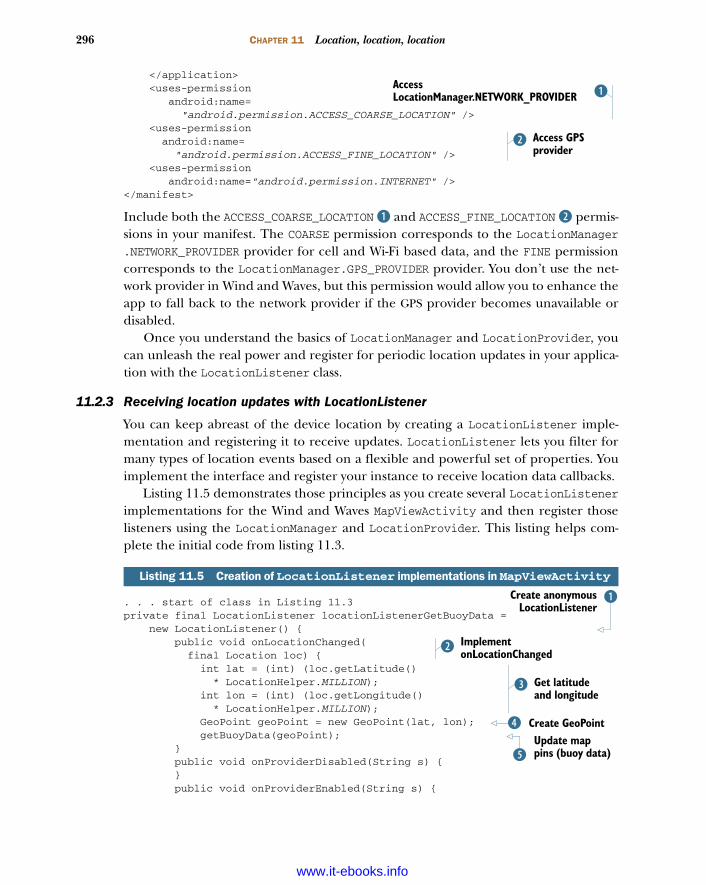
296 CHAPTER 11 Location, location, location
</application> <uses-permission android:name= "android.permission.ACCESS_COARSE_LOCATION" /> <uses-permission android:name= "android.permission.ACCESS_FINE_LOCATION" /> <uses-permission android:name="android.permission.INTERNET" /></manifest>
Include both the ACCESS_COARSE_LOCATION B and ACCESS_FINE_LOCATION C permis-sions in your manifest. The COARSE permission corresponds to the LocationManager.NETWORK_PROVIDER provider for cell and Wi-Fi based data, and the FINE permissioncorresponds to the LocationManager.GPS_PROVIDER provider. You don’t use the net-work provider in Wind and Waves, but this permission would allow you to enhance theapp to fall back to the network provider if the GPS provider becomes unavailable ordisabled.
Once you understand the basics of LocationManager and LocationProvider, youcan unleash the real power and register for periodic location updates in your applica-tion with the LocationListener class.
11.2.3 Receiving location updates with LocationListener
You can keep abreast of the device location by creating a LocationListener imple-mentation and registering it to receive updates. LocationListener lets you filter formany types of location events based on a flexible and powerful set of properties. Youimplement the interface and register your instance to receive location data callbacks.
Listing 11.5 demonstrates those principles as you create several LocationListenerimplementations for the Wind and Waves MapViewActivity and then register thoselisteners using the LocationManager and LocationProvider. This listing helps com-plete the initial code from listing 11.3.
. . . start of class in Listing 11.3private final LocationListener locationListenerGetBuoyData = new LocationListener() { public void onLocationChanged( final Location loc) { int lat = (int) (loc.getLatitude() * LocationHelper.MILLION); int lon = (int) (loc.getLongitude() * LocationHelper.MILLION); GeoPoint geoPoint = new GeoPoint(lat, lon); getBuoyData(geoPoint); } public void onProviderDisabled(String s) { } public void onProviderEnabled(String s) {
Listing 11.5 Creation of LocationListener implementations in MapViewActivity
Access LocationManager.NETWORK_PROVIDER B
Access GPS provider
C
Create anonymousLocationListener
B
Implement onLocationChangedC
Get latitude and longitude
D
Create GeoPointEUpdate map pins (buoy data)F
www.it-ebooks.info
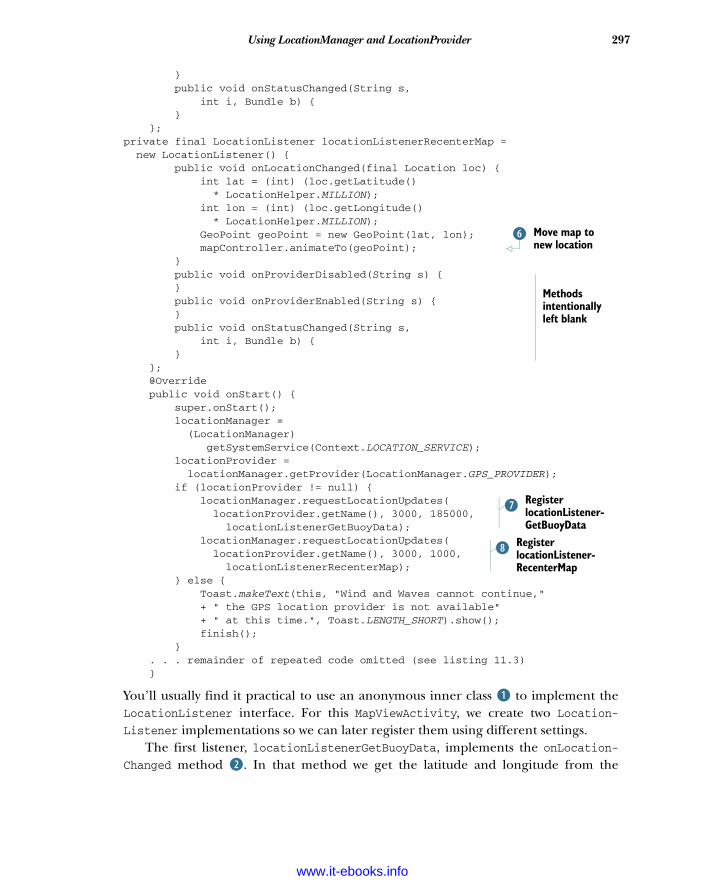
297Using LocationManager and LocationProvider
} public void onStatusChanged(String s, int i, Bundle b) { } };private final LocationListener locationListenerRecenterMap = new LocationListener() { public void onLocationChanged(final Location loc) { int lat = (int) (loc.getLatitude() * LocationHelper.MILLION); int lon = (int) (loc.getLongitude() * LocationHelper.MILLION); GeoPoint geoPoint = new GeoPoint(lat, lon); mapController.animateTo(geoPoint); } public void onProviderDisabled(String s) { } public void onProviderEnabled(String s) { } public void onStatusChanged(String s, int i, Bundle b) { } }; @Override public void onStart() { super.onStart(); locationManager = (LocationManager) getSystemService(Context.LOCATION_SERVICE); locationProvider = locationManager.getProvider(LocationManager.GPS_PROVIDER); if (locationProvider != null) { locationManager.requestLocationUpdates( locationProvider.getName(), 3000, 185000, locationListenerGetBuoyData); locationManager.requestLocationUpdates( locationProvider.getName(), 3000, 1000, locationListenerRecenterMap); } else { Toast.makeText(this, "Wind and Waves cannot continue," + " the GPS location provider is not available" + " at this time.", Toast.LENGTH_SHORT).show(); finish(); } . . . remainder of repeated code omitted (see listing 11.3) }
You’ll usually find it practical to use an anonymous inner class B to implement theLocationListener interface. For this MapViewActivity, we create two Location-Listener implementations so we can later register them using different settings.
The first listener, locationListenerGetBuoyData, implements the onLocation-Changed method C. In that method we get the latitude and longitude from the
Move map to new location
G
Methods intentionally left blank
HRegister locationListener-GetBuoyData
IRegister locationListener-RecenterMap
www.it-ebooks.info
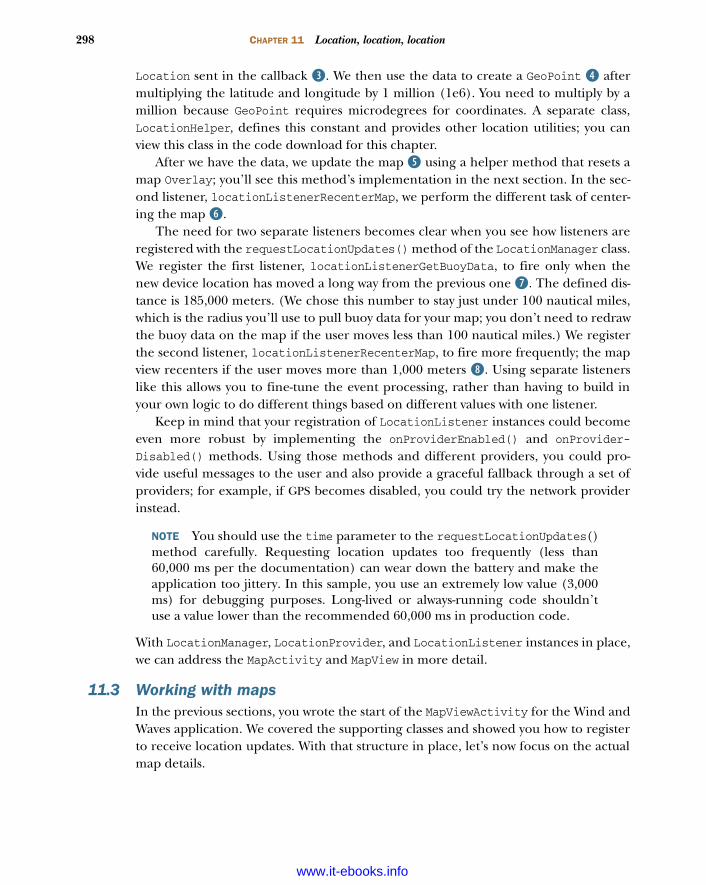
298 CHAPTER 11 Location, location, location
Location sent in the callback D. We then use the data to create a GeoPoint E aftermultiplying the latitude and longitude by 1 million (1e6). You need to multiply by amillion because GeoPoint requires microdegrees for coordinates. A separate class,LocationHelper, defines this constant and provides other location utilities; you canview this class in the code download for this chapter.
After we have the data, we update the map F using a helper method that resets amap Overlay; you’ll see this method’s implementation in the next section. In the sec-ond listener, locationListenerRecenterMap, we perform the different task of center-ing the map G.
The need for two separate listeners becomes clear when you see how listeners areregistered with the requestLocationUpdates() method of the LocationManager class.We register the first listener, locationListenerGetBuoyData, to fire only when thenew device location has moved a long way from the previous one H. The defined dis-tance is 185,000 meters. (We chose this number to stay just under 100 nautical miles,which is the radius you’ll use to pull buoy data for your map; you don’t need to redrawthe buoy data on the map if the user moves less than 100 nautical miles.) We registerthe second listener, locationListenerRecenterMap, to fire more frequently; the mapview recenters if the user moves more than 1,000 meters I. Using separate listenerslike this allows you to fine-tune the event processing, rather than having to build inyour own logic to do different things based on different values with one listener.
Keep in mind that your registration of LocationListener instances could becomeeven more robust by implementing the onProviderEnabled() and onProvider-Disabled() methods. Using those methods and different providers, you could pro-vide useful messages to the user and also provide a graceful fallback through a set ofproviders; for example, if GPS becomes disabled, you could try the network providerinstead.
NOTE You should use the time parameter to the requestLocationUpdates()method carefully. Requesting location updates too frequently (less than60,000 ms per the documentation) can wear down the battery and make theapplication too jittery. In this sample, you use an extremely low value (3,000ms) for debugging purposes. Long-lived or always-running code shouldn’tuse a value lower than the recommended 60,000 ms in production code.
With LocationManager, LocationProvider, and LocationListener instances in place,we can address the MapActivity and MapView in more detail.
11.3 Working with mapsIn the previous sections, you wrote the start of the MapViewActivity for the Wind andWaves application. We covered the supporting classes and showed you how to registerto receive location updates. With that structure in place, let’s now focus on the actualmap details.
www.it-ebooks.info
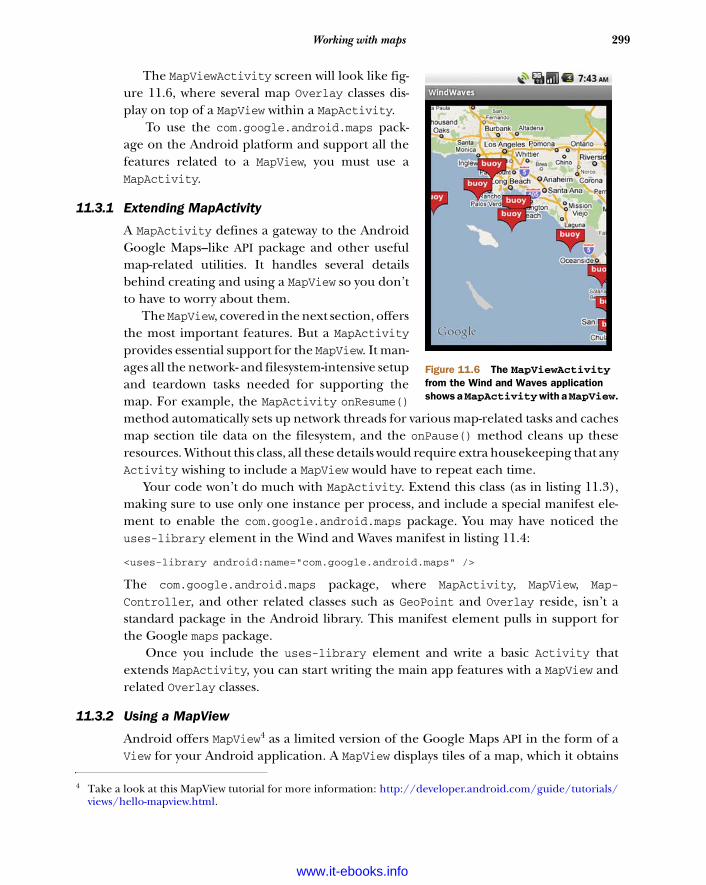
299Working with maps
The MapViewActivity screen will look like fig-ure 11.6, where several map Overlay classes dis-play on top of a MapView within a MapActivity.
To use the com.google.android.maps pack-age on the Android platform and support all thefeatures related to a MapView, you must use aMapActivity.
11.3.1 Extending MapActivity
A MapActivity defines a gateway to the AndroidGoogle Maps–like API package and other usefulmap-related utilities. It handles several detailsbehind creating and using a MapView so you don’tto have to worry about them.
The MapView, covered in the next section, offersthe most important features. But a MapActivityprovides essential support for the MapView. It man-ages all the network- and filesystem-intensive setupand teardown tasks needed for supporting themap. For example, the MapActivity onResume()method automatically sets up network threads for various map-related tasks and cachesmap section tile data on the filesystem, and the onPause() method cleans up theseresources. Without this class, all these details would require extra housekeeping that anyActivity wishing to include a MapView would have to repeat each time.
Your code won’t do much with MapActivity. Extend this class (as in listing 11.3),making sure to use only one instance per process, and include a special manifest ele-ment to enable the com.google.android.maps package. You may have noticed theuses-library element in the Wind and Waves manifest in listing 11.4:
<uses-library android:name="com.google.android.maps" />
The com.google.android.maps package, where MapActivity, MapView, Map-
Controller, and other related classes such as GeoPoint and Overlay reside, isn’t astandard package in the Android library. This manifest element pulls in support forthe Google maps package.
Once you include the uses-library element and write a basic Activity thatextends MapActivity, you can start writing the main app features with a MapView andrelated Overlay classes.
11.3.2 Using a MapView
Android offers MapView4 as a limited version of the Google Maps API in the form of aView for your Android application. A MapView displays tiles of a map, which it obtains
4 Take a look at this MapView tutorial for more information: http://developer.android.com/guide/tutorials/views/hello-mapview.html.
Figure 11.6 The MapViewActivityfrom the Wind and Waves application shows a MapActivity with a MapView.
www.it-ebooks.info
300 CHAPTER 11 Location, location, location
over the network as the map moves and zooms,much like the web version of Google Maps.
Android supports many of the concepts fromthe standard Google Maps API through theMapView. For instance, MapView supports a plainmap mode, a satellite mode, a street-view mode,and a traffic mode. When you want to write some-thing on top of the map, draw a straight linebetween two points, drop a “pushpin” marker, ordisplay full-sized images, you use an Overlay.
You can see examples of several of these con-cepts in figure 11.6, which shows MapView-
Activity screenshots for the Wind and Wavesapplication. Figure 11.7 shows that sameMapViewActivity again after switching into satel-lite mode.
You’ve already seen the MapView we’ll use forthe Wind and Waves application declared andinstantiated in listing 11.3. Now we’ll discussusing this class inside your Activity to control,position, zoom, populate, and overlay your map.
Before you can use a map at all, you have to request a Google Maps API key anddeclare it in your layout file. This listing shows the MapActivity layout file you’ll usewith a special android:apiKey attribute.
<?xml version="1.0" encoding="utf-8"?><RelativeLayout xmlns:android="http://schemas.android.com/apk/res/android" android:layout_width="fill_parent" android:layout_height="fill_parent" android:gravity="center_horizontal" android:padding="10px"> <com.google.android.maps.MapView android:id="@+id/map_view" android:layout_width="fill_parent" android:layout_height="fill_parent" android:enabled="true" android:clickable="true" android:apiKey= "05lSygx-ttd-J5GXfsIB-dlpNtggca4I4DMyVqQ" /></RelativeLayout>
You can declare a MapView in XML just like other View components B. In order to usethe Google Maps network resources, a MapView requires an API key C. You can obtaina map key from the Google Maps Android key registration web page at http://code.google.com/android/maps-api-signup.html.
Listing 11.6 A MapView layout file including the Google Maps API key
Define MapView element in XMLB
Include apiKey attribute
C
Figure 11.7 The MapViewActivityfrom the Wind and Waves application using satellite mode
www.it-ebooks.info
301Working with maps
Before you register for a key, you need to look up the MD5 fingerprint of the certif-icate that signs your application. This sounds tricky, but it’s really simple. When usingthe Android emulator, the SDK always uses a Debug Certificate. To get the MD5 finger-print for this certificate on Mac and Linux, you can use the following command:
cd ~/.androidkeytool -list -keystore ./debug.keystore -storepass android -keypass android
On Windows, adjust for the user’s home directory slash directions, such as
cd c:\Users\Chris\.androidkeytool -list -keystore debug.keystore -storepass android -keypass android
Getting a key for a production application follows the same process, but you need touse the actual certificate your APK file is signed with instead of the debug.keystore file.The Android documentation provides additional information about obtaining a keyat http://code.google.com/android/add-ons/google-apis/mapkey.html. For moreinformation about digital signatures, keys, and signing in general, see appendix B.
CAUTION Android requires you to declare the map API key in the layout file.With the key in the layout file, you must remember to update the key betweendebug and production modes. Additionally, if you debug on different devel-opment machines, you must switch keys by hand.
Once you write a MapActivity with a MapView and create your view in the layout file,complete with map API key, you can make full use of the map. Several of the previouslistings use the MapView from the Wind and Waves application. In the next listing, werepeat a few of the map-related lines of code we’ve already shown and add relateditems to consolidate all the map-related concepts in one listing.
. . . from onCreatemapView = (MapView) findViewById(R.id.map_view);mapView. setBuiltInZoomControls(true); . . . from onStartmapController = mapView.getController();mapController.setZoom(10);mapController. animateTo(lastKnownPoint);. . . from onMenuItemSelectedcase MapViewActivity.MENU_SET_MAP: mapView.setSatellite(false); break;case MapViewActivity.MENU_SET_SATELLITE: mapView.setSatellite(true); break; case MapViewActivity.MENU_BUOYS_FROM_MAP_CENTER: getBuoyData(mapView.getMapCenter()); break;
Listing 11.7 Portions of code that demonstrate working with maps
Inflate MapView from layout
B
Animate to given GeoPoint
C
Set map satellite mode
D
www.it-ebooks.info
302 CHAPTER 11 Location, location, location
We declare the MapView in XML and inflate it just like other View components B.Because it’s a ViewGroup, we can also combine and attach other elements to it. We tellthe MapView to display its built-in zoom controls so the user can zoom in and out.
Next we get a MapController from the MapView. The controller allows us to pro-grammatically zoom and move the map. When starting, we use the controller to setthe initial zoom level and animate to a specified GeoPoint C. When the user selects aview mode from the menu, we set the mode of the map from plain to satellite or backagain D. Along with manipulating the map itself, you can retrieve data from it, suchas the coordinates of the map center.
Besides manipulating the map and getting data from it, you can draw items on topof the map using Overlay instances.
11.3.3 Placing data on a map with an Overlay
The small buoy icons for the Wind and Waves application that we’ve used in severalfigures up to this point draw on the screen at specified coordinates using an Overlay.
Overlay describes an item to draw on the map. You can define your own Overlayby extending this class or MyLocationOverlay. The MyLocationOverlay class lets youdisplay a user’s current location with a compass, and it has other useful features suchas a LocationListener for convenient access to position updates.
Besides showing the user’s location, you’ll often place multiple marker items onthe map. Users generally expect to see markers as pushpins. You’ll create buoy mark-ers for the location of every buoy using data you get back from the NDBC feeds.Android provides built-in support for this with the ItemizedOverlay base class andthe OverlayItem.
OverlayItem, a simple bean, includes a title, a text snippet, a drawable marker,coordinates defined in a GeoPoint, and a few other properties. The following listingshows the buoy data-related BuoyOverlayItem class for Wind and Waves.
public class BuoyOverlayItem extends OverlayItem { public final GeoPoint point; public final BuoyData buoyData; public BuoyOverlayItem(GeoPoint point, BuoyData buoyData) { super(point, buoyData.title, buoyData.dateString); this.point = point; this.buoyData = buoyData; }}
We extend OverlayItem to include all the necessary properties of an item to draw onthe map. In the constructor we call the superclass constructor with the location, thetitle, and a brief snippet, and we assign additional elements our subclass instance vari-ables. In this case, we add a BuoyData member, which is another bean with name,water temperature, wave height, and other properties.
Listing 11.8 The OverlayItem subclass BuoyOverlayItem
www.it-ebooks.info
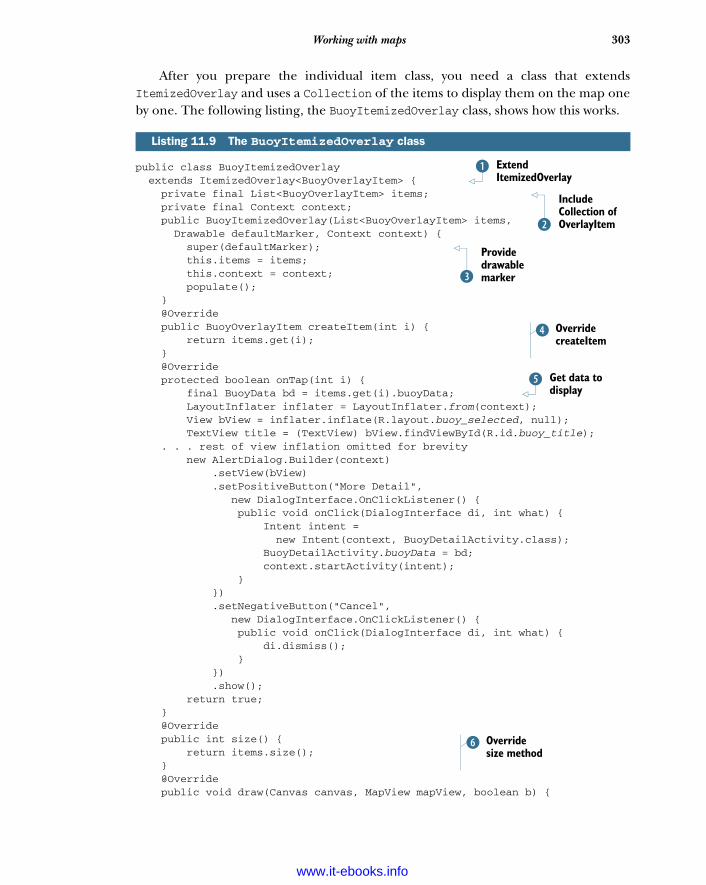
303Working with maps
After you prepare the individual item class, you need a class that extendsItemizedOverlay and uses a Collection of the items to display them on the map oneby one. The following listing, the BuoyItemizedOverlay class, shows how this works.
public class BuoyItemizedOverlay extends ItemizedOverlay<BuoyOverlayItem> { private final List<BuoyOverlayItem> items; private final Context context; public BuoyItemizedOverlay(List<BuoyOverlayItem> items, Drawable defaultMarker, Context context) { super(defaultMarker); this.items = items; this.context = context; populate(); } @Override public BuoyOverlayItem createItem(int i) { return items.get(i); } @Override protected boolean onTap(int i) { final BuoyData bd = items.get(i).buoyData; LayoutInflater inflater = LayoutInflater.from(context); View bView = inflater.inflate(R.layout.buoy_selected, null); TextView title = (TextView) bView.findViewById(R.id.buoy_title); . . . rest of view inflation omitted for brevity new AlertDialog.Builder(context) .setView(bView) .setPositiveButton("More Detail", new DialogInterface.OnClickListener() { public void onClick(DialogInterface di, int what) { Intent intent = new Intent(context, BuoyDetailActivity.class); BuoyDetailActivity.buoyData = bd; context.startActivity(intent); } }) .setNegativeButton("Cancel", new DialogInterface.OnClickListener() { public void onClick(DialogInterface di, int what) { di.dismiss(); } }) .show(); return true; } @Override public int size() { return items.size(); } @Override public void draw(Canvas canvas, MapView mapView, boolean b) {
Listing 11.9 The BuoyItemizedOverlay class
Extend ItemizedOverlay
B
Include Collection of OverlayItemC
Provide drawable markerD
Override createItem
E
Get data to display
F
Override size method
G
www.it-ebooks.info
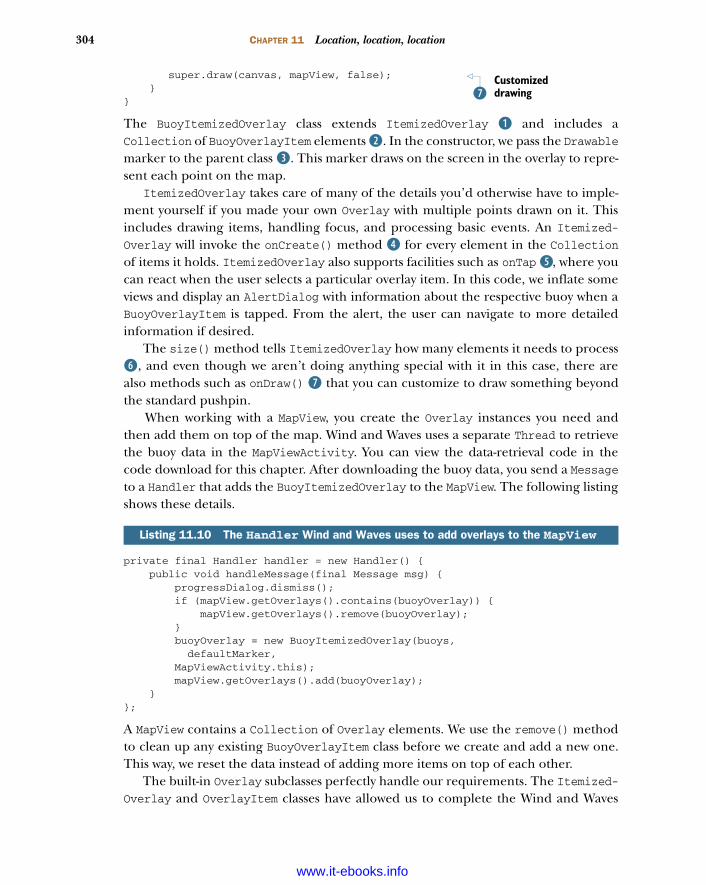
304 CHAPTER 11 Location, location, location
super.draw(canvas, mapView, false); } }
The BuoyItemizedOverlay class extends ItemizedOverlay B and includes aCollection of BuoyOverlayItem elements C. In the constructor, we pass the Drawablemarker to the parent class D. This marker draws on the screen in the overlay to repre-sent each point on the map.
ItemizedOverlay takes care of many of the details you’d otherwise have to imple-ment yourself if you made your own Overlay with multiple points drawn on it. Thisincludes drawing items, handling focus, and processing basic events. An Itemized-Overlay will invoke the onCreate() method E for every element in the Collectionof items it holds. ItemizedOverlay also supports facilities such as onTap F, where youcan react when the user selects a particular overlay item. In this code, we inflate someviews and display an AlertDialog with information about the respective buoy when aBuoyOverlayItem is tapped. From the alert, the user can navigate to more detailedinformation if desired.
The size() method tells ItemizedOverlay how many elements it needs to processG, and even though we aren’t doing anything special with it in this case, there arealso methods such as onDraw() H that you can customize to draw something beyondthe standard pushpin.
When working with a MapView, you create the Overlay instances you need andthen add them on top of the map. Wind and Waves uses a separate Thread to retrievethe buoy data in the MapViewActivity. You can view the data-retrieval code in thecode download for this chapter. After downloading the buoy data, you send a Messageto a Handler that adds the BuoyItemizedOverlay to the MapView. The following listingshows these details.
private final Handler handler = new Handler() { public void handleMessage(final Message msg) { progressDialog.dismiss(); if (mapView.getOverlays().contains(buoyOverlay)) { mapView.getOverlays().remove(buoyOverlay); } buoyOverlay = new BuoyItemizedOverlay(buoys, defaultMarker, MapViewActivity.this); mapView.getOverlays().add(buoyOverlay); }};
A MapView contains a Collection of Overlay elements. We use the remove() methodto clean up any existing BuoyOverlayItem class before we create and add a new one.This way, we reset the data instead of adding more items on top of each other.
The built-in Overlay subclasses perfectly handle our requirements. The Itemized-Overlay and OverlayItem classes have allowed us to complete the Wind and Waves
Listing 11.10 The Handler Wind and Waves uses to add overlays to the MapView
Customized drawingH
www.it-ebooks.info
305Converting places and addresses with Geocoder
application without having to make our own Overlay subclasses directly. If you needto, Android lets you go to that level and implement your own draw(), tap(), touch(),and other methods within your custom Overlay.
With this sample application now complete and providing you with buoy datausing a MapActivity and MapView, we need to address one final maps-related conceptthat you haven’t yet encountered—geocoding.
11.4 Converting places and addresses with GeocoderThe Android documentation describes geocoding as converting a “street address orother description of a location” into latitude and longitude coordinates. Reverse geocod-ing is the opposite—converting latitude and longitude into an address. To accomplishthis, the Geocoder class makes a network call to a web service.
You won’t use geocoding in Wind and Waves because the ocean doesn’t containcities, addresses, and so on. Nevertheless, geocoding provides invaluable tools whenworking with coordinates and maps. To demonstrate the concepts surrounding geo-coding, this listing includes a new single Activity application, GeocoderExample.
. . . Class declaration and Instance variables omitted for brevity @Overridepublic void onCreate(Bundle savedInstanceState) { super.onCreate(savedInstanceState); setContentView(R.layout.main); input = (EditText) findViewById(R.id.input); output = (TextView) findViewById(R.id.output); button = (Button) findViewById(R.id.geocode_button); isAddress = (CheckBox) findViewById(R.id.checkbox_address); button.setOnClickListener(new OnClickListener() { public void onClick(final View v) { output.setText(performGeocode( input.getText().toString(), isAddress.isChecked())); } });}private String performGeocode(String in, boolean isAddr) { String result = "Unable to Geocode - " + in; if (input != null) { Geocoder geocoder = new Geocoder(this); if (isAddr) { try { List<Address> addresses = geocoder.getFromLocationName(in, 1); if (addresses != null) { result = addresses.get(0).toString(); } } catch (IOException e) { Log.e("GeocodExample", "Error", e);
Listing 11.11 A Geocoder example
Instantiate Geocoder with Context
B
Get Address from location name
C
www.it-ebooks.info
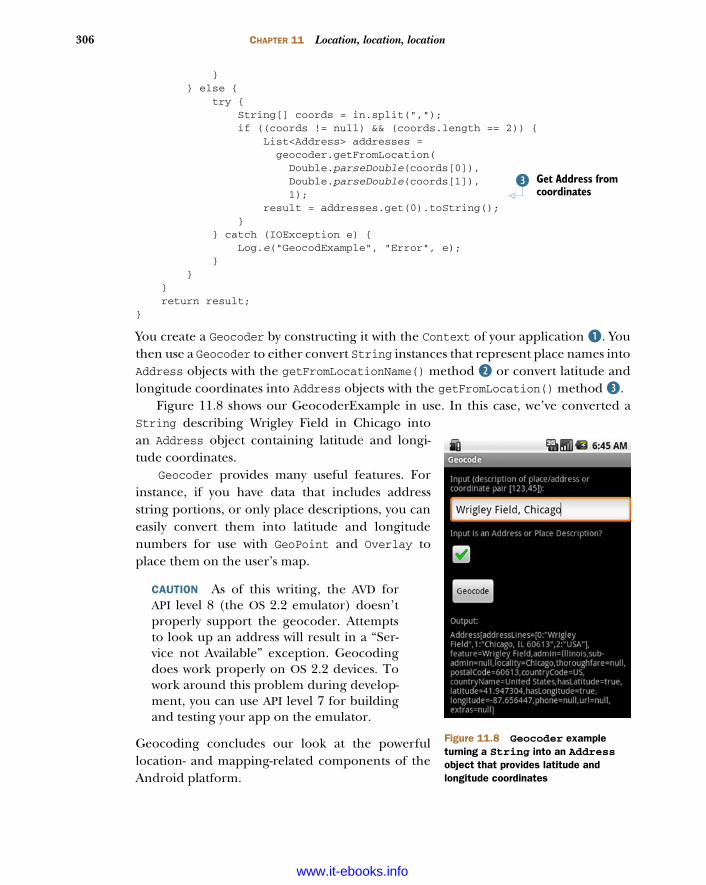
306 CHAPTER 11 Location, location, location
} } else { try { String[] coords = in.split(","); if ((coords != null) && (coords.length == 2)) { List<Address> addresses = geocoder.getFromLocation( Double.parseDouble(coords[0]), Double.parseDouble(coords[1]), 1); result = addresses.get(0).toString(); } } catch (IOException e) { Log.e("GeocodExample", "Error", e); } } } return result;}
You create a Geocoder by constructing it with the Context of your application B. Youthen use a Geocoder to either convert String instances that represent place names intoAddress objects with the getFromLocationName() method C or convert latitude andlongitude coordinates into Address objects with the getFromLocation() method D.
Figure 11.8 shows our GeocoderExample in use. In this case, we’ve converted aString describing Wrigley Field in Chicago intoan Address object containing latitude and longi-tude coordinates.
Geocoder provides many useful features. Forinstance, if you have data that includes addressstring portions, or only place descriptions, you caneasily convert them into latitude and longitudenumbers for use with GeoPoint and Overlay toplace them on the user’s map.
CAUTION As of this writing, the AVD forAPI level 8 (the OS 2.2 emulator) doesn’tproperly support the geocoder. Attemptsto look up an address will result in a “Ser-vice not Available” exception. Geocodingdoes work properly on OS 2.2 devices. Towork around this problem during develop-ment, you can use API level 7 for buildingand testing your app on the emulator.
Geocoding concludes our look at the powerfullocation- and mapping-related components of theAndroid platform.
Get Address from coordinates
D
Figure 11.8 Geocoder example turning a String into an Addressobject that provides latitude and longitude coordinates
www.it-ebooks.info
307Summary
11.5 Summary“Location, location, location,” as they say in real estate, could also be the mantra forthe future of mobile computing. Android supports readily available location informa-tion and includes smart-mapping APIs and other location-related utilities.
In this chapter, we explored the location and mapping capabilities of the Androidplatform. You built an application that acquired a LocationManager and Location-Provider, to which you attached several LocationListener instances. You did this sothat you could keep your application informed about the current device location byusing updates delivered to your listeners. Along with the LocationListener, we alsobriefly discussed several other ways to get location updates from the Android platform.
After we covered location-awareness basics, we showed you how to add informationfrom a unique data source, the National Data Buoy Center, to provide a draggable,zoomable, interactive map. To build the map you used a MapActivity, along withMapView and MapController. These classes make it fairly easy to set up and displaymaps. Once you had your MapView in place, you created an ItemizedOverlay toinclude points of interest, using individual OverlayItem elements. From the individ-ual points, in this case buoys, you linked into another Activity class to display moredetailed information, thereby demonstrating how to go from the map to any otherkind of Activity and back.
Our water-based sample application didn’t include the important mapping featureof converting from an address into a latitude and longitude and vice versa. To demon-strate this capability, we showed you how to build a separate small sample and dis-cussed usage of the Geocoder class.
With our exploration of the mapping capabilities of Android complete, includinga fully functional sample application that combines mapping with many otherAndroid tenets we’ve previously explored, we’ll move into a new stage of the book. Inthe next few chapters, we’ll explore complete nontrivial applications that bringtogether intents, activities, data storage, networking, and more.
www.it-ebooks.info

Part 3
Android applications
As you learned in part 2, the Android platform is capable of enabling richapplications in many genres and vertical industries. The goal of part 3 is to inte-grate many of the lessons of part 2 on a larger scale and spur you on to explorethe platform in greater depth than simply using the Android SDK.
In chapter 12, we take a detailed look at the requirements of a field serviceapplication. We next map those requirements on a practical application thatcould be adapted for many industries. The application includes multiple UI ele-ments, server communications, and detecting touch-screen events for capturingand uploading a signature.
In chapter 13, we move on to a deeper examination of the Android/Linuxrelationship by writing native C applications for Android and connecting toAndroid core libraries such as SQLite and TCP socket communications.
www.it-ebooks.info
Putting Android to workin a field service application
Now that we’ve introduced and examined Android and some of its core technolo-gies, it’s time to put together a more comprehensive application. Exercising APIscan be informative, educational, and even fun for a while, but at some point a plat-form must demonstrate its worth via an application that can be used outside of theivory tower—and that’s what this chapter is all about. In this chapter, we systemati-cally design, code, and test an Android application to aid a team of field servicetechnicians in performing their job. The application syncs XML data with an inter-net-hosted server, presents data to the user via intuitive user interfaces, links toGoogle Maps, and concludes by collecting customer signatures via Android’s touchscreen. Many of the APIs introduced earlier are exercised here, demonstrating thepower and versatility of the Android platform.
This chapter covers Designing a real-world Android application
Mapping out the application flow
Writing application source code
Downloading, data parsing, and signature capture
Uploading data to a server
311
www.it-ebooks.info

312 CHAPTER 12 Putting Android to work in a field service application
In addition to an in-depth Android application, this chapter’s sample applicationworks with a custom website application that manages data for use by a mobile worker.This server-side code is presented briefly toward the end of the chapter. All of thesource code for the server-side application is available for download from the book’scompanion website.
If this example is going to represent a useful real-world application, we need to putsome flesh on it. Beyond helping you understand the application, this definition pro-cess will get you thinking about the kinds of impact a mobile application can have onour economy. This chapter’s sample application is called a field service application. Apretty generic name perhaps, but it’ll prove to be an ample vehicle for demonstratingkey elements required in mobile applications, as well as demonstrating the power ofthe Android platform for building useful applications quickly.
Our application’s target user is a fleet technician who works for a national firmthat makes its services available to a number of contracted customers. One day ourtechnician, who we’ll call a mobile worker, is replacing a hard drive in the computer atthe local fast-food restaurant, and the next day he may be installing a memoryupgrade in a piece of pick-and-place machinery at a telephone system manufacturer.If you’ve ever had a piece of equipment serviced at your home or office and thoughtthe technician’s uniform didn’t really match the job he was doing, you’ve experiencedthis kind of service arrangement. This kind of technician is often referred to as handsand feet. He has basic mechanical or computer skills and is able to follow directionsreliably, often guided by the manufacturer of the equipment being serviced at thetime. Thanks to workers like these, companies can extend their reach to a muchbroader geography than internal staffing levels would ever allow. For example, a smallmanufacturer of retail music-sampling equipment might contract with such a firm toprovide tech support to retail locations across the country.
Because of our hypothetical technician’s varied schedule and lack of experienceon a particular piece of equipment, it’s important to equip him with as much relevantand timely information as possible. But he can’t be burdened with thick referencemanuals or specialized tools. So, with a toolbox containing a few hand tools and ofcourse an Android-equipped device, our fearless hero is counting on us to provide anapplication that enables him to do his job. And remember, this is the person whorestores the ice cream machine to operation at the local Dairy Barn, or perhaps fixesthe farm equipment’s computer controller so the cows get milked on time. You neverknow where a computer will be found in today’s world!
If built well, this application can enable the efficient delivery of service to custom-ers in many industries, where we live, work, and play. Let’s get started and see whatthis application must be able to accomplish and how Android steps up to the task.
12.1 Designing a real-world Android applicationWe’ve established that our mobile worker will be carrying two things: a set of handtools and an Android device. Fortunately, in this book we’re not concerned with theapplicability of the hand tools in his toolbox, leaving us free to focus on the
www.it-ebooks.info
313Designing a real-world Android application
capabilities and features of a field service application running on the Android plat-form. In this section, we define the basic and high-level application requirements.
12.1.1 Core requirements of the application
Before diving into the bits and bytes of data requirements and application features,it’s helpful to enumerate some basic requirements and assumptions about our fieldservice application. Here are a few items that come to mind for such an application:
The mobile worker is dispatched by a home office/dispatching authority,which takes care of prioritizing and distributing job orders to the appropriatetechnician.
The mobile worker is carrying an Android device, which has full data service—adevice capable of browsing rich web content. The application needs to accessthe internet for data transfer as well.
The home office dispatch system and the mobile worker share data via a wire-less internet connection on an Android device; a laptop computer isn’t neces-sary or even desired.
A business requirement is the proof of completion of work, most readily accom-plished with the capture of a customer’s signature. Of course, an electronic sig-nature is preferred.
The home office wants to receive job completion information as soon as possi-ble, as this accelerates the invoicing process, which improves cash flow.
The mobile worker is also eager to perform as many jobs as possible, becausehe’s paid by the job, not by the hour, so getting access to new job information asquickly as possible is a benefit to him.
The mobile worker needs information resources in the field and can use asmuch information as possible about the problem he’s being asked to resolve.The mobile worker may have to place orders for replacement parts while in thefield.
The mobile worker will require navigation assistance, as he’s likely covering arather large geographic area.
The mobile worker needs an intuitive application—one that’s simple to usewith a minimum number of requirements.
There are likely additional requirements for such an application, but this list is ade-quate for our purposes. One of the most glaring omissions from our list is security.
Security in this kind of an application comes down to two fundamental aspects.The first is physical security of the Android device. Our assumption is that the deviceitself is locked and only the authorized worker is using it. A bit naïve perhaps, butthere are more important topics we need to cover in this chapter. If this bothers you,just assume there’s a sign-in screen with a password field that pops up at the mostinconvenient times, forcing you to tap in your password on a small keypad. Feel betternow? The second security topic is the secure transmission of data between the
www.it-ebooks.info
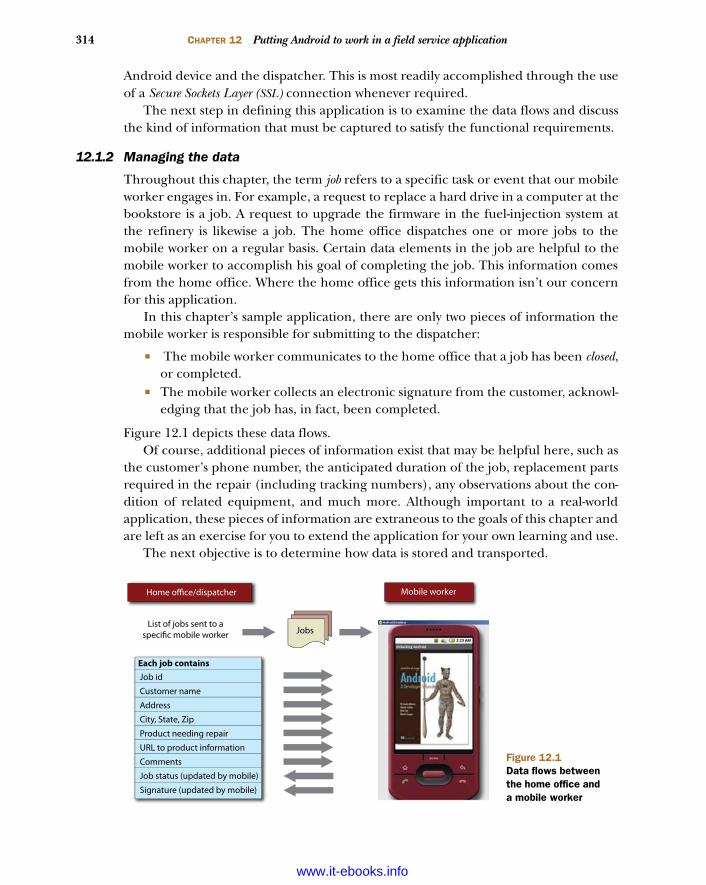
314 CHAPTER 12 Putting Android to work in a field service application
Android device and the dispatcher. This is most readily accomplished through the useof a Secure Sockets Layer (SSL) connection whenever required.
The next step in defining this application is to examine the data flows and discussthe kind of information that must be captured to satisfy the functional requirements.
12.1.2 Managing the data
Throughout this chapter, the term job refers to a specific task or event that our mobileworker engages in. For example, a request to replace a hard drive in a computer at thebookstore is a job. A request to upgrade the firmware in the fuel-injection system atthe refinery is likewise a job. The home office dispatches one or more jobs to themobile worker on a regular basis. Certain data elements in the job are helpful to themobile worker to accomplish his goal of completing the job. This information comesfrom the home office. Where the home office gets this information isn’t our concernfor this application.
In this chapter’s sample application, there are only two pieces of information themobile worker is responsible for submitting to the dispatcher:
The mobile worker communicates to the home office that a job has been closed,or completed.
The mobile worker collects an electronic signature from the customer, acknowl-edging that the job has, in fact, been completed.
Figure 12.1 depicts these data flows. Of course, additional pieces of information exist that may be helpful here, such as
the customer’s phone number, the anticipated duration of the job, replacement partsrequired in the repair (including tracking numbers), any observations about the con-dition of related equipment, and much more. Although important to a real-worldapplication, these pieces of information are extraneous to the goals of this chapter andare left as an exercise for you to extend the application for your own learning and use.
The next objective is to determine how data is stored and transported.
List of jobs sent to aspecific mobile worker Jobs
Home office/dispatcher Mobile worker
Each job containsJob id
Customer name
Address
City, State, Zip
Product needing repair
URL to product information
Comments
Job status (updated by mobile)
Signature (updated by mobile)
Figure 12.1Data flows between the home office and a mobile worker
www.it-ebooks.info
315Designing a real-world Android application
12.1.3 Application architecture and integration
Now that you know which entities are responsible for the relevant data elements, andin which direction they flow, let’s look at how the data is stored and exchanged. You’llbe deep into code before too long, but for now we’ll focus on the available optionsand continue to examine things from a requirements perspective, building to a pro-posed architecture.
At the home office, the dispatcher must manage data for multiple mobile workers.The best tool for this purpose is a relational database. The options here are numer-ous, but we’ll make the simple decision to use MySQL, a popular open source data-base. Not only are there multiple mobile workers, but the organization we’re buildingthis application for is quite spread out, with employees in multiple markets and timezones. Because of the nature of the dispatching team, it’s been decided to host theMySQL database in a data center, where it’s accessed via a browser-based application.For this sample application, the dispatcher system is supersimple and written in PHP.1
Data storage requirements on the mobile device are modest. At any point, a givenmobile worker may have only a half-dozen or so assigned jobs. Jobs may be assigned atany time, so the mobile worker is encouraged to refresh the list of jobs periodically.Although you learned about how to use SQLite in chapter 5, we have little need forsharing data between multiple applications and don’t need to build a Content-Provider, so we’ve decided to use an XML file stored on the filesystem to serve as apersistent store of our assigned job list.
The field service application uses HTTP to exchange data with the home office.Again, we use PHP to build the transactions for exchanging data. Though more com-plex and sophisticated protocols can be employed, such as SOAP, this application sim-ply requests an XML file of assigned jobs and submits an image file representing thecaptured signature. In fact, SOAP is simple in name only and should be avoided. Abetter solution that’s coming on strong in the mobile and web space is the JSON for-mat. This architecture is depicted in figure 12.2.
The last item to discuss before diving into the code is configuration. Every mobileworker needs to be identified uniquely. This way, the field service application canretrieve the correct job list, and the dispatchers can assign jobs to workers in the field.Similarly, the mobile application may need to communicate with different servers,depending on locale. A mobile worker in the United States might use a server locatedin Chicago, but a worker in the United Kingdom may need to use a server in Cam-bridge. Because of these requirements, we’ve decided that both the mobile worker’sidentifier and the server address need to be readily accessed within the application.Remember, these fields would likely be secured in a deployed application, but for ourpurposes they’re easy to access and not secured.
1 See Manning’s PHP in Action for details on PHP development: www.manning.com/reiersol/.
www.it-ebooks.info
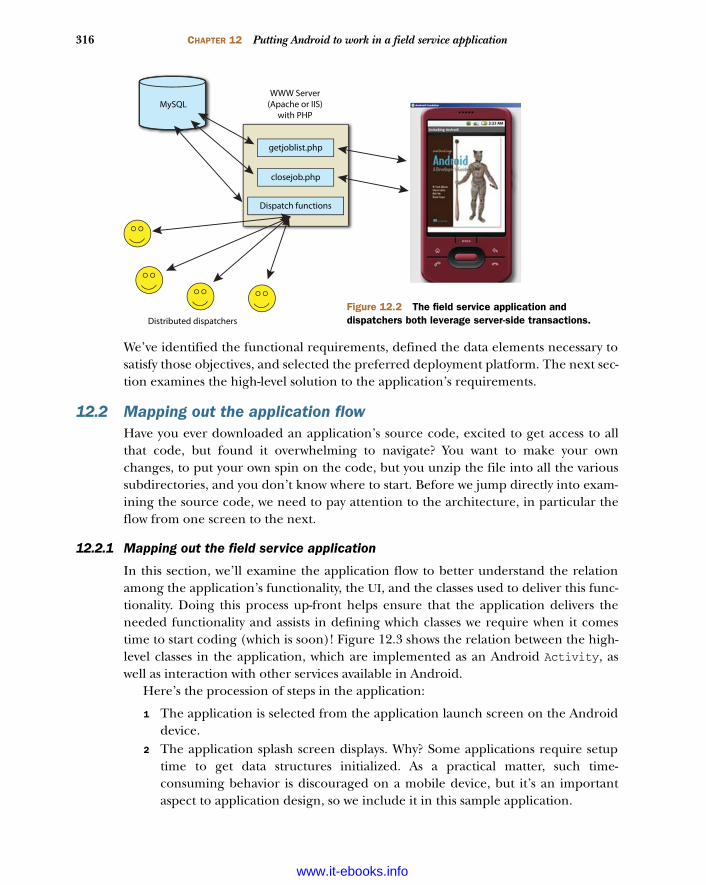
316 CHAPTER 12 Putting Android to work in a field service application
We’ve identified the functional requirements, defined the data elements necessary tosatisfy those objectives, and selected the preferred deployment platform. The next sec-tion examines the high-level solution to the application’s requirements.
12.2 Mapping out the application flowHave you ever downloaded an application’s source code, excited to get access to allthat code, but found it overwhelming to navigate? You want to make your ownchanges, to put your own spin on the code, but you unzip the file into all the varioussubdirectories, and you don’t know where to start. Before we jump directly into exam-ining the source code, we need to pay attention to the architecture, in particular theflow from one screen to the next.
12.2.1 Mapping out the field service application
In this section, we’ll examine the application flow to better understand the relationamong the application’s functionality, the UI, and the classes used to deliver this func-tionality. Doing this process up-front helps ensure that the application delivers theneeded functionality and assists in defining which classes we require when it comestime to start coding (which is soon)! Figure 12.3 shows the relation between the high-level classes in the application, which are implemented as an Android Activity, aswell as interaction with other services available in Android.
Here’s the procession of steps in the application:
1 The application is selected from the application launch screen on the Androiddevice.
2 The application splash screen displays. Why? Some applications require setuptime to get data structures initialized. As a practical matter, such time-consuming behavior is discouraged on a mobile device, but it’s an importantaspect to application design, so we include it in this sample application.
MySQL
Distributed dispatchers
getjoblist.php
closejob.php
Dispatch functions
WWW Server(Apache or IIS)
with PHP
Figure 12.2 The field service application and dispatchers both leverage server-side transactions.
www.it-ebooks.info
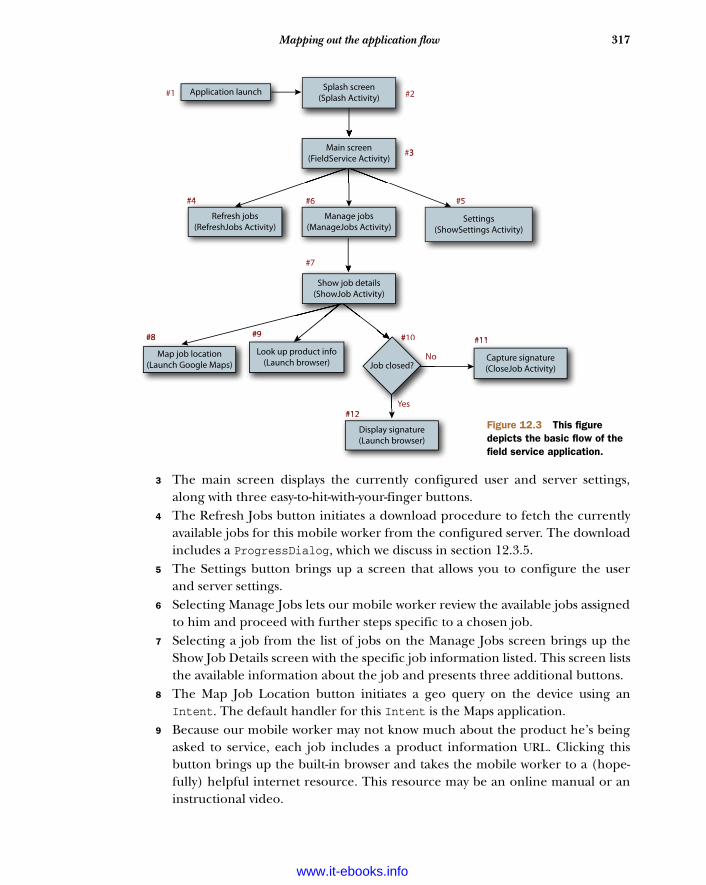
317Mapping out the application flow
3 The main screen displays the currently configured user and server settings,along with three easy-to-hit-with-your-finger buttons.
4 The Refresh Jobs button initiates a download procedure to fetch the currentlyavailable jobs for this mobile worker from the configured server. The downloadincludes a ProgressDialog, which we discuss in section 12.3.5.
5 The Settings button brings up a screen that allows you to configure the userand server settings.
6 Selecting Manage Jobs lets our mobile worker review the available jobs assignedto him and proceed with further steps specific to a chosen job.
7 Selecting a job from the list of jobs on the Manage Jobs screen brings up theShow Job Details screen with the specific job information listed. This screen liststhe available information about the job and presents three additional buttons.
8 The Map Job Location button initiates a geo query on the device using anIntent. The default handler for this Intent is the Maps application.
9 Because our mobile worker may not know much about the product he’s beingasked to service, each job includes a product information URL. Clicking thisbutton brings up the built-in browser and takes the mobile worker to a (hope-fully) helpful internet resource. This resource may be an online manual or aninstructional video.
#1 #2
#3
#4 #5#6
#7
#8 #9 #10 #11
#12
No
Yes
Application launch #Splash screen
(Splash Activity)
#4
Refresh jobs(RefreshJobs Activity)
#6
Manage jobs(ManageJobs Activity)
#5
Settings(ShowSettings Activity)
#8
Map job location(Launch Google Maps)
#9
Look up product info(Launch browser)
#11
Capture signature(CloseJob Activity)
#12
Display signature(Launch browser)
#3Main screen(FieldService Activity)
Show job details(ShowJob Activity)
#10#
No
Yes
Job closed?
Figure 12.3 This figure depicts the basic flow of the field service application.
www.it-ebooks.info
318 CHAPTER 12 Putting Android to work in a field service application
10 The behavior of the third button depends on the current status of the job. Ifthe job is still marked OPEN, this button is used to initiate the closeout or com-pletion of this job.
11 When the close procedure is selected, the application presents an empty canvasupon which the customer can take the stylus (assuming a touch screen–capableAndroid device) and sign that the work is complete. A menu on that screenpresents two options: Sign & Close and Cancel. If the user selects Sign & Closeoption, the application submits the signature as a JPEG image to the server, andthe server marks the job as CLOSED. In addition, the local copy of the job ismarked as CLOSED. The Cancel button causes the Show Job Details screen to berestored.
12 If the job being viewed has already been closed, the browser window is openedto a page displaying the previously captured signature.
Now that you have a feel for what the requirements are and how you’re going to tacklethe problem from a functionality and application-flow perspective, let’s examine thecode that delivers this functionality.
12.2.2 List of source files
The source code for this application consists of 12 Java source files, one of which is theR.java file, which you’ll recall is automatically generated based on the resources in theapplication. This section presents a quick introduction to each of these files. We won’texplain any code yet; we want you to know a bit about each file, and then it’ll be timeto jump into the application, step by step. Table 12.1 lists the source files in theAndroid field service application.
Table 12.1 Source files used to implement the field service application
Source filename Description
Splash.java Activity provides splash screen functionality.
ShowSettings.java Activity provides management of the username and server URL address.
FieldService.java Activity provides the main screen of the application.
RefreshJobs.java Activity interacts with the server to obtain an updated list of jobs.
ManageJobs.java Activity provides access to the list of jobs.
ShowJob.java Activity provides detailed information on a specific job, such as an address lookup, or initiates the signature-capture process.
CloseJob.java Activity collects an electronic signature and interacts with the server to upload images and mark jobs as CLOSED.
R.java Automatically generated source file representing identifiers in the resources.
Prefs.java Helper class encapsulating SharedPreferences.
JobEntry.java Class that represents a job. Includes helpful methods used when passing JobEntry objects from one Activity to another.
www.it-ebooks.info
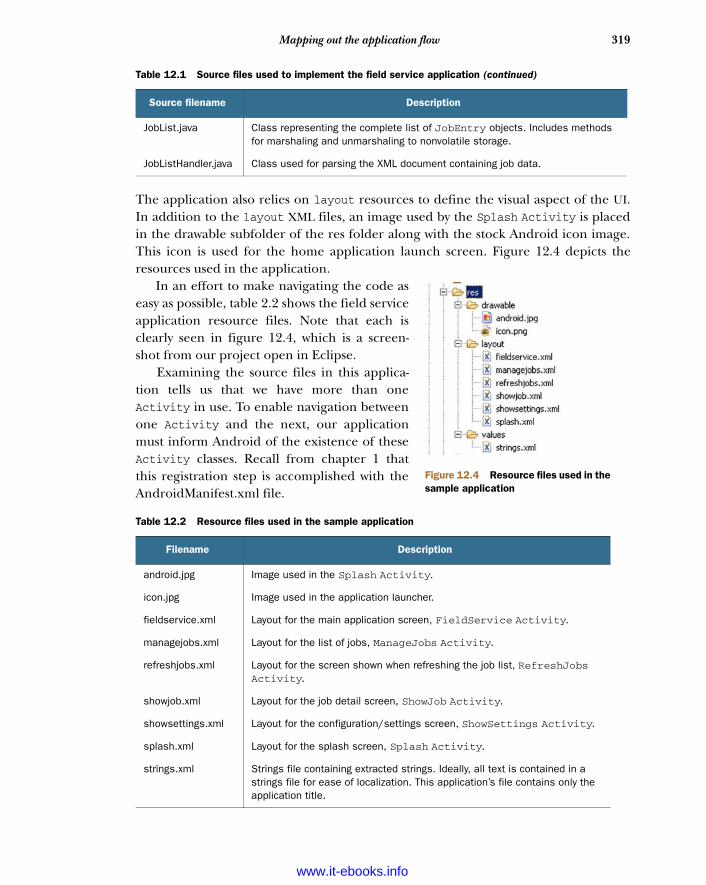
319Mapping out the application flow
The application also relies on layout resources to define the visual aspect of the UI.In addition to the layout XML files, an image used by the Splash Activity is placedin the drawable subfolder of the res folder along with the stock Android icon image.This icon is used for the home application launch screen. Figure 12.4 depicts theresources used in the application.
In an effort to make navigating the code aseasy as possible, table 2.2 shows the field serviceapplication resource files. Note that each isclearly seen in figure 12.4, which is a screen-shot from our project open in Eclipse.
Examining the source files in this applica-tion tells us that we have more than oneActivity in use. To enable navigation betweenone Activity and the next, our applicationmust inform Android of the existence of theseActivity classes. Recall from chapter 1 thatthis registration step is accomplished with theAndroidManifest.xml file.
JobList.java Class representing the complete list of JobEntry objects. Includes methods for marshaling and unmarshaling to nonvolatile storage.
JobListHandler.java Class used for parsing the XML document containing job data.
Table 12.2 Resource files used in the sample application
Filename Description
android.jpg Image used in the Splash Activity.
icon.jpg Image used in the application launcher.
fieldservice.xml Layout for the main application screen, FieldService Activity.
managejobs.xml Layout for the list of jobs, ManageJobs Activity.
refreshjobs.xml Layout for the screen shown when refreshing the job list, RefreshJobsActivity.
showjob.xml Layout for the job detail screen, ShowJob Activity.
showsettings.xml Layout for the configuration/settings screen, ShowSettings Activity.
splash.xml Layout for the splash screen, Splash Activity.
strings.xml Strings file containing extracted strings. Ideally, all text is contained in a strings file for ease of localization. This application’s file contains only the application title.
Table 12.1 Source files used to implement the field service application (continued)
Source filename Description
Figure 12.4 Resource files used in the sample application
www.it-ebooks.info
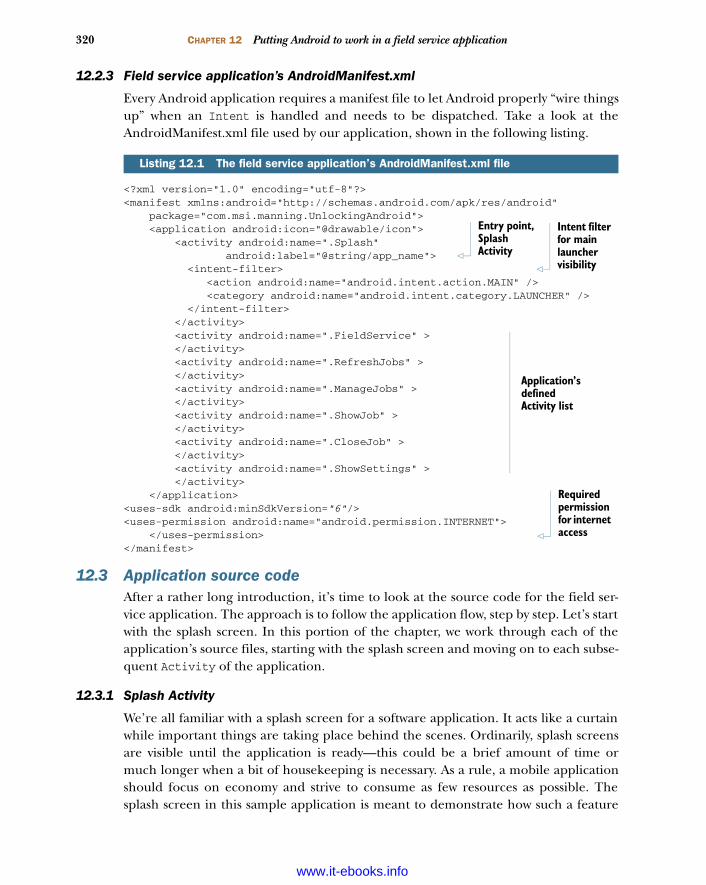
320 CHAPTER 12 Putting Android to work in a field service application
12.2.3 Field service application’s AndroidManifest.xml
Every Android application requires a manifest file to let Android properly “wire thingsup” when an Intent is handled and needs to be dispatched. Take a look at theAndroidManifest.xml file used by our application, shown in the following listing.
<?xml version="1.0" encoding="utf-8"?><manifest xmlns:android="http://schemas.android.com/apk/res/android" package="com.msi.manning.UnlockingAndroid"> <application android:icon="@drawable/icon"> <activity android:name=".Splash" android:label="@string/app_name"> <intent-filter> <action android:name="android.intent.action.MAIN" /> <category android:name="android.intent.category.LAUNCHER" /> </intent-filter> </activity> <activity android:name=".FieldService" > </activity> <activity android:name=".RefreshJobs" > </activity> <activity android:name=".ManageJobs" > </activity> <activity android:name=".ShowJob" > </activity> <activity android:name=".CloseJob" > </activity> <activity android:name=".ShowSettings" > </activity> </application><uses-sdk android:minSdkVersion="6"/><uses-permission android:name="android.permission.INTERNET"> </uses-permission></manifest>
12.3 Application source codeAfter a rather long introduction, it’s time to look at the source code for the field ser-vice application. The approach is to follow the application flow, step by step. Let’s startwith the splash screen. In this portion of the chapter, we work through each of theapplication’s source files, starting with the splash screen and moving on to each subse-quent Activity of the application.
12.3.1 Splash Activity
We’re all familiar with a splash screen for a software application. It acts like a curtainwhile important things are taking place behind the scenes. Ordinarily, splash screensare visible until the application is ready—this could be a brief amount of time ormuch longer when a bit of housekeeping is necessary. As a rule, a mobile applicationshould focus on economy and strive to consume as few resources as possible. Thesplash screen in this sample application is meant to demonstrate how such a feature
Listing 12.1 The field service application’s AndroidManifest.xml file
Entry point, Splash Activity
Intent filter for main launcher visibility
Application’s defined Activity list
Required permission for internet access
www.it-ebooks.info
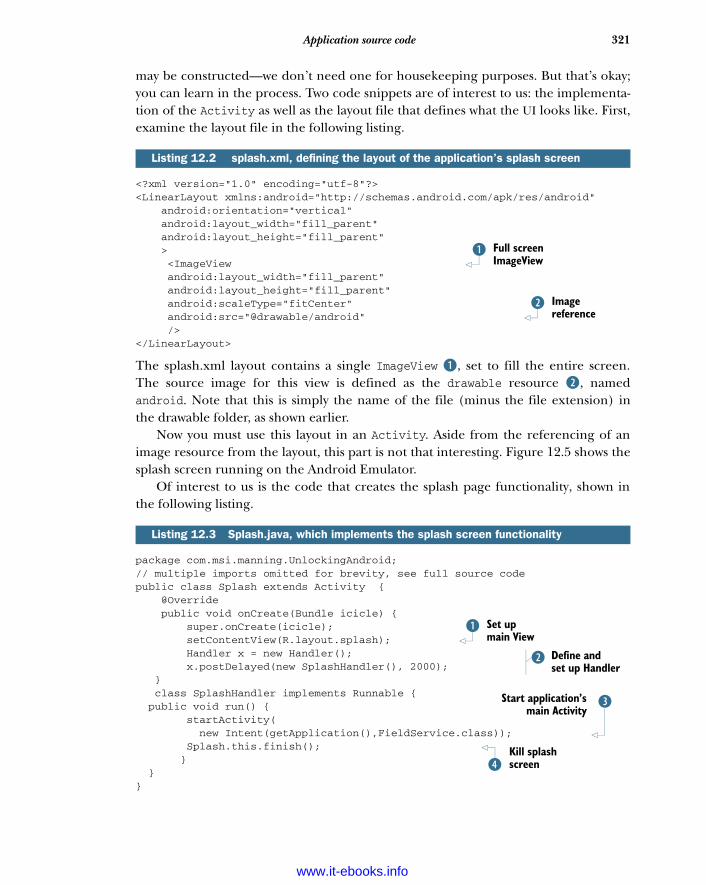
321Application source code
may be constructed—we don’t need one for housekeeping purposes. But that’s okay;you can learn in the process. Two code snippets are of interest to us: the implementa-tion of the Activity as well as the layout file that defines what the UI looks like. First,examine the layout file in the following listing.
<?xml version="1.0" encoding="utf-8"?><LinearLayout xmlns:android="http://schemas.android.com/apk/res/android" android:orientation="vertical" android:layout_width="fill_parent" android:layout_height="fill_parent" > <ImageView android:layout_width="fill_parent" android:layout_height="fill_parent" android:scaleType="fitCenter" android:src="@drawable/android" /> </LinearLayout>
The splash.xml layout contains a single ImageView B, set to fill the entire screen.The source image for this view is defined as the drawable resource C, namedandroid. Note that this is simply the name of the file (minus the file extension) inthe drawable folder, as shown earlier.
Now you must use this layout in an Activity. Aside from the referencing of animage resource from the layout, this part is not that interesting. Figure 12.5 shows thesplash screen running on the Android Emulator.
Of interest to us is the code that creates the splash page functionality, shown inthe following listing.
package com.msi.manning.UnlockingAndroid;// multiple imports omitted for brevity, see full source codepublic class Splash extends Activity { @Override public void onCreate(Bundle icicle) { super.onCreate(icicle); setContentView(R.layout.splash); Handler x = new Handler(); x.postDelayed(new SplashHandler(), 2000); } class SplashHandler implements Runnable { public void run() { startActivity( new Intent(getApplication(),FieldService.class)); Splash.this.finish(); } }}
Listing 12.2 splash.xml, defining the layout of the application’s splash screen
Listing 12.3 Splash.java, which implements the splash screen functionality
Full screen ImageView
B
Image reference
C
Set up main View
B
Define and set up Handler
C
DStart application’smain Activity
Kill splash screenE
www.it-ebooks.info
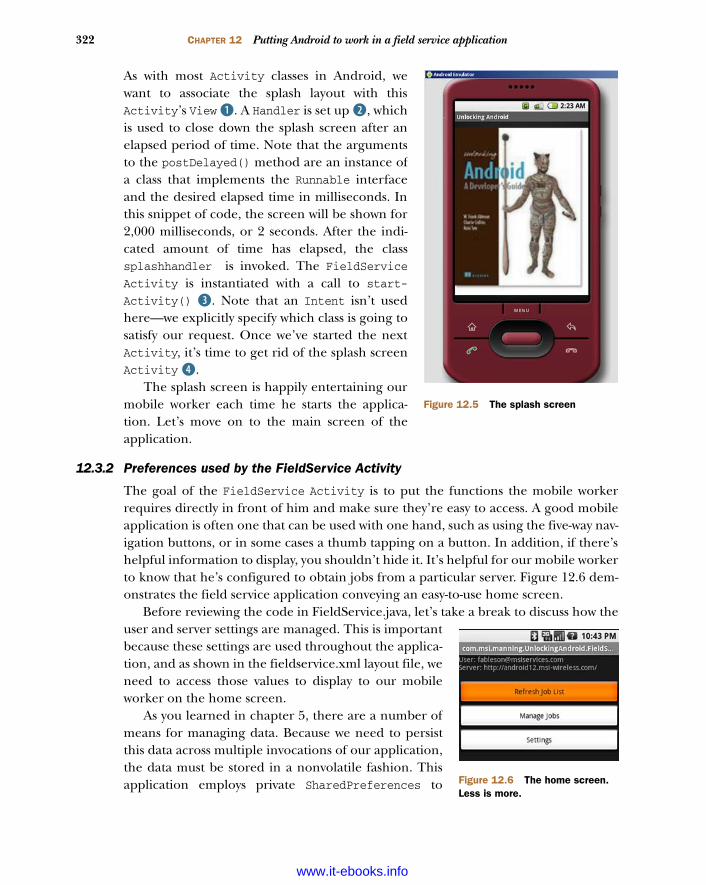
322 CHAPTER 12 Putting Android to work in a field service application
As with most Activity classes in Android, wewant to associate the splash layout with thisActivity’s View B. A Handler is set up C, whichis used to close down the splash screen after anelapsed period of time. Note that the argumentsto the postDelayed() method are an instance ofa class that implements the Runnable interfaceand the desired elapsed time in milliseconds. Inthis snippet of code, the screen will be shown for2,000 milliseconds, or 2 seconds. After the indi-cated amount of time has elapsed, the classsplashhandler is invoked. The FieldServiceActivity is instantiated with a call to start-Activity() D. Note that an Intent isn’t usedhere—we explicitly specify which class is going tosatisfy our request. Once we’ve started the nextActivity, it’s time to get rid of the splash screenActivity E.
The splash screen is happily entertaining ourmobile worker each time he starts the applica-tion. Let’s move on to the main screen of theapplication.
12.3.2 Preferences used by the FieldService Activity
The goal of the FieldService Activity is to put the functions the mobile workerrequires directly in front of him and make sure they’re easy to access. A good mobileapplication is often one that can be used with one hand, such as using the five-way nav-igation buttons, or in some cases a thumb tapping on a button. In addition, if there’shelpful information to display, you shouldn’t hide it. It’s helpful for our mobile workerto know that he’s configured to obtain jobs from a particular server. Figure 12.6 dem-onstrates the field service application conveying an easy-to-use home screen.
Before reviewing the code in FieldService.java, let’s take a break to discuss how theuser and server settings are managed. This is importantbecause these settings are used throughout the applica-tion, and as shown in the fieldservice.xml layout file, weneed to access those values to display to our mobileworker on the home screen.
As you learned in chapter 5, there are a number ofmeans for managing data. Because we need to persistthis data across multiple invocations of our application,the data must be stored in a nonvolatile fashion. Thisapplication employs private SharedPreferences to
Figure 12.5 The splash screen
Figure 12.6 The home screen. Less is more.
www.it-ebooks.info

323Application source code
accomplish this. Why? Despite the fact that we’re largely ignoring security for this sam-ple application, using private SharedPreferences means that other applications can’tcasually access this potentially important data. For example, we presently use only anidentifier (let’s call it an email address for simplicity) and a server URL in this applica-tion. But we might also include a password or a PIN in a production-ready application,so keeping this data private is a good practice.
The Prefs class can be described as a helper or wrapper class. This class wraps theSharedPreferences code and exposes simple getter and setter methods, specific tothis application. This implementation knows something about what we’re trying toaccomplish, so it adds value with some default values as well. Let’s look at the follow-ing listing to see how our Prefs class is implemented.
package com.msi.manning.UnlockingAndroid;// multiple imports omitted for brevity, see full source codepublic class Prefs { private SharedPreferences _prefs = null; private Editor _editor = null; private String _useremailaddress = "Unknown"; private String _serverurl = "http://android12.msi-wireless.com/getjoblist.php"; public Prefs(Context context) { _prefs = context.getSharedPreferences("PREFS_PRIVATE",Context.MODE_PRIVATE); _editor = _prefs.edit(); } public String getValue(String key,String defaultvalue){ if (_prefs == null) return "Unknown"; return _prefs.getString(key,defaultvalue); } public void setValue(String key,String value) { if (_editor == null) return; _editor.putString(key,value); } public String getEmail(){ if (_prefs == null) return "Unknown"; _useremailaddress = _prefs.getString("emailaddress","Unknown"); return _useremailaddress; } public void setEmail(String newemail) { if (_editor == null) return; _editor.putString("emailaddress",newemail); } ... (abbreviated for brevity) public void save() { if (_editor == null) return; _editor.commit(); }}
Listing 12.4 Prefs class
SharedPreferences objectBImplement HandlerC
Default valuesD
EInitialize
SharedPreferences
Generic set/get methods
F
Extract email value
G
Set email valueH
Save preferencesI
www.it-ebooks.info
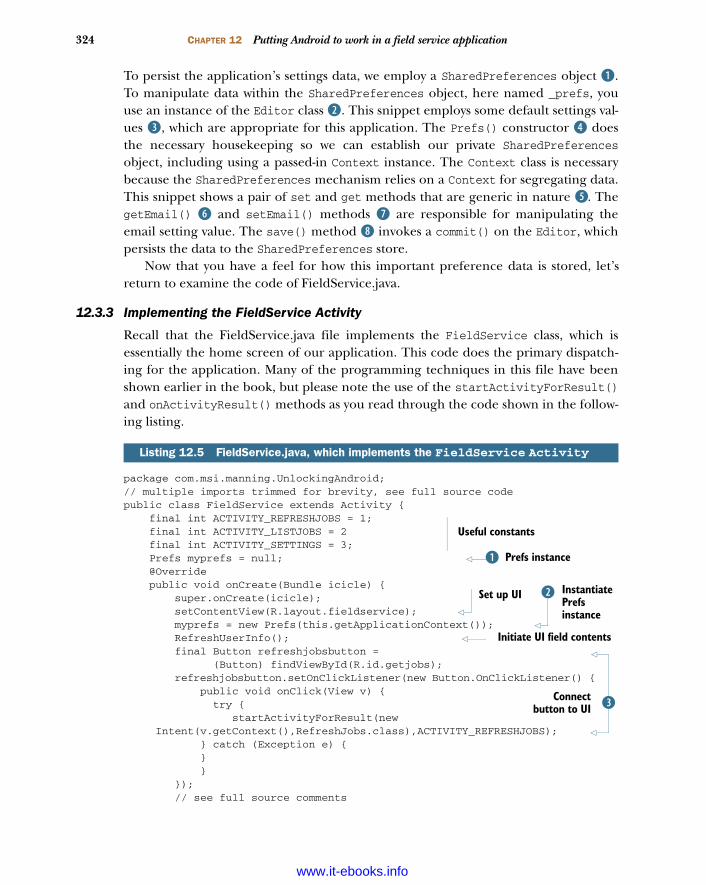
324 CHAPTER 12 Putting Android to work in a field service application
To persist the application’s settings data, we employ a SharedPreferences object B.To manipulate data within the SharedPreferences object, here named _prefs, youuse an instance of the Editor class C. This snippet employs some default settings val-ues D, which are appropriate for this application. The Prefs() constructor E doesthe necessary housekeeping so we can establish our private SharedPreferencesobject, including using a passed-in Context instance. The Context class is necessarybecause the SharedPreferences mechanism relies on a Context for segregating data.This snippet shows a pair of set and get methods that are generic in nature F. ThegetEmail() G and setEmail() methods H are responsible for manipulating theemail setting value. The save() method I invokes a commit() on the Editor, whichpersists the data to the SharedPreferences store.
Now that you have a feel for how this important preference data is stored, let’sreturn to examine the code of FieldService.java.
12.3.3 Implementing the FieldService Activity
Recall that the FieldService.java file implements the FieldService class, which isessentially the home screen of our application. This code does the primary dispatch-ing for the application. Many of the programming techniques in this file have beenshown earlier in the book, but please note the use of the startActivityForResult()and onActivityResult() methods as you read through the code shown in the follow-ing listing.
package com.msi.manning.UnlockingAndroid;// multiple imports trimmed for brevity, see full source codepublic class FieldService extends Activity { final int ACTIVITY_REFRESHJOBS = 1; final int ACTIVITY_LISTJOBS = 2 final int ACTIVITY_SETTINGS = 3; Prefs myprefs = null; @Override public void onCreate(Bundle icicle) { super.onCreate(icicle); setContentView(R.layout.fieldservice); myprefs = new Prefs(this.getApplicationContext()); RefreshUserInfo(); final Button refreshjobsbutton =
(Button) findViewById(R.id.getjobs); refreshjobsbutton.setOnClickListener(new Button.OnClickListener() { public void onClick(View v) { try { startActivityForResult(new
Intent(v.getContext(),RefreshJobs.class),ACTIVITY_REFRESHJOBS); } catch (Exception e) { } } }); // see full source comments
Listing 12.5 FieldService.java, which implements the FieldService Activity
Useful constants
Prefs instanceB
Set up UI Instantiate Prefs instance
C
Initiate UI field contents
DConnect
button to UI
www.it-ebooks.info

325Application source code
} @Override protected void onActivityResult(int requestCode, int resultCode, Intent
data) { switch (requestCode) { case ACTIVITY_REFRESHJOBS: break; case ACTIVITY_LISTJOBS: break; case ACTIVITY_SETTINGS: RefreshUserInfo(); break; } } private void RefreshUserInfo() { try { final TextView emaillabel = (TextView)
findViewById(R.id.emailaddresslabel); emaillabel.setText("User: " + myprefs.getEmail() + "\nServer: " +
myprefs.getServer() + "\n"); } catch (Exception e) { } }}
This code implements a simple UI that displays three distinct buttons. As each isselected, a particular Activity is started in a synchronous, call/return fashion. TheActivity is started with a call to startActivityForResult() D. When the calledActivity is complete, the results are returned to the FieldService Activity via theonActivityResult() method E. An instance of the Prefs class B, C is used toobtain values for displaying in the UI. Updating the UI is accomplished in the methodRefreshUserInfo() F.
Because the settings are so important to thisapplication, the next section covers the managementof the user and server values.
12.3.4 Settings
When the user clicks the Settings button on the mainapplication screen, an Activity is started that allowsthe user to configure her user ID (email address)and the server URL. The screen layout is basic (seelisting 12.6). It’s shown graphically in figure 12.7.
<?xml version="1.0" encoding="utf-8"?><LinearLayout xmlns:android="http://schemas.android.com/apk/res/android" android:orientation="vertical" android:layout_width="fill_parent" android:layout_height="fill_parent"
Listing 12.6 showsettings.xml, which contains UI elements for the settings screen
onActivityResult processingE
RefreshUserInfoF
Figure 12.7 Settings screen in use
www.it-ebooks.info
326 CHAPTER 12 Putting Android to work in a field service application
> <TextView android:layout_width="fill_parent" android:layout_height="wrap_content" android:text="Email Address" /> <EditText android:id="@+id/emailaddress" android:layout_width="fill_parent" android:layout_height="wrap_content" android:autoText="true" /> <TextView android:layout_width="fill_parent" android:layout_height="wrap_content" android:text="Server URL" /> <EditText android:id="@+id/serverurl" android:layout_width="fill_parent" android:layout_height="wrap_content" android:autoText="true" /> <Button android:id="@+id/settingssave" android:text="Save Settings" android:layout_height="wrap_content" android:layout_width="wrap_content" android:enabled="true" /></LinearLayout>
The source code behind the settings screen is also basic. Note the use of thePopulateScreen() method, which makes sure the EditView controls are populatedwith the current values stored in the SharedPreferences. Note also the use of thePrefs helper class to retrieve and save the values, as shown in the following listing.
package com.msi.manning.UnlockingAndroid;// multiple imports trimmed for brevity, see full source codepublic class ShowSettings extends Activity { Prefs myprefs = null; @Override public void onCreate(Bundle icicle) { super.onCreate(icicle); setContentView(R.layout.showsettings);
myprefs = new Prefs(this.getApplicationContext()); PopulateScreen(); final Button savebutton = (Button) findViewById(R.id.settingssave); savebutton.setOnClickListener(new Button.OnClickListener() { public void onClick(View v) { try { final EditText email=
Listing 12.7 ShowSettings.java, which implements code behind the settings screen
TextView for display of labels
EditView for entry of data
TextView for display of labels
EditView for entry of data
Button to initiate saving data
BInitializePrefs instance
Populate UI elements
C
www.it-ebooks.info
327Application source code
(EditText)findViewById(R.id.emailaddress); if (email.getText().length() == 0) { // display dialog, see full source code return; } final EditText serverurl = (EditText)findViewById(R.id.serverurl); if (serverurl.getText().length() == 0) { // display dialog, see full source code return; } myprefs.setEmail(email.getText().toString()); myprefs.setServer(serverurl.getText().toString()); myprefs.save(); finish(); } catch (Exception e) { } } });} private void PopulateScreen() { try { final EditText emailfield = (EditText) findViewById(R.id.emailaddress); final EditText serverurlfield = (EditText)findViewById(R.id.serverurl); emailfield.setText(myprefs.getEmail()); serverurlfield.setText(myprefs.getServer()); } catch Exception e) { } }}
This Activity commences by initializing the SharedPreferences instance B, whichretrieves the setting’s values and subsequently populates the UI elements C by callingthe application-defined PopulateScreen() method G. When the user clicks the SaveSettings button, the onClick() method is invoked, wherein the data is extracted fromthe UI elements D and put back into the Prefs instance E. A call to the finish()method F ends this Activity.
Once the settings are in order, it’s time to focus on the core of the application:managing jobs for our mobile worker. To get the most out the higher-level functional-ity of downloading (refreshing) and managing jobs, let’s examine the core data struc-tures in use in this application.
12.3.5 Managing job data
Data structures represent a key element of any software project and, in particular,projects consisting of multiple tiers, such as our field service application. Job data isexchanged between an Android application and the server, so the elements of the jobare central to our application. In Java, you implement these data structures as classes,which include helpful methods in addition to the data elements. XML data shows upin many locations in this application, so let’s start there.
Connect EditText to UI
D
Store and save settings
E
Finish this ActivityF
PopulateScreen method sets up UI
G
www.it-ebooks.info
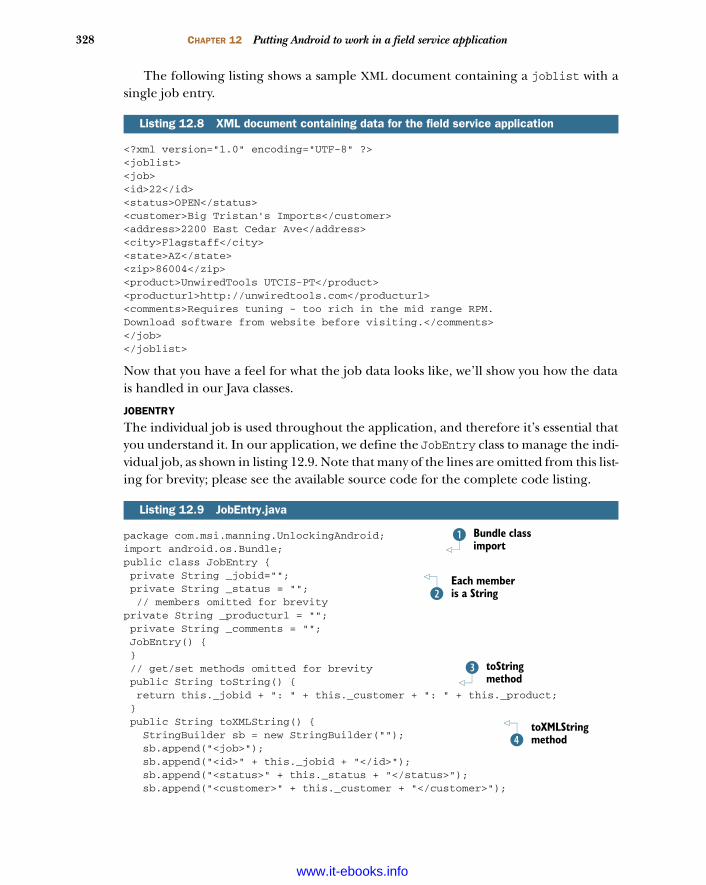
328 CHAPTER 12 Putting Android to work in a field service application
The following listing shows a sample XML document containing a joblist with asingle job entry.
<?xml version="1.0" encoding="UTF-8" ?><joblist><job><id>22</id><status>OPEN</status><customer>Big Tristan's Imports</customer><address>2200 East Cedar Ave</address><city>Flagstaff</city><state>AZ</state><zip>86004</zip><product>UnwiredTools UTCIS-PT</product><producturl>http://unwiredtools.com</producturl><comments>Requires tuning - too rich in the mid range RPM. Download software from website before visiting.</comments></job></joblist>
Now that you have a feel for what the job data looks like, we’ll show you how the datais handled in our Java classes.
JOBENTRY
The individual job is used throughout the application, and therefore it’s essential thatyou understand it. In our application, we define the JobEntry class to manage the indi-vidual job, as shown in listing 12.9. Note that many of the lines are omitted from this list-ing for brevity; please see the available source code for the complete code listing.
package com.msi.manning.UnlockingAndroid;import android.os.Bundle;public class JobEntry { private String _jobid=""; private String _status = ""; // members omitted for brevityprivate String _producturl = ""; private String _comments = ""; JobEntry() { } // get/set methods omitted for brevity public String toString() { return this._jobid + ": " + this._customer + ": " + this._product; } public String toXMLString() { StringBuilder sb = new StringBuilder(""); sb.append("<job>"); sb.append("<id>" + this._jobid + "</id>"); sb.append("<status>" + this._status + "</status>"); sb.append("<customer>" + this._customer + "</customer>");
Listing 12.8 XML document containing data for the field service application
Listing 12.9 JobEntry.java
Bundle class import
B
Each member is a StringC
toString method
D
toXMLString methodE
www.it-ebooks.info
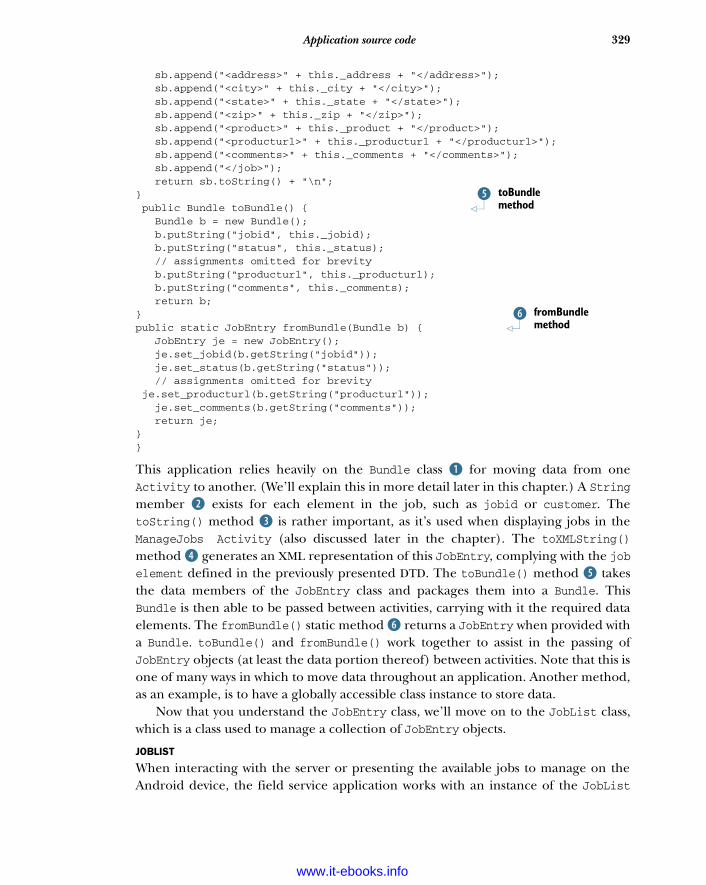
329Application source code
sb.append("<address>" + this._address + "</address>"); sb.append("<city>" + this._city + "</city>"); sb.append("<state>" + this._state + "</state>"); sb.append("<zip>" + this._zip + "</zip>"); sb.append("<product>" + this._product + "</product>"); sb.append("<producturl>" + this._producturl + "</producturl>"); sb.append("<comments>" + this._comments + "</comments>"); sb.append("</job>"); return sb.toString() + "\n";} public Bundle toBundle() { Bundle b = new Bundle(); b.putString("jobid", this._jobid); b.putString("status", this._status); // assignments omitted for brevity b.putString("producturl", this._producturl); b.putString("comments", this._comments); return b;}public static JobEntry fromBundle(Bundle b) { JobEntry je = new JobEntry(); je.set_jobid(b.getString("jobid")); je.set_status(b.getString("status")); // assignments omitted for brevity je.set_producturl(b.getString("producturl")); je.set_comments(b.getString("comments")); return je;}}
This application relies heavily on the Bundle class B for moving data from oneActivity to another. (We’ll explain this in more detail later in this chapter.) A Stringmember C exists for each element in the job, such as jobid or customer. ThetoString() method D is rather important, as it’s used when displaying jobs in theManageJobs Activity (also discussed later in the chapter). The toXMLString()method E generates an XML representation of this JobEntry, complying with the jobelement defined in the previously presented DTD. The toBundle() method F takesthe data members of the JobEntry class and packages them into a Bundle. ThisBundle is then able to be passed between activities, carrying with it the required dataelements. The fromBundle() static method G returns a JobEntry when provided witha Bundle. toBundle() and fromBundle() work together to assist in the passing ofJobEntry objects (at least the data portion thereof) between activities. Note that this isone of many ways in which to move data throughout an application. Another method,as an example, is to have a globally accessible class instance to store data.
Now that you understand the JobEntry class, we’ll move on to the JobList class,which is a class used to manage a collection of JobEntry objects.
JOBLIST
When interacting with the server or presenting the available jobs to manage on theAndroid device, the field service application works with an instance of the JobList
toBundle method
F
fromBundle method
G
www.it-ebooks.info
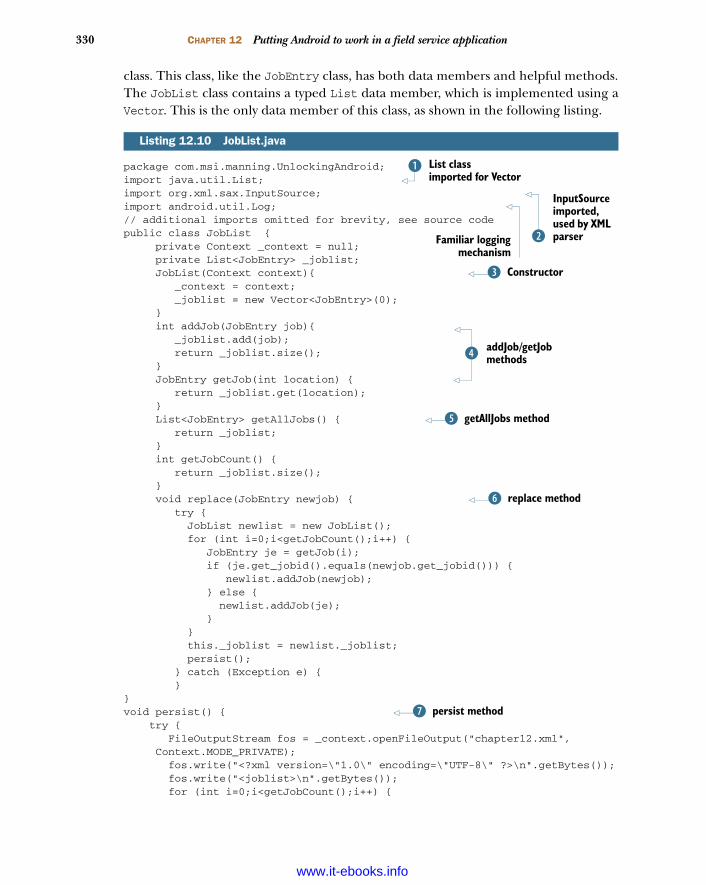
330 CHAPTER 12 Putting Android to work in a field service application
class. This class, like the JobEntry class, has both data members and helpful methods.The JobList class contains a typed List data member, which is implemented using aVector. This is the only data member of this class, as shown in the following listing.
package com.msi.manning.UnlockingAndroid;import java.util.List;import org.xml.sax.InputSource;import android.util.Log;// additional imports omitted for brevity, see source codepublic class JobList { private Context _context = null; private List<JobEntry> _joblist; JobList(Context context){ _context = context; _joblist = new Vector<JobEntry>(0); } int addJob(JobEntry job){ _joblist.add(job); return _joblist.size(); } JobEntry getJob(int location) { return _joblist.get(location); } List<JobEntry> getAllJobs() { return _joblist; } int getJobCount() { return _joblist.size(); } void replace(JobEntry newjob) { try { JobList newlist = new JobList(); for (int i=0;i<getJobCount();i++) { JobEntry je = getJob(i); if (je.get_jobid().equals(newjob.get_jobid())) { newlist.addJob(newjob); } else { newlist.addJob(je); } } this._joblist = newlist._joblist; persist(); } catch (Exception e) { }}void persist() { try { FileOutputStream fos = _context.openFileOutput("chapter12.xml",
Context.MODE_PRIVATE); fos.write("<?xml version=\"1.0\" encoding=\"UTF-8\" ?>\n".getBytes()); fos.write("<joblist>\n".getBytes()); for (int i=0;i<getJobCount();i++) {
Listing 12.10 JobList.java
List class imported for Vector
B
InputSource imported, used by XML parserCFamiliar logging
mechanism
ConstructorD
addJob/getJob methodsE
getAllJobs methodF
replace methodG
persist methodH
www.it-ebooks.info
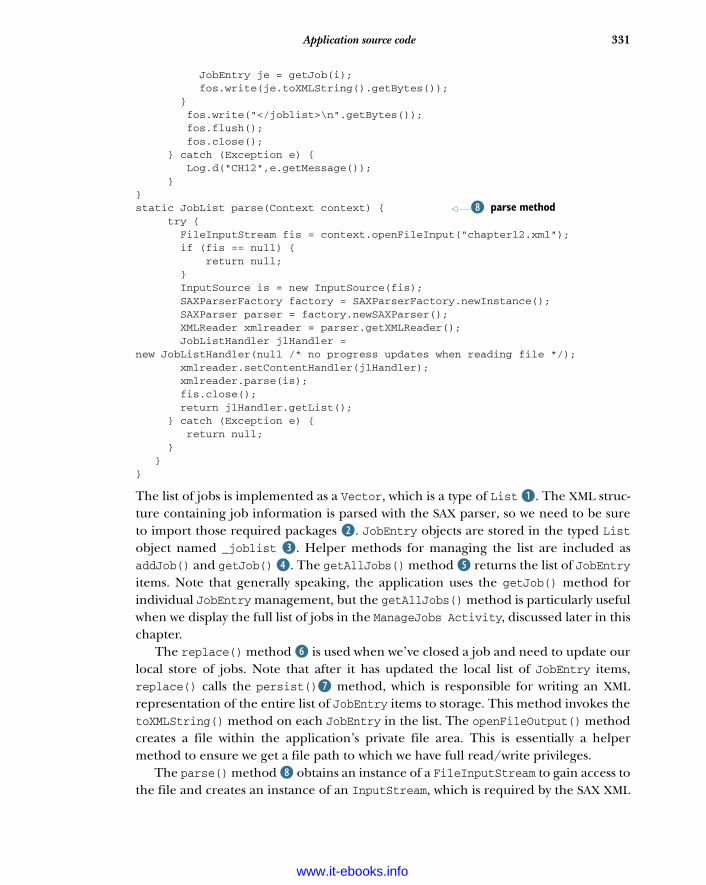
331Application source code
JobEntry je = getJob(i); fos.write(je.toXMLString().getBytes()); } fos.write("</joblist>\n".getBytes()); fos.flush(); fos.close(); } catch (Exception e) { Log.d("CH12",e.getMessage()); }}static JobList parse(Context context) { try { FileInputStream fis = context.openFileInput("chapter12.xml"); if (fis == null) { return null; } InputSource is = new InputSource(fis); SAXParserFactory factory = SAXParserFactory.newInstance(); SAXParser parser = factory.newSAXParser(); XMLReader xmlreader = parser.getXMLReader(); JobListHandler jlHandler = new JobListHandler(null /* no progress updates when reading file */); xmlreader.setContentHandler(jlHandler); xmlreader.parse(is); fis.close(); return jlHandler.getList(); } catch (Exception e) { return null; } }}
The list of jobs is implemented as a Vector, which is a type of List B. The XML struc-ture containing job information is parsed with the SAX parser, so we need to be sureto import those required packages C. JobEntry objects are stored in the typed Listobject named _joblist D. Helper methods for managing the list are included asaddJob() and getJob() E. The getAllJobs() method F returns the list of JobEntryitems. Note that generally speaking, the application uses the getJob() method forindividual JobEntry management, but the getAllJobs() method is particularly usefulwhen we display the full list of jobs in the ManageJobs Activity, discussed later in thischapter.
The replace() method G is used when we’ve closed a job and need to update ourlocal store of jobs. Note that after it has updated the local list of JobEntry items,replace() calls the persist()H method, which is responsible for writing an XMLrepresentation of the entire list of JobEntry items to storage. This method invokes thetoXMLString() method on each JobEntry in the list. The openFileOutput() methodcreates a file within the application’s private file area. This is essentially a helpermethod to ensure we get a file path to which we have full read/write privileges.
The parse() method I obtains an instance of a FileInputStream to gain access tothe file and creates an instance of an InputStream, which is required by the SAX XML
parse methodI
www.it-ebooks.info
332 CHAPTER 12 Putting Android to work in a field service application
parser. In particular, take note of the JobListHandler. SAX is a callback parser, mean-ing that it invokes a user-supplied method to process events in the parsing process. It’sup to the JobListHandler (in our example) to process the data as appropriate.
We have one more class to go before we can jump back to the higher-level func-tionality of our application. The next section takes a quick tour of the JobList-Handler, which is responsible for putting together a JobList from an XML datasource.
JOBLISTHANDLER
As presented earlier, our application uses an XML data storage structure. This XMLdata can come from either the server or a local file on the filesystem. In either case,the application must parse this data and transform it into a useful form. This is accom-plished through the use of the SAX XML parsing engine and the JobListHandler,which is shown in listing 12.11. The JobListHandler is used by the SAX parser for ourXML data, regardless of the data’s source. Where the data comes from dictates howthe SAX parser is set up and invoked in this application. The JobListHandler behavesslightly differently depending on whether the class’s constructor includes a Handlerargument. If the Handler is provided, the JobListHandler will pass messages back foruse in a ProgressDialog. If the Handler argument is null, this status message passingis bypassed. When parsing data from the server, the ProgressDialog is employed; theparsing of a local file is done quickly and without user feedback. The rationale for thisis simple—the network connection may be slow, and we need to show progress infor-mation to the user. An argument could be made for always showing the progress ofthe parse operation, but this approach gives us an opportunity to demonstrate moreconditionally operating code.
package com.msi.manning.UnlockingAndroid;// multiple imports omitted for brevity, see full source codepublic class JobListHandler extends DefaultHandler { Handler phandler = null; JobList _list; JobEntry _job; String _lastElementName = ""; StringBuilder sb = null; Context _context; JobListHandler(Context c,Handler progressHandler) { _context = c; if (progressHandler != null) { phandler = progressHandler; Message msg = new Message(); msg.what = 0; msg.obj = (Object)("Processing List"); phandler.sendMessage(msg); } } public JobList getList() {
Listing 12.11 JobListHandler.java
JobListHandler constructor
B
Check for progress handlerC
getList methodD
www.it-ebooks.info
333Application source code
Message msg = new Message(); msg.what = 0; msg.obj = (Object)("Fetching List"); if (phandler != null) phandler.sendMessage(msg); return _list; } public void startDocument() throws SAXException { Message msg = new Message(); msg.what = 0; msg.obj = (Object)("Starting Document"); if (phandler != null) phandler.sendMessage(msg); _list = new JobList(_context); _job = new JobEntry(); } public void endDocument() throws SAXException { Message msg = new Message(); msg.what = 0; msg.obj = (Object)("End of Document"); if (phandler != null) phandler.sendMessage(msg); } public void startElement (String namespaceURI, String localName,String qName, Attributes atts) throws SAXException { try { sb = new StringBuilder(""); if (localName.equals("job")) { Message msg = new Message(); msg.what = 0; msg.obj = (Object)(localName); if (phandler != null) phandler.sendMessage(msg); _job = new JobEntry(); } } catch (Exception ee) { } } public void endElement (String namespaceURI, String localName, String qName) throws SAXException { if (localName.equals("job")) { // add our job to the list! _list.addJob(_job); Message msg = new Message(); msg.what = 0; msg.obj = (Object)("Storing Job # " + _job.get_jobid()); if (phandler != null) phandler.sendMessage(msg); return; } // portions of the code omitted for brevity } public void characters(char ch[], int start, int length) { String theString = new String(ch,start,length); Log.d("CH12","characters[" + theString + "]"); sb.append(theString); }}
startDocument method
E
endDocument method
F
Check for end of job elementG
Build up String incrementally
H
www.it-ebooks.info
334 CHAPTER 12 Putting Android to work in a field service application
The JobListHandler constructor B takes a single argument of Handler. This valuemay be null. If null, Message passing is omitted from the operation. When readingfrom a local storage file, this Handler argument is null. When reading data from theserver over the internet, with a potentially slow connection, the Message-passing codeis utilized to provide feedback for the user in the form of a ProgressDialog. TheProgressDialog code is shown later in this chapter in the discussion of the Refresh-Jobs Activity. A local copy of the Handler C is set up when using the Progress-Dialog, as described in B.
The getList()D method is invoked when parsing is complete. The role ofgetList() is to return a copy of the JobList that was constructed during the parseprocess. When the startDocument() callback method E is invoked by the SAX parser,the initial class instances are established. The endDocument() method F is invoked bythe SAX parser when all of the document has been consumed. This is an opportunityfor the Handler to perform additional cleanup as necessary. In our example, a mes-sage is posted to the user by sending a Message.
For each element in the XML file, the SAX parser follows the same pattern: start-Element() is invoked, characters() is invoked (one or more times), and end-Element() is invoked. In the startElement() method, we initialize StringBuilderand evaluate the element name. If the name is “job,” we initialize the class-levelJobEntry instance.
In the endElement() method, the element name is evaluated. If the element nameis “job” G, the JobListHandler adds this JobEntry to the JobList data member,_joblist, with a call to addJob(). Also in the endElement() method, the data mem-bers of the JobEntry instance (_job) are updated. Please see the full source code formore details.
The characters() method is invoked by the SAX parser whenever data is availablefor storage. The JobListHandler simply appends this string data to a StringBuilderinstance H each time it’s invoked. It’s possible that the characters() method may beinvoked more than once for a particular element’s data. That’s the rationale behindusing a StringBuilder instead of a single String variable; StringBuilder is a moreefficient class for constructing strings from multiple substrings.
After this lengthy but important look into the data structures and the accompany-ing explanations, it’s time to return to the higher-level functionality of the application.
12.4 Source code for managing jobsMost of the time our mobile worker is using this application, he’ll be reading throughcomments, looking up a job address, getting product information, and performingother aspects of working on a specific job. Our application must supply the functional-ity for the worker to accomplish each of these job-management tasks. We examineeach of these Activitys in detail in this section. The first thing we review is fetchingnew jobs from the server, which gives us the opportunity to discuss the JobList-Handler and the management of the jobs list used throughout the application.
www.it-ebooks.info
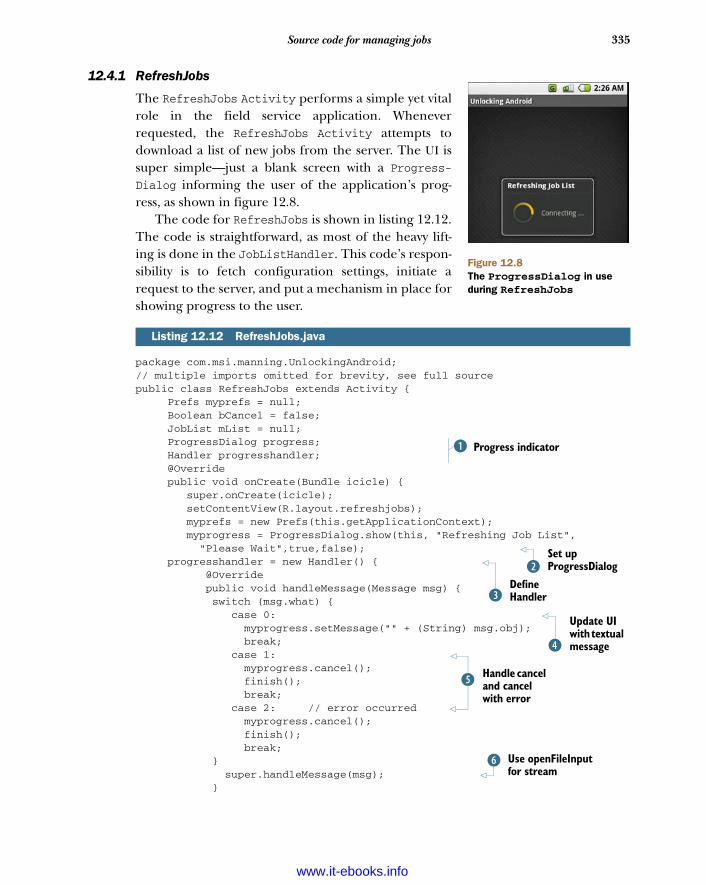
335Source code for managing jobs
12.4.1 RefreshJobs
The RefreshJobs Activity performs a simple yet vitalrole in the field service application. Wheneverrequested, the RefreshJobs Activity attempts todownload a list of new jobs from the server. The UI issuper simple—just a blank screen with a Progress-Dialog informing the user of the application’s prog-ress, as shown in figure 12.8.
The code for RefreshJobs is shown in listing 12.12.The code is straightforward, as most of the heavy lift-ing is done in the JobListHandler. This code’s respon-sibility is to fetch configuration settings, initiate arequest to the server, and put a mechanism in place forshowing progress to the user.
package com.msi.manning.UnlockingAndroid;// multiple imports omitted for brevity, see full sourcepublic class RefreshJobs extends Activity { Prefs myprefs = null; Boolean bCancel = false; JobList mList = null; ProgressDialog progress; Handler progresshandler; @Override public void onCreate(Bundle icicle) { super.onCreate(icicle); setContentView(R.layout.refreshjobs); myprefs = new Prefs(this.getApplicationContext); myprogress = ProgressDialog.show(this, "Refreshing Job List", "Please Wait",true,false); progresshandler = new Handler() { @Override public void handleMessage(Message msg) { switch (msg.what) { case 0: myprogress.setMessage("" + (String) msg.obj); break; case 1: myprogress.cancel(); finish(); break; case 2: // error occurred myprogress.cancel(); finish(); break; } super.handleMessage(msg); }
Listing 12.12 RefreshJobs.java
Progress indicatorB
Set up ProgressDialogC
Define HandlerD
Update UI with textual messageE
Handle cancel and cancel with error
F
Use openFileInput for stream
G
Figure 12.8The ProgressDialog in use during RefreshJobs
www.it-ebooks.info
336 CHAPTER 12 Putting Android to work in a field service application
}; Thread workthread = new Thread(new DoReadJobs()); workthread.start(); } class DoReadJobs implements Runnable { public void run() { InputSource is = null; Message msg = new Message(); msg.what = 0; try { //Looper.prepare(); msg.obj = (Object) ("Connecting ..."); progresshandler.sendMessage(msg); URL url = new URL(myprefs.getServer() + "getjoblist.php?identifier=" + myprefs.getEmail()); is = new InputSource(url.openStream()); SAXParserFactory factory = SAXParserFactory.newInstance(); SAXParser parser = factory.newSAXParser(); XMLReader xmlreader = parser.getXMLReader(); JobListHandler jlHandler = new JobListHandler(progresshandler); xmlreader.setContentHandler(jlHandler); msg = new Message(); msg.what = 0; msg.obj = (Object)("Parsing ..."); progresshandler.sendMessage(msg); xmlreader.parse(is); msg = new Message(); msg.what = 0; msg.obj = (Object)("Parsing Complete"); progresshandler.sendMessage(msg); msg = new Message(); msg.what = 0; msg.obj = (Object)("Saving Job List"); progresshandler.sendMessage(msg); jlHandler.getList().persist(); msg = new Message(); msg.what = 0; msg.obj = (Object)("Job List Saved."); progresshandler.sendMessage(msg); msg = new Message(); msg.what = 1; progresshandler.sendMessage(msg); } catch (Exception e) { Log.d("CH12","Exception: " + e.getMessage()); msg = new Message(); msg.what = 2; // error occurred msg.obj = (Object)("Caught an error retrieving Job data: " + e.getMessage()); progresshandler.sendMessage(msg); } } }}
Initiate DoReadJobs class instanceH
Create Message object
I
Define looping construct
J
Prepare status message1)
Prepare to parse data 1!
Instantiate JobListHandler1@
Persist data1#
Set status flag for completion
1$
Set status flag for error
1%
www.it-ebooks.info
337Source code for managing jobs
A ProgressDialog B is used to display progress information to the user. There are anumber of ways to display progress in Android. This is perhaps the most straightfor-ward approach. A Handler is employed to process Message instances. Though theHandler itself is defined as an anonymous class, the code requires a reference to it forpassing to the JobListHandler when parsing, which is shown in 1@. When instantiat-ing the ProgressDialog C, the arguments include
Context
Title of Dialog
Initial Textual Message
Indeterminate
Cancelable
Using true for the Indeterminate parameter means that you’re not providing anyclue as to when the operation will complete (such as percentage remaining), just anindicator that something is still happening, which can be a best practice when youdon’t have a good handle on how long an operation may take. A new Handler D iscreated to process messages sent from the parsing routine, which will be introducedmomentarily. An important class that has been mentioned but thus far not describedis Message. This class is used to convey information between different threads of exe-cution. The Message class has some generic data members that may be used in a flexi-ble manner. The first of interest is the what member, which acts as a simple identifier,allowing recipients to easily jump to desired code based on the value of the what mem-ber. The most typical (and used here) approach is to evaluate the what data membervia a switch statement.
In this application, a Message received with its what member equal to 0 representsa textual update message E to be displayed in the ProgressDialog. The textual dataitself is passed as a String cast to an Object and stored in the obj data member of theMessage. This interpretation of the what member is purely arbitrary. We could’ve used999 as the value meaning textual update, for example. A what value of 1 or 2 indicatesthat the operation is complete F, and this Handler can take steps to initiate anotherthread of execution. For example, a value of 1 indicates successful completion, so theProgressDialog is canceled, and the RefreshJobs Activity is completed with a callto finish(). The value of 2 for the what member has the same effect as a value of 1,but it’s provided here as an example of handling different result conditions: for exam-ple, a failure response due to an encountered error. In a production-ready applica-tion, this step should be fleshed out to perform an additional step of instruction tothe user and/or a retry step. Any Message not explicitly handled by the Handlerinstance should be passed to the super class G. In this way, system messages may beprocessed.
When communicating with a remote resource, such as a remote web server in ourcase, it’s a good idea to perform the communications steps in a thread other than theprimary GUI thread. A new Thread H is created based on the DoReadJobs class, which
www.it-ebooks.info
338 CHAPTER 12 Putting Android to work in a field service application
implements the Runnable Java interface. A new Message object I is instantiated andinitialized. This step takes place over and over throughout the run() method of theDoReadJobs class. It’s important to not reuse a Message object, as they’re literallypassed and enqueued. It’s possible for them to stack up in the receiver’s queue, soreusing a Message object will lead to losing data or corrupting data at best and Threadsynchronization issues or beyond at worst.
Why are we talking about a commented-out line of code J? Great question—because it caused so much pain in the writing of this application! A somewhat odd andconfusing element of Android programming is the Looper class. This class providesstatic methods to help Java Threads to interact with Android. Threads by default don’thave a message loop, so presumably Messages don’t go anywhere when sent. The firstcall to make is Looper.prepare(), which creates a Looper for a Thread that doesn’talready have one established. Then by placing a call to the loop() method, the flow ofMessages takes place. Prior to implementing this class as a Runnable interface, weexperimented with performing this step in the same thread and attempted to get theProgressDialog to work properly. That said, if you run into funny Thread/Loopermessages on the Android Emulator, consider adding a call to Looper.prepare() at thebeginning of your Thread and then Looper.loop() to help Messages flow.
When we want to send data to the user to inform him of our progress, we updatean instance of the Message class 1) and send it to the assigned Handler.
To parse an incoming XML data stream, we create a new InputSource from theURL stream 1!. This step is required for the SAX parser. This method reads data fromthe network directly into the parser without a temporary storage file.
Note that the instantiation of the JobListHandler 1@ takes a reference to theprogresshandler. This way the JobListHandler can (optionally) propagate messagesback to the user during the parse process. Once the parse is complete, the JobList-Handler returns a JobList object, which is then persisted 1# to store the data to thelocal storage. Because this parsing step is complete, we let the Handler know by pass-ing a Message 1$ with the what field set to 1. If an exception occurs, we pass a messagewith what set to 2, indicating an error 1%.
Congratulations, your Android application has now constructed a URL object withpersistently stored configuration information (user and server) and successfully con-nected over the internet to fetch XML data. That data has been parsed into a JobListcontaining JobEntry objects, while providing our patient mobile worker with feed-back, and subsequently storing the JobList to the filesystem for later use. Now wewant to work with those jobs, because after all, those jobs have to be completed for ourmobile worker friend to make a living!
12.4.2 Managing jobs: the ManageJobs Activity
The ManageJobs Activity presents a scrollable list of jobs for review and action. Atthe top of the screen is a simple summary indicating the number of jobs in the list,and each individual job is enumerated in a ListView.
Earlier we mentioned the importance of the JobEntry’s toString() method:
www.it-ebooks.info
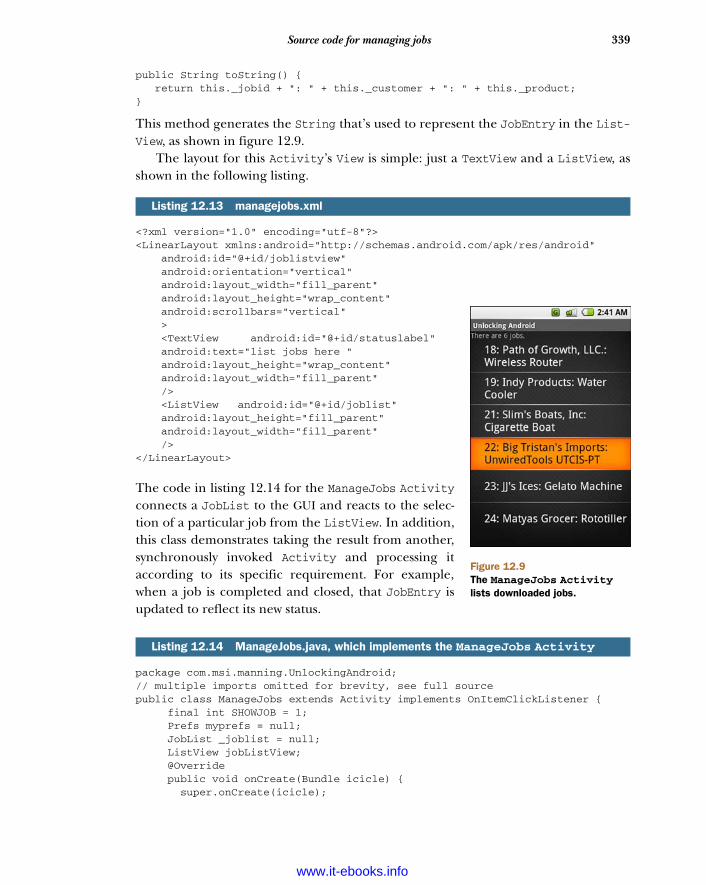
339Source code for managing jobs
public String toString() { return this._jobid + ": " + this._customer + ": " + this._product;}
This method generates the String that’s used to represent the JobEntry in the List-View, as shown in figure 12.9.
The layout for this Activity’s View is simple: just a TextView and a ListView, asshown in the following listing.
<?xml version="1.0" encoding="utf-8"?><LinearLayout xmlns:android="http://schemas.android.com/apk/res/android" android:id="@+id/joblistview" android:orientation="vertical" android:layout_width="fill_parent" android:layout_height="wrap_content" android:scrollbars="vertical" > <TextView android:id="@+id/statuslabel" android:text="list jobs here " android:layout_height="wrap_content" android:layout_width="fill_parent" /> <ListView android:id="@+id/joblist" android:layout_height="fill_parent" android:layout_width="fill_parent" /></LinearLayout>
The code in listing 12.14 for the ManageJobs Activityconnects a JobList to the GUI and reacts to the selec-tion of a particular job from the ListView. In addition,this class demonstrates taking the result from another,synchronously invoked Activity and processing itaccording to its specific requirement. For example,when a job is completed and closed, that JobEntry isupdated to reflect its new status.
package com.msi.manning.UnlockingAndroid;// multiple imports omitted for brevity, see full sourcepublic class ManageJobs extends Activity implements OnItemClickListener { final int SHOWJOB = 1; Prefs myprefs = null; JobList _joblist = null; ListView jobListView; @Override public void onCreate(Bundle icicle) { super.onCreate(icicle);
Listing 12.13 managejobs.xml
Listing 12.14 ManageJobs.java, which implements the ManageJobs Activity
Figure 12.9The ManageJobs Activitylists downloaded jobs.
www.it-ebooks.info

340 CHAPTER 12 Putting Android to work in a field service application
setContentView(R.layout.managejobs);
myprefs = new Prefs(this.getApplicationContext()); TextView tv = (TextView) findViewById(R.id.statuslabel); _joblist = JobList.parse(this.getApplicationContext()); if (_joblist == null) { _joblist = new JobList(this.getApplicationContext()); }
if (_joblist.getJobCount() == 0){ tv.setText("There are No Jobs Available"); } else { tv.setText("There are " + _joblist.getJobCount() + " jobs."); }
jobListView = (ListView) findViewById(R.id.joblist); ArrayAdapter<JobEntry> adapter = new ArrayAdapter<JobEntry>(this, android.R.layout.simple_list_item_1, _joblist.getAllJobs()); jobListView.setAdapter(adapter); jobListView.setOnItemClickListener(this); jobListView.setSelection(0); }
public void onItemClick(AdapterView parent, View v, int position, long id) {
JobEntry je = _joblist.getJob(position); Log.i("CH12", "job clicked! [" + je.get_jobid() + "]"); Intent jobintent = new Intent(this, ShowJob.class); Bundle b = je.toBundle(); jobintent.putExtras(b); startActivityForResult(jobintent, SHOWJOB); }
@Override protected void onActivityResult(int requestCode, int resultCode, Intent
data) { switch (requestCode) { case SHOWJOB: if (resultCode == 1){ Log.d("CH12","Good Close, let's update our list"); JobEntry je = JobEntry.fromBundle(data.getExtras()); _joblist.replace(je); } break; } } }
The objective of this code is to display a list of available jobs to the user in a ListViewD. To display the list of jobs, we must first parse the list stored on the device B. Notethat the Context argument is required to allow the JobList class access to the privatefile area for this application. If the parse fails, we initialize the JobList instance to anew, empty list. This is a somewhat simplistic way to handle the error without the GUIfalling apart C.
Connect TextView to UI
Parse data in storage
B
Handle bad parseCCheck for
empty JobListProcess click events on List
DConnect ListView to UIUse a
built-inlist layout
Connect list with dataevents on List
Fetch job from list by ordinal
EPrepare
Intent forshowing
Job details
Use Bundle to store Job data
F
Start ShowJob ActivityG
Check return code
H
Extract returned JobEntry
Update the list with via replace methodI
www.it-ebooks.info
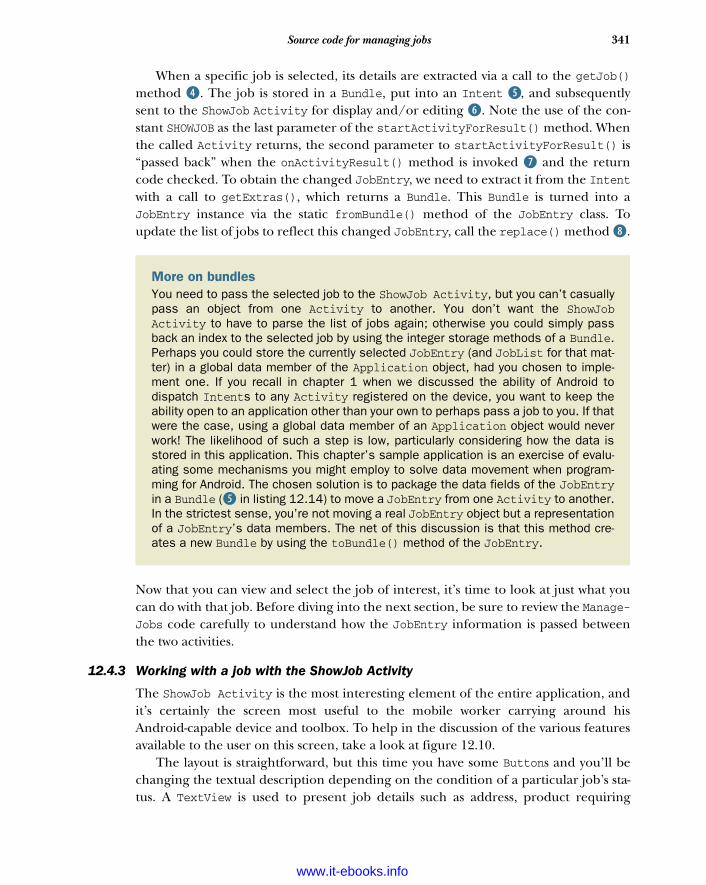
341Source code for managing jobs
When a specific job is selected, its details are extracted via a call to the getJob()method E. The job is stored in a Bundle, put into an Intent F, and subsequentlysent to the ShowJob Activity for display and/or editing G. Note the use of the con-stant SHOWJOB as the last parameter of the startActivityForResult() method. Whenthe called Activity returns, the second parameter to startActivityForResult() is“passed back” when the onActivityResult() method is invoked H and the returncode checked. To obtain the changed JobEntry, we need to extract it from the Intentwith a call to getExtras(), which returns a Bundle. This Bundle is turned into aJobEntry instance via the static fromBundle() method of the JobEntry class. Toupdate the list of jobs to reflect this changed JobEntry, call the replace() method I.
Now that you can view and select the job of interest, it’s time to look at just what youcan do with that job. Before diving into the next section, be sure to review the Manage-Jobs code carefully to understand how the JobEntry information is passed betweenthe two activities.
12.4.3 Working with a job with the ShowJob Activity
The ShowJob Activity is the most interesting element of the entire application, andit’s certainly the screen most useful to the mobile worker carrying around hisAndroid-capable device and toolbox. To help in the discussion of the various featuresavailable to the user on this screen, take a look at figure 12.10.
The layout is straightforward, but this time you have some Buttons and you’ll bechanging the textual description depending on the condition of a particular job’s sta-tus. A TextView is used to present job details such as address, product requiring
More on bundlesYou need to pass the selected job to the ShowJob Activity, but you can’t casuallypass an object from one Activity to another. You don’t want the ShowJobActivity to have to parse the list of jobs again; otherwise you could simply passback an index to the selected job by using the integer storage methods of a Bundle.Perhaps you could store the currently selected JobEntry (and JobList for that mat-ter) in a global data member of the Application object, had you chosen to imple-ment one. If you recall in chapter 1 when we discussed the ability of Android todispatch Intents to any Activity registered on the device, you want to keep theability open to an application other than your own to perhaps pass a job to you. If thatwere the case, using a global data member of an Application object would neverwork! The likelihood of such a step is low, particularly considering how the data isstored in this application. This chapter’s sample application is an exercise of evalu-ating some mechanisms you might employ to solve data movement when program-ming for Android. The chosen solution is to package the data fields of the JobEntryin a Bundle (F in listing 12.14) to move a JobEntry from one Activity to another.In the strictest sense, you’re not moving a real JobEntry object but a representationof a JobEntry’s data members. The net of this discussion is that this method cre-ates a new Bundle by using the toBundle() method of the JobEntry.
www.it-ebooks.info
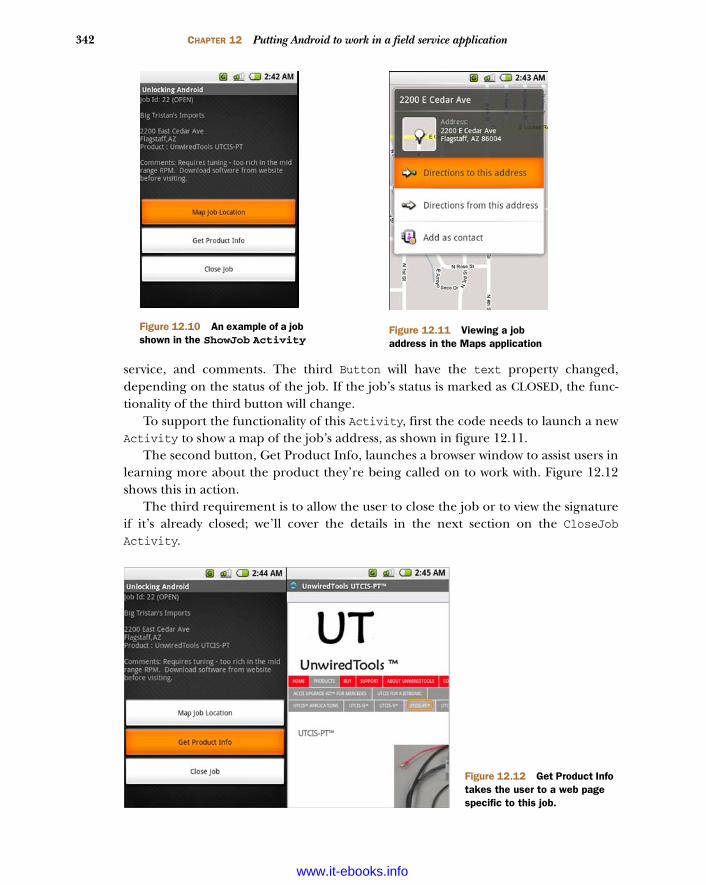
342 CHAPTER 12 Putting Android to work in a field service application
service, and comments. The third Button will have the text property changed,depending on the status of the job. If the job’s status is marked as CLOSED, the func-tionality of the third button will change.
To support the functionality of this Activity, first the code needs to launch a newActivity to show a map of the job’s address, as shown in figure 12.11.
The second button, Get Product Info, launches a browser window to assist users inlearning more about the product they’re being called on to work with. Figure 12.12shows this in action.
The third requirement is to allow the user to close the job or to view the signatureif it’s already closed; we’ll cover the details in the next section on the CloseJobActivity.
Figure 12.10 An example of a job shown in the ShowJob Activity
Figure 12.11 Viewing a job address in the Maps application
Figure 12.12 Get Product Info takes the user to a web page specific to this job.
www.it-ebooks.info
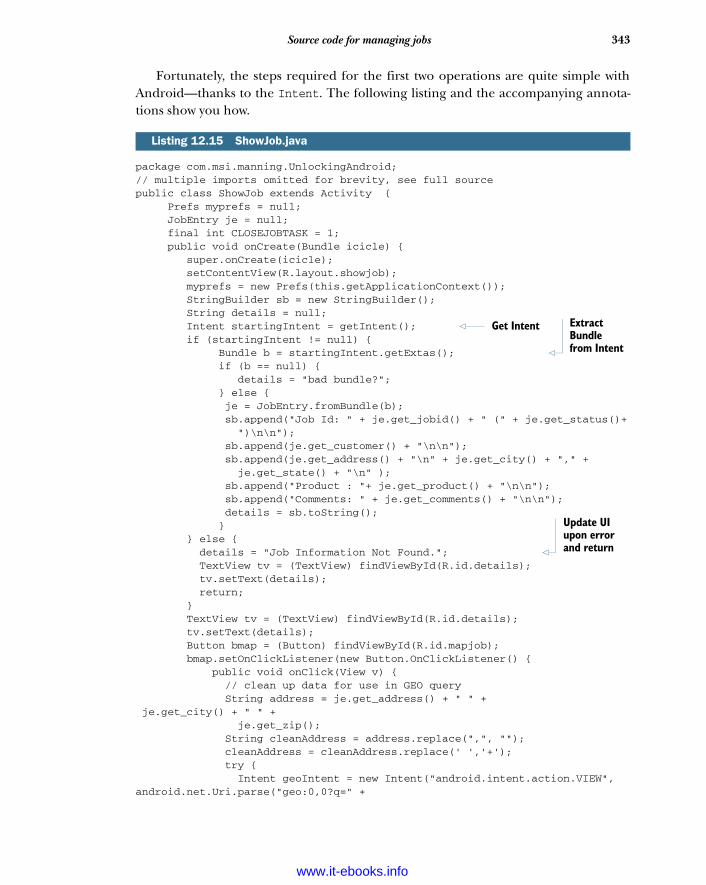
343Source code for managing jobs
Fortunately, the steps required for the first two operations are quite simple withAndroid—thanks to the Intent. The following listing and the accompanying annota-tions show you how.
package com.msi.manning.UnlockingAndroid;// multiple imports omitted for brevity, see full sourcepublic class ShowJob extends Activity { Prefs myprefs = null; JobEntry je = null; final int CLOSEJOBTASK = 1; public void onCreate(Bundle icicle) { super.onCreate(icicle); setContentView(R.layout.showjob); myprefs = new Prefs(this.getApplicationContext()); StringBuilder sb = new StringBuilder(); String details = null; Intent startingIntent = getIntent(); if (startingIntent != null) { Bundle b = startingIntent.getExtas(); if (b == null) { details = "bad bundle?"; } else { je = JobEntry.fromBundle(b); sb.append("Job Id: " + je.get_jobid() + " (" + je.get_status()+ ")\n\n"); sb.append(je.get_customer() + "\n\n"); sb.append(je.get_address() + "\n" + je.get_city() + "," + je.get_state() + "\n" ); sb.append("Product : "+ je.get_product() + "\n\n"); sb.append("Comments: " + je.get_comments() + "\n\n"); details = sb.toString(); } } else { details = "Job Information Not Found."; TextView tv = (TextView) findViewById(R.id.details); tv.setText(details); return; } TextView tv = (TextView) findViewById(R.id.details); tv.setText(details); Button bmap = (Button) findViewById(R.id.mapjob); bmap.setOnClickListener(new Button.OnClickListener() { public void onClick(View v) { // clean up data for use in GEO query String address = je.get_address() + " " + je.get_city() + " " + je.get_zip(); String cleanAddress = address.replace(",", ""); cleanAddress = cleanAddress.replace(' ','+'); try { Intent geoIntent = new Intent("android.intent.action.VIEW",android.net.Uri.parse("geo:0,0?q=" +
Listing 12.15 ShowJob.java
Get Intent Extract Bundle from Intent
Update UI upon error and return
www.it-ebooks.info
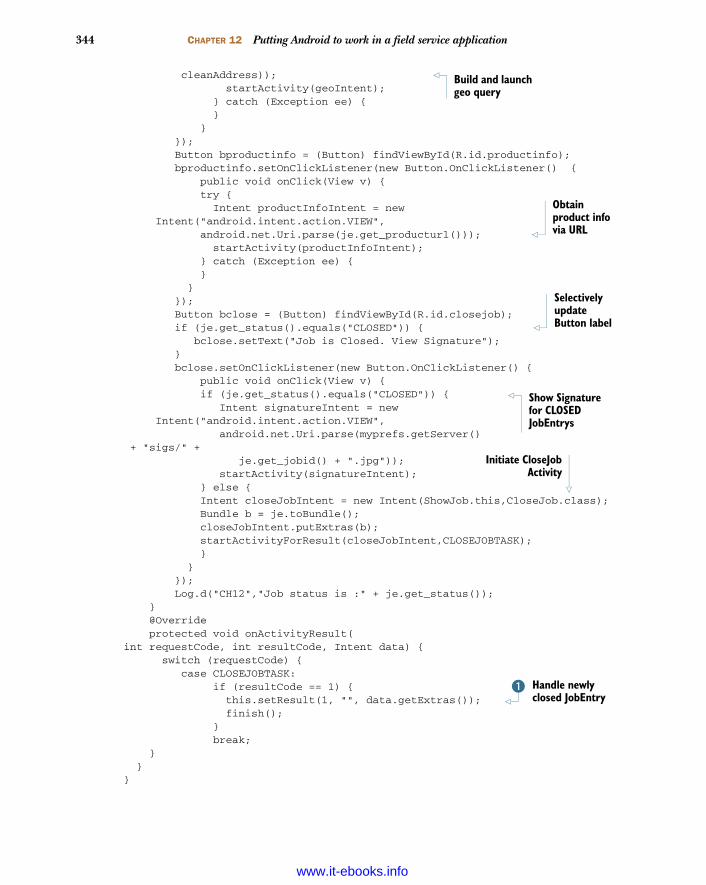
344 CHAPTER 12 Putting Android to work in a field service application
cleanAddress)); startActivity(geoIntent); } catch (Exception ee) { } } }); Button bproductinfo = (Button) findViewById(R.id.productinfo); bproductinfo.setOnClickListener(new Button.OnClickListener() { public void onClick(View v) { try { Intent productInfoIntent = new
Intent("android.intent.action.VIEW", android.net.Uri.parse(je.get_producturl())); startActivity(productInfoIntent); } catch (Exception ee) { } } }); Button bclose = (Button) findViewById(R.id.closejob); if (je.get_status().equals("CLOSED")) { bclose.setText("Job is Closed. View Signature"); } bclose.setOnClickListener(new Button.OnClickListener() { public void onClick(View v) { if (je.get_status().equals("CLOSED")) { Intent signatureIntent = new
Intent("android.intent.action.VIEW", android.net.Uri.parse(myprefs.getServer() + "sigs/" + je.get_jobid() + ".jpg")); startActivity(signatureIntent); } else { Intent closeJobIntent = new Intent(ShowJob.this,CloseJob.class); Bundle b = je.toBundle(); closeJobIntent.putExtras(b); startActivityForResult(closeJobIntent,CLOSEJOBTASK); } } }); Log.d("CH12","Job status is :" + je.get_status()); } @Override protected void onActivityResult(int requestCode, int resultCode, Intent data) { switch (requestCode) { case CLOSEJOBTASK: if (resultCode == 1) { this.setResult(1, "", data.getExtras()); finish(); } break; } }}
Build and launch geo query
Obtain product info via URL
Selectively update Button label
Show Signature for CLOSED JobEntrys
Initiate CloseJobActivity
Handle newly closed JobEntry
B
www.it-ebooks.info
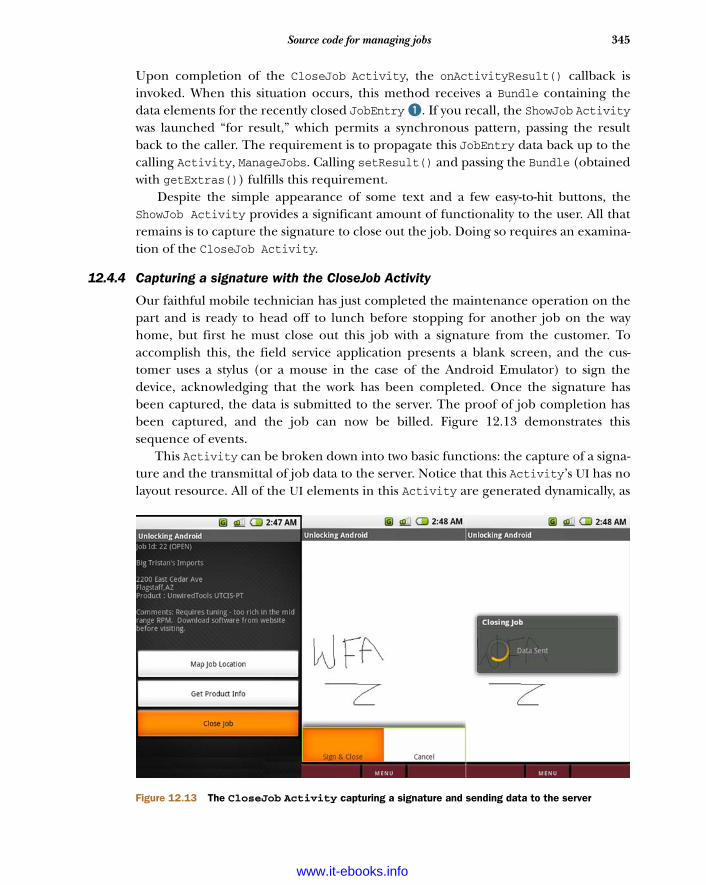
345Source code for managing jobs
Upon completion of the CloseJob Activity, the onActivityResult() callback isinvoked. When this situation occurs, this method receives a Bundle containing thedata elements for the recently closed JobEntry B. If you recall, the ShowJob Activitywas launched “for result,” which permits a synchronous pattern, passing the resultback to the caller. The requirement is to propagate this JobEntry data back up to thecalling Activity, ManageJobs. Calling setResult() and passing the Bundle (obtainedwith getExtras()) fulfills this requirement.
Despite the simple appearance of some text and a few easy-to-hit buttons, theShowJob Activity provides a significant amount of functionality to the user. All thatremains is to capture the signature to close out the job. Doing so requires an examina-tion of the CloseJob Activity.
12.4.4 Capturing a signature with the CloseJob Activity
Our faithful mobile technician has just completed the maintenance operation on thepart and is ready to head off to lunch before stopping for another job on the wayhome, but first he must close out this job with a signature from the customer. Toaccomplish this, the field service application presents a blank screen, and the cus-tomer uses a stylus (or a mouse in the case of the Android Emulator) to sign thedevice, acknowledging that the work has been completed. Once the signature hasbeen captured, the data is submitted to the server. The proof of job completion hasbeen captured, and the job can now be billed. Figure 12.13 demonstrates thissequence of events.
This Activity can be broken down into two basic functions: the capture of a signa-ture and the transmittal of job data to the server. Notice that this Activity’s UI has nolayout resource. All of the UI elements in this Activity are generated dynamically, as
Figure 12.13 The CloseJob Activity capturing a signature and sending data to the server
www.it-ebooks.info
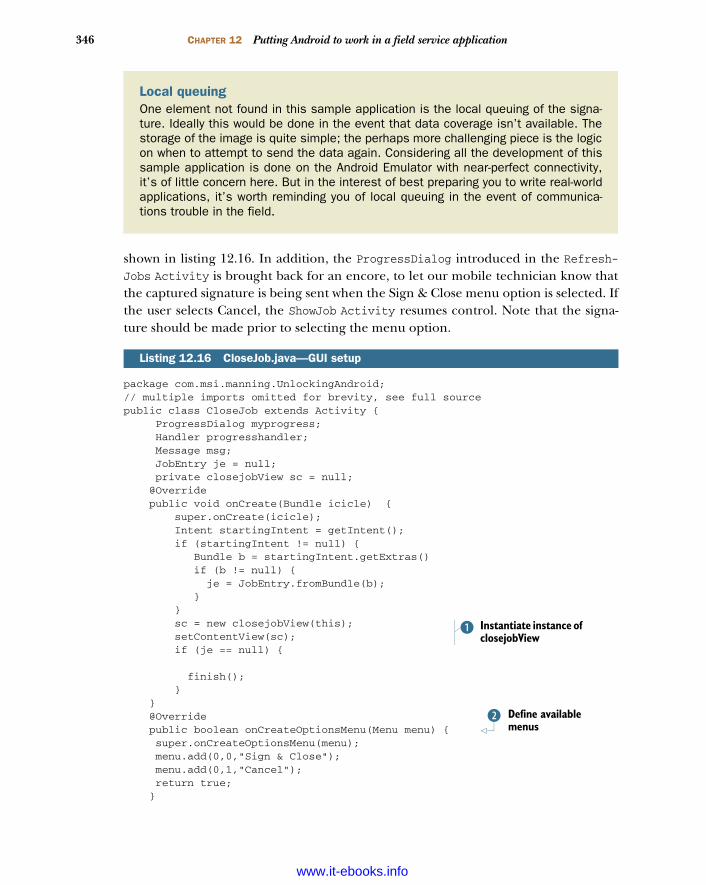
346 CHAPTER 12 Putting Android to work in a field service application
shown in listing 12.16. In addition, the ProgressDialog introduced in the Refresh-Jobs Activity is brought back for an encore, to let our mobile technician know thatthe captured signature is being sent when the Sign & Close menu option is selected. Ifthe user selects Cancel, the ShowJob Activity resumes control. Note that the signa-ture should be made prior to selecting the menu option.
package com.msi.manning.UnlockingAndroid;// multiple imports omitted for brevity, see full sourcepublic class CloseJob extends Activity { ProgressDialog myprogress; Handler progresshandler; Message msg; JobEntry je = null; private closejobView sc = null; @Override public void onCreate(Bundle icicle) { super.onCreate(icicle); Intent startingIntent = getIntent(); if (startingIntent != null) { Bundle b = startingIntent.getExtras() if (b != null) { je = JobEntry.fromBundle(b); } } sc = new closejobView(this); setContentView(sc); if (je == null) { finish(); } } @Override public boolean onCreateOptionsMenu(Menu menu) { super.onCreateOptionsMenu(menu); menu.add(0,0,"Sign & Close"); menu.add(0,1,"Cancel"); return true; }
Listing 12.16 CloseJob.java—GUI setup
Local queuingOne element not found in this sample application is the local queuing of the signa-ture. Ideally this would be done in the event that data coverage isn’t available. Thestorage of the image is quite simple; the perhaps more challenging piece is the logicon when to attempt to send the data again. Considering all the development of thissample application is done on the Android Emulator with near-perfect connectivity,it’s of little concern here. But in the interest of best preparing you to write real-worldapplications, it’s worth reminding you of local queuing in the event of communica-tions trouble in the field.
Instantiate instance of closejobView
B
Define available menus
C
www.it-ebooks.info
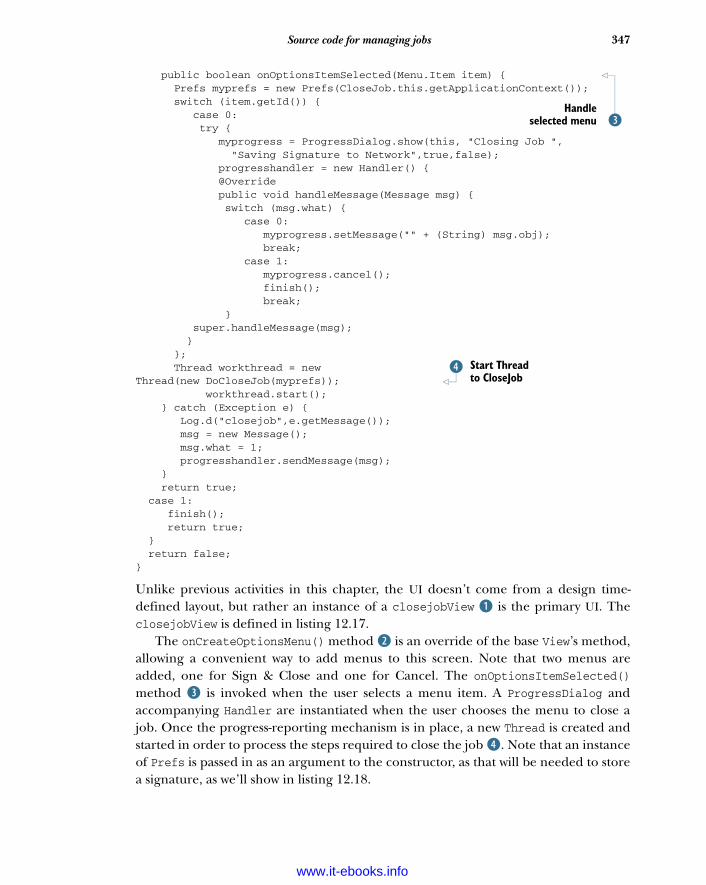
347Source code for managing jobs
public boolean onOptionsItemSelected(Menu.Item item) { Prefs myprefs = new Prefs(CloseJob.this.getApplicationContext()); switch (item.getId()) { case 0: try { myprogress = ProgressDialog.show(this, "Closing Job ", "Saving Signature to Network",true,false); progresshandler = new Handler() { @Override public void handleMessage(Message msg) { switch (msg.what) { case 0: myprogress.setMessage("" + (String) msg.obj); break; case 1: myprogress.cancel(); finish(); break; } super.handleMessage(msg); } }; Thread workthread = new Thread(new DoCloseJob(myprefs)); workthread.start(); } catch (Exception e) { Log.d("closejob",e.getMessage()); msg = new Message(); msg.what = 1; progresshandler.sendMessage(msg); } return true; case 1: finish(); return true; } return false;}
Unlike previous activities in this chapter, the UI doesn’t come from a design time-defined layout, but rather an instance of a closejobView B is the primary UI. TheclosejobView is defined in listing 12.17.
The onCreateOptionsMenu() method c is an override of the base View’s method,allowing a convenient way to add menus to this screen. Note that two menus areadded, one for Sign & Close and one for Cancel. The onOptionsItemSelected()method d is invoked when the user selects a menu item. A ProgressDialog andaccompanying Handler are instantiated when the user chooses the menu to close ajob. Once the progress-reporting mechanism is in place, a new Thread is created andstarted in order to process the steps required to close the job e. Note that an instanceof Prefs is passed in as an argument to the constructor, as that will be needed to storea signature, as we’ll show in listing 12.18.
DHandle
selected menu
Start Thread to CloseJob
E
www.it-ebooks.info
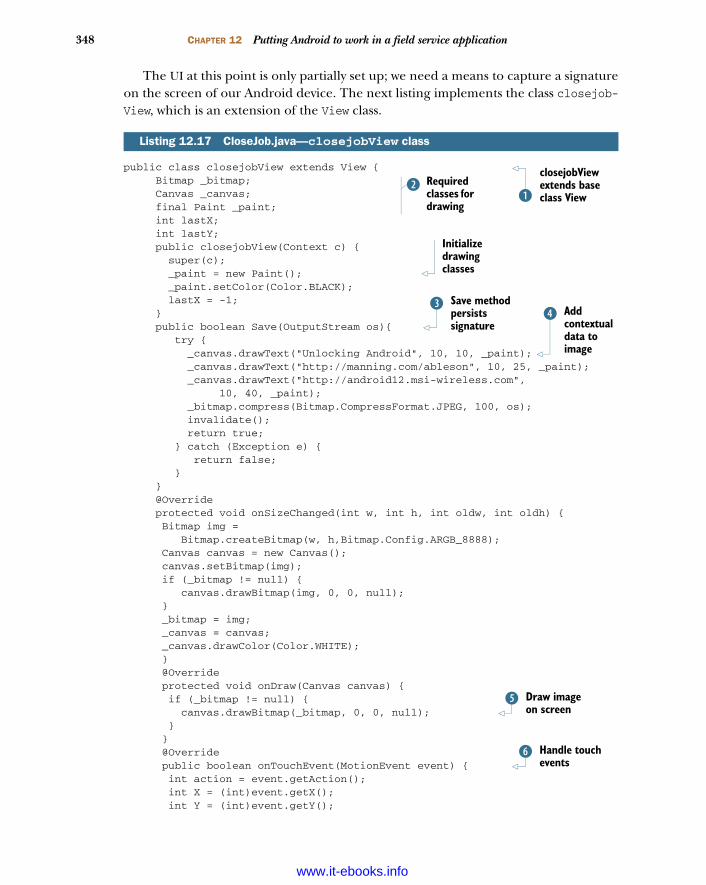
348 CHAPTER 12 Putting Android to work in a field service application
The UI at this point is only partially set up; we need a means to capture a signatureon the screen of our Android device. The next listing implements the class closejob-View, which is an extension of the View class.
public class closejobView extends View { Bitmap _bitmap; Canvas _canvas; final Paint _paint; int lastX; int lastY; public closejobView(Context c) { super(c); _paint = new Paint(); _paint.setColor(Color.BLACK); lastX = -1; } public boolean Save(OutputStream os){ try { _canvas.drawText("Unlocking Android", 10, 10, _paint); _canvas.drawText("http://manning.com/ableson", 10, 25, _paint); _canvas.drawText("http://android12.msi-wireless.com", 10, 40, _paint); _bitmap.compress(Bitmap.CompressFormat.JPEG, 100, os); invalidate(); return true; } catch (Exception e) { return false; } } @Override protected void onSizeChanged(int w, int h, int oldw, int oldh) { Bitmap img = Bitmap.createBitmap(w, h,Bitmap.Config.ARGB_8888); Canvas canvas = new Canvas(); canvas.setBitmap(img); if (_bitmap != null) { canvas.drawBitmap(img, 0, 0, null); } _bitmap = img; _canvas = canvas; _canvas.drawColor(Color.WHITE); } @Override protected void onDraw(Canvas canvas) { if (_bitmap != null) { canvas.drawBitmap(_bitmap, 0, 0, null); } } @Override public boolean onTouchEvent(MotionEvent event) { int action = event.getAction(); int X = (int)event.getX(); int Y = (int)event.getY();
Listing 12.17 CloseJob.java—closejobView class
closejobView extends base class ViewB
Required classes for drawing
C
Initialize drawing classes
Save method persists signature
D Add contextual data to image
E
Draw image on screen
F
Handle touchevents
G
www.it-ebooks.info
349Source code for managing jobs
switch (action ) { case MotionEvent.ACTION_UP: // reset location lastX = -1; break; case MotionEvent.ACTION_DOWN: if (lastX != -1){ if ((int) event.getX() != lastX) { _canvas.drawLine(lastX, lastY, X, Y, _paint); } } lastX = (int)event.getX(); lastY = (int)event.getY(); break; case MotionEvent.ACTION_MOVE: if (lastX != -1){ _canvas.drawLine(lastX, lastY, X, Y, _paint); } lastX = (int)event.getX(); lastY = (int)event.getY(); break; } invalidate(); return true; } }}
The closejobView extends the base View class B. The Bitmap and Canvas classes cwork together to form the drawing surface for this Activity. Note the call to theCanvas.drawColor() method, which sets the background color to white. When theonDraw() method is invoked, the canvas draws its associated bitmap with a call todrawBitmap() f.
The logic for where to draw relies on the onTouchEvent() method g, whichreceives an instance of the MotionEvent class. The MotionEvent class tells what hap-pened and where. ACTION_UP, ACTION_DOWN, and ACTION_MOVE are the events captured,with some logic to guide when and where to draw. Once the signature is complete, theSave() method d is responsible for converting the contents of the image to a formusable for submission to the server. Note that additional text is drawn on the signaturee. In this case, it’s little more than a shameless plug for this book’s web page, but thiscould also be location-based data. Why is this important? Imagine someone forging asignature. It could happen, but it would be more challenging and of less value to arogue mobile technician if the GPS/location data were stamped on the job, along withthe date and time. When converting the image to our desired JPEG format, there’s anadditional input argument to this method—an OutputStream, used to store the imagedata. This OutputStream reference was an input argument to the Save() method.
Now that the UI has been created and a signature drawn on the screen, let’s look atthe code used to close the job. Closing the job involves capturing the signature andsending it to the server via an HTTP POST. The class DoCloseJob is shown in the follow-ing listing.
www.it-ebooks.info
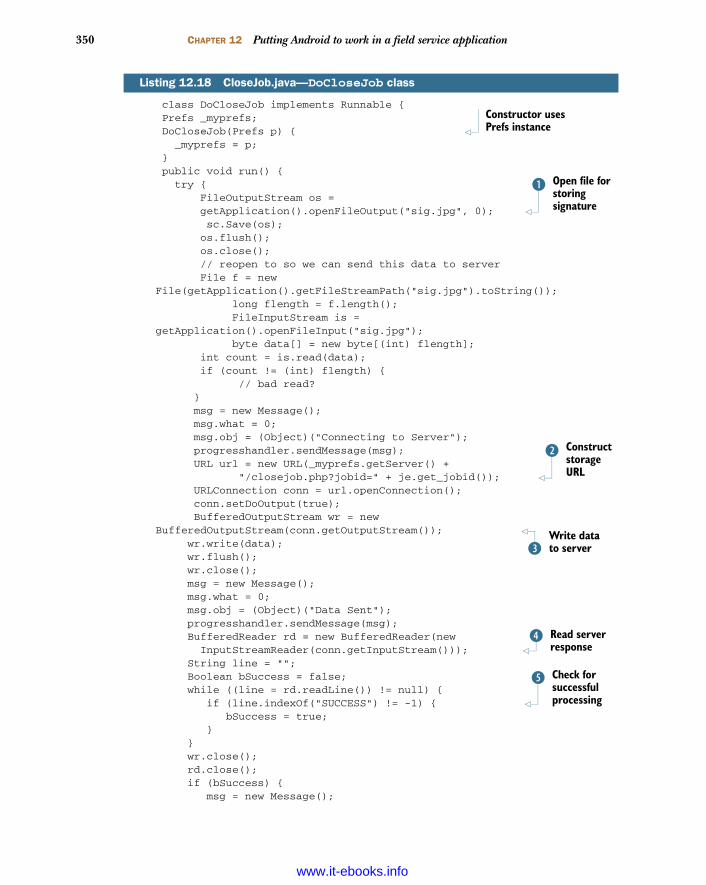
350 CHAPTER 12 Putting Android to work in a field service application
class DoCloseJob implements Runnable { Prefs _myprefs; DoCloseJob(Prefs p) { _myprefs = p; } public void run() { try { FileOutputStream os = getApplication().openFileOutput("sig.jpg", 0); sc.Save(os); os.flush(); os.close(); // reopen to so we can send this data to server File f = new
File(getApplication().getFileStreamPath("sig.jpg").toString()); long flength = f.length(); FileInputStream is =
getApplication().openFileInput("sig.jpg"); byte data[] = new byte[(int) flength]; int count = is.read(data); if (count != (int) flength) { // bad read? } msg = new Message(); msg.what = 0; msg.obj = (Object)("Connecting to Server"); progresshandler.sendMessage(msg); URL url = new URL(_myprefs.getServer() + "/closejob.php?jobid=" + je.get_jobid()); URLConnection conn = url.openConnection(); conn.setDoOutput(true); BufferedOutputStream wr = new
BufferedOutputStream(conn.getOutputStream()); wr.write(data); wr.flush(); wr.close(); msg = new Message(); msg.what = 0; msg.obj = (Object)("Data Sent"); progresshandler.sendMessage(msg); BufferedReader rd = new BufferedReader(new InputStreamReader(conn.getInputStream())); String line = ""; Boolean bSuccess = false; while ((line = rd.readLine()) != null) { if (line.indexOf("SUCCESS") != -1) { bSuccess = true; } } wr.close(); rd.close(); if (bSuccess) { msg = new Message();
Listing 12.18 CloseJob.java—DoCloseJob class
Constructor uses Prefs instance
Open file for storing signature
B
Construct storage URL
C
Write data to serverD
Read server response
E
Check for successful processing
F
www.it-ebooks.info
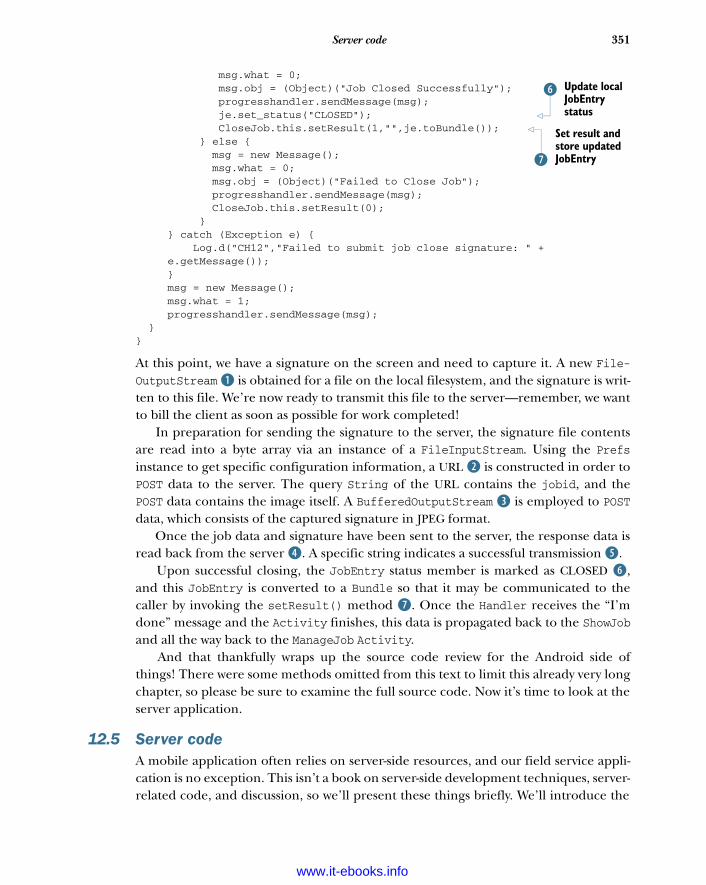
351Server code
msg.what = 0; msg.obj = (Object)("Job Closed Successfully"); progresshandler.sendMessage(msg); je.set_status("CLOSED"); CloseJob.this.setResult(1,"",je.toBundle()); } else { msg = new Message(); msg.what = 0; msg.obj = (Object)("Failed to Close Job"); progresshandler.sendMessage(msg); CloseJob.this.setResult(0); } } catch (Exception e) { Log.d("CH12","Failed to submit job close signature: " +
e.getMessage()); } msg = new Message(); msg.what = 1; progresshandler.sendMessage(msg); }}
At this point, we have a signature on the screen and need to capture it. A new File-OutputStream B is obtained for a file on the local filesystem, and the signature is writ-ten to this file. We’re now ready to transmit this file to the server—remember, we wantto bill the client as soon as possible for work completed!
In preparation for sending the signature to the server, the signature file contentsare read into a byte array via an instance of a FileInputStream. Using the Prefsinstance to get specific configuration information, a URL c is constructed in order toPOST data to the server. The query String of the URL contains the jobid, and thePOST data contains the image itself. A BufferedOutputStream d is employed to POSTdata, which consists of the captured signature in JPEG format.
Once the job data and signature have been sent to the server, the response data isread back from the server e. A specific string indicates a successful transmission f.
Upon successful closing, the JobEntry status member is marked as CLOSED g,and this JobEntry is converted to a Bundle so that it may be communicated to thecaller by invoking the setResult() method h. Once the Handler receives the “I’mdone” message and the Activity finishes, this data is propagated back to the ShowJoband all the way back to the ManageJob Activity.
And that thankfully wraps up the source code review for the Android side ofthings! There were some methods omitted from this text to limit this already very longchapter, so please be sure to examine the full source code. Now it’s time to look at theserver application.
12.5 Server codeA mobile application often relies on server-side resources, and our field service appli-cation is no exception. This isn’t a book on server-side development techniques, server-related code, and discussion, so we’ll present these things briefly. We’ll introduce the
Update local JobEntry status
G
Set result and store updated JobEntryH
www.it-ebooks.info
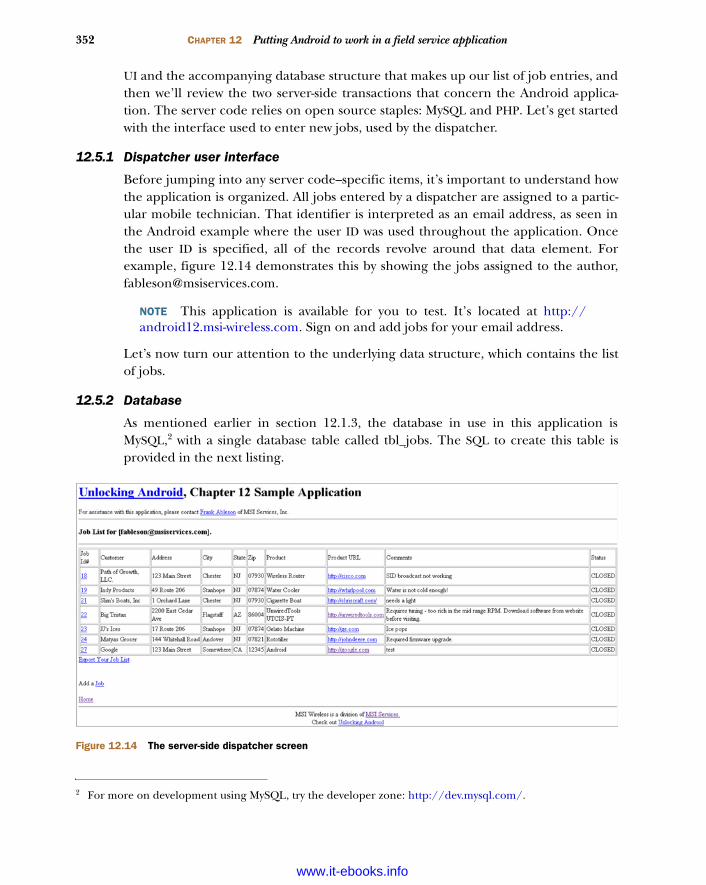
352 CHAPTER 12 Putting Android to work in a field service application
UI and the accompanying database structure that makes up our list of job entries, andthen we’ll review the two server-side transactions that concern the Android applica-tion. The server code relies on open source staples: MySQL and PHP. Let’s get startedwith the interface used to enter new jobs, used by the dispatcher.
12.5.1 Dispatcher user interface
Before jumping into any server code–specific items, it’s important to understand howthe application is organized. All jobs entered by a dispatcher are assigned to a partic-ular mobile technician. That identifier is interpreted as an email address, as seen inthe Android example where the user ID was used throughout the application. Oncethe user ID is specified, all of the records revolve around that data element. Forexample, figure 12.14 demonstrates this by showing the jobs assigned to the author,[email protected].
NOTE This application is available for you to test. It’s located at http://android12.msi-wireless.com. Sign on and add jobs for your email address.
Let’s now turn our attention to the underlying data structure, which contains the listof jobs.
12.5.2 Database
As mentioned earlier in section 12.1.3, the database in use in this application isMySQL,2 with a single database table called tbl_jobs. The SQL to create this table isprovided in the next listing.
2 For more on development using MySQL, try the developer zone: http://dev.mysql.com/.
Figure 12.14 The server-side dispatcher screen
www.it-ebooks.info

353Server code
CREATE TABLE IF NOT EXISTS 'tbl_jobs' ( 'jobid' int(11) NOT NULL auto_increment, 'status' varchar(10) NOT NULL default 'OPEN', 'identifier' varchar(50) NOT NULL, 'address' varchar(50) NOT NULL, 'city' varchar(30) NOT NULL, 'state' varchar(2) NOT NULL, 'zip' varchar(10) NOT NULL, 'customer' varchar(50) NOT NULL, 'product' varchar(50) NOT NULL, 'producturl' varchar(100) NOT NULL, 'comments' varchar(100) NOT NULL, UNIQUE KEY 'jobid' ('jobid')) ENGINE=MyISAM DEFAULT CHARSET=ascii AUTO_INCREMENT=25 ;
Each row in this table is uniquely identified by the jobid B, which is an auto-incrementing integer field. The identifier field C corresponds to the user ID/emailof the assigned mobile technician. The producturl field D is designed to be a spe-cific URL to assist the mobile technician in the field in quickly gaining access to help-ful information for completing the assigned job.
The next section provides a road map to the server code.
12.5.3 PHP dispatcher code
The server-side dispatcher system is written in PHP and contains a number of filesworking together to create the application. Table 12.3 presents a brief synopsis of eachsource file to help you navigate the application if you choose to host a version of ityourself.
Listing 12.19 Data definition for tbl_jobs
Table 12.3 Server-side source code
Source file Description
addjob.php Form for entering new job information
closejob.php Used by the Android application to submit a signature
db.php Database connection information
export.php Used to export list of jobs to a CSV file
footer.php Used to create a consistent look and feel for the footer of each page
getjoblist.php Used by the Android application to request a job XML stream
header.php Used to create a consistent look and feel for the header of each page
index.php Home page, including the search form
manage.php Used to delete jobs on the web application
savejob.php Used to save a new job (called from addjob.php)
showjob.php Used to display job details and load into a form for updating
showjobs.php Displays all jobs for a particular user
Unique record IDB
User identificationC
Product URLD
www.it-ebooks.info
354 CHAPTER 12 Putting Android to work in a field service application
Of all these files, only two concern the Android application. We’ll discuss them in thenext section.
12.5.4 PHP mobile integration code
When the Android application runs the RefreshJobs Activity, the server side gener-ates an XML stream. Without going into excessive detail on the server-side code, weexplain the getjoblist.php file in the following listing.
<?require('db.php'); require('utils.php'); $theuser = $_GET['identifier']; print (getJobsXML($theuser)); ?>
The getJobsXML() function retrieves data from the database and formats each rowinto an XML representation. It wraps the list of XML-wrapped job records in the <job-list> tags along with the <?xml ...> header declaration to generate the expectedXML structure used by the Android application. Remember, this is the data ultimatelyparsed by the SAX-based JobListHandler class, as shown in listing 12.11.
The other transaction that’s important to our Android field service application isthe closejob.php file, examined in the next listing.
<?require('db.php');require('utils.php');$data = file_get_contents('php://input'); $jobid = $_GET['jobid']; $f = fopen("~/pathtofiles/sigs/".$jobid.".jpg","w"); fwrite($f,$data); fclose($f);print(closeJob($_GET['jobid'])); ?>
The POSTed image data is read via the file_get_contents() function. The secret isthe special identifier of php://input. This is the equivalent of a binary read. This datais read into a variable named $data. The jobid is extracted from the query String.The image file is written out to a directory that contains signatures as JPEG files, keyed
updatejob.php Used to save updates to a job
utils.php Contains various routines for interacting with the database
Listing 12.20 getjoblist.php
Listing 12.21 closejob.php
Table 12.3 Server-side source code (continued)
Source file Description
www.it-ebooks.info
355Summary
by the jobid as part of the filename. When a job has been closed and the signature isrequested by the Android application, this file is requested in the Android browser.The closeJob() function (implemented in utils.php) updates the database to markthe selected job as CLOSED.
That wraps up the review of the source code for this chapter’s sample application.
12.6 SummaryThe intent of the sample application was to tie together many things learned in previ-ous chapters into a composite application. Our field service application has real-worldapplicability to the kind of uses an Android device is capable of bringing to fruition. Isthis sample application production ready? Of course not, but almost! That, as they say,is an exercise for the reader.
Starting with a simple splash screen, this application demonstrates the use ofHandlers and displaying images stored in the resources section of an Android project.Moving along to the main screen, a simple UI leads to different activities useful forlaunching various aspects of the realistic application.
Communications with the server involve downloading XML data, while showing theuser a ProgressDialog along the way. Once the data stream commences, the data isparsed by the SAX XML parser, using a custom Handler to navigate the XML document.
We demonstrated that managing jobs in a ListView is as easy as tapping on thedesired job in the list. The next screen, the ShowJobs Activity, allows even morefunctionality, with the ability to jump to a Map showing the location of the job andeven a specific product information page customized to this job. Both of those func-tions are as simple as preparing an Intent and a call to startActivity().
Once the mobile technician completes the job in the field, the CloseJob Activitybrings the touch-screen elements into play by allowing the user to capture a signaturefrom his customer. That digital signature is then stamped with additional, contextualinformation and transmitted over the internet to prove the job was done. Jumpingback to what you learned earlier, it would be straightforward to add location-baseddata to further authenticate the captured signature.
The chapter wrapped up with a quick survey of the server-side components to dem-onstrate some of the steps necessary to tie the mobile and the server sides together.
The sample application is hosted on the internet and is free for you to test out withyour own Android application, and the full source code is provided for the Androidand server applications discussed in this chapter.
Now that we’ve shown what can be accomplished when exercising a broad range ofthe Android SDK, the next chapter takes a decidedly different turn, as we explore theunderpinnings of Android a little deeper and look at building native C applicationsfor the Android platform.
www.it-ebooks.info
Building Androidapplications in C
Up to this point, this book has presented a cross section of development topics inan effort to unlock the potential of the Android platform for the purpose of deliv-ering useful, and perhaps even fun, mobile applications. In chapter 12, you built acomprehensive application, building on what we introduced in the prior chapters.As you embark on this chapter, you’re temporarily leaving behind the comforts ofworking strictly in the Android SDK, Java, and Eclipse. We’ll instead take a closelook at the underlying Linux underpinnings of the Android platform—and morespecifically, you’ll learn how to build an application in C, without the SDK.
The Android SDK is comprehensive and capable, but there may be times whenyour application requires something more. This chapter explores the steps requiredto build applications that run in the Linux foundation layer of Android. To accom-plish this, we’re going to use the C programming language. In this chapter, we use
This chapter covers Building an application in C
Using dynamic linking
Building a DayTime Server in C
Building a Daytime Client in Java
356
www.it-ebooks.info
357Building Android apps without the SDK
the term Android/Linux to refer to the Linux underpinnings of the Android platform.We also use the term Android/Java to refer to a Java application built using the AndroidSDK and Eclipse.
C language mastery on this platform is powerful because much of the C languagedevelopment process involves porting existing, open source Linux code to the mobileplatforms. This technique has the potential benefit of speeding up development foradding future functionality to Android by leveraging existing code bases. Chapter 19examines the Android Native Developer’s kit (NDK). Using the NDK, programmerscan leverage existing C code and map those routines to applications written in Java.This chapter doesn’t use the NDK, but rather looks at building standalone C applica-tions capable of running on the Android platform.
We demonstrate the specific steps of building an Android/Linux application in C.We begin with a description of the environment and the required tool chain. After anobligatory Hello World–caliber application, you’ll construct a more sophisticatedapplication that implements a DayTime Server. Ultimately, any application built forAndroid/Linux needs to bring value to the user in some form. In an effort to meetthis objective, it’s desirable that Android/Java be able to interact in a meaningfulmanner with our Android/Linux application. To that end, you’ll build a traditionalAndroid application using Java in Eclipse to interact with the Android/Linux serverapplication.
Let’s get started with an examination of the requirements for building your first Capplication for Android.
13.1 Building Android apps without the SDKApplications for Android/Linux are markedly different from applications constructedwith the Android SDK. Applications built with Eclipse and the context-sensitive Javasyntax tools make for a comfortable learning environment. In line with the spirit ofLinux development, from here on out all development takes place with command-line tools and nothing more sophisticated than a text editor. Though the Eclipse envi-ronment could certainly be leveraged for non-Java development, the focus of thischapter is on core C language1 coding for Android/Linux. The first place to start iswith the cross-compiling tool chain required to build Android/Linux applications.
13.1.1 The C compiler and linker tools
Building applications for Android/Linux requires the use of a cross-compiler toolchain from CodeSourcery. The specific version required is the Sourcery G++ Lite Editionfor ARM, found at https://support.codesourcery.com/GNUToolchain/release1479.Once installed, the Sourcery G++ tool chain contributes a number of useful tools toassist you in creating applications targeting Linux on ARM, which is the architecture ofthe Android platform. The ARM platform is a 32-bit reduced instruction set computer
1 For details on the C programming language, start here: www.cprogramming.com/.
www.it-ebooks.info
358 CHAPTER 13 Building Android applications in C
(RISC) processor, used in numerous devices, including smartphones, PDAs, and tech-nology appliances such as low-end routers and disk drive controllers. The Code-Sourcery installation comes with a fairly comprehensive set of PDF documentsdescribing the main components of the tool chain, including the C compiler, theassembler, the linker, and many more tools. A full discussion of these versatile tools iswell beyond the scope of this chapter, but three tools in particular are demonstratedin the construction of this chapter’s sample applications. You’ll be using these toolsright away, so let’s briefly introduce them in this section.
The first and most important tool introduced is gcc.2 This tool is the compilerresponsible for turning C source files into object files and optionally initiating the linkprocess to build an executable suitable for the Android/Linux target platform. Thefull name of the gcc compiler for our cross-compilation environment is arm-none-linux-gnueabi-gcc. This tool is invoked from the command line of the developmentmachine. The tool takes command-line arguments of one or more source files, alongwith zero or more of the numerous available switches.
The linker, arm-none-linux-gnueabi-ld, is responsible for producing an execut-able application for our target platform. When performing the link step, object codealong with routines from one or more library files are combined into a relocatable,executable binary file, compatible with the Android Emulator’s Linux environment.Whereas a simple application may be compiled and linked directly with gcc, the linkeris used when creating applications with more than one source file and/or more com-plex application requirements.
If the linker is responsible for constructing applications from more than one con-tributing component, the object dump utility is useful for dissecting, or disassembling,an application. The objdump, or arm-none-linux-gnueabi-objdump tool examines anexecutable application—a binary file—and turns the machine instructions foundthere into an assembly language listing file, suitable for analysis.
NOTE All of the examples in this chapter take place on a Windows XP work-station. It’s also possible to use this tool chain on a Linux developmentmachine. If you are using Linux for your development environment, you mayneed to modify the build scripts slightly as the path separator is different andthe libraries will require a preceding dot (“.”).
With this brief introduction behind us, let’s build the obligatory Hello Android appli-cation to run in the Linux foundation of the Android Emulator.
13.1.2 Building a Hello World application
The first thing we want you to accomplish with your journey into Android/Linuxdevelopment is to print something to the emulator screen to demonstrate that you’rerunning something on the platform outside the Android SDK and its Java applicationenvironment. There’s no better way to accomplish this feat than by writing a variant of
2 For everything you’d want to know about gcc, go here: http://gcc.gnu.org/.
www.it-ebooks.info
359Building Android apps without the SDK
the Hello World application. At this point, there will be little talk of Android activities,views, or resource layouts. Most code samples in this chapter are in the C language.The following listing shows the code for your first Hello Android application.
#include <stdio.h> int main(int argc,char * argv[]) { printf("Hello, Android!\n"); return 0;}
Virtually all C language applications require an #include header file containing func-tion definitions, commonly referred to as prototypes. In this case, the applicationincludes the header file for the standard input and output routines, stdio.h. The stan-dard C language entry point for user code is the function named main. The functionreturns an integer return code (a value of 0 is returned in this simple example) andtakes two arguments. The first, argc, is an integer indicating the number of com-mand-line arguments passed in to the program when invoked. The second, argv, is anarray of pointers to null-terminated strings representing each of the command-linearguments. The first argument, argv[0], is always the name of the program execut-ing. This application has but a single useful instruction, printf, which is to write tostandard output (the screen) a textual string. The printf function is declared in theheader file, stdio.h.
To build this application, you employ the gcc tool:
arm-none-linux-gnueabi-gcc hello.c -static -o hellostatic
You’ll notice a few things about this command-line instruction:
The compiler is invoked with the full name: arm-none-linux-gnueabi-gcc. The source file is named hello.c. The –static command-line switch is used to instruct gcc to fully link all
required routines and data into the resulting binary application file. In essence,the application is fully standalone and ready to be run on the target AndroidEmulator without any additional components. An application that’s staticallylinked tends to be rather large, because so much code and data are included inthe executable file. For example, this statically linked application with basicallya single line of code weighs in at around 600 KB. Ouch! If this -static switch isomitted, the application is built without any extra routines linked in. In thiscase, the application will be much smaller, but it’ll rely on finding compatibleroutines on the target system in order to run. For now, let’s keep things simpleand build the sample application in such a manner that all support routines arelinked statically.
The output switch, -o, is used to request that the executable application beassigned the name hellostatic. If this switch isn’t provided, the default applica-tion name is a.out.
Listing 13.1 Hello.c
www.it-ebooks.info
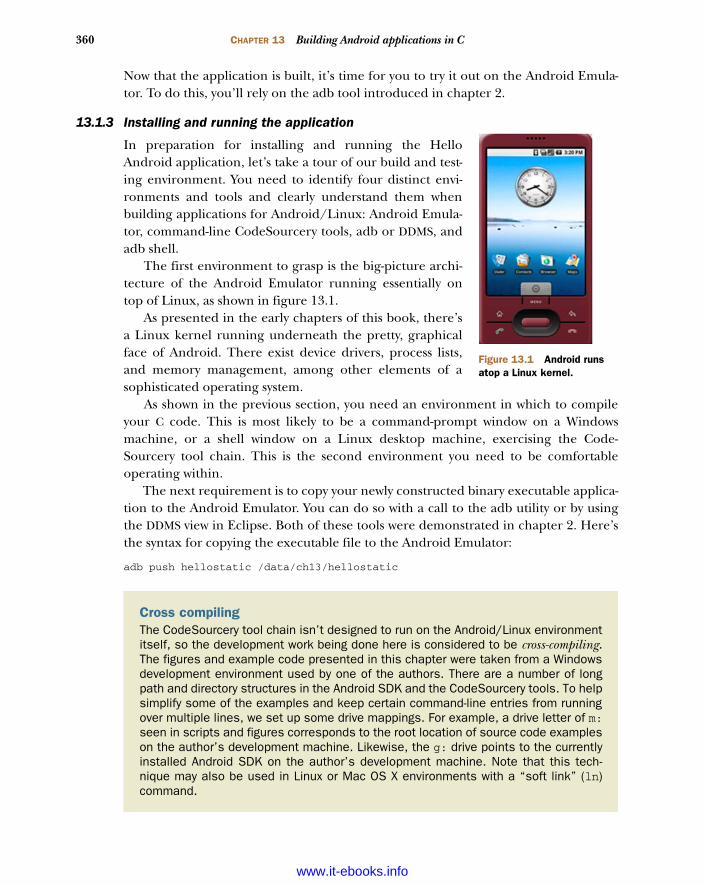
360 CHAPTER 13 Building Android applications in C
Now that the application is built, it’s time for you to try it out on the Android Emula-tor. To do this, you’ll rely on the adb tool introduced in chapter 2.
13.1.3 Installing and running the application
In preparation for installing and running the HelloAndroid application, let’s take a tour of our build and test-ing environment. You need to identify four distinct envi-ronments and tools and clearly understand them whenbuilding applications for Android/Linux: Android Emula-tor, command-line CodeSourcery tools, adb or DDMS, andadb shell.
The first environment to grasp is the big-picture archi-tecture of the Android Emulator running essentially ontop of Linux, as shown in figure 13.1.
As presented in the early chapters of this book, there’sa Linux kernel running underneath the pretty, graphicalface of Android. There exist device drivers, process lists,and memory management, among other elements of asophisticated operating system.
As shown in the previous section, you need an environment in which to compileyour C code. This is most likely to be a command-prompt window on a Windowsmachine, or a shell window on a Linux desktop machine, exercising the Code-Sourcery tool chain. This is the second environment you need to be comfortableoperating within.
The next requirement is to copy your newly constructed binary executable applica-tion to the Android Emulator. You can do so with a call to the adb utility or by usingthe DDMS view in Eclipse. Both of these tools were demonstrated in chapter 2. Here’sthe syntax for copying the executable file to the Android Emulator:
adb push hellostatic /data/ch13/hellostatic
Cross compilingThe CodeSourcery tool chain isn’t designed to run on the Android/Linux environmentitself, so the development work being done here is considered to be cross-compiling.The figures and example code presented in this chapter were taken from a Windowsdevelopment environment used by one of the authors. There are a number of longpath and directory structures in the Android SDK and the CodeSourcery tools. To helpsimplify some of the examples and keep certain command-line entries from runningover multiple lines, we set up some drive mappings. For example, a drive letter of m:seen in scripts and figures corresponds to the root location of source code exampleson the author’s development machine. Likewise, the g: drive points to the currentlyinstalled Android SDK on the author’s development machine. Note that this tech-nique may also be used in Linux or Mac OS X environments with a “soft link” (ln)command.
Figure 13.1 Android runs atop a Linux kernel.
www.it-ebooks.info
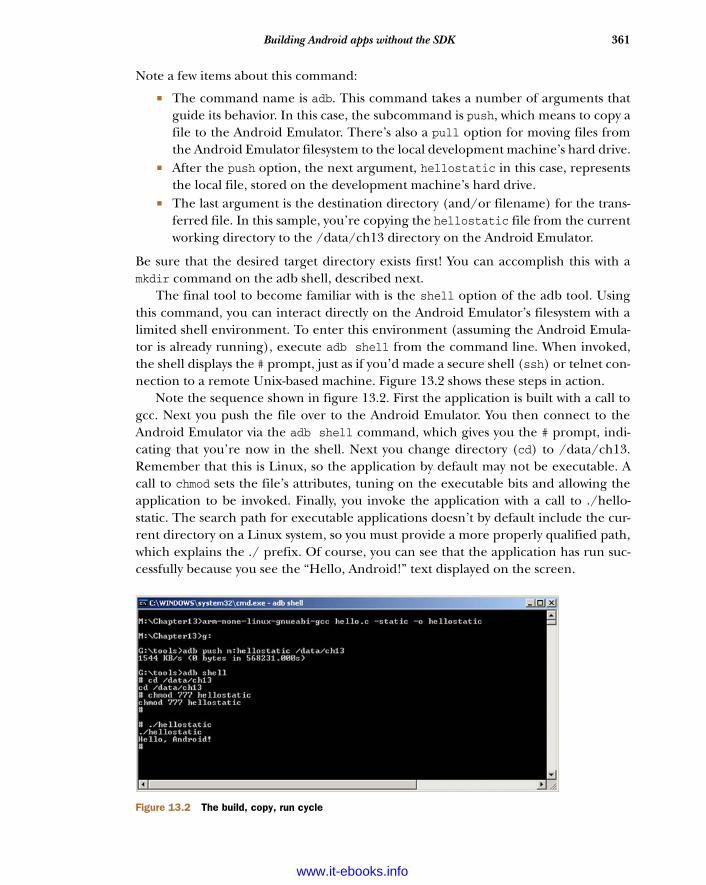
361Building Android apps without the SDK
Note a few items about this command:
The command name is adb. This command takes a number of arguments thatguide its behavior. In this case, the subcommand is push, which means to copy afile to the Android Emulator. There’s also a pull option for moving files fromthe Android Emulator filesystem to the local development machine’s hard drive.
After the push option, the next argument, hellostatic in this case, representsthe local file, stored on the development machine’s hard drive.
The last argument is the destination directory (and/or filename) for the trans-ferred file. In this sample, you’re copying the hellostatic file from the currentworking directory to the /data/ch13 directory on the Android Emulator.
Be sure that the desired target directory exists first! You can accomplish this with amkdir command on the adb shell, described next.
The final tool to become familiar with is the shell option of the adb tool. Usingthis command, you can interact directly on the Android Emulator’s filesystem with alimited shell environment. To enter this environment (assuming the Android Emula-tor is already running), execute adb shell from the command line. When invoked,the shell displays the # prompt, just as if you’d made a secure shell (ssh) or telnet con-nection to a remote Unix-based machine. Figure 13.2 shows these steps in action.
Note the sequence shown in figure 13.2. First the application is built with a call togcc. Next you push the file over to the Android Emulator. You then connect to theAndroid Emulator via the adb shell command, which gives you the # prompt, indi-cating that you’re now in the shell. Next you change directory (cd) to /data/ch13.Remember that this is Linux, so the application by default may not be executable. Acall to chmod sets the file’s attributes, tuning on the executable bits and allowing theapplication to be invoked. Finally, you invoke the application with a call to ./hello-static. The search path for executable applications doesn’t by default include the cur-rent directory on a Linux system, so you must provide a more properly qualified path,which explains the ./ prefix. Of course, you can see that the application has run suc-cessfully because you see the “Hello, Android!” text displayed on the screen.
Figure 13.2 The build, copy, run cycle
www.it-ebooks.info

362 CHAPTER 13 Building Android applications in C
Congratulations! You have a successful, albeit simple, Android/Linux applicationrunning on the Android Emulator. In the next section, we look at streamlining thisbuild process by combining the multiple build operations into a script.
13.1.4 C application build script
In the previous section, we reviewed each step in building and preparing to test ourapplication. Due to the rather tedious nature of executing each of these steps, youlikely want to utilize command-line tools when building C applications, as it greatlyspeeds up the edit, compile, copy, debug cycle. This example with only a single Csource file is rather simplistic; when multiple source files must be linked together, thethought of having a build script is appealing. The need for a build script (shown inlisting 13.2) is particularly evident where there are numerous source files to compileand link, a situation you’ll encounter later in this chapter.
This listing shows the build script for our Hello Android application.
arm-none-linux-gnueabi-gcc hello.c -static -o hellostatic g:\tools\adb push hellostatic /data/ch13 g:\tools\adb shell "chmod 777 /data/ch13/hellostatic"
A call to arm-none-linux-gnueabi-gcc compiles the source file, hello.c. The file isstatically linked against the standard C libraries, and the resulting binary executablefile is written out as hellostatic. The file hellostatic is copied to the Android Emulatorand placed in the directory /data/ch13. The permissions for this file are changed,permitting execution. Note the use of the adb shell with a quote-delimited command.Once this command executes, the adb application exits and returns to the Windowscommand prompt.
This example can be extended to perform other build steps or cleanup proce-dures such as removing temporary test data files on the Android Emulator or any sim-ilarly helpful tasks. As you progress, it’ll become clear what commands you need toput into your build script to make the testing process more efficient.
Now that the pressure is off—you’ve successfully written, built, and executed anapplication in the Android/Linux environment—it’s time to deal with the problem-atic issue of a simple application requiring such an enormous file size!
13.2 Solving the problem with dynamic linkingThat was fun, but who wants a 500+ KB file that only displays something to the screen?Recall that the –static flag links the essentials for running the application, includingthe input/output routines required for printing a message to the screen. If you’rethinking that there must be a better way, you’re correct; you need to link the applica-tion to existing system libraries rather than include all that code in the application’sexecutable file.
Listing 13.2 Build script for Hello Android, buildhello.bat
www.it-ebooks.info
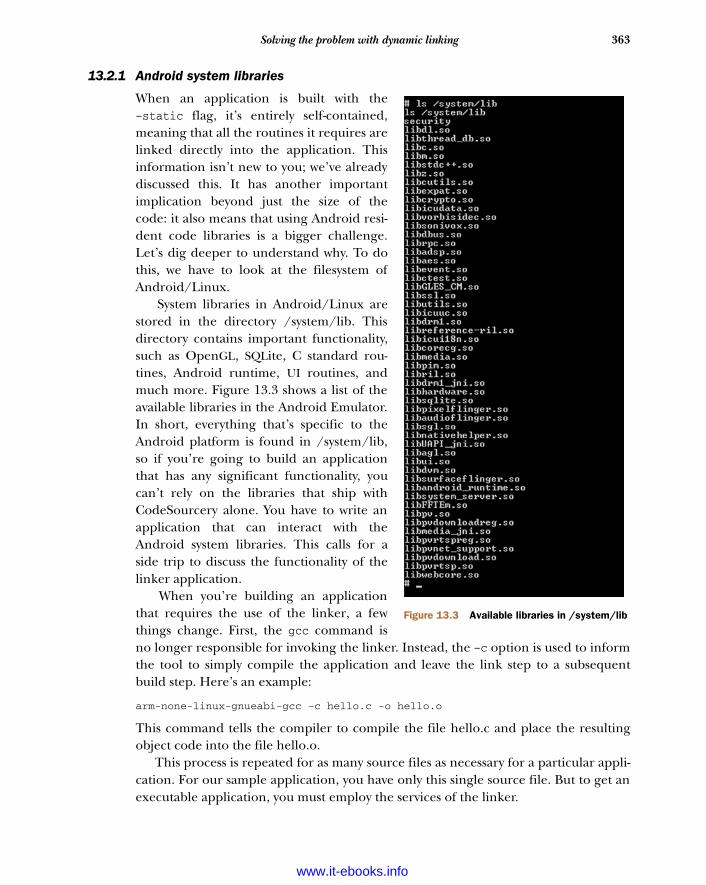
363Solving the problem with dynamic linking
13.2.1 Android system libraries
When an application is built with the–static flag, it’s entirely self-contained,meaning that all the routines it requires arelinked directly into the application. Thisinformation isn’t new to you; we’ve alreadydiscussed this. It has another importantimplication beyond just the size of thecode: it also means that using Android resi-dent code libraries is a bigger challenge.Let’s dig deeper to understand why. To dothis, we have to look at the filesystem ofAndroid/Linux.
System libraries in Android/Linux arestored in the directory /system/lib. Thisdirectory contains important functionality,such as OpenGL, SQLite, C standard rou-tines, Android runtime, UI routines, andmuch more. Figure 13.3 shows a list of theavailable libraries in the Android Emulator.In short, everything that’s specific to theAndroid platform is found in /system/lib,so if you’re going to build an applicationthat has any significant functionality, youcan’t rely on the libraries that ship withCodeSourcery alone. You have to write anapplication that can interact with theAndroid system libraries. This calls for aside trip to discuss the functionality of thelinker application.
When you’re building an applicationthat requires the use of the linker, a fewthings change. First, the gcc command isno longer responsible for invoking the linker. Instead, the –c option is used to informthe tool to simply compile the application and leave the link step to a subsequentbuild step. Here’s an example:
arm-none-linux-gnueabi-gcc –c hello.c -o hello.o
This command tells the compiler to compile the file hello.c and place the resultingobject code into the file hello.o.
This process is repeated for as many source files as necessary for a particular appli-cation. For our sample application, you have only this single source file. But to get anexecutable application, you must employ the services of the linker.
Figure 13.3 Available libraries in /system/lib
www.it-ebooks.info
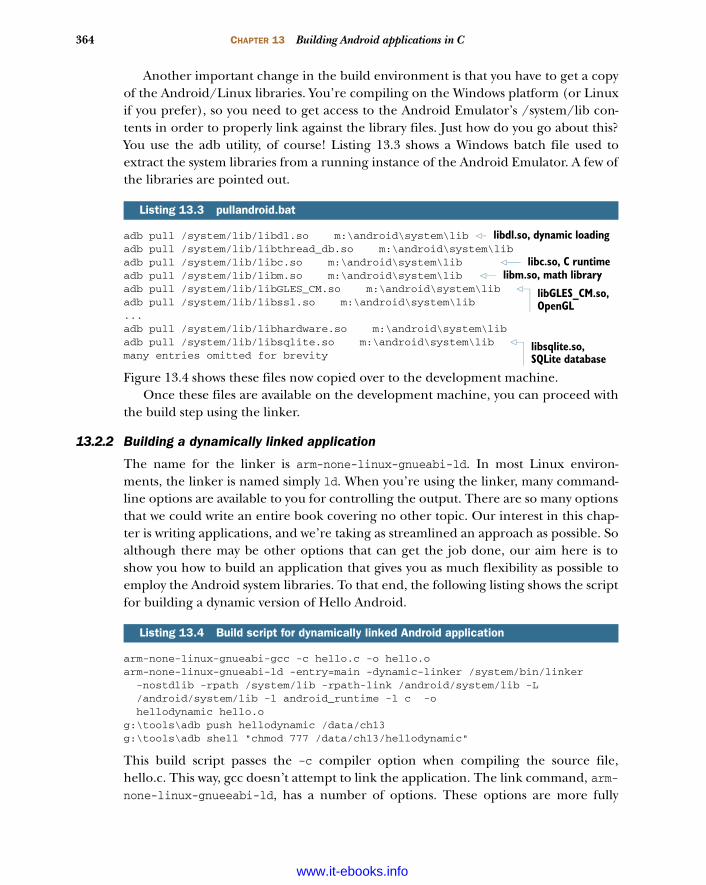
364 CHAPTER 13 Building Android applications in C
Another important change in the build environment is that you have to get a copyof the Android/Linux libraries. You’re compiling on the Windows platform (or Linuxif you prefer), so you need to get access to the Android Emulator’s /system/lib con-tents in order to properly link against the library files. Just how do you go about this?You use the adb utility, of course! Listing 13.3 shows a Windows batch file used toextract the system libraries from a running instance of the Android Emulator. A few ofthe libraries are pointed out.
adb pull /system/lib/libdl.so m:\android\system\libadb pull /system/lib/libthread_db.so m:\android\system\libadb pull /system/lib/libc.so m:\android\system\libadb pull /system/lib/libm.so m:\android\system\libadb pull /system/lib/libGLES_CM.so m:\android\system\libadb pull /system/lib/libssl.so m:\android\system\lib...adb pull /system/lib/libhardware.so m:\android\system\libadb pull /system/lib/libsqlite.so m:\android\system\libmany entries omitted for brevity
Figure 13.4 shows these files now copied over to the development machine. Once these files are available on the development machine, you can proceed with
the build step using the linker.
13.2.2 Building a dynamically linked application
The name for the linker is arm-none-linux-gnueabi-ld. In most Linux environ-ments, the linker is named simply ld. When you’re using the linker, many command-line options are available to you for controlling the output. There are so many optionsthat we could write an entire book covering no other topic. Our interest in this chap-ter is writing applications, and we’re taking as streamlined an approach as possible. Soalthough there may be other options that can get the job done, our aim here is toshow you how to build an application that gives you as much flexibility as possible toemploy the Android system libraries. To that end, the following listing shows the scriptfor building a dynamic version of Hello Android.
arm-none-linux-gnueabi-gcc -c hello.c -o hello.oarm-none-linux-gnueabi-ld -entry=main -dynamic-linker /system/bin/linker -nostdlib -rpath /system/lib -rpath-link /android/system/lib -L /android/system/lib -l android_runtime -l c -o hellodynamic hello.og:\tools\adb push hellodynamic /data/ch13g:\tools\adb shell "chmod 777 /data/ch13/hellodynamic"
This build script passes the –c compiler option when compiling the source file,hello.c. This way, gcc doesn’t attempt to link the application. The link command, arm-none-linux-gnueeabi-ld, has a number of options. These options are more fully
Listing 13.3 pullandroid.bat
Listing 13.4 Build script for dynamically linked Android application
libdl.so, dynamic loading
libc.so, C runtimelibm.so, math library
libGLES_CM.so, OpenGL
libsqlite.so, SQLite database
www.it-ebooks.info
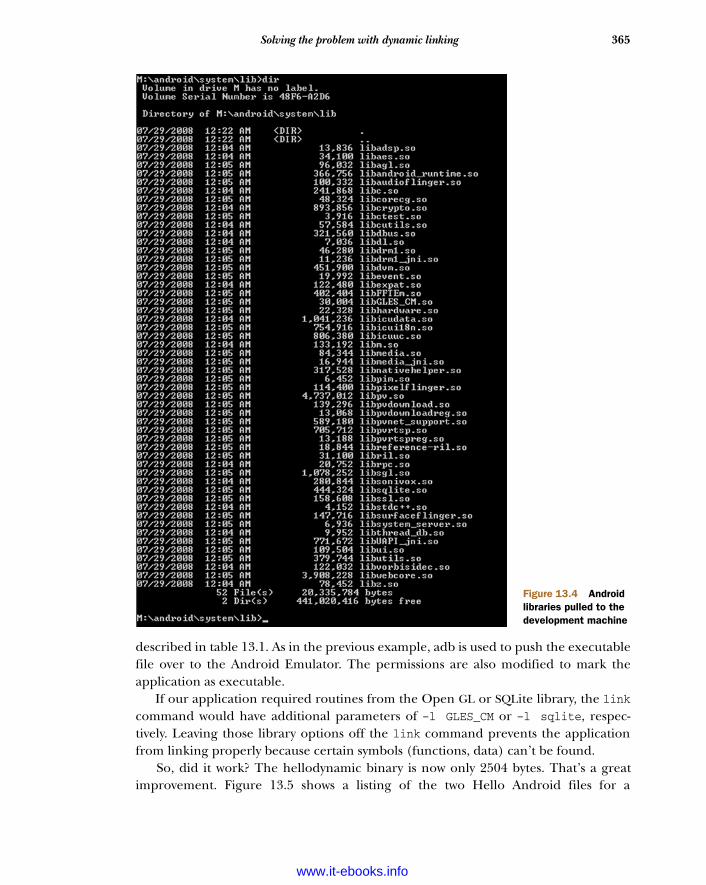
365Solving the problem with dynamic linking
described in table 13.1. As in the previous example, adb is used to push the executablefile over to the Android Emulator. The permissions are also modified to mark theapplication as executable.
If our application required routines from the Open GL or SQLite library, the linkcommand would have additional parameters of –l GLES_CM or –l sqlite, respec-tively. Leaving those library options off the link command prevents the applicationfrom linking properly because certain symbols (functions, data) can’t be found.
So, did it work? The hellodynamic binary is now only 2504 bytes. That’s a greatimprovement. Figure 13.5 shows a listing of the two Hello Android files for a
Figure 13.4 Android libraries pulled to the development machine
www.it-ebooks.info
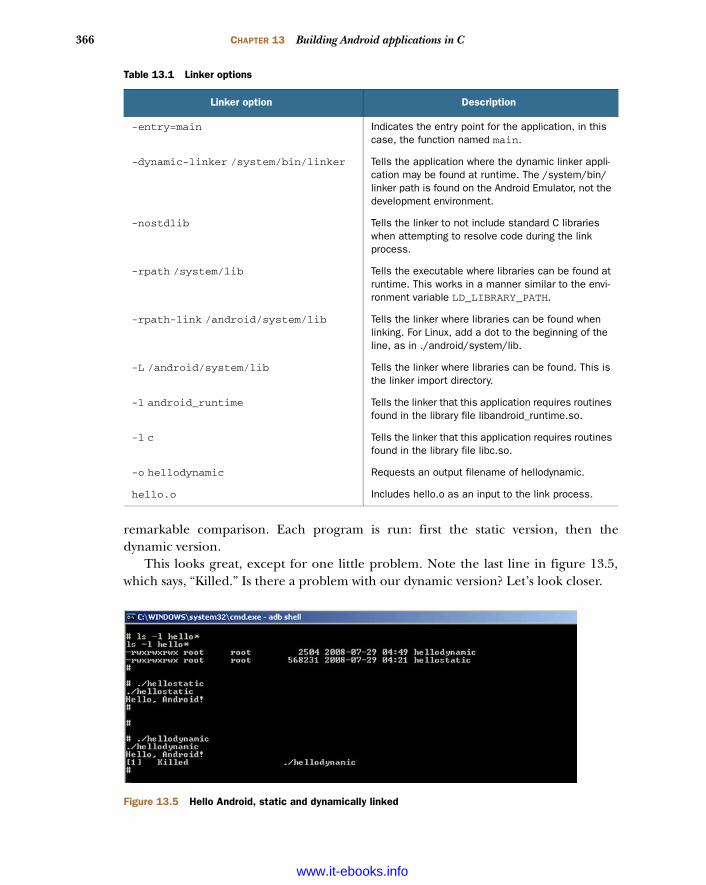
366 CHAPTER 13 Building Android applications in C
remarkable comparison. Each program is run: first the static version, then thedynamic version.
This looks great, except for one little problem. Note the last line in figure 13.5,which says, “Killed.” Is there a problem with our dynamic version? Let’s look closer.
Table 13.1 Linker options
Linker option Description
-entry=main Indicates the entry point for the application, in this case, the function named main.
-dynamic-linker /system/bin/linker Tells the application where the dynamic linker appli-cation may be found at runtime. The /system/bin/linker path is found on the Android Emulator, not the development environment.
-nostdlib Tells the linker to not include standard C libraries when attempting to resolve code during the link process.
-rpath /system/lib Tells the executable where libraries can be found at runtime. This works in a manner similar to the envi-ronment variable LD_LIBRARY_PATH.
-rpath-link /android/system/lib Tells the linker where libraries can be found when linking. For Linux, add a dot to the beginning of the line, as in ./android/system/lib.
-L /android/system/lib Tells the linker where libraries can be found. This is the linker import directory.
-l android_runtime Tells the linker that this application requires routines found in the library file libandroid_runtime.so.
-l c Tells the linker that this application requires routines found in the library file libc.so.
-o hellodynamic Requests an output filename of hellodynamic.
hello.o Includes hello.o as an input to the link process.
Figure 13.5 Hello Android, static and dynamically linked
www.it-ebooks.info
367Solving the problem with dynamic linking
13.2.3 exit() vs. return()
Though our application has successfully linked with the Android system libraries oflibc.so and libandroid_runtime.so and can actually run, there are missing pieces thatcause the application to not properly execute. When you build an application in thismanner, without letting the linker do all its magic of knitting the entire applicationtogether, you have to do a bit of housekeeping yourself. Looks like there was some-thing to that 500 KB application after all!
For one thing, if our application’s entry point is the main function, and the mainfunction executes a return() statement, just where does it return to? Let’s replace thereturn() statement with an exit() call, as shown in this listing.
#include <stdio.h>int main(int argc,char * argv[]) { printf("Hello, Android!\n"); exit(0); //return 0; }
We add a call to the function exit(). This should return execution to the OS. And wecomment out the call to return(). A return() call in this location causes a stackunderflow because there’s nowhere within this application to return to!
This fixed the problem—no more killed messages. Look at figure 13.6, where yousee that the dynamic version of Hello Android now runs just fine.
Unfortunately, you’re not finished. It turns out that the application doesn’t prop-erly interact with other libraries, nor does it properly handle the argc and argv[]arguments to the main function. The C library (remember, you’re linking againstlibc.so) has certain expectations for application structure and stack location. You’recloser but still not quite ready for prime time.
What this application requires is a start routine, which is called by the operatingsystem when the application is invoked. This function in turn calls the application’smain function. This start routine must set up the necessary structures to allow theapplication to properly interact with the operating system and the core C libraries.
Listing 13.5 Adding an exit() call
Figure 13.6 A better-behaving dynamic version of Hello Android
www.it-ebooks.info

368 CHAPTER 13 Building Android applications in C
13.2.4 Startup code
We’ve surmised that the sample application is missing the proper startup code, butjust what does startup code for an Android/Linux application on ARM look like?Where do you turn to get this kind of information? Let’s look deeper into the bag ofCodeSourcery tricks for a clue.
A number of executable applications ship with Android, so pull one of them overto the desktop and see what you can learn. Perhaps you can extract information fromthat file that can assist in solving this puzzle.
The tool you’re going to use to assist in this effort is the object dump command,arm-none-linux-gnueabi-objdump. This utility has a number of options for tearingapart an ELF (executable and linkable format) file for examination. This is the kind of filestructure used by applications in the Android/Linux environment. Using the –doption of the objdump command results in a disassembly of the executable file, show-ing the assembly language equivalent of the code in each executable section. Ourinterest is in the first .text section of the disassembly, as this ought to be the entrypoint of the application. The following listing shows the .text section from the pingprogram taken from the Android Emulator (via adb pull).
000096d0 <dlopen-0x60>: 96d0: e1a0000d mov r0, sp 96d4: e3a01000 mov r1, #0; 0x0 96d8: e28f2004 add r2, pc, #4; 0x4 96dc: e28f3004 add r3, pc, #4; 0x43 96e0: eaffff8b b 9514 <dlopen-0x21c> 96e4: ea000e03 b cef8 <dlclose+0x37bc> 96e8: 0000e408 andeq lr, r0, r8, lsl #8 96ec: 0000e410 andeq lr, r0, r0, lsl r4 96f0: 0000e418 andeq lr, r0, r8, lsl r4 96f4: 0000e420 andeq lr, r0, r0, lsr #8 96f8: e1a00000 nop (mov r0,r0) 96fc: e1a00000 nop (mov r0,r0)
The first instruction assigns the value of the stack pointer (sp) to register 0 (r0) B.Next the literal value of 0 is assigned to register r1 C. The address counter plus fourmemory location spaces is stored in registers r2 and r3 D. The b instruction tells thecode to branch to a specific address E. In this case, the address is 0x21c bytes prior tothe address of the dlopen function. This value is 9514 in decimal. The next branch isto an address that’s 0x37bc bytes beyond the dlclose label F. The next few instruc-tions G are conditional operations. The code snippet finishes up with a pair of nopinstructions H. Note that the address of each instruction is shown to the left of eachline. Each instruction occurs at a 4-byte offset from its predecessor. Four bytes times 6bits per byte equals a 32-bit address bus, which makes sense because the ARM proces-sor family is 32 bit.
Listing 13.6 Disassembly of ping
Stack pointerBmov instructionC
add instructionD
Branch instructionE
Branch instructionF
Conditional expressionsG
nop instructionsH
www.it-ebooks.info
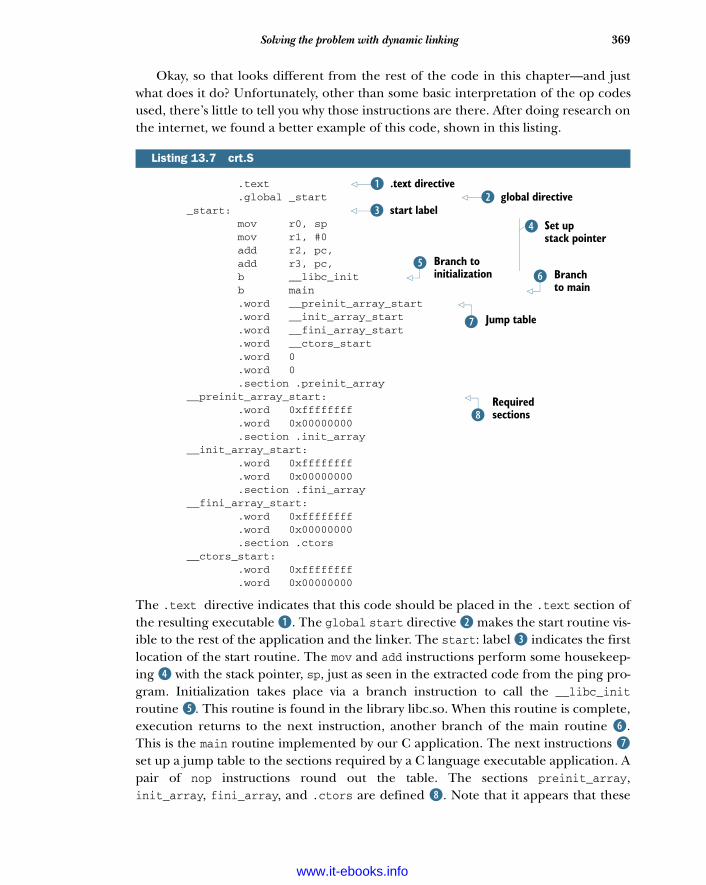
369Solving the problem with dynamic linking
Okay, so that looks different from the rest of the code in this chapter—and justwhat does it do? Unfortunately, other than some basic interpretation of the op codesused, there’s little to tell you why those instructions are there. After doing research onthe internet, we found a better example of this code, shown in this listing.
.text .global _start _start: mov r0, sp mov r1, #0 add r2, pc, add r3, pc, b __libc_init b main .word __preinit_array_start .word __init_array_start .word __fini_array_start .word __ctors_start .word 0 .word 0 .section .preinit_array __preinit_array_start: .word 0xffffffff .word 0x00000000 .section .init_array __init_array_start: .word 0xffffffff .word 0x00000000 .section .fini_array __fini_array_start: .word 0xffffffff .word 0x00000000 .section .ctors __ctors_start: .word 0xffffffff .word 0x00000000
The .text directive indicates that this code should be placed in the .text section ofthe resulting executable B. The global start directive C makes the start routine vis-ible to the rest of the application and the linker. The start: label D indicates the firstlocation of the start routine. The mov and add instructions perform some housekeep-ing E with the stack pointer, sp, just as seen in the extracted code from the ping pro-gram. Initialization takes place via a branch instruction to call the __libc_initroutine F. This routine is found in the library libc.so. When this routine is complete,execution returns to the next instruction, another branch of the main routine G.This is the main routine implemented by our C application. The next instructions Hset up a jump table to the sections required by a C language executable application. Apair of nop instructions round out the table. The sections preinit_array,init_array, fini_array, and .ctors are defined I. Note that it appears that these
Listing 13.7 crt.S
.text directiveBglobal directiveC
start labelDSet up stack pointer
E
Branch to initialization
FBranch to main
G
Jump tableH
Required sectionsI
www.it-ebooks.info
370 CHAPTER 13 Building Android applications in C
sections are required and that the values provided are an allowable address range forthese sections. The linker takes care of putting these sections into the resulting exe-cutable file. Attempting to run the application without these sections results in codethat crashes.
NOTE All credit for this crt.S file belongs to the author of a blog found athttp://honeypod.blogspot.com/2007/12/initialize-libc-for-android.html.You can find additional reference material for low-level Android program-ming information at http://benno.id.au.
Now that we’ve found an adequate startup routine, we’ll show you how to add this rou-tine to your application. The compiler handles the assembly file just like a C languagefile:
arm-none-linux-gnueabi-gcc -c -o crt0.o crt.S
The resulting object file, crt0.o, is passed to the linker as an input file, just as any otherobject file would be. Also, the entry switch to the linker must now specify _startrather than main:
arm-none-linux-gnueabi-ld --entry=_start --dynamic-linker /system/bin/linker -nostdlib -rpath /android/system/lib -rpath-link /android/system/lib -L \android\system\lib -l c -l android_runtime -l sqlite -o hellodynamic hello.o crt0.o
At this point, you should feel confident that you can build applications for Android/Linux, so it’s time to build something useful. The next section walks through the con-struction of a DayTime Server.
13.3 What time is it? The DayTime ServerAlthough we don’t talk about it much today, Linux systems (and more generically,Unix systems) have a service running that provides the server’s current date and time.This application, known as a DayTime Server, typically runs as a daemon (whichmeans it runs in the background and isn’t connected to a particular shell). For ourpurposes, we’ll implement a basic DayTime Server for Android/Linux, but we won’tworry about turning it into a background service.
This application helps exercise our interest in developing Android/Linux applica-tions. First and most important, it’s an application of some significance beyond a sim-ple printf statement. Second, once this application is built, you’ll write an Android/Java application to interact with the DayTime Server.
13.3.1 DayTime Server application
Our DayTime Server application has a basic function: the application listens on a TCPport for incoming socket connections. When a connection is made, the applicationwrites a short textual string representation of the date and time via the socket, closesthe socket, and returns to listening for a new connection.
www.it-ebooks.info

371What time is it? The DayTime Server
In addition to the TCP socket interactions, our application logs requests to a SQLitedatabase. Why? Because we can! The purpose of this application is to demonstratenontrivial activities in the Android/Linux environment, including the use of theSQLite system library. Let’s get started by examining the DayTime Server application.
13.3.2 daytime.c
The DayTime Server application can be broken into two basic functional parts. Thefirst is the TCP socket server.
Our DayTime Server application binds to TCP port 1024 when looking for newconnections. Ordinarily, a daytime service binds to TCP port 13, but Linux has a secu-rity feature where only trusted users can bind to any port below 1023. The second fea-ture is the insertion of data into a SQLite database. The following listing shows thecode for the DayTime Server application.
#include <time.h>#include <stdio.h>#include <string.h>#include <errno.h>#include <arpa/inet.h>#include <netinet/in.h>#include <sys/socket.h>#include <resolv.h>#include "sqlite3.h"int PORTNUMBER = 1024;#define htons(a) ( ((a & 0x00ff) << 8) | ((a & 0xff00) >> 8))void RecordHit(char * when){ int rc; sqlite3
*db; char *zErrMsg = 0; char sql[200]; rc = sqlite3_open("daytime_db.db",&db); if( rc ) { printf( "Can't open database: %s\n", sqlite3_errmsg(db)); sqlite3_close(db); return; } bzero(sql,sizeof(sql)); sprintf(sql,"insert into hits values (DATETIME('NOW'),'%s');",when); rc = sqlite3_exec(db, sql, NULL, 0, &zErrMsg); if( rc!=SQLITE_OK ) { printf( "SQL error: %s\n", zErrMsg); } sqlite3_close(db);}
Listing 13.8 daytime.c
BImport required headers
Listening port number
C
Define helpful macroD
EInteract
with SQLite
www.it-ebooks.info

372 CHAPTER 13 Building Android applications in C
int main(int argc, char **argv){int listenfd, connfd;struct sockaddr_in servaddr;char buf[100];time_t ticks;int done = 0;int rc;fd_set readset;int result;struct timeval tv; printf("Daytime Server\n"); listenfd = socket(AF_INET,SOCK_STREAM,0); bzero(&servaddr,sizeof(servaddr)); servaddr.sin_family = AF_INET; servaddr.sin_addr.s_addr = INADDR_ANY; servaddr.sin_port = htons(PORTNUMBER); rc = bind(listenfd, (struct sockaddr *) &servaddr,sizeof(servaddr)); if (rc != 0) { printf("after bind,rc = [%d]\n",rc); return rc; } listen(listenfd,5); while (!done) { printf("Waiting for connection\n"); while (1) { bzero(&tv,sizeof(tv)); tv.tv_sec = 2; FD_ZERO(&readset); FD_SET(listenfd, &readset); result = select(listenfd + 1, &readset, &readset, NULL, &tv); if (result >= 1) { printf("Incoming connection!\n"); break; } else if (result == 0) { printf("Timeout.\n"); continue; } else { printf("Error, leave.\n"); return result; } } printf("Calling accept:\n"); connfd = accept(listenfd, (struct sockaddr *) NULL, NULL); printf("Connecting\n"); ticks = time(NULL);
Set up andlisten on socket F
Accept socket connection
G
www.it-ebooks.info
373What time is it? The DayTime Server
sprintf(buf,"%.24s",ctime(&ticks)); printf("sending [%s]\n",buf); write(connfd,buf,strlen(buf)); close(connfd); RecordHit(buf); } return 0;}
As with many C language applications, a number of headers B are required, includ-ing definitions and prototypes for time functions, SQLite functions, and TCP sockets.Note that the sqlite3.h header file isn’t provided in the CodeSourcery tool chain. Thisfile was acquired from a sqlite3 distribution, and the file was copied into the localdirectory along with daytime.c. This is why the include file is delimited with quotationmarks rather than <>, which is used for finding include files in the system or compilerpath. The htons function is typically implemented in the library named socket (lib-socket.so). Android doesn’t provide this library, nor was this found in any of the sys-tem libraries. Therefore htons is defined here as a macro D. This macro is requiredto get the network byte ordering correct. When the application is running, we can ver-ify this port by running netstat –tcp on the command line in the adb shell.
The standard TCP port for a DayTime Server is port 13. In C, the application isusing port 1024 because our application can’t bind to any port numbered 1023 orbelow. Only system processes may bind to ports below 1024.
In the RecordHit() function, you see SQLite interaction E. The RecordHit()function is responsible for inserting a record into the SQLite database created for thisapplication.
Jumping into the main function, you see the socket functions in use to listen on asocket for incoming connections F. When a connection is accepted G, the currentsystem time is sent to the calling client. After this, the application makes a record ofthe transaction by calling the RecordHit() function H.
That’s all the code necessary to implement our Android/Linux DayTime Serverapplication. Let’s look next at the SQLite 3 database interaction in more detail.
13.3.3 The SQLite database
This application employs a simple database structure created with the SQLite 3 appli-cation. We interact with SQLite 3 from the adb shell environment, as shown in fig-ure 13.7.
The purpose of this database is to record data each time the DayTime Server pro-cesses an incoming request. From a data perspective, this sample is boring, as it simplyrecords the system time along with the text returned to the client (this text is a ctime-formatted time string). Though somewhat redundant from a data perspective, thepurpose is to demonstrate the use of SQLite from our C application, utilizing theAndroid/Linux resident sqlite3 library, libsqlite.so.
Record activity
H
www.it-ebooks.info
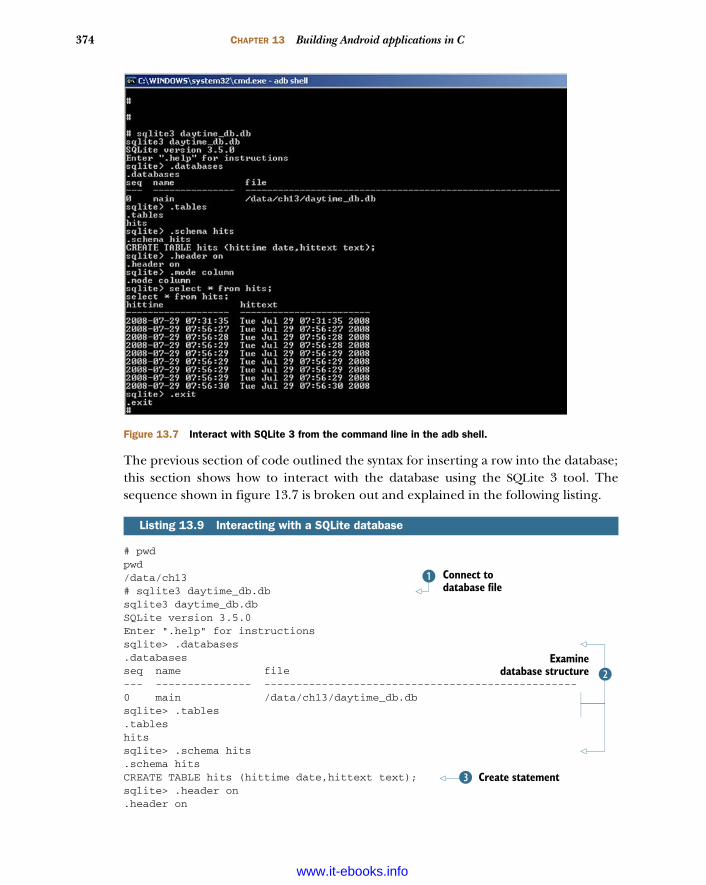
374 CHAPTER 13 Building Android applications in C
The previous section of code outlined the syntax for inserting a row into the database;this section shows how to interact with the database using the SQLite 3 tool. Thesequence shown in figure 13.7 is broken out and explained in the following listing.
# pwdpwd/data/ch13# sqlite3 daytime_db.dbsqlite3 daytime_db.dbSQLite version 3.5.0Enter ".help" for instructionssqlite> .databases.databasesseq name file--- --------------- -------------------------------------------------0 main /data/ch13/daytime_db.dbsqlite> .tables.tableshitssqlite> .schema hits.schema hitsCREATE TABLE hits (hittime date,hittext text);sqlite> .header on.header on
Listing 13.9 Interacting with a SQLite database
Figure 13.7 Interact with SQLite 3 from the command line in the adb shell.
Connect to database file
B
CExamine
database structure
Create statementD
www.it-ebooks.info
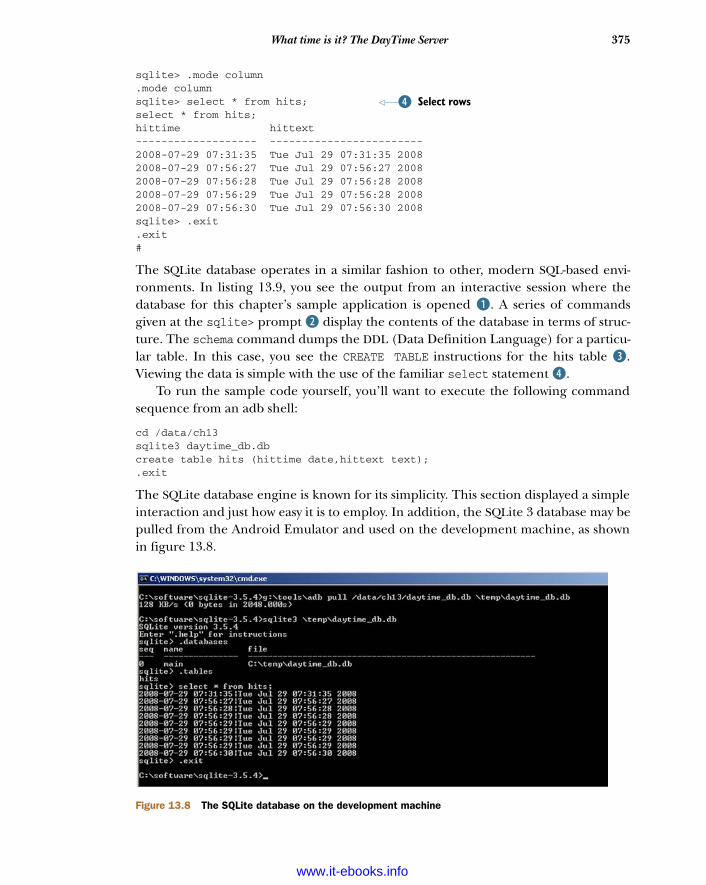
375What time is it? The DayTime Server
sqlite> .mode column.mode columnsqlite> select * from hits;select * from hits;hittime hittext------------------- ------------------------2008-07-29 07:31:35 Tue Jul 29 07:31:35 20082008-07-29 07:56:27 Tue Jul 29 07:56:27 20082008-07-29 07:56:28 Tue Jul 29 07:56:28 20082008-07-29 07:56:29 Tue Jul 29 07:56:28 20082008-07-29 07:56:30 Tue Jul 29 07:56:30 2008sqlite> .exit.exit#
The SQLite database operates in a similar fashion to other, modern SQL-based envi-ronments. In listing 13.9, you see the output from an interactive session where thedatabase for this chapter’s sample application is opened B. A series of commandsgiven at the sqlite> prompt C display the contents of the database in terms of struc-ture. The schema command dumps the DDL (Data Definition Language) for a particu-lar table. In this case, you see the CREATE TABLE instructions for the hits table D.Viewing the data is simple with the use of the familiar select statement E.
To run the sample code yourself, you’ll want to execute the following commandsequence from an adb shell:
cd /data/ch13sqlite3 daytime_db.dbcreate table hits (hittime date,hittext text);.exit
The SQLite database engine is known for its simplicity. This section displayed a simpleinteraction and just how easy it is to employ. In addition, the SQLite 3 database may bepulled from the Android Emulator and used on the development machine, as shownin figure 13.8.
Select rowsE
Figure 13.8 The SQLite database on the development machine
www.it-ebooks.info
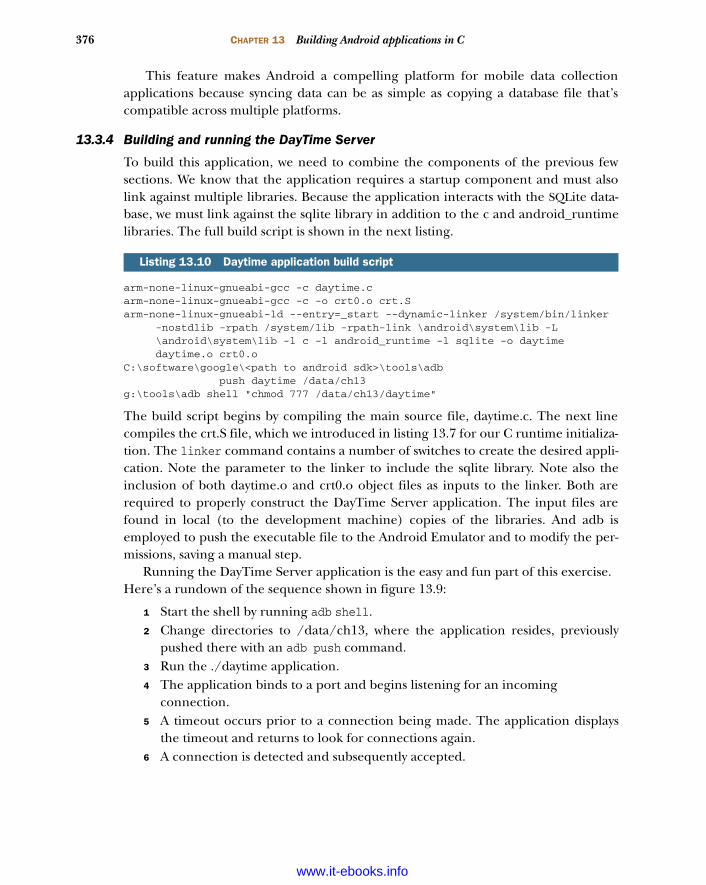
376 CHAPTER 13 Building Android applications in C
This feature makes Android a compelling platform for mobile data collectionapplications because syncing data can be as simple as copying a database file that’scompatible across multiple platforms.
13.3.4 Building and running the DayTime Server
To build this application, we need to combine the components of the previous fewsections. We know that the application requires a startup component and must alsolink against multiple libraries. Because the application interacts with the SQLite data-base, we must link against the sqlite library in addition to the c and android_runtimelibraries. The full build script is shown in the next listing.
arm-none-linux-gnueabi-gcc -c daytime.c arm-none-linux-gnueabi-gcc -c -o crt0.o crt.S arm-none-linux-gnueabi-ld --entry=_start --dynamic-linker /system/bin/linker
-nostdlib -rpath /system/lib -rpath-link \android\system\lib -L \android\system\lib -l c -l android_runtime -l sqlite -o daytime daytime.o crt0.o
C:\software\google\<path to android sdk>\tools\adb push daytime /data/ch13 g:\tools\adb shell "chmod 777 /data/ch13/daytime"
The build script begins by compiling the main source file, daytime.c. The next linecompiles the crt.S file, which we introduced in listing 13.7 for our C runtime initializa-tion. The linker command contains a number of switches to create the desired appli-cation. Note the parameter to the linker to include the sqlite library. Note also theinclusion of both daytime.o and crt0.o object files as inputs to the linker. Both arerequired to properly construct the DayTime Server application. The input files arefound in local (to the development machine) copies of the libraries. And adb isemployed to push the executable file to the Android Emulator and to modify the per-missions, saving a manual step.
Running the DayTime Server application is the easy and fun part of this exercise. Here’s a rundown of the sequence shown in figure 13.9:
1 Start the shell by running adb shell.2 Change directories to /data/ch13, where the application resides, previously
pushed there with an adb push command.3 Run the ./daytime application.4 The application binds to a port and begins listening for an incoming
connection.5 A timeout occurs prior to a connection being made. The application displays
the timeout and returns to look for connections again.6 A connection is detected and subsequently accepted.
Listing 13.10 Daytime application build script
www.it-ebooks.info

377What time is it? The DayTime Server
7 The time string is constructed and sent to the client.8 A record is inserted into the database with the shown sql statement.9 You kill the application and restart the shell. Note that this is because you didn’t
build a clean way of killing the DayTime Server. A proper version of the applica-tion would be to convert it to a daemon, which is beyond the scope of our dis-cussion here.
10 Run sqlite3 to examine the contents of the application’s database.11 Perform a select against the hits table, where you see the recently inserted
record.
You’ve built an Android/Linux application that implements a variant of the traditionalDayTime Server application as well as interacts with a SQL database. Not too shabbywhen you consider that this is a telephone platform! Let’s move on to examine theAndroid/Java application used to exercise the DayTime Server, our Daytime Client.
Figure 13.9 DayTime Server running in the shell
www.it-ebooks.info
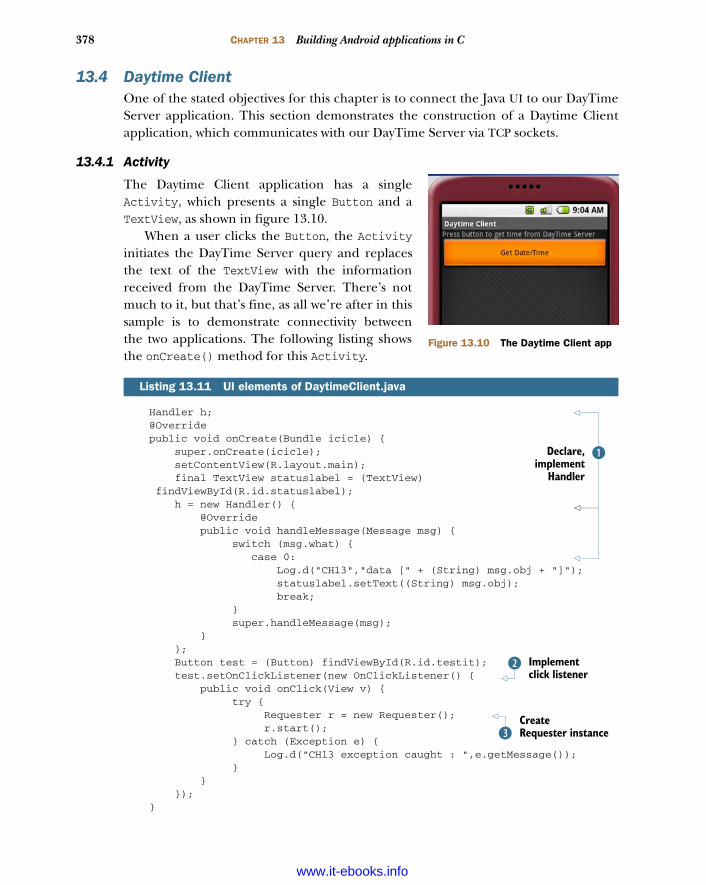
378 CHAPTER 13 Building Android applications in C
13.4 Daytime ClientOne of the stated objectives for this chapter is to connect the Java UI to our DayTimeServer application. This section demonstrates the construction of a Daytime Clientapplication, which communicates with our DayTime Server via TCP sockets.
13.4.1 Activity
The Daytime Client application has a singleActivity, which presents a single Button and aTextView, as shown in figure 13.10.
When a user clicks the Button, the Activityinitiates the DayTime Server query and replacesthe text of the TextView with the informationreceived from the DayTime Server. There’s notmuch to it, but that’s fine, as all we’re after in thissample is to demonstrate connectivity betweenthe two applications. The following listing showsthe onCreate() method for this Activity.
Handler h; @Override public void onCreate(Bundle icicle) { super.onCreate(icicle); setContentView(R.layout.main); final TextView statuslabel = (TextView)
findViewById(R.id.statuslabel); h = new Handler() { @Override public void handleMessage(Message msg) { switch (msg.what) { case 0: Log.d("CH13","data [" + (String) msg.obj + "]"); statuslabel.setText((String) msg.obj); break; } super.handleMessage(msg); } }; Button test = (Button) findViewById(R.id.testit); test.setOnClickListener(new OnClickListener() { public void onClick(View v) { try { Requester r = new Requester(); r.start(); } catch (Exception e) { Log.d("CH13 exception caught : ",e.getMessage()); } } }); }
Listing 13.11 UI elements of DaytimeClient.java
BDeclare,implement
Handler
Implement click listener
C
Create Requester instanceD
Figure 13.10 The Daytime Client app
www.it-ebooks.info
379Daytime Client
This application is all about detecting the selection of a button C and initiating anaction based on that click. The action is the creation of an instance of the Requesterclass D, which we discuss in the next section. We handle the response from the socketserver with the assistance of a Handler B. The Handler has a single role: updating theUI with textual data stored in the obj member of a Message object.
Although the UI of this application is simple, the more interesting side of thisActivity is the interaction with the DayTime Server, which takes place in theRequester class, which we’ll look at next.
13.4.2 Socket client
The DayTime Server application listens on a TCP port for incoming connections. Torequest the date and time, the Daytime Client must establish a client socket connec-tion to the DayTime Server. It’s hard to imagine a simpler TCP service than this—opena socket to the server, and read data until the socket connection is closed. There’s noadditional requirement. Most of the networking examples in this book have focusedon a higher-level protocol, HTTP, where the request and response are clearly definedwith headers and a specific protocol to observe. In this example, the communicationsinvolve a lower-level socket connection, essentially raw, if you will, because there’s noprotocol associated with it beyond being a TCP stream (as opposed to UDP). The fol-lowing listing demonstrates this lower-level socket communication.
public class Requester extends Thread { Socket requestSocket; String message; StringBuilder returnStringBuffer = new StringBuilder(); Message lmsg; int ch; public void run() { try { requestSocket = new Socket("localhost", 1024); InputStreamReader isr = new
InputStreamReader(requestSocket.getInputStream(),"ISO-8859-1"); while ((ch = isr.read()) != -1) { returnStringBuffer.append((char) ch); } message = returnStringBuffer.toString(); lmsg = new Message(); lmsg.obj = (Object) message; lmsg.what = 0; h.sendMessage(lmsg); requestSocket.close(); } catch (Exception ee) { Log.d("CH13","failed to read data" + ee.getMessage()); } } }
Listing 13.12 Requester class implementation
Extend Thread classB
CCommunicateon Socket
Create Message object
D
Send Message to main thread
E
www.it-ebooks.info
380 CHAPTER 13 Building Android applications in C
The Requestor B class extends the Thread class by implementing the run() method.Communications take place via an instance of the Socket class C, which is found inthe java.net package. Note the port number being used—1024, just like our socketserver! A Message D is used to communicate back to the UI thread. Once the Messageobject is initialized, it’s sent back to the calling thread E.
With the Daytime Client now coded, it’s time to test the application. In order forthe Daytime Client to access a TCP socket, a special permission entry is required in theAndroidManifest.xml file: <uses-permission android:name="android.permis-
sion. INTERNET"></uses-permission>.
13.4.3 Testing the Daytime Client
The first step in testing the Daytime Client is to ensure that the DayTime Server appli-cation is running, as described in section 13.3.4. Once you know the DayTime Serveris running, you can run the Daytime Client.
NOTE If you’re unclear on how to build and run the Daytime Client, refer tochapter 2 for information on properly setting up the Android developmentenvironment in Eclipse.
Figure 13.11 demonstrates the Daytime Client running, alongside a view of the Day-Time Server. Note how the TextView of the Android application is updated to reflectthe date and time sent by the DayTime Server.
The DayTime Server is exercising both TCP socket functionality and SQLite data-base record insertions, all running in the Android Emulator. A production-readyAndroid/Linux application would need to be converted to run as a daemon, which isbeyond our aim for this chapter.
13.5 SummaryThis chapter hopefully stretched your imagination for the kinds of applications possi-ble with the versatile and open platform of Android. We had the goal of writing anapplication outside the Android SDK and demonstrating how that kind of applicationmay be leveraged by a standard Android Java application. To write for the Android/Linux layer, we turned to the C programming language.
Developing C language applications for Android/Linux is a cross-platform compi-lation exercise using the freely available CodeSourcery tool chain. This chapter dem-onstrated using that toolset in conjunction with the adb utility provided in theAndroid SDK. The adb utility enabled you to push the application to the AndroidEmulator for testing, as well as extract the Android system libraries essential for link-ing the application with the Android resident libraries. You used the adb shell to inter-act directly with the Android Emulator to run the C application.
Our sample application exercised TCP socket communications. The TCP capabilityproved to be a ready interface mechanism between the Android/Java layer and theAndroid/Linux foundation of the environment in the Daytime Client and server
www.it-ebooks.info
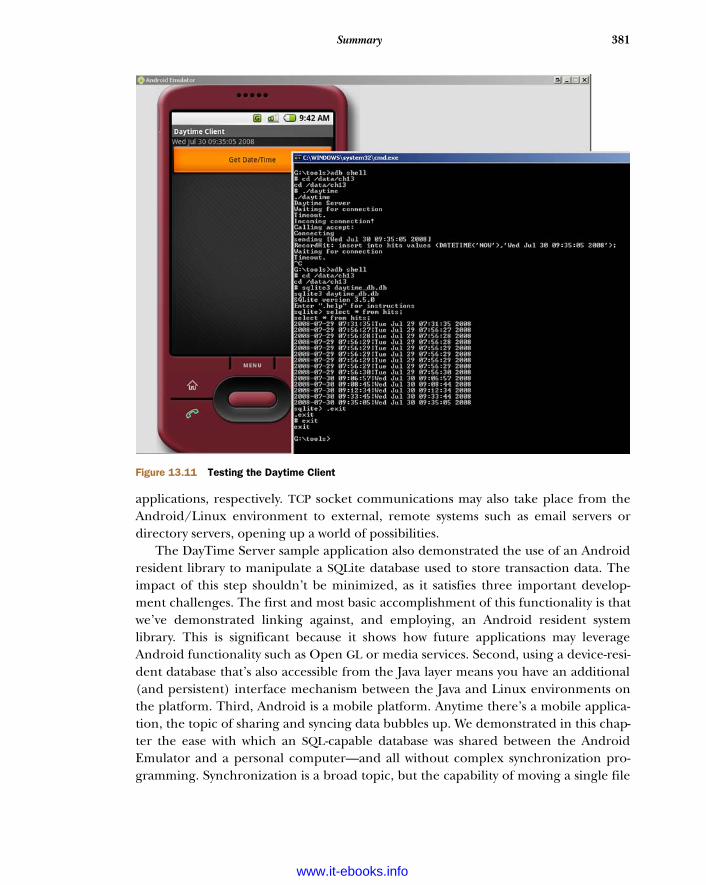
381Summary
applications, respectively. TCP socket communications may also take place from theAndroid/Linux environment to external, remote systems such as email servers ordirectory servers, opening up a world of possibilities.
The DayTime Server sample application also demonstrated the use of an Androidresident library to manipulate a SQLite database used to store transaction data. Theimpact of this step shouldn’t be minimized, as it satisfies three important develop-ment challenges. The first and most basic accomplishment of this functionality is thatwe’ve demonstrated linking against, and employing, an Android resident systemlibrary. This is significant because it shows how future applications may leverageAndroid functionality such as Open GL or media services. Second, using a device-resi-dent database that’s also accessible from the Java layer means you have an additional(and persistent) interface mechanism between the Java and Linux environments onthe platform. Third, Android is a mobile platform. Anytime there’s a mobile applica-tion, the topic of sharing and syncing data bubbles up. We demonstrated in this chap-ter the ease with which an SQL-capable database was shared between the AndroidEmulator and a personal computer—and all without complex synchronization pro-gramming. Synchronization is a broad topic, but the capability of moving a single file
Figure 13.11 Testing the Daytime Client
www.it-ebooks.info
382 CHAPTER 13 Building Android applications in C
between platforms is a welcome feature. There are only a few comparable solutions inthe marketplace for other mobile environments, and that’s after years of market pene-tration by these other platforms. Android gets it right from the start.
This chapter took a bit of a detour from the regular Android SDK programmingenvironment. It’s time to return to the SDK; in the next chapter, you’ll learn aboutBluetooth and sensors.
www.it-ebooks.info
Part 4
The maturing platform
In part 3, you learned about two extremes of the Android platform. Chapter12 provided the full end-to-end SDK application experience, and chapter 13went to the other extreme of exploring application techniques that might bestfit a custom piece of hardware running the Android operating system. Theobjective of part 4 is to explore some of the features added to the Android plat-form that take it a step beyond the other platforms to provide a unique andmemorable mobile experience.
In chapter 14, we get close to the metal by interrogating onboard sensors andcommunicating over Bluetooth. The sensors act as inputs for a navigation systemto control a LEGO Mindstorms robot.
In chapter 15, we build a sophisticated integration between the Androidcontact database and business social networking sensation, LinkedIn. The appli-cation constructed in chapter 15 has become a popular download on theAndroid market. Read along and learn how to get up close and personal withyour contacts.
In chapter 16, the topic of Android web development is explored. Topicssuch as building websites for the WebKit-powered Android browser and customJavaScript handlers are introduced. In addition, local SQL-based storage con-cepts are examined, enabling next-generation web applications directly on yourmobile device.
Chapter 17 presents a nontrivial example of the AppWidget, tying togetherother key concepts such as services, alarms, and BroadcastReceivers. There’ssomething for everyone in chapter 17 as we construct a website monitoring tool
www.it-ebooks.info
that provides near-real-time status information directly to the home page of yourAndroid device.
Chapter 18 circles back to the application constructed in chapter 12, but with atwist. The code in chapter 18 demonstrates the localization of an existing applicationas the field service application presented in chapter 12 is modified to support multi-ple languages. The application now supports English and Spanish, depending on thelocale of the device.
Chapter 19 looks at the Native Development Kit (NDK). The NDK permits Androiddevelopers to incorporate C language source code into SDK applications. Chapter 19demonstrates the NDK in the context of an image-processing application that allowsthe user to capture images with the built-in camera and then perform an edge detec-tion algorithm against the image. It’s loads of fun, and you’ll learn about the JavaNative Interface as well as how to integrate the NDK build process directly into Eclipse.
Chapter 20 covers an application component called Fragment, introduced inAndroid 3.0, that lets you modularize an application and its user interface (into frag-ments). Think of fragments as mini-Activitys: reusable and independent, but relatedmini portions of the application and screen that can be drawn independently of eachother, each receiving its own events and having its own state, application lifecycle, andback stack. Although fragments were introduced in Android 3.0 for tablets, you canuse them for the phone as well.
Chapter 21 covers the use of the action bar, introduced in Android 3.0, which islocated at the top of the screen and replaces the traditional (pre–Android 3.0)application title. The action bar offers application control by providing navigationoptions, widgets, and other contextual information, using a consistent approachacross applications.
Chapter 22 covers the new drag-and-drop capabilities that are now available inAndroid 3.0 applications. Drag-and-drop is a natural addition to touch-based userinterfaces and tablets, and it uses the clipboard classes to store the data to be trans-ferred between views.
www.it-ebooks.info
Bluetooth and sensors
The majority of the material presented in this book is concerned with employingvarious capabilities of the Android SDK. At this point, however, you’re going to seehow to take advantage of an Android device’s hardware. Specifically, we’ll look atconnecting an Android device to remote devices via a Bluetooth wireless connec-tion, as well as reading and interpreting values from a hardware-based orientationsensor. This chapter combines these two hardware-related topics in a sample pro-gram that exercises control over a robot constructed from the popular LEGO Mind-storms NXT. The Mindstorms NXT robot supports a communications protocolknown as Direct Commands,1 allowing it to be controlled by a remote device. Thisis the one chapter of the book where you’ll want to have access to a physicalAndroid device with version 2 or later of the operating system—the simulator aloneisn’t adequate for exercising the Bluetooth and sensor functionality.
This chapter covers Connecting to a Bluetooth peripheral
Interacting with the SensorManager
Building and running the SenseBot application
1 To learn more about Direct Commands for the LEGO Mindstorm, start here: http://mindstorms.lego.com/en-us/support/files/default.aspx.
385
www.it-ebooks.info
386 CHAPTER 14 Bluetooth and sensors
The code accompanying this chapter is organized into an Android applicationnamed SenseBot. SenseBot is a moderately complex example of using Android tomanipulate an external object. Android’s orientation sensor permits the user to“drive” the robot by simply holding the phone in a particular direction, not unlike aNintendo Wii or other advanced gaming system. Tilt the phone forward, and therobot drives forward. Tilt it backward, and the robot reverses direction. Tilting to theleft or right causes the robot to spin in the respective direction. With each interpretedsensor motion, the SenseBot application uses Bluetooth to send commands to therobot, causing the appropriate physical behavior. The LEGO NXT comes equippedwith a built-in command set that permits low-level operations such as direct motorcontrol. The motions of the Android device are interpreted, converted to commands,and transmitted via Bluetooth to the robot.
In addition to basic Bluetooth communications and sensor management, the codedemonstrates the use of a dynamically created BroadcastReceiver employed to handleBluetooth-related connection events.
The topic of Bluetooth communications is much broader and deeper than we canhope to cover in a single chapter. Likewise, there are at least half a dozen hardwaresensors available on the Android platform, yet this chapter demonstrates the use ofonly one. If you’re looking for textbook-like coverage of these two topics, we encour-age you to look at the online documentation or perhaps another text on the subject.The aim of this chapter is to explore Bluetooth and sensor functionality on theAndroid platform in the context of a functional (and fun) application. If you take thetime to follow along and build this application and have access to a LEGO MindstormsNXT robot, I promise that you’ll get hooked on “driving” your robot with your phone.Also, a version of the application is available for download from the Android market.
14.1 Exploring Android’s Bluetooth capabilitiesThe first thing that comes to mind with the term Bluetooth is wireless headsets. Alsoknown as a hands-free, in many parts of the world these wireless wonders are requiredby law for operating your telephone while driving a vehicle. In actuality, the hands-free device is only one of many uses for the versatile Bluetooth technology.
Bluetooth is a wireless communications protocol similar to WiFi but constrained tousage scenarios for short-range applications reaching a range of approximately 10meters. In addition to providing functionality as a hands-free microphone andspeaker for your cell phone, Bluetooth also enables peer-to-peer network access,object exchange, cable replacement, and advanced audio/media capabilities.
Like any other protocol standard, Bluetooth has its own “stack” of layers, each ofwhich implements distinct capabilities and features of the protocol. This chapterdoesn’t spend time dissecting these layers, as the Bluetooth stack is well covered inother places. Rather, this chapter demonstrates the approach for establishing a data
www.it-ebooks.info
387Exploring Android’s Bluetooth capabilities
connection between two peers. The specific Bluetooth “profile” employed here is theRFCOMM2 cable replacement profile.
In this section you’ll learn how to establish a connection between Android andyour remote device via the android.bluetooth package. Given how the Android plat-form permits only encrypted connections, your two communicating devices must firstbe paired or bonded, which will subsequently allow you to connect without a furtherconfirmation or security prompt. Then, in order to know that you’ve connected to aBluetooth device, you must register for two events: ACTION_ACL_CONNECTED andACTION_ACL_DISCONNECTED. And finally, your Android application will need to haveBLUETOOTH permission as defined in the AndroidManifest.xml file. Let’s get started.
14.1.1 Replacing cables
Today, connecting to the internet to exchange emails or browse the web is an everydayexperience for most Android users. With your phone, you can connect to computerson the other side of the planet and beyond, but how can you communicate with some-thing in the same room? In the not-so-distant past, we programmed interfacesbetween computers and peripherals across a serial cable, often described as an RS232interface. In a few short years, the RS232 serial cable has become a museum piece, hav-ing been replaced by the more capable USB and with the Bluetooth Serial Port Profile.
In the same way that USB can be used for many different applications, the Blue-tooth wireless protocol also may be deployed in a variety of manners. The Bluetoothcapability of interest to us is the cable replacement functionality of the Serial Port Pro-file (SPP), which is sometimes referred to as RFCOMM. The RF stands for radio fre-quency, aka “wireless.” The COMM stands for communications port, harkening back toits roots as a point-to-point connection-based streaming protocol.
14.1.2 Primary and secondary roles and sockets
The Bluetooth protocol works in a fashion similar to other communications environ-ments where there’s a primary (or master) device that initiates communications withone or more secondary (or slave) devices. Android is versatile in that it may be eithera primary or a secondary device in a Bluetooth connection.
Regardless of how a connection is established—as a primary or a secondary Blue-tooth device—an Android application exchanges data through a socket interface. That’sright; the familiar networking paradigm of a socket and its associated input streamand output stream is employed for Bluetooth connectivity as well. So once you get pastthe scaffolding of connecting two Bluetooth devices together in a communicationssession, you can be less concerned with the underlying details and can simply view theremote device as an application on the other side of a socket. This is much like therelationship between a web browser and a remote server that exchange data over aTCP socket.
2 To learn more about RFCOMM, look at www.bluetooth.com.
www.it-ebooks.info
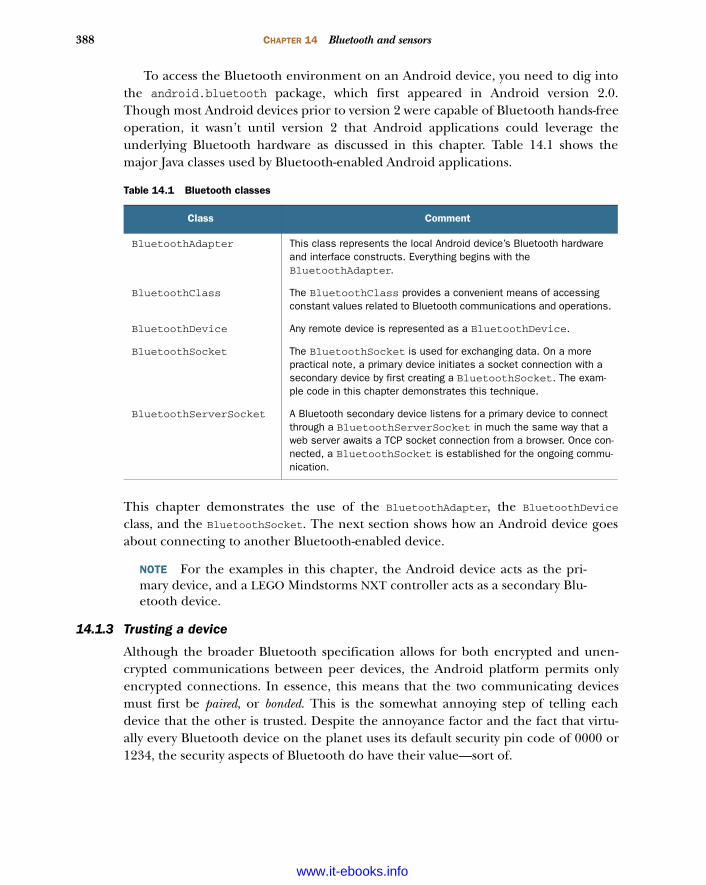
388 CHAPTER 14 Bluetooth and sensors
To access the Bluetooth environment on an Android device, you need to dig intothe android.bluetooth package, which first appeared in Android version 2.0.Though most Android devices prior to version 2 were capable of Bluetooth hands-freeoperation, it wasn’t until version 2 that Android applications could leverage theunderlying Bluetooth hardware as discussed in this chapter. Table 14.1 shows themajor Java classes used by Bluetooth-enabled Android applications.
This chapter demonstrates the use of the BluetoothAdapter, the BluetoothDeviceclass, and the BluetoothSocket. The next section shows how an Android device goesabout connecting to another Bluetooth-enabled device.
NOTE For the examples in this chapter, the Android device acts as the pri-mary device, and a LEGO Mindstorms NXT controller acts as a secondary Blu-etooth device.
14.1.3 Trusting a device
Although the broader Bluetooth specification allows for both encrypted and unen-crypted communications between peer devices, the Android platform permits onlyencrypted connections. In essence, this means that the two communicating devicesmust first be paired, or bonded. This is the somewhat annoying step of telling eachdevice that the other is trusted. Despite the annoyance factor and the fact that virtu-ally every Bluetooth device on the planet uses its default security pin code of 0000 or1234, the security aspects of Bluetooth do have their value—sort of.
Table 14.1 Bluetooth classes
Class Comment
BluetoothAdapter This class represents the local Android device’s Bluetooth hardware and interface constructs. Everything begins with the BluetoothAdapter.
BluetoothClass The BluetoothClass provides a convenient means of accessing constant values related to Bluetooth communications and operations.
BluetoothDevice Any remote device is represented as a BluetoothDevice.
BluetoothSocket The BluetoothSocket is used for exchanging data. On a more practical note, a primary device initiates a socket connection with a secondary device by first creating a BluetoothSocket. The exam-ple code in this chapter demonstrates this technique.
BluetoothServerSocket A Bluetooth secondary device listens for a primary device to connect through a BluetoothServerSocket in much the same way that a web server awaits a TCP socket connection from a browser. Once con-nected, a BluetoothSocket is established for the ongoing commu-nication.
www.it-ebooks.info
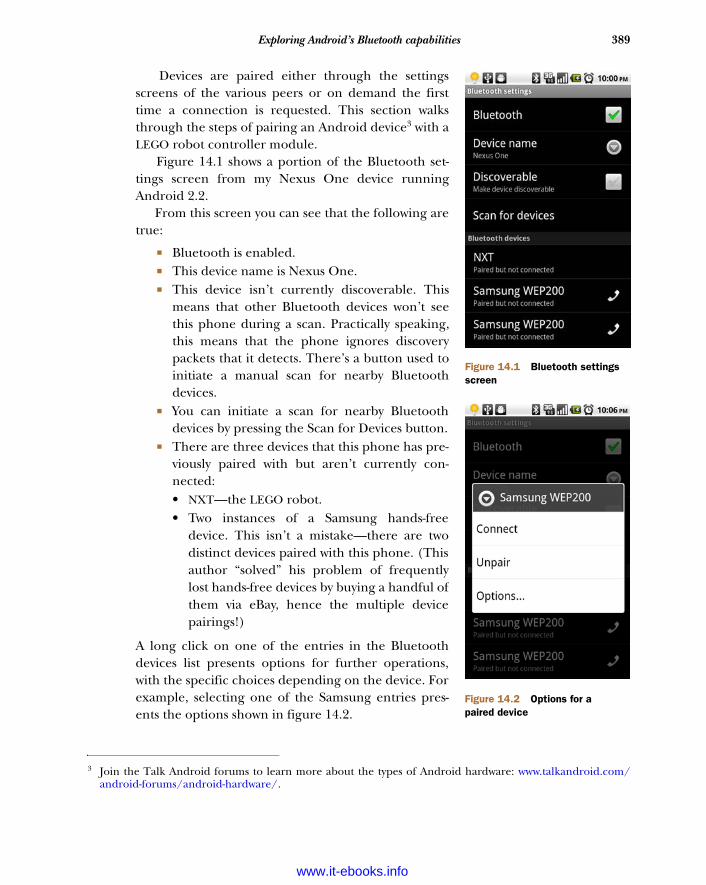
389Exploring Android’s Bluetooth capabilities
Devices are paired either through the settingsscreens of the various peers or on demand the firsttime a connection is requested. This section walksthrough the steps of pairing an Android device3 with aLEGO robot controller module.
Figure 14.1 shows a portion of the Bluetooth set-tings screen from my Nexus One device runningAndroid 2.2.
From this screen you can see that the following aretrue:
Bluetooth is enabled. This device name is Nexus One. This device isn’t currently discoverable. This
means that other Bluetooth devices won’t seethis phone during a scan. Practically speaking,this means that the phone ignores discoverypackets that it detects. There’s a button used toinitiate a manual scan for nearby Bluetoothdevices.
You can initiate a scan for nearby Bluetoothdevices by pressing the Scan for Devices button.
There are three devices that this phone has pre-viously paired with but aren’t currently con-nected:• NXT—the LEGO robot.• Two instances of a Samsung hands-free
device. This isn’t a mistake—there are twodistinct devices paired with this phone. (Thisauthor “solved” his problem of frequentlylost hands-free devices by buying a handful ofthem via eBay, hence the multiple devicepairings!)
A long click on one of the entries in the Bluetoothdevices list presents options for further operations,with the specific choices depending on the device. Forexample, selecting one of the Samsung entries pres-ents the options shown in figure 14.2.
3 Join the Talk Android forums to learn more about the types of Android hardware: www.talkandroid.com/android-forums/android-hardware/.
Figure 14.1 Bluetooth settings screen
Figure 14.2 Options for a paired device
www.it-ebooks.info
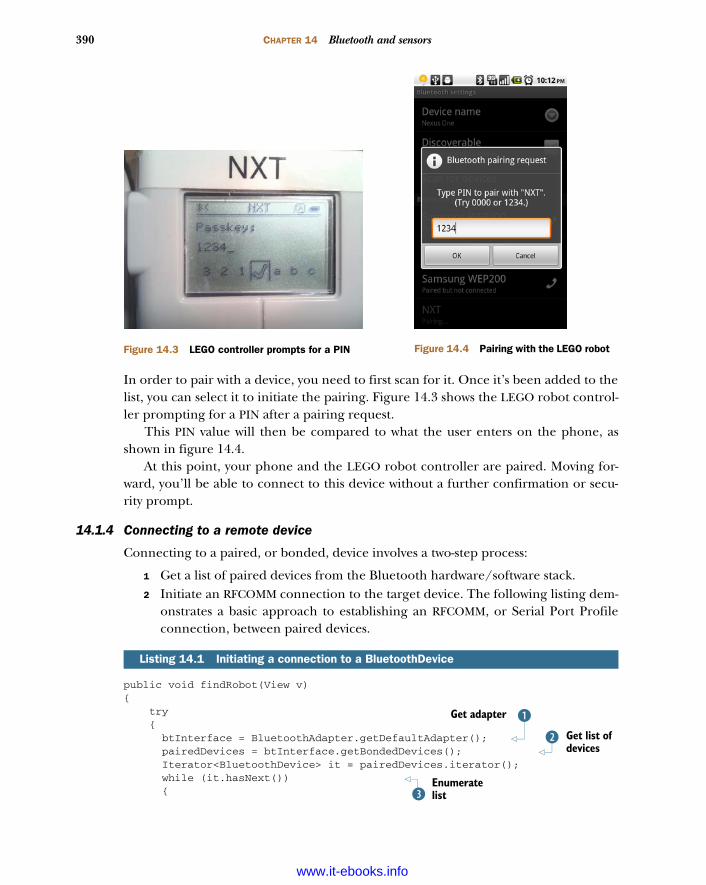
390 CHAPTER 14 Bluetooth and sensors
In order to pair with a device, you need to first scan for it. Once it’s been added to thelist, you can select it to initiate the pairing. Figure 14.3 shows the LEGO robot control-ler prompting for a PIN after a pairing request.
This PIN value will then be compared to what the user enters on the phone, asshown in figure 14.4.
At this point, your phone and the LEGO robot controller are paired. Moving for-ward, you’ll be able to connect to this device without a further confirmation or secu-rity prompt.
14.1.4 Connecting to a remote device
Connecting to a paired, or bonded, device involves a two-step process:
1 Get a list of paired devices from the Bluetooth hardware/software stack.2 Initiate an RFCOMM connection to the target device. The following listing dem-
onstrates a basic approach to establishing an RFCOMM, or Serial Port Profileconnection, between paired devices.
public void findRobot(View v){ try { btInterface = BluetoothAdapter.getDefaultAdapter(); pairedDevices = btInterface.getBondedDevices(); Iterator<BluetoothDevice> it = pairedDevices.iterator(); while (it.hasNext()) {
Listing 14.1 Initiating a connection to a BluetoothDevice
Figure 14.4 Pairing with the LEGO robotFigure 14.3 LEGO controller prompts for a PIN
BGet adapter
Get list of devices
C
Enumerate listD
www.it-ebooks.info
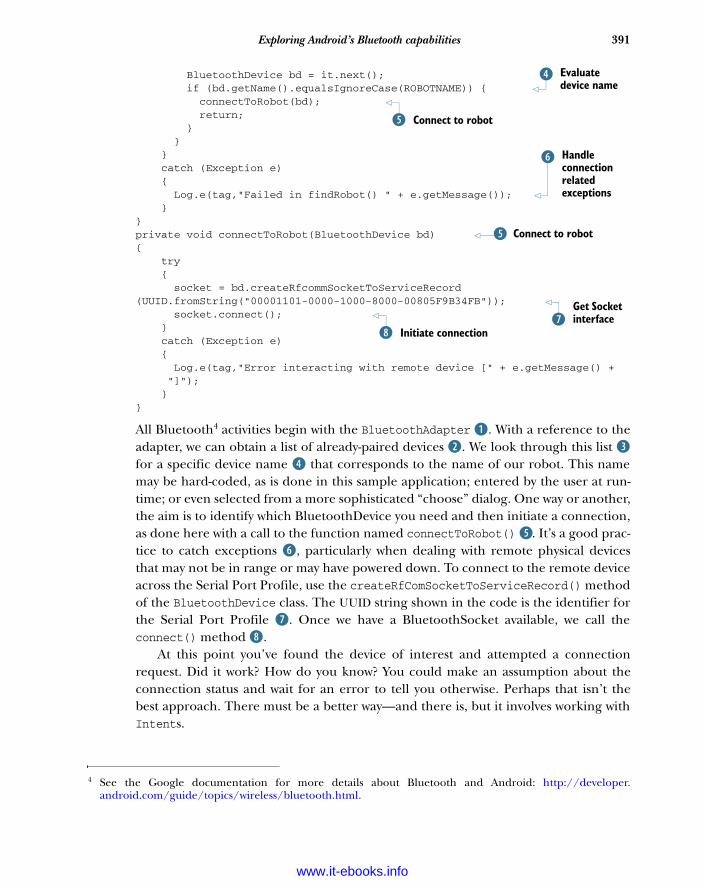
391Exploring Android’s Bluetooth capabilities
BluetoothDevice bd = it.next(); if (bd.getName().equalsIgnoreCase(ROBOTNAME)) { connectToRobot(bd); return; } } } catch (Exception e) { Log.e(tag,"Failed in findRobot() " + e.getMessage()); }}private void connectToRobot(BluetoothDevice bd){ try { socket = bd.createRfcommSocketToServiceRecord(UUID.fromString("00001101-0000-1000-8000-00805F9B34FB")); socket.connect(); } catch (Exception e) { Log.e(tag,"Error interacting with remote device [" + e.getMessage() +
"]"); }}
All Bluetooth4 activities begin with the BluetoothAdapter B. With a reference to theadapter, we can obtain a list of already-paired devices C. We look through this list Dfor a specific device name E that corresponds to the name of our robot. This namemay be hard-coded, as is done in this sample application; entered by the user at run-time; or even selected from a more sophisticated “choose” dialog. One way or another,the aim is to identify which BluetoothDevice you need and then initiate a connection,as done here with a call to the function named connectToRobot() F. It’s a good prac-tice to catch exceptions G, particularly when dealing with remote physical devicesthat may not be in range or may have powered down. To connect to the remote deviceacross the Serial Port Profile, use the createRfComSocketToServiceRecord() methodof the BluetoothDevice class. The UUID string shown in the code is the identifier forthe Serial Port Profile H. Once we have a BluetoothSocket available, we call theconnect() method I.
At this point you’ve found the device of interest and attempted a connectionrequest. Did it work? How do you know? You could make an assumption about theconnection status and wait for an error to tell you otherwise. Perhaps that isn’t thebest approach. There must be a better way—and there is, but it involves working withIntents.
4 See the Google documentation for more details about Bluetooth and Android: http://developer.android.com/guide/topics/wireless/bluetooth.html.
Evaluate device name
E
Connect to robotF
Handle connection related exceptions
G
Connect to robotF
Get Socket interfaceH
Initiate connectionI
www.it-ebooks.info
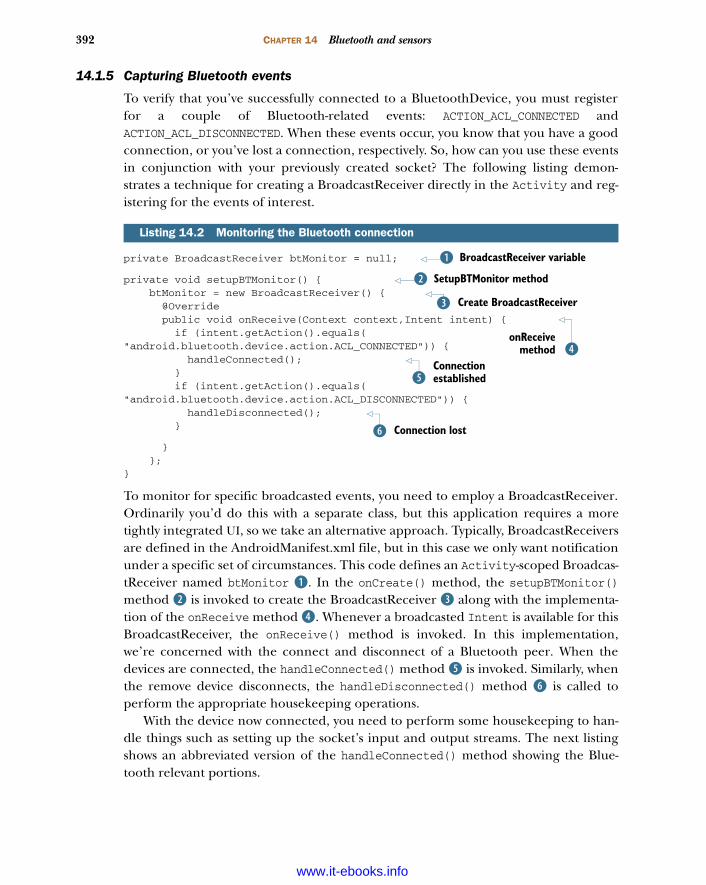
392 CHAPTER 14 Bluetooth and sensors
14.1.5 Capturing Bluetooth events
To verify that you’ve successfully connected to a BluetoothDevice, you must registerfor a couple of Bluetooth-related events: ACTION_ACL_CONNECTED andACTION_ACL_DISCONNECTED. When these events occur, you know that you have a goodconnection, or you’ve lost a connection, respectively. So, how can you use these eventsin conjunction with your previously created socket? The following listing demon-strates a technique for creating a BroadcastReceiver directly in the Activity and reg-istering for the events of interest.
private BroadcastReceiver btMonitor = null;
private void setupBTMonitor() { btMonitor = new BroadcastReceiver() { @Override public void onReceive(Context context,Intent intent) { if (intent.getAction().equals("android.bluetooth.device.action.ACL_CONNECTED")) { handleConnected(); } if (intent.getAction().equals("android.bluetooth.device.action.ACL_DISCONNECTED")) { handleDisconnected(); }
} };}
To monitor for specific broadcasted events, you need to employ a BroadcastReceiver.Ordinarily you’d do this with a separate class, but this application requires a moretightly integrated UI, so we take an alternative approach. Typically, BroadcastReceiversare defined in the AndroidManifest.xml file, but in this case we only want notificationunder a specific set of circumstances. This code defines an Activity-scoped Broadcas-tReceiver named btMonitor B. In the onCreate() method, the setupBTMonitor()method C is invoked to create the BroadcastReceiver D along with the implementa-tion of the onReceive method E. Whenever a broadcasted Intent is available for thisBroadcastReceiver, the onReceive() method is invoked. In this implementation,we’re concerned with the connect and disconnect of a Bluetooth peer. When thedevices are connected, the handleConnected() method F is invoked. Similarly, whenthe remove device disconnects, the handleDisconnected() method G is called toperform the appropriate housekeeping operations.
With the device now connected, you need to perform some housekeeping to han-dle things such as setting up the socket’s input and output streams. The next listingshows an abbreviated version of the handleConnected() method showing the Blue-tooth relevant portions.
Listing 14.2 Monitoring the Bluetooth connection
BroadcastReceiver variableBSetupBTMonitor methodC
Create BroadcastReceiverD
EonReceive
methodConnection establishedF
Connection lostG
www.it-ebooks.info

393Interacting with the SensorManager
private void handleConnected() { try { is =
socket.getInputStream(); os = socket.getOutputStream(); bConnected = true; btnConnect.setVisibility(View.GONE); btnDisconnect.setVisibility(View.VISIBLE); } catch (Exception e) { is = null; os = null; disconnectFromRobot(null); }}
When the handleConnected() method is invoked, a valid Bluetooth socket connectionhas been established, so we need to set up the input and output streams B. With thesestreams established, data communications between the Android device and the LEGOrobot may now begin. As you’ll see later in this chapter, we only want to process sensorevents if we’re connected to a robot, so we set a flag C letting the application know thestatus of the connection. We swap the visibility of a pair of Buttons D—one is used forconnecting to the robot and the other for disconnecting. In the event that an erroroccurs during this step, we want to clean up by closing down the streams E and initi-ating a disconnect request F.
The code for disconnecting a socket is simply this:
socket.close();
To perform most Bluetooth operations with Android, there’s one important item thatmust be established: permissions!
14.1.6 Bluetooth permissions
Working with a paired device peer isn’t the only place where permissions come intoplay. In order to exercise the Bluetooth APIs, an Android application must have theBLUETOOTH permission defined in the AndroidManifest.xml file:
<uses-permission android:name="android.permission.BLUETOOTH"></uses-permission>
The balance of the Bluetooth communications code is presented in the third sectionof this chapter, where we discuss in more depth the code that comprises the SenseBotapplication. Before jumping into the fun of coding and running the robot applica-tion, let’s look at the SensorManager and show how you can put Android’s sensors towork for you to drive a robot.
14.2 Interacting with the SensorManagerAndroid exposes the physical hardware sensors via a class known as the Sensor-Manager. The SensorManager class is similar to the BluetoothAdapter class in that all
Listing 14.3 The handleConnected() method
Set up IO streamsB
Set flagCSwap Button visibility
D
Handle exceptionE
Close connection on errorF
www.it-ebooks.info
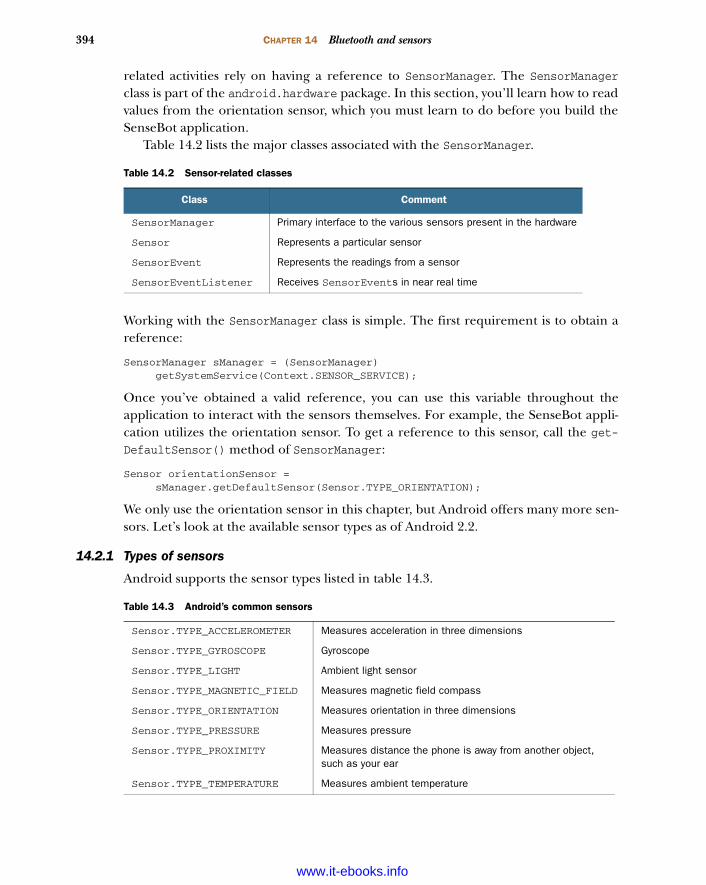
394 CHAPTER 14 Bluetooth and sensors
related activities rely on having a reference to SensorManager. The SensorManagerclass is part of the android.hardware package. In this section, you’ll learn how to readvalues from the orientation sensor, which you must learn to do before you build theSenseBot application.
Table 14.2 lists the major classes associated with the SensorManager.
Working with the SensorManager class is simple. The first requirement is to obtain areference:
SensorManager sManager = (SensorManager) getSystemService(Context.SENSOR_SERVICE);
Once you’ve obtained a valid reference, you can use this variable throughout theapplication to interact with the sensors themselves. For example, the SenseBot appli-cation utilizes the orientation sensor. To get a reference to this sensor, call the get-DefaultSensor() method of SensorManager:
Sensor orientationSensor = sManager.getDefaultSensor(Sensor.TYPE_ORIENTATION);
We only use the orientation sensor in this chapter, but Android offers many more sen-sors. Let’s look at the available sensor types as of Android 2.2.
14.2.1 Types of sensors
Android supports the sensor types listed in table 14.3.
Table 14.2 Sensor-related classes
Class Comment
SensorManager Primary interface to the various sensors present in the hardware
Sensor Represents a particular sensor
SensorEvent Represents the readings from a sensor
SensorEventListener Receives SensorEvents in near real time
Table 14.3 Android’s common sensors
Sensor.TYPE_ACCELEROMETER Measures acceleration in three dimensions
Sensor.TYPE_GYROSCOPE Gyroscope
Sensor.TYPE_LIGHT Ambient light sensor
Sensor.TYPE_MAGNETIC_FIELD Measures magnetic field compass
Sensor.TYPE_ORIENTATION Measures orientation in three dimensions
Sensor.TYPE_PRESSURE Measures pressure
Sensor.TYPE_PROXIMITY Measures distance the phone is away from another object, such as your ear
Sensor.TYPE_TEMPERATURE Measures ambient temperature
www.it-ebooks.info
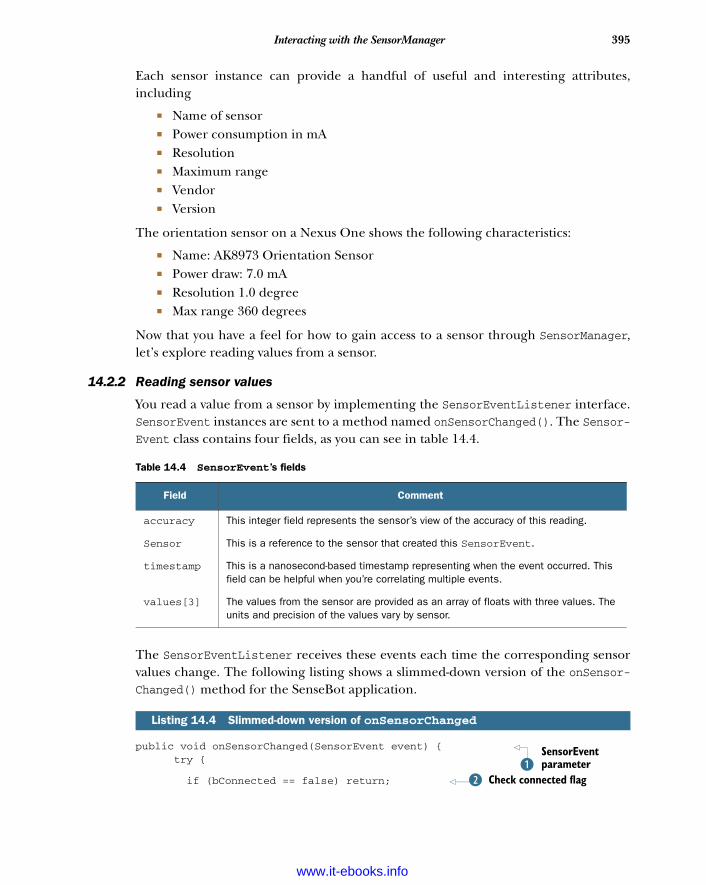
395Interacting with the SensorManager
Each sensor instance can provide a handful of useful and interesting attributes,including
Name of sensor Power consumption in mA Resolution Maximum range Vendor Version
The orientation sensor on a Nexus One shows the following characteristics:
Name: AK8973 Orientation Sensor Power draw: 7.0 mA Resolution 1.0 degree Max range 360 degrees
Now that you have a feel for how to gain access to a sensor through SensorManager,let’s explore reading values from a sensor.
14.2.2 Reading sensor values
You read a value from a sensor by implementing the SensorEventListener interface.SensorEvent instances are sent to a method named onSensorChanged(). The Sensor-Event class contains four fields, as you can see in table 14.4.
The SensorEventListener receives these events each time the corresponding sensorvalues change. The following listing shows a slimmed-down version of the onSensor-Changed() method for the SenseBot application.
public void onSensorChanged(SensorEvent event) { try {
if (bConnected == false) return;
Table 14.4 SensorEvent’s fields
Field Comment
accuracy This integer field represents the sensor’s view of the accuracy of this reading.
Sensor This is a reference to the sensor that created this SensorEvent.
timestamp This is a nanosecond-based timestamp representing when the event occurred. This field can be helpful when you’re correlating multiple events.
values[3] The values from the sensor are provided as an array of floats with three values. The units and precision of the values vary by sensor.
Listing 14.4 Slimmed-down version of onSensorChanged
SensorEvent parameterB
Check connected flagC
www.it-ebooks.info
396 CHAPTER 14 Bluetooth and sensors
StringBuilder sb = new StringBuilder(); sb.append("[" + event.values[0] + "]"); sb.append("[" + event.values[1] + "]"); sb.append("[" + event.values[2] + "]");
readings.setText(sb.toString());
// process this sensor data // updateMotors(); } catch (Exception e) { Log.e(tag,"onSensorChanged Error::" + e.getMessage()); } }
Each time a SensorEvent B is available, it’s passed to the onSensorChanged()method. The first thing the code does is a safety check to make sure we have a goodconnection to the robot C. If there’s no connection, we ignore the data. Each of thethree values is extracted and formatted D for display in a simple TextView widget E.The values are interpreted F and the appropriate instructions are passed to controlthe robot’s motors G. The logic for the interpretation and interaction with therobot’s hardware is provided later in this chapter.
An application must register its SensorEventListener in order to receive thesenotifications. There’s a prescribed manner in performing this registration process,which is up next.
14.2.3 Enabling and disabling sensors
The SensorEventListener interface receives messages only when it’s registered. Sen-sorManager provides two bookend-type functions that permit an application to regis-ter for a particular sensor’s events. In the context of the SenseBot application, you’reonly interested in receiving orientation sensor events when the Android device is con-nected to the robot via Bluetooth. As such, you’ll implement the registration codeinside the previously introduced handleConnected method. The following listingshows the new code to be added to the handleConnected() method.
sManager.registerListener(SenseBot.this, sManager.getDefaultSensor( Sensor.TYPE_ORIENTATION), SensorManager.SENSOR_DELAY_UI);
The registerListener method of the SensorManager takes three arguments in orderto marshal sensor data to an application. The first argument is to an implementationinstance of SensorEventListener, which is in this case our class itself, SenseBot.thisB. The second argument is an instance of the sensor of interest. Here we’re interestedin tracking values for the orientation sensor C. The rate at which the sensor data isupdated is variable and is specified by the programmer as the third parameter. In thiscase, we use the value SensorManager.SENSOR_DELAY_UI D, which is a good general-purpose value. Use faster values for games or other real-time–oriented applications.
Listing 14.5 Sensor registration code
Build visual representation
D
Display valuesEInterpret valuesF
Move robot accordinglyG
Provide SensorEventListenerB
Specify which SensorCSensor update frequencyD
www.it-ebooks.info
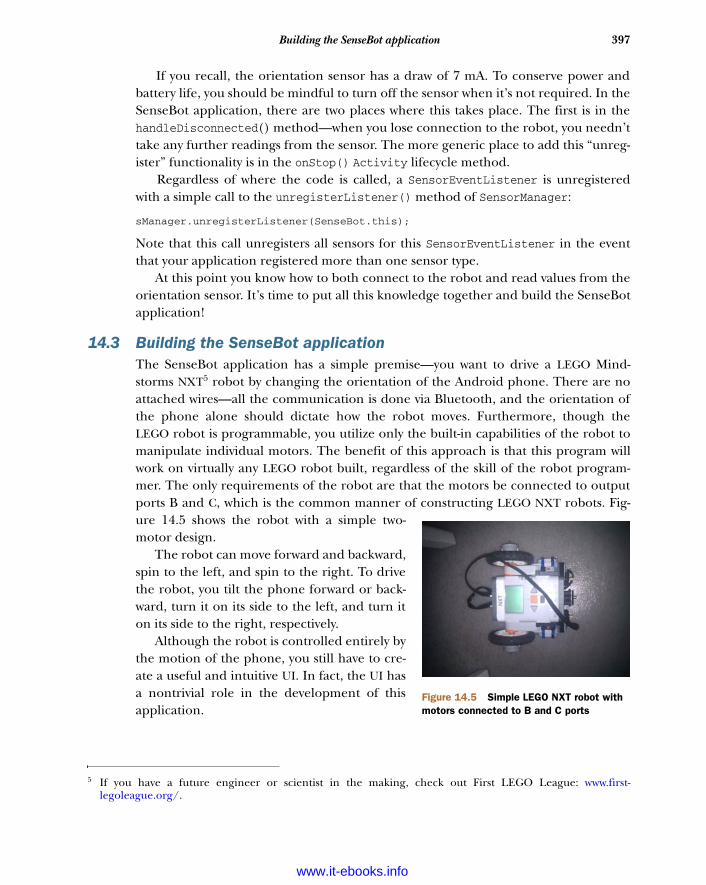
397Building the SenseBot application
If you recall, the orientation sensor has a draw of 7 mA. To conserve power andbattery life, you should be mindful to turn off the sensor when it’s not required. In theSenseBot application, there are two places where this takes place. The first is in thehandleDisconnected() method—when you lose connection to the robot, you needn’ttake any further readings from the sensor. The more generic place to add this “unreg-ister” functionality is in the onStop() Activity lifecycle method.
Regardless of where the code is called, a SensorEventListener is unregisteredwith a simple call to the unregisterListener() method of SensorManager:
sManager.unregisterListener(SenseBot.this);
Note that this call unregisters all sensors for this SensorEventListener in the eventthat your application registered more than one sensor type.
At this point you know how to both connect to the robot and read values from theorientation sensor. It’s time to put all this knowledge together and build the SenseBotapplication!
14.3 Building the SenseBot applicationThe SenseBot application has a simple premise—you want to drive a LEGO Mind-storms NXT5 robot by changing the orientation of the Android phone. There are noattached wires—all the communication is done via Bluetooth, and the orientation ofthe phone alone should dictate how the robot moves. Furthermore, though theLEGO robot is programmable, you utilize only the built-in capabilities of the robot tomanipulate individual motors. The benefit of this approach is that this program willwork on virtually any LEGO robot built, regardless of the skill of the robot program-mer. The only requirements of the robot are that the motors be connected to outputports B and C, which is the common manner of constructing LEGO NXT robots. Fig-ure 14.5 shows the robot with a simple two-motor design.
The robot can move forward and backward,spin to the left, and spin to the right. To drivethe robot, you tilt the phone forward or back-ward, turn it on its side to the left, and turn iton its side to the right, respectively.
Although the robot is controlled entirely bythe motion of the phone, you still have to cre-ate a useful and intuitive UI. In fact, the UI hasa nontrivial role in the development of thisapplication.
5 If you have a future engineer or scientist in the making, check out First LEGO League: www.first-legoleague.org/.
Figure 14.5 Simple LEGO NXT robot with motors connected to B and C ports
www.it-ebooks.info
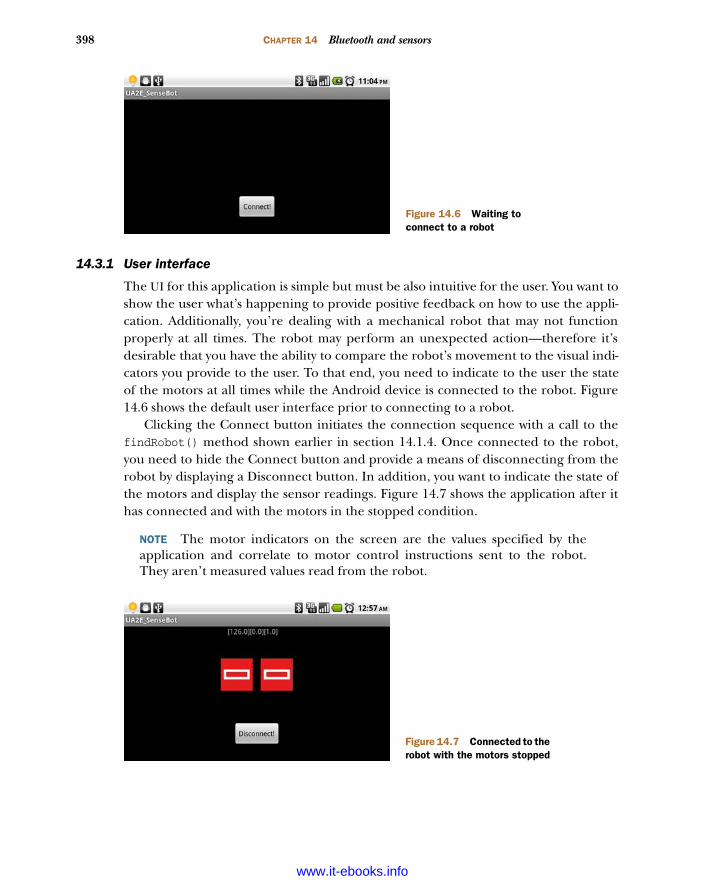
398 CHAPTER 14 Bluetooth and sensors
14.3.1 User interface
The UI for this application is simple but must be also intuitive for the user. You want toshow the user what’s happening to provide positive feedback on how to use the appli-cation. Additionally, you’re dealing with a mechanical robot that may not functionproperly at all times. The robot may perform an unexpected action—therefore it’sdesirable that you have the ability to compare the robot’s movement to the visual indi-cators you provide to the user. To that end, you need to indicate to the user the stateof the motors at all times while the Android device is connected to the robot. Figure14.6 shows the default user interface prior to connecting to a robot.
Clicking the Connect button initiates the connection sequence with a call to thefindRobot() method shown earlier in section 14.1.4. Once connected to the robot,you need to hide the Connect button and provide a means of disconnecting from therobot by displaying a Disconnect button. In addition, you want to indicate the state ofthe motors and display the sensor readings. Figure 14.7 shows the application after ithas connected and with the motors in the stopped condition.
NOTE The motor indicators on the screen are the values specified by theapplication and correlate to motor control instructions sent to the robot.They aren’t measured values read from the robot.
Figure 14.6 Waiting to connect to a robot
Figure 14.7 Connected to the robot with the motors stopped
www.it-ebooks.info
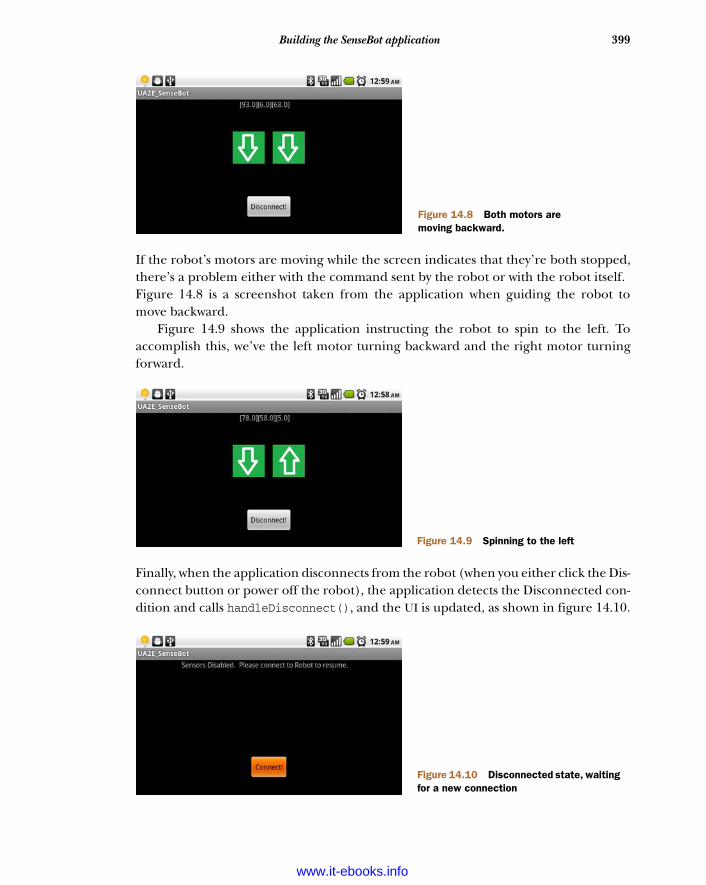
399Building the SenseBot application
If the robot’s motors are moving while the screen indicates that they’re both stopped,there’s a problem either with the command sent by the robot or with the robot itself.Figure 14.8 is a screenshot taken from the application when guiding the robot tomove backward.
Figure 14.9 shows the application instructing the robot to spin to the left. Toaccomplish this, we’ve the left motor turning backward and the right motor turningforward.
Finally, when the application disconnects from the robot (when you either click the Dis-connect button or power off the robot), the application detects the Disconnected con-dition and calls handleDisconnect(), and the UI is updated, as shown in figure 14.10.
Figure 14.8 Both motors are moving backward.
Figure 14.9 Spinning to the left
Figure 14.10 Disconnected state, waiting for a new connection
www.it-ebooks.info
400 CHAPTER 14 Bluetooth and sensors
The UI is generated by a pair of View widgets and three drawables:6 stop, up (for-ward), and down (backward). Based on the values read from the sensors, the respec-tive View widgets have their background changed appropriately.
This application is so dependent on the orientation of the phone for the control ofthe robot that you can’t allow the phone’s orientation to change back and forthbetween portrait and landscape, as it’ll both restart the Activity, which could wreaksome havoc, as well as change the orientation of the sensors. To meet this objective, anattribute was added to the activity tag in the AndroidManifest.xml file:
android:screenOrientation=landscape
Once this orientation is set up, there’s no worry of the orientation changing to por-trait while driving the robot. You’ll find holding the phone in landscape is comfort-able when you’re “driving.”
By carefully coordinating the UI with the physical motors, you have a ready feed-back mechanism to both make you a better robot driver and help troubleshoot anyanomalies during the development phase of this engineering project
The communications are established and the orientation sensor is producing val-ues; it’s now time to examine the interpretation of the sensor values.
14.3.2 Interpreting sensor values
To control the robot with the orientation of the phone, a neutral zone should beestablished with a center represented by the position of the phone when being heldcomfortably in a landscape orientation, slightly tilted back and up. Once this center isdefined, a comfortable spacing or sensitivity is added in both of the x and y dimen-sions. As long as the phone’s orientation in these dimensions doesn’t exceed the sensi-tivity value, the motors remain in neutral and not powered. Variables named xCenter,yCenter, and xSensitivity and ySensitivity govern this neutral box.
Look at the onSensorChanged() method: this is where you receive the Sensor-Event providing the values of each dimension x, y, and z. The following listing showsthe complete implementation of this method, including the sensor evaluation andmovement suggestions.
public void onSensorChanged(SensorEvent event) { try { if (bConnected == false) return; StringBuilder sb = new StringBuilder(); sb.append("[" + event.values[0] + "]"); sb.append("[" + event.values[1] + "]"); sb.append("[" + event.values[2] + "]");
readings.setText(sb.toString());
6 Download a drawables application that lists all resources in android.R.drawable for the current Androiddevice: www.appbrain.com/app/android-drawables/aws.apps.androidDrawables.
Listing 14.6 The onSensorChanged() method, which interprets orientation
www.it-ebooks.info
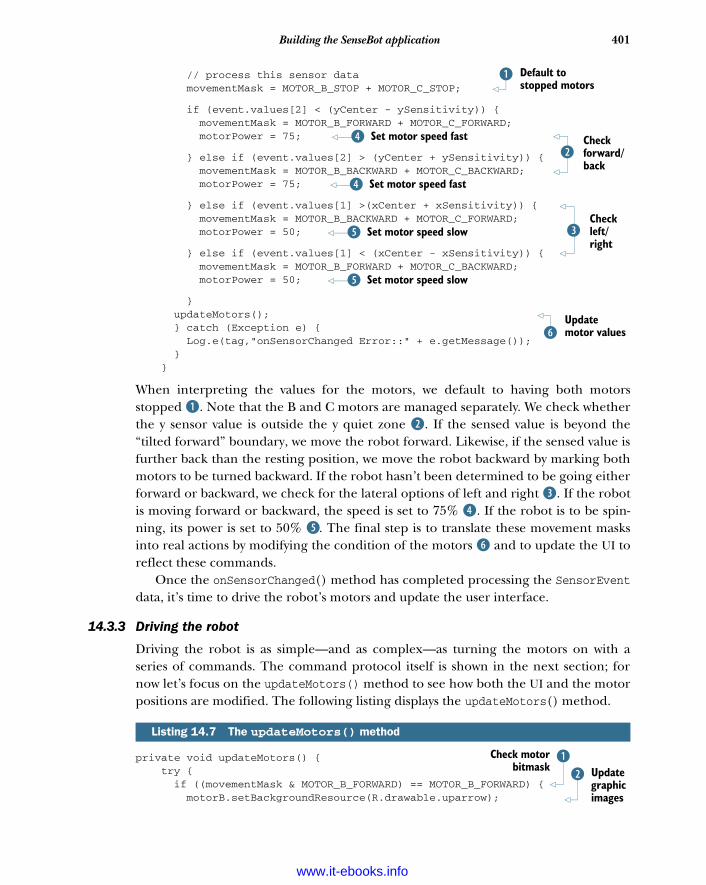
401Building the SenseBot application
// process this sensor data movementMask = MOTOR_B_STOP + MOTOR_C_STOP;
if (event.values[2] < (yCenter - ySensitivity)) { movementMask = MOTOR_B_FORWARD + MOTOR_C_FORWARD; motorPower = 75;
} else if (event.values[2] > (yCenter + ySensitivity)) { movementMask = MOTOR_B_BACKWARD + MOTOR_C_BACKWARD; motorPower = 75;
} else if (event.values[1] >(xCenter + xSensitivity)) { movementMask = MOTOR_B_BACKWARD + MOTOR_C_FORWARD; motorPower = 50;
} else if (event.values[1] < (xCenter - xSensitivity)) { movementMask = MOTOR_B_FORWARD + MOTOR_C_BACKWARD; motorPower = 50;
} updateMotors(); } catch (Exception e) { Log.e(tag,"onSensorChanged Error::" + e.getMessage()); } }
When interpreting the values for the motors, we default to having both motorsstopped B. Note that the B and C motors are managed separately. We check whetherthe y sensor value is outside the y quiet zone C. If the sensed value is beyond the“tilted forward” boundary, we move the robot forward. Likewise, if the sensed value isfurther back than the resting position, we move the robot backward by marking bothmotors to be turned backward. If the robot hasn’t been determined to be going eitherforward or backward, we check for the lateral options of left and right D. If the robotis moving forward or backward, the speed is set to 75% E. If the robot is to be spin-ning, its power is set to 50% F. The final step is to translate these movement masksinto real actions by modifying the condition of the motors G and to update the UI toreflect these commands.
Once the onSensorChanged() method has completed processing the SensorEventdata, it’s time to drive the robot’s motors and update the user interface.
14.3.3 Driving the robot
Driving the robot is as simple—and as complex—as turning the motors on with aseries of commands. The command protocol itself is shown in the next section; fornow let’s focus on the updateMotors() method to see how both the UI and the motorpositions are modified. The following listing displays the updateMotors() method.
private void updateMotors() { try { if ((movementMask & MOTOR_B_FORWARD) == MOTOR_B_FORWARD) { motorB.setBackgroundResource(R.drawable.uparrow);
Listing 14.7 The updateMotors() method
Default to stopped motors
B
CCheck forward/back
Set motor speed fastE
Set motor speed fastE
DCheck left/right
Set motor speed slowF
Set motor speed slowF
Update motor valuesG
BCheck motorbitmask
C Update graphic images
www.it-ebooks.info
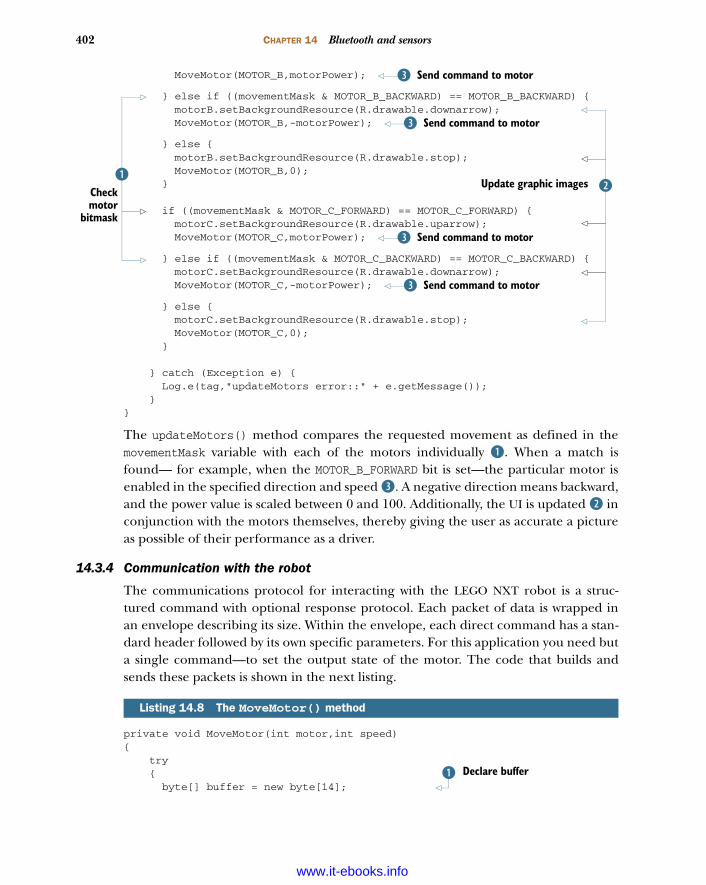
402 CHAPTER 14 Bluetooth and sensors
MoveMotor(MOTOR_B,motorPower);
} else if ((movementMask & MOTOR_B_BACKWARD) == MOTOR_B_BACKWARD) { motorB.setBackgroundResource(R.drawable.downarrow); MoveMotor(MOTOR_B,-motorPower);
} else { motorB.setBackgroundResource(R.drawable.stop); MoveMotor(MOTOR_B,0); }
if ((movementMask & MOTOR_C_FORWARD) == MOTOR_C_FORWARD) { motorC.setBackgroundResource(R.drawable.uparrow); MoveMotor(MOTOR_C,motorPower);
} else if ((movementMask & MOTOR_C_BACKWARD) == MOTOR_C_BACKWARD) { motorC.setBackgroundResource(R.drawable.downarrow); MoveMotor(MOTOR_C,-motorPower);
} else { motorC.setBackgroundResource(R.drawable.stop); MoveMotor(MOTOR_C,0); }
} catch (Exception e) { Log.e(tag,"updateMotors error::" + e.getMessage()); }}
The updateMotors() method compares the requested movement as defined in themovementMask variable with each of the motors individually B. When a match isfound— for example, when the MOTOR_B_FORWARD bit is set—the particular motor isenabled in the specified direction and speed D. A negative direction means backward,and the power value is scaled between 0 and 100. Additionally, the UI is updated C inconjunction with the motors themselves, thereby giving the user as accurate a pictureas possible of their performance as a driver.
14.3.4 Communication with the robot
The communications protocol for interacting with the LEGO NXT robot is a struc-tured command with optional response protocol. Each packet of data is wrapped inan envelope describing its size. Within the envelope, each direct command has a stan-dard header followed by its own specific parameters. For this application you need buta single command—to set the output state of the motor. The code that builds andsends these packets is shown in the next listing.
private void MoveMotor(int motor,int speed){ try { byte[] buffer = new byte[14];
Listing 14.8 The MoveMotor() method
Send command to motorD
BCheckmotor
bitmask
Send command to motorD
CUpdate graphic images
Send command to motorD
Send command to motorD
Declare bufferB
www.it-ebooks.info
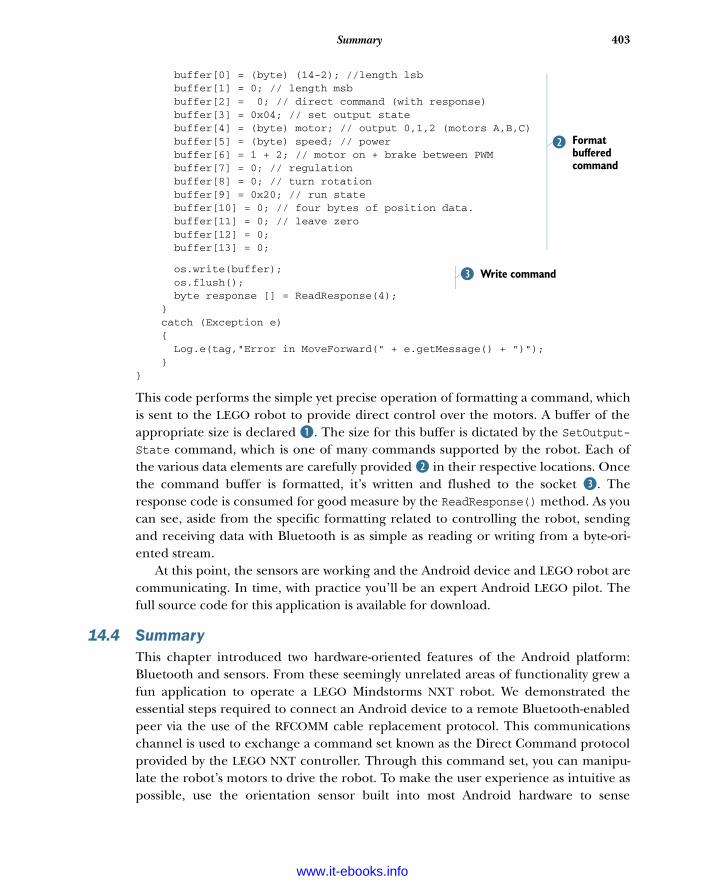
403Summary
buffer[0] = (byte) (14-2); //length lsb buffer[1] = 0; // length msb buffer[2] = 0; // direct command (with response) buffer[3] = 0x04; // set output state buffer[4] = (byte) motor; // output 0,1,2 (motors A,B,C) buffer[5] = (byte) speed; // power buffer[6] = 1 + 2; // motor on + brake between PWM buffer[7] = 0; // regulation buffer[8] = 0; // turn rotation buffer[9] = 0x20; // run state buffer[10] = 0; // four bytes of position data. buffer[11] = 0; // leave zero buffer[12] = 0; buffer[13] = 0;
os.write(buffer); os.flush(); byte response [] = ReadResponse(4); } catch (Exception e) { Log.e(tag,"Error in MoveForward(" + e.getMessage() + ")"); }}
This code performs the simple yet precise operation of formatting a command, whichis sent to the LEGO robot to provide direct control over the motors. A buffer of theappropriate size is declared B. The size for this buffer is dictated by the SetOutput-State command, which is one of many commands supported by the robot. Each ofthe various data elements are carefully provided C in their respective locations. Oncethe command buffer is formatted, it’s written and flushed to the socket D. Theresponse code is consumed for good measure by the ReadResponse() method. As youcan see, aside from the specific formatting related to controlling the robot, sendingand receiving data with Bluetooth is as simple as reading or writing from a byte-ori-ented stream.
At this point, the sensors are working and the Android device and LEGO robot arecommunicating. In time, with practice you’ll be an expert Android LEGO pilot. Thefull source code for this application is available for download.
14.4 SummaryThis chapter introduced two hardware-oriented features of the Android platform:Bluetooth and sensors. From these seemingly unrelated areas of functionality grew afun application to operate a LEGO Mindstorms NXT robot. We demonstrated theessential steps required to connect an Android device to a remote Bluetooth-enabledpeer via the use of the RFCOMM cable replacement protocol. This communicationschannel is used to exchange a command set known as the Direct Command protocolprovided by the LEGO NXT controller. Through this command set, you can manipu-late the robot’s motors to drive the robot. To make the user experience as intuitive aspossible, use the orientation sensor built into most Android hardware to sense
Format buffered command
C
Write commandD
www.it-ebooks.info
404 CHAPTER 14 Bluetooth and sensors
motions made by the user. The position of the device is interpreted and a correspond-ing set of commands is given to navigate the robot. Not only do the sensors provide afunctional means for driving the robot, it’s quite fun!
In addition to these core Bluetooth communications and sensor interactions, thischapter also demonstrated techniques for providing intuitive user feedback duringthe operation of the application. For example, as the motors are engaged, the uservisually sees the direction each motor is being driven. Likewise, the user’s drivingmotions are only processed when an active Bluetooth connection is detected. Becausethis is an event-driven scenario, the application demonstrates listening for theseevents through the use of a dynamically registered BroadcastReceiver with appropri-ate IntentFilters.
Hopefully you’ve enjoyed learning about Bluetooth and sensors in this chapter,and perhaps you even have access to a LEGO Mindstorm robot to take for a spin!
In the next chapter, you’ll learn about another means of connecting your Androiddevice to the outside world—this time working with the integration capabilities of theplatform to sync data with the popular business networking site LinkedIn.
www.it-ebooks.info
Integration
No phone is an island. A mobile smartphone’s primary purpose is to connect withothers, whether through voice calls, email, text messaging, or some other way ofreaching out. But phones have historically acted like islands when it came to stor-ing information. You might painstakingly save phone numbers for years on yourdevice, only to lose everything and start all over again when you switched phones.
Android leads the charge in breaking away from the old device-centric way ofstoring contacts and related data. Like all of Google’s services, Android looks to thecloud as a vast storage location for all your data. Integration allows your phone tostay in sync with what you care about, so you don’t need to manually copy doctors’appointments and important emails from multiple computers to your phone.
For the most part, Android users can feel happily oblivious to much of this;everything “just works.” As a developer, you may want to take advantage of Android’sintegration features and add new conveniences for your users. This chapter showsexactly how Android handles personal data such as contacts, how accounts work,
This chapter covers Manipulating and extending Android contacts
Managing multiple accounts
Synchronizing data to a remote server
405
www.it-ebooks.info
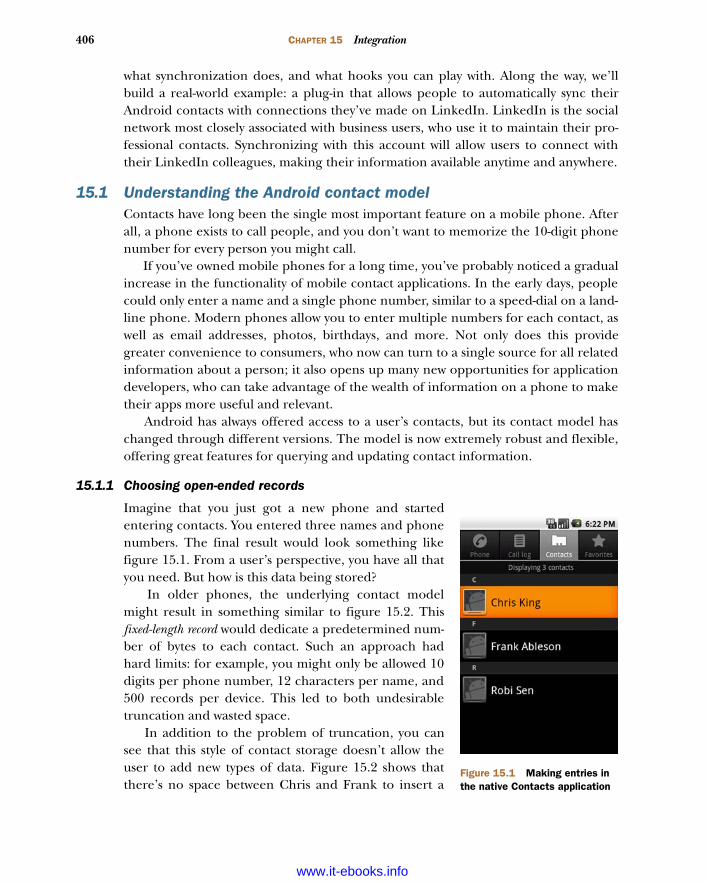
406 CHAPTER 15 Integration
what synchronization does, and what hooks you can play with. Along the way, we’llbuild a real-world example: a plug-in that allows people to automatically sync theirAndroid contacts with connections they’ve made on LinkedIn. LinkedIn is the socialnetwork most closely associated with business users, who use it to maintain their pro-fessional contacts. Synchronizing with this account will allow users to connect withtheir LinkedIn colleagues, making their information available anytime and anywhere.
15.1 Understanding the Android contact modelContacts have long been the single most important feature on a mobile phone. Afterall, a phone exists to call people, and you don’t want to memorize the 10-digit phonenumber for every person you might call.
If you’ve owned mobile phones for a long time, you’ve probably noticed a gradualincrease in the functionality of mobile contact applications. In the early days, peoplecould only enter a name and a single phone number, similar to a speed-dial on a land-line phone. Modern phones allow you to enter multiple numbers for each contact, aswell as email addresses, photos, birthdays, and more. Not only does this providegreater convenience to consumers, who now can turn to a single source for all relatedinformation about a person; it also opens up many new opportunities for applicationdevelopers, who can take advantage of the wealth of information on a phone to maketheir apps more useful and relevant.
Android has always offered access to a user’s contacts, but its contact model haschanged through different versions. The model is now extremely robust and flexible,offering great features for querying and updating contact information.
15.1.1 Choosing open-ended records
Imagine that you just got a new phone and startedentering contacts. You entered three names and phonenumbers. The final result would look something likefigure 15.1. From a user’s perspective, you have all thatyou need. But how is this data being stored?
In older phones, the underlying contact modelmight result in something similar to figure 15.2. Thisfixed-length record would dedicate a predetermined num-ber of bytes to each contact. Such an approach hadhard limits: for example, you might only be allowed 10digits per phone number, 12 characters per name, and500 records per device. This led to both undesirabletruncation and wasted space.
In addition to the problem of truncation, you cansee that this style of contact storage doesn’t allow theuser to add new types of data. Figure 15.2 shows thatthere’s no space between Chris and Frank to insert a
Figure 15.1 Making entries in the native Contacts application
www.it-ebooks.info
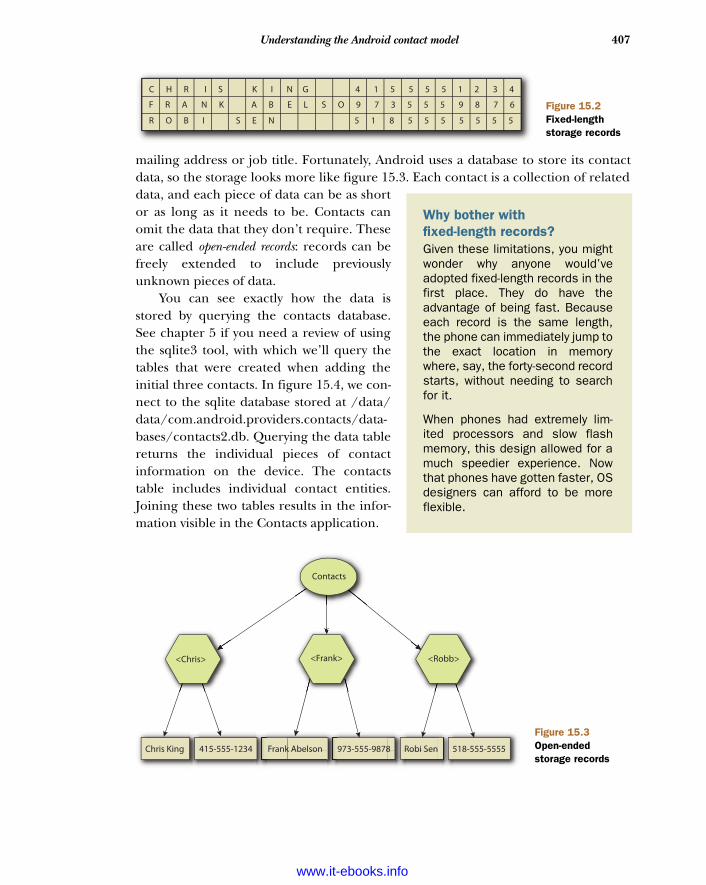
407Understanding the Android contact model
mailing address or job title. Fortunately, Android uses a database to store its contactdata, so the storage looks more like figure 15.3. Each contact is a collection of relateddata, and each piece of data can be as shortor as long as it needs to be. Contacts canomit the data that they don’t require. Theseare called open-ended records: records can befreely extended to include previouslyunknown pieces of data.
You can see exactly how the data isstored by querying the contacts database.See chapter 5 if you need a review of usingthe sqlite3 tool, with which we’ll query thetables that were created when adding theinitial three contacts. In figure 15.4, we con-nect to the sqlite database stored at /data/data/com.android.providers.contacts/data-bases/contacts2.db. Querying the data tablereturns the individual pieces of contactinformation on the device. The contactstable includes individual contact entities.Joining these two tables results in the infor-mation visible in the Contacts application.
C H R I S K I N G 4 1 5 5 5 5 1 2 3 4
R O B I S E N 5 1 8 5 5 5 5 5 5 5
F R A N K A B E L S O 9 7 3 5 5 5 9 8 7 6 Figure 15.2Fixed-length storage records
Contacts
<Chris> <Frank> <Robb>
Chris King 415-555-1234 Frank Abelson 973-555-9878 Robi Sen 518-555-5555
Figure 15.3Open-ended storage records
Why bother with fixed-length records?Given these limitations, you mightwonder why anyone would’veadopted fixed-length records in thefirst place. They do have theadvantage of being fast. Becauseeach record is the same length,the phone can immediately jump tothe exact location in memorywhere, say, the forty-second recordstarts, without needing to searchfor it.
When phones had extremely lim-ited processors and slow flashmemory, this design allowed for amuch speedier experience. Nowthat phones have gotten faster, OSdesigners can afford to be moreflexible.
www.it-ebooks.info
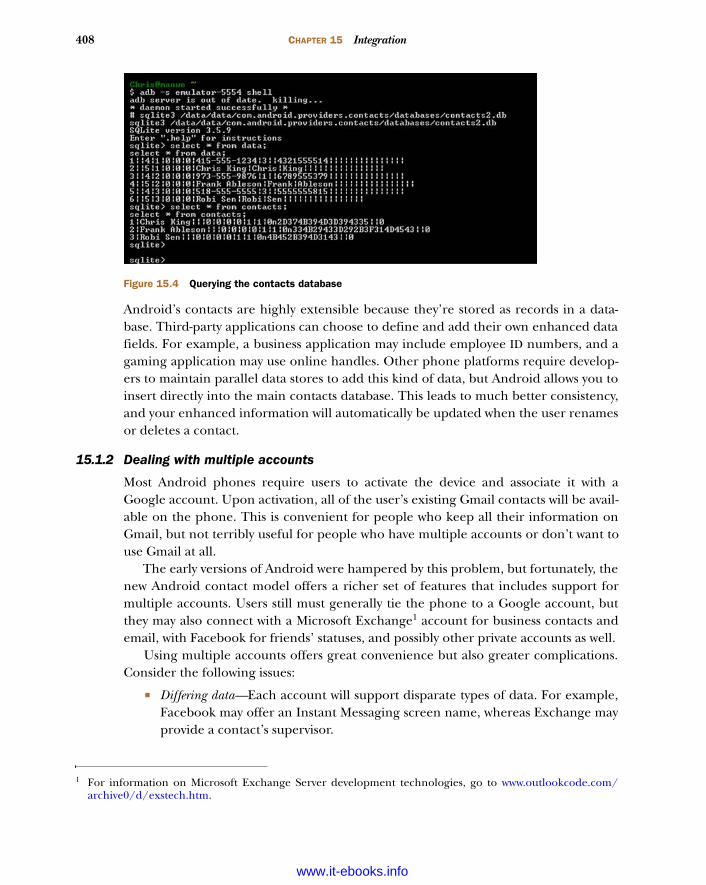
408 CHAPTER 15 Integration
Android’s contacts are highly extensible because they’re stored as records in a data-base. Third-party applications can choose to define and add their own enhanced datafields. For example, a business application may include employee ID numbers, and agaming application may use online handles. Other phone platforms require develop-ers to maintain parallel data stores to add this kind of data, but Android allows you toinsert directly into the main contacts database. This leads to much better consistency,and your enhanced information will automatically be updated when the user renamesor deletes a contact.
15.1.2 Dealing with multiple accounts
Most Android phones require users to activate the device and associate it with aGoogle account. Upon activation, all of the user’s existing Gmail contacts will be avail-able on the phone. This is convenient for people who keep all their information onGmail, but not terribly useful for people who have multiple accounts or don’t want touse Gmail at all.
The early versions of Android were hampered by this problem, but fortunately, thenew Android contact model offers a richer set of features that includes support formultiple accounts. Users still must generally tie the phone to a Google account, butthey may also connect with a Microsoft Exchange1 account for business contacts andemail, with Facebook for friends’ statuses, and possibly other private accounts as well.
Using multiple accounts offers great convenience but also greater complications.Consider the following issues:
Differing data—Each account will support disparate types of data. For example,Facebook may offer an Instant Messaging screen name, whereas Exchange mayprovide a contact’s supervisor.
1 For information on Microsoft Exchange Server development technologies, go to www.outlookcode.com/archive0/d/exstech.htm.
Figure 15.4 Querying the contacts database
www.it-ebooks.info

409Understanding the Android contact model
Different formats—Even if the same type of data is supported by multipleaccounts, it may display differently. For example, one account may return aphone number as (415) 555-1234, whereas another returns it as 4155551234.
Consolidation—Having multiple accounts isn’t very convenient if you need tosearch through three versions of each contact to find the one with the informa-tion you need. Instead, you want to have a single contact that includes datafrom all your accounts.
Linkage—On a related note, the phone needs some way to determine when twodifferent accounts are referring to the same entity. If one refers to “JamesMadison” and the other to “Jim Madison,” a human could guess that they referto the same contact, but software requires some more information to determinehow they link together.
Ownership—Some contacts may only appear on one account, whereas othersmay be listed in several. When you change a contact, you want to be sure they’reupdated appropriately.
Android resolves these issues gracefully. Each account stores its data in separate rowsin the contacts database. The raw_contacts table contains all the contacts that havebeen received from all of the user’s accounts, including potentially duplicate contacts.Table 15.1 shows a hypothetical view of a device’s contacts.
NOTE As you’ve seen, the actual contacts data fields will reside in the datatable. The raw_contacts table allows you to associate the various rows in thedata table with their corresponding accounts.
Splitting out the accounts’ views like this gives Android a great deal of flexibility.Whenever a piece of data is updated, it knows where that data originally came from. Itcan store data in the format most appropriate to the original account. And, becauseeach account gets its own set of rows, no account can mess up the data that originallycame from another account. This type of loose coupling extends a familiar Androidphilosophy to the world of contacts and provides the same sorts of benefits that you’veseen elsewhere: more extensibility, stability, and transparency, at the cost of greatercomplication.
Table 15.1 Raw contacts including duplicates from multiple accounts
ID Name Email Phone number Status
1 James Madison [email protected]
2 Adam Smith [email protected]
3 James Madison 2024561414 “Negotiating with the British...”
4 Adam Smith [email protected] +442055512345
www.it-ebooks.info
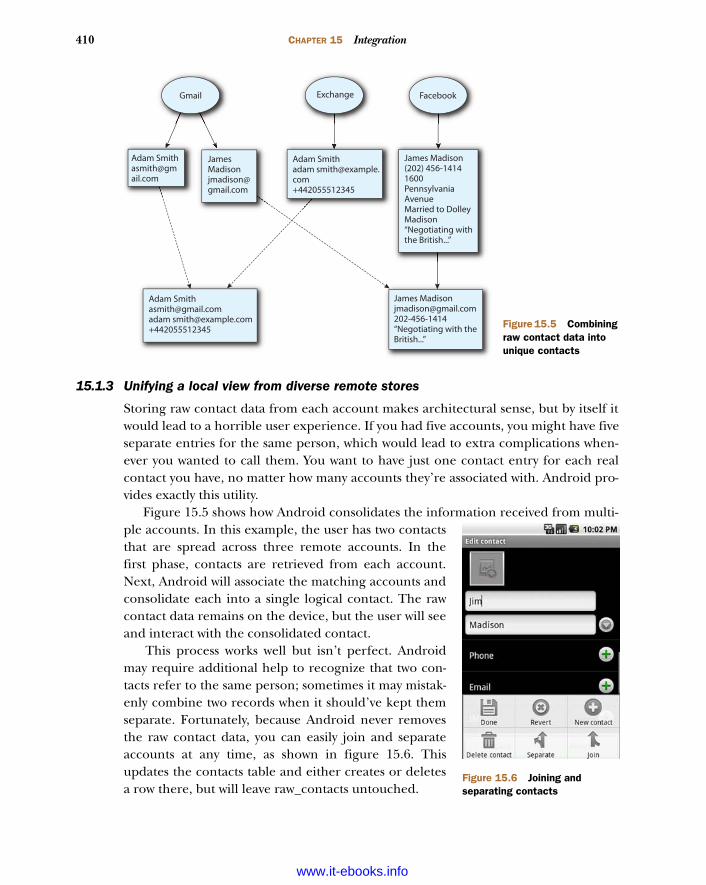
410 CHAPTER 15 Integration
15.1.3 Unifying a local view from diverse remote stores
Storing raw contact data from each account makes architectural sense, but by itself itwould lead to a horrible user experience. If you had five accounts, you might have fiveseparate entries for the same person, which would lead to extra complications when-ever you wanted to call them. You want to have just one contact entry for each realcontact you have, no matter how many accounts they’re associated with. Android pro-vides exactly this utility.
Figure 15.5 shows how Android consolidates the information received from multi-ple accounts. In this example, the user has two contactsthat are spread across three remote accounts. In thefirst phase, contacts are retrieved from each account.Next, Android will associate the matching accounts andconsolidate each into a single logical contact. The rawcontact data remains on the device, but the user will seeand interact with the consolidated contact.
This process works well but isn’t perfect. Androidmay require additional help to recognize that two con-tacts refer to the same person; sometimes it may mistak-enly combine two records when it should’ve kept themseparate. Fortunately, because Android never removesthe raw contact data, you can easily join and separateaccounts at any time, as shown in figure 15.6. Thisupdates the contacts table and either creates or deletesa row there, but will leave raw_contacts untouched.
Gmail Exchange Facebook
Adam [email protected]
Adam Smithadam [email protected]+442055512345
James Madison(202) 456-14141600PennsylvaniaAvenueMarried to DolleyMadison“Negotiating withthe British...”
Adam [email protected] [email protected]+442055512345
James [email protected]“Negotiating with theBritish...”
Figure 15.5 Combining raw contact data into unique contacts
Figure 15.6 Joining and separating contacts
www.it-ebooks.info
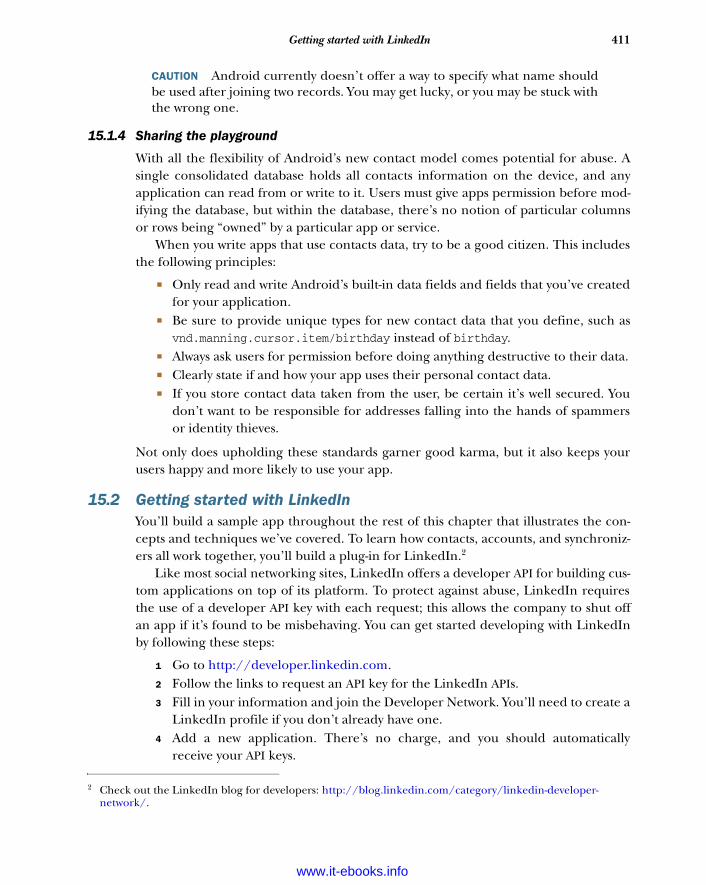
411Getting started with LinkedIn
CAUTION Android currently doesn’t offer a way to specify what name shouldbe used after joining two records. You may get lucky, or you may be stuck withthe wrong one.
15.1.4 Sharing the playground
With all the flexibility of Android’s new contact model comes potential for abuse. Asingle consolidated database holds all contacts information on the device, and anyapplication can read from or write to it. Users must give apps permission before mod-ifying the database, but within the database, there’s no notion of particular columnsor rows being “owned” by a particular app or service.
When you write apps that use contacts data, try to be a good citizen. This includesthe following principles:
Only read and write Android’s built-in data fields and fields that you’ve createdfor your application.
Be sure to provide unique types for new contact data that you define, such asvnd.manning.cursor.item/birthday instead of birthday.
Always ask users for permission before doing anything destructive to their data. Clearly state if and how your app uses their personal contact data. If you store contact data taken from the user, be certain it’s well secured. You
don’t want to be responsible for addresses falling into the hands of spammersor identity thieves.
Not only does upholding these standards garner good karma, but it also keeps yourusers happy and more likely to use your app.
15.2 Getting started with LinkedInYou’ll build a sample app throughout the rest of this chapter that illustrates the con-cepts and techniques we’ve covered. To learn how contacts, accounts, and synchroniz-ers all work together, you’ll build a plug-in for LinkedIn.2
Like most social networking sites, LinkedIn offers a developer API for building cus-tom applications on top of its platform. To protect against abuse, LinkedIn requiresthe use of a developer API key with each request; this allows the company to shut offan app if it’s found to be misbehaving. You can get started developing with LinkedInby following these steps:
1 Go to http://developer.linkedin.com.2 Follow the links to request an API key for the LinkedIn APIs.3 Fill in your information and join the Developer Network. You’ll need to create a
LinkedIn profile if you don’t already have one. 4 Add a new application. There’s no charge, and you should automatically
receive your API keys.
2 Check out the LinkedIn blog for developers: http://blog.linkedin.com/category/linkedin-developer-network/.
www.it-ebooks.info

412 CHAPTER 15 Integration
Once you receive your API key, take a look at the documentation available at http://developer.linkedin.com. LinkedIn also maintains a fairly active developer communityin forums hosted at the same site if you need advice or want to see what the expertsare saying.
Create a new Eclipse project called LinkedIn. The following listing shows a simpleclass called LinkedIn that holds useful constants you’ll use later.
package com.manning.unlockingandroid.linkedin;public class LinkedIn { public static final String MIME_TYPE = "vnd.android.cursor.item/vnd.linkedin.profile"; public static final String TYPE = "com.manning.unlockingandroid.linkedin"; public static final String API_KEY = ""; public static final String SECRET_KEY = ""; public static final String AUTH_TOKEN = "AuthToken"; public static final String AUTH_TOKEN_SECRET = "AuthTokenSecret";}
The MIME_TYPE refers to the new type of data you’ll be adding to contacts. With thisinformation, Android will be able to distinguish between a contact’s LinkedIn dataand data received from other sources. In the next section, you’ll use this type to insertnew LinkedIn records. The other constants will be useful in later sections as you beginto connect with the LinkedIn server.
The LinkedIn docs describe how to use LinkedIn’s API. You can follow this toimplement your app, but you’ll be taking advantage of the linkedin-j project. Writ-ten by Nabeel Siddiqui, it comes under a generous Apache 2 license and provides asimple, logical wrapper around the raw API calls. Visit the project page at http://code.google.com/p/linkedin-j. Once you’ve downloaded the JAR files, add them asexternal JARs to your Java project.
While you’re doing the initial setup, let’s define all the strings for this applicationin strings.xml, based on the following listing. Most will be used by the login UI activity,but some will be used for other user-visible data.
<?xml version="1.0" encoding="utf-8"?><resources> <string name="app_name">LinkedInAdapter</string> <string name="login_activity_email_label">Email Address</string> <string name="login_activity_instructions">Please click the button below to log in to LinkedIn.</string> <string name="remoteLogin">Log In Online</string> <string name="login_activity_pin_label">PIN</string> <string name="login_activity_ok_button">Sign in</string> <string name="empty_fields_error">Please enter your email address and password.</string> <string name="start_login_error">Unable to connect to LinkedIn.
Listing 15.1 Constants for LinkedIn
Listing 15.2 Externalized strings for LinkedIn
Use your LinkedIn API keys
www.it-ebooks.info
413Managing contacts
Please verify your network connection and try again later.</string> <string name="login_fail_error">Login failed. Please click Log In Online and get a new PIN.</string> <string name="working">Finishing authentication. Please wait...</string> <string name="login_label">LinkedIn Login</string> <string name="contact_summary">LinkedIn</string> <string name="auth_token_label">LinkedIn</string></resources>
15.3 Managing contactsNow that you understand the purpose behind Android’s contact model, it’s time tostart interacting with it. Many applications can be improved by plugging into a user’scontacts. The degree of integration that you need, though, will differ depending onthe type of app you’re writing. This section looks at three increasingly complex ways tohook into the phone’s contacts.
15.3.1 Leveraging the built-in Contacts app
Why reinvent the wheel? Android’s engineers have spent the time and effort to buildan attractive and familiar Contacts app. In many cases, it’s quicker and better to justuse that app when you need a contact.
As you’d expect, you communicate with the native Contacts app by using anIntent. The platform will respond to an ACTION_PICK request by bringing the list ofcontacts to the foreground, allowing the user to select a single contact, and thenreturning that selection to your application. You specify that you want to select a con-tact by requesting the android.provider.ContactsContract.Contacts.CONTENT_URIdata type.
NOTE The ContactsContract class and all related classes were introducedduring the overhaul of the contacts model in Android 2.0. You may occasion-ally see legacy code that uses the android.provider.Contacts class for inter-acting with contacts. This usage is deprecated; though it works, it won’tproperly handle information from non-Google accounts.
After the user selects a contact, the response returns to your activity’s onActivity-Result() method. You can query this result to pull out information such as the con-tact’s name and ID, as shown in the following listing from a class called ContactPicker.
public static final int CONTACT_SELECTED = 1;private void selectContact() { Intent chooser = new Intent(Intent.ACTION_PICK, ContactsContract.Contacts.CONTENT_URI); startActivityForResult(chooser, CONTACT_SELECTED);}public void onActivityResult( int requestCode, int resultCode, Intent data) { super.onActivityResult(requestCode, resultCode, data);
Listing 15.3 Selecting a contact from the native Contacts app
Define unique ID for result
www.it-ebooks.info
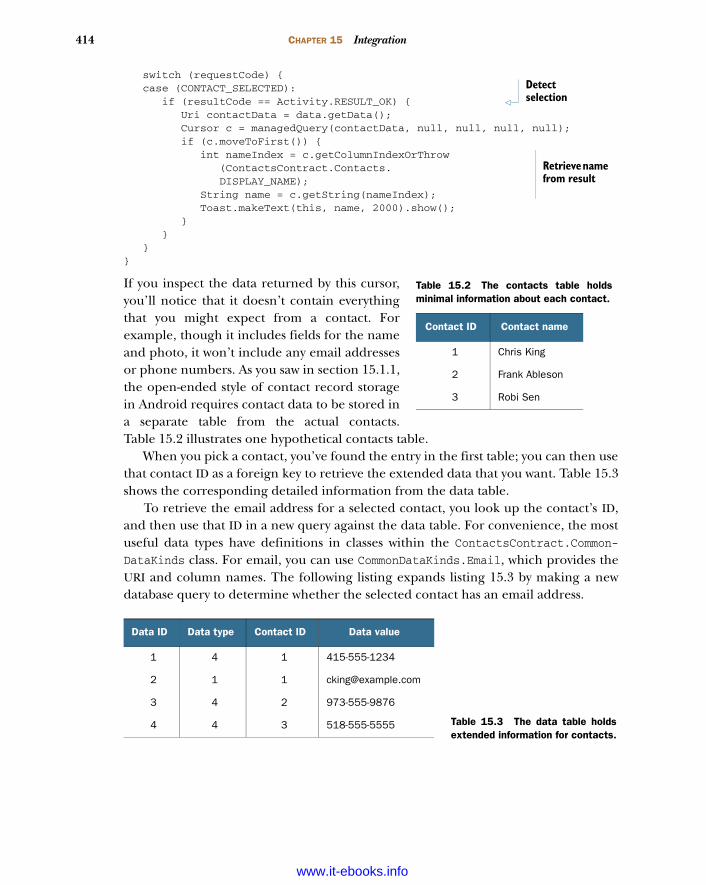
414 CHAPTER 15 Integration
switch (requestCode) { case (CONTACT_SELECTED): if (resultCode == Activity.RESULT_OK) { Uri contactData = data.getData(); Cursor c = managedQuery(contactData, null, null, null, null); if (c.moveToFirst()) { int nameIndex = c.getColumnIndexOrThrow (ContactsContract.Contacts. DISPLAY_NAME); String name = c.getString(nameIndex); Toast.makeText(this, name, 2000).show(); } } }}
If you inspect the data returned by this cursor,you’ll notice that it doesn’t contain everythingthat you might expect from a contact. Forexample, though it includes fields for the nameand photo, it won’t include any email addressesor phone numbers. As you saw in section 15.1.1,the open-ended style of contact record storagein Android requires contact data to be stored ina separate table from the actual contacts.Table 15.2 illustrates one hypothetical contacts table.
When you pick a contact, you’ve found the entry in the first table; you can then usethat contact ID as a foreign key to retrieve the extended data that you want. Table 15.3shows the corresponding detailed information from the data table.
To retrieve the email address for a selected contact, you look up the contact’s ID,and then use that ID in a new query against the data table. For convenience, the mostuseful data types have definitions in classes within the ContactsContract.Common-DataKinds class. For email, you can use CommonDataKinds.Email, which provides theURI and column names. The following listing expands listing 15.3 by making a newdatabase query to determine whether the selected contact has an email address.
Detect selection
Retrieve name from result
Data ID Data type Contact ID Data value
1 4 1 415-555-1234
2 1 1 [email protected]
3 4 2 973-555-9876
4 4 3 518-555-5555 Table 15.3 The data table holdsextended information for contacts.
Table 15.2 The contacts table holdsminimal information about each contact.
Contact ID Contact name
1 Chris King
2 Frank Ableson
3 Robi Sen
www.it-ebooks.info
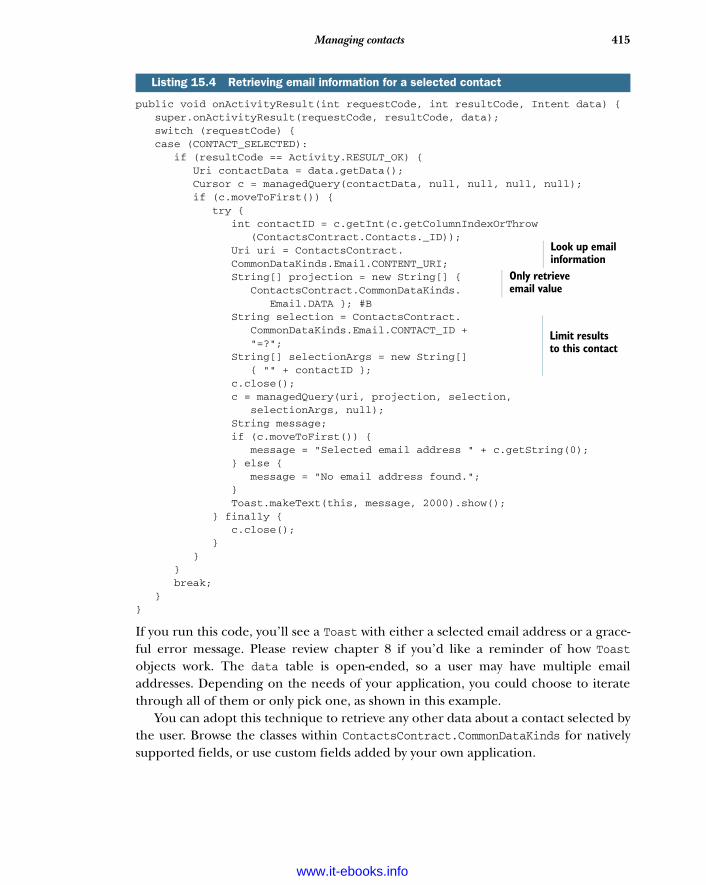
415Managing contacts
public void onActivityResult(int requestCode, int resultCode, Intent data) { super.onActivityResult(requestCode, resultCode, data); switch (requestCode) { case (CONTACT_SELECTED): if (resultCode == Activity.RESULT_OK) { Uri contactData = data.getData(); Cursor c = managedQuery(contactData, null, null, null, null); if (c.moveToFirst()) { try { int contactID = c.getInt(c.getColumnIndexOrThrow (ContactsContract.Contacts._ID)); Uri uri = ContactsContract. CommonDataKinds.Email.CONTENT_URI; String[] projection = new String[] { ContactsContract.CommonDataKinds. Email.DATA }; #B String selection = ContactsContract. CommonDataKinds.Email.CONTACT_ID + "=?"; String[] selectionArgs = new String[] { "" + contactID }; c.close(); c = managedQuery(uri, projection, selection, selectionArgs, null); String message; if (c.moveToFirst()) { message = "Selected email address " + c.getString(0); } else { message = "No email address found."; } Toast.makeText(this, message, 2000).show(); } finally { c.close(); } } } break; }}
If you run this code, you’ll see a Toast with either a selected email address or a grace-ful error message. Please review chapter 8 if you’d like a reminder of how Toastobjects work. The data table is open-ended, so a user may have multiple emailaddresses. Depending on the needs of your application, you could choose to iteratethrough all of them or only pick one, as shown in this example.
You can adopt this technique to retrieve any other data about a contact selected bythe user. Browse the classes within ContactsContract.CommonDataKinds for nativelysupported fields, or use custom fields added by your own application.
Listing 15.4 Retrieving email information for a selected contact
Look up email information
Only retrieve email value
Limit results to this contact
www.it-ebooks.info

416 CHAPTER 15 Integration
15.3.2 Requesting operations from your app
Now that we’ve retrieved contact data from the nativeapp, let’s see how to edit that data. You’ll often want touse the native contact app to perform edits, becauseusers are comfortable and familiar with this interface.
To create a new contact, use Intent.ACTION_INSERT.By itself this will pop open an empty contact for theuser to fill out, which isn’t terribly useful. Most often,you’ll have some pieces of information about a newcontact and ask the user to supply the rest. For exam-ple, your app might retrieve screen names and emailaddresses from a social networking service. You couldfill out these portions of the contact ahead of time andlet the user finish adding the person’s name in thenative Contacts app. Figure 15.7 shows a prepopulatedcontacts screen that was generated by an application.
Listing 15.5 shows how to generate this sort ofscreen. The fields that you can optionally prepopulateare available as static fields in the ContactsContract.Intents.Insert convenience class.
private void createContact() { Intent creator = new Intent(Intent.ACTION_INSERT, ContactsContract.Contacts.CONTENT_URI); creator.putExtra(ContactsContract.Intents.Insert. NAME, "Oedipa Maas"); creator.putExtra(ContactsContract.Intents.Insert. EMAIL, "[email protected]"); startActivity(creator);}
Listing 15.5 Adding a contact using the native Contacts app
Storing contact identifiersAn Android contact is a transient thing. Users may join different contacts together,split them apart, or delete them altogether. As such, you should avoid holding ontoa contact ID for a long time and using it in future queries. If you need to retain a long-lived reference to a contact, such as a list of the user’s gaming buddies, then insteadof the contact ID you should use the lookup key, which is a column defined byContactsContract.Contacts.LOOKUP_KEY. The lookup key will continue to workeven if the user joins or separates the contact.
But using the lookup key is slower than the contact ID, so if speed is critical in yourapplication, you may want to keep both the contact ID and the lookup key, and onlyuse the lookup key if retrieving by ID fails.
Insert contact
Define initial values
Figure 15.7 Partially complete contact requested by application
www.it-ebooks.info
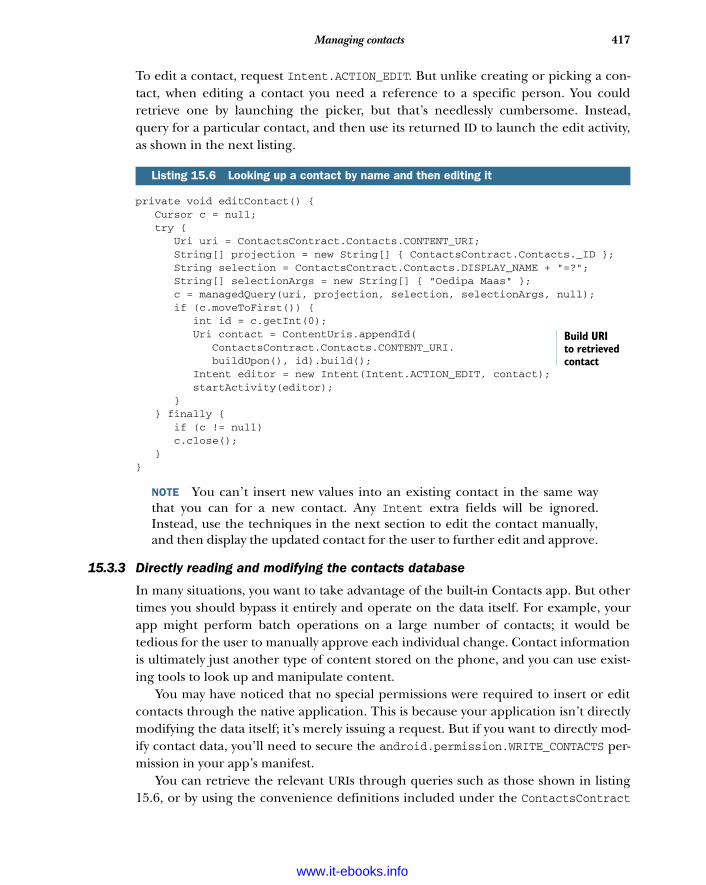
417Managing contacts
To edit a contact, request Intent.ACTION_EDIT. But unlike creating or picking a con-tact, when editing a contact you need a reference to a specific person. You couldretrieve one by launching the picker, but that’s needlessly cumbersome. Instead,query for a particular contact, and then use its returned ID to launch the edit activity,as shown in the next listing.
private void editContact() { Cursor c = null; try { Uri uri = ContactsContract.Contacts.CONTENT_URI; String[] projection = new String[] { ContactsContract.Contacts._ID }; String selection = ContactsContract.Contacts.DISPLAY_NAME + "=?"; String[] selectionArgs = new String[] { "Oedipa Maas" }; c = managedQuery(uri, projection, selection, selectionArgs, null); if (c.moveToFirst()) { int id = c.getInt(0); Uri contact = ContentUris.appendId( ContactsContract.Contacts.CONTENT_URI. buildUpon(), id).build(); Intent editor = new Intent(Intent.ACTION_EDIT, contact); startActivity(editor); } } finally { if (c != null) c.close(); }}
NOTE You can’t insert new values into an existing contact in the same waythat you can for a new contact. Any Intent extra fields will be ignored.Instead, use the techniques in the next section to edit the contact manually,and then display the updated contact for the user to further edit and approve.
15.3.3 Directly reading and modifying the contacts database
In many situations, you want to take advantage of the built-in Contacts app. But othertimes you should bypass it entirely and operate on the data itself. For example, yourapp might perform batch operations on a large number of contacts; it would betedious for the user to manually approve each individual change. Contact informationis ultimately just another type of content stored on the phone, and you can use exist-ing tools to look up and manipulate content.
You may have noticed that no special permissions were required to insert or editcontacts through the native application. This is because your application isn’t directlymodifying the data itself; it’s merely issuing a request. But if you want to directly mod-ify contact data, you’ll need to secure the android.permission.WRITE_CONTACTS per-mission in your app’s manifest.
You can retrieve the relevant URIs through queries such as those shown in listing15.6, or by using the convenience definitions included under the ContactsContract
Listing 15.6 Looking up a contact by name and then editing it
Build URI to retrieved contact
www.it-ebooks.info
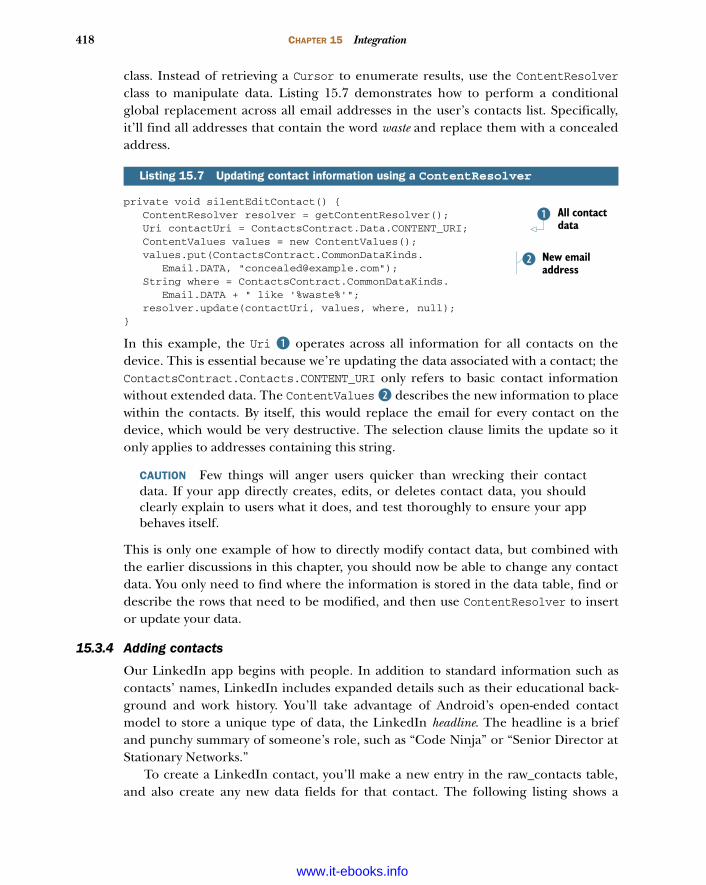
418 CHAPTER 15 Integration
class. Instead of retrieving a Cursor to enumerate results, use the ContentResolverclass to manipulate data. Listing 15.7 demonstrates how to perform a conditionalglobal replacement across all email addresses in the user’s contacts list. Specifically,it’ll find all addresses that contain the word waste and replace them with a concealedaddress.
private void silentEditContact() { ContentResolver resolver = getContentResolver(); Uri contactUri = ContactsContract.Data.CONTENT_URI; ContentValues values = new ContentValues(); values.put(ContactsContract.CommonDataKinds. Email.DATA, "[email protected]"); String where = ContactsContract.CommonDataKinds. Email.DATA + " like '%waste%'"; resolver.update(contactUri, values, where, null);}
In this example, the Uri B operates across all information for all contacts on thedevice. This is essential because we’re updating the data associated with a contact; theContactsContract.Contacts.CONTENT_URI only refers to basic contact informationwithout extended data. The ContentValues C describes the new information to placewithin the contacts. By itself, this would replace the email for every contact on thedevice, which would be very destructive. The selection clause limits the update so itonly applies to addresses containing this string.
CAUTION Few things will anger users quicker than wrecking their contactdata. If your app directly creates, edits, or deletes contact data, you shouldclearly explain to users what it does, and test thoroughly to ensure your appbehaves itself.
This is only one example of how to directly modify contact data, but combined withthe earlier discussions in this chapter, you should now be able to change any contactdata. You only need to find where the information is stored in the data table, find ordescribe the rows that need to be modified, and then use ContentResolver to insertor update your data.
15.3.4 Adding contacts
Our LinkedIn app begins with people. In addition to standard information such ascontacts’ names, LinkedIn includes expanded details such as their educational back-ground and work history. You’ll take advantage of Android’s open-ended contactmodel to store a unique type of data, the LinkedIn headline. The headline is a briefand punchy summary of someone’s role, such as “Code Ninja” or “Senior Director atStationary Networks.”
To create a LinkedIn contact, you’ll make a new entry in the raw_contacts table,and also create any new data fields for that contact. The following listing shows a
Listing 15.7 Updating contact information using a ContentResolver
All contact data
B
New email address
C
www.it-ebooks.info
419Managing contacts
utility class that accepts LinkedIn-style data and either creates a new record or updatesan existing record.
package com.manning.unlockingandroid.linkedin;// imports omitted for brevitypublic class ContactHelper { public static boolean addContact(ContentResolver resolver, Account account, String name, String username, String headline) { ArrayList<ContentProviderOperation> batch = new ArrayList<ContentProviderOperation>();
ContentProviderOperation.Builder builder = ContentProviderOperation .newInsert(RawContacts.CONTENT_URI); builder.withValue(RawContacts.ACCOUNT_NAME, account.name); builder.withValue(RawContacts.ACCOUNT_TYPE, account.type); builder.withValue(RawContacts.SYNC1, username); batch.add(builder.build());
builder = ContentProviderOperation .newInsert(ContactsContract.Data.CONTENT_URI); builder.withValueBackReference(ContactsContract.CommonDataKinds. StructuredName.RAW_CONTACT_ID, 0); builder.withValue(ContactsContract.Data.MIMETYPE, ContactsContract. CommonDataKinds.StructuredName.CONTENT_ITEM_TYPE); builder.withValue(ContactsContract.CommonDataKinds.StructuredName. DISPLAY_NAME, name); batch.add(builder.build());
builder = ContentProviderOperation.newInsert( ContactsContract.Data.CONTENT_URI); builder.withValueBackReference(ContactsContract.Data.RAW_CONTACT_ID, 0); builder.withValue(ContactsContract.Data.MIMETYPE, LinkedIn.MIME_TYPE); builder.withValue(ContactsContract.Data.DATA1, headline); builder.withValue(ContactsContract.Data.DATA2, "LinkedIn");
batch.add(builder.build()); try { resolver.applyBatch(ContactsContract.AUTHORITY, batch); return true; } catch (Exception e) { return false; } }
public static boolean updateContact(ContentResolver resolver, Account account, String username, String headline) { ArrayList<ContentProviderOperation> batch = new ArrayList<ContentProviderOperation>(); ContentProviderOperation.Builder builder = ContentProviderOperation .newInsert(ContactsContract.Data.CONTENT_URI); builder.withValue(ContactsContract.Data.RAW_CONTACT_ID, 0);
Listing 15.8 Helper class for storing LinkedIn connections
Batch operations
B
Unique ID for future sync
Unique data for contact
C
Batch operations
B
www.it-ebooks.info
420 CHAPTER 15 Integration
builder.withValue(ContactsContract.Data.MIMETYPE, LinkedIn.MIME_TYPE); builder.withValue(ContactsContract.Data.DATA1, headline); builder.withValue(ContactsContract.Data.DATA2, "LinkedIn"); batch.add(builder.build()); try { resolver.applyBatch(ContactsContract.AUTHORITY, batch); return true; } catch (Exception e) { return false; } }}
Because you’re performing multiple insertions at a time, we use a batch operation Bto wrap all the tasks involved. This operation performs more quickly and has theadded benefit of protecting against partially updated records if an error occurs mid-way through processing.
The DATA1 field C refers to custom data. Android defines many similar columns,such as DATA1, DATA2, DATA3, and so on. Each new type of contact data can decide foritself how it wants to define and interpret its data. In our example, we’re placing theheadline in the first available data slot. For more complex fields such as structurednames, you can use the various data fields to store multiple components such as firstand last names.
Now that you can create contacts, you need to tell the native Contacts app how todisplay LinkedIn data. This is done through a custom XML file, shown in the followinglisting.
<?xml version="1.0" encoding="utf-8"?><ContactsSource xmlns:android="http://schemas.android.com/apk/res/android"> <ContactsDataKind android:mimeType= "vnd.android.cursor.item/vnd.linkedin.profile" android:icon="@drawable/icon" android:summaryColumn="data2" android:detailColumn="data1" /></ContactsSource>
Google hasn’t documented this file well, but fortunately there isn’t too much to know.The code in B helps the Contacts app find the rows in the data table that correspondto LinkedIn. The icon to display in Contacts and the summary column help usersidentify this type of data. Finally, the detail column describes the information uniqueto this contact. In our case, this is the headline.
Listing 15.9 contacts.xml
Unique data for contact
C
Custom content type
B
www.it-ebooks.info
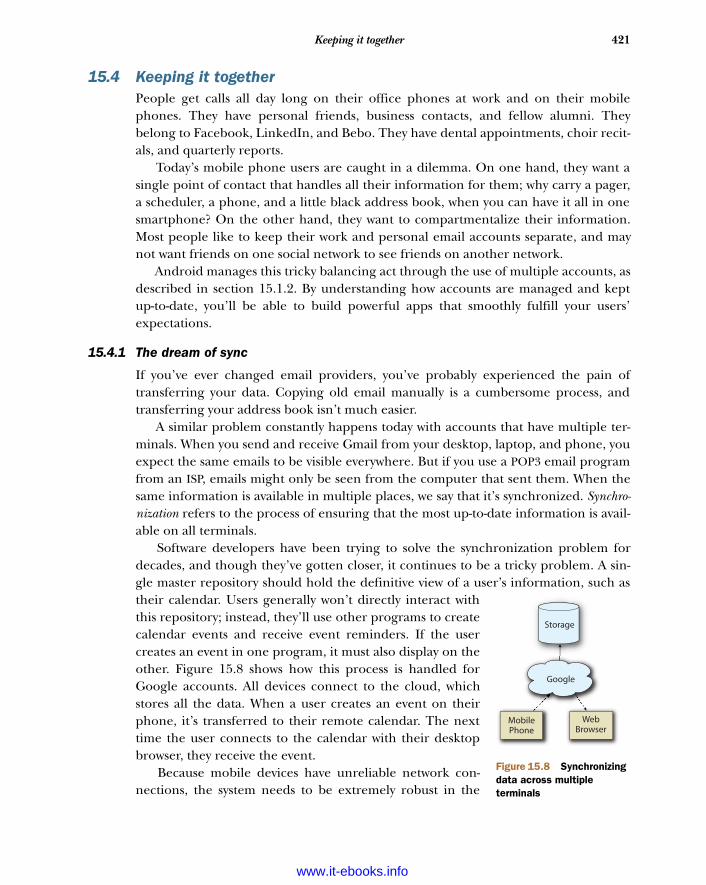
421Keeping it together
15.4 Keeping it togetherPeople get calls all day long on their office phones at work and on their mobilephones. They have personal friends, business contacts, and fellow alumni. Theybelong to Facebook, LinkedIn, and Bebo. They have dental appointments, choir recit-als, and quarterly reports.
Today’s mobile phone users are caught in a dilemma. On one hand, they want asingle point of contact that handles all their information for them; why carry a pager,a scheduler, a phone, and a little black address book, when you can have it all in onesmartphone? On the other hand, they want to compartmentalize their information.Most people like to keep their work and personal email accounts separate, and maynot want friends on one social network to see friends on another network.
Android manages this tricky balancing act through the use of multiple accounts, asdescribed in section 15.1.2. By understanding how accounts are managed and keptup-to-date, you’ll be able to build powerful apps that smoothly fulfill your users’expectations.
15.4.1 The dream of sync
If you’ve ever changed email providers, you’ve probably experienced the pain oftransferring your data. Copying old email manually is a cumbersome process, andtransferring your address book isn’t much easier.
A similar problem constantly happens today with accounts that have multiple ter-minals. When you send and receive Gmail from your desktop, laptop, and phone, youexpect the same emails to be visible everywhere. But if you use a POP3 email programfrom an ISP, emails might only be seen from the computer that sent them. When thesame information is available in multiple places, we say that it’s synchronized. Synchro-nization refers to the process of ensuring that the most up-to-date information is avail-able on all terminals.
Software developers have been trying to solve the synchronization problem fordecades, and though they’ve gotten closer, it continues to be a tricky problem. A sin-gle master repository should hold the definitive view of a user’s information, such astheir calendar. Users generally won’t directly interact withthis repository; instead, they’ll use other programs to createcalendar events and receive event reminders. If the usercreates an event in one program, it must also display on theother. Figure 15.8 shows how this process is handled forGoogle accounts. All devices connect to the cloud, whichstores all the data. When a user creates an event on theirphone, it’s transferred to their remote calendar. The nexttime the user connects to the calendar with their desktopbrowser, they receive the event.
Because mobile devices have unreliable network con-nections, the system needs to be extremely robust in the
Storage
WebBrowser
MobilePhone
Figure 15.8 Synchronizing data across multiple terminals
www.it-ebooks.info

422 CHAPTER 15 Integration
event of failure. If network synchronization fails, as in figure 15.9, the device will beresponsible for retrying at a later time until it succeeds. Each provider will follow itsown strategy for syncing, depending on the data being transferred. For example, insome situations the provider will want to abort all transferred data if the connection isinterrupted; in other cases, the provider will accept the data that was already transmit-ted, and wait to receive the rest later.
Try to keep this as transparent to the user as possible. Things should “just work”:emails sent on one device should display on another without any effort involved.Because of the complexity involved in synchronization, though, there are many waysfor synching to fail, which can lead to baffling results. By seeing what’s happeningbehind the scenes, you’ve gained insight into detecting and handling these kinds oferrors.
15.4.2 Defining accounts
Section 15.1.2 described how Android handles multiple sets of contacts by creatingseparate accounts for each set. Users can manually manage their contacts by visitingAccounts, which is usually available as a menu optionwithin the native Contacts activity. Figure 15.10 showswhere to add and manage accounts.
So what, exactly, is an account? An account combinesyour identity information, such as a login and password,with associated data, such as contacts and email.
Because accounts store their contact data separatelyfrom one another in the raw_contacts table, they can betoggled on and off without affecting unrelated informa-tion. For example, if you leave a company, you canremove all your former colleagues without worryingabout destroying your personal data. You can create yourown type of account by providing three components.
SERVICE
Android will use accounts to retrieve the user’s remoteinformation while running in the background, so a ser-vice will wrap all of the account’s actions.
Time passes...
Dropped connection Retries and succeeds
Google Google
MobilePhone
MobilePhone
Figure 15.9 Retrying a synchronization operation after initial failure
Figure 15.10Managing accounts
www.it-ebooks.info
423Keeping it together
IBINDER
The binder will service requests for this type of account, such as adding a newaccount, authenticating the user, or storing credentials. You can create an appropriatebinder by extending AbstractAccountAuthenticator.
ACTIVITY
Users will need to enter their information to authenticate with their accounts. Differ-ent accounts may have differing requirements; for example, some may require the useof a key phrase, selecting a picture, or entering a soft crypto token. Because Androidcan’t provide a generic UI to cover all possible types of authentication, each accountmust implement an activity that extends AccountAuthenticatorActivity to presentthe user with a login screen and handle the results. You’ll see examples of all threecomponents in section 15.5.
15.4.3 Telling secrets: The AccountManager service
Earlier versions of Android only had native support for a single Google account. Devel-opers did write apps for other account types, such as Exchange, but these solutionswere isolated and inconsistent. Each developer needed to rewrite from scratch the sys-tem for logging in to an account and managing the user’s data. Even worse, there wereno enforceable standards for managing users’ secret data, such as passwords.
Android 2.0 fixed this problem by adding a new service called AccountManager.AccountManager provides a consistent and uniform means for interacting with all theaccounts registered on a device, including adding and removing accounts or modify-ing their security. AccountManager also provides a single and secure storage facility forprivate user credentials; by using this service, your app is released from the burden ofprotecting the user’s secrets.
Each account can define whatever types of information are necessary to authenti-cate the user. Typically, this will include the following:
Login name—The unique identifier for the user, such as [email protected]. Password—A secret string, known to the user, which verifies that they are the
owner of this account. Authentication token—A transient string, known to the account but generally not
to the user, which demonstrates that the user has successfully logged in to theaccount. Often referred to as an auth token, this string frees the user from theneed to manually type the password every time they wish to connect with theaccount, and saves the server from performing additional, time-consumingauthentications. An auth token is usually valid for a limited amount of time andmust occasionally be refreshed by performing a full login.
All of this data is stored and managed by AccountManager, as shown in figure 15.11. Inthis example, the user already has two active accounts on their device, which are cur-rently authenticated. A third account can be added by providing the relevant accountdetails, in this case a name and password. Once verified by AccountManager, thisaccount will be accessible like the others.
www.it-ebooks.info
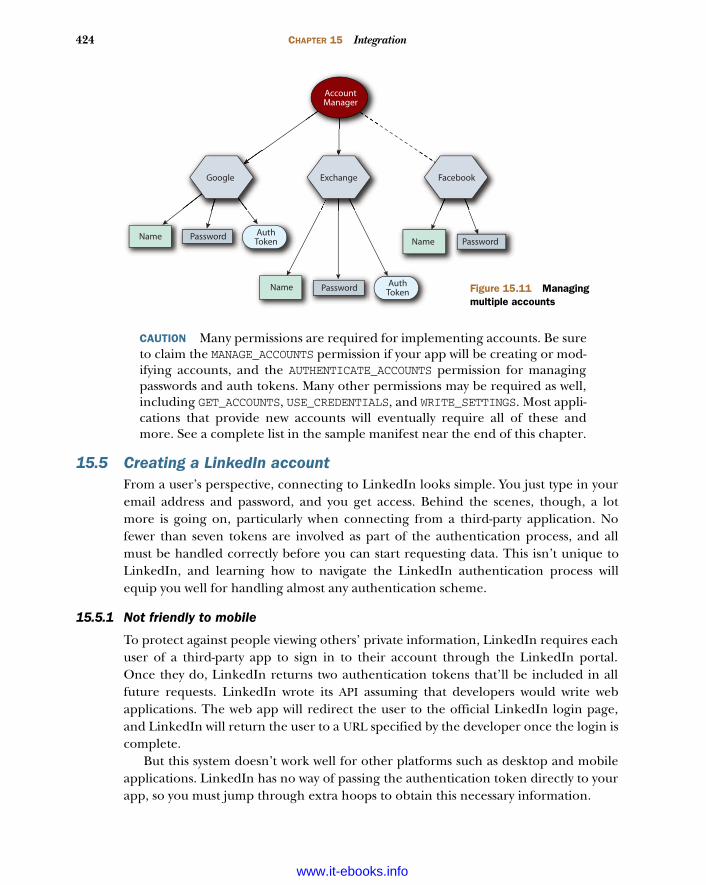
424 CHAPTER 15 Integration
CAUTION Many permissions are required for implementing accounts. Be sureto claim the MANAGE_ACCOUNTS permission if your app will be creating or mod-ifying accounts, and the AUTHENTICATE_ACCOUNTS permission for managingpasswords and auth tokens. Many other permissions may be required as well,including GET_ACCOUNTS, USE_CREDENTIALS, and WRITE_SETTINGS. Most appli-cations that provide new accounts will eventually require all of these andmore. See a complete list in the sample manifest near the end of this chapter.
15.5 Creating a LinkedIn accountFrom a user’s perspective, connecting to LinkedIn looks simple. You just type in youremail address and password, and you get access. Behind the scenes, though, a lotmore is going on, particularly when connecting from a third-party application. Nofewer than seven tokens are involved as part of the authentication process, and allmust be handled correctly before you can start requesting data. This isn’t unique toLinkedIn, and learning how to navigate the LinkedIn authentication process willequip you well for handling almost any authentication scheme.
15.5.1 Not friendly to mobile
To protect against people viewing others’ private information, LinkedIn requires eachuser of a third-party app to sign in to their account through the LinkedIn portal.Once they do, LinkedIn returns two authentication tokens that’ll be included in allfuture requests. LinkedIn wrote its API assuming that developers would write webapplications. The web app will redirect the user to the official LinkedIn login page,and LinkedIn will return the user to a URL specified by the developer once the login iscomplete.
But this system doesn’t work well for other platforms such as desktop and mobileapplications. LinkedIn has no way of passing the authentication token directly to yourapp, so you must jump through extra hoops to obtain this necessary information.
AccountManager
Google Exchange Facebook
Name Password AuthToken Name Password
Name Password AuthToken Figure 15.11 Managing
multiple accounts
www.it-ebooks.info
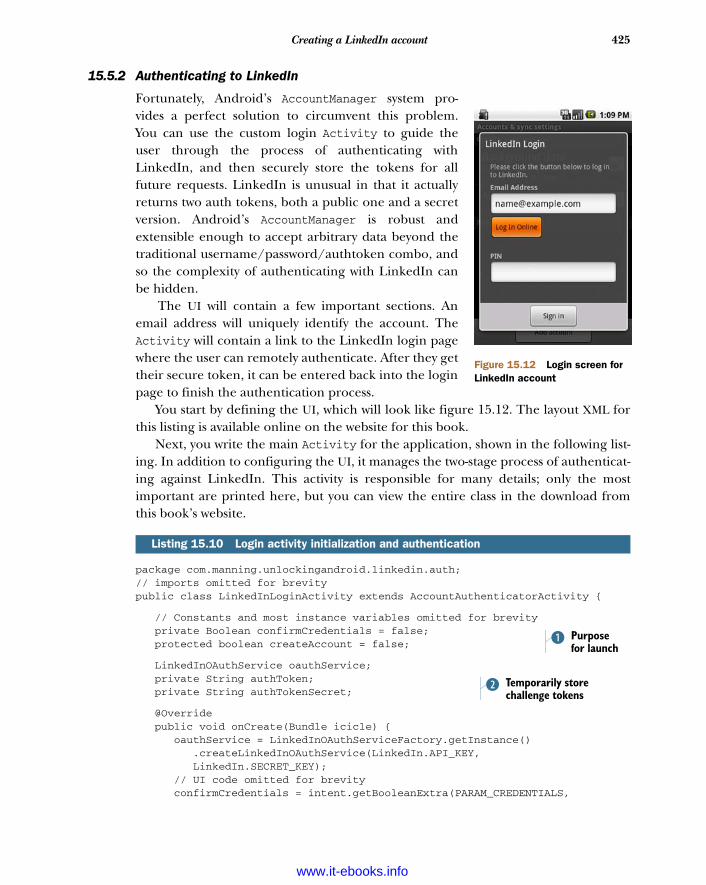
425Creating a LinkedIn account
15.5.2 Authenticating to LinkedIn
Fortunately, Android’s AccountManager system pro-vides a perfect solution to circumvent this problem.You can use the custom login Activity to guide theuser through the process of authenticating withLinkedIn, and then securely store the tokens for allfuture requests. LinkedIn is unusual in that it actuallyreturns two auth tokens, both a public one and a secretversion. Android’s AccountManager is robust andextensible enough to accept arbitrary data beyond thetraditional username/password/authtoken combo, andso the complexity of authenticating with LinkedIn canbe hidden.
The UI will contain a few important sections. Anemail address will uniquely identify the account. TheActivity will contain a link to the LinkedIn login pagewhere the user can remotely authenticate. After they gettheir secure token, it can be entered back into the loginpage to finish the authentication process.
You start by defining the UI, which will look like figure 15.12. The layout XML forthis listing is available online on the website for this book.
Next, you write the main Activity for the application, shown in the following list-ing. In addition to configuring the UI, it manages the two-stage process of authenticat-ing against LinkedIn. This activity is responsible for many details; only the mostimportant are printed here, but you can view the entire class in the download fromthis book’s website.
package com.manning.unlockingandroid.linkedin.auth;// imports omitted for brevitypublic class LinkedInLoginActivity extends AccountAuthenticatorActivity {
// Constants and most instance variables omitted for brevity private Boolean confirmCredentials = false; protected boolean createAccount = false;
LinkedInOAuthService oauthService; private String authToken; private String authTokenSecret;
@Override public void onCreate(Bundle icicle) { oauthService = LinkedInOAuthServiceFactory.getInstance() .createLinkedInOAuthService(LinkedIn.API_KEY, LinkedIn.SECRET_KEY); // UI code omitted for brevity confirmCredentials = intent.getBooleanExtra(PARAM_CREDENTIALS,
Listing 15.10 Login activity initialization and authentication
Purpose for launch
B
Temporarily store challenge tokens
C
Figure 15.12 Login screen for LinkedIn account
www.it-ebooks.info

426 CHAPTER 15 Integration
false); }
private Thread authenticate(final String userToken, final String userTokenSecret, final String pin) { Thread authenticator = new Thread() { public void run() { boolean success; try { LinkedInRequestToken requestToken = new LinkedInRequestToken(userToken, userTokenSecret); LinkedInAccessToken access = oauthService .getOAuthAccessToken(requestToken, pin); authToken = access.getToken(); authTokenSecret = access.getTokenSecret(); success = true; } catch (Exception e) { success = false; } final boolean result = success; handler.post(new Runnable() { public void run() { onAuthenticationResult(result); } }); } }; authenticator.start(); return authenticator; } // Other methods shown in following listings.}
Android always shows this screen when adding a new account; additionally, it’ll displayif the account later fails to sync due to an expired auth token or other security error.As such, instance variables B keep track of the reason for displaying the activity. Herewe use OAuth variables C to store the initially provided challenge tokens so we cansend them to LinkedIn during the final stages of login. The linkedin-j APIs allow usto write terser and clearer code than would be possible with the raw LinkedIn APIs,which are more web services oriented.
Logging into LinkedIn requires a two-stage process: first, you acquire a PIN num-ber when the user visits the LinkedIn website, and then you use that PIN to completethe authentication. The following listing shows the methods in our Activity that con-trol the handling of this authentication data.
@Override protected Dialog onCreateDialog(int id) { final ProgressDialog dialog = new ProgressDialog(this); // UI code omitted for brevity. dialog.setOnCancelListener(new DialogInterface.OnCancelListener() {
Listing 15.11 Login Activity’s multiple stages of logging in
Temporarily store challenge tokens
C
www.it-ebooks.info
427Creating a LinkedIn account
public void onCancel(DialogInterface dialog) { if (authentication != null) { authentication.interrupt(); finish(); } } }); return dialog; }
public void startLogin(View view) { try { LinkedInRequestToken requestToken = oauthService .getOAuthRequestToken(); userToken = requestToken.getToken(); userTokenSecret = requestToken.getTokenSecret(); String authURL = requestToken.getAuthorizationUrl(); Intent authIntent = new Intent(Intent.ACTION_VIEW, Uri .parse(authURL)); startActivity(authIntent); } catch (Exception ioe) { status.setText(R.string.start_login_error); } }
public void finishLogin(View view) { if (createAccount) { accountName = accountNameField.getText().toString(); } enteredPIN = pinField.getText().toString(); if (TextUtils.isEmpty(accountName) || TextUtils.isEmpty(enteredPIN)) { status.setText(R.string.empty_fields_error); } else { showProgress(); authentication = authenticate(userToken, userTokenSecret, enteredPIN); } }
After authentication has finished, you’ll inspect and handle the outcome of theattempt, as shown in this listing. If it succeeds, the token will be stored for futurereuse.
public void onAuthenticationResult(boolean result) { hideProgress(); if (result) { if (!confirmCredentials) { finishLogin(); } else { finishConfirmCredentials(true); } } else {
Listing 15.12 Login Activity responding to completed login attempt
Cancel pending auth attempt
Initiate first login phase
Initiate second login phase
Kick off auth completion
www.it-ebooks.info
428 CHAPTER 15 Integration
if (createAccount) { status.setText(getText(R.string.login_fail_error)); } } }
protected void finishLogin() { final Account account = new Account(accountName, LinkedIn.TYPE); if (createAccount) { Bundle data = new Bundle(); data.putString(LinkedIn.AUTH_TOKEN, authToken); data.putString(LinkedIn.AUTH_TOKEN_SECRET, authTokenSecret); accountManager.addAccountExplicitly(account, enteredPIN, data); ContentResolver.setSyncAutomatically(account, ContactsContract.AUTHORITY, true); } else { accountManager.setPassword(account, enteredPIN); accountManager.setUserData(account, LinkedIn.AUTH_TOKEN, authToken); accountManager.setUserData(account, LinkedIn. AUTH_TOKEN_SECRET, authTokenSecret); } final Intent intent = new Intent(); intent.putExtra(AccountManager.KEY_ACCOUNT_NAME, accountName); intent.putExtra(AccountManager.KEY_ACCOUNT_TYPE, LinkedIn.TYPE); setAccountAuthenticatorResult(intent.getExtras()); setResult(RESULT_OK, intent); finish(); }
protected void finishConfirmCredentials(boolean result) { final Account account = new Account(accountName, LinkedIn.TYPE); accountManager.setPassword(account, enteredPIN); final Intent intent = new Intent(); intent.putExtra(AccountManager.KEY_BOOLEAN_RESULT, result); setAccountAuthenticatorResult(intent.getExtras()); setResult(RESULT_OK, intent); finish(); }
The most important parts of the Activity revolve around the AccountManager, wherewe store the final auth tokens B. Note that, although we store the PIN as the passwordfield, for LinkedIn we never touch the user’s actual password; the auth tokens are theimportant pieces.
Next comes an AccountAuthenticator, shown in listing 15.13, which handles thefinal stages of authenticating against LinkedIn and actually creates the Androidaccount. Most of the actions of an authenticator are boilerplate, so only the most rele-vant portions are shown here. You can view the entire class online. First come twomain entry points that’ll be invoked by the system when adding a new account or con-firming that an existing account still has valid credentials.
Server said auth was OK
Permanently store final auth tokens
B
Register contact sync
Permanently store final auth tokens
B
www.it-ebooks.info
429Creating a LinkedIn account
package com.manning.unlockingandroid.linkedin.auth;// imports omitted for brevityclass LinkedInAccountAuthenticator extends AbstractAccountAuthenticator { private final Context context;
private LinkedInApiClientFactory factory;
public Bundle addAccount( AccountAuthenticatorResponse response, String accountType, String authTokenType, String[] requiredFeatures, Bundle options) { Intent intent = new Intent( context, LinkedInLoginActivity.class); intent.putExtra(LinkedInLoginActivity.PARAM_AUTHTOKEN_TYPE, authTokenType); intent.putExtra(AccountManager.KEY_ACCOUNT_AUTHENTICATOR_RESPONSE, response); Bundle bundle = new Bundle(); bundle.putParcelable(AccountManager.KEY_INTENT, intent); return bundle; }
public Bundle confirmCredentials(AccountAuthenticatorResponse response, Account account, Bundle options) { if (options != null && options.containsKey(AccountManager.KEY_PASSWORD)) { String authToken = options.getString(LinkedIn.AUTH_TOKEN); String authSecret = options .getString(LinkedIn.AUTH_TOKEN_SECRET); boolean verified = validateAuthToken(authToken, authSecret); Bundle result = new Bundle(); result.putBoolean(AccountManager.KEY_BOOLEAN_RESULT, verified); return result; } Intent intent = new Intent( context, LinkedInLoginActivity.class); intent.putExtra(LinkedInLoginActivity.PARAM_USERNAME, account.name); intent.putExtra(LinkedInLoginActivity.PARAM_CREDENTIALS, true); intent.putExtra(AccountManager.KEY_ACCOUNT_AUTHENTICATOR_RESPONSE, response); Bundle bundle = new Bundle(); bundle.putParcelable( AccountManager.KEY_INTENT, intent); return bundle; } public Bundle updateCredentials(AccountAuthenticatorResponse response, Account account, String authTokenType, Bundle loginOptions) { Intent intent = new Intent(context, LinkedInLoginActivity.class); intent.putExtra(LinkedInLoginActivity.PARAM_USERNAME, account.name); intent.putExtra(LinkedInLoginActivity.PARAM_AUTHTOKEN_TYPE, authTokenType); intent.putExtra(LinkedInLoginActivity.PARAM_CREDENTIALS, false); Bundle bundle = new Bundle(); bundle.putParcelable(AccountManager.KEY_INTENT, intent);
Listing 15.13 Authenticating against the LinkedIn account
Explicitly specify login activity
Explicitly specify login activity
Verify credentials through UI
B
www.it-ebooks.info
430 CHAPTER 15 Integration
return bundle; }}
Once again, the linkedin-j classes help clarify the code and take care of some rotebookkeeping tasks. The authenticator will be called in various situations, includingcreating a new account and verifying the auth token for an existing account, and so itimplements the AbstractAccountAuthenticator methods to support the differententry points. Note, for example, that addAccount() B is responsible for launchinginto the UI activity for creating a new account. Additionally, the authenticator will pro-vide previously created tokens, as shown in the following listing.
public Bundle getAuthToken(AccountAuthenticatorResponse response, Account account, String authTokenType, Bundle loginOptions) { // Sanity checking omitted for brevity. AccountManager am = AccountManager.get(context); String authToken = am.getUserData(account, LinkedIn.AUTH_TOKEN); String authTokenSecret = am.getUserData(account, LinkedIn.AUTH_TOKEN_SECRET); if (authToken != null && authTokenSecret != null) { boolean verified = validateAuthToken(authToken, authTokenSecret); if (verified) { // Return bundle omitted for brevity. } } Intent intent = new Intent( context, LinkedInLoginActivity.class); intent.putExtra(AccountManager. KEY_ACCOUNT_AUTHENTICATOR_RESPONSE, response); intent.putExtra(LinkedInLoginActivity.PARAM_USERNAME, account.name); intent.putExtra(LinkedInLoginActivity.PARAM_AUTHTOKEN_TYPE, authTokenType); Bundle bundle = new Bundle(); bundle.putParcelable(AccountManager.KEY_INTENT, intent); return bundle; }
private boolean validateAuthToken(String authToken, String authTokenSecret) { try { LinkedInApiClient client = factory.createLinkedInApiClient( authToken, authTokenSecret); client.getConnectionsForCurrentUser(0, 1); return true; } catch (Exception e) { return false; } }
Listing 15.14 Adding support for handling auth token
Ask user to re-login
Issue test network requestB
www.it-ebooks.info
431Creating a LinkedIn account
Once the final tokens come back from the server, a dummy API request B ensuresthat the connection is good. If any problems occur, notify the caller and it can take anappropriate action, such as showing a notification to the user.
Because authentication will run in the background, it must be a Service. The nextlisting shows the lightweight authentication service wrapper, which defers everythingto our authenticator.
package com.manning.unlockingandroid.linkedin.auth;
import android.app.Service;import android.content.Intent;import android.os.IBinder;
public class LinkedInAuthService extends Service { private LinkedInAccountAuthenticator authenticator;
@Override public void onCreate() { authenticator = new LinkedInAccountAuthenticator(this); }
@Override public void onDestroy() { }
@Override public IBinder onBind(Intent intent) { return authenticator.getIBinder(); }}
Finally, the little piece of XML in the next listing will tell Android how to display thistype of account in the Manage Accounts screen.
<?xml version="1.0" encoding="utf-8"?><account-authenticator xmlns:android="http://schemas.android.com/apk/res/
android" android:accountType= "com.manning.unlockingandroid.linkedin" android:icon="@drawable/icon" android:smallIcon="@drawable/icon" android:label="@string/app_name" />
CAUTION Android went to great lengths to separate account authenticationand account synchronization; there’s no explicit linkage between the twopieces. But early versions of the OS will react badly if you attempt to create anaccount that doesn’t have a synchronizer. For example, the Android 2.1 emu-lator will crash and reboot if you successfully add an account that doesn’thave a matching synchronizer. Later versions of the OS should fix this bug. Inthe meantime, you may want to wait a bit longer before testing your authenti-cation code.
Listing 15.15 Defining the authentication service
Listing 15.16 authenticator.xml
Type advertised for synchronization
www.it-ebooks.info
432 CHAPTER 15 Integration
15.6 Synchronizing to the backend with SyncAdapterAuthenticating an account connects you to the remote server, but by itself does noth-ing. The real power comes from an account’s ability to synchronize data onto and offof the phone. Android 2.0 added the ability to synchronize custom data from arbitraryaccounts.
15.6.1 The synchronizing lifecycle
Synchronizing will generally happen in the background, similarly to authentication.The authenticator and the synchronizer are loosely coupled; the synchronizer willretrieve necessary information from the AccountManager instead of directly from theauthenticator. Again, this is done to keep the user’s private information secure.
To perform synchronization, your service should return an IBinder obtained froma class you define that extends AbstractThreadedSyncAdapter. This defines a singlemethod, onPerformSync, which allows you to perform all synching activities.
TIP Synchronizing operations can differ drastically, depending on what typeof data you’re synching. Though most accounts are oriented around personalinformation, an account could also be used to deliver daily recipes to anapplication, or to upload usage reports. The authenticator/synchronizercombo is best for situations where a password is required and you want totransfer data silently in the background. In other cases, a standard servicewould work better.
15.6.2 Synchronizing LinkedIn data
Now that you’ve written an account and utilities for our LinkedIn connections, all thatremains is to tie the two together. You can accomplish this with a few final classes forsynchronization. The most important is SyncAdapter, shown in this listing.
package com.manning.unlockingandroid.linkedin.sync;// Imports omitted for brevitypublic class SyncAdapter extends AbstractThreadedSyncAdapter { private final AccountManager manager; private final LinkedInApiClientFactory factory; private final ContentResolver resolver;
String[] idSelection = new String[] { ContactsContract.RawContacts.SYNC1 }; String[] idValue = new String[1];
public SyncAdapter(Context context, boolean autoInitialize) { super(context, autoInitialize); resolver = context.getContentResolver(); manager = AccountManager.get(context); factory = LinkedInApiClientFactory.newInstance(LinkedIn.API_KEY, LinkedIn.SECRET_KEY); }
Listing 15.17 Synchronizing LinkedIn connections to contacts
SQL selection to find contacts
www.it-ebooks.info
433Synchronizing to the backend with SyncAdapter
@Override public void onPerformSync(Account account, Bundle extras, String authority, ContentProviderClient provider, SyncResult syncResult) { String authToken = null; try { authToken = manager.blockingGetAuthToken( account, LinkedIn.TYPE, true); if (authToken == null) { syncResult.stats.numAuthExceptions++; return; } authToken = manager.getUserData(account, LinkedIn.AUTH_TOKEN); String authTokenSecret = manager.getUserData( account, LinkedIn.AUTH_TOKEN_SECRET); LinkedInApiClient client = factory.createLinkedInApiClient( authToken, authTokenSecret); Connections people = client.getConnectionsForCurrentUser(); for (Person person:people.getPersonList()) { String id = person.getId(); String firstName = person.getFirstName(); String lastName = person.getLastName(); String headline = person.getHeadline(); idValue[0] = id; Cursor matches = resolver.query(ContactsContract.RawContacts.CONTENT_URI, idSelection,ContactsContract.RawContacts.SYNC1 + "=?", idValue,null); if (matches.moveToFirst()) { ContactHelper.updateContact( resolver, account, id, headline); } else { ContactHelper.addContact(resolver, account, firstName + " " + lastName, id, headline); } } } catch (AuthenticatorException e) { manager.invalidateAuthToken(LinkedIn.TYPE, authToken); syncResult.stats.numAuthExceptions++; } catch (IOException ioe) { syncResult.stats.numIoExceptions++; } catch (OperationCanceledException ioe) { syncResult.stats.numIoExceptions++; } catch (LinkedInApiClientException liace) { manager.invalidateAuthToken(LinkedIn.TYPE, authToken); syncResult.stats.numAuthExceptions++; } }}
When performing a sync, we first verify a working auth token B and then retrieve thetwo auth tokens C that are needed to interact with LinkedIn. The linkedin-j APIssimplify retrieving and manipulating data model objects for the user’s connections.
Ensure established connection
B
Retrieve credentials
C
Examine all connections
D
Already exists?
E
Update headline
F
Insert data and create contact
G
www.it-ebooks.info
434 CHAPTER 15 Integration
We iterate through these models D, check to see whether they’re already in our spe-cial LinkedIn contacts list E, and then add F or update G the contacts as appropri-ate, using the ContactHelper class from listing 15.8. Android will read thesyncResult variable to determine if and why the sync failed; this can cause the OS toprompt the user to reauthenticate if necessary.
As with authentication, a lightweight wrapper service, shown in the next listing,manages the sync adapter.
package com.manning.unlockingandroid.linkedin.sync;
import android.app.Service;import android.content.Intent;import android.os.IBinder;
public class SyncService extends Service { private static final Object syncAdapterLock = new Object(); private static SyncAdapter syncAdapter = null;
@Override public void onCreate() { synchronized (syncAdapterLock) { if (syncAdapter == null) { syncAdapter = new SyncAdapter(getApplicationContext(), true); } } }
@Override public IBinder onBind(Intent intent) { return syncAdapter.getSyncAdapterBinder(); }}
And, last but not least, a final piece of XML is shown in the following listing to describethe synchronization service’s capabilities.
<?xml version="1.0" encoding="utf-8"?><sync-adapter xmlns:android="http://schemas.android.com/apk/res/android" android:contentAuthority="com.android.contacts" android:accountType= "com.manning.unlockingandroid.linkedin" android:supportsUploading="false" />
The content authority tells Android what type of data can be updated by this service;contacts are by far the most common. The account type B links the synchronizer to itscorresponding authenticator. Finally, the XML describes whether the synchronizer sup-ports one-way downloading only, or whether it also supports uploading changes to data.
Listing 15.18 Defining the synchronization service
Listing 15.19 syncadapter.xml
Singleton
Uses the linkedin accountB
www.it-ebooks.info
435Wrapping up: LinkedIn in action
15.7 Wrapping up: LinkedIn in actionA few final pieces of code will conclude the sample project. A well-designed accountseems invisible; once configured, it’ll silently and seamlessly work in the background,pulling in relevant data whenever available. We’ll also discuss a few advanced topicsthat push the limits of integration.
15.7.1 Finalizing the LinkedIn project
You’ve already written all the code, so all that remains is updating your Android mani-fest to describe the application’s capabilities. The following listing shows the finalpieces.
<?xml version="1.0" encoding="utf-8"?><manifest xmlns:android="http://schemas.android.com/apk/res/android" package="com.manning.unlockingandroid.linkedin" android:versionCode="1" android:versionName="1.0"> <application android:icon="@drawable/icon" android:label="@string/app_name"> <service android:name=".auth.LinkedInAuthService" android:exported="true"> <intent-filter> <action android:name= "android.accounts.AccountAuthenticator" /> </intent-filter> <meta-data android:name="android.accounts.AccountAuthenticator" android:resource="@xml/authenticator" /> </service> <service android:name=".sync.SyncService" android:exported="true"> <intent-filter> <action android:name= "android.content.SyncAdapter" /> </intent-filter> <meta-data android:name="android.content.SyncAdapter" android:resource="@xml/syncadapter" /> <meta-data android:name="android.provider.CONTACTS_STRUCTURE" android:resource="@xml/contacts" /> </service> <activity android:name= ".auth.LinkedInLoginActivity" android:label= "@string/login_label" android:theme= "@android:style/Theme.Dialog" android:excludeFromRecents="true"> </activity> </application> <uses-permission android:name="android.permission.GET_ACCOUNTS" /> <uses-permission android:name="android.permission.USE_CREDENTIALS" /> <uses-permission android:name="android.permission.MANAGE_ACCOUNTS" /> <uses-permission android:name="android.permission.AUTHENTICATE_ACCOUNTS" /> <uses-permission android:name="android.permission.INTERNET" /> <uses-permission android:name="android.permission.WRITE_SETTINGS" />
Listing 15.20 AndroidManifest.xml for LinkedIn
Handles adding accounts
B
Handles synching data
C
Private activity for logging in
D
www.it-ebooks.info
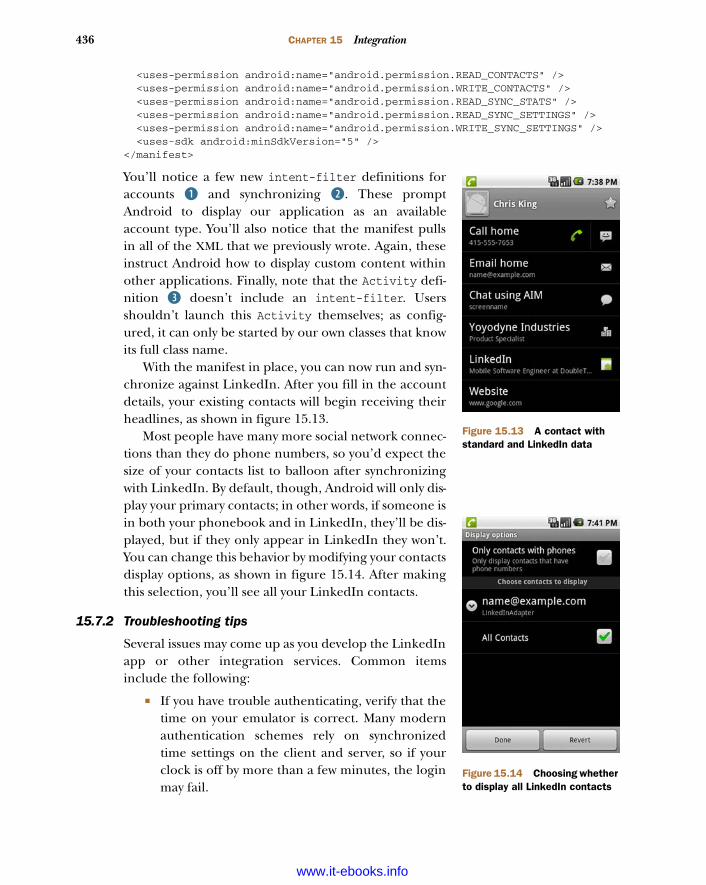
436 CHAPTER 15 Integration
<uses-permission android:name="android.permission.READ_CONTACTS" /> <uses-permission android:name="android.permission.WRITE_CONTACTS" /> <uses-permission android:name="android.permission.READ_SYNC_STATS" /> <uses-permission android:name="android.permission.READ_SYNC_SETTINGS" /> <uses-permission android:name="android.permission.WRITE_SYNC_SETTINGS" /> <uses-sdk android:minSdkVersion="5" /></manifest>
You’ll notice a few new intent-filter definitions foraccounts B and synchronizing C. These promptAndroid to display our application as an availableaccount type. You’ll also notice that the manifest pullsin all of the XML that we previously wrote. Again, theseinstruct Android how to display custom content withinother applications. Finally, note that the Activity defi-nition D doesn’t include an intent-filter. Usersshouldn’t launch this Activity themselves; as config-ured, it can only be started by our own classes that knowits full class name.
With the manifest in place, you can now run and syn-chronize against LinkedIn. After you fill in the accountdetails, your existing contacts will begin receiving theirheadlines, as shown in figure 15.13.
Most people have many more social network connec-tions than they do phone numbers, so you’d expect thesize of your contacts list to balloon after synchronizingwith LinkedIn. By default, though, Android will only dis-play your primary contacts; in other words, if someone isin both your phonebook and in LinkedIn, they’ll be dis-played, but if they only appear in LinkedIn they won’t.You can change this behavior by modifying your contactsdisplay options, as shown in figure 15.14. After makingthis selection, you’ll see all your LinkedIn contacts.
15.7.2 Troubleshooting tips
Several issues may come up as you develop the LinkedInapp or other integration services. Common itemsinclude the following:
If you have trouble authenticating, verify that thetime on your emulator is correct. Many modernauthentication schemes rely on synchronizedtime settings on the client and server, so if yourclock is off by more than a few minutes, the loginmay fail.
Figure 15.13 A contact with standard and LinkedIn data
Figure 15.14 Choosing whether to display all LinkedIn contacts
www.it-ebooks.info
437Summary
If API calls fail, check whether updated JAR files address your issue. In particu-lar, note that linkedin-j works with other libraries such as signpost to man-age authentication. Check that you use all the dependent JARs too.
Because there’s no main activity for this application, selecting Debug fromwithin Eclipse won’t automatically start debugging the application; it’ll onlypush it to the emulator. To debug, switch to the DDMS tab in Eclipse, selectthe com.manning.unlockingandroid.linkedin process, and click the Debugbutton.
If your process isn’t already running, or you want to try some other debug-ging tactics, check out the AccountsTester and SyncTester activities includedin the Dev Tools application. These can provide useful entry points into yourapplication.
To solve problems with LinkedIn transactions, visit the developer forums or search forinformation online. Most likely you’re not the only one who’s encountered your prob-lem, and someone else has found a solution. Similar resources exist for other populartypes of accounts.
15.7.3 Moving on
Simple can be beautiful. For most users, getting a little of the most relevant LinkedIninformation gives them want they want without cluttering up their contact screen. Ifyou’re looking for more, though, consider the following ideas:
Pull in more advanced LinkedIn fields, such as educational background, publi-cations, and previous job positions.
Tie in contacts data with the Field Service application. For example, you couldcreate a contact when you receive a new job from a customer, and remove thatcontact once the job is marked complete.
In addition to the previous, create a new raw_contacts type for a field servicecontact; this will allow users to toggle such contacts on and off as they wish.
Create a new account type and synchronizer for connecting with your ownfavorite online service.
15.8 SummaryCongratulations! You’ve written a fully functional, and fully useful, application thatseamlessly brings your LinkedIn connections to Android. Even better, you’ve experi-enced every piece of the integration puzzle. Android makes no assumptions aboutwhat contacts will look like, and offers a pluggable, extensible contacts model that letsdevelopers add their own custom data into the native contacts experience. Users cansynchronize their contacts remotely, and Android now supports an arbitrary numberof different types of accounts, each of which can follow its own custom authenticationscheme and still take advantage of secure storage for its credentials. Synchronizationwill run in the background, silently delivering useful information to the user.
www.it-ebooks.info

438 CHAPTER 15 Integration
Integration shows Android’s design principles at their finest. Most modernAndroid phones have built-in support for accounts such as Microsoft Exchange, but asuseful as these are, it’d be limiting to restrict users to approved account types. Instead,Android’s open architecture has created an ecosystem where any type of account,even from a small startup, can enjoy equal standing on the phone. The best compli-ment you can pay to this kind of software is to say that it’s unnoticeable; great integra-tion apps fade into the background, becoming an essential part of the user’s dailyexperience.
Now that you’ve integrated with the device’s internal store of contacts, it’s time toturn your focus outward, toward the web browser. Android has an extremely robustbrowser that supports unusually rich user experiences. The next chapter will help youevaluate your strategies for developing content that’ll look great in the Androidbrowser.
www.it-ebooks.info
Android web development
Mobile software development has usually required working with a proprietary tool-set to build applications. The term SDK is a familiar one—the majority of this bookcovers Android software development using the Android SDK. But the Android SDKisn’t the only way to build and deliver applications for the Android platform. Withthe emergence of accessible and powerful mobile browser capabilities, it’s now pos-sible to develop applications for the Android platform with web technologies suchas HTML, CSS, and JavaScript.1
Opening up the world of mobile development to web technologies introduces awide array of possibilities for developers and Android users alike. Mobile devices
This chapter covers Understanding Android web development
Introducing WebKit
Optimizing web applications for Android
Storing data in the browser
Building a custom JavaScript handler
1 See Quick & Easy HTML5 and CSS3 at www.manning.com/crowther. The book is to be published in spring2012.
439
www.it-ebooks.info
440 CHAPTER 16 Android web development
rich in user experience (including Android) are in essence shrinking our world asinternet connectivity is becoming the norm rather than the exception. Being con-nected to the internet allows Android users to share and access information from vir-tually anywhere, at any time. In some ways, the web itself is being redefined as anincreasing percentage of content consumption and creation is taking place on mobiledevices, with Android powering that growth as it reaches new heights of adoption andmarket share.
This chapter aims to equip you with an understanding of various approaches todeploying web technologies so that you can deliver an enhanced Android user experi-ence. We start by surveying the major options for Android web technology develop-ment, all of which rely on the WebKit open source browser engine. After a briefintroduction to WebKit, we look at creating universal web applications—apps that runwell on the desktop as well as the Android browser. From there we move on to demon-strating the use of the SQL capabilities available in the browser, commonly referred toas HTML 5 databases. Note that although the browser SQL functionality was originallypart of HTML 5, it has since been extracted from the core HTML 5 specification.
The chapter concludes with an example of building a “hybrid” application—onethat uses Android SDK Java code along with browser-based HTML and JavaScript code.
16.1 What’s Android web development?Aside from a brief sojourn down the native C path in chapter 13, all of the coding to thispoint has employed the Java-based Android SDK. This chapter breaks from that moldand demonstrates various web programming capabilities of the Android platform.
In short, web development is all about building applications with the traditionaltools that web developers use: HTML for content, CSS for presentation, and JavaScriptfor programmatic control. In order for this capable and complementary trio to worktheir magic, the Android platform relies on the WebKit browser engine.
16.1.1 Introducing WebKit
The WebKit browser engine stems from an open source project that can be tracedback to the K Desktop Environment (KDE). WebKit made its significant mobile debutwhen the iPhone was released, and since then WebKit has been adopted by Androidand other mobile platforms.
Prior to the adoption of WebKit, early mobile web solutions ranged from laugh-able, to mediocre, to tolerable, though always limited. These early mobile web offer-ings were often so constrained that they required content providers to generate amobile-specific stream in addition to the normal desktop version of their material. Insome cases, a server-side component would perform on-the-fly distillation of theHTML into a format more readily digested by the mobile browser. Regardless of theimplementation, any requirement for content providers to generate multiple copiesof their material severely constrained the volume of content the early mobile devicescould readily consume. The early mobile web was virtually nonexistent because brows-ers were not capable of rendering full pages and sites made for mobile were rare.
www.it-ebooks.info
441What’s Android web development?
Fortunately, WebKit has changed the game thanks to its impressive rendering capa-bilities and its envelope-pushing feature set. You can expect the WebKit engine to ren-der any web page on a par with your desktop browser. This means that virtually theentire web is open and accessible to an Android user! The pages of your favorite web-site will render on your Android device’s browser, though you’ll likely need to scrollthe page due to the small screen dimensions, and certain navigation systems that relyon hovering aren’t accessible. Despite these drawbacks, the capabilities of WebKitopen the broad range of the web to mobile users. In this chapter, we demonstrate howto scale your web applications to accommodate for smaller browser windows in a man-ner that retains desktop browsing compatibility, all without the necessity of creatingand managing multiple sites.
WebKit powers the browser on the Android device, but it’s also available as anembedded control or widget, permitting SDK-based applications to render HTMLdirectly within a compiled application. This embeddable browser control is highly cus-tomizable and thereby empowers the Android developer to exercise a tremendousamount of control over the user experience.
Web programming for Android is a broad and versatile topic. In the next sectionwe examine the approaches to using web technologies for Android applicationdevelopment.
16.1.2 Examining the architectural options
When it comes to employing web technologies in an Android application, you have toexamine a few distinct categories of application architecture. Let’s look at the pillarsof Android web technologies.
The first and most basic intersection of web technologies and Android applicationdevelopment involves the standalone browser. The Android browser is a capableHTML and CSS rendering engine, and it also implements a JavaScript engine. TheJavaScript engine is capable of running sophisticated JavaScript, including Ajax, andsupports popular scripting libraries such as JQuery and Prototype. As such, thebrowser itself is capable of running rich internet applications.
The browser can be a good augmentation to an SDK-based application. Let’s sayyou’ve released a software application for distribution. As part of your application,you’d like to register users or perhaps provide access to a list of FAQs. It doesn’t makesense to ship all that content with your application because it’ll both take up spaceunnecessarily and likely be out of date by the time the application is installed on a cli-ent device. Likewise, why should you implement data-collection functionality directlyin your application if it can be more readily accomplished on your website? In thiscase, it’d be more appropriate to have the application launch the browser, taking theuser to the website, where you can readily maintain your list of FAQs and your registra-tion form. As you’ve learned, an Android application launches the browser throughthe use of an Intent and the startActivity() method of the Context class.
A variant of this model is embedding the browser control directly into anActivity’s UI. In this scenario, the browser control is defined in a layout file and
www.it-ebooks.info
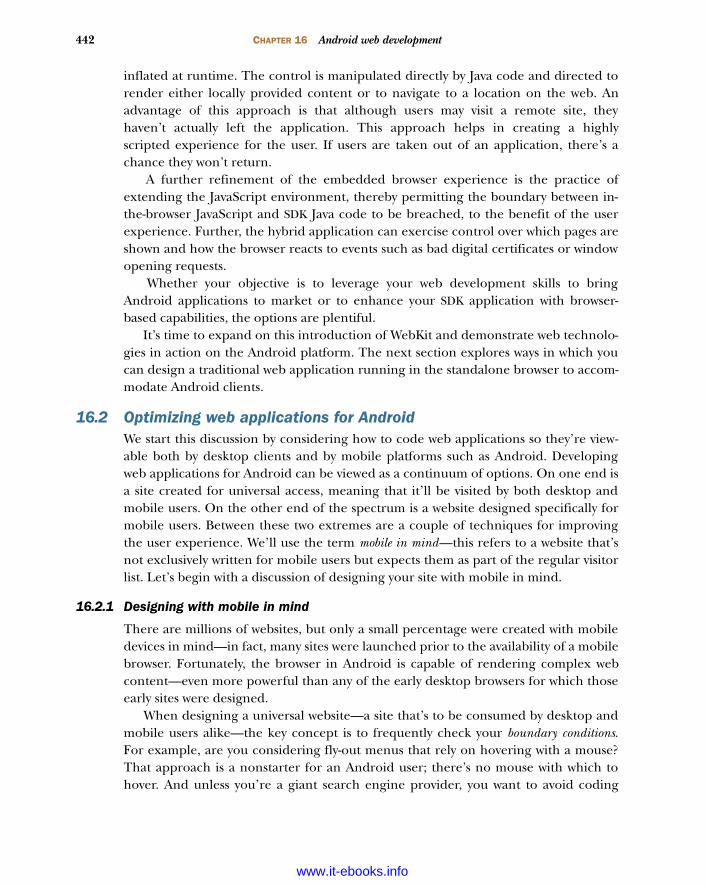
442 CHAPTER 16 Android web development
inflated at runtime. The control is manipulated directly by Java code and directed torender either locally provided content or to navigate to a location on the web. Anadvantage of this approach is that although users may visit a remote site, theyhaven’t actually left the application. This approach helps in creating a highlyscripted experience for the user. If users are taken out of an application, there’s achance they won’t return.
A further refinement of the embedded browser experience is the practice ofextending the JavaScript environment, thereby permitting the boundary between in-the-browser JavaScript and SDK Java code to be breached, to the benefit of the userexperience. Further, the hybrid application can exercise control over which pages areshown and how the browser reacts to events such as bad digital certificates or windowopening requests.
Whether your objective is to leverage your web development skills to bringAndroid applications to market or to enhance your SDK application with browser-based capabilities, the options are plentiful.
It’s time to expand on this introduction of WebKit and demonstrate web technolo-gies in action on the Android platform. The next section explores ways in which youcan design a traditional web application running in the standalone browser to accom-modate Android clients.
16.2 Optimizing web applications for AndroidWe start this discussion by considering how to code web applications so they’re view-able both by desktop clients and by mobile platforms such as Android. Developingweb applications for Android can be viewed as a continuum of options. On one end isa site created for universal access, meaning that it’ll be visited by both desktop andmobile users. On the other end of the spectrum is a website designed specifically formobile users. Between these two extremes are a couple of techniques for improvingthe user experience. We’ll use the term mobile in mind—this refers to a website that’snot exclusively written for mobile users but expects them as part of the regular visitorlist. Let’s begin with a discussion of designing your site with mobile in mind.
16.2.1 Designing with mobile in mind
There are millions of websites, but only a small percentage were created with mobiledevices in mind—in fact, many sites were launched prior to the availability of a mobilebrowser. Fortunately, the browser in Android is capable of rendering complex webcontent—even more powerful than any of the early desktop browsers for which thoseearly sites were designed.
When designing a universal website—a site that’s to be consumed by desktop andmobile users alike—the key concept is to frequently check your boundary conditions.For example, are you considering fly-out menus that rely on hovering with a mouse?That approach is a nonstarter for an Android user; there’s no mouse with which tohover. And unless you’re a giant search engine provider, you want to avoid coding
www.it-ebooks.info
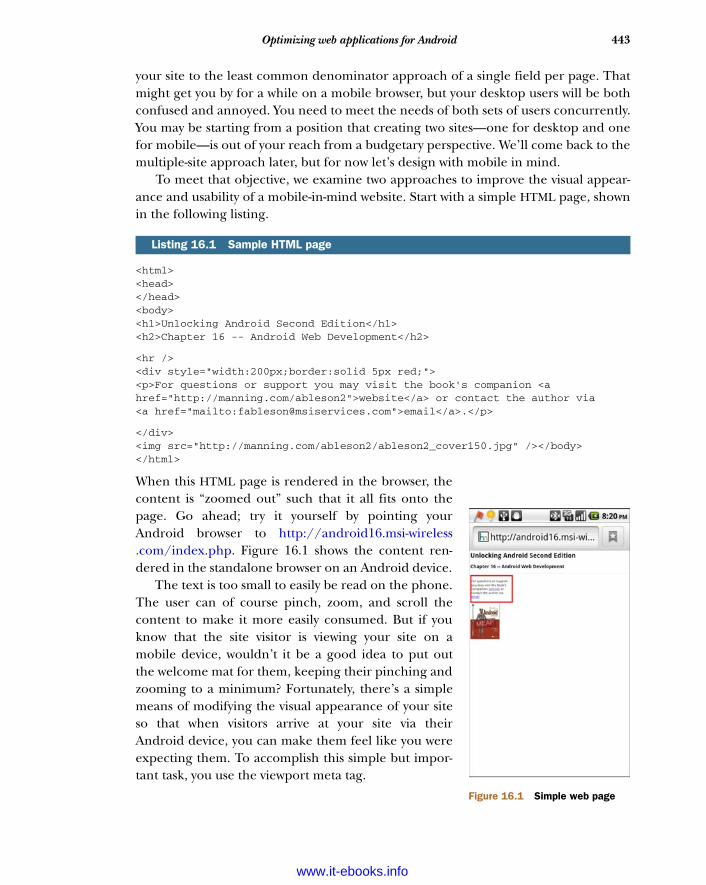
443Optimizing web applications for Android
your site to the least common denominator approach of a single field per page. Thatmight get you by for a while on a mobile browser, but your desktop users will be bothconfused and annoyed. You need to meet the needs of both sets of users concurrently.You may be starting from a position that creating two sites—one for desktop and onefor mobile—is out of your reach from a budgetary perspective. We’ll come back to themultiple-site approach later, but for now let’s design with mobile in mind.
To meet that objective, we examine two approaches to improve the visual appear-ance and usability of a mobile-in-mind website. Start with a simple HTML page, shownin the following listing.
<html><head></head><body><h1>Unlocking Android Second Edition</h1><h2>Chapter 16 -- Android Web Development</h2>
<hr /><div style="width:200px;border:solid 5px red;"><p>For questions or support you may visit the book's companion <a href="http://manning.com/ableson2">website</a> or contact the author via <a href="mailto:[email protected]">email</a>.</p>
</div><img src="http://manning.com/ableson2/ableson2_cover150.jpg" /></body></html>
When this HTML page is rendered in the browser, thecontent is “zoomed out” such that it all fits onto thepage. Go ahead; try it yourself by pointing yourAndroid browser to http://android16.msi-wireless.com/index.php. Figure 16.1 shows the content ren-dered in the standalone browser on an Android device.
The text is too small to easily be read on the phone.The user can of course pinch, zoom, and scroll thecontent to make it more easily consumed. But if youknow that the site visitor is viewing your site on amobile device, wouldn’t it be a good idea to put outthe welcome mat for them, keeping their pinching andzooming to a minimum? Fortunately, there’s a simplemeans of modifying the visual appearance of your siteso that when visitors arrive at your site via theirAndroid device, you can make them feel like you wereexpecting them. To accomplish this simple but impor-tant task, you use the viewport meta tag.
Listing 16.1 Sample HTML page
Figure 16.1 Simple web page
www.it-ebooks.info
444 CHAPTER 16 Android web development
16.2.2 Adding the viewport tag
The lowest-cost and least-obtrusive solution to the default view being too small to seeis the use of a special meta tag. Meta tags have long been the domain of the searchengine optimization (SEO) gurus.2 A meta tag is placed within the <head></head> tagsof a web page to specify such things as the page keywords and description—which areused by search engines to help index the site.
In this case, the meta tag of interest is the viewport. A viewport tag tells the clientbrowser how to craft a virtual window, or viewport, through which to view the website.The viewport tag supports a handful of directives that govern the way in which thebrowser renders the page and interacts with the user.
To provide a more appealing rendering of our sample HTML page, you’ll add aviewport tag between the head tags. Listing 16.2 shows the same web page, but it nowincludes the viewport meta tag. If you want to view the page on your own Androiddevice, you can do so at http://android16.msi-wireless.com/index_view.php.
<html><head><meta name="viewport" content="width=device-width" /></head><body>// omitted html text</body></html>
This web page has been made more mobile friendly bythe addition of the viewport meta tag B. The contentattribute of the tag conveys directives to govern howthe viewport should behave. In this case, the browser isinstructed to create a viewport with a logical widthequal to the screen width of the device.
Figure 16.2 demonstrates the impact this one lineof code has on the visual appearance of the web page.Note how the text of the page is larger and more acces-sible. To be fair, this is an ultrasimple example, but thepoint is that you can provide a readable page rightfrom the start, and the user can easily scroll down verti-cally to view the remainder of the site without needingto zoom in or out just to make out what the page says.
You can specify the width in pixels rather thanrequesting the width to be equal to the device-width.This approach can be useful if you want to display agraphic in a certain manner or if your site can
2 See http://searchenginewatch.com for everything SEO related.
Listing 16.2 Adding the viewport meta tag
Viewport meta tagB
Figure 16.2 The viewport tag modifies the appearance of the web page.
www.it-ebooks.info
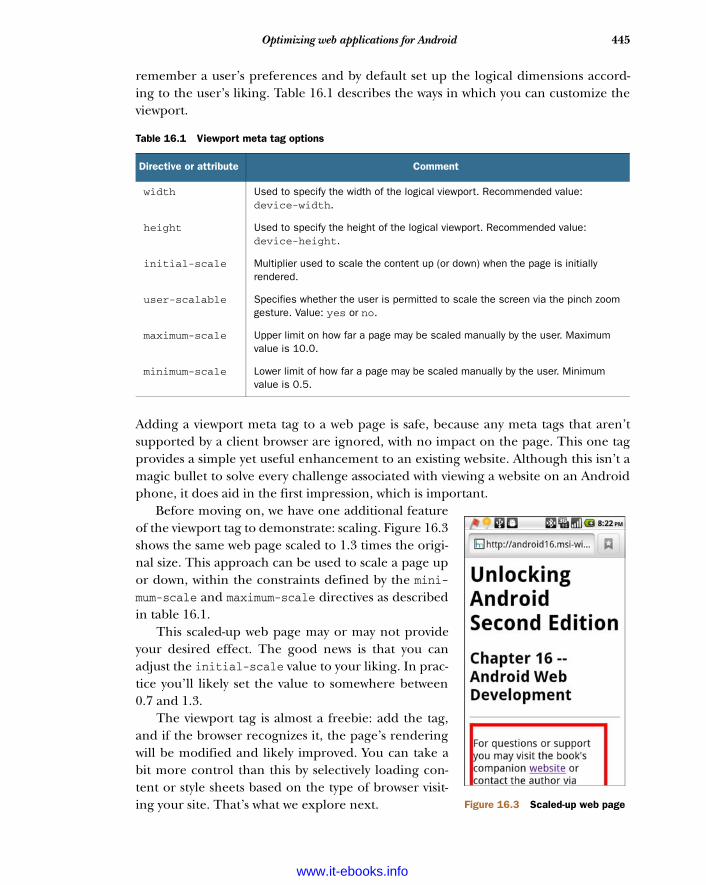
445Optimizing web applications for Android
remember a user’s preferences and by default set up the logical dimensions accord-ing to the user’s liking. Table 16.1 describes the ways in which you can customize theviewport.
Adding a viewport meta tag to a web page is safe, because any meta tags that aren’tsupported by a client browser are ignored, with no impact on the page. This one tagprovides a simple yet useful enhancement to an existing website. Although this isn’t amagic bullet to solve every challenge associated with viewing a website on an Androidphone, it does aid in the first impression, which is important.
Before moving on, we have one additional featureof the viewport tag to demonstrate: scaling. Figure 16.3shows the same web page scaled to 1.3 times the origi-nal size. This approach can be used to scale a page upor down, within the constraints defined by the mini-mum-scale and maximum-scale directives as describedin table 16.1.
This scaled-up web page may or may not provideyour desired effect. The good news is that you canadjust the initial-scale value to your liking. In prac-tice you’ll likely set the value to somewhere between0.7 and 1.3.
The viewport tag is almost a freebie: add the tag,and if the browser recognizes it, the page’s renderingwill be modified and likely improved. You can take abit more control than this by selectively loading con-tent or style sheets based on the type of browser visit-ing your site. That’s what we explore next.
Table 16.1 Viewport meta tag options
Directive or attribute Comment
width Used to specify the width of the logical viewport. Recommended value: device-width.
height Used to specify the height of the logical viewport. Recommended value: device-height.
initial-scale Multiplier used to scale the content up (or down) when the page is initially rendered.
user-scalable Specifies whether the user is permitted to scale the screen via the pinch zoom gesture. Value: yes or no.
maximum-scale Upper limit on how far a page may be scaled manually by the user. Maximum value is 10.0.
minimum-scale Lower limit of how far a page may be scaled manually by the user. Minimum value is 0.5.
Figure 16.3 Scaled-up web page
www.it-ebooks.info

446 CHAPTER 16 Android web development
16.2.3 Selectively loading content
Assuming your budget doesn’t provide for creating and managing entirely parallelwebsites to meet the needs of your desktop and mobile visitors, you need a strategy foradequately delivering quality content to both types of users. To go beyond the func-tionality of the viewport tag, you want to have a more predictable experience for yourmobile visitors. To accomplish this, you’re going to selectively load CSS based on thetype of visitor to your site.
Browser detection approaches have matured over time. Next we explore two basicmethods to accomplish this task, keeping in mind that your site is meant to be univer-sal and expecting browsers of different shapes, sizes, and capabilities.
16.2.4 Interrogating the user agent
The first approach involves the examination of the user agent string. Every time abrowser connects to a web server, one of the pieces of information it provides in theHTTP request is the browser’s user agent. The user agent is a string value representingthe name of the browser, the platform, the version number, and other characteristicsof the browser. For example, the user agent of a Nexus One running Android 2.2looks like this:
Mozilla/5.0 (Linux; U; Android 2.2; en-us;Nexus One Build/FRF91) AppleWebKit/533.1 KHTML, like Gecko) Version/4.0 Mobile Safari/533.1
The contents of this string may be examined and subsequently used to decide whichcontent and or CSS files to load into the browser. The following listing demonstratesthe use of the user agent string to selectively choose a CSS file.
<html><head><meta name="viewport" content="width=device-width" /><link rel="stylesheet" href="corestuff.css" type="text/css" /><script type="text/javascript" src="jquery.js"></script>
<script type="text/javascript"> if (navigator.userAgent.indexOf('Android') != -1) { document.write('<link rel="stylesheet" href="android.css"type="text/css" />'); } else { document.write('<link rel="stylesheet" href="desktop.css"type="text/css" />'); }</script></head><body>...</body></html>
Listing 16.3 Interrogating the user agent
BLoadcore CSS
Look for Android userAgent
C
www.it-ebooks.info
447Optimizing web applications for Android
This HTML snippet includes a viewport meta tag, specifying that the viewport’s widthshould match the width of the device. A CSS file is included named corestuff.css B.Regardless of the platform, this file contains required classes and styles related to theapplication. Using this approach, the web application includes a style sheet aimed atmore than one target platform. This enables us to have a more deterministic impacton the behavior on a particular device, leaving less to chance. Our primary contenthasn’t changed—remember, we’re still targeting a universal website but keepingmobile users in mind. Clearly, more work is being done here, as various stylistic ele-ments have been extracted into platform-specific files. As such, we’re taking a mea-sured step down the continuum toward a made-for-mobile site. If the user agent stringcontains the word “Android” C, the code loads the user-supplied android.css stylesheet. If the user agent isn’t from an Android device, the code loads a style sheetnamed desktop.css. Additional conditional statements may be included here for othermobile platforms, such as the iPhone or BlackBerry.
User agent strings contain a considerable amount of information, though just howmuch of it is useful and trustworthy is a topic of debate. For example, it’s not uncom-mon for a hacker to write code to programmatically bombard a target website and inthe process craft a user agent that masquerades as a particular kind of browser. Someversions of websites are more secure than others. A user agent value is easy to forge,and although the security implications aren’t expressly of concern to us in this discus-sion, it’s something to keep in mind.
The user string has so much data that you have to do a bit of homework to inter-pret it properly. Some JavaScript libraries can aid in this process, but ultimately it maynot be the best approach. There’s another way: the media query.
16.2.5 The media query
Early web styling included inline markup such as font and bold tags. The best practicein web design today is to separate styling information from the content itself. Thisinvolves adding class attributes to elements of content and relying on a style sheet todictate the specific colors, sizes, font face, and so on. Providing multiple CSS files for agiven page enables flexible management of the numerous styles needed to deliver acrisp, clean web page. This approach also permits flexibility in terms of which stylesare used for a particular device.
Professional content sites have leveraged this approach through the use of multi-ple, targeted style sheets along with extensive use of the link statement’s media attri-bute. The media attribute acts as a filter for determining which style sheets should beloaded. For example, consider the familiar scenario where you purchase somethingonline and you’re shown your receipt. The page may have fancy graphics and multipleelements organized in a creative manner. But when the page is printed, the output isrelatively benign and thankfully easy to read. This is accomplished through the use ofthe media attribute applying a print-oriented style sheet. You can leverage this sameapproach to build mobile-in-mind web pages.
www.it-ebooks.info
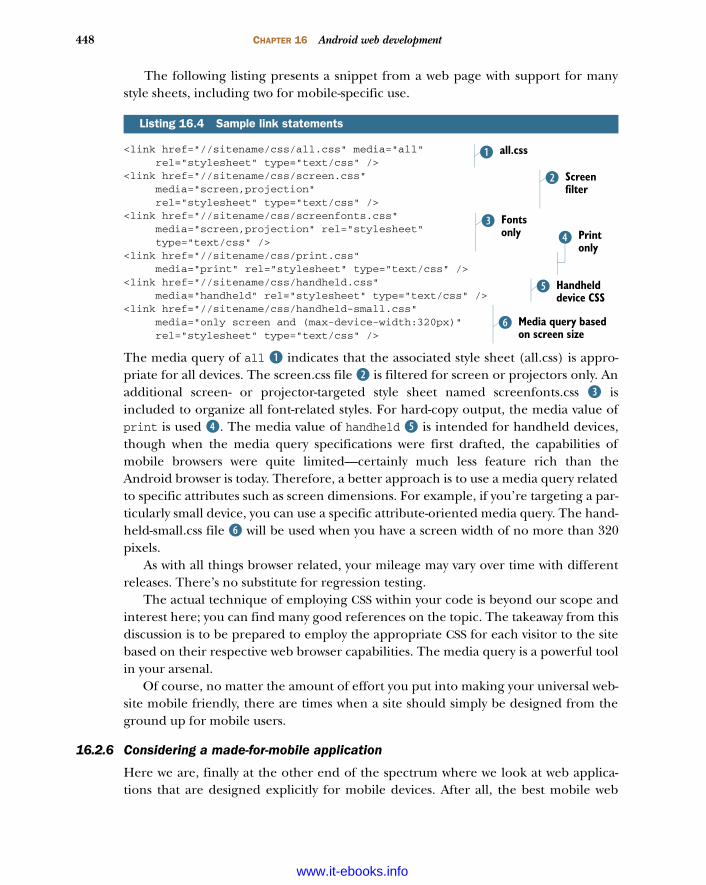
448 CHAPTER 16 Android web development
The following listing presents a snippet from a web page with support for manystyle sheets, including two for mobile-specific use.
<link href="//sitename/css/all.css" media="all" rel="stylesheet" type="text/css" />
<link href="//sitename/css/screen.css" media="screen,projection" rel="stylesheet" type="text/css" />
<link href="//sitename/css/screenfonts.css" media="screen,projection" rel="stylesheet" type="text/css" />
<link href="//sitename/css/print.css" media="print" rel="stylesheet" type="text/css" />
<link href="//sitename/css/handheld.css" media="handheld" rel="stylesheet" type="text/css" />
<link href="//sitename/css/handheld-small.css" media="only screen and (max-device-width:320px)" rel="stylesheet" type="text/css" />
The media query of all B indicates that the associated style sheet (all.css) is appro-priate for all devices. The screen.css file C is filtered for screen or projectors only. Anadditional screen- or projector-targeted style sheet named screenfonts.css D isincluded to organize all font-related styles. For hard-copy output, the media value ofprint is used E. The media value of handheld F is intended for handheld devices,though when the media query specifications were first drafted, the capabilities ofmobile browsers were quite limited—certainly much less feature rich than theAndroid browser is today. Therefore, a better approach is to use a media query relatedto specific attributes such as screen dimensions. For example, if you’re targeting a par-ticularly small device, you can use a specific attribute-oriented media query. The hand-held-small.css file G will be used when you have a screen width of no more than 320pixels.
As with all things browser related, your mileage may vary over time with differentreleases. There’s no substitute for regression testing.
The actual technique of employing CSS within your code is beyond our scope andinterest here; you can find many good references on the topic. The takeaway from thisdiscussion is to be prepared to employ the appropriate CSS for each visitor to the sitebased on their respective web browser capabilities. The media query is a powerful toolin your arsenal.
Of course, no matter the amount of effort you put into making your universal web-site mobile friendly, there are times when a site should simply be designed from theground up for mobile users.
16.2.6 Considering a made-for-mobile application
Here we are, finally at the other end of the spectrum where we look at web applica-tions that are designed explicitly for mobile devices. After all, the best mobile web
Listing 16.4 Sample link statements
all.cssB
Screen filter
C
Fonts only
DPrint only
E
Handheld device CSS
F
Media query based on screen size
G
www.it-ebooks.info
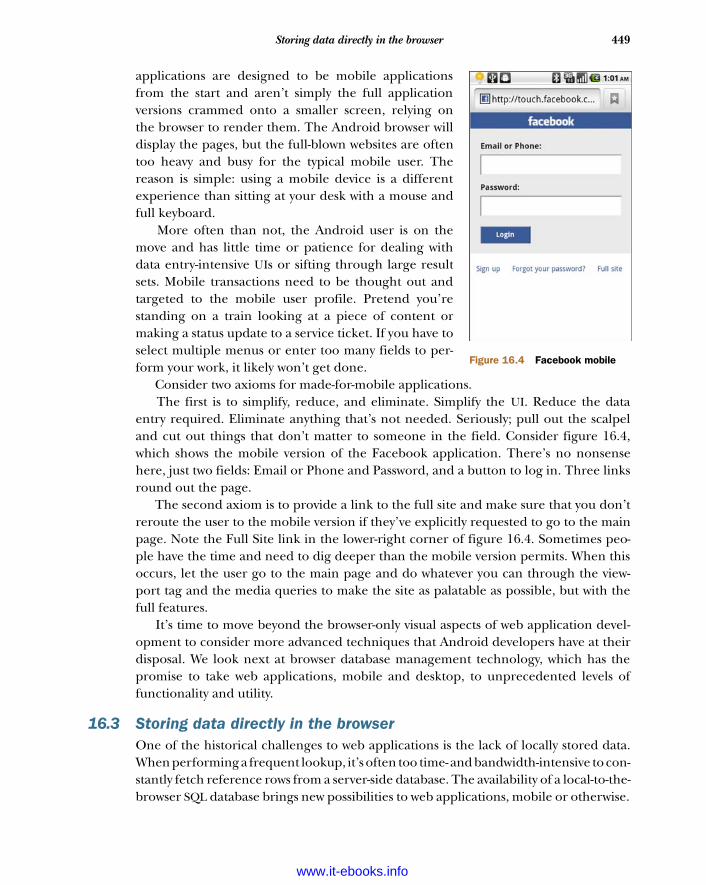
449Storing data directly in the browser
applications are designed to be mobile applicationsfrom the start and aren’t simply the full applicationversions crammed onto a smaller screen, relying onthe browser to render them. The Android browser willdisplay the pages, but the full-blown websites are oftentoo heavy and busy for the typical mobile user. Thereason is simple: using a mobile device is a differentexperience than sitting at your desk with a mouse andfull keyboard.
More often than not, the Android user is on themove and has little time or patience for dealing withdata entry-intensive UIs or sifting through large resultsets. Mobile transactions need to be thought out andtargeted to the mobile user profile. Pretend you’restanding on a train looking at a piece of content ormaking a status update to a service ticket. If you have toselect multiple menus or enter too many fields to per-form your work, it likely won’t get done.
Consider two axioms for made-for-mobile applications. The first is to simplify, reduce, and eliminate. Simplify the UI. Reduce the data
entry required. Eliminate anything that’s not needed. Seriously; pull out the scalpeland cut out things that don’t matter to someone in the field. Consider figure 16.4,which shows the mobile version of the Facebook application. There’s no nonsensehere, just two fields: Email or Phone and Password, and a button to log in. Three linksround out the page.
The second axiom is to provide a link to the full site and make sure that you don’treroute the user to the mobile version if they’ve explicitly requested to go to the mainpage. Note the Full Site link in the lower-right corner of figure 16.4. Sometimes peo-ple have the time and need to dig deeper than the mobile version permits. When thisoccurs, let the user go to the main page and do whatever you can through the view-port tag and the media queries to make the site as palatable as possible, but with thefull features.
It’s time to move beyond the browser-only visual aspects of web application devel-opment to consider more advanced techniques that Android developers have at theirdisposal. We look next at browser database management technology, which has thepromise to take web applications, mobile and desktop, to unprecedented levels offunctionality and utility.
16.3 Storing data directly in the browserOne of the historical challenges to web applications is the lack of locally stored data.When performing a frequent lookup, it’s often too time- and bandwidth-intensive to con-stantly fetch reference rows from a server-side database. The availability of a local-to-the-browser SQL database brings new possibilities to web applications, mobile or otherwise.
Figure 16.4 Facebook mobile
www.it-ebooks.info
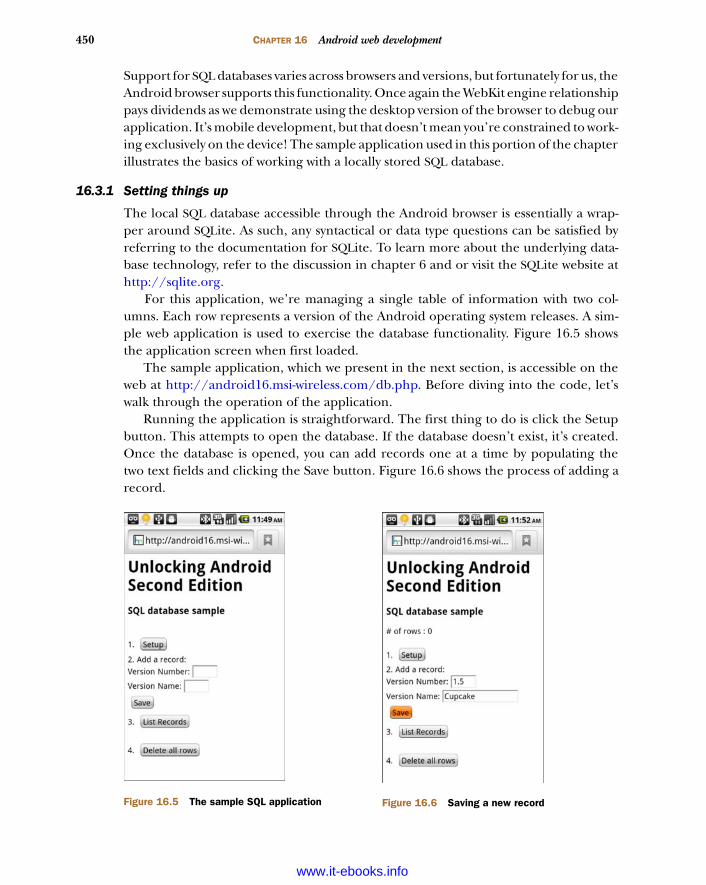
450 CHAPTER 16 Android web development
Support for SQL databases varies across browsers and versions, but fortunately for us, theAndroid browser supports this functionality. Once again the WebKit engine relationshippays dividends as we demonstrate using the desktop version of the browser to debug ourapplication. It’s mobile development, but that doesn’t mean you’re constrained to work-ing exclusively on the device! The sample application used in this portion of the chapterillustrates the basics of working with a locally stored SQL database.
16.3.1 Setting things up
The local SQL database accessible through the Android browser is essentially a wrap-per around SQLite. As such, any syntactical or data type questions can be satisfied byreferring to the documentation for SQLite. To learn more about the underlying data-base technology, refer to the discussion in chapter 6 and or visit the SQLite website athttp://sqlite.org.
For this application, we’re managing a single table of information with two col-umns. Each row represents a version of the Android operating system releases. A sim-ple web application is used to exercise the database functionality. Figure 16.5 showsthe application screen when first loaded.
The sample application, which we present in the next section, is accessible on theweb at http://android16.msi-wireless.com/db.php. Before diving into the code, let’swalk through the operation of the application.
Running the application is straightforward. The first thing to do is click the Setupbutton. This attempts to open the database. If the database doesn’t exist, it’s created.Once the database is opened, you can add records one at a time by populating thetwo text fields and clicking the Save button. Figure 16.6 shows the process of adding arecord.
Figure 16.5 The sample SQL application Figure 16.6 Saving a new record
www.it-ebooks.info

451Storing data directly in the browser
The List Records button queries the database anddisplays the rows in a crudely formatted table. Figure16.7 shows the result of our query after a single entry.
The final piece of demonstrable functionality is theoption to remove all records. Clicking the Delete AllRows button opens the prompt shown in figure 16.8. Ifyou confirm, the application proceeds to remove allthe records from the database.
Remember, all of this is happening inside thebrowser without any interaction with the server sidebeyond the initial download of the page. In fact,there’s no database on the server! If 10 people all hitthe site, download this page, and add records, they’llbe working independently with independently storeddatabases on their respective devices.
Let’s look at the code for this application.
16.3.2 Examining the code
Working with a SQL database within the browser envi-ronment involves the use of some nontrivial JavaScript.If you’re not comfortable working in the flexibleJavaScript3 language, the code may be difficult to fol-low at first. Stick with it—the language becomes easieras you let the code sink in over time. One helpful hintis to work with a text editor that highlights openingand closing braces and brackets. Unlike a compiledAndroid SDK application where the compiler pointsout coding problems during the development process,JavaScript errors are found at runtime. Anomaliesoccur, and you have to track down the offending areasof your code through an iterative process of cat andmouse.
Let’s begin by examining the UI elements of thisapplication.
16.3.3 The user interface
We break down the code into two sections. The follow-ing listing contains the code for the UI of the applica-tion, stored in db.html.
3 For more on JavaScript, take a look at Secrets of the JavaScript Ninja at www.manning.com/resig. The book, byJohn Resig, is to be published by Manning in March 2012.
Figure 16.7 Listing the records from the table
Figure 16.8 Confirming deletion of records
www.it-ebooks.info
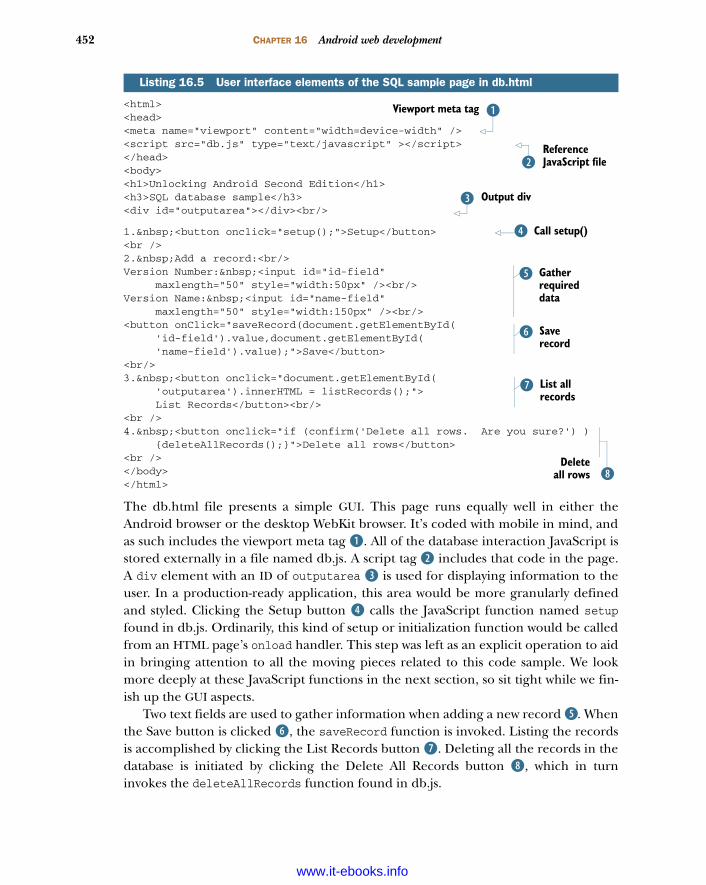
452 CHAPTER 16 Android web development
<html><head><meta name="viewport" content="width=device-width" /> <script src="db.js" type="text/javascript" ></script></head><body><h1>Unlocking Android Second Edition</h1><h3>SQL database sample</h3><div id="outputarea"></div><br/>
1. <button onclick="setup();">Setup</button><br />2. Add a record:<br/>Version Number: <input id="id-field"
maxlength="50" style="width:50px" /><br/>Version Name: <input id="name-field"
maxlength="50" style="width:150px" /><br/><button onClick="saveRecord(document.getElementById(
'id-field').value,document.getElementById('name-field').value);">Save</button>
<br/>3. <button onclick="document.getElementById(
'outputarea').innerHTML = listRecords();">List Records</button><br/>
<br />4. <button onclick="if (confirm('Delete all rows. Are you sure?') )
{deleteAllRecords();}">Delete all rows</button><br /></body></html>
The db.html file presents a simple GUI. This page runs equally well in either theAndroid browser or the desktop WebKit browser. It’s coded with mobile in mind, andas such includes the viewport meta tag B. All of the database interaction JavaScript isstored externally in a file named db.js. A script tag C includes that code in the page.A div element with an ID of outputarea D is used for displaying information to theuser. In a production-ready application, this area would be more granularly definedand styled. Clicking the Setup button E calls the JavaScript function named setupfound in db.js. Ordinarily, this kind of setup or initialization function would be calledfrom an HTML page’s onload handler. This step was left as an explicit operation to aidin bringing attention to all the moving pieces related to this code sample. We lookmore deeply at these JavaScript functions in the next section, so sit tight while we fin-ish up the GUI aspects.
Two text fields are used to gather information when adding a new record F. Whenthe Save button is clicked G, the saveRecord function is invoked. Listing the recordsis accomplished by clicking the List Records button H. Deleting all the records in thedatabase is initiated by clicking the Delete All Records button I, which in turninvokes the deleteAllRecords function found in db.js.
Listing 16.5 User interface elements of the SQL sample page in db.html
BViewport meta tag
Reference JavaScript fileC
Output divD
Call setup()E
Gather required data
F
Save record
G
List all records
H
IDelete
all rows
www.it-ebooks.info
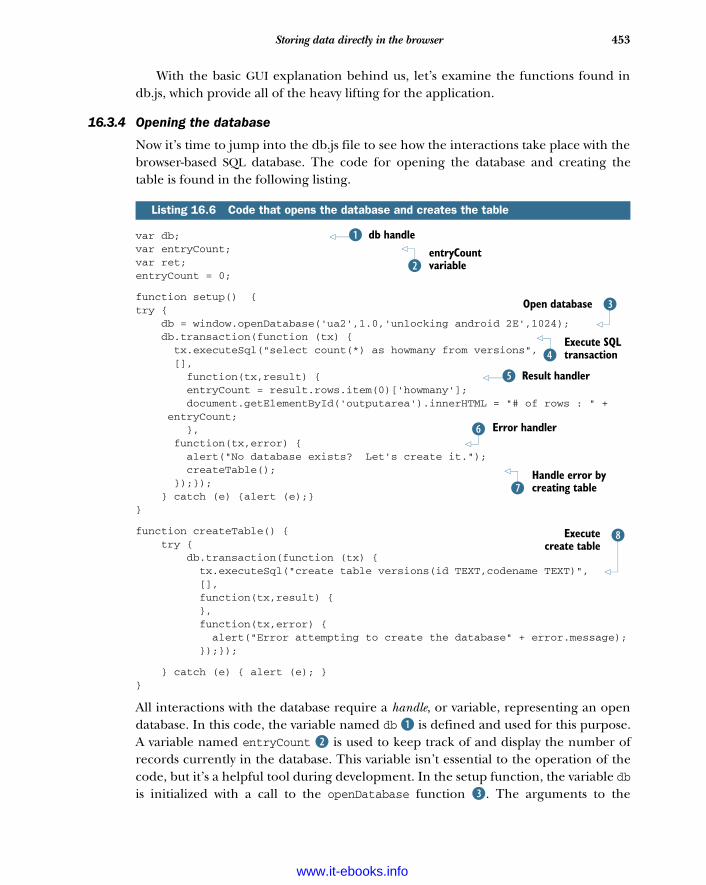
453Storing data directly in the browser
With the basic GUI explanation behind us, let’s examine the functions found indb.js, which provide all of the heavy lifting for the application.
16.3.4 Opening the database
Now it’s time to jump into the db.js file to see how the interactions take place with thebrowser-based SQL database. The code for opening the database and creating thetable is found in the following listing.
var db;var entryCount;var ret;entryCount = 0;
function setup() {try { db = window.openDatabase('ua2',1.0,'unlocking android 2E',1024); db.transaction(function (tx) { tx.executeSql("select count(*) as howmany from versions", [], function(tx,result) { entryCount = result.rows.item(0)['howmany']; document.getElementById('outputarea').innerHTML = "# of rows : " +
entryCount; }, function(tx,error) { alert("No database exists? Let's create it."); createTable(); });}); } catch (e) {alert (e);}}
function createTable() { try { db.transaction(function (tx) { tx.executeSql("create table versions(id TEXT,codename TEXT)", [], function(tx,result) { }, function(tx,error) { alert("Error attempting to create the database" + error.message); });});
} catch (e) { alert (e); }}
All interactions with the database require a handle, or variable, representing an opendatabase. In this code, the variable named db B is defined and used for this purpose.A variable named entryCount C is used to keep track of and display the number ofrecords currently in the database. This variable isn’t essential to the operation of thecode, but it’s a helpful tool during development. In the setup function, the variable dbis initialized with a call to the openDatabase function D. The arguments to the
Listing 16.6 Code that opens the database and creates the table
db handleBentryCount variableC
DOpen database
Execute SQL transactionE
Result handlerF
Error handlerG
Handle error by creating tableH
IExecutecreate table
www.it-ebooks.info

454 CHAPTER 16 Android web development
openDatabase function include the name, version, description, and initial size alloca-tion of the database. If the database exists, a valid handle is returned. If the databaseisn’t yet in existence, it’s created and a handle returned to the newly created database.Calling the transaction E method of the database object invokes a piece of SQL code.
The mechanics of the transaction method are nontrivial and are described indetail in section 16.3.5. For now, understand that the argument to the transactionmethod is a function that has four arguments: a SQL statement, parameters, a callbackfunction for handling a successful invocation of the SQL statement, and an error-handling function invoked when an error occurs processing the SQL. The SQL state-ment invoked here attempts to get a count of the rows in the table named versions.This value is stored in the entryCount variable F. If the table doesn’t exist, an error isthrown G. This is our cue to go ahead and create the table with a call to a user-supplied function named createTable H. The createTable function executes a sin-gle piece of SQL to create a table I. This method could be used to do any number ofdatabase initialization activities, such as creating multiple tables and populating eachwith default values.
Before we go through the balance of the transactions, it’s important to grasp howthe transaction method of the database object is wired.
16.3.5 Unpacking the transaction function
All interactions with the database involve using the transaction method of the data-base object, so it’s important to understand how to interact with each of the four argu-ments introduced previously.
The first argument is a parameterized SQL statement. This is simply a string withany parameterized values replaced with a question mark (?). For example, consider aSQL statement that selectively deletes the iPhone from a table named smartphones:
delete from smartphones where devicename = ?
The second argument is an array of JavaScript objects, each element representing thecorresponding parameter in the SQL statement. Keeping with our example, you needto provide the value needed for the where clause of the delete statement within thearray:
['iPhone']
The net effect of these two lines together results in this SQL statement:
delete form smartphones where devicename = 'iPhone'
This approach keeps you from worrying about delimiters and reduces your exposureto SQL injection attacks, which are a concern when working with dynamically con-structed SQL statements.
The third argument is a function that’s invoked when the SQL statement is success-fully executed. The arguments to this callback function are a handle to the databasetransaction identifier along with an object representing the result of the statement.
www.it-ebooks.info
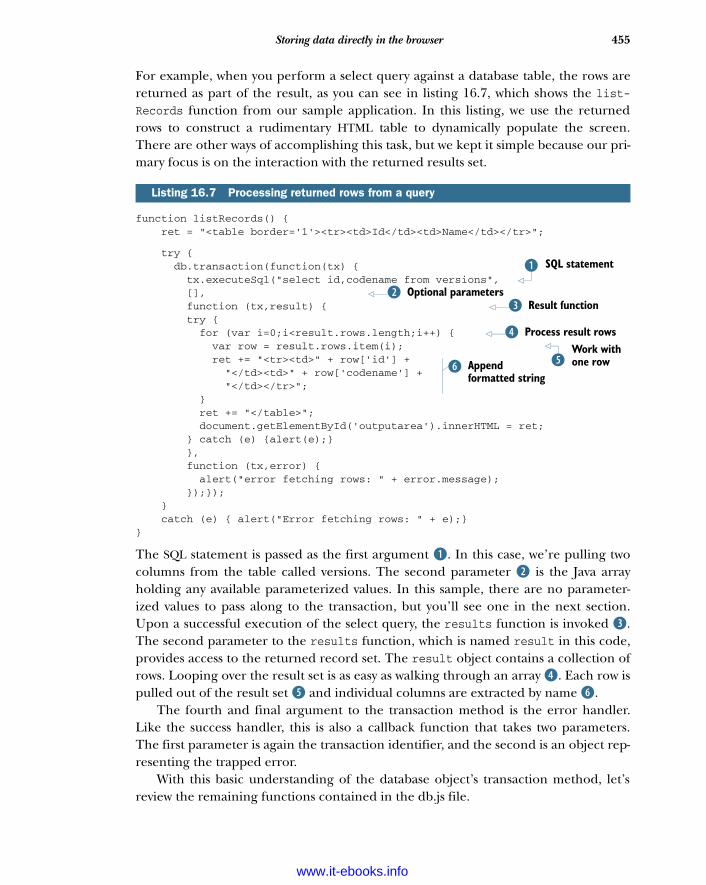
455Storing data directly in the browser
For example, when you perform a select query against a database table, the rows arereturned as part of the result, as you can see in listing 16.7, which shows the list-Records function from our sample application. In this listing, we use the returnedrows to construct a rudimentary HTML table to dynamically populate the screen.There are other ways of accomplishing this task, but we kept it simple because our pri-mary focus is on the interaction with the returned results set.
function listRecords() { ret = "<table border='1'><tr><td>Id</td><td>Name</td></tr>";
try { db.transaction(function(tx) { tx.executeSql("select id,codename from versions", [], function (tx,result) { try { for (var i=0;i<result.rows.length;i++) { var row = result.rows.item(i); ret += "<tr><td>" + row['id'] +
"</td><td>" + row['codename'] + "</td></tr>";
} ret += "</table>"; document.getElementById('outputarea').innerHTML = ret; } catch (e) {alert(e);} }, function (tx,error) { alert("error fetching rows: " + error.message); });}); } catch (e) { alert("Error fetching rows: " + e);}}
The SQL statement is passed as the first argument B. In this case, we’re pulling twocolumns from the table called versions. The second parameter C is the Java arrayholding any available parameterized values. In this sample, there are no parameter-ized values to pass along to the transaction, but you’ll see one in the next section.Upon a successful execution of the select query, the results function is invoked D.The second parameter to the results function, which is named result in this code,provides access to the returned record set. The result object contains a collection ofrows. Looping over the result set is as easy as walking through an array E. Each row ispulled out of the result set F and individual columns are extracted by name G.
The fourth and final argument to the transaction method is the error handler.Like the success handler, this is also a callback function that takes two parameters.The first parameter is again the transaction identifier, and the second is an object rep-resenting the trapped error.
With this basic understanding of the database object’s transaction method, let’sreview the remaining functions contained in the db.js file.
Listing 16.7 Processing returned rows from a query
SQL statementB
Optional parametersCResult functionD
Process result rowsEWork with one rowFAppend
formatted stringG
www.it-ebooks.info
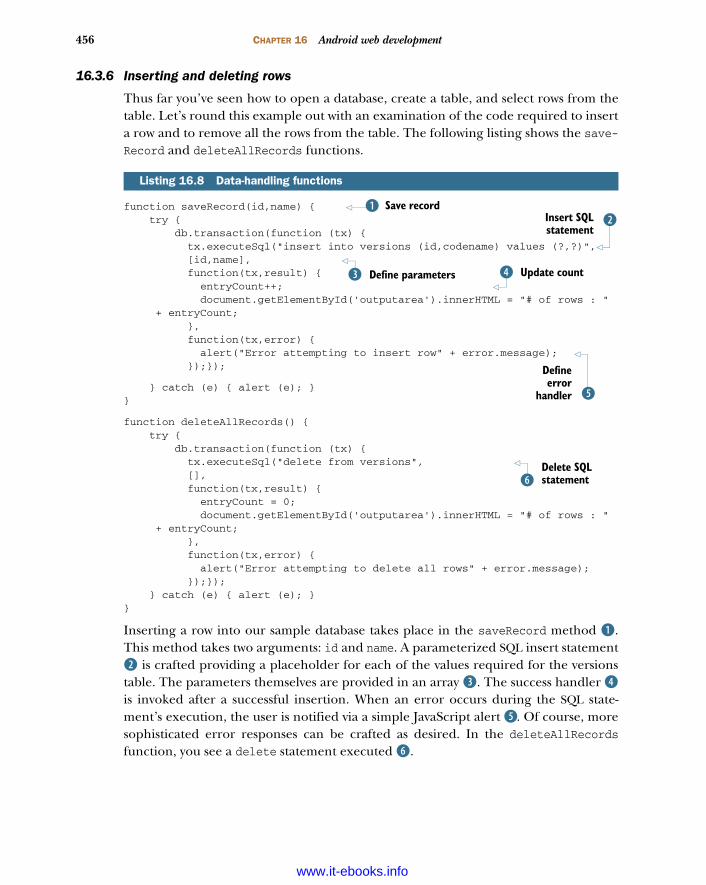
456 CHAPTER 16 Android web development
16.3.6 Inserting and deleting rows
Thus far you’ve seen how to open a database, create a table, and select rows from thetable. Let’s round this example out with an examination of the code required to inserta row and to remove all the rows from the table. The following listing shows the save-Record and deleteAllRecords functions.
function saveRecord(id,name) { try { db.transaction(function (tx) { tx.executeSql("insert into versions (id,codename) values (?,?)", [id,name], function(tx,result) { entryCount++; document.getElementById('outputarea').innerHTML = "# of rows : "
+ entryCount; }, function(tx,error) { alert("Error attempting to insert row" + error.message); });});
} catch (e) { alert (e); }}
function deleteAllRecords() { try { db.transaction(function (tx) { tx.executeSql("delete from versions", [], function(tx,result) { entryCount = 0; document.getElementById('outputarea').innerHTML = "# of rows : "
+ entryCount; }, function(tx,error) { alert("Error attempting to delete all rows" + error.message); });}); } catch (e) { alert (e); }}
Inserting a row into our sample database takes place in the saveRecord method B.This method takes two arguments: id and name. A parameterized SQL insert statementC is crafted providing a placeholder for each of the values required for the versionstable. The parameters themselves are provided in an array D. The success handler Eis invoked after a successful insertion. When an error occurs during the SQL state-ment’s execution, the user is notified via a simple JavaScript alert F. Of course, moresophisticated error responses can be crafted as desired. In the deleteAllRecordsfunction, you see a delete statement executed G.
Listing 16.8 Data-handling functions
Save recordBCInsert SQL
statement
Define parametersD Update countE
F
Defineerror
handler
Delete SQL statementG
www.it-ebooks.info

457Storing data directly in the browser
If you’re starting to get the feeling that this is just plain old SQL like you hoped,you’re correct. And remember, this is running in the client side of your browser onyour Android device!
Though the code runs happily in the Android browser, your phone isn’t necessar-ily the most expedient way of testing the core functionality outside of the visualappearance. Testing on either a real Android device or the emulator provides anacceptable experience, but for web applications such as this one, there’s a better wayto test: WebKit on the desktop.
16.3.7 Testing the application with WebKit tools
The good news about SQL development is that you can do it; the bad news is that thetools are limited compared to other SQL environments you’re accustomed to in thedesktop world. Fortunately, you can leverage the WebKit desktop browser, and itsbuilt-in development tools aid in your database work.
The Web Inspector4 and Error Console found beneath the Develop menu in Web-Kit on the desktop provide helpful tools. When you’re working with JavaScript, one ofthe challenges is that code tends to die silently. This can happen because something ismisspelled or a function doesn’t get properly defined thanks to a parsing error. Whenworking in Eclipse with an Android SDK application, this kind of problem doesn’toccur at runtime because the compiler tells you long before the application ever runs.With WebKit, you can leverage the Error Console, which provides helpful pointers toparsing problems in JavaScript code. This is one of those “don’t leave home withoutit” kind of tools.
When you’re working explicitly with a SQL database, the Web Inspector provides ahelpful database tool that permits you to peer into the database and browse each ofthe defined tables. Although this tool isn’t nearly as powerful as tools for commercialdatabases, there’s something particularly reassuring about seeing your data in thetable. Figure 16.9 shows a row in our versions table along with the web applicationrunning within the WebKit desktop browser.
The ability to move between the powerful WebKit desktop environment and theAndroid-based browser is a tremendous advantage to the Android developer lookingto create a mobile web application.
As you’ve seen, the ability to store and manage relational data in a persistent fash-ion directly in the browser opens up new possibilities for application creation, deploy-ment, and life-cycle management.
Storing data locally is a tremendous capability, but there may be times when yousimply need more raw power and flexibility—and that calls for an SDK-based applica-tion. How do you get the best that HTML, CSS, and JavaScript have to offer but still godeeper? The answer is to build a hybrid application, which we cover next.
4 For more details on the Web Inspector, try http://trac.webkit.org/wiki/WebInspector.
www.it-ebooks.info
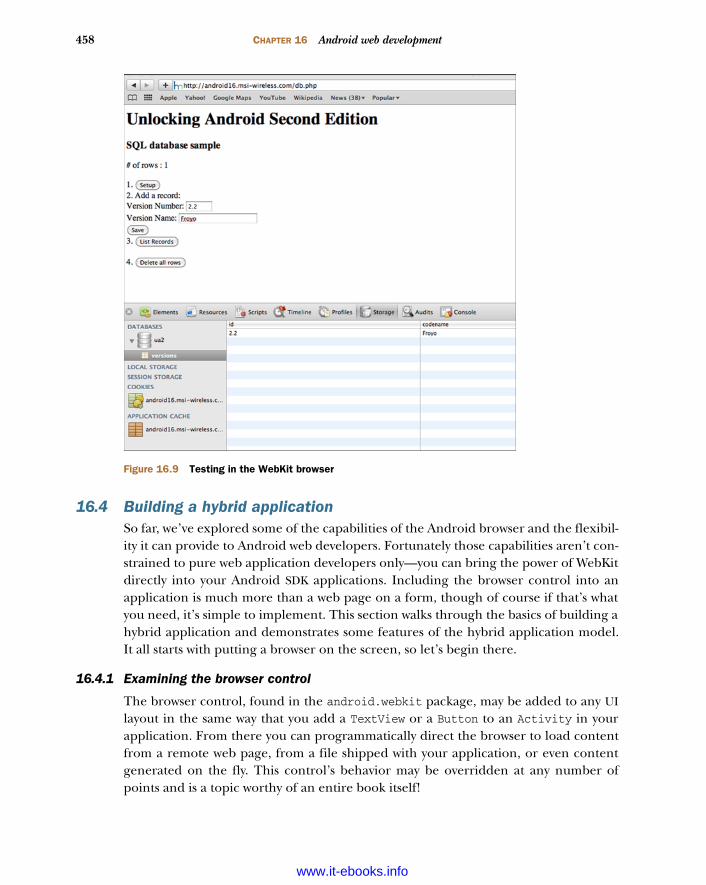
458 CHAPTER 16 Android web development
16.4 Building a hybrid applicationSo far, we’ve explored some of the capabilities of the Android browser and the flexibil-ity it can provide to Android web developers. Fortunately those capabilities aren’t con-strained to pure web application developers only—you can bring the power of WebKitdirectly into your Android SDK applications. Including the browser control into anapplication is much more than a web page on a form, though of course if that’s whatyou need, it’s simple to implement. This section walks through the basics of building ahybrid application and demonstrates some features of the hybrid application model.It all starts with putting a browser on the screen, so let’s begin there.
16.4.1 Examining the browser control
The browser control, found in the android.webkit package, may be added to any UIlayout in the same way that you add a TextView or a Button to an Activity in yourapplication. From there you can programmatically direct the browser to load contentfrom a remote web page, from a file shipped with your application, or even contentgenerated on the fly. This control’s behavior may be overridden at any number ofpoints and is a topic worthy of an entire book itself!
Figure 16.9 Testing in the WebKit browser
www.it-ebooks.info
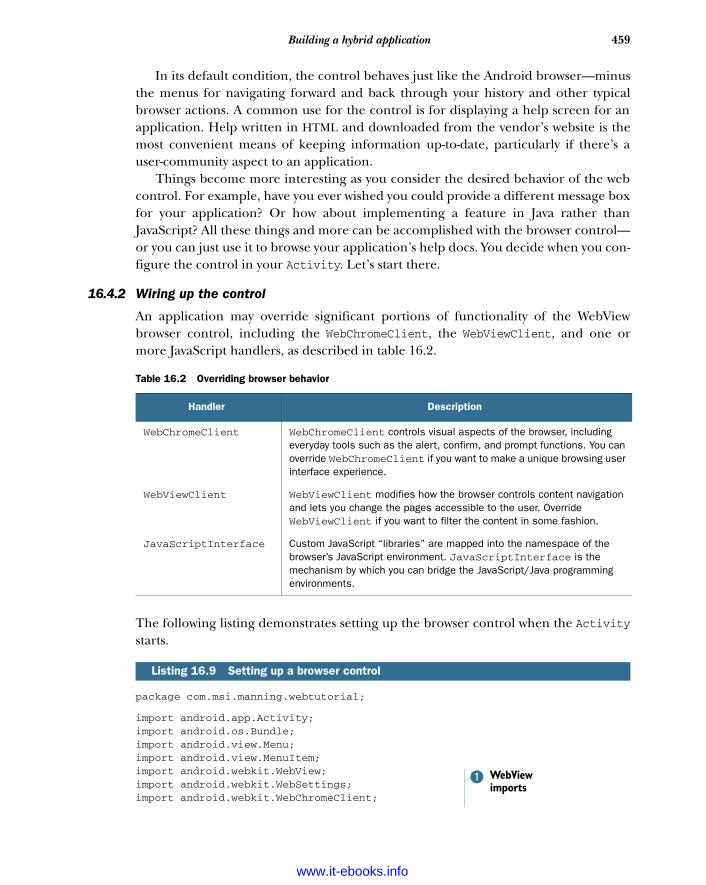
459Building a hybrid application
In its default condition, the control behaves just like the Android browser—minusthe menus for navigating forward and back through your history and other typicalbrowser actions. A common use for the control is for displaying a help screen for anapplication. Help written in HTML and downloaded from the vendor’s website is themost convenient means of keeping information up-to-date, particularly if there’s auser-community aspect to an application.
Things become more interesting as you consider the desired behavior of the webcontrol. For example, have you ever wished you could provide a different message boxfor your application? Or how about implementing a feature in Java rather thanJavaScript? All these things and more can be accomplished with the browser control—or you can just use it to browse your application’s help docs. You decide when you con-figure the control in your Activity. Let’s start there.
16.4.2 Wiring up the control
An application may override significant portions of functionality of the WebViewbrowser control, including the WebChromeClient, the WebViewClient, and one ormore JavaScript handlers, as described in table 16.2.
The following listing demonstrates setting up the browser control when the Activitystarts.
package com.msi.manning.webtutorial;
import android.app.Activity;import android.os.Bundle;import android.view.Menu;import android.view.MenuItem;import android.webkit.WebView;import android.webkit.WebSettings;import android.webkit.WebChromeClient;
Table 16.2 Overriding browser behavior
Handler Description
WebChromeClient WebChromeClient controls visual aspects of the browser, including everyday tools such as the alert, confirm, and prompt functions. You can override WebChromeClient if you want to make a unique browsing user interface experience.
WebViewClient WebViewClient modifies how the browser controls content navigation and lets you change the pages accessible to the user. Override WebViewClient if you want to filter the content in some fashion.
JavaScriptInterface Custom JavaScript “libraries” are mapped into the namespace of the browser’s JavaScript environment. JavaScriptInterface is the mechanism by which you can bridge the JavaScript/Java programming environments.
Listing 16.9 Setting up a browser control
WebView imports
B
www.it-ebooks.info
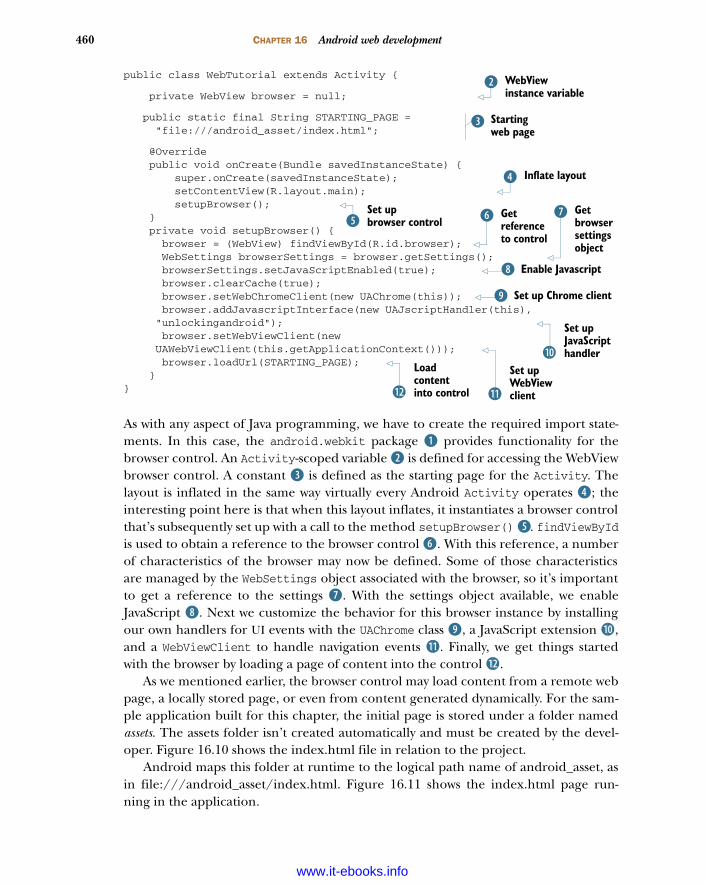
460 CHAPTER 16 Android web development
public class WebTutorial extends Activity {
private WebView browser = null;
public static final String STARTING_PAGE = "file:///android_asset/index.html";
@Override public void onCreate(Bundle savedInstanceState) { super.onCreate(savedInstanceState); setContentView(R.layout.main); setupBrowser(); } private void setupBrowser() { browser = (WebView) findViewById(R.id.browser); WebSettings browserSettings = browser.getSettings(); browserSettings.setJavaScriptEnabled(true); browser.clearCache(true); browser.setWebChromeClient(new UAChrome(this)); browser.addJavascriptInterface(new UAJscriptHandler(this),
"unlockingandroid"); browser.setWebViewClient(new
UAWebViewClient(this.getApplicationContext())); browser.loadUrl(STARTING_PAGE); }}
As with any aspect of Java programming, we have to create the required import state-ments. In this case, the android.webkit package B provides functionality for thebrowser control. An Activity-scoped variable C is defined for accessing the WebViewbrowser control. A constant D is defined as the starting page for the Activity. Thelayout is inflated in the same way virtually every Android Activity operates E; theinteresting point here is that when this layout inflates, it instantiates a browser controlthat’s subsequently set up with a call to the method setupBrowser() F. findViewByIdis used to obtain a reference to the browser control G. With this reference, a numberof characteristics of the browser may now be defined. Some of those characteristicsare managed by the WebSettings object associated with the browser, so it’s importantto get a reference to the settings H. With the settings object available, we enableJavaScript I. Next we customize the behavior for this browser instance by installingour own handlers for UI events with the UAChrome class J, a JavaScript extension 1),and a WebViewClient to handle navigation events 1!. Finally, we get things startedwith the browser by loading a page of content into the control 1@.
As we mentioned earlier, the browser control may load content from a remote webpage, a locally stored page, or even from content generated dynamically. For the sam-ple application built for this chapter, the initial page is stored under a folder namedassets. The assets folder isn’t created automatically and must be created by the devel-oper. Figure 16.10 shows the index.html file in relation to the project.
Android maps this folder at runtime to the logical path name of android_asset, asin file:///android_asset/index.html. Figure 16.11 shows the index.html page run-ning in the application.
WebView instance variable
C
Starting web page
D
Inflate layoutE
Set up browser controlF
Get reference to control
GGet browser settings object
H
Enable JavascriptI
Set up Chrome clientJ
Set up JavaScript handler1)
Set up WebView client1!
Load content into control1@
www.it-ebooks.info

461Building a hybrid application
The sample application is broken up into three demos, each highlighting a slightlydifferent aspect of working with a browser control in an SDK application (a hybridapplication). This approach is typical of hybrid applications where the browser con-trol provides the UI and the Java code of the application provides much of the func-tionality and program logic. The next few sections break down each of these pieces offunctionality along with the respective demonstration. Let’s begin by looking at thetechnique of adding a JavaScript handler to our code.
16.4.3 Implementing the JavaScript handler
There are three pillars to the hybrid application, each supporting one of the majorareas of functionality that the WebView browser provides. The most straightforward ofthese is the JavaScript handler. The browser control permits an application to “install”one or more JavaScript handlers into the JavaScript namespace of the browser. You’vealready seen in listing 16.9 how the browser is set up. To emphasize the JavaScript han-dler initiation, it’s repeated here:
browser.addJavascriptInterface(new UAJscriptHandler(this), "unlockingandroid");
The arguments to the addJavascriptInterface mechanism are simple. The first is anapplication-provided handler, and the second is a textual string. Listing 16.10 presentsthe class for the handler. Note that this kind of class may also be implemented as aninner class to the Activity, but we broke it out for clarity in this example. One conse-quence of breaking the class out on its own is the need to provide a Context for thecode in order to access various elements of the SDK. You accomplish this by passingthe context into the constructor, as in this listing.
Figure 16.10 index.html used in our sample application
Figure 16.11 index.html in our browser control
www.it-ebooks.info
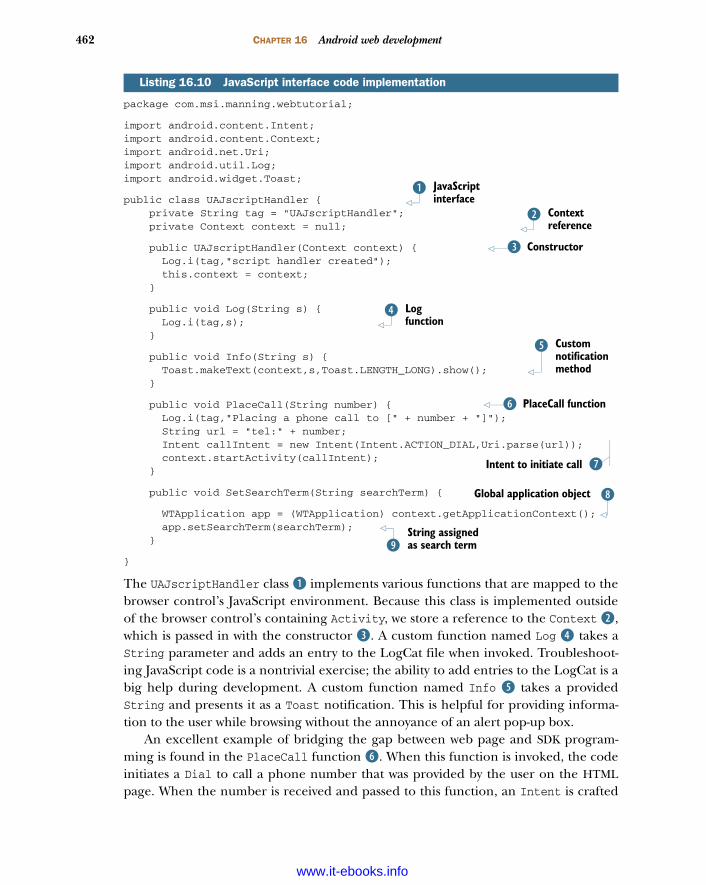
462 CHAPTER 16 Android web development
package com.msi.manning.webtutorial;
import android.content.Intent;import android.content.Context;import android.net.Uri;import android.util.Log;import android.widget.Toast;
public class UAJscriptHandler { private String tag = "UAJscriptHandler"; private Context context = null;
public UAJscriptHandler(Context context) { Log.i(tag,"script handler created"); this.context = context; }
public void Log(String s) { Log.i(tag,s); }
public void Info(String s) { Toast.makeText(context,s,Toast.LENGTH_LONG).show(); }
public void PlaceCall(String number) { Log.i(tag,"Placing a phone call to [" + number + "]"); String url = "tel:" + number; Intent callIntent = new Intent(Intent.ACTION_DIAL,Uri.parse(url)); context.startActivity(callIntent); }
public void SetSearchTerm(String searchTerm) {
WTApplication app = (WTApplication) context.getApplicationContext(); app.setSearchTerm(searchTerm); }
}
The UAJscriptHandler class B implements various functions that are mapped to thebrowser control’s JavaScript environment. Because this class is implemented outsideof the browser control’s containing Activity, we store a reference to the Context C,which is passed in with the constructor D. A custom function named Log E takes aString parameter and adds an entry to the LogCat file when invoked. Troubleshoot-ing JavaScript code is a nontrivial exercise; the ability to add entries to the LogCat is abig help during development. A custom function named Info F takes a providedString and presents it as a Toast notification. This is helpful for providing informa-tion to the user while browsing without the annoyance of an alert pop-up box.
An excellent example of bridging the gap between web page and SDK program-ming is found in the PlaceCall function G. When this function is invoked, the codeinitiates a Dial to call a phone number that was provided by the user on the HTMLpage. When the number is received and passed to this function, an Intent is crafted
Listing 16.10 JavaScript interface code implementation
JavaScript interface
B
Context reference
C
ConstructorD
Log function
E
Custom notification method
F
PlaceCall functionG
HIntent to initiate call
IGlobal application object
String assigned as search termJ
www.it-ebooks.info
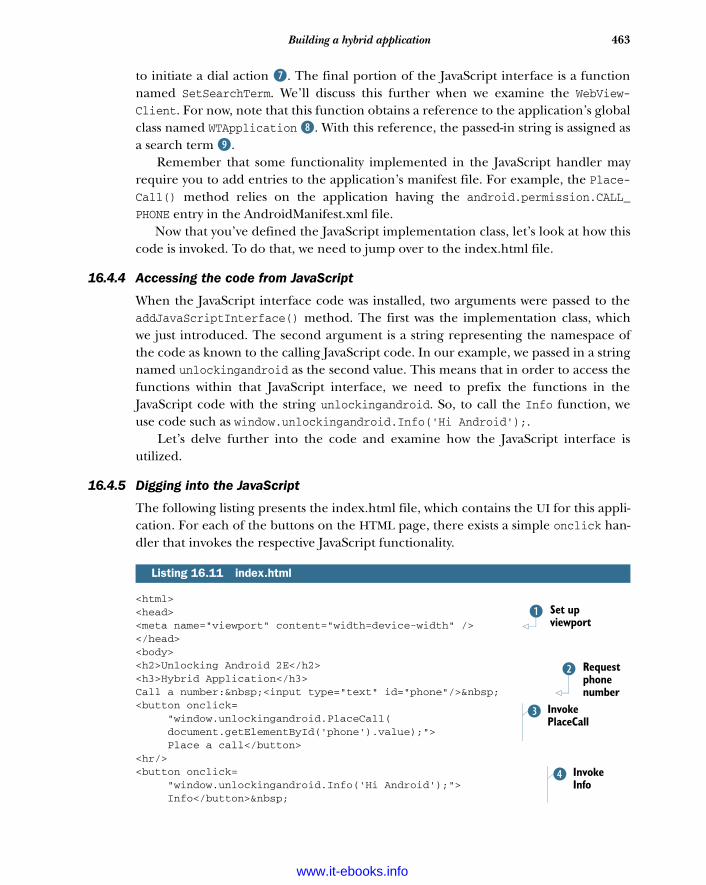
463Building a hybrid application
to initiate a dial action H. The final portion of the JavaScript interface is a functionnamed SetSearchTerm. We’ll discuss this further when we examine the WebView-Client. For now, note that this function obtains a reference to the application’s globalclass named WTApplication I. With this reference, the passed-in string is assigned asa search term J.
Remember that some functionality implemented in the JavaScript handler mayrequire you to add entries to the application’s manifest file. For example, the Place-Call() method relies on the application having the android.permission.CALL_PHONE entry in the AndroidManifest.xml file.
Now that you’ve defined the JavaScript implementation class, let’s look at how thiscode is invoked. To do that, we need to jump over to the index.html file.
16.4.4 Accessing the code from JavaScript
When the JavaScript interface code was installed, two arguments were passed to theaddJavaScriptInterface() method. The first was the implementation class, whichwe just introduced. The second argument is a string representing the namespace ofthe code as known to the calling JavaScript code. In our example, we passed in a stringnamed unlockingandroid as the second value. This means that in order to access thefunctions within that JavaScript interface, we need to prefix the functions in theJavaScript code with the string unlockingandroid. So, to call the Info function, weuse code such as window.unlockingandroid.Info('Hi Android');.
Let’s delve further into the code and examine how the JavaScript interface isutilized.
16.4.5 Digging into the JavaScript
The following listing presents the index.html file, which contains the UI for this appli-cation. For each of the buttons on the HTML page, there exists a simple onclick han-dler that invokes the respective JavaScript functionality.
<html><head><meta name="viewport" content="width=device-width" /></head><body><h2>Unlocking Android 2E</h2><h3>Hybrid Application</h3>Call a number: <input type="text" id="phone"/> <button onclick=
"window.unlockingandroid.PlaceCall(document.getElementById('phone').value);">Place a call</button>
<hr/><button onclick=
"window.unlockingandroid.Info('Hi Android');">Info</button>
Listing 16.11 index.html
Set up viewport
B
Request phone number
C
Invoke PlaceCall
D
Invoke Info
E
www.it-ebooks.info
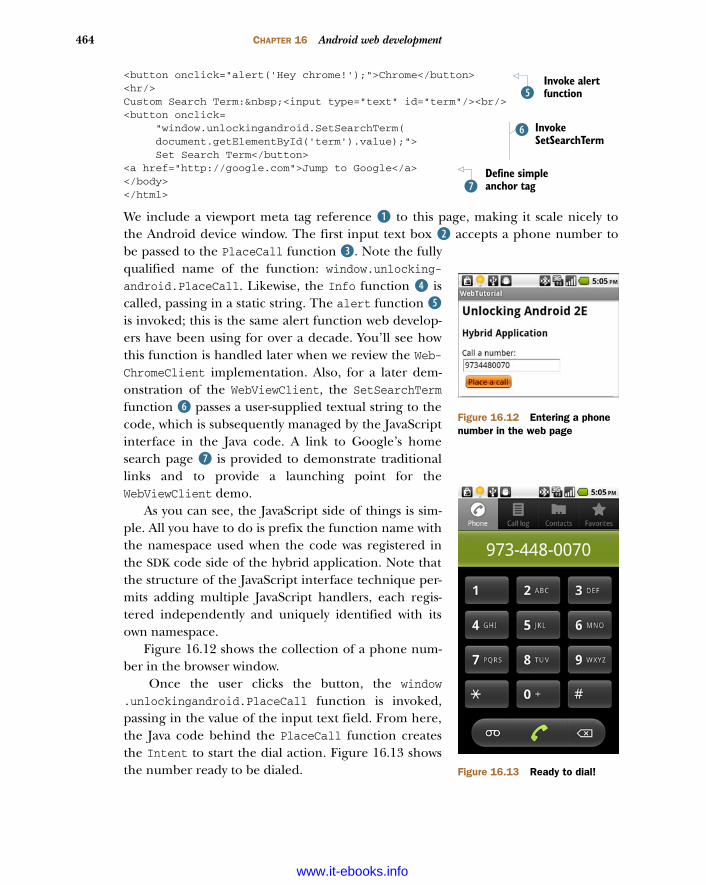
464 CHAPTER 16 Android web development
<button onclick="alert('Hey chrome!');">Chrome</button><hr/>Custom Search Term: <input type="text" id="term"/><br/><button onclick=
"window.unlockingandroid.SetSearchTerm(document.getElementById('term').value);">Set Search Term</button>
<a href="http://google.com">Jump to Google</a></body></html>
We include a viewport meta tag reference B to this page, making it scale nicely tothe Android device window. The first input text box C accepts a phone number tobe passed to the PlaceCall function D. Note the fullyqualified name of the function: window.unlocking-android.PlaceCall. Likewise, the Info function e iscalled, passing in a static string. The alert function Fis invoked; this is the same alert function web develop-ers have been using for over a decade. You’ll see howthis function is handled later when we review the Web-ChromeClient implementation. Also, for a later dem-onstration of the WebViewClient, the SetSearchTermfunction G passes a user-supplied textual string to thecode, which is subsequently managed by the JavaScriptinterface in the Java code. A link to Google’s homesearch page H is provided to demonstrate traditionallinks and to provide a launching point for theWebViewClient demo.
As you can see, the JavaScript side of things is sim-ple. All you have to do is prefix the function name withthe namespace used when the code was registered inthe SDK code side of the hybrid application. Note thatthe structure of the JavaScript interface technique per-mits adding multiple JavaScript handlers, each regis-tered independently and uniquely identified with itsown namespace.
Figure 16.12 shows the collection of a phone num-ber in the browser window.
Once the user clicks the button, the window.unlockingandroid.PlaceCall function is invoked,passing in the value of the input text field. From here,the Java code behind the PlaceCall function createsthe Intent to start the dial action. Figure 16.13 showsthe number ready to be dialed.
Invoke alert functionF
Invoke SetSearchTerm
G
Define simple anchor tagH
Figure 16.12 Entering a phone number in the web page
Figure 16.13 Ready to dial!
www.it-ebooks.info
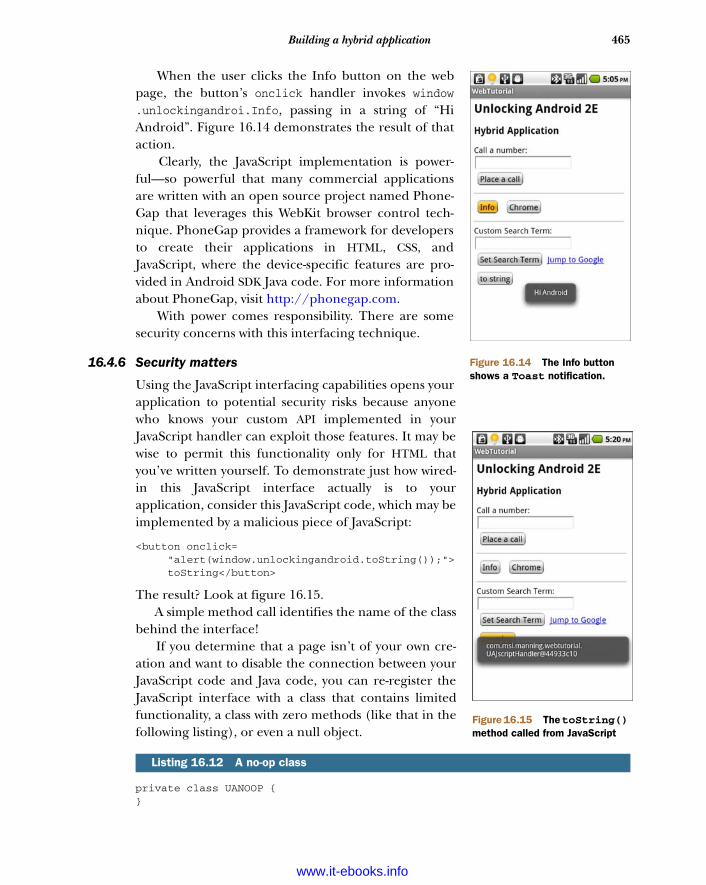
465Building a hybrid application
When the user clicks the Info button on the webpage, the button’s onclick handler invokes window.unlockingandroi.Info, passing in a string of “HiAndroid”. Figure 16.14 demonstrates the result of thataction.
Clearly, the JavaScript implementation is power-ful—so powerful that many commercial applicationsare written with an open source project named Phone-Gap that leverages this WebKit browser control tech-nique. PhoneGap provides a framework for developersto create their applications in HTML, CSS, andJavaScript, where the device-specific features are pro-vided in Android SDK Java code. For more informationabout PhoneGap, visit http://phonegap.com.
With power comes responsibility. There are somesecurity concerns with this interfacing technique.
16.4.6 Security matters
Using the JavaScript interfacing capabilities opens yourapplication to potential security risks because anyonewho knows your custom API implemented in yourJavaScript handler can exploit those features. It may bewise to permit this functionality only for HTML thatyou’ve written yourself. To demonstrate just how wired-in this JavaScript interface actually is to yourapplication, consider this JavaScript code, which may beimplemented by a malicious piece of JavaScript:
<button onclick="alert(window.unlockingandroid.toString());">toString</button>
The result? Look at figure 16.15. A simple method call identifies the name of the class
behind the interface! If you determine that a page isn’t of your own cre-
ation and want to disable the connection between yourJavaScript code and Java code, you can re-register theJavaScript interface with a class that contains limitedfunctionality, a class with zero methods (like that in thefollowing listing), or even a null object.
private class UANOOP {}
Listing 16.12 A no-op class
Figure 16.14 The Info button shows a Toast notification.
Figure 16.15 The toString()method called from JavaScript
www.it-ebooks.info
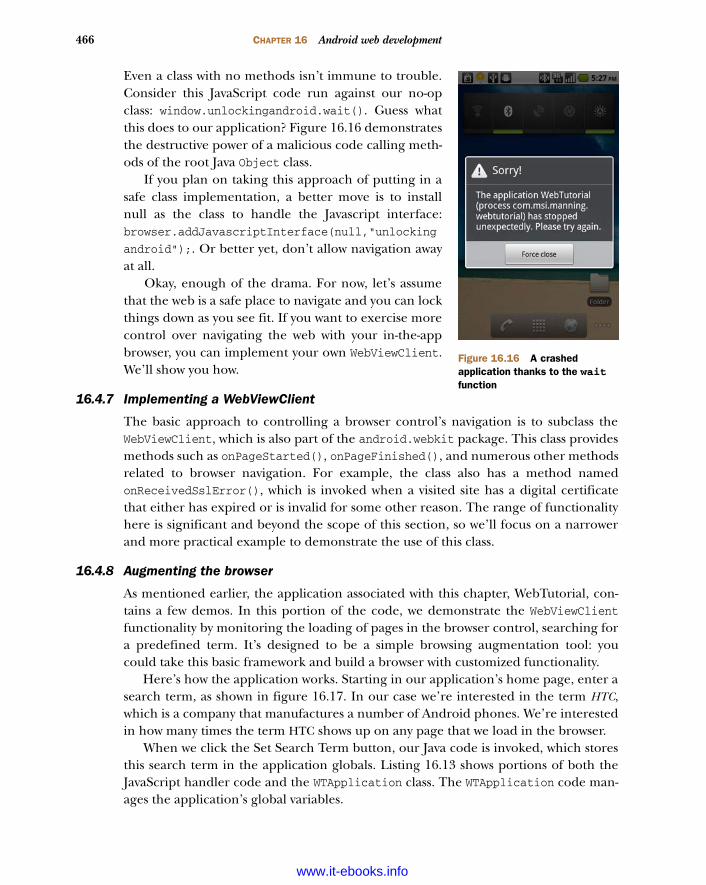
466 CHAPTER 16 Android web development
Even a class with no methods isn’t immune to trouble.Consider this JavaScript code run against our no-opclass: window.unlockingandroid.wait(). Guess whatthis does to our application? Figure 16.16 demonstratesthe destructive power of a malicious code calling meth-ods of the root Java Object class.
If you plan on taking this approach of putting in asafe class implementation, a better move is to installnull as the class to handle the Javascript interface:browser.addJavascriptInterface(null,"unlocking
android");. Or better yet, don’t allow navigation awayat all.
Okay, enough of the drama. For now, let’s assumethat the web is a safe place to navigate and you can lockthings down as you see fit. If you want to exercise morecontrol over navigating the web with your in-the-appbrowser, you can implement your own WebViewClient.We’ll show you how.
16.4.7 Implementing a WebViewClient
The basic approach to controlling a browser control’s navigation is to subclass theWebViewClient, which is also part of the android.webkit package. This class providesmethods such as onPageStarted(), onPageFinished(), and numerous other methodsrelated to browser navigation. For example, the class also has a method namedonReceivedSslError(), which is invoked when a visited site has a digital certificatethat either has expired or is invalid for some other reason. The range of functionalityhere is significant and beyond the scope of this section, so we’ll focus on a narrowerand more practical example to demonstrate the use of this class.
16.4.8 Augmenting the browser
As mentioned earlier, the application associated with this chapter, WebTutorial, con-tains a few demos. In this portion of the code, we demonstrate the WebViewClientfunctionality by monitoring the loading of pages in the browser control, searching fora predefined term. It’s designed to be a simple browsing augmentation tool: youcould take this basic framework and build a browser with customized functionality.
Here’s how the application works. Starting in our application’s home page, enter asearch term, as shown in figure 16.17. In our case we’re interested in the term HTC,which is a company that manufactures a number of Android phones. We’re interestedin how many times the term HTC shows up on any page that we load in the browser.
When we click the Set Search Term button, our Java code is invoked, which storesthis search term in the application globals. Listing 16.13 shows portions of both theJavaScript handler code and the WTApplication class. The WTApplication code man-ages the application’s global variables.
Figure 16.16 A crashed application thanks to the waitfunction
www.it-ebooks.info
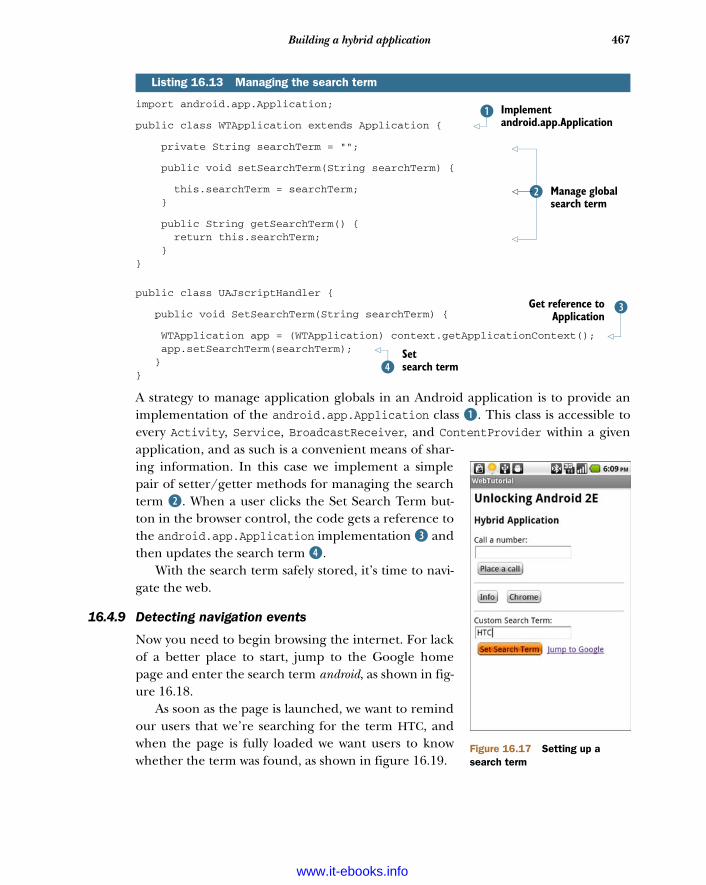
467Building a hybrid application
import android.app.Application;
public class WTApplication extends Application {
private String searchTerm = "";
public void setSearchTerm(String searchTerm) {
this.searchTerm = searchTerm; }
public String getSearchTerm() { return this.searchTerm; }}
public class UAJscriptHandler {
public void SetSearchTerm(String searchTerm) {
WTApplication app = (WTApplication) context.getApplicationContext(); app.setSearchTerm(searchTerm); }}
A strategy to manage application globals in an Android application is to provide animplementation of the android.app.Application class B. This class is accessible toevery Activity, Service, BroadcastReceiver, and ContentProvider within a givenapplication, and as such is a convenient means of shar-ing information. In this case we implement a simplepair of setter/getter methods for managing the searchterm C. When a user clicks the Set Search Term but-ton in the browser control, the code gets a reference tothe android.app.Application implementation D andthen updates the search term E.
With the search term safely stored, it’s time to navi-gate the web.
16.4.9 Detecting navigation events
Now you need to begin browsing the internet. For lackof a better place to start, jump to the Google homepage and enter the search term android, as shown in fig-ure 16.18.
As soon as the page is launched, we want to remindour users that we’re searching for the term HTC, andwhen the page is fully loaded we want users to knowwhether the term was found, as shown in figure 16.19.
Listing 16.13 Managing the search term
Implement android.app.Application
B
C Manage global search term
DGet reference toApplication
Set search termE
Figure 16.17 Setting up a search term
www.it-ebooks.info
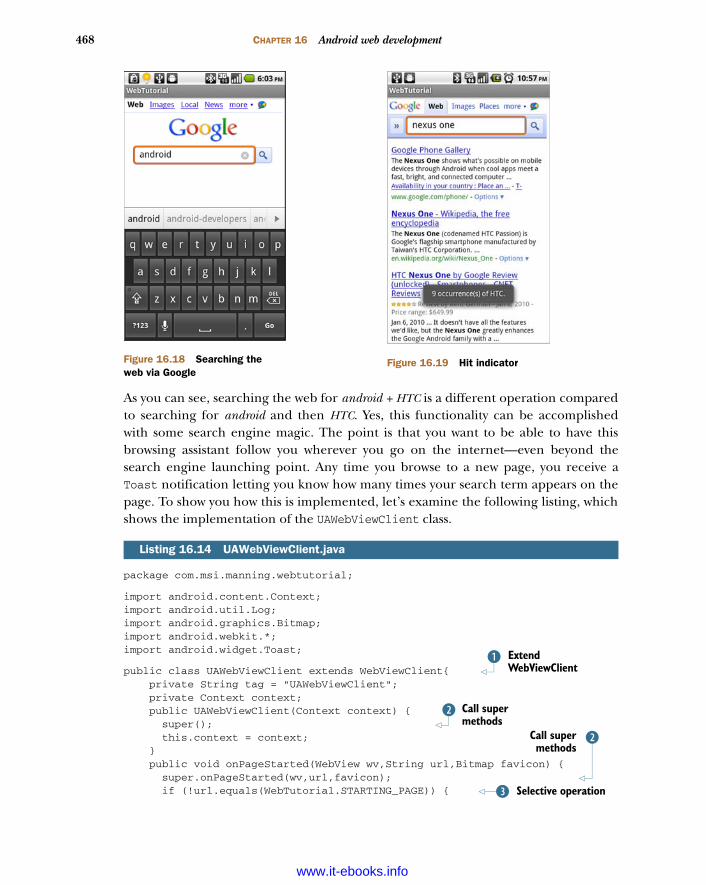
468 CHAPTER 16 Android web development
As you can see, searching the web for android + HTC is a different operation comparedto searching for android and then HTC. Yes, this functionality can be accomplishedwith some search engine magic. The point is that you want to be able to have thisbrowsing assistant follow you wherever you go on the internet—even beyond thesearch engine launching point. Any time you browse to a new page, you receive aToast notification letting you know how many times your search term appears on thepage. To show you how this is implemented, let’s examine the following listing, whichshows the implementation of the UAWebViewClient class.
package com.msi.manning.webtutorial;
import android.content.Context;import android.util.Log;import android.graphics.Bitmap;import android.webkit.*;import android.widget.Toast;
public class UAWebViewClient extends WebViewClient{ private String tag = "UAWebViewClient"; private Context context; public UAWebViewClient(Context context) { super(); this.context = context; } public void onPageStarted(WebView wv,String url,Bitmap favicon) { super.onPageStarted(wv,url,favicon); if (!url.equals(WebTutorial.STARTING_PAGE)) {
Listing 16.14 UAWebViewClient.java
Figure 16.18 Searching the web via Google
Figure 16.19 Hit indicator
Extend WebViewClient
B
Call super methods
C
CCall supermethods
Selective operationD
www.it-ebooks.info

469Building a hybrid application
WTApplication app = (WTApplication) context; String toSearch = app.getSearchTerm(); if (toSearch != null && toSearch.trim().length() > 0) { Toast.makeText(context,"Searching for " +
toSearch,Toast.LENGTH_SHORT).show(); } } } public void onPageFinished(WebView wv,String url) { super.onPageFinished(wv,url); Log.i(tag,"onPageFinished"); if (!url.equals(WebTutorial.STARTING_PAGE)) { WTApplication app = (WTApplication) context; String toSearch = app.getSearchTerm(); if (toSearch != null && toSearch.trim().length() > 0) { int count = wv.findAll(app.getSearchTerm()); Toast.makeText(app, count + " occurrences of " + toSearch +
".",Toast.LENGTH_SHORT).show();
} } }}
Extending the WebViewClient B for our purposes involves a custom constructor plustwo subclassed methods. For each of the three methods, we call the respective supermethods C to make sure the parent class has an opportunity to perform necessaryhousekeeping. When filtering the page loads, we don’t want our augmented behaviorto fire if we’re on the starting index.html page shipped with the application, so we doa basic string comparison D to selectively ignore the additional functionality if we’reback on the starting page within our own content. Assuming we’re on a subsequentlyloaded web page, we need to access the android.app.Application instance E togain access to the globally stored searchTerm F. In the onPageStarted() method, weremind the user of the term we’re searching for through the use of a Toast notifica-tion. In onPageFinished(), we call the findAll() method to search the newly down-loaded page for the search term G. When the search is completed, we again let theuser know via a Toast notification.
This WebViewClient extension is installed with a call to
browser.setWebViewClient(new UAWebViewClient(this.getApplicationContext()));
This simple application is begging for enhancements, so feel free to download thesample code and extend the WebViewClient yourself and enjoy the feeling of addingfunctionality to the world’s most popular application—the browser!
If you have a taste for improving additional behavior modification of the browser,you’ll want to try your hand at updating the chrome by subclassing WebChromeClient.
Get searchF
Get globalsE
Find alloccurrences of term G
Call super methods
C
Get globals
E
Get searchF
Find alloccurrences of term G
www.it-ebooks.info
470 CHAPTER 16 Android web development
16.4.10 Implementing the WebChromeClient
The WebChromeClient class is responsible for handling client-side events such asJavaScript alerts, prompts, and the like. Additionally, the WebChromeClient is notifiedwhen a window is being closed or a new window is attempting to load. Like the Web-ViewClient, this class is a topic unto itself. For our purposes here, we demonstrate itsuse by overriding the alert() JavaScript function.
Referring to the index.html file from listing 16.11, you see the code for handlingthe Chrome button: <button onclick="alert('Hey chrome!');">Chrome</button>.There’s no special namespace qualifier on this function—it’s the same JavaScript alertfunction used since client-side programming first littered our world with pop-up mes-sages. This function’s sole purpose is to inform the user of information that’s hope-fully relevant to their browsing activity. Listing 16.15 demonstrates subclassing theWebChromeClient and implementing the onJsAlert method. Again, this method isinvoked when the JavaScript alert function is encountered in a running web page.
package com.msi.manning.webtutorial;
import android.content.Context;import android.widget.Toast;import android.webkit.JsResult;import android.webkit.WebChromeClient;import android.webkit.WebView;import android.widget.Toast;
public class UAChrome extends WebChromeClient {
private Context context; public UAChrome(Context context) { super(); this.context = context;
} public boolean onJsAlert(WebView wv,String url,
String message,JsResult result) { Toast.makeText(wv.getContext(),message,Toast.LENGTH_SHORT).show(); result.confirm(); return true; }}
The UAChrome class extends the WebChromeClient B. In the constructor, we call theconstructor of the super class with a call to super C. In order to process alert state-ments, we need to implement the onJsAlert() method D. This method takes fourarguments: the WebView instance hosting the JavaScript code, the URL of the page, themessage to be displayed, and a JsResult argument. The JsResult object has methodsfor indicating to the caller whether the user confirmed or canceled the prompt. In thissample implementation, we replace the pop-up box with a tidy Toast notification E;and because the Toast notification clears on its own, we need to inform the caller that
Listing 16.15 UAChrome.java
Extending WebChromeClient
B
Call super method
C
Override onJsAlert
D
Confirm resultF E
ToastnotificationReturn trueG
www.it-ebooks.info
471Summary
the notification was “confirmed.” This is accomplished with a call to the confirm()method of the JsResult parameter named result F. Finally, we return a Booleantrue G to indicate that this overridden method has processed the event.
16.5 SummaryThis chapter covered a fair amount of material related to web development forAndroid. As with most topics related to programming, we’ve only scratched the sur-face—and hopefully provided you with inspiration and guidance on where to digdeeper on your own.
Starting with the idea of making pure web applications as friendly as possible onthe Android standalone browser, we explored the viewport meta tag along with thetechnique of loading platform-specific CSS files. Style sheet management is an impor-tant and recommended skill for any kind of web development today.
Moving beyond the look and feel aspects of the in-the-browser application model,we explored the technique of SQL database access directly from the client-sideJavaScript. After a basic demonstration of the data access methods, we looked at a con-venient testing platform in the desktop version of WebKit.
We then moved on to cover perhaps the most exciting aspect of web programmingin the mobile world today: creating hybrid applications. Hybrid applications canenhance an Android SDK application with highly capable formatting of selective areassuch as help screens or tutorials. Or, as demonstrated in this chapter’s sample code, ahybrid application can enable a purely HTML and CSS user interface while permittingthe underlying Java code to perform the heavy lifting. Regardless of your approach,having an understanding of the basics of Hybrid application development is a benefitto the Android programmer.
In the next chapter, we’ll look at one of the game-changing features of theAndroid platform: the AppWidget.
www.it-ebooks.info
AppWidgets
Continuing with the theme of exploring the maturing Android platform, this chap-ter examines the AppWidget, which brings functionality to the phone-top, or homescreen, of an Android device. In this chapter, you construct an application namedSiteMonitor that ties together many of the fundamental application developmentskills from prior chapters and adds an interactive presence on the home screen.
By placing content directly on the Android device’s home screen, you empowerthe user to fully leverage the platform by making powerful tools available for usequickly and conveniently. Think about it—the deeper a user has to tap into an appli-cation to find information of value, the less likely the application will become aneveryday staple. The goal is to create a mobile experience that brings value withoutbecoming a black hole of time, attention, or worse, annoyance. A key ingredient tomeeting this objective is the effective use of the AppWidget. This chapter equips you
This chapter covers Introducing the AppWidget
Introducing the sample application: SiteMonitor
Implementing the AppWidgetProvider
Configuring an AppWidget instance
Updating the AppWidgets
472
www.it-ebooks.info
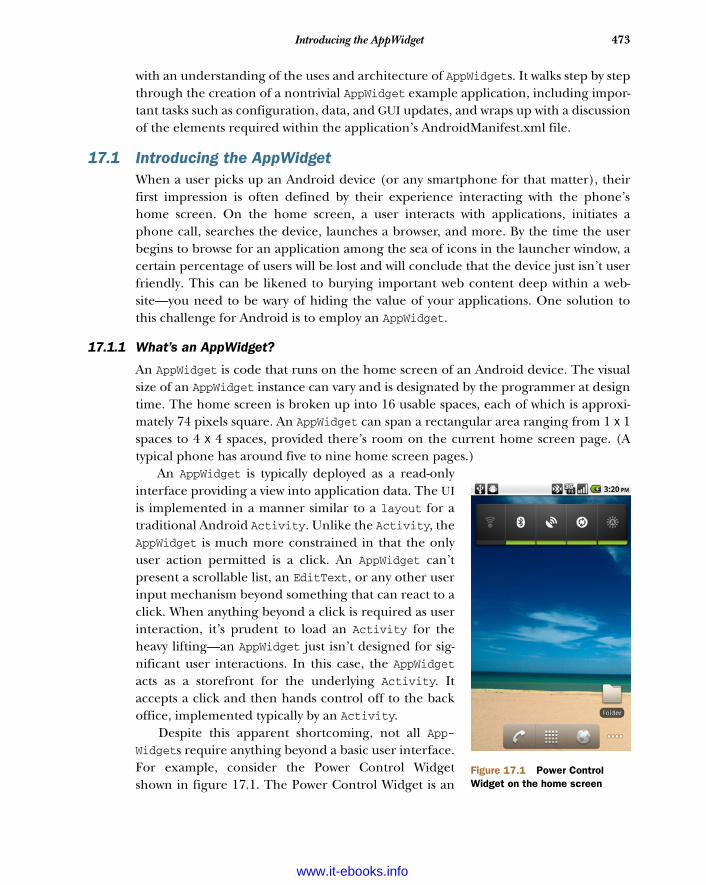
473Introducing the AppWidget
with an understanding of the uses and architecture of AppWidgets. It walks step by stepthrough the creation of a nontrivial AppWidget example application, including impor-tant tasks such as configuration, data, and GUI updates, and wraps up with a discussionof the elements required within the application’s AndroidManifest.xml file.
17.1 Introducing the AppWidgetWhen a user picks up an Android device (or any smartphone for that matter), theirfirst impression is often defined by their experience interacting with the phone’shome screen. On the home screen, a user interacts with applications, initiates aphone call, searches the device, launches a browser, and more. By the time the userbegins to browse for an application among the sea of icons in the launcher window, acertain percentage of users will be lost and will conclude that the device just isn’t userfriendly. This can be likened to burying important web content deep within a web-site—you need to be wary of hiding the value of your applications. One solution tothis challenge for Android is to employ an AppWidget.
17.1.1 What’s an AppWidget?
An AppWidget is code that runs on the home screen of an Android device. The visualsize of an AppWidget instance can vary and is designated by the programmer at designtime. The home screen is broken up into 16 usable spaces, each of which is approxi-mately 74 pixels square. An AppWidget can span a rectangular area ranging from 1 x 1spaces to 4 x 4 spaces, provided there’s room on the current home screen page. (Atypical phone has around five to nine home screen pages.)
An AppWidget is typically deployed as a read-onlyinterface providing a view into application data. The UIis implemented in a manner similar to a layout for atraditional Android Activity. Unlike the Activity, theAppWidget is much more constrained in that the onlyuser action permitted is a click. An AppWidget can’tpresent a scrollable list, an EditText, or any other userinput mechanism beyond something that can react to aclick. When anything beyond a click is required as userinteraction, it’s prudent to load an Activity for theheavy lifting—an AppWidget just isn’t designed for sig-nificant user interactions. In this case, the AppWidgetacts as a storefront for the underlying Activity. Itaccepts a click and then hands control off to the backoffice, implemented typically by an Activity.
Despite this apparent shortcoming, not all App-Widgets require anything beyond a basic user interface.For example, consider the Power Control Widgetshown in figure 17.1. The Power Control Widget is an
Figure 17.1 Power Control Widget on the home screen
www.it-ebooks.info

474 CHAPTER 17 AppWidgets
excellent demonstration of simplicity and value. Thiswidget is used to enable and disable various system ser-vices such as Bluetooth, Wi-Fi, GPS, and other battery-impacting functions. GPS services are a significant drainon the battery—the fact that the Power Control Widgetexposes this on/off feature so easily makes the use oflocation-based services a more realistic option forAndroid users. On other phone platforms, this kind offunctionality is generally hidden under system oroption menus.
You add AppWidgets to the home screen by pressingand holding an empty area until a menu launches, asshown in figure 17.2.
From this menu, select Widgets, and available App-Widgets are displayed in a scrollable list, as shown infigure 17.3. Tap on the desired widget to add aninstance to your home screen.
An AppWidget runs under another application,namely an AppWidgetHost, which is typically thedevice’s home screen. The AppWidget code is imple-mented in an instance of an AppWidgetProvider, whichis an extension of the BroadcastReceiver class. Recallfrom prior chapters that a BroadcastReceiver isdefined as a receiver in the AndroidManifest.xml file.The AppWidgetProvider is a BroadcastReceiver with aspecial IntentFilter and a metadata tag that furtherdefines the AppWidgetProvider’s characteristics. AnAppWidget may be implemented in code as aBroadcastReceiver alone, yet the AppWidgetProviderprovides some convenience wrapper functionality andis the recommended means of coding an AppWidget.
AppWidgets are designed to be updated periodically.The stock implementation of an AppWidget automati-cally updates at an interval defined by the developer atdesign time. In general, this update is kept to a low fre-quency to conserve battery power. There are othermechanisms for updating an AppWidget on an as-needed basis through the use of Intents. The App-WidgetProvider extends BroadcastReceiver and therefore can receive differentIntent Actions based on the defined IntentFilters. The common practice is todefine an application-specific IntentFilter action and use the sendBroadcast()method to trigger an AppWidget update on an as-needed basis.
Figure 17.2 Add to home screen
Figure 17.3 Choose a widget, any widget.
www.it-ebooks.info
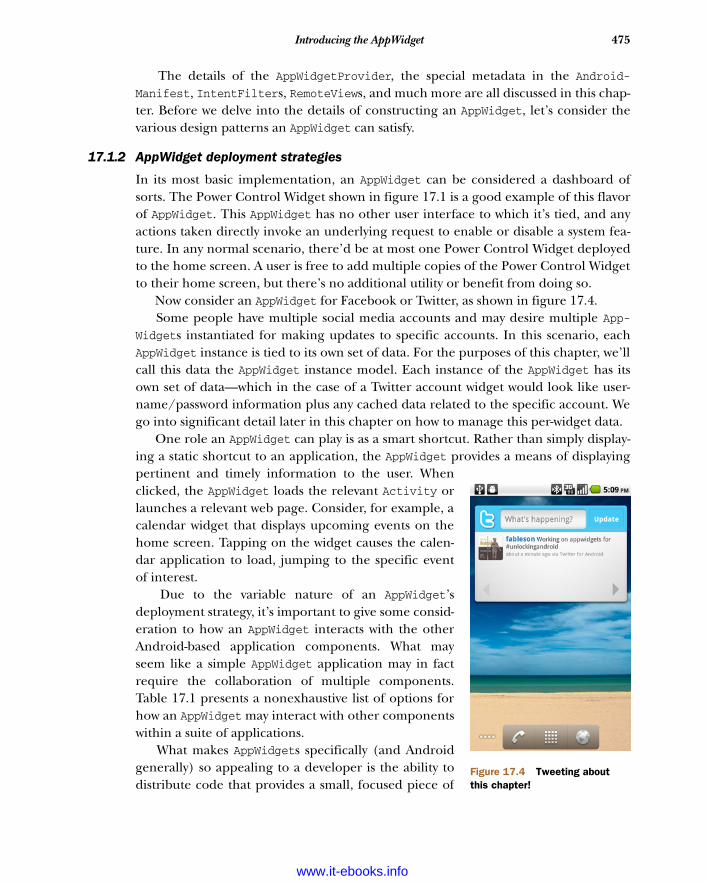
475Introducing the AppWidget
The details of the AppWidgetProvider, the special metadata in the Android-Manifest, IntentFilters, RemoteViews, and much more are all discussed in this chap-ter. Before we delve into the details of constructing an AppWidget, let’s consider thevarious design patterns an AppWidget can satisfy.
17.1.2 AppWidget deployment strategies
In its most basic implementation, an AppWidget can be considered a dashboard ofsorts. The Power Control Widget shown in figure 17.1 is a good example of this flavorof AppWidget. This AppWidget has no other user interface to which it’s tied, and anyactions taken directly invoke an underlying request to enable or disable a system fea-ture. In any normal scenario, there’d be at most one Power Control Widget deployedto the home screen. A user is free to add multiple copies of the Power Control Widgetto their home screen, but there’s no additional utility or benefit from doing so.
Now consider an AppWidget for Facebook or Twitter, as shown in figure 17.4. Some people have multiple social media accounts and may desire multiple App-
Widgets instantiated for making updates to specific accounts. In this scenario, eachAppWidget instance is tied to its own set of data. For the purposes of this chapter, we’llcall this data the AppWidget instance model. Each instance of the AppWidget has itsown set of data—which in the case of a Twitter account widget would look like user-name/password information plus any cached data related to the specific account. Wego into significant detail later in this chapter on how to manage this per-widget data.
One role an AppWidget can play is as a smart shortcut. Rather than simply display-ing a static shortcut to an application, the AppWidget provides a means of displayingpertinent and timely information to the user. Whenclicked, the AppWidget loads the relevant Activity orlaunches a relevant web page. Consider, for example, acalendar widget that displays upcoming events on thehome screen. Tapping on the widget causes the calen-dar application to load, jumping to the specific eventof interest.
Due to the variable nature of an AppWidget’sdeployment strategy, it’s important to give some consid-eration to how an AppWidget interacts with the otherAndroid-based application components. What mayseem like a simple AppWidget application may in factrequire the collaboration of multiple components.Table 17.1 presents a nonexhaustive list of options forhow an AppWidget may interact with other componentswithin a suite of applications.
What makes AppWidgets specifically (and Androidgenerally) so appealing to a developer is the ability todistribute code that provides a small, focused piece of
Figure 17.4 Tweeting about this chapter!
www.it-ebooks.info
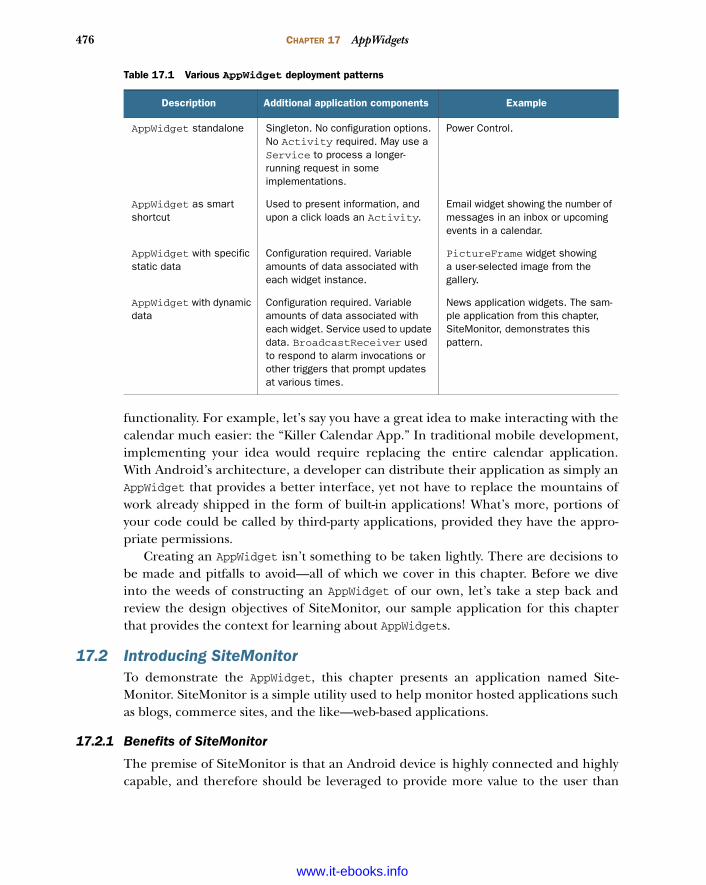
476 CHAPTER 17 AppWidgets
functionality. For example, let’s say you have a great idea to make interacting with thecalendar much easier: the “Killer Calendar App.” In traditional mobile development,implementing your idea would require replacing the entire calendar application.With Android’s architecture, a developer can distribute their application as simply anAppWidget that provides a better interface, yet not have to replace the mountains ofwork already shipped in the form of built-in applications! What’s more, portions ofyour code could be called by third-party applications, provided they have the appro-priate permissions.
Creating an AppWidget isn’t something to be taken lightly. There are decisions tobe made and pitfalls to avoid—all of which we cover in this chapter. Before we diveinto the weeds of constructing an AppWidget of our own, let’s take a step back andreview the design objectives of SiteMonitor, our sample application for this chapterthat provides the context for learning about AppWidgets.
17.2 Introducing SiteMonitorTo demonstrate the AppWidget, this chapter presents an application named Site-Monitor. SiteMonitor is a simple utility used to help monitor hosted applications suchas blogs, commerce sites, and the like—web-based applications.
17.2.1 Benefits of SiteMonitor
The premise of SiteMonitor is that an Android device is highly connected and highlycapable, and therefore should be leveraged to provide more value to the user than
Table 17.1 Various AppWidget deployment patterns
Description Additional application components Example
AppWidget standalone Singleton. No configuration options. No Activity required. May use a Service to process a longer-running request in some implementations.
Power Control.
AppWidget as smart shortcut
Used to present information, and upon a click loads an Activity.
Email widget showing the number of messages in an inbox or upcoming events in a calendar.
AppWidget with specific static data
Configuration required. Variable amounts of data associated with each widget instance.
PictureFrame widget showing a user-selected image from the gallery.
AppWidget with dynamic data
Configuration required. Variable amounts of data associated with each widget. Service used to update data. BroadcastReceiver used to respond to alarm invocations or other triggers that prompt updates at various times.
News application widgets. The sam-ple application from this chapter, SiteMonitor, demonstrates this pattern.
www.it-ebooks.info
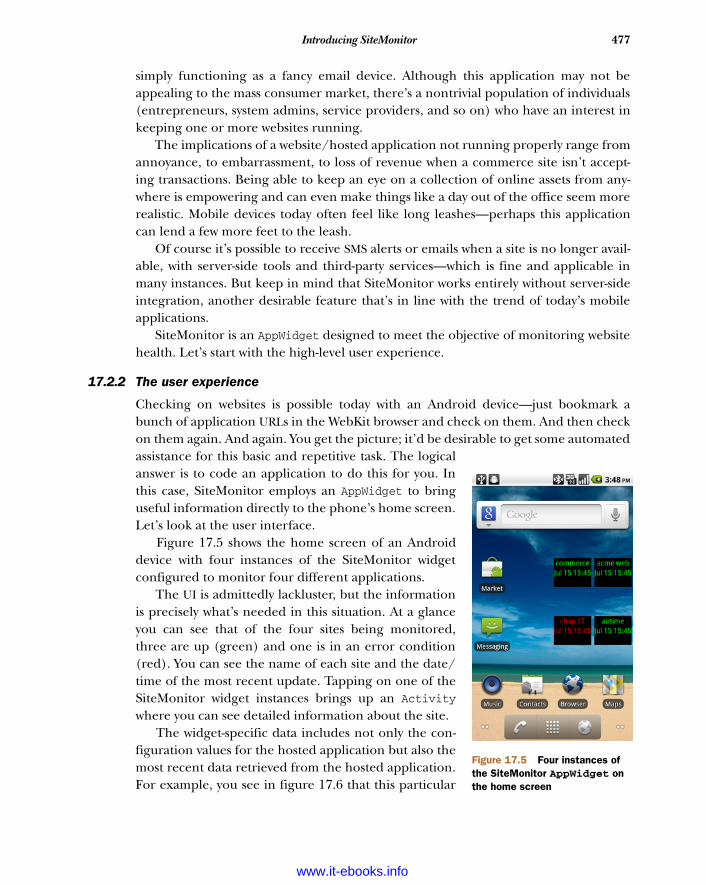
477Introducing SiteMonitor
simply functioning as a fancy email device. Although this application may not beappealing to the mass consumer market, there’s a nontrivial population of individuals(entrepreneurs, system admins, service providers, and so on) who have an interest inkeeping one or more websites running.
The implications of a website/hosted application not running properly range fromannoyance, to embarrassment, to loss of revenue when a commerce site isn’t accept-ing transactions. Being able to keep an eye on a collection of online assets from any-where is empowering and can even make things like a day out of the office seem morerealistic. Mobile devices today often feel like long leashes—perhaps this applicationcan lend a few more feet to the leash.
Of course it’s possible to receive SMS alerts or emails when a site is no longer avail-able, with server-side tools and third-party services—which is fine and applicable inmany instances. But keep in mind that SiteMonitor works entirely without server-sideintegration, another desirable feature that’s in line with the trend of today’s mobileapplications.
SiteMonitor is an AppWidget designed to meet the objective of monitoring websitehealth. Let’s start with the high-level user experience.
17.2.2 The user experience
Checking on websites is possible today with an Android device—just bookmark abunch of application URLs in the WebKit browser and check on them. And then checkon them again. And again. You get the picture; it’d be desirable to get some automatedassistance for this basic and repetitive task. The logicalanswer is to code an application to do this for you. Inthis case, SiteMonitor employs an AppWidget to bringuseful information directly to the phone’s home screen.Let’s look at the user interface.
Figure 17.5 shows the home screen of an Androiddevice with four instances of the SiteMonitor widgetconfigured to monitor four different applications.
The UI is admittedly lackluster, but the informationis precisely what’s needed in this situation. At a glanceyou can see that of the four sites being monitored,three are up (green) and one is in an error condition(red). You can see the name of each site and the date/time of the most recent update. Tapping on one of theSiteMonitor widget instances brings up an Activitywhere you can see detailed information about the site.
The widget-specific data includes not only the con-figuration values for the hosted application but also themost recent data retrieved from the hosted application.For example, you see in figure 17.6 that this particular
Figure 17.5 Four instances of the SiteMonitor AppWidget on the home screen
www.it-ebooks.info
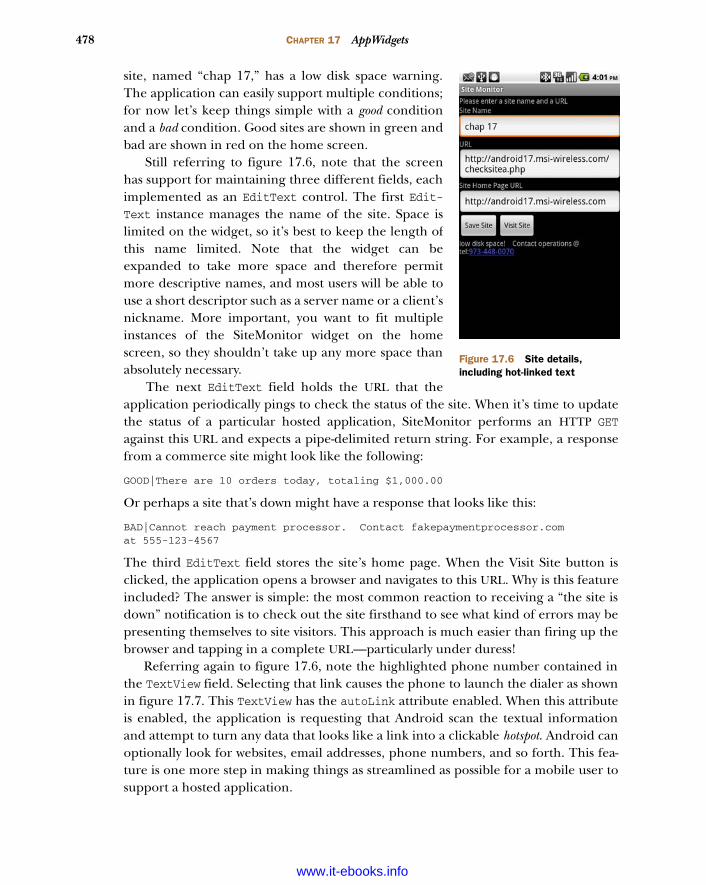
478 CHAPTER 17 AppWidgets
site, named “chap 17,” has a low disk space warning.The application can easily support multiple conditions;for now let’s keep things simple with a good conditionand a bad condition. Good sites are shown in green andbad are shown in red on the home screen.
Still referring to figure 17.6, note that the screenhas support for maintaining three different fields, eachimplemented as an EditText control. The first Edit-Text instance manages the name of the site. Space islimited on the widget, so it’s best to keep the length ofthis name limited. Note that the widget can beexpanded to take more space and therefore permitmore descriptive names, and most users will be able touse a short descriptor such as a server name or a client’snickname. More important, you want to fit multipleinstances of the SiteMonitor widget on the homescreen, so they shouldn’t take up any more space thanabsolutely necessary.
The next EditText field holds the URL that theapplication periodically pings to check the status of the site. When it’s time to updatethe status of a particular hosted application, SiteMonitor performs an HTTP GETagainst this URL and expects a pipe-delimited return string. For example, a responsefrom a commerce site might look like the following:
GOOD|There are 10 orders today, totaling $1,000.00
Or perhaps a site that’s down might have a response that looks like this:
BAD|Cannot reach payment processor. Contact fakepaymentprocessor.com at 555-123-4567
The third EditText field stores the site’s home page. When the Visit Site button isclicked, the application opens a browser and navigates to this URL. Why is this featureincluded? The answer is simple: the most common reaction to receiving a “the site isdown” notification is to check out the site firsthand to see what kind of errors may bepresenting themselves to site visitors. This approach is much easier than firing up thebrowser and tapping in a complete URL—particularly under duress!
Referring again to figure 17.6, note the highlighted phone number contained inthe TextView field. Selecting that link causes the phone to launch the dialer as shownin figure 17.7. This TextView has the autoLink attribute enabled. When this attributeis enabled, the application is requesting that Android scan the textual informationand attempt to turn any data that looks like a link into a clickable hotspot. Android canoptionally look for websites, email addresses, phone numbers, and so forth. This fea-ture is one more step in making things as streamlined as possible for a mobile user tosupport a hosted application.
Figure 17.6 Site details, including hot-linked text
www.it-ebooks.info
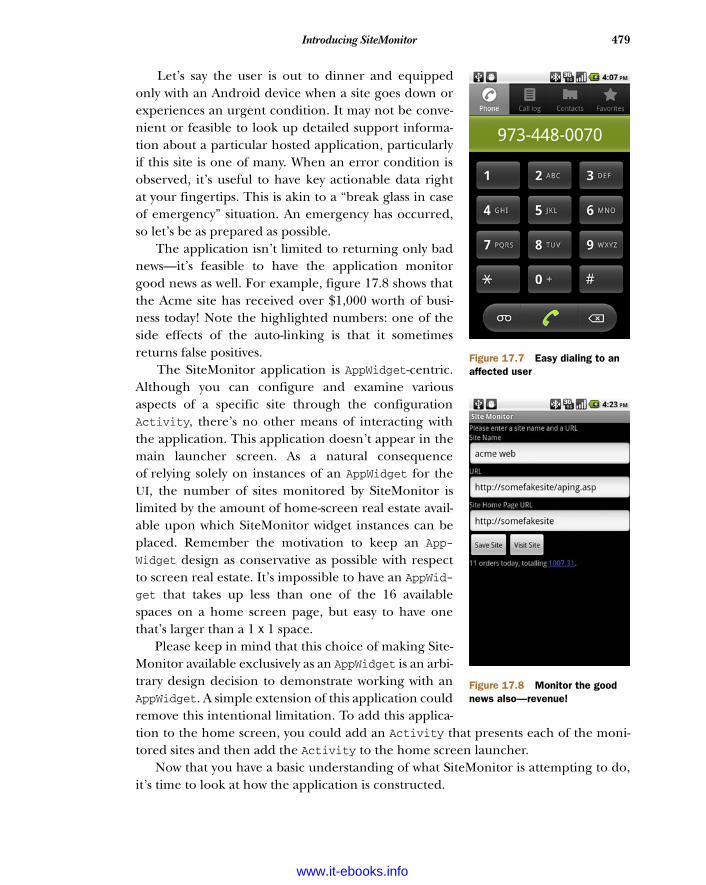
479Introducing SiteMonitor
Let’s say the user is out to dinner and equippedonly with an Android device when a site goes down orexperiences an urgent condition. It may not be conve-nient or feasible to look up detailed support informa-tion about a particular hosted application, particularlyif this site is one of many. When an error condition isobserved, it’s useful to have key actionable data rightat your fingertips. This is akin to a “break glass in caseof emergency” situation. An emergency has occurred,so let’s be as prepared as possible.
The application isn’t limited to returning only badnews—it’s feasible to have the application monitorgood news as well. For example, figure 17.8 shows thatthe Acme site has received over $1,000 worth of busi-ness today! Note the highlighted numbers: one of theside effects of the auto-linking is that it sometimesreturns false positives.
The SiteMonitor application is AppWidget-centric.Although you can configure and examine variousaspects of a specific site through the configurationActivity, there’s no other means of interacting withthe application. This application doesn’t appear in themain launcher screen. As a natural consequenceof relying solely on instances of an AppWidget for theUI, the number of sites monitored by SiteMonitor islimited by the amount of home-screen real estate avail-able upon which SiteMonitor widget instances can beplaced. Remember the motivation to keep an App-Widget design as conservative as possible with respectto screen real estate. It’s impossible to have an AppWid-get that takes up less than one of the 16 availablespaces on a home screen page, but easy to have onethat’s larger than a 1 x 1 space.
Please keep in mind that this choice of making Site-Monitor available exclusively as an AppWidget is an arbi-trary design decision to demonstrate working with anAppWidget. A simple extension of this application couldremove this intentional limitation. To add this applica-tion to the home screen, you could add an Activity that presents each of the moni-tored sites and then add the Activity to the home screen launcher.
Now that you have a basic understanding of what SiteMonitor is attempting to do,it’s time to look at how the application is constructed.
Figure 17.7 Easy dialing to an affected user
Figure 17.8 Monitor the good news also—revenue!
www.it-ebooks.info
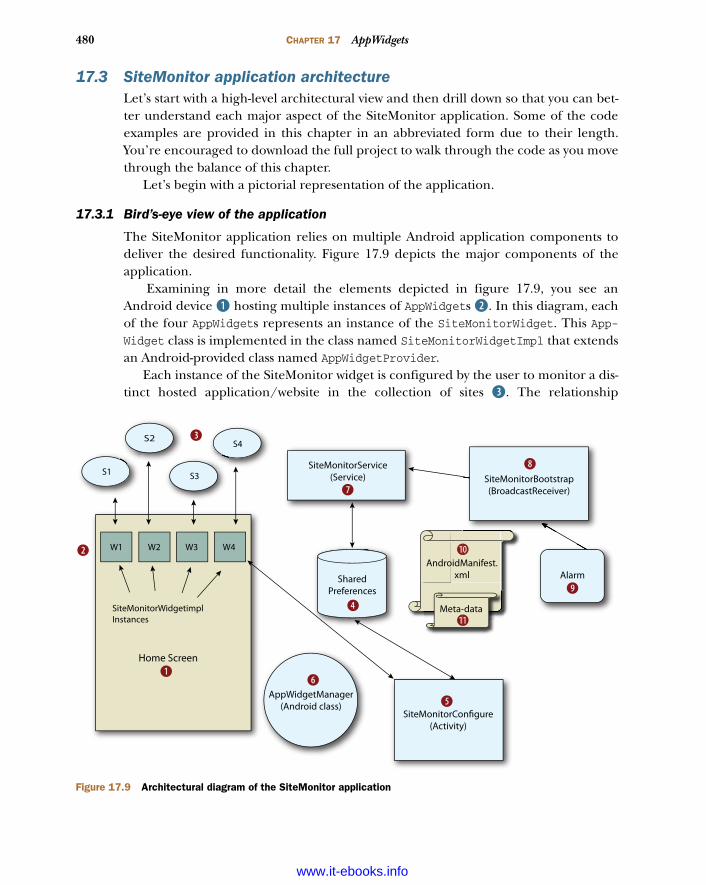
480 CHAPTER 17 AppWidgets
17.3 SiteMonitor application architectureLet’s start with a high-level architectural view and then drill down so that you can bet-ter understand each major aspect of the SiteMonitor application. Some of the codeexamples are provided in this chapter in an abbreviated form due to their length.You’re encouraged to download the full project to walk through the code as you movethrough the balance of this chapter.
Let’s begin with a pictorial representation of the application.
17.3.1 Bird’s-eye view of the application
The SiteMonitor application relies on multiple Android application components todeliver the desired functionality. Figure 17.9 depicts the major components of theapplication.
Examining in more detail the elements depicted in figure 17.9, you see anAndroid device B hosting multiple instances of AppWidgets C. In this diagram, eachof the four AppWidgets represents an instance of the SiteMonitorWidget. This App-Widget class is implemented in the class named SiteMonitorWidgetImpl that extendsan Android-provided class named AppWidgetProvider.
Each instance of the SiteMonitor widget is configured by the user to monitor a dis-tinct hosted application/website in the collection of sites D. The relationship
S1
S4
S3
S2
W1 W2 W3 W4
SiteMonitorWidgetimplInstances
SiteMonitorService(Service)
SharedPreferences
AndroidManifest.xml
Meta-data
Home Screen
AppWidgetManager(Android class)
SiteMonitorConfigure(Activity)
SiteMonitorBootstrap(BroadcastReceiver)
B
C
D
E
F
G
H
I
1)
1!
Alarm
J
Figure 17.9 Architectural diagram of the SiteMonitor application
www.it-ebooks.info
481SiteMonitor application architecture
between a specific widget instance and its data is stored in the application’s Shared-Preferences E persistent store. The class SiteMonitorModel provides methods formanaging and manipulating these data model instances. An Activity F is employedto permit a user to configure the widget instance data. This Activity is implementedas class SiteMonitorConfigure.
Each time a new SiteMonitor widget is added to the home screen, the Site-MonitorConfigure Activity is invoked to query the user for site-specific data: name,URL, home page. This auto-launching of an Activity happens thanks to a specialrelationship between an AppWidget class and its configuration activity. This relationshipis defined in the metadata file 1!. This metadata is referenced by the <receiver>entry of the SiteMonitorWidgetImpl class in the manifest file 1). Note that the prac-tice of having a configuration Activity for an AppWidget is optional.
When a SiteMonitor widget instance is added or removed, a correspondingmethod in the SiteMonitorWidgetImpl class is invoked. The specific methods of thisclass are described in section 17.3.2. The Android-provided AppWidgetManager classG acts as a helper to provide a list of AppWidget identifiers related to the Site-MonitorWidgetImpl class. At this point, there are multiple widget instances on thehome screen, updating their visual display according to an update-refresh interval set-ting defined in the metadata file 1!.
As mentioned earlier, it’s common practice to perform an AppWidget update out-side of its normally defined update interval. This update is generally accomplishedthrough the use of a Service, often triggered by an Alarm. It’s not a recommendedpractice to have long-running Services in the background, so we use the preferredmethod of employing an Alarm J that propagates a PendingIntent.
The PendingIntent contains an Intent that’s received by the SiteMonitor-Bootstrap class I. This class also contains static methods for managing the alarm,called at various points in the application, each of which is discussed further in thischapter. Consider the condition where there are no SiteMonitor widgets instantiatedon the home screen. If there are no hosted applications to monitor, there’s no need tohave a periodic alarm activated. Likewise, when a new SiteMonitor widget is added tothe home screen, it’s desirable for an alarm to be set to ensure that the widget isupdated periodically. The relationship between the Intent Action triggered by thealarm and consumed by the SiteMonitorBootstrap class is defined in the manifest1). The Action field of the Intent set in the Alarm’s PendingIntent matches theIntentFilter Action for the SiteMonitorBootstrap.
When the SiteMonitorBootstrap I receives the Intent in its onReceive() method,the resulting step is the starting of SiteMonitorService H. The SiteMonitorServiceis responsible for carrying out the updates and checking on the hosted applications.
When it’s started, the SiteMonitorService iterates through the available widgetsthanks again to assistance from the AppWidgetManager G, which provides a list of wid-gets. For each active widget instance, the Service extracts the hosted application’s URLand performs an HTTP GET to retrieve the most up-to-date status information. The datamodel for each active AppWidget is updated with the information retrieved from the
www.it-ebooks.info
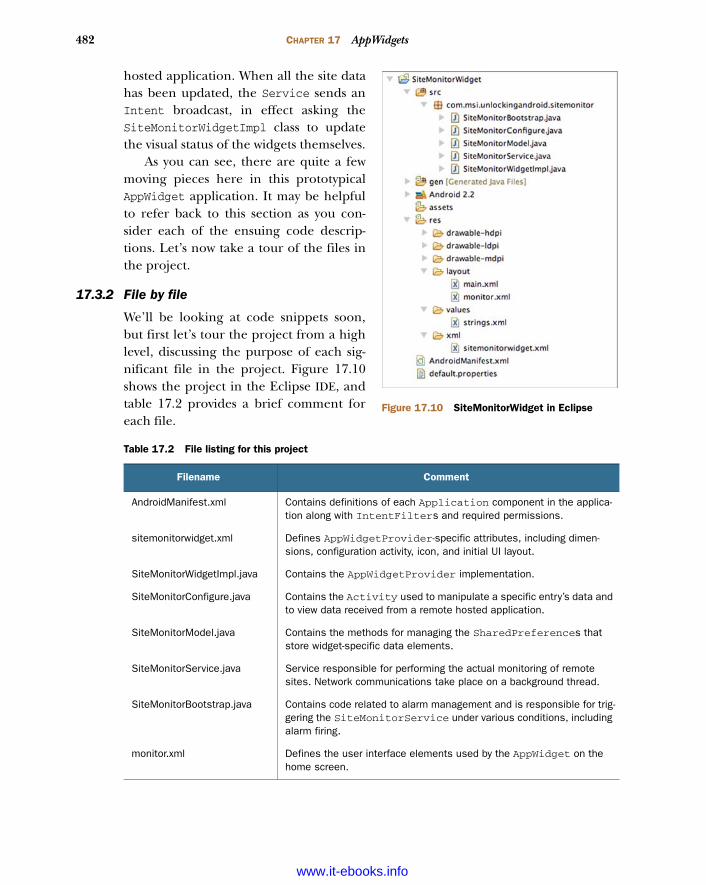
482 CHAPTER 17 AppWidgets
hosted application. When all the site datahas been updated, the Service sends anIntent broadcast, in effect asking theSiteMonitorWidgetImpl class to updatethe visual status of the widgets themselves.
As you can see, there are quite a fewmoving pieces here in this prototypicalAppWidget application. It may be helpfulto refer back to this section as you con-sider each of the ensuing code descrip-tions. Let’s now take a tour of the files inthe project.
17.3.2 File by file
We’ll be looking at code snippets soon,but first let’s tour the project from a highlevel, discussing the purpose of each sig-nificant file in the project. Figure 17.10shows the project in the Eclipse IDE, andtable 17.2 provides a brief comment foreach file.
Table 17.2 File listing for this project
Filename Comment
AndroidManifest.xml Contains definitions of each Application component in the applica-tion along with IntentFilters and required permissions.
sitemonitorwidget.xml Defines AppWidgetProvider-specific attributes, including dimen-sions, configuration activity, icon, and initial UI layout.
SiteMonitorWidgetImpl.java Contains the AppWidgetProvider implementation.
SiteMonitorConfigure.java Contains the Activity used to manipulate a specific entry’s data and to view data received from a remote hosted application.
SiteMonitorModel.java Contains the methods for managing the SharedPreferences that store widget-specific data elements.
SiteMonitorService.java Service responsible for performing the actual monitoring of remote sites. Network communications take place on a background thread.
SiteMonitorBootstrap.java Contains code related to alarm management and is responsible for trig-gering the SiteMonitorService under various conditions, including alarm firing.
monitor.xml Defines the user interface elements used by the AppWidget on the home screen.
Figure 17.10 SiteMonitorWidget in Eclipse
www.it-ebooks.info

483AppWidget data handling
With this foundational understanding of how the various pieces relate to one another,it’s time to start looking at the code behind this application. Although it may betempting to jump into the AppWidgetProvider implementation, we first need to lookat the code for handling the AppWidget-specific data.
17.4 AppWidget data handlingAs mentioned earlier, each instantiated AppWidget has a unique numeric identifierrepresented as an integer primitive (int). Any time the application is asked to workon a particular AppWidget, this identifier value is available to the code. Sometimes it’sprovided, as in an Intent’s extras bundle; in other circumstances a collection of wid-get identifiers is retrieved from the AppWidgetManager as an array of integers(int []). Regardless of its source, managing the relationship between this identifierand the AppWidget instance-specific data defined by your own applications is crucialfor success.
For the SiteMonitor application, all data management is performed by the Site-MonitorModel class, contained in the SiteMonitorModel.java source file. The Site-MonitorModel class can be broken down into two logical sections: the instance dataand methods, and the static method. The instance portion of the class includes anumber of String member variables, their respective getter and setter methods, andhelpful bundling and unbundling methods.
The underlying data storage persistence method is the application’s Shared-Preferences, which we introduced in chapter 5. To keep things simple, every data ele-ment is stored as a java.lang.String. When the entire “record” needs to be stored,the data elements are combined into a composite delimited String. When the data isread out of the SharedPreferences, the retrieved String is parsed and stored intorespective members based on ordinal position in the string. Although this approach isperhaps pedestrian, it’s perfectly adequate for our purposes. Alternatively, we could’veemployed an SQLite database or constructed our own ContentProvider, but both ofthose mechanisms are overkill for this purpose at present. A ContentProvider is oftenonly justified if the data needs to be shared with components outside of a single appli-cation suite.
The data elements managed for each AppWidget include
Site name Site update URL
main.xml Defines the user interface elements used in the SiteMonitorConfigure Activity.
strings.xml Contains externalized strings; useful for easy management of textual data and for potential localization.
Table 17.2 File listing for this project (continued)
Filename Comment
www.it-ebooks.info

484 CHAPTER 17 AppWidgets
Site home page URL
Status Last status date Message/comments
The class also includes four static methods used as helpers to manipulate instances ofwidget data throughout the application. Three of these methods are related to persis-tence of SiteMonitorModel data, and a fourth provides date formatting. This date for-matting method was included to help standardize and centralize Date stringrepresentation.
The following listing presents the implementation of the SiteMonitorModel class,minus a few setter/getters, which are omitted here but are included in the full sourcelisting available for download.
package com.msi.unlockingandroid.sitemonitor;
import java.text.SimpleDateFormat;import android.content.Context;import android.content.SharedPreferences;import android.util.Log;
public class SiteMonitorModel {
private static final String tag = "SiteMonitorModel";
private static final String PREFS_NAME"com.msi.unlockingandroid.SiteMonitor"; private static final String PREFS_PREFIX = "sitemonitor_";
private String name; private String url; private String homepageUrl; private String status; private String statusDate; private String message;
public SiteMonitorModel(String name,String url,String homepageUrl,String status,String statusDate,String message) { this.name = name; this.url = url; this.homepageUrl = homepageUrl; this.status = status; this.statusDate = statusDate; this.message = message; }
public SiteMonitorModel(String instring) { Log.i(SiteMonitorModel.tag,"SiteMonitorModel(" + instring + ")"); String[] data = instring.split("[|]"); if (data.length == 6) { this.name = data[0]; this.url = data[1];
Listing 17.1 SiteMonitorModel class
BContain constants forSharedPreferences
persistence
Contain per-widget data elements
C
Defineconstructor D
Define constructor/parser
E
www.it-ebooks.info

485AppWidget data handling
this.homepageUrl = data[2]; this.status = data[3]; this.statusDate = data[4]; this.message = data[5]; } else { this.name = "?"; this.url = "?"; this.homepageUrl = "?"; this.status = "WARNING"; this.statusDate = java.util.Calendar.getInstance().getTime().toString(); this.message = ""; } }
public String getName() { return this.name; } public void setName(String name) { this.name = name; }
// see full source code for remaining getter/setter methods
public String storageString() { return this.name + "|" + this.url + "|" + this.homepageUrl + "|" + this.status + "|" + this.statusDate + "|" + message; }
public String toString() { return this.storageString(); }
public static void saveWidgetData(Context context,intwidgetId,SiteMonitorModel model) { Log.i(SiteMonitorModel.tag,"saveWidgetData(" + widgetId + "," + model.storageString() + ")"); SharedPreferences.Editor prefsEditor = context.getSharedPreferences(PREFS_NAME, 0).edit(); prefsEditor.putString(PREFS_PREFIX +widgetId,model.storageString()); prefsEditor.commit(); }
public static SiteMonitorModel getWidgetData(Context context,int widget) { Log.i(SiteMonitorModel.tag,"getWidgetData(" + widget + ")");
SharedPreferences prefs = context.getSharedPreferences (PREFS_NAME, 0); String ret = prefs.getString(PREFS_PREFIX + widget,"BAD"); if (ret.equals("BAD")) return null; return new SiteMonitorModel(ret); }
public static void deleteWidgetData(Context context,int widgetId) { Log.i(SiteMonitorModel.tag,"deleteWidgetData(" + widgetId + ")");
Define getter/setterF
Prepare data for storage
G
Override toString()H
Save widget data
I
Retrieve widget data J
Return SiteMonitor-Model instance1)
Remove widget data
1!
www.it-ebooks.info
486 CHAPTER 17 AppWidgets
SharedPreferences.Editor prefsEditor =context.getSharedPreferences(PREFS_NAME, 0).edit(); prefsEditor.remove(PREFS_PREFIX + widgetId); prefsEditor.commit(); }
public static String getFormattedDate() { SimpleDateFormat sdf = new SimpleDateFormat("MMM dd HH:mm"); return sdf.format(java.util.Calendar.getInstance().getTime()); }}
The SiteMonitorModel class meets the data management needs of the SiteMonitorAppWidget. The underlying data persistence method is the application Shared-Preferences and as such a couple of constant String values are employed B to iden-tify the SharedPreferences data. Each data element is defined as a String membervariable C. Two distinct constructors are employed. The first constructor d is for cre-ating a new instance from distinct String values, and the second constructor E isused to parse out data for an existing widget that has been retrieved from a Shared-Preference.
Only one set of getter/setter methods F is shown in this listing, but they allemploy the same basic bean pattern.
When preparing data to be stored in the SharedPreferences, the widget instancedata is reduced to a single delimited String with the assistance of the storage-String() method G. The toString() method H is overridden and invokes thestorageString() method.
Data storage, retrieval, and deletion are handled in statically defined methods.The saveWidgetData() I method stores the widget data with a key of PREFIX_NAME +widgetIdentifier. This means that the data for a widget with an ID of 200 would looklike this:
sitemonitor_200 = "sitename|url|homepageurl|status|statusDate|message"
For more specifics on using SharedPreferences, refer to chapter 5. Widget data is retrieved from SharedPreferences in the getWidgetData() method
J. This method returns a SiteMonitorModel 1) by employing the parsing version ofthe constructor E.
When a widget is removed from the device, we delete the associated data with a callto deleteWidgetData() 1!.
Finally, the getFormattedDate() method 1@ is responsible for formatting ajava.util.Date string into a String representation with the help of a SimpleData-Format class.
At this point you should have a good feel for what data is managed and where itlives. Let’s get to the code to actually implement an AppWidget!
1@ Format status date
www.it-ebooks.info
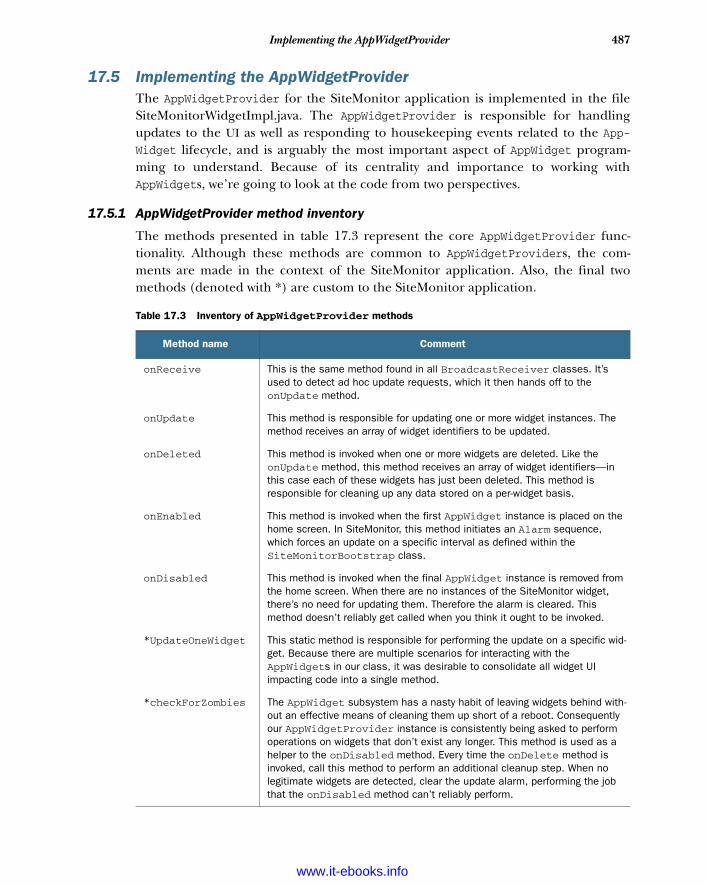
487Implementing the AppWidgetProvider
17.5 Implementing the AppWidgetProviderThe AppWidgetProvider for the SiteMonitor application is implemented in the fileSiteMonitorWidgetImpl.java. The AppWidgetProvider is responsible for handlingupdates to the UI as well as responding to housekeeping events related to the App-Widget lifecycle, and is arguably the most important aspect of AppWidget program-ming to understand. Because of its centrality and importance to working withAppWidgets, we’re going to look at the code from two perspectives.
17.5.1 AppWidgetProvider method inventory
The methods presented in table 17.3 represent the core AppWidgetProvider func-tionality. Although these methods are common to AppWidgetProviders, the com-ments are made in the context of the SiteMonitor application. Also, the final twomethods (denoted with *) are custom to the SiteMonitor application.
Table 17.3 Inventory of AppWidgetProvider methods
Method name Comment
onReceive This is the same method found in all BroadcastReceiver classes. It’s used to detect ad hoc update requests, which it then hands off to the onUpdate method.
onUpdate This method is responsible for updating one or more widget instances. The method receives an array of widget identifiers to be updated.
onDeleted This method is invoked when one or more widgets are deleted. Like the onUpdate method, this method receives an array of widget identifiers—in this case each of these widgets has just been deleted. This method is responsible for cleaning up any data stored on a per-widget basis.
onEnabled This method is invoked when the first AppWidget instance is placed on the home screen. In SiteMonitor, this method initiates an Alarm sequence, which forces an update on a specific interval as defined within the SiteMonitorBootstrap class.
onDisabled This method is invoked when the final AppWidget instance is removed from the home screen. When there are no instances of the SiteMonitor widget, there’s no need for updating them. Therefore the alarm is cleared. This method doesn’t reliably get called when you think it ought to be invoked.
*UpdateOneWidget This static method is responsible for performing the update on a specific wid-get. Because there are multiple scenarios for interacting with the AppWidgets in our class, it was desirable to consolidate all widget UI impacting code into a single method.
*checkForZombies The AppWidget subsystem has a nasty habit of leaving widgets behind with-out an effective means of cleaning them up short of a reboot. Consequently our AppWidgetProvider instance is consistently being asked to perform operations on widgets that don’t exist any longer. This method is used as a helper to the onDisabled method. Every time the onDelete method is invoked, call this method to perform an additional cleanup step. When no legitimate widgets are detected, clear the update alarm, performing the job that the onDisabled method can’t reliably perform.
www.it-ebooks.info
488 CHAPTER 17 AppWidgets
You now know what the method names are and the responsibility of each. It’s time toexamine the code. Let’s begin with the implementation of an AppWidgetProvider aswe look at SiteMonitorWidgetImpl.
17.5.2 Implementing SiteMonitorWidgetImpl
There’s a lot of code to examine in this class, so we’re going to break it into a coupleof sections. In listing 17.2 you can see the basic callbacks or hooks that respond to theAppWidget events. As you know, every widget in the system has an integer identifier.When you’re working with AppWidgets, it’s common to manipulate an array of theseidentifiers, as shown in the upcoming listings, so keep an eye out for those identifiersas you review the code.
package com.msi.unlockingandroid.sitemonitor;
import android.content.Context;import android.content.ComponentName;import android.content.Intent;import android.app.PendingIntent;import android.appwidget.AppWidgetProvider;import android.appwidget.AppWidgetManager;import android.widget.RemoteViews;import android.net.Uri;import android.util.Log;import android.graphics.Color;
public class SiteMonitorWidgetImpl extends AppWidgetProvider { private static final String tag = "SiteMonitor"; public static final String UPDATE_WIDGETS ="com.msi.unlockingandroid.sitemonitor.UPDATE_WIDGETS";
@Override public void onUpdate(Context context,AppWidgetManager appWidgetManager,int[] appWidgetIds ) {
super.onUpdate(context, appWidgetManager, appWidgetIds); int count = appWidgetIds.length; Log.i(SiteMonitorWidgetImpl.tag,"onUpdate::" + count); // we may have multiple instances of this widget ... make sure we hit each one ... for (int i=0;i<count;i++) { SiteMonitorWidgetImpl.UpdateOneWidget(context, appWidgetIds[i]); } }
public void onDeleted(Context context,int[] appWidgetIds) { super.onDeleted(context, appWidgetIds); Log.i(SiteMonitorWidgetImpl.tag,"onDeleted()" + appWidgetIds.length); for (int i = 0;i<appWidgetIds.length;i++) { SiteMonitorModel.deleteWidgetData(context, appWidgetIds[i]);
Listing 17.2 SiteMonitorWidgetImpl, which implements AppWidget functionality
AppWidget imports
B
String used for updates
C
onUpdate methodD
Update of single widgetE
onDeleted
F
method
www.it-ebooks.info
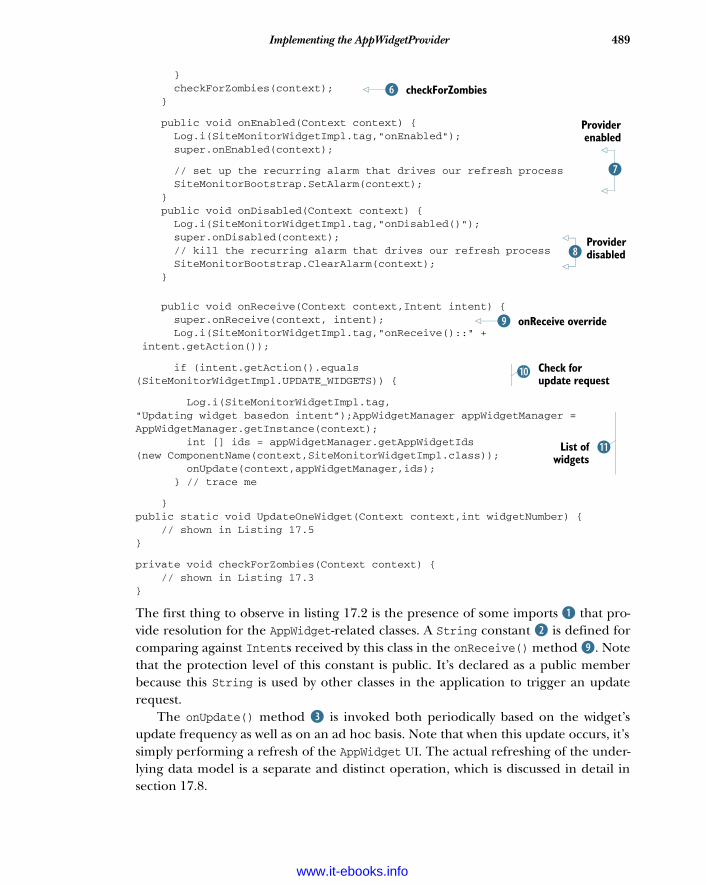
489Implementing the AppWidgetProvider
} checkForZombies(context); }
public void onEnabled(Context context) { Log.i(SiteMonitorWidgetImpl.tag,"onEnabled"); super.onEnabled(context);
// set up the recurring alarm that drives our refresh process SiteMonitorBootstrap.SetAlarm(context); } public void onDisabled(Context context) { Log.i(SiteMonitorWidgetImpl.tag,"onDisabled()"); super.onDisabled(context); // kill the recurring alarm that drives our refresh process SiteMonitorBootstrap.ClearAlarm(context); }
public void onReceive(Context context,Intent intent) { super.onReceive(context, intent); Log.i(SiteMonitorWidgetImpl.tag,"onReceive()::" + intent.getAction());
if (intent.getAction().equals(SiteMonitorWidgetImpl.UPDATE_WIDGETS)) {
Log.i(SiteMonitorWidgetImpl.tag,"Updating widget basedon intent”);AppWidgetManager appWidgetManager =AppWidgetManager.getInstance(context); int [] ids = appWidgetManager.getAppWidgetIds(new ComponentName(context,SiteMonitorWidgetImpl.class)); onUpdate(context,appWidgetManager,ids); } // trace me
}public static void UpdateOneWidget(Context context,int widgetNumber) { // shown in Listing 17.5}
private void checkForZombies(Context context) { // shown in Listing 17.3}
The first thing to observe in listing 17.2 is the presence of some imports B that pro-vide resolution for the AppWidget-related classes. A String constant C is defined forcomparing against Intents received by this class in the onReceive() method J. Notethat the protection level of this constant is public. It’s declared as a public memberbecause this String is used by other classes in the application to trigger an updaterequest.
The onUpdate() method D is invoked both periodically based on the widget’supdate frequency as well as on an ad hoc basis. Note that when this update occurs, it’ssimply performing a refresh of the AppWidget UI. The actual refreshing of the under-lying data model is a separate and distinct operation, which is discussed in detail insection 17.8.
checkForZombiesG
Providerenabled
H
Provider disabledI
onReceive overrideJ
Check for update request1)
1!List ofwidgets
www.it-ebooks.info
490 CHAPTER 17 AppWidgets
Once we have a list of widgets that require updating, each is updated in turn with acall to SiteMonitorWidgetImpl.UpdateOneWidget() E. This method is defined as astatic method, as it’s also called from the SiteMonitorConfigure Activity.
The onDeleted() method F handles the scenario where a widget is removed fromthe home screen. When this method is invoked, it in turn calls the super class’sonDeleted method. Next it removes the data related to each deleted widget with a callto SiteMonitorModel.deleteWidgetData(). Finally, this method wraps up with a callto check for zombie widgets (which we describe in a moment) by calling checkFor-Zombies() G. It’s not uncommon to have a widget identifier allocated but the widgetitself not actually created. An example of this is when a configuration activity islaunched but then canceled by the user—no widget data gets created, so you wind upwith widget identifiers not attached to meaningful widget data. The reason you wantto track this situation is to disable the update alarm when no legitimate widgetsremain. Also, note that the arguments to this method include an array of integers rep-resenting the list of deleted widget instances. This array will usually consist of only asingle widget.
When the AppWidgetProvider() is enabled H, the update alarm is set. Note thatthe onEnabled() method can be used for other housekeeping setup tasks as well. Thismethod is triggered when the first AppWidget is created.
The mirror image of the onEnabled method is the onDisabled() method I. Thismethod cancels the alarm set previously in the onEnabled() method. This methodisn’t called when you think it ought to be! Why? Because of the “zombie” widgets thatlurk about in the ether. It’s for this reason that the checkForZombies() method wasadded to this class, accommodating the scenario where there are no active widgets butthe operating system believes they still exist. These widgets will persist until the deviceis rebooted. The moral of the story here is that although these callback methods arenice to have, it’s ultimately up to the developer to manage around the system. This willin all likelihood be rectified in future releases, but as of Android version 2.2, this “fea-ture” remains.
Rounding out this code listing, you see the onReceive() method J. This is thesame method required of all BroadcastReceiver implementations—recall that App-WidgetProvider extends the BroadcastReceiver. The super class’s onReceive()method is invoked, and then the Intent is examined 1). If the Intent matches thespecial update constant defined in this class, SiteMonitorWidgetImpl.UPDATE_WIDGETS, the code gathers a list of relevant widget identifiers 1! and passes them tothe onUpdate() method to be refreshed visually.
17.5.3 Handling zombie widgets
We’ve discussed at length the nature of the relationship between the widget identifierand the widget data as defined and managed in the SiteMonitorModel class. Thereare a number of places in the application where a widget identifier is available and thecode needs to check for the presence of legitimate data. One example of this is the
www.it-ebooks.info
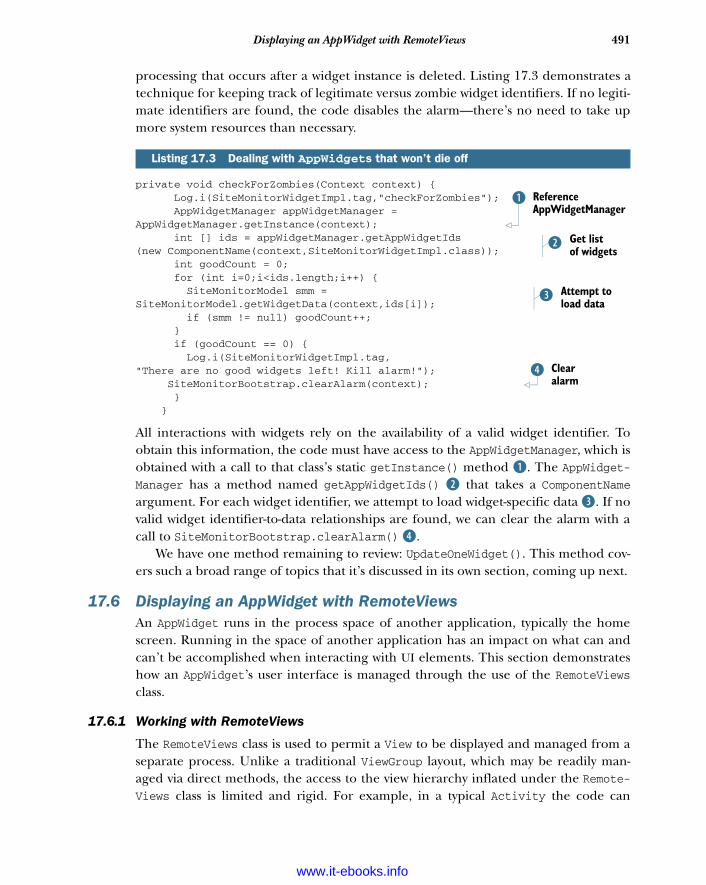
491Displaying an AppWidget with RemoteViews
processing that occurs after a widget instance is deleted. Listing 17.3 demonstrates atechnique for keeping track of legitimate versus zombie widget identifiers. If no legiti-mate identifiers are found, the code disables the alarm—there’s no need to take upmore system resources than necessary.
private void checkForZombies(Context context) { Log.i(SiteMonitorWidgetImpl.tag,"checkForZombies"); AppWidgetManager appWidgetManager =AppWidgetManager.getInstance(context); int [] ids = appWidgetManager.getAppWidgetIds(new ComponentName(context,SiteMonitorWidgetImpl.class)); int goodCount = 0; for (int i=0;i<ids.length;i++) { SiteMonitorModel smm =SiteMonitorModel.getWidgetData(context,ids[i]); if (smm != null) goodCount++; } if (goodCount == 0) { Log.i(SiteMonitorWidgetImpl.tag,"There are no good widgets left! Kill alarm!");
SiteMonitorBootstrap.clearAlarm(context); } }
All interactions with widgets rely on the availability of a valid widget identifier. Toobtain this information, the code must have access to the AppWidgetManager, which isobtained with a call to that class’s static getInstance() method B. The AppWidget-Manager has a method named getAppWidgetIds() C that takes a ComponentNameargument. For each widget identifier, we attempt to load widget-specific data D. If novalid widget identifier-to-data relationships are found, we can clear the alarm with acall to SiteMonitorBootstrap.clearAlarm() E.
We have one method remaining to review: UpdateOneWidget(). This method cov-ers such a broad range of topics that it’s discussed in its own section, coming up next.
17.6 Displaying an AppWidget with RemoteViewsAn AppWidget runs in the process space of another application, typically the homescreen. Running in the space of another application has an impact on what can andcan’t be accomplished when interacting with UI elements. This section demonstrateshow an AppWidget’s user interface is managed through the use of the RemoteViewsclass.
17.6.1 Working with RemoteViews
The RemoteViews class is used to permit a View to be displayed and managed from aseparate process. Unlike a traditional ViewGroup layout, which may be readily man-aged via direct methods, the access to the view hierarchy inflated under the Remote-Views class is limited and rigid. For example, in a typical Activity the code can
Listing 17.3 Dealing with AppWidgets that won’t die off
Reference AppWidgetManager
B
Get list of widgetsC
Attempt to load dataD
Clear alarm
E
www.it-ebooks.info
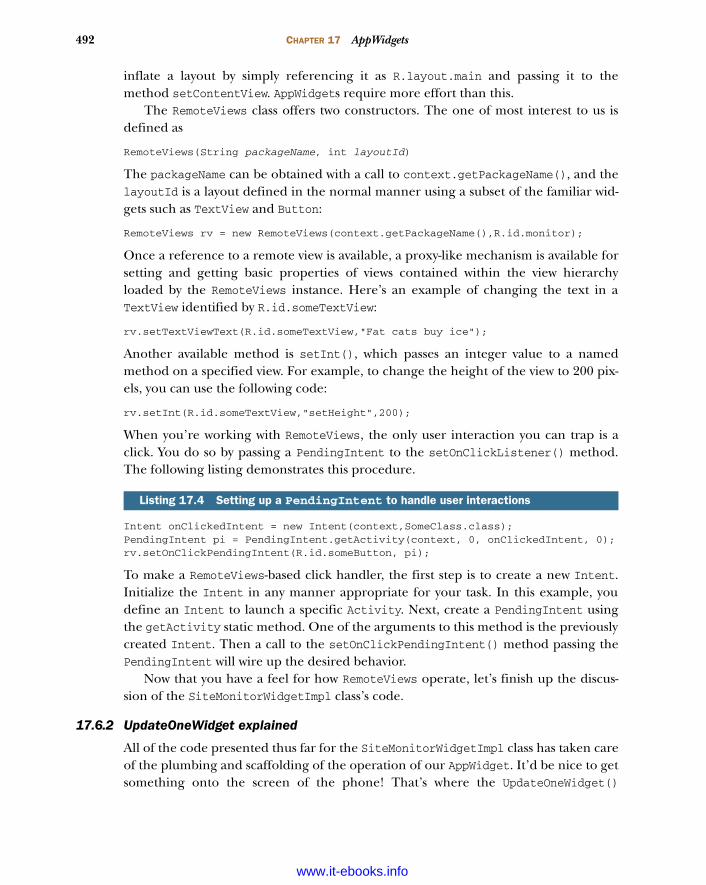
492 CHAPTER 17 AppWidgets
inflate a layout by simply referencing it as R.layout.main and passing it to themethod setContentView. AppWidgets require more effort than this.
The RemoteViews class offers two constructors. The one of most interest to us isdefined as
RemoteViews(String packageName, int layoutId)
The packageName can be obtained with a call to context.getPackageName(), and thelayoutId is a layout defined in the normal manner using a subset of the familiar wid-gets such as TextView and Button:
RemoteViews rv = new RemoteViews(context.getPackageName(),R.id.monitor);
Once a reference to a remote view is available, a proxy-like mechanism is available forsetting and getting basic properties of views contained within the view hierarchyloaded by the RemoteViews instance. Here’s an example of changing the text in aTextView identified by R.id.someTextView:
rv.setTextViewText(R.id.someTextView,"Fat cats buy ice");
Another available method is setInt(), which passes an integer value to a namedmethod on a specified view. For example, to change the height of the view to 200 pix-els, you can use the following code:
rv.setInt(R.id.someTextView,"setHeight",200);
When you’re working with RemoteViews, the only user interaction you can trap is aclick. You do so by passing a PendingIntent to the setOnClickListener() method.The following listing demonstrates this procedure.
Intent onClickedIntent = new Intent(context,SomeClass.class); PendingIntent pi = PendingIntent.getActivity(context, 0, onClickedIntent, 0);rv.setOnClickPendingIntent(R.id.someButton, pi);
To make a RemoteViews-based click handler, the first step is to create a new Intent.Initialize the Intent in any manner appropriate for your task. In this example, youdefine an Intent to launch a specific Activity. Next, create a PendingIntent usingthe getActivity static method. One of the arguments to this method is the previouslycreated Intent. Then a call to the setOnClickPendingIntent() method passing thePendingIntent will wire up the desired behavior.
Now that you have a feel for how RemoteViews operate, let’s finish up the discus-sion of the SiteMonitorWidgetImpl class’s code.
17.6.2 UpdateOneWidget explained
All of the code presented thus far for the SiteMonitorWidgetImpl class has taken careof the plumbing and scaffolding of the operation of our AppWidget. It’d be nice to getsomething onto the screen of the phone! That’s where the UpdateOneWidget()
Listing 17.4 Setting up a PendingIntent to handle user interactions
www.it-ebooks.info
493Displaying an AppWidget with RemoteViews
method comes into play. Recall that the onUpdate() method delegated the responsi-bility of updating the screen to this method. The following listing demonstrates updat-ing the widget with the help of RemoteViews.
public static void UpdateOneWidget(Context context,int widgetNumber) { Log.i(SiteMonitorWidgetImpl.tag,"Update one widget!"); AppWidgetManager appWidgetManager = AppWidgetManager.getInstance(context); SiteMonitorModel smm = SiteMonitorModel.getWidgetData (context, widgetNumber);
if (smm != null) { Log.i(SiteMonitorWidgetImpl.tag,"Processing widget " + smm.toString());
RemoteViews views = newRemoteViews(context.getPackageName(),R.layout.monitor); if (smm.getStatus().equals("GOOD")) { views.setTextColor(R.id.siteName, Color.rgb(0,255,0)); views.setTextColor(R.id.updateTime, Color.rgb(0,255,0)); views.setTextColor(R.id.siteMessage, Color.rgb(0,255,0)); } else if (smm.getStatus().equals("UNKNOWN")){ views.setTextColor(R.id.siteName, Color.rgb(255,255,0)); views.setTextColor(R.id.updateTime, Color.rgb(255,255,0)); views.setTextColor(R.id.siteMessage, Color.rgb(255,255,0)); } else { views.setTextColor(R.id.siteName, Color.rgb(255,0,0)); views.setTextColor(R.id.updateTime, Color.rgb(255,0,0)); views.setTextColor(R.id.siteMessage, Color.rgb(255,0,0)); } views.setTextViewText(R.id.siteName, smm.getName()); views.setTextViewText(R.id.updateTime, smm.getStatusDate());
// make this thing clickable! Intent intWidgetClicked = newIntent(context,SiteMonitorConfigure.class); intWidgetClicked.setData(Uri.parse("file:///bogus" +widgetNumber)); intWidgetClicked.putExtra(AppWidgetManager.EXTRA_APPWIDGET_ID, widgetNumber); PendingIntent pi = PendingIntent.getActivity(context, 0,intWidgetClicked, 0); views.setOnClickPendingIntent(R.id.widgetLayout, pi); appWidgetManager.updateAppWidget(widgetNumber,views); } else { Log.i(SiteMonitorWidgetImpl.tag,"Ignore this widget # " + widgetNumber + ". Must be a zombie widget."); } }
Like virtually everything related to AppWidget programming, the first thing to do isacquire a reference to the AppWidgetManager B. Next, we load the widget-specific
Listing 17.5 Updating the widget with RemoteViews in SiteMonitorWidgetImpl
Acquire AppWidgetManager referenceB
CLoad
widget data
Create RemoteViews instanceD
Format TextViews
E
Assign text values
F
GAssign unique data
HCreate PendingIntent
www.it-ebooks.info
494 CHAPTER 17 AppWidgets
data associated with this widget identifier with SiteMonitorModel.getWidgetData()C and confirm that the data is valid. Assuming we have a good widget to work with,we next create an instance of the RemoteViews class D, passing in an identifier for ourpreferred layout R.id.monitor. Based on the status, we assign different TextColor val-ues E to each of the visible TextViews within the layout, as well as populate the con-trols with the actual textual values for display with calls to setTextViewText F.
At this point, our widget is ready for display. We’d also like the user to be able totap on the widget and bring up related information. To do this, we must assign aPendingIntent to a view within the view hierarchy represented by the RemoteViewsinstance we previously instantiated.
To begin, we create an Intent referencing our configuration activity Site-MonitorConfigure. We next assign data related to this Intent with a call to the set-Data() method G. Note that the data here isn’t particularly important, as long as it’sunique. The reason for this is related to the manner in which PendingIntents areresolved. Without this uniqueness, each subsequent PendingIntent assignment wouldreplace the previously assigned Intent. By adding this custom and unique data to theIntent, your PendingIntent becomes unique per widget. If you doubt this, just com-ment out this line and find out what happens!
Next we assign the widgetNumber to the key AppWidget.EXTRA_APPWIDGET_ID. Thisis used to make things a bit easier in the SiteMonitorConfigure Activity, which isdiscussed in the next section. A PendingIntent is created, requesting an Activity H,and finally this PendingIntent is assigned to our widget via the setOnClickPending-Intent() method. One piece of trivia to note here is that we’ve passed in an ID for theLinearLayout of the user interface. Layouts often don’t have ID attributes associatedwith them. Layouts are instances of ViewGroups, which are extensions of the Viewclass, so there’s no reason why you can’t assign an ID to the layout itself. The net effectis that your entire widget is clickable. Considering the fact that it’s a mere 74 pixelssquare, this is a reasonable approach.
At this point, much of the heavy lifting for our AppWidget is behind you. Let’s lookat some of the details associated with configuring a specific instance of an AppWidgetnext, as we examine the SiteMonitorConfigure Activity.
17.7 Configuring an instance of the AppWidgetThere are two scenarios where our AppWidget may be configured. The first is rightafter the user requests its creation, and the second is when the user taps on an existingwidget instance on the home screen.
Generally speaking, this Activity operates just as any other Activity you’ve expe-rienced throughout the book. It inflates a layout, gets references to the various Views,and responds to user input. Only a couple of items are worthy of highlighting here,but they’re important details that you must implement.
Let’s start with how Android knows which Activity to launch after a new instanceis created. To do that, we’ll take a brief side trip to look at the metadata related to thisAppWidget.
www.it-ebooks.info
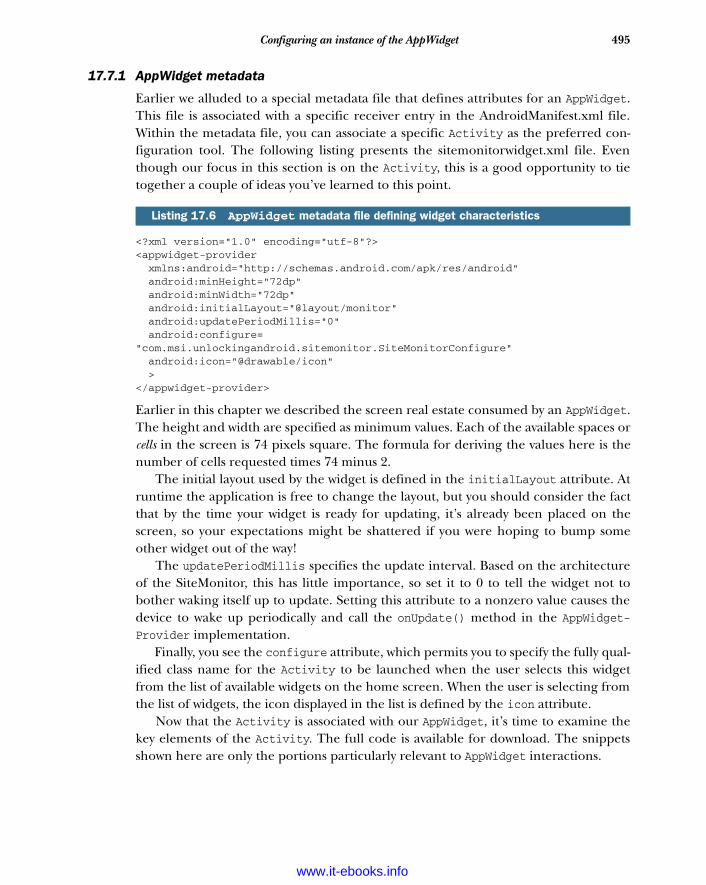
495Configuring an instance of the AppWidget
17.7.1 AppWidget metadata
Earlier we alluded to a special metadata file that defines attributes for an AppWidget.This file is associated with a specific receiver entry in the AndroidManifest.xml file.Within the metadata file, you can associate a specific Activity as the preferred con-figuration tool. The following listing presents the sitemonitorwidget.xml file. Eventhough our focus in this section is on the Activity, this is a good opportunity to tietogether a couple of ideas you’ve learned to this point.
<?xml version="1.0" encoding="utf-8"?><appwidget-provider xmlns:android="http://schemas.android.com/apk/res/android" android:minHeight="72dp" android:minWidth="72dp" android:initialLayout="@layout/monitor" android:updatePeriodMillis="0" android:configure="com.msi.unlockingandroid.sitemonitor.SiteMonitorConfigure" android:icon="@drawable/icon" ></appwidget-provider>
Earlier in this chapter we described the screen real estate consumed by an AppWidget.The height and width are specified as minimum values. Each of the available spaces orcells in the screen is 74 pixels square. The formula for deriving the values here is thenumber of cells requested times 74 minus 2.
The initial layout used by the widget is defined in the initialLayout attribute. Atruntime the application is free to change the layout, but you should consider the factthat by the time your widget is ready for updating, it’s already been placed on thescreen, so your expectations might be shattered if you were hoping to bump someother widget out of the way!
The updatePeriodMillis specifies the update interval. Based on the architectureof the SiteMonitor, this has little importance, so set it to 0 to tell the widget not tobother waking itself up to update. Setting this attribute to a nonzero value causes thedevice to wake up periodically and call the onUpdate() method in the AppWidget-Provider implementation.
Finally, you see the configure attribute, which permits you to specify the fully qual-ified class name for the Activity to be launched when the user selects this widgetfrom the list of available widgets on the home screen. When the user is selecting fromthe list of widgets, the icon displayed in the list is defined by the icon attribute.
Now that the Activity is associated with our AppWidget, it’s time to examine thekey elements of the Activity. The full code is available for download. The snippetsshown here are only the portions particularly relevant to AppWidget interactions.
Listing 17.6 AppWidget metadata file defining widget characteristics
www.it-ebooks.info
496 CHAPTER 17 AppWidgets
17.7.2 Working with Intent data
When the AppWidget’s configuration Activity is launched, the most important pieceof information is the associated widget identifier. This value is stored as an extra in theIntent and should be extracted during the onCreate() method. The following listingdemonstrates this technique.
@Override public void onCreate(Bundle savedInstanceState) { super.onCreate(savedInstanceState); setContentView(R.layout.main);
etSiteName = (EditText) findViewById(R.id.etSiteName); etSiteURL = (EditText) findViewById(R.id.etSiteURL); etSiteHomePageURL = (EditText) findViewById(R.id.etSiteHomePageURL); tvSiteMessage = (TextView) findViewById(R.id.tvSiteMessage);
final Button btnSaveSite =(Button) findViewById(R.id.btnSaveSite); btnSaveSite.setOnClickListener(this); final Button btnVisitSite =(Button) findViewById(R.id.btnVisitSite); btnVisitSite.setOnClickListener(this);
widgetId =getIntent().getIntExtra(AppWidgetManager.EXTRA_APPWIDGET_ID,widgetId);
// lookup to see if we have any info on this widget smm = SiteMonitorModel.getWidgetData(this, widgetId); if (smm != null) { etSiteName.setText(smm.getName()); etSiteURL.setText(smm.getUrl()); etSiteHomePageURL.setText(smm.getHomepageUrl()); tvSiteMessage.setText(smm.getMessage()); } }
The Activity looks like boilerplate code, as it begins with wiring up the various viewelements in the layout to class-level variables B. The widgetId is extracted from thestartingIntent C. Again you see the relationship between widgetId and widget-specific data managed by the SiteMonitorModel class D. If data is available, the GUIelements are prepopulated with the values E. This scenario would only come intoplay after the widget has been successfully created and subsequently clicked for man-aging it.
At this point, the Activity operates as expected, permitting the user to update thedetails of the widget data as well as visit the associated website.
Listing 17.7 Setting up the configuration Activity to manage a widget instance
BWireup GUI
CExtract widget identifier
Look up widget data
D
Populate GUIE
www.it-ebooks.info
497Configuring an instance of the AppWidget
17.7.3 Confirming widget creation
When the user has populated the required fields and clicks the Save button, you needto not only save the data via the SiteMonitorModel class but also let the AppWidgetinfrastructure know that you’ve affirmed the creation of this widget instance. Thistakes place by using the Activity’s setResult() method along with an Intent con-taining an extra indicating the widget number. In addition, you want to ensure thatthe alarm is enabled for future updates. Finally, you really don’t want to wait until thenext alarm interval elapses; you want to get an update now. The following listing dem-onstrates how to accomplish each of these tasks.
public void onClick(View v) { switch (v.getId()) { case R.id.btnSaveSite: { saveInfo(); // update the widget's display SiteMonitorWidgetImpl.UpdateOneWidget(v.getContext(), widgetId);
// let the widget provider know we're done and happy Intent ret = new Intent(); ret.putExtra(AppWidgetManager.EXTRA_APPWIDGET_ID,widgetId); setResult(Activity.RESULT_OK,ret);
// let's ask for an update and also enable the alarm Intent askForUpdate =new Intent(SiteMonitorBootstrap.ALARM_ACTION); this.sendBroadcast(askForUpdate); SiteMonitorBootstrap.setAlarm(this); finish(); } break; case R.id.btnVisitSite: { saveInfo(); Intent visitSite = new Intent(Intent.ACTION_VIEW); visitSite.setData(Uri.parse(smm.getHomepageUrl())); startActivity(visitSite); } break; } }
When the user clicks the Save button (or the Visit Site button), the widget-specificdata is saved B. There’s nothing fancy there—just a call to SiteMonitor-
Model.saveWidgetData(). The AppWidget subsystem is supposed to update the UI ofthe widget after the Configuration dialog box completes successfully, but experienceshows that this isn’t always the case. Therefore a call is made to SiteMonitorWidget-Impl.UpdateOneWidget with the newly created widgetId C.
Listing 17.8 Handling button clicks in the configuration Activity
Save dataBCUpdate
widget’s UI
DAcknowledge widget creation
Set alarmE
Call setAlarmF
Save dataB
Visit site home page
G
www.it-ebooks.info
498 CHAPTER 17 AppWidgets
An important step in the life of a new AppWidget is to be sure to set the Activityresult to RESULT_OK D, passing along an Intent extra that identifies the new widgetby number.
At this point our new widget is populated with a name and no meaningful statusinformation. To force an update, we broadcast an Intent that simulates the conditionwhere the alarm has just triggered E. We also want to ensure that the alarm is armedfor a subsequent operation, so we call SiteMonitorBootstrap.setAlarm() F.
In the event that the Visit Site button is clicked, we want to take the user to thedefined home page of the currently active site being monitored by the widget G.
The last condition to handle is the case where the widget has been selected fromthe Add New Widget list on the home screen when the user cancels out of the config-uration activity. In this case the widget shouldn’t be created. To achieve this result, youset the result of the Activity to RESULT_CANCELED as shown in this listing.
public void onDestroy() { super.onDestroy(); if (!isFinishing()) { Intent ret = new Intent(); ret.putExtra(AppWidgetManager.EXTRA_APPWIDGET_ID,widgetId); setResult(Activity.RESULT_CANCELED,ret); }
This code overrides the onDestroy() method. If this method is invoked for any reasonother than finish() being called by the Activity itself, we want to cancel theActivity. This is accomplished with a call to setResult() with the inclusion of theIntent extra to pass along the widget identifier. Note that this cancel step is onlyrequired when the widget instance is first created. There’s no harm in setting theresult for future invocations of the Activity.
At this point our AppWidget is created, you know how to store data, and you knowhow to configure a particular instance of the SiteMonitor widget. What’s needed nextis to update the data. For that, we’ll look at the SiteMonitorService.
17.8 Updating the AppWidget Our AppWidget instances on the home screen are only useful if they’re actually keep-ing data up-to-date. One means for performing this update is to solely rely on theAppWidgetProvider’s onUpdate() method. The onUpdate() method is invoked peri-odically according to the schedule specified in the metadata file.
One reason for updating the widget outside of the AppWidgetProvider is to pro-vide more granularity than afforded by the built-in scheduling mechanism. For exam-ple, you may wish to update the data more frequently than once per hour dependingon the conditions. Imagine an AppWidget that tracks stock prices. It makes little senseto have the widget update when the market is closed, and it wouldn’t be unreasonableto update once every 15 minutes during market hours.
Listing 17.9 Checking for a cancel
www.it-ebooks.info
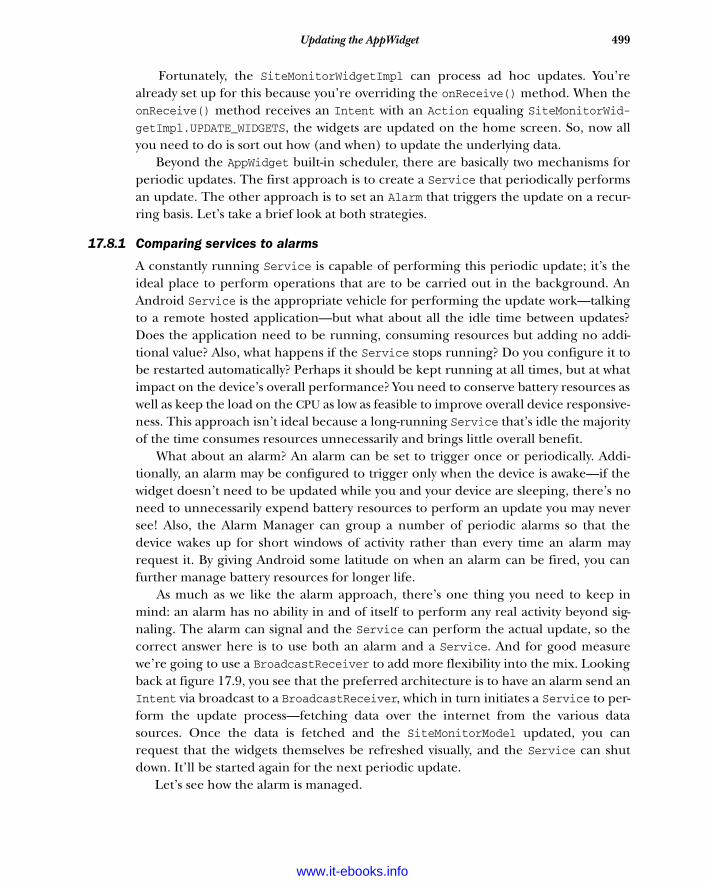
499Updating the AppWidget
Fortunately, the SiteMonitorWidgetImpl can process ad hoc updates. You’realready set up for this because you’re overriding the onReceive() method. When theonReceive() method receives an Intent with an Action equaling SiteMonitorWid-getImpl.UPDATE_WIDGETS, the widgets are updated on the home screen. So, now allyou need to do is sort out how (and when) to update the underlying data.
Beyond the AppWidget built-in scheduler, there are basically two mechanisms forperiodic updates. The first approach is to create a Service that periodically performsan update. The other approach is to set an Alarm that triggers the update on a recur-ring basis. Let’s take a brief look at both strategies.
17.8.1 Comparing services to alarms
A constantly running Service is capable of performing this periodic update; it’s theideal place to perform operations that are to be carried out in the background. AnAndroid Service is the appropriate vehicle for performing the update work—talkingto a remote hosted application—but what about all the idle time between updates?Does the application need to be running, consuming resources but adding no addi-tional value? Also, what happens if the Service stops running? Do you configure it tobe restarted automatically? Perhaps it should be kept running at all times, but at whatimpact on the device’s overall performance? You need to conserve battery resources aswell as keep the load on the CPU as low as feasible to improve overall device responsive-ness. This approach isn’t ideal because a long-running Service that’s idle the majorityof the time consumes resources unnecessarily and brings little overall benefit.
What about an alarm? An alarm can be set to trigger once or periodically. Addi-tionally, an alarm may be configured to trigger only when the device is awake—if thewidget doesn’t need to be updated while you and your device are sleeping, there’s noneed to unnecessarily expend battery resources to perform an update you may neversee! Also, the Alarm Manager can group a number of periodic alarms so that thedevice wakes up for short windows of activity rather than every time an alarm mayrequest it. By giving Android some latitude on when an alarm can be fired, you canfurther manage battery resources for longer life.
As much as we like the alarm approach, there’s one thing you need to keep inmind: an alarm has no ability in and of itself to perform any real activity beyond sig-naling. The alarm can signal and the Service can perform the actual update, so thecorrect answer here is to use both an alarm and a Service. And for good measurewe’re going to use a BroadcastReceiver to add more flexibility into the mix. Lookingback at figure 17.9, you see that the preferred architecture is to have an alarm send anIntent via broadcast to a BroadcastReceiver, which in turn initiates a Service to per-form the update process—fetching data over the internet from the various datasources. Once the data is fetched and the SiteMonitorModel updated, you canrequest that the widgets themselves be refreshed visually, and the Service can shutdown. It’ll be started again for the next periodic update.
Let’s see how the alarm is managed.
www.it-ebooks.info
500 CHAPTER 17 AppWidgets
17.8.2 Triggering the update
Services have been covered in various portions of this book already, so they’ll receiverelatively little coverage here. Of more interest in this section is the relationshipbetween the alarm, the BroadcastReceiver, and the Service. Let’s look first at thecode in SiteMonitorBootstrap.java.
package com.msi.unlockingandroid.sitemonitor;
import android.app.AlarmManager;import android.app.PendingIntent;import android.content.BroadcastReceiver;import android.content.Context;import android.content.Intent;import android.os.SystemClock;import android.util.Log;
public class SiteMonitorBootstrap extends BroadcastReceiver { private static final String tag = "SiteMonitorBootstrap"; public static final String ALARM_ACTION ="com.msi.unlockingandroid.sitemonitor.ALARM_ACTION";
private static final long UPDATE_FREQUENCY =(1000 * 60 * 60); // default to one hour
@Override public void onReceive(Context context, Intent intent) { String action = intent.getAction();
Log.i(SiteMonitorBootstrap.tag,"onReceive");
if (action.equals(SiteMonitorBootstrap.ALARM_ACTION)) { Log.i(SiteMonitorBootstrap.tag,"Alarm fired -- start the service to perform the updates"); Intent startSvcIntent = new Intent(context,SiteMonitorService.class); startSvcIntent.putExtra("ALARMTRIGGERED", "YES"); context.startService(startSvcIntent); } }
public static void setAlarm(Context context) { Log.i(SiteMonitorBootstrap.tag,"setAlarm"); AlarmManager alarmManager =(AlarmManager)context.getSystemService(Context.ALARM_SERVICE);
// setup pending intent Intent alarmIntent = new Intent(SiteMonitorBootstrap.ALARM_ACTION); PendingIntent pIntent = PendingIntent.getBroadcast(context, 0, alarmIntent, PendingIntent.FLAG_UPDATE_CURRENT);
// now go ahead and set the alarm
Listing 17.10 SiteMonitorBootstrap.java
Set up Intent action
B
Update frequency
C
Check for update trigger
D
Start service
E
FGet AlarmManagerreference
GCreate PendingIntent
www.it-ebooks.info
501Updating the AppWidget
alarmManager.setRepeating(AlarmManager.ELAPSED_REALTIME_WAKEUP, SystemClock.elapsedRealtime() + SiteMonitorBootstrap.UPDATE_FREQUENCY,SiteMonitorBootstrap.UPDATE_FREQUENCY, pIntent); }
public static void clearAlarm(Context context) { Log.i(SiteMonitorBootstrap.tag,"clearAlarm"); AlarmManager alarmManager = (AlarmManager)context.getSystemService(Context.ALARM_SERVICE);
// cancel the pending intent! Intent alarmIntent = new Intent(SiteMonitorBootstrap.ALARM_ACTION); PendingIntent pIntent = PendingIntent.getBroadcast(context, 0, alarmIntent, PendingIntent.FLAG_UPDATE_CURRENT);
alarmManager.cancel(pIntent);
}
}
The SiteMonitorBootstrap class is responsible for managing alarms within the appli-cation as well as the starting the SiteMonitorService as needed. This class is aBroadcastReceiver and as such overrides the onReceive() method, looking forIntents D that it can process. The only IntentFilter set up for this class is for theSiteMonitorBootstrap.ALARM_ACTION B. This constant is declared as a public staticmember so it can be accessed from other components as well as the local alarm. Theupdate frequency is fixed and set in the UDPATE_FREQUENCY constant C. An enhance-ment for this type of application would be to make this setting user configurable insome fashion. When an ALARM_ACTION Intent is encountered, an Intent is created tostart the SiteMonitorService E It’s the responsibility of the SiteMonitorService toperform the update of the configured SiteMonitor widgets.
This class can readily be extended to detect other events such as the device boot-ing or power events. For example, if it’s detected that the device is being charged—anonbattery power source is detected—the frequency of updates could be increased.Similarly, if it’s detected that the device is now roaming, this could suspend the updateprocess to minimize any data roaming charges.
Beyond acting as a BroadcastReceiver to react to events of interest, this code alsocontains two static methods for setting and clearing the application-defined alarm.Let’s walk through the two routines, starting with the setAlarm() method. The firststep in working with an alarm is to obtain a reference to the AlarmManager F. Whensetting an alarm, you must create a PendingIntent that contains the Intent to be dis-patched when the alarm triggers. In this case, we create a PendingIntent G that rep-resents a subsequent Broadcast of the SiteMonitorBootstrap.ALARM_ACTION Intent.In essence, we’re setting an alarm to send an Intent to this BroadcastReceiver,which in turn initiates the update process. Once the PendingIntent is set up, it’spassed as an argument to the setRepeating() method H. When canceling the alarm,the steps are the same, except we call cancel I.
HArm alarm
Cancel alarmI
www.it-ebooks.info
502 CHAPTER 17 AppWidgets
You’ve done a lot of setup, and now it’s time to look at the code that performs theupdate of the underlying widget-specific hosted application status data.
17.8.3 Updating the widgets, finally!
Once the SiteMonitorService code is in control, updating the widgets is rather easy.Updating the SiteMonitorModel data is the sole responsibility of the Site-
MonitorService. To accomplish this task, the SiteMonitorService performs thesebasic operations:
1 Starts a thread to perform the update2 Updates each of the sites in turn3 Shuts itself down to conserve resources
The Service creates a separate Thread for performing the update, because by defaultthe Service attempts to run on the main GUI thread of the device. Running in a sepa-rate Thread of execution inside a Service is arguably the best place to perform a poten-tially blocking operation such as the operation required of the SiteMonitorService.
Let’s look at the code structure of the SiteMonitorService class.
package com.msi.unlockingandroid.sitemonitor;
import android.app.Service;import android.content.ComponentName;import android.content.Context;import android.content.Intent;import android.os.IBinder;import android.util.Log;import android.appwidget.AppWidgetManager;
import java.io.BufferedReader;import java.io.InputStreamReader;import java.net.HttpURLConnection;import java.net.URL;
public class SiteMonitorService extends Service {
private static final String tag = "SiteMonitorService";
@Override public IBinder onBind(Intent intent) { return null; }
@Override public int onStartCommand(Intent intent, int flags, int startId) { Log.i(SiteMonitorService.tag,"onStartCommand");
Thread smu = new Thread(newSiteMonitorUpdater(this.getBaseContext())); smu.start();
Listing 17.11 SiteMonitorService class
Create, start new Thread
B
www.it-ebooks.info
503Updating the AppWidget
return Service.START_NOT_STICKY;
}
@Override public void onDestroy() { super.onDestroy(); Log.i(SiteMonitorService.tag,"onDestroy"); }
class SiteMonitorUpdater implements Runnable { private static final String tag = "SiteMonitorUpdater";
private Context context;
public SiteMonitorUpdater(Context context) { this.context = context; }
public void run() { Log.i(SiteMonitorUpdater.tag,"Running update code"); updateAllSites(); stopSelf(); }
private void updateAllSites() { // discussed in Listing 17.12 }
private void updateOneSite(SiteMonitorModel smm,int widgetId) { // discussed in Listing 17.12 }
private String getDataFromSite(String siteUrl) { // discussed in Listing 17.12 }
}
}
The first step this service takes is the creation of a new Thread B based on the Site-MonitorUpdater class D. Once created, the thread is started. The Service thenreturns Service.START_NON_STICKY C. This tells Android not to restart the Serviceif it either crashes or is killed by the operating system. Because our Service will bestarted periodically, there’s no need to have the operating system restart it.
All the update code resides in the SiteMonitorUpdater class D. In the runmethod of this class, we perform two steps. First we call a method called updateAll-Sites() E, which, as the name implies, performs the various steps to update the wid-get data. Once that operation is complete, the service calls stopSelf(), which cleanlyterminates the service F.
At this point our Service is starting and has created an instance of the privateSiteMonitorUpdater class. Let’s look at the update operations.
Don’t restart serviceC
Define SiteMonitorUpdater
D
Update all sitesEStop serviceF
www.it-ebooks.info
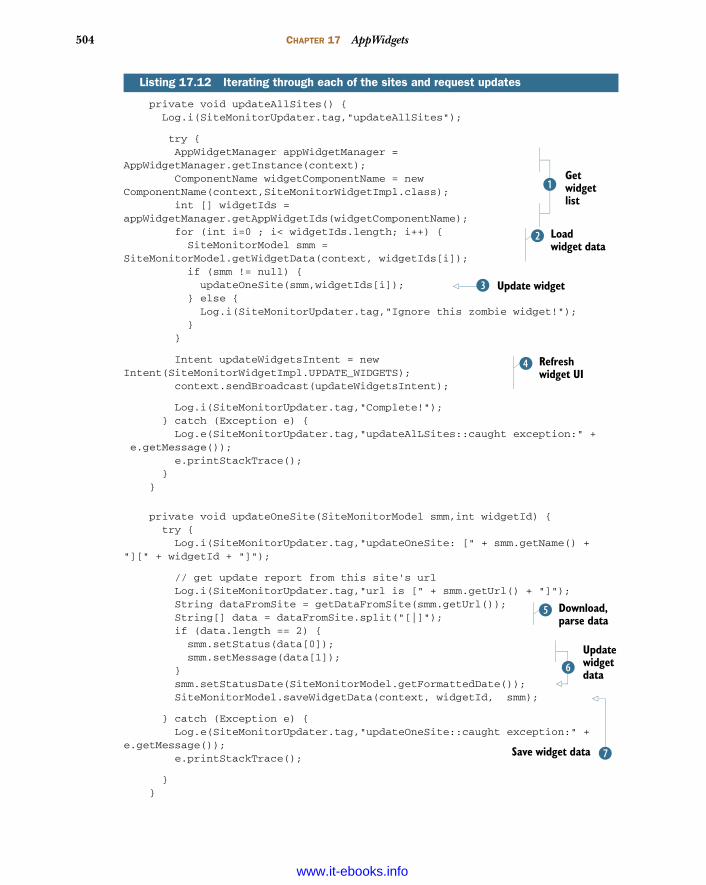
504 CHAPTER 17 AppWidgets
private void updateAllSites() { Log.i(SiteMonitorUpdater.tag,"updateAllSites");
try { AppWidgetManager appWidgetManager =AppWidgetManager.getInstance(context); ComponentName widgetComponentName = new ComponentName(context,SiteMonitorWidgetImpl.class); int [] widgetIds =appWidgetManager.getAppWidgetIds(widgetComponentName); for (int i=0 ; i< widgetIds.length; i++) { SiteMonitorModel smm =SiteMonitorModel.getWidgetData(context, widgetIds[i]); if (smm != null) { updateOneSite(smm,widgetIds[i]); } else { Log.i(SiteMonitorUpdater.tag,"Ignore this zombie widget!"); } }
Intent updateWidgetsIntent = new Intent(SiteMonitorWidgetImpl.UPDATE_WIDGETS); context.sendBroadcast(updateWidgetsIntent);
Log.i(SiteMonitorUpdater.tag,"Complete!"); } catch (Exception e) { Log.e(SiteMonitorUpdater.tag,"updateAlLSites::caught exception:" + e.getMessage()); e.printStackTrace(); } }
private void updateOneSite(SiteMonitorModel smm,int widgetId) { try { Log.i(SiteMonitorUpdater.tag,"updateOneSite: [" + smm.getName() + "][" + widgetId + "]");
// get update report from this site's url Log.i(SiteMonitorUpdater.tag,"url is [" + smm.getUrl() + "]"); String dataFromSite = getDataFromSite(smm.getUrl()); String[] data = dataFromSite.split("[|]"); if (data.length == 2) { smm.setStatus(data[0]); smm.setMessage(data[1]); } smm.setStatusDate(SiteMonitorModel.getFormattedDate()); SiteMonitorModel.saveWidgetData(context, widgetId, smm);
} catch (Exception e) { Log.e(SiteMonitorUpdater.tag,"updateOneSite::caught exception:" + e.getMessage()); e.printStackTrace();
} }
Listing 17.12 Iterating through each of the sites and request updates
Get widget list
B
Load widget data
C
Update widgetD
Refresh widget UI
E
Download, parse data
F
Update widget dataG
HSave widget data
www.it-ebooks.info

505Updating the AppWidget
private String getDataFromSite(String siteUrl) { String ret = "BAD|unable to reach site"; URL url;
try { url = new URL(siteUrl); HttpURLConnection urlConn = (HttpURLConnection) url.openConnection(); BufferedReader inBuf = new BufferedReader(new InputStreamReader(urlConn.getInputStream())); String inputLine; String result = ""; int lineCount = 0; // limit the lines for the example while ((lineCount < 10) && ((inputLine = inBuf.readLine()) !=null)) { lineCount++; Log.v(SiteMonitorUpdater.tag,inputLine); result += inputLine; }
inBuf.close(); urlConn.disconnect();
return result;
} catch (Exception e) { Log.d(SiteMonitorUpdater.tag,"Error caught: " + e.getMessage()); e.printStackTrace(); return ret; } }
The updateAllSites() method starts like so many other methods in this chapter: byobtaining a reference to the AppWidgetManager and creating a list of widgets B. Foreach widget identifier, the code attempts to load the associated widget data C andperform an update by calling the updateOneSite() method D.
The updateOneSite() method invokes the getDataFromSite() method F. ThegetDataFromSite() method performs some basic HTTP GET code to retrieve a stringfrom the remote site I. Once the data is retrieved from the remote site, it’s returnedJ to the updateOneSite() method.
The returned data is parsed and stored in the SiteMonitorModel instance G. Thedate is updated and the widget data is saved with a call to SiteMonitor-
Model.saveWidgetData H. After all the sites have been updated, an Intent is broadcast with the action Site-
MonitorWidgetImpl.UPDATE_WIDGETS E. This causes the user widget UI to update,reflecting the most recent updated information.
That concludes the review of the code for this chapter. Let’s now look atAndroidManifest.xml, which has a lot of important information tucked away.
Talk toweb
serverI
Return web dataJ
www.it-ebooks.info
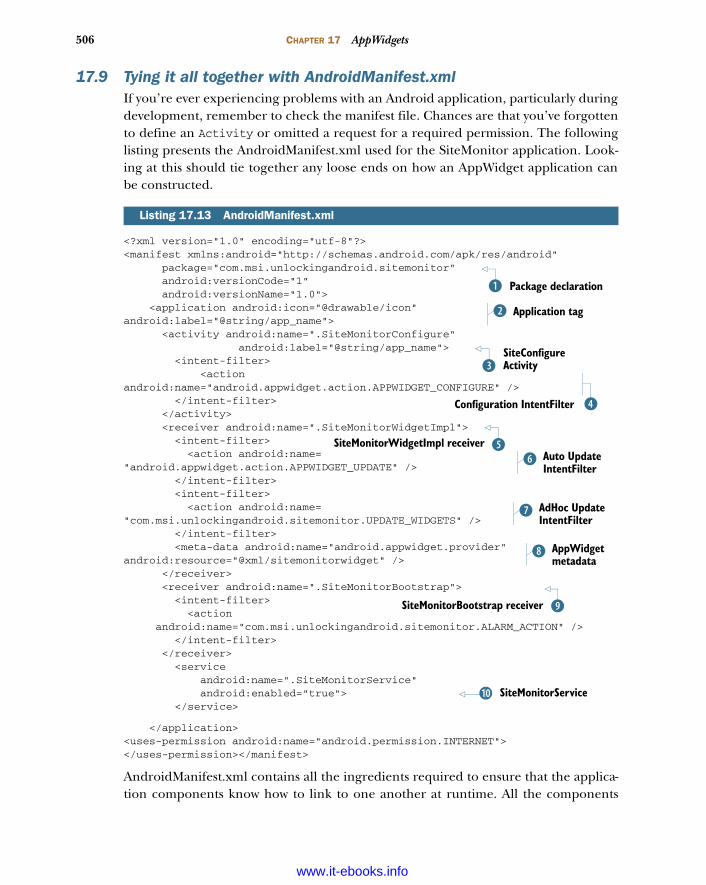
506 CHAPTER 17 AppWidgets
17.9 Tying it all together with AndroidManifest.xmlIf you’re ever experiencing problems with an Android application, particularly duringdevelopment, remember to check the manifest file. Chances are that you’ve forgottento define an Activity or omitted a request for a required permission. The followinglisting presents the AndroidManifest.xml used for the SiteMonitor application. Look-ing at this should tie together any loose ends on how an AppWidget application canbe constructed.
<?xml version="1.0" encoding="utf-8"?><manifest xmlns:android="http://schemas.android.com/apk/res/android" package="com.msi.unlockingandroid.sitemonitor" android:versionCode="1" android:versionName="1.0"> <application android:icon="@drawable/icon"android:label="@string/app_name"> <activity android:name=".SiteMonitorConfigure" android:label="@string/app_name"> <intent-filter> <actionandroid:name="android.appwidget.action.APPWIDGET_CONFIGURE" /> </intent-filter> </activity> <receiver android:name=".SiteMonitorWidgetImpl"> <intent-filter> <action android:name="android.appwidget.action.APPWIDGET_UPDATE" /> </intent-filter> <intent-filter> <action android:name="com.msi.unlockingandroid.sitemonitor.UPDATE_WIDGETS" /> </intent-filter> <meta-data android:name="android.appwidget.provider"android:resource="@xml/sitemonitorwidget" /> </receiver> <receiver android:name=".SiteMonitorBootstrap"> <intent-filter> <action
android:name="com.msi.unlockingandroid.sitemonitor.ALARM_ACTION" /> </intent-filter> </receiver> <service android:name=".SiteMonitorService" android:enabled="true"> </service>
</application><uses-permission android:name="android.permission.INTERNET"></uses-permission></manifest>
AndroidManifest.xml contains all the ingredients required to ensure that the applica-tion components know how to link to one another at runtime. All the components
Listing 17.13 AndroidManifest.xml
Package declarationB
Application tagC
SiteConfigure ActivityD
EConfiguration IntentFilter
FSiteMonitorWidgetImpl receiverAuto Update IntentFilter
G
AdHoc Update IntentFilter
H
AppWidget metadata
I
JSiteMonitorBootstrap receiver
SiteMonitorService1)
www.it-ebooks.info

507Summary
within the application share the same package name B. The Application tag definesthe name of the application C label, which in this case is taken from a stringresource named app_name.
The SiteMonitorConfigure Activity is declared D. Note the presence of theIntentFilter named android.appwidget.action.APPWIDGET_CONFIGURE E. Thepresence of this IntentFilter, along with the contents of the AppWidget’s metadatafile I, serve to provide the necessary elements to support the use of an AppWidget-Provider. Note that this metadata file is stored in the xml folder beneath the resfolder. This xml folder must be created manually, as it’s not part of the stock projectfolders when a new Android project is created in Eclipse.
The class SiteMonitorWidgetImpl F is defined with a receiver tag and additionalpieces of information that are essential for this application’s proper operation. Thisreceiver contains the android.appwidget.action.APPWIDGET_UPDATE IntentFilterG along with the custom IntentFilter with an action of com.msi.unlocking-android.sitemonitor.UPDATE_WIDGETS H. This is the Intent Action used when theapplication wants to update the visual representation of the AppWidgets. Thisreceiver tag also refers to the metadata entry that defines the attributes for anandroid.appwidget.provider.
The SiteMonitorBootstrap is defined J along with an action of com.msi.unlockingandroid.sitemonitor.ALARM_ACTION. This action triggers the launching ofthe SiteMonitorService 1). Finally, the SiteMonitorService can’t retrieve data overthe internet without the uses-permission of android.permission.INTERNET.
17.10 SummaryIn this chapter we covered AppWidgets; you learned not only what they are but howthey can be used and what it takes to make them operate at runtime. You learned thatthere can be more to the AppWidget than meets the eye. A smart phone’s home screenis where users spend most of their time, so learning how to add value to the homescreen is an essential skill for Android developers.
We presented some usage scenarios for AppWidgets and introduced a sample appli-cation named SiteMonitor that served as the context for discussing AppWidgets. Thisapplication demonstrated the techniques required to manage widget instances andrefresh remote data in a nontrivial application. We explained the architecturerequired to support SiteMonitor and then presented it in a step-by-step fashion.
The major building blocks of the sample application presented important topicssuch as managing widget data through the versatile SiteMonitorModel class. Han-dling widget-specific data is critical to a successful AppWidget application. This chap-ter also covered some of the undocumented features of Android’s AppWidgets, andyou learned how to code around those features.
This chapter explored the use of many of the other skills you’ve learned through-out this book. The chapter covered AppWidgets but also integrating with Shared-Preferences, managing alarms, Services, RemoteViews, Threads, and more. After
www.it-ebooks.info
508 CHAPTER 17 AppWidgets
building an AppWidget with moving pieces behind the scenes, you now have an appre-ciation of how and where AppWidgets can be deployed and how Android may be lever-aged to deliver intuitive and high-value applications to your customers.
In the next chapter, we look at another important feature set of Android devices:the numerous sensors that make these devices much more than a mere telephony tool.
www.it-ebooks.info
Localization
Android is a worldwide open platform gaining market share at a rapid pace. AsAndroid reaches into new markets globally, the opportunity for mobile developersto distribute applications is reaching a level previously enjoyed by only the mostsuccessful of software products and projects. You can deploy an application acrossthe globe, have the Google Marketplace handle the commercial transaction, andreceive a royalty check. And you can accomplish all this without ever leaving yourhome office or dorm room!
To sell an application worldwide successfully, you must target it to a broad anddiverse audience. English enjoys a broad acceptance and practice, and therefore youcan expect that an English language application will sell well globally, but why giveup on sales opportunities to the broader non-English-speaking Android market? Inits simplest approach, this means translation into multiple languages. But there’smore! Beyond language translation, an application needs to properly handle dates
This chapter covers The need for localization
Strategies for localizing an application
Dynamic localization in Java
Obstacles to late localization
509
www.it-ebooks.info
510 CHAPTER 18 Localization
and times, number and currency formats, and for some applications unit of measure.This chapter is an introduction to the localization capabilities of the Android platform.
In this chapter, we cover the topics required for localizing an application. You’lllearn high-level strategies for localizing an application, and you’ll take a hands-onapproach to converting an existing application to another language. Looking back tochapter 12’s Field Service application, you’ll refactor that code to be localizationready and then translate it to Spanish. We demonstrate the localized version of theapplication through screenshots throughout the chapter.
We conclude the chapter with a discussion of challenges of localizing an applica-tion as an afterthought rather than designing for localization from the start.
We think it’s only fair to note that the author of this chapter is a native Englishspeaker and his knowledge of any languages beyond English involves computer pro-gramming: Java, C, C#, Objective-C, and so on. If you’re one of the talented and fortu-nate among us who can speak numerous languages, please bear with the rest of us aswe broaden our horizons to the global scene.
18.1 The need for localizationFor many programmers there’s only one language: Java. Of course the world is largerthan one programming language, and it’s much larger than a single spoken and writ-ten language. The majority of computer users choose a language when they set uptheir computer and never think twice about the decision. In fact, after the initial setupmany of the resources related to other languages may even be deleted from the com-puter or phone, to save storage space. If this describes your experience, you’re notalone! The aim of this chapter is to equip you to navigate the task of localizing anAndroid application and in the process reach a broader audience. As a side benefit,you’ll likely find that you look at application development differently, even if younever pursue localization of your own applications.
The reasons for localizing an application are manifold. For a commercial applica-tion, there are numerous markets to reach; there’s no need to limit your sales to a sin-gle marketplace. Your application may be bound for some cultural reasons to aspecific region, but many applications such as games, utilities, and productivity toolsare of universal interest and appeal. Games in particular are often relatively light intextual components, with the majority of the text constrained to settings screens andhelp files. It’s to the developer’s advantage to access additional markets to increasesales volume. Volume is important, considering the low price point of most mobileapplications.
Even if your application isn’t designed to generate sales revenue directly, its pur-pose may be to help build your brand and expand your influence. If you’re part of anorganization with a presence beyond your home country, localization is important toyou as well.
Incredibly, the market reach of the mobile phone is greater worldwide than that ofthe personal computer. People even have cell phones ahead of running water in some
www.it-ebooks.info

511Exploring locales
parts of the globe. Many of these cell phones run a version of the Android OS, so as anAndroid developer, you can reach a large and diverse market. A small amount of reve-nue across numerous transactions can really add up!
Whether your purpose in localizing an application is to increase sales or to reach anew market for noncommercial reasons, you need a strategy and some practical skills,both of which you’ll learn in this chapter. Before jumping into the details of localizingan application, let’s examine the concept of a locale.
18.2 Exploring localesA locale is generally referenced as a short character code including both the languageand the geographic region. The origin and meaning of these values stem from politi-cal actions and boundaries, both of which change overtime. Our discussion should be considered practical andhopefully useful rather than being a treatise on the history,meaning, and minutia of the “official” definition of locale,which is elusive.
As language and regional barriers are blurred thanks totechnology, the concept of a locale has been employedimperfectly to aid electronic communication. The ISO for-mat for a locale identifier is a short character code of thefollowing syntax
language_REGION
where the language is represented first as two lowercasecharacters and followed by the region, which is repre-sented as two uppercase characters. For example, thelocale setting most Android phones employ in the UnitedKingdom is en_GB for “English, Great Britain.” In Australia,the value is en_AU. en_US is the locale for English in theUnited States. Figure 18.1 shows an Android emulatorinstance indicating the various flavors of English locales inthe Customize Locale application.
To access the available locales on an Android device,select Language & Keyboard from the Settings app, andthen tap on Select Language. This presents the installedlocale options, as shown in figure 18.2.
When we speak of a locale, we often think of language:English, Spanish, Chinese, Polish, and so forth. Locale ismore about orthography, or the rules for the written lan-guage. But the topic of localization encompasses morethan just words. For example, Great Britain and the UnitedStates share a common language: English. The differencesextend beyond how the language is used and how certain
Figure 18.1 English locales on Android emulator
Figure 18.2 On-device locale options
www.it-ebooks.info
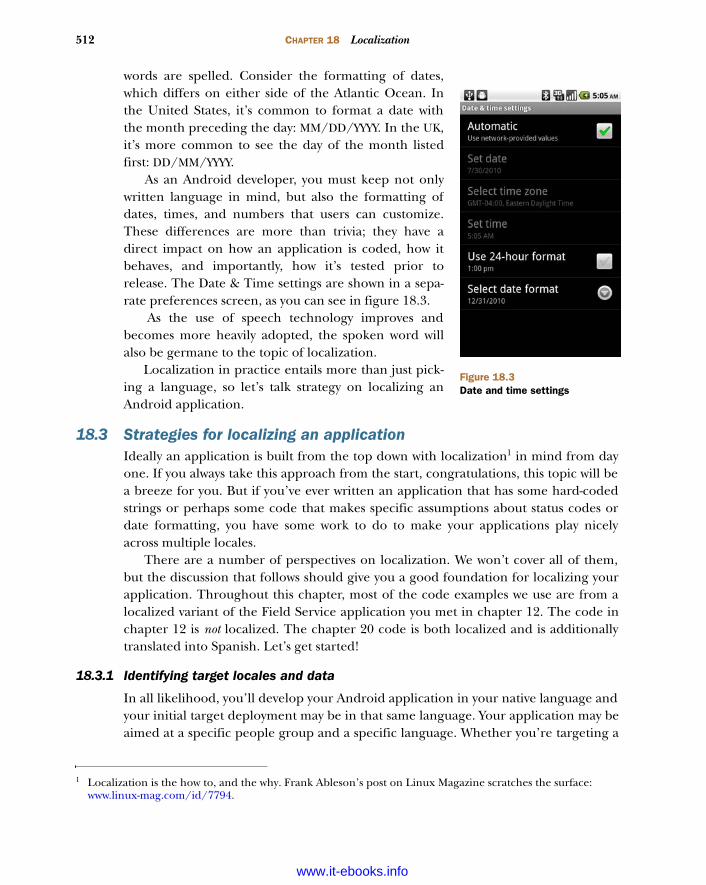
512 CHAPTER 18 Localization
words are spelled. Consider the formatting of dates,which differs on either side of the Atlantic Ocean. Inthe United States, it’s common to format a date withthe month preceding the day: MM/DD/YYYY. In the UK,it’s more common to see the day of the month listedfirst: DD/MM/YYYY.
As an Android developer, you must keep not onlywritten language in mind, but also the formatting ofdates, times, and numbers that users can customize.These differences are more than trivia; they have adirect impact on how an application is coded, how itbehaves, and importantly, how it’s tested prior torelease. The Date & Time settings are shown in a sepa-rate preferences screen, as you can see in figure 18.3.
As the use of speech technology improves andbecomes more heavily adopted, the spoken word willalso be germane to the topic of localization.
Localization in practice entails more than just pick-ing a language, so let’s talk strategy on localizing anAndroid application.
18.3 Strategies for localizing an applicationIdeally an application is built from the top down with localization1 in mind from dayone. If you always take this approach from the start, congratulations, this topic will bea breeze for you. But if you’ve ever written an application that has some hard-codedstrings or perhaps some code that makes specific assumptions about status codes ordate formatting, you have some work to do to make your applications play nicelyacross multiple locales.
There are a number of perspectives on localization. We won’t cover all of them,but the discussion that follows should give you a good foundation for localizing yourapplication. Throughout this chapter, most of the code examples we use are from alocalized variant of the Field Service application you met in chapter 12. The code inchapter 12 is not localized. The chapter 20 code is both localized and is additionallytranslated into Spanish. Let’s get started!
18.3.1 Identifying target locales and data
In all likelihood, you’ll develop your Android application in your native language andyour initial target deployment may be in that same language. Your application may beaimed at a specific people group and a specific language. Whether you’re targeting a
1 Localization is the how to, and the why. Frank Ableson’s post on Linux Magazine scratches the surface: www.linux-mag.com/id/7794.
Figure 18.3Date and time settings
www.it-ebooks.info
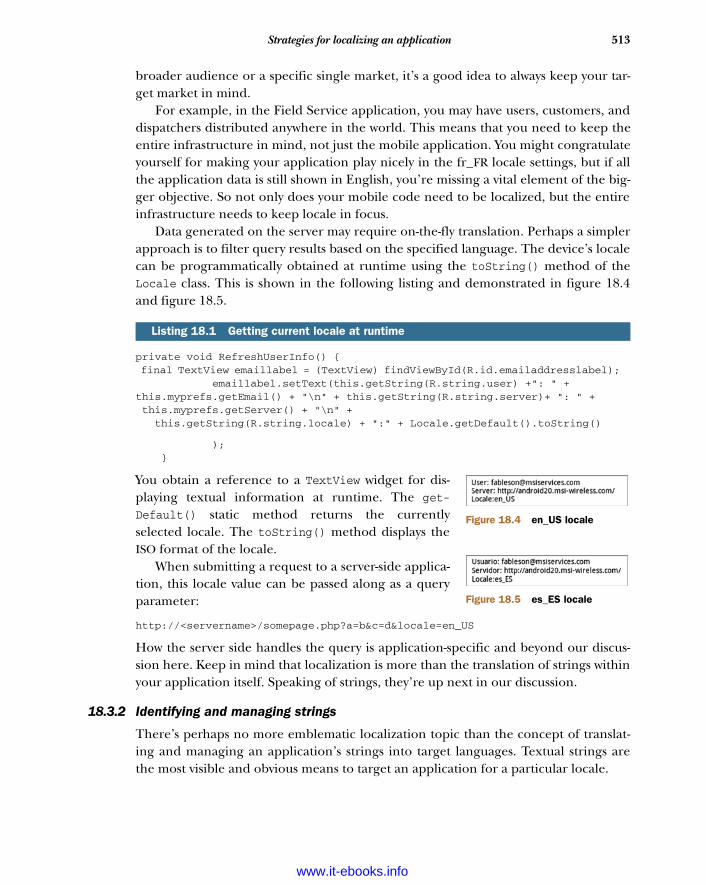
513Strategies for localizing an application
broader audience or a specific single market, it’s a good idea to always keep your tar-get market in mind.
For example, in the Field Service application, you may have users, customers, anddispatchers distributed anywhere in the world. This means that you need to keep theentire infrastructure in mind, not just the mobile application. You might congratulateyourself for making your application play nicely in the fr_FR locale settings, but if allthe application data is still shown in English, you’re missing a vital element of the big-ger objective. So not only does your mobile code need to be localized, but the entireinfrastructure needs to keep locale in focus.
Data generated on the server may require on-the-fly translation. Perhaps a simplerapproach is to filter query results based on the specified language. The device’s localecan be programmatically obtained at runtime using the toString() method of theLocale class. This is shown in the following listing and demonstrated in figure 18.4and figure 18.5.
private void RefreshUserInfo() { final TextView emaillabel = (TextView) findViewById(R.id.emailaddresslabel); emaillabel.setText(this.getString(R.string.user) +": " + this.myprefs.getEmail() + "\n" + this.getString(R.string.server)+ ": " + this.myprefs.getServer() + "\n" + this.getString(R.string.locale) + ":" + Locale.getDefault().toString()
); }
You obtain a reference to a TextView widget for dis-playing textual information at runtime. The get-Default() static method returns the currentlyselected locale. The toString() method displays theISO format of the locale.
When submitting a request to a server-side applica-tion, this locale value can be passed along as a queryparameter:
http://<servername>/somepage.php?a=b&c=d&locale=en_US
How the server side handles the query is application-specific and beyond our discus-sion here. Keep in mind that localization is more than the translation of strings withinyour application itself. Speaking of strings, they’re up next in our discussion.
18.3.2 Identifying and managing strings
There’s perhaps no more emblematic localization topic than the concept of translat-ing and managing an application’s strings into target languages. Textual strings arethe most visible and obvious means to target an application for a particular locale.
Listing 18.1 Getting current locale at runtime
Figure 18.4 en_US locale
Figure 18.5 es_ES locale
www.it-ebooks.info
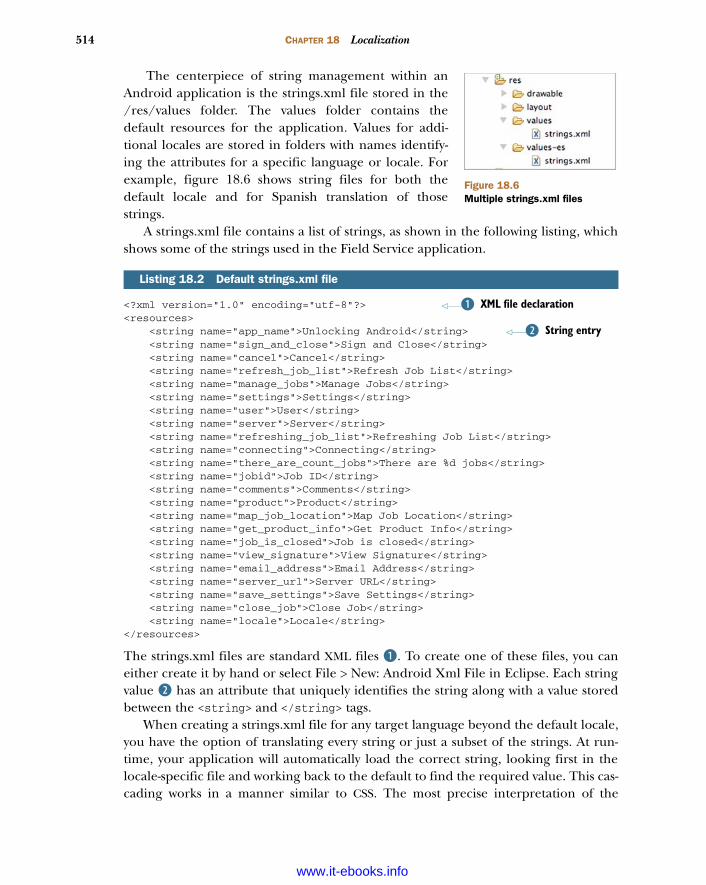
514 CHAPTER 18 Localization
The centerpiece of string management within anAndroid application is the strings.xml file stored in the/res/values folder. The values folder contains thedefault resources for the application. Values for addi-tional locales are stored in folders with names identify-ing the attributes for a specific language or locale. Forexample, figure 18.6 shows string files for both thedefault locale and for Spanish translation of thosestrings.
A strings.xml file contains a list of strings, as shown in the following listing, whichshows some of the strings used in the Field Service application.
<?xml version="1.0" encoding="utf-8"?><resources> <string name="app_name">Unlocking Android</string> <string name="sign_and_close">Sign and Close</string> <string name="cancel">Cancel</string> <string name="refresh_job_list">Refresh Job List</string> <string name="manage_jobs">Manage Jobs</string> <string name="settings">Settings</string> <string name="user">User</string> <string name="server">Server</string> <string name="refreshing_job_list">Refreshing Job List</string> <string name="connecting">Connecting</string> <string name="there_are_count_jobs">There are %d jobs</string> <string name="jobid">Job ID</string> <string name="comments">Comments</string> <string name="product">Product</string> <string name="map_job_location">Map Job Location</string> <string name="get_product_info">Get Product Info</string> <string name="job_is_closed">Job is closed</string> <string name="view_signature">View Signature</string> <string name="email_address">Email Address</string> <string name="server_url">Server URL</string> <string name="save_settings">Save Settings</string> <string name="close_job">Close Job</string> <string name="locale">Locale</string></resources>
The strings.xml files are standard XML files B. To create one of these files, you caneither create it by hand or select File > New: Android Xml File in Eclipse. Each stringvalue C has an attribute that uniquely identifies the string along with a value storedbetween the <string> and </string> tags.
When creating a strings.xml file for any target language beyond the default locale,you have the option of translating every string or just a subset of the strings. At run-time, your application will automatically load the correct string, looking first in thelocale-specific file and working back to the default to find the required value. This cas-cading works in a manner similar to CSS. The most precise interpretation of the
Listing 18.2 Default strings.xml file
XML file declarationB
String entryC
Figure 18.6Multiple strings.xml files
www.it-ebooks.info
515Strategies for localizing an application
device locale is the first file to be searched. If the resource isn’t found in this location,the platform works its way up the tree toward the default. Let’s look at an example.
Let’s say your application is written in a default language of English with 20 uniquestrings stored in /res/values/strings.xml. You anticipate that your application will bedeployed around the globe, but you’re specifically targeting English- and French-speaking users in the United States, France, and Canada.
To implement this strategy, your application contains four different strings.xmlfiles, one in each of the directories listed in table 18.1.
When a string is looked up at runtime, Android uses the current locale as a filter tochoose resources. Let’s say our device is set for the French Canadian locale: fr_CA. Ifthe string we require is found in the /res/values-fr-rCA/strings.xml file, it’s used. Ifthe string isn’t found there, the file /res/values-fr/strings.xml is searched nextbecause it’s the general French strings file. If it’s still not found, the string will betaken from the default strings file /res/values/strings.xml.
Not every string needs to be provided in each file. If only a handful of strings differin Canada versus the general French strings, just provide the Canada-specific values inthe fr_rCA file. Following this practice of managing a minimum number of strings canbe helpful, because it can be labor- and testing-intensive to manage multiple stringtables.
So far, our discussion has included only strings, language, and region-specific files.Strings aren’t the only resources that may be localized. In the next section, we take abrief look at other localized resources.
18.3.3 Drawables and layouts
Beyond strings, your application may need to provide locale-specific resources fordrawables (images) and for user interface layouts. The process of managing drawablesand layouts is identical to managing strings. If you require locale-specific versions ofyour images and layouts, they should be put in locale-specific folders in the /res folder.
Providing locale-specific images seems reasonable, because your application’simages may have textual contents, or perhaps your application has images of region-specific currency. It’d make sense to show an appropriate image of a greenback dollarin the US or a Euro in most of Europe. But what about layouts: why would you want tolocalize a layout?
Table 18.1 List of strings.xml files
Directory Comment
/res/values/strings.xml Default strings.xml stores values in English for this example
/res/values-fr/strings.xml Complete translation of strings in French
/res/values-fr-rFR/strings.xml A subset of strings with France-specific translations, spellings, etc.
/res/values-fr-rCA/strings.xml A subset of strings with Canada-specific translations, spellings, etc.
www.it-ebooks.info
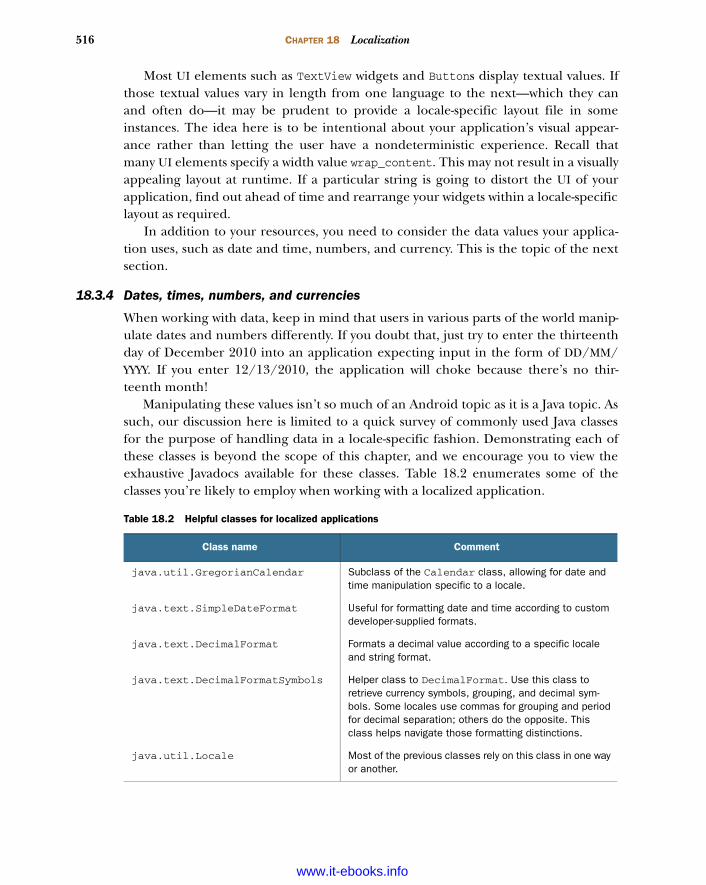
516 CHAPTER 18 Localization
Most UI elements such as TextView widgets and Buttons display textual values. Ifthose textual values vary in length from one language to the next—which they canand often do—it may be prudent to provide a locale-specific layout file in someinstances. The idea here is to be intentional about your application’s visual appear-ance rather than letting the user have a nondeterministic experience. Recall thatmany UI elements specify a width value wrap_content. This may not result in a visuallyappealing layout at runtime. If a particular string is going to distort the UI of yourapplication, find out ahead of time and rearrange your widgets within a locale-specificlayout as required.
In addition to your resources, you need to consider the data values your applica-tion uses, such as date and time, numbers, and currency. This is the topic of the nextsection.
18.3.4 Dates, times, numbers, and currencies
When working with data, keep in mind that users in various parts of the world manip-ulate dates and numbers differently. If you doubt that, just try to enter the thirteenthday of December 2010 into an application expecting input in the form of DD/MM/YYYY. If you enter 12/13/2010, the application will choke because there’s no thir-teenth month!
Manipulating these values isn’t so much of an Android topic as it is a Java topic. Assuch, our discussion here is limited to a quick survey of commonly used Java classesfor the purpose of handling data in a locale-specific fashion. Demonstrating each ofthese classes is beyond the scope of this chapter, and we encourage you to view theexhaustive Javadocs available for these classes. Table 18.2 enumerates some of theclasses you’re likely to employ when working with a localized application.
Table 18.2 Helpful classes for localized applications
Class name Comment
java.util.GregorianCalendar Subclass of the Calendar class, allowing for date and time manipulation specific to a locale.
java.text.SimpleDateFormat Useful for formatting date and time according to custom developer-supplied formats.
java.text.DecimalFormat Formats a decimal value according to a specific locale and string format.
java.text.DecimalFormatSymbols Helper class to DecimalFormat. Use this class to retrieve currency symbols, grouping, and decimal sym-bols. Some locales use commas for grouping and period for decimal separation; others do the opposite. This class helps navigate those formatting distinctions.
java.util.Locale Most of the previous classes rely on this class in one way or another.
www.it-ebooks.info
517Strategies for localizing an application
Before examining the localized version of our Field Service application in moredetail, there’s one more topic to discuss that has less to do with code than it does withcoding.
Most developers we know won’t translate their applications to multiple languagesand locales on their own—they’ll employ a teammate or an outside service. Regardlessof whom you work with, it’s helpful to keep them in mind from the start of your proj-ect. The next section discusses things you can do to work successfully with your trans-lation team.
18.3.5 Working with the translation team
Managing the strings within an application is straightforward on the surface, but it’snot without some challenges, in part because you’re working with others. The transla-tion professionals may be part of your organization or they may be an outside service.If you have the good fortune of working closely with a teammate for translation,things may go easier for you, as you can rely on them for not only term translation butalso context. An outside party can provide those services as well, but the cost in termsof dollars and time may be much greater.
Some of the challenges relate to the translation task itself, but there’s another chal-lenge with building a localized application: discipline. Unless you’re working in astructured environment, some aspects of software creation are fluid. You may have anidea for an enhancement to a section of your code. You’re excited about this feature,so you code the enhancement and add a menu item to enable this new aspect of yourapplication. Terrific, your application is now more functional and your users love you!Hold on a moment. Did you use any string literals when you coded the new feature,including the menu? If so, did you get translations yet? A localized application maysuffer from some latency and added expense when you factor in the translation andtesting steps. When you send data out to your translation team, it’s important not onlyto provide an exhaustive list of strings or terms that need to be translated, but also toprovide as much context as possible. For example, when we had the Field Serviceapplication’s terms translated to Spanish, we sent the list to our outside translationvendor. Included in that list was a brief description of each term and its use in theapplication. A further helpful step would be to storyboard the application with screen-shots (or screencasts), thereby equipping the translation team with as much contextas possible.
It’s also a good idea to keep cultural references in mind. Remember: your objec-tive is to translate user experience, not just textual terms!
At this point, you have enough information on why localization is important andsome feel for what needs to be done to make it happen. The next section digs deeperinto the capabilities built within the Android resource subsystem to aid in localization.
www.it-ebooks.info

518 CHAPTER 18 Localization
18.4 Leveraging Android resource capabilitiesWith the rapid pace of innovation bringing new and varied capabilities to the mobilemarket in general, and Android-powered devices in particular, the topic of localizationfor the Android platform extends beyond mere language- and number-formattingrequirements. Because Android devices can vary in terms of their graphical capabili-ties and physical attributes, some applications will require multiple layout files anddrawables targeted for a particular orientation and collection of display characteris-tics. In short, the mechanics of multiple resource files for supporting multiple localescan also provide Android applications with a flexibility previously unavailable in themobile landscape.
18.4.1 More than locale
Locale is but one of a handful of attributes that can be specified within your resources.In addition to language and region (locale), the following attributes may be used asqualifiers for organizing and specifying resources to be employed at runtime:
Mobile carrier country (mmc) Mobile network code (mnc) Orientation: portrait, landscape Screen size: small, normal, large Screen aspect: long (WQVGA, WVGA, FWVGA), notlong (QVGA, HVGA, VGA) Dock Mode: car, desk Screen pixel density: ldpi, mdpi, hdpi, nodpi (non scalable bitmaps) Screen type: no touch, stylus, finger Input method: qwerty keyboard, no keyboard Navigation: wheel, trackball, dpad, none (touchscreen only) API revision
Android is a moving target as it matures with new capabilities, so this list is regularlyexpanding and improving along with each Android release. For the most up-to-date ver-sion of this list, including the specific qualifiers for the resource folder definition, visithttp://developer.android.com/guide/topics/resources/providing-resources.html.
At this point, you know how to make your applications provide locale- and device-specific resource files. The next section demonstrates how those resources relate toone another.
18.4.2 Assigning strings in resources
To effectively manage a localized application throughout its lifespan, you must lever-age the strings.xml file to manage every string. The place where most (but not all)those strings are employed is within layout files. For example, this listing demonstratesa simple layout resource file that references string values.
www.it-ebooks.info
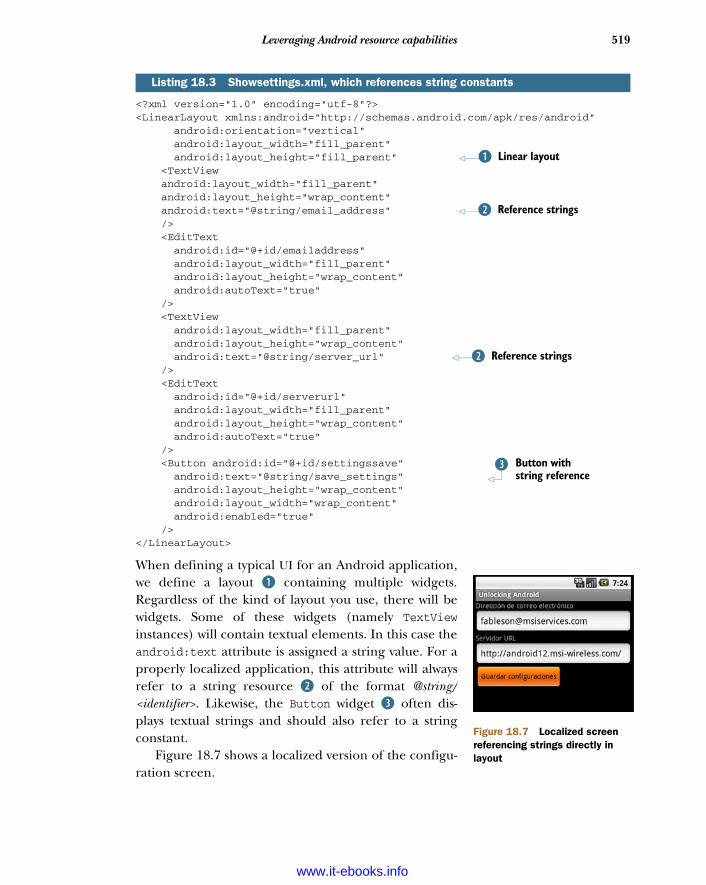
519Leveraging Android resource capabilities
<?xml version="1.0" encoding="utf-8"?><LinearLayout xmlns:android="http://schemas.android.com/apk/res/android" android:orientation="vertical" android:layout_width="fill_parent" android:layout_height="fill_parent" <TextView android:layout_width="fill_parent" android:layout_height="wrap_content" android:text="@string/email_address" /> <EditText android:id="@+id/emailaddress" android:layout_width="fill_parent" android:layout_height="wrap_content" android:autoText="true" /> <TextView android:layout_width="fill_parent" android:layout_height="wrap_content" android:text="@string/server_url" /> <EditText android:id="@+id/serverurl" android:layout_width="fill_parent" android:layout_height="wrap_content" android:autoText="true" /> <Button android:id="@+id/settingssave" android:text="@string/save_settings" android:layout_height="wrap_content" android:layout_width="wrap_content" android:enabled="true" /></LinearLayout>
When defining a typical UI for an Android application,we define a layout B containing multiple widgets.Regardless of the kind of layout you use, there will bewidgets. Some of these widgets (namely TextView
instances) will contain textual elements. In this case theandroid:text attribute is assigned a string value. For aproperly localized application, this attribute will alwaysrefer to a string resource C of the format @string/<identifier>. Likewise, the Button widget D often dis-plays textual strings and should also refer to a stringconstant.
Figure 18.7 shows a localized version of the configu-ration screen.
Listing 18.3 Showsettings.xml, which references string constants
Linear layoutB
Reference stringsC
Reference stringsC
Button with string reference
D
Figure 18.7 Localized screen referencing strings directly in layout
www.it-ebooks.info
520 CHAPTER 18 Localization
Of course, not every string in an application is defined as an attribute of a layoutresource. Some strings are provided at runtime within Java code. Fortunately, thisapproach too is straightforward and is presented in the next section.
18.5 Localizing in Java codeMany of the strings your application uses can be referenced in the application’s layoutfiles, but there’s often a need for building a string dynamically at runtime to display tothe user. These strings embedded into your code must be localized as well! In fact, ourexperience shows that it’s these strings that flesh out the application and test your dis-cipline as a developer committed to localization. These are also the strings that sendyou back to the translation team with further requests for translation services!
The first and fundamental use of localized strings in code is the simple stringretrieved from the string table and directly displayed without further formatting. We’llstart by looking at a snippet of the Field Service application’s code prior to localiza-tion. The following listing shows the onCreateOptionsMenu() method, which handlesthe creation of the presented menu options.
@Override public boolean onCreateOptionsMenu(Menu menu) { super.onCreateOptionsMenu(menu);
menu.add(0, 0, 0, "Sign & Close"); menu.add(0, 1, 1, "Cancel"); return true; }
A literal string B is used to add a menu option to the application in this pre-localization version of the code taken from chapter 12.
Let’s now see how this code is converted to a localized form. The first step (see thefollowing listing) is to ensure that we have these strings present in the string table, asshown in listing 18.2.
<string name="sign_and_close">Sign and Close</string> <string name="cancel">Cancel</string>
With the strings defined in the string table, you can reference them from code. Whenusing localized strings in Java code, your best friend is the Context class’s getString()method. This method takes a single integer argument representing the desired string,as defined by the R class. Recall that the R class is automatically generated by theAndroid Developer Tools whenever a resource is modified and saved within Eclipse.Consider the following code, which demonstrates using the getString() method toretrieve localized strings.
Listing 18.4 Menu creation code prior to localization
Listing 18.5 Subset of the string table
Menu with literal string
B
www.it-ebooks.info
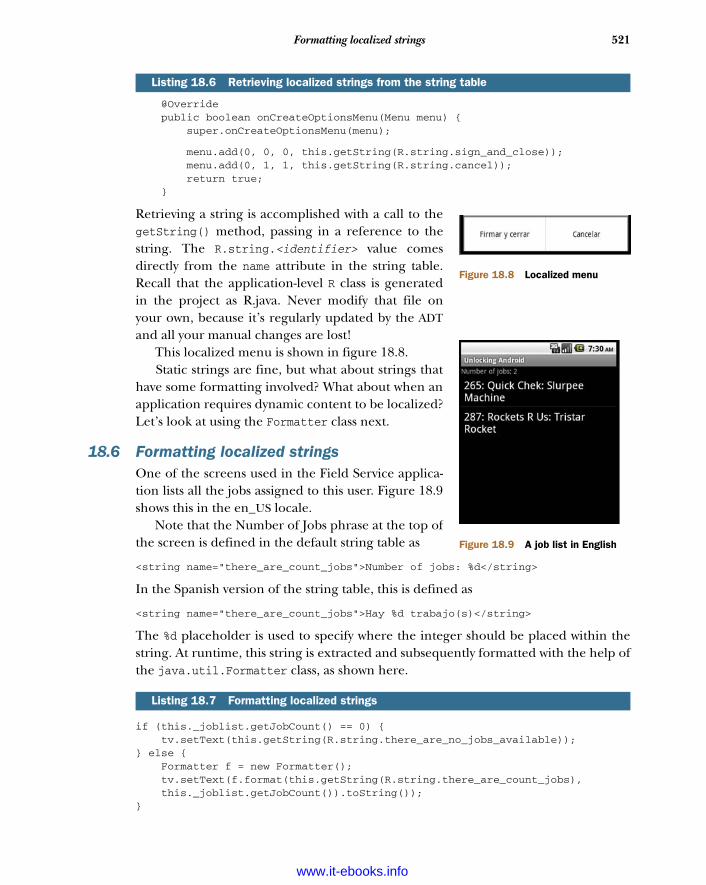
521Formatting localized strings
@Override public boolean onCreateOptionsMenu(Menu menu) { super.onCreateOptionsMenu(menu);
menu.add(0, 0, 0, this.getString(R.string.sign_and_close)); menu.add(0, 1, 1, this.getString(R.string.cancel)); return true; }
Retrieving a string is accomplished with a call to thegetString() method, passing in a reference to thestring. The R.string.<identifier> value comesdirectly from the name attribute in the string table.Recall that the application-level R class is generatedin the project as R.java. Never modify that file onyour own, because it’s regularly updated by the ADTand all your manual changes are lost!
This localized menu is shown in figure 18.8. Static strings are fine, but what about strings that
have some formatting involved? What about when anapplication requires dynamic content to be localized?Let’s look at using the Formatter class next.
18.6 Formatting localized stringsOne of the screens used in the Field Service applica-tion lists all the jobs assigned to this user. Figure 18.9shows this in the en_US locale.
Note that the Number of Jobs phrase at the top ofthe screen is defined in the default string table as
<string name="there_are_count_jobs">Number of jobs: %d</string>
In the Spanish version of the string table, this is defined as
<string name="there_are_count_jobs">Hay %d trabajo(s)</string>
The %d placeholder is used to specify where the integer should be placed within thestring. At runtime, this string is extracted and subsequently formatted with the help ofthe java.util.Formatter class, as shown here.
if (this._joblist.getJobCount() == 0) { tv.setText(this.getString(R.string.there_are_no_jobs_available));} else { Formatter f = new Formatter(); tv.setText(f.format(this.getString(R.string.there_are_count_jobs), this._joblist.getJobCount()).toString());}
Listing 18.6 Retrieving localized strings from the string table
Listing 18.7 Formatting localized strings
Figure 18.8 Localized menu
Figure 18.9 A job list in English
www.it-ebooks.info
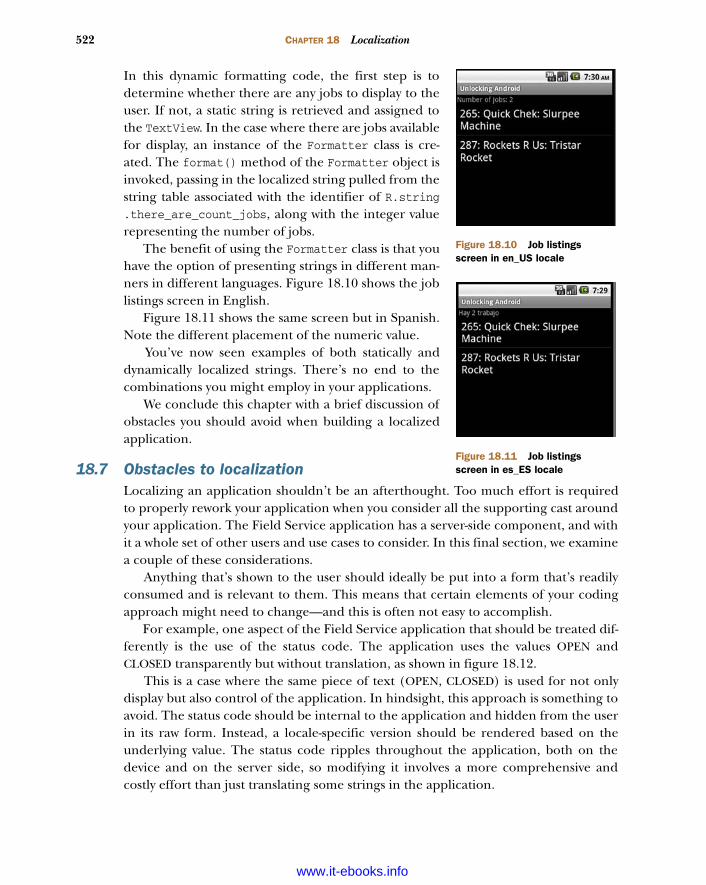
522 CHAPTER 18 Localization
In this dynamic formatting code, the first step is todetermine whether there are any jobs to display to theuser. If not, a static string is retrieved and assigned tothe TextView. In the case where there are jobs availablefor display, an instance of the Formatter class is cre-ated. The format() method of the Formatter object isinvoked, passing in the localized string pulled from thestring table associated with the identifier of R.string.there_are_count_jobs, along with the integer valuerepresenting the number of jobs.
The benefit of using the Formatter class is that youhave the option of presenting strings in different man-ners in different languages. Figure 18.10 shows the joblistings screen in English.
Figure 18.11 shows the same screen but in Spanish.Note the different placement of the numeric value.
You’ve now seen examples of both statically anddynamically localized strings. There’s no end to thecombinations you might employ in your applications.
We conclude this chapter with a brief discussion ofobstacles you should avoid when building a localizedapplication.
18.7 Obstacles to localizationLocalizing an application shouldn’t be an afterthought. Too much effort is requiredto properly rework your application when you consider all the supporting cast aroundyour application. The Field Service application has a server-side component, and withit a whole set of other users and use cases to consider. In this final section, we examinea couple of these considerations.
Anything that’s shown to the user should ideally be put into a form that’s readilyconsumed and is relevant to them. This means that certain elements of your codingapproach might need to change—and this is often not easy to accomplish.
For example, one aspect of the Field Service application that should be treated dif-ferently is the use of the status code. The application uses the values OPEN andCLOSED transparently but without translation, as shown in figure 18.12.
This is a case where the same piece of text (OPEN, CLOSED) is used for not onlydisplay but also control of the application. In hindsight, this approach is something toavoid. The status code should be internal to the application and hidden from the userin its raw form. Instead, a locale-specific version should be rendered based on theunderlying value. The status code ripples throughout the application, both on thedevice and on the server side, so modifying it involves a more comprehensive andcostly effort than just translating some strings in the application.
Figure 18.10 Job listings screen in en_US locale
Figure 18.11 Job listings screen in es_ES locale
www.it-ebooks.info
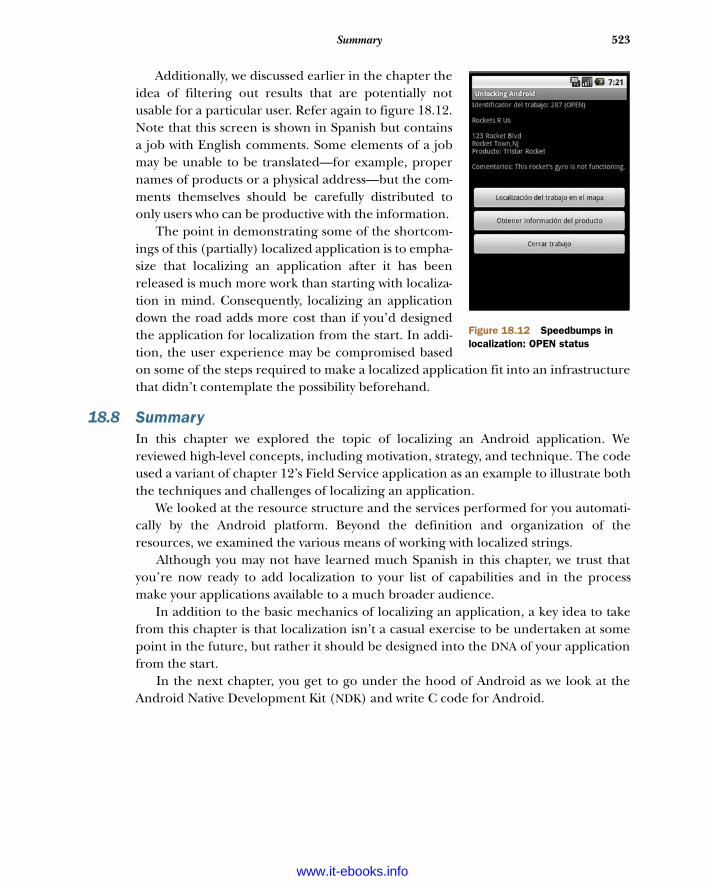
523Summary
Additionally, we discussed earlier in the chapter theidea of filtering out results that are potentially notusable for a particular user. Refer again to figure 18.12.Note that this screen is shown in Spanish but containsa job with English comments. Some elements of a jobmay be unable to be translated—for example, propernames of products or a physical address—but the com-ments themselves should be carefully distributed toonly users who can be productive with the information.
The point in demonstrating some of the shortcom-ings of this (partially) localized application is to empha-size that localizing an application after it has beenreleased is much more work than starting with localiza-tion in mind. Consequently, localizing an applicationdown the road adds more cost than if you’d designedthe application for localization from the start. In addi-tion, the user experience may be compromised basedon some of the steps required to make a localized application fit into an infrastructurethat didn’t contemplate the possibility beforehand.
18.8 SummaryIn this chapter we explored the topic of localizing an Android application. Wereviewed high-level concepts, including motivation, strategy, and technique. The codeused a variant of chapter 12’s Field Service application as an example to illustrate boththe techniques and challenges of localizing an application.
We looked at the resource structure and the services performed for you automati-cally by the Android platform. Beyond the definition and organization of theresources, we examined the various means of working with localized strings.
Although you may not have learned much Spanish in this chapter, we trust thatyou’re now ready to add localization to your list of capabilities and in the processmake your applications available to a much broader audience.
In addition to the basic mechanics of localizing an application, a key idea to takefrom this chapter is that localization isn’t a casual exercise to be undertaken at somepoint in the future, but rather it should be designed into the DNA of your applicationfrom the start.
In the next chapter, you get to go under the hood of Android as we look at theAndroid Native Development Kit (NDK) and write C code for Android.
Figure 18.12 Speedbumps in localization: OPEN status
www.it-ebooks.info
Android NativeDevelopment Kit
The majority of the code in this book is written to employ the Android SDK usingthe Java programming language. Looking back to chapter 13, we explored creatingnative executable applications for Android by writing Linux-compatible applica-tions. The code in that chapter was written in the C language, but it didn’t produceapplications that are easily executed on consumer hardware. The design approachin chapter 13 requires an unlocked developer, or rooted, device and is arguably onlyapplicable for developers who are building custom Android builds—it’s not for thetypical developer looking to deploy applications to consumer-based handsets. Thischapter presents the “approved” manner of writing C code for the Android plat-form with assistance from the Android Native Developer Kit, or simply the NDK.
This chapter presents the NDK as an aid to Android developers. The architectureof the NDK is presented and discussed in the context of a nontrivial, hands-on
This chapter covers Introducing the Android Native Development Kit
Exploring the Java Native Interface
Building an application with the NDK
Integrating NDK into Eclipse
524
www.it-ebooks.info
525Introducing the NDK
image-processing application. Image processing is a broad field encompassing manyapplications across almost every industry. Perhaps the most familiar example of animage-processing application is optical character recognition (OCR). OCR can be imple-mented via a number of different algorithms. Many image-processing algorithms beginby attempting to identify the target object within a still image or frame of a video. Oneclassic technique for separating an object from the background is known as edge detec-tion. An edge detection algorithm analyzes the image looking for the outlines of anyobjects within the image, be they characters or any other object. The application thataccompanies this chapter, named UA2E_FindEdges, implements a classic image-processing algorithm known as Sobel Edge Detection.1 Using UA2E_FindEdges, you’ll usethe Android camera to acquire a photo and then find all of the edges within the image.The algorithm to be used has been ported from another platform in the C program-ming language, compiled into a native code library, and employed by an Android SDKJava application.
The chapter wraps up with a demonstration of integrating the NDK into theEclipse build environment, permitting a nearly seamless experience for the developer.
19.1 Introducing the NDK NDK is a bolt-on, complementary tool chain to the core Android SDK that permitsdevelopers to create application functionality in the C programming language. TheNDK isn’t meant to replace the SDK applications, but rather is designed to augmentthem. In fact, you can’t create a standalone application with the NDK. The NDK com-piles code written in C into libraries that are callable by SDK-based Java code. The roleof these native libraries is to provide additional functionality to the Java application.The NDK also handles all of the application packaging steps to make sure that theresulting APK file contains not only the Java code but the native code libraries as well.
Considering the power and breadth of the Android SDK, why would you botherwith the NDK?
19.1.1 Uses for the NDK
For most developers, there’s no reason to use the NDK, as the combination of the Javaprogramming language and the Android SDK is more than capable of meeting theneeds of their applications, and they’ll never need to drop down to the native level toaccomplish their tasks. But there are scenarios where C is better suited to the taskthan Java. Consider the case where an application needs to perform a large number ofbitwise operations on 8-bit data elements for applications such as raw signal condition-ing, image processing, or encryption. Operations such as these are ideally suited forthe C language with its efficient use of memory and its agility when working with rawdata. Likewise, accessing the OpenGL libraries from C may provide better perfor-mance for some applications where the developer is skilled in C.
1 Here is an introductory tutorial covering the topic of Sobel Edge Detection: www.generation5.org/content/2002/im01.asp.
www.it-ebooks.info
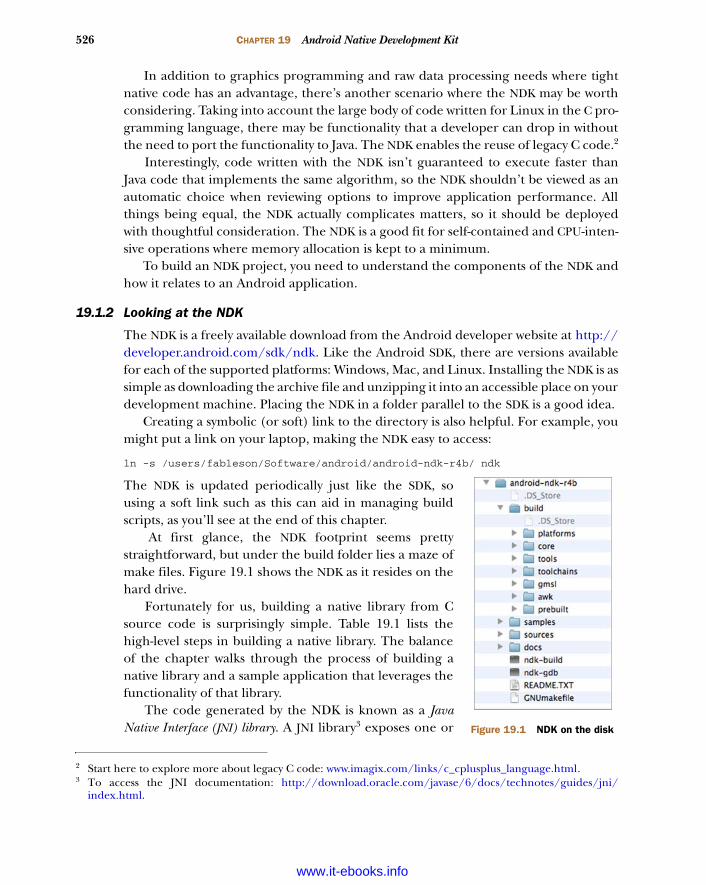
526 CHAPTER 19 Android Native Development Kit
In addition to graphics programming and raw data processing needs where tightnative code has an advantage, there’s another scenario where the NDK may be worthconsidering. Taking into account the large body of code written for Linux in the C pro-gramming language, there may be functionality that a developer can drop in withoutthe need to port the functionality to Java. The NDK enables the reuse of legacy C code.2
Interestingly, code written with the NDK isn’t guaranteed to execute faster thanJava code that implements the same algorithm, so the NDK shouldn’t be viewed as anautomatic choice when reviewing options to improve application performance. Allthings being equal, the NDK actually complicates matters, so it should be deployedwith thoughtful consideration. The NDK is a good fit for self-contained and CPU-inten-sive operations where memory allocation is kept to a minimum.
To build an NDK project, you need to understand the components of the NDK andhow it relates to an Android application.
19.1.2 Looking at the NDK
The NDK is a freely available download from the Android developer website at http://developer.android.com/sdk/ndk. Like the Android SDK, there are versions availablefor each of the supported platforms: Windows, Mac, and Linux. Installing the NDK is assimple as downloading the archive file and unzipping it into an accessible place on yourdevelopment machine. Placing the NDK in a folder parallel to the SDK is a good idea.
Creating a symbolic (or soft) link to the directory is also helpful. For example, youmight put a link on your laptop, making the NDK easy to access:
ln -s /users/fableson/Software/android/android-ndk-r4b/ ndk
The NDK is updated periodically just like the SDK, sousing a soft link such as this can aid in managing buildscripts, as you’ll see at the end of this chapter.
At first glance, the NDK footprint seems prettystraightforward, but under the build folder lies a maze ofmake files. Figure 19.1 shows the NDK as it resides on thehard drive.
Fortunately for us, building a native library from Csource code is surprisingly simple. Table 19.1 lists thehigh-level steps in building a native library. The balanceof the chapter walks through the process of building anative library and a sample application that leverages thefunctionality of that library.
The code generated by the NDK is known as a JavaNative Interface (JNI) library. A JNI library3 exposes one or
2 Start here to explore more about legacy C code: www.imagix.com/links/c_cplusplus_language.html.3 To access the JNI documentation: http://download.oracle.com/javase/6/docs/technotes/guides/jni/
index.html.
Figure 19.1 NDK on the disk
www.it-ebooks.info
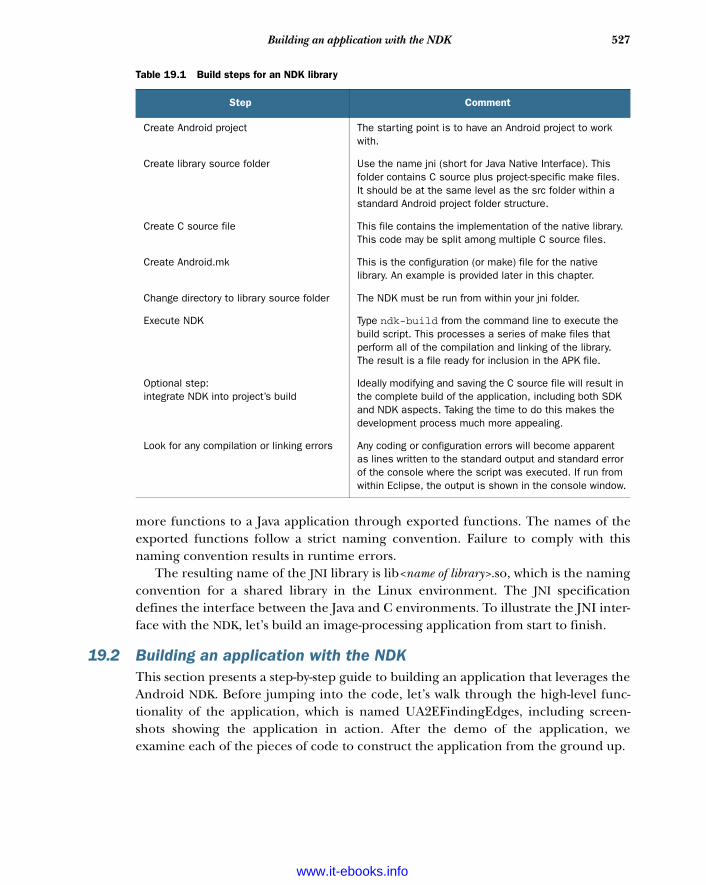
527Building an application with the NDK
more functions to a Java application through exported functions. The names of theexported functions follow a strict naming convention. Failure to comply with thisnaming convention results in runtime errors.
The resulting name of the JNI library is lib<name of library>.so, which is the namingconvention for a shared library in the Linux environment. The JNI specificationdefines the interface between the Java and C environments. To illustrate the JNI inter-face with the NDK, let’s build an image-processing application from start to finish.
19.2 Building an application with the NDKThis section presents a step-by-step guide to building an application that leverages theAndroid NDK. Before jumping into the code, let’s walk through the high-level func-tionality of the application, which is named UA2EFindingEdges, including screen-shots showing the application in action. After the demo of the application, weexamine each of the pieces of code to construct the application from the ground up.
Table 19.1 Build steps for an NDK library
Step Comment
Create Android project The starting point is to have an Android project to work with.
Create library source folder Use the name jni (short for Java Native Interface). This folder contains C source plus project-specific make files. It should be at the same level as the src folder within a standard Android project folder structure.
Create C source file This file contains the implementation of the native library. This code may be split among multiple C source files.
Create Android.mk This is the configuration (or make) file for the native library. An example is provided later in this chapter.
Change directory to library source folder The NDK must be run from within your jni folder.
Execute NDK Type ndk-build from the command line to execute the build script. This processes a series of make files that perform all of the compilation and linking of the library. The result is a file ready for inclusion in the APK file.
Optional step: integrate NDK into project’s build
Ideally modifying and saving the C source file will result in the complete build of the application, including both SDK and NDK aspects. Taking the time to do this makes the development process much more appealing.
Look for any compilation or linking errors Any coding or configuration errors will become apparent as lines written to the standard output and standard error of the console where the script was executed. If run from within Eclipse, the output is shown in the console window.
www.it-ebooks.info
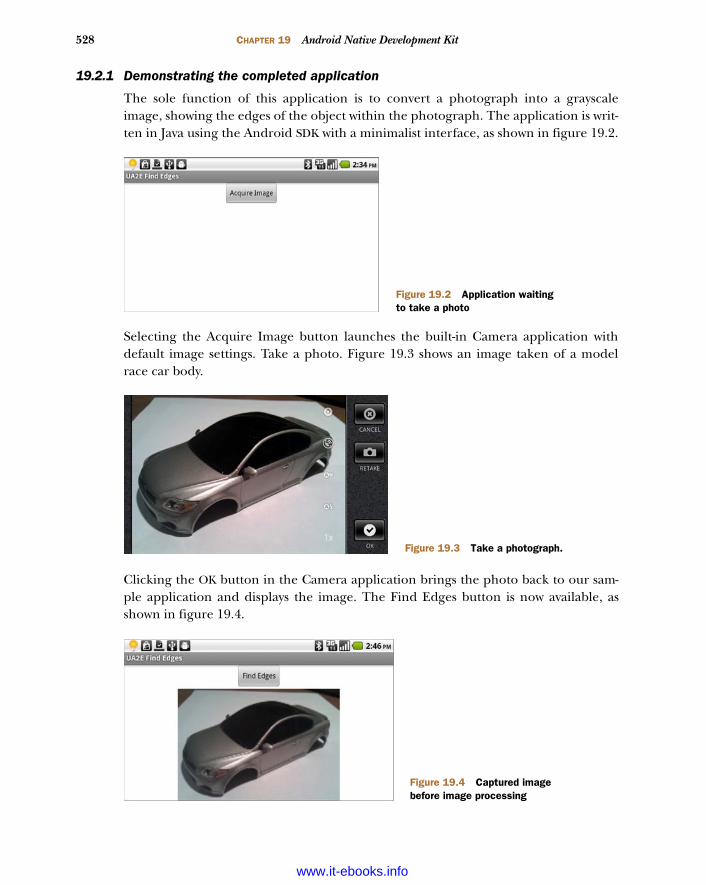
528 CHAPTER 19 Android Native Development Kit
19.2.1 Demonstrating the completed application
The sole function of this application is to convert a photograph into a grayscaleimage, showing the edges of the object within the photograph. The application is writ-ten in Java using the Android SDK with a minimalist interface, as shown in figure 19.2.
Selecting the Acquire Image button launches the built-in Camera application withdefault image settings. Take a photo. Figure 19.3 shows an image taken of a modelrace car body.
Clicking the OK button in the Camera application brings the photo back to our sam-ple application and displays the image. The Find Edges button is now available, asshown in figure 19.4.
Figure 19.2 Application waiting to take a photo
Figure 19.3 Take a photograph.
Figure 19.4 Captured image before image processing
www.it-ebooks.info
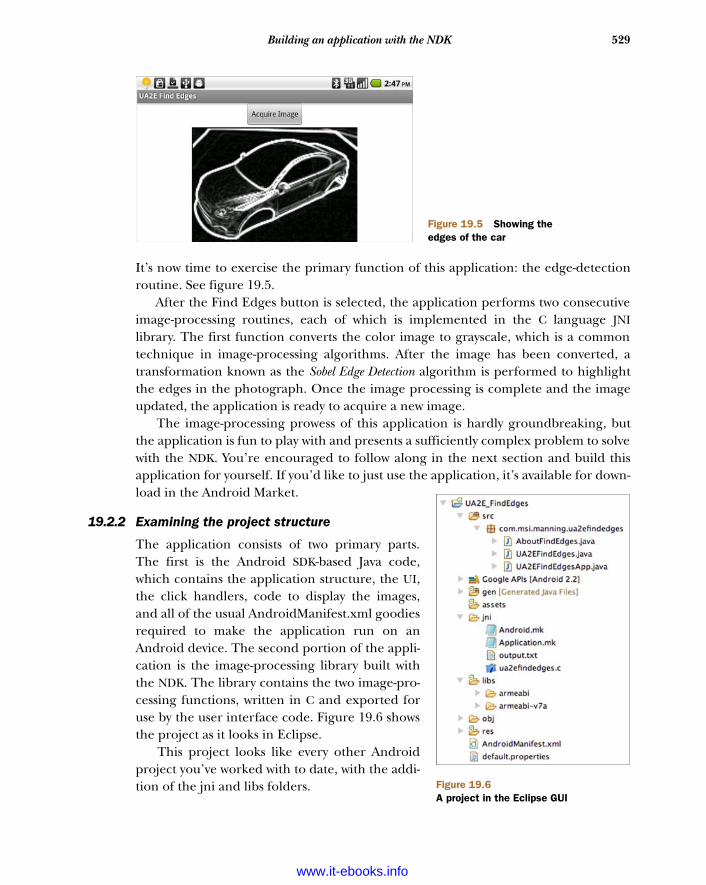
529Building an application with the NDK
It’s now time to exercise the primary function of this application: the edge-detectionroutine. See figure 19.5.
After the Find Edges button is selected, the application performs two consecutiveimage-processing routines, each of which is implemented in the C language JNIlibrary. The first function converts the color image to grayscale, which is a commontechnique in image-processing algorithms. After the image has been converted, atransformation known as the Sobel Edge Detection algorithm is performed to highlightthe edges in the photograph. Once the image processing is complete and the imageupdated, the application is ready to acquire a new image.
The image-processing prowess of this application is hardly groundbreaking, butthe application is fun to play with and presents a sufficiently complex problem to solvewith the NDK. You’re encouraged to follow along in the next section and build thisapplication for yourself. If you’d like to just use the application, it’s available for down-load in the Android Market.
19.2.2 Examining the project structure
The application consists of two primary parts.The first is the Android SDK-based Java code,which contains the application structure, the UI,the click handlers, code to display the images,and all of the usual AndroidManifest.xml goodiesrequired to make the application run on anAndroid device. The second portion of the appli-cation is the image-processing library built withthe NDK. The library contains the two image-pro-cessing functions, written in C and exported foruse by the user interface code. Figure 19.6 showsthe project as it looks in Eclipse.
This project looks like every other Androidproject you’ve worked with to date, with the addi-tion of the jni and libs folders.
Figure 19.5 Showing the edges of the car
Figure 19.6A project in the Eclipse GUI
www.it-ebooks.info
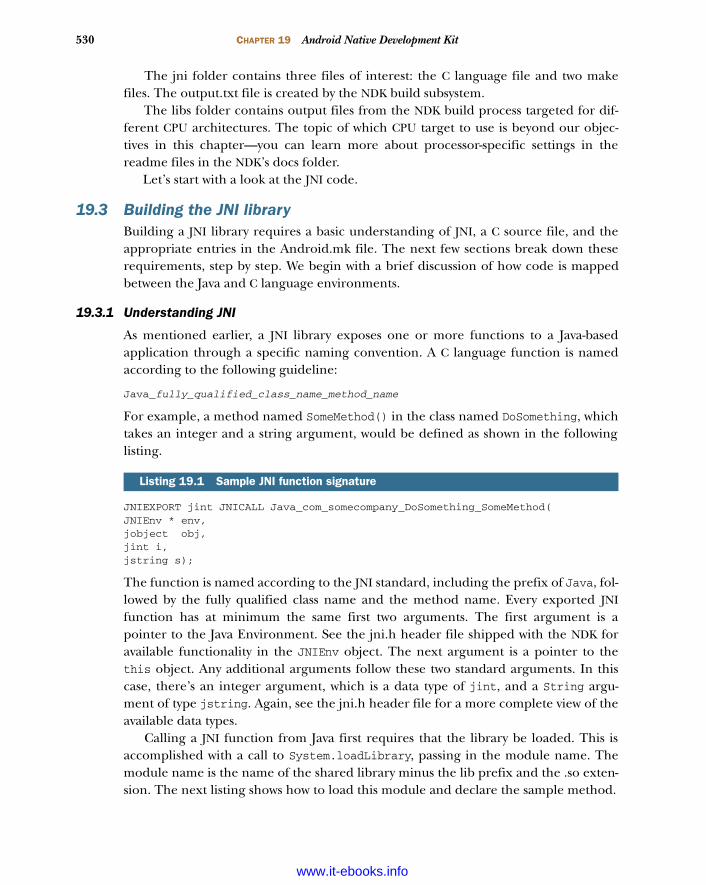
530 CHAPTER 19 Android Native Development Kit
The jni folder contains three files of interest: the C language file and two makefiles. The output.txt file is created by the NDK build subsystem.
The libs folder contains output files from the NDK build process targeted for dif-ferent CPU architectures. The topic of which CPU target to use is beyond our objec-tives in this chapter—you can learn more about processor-specific settings in thereadme files in the NDK’s docs folder.
Let’s start with a look at the JNI code.
19.3 Building the JNI libraryBuilding a JNI library requires a basic understanding of JNI, a C source file, and theappropriate entries in the Android.mk file. The next few sections break down theserequirements, step by step. We begin with a brief discussion of how code is mappedbetween the Java and C language environments.
19.3.1 Understanding JNI
As mentioned earlier, a JNI library exposes one or more functions to a Java-basedapplication through a specific naming convention. A C language function is namedaccording to the following guideline:
Java_fully_qualified_class_name_method_name
For example, a method named SomeMethod() in the class named DoSomething, whichtakes an integer and a string argument, would be defined as shown in the followinglisting.
JNIEXPORT jint JNICALL Java_com_somecompany_DoSomething_SomeMethod( JNIEnv * env, jobject obj, jint i, jstring s);
The function is named according to the JNI standard, including the prefix of Java, fol-lowed by the fully qualified class name and the method name. Every exported JNIfunction has at minimum the same first two arguments. The first argument is apointer to the Java Environment. See the jni.h header file shipped with the NDK foravailable functionality in the JNIEnv object. The next argument is a pointer to thethis object. Any additional arguments follow these two standard arguments. In thiscase, there’s an integer argument, which is a data type of jint, and a String argu-ment of type jstring. Again, see the jni.h header file for a more complete view of theavailable data types.
Calling a JNI function from Java first requires that the library be loaded. This isaccomplished with a call to System.loadLibrary, passing in the module name. Themodule name is the name of the shared library minus the lib prefix and the .so exten-sion. The next listing shows how to load this module and declare the sample method.
Listing 19.1 Sample JNI function signature
www.it-ebooks.info
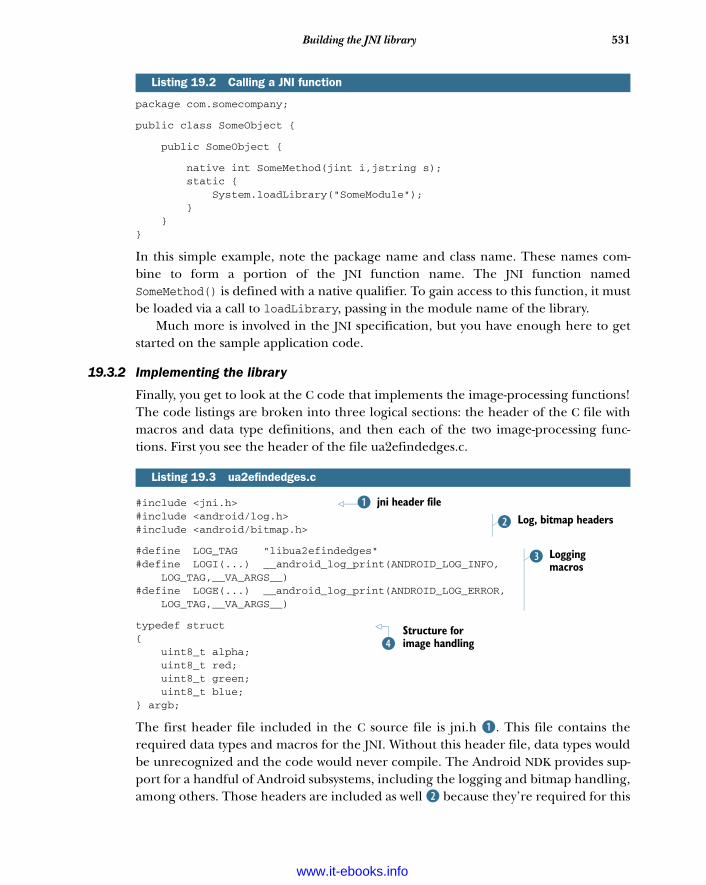
531Building the JNI library
package com.somecompany;
public class SomeObject {
public SomeObject {
native int SomeMethod(jint i,jstring s); static { System.loadLibrary("SomeModule"); } }}
In this simple example, note the package name and class name. These names com-bine to form a portion of the JNI function name. The JNI function namedSomeMethod() is defined with a native qualifier. To gain access to this function, it mustbe loaded via a call to loadLibrary, passing in the module name of the library.
Much more is involved in the JNI specification, but you have enough here to getstarted on the sample application code.
19.3.2 Implementing the library
Finally, you get to look at the C code that implements the image-processing functions!The code listings are broken into three logical sections: the header of the C file withmacros and data type definitions, and then each of the two image-processing func-tions. First you see the header of the file ua2efindedges.c.
#include <jni.h> #include <android/log.h>#include <android/bitmap.h>
#define LOG_TAG "libua2efindedges"#define LOGI(...) __android_log_print(ANDROID_LOG_INFO, LOG_TAG,__VA_ARGS__)#define LOGE(...) __android_log_print(ANDROID_LOG_ERROR, LOG_TAG,__VA_ARGS__)
typedef struct{ uint8_t alpha; uint8_t red; uint8_t green; uint8_t blue;} argb;
The first header file included in the C source file is jni.h B. This file contains therequired data types and macros for the JNI. Without this header file, data types wouldbe unrecognized and the code would never compile. The Android NDK provides sup-port for a handful of Android subsystems, including the logging and bitmap handling,among others. Those headers are included as well C because they’re required for this
Listing 19.2 Calling a JNI function
Listing 19.3 ua2efindedges.c
jni header fileBLog, bitmap headersC
Logging macros
D
Structure for image handlingE
www.it-ebooks.info
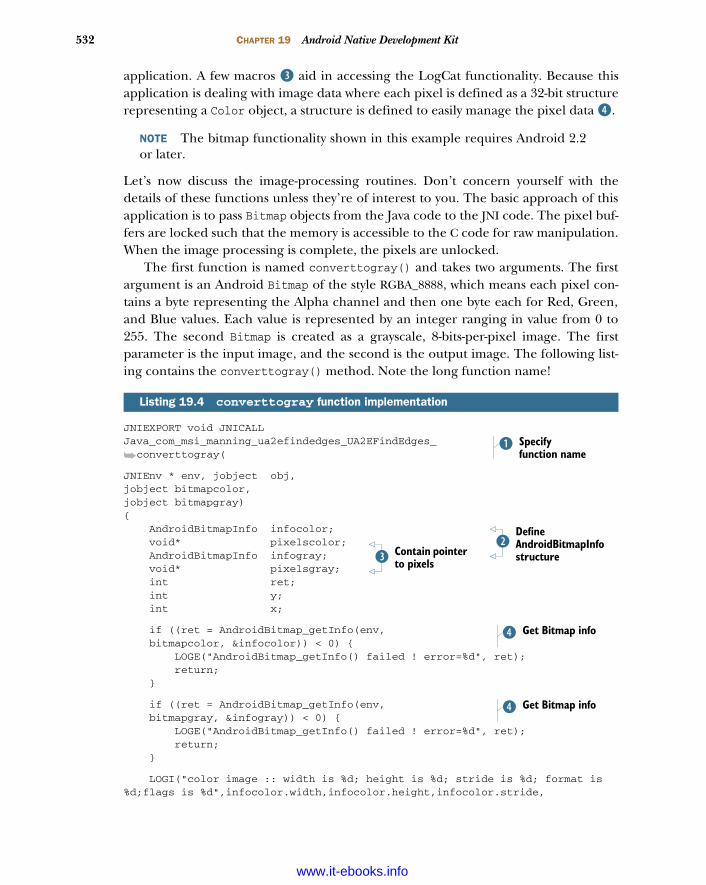
532 CHAPTER 19 Android Native Development Kit
application. A few macros D aid in accessing the LogCat functionality. Because thisapplication is dealing with image data where each pixel is defined as a 32-bit structurerepresenting a Color object, a structure is defined to easily manage the pixel data E.
NOTE The bitmap functionality shown in this example requires Android 2.2or later.
Let’s now discuss the image-processing routines. Don’t concern yourself with thedetails of these functions unless they’re of interest to you. The basic approach of thisapplication is to pass Bitmap objects from the Java code to the JNI code. The pixel buf-fers are locked such that the memory is accessible to the C code for raw manipulation.When the image processing is complete, the pixels are unlocked.
The first function is named converttogray() and takes two arguments. The firstargument is an Android Bitmap of the style RGBA_8888, which means each pixel con-tains a byte representing the Alpha channel and then one byte each for Red, Green,and Blue values. Each value is represented by an integer ranging in value from 0 to255. The second Bitmap is created as a grayscale, 8-bits-per-pixel image. The firstparameter is the input image, and the second is the output image. The following list-ing contains the converttogray() method. Note the long function name!
JNIEXPORT void JNICALL Java_com_msi_manning_ua2efindedges_UA2EFindEdges_
➥converttogray(
JNIEnv * env, jobject obj,jobject bitmapcolor, jobject bitmapgray) { AndroidBitmapInfo infocolor; void* pixelscolor; AndroidBitmapInfo infogray; void* pixelsgray; int ret; int y; int x;
if ((ret = AndroidBitmap_getInfo(env, bitmapcolor, &infocolor)) < 0) { LOGE("AndroidBitmap_getInfo() failed ! error=%d", ret); return; }
if ((ret = AndroidBitmap_getInfo(env, bitmapgray, &infogray)) < 0) { LOGE("AndroidBitmap_getInfo() failed ! error=%d", ret); return; }
LOGI("color image :: width is %d; height is %d; stride is %d; format is %d;flags is %d",infocolor.width,infocolor.height,infocolor.stride,
Listing 19.4 converttogray function implementation
Specify function name
B
Define AndroidBitmapInfo structure
CContain pointer to pixelsD
Get Bitmap infoE
Get Bitmap infoE
www.it-ebooks.info
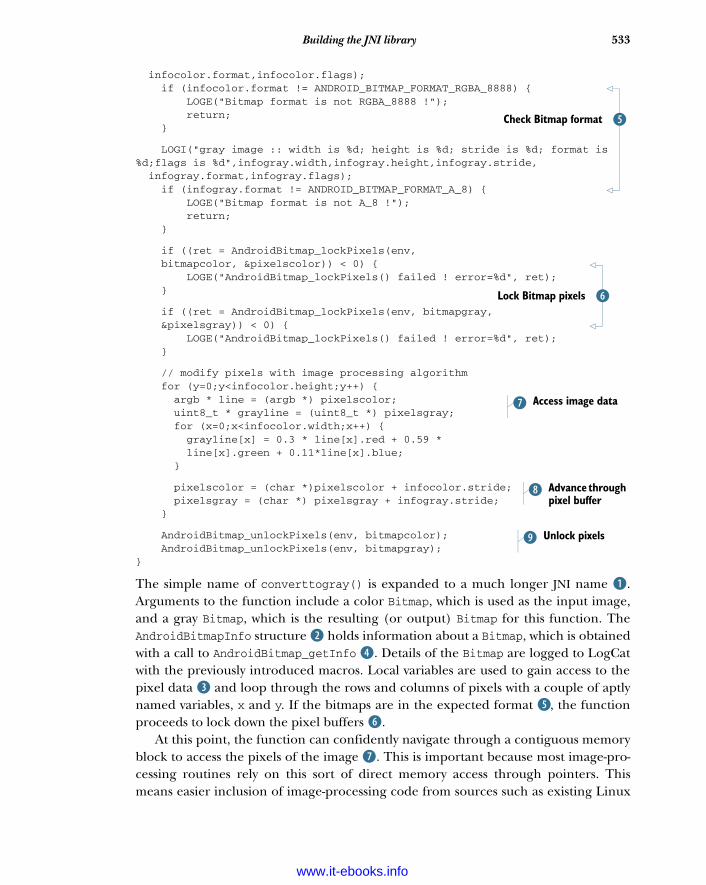
533Building the JNI library
infocolor.format,infocolor.flags); if (infocolor.format != ANDROID_BITMAP_FORMAT_RGBA_8888) { LOGE("Bitmap format is not RGBA_8888 !"); return; }
LOGI("gray image :: width is %d; height is %d; stride is %d; format is%d;flags is %d",infogray.width,infogray.height,infogray.stride, infogray.format,infogray.flags); if (infogray.format != ANDROID_BITMAP_FORMAT_A_8) { LOGE("Bitmap format is not A_8 !"); return; }
if ((ret = AndroidBitmap_lockPixels(env, bitmapcolor, &pixelscolor)) < 0) { LOGE("AndroidBitmap_lockPixels() failed ! error=%d", ret); }
if ((ret = AndroidBitmap_lockPixels(env, bitmapgray, &pixelsgray)) < 0) { LOGE("AndroidBitmap_lockPixels() failed ! error=%d", ret); }
// modify pixels with image processing algorithm for (y=0;y<infocolor.height;y++) { argb * line = (argb *) pixelscolor; uint8_t * grayline = (uint8_t *) pixelsgray; for (x=0;x<infocolor.width;x++) { grayline[x] = 0.3 * line[x].red + 0.59 * line[x].green + 0.11*line[x].blue; }
pixelscolor = (char *)pixelscolor + infocolor.stride; pixelsgray = (char *) pixelsgray + infogray.stride; }
AndroidBitmap_unlockPixels(env, bitmapcolor); AndroidBitmap_unlockPixels(env, bitmapgray);}
The simple name of converttogray() is expanded to a much longer JNI name B.Arguments to the function include a color Bitmap, which is used as the input image,and a gray Bitmap, which is the resulting (or output) Bitmap for this function. TheAndroidBitmapInfo structure C holds information about a Bitmap, which is obtainedwith a call to AndroidBitmap_getInfo E. Details of the Bitmap are logged to LogCatwith the previously introduced macros. Local variables are used to gain access to thepixel data D and loop through the rows and columns of pixels with a couple of aptlynamed variables, x and y. If the bitmaps are in the expected format F, the functionproceeds to lock down the pixel buffers G.
At this point, the function can confidently navigate through a contiguous memoryblock to access the pixels of the image H. This is important because most image-pro-cessing routines rely on this sort of direct memory access through pointers. Thismeans easier inclusion of image-processing code from sources such as existing Linux
FCheck Bitmap format
GLock Bitmap pixels
Access image dataH
Advance through pixel buffer
I
Unlock pixelsJ
www.it-ebooks.info
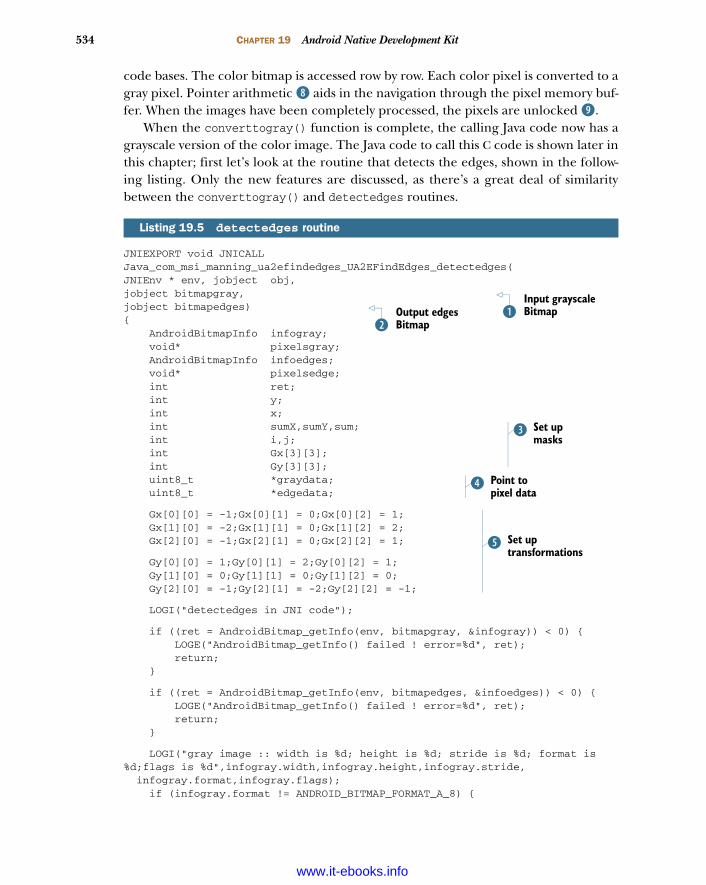
534 CHAPTER 19 Android Native Development Kit
code bases. The color bitmap is accessed row by row. Each color pixel is converted to agray pixel. Pointer arithmetic I aids in the navigation through the pixel memory buf-fer. When the images have been completely processed, the pixels are unlocked J.
When the converttogray() function is complete, the calling Java code now has agrayscale version of the color image. The Java code to call this C code is shown later inthis chapter; first let’s look at the routine that detects the edges, shown in the follow-ing listing. Only the new features are discussed, as there’s a great deal of similaritybetween the converttogray() and detectedges routines.
JNIEXPORT void JNICALL Java_com_msi_manning_ua2efindedges_UA2EFindEdges_detectedges(JNIEnv * env, jobject obj,jobject bitmapgray,jobject bitmapedges){ AndroidBitmapInfo infogray; void* pixelsgray; AndroidBitmapInfo infoedges; void* pixelsedge; int ret; int y; int x; int sumX,sumY,sum; int i,j; int Gx[3][3]; int Gy[3][3]; uint8_t *graydata; uint8_t *edgedata;
Gx[0][0] = -1;Gx[0][1] = 0;Gx[0][2] = 1; Gx[1][0] = -2;Gx[1][1] = 0;Gx[1][2] = 2; Gx[2][0] = -1;Gx[2][1] = 0;Gx[2][2] = 1;
Gy[0][0] = 1;Gy[0][1] = 2;Gy[0][2] = 1; Gy[1][0] = 0;Gy[1][1] = 0;Gy[1][2] = 0; Gy[2][0] = -1;Gy[2][1] = -2;Gy[2][2] = -1;
LOGI("detectedges in JNI code");
if ((ret = AndroidBitmap_getInfo(env, bitmapgray, &infogray)) < 0) { LOGE("AndroidBitmap_getInfo() failed ! error=%d", ret); return; }
if ((ret = AndroidBitmap_getInfo(env, bitmapedges, &infoedges)) < 0) { LOGE("AndroidBitmap_getInfo() failed ! error=%d", ret); return; }
LOGI("gray image :: width is %d; height is %d; stride is %d; format is %d;flags is %d",infogray.width,infogray.height,infogray.stride, infogray.format,infogray.flags); if (infogray.format != ANDROID_BITMAP_FORMAT_A_8) {
Listing 19.5 detectedges routine
Input grayscale BitmapBOutput edges
BitmapC
Set up masks
D
Point to pixel data
E
Set up transformations
F
www.it-ebooks.info
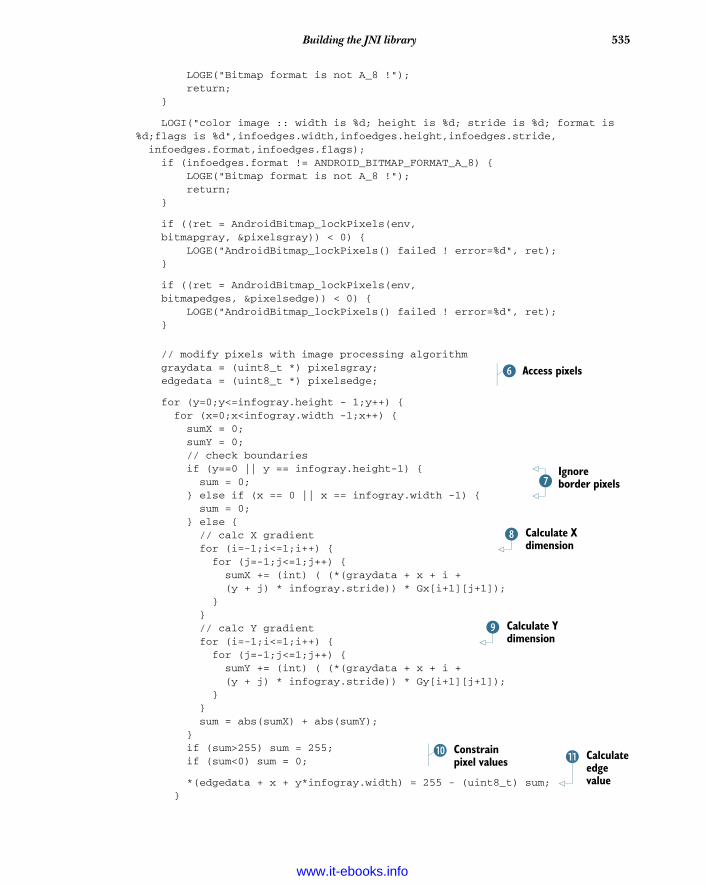
535Building the JNI library
LOGE("Bitmap format is not A_8 !"); return; }
LOGI("color image :: width is %d; height is %d; stride is %d; format is %d;flags is %d",infoedges.width,infoedges.height,infoedges.stride, infoedges.format,infoedges.flags); if (infoedges.format != ANDROID_BITMAP_FORMAT_A_8) { LOGE("Bitmap format is not A_8 !"); return; }
if ((ret = AndroidBitmap_lockPixels(env, bitmapgray, &pixelsgray)) < 0) { LOGE("AndroidBitmap_lockPixels() failed ! error=%d", ret); }
if ((ret = AndroidBitmap_lockPixels(env, bitmapedges, &pixelsedge)) < 0) { LOGE("AndroidBitmap_lockPixels() failed ! error=%d", ret); }
// modify pixels with image processing algorithm graydata = (uint8_t *) pixelsgray; edgedata = (uint8_t *) pixelsedge;
for (y=0;y<=infogray.height - 1;y++) { for (x=0;x<infogray.width -1;x++) { sumX = 0; sumY = 0; // check boundaries if (y==0 || y == infogray.height-1) { sum = 0; } else if (x == 0 || x == infogray.width -1) { sum = 0; } else { // calc X gradient for (i=-1;i<=1;i++) { for (j=-1;j<=1;j++) { sumX += (int) ( (*(graydata + x + i + (y + j) * infogray.stride)) * Gx[i+1][j+1]); } } // calc Y gradient for (i=-1;i<=1;i++) { for (j=-1;j<=1;j++) { sumY += (int) ( (*(graydata + x + i + (y + j) * infogray.stride)) * Gy[i+1][j+1]); } } sum = abs(sumX) + abs(sumY); } if (sum>255) sum = 255; if (sum<0) sum = 0;
*(edgedata + x + y*infogray.width) = 255 - (uint8_t) sum; }
Access pixelsG
Ignore border pixelsH
Calculate X dimension
I
Calculate Y dimension
J
Constrain pixel values
1) Calculate edge value
1!
www.it-ebooks.info
536 CHAPTER 19 Android Native Development Kit
} AndroidBitmap_unlockPixels(env, bitmapgray); AndroidBitmap_unlockPixels(env, bitmapedges); }
Like the prior function, this one takes two Bitmap arguments, both of which are gray-scale images. The first contains the grayscale image B created in the converttogray()method. The second bitmap argument C becomes the “edges only” version of theimage. A number of variables D are defined to aid in the edge-detection process. Likethe prior function, we have local pointers E to the image data. The Sobel Edge Detec-tion algorithm involves a mathematical operation known as a convolution, whichrequires initializing a pair of convolution masks F. The convolution must be per-formed across the entire image G with the exception of the border pixels, which areskipped H. First the calculations are made in the x dimension I and then in the ydimension J. Once the calculations have been performed for a particular pixel, a newvalue is calculated based on the surrounding pixels and stored in the output image 1).Prior to storing a value, the new pixel value is constrained to be between 0 and 255 1!.
You’re now ready to compile this code, but before you can do that you need todefine the make file for the library.
19.3.3 Compiling the JNI library
In addition to the C source file, you require a make file to instruct the NDK on how thelibrary is compiled. The following listing contains the make file used with this library.
LOCAL_PATH := $(call my-dir)
include $(CLEAR_VARS)
LOCAL_MODULE := ua2efindedges LOCAL_SRC_FILES := ua2efindedges.c LOCAL_LDLIBS := -llog –ljnigraphics
include $(BUILD_SHARED_LIBRARY)
The Android.mk file is a make file containing build information about the JNI libraryfor this project. The name of the library module is ua2efindedges. The actual result-ing filename is libua2efindedges.so, which follows the normal file-naming structurefor a dynamically loadable library for Linux. The only source file for this library isua2efindedges.c. The input libraries are also listed. These libraries are searched forcode symbols when the library is linked. The standard C and math libraries are auto-matically searched, so they don’t need to be included in the LOCAL_LDLIBS variable.
Building the application is as simple as opening a terminal window to the jni folderand running the file ndk-build, which can be found in the NDK installation directory.Figure 19.7 shows the build process from the command line.
Listing 19.6 Android.mk
www.it-ebooks.info

537Building the user interface
Now that the JNI library is complete, let’s swing back to the Android SDK and build theuser interface for this application.
19.4 Building the user interfaceThe UI for the application is modest. The things the UI must do include respondingto two different buttons, one for taking a picture and one for calling the JNI functions.Beyond that, the code performs simple operations to display the various bitmapimages. Let’s start by looking at the layout for this application.
19.4.1 User interface layout
The layout for this application is contained in the resource file main.xml, shown next.
<?xml version="1.0" encoding="utf-8"?><LinearLayout xmlns:android="http://schemas.android.com/apk/res/android" android:orientation="vertical" android:layout_width="fill_parent" android:layout_height="fill_parent" android:background="#ffffffff"><LinearLayout xmlns:android="http://schemas.android.com/apk/res/android" android:orientation="horizontal" android:layout_width="fill_parent" android:layout_height="wrap_content" android:background="#ffffffff" android:gravity="center"><Button android:id="@+id/AcquireImage" android:layout_width="wrap_content" android:layout_height="wrap_content" android:text="Acquire Image" /><Button android:id="@+id/FindEdges" android:layout_width="wrap_content" android:layout_height="wrap_content" android:text="Find Edges" />
Listing 19.7 Layout file
Figure 19.7 Building the JNI library
Outer layoutb
Layout containing Buttons
c
Acquire, Find Edges Buttons
d
www.it-ebooks.info
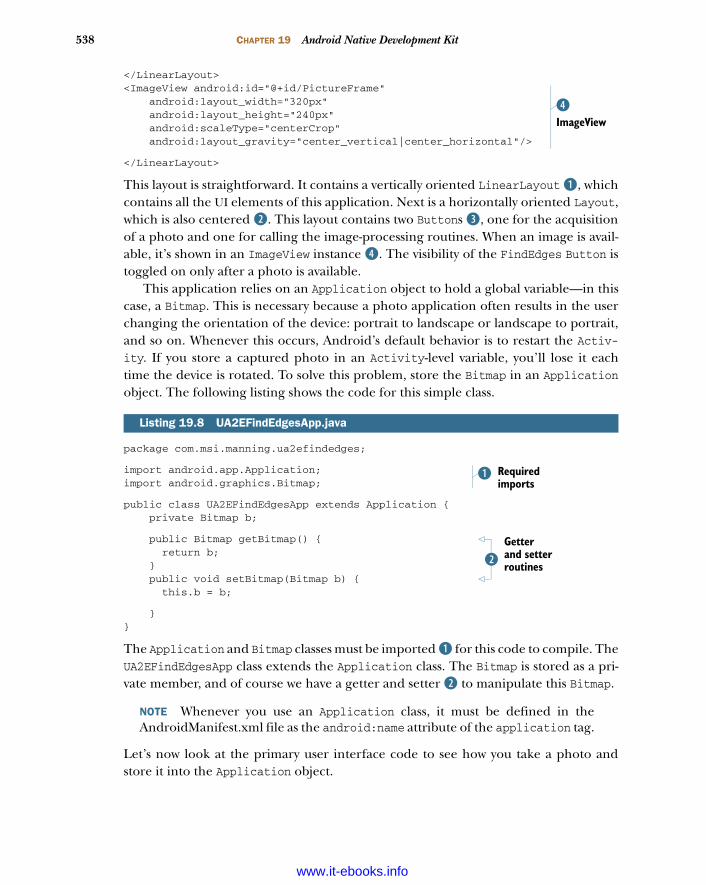
538 CHAPTER 19 Android Native Development Kit
</LinearLayout><ImageView android:id="@+id/PictureFrame" android:layout_width="320px" android:layout_height="240px" android:scaleType="centerCrop" android:layout_gravity="center_vertical|center_horizontal"/>
</LinearLayout>
This layout is straightforward. It contains a vertically oriented LinearLayout B, whichcontains all the UI elements of this application. Next is a horizontally oriented Layout,which is also centered c. This layout contains two Buttons d, one for the acquisitionof a photo and one for calling the image-processing routines. When an image is avail-able, it’s shown in an ImageView instance e. The visibility of the FindEdges Button istoggled on only after a photo is available.
This application relies on an Application object to hold a global variable—in thiscase, a Bitmap. This is necessary because a photo application often results in the userchanging the orientation of the device: portrait to landscape or landscape to portrait,and so on. Whenever this occurs, Android’s default behavior is to restart the Activ-ity. If you store a captured photo in an Activity-level variable, you’ll lose it eachtime the device is rotated. To solve this problem, store the Bitmap in an Applicationobject. The following listing shows the code for this simple class.
package com.msi.manning.ua2efindedges;
import android.app.Application;import android.graphics.Bitmap;
public class UA2EFindEdgesApp extends Application { private Bitmap b;
public Bitmap getBitmap() { return b; } public void setBitmap(Bitmap b) { this.b = b;
}}
The Application and Bitmap classes must be imported B for this code to compile. TheUA2EFindEdgesApp class extends the Application class. The Bitmap is stored as a pri-vate member, and of course we have a getter and setter c to manipulate this Bitmap.
NOTE Whenever you use an Application class, it must be defined in theAndroidManifest.xml file as the android:name attribute of the application tag.
Let’s now look at the primary user interface code to see how you take a photo andstore it into the Application object.
Listing 19.8 UA2EFindEdgesApp.java
ImageViewe
Required imports
b
Getter and setter routinesc
www.it-ebooks.info

539Building the user interface
19.4.2 Taking a photo
There are a number of ways to take a photograph on the Android platform. For thisapplication, you’ll just ask the Camera to do the work for you through the use of anIntent. The next listing demonstrates this approach. Note that the JNI-related codeintroduced next is employed in listing 19.10.
package com.msi.manning.ua2efindedges;
import android.app.Activity;import android.os.Bundle;import android.util.Log;import android.widget.ImageView;import android.widget.Button;import android.view.View;import android.content.Intent;import android.graphics.Bitmap;import android.graphics.Bitmap.Config;
public class UA2EFindEdges extends Activity {
protected ImageView imageView = null; private final String tag = "UA2EFindEdges"; private Button btnAcquire; private Button btnFindEdges; // declare native methods public native int converttogray(Bitmap bitmapcolor, Bitmap gray); public native int detectedges(Bitmap bitmapgray, Bitmap bitmapedges);
static { System.loadLibrary("ua2efindedges"); }
@Override public void onCreate(Bundle savedInstanceState) { super.onCreate(savedInstanceState); setContentView(R.layout.main); btnAcquire = (Button) this.findViewById(R.id.AcquireImage); btnAcquire.setOnClickListener(new View.OnClickListener(){ public void onClick(View v){ try { Intent action = new Intent("android.media.action.IMAGE_CAPTURE"); startActivityForResult(action,1); } catch (Exception e) { Log.e(tag,"Error occurred [" + e.getMessage() + "]"); } } });
btnFindEdges = (Button) this.findViewById(R.id.FindEdges); btnFindEdges.setOnClickListener(new View.OnClickListener(){ // code shown in next listing
Listing 19.9 UA2EFindEdges.java
Declare native methods
b
Load JNI libraryc
Request photo
d
www.it-ebooks.info

540 CHAPTER 19 Android Native Development Kit
});
imageView = (ImageView) this.findViewById(R.id.PictureFrame); UA2EFindEdgesApp app = (UA2EFindEdgesApp) getApplication(); Bitmap b = app.getBitmap(); if (b != null) { imageView.setImageBitmap(b); } else { btnFindEdges.setVisibility(View.GONE); }
}
protected void onActivityResult(int requestCode, int resultCode,Intent data) { try { if (requestCode == 1) { if (resultCode == RESULT_OK) { UA2EFindEdgesApp app = (UA2EFindEdgesApp) getApplication(); Bitmap b = app.getBitmap(); if (b != null) { b.recycle(); }
b = (Bitmap) data.getExtras().get("data"); app.setBitmap(b); if (b != null) { imageView.setImageBitmap(b); btnFindEdges.setVisibility(View.VISIBLE); } } } } catch (Exception e) { Log.e(tag,"onActivityResult Error [" + e.getMessage() + "]"); } }}
This code is the primary Activity for the application and is also the code that calls thepreviously written native code. To call the native methods, they must be declared Band the JNI library must be loaded c at runtime. When the Acquire button is selected,we request a photo by creating an Intent and dispatching it with a call tostartActivityForResult d. Whenever the Activity is created, we need to checkwhether a Bitmap is available; to do that we first get a reference to the Applicationobject e, casting it to the UA2EFindEdgesApp class. If we have a valid Bitmap, we displayit f in the ImageView. This approach handles the scenario where the Android devicehas changed orientations and the Activity has been restarted. When the Camera hascaptured a photo, it’s packaged up into an Intent and sent back to the application viathe onActivityResult() method g. If an existing Bitmap is found in the Applica-tion object, it’s recycled h and the new one is extracted from the Intent i. TheBitmap is stored in the Application object and displayed to the screen. Once thephoto has been acquired, the Find Edges button is shown J.
e
GetApplication
referenceDisplay Bitmapf
Activity result
g
Recycle Bitmap
h
Extract, store, display Bitmap
i
Toggle Button visibility
j
www.it-ebooks.info
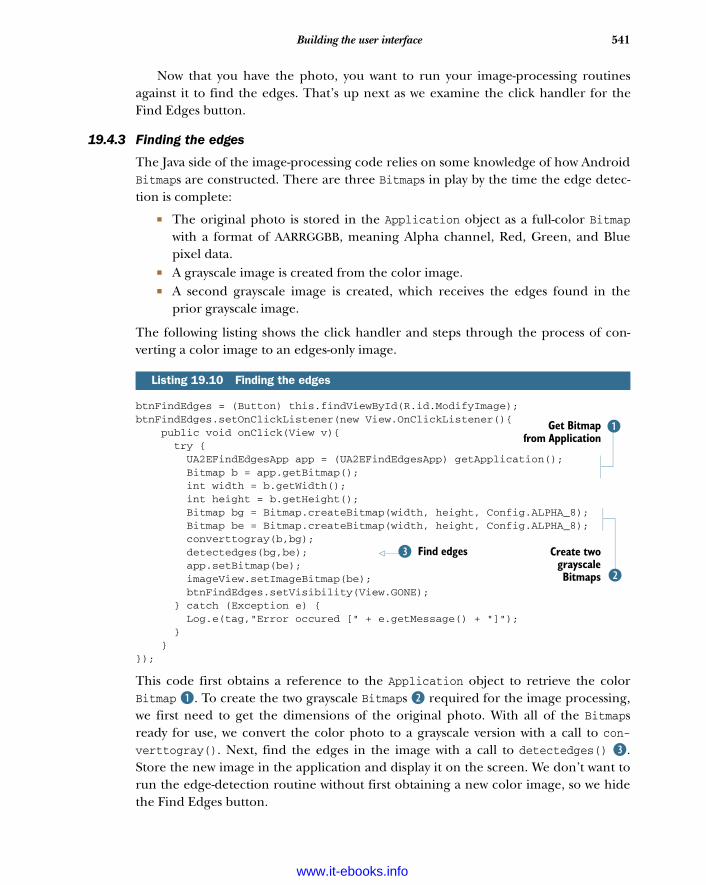
541Building the user interface
Now that you have the photo, you want to run your image-processing routinesagainst it to find the edges. That’s up next as we examine the click handler for theFind Edges button.
19.4.3 Finding the edges
The Java side of the image-processing code relies on some knowledge of how AndroidBitmaps are constructed. There are three Bitmaps in play by the time the edge detec-tion is complete:
The original photo is stored in the Application object as a full-color Bitmapwith a format of AARRGGBB, meaning Alpha channel, Red, Green, and Bluepixel data.
A grayscale image is created from the color image. A second grayscale image is created, which receives the edges found in the
prior grayscale image.
The following listing shows the click handler and steps through the process of con-verting a color image to an edges-only image.
btnFindEdges = (Button) this.findViewById(R.id.ModifyImage);btnFindEdges.setOnClickListener(new View.OnClickListener(){ public void onClick(View v){ try { UA2EFindEdgesApp app = (UA2EFindEdgesApp) getApplication(); Bitmap b = app.getBitmap(); int width = b.getWidth(); int height = b.getHeight(); Bitmap bg = Bitmap.createBitmap(width, height, Config.ALPHA_8); Bitmap be = Bitmap.createBitmap(width, height, Config.ALPHA_8); converttogray(b,bg); detectedges(bg,be); app.setBitmap(be); imageView.setImageBitmap(be); btnFindEdges.setVisibility(View.GONE); } catch (Exception e) { Log.e(tag,"Error occured [" + e.getMessage() + "]"); } }});
This code first obtains a reference to the Application object to retrieve the colorBitmap B. To create the two grayscale Bitmaps c required for the image processing,we first need to get the dimensions of the original photo. With all of the Bitmapsready for use, we convert the color photo to a grayscale version with a call to con-verttogray(). Next, find the edges in the image with a call to detectedges() d.Store the new image in the application and display it on the screen. We don’t want torun the edge-detection routine without first obtaining a new color image, so we hidethe Find Edges button.
Listing 19.10 Finding the edges
bGet Bitmapfrom Application
c
Create twograyscaleBitmaps
Find edgesd
www.it-ebooks.info
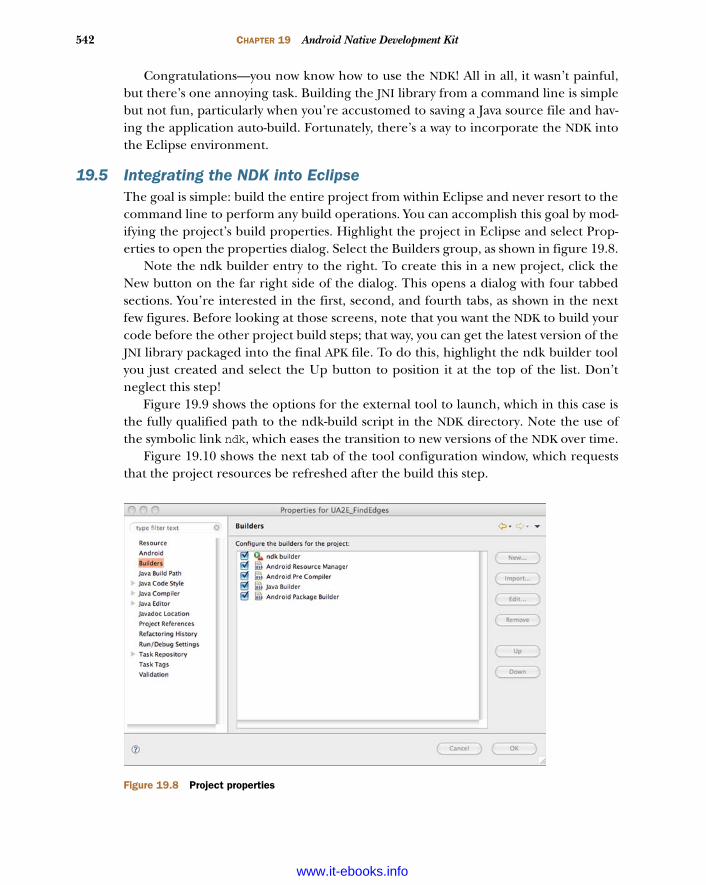
542 CHAPTER 19 Android Native Development Kit
Congratulations—you now know how to use the NDK! All in all, it wasn’t painful,but there’s one annoying task. Building the JNI library from a command line is simplebut not fun, particularly when you’re accustomed to saving a Java source file and hav-ing the application auto-build. Fortunately, there’s a way to incorporate the NDK intothe Eclipse environment.
19.5 Integrating the NDK into EclipseThe goal is simple: build the entire project from within Eclipse and never resort to thecommand line to perform any build operations. You can accomplish this goal by mod-ifying the project’s build properties. Highlight the project in Eclipse and select Prop-erties to open the properties dialog. Select the Builders group, as shown in figure 19.8.
Note the ndk builder entry to the right. To create this in a new project, click theNew button on the far right side of the dialog. This opens a dialog with four tabbedsections. You’re interested in the first, second, and fourth tabs, as shown in the nextfew figures. Before looking at those screens, note that you want the NDK to build yourcode before the other project build steps; that way, you can get the latest version of theJNI library packaged into the final APK file. To do this, highlight the ndk builder toolyou just created and select the Up button to position it at the top of the list. Don’tneglect this step!
Figure 19.9 shows the options for the external tool to launch, which in this case isthe fully qualified path to the ndk-build script in the NDK directory. Note the use ofthe symbolic link ndk, which eases the transition to new versions of the NDK over time.
Figure 19.10 shows the next tab of the tool configuration window, which requeststhat the project resources be refreshed after the build this step.
Figure 19.8 Project properties
www.it-ebooks.info
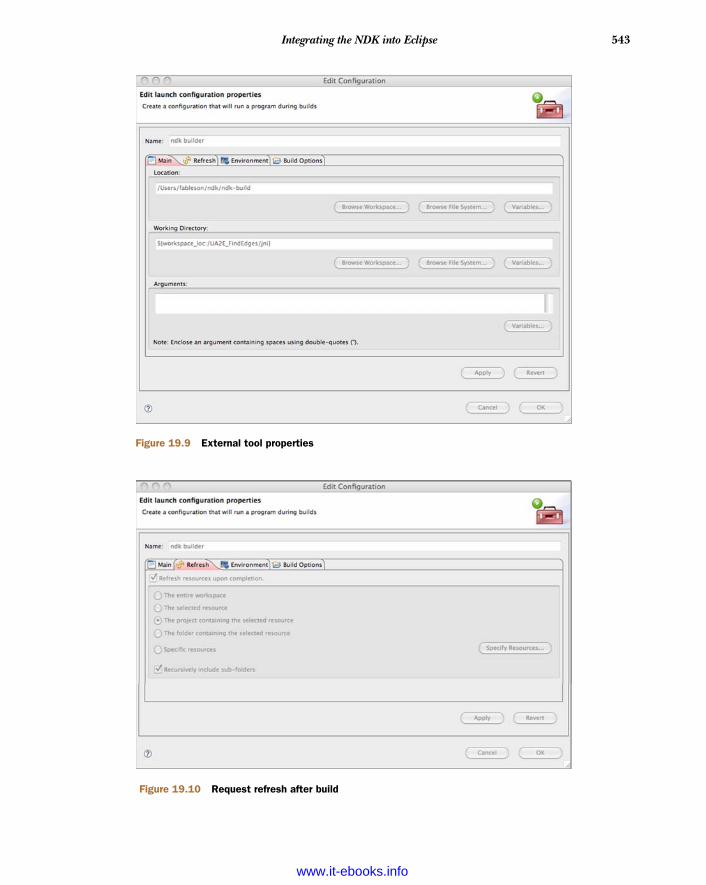
543Integrating the NDK into Eclipse
Figure 19.9 External tool properties
Figure 19.10 Request refresh after build
www.it-ebooks.info
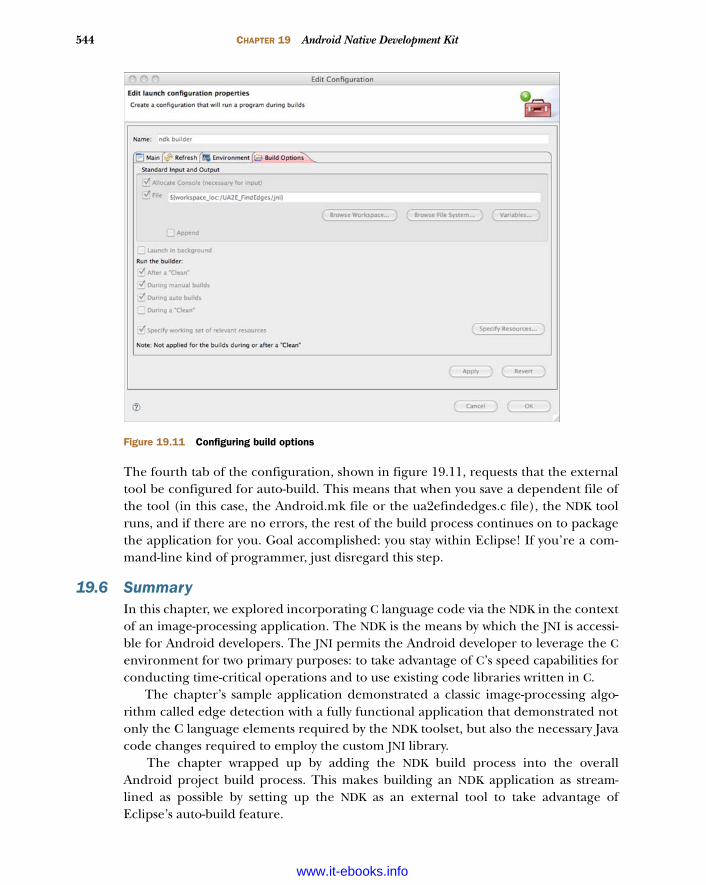
544 CHAPTER 19 Android Native Development Kit
The fourth tab of the configuration, shown in figure 19.11, requests that the externaltool be configured for auto-build. This means that when you save a dependent file ofthe tool (in this case, the Android.mk file or the ua2efindedges.c file), the NDK toolruns, and if there are no errors, the rest of the build process continues on to packagethe application for you. Goal accomplished: you stay within Eclipse! If you’re a com-mand-line kind of programmer, just disregard this step.
19.6 SummaryIn this chapter, we explored incorporating C language code via the NDK in the contextof an image-processing application. The NDK is the means by which the JNI is accessi-ble for Android developers. The JNI permits the Android developer to leverage the Cenvironment for two primary purposes: to take advantage of C’s speed capabilities forconducting time-critical operations and to use existing code libraries written in C.
The chapter’s sample application demonstrated a classic image-processing algo-rithm called edge detection with a fully functional application that demonstrated notonly the C language elements required by the NDK toolset, but also the necessary Javacode changes required to employ the custom JNI library.
The chapter wrapped up by adding the NDK build process into the overallAndroid project build process. This makes building an NDK application as stream-lined as possible by setting up the NDK as an external tool to take advantage ofEclipse’s auto-build feature.
Figure 19.11 Configuring build options
www.it-ebooks.info
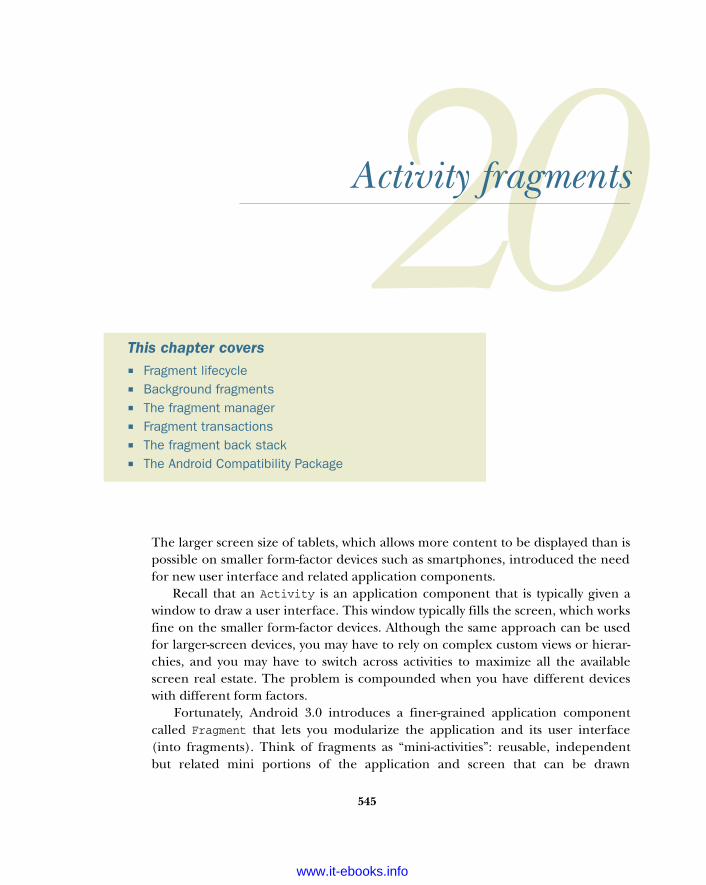
Activity fragments
The larger screen size of tablets, which allows more content to be displayed than ispossible on smaller form-factor devices such as smartphones, introduced the needfor new user interface and related application components.
Recall that an Activity is an application component that is typically given awindow to draw a user interface. This window typically fills the screen, which worksfine on the smaller form-factor devices. Although the same approach can be usedfor larger-screen devices, you may have to rely on complex custom views or hierar-chies, and you may have to switch across activities to maximize all the availablescreen real estate. The problem is compounded when you have different deviceswith different form factors.
Fortunately, Android 3.0 introduces a finer-grained application componentcalled Fragment that lets you modularize the application and its user interface(into fragments). Think of fragments as “mini-activities”: reusable, independentbut related mini portions of the application and screen that can be drawn
This chapter covers Fragment lifecycle Background fragments The fragment manager Fragment transactions The fragment back stack The Android Compatibility Package
545
www.it-ebooks.info
546 CHAPTER 20 Activity fragments
independently of each other, each receiving its own events and having its own state,application lifecycle, and back stack.
Fragments were introduced with Android 3.0 with tablets in mind, but their bene-fits aren’t limited to tablets: fragments are available to previous non-tablet versions ofAndroid via a static library, as covered later in this chapter. Our exploration of frag-ments begins with understanding the fragment lifecycle.
20.1 Fragment lifecyleFragments have a lifecycle that is similar to the lifecycle of activities. Fragments aren’tstandalone entities and are part of a host Activity, which drives the lifecycle of thefragment. The best way to understand the lifecycle of a fragment and its relationshipto activities is by looking at figure 20.1.
You can see in the diagram the similarities between the Activity and fragmentlifecycles; note how the lifecycle states and related callbacks correlate. Next, table 20.1provides more information about the lifecycle states and related callback methods.
In the following sections, we’ll cover these lifecycle methods in more detail.
Table 20.1 Android fragment lifecycle methods and their purpose
Method Purpose
onAttach(Activity) Called when the Activity is in the Created state once the fragment is associ-ated with its Activity
onCreate(Bundle) Called when the Activity is in the Created state to do initial creation of the fragment
onCreateView(LayoutInflater, ViewGroup, Bundle)
Called when the Activity is in the Created state to create and return the view hierarchy associated with the fragment
onActivityCreated(Bundle)
Called when the Activity is in the Created state to tell the fragment that its Activity has completed its own Activity.onCreate()
onStart() Called when the Activity is in the Started state, indicating the fragment is visible to the user
onResume() Called when the Activity is in the Resumed state, indicating the fragment is now interacting with the user
onPause() Called when the Activity is in the Paused state, indicating the fragment is no longer interacting with the user because its Activity is being paused or a frag-ment operation is modifying it in the Activity
onStop() Called when the Activity is in the Stopped state, indicating the fragment is no longer visible to the user because its Activity is being stopped
onDestroyView() Called when the Activity is in the Destroyed state to allow the fragment to clean up resources associated with its view
onDestroy() Called when the Activity is in the Destroyed state to allow the fragment to do final cleanup of the fragment’s state
onDetach() Called when the Activity is in the Destroyed state immediately prior to the fragment no longer being associated with its Activity
www.it-ebooks.info
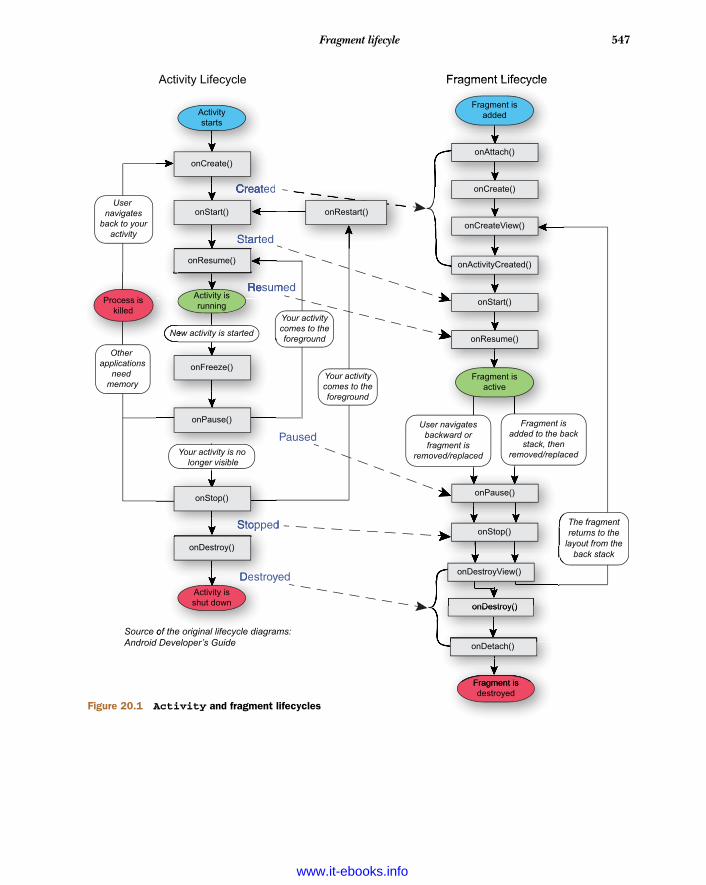
547Fragment lifecyle
Created
Started
Resumed
Paused
Stopped
Destroyed
Source of the original lifecycle diagrams:Android Developer’s Guide
Activity Lifecycle Fragment Lifecycle
Activitystarts
onRestart()
Your activitycomes to theforeground
Your activitycomes to theforeground
Fragment isdestroyed
onCreate()
um
onResume()
onPause()
oy
onDestroy()
of the original lifecycle diagr
DDeDestroActivity isshut down
CCrCrCreaeaatted
StStaarrtted
onStart()
ReReResuActivity isrunning
onFreeze()
New activity is started
Your activity is no longer visible
User navigates
back to youractivity
Ne
Process iskilled
Other applications
need memory
SStStoopopped
onStop()
Fragment Lifecycle
Fragment isadded
onAttach()
onCreate()
onCreateView()
onActivityCreated()
onStart()
onResume()
Fragment isactive
Fragment isadded to the back
stack, thenremoved/replaced
The fragmentreturns to the
layout from theback stack
User navigatesbackward orfragment is
removed/replaced
onPause()
Fragment is
onDetach()
onDestroy()
onStop()
onDestroy()
onDestroyView()
Figure 20.1 Activity and fragment lifecycles
www.it-ebooks.info
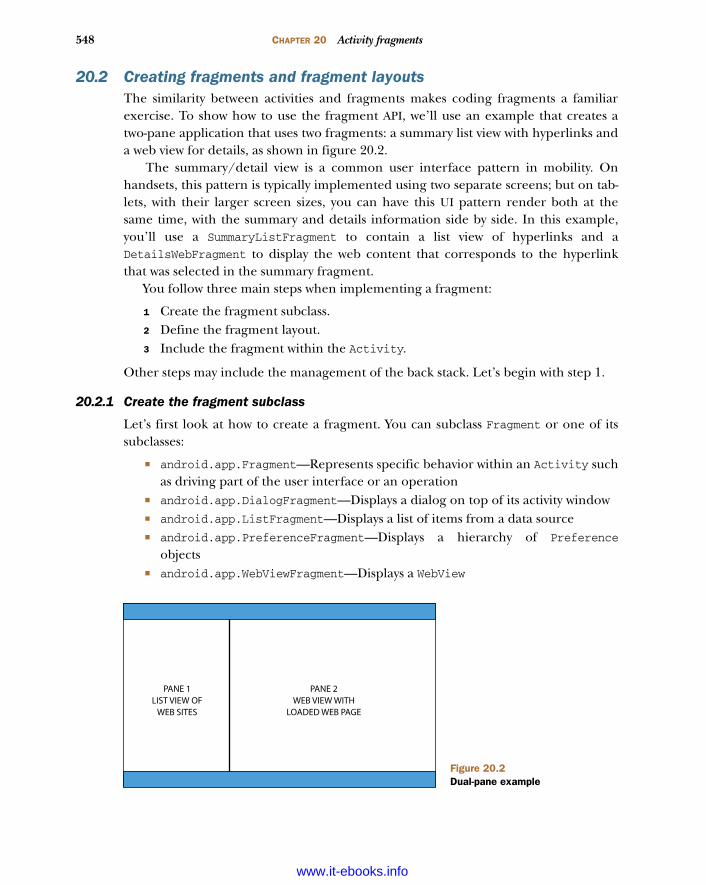
548 CHAPTER 20 Activity fragments
20.2 Creating fragments and fragment layoutsThe similarity between activities and fragments makes coding fragments a familiarexercise. To show how to use the fragment API, we’ll use an example that creates atwo-pane application that uses two fragments: a summary list view with hyperlinks anda web view for details, as shown in figure 20.2.
The summary/detail view is a common user interface pattern in mobility. Onhandsets, this pattern is typically implemented using two separate screens; but on tab-lets, with their larger screen sizes, you can have this UI pattern render both at thesame time, with the summary and details information side by side. In this example,you’ll use a SummaryListFragment to contain a list view of hyperlinks and aDetailsWebFragment to display the web content that corresponds to the hyperlinkthat was selected in the summary fragment.
You follow three main steps when implementing a fragment:
1 Create the fragment subclass.2 Define the fragment layout.3 Include the fragment within the Activity.
Other steps may include the management of the back stack. Let’s begin with step 1.
20.2.1 Create the fragment subclass
Let’s first look at how to create a fragment. You can subclass Fragment or one of itssubclasses:
android.app.Fragment—Represents specific behavior within an Activity suchas driving part of the user interface or an operation
android.app.DialogFragment—Displays a dialog on top of its activity window android.app.ListFragment—Displays a list of items from a data source android.app.PreferenceFragment—Displays a hierarchy of Preference
objects android.app.WebViewFragment—Displays a WebView
PANE 1LIST VIEW OF
WEB SITES
PANE 2WEB VIEW WITH
LOADED WEB PAGE
Figure 20.2Dual-pane example
www.it-ebooks.info
549Creating fragments and fragment layouts
The following listing shows how to create a fragment using the summary pane frag-ment SummaryListFragment.
public class SummaryListFragment extends ListFragment {
private String[] mListItems = new String[] { "Mobility Weblog", "TechCrunch", "Manning Books"};
public SummaryListFragment() {}
@Override public void onActivityCreated(Bundle savedInstanceState) { super.onActivityCreated(savedInstanceState); setListAdapter(new ArrayAdapter<String>(getActivity(), R.layout.frag_summary_textview, mListItems)); }
@Override public void onListItemClick(ListView l, View v, int position, long id) { DetailsWebFragment frag = (DetailsWebFragment) getFragmentManager().findFragmentById(R.id.frag_details_webview); frag.updateDetails(mListItemsUrls[position]); mPosition = position; // remember current position }}
We first define SummaryListFragment, a subclass of ListFragment, which is the frag-ment that drives the left pane of the dual-pane example application. Next, fragmentsmust have an empty constructor that is called when the fragment is instantiated dur-ing the Activity lifecycle. The system notifies the fragment that the Activity hasbeen created B, letting the fragment initialize. In this case, the list view layout and itsdata source adapter are initialized C by using the ArrayAdapter that points to thesimple mListItems array list; your application may instead use a cursor adapter fordata that is stored in a database. Last is the list item click event handler D onList-ItemClick, which is called when a click occurs on the fragment list view. By getting theposition for the selected item, we can properly update the web view by calling the webview fragment’s public method updateDetails(), which is covered shortly.
As we just mentioned, fragments must have an empty constructor that is calledwhen the fragment is instantiated during the Activity lifecycle. At times, you’ll needto pass arguments to your fragment. One way to do so is to implement a method thatinstantiates the fragment and uses a Bundle and setArguments(Bundle) to pass argu-ments that are retrieved later by the fragment with getArguments(); this is shown next.
Listing 20.1 Creating the ListView fragment
Define “activitycreated” callback B
Initialize list viewC
Define list item click event handler
D
www.it-ebooks.info
550 CHAPTER 20 Activity fragments
public static MyFragment newInstance(int arg) { MyFragment frag = new MyFragment(); Bundle args = new Bundle(); args.putInt("arg", arg); frag.setArguments(args); // return the fragment return frag; }
Using the default empty constructor create an instance of the fragment. We create aBundle to hold the necessary arguments by calling setArguments(Bundle) to pass anyarguments. Then, we return the newly created fragment with the associated arguments.The fragment arguments can be retrieved at a later time by calling getArguments().
Next is the definition of the web view fragment DetailsWebFragment. This simplefragment displays the web content for the selected summary list view URL.
public class DetailsWebFragment extends WebViewFragment {
public DetailsWebFragment() {}
WebView mWebView = getWebView();
@Override public void onActivityCreated(Bundle savedInstanceState) { super.onActivityCreated(savedInstanceState);
mWebView = getWebView(); WebSettings webSettings = mWebView.getSettings(); webSettings.setUseWebViewBackgroundForOverscrollBackground(true); webSettings.setJavaScriptEnabled(true); webSettings.setSavePassword(false); webSettings.setSaveFormData(false); webSettings.setSupportZoom(true); webSettings.setLoadWithOverviewMode(true); webSettings.setUseWideViewPort(true);
}
public void updateDetails(String url) { mWebView.loadUrl(url); }
}
We first define DetailsWebFragment, a subclass of WebViewFragment that drives theright side of the dual-pane example application. Again, we have an empty constructorthat is called when the fragment is instantiated during the Activity lifecycle. The sys-tem calls onActivityCreated() to notify the fragment that the Activity has beencreated B, letting the fragment initialize. To initialize the web view C, we retrieve the
Listing 20.2 Using newInstance() to instantiate fragment with arguments
Listing 20.3 Creating the WebViewFragment
Define “activitycreated” callback B
Initialize web view
C
Define updateDetails to load URL
D
www.it-ebooks.info
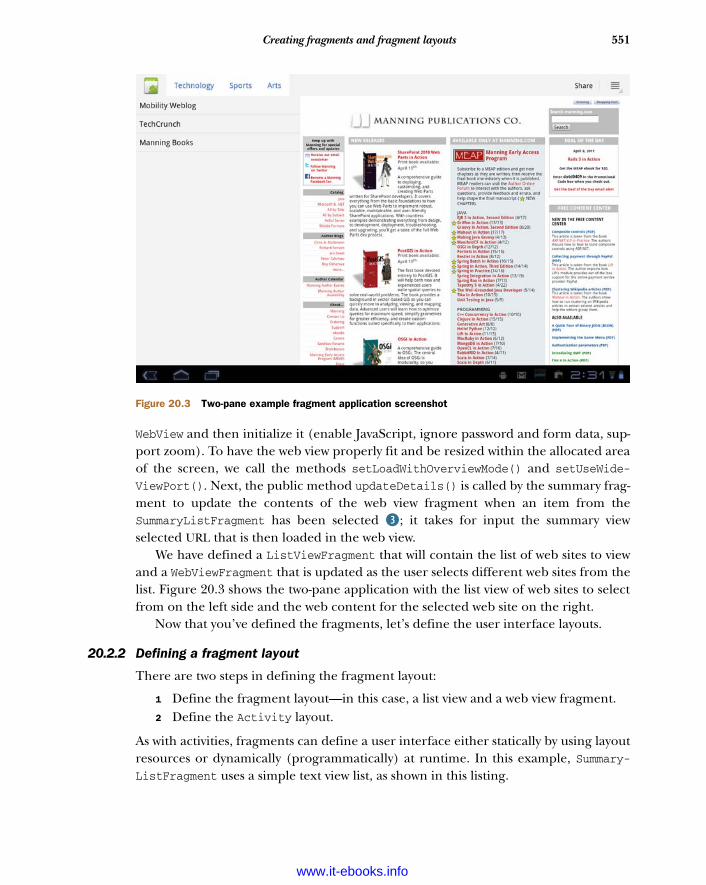
551Creating fragments and fragment layouts
WebView and then initialize it (enable JavaScript, ignore password and form data, sup-port zoom). To have the web view properly fit and be resized within the allocated areaof the screen, we call the methods setLoadWithOverviewMode() and setUseWide-ViewPort(). Next, the public method updateDetails() is called by the summary frag-ment to update the contents of the web view fragment when an item from theSummaryListFragment has been selected D; it takes for input the summary viewselected URL that is then loaded in the web view.
We have defined a ListViewFragment that will contain the list of web sites to viewand a WebViewFragment that is updated as the user selects different web sites from thelist. Figure 20.3 shows the two-pane application with the list view of web sites to selectfrom on the left side and the web content for the selected web site on the right.
Now that you’ve defined the fragments, let’s define the user interface layouts.
20.2.2 Defining a fragment layout
There are two steps in defining the fragment layout:
1 Define the fragment layout—in this case, a list view and a web view fragment. 2 Define the Activity layout.
As with activities, fragments can define a user interface either statically by using layoutresources or dynamically (programmatically) at runtime. In this example, Summary-ListFragment uses a simple text view list, as shown in this listing.
Figure 20.3 Two-pane example fragment application screenshot
www.it-ebooks.info
552 CHAPTER 20 Activity fragments
<TextView xmlns:android="http://schemas.android.com/apk/res/android" android:layout_width="match_parent" android:layout_height="match_parent" android:padding="10dp" android:textSize="20sp" android:gravity="fill" android:textAppearance="?android:attr/textAppearanceMedium" ></TextView>
This layout is referenced during the initialization of the summary list view and the callto setListAdapter:
setListAdapter(new ArrayAdapter<String>(getActivity(), R.layout.frag_summary_textview, mListItems));
The layout can be as complex as you need; for example, it may include images, twolines, and so forth.
For the web view fragment, you aren’t defining a layout, because in this exampleyou’re going to let the web view use that entire part of the pane to render the webcontent as is.
Having defined the fragment layouts, now you need to define the fragments withinthe Activity layout.
20.2.3 Include the fragment within the activity
Now that you’ve defined your fragments and layouts, the fragments need to be addedto the Activity. You do this via the Activity layout file or programmatically. The fol-lowing listing shows how the <fragment> elements are added to the Activity layout.
<?xml version="1.0" encoding="utf-8"?><LinearLayout xmlns:android="http://schemas.android.com/apk/res/android" android:orientation="horizontal" android:layout_width="match_parent" android:layout_height="match_parent"> <fragment android:name="com...SummaryListFragment" android:id="@+id/frag_summary_listview" android:layout_width="0dp" android:layout_weight="1" android:layout_height="match_parent" /> <fragment android:name="com...DetailsWebFragment" android:id="@+id/frag_details_webview" android:layout_width="0dp" android:layout_weight="1" android:layout_height="match_parent" /></LinearLayout>
The <fragment> element defines the fragment and associated Fragment class andattributes: in this example, SummaryListFragment B and DetailsWebFragment C. At
Listing 20.4 TextView for the ListFragment (frag_summary_textview.xml)
Listing 20.5 Adding fragments to an Activity layout (main.xml)
Define SummaryListFragment
B
Define DetailsWebFragment
C
www.it-ebooks.info
553Background fragments
runtime, the system replaces in-place the <fragment> element with the fragment itselfwithin the Activity layout.
The fragments can also be added programmatically to the Activity. The followinglisting shows how to add the SummaryListFragment to the main layout using the frag-ment manager and transactions.
FragmentManager fragmentManager = getFragmentManager();SummaryListFragment fragment = new SummaryListFragment();fragmentTransaction.add(R.id.main_view, fragment);fragmentTransaction.commit();
Note that when you’re adding multiple fragments to the same container, the order inwhich the fragments are added determines the order in which they will appear in theview.
You inflate the Activity’s layout as usual, when the Activity is created, by callingsetContentView().
public class MainActivity extends Activity {
@Override public void onCreate(Bundle savedInstanceState) { super.onCreate(savedInstanceState); setContentView(R.layout.main); } : : }
Up to this point, we’ve defined all the major pieces for foreground fragments: how todefine the fragment subclass and the fragment layout, how to include fragmentswithin the Activity, and how a fragment can call another fragment to update its con-tent on the screen. As covered next, you can use fragments for background/non–userinterface tasks as well.
20.3 Background fragmentsNot all fragments need to have a user interface; you can have background fragmentsperforming different tasks within the Activity. A background fragment has the samelifecycle as a foreground one except that it doesn’t have a user interface. An effect ofthis is that its onCreateView() is never called, and you can avoid implementing it.
Don’t confuse background fragments with Android services. Services are stand-alone application components that can be started and can continue running in thebackground even when you switch between applications. Services typically providespecific tasks to other application components that interact with services by binding tothem or using interprocess communications (IPC). On the other hand, background
Listing 20.6 Adding fragments to Activity programmatically
Listing 20.7 Inflating the Activity layout
www.it-ebooks.info
554 CHAPTER 20 Activity fragments
fragments are part of a specific host Activity, share their lifecycle with the hostActivity, and have access to the host Activity’s resources.
Background fragments are added programmatically to an Activity, similar tolisting 20.6, except that the fragment must be identified by tagname instead of resourceID. To do so, you perform a fragment transaction similar to listing 20.6, but you callFragmentManager.add(fragment, tagString).
Background fragments can be useful. You can use a background fragment to dowork that persists across activities. For example, in one fragment you can find a back-ground fragment, check whether it’s been retained, and, if not, create it. The follow-ing code snippet shows how to set up the background fragment during itsinitialization.
@Override public void onActivityCreated(Bundle savedInstanceState) { super.onActivityCreated(savedInstanceState);
FragmentManager fm = getFragmentManager();
mWorkFragment = (MyWorkFragment)fm.findFragmentByTag("workFrag");
if (mWorkFragment == null) { mWorkFragment = new MyWorkFragment(); mWorkFragment.setTargetFragment(this, 0); fm.beginTransaction(); fm.add(mWorkFragment, "workFrag"); fm.commit(); } }
As with all fragments, we initialize the fragment via onActivityCreated when theActivity has been created. Note the use of the fragment manager and transactions toadd the background fragment programmatically. Background fragments can beretained when the configuration changes; recall that when a configuration ischanged, such as orientation changes, activities are destroyed and re-created. Next, wecheck whether the fragment has been retained B. If the fragment hasn’t beenretained or is running for the first time C, we create a new instance, sets its targetfragment, and add it via the fragment manager.
The following code snippet shows how to indicate that a fragment must beretained when created:
@Override public void onCreate(Bundle savedInstanceState) { super.onCreate(savedInstanceState);
setRetainInstance(true);
: : }
Listing 20.8 Creating a background fragment
Has fragment been retained?B
If not, (re)-create fragmentC
www.it-ebooks.info
555Fragment transactions
During the background fragment creation, we set the fragment to be retained. Whenthe fragment is retained, it will remain even when activities are destroyed during con-figuration changes. Remember that a fragment’s lifecycle is tightly coupled to its hostActivity lifecycle.
A number of the previous examples have made use of the fragment manager,which is at the center of fragments. The fragment manager is covered next.
20.4 The fragment managerThe fragment manager is the entity that allows you to work with fragments inside anActivity. You’ve already seen the fragment manager in action when we covered add-ing a fragment to the Activity view and when creating background fragments. UsingFragmentManager, you can do the following:
Find activity fragments by resource ID or by tag Manage fragment transactions Manage the fragment’s back stack
To retrieve the fragment manager, both the Activity and Fragment classes includethe method getFragmentManager() that returns the FragmentManager instance. Nextare some examples of what you can do with the fragment manager:
Find a fragment by resource id:getFragmentManager().findFragmentById(R.id.frag_details_webview);
Find a fragment by tag:mWorkFragment = (MyWorkFragment)fm.findFragmentByTag("workFrag");
Begin and commit a fragment transaction:FragmentTransaction ft = fragmentManager.beginTransaction();: ft.commit();
Simulate a pop of the back stack:getFragmentManager().popBackStack();
When you’re working with fragments—for example, adding and removing them—youmust do so under a fragment transaction. The next section will cover fragment trans-actions in detail.
20.5 Fragment transactionsThe fragment transaction API allows for a set of related fragment operations to beperformed together as a transaction. Fragment transactions are supported by theFragmentTransaction class, which provides methods that add, hide, replace, andremove fragments; set animation transitions and titles; show fragments; add to theback stack; and commit the transaction.
Before attempting any fragment operation, you must get a FragmentTransactionobject from the fragment manager by calling FragmentManager.beginTransaction():
FragmentManager fm = getFragmentManager(); FragmentTransaction ft = fm.beginTransaction();
www.it-ebooks.info
556 CHAPTER 20 Activity fragments
: ft.commit();
You can then perform fragment operations such as the following:
Add fragments: fragTransaction.add(R.id.viewgroup, newFragment);
Replace an existing fragment: fragTransaction.replace(R.id.viewgroup, newFragment);
Remove an existing fragment: fragTransaction.remove(newFragment);
Add the fragment to the back stack: fragTransaction.addToBackStack(null);
Or, you can call any of the other fragment operations mentioned earlier, as needed.Remember to commit the transaction by calling the FragmentTransaction.commit()method.
All operations in a transaction are committed together. Similarly, operations in atransaction are reverted together when you press the Back key or simulate a back-stackpop.
Committed transactions are scheduled for execution in the Activity’s main UIthread, but you can request an immediate execution of pending transactions by call-ing the FragmentTransaction.executePendingTransactions() method.
As with activities, fragments have a back stack associated with them; this is coverednext.
20.6 Fragment back stackSimilar in concept to the Activity back stack, Android 3.0 supports a back stack forfragments. Note that the fragment back stack holds fragment transactions. You can takeadvantage of the back stack to navigate back, so that as the user presses the Back key,the back stack is popped and the previous fragment transaction is presented.
You add the fragment transaction to the back stack manually by calling theFragmentTransaction.addToBackStack() method before committing the transac-tion. Here’s an example:
FragmentManager fm = getFragmentManager();FragmentTransaction ft = fm.beginTransaction();:ft.addToBackStack(null); ft.commit();
Although this step is optional, note that adding the fragment transaction to the backstack ensures that the fragment isn’t destroyed but is instead stopped when anotherfragment becomes the active fragment in the layout. The fragment is later resumedwhen it becomes the active fragment after the user presses the Back key. Otherwise, ifthe fragment transaction isn’t added to the back stack, the fragment is destroyed whenit’s removed from the layout, and it can’t be navigated back to by pressing the Back key.
www.it-ebooks.info

557The Android Compatibility Package
The fragment manager provides a number of methods in support of the back stack:
Adding a listener for changes in the back stack—addOnBackStackChanged-
Listener()
Removing the listener—removeOnBackStackChangedListener()
Retrieving the fragment at a given position in the back stack—getBackStack-
EntryAt()
Getting the number of entries in the back stack—getBackStackEntryCount()
Popping the back stack (simulating a Back key press)—popBackStack() as wellas other kinds of pop-back-stack methods, including performing immediate ver-sus scheduled pops
In the last section of this chapter, we’ll examine the Android Compatibility Package.
20.7 The Android Compatibility PackageFragments are a great way to modularize your application and activities. But frag-ments, together with other Android 3.0 classes, are only available starting withAndroid 3.0. This API is available across devices and form factors for which Google hascreated the Android Compatibility Package, a static library that exposes the fragmentAPI to Android versions all the way down to Android 1.6.
The Android Compatibility Package is available via the SDK Updater and theAndroid SDK and AVD Manager, under Available Packages > Android Repository, asshown in figure 20.4.
After you download the package, you must include the static API in your project.Open the Project Properties, and select Java Build Path. Select Add External JARs,
Figure 20.4 Installing the Android Compatibility Package
www.it-ebooks.info
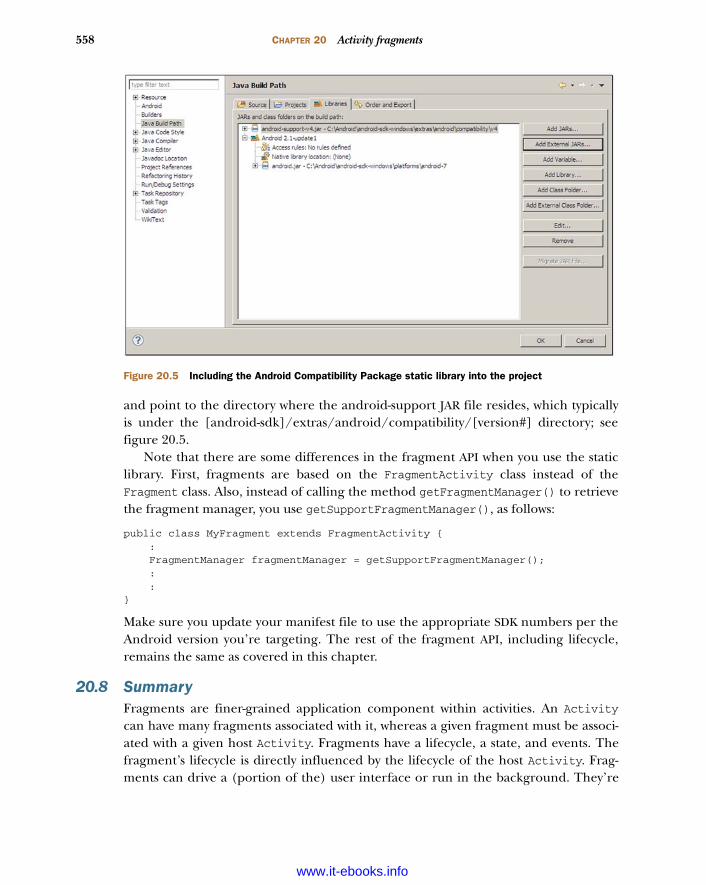
558 CHAPTER 20 Activity fragments
and point to the directory where the android-support JAR file resides, which typicallyis under the [android-sdk]/extras/android/compatibility/[version#] directory; seefigure 20.5.
Note that there are some differences in the fragment API when you use the staticlibrary. First, fragments are based on the FragmentActivity class instead of theFragment class. Also, instead of calling the method getFragmentManager() to retrievethe fragment manager, you use getSupportFragmentManager(), as follows:
public class MyFragment extends FragmentActivity { : FragmentManager fragmentManager = getSupportFragmentManager(); : :}
Make sure you update your manifest file to use the appropriate SDK numbers per theAndroid version you’re targeting. The rest of the fragment API, including lifecycle,remains the same as covered in this chapter.
20.8 SummaryFragments are finer-grained application component within activities. An Activitycan have many fragments associated with it, whereas a given fragment must be associ-ated with a given host Activity. Fragments have a lifecycle, a state, and events. Thefragment’s lifecycle is directly influenced by the lifecycle of the host Activity. Frag-ments can drive a (portion of the) user interface or run in the background. They’re
Figure 20.5 Including the Android Compatibility Package static library into the project
www.it-ebooks.info

559Summary
managed by the fragment manager, which you can find in both the Activity andFragment classes.
Fragment transactions, which are managed via the FragmentTransaction class,provide support for sets of operations that can be committed together, added to theback stack, and reverted together when the user presses the Back button. The frag-ment API is available in Android versions before version 3.0 via the Android Compati-bility Package. For more information about fragments, visit Android’s developerwebsite at http://mng.bz/E6zQ.
www.it-ebooks.info
Android 3.0 action bar
Android 3.0 introduced the action and system bars. The action bar is found at thetop of the screen and replaces the traditional (pre–Android 3.0) application title.The always-visible system bar is found at the bottom of the screen and providesaccess to system-level information. By default, applications that target Android 3.0are automatically assigned the new action bar and the new holographic theme. Thecontent of the action bar is application-defined, meaning it’s contextual, and con-sists of tabs, actions, and menus, providing users of tablet applications with greatervisibility and access to the application controls than on previous versions ofAndroid. The combined bars give users quicker and easier access to applicationactions, controls, and system-wide notifications.
This chapter covers Overview of the ActionBar classes
Action bar display options
The elements of the action bar
Removing, showing and hiding the action bar
Styling the bar
560
www.it-ebooks.info
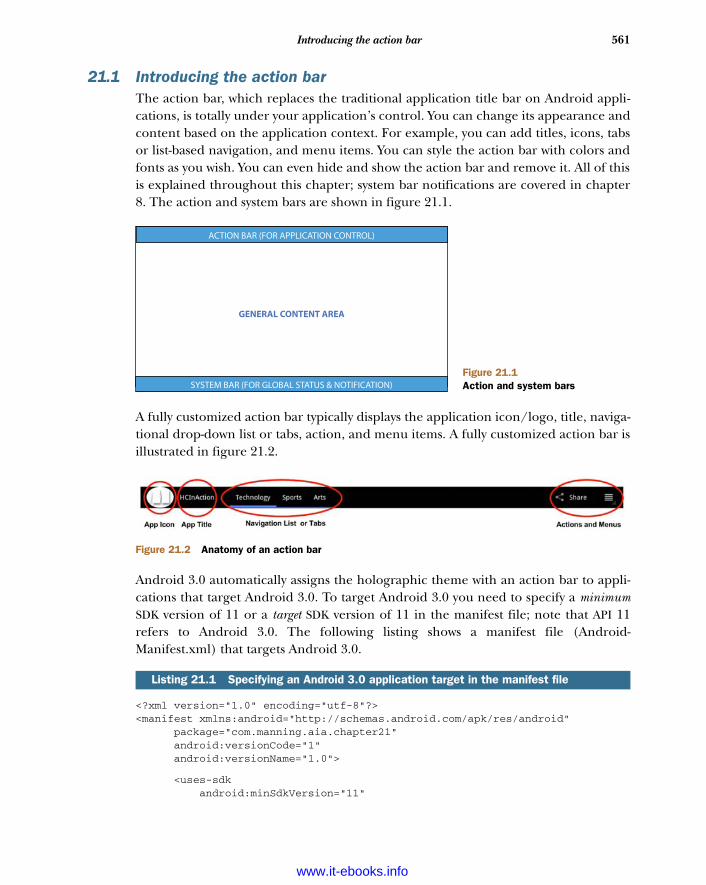
561Introducing the action bar
21.1 Introducing the action barThe action bar, which replaces the traditional application title bar on Android appli-cations, is totally under your application’s control. You can change its appearance andcontent based on the application context. For example, you can add titles, icons, tabsor list-based navigation, and menu items. You can style the action bar with colors andfonts as you wish. You can even hide and show the action bar and remove it. All of thisis explained throughout this chapter; system bar notifications are covered in chapter8. The action and system bars are shown in figure 21.1.
A fully customized action bar typically displays the application icon/logo, title, naviga-tional drop-down list or tabs, action, and menu items. A fully customized action bar isillustrated in figure 21.2.
Android 3.0 automatically assigns the holographic theme with an action bar to appli-cations that target Android 3.0. To target Android 3.0 you need to specify a minimumSDK version of 11 or a target SDK version of 11 in the manifest file; note that API 11refers to Android 3.0. The following listing shows a manifest file (Android-Manifest.xml) that targets Android 3.0.
<?xml version="1.0" encoding="utf-8"?><manifest xmlns:android="http://schemas.android.com/apk/res/android" package="com.manning.aia.chapter21" android:versionCode="1" android:versionName="1.0">
<uses-sdk android:minSdkVersion="11"
Listing 21.1 Specifying an Android 3.0 application target in the manifest file
GENERAL CONTENT AREA
ACTION BAR (FOR APPLICATION CONTROL)
SYSTEM BAR (FOR GLOBAL STATUS & NOTIFICATION)Figure 21.1Action and system bars
Figure 21.2 Anatomy of an action bar
www.it-ebooks.info
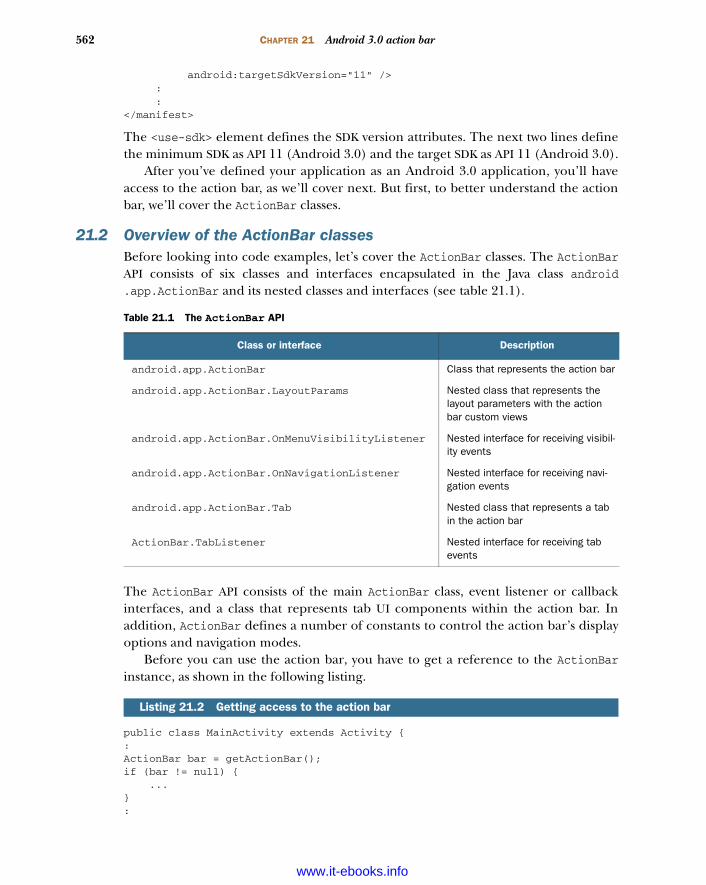
562 CHAPTER 21 Android 3.0 action bar
android:targetSdkVersion="11" /> : :</manifest>
The <use-sdk> element defines the SDK version attributes. The next two lines definethe minimum SDK as API 11 (Android 3.0) and the target SDK as API 11 (Android 3.0).
After you’ve defined your application as an Android 3.0 application, you’ll haveaccess to the action bar, as we’ll cover next. But first, to better understand the actionbar, we’ll cover the ActionBar classes.
21.2 Overview of the ActionBar classesBefore looking into code examples, let’s cover the ActionBar classes. The ActionBarAPI consists of six classes and interfaces encapsulated in the Java class android.app.ActionBar and its nested classes and interfaces (see table 21.1).
The ActionBar API consists of the main ActionBar class, event listener or callbackinterfaces, and a class that represents tab UI components within the action bar. Inaddition, ActionBar defines a number of constants to control the action bar’s displayoptions and navigation modes.
Before you can use the action bar, you have to get a reference to the ActionBarinstance, as shown in the following listing.
public class MainActivity extends Activity {:ActionBar bar = getActionBar(); if (bar != null) { ... }:
Table 21.1 The ActionBar API
Class or interface Description
android.app.ActionBar Class that represents the action bar
android.app.ActionBar.LayoutParams Nested class that represents the layout parameters with the action bar custom views
android.app.ActionBar.OnMenuVisibilityListener Nested interface for receiving visibil-ity events
android.app.ActionBar.OnNavigationListener Nested interface for receiving navi-gation events
android.app.ActionBar.Tab Nested class that represents a tab in the action bar
ActionBar.TabListener Nested interface for receiving tab events
Listing 21.2 Getting access to the action bar
www.it-ebooks.info
563Action bar display options
Listing 21.2 gets a reference to the action bar via the current Activity. Note the testif (bar != null);—not all themes have an action bar, so it’s a good practice tocheck for the presence of the action bar before performing operations on it.
The rest of the classes will be covered throughout the rest of the chapter.
21.3 Action bar display optionsYou can use a number of options to customize and control the action bar. Theseoptions allow you to control certain aspects of the action bar such as displaying theapplication logo instead of the icon, showing the title, and using a custom view. Thefollowing list describes the supported display options:
DISPLAY_SHOW_CUSTOM—Show the custom view, if one has been set. DISPLAY_SHOW_HOME—Show home elements, leaving more space for other navi-
gation elements. DISPLAY_HOME_AS_UP—Display the application home icon with the up indicator. DISPLAY_SHOW_TITLE—Show the Activity title and, if present, subtitle. DISPLAY_USE_LOGO—Use a logo instead of an icon, if available.
Together with these options, the ActionBar class also provides a number of methodsto manipulate them (see table 21.2).
Table 21.2 Action bar display options methods
Action bar method Description
void setDisplayOptions(int options) Set several display options at once. You can select one or more options by ORing them together.
void setDisplayOptions(int options, int mask)
Specified display options that match the mask are set; others are unset.
int getDisplayOptions() Return the current set of display options.
void setDisplayShowCustomEnabled(boolean showCustom)
Helper method. This is the same as calling setDisplayOptions() with DISPLAY_SHOW_CUSTOM.
void setDisplayShowHomeEnabled(boolean showHome)
Helper method. This is the same as calling setDisplayOptions() with DISPLAY_SHOW_HOME.
void setDisplayHomeAsUpEnabled (boolean showHome)
Helper method. This is the same as calling setDisplayOptions() with DISPLAY_HOME_AS_UP.
void setDisplayShowTitleEnabled(boolean showTitle)
Helper method. This is the same as calling setDisplayOptions() with DISPLAY_SHOW_TITLE.
void setDisplayUseLogoEnabled(boolean useLogo)
Helper method. This is the same as calling setDisplayOptions() with DISPLAY_USE_LOGO.
www.it-ebooks.info
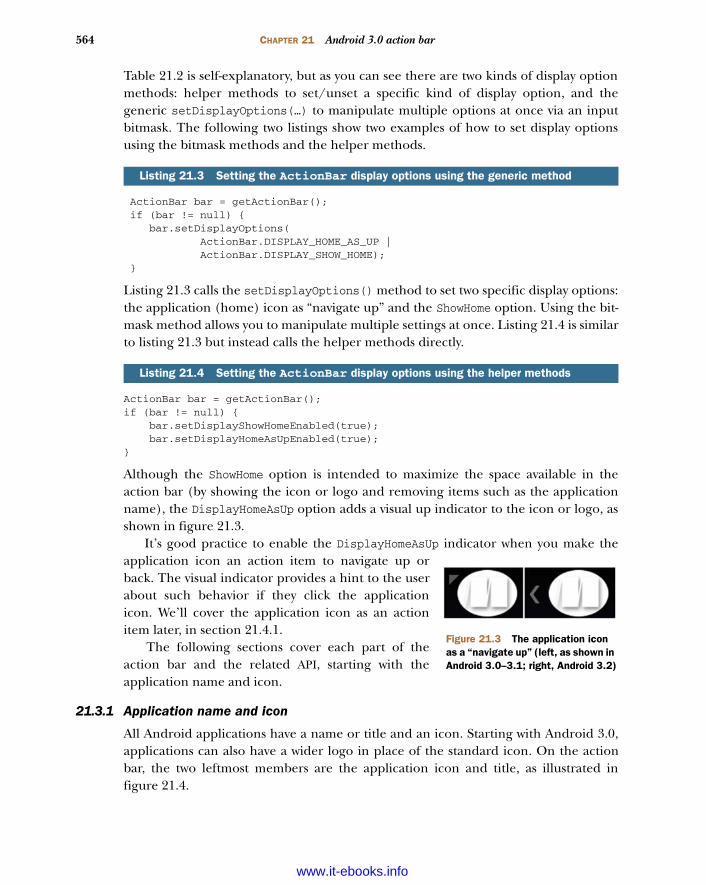
564 CHAPTER 21 Android 3.0 action bar
Table 21.2 is self-explanatory, but as you can see there are two kinds of display optionmethods: helper methods to set/unset a specific kind of display option, and thegeneric setDisplayOptions(…) to manipulate multiple options at once via an inputbitmask. The following two listings show two examples of how to set display optionsusing the bitmask methods and the helper methods.
ActionBar bar = getActionBar(); if (bar != null) { bar.setDisplayOptions( ActionBar.DISPLAY_HOME_AS_UP | ActionBar.DISPLAY_SHOW_HOME); }
Listing 21.3 calls the setDisplayOptions() method to set two specific display options:the application (home) icon as “navigate up” and the ShowHome option. Using the bit-mask method allows you to manipulate multiple settings at once. Listing 21.4 is similarto listing 21.3 but instead calls the helper methods directly.
ActionBar bar = getActionBar();if (bar != null) { bar.setDisplayShowHomeEnabled(true); bar.setDisplayHomeAsUpEnabled(true);}
Although the ShowHome option is intended to maximize the space available in theaction bar (by showing the icon or logo and removing items such as the applicationname), the DisplayHomeAsUp option adds a visual up indicator to the icon or logo, asshown in figure 21.3.
It’s good practice to enable the DisplayHomeAsUp indicator when you make theapplication icon an action item to navigate up orback. The visual indicator provides a hint to the userabout such behavior if they click the applicationicon. We’ll cover the application icon as an actionitem later, in section 21.4.1.
The following sections cover each part of theaction bar and the related API, starting with theapplication name and icon.
21.3.1 Application name and icon
All Android applications have a name or title and an icon. Starting with Android 3.0,applications can also have a wider logo in place of the standard icon. On the actionbar, the two leftmost members are the application icon and title, as illustrated infigure 21.4.
Listing 21.3 Setting the ActionBar display options using the generic method
Listing 21.4 Setting the ActionBar display options using the helper methods
Figure 21.3 The application icon as a “navigate up” (left, as shown in Android 3.0–3.1; right, Android 3.2)
www.it-ebooks.info
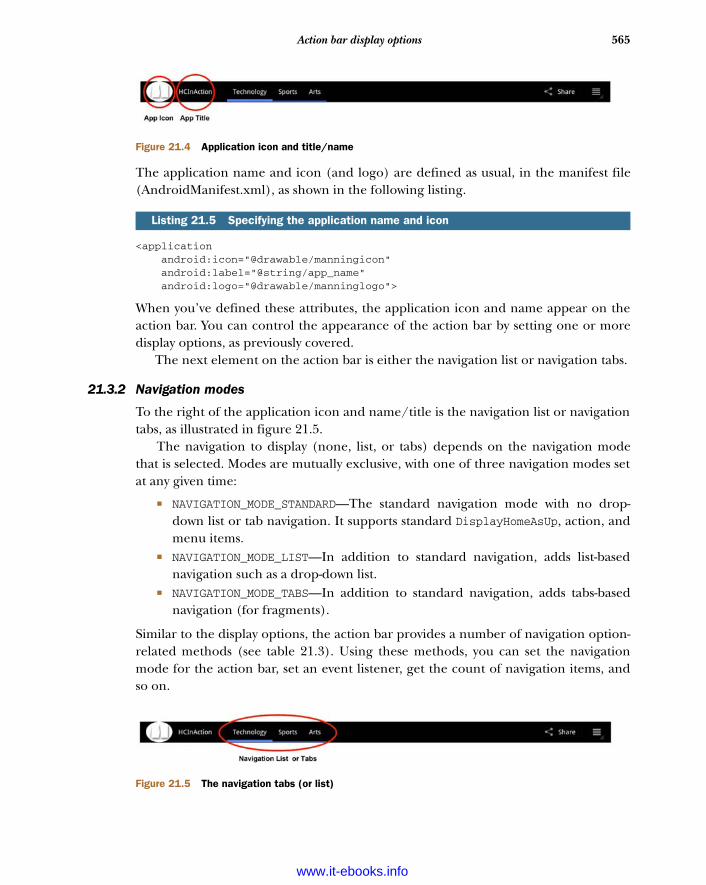
565Action bar display options
The application name and icon (and logo) are defined as usual, in the manifest file(AndroidManifest.xml), as shown in the following listing.
<application android:icon="@drawable/manningicon" android:label="@string/app_name" android:logo="@drawable/manninglogo">
When you’ve defined these attributes, the application icon and name appear on theaction bar. You can control the appearance of the action bar by setting one or moredisplay options, as previously covered.
The next element on the action bar is either the navigation list or navigation tabs.
21.3.2 Navigation modes
To the right of the application icon and name/title is the navigation list or navigationtabs, as illustrated in figure 21.5.
The navigation to display (none, list, or tabs) depends on the navigation modethat is selected. Modes are mutually exclusive, with one of three navigation modes setat any given time:
NAVIGATION_MODE_STANDARD—The standard navigation mode with no drop-down list or tab navigation. It supports standard DisplayHomeAsUp, action, andmenu items.
NAVIGATION_MODE_LIST—In addition to standard navigation, adds list-basednavigation such as a drop-down list.
NAVIGATION_MODE_TABS—In addition to standard navigation, adds tabs-basednavigation (for fragments).
Similar to the display options, the action bar provides a number of navigation option-related methods (see table 21.3). Using these methods, you can set the navigationmode for the action bar, set an event listener, get the count of navigation items, andso on.
Listing 21.5 Specifying the application name and icon
Figure 21.4 Application icon and title/name
Figure 21.5 The navigation tabs (or list)
www.it-ebooks.info
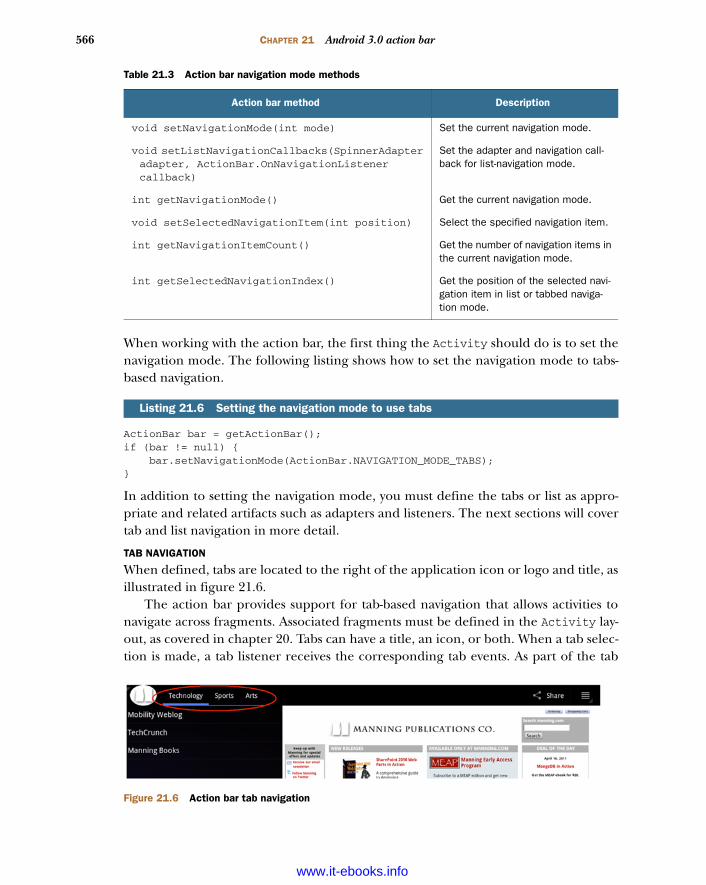
566 CHAPTER 21 Android 3.0 action bar
When working with the action bar, the first thing the Activity should do is to set thenavigation mode. The following listing shows how to set the navigation mode to tabs-based navigation.
ActionBar bar = getActionBar();if (bar != null) { bar.setNavigationMode(ActionBar.NAVIGATION_MODE_TABS); }
In addition to setting the navigation mode, you must define the tabs or list as appro-priate and related artifacts such as adapters and listeners. The next sections will covertab and list navigation in more detail.
TAB NAVIGATION
When defined, tabs are located to the right of the application icon or logo and title, asillustrated in figure 21.6.
The action bar provides support for tab-based navigation that allows activities tonavigate across fragments. Associated fragments must be defined in the Activity lay-out, as covered in chapter 20. Tabs can have a title, an icon, or both. When a tab selec-tion is made, a tab listener receives the corresponding tab events. As part of the tab
Table 21.3 Action bar navigation mode methods
Action bar method Description
void setNavigationMode(int mode) Set the current navigation mode.
void setListNavigationCallbacks(SpinnerAdapter adapter, ActionBar.OnNavigationListener callback)
Set the adapter and navigation call-back for list-navigation mode.
int getNavigationMode() Get the current navigation mode.
void setSelectedNavigationItem(int position) Select the specified navigation item.
int getNavigationItemCount() Get the number of navigation items in the current navigation mode.
int getSelectedNavigationIndex() Get the position of the selected navi-gation item in list or tabbed naviga-tion mode.
Listing 21.6 Setting the navigation mode to use tabs
Figure 21.6 Action bar tab navigation
www.it-ebooks.info
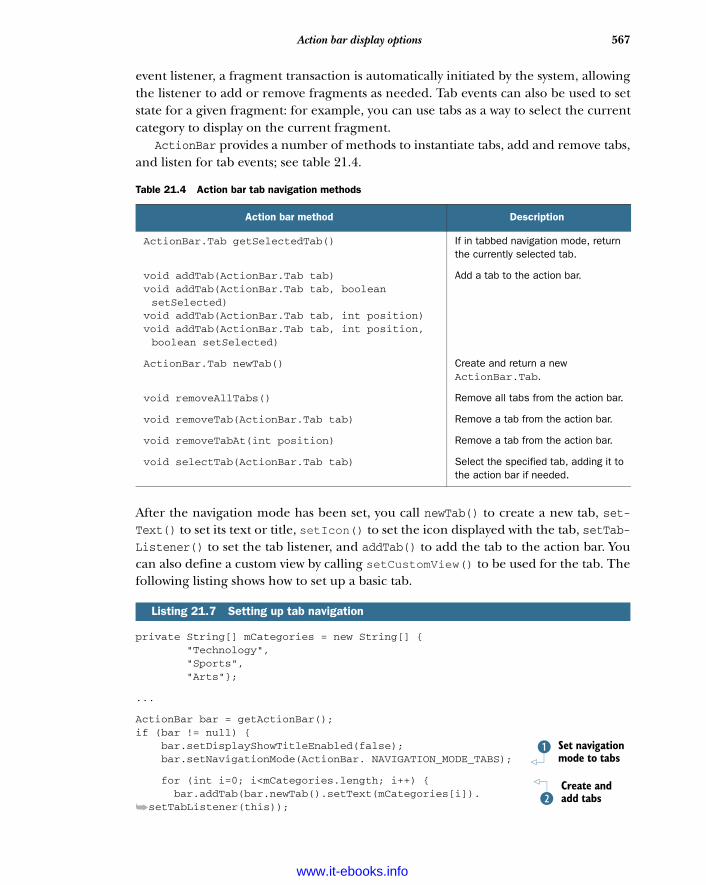
567Action bar display options
event listener, a fragment transaction is automatically initiated by the system, allowingthe listener to add or remove fragments as needed. Tab events can also be used to setstate for a given fragment: for example, you can use tabs as a way to select the currentcategory to display on the current fragment.
ActionBar provides a number of methods to instantiate tabs, add and remove tabs,and listen for tab events; see table 21.4.
After the navigation mode has been set, you call newTab() to create a new tab, set-Text() to set its text or title, setIcon() to set the icon displayed with the tab, setTab-Listener() to set the tab listener, and addTab() to add the tab to the action bar. Youcan also define a custom view by calling setCustomView() to be used for the tab. Thefollowing listing shows how to set up a basic tab.
private String[] mCategories = new String[] { "Technology", "Sports", "Arts"};
...
ActionBar bar = getActionBar();if (bar != null) { bar.setDisplayShowTitleEnabled(false); bar.setNavigationMode(ActionBar. NAVIGATION_MODE_TABS);
for (int i=0; i<mCategories.length; i++) { bar.addTab(bar.newTab().setText(mCategories[i]).
➥setTabListener(this));
Table 21.4 Action bar tab navigation methods
Action bar method Description
ActionBar.Tab getSelectedTab() If in tabbed navigation mode, return the currently selected tab.
void addTab(ActionBar.Tab tab)void addTab(ActionBar.Tab tab, boolean setSelected)
void addTab(ActionBar.Tab tab, int position)void addTab(ActionBar.Tab tab, int position, boolean setSelected)
Add a tab to the action bar.
ActionBar.Tab newTab() Create and return a new ActionBar.Tab.
void removeAllTabs() Remove all tabs from the action bar.
void removeTab(ActionBar.Tab tab) Remove a tab from the action bar.
void removeTabAt(int position) Remove a tab from the action bar.
void selectTab(ActionBar.Tab tab) Select the specified tab, adding it to the action bar if needed.
Listing 21.7 Setting up tab navigation
Set navigation mode to tabs
B
Create and add tabsC
www.it-ebooks.info
568 CHAPTER 21 Android 3.0 action bar
}
bar.setDisplayOptions( ActionBar.DISPLAY_HOME_AS_UP | ActionBar.DISPLAY_SHOW_HOME);}
In listing 21.7, we set a couple of display options: in order to maximize the space avail-able in the action bar, we don’t show the application title; and we set the navigation totab-based B. Next, we instantiate the tabs C and add them to the action bar. Finally,we set some additional display options to enable the application icon for navigation.
Next, you need to listen for tab events. For this you must implement a tab listenerthat will receive tab events when a given tab is added or deleted, receives focus, or getsunfocused. The ActionBar.TabListener interface defines the listener methods intable 21.5.
The following listing shows an example of an action bar tab listener.
public class MainActivity extends Activity implements ActionBar.TabListener {
:
public void onTabSelected(ActionBar.Tab tab, FragmentTransaction ft) { SummaryListFragment frag = (SummaryListFragment) getFragmentManager().findFragmentById(R.id.frag_summary_listview); frag.setCategory(tab.getPosition()); }
public void onTabUnselected(ActionBar.Tab tab, FragmentTransaction ft) { ... }
public void onTabReselected(ActionBar.Tab tab, FragmentTransaction ft) { ... } }
Table 21.5 Action bar tab listener methods
ActionBar.TabListener methods Description
void onTabSelected(ActionBar.Tab tab, FragmentTransaction ft)
Called when a tab enters the selected state
void onTabUnselected(ActionBar.Tab tab, FragmentTransaction ft)
Called when a tab exits the selected state
void onTabReselected(ActionBar.Tab tab, FragmentTransaction ft)
Called when a tab that is already selected is chosen again by the user
Listing 21.8 Action bar tab listener
www.it-ebooks.info
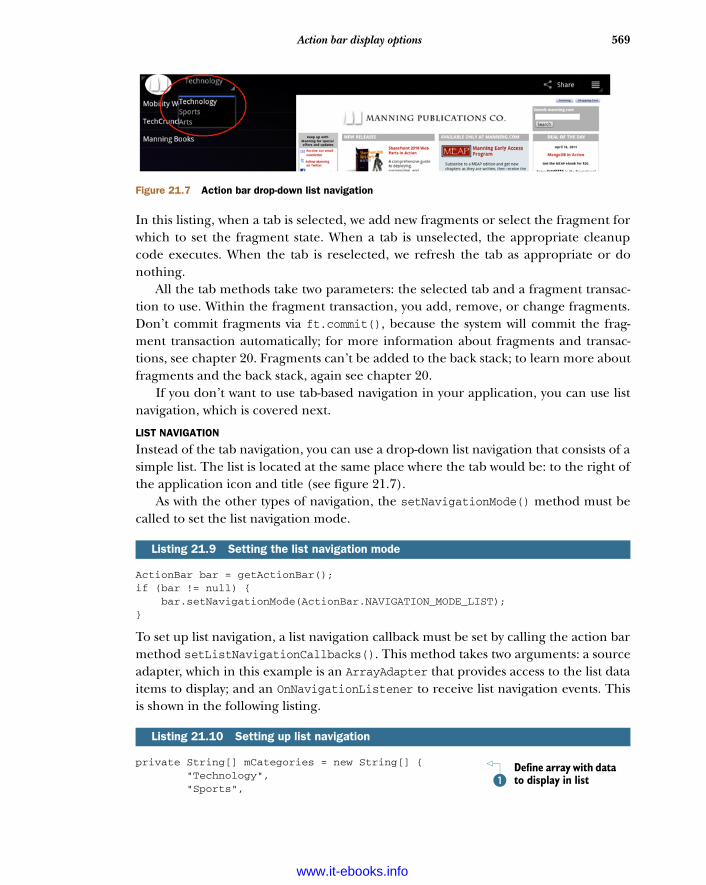
569Action bar display options
In this listing, when a tab is selected, we add new fragments or select the fragment forwhich to set the fragment state. When a tab is unselected, the appropriate cleanupcode executes. When the tab is reselected, we refresh the tab as appropriate or donothing.
All the tab methods take two parameters: the selected tab and a fragment transac-tion to use. Within the fragment transaction, you add, remove, or change fragments.Don’t commit fragments via ft.commit(), because the system will commit the frag-ment transaction automatically; for more information about fragments and transac-tions, see chapter 20. Fragments can’t be added to the back stack; to learn more aboutfragments and the back stack, again see chapter 20.
If you don’t want to use tab-based navigation in your application, you can use listnavigation, which is covered next.
LIST NAVIGATION
Instead of the tab navigation, you can use a drop-down list navigation that consists of asimple list. The list is located at the same place where the tab would be: to the right ofthe application icon and title (see figure 21.7).
As with the other types of navigation, the setNavigationMode() method must becalled to set the list navigation mode.
ActionBar bar = getActionBar();if (bar != null) { bar.setNavigationMode(ActionBar.NAVIGATION_MODE_LIST); }
To set up list navigation, a list navigation callback must be set by calling the action barmethod setListNavigationCallbacks(). This method takes two arguments: a sourceadapter, which in this example is an ArrayAdapter that provides access to the list dataitems to display; and an OnNavigationListener to receive list navigation events. Thisis shown in the following listing.
private String[] mCategories = new String[] { "Technology", "Sports",
Listing 21.9 Setting the list navigation mode
Listing 21.10 Setting up list navigation
Figure 21.7 Action bar drop-down list navigation
Define array with data to display in listB
www.it-ebooks.info
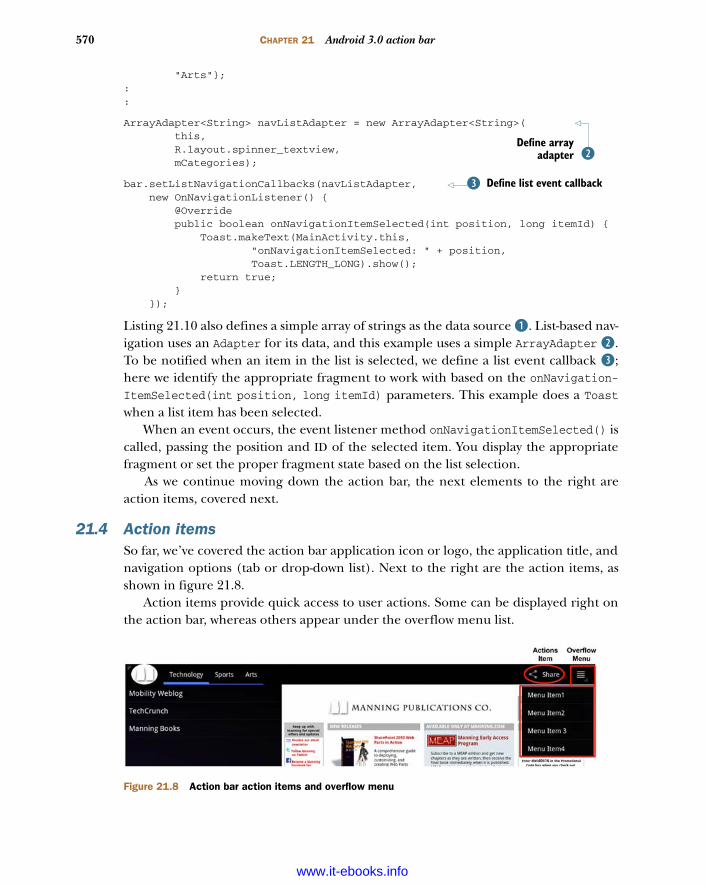
570 CHAPTER 21 Android 3.0 action bar
"Arts"};::
ArrayAdapter<String> navListAdapter = new ArrayAdapter<String>( this, R.layout.spinner_textview, mCategories);
bar.setListNavigationCallbacks(navListAdapter, new OnNavigationListener() { @Override public boolean onNavigationItemSelected(int position, long itemId) { Toast.makeText(MainActivity.this, "onNavigationItemSelected: " + position, Toast.LENGTH_LONG).show(); return true; } });
Listing 21.10 also defines a simple array of strings as the data source B. List-based nav-igation uses an Adapter for its data, and this example uses a simple ArrayAdapter C.To be notified when an item in the list is selected, we define a list event callback D;here we identify the appropriate fragment to work with based on the onNavigation-ItemSelected(int position, long itemId) parameters. This example does a Toastwhen a list item has been selected.
When an event occurs, the event listener method onNavigationItemSelected() iscalled, passing the position and ID of the selected item. You display the appropriatefragment or set the proper fragment state based on the list selection.
As we continue moving down the action bar, the next elements to the right areaction items, covered next.
21.4 Action itemsSo far, we’ve covered the action bar application icon or logo, the application title, andnavigation options (tab or drop-down list). Next to the right are the action items, asshown in figure 21.8.
Action items provide quick access to user actions. Some can be displayed right onthe action bar, whereas others appear under the overflow menu list.
CDefine array
adapter
Define list event callbackD
Figure 21.8 Action bar action items and overflow menu
www.it-ebooks.info
571Action items
If you’re familiar with the options menu, covered in chapter 3, then you’re alreadyfamiliar with action items. In fact, action items are menu items. You can controlwhether action items should appear always in the action bar, in the action bar only ifthere is room available, or never in the action bar and instead be included in the over-flow menu. You define this placement via the showAsAction attribute as follows:
ifRoom—Place the item in the action bar only if there is room for it; otherwise,place it in the overflow menu list.
never—Never place this item in the action bar; always place in the overflowmenu list instead. This is the default value.
always—Always place this item in the action bar. You should avoid using thisapproach if possible, or limit its use to one or two action items, because if toomany UI elements are present in the action bar, smaller screens may encounteroverlapping UI elements (for example, with tabs). Make sure you test across dif-ferent devices.
Note that you can combine any of these flags using a pipe (|) with the keyword with-Text to indicate that text should be included when the item is shown as an action. Thetext to show is defined by the android:title attribute.
The following listing shows the menu resource with action items for the action barshown earlier in figure 21.8, where you have one action item for Share and four menuitems on the overflow menu.
<?xml version="1.0" encoding="utf-8"?><menu xmlns:android="http://schemas.android.com/apk/res/android">
<item android:id="@+id/menuitem0" android:title=" @string/share_label" android:icon="@drawable/ic_menu_share" android:showAsAction="ifRoom|withText" />
<item android:id="@+id/menuitem1" android:title=" @string/menu1_label" android:showAsAction="never" />
<item android:id="@+id/menuitem2" android:title=" @string/menu2_label" android:showAsAction="never" />
<item android:id="@+id/menuitem3" android:title=" @string/menu3_label" android:showAsAction="never" />
<item android:id="@+id/menuitem4" android:title=" @string/menu4_label" android:showAsAction="never" />
</menu>
Listing 21.11 Menu resource defining action and overflow menu items
Define share action item
B
Define menu itemsC
www.it-ebooks.info
572 CHAPTER 21 Android 3.0 action bar
The placement options are flexible. This example includes a Share item that will beshown in the action bar only if space is available B; the action also has a label associ-ated with it. The rest of the items C are to be shown only in the overflow menu.
As with all menu resources, you inflate the action items when onCreateOptions-Menu() is called (see the next listing).
@Overridepublic boolean onCreateOptionsMenu(Menu menu) { MenuInflater inflater = getMenuInflater(); inflater.inflate(R.menu.main_menu, menu); return true;}
You can also create action items programmatically instead of using menu resources.To do so call setShowAsAction() on the MenuItem, passing the corresponding con-stant placement value:
SHOW_AS_ACTION_IF_ROOM—Same as the menu resource android:showAs-
Action attribute value ifRoom explained earlier SHOW_AS_ACTION_NEVER—Same as the menu resource android:showAsAction
attribute value never explained earlier SHOW_AS_ACTION_ALWAYS—Same as the menu resource android:showAsAction
attribute value always explained earlier SHOW_AS_ACTION_WITH_TEXT—Same as the menu resource android:showAs-
Action attribute value withText explained earlier
To handle the action or menu items when selected, add the appropriate logic to themethod onOptionsItemSelected(), as shown in the following listing.
@Overridepublic boolean onOptionsItemSelected(MenuItem item) { switch (item.getItemId()) { case R.id.shareitem: return true; case R.id.menuitem1: return true; case R.id.menuitem2: return true; case R.id.menuitem3: return true; case R.id.menuitem4: return true; default: return super.onOptionsItemSelected(item); }}
Listing 21.12 Inflating the menu resource
Listing 21.13 Handling action or menu items
www.it-ebooks.info
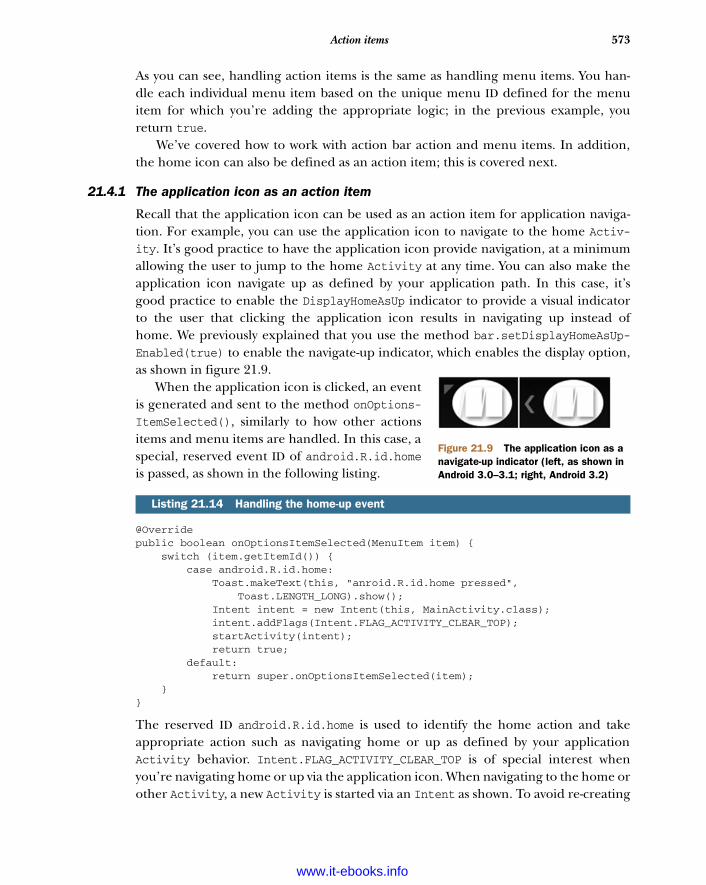
573Action items
As you can see, handling action items is the same as handling menu items. You han-dle each individual menu item based on the unique menu ID defined for the menuitem for which you’re adding the appropriate logic; in the previous example, youreturn true.
We’ve covered how to work with action bar action and menu items. In addition,the home icon can also be defined as an action item; this is covered next.
21.4.1 The application icon as an action item
Recall that the application icon can be used as an action item for application naviga-tion. For example, you can use the application icon to navigate to the home Activ-ity. It’s good practice to have the application icon provide navigation, at a minimumallowing the user to jump to the home Activity at any time. You can also make theapplication icon navigate up as defined by your application path. In this case, it’sgood practice to enable the DisplayHomeAsUp indicator to provide a visual indicatorto the user that clicking the application icon results in navigating up instead ofhome. We previously explained that you use the method bar.setDisplayHomeAsUp-Enabled(true) to enable the navigate-up indicator, which enables the display option,as shown in figure 21.9.
When the application icon is clicked, an eventis generated and sent to the method onOptions-ItemSelected(), similarly to how other actionsitems and menu items are handled. In this case, aspecial, reserved event ID of android.R.id.homeis passed, as shown in the following listing.
@Overridepublic boolean onOptionsItemSelected(MenuItem item) { switch (item.getItemId()) { case android.R.id.home: Toast.makeText(this, "anroid.R.id.home pressed", Toast.LENGTH_LONG).show(); Intent intent = new Intent(this, MainActivity.class); intent.addFlags(Intent.FLAG_ACTIVITY_CLEAR_TOP); startActivity(intent); return true; default: return super.onOptionsItemSelected(item); }}
The reserved ID android.R.id.home is used to identify the home action and takeappropriate action such as navigating home or up as defined by your applicationActivity behavior. Intent.FLAG_ACTIVITY_CLEAR_TOP is of special interest whenyou’re navigating home or up via the application icon. When navigating to the home orother Activity, a new Activity is started via an Intent as shown. To avoid re-creating
Listing 21.14 Handling the home-up event
Figure 21.9 The application icon as a navigate-up indicator (left, as shown in Android 3.0–3.1; right, Android 3.2)
www.it-ebooks.info
574 CHAPTER 21 Android 3.0 action bar
the Activity if it already exists, you should set the Intent.FLAG_ACTIVITY_CLEAR_TOPflag on the intent, in which case all the activities after the one specified are destroyedbefore the selected one is brought up; this is similar behavior to pressing the Back keyuntil you reach the desired Activity.
In short, handling the application icon to navigate home or up is done similarly;the behavior depends on what you want your application to do. If you decide to usethe application icon to navigate up instead of home, you should add the visual cue asexplained.
There is still one more type of action to cover: action views, which are widget-basedaction items.
21.4.2 Action views
An action view is a widget that substitutes an action item in the action bar. A goodexample is a search action that shows a search icon that when clicked turns into asearch box. Another example is an action such as a share icon that starts a new frag-ment or Activity after gathering some input from the user.
You can define an action view for a menu item via the menu resource file or do itprogrammatically. Looking at the menu resource first, for a menu item you can definethe following:
android:actionLayout—Layout resource to use as the action view android:actionViewClass—Fully qualified classname for a view to use as the
action view
For example, the next listing shows a menu resource that uses the Android SearchAction Widget in the action bar.
<menu xmlns:android="http://schemas.android.com/apk/res/android"> <item android:id="@+id/menu_search" android:title="@string/search_action_label" android:showAsAction="ifRoom" android:actionViewClass="android.widget.SearchView" /></menu>
You can also assign action views programmatically by calling the method Menu-Item.setActionView() for the menu item of interest. There are two flavors for set-ActionView():
setActionView(resource ID)—Layout resource to use as the action view setActionView(View)—View to use as the action view
The first method takes for input a menu resource that describes the action view, andthe second takes a view that defines the action view. The example in listing 21.15showed how to use the built-in Android search widget, but you can write your ownaction view class. Writing action view widgets is outside the scope of this chapter.
Listing 21.15 Menu resource definition, using the Search Action View
www.it-ebooks.info
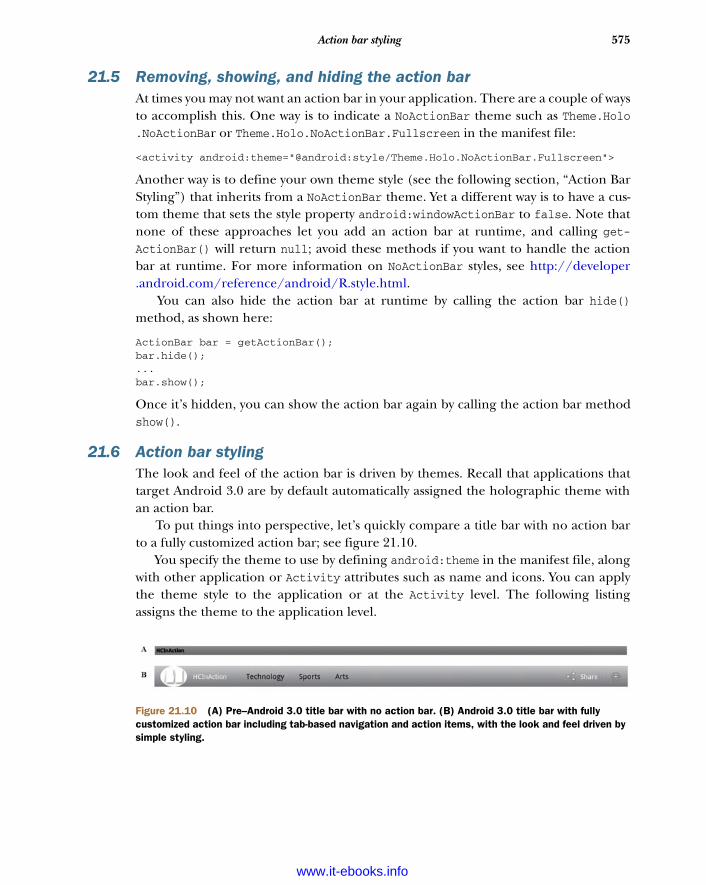
575Action bar styling
21.5 Removing, showing, and hiding the action barAt times you may not want an action bar in your application. There are a couple of waysto accomplish this. One way is to indicate a NoActionBar theme such as Theme.Holo.NoActionBar or Theme.Holo.NoActionBar.Fullscreen in the manifest file:
<activity android:theme="@android:style/Theme.Holo.NoActionBar.Fullscreen">
Another way is to define your own theme style (see the following section, “Action BarStyling”) that inherits from a NoActionBar theme. Yet a different way is to have a cus-tom theme that sets the style property android:windowActionBar to false. Note thatnone of these approaches let you add an action bar at runtime, and calling get-ActionBar() will return null; avoid these methods if you want to handle the actionbar at runtime. For more information on NoActionBar styles, see http://developer.android.com/reference/android/R.style.html.
You can also hide the action bar at runtime by calling the action bar hide()method, as shown here:
ActionBar bar = getActionBar();bar.hide(); ...bar.show();
Once it’s hidden, you can show the action bar again by calling the action bar methodshow().
21.6 Action bar stylingThe look and feel of the action bar is driven by themes. Recall that applications thattarget Android 3.0 are by default automatically assigned the holographic theme withan action bar.
To put things into perspective, let’s quickly compare a title bar with no action barto a fully customized action bar; see figure 21.10.
You specify the theme to use by defining android:theme in the manifest file, alongwith other application or Activity attributes such as name and icons. You can applythe theme style to the application or at the Activity level. The following listingassigns the theme to the application level.
Figure 21.10 (A) Pre–Android 3.0 title bar with no action bar. (B) Android 3.0 title bar with fully customized action bar including tab-based navigation and action items, with the look and feel driven by simple styling.
www.it-ebooks.info
576 CHAPTER 21 Android 3.0 action bar
<?xml version="1.0" encoding="utf-8"?><manifest xmlns:android="http://schemas.android.com/apk/res/android" package="com.cenriqueortiz.androidinaction" android:versionCode="1" android:versionName="1.0">
<uses-sdk android:minSdkVersion="11" /> <uses-permission android:name="android.permission.INTERNET" />
<application android:label="@string/app_name" android:icon="@drawable/manninglogo" android:theme="@style/ThemeWithActionBar">
:
This example assigns the theme at the application level (and thus all actions within)B. Remember, though, that by targeting Android 3.0 (via the minimum and targetSDK versions previously covered in the chapter), Android will automatically assign theholographic theme with an action bar.
The theme style referenced in the manifest must be defined. You add customtheme styles to the style.xml file in a manner similar to how styles are defined inAndroid in general.
The list of theme-styleable items is extensive; Android is flexible when it comes tocustomizing themes. Following are some examples of commonly used theme styleitems:
Action bar styling• android:actionBarTabStyle—Lets you customize the action bar tab by
specifying your own style• android:actionBarTabTextStyle—Lets you customize the action bar tab
text by specifying your own text style Text
• android:textColor—Customizes the foreground text color • android:textSize—Customizes the text size (remember to use sp for scale-
independent pixels when specifying font sizes) • android:typeface—Specifies the font type
Other styling• android:listChoiceIndicatorMultiple—Sets the drawable for multiple-
choice indicators • android:listChoiceIndicatorSingle—Sets the drawable for single-choice
indicators • android:selectableItemBackground—Sets the background drawable for
standalone items that need focus/pressed states• android:popupMenuStyle—Sets the style of pop-up menus
Listing 21.16 Specifying a theme
Assign themeB
www.it-ebooks.info
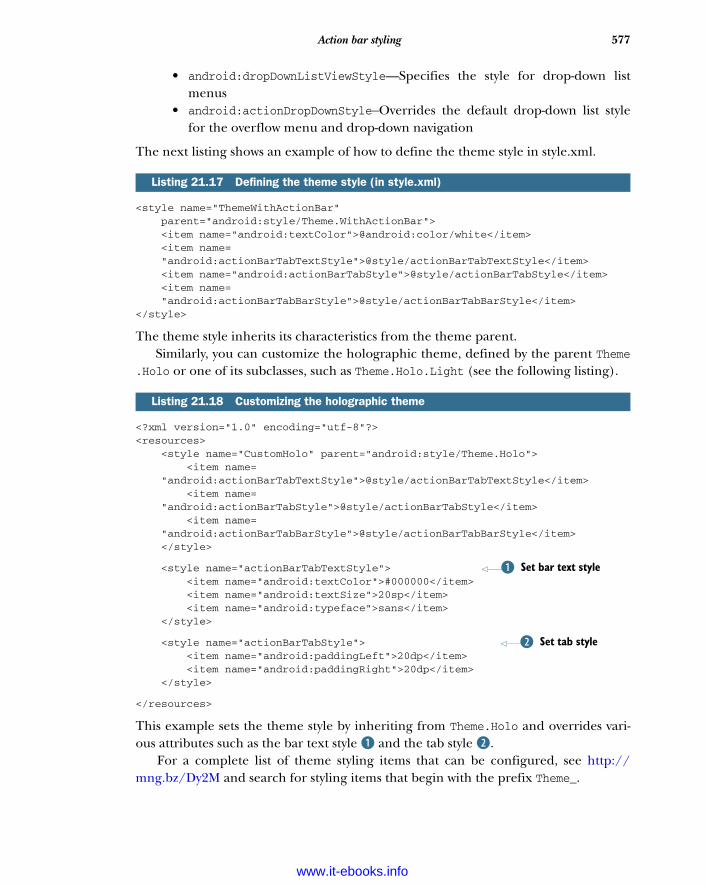
577Action bar styling
• android:dropDownListViewStyle—Specifies the style for drop-down listmenus
• android:actionDropDownStyle—Overrides the default drop-down list stylefor the overflow menu and drop-down navigation
The next listing shows an example of how to define the theme style in style.xml.
<style name="ThemeWithActionBar" parent="android:style/Theme.WithActionBar"> <item name="android:textColor">@android:color/white</item> <item name= "android:actionBarTabTextStyle">@style/actionBarTabTextStyle</item> <item name="android:actionBarTabStyle">@style/actionBarTabStyle</item> <item name= "android:actionBarTabBarStyle">@style/actionBarTabBarStyle</item></style>
The theme style inherits its characteristics from the theme parent. Similarly, you can customize the holographic theme, defined by the parent Theme
.Holo or one of its subclasses, such as Theme.Holo.Light (see the following listing).
<?xml version="1.0" encoding="utf-8"?><resources> <style name="CustomHolo" parent="android:style/Theme.Holo"> <item name= "android:actionBarTabTextStyle">@style/actionBarTabTextStyle</item> <item name= "android:actionBarTabStyle">@style/actionBarTabStyle</item> <item name= "android:actionBarTabBarStyle">@style/actionBarTabBarStyle</item> </style>
<style name="actionBarTabTextStyle"> <item name="android:textColor">#000000</item> <item name="android:textSize">20sp</item> <item name="android:typeface">sans</item> </style>
<style name="actionBarTabStyle"> <item name="android:paddingLeft">20dp</item> <item name="android:paddingRight">20dp</item> </style>
</resources>
This example sets the theme style by inheriting from Theme.Holo and overrides vari-ous attributes such as the bar text style B and the tab style C.
For a complete list of theme styling items that can be configured, see http://mng.bz/Dy2M and search for styling items that begin with the prefix Theme_.
Listing 21.17 Defining the theme style (in style.xml)
Listing 21.18 Customizing the holographic theme
Set bar text styleB
Set tab styleC
www.it-ebooks.info
578 CHAPTER 21 Android 3.0 action bar
21.7 SummaryThis chapter covered the action bar in detail. The action bar offers application con-trol by providing navigation options, widgets, and other contextual information at thetop of the screen, using a consistent approach across applications. This behavioralconsistency results in a familiar approach to application control and navigation andgives you quick access to actions regardless of the nature of the application.
www.it-ebooks.info

Drag-and-drop
Starting with Android 3.0 (API 11), developers can add drag-and-drop capabilitiesto applications. Drag-and-drop support is one of the neat features added inAndroid 3.0, a natural addition to touch-based user interfaces and tablets.Android 3.0 provides a complete framework for drag-and-drop that consists of mul-tiple classes, events, and operations. Related to drag-and-drop are copy-and-pasteoperations. Although copy and paste has been around since API 1, a much richerclipboard API has been introduced in API 11.
Drag-and-drop is a touch-based gesture. With drag-and-drop gestures, you canallow users to move data across views that reside within in the same layout: forexample, to select data items in one view and drop them onto a different view forthe purpose of sharing or synchronizing data items. Or you can use the drag-and-drop gesture itself to trigger a specific action against the dragged item: for exam-ple, viewing the selected item’s details. A typical drag-and-drop operation is shownin figure 22.1.
This chapter covers The drag-and-drop classes
Drag-and-drop operations
The shadow builder
Listening for drag-and-drop events
579
www.it-ebooks.info
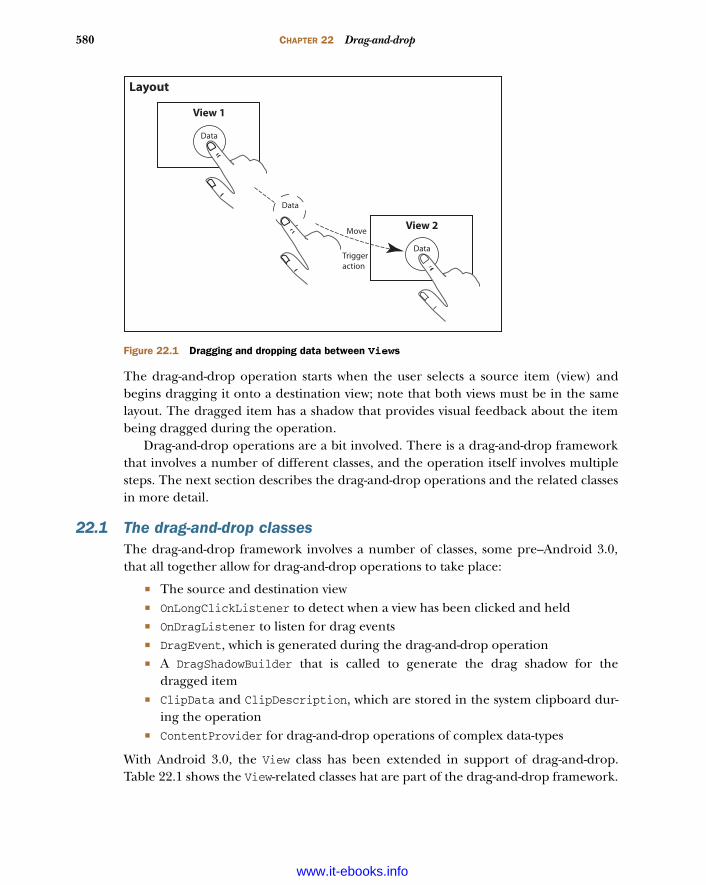
580 CHAPTER 22 Drag-and-drop
The drag-and-drop operation starts when the user selects a source item (view) andbegins dragging it onto a destination view; note that both views must be in the samelayout. The dragged item has a shadow that provides visual feedback about the itembeing dragged during the operation.
Drag-and-drop operations are a bit involved. There is a drag-and-drop frameworkthat involves a number of different classes, and the operation itself involves multiplesteps. The next section describes the drag-and-drop operations and the related classesin more detail.
22.1 The drag-and-drop classesThe drag-and-drop framework involves a number of classes, some pre–Android 3.0,that all together allow for drag-and-drop operations to take place:
The source and destination view OnLongClickListener to detect when a view has been clicked and held OnDragListener to listen for drag events DragEvent, which is generated during the drag-and-drop operation A DragShadowBuilder that is called to generate the drag shadow for the
dragged item ClipData and ClipDescription, which are stored in the system clipboard dur-
ing the operation ContentProvider for drag-and-drop operations of complex data-types
With Android 3.0, the View class has been extended in support of drag-and-drop.Table 22.1 shows the View-related classes hat are part of the drag-and-drop framework.
View 2
Data
View 1
Data
Data
Move
Triggeraction
Layout
Figure 22.1 Dragging and dropping data between Views
www.it-ebooks.info

581Drag-and-drop operations
As previously mentioned, Android 3.0 also introduced a richer copy-and-paste API.Drag-and-drop uses the copy-and-paste API underneath—the drag operation itself isabout selecting (copying and moving) data from a source and dropping (transferringor pasting) the data onto a target. The following list summarizes the copy-and-pasteclasses that are used for drag-and-drop operations:
android.content.ClipboardManager—The manager for placing and retriev-ing clipped data in the global clipboard
android.content.ClipData—Clipped data on the clipboard; it can hold oneor more representations of an item of data (ClipData.Item)
android.content.ClipData.Item—A single item of clipped data (ClipData) android.content.ClipDescription—Metadata that describes the contents of
ClipData
Note that the API 11 android.content.ClipboardManager replaces the API Level 1android.text.ClipboardManager. The latter is now deprecated.
The data being transferred during the drag-and-drop operation can be simple(such as text or URIs) or complex. The clipboard provides a set of methods to handlesimple data, but for complex data, you use ContentProvider. Content providers arecovered in chapter 5.
22.2 Drag-and-drop operationsA drag-and-drop operation consists of a number of steps, some performed by the user,others by the application, and others by the system, as illustrated in figure 22.2.
Table 22.1 android.view.View-related drag-and-drop classes
Classes Description
android.view.View.OnLongClickListener Listener interface that is called when the user has performed a long click (clicked the view and held). It’s common to use long presses to indi-cate the start of the drag-and-drop operation.
android.view.View.DragShadowBuilder A class for creating the shadow image that the system displays during the drag-and-drop operation.
android.view.View.OnDragListener Listener interface that is called when a drag event is being dispatched to this view.
android.view.DragEvent A class that represents a drag-and-drop event (about the operation and underlying data) that is sent out by the system at various times during a drag-and-drop operation, and received either by the drag event listener or the view’s onDragEvent() callback method. See section 22.6.1 for information about when to use the listener versus the callback.
www.it-ebooks.info
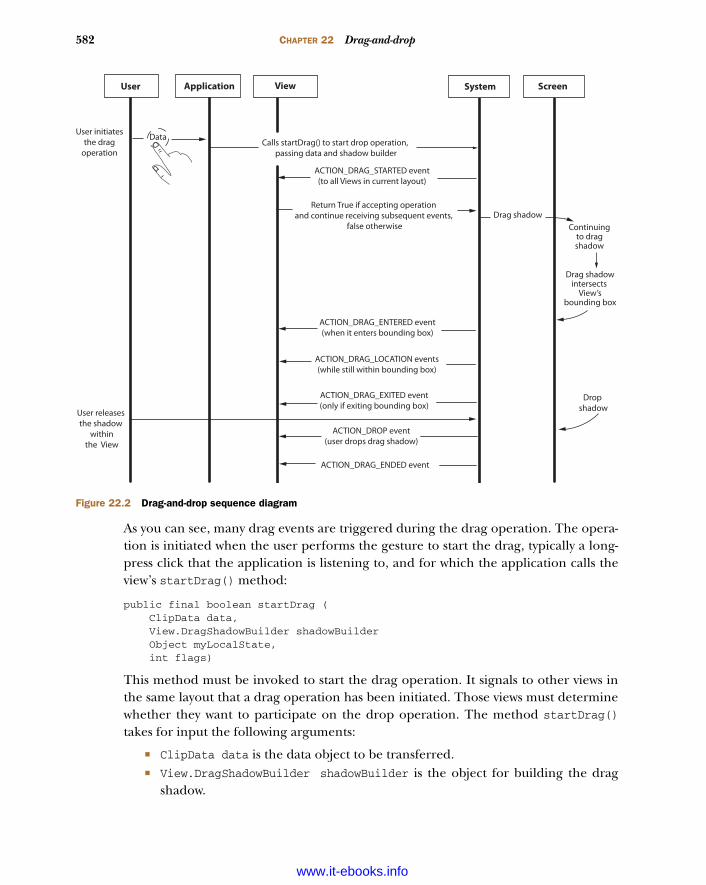
582 CHAPTER 22 Drag-and-drop
As you can see, many drag events are triggered during the drag operation. The opera-tion is initiated when the user performs the gesture to start the drag, typically a long-press click that the application is listening to, and for which the application calls theview’s startDrag() method:
public final boolean startDrag ( ClipData data, View.DragShadowBuilder shadowBuilder Object myLocalState, int flags)
This method must be invoked to start the drag operation. It signals to other views inthe same layout that a drag operation has been initiated. Those views must determinewhether they want to participate on the drop operation. The method startDrag()takes for input the following arguments:
ClipData data is the data object to be transferred. View.DragShadowBuilder shadowBuilder is the object for building the drag
shadow.
Calls startDrag() to start drop operation, passing data and shadow builder
ACTION_DRAG_STARTED event(to all Views in current layout)
Return True if accepting operation and continue receiving subsequent events,
false otherwise
ACTION_DRAG_ENTERED event(when it enters bounding box)
ACTION_DRAG_LOCATION events(while still within bounding box)
ACTION_DRAG_EXITED event(only if exiting bounding box)
ACTION_DROP event(user drops drag shadow)
ACTION_DRAG_ENDED event
User releases the shadow
withinthe View
User initiatesthe drag
operation
Drag shadowContinuing
to dragshadow
Drag shadowintersects
View’sbounding box
Drop shadow
Data
User Application System ScreenView
Figure 22.2 Drag-and-drop sequence diagram
www.it-ebooks.info

583The shadow builder
Object myLocalState is an optional data object that is sent as part of the Drag-Event object generated from the start-drag operation. It’s a simple or light-weight mechanism to pass internal local state or information such as state orflags to the destination view.
int flags are drag-and-drop control flags; no flags are currently defined, andthey should be set to 0.
This method returns true if the start-drag completes successfully and false other-wise, indicating that the system was unable to start the drag operation (for example,due to out-of-memory or other errors during the copy) and thus no drag operation isin progress.
Using the startDrag() method is covered in the section “Starting Drag Opera-tions.” First, the following section introduces drag-and-drop shadows and builders.
22.3 The shadow builderAn important aspect of the drag-and-drop operation is the visual feedback providedduring the drag or data move. When the drag operation is started for a given view bycalling the startDrag() method, a View.DragShadowBuilder callback is specified.The DragShadowBuilder is called by the system to generate a drag shadow for the viewbeing dragged.
DragShadowBuilder defines two kinds of constructors: one that takes a View for anargument, and a no-argument constructor with no associated view. DragShadow-Builder defines three methods:
getView()—Returns the view associated with the shadow builder onDragShadow(Canvas canvas)—Draws the shadow image onProvideShadowMetrics(Point shadowSize, Point shadowTouchPoint)—
Provides the metrics for the shadow image
The following example shows a shadow builder that implements the shadow-builderconstructor, onDragShadow(), and onProvideShadowMetrics() methods.
private static class MyDragShadowBuilder extends View.DragShadowBuilder { private static Drawable mShadow;
public MyDragShadowBuilder(View v) { super(v); mShadow = new ColorDrawable(Color.LTGRAY); }
@Override public void onProvideShadowMetrics (Point size, Point touch) { int width = getView().getWidth(); int height = getView().getHeight(); mShadow.setBounds(0, 0, width, height); size.set(width, height); touch.set(width/2, height/2); }
Listing 22.1 Example shadow builder
Initialize View.DragShadowBuilder superclass
B
CDefine
onProvideShadowMetrics
www.it-ebooks.info
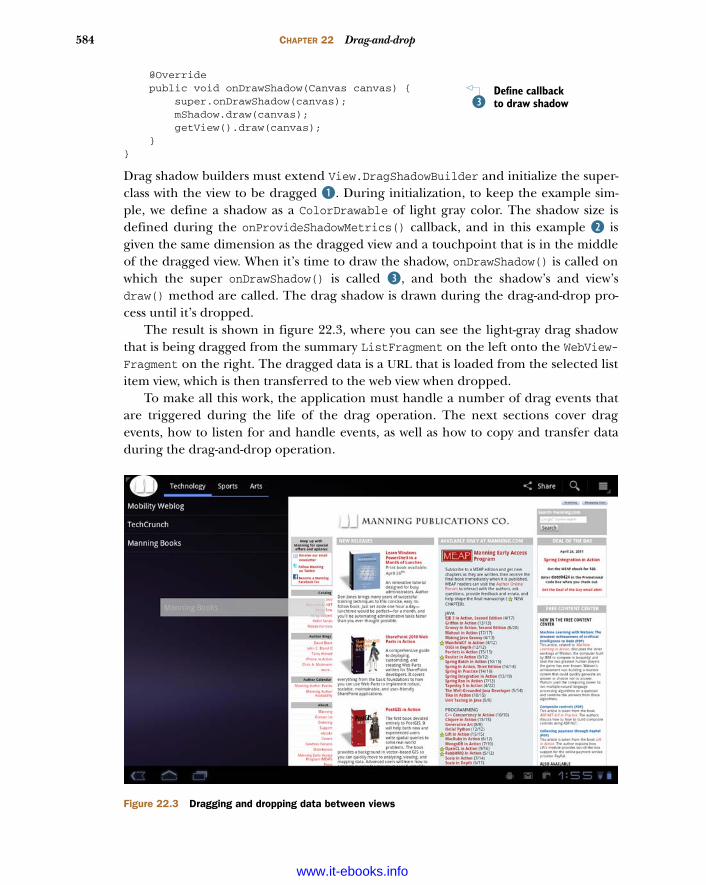
584 CHAPTER 22 Drag-and-drop
@Override public void onDrawShadow(Canvas canvas) { super.onDrawShadow(canvas); mShadow.draw(canvas); getView().draw(canvas); }}
Drag shadow builders must extend View.DragShadowBuilder and initialize the super-class with the view to be dragged B. During initialization, to keep the example sim-ple, we define a shadow as a ColorDrawable of light gray color. The shadow size isdefined during the onProvideShadowMetrics() callback, and in this example C isgiven the same dimension as the dragged view and a touchpoint that is in the middleof the dragged view. When it’s time to draw the shadow, onDrawShadow() is called onwhich the super onDrawShadow() is called D, and both the shadow’s and view’sdraw() method are called. The drag shadow is drawn during the drag-and-drop pro-cess until it’s dropped.
The result is shown in figure 22.3, where you can see the light-gray drag shadowthat is being dragged from the summary ListFragment on the left onto the WebView-Fragment on the right. The dragged data is a URL that is loaded from the selected listitem view, which is then transferred to the web view when dropped.
To make all this work, the application must handle a number of drag events thatare triggered during the life of the drag operation. The next sections cover dragevents, how to listen for and handle events, as well as how to copy and transfer dataduring the drag-and-drop operation.
Define callback to draw shadowD
Figure 22.3 Dragging and dropping data between views
www.it-ebooks.info
585Drag events
22.4 Drag eventsWhen the drag operation has started, and while the user drags the drag shadow, thesystem dispatches events to all views that are listening for drag-and-drop operationevents: that is, if the view has indicated that it wants to receive events, as describedshortly.
An android.view.DragEvent represents events that are dispatched by the systemduring the drag-and-drop operation as illustrated in the figure 22.2 sequence dia-gram. When a view receives an event, it must call the event’s getAction() method toget the event’s action type, which indicates the state of the operation, again as illus-trated in the sequence diagram in figure 22.2. By reacting to the various events, theapplication and views can provide visual feedback when the drag begins, crosses viewboundaries, and completes. The currently supported event actions are as follows:
ACTION_DRAG_STARTED—A drag-and-drop operation has begun. Of great impor-tance is how to respond to ACTION_DRAG_STARTED. To accept the drop operationand continue receiving further drag events, true must be returned in responseto ACTION_DRAG_STARTED.
ACTION_DRAG_ENTERED—The drag point has entered the view’s bounding box. ACTION_DRAG_LOCATION—One or more of these events are sent by the system
after ACTION_DRAG_ENTERED and while the drag shadow is within a given view’sbounding box.
ACTION_DRAG_EXITED—The drag shadow has moved outside the view’s bound-ing box. This event is received after an ACTION_DRAG_ENTERED and at least oneACTION_DRAG_LOCATION have been received. After exit, no more ACTION_DRAG_LOCATION events are sent to the view unless it’s re-entered (that is,ACTION_DRAG_ENTERED, and the cycle repeats).
ACTION_DROP—The user has released the drag shadow, and the drag point iswithin this view’s bounding box. This event is sent by the system only if this viewpreviously accepted the drop operation by returning true in response toACTION_DRAG_STARTED. A call to the event’s getX() and getY() methodsreturns the X and Y position of the drag point at the moment of the drop.
This event isn’t sent by the system if the user releases the shadow on viewsthat aren’t listening for events or on empty areas on the user interface.
ACTION_DRAG_ENDED—The drag-and-drop operation has ended. This event isalso sent if the user releases the shadow on views that aren’t listening for eventsor empty areas on the user interface.
In summary, drag-and-drop events can be grouped based on their purpose:
For handling drag-and-drop data—ACTION_DRAG_STARTED and ACTION_DROPACTION_DRAG_STARTED is generated when the drag operation has started.
ACTION_DROP is generated when the operation has ended with the user per-forming the drop, so that the application can extract the transferred data.
www.it-ebooks.info
586 CHAPTER 22 Drag-and-drop
For changing the view appearance—ACTION_DRAG_ENTERED, ACTION_DRAG
_LOCATION, ACTION_DRAG_EXITED, and ACTION_DRAG_ENDEDDuring the drag-and-drop operation, these events are generated, allowing
the application to change the appearance of views as the drag shadow enters(ACTION_DRAG_ENTERED) or exits (ACTION_DRAG_EXITED) the target views ortouches parts of a view, or the operation completes (ACTION_DRAG_ENDED).
Now that you’ve seen the different kinds of drag-and-drop events, the next sectioncovers how to start drag operations and how to listen for drag-and-drop events.
22.5 Starting drag operationsThe drag operation is started when a source view calls its startDrag() method, typi-cally as a response to a long press by the user. In response to this action, you’ll typicallycreate clip data and related metadata for the data to be moved. You’ll also create theshadow builder. The following listing shows how to set up for the view’s startDrag()method.
private String[] mListItems = new String[] { "Mobility Weblog", "TechCrunch", "Manning Books"};
private String[] mListItemsUrls = new String[] { "http://mobilityweblog.com", "http://www.TechCrunch.com", "http://www.manning.com/"};...
@Override public void onActivityCreated(Bundle savedInstanceState) { super.onActivityCreated(savedInstanceState);
ListView lv = getListView(); lv.setOnItemLongClickListener(new OnItemLongClickListener() { public boolean onItemLongClick(AdapterView<?> av, View v, int pos, long id) { final String title = (String) ((TextView) v).getText(); ClipData data = ClipData.newPlainText(title, mListItemsUrls[pos]); DragShadowBuilder shadowBuilder = new MyDragShadowBuilder(v); v.startDrag(data, shadowBuilder, v, 0); return true; } });
...}
This example listens for long presses and starts the drag operation. We define an arraythat contains the list of URLs that correspond to the data that can be selected by the
Listing 22.2 Starting a view drag operation
CSet list viewitem long-
click listenerGet source viewB
Start drag operationD
www.it-ebooks.info

587Listening for drag-and-drop events
user and copy and moved from the source view to the destination view. A reference tothe source view is captured for later use B, and the long-click listener C is defined toreceive notifications when a given list item is selected. When an item is selected, clipdata is created (in this case, plain text) containing the selected URL to drag. The drag-shadow builder for the source view is instantiated, and the drag operation is started Dby passing the data to drag, the shadow builder to use, and the source view.
Once the startDrag() method is called on the source view, the system starts send-ing drag events to views. The first of such events is ACTION_DRAG_STARTED. Target viewswanting to participate on the drop operation must define a drag event listener, asexplained next.
22.6 Listening for drag-and-drop eventsRecall that a drag-and-drop operation begins with a call to startDrag() from a sourceview. After the operation has started, the system begins sending drag events to views.Views that want to participate in the drag operation and accept events and thedropped data must first listen for events. There are two approaches for listening fordrag events:
Implement android.view.View.OnDragListener and its onDrag(View v, Drag-Event event) method. You set the view’s drag listener by calling the View.set-OnDragListener() method.
Use the view’s callback method by subclassing View and overriding the onDrag-Event(DragEvent event) callback.
The approach to use—listener versus callback-based event handling—is based on yourdesign and/or preference. Implementing a listener allows you to reuse the listenerclass across views; implementing an anonymous inline event listener is often moreconvenient. Using the callback requires you to subclass View and override the callbackmethod. If both approaches are implemented, for testing purposes or in legacy codethat you inherited, the system first calls the event listener; the system won’t call thecallback method if the listener returns false.
It isn’t necessary to react to all drag events. At a minimum, you should react to thefollowing:
ACTION_DRAG_STARTED—The drag operation has started, and you need toaccept or reject the drop operation. Remember to return true to accept thedrop operation and continue receiving drag events from the system.
ACTION_DROP—The user has dropped the drag shadow on the target view. Youneed to process the dragged/transferred data.
The following listing shows an example of an anonymous inline drag-event listenerthat listens for ACTION_DRAG_STARTED and ACTION_DROP events.
www.it-ebooks.info
588 CHAPTER 22 Drag-and-drop
@Overridepublic void onActivityCreated(Bundle savedInstanceState) { super.onActivityCreated(savedInstanceState); mWebView = getWebView();
...
mWebView.setOnDragListener(new View.OnDragListener() { public boolean onDrag(View v, DragEvent event) { switch (event.getAction()) { case DragEvent.ACTION_DRAG_STARTED: return dragStarted(mWebView, event); case DragEvent.ACTION_DROP: return dropReceived(mWebView, event); default: return false; } } });}
In this example, the fragment initializes when onActivityCreated() is called afterActivity creation. We get the view for which a drag-event listener is defined by callingsetOnDragListener(). When the event ACTION_DRAG_STARTED is received B, it meansa drag operation has been started; recall that the view must return true to accept theoperation and continue receiving drag events. When the event ACTION_DROP isreceived C, the user has dropped the drag shadow and the view can get the trans-ferred data. Although this example only shows the handling of the start and dropevents, you should handle the other aforementioned events if you want to make theuser interface dynamic by changing the appearance of the user interface as the drag-and-drop operation is performed.
In this section, we covered how views can participate in drag-and-drop operationsby listening to drag events. The next section discusses how to respond to the start ofthe drag operation.
22.7 Responding to drag-start operationsA participating target view is one that is listening for drag events and responds true tothe ACTION_DRAG_STARTED event. In the previous section, you saw how to set the dragevent listener by calling the view’s method setOnDragListener() on which, for eventACTION_DRAG_STARTED, it will call the helper method dragStarted() to process theevent. The first thing a participating target view must do when responding to a drag-start operation is to validate that it can handle the kind of data being dragged. This isshown in the following listing.
Listing 22.3 Defining a drag-event listener
Process drag-started event
B
Process drop eventC
www.it-ebooks.info

589Handling drop operations
private boolean dragStarted(View view, DragEvent event) { ClipDescription clipDesc = event.getClipDescription(); if (clipDesc != null) { return clipDesc.hasMimeType(ClipDescription.MIMETYPE_TEXT_PLAIN); } return false; }
In this example, the helper method dragStarted() is called to handle ACTION_DRAG_STARTED. The transferred clip data’s description is used to tell the system thatthe view only accepts plain text data types (MIMETYPE_TEXT_PLAIN); if the data type isof type plain text, it returns true to accept the drop operation and receive furtherevents. If the clip data isn’t as expected, the drag operation is rejected and no furtherevents related to the current drag operation are sent to this view.
22.8 Handling drop operationsWhen the user releases the drag shadow, the ACTION_DROP event is dispatched by thesystem. If the shadow is released on a view that is listening for drag events, and thatview previously indicated that it would accept the drop operation, its listener is calledwith an action type of ACTION_DROP. Previously you saw how to set the drag event lis-tener by calling the view’s method setOnDragListener(), on which for eventACTION_DROP it will call the helper method dropReceived() to process the event. Pro-cessing the drop event is about retrieving the transferred data. As shown in the follow-ing listing, the event’s clip data is retrieved and used: in this example, a URL that isused to load a web page.
private boolean dropReceived(View view, DragEvent event) { ClipData data = event.getClipData(); if (data != null) { if (data.getItemCount() > 0) { android.content.ClipData.Item item = data.getItemAt(0); String textData = (String) item.getText(); if (textData != null) { updateDetails(textData); return true; } } } return false;}
In this example, the helper method dropReceived() is called to handle ACTION_DROP.The transferred clip data is retrieved B. Clip data may include one or more items, butin this example it contains only one: plain text that is assumed to be a properly for-matted URL. This data is retrieved and then used C to update the view. If no errors
Listing 22.4 Responding to the ACTION_DRAG_STARTED drag event
Listing 22.5 Handling the ACTION_DROP drag event
Get clip itemBUpdate details fragmentC
www.it-ebooks.info
590 CHAPTER 22 Drag-and-drop
are encountered, we return true to indicate that the dropped was accepted; otherwisewe return false.
22.9 SummaryDrag-and-drop is a very useful feature introduced in Android 3.0. A natural extensionto touch-based user interfaces, drag-and-drop exposes touch gestures to select andmove data or trigger actions between views in a layout. Drag-and-drop is view-centricand event-based, and it uses the clipboard classes to store the data to be transferredbetween views. Source views initiate the drag operation, and target views must definedrag-event listeners to accept the drop operation and the data that is transferred viathe clipboard as part of the drag-and-drop operation. Support for context-based drag-and-drop operations can add interesting and intuitive ways of interacting with yourAndroid application.
www.it-ebooks.info
appendix A:Installing
the Android SDKThis appendix walks through the installation of Eclipse, the Android SDK, and theADT plug-in for Eclipse. This appendix is meant to be a reference resource to assistin setting up the environment for Android application development. The topic ofusing the development tools is covered in chapter 2.
A.1 Development environment requirementsTo develop Android applications, your computing environment must satisfy theminimum requirements. Android development is a quick-paced topic, withchanges coming about very rapidly, so it’s a good idea to stay in tune with the latestdevelopments from the Android development team at Google. You’ll find the latestinformation regarding supported platforms and requirements for Android Devel-opment Tools (ADT) at http://developer.android.com/sdk/requirements.html.
Compatible development environments for the sample applications in this bookinclude
Windows XP/Vista/Windows 7, Mac OS X 10.4.8 or later (Intel x86 only), Linux Eclipse 3.4 (or later), including the JDT and Web Tools Platform, which are
included in the Eclipse installation package JDK and Java Runtime Environment (JRE) version 5 or 6 ADT plug-in for Eclipse
Once you’ve identified a compatible computing environment, it’s time to obtainand install the development tools. We’ll start with the Eclipse IDE.
A.2 Obtaining and installing EclipseA requirement for running the Eclipse IDE is the JRE version 5 or later. For assis-tance in determining the best JRE for your development computer, go towww.eclipse.org/downloads/moreinfo/jre.php. It’s likely that you already have anacceptable JRE installed on your computer. An easy way to determine what version(if any) you have is to run the following command from a command window or ter-minal session on your development computer:
java -version
591
www.it-ebooks.info
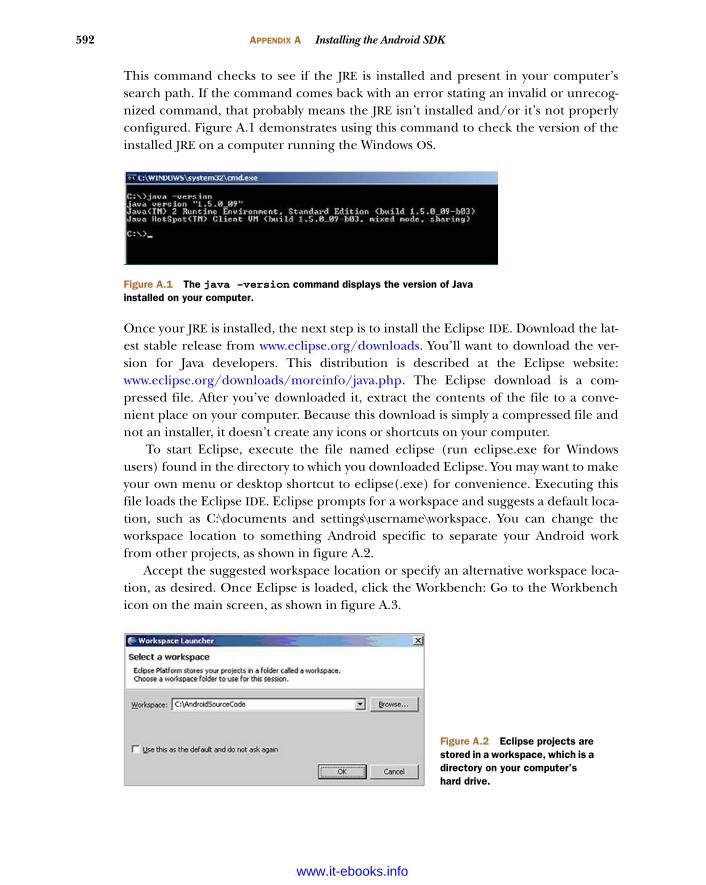
592 APPENDIX A Installing the Android SDK
This command checks to see if the JRE is installed and present in your computer’ssearch path. If the command comes back with an error stating an invalid or unrecog-nized command, that probably means the JRE isn’t installed and/or it’s not properlyconfigured. Figure A.1 demonstrates using this command to check the version of theinstalled JRE on a computer running the Windows OS.
Once your JRE is installed, the next step is to install the Eclipse IDE. Download the lat-est stable release from www.eclipse.org/downloads. You’ll want to download the ver-sion for Java developers. This distribution is described at the Eclipse website:www.eclipse.org/downloads/moreinfo/java.php. The Eclipse download is a com-pressed file. After you’ve downloaded it, extract the contents of the file to a conve-nient place on your computer. Because this download is simply a compressed file andnot an installer, it doesn’t create any icons or shortcuts on your computer.
To start Eclipse, execute the file named eclipse (run eclipse.exe for Windowsusers) found in the directory to which you downloaded Eclipse. You may want to makeyour own menu or desktop shortcut to eclipse(.exe) for convenience. Executing thisfile loads the Eclipse IDE. Eclipse prompts for a workspace and suggests a default loca-tion, such as C:\documents and settings\username\workspace. You can change theworkspace location to something Android specific to separate your Android workfrom other projects, as shown in figure A.2.
Accept the suggested workspace location or specify an alternative workspace loca-tion, as desired. Once Eclipse is loaded, click the Workbench: Go to the Workbenchicon on the main screen, as shown in figure A.3.
Figure A.1 The java –version command displays the version of Java installed on your computer.
Figure A.2 Eclipse projects are stored in a workspace, which is a directory on your computer’s hard drive.
www.it-ebooks.info

593Obtaining and installing Eclipse
Eclipse consists of many perspectives, and the default is the Java Perspective, fromwhich Android application development takes place. The Java Perspective is shown infigure A.4. Chapter 2 discusses in greater detail the use of the Eclipse IDE for Androidapplication development.
Figure A.3 Eclipse defaults to the home screen. Go to the workbench.
Figure A.4 Android development takes place in the Java Perspective.
www.it-ebooks.info
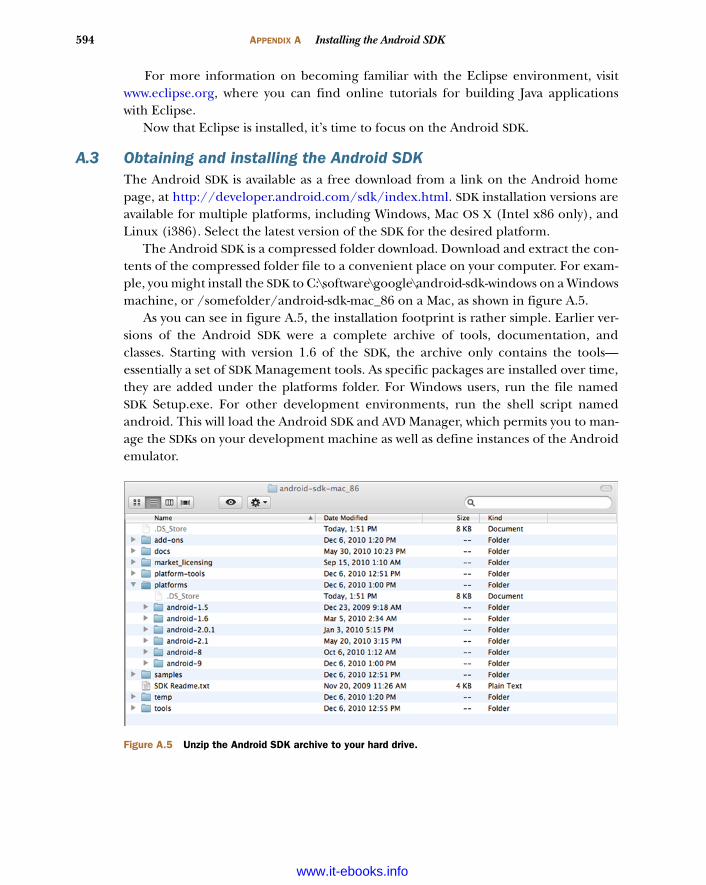
594 APPENDIX A Installing the Android SDK
For more information on becoming familiar with the Eclipse environment, visitwww.eclipse.org, where you can find online tutorials for building Java applicationswith Eclipse.
Now that Eclipse is installed, it’s time to focus on the Android SDK.
A.3 Obtaining and installing the Android SDKThe Android SDK is available as a free download from a link on the Android homepage, at http://developer.android.com/sdk/index.html. SDK installation versions areavailable for multiple platforms, including Windows, Mac OS X (Intel x86 only), andLinux (i386). Select the latest version of the SDK for the desired platform.
The Android SDK is a compressed folder download. Download and extract the con-tents of the compressed folder file to a convenient place on your computer. For exam-ple, you might install the SDK to C:\software\google\android-sdk-windows on a Windowsmachine, or /somefolder/android-sdk-mac_86 on a Mac, as shown in figure A.5.
As you can see in figure A.5, the installation footprint is rather simple. Earlier ver-sions of the Android SDK were a complete archive of tools, documentation, andclasses. Starting with version 1.6 of the SDK, the archive only contains the tools—essentially a set of SDK Management tools. As specific packages are installed over time,they are added under the platforms folder. For Windows users, run the file namedSDK Setup.exe. For other development environments, run the shell script namedandroid. This will load the Android SDK and AVD Manager, which permits you to man-age the SDKs on your development machine as well as define instances of the Androidemulator.
Figure A.5 Unzip the Android SDK archive to your hard drive.
www.it-ebooks.info

595Using the SDK and AVD Manager
A.4 Using the SDK and AVD ManagerTo begin developing Android applications, you must first download at least one of theavailable Android platforms. The benefit of this approach is that it allows you to man-age and use multiple SDK versions in parallel on your development machine. Giventhe pace at which the Android team is releasing code, this is a welcome improvementover earlier versions of the SDK.
In figure A.6, you can see the SDK and AVD Manager displaying the availableAndroid packages for download. Only the packages that are not presently on yourcomputer are listed here. As new packages become available, they appear in this list.
Although the Android platform is generally described as versions, such as 1.1, 1.5,1.6, 2.0, and so on, the underlying technologies have been described as levels. Forexample, Android API Level 5 was introduced at the 2.0 release, and Android 2.3 isAPI level 9. When looking at certain API documentation or working with Android plat-forms, you’ll see these level indicators.
Unless you have a specific older Android device in mind for an application, you’llwant to focus on the most recent SDK release level. Much of this book uses SDK version2.2 and 3.1, but you can install multiple versions of the SDK. Figure A.7 shows aninstallation with support for numerous Android releases.
Testing is often done via the Android emulator; each instance of the emulator isknown as an Android virtual device (AVD). Here’s where the AVD Manager comes intoplay. Under the virtual devices section of the SDK and AVD Manager, you can defineinstances of the emulator, each with specific characteristics, such as SDK version/API
Figure A.6 The packages available for download
www.it-ebooks.info
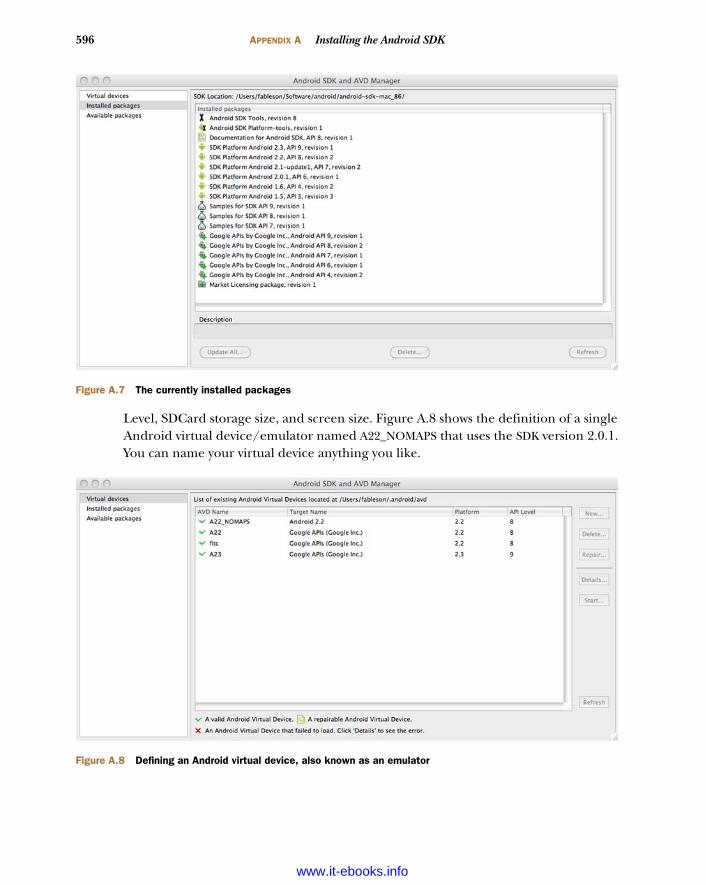
596 APPENDIX A Installing the Android SDK
Level, SDCard storage size, and screen size. Figure A.8 shows the definition of a singleAndroid virtual device/emulator named A22_NOMAPS that uses the SDK version 2.0.1.You can name your virtual device anything you like.
Figure A.7 The currently installed packages
Figure A.8 Defining an Android virtual device, also known as an emulator
www.it-ebooks.info
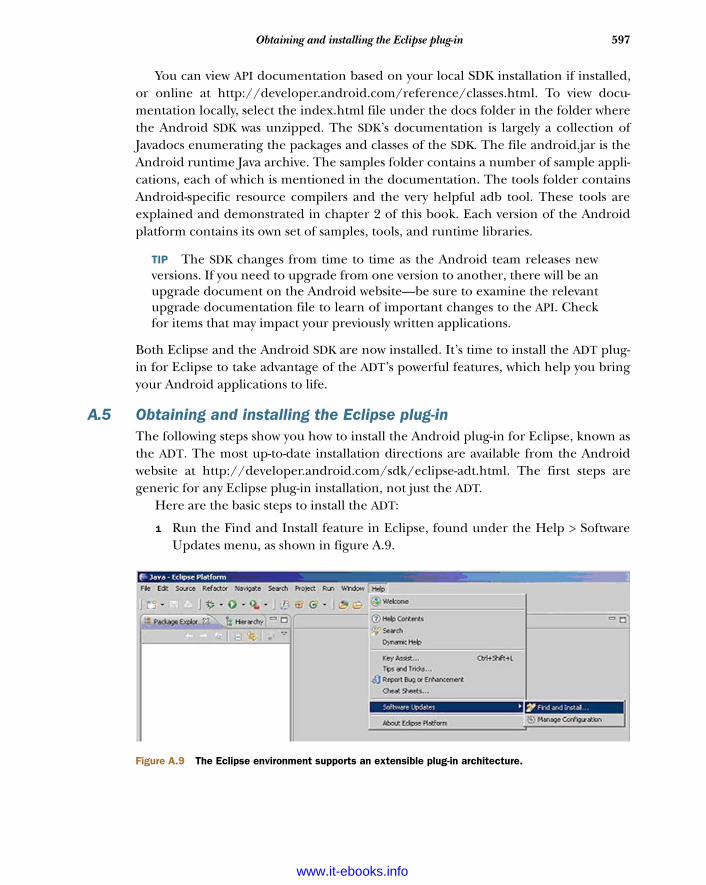
597Obtaining and installing the Eclipse plug-in
You can view API documentation based on your local SDK installation if installed,or online at http://developer.android.com/reference/classes.html. To view docu-mentation locally, select the index.html file under the docs folder in the folder wherethe Android SDK was unzipped. The SDK’s documentation is largely a collection ofJavadocs enumerating the packages and classes of the SDK. The file android.jar is theAndroid runtime Java archive. The samples folder contains a number of sample appli-cations, each of which is mentioned in the documentation. The tools folder containsAndroid-specific resource compilers and the very helpful adb tool. These tools areexplained and demonstrated in chapter 2 of this book. Each version of the Androidplatform contains its own set of samples, tools, and runtime libraries.
TIP The SDK changes from time to time as the Android team releases newversions. If you need to upgrade from one version to another, there will be anupgrade document on the Android website—be sure to examine the relevantupgrade documentation file to learn of important changes to the API. Checkfor items that may impact your previously written applications.
Both Eclipse and the Android SDK are now installed. It’s time to install the ADT plug-in for Eclipse to take advantage of the ADT’s powerful features, which help you bringyour Android applications to life.
A.5 Obtaining and installing the Eclipse plug-inThe following steps show you how to install the Android plug-in for Eclipse, known asthe ADT. The most up-to-date installation directions are available from the Androidwebsite at http://developer.android.com/sdk/eclipse-adt.html. The first steps aregeneric for any Eclipse plug-in installation, not just the ADT.
Here are the basic steps to install the ADT:
1 Run the Find and Install feature in Eclipse, found under the Help > SoftwareUpdates menu, as shown in figure A.9.
Figure A.9 The Eclipse environment supports an extensible plug-in architecture.
www.it-ebooks.info
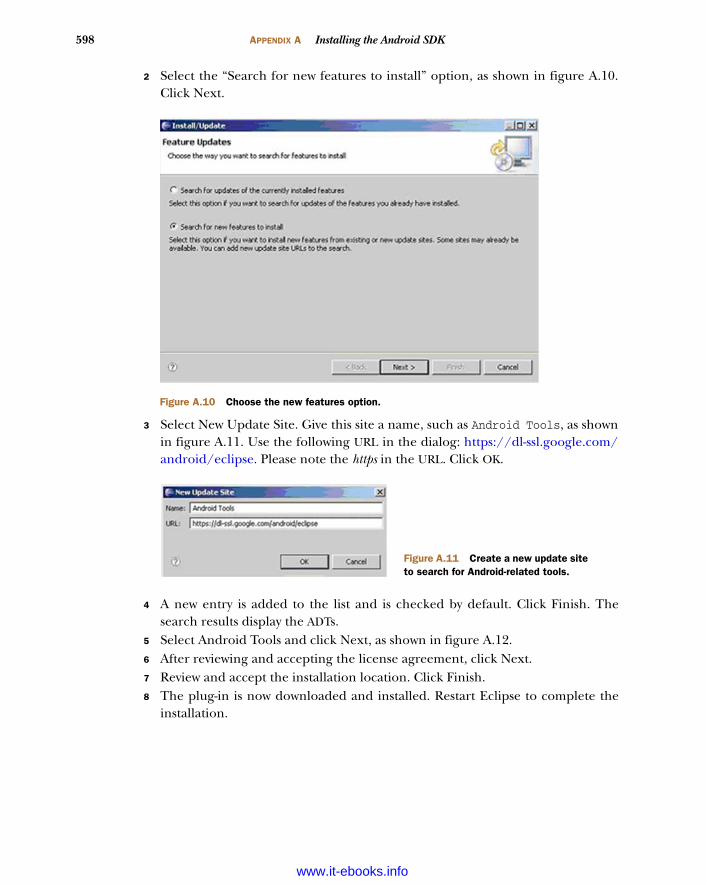
598 APPENDIX A Installing the Android SDK
2 Select the “Search for new features to install” option, as shown in figure A.10.Click Next.
3 Select New Update Site. Give this site a name, such as Android Tools, as shownin figure A.11. Use the following URL in the dialog: https://dl-ssl.google.com/android/eclipse. Please note the https in the URL. Click OK.
4 A new entry is added to the list and is checked by default. Click Finish. Thesearch results display the ADTs.
5 Select Android Tools and click Next, as shown in figure A.12.6 After reviewing and accepting the license agreement, click Next. 7 Review and accept the installation location. Click Finish.8 The plug-in is now downloaded and installed. Restart Eclipse to complete the
installation.
Figure A.10 Choose the new features option.
Figure A.11 Create a new update site to search for Android-related tools.
www.it-ebooks.info

599Configuring the Eclipse plug-in
Congratulations! The ADT Eclipse plug-in is installed. Note that from time to time you may need to upgrade your ADT plug-in to support
a new Android API level/SDK. As of the writing of this book, the latest version of theADT plug-in is version 8.01v201012062107-82219. To check for available ADTupgrades, select Software Updates under the Help menu in Eclipse. Highlight theAndroid Developer Tools in the Installed Software list, and click the Upgrade buttonon the right side of the dialog. This will upgrade your ADT plug-in if an upgrade isavailable. As with the original installation of the ADT, we recommend that you restartthe Eclipse IDE for the software to properly install and be available to you.
Next step: configuration.
A.6 Configuring the Eclipse plug-inOnce Eclipse is restarted, you connect the plug-in to the Android SDK installation.Select Preferences from the Window menu in Eclipse for Windows or from the Eclipsemenu for Mac OS X. Click the Android item in the tree view to the left to expand theAndroid settings. In the right pane, specify the SDK installation location. For example,the value used for this appendix is /Users/fableson/Software/android/android-sdk-mac_86, as shown in figure A.13.
Figure A.12 You must select Android Tools for Eclipse to download and install.
www.it-ebooks.info
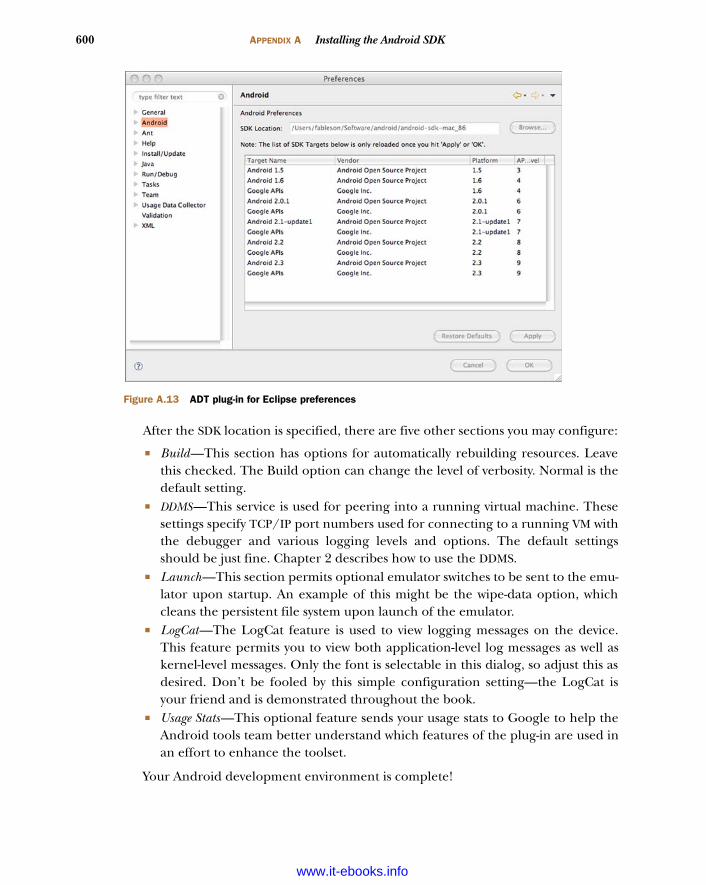
600 APPENDIX A Installing the Android SDK
After the SDK location is specified, there are five other sections you may configure:
Build—This section has options for automatically rebuilding resources. Leavethis checked. The Build option can change the level of verbosity. Normal is thedefault setting.
DDMS—This service is used for peering into a running virtual machine. Thesesettings specify TCP/IP port numbers used for connecting to a running VM withthe debugger and various logging levels and options. The default settingsshould be just fine. Chapter 2 describes how to use the DDMS.
Launch—This section permits optional emulator switches to be sent to the emu-lator upon startup. An example of this might be the wipe-data option, whichcleans the persistent file system upon launch of the emulator.
LogCat—The LogCat feature is used to view logging messages on the device.This feature permits you to view both application-level log messages as well askernel-level messages. Only the font is selectable in this dialog, so adjust this asdesired. Don’t be fooled by this simple configuration setting—the LogCat isyour friend and is demonstrated throughout the book.
Usage Stats—This optional feature sends your usage stats to Google to help theAndroid tools team better understand which features of the plug-in are used inan effort to enhance the toolset.
Your Android development environment is complete!
Figure A.13 ADT plug-in for Eclipse preferences
www.it-ebooks.info

appendix B:Publishing applications
Writing and debugging applications can be both exhausting and satisfying, but theday will come when it’s time to move past development and graduate to publishingyour Android application for others to use. This appendix presents best practices forpreparing an application for publication and then walks step by step through theprocess of digitally signing an application and uploading it to the Android Market.
In the most basic sense, publishing an application involves digitally signing it anduploading it to the Android Market or other venues for distribution. But for you toproperly prepare an Android application, a few steps precede the distribution stage.If you observe these guidelines carefully, the odds of your customers having a posi-tive experience with your application increase significantly. Ignore these best prac-tices, and you run the risk of tarnishing your reputation as a mobile developer.
B.1 Preparing an application for distributionPreparing an Android application for distribution is a somewhat straightforwardand methodical task, though one that requires considerable attention to detail.This section presents a list of things to consider prior to releasing your application.It’s not meant to be an exhaustive list but rather a framework for cleaning up yourapplication.
B.1.1 Logging
During development, it’s common to accumulate superfluous LogCat statementsthroughout your code. For example, you may make verbose entries to the LogCatby dumping the contents of objects to the log or recording every response from aremote server. You may even write sensitive information such as “before and after”strings related to an encryption routine. Although these entries are helpful duringthe debugging of your application, they can be fatal flaws if shipped to users. Imag-ine leaving breadcrumbs to your company’s intellectual property behind in theLogCat—bad idea!
B.1.2 Debugging notifications
Your code may include the use of a Toast notification to inform you of some condi-tion or scenario, such as an unhandled branch in a switch statement or perhaps a
601
www.it-ebooks.info
602 APPENDIX B Publishing applications
notification of a caught exception. This notification is helpful during the debug cyclebut certainly not desirable for a released application.
B.1.3 Sample data
Your application may ship with sample data; if so, be sure that it’s properly set up foryour users in an intuitive manner. Also, be sure to avoid leaving behind your own data.For example, if you have an FTP application, don’t leave behind your own credentialsin the database shipped with your application. And don’t prepopulate a form withyour credit card number!
B.1.4 AndroidManifest.xml
The AndroidManifest.xml file requires careful attention before publication of yourapplication. Let’s look at a few items you need to keep in mind:
Remove the android:debuggable tag, or at minimum set its value to false. Specify appropriate values for the label and icon attributes of the application
tag. Keep the text as short as possible in the label. Unless you’re an artist, getsomeone to assist you in the creation of attractive logo artwork.
Specify the android:versionCode and android:versionName attributes in the<application> element of the manifest as well. The versionCode is an integervalue that can be checked programmatically and is typically incremented ateach release. The versionName is displayed to users. The online documentationat http://developer.android.com covers these attributes in detail.
Specify the minimum SDK level required for your application. For example, theFindEdges application from chapter 19 requires bitmap features introduced inthe 2.2 version of the SDK. The SDK levels are integers that don’t correspondexactly to the commonly referenced SDK versions. The FindEdges application hasthe following line to specify the target and minimum SDK level:
<uses-sdk android:targetSdkVersion="8" android:minSdkVersion="8"></uses-sdk>
The FindEdges application won’t run on a device with an older OS version dueto the bitmap requirements, but your application may not be so constrained. Ifyour application isn’t constrained, consider setting the minSdkVersion as low aspossible to make the application accessible to a wide variety of devices. If yourapplication contains a hard constraint, don’t neglect this step because properlyspecifying a minimum SDK level prevents users with older devices from install-ing an application that can’t run on their devices. This is better than allowingusers to install your application and experience problems running the app.
B.1.5 End-user license agreement
We recommend providing your own end-user license agreement (EULA) even thoughmost users will ignore it. You’ve written this software and likely invested heavily in itscreation. You owe it to yourself and your investors to do what you can to protect your
www.it-ebooks.info
603Preparing an application for distribution
interest in it, particularly with respect to hedging against potential liabilities yourapplication may introduce. Obtaining experienced legal counsel is a good idea unlessyou plan to employ one of the commonly used open source agreements—even then,consider obtaining guidance from an experienced legal expert familiar with softwarelicensing agreements.
It’s common to display the EULA when the application is first launched, requiringthe user to positively acknowledge and agree to the terms. After the user has consentedto the terms of the EULA, don’t show it again unless the user explicitly requests to viewit via a menu selection. Storing a Boolean value in the SharedPreferences is an easyapproach to keeping track of the user’s consent to EULA agreement. You may also con-sider showing the EULA on every upgrade in the event that your EULA is modified.
B.1.6 Testing
After you go through these steps, be sure to perform regression testing on your appli-cation on a real device prior to distribution. It’s easy to break a functioning applica-tion during this cleanup phase. The purpose of this testing is to check that all of yourpotentially damaging debug information has been removed. You can then move on toacceptance-style testing. Having a documented test plan is a good idea, and if possible,let someone other than the primary developer be responsible for signing off on thetest plan.
Be sure to run your application under as many conditions as you can with featuressuch as Wi-Fi, 3G, and GPS both enabled and disabled. Verify that the applicationdegrades gracefully in the event that a required service is unavailable, such as whendata service is unavailable or when roaming. It’s fine for your application to not per-form if a missing communications link is unavailable, but the application should pres-ent an easy-to-understand message to users, advising them of the situation andperhaps suggesting steps to restore connectivity.
Pay particular attention to how your application responds to being stopped andrestarted. Change the screen orientation when running each Activity. Does theapplication behave as expected? Remember that the default behavior is for anActivity to be stopped and restarted when the screen orientation changes. You mayneed to return to your code and implement the Activity lifecycle methods.
B.1.7 Finishing touches
As an extra step, if your application persists data locally via a file, SharedPreferences,or a SQL database, consider providing an import/export feature. This feature can beimplemented as an Activity, allowing the user to save the data out to the SD card in areadily parsable format such as CSV or XML. The import/export feature should alsoallow the user to restore the data to your application’s local storage. This extra featuremay make application upgrades easier and more resistant to errors. Having an easyexport/image mechanism via SD card also makes moving to a new device a noneventbecause your users can easily bring their data with them to the new device. Your userswill love you for this!
www.it-ebooks.info
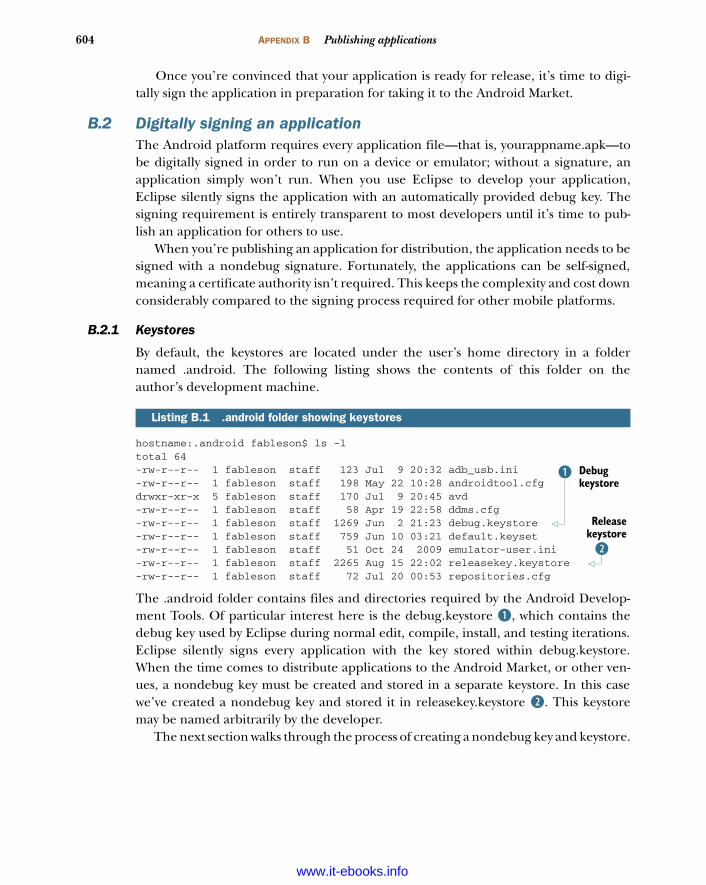
604 APPENDIX B Publishing applications
Once you’re convinced that your application is ready for release, it’s time to digi-tally sign the application in preparation for taking it to the Android Market.
B.2 Digitally signing an applicationThe Android platform requires every application file—that is, yourappname.apk—tobe digitally signed in order to run on a device or emulator; without a signature, anapplication simply won’t run. When you use Eclipse to develop your application,Eclipse silently signs the application with an automatically provided debug key. Thesigning requirement is entirely transparent to most developers until it’s time to pub-lish an application for others to use.
When you’re publishing an application for distribution, the application needs to besigned with a nondebug signature. Fortunately, the applications can be self-signed,meaning a certificate authority isn’t required. This keeps the complexity and cost downconsiderably compared to the signing process required for other mobile platforms.
B.2.1 Keystores
By default, the keystores are located under the user’s home directory in a foldernamed .android. The following listing shows the contents of this folder on theauthor’s development machine.
hostname:.android fableson$ ls -ltotal 64-rw-r--r-- 1 fableson staff 123 Jul 9 20:32 adb_usb.ini-rw-r--r-- 1 fableson staff 198 May 22 10:28 androidtool.cfgdrwxr-xr-x 5 fableson staff 170 Jul 9 20:45 avd-rw-r--r-- 1 fableson staff 58 Apr 19 22:58 ddms.cfg-rw-r--r-- 1 fableson staff 1269 Jun 2 21:23 debug.keystore-rw-r--r-- 1 fableson staff 759 Jun 10 03:21 default.keyset-rw-r--r-- 1 fableson staff 51 Oct 24 2009 emulator-user.ini-rw-r--r-- 1 fableson staff 2265 Aug 15 22:02 releasekey.keystore-rw-r--r-- 1 fableson staff 72 Jul 20 00:53 repositories.cfg
The .android folder contains files and directories required by the Android Develop-ment Tools. Of particular interest here is the debug.keystore B, which contains thedebug key used by Eclipse during normal edit, compile, install, and testing iterations.Eclipse silently signs every application with the key stored within debug.keystore.When the time comes to distribute applications to the Android Market, or other ven-ues, a nondebug key must be created and stored in a separate keystore. In this casewe’ve created a nondebug key and stored it in releasekey.keystore C. This keystoremay be named arbitrarily by the developer.
The next section walks through the process of creating a nondebug key and keystore.
Listing B.1 .android folder showing keystores
Debug keystore
B
C
Releasekeystore
www.it-ebooks.info
605Digitally signing an application
B.2.2 keytool
This section demonstrates the creation of a key and its containing keystore via the pro-gram named keytool. keytool is provided with the Java SDK and should be in the exe-cutable path of your terminal or command window. When this step is complete, you’llhave a valid key with which an Android application may be signed for distribution.
The following command is an example of using keytool to create a self-signed pri-vate key in the .android directory:
keytool -genkey -v -keystore ~/.android/releasekey.keystore -alias releasekey -keyalgRSA -validity 10000
This command generates a key (-genkey) in verbose mode (-v) stored in a keystorefile named releasekey.keystore with an alias of releasekey. The cryptographic algo-rithm is RSA, and the key has a validity of 10,000 days prior to expiration. Every key ina keystore requires an alias. The alias is used when referring to the key within the key-store during the signing of the APK file. The Android documentation recommends atleast a 25-year key life.
The keytool command prompts for a key password and organizational informa-tion when creating a key. You should use accurate information as it’s possible for yourusers to view this later, and you should use a strong password. Once you create yourkey, you also need to be careful to store it securely and keep the password private. Ifyour key is lost or compromised, your identity can be misused, and the trust relation-ships to your key via your applications can be abused.
Now that you have a valid key, it’s time to sign the application. For this task, you’llutilize the jarsigner application.
B.2.3 jarsigner
Signing applications is accomplished with the jarsigner tool. Like keytool, jar-signer is part of the Java SDK, so be sure that it is in your executable path.
To sign an application, you must export it as an unsigned APK file. In Eclipse, right-click and select the Android Tools > Export Unsigned Application Package option, asshown in figure B.1.
Save the file as projectname-unaligned.apk. In this example, you’ll export theunsigned application file for the UA2E_FindEdges application to a file namedUA2E_FindEdges_unaligned.apk.
Let’s now use jarsigner to sign the archive with our key, as shown here:
jarsigner -verbose -keystore ~/.android/releasekey.keystore UA2E_FindEdges-unaligned.apk releasekey
This command tells jarsigner to sign the APK file with a key named releasekey storedin the previously created keystore file—that is, releasekey.keystore in the ~/.androidfolder.
www.it-ebooks.info
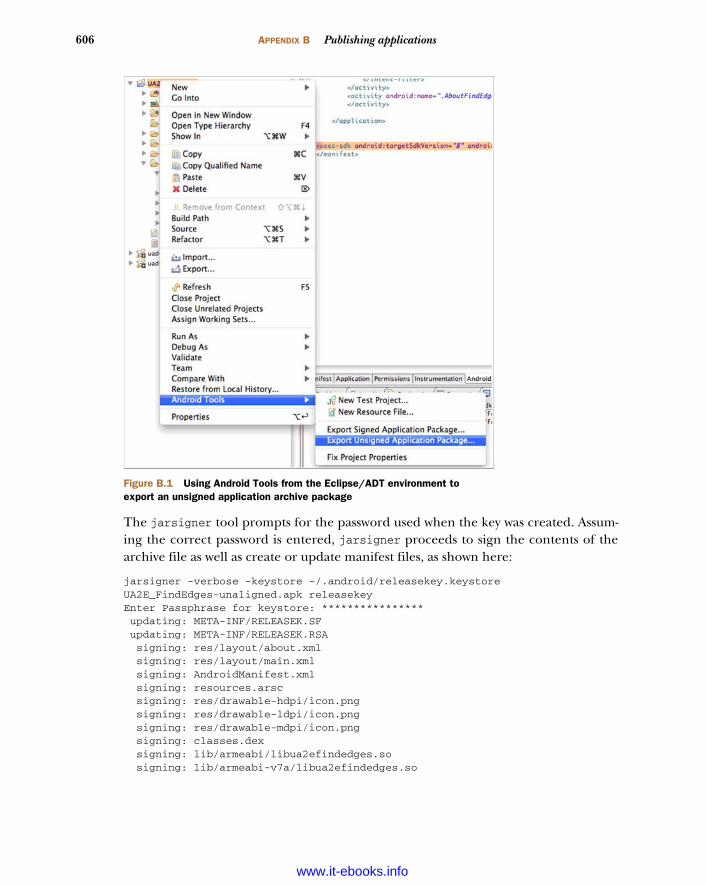
606 APPENDIX B Publishing applications
The jarsigner tool prompts for the password used when the key was created. Assum-ing the correct password is entered, jarsigner proceeds to sign the contents of thearchive file as well as create or update manifest files, as shown here:
jarsigner -verbose -keystore ~/.android/releasekey.keystore UA2E_FindEdges-unaligned.apk releasekeyEnter Passphrase for keystore: **************** updating: META-INF/RELEASEK.SF updating: META-INF/RELEASEK.RSA signing: res/layout/about.xml signing: res/layout/main.xml signing: AndroidManifest.xml signing: resources.arsc signing: res/drawable-hdpi/icon.png signing: res/drawable-ldpi/icon.png signing: res/drawable-mdpi/icon.png signing: classes.dex signing: lib/armeabi/libua2efindedges.so signing: lib/armeabi-v7a/libua2efindedges.so
Figure B.1 Using Android Tools from the Eclipse/ADT environment to export an unsigned application archive package
www.it-ebooks.info
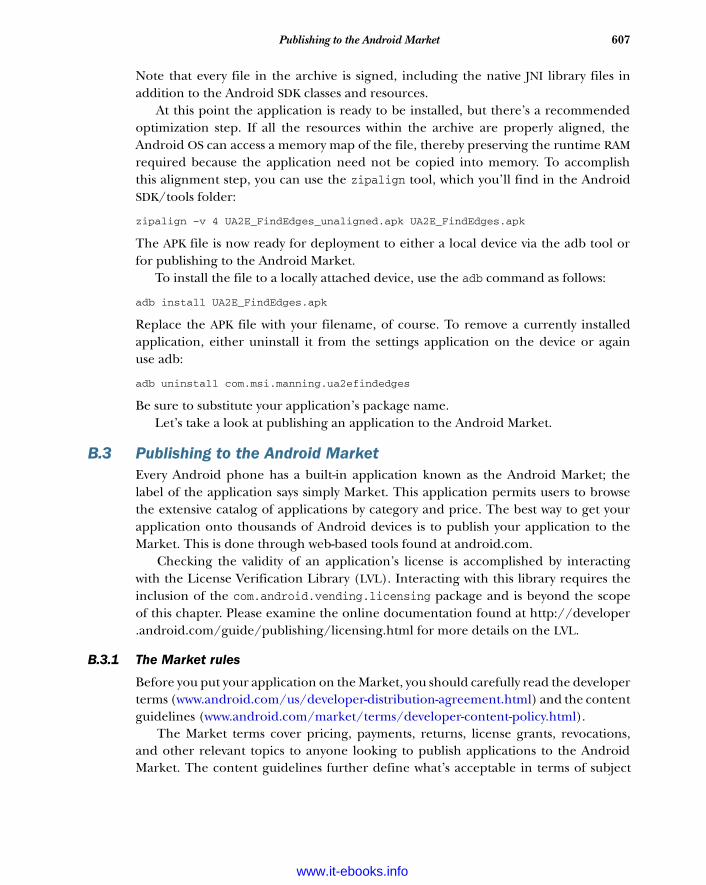
607Publishing to the Android Market
Note that every file in the archive is signed, including the native JNI library files inaddition to the Android SDK classes and resources.
At this point the application is ready to be installed, but there’s a recommendedoptimization step. If all the resources within the archive are properly aligned, theAndroid OS can access a memory map of the file, thereby preserving the runtime RAMrequired because the application need not be copied into memory. To accomplishthis alignment step, you can use the zipalign tool, which you’ll find in the AndroidSDK/tools folder:
zipalign –v 4 UA2E_FindEdges_unaligned.apk UA2E_FindEdges.apk
The APK file is now ready for deployment to either a local device via the adb tool orfor publishing to the Android Market.
To install the file to a locally attached device, use the adb command as follows:
adb install UA2E_FindEdges.apk
Replace the APK file with your filename, of course. To remove a currently installedapplication, either uninstall it from the settings application on the device or againuse adb:
adb uninstall com.msi.manning.ua2efindedges
Be sure to substitute your application’s package name. Let’s take a look at publishing an application to the Android Market.
B.3 Publishing to the Android MarketEvery Android phone has a built-in application known as the Android Market; thelabel of the application says simply Market. This application permits users to browsethe extensive catalog of applications by category and price. The best way to get yourapplication onto thousands of Android devices is to publish your application to theMarket. This is done through web-based tools found at android.com.
Checking the validity of an application’s license is accomplished by interactingwith the License Verification Library (LVL). Interacting with this library requires theinclusion of the com.android.vending.licensing package and is beyond the scopeof this chapter. Please examine the online documentation found at http://developer.android.com/guide/publishing/licensing.html for more details on the LVL.
B.3.1 The Market rules
Before you put your application on the Market, you should carefully read the developerterms (www.android.com/us/developer-distribution-agreement.html) and the contentguidelines (www.android.com/market/terms/developer-content-policy.html).
The Market terms cover pricing, payments, returns, license grants, revocations,and other relevant topics to anyone looking to publish applications to the AndroidMarket. The content guidelines further define what’s acceptable in terms of subject
www.it-ebooks.info
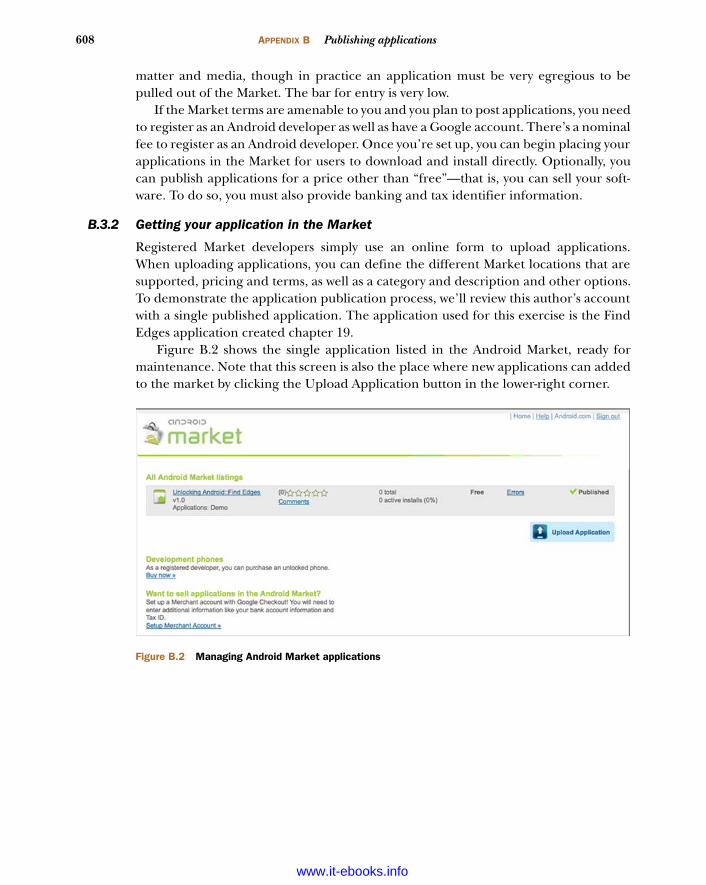
608 APPENDIX B Publishing applications
matter and media, though in practice an application must be very egregious to bepulled out of the Market. The bar for entry is very low.
If the Market terms are amenable to you and you plan to post applications, you needto register as an Android developer as well as have a Google account. There’s a nominalfee to register as an Android developer. Once you’re set up, you can begin placing yourapplications in the Market for users to download and install directly. Optionally, youcan publish applications for a price other than “free”—that is, you can sell your soft-ware. To do so, you must also provide banking and tax identifier information.
B.3.2 Getting your application in the Market
Registered Market developers simply use an online form to upload applications.When uploading applications, you can define the different Market locations that aresupported, pricing and terms, as well as a category and description and other options.To demonstrate the application publication process, we’ll review this author’s accountwith a single published application. The application used for this exercise is the FindEdges application created chapter 19.
Figure B.2 shows the single application listed in the Android Market, ready formaintenance. Note that this screen is also the place where new applications can addedto the market by clicking the Upload Application button in the lower-right corner.
Figure B.2 Managing Android Market applications
www.it-ebooks.info
609Publishing to the Android Market
Clicking through the application allows you to edit this application’s properties on theMarket. The editing screen is too large to fit into one screenshot, so it’s split betweentwo figures. Figure B.3 shows the top portion of the management interface whereupdates to the APK file can be loaded along with screenshots to display the applicationto prospective users browsing in the Market.
Figure B.3 Managing the APK file and screenshots
www.it-ebooks.info
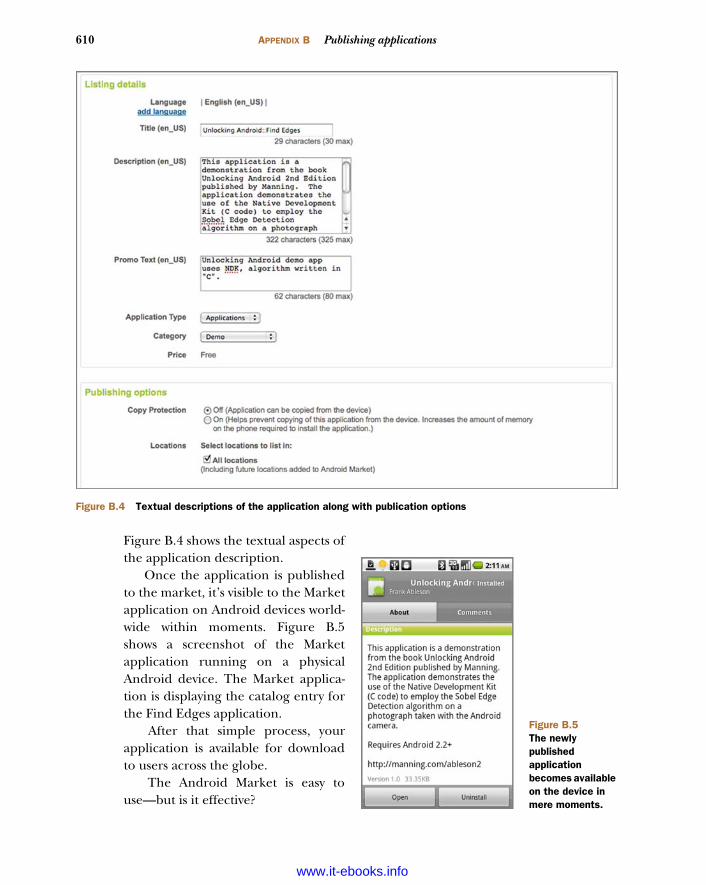
610 APPENDIX B Publishing applications
Figure B.4 shows the textual aspects ofthe application description.
Once the application is publishedto the market, it’s visible to the Marketapplication on Android devices world-wide within moments. Figure B.5shows a screenshot of the Marketapplication running on a physicalAndroid device. The Market applica-tion is displaying the catalog entry forthe Find Edges application.
After that simple process, yourapplication is available for downloadto users across the globe.
The Android Market is easy touse—but is it effective?
Figure B.4 Textual descriptions of the application along with publication options
Figure B.5The newly published application becomes available on the device in mere moments.
www.it-ebooks.info
611Recapping the Android Debug Bridge
B.3.3 Android Market—the right solution
The Android Market is an effective distribution mechanism because it’s built in andaccessible to users and developers alike. Generally speaking, it’s the first place usersgo to find applications.
As mentioned in chapter 1, the open nature of the Android platform—and of theAndroid Market—offers distinct advantages to both developers and users. There’s noarbitrary inclusion or exclusion process that an individual or company holds over theMarket. Anyone who joins and agrees to the terms can publish applications on theMarket without fear of the thought police barring an application.
Virtually all applications are welcome, but some will do better than others. Usersrate the applications on a scale of 1 to 5, and they may leave comments as well. Thesecomments often influence prospective purchasers with their positive or negativeremarks. The Android Market is a merit-based system; impress your users, and they’llrate your application well and compliment you; shortchange your users, and yourdownload count and sales will suffer.
In keeping with the theme of being an open platform, Android applications maybe distributed beyond just the Android Market.
B.4 Other distribution meansThe last thing to consider with regard to distributing applications is that there areother venues beyond the Android Market.
Various third-party sites also offer distribution channels. These sites have differentagreement types and different payment models, so you should research them carefullybefore using them.
You may want to distribute your application in the Android Market or on third-party services, or you may decide to use multiple distribution channels. If you do usethird-party services, keep in mind that although these alternatives are growing in pop-ularity they aren’t nearly as accessible to users compared to the built-in Market. Usershave to find the third-party service and generally then have to install applications ontheir own or at least bootstrap the service with an application specifically designed forthe market.
Last and certainly not least, Android applications can be distributed directly froma company’s website or any other means of shipping an APK file. For commercialdevelopers targeting enterprise applications, this is a distinct advantage over the dra-conian measures taken by Apple for iPhone and iPad application deployment.
The more means you have at your disposal to get your applications into the handsof users, the greater your influence. Good luck!
B.5 Recapping the Android Debug BridgeAlthough we covered the Android Debug Bridge (adb) in chapter 2, a recap is inorder as background for signing and installing applications and working with Androiddevices.
www.it-ebooks.info

612 APPENDIX B Publishing applications
The adb is a client/server program that lets you interact with the Android SDK invarious ways, including pushing and pulling files, installing and removing applica-tions, issuing shell commands, and more. The adb tool consist of three components: adevelopment machine–based server, a development machine client for issuing com-mands, and a client for each emulator or device in use. Other Android tools, such asthe DDMS tool, also create clients to interact with the adb.
You can make sure your local adb server is running by issuing the adb start-server command. Similarly, you can stop your server with adb kill-server and thenrestart it, if necessary (or just to get familiar with the process). When you start theEclipse/ADT environment, it automatically starts an adb server instance.
Once you’re sure your adb server is running, you can tell if any devices or emula-tors are connected by issuing the adb devices command. The output of this com-mand with an emulator running and a physical device attached via a USB cable isshown here:
#$ adb devicesList of devices attached emulator-5554 deviceHT845GZ49611 device
The adb tool acts as the backplane for the Android development process. Communi-cations between the development environment and a device/emulator rely on adb.The first step in getting your applications onto an actual device is to connect yourdevice to the development machine and confirm that it’s recognized by adb. If youhave any running emulator instances, it’d be a good idea to shut them down prior tobeginning this process. Confirm that your physical device is the only attached Androidclient. To do this, run adb devices from the command line and confirm that there’s asingle entry in the list of attached devices, as shown in figure B.1.
www.it-ebooks.info
index
Symbols
@ symbol 25
A
aapt 42abortBroadcast 200AbsoluteLayout class
LayoutParams class 87access permissions 134AccountAuthenticator 428AccountManager service 423accounts, add and manage 422action
ACTION_BATTERY_CHANGED constant 115
ACTION_BOOT_COMPLETED constant 115
ACTION_CALL constant 110ACTION_PACKAGE_ADDED constant 115ACTION_PACKAGE_REMOVED
constant 115ACTION_TIME_CHANGED constant 115ACTION_TIME_TICK constant 115ACTION_TIMEZONE_CHANGED
constant 115and intent filters 107built-in 109
action baraction items 570–574
application icon 573–574creating programmatically 572creating with menu resources 571handling 572location 571
showAsAction attribute 571action views 574
assigning 574app name and title 564–565background drawables 576checking for presence of 563customized 561display options 563–570
DISPLAY_HOME_AS_UP 563DISPLAY_SHOW_CUSTOM 563DISPLAY_SHOW_HOME 563DISPLAY_SHOW_TITLE 563DISPLAY_USE_LOGO 563methods 563setting 564
drop-down list style 577font type 576foreground text color 576getting ActionBar instance 562handling at runtime 575hide() method 575introduction 561–562multiple-choice indicator 576navigation modes 565–566
list navigation 569–570methods 566NAVIGATION_MODE_LIST 565NAVIGATION_MODE_STANDARD 565NAVIGATION_MODE_TABS 565tab navigation 566–569
overriding default overflow menu style 577pop-up menu style 576removing, showing, and hiding 575show() method 575single-choice indicator 576styling 575–577
613
www.it-ebooks.info
614 INDEX
action bar (continued)tab listener methods 568tab navigation methods 567tab style 576text size 576text style 576theme 575
action view 574assigning 574
ACTION_CALL 107ACTION_DOWN 349ACTION_DRAG_ENDED 585ACTION_DRAG_ENTERED 585ACTION_DRAG_EXITED 585ACTION_DRAG_LOCATION 585ACTION_DRAG_STARTED 585
responding to 587–589ACTION_DROP 585
responding to 587, 589–590ACTION_EDIT 106ACTION_MEDIA_SCANNER_SCAN_FILE 275ACTION_MOVE 349ACTION_PICK 15ACTION_UP 349ACTION_VIEW 106ActionBar API 562–563
classes 562ActionBar.TabListener interface 568activities 65–66
creating 66–75entire lifecycle phase 74foreground phase 74handling shutdowns 72lifecycle 72passing objects between 72referencing resources 91–93themes 97visible phase 74
Activity 24, 38, 57, 316, 345, 423adding background fragment to 554creating 68displaying UI elements 18extended by user classes 17findViewById() method 94including fragment in 552–553initiates DayTime Server query 378lifecycle compared to fragment lifecycle 546navigation between 131, 319RefreshJobs 337ShowJob 341
adapters 69ArrayAdapter class 69
AdapterView class 79
adb 43, 72, 139, 611arguments 361interacting with Android SDK 612kill-server 612shell 361, 373start-server 612See also DDMS
addOnBackStackChangedListener() method 557addProximityAlert() method 294Address 306addresses, converting with Geocoder 305addTab() method 567addToDB() method 275ADT 34, 591
configuring 599installing 597plug-in for Eclipse 36
Advanced Audio Coding (AAC) 261Advanced Video Coding (AVC H.264) 261aidl tool 121Ajax 441alarm 219–225, 481
compared to Services 499example 220–222receiver 220setting 222types 222using notifications with 222–225
AlarmManager 222, 499alarm types 222methods 219retrieving 219
AlertDialog 71, 304setMessage() method 71
Alpha, Red, Green, Blue (ARGB) 229Android
applicationbuilding in Eclipse 45–53mapping flow 316–320requires manifest file 320
Bluetooth capabilities 386–393building application in Eclipse 45–53building apps without the SDK 357–362built-in actions 109common sensors 394components 17–24
Activity 17BroadcastReceiver 19ContentProvider 22Service 18
contact model 406–411core packages 35Cursor object 146
www.it-ebooks.info
615INDEX
Android (continued)designing application 312–316
See also field service applicationdevelopment requires Java skills 11discourages direct file sharing 22displaying progress 337emulator 41, 53–58
setting up environment 54splash screen 321working with an SD card 142
environment, should vs. can 185and Exchange account 408and Google account 408licensing 9Linux
applications 356kernel-based OS 4
logging mechanism 19moving from Activity to Activity 131only encrypted connections 387optimizing web applications 442–449packages, world x permission 135philosophy 409platform 4–9runtime 363same-but-different 7SenseBot. See SenseBotshell 26stack 10–13stock icon 319taking a photo 539two versions of platform 56user applications written in Java 4version 2.0 or later 385vs. iPhone 9vs. itself 8web development 440–442
Android 2.2 389Android 3.0 30–32
copy and paste 581drag-and-drop 579new features 31targeting in manifest file 561
Android Activity 473Android ARM. See ARMAndroid Asset Packaging Tool. See aaptAndroid Compatibility Package 557–558Android Debug Bridge. See adbAndroid Development Tools. See ADTAndroid development, Intent 13Android device
security 313touch screen-capable 318
Android Interface Definition Language 120–121allowed types 121directional tags 120
Android Market 10merit-based system 611publishing to 607, 611rules 607
Android Native Developer Kit. See NDKAndroid NDK. See NDKAndroid Open Source Platform. See AOSPAndroid Project Wizard 45Android SDK 34
installing 594Android Service 499Android Virtual Device. See AVDandroid:actionBarTabStyle 576android:actionBarTabTextStyle 576android:actionDropDownStyle 577android:actionLayout 574android:actionViewClass 574android:dropDownListViewStyle 577android:height 231android:id attribute 48android:listChoiceIndicatorMultiple 576android:listChoiceIndicatorSingle 576android:popupMenuStyle 576android:radius 231android:selectableItemBackground 576android:textColor 576android:textSize 576android:theme 575android:title attribute 571android:typeface 576android:windowActionBar 575android.animation 31android.bluetooth package 387android.content.ContentResolver 273android.content.ContentValues 273android.drm 31android.intent.action.MAIN application entry
point 25android.intent.category.LAUNCHER 25Android.jar 47android.media.MediaRecorder 273android.net 161android.provider.Telephony.SMS_RECEIVED 22android.R.id.home 573android.renderscript 31android.telephony 192, 201android.view package 76Android/Java, refers to Java 357Android/Linux
environments and tools 360nontrivial activities 371
www.it-ebooks.info
616 INDEX
Android/Linux (continued)refers to Linux 357startup code appearance 368system libraries 363
AndroidManifest file 99AndroidManifest.xml 21, 24, 45, 506, 561
@symbol 25application descriptor file 15AppWidget 495deployment descriptors 24
animation 231–238code to perform 237–238creating programmatically 234–238frame-by-frame 232–234project, creating 235–236
AnimationDrawable.start() method 232<animation-list> 233animations 90, 98–99
duration attribute 98interpolator attribute 98startOffset attribute 98
AOSP 8Apache 10
commons.io package 145HttpClient 170ResponseHandler 172
Apache Software License. See ASLAPI
dummy request 431linkedin-j 426
API key, LinkedIn APIs 411.apk file 542Apple 7
AppStore 9Application class 71application distribution, Android vs. iPhone 10<application> element 99application icon as action item 573–574Application Layer 163Application Not Responding event 82applications
communicating between 120–129distribution beyond Market 611getting to Market 608hybrid, building 458made for mobile 448
link to full site 449simplify, reduce, and eliminate 449
manifest 158mapping to processes 26name and icon, on action bar 564preparing for distribution 601–604RestaurantFinder 66–101
AppWidgetconfiguring 494data elements 483data handling 483–486deployment patterns 476metadata file 495updating 498–505
AppWidgetHost 474AppWidgetProvider 487–491argc 367argv 367ARM 357
Android/Linux application on 368processor family 368
arm-none-linux-gnueabi-gcc 358–359, 362arm-none-linux-gnueabi-ld 358arm-none-linux-gnueabi-objdump 358<array> element 97arrays 97asInterface() method 121ASL, friendlier toward commercial use 9aspect ratio 247assembly language 358Atom Publishing Protocol. See AtomPubAtomPub 180, 182audio
capturing 272–276encoding, setting 273output file format 273playing 263–264source, setting 273
audio codecs 261audio file, metadata 275AudioPlayer 261auth token 423authenticating to LinkedIn 425authentication 423
key. See Kilightweight service wrapper 431
AuthScope 176AVD 287
management Eclipse 36AVD Manager 54, 595AwesomePlayer 262
B
background fragment 553–555adding to Activity 554creating 554vs. service 553
background services 116–120BaseAdapter class 85
www.it-ebooks.info
617INDEX
BaseColumns 153BasicNameValuePair 178batch builds without using IDE 51batch operations on contacts 417beginRecording 281Binary Runtime Environment for Wireless.
See BREWBitmap 349, 533, 536BlackBerry 7, 10
email capabilities 8Bluetooth 10
capturing events 392classes, Android 388close-range wireless networking 161peer 392permissions 393and SenseBot 386
Bluetooth Serial Port Profile 387BluetoothAdapter 391bonded 388BounceActivity 235bound services 120boundary conditions 442BREW 7broadcast receivers 114–116
creating 115–116BroadcastReceiver 203, 392, 474, 500
in every Android application 24no UI 20tags 25
browser control, add to UI layout 458browser detection
examination of user agent string 446media query 447
browsersoverriding behavior 459storing data directly 449WebView 461
BufferedOutputStream 351BufferedReader 167BufferedWriter 168build script, need for 362Builder pattern 71building a native library 526Bundle 20, 179, 329
C
C 356application 356application build script 362times where better than Java 525
C99 251
CALL_PHONE permission 100CamcorderProfile 282camDemo 271camera 267–272
support for multiple 282support, testing on emulator 272
Camera application 528Camera class 267–272
get() method 282CAMERA permission 267, 276Canvas 349CAPTCHA and GData ClientLogin 185capturing media 266–282
capturing audio 272–276recording video 276–282
carrier. See mobile operatorsCascading Style Sheets 97CATEGORY_LAUNCHER 14CDMA 35, 189
primary rival to GSM 190characters() method 334CharSequence type
and AIDL 121checkForZombies() method 490Class class 104ClassNameRS 256client/server 164ClientLogin 182, 185ClipboardManager 581ClipData 580–581ClipData.Item 581ClipDescription 580–581codecs 261CodeSourcery 357, 360<color> element 96color values, defining 229com.google.android.maps 299com.google.android.phone.Dialer 15ComponentName 104conditional global replacement 418configuration activity 481connecting to a remote device 390connection, wireless internet 313ConnectivityManager 165
mobile or WiFi 161contacts
adding 418conditional global replacement 418identifiers 416managing 413–420modifying database 417multiple insertions 420single logical 410table 414
www.it-ebooks.info
618 INDEX
contentprovider 24selectively loading 446staying up to date 152
CONTENT_URI 151, 153ContentObserver 152ContentProvider 22, 130, 200, 315, 483, 580
accessible by any application 152additional properties 159classes 151–159creating 152, 159extending 154in every Android application 24URI variations 151
ContentResolver 23, 151ContentView 229Context class 19, 68, 135, 194, 324, 340
bindService() method 125, 127stopService() method 128
Context.getSystemService(Context.ALARM_SERVICE) 219
converttogray function 534convolution 536copy-and-paste API, classes used for drag-and-
drop 581corners tag 231createPackageContext 135creation, widget instance 497CSS
multiple files per page 447selectively choose file 446
ctime 373Cursor 23, 131
data items changed 158
D
DAL 146Dalvik Debug Monitor Server. See DDMSDalvik VM 11
relies on Linux kernel 12result is innovation 12
dashboard 475data
contacts, good citizen principles 411raw contact, storing 410sample, properly set up 602storage requirements 315structures 327values 516
Data Access Layer. See DALData Definition Language. See DDLdata handling, AppWidget 483–486
data table 414database
modifying contacts 417not WORLD_READABLE 150open a connection 149opening 453persisting data to 145server 23
datagram 163Date & Time settings 512Daytime Client 377–380
single Activity 378special permission 380testing 380
DayTime Server 373application has two parts 371listens on TCP port 370, 379
DBHelperinner classes 146outer class 147
DBOpenHelper 146, 149DDL 375DDMS 36, 600
perspectivedashboard-like view 39LogCat view 40
DDMS toolrequires decimal format 287supports KML 289two contexts 286working with a GPX file 289
DebugCertificate 301perspective 37, 59–60
debugging 59Delicious 180depth buffer 245
depth test 246flags to compare values 246
DetailsWebFragment 548, 550developer API, LinkedIn 411device ID 194.dex files 12, 53DialogFragment 548digital signature 604–607
jarsigner 605keystores 604keytool 605
<dimen> element 96dimensions 96directory change 361disassembling 358drag event 582, 585–586
actions 585
www.it-ebooks.info
619INDEX
drag event (continued)listening for 587–588
listener vs. callback 587which to respond to 587
drag operation, starting 586–587drag shadow 583drag-and-drop 581–583
drag event. See drag eventdrag operation, starting 586–587drag-start operation, responding to 588–589drop operation, handling 589–590introduction 580sequence diagram 582shadow builder 583–584use of copy-and-paste API 581
drag-and-drop classes 580–581DragEvent 580–581DragShadowBuilder 580–583drag-start operation, responding to 588–589draw() method 228Drawable 228, 238drawables 47, 90, 321, 400
managing 515drawBitmap 349drawColor 349drawFrame 242drawing graphics 227–231
with XML 228–230layout 229shapes 230–231
drawing in OpenGL ES 243–250drop operation, handling 589–590dropReceived() method 589dummy API request 431dynamic linking 362–370
E
EclipseDDMS
perspective 37view 360
debugging Android application 59default perspective 593Emulator Control 286installing 591Java perspective 37and NDK 542Package Explorer 37plug-in, File Explorer view 134setting up development environment 13workspace prompt 592
Eclipse IDE 592–593See also ADT
edge detection 525routine 529
edges, finding 541Editor 324EditText 28EditView 326Electronic Serial Number. See ESNELF 368email addresses, conditional global
replacement 418empty processes 72emulator
switches 600vs. simulator 54
Emulator Control, testing connectivity 41endElement method 334endElement() method 334end-user license agreement. See EULAEnterprise Information Systems 7equator, base for latitude 287Error Console, WebKit 457ESN swap 191EULA 602events 89–90
broadcast receivers 114broadcasting 114–115Observable and Observer 89
executable and linkable format. See ELFexit 367Extensible Markup Language resources 90
F
FAT 142field service application
assumptions 313manifest file 320resource files 319source code 320–334source files 318steps 316
FieldService Activitygoal 322implementing 324
File Allocation Table. See FATFile Explorer view, Eclipse 41file_get_contents 354FileInputStream 145, 331, 351FileOutputStream 138, 144, 351files
accessing 138read and write 138view resource files 93
www.it-ebooks.info
620 INDEX
filesystem, based on Linux 137findViewById 30
method 28finish 337fixed-length record 406focus 88–89
DEFAULT_FOCUS 88for additional locales 514formatNumber 198FountainRS 255fovy 249<fragment> 552fragment 88
adding 556adding to back stack 556Android Compatibility Package 557–558back stack 556–557
adding to 556methods 557pop, simulating 555
background fragment 553–555adding to Activity 554creating 554vs. service 553
creating 548–553finding by resource ID 555finding by tag 555including in Activity 552–553instantiating with arguments 549introduction to 545lifecycle 546
compared to Activity lifecycle 546methods 546
removing 556replacing 556retaining when created 554with no UI 553
Fragment class 548subclasses 548
fragment layoutcreating 548–553defining 551–552
fragment manager 555back stack methods 557
fragment subclass, creating 548–551fragment transaction 555–556
adding to back stack 556FragmentActivity 558FragmentManager class 555FragmentManager.add(fragment, tagString)
method 554FragmentManager.beginTransaction()
method 555FragmentTransaction class 555
FragmentTransaction.addToBackStack() method 556
FragmentTransaction.commit() method 556FragmentTransaction.executePendingTransac-
tions() method 556fromBundle 329, 341
G
gcc 358, 364GData API
implementation of AtomPub 182not true REST 182
GData ClientLogin and CAPTCHA 185GenerateNotification() method 216geo
fix 288query 317
geo type 107, 110Geocoder 305–306
creating 306map between point and place 286
geocoding 305GeoPoint 286, 298getActionBar() method 575getArguments() method 550getBackStackEntryAt() method 557getBackStackEntryCount() method 557getCameraInfo() method 282getDisplayOptions() method 563getEmail() method 324getExtras() method 341getFragmentManager() method 555getHolder() method 242getJob() method 341getLayoutInflater() method 211getMeasuredWidth() method 87getNavigationItemCount() method 566getNavigationMode() method 566getNumberOfCameras() method 282getProvider() method 294getSelectedNavigationIndex() method 566getSelectedTab() method 567getSharedPreferences() method 131getSupportFragmentManager() method 558getSystemService() method 166, 194, 294getTelephonyOverview() method, reset screen
details 195getView() method 85, 583GL_DEPTH_TEST 245GL_PROJECTION 244GL_Triangle_Strip 243glClear 244
www.it-ebooks.info

621INDEX
glDepthFunc 245glDrawArrays 245glEnable 245glEnableClientState 245global number 199Global Positioning System. See GPSglobal replacement, conditional 418global start directive 369Global System for Mobile. See GSMGLU.gluLookAt 249gluOrtho2D 245gluPerspective 247glVertexPointer 245GNU General Public License. See GPLGoogle
Android Market 10Contacts 182GData 180, 182Maps 26and Open Handset Alliance 3
Google APIs 56Google Maps API
key, requesting 300support through MapView 300
Google TV 32GPL 9GPS 6
data stamped on job 349most common location provider 285obtaining provider directly 295services 474
GPS Exchange Format. See GPXGPX
DDMS tool 289storing points 288
graphicsdrawing 227–231
with XML 228–230XML shapes 230–231
OpenGL ES. See OpenGL ESGraphics API 227–238GSM 35, 189
Android standard 190gsm command 196GUIUPDATEIDENTIFIER 236
H
Handango 10handle 453handleMessage() method 83Handler 322, 332, 337
relationship diagram 173Handler class 236
handlers 80, 82–83, 119handling long-running requests 236holographic theme 561
customizing 577home activity 574
jumping to from app icon 573Honeycomb. See Android 3.0hotspot 478HTML5 440HTTP 161
authentication 177creating helper 173defines internet rules 164GET 170, 176headers 176and java.net 170parameters 176POST 170, 176, 349protocol stateless 169working with 169–179
HttpClient 173HttpEntity 173HttpPost 178HttpRequestHelper 170, 175, 181HttpRequestInterceptor 177HTTPS 180
creating helper 173HttpUrlConnection 170
I
IBinder 423IBinder interface 122
transact() method 122ICANN 165ICCID 190
identifies SIM card 190identity matrix 245ifconfig 168ImageCaptureCallback 271ImageView 233, 321IMEI, identifies device 190IMSI 194
subscriber and network identifier 190inches 96independent software vendor. See ISVindex.html file 460InputStream 331instance state 75integer primitive, int 483Intent 13, 80, 103, 180, 197, 317
action 103–104ACTION_DIAL constant 110
www.it-ebooks.info
622 INDEX
Intent (continued)ACTION_VIEW constant 110built-in actions 103–110category 104component 104data 103–104defined 14defining 103–104explicit 16extras 104getExtras() and putExtras() methods 81handing intent requests 107–109implicit 16implicit versus explicit invocation 104intent filter matching criteria 108intent filters 107–114late binding 103linking between applications 105–107making calls 196MIME type 108receiving 19resolution 16type 104
Intent filtersand category 108and data 108associating with broadcast receivers 115defining in XML 110–112
Intent.FLAG_ACTIVITY_CLEAR_TOP 573IntentFilter 19, 25
defined 14defines relationship 14
IntentFilter action 474<intent-filter> element 100, 107, 112, 124interface definition languages 120interfaces
publishing 123remote version 123–124
International Mobile Equipment Identity. See IMEI
International Mobile Subscriber Identity. See IMSIInternational Telecommunication Union H.263
video standard (H.263) 261Internet Layer 163Internet Protocol. See IPinvalidate() method 236IP 161
address 163finding 168
network data 161ipconfig 168iPhone 7
vs. Android 9
ISO format 511ISV 16ItemizedOverlay 302
handles details 304iTunes, as an example 164
J
jar 53jarsigner 605Java 4, 357
array 455connecting UI to a DayTime Server 378locale-specific data classes 516Runnable interface 338
Java byte codes, convert to dex file 52Java development tools. See JDTJava ME 7Java Native Interface. See JNIJava packages, included in Android SDK 35Java Perspective 37
Eclipse default 593Java Platform, Micro Edition. See Java MEJava Runtime Environment. See JREjava.net 161, 170Javadocs
android.provider package 152view 38
JavaScripterrors found at runtime 451implementing handler 461interface code 463multiple handlers 464overriding alert() method 470security matters 465
JDK 591JDT 591
Eclipse 38JNI
building a library 530–537functions 537library 526
compiling 536load at runtime 540
JobEntry 328JobListHandler 332, 335jobs
data managing 327–334ManageJobs Activity 338managing 334–351with GPS data stamp 349working with the ShowJob Activity 341
Joint Photographic Experts Group (JPEG) 261
www.it-ebooks.info
623INDEX
JPEGcaptured signature 351converting to 349
JQuery 441JRE 591
K
KDE 440Keyhole Markup Language. See KMLkeystore, keys require an alias 605keytool 605Khronos 227
OpenGL ES 238Ki, authenticates SIM card 190KML 289
checks files for Placemark 291drawbacks 291international standard 292
kSOAP, documentation 186
L
LAI, region device is in 190Language & Keyboard 511languages, target 513latitude, how expressed 287launch screen 319Layout 47layout 473
managing 515XML 425
LayoutInflater 211layouts 68–72, 86–88
FrameLayout 87layout resources 90
ld 364LD_LIBRARY_PATH. 366LEGO Mindstorms NXT. See robotLEGO robot. See robotlibsqlite.so 373License Verification Library. See LVLlifecycle
activity lifecycle phases 74bound services 128started services 128
lightweight authentication service wrapper 431LinearLayout 29Link Layer 163LinkedIn 406
contacts, expanded details 418creating account 424–431developer API key 411
logging in a two-stage process 426synchronizing 432transactions 437
linkedin-jAPI 426project 412
linker 363arm-none-linux-gnueabi-ld 364options 366
Linux 4building applications 356DayTime Server 370finding IP address 168kernel 10
Linux kerneland Dalvik VM 12why use 11
Linux security system prevents ad hoc file access 22
list navigation on action bar 569–570List type and AIDL 121ListActivity class 79listeners
OnClickListener 70OnFocusChangedListener 89
ListFragment 548ListView 78–82, 339locale 511localization
multiple locales 512need for 510–517obstacles 522translation team 517See also localizing
localizingapplications 516entire infrastructure 513in Java code 520strategies 512
Location 292, 298location
simulating 286–292specify coordinates 286updates 296
Location Area Identity. See LAIlocation-based service. See GPSLocationListener 292, 296
onProviderDisabled 298onProviderEnabled 298receive updates 286
LocationManager 292Criteria 295find available providers 285
www.it-ebooks.info
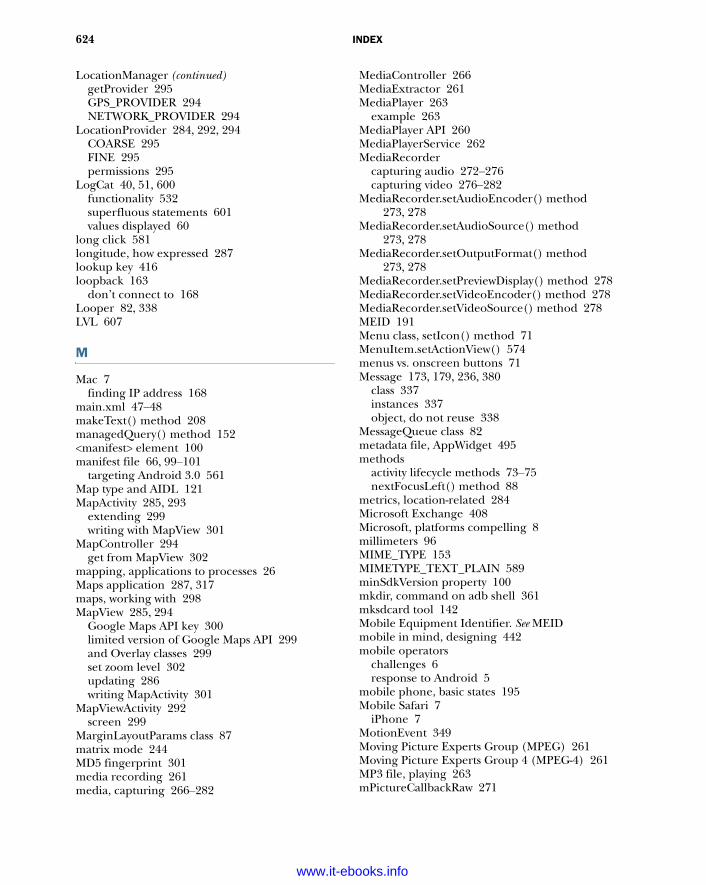
624 INDEX
LocationManager (continued)getProvider 295GPS_PROVIDER 294NETWORK_PROVIDER 294
LocationProvider 284, 292, 294COARSE 295FINE 295permissions 295
LogCat 40, 51, 600functionality 532superfluous statements 601values displayed 60
long click 581longitude, how expressed 287lookup key 416loopback 163
don’t connect to 168Looper 82, 338LVL 607
M
Mac 7finding IP address 168
main.xml 47–48makeText() method 208managedQuery() method 152<manifest> element 100manifest file 66, 99–101
targeting Android 3.0 561Map type and AIDL 121MapActivity 285, 293
extending 299writing with MapView 301
MapController 294get from MapView 302
mapping, applications to processes 26Maps application 287, 317maps, working with 298MapView 285, 294
Google Maps API key 300limited version of Google Maps API 299and Overlay classes 299set zoom level 302updating 286writing MapActivity 301
MapViewActivity 292screen 299
MarginLayoutParams class 87matrix mode 244MD5 fingerprint 301media recording 261media, capturing 266–282
MediaController 266MediaExtractor 261MediaPlayer 263
example 263MediaPlayer API 260MediaPlayerService 262MediaRecorder
capturing audio 272–276capturing video 276–282
MediaRecorder.setAudioEncoder() method273, 278
MediaRecorder.setAudioSource() method273, 278
MediaRecorder.setOutputFormat() method273, 278
MediaRecorder.setPreviewDisplay() method 278MediaRecorder.setVideoEncoder() method 278MediaRecorder.setVideoSource() method 278MEID 191Menu class, setIcon() method 71MenuItem.setActionView() 574menus vs. onscreen buttons 71Message 173, 179, 236, 380
class 337instances 337object, do not reuse 338
MessageQueue class 82metadata file, AppWidget 495methods
activity lifecycle methods 73–75nextFocusLeft() method 88
metrics, location-related 284Microsoft Exchange 408Microsoft, platforms compelling 8millimeters 96MIME_TYPE 153MIMETYPE_TEXT_PLAIN 589minSdkVersion property 100mkdir, command on adb shell 361mksdcard tool 142Mobile Equipment Identifier. See MEIDmobile in mind, designing 442mobile operators
challenges 6response to Android 5
mobile phone, basic states 195Mobile Safari 7
iPhone 7MotionEvent 349Moving Picture Experts Group (MPEG) 261Moving Picture Experts Group 4 (MPEG-4) 261MP3 file, playing 263mPictureCallbackRaw 271
www.it-ebooks.info
625INDEX
mShutterCallback 271multimedia
capturing media 266–282capturing audio 272–276recording video 276–282
introduction to 261–263playing audio 263–264playing video 264–266
multiple accounts 408convenience and complications 408
Music Player 275My Location 287myLocalState 583MyLocationOverlay 302MySQL 315, 352
N
NANP 199National Data Buoy Center. See NDBCNative Developer Kit. See NDKnative library, building 526navigation, detecting events 467NBDC 285
feeds 302NDK 4, 357, 524
build subsystem 530building an application 527directory 542installing 526integrating into Eclipse 542uses for 525
netstat 373network protocols 162NetworkInfo 166networking, overview 162–165newTab() 567newTab() method 567nextFocusDown() method 88nextFocusRight() method 88nextFocusUp() method 88NexusOne device 389Nintendo Wii 386NOAA 285NoActionBar themes 575node 162nop 368North American Numbering Plan. See NANPnostdlib 366notification 212–216
custom view 216–219PendingIntent 214sending 214
using with alarms 222–225with button press 214–216with LED 218with sound 219
Notification class 212–214fields 213
Notification.Builder 214NotificationManager 213notifications 116
debugging 601NT Lan Manager. See NTLMNTLM 177number, global 199NyARToolkit 272
O
-o switch 359objdump 358, 368Observer design pattern 89Ocean Matrix (OMX) 262OCR 525OGC 290onActivityCreated() method 550, 588onActivityResult() method 324–325, 341, 345onBind() method 19, 119, 123onCallStateChanged() method 195onClick() method 327onCreate() method 19, 69, 73–74, 128onCreateOptionsMenu() method 71, 347, 572onDestroy() method 74, 129onDrag() method 587onDragEvent() method 581, 587OnDragListener 580–581, 587onDragShadow() method 583onDraw() method 228, 349onDrawShadow() method 584OnFocusChangeListener 199onListItemClick() method 81onLocationChanged() method 297OnLongClickListener 580–581onMeasure() method 85onMenuItemSelected() method 81onNavigationItemSelected() method 570OnNavigationListener 569onOptionsItemSelected() method 347, 572–573onPause() method 74onPictureTaken() method 270–271onPostCreate() method 74onProvideShadowMetrics() method 583onReceive() method 200onRestart() method 74onResume() method 74
www.it-ebooks.info
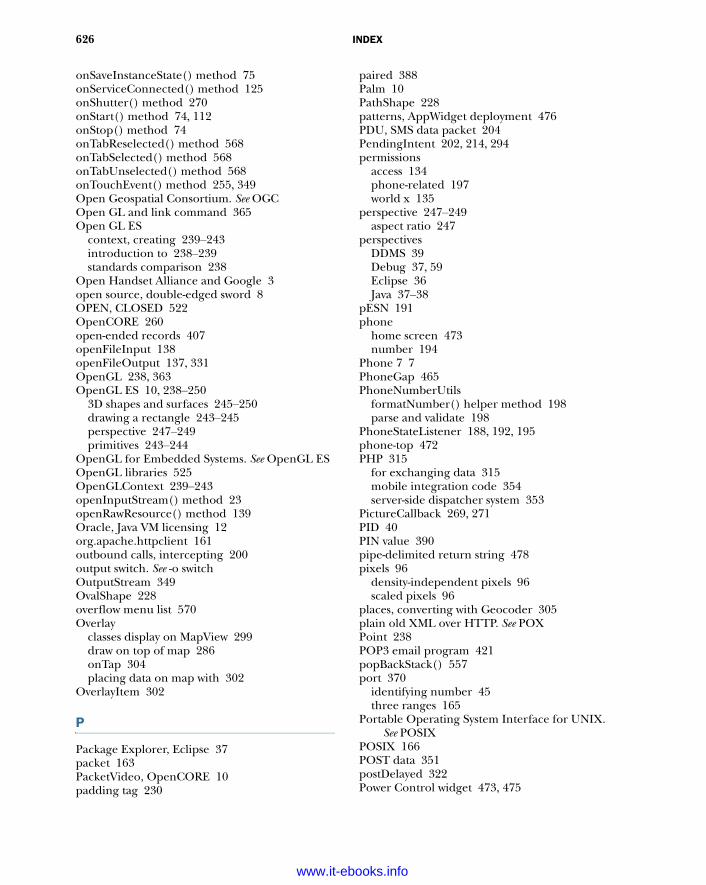
626 INDEX
onSaveInstanceState() method 75onServiceConnected() method 125onShutter() method 270onStart() method 74, 112onStop() method 74onTabReselected() method 568onTabSelected() method 568onTabUnselected() method 568onTouchEvent() method 255, 349Open Geospatial Consortium. See OGCOpen GL and link command 365Open GL ES
context, creating 239–243introduction to 238–239standards comparison 238
Open Handset Alliance and Google 3open source, double-edged sword 8OPEN, CLOSED 522OpenCORE 260open-ended records 407openFileInput 138openFileOutput 137, 331OpenGL 238, 363OpenGL ES 10, 238–250
3D shapes and surfaces 245–250drawing a rectangle 243–245perspective 247–249primitives 243–244
OpenGL for Embedded Systems. See OpenGL ESOpenGL libraries 525OpenGLContext 239–243openInputStream() method 23openRawResource() method 139Oracle, Java VM licensing 12org.apache.httpclient 161outbound calls, intercepting 200output switch. See -o switchOutputStream 349OvalShape 228overflow menu list 570Overlay
classes display on MapView 299draw on top of map 286onTap 304placing data on map with 302
OverlayItem 302
P
Package Explorer, Eclipse 37packet 163PacketVideo, OpenCORE 10padding tag 230
paired 388Palm 10PathShape 228patterns, AppWidget deployment 476PDU, SMS data packet 204PendingIntent 202, 214, 294permissions
access 134phone-related 197world x 135
perspective 247–249aspect ratio 247
perspectivesDDMS 39Debug 37, 59Eclipse 36Java 37–38
pESN 191phone
home screen 473number 194
Phone 7 7PhoneGap 465PhoneNumberUtils
formatNumber() helper method 198parse and validate 198
PhoneStateListener 188, 192, 195phone-top 472PHP 315
for exchanging data 315mobile integration code 354server-side dispatcher system 353
PictureCallback 269, 271PID 40PIN value 390pipe-delimited return string 478pixels 96
density-independent pixels 96scaled pixels 96
places, converting with Geocoder 305plain old XML over HTTP. See POXPoint 238POP3 email program 421popBackStack() 557port 370
identifying number 45three ranges 165
Portable Operating System Interface for UNIX. See POSIX
POSIX 166POST data 351postDelayed 322Power Control widget 473, 475
www.it-ebooks.info

627INDEX
POX 161exposes chunks of XML 179using a service 181
PreferenceFragment 548preferences 131preinit_array 369prime meridian base for longitude 287printf 359process ID. See PIDprocesses
how the system chooses which to kill 72saving state before they’re killed 74
produce information URL 317progress, displaying 337ProgressDialog 317, 332, 337, 346–347
show() method 81projectname.apk 53protocol data unit 204protocol layers 163Prototype 441ps -a 26Pseudo Electronic Serial Number. See pESNpublishing, Android Market 607, 611
Q
Qualcomm 7queuing, local 346
R
R class 30, 95inner classes 93
R.java 30, 46file 318updating 48
raw contact data, storing 410read-only interface, AppWidget 473receiver 474
tag 25<receiver> element 112RECORD_AUDIO 276RECORD_VIDEO 276RecordHit, inserts record into SQLite DB 373records 407
fixed-length 406open-ended 407
choosing 406RectShape 228referencing resources 91RefreshJobs 335RefreshRunner 236regression testing 603
relational database, built-in 145RelativeLayout class 94–95remote device, connecting 390RemoteViews, working with 491removeAllTabs() method 567removeOnBackStackChangedListener()
method 557removeProximityAlert() method 294removeTab() method 567removeTabAt() method 567RenderScript 250–258
applicationbuilding 252–258file structure 252source code 253
bytecode files 252debugging, issues with 251init() method 258introduction to 250–252pragmas 258pros and cons of using 251–252root() method 258types of apps to use for 251
RenderScriptGL 255Representational State Transfer. See RESTrequest, long-running, handling 236requestLocationUpdates 298
use time parameter carefully 298Research in Motion 7Resources 140
raw resources 139XML resources 140
resources 66, 90–99raw 90supported types 90values 90–98views and layouts as 93–95
ResponseHandler 173, 176REST 161, 185
methods 182uses URL-style approach 179
RestaurantFinder application 103–110basic screens 67
return, replace with exit call 367RFCOMM 387
cable replacement profile 387RISC 358robot
communicating with 402controlling with phone orientation 400driving 401
RoundRectShape 228router 164
www.it-ebooks.info
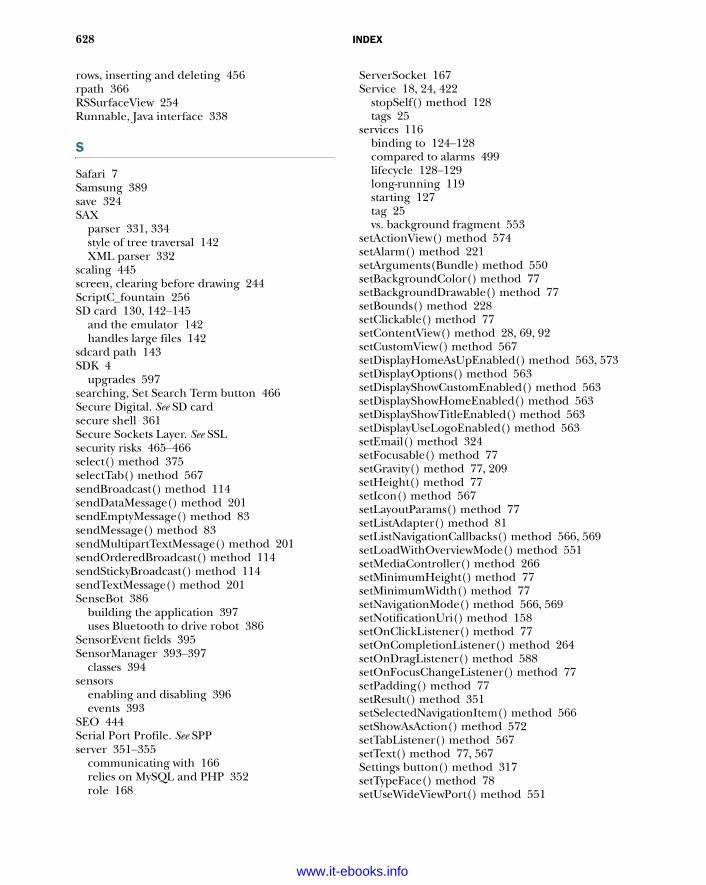
628 INDEX
rows, inserting and deleting 456rpath 366RSSurfaceView 254Runnable, Java interface 338
S
Safari 7Samsung 389save 324SAX
parser 331, 334style of tree traversal 142XML parser 332
scaling 445screen, clearing before drawing 244ScriptC_fountain 256SD card 130, 142–145
and the emulator 142handles large files 142
sdcard path 143SDK 4
upgrades 597searching, Set Search Term button 466Secure Digital. See SD cardsecure shell 361Secure Sockets Layer. See SSLsecurity risks 465–466select() method 375selectTab() method 567sendBroadcast() method 114sendDataMessage() method 201sendEmptyMessage() method 83sendMessage() method 83sendMultipartTextMessage() method 201sendOrderedBroadcast() method 114sendStickyBroadcast() method 114sendTextMessage() method 201SenseBot 386
building the application 397uses Bluetooth to drive robot 386
SensorEvent fields 395SensorManager 393–397
classes 394sensors
enabling and disabling 396events 393
SEO 444Serial Port Profile. See SPPserver 351–355
communicating with 166relies on MySQL and PHP 352role 168
ServerSocket 167Service 18, 24, 422
stopSelf() method 128tags 25
services 116binding to 124–128compared to alarms 499lifecycle 128–129long-running 119starting 127tag 25vs. background fragment 553
setActionView() method 574setAlarm() method 221setArguments(Bundle) method 550setBackgroundColor() method 77setBackgroundDrawable() method 77setBounds() method 228setClickable() method 77setContentView() method 28, 69, 92setCustomView() method 567setDisplayHomeAsUpEnabled() method 563, 573setDisplayOptions() method 563setDisplayShowCustomEnabled() method 563setDisplayShowHomeEnabled() method 563setDisplayShowTitleEnabled() method 563setDisplayUseLogoEnabled() method 563setEmail() method 324setFocusable() method 77setGravity() method 77, 209setHeight() method 77setIcon() method 567setLayoutParams() method 77setListAdapter() method 81setListNavigationCallbacks() method 566, 569setLoadWithOverviewMode() method 551setMediaController() method 266setMinimumHeight() method 77setMinimumWidth() method 77setNavigationMode() method 566, 569setNotificationUri() method 158setOnClickListener() method 77setOnCompletionListener() method 264setOnDragListener() method 588setOnFocusChangeListener() method 77setPadding() method 77setResult() method 351setSelectedNavigationItem() method 566setShowAsAction() method 572setTabListener() method 567setText() method 77, 567Settings button() method 317setTypeFace() method 78setUseWideViewPort() method 551
www.it-ebooks.info
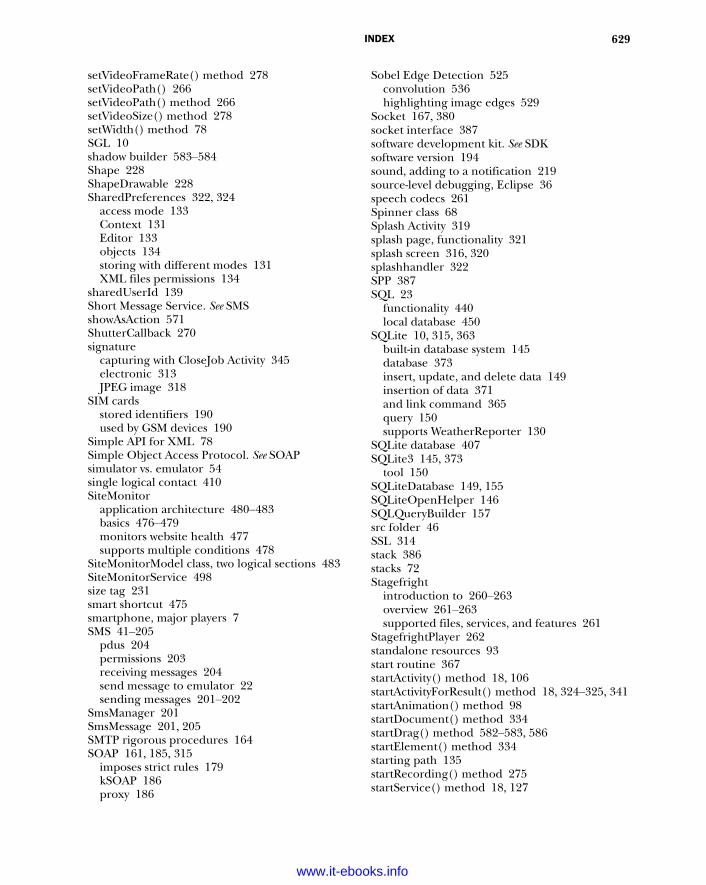
629INDEX
setVideoFrameRate() method 278setVideoPath() 266setVideoPath() method 266setVideoSize() method 278setWidth() method 78SGL 10shadow builder 583–584Shape 228ShapeDrawable 228SharedPreferences 322, 324
access mode 133Context 131Editor 133objects 134storing with different modes 131XML files permissions 134
sharedUserId 139Short Message Service. See SMSshowAsAction 571ShutterCallback 270signature
capturing with CloseJob Activity 345electronic 313JPEG image 318
SIM cardsstored identifiers 190used by GSM devices 190
Simple API for XML 78Simple Object Access Protocol. See SOAPsimulator vs. emulator 54single logical contact 410SiteMonitor
application architecture 480–483basics 476–479monitors website health 477supports multiple conditions 478
SiteMonitorModel class, two logical sections 483SiteMonitorService 498size tag 231smart shortcut 475smartphone, major players 7SMS 41–205
pdus 204permissions 203receiving messages 204send message to emulator 22sending messages 201–202
SmsManager 201SmsMessage 201, 205SMTP rigorous procedures 164SOAP 161, 185, 315
imposes strict rules 179kSOAP 186proxy 186
Sobel Edge Detection 525convolution 536highlighting image edges 529
Socket 167, 380socket interface 387software development kit. See SDKsoftware version 194sound, adding to a notification 219source-level debugging, Eclipse 36speech codecs 261Spinner class 68Splash Activity 319splash page, functionality 321splash screen 316, 320splashhandler 322SPP 387SQL 23
functionality 440local database 450
SQLite 10, 315, 363built-in database system 145database 373insert, update, and delete data 149insertion of data 371and link command 365query 150supports WeatherReporter 130
SQLite database 407SQLite3 145, 373
tool 150SQLiteDatabase 149, 155SQLiteOpenHelper 146SQLQueryBuilder 157src folder 46SSL 314stack 386stacks 72Stagefright
introduction to 260–263overview 261–263supported files, services, and features 261
StagefrightPlayer 262standalone resources 93start routine 367startActivity() method 18, 106startActivityForResult() method 18, 324–325, 341startAnimation() method 98startDocument() method 334startDrag() method 582–583, 586startElement() method 334starting path 135startRecording() method 275startService() method 18, 127
www.it-ebooks.info
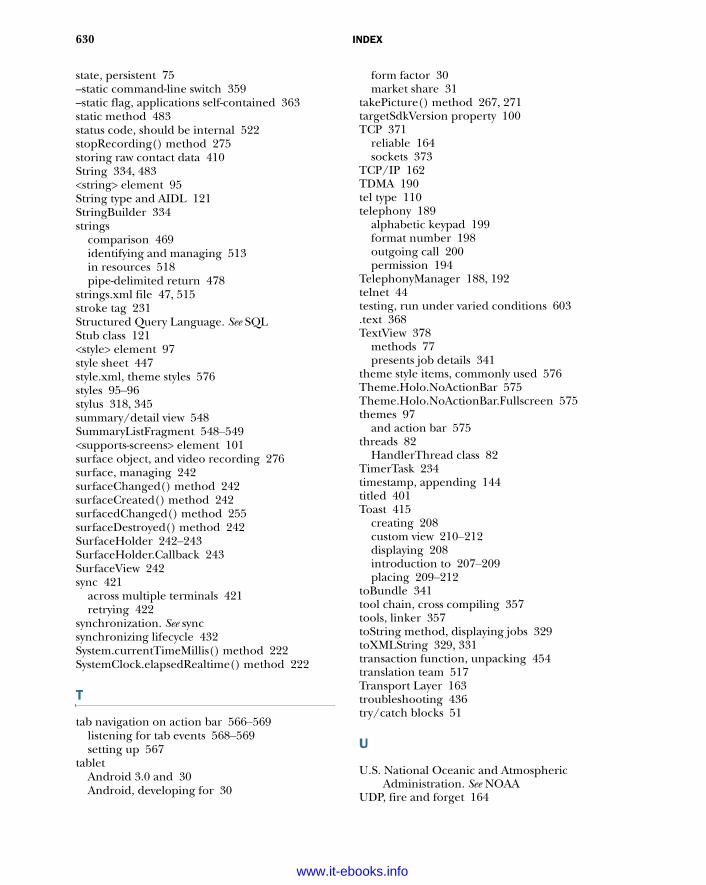
630 INDEX
state, persistent 75–static command-line switch 359–static flag, applications self-contained 363static method 483status code, should be internal 522stopRecording() method 275storing raw contact data 410String 334, 483<string> element 95String type and AIDL 121StringBuilder 334strings
comparison 469identifying and managing 513in resources 518pipe-delimited return 478
strings.xml file 47, 515stroke tag 231Structured Query Language. See SQLStub class 121<style> element 97style sheet 447style.xml, theme styles 576styles 95–96stylus 318, 345summary/detail view 548SummaryListFragment 548–549<supports-screens> element 101surface object, and video recording 276surface, managing 242surfaceChanged() method 242surfaceCreated() method 242surfacedChanged() method 255surfaceDestroyed() method 242SurfaceHolder 242–243SurfaceHolder.Callback 243SurfaceView 242sync 421
across multiple terminals 421retrying 422
synchronization. See syncsynchronizing lifecycle 432System.currentTimeMillis() method 222SystemClock.elapsedRealtime() method 222
T
tab navigation on action bar 566–569listening for tab events 568–569setting up 567
tabletAndroid 3.0 and 30Android, developing for 30
form factor 30market share 31
takePicture() method 267, 271targetSdkVersion property 100TCP 371
reliable 164sockets 373
TCP/IP 162TDMA 190tel type 110telephony 189
alphabetic keypad 199format number 198outgoing call 200permission 194
TelephonyManager 188, 192telnet 44testing, run under varied conditions 603.text 368TextView 378
methods 77presents job details 341
theme style items, commonly used 576Theme.Holo.NoActionBar 575Theme.Holo.NoActionBar.Fullscreen 575themes 97
and action bar 575threads 82
HandlerThread class 82TimerTask 234timestamp, appending 144titled 401Toast 415
creating 208custom view 210–212displaying 208introduction to 207–209placing 209–212
toBundle 341tool chain, cross compiling 357tools, linker 357toString method, displaying jobs 329toXMLString 329, 331transaction function, unpacking 454translation team 517Transport Layer 163troubleshooting 436try/catch blocks 51
U
U.S. National Oceanic and Atmospheric Administration. See NOAA
UDP, fire and forget 164
www.it-ebooks.info
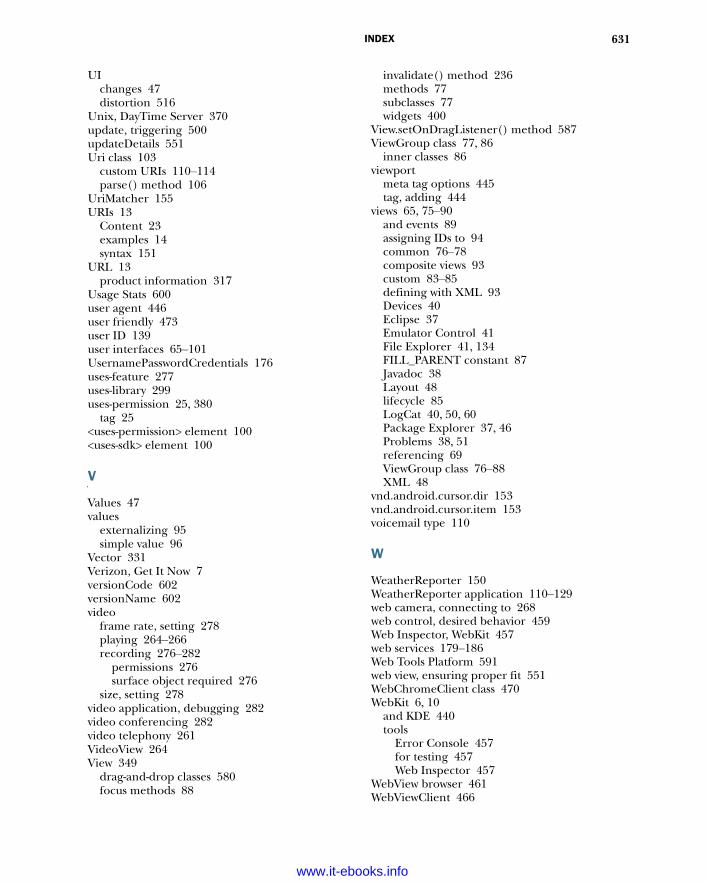
631INDEX
UIchanges 47distortion 516
Unix, DayTime Server 370update, triggering 500updateDetails 551Uri class 103
custom URIs 110–114parse() method 106
UriMatcher 155URIs 13
Content 23examples 14syntax 151
URL 13product information 317
Usage Stats 600user agent 446user friendly 473user ID 139user interfaces 65–101UsernamePasswordCredentials 176uses-feature 277uses-library 299uses-permission 25, 380
tag 25<uses-permission> element 100<uses-sdk> element 100
V
Values 47values
externalizing 95simple value 96
Vector 331Verizon, Get It Now 7versionCode 602versionName 602video
frame rate, setting 278playing 264–266recording 276–282
permissions 276surface object required 276
size, setting 278video application, debugging 282video conferencing 282video telephony 261VideoView 264View 349
drag-and-drop classes 580focus methods 88
invalidate() method 236methods 77subclasses 77widgets 400
View.setOnDragListener() method 587ViewGroup class 77, 86
inner classes 86viewport
meta tag options 445tag, adding 444
views 65, 75–90and events 89assigning IDs to 94common 76–78composite views 93custom 83–85defining with XML 93Devices 40Eclipse 37Emulator Control 41File Explorer 41, 134FILL_PARENT constant 87Javadoc 38Layout 48lifecycle 85LogCat 40, 50, 60Package Explorer 37, 46Problems 38, 51referencing 69ViewGroup class 76–88XML 48
vnd.android.cursor.dir 153vnd.android.cursor.item 153voicemail type 110
W
WeatherReporter 150WeatherReporter application 110–129web camera, connecting to 268web control, desired behavior 459Web Inspector, WebKit 457web services 179–186Web Tools Platform 591web view, ensuring proper fit 551WebChromeClient class 470WebKit 6, 10
and KDE 440tools
Error Console 457for testing 457Web Inspector 457
WebView browser 461WebViewClient 466
www.it-ebooks.info
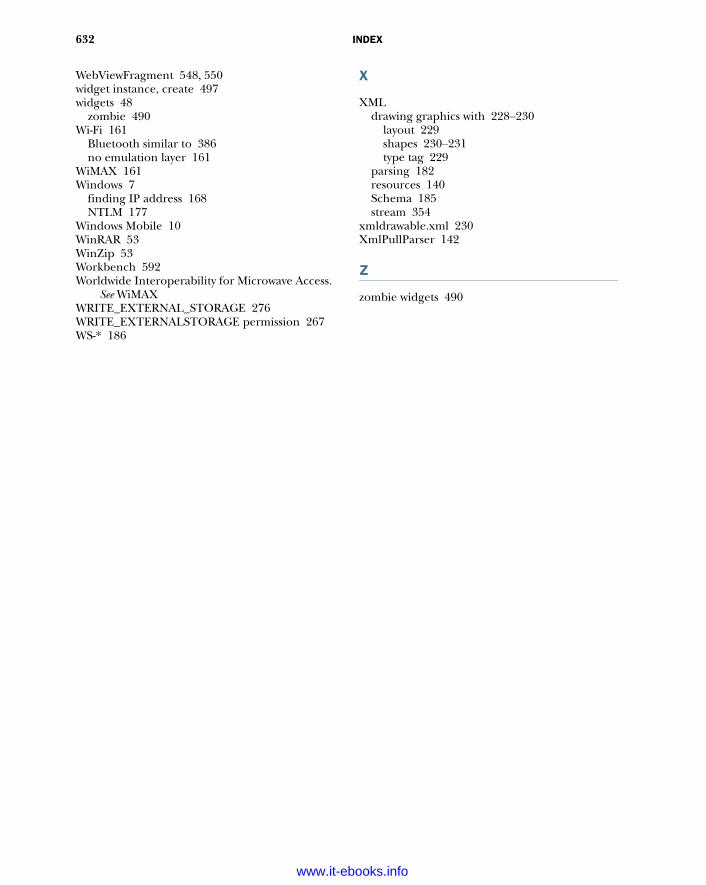
632 INDEX
WebViewFragment 548, 550widget instance, create 497widgets 48
zombie 490Wi-Fi 161
Bluetooth similar to 386no emulation layer 161
WiMAX 161Windows 7
finding IP address 168NTLM 177
Windows Mobile 10WinRAR 53WinZip 53Workbench 592Worldwide Interoperability for Microwave Access.
See WiMAXWRITE_EXTERNAL_STORAGE 276WRITE_EXTERNALSTORAGE permission 267WS-* 186
X
XMLdrawing graphics with 228–230
layout 229shapes 230–231type tag 229
parsing 182resources 140Schema 185stream 354
xmldrawable.xml 230XmlPullParser 142
Z
zombie widgets 490
www.it-ebooks.info

Ableson ● Sen ● King ● Ortiz
When it comes to mobile apps, Android can do almost anything—and with this book, so can you! Android, Google’s popular mobile operating system and SDK
for tablets and smart phones, is the broadest mobile platform available. It is Java-based, HTML5-aware, and loaded with the features today’s mobile users demand.
Android in Action, Third Edition takes you far beyond “Hello Android.” You’ll master the SDK, build WebKit apps using HTML 5, and even learn to extend or replace Android’s built-in features. You’ll fi nd interesting examples on every page as you explore cross-platform graphics with RenderScript, the updated notifi cation system, and the Native Development Kit. Th is book also introduces important tablet concepts like drag and drop, fragments, and the Action Bar, all new in Android 3.
What’s Inside● Covers Android 3.x● SDK and WebKit development from the ground up● Driving a robot with Bluetooth and sensors● Image processing with Native C code
Th is book is written for hobbyists and developers. A back-ground in Java is helpful—no prior experience with Android is assumed.
Frank Ableson and Robi Sen are entrepreneurs focused on mobile and web products, and on novel wireless technologies, respec-tively. Chris King is a senior mobile engineer and C. Enrique Ortiz a mobile technologist, developer, and author.
For access to the book’s forum and a free ebook for owners of this book, go to manning.com/AndroidinActionThirdEdition
$49.99 / Can $52.99 [INCLUDING eBOOK]
Android IN ACTION THIRD EDITION
MOBILE TECHNOLOGY
M A N N I N G
SEE INSERT
“Gold standard of Android training books.” —Gabor Paller, Ericsson
“Still the best single book for both beginners and experts.” —Matthew Johnson Sabaki Engineering
“Fully covers most Android tablet functionalities.” —Loïc Simon, SII
www.it-ebooks.info