Modifying Third-Party Android Apps for Fun and Profit | Trellix
10
Modifying Third-Party Android Apps for Fun and Profit By: Mark Bereza
-
Upload
khangminh22 -
Category
Documents
-
view
3 -
download
0
Transcript of Modifying Third-Party Android Apps for Fun and Profit | Trellix

Modifying Third-Party Android Apps for Fun and Profit By: Mark Bereza
WHITE PAPER
2Modifying Third-Party Android Apps for Fun and Profit
Table of Contents
03 Rationale
04 Installing ADB on Dev Machine
04 Enabling Developer Options + Debugging on an
Android Phone
05 DownloadingtheAPKtobeModified
05 Unpacking the APK
05 Dalvik, smali, and Other Made-Up Words
06 Making Changes to the Code
09 Repacking the APK
09 Signing the APK
09 Installing the APK via ADB
WHITE PAPER
3Modifying Third-Party Android Apps for Fun and Profit
Rationale
Anyone who’s taken at least one computer science course knows that all roads lead to Stack Overflow. In our collective defense, it’s the natural conclusion of many good habits we try to instill in fledgling programmers: be smart but lazy, don’t reinvent the wheel, and embrace modularity. Those of us who progress beyond introductory CScoursesquicklylearnthatwhileyou’reunlikelytofindexactlywhatyouneedreadytobecopiedfromsomepuresoulwith50,000Reputation,oftenyoucanfindsomethingcloseenough–quicklytransforminga“drawthe rest of the ■■■■ingowl”problemintoamuchsimpler“fine-tuning”problem.
Hackers, who often have fundamentally different goals than software engineers (kicking over sand castles vs. buildingthem),canstillbenefitgreatlyfromembracingthisstrategywhenitcomestoexploitationandpost-exploitation.
Similarly,inthecontextofAndroidexploitation,itcanoftenbemucheasiertoinjectcodeintoanappthatisalreadydesignedtoauthenticatewithandexposethefunctionalityofacloud-basedservicethanitwouldbetowriteitallfromscratchjusttodeliverapayload.
‘Easier’,however,isarelativeterm–appdevelopershavethisnastyhabitofshippingAPKsinsteadoftheirsourcecodeonGooglePlay,andbinarypatchinganAPKisn’texactlyawalkinthepark,either.Youcanthrowa Java decompiler at it, of which there are many, but the code it spits out won’t compile for any app more complexthanasingleclass.What’sahackertodo?
The answer is you’re gonna have to get your hands dirty and modify the APK at the bytecode level, allowing you to surgically add (or subtract) functionality without the need to recompile the app. The remainder of this guide will walk you through this process step by step, using my recent research on the temi Personal Robot as a case study.Beforewegettotherecipe,however,it’simportanttofirstcollectallthenecessaryingredients:
� ADBwillbeusedtomovefilesto/fromtheattacker’sAndroiddevice.
� Apktool(>=2.4.1)willbeusedtounpack/repacktheAPK.NOTE: It is important that the Apktool used is at least version 2.4.1. Older versions have a bug that causes it to not copy the META-INF/services directory, resulting in unstable APKs.
� JADX will be used to decompile the app’s bytecode.
� keytool and jarsigner will be used to re-sign the altered app, and are included with the Java Development Kit, or JDK.
After all, what is ROP if not the pinnacle of using someone else’s codeforyourownneeds?

WHITE PAPER
4Modifying Third-Party Android Apps for Fun and Profit
Installing ADB on Dev Machine
This process requires the use of the Android Debug Bridge, or ADB. This can be obtained several ways:
1. Install Android Studio. Although Android Studio does not include ADB by default, you can use it to download the Android SDK, which does include ADB. This might be the best option since you can use Android Studio to debug your altered app.
– FromtheWelcomescreen,click“Configure”inthebottomright(nexttothecog)andselect“SDKManager”fromthedrop-downlist.
– Fromthere,clickthe“SDKTools”tabandmakesurethat“AndroidSDKPlatform-Tools”ischecked.
– Finally,hit“Apply”then“OK”.
– ADB can now be found in <HOME_DIRECTORY>/Android/Sdk/platform-tools/adb . For Windows machines, this will usually be C:\Users\<USER_NAME>\AppData\Local\Android\Sdk\platform-tools\adb .
2. Download the standalone Android platform-tools for Windows, Mac, or Linux. This will allow you to use ADB without installing the full Android Studio. Onceextracted,ADBcanbelauncheddirectlyfrom the platform-tools directory (no need to install)viacmd/PowerShell/terminal.
3. Ifyou’reusingDebian-basedLinux(likeUbuntu),you can install ADB via apt:
sudo apt-get install adb
Enabling Developer Options + Debugging on an Android Phone
To use ADB with an Android phone, you will also need to enable debugging through Android’s developer options, which are hidden by default. On the Android phone you plan to do testing on:
1. Open the Settings app, scroll to the bottom, and select“Aboutphone”.
2. Scrolltothebottomandtap“Buildnumber”7times.
3. Return to the previous screen and this time tap “System.”
Figure 1
Figure 2
Figure 3
WHITE PAPER
5Modifying Third-Party Android Apps for Fun and Profit
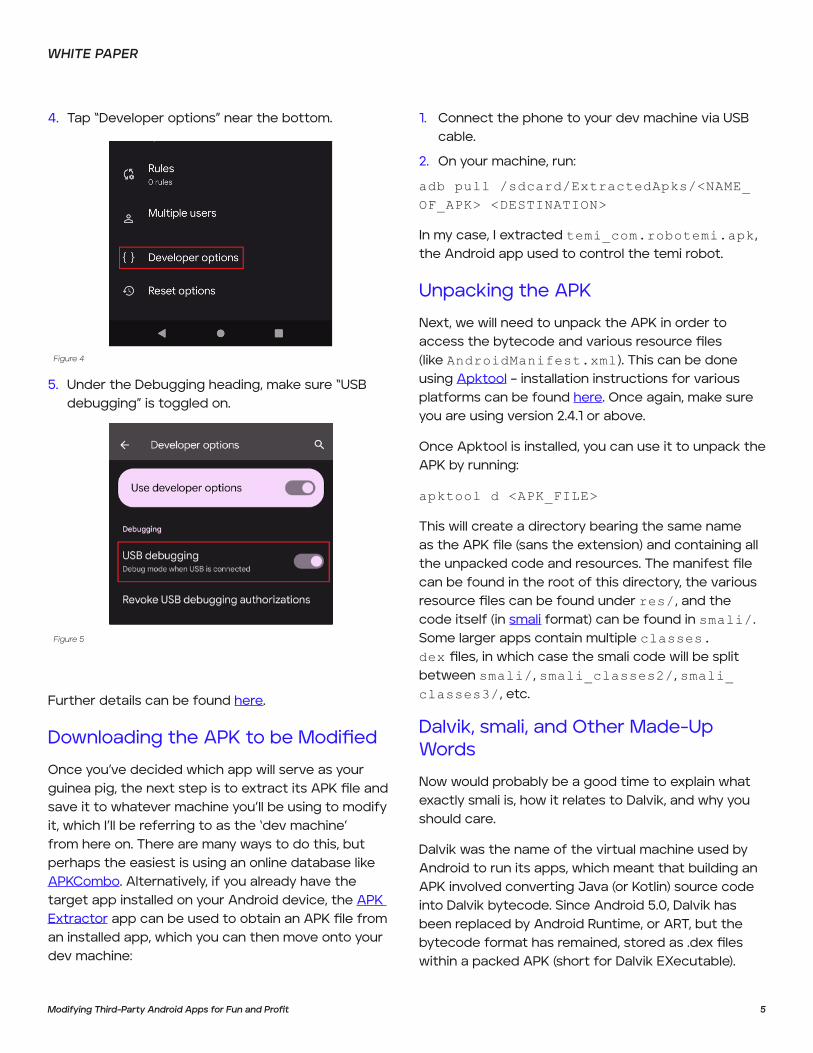
4. Tap“Developeroptions”nearthebottom.
5. UndertheDebuggingheading,makesure“USBdebugging” is toggled on.
Further details can be found here.
DownloadingtheAPKtobeModified
Once you’ve decided which app will serve as your guineapig,thenextstepistoextractitsAPKfileandsave it to whatever machine you’ll be using to modify it, which I’ll be referring to as the ‘dev machine’ from here on. There are many ways to do this, but perhaps the easiest is using an online database like APKCombo. Alternatively, if you already have the target app installed on your Android device, the APK ExtractorappcanbeusedtoobtainanAPKfilefroman installed app, which you can then move onto your dev machine:
1. Connect the phone to your dev machine via USB cable.
2. On your machine, run:
adb pull /sdcard/ExtractedApks/<NAME_OF_APK> <DESTINATION>
Inmycase,Iextractedtemi_com.robotemi.apk , the Android app used to control the temi robot.
Unpacking the APK
Next,wewillneedtounpacktheAPKinordertoaccessthebytecodeandvariousresourcefiles(like AndroidManifest.xml). This can be done using Apktool–installationinstructionsforvariousplatforms can be found here. Once again, make sure you are using version 2.4.1 or above.
Once Apktool is installed, you can use it to unpack the APK by running:
apktool d <APK_FILE>
This will create a directory bearing the same name astheAPKfile(sanstheextension)andcontainingalltheunpackedcodeandresources.Themanifestfilecan be found in the root of this directory, the various resourcefilescanbefoundunderres/ , and the code itself (in smali format) can be found in smali/ . Some larger apps contain multiple classes.dexfiles,inwhichcasethesmalicodewillbesplitbetween smali/ , smali_classes2/ , smali_classes3/ , etc.
Dalvik, smali, and Other Made-Up Words
Nowwouldprobablybeagoodtimetoexplainwhatexactlysmaliis,howitrelatestoDalvik,andwhyyoushould care.
Dalvik was the name of the virtual machine used by Android to run its apps, which meant that building an APK involved converting Java (or Kotlin) source code into Dalvik bytecode. Since Android 5.0, Dalvik has been replaced by Android Runtime, or ART, but the bytecodeformathasremained,storedas.dexfileswithin a packed APK (short for Dalvik EXecutable).
Figure 4
Figure 5
WHITE PAPER
6Modifying Third-Party Android Apps for Fun and Profit
smali, on the other hand, is an assembler for these .dexfilesthatmapsthebytecodeintoaformatthatis“humanreadable”(ahideousoverstatement),thesamewayanx86binarycanbedisassembledintox86assembly. In our case, Apktool has graciously done thedifficulttaskofconvertingtheAPK’svarious.dexfilesintosmali,witheachJavaclassgettingitsown.smalifile.SinceApktoolisalsocapableofturningsmalicodebackintothe.dexformat,wecanhypotheticallymodifythecodewithinthesefilesandreconstruct the APK without needing to recompile the app.
Making Changes to the Code
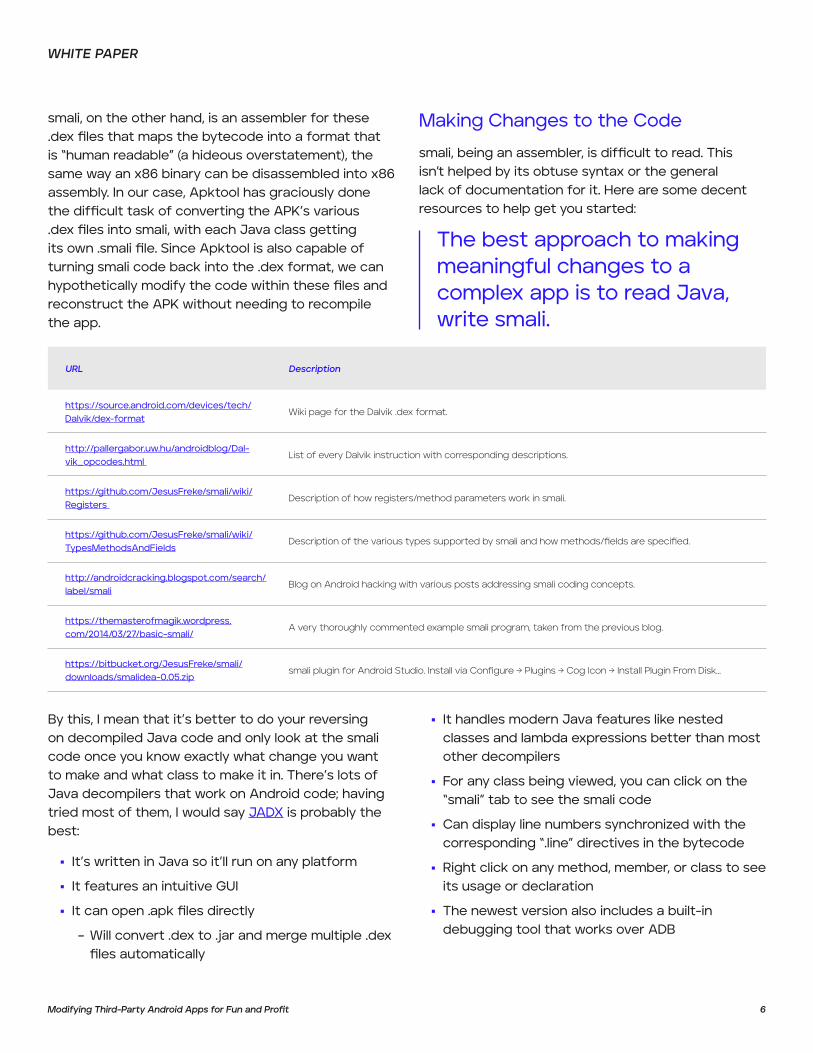
smali,beinganassembler,isdifficulttoread.Thisisn’thelpedbyitsobtusesyntaxorthegenerallack of documentation for it. Here are some decent resources to help get you started:
URL Description
https://source.android.com/devices/tech/Dalvik/dex-format
Wiki page for the Dalvik .dex format.
http://pallergabor.uw.hu/androidblog/Dal-vik_opcodes.html
List of every Dalvik instruction with corresponding descriptions.
https://github.com/JesusFreke/smali/wiki/Registers
Description of how registers/method parameters work in smali.
https://github.com/JesusFreke/smali/wiki/TypesMethodsAndFields
Description of the various types supported by smali and how methods/fields are specified.
http://androidcracking.blogspot.com/search/label/smali
Blog on Android hacking with various posts addressing smali coding concepts.
https://themasterofmagik.wordpress.com/2014/03/27/basic-smali/
A very thoroughly commented example smali program, taken from the previous blog.
https://bitbucket.org/JesusFreke/smali/downloads/smalidea-0.05.zip
smali plugin for Android Studio. Install via Configure → Plugins → Cog Icon → Install Plugin From Disk...
By this, I mean that it’s better to do your reversing on decompiled Java code and only look at the smali codeonceyouknowexactlywhatchangeyouwantto make and what class to make it in. There’s lots of Java decompilers that work on Android code; having tried most of them, I would say JADX is probably the best:
� It’s written in Java so it’ll run on any platform
� It features an intuitive GUI
� Itcanopen.apkfilesdirectly
– Willconvert.dexto.jarandmergemultiple.dexfilesautomatically
� It handles modern Java features like nested classesandlambdaexpressionsbetterthanmostother decompilers
� For any class being viewed, you can click on the “smali”tabtoseethesmalicode
� Can display line numbers synchronized with the corresponding“.line”directivesinthebytecode
� Right click on any method, member, or class to see its usage or declaration
� The newest version also includes a built-in debugging tool that works over ADB
The best approach to making meaningful changes to a complexappistoreadJava,write smali.

WHITE PAPER
7Modifying Third-Party Android Apps for Fun and Profit
Figure 8
A close runner-up is Bytecode Viewer. Like JADX, it is also written in Java, features a GUI, and can open.apkfilesdirectly.Additionally,itallowsyoutoselect which decompiler to use (and features all the prominent ones) and even lets you see the same class decompiled using up to three different decompilers side by side. Unlike JADX, however, it doesn’t display smalicodeandlacksthe“seeusage/declaration”feature,bothofwhichIfoundextremelyusefulwhenreversing the temi app.
Before you go digging through thousands of Java classes, it’s important to narrow your scope by deciding ahead of time what it is you’retryingtoaccomplish–startsmall.Inthecaseofthetemiapp,myfirstgoalwastomodifythe app so that it could be used to intercept video calls intended for another user. While reversing, I hadlearnedthatthetemiusedapublish/subscribeprotocol called MQTT to send various messages between the robot, the phone app, and temi’s cloud-based servers. In MQTT, users can publish messages to topics, causing all users subscribed to that topic to receive the message. In the case of temi, each user (phone app or robot) has their own personal call invite topic, and callers can publish a call invite message to this topic in order to initiate a call. Thus, I was hoping tofindthecoderesponsibleforsubscribingausertotheir own call invite topic and modify it to subscribe to another user’s instead.
Once you have an idea of what functionality you wish to modify, start your Java spelunking by performing a search for a string you know isrelatedtothisfunctionality.Forexample,ifyou’re being told that you need to sign in to Facebook before you can use the app and you want to bypass that check, you can start by doing a string search for the error message in the directory spit out by Apktool. For the temi app, I knew that the invite topic followed the format“client/X/invite”,whereXistheuser’sunique ID:
The third result led me to MqttManagerImpl.buildInviteTopic() , the method responsible for building the invite topic string:
Fromthere,IusedJADX’s“seeusage/declaration” feature to enumerate the locations where this method gets invoked.
Among these was MqttManagerImpl.lambda$initMqttClient$13() ,whichdefinesan anonymous MqttCallbackExtended class that, among other things, subscribes a user to their own call invite topic. It accomplishes this by making a call to MqttManagerImpl.subscribe() , which takes two arguments: the topic string and a number indicating the quality of service (QoS) level, as shownonline498inFigure8.Inthiscase,Iwasonlyinterestedinthefirstargument,whichisobtainedbycalling buildInviteTopic() .
Jackpot. All I needed to do was replace the call to buildInviteTopic() in the smali code with a hardcoded string containing the victim’s user ID.
Figure 6
Figure 7

WHITE PAPER
8Modifying Third-Party Android Apps for Fun and Profit
Once you’ve read enough Java and arrive at your own“Jackpot”moment,it’stimetoswitchtothe“writesmali”steptomaketheactualmodification.In my case, I opened MqttManagerImpl.smali in VSCode and searched for this anonymous class. Unfortunately, Dalvik bytecode doesn’t natively support anonymous classes, so conventional smali classesaredefinedforthemwithmanglednames.The one containing the code I was looking for was named MqttManagerImpl$7.smali , the relevant part of which is shown in Figure 9. Be on the lookout for mangled names containing dollar signs like this if your app also makes liberal use of anonymous classes, nestedclasses,orlambdaexpressions.
The call to subscribe() I was trying to modify can be seen on line 10 in Figure 9. It’s called using Dalvik’s invoke-virtual instruction, which is
used to invoke any method that is not private, static, final,oraconstructor.Unfortunately,thecalltobuildInviteTopic() I was trying to replace is nowhere to be found. Having read some of smali’s sparse documentation, I recalled that the parameters passed to the method are loaded in order from the list of virtual registers between curly braces, which in the case of the subscribe() call above was {p2, v1, v0} . The reason three virtual registers are used despite the method only taking two arguments is that thefirstregisterinthelistalwayscontainstheimplicit
thisreference.Thismeantthatwhatever’sinv1justbefore subscribe() is called should contain the return value of buildInviteTopic() .Sinceline8isusingmove-result-object into v1 right after a call to MqttManagerImpl.access$400() on line 6, it’s safe to assume the return value of access$400() is what’sbeingpassedasthefirstparameter.
As we can see in Figure 10, access$400() is simply a wrapper for buildInviteTopic() .
Thisisaquirkwithinline/nestedclassesinDalvik:callingthe“outer”class’smethodsfromthe“inner”class requires the construction of an intermediary
access method since the child class is treated as an entirely separate class under the hood and their hierarchicalscoperelationshipisnotpreserved–another obstacle to look out for in your reversing endeavors.
Armedwiththisknowledge,Ireplacedlines6-8inFigure8withthelineinfigure10.
const-string , as the name would suggest, is the instruction used to store a static string value in a virtual register; in this case, v1.
Whenyouarecontentwithyour“patch”,saveyourmodificationstothesmalifile(s)andmoveontothenextstep.
Figure 9
Figure 10
Figure 11
WHITE PAPER
9Modifying Third-Party Android Apps for Fun and Profit
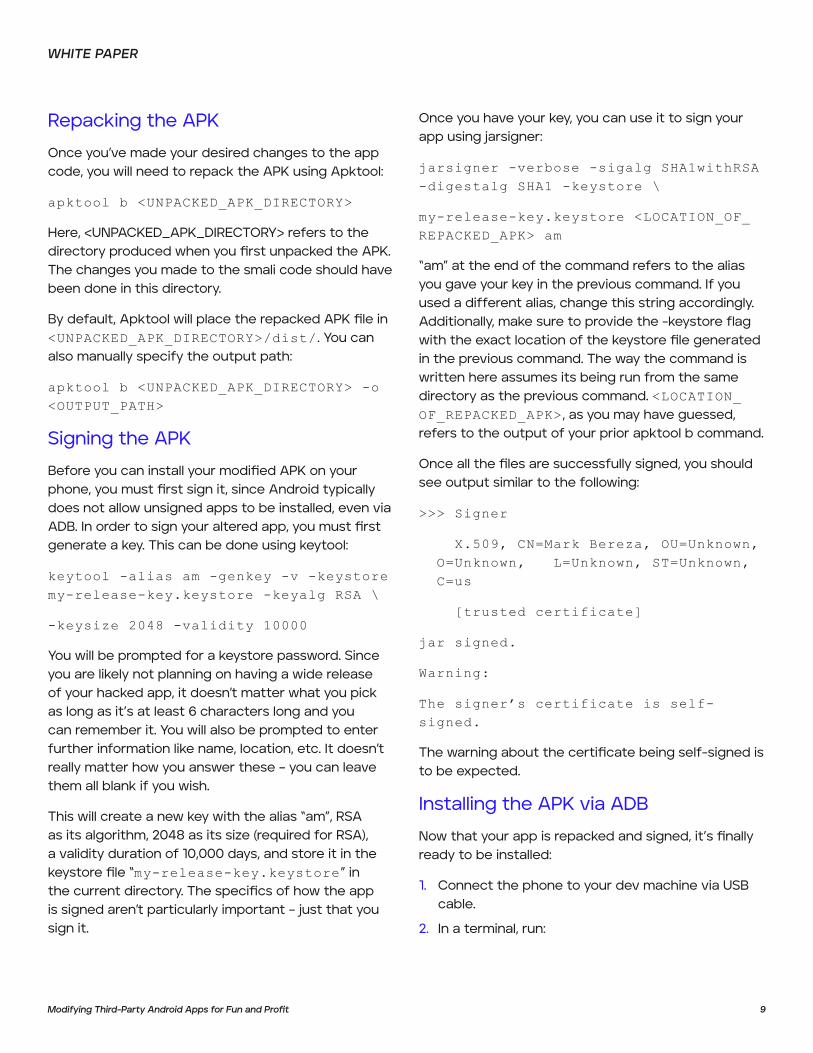
Repacking the APK
Once you’ve made your desired changes to the app code, you will need to repack the APK using Apktool:
apktool b <UNPACKED_APK_DIRECTORY>
Here,<UNPACKED_APK_DIRECTORY>referstothedirectoryproducedwhenyoufirstunpackedtheAPK.The changes you made to the smali code should have been done in this directory.
Bydefault,ApktoolwillplacetherepackedAPKfilein<UNPACKED_APK_DIRECTORY>/dist/ .Youcanalso manually specify the output path:
apktool b <UNPACKED_APK_DIRECTORY> -o <OUTPUT_PATH>
Signing the APK
BeforeyoucaninstallyourmodifiedAPKonyourphone,youmustfirstsignit,sinceAndroidtypicallydoes not allow unsigned apps to be installed, even via ADB.Inordertosignyouralteredapp,youmustfirstgenerate a key. This can be done using keytool:
keytool -alias am -genkey -v -keystore my-release-key.keystore -keyalg RSA \
-keysize 2048 -validity 10000
Youwillbepromptedforakeystorepassword.Sinceyou are likely not planning on having a wide release of your hacked app, it doesn’t matter what you pick as long as it’s at least 6 characters long and you canrememberit.Youwillalsobepromptedtoenterfurther information like name, location, etc. It doesn’t reallymatterhowyouanswerthese–youcanleavethem all blank if you wish.
Thiswillcreateanewkeywiththealias“am”,RSAasitsalgorithm,2048asitssize(requiredforRSA),a validity duration of 10,000 days, and store it in the keystorefile“my-release-key.keystore” in thecurrentdirectory.Thespecificsofhowtheappissignedaren’tparticularlyimportant–justthatyousign it.
Once you have your key, you can use it to sign your appusingjarsigner:
jarsigner -verbose -sigalg SHA1withRSA -digestalg SHA1 -keystore \
my-release-key.keystore <LOCATION_OF_REPACKED_APK> am
“am”attheendofthecommandreferstothealiasyou gave your key in the previous command. If you used a different alias, change this string accordingly. Additionally, make sure to provide the -keystore flag withtheexactlocationofthekeystorefilegeneratedin the previous command. The way the command is written here assumes its being run from the same directory as the previous command. <LOCATION_OF_REPACKED_APK> , as you may have guessed, refers to the output of your prior apktool b command.
Onceallthefilesaresuccessfullysigned,youshouldsee output similar to the following:
>>> Signer
X.509, CN=Mark Bereza, OU=Unknown, O=Unknown, L=Unknown, ST=Unknown, C=us
[trusted certificate]
jar signed.
Warning:
The signer’s certificate is self-signed.
Thewarningaboutthecertificatebeingself-signedistobeexpected.
Installing the APK via ADB
Nowthatyourappisrepackedandsigned,it’sfinallyready to be installed:
1. Connect the phone to your dev machine via USB cable.
2. In a terminal, run:

Copyright © 2022 Musarubra US LLCJANUARY 2022
WHITE PAPER
adb install -d -r <LOCATION_OF_REPACKED_APK>
The -d flag allows for the downgrading of apps and -r allows the app to be installed even if an app with the same name is already present on the device, which is then overwritten.
3. If successful, you should see output similar to the following:
Performing Push Install
temi_com.robotemi.apk: 1 file pushed. 4.2 MB/s (41591446 bytes in 9.458s)
pkg: /data/local/tmp/temi_com.robotemi.apk
Success
Youshouldnowbeabletorunyourmodifiedappandhack the planet. :)