Citrix Virtual Apps and Desktops
972
Citrix Virtual Apps and Desktops Citrix Product Documentation | docs.citrix.com February 10, 2022
-
Upload
khangminh22 -
Category
Documents
-
view
2 -
download
0
Transcript of Citrix Virtual Apps and Desktops

Citrix Virtual Apps and Desktops
Citrix Product Documentation | docs.citrix.com February 10, 2022

Citrix Virtual Apps and Desktops
Contents
Citrix Virtual Apps and Desktops 7 2006 3
Citrix Virtual Apps and Desktops 7 2006 3
Fixed issues 6
Known issues 12
Deprecation 16
System requirements 27
Technical overview 37
Active Directory 46
Databases 49
Deliverymethods 56
Network ports 60
HDX 63
Adaptive transport 73
Citrix ICA virtual channels 82
Double hop in Citrix Virtual Apps and Desktops 91
Install and configure 94
Prepare to install 96
Microsoft System Center Virtual Machine Manager virtualization environments 104
Citrix Hypervisor virtualization environments 107
Microsoft System Center Configuration Manager environments 108
VMware virtualization environments 110
Nutanix virtualization environments 116
Install core components 118
© 1999–2022 Citrix Systems, Inc. All rights reserved. 2

Citrix Virtual Apps and Desktops
Install VDAs 130
Install using the command line 143
Install VDAs using scripts 155
Install VDAs using SCCM 158
Create a site 160
Createmachine catalogs 165
Managemachine catalogs 183
Create delivery groups 189
Manage delivery groups 194
Create application groups 216
Manage application groups 224
Remote PC Access 229
App‑V 238
Virtual Apps Secure Browser 252
Publish content 253
Server VDI 258
User personalization layer 260
Remove components 278
Upgrade andmigrate 279
Upgrade a deployment 282
Secure 302
Security considerations and best practices 303
Integrate Citrix Virtual Apps and Desktops with Citrix Gateway 312
Delegated administration 312
© 1999–2022 Citrix Systems, Inc. All rights reserved. 3

Citrix Virtual Apps and Desktops
Smart cards 320
Smart card deployments 326
Pass‑through authentication and single sign‑on with smart cards 332
App protection 334
Transport Layer Security (TLS) 340
Transport Layer Security (TLS) on Universal Print Server 354
Devices 364
Generic USB devices 366
Mobile and touch screen devices 366
Serial ports 370
Specialty keyboards 375
TWAIN devices 377
Webcams 377
Graphics 378
HDX 3D Pro 380
GPU acceleration for Windowsmulti‑session OS 381
GPU acceleration for Windows single‑session OS 384
Thinwire 388
Text‑based session watermark 394
Multimedia 396
Audio features 398
Browser content redirection 407
HDX video conferencing andwebcam video compression 415
HTML5multimedia redirection 419
© 1999–2022 Citrix Systems, Inc. All rights reserved. 4

Citrix Virtual Apps and Desktops
Optimization for Microsoft Teams 422
Monitor, troubleshoot, and support Microsoft Teams 442
Windows Media redirection 449
General content redirection 450
Client folder redirection 451
Host to client redirection 452
Local App Access and URL redirection 457
Generic USB redirection and client drive considerations 465
Print 475
Printing configuration example 483
Best practices, security considerations, and default operations 486
Printing policies and preferences 488
Provision printers 490
Maintain the printing environment 498
Policies 503
Work with policies 504
Policy templates 507
Create policies 511
Compare, prioritize, model, and troubleshoot policies 516
Default policy settings 520
Policy settings reference 550
ICA policy settings 554
Auto client reconnect policy settings 561
Audio policy settings 563
© 1999–2022 Citrix Systems, Inc. All rights reserved. 5

Citrix Virtual Apps and Desktops
Bandwidth policy settings 566
Bidirectional content redirection policy settings 571
Browser content redirection policy settings 574
Client sensors policy settings 581
Desktop UI policy settings 582
End user monitoring policy settings 583
Enhanced desktop experience policy setting 584
File Redirection policy settings 585
Graphics policy settings 589
Caching policy settings 595
Framehawk policy settings 596
Keep alive policy settings 596
Local App Access policy settings 597
Mobile experience policy settings 598
Multimedia policy settings 599
Multi‑stream connections policy settings 608
Port redirection policy settings 611
Printing policy settings 612
Client printers policy settings 615
Drivers policy settings 619
Universal Print Server policy settings 620
Universal printing policy settings 625
Security policy settings 627
Server limits policy settings 628
© 1999–2022 Citrix Systems, Inc. All rights reserved. 6
Citrix Virtual Apps and Desktops
Session limits policy settings 629
Session reliability policy settings 630
Session watermark policy settings 632
Time zone control policy settings 634
TWAIN devices policy settings 635
USB devices policy settings 636
Virtual channel allow list policy settings 644
Visual display policy settings 645
Moving images policy settings 646
Still images policy settings 648
WebSockets policy settings 650
Loadmanagement policy settings 651
Profile management policy settings 652
Advanced policy settings 652
Basic policy settings 655
Cross‑platform policy settings 659
File system policy settings 661
Exclusions policy settings 661
Synchronization policy settings 663
Folder redirection policy settings 665
AppData(Roaming) policy settings 665
Contacts policy settings 666
Desktop policy settings 666
Documents policy settings 667
© 1999–2022 Citrix Systems, Inc. All rights reserved. 7

Citrix Virtual Apps and Desktops
Downloads policy settings 667
Favorites policy settings 668
Links policy settings 669
Music policy settings 669
Pictures policy settings 670
Saved Games policy settings 671
Start menu policy settings 671
Searches policy settings 672
Video policy settings 672
Log policy settings 673
Profile handling policy settings 677
Registry policy settings 681
Streamed user profiles policy settings 682
User personalization policy settings 683
Virtual Delivery Agent policy settings 684
HDX 3D Pro policy settings 686
Monitoring policy settings 687
Virtual IP policy settings 690
Configure COM Port and LPT Port Redirection settings using the registry 691
Connector for Configuration Manager 2012 policy settings 692
Manage 695
Licensing 697
Multi‑type licensing 701
FAQ for licensing 709
© 1999–2022 Citrix Systems, Inc. All rights reserved. 8

Citrix Virtual Apps and Desktops
Applications 721
Universal Windows Platform Apps 732
Zones 734
Connections and resources 746
Local Host Cache 757
Virtual IP and virtual loopback 767
Delivery Controllers 770
VDA registration 774
Sessions 784
Use Search in Studio 790
Tags 791
IPv4/IPv6 support 800
User profiles 801
Collect a Citrix Diagnostic Facility (CDF) trace at system startup 807
Citrix Insight Services 810
Citrix Scout 821
Monitor 842
Configuration logging 843
Event logs 848
Director 849
Install and configure 854
Advanced configuration 856
Configure PIV smart card authentication 860
Configure network analysis 863
© 1999–2022 Citrix Systems, Inc. All rights reserved. 9

Citrix Virtual Apps and Desktops
Delegated administration and Director 864
Secure Director deployment 867
Configuring on‑premises sites with Citrix Analytics for Performance 870
Site Analytics 875
Alerts and notifications 885
Filter data to troubleshoot failures 898
Monitor historical trends across a site 900
Troubleshoot deployments 905
Troubleshoot applications 906
Application probing 910
Desktop probing 914
Troubleshootmachines 919
Troubleshoot user issues 926
Diagnose session startup issues 928
Diagnose user logon issues 933
Shadow users 940
Sendmessages to users 941
Resolve application failures 942
Restore desktop connections 943
Restore sessions 944
Run HDX channel system reports 945
Reset a user profile 945
Record sessions 949
Feature compatibility matrix 950
© 1999–2022 Citrix Systems, Inc. All rights reserved. 10
Citrix Virtual Apps and Desktops
Data granularity and retention 954
Third party notices 960
SDKs and APIs 960
© 1999–2022 Citrix Systems, Inc. All rights reserved. 11

Citrix Virtual Apps and Desktops
Citrix Virtual Apps and Desktops 7 2006
September 23, 2020
Citrix Virtual Apps and Desktops 7 2006
April 14, 2021
About this release
This Citrix Virtual Apps and Desktops release includes new versions of the Windows Virtual DeliveryAgents (VDAs) and new versions of several core components. You can:
• Install or upgrade a site
Use the ISO for this release to install or upgrade core components and VDAs. Installing or up‑grading to the latest version allows you to use the latest features.
• Install or upgrade VDAs in an existing site
If you already have a deployment, and aren’t ready to upgrade your core components, you canstill use several of the latest HDX features by installing (or upgrading to) a new VDA. Upgradingonly the VDAs can be helpful when youwant to test enhancements in a non‑production environ‑ment.
After upgrading your VDAs to this version (from version 7.9 or later), you do not need to updatethe machine catalog’s functional level. The 7.9 (or later) value remains the default functionallevel, and is valid for this release. Formore information, see VDA versions and functional levels.
For installation and upgrade instructions:
• If you are building a new site, follow the sequence in Install and configure.• If you are upgrading a site, see Upgrade a deployment.
Citrix Virtual Apps and Desktops 7 2006
Upgrade: Removing unsupported items
As of version 2003, the following technologies and host types are not supported in Citrix Virtual Appsand Desktops 7 Current Release deployments:
• Personal vDisks (PvD) for storing data next to users’ VMs. The user personalization layer fea‑ture now handles user persistence.
© 1999–2022 Citrix Systems, Inc. All rights reserved. 12
Citrix Virtual Apps and Desktops
• AppDisks for managing applications used in delivery groups.
• Host types for connections: Azure Classic, Azure Resource Manager (ARM), Amazon Web Ser‑vices (AWS), CloudPlatform (the original Citrix product).
– For information about alternative ways you can continue using ARM and AWS, seeCTX270373.
– For host types supported in this release, see System requirements.
As of version 2006, if your current deployment uses PvDs or AppDisks, or has connections to unsup‑ported host types, you can upgrade your deployment to version 2006 (or later supported versions)only after removing items that use those technologies.
For VDAs, the installation or earlier upgrades might have included PvD and AppDisks components,even if you never used it. You can upgrade VDAs to version 2006 (or later supported versions), onlyafter removing that software. When using the graphical interface, that removal can be done automat‑ically. Or, you can include options when using the CLI.
For details, see Remove PvD, AppDisks, and unsupported hosts.
Install and upgrade: Self‑Service Password Reset no longer in full‑product installer or onmedia
As of version 2003, the Self‑Service Password component is deprecated. As of version 2006, You can‑not use the full‑product installer to install or upgrade the component. The component’s installer isnot available on the installation media.
Youcanget the component software fromthedownloadpage for yourCitrix Virtual AppsandDesktopsversion.
EnhancedDesktopExperience MSI removed
TheEnhancedDesktopExperienceMSIhasbeen removed fromtheCitrix Virtual AppsandDesktopscurrent release layout.
This feature was valid when installing VDAs on Windows Server 2012 R2 and earlier versions. Thefeature is not valid on Windows OS versions that are currently supported for multi‑session VDAs.
If a VDA installation command contains the /nodesktopexperience option, that option is ignored.The Enhanced Desktop Experience policy setting is also ignored, if specified.
Citrix Scout: Usage data collection
When you use Scout, Citrix uses Google Analytics to collect anonymous usage data to be used forfuture product features and improvements. For details on configuring data collection, see Usage datacollection.
© 1999–2022 Citrix Systems, Inc. All rights reserved. 13

Citrix Virtual Apps and Desktops
Citrix Scout: health check updates
Updates have been made to running health checks on Scout. For more information, see Run healthchecks.
Delivery groups: Machine restart schedules
You can now indicate whether a restart schedule affects machines that are in maintenance mode.This feature is available only in PowerShell. For details, see Scheduled restarts for machines in main‑tenance mode.
Virtual Delivery Agents (VDAs) 2006
Version 2006 of the Windows single‑session OS and multi‑session OS VDAs includes the following en‑hancements. These items are in addition to the VDA installation and upgrade items listed earlier inthis article.
Group policy to enable and disable keyboard synchronization and Input Method Editor (IME)
A Studio policy is included to replace registry configurations that enable or disable dynamic keyboardlayout synchronization, Input Method Editor (IME), Unicode keyboard layout mapping, and hide orshow the keyboard layout switch notification dialog message. For more information, see Keyboardand Input Method Editor (IME).
Seamless window enhancement
When you lock a seamless session, its log‑on screen is nowno longer full‑screen. The endpoint’s desk‑top or other applications are accessible.
Virtual channel allow list
This feature enables the use of an allow list that specifies which virtual channels are allowed to beopened in an ICA session. For more information, see Virtual channel allow list policy settings.
Citrix Licensing 11.16.6
Citrix Licensing 11.16.6 contains new features and fixed and known issues.
Citrix Federated Authentication Service 2006
Citrix Federated Authentication Service (FAS) 2006 contains new features.
© 1999–2022 Citrix Systems, Inc. All rights reserved. 14

Citrix Virtual Apps and Desktops
Support for Active Directory‑Based Activation
This release adds support for Active Directory‑Based Activation (ADBA). ADBA enables you to activatemachines through their domain connections. Machines are immediately activated when they jointhe domain. These machines remain activated as long as they remain joined to the domain and incontact with it. This functionality is only supported on Windows 10, Windows Server 2012 R2 andlater versions. For more information, see Active Directory‑based activation.
Related components
For documentation about related components, see:
• Citrix App Layering• HDX RealTime Optimization Pack• Licensing• Linux Virtual Delivery Agent• Profile Management• Citrix Provisioning• Citrix SCOMManagement Packs• Self‑Service Password Reset• Session Recording• StoreFront• Workspace Environment Management
More information
• Be sure to check Deprecation for any changes to announcement and removal versions.• For information about product name and version number changes that were introduced in theyear 2018, see New names and numbers.
Fixed issues
September 15, 2021
The following issues have been fixed since Citrix Virtual Apps and Desktops 7 2003:
Citrix Director
• In Citrix Director, when you pull the report for a Delivery Group without a failed connectionon the Failure tab under Trends, the details populate correctly. But details of all the Delivery
© 1999–2022 Citrix Systems, Inc. All rights reserved. 15

Citrix Virtual Apps and Desktops
Groups, including theDeliveryGroup that has no failed connections,might appear as failed con‑nections when you export the report. [CVADHELP‑14392]
• When Citrix Director attempts to set up an email configuration using an SMTP server, this errormessage might appear:
Invalid Email Server
[CVADHELP‑14449]
Citrix Provisioning
Citrix Provisioning 2006 documentation provides specific information about the updates in this re‑lease.
Citrix Studio
• When you run Studio as a published app, Studio might become unresponsive. [CVADHELP‑14207]
Delivery Controller
• Some published applications might cause application enumeration to fail. The issue occurswhen a corrupted application icon is present in an .exe file. [CVADHELP‑13133]
• When using the PowerShell command Get‑ApplibAppvPackage, the command might not rec‑ognize AppVApplications as a returned property. [CVADHELP‑13296]
• When you add administrators of other domains to Citrix Studio, Studiomight display the follow‑ing error message:
Error: Failed to validate the Central Configuration Service Location.
You do not have sufficient permissions to administer the Site using Studio, or there is aproblemwith the Delegated Administration service.
The issue occurs if a domain controller in any one of the domains is unreachable. [CVADHELP‑13651]
• Attempts to import synchronized configurations to the Local Host Cachedatabasemight repeat‑edly fail with an Error 505. [CVADHELP‑14237]
• Delivery Controllers might receive the following Local Host Cache Error 505 in the event log:
Unknown Error.
[CVADHELP‑14428]
© 1999–2022 Citrix Systems, Inc. All rights reserved. 16
Citrix Virtual Apps and Desktops
• After you upgrade XenApp and XenDesktop 7.15 Cumulative Update 1 to Cumulative Update 3,attempts to import Local Host Cache (LHC) might fail with an Error 505. [CVADHELP‑14429]
• When you log on to a new session using Citrix Director, the logonmight not appear on the Aver‑age Logon Duration graph available on the Logon Performance tab under Trends. However,the logon appears in the Logon Duration by User Session form. [CVADHELP‑14740]
Federated Authentication Service
Federated Authentication Service 2006 contains no fixed issues.
General
• When you modify an existing VDA installation using the meta installer, you can add MCSIO stor‑age optimization to the installation by selecting the option ‘Enable MCSIO write cache for stor‑age optimization.’ The installation proceeds without installing the MCSIO driver. [HDX‑21754]
Licensing
Licensing 2006 documentation provides specific information about the updates in this release.
Linux VDA
Linux VDA 2006 documentation provides specific information about the updates in this release.
Profile Management
Profile Management 2006 documentation provides specific information about the updates in this re‑lease.
Universal Print Server
Client
• When you attempt to launch an application, the Citrix Print Manager Service (CpSvc.exe) mightexit unexpectedly. [CVADHELP‑13945]
© 1999–2022 Citrix Systems, Inc. All rights reserved. 17

Citrix Virtual Apps and Desktops
VDA for single‑session OS
Installing, Uninstalling, Upgrading
• When you upgrade a VDA, theMaxVideoMemoryBytes registry key might revert to the defaultvalue. [CVADHELP‑13629]
Printing
• When you attempt to launch an application, the Citrix Print Manager Service (CpSvc.exe) mightexit unexpectedly. [CVADHELP‑13945]
• PDF printers automatically created might not be deleted. The issue occurs if they are createdunder HKEY_LOCAL_MACHINE\SOFTWARE instead of HKEY_CURRENT_CONFIG. [CVADHELP‑14280]
Session/Connection
• VDAs might experience a fatal exception on ctxdvcs.sys and display a blue screen. [CVADHELP‑13000]
• When you reconnect to an active session on another machine, redirected printers and clientdrivesmightbemissing. The issueoccurswhenyoumove fromonemachine toanotherwithoutlocking or disconnecting the active user session. [CVADHELP‑13035]
• When you configure the High DPI setting to use the native resolution instead of high DPI, DPIscaling between the VDA and the user device might not match. The issue occurs during theinitial connection. [CVADHELP‑13205]
• In a multi‑monitor environment, applications might not display consistently on the samemon‑itor. The issue occurs when youmove to a new workstation. [CVADHELP‑13657]
• A VDA might become unresponsive after restart. The issue occurs when security software suchas Symantec SEP enforces security scans. [CVADHELP‑13832]
• With theAutomatickeyboarddisplaypolicy enabled,whenyouclickon theGoogle searchbox,the keyboard might not pop up automatically. The issue occurs when a session is running onthe Internet Explorer, Firefox, or Chrome browsers. [CVADHELP‑14065]
• In a double‑hop scenario, a single user might consume two Citrix Concurrent User (CCU) li‑censes. Double hop iswhen a user launches theHDX sessionwithin another HDX session (for ex‑ample, when you launch a published application within a virtual desktop session). [CVADHELP‑14409]
• With the time zone policy set toUse local time of the client, the time zonemight be redirectedincorrectly when you launch a session through Citrix Workspace app for HTML5. For example,
© 1999–2022 Citrix Systems, Inc. All rights reserved. 18

Citrix Virtual Apps and Desktops
the time is set toUTC+01:00 instead ofUTC+00:00. As a result, theAutomatically adjust clockfor Daylight Saving setting is cleared instead of being checked. [CVADHELP‑14471]
Smart Cards
• After you configure smart card authentication onWindows 10, smart card pass‑through authen‑tication might fail if you launch a desktop in a user session. The issue occurs when you launcha desktop from a thin client. [CVADHELP‑11757]
System Exceptions
• USB redirection can cause VDAs to experience a fatal exception, displaying a blue screen withbug check codeSYSTEM_THREAD_EXCEPTION_NOT_HANDLED (7e). Also, global lock forUSBredirection might not be released, thus blocking other redirections. [CVADHELP‑9237]
• The Service Host (svchost.exe) process or the wfshell.exe process might experience an ac‑cess violation and exit unexpectedly. The issue occurs because of the faulting module,icaendpoint.dll. [CVADHELP‑14276]
User Experience
• Desktop sessionsmight display artifacts that obscure screen contents and other portions of thedisplay. [CVADHELP‑13301]
VDA for multi‑session OS
Printing
• Attempts to print documents to a different output printer tray might fail. The print job usesthe default tray to print documents even if you choose a different tray in the Print dialog box.[CVADHELP‑13492]
• When you attempt to launch an application, the Citrix Print Manager Service (CpSvc.exe) mightexit unexpectedly. [CVADHELP‑13945]
• PDF printers automatically created might not be deleted. The issue occurs if they are createdunder HKEY_LOCAL_MACHINE\SOFTWARE instead of HKEY_CURRENT_CONFIG. [CVADHELP‑14280]
Session/Connection
• When you launch a published application on a multi‑session VDA, the Windows RunOnce reg‑istry key might not execute. [CVADHELP‑11991]
© 1999–2022 Citrix Systems, Inc. All rights reserved. 19

Citrix Virtual Apps and Desktops
• When attempting to highlight text in a user session, you might experience performance issues.The issue occurs when you do that in Microsoft Outlook Version 2016 running in a publisheddesktop. [CVADHELP‑12886]
• VDAs might experience a fatal exception on ctxdvcs.sys and display a blue screen. [CVADHELP‑13000]
• In a multi‑monitor environment, applications might not display consistently on the samemon‑itor. The issue occurs when youmove to a new workstation. [CVADHELP‑13657]
• A VDA might become unresponsive after restart. The issue occurs when security software suchas Symantec SEP enforces security scans. [CVADHELP‑13832]
• A user session might close unexpectedly. The issue occurs with unauthenticated (anonymous)users when they launch a second application in windowedmode. [CVADHELP‑13917]
• With the Automatic keyboard display policy enabled, when you click on the Google searchbox, the keyboard might not pop up automatically. The issue occurs when a session is runningon the Internet Explorer, Firefox, or Chrome browsers. [CVADHELP‑14065]
• If you connect a USB microphone to a user device and launch a session, the USB microphonemight fail to redirect. The USB device displays as Optimized, Policy Restricted. [CVADHELP‑14301]
• When you lock a seamless session, the logon windowmight cover the entire screen, regardlessof the size of the session window. As a result, you cannot access the endpoint’s desktop andother applications. [CVADHELP‑14589]
System Exceptions
• USB redirection can cause VDAs to experience a fatal exception, displaying a blue screen withbug check codeSYSTEM_THREAD_EXCEPTION_NOT_HANDLED (7e). Also, global lock forUSBredirection might not be released, thus blocking other redirections. [CVADHELP‑9237]
• VDAsmight experiencea fatal exceptiononpicadm.sys anddisplayablue screenwithbugcheckcode 0x22. [CVADHELP‑14332]
• After you upgrade a VDA from Version 1912 to Version 2003, the Group Policy engine(CseEngine.exe) service might exit unexpectedly. [CVADHELP‑14515]
User Experience
• Desktop sessionsmight display artifacts that obscure screen contents and other portions of thedisplay. [CVADHELP‑13301]
© 1999–2022 Citrix Systems, Inc. All rights reserved. 20

Citrix Virtual Apps and Desktops
Virtual Desktop Components – Other
• When you launch an App‑V application from a VDA hosting many App‑V applications, the VDAmight deregister. The issue occurs when the time it takes to process associated policy files islong. [CVADHELP‑12592]
• When you open a file with the associated published App‑V application, the application opens.But the file fails to open in the associated application. [CVADHELP‑13971]
• During a call, if a user opens a shared file on Microsoft Teams, the call might disconnect.[CVADHELP‑14303]
• Whenyou launchanApp‑Vapplicationusing a shortcut that is locatedoutsideof theapplicationpackage, the appve argument might be added to the command line. This appve argument isunnecessary. [CVADHELP‑14369]
Known issues
September 17, 2021
The Citrix Virtual Apps and Desktops 7 2006 release contains the following issues. Components andfeatures that are documented separately have their own known issues articles.
This warning applies to any workaround that suggests changing a registry entry:
Warning:
Editing the registry incorrectly can cause serious problems that might require you to reinstallyour operating system. Citrix cannot guarantee that problems resulting from the incorrect useof Registry Editor can be solved. Use Registry Editor at your own risk. Be sure to back up theregistry before you edit it.
Install and upgrade
• When you run the Citrix Virtual Apps and Desktops metainstaller, on the Diagnostics page ifyou click Connect without first selecting Collect diagnostic information, after you close theConnect to Citrix Insight Services dialog theNext button is disabled and you cannotmove tonext page. To re‑enable the Next button, select and immediately deselect Collect diagnosticinformation. [XAXDINST‑572]
© 1999–2022 Citrix Systems, Inc. All rights reserved. 21

Citrix Virtual Apps and Desktops
General
• If you try to add a protected app to your Favorites, this message might appear, “Your apps arenot available at this time…”When you then clickOK, this message appears, “Cannot add app.”After you switch to the Favorites screen, the protected app is listed there, but you can’t removeit from Favorites. [WSP‑5497]
• In the Chrome browser with browser content redirection in effect, when you click on a link thatopens a new tab, the tab might not open. As a workaround, select Always allow pop‑ups andredirects in the Pop‑ups blockedmessage. [HDX‑23950]
• After installing the Skype for BusinessWebAppPlug‑in, webcamsmight not be enumerated andmeeting pages on Firefox might not refresh automatically. [HDX‑13288]
• When using Windows 10 1809 LTSC, VCLibs dependencies fail to install. [HDX‑16754]
• The combo box might not display properly when a user selects a combo box that is already infocus on the host. As a workaround, select another UI element and then select the combo box.[HDX‑21671]
• You have enabled Local App Access. If you start aWindows 2012 R2 VDA session, disconnect andreconnect the session, and then start a local application andmaximize it, the VDA taskbarmighttruncate the application. [HDX‑21913]
• WhenyouusegenericUSB redirection to redirect a compositeUSBdevice that contains amouseas a subdevice into an RDS session, that device might not be available in the session. Themostcommon such device is a Wacom drawing tablet (not Wacom signature pad). As a workaround,manually starticak2meng.exe in the sessionafter loggingon. Wesuggest creatingagrouppol‑icy for Windows Multi‑session OS 2016 or 2019 (not needed for Windows 10) that automaticallystartsC:\Program Files\Citrix\HDX\bin\icak2meng.exe. Create thepolicy to start theprogram in each user’s session as they log on. Only one instance running in each user’s session.The workaround is not need [HDX‑25085]
• Whenboth IPv4and IPv6addressing is configured in yournetwork, resources in adelivery groupmay not be accessible when the delivery group uses a Broker Access Policy rule configured toallow IPv4 address filtering only. To ensure all resource filtering behaves as expected, configurethe Broker Access Policy rule to include both client IPv4 and IPv6 addresses. [WADA‑7776]
For example, to set rules allowing IPv4 and IPv6 addresses via ‘direct to StoreFront’ and ‘CitrixGateway’ access, use PowerShell such as:
1 Set-BrokerAccessPolicyRule -Name "Apps_Direct" -IncludedClientIPFilterEnabled $True -IncludedClientIPs @("10.0.0.1","2001::3")
2 Set-BrokerAccessPolicyRule -Name "Apps_AG" -IncludedClientIPFilterEnabled $True -IncludedClientIPs @("10.0.0.1","2001::3")
© 1999–2022 Citrix Systems, Inc. All rights reserved. 22

Citrix Virtual Apps and Desktops
To confirm a rule, use PowerShell such as:
1 Get-BrokerAccessPolicyRule -Name "Apps_Direct" | Select Name,IncludedClientIPFilterEnabled,IncludedClientIPs
This returns the following when the rule is correctly set for IPv4 and IPv6 addresses:
1 Name IncludedClientIPFilterEnabled IncludedClientIPs2 -- --------------------------- -----------------3 Apps_Direct True {4 10.0.0.1/32, 2001::3/128 }
• When applications from Microsoft Office 365 build 16.0.7967 and later are published as appli‑cations from a Windows Server 2019 host, Office license activation fails. This is caused by aMicrosoft limitation. [LCM‑7637]
Director
• If you configure your on‑premises Citrix Virtual Apps and Desktop site with Citrix Analytics forPerformanceandyour subscriptionexpires, youmight experiencememory spikes fromtheMon‑itor Service. As a workaround, use the Disconnect Site link on the Analytics tab in your on‑premises Director console. [DIR‑12625]
• When you try to view the historical utilization ofmachines on theMachineDetails page for VDAversions2003and2006, the followingerrormessageappears (evenafter yousetEnableprocessmonitoring to Allowed in Citrix Studio).
Process data collection is disabled on this machine. Enable process monitoring policy tostart collection.
As a workaround, set the registry value of HKLM\Software\Citrix\GroupPolicy\SaveRsopToFile to 1 to view the policy monitoring data in Citrix Director. [DIR‑11794]
• The Console link on Citrix Director > Machine Details does not launch the Machine Console inthe Microsoft Edge 44 and Firefox 68 ESR browsers. [DIR‑8160]
• If you have upgraded to Director 7 1903 or later from any previous releases and not cleared thebrowser cache (not selected the ‘Disable cache’ check box), custom reports previously createdare lost and Director displays an “Unexpected Server error” on the Custom Reports tab. Dif‑ferences in UI design between previous and current versions of Director can cause this issue.Disable cache and perform a hard refresh to view old custom reports and create and view newcustom reports. [DIR‑7634]
© 1999–2022 Citrix Systems, Inc. All rights reserved. 23

Citrix Virtual Apps and Desktops
Graphics
• Setting the policyViewwindowcontentswhile dragging toProhibiteddoes notwork on ESXiand Hyper‑V. [HDX‑22002]
• If you start a video preview using a 64‑bit webcam app over Theora compression, the sessionmight crash. [HDX‑21443]
• Skype Universal Windows app (UWA) launches with a black background. In some cases, thisbackground occupies the client’s entire screen. [HDX‑22088]
• In some cases, an application may launch in the background while another application is cur‑rently in focus. As a result, local window ordering is lost. [HDX‑21569]
• The XenCenter consolemight display a blank screen after disconnecting a XenDesktop session.As a workaround, send CTLR+ALT+DEL to the XenCenter console to make the console screenappear. [HDX‑17261]
• DPImight notmatch during a session running onWindowsMulti‑session OS 2016 or 2019whenthe DPI is changed on the client and the session is reconnected. As a workaround, resize thesession window tomatch the DPI. [HDX‑17313]
• These issues apply to AMD hardware encoding. [HDX‑20476]:
– Pixelation might occur when using Citrix Workspace app for Windows. As a workaround,make the following registry settingon theclient thathasCitrixWorkspaceapp forWindowsinstalled:
HKEY_LOCAL_MACHINE\Software\Citrix\ICAClient\Engine\Configuration\Advanced\Modules\GfxRender(32‑bit)
HKEY_LOCAL_MACHINE\Software\Wow6432Node\Citrix\ICAClient\Engine\Configuration\Advanced\Modules\GfxRender(64‑bit)
Name: MaxNumRefFrames
Type: DWORD
Value: 5
– Youmight see less than optimal performance when using 4k resolution. This issue causesa frame rate of only 7–10 frames per second. Also, encoding time increases.
– Video stutter might occur for the first two to five seconds of the video when using the Se‑lective H.264 graphics mode. RapidFire SDK is not designed for this use case.
Printing
• Universal Print Server printers selected on the virtual desktopdonot appear in theDevices andPrinterswindow in Windows Control Panel. However, when users are working in applications,
© 1999–2022 Citrix Systems, Inc. All rights reserved. 24
Citrix Virtual Apps and Desktops
they can print using those printers. This issue occurs only on the Windows Server 2012, Win‑dows 10 and Windows 8 platforms. For more information, see CTX213540. [HDX‑5043, 335153]
• Thedefault printermight not bemarked correctly in theprintingdialogwindow. This issuedoesnot affect print jobs sent to the default printer.[HDX‑12755]
Third‑party issues
• Chrome supports UI Automation only for toolbars, tabs, menus, and buttons around a webpage. Because of this Chrome issue, the automatic keyboard display feature might not workin a Chrome browser on touch devices. As a workaround, run chrome --force-renderer-accessibility or you can open a new browser tab, type chrome://accessibility, andenable Native accessibility API support for specific or all pages. In addition, when you pub‑lish a seamless app, you can publish Chrome with the --force-renderer-accessibilityswitch. [HDX‑20858]
• An issue in Microsoft Windows 10 version 1809 might cause slight erratic behavior when usingthe Surface Pro and Surface Book pen. [HDX‑17649]
• A VDA running on Azuremight freeze when using Enlightened Data Transport (EDT), requiring asession reconnect. As a workaround, set edtMSS=1350 and OutbufLength=1350 in Azure envi‑ronments. For more information, see CTX231821. [HDX‑12913]
• In browser content redirection, after starting a YouTube video using the YouTube HTML5 videoplayer, full‑screenmodemightnotwork. Youclick the icon in the lower‑right cornerof thevideo,and the video doesn’t resize leaving the black background in the full area of the page. As aworkaround, click the full screen button, and then select theater mode. [HDX‑11294]
Deprecation
April 14, 2021
The announcements in this article are intended to give you advanced notice of platforms, Citrix prod‑ucts, and features that are being phased out so that you can make timely business decisions. Citrixmonitors customer use and feedback to determine when they are withdrawn. Announcements canchange in subsequent releases and might not include every deprecated feature or functionality. Fordetails about product lifecycle support, see the Product Lifecycle Support Policy article. For infor‑mation about the Long Term Service Release (LTSR) servicing option, see https://support.citrix.com/article/CTX205549.
© 1999–2022 Citrix Systems, Inc. All rights reserved. 25
Citrix Virtual Apps and Desktops
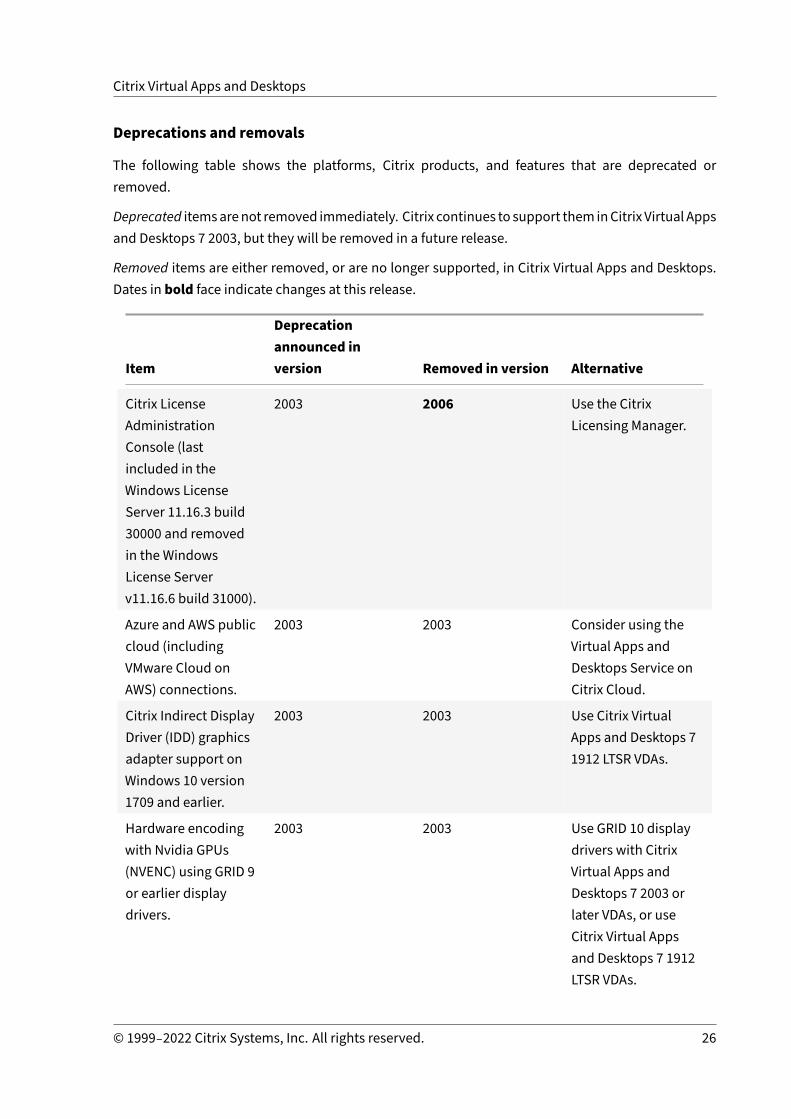
Deprecations and removals
The following table shows the platforms, Citrix products, and features that are deprecated orremoved.
Deprecated itemsarenot removed immediately. Citrix continues to support them inCitrix Virtual Appsand Desktops 7 2003, but they will be removed in a future release.
Removed items are either removed, or are no longer supported, in Citrix Virtual Apps and Desktops.Dates in bold face indicate changes at this release.
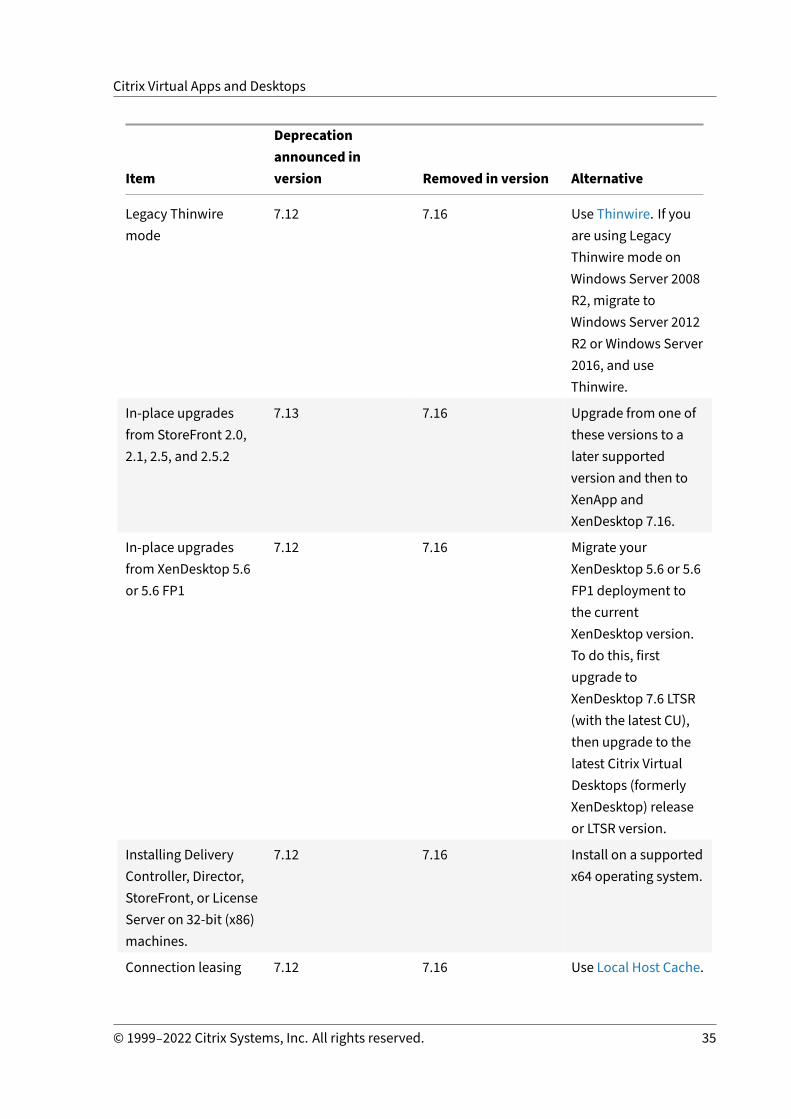
Item
Deprecationannounced inversion Removed in version Alternative
Citrix LicenseAdministrationConsole (lastincluded in theWindows LicenseServer 11.16.3 build30000 and removedin the WindowsLicense Serverv11.16.6 build 31000).
2003 2006 Use the CitrixLicensing Manager.
Azure and AWS publiccloud (includingVMware Cloud onAWS) connections.
2003 2003 Consider using theVirtual Apps andDesktops Service onCitrix Cloud.
Citrix Indirect DisplayDriver (IDD) graphicsadapter support onWindows 10 version1709 and earlier.
2003 2003 Use Citrix VirtualApps and Desktops 71912 LTSR VDAs.
Hardware encodingwith Nvidia GPUs(NVENC) using GRID 9or earlier displaydrivers.
2003 2003 Use GRID 10 displaydrivers with CitrixVirtual Apps andDesktops 7 2003 orlater VDAs, or useCitrix Virtual Appsand Desktops 7 1912LTSR VDAs.
© 1999–2022 Citrix Systems, Inc. All rights reserved. 26

Citrix Virtual Apps and Desktops
Item
Deprecationannounced inversion Removed in version Alternative
Self‑Service PasswordReset (SSPR) feature.
2003 2006
Citrix SCOMManagement Packsfor XenApp andXenDesktop,Provisioning Services,and StoreFront. Forthe product versionsthat can bemonitored, see CitrixSCOMManagementPacks documention.
1912 Use Director formonitoring andmanaging yourdeployment. Formore information onSCOM EOL andalternatives, seehttps://support.citrix.com/article/CTX266943.
Support for Microsoft.NET Frameworkversions prior toversion 4.8 for VDAsand core servercomponents.Includes DeliveryController, Studio,Director, andStoreFront.
1912 2003 Upgrade to .NETFramework version4.8.
VDAs on WindowsServer 2012 R2.
1912 2003 Install VDAs on asupported operatingsystem.
AppDNA applicationmigration componentof Citrix Virtual Appsand DesktopsPremium edition.
1909 2003
Installing Studio on32‑bit (x86)machines.
1909 2003 Install on a supportedx64 operating system.
© 1999–2022 Citrix Systems, Inc. All rights reserved. 27
Citrix Virtual Apps and Desktops
Item
Deprecationannounced inversion Removed in version Alternative
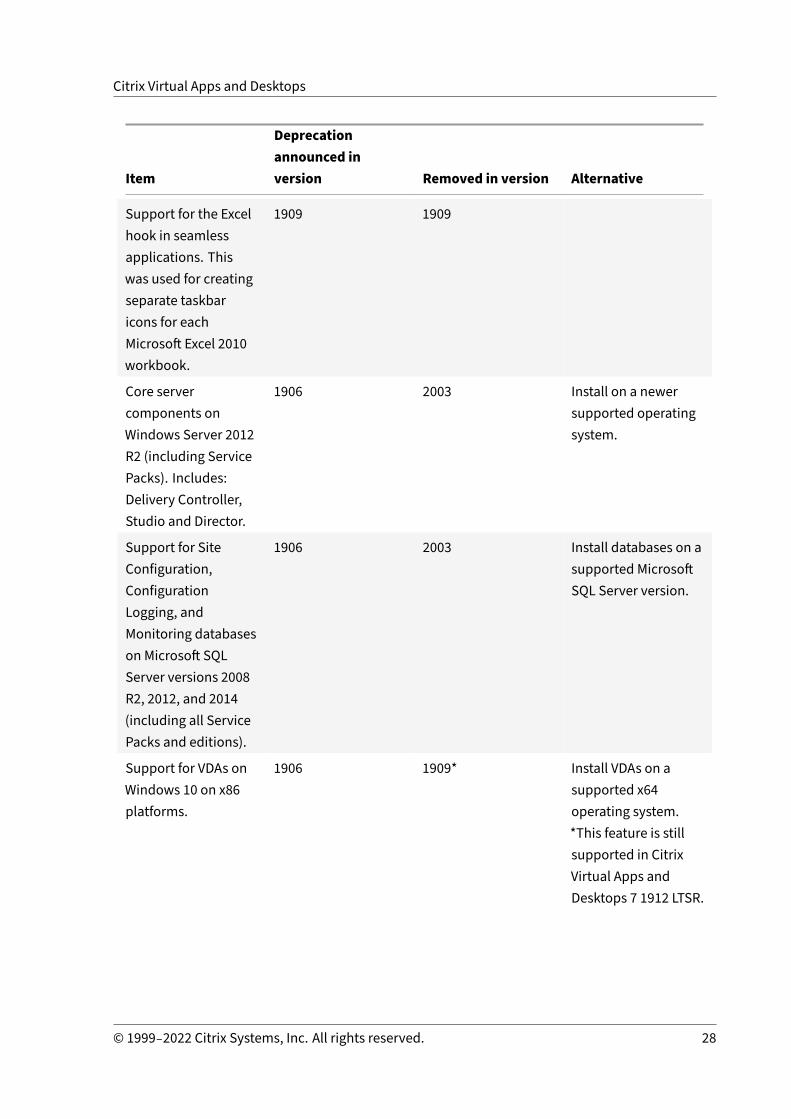
Support for the Excelhook in seamlessapplications. Thiswas used for creatingseparate taskbaricons for eachMicrosoft Excel 2010workbook.
1909 1909
Core servercomponents onWindows Server 2012R2 (including ServicePacks). Includes:Delivery Controller,Studio and Director.
1906 2003 Install on a newersupported operatingsystem.
Support for SiteConfiguration,ConfigurationLogging, andMonitoring databaseson Microsoft SQLServer versions 2008R2, 2012, and 2014(including all ServicePacks and editions).
1906 2003 Install databases on asupported MicrosoftSQL Server version.
Support for VDAs onWindows 10 on x86platforms.
1906 1909* Install VDAs on asupported x64operating system.*This feature is stillsupported in CitrixVirtual Apps andDesktops 7 1912 LTSR.
© 1999–2022 Citrix Systems, Inc. All rights reserved. 28

Citrix Virtual Apps and Desktops
Item
Deprecationannounced inversion Removed in version Alternative
Removal of CitrixSmart Tools Agentfrom Citrix VirtualApps and Desktopsinstallation media.
1903 1906
Removal of CitrixBrokering Protocol1.0.
7.15 LTSR CU3
Removal of DeliveryController options forthe followingend‑of‑life productswithin StoreFront:VDI‑in‑a‑Box, andXenMobile (9.0 andearlier).
1903 1903
Support for Linux VDAon Red Hat EnterpriseLinux/CentOS 7.5.
1903 1903 Install Linux VDA on alater version of RedHat Enterprise Linux.
StoreFront supportfor users to accessdesktops on DesktopAppliance sites
1811 1912 Use Desktop Lock fornondomain‑joineduse cases.
Support forFramehawk displayremoting technology
1811 1903 Use Thinwire withadaptive transportenabled.
© 1999–2022 Citrix Systems, Inc. All rights reserved. 29

Citrix Virtual Apps and Desktops
Item
Deprecationannounced inversion Removed in version Alternative
Support for CitrixSmart Scale in allCitrix Virtual Appsand Desktops (andXenApp andXenDesktop)versions. Thisfunctionality willreach End of Life on31 May 2019.
1808 1906 Consider using theVirtual Apps andDesktops Service onCitrix Cloud forimproved powermanagementfunctionality.
Support for Microsoft.NET Frameworkversions 4.5.1, 4.5.2,4.6, 4.6.1, 4.6.2, and4.7 by CitrixStoreFront, CitrixVDAs, Citrix Studio,Citrix Director, andCitrix DeliveryController.
7.18 1808 Upgrade to .NETFramework version4.7.1 or later. (Theinstallerautomatically installs.NET Framework 4.7.1if it is not alreadyinstalled.)
Support for Linux VDAon Red Hat EnterpriseLinux 7.3.
7.18 1808 Install Linux VDA on alater version of RedHat Enterprise Linux.
StoreFront supportfor TLS 1.0, and TLS1.1 protocolsbetween Citrix VirtualApps and Desktops(formerly XenApp andXenDesktop) andCitrix Receiver, andWorkspace Hub.
7.17 Upgrade CitrixReceivers to a CitrixWorkspace app thatsupports the TLS 1.2protocol. For moreinformation on CitrixWorkspace app, seehttps://docs.citrix.com/en‑us/citrix‑workspace‑app.
© 1999–2022 Citrix Systems, Inc. All rights reserved. 30

Citrix Virtual Apps and Desktops
Item
Deprecationannounced inversion Removed in version Alternative
VDA support forpolicy setting“Automaticinstallation of in‑boxprinter drivers”.
7.16 7.16 None. Policy settingsupported with VDAson earlier OSs only(Windows 7, WindowsServer 2012 R2 andearlier).
Support for the LinuxVDA on SUSE LinuxEnterprise Server 11Service Pack 4.
7.16 7.16 Install Linux VDA onsupported SUSEversion.
Support for CitrixWDDM driver on VDAs
7.16 7.16 The Citrix WDDMdriver is no longerinstalled with VDAs.
Mobility SDK / MobileSDK (from the formerCitrix Labs)
7.16 Superseded bymobile experiencepolicy settings, andnative experiences forhosteddesktops/apps.
VDAs on Windows 10version 1511(Threshold 2) andearlier WindowsSingle‑session OSreleases, includingWindows 8.x andWindows 7 (seehttps://www.citrix.com/blogs/2018/01/08/the‑citrix‑strategy‑for‑windows‑7‑virtual‑desktop‑users/).
7.15 LTSR (and 7.12) 7.16 Install Single‑sessionOS VDAs on Windows10 minimum version1607 (Redstone 1) ornewer Semi‑AnnualChannels. If using1607 LTSB, werecommend a 7.15VDA. See CTX224843.
© 1999–2022 Citrix Systems, Inc. All rights reserved. 31

Citrix Virtual Apps and Desktops
Item
Deprecationannounced inversion Removed in version Alternative
VDAs on WindowsServer 2008 R2 andWindows Server 2012(including ServicePacks)
7.15 LTSR (and 7.12) 7.16 Install VDAs on asupported operatingsystem.
Desktop CompositionRedirection (previously known asDirectX CommandRemoting) (DCR)
7.15 LTSR 7.16 Use Thinwire.
Citrix Receiver forWeb classicexperience (“greenbubbles” userinterface)
7.15 LTSR (andStoreFront 3.12)
1903 Citrix Receiver forWeb unifiedexperience.
Core components onWindows Server 2012and Windows Server2008 R2 (includingService Packs).Includes: DeliveryController, Studio,Director, StoreFront,License Server, andUniversal PrintServer.
7.15 LTSR 7.18 Install componentson a supportedoperating system.
Self‑Service PasswordReset (SSPR) featureon Windows Server2012 and WindowsServer 2008 R2(including ServicePacks)
7.15 LTSR 7.18 Install on a newersupported operatingsystem.
© 1999–2022 Citrix Systems, Inc. All rights reserved. 32
Citrix Virtual Apps and Desktops
Item
Deprecationannounced inversion Removed in version Alternative
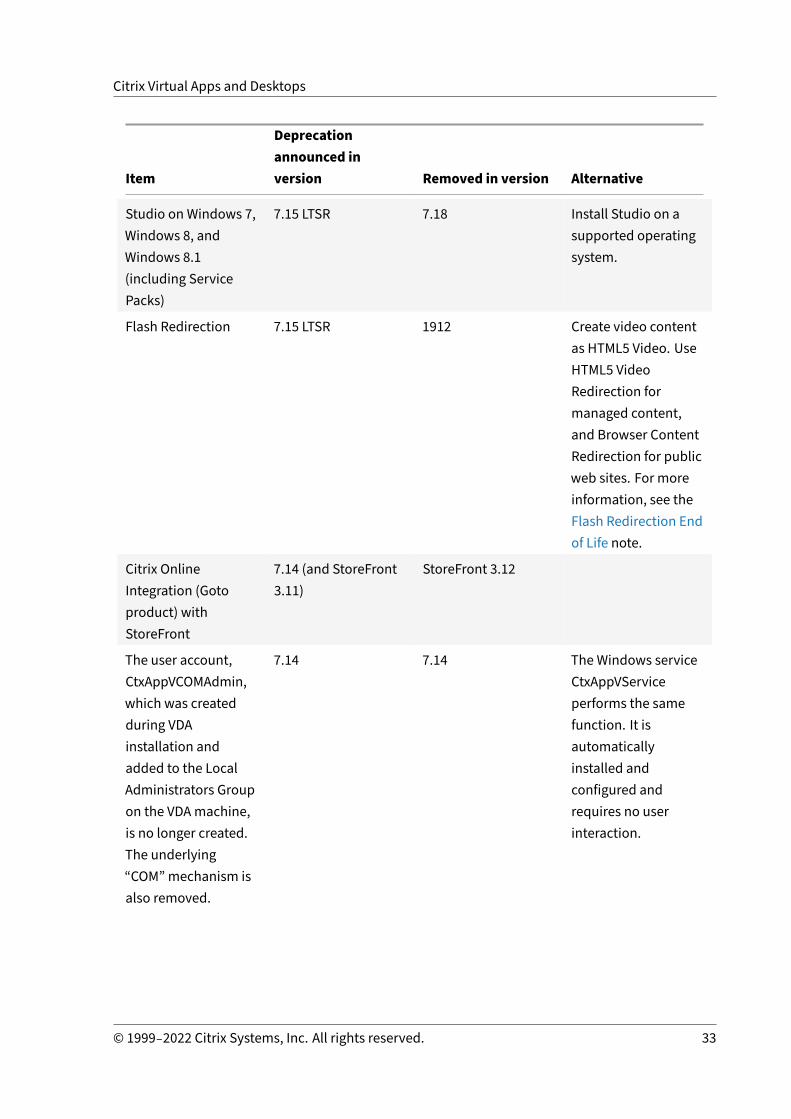
Studio on Windows 7,Windows 8, andWindows 8.1(including ServicePacks)
7.15 LTSR 7.18 Install Studio on asupported operatingsystem.
Flash Redirection 7.15 LTSR 1912 Create video contentas HTML5 Video. UseHTML5 VideoRedirection formanaged content,and Browser ContentRedirection for publicweb sites. For moreinformation, see theFlash Redirection Endof Life note.
Citrix OnlineIntegration (Gotoproduct) withStoreFront
7.14 (and StoreFront3.11)
StoreFront 3.12
The user account,CtxAppVCOMAdmin,which was createdduring VDAinstallation andadded to the LocalAdministrators Groupon the VDAmachine,is no longer created.The underlying“COM”mechanism isalso removed.
7.14 7.14 The Windows serviceCtxAppVServiceperforms the samefunction. It isautomaticallyinstalled andconfigured andrequires no userinteraction.
© 1999–2022 Citrix Systems, Inc. All rights reserved. 33
Citrix Virtual Apps and Desktops
Item
Deprecationannounced inversion Removed in version Alternative
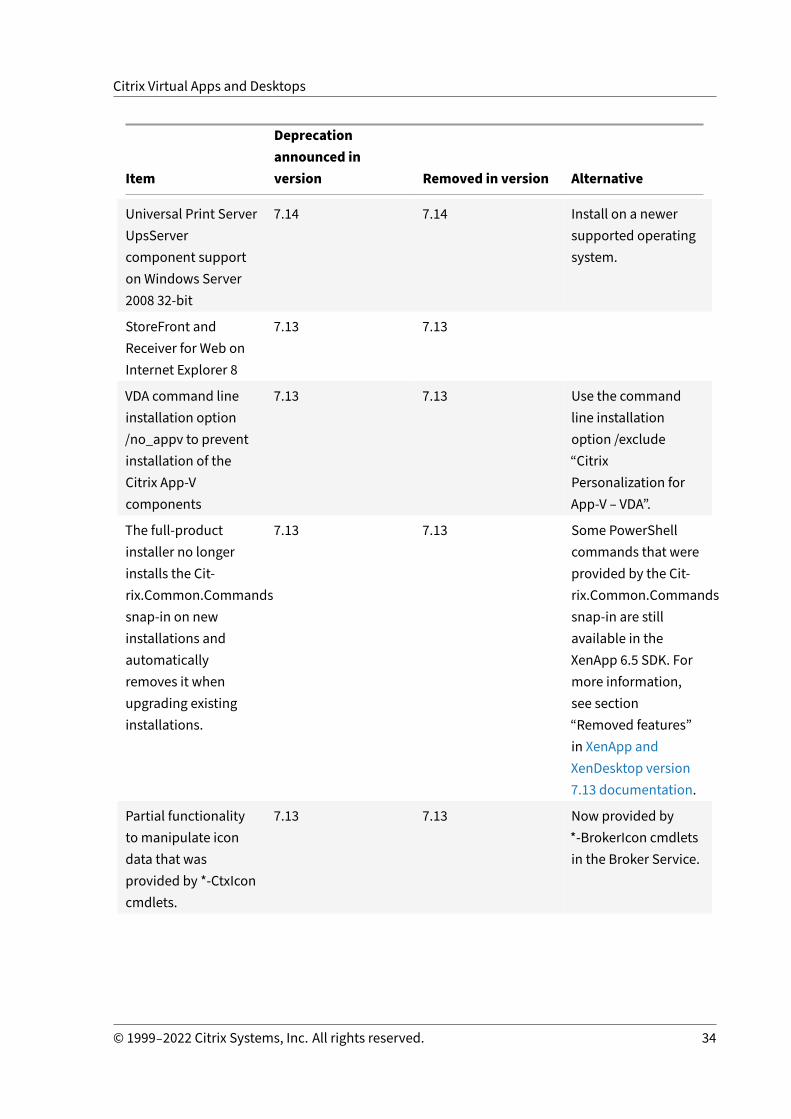
Universal Print ServerUpsServercomponent supporton Windows Server2008 32‑bit
7.14 7.14 Install on a newersupported operatingsystem.
StoreFront andReceiver for Web onInternet Explorer 8
7.13 7.13
VDA command lineinstallation option/no_appv to preventinstallation of theCitrix App‑Vcomponents
7.13 7.13 Use the commandline installationoption /exclude“CitrixPersonalization forApp‑V – VDA”.
The full‑productinstaller no longerinstalls the Cit‑rix.Common.Commandssnap‑in on newinstallations andautomaticallyremoves it whenupgrading existinginstallations.
7.13 7.13 Some PowerShellcommands that wereprovided by the Cit‑rix.Common.Commandssnap‑in are stillavailable in theXenApp 6.5 SDK. Formore information,see section“Removed features”in XenApp andXenDesktop version7.13 documentation.
Partial functionalityto manipulate icondata that wasprovided by *‑CtxIconcmdlets.
7.13 7.13 Now provided by*‑BrokerIcon cmdletsin the Broker Service.
© 1999–2022 Citrix Systems, Inc. All rights reserved. 34
Citrix Virtual Apps and Desktops
Item
Deprecationannounced inversion Removed in version Alternative
Legacy Thinwiremode
7.12 7.16 Use Thinwire. If youare using LegacyThinwire mode onWindows Server 2008R2, migrate toWindows Server 2012R2 or Windows Server2016, and useThinwire.
In‑place upgradesfrom StoreFront 2.0,2.1, 2.5, and 2.5.2
7.13 7.16 Upgrade from one ofthese versions to alater supportedversion and then toXenApp andXenDesktop 7.16.
In‑place upgradesfrom XenDesktop 5.6or 5.6 FP1
7.12 7.16 Migrate yourXenDesktop 5.6 or 5.6FP1 deployment tothe currentXenDesktop version.To do this, firstupgrade toXenDesktop 7.6 LTSR(with the latest CU),then upgrade to thelatest Citrix VirtualDesktops (formerlyXenDesktop) releaseor LTSR version.
Installing DeliveryController, Director,StoreFront, or LicenseServer on 32‑bit (x86)machines.
7.12 7.16 Install on a supportedx64 operating system.
Connection leasing 7.12 7.16 Use Local Host Cache.
© 1999–2022 Citrix Systems, Inc. All rights reserved. 35
Citrix Virtual Apps and Desktops
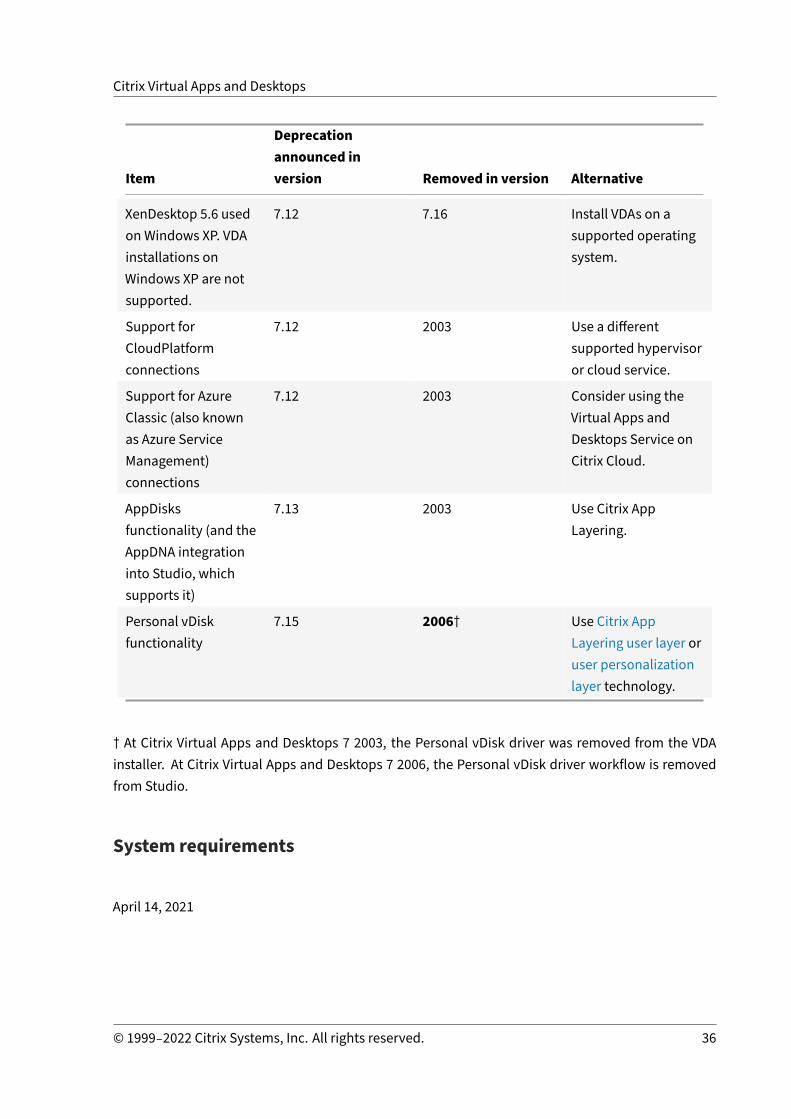
Item
Deprecationannounced inversion Removed in version Alternative
XenDesktop 5.6 usedon Windows XP. VDAinstallations onWindows XP are notsupported.
7.12 7.16 Install VDAs on asupported operatingsystem.
Support forCloudPlatformconnections
7.12 2003 Use a differentsupported hypervisoror cloud service.
Support for AzureClassic (also knownas Azure ServiceManagement)connections
7.12 2003 Consider using theVirtual Apps andDesktops Service onCitrix Cloud.
AppDisksfunctionality (and theAppDNA integrationinto Studio, whichsupports it)
7.13 2003 Use Citrix AppLayering.
Personal vDiskfunctionality
7.15 2006† Use Citrix AppLayering user layer oruser personalizationlayer technology.
† At Citrix Virtual Apps and Desktops 7 2003, the Personal vDisk driver was removed from the VDAinstaller. At Citrix Virtual Apps and Desktops 7 2006, the Personal vDisk driver workflow is removedfrom Studio.
System requirements
April 14, 2021
© 1999–2022 Citrix Systems, Inc. All rights reserved. 36
Citrix Virtual Apps and Desktops
Introduction
The system requirements in this document were valid when this product version released. Updatesaremade periodically. System requirements for components not covered here (such as host systems,Citrix Workspace app, and Citrix Provisioning) are described in their respective documentation.
Review Prepare to install before beginning an installation.
Unless noted, the component installer deploys software prerequisites automatically (such as .NETand C++ packages) if the required versions are not detected on the machine. The Citrix installationmedia also contains some of this prerequisite software.
The installation media contains several third‑party components. Before using the Citrix software,check for security updates from the third party, and install them.
For globalization information, see Knowledge Center article CTX119253.
For components and features that can be installed onWindows Servers, Nano Server installations arenot supported, unless noted. Server Core is supported only for Delivery Controllers and Director.
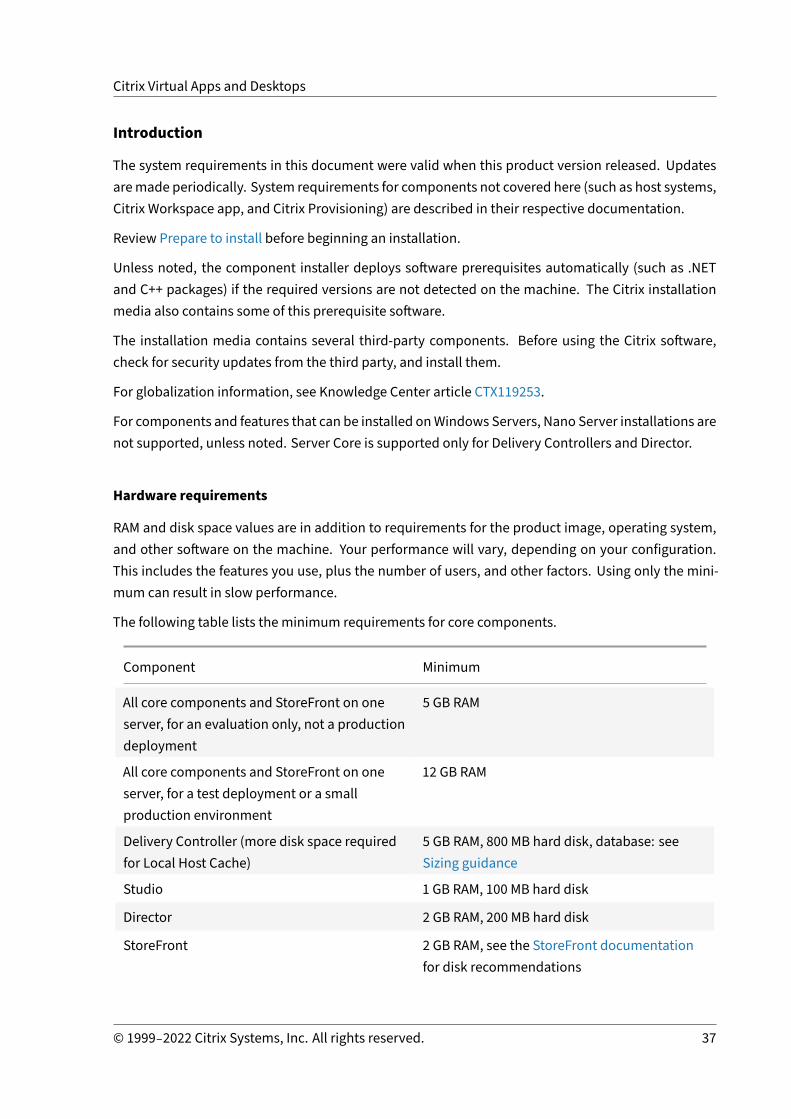
Hardware requirements
RAM and disk space values are in addition to requirements for the product image, operating system,and other software on the machine. Your performance will vary, depending on your configuration.This includes the features you use, plus the number of users, and other factors. Using only the mini‑mum can result in slow performance.
The following table lists the minimum requirements for core components.
Component Minimum
All core components and StoreFront on oneserver, for an evaluation only, not a productiondeployment
5 GB RAM
All core components and StoreFront on oneserver, for a test deployment or a smallproduction environment
12 GB RAM
Delivery Controller (more disk space requiredfor Local Host Cache)
5 GB RAM, 800 MB hard disk, database: seeSizing guidance
Studio 1 GB RAM, 100 MB hard disk
Director 2 GB RAM, 200 MB hard disk
StoreFront 2 GB RAM, see the StoreFront documentationfor disk recommendations
© 1999–2022 Citrix Systems, Inc. All rights reserved. 37

Citrix Virtual Apps and Desktops
Component Minimum
License Server 2 GB RAM; see the Licensing documentation fordisk recommendations
Sizing of VMs that deliver desktops and applications
Specific recommendations cannot be provided because of the complex and dynamic nature of hard‑ware offerings, and every deployment has unique needs. Generally, sizing a Citrix Virtual Apps VM isbased on the hardware and not the user workloads. The exception is RAM. You’ll need more RAM forapplications that consumemore.
For more information:
• Citrix VDI Handbook and Best Practices contains guidance on sizing.• Citrix Virtual Apps and Desktops Single Server Scalability discusses howmany users or VMs canbe supported on a single physical host.
Microsoft Visual C++ 2017 Runtime
InstallingMicrosoftVisual C++ 2017 Runtimeon amachine that hasMicrosoftVisual C++ 2015Runtimeinstalled can result in automatic removal of the Visual C++ 2015 Runtime. This is as designed.
If you’ve already installed Citrix components that automatically install the Visual C++ 2015 Runtime,those components will continue to operate correctly with the Visual C++ 2017 version.
For more information, see the Microsoft article https://developercommunity.visualstudio.com/content/problem/332815/visual‑c‑redistributable‑2017‑install‑removes‑visu.html.
Delivery Controller
Supported operating systems:
• Windows Server 2019, Standard and Datacenter Editions, and with the Server Core option• Windows Server 2016, Standard and Datacenter Editions, and with the Server Core option
Requirements:
• Microsoft .NET Framework 4.8 is installed automatically if it (or a later version) is not alreadyinstalled.
• Microsoft Internet InformationServices (installed automatically, andusedbya feature currentlyin development that is installed by the Citrix Orchestration Service).
• Windows PowerShell 3.0 or later.• Microsoft Visual C++ 2017 Runtime, 32‑bit and 64‑bit.
© 1999–2022 Citrix Systems, Inc. All rights reserved. 38
Citrix Virtual Apps and Desktops
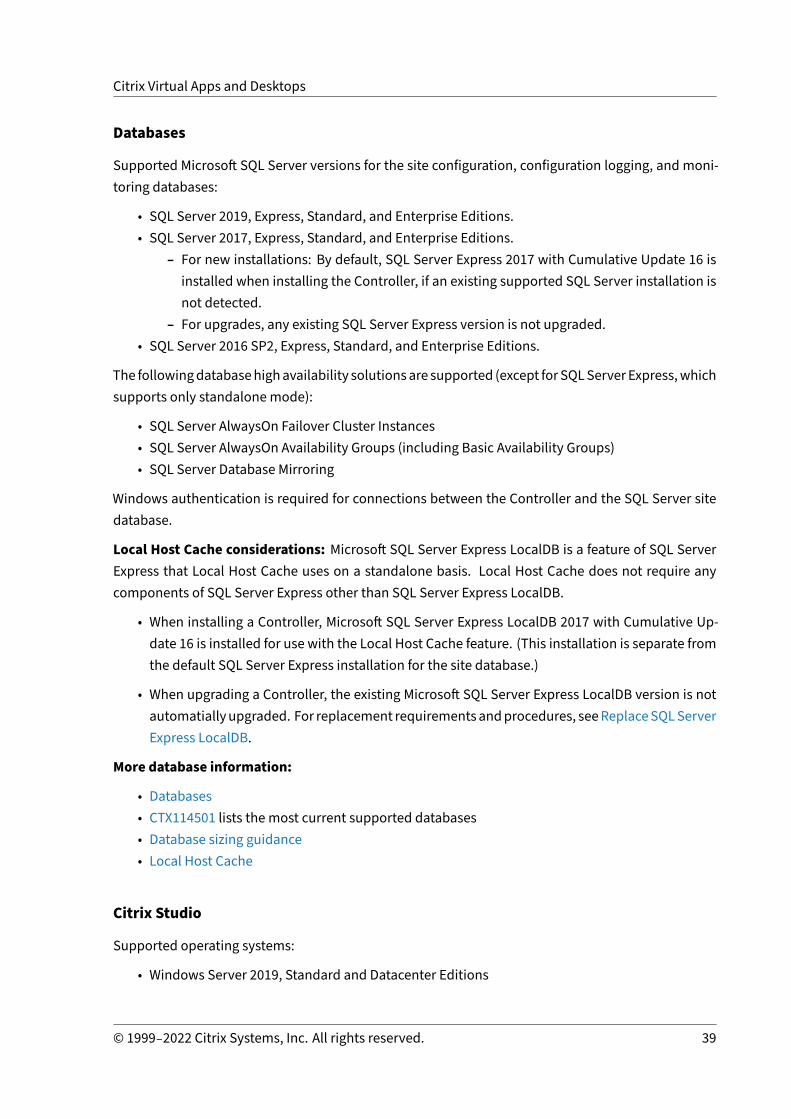
Databases
Supported Microsoft SQL Server versions for the site configuration, configuration logging, and moni‑toring databases:
• SQL Server 2019, Express, Standard, and Enterprise Editions.• SQL Server 2017, Express, Standard, and Enterprise Editions.
– For new installations: By default, SQL Server Express 2017 with Cumulative Update 16 isinstalled when installing the Controller, if an existing supported SQL Server installation isnot detected.
– For upgrades, any existing SQL Server Express version is not upgraded.• SQL Server 2016 SP2, Express, Standard, and Enterprise Editions.
The followingdatabasehighavailability solutionsare supported (except forSQLServerExpress,whichsupports only standalonemode):
• SQL Server AlwaysOn Failover Cluster Instances• SQL Server AlwaysOn Availability Groups (including Basic Availability Groups)• SQL Server Database Mirroring
Windows authentication is required for connections between the Controller and the SQL Server sitedatabase.
Local Host Cache considerations: Microsoft SQL Server Express LocalDB is a feature of SQL ServerExpress that Local Host Cache uses on a standalone basis. Local Host Cache does not require anycomponents of SQL Server Express other than SQL Server Express LocalDB.
• When installing a Controller, Microsoft SQL Server Express LocalDB 2017 with Cumulative Up‑date 16 is installed for use with the Local Host Cache feature. (This installation is separate fromthe default SQL Server Express installation for the site database.)
• When upgrading a Controller, the existing Microsoft SQL Server Express LocalDB version is notautomatiallyupgraded. For replacement requirementsandprocedures, seeReplaceSQLServerExpress LocalDB.
More database information:
• Databases• CTX114501 lists the most current supported databases• Database sizing guidance• Local Host Cache
Citrix Studio
Supported operating systems:
• Windows Server 2019, Standard and Datacenter Editions
© 1999–2022 Citrix Systems, Inc. All rights reserved. 39

Citrix Virtual Apps and Desktops
• Windows Server 2016, Standard and Datacenter Editions• Windows 10 (64‑bit only)
Requirements:
• Microsoft .NET Framework 4.8 is installed automatically if it (or a later version) is not alreadyinstalled.
• Microsoft Management Console 3.0 (included with all supported operating systems).• Windows PowerShell 3.0 or later.
Citrix Director
Supported operating systems:
• Windows Server 2019, Standard and Datacenter Editions, and with the Server Core option• Windows Server 2016, Standard and Datacenter Editions, and with the Server Core option
Requirements:
• Microsoft .NET Framework 4.8 is installed automatically if it (or a later version) is not alreadyinstalled.
• Microsoft Internet Information Services (IIS) 7.0 and ASP.NET 2.0. Ensure that the IIS server rolehas the Static Content role service installed. If this software is not already installed, you areprompted for the Windows Server installation media. Then, that software is installed for you.
• To view the event logs onmachines where Citrix Director is installed, youmust install Microsoft.NET Framework 2.0.
Citrix User Profile Manager:
• Ensure that the Citrix User Profile Manager and Citrix User Profile Manager WMI Plugin are in‑stalled on the VDA (Additional Components page in the installation wizard) and that the CitrixProfile Management Service is running to view the user profile details in Director.
System Center Operations Manager (SCOM) integration requirements:
• Windows Server 2012 R2• System Center 2012 R2 Operations Manager
Supported browsers for viewing Director:
• Internet Explorer 11. Compatibility mode is not supported for Internet Explorer. Use the rec‑ommended browser settings to access Director. When you install Internet Explorer, accept thedefault to use the recommended security and compatibility settings. If you already installedthe browser and chose not to use the recommended settings, go to Tools > Internet Options >Advanced > Reset and follow the instructions.
• Microsoft Edge.
© 1999–2022 Citrix Systems, Inc. All rights reserved. 40

Citrix Virtual Apps and Desktops
• Firefox ESR (Extended Support Release).• Chrome.
The recommended optimal screen resolution for viewing Director is 1366 x 1024.
Virtual Delivery Agent (VDA) for single‑session OS
Supported operating systems:
• Windows 10 (x64 only), minimum version 1607.– For edition support, see Knowledge Center article CTX224843.– For Citrix known issues with version 1709, see Knowledge Center article CTX229052.
Requirements:
• Microsoft .NET Framework 4.8 is installed automatically if it (or a later version) is not alreadyinstalled.
• Microsoft Visual C++ 2017 Runtime, 32‑bit and 64‑bit.
Remote PC Access uses this VDA, which you install on physical office PCs. This VDA supports SecureBoot for Citrix Virtual Desktops Remote PC Access on Windows 10.
Several multimedia acceleration features (such as HDX MediaStreamWindows Media Redirection) re‑quire that Microsoft Media Foundation be installed on the machine on which you install the VDA. Ifthemachine does not haveMedia Foundation installed, themultimedia acceleration features will notbe installed and will not work. Do not remove Media Foundation from the machine after installingthe Citrix software. Otherwise, users will not be able to log on to the machine. On most supportedWindows single‑session OS editions, Media Foundation support is already installed and cannot be re‑moved. However, N editions do not include certain media‑related technologies; you can obtain thatsoftware fromMicrosoft or a third party. For more information, see Prepare to install.
For Linux VDA information, see the Linux Virtual Delivery Agent articles.
To use the Server VDI feature, you can use the command line interface to install a VDA for Windowssingle‑session OS on a Windows Server 2019 or Windows Server 2016 machine. See Server VDI forguidance.
For information about installing a VDA on a Windows 7machine, see Earlier operating systems.
Virtual Delivery Agent (VDA) for multi‑session OS
Supported operating systems:
• Windows Server 2019, Standard and Datacenter Editions• Windows Server 2016, Standard and Datacenter Editions
© 1999–2022 Citrix Systems, Inc. All rights reserved. 41

Citrix Virtual Apps and Desktops
The installer automatically deploys the following requirements, which are also available on the Citrixinstallation media in the Support folders:
• Microsoft .NET Framework 4.8 is installed automatically if it (or a later version) is not alreadyinstalled.
• Microsoft Visual C++ 2017 Runtime, 32‑ and 64‑bit.
The installer automatically installs and enables Remote Desktop Services role services, if they are notalready installed and enabled.
Several multimedia acceleration features (such as HDX MediaStreamWindows Media Redirection) re‑quire that theMicrosoftMedia Foundation be installed on themachine onwhich you install the VDA. Ifthemachine does not haveMedia Foundation installed, themultimedia acceleration features will notbe installed andwill not work. Do not removeMedia Foundation from themachine after installing theCitrix software; otherwise, users will not be able to log on to the machine. On most Windows Serverversions, the Media Foundation feature is installed through the Server Manager. For more informa‑tion, see Prepare to install.
If Media Foundation is not present on the VDA, these multimedia features do not work:
• Windows Media Redirection• HTML5 Video Redirection• HDX Realtime Webcam Redirection
For Linux VDA information, see the Linux Virtual Delivery Agent articles.
For information about installing a VDA on a Windows Server 2008 R2 machine, see Earlier operatingsystems.
Hosts / virtualization resourcesImportant:
If you’re upgrading, and your current version uses Microsoft Azure, Amazon Web Services, orCitrix CloudPlatform connections, see the requirements in Remove unsupported host items.
The following host/virtualization resources (listed alphabetically) are supported. Where applicable,themajor.minor versions are supported, including updates to those versions. Knowledge Center arti‑cle CTX131239 contains current version information, plus links to known issues.
Some features might not be supported on all host platforms or all platform versions. See the featuredocumentation for details.
The Remote PC Access Wake on LAN feature requires Microsoft System Center Configuration Managerminimum 2012.
• Citrix Hypervisor (formerly XenServer)
© 1999–2022 Citrix Systems, Inc. All rights reserved. 42

Citrix Virtual Apps and Desktops
CTX131239 contains current version information, plus links to known issues.
For more information, see Citrix Hypervisor virtualization environments.
• Microsoft System Center Virtual Machine Manager
Includes any version of Hyper‑V that can register with the supported System Center Virtual Ma‑chine Manager versions.
CTX131239 contains current version information, plus links to known issues.
For more information, see Microsoft System Center Virtual Machine Manager virtualization en‑vironments.
• Nutanix Acropolis
CTX131239 contains current version information, plus links to known issues.
For more information, see Nutanix virtualization environments.
• VMware vSphere (vCenter + ESXi)
No support is provided for vSphere vCenter Linked Mode operation.
CTX131239 contains current version information, plus links to known issues.
For more information, see VMware virtualization environments.
Active Directory functional levels
The following functional levels for the Active Directory forest and domain are supported:
• Windows Server 2016• Windows Server 2012 R2• Windows Server 2012• Windows Server 2008 R2• Windows Server 2008
HDX
Audio
UDP audio for Multi‑Stream ICA is supported on Citrix Workspace app for Windows and CitrixWorkspace app for Linux 13.
Echo cancellation is supported on Citrix Workspace app for Windows.
See the specific HDX feature support and requirements below. Formore information on HDX featuresand Citrix Workspace apps, see the Feature matrix.
© 1999–2022 Citrix Systems, Inc. All rights reserved. 43

Citrix Virtual Apps and Desktops
HDXWindows Media delivery
The following clients are supported for Windows Media client‑side content fetching, Windows Mediaredirection, and realtimeWindowsMediamultimedia transcoding: CitrixWorkspaceapp forWindows,Citrix Workspace app for iOS, and Citrix Workspace app for Linux.
To use Windows Media client‑side content fetching on Windows 8 devices, set the Citrix MultimediaRedirector as a default program: in Control Panel > Programs > Default Programs > Set your de‑fault programs, select Citrix Multimedia Redirector and click either Set this program as defaultor Choose defaults for this program. GPU transcoding requires an NVIDIA CUDA‑enabled GPU withCompute Capability 1.1 or higher; see https://developer.nvidia.com/cuda/cuda‑gpus.
HDX 3D Pro
The VDA for Windows single‑session OS detects the presence of GPU hardware at runtime.
The physical or virtual machine hosting the application can use GPU Passthrough or Virtual GPU(vGPU):
• GPU Passthrough is available with:
– Citrix XenServer– Nutanix AHV– VMware vSphere and VMware ESX, where it is referred to as virtual Direct Graphics Accel‑eration (vDGA)
– MicrosoftHyper‑V inWindows Server 2016where it is referred to as Discrete Device Assign‑ment (DDA).
• vGPU is available with:
– Citrix Hypervisor– Nutanix AHV– VMware vSphere
See https://www.citrix.com/products/xenapp‑xendesktop/hdx‑3d‑pro.html.
Citrix recommends that the host computer have at least 4GBof RAMand four virtual CPUswith a clockspeed of 2.3 GHz or higher.
Graphical Processing Unit (GPU):
• For CPU‑based compression (including lossless compression), HDX 3DPro supports any displayadapter on the host computer that is compatible with the application being delivered.
• For virtualized graphics acceleration using the NVIDIA GRID API, you can use HDX 3D Pro withall the NVIDIA GRID GPUs supported by the GRID 10 driver (see NVIDIA GRID). The NVIDIA GRIDdelivers a high frame rate, resulting in a highly interactive user experience.
© 1999–2022 Citrix Systems, Inc. All rights reserved. 44
Citrix Virtual Apps and Desktops
• Virtualized graphics acceleration is supported on the Intel Xeon Processor E3 Family of datacenter graphics platform. For more information, see https://www.citrix.com/intel and https://www.intel.com/content/www/us/en/servers/data‑center‑graphics.html.
• Virtualized graphics acceleration is supported with AMD RapidFire on the AMD FirePro S‑seriesserver cards. See AMD Virtualization Solution).
User device:
• HDX 3D Pro supports all monitor resolutions that are supported by the GPU on the host com‑puter. However, for optimum performance with the minimum recommended user device andGPU specifications, Citrix recommends amaximummonitor resolution for user devices of 1920x 1200 pixels for LAN connections, and 1280 x 1024 pixels for WAN connections.
• Citrix recommends that user devices have at least 1 GB of RAM and a CPU with a clock speedof 1.6 GHz or higher. Use of the default deep compression codec, which is required on low‑bandwidth connections, requires a more powerful CPU unless the decoding is done in hard‑ware. For optimum performance, Citrix recommends that user devices have at least 2 GB ofRAM and a dual‑core CPU with a clock speed of 3 GHz or higher.
• For multi‑monitor access, Citrix recommends user devices with quad‑core CPUs.• User devices do not need a GPU to access desktops or applications delivered with HDX 3D Pro.• Citrix Workspace appmust be installed.
For more information, see the HDX 3D Pro articles and www.citrix.com/xenapp/3d.
Universal Print Server
The Universal Print Server comprises client and server components. The UpsClient component is in‑cluded in theVDA installation. You install theUpsServer componentoneachprint serverwhere sharedprinters reside that you want to provision with the Citrix Universal Print Driver in user sessions.
The UpsServer component is supported on:
• Windows Server 2019• Windows Server 2016
Requirements:
• Microsoft Visual C++ 2017 Runtimes, x86 and x64• Microsoft .NET Framework 4.8 (minimum)
For VDAs for Multi‑session OS, user authentication during printing operations requires the UniversalPrint Server to be joined to the same domain as the VDA.
Standalone client and server component packages are also available for download.
For more information, see Provision printers.
© 1999–2022 Citrix Systems, Inc. All rights reserved. 45

Citrix Virtual Apps and Desktops
Other
Only Citrix License Server 11.16 and later are supported. For more information, see Licensing.
WhenusingCitrixProvisioning (formerlyProvisioningServices)with this release, version7.x is coveredby the XenApp 7.x/XenDesktop 7.x lifecycle and the Citrix Virtual Apps and Desktops lifecycle. See theProduct Matrix for more information about version compatibility.
For supported StoreFront versions, see the StoreFront system requirements.
The Microsoft Group Policy Management Console (GPMC) is required if you store Citrix pol‑icy information in Active Directory rather than the site configuration database. If you installCitrixGroupPolicyManagement_x64.msi separately (for example, on a machine that does nothave a Citrix Virtual Apps and Desktops core component installed), that machine must have VisualStudio 2015 runtime installed. For more information, see the Microsoft documentation.
If you want to edit domain GPOs using GPMC, enable the Group Policy Management feature (in theWindows Server Manager) on all machines containing Delivery Controllers.
Multiple network interface cards are supported.
By default, the Citrix Workspace app for Windows is not installed when you install a current VDA. Formore information, see the Citrix Workspace app for Windows documentation.
See App‑V for supported versions of Microsoft App‑V.
See Local App Access for supported browser information for that feature.
This version of Citrix Virtual Apps and Desktops requires a minimum of HDX RealTime Connector 2.9LTSR. For more information, see the HDX RealTime Optimization Pack documentation.
Technical overview
June 3, 2021
Citrix Virtual Apps and Desktops are virtualization solutions that give IT control of virtual machines,applications, licensing, and security while providing anywhere access for any device.
Citrix Virtual Apps and Desktops allow:
• End users to run applications and desktops independently of the device’s operating systemandinterface.
• Administrators to manage the network and control access from selected devices or from all de‑vices.
• Administrators to manage an entire network from a single data center.
© 1999–2022 Citrix Systems, Inc. All rights reserved. 46

Citrix Virtual Apps and Desktops
Citrix Virtual AppsandDesktops shareaunifiedarchitecture calledFlexCastManagementArchitecture(FMA). FMA’s key features are the ability to run multiple versions of Citrix Virtual Apps or Citrix VirtualDesktops from a single site and integrated provisioning.
Learn about product name changes.
Key components
This article ismost helpful if you’re new to Citrix Virtual Apps and Desktops. If you currently have a 6.xor earlier XenApp farm, or a XenDesktop 5.6 or earlier site, see Changes in 7.x.
This illustration shows the key components in a typical deployment, which is called a site.
Delivery Controller
The Delivery Controller is the central management component of a site. Each site has one or moreDelivery Controllers. It is installed on at least one server in the data center. For site reliability andavailability, install Controllers on more than one server. If your deployment includes a hypervisor orother service, the Controller services communicate with it to:
• Distribute applications and desktops• Authenticate andmanage user access• Broker connections between users and their desktops and applications• Optimize use connections• Load balance these connections.
The Controller’s Broker Service tracks which users are logged on and where, what session resourcesthe users have, and if users need to reconnect to existing applications. The Broker Service executesPowerShell cmdlets and communicates with a broker agent on the VDAs over TCP port 80. It does nothave the option to use TCP port 443.
© 1999–2022 Citrix Systems, Inc. All rights reserved. 47

Citrix Virtual Apps and Desktops
TheMonitor Service collects historical data andplaces it in themonitoring database. This service usesTCP port 80 or 443.
Data from the Controller services is stored in the site database.
The Controller manages the state of desktops, starting and stopping them based on demand and ad‑ministrative configuration. In some editions, the Controller allows you to install Profile Managementto manage user personalization settings in virtualized or physical Windows environments.
Database
At least oneMicrosoft SQL Server database is required for every site to store configuration and sessioninformation. This database stores the data collected and managed by the services that make up theController. Install the database within your data center, and ensure it has a persistent connection tothe Controller.
The site also uses a configuration logging database and a monitoring database. By default, thosedatabases are installed in the same location as the site database, but you can change this.
Virtual Delivery Agent (VDA)
The VDA is installed on each physical or virtual machine in your site that youmake available to users.Those machines deliver applications or desktops. The VDA enables the machine to register with theController, which in turn allows the machine and the resources it is hosting to be made available tousers. VDAs establish and manage the connection between the machine and the user device. VDAsalsoverify that aCitrix license is available for theuseror session, andapplypolicies thatare configuredfor the session.
The VDA communicates session information to theBroker Service in theController through thebrokeragent in the VDA. The broker agent hosts multiple plug‑ins and collects real‑time data. It communi‑cates with the Controller over TCP port 80.
The word “VDA” is often used to refer to the agent and the machine on which it is installed.
VDAs are available for Single‑session and Multi‑session Windows operating systems. VDAs for Multi‑session Windows operating systems allow multiple users to connect to the server at one time. VDAsfor Single‑sessionWindowsoperating systemsallowonly oneuser to connect to thedesktopat a time.Linux VDAs are also available.
Citrix StoreFront
StoreFront authenticates users andmanages stores of desktops and applications that users access. Itcan host your enterprise application store, which gives users self‑service access to the desktops andapplications that you make available to them. It also keeps track of users’ application subscriptions,
© 1999–2022 Citrix Systems, Inc. All rights reserved. 48
Citrix Virtual Apps and Desktops
shortcut names, and other data. This helps ensure that users have a consistent experience acrossmultiple devices.
Citrix Workspace app
Installed on user devices and other endpoints (such as virtual desktops), Citrix Workspace app pro‑vides users with quick, secure, self‑service access to documents, applications, and desktops. CitrixWorkspace app provides on‑demand access to Windows, Web, and Software as a Service (SaaS) ap‑plications. For devices that cannot install the device‑specific Citrix Workspace app software, CitrixWorkspace app for HTML5 provides a connection through an HTML5‑compatible web browser.
Citrix Studio
Studio is themanagement consolewhere you configure andmanage yourCitrix Virtual Apps andDesk‑tops deployment. Studio eliminates the need for separatemanagement consoles for managing deliv‑ery of applications and desktops. Studio provides wizards to guide you through environment setup,creating workloads to host applications and desktops, and assigning applications and desktops tousers. You can also use Studio to allocate and track Citrix licenses for your site.
Studio gets the information it displays from the Broker Service in the Controller, communicating overTCP port 80.
Citrix Director
Director is a web‑based tool that enables IT support and help desk teams tomonitor an environment,troubleshoot issues before theybecome system‑critical, andperformsupport tasks for endusers. YoucanuseoneDirectordeployment toconnect toandmonitormultipleCitrix VirtualAppsorCitrixVirtualDesktops sites.
Director displays:
• Real‑time session data from theBroker Service in the Controller, which includes data theBrokerService gets from the broker agent in the VDA.
• Historical site data from the Monitor Service in the Controller.
Director uses the ICA performance and heuristics data captured by the Citrix Gateway device to buildanalytics from the data and then presents it to the administrators.
You can also view and interact with a user’s sessions through Director, using Windows Remote Assis‑tance.
© 1999–2022 Citrix Systems, Inc. All rights reserved. 49
Citrix Virtual Apps and Desktops
Citrix License Server
The License Servermanages your Citrix product licenses. It communicateswith theController toman‑age licensing for each user’s session and with Studio to allocate license files. A site must have at leastone license server to store andmanage your license files.
Hypervisor or other service
The hypervisor or other service hosts the virtual machines in your site. These can be the VMs youuse to host applications and desktops, and VMs you use to host the Citrix Virtual Apps and Desktopscomponents. Ahypervisor is installedonahost computerdedicatedentirely to running thehypervisorand hosting virtual machines.
Citrix Virtual Apps and Desktops support various hypervisors and other services.
Although many deployments require a hypervisor, you don’t need one to provide Remote PC Access.A hypervisor is also not required when you are using Provisioning Services (PVS) to provision VMs.
For more information, see:
• Network ports.• Databases.• Windows services in Citrix Virtual Apps and Desktops components: Configure user rights.• Supported hypervisors and other services: System requirements.
Additional components
The following additional components can also be included in Citrix Virtual Apps andDesktops deploy‑ments. For more information, see their documentation.
Citrix Provisioning
Citrix Provisioning (formerly Provisioning Services) is an optional component that is available withsome editions. It provides an alternative to MCS for provisioning virtual machines. Whereas MCS cre‑ates copies of a master image, PVS streams the master image to user devices. PVS doesn’t require ahypervisor to do this, so you can use it to host physical machines. PVS communicates with the Con‑troller to provide users with resources.
Citrix Gateway
Whenusers connect fromoutside thecorporate firewall, Citrix Virtual AppsandDesktops canuseCitrixGateway (formerly Access Gateway and NetScaler Gateway) technology to secure these connectionswith TLS. The Citrix Gateway or VPX virtual appliance is an SSL VPN appliance that is deployed in thedemilitarized zone (DMZ). It provides a single secure point of access through the corporate firewall.
© 1999–2022 Citrix Systems, Inc. All rights reserved. 50

Citrix Virtual Apps and Desktops
Citrix SD‑WAN
In deployments where virtual desktops are delivered to users at remote locations such as branch of‑fices, Citrix SD‑WAN technology can be employed to optimize performance. Repeaters accelerate per‑formance across wide‑area networks. With repeaters in the network, users in the branch office ex‑perience LAN‑like performance over the WAN. Citrix SD‑WAN can prioritize different parts of the userexperience so that, for example, the user experience does not degrade in the branch location when alarge file or print job is sent over thenetwork. HDXWANoptimizationprovides tokenized compressionanddata deduplication, dramatically reducing bandwidth requirements and improving performance.
How typical deployments work
A site is made up of machines with dedicated roles that allow for scalability, high availability, andfailover, and provide a solution that is secure by design. A site consists of VDA‑installed servers anddesktopmachines, and the Delivery Controller, which manages access.
The VDA enables users to connect to desktops and applications. It is installed on virtual machines inthe data center for most delivery methods, but it can also be installed on physical PCs for Remote PCAccess.
The Controller is made up of independent Windows services that manage resources, applications,and desktops, and optimize and balance user connections. Each site has one or more Controllers.Because sessions are affected by latency, bandwidth, and network reliability, all Controllers ideallyshould be on the same LAN.
Users never directly access the Controller. The VDA serves as an intermediary between users and the
© 1999–2022 Citrix Systems, Inc. All rights reserved. 51

Citrix Virtual Apps and Desktops
Controller. Whenusers logonusingStoreFront, their credentialspass through to theBrokerServiceonthe Controller. The Broker Service then obtains profiles and available resources based on the policiesset for them.
How user connections are handled
Tostart a session, theuser connects either throughCitrixWorkspaceapp installedon theuser’sdevice,or a StoreFront website.
The user selects the physical or virtual desktop or virtual application that is needed.
The user’s credentials move through this pathway to access the Controller, which determines whichresources are needed by communicating with a Broker Service. Citrix recommends that administra‑tors place an SSL certificate on StoreFront to encrypt the credentials coming from Citrix Workspaceapp.
The Broker Service determines which desktops and applications the user is allowed to access.
After the credentials are verified, information about available applications or desktops is sent back tothe user through the StoreFront‑CitrixWorkspace app pathway. When the user selects applications ordesktops fromthis list, that informationgoesbackdown thepathway to theController. TheControllerthen determines the proper VDA to host the specific applications or desktop.
The Controller sends a message to the VDA with the user’s credentials, and then sends all the dataabout the user and the connection to the VDA. The VDA accepts the connection and sends the infor‑mation back through the same pathways to Citrix Workspace app. A set of required parameters iscollected on StoreFront. These parameters are then sent to Citrix Workspace app either as part of the
© 1999–2022 Citrix Systems, Inc. All rights reserved. 52

Citrix Virtual Apps and Desktops
Citrix‑Workspace‑app‑StoreFront protocol conversation, or converted to an Independent ComputingArchitecture (ICA) file and downloaded. As long as the sitewas properly set up, the credentials remainencrypted throughout this process.
The ICA file is copied to the user’s device and establishes a direct connection between the device andthe ICA stack running on the VDA. This connection bypasses the management infrastructure (CitrixWorkspace app, StoreFront, and Controller).
The connection between Citrix Workspace app and the VDA uses the Citrix Gateway Protocol (CGP).If a connection is lost, the Session Reliability feature enables the user to reconnect to the VDA ratherthan having to relaunch through the management infrastructure. Session Reliability can be enabledor disabled in Citrix policies.
After the client connects to the VDA, the VDA notifies the Controller that the user is logged on. TheController then sends this information to the site database and starts logging data in the monitoringdatabase.
How data access works
Every Citrix Virtual Apps and Desktops session produces data that IT can access through Studio orDirector. Using Studio, administrators can access real‑time data from the Broker Agent to managesites. Director accesses the same data plus historical data stored in the monitoring database. It alsoaccesses HDX data from NetScaler Gateway for help desk support and troubleshooting.
Within the Controller, the Broker Service reports session data for every session on themachine provid‑ing real‑time data. The Monitor Service also tracks the real‑time data and stores it as historical datain the monitoring database.
© 1999–2022 Citrix Systems, Inc. All rights reserved. 53

Citrix Virtual Apps and Desktops
Studio communicates only with the Broker Service. It accesses only real‑time data. Director commu‑nicates with the Broker Service (through a plug‑in in the Broker Agent) to access the site database.
Director can also access Citrix Gateway to get information on the HDX data.
Deliver desktops and applications
You set up themachines that deliver applications and desktopswithmachine catalogs. Then, you cre‑ate delivery groups that specify the applications and desktops that will be available (using machinesin the catalogs), andwhich users can access them. Optionally, you can then create application groupsto manage collections of applications.
Machine catalogs
Machine catalogs are collections of virtual or physical machines that you manage as a single entity.These machines, and the application or virtual desktops on them, are the resources you provide toyour users. All themachines in a catalog have the same operating system and the same VDA installed.They also have the same applications or virtual desktops.
Typically, you create a master image and use it to create identical VMs in the catalog. For VMs youcan specify the provisioning method for the machines in that catalog: Citrix tools (Citrix Provisioningor MCS) or other tools. Alternatively, you can use your own existing images. In that case, you mustmanage target devices on an individual basis or collectively using third‑party electronic software dis‑tribution (ESD) tools.
Valid machine types are:
• Multi‑sessionOS: Virtual or physicalmachineswith amulti‑session operating system. Used fordelivering Citrix Virtual Apps published apps (also known as server‑based hosted applications)and Citrix Virtual Apps published desktops (also known as server‑hosted desktops). These ma‑chines allowmultiple users to connect to them at one time.
• Single‑session OS: Virtual or physical machines with a single‑session operating system. Usedfor delivering VDI desktops (desktops running single‑session OSs that can optionally be person‑alized), VM hosted apps (applications from single‑session OSs), and hosted physical desktops.Only one user at a time can connect to each of these desktops.
• Remote PC Access: Enables remote users to access their physical office PCs from any devicerunning Citrix Workspace app. The office PCs are managed through the Citrix Virtual Desktopsdeployment, and require user devices to be specified in an allow list.
For more information, see Citrix Virtual Apps and Desktops Image Management and Create machinecatalogs.
© 1999–2022 Citrix Systems, Inc. All rights reserved. 54

Citrix Virtual Apps and Desktops
Delivery groups
Delivery groups specify which users can access which applications, desktops, or both on which ma‑chines. Delivery groups contain machines from your machine catalogs, and Active Directory userswho have access to your site. You might assign users to your delivery groups by their Active Direc‑tory group, because Active Directory groups and delivery groups are ways to group users with similarrequirements.
Each delivery group can contain machines from more than one catalog, and each catalog can con‑tribute machines to more than one delivery group. However, each individual machine can only be‑long to one delivery group at a time.
You define which resources users in the delivery group can access. For example, to deliver differentapplications to different users, you might install all of the applications on the master image for onecatalog and create enoughmachines in that catalog to distribute among several delivery groups. Youcan then configure each delivery group to deliver a different subset of applications that are installedon the machines.
For more information, see Create delivery groups.
Application groups
Application groups provide application management and resource control advantages over usingmore delivery groups. Using the tag restriction feature, you can use your existing machines formore than one publishing task, saving the costs associated with deployment and managing moremachines. A tag restriction can be thought of as subdividing (or partitioning) the machines in adelivery group. Application groups can also be helpful when isolating and troubleshooting a subsetof machines in a delivery group.
For more information, see Create application groups.
More information
Citrix Virtual Apps and Desktops diagrams
Active Directory
April 14, 2021
Active Directory is required for authentication and authorization. The Kerberos infrastructure in Ac‑tive Directory is used to guarantee the authenticity and confidentiality of communications with theDelivery Controllers. For information about Kerberos, see the Microsoft documentation.
© 1999–2022 Citrix Systems, Inc. All rights reserved. 55

Citrix Virtual Apps and Desktops
The System requirements article lists the supported functional levels for the forest and domain. Touse Policy Modeling, the domain controller must be running on Windows Server 2003 to WindowsServer 2012 R2; this does not affect the domain functional level.
This product supports:
• Deployments inwhich the user accounts and computer accounts exist in domains in a sin‑gle Active Directory forest. User and computer accounts can exist in arbitrary domains withina single forest. All domain functional levels and forest functional levels are supported in thistype of deployment.
• Deployments in which user accounts exist in an Active Directory forest that is differentfrom the Active Directory forest containing the computer accounts of the Controllers andvirtualdesktops. In this typeof deployment, thedomains containing theController andvirtualdesktop computer accounts must trust the domains containing user accounts. Forest trusts orexternal trusts can be used. All domain functional levels and forest functional levels are sup‑ported in this type of deployment.
• Deployments in which the computer accounts for Controllers exist in an Active Directoryforest that is different from one or more additional Active Directory forests that containthe computer accounts of the virtual desktops. In this type of deployment a bi‑directionaltrust must exist between the domains containing the Controller computer accounts and all do‑mains containing the virtual desktop computer accounts. In this type of deployment, all do‑mains containing Controller or virtual desktop computer accounts must be at “Windows 2000native” functional level or higher. All forest functional levels are supported.
• Writable domain controllers. Read‑only domain controllers are not supported.
Optionally, Virtual Delivery Agents (VDAs) can use information published in Active Directory to deter‑mine which Controllers they can register with (discovery). This method is supported primarily forbackward compatibility, and is available only if the VDAs are in the same Active Directory forest as theControllers. For information about this discovery method see Active Directory OU‑based discoveryand CTX118976.
Note:
Do not change the computer name or the domainmembership of a Delivery Controller after thesite is configured.
Deploy in amultiple Active Directory forest environment
This information applies to minimum version XenDesktop 7.1 and XenApp 7.5. It does not apply toearlier versions of XenDesktop or XenApp.
In an Active Directory environment with multiple forests, if one‑way or two‑way trusts are in placeyou can use DNS forwarders or conditional forwarders for name lookup and registration. To allow the
© 1999–2022 Citrix Systems, Inc. All rights reserved. 56

Citrix Virtual Apps and Desktops
appropriate Active Directory users to create computer accounts, use theDelegation of Control wizard.See the Microsoft documentation for details about this wizard.
No reverse DNS zones are necessary in the DNS infrastructure if appropriate DNS forwarders are inplace between forests.
The SupportMultipleForest key is necessary if the VDA and Controller are in separate forests, re‑gardless of whether the Active Directory and NetBIOS names are different. Use the following informa‑tion to add the registry key to the VDA and the Delivery Controllers:
Caution:
Editing the registry incorrectly can cause serious problems thatmay require you to reinstall youroperating system. Citrix cannot guarantee that problems resulting from the incorrect use of Reg‑istry Editor can be solved. Use Registry Editor at your own risk. Back up the registry before youedit it.
On the VDA, configure: HKEY_LOCAL_MACHINE\Software\Citrix\VirtualDesktopAgent\SupportMultipleForest.
• Name: SupportMultipleForest• Type: REG_DWORD• Data: 0x00000001 (1)
OnallDeliveryControllers, configure: HKEY_LOCAL_MACHINE\Software\Citrix\DesktopServer\SupportMultipleForest.
• Name: SupportMultipleForest• Type: REG_DWORD• Data: 0x00000001 (1)
You might need reverse DNS configuration if your DNS namespace is different than that of Active Di‑rectory.
If external trusts are in place during setup, theListOfSIDs registry key is required. TheListOfSIDsregistry key is also necessary if the Active Directory FQDN is different than the DNS FQDN, or if thedomain containing the Domain Controller has a different NetBIOS name than the Active DirectoryFQDN. To add the registry key, use the following information:
For theVDA, locate the registrykeyHKEY_LOCAL_MACHINE\Software\Citrix\VirtualDesktopAgent\ListOfSIDs.
• Name: ListOfSIDs• Type: REG_SZ• Data: Security Identifier (SID) of the Controllers. (SIDs are included in the results of the Get-BrokerController cmdlet.)
When external trusts are in place, make the following change on the VDA:
© 1999–2022 Citrix Systems, Inc. All rights reserved. 57

Citrix Virtual Apps and Desktops
1. Locate the file Program Files\Citrix\Virtual Desktop Agent\brokeragent.exe.config.
2. Make a backup copy of the file.3. Open the file in a text editing program such as Notepad.4. Locate the text allowNtlm="false" and change the text to allowNtlm="true".5. Save the file.
After adding the ListOfSIDs registry key and editing the brokeragent.exe.config file, restartthe Citrix Desktop Service to apply the changes.
The following table lists the supported trust types:
Trust type Transitivity DirectionSupported in thisrelease
Parent and child Transitive Two‑way Yes
Tree‑root Transitive Two‑way Yes
External Nontransitive One‑way or two‑way Yes
Forest Transitive One‑way or two‑way Yes
Shortcut Transitive One‑way or two‑way Yes
Realm Transitive ornontransitive
One‑way or two‑way No
For more information about complex Active Directory environments, see CTX134971.
Databases
April 14, 2021
A Citrix Virtual Apps or Citrix Virtual Desktops site uses three SQL Server databases:
• Site: (also known as site configuration) stores the running site configuration, plus the currentsession state and connection information.
• Configuration logging: (also known as logging) stores information about site configurationchanges and administrative activities. This database is used when the configuring logging fea‑ture is enabled (default = enabled).
• Monitoring: stores data used by Director, such as session and connection information.
Each Delivery Controller communicates with the site database. Windows authentication is requiredbetween the Controller and the databases. A Controller can be unplugged or turned off without af‑
© 1999–2022 Citrix Systems, Inc. All rights reserved. 58

Citrix Virtual Apps and Desktops
fecting other Controllers in the site. This means, however, that the site database forms a single pointof failure. If the database server fails, existing connections continue to function until a user eitherlogs off or disconnects. For information about connection behavior when the site database becomesunavailable, see Local Host Cache.
Citrix recommends that you back up the databases regularly so that you can restore from the backupif the database server fails. The backup strategy for each database may differ. For instructions, seeCTX135207.
If your site contains more than one zone, the primary zone should always contain the site database.Controllers in every zone communicate with that database.
High availability
There are several high availability solutions to consider for ensuring automatic failover:
• AlwaysOn Availability Groups (including Basic Availability Groups): This enterprise‑levelhigh availability and disaster recovery solution introduced in SQL Server 2012 enables you tomaximize availability for one or more databases. AlwaysOn Availability Groups requires thatthe SQL Server instances reside onWindows Server Failover Clustering (WSFC) nodes. Formoreinformation, see Windows Server Failover Clustering with SQL Server.
• SQL Server database mirroring: Mirroring the database ensures that, if you lose the activedatabase server, an automatic failover process happens in a matter of seconds, so that usersare generally unaffected. This method is more expensive than other solutions because full SQLServer licensesare requiredoneachdatabase server; youcannotuseSQLServerExpresseditionin a mirrored environment.
• SQL clustering: The Microsoft SQL clustering technology can be used to automatically allowone server to take over the tasks and responsibilities of another server that has failed. How‑ever, settingup this solution ismore complicated, and theautomatic failoverprocess is typicallyslower than alternatives such as SQLmirroring.
• Using thehypervisor’s highavailability features: With thismethod, youdeploy the databaseas a virtual machine and use your hypervisor’s high availability features. This solution is lessexpensive than mirroring because it uses your existing hypervisor software and you can alsouse SQL Server Express edition. However, the automatic failover process is slower, as it cantake time for a newmachine to start for the database, whichmay interrupt the service to users.
The Local Host Cache feature supplements the SQL Server high availability best practices by enablingusers to connect and reconnect to applications and desktops evenwhen the site database is not avail‑able. For more information, see Local Host Cache.
If all Controllers in a site fail, you can configure the VDAs to operate in high availability mode so thatusers can continue to access and use their desktops and applications. In high availability mode, theVDA accepts direct ICA connections from users, rather than connections brokered by the Controller.
© 1999–2022 Citrix Systems, Inc. All rights reserved. 59
Citrix Virtual Apps and Desktops
Use this feature only on the rare occasion when communication with all Controllers fails; it is not analternative to other high availability solutions. For more information, see CTX 127564.
Installing a Controller on a node in an SQL clustering or SQLmirroring installation is not supported.
Install database software
By default, SQL Server Express edition is installed when you install the first Delivery Controller if an‑other SQL Server instance is not detected on that server. That default action is generally sufficient forproof of concept or pilot deployments. However, SQL Server Express does not support Microsoft highavailability features.
Thedefault installationuses thedefaultWindows serviceaccounts andpermissions. See theMicrosoftdocumentation fordetails of thesedefaults, including theadditionofWindows service accounts to thesysadmin role. The Controller uses the Network Service account in this configuration. The Controllerdoes not require any additional SQL Server roles or permissions.
If necessary, you can selectHide instance for the database instance. When configuring the address ofthedatabase inStudio, enter the instance’s static port number, rather than its name. See theMicrosoftdocumentation for details about hiding an instance of SQL Server Database Engine.
Most production deployments, and any deployment that uses Microsoft high availability features,should use supported non‑Express editions of SQL Server installed onmachines other than the serverwhere the first Controller is installed. The System requirements article lists the supported SQL Serverversions. The databases can reside on one or more machines.
Ensure the SQL Server software is installed before creating a site. You don’t have to create thedatabase, but if you do, it must be empty. Configuring Microsoft high availability technologies is alsorecommended.
Use Windows Update to keep SQL Server up‑to‑date.
Set up the databases from the site creation wizard
Specify the database names and addresses (location) on the Databases page in the site creation wiz‑ard. (See Database address formats.) To avoid potential errors when Director queries the MonitorService, do not use whitespace in the name of the monitoring database.
The Databases page offers two options for setting up the databases: automatic and using scripts.Generally, you can use the automatic option if you (the Studio user and Citrix administrator) have therequired database privileges. (See Permissions required to set up databases.)
You can change the location of the configuration logging and monitoring database later, after youcreate the site. See Change database locations.
© 1999–2022 Citrix Systems, Inc. All rights reserved. 60

Citrix Virtual Apps and Desktops
To configure a site to use a mirror database, complete the following and then proceed with the auto‑matic or scripted setup procedures.
1. Install the SQL Server software on two servers, A and B.2. On Server A, create the database intended to be used as the principal. Back up the database on
Server A and then copy it to server B.3. On Server B, restore the backup file.4. Start mirroring on server A.
To verify mirroring after creating the site, run the PowerShell cmdlet get-configdbconnection toensure that the Failover Partner has been set in the connection string to the mirror.
If you later add, move, or remove a Delivery Controller in a mirrored database environment, see De‑livery Controllers.
Automatic setup
If you have the required database privileges, select the “Create and set up databases from Studio”option on theDatabases page of the site creationwizard, and then provide the names and addressesof the principal databases.
If a database exists at an address you specify, it must be empty. If databases don’t exist at a specifiedaddress, you are informed that a database cannot be found, and then asked if you want the databaseto be created for you. When you confirm that action, Studio automatically creates the databases, andthen applies the initialization scripts for the principal and replica databases.
Scripted setup
If you do not have the required database privileges, someonewith those permissionsmust help, suchas a database administrator. Here’s the sequence:
1. In the site creationwizard, select theGenerate scripts option. This action generates six scripts:two for each of the three databases (one for each principal database and another for eachreplica). You can indicate where to store the scripts.
2. Give those scripts to your database administrator. The site creation wizard stops automaticallyat this point; you’ll be prompted when you return later to continue the site creation.
The database administrator then creates the databases. Each databasemust have the following char‑acteristics:
• Use a collation that ends with “_CI_AS_KS”. Citrix recommends using a collation that ends with“_100_CI_AS_KS”.
• For optimum performance, enable the SQL Server Read‑Committed Snapshot. For details, seeCTX 137161.
© 1999–2022 Citrix Systems, Inc. All rights reserved. 61

Citrix Virtual Apps and Desktops
• Configured high availability features, if desired.• To configuremirroring, first set the database to use the full recoverymodel (simplemodel is thedefault). Back up the principal database to a file and copy it to the mirror server. On the mirrordatabase, restore the backup file to the mirror server. Then, start mirroring on the principalserver.
The database administrator uses the SQLCMD command‑line utility or SQL Server Management Stu‑dio in SQLCMD mode to run each of the xxx_Replica.sql scripts on the high availability SQL Serverdatabase instances (if highavailability is configured), and then runeachof thexxx_Principal.sql scriptson theprincipal SQLServer database instances. See theMicrosoftdocumentation for SQLCMDdetails.
When all the scripts complete successfully, the database administrator gives the Citrix administratorthe three principal database addresses.
In Studio, you are prompted to continue the site creation, and are returned to the Databases page.Enter the addresses. If any of the servers hosting a database cannot be contacted, an error messageis displayed.
Permissions required to set up databases
Youmust be a local administrator and a domain user to create and initialize the databases (or changethe database location). You must also have certain SQL Server permissions. The following permis‑sions can be explicitly configured or acquired by Active Directory group membership. If your Studiouser credentials do not include these permissions, you are prompted for SQL Server user credentials.
Operation Purpose Server role Database role
Create a database Create a suitableempty database
dbcreator
Create a schema Create allservice‑specificschemas and add thefirst Controller to thesite
securityadmin* db_owner
Add a Controller Add a Controller(other than the first)to the site
securityadmin* db_owner
Add a Controller(mirror server)
Add a Controller loginto the databaseserver currently in themirror role of amirrored database
securityadmin*
© 1999–2022 Citrix Systems, Inc. All rights reserved. 62
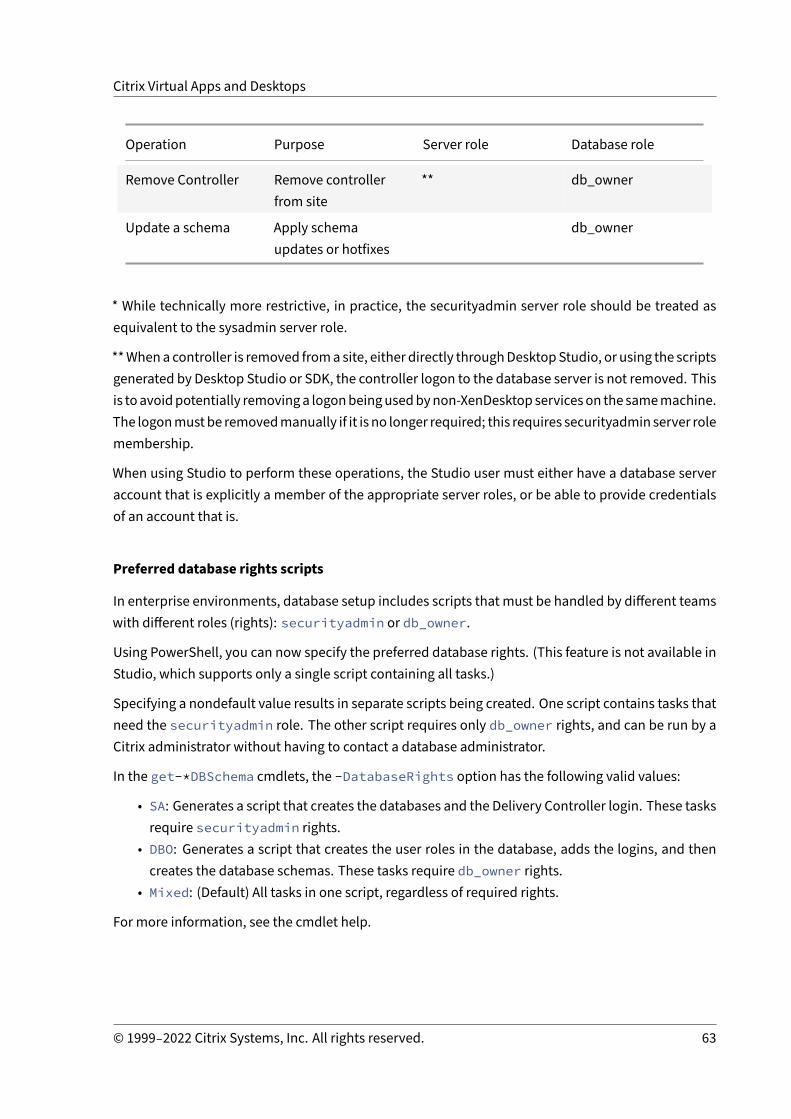
Citrix Virtual Apps and Desktops
Operation Purpose Server role Database role
Remove Controller Remove controllerfrom site
** db_owner
Update a schema Apply schemaupdates or hotfixes
db_owner
* While technically more restrictive, in practice, the securityadmin server role should be treated asequivalent to the sysadmin server role.
**Whena controller is removed froma site, either directly throughDesktopStudio, or using the scriptsgenerated by Desktop Studio or SDK, the controller logon to the database server is not removed. Thisis toavoidpotentially removinga logonbeingusedbynon‑XenDesktop serviceson the samemachine.The logonmustbe removedmanually if it is no longer required; this requires securityadmin server rolemembership.
When using Studio to perform these operations, the Studio user must either have a database serveraccount that is explicitly a member of the appropriate server roles, or be able to provide credentialsof an account that is.
Preferred database rights scripts
In enterprise environments, database setup includes scripts that must be handled by different teamswith different roles (rights): securityadmin or db_owner.
Using PowerShell, you can now specify the preferred database rights. (This feature is not available inStudio, which supports only a single script containing all tasks.)
Specifying a nondefault value results in separate scripts being created. One script contains tasks thatneed the securityadmin role. The other script requires only db_owner rights, and can be run by aCitrix administrator without having to contact a database administrator.
In the get-*DBSchema cmdlets, the -DatabaseRights option has the following valid values:
• SA: Generates a script that creates the databases and the Delivery Controller login. These tasksrequire securityadmin rights.
• DBO: Generates a script that creates the user roles in the database, adds the logins, and thencreates the database schemas. These tasks require db_owner rights.
• Mixed: (Default) All tasks in one script, regardless of required rights.
For more information, see the cmdlet help.
© 1999–2022 Citrix Systems, Inc. All rights reserved. 63

Citrix Virtual Apps and Desktops
Database address formats
You can specify a database address in one of the following forms:
• ServerName• ServerName\InstanceName• ServerName,PortNumber
For an AlwaysOn Availability Group, specify the group’s listener in the location field.
Change database locations
After you create a site, you can change the location of the configuration logging and monitoringdatabases. (You cannot change the location of the site database.) When you change the location of adatabase:
• The data in the previous database is not imported to the new database.• Logs cannot be aggregated from both databases when retrieving logs.• The first log entry in the new database indicates that a database change occurred, but it doesnot identify the previous database.
You cannot change the location of the configuration logging database when mandatory logging isenabled.
To change the location of a database:
1. Ensure a supported version of Microsoft SQL Server is installed on the server where you wantthe database to reside. Set up high availability features as needed.
2. Select Configuration in the Studio navigation pane.3. Select the database for which you want to specify a new location and then select Change
Database in the Actions pane.4. Specify the new location and the database name.5. If you want Studio to create the database and you have the appropriate permissions, click OK.
Whenprompted, clickOK, and thenStudio creates thedatabase automatically. Studio attemptsto access the database using your credentials. If that fails, you are prompted for the databaseuser’s credentials. Studio then uploads the database schema to the database. The credentialsare retained only for the database creation time frame.
6. If youdonotwant Studio to create thedatabase, or youdonot have sufficient permissions, clickGenerate script. The generated scripts include instructions formanually creating the databaseand a mirror database, if needed. Before uploading the schema, ensure that the database isempty and that at least one user has permission to access and change the database.
© 1999–2022 Citrix Systems, Inc. All rights reserved. 64

Citrix Virtual Apps and Desktops
More information
• Database sizing tool.• Sizing the site database and configuring connection strings when using SQL Server high avail‑ability solutions.
Deliverymethods
April 14, 2021
Citrix Virtual Apps and Desktops offers various delivery methods. A single delivery method will likelynot meet all of your requirements.
Introduction
Choosing the appropriate application delivery method helps improve scalability, management, anduser experience.
• Installed app: The application is part of the base desktop image. The install process involvesdll, exe, and other files copied to the image drive, in addition to registry modifications. Fordetails, see Create machine catalogs.
• Streamed app (Microsoft App‑V): The application is profiled and delivered to the desktopsacross the network on demand. Application files and registry settings are placed in a containeron the virtual desktop and isolated from the base operating system and each other. This isola‑tion helps address compatibility issues. For details, see App‑V.
• Layered app (Citrix App Layering): Each layer contains a single application, agent, or operat‑ing system. By integrating one OS layer, one platform layer (VDA, Citrix Provisioning agent) andmany application layers, an administrator can easily create new, deployable images. Layeringsimplifies ongoingmaintenance, as an OS, agent, and application exists in a single layer. Whenyou update the layer, all deployed images containing that layer are updated. For details, seeCitrix App Layering.
• Hosted Windows app: An application installed on a multi‑user Citrix Virtual Apps host and de‑ployedasanapplicationandnotadesktop. Auser accesses thehostedWindowsappseamlesslyfrom the VDI desktop or endpoint device, hiding the fact that the app is executing remotely. Fordetails, see Create delivery groups.
• Local app: An application deployed on the endpoint device. The application interface appearswithin the user’s hosted VDI session, even though it executes on the endpoint. For details, seeLocal App Access and URL redirection.
• Remote PC Access: Remote PC Access enables employees to remotely access their physicaloffice PCs. When users access their office PCs, they can access all the applications, data, and
© 1999–2022 Citrix Systems, Inc. All rights reserved. 65

Citrix Virtual Apps and Desktops
resources they need to do their work. Remote PC Access eliminates the need to introduce andprovide other tools to accommodate teleworking. For details, see Remote PC Access.
For desktops, consider published desktops or VDI desktops.
Citrix Virtual Apps published apps and desktops
Use multi‑session OS machines to deliver Citrix Virtual Apps and Desktops published apps and pub‑lished desktops.
Use case:
• You want inexpensive server‑based delivery to minimize the cost of delivering applications tomany users, while providing a secure, high‑definition user experience.
• Your users perform well‑defined tasks and do not require personalization or offline access toapplications. Users can include task workers such as call center operators and retail workers,or users that share workstations.
• Application types: any application.
Benefits and considerations:
• Manageable and scalable solution within your data center.• Most cost effective application delivery solution.• Hosted applications are managed centrally and users cannot modify the application. This pro‑vides a user experience that is consistent, safe, and reliable.
• Users must be online to access their applications.
User experience:
• User requestsoneormoreapplications fromStoreFront, theirStartmenu, or aURLyouprovide.• Applications are delivered virtually and display seamlessly in high definition on user devices.• Dependingonprofile settings, user changes are savedwhen theuser’s application sessionends.Otherwise, the changes are deleted.
Process, host, and deliver applications:
• Application processing takes place on hosting machines, rather than on the user devices. Thehosting machine can be a physical or a virtual machine.
• Applications and desktops reside on amulti‑session OSmachine.• Machines become available throughmachine catalogs.• Machines frommachine catalogs are organized into delivery groups that deliver the same set ofapplications to groups of users.
• Multi‑session OS machines support delivery groups that host either desktops or applications,or both.
Sessionmanagement and assignment:
© 1999–2022 Citrix Systems, Inc. All rights reserved. 66

Citrix Virtual Apps and Desktops
• Multi‑sessionOSmachines runmultiple sessions fromasinglemachine todelivermultipleappli‑cations and desktops to multiple, simultaneously connected users. Each user requires a singlesession fromwhich they can run all their hosted applications.
For example, a user logs on and requests an application. One session on thatmachine becomesunavailable to other users. A second user logs on and requests an application which that ma‑chine hosts. A second session on the same machine is now unavailable. If both users requestmore applications, no additional sessions are required because a user can runmultiple applica‑tions using the same session. If twomore users log on and request desktops, and two sessionsare available on that samemachine, that singlemachine is now using four sessions to host fourdifferent users.
• Within the delivery group to which a user is assigned, a machine on the least loaded server isselected. A machine with session availability is randomly assigned to deliver applications to auser when that user logs on.
VM hosted apps
Use single‑session OSmachines to deliver VM hosted applications
Use case:
• You want a client‑based application delivery solution that is secure, provides centralized man‑agement, and supportsmany users per host server. You want to provide those users with appli‑cations that display seamlessly in high definition.
• Your users are internal, external contractors, third‑party collaborators, and other provisionalteammembers. Your users do not require offline access to hosted applications.
• Application types: Applications thatmight not work well with other applications ormight inter‑act with the operation system, such as Microsoft .NET Framework. These types of applicationsare ideal for hosting on virtual machines.
Benefits and considerations:
• Applications and desktops on the master image are securely managed, hosted, and run onma‑chines within your data center, providing a more cost‑effective application delivery solution.
• On logon, users can be randomly assigned to a machine within a delivery group that is config‑ured to host the same application. You can also statically assign a single machine to deliveran application to a single user each time that user logs on. Statically assigned machines allowusers to install andmanage their own applications on the virtual machine.
• Running multiple sessions is not supported on single‑session OS machines. Therefore, eachuser consumes a single machine within a delivery group when they log on, and users must beonline to access their applications.
• This method can increase the amount of server resources for processing applications and in‑crease the amount of storage for users’ data.
© 1999–2022 Citrix Systems, Inc. All rights reserved. 67

Citrix Virtual Apps and Desktops
User experience:
• The same seamless application experience as hosting shared applications onmulti‑session OSmachines.
Process, host, and deliver applications:
• The same as multi‑session OSmachines except they are virtual single‑session OSmachines.
Sessionmanagement and assignment:
• Single‑session OS machines run a single desktop session from a single machine. When access‑ing applications only, a single user can use multiple applications (and is not limited to a singleapplication) because the operating system sees each application as a new session.
• Within a delivery group, when users log on they can access either a statically assignedmachine(each time the user logs on to the same machine), or a randomly assigned machine that is se‑lected based on session availability.
VDI desktops
Use single‑session OSmachines to deliver Citrix Virtual Apps and Desktops VDI desktops.
VDI desktops are hosted on virtual machines and provide each user with a desktop operating system.
VDI desktops require more resources than published desktops, but do not require that applicationsinstalled on them support server‑based operating systems. Also, depending on the type of VDI desk‑top you choose, these desktops can be assigned to individual users. This allows users a high level ofpersonalization.
When you create a machine catalog for VDI desktops, you create one of these types of desktops:
• Random non‑persistent desktop, also known as pooled VDI desktop: Each time a user logson to one of these desktops, that user connects to a desktop selected from a pool of desktops.That pool is based on a single master image. All changes to the desktop are lost when the ma‑chine restarts.
• Static non‑persistent desktop: During the first logon, a user is assigned a desktop from a poolof desktops. (Each machine in the pool is based on a single master image.) After the first use,each time a user logs on to use a desktop, that user connects to the same desktop that wasassigned on first use. All changes to the desktop are lost when the machine restarts.
• Static persistentdesktop: Unlike other types of VDI desktops, users can fully personalize thesedesktops. During the first logon, a user is assigned a desktop from a pool of desktops. Sub‑sequent logons from that user connect to the same desktop that was assigned on first use.Changes to the desktop are retained when the machine restarts.
© 1999–2022 Citrix Systems, Inc. All rights reserved. 68
Citrix Virtual Apps and Desktops
Network ports
April 14, 2021
The following tables list the default network ports used by Delivery Controllers, Windows VDAs, Di‑rector, and Citrix License Server. When Citrix components are installed, the operating system’s hostfirewall is also updated, by default, to match these default network ports.
For an overview of communication ports used in other Citrix technologies and components, seeCTX101810.
Youmay need this port information:
• For regulatory compliance purposes.• If there is a network firewall between these components and other Citrix products or compo‑nents, so you can configure that firewall appropriately.
• If youuse a third‑party host firewall, such as oneprovidedwith an anti‑malwarepackage, ratherthan the operating system’s host firewall.
• If youalter theconfigurationof thehost firewall on thesecomponents (usuallyWindowsFirewallService).
• If you reconfigure any features of these components to use a different port or port range, andthen want to disable or block ports that are not used in your configuration. Refer to the docu‑mentation for the component for details.
• For port information about other components such as StoreFront and Citrix Provisioning (for‑merly Provisioning Services), see the component’s current “System requirements” article.
The tables list only incoming ports. Outgoing ports are usually determined by the operating systemand use unrelated numbers. Information for outgoing ports is not normally needed for the purposeslisted above.
Someof theseports are registeredwith the Internet AssignedNumbersAuthority (IANA). Details aboutthese assignments are available at http://www.iana.org/assignments/port‑numbers. However, thedescriptive information held by IANA does not always reflect today’s usage.
Additionally, the operating system on the VDA and Delivery Controller require incoming ports for itsown use. See the MicrosoftWindows documentation for details.
VDA, Delivery Controller, and Director
© 1999–2022 Citrix Systems, Inc. All rights reserved. 69

Citrix Virtual Apps and Desktops
Component Usage ProtocolDefaultincoming port Notes
VDA ICA/HDX TCP, UDP 1494 EDT protocolrequires 1494 tobe open for UDP.See ICA policysettings.
VDA ICA/HDX withSessionReliability
TCP, UDP 2598 EDT protocolrequires 2598 tobe open for UDP.If multi‑streamandmulti‑portare enabled, theadministratordefines the portnumbers for theadditional threestreams. See ICApolicy settings.
VDA ICA/HDX overTLS/DTLS
TCP, UDP 443 All CitrixWorkspace apps
VDA ICA/HDX overWebSocket
TCP 8008 Citrix Workspaceapp for HTML5,and CitrixWorkspace appfor Chrome 1.6and earlier only
VDA ICA/HDX audioover UDPReal‑timeTransport
UDP 16500..16509
© 1999–2022 Citrix Systems, Inc. All rights reserved. 70

Citrix Virtual Apps and Desktops
Component Usage ProtocolDefaultincoming port Notes
VDA ICA/UniversalPrint Server
TCP 7229 Used by theUniversal PrintServer print datastream CGP(CommonGatewayProtocol)listener.
VDA ICA/UniversalPrint Server
TCP 8080 Used by theUniversal PrintServer listenerfor incomingHTTP/SOAPrequests.
VDA Wake On LAN UDP 9 Remote PCAccess powermanagement
VDA Wake Up Proxy TCP 135 Remote PCAccess powermanagement
VDA DeliveryController
TCP 80
DeliveryController
VDA, StoreFront,Director, Studio
TCP 80
DeliveryController
StoreFront,Director, Studioover TLS
TCP 443
DeliveryController
DeliveryController, VDA
TCP 89 Local HostCache (This useof port 89 mightchange in futurereleases.)
DeliveryController
Orchestration TCP 9095 Orchestration
© 1999–2022 Citrix Systems, Inc. All rights reserved. 71

Citrix Virtual Apps and Desktops
Component Usage ProtocolDefaultincoming port Notes
Director DeliveryController
TCP 80, 443
Citrix Licensing
The following ports are used for Citrix Licensing.
Component Usage Protocol Default incoming port
License Server License Server TCP 27000
License Server License Server forCitrix (vendordaemon)
TCP 7279
License Server LicenseAdministrationConsole
TCP 8082
License Server Web Services forLicensing
TCP 8083
HDX
April 14, 2021
Warning:
Editing the registry incorrectly can cause serious problems that might require you to reinstallyour operating system. Citrix cannot guarantee that problems resulting from the incorrect useof Registry Editor can be solved. Use Registry Editor at your own risk. Be sure to back up theregistry before you edit it.
Citrix HDX represents a broad set of technologies that deliver a high‑definition experience to users ofcentralized applications and desktops, on any device and over any network.
© 1999–2022 Citrix Systems, Inc. All rights reserved. 72
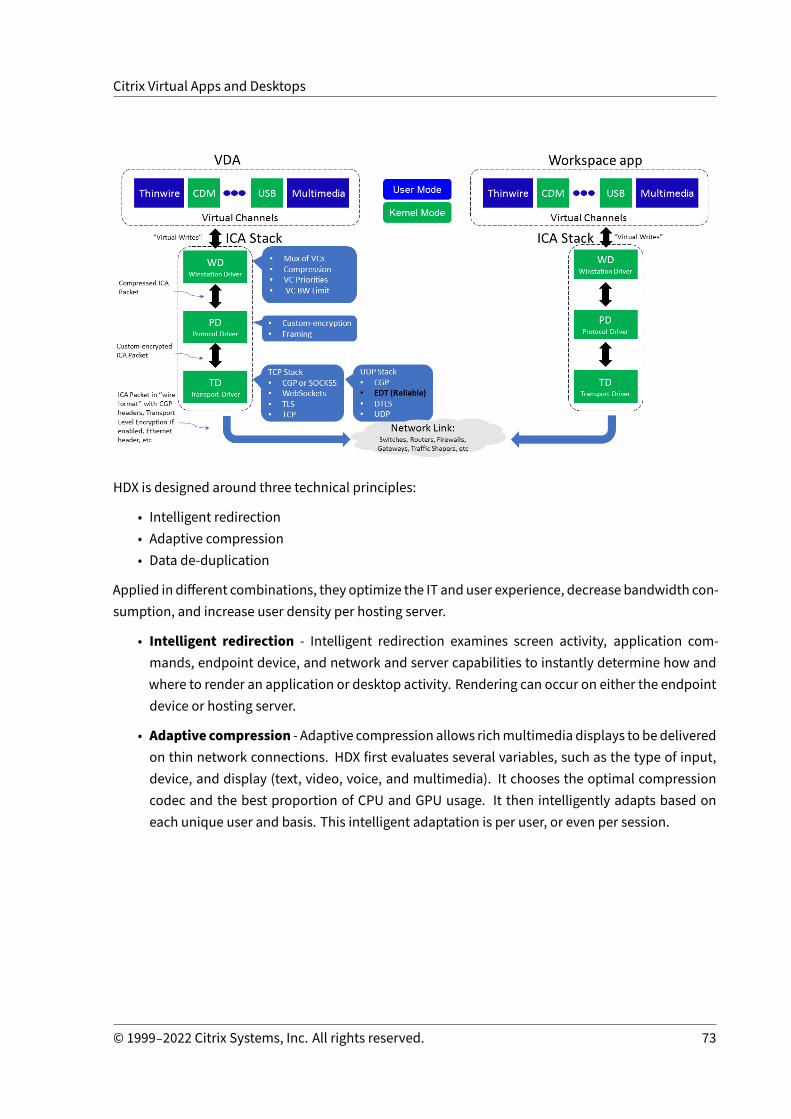
Citrix Virtual Apps and Desktops
HDX is designed around three technical principles:
• Intelligent redirection• Adaptive compression• Data de‑duplication
Applied in different combinations, they optimize the IT and user experience, decrease bandwidth con‑sumption, and increase user density per hosting server.
• Intelligent redirection ‑ Intelligent redirection examines screen activity, application com‑mands, endpoint device, and network and server capabilities to instantly determine how andwhere to render an application or desktop activity. Rendering can occur on either the endpointdevice or hosting server.
• Adaptive compression ‑ Adaptive compression allows richmultimedia displays to be deliveredon thin network connections. HDX first evaluates several variables, such as the type of input,device, and display (text, video, voice, and multimedia). It chooses the optimal compressioncodec and the best proportion of CPU and GPU usage. It then intelligently adapts based oneach unique user and basis. This intelligent adaptation is per user, or even per session.
© 1999–2022 Citrix Systems, Inc. All rights reserved. 73

Citrix Virtual Apps and Desktops
• Data de‑duplication ‑ De‑duplication of network traffic reduces the aggregate data sent be‑tween client and server. It does so by taking advantage of repeated patterns in commonly ac‑cessed data such as bitmap graphics, documents, print jobs, and streamed media. Cachingthese patterns allows only the changes to be transmitted across the network, eliminating dupli‑cate traffic. HDX also supportsmulticasting ofmultimedia streams, where a single transmissionfrom the source is viewed bymultiple subscribers at one location, rather than a one‑to‑one con‑nection for each user.
For more information, see Boost productivity with a high‑definition user workspace.
At the device
HDX uses the computing capacity of user devices to enhance and optimize the user experience. HDXtechnology ensures that users receive a smooth, seamless experience with multimedia content intheir virtual desktops or applications. Workspace control enables users to pause virtual desktops andapplications and resume working from a different device at the point where they left off.
On the network
HDX incorporates advanced optimization and acceleration capabilities to deliver the best perfor‑mance over any network, including low‑bandwidth and high‑latency WAN connections.
© 1999–2022 Citrix Systems, Inc. All rights reserved. 74

Citrix Virtual Apps and Desktops
HDX features adapt to changes in the environment. The features balance performance and band‑width. They apply the best technologies for each user scenario, whether the desktop or application isaccessed locally on the corporate network or remotely from outside the corporate firewall.
In the data center
HDX uses the processing power and scalability of servers to deliver advanced graphical performance,regardless of the client device capabilities.
HDX channelmonitoring provided by Citrix Director displays the status of connectedHDX channels onuser devices.
HDX Insight
HDX Insight is the integrationofNetScalerNetwork Inspector andPerformanceManagerwithDirector.It capturesdataabout ICA trafficandprovidesadashboardviewof real timeandhistorical details. Thisdata includes client‑side and server‑side ICA session latency, bandwidth use of ICA channels, and theICA round‑trip time value of each session.
You can enable NetScaler to use the HDX Insight virtual channel to move all the required data pointsin an uncompressed format. If you disable this feature, the NetScaler device decrypts and decom‑presses the ICA traffic spread across various virtual channels. Using the single virtual channel lessenscomplexity, enhances scalability, and is more cost effective.
Minimum requirements:
• Citrix Virtual Apps and Desktops 7 v1808• XenApp and XenDesktop 7.17• NetScaler version 12.0 Build 57.x• Citrix Workspace app for Windows 1808• Citrix Receiver for Windows 4.10• Citrix Workspace app for Mac 1808• Citrix Receiver for Mac 12.8
Enable or disable HDX Insight virtual channel
To disable this feature, set the Citrix NetScaler Application Flow service properties to Disabled. To en‑able, set the service to Automatic. In either case, we recommend that you restart the server machineafter changing these properties. By default, this service is enabled (Automatic).
© 1999–2022 Citrix Systems, Inc. All rights reserved. 75

Citrix Virtual Apps and Desktops
Experience HDX capabilities from your virtual desktop
• To see how browser content redirection, one of four HDXmultimedia redirection technologies,accelerates delivery of HTML5 and WebRTCmultimedia content:1. Download the Chrome browser extension and install it on the virtual desktop.2. To experience how browser content redirection accelerates the delivery of multimedia
content to virtual desktops, view a video on your desktop from a website containingHTML5 videos, such as YouTube. Users don’t know when browser content redirectionis running. To see whether browser content redirection is being used, drag the browserwindow quickly. You’ll see a delay or out of frame between the viewport and the userinterface. You can also right‑click on the webpage and look for About HDX BrowserRedirection in the menu.
• To see how HDX delivers high definition audio:1. Configure your Citrix client for maximum audio quality; see the Citrix Workspace app doc‑
umentation for details.2. Play music files by using a digital audio player (such as iTunes) on your desktop.
HDX provides a superior graphics and video experience for most users by default, and configurationisn’t required. Citrix policy settings that provide the best experience for most use cases are enabledby default.
• HDX automatically selects the best delivery method based on the client, platform, application,and network bandwidth, and then self‑tunes based on changing conditions.
• HDX optimizes the performance of 2D and 3D graphics and video.• HDX enables user devices to stream multimedia files directly from the source provider on theinternet or intranet, rather than through the host server. If the requirements for this client‑sidecontent fetching are notmet, media delivery falls back to server‑side content fetching andmul‑timedia redirection. Usually, adjustments to the multimedia redirection feature policies aren’tneeded.
© 1999–2022 Citrix Systems, Inc. All rights reserved. 76
Citrix Virtual Apps and Desktops
• HDX delivers rich server‑rendered video content to virtual desktops when multimedia redirec‑tion is not available: View a video on a website containing high definition videos, such as http://www.microsoft.com/silverlight/iis‑smooth‑streaming/demo/.
Good to know:
• For support and requirements information for HDX features, see the System requirements ar‑ticle. Except where otherwise noted, HDX features are available for supported Windows Multi‑session OS and Windows Single‑session OSmachines, plus Remote PC Access desktops.
• This content describes how to optimize the user experience, improve server scalability, or re‑duce bandwidth requirements. For information about using Citrix policies and policy settings,see the Citrix policies documentation for this release.
• For instructions that includeediting the registry, use caution: editing the registry incorrectly cancause serious problems thatmight require you to reinstall your operating system. Citrix cannotguarantee that problems resulting from the incorrect use of Registry Editor can be solved. UseRegistry Editor at your own risk. Be sure to back up the registry before you edit it.
Auto client reconnect and session reliability
When accessing hosted applications or desktops, network interruption might occur. To experience asmoother reconnection, we offer auto client reconnect and session reliability. In a default configura‑tion, session reliability starts and then auto client reconnect follows.
Auto client reconnect:
Auto client reconnect relaunches the client engine to reconnect to a disconnected session. Auto clientreconnect closes (or disconnects) the user session after the time specified in the setting. If auto clientreconnect is in progress, the systemsends application anddesktopsnetwork interruptionnotificationto the user as follows:
• Desktops. The session window is grayed out and a countdown timer shows the time until thereconnections occur.
• Applications. The session window closes and a dialog appears to the user containing a count‑down timer showing the time until the reconnections are attempted.
During auto client reconnect, sessions relaunch expecting network connectivity. User cannot interactwith sessions while auto client reconnect is in progress.
On reconnection, the disconnected sessions reconnect using saved connection information. The usercan interact with the applications and desktops normally.
Default auto client reconnect settings:
• Auto client reconnect timeout: 120 seconds• Auto client reconnect: Enabled
© 1999–2022 Citrix Systems, Inc. All rights reserved. 77
Citrix Virtual Apps and Desktops
• Auto client reconnect authentication: Disabled• Auto client reconnect Logging: Disabled
For more information, see Auto client reconnect policy settings.
Session reliability:
Session reliability reconnects ICA sessions seamlessly across network interruptions. Session reliabil‑ity closes (or disconnects) the user session after the time specified in the setting. After the sessionreliability timeout, the auto client reconnect settings take effect, attempting to reconnect the user tothe disconnected session. When session reliability is in progress, application and desktops networkinterruption notification are sent to the user as follows:
• Desktops. The session window becomes translucent and a countdown timer shows the timeuntil the reconnections occur.
• Applications. The window becomes translucent along with connection interrupted pop upsfrom the notification area.
While session reliability is active, the user cannot interact with the ICA sessions. However, user ac‑tions like keystrokes are buffered for few seconds immediately after the network interruption andretransmitted when the network is available.
On reconnection, the client and the server resume at the same point where they were in their ex‑change of protocol. The session windows lose translucency and appropriate notification area popups are shown for applications.
Default session reliability settings
• Session reliability timeout: 180 seconds• Reconnection UI opacity level: 80%• Session reliability connection: Enabled• Session reliability port number: 2598
For more information, see Session reliability policy settings.
NetScaler with auto client reconnect and session reliability:
If Multistream and Multiport policies are enabled on the server and any or all these conditions aretrue, auto client reconnect does not work:
• Session reliability is disabled on NetScaler Gateway.• A failover occurs on the NetScaler appliance.• NetScaler SD‑WAN is used with NetScaler Gateway.
HDX adaptive throughput
HDX adaptive throughput intelligently fine‑tunes the peak throughput of the ICA session by adjustingoutput buffers. The number of output buffers is initially set at a high value. This high value allows
© 1999–2022 Citrix Systems, Inc. All rights reserved. 78

Citrix Virtual Apps and Desktops
data to be transmitted to the client more quickly and efficiently, especially in high latency networks.Providing better interactivity, faster file transfers, smoother video playback, higher framerate and res‑olution results in an enhanced user experience.
Session interactivity is constantly measured to determine whether any data streams within the ICAsession are adversely affecting interactivity. If that occurs, the throughput is decreased to reduce theimpact of the large data stream on the session and allow interactivity to recover.
Important:
HDXadaptive throughput changes theway that output buffers are set bymoving thismechanismfrom the client to the VDA, and nomanual configuration is necessary.
This feature has the following requirements:
• VDA version 1811 or later• Workspace app for Windows 1811 or later
For deployments that do not meet the minimum requirements, see Optimize HDX bandwidth overhigh latency connections for information about manual output buffer configuration.
Improve the image quality sent to user devices
The following visual display policy settings control the quality of images sent from virtual desktops touser devices.
• Visual quality. Controls the visual quality of imagesdisplayedon theuser device: medium, high,always lossless, build to lossless (default =medium). The actual video quality using the defaultsetting of medium depends on available bandwidth.
• Target frame rate. Specifies the maximum number of frames per second that are sent from thevirtual desktop to the user device (default = 30). For devices that have slower CPUs, specifying alower value can improve the user experience. The maximum supported frame rate per secondis 60.
• Display memory limit. Specifies themaximum video buffer size for the session in kilobytes (de‑fault = 65536 KB). For connections requiring more color depth and higher resolution, increasethe limit. You can calculate the maximummemory required.
Improve video conference performance
Several popular video conferencing applications are optimized for delivery from Citrix Virtual Appsand Desktops through multimedia redirection (see, for example, HDX RealTime Optimization Pack).For applications that are not optimized, HDX webcam video compression improves bandwidth effi‑ciency and latency tolerance for webcams during video conferencing in a session. This technology
© 1999–2022 Citrix Systems, Inc. All rights reserved. 79
Citrix Virtual Apps and Desktops
streamswebcam traffic over a dedicatedmultimedia virtual channel. This technology uses less band‑width compared to the isochronous HDX Plug‑n‑Play USB redirection support, and works well overWAN connections.
Citrix Workspace app users can override the default behavior by choosing the Desktop Viewer Mic &Webcam setting Don’t use my microphone or webcam. To prevent users from switching from HDXwebcam video compression, disable USB device redirection by using the policy settings under ICApolicy settings > USB Devices policy settings.
HDX webcam video compression requires that the following policy settings be enabled (all are en‑abled by default).
• Client audio redirection• Client microphone redirection• Multimedia conferencing• Windows Media Redirection
If a webcam supports hardware encoding, HDX video compression uses the hardware encod‑ing by default. Hardware encoding might consume more bandwidth than software encod‑ing. To force software compression, add the following DWORD key value to the registry key:HKCU\Software\Citrix\HdxRealTime: DeepCompress_ForceSWEncode=1.
Network traffic priorities
Priorities are assigned to network traffic across multiple connections for a session using Quality ofService supported routers. FourTCPstreamsand twoUserDatagramProtocol (UDP) streamsareavail‑able to carry ICA traffic between the user device and the server:
• TCP streams ‑ real time, interactive, background, and bulk• UDP streams ‑ voice and Framehawk display remoting
Each virtual channel is associated with a specific priority and transported in the corresponding con‑nection. You can set the channels independently, based on the TCP port number used for the connec‑tion.
Multiple channel streaming connections are supported for Virtual Delivery Agents (VDAs) installed onWindows 10, Windows 8, and Windows 7 machines. Work with your network administrator to ensurethe Common Gateway Protocol (CGP) ports configured in the Multi‑Port Policy setting are assignedcorrectly on the network routers.
Quality of Service is supported only whenmultiple session reliability ports, or the CGP ports, are con‑figured.
© 1999–2022 Citrix Systems, Inc. All rights reserved. 80

Citrix Virtual Apps and Desktops
Warning:
Use transport security when using this feature. Citrix recommends using Internet Protocol Se‑curity (IPsec) or Transport Layer Security (TLS). TLS connections are supported only when theconnections traverse a NetScaler Gateway that supportsmulti‑stream ICA. On an internal corpo‑rate network, multi‑stream connections with TLS are not supported.
To set Quality of Service for multiple streaming connections, add the following Citrix policy settingsto a policy (see Multi‑stream connections policy settings for details):
• Multi‑Port policy ‑ This setting specifies ports for ICA traffic across multiple connections, andestablishes network priorities.
– Select a priority from the CGP default port priority list. By default, the primary port (2598)has a High priority.
– Type more CGP ports in CGP port1, CGP port2, and CGP port3 as needed, and identify pri‑orities for each. Each port must have a unique priority.
Explicitly configure the firewalls on VDAs to allow the additional TCP traffic.
• Multi‑Stream computer setting ‑ This setting is disabled by default. If you use Citrix NetScalerSD‑WAN with Multi‑Stream support in your environment, you do not need to configure this set‑ting. Configure this policy setting when using third‑party routers or legacy Branch Repeaters toachieve the desired Quality of Service.
• Multi‑Stream user setting ‑ This setting is disabled by default.
For policies containing these settings to take effect, usersmust log off and then log on to the network.
Show or hide the remote language bar
The language bar displays the preferred input language in an application session. If this feature is en‑abled (default), you can show or hide the language bar from the Advanced Preferences > Languagebar UI in Citrix Workspace app for Windows. By using a registry setting on the VDA side, you can dis‑able client control of the language bar feature. If this feature is disabled, the client UI setting doesn’ttake effect, and the per user current setting determines the language bar state. Formore information,see Improve the user experience.
To disable client control of the language bar feature from the VDA:
1. In the registryeditor, navigate toHKEY_LOCAL_MACHINE\SYSTEM\CurrentControlSet\Control\Citrix\wfshell\TWI.2. Create a DWORD value key, SeamlessFlags, and set it to 0x40000.
© 1999–2022 Citrix Systems, Inc. All rights reserved. 81
Citrix Virtual Apps and Desktops
Unicode keyboardmapping
Non‑Windows Citrix Receivers use the local keyboard layout (Unicode). If a user changes the localkeyboard layout and the server keyboard layout (scan code), theymight not be in sync and the outputis incorrect. For example, User1 changes the local keyboard layout from English to German. User1then changes the server‑side keyboard to German. Even though both keyboard layouts are German,they might not be in sync causing incorrect character output.
Enable or disable Unicode keyboard layoutmapping
By default, the feature is disabled on the VDA side. To enable the feature, toggle on the feature byusing registry editor regedit on the VDA. Add the following registry key:
KEY_LOCAL_MACHINE/SOFTWARE/Citrix/CtxKlMap
Name: EnableKlMap
Type: DWORD
Value: 1
To disable this feature, set EnableKlMap to 0 or delete the CtxKlMap key.
Enable Unicode keyboard layoutmapping compatible mode
By default, Unicode keyboard layout mapping automatically hooks some windows API to reload thenewUnicode keyboard layoutmapwhen you change the keyboard layout on the server side. A fewap‑plications cannot be hooked. To keep compatibility, you can change the feature to compatible modeto support these non‑hooked applications. Add the following registry key:
HKEY_LOCAL_MACHINE/SOFTWARE/Citrix/CtxKlMap
Name: DisableWindowHook
Type: DWORD
Value: 1
To use normal Unicode keyboard layout mapping, set DisableWindowHook to 0.
Adaptive transport
July 14, 2021
© 1999–2022 Citrix Systems, Inc. All rights reserved. 82

Citrix Virtual Apps and Desktops
Adaptive Transport is amechanism in Citrix Virtual Apps and Desktops that provides the ability to useEnlightened Data Transport (EDT) as the transport protocol for ICA connections. Adaptive Transportswitches to TCP when EDT is not available.
EDT is a Citrix‑proprietary transport protocol built on top of User DatagramProtocol (UDP). It deliversa superior user experience on challenging long‑haul connectionswhilemaintaining server scalability.EDT improves data throughput for all ICA virtual channels on unreliable networks, providing a betterandmore consistent user experience.
When Adaptive Transport is set toPreferred, EDT is used as the primary transport protocol and TCP isused for fallback. By default, Adaptive Transport is set to Preferred. You can set Adaptive Transportto Diagnostic mode for testing purposes, which only allows EDT and disables the fallback to TCP.
With Citrix Workspace app forWindows, Mac, and iOS, EDT and TCP connections are attempted in par‑allel during the initial connection, session reliability reconnection, andautomatic client reconnection.Doing so reduces the connection time if the underlying UDP transport is unavailable and TCPmust beused instead. If Adaptive Transport is set to Preferred and the connection is established using TCP,Adaptive Transport continues to attempt to switch to EDT every five minutes.
With Citrix Workspace app for Linux and Android, EDT connections are attempted first. If the connec‑tion is unsuccessful, Citrix Workspace app tries to connect using TCP after the EDT request times out.
© 1999–2022 Citrix Systems, Inc. All rights reserved. 83

Citrix Virtual Apps and Desktops
System requirements
The following are the requirements for using Adaptive Transport and EDT:
• Control plane
– Citrix Virtual Apps and Desktops Service– Citrix Virtual Apps and Desktops 1912 or later
• Virtual Delivery Agent
– Version 1912 or later (2103 or later recommended)– Version 2012 is the minimum required for using EDT with Citrix Gateway Service
• StoreFront
– Version 3.12.x– Version 1912.0.x
• Citrix Workspace app
– Windows: version 1912 or later (2105 or later recommended)– Linux: version 1912 or later (2104 or later recommended)– Mac: version 1912 or later– iOS: latest version available in Apple App Store– Android: latest version available in Google Play
• Citrix Gateway (ADC)
– 13.0.52.24 or later– 12.1.56.22 or later
• Firewall (from VDA perspective)
• UDP 1494 inbound – if session reliability is disabled
© 1999–2022 Citrix Systems, Inc. All rights reserved. 84
Citrix Virtual Apps and Desktops
• UDP 2598 inbound – if session reliability is enabled
• UDP 443 inbound – if VDA SSL is enabled for ICA encryption (DTLS)
• UDP 443 outbound – if using Citrix Gateway Service. For more information, see the Citrix Gate‑way service documentation.
Considerations
• Enable session reliability to use EDT MTU Discovery and to use EDT with Citrix Gateway andCitrix Gateway service.
• Ensure that the EDTMTU is adequately set to avoid fragmentation. Otherwise, performance canbe impacted or sessions might fail to launch in some situations. For more information, see theEDT MTU Discover.
• For details on requirements and considerations for using EDT with Citrix Gateway service, seeHDX Adaptive Transport with EDT support for Citrix Gateway service.
• For details on Citrix Gateway configuration to support EDT, see Configure Citrix Gateway to sup‑port Enlightened Data Transport and HDX Insight.
• IPv6 is not supported currently.
Configuration
Adaptive Transport is enabled by default. You can configure the following options using the HDXAdaptive Transport setting in Citrix policy.
• Preferred. This is the default setting. Adaptive Transport is enabled, and it uses EDT as thepreferred transport protocol, with fallback to TCP.
• Diagnostic mode. Adaptive Transport is enabled, and it forces the use of EDT. Fallback to TCPis disabled. This setting is recommended for testing and troubleshooting only.
• Off. Adaptive Transport is disabled, and only TCP is used for transport.
To confirm that EDT is being used as the transport protocol for the session, you can use Director or theCtxSession.exe command‑line utility on the VDA.
In Director, look up the session and selectDetails. If the Connection type isHDX and the Protocol isUDP, EDT is being used as the transport protocol for the session. If the Connection type is RDP, ICAis not in use, and the Protocol displays N/A. For more information, see Monitor sessions.
© 1999–2022 Citrix Systems, Inc. All rights reserved. 85

Citrix Virtual Apps and Desktops
Touse theCtxSession.exeutility, launchaCommandPromptor PowerShellwithin the session and runctxsession.exe. To see verbose statistics, run ctxsession.exe -v. If EDT is in use, the transportprotocol shows one of the following:
• UDP > ICA (Session Reliability disabled)• UDP > CGP > ICA (Session Reliability enabled)• UDP > DTLS > CGP > ICA (ICA is DTLS‑encrypted end‑to‑end)
© 1999–2022 Citrix Systems, Inc. All rights reserved. 86
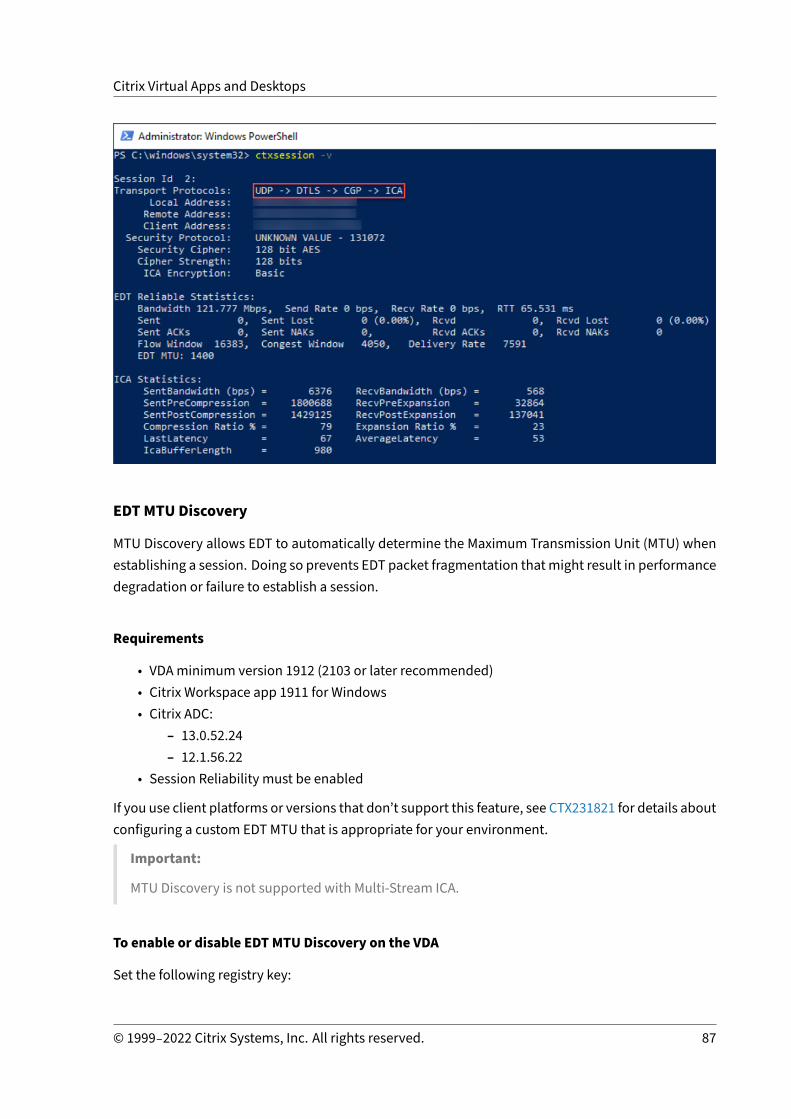
Citrix Virtual Apps and Desktops
EDTMTU Discovery
MTU Discovery allows EDT to automatically determine the Maximum Transmission Unit (MTU) whenestablishing a session. Doing so prevents EDT packet fragmentation thatmight result in performancedegradation or failure to establish a session.
Requirements
• VDAminimum version 1912 (2103 or later recommended)• Citrix Workspace app 1911 for Windows• Citrix ADC:
– 13.0.52.24– 12.1.56.22
• Session Reliability must be enabled
If you use client platforms or versions that don’t support this feature, see CTX231821 for details aboutconfiguring a custom EDT MTU that is appropriate for your environment.
Important:
MTU Discovery is not supported with Multi‑Stream ICA.
To enable or disable EDTMTU Discovery on the VDA
Set the following registry key:
© 1999–2022 Citrix Systems, Inc. All rights reserved. 87

Citrix Virtual Apps and Desktops
• Key: HKEY_LOCAL_MACHINE\SYSTEM\CurrentControlSet\Control\Terminal Server\Wds\icawd• Value name: MtuDiscovery• Value type: DWORD• Value data: 00000001
Restart the VDA and wait for the VDA to register.
To disable EDT MTU Discovery, delete this registry value and restart the VDA.
This setting is machine‑wide and affects all sessions connecting from a supported client.
Warning:
Editing the registry incorrectly can cause serious problems that might require you to reinstallyour operating system. Citrix cannot guarantee that problems resulting from the incorrect useof Registry Editor can be solved. Use Registry Editor at your own risk. Be sure to back up theregistry before you edit it.
To control EDT MTU Discovery on the client
You can control EDT MTU Discovery selectively on the client by adding theMtuDiscovery parameterin the ICA file. To disable the feature, set the following under the Application section:
MtuDiscovery=Off
To re‑enable the feature, remove theMtuDiscovery parameter from the ICA file.
Important:
For this ICA file parameter to work, enable the feature on the VDA. If the feature is not enabledon the VDA, the ICA file parameter has no effect.
Loss tolerant modeImportant:
• The feature requires a minimum of Citrix Workspace app 2002 for Windows.• Loss tolerantmode is not supportedonCitrix GatewayorCitrixGatewayService. Thismodeis available only with direct connections.
Loss tolerant mode uses the EDT Lossy transport protocol to enhance the user experience for usersconnecting through networks with high latency and packet loss.
Initially, sessions are established using EDT. If the latency and packet loss thresholds are reached orsurpassed, the applicable virtual channels switch from EDT to EDT Lossy, while leaving the other vir‑tual channels on EDT. If the latency and packet loss decrease below the thresholds, the applicablevirtual channels switch back to EDT.
The default thresholds are:
© 1999–2022 Citrix Systems, Inc. All rights reserved. 88

Citrix Virtual Apps and Desktops
• Packet loss: 5%• Latency: 300 ms (RTT)
Loss tolerant mode is enabled by default. You can disable the mode or adjust the packet loss andlatency thresholds using the loss tolerant mode thresholds setting.
Requirements
• Citrix Virtual Delivery Agent (VDA) 2003• Citrix Workspace app 2002 for Windows• Session reliability enabled. For more information about session reliability, see Session reliabil‑ity policy settings.
Known issues
Adaptive Transport and EDT contain the following issues:
• Packet fragmentation can cause performance degradation or even failure to launch sessions.You can adjust the EDT MTU to avoid this. Use MTU Discovery or the workaround described inCTX231821.
• A grey or black screen may appear when launching a session from a Windows client if MTU Dis‑covery is enabled. To address this issue, upgrade to Workspace app for Windows 2105 or lateror Workspace app for Windows 1912 CU4 or later.
• Fallback to TCPmay fail on Linux and Android clients when connecting through Citrix Gatewayor Citrix Gateway Service. This happens when there is a successful EDT negotiation betweenthe client and the Gateway, and the EDT negotiation fails between the Gateway and the VDA.To address this issue, upgrade to Workspace app for Linux 2104 or later and Workspace app forAndroid 21.5 or later.
• Asymmetrical network paths can cause MTU Discovery to fail for connections that do not gothrough Citrix Gateway or Citrix Gateway Service. To address this issue, upgrade to VDA version2103 or later. [CVADHELP‑16654]
• When using Citrix Gateway or Citrix Gateway Service, asymmetrical network paths can causeMTU Discovery to fail. This is due to an issue on Gateway that causes the Don’t Fragment (DF)bit in the EDT packets’ header not to be propagated. A fix for this issue is not yet available.[CGOP‑18438]
• MTUDiscoverymay fail for users that connect through a DS‑Lite network. Somemodems fail tohonor the DF bit when packet processing is enabled, preventing MTU Discovery from detectingfragmentation. In this situation, these are the available options:
– Disable packet processing on the user’s modem.
© 1999–2022 Citrix Systems, Inc. All rights reserved. 89
Citrix Virtual Apps and Desktops
– Disable MTU Discovery and use a hardcoded MTU as described in CTX231821.– Disable Adaptive Transport to force sessions to use TCP. If only a subset of users is affected,consider disabling it on the client‑side so that other users can continue to use EDT.
Troubleshoot
To troubleshoot Adaptive Transport and EDT, we suggest the following:
1. Thoroughly review and validate the requirements, considerations, and known issues.
2. Check if there are Citrix policies in Studio or GPO overwriting the desiredHDX Adaptive Trans‑port setting.
3. Check if there are settings on the client overwriting the desiredHDX Adaptive Transport setting.This can be a GPO preference, a setting configured using the optional Workspace app adminis‑trative template, or amanual configurationof theHDXoverUDP setting in the registry or client’sconfiguration file.
4. On multi‑session VDA machines, ensure that the UDP listeners are active. Open a commandprompt in the VDA machine and run netstat -a -p udp. For more information, see How toConfirm HDX Enlightened Data Transport Protocol.
5. Launch a direct session internally, bypassing the Citrix Gateway, and check the protocol in use.If the session uses EDT, the VDA is ready to use EDT for external connections through Citrix Gate‑way.
6. If EDT works for direct internal connections and not for sessions going through Citrix Gateway:
• Ensure that Session Reliability is enabled• Ensure that the Gateway has DTLS enabled
7. Check if the appropriate firewall rules have been configured in both network firewalls and fire‑walls running on the VDAmachines.
8. Check if your users’ connections require a non‑standard MTU. Connections with an effectiveMTU lower than 1500 bytes cause EDT packet fragmentation, which in turn can affect perfor‑mance or even cause session launch failures. This issue is commonwhenusing VPN, someWi‑Fiaccess points, andmobile networks, such as 4G and 5G. For information on how to address thisissue, see the MTU Discovery section.
Interoperability with Citrix SD‑WAN
Citrix SD‑WANWAN optimization (WANOP) offers cross‑session tokenized compression (data dedupli‑cation), including URL‑based video caching, providing significant bandwidth reduction. The reduc‑tion occurs if two or more people at the office location watch the same client‑fetched video or trans‑fer or print significant portions of the same file or document. Furthermore, by running the processes
© 1999–2022 Citrix Systems, Inc. All rights reserved. 90

Citrix Virtual Apps and Desktops
for ICA data reduction and print job compression on the branch office appliance, WANOP offers VDAserver CPU offload and enables higher Citrix Virtual Apps and Desktops server scalability.
Currently, SD‑WANWANOPdoesnot support EDT.However, there is noneed todisable Adaptive Trans‑port if SD‑WAN WANOP is in use. When a user launches a session that goes through an SD‑WAN withWANOP enabled, it automatically sets the session to use TCP as the transport protocol. Non‑WANOPsessions continue to use EDT whenever possible.
Citrix ICA virtual channels
April 14, 2021
Warning:
Editing the registry incorrectly can cause serious problems that might require you to reinstallyour operating system. Citrix cannot guarantee that problems resulting from the incorrect useof Registry Editor can be solved. Use Registry Editor at your own risk. Be sure to back up theregistry before you edit it.
What are ICA virtual channels?
A large portion of the functionality and communication between the Citrix Workspace app and theCitrix Virtual Apps andDesktops servers occurs over virtual channels. Virtual channels are a necessarypart of the remote computing experience with the Citrix Virtual Apps and Desktops servers. Virtualchannels are used for:
• Audio• COM ports• Disks• Graphics• LPT ports• Printers• Smart cards• Third‑party custom virtual channels• Video
New virtual channels are sometimes released with new versions of the Citrix Virtual Apps and Desk‑tops servers and Citrix Workspace app products to provide more functionality.
© 1999–2022 Citrix Systems, Inc. All rights reserved. 91

Citrix Virtual Apps and Desktops
A virtual channel consists of a client‑side virtual driver that communicates with a server‑side applica‑tion. Citrix Virtual Apps and Desktops ship with various virtual channels included. They’re designedto allow customers and third‑party vendors to create their own virtual channels by using one of theprovided Software Development Kits (SDKs).
Virtual channels provide a secure way to accomplish various tasks. For example, an application thatis running on a Citrix Virtual Apps server that is communicating with a client‑side device or an appli‑cation that is communicating with the client‑side environment.
On theclient side, virtual channels correspond tovirtual drivers. Eachvirtual driverprovidesa specificfunction. Some are required for normal operation, and others are optional. Virtual drivers operate atthepresentation layerprotocol level. Therecanbeseveralprotocols activeatany timebymultiplexingchannels that are provided by the Windows Station (WinStation) protocol layer.
The following functions are contained in the VirtualDriver registry value under this registry path:
HKEY_LOCAL_MACHINE\SOFTWARE\Citrix\ICA Client\Engine\Configuration\Advanced\Modules\ICA 3.0
Or
© 1999–2022 Citrix Systems, Inc. All rights reserved. 92

Citrix Virtual Apps and Desktops
HKEY_LOCAL_MACHINE\SOFTWARE\WOW6432Node\Citrix\ICA Client\Engine\Configuration\Advanced\Modules\ICA 3.0 (for 64‑bit)
• Thinwire3.0 (Required)• ClientDrive• ClentPrinterQueue• ClentPrinterPort• Clipboard• ClientComm• ClientAudio• LicenseHandler (Required)• TWI (Required)• SmartCard• ICACTL (Required)• SSPI• TwainRdr• UserEXperience• Vd3d
Note:
You can disable specific client functionality by removing one or more of these values from theregistry key. For example, if you wanted to remove the Client Clipboard, remove the word Clip‑board.
This list contains the client virtual driver files and their respective functions. Citrix Virtual Apps andCitrixWorkspace app forWindows use these files. They are in the formof Dynamic Link Libraries (usermode), and not Windows drivers (kernel mode) except for Generic USB as described in the GenericUSB virtual channel.
• vd3dn.dll – Direct3D virtual channel used for desktop composition redirection• vdcamN.dll – Bidirectional audio• vdcdm30n.dll – Client drive mapping• vdcom30N.dll ‑ Client COM port mapping• vdcpm30N.dll – Client printer mapping• vdctln.dll – ICA controls channel• vddvc0n.dll – Dynamic virtual channel• vdeuemn.dll ‑ End user experience monitoring• vdgusbn.dll – Generic USB virtual channel• vdkbhook.dll – Transparent key pass‑through• vdlfpn.dll – Framehawk display channel over UDP like transport• vdmmn.dll – Multimedia support• vdmrvc.dll – Mobile Receiver virtual channel
© 1999–2022 Citrix Systems, Inc. All rights reserved. 93

Citrix Virtual Apps and Desktops
• vdmtchn.dll ‑ Multi‑touch support• vdscardn.dll – Smartcard support• vdsens.dll – Sensors virtual channel• vdspl30n.dll – Client UPD• vdsspin.dll – Kerberos• vdtuin.dll – Transparent UI• vdtw30n.dll – Client Thinwire• vdtwin.dll – Seamless• vdtwn.dll – Twain
Some virtual channels are compiled into other files. For example Clipboard Mapping is available inwfica32.exe
64‑bit compatibility
Citrix Workspace app for Windows is 64‑bit compatible. As with most of the binaries compiled for 32bit, these client files have 64‑bit compiled equivalents:
• brapi64.dll• confmgr.dll• ctxlogging.dll• ctxmui.dll• icaconf.exe• icaconfs.dll• icafile.dll• pnipcn64.dll• pnsson.dll• ssoncom.exe• ssonstub.dll• vdkbhook64.dll
Generic USB virtual channel
GenericUSBvirtual channel implementationuses twokernelmodedrivers alongwith thevirtual chan‑nel driver vdgusbn.dll:
• ctxusbm.sys• ctxusbr.sys
© 1999–2022 Citrix Systems, Inc. All rights reserved. 94

Citrix Virtual Apps and Desktops
How ICA virtual channels work
Virtual channels are loaded in multiple ways. The Shell (WfShell for the server and PicaShell for theworkstation) load some virtual channels. Some virtual channels are hosted as windows services.
Virtual channel modules loaded by the Shell, for example:
• EUEM• Twain• Clipboard• Multimedia• Seamless session sharing• Time Zone
Some are loaded as kernel mode, for example:
• CtxDvcs.sys – Dynamic virtual channel• Icausbb.sys – Generic USB redirection• Picadm.sys – Client drive mapping• Picaser.sys – COM port redirection• Picapar.sys – LPT port redirection
Graphics virtual channel on the server side
Startingwith XenApp7.0 and XenDesktop7.0, ctxgfx.exehosts the graphics virtual channel for bothworkstation and terminal server based sessions. Ctxgfx hosts platform specific modules that inter‑act with the corresponding driver (Icardd.dll for RDSH and vdod.dll and vidd.dll for worksta‑tion).
For XenDesktop 3D Pro deployments an OEM graphics driver is installed for the corresponding GPUon the VDA. Ctxgfx loads specialized adaptor modules to interact with the OEM graphics driver.
Hosting specialized channels in windows services
On Citrix Virtual Apps and Desktops servers, various channels are hosted as windows services. Suchhosting provides one‑to‑many semantics for multiple applications in a session andmultiple sessionson the server. Examples of such services include:
• Citrix Device Redirector Service• Citrix Dynamic Virtual Channel Service• Citrix End User Experience Monitoring Service• Citrix Location and Sensor Virtual Channel Service• Citrix MultiTouch Redirection Service• Citrix Print Manager Service
© 1999–2022 Citrix Systems, Inc. All rights reserved. 95

Citrix Virtual Apps and Desktops
• Citrix Smartcard Service• Citrix Audio Redirection Service (Citrix Virtual Desktops only)
The audio virtual channel on Citrix Virtual Apps is hosted using Windows Audio service.
On the server side, all client virtual channels are routed through the WinStation driver, Wdica.sys.On the client side, the corresponding WinStation driver, built into wfica32.exe, polls the client virtualchannels. This image illustrates the virtual channel client‑server connection.
This overview contains a client‑server data exchange using a virtual channel.
1. The client connects to theCitrix Virtual Apps andDesktops server. The client passes informationabout the virtual channels it supports to the server.
2. The server‑side application starts, obtains a handle to the virtual channel, and optionallyqueries for additional information about the channel.
3. The client virtual driver and server‑side application pass data using the following twomethods:
• If the server application has data to send to the client, the data is sent to the client imme‑diately. When the client receives the data, theWinStation driver de‑multiplexes the virtualchannel data from the ICA stream and immediately passes it to the client virtual driver.
• If the client virtual driver has data to send to the server, the data is sent the next time theWinStation driver polls it. When the server receives the data, it is queued until the virtual
© 1999–2022 Citrix Systems, Inc. All rights reserved. 96
Citrix Virtual Apps and Desktops
channel application reads it. There is noway to alert the server virtual channel applicationthat data was received.
4. When the server virtual channel application is completed, it closes the virtual channel and freesany allocated resources.
Creating your own virtual channel using the Virtual Channel SDK
Creating a virtual channel using the Virtual Channel SDK requires intermediate programming knowl‑edge. Use thismethod to provide amajor communication path between the client and the server. Forexample, if you are implementing usage of a device on the client side, such as a scanner, to be usedwith a process in the session.
Note:
• The Virtual Channel SDK requires theWFAPI SDK towrite the server side of the virtual chan‑nel.
• Becauseof enhanced security forCitrix Virtual AppsandDesktopsandCitrixWorkspaceappfor Windows, youmust take an extra step when installing a custom virtual channel.
Creating your own virtual channel using the ICA Client Object SDK
Creating a virtual channel using the ICA Client Object (ICO) is easier than using the Virtual ChannelSDK. Use the ICO by creating a named object in your program using the CreateChannelsmethod.
Important:
Because of enhanced security starting with the 10.00 version of the Citrix Receiver for Windowsand later (and Citrix Workspace apps for Windows), you must take an extra step when creatingan ICO virtual channel.
For more information, see Client Object API Specification Programmer’s Guide.
Pass‑through functionality of virtual channels
Most virtual channels that Citrix provides operate unmodifiedwhen you use the CitrixWorkspace appfor Windows within an ICA session (also known as a pass‑through session). There are considerationswhen using the client in extra hops.
The following functions operate the same way in single or multiple hops:
• Client COM port mapping• Client drive mapping• Client printer mapping
© 1999–2022 Citrix Systems, Inc. All rights reserved. 97

Citrix Virtual Apps and Desktops
• Client UPD• End user experience monitoring• Generic USB• Kerberos• Multimedia support• Smartcard support• Transparent key pass‑through• Twain
As the inherent nature of latency and factors such as compression and decompression and renderingbeing performed at each hop, performancemight be affectedwith each additional hop that the clientundergoes. The affected areas are:
• Bidirectional audio• File transfers• Generic USB redirection• Seamless• Thinwire
Important:
By default, the client drives mapped by an instance of the client running in a pass‑through ses‑sion are restricted to the client drives of the connecting client.
Pass‑through functionality of virtual channels between a Citrix Virtual Desktopsession and a Citrix Virtual App session
Most virtual channels provided by Citrix operate unmodified when you use Citrix Workspace app forWindows within an ICA session on a Citrix Virtual Desktops server (also known as a pass‑through ses‑sion).
Specifically, on the Citrix Virtual Desktops server, there is a VDA hook that runs picaPassthruHook.This hookmakes the client think it’s running on a CPS server, and placing the client into its traditionalpass‑throughmode.
We support the following traditional virtual channels and their functionality:
• Client• Client COM port mapping• Client drive mapping• Client printer mapping• Generic USB (limited due to performance)• Multimedia support• Smartcard support
© 1999–2022 Citrix Systems, Inc. All rights reserved. 98

Citrix Virtual Apps and Desktops
• SSON• Transparent key pass‑through
Security and ICA virtual channels
Securing usage is an important part of planning, developing, and implementing virtual channels.There are several references to specific areas of security located throughout this document.
Best practices
Open virtual channels when you Connect and Reconnect. Close virtual channels when you log offand Disconnect.
Keep the following guidelines in mind when you create scripts that use virtual channel functions.
Naming the Virtual Channels:
You can create a maximum of 32 virtual channels. Seventeen of the 32 channels are reserved for spe‑cial purposes.
• Virtual channel names must not be more than seven characters in length.
• The first three characters are reserved for the vendor name, and the next four for the channeltype. For example, CTXAUD represents the Citrix audio virtual channel.
Virtual channels are referred to by a seven‑character (or shorter) ASCII name. In some previous ver‑sions of the ICA protocol, virtual channels were numbered. The numbers are now assigned dynam‑ically based on the ASCII name, making implementation easier. Users who are developing virtualchannel code for internal use only can use any seven‑character name that does not conflict with ex‑isting virtual channels. Use only numbers and upper and lowercase ASCII. Follow the existing namingconvention when adding your own virtual channels. There are several predefined channels. The pre‑defined channels begin with the OEM identifier CTX and are for use only by Citrix.
Double‑Hop Support:
Virtual Channel Is double hop supported?
Audio No
Browser Content Redirection No
CDM Yes
CEIP No
Clipboard Yes
Continuum (MRVC) No
© 1999–2022 Citrix Systems, Inc. All rights reserved. 99

Citrix Virtual Apps and Desktops
Virtual Channel Is double hop supported?
Control VC Yes
HTML5 Video Redirection (v1) Yes
Keyboard, Mouse Yes
MultiTouch No
NSAPVC No
Printing Yes
SensVC No
Smartcard Yes
Twain Yes
USB VC Yes
WAYCOM devices ‑K2M using USB VC Yes
Webcam Video Compression Yes
Windows Media Redirection Yes
See also
• ICA Virtual Channel SDK• The Citrix Developer Network is the home for all technical resources and discussions involvingthe use of Citrix SDKs. In this network, you can find access to SDKs, sample code and scripts, ex‑tensions and plug‑ins, and SDKdocumentation. Also included are the Citrix Developer Networkforums, where technical discussions take place around each of the Citrix SDKs.
Double hop in Citrix Virtual Apps and Desktops
April 14, 2021
In the context of a Citrix client session, the term “double hop” refers to a Citrix Virtual App session thatis running within a Citrix Virtual Desktop session. The following diagram illustrates a double hop.
© 1999–2022 Citrix Systems, Inc. All rights reserved. 100
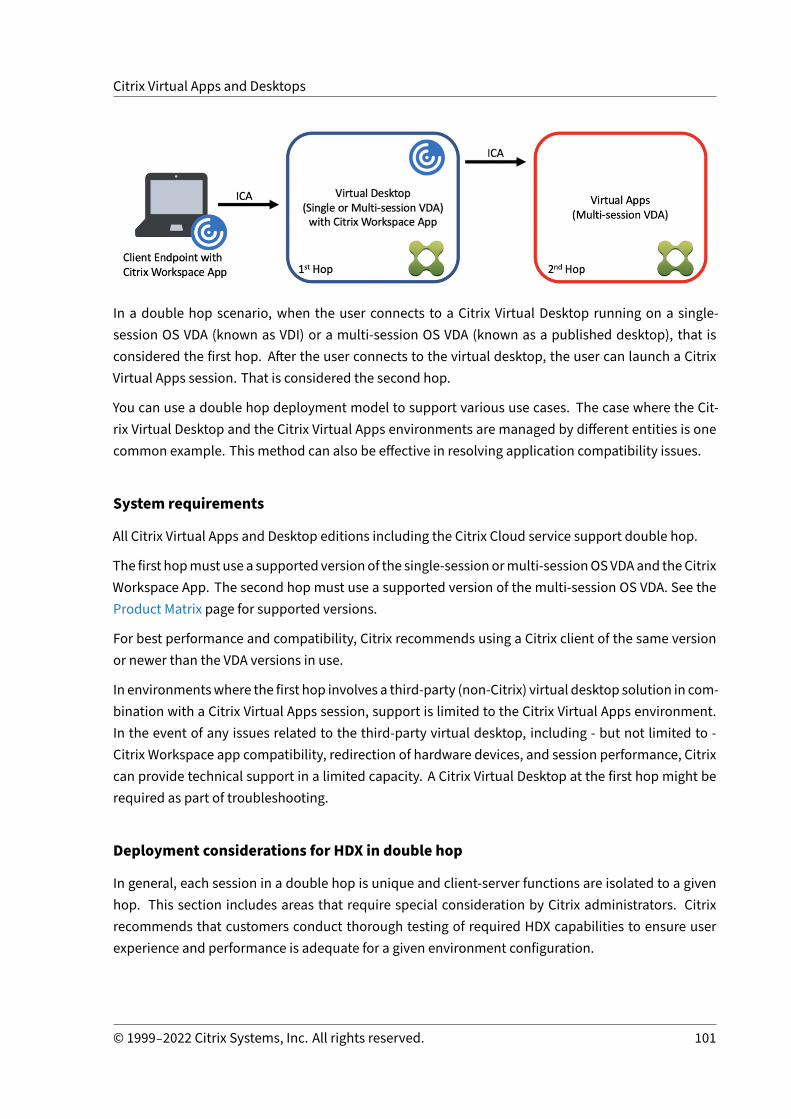
Citrix Virtual Apps and Desktops
In a double hop scenario, when the user connects to a Citrix Virtual Desktop running on a single‑session OS VDA (known as VDI) or a multi‑session OS VDA (known as a published desktop), that isconsidered the first hop. After the user connects to the virtual desktop, the user can launch a CitrixVirtual Apps session. That is considered the second hop.
You can use a double hop deployment model to support various use cases. The case where the Cit‑rix Virtual Desktop and the Citrix Virtual Apps environments are managed by different entities is onecommon example. This method can also be effective in resolving application compatibility issues.
System requirements
All Citrix Virtual Apps and Desktop editions including the Citrix Cloud service support double hop.
The first hopmust use a supported versionof the single‑session ormulti‑sessionOSVDAand theCitrixWorkspace App. The second hop must use a supported version of the multi‑session OS VDA. See theProduct Matrix page for supported versions.
For best performance and compatibility, Citrix recommends using a Citrix client of the same versionor newer than the VDA versions in use.
In environmentswhere the first hop involves a third‑party (non‑Citrix) virtual desktop solution in com‑bination with a Citrix Virtual Apps session, support is limited to the Citrix Virtual Apps environment.In the event of any issues related to the third‑party virtual desktop, including ‑ but not limited to ‑Citrix Workspace app compatibility, redirection of hardware devices, and session performance, Citrixcan provide technical support in a limited capacity. A Citrix Virtual Desktop at the first hop might berequired as part of troubleshooting.
Deployment considerations for HDX in double hop
In general, each session in a double hop is unique and client‑server functions are isolated to a givenhop. This section includes areas that require special consideration by Citrix administrators. Citrixrecommends that customers conduct thorough testing of required HDX capabilities to ensure userexperience and performance is adequate for a given environment configuration.
© 1999–2022 Citrix Systems, Inc. All rights reserved. 101
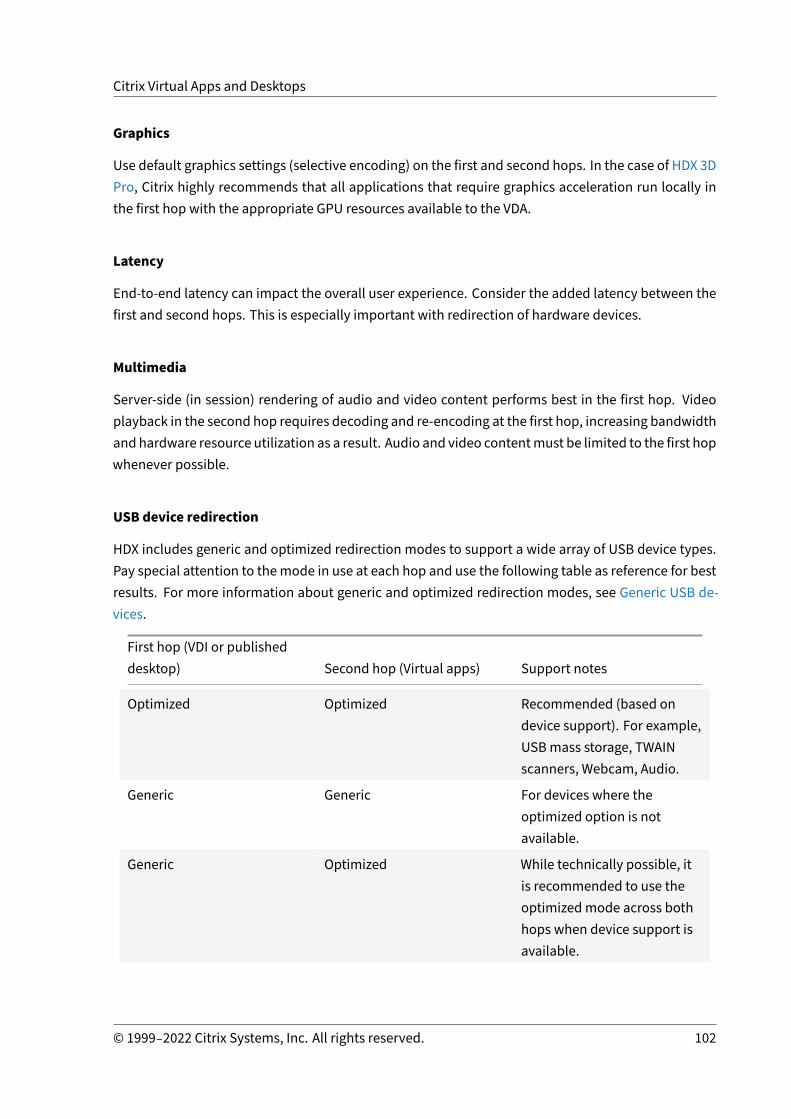
Citrix Virtual Apps and Desktops
Graphics
Use default graphics settings (selective encoding) on the first and second hops. In the case of HDX 3DPro, Citrix highly recommends that all applications that require graphics acceleration run locally inthe first hop with the appropriate GPU resources available to the VDA.
Latency
End‑to‑end latency can impact the overall user experience. Consider the added latency between thefirst and second hops. This is especially important with redirection of hardware devices.
Multimedia
Server‑side (in session) rendering of audio and video content performs best in the first hop. Videoplayback in the second hop requires decoding and re‑encoding at the first hop, increasing bandwidthand hardware resource utilization as a result. Audio and video contentmust be limited to the first hopwhenever possible.
USB device redirection
HDX includes generic and optimized redirection modes to support a wide array of USB device types.Pay special attention to themode in use at each hop and use the following table as reference for bestresults. For more information about generic and optimized redirection modes, see Generic USB de‑vices.
First hop (VDI or publisheddesktop) Second hop (Virtual apps) Support notes
Optimized Optimized Recommended (based ondevice support). For example,USBmass storage, TWAINscanners, Webcam, Audio.
Generic Generic For devices where theoptimized option is notavailable.
Generic Optimized While technically possible, itis recommended to use theoptimizedmode across bothhops when device support isavailable.
© 1999–2022 Citrix Systems, Inc. All rights reserved. 102

Citrix Virtual Apps and Desktops
First hop (VDI or publisheddesktop) Second hop (Virtual apps) Support notes
Optimized Generic Not supported
Note:
Due to the inherent chattiness of USB protocols, performance may decrease across hops. Func‑tionality and results vary depending on specific device and application requirements. Validationtesting is highly recommended in all cases of device redirection and especially important in dou‑ble hop scenarios.
Support exceptions
Double hop sessions support most HDX features and capabilities except for the following:
• Browser content redirection• Local App Access• RealTime Optimization Pack for Skype for Business• Optimization for Microsoft Teams
Install and configure
April 14, 2021
Review the referenced articles before starting each deployment step, to learn aboutwhat you see andspecify during the deployment.
Use the following sequence to deploy Citrix Virtual Apps and Desktops.
Prepare
Review Prepare to install and complete any necessary tasks.
• Where to find information about concepts, features, differences from earlier releases, systemrequirements, and databases.
• Considerations when deciding where to install core components.• Permission and Active Directory requirements.• Information about the available installers, tools, and interfaces.
© 1999–2022 Citrix Systems, Inc. All rights reserved. 103

Citrix Virtual Apps and Desktops
Install core components
Install the Delivery Controller, Citrix Studio, Citrix Director, and Citrix License Server. You can alsoinstall Citrix StoreFront. For details, see Install core components or Install using the command line.
Create a site
After you install the core components and launchStudio, you are automatically guided to create a site.
Install one or more Virtual Delivery Agents (VDAs)
Install a VDA on amachine running aWindows operating system, either on amaster image or directlyon each machine. See Install VDAs or Install using the command line. Sample scripts are provided ifyou want to install VDAs through Active Directory.
For machines with a Linux operating system, follow the guidance in Linux Virtual Delivery Agent.
For a Remote PC Access deployment, install a VDA for single‑session OS on each office PC. If you needonly the core VDA services, use the standalone VDAWorkstationCoreSetup.exe installer and yourexisting Electronic Software Distribution (ESD) methods. (Prepare to install describes the availableVDA installers.)
Install optional components
If you plan to use the Citrix Universal Print Server, install its server component on your print servers.See Install core components or Install using the command line.
To allowStoreFront to use authenticationoptions such as SAMLassertions, install theCitrix FederatedAuthentication Service.
To enable end users to have greater control over their user accounts, install Self‑Service PasswordReset.
Optionally, integratemore Citrix components into your Citrix Virtual Apps and Desktops deployment.
• Citrix Provisioning is an optional component that provisions machines by streaming a masterimage to target devices.
• CitrixGateway is a secureapplicationaccess solution thatprovidesadministratorswithgranularapplication‑level policy and action controls to secure access to applications and data.
• Citrix SD‑WAN is a set of appliances that optimize WAN performance.
Create amachine catalog
After you create a site in Studio, you are guided to create a machine catalog.
© 1999–2022 Citrix Systems, Inc. All rights reserved. 104

Citrix Virtual Apps and Desktops
A catalog can contain physical or virtualmachines (VMs). Virtualmachines can be created from amas‑ter image. When using a hypervisor or other service to provide VMs, you first create a master imageon that host. Then, when you create the catalog, you specify that image, which is used when creatingVMs.
Create a delivery group
After you create your first machine catalog in Studio, you are guided to create a delivery group.
A delivery group specifies which users can accessmachines in a selected catalog and the applicationsavailable to those users.
Create an application group (optional)
After you create a delivery group, you can optionally create an application group. You can create ap‑plication groups for applications that are shared across different delivery groups or used by a subsetof users within delivery groups.
Prepare to install
April 14, 2021
Deploying Citrix Virtual Apps and Desktops beginswith installing the following components. This pro‑cess prepares for delivery of applications and desktops to users inside your firewall.
• One or more Delivery Controllers• Citrix Studio• Citrix Director• Citrix StoreFront• Citrix License Server• One or more Citrix Virtual Delivery Agents (VDAs)• Optional components and technologies such as the Universal Print Server, the Federated Au‑thentication Service, and Self‑Service Password Reset
For users outside your firewall, install and configure an extra component, such as Citrix Gateway. Foran introduction, see Integrate Citrix Virtual Apps and Desktops with Citrix Gateway.
You can use the full‑product installer on the product ISO to deploy many components and technolo‑gies. Youcanusea standaloneVDA installer to install VDAs. The standaloneVDA installers areavailableon the Citrix download site. All installers offer graphical and command line interfaces. See Installers.
© 1999–2022 Citrix Systems, Inc. All rights reserved. 105

Citrix Virtual Apps and Desktops
The product ISO contains sample scripts that install, upgrade, or remove VDAs for machines in Ac‑tive Directory. You can also use the scripts to manage master images used by Machine Creation Ser‑vices (MCS) and Citrix Provisioning (formerly Provisioning Services). For details, see Install VDAs usingscripts.
Information to review before installation
• Technical overview: If you’re unfamiliar with the product and its components.• Security: When planning your deployment environment.• Known issues: Issues youmight encounter in this version.• Databases: Learn about the system databases and how to configure them. During Controllerinstallation, you can install SQL Server Express for use as the site database. You configuremostdatabase information when you create a site, after you install the core components.
• Remote PC Access: If you’re deploying an environment that enables your users to access theirphysical machines in the office remotely.
• Connections and resources: If you’re using a hypervisor or other service to host or provisionVMs for applications anddesktops. You can configure the first connectionwhen you create a site(after you install the core components). Set up your virtualization environment before then.
• Microsoft SystemCenter ConfigurationManager: If you’re using ConfigMgr tomanage access toapplications and desktops, or if you’re using the Wake on LAN feature with Remote PC Access.
Where to install components
Review the System requirements for supported platforms, operating systems, and versions. Compo‑nent prerequisites are installed automatically, except as noted. See theCitrix StoreFront and theCitrixLicense Server documentation for their supported platforms and prerequisites.
You can install the core components on the same server or on different servers.
• Installing all the core components on one server can work for evaluation, test, or small produc‑tion deployments.
• To accommodate future expansion, consider installing components on different servers. Forexample, installing Studio on a different machine than the server where you installed the Con‑troller allows you to manage the site remotely.
• For most production deployments, installing core components on separate servers is recom‑mended.
• To install a supported component on a Server CoreOS (such as a Delivery Controller), youmustuse the command line. That OS type does not offer a graphical interface, so install Studio andother tools elsewhere, and then point them to the Controller server.
You can install both a Delivery Controller and a VDA for multi‑session OS on the same server. Launchthe installer and select the Delivery Controller (plus any other core components you want on that
© 1999–2022 Citrix Systems, Inc. All rights reserved. 106

Citrix Virtual Apps and Desktops
machine). Then launch the installer again and select the Virtual Delivery Agent for multi‑sessionOS.
Ensure that each operating system has the latest updates.
Ensure that all machines have synchronized system clocks. The Kerberos infrastructure that securescommunication between the machines requires synchronization.
With Citrix Hypervisors, the virtualmachine’s power statemight appear as unknown even if it appearsregistered. To resolve this issue, edit the registry key HostTime value to disable time synchronizationwith the host:
HKEY_LOCAL_MACHINE\Software\Citrix\XenTools\HostTime="Local"
HKEY_LOCAL_MACHINE\Software\Wow6432Node\Citrix\XenTools\HostTime="Local"
Tip:
The default value is HostTime="UTC". Change this value to something other than UTC, for ex‑ample, Local. This change effectively disables time synchronization with the host.
Optimization guidance for Windows 10 single‑session machines is available in CTX216252.
Where NOT to install components:
• Do not install any components on an Active Directory domain controller.• Installing a Controller on a node in a SQL Server clustering installation, SQL Server mirroringinstallation, or on a server running Hyper‑V is not supported.
If you try to install or upgrade a VDA on a Windows OS that this product version does not support, amessage guides you to an article describing options.
Permission and Active Directory requirements
You must be a domain user and a local administrator on the machines where you are installing com‑ponents.
To use a standalone VDA installer, you must have elevated administrative privileges or use Run asadministrator.
Configure your Active Directory domain before starting an installation.
• Systemrequirements lists the supportedActiveDirectory functional levels. ActiveDirectory con‑tains more information.
• Youmust have at least one domain controller running Active Directory Domain Services.• Do not install any Citrix Virtual Apps and Desktops components on a domain controller.• Do not use a forward slash (/) when specifying Organizational Unit names in Studio.
© 1999–2022 Citrix Systems, Inc. All rights reserved. 107
Citrix Virtual Apps and Desktops
The Windows user account used to install the Citrix License Server is automatically configured as adelegated administration full administrator on the license server.
For more information:
• Security best practices• Delegated administration• Microsoft documentation for Active Directory configuration
Installation guidance, considerations, and best practice
During installation of any component
• When installing or upgrading a Delivery Controller, Studio, License Server, or Director from thefull‑product media, if the Citrix installer detects that a restart is pending from a previous Win‑dows installation on themachine, the installer stops with exit/return code 9. You are promptedto restart the machine.
This is not a Citrix forced restart. It is due to other components installed earlier on themachine.If this occurs, restart the machine and then launch the Citrix installer again.
When using the command‑line interface, you can prevent the check for the pending restart byincluding the /no_pending_reboot_check option in the command.
• Usually, if a component has prerequisites, the installer deploys them if they are not present.Some prerequisites might require a machine restart.
• When you create objects before, during, and after installation, specify unique names for eachobject. For example, provide unique names for networks, groups, catalogs, and resources.
• If a component does not install successfully, the installation stops with an error message. Com‑ponents that installed successfully are retained. You do not need to reinstall them.
• Citrix Analytics are collected automatically when you install (or upgrade) components. By de‑fault, that data is uploaded to Citrix automatically when the installation completes. Also, whenyou install components, you are automatically enrolled in the Citrix Customer Experience Im‑provement Program (CEIP), which uploads anonymous data.
During installation, you can also choose to participate in other Citrix technologies that collectdiagnostics for maintenance and troubleshooting. For information about these programs, seeCitrix Insight Services.
• Google Analytics are collected (and later uploaded) automaticallywhen you install (or upgrade)Studio. After installingStudio, youcanchange this settingwith the registrykeyHKLM\Software\Citrix\DesktopStudio\GAEnabled. A valueof1enables collectionandupload,0disablescollection and upload.
© 1999–2022 Citrix Systems, Inc. All rights reserved. 108

Citrix Virtual Apps and Desktops
• If a VDA installation fails, an MSI analyzer parses the failing MSI log, displaying the exact er‑ror code. The analyzer suggests a CTX article, if it’s a known issue. The analyzer also collectsanonymized data about the failure error code. This data is included with other data collectedby CEIP. If you end enrollment in CEIP, the collectedMSI analyzer data is no longer sent to Citrix.
During VDA installation
• The Citrix Workspace app for Windows is available, but not installed by default when you in‑stall a VDA. You or your users can download and install (and upgrade) Citrix Workspace app forWindows and other Citrix Workspace apps from the Citrix website. Alternatively, you can makethose Citrix Workspace apps available from your StoreFront server. See the StoreFront docu‑mentation.
• The Print Spooler Service is enabled by default on supported Windows servers. If you disablethis service, you cannot successfully install a VDA for Windowsmulti‑session OS, so ensure thatthis service is enabled before installing a VDA.
• Most supported Windows editions come with Microsoft Media Foundation already installed. Ifthemachine does not haveMedia Foundation (such as N editions), severalmultimedia featuresare not installed and will not work.
– Windows Media Redirection– HTML5 Video Redirection– HDX RealTimeWebcam Redirection
You can acknowledge the limitation, or end the VDA installation and restart it later, after in‑stalling Media Foundation. In the graphical interface, this choice is presented in a message. Inthe command line, you can use the /no_mediafoundation_ack option to acknowledge thelimitation.
• When you install the VDA, a new local user group calledDirect Access Users is created automat‑ically. On a VDA for single‑session OS, this group applies only to RDP connections. On a VDA formulti‑session OS, this group applies to ICA and RDP connections.
• The VDAmust have valid Controller addresseswithwhich to communicate. Otherwise, sessionscannot be established. You can specify Controller addresses when you install the VDA or later.Remember that it must be done. For more information, see VDA registration.
VDA supportability tools
Each VDA installer includes a supportability MSI that contains Citrix tools for checking the VDA per‑formance, such as its overall health and the quality of connections. Enable or disable installationof this MSI on the Additional Components page of the VDA installer’s graphical interface. From the
© 1999–2022 Citrix Systems, Inc. All rights reserved. 109
Citrix Virtual Apps and Desktops
command line, you candisable installationwith the/exclude "Citrix Supportability Tools" option.
Bydefault, the supportabilityMSI is installed inc:\Program Files (x86)\Citrix\SupportabilityTools\. You can change this location on the Components page of the VDA installer’s graphical
interface, or with the /installdir command‑line option. Keep in mind that changing the locationchanges it for all installed VDA components, not just the supportability tools.
Current tools in the supportability MSI:
• Citrix Health Assistant: For details, see CTX207624.• VDA Cleanup Utility: For details, see CTX209255.
If you do not install the tools when you install the VDA, the CTX article contains a link to the currentdownload package.
Restarts after and during VDA installation
A restart is required at the end of the VDA installation. That restart occurs automatically by default.
When you’re upgrading a VDA to version 7.17 (or a later supported version), a restart occurs during theupgrade. This cannot be avoided.
Tominimize the number of restarts needed during VDA installation:
• Ensure that a supported .NET Framework version is installed before beginning the VDA installa‑tion.
• For Windows multi‑session OS machines, install and enable the RDS role services before in‑stalling the VDA.
If you do not install those prerequisites before installing the VDA:
• If you are using the graphical interface or the command line interface without the /norebootoption, the machine restarts automatically after installing the prerequisite.
• If you are using the command line interface with the /noreboot option, you must initiate therestart.
Note:
When you’re upgrading a VDA to version 7.17 or a later supported version, a restart occurs duringthe upgrade. This cannot be avoided.
Installers
Full‑product installer
Using the full‑product installer provided in the ISO, you can:
© 1999–2022 Citrix Systems, Inc. All rights reserved. 110

Citrix Virtual Apps and Desktops
• Install, upgrade, or remove core components: Delivery Controller, Studio, Director, and LicenseServer.
• Install or upgrade StoreFront.• Install or upgrade Windows VDAs for single‑session or multi‑session operating systems.• Install the Universal Print Server UpsServer component on your print servers.• Install the Federated Authentication Service.• Install Session Recording.
To deliver a desktop fromamulti‑sessionOS for one user (for example, forwebdevelopment), use thefull‑product installer’s command‑line interface. For details, see Server VDI.
Standalone VDA installers
Standalone VDA installers are available on theCitrix downloadpages. (They are not available from theproduct installationmedia.) ThestandaloneVDA installersaremuchsmaller than the full‑product ISO.They more easily accommodate deployments that:
• Use Electronic Software Distribution (ESD) packages that are staged or copied locally• Have physical machines• Have remote offices
By default, files in the self‑extracting standalone VDAs are extracted to the Temp folder. More diskspace is requiredon themachinewhenextracting to theTemp folder thanwhenusing the full‑productinstaller. However, files extracted to the Temp folder are automatically deleted after the installationcompletes. Alternatively, you can use the /extract command with an absolute path.
Three standalone VDA installers are available for download.
VDAServerSetup.exe:
Installs a VDA for multi‑session OS. It supports all the VDA for multi‑session OS options that are avail‑able with the full‑product installer.
VDAWorkstationSetup.exe:
Installs a VDA for single‑session OS. It supports all the VDA for single‑session OS options that are avail‑able with the full‑product installer.
VDAWorkstationCoreSetup.exe:
Installs a VDA for single‑session OS that is optimized for Remote PC Access deployments or core VDIinstallations. Remote PC Access uses physical machines. Core VDI installations are VMs that are notbeing used as a master image. It installs only the core services necessary for VDA connections suchdeployments. Therefore, it supports only a subset of the options that are valid with the full‑productor VDAWorkstationSetup.exe installers.
This installer does not install or contain the components used for:
© 1999–2022 Citrix Systems, Inc. All rights reserved. 111

Citrix Virtual Apps and Desktops
• App‑V.• Profile Management. Excluding Citrix Profile Management from the installation affects CitrixDirector displays. For details, see Install VDAs.
• Machine Identity Service.• Citrix Supportability Tools.• Citrix Files for Windows.• Citrix Files for Outlook.
TheVDAWorkstationCoreSetup.exe installer does not install or contain aCitrixWorkspace app forWindows.
UsingVDAWorkstationCoreSetup.exe is equivalent tousing the full‑productorVDAWorkstationSetupinstaller to install a single‑session OS VDA and either:
• In the graphical interface: Selecting the Remote PC Access option on the Environment page.• In the command line interface: Specifying the /remotepc option.• In the command line interface: Specifying /components vda and /exclude "Citrix
Personalization for App-V - VDA""Machine Identity Service""CitrixUser Profile Manager""Citrix User Profile Manager WMI Plugin""CitrixSupportability Tools""Citrix Files for Windows".
You can install the omitted components/features later by running the full‑product installer. That ac‑tion enables you to install all missing components.
The VDAWorkstationCoreSetup.exe installer automatically installs the Browser Content Redirec‑tion MSI. This automatic installation applies to release 2003 and later supported releases.
Citrix installation return codes
The installation log contains the result of component installations as a Citrix return code, not a Mi‑crosoft value.
• 0 = Success• 1 = Failed• 2 = PartialSuccess• 3 = PartialSuccessAndRebootNeeded• 4 = FailureAndRebootNeeded• 5 = UserCanceled• 6 = MissingCommandLineArgument• 7 = NewerVersionFound
For example, when using tools such as Microsoft System Center Configuration Manager, a scriptedVDA installation might appear to fail when the installation log contains the return code 3. This canoccurwhen the VDA installer is waiting for a restart that youmust initiate (for example, after a Remote
© 1999–2022 Citrix Systems, Inc. All rights reserved. 112

Citrix Virtual Apps and Desktops
DesktopServices role prerequisite installationona server). A VDA installation is considered successfulonly after all prerequisites and selected components are installed, and the machine is restarted afterthe installation.
Alternatively, you can wrap your installation in CMD scripts (which return Microsoft exit codes) orchange the success codes in your Configuration Manager package.
Microsoft System Center Virtual Machine Manager virtualizationenvironments
April 14, 2021
Follow this guidance if you use Hyper‑V with Microsoft SystemCenter Virtual MachineManager (VMM)to provide virtual machines.
This release supports the VMM versions listed in System requirements.
You can use Citrix Provisioning (formerly Provisioning Services) andMachine Creation Services to pro‑vision:
• Generation 1 supported Desktop or Server OS VMs.• Generation 2 supported Desktop or Server OS VMs, including Secure Boot support.
Install and configure a hypervisorImportant:
All Delivery Controllers must be in the same forest as the VMM servers.
1. Install Microsoft Hyper‑V server and VMM on your servers.
2. Install the System Center Virtual Machine Manager console on all Controllers. The console ver‑sion must match the management server version. Although an earlier console can connect tothe management server, provisioning VDAs fails if the versions differ.
3. Verify the following account information:
The account you use to specify hosts in Studio is a VMM administrator or VMM delegated admin‑istrator for the relevant Hyper‑Vmachines. If this account only has the delegated administratorrole in VMM, the storage data is not listed in Studio during the host creation process.
The user account used for Studio integrationmust also be amember of the administrators localsecurity group on each Hyper‑V server. This configuration supports VM life cycle management,such as VM creation, update, and deletion.
Installing a Controller on a server running Hyper‑V is not supported.
© 1999–2022 Citrix Systems, Inc. All rights reserved. 113

Citrix Virtual Apps and Desktops
Create amaster VM
1. Install a VDA on the master VM, and select the option to optimize the desktop to improve per‑formance.
2. Take a snapshot of the master VM to use as a backup.
Create virtual desktops
If you are using MCS to create VMs, when creating a site or a connection:
1. Select the Microsoft virtualization host type.
2. Enter the address as the fully qualified domain name of the host server.
3. Enter the credentials for the administrator account you set up earlier that has permissions tocreate VMs.
4. InHost Details, select the cluster or standalone host to use when creating VMs.
Browse for and select a cluster or standalone host even if you are using a single Hyper‑V hostdeployment.
MCS on SMB 3 file shares
For machine catalogs created with MCS on SMB 3 file shares for VM storage, ensure that credentialsmeet the following requirements. These requirements ensure that calls from the Controller’s Hyper‑visor Communications Library (HCL) connect successfully to SMB storage:
• VMM user credentials must include full read write access to the SMB storage.• Storage virtual disk operations during VM life cycle events are performed through the Hyper‑Vserver using the VMM user credentials.
WhenyouuseSMBstorage, enable theAuthenticationCredential SecuritySupportProvider (CredSSP)from the Controller to individual Hyper‑V machines. Use this process for VMM 2012 SP1 with Hyper‑Von Windows Server 2012. For more information, see CTX137465.
The HCL uses CredSSP to open a connection to the Hyper‑V machine. This feature passes Kerberos‑encrypted user credentials to theHyper‑Vmachine. ThePowerShell commands in the session on theremote Hyper‑V machine run with the credentials provided. In this case, the credentials of the VMMuser, so that communication commands to storage work correctly.
The following tasks use PowerShell scripts that originate in the HCL and are then sent to the Hyper‑Vmachine to act on the SMB 3.0 storage.
• Consolidatemaster image: Amaster image creates aMCS provisioning scheme (machine cata‑log). It clones and flattens themaster VM ready for creating VMs from the new disk created (andremoves dependency on the original master VM).
© 1999–2022 Citrix Systems, Inc. All rights reserved. 114
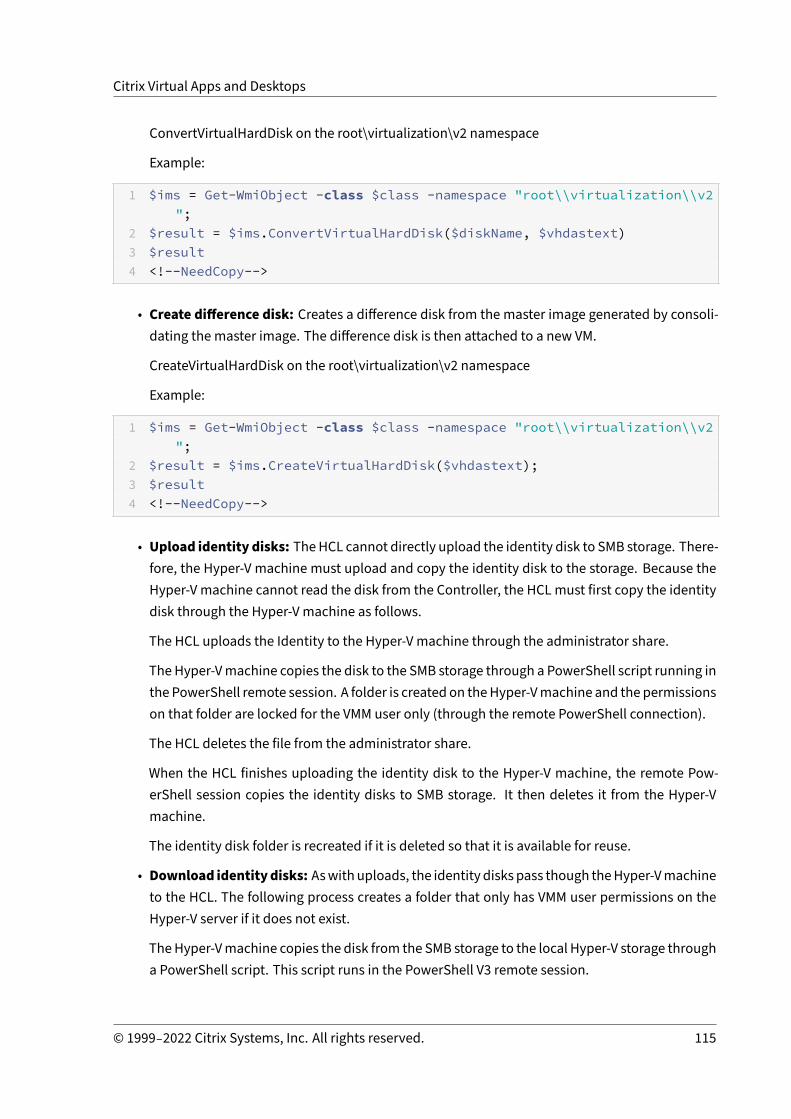
Citrix Virtual Apps and Desktops
ConvertVirtualHardDisk on the root\virtualization\v2 namespace
Example:
1 $ims = Get-WmiObject -class $class -namespace "root\\virtualization\\v2";
2 $result = $ims.ConvertVirtualHardDisk($diskName, $vhdastext)3 $result4 <!--NeedCopy-->
• Create difference disk: Creates a difference disk from the master image generated by consoli‑dating the master image. The difference disk is then attached to a new VM.
CreateVirtualHardDisk on the root\virtualization\v2 namespace
Example:
1 $ims = Get-WmiObject -class $class -namespace "root\\virtualization\\v2";
2 $result = $ims.CreateVirtualHardDisk($vhdastext);3 $result4 <!--NeedCopy-->
• Upload identity disks: TheHCL cannot directly upload the identity disk to SMB storage. There‑fore, the Hyper‑V machine must upload and copy the identity disk to the storage. Because theHyper‑V machine cannot read the disk from the Controller, the HCLmust first copy the identitydisk through the Hyper‑V machine as follows.
The HCL uploads the Identity to the Hyper‑V machine through the administrator share.
The Hyper‑Vmachine copies the disk to the SMB storage through a PowerShell script running inthe PowerShell remote session. A folder is created on theHyper‑Vmachine and the permissionson that folder are locked for the VMM user only (through the remote PowerShell connection).
The HCL deletes the file from the administrator share.
When the HCL finishes uploading the identity disk to the Hyper‑V machine, the remote Pow‑erShell session copies the identity disks to SMB storage. It then deletes it from the Hyper‑Vmachine.
The identity disk folder is recreated if it is deleted so that it is available for reuse.
• Download identitydisks: Aswithuploads, the identity disks pass though theHyper‑Vmachineto the HCL. The following process creates a folder that only has VMM user permissions on theHyper‑V server if it does not exist.
TheHyper‑Vmachine copies the disk from the SMB storage to the local Hyper‑V storage througha PowerShell script. This script runs in the PowerShell V3 remote session.
© 1999–2022 Citrix Systems, Inc. All rights reserved. 115

Citrix Virtual Apps and Desktops
HCL reads the disk from the Hyper‑V machine’s administrator share into memory.
HCL deletes the file from the administrator share.
Citrix Hypervisor virtualization environments
April 14, 2021
Create a connection to Citrix Hypervisor
When you create a connection to Citrix Hypervisor (formerly XenServer), youmust provide the creden‑tials for a VM Power Admin or higher‑level user.
Citrix recommends using HTTPS to secure communicationswith Citrix Hypervisor. To useHTTPS, youmust replace the default SSL certificate installed on Citrix Hypervisor; see CTX128656.
You can configure high availability if it is enabled on the Citrix Hypervisor server. Citrix recommendsthat you select all servers in the pool (from Edit High Availability) to allow communication with theCitrix Hypervisor server if the pool master fails.
You can select a GPU type and group, or pass through, if the Citrix Hypervisor supports vGPU. Thedisplay indicates if the selection has dedicated GPU resources.
Whenusing local storageononeormoreCitrixHypervisorhosts for temporarydata storage,makesurethat each storage location in the pool has a unique name. (To change a name in XenCenter, right‑clickthe storage and edit the name property.)
You can use Citrix Provisioning (formerly Provisioning Services) andMachine Creation Services to pro‑vision:
• legacy BIOS for supported Desktop or Server OS VMs.• UEFI for supported Desktop or Server OS VMs, including Secure Boot.
Use IntelliCache for Citrix Hypervisor connections
Using IntelliCache, hosted VDI deployments are more cost‑effective because you can use a combina‑tion of shared storage and local storage. This enhances performance and reduces network traffic. Thelocal storage caches themaster image from the shared storage, which reduces the number of reads onthe shared storage. For shared desktops, writes to the differencing disks are written to local storageon the host and not to shared storage.
• Shared storage must be NFS when using IntelliCache.• Citrix recommends that you use a high performance local storage device to ensure the fastestpossible data transfer.
© 1999–2022 Citrix Systems, Inc. All rights reserved. 116

Citrix Virtual Apps and Desktops
To use IntelliCache, youmust enable it in both this product and Citrix Hypervisor.
• When installing Citrix Hypervisor, select Enable thin provisioning (Optimized storage for Vir‑tual Desktops). Citrix does not support mixed pools of servers that have IntelliCache enabledand servers that do not. For more information, see the Citrix Hypervisor documentation.
• In Citrix Virtual Apps and Desktops, IntelliCache is disabled by default. You can change the set‑ting only when creating a Citrix Hypervisor connection; you cannot disable IntelliCache later.When you add a Citrix Hypervisor connection:
– Select Shared as the storage type.– Select theUse IntelliCache check box.
Create amachine catalog using a Citrix Hypervisor connection
GPU‑capable machines require a dedicated master image. Those VMs require video card drivers thatsupport GPUs. Configure GPU‑capable machines to allow the VM to operate with software that usesthe GPU for operations.
1. In XenCenter, create a VM with standard VGA, networks, and vCPU.2. Update the VM configuration to enable GPU use (either Passthrough or vGPU).3. Install a supported operating system and enable RDP.4. Install Citrix VM Tools and NVIDIA drivers.5. Clear the Virtual Network Computing (VNC) Admin Console to optimize performance, and then
restart the VM.6. You are prompted to use RDP. Using RDP, install the VDA and then restart the VM.7. Optionally, create a snapshot for the VM as a baseline template for other GPUmaster images.8. Using RDP, install customer‑specific applications that are configured in XenCenter and use GPU
capabilities.
More information
• Connections and resources• Create machine catalogs
Microsoft System Center Configuration Manager environments
April 14, 2021
Sites using Microsoft System Center Configuration Manager (Configuration Manager) to manage ac‑cess to applications and desktops can extend that use to XenApp or XenDesktop using these options:
© 1999–2022 Citrix Systems, Inc. All rights reserved. 117
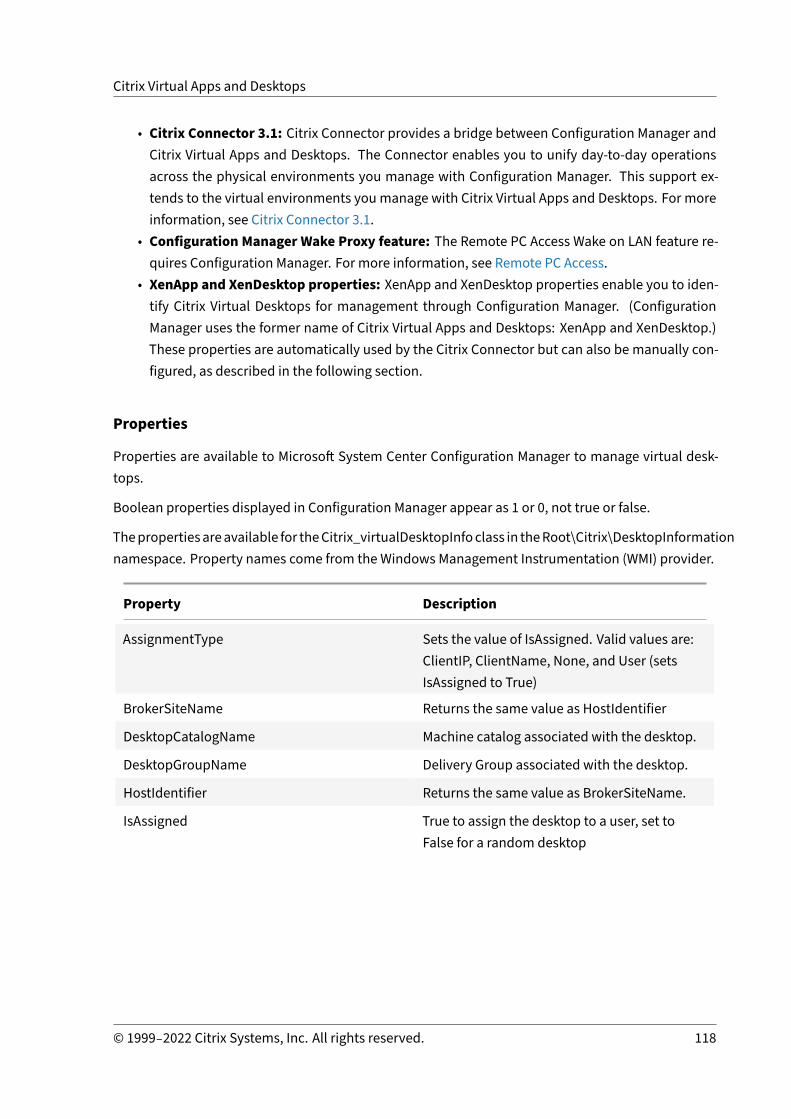
Citrix Virtual Apps and Desktops
• Citrix Connector 3.1: Citrix Connector provides a bridge between Configuration Manager andCitrix Virtual Apps and Desktops. The Connector enables you to unify day‑to‑day operationsacross the physical environments you manage with Configuration Manager. This support ex‑tends to the virtual environments youmanage with Citrix Virtual Apps and Desktops. For moreinformation, see Citrix Connector 3.1.
• Configuration Manager Wake Proxy feature: The Remote PC Access Wake on LAN feature re‑quires Configuration Manager. For more information, see Remote PC Access.
• XenApp and XenDesktop properties: XenApp and XenDesktop properties enable you to iden‑tify Citrix Virtual Desktops for management through Configuration Manager. (ConfigurationManager uses the former name of Citrix Virtual Apps and Desktops: XenApp and XenDesktop.)These properties are automatically used by the Citrix Connector but can also be manually con‑figured, as described in the following section.
Properties
Properties are available to Microsoft System Center Configuration Manager to manage virtual desk‑tops.
Boolean properties displayed in Configuration Manager appear as 1 or 0, not true or false.
Thepropertiesareavailable for theCitrix_virtualDesktopInfoclass in theRoot\Citrix\DesktopInformationnamespace. Property names come from the Windows Management Instrumentation (WMI) provider.
Property Description
AssignmentType Sets the value of IsAssigned. Valid values are:ClientIP, ClientName, None, and User (setsIsAssigned to True)
BrokerSiteName Returns the same value as HostIdentifier
DesktopCatalogName Machine catalog associated with the desktop.
DesktopGroupName Delivery Group associated with the desktop.
HostIdentifier Returns the same value as BrokerSiteName.
IsAssigned True to assign the desktop to a user, set toFalse for a random desktop
© 1999–2022 Citrix Systems, Inc. All rights reserved. 118

Citrix Virtual Apps and Desktops
Property Description
IsMasterImage Allows decisions about the environment. Forexample, install applications on the masterimage and not on the provisionedmachines.Valid values are: True on a VM that is used as amaster image. This value is set duringinstallation based on a selection, or cleared ona VM that is provisioned from that image.
IsVirtualMachine True for a virtual machine, false for a physicalmachine.
OSChangesPersist False if the desktop operating system image isreset to a clean state every time it is restarted;otherwise, true.
PersistentDataLocation The location where Configuration Managerstores persistent data. This is not accessible tousers.
PersonalvDiskDriveLetter For a desktop with a Personal vDisk, the driveletter you assign to the Personal vDisk.
BrokerSiteName, DesktopCatalogName,DesktopGroupName, HostIdentifier
Determined when the desktop registers withthe Controller. They are null for a desktop thathas not fully registered.
To collect the properties, run a hardware inventory in Configuration Manager. To view the properties,use the Configuration Manager Resource Explorer. In these instances, the names include spaces orvary slightly from the property names. For example, BrokerSiteName appears as Broker Site Name.
• Configure Configuration Manager to collect Citrix WMI properties from the Citrix VDA• Create query‑based device collections using Citrix WMI properties• Create global conditions based on Citrix WMI properties• Use global conditions to define application deployment type requirements
YoucanalsouseMicrosoftproperties in theMicrosoftclassCCM_DesktopMachine in theRoot\ccm_vdinamespace. For more information, see the Microsoft documentation.
VMware virtualization environments
April 14, 2021
© 1999–2022 Citrix Systems, Inc. All rights reserved. 119
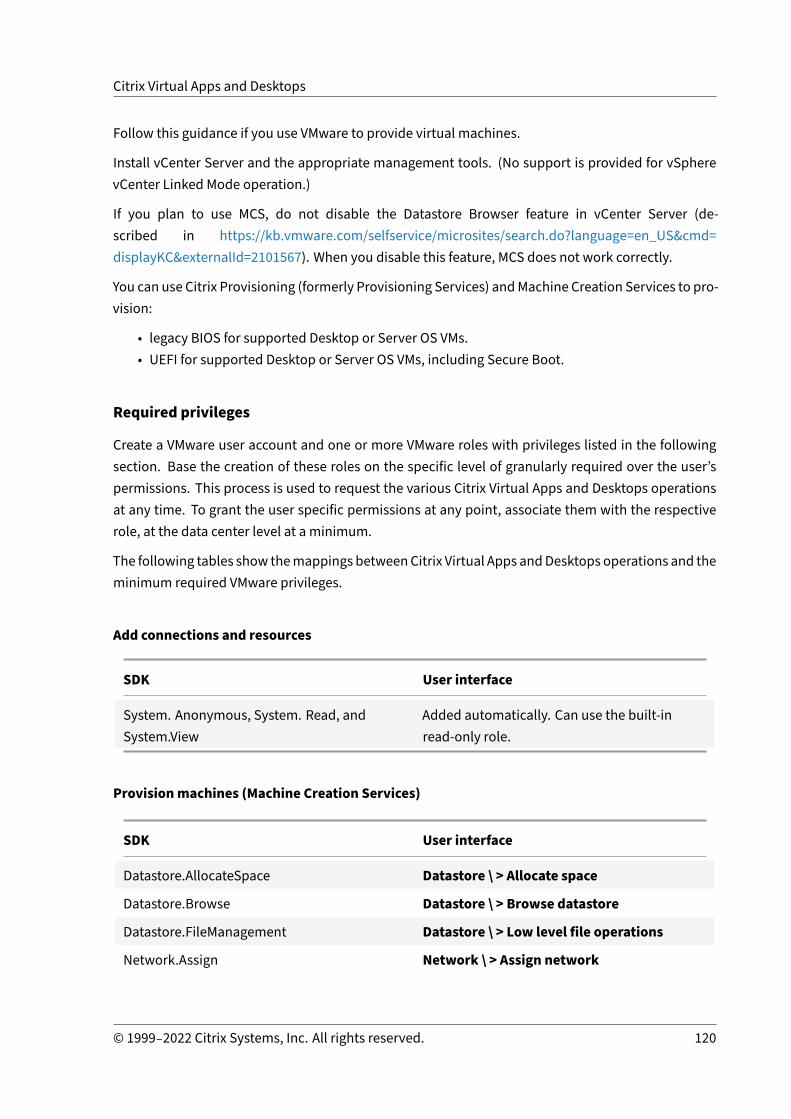
Citrix Virtual Apps and Desktops
Follow this guidance if you use VMware to provide virtual machines.
Install vCenter Server and the appropriate management tools. (No support is provided for vSpherevCenter Linked Mode operation.)
If you plan to use MCS, do not disable the Datastore Browser feature in vCenter Server (de‑scribed in https://kb.vmware.com/selfservice/microsites/search.do?language=en_US&cmd=displayKC&externalId=2101567). When you disable this feature, MCS does not work correctly.
You can use Citrix Provisioning (formerly Provisioning Services) andMachine Creation Services to pro‑vision:
• legacy BIOS for supported Desktop or Server OS VMs.• UEFI for supported Desktop or Server OS VMs, including Secure Boot.
Required privileges
Create a VMware user account and one or more VMware roles with privileges listed in the followingsection. Base the creation of these roles on the specific level of granularly required over the user’spermissions. This process is used to request the various Citrix Virtual Apps and Desktops operationsat any time. To grant the user specific permissions at any point, associate them with the respectiverole, at the data center level at a minimum.
The following tables show themappings betweenCitrix Virtual Apps andDesktops operations and theminimum required VMware privileges.
Add connections and resources
SDK User interface
System. Anonymous, System. Read, andSystem.View
Added automatically. Can use the built‑inread‑only role.
Provisionmachines (Machine Creation Services)
SDK User interface
Datastore.AllocateSpace Datastore \ > Allocate space
Datastore.Browse Datastore \ > Browse datastore
Datastore.FileManagement Datastore \ > Low level file operations
Network.Assign Network \ > Assign network
© 1999–2022 Citrix Systems, Inc. All rights reserved. 120

Citrix Virtual Apps and Desktops
SDK User interface
Resource.AssignVMToPool Resource \ > Assign virtual machine toresource pool
VirtualMachine.Config.AddExistingDisk Virtual machine > Configuration \ > Addexisting disk
VirtualMachine.Config.AddNewDisk Virtual machine > Configuration \ > Add newdisk
VirtualMachine.Config.AdvancedConfig Virtual machine > Configuration \ >Advanced
VirtualMachine.Config.RemoveDisk Virtual machine > Configuration \ > Removedisk
VirtualMachine.Interact.PowerOff Virtual machine > Interaction \ > Power Off
VirtualMachine.Interact.PowerOn Virtual machine > Interaction \ > Power On
VirtualMachine.Inventory.CreateFromExisting Virtual machine > Inventory \ > Create fromexisting
VirtualMachine.Inventory.Create Virtual machine > Inventory \ > Create new
VirtualMachine.Inventory.Delete Virtual machine > Inventory \ > Remove
VirtualMachine.Provisioning.Clone Virtual machine > Provisioning \ > Clonevirtual machine
VirtualMachine.State.CreateSnapshot vSphere 5.0, Update 2 and vSphere 5.1, Update1: Virtual machine > State \ > Createsnapshot. vSphere 5.5: Virtual machine >Snapshotmanagement \ > Create snapshot
If you want the VMs you create to be tagged, add the following permissions for the user account.
To ensure that you use a clean base image for creating VMs, tag VMs created with Machine CreationServices to exclude them from the list of VMs available to use as base images.
SDK User interface
Global.ManageCustomFields Global \ > Manage custom attributes
Global.SetCustomField Global \ > Set custom attribute
© 1999–2022 Citrix Systems, Inc. All rights reserved. 121

Citrix Virtual Apps and Desktops
Provisionmachines (Citrix Provisioning)
All privileges from Provisionmachines (Machine Creation Services) and the following.
SDK User interface
VirtualMachine.Config.AddRemoveDevice Virtual machine > Configuration \ > Add orremove device
VirtualMachine.Config.CPUCount Virtual machine > Configuration \ > ChangeCPU Count
VirtualMachine.Config.Memory Virtual machine > Configuration \ > Memory
VirtualMachine.Config.Settings Virtual machine > Configuration \ > Settings
VirtualMachine.Provisioning.CloneTemplate Virtual machine > Provisioning \ > Clonetemplate
VirtualMachine.Provisioning.DeployTemplate Virtual machine > Provisioning \ > Deploytemplate
Powermanagement
SDK User interface
VirtualMachine.Interact.PowerOff Virtual machine > Interaction \ > Power Off
VirtualMachine.Interact.PowerOn Virtual machine > Interaction \ > Power On
VirtualMachine.Interact.Reset Virtual machine > Interaction \ > Reset
VirtualMachine.Interact.Suspend Virtual machine > Interaction \ > Suspend
Image update and rollback
SDK User interface
Datastore.AllocateSpace Datastore \ > Allocate space
Datastore.Browse Datastore \ > Browse datastore
Datastore.FileManagement Datastore \ > Low level file operations
Network.Assign Network \ > Assign network
Resource.AssignVMToPool Resource \ > Assign virtual machine toresource pool
© 1999–2022 Citrix Systems, Inc. All rights reserved. 122

Citrix Virtual Apps and Desktops
SDK User interface
VirtualMachine.Config.AddExistingDisk Virtual machine > Configuration \ > Addexisting disk
VirtualMachine.Config.AddNewDisk Virtual machine > Configuration \ > Add newdisk
VirtualMachine.Config.AdvancedConfig Virtual machine > Configuration \ >Advanced
VirtualMachine.Config.RemoveDisk Virtual machine > Configuration \ > Removedisk
VirtualMachine.Interact.PowerOff Virtual machine > Interaction \ > Power Off
VirtualMachine.Interact.PowerOn Virtual machine > Interaction \ > Power On
VirtualMachine.Interact.Reset Virtual machine > Interaction \ > Reset
VirtualMachine.Inventory.CreateFromExisting Virtual machine > Inventory \ > Create fromexisting
VirtualMachine.Inventory.Create Virtual machine > Inventory \ > Create new
VirtualMachine.Inventory.Delete Virtual machine > Inventory \ > Remove
VirtualMachine.Provisioning.Clone Virtual machine > Provisioning \ > Clonevirtual machine
Delete provisionedmachines
SDK User interface
Datastore.Browse Datastore \ > Browse datastore
Datastore.FileManagement Datastore \ > Low level file operations
VirtualMachine.Config.RemoveDisk Virtual machine > Configuration \ > Removedisk
VirtualMachine.Interact.PowerOff Virtual machine > Interaction \ > Power Off
VirtualMachine.Inventory.Delete Virtual machine > Inventory \ > Remove
Obtain and import a certificate
Toprotect vSphere communications, Citrix recommends that youuseHTTPS rather thanHTTP.HTTPSrequires digital certificates. Citrix recommends a digital certificate issued from a certificate authority
© 1999–2022 Citrix Systems, Inc. All rights reserved. 123

Citrix Virtual Apps and Desktops
in accordance with your organization’s security policy.
If you are unable to use a digital certificate issued froma certificate authority, you canuse the VMware‑installed self‑signed certificate. Only use this method if your organization’s security policy permits it.Add the VMware vCenter certificate to each Delivery Controller.
1. Add the fully qualified domain name (FQDN) of the computer running vCenter Server to thehosts file on that server, at %SystemRoot%/WINDOWS/system32/Drivers/etc/. This step isrequired only if the FQDN of the computer running vCenter Server is not already present in thedomain name system.
2. Obtain the vCenter certificate using any of the following three methods:
From the vCenter server.
a) Copy the file rui.crt from the vCenter server to a location accessible on your Delivery Con‑trollers.
b) On the Controller, navigate to the location of the exported certificate and open the rui.crtfile.
Download the certificate using a web browser. If you are using Internet Explorer, right‑clickon Internet Explorer and choose Run as Administrator to download or install the certificate.
a) Open your web browser and make a secure web connection to the vCenter server (for ex‑ample https://server1.domain1.com).
b) Accept the security warnings.c) Click the address bar displaying the certificate error.d) View the certificate and click the Details tab.e) Select Copy to file and export in .CER format, providing a name when prompted to do
so.f) Save the exported certificate.g) Navigate to the location of the exported certificate and open the .CER file.
Import directly from Internet Explorer running as an administrator.
• Open your web browser and make a secure web connection to the vCenter server (for ex‑ample https://server1.domain1.com).
• Accept the security warnings.• Click the address bar displaying the certificate error.• View the certificate.
3. Import the certificate into the certificate store on each of your Controllers.
a) Click the Install certificate option, select Local Machine, and then clickNext.b) SelectPlaceall certificates in the followingstore, and thenclickBrowse. SelectTrusted
People and then clickOK. ClickNext and then click Finish.
© 1999–2022 Citrix Systems, Inc. All rights reserved. 124
Citrix Virtual Apps and Desktops
If you change the name of the vSphere server after installation, you must generate a new self‑signed certificate on that server before importing the new certificate.
Configuration considerations
Create amaster VM:
Use amaster VM to provide user desktops and applications in amachine catalog. On your hypervisor:
1. Install a VDA on the master VM, selecting the option to optimize the desktop, which improvesperformance.
2. Take a snapshot of the master VM to use as a back‑up.
Create a connection:
In the connection creation wizard:
• Select the VMware connection type.• Specify the address of the access point for the vCenter SDK.• Specify the credentials for a VMware user account you set up earlier that has permissions tocreate VMs. Specify the user name in the form domain/username.
VMware SSL thumbprint
The VMware SSL thumbprint feature addresses a frequently reported error when creating a host con‑nection to a VMware vSphere hypervisor. Previously, administrators had tomanually create a trust re‑lationship between the Delivery Controllers in the Site and the hypervisor’s certificate before creatinga connection. The VMware SSL thumbprint feature removes that manual requirement: the untrustedcertificate’s thumbprint is stored on the Site database. This configuration ensures that the hypervi‑sor can be continuously identified as trusted by Citrix Virtual Apps and Desktops, even if not by theControllers.
When creating a vSphere host connection in Studio, a dialog box allows you to view the certificate ofthe machine you are connecting to. You can then choose whether to trust it.
Nutanix virtualization environments
April 14, 2021
Follow this guidance when using Nutanix Acropolis to provide virtual machines in your Citrix VirtualApps and Desktops deployment. The setup process includes the following tasks:
• Install and register the Nutanix plug‑in in your Citrix Virtual Apps and Desktops environment.
© 1999–2022 Citrix Systems, Inc. All rights reserved. 125

Citrix Virtual Apps and Desktops
• Create a connection to the Nutanix Acropolis hypervisor.• Create a machine catalog that uses a snapshot of a master image you created on the Nutanixhypervisor.
For more information, see the Nutanix Acropolis MCS plug‑in Installation Guide, available at the Nu‑tanix Support Portal.
Install and register the Nutanix plug‑in
After you install the Citrix Virtual Apps and Desktops components, complete the following procedureto install and register the Nutanix plug‑in on the Delivery Controllers. Use Studio to create a connec‑tion to the Nutanix hypervisor and then create a machine catalog that uses a snapshot of a masterimage you created in the Nutanix environment.
1. Obtain the Nutanix plug‑in from Nutanix, and install it on the Delivery Controllers.
2. Verify that a Nutanix Acropolis folder has been created in C:\Program Files\CommonFiles\Citrix\HCLPlugins\CitrixMachineCreation\v1.0.0.0.
3. RunC:\\Program Files\\Common Files\\Citrix\\HCLPlugins\\RegisterPlugins.exe –PluginsRoot “C:\\Program Files\\Common Files\\Citrix\\HCLPlugins\\CitrixMachineCreation\\v1.0.0.0”.
4. Restart the Citrix Host Service, Citrix Broker Service, and Citrix Machine Creation Service.
5. Run the following PowerShell cmdlets to verify that the Nutanix Acropolis plug‑in has been reg‑istered:
1 Add-PSSnapin Citrix\*2 Get-HypHypervisorPlugin3 <!--NeedCopy-->
Create a connection to Nutanix
See Create a Site or Connections and resources for complete information about all pages in the wiz‑ards that create a connection.
In the Site Setup or Add Connection and Resourceswizard, select theNutanix connection type on theConnection page. Specify the hypervisor address and credentials, plus a name for the connection.On theNetwork page, select a network for the hosting unit.
Create amachine catalog using a Nutanix snapshot
This information is a supplement to the guidance in the Create machine catalogs article. It describesonly the fields that are unique to Nutanix.
© 1999–2022 Citrix Systems, Inc. All rights reserved. 126

Citrix Virtual Apps and Desktops
The snapshot you select is the template that is used to create the VMs in the catalog. Before creatingthe catalog, create images and snapshots in Nutanix.
• For information about master images in general, see the Create machine catalogs article.• For Nutanix procedures for creating images and snapshots, see the Nutanix documentation.
The Operating System and Machine Management pages do not contain Nutanix‑specific informa‑tion. Follow the guidance in the Create machine catalogs article.
On the Container page, which is unique to Nutanix, select the container where the VMs’ disks reside.
On the Master Image page, select the image snapshot. Use the Acropolis console to rename yoursnapshots, if needed. If you rename snapshots, restart the Create Catalog wizard to see a refreshedlist.
On theVirtualMachinespage, indicate thenumberof virtual CPUsand thenumberof coresper vCPU.
The Network Cards, Computer Accounts, and Summary pages do not contain Nutanix‑specific in‑formation. Follow the guidance in the Create machine catalogs article.
Install core components
April 14, 2021
The core components are the Citrix Delivery Controller, Citrix Studio, Citrix Director, and Citrix LicenseServer.
(In versions before 2003, core components included Citrix StoreFront. You can still install StoreFrontby clicking the Citrix StoreFront tile or running the command available on the installation media.)
Before you start an installation, review this article and Prepare to install.
This article describes the installation wizard sequence when installing core components. Command‑line equivalents are provided. For more information, see Install using the command line.
Step 1. Download the product software and launch the wizard
Use your Citrix account credentials to access the Citrix Virtual Apps and Desktops download page.Download the product ISO file.
Unzip the file. Optionally, burn a DVD of the ISO file.
Log on to the machine where you are installing the core components, using a local administrator ac‑count.
Insert the DVD in the drive ormount the ISO file. If the installer does not launch automatically, double‑click the AutoSelect application or the mounted drive.
© 1999–2022 Citrix Systems, Inc. All rights reserved. 127

Citrix Virtual Apps and Desktops
Step 2. Choose which product to install
Click Start next to the product to install: Virtual Apps or Virtual Apps and Desktops.
(If themachinealreadyhasCitrix Virtual Apps andDesktops components installedon it, this pagedoesnot appear.)
Command‑line option: /xenapp to install Citrix Virtual Apps. Citrix Virtual Apps and Desktops is in‑stalled if option is omitted.
© 1999–2022 Citrix Systems, Inc. All rights reserved. 128

Citrix Virtual Apps and Desktops
Step 3. Choose what to install
If you’re just getting started, selectDelivery Controller. (On a later page, you select the specific com‑ponents to install on this machine.)
If you’ve already installed a Controller (on this machine or another) and want to install another com‑ponent, select the component from the Extend Deployment section.
Command‑line option: /components
© 1999–2022 Citrix Systems, Inc. All rights reserved. 129
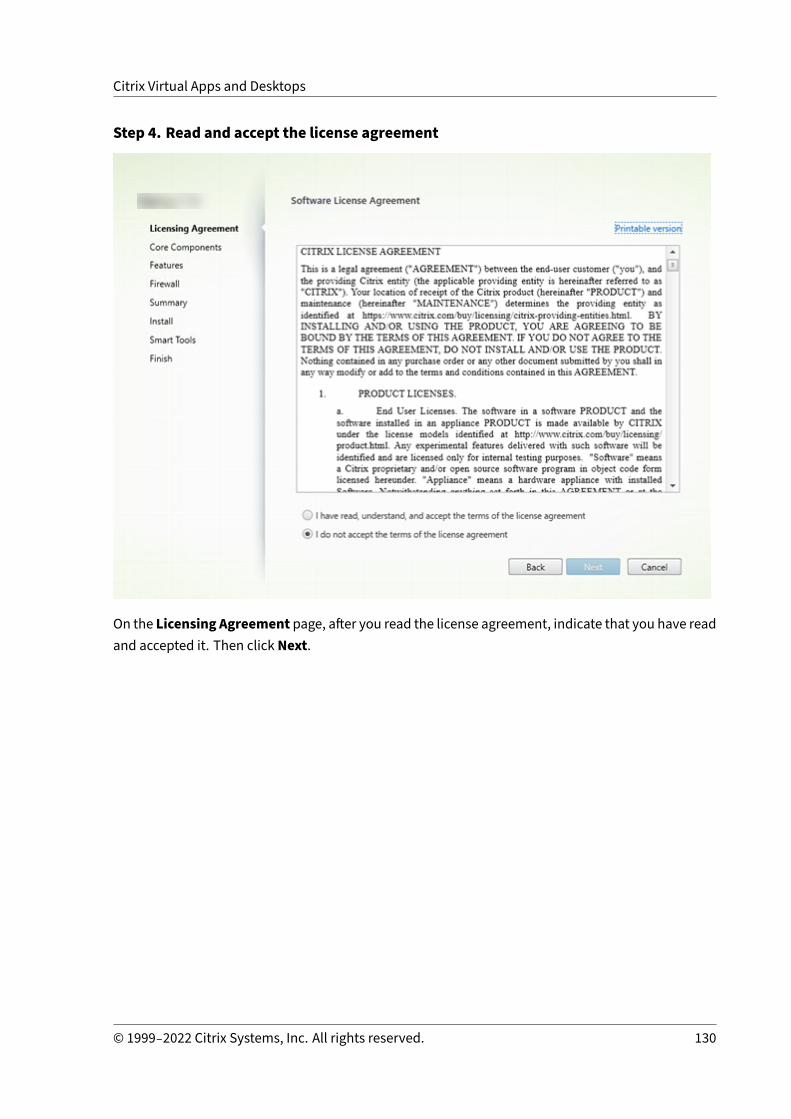
Citrix Virtual Apps and Desktops
Step 4. Read and accept the license agreement
On the Licensing Agreement page, after you read the license agreement, indicate that you have readand accepted it. Then click Next.
© 1999–2022 Citrix Systems, Inc. All rights reserved. 130

Citrix Virtual Apps and Desktops
Step 5. Select the components to install and the installation location
On the Core components page:
• Location: Bydefault, components are installed inC:\Program Files\Citrix. Thedefault isfine for most deployments. If you specify a different location, it must have execute permissionsfor network service.
• Components: By default, the check boxes for all core components are selected. Installing all ofthe core components on one server is fine for proof of concept, test, or small production deploy‑ments. For larger production environments, Citrix recommends installing Director, StoreFront,and the License Server on separate servers.
Select only the components you want to install on this machine. After you install componentson thismachine, you can run the installer again on othermachines to install other components.
An icon alerts you when you choose not to install a required core component on this machine.That alert reminds you to install that component, although not necessarily on this machine.
ClickNext.
Command‑line options: /installdir, /components, /exclude
© 1999–2022 Citrix Systems, Inc. All rights reserved. 131
Citrix Virtual Apps and Desktops
Hardware check
When you install or upgrade a Delivery Controller, the hardware is checked. The installer alerts youif the machine has less than the recommended amount of RAM (5 GB), which can affect site stability.For more information, see Hardware requirements.
Graphical interface: A dialog box appears.
• Recommended: Click Cancel to stop the installation. Add more RAM to the machine and thenstart the installation again.
• Alternatively, clickNext to continue with the installation. The site might have stability issues.
Command‑line interface: The install/upgrade ends. The install logs contain a message thatdescribes what was found and the available options.
• Recommended: Addmore RAM to the machine and then run the command again.• Alternatively, run the command again with the /ignore_hw_check_failure option to over‑ride the warning. Your site might have stability issues.
When upgrading, you’re also notified if the OS or SQL Server version is no longer supported. See Up‑grade a deployment.
© 1999–2022 Citrix Systems, Inc. All rights reserved. 132

Citrix Virtual Apps and Desktops
Step 6. Enable or disable features
On the Features page:
• Choose whether to install Microsoft SQL Server Express for use as the site database. By de‑fault, this selection is enabled. If you’re not familiar with the Citrix Virtual Apps and Desktopsdatabases, review Databases.
• When you install Director, Windows Remote Assistance is installed automatically. You choosewhether to enable shadowing inWindowsRemote Assistance for usewithDirector user shadow‑ing. Enabling shadowing opens TCP port 3389. By default, this feature is enabled. The defaultsetting is fine formost deployments. This feature appears onlywhen you are installing Director.
ClickNext.
Command‑line options: /nosql (to prevent installation), /no_remote_assistance (to prevent en‑abling)
© 1999–2022 Citrix Systems, Inc. All rights reserved. 133

Citrix Virtual Apps and Desktops
Step 7. OpenWindows firewall ports
By default, the ports on the Firewall page are opened automatically if the Windows Firewall Serviceis running, even if the firewall is not enabled. The default setting is fine for most deployments. Forport information, see Network ports.
ClickNext.
(The graphic shows the port lists when you install all the core components on thismachine. That typeof installation is usually for test deployments only.)
Command‑line option: /configure_firewall
© 1999–2022 Citrix Systems, Inc. All rights reserved. 134

Citrix Virtual Apps and Desktops
Step 8. Review prerequisites and confirm installation
The Summary page lists what will be installed. Use the Back button to return to earlier wizard pagesand change selections, if needed.
When you’re ready, click Install.
The display shows the progress of the installation:
© 1999–2022 Citrix Systems, Inc. All rights reserved. 135

Citrix Virtual Apps and Desktops
© 1999–2022 Citrix Systems, Inc. All rights reserved. 136
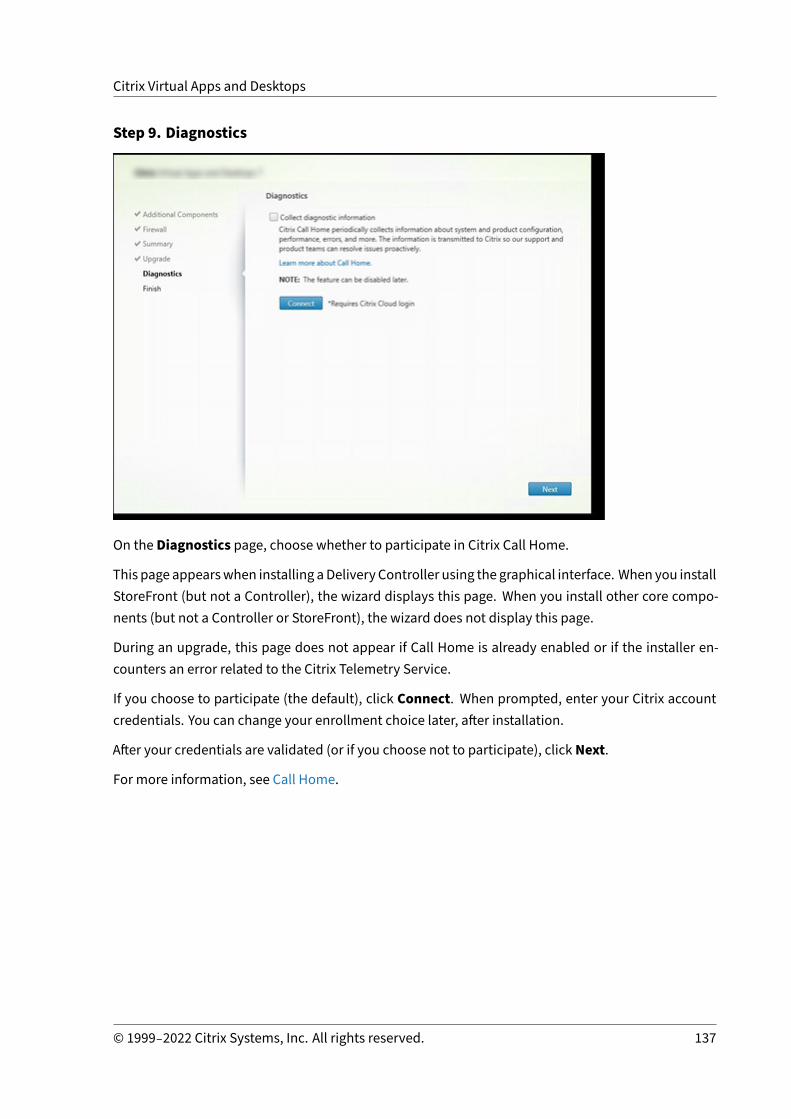
Citrix Virtual Apps and Desktops
Step 9. Diagnostics
On the Diagnostics page, choose whether to participate in Citrix Call Home.
This page appearswhen installing aDelivery Controller using the graphical interface. When you installStoreFront (but not a Controller), the wizard displays this page. When you install other core compo‑nents (but not a Controller or StoreFront), the wizard does not display this page.
During an upgrade, this page does not appear if Call Home is already enabled or if the installer en‑counters an error related to the Citrix Telemetry Service.
If you choose to participate (the default), click Connect. When prompted, enter your Citrix accountcredentials. You can change your enrollment choice later, after installation.
After your credentials are validated (or if you choose not to participate), clickNext.
For more information, see Call Home.
© 1999–2022 Citrix Systems, Inc. All rights reserved. 137
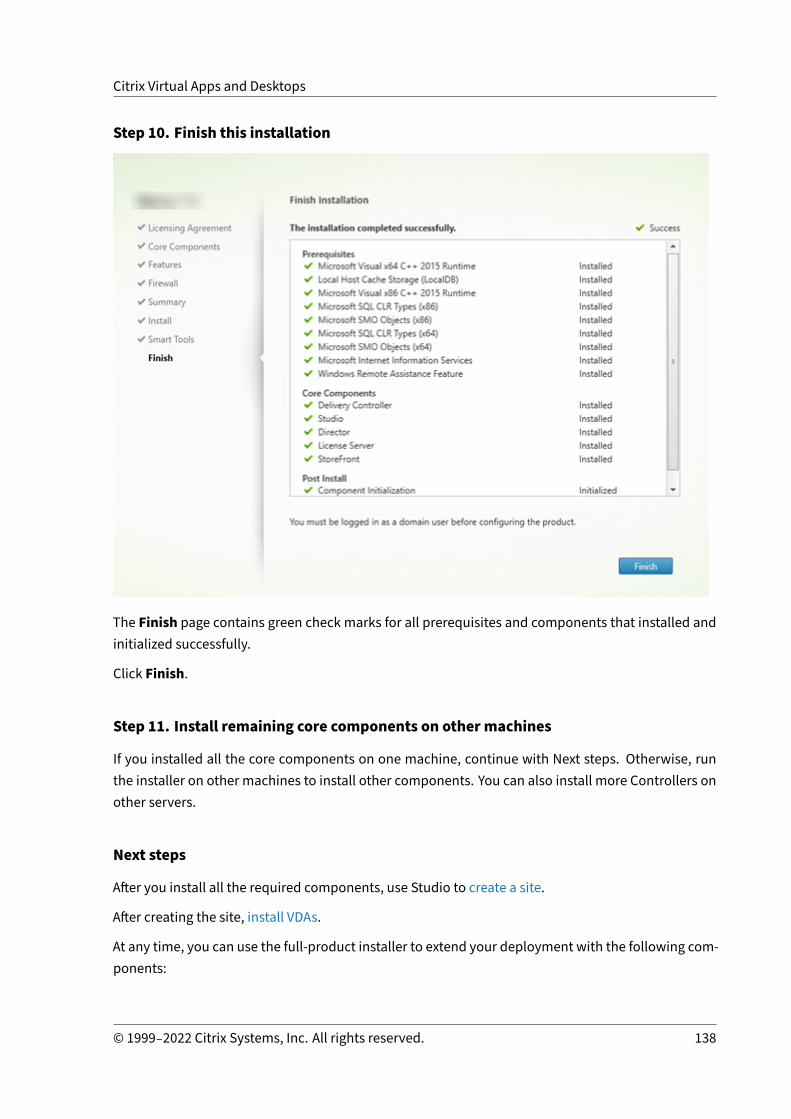
Citrix Virtual Apps and Desktops
Step 10. Finish this installation
The Finish page contains green check marks for all prerequisites and components that installed andinitialized successfully.
Click Finish.
Step 11. Install remaining core components on other machines
If you installed all the core components on one machine, continue with Next steps. Otherwise, runthe installer on other machines to install other components. You can also install more Controllers onother servers.
Next steps
After you install all the required components, use Studio to create a site.
After creating the site, install VDAs.
At any time, you can use the full‑product installer to extend your deployment with the following com‑ponents:
© 1999–2022 Citrix Systems, Inc. All rights reserved. 138

Citrix Virtual Apps and Desktops
• Universal Print Server server component: Launch the installer on your print server.
1. SelectUniversal Print Server in the Extend Deployment section.2. Accept the license agreement.3. On the Firewall page, by default, TCP ports 7229 and 8080 are opened in the firewall if the
Windows Firewall Service is running, even if the firewall is not enabled. You can disablethat default action if you want to open the ports manually.
To install this component from the command line, see Command‑line options for installing aUniversal Print Server.
• Federated Authentication Service.
• Session Recording.
Install VDAs
April 14, 2021
Important:
If you’re upgrading, and your current version has the Personal vDisk or AppDisks software in‑stalled, see Removing PvD, AppDisks, and unsupported hosts.
There are two types of VDAs for Windows machines: VDA for multi‑session OS and VDA for single‑session OS. (For information about VDAs for Linuxmachines, see the Linux Virtual Delivery Agent doc‑umentation.)
Before starting an installation, review Prepare to install and complete all preparation tasks.
Before installing VDAs, you should have already installed the core components. You can also createthe site before installing VDAs.
This article describes the installation wizard sequence when installing a VDA. Command‑line equiva‑lents are provided. For details, see Install using the command line.
Step 1. Download the product software and launch the wizard
If you’re using the full‑product installer:
1. If you haven’t downloaded the product ISO yet:
• Use your Citrix account credentials to access the Citrix Virtual Apps and Desktops down‑load page. Download the product ISO file.
• Unzip the file. Optionally, burn a DVD of the ISO file.
© 1999–2022 Citrix Systems, Inc. All rights reserved. 139

Citrix Virtual Apps and Desktops
2. Use a local administrator account on the image or machine where you’re installing the VDA.Insert the DVD in the drive or mount the ISO file. If the installer does not launch automatically,double‑click the AutoSelect application or the mounted drive.
The installation wizard launches.
If you’re using a standalone package:
1. Use your Citrix account credentials to access the Citrix Virtual Apps and Desktops downloadpage. Download the appropriate package:
• VDAServerSetup.exe: Multi‑session OS VDA version• VDAWorkstationSetup.exe: Single‑session OS VDA version• VDAWorkstationCoreSetup.exe: Single‑session OS Core Services VDA version
2. Right‑click the package and choose Run as administrator.
The installation wizard launches.
Step 2. Choose which product to install
Click Start next to the product to install: Citrix Virtual Apps or Citrix Virtual Desktops. (If the machinealready has a Citrix Virtual Apps or Citrix Virtual Desktops component installed, this page does notappear.)
Command‑line option: /xenapp to install Citrix Virtual Apps. Citrix Virtual Desktops is installed ifoption is omitted.
© 1999–2022 Citrix Systems, Inc. All rights reserved. 140

Citrix Virtual Apps and Desktops
Step 3. Select the VDA
Select the Virtual Delivery Agent entry. The installer knows whether it’s running on a single‑sessionor multi‑session OS, so it offers only the appropriate VDA type.
For example, when you run the installer on aWindowsServer 2016machine, the VDA formulti‑sessionOS option is available. The VDA for single‑session OS option is not offered.
If you try to install (or upgrade to) a Windows VDA on an OS that is not supported for this Citrix VirtualApps and Desktops version, a message guides you to information that describes your options.
Step 4. Specify how the VDAwill be used
On the Environment page, specify how you plan to use the VDA, indicating whether you’ll use thismachine as a master image to provision additional machines.
© 1999–2022 Citrix Systems, Inc. All rights reserved. 141
Citrix Virtual Apps and Desktops
The option you choose affects which Citrix provisioning tools are installed automatically (if any), andthe default values on the Additional Components page of the VDA installer.
SeveralMSIs (provisioning andother) are installed automaticallywhen you install a VDA. The onlywayto prevent their installation is with the /exclude option in a command‑line installation.
Choose one of the following:
• Create a master MCS image: Select this option to install a VDA on a VM master image, if youplan touseMachineCreationServices toprovisionVMs. Thisoption installs theMachine IdentityService, which includes TargetOSOptimizer.exe. This is the default option.
Command‑line option: /mastermcsimage or /masterimage
• Create a master image using Citrix Provisioning or third‑party provisioning tools: Selectthis option to install a VDA on a VM master image, if you plan to use either Citrix Provisioningor third‑party provisioning tools (such as Microsoft System Center Configuration Manager) toprovision VMs.
Command‑line option: /masterpvsimage
• (Appears only on multi‑session OS machines) Enable brokered connections to a server: Se‑lect this option to install a VDA on a physical or virtualmachine that will not be used as amasterimage to provision other machines.
Command‑line option: /remotepc
• (Appears only on single‑session OSmachines) Enable Remote PC Access: Select this option toinstall a VDA on a physical machine for use with Remote PC Access.
Command‑line option: /remotepc
ClickNext.
This page does not appear:
• If you’re upgrading a VDA• If you are using the VDAWorkstationCoreSetup.exe installer
© 1999–2022 Citrix Systems, Inc. All rights reserved. 142

Citrix Virtual Apps and Desktops
Step 5. Select the components to install and the installation location
On the Core components page:
• Location: By default, components are installed in C:\Program Files\Citrix. This defaultis fine formost deployments. If you specify a different location, that locationmust have executepermissions for network service.
• Components: By default, Citrix Workspace app for Windows is not installed with the VDA. Ifyou are using the VDAWorkstationCoreSetup.exe installer, Citrix Workspace app for Windows isnever installed, so this check box is not displayed.
ClickNext.
Command‑line options: /installdir, /components vda plugin to install the VDA and the CitrixWorkspace app for Windows
© 1999–2022 Citrix Systems, Inc. All rights reserved. 143
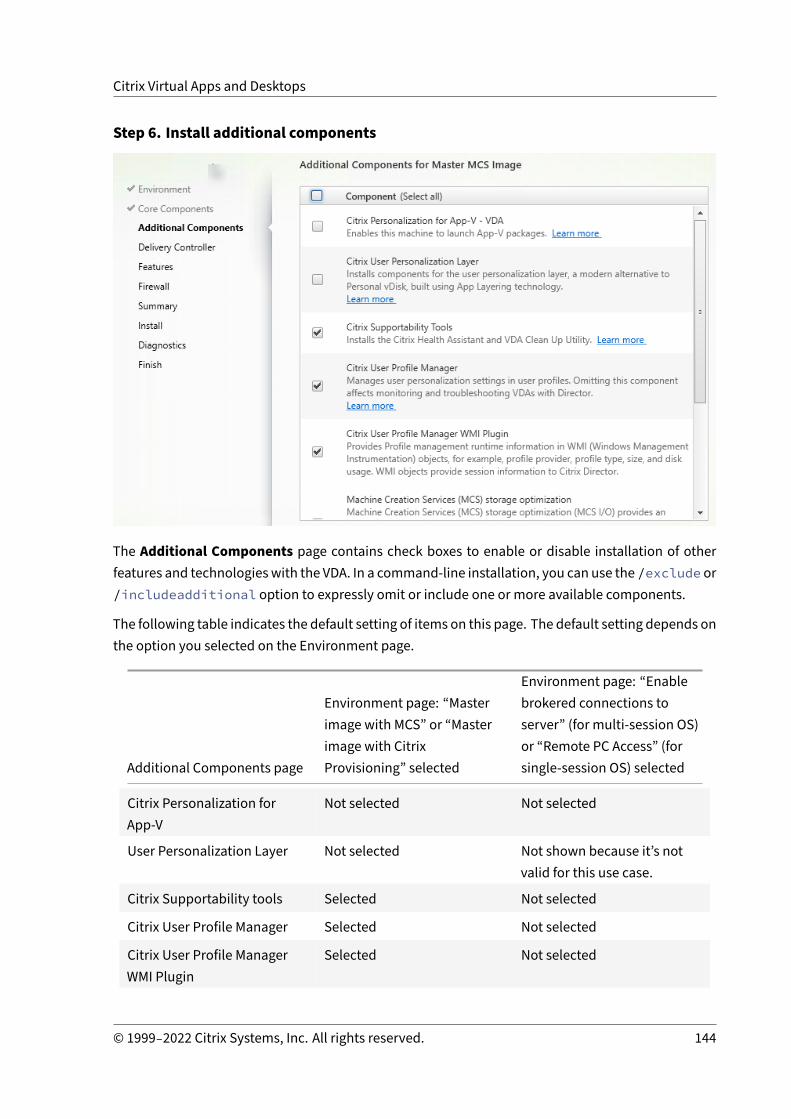
Citrix Virtual Apps and Desktops
Step 6. Install additional components
The Additional Components page contains check boxes to enable or disable installation of otherfeatures and technologieswith the VDA. In a command‑line installation, you can use the /exclude or/includeadditional option to expressly omit or include one or more available components.
The following table indicates the default setting of items on this page. The default setting depends onthe option you selected on the Environment page.
Additional Components page
Environment page: “Masterimage with MCS” or “Masterimage with CitrixProvisioning” selected
Environment page: “Enablebrokered connections toserver” (for multi‑session OS)or “Remote PC Access” (forsingle‑session OS) selected
Citrix Personalization forApp‑V
Not selected Not selected
User Personalization Layer Not selected Not shown because it’s notvalid for this use case.
Citrix Supportability tools Selected Not selected
Citrix User Profile Manager Selected Not selected
Citrix User Profile ManagerWMI Plugin
Selected Not selected
© 1999–2022 Citrix Systems, Inc. All rights reserved. 144

Citrix Virtual Apps and Desktops
Additional Components page
Environment page: “Masterimage with MCS” or “Masterimage with CitrixProvisioning” selected
Environment page: “Enablebrokered connections toserver” (for multi‑session OS)or “Remote PC Access” (forsingle‑session OS) selected
Citrix Files for Windows Not selected Not selected
Citrix Files for Outlook Not selected Not selected
This page does not appear if:
• You are using theVDAWorkstationCoreSetup.exe installer. Also, the command‑line optionsfor the additional components are not valid with that installer.
• You are upgrading a VDA and all the additional components are already installed. If some ofthe additional components are already installed, the page lists only components that are notinstalled.
Select or clear the following check boxes:
• Citrix Personalization for App‑V: Install this component if you use applications fromMicrosoftApp‑V packages. For details, see App‑V.
Command‑line option: /includeadditional "Citrix Personalization for App-V –VDA" to enable component installation, /exclude "Citrix Personalization for App
-V – VDA" to prevent component installation
• User Personalization Layer: Installs the MSI for the user personalization layer. For details, seeUser personalization layer.
This component appears only when installing a VDA on a single‑session Windows 10 machine.
Command‑line option: /includeadditional "User Personalization Layer" toenable component installation, /exclude "User Personalization Layer" to preventcomponent installation
• Citrix Supportability Tools Installs theMSI that containsCitrix supportability tools, such as theCitrix Health Assistant.
Command‑line option: /includeadditional "Citrix Supportability Tools" toenable component installation, /exclude "Citrix Supportability Tools" to preventcomponent installation
• Citrix User Profile Manager: This component manages user personalization settings in userprofiles. For details, see Profile Management.
Excluding Citrix Profile Management from the installation affects the monitoring and trou‑bleshooting of VDAs with Citrix Director. On the User details and End Point pages, the
© 1999–2022 Citrix Systems, Inc. All rights reserved. 145

Citrix Virtual Apps and Desktops
Personalization panel and the Logon Duration panel fail. On the Dashboard and Trendspages, the Average Logon Duration panel display data only for machines that have ProfileManagement installed.
Even if you are using a third‑party user profile management solution, Citrix recommends thatyou install and run the Citrix Profile Management Service. Enabling the Citrix Profile Manage‑ment Service is not required.
Command‑line option: /includeadditional "Citrix User Profile Manager" toenable component installation, /exclude "Citrix User Profile Manager" to preventcomponent installation
• Citrix User Profile Manager WMI Plugin: This plug‑in provides Profile Management runtimeinformation in WMI (Windows Management Instrumentation) objects (for example, profileprovider, profile type, size, and disk usage). WMI objects provide session information toDirector.
Command‑line option: /includeadditional "Citrix User Profile Manager WMIPlugin" to enable component installation, /exclude "Citrix User Profile ManagerWMI Plugin" to prevent component installation
• CitrixFiles forWindows: This component enablesusers to connect to their Citrix Files account.They can then interactwithCitrix Files throughamappeddrive in theWindows file system (with‑out requiring a full sync of their content). For more information, see Content Collaboration.
Command‑line options: /includeadditional "Citrix Files for Windows" to enablecomponent installation, /exclude "Citrix Files for Windows" to prevent componentinstallation
• Citrix Files for Outlook: Citrix Files for Outlook allows you to bypass file size restrictions andadd security to your attachments or emails by sending them through Citrix Files. You can pro‑vide a secure file upload request for co‑workers, customers, and partners directly in your email.For more information, see Content Collaboration.
Command‑line options: /includeadditional "Citrix Files for Outlook" to enablecomponent installation, /exclude "Citrix Files for Outlook" to prevent componentinstallation
© 1999–2022 Citrix Systems, Inc. All rights reserved. 146

Citrix Virtual Apps and Desktops
Step 7. Delivery Controller addresses
OntheDeliveryControllerpage, choosehowyouwant toenter theaddressesof installedControllers.Citrix recommends that you specify the addresses while you’re installing the VDA (Do it manually).The VDA cannot register with a Controller until it has this information. If a VDA cannot register, userscannot access applications and desktops on that VDA.
• Do itmanually: (default) Enter the FQDNof an installedController and then clickAdd. If you’veinstalled more Controllers, add their addresses.
• Do it later (Advanced): If you choose this option, the wizard asks you to confirm that’s whatyou want to do before continuing. To specify addresses later, you can either rerun the installeror use Citrix Group Policy. The wizard also reminds you on the Summary page.
• Choose locations from Active Directory: Valid only when the machine is joined to a domainand the user is a domain user.
• Let Machine Creation Services do it automatically: Valid only when using MCS to provisionmachines.
Click Next. If you selected Do it later (Advanced), you are prompted to confirm that you will specifyController addresses later.
Other considerations:
• The address cannot contain non‑alphanumeric characters.• If you specify addresses during VDA installation and in GroupPolicy, the policy settings overridesettings provided during installation.
• Successful VDA registration requires that the firewall ports used to communicate with the Con‑troller are open. That action is enabled by default on the Firewall page of the wizard.
• After you specify Controller locations (during or after VDA installation), you can use the auto‑update feature to update the VDAs when Controllers are added or removed. For details abouthow VDAs discover and register with Controllers, see VDA registration.
© 1999–2022 Citrix Systems, Inc. All rights reserved. 147
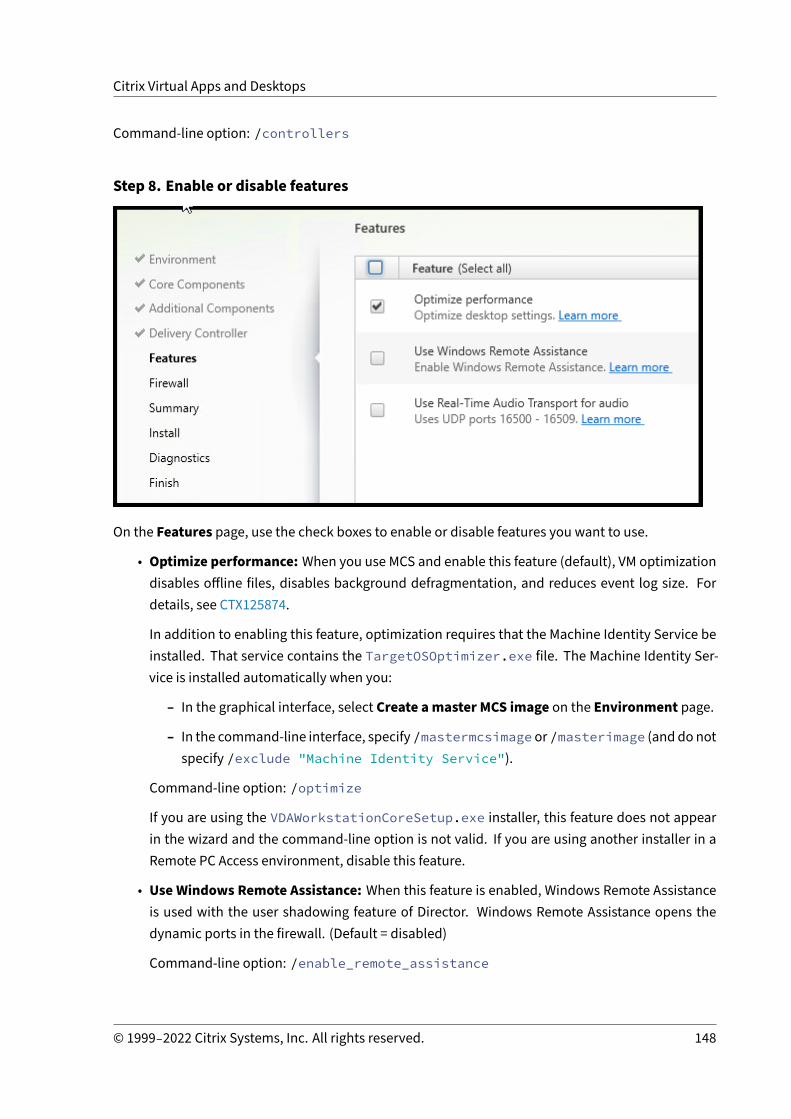
Citrix Virtual Apps and Desktops
Command‑line option: /controllers
Step 8. Enable or disable features
On the Features page, use the check boxes to enable or disable features you want to use.
• Optimize performance: When you use MCS and enable this feature (default), VM optimizationdisables offline files, disables background defragmentation, and reduces event log size. Fordetails, see CTX125874.
In addition to enabling this feature, optimization requires that the Machine Identity Service beinstalled. That service contains the TargetOSOptimizer.exe file. The Machine Identity Ser‑vice is installed automatically when you:
– In the graphical interface, select Create amaster MCS image on the Environment page.
– In the command‑line interface, specify/mastermcsimage or/masterimage (and do notspecify /exclude "Machine Identity Service").
Command‑line option: /optimize
If you are using the VDAWorkstationCoreSetup.exe installer, this feature does not appearin the wizard and the command‑line option is not valid. If you are using another installer in aRemote PC Access environment, disable this feature.
• Use Windows Remote Assistance: When this feature is enabled, Windows Remote Assistanceis used with the user shadowing feature of Director. Windows Remote Assistance opens thedynamic ports in the firewall. (Default = disabled)
Command‑line option: /enable_remote_assistance
© 1999–2022 Citrix Systems, Inc. All rights reserved. 148

Citrix Virtual Apps and Desktops
• UseReal‑TimeAudio Transport for audio: Enable this feature if voice‑over‑IP iswidely used inyour network. The feature reduces latency and improves audio resilience over lossy networks.It allows audio data to be transmitted using RTP over UDP transport. (Default = disabled)
Command‑line option: /enable_real_time_transport
• MCS I/O: Valid only when using MCS to provision VMs. When selected, the MCSIO write cachingdriver is installed. For more information, see Storage shared by hypervisors and Configurecache for temporary data.
Command‑line option: /install_mcsio_driver
ClickNext.
Step 9. Firewall ports
On the Firewall page, by default, the ports are opened automatically if the Windows Firewall Serviceis running, even if the firewall is not enabled. This default setting is fine for most deployments. Forport information, see Network ports.
ClickNext.
Command‑line option: /enable_hdx_ports
© 1999–2022 Citrix Systems, Inc. All rights reserved. 149
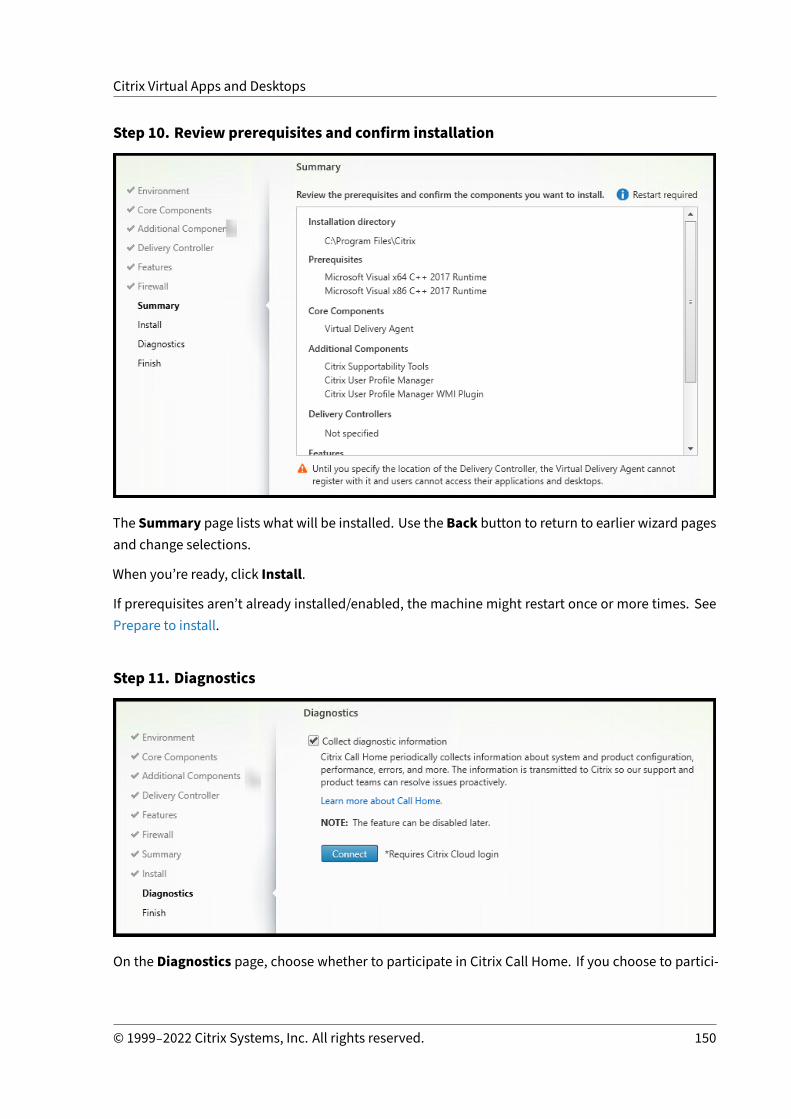
Citrix Virtual Apps and Desktops
Step 10. Review prerequisites and confirm installation
The Summary page lists what will be installed. Use the Back button to return to earlier wizard pagesand change selections.
When you’re ready, click Install.
If prerequisites aren’t already installed/enabled, the machine might restart once or more times. SeePrepare to install.
Step 11. Diagnostics
On the Diagnostics page, choose whether to participate in Citrix Call Home. If you choose to partici‑
© 1999–2022 Citrix Systems, Inc. All rights reserved. 150
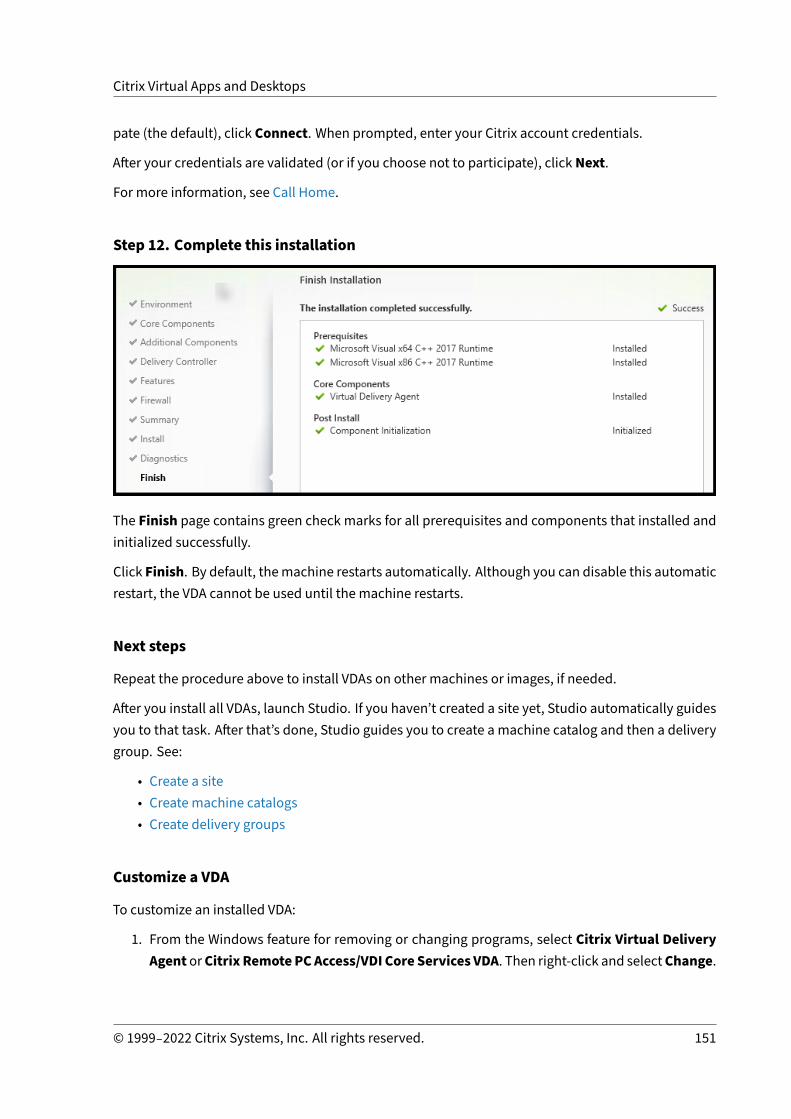
Citrix Virtual Apps and Desktops
pate (the default), click Connect. When prompted, enter your Citrix account credentials.
After your credentials are validated (or if you choose not to participate), clickNext.
For more information, see Call Home.
Step 12. Complete this installation
The Finish page contains green check marks for all prerequisites and components that installed andinitialized successfully.
Click Finish. By default, themachine restarts automatically. Although you can disable this automaticrestart, the VDA cannot be used until the machine restarts.
Next steps
Repeat the procedure above to install VDAs on other machines or images, if needed.
After you install all VDAs, launch Studio. If you haven’t created a site yet, Studio automatically guidesyou to that task. After that’s done, Studio guides you to create a machine catalog and then a deliverygroup. See:
• Create a site• Create machine catalogs• Create delivery groups
Customize a VDA
To customize an installed VDA:
1. From the Windows feature for removing or changing programs, select Citrix Virtual DeliveryAgent orCitrix RemotePCAccess/VDI Core Services VDA. Then right‑click and selectChange.
© 1999–2022 Citrix Systems, Inc. All rights reserved. 151

Citrix Virtual Apps and Desktops
2. Select Customize Virtual Delivery Agent Settings. When the installer launches, you canchange:
• Controller addresses• TCP/IP port to register with the Controller (default = 80)• Whether to open Windows Firewall ports automatically
Troubleshoot
• For information about how Citrix reports the result of component installations, see Citrix instal‑lation return codes.
• In the Studio display for a delivery group, the Installed VDA version entry in the Details panemight not be the version installed on the machines. The machine’s Windows Programs andFeatures display shows the actual VDA version.
• After a VDA is installed, it cannot deliver apps or a desktop to users until it registers with a Deliv‑ery Controller.
To learn about VDA registration methods and how to troubleshoot registration issues, see VDAregistration.
Install using the command line
April 14, 2021
Important:
If you’re upgrading, and your current versionuses or has thePersonal vDisk or AppDisks softwareinstalled, see Removing PvD, AppDisks, and unsupported hosts.
Introduction
This article applies to installing components onmachineswithWindows operating systems. For infor‑mation about VDAs for Linux operating systems, see Linux Virtual Delivery Agents.
This article describes how to issue product installation commands. Before beginning any installation,review Prepare to install. That article includes descriptions of the available installers.
To see command execution progress and return values, youmust be the original administrator or useRun as administrator. For more information, see the Microsoft command documentation.
© 1999–2022 Citrix Systems, Inc. All rights reserved. 152
Citrix Virtual Apps and Desktops
As a complement to using the installation commands directly, sample scripts are provided on theproduct ISO that install, upgrade, or remove VDAs on machines in Active Directory. For details, seeInstall VDAs using scripts.
If you attempt to install or upgradeonaWindowsOSversion that is not supported for this Citrix VirtualApps and Desktops version, a message guides you to information about your options. See Earlieroperating systems.
For information about how Citrix reports the result of component installations, see Citrix installationreturn codes.
Use the full‑product installer
To access the full product installer’s command‑line interface:
1. Download theproduct package fromCitrix. Citrix account credentials are required to access thedownload site.
2. Unzip the file. Optionally, burn a DVD of the ISO file.
3. Log on to the server where you are installing the components, using a local administrator ac‑count.
4. Insert the DVD in the drive or mount the ISO file.
5. From the \x64\XenDesktop Setup directory on the media, run the appropriate command.
To install core components: Run XenDesktopServerSetup.exe, with the options listed inCommand‑line options for installing core components.
To install a VDA: Run XenDesktopVDASetup.exe with the options listed in Command‑lineoptions for installing a VDA.
To install StoreFront: Run CitrixStoreFront-x64.exe in the x64 > StoreFront folderon the installation media.
To install the Universal Print Server: Follow the guidance in Command‑line options for in‑stalling a Universal Print Server.
To install the Federated Authentication Service: Citrix recommends using the graphical in‑terface.
To install Session Recording: Follow the guidance in Session Recording.
Use a standalone VDA installer
Citrix account credentials are required to access the download site. You must either have elevatedadministrative privileges before starting the installation, or use Run as administrator.
© 1999–2022 Citrix Systems, Inc. All rights reserved. 153

Citrix Virtual Apps and Desktops
1. Download the appropriate package from Citrix:
• Multi‑session OS Virtual Delivery Agent: VDAServerSetup.exe• Single‑session OS Virtual Delivery Agent: VDAWorkstationSetup.exe• Single‑session OS Core Services Virtual Delivery Agent: VDAWorkstationCoreSetup.exe
2. Either extract the files fromthepackage toanexistingdirectory first and then run the installationcommand, or simply run the package.
To extract the files before installing them, use /extract with the absolute path, for example.\VDAWorkstationCoreSetup.exe /extract %temp%\CitrixVDAInstallMedia. Thedirectory must exist. Otherwise, the extract fails. Then in a separate command, run the appro‑priate command below, using the valid options listed in this article.
• For VDAServerSetup_XXXX.exe, run <extract folder>\Extract\Image-Full\x64\XenDesktop Setup\XenDesktopVDASetup.exe
• For VDAWorkstationCoreSetup_XXXX.exe, run <extract folder>\Extract\Image-Full\x64\XenDesktop Setup\XenDesktopRemotePCSetup.exe
• For VDAWorkstationSetup_XXXX.exe, run <extract folder>\Extract\Image-Full\x64\XenDesktop Setup\XenDesktopVDASetup.exe
Torun thedownloadedpackage, run itsname: VDAServerSetup.exe,VDAWorkstationSetup.exe, or VDAWorkstationCoreSetup.exe. Use the valid options listed in this article.
If you are familiar with the full product installer:
• Run the standalone VDAServerSetup.exe or VDAWorkstationSetup.exe installer as if itwas the XenDesktopVdaSetup.exe command in everything except its name.
• TheVDAWorkstationCoreSetup.exe installer is different, because it supports a subsetof theoptions available to the other installers.
Command‑line options for installing core components
The followingoptions are validwhen installing core componentswith theXenDesktopServerSetup.exe command. For more detail about options, see Install core components.
• /components component [,component] …
Comma‑separated list of components to install or remove. Valid values are:
– CONTROLLER: Controller– DESKTOPSTUDIO: Studio– DESKTOPDIRECTOR: Director– LICENSESERVER: Citrix License Server
© 1999–2022 Citrix Systems, Inc. All rights reserved. 154

Citrix Virtual Apps and Desktops
If this option is omitted, all components are installed (or removed, if the /remove option is alsospecified).
(In releases before 2003, valid values included StoreFront. For version 2003 and later, use thededicated StoreFront installation command noted in Use the full‑product installer).
• /configure_firewall
Opens all ports in theWindows firewall used by the components being installed, if theWindowsFirewall Service is running, even if the firewall is not enabled. If you are using a third‑partyfirewall or no firewall, youmust manually open the ports.
• /disableexperiencemetrics
Prevents automatic upload of analytics collected during installation, upgrade, or removal toCitrix.
• /exclude “feature”[,”feature”]
Prevents installation of one ormore comma‑separated features, services, or technologies, eachenclosed in straight quotation marks. Valid values are:
– "Local Host Cache Storage (LocalDB)": Prevents installation of the databaseused for Local Host Cache. This option has no effect on whether SQL Server Express isinstalled for use as the site database.
• /help or /h
Displays command help.
• /ignore_hw_check_failure
Allows the Delivery Controller installation or upgrade to continue, even if the hardware checksfail (for example, due to insufficient RAM). For more information, see Hardware check.
• /ignore_site_test_failure
Valid only during Controller upgrade. In most cases, any site test failures are ignored and theupgrade proceeds. If omitted (or set to false), any site test failure causes the installer to fail,without performing the upgrade. Default = false
During an upgrade, this option is ignored if an unsupported SQL Server version is detected. Fordetails, see SQL Server version check.
• /installdir directory
Existing empty directory where components will be installed. Default = c:\Program Files\Citrix.
• /logpath path
Log file location. The specified foldermust exist. The installer does not create it. Default = TEMP%\Citrix\XenDesktop Installer
© 1999–2022 Citrix Systems, Inc. All rights reserved. 155

Citrix Virtual Apps and Desktops
• /no_pending_reboot_check
When installing or upgrading core components, prevents checking for a pending restart from aprevious Windows installation on the machine.
• /no_remote_assistance
Valid only when installing Director. Disables the user shadowing feature that uses Windows Re‑mote Assistance.
• /noreboot
Prevents a restart after installation. (For most core components, a restart is not enabled bydefault.)
• /noresume
By default, when a machine restart is needed during an installation, the installer resumes au‑tomatically after the restart completes. To override the default, specify /noresume. This canbe helpful if youmust remount themedia or want to capture information during an automatedinstallation.
• /nosql
Prevents installation of Microsoft SQL Server Express on the server where you are installing theController. If this option is omitted, SQL Server Express is installed for use as the site database.
This option has no effect on the installation of SQL Server Express LocalDB used for Local HostCache.
• /quiet or /passive
No user interface appears during the installation. The only evidence of the installation processis in Windows Task Manager. If this option is omitted, the graphical interface launches.
• /remove
Removes the core components specified with the /components option.
• /removeall
Removes all installed core components.
• /sendexperiencemetrics
Automatically sends analytics collected during the installation, upgrade, or removal to Citrix.If this option is omitted (or /disableexperiencemetrics is specified), the analytics are col‑lected locally, but not sent automatically.
• /tempdir directory
Directory that holds temporary files during installation. Default = c:\Windows\Temp.
© 1999–2022 Citrix Systems, Inc. All rights reserved. 156

Citrix Virtual Apps and Desktops
• /xenapp
Installs Citrix Virtual Apps. If this option is omitted, Citrix Virtual Apps and Desktops is installed.
Examples of installing core components
The following command installs a Delivery Controller, Studio, Citrix Licensing, andSQLServer Expresson a server. Firewall ports required for component communications are opened automatically.
\x64\XenDesktop Setup\XenDesktopServerSetup.exe /components controller,desktopstudio,licenseserver /configure_firewall
The following command installs a Citrix Virtual Apps Controller, Studio, andSQLServer Express on theserver. Firewall ports required for component communication are opened automatically.
\x64\XenDesktop Setup\\XenDesktopServerSetup.exe /xenapp /componentscontroller,desktopstudio /configure_firewall
Command‑line options for installing a VDA
The following options are valid with one or more of the following commands (installers):XenDesktopVDASetup.exe, VDAWorkstationSetup.exe, and VDAWorkstationCoreSetup.exe.
For more detail about options, see Install VDAs.
• /components component[,component]
Comma‑separated list of components to install or remove. Valid values are:
– VDA: Virtual Delivery Agent– PLUGINS: Citrix Workspace app for Windows
To install the VDA andCitrixWorkspace app forWindows, specify/components vda plugins.
If this option is omitted, only the VDA is installed (not Citrix Workspace app).
This option is not valid when using the VDAWorkstationCoreSetup.exe installer. That in‑staller cannot install Citrix Workspace app.
• /controllers “controller [controller]”
Space‑separated FQDNs of Controllers with which the VDA can communicate, enclosed instraight quotation marks. Do not specify both the /site_guid and /controllers options.
• /disableexperiencemetrics
Prevents the automatic upload of analytics collected during installation, upgrade, or removalto Citrix.
© 1999–2022 Citrix Systems, Inc. All rights reserved. 157

Citrix Virtual Apps and Desktops
• /enable_hdx_ports
Opens ports in theWindows firewall required by the VDA and enabled features (exceptWindowsRemote Assistance), if the Windows Firewall Service is detected, even if the firewall is not en‑abled. If you are using a different firewall or no firewall, you must configure the firewall manu‑ally. For port information, see Network ports.
Toopen theUDPports thatHDXadaptive transportuses, specify the/enable_hdx_udp_portsoption, in addition to this /enable_hdx_ports option.
• /enable_hdx_udp_ports
Opens UDP ports in theWindows firewall that HDX adaptive transport uses, if theWindows Fire‑wall Service is detected, even if the firewall is not enabled. If you are using a different firewall orno firewall, youmust configure the firewall manually. For port information, see Network ports.
To open extra ports that the VDA uses, specify the /enable_hdx_ports option, in addition tothis /enable_hdx_udp_ports option.
• /enable_real_time_transport
EnablesordisablesuseofUDP foraudiopackets (RealTimeAudioTransport for audio). Enablingthis feature can improve audio performance. Include the /enable_hdx_ports option if youwant the UDP ports opened automatically when the Windows Firewall Service is detected.
• /enable_remote_assistance
Enables the shadowing feature inWindows Remote Assistance for usewith Director. If you spec‑ify this option, Windows Remote Assistance opens the dynamic ports in the firewall.
• /exclude “component”[,”component”]
Prevents installation of one ormore comma‑separated optional components, each enclosed instraight quotation marks. For example, installing or upgrading a VDA on an image that is notmanaged by MCS does not require the Machine Identity Service component. Valid values are:
– Machine Identity Service (includes TargetOSOptimizer.exe)– Citrix User Profile Manager– Citrix User Profile Manager WMI Plugin– Citrix Universal Print Client– Citrix Telemetry Service– Citrix Personalization for App-V - VDA– Citrix Supportability Tools– Citrix Files for Windows– Citrix Files for Outlook– User personalization layer
© 1999–2022 Citrix Systems, Inc. All rights reserved. 158
Citrix Virtual Apps and Desktops
Excluding Citrix Profile Management from the installation (/exclude "Citrix UserProfile Manager") affects monitoring and troubleshooting of VDAs with Citrix Director. OntheUser details and EndPoint pages, the Personalization panel and the Logon Duration panelfail. On the Dashboard and Trends pages, the Average Logon Duration panel displays dataonly for machines that have Profile Management installed.
Even if you are using a third‑party user profile management solution, Citrix recommends thatyou install and run the Citrix Profile Management Service. Enabling the Citrix Profile Manage‑ment Service is not required.
If you plan to use MCS to provision VMs, do not exclude the Machine Identity Service. Excludingthat service also excludes installation of TargetOSOptimizer.exe.
If you specify both /exclude and /includeadditional with the same component name,that component is not installed.
This option is not valid when using the VDAWorkstationCoreSetup.exe installer. That in‑staller automatically excludes many of these items.
• /h or /help
Displays command help.
• /includeadditional “component”[,”component”]
Includes installation of one or more comma‑separated optional components, each enclosed instraight quotationmarks. This option can be helpful when you are creating a Remote PC Accessdeployment, andwant to install other components that arenot includedbydefault. Valid valuesare:
– Citrix User Profile Manager– Citrix User Profile Manager WMI Plugin– Citrix Universal Print Client– Citrix Telemetry Service– Citrix Personalization for App-V - VDA– Citrix Supportability Tools– Citrix Files for Windows– Citrix Files for Outlook– User personalization layer
If you specify both /exclude and /includeadditional with the same component name,that component is not installed.
• /installdir directory
Existing empty directory where components will be installed. Default = c:\Program Files\Citrix.
• /install_mcsio_driver
© 1999–2022 Citrix Systems, Inc. All rights reserved. 159
Citrix Virtual Apps and Desktops
Enables MCS I/O write cache for storage optimization.
• /logpath path
Log file location. The specified folder must exist. The installer does not create it. Default =“%TEMP%\Citrix\XenDesktop Installer”
This option is not available in the graphical interface.
• /masterimage
Valid only when installing a VDA on a VM. Sets up the VDA as a master image. This option isequivalent to /mastermcsimage.
This option is not valid when using the VDAWorkstationCoreSetup.exe installer.
• /mastermcsimage
Specifies that thismachinewill be used as amaster imagewithMachine Creation Services. Thisoption also installs TargetOSOptimizer.exe (unless you also specify /exclude "MachineIdentity Service" which includes the optimizer installer). This option is equivalent to /
masterimage.
• /masterpvsimage
Specifies that this machine will be used as a master image with either Citrix Provisioning or athird‑party provisioning tool (such asMicrosoft SystemCenter ConfigurationManager) to provi‑sion VMs.
• /no_mediafoundation_ack
Acknowledges that Microsoft Media Foundation is not installed, and several HDX multimediafeatures will not be installed and will not work. If this option is omitted and Media Foundationis not installed, the VDA installation fails. Most supported Windows editions come with MediaFoundation already installed, except N editions.
• /nodesktopexperience
The Enhanced Desktop Experience feature is no longer available. This option (and policy set‑ting) is ignored, if specified.
Valid only when installing a VDA for multi‑session OS. Prevents enabling of the Enhanced Desk‑top Experience feature. This feature is also controlled with the Enhanced Desktop ExperienceCitrix policy setting.
• /noreboot
Prevents a restart after installation. The VDA cannot be used until after a restart.
• /noresume
© 1999–2022 Citrix Systems, Inc. All rights reserved. 160

Citrix Virtual Apps and Desktops
By default, when a machine restart is needed during an installation, the installer resumes au‑tomatically after the restart completes. To override the default, specify /noresume. This canbe helpful if youmust remount themedia or want to capture information during an automatedinstallation.
• /optimize
When you use MCS and enable this feature (default), VM optimization disables offline files, dis‑ables background defragmentation, and reduces event log size. For details, see CTX125874.
In addition to enabling this feature, optimization requires that the Machine Identity Service beinstalled. That service contains the TargetOSOptimizer.exe. The Machine Identity Serviceis installed automatically when you specify /mastermcsimage or /masterimage (and do notspecify /exclude "Machine Identity Service").
Do not specify this option for Remote PC Access deployments.
• /portnumber port
Valid onlywhen the/reconfigoption is specified. Port number to enable for communicationsbetween the VDA and the Controller. The previously configured port is disabled, unless it is port80.
• /quiet or /passive
No user interface appears during the installation. The only evidence of the installation and con‑figuration process is in Windows Task Manager. If this option is omitted, the graphical interfacelaunches.
• /reconfigure
Customizes previously configured VDA settings when used with the /portnumber, /controllers, or /enable_hdx_ports options. If you specify this option without alsospecifying the /quiet option, the graphical interface for customizing the VDA launches.
• /remotepc
Valid only for Remote PC Access deployments (single‑session OS) or brokered connections(multi‑session OS). Excludes installation of the following components on a single‑session OS:
– Citrix Personalization for App‑V– Citrix User Profile Manager– Citrix User Profile Manager WMI Plugin– Machine Identity Service (includes TargetOSOptimizer.exe)– Citrix Supportability Tools– Citrix Files for Windows– Citrix Files for Outlook– User personalization layer
© 1999–2022 Citrix Systems, Inc. All rights reserved. 161
Citrix Virtual Apps and Desktops
This option is not valid when using the VDAWorkstationCoreSetup.exe installer. That in‑staller automatically excludes installation of these components.
• /remove
Removes the components specified with the /components option.
• /removeall
Removes all installed VDA components.
• /sendexperiencemetrics
Automatically sends analytics collected during the installation, upgrade, or removal to Citrix.If this option is omitted (or the /disableexperiencemetrics option is specified), analyticsare collected locally, but not sent automatically.
• /servervdi
Installs a VDA for single‑session OS on a supported Windows multi‑session machine. Omit thisoption when installing a VDA for multi‑session OS on a Windowsmulti‑session machine.
Before using this option, see Server VDI.
Use this option only with the full‑product VDA installer. This option is not available in the graph‑ical interface.
• /site_guid guid
Globally Unique Identifier of the site Active Directory Organizational Unit (OU). This associatesa virtual desktop with a site when you are using Active Directory for discovery (auto‑update isthe recommended and default discovery method). The site GUID is a site property displayed inStudio. Do not specify both the /site_guid and /controllers options.
• /tempdir directory
Directory to hold temporary files during installation. Default = c:\Windows\Temp.
This option is not available in the graphical interface.
• /virtualmachine
Valid only when installing a VDA on a VM. Overrides detection by the installer of a physical ma‑chine, where BIOS information passed to VMsmakes them appear as physical machines.
This option is not available in the graphical interface.
Examples of installing a VDA
Install a VDAwith the full‑product installer:
© 1999–2022 Citrix Systems, Inc. All rights reserved. 162

Citrix Virtual Apps and Desktops
The following command installs a VDA for single‑session OS and Citrix Workspace app to the defaultlocation on a VM. This VDAwill be used as amaster image and use MCS to provision VMs. The VDAwillregister initially with the Controller on the server named Contr-Main in the domain mydomain. TheVDA will use user personalization layer, optimization, and Windows Remote Assistance.
\x64\XenDesktop Setup\XenDesktopVdaSetup.exe /quiet /components vda,plugins/controllers "Contr-Main.mydomain.local"/enable_hdx_ports /includeadditional"user personalization layer"/optimize /mastermcsimage /enable_remote_assistance
Install a single‑session OS VDAwith the VDAWorkstationCoreSetup standalone installer:
The following command installs a Core Services VDA on a single‑session OS for use in a Remote PCAccess or VDI deployment. Citrix Workspace app and other non‑core services are not installed. Theaddress of a Controller is specified, and ports in the Windows Firewall Service will be opened auto‑matically. The administrator will handle restarts.
VDAWorkstationCoreSetup .exe /quiet /controllers "Contr-East.domain.com"/enable_hdx_ports /noreboot
Customize a VDA
After you install a VDA, you can customize several settings. From the \x64\XenDesktop Setup di‑rectory on the product media, run XenDesktopVdaSetup.exe, using one or more of the followingoptions, which are described in Command‑line options for installing a VDA.
• /reconfigure (required when customizing a VDA)• /h or /help• /quiet• /noreboot• /controllers• /portnumber port• /enable_hdx_ports
Troubleshoot VDAs
• In the Studio display for a delivery group, the Installed VDA version entry in the Details panemight not be the version installed on the machines. The machine’s Windows Programs andFeatures display shows the actual VDA version.
• After a VDA is installed, it cannot deliver apps or a desktop to users until it registers with a Deliv‑ery Controller.
To learn about VDA registration methods and how to troubleshoot registration issues, see VDAregistration.
© 1999–2022 Citrix Systems, Inc. All rights reserved. 163

Citrix Virtual Apps and Desktops
Command‑line options for installing a Universal Print Server
The following option is valid with the XenDesktopPrintServerSetup.exe command.
• /enable_upsserver_port
Software Folder File name
Microsoft Visual C++ 2017Runtime, 32‑bit and 64‑bit
Support > VcRedist_2017 vcredist_x64.exe andvcredist_x86.exe
Citrix Diagnostic Facility x64 > Virtual DesktopComponents
cdf_x64.msi
Universal Print Server servercomponent
x64 > Universal Print Server UpsServer_x64.msi
When this option is not specified, the installer displays the Firewallpage from the graphical interface.SelectAutomatically to have the installer automatically add theWindows firewall rules, orManuallyto let the administrator manually configure the firewall.
After installing the software on your print servers, configure the Universal Print Server using the guid‑ance in Provision printers.
More information
For information about how Citrix reports the result of component installations, see Citrix installationreturn codes.
Install VDAs using scripts
April 14, 2021
This article applies to installing VDAs onmachines with Windows operating systems. For informationabout VDAs for Linux operating systems, see the Linux Virtual Delivery Agent documentation.
The installationmedia contains sample scripts that install, upgrade, or remove Virtual Delivery Agents(VDAs) for machines in Active Directory. You can also use the scripts to maintain master images usedby Machine Creation Services and Citrix Provisioning (formerly Provisioning Services).
Required access:
© 1999–2022 Citrix Systems, Inc. All rights reserved. 164

Citrix Virtual Apps and Desktops
• The scripts need Everyone Read access to the network share where the VDA installation com‑mand is located. The installation command is XenDesktopVdaSetup.exe in the full productISO, or VDAWorkstationSetup.exe or VDAServerSetup.exe in a standalone installer.
• Loggingdetails are storedoneach localmachine. To log results centrally for reviewandanalysis,the scripts need Everyone Read and Write access to the appropriate network share.
To check the results of runninga script, examine the central log share. Captured logs include the scriptlog, the installer log, and theMSI installation logs. Each installation or removal attempt is recorded ina time‑stamped folder. The folder title indicates the operation result with the prefix PASS or FAIL. Youcan use standard directory search tools to find a failed installation or removal in the central log share.Those tools offer an alternative to searching locally on the target machines.
Before beginning any installation, read and complete the tasks in Prepare to install.
Install or upgrade VDAs using the script
1. Obtain the sample script InstallVDA.bat from \Support\AdDeploy\ on the installation media.Citrix recommends that youmake a backup of the original script before customizing it.
2. Edit the script:• Specify the version of the VDA to install: SET DESIREDVERSION. For example, version 7can be specified as 7.0. The full value can be found on the installation media in the Pro‑ductVersion.txt file. However, a complete match is not required.
• Specify the network share where the installer will be invoked. Point to the root of thelayout (the highest point of the tree). The appropriate version of the installer (32‑bit or64‑bit) is called automatically when the script runs. For example: SET DEPLOYSHARE=\\fileserver1\share1.
• Optionally, specify a network share location for storing centralized logs. For example: SETLOGSHARE=\\fileserver1\log1).
• Specify VDA configuration options as described in Install using the command line. The/quiet and /noreboot options are included by default in the script and are required:SET COMMANDLINEOPTIONS=/QUIET /NOREBOOT.
3. Using Group Policy Startup Scripts, assign the script to the OU containing your machines. ThisOU should contain only machines on which you want to install the VDA. When the machines inthat OU are restarted, the script runs on all of them. A VDA is installed on eachmachine that hasa supported operating system.
Remove VDAs using the script
1. Obtain the sample script UninstallVDA.bat from \Support\AdDeploy\ on the installationmedia.Citrix recommends that youmake a backup of the original script before customizing it.
2. Edit the script.
© 1999–2022 Citrix Systems, Inc. All rights reserved. 165
Citrix Virtual Apps and Desktops
• Specify the version of the VDA to remove: SET CHECK\\_VDA\\_VERSION. For example,version 7 can be specified as 7.0. The full value can be found on the installation mediain the ProductVersion.txt file (such as 7.0.0.3018). However, a complete match is not re‑quired.
• Optionally, specify a network share location for storing centralized logs.3. Using Group Policy Startup Scripts, assign the script to the OU containing your machines. This
OU should contain onlymachines fromwhich youwant to remove the VDA.When themachinesin the OU are restarted, the script runs on all of them. The VDA is removed from eachmachine.
Troubleshoot
• The script generates internal log files that describe script execution progress. The script copiesa Kickoff_VDA_Startup_Script log to the central log share within seconds of starting thedeployment. You can verify that the overall process is working. If this log is not copied to thecentral log share as expected, troubleshoot further by inspecting the local machine. The scriptplaces two debugging log files in the %temp% folder on eachmachine:
– Kickoff_VDA_Startup_Script_<DateTimeStamp>.log– VDA_Install_ProcessLog_<DateTimeStamp>.log
Review these logs to ensure that the script is:
– Running as expected.– Properly detecting the target operating system.– Correctly configured to point to the ROOT of the DEPLOYSHARE share (contains the filenamed AutoSelect.exe).
– Capable of authenticating to both the DEPLOYSHARE and LOG shares.
• For information about how Citrix reports the result of component installations, see Citrix instal‑lation return codes.
• In the Studio display for a delivery group, the Installed VDA version entry in the Details panemight not be the version installed on the machines. The machine’s programs and features dis‑play shows the actual VDA version.
• After a VDA is installed, it cannot deliver apps or a desktop to users until it registers with a Deliv‑ery Controller.
To learn about VDA registration methods and how to troubleshoot registration issues, see VDAregistration.
© 1999–2022 Citrix Systems, Inc. All rights reserved. 166
Citrix Virtual Apps and Desktops
Install VDAs using SCCM
April 14, 2021
Overview
VDA installation has two phases:
• Install prerequisites• Install the VDA
To successfully deploy the VDA using Microsoft System Center Configuration Manager (SCCM) or simi‑lar software distribution tools, Citrix recommends addressing the phases separately. In other words,instead of using the VDA installer to install both the prerequisites and the VDA, we recommend thatyou first install the prerequisites using the prerequisites’ installers, and then install the VDA using aVDA installer.
Identify requirements and task sequence
Prerequisites must be installed on the machine before the VDA is installed. VDA prerequisites vary,depending on the VDA version. For guidance, see the system requirements for the VDA version you’reinstalling:
• Citrix Virtual Apps and Desktops Current Release• Citrix Virtual Apps and Desktops 1912 LTSR• XenApp and XenDesktop 7.15 LTSR
Similarly, the need to install these prerequisites can vary between environments (for example, basedon the target machines’ operating system, and what the machines already have installed). Beforecreating scripts or task sequences, it is important to understand your environment’s specific require‑ments (such as which prerequisites need to be installed). Then, you can properly define the task se‑quence.
Tip: A good way to collect this information is by manually installing the VDA in one of the machinesin the environment. This process reveals which prerequisites are identified as needed and installedthroughout the VDA installation process.
The installation files for the VDA’s prerequisites are included in the installation media for the CitrixVirtual Apps and Desktops (or XenApp and XenDesktop) release under the Support folder. Use thosefiles to ensure that you’re installing the correct prerequisite versions.
© 1999–2022 Citrix Systems, Inc. All rights reserved. 167

Citrix Virtual Apps and Desktops
Restarts
The required number of restarts during the installation of prerequisites and the VDA depends on theenvironment. For example, a restart might be required for pending updates or restarts from earliersoftware installations. Also, files previously locked by other processes might need updates.
• During the manual installation, identify which prerequisites trigger a restart.• Some optional components in the VDA installer (such as Citrix User Profile Manager, Citrix Files)might require a restart. During themanual installation, identify which component installationstrigger a restart.
Define the task sequence
After identifying all prerequisites and restarts, use the SCCM Task Sequencer to complete the follow‑ing:
1. Create separate SCCM jobs for installing each prerequisite. This helps isolate any issues or fail‑ures that occur during the deployment, which facilitates troubleshooting.
2. Create the VDA installation job. Do not execute this job until all prerequisites are successfullyinstalled. This can be accomplished one of two ways:
• Have the SCCM client monitor the prerequisites’ GUIDs to determine whether they arepresent.
• Make the VDA installation job dependent on the prerequisites’ jobs.
SCCM installation sequence example
The following is an example SCCM installation sequence. Remember: Your prerequisite versionsmaydiffer, depending on which VDA version you’re installing.
1. SCCM JOB1: Microsoft .NET Framework 4.82. SCCM JOB2: Microsoft Visual C++ 2017 Runtime (32‑bit and 64‑bit)3. SCCM JOB3: VDA installation
a) Use the appropriate VDA installer command, based on requirements. Add the /quiet,/noreboot, and /noresume options. (The /noresume option removes the dependencyon the interactive login to continue the install, thus allowing SCCM to drive the installationprocess.)
b) Watch for return codes.• 0: success, installation complete, restart required.• 3: success, installation is not complete, restart required.• 8: success, installation complete, restart required.
c) Restart the machine.
© 1999–2022 Citrix Systems, Inc. All rights reserved. 168

Citrix Virtual Apps and Desktops
d) If the return code was 3, repeat step 3a.
For more information about return codes see Citrix installation return codes.
VDA installation command examples
The available installation options vary, depending on which installer is used. See the following arti‑cles for command line option details. (Links are provided to Citrix Virtual Apps and Desktops CurrentRelease locations. If you’re using an LTSR product version, see the equivalent LTSR articles.)
• Install VDAs• Install using the command line
Installation commands for Remote PC Access
• The followingcommanduses thesingle‑sessioncoreVDA installer (standaloneVDAWorkstationCoreSetup.exe):
VDAWorkstationCoreSetup.exe /quiet /controllers “control.domain.com” /enable_hdx_ports /noresume /noreboot
• The followingcommanduses thesingle‑session full VDA installer (standaloneVDAWorkstationSetup.exe):
VDAWorkstationSetup.exe /quiet /remotepc /controllers “control.domain.com” /enable_hdx_ports /noresume /noreboot
Installation command for dedicated VDI
• The followingcommanduses thesingle‑session full VDA installer (standaloneVDAWorkstationSetup.exe):
VDAWorkstationSetup.exe /quiet /components vda /controllers “control.domain.com” /enable_hdx_ports /optimize /enable_remote_assistance /noresume /noreboot
Create a site
April 14, 2021
A site is the name you give to a Citrix Virtual Apps andDesktops deployment. It comprises theDeliveryControllers andother core components, VirtualDeliveryAgents (VDAs), connections tohosts,machine
© 1999–2022 Citrix Systems, Inc. All rights reserved. 169

Citrix Virtual Apps and Desktops
catalogs, and delivery groups. You create the site after you install the core components and beforecreating the first machine catalog and delivery group.
If your Controller is installed on Server Core, use PowerShell cmdlets in the Citrix Virtual Apps andDesktops SDK to create a site.
Whenyoucreate a site, youare automatically enrolled in theCitrix CustomerExperience ImprovementProgram (CEIP). CEIP collects anonymous statistics and usage information, and then sends it to Citrix.The first data package is sent to Citrix approximately seven days after you create the site. You canchange your enrollment at any time after site creation. Select Configuration in the Studio navigationpane, then theProductSupport tab, and follow theguidance. Fordetails, seehttp://more.citrix.com/XD‑CEIP.
The user who creates a site becomes a full administrator; for more information, see Delegated admin‑istration.
Review this article before you create the site, so you knowwhat to expect.
Step 1. Open Studio and start the site creation wizard
Open Studio if it is not already open. You are automatically guided to the action that starts the sitecreation wizard. Select that action.
Step 2. Site type and name
On the Introduction page, choose a site type:
• Application and desktop delivery Site. When you create an application and desktop deliverysite, you can further choose to create a full deployment site (recommended) or an empty site.An empty site is only partially configured, and is usually created by advanced administrators.
• Remote PC Access Site. A Remote PC Access site allows designated users to remotely accesstheir office PCs through a secure connection.
If you create an application and desktop delivery deployment now, you can add a Remote PC Accessdeployment later. Conversely, if you create a Remote PC Access deployment now, you can add a fulldeployment later.
Type a name for the site. After the site is created, its name appears at the top of the Studio navigationpane: Citrix Studio (site‑name).
Step 3. Databases
TheDatabases page contains selections for setting up the site,monitoring, and configuration loggingdatabases. For details about database setup choices and requirements, see Databases.
© 1999–2022 Citrix Systems, Inc. All rights reserved. 170
https://docs.citrix.com/en-us/citrix-virtual-apps-desktops/2006/secure/delegated-administration.html

Citrix Virtual Apps and Desktops
If you choose to install SQL Server Express for use as the site database (the default), a restart occursafter that software is installed. That restart does not occur if you choose not to install the SQL ServerExpress software for use as the site database.
If you are not using the default SQL Server Express, ensure that the SQL Server software is installedon the machines before creating a site. System requirements lists the supported versions.
If you want to add more Delivery Controllers to the site, and have already installed the Controllersoftware on other servers, you can add those Controllers from this page. If you also plan to generatescripts that set up the databases, add the Controllers before generating the scripts.
Step 4. Licensing
On the Licensing page, specify the License Server address and then indicate which license to use(install).
• Specify the License Server address in the form name:[port]. The name must be an FQDN,NetBIOS, or IP address. FQDN is recommended. If you omit the port number, the default is27000. Click Connect. You cannot proceed to the next page until a successful connection ismade to the License Server.
• When a connection is made, Use an existing license is selected by default. The display liststhe compatible products that this product can be configured as, based on currently installedlicenses.
– If you want to configure this product as one of the listed products (for example, Citrix Vir‑tual Apps Premiumor Citrix Virtual Desktops Premium), using one of those licenses, selectthat entry.
– If you already allocated and downloaded a license (using the Citrix Manage Licenses Tool)to use with this product, but haven’t installed the license yet:
* Click Browse for license file.
* In the file explorer, locate and select the license you downloaded. The associatedproducts now appear on the Licensing page of the site creation wizard. Select theentry you want to use.
– If the product you want is not displayed, or if you have no allocated and downloaded li‑censes, you can allocate, download, and install a license. To do this, the License Servermust have internet access. Youmust have a License Access Code for the product youwant.Citrix emails that code to you.
* Click Allocate and download.
* In the Allocate Licenses dialog, enter the License Access Code sent by Citrix. ClickAllocate licenses.
© 1999–2022 Citrix Systems, Inc. All rights reserved. 171
Citrix Virtual Apps and Desktops
* The products associated with the new license appear on the Licensing page of thesite creation wizard. Select the entry you want to use.
Alternatively, select Use the free 30‑day trial, and install licenses later. For details, seethe Licensing documentation.
Step 5. Powermanagement (Remote PC Access only)
See Step 8. Remote PC Access.
Step 6. Host connection, network, and storage
If you are using VMs on a hypervisor or other service to deliver applications and desktops, you canoptionally create the first connection to that host. You can also specify storage and network resourcesfor that connection. After creating the site, you canmodify this connection and resources, and createmore connections. For details, see Connections and resources.
• For information specified on the Connection page, see Connections and resources.
– If you are not using VMs on a hypervisor or other service (or if you use Studio to managedesktops on dedicated blade PCs), select the connection typeNone.
– If you are configuring a Remote PC Access site and plan to use the Wake on LAN feature,select theMicrosoft System Center Configuration Manager type.
In addition to the connection type, specify whether you will use Citrix tools (such as MachineCreation Services) or other tools to create VMs.
• For information specified on the Storage and Network pages, see Host storage, Storage man‑agement, and Storage selection.
Step 7. Additional Features
On theAdditional Features page, you can select features to customize your site. When you select thecheck box for an item that requires information, a configuration box appears.
• App‑V Publishing: Select this feature if you use applications fromMicrosoft App‑V packages onApp‑V servers. Provide the URL of the App‑Vmanagement server and the URL and port numberof the App‑V publishing server.
If you use applications from App‑V packages on network share locations only, you do not needto select this feature.
You can also enable/disable and configure this feature later in Studio. For more information,see App‑V.
© 1999–2022 Citrix Systems, Inc. All rights reserved. 172

Citrix Virtual Apps and Desktops
Step 8. Remote PC Access
For information about Remote PC Access deployments, see Remote PC Access.
If you use the Wake on LAN feature, complete the configuration steps on the Microsoft System CenterConfiguration Manager before creating the site. For details, see Configuration Manager and RemotePC Access Wake on LAN.
When you create a Remote PC Access site:
• If you’re using theWake on LAN feature, specify theMicrosoft SystemCenter ConfigurationMan‑ager address, credentials, and connection information on the Power Management page.
• Specify users or user groups on the Users page. There is no default action that automaticallyadds all users. Also, specify machine accounts (domain and OU) information on the MachineAccounts page.
To add user information, click Add Users. Select users and user groups, and then click Addusers.
To add machine accounts information, click Add machine accounts. Select the machine ac‑counts, and then click Add machine accounts. Click Add OUs. Select the domain and Organi‑zational Units, and indicate whether to include items in subfolders. Click Add OUs.
Amachine catalog named Remote PC User Machine Accounts is created automatically. The cat‑alog contains all themachine accounts you added in the site creationwizard. A delivery group namedRemote PC User Desktops is created automatically. The group contains all the users and usergroups you added.
Step 9. Summary
The Summary page lists the information you specified. Use the Back button if you want to changeanything. When you’re finished, click Create and the site creation begins.
Test a site configuration
To run the tests after you create the site, select Citrix Studio (Site site‑name) at the top of the nav‑igation pane. Then click Test site in the center pane. You can view an HTML report of the site testresults.
The site test functionality might fail for a Controller installed on Windows Server 2016. The failureoccurs when a local SQL Server Express is used for the site database and the SQL Server Browserservice is not started. To avoid this failure, complete the following tasks.
1. Enable the SQL Server Browser service (if necessary) and then start it.2. Restart the SQL Server (SQLEXPRESS) service.
© 1999–2022 Citrix Systems, Inc. All rights reserved. 173

Citrix Virtual Apps and Desktops
Site tests run automatically when you upgrade an earlier deployment. For details, see Preliminarysite tests.
Troubleshoot
After configuring the site, you can install Studio and add it through the MMC as a snap‑in on a re‑mote machine. If you later attempt to remove that snap‑in, the MMC might stop responding. As aworkaround, restart the MMC.
Createmachine catalogs
April 14, 2021
Important:
AsofCitrix Virtual AppsandDesktops72006, if your currentdeploymentusesanyof the followingtechnologies or host types, you can upgrade your deployment to the current release only afterremoving items that use those technologies.
• Personal vDisks (PvDs)• AppDisks• Public cloudhost types: AmazonWebServices (AWS), Citrix CloudPlatform,MicrosoftAzureClassic, Microsoft Azure Resource Manager
For details, see Remove PVD, AppDisks, and unsupported hosts.
Introduction
Collections of physical or virtual machines are managed as a single entity called a machine catalog.Machines in a catalog have the same type of operating system: multi‑session OS or single‑session OS.A catalog containing multi‑session OS machines can contain either Windows or Linux machines, notboth.
Citrix Studio guides you to create the first machine catalog after you create the site. After you createthe first catalog, Studio guides you to create the first delivery group. Later, you can change the catalogyou created, and create more catalogs.
Tip:
Upgrading an existing deployment enables the Machine Creation Services (MCS) storage opti‑mization (MCS I/O) feature, no additional configuration is required. The Virtual Delivery Agent(VDA) and the Delivery Controller upgrade handle the MCS I/O upgrade.
© 1999–2022 Citrix Systems, Inc. All rights reserved. 174

Citrix Virtual Apps and Desktops
Overview
When you create a catalog of VMs, you specify how to provision those VMs. You can use Citrix toolssuch as Machine Creation Services (MCS) or Citrix Provisioning (formerly Provisioning Services). Or,you can use your own tools to provide machines.
Consider:
• MCS supports a single system disk from the virtual machine image. It ignores the rest of thedata disks attached to that image.
• If you use Citrix Provisioning to create machines, see the Citrix Provisioning documentation forinstructions.
• If you useMCS to provision VMs, you provide amaster image (or snapshot of an image) to createidentical VMs in the catalog. Before you create the catalog, you first use tools to create andconfigure the master image. This process includes installing a Virtual Delivery Agent (VDA) onthe image. Then you create themachine catalog in Studio. You select that image (or snapshot),specify the number of VMs to create in the catalog, and configure additional information.
• If your machines are already available, you must still create one or more machine catalogs forthose machines.
• If you are creating a catalog using the PowerShell SDK directly, you can specify a hypervisortemplate (VMTemplates), rather than an image or a snapshot.
• Using a template to provision a catalog is considered an experimental feature. When using thismethod, virtual machine preparation might fail. As a result, the catalog cannot be publishedusing the template.
When usingMCS or Citrix Provisioning to create the first catalog, you use the host connection that youconfigured when you created the site. Later (after you create your first catalog and delivery group),you can change information about that connection or create more connections.
After you complete the catalog creation wizard, tests run automatically to ensure that it is configuredcorrectly. When the tests complete, you can view a test report. Run the tests at any time from Studio.
Note:
MCSdoesnot supportWindows10 IoTCoreandWindows10 IoTEnterprise. Refer to theMicrosoftsite for more information.
For technical details about the Citrix Provisioning tools, see Citrix Virtual Apps and Desktops ImageManagement.
RDS license check
Citrix Studio currently does not perform the check for validMicrosoftRDS licenseswhile creating ama‑chine catalog that contains Windows multi‑session OS machines. To view the status of the MicrosoftRDS license for a Windows multi‑session OS machine, go to Citrix Director. View the status of the
© 1999–2022 Citrix Systems, Inc. All rights reserved. 175
Citrix Virtual Apps and Desktops
Microsoft RDS license in theMachine Details panel. This panel is located in theMachine Details andthe User Details page. For more information, see Microsoft RDS license health.
VDA registration
A VDAmust be registered with a Delivery Controller when launching brokered sessions. UnregisteredVDAs can result in underutilization of otherwise available resources. There are various reasons a VDAmight not be registered, many of which an administrator can troubleshoot. Studio provides trou‑bleshooting information in the catalog creation wizard, and after you add machines from a catalogto a delivery group.
After you add existing machines using the wizard, the list of computer account names indicateswhether eachmachine is suitable for adding to the catalog. Hover over the icon next to eachmachineto display an informative message about that machine.
If the message identifies a problematic machine, either remove that machine, or add the machine.For example, if amessage indicates that informationmight not be obtained about amachine, add themachine anyway.
For more information, see:
• CTX136668 for VDA registration troubleshooting guidance• VDA versions and functional levels• VDA registration methods
MCS catalog creation summary
Here’s a brief overview of default MCS actions after you provide information in the catalog creationwizard.
• If you selected a master image (rather than a snapshot), MCS creates a snapshot.• MCS creates a full copy of the snapshot and places the copy on each storage location defined inthe host connection.
• MCS adds the machines to Active Directory, which creates unique identities.• MCS creates the number of VMs specified in the wizard, with two disks defined for each VM. Inaddition to the two disks per VM, a master is also stored in the same storage location. If youhave multiple storage locations defined, each gets the following disk types:
– The full copy of the snapshot which is read‑only and shared across the just‑created VMs.– A unique 16MB identity disk that gives each VMaunique identity. Each VMgets an identitydisk.
– A unique difference disk to store writes made to the VM. This disk is thin provisioned (ifsupported by the host storage) and increases to themaximum size of themaster image, ifnecessary. Each VM gets a difference disk. The difference disk holds changesmade during
© 1999–2022 Citrix Systems, Inc. All rights reserved. 176

Citrix Virtual Apps and Desktops
sessions. It is permanent for dedicated desktops. For pooled desktops, it is deleted and anew one created after each restart via the delivery controller.
Alternatively, when creating VMs to deliver static desktops, you can specify (on the Machines pageof the catalog creation wizard) thick (full copy) VM clones. Full clones do not require retention of themaster image on every data store. Each VM has its own file.
MCS storage considerations
There are many factors when deciding on storage solutions, configurations, and capacities for MCS.The following information provides proper considerations for storage capacity:
Capacity considerations:
• Disks
The Delta or Differencing (Diff) Disks consume the largest amount of space inmost MCS deploy‑ments for each VM. Each VM created by MCS is given at minimum 2 disks upon creation.
– Disk0 = Diff Disk: contains the OS when copied from the Master Base Image.– Disk1 = Identity Disk: 16 MB ‑ contains Active Directory data for each VM.
As theproduct evolves, youmighthave toaddmoredisks to satisfy certainuse casesand featureconsumption. For example:
– MCS Storage Optimization creates a write cache style disk for each VM.– MCS added the ability to use full clones as opposed to the Delta disk scenario described inthe previous section.
Hypervisor features might also enter into the equation. For example:
– Citrix Hypervisor IntelliCache creates a Read Disk on local storage for each Citrix Hyper‑visor. This option saves on IOPS against the master image which might be held on theshared storage location.
• Hypervisor overhead
Different hypervisors utilize specific files that create overhead for VMs. Hypervisors also usestorage for management and general logging operations. Calculate space to include overheadfor:
– Log files– Hypervisor specific files. For example:
* VMware adds more files to the VM storage folder. See VMware Best Practices.
* Calculate your total virtual machine size requirements. Consider a virtual machinecontaining 20 GB for the virtual disk, 16 GB for the swap file, and 100 MB for log filesconsuming 36.1 GB total.
© 1999–2022 Citrix Systems, Inc. All rights reserved. 177

Citrix Virtual Apps and Desktops
– Snapshots for XenServer; Snapshots for VMware.
• Process overhead
Creating a catalog, adding amachine, andupdating a catalog have unique storage implications.For example:
– Initial catalog creation requires a copy of the base disk to be copied to each storage loca‑tion.
* It also requires you to create a Preparation VM temporarily.– Adding a machine to a catalog does not require copying of the base disk to each storagelocation. Catalog creation varies based on the features selected.
– Updating the catalog to create an extra base disk on each storage location. Catalog up‑dates also experience a temporary storage peak where each VM in the catalog has 2 Diffdisks for a certain amount of time.
More considerations:
• RAM sizing: Affects the size of certain hypervisor files and disks, including I/O optimizationdisks, write cache, and snapshot files.
• Thin / Thick provisioning: NFS storage is preferred due to the thin provisioning capabilities.
Machine Creation Services (MCS) storage optimization
With the Machine Creation Services (MCS) storage optimization feature, referred to as MCS I/O:
• The write cache container is file‑based, the same functionality found in Citrix Provisioning. Forexample, the Citrix Provisioning write cache file name is D:\vdiskdif.vhdx and the MCS I/Owrite cache file name is D:\mcsdif.vhdx.
• Achieve diagnostic improvements by including support for a Windows crash dump file writtento the write cache disk.
• MCS I/O retains the technology cache in RAM with overflow to hard disk to provide the most op‑timal multi‑tier write cache solution. This functionality allows an administrator to balance be‑tween the cost in each tier, RAM and disk, and performance to meet the desired workload ex‑pectation.
Updating the write cachemethod from disk‑based to file‑based requires the following changes:
1. MCS I/O no longer supports RAM only cache. Specify a disk size in Citrix Studio during machinecatalog creation.
2. The VMwrite cache disk is created and formatted automatically when booting a VM for the firsttime. Once the VM is up, thewrite cache file mcsdif.vhdx is written into the formatted volumeMCSWCDisk.
3. Thepagefile is redirected to this formattedvolume,MCSWCDisk. Asa result, thisdisk size consid‑ers the total amount of disk space. It includes the delta between the disk size and the generated
© 1999–2022 Citrix Systems, Inc. All rights reserved. 178

Citrix Virtual Apps and Desktops
workload plus the pagefile size. This is typically associated with VM RAM size.
Enabling MCS storage optimization updates
To enable MCS I/O storage optimization functionality, upgrade the Delivery Controller and the VDA tothe latest version of Citrix Virtual Apps and Desktops.
Note:
If you upgrade an existing deployment which has MCS I/O enabled, no additional configurationis required. The VDA and the Delivery Controller upgrade handle the MCS I/O upgrade.
When enabling the MCS storage optimization update, consider the following:
• When creating a machine catalog, the administrator can configure the RAM and disk size.
• Updating an existing machine catalog to a new VM snapshot containing a VDA configured forversion 1903 results in the following behavior: the new snapshot continues to use the existingcatalog’s MCS I/O setting for RAM and disk size. The existing raw disk is formatted.
Important:
MCS storage optimization changed with Citrix Virtual Apps and Desktops version 1903. This re‑
© 1999–2022 Citrix Systems, Inc. All rights reserved. 179
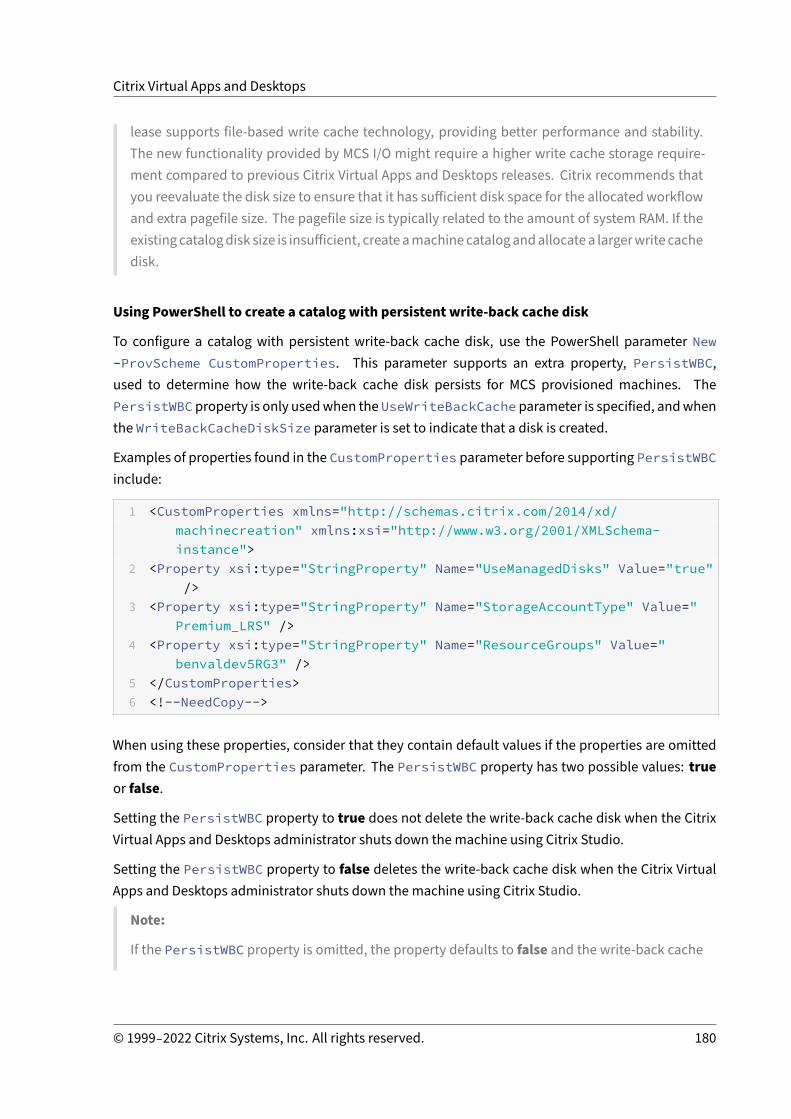
Citrix Virtual Apps and Desktops
lease supports file‑based write cache technology, providing better performance and stability.The new functionality provided by MCS I/O might require a higher write cache storage require‑ment compared to previous Citrix Virtual Apps and Desktops releases. Citrix recommends thatyou reevaluate the disk size to ensure that it has sufficient disk space for the allocated workflowand extra pagefile size. The pagefile size is typically related to the amount of system RAM. If theexisting catalogdisk size is insufficient, createamachinecatalogandallocatea largerwrite cachedisk.
Using PowerShell to create a catalog with persistent write‑back cache disk
To configure a catalog with persistent write‑back cache disk, use the PowerShell parameter New-ProvScheme CustomProperties. This parameter supports an extra property, PersistWBC,used to determine how the write‑back cache disk persists for MCS provisioned machines. ThePersistWBC property is only usedwhen the UseWriteBackCache parameter is specified, andwhenthe WriteBackCacheDiskSize parameter is set to indicate that a disk is created.
Examples of properties found in the CustomProperties parameter before supporting PersistWBCinclude:
1 <CustomProperties xmlns="http://schemas.citrix.com/2014/xd/machinecreation" xmlns:xsi="http://www.w3.org/2001/XMLSchema-instance">
2 <Property xsi:type="StringProperty" Name="UseManagedDisks" Value="true"/>
3 <Property xsi:type="StringProperty" Name="StorageAccountType" Value="Premium_LRS" />
4 <Property xsi:type="StringProperty" Name="ResourceGroups" Value="benvaldev5RG3" />
5 </CustomProperties>6 <!--NeedCopy-->
When using these properties, consider that they contain default values if the properties are omittedfrom the CustomProperties parameter. The PersistWBC property has two possible values: trueor false.
Setting the PersistWBC property to true does not delete the write‑back cache disk when the CitrixVirtual Apps and Desktops administrator shuts down the machine using Citrix Studio.
Setting the PersistWBC property to false deletes the write‑back cache disk when the Citrix VirtualApps and Desktops administrator shuts down the machine using Citrix Studio.
Note:
If the PersistWBC property is omitted, the property defaults to false and the write‑back cache
© 1999–2022 Citrix Systems, Inc. All rights reserved. 180
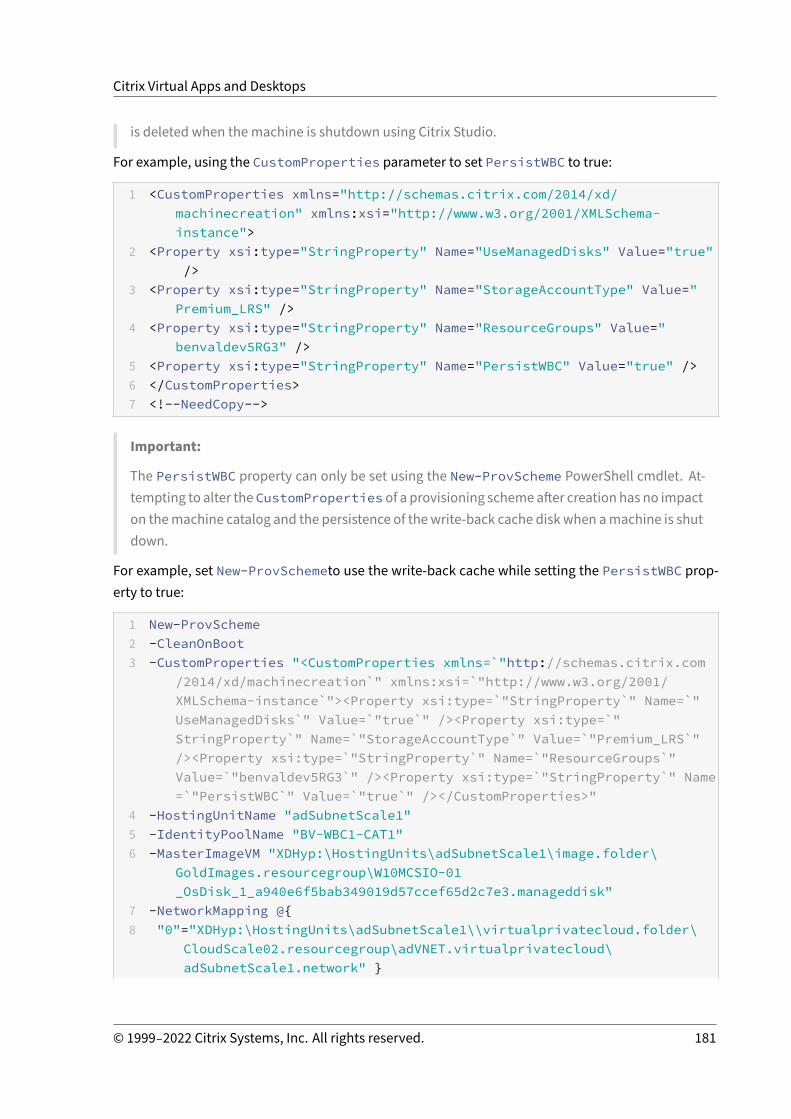
Citrix Virtual Apps and Desktops
is deleted when the machine is shutdown using Citrix Studio.
For example, using the CustomProperties parameter to set PersistWBC to true:
1 <CustomProperties xmlns="http://schemas.citrix.com/2014/xd/machinecreation" xmlns:xsi="http://www.w3.org/2001/XMLSchema-instance">
2 <Property xsi:type="StringProperty" Name="UseManagedDisks" Value="true"/>
3 <Property xsi:type="StringProperty" Name="StorageAccountType" Value="Premium_LRS" />
4 <Property xsi:type="StringProperty" Name="ResourceGroups" Value="benvaldev5RG3" />
5 <Property xsi:type="StringProperty" Name="PersistWBC" Value="true" />6 </CustomProperties>7 <!--NeedCopy-->
Important:
The PersistWBC property can only be set using the New-ProvScheme PowerShell cmdlet. At‑tempting to alter theCustomPropertiesof a provisioning schemeafter creation has no impacton themachine catalog and the persistence of thewrite‑back cache diskwhen amachine is shutdown.
For example, set New-ProvSchemeto use the write‑back cache while setting the PersistWBC prop‑erty to true:
1 New-ProvScheme2 -CleanOnBoot3 -CustomProperties "<CustomProperties xmlns=`"http://schemas.citrix.com
/2014/xd/machinecreation`" xmlns:xsi=`"http://www.w3.org/2001/XMLSchema-instance`"><Property xsi:type=`"StringProperty`" Name=`"UseManagedDisks`" Value=`"true`" /><Property xsi:type=`"StringProperty`" Name=`"StorageAccountType`" Value=`"Premium_LRS`"/><Property xsi:type=`"StringProperty`" Name=`"ResourceGroups`"Value=`"benvaldev5RG3`" /><Property xsi:type=`"StringProperty`" Name=`"PersistWBC`" Value=`"true`" /></CustomProperties>"
4 -HostingUnitName "adSubnetScale1"5 -IdentityPoolName "BV-WBC1-CAT1"6 -MasterImageVM "XDHyp:\HostingUnits\adSubnetScale1\image.folder\
GoldImages.resourcegroup\W10MCSIO-01_OsDisk_1_a940e6f5bab349019d57ccef65d2c7e3.manageddisk"
7 -NetworkMapping @{8 "0"="XDHyp:\HostingUnits\adSubnetScale1\\virtualprivatecloud.folder\
CloudScale02.resourcegroup\adVNET.virtualprivatecloud\adSubnetScale1.network" }
© 1999–2022 Citrix Systems, Inc. All rights reserved. 181
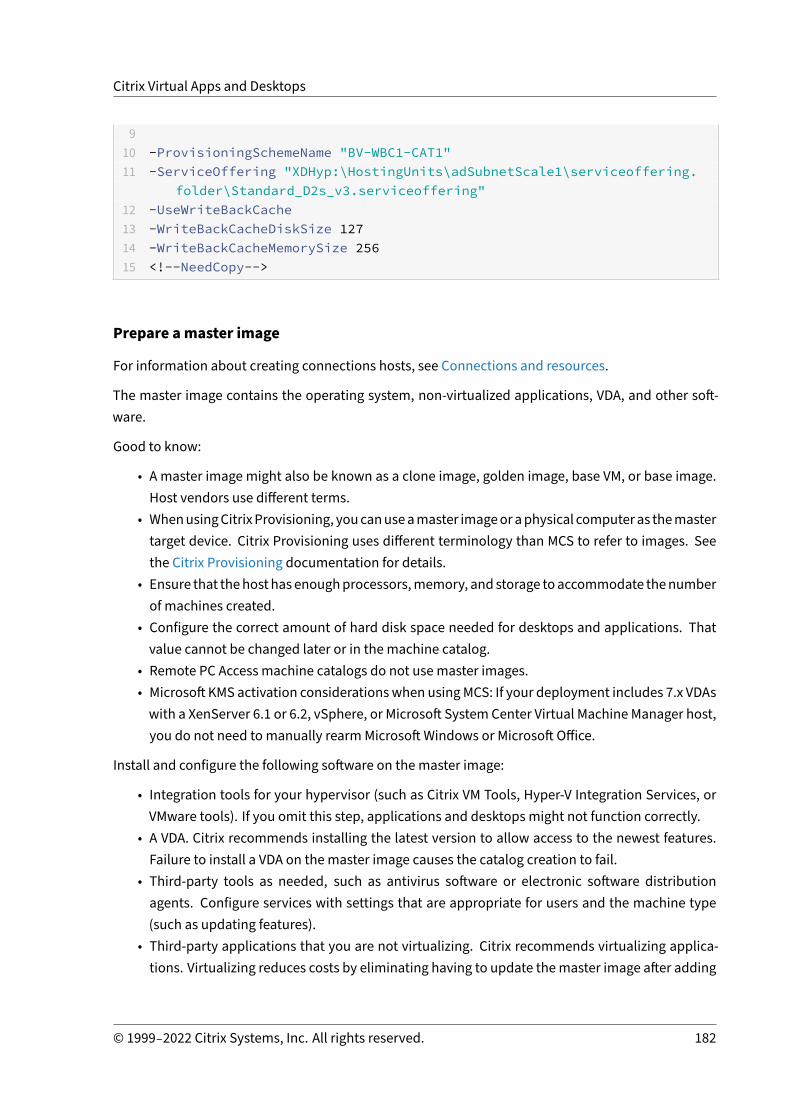
Citrix Virtual Apps and Desktops
910 -ProvisioningSchemeName "BV-WBC1-CAT1"11 -ServiceOffering "XDHyp:\HostingUnits\adSubnetScale1\serviceoffering.
folder\Standard_D2s_v3.serviceoffering"12 -UseWriteBackCache13 -WriteBackCacheDiskSize 12714 -WriteBackCacheMemorySize 25615 <!--NeedCopy-->
Prepare amaster image
For information about creating connections hosts, see Connections and resources.
The master image contains the operating system, non‑virtualized applications, VDA, and other soft‑ware.
Good to know:
• A master image might also be known as a clone image, golden image, base VM, or base image.Host vendors use different terms.
• WhenusingCitrixProvisioning, youcanuseamaster imageoraphysical computeras themastertarget device. Citrix Provisioning uses different terminology than MCS to refer to images. Seethe Citrix Provisioning documentation for details.
• Ensure that thehost has enoughprocessors,memory, and storage toaccommodate thenumberof machines created.
• Configure the correct amount of hard disk space needed for desktops and applications. Thatvalue cannot be changed later or in the machine catalog.
• Remote PC Access machine catalogs do not use master images.• Microsoft KMS activation considerationswhen usingMCS: If your deployment includes 7.x VDAswith a XenServer 6.1 or 6.2, vSphere, or Microsoft System Center Virtual Machine Manager host,you do not need to manually rearmMicrosoftWindows or Microsoft Office.
Install and configure the following software on the master image:
• Integration tools for your hypervisor (such as Citrix VM Tools, Hyper‑V Integration Services, orVMware tools). If you omit this step, applications and desktops might not function correctly.
• A VDA. Citrix recommends installing the latest version to allow access to the newest features.Failure to install a VDA on the master image causes the catalog creation to fail.
• Third‑party tools as needed, such as antivirus software or electronic software distributionagents. Configure services with settings that are appropriate for users and the machine type(such as updating features).
• Third‑party applications that you are not virtualizing. Citrix recommends virtualizing applica‑tions. Virtualizing reduces costs by eliminating having to update themaster image after adding
© 1999–2022 Citrix Systems, Inc. All rights reserved. 182

Citrix Virtual Apps and Desktops
or reconfiguring an application. Also, fewer installed applications reduce the size of themasterimage hard disks, which saves storage costs.
• App‑V clients with the recommended settings, if you plan to publish App‑V applications. TheApp‑V client is available fromMicrosoft.
• When using MCS, if you localize MicrosoftWindows, install the locales and language packs. Dur‑ing provisioning, when a snapshot is created, the provisioned VMs use the installed locales andlanguage packs.
Important:
If you are using Citrix Provisioning or MCS, do not run Sysprep onmaster images.
To prepare a master image:
1. Using your hypervisor’smanagement tool, create amaster image and then install the operatingsystem, plus all service packs and updates. Specify the number of vCPUs. You can also specifythe vCPUvalue if you create themachine catalogusingPowerShell. You cannot specify the num‑ber of vCPUs when creating a catalog using Studio. Configure the amount of hard disk spaceneeded for desktops and applications. That value cannot be changed later or in the catalog.
2. Ensure that the hard disk is attached at device location 0. Most standard master image tem‑plates configure this location by default, but some custom templates might not.
3. Install and configure the software listed above on the master image.4. When using Citrix Provisioning, create a VHD file for the virtual disk from your master target
device before you join the master target device to a domain. See the Citrix Provisioning docu‑mentation for details.
5. If you are not using MCS, join the master image to the domain where applications and desk‑tops are members. Ensure that the master image is available on the host where the machinesare created. If you are using MCS, joining the master image to a domain is not required. Theprovisionedmachines are joined to the domain specified in the catalog creation wizard.
6. Citrix recommends that you create and name a snapshot of your master image. If you specify amaster image rather than a snapshot when creating a catalog, Studio creates a snapshot. Youcannot name it.
Create amachine catalog using Studio
Before starting the catalog creation wizard, review this section.
If you are using amaster image, ensure that you have installed a VDA on the image before creating thecatalog.
From Studio:
• If you already created a site but haven’t yet created amachine catalog, Studio guides you to thecorrect starting place to create a catalog.
© 1999–2022 Citrix Systems, Inc. All rights reserved. 183
Citrix Virtual Apps and Desktops
• If you already created a catalog and want to create another, select Machine Catalogs in theStudio navigation pane. Then select Create Machine Catalog in the Actions pane.
The wizard walks you through the following items. The wizard pages you see differ, depending on theselections youmake.
Operating system
Each catalog contains machines of only one type. Select one.
• Multi‑session OS: Amulti‑session OS catalog provides hosted shared desktops. Themachinescan be running supported versions of the Windows or Linux operating systems, but the catalogcannot contain both. (See the Linux VDA documentation for details about that OS.)
• Single‑session OS: A single‑session OS catalog provides VDI desktops that you can assign tovarious different users.
• Remote PC Access: A Remote PC Access catalog provides users with remote access to theirphysical office desktopmachines. RemotePCAccess does not require a VPN toprovide security.
Machinemanagement
This page does not appear when you are creating Remote PC Access catalogs.
The Machine Management page indicates how machines are managed and which tool you use todeploy machines.
Choose whether machines in the catalog are power managed through Studio.
• Machines are power managed through Studio, for example, VMs or blade PCs. This option isavailable only if you already configured a connection to a host.
• Machines are not power managed through Studio, for example, physical machines.
If you indicated thatmachines are powermanaged through Studio, choosewhich tool to use to createVMs.
• Citrix Machine Creation Services (MCS): Uses a master image to create and manage virtualmachines. MCS is not available for physical machines.
• Citrix Provisioning: (Formerly Provisioning Services.) Manages target devices as a device col‑lection. A Citrix Provisioning virtual disk imaged from amaster target device delivers desktopsand applications.
• Other: A tool that manages machines already in the data center. Citrix recommends that youuse Microsoft System Center Configuration Manager or another third‑party application to en‑sure that the machines in the catalog are consistent.
© 1999–2022 Citrix Systems, Inc. All rights reserved. 184
Citrix Virtual Apps and Desktops
Desktop types (desktop experience)
This page appears only when you are creating a catalog containing single‑session OSmachines.
The Desktop Experience page determines what occurs each time a user logs on. Select one of:
• Users connect to a new (random) desktop each time they log on.• Users connect to the same (static) desktop each time they log on.
If you choose the second option and are using Citrix Provisioning to provision the machines, you canconfigure how user changes to the desktop are handled:
• Save user changes to the desktop on the local disk.• Discard user changes and clear the virtual desktop when the user logs off. Select this option ifyou are using user personalization layer.
Master image
This page appears only when you are using MCS to create VMs.
On the Master image page, select the connection to the host, and then select the snapshot or VMcreated earlier. If you are creating the first catalog, the only available connection is the one you con‑figured when you created the site.
Remember:
• When you are using MCS or Citrix Provisioning, do not run Sysprep onmaster images.• If you specify amaster image rather than a snapshot, Studio creates a snapshot, but you cannotname it.
To enable use of the latest product features, ensure the master image has the latest VDA version in‑stalled. Do not change the default minimum VDA selection. However, if you must use an earlier VDAversion, see VDA versions and functional levels.
An error message appears if you select a snapshot or VM that is not compatible with the machinemanagement technology you selected earlier in the wizard.
Device Collection
This page appears only when using Citrix Provisioning to create VMs.
TheDeviceCollectionpagedisplays thedevice collectionsand thedevices thathavenotalreadybeenadded to catalogs.
Select the device collections to use.
© 1999–2022 Citrix Systems, Inc. All rights reserved. 185
Citrix Virtual Apps and Desktops
Machines
This page does not appear when you are creating Remote PC Access catalogs.
The title of this page depends on what you selected on theMachine Management page: Machines,Virtual Machines, or VMs and users.
When using MCS:
• Specify howmany virtual machines to create.• Choose the amount of memory (in MB) each VM has.• Each created VM has a hard disk. Its size is set in themaster image. You cannot change the harddisk size in the catalog.
• If your deployment contains more than one zone, you can select a zone for the catalog.• If you are creating static desktop VMs, select a virtual machine copymode. See Virtual machinecopymode.
• If you are creating random desktop VMs that do not use vDisks, you can configure a cache to beused for temporary data on eachmachine. See Configure cache for temporary data.
When using Citrix Provisioning:
TheDevices page lists themachines in the device collection that you selected on the previous wizardpage. You cannot add or removemachines on this page.
When using other tools:
Add (or import a list of) Active Directory machine account names. You can change the Active Direc‑tory account name for a VM after you add/import it. If you specified static machines on the DesktopExperience page, you can optionally specify the Active Directory user name for each VM you add.
After you add or import names, you can use the Remove button to delete names from the list, whileyou are still on this page.
When using Citrix Provisioning or other tools (but not MCS):
An icon and tooltip for each machine added (or imported, or from a Citrix Provisioning device collec‑tion) help identify machines that might not be eligible to add to the catalog, or be unable to registerwith a Delivery Controller. For details, see VDA versions and functional levels.
Virtual machine copymode
The copy mode you specify on the Machines page determines whether MCS creates thin (fast copy)or thick (full copy) clones from themaster image. (Default = thin clones)
• Use fast copy clones for more efficient storage use and faster machine creation.• Use full copy clones for better data recovery and migration support, with potentially reducedIOPS after the machines are created.
© 1999–2022 Citrix Systems, Inc. All rights reserved. 186
Citrix Virtual Apps and Desktops
VDA versions and functional levels
A catalog’s functional level controls which product features are available to machines in the catalog.Using features introduced innewproduct versions require anewVDA. Setting a functional levelmakesall features introduced in that version (and later, if the functional level does not change) availableto machines in the catalog. However, machines in that catalog with an earlier VDA version cannotregister.
A menu near the bottom of the Machines (or Devices) page allows you to select the minimum VDAlevel. This sets the catalog’s minimum functional level. By default, the most current functional levelis selected for on‑premises deployments. If you follow the Citrix recommendation to always installandupgrade VDAs and core components to the latest version, youdon’t need to change this selection.However, if youmust continue using older VDA versions, select the correct value.
A Citrix Virtual Apps and Desktops release might not include a new VDA version, or the new VDA doesnot impact the functional level. In such cases, the functional levelmight indicate a VDA version that isearlier than the installedorupgradedcomponents. Forexample, althoughversion7.17containsa7.17VDA, the default functional level (“7.9 or later”) remains the most current. Therefore, after installingor upgrading components 7.9–7.16 to 7.17, you do not need to change the default functional level.Each release’s What’s new article indicates any change in the default functional level.
The selected functional level affects the list of machines above it. In the list, a tooltip next to eachentry indicates whether the machine’s VDA is compatible with the catalog at that functional level.
Messages are posted on the page if the VDA on each machine does not meet or exceed the minimumfunctional level selected. You can continue with the wizard. Thosemachines will likely not be able toregister with a Controller later. Alternatively, you can:
• Remove the machines containing older VDAs from the list, upgrade their VDAs and then addthem back to the catalog.
• Choose a lower functional level that prevents access to the latest product features.
Amessage is alsoposted if amachinewasnot be added to the catalogbecause it is thewrongmachinetype. Examples include attempting to add a server to a single‑session OS catalog, or adding a single‑session OSmachine originally created for random allocation to a catalog of static machines.
Important:
At release 1811, an extra functional level was added: 1811 (or newer). That level is intended foruse with future Citrix Virtual Apps and Desktops features. The 7.9 (or newer) selection remainsthe default. That default is valid for all deployments now.
If you select 1811 (or newer), any earlier VDA versions in that catalog are unable to register witha Controller or Cloud Connector. However, if the catalog contains only VDAs at version 1811 orlater supported versions, they are all eligible to register. This includes catalogs containing VDAs
© 1999–2022 Citrix Systems, Inc. All rights reserved. 187
Citrix Virtual Apps and Desktops
configured for later Citrix Virtual Apps and Desktops releases, including version 1903 and other19XX releases prior to the current release.
Configure cache for temporary data
Caching temporary data locally on the VM is optional. You can enable use of the temporary data cacheon the machine when you use MCS to manage pooled (not dedicated) machines in a catalog. If thecatalog uses a connection that specifies storage for temporary data, you can enable and configure thetemporary data cache information when you create the catalog.
Important:
This feature requires a current MCS I/O driver. Installing this driver is an option when you installor upgrade a VDA. By default, that driver is not installed.
You specify whether temporary data uses shared or local storage when you create the connectionthat the catalog uses. For more information, see Connections and resources. To configure a cachefor temporary data on each machine, you can use the following two options: Memory allocated tocache (MB) andDisk cache size (GB). By default, the two options are cleared. To enable the Memoryallocated to cache (MB) option, select the Disk cache size (GB) check box. If theDisk cache size checkbox is not selected, theMemory allocated to cacheoption is grayedout. Dependingon the connectiontype, the default values for these options might differ. Generally, the default values are sufficient formost cases. However, take into account the space needed for:
• Temporary data files created by Windows itself, including the Windows page file.• User profile data.• ShareFile data that is synced to users’ sessions.• Data that might be created or copied by a session user or any applications users might installinside the session.
Windows will not allow a session to use a cache disk that is larger than the amount of free space onthe originalmaster image fromwhichmachines in themachine catalog are provisioned. For example,there is nobenefit specifyinga20GBcachedisk if there is only 10GBof free spaceon themaster image.
© 1999–2022 Citrix Systems, Inc. All rights reserved. 188

Citrix Virtual Apps and Desktops
To configure a cache for temporary data on eachmachine, be aware of the following three scenarios:
• If you don’t select the Disk cache size check box and the Memory allocated to cache check box,temporary data is not cached. It is directly written to the difference disk (located in the OS stor‑age) for each VM. (This is the provisioning action in version 7.8 and earlier.)
• If you select theDisk cache size check box anddon’t select theMemory allocated to cache checkbox, temporary data is directly written to the cache disk, using a minimal amount of memorycache.
• If you select the Disk cache size check box and the Memory allocated to cache check box, tem‑porary data is initially written to the memory cache. When the memory cache reaches its con‑figured limit (the Memory allocated to cache value), the oldest data is moved to the temporarydata cache disk.
Important:
• If the disk cache runs out of space, the user’s session becomes unusable.• This feature is not available when using a Nutanix host connection.• You cannot change the cache values in a machine catalog after the machine is created.
Note:
• The memory cache is part of the total amount of memory on each machine. Therefore, ifyou enable the Memory allocated to cache option, consider increasing the total amount ofmemory on eachmachine.
• Changing the Disk cache size from its default value can affect performance. The size mustmatch user requirements and the load placed on the machine.
© 1999–2022 Citrix Systems, Inc. All rights reserved. 189

Citrix Virtual Apps and Desktops
Network Interface Cards (NICs)
This page does not appear when you are creating Remote PC Access catalogs.
On the Network Interface Cards page, if you plan to use multiple NICs, associate a virtual networkwith each card. For example, you can assignone card to access a specific secure network, and anothercard to access a more commonly used network. You can also add or remove NICs from this page.
Machine accounts
This page appears only when creating Remote PC Access catalogs.
On the Machine Accounts page, specify the Active Directory machine accounts or OrganizationalUnits (OUs) to add that correspond to users or user groups. Do not use a forward slash (/) in an OUname.
You can choose a previously configured power management connection or elect not to use powermanagement. If you want to use power management but a suitable connection hasn’t been config‑ured yet, you can create that connection later and then edit themachine catalog to update the powermanagement settings.
Computer accounts
This page appears only when using MCS to create VMs.
Each machine in the catalog must have a corresponding Active Directory computer account. On theComputer Accounts page, indicate whether to create accounts or use existing accounts, and the lo‑cation for those accounts.
• If you create accounts, youmust have access to a domain administrator account for the domainwhere the machines reside.
Specify the account naming scheme for the machine, using hash marks to indicate where se‑quential numbers or letters appear. Do not use a forward slash (/) in an OU name. A namecannot begin with a number. For example, a naming scheme of PC‑Sales‑## (with 0‑9 selected)results in computer accounts named PC‑Sales‑01, PC‑Sales‑02, PC‑Sales‑03, and so on.
• If you use existing accounts, either browse to the accounts or click Import and specify a .csv filecontaining account names. The imported file content must use the format:
1 [ADComputerAccount]2 ADcomputeraccountname.domain3 ...4 <!--NeedCopy-->
© 1999–2022 Citrix Systems, Inc. All rights reserved. 190

Citrix Virtual Apps and Desktops
Ensure that there are enough accounts for all the machines you’re adding. Studio manages theseaccounts, so either allow Studio to reset the passwords for all the accounts or specify the accountpassword, which must be the same for all accounts.
For catalogs containing physical machines or existing machines, select or import existing accounts.Assign eachmachine to both an Active Directory computer account and to a user account.
Formachines created with Citrix Provisioning, computer accounts for target devices aremanaged dif‑ferently; see the Citrix Provisioning documentation.
Summary, name, and description
On the Summary page, review the settings you specified. Enter a name and description for the cata‑log. This information appears in Studio.
When you’re done, click Finish to start the catalog creation.
TroubleshootImportant:
After creating themachine catalog using Citrix Studio, you can no longer use the Get-ProvTaskPowerShell command to retrieve the tasks associated with machine catalog creation. This re‑striction is a result of Studio deleting those tasks after machine catalog creation regardless ofwhether the catalog is created successfully.
Citrix recommends collecting logs to help the Support team provide solutions. When using Citrix Pro‑visioning, use the following procedure to generate log files:
1. On the master image, create the following registry key with the value of 1 (as a DWORD (32‑bit)value): HKLM\Software\Citrix\MachineIdentityServiceAgent\LOGGING.
2. Shut down the master image and create a snapshot.
3. On theDeliveryController, run the followingPowerShell command: Set-ProvServiceConfigurationData-Name ImageManagementPrep_NoAutoShutdown -Value $True.
4. Create a catalog based on that snapshot.
5. When the preparation VM is created on the hypervisor, log in and extract the following files fromthe root of C:\: Image‑prep.log and PvsVmAgentLog.txt.
6. Shut down the machine, at which point it reports the failure.
7. Run the following PowerShell command to re‑enable auto shutdown of the image preparationmachines: Remove-ProvServiceConfigurationData -Name ImageManagementPrep_NoAutoShutdown.
© 1999–2022 Citrix Systems, Inc. All rights reserved. 191

Citrix Virtual Apps and Desktops
Where to go next
If this is the first catalog created, Studio guides you to create a delivery group.
Managemachine catalogs
April 14, 2021
Introduction
You canaddor removemachines fromamachine catalog, rename, change thedescription, ormanagea catalog’s Active Directory computer accounts.
Maintaining catalogs can also includemaking sure eachmachine has the latest OS updates. Includingantivirus updates, operating system upgrades, or configuration changes.
• Catalogs containing pooled random machines created using Machine Creation Services (MCS)maintain machines by updating the master image used in the catalog and then updating themachines. This method enables you to efficiently update large numbers of user machines.
• For machines created using Citrix Provisioning, updates to machines are propagated throughthe virtual disk. See the Citrix Provisioning documentation for details.
• For catalogs containing static, permanently assigned machines, and for Remote PC Access Ma‑chine catalogs, you manage updates to users’ machines outside of Studio. Perform this taskeither individually or collectively using third‑party software distribution tools.
For information about creating andmanaging connections to host hypervisors, see Connections andresources.
Note:
MCSdoesnot supportWindows10 IoTCoreandWindows10 IoTEnterprise. Refer to theMicrosoftsite for more information.
About persistent instances
When updating an MCS catalog created using persistent, or dedicated instances, any new machinescreated for the catalog use the updated image. Pre‑existing instances continue to use the original in‑stance. Theprocessof updatingan image is done the sameway for anyother typeof catalog. Considerthe following:
• With persistent disk catalogs, the pre‑existingmachines are not updated to the new image, butany newmachines added to the catalog use the new image.
© 1999–2022 Citrix Systems, Inc. All rights reserved. 192
Citrix Virtual Apps and Desktops
• For non‑persistent disk catalogs, the machine image is updated the next time the machine isreset.
• With persistent machine catalogs, updating the image also updates the catalog instances thatuse it.
• For catalogs that do not persist, if you want different images for differentmachines, the imagesmust reside in separate catalogs.
Addmachines to a catalog
Before you start:
• Make sure the virtualization host has sufficient processors, memory, and storage to accommo‑date the additional machines.
• Make sure that you have enough unused Active Directory computer accounts. If you are usingexisting accounts, the number of machines you can add is limited by the number of accountsavailable.
• If you use Studio to create Active Directory computer accounts for the additionalmachines, youmust have appropriate domain administrator permission.
To addmachines to a catalog:
1. SelectMachine Catalogs in the Studio navigation pane.2. Select a machine catalog and then select Addmachines in the Actions pane.3. Select the number of virtual machines to add.4. If there are insufficient existing Active Directory accounts for the number of VMs you are adding,
select the domain and location where the accounts are created. Specify an account namingscheme, using hash marks to indicate where sequential numbers or letters appear. Do not usea forward slash (/) in an OU name. A name cannot begin with a number. For example, a namingschemeof PC‑Sales‑## (with 0‑9 selected) results in computer accounts namedPC‑Sales‑01, PC‑Sales‑02 , PC‑Sales‑03, and so on.
5. If you use existing Active Directory accounts, either browse to the accounts or click Import andspecify a .csv file containing account names. Make sure that there are enough accounts for allthe machines you’re adding. Studio manages these accounts. Either allow Studio to reset thepasswords for all the accounts, or specify the account password, whichmust be the same for allaccounts.
The machines are created as a background process, and can take much time when creating manymachines. Machine creation continues even if you close Studio.
Deletemachines from a catalog
After you delete a machine from a machine catalog, users can no longer access it, so before deletinga machine, ensure that:
© 1999–2022 Citrix Systems, Inc. All rights reserved. 193
Citrix Virtual Apps and Desktops
• User data is backed up or no longer required.• All users are loggedoff. Turningonmaintenancemode stopsnewconnections frombeingmadeto a machine.
• Machines are powered off.
To delete machines from a catalog:
1. SelectMachine Catalogs in the Studio navigation pane.2. Select a catalog and then select ViewMachines in the Actions pane.3. Select one or more machines and then select Delete in the Actions pane.
Choosewhether todelete themachinesbeing removed. If youchoose todelete themachines, indicateif the Active Directory accounts for those machines are retained, disabled, or deleted.
Change a catalog description or change Remote PC Access settings
1. SelectMachine Catalogs in the Studio navigation pane.2. Select a catalog and then select Edit Machine Catalog in the Actions pane.3. For Remote PC Access catalog, use thePowerManagementpage to change the powermanage‑
ment settings and select a powermanagement connection. On theOrganizational Unitspage,add or remove Active Directory OUs.
4. On the Description page, change the catalog description.
Rename a catalog
1. SelectMachine Catalogs in the Studio navigation pane.2. Select a catalog and then select RenameMachine Catalog in the Actions pane.3. Enter the new name.
Move a catalog to a different zone
If your deployment has more than one zone, you canmove a catalog from one zone to another.
Moving a catalog to a different zone, other than the hypervisor containing the VMs in that catalog,affects performance.
1. SelectMachine Catalogs in the Studio navigation pane.2. Select a catalog and then selectMove in the Actions pane.3. Select the zone where you want to move the catalog.
Delete a catalog
Before deleting a catalog, ensure that:
© 1999–2022 Citrix Systems, Inc. All rights reserved. 194

Citrix Virtual Apps and Desktops
• All users are logged off and that no disconnected sessions are running.• Maintenancemode is turned on for all machines in the catalog so that new connections cannotbe made.
• All machines in the catalog are powered off.• The catalog is not associated a delivery group. In other words, the delivery group does not con‑tain machines from the catalog.
To delete a catalog:
1. SelectMachine Catalogs in the Studio navigation pane.2. Select a catalog and then select Delete Machine Catalog in the Actions pane.3. Indicatewhether themachines in the catalog are deleted. If you choose to delete themachines,
indicate whether the Active Directory computer accounts for those machines are retained, dis‑abled, or deleted.
Manage Active Directory computer accounts in a catalog
Tomanage Active Directory accounts in a machine catalog, you can:
• Free unused machine accounts by removing Active Directory computer accounts from single‑sessionOSandmulti‑sessionOScatalogs. Thoseaccounts can thenbeused for othermachines.
• Add accounts so that when more machines are added to the catalog, the computer accountsare already in place. Do not use a forward slash (/) in an OU name.
Tomanage Active Directory accounts:
1. SelectMachine Catalogs in the Studio navigation pane.
2. Select a catalog and then selectManage AD accounts in the Actions pane.
3. Choose whether to add or delete computer accounts. If you add accounts, specify what to dowith the account passwords: either reset them all or enter a password that applies to all ac‑counts.
You might reset passwords if you do not know the current account passwords; you must havepermission to perform a password reset. When entering a password, the password is changedon the accounts as they are imported. When deleting an account, choose whether the accountin Active Directory is kept, disabled, or deleted.
Indicate if Active Directory accounts are retained, disabled, or deleted when you remove machinesfrom a catalog or delete a catalog.
Update a catalog
Citrix recommends that you save copies or snapshots ofmaster images before updating themachinesin the catalog. The database keeps a historical record of the master images used with each machine
© 1999–2022 Citrix Systems, Inc. All rights reserved. 195
Citrix Virtual Apps and Desktops
catalog. Roll back, or revert, machines in a catalog to use the previous version of the master image.Perform this task if users encounter problemswith updates you deployed to their desktops. Thismin‑imizes user downtime. Do not delete, move, or rename master images. You cannot revert a catalogto use them.
For catalogs that use Citrix Provisioning (formerly Provisioning Services), youmust publish a new vir‑tual disk to apply changes to the catalog. For details, see the Citrix Provisioning documentation.
After a machine is updated, it restarts automatically.
Update or create amaster image
Before you update the machine catalog, either update an existing master image or create a one onyour host hypervisor.
1. Onyourhypervisor, takea snapshotof thecurrentVMandgive the snapshotameaningfulname.This snapshot can be used to revert (roll back) machines in the catalog, if needed.
2. If necessary, power on the master image, and log on.3. Install updates or make any required changes to the master image.4. Power off the VM.5. Take a snapshot of the VM. Give it a meaningful name that is recognized when the catalog is
updated in Studio. Although Studio can create a snapshot, Citrix recommends that you createit using the hypervisormanagement console. Then select that snapshot in Studio. This processenables you to provide ameaningful name and description rather than an automatically gener‑ated name. For GPU master images, you can change the master image only through the CitrixHypervisor console.
Update the catalog
To prepare and roll out the update to all machines in a catalog:
1. SelectMachine Catalogs in the Studio navigation pane.2. Select a catalog and then selectUpdate Machines in the Actions pane.3. On theMaster Image page, select the host and the image you want to roll out.4. On the Rollout Strategy page, choose when themachines in the machine catalog are updated
with the newmaster image: on the next shutdown or immediately.5. Verify the information on the Summary page and then click Finish. Each machine restarts au‑
tomatically after it is updated.
When updating a catalog using PowerShell SDK directly, rather than Studio, specify a hypervisor tem‑plate (VMTemplates). Use this as an alternative to an image or a snapshot of an image.
Rollout strategy:
© 1999–2022 Citrix Systems, Inc. All rights reserved. 196

Citrix Virtual Apps and Desktops
Updating the image on next shutdownwill immediately affect anymachines not currently in use, thatis, machines that do not have an active user session. A system that is in use receives the update whenthe current active session ends. Consider the following:
• New sessions cannot be launched until the update has completed on applicable machines.• For desktop OSmachines, machines are immediately updated when the machine is not in use,or when users are not logged in.
• For a server OS with child machines, reboots do not occur automatically. They must be manu‑ally shut down and restarted.
Tip:
Limit the number of machines being rebooted by using the advanced settings for a host connec‑tion. Use these settings to modify the actions taken for a given catalog; advanced settings varydepending on the hypervisor.
If you choose to update the image immediately, configure a distribution time and notifications.
• Distribution time: Choose to update all machines at the same time, or specify the total lengthof time to begin updating all machines in the catalog. An internal algorithm determines wheneachmachine is updated and restarted during that interval.
• Notification: In the left notification drop‑down menu, choose whether to display a notifica‑tion message on the machines before an update begins. By default, no message is displayed.Choose to display a message 15 minutes before the update begins. Or, choose to repeat themessage every five minutes after the initial message. By default, the message is not repeated.Unless you choose to update all machines at the same time, the notification message displayson eachmachine at the appropriate time before the update begins.
Roll back an update
After you roll out an updated/newmaster image, you can roll it back. This processmight be necessaryif issues occur with the newly updated machines. When you roll back, machines in the catalog arerolled back to the last working image. Any new features that require the newer image are no longeravailable. As with the rollout, rolling back a machine includes a restart.
1. SelectMachine Catalogs in the Studio navigation pane.2. Select the catalog and then select Rollbackmachine update in the Actions pane.3. Specify when to apply the earlier master image tomachines, as described in the preceding sec‑
tion for the rollout operation.
The rollback is applied only to machines that need to be reverted. Machines that have not been up‑datedwith the new/updatedmaster image do not receive notificationmessages and are not forced tolog off.
© 1999–2022 Citrix Systems, Inc. All rights reserved. 197
Citrix Virtual Apps and Desktops
Upgrade a catalog or revert an upgrade
Upgrade the machine catalog after you upgrade the VDAs on the machines to a newer version. Citrixrecommends upgrading all VDAs to the latest version to enable access to all the newest features.
Before upgrading a catalog:
• If you’re using Citrix Provisioning, upgrade the VDA version. The provisioning console does notretain the VDA version. Citrix Provisioning communicates directly with the Citrix Virtual Appsand Desktops Setup Wizard to set the VDA version in the created catalog.
• Start the upgraded machines so that they register with the Controller. This process lets Studiodetermine that the machines in the catalog need upgrading.
To upgrade a catalog:
1. SelectMachine Catalogs in the Studio navigation pane.2. Select the catalog. The Details tab in the lower pane displays version information.3. Select Upgrade Catalog. If Studio detects that the catalog needs upgrading, it displays a mes‑
sage. Follow the prompts. If one or more machines cannot be upgraded, a message explainswhy. Citrix recommends you resolve machine issues before upgrading the catalog to ensurethat all machines function properly.
After the catalog upgrade completes, you can revert the machines to their previous VDA versions byselecting the catalog and then selectingUndo in the Actions pane.
Troubleshoot
For machines with “Power State Unknown” status, see CTX131267 for guidance.
Create delivery groups
June 24, 2021
Adelivery group is a collection ofmachines selected fromoneormoremachine catalogs. Thedeliverygroup specifies which users can use those machines, plus the applications and desktops available tothose users.
Creating a delivery group is the next step in configuring your deployment after creating a site andcreating a machine catalog. Later, you can change the initial settings in the first delivery group andcreate other delivery groups. There are also features and settings you can configure onlywhen editinga delivery group, not when creating it.
For Remote PC Access, when you create a site, a delivery group named “Remote PC Access Desktops”is automatically created.
© 1999–2022 Citrix Systems, Inc. All rights reserved. 198

Citrix Virtual Apps and Desktops
To create a delivery group:
1. If you have created a site and amachine catalog, without a delivery group, Studio guides you tothe correct starting place to create one. If you have already created a delivery group and wantto create another, select Delivery Groups. Select Create Delivery Group in the Actions pane.
2. The wizard launches with an Introduction page, which you can remove from future launchesof this wizard.
3. Thewizard then guides you through the pages described in the following section. When you aredone with each page, clickNext until you reach the final page.
Step 1. Machines
On theMachines page, select a catalog and select the number ofmachines youwant to use from thatcatalog.
Good to know:
• At least one machine must remain unused in a selected catalog.• A catalog can be specified in more than one delivery group. A machine can be used in only onedelivery group.
• A delivery group can use machines frommore than one catalog; however, those catalogs mustcontain the samemachine types (multi‑session OS, single‑session OS, or Remote PC Access). Inother words, you cannot mix machine types in a delivery group. Similarly, if your deploymenthas catalogsofWindowsmachinesandcatalogsof Linuxmachines, adelivery groupcancontainmachines from either OS type, but not both.
• Citrix recommends that you install or upgrade all machines with the most recent VDA version.Upgrade catalogs and delivery groups as needed. When creating a delivery group, if you selectmachines that have different VDA versions installed, the delivery group is compatible with theearliest VDA version. This is called the group’s functional level. For example, if one of the ma‑chines has VDA version 7.1 and other machines have the current version, all machines in thegroup can use only those features that were supported in VDA 7.1. This means that some fea‑tures that require later VDA versions might not be available in that delivery group.
• Eachmachine in a Remote PC Access catalog is automatically associated with a delivery group.When you create a Remote PC Access site, a catalog named “Remote PC Access Machines” anda delivery group named “Remote PC Access Desktops” are created automatically.
• The following compatibility checks are performed:– MinimumFunctionalLevel must be compatible– SessionSupport must be compatible– AllocationTypemust be compatible for SingleSession– ProvisioningType‘ must be compatible– PersistChanges must be compatible for MCS and Citrix Provisioning
© 1999–2022 Citrix Systems, Inc. All rights reserved. 199

Citrix Virtual Apps and Desktops
– RemotePC catalog is only compatible with RemotePC catalog– AppDisk related check
Step 2. Delivery type
This page appears only if you chose a catalog containing static (assigned) single‑sessionOSmachines.
On the Delivery Type page, choose either Applications or Desktops. You cannot enable both.
If you selected machines from a multi‑session OS or single‑session OS random (pooled) catalog, thedelivery type is assumed to be applications and desktops: you can deliver applications, desktops, orboth.
Step 3. Users
Specify the users and user groups who can use the applications and desktops in the delivery group.
Where user lists are specified
Active Directory user lists are specified when you create or edit the following:
• A site’s user access list, which is not configured through Studio. By default, the application enti‑tlementpolicy rule includeseveryone. See thePowerShell SDKBrokerAppEntitlementPolicyRulecmdlets for details.
• Application groups (if configured).• Delivery groups.• Applications.
The list of users who can access an application through StoreFront is formed by the intersection ofthe above user lists. For example, to configure the use of application A to a particular department,without unduly restricting access to other groups:
• Use the default application entitlement policy rule that includes everyone.• Configure the delivery group user list to allow all headquarters users to use any of the applica‑tions specified in the delivery group.
• (If application groups are configured) Configure the application group user list to allow mem‑bers of the Administration and Finance business unit to access applications A through L.
• Configure application A’s properties to restrict its visibility to only Accounts Receivable staff inAdministration and Finance.
Authenticated and unauthenticated users
There are two types of users: authenticated and unauthenticated (unauthenticated is also calledanonymous). You can configure one or both types in a delivery group.
© 1999–2022 Citrix Systems, Inc. All rights reserved. 200

Citrix Virtual Apps and Desktops
• Authenticated: Toaccess applicationsanddesktops, theusers andgroupmembers you specifyby namemust present credentials such as smart card or user name and password to StoreFrontor Citrix Workspace app. For delivery groups containing single‑session OS machines, you canimport user data (a list of users) later by editing the delivery group.
• Unauthenticated (anonymous): For delivery groups containing multi‑session OS machines,you can allow users to access applications and desktops without presenting credentials toStoreFront or Citrix Workspace app. For example, at kiosks, the application might requirecredentials, but the Citrix access portal and tools do not. An Anonymous Users Group is createdwhen you install the first Delivery Controller.
To grant access to unauthenticated users, eachmachine in the delivery groupmust have a VDAfor Windows Server OS (minimum version 7.6) installed. When unauthenticated users are en‑abled, youmust have an unauthenticated StoreFront store.
Unauthenticated user accounts are created on demand when a session is launched, and arenamed AnonXYZ, in which XYZ is a unique three‑digit value.
Unauthenticated user sessions have a default idle timeout of 10 minutes, and are loggedoff automatically when the client disconnects. Reconnection, roaming between clients, andWorkspace Control are not supported.
The following table describes your choices on theUsers page:
Enable access forAdd/assign users and usergroups?
Enable the “Give access tounauthenticated users” checkbox?
Only authenticated users Yes No
Only unauthenticated users No Yes
Both authenticated andunauthenticated users
Yes Yes
Step 4. Applications
Good to know:
• You cannot add applications to Remote PC Access delivery groups.• By default, newapplications you add are placed in a folder namedApplications. You can specifya different folder. For details, see the Manage Applications article.
• You can change the properties for an application when you add it to a delivery group, or later.For details, see the Manage Applications article.
• If you try to add an application and one with the same name exists in that folder, you are
© 1999–2022 Citrix Systems, Inc. All rights reserved. 201

Citrix Virtual Apps and Desktops
prompted to rename the application you are adding. If you decline, the application is addedwith a suffix that makes it unique within that application folder.
• When you add an application tomore than one delivery group, a visibility issue can occur if youdo not have sufficient permission to view the application in all of those delivery groups. In suchcases, either consult an administrator with greater permissions or have your scope extended toinclude all the delivery groups to which the application was added.
• If you publish two applications with the same name to the same users, change the Applicationname (for user) property in Studio; otherwise, users see duplicate names in Citrix Workspaceapp.
Click Add to display the application sources.
• From Start menu: Applications that are discovered on a machine created from the master im‑age in the selected catalog. When you select this source, a new page launches with a list ofdiscovered applications; select those you want to add and then clickOK.
• Manually defined: Applications located in the site or elsewhere in your network. Selecting thissource launches a new page where you type the path to the executable, working directory, op‑tional command line arguments, anddisplaynames for administrators andusers. After enteringthis information, clickOK.
• Existing: Applications previously added to the site, perhaps in another delivery group. Whenyou select this source, a new page launches with a list of discovered applications. Add the ap‑plications and clickOK.
• App‑V: Applications in App‑V packages. When you select this source, a new page launcheswhere you select the App‑V server or the Application Library. Select the applications you wantto add from the resulting display and then clickOK. For more information, see App‑V.
If an application source or application is not available or valid, it is either not visible or cannot beselected. For example, the Existing source is not available if no applications have been added to thesite. Or, an applicationmight not be compatible with the supported session types onmachines in theselected catalog.
Step 5. Desktops
The title of this page depends on the catalog you chose on theMachines page:
• If you chose a catalog containing pooled machines, this page is titled Desktops.• If you chose a catalog containing assignedmachines and specified “Desktops” on the DeliveryType page, this page is titled Desktop User Assignments.
• If you chose a catalog containing assignedmachines and specified “Applications” on theDeliv‑ery Type page, this page is titled Application Machine User Assignments.
Click Add. In the dialog box:
© 1999–2022 Citrix Systems, Inc. All rights reserved. 202
Citrix Virtual Apps and Desktops
• In the Display name and Description fields, type the information to be displayed in CitrixWorkspace app.
• To add a tag restriction to a desktop, select Restrict launches to machines with this tag andthen select the tag from the drop‑down list. For more information, see Tags.
• Use the radio buttons to launch a desktop or to assign amachine when launching the desktop.The users can be either everyone who can access this delivery group, or specific users and usergroups.
• If the group contains assigned machines, specify the maximum number of desktops per user.This must be a value of one or greater.
• Enable or disable the desktop (for pooled machines) or desktop assignment rule (for assignedmachines). Disabling a desktop stops desktop delivery. Disabling a desktop assignment rulestops desktop auto‑assignment to users.
• When you are finished with the dialog box, clickOK.
Maximum instances of a desktop in a site (PowerShell only)
To configure the maximum instances of a desktop in the site (PowerShell only):
• In PowerShell, use the appropriate BrokerEntitlementPolicyRule cmdlet with the MaxPerEnti‑tlementInstances parameter. For example, the following cmdlet modifies the tsvda-desktoprule to set the maximum concurrent instances of a desktop allowed in the site to two. Whenthere are two desktop instances running, an error occurs if a third subscriber attempts to starta desktop.
Set-BrokerEntitlementPolicyRule -Name tsvda-desktop -MaxPerEntitlementInstances2
• Forguidance, use theGet‑Helpcmdlet. Forexample,Get-Help Set-BrokerEntitlementPolicyRule-Parameter MaxPerEntitlementInstances.
Step 6. Summary
Enter a name for the delivery group. You can also (optionally) enter a description, which appears inthe Citrix Workspace app and in Studio.
Review the summary information and then click Finish.
Manage delivery groups
April 14, 2021
© 1999–2022 Citrix Systems, Inc. All rights reserved. 203

Citrix Virtual Apps and Desktops
Introduction
This article describes procedures for managing delivery groups from the management console. Inaddition to changing settings specifiedwhen creating the group, you can configure other settings thatare not available when you create a delivery group.
Procedure categories include: general, users, machines, and sessions. Some tasks span more thanonecategory. For example, “Preventusers fromconnecting tomachines” isdescribed in themachinescategory, but it also affects users. If you can’t find a task in one category, check a related category.
Other articles also contain related information:
• Applications contain information about managing applications in delivery groups.• Managing delivery groups requires the Delivery Group Administrator built‑in role permissions.For details, see Delegated administration.
General
• Change the delivery type• Change StoreFront addresses• Upgrade a delivery group• Manage Remote PC Access delivery groups
Change the delivery type of a delivery group
The delivery type indicates what the group can deliver: applications, desktops, or both.
Before changing an application only or desktops and applications type to the desktops only type,delete all applications from the group.
1. Select Delivery Groups in the navigation pane.2. Select a group and then click Edit Delivery Group in the Actions pane.3. On the Delivery Type page, select the delivery type you want.4. Click Apply to apply any changes you made and keep the window open. Or, click OK to apply
changes and close the window.
Change StoreFront addresses
1. Select Delivery Groups in the navigation pane.2. Select a group and then click Edit Delivery Group in the Actions pane.3. On the StoreFront page, select or add StoreFront URLs. These URLs are used by the Citrix
Workspace app, which is installed on eachmachine in the delivery group.4. Click Apply to apply any changes you made and keep the window open. Or, click OK to apply
changes and close the window.
© 1999–2022 Citrix Systems, Inc. All rights reserved. 204

Citrix Virtual Apps and Desktops
You can also specify StoreFront server addresses by selecting Configuration > StoreFront in the nav‑igation pane.
Upgrade a delivery group or revert an upgrade
Upgrade a delivery group after you upgrade the Virtual Delivery Agents (VDAs) on its machines andthe machine catalogs containing the machines used in the delivery group.
Before you start the delivery group upgrade:
• If you use Citrix Provisioning (formerly Provisioning Services), upgrade the VDA version in theCitrix Provisioning console.
• Start the machines containing the upgraded VDA so that they can register with a Delivery Con‑troller. This process tells the console about what needs upgrading in the delivery group.
• If you continue to use earlier VDA versions, newer product features are not available. For moreinformation, see the upgrade documentation.
To upgrade a delivery group:
1. Select Delivery Groups in the navigation pane.2. Select a group and then click Upgrade Delivery Group in the Actions pane. The Upgrade De‑
livery Group action appears only if upgraded VDAs are detected.
The display indicates you which, if any, machines cannot be upgraded and why. You can then cancelthe upgrade, resolve the machine issues, and then start the upgrade again.
After the upgrade completes, you can revert the machines to their previous states by selecting thedelivery group and then clickingUndo in the Actions pane.
Manage Remote PC Access delivery groups
If a machine in a Remote PC Access machine catalog is not assigned, the machine is temporarily as‑signed to a delivery group associated with that catalog. This temporary assignment enables the ma‑chine to be assigned to a user later.
The delivery group‑to‑machine catalog association has a priority value. Priority determines the ma‑chine’s assigned delivery group when it registers with the system or when a user needs a machineassignment. The lower the value, the higher the priority. If a Remote PC Access machine catalog hasmultiple delivery group assignments, the software selects the match with the highest priority. Usethe PowerShell SDK to set this priority value.
When first created, RemotePCAccessmachine catalogs are associatedwith adelivery group. Machineaccounts or Organizational Units added to the catalog later can be added to the delivery group. Thisassociation can be switched off or on.
To add or remove a Remote PC Access machine catalog association with a delivery group:
© 1999–2022 Citrix Systems, Inc. All rights reserved. 205
Citrix Virtual Apps and Desktops
1. Select Delivery Groups in the navigation pane.2. Select a Remote PC Access group.3. In the Details section, click theMachine Catalogs tab and then select a Remote PC Access cat‑
alog.4. To add or restore an association, click Add Desktops. To remove an association, click Remove
Association.
Users
• Change user settings• Add or remove users
Change user settings in a delivery group
The name of this page appears as eitherUser Settings or Basic Settings.
1. Select Delivery Groups in the navigation pane.2. Select a group and then click Edit Delivery Group in the Actions pane.3. On theUser Settings (orBasic Settings) page, change any of the settings in the following table.4. Click Apply to apply any changes you made and keep the window open. Or, click OK to apply
changes and close the window.
Setting Description
Description The text that Citrix Workspace (or StoreFront)uses and that users see.
Enable delivery group Whether the delivery group is enabled.
Time zone
Enable Secure ICA Secures communications to and frommachines in the delivery group usingSecureICA, which encrypts the ICA protocol.The default level is 128‑bit. The level can bechanged using the SDK. Citrix recommendsusing more encryption methods such as TLSencryption when traversing public networks.Also, SecureICA does not check data integrity.
© 1999–2022 Citrix Systems, Inc. All rights reserved. 206

Citrix Virtual Apps and Desktops
Add or remove users in a delivery group
For detailed information about users, see Users.
1. Select Delivery Groups in the navigation pane.
2. Select a group and then click Edit Delivery Group in the Actions pane.
3. On theUsers page:
• To add users, click Add, and then specify the users you want to add.• To remove users, select one or more users and then click Remove.• Select or clear the check box to allow access by unauthenticated users.
4. Click Apply to apply any changes you made and keep the window open. Or, click OK to applychanges and close the window.
Import or export user lists
For delivery groups containing physical single‑sessionOSmachines, you can import user informationfrom a .csv file after you create the delivery group. You can also export user information to a .csv file.The .csv file can contain data from a previous product version.
The first line in the .csv filemust contain comma‑separated columnheadings (in any order), which caninclude: ADComputerAccount, AssignedUser, VirtualMachine, and HostId. Subsequent linesin the file contain comma‑separated data. The ADComputerAccount entries can be common names,IP addresses, distinguished names, or domain and computer name pairs.
To import or export user information:
1. Select Delivery Groups in the navigation pane.2. Select a group and then click Edit Delivery Group in the Actions pane.3. On the Machine Allocation page, select Import list or Export list, and then browse to the file
location.4. Click Apply to apply any changes you made and keep the window open. Or, click OK to apply
changes and close the window.
Machines
• Change assignments of machines to users• Change the maximum number of machines per user• Update a machine• Add, change, or remove a tag restriction for a desktop• Remove amachine• Restrict access to machines• Prevent users from connecting to a machine (maintenance mode)
© 1999–2022 Citrix Systems, Inc. All rights reserved. 207

Citrix Virtual Apps and Desktops
• Shut down and restart machines• Create andmanage restart schedules for machines• Loadmanagedmachines• Power managedmachines
Change assignments of machines to users in a delivery group
You can change the assignments of single‑session OS machines provisioned with MCS. You cannotchange assignments formulti‑sessionOSmachines ormachines provisionedwith Citrix Provisioning.
1. Select Delivery Groups in the navigation pane.2. Select a group and then click Edit Delivery Group in the Actions pane.3. On the Desktops or Desktop Assignment Rules page (the page title depends on the type of
machine catalog the delivery group uses), specify the new users.4. Click Apply to apply any changes you made and keep the window open. Or, click OK to apply
changes and close the window.
Change themaximum number of machines per user in a delivery group
1. Select Delivery Groups in the navigation pane.2. Select a group and then click Edit Delivery Group in the Actions pane.3. On the Desktop Assignment Rules page, set the maximum desktops per user value.4. Click Apply to apply any changes you made and keep the window open. Or, click OK to apply
changes and close the window.
Update amachine in a delivery group
1. Select Delivery Groups in the navigation pane.2. Select a group and then click ViewMachines in the Actions pane.3. Select a machine and then clickUpdate Machines in the Actions pane.
To choose a different master image, selectMaster image and then select a snapshot.
To apply changes and notify machine users, select Rollout notification to end‑users. Then specify:
• When to update the master image: now or on the next restart• The restart distribution time (the total time to begin updating all machines in the group)• Whether users are notified of the restart• The message users receive
© 1999–2022 Citrix Systems, Inc. All rights reserved. 208

Citrix Virtual Apps and Desktops
Add, change, or remove a tag restriction for a desktop
Adding, changing, and removing tag restrictions can have unanticipated effects on which desktopsare considered for launch. Review the considerations and cautions in Tags.
1. Select Delivery Groups in the navigation pane.
2. Select a group and then click Edit Delivery Group in the Actions pane.
3. On the Desktops page, select the desktop and click Edit.
4. To add a tag restriction, selectRestrict launches tomachineswith the tag and then select thetag.
5. To change or remove a tag restriction, either:
• Select a different tag.• Remove the tag restriction by clearing Restrict launches tomachines with this tag.
6. Click Apply to apply any changes you made and keep the window open. Or, click OK to applychanges and close the window.
Remove amachine from a delivery group
Removing a machine deletes it from a delivery group. It does not delete it from the machine catalogthat the delivery group uses. Therefore, that machine is available for assignment to another deliverygroup.
Machinesmust be shut downbefore they can be removed. To temporarily stop users from connectingto a machine while you are removing it, put the machine into maintenance mode before shutting itdown.
Machinesmight contain personal data, so use caution before allocating themachine to another user.Consider reimaging the machine.
1. Select Delivery Groups in the navigation pane.2. Select a group and then click ViewMachines in the Actions pane.3. Ensure that the machine is shut down.4. Select the machine and then click Remove from Delivery Group in the Actions pane.
You can also remove amachine from a delivery group through the connection the machine uses.
Restrict access tomachines in a delivery group
Any changes youmake to restrict access tomachines in a delivery group supersede previous settings,regardless of the method you use. You can:
© 1999–2022 Citrix Systems, Inc. All rights reserved. 209

Citrix Virtual Apps and Desktops
• Restrict access for administrators using delegated administration scopes: Create and as‑sign a scope that permits administrators to access all applications, and another scope that pro‑vides access to only certain applications. For details, see Delegated administration.
• Restrict access for users through SmartAccess policy expressions: Use policy expressionsto filter user connections made through Citrix Gateway.
1. Select Delivery Groups in the navigation pane.2. Select a group and then click Edit Delivery Group in the Actions pane.3. On the Access Policy page, select Connections through NetScaler Gateway.4. To choose a subset of those connections, selectConnectionsmeeting any of the follow‑
ing filters. Then define the Citrix Gateway site, and add, edit, or remove the SmartAccesspolicy expressions for the allowed user access scenarios. For details, see the Citrix Gate‑way documentation.
5. Click Apply to apply any changes you made and keep the window open. Or, click OK toapply changes and close the window.
• Restrict access for users through exclusion filters: Use exclusion filters on access policiesthat you set in the SDK. Access policies are applied to delivery groups to refine connections. Forexample, you can restrictmachine access to a subset of users, and you can specify allowed userdevices. Exclusion filters further refine access policies. For example, for security, you can denyaccess to a subset of users or devices. By default, exclusion filters are disabled.
For example, a teaching lab on a corporate network subnet which prevents access fromthat lab to a particular delivery group. Regardless of who is using the machines in thelab, use the command: Set-BrokerAccessPolicy -Name VPDesktops_Direct -ExcludedClientIPFilterEnabled $True -.
Use the asterisk (*) wildcard to match all tags that start with the same policy expression. Forexample, if you add the tag VPDesktops_Direct to one machine and VPDesktops_Test toanother, setting the tag in theSet-BrokerAccessPolicy script toVPDesktops_*applies thefilter to both machines.
If you are connected using a web browser or with the Citrix Workspace app user experiencefeature enabled in the store, you cannot use a client name exclusion filter.
Prevent users from connecting to amachine (maintenancemode) in a delivery group
Whenyouneed to temporarily stopnewconnections tomachines, youcan turnonmaintenancemodefor one or all machines in a delivery group. You might do this before applying patches or using man‑agement tools.
• When a multi‑session OS machine is in maintenance mode, users can connect to existing ses‑sions, but cannot start new sessions.
© 1999–2022 Citrix Systems, Inc. All rights reserved. 210

Citrix Virtual Apps and Desktops
• When a single‑session OS machine (or a PC using Remote PC Access) is in maintenance mode,users cannot connect or reconnect. Current connections remain connected until they discon‑nect or log off.
To turn maintenance mode on or off:
1. Select Delivery Groups in the navigation pane.
2. Select a group.
3. To turn on maintenance mode for all machines in the delivery group, click Turn On Mainte‑nance Mode in the Actions pane.
To turnonmaintenancemode for onemachine, clickViewMachines in theActionspane. Selecta machine, and then click Turn OnMaintenance Mode in the Actions pane.
4. To turn maintenance mode off for one or all machines in a delivery group, follow the previousinstructions, but click Turn OffMaintenance Mode in the Actions pane.
Windows Remote Desktop Connection (RDC) settings also affect whether amulti‑session OSmachineis in maintenance mode. Maintenance mode is on when any of the following occur:
• Maintenance mode is set to on, as described earlier.• RDC is set to Don’t allow connections to this computer.• RDC is not set toDon’t allow connections to this computer. TheRemoteHost ConfigurationUser Logon Mode setting is either Allow reconnections, but prevent new logons or Allowreconnections, but prevent new logons until the server is restarted.
You can also turn maintenance mode on or off for:
• A connection, which affects the machines using that connection.• A machine catalog, which affects the machines in that catalog.
Shut down and restart machines in a delivery group
This procedure is not supported for Remote PC Access machines.
1. Select Delivery Groups in the navigation pane.
2. Select a group and then click ViewMachines in the Actions pane.
3. Select the machine and then click one of the following entries in the Actions pane:
• Force shut down: Forcibly powers off the machine and refreshes the list of machines.• Restart: Requests the operating system to shut down and then start the machine again.If the operating system cannot comply, the machine remains in its current state.
• Force restart: Forcibly shuts down the operating system and then restarts the machine.• Suspend: Pauses the machine without shutting it down, and refreshes the list ofmachines.
© 1999–2022 Citrix Systems, Inc. All rights reserved. 211
Citrix Virtual Apps and Desktops
• Shut down: Requests the operating system to shut down.
For non‑force actions, if the machine does not shut down within 10 minutes, it is powered off. If Win‑dows attempts to install updates during the shutdown, there is a risk that themachine is powered offbefore the updates finish.
Citrix recommends that you prevent single‑session OS machine users from selecting Shut downwithin a session. See the Microsoft policy documentation for details.
You can also shut down and restart machines on a connection.
Create andmanage restart schedules for machines in a delivery group
A restart schedule specifies when machines in a delivery group are periodically restarted. You cancreate one or more schedules for a delivery group. A schedule can affect either:
• All of the machines in the group.• One or more (but not all) machines in the group. The machines are identified by a tag that youapply to the machine. This is called a tag restriction, because the tag restricts an action to onlyitems that have the tag.
For example, let’s say all of your machines are in one delivery group. You want every machinerestarted once every week, and you want the machines used by the accounting team restarted daily.To accomplish this, set up one schedule for all machines, and another schedule for only themachinesin accounting.
A schedule includes the day and time the restart begins, and the duration. Theduration is either “startall affectedmachines at the same time” or an interval it takes to restart all affectedmachines.
You canenable or disable a schedule. Disabling a schedule canbehelpfulwhen testing, during specialintervals, or when preparing schedules before you need them.
You cannot use schedules for automated power‑on or shutdown from themanagement console, onlyto restart.
Schedule overlap
Multiple schedules can overlap. In the example above, both schedules affect the accounting ma‑chines. Those machines might be restarted twice on Sunday. The scheduling code is designed toavoid restarting the samemachine more often than intended, but it cannot be guaranteed.
• If the schedules coincideprecisely in start andduration times, it ismore likely that themachinesare restarted only once.
• The more the schedules differ in start and duration times, it’s more likely that multiple restartsoccur.
© 1999–2022 Citrix Systems, Inc. All rights reserved. 212

Citrix Virtual Apps and Desktops
• The number of machines affected by a schedule also affects the chance of an overlap. In theexample, the weekly schedule that affects all machines might initiate restarts faster than thedaily schedule for accounting machines, depending on the duration specified for each.
For an in‑depth look at restart schedules, see Reboot schedule internals.
View restart schedules
1. Select Delivery Groups in the navigation pane.2. Select a group and then click Edit Delivery Group in the Actions pane.3. Select the Restart Schedule page.
The Restart Schedule page contains the following information for each configured schedule:
• Schedule name.• Tag restriction used, if any.• How often the machine restarts occur.• Whether machine users receive a notification.• Whether the schedule is enabled. Disabling a schedule can be helpful when testing, during spe‑cial intervals, or when preparing schedules before you need them.
Add (apply) tags
When you configure a restart schedule that uses a tag restriction, ensure that the tag has been addedto the machines that the schedule affects. In the example above, each of the machines used by theaccounting team has a tag applied. For details, see Tags.
Although you can apply more than one tag to a machine, a restart schedule can specify only one tag.
1. Select Delivery Groups in the navigation pane.2. Select the group containing the machines controlled by the schedule.3. Click ViewMachines and then select the machines you want to add a tag to.4. ClickManage Tags in the Actions pane.5. If the tag exists, enable the check box next to the tag name. If the tag does not exist, clickCreate
and then specify the name for the tag. After the tag is created, enable the check box next to thenewly created tag name.
6. Click Save in theManage Tags dialog.
Create a restart schedule
1. Select Delivery Groups in the navigation pane.
2. Select a group and then click Edit Delivery Group in the Actions pane.
3. On the Restart Schedule page, click Add.
© 1999–2022 Citrix Systems, Inc. All rights reserved. 213

Citrix Virtual Apps and Desktops
4. On the Add Restart Schedule page:
• Type a schedule name and description.
• If you’re using a tag restriction, select the tag.
• InRestart frequency, select howoften the restart occurs: daily, weekdays,weekenddays,or a specific day each week.
• Using the 24‑hour clock, specify the time of day to begin the restart.
• For Restart duration, choose whether all machines are restarted at the same time, or thetotal length of time to begin restarting all of the affected machines. An internal algorithmdetermines when eachmachine is restarted during that interval.
• In Send notification to users, choose whether to display a notification message on theaffectedmachines before a restart begins. By default, no message is displayed.
• If you choose todisplay amessage15minutesbefore the restart begins, you canchoose (inNotification frequency) to repeat themessage every fiveminutes after the initialmessage.By default, the message is not repeated.
• Enter the notification title and text. There is no default text.
If you want themessage to include the number of minutes before restart, include the vari‑able %m%. For example: “Warning: Your computer is automatically restarted in %m%minutes.” The value decrements by five minutes in each repeated message. Unless youchose to restart all machines at the same time, the message displays on each machine atthe appropriate time before the restart, calculated by the internal algorithm.
• To enable the schedule, select the check box. To disable the schedule, clear the check box.
5. Click Apply to apply the changes you made and keep the window open. Or, click OK to applychanges and close the window.
Edit, remove, enable, or disable a restart schedule
1. Select Delivery Groups in the navigation pane.2. Select a group and then click Edit Delivery Group in the Actions pane.3. On the Restart Schedule page, select the check box for a schedule.
• To edit a schedule, click Edit. Update the schedule configuration, using the guidance inCreate a restart schedule.
• To enable or disable a schedule, click Edit. Select or clear the Enable restart schedulecheck box.
• To remove a schedule, click Remove. Confirm the removal. Removing a schedule doesnot affect any tags applied to machines in the affectedmachines.
© 1999–2022 Citrix Systems, Inc. All rights reserved. 214
Citrix Virtual Apps and Desktops
Scheduled restarts delayed due to database outage
Note:
This feature is available only through PowerShell.
If a site database outage occurs before a scheduled restart begins for machines (VDAs) in a deliverygroup, the restarts begin when the outage ends. This can have unintended results.
For example, let’s say you’ve scheduled a delivery group’s restarts to occur during off‑productionhours (beginning at 03:00). A site database outage occurs one hour before a scheduled restart begins(02:00). The outage lasts six hours (until 08:00). The restart schedule begins when the connection be‑tween the Delivery Controller and the site database is restored. The VDA restarts nowbegin five hoursafter their original schedule, resulting in VDAs restarting during production hours.
To help avoid this situation, you can use the MaxOvertimeStartMins parameter for the New-BrokerRebootScheduleV2 and Set-BrokerRebootScheduleV2 cmdlets. The value specifiesthemaximum number of minutes beyond the scheduled start time that a restart schedule can begin.
If the database connection is restoredwithin that time (scheduled time + MaxOvertimeStartMins),the VDA restarts begin.
If the database connection is not restored within that time, the VDA restarts do not begin.
If this parameter is omitted, the scheduled restart begins when the connection to the database is re‑stored, regardless of the outage duration.
For more information, see the cmdlet help. This feature is available only in PowerShell. You cannotset this value when configuring a restart schedule in Studio.
Scheduled restarts for machines inmaintenancemode
Note:
This feature is available only in PowerShell.
To indicate whether a restart schedule affects machines that are in maintenance mode, use theIgnoreMaintenanceMode option with BrokerRebootScheduleV2 cmdlets.
For example, the following cmdlet creates a schedule that restarts machines that are in maintenancemode (in addition to machines that aren’t in maintenance mode).
New-Brokerrebootschedulev2 rebootSchedule1 -DesktopGroupName <myDesktopGroup> -IgnoreMaintenanceMode $true
The following cmdlet modifies an existing restart schedule.
Set-Brokerrebootschedulev2 rebootSchedule1 -IgnoreMaintenanceMode $true
For more information, see the cmdlet help. This feature is available only in PowerShell.
© 1999–2022 Citrix Systems, Inc. All rights reserved. 215
Citrix Virtual Apps and Desktops
Loadmanagedmachines in delivery groups
You can loadmanagemulti‑session OSmachines only.
Loadmanagementmeasures the server load and determineswhich server to select under the currentenvironment conditions. This selection is based on:
• Server maintenance mode status: A multi‑session OS machine is considered for load balanc‑ing only whenmaintenance mode is off.
• Server load index: Determines how likely a server delivering multi‑session OS machines is toreceive connections. The index is a combination of load evaluators: the number of sessions andthe settings for performance metrics such as CPU, disk, and memory use. Load evaluators arespecified in loadmanagement policy settings.
A server load index of 10000 indicates that the server is fully loaded. If no other servers areavailable, users might receive a message that the desktop or application is unavailable whenthey launch a session.
You canmonitor the load index in Director (Monitor), Studio (Manage) search, and the SDK.
In console displays, to display the Server Load Index column (which is hidden by default), se‑lect a machine, right‑click a column heading, and then select Select Column. In the Machinecategory, select Load Index.
In the SDK, use the Get-BrokerMachine cmdlet. For details, see CTX202150.
• Concurrent logon tolerance policy setting: The maximum number of concurrent requests tolog on to the server. (This setting is equivalent to load throttling in XenApp 6.x versions.)
When all servers are at or higher than the concurrent logon tolerance setting, the next logonrequest is assigned to the server with the lowest pending logons. If more than one servermeetsthese criteria, the server with the lowest load index is selected.
Powermanagedmachines in a delivery group
You can powermanage only virtual single‑session OSmachines, not physical machines (including Re‑mote PC Access machines). Single‑session OSmachines with GPU capabilities cannot be suspended,so power‑off operations fail. For multi‑session OSmachines, you can create a restart schedule.
In delivery groups containing pooled machines, virtual single‑session OS machines can be in one ofthe following states:
• Randomly allocated and in use• Unallocated and unconnected
In delivery groups containing static machines, virtual single‑session OSmachines can be:
• Permanently allocated and in use
© 1999–2022 Citrix Systems, Inc. All rights reserved. 216

Citrix Virtual Apps and Desktops
• Permanently allocated and unconnected (but ready)• Unallocated and unconnected
During normal use, static delivery groups typically contain both permanently allocated and unallo‑catedmachines. Initially, all machines are unallocated, except for manually allocated ones when thedelivery group was created. As users connect, machines become permanently allocated. You canfully power manage the unallocated machines in those delivery groups, but only partially managethe permanently allocatedmachines.
• Pools and buffers: For pooled delivery groups and static delivery groups with unallocatedma‑chines, a pool (in this instance) is a set of unallocated or temporarily allocated machines thatare kept in a powered‑on state, ready for users to connect. A user gets a machine immediatelyafter logon. The pool size (the number of machines kept powered‑on) is configurable by timeof day. For static delivery groups, use the SDK to configure the pool.
A buffer is an extra standby set of unallocated machines that are turned on when the numberof machines in the pool falls below a threshold. The threshold is a percentage of the deliverygroup size. For large delivery groups, a significant number of machines might be turned onwhen the threshold is exceeded. So, plan delivery group sizes carefully or use the SDK to adjustthe default buffer size.
• Power state timers: You can use power state timers to suspendmachines after users have dis‑connected for a specified amount of time. For example, machines suspend automatically out‑side of office hours if users are disconnected for at least 10 minutes.
You can configure timers for weekdays and weekends, and for peak and nonpeak intervals.
• Partial powermanagementofpermanently allocatedmachines: Forpermanently allocatedmachines, you can set power state timers, but not pools or buffers. Themachines are turned onat the start of each peak period, and turned off at the start of each off‑peak period. You do nothave the fine control that you have with unallocated machines over the number of machinesthat become available to compensate for machines that are consumed.
Powermanage virtual single‑session OSmachines
1. Select Delivery Groups in the navigation pane.2. Select a group and then click Edit Delivery Group in the Actions pane.3. On the Power Management page, selectWeekdays in Power manage machines. By default,
weekdays are Monday to Friday.4. For random Delivery groups, in Machines to be powered on, click Edit and then specify the
pool size during weekdays. Then, select the number of machines to power on.5. In Peak hours, set the peak and off‑peak hours for each day.6. Set thepower state timers forpeakandnon‑peakhoursduringweekdays: InDuringpeakhours
>When disconnected, specify the delay (in minutes) before suspending any disconnectedma‑
© 1999–2022 Citrix Systems, Inc. All rights reserved. 217
Citrix Virtual Apps and Desktops
chine in thedeliverygroup, and thenselectSuspend. InDuringoff‑peakhours>Whendiscon‑nected, specify the delay before turning off any logged‑off machine in the delivery group, andthen select Shutdown. This timer is not available for delivery groups with randommachines.
7. Select Weekend in Power manage machines, and then configure the peak hours and powerstate timers for weekends.
8. Click Apply to apply any changes you made and keep the window open. Or, click OK to applychanges and close the window.
Use the SDK to:
• Shut down, rather than suspend,machines in response to power state timers, or if youwant thetimers to be based on logoffs, rather than disconnections.
• Change the default weekday and weekend definitions.• Disable power management. See CTX217289.
PowermanageVDImachines transitioning toadifferent timeperiodwithdisconnectedsessions
Important:
This enhancement applies only to VDI machines with disconnected sessions. It does not applyto VDI machines with logged off sessions.
In earlier releases, a VDI machine transitioning to a time period where an action (disconnect ac‑tion=“Suspend” or “Shutdown”) was required remained powered on. This scenario occurred if themachine disconnected during a time period (peak or off‑peak times) where no action (disconnectaction=“Nothing”) was required.
Starting with Citrix Virtual Apps and Desktops 7 1909, themachine is suspended or powered offwhenthe specified disconnection time elapses, depending on the disconnect action configured for the des‑tination time period.
For example, you configure the following power policies for a VDI delivery group:
• Set PeakDisconnectAction to “Nothing”• Set OffPeakDisconnectAction to “Shutdown”• Set OffPeakDisconnectTimeout to “10”Note:
For more information about the disconnect action power policy, see https://developer‑docs.citrix.com/projects/delivery‑controller‑sdk/en/latest/Broker/about_Broker_PowerManagement/#power‑policy and https://developer‑docs.citrix.com/projects/delivery‑controller‑sdk/en/latest/Broker/Get‑BrokerDesktopGroup/.
In earlier releases, a VDI machine with a session disconnected during peak times remained poweredon when it transitioned from peak to off‑peak. Starting with Citrix Virtual Apps and Desktops 7 1909,
© 1999–2022 Citrix Systems, Inc. All rights reserved. 218
Citrix Virtual Apps and Desktops
the OffPeakDisconnectAction and the OffPeakDisconnectTimeout policy actions are appliedto the VDI machine on period transition. As a result, the machine is powered off 10 minutes after ittransitions to off‑peak.
If youwant to revert to the previous behavior (that is, take no action onmachines that transition frompeak to off‑peak or off‑peak to peak with disconnected sessions), do one of the following:
• Set the “LegacyPeakTransitionDisconnectedBehaviour” registry value to 1, the equivalent oftrue which enables the previous behavior. By default, the value is 0, or false, which triggersdisconnect power policy actions on period transition.
– Path: HKEY_LOCAL_MACHINE\SOFTWARE\Citrix\DesktopServer– Name: LegacyPeakTransitionDisconnectedBehaviour– Type: REG_DWORD– Data: 0x00000001 (1)
• Configure the setting by using the Set-BrokerServiceConfigurationData PowerShellcommand. For example:
– PS C:\> Set-BrokerServiceConfigurationData HostingManagement.LegacyPeakTransitionDisconnectedBehaviour -SettingValue $true
Amachinemustmeet the following criteria before power policy actions can be applied to it on periodtransition:
• Has a disconnected session.• Has no pending power actions.• Belongs to a VDI (single session) delivery group that transitions to a different time period.• Has a session that disconnects during a certain time period (peak or off‑peak times) and transi‑tions to a period where a power action is assigned.
Change the percentage of VDAs in a powered state for catalogs
1. Adjust the peak hours for the delivery group from the Power management section for the de‑livery group.
2. Make a note of the Desktop Group name.
3. With administrator privileges, start PowerShell and run the following commands. Replace“Desktop Group Name” with the name of your desktop group that has a changed percentageof the VDAs running.
asnp Citrix*
## Set-BrokerDesktopGroup "Desktop Group Name"-PeakBufferSizePercent100
A value of 100 means that 100% of the VDAs are in the ready state.
© 1999–2022 Citrix Systems, Inc. All rights reserved. 219
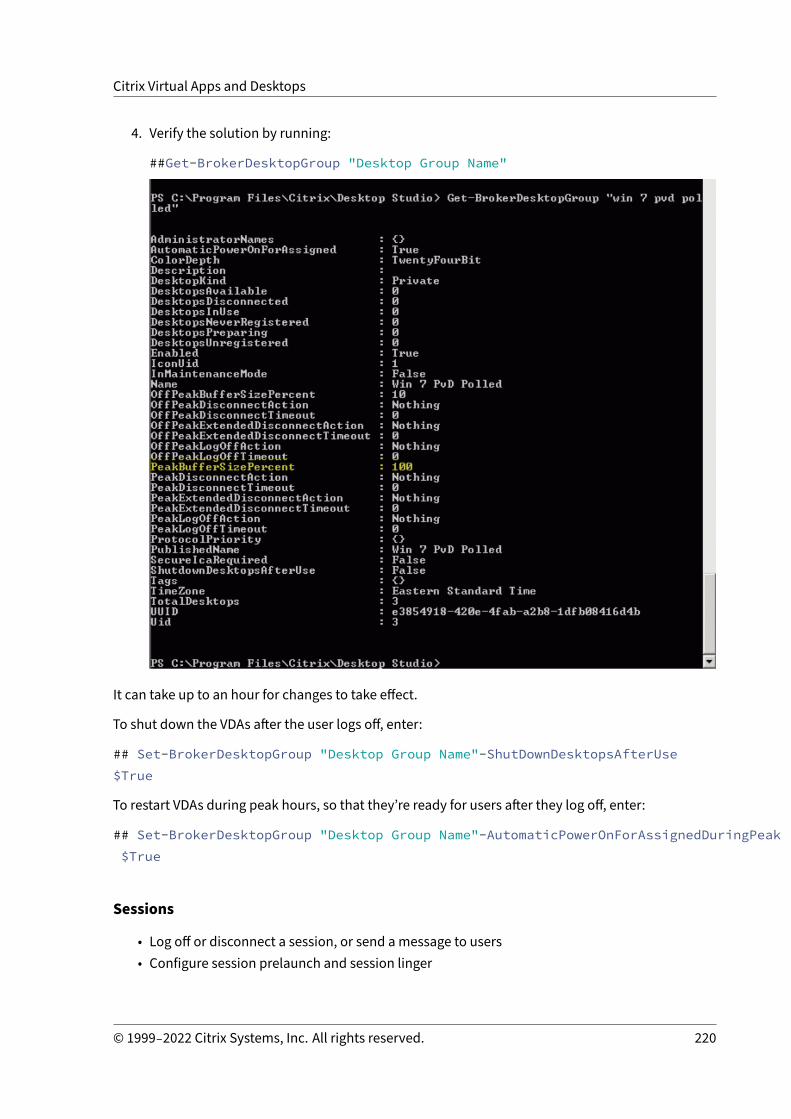
Citrix Virtual Apps and Desktops
4. Verify the solution by running:
##Get-BrokerDesktopGroup "Desktop Group Name"
It can take up to an hour for changes to take effect.
To shut down the VDAs after the user logs off, enter:
## Set-BrokerDesktopGroup "Desktop Group Name"-ShutDownDesktopsAfterUse$True
To restart VDAs during peak hours, so that they’re ready for users after they log off, enter:
## Set-BrokerDesktopGroup "Desktop Group Name"-AutomaticPowerOnForAssignedDuringPeak$True
Sessions
• Log off or disconnect a session, or send amessage to users• Configure session prelaunch and session linger
© 1999–2022 Citrix Systems, Inc. All rights reserved. 220

Citrix Virtual Apps and Desktops
Log off or disconnect a session
1. In the Studio navigation pane, select Delivery Groups.2. Select a delivery group and then select ViewMachines in the Actions pane.3. In the middle pane, select the machine, select View Sessions in the Actions pane, and then
select a session.• Alternatively, in the middle pane, select the Session tab and then select a session.
4. To log off from a session, select Log off in the Actions pane. The session closes and the useris logged out. The machine becomes available to other users unless it is allocated to a specificuser.
5. To disconnect a session, select Disconnect in the Actions pane. Applications continue to runin the session and the machine remains allocated to that user. The user can reconnect to thesamemachine.
You can configure power state timers for single‑session OSmachines to automatically handle unusedsessions. For details, see Power managedmachines.
Send amessage to a delivery group
1. In the Studio navigation pane, select Delivery Groups.2. Select a delivery group and then select ViewMachines in the Actions pane.3. In the middle pane, select a machine to which you want to send amessage.4. In the Actions pane, select View Sessions.5. In the middle pane, select all sessions and then select SendMessage in the Actions pane.6. Type yourmessage and clickOK. You can specify the level of severity if needed. Options include
Critical,Question,Warning, and Information.
Alternatively, you can send a message by using Citrix Director. For more information, see Send mes‑sages to users.
Configure session prelaunch and session linger in a delivery group
These features are supported only onmulti‑session OSmachines.
The session prelaunch and session linger features help specified users access applications quickly,by starting sessions before they are requested (session prelaunch) and keeping application sessionsactive after a user closes all applications (session linger).
By default, session prelaunch and session linger are not used. A session starts (launches) when a userstarts an application, and remains active until the last open application in the session closes.
Considerations:
• The delivery group must support applications, and the machines must be running a VDA formulti‑session OS, minimum version 7.6.
© 1999–2022 Citrix Systems, Inc. All rights reserved. 221
Citrix Virtual Apps and Desktops
• These features are supported only when using Citrix Workspace app for Windows, and also re‑quire extra Citrix Workspace app configuration. For instructions, search for session prelaunchin the product documentation for your Citrix Workspace app for Windows version.
• Citrix Workspace app for HTML5 is not supported.• When using session prelaunch, if a user’s machine is put into suspend or hibernate mode,prelaunch does not work (regardless of session prelaunch settings). Users can lock theirmachines/sessions. However, if a user logs off from Citrix Workspace app, the session is endedand prelaunch no longer applies.
• When using session prelaunch, physical client machines cannot use the suspend or hibernatepower management functions. Client machine users can lock their sessions but should not logoff.
• Prelaunched and lingering sessions consume a concurrent license, but only when connected.If using a user/device license, the license lasts 90 days. Unused prelaunched and lingering ses‑sions disconnect after 15minutes by default. This value can be configured in PowerShell (New/Set-BrokerSessionPreLaunch cmdlet).
• Careful planning andmonitoring of your users’ activity patterns are essential to tailoring thesefeatures to complement eachother. Optimal configurationbalances thebenefits of earlier appli‑cation availability for users against the cost of keeping licenses in use and resources allocated.
• You can also configure session prelaunch for a scheduled time of day in Citrix Workspace app.
How long unused prelaunched and lingering sessions remain active
There are several ways to specify how long an unused session remains active if the user does not startan application: a configured timeout and server load thresholds. You can configure all of them. Theevent that occurs first causes the unused session to end.
• Timeout: A configured timeout specifies the number of minutes, hours, or days an unusedprelaunched or lingering session remains active. If you configure too short a timeout,prelaunched sessions end before they provide the user benefit of quicker application access.If you configure too long a timeout, incoming user connections might be denied because theserver doesn’t have enough resources.
You can enable this timeout from the SDK only (New/Set-BrokerSessionPreLaunchcmdlet), not from the management console. If you disable the timeout, it does not appear inthe console display for that delivery group or in the Edit Delivery Group pages.
• Thresholds: Automatically ending prelaunched and lingering sessions basedon server load en‑sures that sessions remain open as long as possible, assuming that server resources are avail‑able. Unused prelaunched and lingering sessions do not cause denied connections becausethey are ended automatically when resources are needed for new user sessions.
You can configure two thresholds: the average percentage load of all servers in the deliverygroup, and the maximum percentage load of a single server in the group. When a threshold is
© 1999–2022 Citrix Systems, Inc. All rights reserved. 222

Citrix Virtual Apps and Desktops
exceeded, the sessions that have been in the prelaunch or lingering state for the longest timeare ended. Sessions are ended one‑by‑one at minute intervals until the load falls below thethreshold. While the threshold is exceeded, no new prelaunch sessions are started.
Servers with VDAs that have not registered with a Controller and servers in maintenance mode areconsidered fully loaded. An unplanned outage causes prelaunch and lingering sessions to end auto‑matically to free capacity.
To enable session prelaunch
1. Select Delivery Groups in the navigation pane.
2. Select a group and then click Edit Delivery Group in the Actions pane.
3. On the Application Prelaunch page, enable session prelaunch by choosing when sessionslaunch:
• When a user starts an application. This is the default setting. Session prelaunch is dis‑abled.
• When any user in the delivery group logs on to Citrix Workspace app for Windows.• When anyone in a list of users and user groups logs on to Citrix Workspace app for Win‑dows. Be sure to also specify users or user groups if you choose this option.
© 1999–2022 Citrix Systems, Inc. All rights reserved. 223
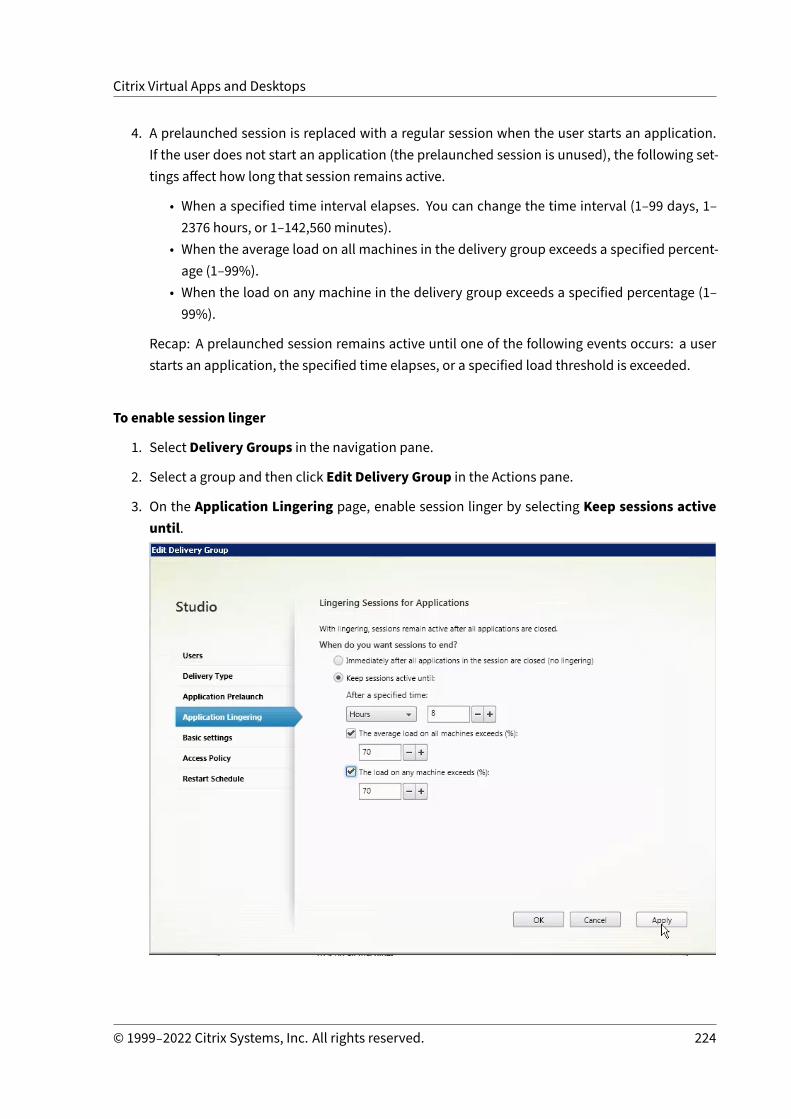
Citrix Virtual Apps and Desktops
4. A prelaunched session is replaced with a regular session when the user starts an application.If the user does not start an application (the prelaunched session is unused), the following set‑tings affect how long that session remains active.
• When a specified time interval elapses. You can change the time interval (1–99 days, 1–2376 hours, or 1–142,560 minutes).
• When the average load on all machines in the delivery group exceeds a specified percent‑age (1–99%).
• When the load on any machine in the delivery group exceeds a specified percentage (1–99%).
Recap: A prelaunched session remains active until one of the following events occurs: a userstarts an application, the specified time elapses, or a specified load threshold is exceeded.
To enable session linger
1. Select Delivery Groups in the navigation pane.
2. Select a group and then click Edit Delivery Group in the Actions pane.
3. On the Application Lingering page, enable session linger by selecting Keep sessions activeuntil.
© 1999–2022 Citrix Systems, Inc. All rights reserved. 224

Citrix Virtual Apps and Desktops
4. Several settings affect how long a lingering session remains active if the user does not start an‑other application.
• When a specified time interval elapses. You can change the time interval: 1–99 days, 1–2376 hours, or 1–142,560 minutes.
• When the average load on all machines in the delivery group exceeds a specified percent‑age: 1–99%.
• When the load on any machine in the delivery group exceeds a specified percentage: 1–99%.
Recap: A lingering session remains active until one of the following events occurs: a user startsan application, the specified time elapses, or a specified load threshold is exceeded.
Troubleshoot
• VDAs that are not registered with a Delivery Controller are not considered when launching bro‑kered sessions. This results in underutilization of otherwise available resources. There are var‑ious reasons a VDAmight not be registered, many of which an administrator can troubleshoot.The details display provides troubleshooting information in the catalog creation wizard, andafter you add a catalog to a delivery group.
After you create a delivery group, the details pane for a delivery group indicates the number ofmachines that can be registered but are not. For example, one or more machines are poweredon and not inmaintenancemode, but are not currently registeredwith a Controller. When view‑ing a “not registered, but should be”machine, review the Troubleshoot tab in the details panefor possible causes and recommended corrective actions.
For messages about functional level, see VDA versions and functional levels.
For information about VDA registration troubleshooting, seeCTX136668.
• In the display for a delivery group, the Installed VDA version in the details pane might differfrom the actual version installed on the machines. The machine’s Windows Programs and Fea‑tures display shows the actual VDA version.
• For machines with Power State Unknown status, see CTX131267 for guidance.
Create application groups
April 14, 2021
© 1999–2022 Citrix Systems, Inc. All rights reserved. 225

Citrix Virtual Apps and Desktops
Introduction
Application groups let you manage collections of applications. Create application groups for appli‑cations shared across different delivery groups. Or, applications used by a subset of users withindelivery groups. Application groups are optional; they offer an alternative to adding the same appli‑cations tomultiple delivery groups. Associate delivery groupswithmore than one application group,and associate an application group with more than one delivery group.
Using application groups canprovide applicationmanagement and resource control advantages overusing more delivery groups:
• The logical grouping of applications and their settings lets you manage those applications asa single unit. For example, you don’t have to add (publish) the same application to individualdelivery groups one at a time.
• Session sharing between application groups can conserve resource consumption. In othercases, disabling session sharing between application groups can be beneficial.
• You can use the tag restriction feature to publish applications from an application group, con‑sidering only a subset of the machines in selected delivery groups. With tag restrictions, youcan use your existing machines for more than one publishing task, saving the costs associatedwith deploying and managing extra machines. A tag restriction can be thought of as subdivid‑ing (or partitioning) the machines in a delivery group. Using an application group or desktopswith a tag restriction can be helpful when isolating and troubleshooting a subset of machinesin a delivery group.
Example configurations
Example 1:
The following graphic shows a Citrix Virtual Apps and Desktops deployment that includes applicationgroups:
© 1999–2022 Citrix Systems, Inc. All rights reserved. 226

Citrix Virtual Apps and Desktops
In this configuration, applications are added to the application groups, not the delivery groups. Thedelivery groups specify whichmachines are used. (Although not shown, themachines are inmachinecatalogs.)
Application group 1 is associated with delivery group 1. Access the applications in application group1 by the users specified in application group 1. These groups only appear as long as they are also inthe user list for delivery group 1. This configuration follows the guidance that the user list for an appli‑cation group is a subset (a restriction) of the user lists for the associated delivery groups. The settingsin application group 1 (such as application session sharing between application groups, associateddelivery groups) apply to applications and users in that group. The settings in delivery group 1 applyto users in application groups 1 and 2, because those application groups have been associated withthat delivery group.
Applicationgroup2 is associatedwith twodeliverygroups: 1and2. Eachof thosedeliverygroups is as‑signed a priority in application group 2, indicating the order in which the delivery groups are checkedwhen an application is launched. Delivery groups with equal priority are load balanced. Access theapplications in application group 2 by the users specified in application group 2. However, theymustalso appear in the user lists for delivery group 1 and delivery group 2.
Example 2:
This simple layout uses tag restrictions to limit which machines are considered for certain desktop
© 1999–2022 Citrix Systems, Inc. All rights reserved. 227

Citrix Virtual Apps and Desktops
and application launches. The site has one shared delivery group, one published desktop, and oneapplication group configured with two applications.
Tags have been added to each of the three machines (VDA 101–103).
The application group was created with the “Orange” tag restriction. Each of its applications islaunched only onmachines in that delivery group that have the tag “Orange,” VDA 102 and 103.
Formore comprehensive examples and guidance for using tag restrictions in application groups (andfor desktops), see Tags.
Guidance and considerations
Citrix recommends adding applications to either application groups or delivery groups, but not both.Otherwise, the additional complexity of having applications in two group types can make it moredifficult to manage.
By default, an application group is enabled. After you create an application group, you can edit thegroup to change this setting. See Manage application groups.
By default, application session sharing between application groups is enabled. See Session sharingbetween application groups.
Citrix recommends upgrading your delivery groups to the current version. This process requires:
1. Upgrading VDAs on the machines used in the delivery group.2. Upgrading the machine catalogs containing those machines.3. Upgrading the delivery group.
For details, see Manage delivery groups.
To use application groups, your core components must be minimum version 7.9.
Creating application groups requires the delegated administration permission of the Delivery GroupAdministrator built‑in role. See Delegated administration for details.
© 1999–2022 Citrix Systems, Inc. All rights reserved. 228

Citrix Virtual Apps and Desktops
This article refers to “associating” an application with more than one application group. It differenti‑ates that action fromadding instances of that application fromanavailable source. Similarly, deliverygroups are associated with application groups, rather than being additions or components of one an‑other.
Session sharing with application groups
When application session sharing is enabled, all applications launch in the same application session.This saves the costs associated with launching more application sessions, and allows the use of ap‑plication features that involve the clipboard, such as copy‑paste operations. However, in some situa‑tions you can clear session sharing.
When you use application groups you can configure application session sharing in the following threeways which extend the standard session sharing behavior available when you are using only deliverygroups:
• Session sharing enabled between application groups.• Session sharing enabled only between applications in the same application group.• Session sharing disabled.
Session sharing between application groups
You can enable application session sharing between application groups, or you can disable it to limitapplication session sharing only to applications in the same application group.
• An example when enabling session sharing between application groups is helpful:
Application group 1 contains Microsoft Office applications such as Word and Excel. Applica‑tion group 2 contains other applications such as Notepad and Calculator, and both applicationgroups are attached to the same delivery group. A user who has access to both applicationgroups starts an application session by launching Word, and then launches Notepad. If thecontroller finds that the user’s existing session running Word is suitable for running Notepadthen Notepad is started within the existing session. If Notepad cannot be run from the exist‑ing session—for example if the tag restriction excludes the machine that the session is runningon—then a new session on a suitable machine is created rather than using session sharing.
• An example when disabling session sharing between application groups is helpful:
A configuration with a set of applications that do not interoperate well with other applicationsthat are installed on the same machines. Such as two different versions of the same softwaresuite or twodifferent versions of the samewebbrowser. You prefer not to allow a user to launchboth versions in the same session.
© 1999–2022 Citrix Systems, Inc. All rights reserved. 229
Citrix Virtual Apps and Desktops
Create an application group for each version of the software suite, and add the applications foreach version of the software suite to the corresponding application group. If session sharing be‑tween groups is disabled for each of those application groups, a user specified in those groupscan run applications of the same version in the same session. The user can still run other ap‑plications at the same time, but not in the same session. When launching one of the different‑versioned applications, or any application that is not contained in an application group, thatapplication is launched in a new session.
This session sharing between application groups feature is not a security sandboxing feature. It is notfoolproof, and it cannot prevent users from launching applications into their sessions through othermeans (for example, through Windows Explorer).
If a machine is at capacity, new sessions are not started on it. New applications are started in existingsessions on the machine as needed using session sharing.
You can only make prelaunched sessions available to application groups which have application ses‑sion sharing allowed. (Sessions which use the session linger feature are available to all applicationgroups.) These features must be enabled and configured in each of the delivery groups associatedwith the application group. You cannot configure them in the application groups.
By default, application session sharing between application groups is enabled when you create anapplication group. You cannot change this when you create the group. After you create an applicationgroup, you can edit the group to change this setting. See Manage application groups.
Disable session sharing within an application group
You can prevent application session sharing between applications which are in the same applicationgroup.
• An example when disabling session sharing within application groups is helpful:
You want your users to access multiple simultaneous full screen sessions of an application onseparate monitors.
You create an application group and add the applications to it.
By default, application session sharing is enabled when you create an application group. You cannotchange this settingwhen you create the group. After you create an application group, you can edit thegroup to change this setting. See Manage application groups.
Create an application group
To create an application group:
1. Select Applications in the Studio navigation pane, and then select Create Application Groupin the Actions pane.
© 1999–2022 Citrix Systems, Inc. All rights reserved. 230

Citrix Virtual Apps and Desktops
2. The wizard launches with an Introduction page, which you can remove from future launchesof this wizard.
3. Thewizard guides you through thepagesdescribed in the following section. Whenyouaredonewith each page, clickNext until you reach the Summary page.
Step 1. Delivery Groups
TheDeliveryGroupspage lists all delivery groups,with thenumberofmachines eachgroupcontains.
• The Compatible Delivery Groups list contains delivery groups you can select. Compatible de‑livery groups contain random (not permanently or statically assigned) multi‑session or single‑session OSmachines.
• The Incompatible Delivery Groups list contains delivery groups you cannot select. Each entryexplains why it is not compatible, such as containing statically assignedmachines.
Anapplicationgroupcanbeassociatedwithdelivery groups containing shared (not private)machinesthat can deliver applications.
You can also select delivery groups containing shared machines that deliver only desktops, if both ofthe following conditions are met:
• Thedeliverygroupcontains sharedmachinesandwascreatedwithaXenDesktopversionearlierthan 7.9.
• You have Edit Delivery Group permission.
The delivery group type is automatically converted to “desktops and applications” when the applica‑tion group creation wizard is committed.
Although you can create an application group that has no associated delivery groups (perhaps to or‑ganize applications or to serve as storage for applications not currently used) the application groupcannot be used to deliver applications until it specifies at least one delivery group. Also, you cannotadd applications to the application group from the From Startmenu source if there are no deliverygroups specified.
The delivery groups you select specify the machines that are used to deliver applications. Select thecheck boxes next to the delivery groups you want to associate with the application group.
To add a tag restriction, select Restrict launches to machines with the tag and then select the tagfrom the drop‑down list.
Step 2. Users
Specify application users in the application group. Either allow all users and user groups in the de‑livery groups you selected on the previous page, or select specific users and user groups from thosedelivery groups. If you restrict use to specified users, then only the users specified in the delivery
© 1999–2022 Citrix Systems, Inc. All rights reserved. 231
Citrix Virtual Apps and Desktops
group, the application group can access the applications in this group. Essentially, the user list in theapplication group provides a filter on the user lists in the delivery groups.
Enabling or disabling application use by unauthenticated users is available only in delivery groups,not in application groups.
For information about where user lists are specified in a deployment, see Where user lists are speci‑fied.
Step 3. Applications
Good to know:
• By default, new applications you add are placed in a folder named Applications. You can spec‑ify a different folder. If you try to add an application and one with the same name exists inthat folder, you are prompted to rename the application you are adding. If you agree with thesuggested unique name, the application is added with that new name. Otherwise, you mustrename it yourself before it can be added. For details, see Manage application folders.
• You can change an application’s properties (settings) when you add it, or later. See Changeapplication properties. If you publish two applications with the same name to the same users,change the Application name (for user) property in Studio. Otherwise, users see duplicatenames in Citrix Workspace app.
• When you add an application to more than one application group, a visibility issue can occurif you do not have sufficient permission to view the application in all of those groups. In suchcases, either consult an administrator with greater permissions or have your scope extended toinclude all the groups to which the application was added.
Click the Add from the drop‑downmenu to display the application sources.
• From Start menu: Applications that are discovered on a machine in the selected deliverygroups. When you select this source, a newpage launcheswith a list of discovered applications.Select the check boxes of applications to add, and then clickOK.
This source cannot be selected if you selected any of the following:
– Application groups that have no associated delivery groups.– Application groups with associated delivery groups that contain nomachines.– A delivery group containing nomachines.
• Manually defined: Applications located in the site or elsewhere in your network. When youselect this source, a new page launches where you type the path to the executable, workingdirectory, optional command line arguments, and display names for administrators and users.After entering this information, clickOK.
• Existing: Applications previously added to the site. When you select this source, a new page
© 1999–2022 Citrix Systems, Inc. All rights reserved. 232

Citrix Virtual Apps and Desktops
launches with a list of discovered applications. Select the check boxes of applications to addand then clickOK. This source cannot be selected If the site has no applications.
• App‑V: Applications in App‑V packages. When you select this source, a new page launcheswhere you select the App‑V server or the Application Library. From the resulting display, selectthe check boxes of applications to add, and then click OK. For more information, see App‑V.This source cannot be selected (or might not appear) if App‑V is not configured for the site.
As noted, certain entries in the Add drop‑down menu are not selectable if there is no valid source ofthat type. Sources that are incompatible are not listed at all (for example, you cannot add applicationgroups to application groups, so that source is not listed when you create an application group).
Step 4. Scopes
This page appears only if you have previously created a custom scope. By default, the All scope isselected. For more information, see Delegated administration.
Step 5. Summary
Enter a name for the application group. You can also (optionally) enter a description.
Review the summary information and then click Finish.
Manage application groups
April 14, 2021
Introduction
This article describes how tomanage the application groups you created.
See Applications for information about managing applications in application groups or deliverygroups, including how to:
• Add or remove applications in an application group.• Change application group associations.
Managing application groups requires the delegated administration permissions of the DeliveryGroup Administrator built‑in role. See Delegated administration for details.
© 1999–2022 Citrix Systems, Inc. All rights reserved. 233

Citrix Virtual Apps and Desktops
Enable or disable an application group
When an application group is enabled, it can deliver the applications that have been added to it. Dis‑abling an application group disables each application in that group. However, if those applicationsare also associated with other enabled application groups, they can be delivered from those othergroups. If the application was explicitly added to delivery groups associated with the applicationgroup, disabling the application group does not affect the applications in those delivery groups.
An application group is enabled when you create it. You cannot change this configuration when youcreate the group.
1. Select Applications in the Studio navigation pane.2. Select an application group in the middle pane and then select Edit Application Group in the
Actions pane.3. On the Settings page, select or clear the Enable Application Group check box.4. Click Apply to keep the window open, or clickOK to apply changes and close the window.
Enable or disable application session sharing between application groups
Session sharing between application groups is enabled when you create an application group. Youcannot change this configurationwhen you create the group. Formore information, see Session shar‑ing with application groups.
1. Select Applications in the Studio navigation pane.2. Select an application group in the middle pane and then select Edit Application Group in the
Actions pane.3. On the Settings page, select or clear the Enable application session sharing between Appli‑
cation Groups check box.4. Click Apply to keep the window open, or clickOK to apply changes and close the window.
Disable application session sharing within an application group
Session sharing between applications in the same application group is enabled by default when youcreate an application group. If you disable application session sharing between application groups,session sharing between applications in the same application group remains enabled.
You can use the PowerShell SDK to configure application groups with application session sharing dis‑abled between the applications they contain. In some circumstances this option is desirable. Forexample, you might want users to start non‑seamless applications in full‑size application windowson separate monitors.
When you disable application session sharing within an application group, each application in thatgroup launches in a new application session. If a suitable disconnected session is available which is
© 1999–2022 Citrix Systems, Inc. All rights reserved. 234

Citrix Virtual Apps and Desktops
running the same application, it is reconnected. For example, when launching Notepadwith a discon‑nected session with Notepad running, that session is reconnected instead of creating a one. Whenmultiple suitable disconnected sessions are available, one of the sessions is chosen to reconnect to,in a random but deterministic manner. When the situation reoccurs in the same circumstances, thesame session is chosen, but the session is not necessarily predictable otherwise.
Use the PowerShell SDK either to disable application session sharing for all applications in an existingapplication group, or to create a group with application session sharing disabled.
PowerShell cmdlet examples
To disable session sharing, use the Broker PowerShell cmdlets New-BrokerApplicationGroup orSet-BrokerApplicationGroup with the parameter SessionSharingEnabled set to False andthe parameter SingleAppPerSession set to True.
• For example, to create an application group with application session sharing disabled for allapplications in the group:
New-BrokerApplicationGroup AppGr1 -SessionSharingEnabled $False ‐SingleAppPerSession $True
• For example, to disable application session sharing between all applications in an existing ap‑plication group:
Set-BrokerApplicationGroup AppGR1 -SessionSharingEnabled $False ‐SingleAppPerSession $True
Considerations
• To enable the SingleAppPerSession property you must set the SessionSharingEnabledproperty to False. The two properties must not be enabled at the same time. TheSessionSharingEnabled parameter refers to sharing sessions between applicationgroups.
• Application session sharing works only for applications that are associated with applicationgroups but are not associated with delivery groups. All applications associated directly witha delivery group share sessions by default.
• If an application is assigned to multiple application groups, make sure that the groups do nothave conflicting settings. For example, one group with the option set to True, and anothergroup’s option set to False results in unpredictable behavior.
Rename an application group
1. Select Applications in the Studio navigation pane.
© 1999–2022 Citrix Systems, Inc. All rights reserved. 235
Citrix Virtual Apps and Desktops
2. Select an application group in the middle pane and then select Rename Application Group inthe Actions pane.
3. Specify the new unique name and then clickOK.
Add, remove, or change the priority of delivery group associations with an applicationgroup
Anapplicationgroupcanbeassociatedwithdelivery groups containing shared (not private)machinesthat can deliver applications.
You can also select delivery groups containing shared machines that deliver only desktops, if both ofthe following conditions are met:
• The delivery group contains sharedmachines and was created with a version earlier than 7.9.• You have Edit Delivery Group permission.
The delivery group type is automatically converted to “desktops and applications” when the Edit Ap‑plication Group dialog is committed.
1. Select Applications in the Studio navigation pane.2. Select an application group in the middle pane and then select Edit Application Group in the
Actions pane.3. Select the Delivery Groups page.4. To add delivery groups, click Add. Select the check boxes of available delivery groups. (Incom‑
patible delivery groups cannot be selected.) When you finish your selections, clickOK.5. To remove delivery groups, select the check boxes of the groups you want to remove and then
click Remove. Confirm the deletion when prompted.6. To change the priority of delivery groups, select the check box of the delivery group and then
click Edit Priority. Enter the priority (0 = highest) and then clickOK.7. Click Apply to apply any changes you made and keep the window open, or click OK to apply
changes and close the window.
Add, change, or remove a tag restriction in an application group
Adding, changing, and removing tag restrictions can have unanticipated effects on which machinesare considered for application launch. Review the considerations and cautions in Tags.
1. Select Applications in the Studio navigation pane.2. Select an application group in the middle pane and then select Edit Application Group in the
Actions pane.3. Select the Delivery Groups page.4. To add a tag restriction, selectRestrict launches tomachineswith the tag and then select the
tag from the drop‑down list.
© 1999–2022 Citrix Systems, Inc. All rights reserved. 236

Citrix Virtual Apps and Desktops
5. To changeor remove a tag restriction, select a different tag or remove the tag restriction entirelyby clearing Restrict launches tomachines with this tag.
6. Click Apply to apply any changes you made and keep the window open, or click OK to applychanges and close the window.
Add or remove users in an application group
For detailed information about users, see Create application groups.
1. Select Applications in the Studio navigation pane.2. Select an application group in the middle pane and then select Edit Application Group in the
Actions pane.3. Select the Users page. Indicate whether you want to allow all users in the associated delivery
groups to use applications in the application group, or only specific users and groups. To addusers, click Add, and then specify the users you want to add. To remove users, select one ormore users and then click Remove.
4. Click Apply to apply any changes you made and keep the window open, or click OK to applychanges and close the window.
Change scopes in an application group
You can change a scope only if you have created a scope (you cannot edit the All scope). For moreinformation, see Delegated administration.
1. Select Applications in the Studio navigation pane.2. Select an application group in the middle pane and then select Edit Application Group in the
Actions pane.3. Select the Scopes page. Select or clear the check box next to a scope.4. Click Apply to apply any changes you made and keep the window open, or click OK to apply
changes and close the window.
Delete an application group
An applicationmust be associatedwith at least one delivery group or application group. If deleting anapplication group results in one ormore applications no longer belonging to a group, you arewarnedthat deleting that groupalso removes those applications. You can then confirmor cancel thedeletion.
Deleting an application does not delete it from its original source. However, if you want to make itavailable again, youmust add it again.
1. Select Applications in the Studio navigation pane.2. Select an application group in the middle pane and then select Delete Group in the Actions
pane.
© 1999–2022 Citrix Systems, Inc. All rights reserved. 237
Citrix Virtual Apps and Desktops
3. Confirm the deletion when prompted.
Remote PC Access
April 14, 2021
Remote PC Access is a feature of Citrix Virtual Apps and Desktops that enables organizations to easilyallow their employees to access corporate resources remotely in a securemanner. The Citrix platformmakes this secure access possible by giving users access to their physical office PCs. If users can ac‑cess their office PCs, they can access all the applications, data, and resources they need to do theirwork. Remote PC Access eliminates the need to introduce and provide other tools to accommodateteleworking. For example, virtual desktops or applications and their associated infrastructure.
Remote PC Access uses the same Citrix Virtual Apps and Desktops components that deliver virtualdesktops and applications. As a result, the requirements and process of deploying and configuringRemote PC Access are the same as those required for deploying Citrix Virtual Apps and Desktops forthe delivery of virtual resources. This uniformity provides a consistent and unified administrative ex‑perience. Users receive the best user experience by using Citrix HDX to deliver their office PC session.
The feature consists of a machine catalog of type Remote PC Access that provides this functionality:
• Ability to addmachines by specifying OUs. This ability facilitates the addition of PCs in bulk.• Automatic user assignment based on the user that logs into the officeWindows PC. We supportsingle user andmultiple users assignments.
Citrix Virtual Apps and Desktops can accommodate more use cases for physical PCs by using othertypes of machine catalogs. These use cases include:
• Physical Linux PCs• Pooled physical PCs (that is, randomly assigned, not dedicated)
Notes:
For details on the supported OS versions, see the system requirements for the VDA for single‑session OS and Linux VDA.
Foron‑premisesdeployments, RemotePCAccess is validonly forCitrix VirtualAppsandDesktopsAdvancedorPremium licenses. Sessions consume licenses in the samewayasotherCitrix VirtualDesktops sessions. For Citrix Cloud, Remote PC Access is valid for the Citrix Virtual Apps andDesktops Service and Workspace Premium Plus.
© 1999–2022 Citrix Systems, Inc. All rights reserved. 238
Citrix Virtual Apps and Desktops
Considerations
While all the technical requirements and considerations that apply to Citrix Virtual Apps andDesktopsin general also apply to Remote PC Access, some might be more relevant or exclusive to the physicalPC use case.
Deployment considerations
While planning the deployment of Remote PC Access, make a few general decisions.
• You can add Remote PC Access to an existing Citrix Virtual Apps and Desktops deployment. Be‑fore choosing this option, consider the following:
– Are the current Delivery Controllers or Cloud Connectors appropriately sized to supportthe additional load associated with the Remote PC Access VDAs?
– Are the on‑premises site databases and database servers appropriately sized to supportthe additional load associated with the Remote PC Access VDAs?
– Will the existing VDAs and the new Remote PC Access VDAs exceed the number of maxi‑mum supported VDAs per site?
• Youmust deploy the VDA to office PCs through an automated process. The following are two ofoptions available:
– Electronic Software Distribution (ESD) tools such as SCCM: Install VDAs using SCCM.– Deployment scripts: Install VDAs using scripts.
• Review the Remote PC Access security considerations.
Machine catalog considerations
The type of machine catalog required depends on the use case:
• Remote PC Access– Windows dedicated PCs– Windows dedicatedmulti‑user PCs
• Single‑session OS– Static ‑ Dedicated Linux PCs– Random ‑ Pooled Windows and Linux PCs
Once you identify the type of machine catalog, consider the following:
• A machine can be assigned to only onemachine catalog at a time.• To facilitate delegated administration, consider creatingmachine catalogs basedongeographiclocation, department, or any other grouping that eases delegating administration of each cata‑log to the appropriate administrators.
• Whenchoosing theOUs inwhich themachineaccounts reside, select lower‑levelOUs for greatergranularity. If such granularity is not required, you can choose higher‑level OUs. For example,
© 1999–2022 Citrix Systems, Inc. All rights reserved. 239

Citrix Virtual Apps and Desktops
in the case of Bank/Officers/Tellers, select Tellers for greater granularity. Otherwise, you canselectOfficers or Bank based on the requirement.
• Moving or deleting OUs after being assigned to a Remote PC Access machine catalog affectsVDA associations and causes issues with future assignments. Therefore, make sure to plan ac‑cordingly so that OU assignment updates for machine catalogs are accounted for in the ActiveDirectory change plan.
• If it is not easy to choose OUs to addmachines to themachine catalog because of the OU struc‑ture, you don’t have to select any OUs. You can use PowerShell to addmachines to the catalogafterward. User auto‑assignments continue to work if the desktop assignment is configuredcorrectly in the Delivery Group. A sample script to add machines to the machine catalog alongwith user assignments is available in GitHub.
• Integrated Wake on LAN is available only with the Remote PC Access type machine catalog.
Linux VDA considerations
These considerations are specific to the Linux VDA:
• Use the Linux VDA on physical machines only in non‑3D mode. Due to limitations on NVIDIA’sdriver, the local screen of the PC cannot be blacked out and displays the activities of the sessionwhen HDX 3Dmode is enabled. Showing this screen is a security risk.
• Use machine catalogs of type single‑session OS for physical Linux machines.• The integrated Wake on LAN functionality is not available for Linux machines.
Technical requirements and considerations
This section contains the technical requirements and considerations for physical PCs.
• The following are not supported:
– KVM switches or other components that can disconnect a session.– Hybrid PCs, including All‑in‑One and NVIDIA Optimus laptops and PCs.
• Connect the keyboard and mouse directly to the PC. Connecting to the monitor or other com‑ponents that can be turned off or disconnected, canmake these peripherals unavailable. If youmust connect the inputdevices to components suchasmonitors, donot turn thosecomponentsoff.
• The PCs must be joined to an Active Directory Domain Services domain.
• Secure Boot is supported on Windows 10 only.
• The PC must have an active network connection. A wired connection is preferred for greaterreliability and bandwidth.
• If using Wi‑Fi, do the following:
© 1999–2022 Citrix Systems, Inc. All rights reserved. 240

Citrix Virtual Apps and Desktops
1. Set the power settings to leave the wireless adapter turned on.2. Configure the wireless adapter and network profile to allow automatic connection to the
wireless network before the user logs on. Otherwise, the VDA does not register until theuser logs on. The PC isn’t available for remote access until a user has logged on.
3. Ensure that the Delivery Controllers or Cloud Connectors can be reached from the Wi‑Finetwork.
• You can use Remote PC Access on laptop computers. Ensure the laptop is connected to a powersource instead of running on the battery. Configure the laptop power options to match the op‑tions of a desktop PC. For example:
1. Disable the hibernate feature.2. Disable the sleep feature.3. Set the close lid action to Do Nothing.4. Set the “press the power button” action to Shut Down.5. Disable video card and NIC energy‑saving features.
• RemotePCAccess is supportedonSurfaceProdeviceswithWindows10. Follow the sameguide‑lines for laptops mentioned previously.
• If usingadocking station, youcanundockand redock laptops. Whenyouundock the laptop, theVDA reregisters with the Delivery Controllers or Cloud Connectors over Wi‑Fi. However, whenyou redock the laptop, the VDA doesn’t switch to use the wired connection unless you discon‑nect the wireless adapter. Some devices provide built‑in functionality to disconnect the wire‑less adapter upon establishing a wired connection. The other devices require custom solutionsor third‑party utilities to disconnect thewireless adapter. Review theWi‑Fi considerationsmen‑tioned previously.
Do the following to enable docking and undocking for Remote PC Access devices:
1. In the Startmenu, select Settings > System > Power & Sleep, and set Sleep toNever.2. Under the Device Manager > Network adapters > Ethernet adapter go to Power Man‑
agement and clear Allow the computer to turn off this device to save power. Ensurethat Allow this device to wake the computer is checked.
• Multiple users with access to the same office PC see the same icon in Citrix Workspace. Whena user logs on to Citrix Workspace, that resource appears as unavailable if already in use byanother user.
• Install the Citrix Workspace app on each client device (for example, a home PC) that accessesthe office PC.
© 1999–2022 Citrix Systems, Inc. All rights reserved. 241

Citrix Virtual Apps and Desktops
Configuration sequence
This section contains an overview of how to configure Remote PC Access when using the Remote PCAccess type machine catalog. For information on how to create other types of machine catalogs, seethe Create machine catalogs.
1. On‑premises site only ‑ To use the integrated Wake on LAN feature, configure the prerequisitesoutlined in Wake on LAN.
2. If a new Citrix Virtual Apps and Desktops site was created for Remote PC Access:
a) Select the Remote PC Access Site type.b) On thePowerManagementpage, choose to enable or disable powermanagement for the
default RemotePCAccessmachine catalog. Youcanchange this setting later byediting themachine catalog properties. For details on configuring Wake on LAN, see Wake on LAN.
c) Complete the information on theUsers andMachine Accounts pages.
Completing these steps creates a machine catalog named Remote PC Access Machines and aDelivery Group named Remote PC Access Desktops.
3. If adding to an existing Citrix Virtual Apps and Desktops site:
a) Create a machine catalog of type Remote PC Access (Operating System page of the wiz‑ard). For details on how to create a machine catalog, see Create machine catalogs. Makesure to assign the correctOU so that the target PCs aremade available for usewith RemotePC Access.
b) Create a Delivery Group to provide users access to the PCs in the machine catalog. Fordetails on how to create a Delivery Group, see Create Delivery Groups. Make sure to assignthe Delivery Group to an Active Directory group that contains the users that require accessto their PCs.
4. Deploy the VDA to the office PCs.
• We recommend using the single‑session OS core VDA installer (VDAWorkstationCore‑Setup.exe).
• You can also use the single‑session full VDA installer (VDAWorkstationSetup.exe) with the/remotepc option, which achieves the same outcome as using the core VDA installer.
• Consider enabling Windows Remote Assistance to allow help desk teams to provide re‑mote support through Citrix Director. To do so, use the /enable_remote_assistanceoption. For details, see Install using the command line.
• To be able to see logon duration information in Director, you must use the single‑sessionfull VDA installer and include theCitrix User ProfileManagerWMI Plugin component. In‑clude this component by using the /includeadditional option. For details, see Installusing the command line.
• For information about deploying the VDA using SCCM, see Install VDAs using SCCM.
© 1999–2022 Citrix Systems, Inc. All rights reserved. 242

Citrix Virtual Apps and Desktops
• For information about deploying the VDA through deployment scripts, see Install VDAs us‑ing scripts.
After you successfully complete steps 2–4, users are automatically assigned to their own ma‑chines when they log in locally on the PCs.
5. Instruct users to download and install Citrix Workspace app on each client device that they useto access the office PC remotely. CitrixWorkspace app is available fromhttps://www.citrix.com/downloads/ or the application stores for supportedmobile devices.
Featuresmanaged through the registryCaution:
Editing the registry incorrectly can cause serious problems that might require you to reinstallyour operating system. Citrix cannot guarantee that problems resulting from the incorrect useof Registry Editor can be solved. Use Registry Editor at your own risk. Be sure to back up theregistry before you edit it.
Disable multiple user auto‑assignments
On each Delivery Controller, add the following registry setting:
HKEY_LOCAL_MACHINE\Software\Citrix\DesktopServer
• Name: AllowMultipleRemotePCAssignments• Type: DWORD• Data: 0
Sleepmode (minimum version 7.16)
To allow a Remote PC Accessmachine to go into a sleep state, add this registry setting on the VDA, andthen restart themachine. After the restart, the operating system power saving settings are respected.Themachine goes into sleepmode after the preconfigured idle timer passes. After themachinewakesup, it reregisters with the Delivery Controller.
HKEY_LOCAL_MACHINE\SOFTWARE\Citrix\PortICA
• Name: DisableRemotePCSleepPreventer• Type: DWORD• Data: 1
© 1999–2022 Citrix Systems, Inc. All rights reserved. 243

Citrix Virtual Apps and Desktops
Sessionmanagement
By default, a remote user’s session is automatically disconnectedwhen a local user initiates a sessionon that machine (by pressing CTRL+ATL+DEL). To prevent this automatic action, add the followingregistry entry on the office PC, and then restart the machine.
HKEY_LOCAL_MACHINE\SOFTWARE\Citrix\PortICA\RemotePC
• Name: SasNotification• Type: DWORD• Data: 1
By default, the remote user has preference over the local user when the connection message is notacknowledged within the timeout period. To configure the behavior, use this setting:
HKEY_LOCAL_MACHINE\SOFTWARE\Citrix\PortICA\RemotePC
• Name: RpcaMode• Type: DWORD• Data:
– 1 ‑The remoteuseralwayshaspreference if heor shedoesnot respond to themessagingUIin the specified timeout period. This behavior is thedefault if this setting is not configured.
– 2 ‑ The local user has preference.
The timeout for enforcing the Remote PCAccessmode is 30 seconds by default. You can configure thistimeout but do not set it lower than 30 seconds. To configure the timeout, use this registry setting:
HKLM\SOFTWARE\Citrix\PortICA\RemotePC
• Name: RpcaTimeout• Type: DWORD• Data: number of seconds for timeout in decimal values
When a user wants to forcibly get the console access: The local user can press Ctrl+Alt+Del twice in agap of 10 seconds to get local control over a remote session and force a disconnect event.
After the registry change and machine restart, if a local user presses Ctrl+Alt+Del to log on to thatPC while it is in use by a remote user, the remote user receives a prompt. The prompt asks whetherto allow or deny the local user’s connection. Allowing the connection disconnects the remote user’ssession.
Wake on LAN
IntegratedWake on LAN is available only in on‑premises Citrix Virtual Apps andDesktops and requiresMicrosoft System Center Configuration Manager (SCCM).
Remote PC Access supports Wake on LAN, which gives users the ability to turn on physical PCs re‑motely. This feature enables users to keep their office PCs turned off when not in use, saving energy
© 1999–2022 Citrix Systems, Inc. All rights reserved. 244
Citrix Virtual Apps and Desktops
costs. It also enables remote access when amachine has been turned off inadvertently. For example,because of a power outage.
The Remote PC Access Wake on LAN feature is supported withPCs that have the Wake on LAN option enabled in the BIOS/UEFI.
SCCM and Remote PC Access Wake on LAN
To configure the Remote PC AccessWake on LAN feature, complete the following before deploying theVDA.
• Configure SCCM 2012 R2, 2016, or 2019 within the organization. Then deploy the SCCM clientto all Remote PC Accessmachines, allowing time for the scheduled SCCM inventory cycle to run(or force onemanually, if necessary).
• For SCCMWake Proxy or magic packet support:– Configure Wake on LAN in each PC’s BIOS/UEFI settings.– For Wake Proxy support, enable the option in SCCM. For each subnet in the organizationthat contains PCs that use the Remote PC Access Wake on LAN feature, ensure that threeor more machines can serve as sentinel machines.
– Formagic packet support, configure network routers and firewalls to allowmagic packetsto be sent, using either a subnet‑directed broadcast or unicast.
After you install the VDA on office PCs, enable or disable power management when you create theconnection and the machine catalog.
• If you enable powermanagement in the catalog, specify connection details: the SCCM address,access credentials, and connection name. The access credentials must have access to collec‑tions in the scope and the Remote Tools Operator role.
• If you do not enable power management, you can add a power management (ConfigurationManager) connection later and then edit a Remote PC Access machine catalog to enable powermanagement.
You can edit a power management connection to configure advanced settings. You can enable:
• Wake‑up proxy delivered by SCCM.• Wake on LAN (magic) packets. If you enableWake on LANpackets, you can select aWake on LANtransmission method: subnet‑directed broadcasts or Unicast.
ThePCuses AMTpower commands (if they are supported), plus anyof the enabled advanced settings.If the PC does not use AMT power commands, it uses the advanced settings.
© 1999–2022 Citrix Systems, Inc. All rights reserved. 245
Citrix Virtual Apps and Desktops
Troubleshoot
Monitor blanking not working
If the Windows PC’s local monitor is not blank while there is an active HDX session (the local monitordisplays what’s happening in the session) it is likely due to issues with the GPU vendor’s driver. Toresolve the issue, give the Citrix Indirect Display driver (IDD) higher priority than the graphic card’svendor driver by setting the following registry value:
HKEY_LOCAL_MACHINE\SOFTWARE\Citrix\Graphics\AdapterMerits
• Name: CitrixIDD• Type: DWORD• Data: 3
For more details about display adapter priorities and monitor creation, see the Knowledge Centerarticle CTX237608.
Session disconnects when you select Ctrl+Alt+Del on themachine that has sessionmanagement notification enabled
The session management notification controlled by the SasNotification registry value only workswhen Remote PC Access mode is enabled on the VDA. If the physical PC has the Hyper‑V role or anyvirtualization‑based security features enabled, the PC reports as a virtual machine. If the VDA detectsthat it is running on a virtual machine, it automatically disables Remote PC Access mode. To enableRemote PC Access mode, add the following registry value:
HKEY_LOCAL_MACHINE\SOFTWARE\Citrix\PortICA
• Name: ForceEnableRemotePC• Type: DWORD• Data: 1
Restart the PC for the setting to take effect.
Diagnostic information
Diagnostic informationaboutRemotePCAccess iswritten to theWindowsApplicationEvent log. Infor‑mationalmessages are not throttled. Errormessages are throttled by discarding duplicatemessages.
• 3300 (informational): Machine added to catalog• 3301 (informational): Machine added to delivery group• 3302 (informational): Machine assigned to user• 3303 (error): Exception
© 1999–2022 Citrix Systems, Inc. All rights reserved. 246

Citrix Virtual Apps and Desktops
Powermanagement
If powermanagement for Remote PC Access is enabled, subnet‑directed broadcastsmight fail to startmachines that are on a different subnet from the Controller. If you need power management acrosssubnets using subnet‑directed broadcasts, and AMT support is not available, try the Wake‑up proxyor Unicast method. Ensure those settings are enabled in the advanced properties for the power man‑agement connection.
The active remote session records the local touchscreen input
When the VDA enables Remote PC Accessmode, themachine ignores the local touchscreen input dur‑ing an active session. If the physical PC has the Hyper‑V role or any virtualization‑based security fea‑tures enabled, the PC reports as a virtual machine. If the VDA detects that it is running on a virtualmachine, it automatically disables Remote PC Access mode. To enable Remote PC Access mode, addthe following registry setting:
HKEY_LOCAL_MACHINE\SOFTWARE\Citrix\PortICA
• Name: ForceEnableRemotePC• Type: DWORD• Data: 1
Restart the PC for the setting to take effect.
More resources
The following are other resources for Remote PC Access:
• Solution design guidance: Remote PC Access Design Decisions.• Examples of Remote PC Access architectures: Reference Architecture for Citrix Remote PC Ac‑cess Solution.
App‑V
April 14, 2021
Using App‑V with Citrix Virtual Apps and Desktops
Microsoft Application Virtualization (App‑V) lets you deploy, update, and support applications as ser‑vices. Users access applications without installing them on their own devices. App‑V and Microsoft
© 1999–2022 Citrix Systems, Inc. All rights reserved. 247

Citrix Virtual Apps and Desktops
User State Virtualization (USV) provide access to applications anddata, regardless of location and con‑nection to the internet.The following table lists supported versions.
App‑V
Citrix Virtual Apps andDesktops DeliveryController
Citrix Virtual Apps andDesktops VDA
5.0 and 5.0 SP1 XenDesktop 7 throughcurrent, XenApp 7.5 throughcurrent
7.0 through current
5.0 SP2 XenDesktop 7 throughcurrent, XenApp 7.5 throughcurrent
7.1 through current
5.0 SP3 and 5.1 XenDesktop 7.6 throughcurrent, XenApp 7.6 throughcurrent
7.6.300 through current
App‑V inWindows Server 2016 XenDesktop 7.12 throughcurrent, XenApp 7.12 throughcurrent
7.12 through current
The App‑V client does not support offline access to applications. App‑V integration support includesusing SMB shares for applications. The HTTP protocol is not supported.If you’re not familiar with App‑V, see the Microsoft documentation. Here’s a recap of the App‑V com‑ponents mentioned in this article:
• Management server. Provides a centralized console tomanage App‑V infrastructure and deliv‑ers virtual applications to both the App‑V Desktop Client and a Remote Desktop Services Client.The App‑V management server authenticates, requests, and provides the security, metering,monitoring, and data gathering required by the administrator. The server uses Active Directoryand supporting tools to manage users and applications.
• Publishing server. Provides App‑V clients with applications for specific users, and hosts thevirtual applicationpackage for streaming. It fetches thepackages from themanagement server.
• Client. Retrieves virtual applications, publishes the applications on the client, and automati‑cally sets up andmanages virtual environments at runtime onWindows devices. You install theApp‑V client on the VDA,where it stores user‑specific virtual application settings such as registryand file changes in each user’s profile.
Applications are available seamlessly without any pre‑configuration or changes to operating systemsettings. You can launch App‑V applications from Server OS and Desktop OS Delivery Groups:
© 1999–2022 Citrix Systems, Inc. All rights reserved. 248

Citrix Virtual Apps and Desktops
• Through Citrix Workspace app• Through the App‑V client and Citrix Workspace app• Simultaneously by multiple users onmultiple devices• Through Citrix StoreFront
Modified App‑V applicationproperties are implementedwhen the application is started. For example,for applications with a modified display name or customized icon, the modification appears whenusers start the application. Application customizations saved in dynamic configuration files are alsoapplied when the application is launched.
Managementmethods
You can use App‑V packages and dynamic configuration files created with the App‑V sequencer andthen located on either App‑V servers or network shares.
• App‑V servers: Using applications from packages on App‑V servers requires ongoing commu‑nication between Studio and the App‑V servers for discovery, configuration, and downloadingto the VDAs. This incurs hardware, infrastructure, and administration overhead. Studio and theApp‑V servers must remain synchronized, particularly for user permissions.
This is called the dual adminmanagement method because App‑V package and application ac‑cess requires both Studio and the App‑V server consoles. This method works best in closelycoupled App‑V and Citrix deployments. In thismethod, themanagement server handles the dy‑namic configuration files. When you use the dual adminmanagementmethod, the Citrix App‑Vcomponents manage the registration of the appropriate publishing server required for an ap‑plication launch. This ensures that the publishing server is synchronized for the user at theappropriate time. The publishing server maintains other aspects of the package life cycle (likerefresh on logon and connection groups) using the settings that it is configured with.
• Network share: Packages and XML deployment configuration files placed on a network shareremove Studio’s dependence on the App‑V server and database infrastructure, reducing over‑head. (Youmust install the Microsoft App‑V client on each VDA.)
This is called the single admin management method because App‑V package and applicationuse only needs the Studio console. You browse to the network share and add one or moreApp‑V packages from that location to the Site‑level Application Library [1]. In this method, theCitrix App‑V components process the Deployment Configuration Files when the application islaunched. (User Configuration Files are not supported.) When you use the single admin man‑agementmethod, theCitrix App‑V componentsmanage all aspects of the Package’s life cycle onthe host machine. Packages are added to the machine at broker startup, or when a configura‑tion change is detected (which can also be at session launch time). Packages are first publishedto individual users on demand ‘just in time’ when a launch request is received from the CitrixWorkspace app.
© 1999–2022 Citrix Systems, Inc. All rights reserved. 249
Citrix Virtual Apps and Desktops
Single Admin also manages the lifecycle of connection groups required to meet the IsolationGroup configuration definitions made in Studio.
[1] Application Library is a Citrix term for a caching repository that stores information aboutApp‑V packages. The Application Library also stores information about other Citrix applicationdelivery technologies.
In both management methods, if the VDA is configured to discard user data, the publishing (or syn‑chronizing) must be redone at the next session launch.
You can use one or both management methods simultaneously. In other words, when you add appli‑cations to Delivery Groups, the applications can come from App‑V packages located on App‑V serversor on a network share.
Note:
If you are using both management methods simultaneously, and the App‑V package has a dy‑namic configuration file in both locations, the file in theApp‑V server (dualmanagement) is used.
When you select Configuration > App‑V Publishing in the Studio navigation pane, the display showsApp‑V package names and sources. The source column indicates whether the packages are locatedon the App‑V server or cached in the Application Library. When you select a package, the details panelists the applications and shortcuts in the package.
Dynamic configuration files
Overview
App‑V packages can be customized using dynamic configuration files, that when applied to the pack‑age, can be used to change its characteristics. For example, you can use them to define extra appli‑cation shortcuts and behaviors. Citrix App‑V supports both types of dynamic configuration file. Filesettings are applied when the application is launched:
• Deployment Configuration Files provide machine‑wide configuration for all users. These filesare expected tobenamed<packageFileName>_DeploymentConfig.xml and located in the samefolder as the App‑V package they apply to. Supported by single and dual admin management.
• User Configuration Files provide user‑specific configuration which supports per‑user cus‑tomizations to the package. Single Admin supports user config files named in the followingformat: <packageFileName>_[UserSID | Username | GroupSID |GroupName_]UserConfig.xmland located in the same folder as the App‑V package they apply to.
When multiple user config files exist for a particular package, they are applied with the following pri‑ority:
1. User SID2. Username
© 1999–2022 Citrix Systems, Inc. All rights reserved. 250
Citrix Virtual Apps and Desktops
3. AD Group SID (First found wins)4. AD Group Name (First found wins)5. Default
For example
1 MyAppVPackage_S-1-5-21-000000001-0000000001-000000001-001_UserConfig.xml
2 MyAppVPackage_joeblogs_UserConfig.xml3 MyAppVPackage_S-1-5-32-547_UserConfig.xml4 MyAppVPackage_Power Users_UserConfig.xml5 MyAppVPackage_UserConfig.xml
Note:
The user‑specific portion of the file name can also optionally occur at the end (for exampleMyAp‑pVPackage_UserConfig_joeblogs.xml).
Dynamic configuration file location
In single admin management, the Citrix App‑V components only process dynamic configuration fileswhich are found in the same folder as their App‑V package. When applications in the package arelaunched, any changes to the corresponding dynamic configuration files are reapplied. If your dy‑namic configuration files are located in a different location to their packages, use a mapping file tomap packages to their deployment configuration files.
To create amapping file
1. Open a new text file.
2. For each dynamic configuration file, add a line which specifies the path to the package usingthe format <PackageGuid> : path.
For example:
F1f4fd78ef044176aad9082073a0c780 : c:\widows\file\packagedeploy.xml
3. Save the file as ctxAppVDynamicConfigurations.cfg in the same folder as the package. The en‑tire directory hierarchy on the same UNC share as the App‑V package is searched recursivelyupwards for this file every time an application in the package is launched.
Note:
You cannot apply changes to Dynamic Deployment Configuration when there are user sessionswith an application in the package open. You can apply changes to Dynamic User Configuration
© 1999–2022 Citrix Systems, Inc. All rights reserved. 251
Citrix Virtual Apps and Desktops
files if other users but not the current user have the an application from the package open.
Isolation groups
When you use the App‑V single adminmethod, creating isolation groups allow you to specify interde‑pendent groups of applications thatmust run in the sandbox. This feature is similar, but not identicalto, App‑V connection groups. Instead of the mandatory and optional package terminology used bythe App‑V management server, Citrix uses automatic and explicit for package deployment options.
• When a user launches an App‑V application (the primary application), the isolation groups aresearched for other application packages that are marked for automatic inclusion. Those pack‑ages are downloaded and included in the isolation group automatically. Youdonot need to addthem to the Delivery Group that contains the primary application.
• Anapplicationpackage in the isolationgroup that ismarked for explicit inclusion isdownloadedonly if you have explicitly added that application to the same Delivery Group that contains theprimary application.
This allows you to create isolationgroups containingamixof automatically includedapplications thatare available globally to all users. Plus, the group can contain a set of plug‑ins and other applications(thatmight have specific licensing constraints), which you can limit to a certain set of users (identifiedthrough Delivery Groups) without having to create more isolation groups.
For example, application “app‑a” requires JRE 1.7 to run. You can create an isolation group containingapp‑a (with an explicit deployment type) and JRE 1.7 (with an automatic deployment type). Then,add those App‑V packages to one or more Delivery Groups. When a user launches app‑a, JRE 1.7 isautomatically deployed with it.
You can add an application to more than one App‑V isolation group. However, when a user launchesthat application, the first isolation group to which that application was added is always used. Youcannot order or prioritize other isolation groups containing that application.
Load balancing App‑V servers
Load balancing management and publishing servers using DNS Round‑Robin is supported if youare using the dual admin management method. Load balancing the management server behindNetscaler, F5 (or similar) Virtual IP is not supported because of the way Studio needs to communicatewith the Management Server via remote PowerShell. For more information, see this Citrix blogarticle.
Setup
The following table summarizes the sequence of setup tasks for using App‑V in Citrix Virtual Apps andDesktops using single‑ and dual admin management methods.
© 1999–2022 Citrix Systems, Inc. All rights reserved. 252

Citrix Virtual Apps and Desktops
Single admin Dual admin Task
X X Deploy App‑V
X X Packaging and placement
X Configure App‑V serveraddresses in Studio
X X Install software on VDAmachines
X Add App‑V packages to theApplication Library
X Add App‑V isolation groups(optional)
X X Add App‑V applications toDelivery Groups
Deploy Microsoft App‑V
For App‑V deployment instructions, see https://docs.microsoft.com/en‑us/microsoft‑desktop‑optimization‑pack/.
Optionally, change App‑V publishing server settings. Citrix recommends using the SDK cmdlets onthe Controller. See the SDK documentation for details.
• To view publishing server settings, enter Get‑CtxAppvServerSetting ‑AppVPublishingServer<pubServer>.
• To ensure that App‑V applications launch properly, enter Set‑CtxAppvServerSetting –UserRefreshonLogon 0.
If you previously used GPO policy settings to manage publishing server settings, the GPO settingsoverrideanyApp‑V integration settings, including cmdlet settings. This can result inApp‑Vapplicationlaunch failure. Citrix recommends that you remove all GPO policy settings and then use the SDK toconfigure those settings.
Packaging and placement
For either management method, create application packages using the App‑V sequencer. See theMicrosoft documentation for details.
• For single admin management, make the packages, and their corresponding dynamic configu‑ration files, available on a UNC or SMB shared network location. Ensure that the Studio admin‑istrator who adds applications to Delivery Groups has at least read access to that location.
© 1999–2022 Citrix Systems, Inc. All rights reserved. 253

Citrix Virtual Apps and Desktops
• For dual admin management, publish the packages on the App‑V management server from aUNC path. (Publishing from HTTP URLs is not supported.)
Regardless of whether packages are on the App‑V server or on a network share, ensure the packageshave appropriate security permissions to allow the Studio administrator to access them. Networkshares must be shared with “Authenticated users” to ensure that both the VDA and Studio have readaccess by default.
Configure App‑V server addresses in StudioImportant:
Citrix recommends using the PowerShell cmdlets on the Controller to specify App‑V server ad‑dresses if those servers use nondefault property values. See the SDK documentation for details.If you change App‑V server addresses in Studio, some server connection properties you specifymight be reset to default values. These properties are used on the VDAs to connect to App‑V pub‑lishing servers. If this happens, reconfigure the nondefault values for any reset properties on theservers.
This procedure is valid only for the dual admin management method.
SpecifyApp‑Vmanagementandpublishing server addresses for thedual adminmanagementmethodeither during or after Site creation. You can do this during or after creating the Site.
During Site creation:
• On the App‑V page of thewizard, enter the URL of theMicrosoft App‑Vmanagement server, andthe URL and port number of the App‑V publishing server.
• Test the connection before continuing with the wizard. If the test fails, see the Troubleshootsection below.
After Site creation:
1. Select Configuration > App‑V Publishing in the Studio navigation pane.2. If you have not previously specified App‑V server addresses, select AddMicrosoft Server in the
Actions pane.3. To change App‑V server addresses, select Edit Microsoft Server in the Actions pane.4. Enter the URL of the Microsoft App‑V management server, and the URL and port number of the
App‑V publishing server.5. Test the connection to those servers before closing the dialog box. If the test fails, see the Trou‑
bleshoot section below.
Later, if you want to remove all links to the App‑V management and publishing servers and stop Stu‑dio from discovering App‑V packages from those servers, select Remove Microsoft Server in the Ac‑tions pane. This action is allowed only if no applications in packages on those servers are currently
© 1999–2022 Citrix Systems, Inc. All rights reserved. 254
Citrix Virtual Apps and Desktops
published in any Delivery Groups. If they are, you must remove those applications from the DeliveryGroups before you can remove the App‑V servers.
Install software on VDAmachines
Machines containing VDAs must have two sets of software installed to support App‑V: one from Mi‑crosoft and the other from Citrix.
Microsoft App‑V client
This software retrieves virtual applications, publishes the applications on the client, and automati‑cally sets up and manages virtual environments at runtime on Windows devices. The App‑V clientstores user‑specific virtual application settings, such as registry and file changes in each user’s pro‑file.
The App‑V client is available from Microsoft. Install a client on each machine containing a VDA, oron the master image that is used in a machine catalog to create VMs. Note: Windows 10 (1607 orgreater) and Windows Server 2016 already include the App‑V client. On those OSs only, enable theApp‑V client by running the PowerShell Enable‑AppV cmdlet (no parameters). The Get‑AppVStatuscmdlet retrieves the current enablement status.
Tip:
After you install the App‑V client, with Administrator permissions, run the PowerShell Get‑AppvClientConfiguration cmdlet, and ensure that EnablePackageScripts is set to 1. If it is notset to 1, run Set‑AppvClientConfiguration ‑EnablePackageScripts $true.
Citrix App‑V components
The Citrix App‑V component software is excluded by default when you install a VDA.
You can control this default behavior during VDA installation. In the graphical interface, select theCitrix Personalization for App‑V ‑ VDA check box on the Additional Components page. In the com‑mand line interface, use the /includeadditional “Citrix Personalization for App‑V – VDA” option.
If you do not include the Citrix App‑V components during VDA installation, but later want to use App‑V applications: In the Windows machine’s Programs and Features list, right‑click the Citrix VirtualDelivery Agent entry and then select Change. A wizard launches. In the wizard, enable the optionthat installs and enables App‑V publishing components.
Add or remove App‑V packages in the Application Library
These procedures are valid only for the single admin management method.
Youmust have at least read access to the network share containing the App‑V packages.
© 1999–2022 Citrix Systems, Inc. All rights reserved. 255
Citrix Virtual Apps and Desktops
Add an App‑V package to the Application Library
1. Select Configuration > App‑V Publishing in the Studio navigation pane.2. Select Add Packages in the Actions pane.3. Browse to the share containing the App‑V packages and select one or more packages.4. Click Add.
Remove an App‑V package from the Application Library
Removing anApp‑Vpackage from theApplication Library removes it from theStudioApp‑VPublishingnode display. However, it does not remove its applications from Delivery Groups, and those applica‑tions can still be launched. The package remains in its physical network location. (This effect differsfrom removing an App‑V application from a Delivery Group.)
1. Select Configuration > App‑V Publishing in the Studio navigation pane.2. Select one or more packages to be removed.3. Select Remove Package in the Actions pane.
Add, edit, or remove App‑V isolation groups
Add an App‑V isolation group
1. Select App‑V Publishing in the Studio navigation pane.2. Select Add Isolation Group in the Actions pane.3. In the Add Isolation Group Settings dialog box, type a name and description for the isolation
group.4. From the Available Packages list, select the applications youwant to add to the isolation group,
and then click the right arrow. The selected applications should now appear in the Packagesin Isolation Group list. In the Deployment drop‑down next to each application, select eitherExplicit or Automatic. You can also use the up and down arrows to change the order of appli‑cations in the list.
5. When you are done, clickOK.
Edit an App‑V isolation group
1. Select App‑V Publishing from the Studio navigation pane.2. Select the IsolationGroups tab in themiddlepaneand then select the isolationgroupyouwant
to edit.3. Select Edit Isolation Group in the Actions pane.4. In the Edit Isolation Group Settings dialog box, change the isolation group name or descrip‑
tion, add or remove applications, change their deployment type, or change the application or‑der.
© 1999–2022 Citrix Systems, Inc. All rights reserved. 256
Citrix Virtual Apps and Desktops
5. When you are done, clickOK.
Remove an App‑V isolation group
Removingan isolationgroupdoesnot remove theapplicationpackages. It removesonly thegrouping.
1. Select App‑V Publishing from the Studio navigation pane.2. Select the IsolationGroups tab in themiddlepaneand then select the isolationgroupyouwant
to remove.3. Select Remove Isolation Group from the Actions pane.4. Confirm the removal.
Add App‑V applications to Delivery Groups
The following procedure focuses on how to add App‑V applications to Delivery Groups. For completedetails about creating a Delivery Group, see Create Delivery Groups.
Step 1: Choose whether you want to create a new Delivery Group or add App‑V applications to anexisting Delivery Group:
To create a Delivery Group containing App‑V applications:
1. Select Delivery Groups in the Studio navigation pane.2. Select Create Delivery Group in the Actions pane.3. On successive pages of the wizard, specify a machine catalog and users.
To add App‑V applications to existing Delivery Groups:
1. Select Applications in the Studio navigation pane.2. Select Add Applications in the Actions pane.3. Select one or more Delivery Groups where the App‑V applications will be added.
Step 2: On the Applications page of the wizard, click the Add drop‑down to display applicationsources. Select App‑V.
Step 3: On the Add App‑V Applications page, choose the App‑V source: the App‑V server or the Ap‑plication Library. The resulting display includes the application names plus their package names andpackage versions. Select the check boxes next to the applications or application shortcuts you wantto add. Then clickOK.
Step 4: Complete the wizard.
Good to know:
• If you change an App‑V application’s properties when adding them to a Delivery Group, thechanges are made when the application is started. For example, if you modify an application’sdisplay name or icon when adding it to the group, the change appears when a user starts theapplication.
© 1999–2022 Citrix Systems, Inc. All rights reserved. 257

Citrix Virtual Apps and Desktops
• If youusedynamic configuration files to customize theproperties of anApp‑V application, thoseproperties override any changes youmade when adding them to a Delivery Group.
• If you later edit a Delivery Group containing App‑V applications, there is no change in App‑Vapplicationperformance if youchange thegroup’sdelivery type fromdesktopsandapplicationsto applications only.
• When you remove a previously published (single admin) App‑V package from a Delivery Group,Citrix App‑V client components attempt to clean up, unpublish, and remove any packages thatare no longer in use by the single admin management method.
• If you are using a hybrid deployment—with packages delivered by the single admin manage‑ment method and an App‑V publishing server, managed either by dual admin or by anothermechanism (such as Group policy)—it is not possible to determine which (now potentially re‑dundant) packages came fromwhich source. In this case, cleanup is not attempted.
• If youpublishmore than100App‑V applications in a singleDeliveryGroup, applicationsmaynotlaunch. If so, use theMaxReceivedMessageSize property on the appropriate binding element toincrease Max Receivablemessage size in the configuration of the Delivery Controller and/or theBroker Agent on the VDA.
Troubleshoot
Issues that can occur only when using the dual admin method are marked (DUAL).
(DUAL) There is a PowerShell connection error when you select Configuration > App‑V Publishing inthe Studio navigation pane.
• Is the Studio administrator also an App‑V server administrator? The Studio administrator mustbelong to the “administrators” group on the App‑V management server so that they can com‑municate with it.
(DUAL) The Test connection operation returns an error when you specify App‑V server addresses inStudio.
• Is the App‑V server powered on? Either send a Ping command or check the IIS Manager; eachApp‑V server should be in a Started and Running state.
• Is PowerShell remoting enabledon theApp‑V server? If not, see https://docs.microsoft.com/en‑us/previous‑versions/technet‑magazine/ff700227(v=msdn.10).
• Is the Studio administrator also an App‑V server administrator? The Studio administrator mustbelong to the administrators group on the App‑V management server so that they can commu‑nicate with it.
• Is file sharing enabled on the App‑V server? Enter \\<App-V server FQDN> in Windows Ex‑plorer or with the Run command.
© 1999–2022 Citrix Systems, Inc. All rights reserved. 258

Citrix Virtual Apps and Desktops
• Does the App‑V server have the same file sharing permissions as the App‑V administrator? Onthe App‑V server, add an entry for \\<App-V server FQDN> in Stored User Names and Pass‑words, specifying the credentials of the user who has administrator privileges on the App‑Vserver. For guidance, see http://support.microsoft.com/kb/306541.
• Is the App‑V server in Active Directory?
If the Studio machine and the App‑V server are in different Active Directory domains that donot have a trust relationship, from the PowerShell console on the Studiomachine, runwinrm swinrm/Config/client ‘@(TrustedHosts=”<App‑V server FQDN>”)’.
If TrustedHosts is managed by GPO, the following error message displays: “The config settingTrustedHosts cannotbe changedbecauseuse is controlledbypolicies. Thepolicywouldneed tobeset to Not Configured to change the config setting.” In this case, add an entry for the App‑V servername to the TrustedHosts policy in GPO (Administrative Templates > Windows Components >Windows Remote Management (WinRM) > WinRM Client).
(DUAL) Discovery fails when adding an App‑V application to a Delivery Group.
• Is the Studio administrator also an App‑V management server administrator? The Studio ad‑ministrator must belong to the administrators group on the App‑V management server so thatthey can communicate with it.
• Is the App‑V management server running? Either send a Ping command or check the IIS Man‑ager; each App‑V server should be in a Started and Running state.
• Is PowerShell remoting enabled on both App‑V servers? If not, see https://docs.microsoft.com/en‑us/previous‑versions/technet‑magazine/ff700227(v=msdn.10).
• Do packages have the appropriate security permissions for the Studio administrator to access?
App‑V applications only launch in one browser version.
• If youpublishmultiple sequencedversionsof the samebrowser app, onlyoneversionof theappis able to launch at a time per user on the VDA. The same thing occurs even if Citrix componentsare not involved and the user starts the sequenced apps from desktop shortcuts which point todifferent paths.
Whichever browser version a user launches first, determines the browser version which runssubsequently for them. When Firefox detects a second launch of itself, it prefers to create aninstance of the already running process, rather than create a new process. Other browsersmaybehave in the same way.
You can make the application launch in the intended Firefox browser version, by adding thecommand line parameter ‑no‑remote to the shortcut’s launch command. Other browsers offerthe same or similar facility.
© 1999–2022 Citrix Systems, Inc. All rights reserved. 259

Citrix Virtual Apps and Desktops
Note:
You must be using XenApp 7.17 or higher to take advantage of the shortcut enumera‑tion feature. You must also change the package in both versions of the app to get thisbi‑directional behavior.
App‑V applications do not launch.
• (DUAL) Is the publishing server running?• (DUAL) Do the App‑V packages have appropriate security permissions so that users can accessthem?
• (DUAL)On theVDA, ensure thatTemp ispointing to thecorrect location, and that there is enoughspace available in the Temp directory.
• (DUAL) On the App‑V publishing server, run Get-AppvPublishingServer \* to display thelist of publishing servers.
• (DUAL) On the App‑V publishing server, ensure that UserRefreshonLogon is set to False.• (DUAL) On the App‑V publishing server, as an administrator, run Set‑AppvPublishingServerand set UserRefreshonLogon to False.
• Is a supported version of the App‑V client installed on the VDA? Does the VDA have the enablepackage scripts setting enabled?
• On the machine containing the App‑V client and VDA, from the Registry editor (regedit), goto HKEY_LOCAL_MACHINE\SOFTWARE\Policies\Citrix\AppV. Ensure that the AppVServers keyhas the following value format: AppVManagementServer+metadata;PublishingServer (forexample: http://xmas-demo-appv.blrstrm.com+0+0+0+1+1+1+0+1;http://xmas-demo-appv.blrstrm.com:8082).
• On the machine or master image containing the App‑V client and VDA, check that the Power‑Shell ExecutionPolicy is set to RemoteSigned. The App‑V client provided by Microsoft is notsigned, and this ExecutionPolicy allows PowerShell to run unsigned local scripts and cmdlets.Use one of the following twomethods to set the ExecutionPolicy: (1) As an administrator, enterthe cmdlet: Set‑ExecutionPolicy RemoteSigned, or (2) FromGroup Policy settings, go to Com‑puter Configuration > Policies > Administrative Templates > Windows Components > WindowsPowerShell> Turn on Script Execution.
• If the error “RegistrationManager.AttemptRegistrationWithSingleDdc: Failed to register”appears, use the MaxReceivedMessageSize property on the appropriate binding element toincrease Max Receivablemessage size in the configuration of the Delivery Controller and/or theBroker Agent on the VDA.
If these steps do not resolve the issues, enable and examine the logs.
© 1999–2022 Citrix Systems, Inc. All rights reserved. 260
Citrix Virtual Apps and Desktops
Logs
App‑V configuration‑related logs are located at C:\CtxAppvLogs. The application launch logs are lo‑cated at: %LOCALAPPDATA%\Citrix\CtxAppvLogs. LOCALAPPDATA resolves to the local folder for thelogged‑on user. Check the local folder of the user for whom the application launch failed.
To enable Studio and VDA logs used for App‑V, you must have administrator privileges. You will alsoneed a text editor such as Notepad.
To enable Studio logs:
1. Create the folder C:\CtxAppvLogs.2. Go to C:\Program Files\Citrix\StudioAppVIntegration\SnapIn\Citrix.Appv.Admin.V1. Open
CtxAppvCommon.dll.config in a text editor and uncomment the line: <add key =”LogFileName”value=”C:\CtxAppvLogs\log.txt”/>
3. Restart the Broker service to start logging.
To enable VDA logs:
1. Create the folder C:\CtxAppvLogs.2. Go to C:\Program Files\Citrix\ Virtual Desktop Agent. Open CtxAppvCommon.dll.config in a text
editoranduncomment the following line: <addkey=”LogFileName”value=”C:\CtxAppvLogs\log.txt”/>3. Uncomment the line and set the value field to 1: <add key =”EnableLauncherLogs” value=”1”/>4. Restart the machine to start logging.
Virtual Apps Secure Browser
April 14, 2021
As applications are ported to the web, users must rely on multiple browser vendors and versions inorder to achieve compatibility with web‑based apps. If the application is an internally hosted appli‑cation, organizations are often required to install and configure complex VPN solutions in order toprovide access to remote users. Typical VPN solutions require a client‑side agent that must also bemaintained across numerous operating systems.
With the Secure Browser, users can have a seamless web‑based application experience where ahostedweb‑based application simply appearswithin the user’s preferred local browser. For example,a user’s preferred browser is Mozilla Firefox but the application is compatible with only MicrosoftInternet Explorer. Secure Browser displays the Internet Explorer‑compatible application as a tabwithin the Firefox browser.
Deploying Virtual Apps Secure Browser Edition
1. Download the Citrix Virtual Apps Secure Browser Edition ISO from the Citrix download site.
© 1999–2022 Citrix Systems, Inc. All rights reserved. 261
Citrix Virtual Apps and Desktops
2. Follow the installation instructions for various components of Citrix Virtual Apps.
3. Configure the edition and licensemode for the Secure Browser edition after installation, by per‑forming the following additional steps:
a) On the Delivery Controller, start a PowerShell session by clicking the blue icon on thetaskbar, or by browsing to Start > All Programs > Accessories >Windows PowerShell > Win‑dows PowerShell.
On 64‑bit systems, this starts the 64‑bit version. Both the 32‑bit or 64‑bit versions are sup‑ported.
b) Type asnp Citrix* and press Enter to load the Citrix‑specific PowerShell modules.(asnp represents Add-PSSnapin.)
c) Check the current site settings and license mode: run Get-ConfigSite.
d) Set the license mode to Virtual Apps Secure Browser edition: run Set-ConfigSite -ProductCode XDT -ProductEdition BAS.
e) Confirm that the Virtual Apps Secure Browser edition and license mode is set correctly:run Get-BrokerSite.
After completing the installation, further optimize your environment forwebappdelivery byusing theconfiguration steps specified in the XenApp Secure Browser Deployment Guide.
Publish content
April 14, 2021
Youcanpublish anapplication that is simply aURLorUNCpath toa resource, suchas aMicrosoftWorddocument or a web link. This feature is known as published content. The ability to publish contentadds flexibility to how you deliver content to users. You benefit from the existing access control andmanagement of applications. You can also specify whether to use local or published applications toopen the content.
The published content appears just like other applications in StoreFront and Citrix Workspace app.Users access it in the same way they access applications. On the client, the resource opens as usual.
• If a locally installed application is appropriate, it is launched to open the resource.• If a File Type Association has been defined, a published application launches to open the re‑source.
You publish content using the PowerShell SDK. You cannot use Studio to publish content. However,you can use Studio to edit application properties later, after they are published.
© 1999–2022 Citrix Systems, Inc. All rights reserved. 262

Citrix Virtual Apps and Desktops
Configuration overview and preparation
Publishing content uses the New-BrokerApplication cmdlet with the following key properties.(See the cmdlet help for descriptions of all cmdlet properties.)
1 New-BrokerApplication – ApplicationType PublishedContent -CommandLineExecutable location -Name app-name -DesktopGroup delivery-group-name
2 <!--NeedCopy-->
The ApplicationType property must be PublishedContent.
The CommandLineExecutable property specifies the location of the published content. The follow‑ing formats are supported, with a limit of 255 characters.
• HTML website address (for example, http://www.citrix.com)• Document file on a web server (for example, https://www.citrix.com/press/pressrelease.doc)
• Directory on an FTP server (for example, ftp://ftp.citrix.com/code)• Document file on an FTP server (for example, ftp://ftp.citrix.com/code/Readme.txt>)• UNC directory path (for example, file://myServer/myShare or \\\\\myServer\\myShare)
• UNC file path (for example, file://myServer/myShare/myFile.asf or \\myServer\myShare\myFile.asf)
Ensure that you have the correct SDK.
• ForCitrix Virtual AppsandDesktops servicedeployments, downloadand install theCitrix VirtualApps and Desktops Remote PowerShell SDK.
• For on‑premises Citrix Virtual Apps and Desktops deployments, use the PowerShell SDK that isinstalled with the Delivery Controller. Adding a published content application requires a mini‑mum version 7.11 Delivery Controller.
The following procedures use examples. In the examples:
• A machine catalog has been created.• A delivery group named PublishedContentApps has been created. The group uses a multi‑session OSmachine from the catalog. The WordPad application has been added to the group.
• Assignments are made for the delivery group name, the CommandLineExecutable location,and the application name.
Get started
On the machine containing the PowerShell SDK, open PowerShell.
© 1999–2022 Citrix Systems, Inc. All rights reserved. 263
Citrix Virtual Apps and Desktops
The following cmdlet adds the appropriatePowerShell SDK snap‑in, andassigns the returneddeliverygroup record.
Add-PsSnapin Citrix\* $dg = Get-BrokerDesktopGroup –Name PublishedContentApps
If youareusing theCitrix Virtual Apps andDesktops service, authenticate by entering yourCitrix Cloudcredentials. If there is more than one customer, choose one.
Publish a URL
After assigning the location and application name, the following cmdlet publishes the Citrix homepage as an application.
1 $citrixUrl = "https://www.citrix.com/"2 $appName = "Citrix Home Page"34 New-BrokerApplication – ApplicationType PublishedContent –
CommandLineExecutable $citrixURL – Name $appName – DesktopGroup $dg.Uid
5 <!--NeedCopy-->
Verify success:
• OpenStoreFront and log onas a userwho canaccess applications in thePublishedContentAppsdelivery group. The display includes the newly created application with the default icon. Tolearn about customizing the icon, see https://www.citrix.com/blogs/2013/08/21/xd‑tipster‑changing‑delivery‑group‑icons‑revisited‑xd7/.
• Click the Citrix Home Page application. The URL launches in a new tab in a locally runninginstance of your default browser.
Publish resources located at UNC paths
In this example, the administrator has already created a share named PublishedResources. Afterassigning the locations and application names, the following cmdlets publish an RTF and a DOCX filein that share as a resource.
1 $rtfUNC = "\\GMSXJ-EDGE0.xd.local\\PublishedResources\\PublishedRTF.rtf"
2 $rtfAppName = "PublishedRTF"34 New-BrokerApplication – ApplicationType PublishedContent5 – CommandLineExecutable $rtfUNC -Name $rtfAppName6 -DesktopGroup $dg.Uid
© 1999–2022 Citrix Systems, Inc. All rights reserved. 264

Citrix Virtual Apps and Desktops
78 $docxUNC = "\\GMSXJ-EDGE0.xd.local\PublishedResources\PublishedDOCX.
docx"9 $docxAppName = "PublishedDOCX"
1011 New-BrokerApplication – ApplicationType PublishedContent12 – CommandLineExecutable $docxUNC -Name $docxAppName13 -DesktopGroup $dg.Uid14 <!--NeedCopy-->
Verify success:
• Refresh your StoreFront window to see the newly published documents.• Click the PublishedRTF and PublishedDOCX applications. Each document opens in a locallyrunning WordPad.
View and edit PublishedContent applications
Youmanage published content using the samemethods that you use for other application types. Thepublished content items appear in the Applications list in Studio and can be edited in Studio.
Application properties (such as user visibility, group association, and shortcut) apply to the publishedcontent. However, you cannot change the command‑line argument or working directory propertieson the Location page. To change the resource, modify the Path to the executable file field on thatpage.
© 1999–2022 Citrix Systems, Inc. All rights reserved. 265
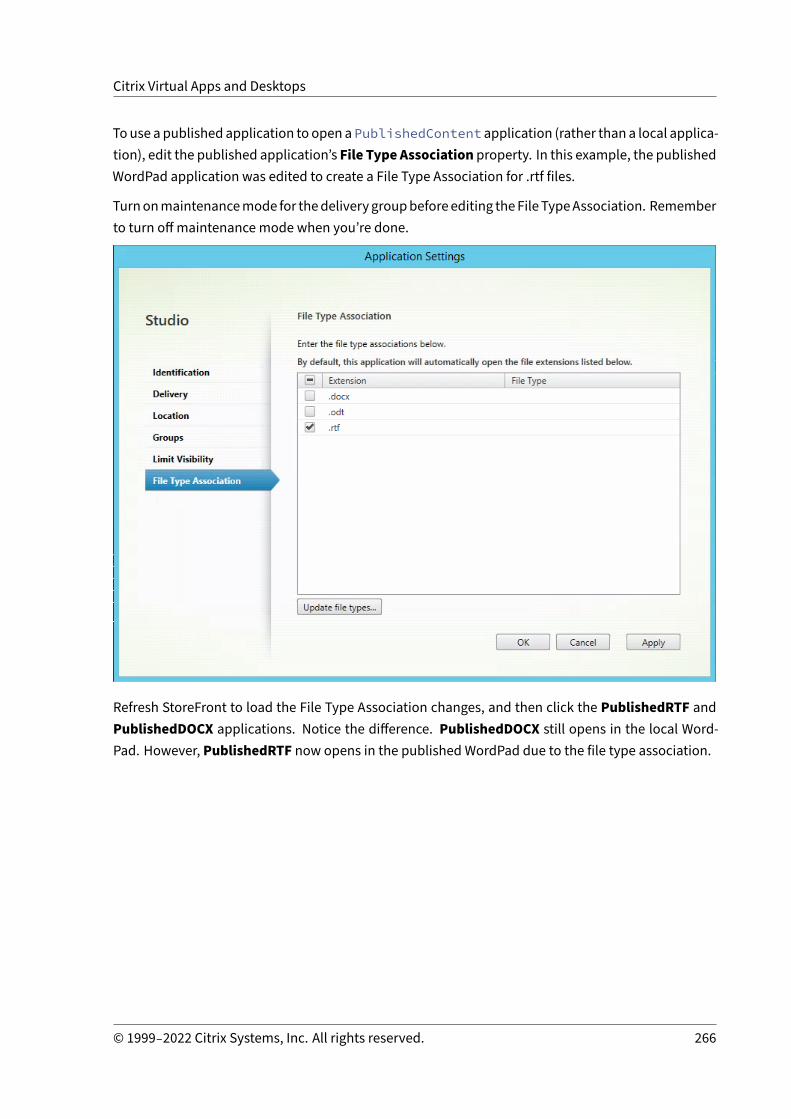
Citrix Virtual Apps and Desktops
Touse a published application to open aPublishedContent application (rather than a local applica‑tion), edit the published application’s File Type Association property. In this example, the publishedWordPad application was edited to create a File Type Association for .rtf files.
Turnonmaintenancemode for thedelivery groupbeforeediting theFile TypeAssociation. Rememberto turn offmaintenance mode when you’re done.
Refresh StoreFront to load the File Type Association changes, and then click the PublishedRTF andPublishedDOCX applications. Notice the difference. PublishedDOCX still opens in the local Word‑Pad. However, PublishedRTF now opens in the published WordPad due to the file type association.
© 1999–2022 Citrix Systems, Inc. All rights reserved. 266

Citrix Virtual Apps and Desktops
Formore information
• Create machine catalogs• Create delivery groups• Change application properties
Server VDI
April 14, 2021
Use the Server VDI (Virtual Desktop Infrastructure) feature todeliver a desktop froma server operatingsystem for a single user.
• Enterprise administrators can deliver server operating systems as VDI desktops, which can bevaluable for users such as engineers and designers.
• Service Providers can offer desktops from the cloud. Those desktops complywith theMicrosoftServices Provider License Agreement (SPLA).
The following features cannot be used with Server VDI:
• Hosted applications• Local App Access• Direct (non‑brokered) desktop connections• Remote PC Access
© 1999–2022 Citrix Systems, Inc. All rights reserved. 267

Citrix Virtual Apps and Desktops
In Citrix Virtual Apps and Desktops 7 deployments, Server VDI is supported on Windows Server 2019and Windows Server 2016.
In Citrix Virtual Apps and Desktops service deployments, server VDI is supported on Windows Server2019, Windows Server 2016, and Windows 10 Enterprise for Virtual Desktops.
All Server VDI deployments support the user personalization layer technology.
For Server VDI toworkwith TWAIN devices such as scanners, theWindows Server Desktop Experiencefeature must be installed.
Install and configure Server VDI
1. Prepare the Windows server for installation.
• Use Windows Server Manager to ensure that the Remote Desktop Services role servicesare not installed. If theywere previously installed, remove them. The VDA installation failsif these role services are installed.
• Ensure that the Restrict each user to a single session property is enabled. On the Win‑dows server, edit the registry for the Terminal Server setting:
HKEY\\_LOCAL\\_MACHINE\\SYSTEM\\CurrentControlSet\\Control\\TerminalServer
DWORD fSingleSessionPerUser = 1
2. Use the Citrix Virtual Apps and Desktops installer’s command line interface to install a VDA on asupported server or servermaster image, specifying the /quiet and /servervdi options. (Bydefault, the installer’s graphical interface blocks theWindows single‑sessionOSVDAon a serveroperating system. Using the command line overrides this behavior.) Use one of the followingcommands:
• Citrix Virtual Apps and Desktops deployments:– XenDesktopVdaSetup.exe /quiet /servervdi– VDAWorkstationSetup.exe /quiet /servervdi
• Citrix Virtual Apps and Desktops service deployments:– VDAWorkstationSetup.exe /quiet /servervdi
Other options:
• Use /controllers to specify Delivery Controllers or Cloud Connectors.• Use /enable_hdx_ports to open ports in the firewall, unless the firewall is to be config‑uredmanually.
• Use /mastermcsimage (or /masterimage) if you are installing the VDA on an image, andwill use MCS to create server VMs from that image.
• For all option details, see Install using the command line.
© 1999–2022 Citrix Systems, Inc. All rights reserved. 268
Citrix Virtual Apps and Desktops
3. Create a machine catalog for Server VDI. In the catalog creation wizard:
• On theOperating System page, select Single‑session OS.• On the Summary page, specify a machine catalog name and description for administra‑tors that clearly identifies it as Server VDI. This is the only indicator in Studio that the cat‑alog supports Server VDI.
When using search in Studio, the Server VDI catalog is displayed on the Single‑session OSMa‑chines tab, even though the VDA is installed on a server.
4. Create a Delivery Group and select the Server VDI catalog you created.
If you did not specify Delivery Controllers or Cloud Connectors during VDA installation, remember tospecify them afterward. For details, see VDA registration.
User personalization layer
April 14, 2021
The user personalization layer feature for Citrix Virtual Apps and Desktops extends the capabilitiesof non‑persistent machine catalogs. User personalization layers preserve users’ data and locally in‑stalled applications across sessions. Powered by Citrix App Layering, this feature replaces PersonalvDisk (PvD).
Like PvD, the user personalization layer feature supports Citrix Provisioning and Machine CreationServices (MCS) in a non‑persistentmachine catalog. You install the feature components alongside theVirtual Delivery Agent within the master image.
A VHD file stores any applications that the user installs locally. The VHD, which is mounted on theimage, acts as the user’s own user layer virtual hard drive.
This document includes instructions for deploying and configuring the user personalization layer fea‑ture. It describes the requirements for successful deployment, limitations, and known issues.
To use the User personalization layer feature, you must first deploy it using the steps detailed in thearticle. Until then, the feature is not available for you to use.
Application support
Aside from the following exceptions, all applications that a user installs locally on the desktop aresupported in the user personalization layer.
© 1999–2022 Citrix Systems, Inc. All rights reserved. 269

Citrix Virtual Apps and Desktops
Exceptions
The following applications are the exception and are not supported on the user personalization layer:
• Enterprise applications, such as MS Office and Visual Studio.
• Applications that modify the network stack or hardware. Example: a VPN client.
• Applications that have boot level drivers. Example: a virus scanner.
• Applications with drivers that use the driver store. Example: a printer driver.
Note:
You canmake printers available using Windows Group Policy Objects (GPOs).
Do not allow users to install any unsupported applications locally. Rather, install these applicationsdirectly on the master image.
Applications that require a local user or administrator account
When a user installs an application locally, the app goes into their user layer. If the user then adds oredits a local user or group, the changes do not persist beyond the session.
Important:
Add any required local user or group in the master image.
Requirements
The user personalization layer feature requires the following components:
• Citrix Virtual Apps and Desktops 7 1909 or later• Virtual Delivery Agent (VDA), version 1912• Citrix Provisioning, version 1909 or later• Windows File Share (SMB), or Azure Files with on‑prem AD authentication enabled
You can deploy the User personalization layer feature on the following Windows versions when theOS is deployed as single session. Support is limited to a single user on a single session.
• Windows 10 Enterprise x64, version 1607 or later• Windows 10 Multi‑Session (Azure Files supported)• Windows Server 2016 (Azure Files supported)• Windows Server 2019 (Azure Files supported)
As indicated above, for Citrix Virtual Apps andDesktops 7, use of Azure Files with User personalizationlayers is supported on Windows Server 2019, Windows Server 2016v, and Windows 10 client.
© 1999–2022 Citrix Systems, Inc. All rights reserved. 270

Citrix Virtual Apps and Desktops
Note:
Userpersonalization layer isonly supportedasaServerVDIdeployment. Fordeploymentdetails,see the Server VDI article.
If you installed the preview version of the user personalization layer feature, uninstall the softwareand reboot the master image before installing this release.
Set up your file share
The user personalization layer feature requires Windows Server Message Block (SMB) storage. To cre‑ate a Windows file share, follow the usual steps for the Windows operating system that you are on.
For more about using Azure Files with Azure‑based catalogs, see Set up Azure Files storage for Userpersonalization layers.
Recommendations
Follow the recommendations in this section for a successful user personalization layer deployment.
Profile Management solution
User personalization layer stores all changes the user makes for a single machine catalog image. Toadd enhanced capabilities such as roaming profile data across multiple catalog images, Citrix recom‑mends also using Profile Management. Refer to the Profile Management documentation for moredetails.
When using Profile Management with the user personalization layer feature, clear deletion of theuser’s information on logoff. You can clear deletion using a Group Policy Object (GPO) or the policyon the Delivery Controller (DDC).
For details about available Profile Management policies, see Profile Management policy descriptionsand defaults.
Microsoft System Center Configuration Manager (SCCM)
If you are using SCCM with the user personalization layer feature, follow the Microsoft guidelines forpreparing your image in a VDI environment. Refer to this Microsoft TechNet article for more informa‑tion.
User layer size
The default user layer size is 10 GB, the minimumwe recommend.
© 1999–2022 Citrix Systems, Inc. All rights reserved. 271

Citrix Virtual Apps and Desktops
Note:
During installation, if the value is set to zero (0), the default user layer size is set to 10 GB.
If youwant to change the user layer size, you can enter a different value for theUser Layer SizeStudiopolicy. (For details, see Step 5: Create delivery group custom policies).
Tools for overriding the User Layer Size (Optional)
You can override the User Layer Size by using a Windows tool to define a quota on the user layer fileshare.
Use one of the following Microsoft quota tools to set a hard quota on the user layer directory namedUsers:
• File Server Resource Manager (FSRM)• Quota Manager
Note:
Increasing or decreasing the quota only impacts new user layers. It does not change the maxi‑mum size of existing user layers. Existing user layers remain unchanged when the quota is up‑dated.
Deploy a User personalization layer
When deploying the user personalization feature, you define the policies within Studio. You then as‑sign the policies to the delivery group bound to the machine catalog, where the feature is deployed.
If you leave the master image with no user personalization layer configuration, the services remainidle and do not interfere with authoring activities.
If you set the policies in the master image, the services attempt to run and mount a user layer withinthe master image. The master image would exhibit unexpected behaviors and instability.
To deploy the user personalization layer feature, complete the following steps in this order:
• Step 1: Verify availability of a Citrix Virtual Apps and Desktops environment.• Step 2: Prepare your master image.• Step 3: Create a machine catalog.• Step 4: Create a delivery group.• Step 5: Create delivery group custom policies.
Step 1: Verify that the Citrix Virtual Apps and Desktops environment is available
Be sure that your Citrix Virtual Apps and Desktops environment is available to use with this new fea‑ture. For setup details, see Install and configure Citrix Virtual Apps and Desktops.
© 1999–2022 Citrix Systems, Inc. All rights reserved. 272
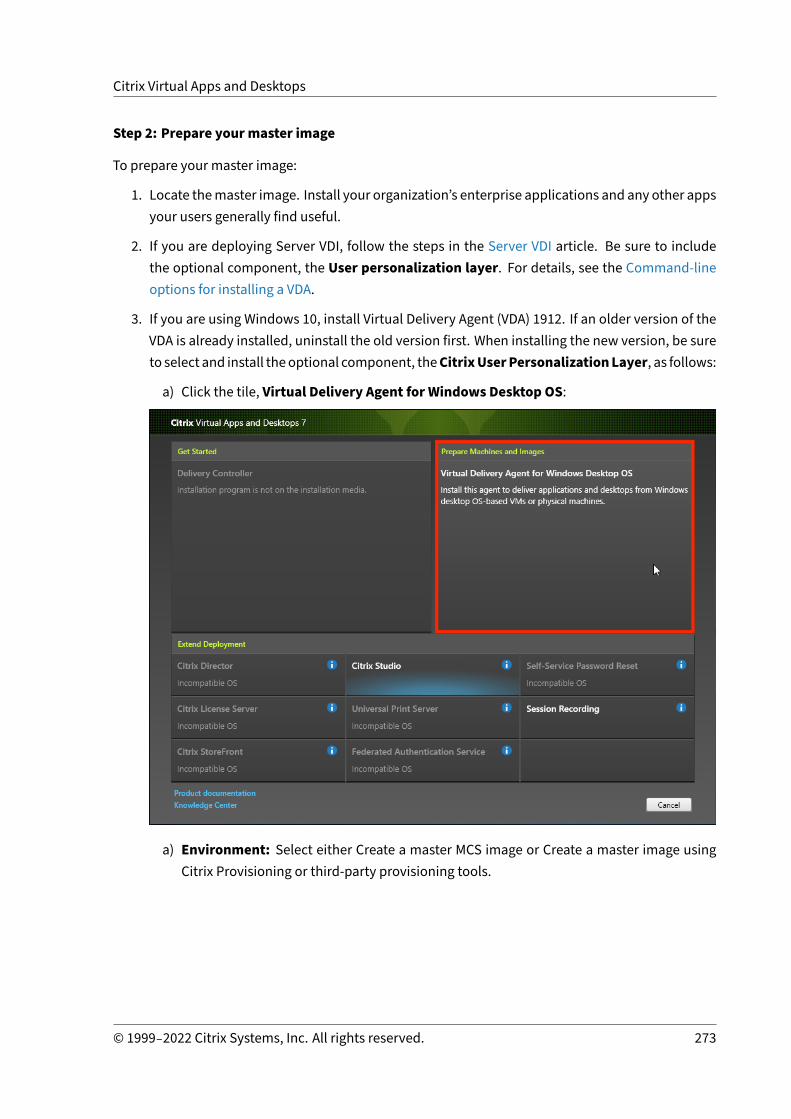
Citrix Virtual Apps and Desktops
Step 2: Prepare yourmaster image
To prepare your master image:
1. Locate themaster image. Install your organization’s enterprise applications and any other appsyour users generally find useful.
2. If you are deploying Server VDI, follow the steps in the Server VDI article. Be sure to includethe optional component, the User personalization layer. For details, see the Command‑lineoptions for installing a VDA.
3. If you are using Windows 10, install Virtual Delivery Agent (VDA) 1912. If an older version of theVDA is already installed, uninstall the old version first. When installing the new version, be sureto select and install theoptional component, theCitrixUserPersonalizationLayer, as follows:
a) Click the tile, Virtual Delivery Agent for Windows Desktop OS:
a) Environment: Select either Create a master MCS image or Create a master image usingCitrix Provisioning or third‑party provisioning tools.
© 1999–2022 Citrix Systems, Inc. All rights reserved. 273

Citrix Virtual Apps and Desktops
a) Core Components: ClickNext.
b) Additional Components: Check Citrix User Personalization Layer.
© 1999–2022 Citrix Systems, Inc. All rights reserved. 274
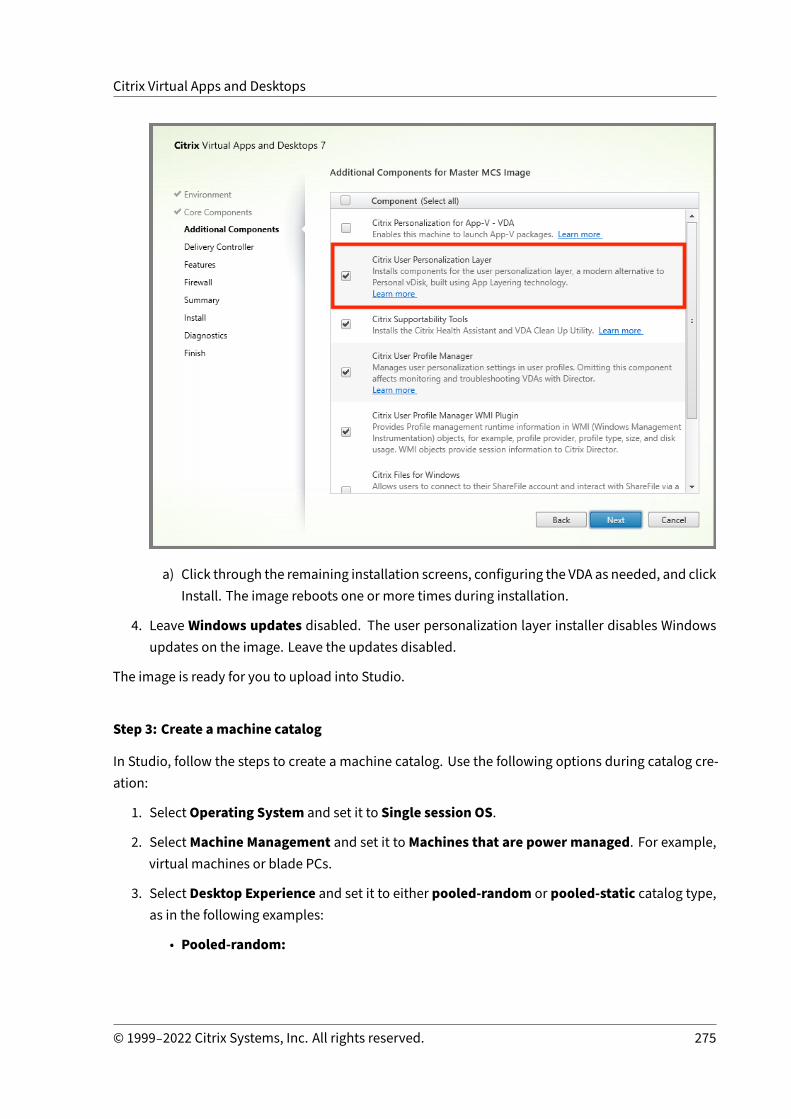
Citrix Virtual Apps and Desktops
a) Click through the remaining installation screens, configuring the VDA as needed, and clickInstall. The image reboots one or more times during installation.
4. Leave Windows updates disabled. The user personalization layer installer disables Windowsupdates on the image. Leave the updates disabled.
The image is ready for you to upload into Studio.
Step 3: Create amachine catalog
In Studio, follow the steps to create a machine catalog. Use the following options during catalog cre‑ation:
1. SelectOperating System and set it to Single session OS.
2. SelectMachine Management and set it toMachines that are power managed. For example,virtual machines or blade PCs.
3. Select Desktop Experience and set it to either pooled‑random or pooled‑static catalog type,as in the following examples:
• Pooled‑random:
© 1999–2022 Citrix Systems, Inc. All rights reserved. 275

Citrix Virtual Apps and Desktops
• Pooled‑static: If you select pooled‑static, configure desktops to discard all changes andclear virtual desktops when the user logs off, as shown in the following screenshot:
© 1999–2022 Citrix Systems, Inc. All rights reserved. 276
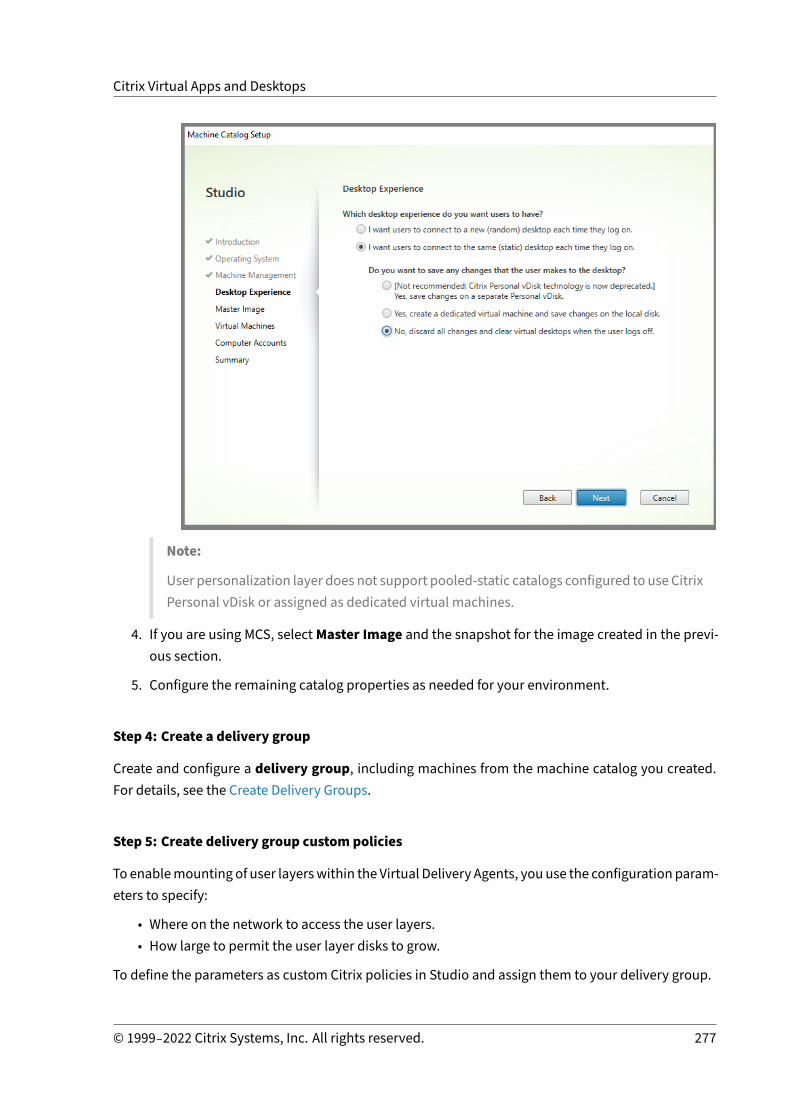
Citrix Virtual Apps and Desktops
Note:
User personalization layer does not support pooled‑static catalogs configured to use CitrixPersonal vDisk or assigned as dedicated virtual machines.
4. If you are using MCS, selectMaster Image and the snapshot for the image created in the previ‑ous section.
5. Configure the remaining catalog properties as needed for your environment.
Step 4: Create a delivery group
Create and configure a delivery group, including machines from the machine catalog you created.For details, see the Create Delivery Groups.
Step 5: Create delivery group custom policies
To enablemounting of user layerswithin the Virtual Delivery Agents, you use the configuration param‑eters to specify:
• Where on the network to access the user layers.• How large to permit the user layer disks to grow.
To define the parameters as custom Citrix policies in Studio and assign them to your delivery group.
© 1999–2022 Citrix Systems, Inc. All rights reserved. 277

Citrix Virtual Apps and Desktops
1. In Studio, select Policies in the navigation pane:
2. Select Create Policy in the Actions pane. The Create Policy window appears.
3. Type ‘user layer’ into the search field. The following two policies appear in the list of availablepolicies:
• User Layer Repository Path
• User Layer Size GB
Note:
Changing the User Layer Size in the policy does not change the size of existing layers.
4. Click Select next to User Layer Repository Path. The Edit Setting window appears.
© 1999–2022 Citrix Systems, Inc. All rights reserved. 278

Citrix Virtual Apps and Desktops
5. Enter a path in the format \\server name or address\folder name in the Value field,ClickOK:
© 1999–2022 Citrix Systems, Inc. All rights reserved. 279

Citrix Virtual Apps and Desktops
6. Optional: Click Select next to User Layer Size in GB:
© 1999–2022 Citrix Systems, Inc. All rights reserved. 280

Citrix Virtual Apps and Desktops
7. The Edit Settings window appears.
8. Optional: Change the default value of ‘0’ to the maximum size (in GB) that the user layer cangrow. Click OK.
Note:
If you keep the default value, the maximum user layer size is 10 GB.
9. Click Next to configure Users and Machines. Click the Delivery Group Assign link highlighted inthis image:
© 1999–2022 Citrix Systems, Inc. All rights reserved. 281

Citrix Virtual Apps and Desktops
10. In the Delivery Groupmenu, select the delivery group created in the previous section. Click OK.
© 1999–2022 Citrix Systems, Inc. All rights reserved. 282

Citrix Virtual Apps and Desktops
11. Enter a name for the policy. Click the check box to enable the policy, and click Finish.
© 1999–2022 Citrix Systems, Inc. All rights reserved. 283

Citrix Virtual Apps and Desktops
Configure security settings on the user layer folder
As adomain administrator, you can specifymore thanone storage location for your user layers. Createa \Users subfolder For each storage location (including the default location). Secure each locationusing the following settings.
Setting name Value Apply to
Creator Owner Modify Subfolders and Files only
Owner Rights Modify Subfolders and Files only
Users or group: Create Folder/Append Data;Traverse Folder/Execute File;List Folder/Read Data; ReadAttributes
Selected Folder Only
System Full Control Selected Folder, Subfolders,and Files
© 1999–2022 Citrix Systems, Inc. All rights reserved. 284

Citrix Virtual Apps and Desktops
Setting name Value Apply to
Domain Admins, and selectedAdmin group
Full Control Selected Folder, Subfolders,and Files
User layer messages
When a user is unable to access their user layer, they receive one of these notification messages.
• User Layer In Use
We were unable to attach your user layer because it is in use. Anychanges you make to application settings or data will not be saved. Besure to save any work to a shared network location.<!--NeedCopy-->
• User Layer Unavailable
We were unable to attach your user layer. Any changes you make toapplication settings or data will not be saved. Be sure to save anywork to a shared network location.<!--NeedCopy-->
• System not reset after user sign‑out
This system was not shut down properly. Please log off immediately andcontact your system administrator.<!--NeedCopy-->
Log files to use when troubleshooting
The log file, ulayersvc.log, contains the output of the user personalization layer software wherechanges are logged.
1 C:\ProgramData\Unidesk\Logs\ulayersvc.log2 <!--NeedCopy-->
Limitations
Keep the following limitations in mind when installing and using the user personalization layer fea‑ture.
• Donot attempt todeploy the user personalization layer software on a layerwithin App Layering.Either deploy user personalization layers in Citirix Virtual Apps and Desktops, or enable userlayers in an App Layering image template, not both. Either process produces the user layers youneed.‑ Donot configure the user personalization layer featurewith persistentmachine catalogs.
© 1999–2022 Citrix Systems, Inc. All rights reserved. 285
Citrix Virtual Apps and Desktops
• Do not use Session hosts.
• Do not update the machine catalog with an image running a new OS install (even the same ver‑sion of Windows 10). Best practice is to apply updates to the OS within the samemaster imageused when creating the machine catalog.
• Do not use boot‑time drivers, nor any other early boot personalization.
• Do notmigrate PvD data to the user personalization layer feature.
• Do not migrate existing user layers from the full App Layering product to the user personaliza‑tion layer feature.
• Do not change the user layer SMB path to access user layers created using a differentmaster OSimage.
• Do not enable Secure Boot within User personalization layer virtual machines, as it is not cur‑rently supported.
• When a user logs out of a session and then logs in again, the new session runs on a differentmachine in the pool. In a VDI environment, Microsoft Software Center lists an application asInstalled on the first machine, but shows it asUnavailable on the secondmachine.
To find out the true status of the application, instruct the user to select the application in theSoftware Center and click Install. SCCM then updates the status to the true value.
• Software Center occasionally stops immediately after launching within a VDA that has the userpersonalization layer feature enabled. To avoid this issue, followMicrosoft’s recommendationsfor Implementing SCCM in a XenDesktop VDI environment. Also, make sure that the ccmexecservice is running before you start the Software Center.
• In Group Polices (Computer Settings), User layer settings override settings applied to the mas‑ter image. Therefore, the changes you make in Computer Settings using a GPO are not alwayspresent for the user on the next session login.
To get around this issue, create a User Logon Script that issues the command:
gpupdate /force
For example, one customer set the following command to run at each user login:
gpudate /Target:Computer /force
For best results, apply changes to Computer Settings directly on the user layer, after the userhas logged in.
© 1999–2022 Citrix Systems, Inc. All rights reserved. 286
Citrix Virtual Apps and Desktops
Remove components
April 14, 2021
To remove components, Citrix recommends using theWindows feature for removing or changing pro‑grams. Alternatively, you can remove components using the command line, or a script on the instal‑lation media.
When you remove components, prerequisites are not removed, and firewall settings are not changed.For example, when you remove a Delivery Controller, the SQL Server software and the databases arenot removed.
If you upgraded a Controller from an earlier deployment that included Web Interface, you must re‑move theWeb Interface component separately. You cannot use the installer to removeWeb Interface.
For information about removing features not mentioned below, see the feature’s documentation.
Preparation
Before removing a Controller, remove it from the Site. For details, see Remove a Controller.
Close Studio and Director before removing them.
Remove components using the Windows feature for removing or changing programs
From the Windows feature for removing or changing programs:
• To remove a Controller, Studio, Director, License Server, or StoreFront, right‑click Citrix VirtualApps version or Citrix Virtual Desktops version and select Uninstall. The installer launches.Select the components to be removed.
Alternatively, you can remove StoreFront by right‑clicking Citrix StoreFront and selectingUninstall.
• To remove a VDA, right‑click Citrix Virtual Delivery Agent version and select Uninstall. Theinstaller launches and you can select the components to be removed. The machine restartsautomatically after the removal, by default.
• To remove theUniversal Print Server, right‑clickCitrixUniversal Print Server and selectUnin‑stall.
Remove core components using the command line
Fromthe \x64\XenDesktopSetupdirectoryon the installationmedia, run theXenDesktopServerSetup.exe command.
© 1999–2022 Citrix Systems, Inc. All rights reserved. 287

Citrix Virtual Apps and Desktops
• To remove one or more components, specify the /remove and /components options.• To remove all components, specify the /removeall option.
For command and parameter details, see Install using the command line.
For example, the following command removes Studio.
\x64\XenDesktop Setup\XenDesktopServerSetup.exe /remove /components studio
Remove VDAs using the command line
From the \x64\XenDesktop Setup directory on the installationmedia, run the XenDesktopVdaSetup.exe command.
• To remove one or more components, use the /remove and /components options.• To remove all components, use the /removeall option.
For command and parameter details, see Install using the command line.
The machine restarts automatically after the removal, by default.
For example, the following command removes the VDA and Citrix Workspace app.
\x64\XenDesktop Setup\XenDesktopVdaSetup.exe /removeall
To remove VDAs using a script in Active Directory; see Install or remove VDAs using scripts.
Upgrade andmigrate
April 14, 2021
Introduction
Upgrading changes your deployment to the Citrix Virtual Apps and Desktops 7 Current Release (CR)without having to set up newmachines or sites. This is known as an in‑place upgrade.
Upgrading gives you access to the latest features and technologies that you’re eligible for. Upgradescan also contain fixes, clarifications, and enhancements from earlier versions.
Upgrade overview
1. Review the Upgrade a deployment article before beginning the upgrade. This is the primaryinformation source for learning how to prepare for and implement an upgrade.
2. Complete the preparation guidance.3. Run installers to upgrade core components.
© 1999–2022 Citrix Systems, Inc. All rights reserved. 288

Citrix Virtual Apps and Desktops
4. Upgrade the system databases and the site.5. Upgrade VDAs onmaster images (or directly onmachines).6. Upgrade other components.
Each preparation and upgrade step is detailed in Upgrade a deployment.
Versions you can upgrade
The Citrix Upgrade Guide lists the Citrix Virtual Apps and Desktops (and XenApp and XenDesktops)versions you can upgrade from.
Frequently asked questions
This section answers some commonly asked questions about upgrading Citrix Virtual Apps and Desk‑tops.
• What is the correct order to upgrademy Virtual Apps and Desktops environment?
The VDA can be upgraded at any time, in any order. Upgrade half of the Controllers before up‑grading your site. Then upgrade the remaining Controllers after the site upgrade. For moreinformation, see Upgrade sequence and Upgrade procedure.
• My site has several Delivery Controllers (in different zones). What happens if I upgradeonly some of them? Am I required to upgrade every Controller in the site during the samemaintenance window?
Thebestpractice is toupgradeall DeliveryControllersduring the samemaintenancewindow, asvarious services on each Controller communicate with each other. Keeping different versionsmight cause issues. During a maintenance window, we recommend you upgrade half of theControllers, upgrade the site, and then upgrade the remaining Controllers. (For details, see theUpgrade procedure.)
• Can I go directly to the latest version, or do I have to do incremental upgrades?
You can almost always upgrade to the latest version and skip intermediate releases, unless ex‑plicitly stated in the What’s new article for the version you’re upgrading to. See the UpgradeGuide.
• Can a customer upgrade from a Long Term Service Release (LTSR) environment to a Cur‑rent Release?
Yes. Customers are not required to remain on a Long Term Service Release for an extendedperiod. Customers can move an LTSR environment to a Current Release, based on businessrequirements and features.
• Aremixed versions of components allowed?
© 1999–2022 Citrix Systems, Inc. All rights reserved. 289
Citrix Virtual Apps and Desktops
Within each site, Citrix recommends upgrading all components to the same version. Althoughyou can use earlier versions of some components, all features in the latest versionmight not beavailable. For more information, see Mixed environment considerations.
• How oftenmust a Current Release be upgraded?
Current Releases reach End ofMaintenance (EOM) 6months after the release date. Citrix recom‑mends customers adopt the latest Current Release. Current Releases reach End of Life (EOL) 18months after the release date. For more information, see Current Release Lifecycle.
• What is recommended: upgrade to LTSR or CR?
Current Releases (CRs) deliver the latest and most innovative app, desktop, and server virtu‑alization features and functionality. This allows you to stay on leading‑edge technology andahead of your competition.
Long TermService Releases (LTSRs) are ideal for large enterprise production environments thatprefer to retain the same base version for an extended period.
For details, see Servicing Options.
• Do I need to upgrademy licenses?
Ensure that the current license date has not expired, and is valid for the release you are upgrad‑ing to. See CTX111618. For information about renewal, see Customer Success Services renewallicenses.
• How long does an upgrade take?
The time required to upgrade a deployment varies, depending on the infrastructure and net‑work. So, we can’t provide an exact time.
• What are the best practices?
Ensure that you understand and follow the preparation guidance.
• Which operating systems are supported?
The System requirements article for the version you’re upgrading to lists the supported OSs.
If your current deployment uses operating systems that are no longer supported, see Earlieroperating systems.
• Which versions of VMware vSphere (vCenter + ESXi) are supported?
CTX131239 lists the supported hosts and versions, plus links to known issues.
• When doesmy version go EOL?
Check the Product Matrix.
• What are the known issues with the latest release?
© 1999–2022 Citrix Systems, Inc. All rights reserved. 290

Citrix Virtual Apps and Desktops
– Citrix Virtual Apps and Desktops– StoreFront– Citrix Provisioning– Citrix License Server– Citrix Workspace app for Windows
More information
Long Term Service Release (LTSR) deployment updates use Cumulative Updates (CUs). A CU updatesbaseline components of the LTSR, and each CU includes its ownmetainstaller.
Each CU has dedicated documentation. For example, for the 7.15 LTSR, check the link on that LTSR’sWhat’s new page for the latest CU. Each CU page includes supported version information, instruc‑tions, and a link to the CU download package.
Migrate
Migratingmoves data from an earlier deployment to a newer version. The process includes installingnewer components and creating a new site, exporting data from the older farm, and then importingthe data to the new site.
There are no supported tools or scripts for migrating XenApp and XenDesktop versions, or migratingearlierCitrix VirtualAppsandDesktopsversions. Upgrading is supported for theCitrix VirtualAppsandDesktops versions listed in the Citrix Upgrade Guide, and described in this product documentation.
For earlier XenApp 6.x migration content, see the following. Neither the scripts nor the articles aresupported or maintained.
• Opensourcemigration scripts for XenApp6.x versionsareavailableathttps://github.com/citrix/xa65migrationtool. Citrix does not support or maintain these migration scripts
• Changes in 7.x• Upgrade a XenApp 6.5 worker to a new VDA• Migrate XenApp 6.x
Upgrade a deployment
April 14, 2021
© 1999–2022 Citrix Systems, Inc. All rights reserved. 291
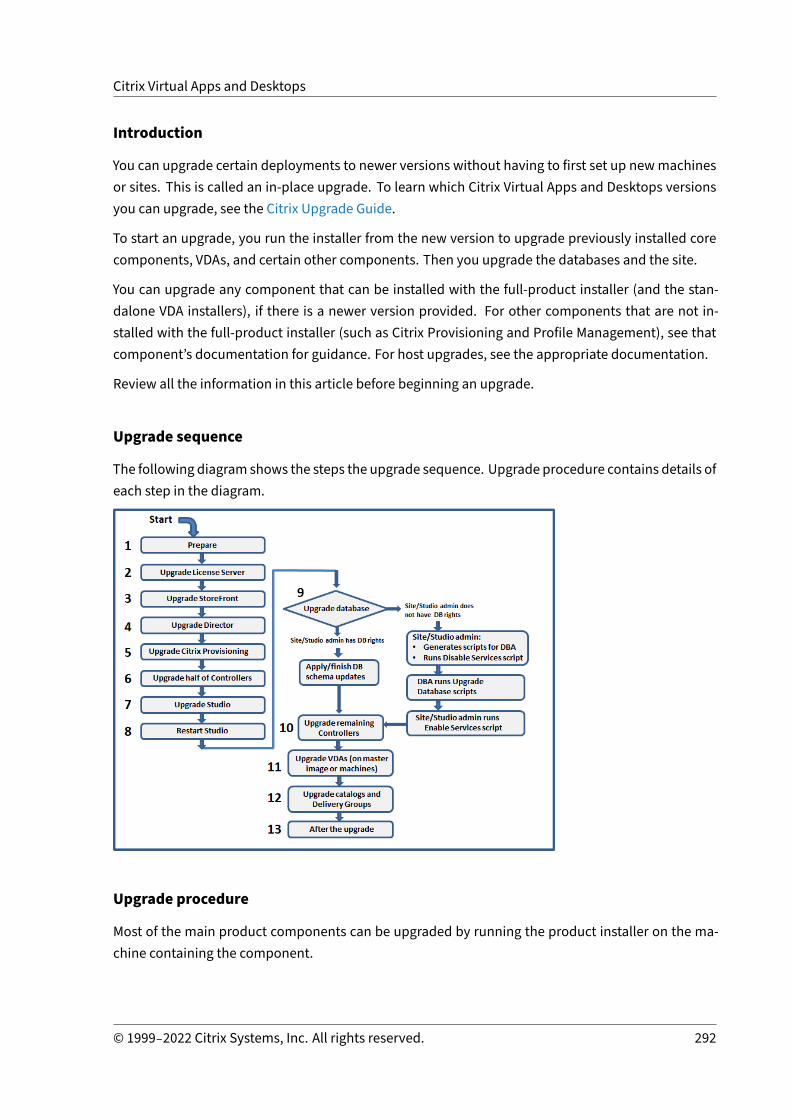
Citrix Virtual Apps and Desktops
Introduction
You can upgrade certain deployments to newer versions without having to first set up newmachinesor sites. This is called an in‑place upgrade. To learn which Citrix Virtual Apps and Desktops versionsyou can upgrade, see the Citrix Upgrade Guide.
To start an upgrade, you run the installer from the new version to upgrade previously installed corecomponents, VDAs, and certain other components. Then you upgrade the databases and the site.
You can upgrade any component that can be installed with the full‑product installer (and the stan‑dalone VDA installers), if there is a newer version provided. For other components that are not in‑stalled with the full‑product installer (such as Citrix Provisioning and Profile Management), see thatcomponent’s documentation for guidance. For host upgrades, see the appropriate documentation.
Review all the information in this article before beginning an upgrade.
Upgrade sequence
The following diagram shows the steps the upgrade sequence. Upgrade procedure contains details ofeach step in the diagram.
Upgrade procedure
Most of the main product components can be upgraded by running the product installer on the ma‑chine containing the component.
© 1999–2022 Citrix Systems, Inc. All rights reserved. 292

Citrix Virtual Apps and Desktops
If onemachine containsmore than one component (for example, Studio and License Server), all com‑ponents on that machine are upgraded, if the product media contains newer versions of their soft‑ware.
To use the installers:
• To run the full product installer’s graphical interface, log on to the machine and then insert themedia or mount the ISO drive for the new release. Double‑click AutoSelect.
• To use the command‑line interface, issue the appropriate command. See Install using the com‑mand line.
Step 1: Prepare
Before you begin an upgrade, make sure you’re ready. Read and complete any necessary tasks:
• Remove PVD, App Disks, and unsupported hosts• VDAs that have PvD or AppDisk components• Limitations• Mixed environment considerations• Earlier operating systems• Preparation• Preliminary site tests• SQL Server version check
Step 2: Upgrade License Server
If the installation has a newversion of the Citrix License Server software, upgrade this component firstbefore any other components.
If you have not yet determined whether your License Server is compatible with the new version, it isessential that you run the installeron theLicenseServerbeforeupgradinganyother corecomponents.
Step 3: Upgrade StoreFront
If the installation media contains a new version of the StoreFront software, run the installer on themachine containing the StoreFront server.
• In the graphical interface, choose Citrix StoreFront from the Extend deployment section.• From the command line, run CitrixStoreFront-x64.exe, which is available in the CitrixVirtual Apps and Desktops installation media’s x64 folder.
© 1999–2022 Citrix Systems, Inc. All rights reserved. 293

Citrix Virtual Apps and Desktops
Step 4: Upgrade Director
If the installation media contains a new version of the Director software, run the installer on the ma‑chine containing Director.
Step 5: Upgrade Citrix Provisioning
The Citrix Provisioning installationmedia is available separately from the Citrix Virtual Apps andDesk‑tops installation media. To learn how to install and upgrade Citrix Provisioning server and target de‑vice software, see the Citrix Provisioning product documentation.
Step 6: Upgrade half of Delivery Controllers
For example, if your site has four Controllers, run the installer on two of them.
Leavinghalf of theControllers active allowsusers to access the site. VDAs can registerwith the remain‑ing Controllers. There might be times when the site has reduced capacity because fewer Controllersare available. The upgrade causes only a brief interruption in establishing new client connectionsduring the final database upgrade steps. The upgraded Controllers cannot process requests until theentire site is upgraded.
If your site has only one Controller, it is inoperable during the upgrade.
Preliminary site tests run on the first Controller, before the actual upgrade starts. For details, seePreliminary site tests.
Step 7: Upgrade Studio
If you haven’t already upgraded Studio (because it was on the samemachine as another component),run the installer on the machine containing Studio.
Step 8: Restart Studio
Restart the upgraded Studio. The upgrade process automatically resumes.
Step 9: Upgrade database and site
Check Preparation for the permissions required to update the schema of the SQL Server databases.
• If you have sufficient permission to update the SQL Server database schema, you can initiatean automatic database upgrade. Continue with Upgrade the database and site automatically.
© 1999–2022 Citrix Systems, Inc. All rights reserved. 294

Citrix Virtual Apps and Desktops
• If you do not have sufficient database permissions, you can initiate amanual upgrade that usesscripts, and proceed with the help of your database administrator (someone who has the re‑quired permissions). For amanual upgrade, the Studio user generates the scripts and then runsthe scripts that enable and disable services. The database administrator runs other scripts thatupdate the database schema, using either the SQLCMD utility or the SQL Server ManagementStudio in SQLCMDmode. Continue with Upgrade the database and site manually.
Citrix strongly recommends that you back up the database before upgrading. See CTX135207. Duringa database upgrade, product services are disabled. During that time, Controllers cannot broker newconnections for the site, so plan carefully.
Upgrade the database and site automatically
1. Start the newly upgraded Studio.2. Indicate that you want to start the site upgrade automatically and confirm that you are ready.
The database and site upgrade proceeds.
Upgrade the database and site manually
1. Start the newly upgraded Studio.
2. Indicate that youwant to upgrade the sitemanually. The wizard checks for License Server com‑patibility and requests confirmation.
3. Confirm that you have backed up the database.
The wizard generates and displays the scripts and a checklist of upgrade steps. If a database’sschemahas not changed since the product version being upgraded, that script is not generated.For example, if the loggingdatabase schemadoesnot change, theUpgradeLoggingDatabase.sql script is not generated.
4. Run the following scripts in the order shown.
• DisableServices.ps1: The Studio user runs this PowerShell script on a Controller todisable product services.
• UpgradeSiteDatabase.sql: The database administrator runs this SQL script on theserver containing the Site database
• UpgradeMonitorDatabase.sql: Thedatabaseadministrator runs this SQL script on theserver containing the Monitor database.
• UpgradeLoggingDatabase.sql: Thedatabaseadministrator runs this SQL script on theserver containing the Configuration Logging database. Run this script only if this databasechanges (for example, after applying a hotfix).
• EnableServices.ps1: The Studio user runs this PowerShell script on a Controller to en‑able product services.
© 1999–2022 Citrix Systems, Inc. All rights reserved. 295

Citrix Virtual Apps and Desktops
After the database upgrade completes and product services are enabled, Studio automaticallytests the environment and configuration, and then generates an HTML report. If problems areidentified, you can restore the database backup. After resolving issues, you can upgrade thedatabase again.
5. After completing the checklist tasks, click Finish upgrade.
Step 10: Upgrade remaining Delivery Controllers
From the newly upgraded Studio, select Citrix Studio site‑name in the navigation pane. On the Com‑mon Tasks tab, selectUpgrade remaining Delivery Controllers.
After completing theupgradeandconfirming completion, close and then reopenStudio. Studiomightprompt for an extra site upgrade to register the Controller’s services to the site, or to create a zone IDif it does not exist.
Step 11: Upgrade VDAsImportant:
If you’re upgrading a VDA to version 1912 or later, see Upgrading VDAs to 1912 or later.
Run the product installer on machines containing VDAs.
If you used Machine Creation Services and a master image to create machines, go to your host andupgrade the VDA on the master image. You can use any of the available VDA installers.
• For graphic interface guidance, see Install VDAs.• For command line guidance, see Install using the command line.
If you used Citrix Provisioning to createmachines, see the Citrix Provisioning product documentationfor guidance about upgrading.
Watch this video to learnmore:
© 1999–2022 Citrix Systems, Inc. All rights reserved. 296

Citrix Virtual Apps and Desktops
Step 12: Updatemachine catalogs and Delivery Groups
• Update catalogs that use machines with upgraded VDAs.• Upgrade catalogs that use machines with upgraded VDAs.• Upgrade Delivery Groups that use machines with upgraded VDAs.
Step 13: After the upgrade
After completing an upgrade, you can test the newly upgraded site. From Studio, select Citrix Stu‑dio site‑name in the navigation pane. On the Common Tasks tab, select Test Site. These tests runautomatically after you upgrade the database, but you can run them again at any time.
The testsmight fail for aController onWindowsServer 2016whena localMicrosoftSQLServer Expressis used for the site database, if the SQL Server Browser Service is not started. To avoid this:
• Enable the SQL Server Browser Service (if necessary) and then start it.• Restart the SQL Server (SQLEXPRESS) service.
Upgrade other components in your deployment. For guidance, see the following product documen‑tation:
• StoreFront• AppDNA• Citrix App Layering• HDX RealTime Optimization Pack
© 1999–2022 Citrix Systems, Inc. All rights reserved. 297
Citrix Virtual Apps and Desktops
• Profile Management• Citrix Provisioning• Session Recording• Workspace Environment Management
If you need to replace the Microsoft SQL Server Express LocalDB software with a later version, seeReplace SQL Server Express LocalDB.
Remove PvD, AppDisks, and unsupported hosts
The following technologies and host types are not supported in Citrix Virtual Apps and Desktops 7Current Release deployments:
• Personal vDisks (PvD) for storing data next to users’ VMs in catalogs. The user personalizationlayer feature now handles user persistence.
• AppDisks for managing applications used in Delivery Groups.
• Host types: Azure Classic, Azure Resource Manager (ARM), AmazonWeb Services (AWS), Cloud‑Platform (the original Citrix product).
– For host types supported in this release, see System requirements.– For information about alternative ways you can continue using ARM and AWS, seeCTX270373.
If your current deployment uses PvDs or AppDisks, or has connections to unsupportedhost types, youcan upgrade to version 2006 (or later supported versions) only after removing items that use thosetechnologies.
When the installer detects one or more of the unsupported technologies or host types, the upgradepauses or stops, and an explanatory message appears. The installer logs contain details.
To help ensure a successful upgrade, review and follow the applicable guidance for removing the un‑supported items.
• Remove PvD• Remove AppDisks• Remove unsupported host items
Even if you did not use PvD or AppDisks in your deployment, related MSIs might have been includedin an earlier VDA installation or upgrade. Before you can upgrade your VDAs to version 2006 (or alater supported version), you must remove that software, even if you never used it. When using thegraphical interface, that removal can be done for you, or you can include removal optionswhen usingthe CLI. For details, see Upgrading VDAs that have PvD or AppDisks components.
© 1999–2022 Citrix Systems, Inc. All rights reserved. 298

Citrix Virtual Apps and Desktops
Remove PvD
A deployment upgrade cannot succeed until you remove all machines that are configured to use PvD.This affects catalogs and Delivery Groups.
To remove PvD from groups and catalogs:
1. From Studio, if a Delivery Group containsmachines from a catalog that uses PvD, remove thosemachines from the group.
2. From Studio, delete all catalogs containing machines that use PvD.
VDA upgrades: The deployment upgrade does not detect whether VDAs have the AppDisk or PvDcomponents installed. However, theVDA installers do. Fordetails, seeVDAs that havePvDorAppDiskscomponents.
If youplan touseAppLayering insteadofPvD, seeMigratingPvD toAppLayering for informationaboutmoving data.
Remove AppDisks
A deployment upgrade cannot proceed until you remove AppDisks from all Delivery Groups that usethem, and then remove the AppDisks themselves.
1. Select Delivery Groups in the Studio navigation pane.2. Select a group and then clickManage AppDisks in the Action pane.3. Click the action that removes the AppDisk from the group.4. Repeat steps 2 and 3 for each Delivery Group that uses AppDisks.5. Select AppDisks in the Studio navigation pane.6. Select an AppDisk and click the action that deletes the AppDisk.7. Repeat steps 5 and 6 for each AppDisk.
VDA upgrades: The deployment upgrade does not detect whether VDAs have the AppDisk or PvDcomponents installed. However, theVDA installers do. Fordetails, seeVDAs that havePvDorAppDiskscomponents.
Remove unsupported host items
A deployment upgrade to version 2006 (or later supported version) cannot proceed if the site has con‑nections to unsupported host types, such as Azure or AWS. Complete the following tasks before at‑tempting an upgrade.
From Studio:
• Delete all connections to unsupported hosts.• If a Delivery Group contains machines from a catalog created with a master image from an un‑supported host, remove those machines from the group.
© 1999–2022 Citrix Systems, Inc. All rights reserved. 299
Citrix Virtual Apps and Desktops
• Delete all catalogs that were created using a master image from an unsupported host.
VDAs that have PvD or AppDisks components
If the components that enable PvD and AppDisks technologies are installed on a VDA, that VDA cannotbe upgraded until those components are removed.
Note:
When upgrading to version 1912, you had to uninstall the current VDA and then install the newVDA. In this version, you’re asked if you want Citrix to remove the component and then continuethe upgrade.
The AppDisk andPvD componentsmight have been installed in earlier VDA versions, even if you neverused those technologies:
• Graphical interface: In the VDA installers, the Additional Components page contained the Cit‑rix AppDisk / Personal vDisk option. The 7.15 LTSR and earlier 7.x releases enabled this optionby default. So, if you accepted the defaults (or explicitly enabled the option in any release thatoffered it), that component was installed.
• CLI: Specifying the /baseimage option installed the component.
What to do
If the VDA installer does not detect the AppDisks or PvD components in the currently installed VDA,the upgrade proceeds as usual.
If the installer detects AppDisks or PvD components in the currently installed VDA:
• Graphical interface: The upgrade pauses. A message asks if you want the unsupported compo‑nents removed automatically. If you clickOK, the components are removed automatically andthe upgrade proceeds.
• CLI: To avoid command failure, include the following options in the command:
– /remove_appdisk_ack– /remove_pvd_ack
Limitations
The following limitations apply to upgrades:
• Selective component install: If you install or upgrade any components to the new version butchoose not to upgrade other components (on different machines) that require upgrade, Studioreminds you. For example, let’s say an upgrade includes new versions of the Controller and
© 1999–2022 Citrix Systems, Inc. All rights reserved. 300

Citrix Virtual Apps and Desktops
Studio. Youupgrade theController but youdonot run the installer on themachinewhereStudiois installed. Studio will not let you continue to manage the site until you upgrade Studio.
You do not have to upgrade VDAs, but Citrix recommends upgrading all VDAs to enable you touse all available features.
• Early Release or Technology Preview versions: You cannot upgrade from an Early Release,Technology Preview, or preview version.
• Components on earlier operating systems: You cannot install current VDAs on operating sys‑tems that are no longer supported by Microsoft or Citrix. For more information, see Earlier op‑erating systems.
• Mixedenvironments/sites: If youmust continue to runearlier version sites andcurrent versionsites, see Mixed environment considerations.
• Product selection: When youupgrade froman earlier version, youdonot choose or specify theproduct (Citrix Virtual Apps or Citrix Virtual Apps and Desktops) that was set during the installa‑tion.
Mixed environment considerations
When you upgrade, Citrix recommends that you upgrade all components and VDAs so that you canaccess all the new and enhanced features in your edition and version.
For example, although you can use current VDAs in deployments containing earlier Controller ver‑sions, new features in the current release might not be available. VDA registration issues can alsooccur when using non‑current versions.
In some environments, youmight not be able to upgrade all VDAs to themost current version. In thatcase, when you create a machine catalog, you can specify the VDA version installed on themachines.(This is called the functional level.) By default, this setting specifies theminimum recommended VDAversion. The default value is sufficient for most deployments. Consider changing the setting to anearlier version only if the catalog contains VDAs earlier than the default. Mixing VDA versions in amachine catalog is not recommended.
If a catalog is createdwith the default minimumVDA version setting, and one ormoremachines has aVDA earlier than the default version, those machines cannot register with the Controller, and will notwork.
For more information, see VDA versions and functional levels.
Multiple sites with different versions
When your environment contains sites with different product versions (for example, a XenDesktop7.18 site and a Citrix Virtual Apps and Desktops 1909 site), Citrix recommends using StoreFront to
© 1999–2022 Citrix Systems, Inc. All rights reserved. 301

Citrix Virtual Apps and Desktops
aggregate applications and desktops from different product versions. For details, see the StoreFrontdocumentation.
In amixed environment, continue using the Studio and Director versions for each release, but ensurethat different versions are installed on separate machines.
Earlier operating systems
Let’s say you installed an earlier version of a component on a machine that was running a supportedoperating system (OS) version. Now, you want to use a newer component version, but that OS is nolonger supported for the current version of the component.
For example, assume that you installed a server VDA on aWindows Server 2008 R2machine. Now youwant to upgrade that VDA to the current release, but Windows Server 2008 R2 is not supported in thecurrent release you’re upgrading to.
If you try to install or upgrade a component on an operating system that is no longer allowed, an errormessage displays, such as “Cannot be installed on this operating system”.
These considerations apply to upgrading Current Release and Long Term Service Release versions. (Itdoes not affect applying CUs to an LTSR version.)
Follow the links to learn which OSs are supported:
• Citrix Virtual Apps and Desktops (Current Release):– Delivery Controller, Studio, Director, VDAs, Universal Print Server– Federated Authentication Service– For StoreFront, Self‑Service Password Reset, and Session Recording, see the system re‑quirements article for the current release.
• For LTSRs, see the components lists for your LTSR version andCU. (Select your LTSR version fromthemain Citrix Virtual Apps and Desktops product documentation page.)
Invalid operating systems
The following table lists the earlier operating systems that are not valid for installing/upgrading com‑ponents in the current release. It indicates the latest valid component version supported for eachlisted OS, and the component version when installation and upgrade became invalid.
The operating systems in the table include service packs and updates.
© 1999–2022 Citrix Systems, Inc. All rights reserved. 302
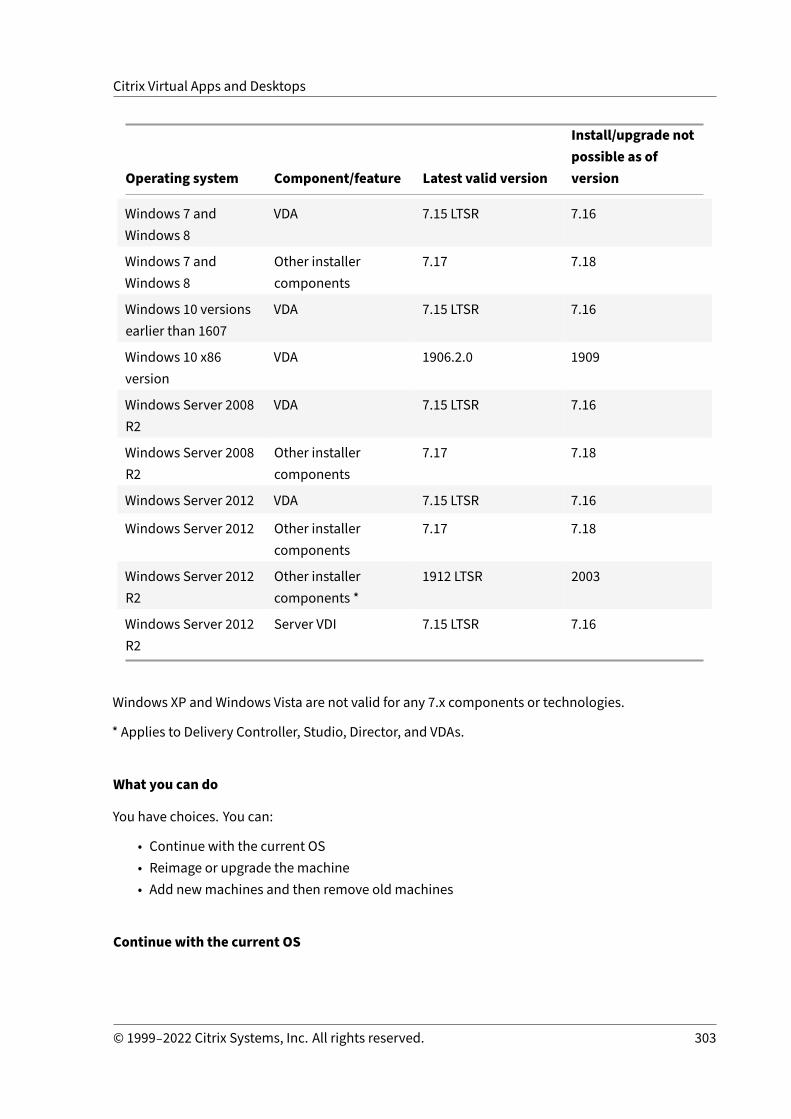
Citrix Virtual Apps and Desktops
Operating system Component/feature Latest valid version
Install/upgrade notpossible as ofversion
Windows 7 andWindows 8
VDA 7.15 LTSR 7.16
Windows 7 andWindows 8
Other installercomponents
7.17 7.18
Windows 10 versionsearlier than 1607
VDA 7.15 LTSR 7.16
Windows 10 x86version
VDA 1906.2.0 1909
Windows Server 2008R2
VDA 7.15 LTSR 7.16
Windows Server 2008R2
Other installercomponents
7.17 7.18
Windows Server 2012 VDA 7.15 LTSR 7.16
Windows Server 2012 Other installercomponents
7.17 7.18
Windows Server 2012R2
Other installercomponents *
1912 LTSR 2003
Windows Server 2012R2
Server VDI 7.15 LTSR 7.16
Windows XP and Windows Vista are not valid for any 7.x components or technologies.
* Applies to Delivery Controller, Studio, Director, and VDAs.
What you can do
You have choices. You can:
• Continue with the current OS• Reimage or upgrade the machine• Add newmachines and then remove old machines
Continue with the current OS
© 1999–2022 Citrix Systems, Inc. All rights reserved. 303

Citrix Virtual Apps and Desktops
Thesemethods are feasible for VDAs. If you want to continue usingmachines with the earlier OS, youcan choose one of the following:
• Continue using the installed component version.• Download the latest valid component version and then upgrade the component to that version.(This assumes that the latest valid component version isn’t already installed.)
For example, you have a 7.14 VDA on a Windows 7 SP1 machine. The latest valid VDA version on Win‑dows7OSmachines is XenAppandXenDesktop7.15LTSR. Youcaneither continueusing7.14, ordown‑load a 7.15 LTSR VDA and then upgrade your VDA to that version. Those earlier VDA versions work indeployments containing Delivery Controllers with newer versions. For example, a 7.15 LTSR VDA canconnect to a Citrix Virtual Apps and Desktops 7 1808 Controller.
Reimage or upgrade themachine
These methods are feasible for VDAs and other machines that do not have core components (such asDelivery Controllers) installed. Choose one of the following:
• After taking themachine out of service (turning onmaintenancemode and allowing all sessionsto close), you can reimage it to a supported Windows OS version, and then install the latestversion of the component.
• To upgrade the OS without reimaging, uninstall the Citrix software before upgrading the OS.Otherwise, theCitrix softwarewill be in anunsupported state. Then, install thenewcomponent.
Add newmachines and then remove oldmachines
This method is feasible if you must upgrade the OS on machines containing a Delivery Controller orother core component.
Citrix recommends that all Controllers in a site have the same OS. The following upgrade sequenceminimizes the interval when different Controllers have different OSs.
1. Take a snapshot of all Delivery Controllers in the site and then back up the site database.2. Install new Delivery Controllers on clean servers with supported operating systems. For exam‑
ple, install a Controller on twoWindows Server 2016 machines.3. Add the new Controllers to the site.4. Remove the Controllers that are running on operating systems that are not valid for the cur‑
rent release. For example, remove two Controllers on two Windows Server 2008 R2 machines.Follow the recommendations for removing Controllers in Delivery Controllers.
Preparation
Before beginning an upgrade, review the following information and complete necessary tasks.
© 1999–2022 Citrix Systems, Inc. All rights reserved. 304

Citrix Virtual Apps and Desktops
Choose an installer and interface
Use the full‑product installer from the product ISO to upgrade components. You can upgrade VDAsusing the full‑product installer or one of the standalone VDA installers. All installers offer graphicaland command line interfaces.
For more information, see Installers.
Installation specifics: After you complete any preparation work and are ready to start the installer,the installation article shows you what you will see (if you’re using the graphical interface) or what totype (if you’re using the command‑line interface).
• Install/upgrade core components using the graphical interface• Install/upgrade core components using the command line• Install/upgrade VDAs using the graphical interface• Install/upgrade VDAs using the command line
If you originally installed a single‑session VDA with the VDAWorkstationCoreSetup.exe installer,Citrix recommends using that installer to upgrade it. If you use the full‑product VDA installer or theVDAWorkstationSetup.exe installer to upgrade the VDA, the components that were originally ex‑cludedmight be installed, unless you expressly omit/exclude them from the upgrade.
When upgrading a VDA to the current release, a machine restart occurs during the upgrade process.(This requirement started with the 7.17 release.) This cannot be avoided. The upgrade resumes auto‑matically after the restart (unless you specify /noresume on the command line).
Database actions
Back up the site, monitoring, and configuration logging databases. Follow the instructions inCTX135207. If any issues are discovered after the upgrade, you can restore the backup.
For information about upgrading SQL Server versions that are no longer supported, see SQL Serverversion check. (This refers to the SQL Server that is used for the site, monitor, and configuration log‑ging databases.)
Microsoft SQL Server Express LocalDB is installed automatically, for use with Local Host Cache. If youneed to replace an earlier version, the new versionmust be at least SQL Server Express 2017 LocalDBCU16. For details about replacing SQL Server Express LocalDB with a new version after you upgradethe components and the site, see Replace SQL Server Express LocalDB.
Ensure that your Citrix licensing is up‑to‑date
For a comprehensive look at managing Citrix Licensing, see Activate, upgrade, and manage Citrix li‑censes.
© 1999–2022 Citrix Systems, Inc. All rights reserved. 305

Citrix Virtual Apps and Desktops
You can use the full‑product installer to upgrade the License Server. Or, you can download and up‑grade the license components separately. See Upgrade.
Before upgrading, be sure your Customer Success Services / Software Maintenance / Subscription Ad‑vantage date is valid for the new product version. If you are upgrading from an earlier 7.x productversion, the date must be at least 2020.0515.
Ensure that your Citrix License Server is compatible
Ensure that your Citrix License Server is compatible with the new version. There are two ways to dothis:
• Before upgrading any other Citrix components, run the XenDesktopServerSetup.exeinstaller from the ISO layout on the machine containing a Delivery Controller. If there are anyincompatibility issues, the installer reports it with recommended steps to resolve the issues.
• From the XenDesktop Setup directory on the installation media, run the command: .\LicServVerify.exe -h <license-server-fqdn> -p 27000 -v.The display indicateswhether the License Server is compatible. If the License Server is incompatible, upgrade thelicense server.
Close applications and consoles
Before starting an upgrade, close all programs that might potentially cause file locks, including ad‑ministration consoles and PowerShell sessions.
Restarting themachine ensures that any file locks are cleared, and that there are noWindowsupdatespending.
Before starting an upgrade, stop and disable any third‑party monitoring agent services.
Ensure that you have proper permissions
In addition to being a domain user, youmust be a local administrator on themachines where you areupgrading product components.
The site database and the site can be upgraded automatically or manually. For an automaticdatabase upgrade, the Studio user’s permissions must include the ability to update the SQL Serverdatabase schema (for example, the db_securityadmin or db_owner database role). For details,see Databases.
If the Studio user does not have those permissions, initiating a manual database upgrade generatesscripts. The Studio user runs some of the scripts from Studio. The database administrator runs otherscripts, using a tool such as SQL Server Management Studio.
© 1999–2022 Citrix Systems, Inc. All rights reserved. 306

Citrix Virtual Apps and Desktops
Other preparation tasks
• Back up templates and upgrade hypervisors, if needed• Complete any other preparation tasks dictated by your business continuity plan.
Preliminary site tests
When youupgradeDelivery Controllers and a site, preliminary site tests runbefore the actual upgradebegins. These tests verify:
• The site database can be reached and has been backed up• Connections to essential Citrix services are working correctly• The Citrix License Server address is available• The configuration logging database can be reached
After the tests run, you can view a report of the results. You can then fix any issues that were detected,and run the tests again. Failure to run thepreliminary site tests and then resolve any issues can impacthow your site works.
The report containing the test results is an HTML file (PreliminarySiteTestResult.html) in thesame directory as the installation logs. That file is created if it does not exist. If the file exists, itscontent is overwritten.
Run the tests
• When you’re using the installer’s graphical interface to upgrade, the wizard includes a pagewhere you can start the tests and then display the report. After the tests run and you haveviewed the report and resolved any issues that were found, you can rerun the tests. When thetests complete successfully, click Next to continue with the wizard.
• When you’re using the command‑line interface to upgrade, the tests run automatically. By de‑fault, if a test fails, the upgrade is not performed. After you view the report and resolve issues,rerun the command.
Citrix recommends always running the preliminary site tests and then resolving any issues before youcontinue the Controller and site upgrade. The potential benefit is well worth the fewmoments to runthe tests. However, you can override this recommended action.
• Whenupgradingwith the graphical interface, you can choose to skip the tests and continuewiththe upgrade.
• When upgrading from the command line, you cannot skip the tests. By default, a failed site testcauses the installer to fail, without performing the upgrade. In most cases, if you include the /ignore_site_test_failure option, any test failures are ignored and the upgrade proceeds.(See SQL Server version check for exceptions.)
© 1999–2022 Citrix Systems, Inc. All rights reserved. 307

Citrix Virtual Apps and Desktops
When upgradingmultiple Controllers
When you start an upgrade on one Controller, and then start an upgrade of another Controller in thesame site (before the first upgrade completes):
• If thepreliminary site testshavecompletedon the firstController, thepreliminary site testspagedoes not appear in the wizard on the other Controller.
• If the testson the firstController areongoingwhenyoustart theupgradeon theotherController,the site tests page appears in thewizardon theother Controller. However, if the tests on the firstController finish, only the test results from the first Controller are retained.
Test failures not related to the site’s health
• If the preliminary site tests fail due to insufficient memory, make more memory available andthen rerun the tests.
• If youhavepermission toupgrade, butnot runsite tests, thepreliminary site tests fail. To resolvethis, rerun the installer with a user account that has permission to run the tests.
SQL Server version check
A successful Citrix Virtual Apps and Desktops deployment requires a supported version of MicrosoftSQL Server for the site, monitor, and configuration logging databases. Upgrading a Citrix deploymentwith a SQL Server version that’s no longer supported can result in functionality issues, and the sitewill be unsupported.
To learn which SQL Server versions are supported for the Citrix release you’re upgrading to, see theSystem requirements article for that release.
WhenupgradingaController, theCitrix installer checks the currently installedSQLServer versionusedfor the site, monitor, and configuration logging databases.
• If thecheckdetermines that thecurrently installedSQLServer version isnota supportedversionin the Citrix release you’re upgrading to:
– Graphical interface: The upgrade halts with a message. Click I understand and then clickCancel to close the Citrix installer. (You cannot continue with the upgrade.)
– Command‑line interface: thecommand fails (even if you included the/ignore_db_check_failureoption with the command).
Upgrade the SQL Server version, and then start the Citrix upgrade again.
• If the check cannot determine which SQL Server version is currently installed, see if your cur‑rently installed version is supported in the version you’re upgrading to (System requirements).
– Graphical interface: The upgrade halts with a message.
© 1999–2022 Citrix Systems, Inc. All rights reserved. 308

Citrix Virtual Apps and Desktops
* If the currently installed SQL Server version is supported, click I understand to closethe message, and then clickNext to continue with the Citrix upgrade.
* If the currently installed SQL Server version is not supported, click I understand toclose the message, and then click Cancel to end the Citrix upgrade. Upgrade yourSQL Server to a supported version and then start the Citrix upgrade again.
– Command‑line interface: The command fails with a message. After closing the message:
* If thecurrently installedSQLServer version is supported, run thecommandagainwiththe /ignore_db_check_failure option.
* If the currently installedSQLServer version isnot supported, upgradeyourSQLServerto a supported version. Run the command again to start the Citrix upgrade.
Upgrading SQL Server
If you bring up new SQL Server servers and migrate the site database, then connection strings mustbe updated.
If the site currently uses SQL Server Express (that Citrix installed automatically during site creation):
1. Install the latest SQL Server Express version.2. Detach the database.3. Attach the database to the new SQL Server Express.4. Migrate connection strings.
For more information, see Configuring connection strings and the Microsoft SQL Server product doc‑umentation.
Replace SQL Server Express LocalDB
Microsoft SQL Server Express LocalDB is a feature of SQL Server Express that Local Host Cache uses ona standalone basis. Local Host Cache does not require any components of SQL Server Express otherthan SQL Server Express LocalDB.
If you installed a Delivery Controller version earlier than 1912 and then upgrade your deployment toversion 1912 or later, Citrix does not automatically upgrade the SQL Server Express LocalDB version.Why not? Because you might have non‑Citrix components that rely on SQL Server Express LocalDB.If you have non‑Citrix components that are using SQL Server Express LocalDB, ensure that upgradingSQL Server Express LocalDBdoes not disrupt those components. To upgrade (replace) the SQL ServerExpress LocalDB version, follow the guidance in this section.
• When upgrading Delivery Controllers to Citrix Virtual Apps and Desktops version 1912 or2003: Upgrading SQL Server Express LocalDB is optional. Local Host Cache works properly,with no loss of functionality, regardless of whether you upgrade SQL Server Express LocalDB.
© 1999–2022 Citrix Systems, Inc. All rights reserved. 309

Citrix Virtual Apps and Desktops
We added the option to move to a newer version of SQL Server Express LocalDB in case thereare concerns about end of support fromMicrosoft for SQL Server Express LocalDB 2014.
• When upgrading Delivery Controllers to Citrix Virtual Apps and Desktops versions newerthan 2003: The minimum supported version is SQL Server Express 2017 LocalDB CumulativeUpdate (CU) 16. If you originally installed a Delivery Controller earlier than version 1912, andhave not replaced SQL Server Express LocalDB with a newer version since then, you must re‑place that database software now. Otherwise, Local Host Cache will not work.
What you need:
• The Citrix Virtual Apps and Desktops installation media (for the version you’ve upgraded to).The media contains a copy of Microsoft SQL Server Express LocalDB 2017 CU 16.
• A Windows Sysinternals tool that you download fromMicrosoft.
Procedure:
1. Complete the upgrade of your Citrix Virtual Apps and Desktops components, databases,and site. (Those database upgrades affect the site, monitoring, and configuration loggingdatabases. They do not affect the Local Host Cache database that uses SQL Server ExpressLocalDB.)
2. On the Delivery Controller, download PsExec from Microsoft. See the Microsoft documentPsExec v2.2.
3. Stop the Citrix High Availability Service.
4. From the command prompt, run PsExec and switch to the Network Service account.
psexec -i -u "NT AUTHORITY\NETWORK SERVICE"cmd
Optionally, you canusewhoami to confirm that the commandprompt is running as theNetworkService account.
whoami
nt authority\network service
5. Move to the folder containing SqlLocalDB.
cd "C:\Program Files\Microsoft SQL Server\120\Tools\Binn"
6. Stop and delete CitrixHA (LocalDB).
SqlLocalDB stop CitrixHA
SqlLocalDB delete CitrixHA
7. Remove the related files in C:\Windows\ServiceProfiles\NetworkService.
1 HADatabaseName.*2 HADatabaseName_log.*
© 1999–2022 Citrix Systems, Inc. All rights reserved. 310

Citrix Virtual Apps and Desktops
3 HAImportDatabaseName.*4 HAImportDatabaseName_log.*5 <!--NeedCopy-->
Tip: YourdeploymentmightnothaveHAImportDatabaseName.*andHAImportDatabaseName_log.*
8. Uninstall SQL Server Express LocalDB 2014 from the server, using the Windows feature for re‑moving programs.
9. Install SQL Server Express LocalDB 2017. In the Support > SQLLocalDB folder on theCitrix Virtual Apps and Desktops installation media, double‑click sqllocaldb.msi. Arestart might be requested to complete the installation. (The new SQLLocalDB resides inC:\Program Files\Microsoft SQL Server\140\Tools\Binn.)
10. Start the Citrix High Availability Service.
11. Ensure that the Local Host Cache database was created on each Delivery Controller. This con‑firms that the High Availability Service (secondary broker) can take over, if needed.
• On theController server, browse toC:\Windows\ServiceProfiles\NetworkService.
• Verify that HaDatabaseName.mdf and HaDatabaseName_log.ldf are created.
Secure
April 14, 2021
Citrix Virtual Apps and Desktops offers a secure‑by‑design solution that allows you to tailor your envi‑ronment to your security needs.
One security concern IT faces with mobile workers is lost or stolen data. By hosting applications anddesktops, Citrix Virtual Apps and Desktops securely separates sensitive data and intellectual propertyfrom end‑point devices by keeping all data in a data center. When policies are enabled to allow datatransfer, all data is encrypted.
The Citrix Virtual Apps and Desktops data centers also make incident response easier with a central‑izedmonitoring andmanagement service. Director allows IT tomonitor andanalyzedata that is beingaccessed around the network, and Studio allows IT to patch and remedy most vulnerabilities in thedata center instead of fixing the problems locally on each end‑user device.
Citrix Virtual Apps andDesktops also simplify audits and regulatory compliance because investigatorscan use a centralized audit trail to determinewho accessedwhat applications and data. Director gath‑ers historical data regarding updates to the system and user data usage by accessing ConfigurationLogging and OData API.
© 1999–2022 Citrix Systems, Inc. All rights reserved. 311

Citrix Virtual Apps and Desktops
Delegated administration allows you to set up administrator roles to control access to Citrix VirtualApps and Desktops at a granular level. This allows flexibility in your organization to give certain ad‑ministrators full access to tasks, operations, and scopes while other administrators have limited ac‑cess.
Citrix Virtual Apps and Desktops give administrators granular control over users by applying policiesat different levels of the network ‑ from the local level to the Organizational Unit level. This controlof policies determines if a user, device, or groups of users and devices can connect, print, copy/paste,or map local drives, which can minimize security concerns with third‑party contingency workers. Ad‑ministrators can also use the Desktop Lock feature so end users can only use the virtual desktopwhilepreventing any access to the local operating system of the end‑user device.
Administrators can increase security on Citrix Virtual Apps or Citrix Virtual Desktops by configuringthe Site to use the Transport Layer Security (TLS) protocol of the Controller or between end users andVirtual Delivery Agents (VDA). The protocol can also be enabled on a Site to provide server authenti‑cation, data stream encryption, andmessage integrity checks for a TCP/IP connection.
Citrix Virtual Apps and Desktops also support multifactor authentication for Windows or a specificapplication. Multifactor authentication can also be used to manage all resources delivered by CitrixVirtual Apps and Desktops. These methods include:
• Tokens• Smart cards• RADIUS• Kerberos• Biometrics
Citrix Virtual Desktops can be integrated with many third‑party security solutions, ranging from iden‑titymanagement to antivirus software. A list of supported products can be found at http://www.citrix.com/ready.
Select releases of Citrix Virtual Apps and Desktops are certified for Common Criteria standard. For alist of those standards, go to https://www.commoncriteriaportal.org/cc/.
Security considerations and best practices
April 14, 2021
Note:
Your organization may need to meet specific security standards to satisfy regulatory require‑ments. This document does not cover this subject, because such security standards changeover time. For up‑to‑date information on security standards and Citrix products, consult http:
© 1999–2022 Citrix Systems, Inc. All rights reserved. 312

Citrix Virtual Apps and Desktops
//www.citrix.com/security/.
Security best practices
Keep all machines in your environment up to date with security patches. One advantage is that youcan use thin clients as terminals, which simplifies this task.
Protect all machines in your environment with antivirus software.
Consider using platform‑specific anti‑malware software.
Protect all machines in your environment with perimeter firewalls, including at enclave boundariesas appropriate.
If youaremigratingaconventional environment to this release, youmayneed to repositionanexistingperimeter firewall or add new perimeter firewalls. For example, suppose there is a perimeter firewallbetween a conventional client and database server in the data center. When this release is used, thatperimeter firewall must be placed so that the virtual desktop and user device are on one side, andthe database servers and Delivery Controllers in the data center are on the other side. Therefore,consider creating an enclave within your data center to contain the database servers and Controllers.Also consider having protection between the user device and the virtual desktop.
All machines in your environment should be protected by a personal firewall. When you install corecomponents and VDAs, you can choose to have the ports required for component and feature com‑munication opened automatically if the Windows Firewall Service is detected (even if the firewall isnot enabled). You can also choose to configure those firewall ports manually. If you use a differentfirewall, youmust configure the firewall manually.
Note:
TCP ports 1494 and 2598 are used for ICA and CGP and are therefore likely to be open at firewallsso that users outside the data center can access them. Citrix recommends that you do not usethese ports for anything else, to avoid the possibility of inadvertently leaving administrative in‑terfaces open to attack. Ports 1494 and 2598 are officially registered with the Internet AssignedNumber Authority (https://www.iana.org/about).
All network communications should be appropriately secured and encrypted to match your securitypolicy. You can secure all communicationbetweenMicrosoftWindowscomputers using IPSec; refer toyour operating system documentation for details about how to do this. In addition, communicationbetween user devices and desktops is secured through Citrix SecureICA, which is configured by de‑fault to 128‑bit encryption. You can configure SecureICAwhen you are creating or updating a DeliveryGroup.
Apply Windows best practice for account management. Do not create an account on a template orimage before it is duplicated by Machine Creation Services or Provisioning Services. Do not schedule
© 1999–2022 Citrix Systems, Inc. All rights reserved. 313

Citrix Virtual Apps and Desktops
tasks using stored privileged domain accounts. Do not manually create shared Active Directory ma‑chine accounts. These practices will help prevent a machine attack from obtaining local persistentaccount passwords and then using them to log on to MCS/PVS shared images belonging to others.
Application security
To prevent non‑admin users from performing malicious actions, we recommend that you configureWindows AppLocker rules for installers, applications, executables and scripts on the VDA host and onthe local Windows client.
Manage user privileges
Grant users only the capabilities they require. Microsoft Windows privileges continue to be appliedto desktops in the usual way: configure privileges through User Rights Assignment and group mem‑berships through Group Policy. One advantage of this release is that it is possible to grant a useradministrative rights to a desktopwithout also granting physical control over the computer onwhichthe desktop is stored.
Note the following when planning for desktop privileges:
• By default, when non‑privileged users connect to a desktop, they see the time zone of the sys‑tem running the desktop instead of the time zone of their own user device. For information onhow to allowusers to see their local timewhen using desktops, see theManageDelivery Groupsarticle.
• A user who is an administrator on a desktop has full control over that desktop. If a desktop isa pooled desktop rather than a dedicated desktop, the user must be trusted in respect of allother users of that desktop, including future users. All users of the desktop need to be aware ofthe potential permanent risk to their data security posed by this situation. This considerationdoes not apply to dedicated desktops, which have only a single user; that user should not be anadministrator on any other desktop.
• A user who is an administrator on a desktop can generally install software on that desktop, in‑cluding potentially malicious software. The user can also potentially monitor or control trafficon any network connected to the desktop.
Manage logon rights
Logon rights are required for both user accounts and computer accounts. As with MicrosoftWindowsprivileges, logon rights continue to be applied to desktops in the usual way: configure logon rightsthrough User Rights Assignment and groupmemberships through Group Policy.
The Windows logon rights are: log on locally, log on through Remote Desktop Services, log on overthe network (access this computer from the network), log on as a batch job, and log on as a service.
© 1999–2022 Citrix Systems, Inc. All rights reserved. 314
Citrix Virtual Apps and Desktops
For computer accounts, grant computers only the logon rights they require. The logon right “Accessthis computer from the network” is required:
• At VDAs, for the computer accounts of Delivery Controllers• At Delivery Controllers, for the computer accounts of VDAs. See Active Directory OU‑based Con‑troller discovery.
• At StoreFront servers, for the computer accounts of other servers in the same StoreFront servergroup
For user accounts, grant users only the logon rights they require.
According to Microsoft, by default the group Remote Desktop Users is granted the logon right “Allowlog on through Remote Desktop Services” (except on domain controllers).
Your organization’s security policy may state explicitly that this group should be removed from thatlogon right. Consider the following approach:
• The Virtual Delivery Agent (VDA) for Multi‑session OS uses Microsoft Remote Desktop Services.You can configure the Remote Desktop Users group as a restricted group, and control member‑ship of the group via ActiveDirectory grouppolicies. Refer toMicrosoftdocumentation formoreinformation.
• For other components of Citrix Virtual Apps and Desktops, including the VDA for Single‑sessionOS, the group Remote Desktop Users is not required. So, for those components, the group Re‑mote Desktop Users does not require the logon right “Allow log on through Remote DesktopServices”; you can remove it. Additionally:
– If you administer those computers via Remote Desktop Services, ensure that all such ad‑ministrators are already members of the Administrators group.
– If youdonot administer those computers via RemoteDesktop Services, consider disablingRemote Desktop Services itself on those computers.
Although it is possible to addusers andgroups to the login right “Deny logon throughRemoteDesktopServices”, the use of deny logon rights is not generally recommended. Refer to Microsoft documenta‑tion for more information.
Configure user rights
Delivery Controller installation creates the following Windows services:
• Citrix AD Identity Service (NTSERVICE\CitrixADIdentityService): ManagesMicrosoftActiveDirec‑tory computer accounts for VMs.
• Citrix Analytics (NT SERVICE\CitrixAnalytics): Collects site configuration usage information foruse by Citrix, if this collection been approved by the site administrator. It then submits thisinformation to Citrix, to help improve the product.
© 1999–2022 Citrix Systems, Inc. All rights reserved. 315
Citrix Virtual Apps and Desktops
• Citrix App Library (NT SERVICE\CitrixAppLibrary): Supports management and provisioning ofAppDisks, AppDNA integration, andmanagement of App‑V.
• Citrix Broker Service (NT SERVICE\CitrixBrokerService): Selects the virtual desktops or applica‑tions that are available to users.
• Citrix Configuration Logging Service (NT SERVICE\CitrixConfigurationLogging): Records all con‑figuration changes and other state changes made by administrators to the site.
• Citrix Configuration Service (NT SERVICE\CitrixConfigurationService): Site‑wide repository forshared configuration.
• Citrix Delegated Administration Service (NT SERVICE\CitrixDelegatedAdmin): Manages the per‑missions granted to administrators.
• Citrix Environment Test Service (NT SERVICE\CitrixEnvTest): Manages self‑tests of the other De‑livery Controller services.
• Citrix Host Service (NT SERVICE\CitrixHostService): Stores information about the hypervisor in‑frastructures used in a Citrix Virtual Apps or Citrix Virtual Desktops deployment, and also offersfunctionality used by the console to enumerate resources in a hypervisor pool.
• Citrix Machine Creation Service (NT SERVICE\CitrixMachineCreationService): Orchestrates thecreation of desktop VMs.
• Citrix Monitor Service (NT SERVICE\CitrixMonitor): Collects metrics for Citrix Virtual Apps orCitrix Virtual Desktops, stores historical information, and provides a query interface for trou‑bleshooting and reporting tools.
• Citrix Storefront Service (NT SERVICE\ CitrixStorefront): Supports management of StoreFront.(It is not part of the StoreFront component itself.)
• Citrix Storefront Privileged Administration Service (NT SERVICE\CitrixPrivilegedService): Sup‑ports privilegedmanagement operations of StoreFront. (It is not part of the StoreFront compo‑nent itself.)
• Citrix Config Synchronizer Service (NT SERVICE\CitrixConfigSyncService): Propagates configu‑ration data from themain site database to the Local Host Cache.
• Citrix High Availability Service (NT SERVICE\CitrixHighAvailabilityService): Selects the virtualdesktops or applications that are available to users, when themain site database is unavailable.
Delivery Controller installation also creates the following Windows services. These are also createdwhen installed with other Citrix components:
• CitrixDiagnostic FacilityCOMServer (NTSERVICE\CdfSvc): Supports thecollectionofdiagnosticinformation for use by Citrix Support.
• Citrix Telemetry Service (NT SERVICE\CitrixTelemetryService): Collects diagnostic informationfor analysis by Citrix, such that the analysis results and recommendations can be viewed byadministrators to help diagnose issues with the site.
Delivery Controller installation also creates the followingWindows service. This is not currently used.If it has been enabled, disable it.
© 1999–2022 Citrix Systems, Inc. All rights reserved. 316
Citrix Virtual Apps and Desktops
• Citrix Remote Broker Provider (NT SERVICE\XaXdCloudProxy)
DeliveryController installationalso creates these followingWindows services. These arenot currentlyused, but must be enabled. Do not disable them.
• Citrix Orchestration Service (NT SERVICE\CitrixOrchestration)• Citrix Trust Service (NT SERVICE\CitrixTrust)
Except for the Citrix Storefront Privileged Administration Service, these services are granted the logonright Log on as a service and the privileges Adjust memory quotas for a process, Generate security au‑dits, and Replace a process level token. You do not need to change these user rights. These privilegesare not used by the Delivery Controller and are automatically disabled.
Configure service settings
Except for the Citrix Storefront Privileged Administration service and the Citrix Telemetry Service, theDelivery Controller Windows services listed above in the Configure user rights section are configuredto log on as the NETWORK SERVICE identity. Do not alter these service settings.
The Citrix Storefront Privileged Administration service is configured to log on Local System (NT AU‑THORITY\SYSTEM). This is required forDeliveryController StoreFront operations that arenotnormallyavailable to services (including creating Microsoft IIS sites). Do not alter its service settings.
The Citrix Telemetry Service is configured to log on as its own service‑specific identity.
You can disable the Citrix Telemetry Service. Apart from this service, and services that are alreadydisabled, do not disable any other of these Delivery Controller Windows services.
Configure registry settings
It is no longer necessary to enable creation of 8.3 file names and folders on the VDA file system. Theregistry keyNtfsDisable8dot3NameCreation can be configured to disable creation of 8.3 file namesand folders. You can also configure this using the fsutil.exe behavior set disable8dot3 command.
Deployment scenario security implications
Your user environment can contain either user devices that are unmanaged by your organization andcompletely under the control of the user, or user devices that aremanaged and administered by yourorganization. The security considerations for these two environments are generally different.
Managed user devices
Managed user devices are under administrative control; they are either under your own control, orthe control of another organization that you trust. Youmay configure and supply user devices directly
© 1999–2022 Citrix Systems, Inc. All rights reserved. 317

Citrix Virtual Apps and Desktops
to users; alternatively, you may provide terminals on which a single desktop runs in full‑screen‑onlymode. Follow the general security best practices described above for all managed user devices. Thisrelease has the advantage that minimal software is required on a user device.
A managed user device can be configured to be used in full‑screen‑only mode or in windowmode:
• Full‑screen‑only mode: Users log on to it with the usual Log On To Windows screen. The sameuser credentials are then used to log on automatically to this release.
• Users see their desktop in a window: Users first log on to the user device, then log on to thisrelease through a web site supplied with the release.
Unmanaged user devices
User devices that are notmanaged and administered by a trusted organization cannot be assumed tobe under administrative control. For example, you might permit users to obtain and configure theirown devices, but users might not follow the general security best practices described above. Thisrelease has the advantage that it is possible to deliver desktops securely to unmanaged user devices.These devices should still have basic antivirus protection that will defeat keylogger and similar inputattacks.
Data storage considerations
When using this release, you can prevent users from storing data on user devices that are under theirphysical control. However, youmust still consider the implications of users storing data on desktops.It is not goodpractice for users to store data ondesktops; data should beheld on file servers, databaseservers, or other repositories where it can be appropriately protected.
Your desktop environment may consist of various types of desktops, such as pooled and dedicateddesktops. Users should never store data on desktops that are shared amongst users, such as pooleddesktops. If users store data on dedicated desktops, that data should be removed if the desktop islater made available to other users.
Mixed‑version environments
Mixed‑version environments are inevitable during someupgrades. Followbest‑practice andminimizethe time that Citrix components of different versions co‑exist. In mixed‑version environments, secu‑rity policy, for example, may not be uniformly enforced.
Note:
This is typical of other software products; the use of an earlier version of Active Directory onlypartially enforces Group Policy with later versions of Windows.
© 1999–2022 Citrix Systems, Inc. All rights reserved. 318

Citrix Virtual Apps and Desktops
The following scenario describes a security issue that can occur in a specific mixed‑version Citrix en‑vironment. When Citrix Receiver 1.7 is used to connect to a virtual desktop running the VDA in Xe‑nApp and XenDesktop 7.6 Feature Pack 2, the policy setting Allow file transfer between desktopand client is enabled in the Site but cannot be disabled by a Delivery Controller running XenApp andXenDesktop 7.1. It does not recognize the policy setting, which was released in the later version ofthe product. This policy setting allows users to upload and download files to their virtual desktop,which is the security issue. To work around this, upgrade the Delivery Controller (or a standalone in‑stance of Studio) to version 7.6 Feature Pack 2 and then use Group Policy to disable the policy setting.Alternatively, use local policy on all affected virtual desktops.
Remote PC Access security considerations
Remote PC Access implements the following security features:
• Smart card use is supported.• When a remote session connects, the office PC’s monitor appears as blank.• Remote PC Access redirects all keyboard and mouse input to the remote session, exceptCTRL+ALT+DEL and USB‑enabled smart cards and biometric devices.
• SmoothRoaming is supported for a single user only.• When a user has a remote session connected to an office PC, only that user can resume localaccess of the office PC. To resume local access, the user presses Ctrl‑Alt‑Del on the local PCand then logs on with the same credentials used by the remote session. The user can also re‑sume local access by inserting a smart card or leveraging biometrics, if your system has appro‑priate third‑party Credential Provider integration. This default behavior can be overridden byenabling Fast User Switching via Group Policy Objects (GPOs) or by editing the registry.
Note:
Citrix recommends that you do not assign VDA administrator privileges to general session users.
Automatic assignments
By default, Remote PC Access supports automatic assignment of multiple users to a VDA. In XenDesk‑top 5.6 Feature Pack 1, administrators could override this behavior using the RemotePCAccess.ps1PowerShell script. This release uses a registry entry to allow or prohibit multiple automatic remotePC assignments; this setting applies to the entire Site.
Caution:
Editing the registry incorrectly can cause serious problems thatmay require you to reinstall youroperating system. Citrix cannot guarantee that problems resulting from the incorrect use of Reg‑istry Editor can be solved. Use Registry Editor at your own risk. Be sure to back up the registry
© 1999–2022 Citrix Systems, Inc. All rights reserved. 319
Citrix Virtual Apps and Desktops
before you edit it.
To restrict automatic assignments to a single user:
On each Controller in the Site, set the following registry entry:
1 HKEY_LOCAL_MACHINE\Software\Citrix|DesktopServer2 Name: AllowMultipleRemotePCAssignments3 Type: REG_DWORD4 Data: 0 = Disable multiple user assignment, 1 = (Default) Enable
multiple user assignment.
If there are any existing user assignments, remove them using SDK commands for the VDA to subse‑quently be eligible for a single automatic assignment.
• Remove all assigned users from the VDA: $machine.AssociatedUserNames | %{ Remove-BrokerUser-Name $_ -Machine $machine
• Remove the VDA from the Delivery Group: $machine | Remove-BrokerMachine -DesktopGroup $desktopGroup
Restart the physical office PC.
XML trust
The XML trust setting applies to deployments that use:
• An on‑premises StoreFront.• A subscriber (user) authentication technology that does not require passwords. Examples ofsuch technologies are domain pass‑through, smart cards, SAML, and Veridium solutions.
Enabling the XML trust setting allows users to successfully authenticate and then start applications.The Delivery Controller trusts the credentials sent from StoreFront. Enable this setting only whenyouhave secured communications between yourDelivery Controllers andStoreFront (using firewalls,IPsec, or other security recommendations).
This setting is disabled by default.
Use the Citrix Virtual Apps and Desktops PowerShell SDK to check, enable, or disable the XML trustsetting.
• To check the XML trust setting’s current value, run Get-BrokerSite and inspect the value ofTrustRequestsSentToTheXMLServicePort.
• To enable XML trust, run Set-BrokerSite -TrustRequestsSentToTheXmlServicePort$true.
• To disable XML trust, run Set-BrokerSite -TrustRequestsSentToTheXmlServicePort$false.
© 1999–2022 Citrix Systems, Inc. All rights reserved. 320

Citrix Virtual Apps and Desktops
Integrate Citrix Virtual Apps and Desktops with Citrix Gateway
April 14, 2021
StoreFront servers are deployed and configured to manage access to published resources and data.For remote access, adding Citrix Gateway in front of StoreFront is recommended.
Note:
For detailed configuration steps on how to integrate Citrix Virtual Apps and Desktops with CitrixGateway, see the StoreFront documentation.
The following diagram illustrates an example of a simplified Citrix deployment that includes CitrixGateway. Citrix Gateway communicates with StoreFront to protect apps and data delivered by CitrixVirtual Apps and Desktops. The user devices run Citrix Workspace app to create a secure connectionand access their apps, desktops, and files.
Users log on and authenticate using Citrix Gateway. Citrix Gateway is deployed and secured in theDMZ. Two‑factor authentication is configured. Based on the user credentials, users are providedwiththe relevant resources and applications. Applications anddata are on appropriate servers (not shownon the diagram). Separate servers used for security sensitive applications and data.
Delegated administration
April 14, 2021
The delegated administration model offers the flexibility to match how your organization wants todelegate administration activities, using role and object‑based control. Delegated administration ac‑commodates deployments of all sizes, and allows you to configure more permission granularity as
© 1999–2022 Citrix Systems, Inc. All rights reserved. 321

Citrix Virtual Apps and Desktops
your deployment grows in complexity. Delegated administration uses three concepts: administra‑tors, roles, and scopes.
• Administrators: An administrator represents an individual person or a group of people identi‑fied by their Active Directory account. Each administrator is associated with one or more roleand scope pairs.
• Roles: A role represents a job function, and has defined permissions associated with it. Forexample, theDelivery GroupAdministrator role has permissions such as ‘CreateDeliveryGroup’and ‘Remove Desktop from Delivery Group.’ An administrator can havemultiple roles for a site,so a person can be a Delivery Group Administrator and a Machine Catalog Administrator. Rolescan be built‑in or custom.
The built‑in roles are:
Role Permissions
Full Administrator Can perform all tasks and operations. A FullAdministrator is always combined with the Allscope.
Read Only Administrator Can see all objects in specified scopes inaddition to global information, but cannotchange anything. For example, a Read OnlyAdministrator with Scope=London can see allglobal objects (such as Configuration Logging)and any London‑scoped objects (for example,London Delivery Groups). However, thatadministrator cannot see objects in the NewYork scope (assuming that the London andNew York scopes do not overlap).
Help Desk Administrator Can view Delivery Groups, andmanage thesessions andmachines associated with thosegroups. Can see the Machine Catalog and hostinformation for the Delivery Groups beingmonitored. Can also perform sessionmanagement andmachine powermanagement operations for the machines inthose Delivery Groups.
© 1999–2022 Citrix Systems, Inc. All rights reserved. 322

Citrix Virtual Apps and Desktops
Role Permissions
Machine Catalog Administrator Can create andmanage Machine Catalogs andprovision the machines into them. Can buildMachine Catalogs from the virtualizationinfrastructure, Provisioning Services, andphysical machines. This role canmanage baseimages and install software, but cannot assignapplications or desktops to users.
Delivery Group Administrator Can deliver applications, desktops, andmachines; can also manage the associatedsessions. Can also manage application anddesktop configurations such as policies andpower management settings.
Host Administrator Canmanage host connections and theirassociated resource settings. Cannot delivermachines, applications, or desktops to users.
In certain product editions, you can create custom roles to match the requirements of your or‑ganization, and delegate permissions with more detail. You can use custom roles to allocatepermissions at the granularity of an action or task in a console.
• Scopes: A scope represents a collection of objects. Scopes are used to group objects in a waythat is relevant to your organization (for example, the set of Delivery Groups used by the Salesteam). Objects canbe inmore thanonescope; youcan thinkofobjectsbeing labeledwithoneormore scopes. There is one built‑in scope: ‘All,’ which contains all objects. The Full Administratorrole is always paired with the All scope.
Example
Company XYZ decided to manage applications and desktops based on their department (Accounts,Sales, and Warehouse) and their desktop operating system (Windows 7 or Windows 8). The adminis‑trator created five scopes, then labeled each Delivery Groupwith two scopes: one for the departmentwhere they are used and one for the operating system they use.
The following administrators were created:
© 1999–2022 Citrix Systems, Inc. All rights reserved. 323

Citrix Virtual Apps and Desktops
Administrator Roles Scopes
domain/fred Full Administrator All (the Full Administrator rolealways has the All scope)
domain/rob Read Only Administrator All
domain/heidi Read Only Administrator,Help Desk Administrator
All Sales
domain/warehouseadmin Help Desk Administrator Warehouse
domain/peter Delivery Group Administrator,Machine CatalogAdministrator
Win7
• Fred is a Full Administrator and can view, edit, and delete all objects in the system.• Rob can view all objects in the site but cannot edit or delete them.• Heidi canviewall objectsandcanperformhelpdesk tasksonDeliveryGroups in theSales scope.This allows her tomanage the sessions andmachines associatedwith those groups; she cannotmake changes to the Delivery Group, such as adding or removing machines.
• Anyone who is amember of the warehouseadmin Active Directory security group can view andperform help desk tasks onmachines in the Warehouse scope.
• Peter is aWindows 7 specialist and canmanage allWindows 7Machine Catalogs and candeliverWindows 7 applications, desktops, and machines, regardless of which department scope theyare in. The administrator consideredmakingPeter a Full Administrator for theWin7 scope. How‑ever, she decided against this, because a Full Administrator also has full rights over all objectsthat are not scoped, such as ‘Site’ and ‘Administrator.’
How to use delegated administration
Generally, the number of administrators and the granularity of their permissions depends on the sizeand complexity of the deployment.
• In small or proof‑of‑concept deployments, one or a few administrators do everything. There isno delegation. In this case, create each administrator with the built‑in Full Administrator role,which has the All scope.
• In larger deployments with more machines, applications, and desktops, more delegation isneeded. Several administratorsmight havemore specific functional responsibilities (roles). Forexample, two are Full Administrators, and others are Help Desk Administrators. Also, an admin‑istratormightmanage only certain groups of objects (scopes), such asmachine catalogs. In thiscase, create new scopes, plus administrators with one of the built‑in roles and the appropriatescopes.
© 1999–2022 Citrix Systems, Inc. All rights reserved. 324

Citrix Virtual Apps and Desktops
• Even larger deployments might require more (or more specific) scopes, plus different adminis‑trators with unconventional roles. In this case, edit or createmore scopes, create custom roles,and create each administrator with a built‑in or custom role, plus existing and new scopes.
For flexibility and ease of configuration, you can create scopes when you create an administrator. Youcan also specify scopes when creating or editing Machine Catalogs or connections.
Create andmanage administrators
When you create a site as a local administrator, your user account automatically becomes a Full Ad‑ministrator with full permissions over all objects. After a site is created, local administrators have nospecial privileges.
The Full Administrator role always has the All scope; you cannot change this.
By default, an administrator is enabled. Disabling an administrator might be necessary if you are cre‑ating the administrator now, but that personwon’t start administration duties until later. For existingenabled administrators, you might want to disable several of them while you are reorganizing yourobject/scopes, then re‑enable them when you are ready to go live with the updated configuration.You cannot disable a Full Administrator if it would result in there being no enabled Full Administrator.The enable/disable check box is available when you create, copy, or edit an administrator.
When you delete a role/scope pair while copying, editing, or deleting an administrator, it deletes onlythe relationship between the role and the scope for that administrator. It does not delete either theroleor the scope. It alsodoesnotaffectanyotheradministratorwho is configuredwith that role/scopepair.
To manage administrators, click Configuration > Administrators in the Studio navigation pane, andthen click the Administrators tab in the upper middle pane.
• Createanadministrator: ClickCreatenewAdministrator in theActionspane. Typeorbrowseto the user account name, select or create a scope, and select a role. The new administrator isenabled by default; you can change this.
• Copy an administrator: Select the administrator in the middle pane and then click Copy Ad‑ministrator in the Actions pane. Type or browse to the user account name. You can select andthen edit or delete any of the role/scope pairs, and add new ones. The new administrator isenabled by default; you can change this.
• Edit an administrator: Select the administrator in the middle pane and then click Edit Ad‑ministrator in the Actions pane. You can edit or delete any of the role/scope pairs, and addnew ones.
• Delete an administrator: Select the administrator in the middle pane and then click DeleteAdministrator in the Actions pane. You cannot delete a Full Administrator if it would result inthere being no enabled Full Administrator.
© 1999–2022 Citrix Systems, Inc. All rights reserved. 325

Citrix Virtual Apps and Desktops
The upper pane displays the administrators that you created. Select an administrator to view its de‑tails in the lower pane. TheWarnings column indicates whether the role and scope pairs associatedwith the administrator contain unusable roles or scopes. The following warning message appears ifan associated role and scope pair contains unusable roles or scopes:
• Associated role or scope not usable– Remove the role and scope pair from the administrator.
Important:
Awarningmessage appears onlywhenanassociated role and scopepair contains unusable rolesor scopes or both.
To remove the role and scope pair from the administrator, complete one of the following steps:
• Delete the role and scope pair.1. In the Actions pane, click Edit Administrator.2. In the Edit Administratorwindow, select the role and scope pair and then click Delete.3. ClickOK to exit.
• Delete the administrator.1. In the Actions pane, click Delete Administrator.2. In the Studiowindow, Click Delete.
Create andmanage roles
When administrators create or edit a role, they can enable only the permissions that they themselveshave. This prevents administrators from creating a role with more permissions than they currentlyhave and then assigning it to themselves (or editing a role that they are already assigned).
Role names can contain up to 64 Unicode characters; they cannot contain: backslash, forward slash,semicolon, colon, pound sign, comma, asterisk, question mark, equal sign, left or right arrow, pipe,left or right bracket, left or right parenthesis, quotation marks, or apostrophe. Descriptions can con‑tain up to 256 Unicode characters.
You cannot edit or delete a built‑in role. You cannot delete a custom role if any administrator is usingit.
Note:
Only certain product editions support custom roles. Only editions that support custom roleshave related entries in the Actions pane.
Tomanage roles, click Configuration > Administrators in the Studio navigation pane, and then clickthe Roles tab in the upper middle pane.
• View role details: Select the role in the middle pane. The lower portion of the middle panelists the object types and associated permissions for the role. Click the Administrators tab in
© 1999–2022 Citrix Systems, Inc. All rights reserved. 326

Citrix Virtual Apps and Desktops
the lower pane to display a list of administrators who currently have this role.• Create a custom role: Click Create new Role in the Actions pane. Enter a name and descrip‑tion. Select the object types and permissions.
• Copy a role: Select the role in the middle pane and then click Copy Role in the Actions pane.Change the name, description, object types, and permissions, as needed.
• Edit a custom role: Select the role in the middle pane and then click Edit Role in the Actionspane. Change the name, description, object types, and permissions, as needed.
• Delete a custom role: Select the role in the middle pane and then click Delete Role in theActions pane. When prompted, confirm the deletion.
Create andmanage scopes
When you create a site, the only available scope is the ‘All’ scope, which cannot be deleted.
You can create scopes using the following procedure. You can also create scopes when you create anadministrator; each administratormust be associatedwith at least one role and scope pair. When youare creating or editing desktops, machine catalogs, applications, or hosts, you can add them to anexisting scope. If you do not add them to a scope, they remain part of the ‘All’ scope.
Site creation cannot be scoped, nor can delegated administration objects (scopes and roles). How‑ever, objects you cannot scope are included in the ‘All’ scope. (Full Administrators always have theAll scope.) Machines, power actions, desktops, and sessions are not directly scoped. Administratorscan be allocated permissions over these objects through the associatedmachine catalogs or DeliveryGroups.
Scope names can contain up to 64 Unicode characters. Scope names cannot include: backslash, for‑ward slash, semicolon, colon, pound sign, comma, asterisk, question mark, equal sign, left arrow,right arrow, pipe, left or right bracket, left or right parenthesis, quotation marks, or apostrophe. De‑scriptions can contain up to 256 Unicode characters.
When you copy or edit a scope, keep in mind that removing objects from the scope can make thoseobjects inaccessible to the administrator. If the edited scope is paired with one or more roles, ensurethat the scope updates do not make any role/scope pair unusable.
To manage scopes, click Configuration > Administrators in the Studio navigation pane, and thenclick the Scopes tab in the upper middle pane.
• Create a scope: Click Create new Scope in the Actions pane. Enter a name and description.To include all objects of a particular type (for example, Delivery Groups), select the object type.To include specific objects, expand the type and then select individual objects (for example,Delivery Groups used by the Sales team).
• Copy a scope: Select the scope in the middle pane and then click Copy Scope in the Actionspane. Enter a name and description. Change the object types and objects, as needed.
© 1999–2022 Citrix Systems, Inc. All rights reserved. 327
Citrix Virtual Apps and Desktops
• Edit a scope: Select the scope in themiddle paneand then clickEdit Scope in the Actions pane.Change the name, description, object types, and objects, as needed.
• Delete a scope: Select the scope in themiddle pane and then clickDelete Scope in the Actionspane. When prompted, confirm the deletion.
Create reports
You can create two types of delegated administration reports:
• AnHTML report that lists the role/scope pairs associatedwith an administrator, plus the individ‑ual permissions for each type of object (for example, Delivery Groups and Machine Catalogs).You generate this report from Studio.
To create this report, click Configuration > Administrators in the Studio navigation pane. Se‑lect an administrator in the middle pane and then click Create Report in the Actions pane.
You can also request this report when creating, copying, or editing an administrator.
• AnHTML or CSV report thatmaps all built‑in and custom roles to permissions. You generate thisreport by running a PowerShell script named OutputPermissionMapping.ps1.
To run this script, you must be a Full Administrator, a Read Only Administrator, or acustom administrator with permission to read roles. The script is located in: ProgramFiles\Citrix\DelegatedAdmin\SnapIn\Citrix.DelegatedAdmin.Admin.V1\Scripts.
Syntax:
OutputPermissionMapping.ps1 [-Help] [-Csv] [-Path string] [-AdminAddressstring] [-Show] [CommonParameters]
Parameter Description
-Help Displays script help.
-Csv Specifies CSV output. Default = HTML
-Path string Where to write the output. Default = stdout
-AdminAddress string IP address or host name of the DeliveryController to connect to. Default = localhost
-Show (Valid only when the -Path parameter is alsospecified) When you write the output to a file,-Show causes the output to be opened in anappropriate program, such as a web browser.
© 1999–2022 Citrix Systems, Inc. All rights reserved. 328
Citrix Virtual Apps and Desktops
Parameter Description
CommonParameters Verbose, Debug, ErrorAction,ErrorVariable, WarningAction,WarningVariable, OutBuffer, andOutVariable. For details, see the Microsoftdocumentation.
The following example writes an HTML table to a file named Roles.html and opens the table in a webbrowser.
1 & "$env:ProgramFiles\Citrix\DelegatedAdmin\SnapIn\2 Citrix.DelegatedAdmin.Admin.V1\Scripts\OutputPermissionMapping.ps1"3 -Path Roles.html – Show4 <!--NeedCopy-->
The following example writes a CSV table to a file named Roles.csv. The table is not displayed.
1 & "$env:ProgramFiles\Citrix\DelegatedAdmin\SnapIn\2 Citrix.DelegatedAdmin.Admin.V1\Scripts\OutputPermissionMapping.ps1"3 – CSV -Path Roles.csv4 <!--NeedCopy-->
From aWindows command prompt, the preceding example command is:
1 powershell -command "& '%ProgramFiles%\Citrix\DelegatedAdmin\SnapIn\2 Citrix.DelegatedAdmin.Admin.V1\Scripts\OutputPermissionMapping.ps1'3 -CSV -Path Roles.csv"4 <!--NeedCopy-->
Smart cards
April 14, 2021
Smart cards andequivalent technologies are supportedwithin the guidelines described in this article.To use smart cards with Citrix Virtual Apps or Citrix Virtual Desktops:
• Understand your organization’s security policy concerning the use of smart cards. These poli‑ciesmight, for example, statehowsmart cardsare issuedandhowusers should safeguard them.Some aspects of these policies might need to be reassessed in a Citrix Virtual Apps or Citrix Vir‑tual Desktops environment.
© 1999–2022 Citrix Systems, Inc. All rights reserved. 329

Citrix Virtual Apps and Desktops
• Determine which user device types, operating systems, and published applications are to beused with smart cards.
• Familiarize yourself with smart card technology and your selected smart card vendor hardwareand software.
• Know how to deploy digital certificates in a distributed environment.
Types of smart cards
Enterprise and consumer smart cards have the same dimensions, electrical connectors, and fit thesame smart card readers.
Smart cards for enterprise use contain digital certificates. These smart cards supportWindows Logon,and can also be used with applications for digital signing and encryption of documents and email.Citrix Virtual Apps and Desktops support these uses.
Smart cards for consumer use do not contain digital certificates; they contain a shared secret. Thesesmart cards can support payments (such as a chip‑and‑signature or chip‑and‑PIN credit card). Theydo not support Windows Logon or typical Windows applications. Specialized Windows applicationsand a suitable software infrastructure (including, for example, a connection to a payment card net‑work) are needed for use with these smart cards. Contact your Citrix representative for informationon supporting these specialized applications on Citrix Virtual Apps or Citrix Virtual Desktops.
For enterprise smart cards, there are compatible equivalents that can be used in a similar way.
• A smart card‑equivalent USB token connects directly to a USB port. These USB tokens are usu‑ally the size of a USB flash drive, but can be as small as a SIM card used in amobile phone. Theyappear as the combination of a smart card plus a USB smart card reader.
• A virtual smart card using a Windows Trusted Platform Module (TPM) appears as a smart card.These virtual smart cards are supported forWindows 8 andWindows 10, using CitrixWorkspaceapp (minimum version Citrix Receiver 4.3).
– Versions of Citrix Virtual Apps and Desktops (formerly XenApp and XenDesktop) earlierthan XenApp and XenDesktop 7.6 FP3 do not support virtual smart cards.
– For more information on virtual smart cards, see Virtual Smart Card Overview.
Note: The term “virtual smart card” is also used to describe a digital certificate simply storedon the user computer. These digital certificates are not strictly equivalent to smart cards.
Citrix Virtual Apps and Desktops smart card support is based on the Microsoft Personal Computer/S‑mart Card (PC/SC) standard specifications. A minimum requirement is that smart cards and smartcard devicesmust be supported by the underlyingWindows operating system andmust be approvedby the Microsoft Windows Hardware Quality Labs (WHQL) to be used on computers running qualify‑ing Windows operating systems. See the Microsoft documentation for additional information about
© 1999–2022 Citrix Systems, Inc. All rights reserved. 330

Citrix Virtual Apps and Desktops
hardware PC/SC compliance. Other types of user devices may comply with the PS/SC standard. Formore information, refer to the Citrix Ready program.
Usually, a separate device driver is needed for each vendor’s smart card or equivalent. However, ifsmart cards conform to a standard such as the NIST Personal Identity Verification (PIV) standard, itmay be possible to use a single device driver for a range of smart cards. The device driver must be in‑stalledonboth theuser device and theVirtual Delivery Agent (VDA). Thedevicedriver is often suppliedaspart of a smart cardmiddlewarepackageavailable fromaCitrix partner; the smart cardmiddlewarepackagewill offer advanced features. The device drivermay also be described as a Cryptographic Ser‑vice Provider (CSP), Key Storage Provider (KSP), or minidriver.
The following smart card and middleware combinations for Windows systems have been tested byCitrix as representative examples of their type. However, other smart cards andmiddleware can alsobe used. Formore information about Citrix‑compatible smart cards andmiddleware, see http://www.citrix.com/ready.
Middleware Matching cards
Gemalto Mini Driver for .NET card Gemalto .NET v2+
For information about smart card usage with other types of devices, see the Citrix Workspace appdocumentation for that device.
Remote PC Access
Smart cardsare supportedonly for remoteaccess tophysical officePCs runningWindows10,Windows8 or Windows 7.
The following smart cards were tested with Remote PC Access:
Middleware Matching cards
Gemalto .NETminidriver Gemalto .NET v2+
Fast smart card
Fast smart card is an improvement over the existing HDX PC/SC‑based smart card redirection. It im‑proves performance when smart cards are used in high‑latency WAN situations.
Fast smart card is enabled by default on host machines with currently supported Windows VDAs. Todisable Fast Smart Card on the host‑side—for example for diagnostic purposes—set the ‘Disable Cryp‑tographic Redirection’ registry setting to any non‑zero value:
© 1999–2022 Citrix Systems, Inc. All rights reserved. 331

Citrix Virtual Apps and Desktops
1 HKLM\SOFTWARE\Citrix\SmartCard2 CryptographicRedirectionDisable (DWORD)3 <!--NeedCopy-->
On the client side, to enable fast smart card, include the SmartCardCryptographicRedirection ICA pa‑rameter in the default.ica file of the associated StoreFront site:
1 [WFClient]2 SmartCardCryptographicRedirection=On
Limitations:
• Only Citrix Receiver for Windows supports fast smart card. If you configure fast smart cardsin the default.ica file, Citrix Receivers that are not for Windows still work with existing PC/SCRedirection.
• The only double‑hop scenarios that fast smart card supports are ICA > ICA with fast smart cardenabled on both hops. Because fast smart card doesn’t support ICA > RDP double‑hop scenar‑ios, those scenarios don’t work.
• Fast smart card doesn’t support Cryptography Next Generation. Thus, fast smart card doesn’tsupport Elliptic Curve Cryptography (ECC) smart cards.
• Fast smart card supports only read‑only key container operations. For example, a smart cardcannot be enrolled with fast smart card.
• Fast smart card doesn’t support changing the smart card PIN.
Types of smart card readers
A smart card reader may be built in to the user device, or be separately attached to the user device(usually via USB or Bluetooth). Contact card readers that comply with the USB Chip/Smart Card In‑terface Devices (CCID) specification are supported. They contain a slot or swipe into which the userinserts the smart card. The Deutsche Kreditwirtschaft (DK) standard defines four classes of contactcard readers.
• Class 1 smart card readers are the most common, and usually just contain a slot. Class 1 smartcard readers are supported, usually with a standard CCID device driver supplied with the oper‑ating system.
• Class 2 smart card readers also contain a secure keypad that cannot be accessed by the user de‑vice. Class 2 smart card readersmay be built into a keyboardwith an integrated secure keypad.For class 2 smart card readers, contact your Citrix representative; a reader‑specific device drivermay be required to enable the secure keypad capability.
• Class 3 smart card readers also contain a secure display. Class 3 smart card readers are notsupported.
© 1999–2022 Citrix Systems, Inc. All rights reserved. 332

Citrix Virtual Apps and Desktops
• Class 4 smart card readers also contain a secure transactionmodule. Class 4 smart card readersare not supported.
Note:
The smart card reader class is unrelated to the USB device class.
Smart card readers must be installed with a corresponding device driver on the user device.
For information about supported smart card readers, see the documentation for the CitrixWorkspaceapp you are using. In the Citrix Workspace app documentation, supported versions are usually listedin a smart card article or in the system requirements article.
User experience
Smart card support is integrated into Citrix Virtual Apps and Desktops, using a specific ICA/HDX smartcard virtual channel that is enabled by default.
Important: Do not use generic USB redirection for smart card readers. This is disabled by default forsmart card readers, and is not supported if enabled.
Multiple smart cards and multiple readers can be used on the same user device, but if pass‑throughauthentication is in use, only one smart card must be inserted when the user starts a virtual desktopor application. When a smart card is used within an application (for example, for digital signing orencryption functions), there might be additional prompts to insert a smart card or enter a PIN. Thiscan occur if more than one smart card has been inserted at the same time.
• If users are prompted to insert a smart card when the smart card is already in the reader, theyshould select Cancel.
• If users are prompted for the PIN, they should enter the PIN again.
You can reset PINs using a card management system or vendor utility.
Important:
Within a Citrix Virtual Apps or Citrix Virtual Desktops session, using a smart card with the Mi‑crosoft Remote Desktop Connection application is not supported. This is sometimes describedas a “double hop” use.
Before deploying smart cards
• Obtain a device driver for the smart card reader and install it on the user device. Many smartcard readers can use the CCID device driver supplied by Microsoft.
• Obtain a device driver and cryptographic service provider (CSP) software from your smart cardvendor, and install themonbothuser devices and virtual desktops. Thedriver andCSP softwaremust be compatible with Citrix Virtual Apps and Desktops; check the vendor documentation
© 1999–2022 Citrix Systems, Inc. All rights reserved. 333

Citrix Virtual Apps and Desktops
for compatibility. For virtual desktops using smart cards that support and use the minidrivermodel, smart card minidrivers should download automatically, but you can obtain them fromhttp://catalog.update.microsoft.com or from your vendor. Also, if PKCS#11 middleware is re‑quired, obtain it from the card vendor.
• Important: Citrix recommends that you install and test the drivers and CSP software on a phys‑ical computer before installing Citrix software.
• Add the Citrix Receiver forWebURL to the Trusted Sites list for users whoworkwith smart cardsin InternetExplorerwithWindows10. InWindows10, InternetExplorerdoesnot run inprotectedmode by default for trusted sites.
• Ensure that your public key infrastructure (PKI) is configured appropriately. This includes ensur‑ing that certificate‑to‑accountmapping is correctly configured for ActiveDirectory environmentand that user certificate validation can be performed successfully.
• Ensure your deployment meets the system requirements of the other Citrix components usedwith smart cards, including Citrix Workspace app and StoreFront.
• Ensure access to the following servers in your Site:– The Active Directory domain controller for the user account that is associatedwith a logoncertificate on the smart card
– Delivery Controller– Citrix StoreFront– Citrix Gateway/Citrix Access Gateway 10.x– VDA– (Optional for Remote PC Access): Microsoft Exchange Server
Enable smart card use
Step 1. Issue smart cards to users according to your card issuance policy.
Step 2. (Optional) Set up the smart cards to enable users for Remote PC Access.
Step 3. Install and configure the Delivery Controller and StoreFront (if not already installed) for smartcard remoting.
Step 4. Enable StoreFront for smart card use. For details, see Configure smart card authentication inthe StoreFront documentation.
Step5. Enable Citrix Gateway/AccessGateway for smart carduse. For details, seeConfiguring Authen‑tication and Authorization and Configuring Smart Card Accesswith theWeb Interface in theNetScalerdocumentation.
Step 6. Enable VDAs for smart card use.
• Ensure the VDA has the required applications and updates.• Install the middleware.
© 1999–2022 Citrix Systems, Inc. All rights reserved. 334
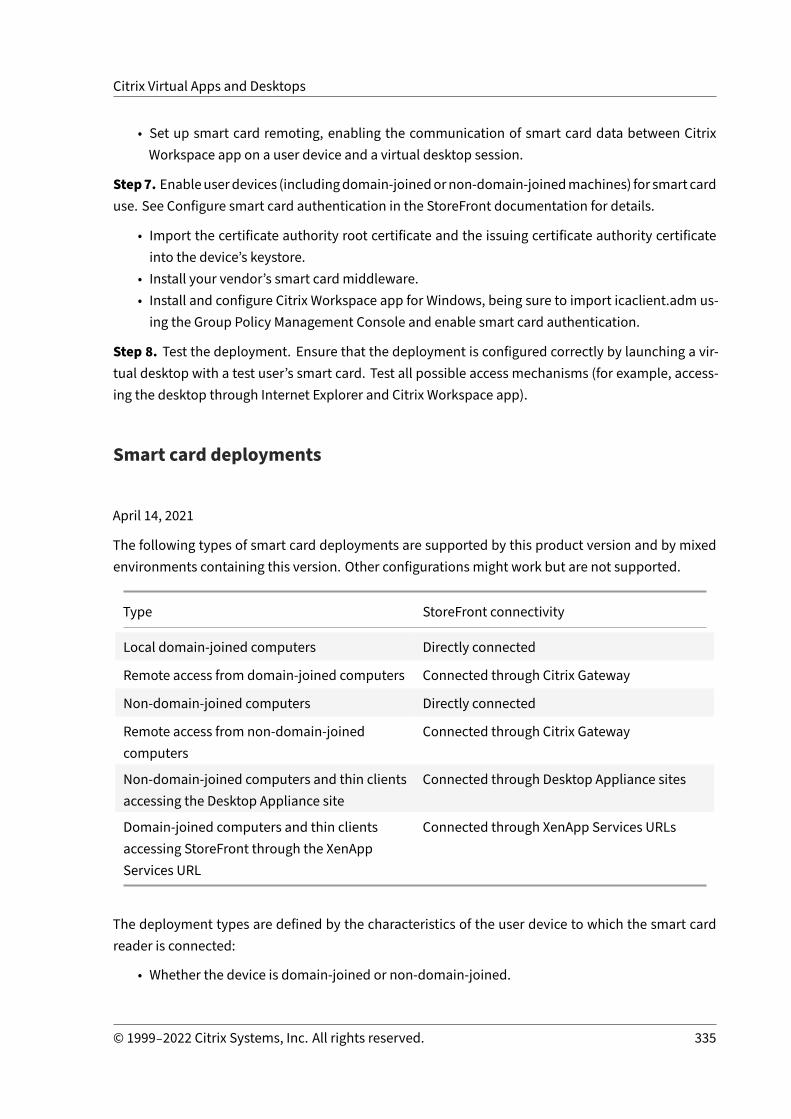
Citrix Virtual Apps and Desktops
• Set up smart card remoting, enabling the communication of smart card data between CitrixWorkspace app on a user device and a virtual desktop session.
Step7. Enableuserdevices (includingdomain‑joinedornon‑domain‑joinedmachines) for smart carduse. See Configure smart card authentication in the StoreFront documentation for details.
• Import the certificate authority root certificate and the issuing certificate authority certificateinto the device’s keystore.
• Install your vendor’s smart card middleware.• Install and configure Citrix Workspace app for Windows, being sure to import icaclient.adm us‑ing the Group Policy Management Console and enable smart card authentication.
Step 8. Test the deployment. Ensure that the deployment is configured correctly by launching a vir‑tual desktop with a test user’s smart card. Test all possible access mechanisms (for example, access‑ing the desktop through Internet Explorer and Citrix Workspace app).
Smart card deployments
April 14, 2021
The following types of smart card deployments are supported by this product version and by mixedenvironments containing this version. Other configurations might work but are not supported.
Type StoreFront connectivity
Local domain‑joined computers Directly connected
Remote access from domain‑joined computers Connected through Citrix Gateway
Non‑domain‑joined computers Directly connected
Remote access from non‑domain‑joinedcomputers
Connected through Citrix Gateway
Non‑domain‑joined computers and thin clientsaccessing the Desktop Appliance site
Connected through Desktop Appliance sites
Domain‑joined computers and thin clientsaccessing StoreFront through the XenAppServices URL
Connected through XenApp Services URLs
The deployment types are defined by the characteristics of the user device to which the smart cardreader is connected:
• Whether the device is domain‑joined or non‑domain‑joined.
© 1999–2022 Citrix Systems, Inc. All rights reserved. 335

Citrix Virtual Apps and Desktops
• How the device is connected to StoreFront.• What software is used to view virtual desktops and applications.
In addition, smart card‑enabled applications such asMicrosoftWord, andMicrosoft Excel can be usedin these deployments. Those applications allow users to digitally sign or encrypt documents.
Bimodal authentication
Where possible in each of these deployments, Receiver supports bimodal authentication by offeringthe user a choice between using a smart card and entering their user name and password. This isuseful if the smart card cannotbeused (for example, theuser has left it at homeor the logoncertificatehas expired).
Because users of non‑domain‑joined devices log on to Receiver for Windows directly, you can enableusers to fall back to explicit authentication. If you configure bimodal authentication, users are initiallyprompted to log on using their smart cards and PINs but have the option to select explicit authentica‑tion if they experience any issues with their smart cards.
If youdeployCitrixGateway, users logon to theirdevicesandarepromptedbyReceiver forWindows toauthenticate to Citrix Gateway. This applies to both domain‑joined and non‑domain‑joined devices.Users can log on to Citrix Gateway using either their smart cards and PINs, orwith explicit credentials.This enables you to provide users with bimodal authentication for Citrix Gateway logons. Configurepass‑through authentication from Citrix Gateway to StoreFront and delegate credential validation toCitrix Gateway for smart card users so that users are silently authenticated to StoreFront.
Multiple Active Directory forest considerations
In a Citrix environment, smart cards are supported within a single forest. Smart card logons acrossforests require a direct two‑way forest trust to all user accounts. More complex multi‑forest deploy‑ments involving smart cards (that is, where trusts are only one‑way or of different types) are not sup‑ported.
You can use smart cards in a Citrix environment that includes remote desktops. This feature can beinstalled locally (on the user device that the smart card is connected to) or remotely (on the remotedesktop that the user device connects to).
Smart card removal policy
The smart card removal policy set on the product determines what happens if you remove the smartcard from the reader during a session. The smart card removal policy is configured through and han‑dled by the Windows operating system.
© 1999–2022 Citrix Systems, Inc. All rights reserved. 336

Citrix Virtual Apps and Desktops
Policy setting Desktop behavior
No action No action.
Lock workstation The desktop session is disconnected and thevirtual desktop is locked.
Force logoff The user is forced to log off. If the networkconnection is lost and this setting is enabled,the session may be logged off and the usermay lose data.
Disconnect if a remote Terminal Servicessession
The session is disconnected and the virtualdesktop is locked.
Certificate revocation checking
If certificate revocation checking is enabled and a user inserts a smart card with an invalid certificateinto a card reader, the user cannot authenticate or access the desktop or application related to thecertificate. For example, if the invalid certificate is used for email decryption, the email remains en‑crypted. If other certificates on the card, such as ones used for authentication, are still valid, thosefunctions remain active.
Deployment example: domain‑joined computers
This deployment involves domain‑joined user devices that run the Desktop Viewer and connect di‑rectly to StoreFront.
A user logs on to a device using a smart card and PIN. Receiver authenticates the user to a Storefrontserver using IntegratedWindows Authentication (IWA). StoreFront passes the user security identifiers(SIDs) to Citrix Virtual Apps or Citrix Virtual Desktops. When the user starts a virtual desktop or appli‑cation, the user is not prompted for a PIN again because the single sign‑on feature is configured onReceiver.
© 1999–2022 Citrix Systems, Inc. All rights reserved. 337

Citrix Virtual Apps and Desktops
This deployment canbeextended toadouble‑hopwith theadditionof a secondStoreFront server anda server hosting applications. A Receiver from the virtual desktop authenticates to the second Store‑Front server. Any authentication method can be used for this second connection. The configurationshown for the first hop can be reused in the second hop or used in the second hop only.
Deployment example: remote access from domain‑joined computers
This deployment involves domain‑joined user devices that run the Desktop Viewer and connect toStoreFront through Citrix Gateway/Access Gateway.
A user logs on to a device using a smart card and PIN, and then logs on again to Citrix Gateway/AccessGateway. This second logon can be with either the smart card and PIN or a user name and passwordbecause Receiver allows bimodal authentication in this deployment.
The user is automatically logged on to StoreFront, which passes the user security identifiers (SIDs) toCitrix Virtual Apps or Citrix Virtual Desktops. When the user starts a virtual desktop or application, theuser is not prompted again for a PIN because the single sign‑on feature is configured on Receiver.
This deployment canbeextended toadouble‑hopwith theadditionof a secondStoreFront server anda server hosting applications. A Receiver from the virtual desktop authenticates to the second Store‑Front server. Any authentication method can be used for this second connection. The configurationshown for the first hop can be reused in the second hop or used in the second hop only.
Deployment example: non‑domain‑joined computers
This deployment involves non‑domain‑joined user devices that run the Desktop Viewer and connectdirectly to StoreFront.
© 1999–2022 Citrix Systems, Inc. All rights reserved. 338

Citrix Virtual Apps and Desktops
A user logs on to a device. Typically, the user enters a user name and password but, since the deviceis not joined to a domain, credentials for this logon are optional. Because bimodal authentication ispossible in this deployment, Receiver prompts the user either for a smart card and PIN or a user nameand password. Receiver then authenticates to Storefront.
StoreFront passes the user security identifiers (SIDs) to Citrix Virtual Apps or Citrix Virtual Desktops.When the user starts a virtual desktop or application, the user is prompted for a PIN again because thesingle sign‑on feature is not available in this deployment.
This deployment canbeextended toadouble‑hopwith theadditionof a secondStoreFront server anda server hosting applications. A Receiver from the virtual desktop authenticates to the second Store‑Front server. Any authentication method can be used for this second connection. The configurationshown for the first hop can be reused in the second hop or used in the second hop only.
Deployment example: remote access from non‑domain‑joined computers
This deployment involves non‑domain‑joined user devices that run the Desktop Viewer and connectdirectly to StoreFront.
A user logs on to a device. Typically, the user enters a user name and password but, since the deviceis not joined to a domain, credentials for this logon are optional. Because bimodal authentication ispossible in this deployment, Receiver prompts the user either for a smart card and PIN or a user nameand password. Receiver then authenticates to Storefront.
© 1999–2022 Citrix Systems, Inc. All rights reserved. 339

Citrix Virtual Apps and Desktops
StoreFront passes the user security identifiers (SIDs) to Citrix Virtual Apps or Citrix Virtual Desktops.When the user starts a virtual desktop or application, the user is prompted for a PIN again because thesingle sign‑on feature is not available in this deployment.
This deployment canbeextended toadouble‑hopwith theadditionof a secondStoreFront server anda server hosting applications. A Receiver from the virtual desktop authenticates to the second Store‑Front server. Any authentication method can be used for this second connection. The configurationshown for the first hop can be reused in the second hop or used in the second hop only.
Deployment example: non‑domain‑joined computers and thin clients accessing theDesktop Appliance site
This deployment involves non‑domain‑joined user devices that may run the Desktop Lock and con‑nect to StoreFront through Desktop Appliance sites.
The Desktop Lock is a separate component that is releasedwith Citrix Virtual Apps, Citrix Virtual Desk‑tops, and VDI‑in‑a‑Box. It is an alternative to the Desktop Viewer and is designed mainly for repur‑posed Windows computers and Windows thin clients. The Desktop Lock replaces the Windows shellandTaskManager in these user devices, preventing users fromaccessing theunderlyingdevices. WiththeDesktopLock, users canaccessWindowsServerMachinedesktops andWindowsDesktopMachinedesktops. Installation of Desktop Lock is optional.
A user logs on to a device with a smart card. If Desktop Lock is running on the device, the device isconfigured to launch a Desktop Appliance site through Internet Explorer running in Kiosk Mode. AnActiveX control on the site prompts the user for a PIN, and sends it to StoreFront. StoreFront passesthe user security identifiers (SIDs) to Citrix Virtual Apps or Citrix Virtual Desktops. The first availabledesktop in the alphabetical list in an assigned Desktop Group starts.
This deployment canbeextended toadouble‑hopwith theadditionof a secondStoreFront server anda server hosting applications. A Receiver from the virtual desktop authenticates to the second Store‑Front server. Any authentication method can be used for this second connection. The configurationshown for the first hop can be reused in the second hop or used in the second hop only.
© 1999–2022 Citrix Systems, Inc. All rights reserved. 340

Citrix Virtual Apps and Desktops
Deployment example: domain‑joined computers and thin clients accessing StoreFrontthrough the XenApp Services URL
This deployment involves domain‑joineduser devices that run theDesktopLock and connect to Store‑Front through XenApp Services URLs.
The Desktop Lock is a separate component that is releasedwith Citrix Virtual Apps, Citrix Virtual Desk‑tops, and VDI‑in‑a‑Box. It is an alternative to the Desktop Viewer and is designed mainly for repur‑posed Windows computers and Windows thin clients. The Desktop Lock replaces the Windows shellandTaskManager in these user devices, preventing users fromaccessing theunderlyingdevices. WiththeDesktopLock, users canaccessWindowsServerMachinedesktops andWindowsDesktopMachinedesktops. Installation of Desktop Lock is optional.
A user logs on to a device using a smart card and PIN. If Desktop Lock is running on the device, itauthenticates the user to a Storefront server using Integrated Windows Authentication (IWA). Store‑Front passes the user security identifiers (SIDs) to Citrix Virtual Apps or Citrix Virtual Desktops. Whenthe user starts a virtual desktop, the user is not prompted for a PIN again because the single sign‑onfeature is configured on Receiver.
This deployment canbeextended toadouble‑hopwith theadditionof a secondStoreFront server anda server hosting applications. A Receiver from the virtual desktop authenticates to the second Store‑Front server. Any authentication method can be used for this second connection. The configurationshown for the first hop can be reused in the second hop or used in the second hop only.
Pass‑through authentication and single sign‑on with smart cards
April 14, 2021
Pass‑through authentication
Pass‑through authentication with smart cards to virtual desktops is supported on user devices run‑ning Windows 10, Windows 8, and Windows 7 SP1 Enterprise and Professional Editions.
© 1999–2022 Citrix Systems, Inc. All rights reserved. 341

Citrix Virtual Apps and Desktops
Pass‑through authenticationwith smart cards to hosted applications is supported on servers runningWindows Server 2016, Windows Server 2012 R2, Windows Server 2012, and Windows Server 2008 R2SP1.
To use pass‑through authentication with smart cards hosted applications, ensure you enable the useof Kerberos when you configure Pass‑through with smartcard as the authentication method for thesite.
Note: The availability of pass‑through authentication with smart cards depends on many factors in‑cluding, but not limited to:
• Your organization’s security policies regarding pass‑through authentication.• Middleware type and configuration.• Smart card reader types.• Middleware PIN caching policy.
Pass‑through authentication with smart cards is configured on Citrix StoreFront. See the StoreFrontdocumentation for details.
Single sign‑on
Single sign‑on is a Citrix feature that implements pass‑through authentication with virtual desktopand application launches. You can use this feature in domain‑joined, direct‑to‑StoreFront anddomain‑joined, NetScaler‑to‑StoreFront smart card deployments to reduce the number of times thatusers enter their PIN. To use single sign‑on in these deployment types, edit the following parametersin the default.ica file, which is located on the StoreFront server:
• Domain‑joined, direct‑to‑StoreFront smart card deployments — Set DisableCtrlAltDel to Off• Domain‑joined, NetScaler‑to‑StoreFront smart card deployments — Set UseLocalUserAndPass‑word to On
For more instructions on setting these parameters, see the StoreFront or Citrix Gateway documenta‑tion.
The availability of single sign‑on functionality depends onmany factors including, but not limited to:
• Your organization’s security policies regarding single sign‑on.• Middleware type and configuration.• Smart card reader types.• Middleware PIN caching policy.
Note:
Whenauser logs on to the Virtual Delivery Agent (VDA) on amachinewith an attached smart cardreader, aWindows tilemay appear representing the previous successfulmodeof authentication,such as smart card or password. As a result, when single sign‑on is enabled, the single sign‑on
© 1999–2022 Citrix Systems, Inc. All rights reserved. 342

Citrix Virtual Apps and Desktops
tile may appear. To log on, the user must select Switch Users to select another tile because thesingle sign‑on tile will not work.
App protection
April 14, 2021
App protection is an add‑on feature for the Citrix Workspace app that provides enhanced securitywhen using Citrix Virtual Apps and Desktops published resources.
Two policies provide anti‑keylogging and anti‑screen‑capturing capabilities for a Citrix HDX session.The policies alongwith aminimumof CitrixWorkspace app 1912 forWindows or CitrixWorkspace app2001 for Mac can help protect data from keyloggers and screen scrapers.
Anti‑keylogging when enabled:
• A keylogger sees encrypted keystrokes.• This feature is active only when a protected window is in focus.
Anti‑screen‑capturing when enabled:
• Screen capture is a blank screen on Windows OS. OnmacOS, only the content of the protectedwindow is blank.
• This feature is active when a protected window is visible (not minimized).
You configure the policies through PowerShell only. There is no GUI administration capability. Thisconfiguration is required only to enable or disable functionality for a specific delivery group.
After purchasing this feature, ensure you enable the app protection license and the app protectionpolicies and import the FeatureTable.OnPrem.AppProtection.xml feature table.
Disclaimer:
Appprotection policieswork by filtering access to required functions of the underlying operatingsystem (specific API calls required to capture screens or keyboard presses). Doing someans thatapp protection policies can provide protection even against custom and purpose‑built hackertools. However, as operating systems evolve, new ways of capturing screens and logging keyscan emerge. While we continue to identify and address them, we cannot guarantee full protec‑tion in specific configurations and deployments.
Limitations
These limitations exist by design:
• No anti‑keylogging support inside HDX or RDP sessions. Endpoint protection is still active. Thislimitation applies to double‑hop scenarios only.
© 1999–2022 Citrix Systems, Inc. All rights reserved. 343

Citrix Virtual Apps and Desktops
• No feature support when using an unsupported version of the Citrix Workspace app or CitrixReceiver. In that case, resources are hidden.
• No feature support for Citrix Cloud services. App protection is supported only for on‑premisesCitrix Virtual Apps and Desktops deployments.
• No feature support for StoreFront web stores.
Expected behavior
The expected behaviors depend on how you access the StoreFront store that contains protected re‑sources. You can access the resources using a supported native Citrix Workspace app client.
• BehavioronStoreWeb ‑ Applicationswithappprotectionpolicies arenot enumeratedonStore‑Front web stores.
• Behavior on unsupported Citrix Receivers or CitrixWorkspace apps ‑ Applications with appprotection policies are not enumerated.
• Behavior on supported Citrix Workspace app versions ‑ Protected resources enumerate andstart properly.
Protection is applied under the following conditions:
• Anti screen capture – enabled if any protected window is visible on the screen. To disableprotection, minimize all protected windows.
• Anti‑keylogging – enabled if a protected window is in focus. To disable protection, changefocus to another window.
What does app protection protect?
To capture the screenshot of any non‑Citrix Workspace app window, users must first minimize theprotected window.
By default, app protection protects the following Citrix windows:
• Citrix logonwindows ‑ CitrixWorkspaceauthenticationdialogs areprotectedonlyonWindowsoperating systems.
© 1999–2022 Citrix Systems, Inc. All rights reserved. 344

Citrix Virtual Apps and Desktops
• Citrix Workspace app HDX session windows (example, managed desktop)
• Self‑Service (Store) windows
© 1999–2022 Citrix Systems, Inc. All rights reserved. 345

Citrix Virtual Apps and Desktops
What doesn’t app protection protect?
The items under the Citrix Workspace apps icon in the navigation bar:
• Connections Center• All links under Advanced Preferences• Personalize• Check for Updates• Sign Out
System requirements
Minimum versions of Citrix components:
• Citrix Workspace app 1912 for Windows Long Term Service Release• Citrix Workspace app 2002 for Windows• Citrix Workspace app 2001 for Mac• StoreFront 1912• Delivery Controller 1912• Valid Citrix licenses
– App protection add‑on license– Citrix Virtual Apps and Desktops 1912
Operating system platforms:
© 1999–2022 Citrix Systems, Inc. All rights reserved. 346

Citrix Virtual Apps and Desktops
These operating systems are supported on the endpoint. The VDA supports all operating systems.
• Windows 10• Windows 8.1• Windows 7• macOS High Sierra (10.13) and higher
Configure
After purchasing the app protection, follow these steps to fully configure and enable the feature:
1. Import the app protection license.2. Configure the Workspace app.3. Import the FeatureTable.OnPrem.AppProtection.xml feature table.4. Enable the app protection policies on the Delivery Controllers.
1. Licensing
App protection requires that you install an add‑on license on the Citrix License Server. A minimumCitrix Virtual Desktops 1912 version license must be present. Contact a Citrix Sales Representative topurchase the app protection add‑on license.
1. Download the license file and import it into the Citrix License Server alongside an existing CitrixVirtual Desktops license.
2. Use theCitrix LicensingManager to import the license file (preferredmethod)or copy the licensefile to C:\Program Files (x86)\Citrix\Licensing\MyFiles on the License Server andrestart the Citrix Licensing service. For more information, see Install licenses.
2. Citrix Workspace app
Configure app protection on the Citrix Workspace app.
Citrix Workspace app for Windows:
You can include the app protection component with the Citrix Workspace app using the followingmethods:
• During Citrix Workspace app installation.• Using the command‑line interface after the Citrix Workspace app installation.
Ensure the Citrix Workspace app was installed with the /includeappprotection switch enabled.
For more information, see App protection.
Citrix Workspace app for Mac:
App protection requires no specific configuration on the Citrix Workspace app for Mac.
© 1999–2022 Citrix Systems, Inc. All rights reserved. 347

Citrix Virtual Apps and Desktops
3. Feature table file
After you purchase the app protection feature, enable the app protection license and the app protec‑tion policies, and import the FeatureTable.OnPrem.AppProtection.xml feature table.
The Components section on the Citrix Virtual Apps and Desktops 1912 or later download page con‑tains the required XML file. Youmust have a Citrix account to download the file.
Bydefault, appprotection is disabled. Toenable the feature, use theImport-ConfigFeatureTablecmdlet to import the FeatureTable.OnPrem.AppProtection.xml feature table, which has appprotection enabled. Run the cmdlet once for the whole site. For more information, see Import‑Configfeaturetable.
Import-ConfigFeatureTable –Path .\FeatureTable.OnPrem.AppProtection.xml
You can run the cmdlet on any installed Delivery Controller machine or on a machine with a stand‑alone Studio installed that has the FMA PowerShell snap‑ins installed.
To verify that app protection is enabled, run Get-ConfigEnabledFeature | Select-String –Pattern ‘AppProtection’.
4. Delivery Groups
Enable the following properties for the app protection Delivery Group using the PowerShell SDK onany installed Delivery Controller machine or on a machine with a stand‑alone Studio installed thathas the FMA PowerShell snap‑ins installed.
• AppProtectionKeyLoggingRequired: True• AppProtectionScreenCaptureRequired: True
You can enable each of these policies individually per Delivery Group. For example, you can configurekeylogging protection only for DG1, and screen capture protection only for DG2. You can enable bothpolicies for DG3.
Example:
To enable both policies for a Delivery Group namedDG3, run the following command on any DeliveryController in the site:
Set-BrokerDesktopGroup -Name DG3 -AppProtectionKeyLoggingRequired $true -AppProtectionScreenCaptureRequired $true
To validate the settings, run this cmdlet:
Get-BrokerDesktopGroup -Property Name, AppProtectionKeyLoggingRequired,AppProtectionScreenCaptureRequired | Format-Table -AutoSize
In addition, enable XML trust:
© 1999–2022 Citrix Systems, Inc. All rights reserved. 348

Citrix Virtual Apps and Desktops
Set-BrokerSite -TrustRequestsSentToTheXmlServicePort $true
Ensure that you secure the network between the StoreFront and the Broker. For more information,see Knowledge Center articles CTX236929 and Securing the XenApp and XenDesktop XML Service.
Recommendation
App protection policies are primarily focused on enhancing the security and protection of an end‑point. Review all other security recommendations and policies for your environment. You can use aSecurity and Control policy template for a recommended configuration in environments with lowtolerance to risk. For more information, see Policy templates.
Troubleshoot
Applications are not enumerating or not starting:
• Confirm the affected user is using a supported version of the Citrix Workspace app.• Ensure the feature is enabled on the StoreFront server.• Ensure the Delivery Group has the proper features enabled.
App protection policies are not applying properly:
• Ensure the feature is enabled on StoreFront.• Ensure the Delivery Group has the proper features enabled.• Ensure the feature is installed on the endpoint.• Ensure the affected user is using a supported Citrix Workspace app version.• Ensure the Citrix Workspace app was installed with the /includeappprotection switch enabled.
Screenshots not working on non‑Citrix windows:
• Minimize or close the protected Citrix windows.
Transport Layer Security (TLS)
April 14, 2021
Citrix Virtual Apps and Desktops support the Transport Layer Security (TLS) protocol for TCP‑basedconnectionsbetween components. Citrix Virtual Apps andDesktops also support theDatagramTrans‑port Layer Security (DTLS) protocol for UDP‑based ICA/HDX connections, using adaptive transport.
TLS and DTLS are similar, and support the same digital certificates. Configuring a Citrix Virtual Appsor Citrix Virtual Desktops Site to use TLS also configures it to use DTLS. Use the following procedures;the steps are common to both TLS and DTLS except where noted:
© 1999–2022 Citrix Systems, Inc. All rights reserved. 349

Citrix Virtual Apps and Desktops
• Obtain, install, and register a server certificate on all Delivery Controllers, and configure a portwith the TLS certificate. For details, see Install TLS server certificates on Controllers.
Optionally, you can change the ports the Controller uses to listen for HTTP and HTTPS traffic.
• Enable TLS connections between Citrix Workspace app and Virtual Delivery Agents (VDAs) bycompleting the following tasks:
– Configure TLS on the machines where the VDAs are installed. (For convenience, furtherreferences to machines where VDAs are installed are simply called “VDAs.”) For generalinformation, see TLS settings on VDAs. It is highly recommended that you use the Citrixsupplied PowerShell script to configure TLS/DTLS. For details, see Configure TLS on a VDAusing the PowerShell script. However, if you want to configure TLS/DTLS manually, seeManually configure TLS on a VDA.
– Configure TLS in the Delivery Groups containing the VDAs by running a set of PowerShellcmdlets in Studio. For details, see Configure TLS on Delivery Groups.
Requirements and considerations:
* Enabling TLS connections between users and VDAs is valid only for XenApp 7.6 andXenDesktop 7.6 Sites, plus later supported releases.
* Configure TLS in the Delivery Groups and on the VDAs after you install components,create a Site, create machine catalogs, and create Delivery Groups.
* To configure TLS in the Delivery Groups, you must have permission to change Con‑troller access rules. A Full Administrator has this permission.
* To configure TLS on the VDAs, you must be a Windows administrator on the machinewhere the VDA is installed.
* On pooled VDAs that are provisioned by Machine Creation Services or ProvisioningServices, the VDA machine image is reset on restart, causing previous TLS settings tobe lost. Run the PowerShell script each time the VDA is restarted to reconfigure theTLS settings.
Warning:
For tasks that includeworking in theWindows registry—editing the registry incorrectly can causeserious problems that may require you to reinstall your operating system. Citrix cannot guaran‑tee that problems resulting from the incorrect use of Registry Editor can be solved. Use RegistryEditor at your own risk. Be sure to back up the registry before you edit it.
For information about enabling TLS to the Site database, see CTX137556.
Install TLS server certificates on Controllers
For HTTPS, the XML Service supports TLS features by using server certificates, not client certificates.This section describes acquiring and installing TLS certificates in Delivery Controllers. The same steps
© 1999–2022 Citrix Systems, Inc. All rights reserved. 350
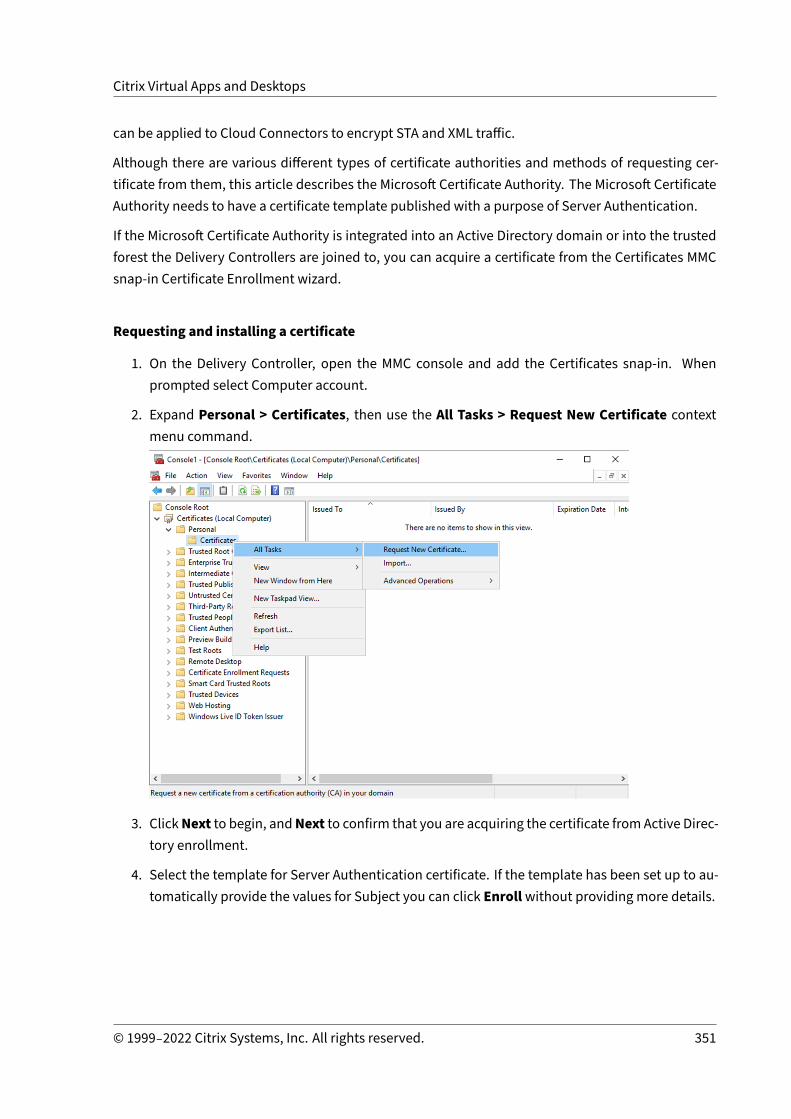
Citrix Virtual Apps and Desktops
can be applied to Cloud Connectors to encrypt STA and XML traffic.
Although there are various different types of certificate authorities and methods of requesting cer‑tificate from them, this article describes the Microsoft Certificate Authority. The Microsoft CertificateAuthority needs to have a certificate template published with a purpose of Server Authentication.
If the Microsoft Certificate Authority is integrated into an Active Directory domain or into the trustedforest the Delivery Controllers are joined to, you can acquire a certificate from the Certificates MMCsnap‑in Certificate Enrollment wizard.
Requesting and installing a certificate
1. On the Delivery Controller, open the MMC console and add the Certificates snap‑in. Whenprompted select Computer account.
2. Expand Personal > Certificates, then use the All Tasks > Request New Certificate contextmenu command.
3. ClickNext to begin, andNext to confirm that you are acquiring the certificate from Active Direc‑tory enrollment.
4. Select the template for Server Authentication certificate. If the template has been set up to au‑tomatically provide the values for Subject you can click Enrollwithout providing more details.
© 1999–2022 Citrix Systems, Inc. All rights reserved. 351

Citrix Virtual Apps and Desktops
5. Toprovidemoredetails for the certificate template, click theDetailsarrowbuttonandconfigurethe following:
Subject name: select Common Name and add the FQDN of the Delivery Controller.
Alternative name: select DNS and add the FQDN of the Delivery Controller.
Configuring SSL/TLS listener port
1. Open a PowerShell command window as an administrator of the machine.
2. Run the following commands to get Broker Service Application GUID:
© 1999–2022 Citrix Systems, Inc. All rights reserved. 352

Citrix Virtual Apps and Desktops
1 New-PSDrive -Name HKCR -PSProvider Registry -RootHKEY_CLASSES_ROOT
23 $Service_Guid = Get-ChildItem HKCR:\Installer\Products -Recurse -
Ea 0 | Where-Object {4 $key = $_; $_.GetValueNames() | ForEach-Object {5 $key.GetValue($_) }6 | Where-Object {7 $_ -like 'Citrix Broker Service' }8 }9 | Select-Object Name
1011 $Service_Guid.Name -match "[A-Z0-9]*$"1213 $Guid = $Matches[0]1415 [GUID]$Formatted_Guid = $Guid1617 Remove-PSDrive -Name HKCR1819 Write-Host "Broker Service Application GUID: $($Formatted_Guid)" -
ForegroundColor Yellow20 <!--NeedCopy-->
3. Run the following commands on the same PowerShell window to get the Thumbprint of thecertificate you installed previously:
1 $HostName = ([System.Net.Dns]::GetHostByName(($env:computerName))).Hostname
23 $Thumbprint = (Get-ChildItem -Path Cert:\LocalMachine\My | Where-
Object {4 $_.Subject -match ("CN=" + $HostName) }5 ).Thumbprint -join ';'67 Write-Host -Object "Certificate Thumbprint for $($HostName): $(
$Thumbprint)" -Foreground Yellow8 <!--NeedCopy-->
4. Run the following commands on the same PowerShell window to configure the Broker ServiceSSL/TLS port and use the certificate for encryption:
1 $IPV4_Address = Test-Connection -ComputerName $HostName -Count 1| Select-Object -ExpandProperty IPV4Address
2
© 1999–2022 Citrix Systems, Inc. All rights reserved. 353

Citrix Virtual Apps and Desktops
3 $IPPort = "$($IPV4_Address):443"45 $SSLxml = "http add sslcert ipport=$IPPort certhash=$Thumbprint
appid={6 $Formatted_Guid }7 "89 $SSLxml | netsh
1011 . netsh http show sslcert12 <!--NeedCopy-->
When correctly configured, the output from the last command .netsh http show sslcert showsthat the listener is using the correctIP:port, and thatApplication IDmatches the Broker ServiceApplication GUID.
Providing the servers trust the certificate installed on the Delivery Controllers, you can now configureStoreFront Delivery Controllers and Citrix Gateway STA bindings to use HTTPS instead of HTTP.
Note:
If the Controller is installed on Windows Server 2016, and StoreFront is installed on WindowsServer 2012 R2, a configuration change is needed at the Controller, to change the order of TLScipher suites. This configuration change is not needed for Controller and StoreFront with othercombinations of Windows Server versions.
The cipher suite order list must include the TLS_ECDHE_RSA_WITH_AES_256CBC_SHA384, orTLS_ECDHE_RSA_WITH_AES_128_CBC_SHA256 cipher suites (or both); and these cipher suites mustprecede any TLS_DHE cipher suites.
1. Using the Microsoft Group Policy Editor, browse to Computer Configuration > AdministrativeTemplates > Network > SSL Configuration Settings.
2. Edit the policy “SSL Cipher Suite Order”. By default, this policy is set to “Not Configured”. Setthis policy to Enabled.
3. Arrange suites in the correct order; remove any cipher suites suites you do not want to use.
Ensure thateitherTLS_ECDHE_RSA_WITH_AES_256CBC_SHA384, orTLS_ECDHE_RSA_WITH_AES_128_CBC_SHA256precedes any TLS_DHE cipher suites.
On Microsoft MSDN, see also Prioritizing Schannel Cipher Suites.
Change HTTP or HTTPS ports
Bydefault, the XML Service on the Controller listens on port 80 for HTTP traffic and port 443 for HTTPStraffic. Although you can use non‑default ports, be aware of the security risks of exposing a Controller
© 1999–2022 Citrix Systems, Inc. All rights reserved. 354

Citrix Virtual Apps and Desktops
to untrusted networks. Deploying a standalone StoreFront server is preferable to changing the de‑faults.
To change the default HTTP or HTTPS ports used by the Controller, run the following command fromStudio:
BrokerService.exe ‑WIPORT <http‑port> ‑WISSLPORT <https‑port>
where <http‑port> is the port number for HTTP traffic and <https‑port> is the port number for HTTPStraffic.
Note:
After changing a port, Studio might display a message about license compatibility and upgrad‑ing. To resolve the issue, re‑register service instances using the following PowerShell cmdletsequence:
1 Get-ConfigRegisteredServiceInstance -ServiceType Broker -BindingXML_HTTPS |
2 Unregister-ConfigRegisteredServiceInstance3 Get-BrokerServiceInstance | where Binding -eq "XML_HTTPS" |4 Register-ConfigServiceInstance5 <!--NeedCopy-->
Enforce HTTPS traffic only
If you want the XML Service to ignore HTTP traffic, create the following registry setting inHKLM\Software\Citrix\DesktopServer\ on the Controller and then restart the Broker Service.
To ignore HTTP traffic, create DWORD XmlServicesEnableNonSsl and set it to 0.
There is a corresponding registryDWORDvalue youcancreate to ignoreHTTPS traffic: DWORDXmlSer‑vicesEnableSsl. Ensure that it is not set to 0.
TLS settings on VDAs
ADeliveryGroupcannothaveamixtureof someVDAswithTLSconfiguredand someVDAswithout TLSconfigured. Before you configure TLS for a Delivery Group, ensure that you have already configuredTLS for all the VDAs in that Delivery Group
When you configure TLS on VDAs, permissions on the installed TLS certificate are changed, giving theICA Service read access to the certificate’s private key, and informing the ICA Service of the following:
• Which certificate in the certificate store to use for TLS.
• Which TCP port number to use for TLS connections.
© 1999–2022 Citrix Systems, Inc. All rights reserved. 355

Citrix Virtual Apps and Desktops
TheWindows Firewall (if enabled)must be configured to allow incoming connectionon this TCPport. This configuration is done for you when you use the PowerShell script.
• Which versions of the TLS protocol to allow.
Important:
Citrix recommends that you review your use of SSLv3, and reconfigure those deploymentsto remove support for SSLv3 where appropriate. See CTX200238.
The supported TLS protocol versions follow a hierarchy (lowest to highest): SSL 3.0, TLS 1.0,TLS 1.1, and TLS 1.2. Specify theminimum allowed version; all protocol connections using thatversion or a higher version are allowed.
For example, if you specify TLS 1.1 as the minimum version, then TLS 1.1 and TLS 1.2 protocolconnections are allowed. If you specify SSL 3.0 as the minimum version, then connections forall the supported versions are allowed. If you specify TLS 1.2 as theminimum version, only TLS1.2 connections are allowed.
DTLS 1.0 corresponds to TLS 1.1, and DTLS 1.2 corresponds to TLS 1.2.
• Which TLS cipher suites to allow.
A cipher suite selects the encryption that is used for a connection. Clients and VDAs can supportdifferent sets of cipher suites. When a client (Citrix Workspace app or StoreFront) connects andsends a list of supportedTLS cipher suites, the VDAmatchesoneof the client’s cipher suiteswithone of the cipher suites in its own list of configured cipher suites, and accepts the connection.If there is no matching cipher suite, the VDA rejects the connection.
TheVDA supports three sets of cipher suites (also knownas compliancemodes): GOV(ernment),COM(mercial), and ALL. The acceptable cipher suites also depend on the Windows FIPS mode;see http://support.microsoft.com/kb/811833 for information about Windows FIPS mode. Thefollowing table lists the cipher suites in each set:
TLS/DTLSciphersuite ALL COM GOV ALL COM GOV
FIPS Mode Off Off Off On On On
TLS_ECDHE_RSA_WITH_AES_256_GCM_SHA384*X X X X
TLS_ECDHE_RSA_WITH_AES_256_CBC_SHA384X X X X
TLS_ECDHE_RSA_WITH_AES_128_CBC_SHAX X X X
* Not supported in Windows Server 2012 R2.
© 1999–2022 Citrix Systems, Inc. All rights reserved. 356

Citrix Virtual Apps and Desktops
Note:
TheVDAdoesnot supportDHEciphersuites (forexample, TLS_DHE_RSA_WITH_AES_256_GCM_SHA384,TLS_DHE_RSA_WITH_AES_256_CBC_SHA, TLS_DHE_RSA_WITH_AES_128_GCM_SHA256, andTLS_DHE_RSA_WITH_AES_128_CBC_SHA.) If selected by Windows, they may not be used byReceiver.
If you are using a Citrix Gateway, refer to the Citrix ADC documentation for information on ciphersuite support for back‑end communication. For information on TLS cipher suite support, seeCiphers available on the Citrix ADC appliances. For information on DTLS cipher suite support,see DTLS cipher support.
Configure TLS on a VDA using the PowerShell script
Install the TLS Certificate in the Local Computer > Personal > Certificates area of the certificate store.If more than one certificate resides in that location, supply the thumbprint of the certificate to thePowerShell script.
Note:
Starting with XenApp and XenDesktop 7.16 LTSR, the PowerShell script finds the correct certifi‑cate based on the FQDNof the VDA. You do not need to supply the thumbprintwhen only a singlecertificate is present for the VDA FQDN.
The Enable‑VdaSSL.ps1 script enables or disables the TLS listener on a VDA. This script is available inthe Support > Tools > SslSupport folder on the installation media.
When you enable TLS, DHE cipher suites are disabled. ECDHE cipher suites are not affected.
When youenable TLS, the script disables all existingWindows Firewall rules for the specified TCPport.It then adds a new rule that allows the ICA Service to accept incoming connections only on the TLSTCP and UDP ports. It also disables the Windows Firewall rules for:
• Citrix ICA (default: 1494)• Citrix CGP (default: 2598)• Citrix WebSocket (default: 8008)
The effect is that users can only connect using TLS or DTLS. They cannot use ICA/HDX, ICA/HDX withSession Reliability, or HDX over WebSocket, without TLS or DTLS.
Note:
DTLS is not supportedwith ICA/HDXAudiooverUDPReal‑timeTransport, orwith ICA/HDXFrame‑hawk.
See Network ports.
© 1999–2022 Citrix Systems, Inc. All rights reserved. 357

Citrix Virtual Apps and Desktops
The script contains the following syntax descriptions, plus extra examples; you can use a tool such asNotepad++ to review this information.
Important:
Specify either the Enable or Disable parameter, and the CertificateThumbPrint parameter. Theother parameters are optional.
Syntax
Enable-VdaSSL { -Enable | -Disable } -CertificateThumbPrint "<thumbprint>"[–SSLPort <port>] [-SSLMinVersion "<min-ssl-version>"] [-SSLCipherSuite"\<suite>"]
Parameter Description
Enable Installs and enables the TLS listener on theVDA. Either this parameter or the Disableparameter is required.
Disable Disables the TLS listener on the VDA. Either thisparameter or the Enable parameter is required.If you specify this parameter, no otherparameters are valid.
CertificateThumbPrint “<thumbprint>” Thumbprint of the TLS certificate in thecertificate store, enclosed in quotation marks.The script uses the specified thumbprint toselect the certificate you want to use. If thisparameter is omitted, an incorrect certificate isselected.
SSLPort <port> TLS port. Default: 443
SSLMinVersion “<version>” Minimum TLS protocol version, enclosed inquotation marks. Valid values: “TLS_1.0”(default), “TLS_1.1”, and “TLS_1.2”.
SSLCipherSuite “<suite>” TLS cipher suite, enclosed in quotation marks.Valid values: “GOV”, “COM”, and “ALL” (default).
Examples
The following script installs and enables the TLS protocol version value. The thumbprint (representedas “12345678987654321” in this example) is used to select the certificate to use.
© 1999–2022 Citrix Systems, Inc. All rights reserved. 358

Citrix Virtual Apps and Desktops
1 Enable-VdaSSL – Enable -CertificateThumbPrint "12345678987654321"
The following script installs and enables the TLS listener, and specifies TLS port 400, the GOV ciphersuite, and aminimum TLS 1.2 protocol value. The thumbprint (represented as “12345678987654321”in this example) is used to select the certificate to use.
1 Enable-VdaSSL – Enable2 -CertificateThumbPrint "12345678987654321"3 – SSLPort 443 'SSLMinVersion "TLS_1.2"4 – SSLCipherSuite "All"
The following script disables the TLS listener on the VDA.
1 Enable-VdaSSL – Disable
Manually configure TLS on a VDA
When configuring TLS on a VDA manually, you grant generic read access to the private key of the TLScertificate for the appropriate service on each VDA: NT SERVICE\PorticaService for a VDA for WindowsSingle‑session OS, or NT SERVICE\TermService for a VDA for Windows Multi‑session OS. On the ma‑chine where the VDA is installed:
STEP 1. Launch the Microsoftmanagement console (MMC): Start > Run >mmc.exe.
STEP 2. Add the Certificates snap‑in to the MMC:
1. Select File > Add/Remove Snap‑in.2. Select Certificates and then click Add.3. When prompted with “This snap‑in will always manage certificates for:” choose “Computer ac‑
count” and then click Next.4. When prompted with “Select the computer you want this snap‑in to manage” choose “Local
computer” and then click Finish.
STEP 3. Under Certificates (Local Computer) > Personal > Certificates, right–click the certificate andthen select All Tasks > Manage Private Keys.
STEP 4. The Access Control List Editor displays “Permissions for (FriendlyName) private keys” where(FriendlyName) is the name of your TLS certificate. Add one of the following services and give it Readaccess:
• For a VDA for Windows Single‑session OS, “PORTICASERVICE”• For a VDA for Windows Multi‑session OS, “TERMSERVICE”
STEP 5. Double‑click the installed TLS certificate. In the certificate dialog, select the Details tab andthen scroll to the bottom. Click Thumbprint.
© 1999–2022 Citrix Systems, Inc. All rights reserved. 359

Citrix Virtual Apps and Desktops
STEP6. Runregedit andgo toHKLM\SYSTEM\CurrentControlSet\Control\TerminalServer\Wds\icawd.
1. Edit the SSL Thumbprint key and copy the value of the TLS certificate’s thumbprint into thisbinary value. You can safely ignore unknown items in the Edit Binary Value dialog box (such as‘0000’ and special characters).
2. Edit the SSLEnabled key and change the DWORD value to 1. (To disable SSL later, change theDWORD value to 0.)
3. If youwant to change thedefault settings (optional), use the following in the same registry path:
SSLPort DWORD – SSL port number. Default: 443.
SSLMinVersion DWORD – 1 = SSL 3.0, 2 = TLS 1.2, 3 = TLS 1.1, 4 = TLS 1.2. Default: 2 (TLS 1.2).
SSLCipherSuite DWORD – 1 = GOV, 2 = COM, 3 = ALL. Default: 3 (ALL).
STEP 7. Ensure that the TLS TCP and UDP ports are that open in the Windows Firewall if they are notthe default 443. (When you create the inbound rule in Windows Firewall, ensure its properties havethe “Allow the connection” and “Enabled” entries selected.)
STEP 8. Ensure that no other applications or services (such as IIS) are using the TLS TCP port.
STEP 9. For VDAs for Windows Multi‑session OS, restart the machine for the changes to take effect.(You do not need to restart machines containing VDAs for Windows Single‑session OS.)
Important:
An extra step is necessary when the VDA is on Windows Server 2012 R2, Windows Server 2016,or Windows 10 Anniversary Edition or later supported release. This affects connections fromCitrix Receiver forWindows (version 4.6 through 4.9), Citrix Workspace app for HTML5, and CitrixWorkspace app for Chrome. This also includes connections using Citrix Gateway.
This step is also required for all connections using Citrix Gateway, for all VDA versions, if TLSbetween the Citrix Gateway and the VDA is configured. This affects all Citrix Receiver versions.
On the VDA (Windows Server 2012 R2, Windows Server 2016, or Windows 10 Anniversary Edition orlater), using the Group Policy Editor, go to Computer Configuration > Policies > Administrative Tem‑plates > Network > SSL Configuration Settings > SSL Cipher Suite Order. Select the following order:
1 TLS_ECDHE_RSA_WITH_AES_256_GCM_SHA384_P3842 TLS_ECDHE_RSA_WITH_AES_256_GCM_SHA384_P2563 TLS_ECDHE_RSA_WITH_AES_256_CBC_SHA384_P3844 TLS_ECDHE_RSA_WITH_AES_256_CBC_SHA384_P2565 TLS_ECDHE_RSA_WITH_AES_128_CBC_SHA_P3846 TLS_ECDHE_RSA_WITH_AES_128_CBC_SHA_P256
© 1999–2022 Citrix Systems, Inc. All rights reserved. 360

Citrix Virtual Apps and Desktops
Note:
The first six items also specify the elliptic curve, P384 or P256. Ensure that “curve25519” is notselected. FIPS Mode does not prevent the use of “curve25519”.
When this GroupPolicy setting is configured, the VDA selects a cipher suite only if appears in both lists:theGroupPolicy list and the list for the selected compliancemode (COM,GOV, or ALL). The cipher suitemust also appear in the list sent by the client (Citrix Workspace app or StoreFront).
This Group Policy configuration also affects other TLS applications and services on the VDA. If yourapplications require specific cipher suites, youmay need to add them to this Group Policy list.
Important:
Even though Group Policy changes are shown when they are applied, Group Policy changes forTLS configuration only take effect after an operating system restart. Therefore, for pooled desk‑tops, apply the Group Policy changes for TLS configuration to the base image.
Configure TLS on Delivery Groups
Complete this procedure for each Delivery Group that contains VDAs you have configured for TLS con‑nections.
1. From Studio, open the PowerShell console.2. Run asnp Citrix.* to load the Citrix product cmdlets.3. Run Get‑BrokerAccessPolicyRule ‑DesktopGroupName ‘<delivery‑group‑name>’ | Set‑
BrokerAccessPolicyRule ‑HdxSslEnabled $true.4. Run Set‑BrokerSite ‑DnsResolutionEnabled $true.
Troubleshooting
If a connection error occurs, check the system event log on the VDA.
When using Citrix Workspace app for Windows, if you receive a connection error that indicates a TLSerror, disable Desktop Viewer and then try connecting again. Although the connection still fails anexplanation of the underlying TLS issue might be provided. For example, you specified an incorrecttemplate when requesting a certificate from the certificate authority.)
Most configurations that use HDX Adaptive Transport work successfully with DTLS, including thoseusing the latest versions of Citrix Workspace app, Citrix Gateway, and the VDA. Some configurationswhich useDTLSbetweenCitrixWorkspace appandCitrix Gateway, andwhich useDTLSbetweenCitrixGateway and the VDA, require additional action.
Additional action is needed if:
© 1999–2022 Citrix Systems, Inc. All rights reserved. 361
Citrix Virtual Apps and Desktops
• the Citrix Receiver version supports HDX Adaptive Transport and DTLS: Receiver for Windows(4.7, 4.8, 4.9), Receiver for Mac (12.5, 12.6, 12.7), Receiver for iOS (7.2, 7.3.x) or Receiver for Linux(13.7)
and either of the following also applies:
• theCitrix Gateway version supportsDTLS to the VDA, but the VDAversiondoesnot support DTLS(version 7.15 or earlier),
• the VDA version supports DTLS (version 7.16 or later), but the Citrix Gateway version does notsupport DTLS to the VDA.
To avoid connections from Citrix Receiver failing, do one of the following:
• update Citrix Receiver, to Receiver for Windows version 4.10 or later, Receiver for Mac 12.8 orlater, or Receiver for iOS version 7.5 or later; or,
• update the Citrix Gateway to a version that supports DTLS to the VDA; or,• update the VDA, to version 7.16 or later; or,• disable DTLS at the VDA; or,• disable HDX Adaptive Transport.
Note:
A suitable update for Receiver for Linux is not yet available. Receiver for Android (version 3.12.3)does not support HDX Adaptive Transport and DTLS via Citrix Gateway, and is therefore not af‑fected.
To disable DTLS at the VDA, modify the VDA firewall configuration to disable UDP port 443. SeeNetwork ports.
Communication between Controller and VDA
Windows Communication Framework (WCF) message‑level protection secures communication be‑tween the Controller and the VDA. Extra transport‑level protection using TLS is not required. TheWCFconfiguration uses Kerberos for mutual authentication between the Controller and VDA. Encryptionuses AES in CBCmode with a 256‑bit key. Message integrity uses SHA‑1.
According to Microsoft, the Security protocols used by WCF conform to standards from OASIS (Orga‑nization for the Advancement of Structured Information Standards), includingWS‑SecurityPolicy 1.2.Additionally, Microsoft states that WCF supports all algorithm suites listed in Security Policy 1.2.
Communicationbetween theController andVDAuses thebasic256 algorithmsuite, whose algorithmsare as stated above.
© 1999–2022 Citrix Systems, Inc. All rights reserved. 362
Citrix Virtual Apps and Desktops
TLS and HTML5 video redirection, and browser content redirection
You can use HTML5 video redirection and browser content redirection to redirect HTTPS websites.The JavaScript injected into those websites must establish a TLS connection to the Citrix HDX HTML5Video Redirection Service running on the VDA. To achieve this, the HTML5 Video Redirection Servicegenerates two customcertificates in the certificate store on the VDA. Stopping the service removes thecertificates.
The HTML5 video redirection policy is disabled by default.
The browser content redirection is enabled by default.
For more information on HTML5 video redirection, see Multimedia policy settings.
Transport Layer Security (TLS) on Universal Print Server
April 14, 2021
The Transport Layer Security (TLS) protocol is supported for TCP‑based connections between the Vir‑tual Delivery Agent (VDA) and the Universal Print Server.
Warning:
For tasks that includeworking in theWindows registry—editing the registry incorrectly can causeserious problems that may require you to reinstall your operating system. Citrix cannot guaran‑tee that problems resulting from the incorrect use of Registry Editor can be solved. Use RegistryEditor at your own risk. Be sure to back up the registry before you edit it.
Types of printing connections between the VDA and Universal Print Server
Cleartext connections
The following connections related to printing originate from the VDA and connect to ports on the Uni‑versal Print Server. These connections are made only when the SSL enabled policy setting is set toDisabled (the default).
• Cleartext print web service connections (TCP port 8080)• Cleartext print data stream (CGP) connections (TCP port 7229)
TheMicrosoft support article Service overviewandnetwork port requirements forWindowsdescribestheports usedby theMicrosoftWindowsPrint Spooler Service. TheSSL/TLS settings in this documentdo not apply to the NETBIOS and RPC connections made by the Windows Print Spooler service. TheVDAuses theWindowsNetworkPrintProvider (win32spl.dll) asa fallback if theUniversalPrintServerenable policy setting is set to Enabled with fallback to Windows’ native remote printing.
© 1999–2022 Citrix Systems, Inc. All rights reserved. 363

Citrix Virtual Apps and Desktops
Encrypted connections
These SSL/TLS connections related to printing originate from the VDA and connect to ports on theUniversal Print Server. These connections are made only when the SSL enabled policy setting is setto Enabled.
• Encrypted print web service connections (TCP port 8443)• Encrypted print data stream (CGP) connections (TCP port 443)
© 1999–2022 Citrix Systems, Inc. All rights reserved. 364

Citrix Virtual Apps and Desktops
SSL/TLS client configuration
The VDA functions as the SSL/TLS client.
Use Microsoft Group Policy and the registry to configure Microsoft SCHANNEL SSP for encryptedprint web service connections (TCP port 8443). The Microsoft support article TLS Registry Settingsdescribes the registry settings for Microsoft SCHANNEL SSP.
Using the Group Policy Editor on the VDA (Windows Server 2016 or Windows 10), go to ComputerConfiguration > Administrative Templates > Network > SSL Configuration Settings > SSL CipherSuite Order. Select the following order:
TLS_ECDHE_RSA_WITH_AES_256_GCM_SHA384_P384TLS_ECDHE_RSA_WITH_AES_256_GCM_SHA384_P256TLS_ECDHE_RSA_WITH_AES_256_CBC_SHA384_P384TLS_ECDHE_RSA_WITH_AES_256_CBC_SHA384_P256
© 1999–2022 Citrix Systems, Inc. All rights reserved. 365
Citrix Virtual Apps and Desktops
TLS_ECDHE_RSA_WITH_AES_128_CBC_SHA_P384TLS_ECDHE_RSA_WITH_AES_128_CBC_SHA_P256
Note:
When this Group Policy setting is configured, the VDA selects a cipher suite for encrypted printweb service connections (default port: 8443) only if the connections appears in both SSL ciphersuite lists:
• Group Policy SSL cipher suite order list• List corresponding to the selected SSL Cipher Suite policy setting (COM, GOV, or ALL)
This Group Policy configuration also affects other TLS applications and services on the VDA. Ifyour applications require specific cipher suites, youmight need to add them to this Group PolicyCipher Suite Order list.
Important:
Group Policy changes for TLS configuration take effect only after an operating system restart.
Use a Citrix policy to configure SSL/TLS settings for encrypted print data stream (CGP) connec‑tions (TCP port 443).
SSL/TLS server configuration
The Universal Print Server functions as the SSL/TLS server.
Use the Enable-UpsSsl.ps1 PowerShell script to configure SSL/TLS settings.
Install the TLS server certificate on the Universal Print Server
For HTTPS, the Universal Print Server supports TLS features by using server certificates. Client certifi‑cates are not used. Use Microsoft Active Directory Certificate Services or another certification author‑ity to request a certificate for the Universal Print Server.
Keep inmind the following considerations when enrolling/requesting a certificate using Microsoft Ac‑tive Directory Certificate Services:
1. Place the certificate in the Local Computer Personal certificate store.2. Set the Common Name attribute of the Subject Distinguished Name (Subject DN) of the certifi‑
cate to the fully qualified domain name (FQDN) of the Universal Print Server. Specify this in thecertificate template.
3. Set theCryptographicServiceProvider (CSP)used togenerate thecertificate requestandprivatekey toMicrosoft Enhanced RSA and AES Cryptographic Provider (Encryption). Specify thisin the certificate template.
4. Set the Key Size to at least 2048 bits. Specify this in the certificate template.
© 1999–2022 Citrix Systems, Inc. All rights reserved. 366

Citrix Virtual Apps and Desktops
Configuring SSL on the Universal Print Server
The XTE Service on the Universal Print Server listens for incoming connections. It functions as anSSL server when SSL is enabled. The incoming connections have two types: print web service con‑nections, which contain printing commands, and print data stream connections, which contain printjobs. SSL can be enabled on these connections. SSL protects the confidentiality and integrity of theseconnections. By default, SSL is disabled.
The PowerShell script used to configure SSL is on the installation media and has this file name: \Support\Tools\SslSupport\Enable-UpsSsl.ps1.
Configuring listening port numbers on the Universal Print Server
These are default ports for the XTE Service:
• Cleartext print web service (HTTP) TCP port: 8080• Cleartext print data stream (CGP) TCP port: 7229• Encrypted print web service (HTTPS) TCP port: 8443• Encrypted print data stream (CGP) TCP port: 443
To change the ports used by the XTE Service on the Universal Print Server, run the following com‑mands in PowerShell as administrator (see the later section for notes on the usage of the Enable‑UpsSsl.ps1 PowerShell script):
1. Stop-Service CitrixXTEServer, UpSvc2. Enable-UpsSsl.ps1 -Enable -HTTPSPort <port> -CGPSSLPort <port> or Enable-
UpsSsl.ps1 -Disable -HTTPPort <port> -CGPPort <port>3. Start-Service CitrixXTEServer
TLS settings on Universal Print Server
If you havemultiple Universal Print Servers in a load‑balanced configuration, ensure that the TLS set‑tings are configured consistently across all Universal Print Servers.
When you configure TLS on Universal Print Server, permissions on the installed TLS certificate arechanged, giving the Universal Printing Service read access to the certificate’s private key, and inform‑ing the Universal Printing Service of the following:
• Which certificate in the certificate store to use for TLS.• Which TCP port numbers to use for TLS connections.
The Windows Firewall (if enabled) must be configured to allow incoming connections on these TCPports. This configuration is done for you when you use the Enable‑UpsSsl.ps1 PowerShell script.
• Which versions of the TLS protocol to allow.
© 1999–2022 Citrix Systems, Inc. All rights reserved. 367

Citrix Virtual Apps and Desktops
Universal Print Server supports TLS protocol versions 1.2, 1.1 and 1.0. Specify the minimum allowedversion.
The default TLS protocol version is 1.2.
• Which TLS cipher suites to allow.
A cipher suite selects the cryptographic algorithms that are used for a connection. VDAs and Univer‑sal Print Server can support different sets of cipher suites. When a VDA connects and sends a list ofsupported TLS cipher suites, the Universal Print Server matches one of the client’s cipher suites withone of the cipher suites in its own list of configured cipher suites, and accepts the connection. If thereis no matching cipher suite, the Universal Print Server rejects the connection.
The Universal Print Server supports the following sets of cipher suites named GOV(ernment),COM(mercial), and ALL for the OPEN, FIPS and SP800‑52 native Crypto Kit modes. The acceptablecipher suites also depend on the SSL FIPS Mode policy setting and on the Windows FIPS Mode. Seethis Microsoft support article for information about Windows FIPSmode.
Ciphersuite(in de‑creas‑ingprior‑ityorder)
OPENALL
OPENCOM
OPENGOV
FIPSALL
FIPSCOM
FIPSGOV
SP800‑52 ALL
SP800‑52COM
SP800‑52GOV
TLS_ECDHE_RSA_AES256_GCM_SHA384
X X X X X X
TLS_ECDHE_RSA_AES256_CBC_SHA384
X X X X X X
TLS_ECDHE_RSA_AES256_CBC_SHA
X X X X X X
Configure TLS on a Universal Print Server using the PowerShell script
Install theTLSCertificate in theLocalComputer>Personal>Certificatesareaof the certificate store.If more than one certificate resides in that location, supply the thumbprint of the certificate to theEnable-UpsSsl.ps1 PowerShell script.
Note:
The PowerShell script finds the correct certificate based on the FQDN of the Universal Print
© 1999–2022 Citrix Systems, Inc. All rights reserved. 368
Citrix Virtual Apps and Desktops
Server. You do not need to supply the certificate thumbprint when only a single certificate ispresent for the Universal Print Server FQDN.
The Enable-UpsSsl.ps1 script enables or disables TLS connections originating from the VDA to theUniversal Print Server. This script is available in the Support > Tools > SslSupport folder on the in‑stallation media.
When you enable TLS, the script disables all existing Windows Firewall rules for the Universal PrintServer’s TCP ports. It then adds new rules that allow the XTE Service to accept incoming connectionsonly on the TLS TCP and UDP ports. It also disables the Windows Firewall rules for:
• Cleartext print web service connections (default: 8080)• Cleartext print data stream (CGP) connections (default: 7229)
The effect is that the VDA canmake these connections only when using TLS.
Note:
Enabling TLS does not affect Windows Print Spooler RPC/SMB connections originating from theVDA and going to the Universal Print Server.
Important:
Specify either Enable orDisable as the first parameter. The CertificateThumbprint parameter isoptional if only one certificate in the Local Computer Personal certificate store has the UniversalPrint Server’s FQDN. The other parameters are optional.
Syntax
1 Enable-UpsSSL.ps1 -Enable [-HTTPPort <port>] [-CGPPort <port>] [ –HTTPSPort <port>] [-CGPSSLPort <port>] [-SSLMinVersion <version>] [-SSLCipherSuite <name>] [-CertificateThumbprint <thumbprint>] [-FIPSMode <Boolean>] [-ComplianceMode <mode>]
2 Enable-UpsSSL.ps1 -Disable [-HTTPPort <portnum>] [-CGPPort <portnum>]
Parameter Description
Enable Enables SSL/TLS on the XTE Server. Either thisparameter or the Disable parameter isrequired.
Disable Disables SSL/TLS on the XTE Server. Either thisparameter or the Enable parameter is required.
© 1999–2022 Citrix Systems, Inc. All rights reserved. 369

Citrix Virtual Apps and Desktops
Parameter Description
CertificateThumbprint "<thumbprint>" Thumbprint of the TLS certificate in the LocalComputer Personal certificate store, enclosedin quotation marks. The script uses thespecified thumbprint to select the certificateyou want to use.
HTTPPort <port> Cleartext print web service (HTTP/SOAP) port.Default: 8080
CGPPort <port> Cleartext print data stream (CGP) port. Default:7229
HTTPSPort <port> Encrypted print web service (HTTPS/SOAP)port. Default: 8443
CGPSSLPort <port> Encrypted print data stream (CGP) port.Default: 443
SSLMinVersion "<version>" Minimum TLS protocol version, enclosed inquotation marks. Valid values: “TLS_1.0”,“TLS_1.1”, and “TLS_1.2”. Default: TLS_1.2.
SSLCipherSuite “<name>” Name of TLS cipher suite package, enclosed inquotation marks. Valid values: “GOV”, “COM”,and “ALL” (default).
FIPSMode <Boolean> Enables or disables FIPS 140 mode in the XTEServer. Valid values: $true to enable FIPS 140mode, $false to disable FIPS 140 mode.
Examples
The following script enables TLS. The thumbprint (represented as “12345678987654321” in this exam‑ple) is used to select the certificate to use.
Enable-UpsSsl.ps1 –Enable -CertificateThumbprint "12345678987654321"
The following script disables TLS.
Enable-UpsSsl.ps1 –Disable
Configuring FIPSmode
Enabling US Federal Information Processing Standards (FIPS) mode ensures that only FIPS 140 com‑pliant cryptography is used for Universal Print Server encrypted connections.
© 1999–2022 Citrix Systems, Inc. All rights reserved. 370

Citrix Virtual Apps and Desktops
Configure FIPSmode on the server before configuring FIPSmode on the client.
Consult Microsoft’s documentation site for enabling/disabling Windows FIPSmode.
Enabling FIPSmode on the client
On the Delivery Controller, run Citrix Studio and set the SSL FIPS Mode Citrix policy setting to En‑abled. Enable the Citrix policy.
Do this on each VDA:
1. Enable Windows FIPSmode.2. Restart the VDA.
Enabling FIPSmode on the server
Do this on each Universal Print Server:
1. Enable Windows FIPSmode.2. Run this PowerShell command as Administrator: stop-service CitrixXTEServer,
UpSvc3. Run the Enable-UpsSsl.ps1 script with the -Enable -FIPSMode $true parameters.4. Restart the Universal Print Server.
Disabling FIPSmode on the client
On the Delivery Controller, run Citrix Studio and set the SSL FIPS Mode Citrix policy setting to Dis‑abled. Enable the Citrix policy. You can also delete the SSL FIPS Mode Citrix policy setting.
Do this on each VDA:
1. Disable Windows FIPSmode.2. Restart the VDA.
Disabling FIPSmode on the server
Do this on each Universal Print Server:
1. Disable Windows FIPSmode.2. Run this PowerShell command as Administrator: stop-service CitrixXTEServer,
UpSvc3. Run the Enable-UpsSsl.ps1 script with the -Enable -FIPSMode $false parameters.4. Restart the Universal Print Server.
© 1999–2022 Citrix Systems, Inc. All rights reserved. 371

Citrix Virtual Apps and Desktops
Configuring SSL/TLS protocol version
The default SSL/TLS protocol version is TLS 1.2. TLS 1.2 is the only recommended SSL/TLS protocolversion for production use. For troubleshooting, it might be necessary to temporarily change the SS‑L/TLS protocol version in a non‑production environment.
SSL 2.0 and SSL 3.0 are not supported on the Universal Print Server.
Setting SSL/TLS protocol version on the server
Do this on each Universal Print Server:
1. Run this PowerShell command as Administrator: stop-service CitrixXTEServer,UpSvc
2. Run the Enable-UpsSsl.ps1 script with the -Enable -SSLMinVersion version parame‑ters. Remember to set this back to TLS 1.2 when you are done testing.
3. Restart the Universal Print Server.
Setting SSL/TLS protocol version on the client
Do this on each VDA:
1. On the Delivery Controller, set the SSL Protocol Version policy setting to the desired protocol ver‑sion and enable the policy.
2. The Microsoft support article TLS Registry Settings describes the registry settings for MicrosoftSCHANNEL SSP. Enable the client‑side TLS 1.0, TLS 1.1 or TLS 1.2 using the registry settings.
Important:
Remember to restore the registry settings to their original values when you are done testing.
3. Restart the VDA.
Troubleshooting
If a connection error occurs, check the C:\Program Files (x86)\Citrix\XTE\logs\error.log log file on theUniversal Print Server.
The errormessageSSLhandshake fromclient failedappears in this log file if the SSL/TLShandshakefails. Such failures can occur if the SSL/TLS protocol version on the VDA and theUniversal Print Serverdo not match.
Use theUniversal Print Server FQDN in the followingpolicy settings that containUniversal Print Serverhost names:
• Session printers
© 1999–2022 Citrix Systems, Inc. All rights reserved. 372

Citrix Virtual Apps and Desktops
• Printer assignments• Universal Print Servers for load balancing
Ensure that the system clock (date, time, and time zone) are correct on the Universal Print Serversand the VDAs.
Devices
April 14, 2021
HDX provides a high‑definition user experience on any device, at any location. The articles in theDevices section describe these devices:
• Generic USB device• Mobile and touch screen devices• Serial devices• Specialty keyboards• TWAIN devices• Webcams
Optimized vs. generic USB device
An optimized USB device is one for which Citrix Workspace app has specific support. For example,the ability to redirect webcams using the HDX Multimedia virtual channel. A generic device is a USBdevice for which there is no specific support in Citrix Workspace app.
By default, generic USB redirection can’t redirect USB devices with optimized virtual channel supportunless put into Generic mode.
In general, you get better performance for USB devices in Optimized mode than in Generic mode.However, there are cases where a USB device doesn’t have full functionality in Optimized mode. Itmight be necessary to switch to Generic mode to gain full access to its features.
With USB mass storage devices, you can use either client drive mapping or generic USB redirection,or both, controlled by Citrix polices. The main differences are:
If both generic USB redirection and the client drive mapping policies are enabled and amass storagedevice is inserted either before or after a session starts, it’s redirected using client drive mapping.
When these conditions are true, the mass storage device is redirected using generic USB redirection:
• Both generic USB redirection and the client drive mapping policies are enabled.• A device is configured for automatic redirection.• A mass storage device is inserted either before or after a session starts.
© 1999–2022 Citrix Systems, Inc. All rights reserved. 373

Citrix Virtual Apps and Desktops
For more information, see http://support.citrix.com/article/CTX123015.
Feature Client drive mapping Generic USB redirection
Enabled by default Yes No
Read‑only accessconfigurable
Yes No
Encrypted device access Yes, if encryption is unlockedbefore the device is accessedon the virtual session.
Citrix Virtual Desktops only
Mixed DPIs withmulti‑monitors
Citrix Virtual Apps and Desktops environments do not support the use of different DPIs betweenmon‑itors. You can verify the DPI (% scaling) using Windows Control Panel > Display options. If using aWindows 8.1 or Windows 10 client device, enabling the Let me choose one scaling level for all mydisplays option in the Windows Control Panel > Display options configures the monitors appropri‑ately. For more information, see Knowledge Center article CTX201696.
Mapped client drives
As a security precaution,whenauser logs on toCitrix Virtual Apps andDesktops, bydefault, the servermaps client drives without user run permission. To enable users to run executable files residing onmapped client drives, override this default by editing the registry on the server.
Important:
Editing the registry incorrectly can cause serious problems that might require you to reinstallyour operating system. Citrix cannot guarantee that problems resulting from the incorrect useof Registry Editor can be solved. Use Registry Editor at your own risk. Be sure to back up theregistry before you edit it.
To allow access, edit the following registry key (create CDMSettings if it doesn’t exist):
HKEY_LOCAL_MACHINE\ SOFTWARE\Policies\Citrix\CDMSettings\
Name: ExecuteFromMappedDrive
Type: DWORD
Value: 1 to allow permission and 0 to deny permission onmapped drives
The change takes effect for sessions connected after the registry edit.
© 1999–2022 Citrix Systems, Inc. All rights reserved. 374

Citrix Virtual Apps and Desktops
Citrix Virtual Apps and Desktops 7 2006 is the first version to contain this registry location. Earlierversions of Citrix Virtual Apps and Desktops used a different registry location.
Generic USB devices
April 14, 2021
HDX technology provides optimized support for most popular USB devices. These devices include:
• Monitors• Mice• Keyboards• Voice over Internet Protocol phones• Headsets• Webcams• Scanners• Cameras• Printers• Drives• Smart card readers• Drawing tablets• Signature pads
Optimized support offers an improved user experience with better performance and bandwidth effi‑ciency over aWAN. Optimized support is usually the best option, especially in high latency or security‑sensitive environments.
HDX technology provides generic USB redirection for specialty devices that don’t have optimizedsupport or where it is unsuitable. For more information about generic USB redirection, see GenericUSB redirection.
Formore information aboutUSBdevices andCitrixWorkspace app forWindows, see Configuring com‑posite USB device redirection and Configuring USB support.
Mobile and touch screen devices
April 14, 2021
© 1999–2022 Citrix Systems, Inc. All rights reserved. 375
https://docs.citrix.com/en-us/citrix-virtual-apps-desktops/2006/general-content-redirection/usb.html

Citrix Virtual Apps and Desktops
Tablet mode for touch screen devices using Windows Continuum
Continuum is a Windows 10 feature that adapts to the way the client device is used. This version ofContinuumsupport, including dynamic change ofmodes, is available starting at VDA version 7.16 andCitrix Receiver for Windows version 4.10.
Windows 10 VDA detects the presence of a keyboard or mouse on a touch enabled client and putsthe client in to desktopmode. If a keyboard or mouse is not present, Windows 10 VDA puts the clientin to tablet/mobile mode. This detection occurs on connection and reconnection. It also occurs atdynamic attachment or detachment of the keyboard or mouse.
The feature is enabled by default. To disable this version of the feature, edit the Tablet mode togglepolicy settings in the ICA policy settings article.
For the feature version included in XenApp 7.14 and 7.15 LTSR and XenDesktop 7.14 and 7.15 LTSR, usethe registry settings to disable the feature. For more information, see Tablet mode for touch screendevices.
The tablet mode offers a user interface that is better suited to touch screens:
• Slightly larger buttons.• The Start screen and any apps you start open in a full screen.• Taskbar contains a back button.• Icons deleted from the task bar.
You have access to the File Explorer.
The desktop mode offers the traditional user interface where you interact in the same manner asusing PC and a keyboard andmouse.
Tabletmode requires aminimumof version XenServer 7.2. XenServer 7.2 integrateswith the Citrix Vir‑tual Desktops VDA, changing the hypervisor to enable the virtual firmware settings for 2‑in‑1 devices.Windows 10 loads the GPIO driver on the target virtualmachine based on this updated BIOS. It is usedfor toggling between tablet and desktop modes within the virtual machine. For more information,see the XenServer 7.2 release notes.
Citrix Workspace app for HTML5 (the light version) does not support Windows Continuum features.
© 1999–2022 Citrix Systems, Inc. All rights reserved. 376
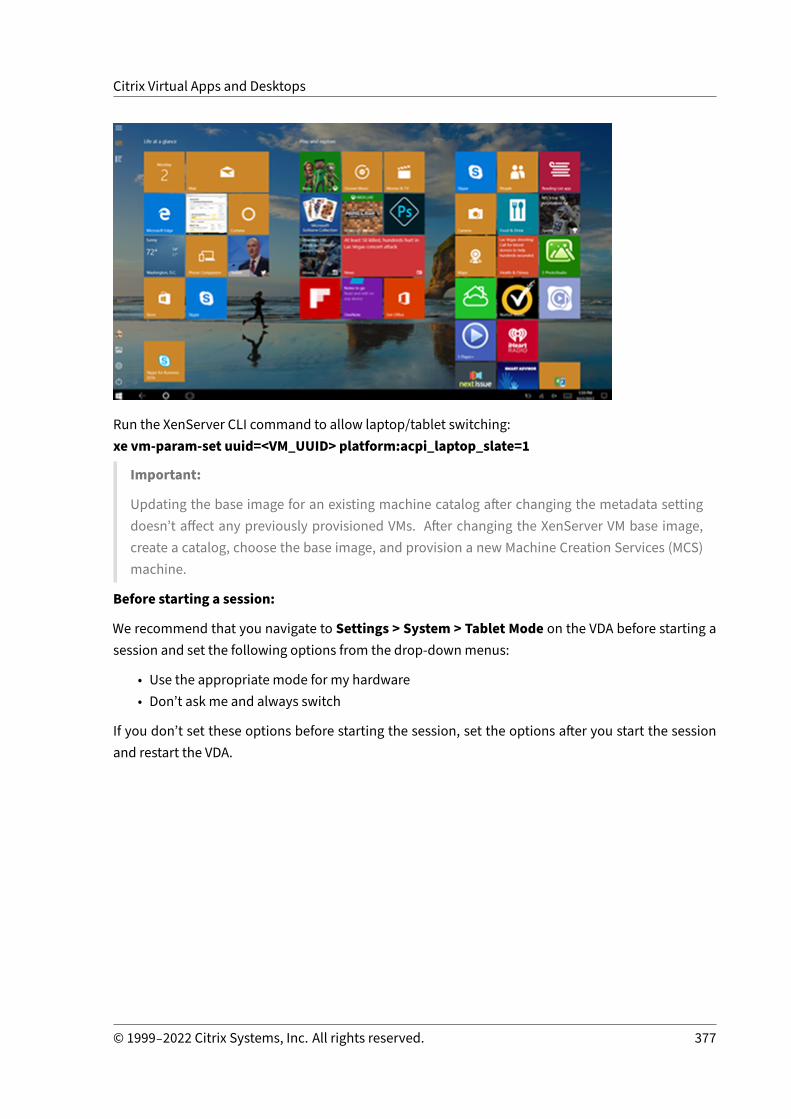
Citrix Virtual Apps and Desktops
Run the XenServer CLI command to allow laptop/tablet switching:xe vm‑param‑set uuid=<VM_UUID> platform:acpi_laptop_slate=1
Important:
Updating the base image for an existing machine catalog after changing the metadata settingdoesn’t affect any previously provisioned VMs. After changing the XenServer VM base image,create a catalog, choose the base image, and provision a new Machine Creation Services (MCS)machine.
Before starting a session:
We recommend that you navigate to Settings > System > Tablet Mode on the VDA before starting asession and set the following options from the drop‑downmenus:
• Use the appropriate mode for my hardware• Don’t ask me and always switch
If you don’t set these options before starting the session, set the options after you start the sessionand restart the VDA.
© 1999–2022 Citrix Systems, Inc. All rights reserved. 377

Citrix Virtual Apps and Desktops
Microsoft Surface Pro and Surface Book pens
We support standard pen functionality with Windows Ink‑based applications. This functionality re‑quires a Virtual Delivery Agent runningonaminimumofMicrosoftWindows10 version 1809 and clientdevices using aminimum of Citrix Workspace app for Windows version 1902. Support includes point‑ing, erasing, pen pressure, Bluetooth signals, and other features depending on the operating systemfirmware and penmodel. For example, pen pressure can be up to 4096 levels. This feature is enabledby default.
For a demonstration of Windows Ink and the pen functionality, click this graphic:
System requirements
• Citrix Virtual Apps and Desktops minimum version 1903• Citrix Workspace app for Windowsminimum version 1902
© 1999–2022 Citrix Systems, Inc. All rights reserved. 378
Citrix Virtual Apps and Desktops
• MicrosoftWindows 10 minimum version 1809
Disable or enable
To disable or enable this feature, set the following registry:
HKEY_LOCAL_MACHINE\Software\ Citrix\Citrix Virtual Desktop Agent\PenApi
Name: DisablePen
Type: DWORD
Value:
1 ‑ disables
0 ‑ enables
Serial ports
April 14, 2021
MostnewPCsdon’t havebuilt‑in serial (COM)ports. Theports areeasy toaddbyusingUSBconverters.Applications suited for serial ports often involve sensors, controllers, old check readers, pads, andso forth. Some USB virtual COM‑port devices use vendor‑specific drivers in place of the Windows‑provided drivers (usbser.sys). These drivers allow you to force the virtual COM port of the USB deviceso that it doesn’t change even if connected to different USB sockets. This might be done from theDevice Manager > Ports (COM& LPT) > Properties or from the application that controls the device.
Client COM portmapping allows devices attached to the COM ports on the user’s endpoint to be usedduring virtual sessions. You can use these mappings like any other network mappings.
For each COM port, a driver in the operating system assigns a symbolic link name such as COM1 andCOM2. The applications then use the link to access the port.
Important:
Because a device can attach to the endpoint by using USB directly, doesn’t mean it can be redi‑rected using generic USB redirection. Some USB devices function as virtual COM ports, whichapplications can access in the same way as physical serial port. The operating system can ab‑stract COM ports and treat them like fileshares. Two common protocols for virtual COM are CDCACM or MCT. When connected through an RS‑485 port, applicationsmight not work at all. Get anRS‑485‑to‑RS232 converter to use RS‑485 as a COM port.Important:
© 1999–2022 Citrix Systems, Inc. All rights reserved. 379
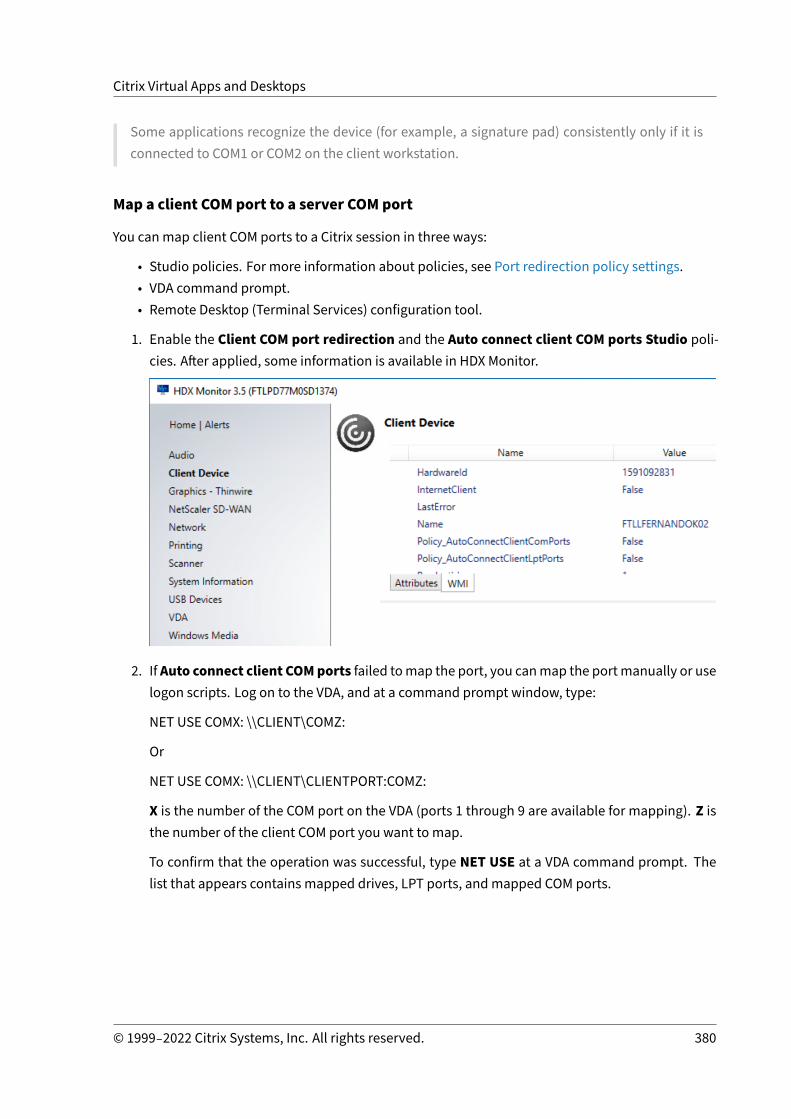
Citrix Virtual Apps and Desktops
Some applications recognize the device (for example, a signature pad) consistently only if it isconnected to COM1 or COM2 on the client workstation.
Map a client COM port to a server COM port
You canmap client COM ports to a Citrix session in three ways:
• Studio policies. For more information about policies, see Port redirection policy settings.• VDA command prompt.• Remote Desktop (Terminal Services) configuration tool.
1. Enable the Client COM port redirection and the Auto connect client COM ports Studio poli‑cies. After applied, some information is available in HDX Monitor.
2. If Auto connect client COMports failed tomap the port, you canmap the portmanually or uselogon scripts. Log on to the VDA, and at a command prompt window, type:
NET USE COMX: \\CLIENT\COMZ:
Or
NET USE COMX: \\CLIENT\CLIENTPORT:COMZ:
X is the number of the COM port on the VDA (ports 1 through 9 are available for mapping). Z isthe number of the client COM port you want to map.
To confirm that the operation was successful, type NET USE at a VDA command prompt. Thelist that appears contains mapped drives, LPT ports, andmapped COM ports.
© 1999–2022 Citrix Systems, Inc. All rights reserved. 380

Citrix Virtual Apps and Desktops
3. To use this COMport in a virtual desktop or application, install your user device application andpoint it to themapped COMport name. For example, if youmap COM1 on the client to COM3 onthe server, install your COM port device application in the VDA and point it to COM3 during thesession. Use this mapped COM port as you would a COM port on the user device.
Important:
COM port mapping is not TAPI‑compatible. You can’t map Windows Telephony Application Pro‑gramming Interface (TAPI) devices to client COM ports. TAPI defines a standard way for applica‑tions to control telephone functions for data, fax, and voice calls. TAPI manages signaling, in‑cluding dialing, answering, and ending calls. Also, supplemental services such as holding, trans‑ferring, and conference calls.
Troubleshoot
1. Ensure you can access the device directly from the endpoint, bypassing Citrix. While the port isnot mapped to the VDA, you are not connected to a Citrix session. Follow any troubleshootinginstructions that came with the device and verify that it works locally first.When a device is connected to a serial COM port, a registry key is created on the hive shownhere:
You can also find this information from the command prompt by running chgport /query.
© 1999–2022 Citrix Systems, Inc. All rights reserved. 381

Citrix Virtual Apps and Desktops
If troubleshooting instructions for the device aren’t available, try opening a PuTTY session.Choose Session and in Serial line specify your COM Port.
© 1999–2022 Citrix Systems, Inc. All rights reserved. 382
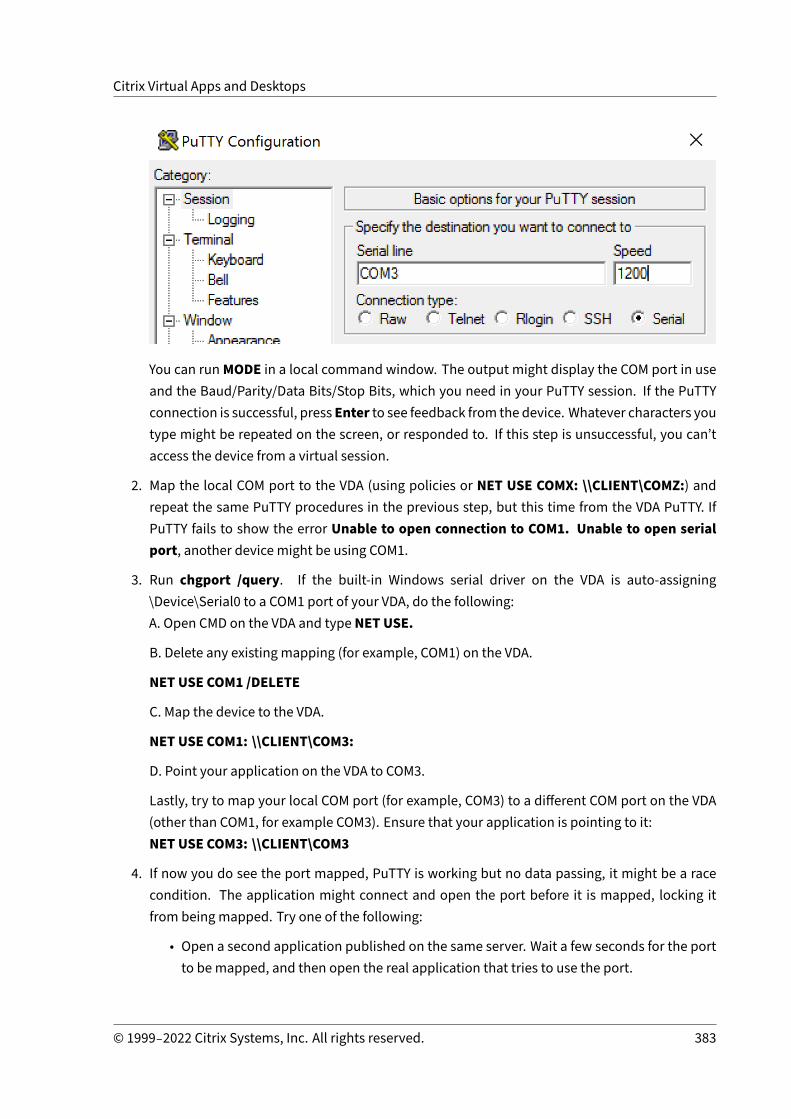
Citrix Virtual Apps and Desktops
You can runMODE in a local command window. The output might display the COM port in useand the Baud/Parity/Data Bits/Stop Bits, which you need in your PuTTY session. If the PuTTYconnection is successful, press Enter to see feedback from the device. Whatever characters youtype might be repeated on the screen, or responded to. If this step is unsuccessful, you can’taccess the device from a virtual session.
2. Map the local COM port to the VDA (using policies or NET USE COMX: \\CLIENT\COMZ:) andrepeat the same PuTTY procedures in the previous step, but this time from the VDA PuTTY. IfPuTTY fails to show the error Unable to open connection to COM1. Unable to open serialport, another device might be using COM1.
3. Run chgport /query. If the built‑in Windows serial driver on the VDA is auto‑assigning\Device\Serial0 to a COM1 port of your VDA, do the following:A. Open CMD on the VDA and type NET USE.
B. Delete any existing mapping (for example, COM1) on the VDA.
NET USE COM1 /DELETE
C. Map the device to the VDA.
NET USE COM1: \\CLIENT\COM3:
D. Point your application on the VDA to COM3.
Lastly, try to map your local COM port (for example, COM3) to a different COM port on the VDA(other than COM1, for example COM3). Ensure that your application is pointing to it:NET USE COM3: \\CLIENT\COM3
4. If now you do see the port mapped, PuTTY is working but no data passing, it might be a racecondition. The application might connect and open the port before it is mapped, locking itfrom being mapped. Try one of the following:
• Open a second application published on the same server. Wait a few seconds for the portto be mapped, and then open the real application that tries to use the port.
© 1999–2022 Citrix Systems, Inc. All rights reserved. 383

Citrix Virtual Apps and Desktops
• Enable theCOMport redirectionpolicies fromtheGroupPolicyEditor inActiveDirectory in‑stead of Studio. Those policies are Client COMport redirection and Auto connect clientCOM ports. Policies applied this waymight be processed before the Studio policies, guar‑anteeing that the COMport ismapped. Citrix policies are pushed to the VDA and stored in:HKLN\SOFTWARE\Policies\Citrix \<user session ID\>
• Use this logon script for the user or instead of publishing the application, publish a .batscript that first deletes any mapping on the VDA, remaps the virtual COM port, and thenstarts the application:
@echo offNET USE COM1 /deleteNET USE COM2 /deleteNET USE COM1: \\CLIENT\COM1:NET USE COM2: \\CLIENT\COM2:MODE COM1: BAUD=1200 (or whatever value needed)MODE COM2: BAUD=9600 PARITY=N Data=8 Stop=1 (or whatever value needed)START C:\Program Files\<Your Software Path>\<your_software.exe>
5. Process Monitor from Sysinternals is the tool of last resort. When running the tool on the VDA,find and filter objects like COM3, picaser.sys, CdmRedirector, but especially <your_app>.exe.Any errors might appear as Access Denied or similar.
Specialty keyboards
April 14, 2021
Bloomberg keyboardsWarning:
Editing the registry incorrectly can cause serious problems that might require you to reinstallyour operating system. Citrix cannot guarantee that problems resulting from the incorrect useof Registry Editor can be solved. Use Registry Editor at your own risk. Be sure to back up theregistry before you edit it.
Citrix Virtual Apps and Desktops support the Bloomberg model 4 Starboard keyboard (and earliermodel 3). This keyboard enables customers in the financial sector to use the special features of thekeyboard to access financial market data and perform trading quickly.
This keyboard is compatible with the KVM switch boxes and can work in twomodes:
• PC (One USB cable with no KVM)
© 1999–2022 Citrix Systems, Inc. All rights reserved. 384

Citrix Virtual Apps and Desktops
• KVMmode (Two USB Cables with one routed through KVM)
Important:
We recommend that you use the Bloomberg keyboard with only one session. We don’t recom‑mend using the keyboard with multiple concurrent sessions (one client to multiple sessions).
The Bloomberg keyboard 4 is a USB composite device comprising four USB devices in one physicalshell:
• Keyboard.• Fingerprint reader.• Audio device with keys to increase and decrease volume and mute the speaker and the micro‑phone. This device includes onboard speaker, microphone, and jack for the microphone andheadset.
• USB hub to connect all of these devices to the system.
Requirements:
• The session to which Citrix Workspace app for Windows is connecting must support USB de‑vices.
• Minimum of Citrix Workspace app 1808 for Windows or Citrix Receiver for Windows 4.8 to sup‑port Bloomberg keyboard model 3 and 4.
• Minimum of Citrix Workspace app 1808 for Windows or Citrix Receiver for Windows 4.12 to useKVMmode (two USB cables with one routed through KVM) for Model 4.
For information about configuring Bloomberg keyboards on Citrix Workspace app for Windows, seeConfiguring Bloomberg keyboards.
Enable Bloomberg keyboard support:
By default, the support for the enhanced Bloomberg keyboard is disabled. Enable this support byediting this registry entry on the client machine before you start a connection.
HKEY_LOCAL_MACHINE\SOFTWARE\Citrix\ICAClient\GenericUSB
Name: EnableBloombergHID
Type: DWORD
Value: 0 = Disable, 1 = Enable
Verify support:
To determine if Bloomberg keyboard support is enabled in CitrixWorkspace app, check if the DesktopViewer correctly reports the Bloomberg keyboard’s devices.
Desktop scenario:
Open the Desktop Viewer. If support for Bloomberg keyboard is enabled, the Desktop Viewer showssee three devices under the USB icon:
© 1999–2022 Citrix Systems, Inc. All rights reserved. 385
Citrix Virtual Apps and Desktops
• Bloomberg Fingerprint Scanner• Bloomberg Keyboard Features• Bloomberg LP Keyboard 2013
Seamless Application only scenario:
Open the Connection Center menu from the Citrix Workspace app notification area icon. If supportfor the Bloomberg keyboard is enabled, the three devices appear in the Devices menu.
The check mark against each of these devices indicates that they are remoted to the session.
TWAIN devices
April 14, 2021
Requirements
• The scanner must be TWAIN compliant.• Install the TWAIN drivers on the local device. They are not required on the server.• Attach the scanner locally (for example, through USB).• Ensure that the scanner is using the local TWAIN driver and not theWindows Image Acquisitionservice.
• Ensure that there is no policy applied to the user account that is used for the test, and which islimiting the bandwidth within the ICA session. For example, client USB redirection bandwidthlimit.
For information about policy settings, see TWAIN devices policy settings.
Webcams
April 14, 2021
High definition webcam streaming
Webcams can be used by video conferencing applications running within the virtual session. Theapplication on the server selects the webcam format and resolution based on the supported formattypes. When a session starts, the client sends the webcam information to the server. Choose a web‑cam from the video conferencing application. When the webcam and the application both support
© 1999–2022 Citrix Systems, Inc. All rights reserved. 386
Citrix Virtual Apps and Desktops
high‑definition rendering, the application uses high‑definition resolution. We support webcam reso‑lutions up to 1920x1080.
This feature requires the Citrix Receiver for Windows, minimum version 4.10. For a list of CitrixWorkspace app platforms that support HDX webcam redirection, see Citrix Workspace app featurematrix.
For more information about high definition webcam streaming, see HDX video conferencing and we‑bcam video compression.
Warning:
Editing the registry incorrectly can cause serious problems that might require you to reinstallyour operating system. Citrix cannot guarantee that problems resulting from the incorrect useof the Registry Editor can be solved. Use the Registry Editor at your own risk. Be sure to back upthe registry before you edit it.
You can use a registry key to disable and enable the feature. The default resolution of 352x288 is used:
HKEY_LOCAL_MACHINE\Software\Citrix\HDXRealTime
Name: Enable_HighDefWebcam
Type: REG_DWORD
Data:
0 = Disable the high definition webcam streaming
1 = Enable the high definition webcam streaming
You can use registry keys on the client to configure a specific resolution. Ensure that the camera sup‑ports the specified resolution:
HKEY_CURRENT_USER\Software\Citrix\HDXRealTime
Name: DefaultWidth
Type: REG_DWORD
Data (decimal): desired width (for example 1280)
Name: DefaultHeight
Type: REG_DWORD
Data (decimal): desired height (for example 720)
Graphics
April 14, 2021
© 1999–2022 Citrix Systems, Inc. All rights reserved. 387

Citrix Virtual Apps and Desktops
Citrix HDX graphics include an extensive set of graphics acceleration and encoding technologies thatoptimizes thedelivery of rich graphics applications fromCitrix Virtual Apps andDesktops. Thegraphictechnologies provide the same experience as using a physical desktop when working remotely withvirtual applications that are graphics intensive.
You can use software or hardware for graphics rendering. Software rendering requires a third‑party li‑brary called software rasterizer. For example,Windows includes theWARP rasterizer for DirectX basedgraphics. Sometimes, you might want to use an alternative software renderer. Hardware rendering(hardware acceleration) requires a graphics processor (GPU).
HDX Graphics offers a default encoding configuration that is optimized for the most common usecases. By using Citrix policies, IT administrators can also configure various graphics‑related settingsto meet different requirements and provide the desired user experience.
Thinwire
Thinwire is the Citrix default display remoting technology used in Citrix Virtual Apps and Desktops.
Display remoting technology allows graphics generated on one machine to be transmitted, typicallyacross a network, to anothermachine for display. Graphics are generated as a result of user input, forexample, keystrokes or mouse actions.
HDX 3D Pro
TheHDX 3DPro capabilities in Citrix Virtual Apps andDesktops enable you to deliver desktops and ap‑plications that perform best using a graphics processing unit (GPU) for hardware acceleration. Theseapplications include 3D professional graphics applications based on OpenGL and DirectX. The stan‑dard VDA supports GPU acceleration of DirectX only.
GPU acceleration for Windows Single‑session OS
By using HDX 3D Pro, you can deliver graphically intensive applications as part of hosted desktops orapplicationsonSingle‑sessionOSmachines. HDX3DPro supports physical host computers (includingdesktop, blade, and rack workstations) and GPU Passthrough and GPU virtualization technologiesoffered by XenServer, vSphere, and Hyper‑V (passthrough only) hypervisors.
Using GPUPassthrough, you can create VMs that have exclusive access to dedicated graphics process‑ing hardware. You can install multiple GPUs on the hypervisor and assign VMs to each of these GPUson a one‑to‑one basis.
UsingGPUvirtualization,multiple virtualmachines candirectly access the graphics processing powerof a single physical GPU.
GPU acceleration for Windows Multi‑session OS
HDX 3D Pro allows graphics‑heavy applications running in Windows Multi‑session OS sessions to ren‑der on the server graphics processing unit (GPU). BymovingOpenGL, DirectX, Direct3D, andWindowsPresentation Foundation (WPF) rendering to the server GPU, graphics rendering doesn’t slow down
© 1999–2022 Citrix Systems, Inc. All rights reserved. 388

Citrix Virtual Apps and Desktops
the server CPU. Also, the server is able to processmore graphics because the workload is split amongthe CPU and GPU.
Framehawk
Important:
As of Citrix Virtual Apps and Desktops 7 1903, Framehawk is no longer supported. Instead, useThinwire with adaptive transport enabled.
Framehawk is a display remoting technology for mobile workers on broadband wireless connections(Wi‑Fi and 4G/LTE cellular networks). Framehawk overcomes the challenges of spectral interferenceandmultipath propagation anddelivers a fluid and interactive user experience to users of virtual appsand desktops.
Text‑based session watermark
Text‑based session watermarks help to deter and enable tracking data theft. This traceable informa‑tion appears on the session desktop as a deterrent to those using photographs and screen capturesto steal data. You can specify a watermark that is a layer of text. The watermark can display overthe entire session screen without changing the content of the original document. Text‑based sessionwatermarks require VDA support.
Related information
• HDX 3D Pro• GPU acceleration for Windows Single‑session OS• GPU acceleration for Windows Multi‑session OS• Framehawk• Thinwire• Text‑based session watermark
HDX 3D Pro
April 14, 2021
TheHDX 3DPro capabilities of Citrix Virtual Apps andDesktops enable you to deliver desktops and ap‑plications that perform best using a graphics processing unit (GPU) for hardware acceleration. Theseapplications include 3D professional graphics applications based on OpenGL and DirectX. The stan‑dard VDA supports GPU acceleration of DirectX only.
For the HDX 3D Pro policy settings, see Optimize for 3D graphics workload.
© 1999–2022 Citrix Systems, Inc. All rights reserved. 389
Citrix Virtual Apps and Desktops
All supportedCitrixWorkspaceappscanbeusedwith3Dgraphics. Forbestperformancewithcomplex3D workloads, high‑resolution monitors, multi‑monitor configurations, and high frame rate applica‑tions, we recommend the latest versions of Citrix Workspace app for Windows and Citrix Workspaceapp for Linux. For more information on supported versions of Citrix Workspace app, see LifecycleMilestones for Citrix Workspace app.
Examples of 3D professional applications include:
• Computer‑aided design, manufacturing, and engineering (CAD/CAM/CAE) applications• Geographical Information System (GIS) software• Picture Archiving Communication System (PACS) for medical imaging• Applications using the latest OpenGL, DirectX, NVIDIA CUDA, and OpenCL and WebGL versions• Computationally intensive non‑graphical applications that use NVIDIA Compute Unified DeviceArchitecture (CUDA) GPUs for parallel computing
HDX 3D Pro provides the best user experience over any bandwidth:
• On WAN connections: Deliver an interactive user experience over WAN connections with band‑widths as low as 1.5 Mbps.
• On LAN connections: Deliver a user experience equivalent to that of a local desktop on LANconnections.
You can replace complex and expensive workstations with simpler user devices by moving thegraphics processing into the data center for centralized management.
HDX 3D Pro provides GPU acceleration for Windows single‑session OS machines and Windows multi‑sessionOSmachines. Formore information, seeGPUacceleration forWindows single‑sessionOS andGPU acceleration for Windowsmulti‑session OS.
HDX 3D Pro is compatible with GPU passthrough and GPU virtualization technologies offered by thefollowing hypervisors, in addition to bare metal:
• Citrix Hypervisor– GPU passthrough with NVIDIA GRID, AMD, and Intel GVT‑d– GPU virtualization with NVIDIA GRID, AMD, and Intel GVT‑g– See hardware compatibility at Hypervisor Hardware Compatibility List.
Use the HDX Monitor tool to validate the operation and configuration of HDX visualization technolo‑gies and to diagnose and troubleshoot HDX issues. To download the tool and learnmore about it, seehttps://taas.citrix.com/hdx/download/.
GPU acceleration for Windowsmulti‑session OS
April 14, 2021
© 1999–2022 Citrix Systems, Inc. All rights reserved. 390

Citrix Virtual Apps and Desktops
HDX 3D Pro allows graphics‑heavy applications running in Windows Multi‑session OS sessions to ren‑der on the server’s graphics processing unit (GPU). By moving OpenGL, DirectX, Direct3D, and Win‑dowsPresentation Foundation (WPF) rendering to the server’s GPU, graphics rendering does not slowthe server’s CPU. Also, the server is able to process more graphics because the workload is split be‑tween the CPU and GPU.
Since Windows Server is a multi‑user operating system, multiple users can share a GPU accessed byCitrix Virtual Apps without the need for GPU virtualization (vGPU).
For procedures that involve editing the registry, use caution: Editing the registry incorrectly can causeseriousproblems thatmay require you to reinstall youroperating system. Citrix cannotguarantee thatproblems resulting from the incorrect use of Registry Editor can be solved. Use Registry Editor at yourown risk. Be sure to back up the registry before you edit it.
GPU sharing
GPUSharing enables GPU hardware rendering of OpenGL andDirectX applications in remote desktopsessions. It has the following characteristics:
• Can be used on bare metal or virtual machines to increase application scalability and perfor‑mance.
• Enables multiple concurrent sessions to share GPU resources (most users do not require therendering performance of a dedicated GPU).
• Requires no special settings.
A GPU can be assigned to the Windows Server virtual machine in either full pass‑through or virtualGPU (vGPU)modes following Hypervisor and GPU vendor requirements. Bare‑metal deployments onphysical Windows Server machines are also supported.
GPU Sharing does not depend on any specific graphics card.
• For virtual machines, select a graphics card that is compatible with the Hypervisor in use. For aCitrix Hypervisor hardware compatibility list, see Hypervisor Hardware Compatibility List.
• When running onbaremetal, it is recommended to have a single display adapter enabledby theoperating system. If multiple GPUs are installed on the hardware, disable all but one of themusing Device Manager.
Scalability using GPU Sharing depends on several factors:
• The applications being run• The amount of video RAM they consume• The graphics card’s processing power
Some applications handle video RAM shortages better than others. If the hardware becomes over‑loaded, instability or a crash of the graphics card driver might occur. Limit the number of concurrentusers to avoid such issues.
© 1999–2022 Citrix Systems, Inc. All rights reserved. 391

Citrix Virtual Apps and Desktops
To confirm that GPU acceleration is occurring, use a third‑party tool such as GPU‑Z. GPU‑Z is availableat http://www.techpowerup.com/gpuz/.
• Access to a high‑performance video encoder for NVIDIA GPUs and Intel Iris Pro graphics proces‑sors. A policy setting (enabled by default) controls this feature and allows the use of hardwareencoding for H.264 encoding (where available). If such hardware is not available, the VDA fallbacks toCPU‑based encoding using the software video codec. Formore information, seeGraph‑ics policy settings.
DirectX, Direct3D, andWPF rendering
DirectX, Direct3D, andWPF rendering are only available on servers with a GPU that supports a displaydriver interface (DDI) version of 9ex, 10, or 11.
• On Windows Server 2008 R2, DirectX and Direct3D require no special settings to use a singleGPU.
• On Windows Server 2016 and Windows Server 2012, Remote Desktop Services (RDS) sessionson the RD Session Host server use the Microsoft Basic Render Driver as the default adapter.To use the GPU in RDS sessions on Windows Server 2012, enable the Use the hardware de‑fault graphics adapter for all Remote Desktop Services sessions setting in the group policyLocal Computer Policy > Computer Configuration > Administrative Templates >WindowsComponents >RemoteDesktopServices >RemoteDesktopSessionHost >Remote SessionEnvironment.
• To enable WPF applications to render using the server’s GPU, create the following settings inthe registry of the server running Windows Multi‑session OS sessions:
– [HKEY_LOCAL_MACHINE\SOFTWARE\Citrix\CtxHook\AppInit_Dlls\Multiple MonitorHook] “EnableWPFHook”=dword:00000001
– [HKEY_LOCAL_MACHINE\SOFTWARE\Wow6432Node\Citrix\CtxHook\AppInit_Dlls\MultipleMonitor Hook] “EnableWPFHook”=dword:00000001
GPU acceleration for CUDA or OpenCL applications
GPU acceleration of CUDA and OpenCL applications running in a user session is disabled by default.
To use the CUDA acceleration POC features, enable the following registry settings:
• [HKEY_LOCAL_MACHINE\SOFTWARE\Citrix\CtxHook\AppInit_Dlls\GraphicsHelper] “CUDA”=dword:00000001• [HKEY_LOCAL_MACHINE\SOFTWARE\Wow6432Node\Citrix\CtxHook\AppInit_Dlls\GraphicsHelper] “CUDA”=dword:00000001
To use the OpenCL acceleration POC features, enable the following registry settings:
• [HKEY_LOCAL_MACHINE\SOFTWARE\Citrix\CtxHook\AppInit_Dlls\GraphicsHelper] “OpenCL”=dword:00000001
© 1999–2022 Citrix Systems, Inc. All rights reserved. 392

Citrix Virtual Apps and Desktops
• [HKEY_LOCAL_MACHINE\SOFTWARE\Wow6432Node\Citrix\CtxHook\AppInit_Dlls\GraphicsHelper] “OpenCL”=dword:00000001
GPU acceleration for Windows single‑session OS
April 14, 2021
With HDX 3D Pro, you can deliver graphically intensive applications as part of hosted desktops or ap‑plications on Single‑session OS machines. HDX 3D Pro supports physical host computers (includingdesktop, blade, and rack workstations) and GPU Passthrough and GPU virtualization technologiesoffered by XenServer, vSphere, and Hyper‑V (passthrough only) hypervisors.
HDX 3D Pro offers the following features:
• Adaptive H.264‑based or H.265‑based deep compression for optimal WAN and wireless perfor‑mance. HDX 3D Pro uses CPU‑based full‑screen H.264 compression as the default compressiontechnique for encoding. Hardware encoding with H.264 is used with NVIDIA, Intel, and AMDcards that support NVENC. Hardware encoding with H.265 is used with NVIDIA cards that sup‑port NVENC.
• Lossless compression option for specialized use cases. HDX 3DPro also offers a CPU‑based loss‑less codec to support applications where pixel‑perfect graphics are required, such as medicalimaging. True lossless compression is recommended only for specialized use cases because itconsumesmore network and processing resources.
When using lossless compression:
– The lossless indicator, a notification area icon, notifies the user if the screen displayed isa lossy frame or a lossless frame. This icon helps when the Visual Quality policy settingspecifies Build to lossless. The lossless indicator turns green when the frames sent arelossless.
– The lossless switch enables the user to change to Always Lossless mode anytime withinthe session. To select or deselect Lossless anytime within a session, right‑click the iconor use the shortcut ALT+SHIFT+1.
For lossless compression: HDX 3D Pro uses the lossless codec for compression regardlessof the codec selected through policy.
For lossy compression: HDX 3D Pro uses the original codec, either the default or the oneselected through policy.
Lossless switch settings are not retained for subsequent sessions. To use a lossless codecfor every connection, select Always lossless in the Visual quality policy setting.
© 1999–2022 Citrix Systems, Inc. All rights reserved. 393
Citrix Virtual Apps and Desktops
• You can override the default shortcut, ALT+SHIFT+1, to select or deselect Lossless within a ses‑sion. Configureanewregistry settingatHKEY_LOCAL_MACHINE\SOFTWARE\Citrix\HDX3D\LLIndicator.
– Name: HKEY_LOCAL_MACHINE_HotKey, Type: String– The format to configure a shortcut combination is C=0|1, A=0|1, S=0|1, W=0|1, K=val.Keys must be comma “,” separated. The order of the keys does not matter.
– A, C, S, W and K are keys, where C=Control, A=ALT, S=SHIFT, W=Win, and K=a valid key.Allowed values for K are 0–9, a–z, and any virtual key code.
– For example:
* For F10, set K=0x79
* For Ctrl + F10, set C=1, K=0x79
* For Alt + A, set A=1, K=a or A=1, K=A or K=A, A=1
* For Ctrl + Alt + 5, set C=1, A=1, K=5 or A=1, K=5, C=1
* For Ctrl + Shift + F5, set A=1, S=1, K=0x74
Caution:
Editing the registry incorrectly can cause serious problems that might require you to reinstallyour operating system. Citrix cannot guarantee that problems resulting from the incorrect useof Registry Editor can be solved. Use Registry Editor at your own risk. Be sure to back up theregistry before you edit it.
• Multiple andhigh resolutionmonitor support. For Single‑sessionOSmachines, HDX 3DPro sup‑ports user devices with up to four monitors. Users can arrange their monitors in any configura‑tion and canmixmonitors with different resolutions and orientations. The number ofmonitorsis limited by the capabilities of the host computer GPU, the user device, and the available band‑width. HDX 3D Pro supports all monitor resolutions and is limited only by the capabilities of theGPU on the host computer.
HDX 3D Pro also provides limited support for dual‑monitor access toWindows XP desktops. Formore information about this support, see VDAs on machines running Windows XP or WindowsVista.
• Dynamic resolution. You can resize the virtual desktopor applicationwindow to any resolution.Note: The only supported method to change the resolution is by resizing the VDA session win‑dow. Changing resolution from within the VDA session (using Control Panel \ > Appearanceand Personalization > Display \ > Screen Resolution) is not supported.
• Support forNVIDIAGRIDarchitecture. HDX3DPro supportsNVIDIAGRIDcards (seeNVIDIAGRID)for GPU passthrough and GPU sharing. NVIDIA GRID vGPU enables multiple VMs to have simul‑taneous, direct access to a single physical GPU, using the same NVIDIA graphics drivers that aredeployed on non‑virtualized operating systems.
• Support for VMware vSphere and VMware ESX using Virtual Direct Graphics Acceleration (vDGA)‑ You can use HDX 3D Pro with vDGA for both RDS and VDI workloads.
© 1999–2022 Citrix Systems, Inc. All rights reserved. 394

Citrix Virtual Apps and Desktops
• Support for VMware vSphere/ESX using NVIDIA GRID vGPU and AMDMxGPU.
• Support for Microsoft HyperV using Discrete Device Assignment in Windows Server 2016.
• Support for Data Center Graphics with Intel Xeon Processor E3 Family. HDX 3D Pro supportsmulti‑monitors (up to 3), console blanking, custom resolution, and high frame‑rate with thesupported family of Intel processors. For more information, see http://www.citrix.com/inteland http://www.intel.com/content/www/us/en/servers/data‑center‑graphics.html.
• Support for AMD RapidFire on the AMD FirePro S‑series server cards. HDX 3D Pro supportsmulti‑monitors (up to 6), console blanking, custom resolution, and high frame‑rate. Note: HDX3D Pro support for AMD MxGPU (GPU virtualization) works with VMware vSphere vGPUs only.XenServer and Hyper‑V are supported with GPU passthrough. For more information, see AMDVirtualization Solution.
• Access to a high‑performance video encoder for NVIDIA GPUs, AMD GPUs, and Intel Iris Prographics processors. A policy setting (enabled by default) controls this feature. The featureallows the use of hardware encoding for H.264 encoding (where available). If such hardware isnot available, the VDA falls back to CPU‑based encoding using the software video codec. Formore information, see Graphics policy settings.
As shown in the following figure:
• When a user logs on to Citrix Workspace app and accesses the virtual application or desktop,the Controller authenticates the user. The Controller then contacts the VDA for HDX 3D Pro tobroker a connection to the computer hosting the graphical application.
The VDA for HDX 3DPro uses the appropriate hardware on the host to compress views of the completedesktop or of just the graphical application.
• The desktop or application views and the user interactions with them are transmitted betweenthe host computer and the user device. This transmission is done through a direct HDX connec‑tion between Citrix Workspace app and the VDA for HDX 3D Pro.
© 1999–2022 Citrix Systems, Inc. All rights reserved. 395

Citrix Virtual Apps and Desktops
Optimize the HDX 3D Pro user experience
To use HDX 3D Pro with multiple monitors, ensure that the host computer is configured with at leastas many monitors as are attached to user devices. The monitors attached to the host computer canbe either physical or virtual.
Do not attach a monitor (either physical or virtual) to a host computer while a user is connected tothe virtual desktop or application providing the graphical application. Doing so can cause instabilityduring a user’s session.
Let your users know that changes to the desktop resolution (by them or an application) are not sup‑ported while a graphical application session is running. After closing the application session, a usercan change the resolution of theDesktop Viewerwindow in theCitrixWorkspace app ‑DesktopViewerPreferences.
Whenmultiple users share a connection with limited bandwidth (for example, at a branch office), werecommend that you use the Overall session bandwidth limit policy setting to limit the bandwidthavailable to each user. Using this setting ensures that the available bandwidth does not fluctuatewidely as users log on and off. Because HDX 3D Pro automatically adjusts to use all the availablebandwidth, large variations in the available bandwidthover the course of user sessions cannegativelyimpact performance.
© 1999–2022 Citrix Systems, Inc. All rights reserved. 396

Citrix Virtual Apps and Desktops
For example, if 20 users share a 60 Mbps connection, the bandwidth available to each user can varybetween 3 Mbps and 60 Mbps, depending on the number of concurrent users. To optimize the userexperience in this scenario, determine thebandwidth requiredperuser atpeakperiodsand limit usersto this amount always.
For users of a 3Dmouse, we recommend that you increase the priority of the Generic USB Redirectionvirtual channel to 0. For information about changing the virtual channel priority, see the KnowledgeCenter article CTX128190.
Thinwire
April 14, 2021
Introduction
Thinwire, a part of Citrix HDX technology, is the Citrix default display remoting technology used inCitrix Virtual Apps and Desktops.
Display remoting technology allows graphics generated on one machine to be transmitted, typicallyacross a network, to another machine for display.
A successful display remoting solution provides a highly interactive user experience that is similarto that of a local PC. Thinwire achieves this experience by using a range of complex and efficient im‑age analysis and compression techniques. Thinwire maximizes server scalability and consumes lessbandwidth than other display remoting technologies.
Because of this balance, Thinwire meets most general business use cases and is used as the defaultdisplay remoting technology in Citrix Virtual Apps and Desktops.
HDX 3D Pro
In its default configuration, Thinwire can deliver 3D or highly interactive graphics and use a graphicsprocessing unit (GPU), if present. However, we recommend enabling HDX 3D Pro mode using theOptimize for 3Dgraphicsworkload orVisual quality >Build to losslesspolicies for scenarioswhenGPUs are present. These policies configure Thinwire to use a video codec (H.264 or H.265) to encodethe entire screen using hardware acceleration if a GPU is present. Doing so provides a more fluidexperience for 3D professional graphics. For more information, see H.264 Build to lossless, HDX 3DPro, and GPU acceleration for Windows Single‑session OS.
© 1999–2022 Citrix Systems, Inc. All rights reserved. 397

Citrix Virtual Apps and Desktops
Requirements
Thinwire is optimized for modern operating systems, including Windows Server 2012 R2, WindowsServer 2016, Windows Server 2019, Windows 7, andWindows 10. ForWindows Server 2008 R2, legacygraphics mode is recommended. Use the built‑in Citrix policy templates, High Server Scalability‑Legacy OS and Optimized for WAN‑Legacy OS to deliver the Citrix recommended combinations ofpolicy settings for these use cases.
Note:
Wedonot support legacy graphicsmode in this release. It is included for backward compatibilitywhen using XenApp 7.15 LTSR, XenDesktop 7.15 LTSR, and previous VDA releases with Windows7 and Windows 2008 R2.
• The policy setting which drives the behavior of Thinwire,Use video codec for compression, isavailableonVDAversions inCitrix Virtual AppsandDesktops71808or later andXenAppandXen‑Desktop 7.6 FP3 and later. The Use video codec when preferred option is the default settingon VDA versions Citrix Virtual Apps and Desktops 7 1808 or later and XenApp and XenDesktop7.9 and later.
• All Citrix Workspace apps support Thinwire. Some Citrix Workspace apps might support fea‑tures of Thinwire that others donot, for example, 8‑bit or 16‑bit graphics for reducedbandwidthusage. Support for such features is automatically negotiated by Citrix Workspace app.
• Thinwire uses more server resources (CPU, memory) in multi‑monitor and high‑resolution sce‑narios. It is possible to tune the amount of resources Thinwire uses, however, bandwidth usagemight increase as a result.
• In low bandwidth or high latency scenarios, consider enabling 8‑bit or 16‑bit graphics to im‑prove interactivity. Visual quality might be affected, especially at 8‑bit color depth.
Encodingmethods
Thinwire can operate in two different encoding modes depending on policy and client capabilities:
• Thinwire full screen H.264 or H.265• Thinwire with selective H.264 or H.265
Legacy GDI remoting uses the XPDM remoting driver and not a Thinwire bitmap encoder.
Configuration
Thinwire is the default display remoting technology.
The followingGraphics policy setting sets the default andprovides alternatives for different use cases:
• Use video codec for compression
© 1999–2022 Citrix Systems, Inc. All rights reserved. 398
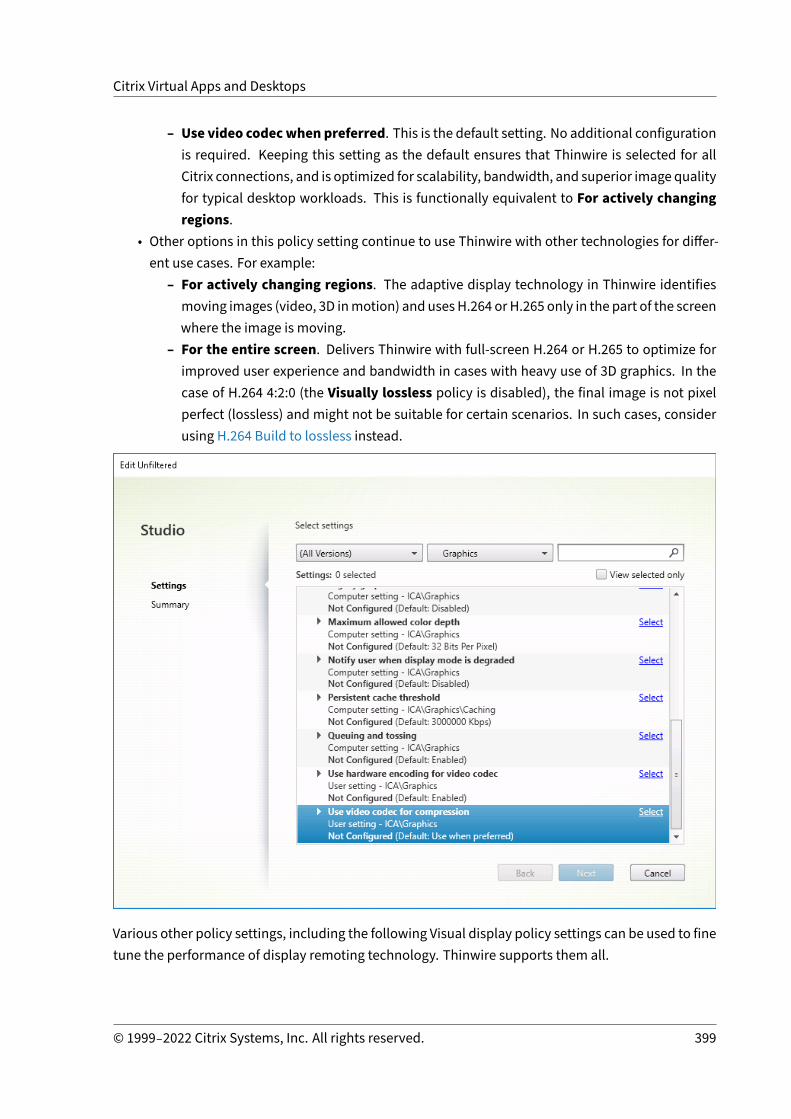
Citrix Virtual Apps and Desktops
– Use video codecwhen preferred. This is the default setting. No additional configurationis required. Keeping this setting as the default ensures that Thinwire is selected for allCitrix connections, and is optimized for scalability, bandwidth, and superior image qualityfor typical desktop workloads. This is functionally equivalent to For actively changingregions.
• Other options in this policy setting continue to use Thinwire with other technologies for differ‑ent use cases. For example:
– For actively changing regions. The adaptive display technology in Thinwire identifiesmoving images (video, 3D inmotion) and uses H.264 or H.265 only in the part of the screenwhere the image is moving.
– For the entire screen. Delivers Thinwire with full‑screen H.264 or H.265 to optimize forimproved user experience and bandwidth in cases with heavy use of 3D graphics. In thecase of H.264 4:2:0 (the Visually lossless policy is disabled), the final image is not pixelperfect (lossless) and might not be suitable for certain scenarios. In such cases, considerusing H.264 Build to lossless instead.
Various other policy settings, including the following Visual display policy settings can be used to finetune the performance of display remoting technology. Thinwire supports them all.
© 1999–2022 Citrix Systems, Inc. All rights reserved. 399

Citrix Virtual Apps and Desktops
• Preferred color depth for simple graphics• Target frame rate• Visual quality
To get the Citrix recommended combinations of policy settings for different business use cases, usethe built‑in Citrix Policy templates. The High Server Scalability and Very High Definition User Ex‑perience templates both use Thinwire with the optimum combinations of policy settings for yourorganization’s priorities and your users’ expectations.
Monitoring Thinwire
You can monitor the use and performance of Thinwire from Citrix Director. The HDX virtual channeldetails view contains useful information for troubleshooting andmonitoring Thinwire in any session.To view Thinwire‑related metrics:
1. In Director, search for a user, machine or endpoint, open an active session and clickDetails. Or,you can select Filters > Sessions > All Sessions, open an active session and click Details.
2. Scroll down to theHDX panel.
3. Select Graphics ‑ Thinwire.
© 1999–2022 Citrix Systems, Inc. All rights reserved. 400

Citrix Virtual Apps and Desktops
Lossless compression codec (MDRLE)
In a typical desktop session, most of the imagery is simple graphics or text regions. Thinwire deter‑mineswhere these regions are and selects these areas for lossless encodingusing the 2DRLE codec. Atthe CitrixWorkspace app client side, these elements are decoded using the CitrixWorkspace app‑side2DRLE decoder for session display.
In XenApp and XenDesktop 7.17, we added a higher compression ratio MDRLE codec that consumesless bandwidth in typical desktop sessions than the 2DRLE codec. This new codec does not impactserver scalability.
Lower bandwidth usually means improved session interactivity (especially on shared or constrainedlinks) and reduced costs. For example, the expected bandwidth consumption when using the MDRLEcodec is approximately 10–15% less compared with XenApp and XenDesktop 7.15 LTSR for typicalOffice‑like workloads.
Configuration isn’t required for the MDRLE codec. If Citrix Workspace app supports MDRLE decod‑ing, the VDA uses the VDA MDRLE encoding and the Citrix Workspace app MDRLE decoding. If CitrixWorkspace app doesn’t support MDRLE decoding, the VDA automatically falls back to 2DRLE encod‑ing.
MDRLE Requirements:
• Citrix Virtual Apps and Desktops minimum version 7 1808 VDAs• XenApp and XenDesktopminimum version 7.17 VDAs• Citrix Workspace app for Windowsminimum version 1808
© 1999–2022 Citrix Systems, Inc. All rights reserved. 401

Citrix Virtual Apps and Desktops
• Citrix Receiver for Windowsminimum version 4.11
Progressive Mode
Citrix Virtual Apps and Desktops 1808 introduced progressivemode and enabled it by default. In con‑strained network conditions (default: bandwidth < 2 Mbps, or latency > 200 ms), Thinwire increasedthe compression of text and static imagery to improve interactivity during screen activity. The heav‑ily compressed text and images are then progressively sharpened, in a random block fashion, whenscreen activity stopped. While compressing and sharpening this way improves overall interactivity, itreduces cache efficiency and increases bandwidth usage.
As of Citrix Virtual Apps and Desktops 1906, progressive mode is disabled by default. We now usea different approach. The quality of still images is now based on network conditions and floats be‑tween a pre‑defined minimum andmaximum value for each Visual quality setting. Because there isno explicit sharpening step, Thinwire optimizes image delivery andmaintains cache efficiency, whileproviding nearly all of the benefits of progressive mode.
Changing progressivemode behaviorImportant:
Editing the registry incorrectly can cause serious problems that might require you to reinstallyour operating system. Citrix cannot guarantee that problems resulting from the incorrect useof Registry Editor can be solved. Use Registry Editor at your own risk. Be sure to back up theregistry before you edit it.
You can change the progressive mode state with the following registry key:
HKEY_LOCAL_MACHINE\Software\Citrix\Graphics\
Type: REG_DWORD
Name: ProgressiveDisplay
Values:
0 = Always off (Disables progressive mode. This value is the default.)
1 = Automatic (Toggle based on network conditions.)
2 = Always on
H.264 Build to lossless
Build to lossless is a special Thinwire configuration that optimizes graphics delivery for interactivityand final image quality. You can enable this setting by setting the Visual quality policy to Build tolossless.
© 1999–2022 Citrix Systems, Inc. All rights reserved. 402

Citrix Virtual Apps and Desktops
Build to lossless compresses the screen using H.264 (or H.265) during screen activity and sharpensto pixel perfect (lossless) when activity stops. The H.264 (or H.265) image quality adapts to availableresources tomaintain thebestpossible frame rate. The sharpening step is performedgradually, givingan immediate response if the user begins screen activity shortly after sharpening starts. For example,selecting a model and rotating it.
H.264 Build to lossless offers all the advantages of full screen H.264 or H.265, including hardwareacceleration, but with the added benefit of a final, guaranteed lossless screen. This is critical for 3D‑type workloads that require a final pixel‑perfect image. For example, manipulating medical imagery.Also, H.264Build to losslessuses fewer resources than full screenH.264 4:4:4. As a result, usingBuildto lossless usually results in a higher frame rate than Visually lossless H.264 4:4:4.
Note:
In addition to the Visual quality policy, set the Use video codec policy to Use when preferred(default) or For actively changing regions. You can revert to non‑H.264 Build to lossless bysetting the Use video codec policy to Do not use video codec. This results in moving imagesbeing encoded with JPEG instead of H.264 (or H.265).
Text‑based session watermark
April 14, 2021
Text‑based session watermarks help to deter and enable tracking data theft. This traceable informa‑tion appears on the session desktop as a deterrent to those using photographs and screen capturesto steal data. You can specify a watermark that is a layer of text, which displays over the entire ses‑sion screen without changing the content of the original document. Text‑based session watermarksrequire VDA support.
Important:
Text‑based session watermarking is not a security feature. The solution does not prevent datatheft completely, but it provides some level of deterrent and traceability. Although we do notguarantee complete information traceability when using this feature, we recommend that youcombine this feature with other security solutions as applicable.
The session watermark is text and is applied to the session that is delivered to the user. The sessionwatermark carries information for tracking data theft. The most important data is the identity of thelogon user of the current session inwhich the screen imagewas taken. To trace the data leakagemoreeffectively, include other information such as server or client internet protocol address and a connecttime.
© 1999–2022 Citrix Systems, Inc. All rights reserved. 403
Citrix Virtual Apps and Desktops
To adjust the user experience, use the Session Watermark policy settings to configure the placementand watermark appearance on the screen.
Requirements:
Virtual Delivery Agents:
Multi‑session OS 7.17Single‑session OS 7.17
Limitations:
• Session watermarks are not supported in sessions where Local App Access, Windows mediaredirection, MediaStream, browser content redirection, and HTML5 video redirection are used.To use session watermark, ensure that these features are disabled.
• Session watermark is not supported and doesn’t appear if the session is running in full‑screenhardware acceleratedmodes (full‑screen H.264 or H.265 encoding).
• If you set these HDX policies, watermark settings don’t take effect and a watermark isn’t dis‑played in the session display.
Use hardware encoding for video codec to EnabledUse video codec for compression to For the entire screen
• If you set these HDX policies, the behavior is undetermined and the watermark might not dis‑play.
Use hardware encoding for video codec to EnabledUse video codec for compression toUse video codec when preferred
To ensure thewatermark displays, setUsehardware encoding for video codec toDisabled, orset Use video codec for compression to For actively changing regions or Do not use videocodec.
• Session watermark supports only Thinwire and not the Framehawk or Desktop CompositionRedirection (DCR) graphic modes.
• If you use Session Recording, the recorded session doesn’t include the watermark.
• If you use Windows remote assistance, the watermark is not shown.
• If a user presses thePrint Screen key to capture the screen, the screen captured at the VDA sidedoesn’t include the watermarks. We recommend that you takemeasures to avoid the capturedimage being copied.
© 1999–2022 Citrix Systems, Inc. All rights reserved. 404

Citrix Virtual Apps and Desktops
Multimedia
April 14, 2021
TheHDX technology stack supports the delivery ofmultimedia applications through two complemen‑tary approaches:
• Server‑side rendering multimedia delivery• Client‑side rendering multimedia redirection
This strategy ensures that you can deliver a full range of multimedia formats, with a great user experi‑ence, while maximizing server scalability to reduce the cost‑per‑user.
With server‑rendered multimedia delivery, audio and video content is decoded and rendered on theCitrix Virtual Apps and Desktops server by the application. The content is then compressed and deliv‑ered using ICA protocol to Citrix Workspace app on the user device. This method provides the high‑est rate of compatibility with various applications and media formats. Because video processing iscompute‑intensive, server‑renderedmultimedia delivery benefits greatly from theonboardhardwareacceleration. For example, support for DirectX Video Acceleration (DXVA) offloads the CPU by per‑forming H.264 decoding in separate hardware. Intel Quick Sync, AMD RapidFire, and NVIDIA NVENCtechnologies provide hardware‑accelerated H.264 encoding.
Becausemost servers donot offer anyhardware acceleration for video compression, server scalabilityis negatively impacted if all video processing is done on the server CPU. You canmaintain high serverscalability, by redirecting manymultimedia formats to the user device for local rendering.
• Windows Media redirection offloads the server for a wide variety of media formats typically as‑sociated with the Windows Media Player.
• HTML5 video has become popular, and Citrix introduced a redirection technology for this typeof content. We recommend the browser content redirection for websites using HTML5, HLS,DASH, or WebRTC.
• You can apply the general contact redirection technologies Host‑to‑client redirection and LocalApp Access to the multimedia content.
Putting these technologies together, if you don’t configure redirection, HDX does Server‑Side Render‑ing.If you configure redirection, HDX uses either Server Fetch and Client Render or Client Fetch and ClientRender. If thosemethods fail, HDX falls back to Server‑Side Rendering as needed and is subject to theFallback Prevention Policy.
© 1999–2022 Citrix Systems, Inc. All rights reserved. 405

Citrix Virtual Apps and Desktops
Example scenarios
Scenario 1. (Server Fetch and Server Rendering):
1. The server fetches the media file from its source, decodes, and then presents the content to anaudio device or display device.
2. The server extracts the presented image or sound from the display device or audio device re‑spectively.
3. The server optionally compresses it, and then transmits it to the client.
This approach incurs a high CPU cost, high bandwidth cost (if the extracted image/sound isn’t com‑pressed efficiently), and has low server scalability.
Thinwire and Audio virtual channels handle this approach. The advantage of this approach is that itreduces the hardware and software requirements for the clients. Using this approach the decodinghappens on the server and it works for a wider variety of devices and formats.
Scenario 2. (Server Fetch and Client Render):
This approach relies on being able to intercept themedia content before it is decoded and presentedto theaudioordisplaydevice. The compressedaudio/video content is instead sent to the clientwhereit is then decoded and presented locally. The advantage of this approach is that the are offloaded tothe client devices, saving CPU cycles on the server.
However, it also introduces some additional hardware and software requirements for the client. The
© 1999–2022 Citrix Systems, Inc. All rights reserved. 406

Citrix Virtual Apps and Desktops
client must be able to decode each format that it might receive.
Scenario 3. (Client Fetching and Client Rendering):
This approach relies on being able to intercept the media content URL before it’s fetched from thesource. The URL is sent to the client where the media content is fetched, decoded, and presentedlocally. This approach is conceptually simple. Its advantage is that it saves both CPU cycles on theserver andbandwidthbecause the server sendsonly control commands. However, themedia contentis not always accessible to the clients.
Framework and platform:
Single‑session operating systems (Windows, Mac OS X, and Linux) provide multimedia frameworksthat enable the faster development of multimedia applications. This table lists some of the morepopular multimedia frameworks. Each framework divides media processing into several stages anduses a pipelined‑based architecture.
Framework Platform
DirectShow Windows (98 and later)
Media Foundation Windows (Vista and later)
Gstreamer Linux
Quicktime Mac OS X
Double hop support withmedia redirection technologies
Audio redirection No
Browser content redirection No
HDX webcam redirection Yes
HTML5 Video redirection Yes
Windows Media redirection Yes
Audio features
April 14, 2021
© 1999–2022 Citrix Systems, Inc. All rights reserved. 407
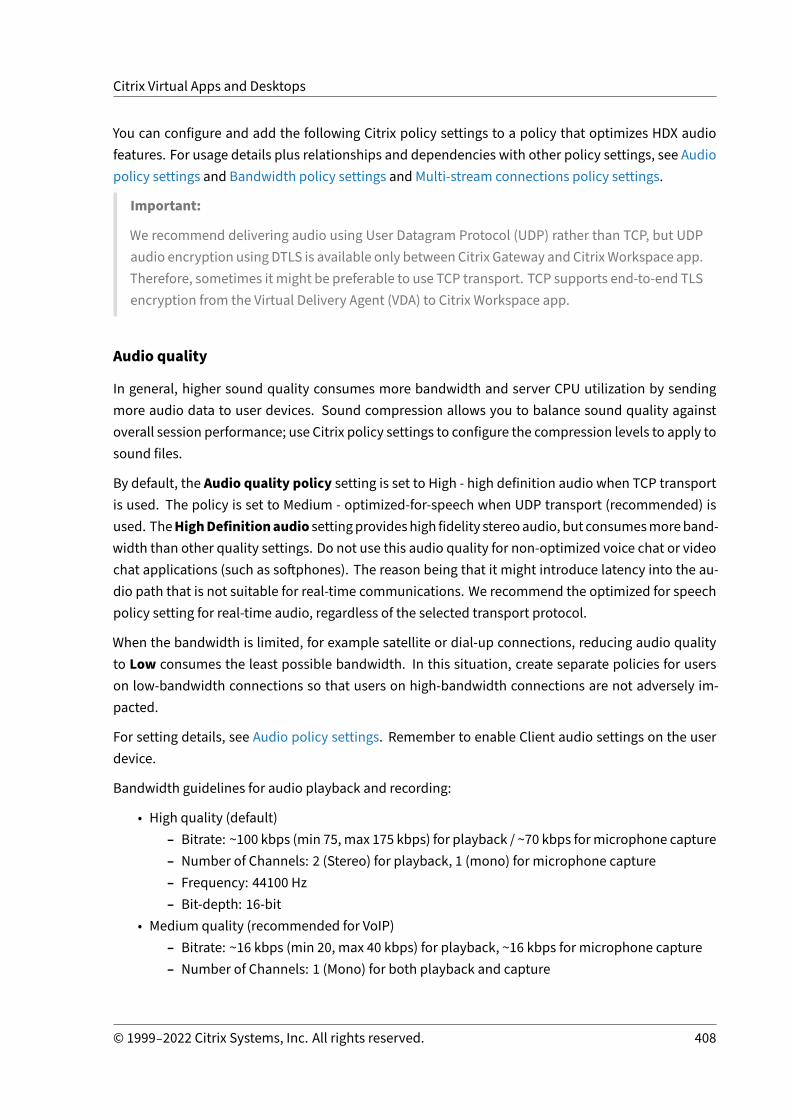
Citrix Virtual Apps and Desktops
You can configure and add the following Citrix policy settings to a policy that optimizes HDX audiofeatures. For usage details plus relationships and dependencies with other policy settings, see Audiopolicy settings and Bandwidth policy settings and Multi‑stream connections policy settings.
Important:
We recommend delivering audio using User Datagram Protocol (UDP) rather than TCP, but UDPaudio encryption using DTLS is available only between Citrix Gateway and CitrixWorkspace app.Therefore, sometimes it might be preferable to use TCP transport. TCP supports end‑to‑end TLSencryption from the Virtual Delivery Agent (VDA) to Citrix Workspace app.
Audio quality
In general, higher sound quality consumes more bandwidth and server CPU utilization by sendingmore audio data to user devices. Sound compression allows you to balance sound quality againstoverall session performance; use Citrix policy settings to configure the compression levels to apply tosound files.
By default, the Audio quality policy setting is set to High ‑ high definition audio when TCP transportis used. The policy is set to Medium ‑ optimized‑for‑speech when UDP transport (recommended) isused. TheHighDefinitionaudio settingprovideshigh fidelity stereoaudio, but consumesmoreband‑width than other quality settings. Do not use this audio quality for non‑optimized voice chat or videochat applications (such as softphones). The reason being that it might introduce latency into the au‑dio path that is not suitable for real‑time communications. We recommend the optimized for speechpolicy setting for real‑time audio, regardless of the selected transport protocol.
When the bandwidth is limited, for example satellite or dial‑up connections, reducing audio qualityto Low consumes the least possible bandwidth. In this situation, create separate policies for userson low‑bandwidth connections so that users on high‑bandwidth connections are not adversely im‑pacted.
For setting details, see Audio policy settings. Remember to enable Client audio settings on the userdevice.
Bandwidth guidelines for audio playback and recording:
• High quality (default)– Bitrate: ~100 kbps (min 75, max 175 kbps) for playback / ~70 kbps formicrophone capture– Number of Channels: 2 (Stereo) for playback, 1 (mono) for microphone capture– Frequency: 44100 Hz– Bit‑depth: 16‑bit
• Medium quality (recommended for VoIP)– Bitrate: ~16 kbps (min 20, max 40 kbps) for playback, ~16 kbps for microphone capture– Number of Channels: 1 (Mono) for both playback and capture
© 1999–2022 Citrix Systems, Inc. All rights reserved. 408

Citrix Virtual Apps and Desktops
– Frequency: 16000 Hz (wideband)– Bit‑depth: 16‑bit
• Low quality– Bitrate: ~ 11 kbps (min 10; max 25 kbps) for playback, ~11 kbps for microphone capture– Number of Channels: 1 (Mono) for both playback and capture– Frequency: 8000 Hz (narrowband)– Bit‑depth: 16‑bit
Client audio redirection
To allow users to receive audio from an application on a server through speakers or other sound de‑vices on the user device, leave the Client audio redirection setting at Allowed. This is the default.
Client audio mapping puts extra load on the servers and the network. However, prohibiting clientaudio redirection disables all HDX audio functionality.
For setting details, see Audio policy settings. Remember to enable client audio settings on the userdevice.
Client microphone redirection
To allow users to record audio using input devices such as microphones on the user device, leave theClient microphone redirection setting at its default (Allowed).
For security, user devices alert their users when servers they don’t trust try to access microphones.Users can choose to accept or reject access before using themicrophone. Users can disable this alerton Citrix Workspace app.
For setting details, see Audio policy settings. Remember to enable Client audio settings on the userdevice.
Audio Plug N Play
The Audio Plug N Play policy setting allows or prevents the use of multiple audio devices to recordand play sound. This setting is Enabled by default. Audio Plug N Play enables audio devices to berecognized. The devices are recognized even if they are not plugged in until after the user session hasstarted.
This setting applies only to Windows Multi‑session OSmachines.
For setting details, see Audio policy settings.
© 1999–2022 Citrix Systems, Inc. All rights reserved. 409

Citrix Virtual Apps and Desktops
Audio redirection bandwidth limit and audio redirection bandwidth limit percent
The Audio redirection bandwidth limit policy setting specifies the maximum bandwidth (in kilobitsper second) for a playing and recording audio in a session.
The Audio redirection bandwidth limit percent setting specifies the maximum bandwidth for audioredirection as a percentage of the total available bandwidth.
By default, zero (no maximum) is specified for both settings. If both settings are configured, the onewith the lowest bandwidth limit is used.
For setting details, see Bandwidth policy settings. Remember to enable Client audio settings on theuser device.
Audio over UDP Real‑time Transport and Audio UDP port range
By default, Audio over User Datagram Protocol (UDP) Real‑time Transport is allowed (when selectedat the time of installation). It opens up a UDP port on the server for connections that use Audio overUDP Real‑time Transport. If there is network congestion or packet loss, we recommend configuringUDP/RTP for audio to ensure the best possible user experience. For any real time audio such as soft‑phone applications, UDPaudio is preferred to EDT.UDPallows for packet losswithout retransmission,ensuring that no latency is added on connections with high packet loss.
Important:
WhenCitrix Gateway is not in thepath, audio data transmittedwithUDP is not encrypted. If CitrixGateway is configured to access Citrix Virtual Apps and Desktops resources, then audio trafficbetween the endpoint device and Citrix Gateway is secured using DTLS protocol.
The Audio UDP port rang specifies the range of port numbers that the VDA uses to exchange audiopacket data with the user device.
By default, the range is 16500 through 16509.
For setting details about Audio over UDP Real‑time Transport, see Audio policy settings. For detailsabout Audio UDP port range, see Multi‑stream connections policy settings. Remember to enableClient audio settings on the user device.
Audio setting policies for user devices
1. Load the group policy templates by following Configuring the Group Policy Object administra‑tive template.
2. In the Group Policy Editor, expand Administrative Templates > Citrix Components > CitrixWorkspace > User Experience.
3. For Client audio settings, selectNot Configured, Enabled, or Disabled.
© 1999–2022 Citrix Systems, Inc. All rights reserved. 410

Citrix Virtual Apps and Desktops
• Not Configured. By default, Audio Redirection is enabled using high quality audio or thepreviously configured custom audio settings.
• Enabled. Enables audio redirection using the selected options.• Disabled. Disables audio redirection.
4. If you select Enabled, choose a sound quality. For UDP audio, useMedium (default).5. For UDP audio only, select Enable Real‑Time Transport and then set the range of incoming
ports to open in the local Windows firewall.6. To use UDP Audio with Citrix Gateway, select Allow Real‑Time Transport Through gateway.
Configure Citrix Gateway with DTLS. For more information, see this article.
As an Administrator, if you do not have control on endpoint devices to make these changes, use thedefault.ica attributes from StoreFront to enable UDP Audio. For example, for bring your own devicesor home computers.
1. On theStoreFrontmachine, openC:\inetpub\wwwroot\Citrix\<StoreName>\App_Data\default.icawith an editor such as notepad.
2. Make the following entries under the [Application] section.
; This text enables Real‑Time Transport
EnableRtpAudio=true
; This text allows Real‑Time Transport Through gateway
EnableUDPThroughGateway=true
; This text sets audio quality to Medium
AudioBandwidthLimit=1
; UDP Port range
RtpAudioLowestPort=16500
RtpAudioHighestPort=16509
If you enable User Datagram Protocol (UDP) audio by editing default.ica, then UDP audio is enabledfor all users who are using that store.
Avoid echo duringmultimedia conferences
Users in audio or video conferences might hear an echo. Echoes usually occur when speakers andmicrophones are too close to each other. For that reason, we recommend the use of headsets foraudio and video conferences.
HDX provides an echo cancellation option (enabled by default) that minimizes any echo. The effec‑tiveness of echo cancellation is sensitive to the distance between the speakers and the microphone.Ensure that the devices aren’t too close or too far away from each other.
© 1999–2022 Citrix Systems, Inc. All rights reserved. 411

Citrix Virtual Apps and Desktops
You can change a registry setting to disable echo cancellation.
Warning:
Editing the Registry incorrectly can cause serious problems that might require you to reinstallyour operating system. Citrix cannot guarantee that problems resulting from the incorrect useof Registry Editor can be solved. Use Registry Editor at your own risk. Be sure to back up theregistry before you edit it.
1. Using the Registry Editor on the user device, navigate to one of the following:• 32‑bit computers: HKEY_LOCAL_MACHINE\SOFTWARE\Citrix\ICAClient\Engine\Configuration\Advanced\Modules\ClientAudio\EchoCancellation• 64‑bit computers: HKEY_LOCAL_MACHINE\SOFTWARE\Wow6432Node\Citrix\ICAClient\Engine\Configuration\Advanced\Modules\ClientAudio\EchoCancellation
2. Change the Value data field to FALSE.
Softphones
Asoftphone is softwareactingasaphone interface. Youusea softphone tomakecalls over the internetfrom a computer or other smart device. By using a softphone, you can dial phone numbers and carryout other phone‑related functions using a screen.
Citrix Virtual Apps and Desktops support several alternatives for delivering softphones.
• Controlmode. The hosted softphone controls a physical telephone set. In thismode, no audiotraffic goes through the Citrix Virtual Apps and Desktops server.
• HDX RealTime optimized softphone support (recommended). The media engine runs onuser device, and Voice over Internet Protocol traffic flows peer‑to‑peer. For examples, see:
– HDX Optimization for Microsoft Teams– HDXRealTimeOptimizationPack,whichoptimizes thedelivery ofMicrosoftSkype for Busi‑ness
– Cisco Jabber Softphone for VDI (formerly known as VXME)– Cisco Webex Meetings for VDI– Avaya VDI Equinox (formerly known as VDI Communicator)– Zoom VDI Plugin– Genesys PureEngage Cloud– Nuance Dragon PowerMic dictation device
• Local App Access. A Citrix Virtual Apps and Desktops feature that allows an application such asa softphone to run locally on the Windows user device yet appear seamlessly integrated withtheir virtual/published desktop. This feature offloads all audio processing to the user device.For more information, see Local App Access and URL redirection.
• HDX RealTime generic softphone support. Voice over Internet Protocol‑over‑ICA.
© 1999–2022 Citrix Systems, Inc. All rights reserved. 412
Citrix Virtual Apps and Desktops
Generic softphone support
Generic softphone support, enables you to host an unmodified softphone on XenApp or XenDesktopin the data center. The audio traffic goes over the Citrix ICA protocol (preferably using UDP/RTP) tothe user device running the Citrix Workspace app.
Generic softphone support is a feature of HDX RealTime. This approach to softphone delivery is espe‑cially useful when:
• An optimized solution for delivering the softphone is not available and the user is not on a Win‑dows device where Local App Access can be used.
• The media engine that is needed for optimized delivery of the softphone isn’t installed on theuser device or isn’t available for the operating systemversion running on the user device. In thisscenario, Generic HDX RealTime provides a valuable fallback solution.
There are two softphone delivery considerations using Citrix Virtual Apps and Desktops:
• How the softphone application is delivered to the virtual/published desktop.• How the audio is delivered to and from the user headset, microphone, and speakers, or USBtelephone set.
Citrix Virtual Apps and Desktops include numerous technologies to support generic softphone deliv‑ery:
• Optimized‑for‑Speech codec for fast encode of the real‑time audio and bandwidth efficiency.• Low latency audio stack.• Server‑side jitter buffer to smooth out the audio when the network latency fluctuates.• Packet tagging (DSCP and WMM) for Quality of Service.
– DSCP tagging for RTP packets (Layer 3)– WMM tagging for Wi‑Fi
The Citrix Workspace app versions for Windows, Linux, Chrome, and Mac also are Voice over InternetProtocol capable. Citrix Workspace app for Windows offers these features:
• Client‑side jitter buffer ‑ Ensures smooth audio even when the network latency fluctuates.• Echo cancellation ‑ Allows for greater variation in the distance betweenmicrophone and speak‑ers for workers who do not use a headset.
• Audio plug‑n‑play ‑ Audio devices do not need to be plugged in before starting a session. Theycan be plugged in at any time.
• Audio device routing ‑ Users can direct ringtone to speakers but the voice path to their headset.• Multi‑stream ICA ‑ Enables flexible Quality of Service‑based routing over the network.• ICA supports four TCP and two UDP streams. One of the UDP streams supports the real‑timeaudio over RTP.
For a summary of Citrix Workspace app capabilities, see Citrix Receiver Feature Matrix.
System configuration recommendations
© 1999–2022 Citrix Systems, Inc. All rights reserved. 413

Citrix Virtual Apps and Desktops
Client Hardware and Software:For optimal audio quality, we recommend the latest version of Citrix Workspace app and a good qual‑ity headset that has acoustic echo cancellation (AEC). Citrix Workspace app versions for Windows,Linux, and Mac support Voice over Internet Protocol. Also, Dell Wyse offers Voice over Internet Proto‑col support for ThinOS (WTOS).
CPU Considerations:Monitor CPUusage on the VDA to determine if it is necessary to assign two virtual CPUs to each virtualmachine. Real‑time voice and video are data intensive. Configuring two virtual CPUs reduces thethread switching latency. Therefore, we recommend that you configure two vCPUs in a Citrix VirtualDesktops VDI environment.
Having two virtual CPUs does not necessarily mean doubling the number of physical CPUs, becausephysical CPUs can be shared across sessions.
Citrix Gateway Protocol (CGP), which is used for the Session Reliability feature, also increases CPUconsumption. On high‑quality network connections, you can disable this feature to reduce CPU con‑sumption on the VDA. Neither of the preceding steps might be necessary on a powerful server.
UDP Audio:Audio over UDP provides excellent tolerance of network congestion and packet loss. We recommendit instead of TCP when available.
LAN/WAN configuration:Proper configuration of the network is critical for good real‑time audio quality. Typically, you mustconfigurevirtual LANs (VLANs)becauseexcessivebroadcastpackets can introduce jitter. IPv6‑enableddevices might generate many broadcast packets. If IPv6 support is not needed, you can disable IPv6on those devices. Configure to support Quality of Service.
Settings for use WAN connections:You can use voice chat over LAN andWAN connections. On aWAN connection, audio quality dependson the latency, packet loss, and jitter on the connection. If delivering softphones to users on a WANconnection, we recommend using the NetScaler SD‑WAN between the data center and the remoteoffice. Doing so maintains a high Quality of Service. NetScaler SD‑WAN supports Multi‑Stream ICA,including UDP. Also, for a single TCP stream, it’s possible to distinguish the priorities of various ICAvirtual channels to ensure that high priority real‑time audio data receives preferential treatment.
Use Director or the HDX Monitor to validate your HDX configuration.
Remote user connections:Citrix Gateway supports DTLS to deliver UDP/RTP traffic natively (without encapsulation in TCP).Open firewalls bidirectionally for UDP traffic over Port 443.
Codec selection and bandwidth consumption:Between the user device and the VDA in the data center, we recommend using the Optimized‑for‑
© 1999–2022 Citrix Systems, Inc. All rights reserved. 414

Citrix Virtual Apps and Desktops
Speech codec setting, also known as Medium Quality audio. Between the VDA platform and the IP‑PBX, the softphone uses whatever codec is configured or negotiated. For example:
• G711 provides good voice quality but has a bandwidth requirement of from 80 kilobits per sec‑ond through 100 kilobits per second per call (depending on Network Layer2 overheads).
• G729 provides good voice quality and has a low bandwidth requirement of from 30 kilobits persecond through 40 kilobits per second per call (depending on Network Layer 2 overheads).
Delivering softphone applications to the virtual desktop
There are twomethods by which you can deliver a softphone to the XenDesktop virtual desktop:
• The application can be installed in the virtual desktop image.• Theapplicationcanbe streamed to thevirtual desktopusingMicrosoftApp‑V. This approachhasmanageability advantages because the virtual desktop image is kept uncluttered. After beingstreamed to the virtual desktop, the application runs in that environment as if it was installedin the usual manner. Not all applications are compatible with App‑V.
Delivering audio to and from the user device
Generic HDX RealTime supports twomethods of delivering audio to and from the user device:
• Citrix Audio Virtual Channel. We generally recommend the Citrix Audio Virtual Channel be‑cause it’s designed specifically for audio transport.
• GenericUSBRedirection. Supports audiodeviceshavingbuttonsor adisplay (orboth), humaninterface device (HID), if the user device is on a LAN or LAN‑like connection back to the CitrixVirtual Apps and Desktops server.
Citrix audio virtual channel
The bidirectional Citrix Audio Virtual Channel (CTXCAM) enables audio to be delivered efficiently overthe network. Generic HDX RealTime takes the audio from the user headset or microphone and com‑presses it. Then, it sends it over ICA to the softphone application on the virtual desktop. Likewise, theaudio output of the softphone is compressed and sent in the other direction to the user headset orspeakers. This compression is independent of the compression used by the softphone itself (such asG.729 or G.711). It is done using theOptimized‑for‑Speech codec (MediumQuality). Its characteristicsare ideal for Voice over Internet Protocol. It features quick encode time, and it consumes only approx‑imately 56 Kilobits per second of network bandwidth (28 Kbps in each direction), peak. This codecmust be explicitly selected in the Studio console because it is not the default audio codec. The de‑fault is the HD Audio codec (High Quality). This codec is excellent for high fidelity stereo soundtracksbut is slower to encode compared to the Optimized‑for‑Speech codec.
Generic USB Redirection
Citrix Generic USB Redirection technology (CTXGUSB virtual channel) provides a generic means of re‑motingUSBdevices, including composite devices (audio plusHID) and isochronousUSBdevices. This
© 1999–2022 Citrix Systems, Inc. All rights reserved. 415

Citrix Virtual Apps and Desktops
approach is limited to LAN‑connected users. This reason being that the USB protocol tends to be sen‑sitive to network latency and requires considerable networkbandwidth. IsochronousUSB redirectionworks well when using some softphones. This redirection provides excellent voice quality and low la‑tency. However, Citrix Audio Virtual Channel is preferred because it is optimized for audio traffic. Theprimary exception is when you’re using an audio device with buttons. For example, a USB telephoneattached to the user device that is LAN‑connected to the data center. In this case, Generic USB Redi‑rection supports buttons on the phone set or headset that control features by sending a signal backto the softphone. There isn’t an issue with buttons that work locally on the device.
LimitationWarning:
Editing the Registry incorrectly can cause serious problems that might require you to reinstallyour operating system. Citrix cannot guarantee that problems resulting from the incorrect useof Registry Editor can be solved. Use Registry Editor at your own risk. Be sure to back up theregistry before you edit it.
You install an audio device on your client, enable the audio redirection, and start an RDS session. Theaudio files might fail to play and an error message appears.
As a workaround, add this registry key on the RDSmachine, and then restart the machine:
HKEY_LOCAL_MACHINE\SYSTEM\CurrentControlSet\Control\SCMConfig
Name: EnableSvchostMitigationPolicy
Type: REG_DWORD
Data: 0
Browser content redirection
April 14, 2021
Browser content redirection prevents the rendering ofwebpages in the allow list on the VDA side. Thisfeature uses Citrix Workspace app to instantiate a corresponding rendering engine on the client side,which fetches the HTTP and HTTPS content from the URL.
Note:
You can specify that webpages be redirected to the VDA side (and not redirected on the clientside) by using a block list.
This overlay web layout engine runs on the endpoint device instead of on the VDA and uses the end‑point CPU, GPU, RAM, and Network.
© 1999–2022 Citrix Systems, Inc. All rights reserved. 416

Citrix Virtual Apps and Desktops
Only the browser viewport is redirected. The viewport is the rectangular area in your browser wherecontent displays. The viewport doesn’t include things like the Address Bar, Favorites Toolbar, StatusBar. Those items are in the user interface, which are still running on the browser in the VDA.
1. Configure a Studio policy that specifies an Access Control List containing the URLs in the al‑low list for redirection or the block list that disables redirection for specific URL paths. For thebrowser on the VDA to detect that the URL that the user is navigating to matches the allow listor does not match a block list, a browser extension performs the comparison. The browserextension (BHO) for Internet Explorer 11 is included in the installation media and is installedautomatically. For Chrome, the browser extension is available in the Chrome Web Store, andyou can deploy it using the Group Policies and ADMX files. Chrome extensions are installed ona per‑user basis. Updating a golden image to add or remove an extension is not required.
2. If a match is found in the allow list (for example https://www.mycompany.com/), andthere is no match to a URL in the block list (for example https://www.mycompany.com/engineering), a virtual channel (CTXCSB) instructs the CitrixWorkspace app that a redirectionis required and relays the URL. Citrix Workspace app then instantiates a local rendering engineand displays the website.
3. Citrix Workspace app then blends back the website into the virtual desktop browser contentarea seamlessly.
The color of the logo specifies the status of the Chrome extension. It is one of these three colors:
• Green: Active and connected.• Gray: Not active/idle on the current tab.
© 1999–2022 Citrix Systems, Inc. All rights reserved. 417

Citrix Virtual Apps and Desktops
• Red: Broken/Not working.
You can debug logging by usingOptions in the extensions menu.
Here are scenarios of how the Citrix Workspace app fetches content:
• Server fetch and server render: There is no redirection because you didn’t add the site to theallow list or the redirection failed. We fall back to rendering the webpage on the VDA and useThinwire to remote the graphics. Use policies to control the fallback behavior. High CPU, RAM,and bandwidth consumption on the VDA.
• Server fetch and client render: Citrix Workspace app contacts and fetches content from theweb server through the VDA using a virtual channel (CTXPFWD). This option is useful when theclient doesn’t have internet access (for example, thin clients). Low CPU and RAM consumptionon the VDA, but bandwidth is consumed on the ICA virtual channel.
There are three modes of operation for this scenario. The term proxy refers to a proxy devicethat the VDA accesses to gain Internet access.
Which policy option to choose:
– Explicit Proxy ‑ If you have a single explicit proxy in your Datacenter.– Direct or Transparent ‑ If you do not have proxies, or if you use transparent proxies.– PAC files ‑ If you rely on PAC files so browsers in the VDA can automatically choose theappropriate proxy server for fetching a specified URL.
© 1999–2022 Citrix Systems, Inc. All rights reserved. 418
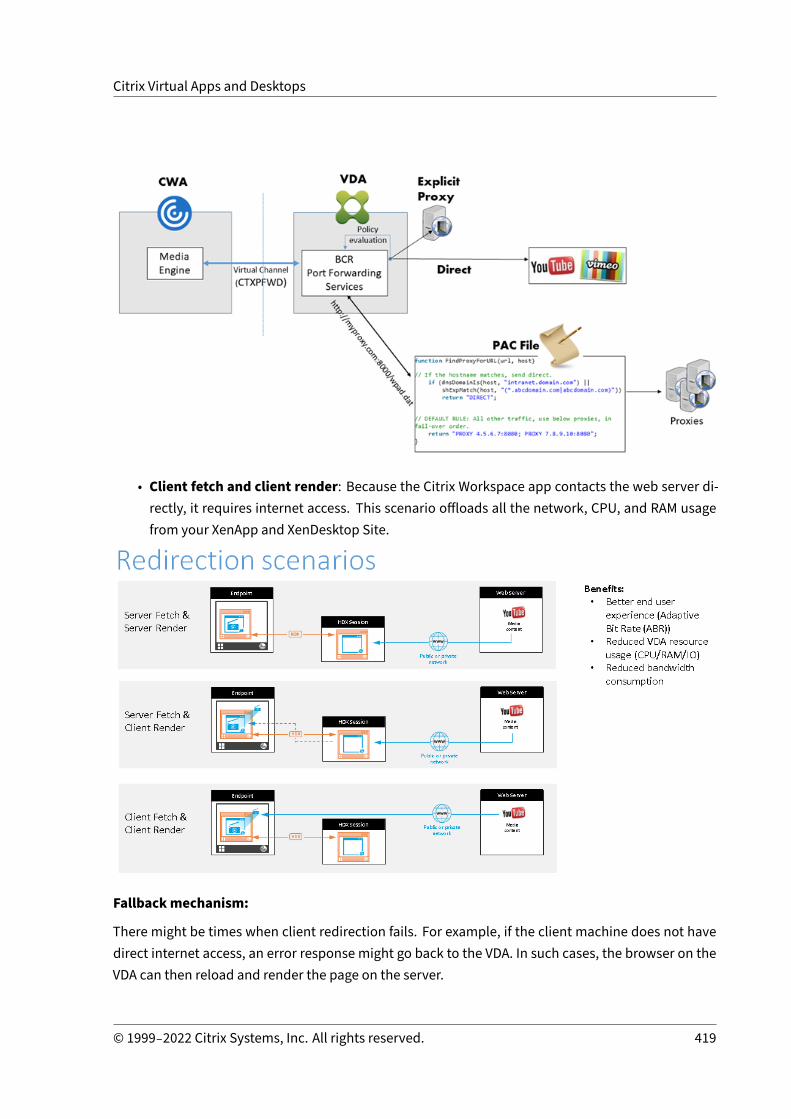
Citrix Virtual Apps and Desktops
• Client fetch and client render: Because the Citrix Workspace app contacts the web server di‑rectly, it requires internet access. This scenario offloads all the network, CPU, and RAM usagefrom your XenApp and XenDesktop Site.
Fallbackmechanism:
There might be times when client redirection fails. For example, if the client machine does not havedirect internet access, an error response might go back to the VDA. In such cases, the browser on theVDA can then reload and render the page on the server.
© 1999–2022 Citrix Systems, Inc. All rights reserved. 419
Citrix Virtual Apps and Desktops
You can suppress server rendering of video elements by using the existingWindowsmedia fallbackprevention policy. Set this policy to Play all content only on client or Play only client‑accessiblecontent on client. These settings block video elements fromplaying on the server if there are failuresin client redirection. This policy takes effect only when you enable browser content redirection andthe Access Control List policy contains the URL that falls back. The URL can’t be in the block listpolicy.
System requirements:
Windows endpoints:
• Windows 7, 8.x, or 10• Citrix Workspace app 1808 for Windows or later• Citrix Receiver for Windows 4.10 or later
Note:
Citrix Workspace app 1912 LTSR for Windows as well as all cumulative updates to the CitrixWorkspace app 1912 LTSR do not support browser content redirection.
Linux endpoints:
• Citrix Workspace app 1808 for Linux or later• Citrix Receiver for Linux 13.9 or later• Thin client terminals must include WebKitGTK+
Citrix Virtual Apps and Desktops 7 1808 and XenApp and XenDesktop 7.15 CU5, 7.18, 7.17, 7.16:
• VDAoperating system: Windows10 (minimumversion1607),WindowsServer2012R2,WindowsServer 2016
• Browser on the VDA:
– Google Chrome v66 or higher (Chrome requires CitrixWorkspace app 1809 forWindowsonthe user endpoint, Citrix Virtual Apps and Desktops 7 1808 VDA, and the browser contentredirection extension)
– Internet Explorer 11 and configure these options:
* Clear Enhanced Protected Mode under: Internet Options > Advanced > Security
* Check Enable third‑party browser extensions under: Internet Options > Ad‑vanced > Browsing
Troubleshooting
For troubleshooting information, see theKnowledgeCenter article https://support.citrix.com/article/CTX230052
© 1999–2022 Citrix Systems, Inc. All rights reserved. 420

Citrix Virtual Apps and Desktops
Browser content redirection Chrome extension
To use browser content redirectionwith Chrome, add the browser content redirection extension fromthe ChromeWeb Store. Click Add to Chrome in the Citrix Virtual App and Desktop environment.
Important
The extension is not required on the user’s client machine – only in the VDA.
System requirements
• Chrome v66 or higher• Browser content redirection extension• Citrix Virtual Apps and Desktops 7 1808 or higher• Citrix Workspace app 1809 for Windows or higher
This method works for individual users. To deploy the extension to a large group of users in yourorganization, deploy the extension using Group Policy.
Deploy the extension using Group Policy
1. Import theGoogle ChromeADMX files into your environment. For information about download‑ing policy templates and installing and configuring the templates into your Group Policy Editor,see https://support.google.com/chrome/a/answer/187202?hl=en.
2. Open your Group Policy Management console and go to User Configuration \ AdministrativeTemplates\Classic Administrative Templates (ADM) \ Google\ Google Chrome \ Extensions.
© 1999–2022 Citrix Systems, Inc. All rights reserved. 421

Citrix Virtual Apps and Desktops
Enable the Configure the list of force‑installed apps and extensions setting.
3. Click Show and type the following string, which corresponds to the extension ID. Update theURL for the browser content redirection extension.
hdppkjifljbdpckfajcmlblbchhledln; https://clients2.google.com/service/update2/crx
© 1999–2022 Citrix Systems, Inc. All rights reserved. 422
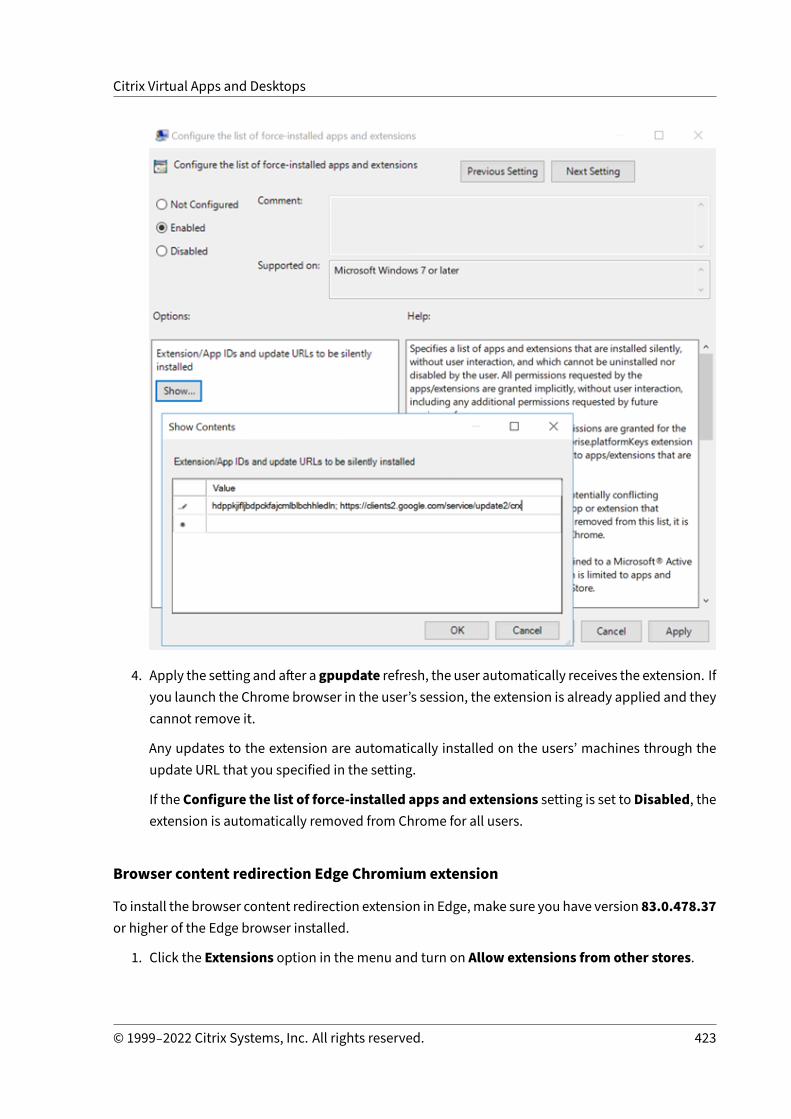
Citrix Virtual Apps and Desktops
4. Apply the setting and after a gpupdate refresh, the user automatically receives the extension. Ifyou launch the Chrome browser in the user’s session, the extension is already applied and theycannot remove it.
Any updates to the extension are automatically installed on the users’ machines through theupdate URL that you specified in the setting.
If the Configure the list of force‑installed apps and extensions setting is set to Disabled, theextension is automatically removed from Chrome for all users.
Browser content redirection Edge Chromium extension
To install the browser content redirection extension in Edge,make sure you have version 83.0.478.37or higher of the Edge browser installed.
1. Click the Extensions option in the menu and turn on Allow extensions from other stores.
© 1999–2022 Citrix Systems, Inc. All rights reserved. 423
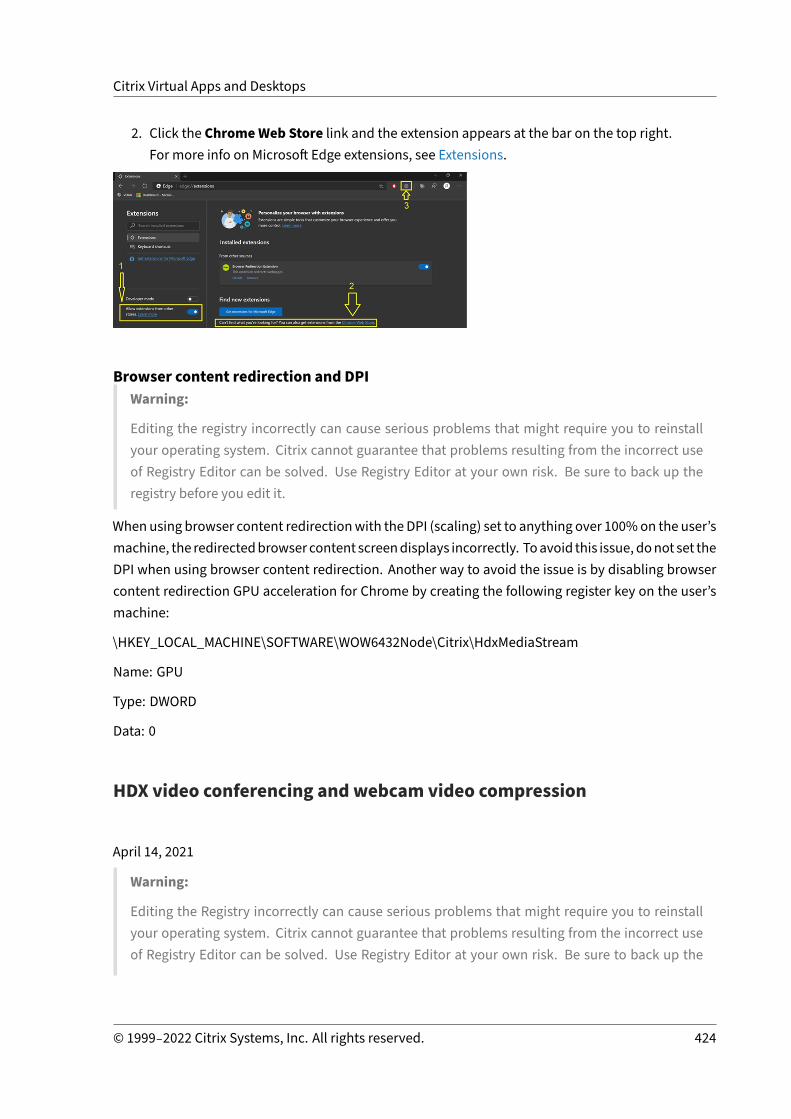
Citrix Virtual Apps and Desktops
2. Click the ChromeWeb Store link and the extension appears at the bar on the top right.For more info on Microsoft Edge extensions, see Extensions.
Browser content redirection and DPIWarning:
Editing the registry incorrectly can cause serious problems that might require you to reinstallyour operating system. Citrix cannot guarantee that problems resulting from the incorrect useof Registry Editor can be solved. Use Registry Editor at your own risk. Be sure to back up theregistry before you edit it.
When using browser content redirectionwith theDPI (scaling) set to anything over 100%on the user’smachine, the redirectedbrowser content screendisplays incorrectly. Toavoid this issue, donot set theDPI when using browser content redirection. Another way to avoid the issue is by disabling browsercontent redirection GPU acceleration for Chrome by creating the following register key on the user’smachine:
\HKEY_LOCAL_MACHINE\SOFTWARE\WOW6432Node\Citrix\HdxMediaStream
Name: GPU
Type: DWORD
Data: 0
HDX video conferencing andwebcam video compression
April 14, 2021
Warning:
Editing the Registry incorrectly can cause serious problems that might require you to reinstallyour operating system. Citrix cannot guarantee that problems resulting from the incorrect useof Registry Editor can be solved. Use Registry Editor at your own risk. Be sure to back up the
© 1999–2022 Citrix Systems, Inc. All rights reserved. 424
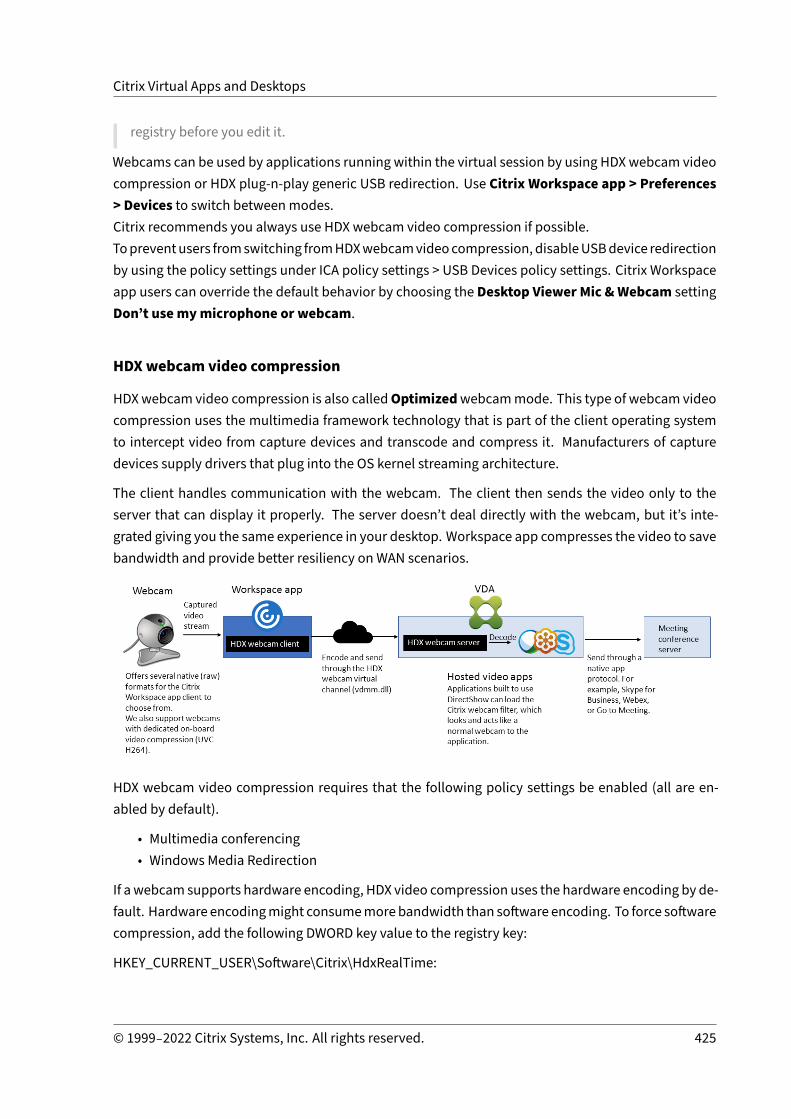
Citrix Virtual Apps and Desktops
registry before you edit it.
Webcams can be used by applications running within the virtual session by using HDXwebcam videocompression or HDX plug‑n‑play generic USB redirection. Use Citrix Workspace app > Preferences> Devices to switch betweenmodes.Citrix recommends you always use HDX webcam video compression if possible.Topreventusers fromswitching fromHDXwebcamvideocompression, disableUSBdevice redirectionby using the policy settings under ICA policy settings > USB Devices policy settings. Citrix Workspaceapp users can override the default behavior by choosing the Desktop Viewer Mic &Webcam settingDon’t usemymicrophone or webcam.
HDXwebcam video compression
HDXwebcam video compression is also calledOptimizedwebcammode. This type of webcam videocompression uses the multimedia framework technology that is part of the client operating systemto intercept video from capture devices and transcode and compress it. Manufacturers of capturedevices supply drivers that plug into the OS kernel streaming architecture.
The client handles communication with the webcam. The client then sends the video only to theserver that can display it properly. The server doesn’t deal directly with the webcam, but it’s inte‑grated giving you the same experience in your desktop. Workspace app compresses the video to savebandwidth and provide better resiliency on WAN scenarios.
HDX webcam video compression requires that the following policy settings be enabled (all are en‑abled by default).
• Multimedia conferencing• Windows Media Redirection
If awebcam supports hardware encoding, HDX video compression uses the hardware encoding by de‑fault. Hardware encodingmight consumemorebandwidth than software encoding. To force softwarecompression, add the following DWORD key value to the registry key:
HKEY_CURRENT_USER\Software\Citrix\HdxRealTime:
© 1999–2022 Citrix Systems, Inc. All rights reserved. 425

Citrix Virtual Apps and Desktops
DeepCompress_ForceSWEncode=1
HDXwebcam video compression requirements
Supported clients: CitrixWorkspace app forWindows, CitrixWorkspace app forMac, CitrixWorkspaceapp for Chrome, and Citrix Workspace app for Linux.
Note:
Only Citrix Workspace app for Windows, Citrix Workspace app for Chrome, and Citrix Workspaceapp for Mac 2006 or later support webcam redirection for 64‑bit apps.
Supported video conferencing applications (32 bit and 64 bit):
• Adobe Connect• Cisco Webex and Webex for Teams• GoToMeeting• Google Hangouts and Hangouts Meet• IBM Sametime• Microsoft Skype for Business 2015• Microsoft Lync 2010 and 2013• Microsoft Skype 7 or higher• MediaFoundation‑basedvideoapplicationsonWindows8.xorhigherandWindowsServer2012R2 and higher
To use Skype on a Windows client, edit the registry on the client and the server:
• Client registry key HKEY_CURRENT_USER\Software\Citrix\HdxRealTime
Name: DefaultHeight
Type: REG_DWORD
Data: 240
Name: DefaultWidth, Type: REG_DWORD
Data: 320
• Server registry key HKEY_LOCAL_MACHINE\SOFTWARE\Citrix\Vd3d\Compatibility
Name: skype.exe,
Type: REG_DWORD
Data: Set to 0
Other user device requirements:
• Appropriate hardware to produce sound.
© 1999–2022 Citrix Systems, Inc. All rights reserved. 426

Citrix Virtual Apps and Desktops
• DirectShow‑compatible webcam (use the webcam default settings). Webcams that are hard‑ware encoding capable reduces client‑side CPU usage.
• For HDX webcam video compression, install webcam drivers on the client, obtained from thecamera manufacturer, if possible.
High definition webcam streaming
The video conferencing application on the server selects thewebcam format and resolution based onthe supported format types. When a session starts, the client sends the webcam information to theserver. Choose a webcam from the application. When the webcam and the application support highdefinition rendering, the application uses high definition resolution. We support webcam resolutionsup to 1920x1080.
This feature requires the Citrix Workspace app for Windows, minimum version 1808 or Citrix Receiverfor Windows, minimum version 4.10.
You can use a registry key to disable and enable the feature. The default resolution of 352x288 is used:
HKEY_LOCAL_MACHINE\Software\Citrix\HDXRealTime
Name: Enable_HighDefWebcam
Type: REG_DWORD
Data:
0 = Disable the high definition webcam streaming
1 = Enable the high definition webcam streaming
You can use registry keys on the client to configure a specific resolution. Ensure that the camera sup‑ports the specified resolution:
HKEY_CURRENT_USER\Software\Citrix\HDXRealTime
Name: DefaultWidth
Type: REG_DWORD
Data (decimal): desired width (for example 1280)
Name: DefaultHeight
Type: REG_DWORD
Data (decimal): desired height (for example 720)
HDX plug‑n‑play generic USB redirection
HDX plug‑n‑play generic USB redirection (isochronous) is also called Generic webcam mode. Thebenefit of HDX Plug‑n‑Play Generic USB Redirection is that you don’t have to install drivers on your
© 1999–2022 Citrix Systems, Inc. All rights reserved. 427

Citrix Virtual Apps and Desktops
thin client/endpoint. The USB stack is virtualized such that anything you plug into the local client issent to the remote VM. The remote desktop acts as if you plugged it natively. The Windows desktophandlesall the interactionwith thehardwareand runs through theplug‑n‑play logic to find thecorrectdrivers. Most webcams work if the drivers exist and can work over ICA. Generic webcam mode usessignificantly more bandwidth (many Megabits per second) because you are sending uncompressedvideo down with USB protocol over the network.
HTML5multimedia redirection
April 14, 2021
HTML5 multimedia redirection extends the multimedia redirection features of HDX MediaStream toinclude HTML5 audio and video. Because of growth in online distribution of multimedia content, es‑pecially to mobile devices, the browser industry has developed more efficient ways to present audioand video.
Flash has been the standard, but it requires a plug‑in, doesn’t work on all devices, and has higherbattery usage inmobile devices. Companies like YouTube, NetFlix.com, and newer browsers versionsof Mozilla, Google, and Microsoft are moving to HTML5making it the new standard.
HTML5‑basedmultimedia has many advantages over proprietary plug‑ins, including:
• Company‑independent standards (W3C)• Simplified digital rights management (DRM) workflow• Better performance without the security issues raised by plug‑ins
HTTP progressive downloads
HTTP progressive download is an HTTP‑based pseudo‑streaming method that supports HTML5. Ina progressive download, the browser plays back a single file (encoded at a single quality) while it isbeing downloaded from an HTTP web server. The video is stored on the drive as it’s received and isplayed from the drive. If you rewatch the video, the browser can load the video from cache.
For an example of a progressive download, see the HTML5 video redirection test page. To inspect thevideo elements in the webpage and find the sources (mp4 container format) in HTML5 video tags, usethe developer tools in your browser:
Comparing HTML5 and Flash
© 1999–2022 Citrix Systems, Inc. All rights reserved. 428

Citrix Virtual Apps and Desktops
Feature HTML5 Flash
Requires a proprietary player No Yes
Runs onmobile devices Yes Some
Running speed on differentplatforms
High Slow
Supported by iOS Yes No
Resource usage Less More
Load faster Yes No
Requirements
We support only redirection for progressive downloads in mp4 format. We don’t support WebM andAdaptive bitrate streaming technologies like DASH/HLS.
We support the following, and use policies to control them. For more information, see Multimediapolicy settings.
• Server side render• Server fetch client render• Client side fetching and rendering
Minimum versions of Citrix Workspace app and Citrix Receiver:
• Citrix Workspace app 1808 for Windows• Citrix Receiver for Windows 4.5• Citrix Workspace app 1808 for Linux• Citrix Receiver for Linux 13.5
Minimum VDA browser version Windows OS version/build/SP
Internet Explorer 11.0 Windows 10 x86 (1607 RS1) and x64 (1607 RS1);Windows 7 x86 and x64; Windows Server 2016RTM 14393 (1607); Windows Server 2012 R2
Firefox 47 Manually add the certificates to theFirefox certificate store or configure Firefox tosearch for certificates from aWindows trustedcertificate store. For more information, seehttps://wiki.mozilla.org/CA:AddRootToFirefox
Windows 10 x86 (1607 RS1) and x64 (1607 RS1);Windows 7 x86 and x64; Windows Server 2016RTM 14393 (1607); Windows Server 2012 R2
© 1999–2022 Citrix Systems, Inc. All rights reserved. 429

Citrix Virtual Apps and Desktops
Minimum VDA browser version Windows OS version/build/SP
Chrome 51 Windows 10 x86 (1607 RS1) and x64 (1607 RS1);Windows 7 x86 and x64; Windows Server 2016RTM 14393 (1607); Windows Server 2012 R2
Components of the HTML5 video redirection solution
• HdxVideo.js ‑ JavaScript hook intercepting video commands on thewebsite. HdxVideo.js com‑municates with WebSocketService using Secure WebSockets (SSL/TLS).
• WebSocket SSL Certificates– For the CA (root): Citrix XenApp/XenDesktop HDX In‑Product CA (C = US; S = Florida; L= Fort Lauderdale; O = Citrix Systems, Inc.; OU = XenApp/XenDesktop Engineering; CN =Citrix XenApp/XenDesktop HDX In‑Product CA)Location: Certificates (Local Computer) > Trusted Root Certification Authorities > Certifi‑cates.
– For the end‑entity (leaf): Citrix XenApp/XenDesktop HDX Service (C = US; S = Florida; L= Fort Lauderdale; O = Citrix Systems, Inc.; OU = XenApp/XenDesktop Engineering; CN =Citrix XenApp/XenDesktop HDX Service)Location: Certificates (Local Computer) > Personal > Certificates.
• WebSocketService.exe ‑ Runs on the local system and performs SSL termination and user ses‑sion mapping. TLS Secure WebSocket listening on 127.0.0.1 port 9001.
• WebSocketAgent.exe ‑ Runs on the user session and renders the video as instructed fromWeb‑SocketService commands.
How do I enable HTML5 video redirection?
In this release, this feature is available for controlled webpages only. It requires the addition of theHdxVideo.js JavaScript (included in the Citrix Virtual Apps and Desktops Installation media) to thewebpageswhere theHTML5multimedia content is available. For example, videos on an internal train‑ing site.
Websites like youtube.com,which are basedonAdaptiveBitrate technologies (for example, HTTPLiveStreaming (HLS) and Dynamic Adaptive Streaming over HTTP (DASH)), are not supported.
For more information, seeMultimedia policy settings.
Troubleshooting Tips
Errors might occur when the webpage tries to run HdxVideo.js. If the JavaScript fails to load, theHTML5 redirectionmechanism fails. Ensure that there are no errors related to HdxVideo.js by inspect‑
© 1999–2022 Citrix Systems, Inc. All rights reserved. 430
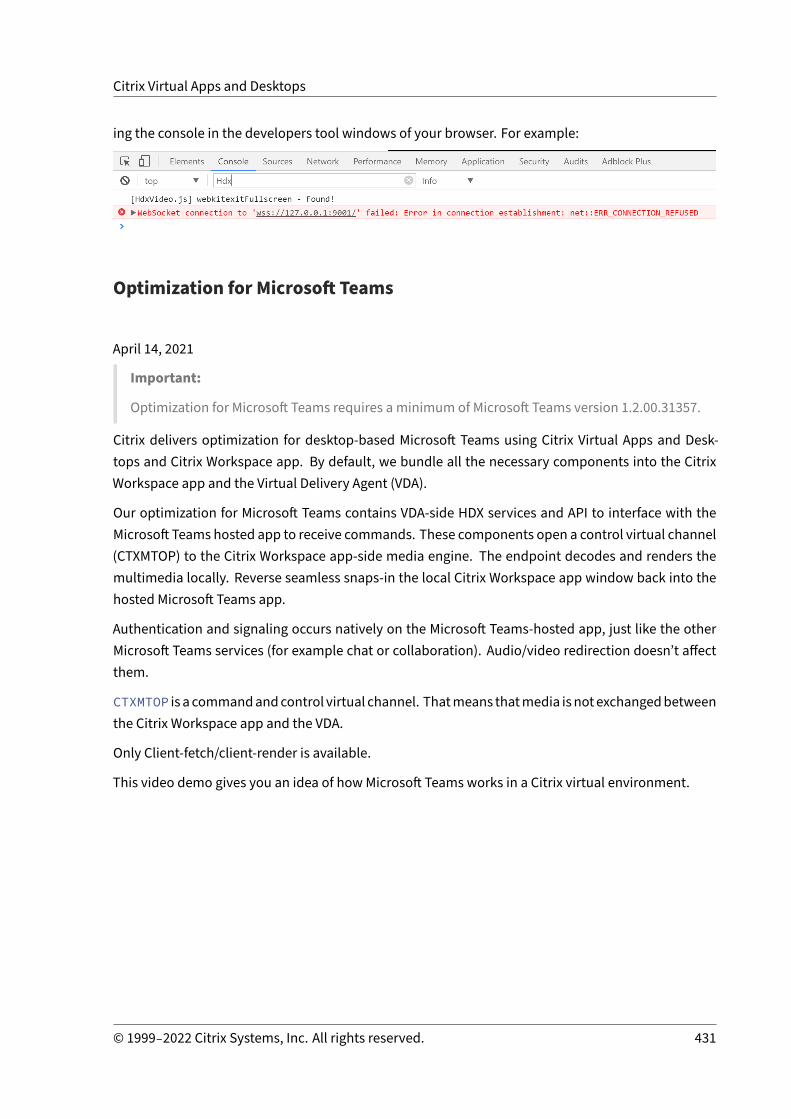
Citrix Virtual Apps and Desktops
ing the console in the developers tool windows of your browser. For example:
Optimization for Microsoft Teams
April 14, 2021
Important:
Optimization for Microsoft Teams requires a minimum of Microsoft Teams version 1.2.00.31357.
Citrix delivers optimization for desktop‑based Microsoft Teams using Citrix Virtual Apps and Desk‑tops and Citrix Workspace app. By default, we bundle all the necessary components into the CitrixWorkspace app and the Virtual Delivery Agent (VDA).
Our optimization for Microsoft Teams contains VDA‑side HDX services and API to interface with theMicrosoft Teams hosted app to receive commands. These components open a control virtual channel(CTXMTOP) to the Citrix Workspace app‑side media engine. The endpoint decodes and renders themultimedia locally. Reverse seamless snaps‑in the local Citrix Workspace app window back into thehosted Microsoft Teams app.
Authentication and signaling occurs natively on the Microsoft Teams‑hosted app, just like the otherMicrosoft Teams services (for example chat or collaboration). Audio/video redirection doesn’t affectthem.
CTXMTOP is a commandandcontrol virtual channel. Thatmeans thatmedia isnotexchangedbetweenthe Citrix Workspace app and the VDA.
Only Client‑fetch/client‑render is available.
This video demo gives you an idea of howMicrosoft Teams works in a Citrix virtual environment.
© 1999–2022 Citrix Systems, Inc. All rights reserved. 431
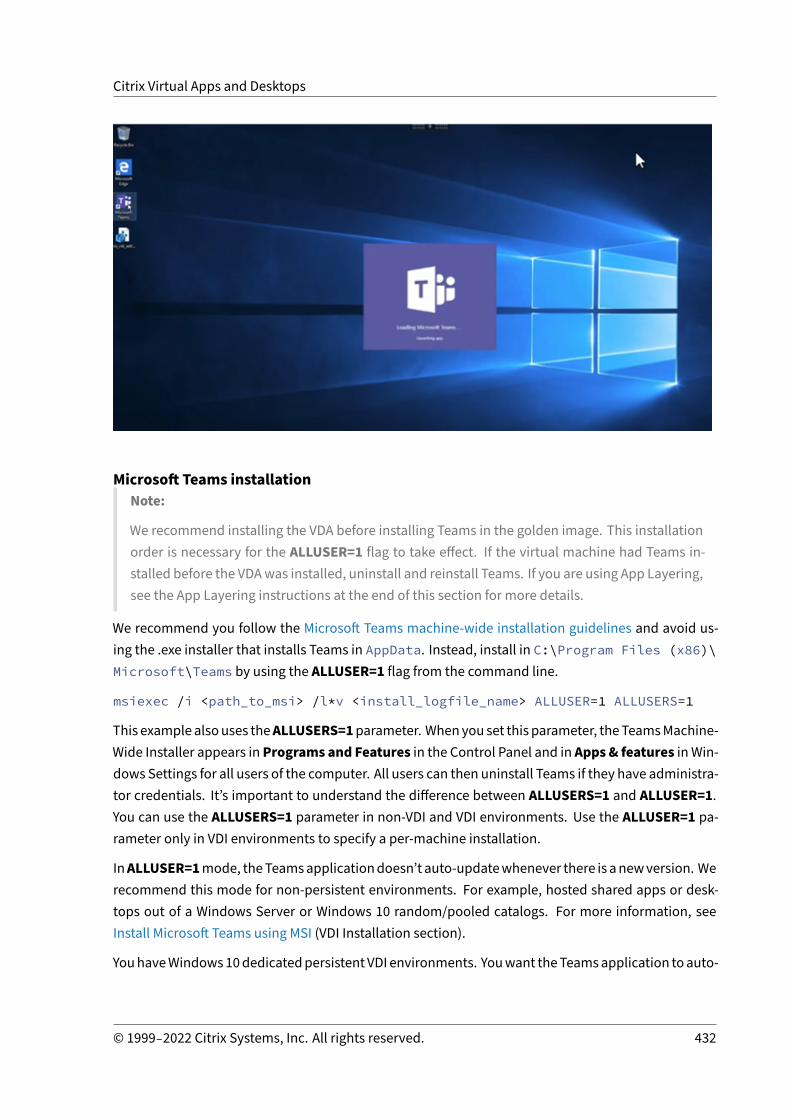
Citrix Virtual Apps and Desktops
Microsoft Teams installationNote:
We recommend installing the VDA before installing Teams in the golden image. This installationorder is necessary for the ALLUSER=1 flag to take effect. If the virtual machine had Teams in‑stalled before the VDAwas installed, uninstall and reinstall Teams. If you are using App Layering,see the App Layering instructions at the end of this section for more details.
We recommend you follow the Microsoft Teams machine‑wide installation guidelines and avoid us‑ing the .exe installer that installs Teams in AppData. Instead, install in C:\Program Files (x86)\Microsoft\Teams by using the ALLUSER=1 flag from the command line.
msiexec /i <path_to_msi> /l*v <install_logfile_name> ALLUSER=1 ALLUSERS=1
This examplealsouses theALLUSERS=1parameter. Whenyou set this parameter, theTeamsMachine‑Wide Installer appears in Programs and Features in the Control Panel and in Apps & features in Win‑dows Settings for all users of the computer. All users can then uninstall Teams if they have administra‑tor credentials. It’s important to understand the difference between ALLUSERS=1 and ALLUSER=1.You can use the ALLUSERS=1 parameter in non‑VDI and VDI environments. Use the ALLUSER=1 pa‑rameter only in VDI environments to specify a per‑machine installation.
InALLUSER=1mode, theTeamsapplicationdoesn’t auto‑updatewhenever there is anewversion. Werecommend this mode for non‑persistent environments. For example, hosted shared apps or desk‑tops out of a Windows Server or Windows 10 random/pooled catalogs. For more information, seeInstall Microsoft Teams using MSI (VDI Installation section).
YouhaveWindows10dedicatedpersistent VDI environments. Youwant theTeamsapplication toauto‑
© 1999–2022 Citrix Systems, Inc. All rights reserved. 432

Citrix Virtual Apps and Desktops
update and would prefer Teams to install per‑user under Appdata/Local, use the .exe installer orthe MSI without ALLUSER=1.
For App Layering:
Warning:
Editing the registry incorrectly can cause serious problems that might require you to reinstallyour operating system. Citrix cannot guarantee that problems resulting from the incorrect useof Registry Editor can be solved. Use Registry Editor at your own risk. Be sure to back up theregistry before you edit it.Create an empty registry key named PortICA (leave the default Name, Type, and Data).
If usingCitrix AppLayering tomanageVDAandMicrosoftTeams installations indifferent layers, deploythis registry key on Windows before installing Teams with ALLUSER =1:
HKEY_LOCAL_MACHINE\SOFTWARE\Citrix
Or
HKEY_LOCAL_MACHINE\SOFTWARE\WOW6432Node\Citrix
Profile Management recommendations
We recommend using the machine‑wide installer for Windows Server and Pooled VDI Windows 10environments.
When the ALLUSER =1 flag is passed to the MSI from the command line (the machine‑wide installer),theTeamsapp installsunderC:\Program Files (x86) (~300MB). TheappusesAppData\Local\Microsoft\TeamsMeetingAddin for logs and AppData\Roaming\Microsoft\Teams (~600–700MB) for user specific configurations, caching of elements in the user interface, and so forth.
Machine wide installer
The following is an example of folders, desktop shortcuts, and registries created by installing Teamsmachine‑wide installer on a Windows Server 2016 64‑bit VM:
Folder:
• C:\Program Files (x86)\Microsoft\Teams• C:\Users\<username>\AppData\Roaming\Microsoft\Teams
Desktop Shortcut:
C:\Program Files (x86)\Microsoft\Teams\current\Teams.exe
Registry:
© 1999–2022 Citrix Systems, Inc. All rights reserved. 433

Citrix Virtual Apps and Desktops
• HKEY_LOCAL_MACHINE \SOFTWARE\WOW6432Node\Microsoft\Windows\CurrentVersion\Run
• HKEY_LOCAL_MACHINE \SOFTWARE\Microsoft\Windows\CurrentVersion\Run• HKEY_CURRENT_USER \SOFTWARE\Microsoft\Windows\CurrentVersion\Run
Recommendations
• We recommend disabling auto‑start by deleting the Teams registry keys. Doing so prevents“8AM logon storms” from spiking up the VM’s CPU.
• If the Virtual Desktop does not have a GPU/vGPU, we recommend setting Disable GPU hard‑ware acceleration in the Teams Settings to improve performance. This setting ("disableGpu":true) is stored in %Appdata%\Microsoft\Teams inside the desktop-config.json file.You can use a logon script to edit that file and set the value to true.
• If using Citrix Workspace Environment Management (WEM), enable CPU Spikes Protection tomanage processor consumption for Teams.
Important:
If you don’t pass the ALLUSER=1 flag, the MSI places the Teams.exe installer and setup.jsonunder C:\Program Files (x86)\Teams Installer.A registry key (TeamsMachineInstaller) is added under:HKEY_LOCAL_MACHINE \SOFTWARE\WOW6432Node\Microsoft\Windows\CurrentVersion\Run
A subsequent user logon triggers the final installation in AppData instead.
Per‑user installer
When using the .exe installer, the installation process changes significantly, and all the files areplaced in AppData.
Folder:
• C:\Users\<username>\AppData\Local\Microsoft\Teams• C:\Users\<username>\AppData\Local\Microsoft\TeamsMeetingAddin• C:\Users\<username>\AppData\Local\SquirrelTemp• C:\Users\<username>\AppData\Roaming\Microsoft\Teams
Desktop Shortcut:
C:\Users\<username>\AppData\Local\Microsoft\Teams\Update.exe --processStart"Teams.exe"
Registry:
HKEY_CURRENT_USER \SOFTWARE\Microsoft\Windows\CurrentVersion\Run
© 1999–2022 Citrix Systems, Inc. All rights reserved. 434

Citrix Virtual Apps and Desktops
Best Practices
The best practice recommendations are based on the use case scenarios.Using Teams with a non‑persistent setup requires a profile caching manager for efficient Teamsruntime data synchronization. Having a profile caching manager ensures that the appropriateuser‑specific information (for example, user data, profile, and settings) is cached during the usersession. Make sure you synchronize the data in these two folders:
• C:\Users\<username>\AppData\Local\Microsoft\IdentityCache• C:\Users\<username>\AppData\Roaming\Microsoft\Teams
Teams cached content exclusion list for non‑persistent setup:
Exclude the following items from the Teams caching folder, %AppData%/Microsoft/Teams. Exclud‑ing these items helps reduce the user caching size to further optimize your non‑persistent setup.
Exclusion list – files
• Roaming\Microsoft\Teams\* .txt
Exclusion list – directories
• Roaming\Microsoft\Teams\Logs• Roaming\Microsoft\Teams\media‑stack• Roaming\Microsoft\Teams\Service Worker\CacheStorage• Roaming\Microsoft\Teams\Application Cache• Roaming\Microsoft\Teams\Cache• Roaming\Microsoft\Teams\GPUCache• Roaming\Microsoft\Teams\meeting‑addin\Cache (Critical for issues where the Add‑in is miss‑ing in Outlook)
Use case: single session scenario:
In this scenario, the end user uses Microsoft Teams in one location at a time. There is no need to runTeams in two different Windows sessions simultaneously. For instance, in a common virtual desktopdeployment, each user is assigned to one desktop, Teams is deployed inside the virtual desktop asone application.We recommend enabling the Citrix Profile container and redirect the previously mentioned per‑userdirectories into the container.
1. Deploy the Microsoft Teamsmachine wide installer (ALLUSER=1) in the golden image.
2. Enable Citrix Profile Management and set up the user profile storewith the proper permissions.
3. Enable the following ProfileManagement policy setting: File system>Synchronization >Pro‑file container – List of folders to be contained in profile disk.
© 1999–2022 Citrix Systems, Inc. All rights reserved. 435
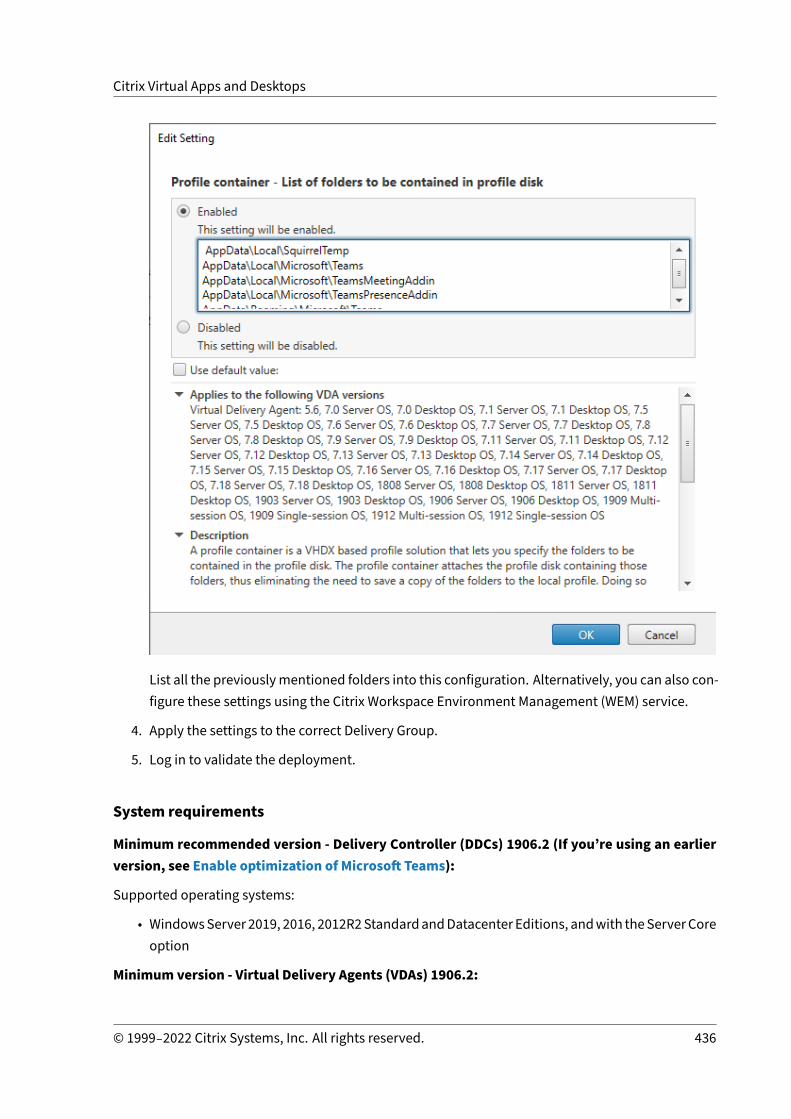
Citrix Virtual Apps and Desktops
List all the previouslymentioned folders into this configuration. Alternatively, you can also con‑figure these settings using the Citrix Workspace Environment Management (WEM) service.
4. Apply the settings to the correct Delivery Group.
5. Log in to validate the deployment.
System requirements
Minimum recommended version ‑ Delivery Controller (DDCs) 1906.2 (If you’re using an earlierversion, see Enable optimization of Microsoft Teams):
Supported operating systems:
• WindowsServer 2019, 2016, 2012R2StandardandDatacenterEditions, andwith theServerCoreoption
Minimum version ‑ Virtual Delivery Agents (VDAs) 1906.2:
© 1999–2022 Citrix Systems, Inc. All rights reserved. 436

Citrix Virtual Apps and Desktops
Supported operating systems:
• Windows 10 64‑bit, versions 1607 and higher.• Windows Server 2019, 2016, and 2012 R2 (Standard and Datacenter Editions).
Requirements:
• BCR_x64.msi ‑ theMSI that contains theMicrosoft Teams optimization code and starts automat‑ically from the GUI. If you’re using the command line interface for the VDA installation, don’texclude it.
Recommended version – Citrix Workspace app 2009 for Windows and Minimum version ‑ CitrixWorkspace app 1907 for Windows:
• Windows 8 and 10 (32‑bit and 64‑bit editions, including Embedded editions) (Support for Win‑dows 7 has been stopped from Version 2006 onwards)
• Windows 10 IoT Enterprise 2016 LTSB (v1607) and 2019 LTSC (v1809)• Processor (CPU) architectures supported: x86 and x64 (ARM is not supported)• Endpoint requirement: Approximately 2.2–2.4 GHz dual core CPU that can support 720p HDresolution during a peer‑to‑peer video conference call.
• Dual or quad‑core CPUs with lower base speeds (~1.5 GHz) equipped with Intel Turbo Boost orAMD Turbo Core that can boost up to at least 2.4 GHz.
• HP Thin Clients verified: t630/t640, t730/t740, mt44/mt45.• Dell Thin Clients verified: 5070, 5470 Mobile TC.• 10ZiG Thin Clients verified: 4510 and 5810q.• For a complete list of verified endpoints, see Thin Clients.• Citrix Workspace app requires a minimum of 600 MB free disk space and 1 GB RAM.• Microsoft .NET Framework minimum requirement is version 4.6.2. Citrix Workspace app auto‑matically downloads and installs .NET Framework if it is not present in the system.
Minimum version ‑ Citrix Workspace app 2006 for Linux:
For more information, see Optimization for Microsoft Teams in What’s new in 2006.
Software:
• GStreamer 1.0 or later or Cairo 2• libc++‑9.0 or later• libgdk 3.22 or later• OpenSSL 1.1.1d• x64 Linux distribution
Hardware:
• Minimum 1.8 GHz dual‑core CPU that can support 720p HD resolution during a peer‑to‑peervideo conference call.
© 1999–2022 Citrix Systems, Inc. All rights reserved. 437

Citrix Virtual Apps and Desktops
• Dual or quad‑core CPU with a base speed of 1.8 GHz and a high Intel Turbo Boost speed of atleast 2.9 GHz.
For more information, see Prerequisites to install Citrix Workspace app.
Enable optimization of Microsoft Teams
To enable optimization for Microsoft Teams, use the Studio policy described in Microsoft Teamsredirection policy (it is ON by default). In addition to this policy being enabled, HDX checks toverify that the version of the Citrix Workspace app is equal to or greater than the minimum re‑quired version. If you enabled the policy and the Citrix Workspace app version is supported, theHKEY_CURRENT_USER\Software\Citrix\HDXMediaStream\MSTeamsRedirSupport registry key isset to 1 automatically on the VDA. TheMicrosoft Teams application reads the key to load in VDImode.
Note:
If youareusing version1906.2 VDAsorhigherwitholderController versions (for example, version7.15), which do not have the policy available in Studio, you can still be optimized because HDXoptimization for Microsoft Teams is enabled by default in the VDA.
If you click About > Version, the Citrix HDX Optimized legend displays:
If you see Citrix HDX Not Connected instead, the Citrix API is loaded in Teams (which is the first steptowards redirection), but there was an error in the subsequent parts of the stack. The error is mostlikely in the VDA services or the Citrix Workspace app).
If you don’t see any legend, Teams failed to load the Citrix API. Exit Teams by right‑clicking on thenotification area icon and restart. Make sure the Studio policy is not set to Prohibited, and that theCitrix Workspace app version is supported.
Network requirements
Microsoft Teams relies on Media Processor servers in Office 365 for meetings or multiparty calls. Mi‑crosoft Teams relies on Office 365 Transport Relays for these scenarios:
• Two peers in a point‑to‑point call do not have direct connectivity• A participant does not have direct connectivity to the media processor.
© 1999–2022 Citrix Systems, Inc. All rights reserved. 438

Citrix Virtual Apps and Desktops
Therefore, thenetworkhealthbetween thepeer and theOffice 365 clouddetermines theperformanceof the call.
We recommendevaluatingyourenvironment to identify any risksand requirements that can influenceyour overall cloud voice and video deployment.Use the Skype for Business Network Assessment Tool to test if your network is ready for MicrosoftTeams. For support information, see Support.
Summary of key network recommendations for Real Time Protocol (RTP) traffic:
• Connect to the Office 365 network as directly as possible from the branch office.• If you must use any of the following at the branch office, ensure that RTP/UDP Teams traffic isunhindered. HdxTeams.exe doesn’t honor explicit proxies configured on the endpoint.
– Bypass proxy servers– Network SSL intercept– Deep packet inspection devices– VPN hairpins (use split tunneling if possible)
• Plan and provide sufficient bandwidth.• Check each branch office for network connectivity and quality.
TheWebRTCmedia engine in theWorkspace app (HdxTeams.exe) uses theSecureReal‑timeTransportProtocol (SRTP) formultimedia streams that are offloaded to the client. SRTPprovides confidentialityand authentication to RTP by using symmetric keys (128 bit) to encryptmedia and control messages,and uses the AES encryption cipher in counter mode.
The following metrics are recommended for guaranteeing a positive user experience:
Metric Endpoint to Office 365
Latency (one way) < 50 msec
Latency (RTT) < 100 msec
Packet Loss <1% during any 15s interval
Packet inter‑arrival jitter <30ms during any 15s interval
For more information, see Prepare your organization’s network for Microsoft Teams.
In terms of bandwidth requirements, optimization for Microsoft Teams can use a wide variety ofcodecs for audio (OPUS/G.722/PCM G711) and video (H264/VP9).
The peers negotiate these codecs during the call establishment process using the Session DescriptionProtocol (SDP) Offer/Answer.Citrix minimum recommendations are:
© 1999–2022 Citrix Systems, Inc. All rights reserved. 439

Citrix Virtual Apps and Desktops
Type Bandwidth Codec
Audio (each way) ~ 90 kbps G.722
Audio (each way) ~ 60 kbps Opus*
Video (each way) ~ 700 kbps H264 360p@ 30 fps 16:9
Video (each way) ~ 2,500 kbps VP9 720p@ 30 fps 16:9
Screen sharing ~ 300 kbps H264 1080p@ 15 fps
* Opus supports constant and variable bitrate encoding from 6 kbps up to 510 kbps.
Opus and VP9 are the preferred codecs for peer‑to‑peer calls between two optimized VDI users.
G.722 and H264 are the preferred codecs for a VDI user joining a meeting.
Call establishment andmedia flow paths
When possible, the HDXmedia engine in the Citrix Workspace app (HdxTeams.exe) tries to establish adirect network Secure Real‑time Transport Protocol (SRTP) connection over User Datagram Protocol(UDP) in a peer‑to‑peer call. If the UDP ports are blocked, the media engine falls back to TCP 443.
The HDX media engine supports ICE, Session Traversal Utilities for NAT (STUN), and Traversal UsingRelays around NAT (TURN) for candidate discovery and connection establishment.
If there is no direct path between the two peers or between a peer and a conference server (if the useris joining a multi‑party call or meeting), HdxTeams.exe uses a Microsoft Teams transport relay serverin Office 365 to reach the other peer or the media processor (where meetings are hosted). The user’sclient machine must have access to two Office 365 subnet IP address ranges and 4 UDP ports. Formore information, see the Architecture diagram in the “Call setup” section further down and Office365 URLs and IP address ranges ID 11.
ID Category Addresses Destination Ports
11 Optimize required 13.107.64.0/18,52.112.0.0/14,52.120.0.0/14
UDP: 3478, 3479,3480, 3481, TCP: 443(fallback)
These ranges contain both Transport Relays andmedia processors.The Teams Transport Relays provide STUN and TURN functionality, but they are not ICE endpoints.Also, the Teams Transport Relays do not terminate media nor perform any transcoding. They canbridge TCP (if HdxTeams.exe uses TCP) to UDP when they forward traffic to other peers or media pro‑
© 1999–2022 Citrix Systems, Inc. All rights reserved. 440

Citrix Virtual Apps and Desktops
cessors.
HdxTeams.exe contacts the closest Microsoft Teams Transport Relay in the Office 365 cloud. Hdx‑Teams.exe uses anycast IP and port 3478–3481 UDP (different UDP ports per workload, thoughmulti‑plexing can happen) or 443 TCP TLSv1.2 for fallbacks. Call quality depends on the underlying networkprotocol. Because UDP is always recommended over TCP, we advise you to design your networks toaccommodate UDP traffic in the branch office.
If Teams loaded in optimized mode and HdxTeams.exe is running on the endpoint, Interactive Con‑nectivity Establishment (ICE) failures might cause a call setup failure or one‑way‑only audio/video.When a call cannot be completed ormedia streams are not full duplex, check theWireshark trace onthe endpoint first. For more information about the ICE candidate gathering process, see “Collectinglogs” in the Support section.
Note:
If the endpoints don’t have internet access, it might still be possible for the user to make a peer‑to‑peer call only if they are on the same LAN. Meetings fail. In this case, there is a 30 secondtimeout before the call setup begins.
Call setup
Use this architecturediagramasavisual reference for the call flowsequence. Thecorresponding stepsare indicated in the diagram.
Architecture:
© 1999–2022 Citrix Systems, Inc. All rights reserved. 441

Citrix Virtual Apps and Desktops
1. Launch Microsoft Teams.
2. Teams authenticates to O365. Tenant policies are pushed down to the Teams client, and rele‑vant TURN and signaling channel information is relayed to the app.
3. Teams detects that it is running in a VDA andmakes API calls to the Citrix JavaScript API.
4. Citrix JavaScript in Teams opens a secureWebSocket connection toWebSocketService.exe run‑ning on the VDA (127.0.0.1:9002), which spawns WebSocketAgent.exe inside the user session.
5. WebSocketAgent.exe instantiates a generic virtual channel by calling into the Citrix HDX TeamsRedirection Service (CtxSvcHost.exe).
© 1999–2022 Citrix Systems, Inc. All rights reserved. 442

Citrix Virtual Apps and Desktops
6. Citrix Workspace app’s wfica32.exe (HDX engine) spawns a new process called HdxTeams.exe,which is the newWebRTC engine used for Teams optimization.
7. HdxTeams.exe and Teams.exe have a 2‑way virtual channel path and can start processing mul‑timedia requests.
—–User calls——
8. Peer A clicks the call button. Teams.exe communicates with the Teams services in Office 365establishing an end‑to‑end signaling path with Peer B. Teams asks HdxTeams for a series ofsupported call parameters (codecs, resolutions, and so forth, which is known as a Session De‑scription Protocol (SDP) offer). These call parameters are then relayed using the signaling pathto the Teams services in Office 365 and from there to the other peer.
9. The SDP offer/answer (single‑pass negotiation) takes place through the signaling channel, andthe ICE connectivity checks (NAT and Firewall traversal using Session Traversal Utilities for NAT(STUN)bind requests) complete. Then, SecureReal‑timeTransport Protocol (SRTP)media flowsdirectly between HdxTeams.exe and the other peer (or Office 365 conference servers if it is ameeting).
Microsoft Phone System
Phone System isMicrosoft’s technology that enables call control andPBX capabilities in theOffice 365cloud with Microsoft Teams. Optimization for Microsoft Teams supports Phone System, using Office365Calling Plans or Direct Routing. WithDirect Routing, you connect your own supported sessionbor‑der controller to the Microsoft Phone System directly without any additional on‑premises software.
Firewall considerations
When users initiate an optimized call using the Microsoft Teams client for the first time, they mightnotice a warning with theWindows firewall settings. The warning asks for users to allow communi‑cation for HdxTeams.exe (HDX Overlay Teams).
© 1999–2022 Citrix Systems, Inc. All rights reserved. 443

Citrix Virtual Apps and Desktops
The following four entries are added under Inbound Rules in theWindows Defender Firewall > Ad‑vanced Security console. You can apply more restrictive rules if desired.
Microsoft Teams and Skype for Business Coexistence
You can deploy Microsoft Teams and Skype for Business side by side, as two separate solutions withoverlapping capabilities.Formore information, see UnderstandMicrosoft Teams and Skype for Business coexistence and inter‑operability.
Citrix RealTime Optimization Pack and HDX optimization for Teams multimedia engines then honorwhatever configuration is set in your environment (for example, island modes, Skype for Businesswith Teams collaboration, Skype for Business with Teams collaboration andmeetings).
Peripheral access canbe grantedonly to a single application at the time. For example, webcamaccessby the RealTimeMedia Engine during a call locks the imaging device during a call. When the device isreleased, it becomes available for Teams.
© 1999–2022 Citrix Systems, Inc. All rights reserved. 444
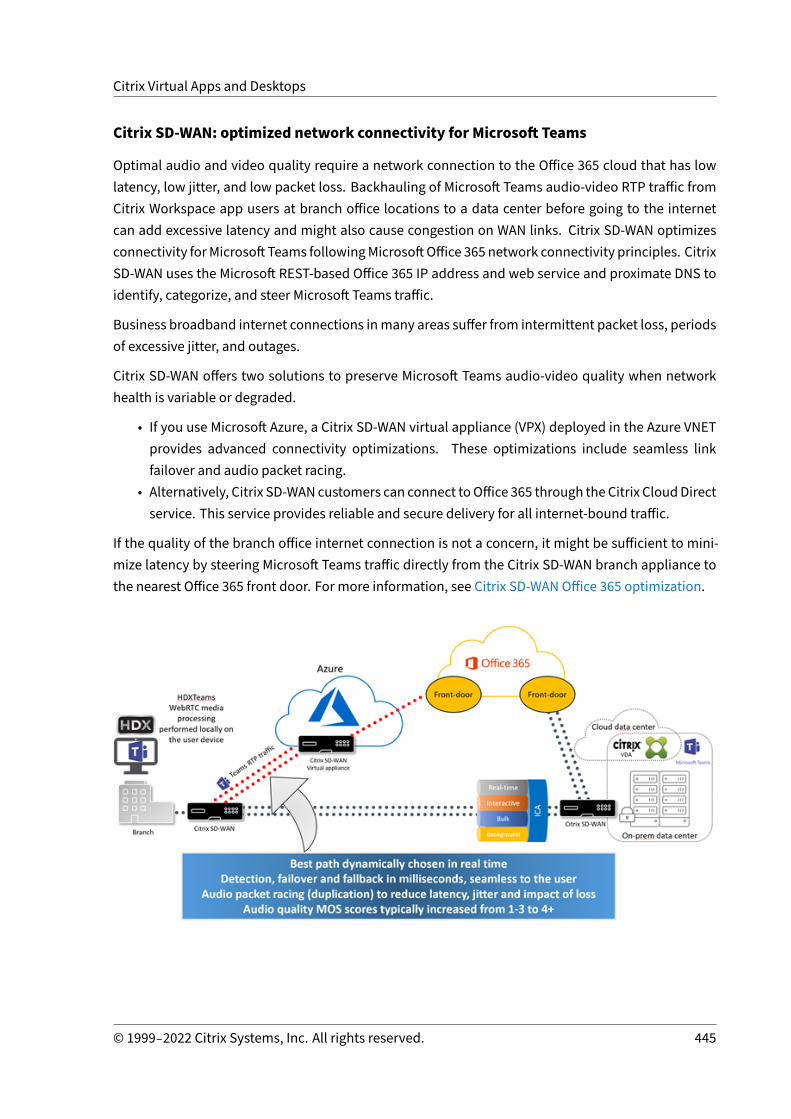
Citrix Virtual Apps and Desktops
Citrix SD‑WAN: optimized network connectivity for Microsoft Teams
Optimal audio and video quality require a network connection to the Office 365 cloud that has lowlatency, low jitter, and low packet loss. Backhauling of Microsoft Teams audio‑video RTP traffic fromCitrix Workspace app users at branch office locations to a data center before going to the internetcan add excessive latency and might also cause congestion on WAN links. Citrix SD‑WAN optimizesconnectivity forMicrosoftTeams followingMicrosoftOffice 365 network connectivity principles. CitrixSD‑WAN uses the Microsoft REST‑based Office 365 IP address and web service and proximate DNS toidentify, categorize, and steer Microsoft Teams traffic.
Business broadband internet connections inmany areas suffer from intermittent packet loss, periodsof excessive jitter, and outages.
Citrix SD‑WAN offers two solutions to preserve Microsoft Teams audio‑video quality when networkhealth is variable or degraded.
• If you use Microsoft Azure, a Citrix SD‑WAN virtual appliance (VPX) deployed in the Azure VNETprovides advanced connectivity optimizations. These optimizations include seamless linkfailover and audio packet racing.
• Alternatively, Citrix SD‑WANcustomers can connect toOffice 365 through the Citrix CloudDirectservice. This service provides reliable and secure delivery for all internet‑bound traffic.
If the quality of the branch office internet connection is not a concern, it might be sufficient to mini‑mize latency by steering Microsoft Teams traffic directly from the Citrix SD‑WAN branch appliance tothe nearest Office 365 front door. For more information, see Citrix SD‑WAN Office 365 optimization.
© 1999–2022 Citrix Systems, Inc. All rights reserved. 445
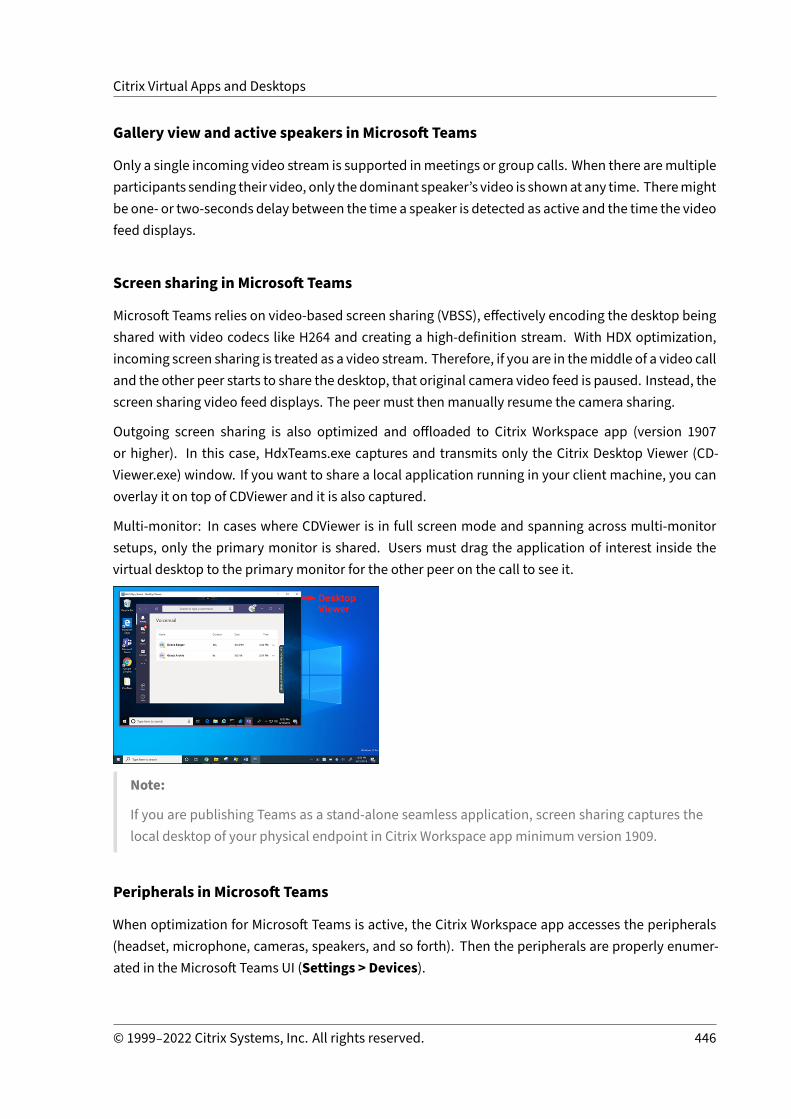
Citrix Virtual Apps and Desktops
Gallery view and active speakers in Microsoft Teams
Only a single incoming video stream is supported inmeetings or group calls. When there aremultipleparticipants sending their video, only thedominant speaker’s video is shownat any time. Theremightbe one‑ or two‑seconds delay between the time a speaker is detected as active and the time the videofeed displays.
Screen sharing in Microsoft Teams
Microsoft Teams relies on video‑based screen sharing (VBSS), effectively encoding the desktop beingshared with video codecs like H264 and creating a high‑definition stream. With HDX optimization,incoming screen sharing is treated as a video stream. Therefore, if you are in themiddle of a video calland the other peer starts to share the desktop, that original camera video feed is paused. Instead, thescreen sharing video feed displays. The peer must thenmanually resume the camera sharing.
Outgoing screen sharing is also optimized and offloaded to Citrix Workspace app (version 1907or higher). In this case, HdxTeams.exe captures and transmits only the Citrix Desktop Viewer (CD‑Viewer.exe) window. If you want to share a local application running in your client machine, you canoverlay it on top of CDViewer and it is also captured.
Multi‑monitor: In cases where CDViewer is in full screen mode and spanning across multi‑monitorsetups, only the primary monitor is shared. Users must drag the application of interest inside thevirtual desktop to the primary monitor for the other peer on the call to see it.
Note:
If you are publishing Teams as a stand‑alone seamless application, screen sharing captures thelocal desktop of your physical endpoint in Citrix Workspace appminimum version 1909.
Peripherals in Microsoft Teams
When optimization for Microsoft Teams is active, the Citrix Workspace app accesses the peripherals(headset, microphone, cameras, speakers, and so forth). Then the peripherals are properly enumer‑ated in the Microsoft Teams UI (Settings > Devices).
© 1999–2022 Citrix Systems, Inc. All rights reserved. 446

Citrix Virtual Apps and Desktops
Microsoft Teams does not access the devices directly. Instead, it relies onHdxTeams.exe for acquiring,capturing, and processing the media. Microsoft Teams lists the devices for the user to select.
Recommendations:
• Microsoft Teams certified headsets with built‑in echo cancellation. In setups with multiple pe‑ripherals, where microphone and speakers are on separate devices an echo might be present.For example, a webcam with a built‑in microphone, and a monitor with speakers. When usingexternal speakers, place themas far as possible from themicrophone and fromany surface thatmight refract the sound into the microphone.
• Microsoft Teams certified cameras, although Skype for Business certified peripherals are com‑patible with Microsoft Teams.
• HdxTeams.exe cannot take advantage of CPU offloading with webcams that perform on‑boardH.264 encoding ‑UVC 1.1 and 1.5.
Note:
HdxTeams.exe supports only these specific audio device formats (channels, bit depth, and sam‑ple rate):
• Playback Devices: up to 2 channels, 16 bit, frequencies up to 96,000 Hz• Recording Devices: up to 4 channels, 16 bit, frequencies up to 96,000 Hz
Even if one speaker or microphone does not match the expected settings, device enumerationin Teams fails and None displays under Settings > Devices.
Webrpc logs inHdxTeams.exe show this type of information:
Mar 27 20:58:22.885 webrtcapi.WebRTCEngine Info: init. initializing...
Mar 27 20:58:23.190 webrtcapi.WebRTCEngine Error: init. couldn't create
© 1999–2022 Citrix Systems, Inc. All rights reserved. 447
Citrix Virtual Apps and Desktops
audio module!
As a workaround, open the Sound Control Panel (mmsys.cpl), select the playback or recordingdevice, go to Properties > Advanced and change the settings to a supported mode. Alterna‑tively, disable the specific device.
Fallbackmode
If Microsoft Teams fails to load in optimized VDI mode, the VDA falls back to legacy HDX technologieslikeWebcam redirection and client audio andmicrophone redirection. In the unoptimizedmode, theperipherals aremapped to the VDA. The peripherals appear to theMicrosoft Teams app as if theywerelocally attached to the virtual desktop.
Youcannowgranularly control the fallbackmechanismbysettingoneof the following registryDWORDvalues in the VDA:
HKLM\SOFTWARE\Microsoft\Teams\DisableFallback
HKCU\SOFTWARE\Microsoft\Office\Teams\DisableFallback
To disable fallback mode, set the value to 1. To enable audio only, set the value to 2. If the value isn’tpresent or is set to 0, fallback mode is enabled. This feature requires Teams version 1.3.0.13565 orlater.
To determine if you are in optimized or unoptimized mode when looking at the Settings > Devicestab in Teams, themost significant difference is the camera name. If Microsoft Teams loaded in unopti‑mizedmode, legacy HDX technologies launch. The webcam name has the Citrix HDX suffix as shownin the following graphic. The speaker and microphone device names might be slightly different (ortruncated) when compared to the optimizedmode.
© 1999–2022 Citrix Systems, Inc. All rights reserved. 448

Citrix Virtual Apps and Desktops
When legacy HDX technologies are used, Microsoft Teams doesn’t offload audio, video, and screensharing processing to the endpoint’s Citrix Workspace appWebRTCmedia engine. Instead, HDX tech‑nologies use server‑side rendering. Expect highCPUconsumptionon theVDAwhenyou turnonvideo.Real time audio performancemight not be optimal.
Known limitations
Limitations Comments
Pop out chat (also known as multi‑windowchat or the newmeeting experience) is notsupported.
Citrix and Microsoft limitation
Gallery view ‑ Active speaker only. Teams dependency – Contact Microsoft forwhen to expect Gallery View (2x2)
HID buttons ‑ Answer and end call notsupported. Volume up and down aresupported.
Citrix Workspace app limitation
When switching the peripheral input or outputin Settings > Devices in the middle of the call,youmight experience a one second audioglitch.
When doing screen sharing in multi‑monitorsetups, only the main monitor is shared.
Citrix Workspace app limitation
© 1999–2022 Citrix Systems, Inc. All rights reserved. 449
Citrix Virtual Apps and Desktops
Limitations Comments
When you configure the Citrix Workspace appHigh DPI setting toNo, use the nativeresolution, the redirected video windowappears out of place when the monitor’s DPIscaling factor is set to anything above 100%.
Citrix VDA limitation
We don’t support Dual Tone Multi Frequency(DTMF) interaction with telephony systems.
Citrix Workspace app limitation
When doing screen sharing, the option includesystem audio is not available.
Citrix and Microsoft limitation
Interoperability with Skype for Business islimited to audio calls, no videomodality.
Microsoft limitation
Incoming and outgoing video streammaximum resolution is 720p.
Teams dependency – contact Microsoft forwhen to expect 1080p
We support only one video stream from anincoming camera or screen share stream.When there’s an incoming screen share, thatscreen share is shown it instead of the video ofthe dominant speaker.
Teams dependency – contact Microsoft
Outgoing screen sharing: Application sharingis not supported.
Citrix Workspace app and VDA limitation
Live events are not optimized: Attendee view issupported through server‑side rendering.Producer and presenter roles are notsupported.
Citrix and Microsoft limitation
Give control and take control: Not supportedduring a screen sharing or application sharingsession and supported during a PowerPointsharing session.
Citrix and Microsoft limitation
In outgoing screen sharing, the mouse pointeris not captured
Citrix limitation
Secondary ringer (Teams > Settings >Devices) is not supported
Citrix limitation
During a call, if a user opens a file sharedthrough Microsoft Teams, the call mightdisconnect.
Teams limitation – Contact Microsoft
© 1999–2022 Citrix Systems, Inc. All rights reserved. 450
Citrix Virtual Apps and Desktops
Limitations Comments
PSTN call ringback tone is not supported Teams limitation – Contact Microsoft
The Call Quality Dashboard for MicrosoftTeams Admin Center does not display data forVDI users
Teams limitation – Contact Microsoft
QoS settings in Admin Center for MicrosoftTeams do not apply for VDI users
Citrix Workspace app limitation
Additional information
• Monitor, troubleshoot, and support Microsoft Teams• Deploy the Teams desktop app to the VM• Install Microsoft Teams using MSI (VDI Installation section)• Thin clients• Skype for Business Network Assessment Tool• Understand Microsoft Teams and Skype for Business coexistence and interoperability
Monitor, troubleshoot, and support Microsoft Teams
April 14, 2021
Monitor Teams
This section provides guidelines for monitoring Microsoft Teams optimization with HDX.If the user is running in optimizedmode andHdxTeams.exe is running on the clientmachine, there isa process in the VDA called WebSocketAgent.exe running in the session. Use the ActivityManagerin Director to see the application.
© 1999–2022 Citrix Systems, Inc. All rights reserved. 451
Citrix Virtual Apps and Desktops
With the VDA minimum version 1912, you can monitor active Teams calls using the Citrix HDX Mon‑itor (minimum version 3.11). The Citrix Virtual Apps and Desktops product ISO contains the latesthdxmonitor.msi in the folder layout\image-full\Support\HDX Monitor.
For more information, seeMonitoring in the Knowledge Center article CTX253754.
Troubleshoot
This section provides troubleshooting tips for issues that you might encounter when using optimiza‑tion for Microsoft Teams. For more information, see CTX253754.
On the Virtual Delivery Agent
There are four services installed by BCR_x64.msi. Only two are responsible for Microsoft Teams redi‑rection in the VDA.
• CitrixHDXTeamsRedirectionService establishes the virtual channel used inMicrosoftTeams.The service relies on CtxSvcHost.exe.
• Citrix HDX HTML5 Video Redirection Service runs as WebSocketService.exe listening on127.0.0.1:9002 TCP. WebSocketService.exe performs twomain functions:
© 1999–2022 Citrix Systems, Inc. All rights reserved. 452

Citrix Virtual Apps and Desktops
i. TLS termination for secureWebSockets receives a secureWebSocket connection from vdiC‑itrixPeerConnection.js, which is a component inside the Microsoft Teams app. You can track itwith the Process Monitor. For more information about certificates, see the section “TLS andHTML5 video redirection, and browser content redirection” under Communication betweenController and VDA.
Some antivirus and desktop security software interferes with the proper functioning ofWebSocketService.exe and its certificates. While the Citrix HDX HTML5 Video Redirectionservice might be running in the services.msc console, the localhost 127.0.0.1:9002 TCPsocket is never in listening mode as seen in netstat. Trying to restart the service causes it tohang (“Stopping…”). Ensure you apply the proper exclusions for the WebSocketService.exeprocess.
ii. User sessionmapping. When theMicrosoftTeams application starts, WebSocketService.exestarts the WebSocketAgent.exe process in the user’s session in the VDA. WebSocketService.exeruns in Session 0 as a LocalSystem account.
You can use netstat to check if theWebSocketService.exe service is in an active listening statein the VDA.
Run netstat -anob -p tcp from an elevated command prompt window:
On a successful connection, the state changes to ESTABLISHED:
Important:
WebSocketService.exe listens in two TCP sockets, 127.0.0.1:9001 and 127.0.0.1:9002. Port 9001is used for browser content redirection and HTML5 video redirection. Port 9002 is used for Mi‑crosoft Teams redirection. Ensure that you don’t have any proxy configurations in the Windows
© 1999–2022 Citrix Systems, Inc. All rights reserved. 453

Citrix Virtual Apps and Desktops
OS of the VDA that can prevent a direct communication between Teams.exe and WebSocketSer‑vice.exe. Sometimes, when you configure an explicit proxy in Internet Explorer 11 (Internet Op‑tions > Connections > LAN settings > Proxy Server), connections might flow through an as‑signed proxy server. Verify thatBypass proxy server for local addresses is checkedwhen usinga manual and explicit proxy setting.
Services locations and descriptions
ServicePath to executable inWindows Server OS Log on as Description
Citrix HTML5 VideoRedirection Service
“C:\Program Files(x86)\Citrix\System32\WebSocketService.exe”/service
Local System account Provides multipleHDX Multimediaservices with theinitial frameworkrequired to performmedia redirectionbetween the virtualdesktop and theendpoint device.
Citrix HDX BrowserRedirection Service
“C:\Program Files(x86)\Citrix\System32\CtxSvcHost.exe”‑g BrowserRedirSvcs
This account (localservice)
Provides browsercontent redirectionbetween theendpoint device andthe virtual desktop.
Citrix Port ForwardingService
“C:\Program Files(x86)\Citrix\System32\CtxSvcHost.exe”‑g PortFwdSvcs
This account (localservice)
Provides portforwarding betweenthe endpoint deviceand the virtualdesktop for browsercontent redirection.
Citrix HDX TeamsRedirection Service
“C:\Program Files(x86)\Citrix\System32\CtxSvcHost.exe”‑g TeamsSvcs
Local System account Provides MicrosoftTeams redirectionbetween theendpoint device andthe virtual desktop.
© 1999–2022 Citrix Systems, Inc. All rights reserved. 454

Citrix Virtual Apps and Desktops
Citrix Workspace app
On the user’s endpoint, the Citrix Workspace app for Windows instantiates a new service called Hdx‑Teams.exe. It does so when Microsoft Teams launches in the VDA and the user tries to call or accessperipherals in self‑preview. If you don’t see this service, check the following:
1. Ensure that you installed as a minimum the Workspace App version 1905 for Windows. Do yousee HdxTeams.exe and the webrpc.dll binaries in the Workspace app installation path?
2. If you validated step1, do the following to check if HdxTeams.exe is getting launched.a) Exit Microsoft Teams on the VDA.b) Start services.msc on VDA.c) Stop the Citrix HDX Teams Redirection Service.d) Disconnect the ICA session.e) Connect the ICA session.f) Start the Citrix HDX Teams Redirection Service.g) Restart the Citrix HDX HTML5 Video Redirection Service.h) Launch Microsoft Teams on the VDA.
3. If you still don’t see HdxTeams.exe being launched on the client endpoint, do the following:a) Restart the VDA.b) Restart the client endpoint.
Support
Citrix and Microsoft jointly support the delivery of Microsoft Teams from Citrix Virtual Apps and Desk‑tops using optimization for Microsoft Teams. This joint support is the result of close collaborationbetween the two companies. If you have valid support contracts and you experience an issue withthis solution, open a support ticket with the vendor whose code you suspect to be causing the issue.That is, Microsoft for Teams or Citrix for the optimization components.
Citrix orMicrosoft receives the ticket, triages the issue, and escalates as appropriate. There is no needfor you to contact each company’s support team.
When you have a problem, we recommend you click Help > Report a Problem in the Teams UI. VDA‑side logs are automatically shared between Citrix and Microsoft to resolve technical issues faster.
Collecting logs
HDXTeams.exe logs can be found on the user’s machine at%TEMP% inside theHDXTeams folder (Ap‑pData/Local/Temp/HDXTeams). Look for a .txt file called webrpc_Day_Month_timestamp_Year.txt.
When establishing a call, these four ICE phases are required:
• Candidate gathering
© 1999–2022 Citrix Systems, Inc. All rights reserved. 455
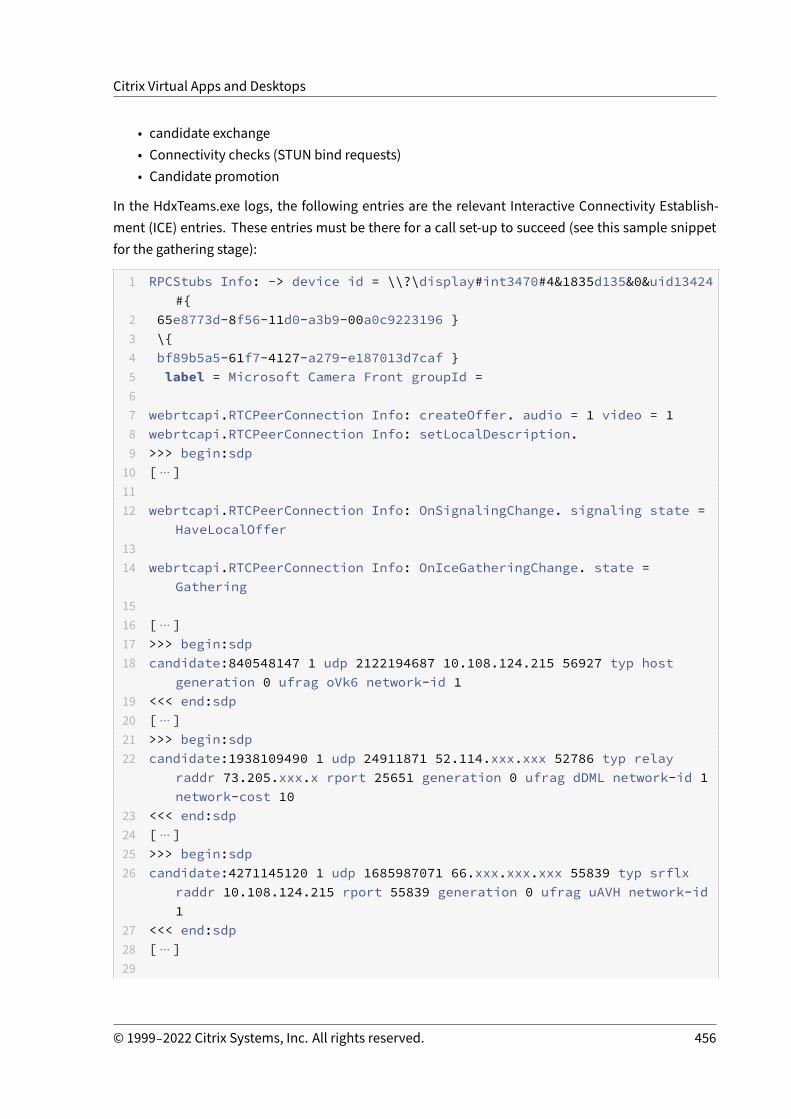
Citrix Virtual Apps and Desktops
• candidate exchange• Connectivity checks (STUN bind requests)• Candidate promotion
In the HdxTeams.exe logs, the following entries are the relevant Interactive Connectivity Establish‑ment (ICE) entries. These entries must be there for a call set‑up to succeed (see this sample snippetfor the gathering stage):
1 RPCStubs Info: -> device id = \\?\display#int3470#4&1835d135&0&uid13424#{
2 65e8773d-8f56-11d0-a3b9-00a0c9223196 }3 \{4 bf89b5a5-61f7-4127-a279-e187013d7caf }5 label = Microsoft Camera Front groupId =67 webrtcapi.RTCPeerConnection Info: createOffer. audio = 1 video = 18 webrtcapi.RTCPeerConnection Info: setLocalDescription.9 >>> begin:sdp
10 [⋯ ]1112 webrtcapi.RTCPeerConnection Info: OnSignalingChange. signaling state =
HaveLocalOffer1314 webrtcapi.RTCPeerConnection Info: OnIceGatheringChange. state =
Gathering1516 [⋯ ]17 >>> begin:sdp18 candidate:840548147 1 udp 2122194687 10.108.124.215 56927 typ host
generation 0 ufrag oVk6 network-id 119 <<< end:sdp20 [⋯ ]21 >>> begin:sdp22 candidate:1938109490 1 udp 24911871 52.114.xxx.xxx 52786 typ relay
raddr 73.205.xxx.x rport 25651 generation 0 ufrag dDML network-id 1network-cost 10
23 <<< end:sdp24 [⋯ ]25 >>> begin:sdp26 candidate:4271145120 1 udp 1685987071 66.xxx.xxx.xxx 55839 typ srflx
raddr 10.108.124.215 rport 55839 generation 0 ufrag uAVH network-id1
27 <<< end:sdp28 [⋯ ]29
© 1999–2022 Citrix Systems, Inc. All rights reserved. 456

Citrix Virtual Apps and Desktops
30 webrtcapi.RTCPeerConnection Info: OnIceGatheringChange. state =Complete webrtcapi.RTCPeerConnection Info: setRemoteDescription.
31 >>> begin:sdp32 [⋯ ]3334 webrtcapi.RTCPeerConnection Info: OnSignalingChange. signaling state =
HaveRemotelOffer3536 <!--NeedCopy-->
If there are multiple ICE candidates, the order of preference is:
1. host2. peer reflexive3. server reflexive4. transport relay
If you encounter an issue and can reproduce it consistently, we recommend clicking Help > Reporta problem in Teams. Logs are shared between Citrix and Microsoft to resolve technical issues if youopened a case with Microsoft.Capturing CDF traces before contacting Citrix Support is also beneficial. For more information, seethe Knowledge Center article CDFcontrol.
For recommendations for collecting CDF Traces, see the Knowledge Center article Recommendationsfor Collecting the CDF Traces.
VDA side CDF traces ‑ Enable the following CDF trace providers:
© 1999–2022 Citrix Systems, Inc. All rights reserved. 457
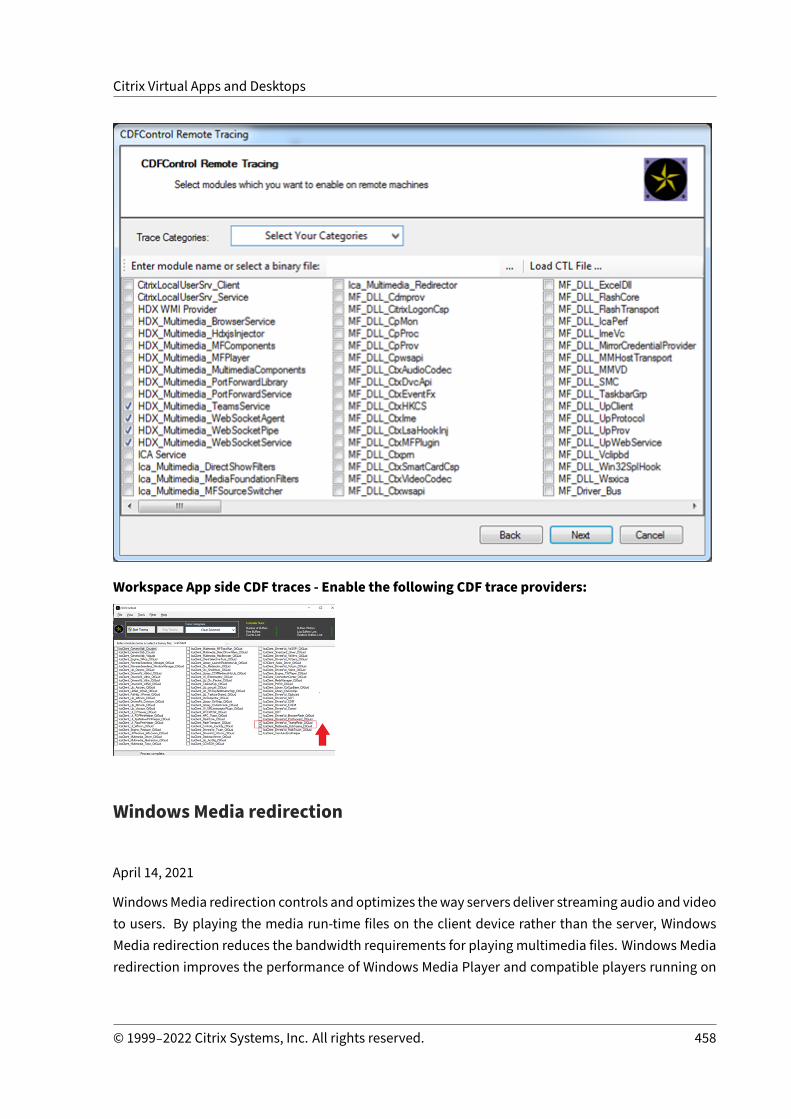
Citrix Virtual Apps and Desktops
Workspace App side CDF traces ‑ Enable the following CDF trace providers:
Windows Media redirection
April 14, 2021
WindowsMedia redirection controls and optimizes theway servers deliver streaming audio and videoto users. By playing the media run‑time files on the client device rather than the server, WindowsMedia redirection reduces the bandwidth requirements for playingmultimedia files. Windows Mediaredirection improves the performance of Windows Media Player and compatible players running on
© 1999–2022 Citrix Systems, Inc. All rights reserved. 458

Citrix Virtual Apps and Desktops
virtual Windows desktops.
If the requirements for Windows Media client‑side content fetching are not met, media delivery auto‑matically uses server‑side fetching. This method is transparent to users. You can use the Citrix Scoutto perform a Citrix Diagnosis Facility (CDF) trace from HostMMTransport.dll to determine themethodused. For more information see, Citrix Scout.
Windows Media redirection intercepts the media pipeline at the host server, captures the media datain its native compressed format, and redirects the content to the client device. The client device thenrecreates themedia pipeline to decompress and render themedia data received from the host server.Windows Media redirection works well on client devices running aWindows operating system. Thosedevices have the multimedia framework required to rebuild the media pipeline as it existed on thehost server. Linux clients use similar open‑source media frameworks to rebuild the media pipeline.
The policy settingWindows Media Redirection controls this feature and is Allowed by default. Usu‑ally, this setting increases audio and video quality rendered from the server to a level that is compara‑ble to content played locally on a client device. In the rare cases, media playing usingWindowsMediaredirection appears worse than media rendered using basic ICA compression and regular audio. Youcan disable this feature by adding theWindowsMedia Redirection setting to a policy and setting itsvalue to Prohibited.
For more information about the policy settings, see Multimedia policy settings.
Limitation:
Whenyou’reusingWindowsMediaPlayer andRemoteAudio&VideoExtensions (RAVE) enabled insidea session, a black screenmight appear. This black screenmight appear if you right‑click on the videocontent and select Always showNow Playing on top.
General content redirection
April 14, 2021
Content redirectionallows you to controlwhether users access informationbyusingapplicationspub‑lished on servers or by using applications running locally on user devices.
Client folder redirection
Client folder redirection changes the way client‑side files are accessible on the host‑side session.
• When you enable only client drive mapping on the server, client‑side full volumes are automat‑ically mapped to the sessions as Universal Naming Convention (UNC) links.
• When you enable client folder redirection on the server and the user configures it on the Win‑dows desktop device, the portion of the local volume specified by the user is redirected.
© 1999–2022 Citrix Systems, Inc. All rights reserved. 459
Citrix Virtual Apps and Desktops
Host to client redirection
Consider using host to client redirection for specific uncommon use cases. Normally, other forms ofcontent redirectionmight bebetter. We support this typeof redirectiononly onMulti‑sessionOSVDAsand not on Single‑session OS VDAs.
Local App Access and URL redirection
Local App Access seamlessly integrates locally installed Windows applications in to a hosted desktopenvironment. It does so without changing from one computer to another.
HDX technologyprovidesgenericUSBredirection for specialtydevices thatdon’thaveanyoptimizedsupport or where it is unsuitable.
Client folder redirection
April 14, 2021
Client folder redirectionchanges thewayclient‑side filesareaccessibleon thehost‑side session. If youenable only client drive mapping on the server, client‑side full volumes are automatically mapped asUniversal Naming Convention (UNC) links to the sessions. When you enable client folder redirectionon the server and the user configures it on the user device, the portion of the local volume specifiedby the user is redirected.
Only the user‑specified folders appear as UNC links inside sessions. That is, instead of the completefile system on the user device. If you disable UNC links through the registry, client folders appear asmapped drives inside the session.
Client folder redirection is supported on Windows Single‑session OSmachines only.
Client folder redirection for an external USB drive is not saved on detaching and reattaching the de‑vice.
Enable client folder direction on the server. Then, on the client device, specify which folders to redi‑rect. The application you use to specify the client folder options is includedwith the Citrix Workspaceapp supplied with this release.
Requirements:
For servers:
• Windows Server 2019, Standard and Datacenter Editions• Windows Server 2016, Standard and Datacenter Editions• Windows Server 2012 R2, Standard and Datacenter Editions
For Clients:
© 1999–2022 Citrix Systems, Inc. All rights reserved. 460

Citrix Virtual Apps and Desktops
• Windows 10, 32‑bit and 64‑bit editions (minimum version 1607)• Windows 8.1, 32‑bit and 64‑bit editions (including Embedded edition)• Windows 7, 32‑bit and 64‑bit editions (including Embedded edition)
Warning
Editing the registry incorrectly can cause serious problems that might require you to reinstallyour operating system. Citrix cannot guarantee that problems resulting from the incorrect useof Registry Editor can be solved. Use Registry Editor at your own risk. Be sure to back up theregistry before you edit it.
1. On the server:a) Create a key: HKEY_LOCAL_MACHINE\SOFTWARE\Wow6432Node\Citrix\Client Folder
Redirection.b) Create a REG_DWORD value.
• Name: CFROnlyModeAvailable• Type: REG_DWORD• Data: Set to 1
2. On the user device:a) Ensure that the latest version of Citrix Workspace app is installed.b) From the Citrix Workspace app installation directory, start CtxCFRUI.exe.c) Choose the Custom radio button and add, edit, or remove folders.d) Disconnect and reconnect your sessions for the setting to take effect.
Host to client redirection
July 21, 2021
Host to client redirection allows URLs, embedded as hyperlinks in applications running on a Citrixsession, to open using the corresponding application on the user endpoint device. Some commonuse cases for host to client redirection include:
• Redirection ofwebsites in caseswhere the Citrix server doesn’t have Internet or network accessto the source.
• Redirection of websites when running a web browser inside the Citrix session is not desired forsecurity, performance, compatibility, or scalability reasons.
• Redirection of specific URL types in cases where the required applications to open the URL arenot installed on the Citrix server.
Host to client redirection is not intended for URLs that you access on awebpage or type in the addressbar of the web browser running in the Citrix session. For redirection of URLs in web browsers, seeBidirectional URL redirection or Browser content redirection.
© 1999–2022 Citrix Systems, Inc. All rights reserved. 461

Citrix Virtual Apps and Desktops
System requirements
• Multi‑session OS VDA• Supported clients:
– Citrix Workspace app for Windows– Citrix Workspace app for Mac– Citrix Workspace app for Linux– Citrix Workspace app for HTML5– Citrix Workspace app for Chrome
The client devicemust have an application installed and configured for handling the redirection of theURL types.
Configuration
Use the Host to client redirection Citrix policy to enable this functionality. Host to client redirectionis disabled by default. After you enable the Host to client redirection policy, the Citrix Launcher ap‑plication registers with the Windows server to ensure that it can intercept URLs and send them to theclient device.
Then you must configure the Windows Group Policy to use Citrix Launcher as the default applicationfor the required URL types. On the Citrix server VDA, create the ServerFTAdefaultPolicy.xml file andinsert the following XML code.
1 <?xml version="1.0" encoding="UTF-8"?>23 <DefaultAssociations>45 <Association Identifier="http" ProgId="ServerFTAHTML" ApplicationName="
ServerFTA" />67 <Association Identifier="https" ProgId="ServerFTAHTML" ApplicationName=
"ServerFTA" />89 </DefaultAssociations>
10 <!--NeedCopy-->
From the Group Policy management console, go toComputer configuration > Administrative Tem‑plates >WindowsComponents > File Explorer > Set adefault associations configuration file, andsave your ServerFTAdefaultPolicy.xml file.
Note:
If a Citrix server doesn’t have the Group Policy settings, Windows prompts users to select an
© 1999–2022 Citrix Systems, Inc. All rights reserved. 462
Citrix Virtual Apps and Desktops
application for opening URLs.
By default, we support redirection of the following URL types:
• HTTP• HTTPS• RTSP• RTSPU• PNM• MMS
To include additional standard or custom URL types on the list for redirection, create a new Associa‑tion Identifier line in the ServerFTAdefaultPolicy.xml file referenced earlier. For example:
<Association Identifier="ftp"ProgId="ServerFTAHTML"ApplicationName="ServerFTA"/>
<Association Identifier="mailto"ProgId="ServerFTAHTML"ApplicationName="ServerFTA"/>
<Association Identifier="customtype1"ProgId="ServerFTAHTML"ApplicationName="ServerFTA"/>
<Association Identifier="customtype2"ProgId="ServerFTAHTML"ApplicationName="ServerFTA"/>
Adding URL types to the list also requires client configuration. Create the following registry key andvalues on the Windows client.
Note:
Editing the registry incorrectly can cause serious problems that might require you to reinstallyour operating system. Citrix cannot guarantee that problems resulting from the incorrect useof Registry Editor can be solved. Use Registry Editor at your own risk. Be sure to back up theregistry before you edit it.
• Key: HKEY_LOCAL_MACHINE\SOFTWARE\WOW6432Node\Policies\Citrix\ICA Client\SFTA• Value name: ExtraURLProtocols• Value type: REG_SZ• Value data: Specify the required URL types separated by semicolon. Include everything beforethe authority portion of the URL. For example:ftp://;mailto:;customtype1://;custometype2://
You can add URL types only for Windows clients. Clients missing the registry settings above rejectredirection back to the Citrix session. Client must have an application installed and configured tohandle the specified URL types.
© 1999–2022 Citrix Systems, Inc. All rights reserved. 463

Citrix Virtual Apps and Desktops
To remove URL types from the default redirection list, create the following registry key and values onthe server VDA.
• Key: HKEY_LOCAL_MACHINE\SOFTWARE\Wow6432Node\Citrix\SFTA
• Value name: DisableServerFTA
• Value type: DWORD
• Value data: 1
• Value name: NoRedirectClasses
• Value type: REG_MULTI_SZ
• Value data: Specify any combination of the values: http, https, rtsp, rtspu, pnm, or mms.Type multiple values on separate lines. For example:
http
https
rtsp
To enable host to client redirection for a specific set of websites, create a registry key and values onthe server VDA.
• Key: HKEY_LOCAL_MACHINE\SOFTWARE\Wow6432Node\Citrix\SFTA• Value name: ValidSites• Value type: REG_MULTI_SZ• Value data: Specify any combination of fully qualified domain names (FQDNs). Type multipleFQDNs on separate lines. Include the FQDN only, without protocols (http:// or https://).An FQDN can include an asterisk (*) as a wildcard character in the leftmost position only. Thiswildcard matches a single level of domain, which is consistent with the rules in RFC 6125. Forexample:
www.exmaple.com
*.example.com
Note:
You cannot use the ValidSites key in combination with the DisableServerFTA andNoRedirect‑Classes keys.
Server VDA default browser configuration
You can enable host to client redirection to supersede anydefault browser configuration on the serverVDA. If a web URL is not redirected, the Citrix launcher passes the URL to the browser configured in
© 1999–2022 Citrix Systems, Inc. All rights reserved. 464

Citrix Virtual Apps and Desktops
the command_backup registry key. The key points to Internet Explorer by default, but you canmodifyit to include the path to a different browser.
• Internet Explorer (Default)
– Key: HKEY_CLASSES_ROOT\http\shell\open\command_backup
– Value name: Default
– Value type: REG_SZ
– Value data: "c:\program files\internet explorer\iexplore.exe"%1
– Key: HKEY_CLASSES_ROOT\https\shell\open\command_backup‘
– Value name: Default
– Value type: REG_SZ
– Value data: "c:\program files\internet explorer\iexplore.exe"%1
• Google Chrome
– Key: HKEY_CLASSES_ROOT\http\shell\open\command_backup
– Value name: Default
– Value type: REG_SZ
– Value data: "C:\Program Files (x86)\Google\Chrome\Application\chrome.exe"%1
– Key: HKEY_CLASSES_ROOT\https\shell\open\command_backup
– Value name: Default
– Value type: REG_SZ
– Value data: "C:\Program Files (x86)\Google\Chrome\Application\chrome.exe"%1
• Microsoft Edge
– Key: HKEY_CLASSES_ROOT\http\shell\open\command_backup
– Value name: Default
– Value type: REG_SZ
– Value data: "C:\Program Files (x86)\Microsoft\Edge\Application\msedge.exe"%1
– Key: HKEY_CLASSES_ROOT\https\shell\open\command_backup
– Value name: Default
© 1999–2022 Citrix Systems, Inc. All rights reserved. 465

Citrix Virtual Apps and Desktops
– Value type: REG_SZ
– Value data: "C:\Program Files (x86)\Microsoft\Edge\Application\msedge.exe"%1
Local App Access and URL redirection
April 14, 2021
Introduction
Local App Access seamlessly integrates locally installed Windows applications into a hosted desktopenvironment without switching from one desktop to another. With Local App Access, you can:
• Access applications installed locally on a physical laptop, PC, or other device directly from thevirtual desktop.
• Provide a flexible application delivery solution. If users have local applications that you can‑not virtualize or that IT does not maintain, those applications still behave as though they areinstalled on a virtual desktop.
• Eliminate the double‑hop latency when applications are hosted separately from the virtualdesktop. Do so by putting a shortcut to the published application on the user’s Windowsdevice.
• Use applications such as:– Video conferencing software such as GoToMeeting.– Specialty or niche applications that are not yet virtualized.– Applications and peripherals that would otherwise transfer large amounts of data froma user device to a server and back to the user device. For example, DVD burners and TVtuners.
In Citrix Virtual Apps and Desktops, hosted desktop sessions use URL redirection to start Local AppAccess applications. URL redirection makes the application available under more than one URL ad‑dress. It launches a local browser (based on the browser’s URL block list) by selecting embedded linkswithin a browser in a desktop session. If you navigate to a URL that is not present in the block list, theURL is opened in the desktop session again.
URL redirection works only for desktop sessions, not application sessions. The only redirection fea‑ture you can use for application sessions is host‑to‑client content redirection, which is a type of serverFTA (File TypeAssociation) redirection. This FTA redirects certainprotocols to the client, suchasHTTP,HTTPS, RTSP, or MMS. For example, if you only open embedded links with HTTP, the links directlyopen with the client application. There is no URL block list or allow list support.
© 1999–2022 Citrix Systems, Inc. All rights reserved. 466

Citrix Virtual Apps and Desktops
When Local App Access is enabled, URLs that are displayed to users as links from locally running ap‑plications, from user‑hosted applications, or as shortcuts on the desktop are redirected in one of thefollowing ways:
• From the user’s computer to the hosted desktop• From the Citrix Virtual Apps and Desktops server to the user’s computer• Rendered in the environment in which they are started (not redirected)
To specify the redirection path of content from specific websites, configure the URL allow list andURLblock list on the Virtual Delivery Agent. Those lists contain multi‑string registry keys that specify theURL redirection policy settings. For more information, see the Local App Access policy settings.
URLs can be rendered on the VDA with the following exceptions:
• Geo/Locale information — Websites that require locale information, such as msn.com ornews.google.com (opens a country specific page based on the Geo). For example, if the VDAis provisioned from a data center in the UK and the client is connecting from India, the userexpects to see in.msn.com. Instead, the user sees uk.msn.com.
• Multimedia content — Websites containing rich media content, when rendered on the clientdevice, give the end users a native experience and also save bandwidth even in high latencynetworks. This feature redirects sites with othermedia types such as Silverlight. This process isin a secure environment. That is, the URLs that the administrator approves are run on the clientwhile the rest of the URLs are redirected to the VDA.
In addition to URL redirection, you can use FTA redirection. FTA starts local applications when a fileis encountered in the session. If the local app is started, the local app must have access to the file toopen it. Therefore, you can only open files that reside on network shares or on client drives (usingclient drive mapping) using local applications. For example, when opening a PDF file, if a PDF readeris a local app, then the file opens using that PDF reader. Because the local app can access the filedirectly, there is no network transfer of the file through ICA to open the file.
Requirements, considerations, and limitations
We support Local App Access on the valid operating systems for VDAs for Windows Multi‑session OSand for VDAs for Windows Single‑session OS. Local App Access requires Citrix Workspace app for Win‑dows version 4.1 (minimum). The following browsers are supported:
• Internet Explorer 11. You can use Internet Explorer 8, 9, or 10, but Microsoft supports (and Citrixrecommends using) version 11.
• Firefox 3.5 through 21.0• Chrome 10
Reviewthe followingconsiderationsand limitationswhenusingLocalAppAccessandURL redirection.
• Local App Access is designed for full‑screen, virtual desktops spanning all monitors:
© 1999–2022 Citrix Systems, Inc. All rights reserved. 467

Citrix Virtual Apps and Desktops
– The user experience can be confusing if you use Local App Access with a virtual desktopthat runs in windowedmode or does not cover all monitors.
– Multiple monitors — When one monitor is maximized, it becomes the default desktop forall applications started in that session. This default occurs even if the subsequent applica‑tions typically start on another monitor.
– The feature supports one VDA. There is no integration with multiple concurrent VDAs.• Some applications can behave unexpectedly, affecting users:
– The drive letters might confuse users, such as local C: rather than virtual desktop C: drive.– Available printers in the virtual desktop are not available to local applications.– Applications that require elevated permissions cannot be started as client‑hosted applica‑tions.
– There is no special handling for single‑instance applications (such as Windows MediaPlayer).
– Local applications appear with the Windows theme of the local machine.– Full‑screen applications are not supported. These applications include applications thatopen toa full screen, suchasPowerPoint slide showsorphotoviewers that cover theentiredesktop.
– Local App Access copies the properties of the local application (such as the shortcuts onthe client’s desktop and Start menu) on the VDA. However, it does not copy other proper‑ties such as shortcut keys and read‑only attributes.
– Applications that customize how overlapping window order is handled can have unpre‑dictable results. For example, some windowsmight be hidden.
– Shortcuts are not supported, includingMy Computer, Recycle Bin, Control Panel, NetworkDrive shortcuts, and folder shortcuts.
– The following file types and files are not supported: custom file types, files with no associ‑ated programs, zip files, and hidden files.
– Taskbar grouping is not supported for mixed 32‑bit and 64‑bit client‑hosted or VDA appli‑cations. That is, grouping 32‑bit local applications with 64‑bit VDA applications.
– Applications cannot be started using COM. For example, if you click an embedded Officedocument fromwithin anOffice application, the process start cannot be detected, and thelocal application integration fails.
• Double‑hop scenarios, where a user is starting a virtual desktop from within another virtualdesktop session, are not supported.
• URL redirection supports only explicit URLs (that is, URLs appearing in the browser’s addressbar or found using the in‑browser navigation, depending on the browser).
• URL redirection works only with desktop sessions, not with application sessions.• The local desktop folder in a VDA session does not allow users to create files.• Multiple instances of a locally running application behave according to the taskbar settings es‑tablished for the virtual desktop. However, shortcuts to locally running applications are not
© 1999–2022 Citrix Systems, Inc. All rights reserved. 468
Citrix Virtual Apps and Desktops
grouped with running instances of those applications. They are also not grouped with runninginstances of hosted applications or pinned shortcuts to hosted applications. Users can closeonly windows of locally running applications from the Taskbar. Although users can pin localapplication windows to the desktop Taskbar and Start menu, the applications might not startconsistently when using these shortcuts.
Interaction with Windows
The Local App Access interaction with Windows includes the following behaviors.
• Windows 8 and Windows Server 2012 shortcut behavior– WindowsStore applications installedon the client are not enumeratedaspart of Local AppAccess shortcuts.
– Image and video files are opened by default using Windows store applications. However,Local App Access enumerates the Windows store applications and opens shortcuts withdesktop applications.
• Local Programs– For Windows 7, the folder is available in the Start menu.– For Windows 8, Local Programs is available only when the user chooses All Apps as a cat‑egory from the Start screen. Not all subfolders are displayed in Local Programs.
• Windows 8 graphics features for applications– Desktopapplications are restricted to thedesktoparea andare coveredby theStart screenand Windows 8 style applications.
– Local App Access applications do not behave like desktop applications in multi‑monitormode. In multi‑monitor mode, the Start screen and the desktop display on different mon‑itors.
• Windows 8 and Local App Access URL Redirection– Because Windows 8 Internet Explorer has no add‑ons enabled, use desktop Internet Ex‑plorer to enable URL redirection.
– InWindows Server 2012, Internet Explorer disables add‑ons by default. To implementURLRedirection, disable the Internet Explorer enhanced configuration. Then reset the InternetExplorer options and restart to ensure that add‑ons are enabled for standard users.
Configure Local App Access and URL redirection
To use Local App Access and URL redirection with Citrix Workspace app:
• Install theCitrixWorkspaceappon the local clientmachine. Youcanenableboth featuresduringthe Citrix Workspace app installation or you can enable Local App Access template using theGroup Policy editor.
© 1999–2022 Citrix Systems, Inc. All rights reserved. 469

Citrix Virtual Apps and Desktops
• Set the Allow local app access policy setting to Enabled. You can also configure URL allow listand block list policy settings for URL redirection. For more information, see Local App Accesspolicy settings.
Enable Local App Access and URL redirection
To enable Local App Access for all local applications, follow these steps:
1. Start Citrix Studio.• For on‑premises deployments, open Citrix Studio from the Start menu.• For Cloud service deployments, go to Citrix Cloud > Virtual Apps and Desktops service> Manage tab.
2. In the Studio navigation pane, click Policies.3. In the Actions pane, click Create Policy.4. In the Create Policy window, type “Allow Local App Access” in the search box and then click
Select.5. In the Edit Settingwindow, select Allowed. By default, the Allow local app access policy is pro‑
hibited. When this setting is allowed, the VDA allows the end‑user to decide whether publishedapplications and Local App Access shortcuts are enabled in the session. (When this setting isprohibited, both published applications and Local App Access shortcuts do not work for theVDA.) This policy setting applies to the entire machine and the URL redirection policy.
6. In the Create Policy window, type “URL redirection white list” in the search box and then clickSelect. The URL redirection allow list specifies URLs to open in the default browser of the re‑mote session.
7. In the Edit Setting window, click Add to add the URLs and then clickOK.8. In the Create Policy window, type “URL redirection black list” in the search box and then click
Select. The URL redirection block list specifies URLs that are redirected to the default browserrunning on the endpoint.
9. In the Edit Setting window, click Add to add the URLs and then clickOK.10. On the Settings page, clickNext.11. On the Users and Machines page, assign the policy to the applicable Delivery Groups and then
clickNext.12. On the Summary page, review the settings and then click Finish.
To enable URL redirection for all local applications during Citrix Workspace app installation, followthese steps:
1. Enable URL redirection when you install the Citrix Workspace app for all users on a machine.Doing so also registers the browser add‑ons required for URL redirection.
2. From the command prompt, run the appropriate command to install the Citrix Workspace appusing one of the following options:
• For CitrixReceiver.exe, use /ALLOW_CLIENTHOSTEDAPPSURL=1.
© 1999–2022 Citrix Systems, Inc. All rights reserved. 470

Citrix Virtual Apps and Desktops
• For CitrixReceiverWeb.exe, use /ALLOW_CLIENTHOSTEDAPPSURL=1.
Enable the Local App Access template using the Group Policy editorNote:
• Before you enable the Local App Access template using the Group Policy editor, add thereceiver.admx/adml template files to the local GPO. Formore information, see Configuringthe Group Policy Object administrative template.
• Citrix Workspace app for Windows template files are available in the local GPO in Admin‑istrative Templates > Citrix Components > Citrix Workspace folder only when you addthe CitrixBase.admx/CitrixBase.adml to the %systemroot%\policyDefinitions folder.
To enable the Local App Access template using the Group Policy editor, follow these steps:
1. Run gpedit.msc.2. Go to Computer Configuration > Administrative Templates > Classic Administrative Tem‑
plates (ADM) > Citrix Components > Citrix Workspace > User Experience.3. Click Local App Access settings.4. Select Enabled and then select Allow URL Redirection. For URL redirection, register browser
add‑ons using the command line described in the Register browser add‑ons section furtherdown in this article.
Provide access only to published applications
You can provide access to published applications using one of the following two ways:
Use the Registry Editor.
1. On the server where Citrix Studio is installed, run regedit.exe.2. Navigate to HKEY_LOCAL_MACHINE\SOFTWARE\Wow6432Node\Citrix\DesktopStudio.3. Add the REG_DWORD entry ClientHostedAppsEnabled and a value of 1. (A 0 value disables
Local App Access.)
Use the PowerShell SDK.
1. Open PowerShell on the machine where the Delivery Controller is running.2. Enter the followingcommand: set-configsitemetadata -name "studio_clientHostedAppsEnabled
"-value "true".
To have access to Add Local App Access Application in a Cloud service deployment, use the CitrixVirtual Apps and Desktops Remote PowerShell SDK. Formore information, see Citrix Virtual Apps andDesktops Remote PowerShell SDK.
1. Download the installer:
https://download.apps.cloud.com/CitrixPoshSdk.exe
© 1999–2022 Citrix Systems, Inc. All rights reserved. 471

Citrix Virtual Apps and Desktops
2. Run these commands:
a) asnp citrix.*b) Get-XdAuthentication
3. Enter the followingcommand: set-configsitemetadata -name “studio_clientHostedAppsEnabled” -value “true”.
After you complete the applicable preceding steps, follow these steps to continue.
1. Open Citrix Studio from the Startmenu.
2. In the Studio navigation pane, click Applications.
3. In the upper middle pane, right‑click the blank area and select Add Local App Access Appli‑cation from the context menu. You can also click Add Local App Access Application in theActions pane. To display the Add Local App Access Application option in the Actions pane, clickRefresh.
4. Publish Local App Access application.
• The Local Application Access wizard launches with an Introduction page, which you canremove from future launches of the wizard.
• The wizard guides you through the Groups, Location, Identification, Delivery, and Sum‑mary pages described below. When you are finished with each page, click Next until youreach the Summary page.
• On the Groups page, select one or more Delivery Groups where the new applications willbe added, and then clickNext.
• On the Location page, type the full executable path of the application on the user’s lo‑cal machine, and type the path to the folder where the application is located. Citrix rec‑ommends that you use the system environment variable path; for example, %Program‑Files(x86)%\Internet Explorer\iexplore.exe.
• On the Identificationpage, accept the default values or type the information that youwantand then clickNext.
• On the Delivery page, configure how this application is delivered to users and then clickNext. You can specify the icon for the selected application. You can also specify whetherthe shortcut to the local application on the virtual desktop is visible on the Startmenu, thedesktop, or both.
• On the Summary page, review the settings and then click Finish to exit the Local Applica‑tion Access wizard.
Register browser add‑ons
© 1999–2022 Citrix Systems, Inc. All rights reserved. 472

Citrix Virtual Apps and Desktops
Note:
The browser add‑ons required for URL redirection are registered automatically when you installthe Citrix Workspace app from the command line using the /ALLOW_CLIENTHOSTEDAPPSURL=1option.
You can use the following commands to register and unregister one or all add‑ons:
• To register add‑ons on a client device: <client‑installation‑folder>\redirector.exe /reg<browser>• To unregister add‑ons on a client device: <client‑installation‑folder>\redirector.exe /un‑reg<browser>
• To register add‑ons on a VDA: <VDAinstallation‑folder>\VDARedirector.exe /reg<browser>• To unregister add‑ons on a VDA: <VDAinstallation‑folder>\VDARedirector.exe /unreg<browser>
Where <browser> is Internet Explorer, Firefox, Chrome, or All.
Forexample, the followingcommandregisters InternetExploreradd‑onsonadevice running theCitrixWorkspace app.
C:\Program Files\Citrix\ICA Client\redirector.exe/regIE
The following command registers all add‑ons on a Windows Multi‑session OS VDA.
C:\Program Files (x86)\Citrix\System32\VDARedirector.exe /regAll
URL interception across browsers
• By default, Internet Explorer redirects the specified URL. If the URL is not in the blacklist but thebrowser orwebsite redirects it to anotherURL, the finalURL is not redirected. It is not redirectedeven if it is on the block list.
For URL redirection to work correctly, enable the add‑on when prompted by the browser. If the add‑ons that are using Internet options or the add‑ons in the prompt are disabled, URL redirection doesnot work correctly.
• The Firefox add‑ons always redirect the URLs.
When an add‑on is installed, Firefox prompts to allow or prevent installing the add‑on on a new tabpage. Allow the add‑on for the feature to work.
• The Chrome add‑on always redirects the final URL that is navigated, and not the entered URLs.
The extensions have been installed externally. When you disable the extension, the URL redirectionfeature does not work in Chrome. If the URL redirection is required in Incognito mode, allow the ex‑tension to run in that mode in the browser settings.
Configure local application behavior on logoff and disconnect
© 1999–2022 Citrix Systems, Inc. All rights reserved. 473
Citrix Virtual Apps and Desktops
Note:
If you do not follow these steps to configure the settings, by default, local applications continueto run when a user logs off or disconnects from the virtual desktop. After reconnection, localapplications are reintegrated if they are available on the virtual desktop.
1. On the hosted desktop, run regedit.msc.
2. Navigate to HKEY_LOCAL_MACHINE\SOFTWARE\Citrix\Client Hosted Apps\Policies\Session State.
For a 64‑bit system, navigate to HKEY_LOCAL_MACHINE\SOFTWARE\wow6432node\Citrix\Client Hosted Apps\Policies\Session State.
3. Add the REG_DWORD entry Terminate and one of the values:
• 1 ‑ Local applications continue to run when a user logs off or disconnects from the virtualdesktop. Upon reconnection, local applications are reintegrated if they are available in thevirtual desktop.
• 3 ‑ Local applications close when a user logs off or disconnects from the virtual desktop.
Generic USB redirection and client drive considerations
April 14, 2021
HDX technology provides optimized support for most popular USB devices. Optimized support of‑fers an improveduser experiencewith better performance andbandwidth efficiency over aWAN.Opti‑mizedsupport is usually thebestoption, especially inhigh latencyor security‑sensitiveenvironments.
HDX technology provides generic USB redirection for specialty devices that don’t have optimizedsupport or where it is unsuitable, for example:
• The USB device has more advanced features that are not part of optimized support, such as amouse or webcam having more buttons.
• Users need functions which are not part of optimized support.• The USB device is a specialized device, such as test and measurement equipment or an indus‑trial controller.
• An application requires direct access to the device as a USB device.• The USB device only has a Windows driver available. For example, a smart card reader mightnot have a driver available for the Citrix Workspace app for Android.
• The version of the CitrixWorkspace app does not provide any optimized support for this type ofUSB device.
With generic USB redirection:
© 1999–2022 Citrix Systems, Inc. All rights reserved. 474

Citrix Virtual Apps and Desktops
• Users do not need to install device drivers on the user device.• USB client drivers are installed on the VDAmachine.
Important:
• GenericUSB redirectioncanbeused togetherwithoptimized support. If youenablegenericUSB redirection, configure Citrix USB devices policy settings for both generic USB redirec‑tion and optimized support.
• The Citrix policy setting in Client USB device optimization rules is a specific setting forgeneric USB redirection, for a particular USB device. It doesn’t apply to optimized supportas described here.
Performance considerations for USB devices
Network latency and bandwidth can affect user experience and USB device operation when usinggeneric USB redirection for some types of USB devices. For example, timing‑sensitive devices mightnot operate correctly over high‑latency low‑bandwidth links. Use optimized support instead wherepossible.
Some USB devices require high bandwidth to be usable, for example a 3Dmouse (used with 3D appsthat also typically require high bandwidth). If bandwidth cannot be increased, you might be ableto mitigate the issue by tuning bandwidth usage of other components using the bandwidth policysettings. For more information, see Bandwidth policy settings for Client USB device redirection, andMulti‑stream connection policy settings.
Security considerations for USB devices
Some USB devices are security‑sensitive by nature, for example, smart card readers, fingerprint read‑ers, and signature pads. Other USB devices such as USB storage devices can be used to transmit datathat might be sensitive.
USB devices are often used to distribute malware. Configuration of Citrix Workspace app and CitrixVirtual Apps and Desktops can reduce, but not eliminate, risk from these USB devices. This situationapplies whether generic USB redirection or optimized support is used.
Important:
For security‑sensitive devices and data, always secure the HDX connection using either TLS orIPsec.
Only enable support for the USB devices that you need. Configure both generic USB redirectionand optimized support to meet this need.
Provide guidance to users for safe use of USB devices:
© 1999–2022 Citrix Systems, Inc. All rights reserved. 475

Citrix Virtual Apps and Desktops
• Use only USB devices that have been obtained from a trustworthy source.• Don’t leaveUSBdevices unattended in open environments ‑ for example, a flash drive in aninternet cafe.
• Explain the risks of using a USB device onmore than one computer.
Compatibility with generic USB redirection
Generic USB redirection is supported for USB 2.0 and earlier devices. Generic USB redirection is alsosupported for USB 3.0 devices connected to a USB 2.0 or USB 3.0 port. Generic USB redirection doesnot support USB features introduced in USB 3.0, such as super speed.
These Citrix Workspace apps support generic USB redirection:
• Citrix Workspace app for Windows, see Configuring application delivery.• Citrix Workspace app for Mac, see Citrix Workspace app for Mac.• Citrix Workspace app for Linux, see Optimize.• Citrix Workspace app for Chrome OS, see Citrix Workspace app for Chrome.
For Citrix Workspace app versions, see the Citrix Workspace app feature matrix.
If you are using earlier versions of the CitrixWorkspace app, see the CitrixWorkspace app documenta‑tion to confirm that generic USB redirection is supported. See Citrix Workspace app documentationfor any restrictions on USB device types that are supported.
Generic USB redirection is supported for desktop sessions from VDA for Single‑session OS version 7.6through current.
Generic USB redirection is supported for desktop sessions from VDA for Multi‑session OS version 7.6through current, with these restrictions:
• The VDAmust be running Windows Server 2012 R2 or Windows Server 2016.• The USB device driversmust be fully compatible with the Remote Desktop Session Host (RDSH)for the VDA OS (Windows 2012 R2), including full virtualization support.
Some types of USB devices are not supported for generic USB redirection because it would not beuseful to redirect them:
• USBmodems.• USB network adapters.• USB hubs. The USB devices connected to USB hubs are handled individually.• USB virtual COM ports. Use COM port redirection rather than generic USB Redirection.
For information on USB devices that have been tested with generic USB redirection, see Citrix ReadyMarketplace. Some USB devices do not operate correctly with generic USB redirection.
© 1999–2022 Citrix Systems, Inc. All rights reserved. 476

Citrix Virtual Apps and Desktops
Configure generic USB redirection
You can control, and separately configure, which types of USB devices use generic USB redirection:
• On the VDA, using Citrix policy settings. For more information, see Redirection of client drivesand user devices and USB devices policy settings in the Policy settings reference
• In Citrix Workspace app, using Citrix Workspace app‑dependent mechanisms. For example, anAdministrative Template controls registry settings that configure Citrix Workspace app for Win‑dows. By default, USB redirection is allowed for certain classes of USB devices and denied forothers. Formore information, see Configure in the CitrixWorkspace app forWindows documen‑tation.
This separate configuration provides flexibility. For example:
• If two different organizations or departments are responsible for the Citrix Workspace app andVDA, they can enforce control separately. This configuration applies when a user in one organi‑zation accesses an application in another organization.
• Citrix policy settings can control USB devices that are allowed only for certain users or for usersconnecting only over a LAN (rather than by using Citrix Gateway).
Enable generic USB redirection
To enable generic USB Redirection, and not require manual redirection by the user, configure bothCitrix policy settings and Citrix Workspace app connections preferences.
In Citrix policy settings:
1. Add the Client USB device redirection to a policy and set its value to Allowed.
© 1999–2022 Citrix Systems, Inc. All rights reserved. 477

Citrix Virtual Apps and Desktops
2. (Optional) To update the list of USB devices available for redirection, add the Client USB deviceredirection rules setting to a policy and specify the USB policy rules.
In Citrix Workspace app:
3. Specify that devices are connected automatically without manual redirection. You can do thisusing an Administrative template or in the Citrix Workspace app forWindows > Preferences >Connections.
© 1999–2022 Citrix Systems, Inc. All rights reserved. 478

Citrix Virtual Apps and Desktops
If you specified the USB policy rules for the VDA in the previous step, specify those same policy rulesfor the Citrix Workspace app.
For thin clients, consult the manufacturer for details of USB support and any required configuration.
Configuring the types of USB devices available for generic USB redirection
USB devices are automatically redirected when USB support is enabled and the USB user preferencesettings are set to connect USB devices automatically. USB devices are also automatically redirectedwhen the connection bar is not present.
Users can explicitly redirect devices that are not automatically redirected by selecting the devicesfrom the USB device list. For more information, the Citrix Workspace app for Windows user help arti‑cle, Display your devices in the Desktop Viewer.
© 1999–2022 Citrix Systems, Inc. All rights reserved. 479
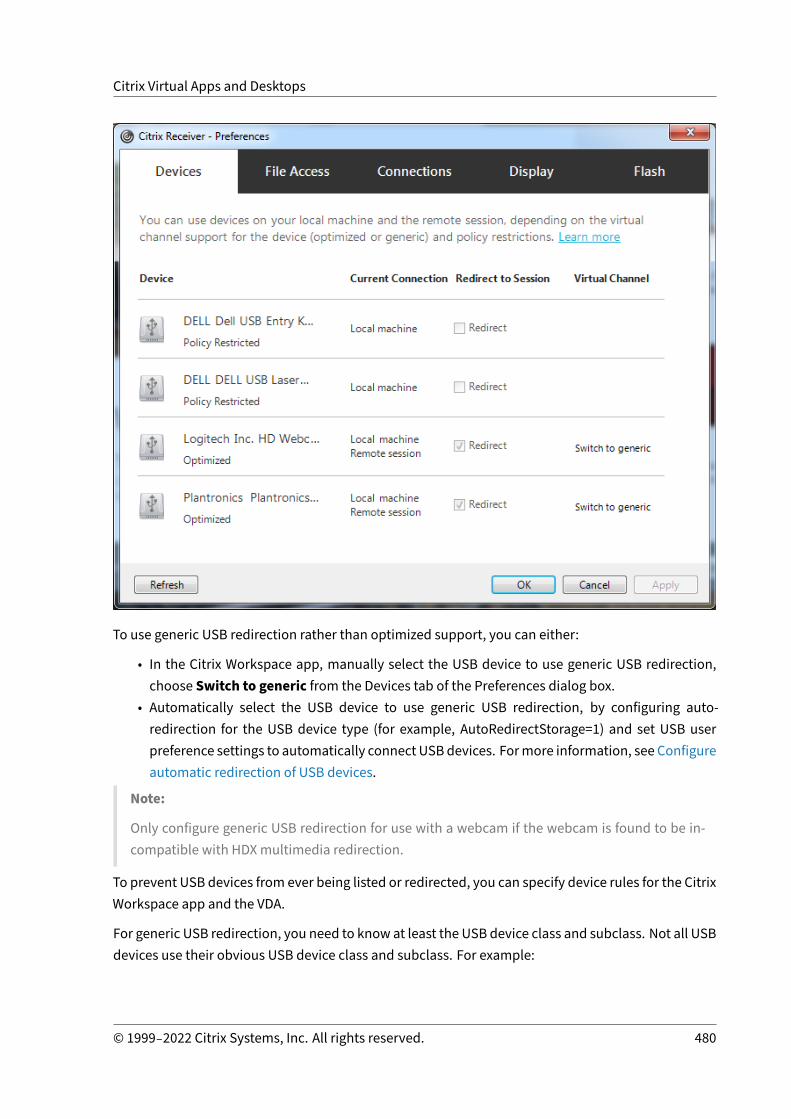
Citrix Virtual Apps and Desktops
To use generic USB redirection rather than optimized support, you can either:
• In the Citrix Workspace app, manually select the USB device to use generic USB redirection,choose Switch to generic from the Devices tab of the Preferences dialog box.
• Automatically select the USB device to use generic USB redirection, by configuring auto‑redirection for the USB device type (for example, AutoRedirectStorage=1) and set USB userpreference settings to automatically connect USBdevices. Formore information, see Configureautomatic redirection of USB devices.
Note:
Only configure generic USB redirection for use with a webcam if the webcam is found to be in‑compatible with HDXmultimedia redirection.
To prevent USB devices from ever being listed or redirected, you can specify device rules for the CitrixWorkspace app and the VDA.
For generic USB redirection, you need to know at least the USB device class and subclass. Not all USBdevices use their obvious USB device class and subclass. For example:
© 1999–2022 Citrix Systems, Inc. All rights reserved. 480
Citrix Virtual Apps and Desktops
• Pens use the mouse device class.• Smart card readers can use the vendor‑defined or HID device class.
Formore precise control, you need to know the Vendor ID, Product ID, and Release ID. You can get thisinformation from the device vendor.
Important:
MaliciousUSBdevicesmightpresentUSBdevice characteristics thatdonotmatch their intendedusage. Device rules are not intended to prevent this behavior.
You control theUSBdevices available for genericUSB redirectionby specifyingUSBdevice redirectionrules for both VDA and Citrix Workspace app, to override the default USB policy rules.
For the VDA:
• Edit the administrator override rules for the Multi‑session OS machines through group policyrules. The Group Policy Management Console is included on the installation media:
– For x64: dvd root \os\lang\x64\Citrix Policy\ CitrixGroupPolicyManagement_x64.msi– For x86: dvd root \os\lang\x86\Citrix Policy\ CitrixGroupPolicyManagement_x86.msi
At Citrix Workspace app for Windows:
• Edit the user device registry. An Administrative template (ADM file) is included on the installa‑tion media so you can change the user device through the Active Directory Group Policy:dvd root \os\lang\Support\Configuration\icaclient_usb.adm
Warning:
Editing the registry incorrectly can cause serious problems that might require you to reinstallyour operating system. Citrix cannot guarantee that problems resulting from the incorrect useof Registry Editor can be solved. Use Registry Editor at your own risk. Be sure to back up theregistry before you edit it.
Theproduct default rules are stored inHKLM\SOFTWARE\Citrix\PortICA\GenericUSB\DeviceRules. Donot edit these product default rules. Instead, use them as a guide for creating administrator overriderules, which is explained later in this article. The GPO overrides are evaluated before the productdefault rules.
Theadministratoroverride rulesare stored inHKLM\SOFTWARE\Policies\Citrix\PortICA\GenericUSB\DeviceRules.GPOpolicy rules take the format {Allow:|Deny:} followedbya set of tag=valueexpressions separatedby white space.
The following tags are supported:
© 1999–2022 Citrix Systems, Inc. All rights reserved. 481

Citrix Virtual Apps and Desktops
Tag Description
VID Vendor ID from the device descriptor
PID Product ID from the device descriptor
REL Release ID from the device descriptor
Class Class from either the device descriptor or aninterface descriptor; see the USB website athttp://www.usb.org/ for available USB ClassCodes
SubClass Subclass from either the device descriptor oran interface descriptor
Prot Protocol from either the device descriptor oran interface descriptor
When creating policy rules, note the following:
• Rules are case‑insensitive.• Rules can have an optional comment at the end, introduced by ##. A delimiter is not required,and the comment is ignored for matching purposes.
• Blank and pure comment lines are ignored.• White space is used as a separator, but cannot appear in the middle of a number or identifier.For example, Deny: Class = 08 SubClass=05 is a valid rule, but Deny: Class=0 SubClass=05 is not.
• Tags must use the matching operator =. For example, VID=1230.• Each rule must start on a new line or form part of a semicolon‑separated list.
Note:
If you are using the ADM template file, you must create rules on a single line, as a semicolon‑separated list.
Examples:
• The following example shows an administrator‑defined USB policy rule for vendor and productidentifiers:
Allow: VID=046D PID=C626 ## Allow Logitech SpaceNavigator 3D Mouse Deny: VID=046D ## Deny all Logitech products
• The following example shows an administrator‑defined USB policy rule for a defined class, sub‑class, and protocol:
Deny: Class=EF SubClass=01 Prot=01 ## Deny MS Active Sync devices Allow: Class=EF SubClass=01 ## Allow Sync devices Allow: Class=EF ## Allow
© 1999–2022 Citrix Systems, Inc. All rights reserved. 482
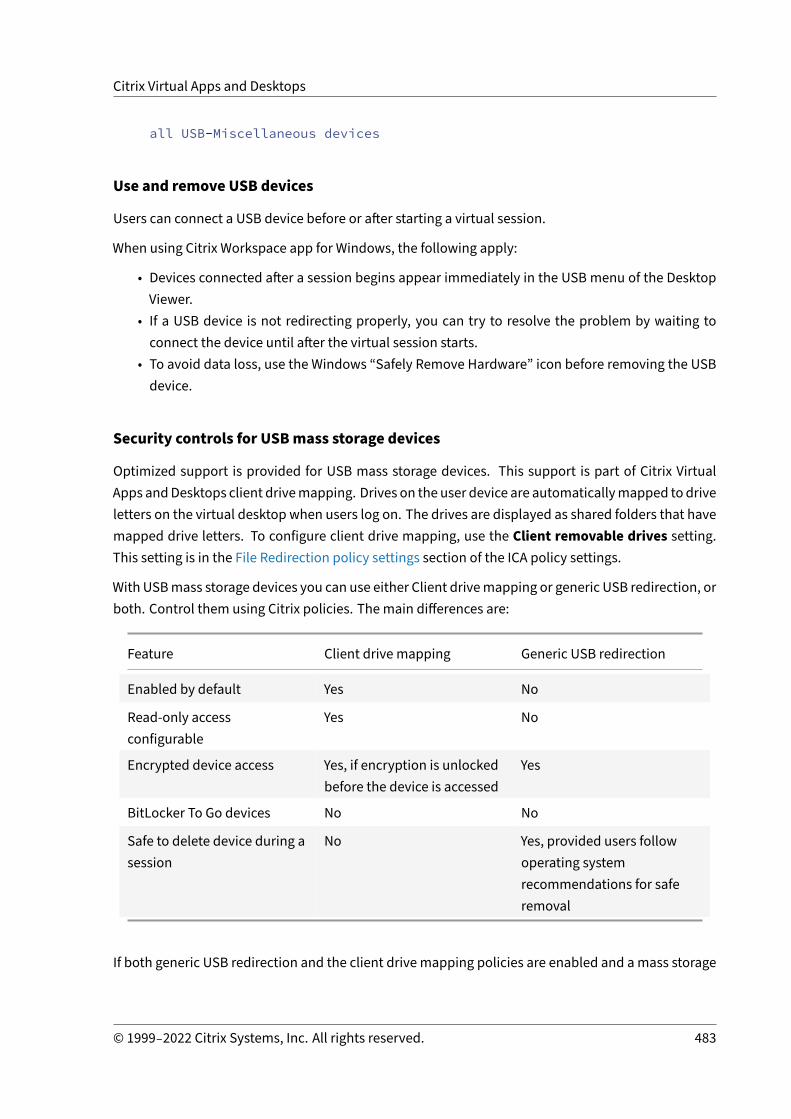
Citrix Virtual Apps and Desktops
all USB-Miscellaneous devices
Use and remove USB devices
Users can connect a USB device before or after starting a virtual session.
When using Citrix Workspace app for Windows, the following apply:
• Devices connected after a session begins appear immediately in the USB menu of the DesktopViewer.
• If a USB device is not redirecting properly, you can try to resolve the problem by waiting toconnect the device until after the virtual session starts.
• To avoid data loss, use the Windows “Safely Remove Hardware” icon before removing the USBdevice.
Security controls for USBmass storage devices
Optimized support is provided for USB mass storage devices. This support is part of Citrix VirtualApps andDesktops client drivemapping. Drives on the user device are automaticallymapped to driveletters on the virtual desktop when users log on. The drives are displayed as shared folders that havemapped drive letters. To configure client drive mapping, use the Client removable drives setting.This setting is in the File Redirection policy settings section of the ICA policy settings.
With USBmass storage devices you can use either Client drivemapping or generic USB redirection, orboth. Control them using Citrix policies. The main differences are:
Feature Client drive mapping Generic USB redirection
Enabled by default Yes No
Read‑only accessconfigurable
Yes No
Encrypted device access Yes, if encryption is unlockedbefore the device is accessed
Yes
BitLocker To Go devices No No
Safe to delete device during asession
No Yes, provided users followoperating systemrecommendations for saferemoval
If both generic USB redirection and the client drive mapping policies are enabled and amass storage
© 1999–2022 Citrix Systems, Inc. All rights reserved. 483
Citrix Virtual Apps and Desktops
device is inserted either before or after a session starts, it is redirected using client drive mapping.When both generic USB redirection and the client drive mapping policies are enabled and a deviceis configured for automatic redirection and a mass storage device is inserted either before or after asession starts, it is redirected using generic USB redirection. For more information, see KnowledgeCenter article CTX123015.
Note:
USB redirection is supported over lower bandwidth connections, for example 50 Kbps. However,copying large files doesn’t work.
Control file access with client drivemapping
You can control whether users can copy files from their virtual environments to their user devices. Bydefault, files and folders on mapped client‑drives are available in read/write mode from within thesession.
To prevent users from adding or changing files and folders on mapped client‑devices, enable theRead‑only client drive access policy setting. When adding this setting to a policy, ensure that theClient drive redirection setting is set to Allowed and is also added to the policy.
April 14, 2021
Managing printers in your environment is a multistage process:
1. Become familiar with printing concepts, if you are not already.2. Planyourprintingarchitecture. This includesanalyzingyourbusinessneeds, your existingprint‑
ing infrastructure, how your users and applications interact with printing today, and whichprinting management model best applies to your environment.
3. Configure your printing environment by selecting a printer provisioning method and then cre‑ating policies to deploy your printing design. Update policies when new employees or serversare added.
4. Test a pilot printing configuration before deploying it to users.5. Maintain your Citrix printing environment by managing printer drivers and optimizing printing
performance.6. Troubleshoot issues that may arise.
© 1999–2022 Citrix Systems, Inc. All rights reserved. 484

Citrix Virtual Apps and Desktops
Printing concepts
Before you begin planning your deployment, make sure that you understand these core concepts forprinting:
• The types of printer provisioning available• How print jobs are routed• The basics of printer driver management
Printing conceptsbuildonWindowsprinting concepts. To configure and successfullymanageprintingin your environment, youmust understand howWindows network and client printingworks and howthis translates into printing behavior in this environment.
Print process
In this environment, all printing is initiated (by the user) onmachines hosting applications. Print jobsare redirected through the network print server or user device to the printing device.
There is no persistent workspace for users of virtual desktops and applications. When a session endsthe user’s workspace is deleted, thus all settings need to be rebuilt at the beginning of each session.As a result, each time a user starts a new session, the systemmust rebuild the user’s workspace.
When a user prints:
• Determines what printers to provide to the user. This is known as printer provisioning.• Restores the user’s printing preferences.• Determines which printer is the default for the session.
You can customize how to perform these tasks by configuring options for printer provisioning, printjob routing, printer property retention, and driver management. Be sure to evaluate how the variousoption settings might change the performance of printing in your environment and the user experi‑ence.
Printer provisioning
The process that makes printers available in a session is known as provisioning. Printer provisioningis typically handled dynamically. That is, the printers that appear in a session are not predeterminedand stored. Instead, the printers are assembled, basedonpolicies, as the session is built during log onand reconnection. As a result, the printers can change according to policy, user location, and networkchanges, provided they are reflected in policies. Thus, users who roam to a different location mightsee changes to their workspace.
The system also monitors client‑side printers and dynamically adjusts in‑session auto‑created print‑ers based on additions, deletions, and changes to the client‑side printers. This dynamic printer dis‑covery benefits mobile users as they connect from various devices.
© 1999–2022 Citrix Systems, Inc. All rights reserved. 485

Citrix Virtual Apps and Desktops
Themost commonmethods of printer provisioning are:
• Universal Print Server ‑ The Citrix Universal Print Server provides universal printing supportfor network printers. The Universal Print Server uses the Universal print driver. This solutionenables you to use a single driver on aMulti‑sessionOSmachine to allownetwork printing fromany device.
Citrix recommends the Citrix Universal Print Server for remote print server scenarios. The UniversalPrint Server transfers the print job over the network in an optimized and compressed format, thusminimizing network use and improving the user experience.
The Universal Print Server feature comprises:
A client component,UPClient ‑ Enable theUPClient oneachMulti‑sessionOSmachine thatprovisionssession network printers and uses the Universal print driver.
A server component,UPServer ‑ Install UPServer oneachprint server that provisions sessionnetworkprinters anduses theUniversal print driver for the sessionprinters (whetherornot the sessionprintersare centrally provisioned).
For Universal Print Server requirements and setup details, refer to the system requirements and in‑stallation articles.
The following illustration shows the typical workflow for a network based printer in an environmentthat uses Universal Print Server.
© 1999–2022 Citrix Systems, Inc. All rights reserved. 486
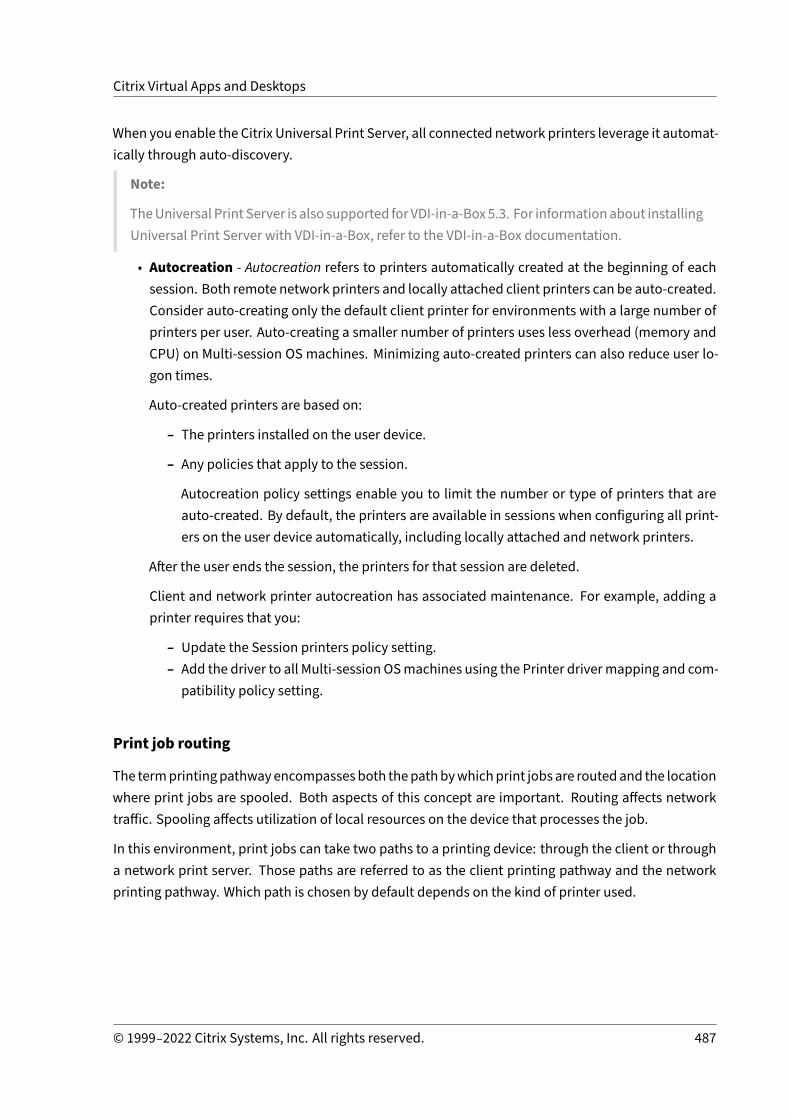
Citrix Virtual Apps and Desktops
When you enable the Citrix Universal Print Server, all connected network printers leverage it automat‑ically through auto‑discovery.
Note:
TheUniversal Print Server is also supported for VDI‑in‑a‑Box 5.3. For informationabout installingUniversal Print Server with VDI‑in‑a‑Box, refer to the VDI‑in‑a‑Box documentation.
• Autocreation ‑ Autocreation refers to printers automatically created at the beginning of eachsession. Both remote network printers and locally attached client printers can be auto‑created.Consider auto‑creating only the default client printer for environments with a large number ofprinters per user. Auto‑creating a smaller number of printers uses less overhead (memory andCPU) on Multi‑session OS machines. Minimizing auto‑created printers can also reduce user lo‑gon times.
Auto‑created printers are based on:
– The printers installed on the user device.
– Any policies that apply to the session.
Autocreation policy settings enable you to limit the number or type of printers that areauto‑created. By default, the printers are available in sessions when configuring all print‑ers on the user device automatically, including locally attached and network printers.
After the user ends the session, the printers for that session are deleted.
Client and network printer autocreation has associated maintenance. For example, adding aprinter requires that you:
– Update the Session printers policy setting.– Add the driver to all Multi‑session OSmachines using the Printer drivermapping and com‑patibility policy setting.
Print job routing
The termprintingpathwayencompassesboth thepathbywhichprint jobs are routedand the locationwhere print jobs are spooled. Both aspects of this concept are important. Routing affects networktraffic. Spooling affects utilization of local resources on the device that processes the job.
In this environment, print jobs can take two paths to a printing device: through the client or througha network print server. Those paths are referred to as the client printing pathway and the networkprinting pathway. Which path is chosen by default depends on the kind of printer used.
© 1999–2022 Citrix Systems, Inc. All rights reserved. 487

Citrix Virtual Apps and Desktops
Locally attached printers
The system routes jobs to locally attached printers from the Multi‑session OS machine, through theclient, and then to the print device. The ICA protocol optimizes and compresses the print job traffic.When a printing device is attached locally to the user device, print jobs are routed over the ICA virtualchannel.
Network‑based printers
Bydefault, all print jobsdestined fornetworkprinters route fromtheMulti‑sessionOSmachine, acrossthe network, and directly to the print server. However, print jobs are automatically routed over theICA connection in the following situations:
• If the virtual desktop or application cannot contact the print server.• If the native printer driver is not available on the Multi‑session OSmachine.
If the Universal Print Server is not enabled, configuring the client printing pathway for network print‑ing is useful for low bandwidth connections, such as wide area networks, that can benefit from theoptimization and traffic compression that results from sending jobs over the ICA connection.
The client printing pathway also lets you limit traffic or restrict bandwidth allocated for print jobs. Ifrouting jobs through the user device is not possible, such as for thin clients without printing capabili‑ties, Quality of Service should be configured to prioritize ICA/HDX traffic and ensure a good in‑sessionuser experience.
© 1999–2022 Citrix Systems, Inc. All rights reserved. 488
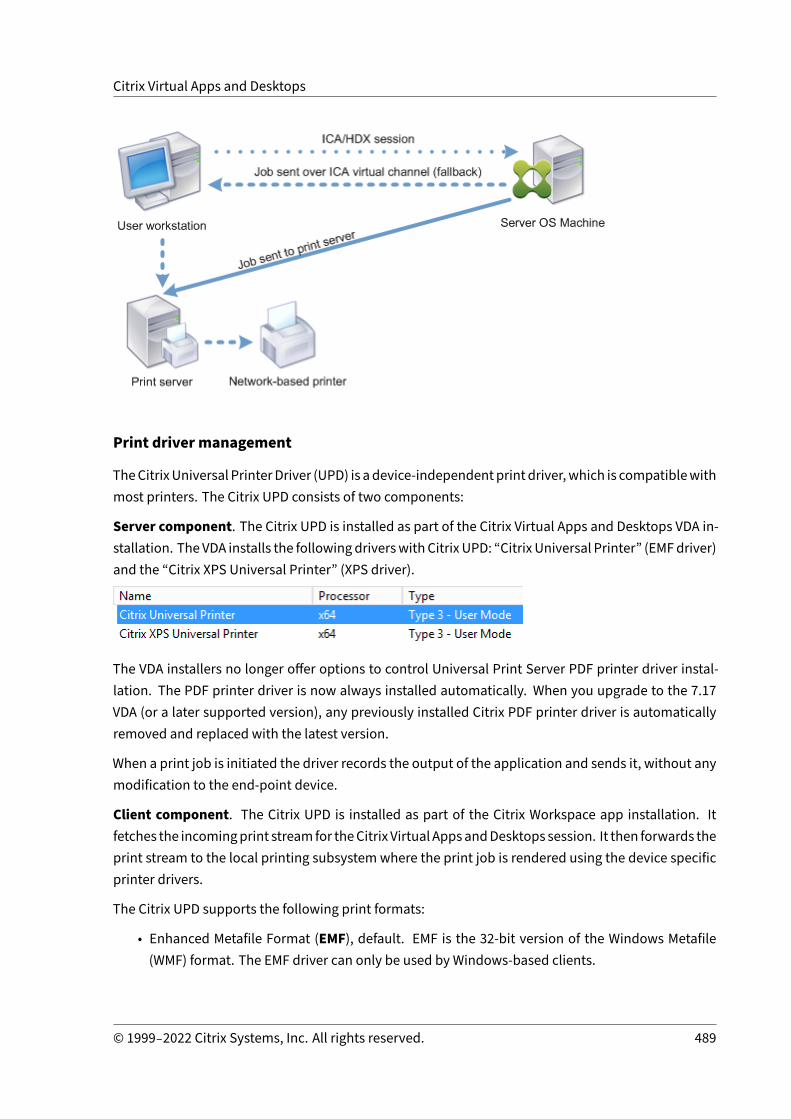
Citrix Virtual Apps and Desktops
Print driver management
TheCitrixUniversal PrinterDriver (UPD) is adevice‑independentprint driver,which is compatiblewithmost printers. The Citrix UPD consists of two components:
Server component. The Citrix UPD is installed as part of the Citrix Virtual Apps and Desktops VDA in‑stallation. The VDA installs the followingdriverswith Citrix UPD: “Citrix Universal Printer” (EMFdriver)and the “Citrix XPS Universal Printer” (XPS driver).
The VDA installers no longer offer options to control Universal Print Server PDF printer driver instal‑lation. The PDF printer driver is now always installed automatically. When you upgrade to the 7.17VDA (or a later supported version), any previously installed Citrix PDF printer driver is automaticallyremoved and replaced with the latest version.
When a print job is initiated the driver records the output of the application and sends it, without anymodification to the end‑point device.
Client component. The Citrix UPD is installed as part of the Citrix Workspace app installation. Itfetches the incomingprint stream for theCitrix Virtual AppsandDesktops session. It then forwards theprint stream to the local printing subsystemwhere the print job is rendered using the device specificprinter drivers.
The Citrix UPD supports the following print formats:
• Enhanced Metafile Format (EMF), default. EMF is the 32‑bit version of the Windows Metafile(WMF) format. The EMF driver can only be used by Windows‑based clients.
© 1999–2022 Citrix Systems, Inc. All rights reserved. 489
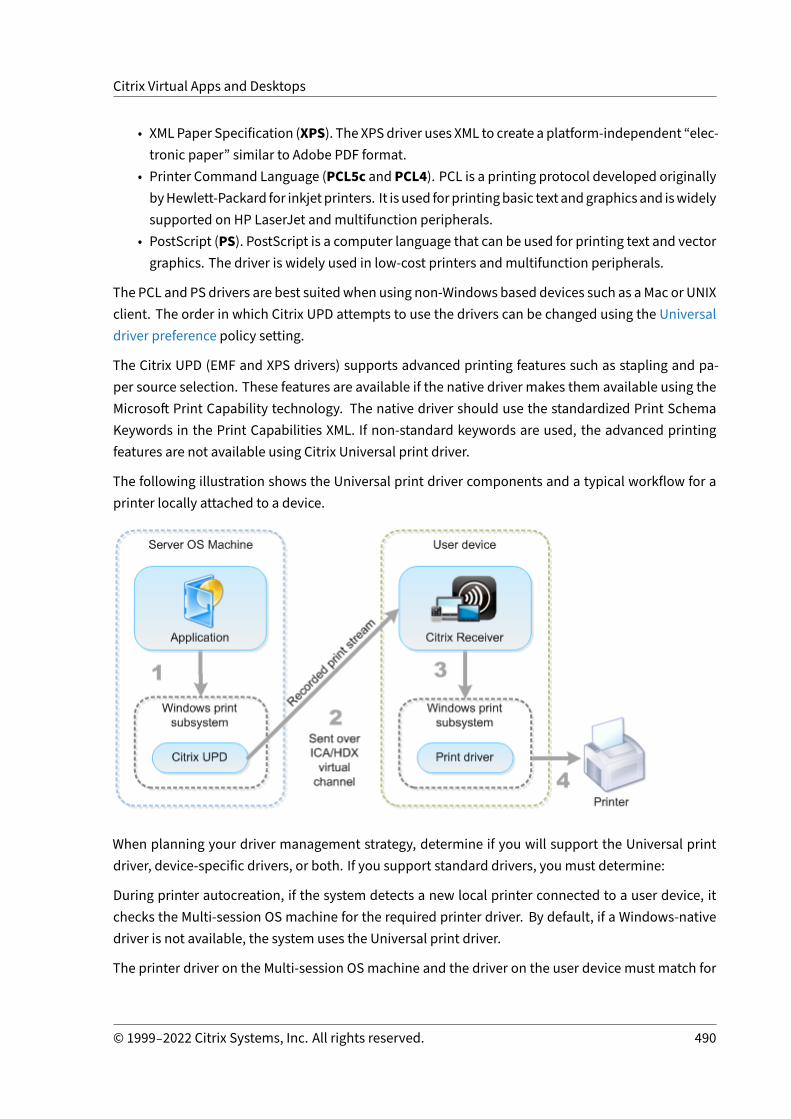
Citrix Virtual Apps and Desktops
• XMLPaper Specification (XPS). The XPSdriver uses XML to create a platform‑independent “elec‑tronic paper” similar to Adobe PDF format.
• Printer Command Language (PCL5c and PCL4). PCL is a printing protocol developed originallybyHewlett‑Packard for inkjet printers. It is used forprintingbasic text andgraphics and iswidelysupported on HP LaserJet andmultifunction peripherals.
• PostScript (PS). PostScript is a computer language that can be used for printing text and vectorgraphics. The driver is widely used in low‑cost printers andmultifunction peripherals.
The PCL and PS drivers are best suitedwhen using non‑Windows based devices such as aMac or UNIXclient. The order in which Citrix UPD attempts to use the drivers can be changed using the Universaldriver preference policy setting.
The Citrix UPD (EMF and XPS drivers) supports advanced printing features such as stapling and pa‑per source selection. These features are available if the native driver makes them available using theMicrosoft Print Capability technology. The native driver should use the standardized Print SchemaKeywords in the Print Capabilities XML. If non‑standard keywords are used, the advanced printingfeatures are not available using Citrix Universal print driver.
The following illustration shows the Universal print driver components and a typical workflow for aprinter locally attached to a device.
When planning your driver management strategy, determine if you will support the Universal printdriver, device‑specific drivers, or both. If you support standard drivers, youmust determine:
During printer autocreation, if the system detects a new local printer connected to a user device, itchecks the Multi‑session OS machine for the required printer driver. By default, if a Windows‑nativedriver is not available, the system uses the Universal print driver.
The printer driver on the Multi‑session OS machine and the driver on the user device must match for
© 1999–2022 Citrix Systems, Inc. All rights reserved. 490

Citrix Virtual Apps and Desktops
printing to succeed. The illustration that follows shows how a printer driver is used in two places forclient printing.
• The types of drivers to support.• Whether to install printer drivers automatically when they are missing from Multi‑session OSmachines.
• Whether to create driver compatibility lists.
Related content
• Printing configuration example• Best practices, security considerations, and default operations• Print policies and preferences• Provision printers• Maintain the printing environment
© 1999–2022 Citrix Systems, Inc. All rights reserved. 491

Citrix Virtual Apps and Desktops
Printing configuration example
April 14, 2021
Choosing the most appropriate printing configuration options for your needs and environment cansimplify administration. Although the default print configuration enables users to print in most en‑vironments, the defaults might not provide the expected user experience or the optimum networkusage andmanagement overhead for your environment.
Your printing configuration depends upon:
• Your business needs and your existing printing infrastructure.
Design yourprinting configurationaround theneedsof yourorganization. Your existingprintingimplementation (whether users can addprinters, which users have access towhat printers, andso on) might be a useful guide when defining your printing configuration.
• Whether your organization has security policies that reserve printers for certain users (for exam‑ple, printers for Human Resources or payroll).
• Whether users need to print while away from their primary work location, such as workers whomove between workstations or travel on business.
When designing your printing configuration, try to give users the same experience in a session as theyhave when printing from local user devices.
Example print deployment
The following illustration shows the print deployment for these use cases:
• Branch A ‑ A small overseas branch office with a few Windows workstations. Every user work‑station has a locally attached, private printer.
• Branch B ‑ A large branch office with thin clients and Windows‑based workstations. Forincreased efficiency, the users of this branch share network‑based printers (one per floor).Windows‑based print servers located within the branchmanage the print queues.
• Homeoffice ‑ A homeofficewith aMacOS‑baseduser device that accesses the company’s Citrixinfrastructure. The user device has a locally attached printer.
© 1999–2022 Citrix Systems, Inc. All rights reserved. 492

Citrix Virtual Apps and Desktops
The following sectionsdescribe the configurationswhichminimize the complexity of the environmentand simplify its management.
Auto‑created client printers and Citrix Universal printer driver
In Branch A, all users work on Windows‑based workstations, therefore auto‑created client printersand the Universal printer driver are used. Those technologies provide these benefits:
• Performance ‑ Print jobs are delivered over the ICA printing channel, thus the print data can becompressed to save bandwidth.
To ensure that a single user printing a large document cannot degrade the session performanceof other users, a Citrix policy is configured to specify the maximum printing bandwidth.
An alternative solution is to leverage amulti‑stream ICA connection, in which the print traffic istransferred within a separate low priority TCP connection. Multi‑stream ICA is an option whenQuality of Service (QoS) is not implemented on the WAN connection.
© 1999–2022 Citrix Systems, Inc. All rights reserved. 493

Citrix Virtual Apps and Desktops
• Flexibility ‑ Use of the Citrix Universal printer driver ensures that all printers connected to aclient can also be used from a virtual desktop or application session without integrating a newprinter driver in the data center.
Citrix Universal Print Server
In Branch B, all printers are network‑based and their queues aremanaged on aWindows print server,thus the Citrix Universal Print Server is the most efficient configuration.
All requiredprinter drivers are installed andmanagedon theprint server by local administrators. Map‑ping the printers into the virtual desktop or application session works as follows:
• For Windows‑based workstations ‑ The local IT team helps users connect the appropriatenetwork‑based printer to their Windows workstations. This enables users to print fromlocally‑installed applications.
During a virtual desktop or application session, the printers configured locally are enumeratedthrough autocreation. The virtual desktop or application then connects to the print server as adirect network connection if possible.
The Citrix Universal Print Server components are installed and enabled, thus native printerdrivers are not required. If a driver is updated or a printer queue is modified, no additionalconfiguration is required in the data center.
• For thin clients ‑ For thin client users, printers must be connected within the virtual desktopor application session. To provide users with the simplest printing experience, administratorsconfigure a single Citrix SessionPrinter policy per floor to connect a floor’s printer as the defaultprinter.
To ensure the correct printer is connected even if users roam between floors, the policies arefiltered based on the subnet or the name of the thin client. That configuration, referred to asproximity printing, allows for local printer driver maintenance (according to the delegated ad‑ministration model).
If a printer queue needs to bemodified or added, Citrix administrators must modify the respec‑tive Session printer policy within the environment.
Because the network printing traffic will be sent outside the ICA virtual channel, QoS is implemented.Inbound and outbound network traffic on ports used by ICA/HDX traffic are prioritized over all othernetwork traffic. That configuration ensures that user sessions are not impacted by large print jobs.
Auto‑created client printers and Citrix Universal printer driver
For home offices where users work on non‑standard workstations and use non‑managed print de‑vices, the simplest approach is to use auto‑created client printers and the Universal printer driver.
© 1999–2022 Citrix Systems, Inc. All rights reserved. 494
Citrix Virtual Apps and Desktops
Deployment summary
In summary, the sample deployment is configured as follows:
• No printer drivers are installed on Multi‑session OS machines. Only the Citrix Universal printerdriver is used. Fallback to native printing and the automatic installation of printer drivers aredisabled.
• A policy is configured to auto‑create all client printers for all users. Multi‑session OS machineswill directly connect to the print servers by default. The only configuration required is to enablethe Universal Print Server components.
• A session printer policy is configured for every floor of Branch B and applied to all thin clientsof the respective floor.
• QoS is implemented for Branch B to ensure excellent user experience.
Best practices, security considerations, and default operations
April 14, 2021
Best practices
Many factors determine the best printing solution for a particular environment. Some of these bestpractices might not apply to your Site.
• Use the Citrix Universal Print Server.
• Use the Universal printer driver or Windows‑native drivers.
• Minimize the number of printer drivers installed on Multi‑session OSmachines.
• Use driver mapping to native drivers.
• Never install untested printer drivers on a production site.
• Avoid updating a driver. Always attempt to uninstall a driver, restart the print server, and theninstall the replacement driver.
• Uninstall unused drivers or use the Printer driver mapping and compatibility policy to preventprinters from being created with the driver.
• Try to avoid using version 2 kernel‑mode drivers.
• To determine if a printer model is supported, contact the manufacturer or see the Citrix Readyproduct guide at www.citrix.com/ready.
In general, all of the Microsoft‑supplied printer drivers are tested with Terminal Services andguaranteed to work with Citrix. However, before using a third‑party printer driver, consult your
© 1999–2022 Citrix Systems, Inc. All rights reserved. 495

Citrix Virtual Apps and Desktops
printer driver vendor so that the driver is certified for Terminal Services by the Windows Hard‑ware Quality Labs (WHQL) program. Citrix does not certify printer drivers.
Security considerations
Citrix printing solutions are secure by design.
• The Citrix Print Manager Service constantly monitors and responds to session events such aslogon and logoff, disconnect, reconnect, and session termination. It handles service requestsby impersonating the actual session user.
• Citrix printing assigns each printer a unique namespace in a session.• Citrix printing sets the default security descriptor for auto‑created printers to ensure that clientprinters auto‑created in one session are inaccessible to users running in other sessions. By de‑fault, administrative users cannot accidentally print to another session’s client printer, eventhough they can see andmanually adjust permissions for any client printer.
Default print operations
By default, if you do not configure any policy rules, printing behavior is as follows:
• The Universal Print Server is disabled.
• All printers configured on the user device are created automatically at the beginning of eachsession.
This behavior is equivalent to configuring the Citrix policy setting Auto‑create client printerswith the Auto‑create all client printers option.
• The system routes all print jobs queued to printers locally attached to user devices as clientprint jobs (that is, over the ICA channel and through the user device).
• The system routes all print jobs queued to network printers directly from Multi‑session OS ma‑chines. If the system cannot route the jobs over the network, it will route them through the userdevice as a redirected client print job.
This behavior is equivalent to disabling the Citrix policy setting Direct connection to printservers.
• The system attempts to store printing properties, a combination of the user’s printing prefer‑ences and printing device‑specific settings, on the user device. If the client does not supportthis operation, the system stores printing properties in user profiles on the Multi‑session OSmachine.
This behavior is equivalent to configuring the Citrix policy setting Printer properties retentionwith the Held in profile only if not saved on client option.
© 1999–2022 Citrix Systems, Inc. All rights reserved. 496

Citrix Virtual Apps and Desktops
• In VDAs version 7.16 and later, the Citrix policy setting “Automatic installation of inbox printerdrivers” does not have any effect on Windows 8 and later Windows operating systems versionsbecause V3 in‑box printer drivers are not included in the operating system.
• In VDAs earlier than 7.16, the system uses the Windows version of the printer driver if it is avail‑able on theMulti‑session OSmachine. If the printer driver is not available, the system attemptsto install thedriver fromtheWindowsoperating system. If thedriver is notavailable inWindows,it uses a Citrix Universal print driver.
This behavior is equivalent to enabling the Citrix policy setting “Automatic installation of in‑boxprinter drivers” and configuring the Universal printing setting with the “Use universal printingonly if requested driver is unavailable”.
Enabling “Automatic installation of in‑box printer drivers” might result in the installation of alarge number of native printer drivers.
Note:
If you are unsure about what the shipping defaults are for printing, display them by creating anewpolicy and setting all printingpolicy rules to Enabled. Theoption that appears is thedefault.
Always‑On logging
An Always‑On logging feature is available for the print server and printing subsystem on the VDA.
To collate the logs as a ZIP for emailing, or to automatically upload logs to Citrix Insight Services, usethe Start‑TelemetryUpload PowerShell cmdlet.
Printing policies and preferences
April 14, 2021
When users access printers from published applications, you can configure Citrix policies to specify:
• How printers are provisioned (or added to sessions)• How print jobs are routed• How printer drivers are managed
You can have different printing configurations for different user devices, users, or any other objectson which policies are filtered.
Most printing functions are configured through the Citrix Printing policy settings. Printing settingsfollow standard Citrix policy behavior.
© 1999–2022 Citrix Systems, Inc. All rights reserved. 497

Citrix Virtual Apps and Desktops
The system canwrite printer settings to the printer object at the end of a session or to a client printingdevice, provided the user’s network account has sufficient permissions. By default, Citrix Workspaceapp uses the settings stored in the printer object in the session, before looking in other locations forsettings and preferences.
By default, the system stores, or retains, printer properties on the user device (if supported by thedevice) or in the user profile on theMulti‑sessionOSmachine. Whenauser changes printer propertiesduring a session, those changes are updated in the user profile on the machine. The next time theuser logs on or reconnects, the user device inherits those retained settings. That is, printer propertychanges on the user device do not impact the current session until after the user logs off and then logson again.
Printing preference locations
In Windows printing environments, changes made to printing preferences can be stored on the localcomputer or in a document. In this environment, when users modify printing settings, the settingsare stored in these locations:
• On the user device itself ‑ Windows users can change device settings on the user device byright‑clicking the printer in the Control Panel and selecting Printing Preferences. For example,if Landscape is selected as page orientation, landscape is saved as the default page orientationpreference for that printer.
• Inside of a document ‑ In word‑processing and desktop‑publishing programs, document set‑tings, such as page orientation, are often stored inside documents. For example, when youqueue a document to print, Microsoft Word typically stores the printing preferences you spec‑ified, such as page orientation and the printer name, inside the document. These settings ap‑pear by default the next time you print that document.
• From changes a user made during a session ‑ The system keeps only changes to the printingsettings of an auto‑created printer if the change was made in the Control Panel in the session;that is, on the Multi‑session OSmachine.
• On theMulti‑session OSmachine ‑ These are the default settings associated with a particularprinter driver on the machine.
Thesettingspreserved inanyWindows‑basedenvironmentvaryaccording towhere theusermade thechanges. This alsomeans that the printing settings that appear in one place, such as in a spreadsheetprogram, canbedifferent than those inothers, suchasdocuments. As result, printing settings appliedto a specific printer can change throughout a session.
Hierarchy of user printing preferences
Because printing preferences can be stored in multiple places, the system processes them accordingto a specific priority. Also, it is important to note that device settings are treated distinctly from, and
© 1999–2022 Citrix Systems, Inc. All rights reserved. 498

Citrix Virtual Apps and Desktops
usually take precedence over, document settings.
By default, the system always applies any printing settings a user modified during a session (that is,the retained settings) before considering any other settings. When the user prints, the systemmergesand applies the default printer settings stored on the Multi‑session OS machine with any retained orclient printer settings.
Saving user printing preferences
Citrix recommends that you do not change where the printer properties are stored. The default set‑ting, which saves the printer properties on the user device, is the easiest way to ensure consistentprinting properties. If the system is unable to save properties on the user device, it automatically fallsback to the user profile on the Multi‑session OSmachine.
Review the Printer properties retention policy setting if these scenarios apply:
• If you use legacy plug‑ins that do not allow users to store printer properties on a user device.• If you use mandatory profiles on your Windows network and want to retain the user’s printerproperties.
Provision printers
April 14, 2021
Citrix Universal Print Server
When determining the best print solution for your environment, consider the following:
• The Universal Print Server provides features not available for the Windows Print Provider: Im‑age and font caching, advanced compression, optimization, and QoS support.
• The Universal print driver supports the public device‑independent settings defined by Mi‑crosoft. If users need access to device settings that are specific to a print driver manufacturer,the Universal Print Server paired with a Windows‑native driver might be the best solution.With that configuration, you retain the benefits of the Universal Print Server while providingusers access to specialized printer functionality. A trade‑off to consider is that Windows‑nativedrivers require maintenance.
• The Citrix Universal Print Server provides universal printing support for network printers. TheUniversal Print Server uses theUniversal print driver, a single driver on theMulti‑sessionOSma‑chine that allows local or network printing from any device, including thin clients and tablets.
To use the Universal Print Server with a Windows‑native driver, enable the Universal Print Server. Bydefault, if the Windows‑native driver is available, it is used. Otherwise, the Universal print driver is
© 1999–2022 Citrix Systems, Inc. All rights reserved. 499

Citrix Virtual Apps and Desktops
used. To specify changes to that behavior, such as to use only the Windows‑native driver or only theUniversal print driver, update the Universal print driver usage policy setting.
Install the Universal Print Server
To use theUniversal Print Server, install theUpsServer component on your print servers, as describedin the installation documents, and configure it. For more information, see Install core componentsand Install using the command line.
For environments where you want to deploy the UPClient component separately, for example withXenApp 6.5:
1. Download the Citrix Virtual Apps andDesktops Virtual Delivery Agent (VDA) standalone packagefor Windows Single‑session OS or Windows Multi‑session OS.
2. Extract the VDA using the command line instructions described in Install using the commandline.
3. Install the pre‑requisites from the \Image‑Full\Support\VcRedist_2013_RTM• Vcredist_x64 / vcredist_x86
– Run x86 for 32‑bit only, and both for 64‑bit deployments4. Install the cdf prerequisite from the \Image‑Full\x64\Virtual Desktop Components or \Image‑
Full\x86\Virtual Desktop Components.• Cdf_x64 / Cdf_x86
– x86 for 32‑bit, x64 for 64‑bit5. Find the UPClient component in \Image‑Full\x64\Virtual Desktop Components or \Image‑
Full\x86\Virtual Desktop Components.6. Install the UPClient component by extracting and then launching the component’s MSI.7. A restart is required after installing the UPClient component.
Opt out of CEIP for the Universal Print Server
You are automatically enrolled in the Citrix Customer Experience Improvement Program (CEIP) whenyou install the Universal Print Server. The first upload of data occurs after seven days from the dateand time of installation.
To opt out of CEIP, edit the registry keyHKLM\Software\Citrix\Universal Print Server\CEIPEnabledand set the DWORD value to 0.
To opt back in, set the DWORD value to 1.
Caution: Editing the registry incorrectly can cause serious problems thatmay require you to reinstallyour operating system. Citrix cannot guarantee that problems resulting from the incorrect use of Reg‑istry Editor can be solved. Use Registry Editor at your own risk. Be sure to back up the registry beforeyou edit it.
© 1999–2022 Citrix Systems, Inc. All rights reserved. 500

Citrix Virtual Apps and Desktops
For more information, see Citrix Insight Services.
Configure the Universal Print Server
Use the following Citrix policy settings to configure the Universal Print Server. For more information,refer to the on‑screen policy settings help.
• Universal Print Server enable. Universal Print Server is disabled by default. When you enableUniversal Print Server, you choose whether to use the Windows Print Provider if the UniversalPrint Server is unavailable. After you enable the Universal Print Server, a user can add and enu‑merate network printers through the Windows Print Provider and Citrix Provider interfaces.
• Universal Print Server print data stream (CGP) port. Specifies the TCP port number used bythe Universal Print Server print data streamCGP (CommonGateway Protocol) listener. Defaultsto 7229.
• Universal Print Server web service (HTTP/SOAP) port. Specifies the TCP port number usedby the Universal Print Server listener for incoming HTTP/SOAP requests. Defaults to 8080.
To change the default port of HTTP 8080 for Universal Print Server communication to Citrix VirtualApps and Desktops VDAs, the following registrymust also be created and the port number valuemod‑ified on the Universal Print Server computer(s):
HKEY_LOCAL_MACHINE\SOFTWARE\Policies\Citrix\PrintingPolicies“UpsHttpPort”=DWORD:<portnumber>
This port number must match the HDX Policy, Universal Print Server web service (HTTP/SOAP) port,in Studio.
• Universal Print Server print stream input bandwidth limit (kbps). Specifies the upperbound (in kilobits‑per‑second) for the transfer rate of print data delivered from each print jobto the Universal Print Server using CGP. Defaults to 0 (unlimited).
• Universal Print Servers for load balancing. This setting lists the Universal Print Servers to beused to load balance printer connections established at session launch, after evaluating otherCitrixprintingpolicy settings. Tooptimizeprinter creation time, Citrix recommends thatall printservers have the same set of shared printers.
© 1999–2022 Citrix Systems, Inc. All rights reserved. 501

Citrix Virtual Apps and Desktops
• Universal Print Servers out‑of‑service threshold. Specifies how long the load balancershould wait for an unavailable print server to recover before it determines that the server ispermanently offline and redistributes its load to other available print servers. Default is 180(seconds).
Once the printing policies are modified on the Delivery Controller, it can take a few minutes for thepolicy changes to be applied to the VDAs.
Interactions with other policy settings ‑ The Universal Print Server honors other Citrix printing pol‑icy settings and interacts with them as noted in the following table. The information provided as‑sumes that theUniversal Print Server policy setting is enabled, theUniversal Print Server componentsare installed, and the policy settings are applied.
Policy setting Interaction
Client printer redirection, Auto‑create clientprinters
After the Universal Print Server is enabled,client network printers are created using theUniversal print driver instead of the nativedrivers. Users see the same printer name asbefore.
Session printers When you use the Citrix Universal Print Serversolution, Universal print driver policy settingsare honored.
© 1999–2022 Citrix Systems, Inc. All rights reserved. 502

Citrix Virtual Apps and Desktops
Direct connections to print server When the Universal Print Server is enabled andthe Universal print driver usage policy settingis configured to use universal printing only, adirect network printer connection can becreated to the print server, using the Universalprint driver.
UPD preference Supports EMF and XPS drivers.
Effects on user interfaces ‑ The Citrix Universal print driver used by the Universal Print Server dis‑ables the following user interface controls:
• In the Printer Properties dialog box, the Local Printer Settings button• In theDocument Properties dialog box, the Local Printer Settings andPreviewon client buttons
The Citrix Universal print driver (EMF and XPS drivers) supports advanced printing features such asstapling and paper source. The user can select Stapling or Paper Source options from the customUPD print dialog if the client or network printers which aremapped to the UPD in the session supportthese features.
© 1999–2022 Citrix Systems, Inc. All rights reserved. 503

Citrix Virtual Apps and Desktops
To set non‑standard printer settings such as stapling and secure PIN, select Local Settings in thecustomer UPD print dialog for any client mapped printers that use either the Citrix UPD EMF or XPSdrivers. The Printing Preferences dialog of the mapped printer is displayed outside the session onthe client, allowing the user to change any printer option, and the modified printer settings are usedin the active session when printing that document.
These features are available if the native driver makes them available using the Microsoft Print Capa‑bility technology. The native driver should use the standardized Print Schema Keywords in the PrintCapabilities XML. If non‑standard keywords are used, the advanced printing features will not be avail‑able using Citrix Universal print driver.
When using the Universal Print Server, the Add Printer Wizard for the Citrix Print Provider is the sameas the Add Printer Wizard for the Windows Print Provider, with the following exceptions:
• When adding a printer by name or address, you can provide anHTTP/SOAP port number for theprint server. That port number becomes a part of the printer name and appears in displays.
• If the Citrix Universal print driver usage policy setting specifies that universal printing must beused, the Universal print driver name appears when selecting a printer. The Windows PrintProvider cannot use the Universal print driver.
© 1999–2022 Citrix Systems, Inc. All rights reserved. 504

Citrix Virtual Apps and Desktops
The Citrix Print Provider does not support client‑side rendering.
For more information about the Universal Print Server, see CTX200328.
Auto‑created client printers
These universal printing solutions are provided for client printers:
• Citrix Universal Printer ‑ A generic printer created at the beginning of sessions that is not tiedtoaprintingdevice. TheCitrixUniversal Printer is not required toenumerate theavailable clientprinters during logon, which can greatly reduce resource usage and decrease user logon times.The Universal Printer can print to any client‑side printing device.
The Citrix Universal Printer might not work for all user devices or Citrix Workspace apps in yourenvironment. The Citrix Universal Printer requires a Windows environment and does not sup‑port the Citrix Offline Plug‑in or applications that are streamed to the client. Consider usingauto‑created client printers and the Universal print driver for such environments.
Touseauniversalprinting solution fornon‑WindowsCitrixWorkspaceapps, useoneof theotherUniversal print drivers that are based on postscript/PCL and installed automatically.
• Citrix Universal print drivers ‑ A device‑independent printer driver. If you configure a CitrixUniversal print driver, the system uses the EMF‑based Universal print driver by default.
The Citrix Universal print driver might create smaller print jobs than older or less advancedprinter drivers. However, a device‑specific driver might be needed to optimize print jobs fora specialized printer.
Configure universal printing ‑ Use the following Citrix policy settings to configure universal printing.For more information, refer to the on‑screen policy settings help.
• Universal print driver usage. Specifies when to use universal printing.• Auto‑create generic universal printer. Enables or disables auto‑creation of the generic CitrixUniversal Printer object for sessions when a user device compatible with Universal Printing isin use. By default, the generic Universal Printer object is not auto‑created.
• Universal driver preference. Specifies the order in which the system attempts to use Universalprint drivers, beginning with the first entry in the list. You can add, edit, or remove drivers andchange the order of the drivers in the list.
• Universal printing preview preference. Specifies whether to use the print preview function forauto‑created or generic universal printers.
• Universal printing EMF processingmode. Controls themethod of processing the EMF spool fileon the Windows user device. By default, EMF records are spooled directly to the printer. Spool‑ing directly to the printer allows the spooler to process the records faster and uses fewer CPUresources.
© 1999–2022 Citrix Systems, Inc. All rights reserved. 505

Citrix Virtual Apps and Desktops
For more policies, see Optimize printing performance. To change the defaults for settings such aspaper size, print quality, color, duplex, and the number of copies, see CTX113148.
Auto‑create printers from the user device ‑ At the start of a session, the system auto‑creates allprinters on the user device by default. You can control what, if any, types of printers are provisionedto users and prevent autocreation.
Use the Citrix policy settingAuto‑create client printers to control autocreation. You can specify that:
• All printers visible to the user device, including network and locally attached printers, are cre‑ated automatically at the start of each session (default)
• All local printers physically attached to the user device is created automatically• Only the default printer for the user device is created automatically• Autocreation is disabled for all client printers
The Auto‑create client printers setting requires that the Client printer redirection setting is Allowed(the default).
Assign network printers to users
Bydefault, network printers on the user device are created automatically at the beginning of sessions.The system enables you to reduce the number of network printers that are enumerated andmappedby specifying the network printers to be created within each session. Such printers are referred to assession printers.
You can filter session printer policies by IP address to provide proximity printing. Proximity printingenables userswithin a specified IP address range toautomatically access thenetworkprintingdevicesthat exist within that same range. Proximity printing is provided by the Citrix Universal Print Serverand does not require the configuration described in this section.
Proximity printing might involve the following scenario:
• The internal company network operates with a DHCP server which automatically designates IPaddresses to users.
• All departments within the company have unique designated IP address ranges.• Network printers exist within each department’s IP address range.
When proximity printing is configured and an employee travels from one department to another, noadditional printing device configuration is required. Once the user device is recognized within thenew department’s IP address range, it will have access to all network printers within that range.
Configure specific printers to be redirected in sessions ‑ To create administrator‑assignedprinters,configure the Citrix policy setting Session printers. Add a network printer to that policy using one ofthe following methods:
© 1999–2022 Citrix Systems, Inc. All rights reserved. 506

Citrix Virtual Apps and Desktops
• Enter the printer UNC path using the format \\servername\printername.• Browse to a printer location on the network.• Browse for printers on a specific server. Enter the server name using the format \\servernameand click Browse.
Important: The servermerges all enabled sessionprinter settings for all appliedpolicies, starting fromthehighest to lowest priorities. Whenaprinter is configured inmultiple policy objects, customdefaultsettings are taken from only the highest priority policy object in which that printer is configured.
Network printers created with the Session printers setting can vary according to where the sessionwas initiated by filtering on objects such as subnets.
Specify a default network printer for a session ‑ By default, the user’s main printer is used as thedefault printer for the session. Use the Citrix policy setting Default printer to change how the defaultprinter on the user device is established in a session.
1. On the Default printer settings page, select a setting for Choose client’s default printer:• Network printer name. Printers added with the Session printers policy setting appear inthis menu. Select the network printer to use as the default for this policy.
• Do not adjust the user’s default printer. Uses the current Terminal Services or Windowsuser profile setting for the default printer. For more information, refer to the on‑screenpolicy settings help.
2. Apply the policy to the group of users (or other filtered objects) you want to affect.
Configureproximityprinting ‑ Proximityprinting is alsoprovidedby theCitrixUniversal Print Server,which does not require the configuration described here.
1. Create a separate policy for each subnet (or to correspond with printer location).2. In each policy, add the printers in that subnet’s geographic location to the Session printers set‑
ting.3. Set the Default printer setting to Do not adjust the user’s default printer.4. Filter the policies by client IP address. Be sure to update these policies to reflect changes to the
DHCP IP address ranges.
Maintain the printing environment
April 14, 2021
Maintaining the printing environment includes:
• Managing printer drivers• Optimizing printing performance• Displaying printer andmanaging print queues
© 1999–2022 Citrix Systems, Inc. All rights reserved. 507

Citrix Virtual Apps and Desktops
Manage printer drivers
Tominimize administrative overhead and the potential for print driver issues, Citrix recommends useof the Citrix Universal print driver.
If auto‑creation fails, by default, the system installs a Windows‑native printer driver provided withWindows. If a driver is not available, the system falls back to the Universal print driver. For moreinformation about printer driver defaults, refer to Best practices, security considerations, and defaultoperations.
If the Citrix Universal print driver is not an option for all scenarios, map printer drivers to minimizethe amount of drivers installed on Multi‑session OS machines. In addition, mapping printer driversenables you to:
• Allow specified printers to use only the Citrix Universal print driver• Allow or prevent printers to be created with a specified driver• Substitute good printer drivers for outdated or corrupted drivers• Substitute a driver that is available on Windows server for a client driver name
Prevent the automatic installation of printer drivers ‑ The automatic installation of print driversshould be disabled to ensure consistency across Multi‑session OS machines. This can be achievedthrough Citrix policies, Microsoft policies, or both. To prevent the automatic installation of Windows‑native printer drivers, disable the Citrix policy setting Automatic installation of in‑box printer drivers.
Map client printer drivers ‑ Each client provides information about client‑side printers during logon,including the printer driver name. During client printer autocreation, Windows server printer drivernames are selected that correspond to the printer model names provided by the client. The autocre‑ation process then uses the identified, available printer drivers to construct redirected client printqueues.
Here is the general process for defining driver substitution rules and editing print settings formappedclient printer drivers:
1. To specify driver substitution rules for auto‑created client printers, configure the Citrix policysetting Printer driver mapping and compatibility by adding the client printer driver name andselecting the server driver that you want to substitute for the client printer driver from the Findprinter driver menu. You can use wildcards in this setting. For example, to force all HP printersto use a specific driver, specify HP* in the policy setting.
2. To ban a printer driver, select the driver name and choose the Do not create setting.3. As needed, edit an existing mapping, remove a mapping, or change the order of driver entries
in the list.4. To edit the printing settings formapped client printer drivers, select the printer driver, click Set‑
tings, and specify settings such as print quality, orientation, and color. If you specify a printingoption that the printer driver does not support, that option has no effect. This setting overridesretained printer settings the user set during a previous session.
© 1999–2022 Citrix Systems, Inc. All rights reserved. 508

Citrix Virtual Apps and Desktops
5. Citrix recommends testing the behavior of the printers in detail after mapping drivers, sincesome printer functionality can be available only with a specific driver.
When users log on the system checks the client printer driver compatibility list before it sets up theclient printers.
Optimize printing performance
To optimize printing performance, use the Universal Print Server and Universal print driver. The fol‑lowing policies control printing optimization and compression:
• Universal printing optimization defaults. Specifies default settings for the Universal Printerwhen it is created for a session:
– Desired image quality specifies the default image compression limit applied to universalprinting. Bydefault, StandardQuality is enabled,meaning thatusers canonlyprint imagesusing standard or reduced quality compression.
– Enable heavyweight compression enables or disables reducing bandwidth beyond thecompression level set by Desired image quality, without losing image quality. By default,heavyweight compression is disabled.
– Image and Font Caching settings specify whether or not to cache images and fonts thatappear multiple times in the print stream, ensuring each unique image or font is sent tothe printer only once. By default, embedded images and fonts are cached.
– Allow non‑administrators to modify these settings specifies whether or not users canchange the default print optimization settings within a session. By default, users are notallowed to change the default print optimization settings.
• Universal printing image compression limit. Defines the maximum quality and the minimumcompression level available for images printed with the Universal print driver. By default, theimage compression limit is set to Best Quality (lossless compression).
• Universal printing print quality limit. Specifies the maximum dots per inch (dpi) available forgenerating printed output in the session. By default, no limit is specified.
Bydefault, all print jobsdestined fornetworkprinters route fromtheMulti‑sessionOSmachine, acrossthe network, and directly to the print server. Consider routing print jobs over the ICA connection if thenetwork has substantial latency or limited bandwidth. To do that, disable the Citrix policy setting Di‑rect connections to print servers. Data sent over the ICA connection is compressed, so less bandwidthis consumed as the data travels across the WAN.
Improve session performance by limiting printing bandwidth ‑ While printing files from Multi‑session OS machines to user printers, other virtual channels (such as video) may experiencedecreased performance due to competition for bandwidth especially if users access servers throughslower networks. To prevent such degradation, you can limit the bandwidth used by user printing.By limiting the data transmission rate for printing, you make more bandwidth available in the HDX
© 1999–2022 Citrix Systems, Inc. All rights reserved. 509
Citrix Virtual Apps and Desktops
data stream for transmission of video, keystrokes, andmouse data.
Important:
The printer bandwidth limit is always enforced, even when no other channels are in use.
Use the following Citrix policy bandwidth printer settings to configure printing bandwidth sessionlimits. To set the limits for the site, perform this task using Studio. To set the limits for individualservers, perform this task using the Group Policy Management Console in Windows locally on eachMulti‑session OSmachine.
• The Printer redirection bandwidth limit setting specifies the bandwidth available for printing inkilobits per second (kbps).
• The Printer redirection bandwidth limit percent setting limits the bandwidth available for print‑ing to a percentage of the overall bandwidth available.
Note: To specify bandwidth as a percentage using the Printer redirection bandwidth limit per‑cent setting, enable the Overall session bandwidth limit as well.
If you enter values for both settings, the most restrictive setting (the lower value) is applied.
To obtain real‑time information about printing bandwidth, use Citrix Director.
Load balance Universal Print Servers
The Universal Print Server solution can scale by addingmore print servers into the load balance solu‑tion. There is no single point of failure as each VDA has its own load balancer to distribute the printingload to all print servers.
Use the policy settings, Universal Print Servers for load balancing and Universal Print Servers out‑of‑service threshold, to distribute the printing load across all the print servers in the load balancesolution.
If there is an unforeseen failure of a print server, the failover mechanism of the load balancer in eachVDA automatically redistributes the printer connections allocated on the failed print servers to theother available print servers such that all existing and incoming sessions function normally withoutaffecting the user experience and without requiring the immediate administrator intervention.
Administrators canmonitor the activity of the load balanced print servers using a set of performancecounters to track the following on the VDA:
• List of load balanced print servers on the VDA and their state (available, unavailable)• Number of printer connections accepted by each print server• Number of printer connections failed on each print server• Number of active printer connection on each print server• Number of pending printer connections on each print server
© 1999–2022 Citrix Systems, Inc. All rights reserved. 510
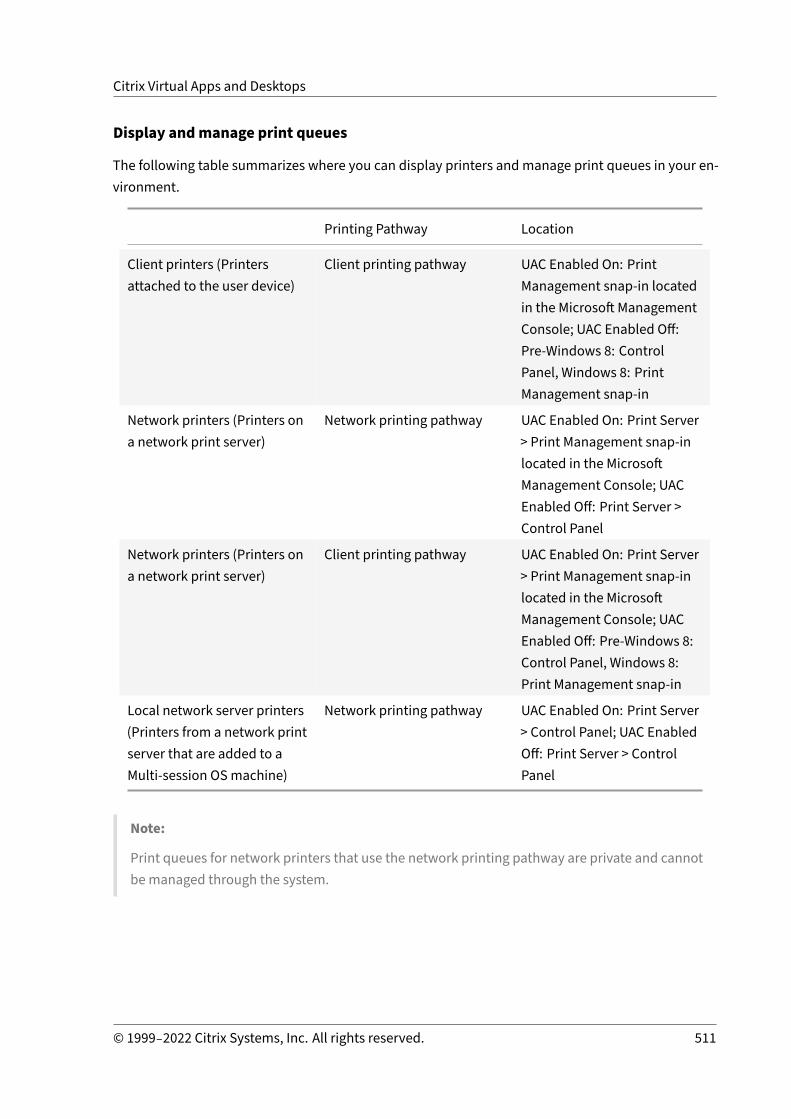
Citrix Virtual Apps and Desktops
Display andmanage print queues
The following table summarizes where you can display printers and manage print queues in your en‑vironment.
Printing Pathway Location
Client printers (Printersattached to the user device)
Client printing pathway UAC Enabled On: PrintManagement snap‑in locatedin the Microsoft ManagementConsole; UAC Enabled Off:Pre‑Windows 8: ControlPanel, Windows 8: PrintManagement snap‑in
Network printers (Printers ona network print server)
Network printing pathway UAC Enabled On: Print Server> Print Management snap‑inlocated in the MicrosoftManagement Console; UACEnabled Off: Print Server >Control Panel
Network printers (Printers ona network print server)
Client printing pathway UAC Enabled On: Print Server> Print Management snap‑inlocated in the MicrosoftManagement Console; UACEnabled Off: Pre‑Windows 8:Control Panel, Windows 8:Print Management snap‑in
Local network server printers(Printers from a network printserver that are added to aMulti‑session OSmachine)
Network printing pathway UAC Enabled On: Print Server> Control Panel; UAC EnabledOff: Print Server > ControlPanel
Note:
Print queues for network printers that use the network printing pathway are private and cannotbe managed through the system.
© 1999–2022 Citrix Systems, Inc. All rights reserved. 511

Citrix Virtual Apps and Desktops
Policies
April 14, 2021
Policies are a collection of settings that define how sessions, bandwidth, and security are managedfor a group of users, devices, or connection types.
You can apply policy settings to physical and virtual machines or to users. You can apply settings toindividual users at the local level or in security groups in Active Directory. The configurations definespecific criteria and rules. If you don’t specifically assign the policies, the settings are applied to allconnections.
You can apply policies on different levels of the network. Policy settings placed at the OrganizationalUnit GPO level take the highest precedence on the network. Policies at the Domain GPO level over‑ride policies on the Site Group Policy Object level, which override any conflicting policies on both theMicrosoft and Citrix Local Policies levels.
All Citrix Local Policies are created and managed in the Citrix Studio console and stored in the SiteDatabase. Group Policies are created andmanaged by using the Microsoft Group Policy ManagementConsole (GPMC) and stored in Active Directory. Microsoft Local Policies are created in the WindowsOperating System and are stored in the registry.
Studio uses a Modeling Wizard to help administrators compare configuration settings within tem‑plates and policies to help eliminate conflicting and redundant settings. Administrators can set GPOsusing the GPMC to configure settings and apply them to a target set of users at different levels of thenetwork.
TheseGPOs are saved in ActiveDirectory, andaccess to themanagement of these settings is restricted
© 1999–2022 Citrix Systems, Inc. All rights reserved. 512
Citrix Virtual Apps and Desktops
for most of IT for security.
Settings are merged according to priority and their condition. Any disabled setting overrides a lower‑ranked enabled setting. Unconfigured policy settings are ignored and do not override lower‑rankedsettings.
Local policies can also have conflicts with group policies in the Active Directory, whichmight overrideeach other depending on the situation.
All policies are processed in the following order:
1. The end user logs on to a machine using domain credentials.2. Credentials are sent to the domain controller.3. Active Directory applies all policies (end user, endpoint, organizational unit, and domain).4. The end user logs on to Citrix Workspace app and accesses an application or desktop.5. Citrix and Microsoft policies are processed for the end user andmachine hosting the resource.6. ActiveDirectorydeterminesprecedence for policy settings. It thenapplies themto the registries
of the endpoint device and to the machine hosting the resource.7. The end user logs off from the resource. Citrix policies for the end user and endpoint device are
no longer active.8. The end user logs off the user device, which releases the GPO user policies.9. The end user turns off the device, which releases the GPOmachine policies.
When creating policies for groups of users, devices, and machines, somemembers might have differ‑ent requirements andwould need exceptions to some policy settings. Exceptions aremade byway offilters in Studio and the GPMC that determine who or what the policy affects.
Note:We do not support mixing Windows and Citrix policies in the same GPO.
Work with policies
April 14, 2021
Configure Citrix policies to control user access and session environments. Citrix policies are themostefficient method of controlling connection, security, and bandwidth settings. You can create policiesfor specific groups of users, devices, or connection types. Each policy can contain multiple settings.
Tools for working with Citrix policies
You can use the following tools to work with Citrix policies.
© 1999–2022 Citrix Systems, Inc. All rights reserved. 513

Citrix Virtual Apps and Desktops
• Studio ‑ If you are a Citrix administratorwithout permission tomanage grouppolicy, use Studioto create policies for your site. Policies created using Studio are stored in the site database andupdates are pushed to the virtual desktop either when that virtual desktop registers with thebroker or when a user connects to that virtual desktop.
• Local Group Policy Editor (Microsoft Management Console snap‑in) ‑ If your network environ‑ment uses Active Directory and you have permission to manage group policy, you can use theLocal Group Policy Editor to create policies for your Site. The settings you configure affect theGroup Policy Objects (GPOs) you specify in the Group Policy Management Console.
Important:
You must use the Local Group Policy Editor to configure some policy settings, including thoserelated to registering VDAs with a Controller and those related to Microsoft App‑V servers.
Policy processing order and precedence
Group policy settings are processed in the following order:
1. Local GPO2. XenApp or XenDesktop Site GPO (stored in the Site database)3. Site‑level GPOs4. Domain‑level GPOs5. Organizational Units
However, if a conflict occurs, policy settings that are processed last can overwrite those that are pro‑cessed earlier. This means that policy settings take precedence in the following order:
1. Organizational Units2. Domain‑level GPOs3. Site‑level GPOs4. XenApp or XenDesktop Site GPO (stored in the Site database)5. Local GPO
For example, a Citrix administrator uses Studio to create a policy (Policy A) that enables client fileredirection for the company’s sales employees. Meanwhile, another administrator uses the GroupPolicy Editor to create apolicy (PolicyB) that disables client file redirection for sales employees. Whenthe sales employees log on to the virtual desktops, Policy B is applied and Policy A is ignored becausePolicy B was processed at the domain level and Policy A was processed at the XenApp or XenDesktopSite GPO level.
However, when a user launches an ICA or Remote Desktop Protocol (RDP) session, Citrix session set‑tings override the same settings configured in an Active Directory policy or using Remote DesktopSession Host Configuration. This includes settings that are related to typical RDP client connectionsettings such as Desktop wallpaper, Menu animation, and View window contents while dragging.
© 1999–2022 Citrix Systems, Inc. All rights reserved. 514

Citrix Virtual Apps and Desktops
When using multiple policies, you can prioritize policies that contain conflicting settings; see Com‑pare, prioritize, model, and troubleshoot policies for details.
Workflow for Citrix policies
The process for configuring policies is as follows:
1. Create the policy.2. Configure policy settings.3. Assign the policy to machine and user objects.4. Prioritize the policy.5. Verify the effective policy by running the Citrix Group Policy Modeling wizard.
Navigate Citrix policies and settings
In the Local Group Policy Editor, policies and settings appear in two categories: Computer Configura‑tion and User Configuration. Each category has a Citrix Policies node. See the Microsoft documenta‑tion for details about navigating and using this snap‑in.
In Studio, policy settings are sorted into categories based on the functionality or feature they affect.For example, the Profile management section contains policy settings for Profile management.
• Computer settings (policy settings applying to machines) define the behavior of virtual desk‑tops and are applied when a virtual desktop starts. These settings apply even when there areno active user sessions on the virtual desktop. User settings define the user experience whenconnecting using ICA. User policies are applied when a user connects or reconnects using ICA.User policies are not applied if a user connects using RDP or logs on directly to the console.
To access policies, settings, or templates, select Policies in the Studio navigation pane.
– The Policies tab lists all policies. When you select a policy, tabs to the right display:Overview (name, priority, enabled/disabled status, and description), Settings (list ofconfigured settings), and Assigned to (user and machine objects to which the policy iscurrently assigned). For more information, see Create policies.
– The Templates tab lists Citrix‑provided and custom templates you created. When youselect a template, tabs to the right display: Description (why you might want to use thetemplate) and Settings (list of configured settings). For more information, see Policy tem‑plates.
– The Comparison tab enables you to compare the settings in a policy or template withthose in other policies or templates. For example, you might want to verify setting valuesto ensure compliance with best practices. For more information, see Compare, prioritize,model, and troubleshoot policies.
© 1999–2022 Citrix Systems, Inc. All rights reserved. 515
https://docs.citrix.com/en-us/xenapp-and-xendesktop/current-release/policies/policies-templates.html

Citrix Virtual Apps and Desktops
– From the Modelling tab, you can simulate connection scenarios with Citrix policies. Formore information, see Compare, prioritize, model, and troubleshoot policies.
To search for a setting in a policy or template:
1. Select the policy or template.2. Select Edit policy or Edit Template in the Actions pane.3. On the Settings page, begin to type the name of the setting.
You can refine your search by selecting a specific product version, selecting a category (for ex‑ample, Bandwidth), or by selecting the View selected only check box or selecting to search onlythe settings that have been added to the selected policy. For an unfiltered search, select AllSettings.
• To search for a setting within a policy :
1. Select the policy.2. Select the Settings tab, begin to type the name of the setting.
You can refine your search by selecting a specific product version or by selecting a category. For anunfiltered search, select All Settings.
A policy, once created, is completely independent of the template used. You can use the Descriptionfield on a new policy to keep track of the source template used.
In Studio, policies and templates are displayed in a single list regardless of whether they contain user,computer or both types of settings and can be applied using both user and computer filters.
In Group Policy Editor, Computer and User settings must be applied separately, even if created froma template that contains both types of settings. In this example choosing to use Very High DefinitionUser Experience in Computer Configuration:
• Legacy Graphics mode is a Computer setting that will be used in a policy created from this tem‑plate.
• The User settings, grayed out, will not be used in a policy created from this template.
Policy templates
April 14, 2021
Templates are a source for creating policies fromapredefined starting point. Built‑in Citrix templates,optimized for specific environments or network conditions, can be used as:
• A source for creating your own policies and templates to share between sites.• A reference for easier comparison of results between deployments as you are able to quote theresults, for example, “…when using Citrix template x or y…”.
© 1999–2022 Citrix Systems, Inc. All rights reserved. 516
Citrix Virtual Apps and Desktops
• A method for communicating policies with Citrix Support or trusted third parties by importingor exporting templates.
Policy templates can be imported and exported.
For considerations when using templates to create policies, see the Knowledge Center articleCTX202330.
Built‑in Citrix templates
The following policy templates are available:
• Very High Definition User Experience. This template enforces default settings that maximizethe user experience. Use this template in scenarios where multiple policies are processed inorder of precedence.
• High Server Scalability. Apply this template to economize on server resources. This templatebalances user experience and server scalability. It offers a good user experience while increas‑ing the number of users you can host on a single server. This template does not use a videocodec for compression of graphics and prevents server side multimedia rendering.
• High Server Scalability‑LegacyOS. This High Server Scalability template applies only to VDAsrunning Windows Server 2008 R2 or Windows 7 and earlier. This template relies on the Legacygraphics mode which is more efficient for those operating systems.
• Optimized for NetScaler SD‑WAN. Apply this template for users working from branch officeswith NetScaler SD‑WAN for optimizing delivery of Citrix Virtual Desktops. (NetScaler SD‑WAN isthe new name for CloudBridge).
• Optimized forWAN. This template is intended for taskworkers in branch offices using a sharedWAN connection or remote locations with low bandwidth connections accessing applicationswith graphically simple user interfaces and little multimedia content. This template trades offvideo playback experience and some server scalability for optimized bandwidth efficiency.
• Optimized forWAN‑Legacy OS. ThisOptimized for WAN template applies only to VDAs runningWindows Server 2008 R2 or Windows 7 and earlier. This template relies on the Legacy graphicsmode which is more efficient for those operating systems.
• Security and Control. Use this template in environments with low tolerance to risk, to mini‑mize the features enabled by default in Citrix Virtual Apps andDesktops. This template includessettings that disable access to printing, clipboard, peripheral devices, drivemapping, port redi‑rection, and Flash acceleration on user devices. Applying this template might use more band‑width and reduce user density per server.
While we recommend using the built‑in Citrix templates with their default settings, there are settingsthat do not have a specific recommended value. For example, Overall session bandwidth limit,included in the Optimized for WAN templates. In this case, the template exposes the setting so theadministrator understands this setting is likely to apply to the scenario.
© 1999–2022 Citrix Systems, Inc. All rights reserved. 517

Citrix Virtual Apps and Desktops
If you are working with a deployment (policy management and VDAs) earlier than XenApp and Xen‑Desktop7.6 FP3, and requireHighServer Scalability andOptimized forWAN templates, use the LegacyOS versions of these templates when they apply.
Note:
Citrix creates and updates built‑in templates. You cannot modify or delete these templates.
Create andmanage templates using Studio
To create a template based on a template:
1. Select Policies in the Studio navigation pane.2. Select the Templates tab and then select the template fromwhich youwill create the template.3. Select Create Template in the Actions pane.4. Select and configure thepolicy settings to include in the template. Removeany existing settings
that don’t belong. Enter a name for the template.
After you click Finish, the new template appears on the Templates tab.
To create a template based on a policy:
1. Select Policies in the Studio navigation pane.2. Select the Policies tab and then select the policy fromwhich you will create the template.3. Select Save as Template in the Actions pane.4. Select and configure any new policy settings to include in the template. Remove any existing
settings thatdon’t belong. Enter anameanddescription for the template, and then clickFinish.
To import a template:
1. Select Policies in the Studio navigation pane.2. Select the Templates tab and then select Import Template.3. Select the template file to import and then click Open. If you import a template with the same
name as an existing template, you can choose to overwrite the existing template or save thetemplate with a different name that is generated automatically.
To export a template:
1. Select Policies in the Studio navigation pane.2. Select the Templates tab and then select Export Template.3. Select the location where you want to save the template and then click Save.
A .gpt file is created in the specified location.
© 1999–2022 Citrix Systems, Inc. All rights reserved. 518
Citrix Virtual Apps and Desktops
Create andmanage templates using the Group Policy Editor
From the Group Policy Editor, expand Computer Configuration or User Configuration. Expand thePolicies node and then select Citrix Policies. Choose the appropriate action.
Task Instruction
Create a template from an existing policy On the Policies tab, select the policy and thenselect Actions > Save as Template.
Create a policy from an existing template On the Templates tab, select the template andthen click New Policy.
Create a template from an existing template On the Templates tab, select the template andthen click New Template.
Import a template On the Templates tab, select Actions >Import.
Export a template On the Templates tab, select Actions > Export.
View template settings On the Templates tab, select the template andthen click the Settings tab.
View a summary of template properties On the Templates tab, select the template andthen click the Properties tab.
View template prerequisites On the Templates tab, select the template andthen click the Prerequisites tab.
Templates and delegated administration
Policy templatesare storedon themachinewhere thepolicymanagementpackagewas installed. Thismachine is either theDelivery Controllermachineor theGroupPolicyObjectsmanagementmachine ‑not the Citrix Virtual Apps and Desktops Site’s database. Thismeans that theWindows administrativepermissions control the policy template files rather than site’s delegated administration roles andscopes.
As a result, an administrator with read‑only permission in the Site can, for example, create templates.However, because templates are local files, no changes are made to your environment.
Custom templates are only visible to the user account that creates them and stored in the user’s Win‑dows profile. To expose a custom template further, create a policy from it or export it to a sharedlocation.
© 1999–2022 Citrix Systems, Inc. All rights reserved. 519

Citrix Virtual Apps and Desktops
Create policies
April 14, 2021
Before creating a policy, decide which group of users or devices it should affect. You may want tocreate a policy based on user job function, connection type, user device, or geographic location. Al‑ternatively, you can use the same criteria that you use for Windows Active Directory group policies.
If you already created a policy that applies to a group, consider editing that policy and configuring theappropriate settings, instead of creating another policy. Avoid creating a new policy solely to enablea specific setting or to exclude the policy from applying to certain users.
When you create a new policy, you can base it on settings in a policy template and customize settingsas needed, or you can create it without using a template and add all the settings you need.
In Citrix Studio, newpolicies created are set toDisabledunless the Enable policy checkbox is explicitlychecked.
Policy settings
Policy settings can be enabled, disabled, or not configured. By default, policy settings are not config‑ured, which means they are not added to a policy. Settings are applied only when they are added toa policy.
Some policy settings can be in one of the following states:
• Allowed or Prohibited allows or prevents the action controlled by the setting. In some cases,users are allowed or prevented frommanaging the setting’s action in a session. For example, ifthe Menu animation setting is set to Allowed, users can control menu animations in their clientenvironment.
• Enabled or Disabled turns the setting on or off. If you disable a setting, it is not enabled in lower‑ranked policies.
In addition, some settings control the effectiveness of dependent settings. For example, Client driveredirection controls whether or not users are allowed to access the drives on their devices. To allowusers to access their network drives, both this setting and the Client network drives setting must beadded to the policy. If the Client drive redirection setting is disabled, users cannot access their net‑work drives, even if the Client network drives setting is enabled.
In general, policy setting changes that impact machines go into effect either when the virtual desk‑top restarts or when a user logs on. Policy setting changes that impact users go into effect the nexttime users log on. If you are using Active Directory, policy settings are updated when Active Direc‑tory reevaluates policies at 90‑minute intervals and applied either when the virtual desktop restartsor when a user logs on.
© 1999–2022 Citrix Systems, Inc. All rights reserved. 520

Citrix Virtual Apps and Desktops
For some policy settings, you can enter or select a value when you add the setting to a policy. Youcan limit configuration of the setting by selecting Use default value. This disables configuration of thesetting and allows only the setting’s default value to be used when the policy is applied, regardless ofthe value that was entered before selecting Use default value.
As best practice:
• Assign policies to groups rather than individual users. If you assign policies to groups, assign‑ments are updated automatically when you add or remove users from the group.
• Do not enable conflicting or overlapping settings in Remote Desktop Session Host Configura‑tion. In some cases, Remote Desktop Session Host Configuration provides similar functionalityto Citrix policy settings. When possible, keep all settings consistent (enabled or disabled) forease of troubleshooting.
• Disable unused policies. Policies with no settings added create unnecessary processing.
Policy assignments
When creating a policy, you assign it to certain user and machine objects; that policy is applied toconnections according to specific criteria or rules. In general, you can add as many assignments asyou want to a policy, based on a combination of criteria. If you specify no assignments, the policy isapplied to all connections.
The following table lists the available assignments:
Assignment name Applies a policy based on
Access Control Access control conditions through which aclient is connecting. Connection type ‑ Whetherto apply the policy to connections made withor without NetScaler Gateway. NetScalerGateway farm name ‑ Name of the NetScalerGateway virtual server. Access condition ‑Name of the end point analysis policy orsession policy to use.
Netscaler SD‑WAN Whether or not a user session is launchedthrough Netscaler SD‑WAN. Note: You can addonly one Netscaler SD‑WAN assignment to apolicy.
© 1999–2022 Citrix Systems, Inc. All rights reserved. 521

Citrix Virtual Apps and Desktops
Assignment name Applies a policy based on
Client IP Address IP address of the user device used to connectto the session: IPv4 examples: 12.0.0.0,12.0.0.*, 12.0.0.1‑12.0.0.70, 12.0.0.1/24; IPv6examples: 2001:0db8:3c4d:0015:0:0:abcd:ef12,2001:0db8:3c4d:0015::/54
Client Name Name of the user device. Exact match:ClientABCName. Using wildcard: Client*Name.
Delivery Group Delivery Groupmembership.
Delivery Group type Type of desktop or application: privatedesktop, shared desktop, private application,or shared application. Note: Private desktopand shared desktop filter options are availableonly for Citrix Virtual Apps and Desktops 7.x.For more information, see CTX219153.
Organizational Unit (OU) Organizational unit.
Tag Tags. Note: Apply this policy to all taggedmachines. Note that application tags are notincluded.
User or Group User or group name.
When a user logs on, all policies that match the assignments for the connection are identified. Thosepolicies are sorted intopriority order andmultiple instancesof any setting are compared. Each settingis applied according to the priority ranking of the policy. Any policy setting that is disabled takesprecedence over a lower‑ranked setting that is enabled. Policy settings that are not configured areignored.
Important:
When configuring both Active Directory and Citrix policies using the Group Policy ManagementConsole, assignments and settings may not be applied as expected. For more information, seeCTX127461
A policy named “Unfiltered” is provided by default.
• If you use Studio tomanage Citrix policies, settings you add to the Unfiltered policy are appliedto all servers, desktops, and connections in a Site.
• If you use the Local Group Policy Editor to manage Citrix policies, settings you add to the Un‑filtered policy are applied to all Sites and connections that are within the scope of the Group
© 1999–2022 Citrix Systems, Inc. All rights reserved. 522
Citrix Virtual Apps and Desktops
Policy Objects (GPOs) that contain the policy. For example, the Sales OU contains a GPO calledSales‑US that includes all members of the US sales team. The Sales‑US GPO is configured withan Unfiltered policy that includes several user policy settings. When the US Salesmanager logson to the Site, the settings in the Unfiltered policy are automatically applied to the session be‑cause the user is a member of the Sales‑US GPO.
An assignment’s mode determines if the policy is applied only to connections that match all the as‑signment criteria. If the mode is set to Allow (the default), the policy is applied only to connectionsthat match the assignment criteria. If the mode is set to Deny, the policy is applied if the connectiondoes not match the assignment criteria. The following examples illustrate how assignment modesaffect Citrix policies whenmultiple assignments are present.
• Example: Assignments of like type with differing modes ‑ In policies with two assignmentsof the same type, one set to Allow and one set to Deny, the assignment set to Deny takes prece‑dence, provided the connection satisfies both assignments. For example:
Policy 1 includes the following assignments:
– Assignment A specifies the Sales group; the mode is set to Allow– Assignment B specifies the Sales manager’s account; the mode is set to Deny
Because the mode for Assignment B is set to Deny, the policy is not applied when the Salesmanager logs on to the Site, even though the user is a member of the Sales group.
• Example: Assignments of differing type with like modes ‑ In policies with two or more as‑signments of differing types, set to Allow, the connection must satisfy at least one assignmentof each type in order for the policy to be applied. For example:
Policy 2 includes the following assignments:
– Assignment C is a User assignment that specifies the Sales group; themode is set to Allow– Assignment D is a Client IP Address assignment that specifies 10.8.169.* (the corporate net‑work); the mode is set to Allow
When the Sales manager logs on to the Site from the office, the policy is applied because theconnection satisfies both assignments.
Policy 3 includes the following assignments:
– Assignment E is a User assignment that specifies the Sales group; themode is set to Allow– Assignment F is an Access Control assignment that specifies NetScaler Gateway connec‑tion conditions; the mode is set to Allow
When the Sales manager logs on to the Site from the office, the policy is not applied becausethe connection does not satisfy Assignment F.
© 1999–2022 Citrix Systems, Inc. All rights reserved. 523

Citrix Virtual Apps and Desktops
Create a new policy based on a template, using Studio
1. Select Policies in the Studio navigation pane.
2. Select the Templates tab and select a template.
3. Select Create Policy from Template in the Actions pane.
4. By default, the newpolicy uses all the default settings in the template (the Use template defaultsettings radio button is selected). If youwant to change settings, select the Modify defaults andaddmore settings radio button, and then add or remove settings.
5. Specify how to apply the policy by selecting one of the following:
• Assign to selected user andmachine objects and then select the user andmachine objectsto which the policy will apply.
• Assign to all objects in a site to apply the policy to all user andmachine objects in the Site.
6. Enter a name for the policy (or accept the default); consider naming the policy according towho or what it affects, for example Accounting Department or Remote Users. Optionally, add adescription.
The policy is enabled by default; you can disable it. Enabling the policy allows it to be appliedimmediately to users logging on. Disabling prevents the policy from being applied. If you needto prioritize the policy or add settings later, consider disabling the policy until you are ready toapply it.
Create a new policy using Studio
1. Select Policies in the Studio navigation pane.
2. Select the Policies tab.
3. Select Create Policy in the Actions pane.
4. Add and configure policy settings.
5. Specify how to apply the policy by choosing one of the following:
• Assign to selected user andmachine objects and then select the user andmachine objectsto which the policy will apply.
• Assign to all objects in a site to apply the policy to all user andmachine objects in the Site.
6. Enter a name for the policy (or accept the default); consider naming the policy according towho or what it affects, for example Accounting Department or Remote Users. Optionally, add adescription.
The policy is enabled by default; you can disable it. Enabling the policy allows it to be appliedimmediately to users logging on. Disabling prevents the policy from being applied. If you need
© 1999–2022 Citrix Systems, Inc. All rights reserved. 524

Citrix Virtual Apps and Desktops
to prioritize the policy or add settings later, consider disabling the policy until you are ready toapply it.
Create andmanage policies using the Group Policy Editor
From the Group Policy Editor, expand Computer Configuration or User Configuration. Expand thePolicies node and then select Citrix Policies. Choose the appropriate action below.
Task Instruction
Create a new policy On the Policies tab, click New.
Edit an existing policy On the Policies tab, select the policy and thenclick Edit.
Change the priority of an existing policy On the Policies tab, select the policy and thenclick either Higher or Lower.
View summary information about a policy On the Policies tab, select the policy and thenclick the Summary tab.
View and amend policy settings On the Policies tab, select the policy and thenclick the Settings tab.
View and amend policy filters On the Policies tab, select the policy and thenclick the Filters tab. When you addmore thanone filter to a policy, all the filter conditionsmust be met for the policy to be applied.
Enable or disable a policy On the Policies tab, select the policy and thenselect either Actions > Enable or Actions >Disable.
Create a new policy from an existing template On the Templates tab, select the template andthen click New Policy.
Compare, prioritize, model, and troubleshoot policies
April 14, 2021
You can use multiple policies to customize your environment to meet users’ needs based on theirjob functions, geographic locations, or connection types. For example, for security you may need toplace restrictions on user groups who regularly work with sensitive data. You can create a policy thatprevents users from saving sensitive files on their local client drives. However, if some people in the
© 1999–2022 Citrix Systems, Inc. All rights reserved. 525
Citrix Virtual Apps and Desktops
user groupdoneed access to their local drives, you can create another policy for only those users. Youthen rank or prioritize the two policies to control which one takes precedence.
When using multiple policies, you must determine how to prioritize them, how to create exceptions,and how to view the effective policy when policies conflict.
In general, policies override similar settings configured for the entire Site, for specific Delivery Con‑trollers, or on the user device. The exception to this principle is security. The highest encryption set‑ting in your environment, including the operating system and themost restrictive shadowing setting,always overrides other settings and policies.
Citrix policies interact with policies you set in your operating system. In a Citrix environment, Citrixsettings override the same settings configured in an Active Directory policy or using Remote DesktopSession Host Configuration. This includes settings that are related to typical Remote Desktop Proto‑col (RDP) client connection settings such as Desktop wallpaper, Menu animation, and View windowcontents while dragging. For some policy settings, such as Secure ICA, the settings in policies mustmatch the settings in the operating system. If a higher priority encryption level is set elsewhere, theSecure ICA policy settings that you specify in the policy or when you are delivering application anddesktops can be overridden.
For example, the encryption settings that you specify when creating Delivery Groups should be at thesame level as the encryption settings you specified throughout your environment.
Note: In the second hop of double‑hop scenarios, when a Single‑session OS VDA connects to Multi‑session OS VDA, Citrix policies act on the Single‑session OS VDA as if it were the user device. For ex‑ample, if policies are set to cache images on the user device, the images cached for the second hop ina double‑hop scenario are cached on the Single‑session OS VDAmachine.
Compare policies and templates
You can compare settings in a policy or template with those in other policies or templates. For exam‑ple, you might need to verify setting values to ensure compliance with best practices. Youmight alsowant to compare settings in a policy or template with the default settings provided by Citrix.
1. Select Policies in the Studio navigation pane.2. Click the Comparison tab and then click Select.3. Choose the policies or templates to compare. To include default values in the comparison, se‑
lect the Compare to default settings check box.4. After you click Compare, the configured settings are displayed in columns.5. To see all settings, select Show All Settings. To return to the default view, select Show Common
Settings.
© 1999–2022 Citrix Systems, Inc. All rights reserved. 526

Citrix Virtual Apps and Desktops
Prioritize policies
Prioritizing policies allows you to define the precedence of policies when they contain conflicting set‑tings. When a user logs on, all policies that match the assignments for the connection are identified.Those policies are sorted into priority order andmultiple instances of any setting are compared. Eachsetting is applied according to the priority ranking of the policy.
You prioritize policies by giving themdifferent priority numbers in Studio. By default, newpolicies aregiven the lowest priority. If policy settings conflict, a policywith a higher priority (a priority number of1 is the highest) overrides a policy with a lower priority. Settings aremerged according to priority andthe setting’s condition; for example, whether the setting is disabled or enabled. Any disabled settingoverrides a lower‑ranked setting that is enabled. Policy settings that are not configured are ignoredand do not override the settings of lower‑ranked settings.
1. Select Policies in the Studio navigation pane. Make sure the Policies tab is selected.2. Select a policy.3. Select Lower Priority or Higher Priority in the Actions pane.
Exceptions
When you create policies for groups of users, user devices, ormachines, youmay find that somemem‑bers of the group require exceptions to some policy settings. You can create exceptions by:
• Creating a policy only for those groupmembers who need the exceptions and then ranking thepolicy higher than the policy for the entire group
• Using the Deny mode for an assignment added to the policy
An assignment with the mode set to Deny applies a policy only to connections that do not match theassignment criteria. For example, a policy contains the following assignments:
• Assignment A is a client IP address assignment that specifies the range 208.77.88.*; themode isset to Allow
• Assignment B is a user assignment that specifies a particular user account; the mode is set toDeny
The policy is applied to all users who log on to the Site with IP addresses in the range specified in As‑signment A. However, the policy is not applied to the user logging on to the Site with the user accountspecified in Assignment B, even though the user’s computer is assigned an IP address in the rangespecified in Assignment A.
Determine which policies apply to a connection
Sometimes a connection does not respond as expected because multiple policies apply. If a higherpriority policy applies to a connection, it can override the settings you configure in the original policy.
© 1999–2022 Citrix Systems, Inc. All rights reserved. 527

Citrix Virtual Apps and Desktops
You can determine how final policy settings are merged for a connection by calculating the ResultantSet of Policy.
You can calculate the Resultant Set of Policy in the following ways:
• Use the Citrix Group Policy ModelingWizard to simulate a connection scenario and discern howCitrix policies might be applied. You can specify conditions for a connection scenario such asdomain controller, users, Citrix policy assignment evidence values, and simulated environmentsettings such as slow network connection. The report that the wizard produces lists the Citrixpolicies that would likely take effect in the scenario. If you are logged on to the Controller asa domain user, the wizard calculates the Resultant Set of Policy using both site policy settingsand Active Directory Group Policy Objects (GPOs).
• Use Group Policy Results to produce a report describing the Citrix policies in effect for a givenuser and controller. The Group Policy Results tool helps you evaluate the current state of GPOsin your environment and generates a report that describes how these objects, including Citrixpolicies, are currently being applied to a particular user and controller.
You can launch the Citrix Group Policy Modeling Wizard from the Actions pane in Studio. You canlaunch either tool from the Group Policy Management Console in Windows.
If you run the Citrix Group Policy Modeling Wizard or Group Policy Results tool from the Group PolicyManagement Console, site policy settings created using Studio are not included in the Resultant Setof Policy.
To ensure you obtain the most comprehensive Resultant Set of Policy, Citrix recommends launchingthe Citrix Group Policy Modeling wizard from Studio, unless you create policies using only the GroupPolicy Management Console.
Use the Citrix Group Policy Modeling Wizard
Open the Citrix Group Policy Modeling Wizard using one of the following:
• Select Policies in the Studio navigation pane, select the Modeling tab, and then select LaunchModeling Wizard in the Actions pane.
• Launch the Group Policy Management Console (gpmc.msc), right‑click Citrix Group Policy Mod‑eling in the tree pane, and then select Citrix Group Policy Modeling Wizard.
Follow the wizard instructions to select the domain controller, users, computers, environment set‑tings, and Citrix assignment criteria to use in the simulation. After you click Finish, the wizard pro‑duces a report of the modeling results. In Studio, the report appears in the middle pane under theModeling tab.
To view the report, select View Modeling Report.
© 1999–2022 Citrix Systems, Inc. All rights reserved. 528
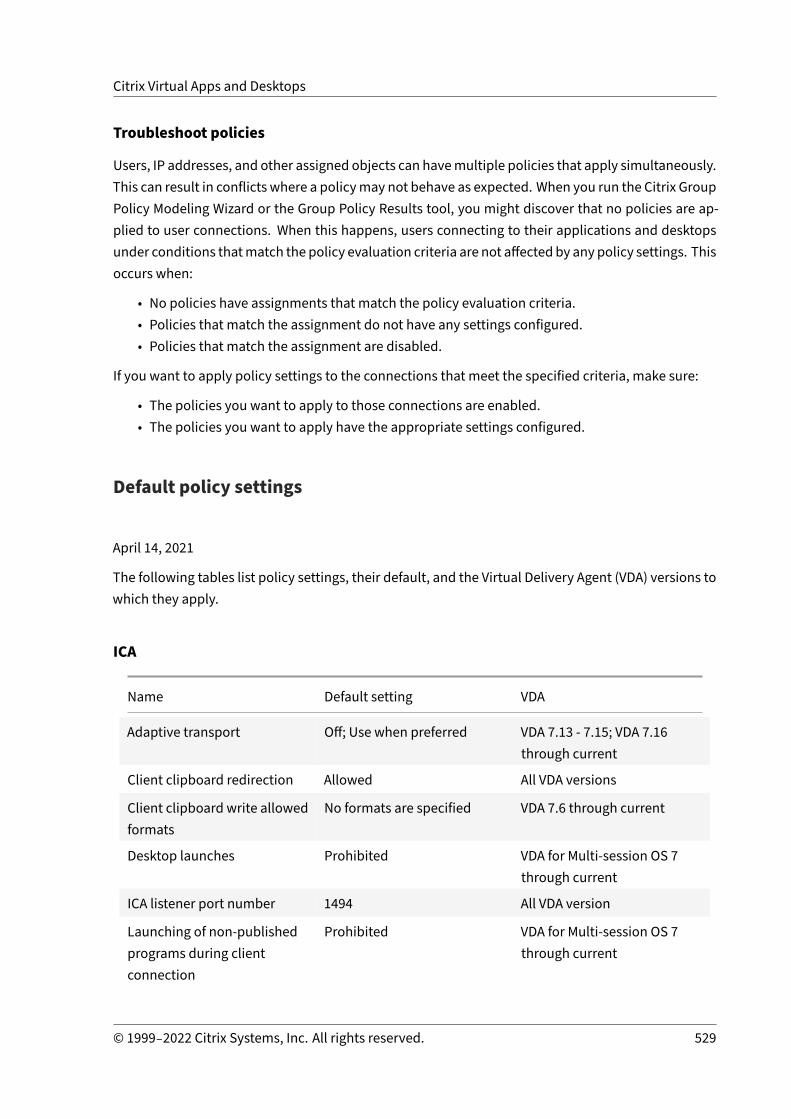
Citrix Virtual Apps and Desktops
Troubleshoot policies
Users, IP addresses, and other assigned objects can havemultiple policies that apply simultaneously.This can result in conflicts where a policymay not behave as expected. When you run the Citrix GroupPolicy Modeling Wizard or the Group Policy Results tool, you might discover that no policies are ap‑plied to user connections. When this happens, users connecting to their applications and desktopsunder conditions thatmatch the policy evaluation criteria are not affected by any policy settings. Thisoccurs when:
• No policies have assignments that match the policy evaluation criteria.• Policies that match the assignment do not have any settings configured.• Policies that match the assignment are disabled.
If you want to apply policy settings to the connections that meet the specified criteria, make sure:
• The policies you want to apply to those connections are enabled.• The policies you want to apply have the appropriate settings configured.
Default policy settings
April 14, 2021
The following tables list policy settings, their default, and the Virtual Delivery Agent (VDA) versions towhich they apply.
ICA
Name Default setting VDA
Adaptive transport Off; Use when preferred VDA 7.13 ‑ 7.15; VDA 7.16through current
Client clipboard redirection Allowed All VDA versions
Client clipboard write allowedformats
No formats are specified VDA 7.6 through current
Desktop launches Prohibited VDA for Multi‑session OS 7through current
ICA listener port number 1494 All VDA version
Launching of non‑publishedprograms during clientconnection
Prohibited VDA for Multi‑session OS 7through current
© 1999–2022 Citrix Systems, Inc. All rights reserved. 529

Citrix Virtual Apps and Desktops
Name Default setting VDA
Loss tolerant mode Allowed VDA 2003. Note: Losstolerance mode is not yetavailable. This version of theVDA will support it when itbecomes available.
Loss tolerant thresholds When loss tolerant mode isavailable: Packet loss: 5%,Latency: 300ms (RTT)
VDA 2003 through current
Rendezvous protocol Enabled Applies only to HDX sessionsestablished through CitrixCloud.
Restrict client clipboard write Prohibited VDA 7.6 through current
Restrict session clipboardwrite
Prohibited VDA 7.6 through current
Session clipboard writeallowed formats
No formats are specified VDA 7.6 through current
Tablet mode toggle Enabled VDA 7.16 through current; forVDA 7.14 and 7.15 LTSR,configure this setting usingthe registry.
Virtual channel whitelist Disabled VDA 2006
ICA/Adobe Flash delivery/Flash redirection
Name Default setting VDA
Flash video fallbackprevention
Not configured VDA 7.6 FP3 through current
Flash video fallbackprevention error *.swf
VDA 7.6 FP3 through current
ICA/Audio
© 1999–2022 Citrix Systems, Inc. All rights reserved. 530

Citrix Virtual Apps and Desktops
Name Default setting VDA
Audio Plug N Play Allowed VDA for Multi‑session OS 7through current
Audio quality High ‑ high definition audio All VDA versions
Client audio redirection Allowed All VDA versions
Client microphoneredirection
Allowed All VDA versions
ICA/Auto client reconnect
Name Default setting VDA
Audio over UDP real‑timetransport
Allowed All VDA versions
Auto client reconnect Allowed All VDA versions
Auto client reconnectauthentication
Do not require authentication All VDA versions
Auto client reconnect logging Do not log auto‑reconnectevents
All VDA versions
Auto client reconnect timeout 120 seconds VDA 7.13 through current
Reconnect UI transparencylevel
80% VDA 7.13 through current
ICA/Bandwidth
Name Default setting VDA
Audio redirection bandwidthlimit
0 Kbps All VDA versions
Audio redirection bandwidthlimit percent
0 All VDA versions
© 1999–2022 Citrix Systems, Inc. All rights reserved. 531
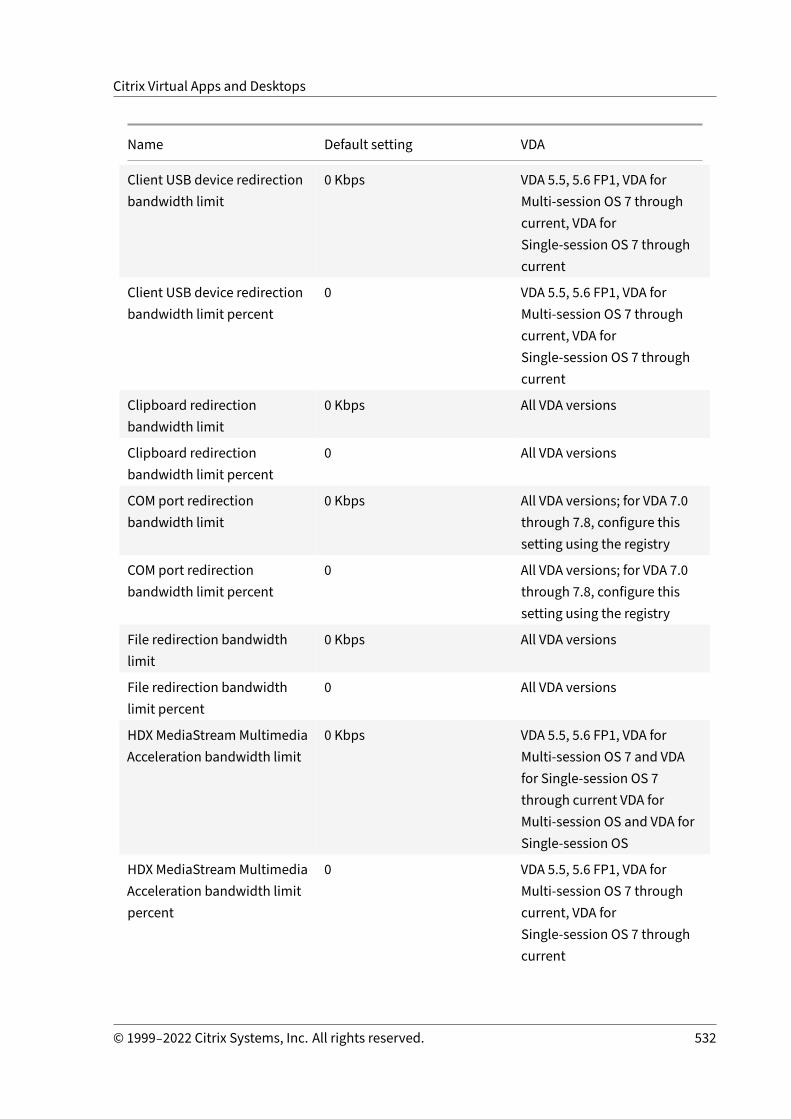
Citrix Virtual Apps and Desktops
Name Default setting VDA
Client USB device redirectionbandwidth limit
0 Kbps VDA 5.5, 5.6 FP1, VDA forMulti‑session OS 7 throughcurrent, VDA forSingle‑session OS 7 throughcurrent
Client USB device redirectionbandwidth limit percent
0 VDA 5.5, 5.6 FP1, VDA forMulti‑session OS 7 throughcurrent, VDA forSingle‑session OS 7 throughcurrent
Clipboard redirectionbandwidth limit
0 Kbps All VDA versions
Clipboard redirectionbandwidth limit percent
0 All VDA versions
COM port redirectionbandwidth limit
0 Kbps All VDA versions; for VDA 7.0through 7.8, configure thissetting using the registry
COM port redirectionbandwidth limit percent
0 All VDA versions; for VDA 7.0through 7.8, configure thissetting using the registry
File redirection bandwidthlimit
0 Kbps All VDA versions
File redirection bandwidthlimit percent
0 All VDA versions
HDX MediaStreamMultimediaAcceleration bandwidth limit
0 Kbps VDA 5.5, 5.6 FP1, VDA forMulti‑session OS 7 and VDAfor Single‑session OS 7through current VDA forMulti‑session OS and VDA forSingle‑session OS
HDX MediaStreamMultimediaAcceleration bandwidth limitpercent
0 VDA 5.5, 5.6 FP1, VDA forMulti‑session OS 7 throughcurrent, VDA forSingle‑session OS 7 throughcurrent
© 1999–2022 Citrix Systems, Inc. All rights reserved. 532

Citrix Virtual Apps and Desktops
Name Default setting VDA
LPT port redirectionbandwidth limit
0 Kbps All VDA versions; for VDA 7.0through 7.8, configure thissetting using the registry
LPT port redirectionbandwidth limit percent
0 All VDA versions; for VDA 7.0through 7.8, configure thissetting using the registry
Overall session bandwidthlimit
0 Kbps All VDA versions
Printer redirection bandwidthlimit
0 Kbps All VDA versions
Printer redirection bandwidthlimit percent
0 All VDA versions
TWAIN device redirectionbandwidth limit
0 Kbps VDA 5.5, 5.6 FP1, VDA forMulti‑session OS 7 throughcurrent, VDA forSingle‑session OS 7 throughcurrent
TWAIN device redirectionbandwidth limit percent
0 VDA 5.5, 5.6 FP1, VDA forMulti‑session OS 7 throughcurrent, VDA forSingle‑session OS 7 throughcurrent
ICA/Bidirectional content redirection
Name Default setting VDA
Allow bidirectional contentredirection
Prohibited VDA 7.13 through current
Allowed URLs to be redirectedto client
empty VDA 7.13 through current
Allowed URLs to be redirectedto VDA
empty VDA 7.13 through current
© 1999–2022 Citrix Systems, Inc. All rights reserved. 533

Citrix Virtual Apps and Desktops
Name Default setting VDA
Client to host (VDA) and clientto client bidirectional contentredirection
Use the Citrix Workspace AppGroup Policy Objectadministrative template
ICA/Browser content redirection
Name Default setting VDA
Browser content redirection Allowed VDA 7.16 through current
Browser content redirectionACL configuration
https://www.youtube.com/*
VDA 7.16 through current
Browser content redirectionproxy configuration
empty VDA 7.16 through current
ICA/Client sensors
Name Default setting VDA
Allow applications to use thephysical location of the clientdevice
Prohibited VDA 5.6 FP1, VDA forMulti‑session OS 7 throughcurrent, VDA forSingle‑session OS 7 throughcurrent
ICA/Desktop UI
Name Default setting VDA
Desktop CompositionRedirection
Disabled (7.6 FP3 throughcurrent);Enabled (5.6 through7.6 FP2)
VDA 5.6, VDA forSingle‑session OS 7 through7.15
Desktop CompositionRedirection graphics quality
Medium VDA 5.6, VDA forSingle‑session OS 7 through7.15
Desktop wallpaper Allowed All VDA versions
© 1999–2022 Citrix Systems, Inc. All rights reserved. 534

Citrix Virtual Apps and Desktops
Name Default setting VDA
Menu animation Allowed All VDA versions
View window contents whiledragging
Allowed All VDA versions
ICA/End user monitoring
Name Default setting VDA
ICA round trip calculation Enabled All VDA versions
ICA round trip calculationinterval
15 seconds All VDA versions
ICA round trip calculations foridle connections
Disabled All VDA versions
ICA/Enhanced desktop experience
Name Default setting VDA
Enhanced DesktopExperience
Allowed VDA for Multi‑session OS 7through current
ICA/File redirection
Name Default setting VDA
Auto connect client drives Allowed All VDA versions
Client drive redirection Allowed All VDA versions
Client fixed drives Allowed All VDA versions
Client floppy drives Allowed All VDA versions
Client network drives Allowed All VDA versions
Client optical drives Allowed All VDA versions
Client removable drives Allowed All VDA versions
© 1999–2022 Citrix Systems, Inc. All rights reserved. 535

Citrix Virtual Apps and Desktops
Name Default setting VDA
Host to client redirection Disabled VDA for Multi‑session OS 7through current
Preserve client drive letters Disabled VDA 5, 5.5, 5.6 FP1, VDA forSingle‑session OS 7 throughcurrent
Read‑only client drive access Disabled VDA 5.5, 5.6 FP1, VDA forMulti‑session OS 7 throughcurrent, VDA forSingle‑session OS 7 throughcurrent
Special folder redirection Allowed Web Interface deploymentsonly; VDA for Multi‑session OS7 through current
Use asynchronous writes Disabled All VDA versions
ICA/Graphics
Name Default setting VDA
Allow visually losslesscompression
Disabled VDA 7.6 through current
Display memory limit 65536 Kb VDA 5, 5.5, 5.6 FP1, VDA forSingle‑session OS 7 throughcurrent
Display mode degradepreference
Degrade color depth first All VDA versions
Dynamic windows preview Enabled VDA 5.5, 5.6 FP1, VDA forMulti‑session OS 7 throughcurrent, VDA forSingle‑session OS 7 throughcurrent
Image caching Enabled VDA 5.5, 5.6 FP1, VDA forMulti‑session OS 7 throughcurrent, VDA forSingle‑session OS 7 throughcurrent
© 1999–2022 Citrix Systems, Inc. All rights reserved. 536
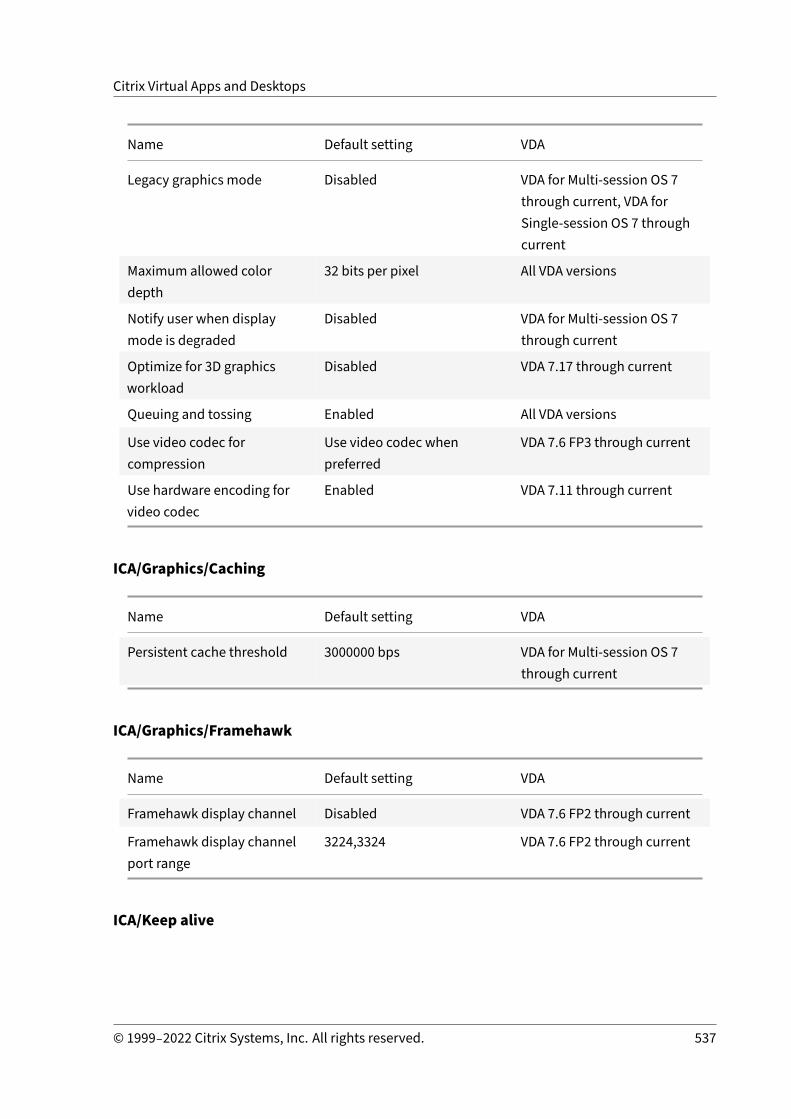
Citrix Virtual Apps and Desktops
Name Default setting VDA
Legacy graphics mode Disabled VDA for Multi‑session OS 7through current, VDA forSingle‑session OS 7 throughcurrent
Maximum allowed colordepth
32 bits per pixel All VDA versions
Notify user when displaymode is degraded
Disabled VDA for Multi‑session OS 7through current
Optimize for 3D graphicsworkload
Disabled VDA 7.17 through current
Queuing and tossing Enabled All VDA versions
Use video codec forcompression
Use video codec whenpreferred
VDA 7.6 FP3 through current
Use hardware encoding forvideo codec
Enabled VDA 7.11 through current
ICA/Graphics/Caching
Name Default setting VDA
Persistent cache threshold 3000000 bps VDA for Multi‑session OS 7through current
ICA/Graphics/Framehawk
Name Default setting VDA
Framehawk display channel Disabled VDA 7.6 FP2 through current
Framehawk display channelport range
3224,3324 VDA 7.6 FP2 through current
ICA/Keep alive
© 1999–2022 Citrix Systems, Inc. All rights reserved. 537

Citrix Virtual Apps and Desktops
Name Default setting VDA
ICA keep alive timeout 60 seconds All VDA versions
ICA keep alives Do not send ICA keep alivemessages
All VDA versions
ICA/Local App Access
Name Default setting VDA
Allow local app access Prohibited VDA for Multi‑session OS 7through current, VDA forSingle‑session OS 7 throughcurrent
URL redirection black list No sites are specified VDA for Multi‑session OS 7through current, VDA forSingle‑session OS 7 throughcurrent
URL redirection white list No sites are specified VDA for Multi‑session OS 7through current, VDA forSingle‑session OS 7 throughcurrent
ICA/Mobile experience
Name Default setting VDA
Automatic keyboard display Prohibited VDA 5.6 FP1, VDA forMulti‑session OS 7 throughcurrent, VDA forSingle‑session OS 7 throughcurrent
© 1999–2022 Citrix Systems, Inc. All rights reserved. 538

Citrix Virtual Apps and Desktops
Name Default setting VDA
Launch touch‑optimizeddesktop
Allowed VDA 5.6 FP1, VDA forMulti‑session OS 7 throughcurrent, VDA forSingle‑session OS 7 throughcurrent. This setting isdisabled and not available forWindows 10 and WindowsServer 2016 machines.
Remote the combo box Prohibited VDA 5.6 FP1, VDA forMulti‑session OS 7 throughcurrent, VDA forSingle‑session OS 7 throughcurrent
ICA/Multimedia
Name Default setting VDA
HTML5 video redirection Prohibited VDA 7.12 through current
Limit video quality Not configured VDA for Multi‑session OS 7through current, VDA forSingle‑session OS 7 throughcurrent
Microsoft Teams redirection Allowed VDA for Multi‑session OS 1906through current, VDA forSingle‑session OS 1906through current.
Multimedia conferencing Allowed All VDA versions
Optimization for WindowsMedia multimedia redirectionover WAN
Allowed VDA for Multi‑session OS 7through current, VDA forSingle‑session OS 7 throughcurrent
Use GPU for optimizingWindows Media multimediaredirection over WAN
Prohibited VDA for Multi‑session OS 7through current, VDA forSingle‑session OS 7 throughcurrent
© 1999–2022 Citrix Systems, Inc. All rights reserved. 539

Citrix Virtual Apps and Desktops
Name Default setting VDA
Windows Media fallbackprevention
Not configured VDA 7.6 FP3 through current
Windows Media client‑sidecontent fetching
Allowed VDA for Multi‑session OS 7through current, VDA forSingle‑session OS 7 throughcurrent
Windows Media redirection Allowed All VDA versions
Windows Media redirectionbuffer size
5 seconds VDA 5, 5.5, 5.6 FP1 throughcurrent
Windows Media redirectionbuffer size use
Disabled VDA 5, 5.5, 5.6 FP1 throughcurrent
ICA/Multi‑Stream Connections
Name Default setting VDA
Audio over UDP Allowed VDA for Multi‑session OS 7through current
Audio UDP port range 16500, 16509 VDA 5.5, 5.6 FP1, VDA forMulti‑session OS 7 throughcurrent, VDA forSingle‑session OS 7 throughcurrent
Multi‑Port policy Primary port (2598) has HighPriority
VDA 5.5, 5.6 FP1, VDA forMulti‑session OS 7 throughcurrent, VDA forSingle‑session OS 7 throughcurrent
Multi‑Stream computersetting
Disabled VDA 5.5, 5.6 FP1, VDA forMulti‑session OS 7 throughcurrent, VDA forSingle‑session OS 7 throughcurrent
© 1999–2022 Citrix Systems, Inc. All rights reserved. 540

Citrix Virtual Apps and Desktops
Name Default setting VDA
Multi‑Stream user setting Disabled VDA 5.5, 5.6 FP1, VDA forMulti‑session OS 7 throughcurrent, VDA forSingle‑session OS 7 throughcurrent
Multi‑Stream virtual channelstream assignment setting
See Multi‑Stream virtualchannel assignment settingfor default streamassignments
VDA 2003
ICA/Port Redirection
Name Default setting VDA
Auto connect client COM ports Disabled All VDA versions; for VDA 7.0through 7.8, configure thissetting using the registry
Auto connect client LPT ports Disabled All VDA versions; for VDA 7.0through 7.8, configure thissetting using the registry
Client COM port redirection Prohibited All VDA versions; for VDA 7.0through 7.8, configure thissetting using the registry
Client LPT port redirection Prohibited All VDA versions; for VDA 7.0through 7.8, configure thissetting using the registry
ICA/Printing
Name Default setting VDA
Client printer redirection Allowed All VDA versions
Default printer Set default printer to theclient’s main printer
All VDA versions
© 1999–2022 Citrix Systems, Inc. All rights reserved. 541

Citrix Virtual Apps and Desktops
Name Default setting VDA
Printer assignments User’s current printer is usedas the default printer for thesession
All VDA versions
Printer auto‑creation eventlog preference
Log errors and warnings All VDA versions
Session printers No printers are specified All VDA versions
Wait for printers to be created(desktop)
Disabled All VDA versions
ICA/Printing/Client Printers
Name Default setting VDA
Auto‑create client printers Auto‑create all client printers All VDA versions
Auto‑create generic universalprinter
Disabled All VDA versions
Client printer names Standard printer names VDA 5.6
Direct connections to printservers
Enabled All VDA versions
Printer driver mapping andcompatibility
No rules are specified All VDA versions
Printer properties retention Held in profile only if notsaved on client
All VDA versions
Retained and restored clientprinters
Allowed VDA 5, 5,5, 5.6 FP1
ICA/Printing/Drivers
Name Default setting VDA
Automatic installation ofin‑box printer drivers
Enabled All VDA versions
Universal driver preference EMF; XPS; PCL5c; PCL4; PS All VDA versions
© 1999–2022 Citrix Systems, Inc. All rights reserved. 542

Citrix Virtual Apps and Desktops
Name Default setting VDA
Universal print driver usage Use universal printing only ifrequested driver isunavailable
All VDA versions
ICA/Printing/Universal Print Server
Name Default setting VDA
Universal Print Server enable Disabled All VDA versions
Universal Print Server printdata stream (CGP) port
7229 All VDA version
Universal Print Server printstream input bandwidth limit(kpbs)
0 All VDA versions
Universal Print Server webservice (HTTP/SOAP) port
8080 All VDA versions
Universal Print Servers forload balancing
VDA versions 7.9 throughcurrent
Universal Print Serverout‑of‑service threshold
180 (seconds) VDA versions 7.9 throughcurrent
ICA/Printing/Universal Printing
Name Default setting VDA
Universal printing EMFprocessing mode
Spool directly to printer All VDA versions
Universal printing imagecompression limit
Best quality (losslesscompression)
All VDA versions
© 1999–2022 Citrix Systems, Inc. All rights reserved. 543

Citrix Virtual Apps and Desktops
Name Default setting VDA
Universal printingoptimization defaults
Image Compression: Desiredimage quality = Standardquality, Enable heavyweightcompression = False; Imageand Font Caching: Allowcaching of embedded images= True; Allownon‑administrators to modifythese settings = False;
All VDA versions
Universal printing previewpreference
Do not use print preview forauto‑created or genericuniversal printers
All VDA versions
Universal printing printquality limit
No limit All VDA versions
ICA/Security
Name Default setting VDA
SecureICAminimumencryption level
Basic VDA for Multi‑session OS 7through current
ICA/Server Limits
Name Default setting VDA
Server idle timer interval 0 milliseconds VDA for Multi‑session OS 7through current
ICA/Session Limits
© 1999–2022 Citrix Systems, Inc. All rights reserved. 544
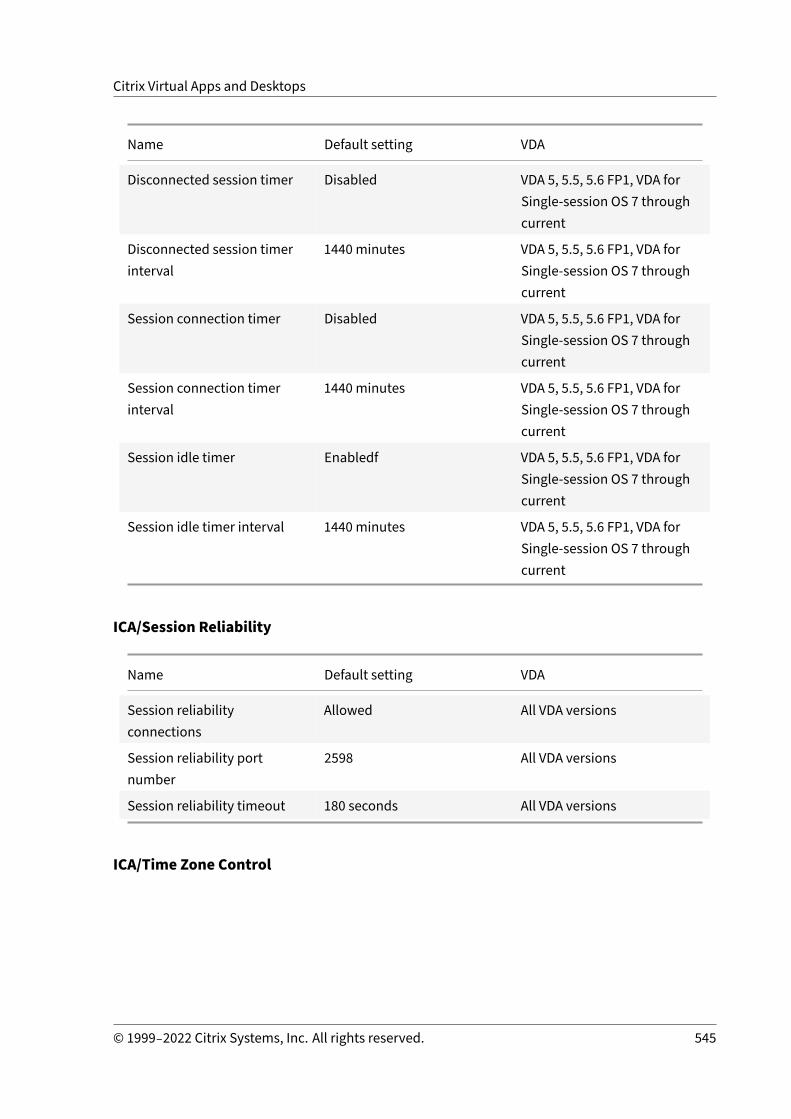
Citrix Virtual Apps and Desktops
Name Default setting VDA
Disconnected session timer Disabled VDA 5, 5.5, 5.6 FP1, VDA forSingle‑session OS 7 throughcurrent
Disconnected session timerinterval
1440 minutes VDA 5, 5.5, 5.6 FP1, VDA forSingle‑session OS 7 throughcurrent
Session connection timer Disabled VDA 5, 5.5, 5.6 FP1, VDA forSingle‑session OS 7 throughcurrent
Session connection timerinterval
1440 minutes VDA 5, 5.5, 5.6 FP1, VDA forSingle‑session OS 7 throughcurrent
Session idle timer Enabledf VDA 5, 5.5, 5.6 FP1, VDA forSingle‑session OS 7 throughcurrent
Session idle timer interval 1440 minutes VDA 5, 5.5, 5.6 FP1, VDA forSingle‑session OS 7 throughcurrent
ICA/Session Reliability
Name Default setting VDA
Session reliabilityconnections
Allowed All VDA versions
Session reliability portnumber
2598 All VDA versions
Session reliability timeout 180 seconds All VDA versions
ICA/Time Zone Control
© 1999–2022 Citrix Systems, Inc. All rights reserved. 545

Citrix Virtual Apps and Desktops
Name Default setting VDA
Estimate local time for legacyclients
Enabled VDA for Multi‑session OS 7through current
Restore Single‑session OStime zone on sessiondisconnect or logoff
Enabled Current VDA version
Use local time of client Use server time zone All VDA versions
ICA/TWAIN Devices
Name Default setting VDA
Client TWAIN deviceredirection
Allowed VDA 5.5, 5.6 FP1, VDA forMulti‑session OS 7 throughcurrent, VDA forSingle‑session OS 7 throughcurrent
TWAIN compression level Medium VDA 5.5, 5.6 FP1, VDA forMulti‑session OS 7 throughcurrent, VDA forSingle‑session OS 7 throughcurrent
ICA/USB Devices
Name Default setting VDA
Client USB deviceoptimization rules
Enabled (VDA 7.6 FP3 throughcurrent); Disabled (VDA 7.11through current); By default,no rules are specified
VDA 7.6 FP3 through current
Client USB device redirection Prohibited All VDA versions
Client USB device redirectionrules
No rules are specified All VDA versions
© 1999–2022 Citrix Systems, Inc. All rights reserved. 546
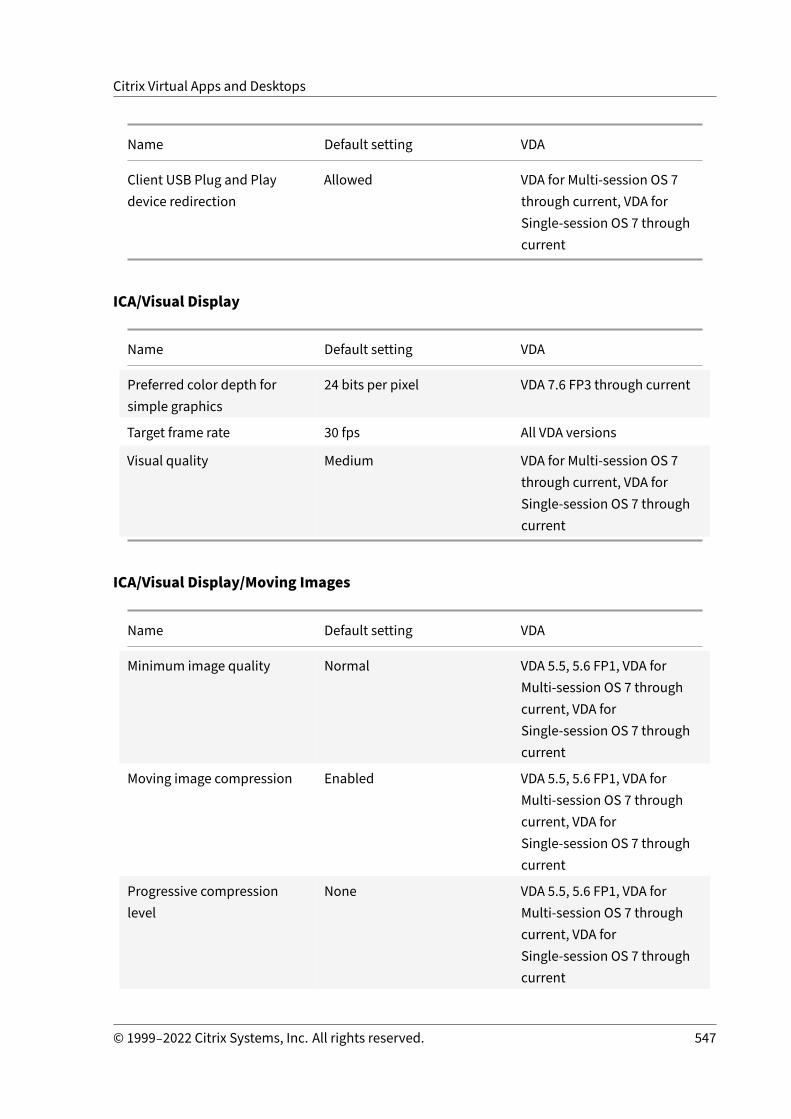
Citrix Virtual Apps and Desktops
Name Default setting VDA
Client USB Plug and Playdevice redirection
Allowed VDA for Multi‑session OS 7through current, VDA forSingle‑session OS 7 throughcurrent
ICA/Visual Display
Name Default setting VDA
Preferred color depth forsimple graphics
24 bits per pixel VDA 7.6 FP3 through current
Target frame rate 30 fps All VDA versions
Visual quality Medium VDA for Multi‑session OS 7through current, VDA forSingle‑session OS 7 throughcurrent
ICA/Visual Display/Moving Images
Name Default setting VDA
Minimum image quality Normal VDA 5.5, 5.6 FP1, VDA forMulti‑session OS 7 throughcurrent, VDA forSingle‑session OS 7 throughcurrent
Moving image compression Enabled VDA 5.5, 5.6 FP1, VDA forMulti‑session OS 7 throughcurrent, VDA forSingle‑session OS 7 throughcurrent
Progressive compressionlevel
None VDA 5.5, 5.6 FP1, VDA forMulti‑session OS 7 throughcurrent, VDA forSingle‑session OS 7 throughcurrent
© 1999–2022 Citrix Systems, Inc. All rights reserved. 547

Citrix Virtual Apps and Desktops
Name Default setting VDA
Progressive compressionthreshold value
2147483647 Kbps VDA 5.5, 5.6 FP1, VDA forMulti‑session OS 7 throughcurrent, VDA forSingle‑session OS 7 throughcurrent
Target minimum frame rate 10 fps VDA 5.5, 5.6 FP1, VDA forMulti‑session OS 7 throughcurrent, VDA forSingle‑session OS 7 throughcurrent
ICA/Visual Display/Still Images
Name Default setting VDA
Extra color compression Disabled All VDA versions
Extra color compressionthreshold
8192 Kbps All VDA versions
Heavyweight compression Disabled All VDA versions
Lossy compression level Medium All VDA versions
Lossy compression thresholdvalue
2147483647 Kbps All VDA versions
ICA/WebSockets
Name Default setting VDA
WebSockets connections Prohibited VDA for Multi‑session OS 7through current, VDA forSingle‑session OS 7 throughcurrent
WebSockets port number 8008 VDA for Multi‑session OS 7through current, VDA forSingle‑session OS 7 throughcurrent
© 1999–2022 Citrix Systems, Inc. All rights reserved. 548

Citrix Virtual Apps and Desktops
Name Default setting VDA
WebSockets trusted originserver list
The wildcard, *, is used totrust all Receiver for WebURLs
VDA for Multi‑session OS 7through current, VDA forSingle‑session OS 7 throughcurrent
Load Management
Name Default setting VDA
Concurrent logon tolerance 2 VDA for Multi‑session OS 7through current
CPU usage Disabled VDA for Multi‑session OS 7through current
CPU usage excluded processpriority
Below Normal or Low VDA for Multi‑session OS 7through current
Disk usage Disabled VDA for Multi‑session OS 7through current
Maximum number of sessions 250 VDA for Multi‑session OS 7through current
Memory usage Disabled VDA for Multi‑session OS 7through current
Memory usage base load Zero load: 768MB VDA for Multi‑session OS 7through current
Profile Management/Advanced settings
Name Default setting VDA
Disable automaticconfiguration
Disabled All VDA versions
Log off user if a problem isencountered
Disabled All VDA versions
Number of retries whenaccessing locked files
5 All VDA versions
© 1999–2022 Citrix Systems, Inc. All rights reserved. 549
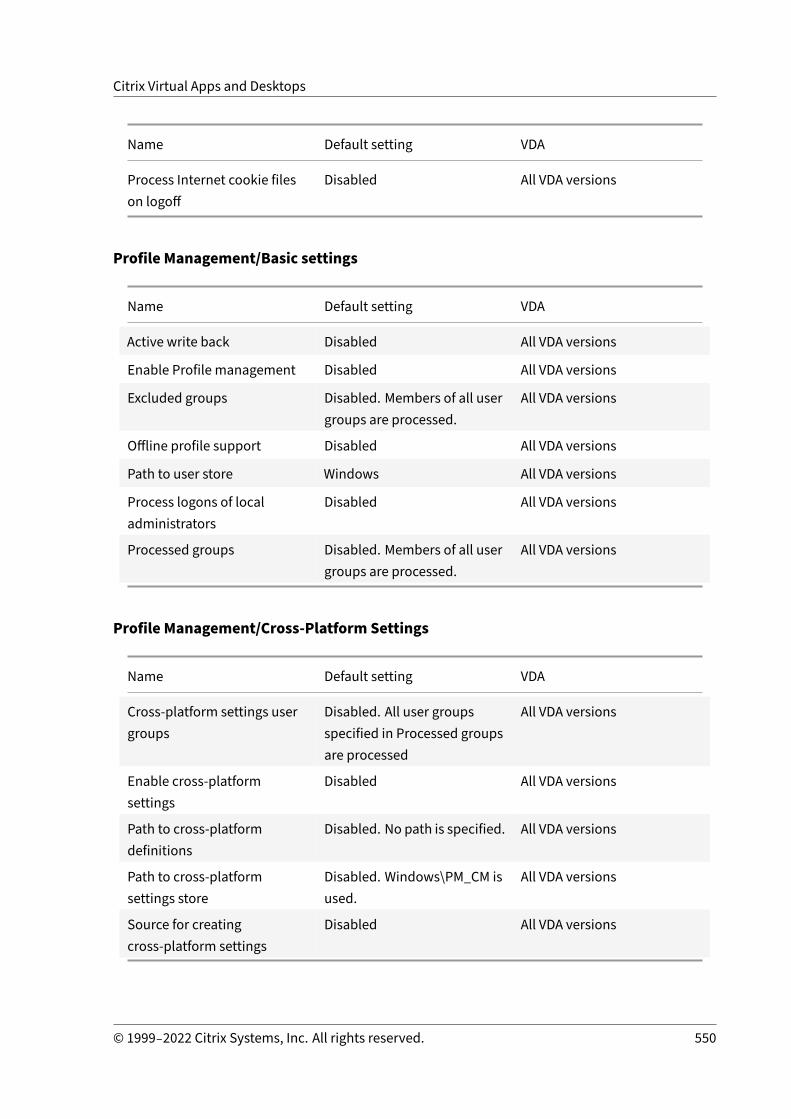
Citrix Virtual Apps and Desktops
Name Default setting VDA
Process Internet cookie fileson logoff
Disabled All VDA versions
Profile Management/Basic settings
Name Default setting VDA
Active write back Disabled All VDA versions
Enable Profile management Disabled All VDA versions
Excluded groups Disabled. Members of all usergroups are processed.
All VDA versions
Offline profile support Disabled All VDA versions
Path to user store Windows All VDA versions
Process logons of localadministrators
Disabled All VDA versions
Processed groups Disabled. Members of all usergroups are processed.
All VDA versions
Profile Management/Cross‑Platform Settings
Name Default setting VDA
Cross‑platform settings usergroups
Disabled. All user groupsspecified in Processed groupsare processed
All VDA versions
Enable cross‑platformsettings
Disabled All VDA versions
Path to cross‑platformdefinitions
Disabled. No path is specified. All VDA versions
Path to cross‑platformsettings store
Disabled. Windows\PM_CM isused.
All VDA versions
Source for creatingcross‑platform settings
Disabled All VDA versions
© 1999–2022 Citrix Systems, Inc. All rights reserved. 550
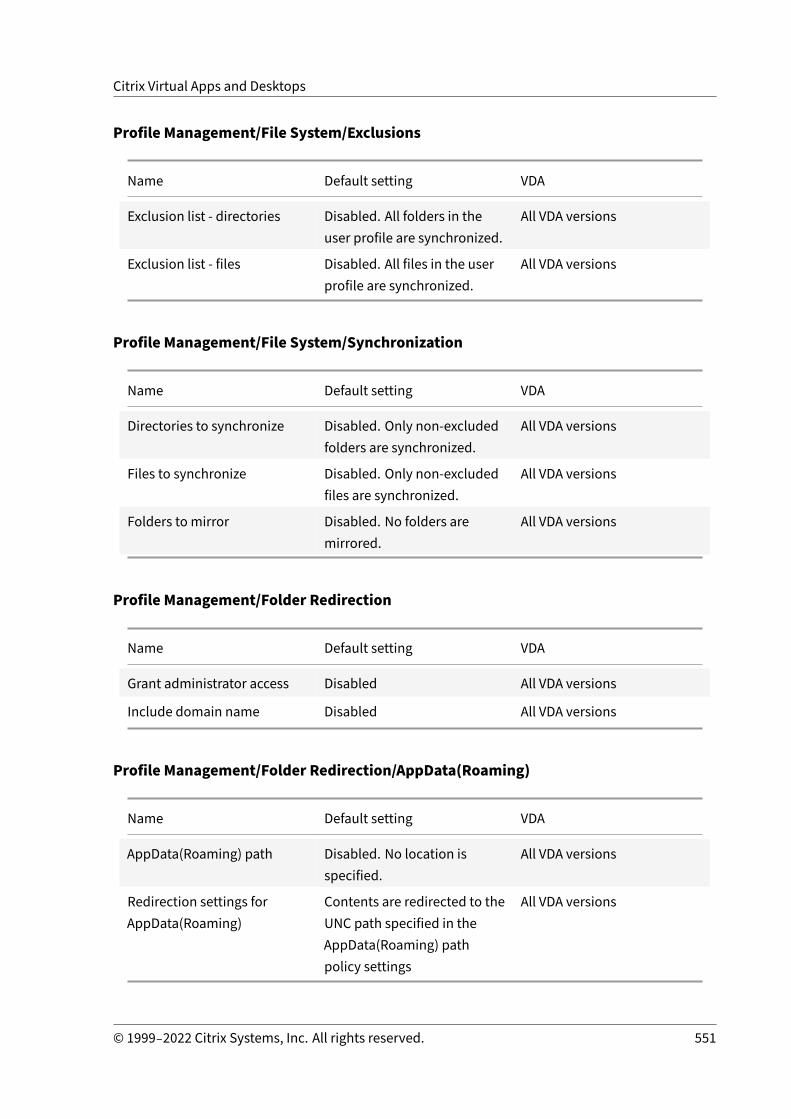
Citrix Virtual Apps and Desktops
Profile Management/File System/Exclusions
Name Default setting VDA
Exclusion list ‑ directories Disabled. All folders in theuser profile are synchronized.
All VDA versions
Exclusion list ‑ files Disabled. All files in the userprofile are synchronized.
All VDA versions
Profile Management/File System/Synchronization
Name Default setting VDA
Directories to synchronize Disabled. Only non‑excludedfolders are synchronized.
All VDA versions
Files to synchronize Disabled. Only non‑excludedfiles are synchronized.
All VDA versions
Folders to mirror Disabled. No folders aremirrored.
All VDA versions
Profile Management/Folder Redirection
Name Default setting VDA
Grant administrator access Disabled All VDA versions
Include domain name Disabled All VDA versions
Profile Management/Folder Redirection/AppData(Roaming)
Name Default setting VDA
AppData(Roaming) path Disabled. No location isspecified.
All VDA versions
Redirection settings forAppData(Roaming)
Contents are redirected to theUNC path specified in theAppData(Roaming) pathpolicy settings
All VDA versions
© 1999–2022 Citrix Systems, Inc. All rights reserved. 551

Citrix Virtual Apps and Desktops
Profile Management/Folder Redirection/Contacts
Name Default setting VDA
Contacts path Disabled. No location isspecified.
All VDA versions
Redirection settings forContacts
Contents are redirected to theUNC path specified in theContacts path policy settings
All VDA versions
Profile Management/Folder Redirection/Desktop
Name Default setting VDA
Desktop path Disabled. No location isspecified.
All VDA versions
Redirection settings forDesktop
Contents are redirected to theUNC path specified in theDesktop path policy settings
All VDA versions
Profile Management/Folder Redirection/Documents
Name Default setting VDA
Documents path Disabled. No location isspecified.
All VDA versions
Redirection settings forDocuments
Contents are redirected to theUNC path specified in theDocuments path policysettings
All VDA versions
Profile Management/Folder Redirection/Downloads
Name Default setting VDA
Downloads path Disabled. No location isspecified.
All VDA versions
© 1999–2022 Citrix Systems, Inc. All rights reserved. 552

Citrix Virtual Apps and Desktops
Name Default setting VDA
Redirection settings forDownloads
Contents are redirected to theUNC path specified in theDownloads path policysettings
All VDA versions
Profile Management/Folder Redirection/Favorites
Name Default setting VDA
Favorites path Disabled. No location isspecified.
All VDA versions
Redirection settings forFavorites
Contents are redirected to theUNC path specified in theFavorites path policy settings
All VDA versions
Profile Management/Folder Redirection/Links
Name Default setting VDA
Links path Disabled. No location isspecified.
All VDA versions
Redirection settings for Links Contents are redirected to theUNC path specified in theLinks path policy settings
All VDA versions
Profile Management/Folder Redirection/Music
Name Default setting VDA
Music path Disabled. No location isspecified.
All VDA versions
Redirection settings for Music Contents are redirected to theUNC path specified in theMusic path policy settings
All VDA versions
© 1999–2022 Citrix Systems, Inc. All rights reserved. 553
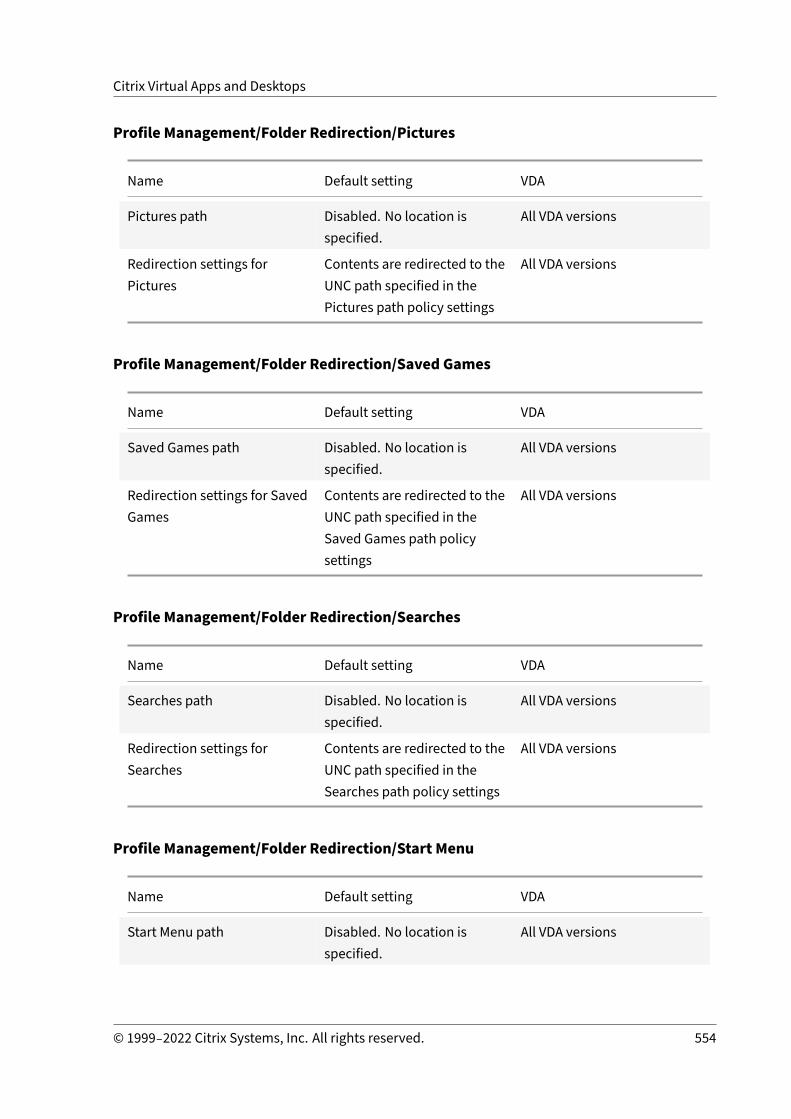
Citrix Virtual Apps and Desktops
Profile Management/Folder Redirection/Pictures
Name Default setting VDA
Pictures path Disabled. No location isspecified.
All VDA versions
Redirection settings forPictures
Contents are redirected to theUNC path specified in thePictures path policy settings
All VDA versions
Profile Management/Folder Redirection/Saved Games
Name Default setting VDA
Saved Games path Disabled. No location isspecified.
All VDA versions
Redirection settings for SavedGames
Contents are redirected to theUNC path specified in theSaved Games path policysettings
All VDA versions
Profile Management/Folder Redirection/Searches
Name Default setting VDA
Searches path Disabled. No location isspecified.
All VDA versions
Redirection settings forSearches
Contents are redirected to theUNC path specified in theSearches path policy settings
All VDA versions
Profile Management/Folder Redirection/Start Menu
Name Default setting VDA
Start Menu path Disabled. No location isspecified.
All VDA versions
© 1999–2022 Citrix Systems, Inc. All rights reserved. 554
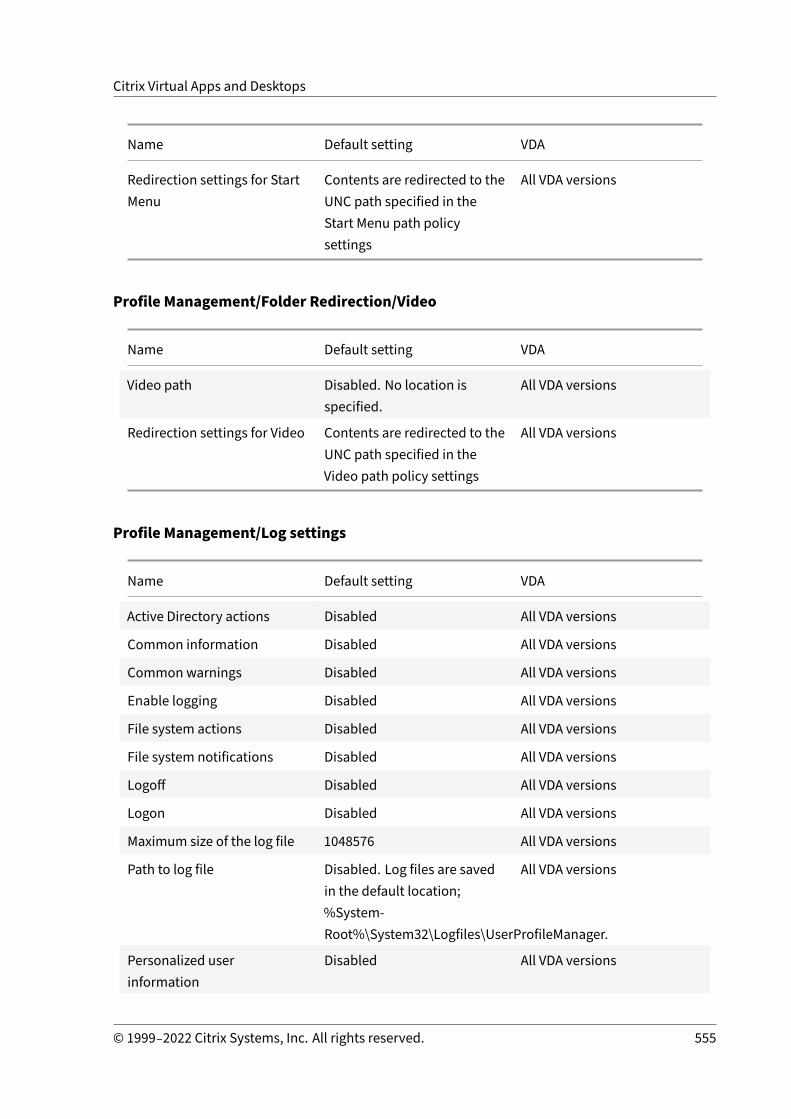
Citrix Virtual Apps and Desktops
Name Default setting VDA
Redirection settings for StartMenu
Contents are redirected to theUNC path specified in theStart Menu path policysettings
All VDA versions
Profile Management/Folder Redirection/Video
Name Default setting VDA
Video path Disabled. No location isspecified.
All VDA versions
Redirection settings for Video Contents are redirected to theUNC path specified in theVideo path policy settings
All VDA versions
Profile Management/Log settings
Name Default setting VDA
Active Directory actions Disabled All VDA versions
Common information Disabled All VDA versions
Common warnings Disabled All VDA versions
Enable logging Disabled All VDA versions
File system actions Disabled All VDA versions
File system notifications Disabled All VDA versions
Logoff Disabled All VDA versions
Logon Disabled All VDA versions
Maximum size of the log file 1048576 All VDA versions
Path to log file Disabled. Log files are savedin the default location;%System‑Root%\System32\Logfiles\UserProfileManager.
All VDA versions
Personalized userinformation
Disabled All VDA versions
© 1999–2022 Citrix Systems, Inc. All rights reserved. 555

Citrix Virtual Apps and Desktops
Name Default setting VDA
Policy values at logon andlogoff
Disabled All VDA versions
Registry actions Disabled All VDA versions
Registry differences at logoff Disabled All VDA versions
Profile Management/Profile handling
Name Default setting VDA
Delay before deleting cachedprofiles
0 All VDA versions
Delete locally cached profileson logoff
Disabled All VDA versions
Local profile conflict handling Use local profile All VDA versions
Migration of existing profiles Local and roaming All VDA versions
Path to the template profile Disabled. New user profilesare created from the defaultuser profile on the devicewhere a user first logs on.
All VDA versions
Template profile overrideslocal profile
Disabled All VDA versions
Template profile overridesroaming profile
Disabled All VDA versions
Template profile used as aCitrix mandatory profile forall logons
Disabled All VDA versions
Profile Management/Registry
Name Default setting VDA
Exclusion list Disabled. All registry keys inthe HKCU hive are processedwhen a user logs off.
All VDA versions
© 1999–2022 Citrix Systems, Inc. All rights reserved. 556

Citrix Virtual Apps and Desktops
Name Default setting VDA
Inclusion list Disabled. All registry keys inthe HKCU hive are processedwhen a user logs off.
All VDA versions
Profile Management/Streamed user profiles
Name Default setting VDA
Always cache Disabled All VDA versions
Always cache size 0 Mb All VDA versions
Profile streaming Disabled All VDA versions
Streamed user profile groups Disabled. All user profileswithin an OU are processednormally.
All VDA versions
Timeout for pending area lockfiles (days)
1 day All VDA versions
Receiver
Name Default setting VDA
StoreFront accounts list No stores are specified VDA for Multi‑session OS 7through current, VDA forSingle‑session OS 7 throughcurrent
User personalization layer
Name Default setting VDA
User Layer Repository Path Disabled. No path specified. VDA 19.12 and later versions
User Layer Size in GB 0 GB (Defaults to minimumlayer size of 10 GB)
VDA 19.12 or later versions
© 1999–2022 Citrix Systems, Inc. All rights reserved. 557
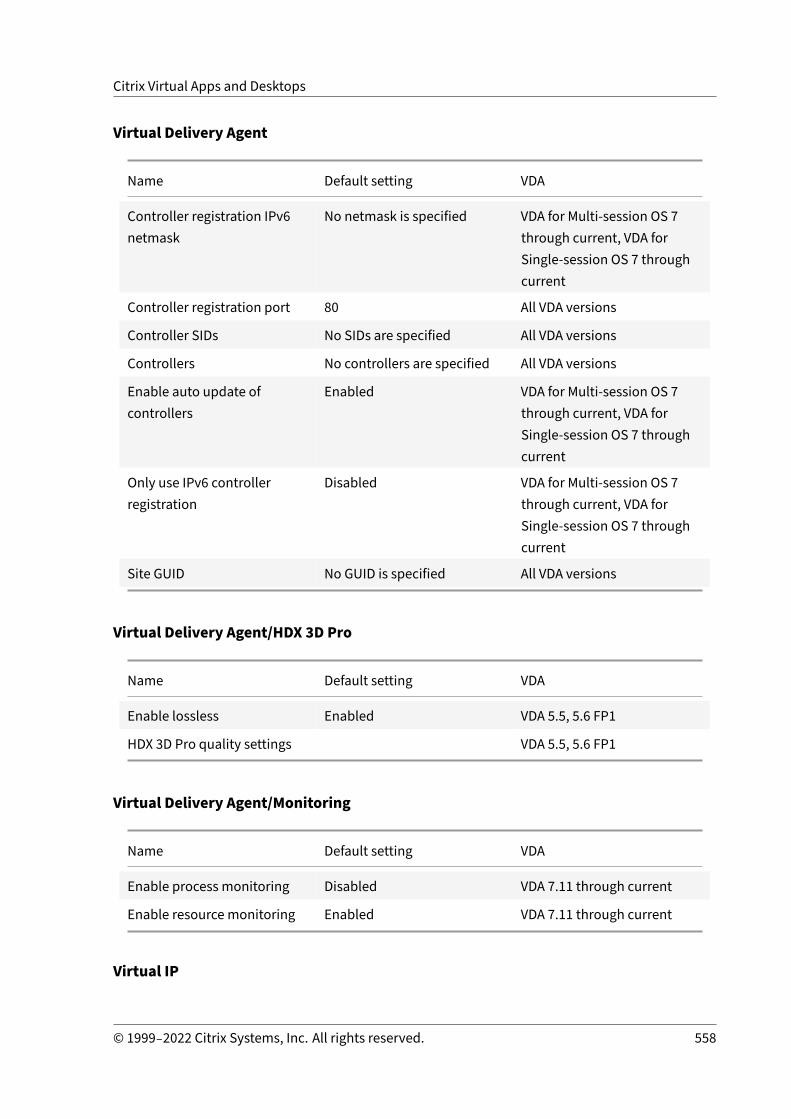
Citrix Virtual Apps and Desktops
Virtual Delivery Agent
Name Default setting VDA
Controller registration IPv6netmask
No netmask is specified VDA for Multi‑session OS 7through current, VDA forSingle‑session OS 7 throughcurrent
Controller registration port 80 All VDA versions
Controller SIDs No SIDs are specified All VDA versions
Controllers No controllers are specified All VDA versions
Enable auto update ofcontrollers
Enabled VDA for Multi‑session OS 7through current, VDA forSingle‑session OS 7 throughcurrent
Only use IPv6 controllerregistration
Disabled VDA for Multi‑session OS 7through current, VDA forSingle‑session OS 7 throughcurrent
Site GUID No GUID is specified All VDA versions
Virtual Delivery Agent/HDX 3D Pro
Name Default setting VDA
Enable lossless Enabled VDA 5.5, 5.6 FP1
HDX 3D Pro quality settings VDA 5.5, 5.6 FP1
Virtual Delivery Agent/Monitoring
Name Default setting VDA
Enable process monitoring Disabled VDA 7.11 through current
Enable resource monitoring Enabled VDA 7.11 through current
Virtual IP
© 1999–2022 Citrix Systems, Inc. All rights reserved. 558

Citrix Virtual Apps and Desktops
Name Default setting VDA
Virtual IP loopback support Disabled VDA 7.6 through current
Virtual IP virtual loopbackprograms list
None VDA 7.6 through current
Policy settings reference
April 14, 2021
Policies contain settings that are appliedwhen the policy is enforced. Descriptions in this section alsoindicate if more settings are required to enable a feature or are similar to a setting.
Quick reference
The following tables list the settings you can configure within a policy. Find the task you want tocomplete in the left column, then locate its corresponding setting in the right column.
A full listing of all policy settings is available in .CHM (Compiled HTML) format and .CSV format. Thesefiles are available in the \program files\citrix\grouppolicy folder on the server where thebroker (delivery controller) is installed. You can also download the latest version of the policy settingsby clicking here.
Audio
For this task Use this policy setting
Control whether to allow the use of multipleaudio devices
Audio Plug N Play
Control whether to allow audio input frommicrophones on the user device
Client microphone redirection
Control audio quality on the user device Audio quality
Control audio mapping to speakers on the userdevice
Client audio redirection
Bandwidth for user devices
© 1999–2022 Citrix Systems, Inc. All rights reserved. 559

Citrix Virtual Apps and Desktops
To limit bandwidth used for Use this policy setting
Client audio mapping Audio redirection bandwidth limit or Audioredirection bandwidth limit percent
Cut‑and‑paste using local clipboard Clipboard redirection bandwidth limit orClipboard redirection bandwidth limit percent
Access in a session to local client drives File redirection bandwidth limit or Fileredirection bandwidth limit percent
HDX MediaStreamMultimedia Acceleration HDX MediaStreamMultimedia Accelerationbandwidth limit or HDX MediaStreamMultimedia Acceleration bandwidth limitpercent
Client session Overall session bandwidth limit
Printing Printer redirection bandwidth limit or Printerredirection bandwidth limit percent
TWAIN devices (such as a camera or scanner) TWAIN device redirection bandwidth limit orTWAIN device redirection bandwidth limitpercent
USB devices Client USB device redirection bandwidth limitor Client USB device redirection bandwidthlimit percent
Redirection of client drives and user devices
For this task Use this policy setting
Control whether or not drives on the userdevice are connected when users log on to theserver
Auto connect client drives
Control cut‑and‑paste data transfer betweenthe server and the local clipboard
Client clipboard redirection
Control how drives map from the user device Client drive redirection
Control whether users’ local hard drives areavailable in a session
Client fixed drives and Client drive redirection
Control whether users’ local floppy drives areavailable in a session
Client floppy drives and Client drive redirection
© 1999–2022 Citrix Systems, Inc. All rights reserved. 560
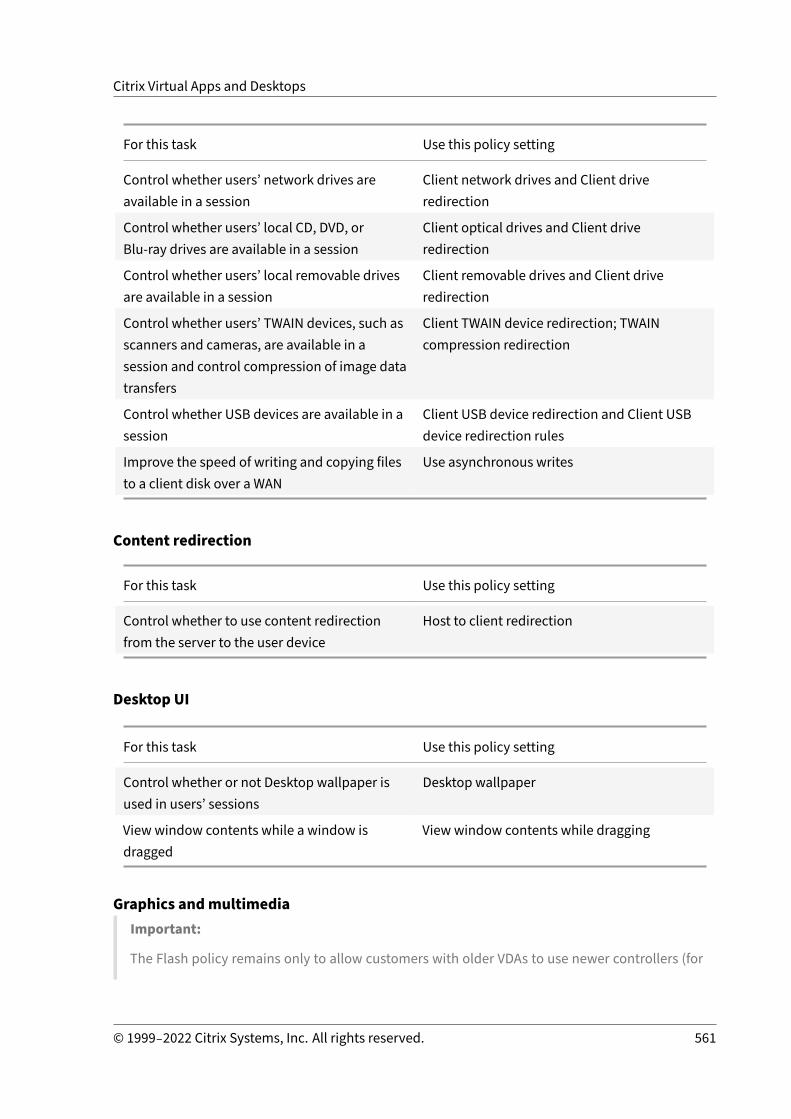
Citrix Virtual Apps and Desktops
For this task Use this policy setting
Control whether users’ network drives areavailable in a session
Client network drives and Client driveredirection
Control whether users’ local CD, DVD, orBlu‑ray drives are available in a session
Client optical drives and Client driveredirection
Control whether users’ local removable drivesare available in a session
Client removable drives and Client driveredirection
Control whether users’ TWAIN devices, such asscanners and cameras, are available in asession and control compression of image datatransfers
Client TWAIN device redirection; TWAINcompression redirection
Control whether USB devices are available in asession
Client USB device redirection and Client USBdevice redirection rules
Improve the speed of writing and copying filesto a client disk over a WAN
Use asynchronous writes
Content redirection
For this task Use this policy setting
Control whether to use content redirectionfrom the server to the user device
Host to client redirection
Desktop UI
For this task Use this policy setting
Control whether or not Desktop wallpaper isused in users’ sessions
Desktop wallpaper
View window contents while a window isdragged
View window contents while dragging
Graphics andmultimediaImportant:
The Flash policy remains only to allow customers with older VDAs to use newer controllers (for
© 1999–2022 Citrix Systems, Inc. All rights reserved. 561
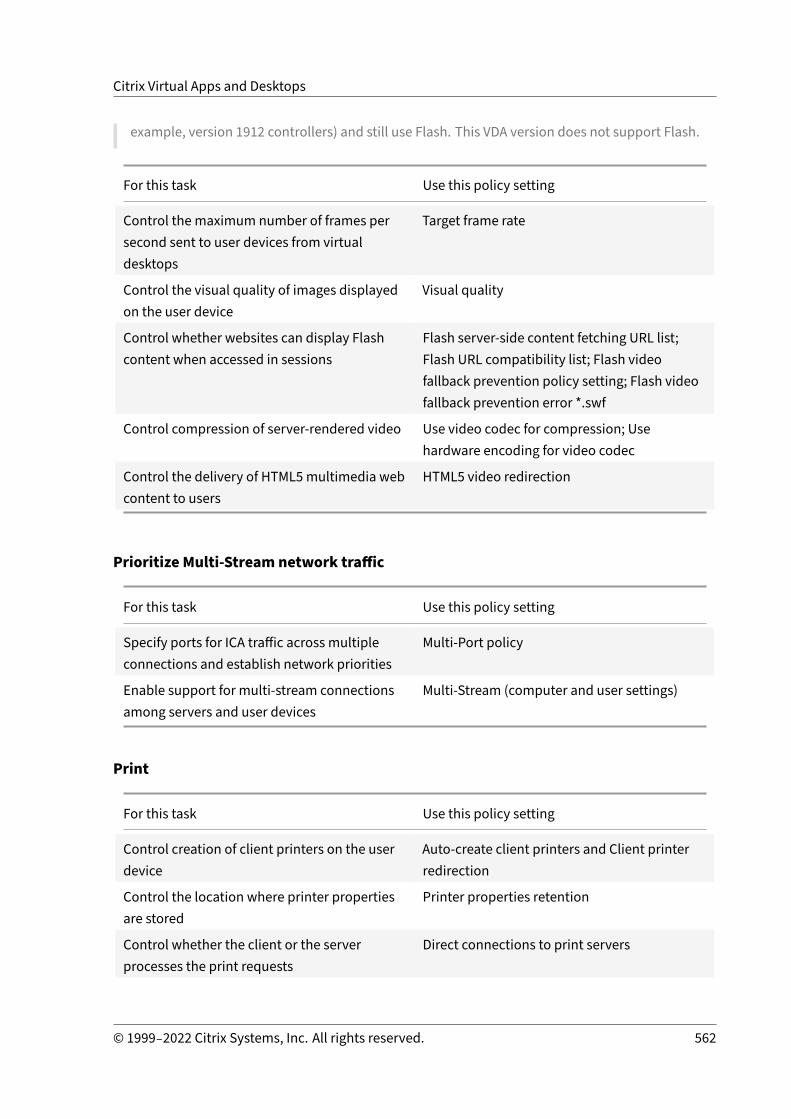
Citrix Virtual Apps and Desktops
example, version 1912 controllers) and still use Flash. This VDA version does not support Flash.
For this task Use this policy setting
Control the maximum number of frames persecond sent to user devices from virtualdesktops
Target frame rate
Control the visual quality of images displayedon the user device
Visual quality
Control whether websites can display Flashcontent when accessed in sessions
Flash server‑side content fetching URL list;Flash URL compatibility list; Flash videofallback prevention policy setting; Flash videofallback prevention error *.swf
Control compression of server‑rendered video Use video codec for compression; Usehardware encoding for video codec
Control the delivery of HTML5multimedia webcontent to users
HTML5 video redirection
Prioritize Multi‑Stream network traffic
For this task Use this policy setting
Specify ports for ICA traffic across multipleconnections and establish network priorities
Multi‑Port policy
Enable support for multi‑stream connectionsamong servers and user devices
Multi‑Stream (computer and user settings)
For this task Use this policy setting
Control creation of client printers on the userdevice
Auto‑create client printers and Client printerredirection
Control the location where printer propertiesare stored
Printer properties retention
Control whether the client or the serverprocesses the print requests
Direct connections to print servers
© 1999–2022 Citrix Systems, Inc. All rights reserved. 562

Citrix Virtual Apps and Desktops
For this task Use this policy setting
Control whether users can access printersconnected to their user devices
Client printer redirection
Control installation of native Windows driverswhen automatically creating client andnetwork printers
Automatic installation of in‑box printer drivers
Control when to use the Universal PrinterDriver
Universal print driver usage
Choose a printer based on a roaming usersession information
Default printer
Load balance and set failover threshold forUniversal Print Servers
Universal Print Servers for load balancing;Universal Print Servers out‑of‑servicethreshold
Note:
Policies cannot be used to enable a screen saver in a desktop or application session. For userswho require screen savers, the screen saver can be implemented on the user device.
ICA policy settings
April 14, 2021
Adaptive transport
This setting allows or prevents data transport over EDT as primary and fallback to TCP.
By default, adaptive transport is enabled (Preferred), and EDT is used when possible, with fallbackto TCP. If it’s been disabled and you want to enable it, follow this procedure.
1. In Studio, enable the policy setting, HDX adaptive transport. We also recommend that you donot enable this feature as a universal policy for all objects in the Site.
2. To enable the policy setting, set the value to Preferred, then clickOK.
Preferred. Adaptive transport over EDT is used when possible, with fallback to TCP.
Diagnostic mode. EDT is forced on and fallback to TCP is disabled. We recommend this setting onlyfor troubleshooting.
Off. TCP is forced on, and EDT is disabled.
© 1999–2022 Citrix Systems, Inc. All rights reserved. 563

Citrix Virtual Apps and Desktops
For more information, see Adaptive transport.
Application launch wait timeout
This setting specifies the wait timeout value in milliseconds for a session to wait for the first applica‑tion to start. If the start of the application exceeds this time period, the session ends.
You can choose the default time (10000 milliseconds) or specify a number in milliseconds.
Client clipboard redirection
This setting allows or prevents the clipboard on the user device beingmapped to the clipboard on theserver.
By default, clipboard redirection is allowed.
To prevent cut‑and‑paste data transfer between a session and the local clipboard, select Prohibit.Users can still cut and paste data between applications running in sessions.
After allowing this setting, configure themaximum allowed bandwidth the clipboard can consume ina client connection. Use the Clipboard redirection bandwidth limit or the Clipboard redirectionbandwidth limit percent settings.
Client clipboard write allowed formats
When the Restrict client clipboard write setting is Enabled, host clipboard data cannot be sharedwith the client endpoint. You can use this setting to allow specific data formats to be shared with theclient endpoint clipboard. To use this setting, enable it and add the specific formats to be allowed.
The following clipboard formats are system defined:
• CF_TEXT• CF_BITMAP• CF_METAFILEPICT• CF_SYLK• CF_DIF• CF_TIFF• CF_OEMTEXT• CF_DIB• CF_PALETTE• CF_PENDATA• CF_RIFF• CF_WAVE• CF_UNICODETEXT
© 1999–2022 Citrix Systems, Inc. All rights reserved. 564

Citrix Virtual Apps and Desktops
• CF_ENHMETAFILE• CF_HDROP• CF_LOCALE• CF_DIBV5• CF_OWNERDISPLAY• CF_DSPTEXT• CF_DSPBITMAP• CF_DSPMETAFILEPICT• CF_DISPENHMETAFILE• CF_HTML
The following custom formats are predefined in XenApp and XenDesktop and Citrix Virtual Apps andDesktops:
• CFX_RICHTEXT• CFX_OfficeDrawingShape• CFX_BIFF8
HTML format is disabled by default. To enable this feature:
• Ensure that Client clipboard redirection is set to Allowed.• Ensure that Restrict client clipboard write is set to Enabled.• Add an entry for CF_HTML (and any other formats you want supported) in Client clipboardwrite allowed formats.
You can addmore custom formats. The custom format namemustmatch the formats to be registeredwith the system. Format names are case‑sensitive.
This setting does not apply if either Client clipboard redirection or Restrict client clipboard writeis set to Prohibited.
Note
Enabling HTML format clipboard copy support (CF_HTML) copies any scripts from the source ofthe copied content to thedestination. Check that you trust the sourcebeforeproceeding to copy.If you do copy content containing scripts, they are live only if you save the destination file as anHTML file and execute it.
Restrict client clipboard write
If this setting isAllowed, host clipboarddata cannot be sharedwith the client endpoint. You canallowspecific formats by enabling the Client clipboard write allowed formats setting.
By default, this setting is Prohibited.
© 1999–2022 Citrix Systems, Inc. All rights reserved. 565

Citrix Virtual Apps and Desktops
Restrict session clipboard write
When this setting is Allowed, client clipboard data cannot be shared within the user session. You canallow specific formats by enabling the Session clipboard write allowed formats setting.
By default, this setting is Prohibited.
Session clipboard write allowed formats
When theRestrict session clipboardwrite setting isAllowed, client clipboarddata cannot be sharedwith session applications. You can use this setting to allow specific data formats to be sharedwith thesession clipboard.
The following clipboard formats are system defined:
• CF_TEXT• CF_BITMAP• CF_METAFILEPICT• CF_SYLK• CF_DIF• CF_TIFF• CF_OEMTEXT• CF_DIB• CF_PALETTE• CF_PENDATA• CF_RIFF• CF_WAVE• CF_UNICODETEXT• CF_ENHMETAFILE• CF_HDROP• CF_LOCALE• CF_DIBV5• CF_OWNERDISPLAY• CF_DSPTEXT• CF_DSPBITMAP• CF_DSPMETAFILEPICT• CF_DISPENHMETAFILE• CF_HTML
The following custom formats are predefined in XenApp and XenDesktop and Citrix Virtual Apps andDesktops:
• CFX_RICHTEXT
© 1999–2022 Citrix Systems, Inc. All rights reserved. 566
Citrix Virtual Apps and Desktops
• CFX_OfficeDrawingShape• CFX_BIFF8
HTML format is disabled by default. To enable this feature:
• Ensure that Client clipboard redirection is set to Allowed.• Ensure that Restrict session clipboard write is set to Enabled.• Add an entry for CF_HTML (and any other formats you want supported) in Session clipboardwrite allowed formats.
You can addmore custom formats. The custom format namemustmatch the formats to be registeredwith the system. Format names are case‑sensitive.
This setting does not apply if either the Client clipboard redirection setting or Restrict session clip‑board write setting is set to Prohibited.
Note
Enabling HTML format clipboard copy support (CF_HTML) copies any scripts from the source ofthe copied content to thedestination. Check that you trust the sourcebeforeproceeding to copy.If you do copy content containing scripts, they are live only if you save the destination file as anHTML file and execute it.
Desktop starts
This setting allows or prevents connections to a session on that VDA using an ICA connection by non‑administrative users in a VDA Direct Access Users group.
By default, non‑administrative users cannot connect to these sessions.
This setting doesn’t affect non‑administrative users in a VDA Direct Access Users group who are usingan RDP connection. These users can connect to the VDA whether this setting is enabled or disabled.This setting doesn’t affect non‑administrative users who are not in a VDA Direct Access Users group.These users cannot connect to the VDA whether this setting is enabled or disabled.
ICA listener connection timeout
This setting specifies themaximumwait time for a connectionusing the ICAprotocol to be completed.
By default, the maximumwait time is 120000 milliseconds, or twominutes.
ICA listener port number
This setting specifies the TCP/IP port number used by the ICA protocol on the server.
By default, the port number is set to 1494.
© 1999–2022 Citrix Systems, Inc. All rights reserved. 567

Citrix Virtual Apps and Desktops
Valid port numbersmust be in the range of 0‑65535 andmust not conflict with other well‑known portnumbers. If you change the port number, restart the server for the new value to take effect. If youchange the port number on the server, youmust also change it on every CitrixWorkspace app or plug‑in that connects to the server.
Keyboard and Input Method Editor (IME)
This setting enables or disables dynamic keyboard layout synchronization, InputMethodEditor (IME),Unicode keyboard layoutmapping, andhides or shows the keyboard layout switch notification dialogmessage.
1. In Studio, select Keyboard and IME.
2. SelectClientkeyboard layoutsynchronizationand IME improvement tocontrol thedynamickeyboard layout synchronization and generic client Input Method Editor (IME) features in theVDA. You can configure:
Disabled ‑ dynamic keyboard layout synchronization and generic client Input Method Editor(IME).
Support dynamic client keyboard layout synchronization ‑ enables dynamic keyboard lay‑out synchronization.
Support dynamic client keyboard layout synchronization and IME improvement ‑ enablesboth dynamic keyboard layout synchronization and generic client Input Method Editor (IME).
3. SelectEnableUnicodekeyboard layoutmapping to enable or disableUnicodekeyboardmap‑ping.
4. SelectHide keyboard layout switch pop‑upmessage box to allow or prohibit whether ames‑sage displays that the keyboard layout is synchronizing when the user changes the client key‑board layout.
Default settings:
• Client keyboard layout synchronization and IME improvement– Disabled in Windows Server 2016 and Windows Server 2019.– Support dynamic client keyboard layout synchronization and IME improvement in Win‑dows Server 2012 and Windows 2010.
• Disable Unicode keyboard layoutmapping• Show keyboard layout switch pop‑upmessage box
This policy replaces the registry settings that are listed in the Description section of the policy set‑tings.
© 1999–2022 Citrix Systems, Inc. All rights reserved. 568

Citrix Virtual Apps and Desktops
Logoff checker startup delay
This setting specifies the duration to delay the logoff checker startup. Use this policy to set the time(in seconds) that a client session waits before disconnecting the session.
This setting also increases the time it takes for a user to log off from the server.
Loss tolerant modeImportant:
• The feature requires aminimumof Citrix Workspace app 2002 for Windows. This version ofthe VDA will support it when it becomes available.
• Loss tolerantmode is not supportedonCitrix GatewayorCitrixGatewayService. Thismodeis available only with direct connections.
This setting enables or disables loss tolerant mode.
By default, loss tolerant mode is Allowed.
When allowed, the mode is entered when the packet loss and latency are above a threshold. You canset the thresholds using the loss tolerant thresholds policy.
For more information, see Loss tolerant mode.
Loss tolerant thresholds
When the loss tolerant mode is available, this setting specifies the network metrics thresholds atwhich the session switches to loss tolerant mode.
The default thresholds are:
• Packet loss: 5%• Latency: 300 ms (RTT)
For more information, see Loss tolerant mode.
Rendezvous protocol
This setting changes how HDX sessions are proxied when using the Citrix Gateway Service. When en‑abled, HDX traffic no longer flows through the Citrix Cloud Connector. Instead, the VDA establishes anoutbound connection directly to the Citrix Gateway Service (enhancing Cloud Connector scalability).
Important:
This feature is controlled by a feature toggle in Citrix Cloud and an HDX policy setting. The CitrixCloud feature toggle is enabled by default while the HDX setting is disabled by default. The HDX
© 1999–2022 Citrix Systems, Inc. All rights reserved. 569

Citrix Virtual Apps and Desktops
settingaffectsonlyHDXsessionsestablished though theCitrixGatewayService. This settingdoesnot affect sessions established directly between client and VDA or through an on‑premises CitrixGateway.
For information, see Rendezvous protocol.
Starting of non‑published programs during client connection
This setting specifies whether to allow starting initial applications through RDP on the server.
By default, starting initial applications through RDP on the server is not allowed.
Tablet mode toggle policy settings
Tabletmode toggle optimizes the lookandbehavior of Store apps,Win32apps, and theWindows shellon the VDA. It does so by automatically toggling the virtual desktop to Tablet mode when connectingfrom small form factor devices like phones and tablets, or any touch enabled device.
If this policy is disabled, the VDA is in the mode the user sets it to and maintains the same modethroughout, irrespective of the type of client.
Auto client reconnect policy settings
April 14, 2021
The auto client reconnect section contains policy settings for controlling the automatic reconnectionof sessions.
Auto client reconnect
This setting allowsor prevents automatic reconnectionby the sameclient after a connectionhas beeninterrupted.
For Citrix Receiver for Windows 4.7 and later and Citrix Workspace app 1808 and later, auto client re‑connect uses only the policy settings from Citrix Studio. Updates to these policies in Studio synchro‑nize auto client reconnect from server to client. With older versions of Citrix Receiver for Windows, toconfigure auto client reconnect, use a Studio policy and change the registry or the default.ica file.
Allowing automatic client reconnect allows users to resume working where they were interruptedwhen a connection was broken. Automatic reconnection detects broken connections and then re‑connects the users to their sessions.
© 1999–2022 Citrix Systems, Inc. All rights reserved. 570
Citrix Virtual Apps and Desktops
If the Citrix Workspace app cookie containing the key to the session ID and credentials isn’t used, au‑tomatic reconnection might result in a new session being started. That is, instead of reconnecting toan existing session. The cookie is not used if it has expired, for example, because of a delay in recon‑nection, or if credentials must be reentered. If users intentionally disconnect, auto client reconnectis not triggered.
A session window is grayed out when a reconnection is in progress. A countdown timer displays thetime remaining before the session is reconnected. When a session times out, it is disconnected.
For application sessions, when automatic reconnect is allowed, a countdown timer appears in thenotification area specifying the time remaining before the session is reconnected. Citrix Workspaceapp tries to reconnect to the session until there is a successful reconnection or the user cancels thereconnection attempts.
For user sessions, when automatic reconnect is allowed, Citrix Workspace app tries to reconnect tothe session for a specified period, unless there is a successful reconnection or the user cancels thereconnection attempts. By default, this period is twominutes. To change this period, edit the policy.
By default, automatic client reconnect is allowed.
To disable auto client reconnect:
1. Start Citrix Studio.2. Open the Auto client reconnect policy.3. Set the policy to Prohibited.
Auto client reconnect authentication
This setting requires authentication for automatic client reconnections.
When a user initially logs on, the credentials are encrypted, stored inmemory, and a cookie is createdcontaining the encryption key. The cookie is sent to Citrix Workspace app. When this setting is con‑figured, cookies are not used. Instead, a dialog box is displayed to users requesting credentials whenCitrix Workspace app attempts to reconnect automatically.
By default, authentication is not required.
To change auto client reconnect authentication:
1. Start Citrix Studio.2. Open the Auto client reconnect authentication policy.3. Enable or disable authentication.4. ChooseOK.
Auto client reconnect logging
This setting enables or disables the recording of auto client reconnections in the event log.
© 1999–2022 Citrix Systems, Inc. All rights reserved. 571

Citrix Virtual Apps and Desktops
When logging is enabled, the server System Log captures information about successful and failed au‑tomatic reconnection events. A site does not provide a combined log of reconnection events for allservers.
By default, logging is disabled.
To change auto client reconnect logging:
1. Start Citrix Studio.2. Open the Auto client reconnect logging policy.3. Enable or disable logging.4. ChooseOK.
Auto client reconnect timeout
By default, auto client reconnect timeout is set to 120 seconds, the maximum configurable value foran auto client reconnect timeout is 300 seconds.
To change auto client reconnect timeout:
1. Start Citrix Studio.2. Open the Auto client reconnect timeout policy.3. Edit the timeout value.4. ChooseOK.
Reconnect UI transparency level
You can use Studio policy to configure the opacity level applied to the XenApp or XenDesktop sessionwindow during session reliability reconnection time.
By default, Reconnect UI transparency is set to 80%.
To change the reconnect user interface opacity level:
1. Start Citrix Studio.2. Open the Reconnect UI transparency level policy.3. Edit the value.4. ChooseOK.
Audio policy settings
April 14, 2021
The Audio section contains policy settings that permit user devices to send and receive audio in ses‑sions without reducing performance.
© 1999–2022 Citrix Systems, Inc. All rights reserved. 572

Citrix Virtual Apps and Desktops
Audio over UDP real‑time transport
This setting allowsor prevents the transmission and receipt of audio between the VDAanduser deviceover RTP using the User Datagram Protocol (UDP). When this setting is disabled, audio is sent andreceived over TCP.
By default, audio over UDP is allowed.
Audio Plug N Play
This setting allows or prevents the use of multiple audio devices to record and play sound.
By default, the use of multiple audio devices is allowed.
This setting applies only to Windows Multi‑session OSmachines.
Audio quality
This setting specifies the quality level of sound received in user sessions.
By default, sound quality is set to High ‑ high definition audio.
To control sound quality, choose one of the following options:
• Select Low ‑ for low speed connections for low‑bandwidth connections. Sounds sent to theuserdevice are compressed up to 16 Kbps. This compression results in a significant decrease in thequality of the sound but allows reasonable performance for a low‑bandwidth connection.
• Select Medium ‑ optimized for speech to deliver Voice over Internet Protocol applications, todeliver media applications in challenging network connections with lines less than 512 Kbps,or significant congestion and packet loss. This codec offers fast encode time,making it ideal foruse with softphones and Unified Communications applications when you require server‑sidemedia processing.
Audio sent to the user device is compressed up to 64 Kbps. This compression results in amoder‑ate decrease in the quality of the audio played on the user device, while providing low latencyand consuming low bandwidth. If Voice over Internet Protocol quality is unsatisfactory, ensurethat the Audio over UDP Real‑time Transport policy setting is set to Allowed.
Now, Real‑time Transport (RTP) over UDP is only supported when this audio quality is selected.Use this audio quality even for delivering media applications for challenging network connec‑tions like low (fewer than 512 Kbps) lines and when there is congestion and packet loss in thenetwork.
• SelectHigh ‑ highdefinition audio for connectionswherebandwidth is plentiful and soundqual‑ity is important. Clients can play sound at its native rate. Sounds are compressed at a high qual‑
© 1999–2022 Citrix Systems, Inc. All rights reserved. 573

Citrix Virtual Apps and Desktops
ity levelmaintaining up to CDquality, and using up to 112 Kbps of bandwidth. Transmitting thisamount of data can result in increased CPU usage and network congestion.
Bandwidth is consumed only while audio is recording or playing. If both occur at the same time, thebandwidth consumption doubles.
To specify the maximum amount of bandwidth, configure the Audio redirection bandwidth limit orthe Audio redirection bandwidth limit percent settings.
Client audio redirection
This setting specifies whether applications hosted on the server can play sounds through a sounddevice installed on the user device. This setting also specifies whether users can record audio input.
By default, audio redirection is allowed.
After allowing this setting, you can limit the bandwidth consumed by playing or recording audio. Lim‑iting the amount of bandwidth consumed by audio can improve application performance but mightalso degrade audio quality. Bandwidth is consumed only while audio is recording or playing. If bothoccur at the same time, the bandwidth consumption doubles. To specify the maximum amount ofbandwidth, configure the Audio redirection bandwidth limit or the Audio redirection bandwidth limitpercent settings.
On Windows Multi‑session OS machines, ensure that the Audio Plug N Play setting is Enabled to sup‑port multiple audio devices.
Important: Prohibiting Client audio redirection disables all HDX audio functionality.
Client microphone redirection
This setting enables or disables client microphone redirection. When enabled, users can use micro‑phones to record audio input in a session.
By default, microphone redirection is allowed.
For security, users are alerted when servers that are not trusted by their devices try to access mi‑crophones. Users can choose to accept or not accept access. Users can disable the alert on CitrixWorkspace app.
On Windows Multi‑session OS machines, ensure that the Audio Plug N Play setting is Enabled to sup‑port multiple audio devices.
If the Client audio redirection setting is disabled on the user device, this rule has no effect.
© 1999–2022 Citrix Systems, Inc. All rights reserved. 574

Citrix Virtual Apps and Desktops
Bandwidth policy settings
April 14, 2021
The Bandwidth section contains policy settings to avoid performance problems related to client ses‑sion bandwidth use.
Important: Using these policy settings with the Multi‑Stream policy settings might produce unex‑pected results. If you use Multi‑Stream settings in a policy, ensure these bandwidth limit policy set‑tings are not included.
Audio redirection bandwidth limit
This setting specifies themaximumallowedbandwidth, in kilobitsper second, forplayingor recordingaudio in a user session.
By default, no maximum (zero) is specified.
If you enter a value for this setting and a value for the Audio redirection bandwidth limit percent set‑ting, the most restrictive setting (lower value) is applied.
Audio redirection bandwidth limit percent
This setting specifies the maximum allowed bandwidth limit for playing or recording audio as a per‑centage of the total session bandwidth.
By default, no maximum (zero) is specified.
If you enter a value for this setting and a value for the Audio redirection bandwidth limit setting, themost restrictive setting (the lower value) is applied.
If you configure this setting, you must also configure the Overall session bandwidth limit setting,which specifies the total amount of bandwidth available for client sessions.
Client USB device redirection bandwidth limit
This setting specifies the maximum allowed bandwidth, in kilobits per second, for the redirection ofUSB devices to and from the client.
By default, no maximum (zero) is specified.
If you enter a value for this setting and a value for the Client USB device redirection bandwidth limitpercent setting, the most restrictive setting (the lower value) is applied.
© 1999–2022 Citrix Systems, Inc. All rights reserved. 575

Citrix Virtual Apps and Desktops
Client USB device redirection bandwidth limit percent
This setting specifies themaximumallowed bandwidth for the redirection of USB devices to and fromthe client as a percentage of the total session bandwidth.
By default, no maximum (zero) is specified.
If you enter a value for this setting and a value for the Client USB device redirection bandwidth limitsetting, the most restrictive setting (the lower value) is applied.
If you configure this setting, you must also configure the Overall session bandwidth limit setting,which specifies the total amount of bandwidth available for client sessions.
Clipboard redirection bandwidth limit
This setting specifies the maximum allowed bandwidth, in kilobits per second, for data transfer be‑tween a session and the local clipboard.
By default, no maximum (zero) is specified.
If you enter a value for this setting and a value for the Clipboard redirection bandwidth limit percentsetting, the most restrictive setting (the lower value) is applied.
Clipboard redirection bandwidth limit percent
This setting specifies the maximum allowed bandwidth for data transfer between a session and thelocal clipboard as a percentage of the total session bandwidth.
By default, no maximum (zero) is specified.
If you enter a value for this setting and a value for the Clipboard redirection bandwidth limit setting,the most restrictive setting (the lower value) is applied.
If you configure this setting, you must also configure the Overall session bandwidth limit setting,which specifies the total amount of bandwidth available for client sessions.
COM port redirection bandwidth limit
Note: For the Virtual Delivery Agent 7.0 through 7.8, configure this setting using the registry; see Con‑figure COM Port and LPT Port Redirection settings using the registry.
This setting specifies themaximumallowedbandwidth in kilobits per second for accessing aCOMportin a client connection. If you enter a value for this setting and a value for the COM port redirectionbandwidth limit percent setting, the most restrictive setting (the lower value) is applied.
© 1999–2022 Citrix Systems, Inc. All rights reserved. 576

Citrix Virtual Apps and Desktops
COM port redirection bandwidth limit percent
Note: For the Virtual Delivery Agent 7.0 through 7.8, configure this setting using the registry; see Con‑figure COM Port and LPT Port Redirection settings using the registry.
This setting specifies themaximumallowedbandwidth for accessing COMports in a client connectionas a percentage of the total session bandwidth.
By default, no maximum (zero) is specified
If you enter a value for this setting and a value for the COM port redirection bandwidth limit setting,the most restrictive setting (the lower value) is applied.
If you configure this setting, you must also configure the Overall session bandwidth limit setting,which specifies the total amount of bandwidth available for client sessions
File redirection bandwidth limit
This setting specifies the maximum allowed bandwidth, in kilobits per second, for accessing a clientdrive in a user session.
By default, no maximum (zero) is specified.
If you enter a value for this setting and a value for the File redirection bandwidth limit percent setting,the most restrictive setting (the lower value) takes effect.
File redirection bandwidth limit percent
This setting specifies the maximum allowed bandwidth limit for accessing client drives as a percent‑age of the total session bandwidth.
By default, no maximum (zero) is specified.
If youenter a value for this setting anda value for the File redirectionbandwidth limit setting, themostrestrictive setting (the lower value) is applied.
If you configure this setting, you must also configure the Overall session bandwidth limit setting,which specifies the total amount of bandwidth available for client sessions.
HDXMediaStreamMultimedia Acceleration bandwidth limit
This setting specifies the maximum allowed bandwidth limit, in kilobits per second, for deliveringstreaming audio and video using HDX MediaStreamMultimedia Acceleration.
By default, no maximum (zero) is specified.
If you enter a value for this setting and a value for the HDX MediaStream Multimedia Accelerationbandwidth limit percent setting, the most restrictive setting (the lower value) takes effect.
© 1999–2022 Citrix Systems, Inc. All rights reserved. 577

Citrix Virtual Apps and Desktops
HDXMediaStreamMultimedia Acceleration bandwidth limit percent
This setting specifies themaximumallowedbandwidth fordelivering streamingaudioandvideousingHDX MediaStreamMultimedia Acceleration as a percentage of the total session bandwidth.
By default, no maximum (zero) is specified.
If you enter a value for this setting and a value for the HDX MediaStream Multimedia Accelerationbandwidth limit setting, the most restrictive setting (the lower value) takes effect.
If you configure this setting, you must also configure the Overall session bandwidth limit setting,which specifies the total amount of bandwidth available for client sessions.
LPT port redirection bandwidth limit
Note: For the Virtual Delivery Agent 7.0 through 7.8, configure this setting using the registry; see Con‑figure COM Port and LPT Port Redirection settings using the registry.
This setting specifies themaximum allowed bandwidth, in kilobits per second, for print jobs using anLPT port in a single user session.
By default, no maximum (zero) is specified.
If you enter a value for this setting and a value for the LPT port redirection bandwidth limit percentsetting, the most restrictive setting (the lower value) is applied.
LPT port redirection bandwidth limit percent
Note: For the Virtual Delivery Agent 7.0 through 7.8, configure this setting using the registry; see Con‑figure COM Port and LPT Port Redirection settings using the registry.
This setting specifies the bandwidth limit for print jobs using an LPT port in a single client session asa percentage of the total session bandwidth.
By default, no maximum (zero) is specified.
If you enter a value for this setting and a value for the LPT port redirection bandwidth limit setting,the most restrictive setting (the lower value) is applied.
If you configure this setting, you must also configure the Overall session bandwidth limit setting,which specifies the total amount of bandwidth available for client sessions.
Overall session bandwidth limit
This setting specifies the total amountofbandwidthavailable, in kilobitsper second, foruser sessions.
The maximum enforceable bandwidth cap is 10 Mbps (10,000 Kbps). By default, no maximum (zero)is specified.
© 1999–2022 Citrix Systems, Inc. All rights reserved. 578

Citrix Virtual Apps and Desktops
Limiting the amount of bandwidth consumed by a client connection can improve performance whenother applications outside the client connection are competing for limited bandwidth.
Printer redirection bandwidth limit
This setting specifies the maximum allowed bandwidth, in kilobits per second, for accessing clientprinters in a user session.
By default, no maximum (zero) is specified.
If you enter a value for this setting and a value for the Printer redirection bandwidth limit percentsetting, the most restrictive setting (the lower value) is applied.
Printer redirection bandwidth limit percent
This setting specifies the maximum allowed bandwidth for accessing client printers as a percentageof the total session bandwidth.
By default, no maximum (zero) is specified.
If you enter a value for this setting and a value for the Printer redirection bandwidth limit setting, themost restrictive setting (with the lower value) is applied.
If you configure this setting, you must also configure the Overall session bandwidth limit setting,which specifies the total amount of bandwidth available for client sessions.
TWAIN device redirection bandwidth limit
This setting specifies the maximum allowed bandwidth, in kilobits per second, for controlling TWAINimaging devices from published applications.
By default, no maximum (zero) is specified.
If you enter a value for this setting and a value for the TWAIN device redirection bandwidth limit per‑cent setting, the most restrictive setting (the lower value) is applied.
TWAIN device redirection bandwidth limit percent
This setting specifies the maximum allowed bandwidth for controlling TWAIN imaging devices frompublished applications as a percentage of the total session bandwidth.
By default, no maximum (zero) is specified.
If you enter a value for this setting and a value for the TWAIN device redirection bandwidth limit set‑ting, the most restrictive setting (having the lower value) is applied.
© 1999–2022 Citrix Systems, Inc. All rights reserved. 579
Citrix Virtual Apps and Desktops
If you configure this setting, you must also configure the Overall session bandwidth limit setting,which specifies the total amount of bandwidth available for client sessions.
Bidirectional content redirection policy settings
April 14, 2021
The bidirectional content redirection section contains policy settings to enable or disable the clientto host and host to client URL redirection. Server policies are set in Studio, and client policies are setfrom the Citrix Workspace app Group Policy Object administration template.
Though Citrix also offers host to client redirection and Local App Access for client to URL redirection,we recommend that you use bidirectional content redirection for domain‑joined Windows clients.
Bidirectional content redirection requires Citrix Virtual Apps and Desktops 1808 or XenApp or Xen‑Desktop 7.13 and later plus Citrix Workspace app 1808 or later or Citrix Receiver for Windows 4.7 andlater.
Important
• Ensure that redirection rules don’t result in a looping configuration. For example, clientrules at the VDA are set to https://www.citrix.com, and VDA rules at the client are set to thesame URL possibly resulting in infinite looping.
• We support only domain joined endpoints.• URL redirection supports only explicit URLs (URLs displayed in the browser address bar orfound using the in‑browser navigation, depending on the browser). We don’t support linkshorteners.
• Bidirectional content redirection supports only Internet Explorer 8 through 11. Internet Ex‑plorer must be used on both the user device and the VDA.
• The Internet Explorer browser add‑on is required for Bidirectional Content Redirection. Formore information, see Register browser add‑ons.
• No fallback mechanism is present if redirection fails due to session start issues.• If two applications with the same display name are configured with multiple StoreFrontaccounts, one display name in the primary StoreFront account is used to start.
• Supports only Citrix Workspace app for Windows.• A new browser window appears only when the URL is redirected to the client. When theURL is redirected to the VDA and the browser is already open, the redirected URL opens ina new tab.
• Supports embedded links in files including documents, emails, and PDFs.• This feature works on both desktop sessions and application sessions, unlike Local AppAccess URL redirection, which works only on desktop sessions.
© 1999–2022 Citrix Systems, Inc. All rights reserved. 580

Citrix Virtual Apps and Desktops
• If Local App Access is enabled for URL redirection (either at the VDA or client), bidirectionalcontent redirection does not take effect.
Host to client and host to host redirection
Use Studio to configure the host to client (client) and host to host (VDA) redirection policies.
By default, bidirectional content redirection is Prohibited.
To enable bidirectional content redirection
When you include URLs, you can specify one URL or a semi‑colon delimited list of URLs. You can usean asterisk (*) as a wildcard in the domain name. For example:
http://*.citrix.com; http://www.google.com
1. Start Citrix Studio.2. Open the Bidirectional Content Redirection policy.3. Select Allow Bidirectional Content Redirection, choose Allowed, andOK. If you do not allow
this option, you are unable to complete this procedure.4. Select AllowedURLs to be redirected to Client and specify a URL, a list of URLs, or choose the
default value.5. Select Allowed URLs to be redirected to VDA and specify a URL, a list of URLs, or choose the
default value.
© 1999–2022 Citrix Systems, Inc. All rights reserved. 581
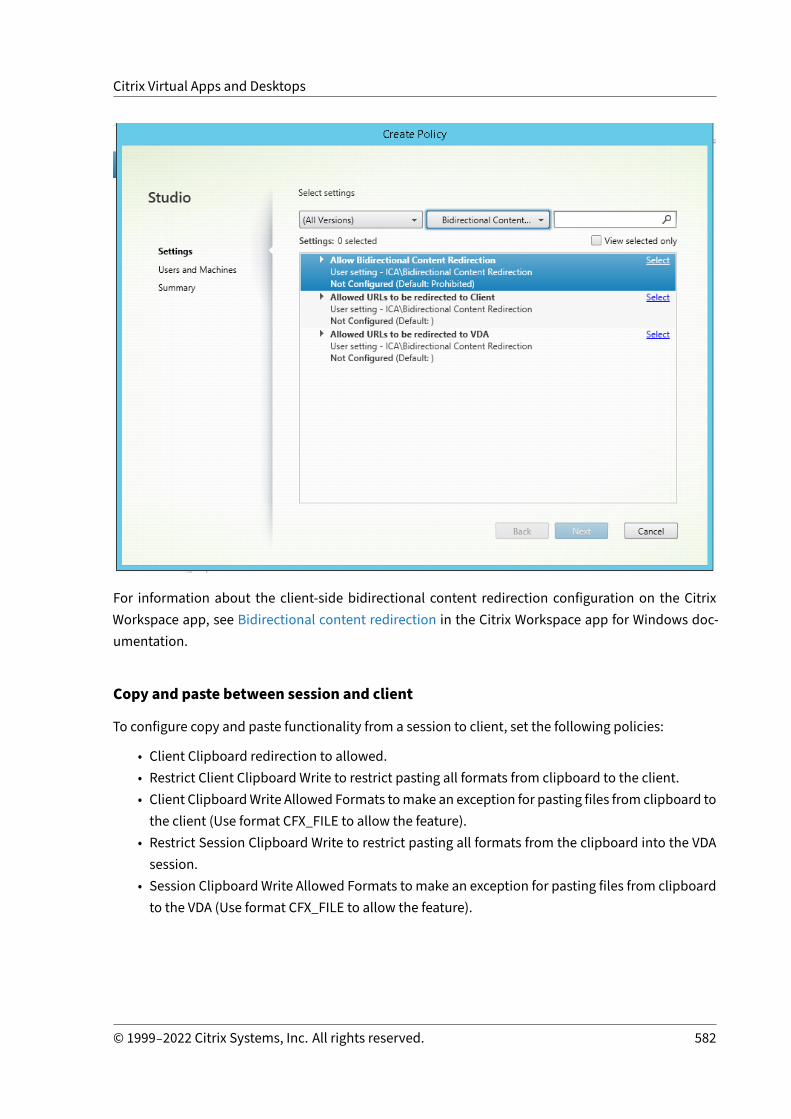
Citrix Virtual Apps and Desktops
For information about the client‑side bidirectional content redirection configuration on the CitrixWorkspace app, see Bidirectional content redirection in the Citrix Workspace app for Windows doc‑umentation.
Copy and paste between session and client
To configure copy and paste functionality from a session to client, set the following policies:
• Client Clipboard redirection to allowed.• Restrict Client Clipboard Write to restrict pasting all formats from clipboard to the client.• Client ClipboardWrite Allowed Formats tomake an exception for pasting files from clipboard tothe client (Use format CFX_FILE to allow the feature).
• Restrict Session Clipboard Write to restrict pasting all formats from the clipboard into the VDAsession.
• Session Clipboard Write Allowed Formats tomake an exception for pasting files from clipboardto the VDA (Use format CFX_FILE to allow the feature).
© 1999–2022 Citrix Systems, Inc. All rights reserved. 582

Citrix Virtual Apps and Desktops
Register browser add‑ons
The Internet Explorer browser add‑on is required for bidirectional content redirection.
You can use the following commands to register and unregister the Internet Explorer add‑on:
• To register the InternetExploreradd‑ononaclientdevice: <client‑installation‑folder>\redirector.exe/regIE
• Tounregister the InternetExploreradd‑ononaclientdevice: <client‑installation‑folder>\redirector.exe/unregIE
• To register the Internet Explorer add‑on on a VDA: <VDAinstallation‑folder>\VDARedirector.exe/regIE
• Tounregister the InternetExploreradd‑ononaVDA:<VDAinstallation‑folder>\VDARedirector.exe/unregIE
For example, the following command registers the Internet Explorer add‑on on a device running CitrixWorkspace app.
C:\Program Files\Citrix\ICA Client\redirector.exe/regIE
The following command registers the Internet Explorer add‑on on a Windows Multi‑session OS VDA.
C:\Program Files (x86)\Citrix\System32\VDARedirector.exe /regIE
Browser content redirection policy settings
April 14, 2021
The browser content redirection section contains policy settings to configure this feature.
Browser content redirection controls and optimizes the way Citrix Virtual Apps and Desktops deliverany web browser content (for example, HTML5) to users. Only the visible area of the browser wherecontent is displayed is redirected.
HTML5video redirectionandbrowser content redirectionare independent features. TheHTML5videoredirection policies are not needed for this feature to work, but the Citrix HDX HTML5 Video Redirec‑tion Service is used for browser content redirection. For more information, see Browser content redi‑rection.
Policy settings:
The following policy settings are available for the browser content redirection feature in Citrix Studio.These policies can be overridden with registry keys on the VDA, but registry keys are optional.
© 1999–2022 Citrix Systems, Inc. All rights reserved. 583

Citrix Virtual Apps and Desktops
TLS and browser content redirection
You can use browser content redirection to redirect HTTPS websites. The JavaScript injected intothose websites must establish a TLS connection to the Citrix HDX HTML5 Video Redirection Service(WebSocketService.exe) runningon theVDA.Toachieve this redirectionandmaintain theTLS integrityof the webpage, the Citrix HDX HTML5 Video Redirection Service generates two custom certificates inthe certificate store on the VDA.
HdxVideo.js uses Secure Websockets to communicate with WebSocketService.exe running on theVDA. This process runs on the Local System, and performs SSL termination and user sessionmapping.
WebSocketService.exe is listening on 127.0.0.1 port 9001.
Browser content redirection
By default, Citrix Workspace app tries client fetch and client render. If client fetch client and renderfails, server‑side rendering is tried. If you also enable the browser content redirection proxy configu‑ration policy, Citrix Workspace app tries only server fetch and client render.
By default, this setting is Allowed.
© 1999–2022 Citrix Systems, Inc. All rights reserved. 584
Citrix Virtual Apps and Desktops
Browser content redirection Access Control List (ACL) policy settings
Use this setting to configure an Access Control List (ACL) of URLs that can use browser content redi‑rection or are denied access to browser content redirection.
Authorized URLs are the URLs in the allow list whose content is redirected to the client.
The wildcard * is permitted, but it isn’t permitted within the protocol or the domain address part ofthe URL.
Allowed: http://www.xyz.com/index.html, https://www.xyz.com/*, http://www.xyz.com/*videos*
Not allowed: http://*.xyz.com/
You can achieve better granularity by specifying paths in the URL. For example, if you specify https://www.xyz.com/sports/index.html, only the index.html page is redirected.
By default, this setting is set to https://www.youtube.com/*
For more information, see the Knowledge Center article CTX238236.
Browser content redirection authentication sites
Use this setting to configure a list of URLs. Sites redirected by using browser content redirection usethe list to authenticate a user. The setting specifies the URLs for which browser content redirectionremains active (redirected) when navigating away from a URL in the allow list.
A classic scenario is awebsite that relies on an Identity Provider (IdP) for authentication. For example,website www.xyz.commust be redirected to the endpoint, but a third party IdP, like Okta (www.xyz.okta.com) handles the authentication portion. The administrator uses the browser content redirec‑tion ACL configuration policy to add www.xyz.com to the allow list, and then uses browser contentredirection authentication sites to add www.xyz.okta.com to the allow list.
For more information, see the Knowledge Center article CTX238236.
Browser content redirection blacklist setting
This setting works along with the browser content redirection ACL configuration setting. If URLs arepresent in the browser content redirection ACL configuration setting and the blacklist configurationsetting, the blacklist configuration takes precedence and the browser content of the URL isn’t redi‑rected.
Unauthorized URLs: Specifies the blacklisted URLs whose browser content isn’t redirected to theclient, but rendered on the server.
The wildcard * is permitted, but it isn’t permitted within the protocol or the domain address part ofthe URL.
© 1999–2022 Citrix Systems, Inc. All rights reserved. 585
Citrix Virtual Apps and Desktops
Allowed: http://www.xyz.com/index.html, https://www.xyz.com/*, http://www.xyz.com/*videos*
Not allowed: http://*.xyz.com/
You can achieve better granularity by specifying paths in the URL. For example, if you specify https://www.xyz.com/sports/index.html, only index.html is blacklisted.
Browser content redirection proxy setting
This setting provides configuration options for proxy settings on the VDA for browser content redirec‑tion. If enabled with a valid proxy address and port number, PAC / WPAD URL, or Direct/Transparentsetting, Citrix Workspace app tries only server fetch and client rendering.
If disabled or not configured and using a default value, Citrix Workspace app tries client fetch andclient rendering.
By default, this setting is Prohibited.
Allowed pattern for an explicit proxy:
http://\<hostname/ip address\>:\<port\>
Example:
http://proxy.example.citrix.com:80http://10.10.10.10:8080
Allowed patterns for PAC/WPAD files:
http://<hostname/ip address>:<port>/<path>/<Proxy.pac>
Example: http://wpad.myproxy.com:30/configuration/pac/Proxy.pac
https://<hostname/ip address>:<port>/<path>/<wpad.dat>
Example: http://10.10.10.10/configuration/pac/wpad.dat
Allowed patterns for direct or transparent proxies:
Type the word DIRECT in the policy text box.
Browser content redirection registry key overridesWarning
Editing the registry incorrectly can cause serious problems that might require you to reinstallyour operating system. Citrix cannot guarantee that problems resulting from the incorrect useof Registry Editor can be solved. Use Registry Editor at your own risk. Be sure to back up theregistry before you edit it.
© 1999–2022 Citrix Systems, Inc. All rights reserved. 586

Citrix Virtual Apps and Desktops
Registry override options for policy settings:
\HKEY_LOCAL_MACHINE\SOFTWARE\Citrix\HdxMediastream
Name Type Value
WebBrowserRedirection DWORD 1=Allowed, 0=Prohibited
WebBrowserRedirectionAcl REG_MULTI_SZ
WebBrowserRedirectionAuthenticationSitesREG_MULTI_SZ
WebBrowserRedirectionProxyAddressREG_SZ http://myproxy.citrix.com:8080 orhttp://10.10.10.10:8888
WebBrowserRedirectionBlacklistREG_MULTI_SZ
© 1999–2022 Citrix Systems, Inc. All rights reserved. 587

Citrix Virtual Apps and Desktops
© 1999–2022 Citrix Systems, Inc. All rights reserved. 588
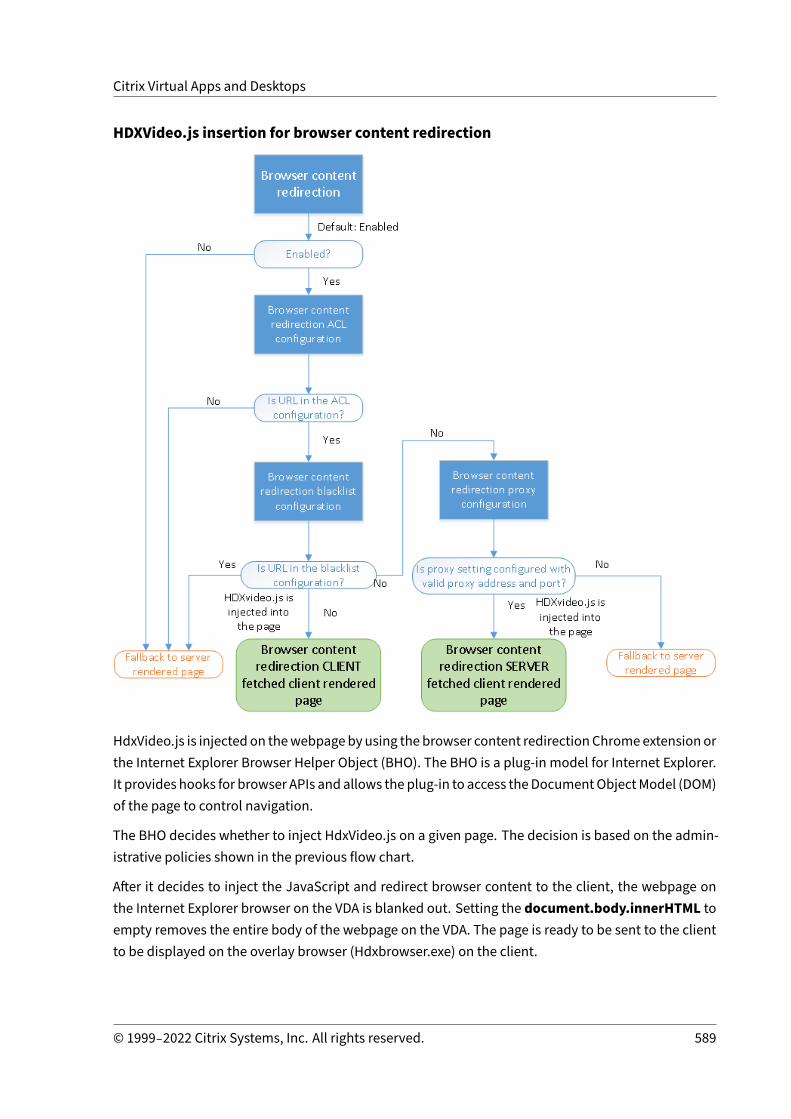
Citrix Virtual Apps and Desktops
HDXVideo.js insertion for browser content redirection
HdxVideo.js is injected on thewebpageby using the browser content redirectionChromeextension orthe Internet Explorer Browser Helper Object (BHO). The BHO is a plug‑in model for Internet Explorer.It provides hooks for browser APIs and allows the plug‑in to access theDocumentObjectModel (DOM)of the page to control navigation.
The BHO decides whether to inject HdxVideo.js on a given page. The decision is based on the admin‑istrative policies shown in the previous flow chart.
After it decides to inject the JavaScript and redirect browser content to the client, the webpage onthe Internet Explorer browser on the VDA is blanked out. Setting the document.body.innerHTML toempty removes the entire body of the webpage on the VDA. The page is ready to be sent to the clientto be displayed on the overlay browser (Hdxbrowser.exe) on the client.
© 1999–2022 Citrix Systems, Inc. All rights reserved. 589

Citrix Virtual Apps and Desktops
Client sensors policy settings
April 14, 2021
The Client Sensors section contains policy settings for controlling howmobile device sensor informa‑tion is handled in a user session.
Allow applications to use the physical location of the client device
This setting determines whether applications running in a session on a mobile device are allowed touse the physical location of the user device.
By default, the use of location information is prohibited
When this setting is prohibited, attempts by an application to retrieve location information return a“permission denied” value.
When this setting is allowed, a user can prohibit use of location information by denying a CitrixWorkspace app request to access the location. Android and iOS devices prompt at the first requestfor location information in each session.
When developing hosted applications that use the Allow applications to use the physical location ofthe client device setting, consider the following:
• Ensure a location‑enabled application doesn’t rely on location information being available be‑cause:
– A user might not allow access to location information.– The location might not be available or might change while the application is running.– A user might connect to the application session from a different device that does not sup‑port location information.
• A location‑enabled application must:– Have the location feature off by default.– Provide a user option to allow or disallow the feature while the application is running.– Provide a user option to clear location data that the application caches. (Citrix Workspaceapp does not cache location data.)
• A location‑enabled applicationmustmanage the granularity of the location information so thatthe data acquired is appropriate to the purpose of the application and conforms to regulationsin all relevant jurisdictions.
• Enforce a secure connection (for example, using TLS or a VPN) when using location services.Connect Citrix Workspace app to trusted servers.
• Consider obtaining legal advice regarding the use of location services.
© 1999–2022 Citrix Systems, Inc. All rights reserved. 590

Citrix Virtual Apps and Desktops
Desktop UI policy settings
April 14, 2021
The Desktop UI section contains policy settings that control visual effects such as desktop wallpaper,menu animations, and drag‑and‑drop images, to manage the bandwidth used in client connections.You can improve application performance on a WAN by limiting bandwidth usage.
Important
We do not support legacy graphics mode and Desktop Composition Redirection (DCR) in thisrelease. This policy is included only for backward compatibility when using XenApp 7.15 LTSR,XenDesktop 7.15 LTSR, and previous VDA releases with Windows 7 and Windows 2008 R2.
Desktop Composition Redirection
This setting specifies whether to use the processing capabilities of the graphics processing unit (GPU)or integrated graphics processor (IGP) on the user device for local DirectX graphics rendering to pro‑vide users with amore fluidWindows desktop experience. When enabled, Desktop Composition Redi‑rection delivers a highly responsive Windows experience while maintaining high scalability on theserver.
By default, Desktop Composition Redirection is disabled.
To deselect Desktop Composition Redirection and reduce the bandwidth required in user sessions,select Disabled when adding this setting to a policy.
Desktop Composition Redirection graphics quality
This setting specifies the quality of graphics used for Desktop Composition Redirection.
The default is High.
Choose from High, Medium, Low, or Lossless quality.
Desktop wallpaper
This setting allows or prevents wallpaper showing in user sessions.
By default, user sessions can showwallpaper.
To deselect desktopwallpaper and reduce the bandwidth required in user sessions, select Prohibitedwhen adding this setting to a policy.
© 1999–2022 Citrix Systems, Inc. All rights reserved. 591

Citrix Virtual Apps and Desktops
Menu animation
This setting allows or prevents menu animation in user sessions.
By default, menu animation is allowed.
Menu animation is aMicrosoft personal preference setting for ease of access. When enabled, it causesa menu to appear after a short delay, either by scrolling or fading in. An arrow icon appears at thebottom of the menu. The menu appears when you point to that arrow.
Menuanimation is enabledonadesktop if this policy setting is set toAllowedand themenuanimationMicrosoft personal preference setting is enabled.
Note: Changes to themenu animation Microsoft personal preference setting are changes to the desk‑top. If the desktop is set to discard changes when the session ends, a user who has enabled menuanimations in a sessionmight not havemenuanimation available in subsequent sessions on thedesk‑top. For users who require menu animation, enable the Microsoft setting in the master image for thedesktop or ensure that the desktop retains user changes.
Viewwindow contents while dragging
This setting allows or prevents the display of window contents when dragging a window across thescreen.
By default, viewing window contents is allowed.
When set to Allowed, the entire window appears to move when you drag it. When set to Prohibited,only the window outline appears to move until you drop it.
End user monitoring policy settings
April 14, 2021
The End User Monitoring section contains policy settings for measuring session traffic.
ICA round trip calculation
This setting determines whether ICA round trip calculations are performed for active connections.
By default, calculations for active connections are enabled.
By default, each ICA round trip measurement initiation is delayed until some traffic occurs that indi‑cates user interaction. This delay can be indefinite in length and is designed to prevent the ICA roundtrip measurement being the sole reason for ICA traffic.
© 1999–2022 Citrix Systems, Inc. All rights reserved. 592

Citrix Virtual Apps and Desktops
ICA round trip calculation interval
This setting specifies the frequency, in seconds, at which ICA round trip calculations are performed.
By default, ICA round trip is calculated every 15 seconds.
ICA round trip calculations for idle connections
This setting determines whether ICA round trip calculations are performed for idle connections.
By default, calculations are not performed for idle connections.
By default, each ICA round trip measurement initiation is delayed until some traffic occurs that indi‑cates user interaction. This delay can be indefinite in length and is designed to prevent the ICA roundtrip measurement being the sole reason for ICA traffic.
Enhanced desktop experience policy setting
April 14, 2021
TheEnhancedDesktopExperiencepolicy setting sessions runningon server operating systems to looklike local Windows 7 desktops, providing users with an enhanced desktop experience.
By default, this setting is allowed.
If a user profile with Windows Classic theme exists on the virtual desktop, enabling this policy doesnot provide an enhanced desktop experience for that user. If a user with a Windows 7 theme userprofile logs on to a virtual desktop running Windows Server 2012 for which this policy is either notconfigured or disabled, that user sees an error message indicating failure to apply the theme.
In both cases, resetting the user profile resolves the issue.
If the policy changes from enabled to disabled on a virtual desktopwith active user sessions, the lookand feel of those sessions is inconsistentwith both theWindows 7 andWindows Classic desktop expe‑rience. To avoid this inconsistency, ensure you restart the virtual desktop after changing this policysetting. You must also delete any roaming profiles on the virtual desktop. Citrix also recommendsdeleting any other user profiles on the virtual desktop to avoid inconsistencies between profiles.
If you are using roaming user profiles in your environment, ensure the Enhanced Desktop Experiencefeature is enabled or disabled for all virtual desktops that share a profile.
Citrix does not recommend sharing roaming profiles between virtual desktops running server operat‑ing systems and client operating systems. Profiles for client and server operating systems differ andsharing roaming profiles across both types can lead to inconsistencies in profile properties when auser moves between the two.
© 1999–2022 Citrix Systems, Inc. All rights reserved. 593

Citrix Virtual Apps and Desktops
File Redirection policy settings
April 14, 2021
The File Redirection section contains policy settings relating to client drive mapping and client driveoptimization.
Auto connect client drives
This setting allows or prevents automatic connection of client drives when users log on.
By default, automatic connection is allowed.
When adding this setting to a policy, ensure to enable the settings for the drive types you want auto‑matically connected. For example, to allow automatic connection of users’ CD‑ROM drives, configurethis setting and the Client optical drives setting.
The following policy settings are related:
• Client drive redirection• Client floppy drives• Client optical drives• Client fixed drives• Client network drives• Client removable drives
Client drive redirection
This setting enables or disables file redirection to and from drives on the user device.
By default, file redirection is enabled.
Note:
Client drive redirection policy settings do not apply to drives mapped to sessions using genericUSB redirection.
When enabled, users can save files to all their client drives. When disabled, all file redirection is pre‑vented, regardless of the state of the individual file redirection settings such as Client floppy drivesand Client network drives.
The following policy settings are related:
• Client floppy drives• Client optical drives• Client fixed drives
© 1999–2022 Citrix Systems, Inc. All rights reserved. 594

Citrix Virtual Apps and Desktops
• Client network drives• Client removable drives
Client fixed drives
This setting allows or prevents users from accessing or saving files to fixed drives on the user device.
By default, accessing client fixed drives is allowed.
When adding this setting to a policy, ensure that the Client drive redirection setting is present and setto Allowed. If these settings are disabled, client fixed drives are not mapped and users cannot accessthese drives manually, regardless of the state of the Client fixed drives setting.
Toensure that fixeddrives are automatically connectedwhenusers logon, configure theAuto connectclient drives setting.
Client floppy drives
This setting allows or prevents users from accessing or saving files to floppy drives on the user device.
By default, accessing client floppy drives is allowed.
When adding this setting to a policy, ensure that the Client drive redirection setting is present and setto Allowed. If these settings are disabled, client floppydrives are notmappedandusers cannot accessthese drives manually, regardless of the state of the Client floppy drives setting.
To ensure that floppy drives are automatically connected when users log on, configure the Auto con‑nect client drives setting.
Client network drives
This setting allows or prevents users from accessing and saving files to network (remote) drivesthrough the user device.
By default, accessing client network drives is allowed.
When adding this setting to a policy, ensure that the Client drive redirection setting is present andset to Allowed. If these settings are disabled, client network drives are not mapped and users cannotaccess these drives manually, regardless of the state of the Client network drives setting.
To ensure that network drives are automatically connected when users log on, configure the Autoconnect client drives setting.
© 1999–2022 Citrix Systems, Inc. All rights reserved. 595
Citrix Virtual Apps and Desktops
Client optical drives
This setting allowsor prevents users fromaccessing or saving files to CD‑ROM,DVD‑ROM, andBD‑ROMdrives on the user device.
By default, accessing client optical drives is allowed.
When adding this setting to a policy, ensure that the Client drive redirection setting is present andset to Allowed. If these settings are disabled, client optical drives are not mapped and users cannotaccess these drives manually, regardless of the state of the Client optical drives setting.
To ensure that optical drives are automatically connected when users log on, configure the Auto con‑nect client drives setting.
Client removable drives
This setting allows or prevents users from accessing or saving files to USB drives on the user device.
By default, accessing client removable drives is allowed.
When adding this setting to a policy, ensure that the Client drive redirection setting is present and setto Allowed. If these settings are disabled, client removable drives are not mapped and users cannotaccess these drives manually, regardless of the state of the Client removable drives setting.
To ensure that removable drives are automatically connected when users log on, configure the Autoconnect client drives setting.
Host to client redirection
This setting enables or disables file type associations for URLs and somemedia content to be openedon the user device. When disabled, content opens on the server.
By default, file type association is disabled.
These URL types are opened locally when you enable this setting:
• Hypertext Transfer Protocol (HTTP)• Secure Hypertext Transfer Protocol (HTTPS)• Real Player and QuickTime (RTSP)• Real Player and QuickTime (RTSPU)• Legacy Real Player (PNM)• Microsoft Media Server (MMS)
Preserve client drive letters
This setting enables or disables mapping of client drives to the same drive letter in the session.
© 1999–2022 Citrix Systems, Inc. All rights reserved. 596

Citrix Virtual Apps and Desktops
By default, client drive letters are not preserved.
When adding this setting to a policy, ensure that the Client drive redirection setting is present and setto Allowed.
Read‑only client drive access
This setting allows or prevents users and applications from creating or changing files or folders onmapped client drives.
By default, files and folders onmapped client drives can be changed.
If set to Enabled, files and folders are accessible with read‑only permissions.
When adding this setting to a policy, ensure the Client drive redirection setting is present and set toAllowed.
Special folder redirection
This setting allows or prevents Citrix Workspace app and Web Interface users to see their local Docu‑ments and Desktop special folders from a session.
By default, special folder redirection is allowed.
This setting prevents any objects filtered through a policy from having special folder redirection, re‑gardless of settings that exist elsewhere. When this setting is prohibited, any related settings specifiedfor StoreFront, Web Interface, or Citrix Workspace app are ignored.
To define which users can have special folder redirection, select Allowed and include this setting in apolicy filtered on the users youwant to have this feature. This setting overrides all other special folderredirection settings.
Because special folder redirection must interact with the user device, policy settings that preventusers from accessing or saving files to their local hard drives also prevent special folder redirectionfromworking.
When adding this setting to a policy, ensure that the Client fixed drives setting is present and set toAllowed.
Use asynchronous writes
This setting enables or disables asynchronous disk writes.
By default, asynchronous writes are disabled.
© 1999–2022 Citrix Systems, Inc. All rights reserved. 597

Citrix Virtual Apps and Desktops
Asynchronousdiskwrites can improve the speedof file transfers andwriting to client disks overWANs,which relatively high bandwidth and high latency typically characterize. However, if there is a connec‑tion or disk fault, the client file or files beingwrittenmight end in an undefined state. If this undefinedstate occurs, a pop‑up window informs the user of the files affected. The user can then take reme‑dial action such as restarting an interrupted file transfer on reconnection or when the disk fault iscorrected.
We recommend enabling asynchronous disk writes only for users requiring remote connectivity hav‑ing good file access speed and who can easily recover files or data lost if there is a connection or diskfailure.
When adding this setting to a policy, ensure that the Client drive redirection setting is present and setto Allowed. If this setting is disabled, asynchronous writes don’t occur.
Graphics policy settings
April 14, 2021
TheGraphics section contains policy settings for controlling how images are handled in user sessions.
Allow visually lossless compression
This setting allows visually lossless compression to be used instead of true lossless compression forgraphics. Visually lossless improves performance over true lossless, but has minor loss that is unno‑ticeable by sight. This setting changes the way the values of the Visual quality setting are used.
By default this setting is disabled.
Graphics status indicator
This setting configures the graphics status indicator to run in the user session. This indicator allowsthe user to see details on the graphics mode in use, including graphics provider, encoder, hardwareencoding, image quality, progressive display status, and lossless text.
By default the graphics status indicator is disabled. This setting replaces the lossless indicator. Previ‑ous releases of Citrix Virtual Apps and Desktops enable the lossless indicator instead.
Limitation due to Microsoft quiet time:
After enabling the graphics status indicator, there might be an issue the first time a user logs on toCitrix Virtual Apps and Desktops. Four hours elapse before the status indicator icon appears in thenotification area.
© 1999–2022 Citrix Systems, Inc. All rights reserved. 598

Citrix Virtual Apps and Desktops
Displaymemory limit
This setting specifies the maximum video buffer size in kilobytes for the session.
By default, the display memory limit is 65,536 kilobytes.
Specifies the maximum video buffer size in kilobytes for the session. Specify an amount in kilobytesfrom128 to4,194,303. Themaximumvalueof 4,194,303doesnot limit thedisplaymemory. Bydefault,thedisplaymemory is 65,536 kilobytes. Usingmore color depth andhigher resolution for connectionsrequiresmorememory. In legacy graphicsmode, if thememory limit is reached, the display degradesaccording to the “Display mode degrade preference” setting.
For connections requiring more color depth and higher resolution, increase the limit. Calculate themaximummemory required using the equation:
Memory depth in bytes = (color‑depth‑in‑bits‑per‑pixel) / 8) x (vertical‑resolution‑in‑pixels) x(horizontal‑resolution‑in‑pixels).
For example, with a color depthof 32, vertical resolutionof 600, and ahorizontal resolutionof 800, themaximummemory required is (32 / 8) x (600) x (800) = 1920000 bytes, which yields a display memorylimit of 1920 KB.
Color depthsother than32‑bit are available only if the Legacy graphicsmodepolicy setting is enabled.
HDX allocates only the amount of display memory needed for each session. So, if only some usersrequire more than the default, there is no negative impact on scalability by increasing the displaymemory limit.
Displaymode degrade preferenceNote:
For the Virtual Delivery Agent 7.x, this policy setting applies onlywhen the Legacy graphicsmodepolicy setting is enabled.
This setting specifies whether color depth or resolution degrades first when the session displaymem‑ory limit is reached.
By default, color depth is degraded first.
When the session memory limit is reached, you can reduce the quality of displayed images by choos‑ing whether color depth or resolution is degraded first. When color depth is degraded first, displayedimages use fewer colors. When resolution is degraded first, displayed images use fewer pixels perinch.
To notify users when either color depth or resolution is degraded, configure the Notify user when dis‑play mode is degraded setting.
© 1999–2022 Citrix Systems, Inc. All rights reserved. 599
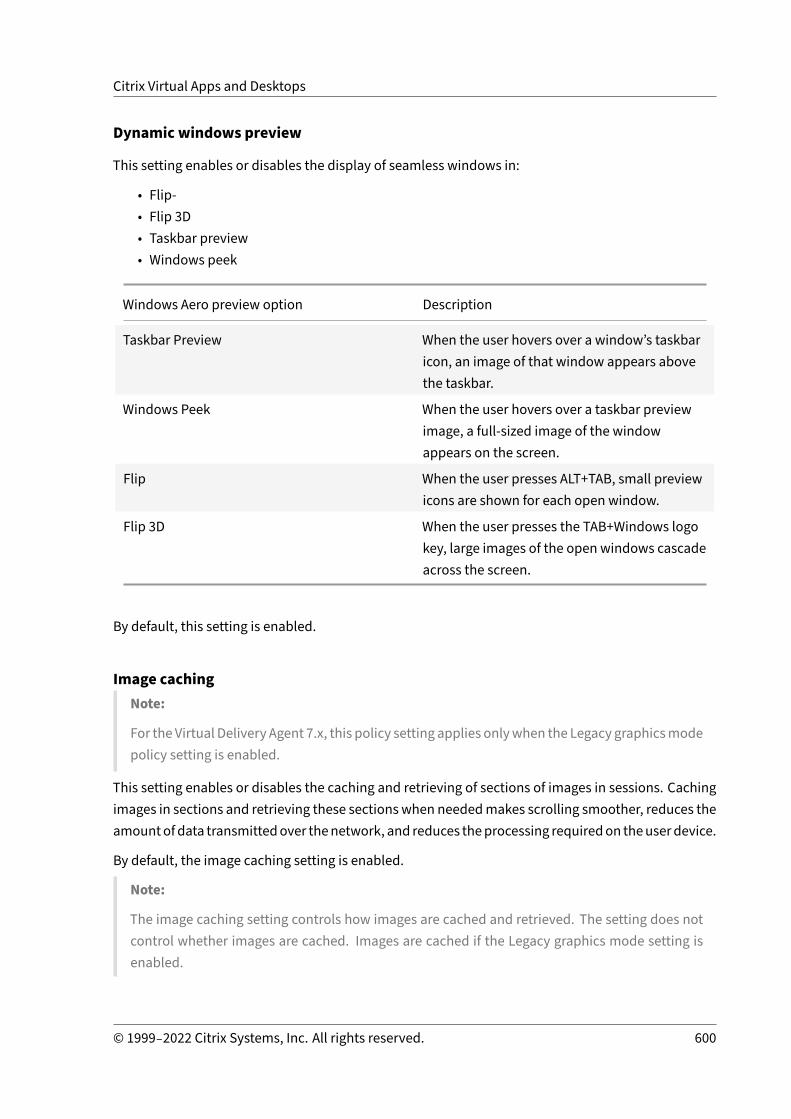
Citrix Virtual Apps and Desktops
Dynamic windows preview
This setting enables or disables the display of seamless windows in:
• Flip‑• Flip 3D• Taskbar preview• Windows peek
Windows Aero preview option Description
Taskbar Preview When the user hovers over a window’s taskbaricon, an image of that window appears abovethe taskbar.
Windows Peek When the user hovers over a taskbar previewimage, a full‑sized image of the windowappears on the screen.
Flip When the user presses ALT+TAB, small previewicons are shown for each open window.
Flip 3D When the user presses the TAB+Windows logokey, large images of the open windows cascadeacross the screen.
By default, this setting is enabled.
Image cachingNote:
For the Virtual Delivery Agent 7.x, this policy setting applies onlywhen the Legacy graphicsmodepolicy setting is enabled.
This setting enables or disables the caching and retrieving of sections of images in sessions. Cachingimages in sections and retrieving these sections when neededmakes scrolling smoother, reduces theamountofdata transmittedover thenetwork, and reduces theprocessing requiredon theuserdevice.
By default, the image caching setting is enabled.
Note:
The image caching setting controls how images are cached and retrieved. The setting does notcontrol whether images are cached. Images are cached if the Legacy graphics mode setting isenabled.
© 1999–2022 Citrix Systems, Inc. All rights reserved. 600
Citrix Virtual Apps and Desktops
Legacy graphics mode ‑ not supported. For backward compatibility onlyImportant:
We do not support legacy graphics mode and Desktop Composition Redirection (DCR) in thisrelease. This policy is included only for backward compatibility when using XenApp 7.15 LTSR,XenDesktop 7.15 LTSR, and previous VDA releases with Windows 7 and Windows 2008 R2.
This setting disables the rich graphics experience. Use this setting to revert to the legacy graphics ex‑perience, reducingbandwidth consumptionover aWANormobile connection. Bandwidth reductionsintroduced in XenApp and XenDesktop 7.13 make this mode obsolete.
By default, this setting is disabled and users are provided with the rich graphics experience.
Legacy graphics mode is supported with Windows 7 and Windows Server 2008 R2 VDAs.
Legacy graphics mode is not supported on Windows 8.x, 10 or Windows Server 2012, 2012 R2, and2016.
See CTX202687 for more on optimizing graphics modes and policies in XenApp and XenDesktop 7.6FP3 or higher.
Maximum allowed color depthNote:
For the Virtual Delivery Agent 7.x, this policy setting applies onlywhen the Legacy graphicsmodepolicy setting is enabled.
This setting specifies the maximum color depth allowed for a session.
By default, the maximum allowed color depth is 32 bits per pixel.
This setting applies only to Thinwire drivers and connections. It does not apply to VDAs that have anon‑ThinWire driver as the primary display driver, such as VDAs that use a Windows Display DriverModel (WDDM) driver as the primary display driver. For Single‑session OS VDAs using a WDDM driveras theprimary display driver, such asWindows 8, this setting has no effect. ForWindowsMulti‑sessionOS VDAs using aWDDMdriver, such asWindows Server 2012 R2, this settingmight prevent users fromconnecting to the VDA.
Setting a high color depth requires more memory. To degrade color depth when the memory limitis reached, configure the Display mode degrade preference setting. When color depth is degraded,displayed images use fewer colors.
Notify user when displaymode is degraded
© 1999–2022 Citrix Systems, Inc. All rights reserved. 601

Citrix Virtual Apps and Desktops
Note:
For the Virtual Delivery Agent 7.x, this policy setting applies onlywhen the Legacy graphicsmodepolicy setting is enabled.
This setting displays a brief explanation to the user when the color depth or resolution is degraded.
By default, notifying users is disabled.
Optimize for 3D graphics workload
This setting configures the appropriate default settings that best suit graphically intense workloads.Enable this setting for users whose workload focuses on graphically intense applications. Apply thispolicy only in cases where a GPU is available to the session. Any other settings that explicitly overridethe default settings set by this policy take precedence.
By default, optimize for 3D graphics workload is disabled.
Queuing and tossingNote:
For the Virtual Delivery Agent 7.x, this policy setting applies onlywhen the Legacy graphicsmodepolicy setting is enabled.
This setting discards queued images that another image replaces.
By default, queuing and tossing is enabled.
This setting improves responsewhen graphics are sent to the user device. Configuring this setting cancause animations to become choppy because of dropped frames.
Use video codec for compression
Allows use of a video codec to compress graphics when video decoding is available on the endpoint.When For the entire screen is chosen the video codec is applied as the default codec for all. WhenFor actively changing regions is selected the video codec is used for areas where there is constantchange on the screen, other data uses still image compression and bitmap caching. When video de‑coding is not available on the endpoint, or when you specify Do not use video codec, a combinationof still image compression and bitmap caching is used. When Use when preferred is selected, thesystem chooses, based on various factors. The results might vary between versions as the selectionmethod is enhanced.
SelectUsewhen preferred to allow the system tomake its best effort to choose appropriate settingsfor the current scenario.
© 1999–2022 Citrix Systems, Inc. All rights reserved. 602

Citrix Virtual Apps and Desktops
Select For the entire screen to optimize for improved user experience and bandwidth, especially incases with heavy use of server‑rendered video and 3D graphics.
Select For actively changing regions to optimize for improved video performance, especially in lowbandwidth, while maintaining scalability for static and slowly changing content. This setting is sup‑ported in multi‑monitor deployments.
Select Do not use video codec to optimize for server CPU load and for cases that do not have numer‑ous server‑rendered videos or other graphically intense applications.
The default is Use when preferred.
Use hardware encoding for video
This setting allows the use of graphics hardware, if available, to compress screen elements with thevideo codec. If such hardware is not available, the VDA falls back to CPU‑based encoding using thesoftware video codec.
The default option for this policy setting is Enabled.
Multiple monitors are supported.
Any Citrix Workspace app that supports video decoding can be used with hardware encoding.
NVIDIA
For NVIDIA GRID GPUs, hardware encoding is supported with VDAs for Multi‑session OS and Single‑session OS.
NVIDIA GPUs must support NVENC hardware encoding. See NVIDIA video codec SDK for a list of sup‑ported GPUs.
NVIDIA GRID requires driver version 3.1 or higher. NVIDIA Quadro requires driver version 362.56 orhigher. Citrix recommends drivers from the NVIDIA Release R361 branch.
Lossless text is not compatible with NVENC hardware encoding. If you enabled lossless text, losslesstext takes priority over NVENC hardware encoding.
Selective use of the H.264 hardware codec for actively changing regions is supported.
Visually lossless (YUV 4:4:4) compression is supported. Visually lossless (graphics policy setting, Al‑low visually lossless compression) requires Citrix Workspace app 1808 or higher or Citrix Receiver forWindows 4.5 or higher.
Intel
For Intel Iris Pro graphics processors, hardware encoding is supported with VDAs for Single‑sessionOS and Multi‑session OS.
© 1999–2022 Citrix Systems, Inc. All rights reserved. 603

Citrix Virtual Apps and Desktops
Intel Iris Pro graphics processors in the Intel Broadwell processor family and later are supported. IntelRemote Displays SDK version 1.0 is required and can be downloaded from the Intel website: RemoteDisplays SDK.
Lossless text is supported only when the Video codec policy is set for the entire screen and the Opti‑mize for 3D graphics workload policy is disabled.
Visually lossless (YUV 4:4:4) is not supported.
The Intel encoder provides a good user experience for up to eight encoding sessions (for example oneuser using eight monitors or eight users using a monitor each). If more than eight encoding sessionsare required, check howmany monitors the virtual machine connects with. To maintain a good userexperience, the administrator can decide to configure this policy setting on a per user or permachinebasis.
AMD
For AMD, hardware encoding is supported with VDAs for Single‑session OS.
AMD GPUsmust support the RapidFire SDK. For example, the AMD Radeon Pro or FirePro GPUs.
For encoding to work, install the latest AMD drivers. You can download those drivers from https://www.amd.com/en/support.
Lossless text is not compatiblewith AMDhardware encoding. If you enabled lossless text, lossless texttakes priority over AMD hardware encoding.
Selective use of the H.264 hardware codec for actively changing regions is supported.
Caching policy settings
April 14, 2021
The Caching section contains policy settings that enable caching image data on user devices whenclient connections are limited in bandwidth.
Persistent cache threshold
Note: For the Virtual Delivery Agent 7.x, this policy setting applies only when the Legacy graphicsmode policy setting is enabled.
This setting caches bitmaps on the hard drive of the user device. This enables re‑use of large,frequently‑used images from previous sessions.
By default, the threshold is 3000000 bits per second.
© 1999–2022 Citrix Systems, Inc. All rights reserved. 604

Citrix Virtual Apps and Desktops
The threshold value represents the point below which the Persistent Cache feature will take effect.For example, using the default value, bitmaps are cached on the hard drive of the user device whenbandwidth falls below 3000000 bps.
Framehawk policy settings
April 14, 2021
Important:
As of Citrix Virtual Apps and Desktops 7 1903, Framehawk is no longer supported. Instead, useThinwire with adaptive transport enabled.
The Framehawk section contains policy settings that enable and configure the Framehawk displaychannel on the server.
Framehawk display channel
When enabled, the server attempts to use the Framehawk display channel for the user’s graphics andinput remoting. That display channel uses UDP to provide a better user experience on networks withhigh loss and latency characteristics. However, it can also use more server resources and bandwidththan other graphics modes.
By default, the Framehawk display channel is disabled.
Framehawk display channel port range
This policy setting specifies the range of UDP port numbers (in the form lowest port number, highestport number) the VDA uses to exchange Framehawk display channel data with the user device. TheVDA attempts to use each port, starting with the lowest port number and incrementing for each sub‑sequent attempt. The port handles inbound and outbound traffic.
By default, the port range is 3224,3324.
Keep alive policy settings
April 14, 2021
The Keep Alive section contains policy settings for managing ICA keep‑alive messages.
© 1999–2022 Citrix Systems, Inc. All rights reserved. 605

Citrix Virtual Apps and Desktops
ICA keep alive timeout
This setting specifies the number of seconds between successive ICA keep‑alive messages.
By default, the interval between keep‑alive messages is 60 seconds.
Specify an interval between 1‑3600 seconds in which to send ICA keep‑alive messages. Do not config‑ure this setting if your network monitoring software is responsible for closing inactive connections.
ICA keep alives
This setting enables or disables sending ICA keep‑alive messages periodically.
By default, keep‑alive messages are not sent.
Enabling this setting prevents broken connections from being disconnected. If the server detects noactivity, this setting prevents Remote Desktop Services (RDS) from disconnecting the session. Theserver sends keep‑alivemessages every few seconds to detect if the session is active. If the session isno longer active, the server marks the session as disconnected.
ICA keep‑alive does not work if you are using session reliability. Configure ICA keep‑alive only forconnections that are not using Session Reliability.
Related policy settings: Session reliability connections.
Local App Access policy settings
April 14, 2021
The Local App Access section contains policy settings that manage the integration of users’ locallyinstalled applications with hosted applications in a hosted desktop environment.
Allow local app access
This setting allows or prevents the integration of users’ locally installed applications with hosted ap‑plications within a hosted desktop environment.
When a user starts a locally installed application, that application appears to run within their virtualdesktop, even though it is actually running locally.
By default, local app access is prohibited.
© 1999–2022 Citrix Systems, Inc. All rights reserved. 606

Citrix Virtual Apps and Desktops
URL redirection black list
This setting specifies websites that are redirected to and started in the local Web browser. Theseweb‑sites might include websites requiring locale information, such as msn.com or newsgoogle.com, orwebsites containing rich media content that are better rendered on the user device.
By default, no sites are specified.
URL redirection white list
This setting specifies websites that are rendered in the environment in which they are started.
By default, no sites are specified.
Mobile experience policy settings
April 14, 2021
The Mobile Experience section contains policy settings for handling the Citrix Mobility Pack.
Automatic keyboard display
This setting enables or disables the automatic display of the keyboard onmobile device screens.
By default, the automatic display of the keyboard is disabled.
Launch touch‑optimized desktop
This setting is disabled and not available for Windows 10 or Windows Server 2016 machines.
This setting determines the overall CitrixWorkspace app interface behavior by allowing or prohibitinga touch‑friendly interface that is optimized for tablet devices.
By default, a touch‑friendly interface is used.
To use only the Windows interface, set this policy setting to Prohibited.
Remote the combo box
This setting determines the types of combo boxes you can display in sessions on mobile devices. Todisplay the device‑native combo box control, set this policy setting to Allowed. When this setting isallowed, a user can change a Citrix Workspace app for iOS session setting to use the Windows combobox.
By default, the Remote the combo box feature is prohibited.
© 1999–2022 Citrix Systems, Inc. All rights reserved. 607

Citrix Virtual Apps and Desktops
Multimedia policy settings
April 14, 2021
The Multimedia section contains policy settings for managing streaming HTML5 and Windows audioand video in user sessions.
Warning
Editing the registry incorrectly can cause serious problems that might require you to reinstallyour operating system. Citrix cannot guarantee that problems resulting from the incorrect useof the Registry Editor can be solved. Use the Registry Editor at your own risk. Be sure to back upthe registry before you edit it.
Multimedia policies
By default, all multimedia policies set on the Delivery Controller are stored in these registries:
Machine policies:
HKEY_LOCAL_MACHINE\Software\Policies\Citrix\MultimediaPolicies
User policies:
HKEY_LOCAL_MACHINE\Software\Policies\Citrix{User Session ID}\User\MultimediaPolicies
To locate the current user session ID, issue the qwinsta command on the Windows command line.
HTML5 video redirection
Controls and optimizes the way Citrix Virtual Apps and Desktops servers deliver HTML5 multimediaweb content to users.
By default, this setting is disabled.
© 1999–2022 Citrix Systems, Inc. All rights reserved. 608

Citrix Virtual Apps and Desktops
© 1999–2022 Citrix Systems, Inc. All rights reserved. 609

Citrix Virtual Apps and Desktops
In this release, this feature is available for controlled webpages only. It requires the addition ofJavaScript to the webpages where the HTML5 multimedia content is available, for example, videoson an internal training site.
To configure HTML5 video redirection:
1. Copy the file,HdxVideo.js, from%ProgramFiles%/Citrix/ICA Service/HTML5 Video Redirectionon the VDA install to the location of your internal webpage.
2. Insert this line into your webpage (if your webpage has other scripts, include HdxVideo.js be‑fore those scripts):<script src="HdxVideo.js"type="text/javascript"\></script>
Note: If HdxVideo.js is not in the same location as your webpage, use the src attribute to specify thefull path to it.
If the JavaScript has not been added to your controlledwebpages and the user plays anHTML5 video,Citrix Virtual Apps and Desktops default to server side rendering.
For redirection of HTML5 videos towork, allowWindowsMedia Redirection. This policy ismandatoryfor Server Fetch Client Render, and necessary for Client Side Fetching (which in turn also requiresWindows Media client‑side content fetching to be Allowed).
Microsoft Edge doesn’t support this feature.
HdxVideo.js replaces the browser HTML5 Player controls with its own. To check that the HTML5 videoredirection policy is in effect on a certain website, compare the player controls to a scenario wheretheHTML5 video redirection policy is Prohibited:
(Citrix custom controls when the policy is Allowed)
© 1999–2022 Citrix Systems, Inc. All rights reserved. 610

Citrix Virtual Apps and Desktops
(Native webpage controls when the policy is Prohibited or not configured)
The following video controls are supported:
• play• pause• seek• repeat• audio• full screen
You can view an HTML5 video redirection test page at https://www.citrix.com/virtualization/hdx/html5‑redirect.html.
TLS, HTML5 video redirection, and browser content redirection
You can use HTML5 video redirection to redirect videos fromHTTPSwebsites or browser content redi‑rection to redirect the entire website. The JavaScript injected into those websites must establish aTLS connection to the Citrix HDX HTML5 Video Redirection Service (WebSocketService.exe) runningon the VDA. To achieve this redirection and maintain the TLS integrity of the webpage, two customcertificates are generated by the Citrix HDX HTML5 Video Redirection Service in the certificate storeon the VDA.
HdxVideo.js uses Secure WebSockets to communicate with WebSocketService.exe running on theVDA. This process runs as a Local System account, and performs SSL termination and user sessionmapping.
WebSocketService.exe is listening on 127.0.0.1 port 9001.
Limit video quality
This setting applies only to Windows Media and not to HTML5. It requires you enable Optimizationfor Windows Mediamultimedia redirection over WAN.
This setting specifies the maximum video quality level allowed for an HDX connection. When config‑ured, maximum video quality is limited to the specified value, ensuring that multimedia Quality ofService (QoS) is maintained within an environment.
By default, this setting is not configured.
© 1999–2022 Citrix Systems, Inc. All rights reserved. 611

Citrix Virtual Apps and Desktops
To limit the maximum video quality level allowed, choose one of the following options:
• 1080p/8.5mbps• 720p/4.0mbps• 480p/720kbps• 380p/400kbps• 240p/200kbps
Playingmultiple videos simultaneously on the same server consumes large amounts of resources andcan impact server scalability.
Microsoft Teams redirection
This setting enables optimization of Microsoft Teams, based on the HDX technology.
If this policy is enabled, and you’re using a supported version of Citrix Workspace app, this registrykey is set to 1 on the VDA. The Microsoft Teams application reads the key to load in VDI mode.
© 1999–2022 Citrix Systems, Inc. All rights reserved. 612

Citrix Virtual Apps and Desktops
Note it is not required to set the registry key manually.
HKEY_CURRENT_USER\Software\Citrix\HDXMediaStream
Name: MSTeamsRedirSupport
Value: DWORD (1 ‑ on, 0 ‑ off)
Note:
If you are using version 1906.2 VDAs or later with older versions of the Controller (for example,version 7.15), which do not have the policy available in Studio, HDX optimization is enabled bydefault on the VDA. If the Workspace app version is 1907 or later, Teams launches in optimizedmode. For information about caveats in mixing 7.15 LTSR Controllers and CR VDAs, see Knowl‑edge Center article CTX205549.
In this case, to disable the feature for specific users, you canoverride the registry setting by usinga group policy to apply a logon script to the user’s organizational unit.
By default, Microsoft Teams redirection is enabled.
Multimedia conferencing
This setting allows or prevents the use of optimized webcam redirection technology by video confer‑encing applications.
By default, video conferencing support is allowed.
When adding this setting to a policy, ensure that theWindowsMedia redirection setting is present andset to Allowed (the default).
When using multimedia conferencing, ensure that the following conditions are met:
• Manufacturer‑supplied drivers for the webcam used for multimedia conferencing are installedon the client.
• Connect the webcam to the user device before initiating a video conferencing session. Theserver uses only one installed webcam at any given time. If multiple webcams are installedon the user device, the server attempts to use each webcam in succession until a video confer‑encing session is created successfully.
This policy is not needed when redirecting the web cam using Generic USB redirection. In that case,install the webcam drivers on the VDA.
Optimization for Windows Mediamultimedia redirection over WAN
This setting applies only to Windows Media and not to HTML5. The setting enables real‑time multi‑media transcoding, allowing audio and video media streaming to mobile devices over degraded net‑
© 1999–2022 Citrix Systems, Inc. All rights reserved. 613

Citrix Virtual Apps and Desktops
works, andenhancing theuser experienceby improvinghowWindowsMedia content is deliveredovera WAN.
By default, the delivery of Windows Media content over the WAN is optimized.
When adding this setting to a policy, make sure the Windows Media Redirection setting is presentand set to Allowed.
When this setting is enabled, real‑time multimedia transcoding is deployed automatically as neededto enable media streaming, providing a seamless user experience even in extreme network condi‑tions.
Use GPU for optimizing Windows Mediamultimedia redirection over WAN
This setting applies only toWindowsMedia and enables real‑timemultimedia transcoding to be donein the Graphics Processing Unit (GPU) on the Virtual Delivery Agent (VDA). It improves server scala‑bility. GPU transcoding is available only if the VDA has a supported GPU for hardware acceleration.Otherwise, transcoding falls back to the CPU.
Note: GPU transcoding is supported only on NVIDIA GPUs.
By default, using theGPUon the VDA to optimize the delivery ofWindowsMedia content over theWANis prohibited.
When adding this setting to a policy, make sure the Windows Media Redirection and Optimization forWindows Media multimedia redirection over WAN settings are present and set to Allowed.
Windows Media fallback prevention
This setting applies to browser content redirection, HTML5, and Windows Media. For it to supportHTML5, set theHTML5 video redirection policy to Allowed.
Administrators can use the Windows Media fallback prevention policy setting to specify the methodsthat is attempted to deliver streamed content to users.
By default, this setting is not configured. When the setting is set to Not Configured, the behavior is thesame as Play all content.
To configure this setting, choose one of the following options:
• Play all content. Attempt client‑side content fetching, then Windows Media Redirection. If un‑successful, play content on the server.
• Play all content only on client. Attempt client‑side fetching, thenWindowsMedia Redirection.If unsuccessful, the content does not play.
• Play only client‑accessible content on client. Attempt only client‑side fetching. If unsuccess‑ful, the content does not play.
© 1999–2022 Citrix Systems, Inc. All rights reserved. 614
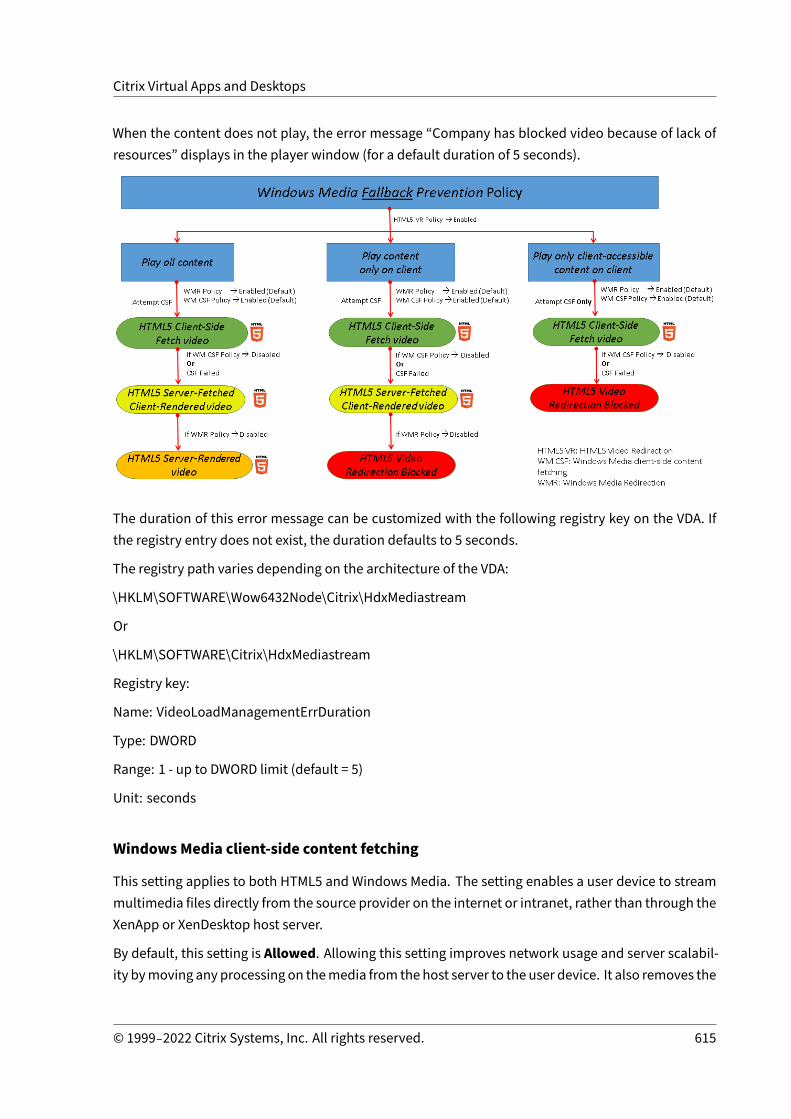
Citrix Virtual Apps and Desktops
When the content does not play, the error message “Company has blocked video because of lack ofresources” displays in the player window (for a default duration of 5 seconds).
The duration of this error message can be customized with the following registry key on the VDA. Ifthe registry entry does not exist, the duration defaults to 5 seconds.
The registry path varies depending on the architecture of the VDA:
\HKLM\SOFTWARE\Wow6432Node\Citrix\HdxMediastream
Or
\HKLM\SOFTWARE\Citrix\HdxMediastream
Registry key:
Name: VideoLoadManagementErrDuration
Type: DWORD
Range: 1 ‑ up to DWORD limit (default = 5)
Unit: seconds
Windows Media client‑side content fetching
This setting applies to both HTML5 and Windows Media. The setting enables a user device to streammultimedia files directly from the source provider on the internet or intranet, rather than through theXenApp or XenDesktop host server.
By default, this setting is Allowed. Allowing this setting improves network usage and server scalabil‑ity bymoving any processing on themedia from the host server to the user device. It also removes the
© 1999–2022 Citrix Systems, Inc. All rights reserved. 615
Citrix Virtual Apps and Desktops
requirement that an advanced multimedia framework such as Microsoft DirectShow or Media Foun‑dation be installed on the user device. The user device requires only the ability to play a file from aURL
When adding this setting to a policy, make sure the Windows Media Redirection setting is presentand set to Allowed. IfWindows Media Redirection is disabled, the streaming of multimedia files tothe user device direct from the source provider is also disabled.
Windows Media redirection
This setting applies to both HTML5 and Windows Media and controls and optimizes the way serversdeliver streaming audio and video to users.
By default, this setting is Allowed. For HTML5, this setting doesn’t take effect if the policy HTML5video redirection is Prohibited.
Allowing this setting increases the quality of audio and video rendered from the server to a level thatcompares with audio and video played locally on a user device. The server streams multimedia tothe client in the original, compressed form and allows the user device to decompress and render themedia.
Windows Media redirection optimizes multimedia files that are encoded with codecs that adhere toMicrosoft DirectShow, DirectX Media Objects (DMO), and Media Foundation standards. To play backa given multimedia file, a codec compatible with the encoding format of the multimedia file must bepresent on the user device.
By default, audio is disabled on Citrix Workspace app. To allow users to run multimedia applicationsin ICA sessions, turn on audio or give users permission to turn on audio in their Citrix Workspace appinterface.
Select Prohibited only if playing media using Windows Media redirection appears worse than whenrendered using basic ICA compression and regular audio. This is rare but can happen under low band‑width conditions, for example, with media with a low frequency of key frames.
Windows Media Redirection buffer size
This setting is a legacy and does not apply to HTML5.
This setting specifies a buffer size from 1 to 10 seconds for multimedia acceleration.
By default, the buffer size is 5 seconds.
Windows Media Redirection buffer size use
This setting is a legacy and does not apply to HTML5.
© 1999–2022 Citrix Systems, Inc. All rights reserved. 616

Citrix Virtual Apps and Desktops
This setting enables or disables using the buffer size specified in the Windows Media Redirectionbuffer size setting.
By default, the buffer size specified is not used.
If this setting is disabled or if the Windows Media Redirection buffer size setting is not configured, theserver uses the default buffer size value (five seconds).
Multi‑stream connections policy settings
April 14, 2021
The Multi‑Stream Connections section contains policy settings for managing Quality of Service prior‑itization for multiple ICA connections in a session.
Audio over UDP
This setting allows or prevents audio over UDP on the server.
By default, audio over UDP is allowed on the server.
When enabled, this setting opens a UDP port on the server to support all connections configured touse Audio over UDP Realtime Transport.
Audio UDP port range
This setting specifies the range of port numbers (lowest port number, highest port number) used bytheVirtual Delivery Agent (VDA) to exchangeaudiopacket datawith theuser device. TheVDAattemptsto use each UDP port pair to exchange data with the user device, starting with the lowest and incre‑menting by two for each subsequent attempt. Each port handles both inbound and outbound traffic.
By default, this range is set to 16500,16509.
Multi‑Port policy
This setting specifies the TCP ports to be used for ICA traffic and establishes the network priority foreach port.
By default, the primary port (2598) has a High priority.
When you configure ports, you can assign the following priorities:
• Very High ‑ for real‑time activities, such as webcam conferences• High ‑ for interactive elements, such as screen, keyboard, andmouse
© 1999–2022 Citrix Systems, Inc. All rights reserved. 617
Citrix Virtual Apps and Desktops
• Medium ‑ for bulk processes, such as client drive mapping• Low ‑ for background activities, such as printing
Each port must have a unique priority. For example, you cannot assign a Very High priority to bothCGP port 1 and CGP port 3.
To remove a port from prioritization, set the port number to 0. You cannot remove the primary portand you cannot change its priority level.
When configuring this setting, restart the server. This setting takes effect only when the Multi‑Streamcomputer setting policy setting is enabled.
Multi‑Stream computer setting
This setting enables or disables Multi‑Stream on the server.
By default, Multi‑Stream is disabled.
If youuseCitrix SD‑WANwithMulti‑Streamsupport in your environment, youdonot need to configurethis setting. Configure this policy setting when using third‑party routers or legacy Branch Repeatersto achieve the desired Quality of Service.
When configuring this setting, reboot the server to ensure that changes take effect.
Important:
Using this policy setting with bandwidth limit policy settings such as Overall session bandwidthlimitmightproduceunexpected results. When including this setting inapolicy, ensure thatband‑width limit settings are not included.
Multi‑Stream user setting
This setting enables or disables Multi‑Stream on the user device.
By default, Multi‑Stream is disabled for all users.
This setting takes effect only on hosts where the Multi‑Stream computer setting policy setting is en‑abled.
Important:
Using this policy setting with bandwidth limit policy settings such as Overall session bandwidthlimitmightproduceunexpected results. When including this setting inapolicy, ensure thatband‑width limit settings are not included.
© 1999–2022 Citrix Systems, Inc. All rights reserved. 618
Citrix Virtual Apps and Desktops
Multi‑Stream virtual channel assignment settings
This setting specifies the ICA stream the virtual channels are assigned to whenmulti‑stream is used.
If you do not configure these settings, virtual channels are kept in their default stream. To assigna virtual channel to an ICA stream, select the desired stream number (0, 1, 2, 3) from the StreamNumber list next to the virtual channel name.
If there is a custom virtual channel in use in the environment, click Add, specify the virtual channelname in the text box under Virtual Channels, and select the desired streamnumber from the StreamNumber list next to it. The name you specify must be the actual virtual channel name and not afriendly name. For example, CTXSBR instead of Citrix Browser Acceleration.
These settings take effect only when you’ve enabled the multi‑stream computer setting.
By default, the virtual channels and their stream assignments are:
• App Flow: 2• Audio: 0• Browser Content Redirection: 2• Client COM Port Mapping: 3• Client Drive Mapping: 2• Client Printer Mapping: 3• Clipboard: 2• CTXDND: 1 (Note: We have added CTXDND for customers evaluating the new drag and dropfeature. For more information, see “Drag and then drop files between a Citrix session and alocal endpoint (for evaluation only)” in What’s new.
• DVC Plugins (Static VC name auto‑generated from DVC Plugin Friendly Name, or admin‑assigned): 2
• End User Experience Monitoring: 1• File Transfer (HTML5 Receiver): 2• Generic Data Transfer: 2• ICA Control: 1• Input Method Editor: 1• Legacy Client Printer Mapping (COM1): 1, 3• Legacy Client Printer Mapping (COM2): 2, 3• Legacy Client Printer Mapping (LPT1): 1, 3• Legacy Client Printer Mapping (LPT2): 2, 3• License Management: 1• Microsoft Teams/WebRTC Redirection: 1• Mobile Receiver: 1• MultiTouch: 1• Port Forwarding: 2
© 1999–2022 Citrix Systems, Inc. All rights reserved. 619

Citrix Virtual Apps and Desktops
• Remote Audio and Video Extensions (RAVE): 2• Seamless (Transparent Window Integration): 1• Sensor and Location: 1• Smart Card: 1• Thinwire Graphics: 1• Transparent UI Integration/Logon Status: 2• TWAIN Redirection: 2• USB: 2• Zero Latency Font and Keyboard: 2• Zero Latency Data Channel: 2
Formore information on virtual channel assignments andpriorities, see the KnowledgeCenter articleCTX131001.
Port redirection policy settings
April 14, 2021
The Port Redirection section contains policy settings for client LPT and COM port mapping.
For Virtual Delivery Agent versions earlier than 7.0, use the following policy settings to configureport redirection. For VDA versions 7.0 through 7.8, configure these settings using the registry; seeConfigure COM Port and LPT Port Redirection settings using the registry. For VDA version 7.9, use thefollowing policy settings.
Auto connect client COM ports
This setting enables or disables automatic connection of COM ports on user devices when users logon to a site.
By default, client COM ports are not automatically connected.
Auto connect client LPT ports
This setting enables or disables automatic connection of LPT ports on user devices when users log onto a site.
By default, client LPT ports are not connected automatically.
Client COM port redirection
This setting allows or prevents access to COM ports on the user device.
© 1999–2022 Citrix Systems, Inc. All rights reserved. 620

Citrix Virtual Apps and Desktops
By default, COM port redirection is prohibited.
The following policy settings are related:
• COM port redirection bandwidth limit• COM port redirection bandwidth limit percent
Client LPT port redirection
This setting allows or prevents access to LPT ports on the user device.
By default, LPT port redirection is prohibited.
LPT ports are used only by legacy applications that send print jobs to the LPT ports and not to theprint objects on the user device. Most applications today can send print jobs to printer objects. Thispolicy setting is necessary only for servers that host legacy applications that print to LPT ports.
Note, although Client COM port redirection is bi‑directional, LPT port redirection is output onlyand limited to \\client\LPT1 and \\client\LPT2 within an ICA session.
The following policy settings are related:
• LPT port redirection bandwidth limit• LPT port redirection bandwidth limit percent
Printing policy settings
April 14, 2021
The Printing section contains policy settings for managing client printing.
Client printer redirection
This setting controls whether client printers are mapped to a server when a user logs on to a session.
By default, client printermapping is allowed. If this setting is disabled, the PDF printer for the sessionis not auto‑created.
Related policy settings: auto‑create client printers
Default printer
This setting specifies how the default printer on the user device is established in a session.
By default, the user’s current printer is used as the default printer for the session.
© 1999–2022 Citrix Systems, Inc. All rights reserved. 621

Citrix Virtual Apps and Desktops
To use the current Remote Desktop Services or Windows user profile setting for the default printer,select Do not adjust the user’s default printer. If you choose this option, the default printer is notsaved in the profile and it does not change according to other session or client properties. The defaultprinter in a session is the first printer auto‑created in the session, which is either:
• The first printer added locally to the Windows server in Control Panel > Devices and Printers.• The first auto‑created printer, if there are no printers added locally to the server.
You can use this option to present users with the nearest printer through profile settings (known asproximity printing).
Printer assignments
This setting provides an alternative to the Default printer and Session printers settings. Use the indi‑vidual Default printer and Session printers settings to configure behaviors for a site, large group, ororganizational unit. Use the Printer assignments setting to assign a large group of printers to multi‑ple users.
This setting specifies how the default printer on the listed user devices is established in a session.
By default, the user’s current printer is used as the default printer for the session.
It also specifies the network printers to be auto‑created in a session for each user device. By default,no printers are specified.
• When setting the default printer value:
To use the current default printer for the user device, select Do not adjust.
To use the current Remote Desktop Services or Windows user profile setting for the defaultprinter, select Do no adjust. If you choose this option, the default printer is not saved in the pro‑file and it does not change according to other session or client properties. The default printerin a session is the first printer auto‑created in the session, which is either:
– The first printer added locally to theWindows server inControl Panel >Devices andPrint‑ers.
– The first auto‑created printer, if there are no printers added locally to the server.
• When setting the session printers value: to add printers, type the UNC path of the printer youwant to auto‑create. After adding the printer, you can apply customized settings for the currentsession at every logon.
Printer auto‑creation event log preference
This setting specifies the events that are logged during the printer auto‑creation process. You canchoose to log no errors or warnings, only errors, or errors and warnings.
© 1999–2022 Citrix Systems, Inc. All rights reserved. 622

Citrix Virtual Apps and Desktops
By default, errors and warnings are logged.
An example of a warning is an event in which a printer’s native driver cannot be installed and theUniversal print driver is installed instead. To use the Universal print driver in this scenario, configurethe Universal print driver usage setting to Use universal printing only or Use universal printing only ifthe requested driver is unavailable.
Session printers
This setting specifies the network printers to be auto‑created in a session. Inside the ICA/HDX session,the Citrix Print Manager service (CpSvc.exe) creates a network printer connection during the sessionlogon for each network printer specified in the Session Printer policy setting. It deletes the printersduring the session logoff. By default, no printers are specified.
In the Session Printer policy setting, the network printers can reside on a Windows Print Server or aCitrix Universal Print Server.
• Windows Print Server: Shares one or more network printers. It also has the native printerdrivers required to use the network printers.
• Universal Print Server: A Windows Print Server where the Citrix Universal Print Server soft‑ware has been installed.
When using a Windows Print Server, the Citrix Print Manager service creates the network printerconnections using native printer drivers. The Citrix Virtual Apps server must have the native printerdrivers installed on it.
When using a Citrix Universal Print Server, the Citrix PrintManager service creates the network printerconnections using either native printer drivers, Citrix Universal Printer Driver, or Citrix Universal XPSPrinter Driver. The driver that you use is controlled by the Universal Print Driver usage policy setting.
All Windows printer drivers currently fall within either the v3 or v4 driver version. For more informa‑tion, see Support for the Microsoft V3 and V4 Printer Driver Architectures.
To add session printers and verify if they appear in the sessions, complete the following procedure:
1. In Citrix Studio, navigate to the Policies tab.
2. Enable the session printing policy in the Edit Policy dialog box.
3. In the policy, add the session printer. To add printers, type the UNC path of the printer youwant to auto‑create. After adding the printer, you can apply customized settings for the currentsession at every logon. The session printer must display in the list.
4. After the policy has been set, the published applicationmight not display session printers. Thisissuemight occur because the printer driver ismissing from the Citrix Virtual Apps server or thepolicy has been created but not enabled.
© 1999–2022 Citrix Systems, Inc. All rights reserved. 623
Citrix Virtual Apps and Desktops
Note:
If the printer driver has not been installed on the Citrix Virtual Apps server, you might ex‑perience the most common mistake with session printers where administrators forget toinstall the printer driver on the Citrix Virtual Apps server.
5. Start the published desktop and manually add the session printer in Devices and Printers >Control Panel.
6. If this fails, investigate the communication between the Citrix Virtual Apps server and the printserver. Consider running a test with RDP.
Wait for printers to be created
Enable this feature differently depending on whether it’s for Citrix Virtual Desktops or Citrix VirtualApps. Use the policy on the Delivery Controller to enable the feature on Citrix Virtual Desktops. Use aPowerShell cmdlet on the Delivery Controller to enable the feature on Citrix Virtual Apps.
Wait for printers to be created (Server Desktop):
This setting allows a delay in connecting to a session so that client‑redirected printers can be auto‑created.
By default, a connection delay does not occur.
Wait for printers to be created (Citrix Virtual Apps):
Setting the followingPowerShell cmdlet allows adelay in connecting to virtual apps createdon serverdesktops so that client‑redirected printers can be auto‑created.
Set-BrokerApplication -Name <VirualAppName> -WaitForPrinterCreation $true
By default, a connection delay does not occur.
Client printers policy settings
April 14, 2021
TheClient Printers section contains policy settings for client printers, including settings to auto‑createclient printers, retain printer properties, and connect to print servers.
Auto‑create client printers
This setting specifies the client printers that are auto‑created. This setting overrides default clientprinter auto‑creation settings.
© 1999–2022 Citrix Systems, Inc. All rights reserved. 624

Citrix Virtual Apps and Desktops
By default, all client printers are auto‑created.
This setting takes effect only if the Client printer redirection setting is present and set to Allowed.
When adding this setting to a policy, select an option:
• Auto‑create all client printers automatically creates all printers on a user device.• Auto‑create the client’s default printer only automatically creates only the printer selectedas the default printer on the user device.
• Auto‑create local (non‑network) client printers only automatically creates only printers di‑rectly connected to the user device through an LPT, COM, USB, TCP/IP, or other local port.
• Do not auto‑create client printers turns off autocreation for all client printers when users logon. Choosing this option causes the Remote Desktop Services (RDS) settings for autocreatingclient printers to override this setting in lower priority policies.
Auto‑create generic universal printer
Note: Hotfixes that address the issues with this policy setting are available as Knowledge Center arti‑cles CTX141565 and CTX141566.
This setting enables or disables auto‑creationof the generic CitrixUniversal Printer object for sessionswhere a user device compatible with Universal Printing is in use.
By default, the generic Universal Printer object is not auto‑created.
The following policy settings are related:
• Universal print driver usage• Universal driver preference
Auto‑create PDF universal printer
This setting enables or disables auto‑creation of the Citrix PDF printer for sessions using CitrixWorkspace app for Windows (starting from VDA 7.19), Citrix Workspace app for HTML5, or CitrixWorkspace app for Chrome.
By default, the Citrix PDF printer is not auto‑created.
Client printer names
This setting selects the naming convention for auto‑created client printers.
By default, standard printer names are used.
Select Standard printer names to use printer names such as “HPLaserJet 4 from client name in ses‑sion 3.”
© 1999–2022 Citrix Systems, Inc. All rights reserved. 625

Citrix Virtual Apps and Desktops
Select Legacy printer names to use old‑style client printer names and preserve backward compati‑bility for users or groups using MetaFrame Presentation Server 3.0 or earlier. An example of a legacyprinter name is “Client/clientname#/HPLaserJet 4.” This option is less secure.
Note: This option is provided for backwards compatibility with legacy versions of XenApp and Xen‑Desktop. You can use it with newer versions of Citrix Virtual Apps and Desktops.
Direct connections to print servers
This setting enables or disables direct connections from the virtual desktop or server hosting applica‑tions to a print server for client printers hosted on an accessible network share.
By default, direct connections are enabled.
Enable direct connections if the network print server is not across a WAN from the virtual desktop orserver hosting applications. Direct communication results in faster printing if the networkprint serverand the virtual desktop or server hosting applications are on the same LAN.
Disable direct connections if the network is across a WAN or has substantial latency or limited band‑width. Print jobs are routed through the user device where they are redirected to the network printserver. Data sent to the user device is compressed, so less bandwidth is consumed as the data travelsacross the WAN.
If two network printers have the same name, the printer on the same network as the user device isused.
Printer driver mapping and compatibility
This setting specifies the driver substitution rules for auto‑created client printers.
This setting is configured to exclude Microsoft OneNote and XPS Document Writer from the auto‑created client printers list.
When you define driver substitution rules, you can allow or prevent printers to be created with thespecified driver. Also, you can allow created printers to use only universal print drivers. Driver sub‑stitution overrides or maps printer driver names the user device provides, substituting an equivalentdriver on the server. This gives server applications access to client printers that have the same driversas the server, but different driver names.
You can add a driver mapping, edit an existing mapping, override custom settings for a mapping, re‑move a mapping, or change the order of driver entries in the list. When adding a mapping, enter theclient printer driver name and then select the server driver you want to substitute.
© 1999–2022 Citrix Systems, Inc. All rights reserved. 626
Citrix Virtual Apps and Desktops
Printer properties retention
This setting specifies whether to store printer properties and where to store them.
By default, the systemdetermines if printer properties are stored on the user device, if available, or inthe user profile.
When adding this setting to a policy, select an option:
• Saved on the client device only is for user devices that have amandatory or roaming profile thatis not saved. Choose this option only if all the servers in your farm are running XenApp 5 andabove and your users are using Citrix online plug‑in versions 9 through 12.x, or Citrix Receiver3.x.
• Retained in user profile only is for user devices constrained by bandwidth (this option reducesnetwork traffic) and logon speed or for users with legacy plug‑ins. This option stores printerproperties in the user profile on the server and prevents any properties exchange with the userdevice. Use this option with MetaFrame Presentation Server 3.0 or earlier and MetaFrame Pre‑sentation Server Client 8.x or earlier. Note that this is applicable only if a Remote Desktop Ser‑vices (RDS) roaming profile is used.
• Held in profile only if not saved on client allows the system to determine where printer prop‑erties are stored. Printer properties are stored either on the user device, if available, or in theuser profile. Although this option is the most flexible, it can also slow logon time and use extrabandwidth for system‑checking.
• Do not retain printer properties prevents storing printer properties.
Retained and restored client printers
This settingenablesordisables the retentionand re‑creationofprinterson theuserdevice. Bydefault,client printers are auto‑retained and auto‑restored.
Retained printers are user‑created printers that are created again, or remembered, at the start of thenext session. When Citrix Virtual Apps recreates a retained printer, it considers all policy settings ex‑cept the Auto‑create client printers setting.
Restored printers are printers fully customized by an administrator, with a saved state that is perma‑nently attached to a client port.
Citrix PDF Universal Printer driver
The Citrix PDF Universal Printer driver enables users to print documents opened with hosted applica‑tions or applications running on virtual desktops delivered by Citrix Virtual Apps and Desktops. Whena user selects the Citrix PDF Printer option, the driver converts the file to PDF and transfers the PDFto the local device. The PDF is then opened for viewing and printing from a locally attached printer.
© 1999–2022 Citrix Systems, Inc. All rights reserved. 627

Citrix Virtual Apps and Desktops
PDF is one of the formats supported with Citrix Universal Printing (in addition to EMF and XPS).The PDF printer can be enabled, configured, and set as default using a Citrix Policy. The Citrix PDFPrinter option is available to users of the Citrix Workspace app for Windows, Chrome, and HTML5.
Note:
A PDF viewer is required for Windows endpoints. The client must have an application that hasfile type association registered on Windows to open PDF files.
Drivers policy settings
April 14, 2021
The Drivers section contains policy settings related to printer drivers.
Automatic installation of in‑box printer driversNote
This policy does not support VDAs in this release.
This setting enables or disables the automatic installation of printer drivers from theWindows in‑boxdriver set or from driver packages staged on the host using pnputil.exe /a.
By default, these drivers are installed as needed.
Universal driver preference
This setting specifies the order in which universal printer drivers are used, beginning with the firstentry in the list.
By default, the preference order is:
• EMF• XPS• PCL5c• PCL4• PS
You can add, edit, or remove drivers, and change the order of drivers in the list.
Universal print driver usage
This setting specifies when to use universal printing.
© 1999–2022 Citrix Systems, Inc. All rights reserved. 628

Citrix Virtual Apps and Desktops
By default, universal printing is used only if the requested driver is unavailable.
Universal printing employs generic printer drivers instead of standard model‑specific drivers, poten‑tially simplifying the burden of driver management on host computers. The availability of universalprint drivers depends on the capabilities of the user device, host, and print server software. In certainconfigurations, universal printing might not be available.
When adding this setting to a policy, select an option:
• Use only printer model specific drivers specifies that the client printer uses only the standardmodel‑specific drivers that are auto‑created at logon. If the requested driver is unavailable, theclient printer cannot be auto‑created.
• Use universal printing only specifies that no standard model‑specific drivers are used. Onlyuniversal print drivers are used to create printers.
• Use universal printing only if requested driver is unavailable uses standard model‑specificdrivers for printer creation if they are available. If the driver is not available on the server, theclient printer is created automatically with the appropriate universal driver.
• Use printer model specific drivers only if universal printing is unavailable uses the universalprint driver if it is available. If thedriver is not availableon the server, the client printer is createdautomatically with the appropriate model‑specific printer driver.
Universal Print Server policy settings
April 14, 2021
The Universal Print Server section contains policy settings for handling the Universal Print Server.
SSL cipher suite
This setting specifies the set of SSL/TLS cipher suites used by the Universal Print Client for encryptedprint data stream (CGP) connections.
To control the cipher suite package used by the Universal Print Client for encrypted print web service(HTTPS/SOAP) connections, see [SCHANNEL].
Default value: ALL
This setting has the following values: ALL, COM or GOV.
The cipher suites corresponding to each value are listed below:
ALL:
TLS_ECDHE_RSA_AES256_GCM_SHA384
© 1999–2022 Citrix Systems, Inc. All rights reserved. 629
Citrix Virtual Apps and Desktops
TLS_ECDHE_RSA_AES256_CBC_SHA384
TLS_ECDHE_RSA_AES128_CBC_SHA
COM:
TLS_ECDHE_RSA_AES128_CBC_SHA
GOV:
TLS_ECDHE_RSA_AES256_GCM_SHA384
TLS_ECDHE_RSA_AES256_CBC_SHA384
SSL compliancemode
This setting specifies the level of compliance with NIST Special Publication 800‑52 that is used by theUniversal Print Client for encrypted print data stream (CGP) connections.
Default value: None.
This setting has the following values:
None.
The encrypted print data stream (CGP) connections use the default compliance mode.
SP800‑52.
The encrypted print data stream (CGP) connections use the NIST Special Publication 800‑52 compli‑ance mode.
SSL enabled
This setting specifieswhether SSL/TLS is used by theUniversal Print Client for print data stream (CGP)connections and for web service (HTTP/SOAP) connections.
When you setUniversal Print Server enable to Enabled with fallback toWindows’ native remoteprinting, fallback connections are made by the Microsoft Windows Network Print Provider. This set‑ting does not affect these fallback connections.
Default value: Disabled
This setting has the following values:
Enabled.
The Universal Print Client uses SSL/TLS to connect to the Universal Print Server.
Disabled.
The Universal Print Client uses SSL/TLS to connect to the Universal Print Server.
© 1999–2022 Citrix Systems, Inc. All rights reserved. 630
Citrix Virtual Apps and Desktops
SSL FIPSmode
This setting specifies whether the SSL/TLS cryptographic module used by the Universal Print Clientfor print data stream (CGP) connections will run in FIPSmode.
Default value: Disabled
This setting has the following values:
Enabled.
FIPSmode is on.
Disabled.
FIPSmode is off.
SSL protocol version
This setting specifies the SSL/TLS protocol version used by the Universal Print Client.
Default value: ALL
This setting has the following values:
ALL.
Use TLS versions 1.0, 1.1 or 1.2.
TLSv1.
Use TLS version 1.0.
TLSv1.1.
Use TLS version 1.1.
TLSv1.2.
Use TLS version 1.2.
SSL Universal Print Server encrypted print data stream (CGP) port
This setting specifies the TCP port number of the Universal Print Server encrypted print data stream(CGP) port. This port receives data for print jobs.
Default value: 443
© 1999–2022 Citrix Systems, Inc. All rights reserved. 631

Citrix Virtual Apps and Desktops
SSL Universal Print Server encrypted web service (HTTPS/SOAP) port
This setting specifies the TCP port number of the Universal Print Server encryptedweb service (HTTP‑S/SOAP) port. This port receives data for print commands.
Default value: 8443
Universal Print Server enable
This setting enables or disables the Universal Print Server feature on the virtual desktop or the serverhosting applications. Apply this policy setting to Organizational Units (OUs) containing the virtualdesktop or server hosting applications.
By default, the Universal Print Server is disabled.
When adding this setting to a policy, select one of the following options:
• Enabledwith fallback toWindows native remote printing. Network printer connections areserviced by the Universal Print Server, if possible. If the Universal Print Server is not available,theWindowsPrint Provider is used. TheWindowsPrint Provider continues tohandle all printerspreviously created with the Windows Print Provider.
• Enabled with no fallback to Windows native remote printing. Network printer connectionsare servicedby theUniversalPrintServer exclusively. If theUniversalPrintServer is unavailable,the network printer connection fails. This setting effectively disables network printing throughthe Windows Print Provider. Printers previously created with the Windows Print Provider arenot created while a policy containing this setting is active.
• Disabled. The Universal Print Server feature is disabled. No attempt is made to connect withtheUniversal Print Serverwhen connecting to anetworkprinterwith aUNCname. Connectionsto remote printers continue to use the Windows native remote printing facility.
Universal Print Server print data stream (CGP) port
This setting specifies the TCP port number used by the Universal Print Server print data stream Com‑monGatewayProtocol (CGP) listener. Apply this policy setting only toOUs containing the print server.
By default, the port number is set to 7229.
Valid port numbers must be in the range of 1 to 65535.
Universal Print Server print stream input bandwidth limit (kpbs)
This setting specifies the upper boundary (in kilobits per second) for the transfer rate of print datadelivered from each print job to the Universal Print Server using CGP. Apply this policy setting to OUscontaining the virtual desktop or server hosting applications.
© 1999–2022 Citrix Systems, Inc. All rights reserved. 632

Citrix Virtual Apps and Desktops
By default, the value is 0, which specifies no upper boundary.
Universal Print Server web service (HTTP/SOAP) port
This setting specifies the TCP port number used by the Universal Print Server’s web service (HTTP/‑SOAP) listener. The Universal Print Server is an optional component that enables the use of Citrixuniversal print drivers for network printing scenarios. When the Universal Print Server is used, print‑ing commands are sent from Citrix Virtual Apps and Desktops hosts to the Universal Print Server viaSOAPover HTTP. This settingmodifies the default TCP port onwhich theUniversal Print Server listensfor incoming HTTP/SOAP requests.
Youmust configure both host and print server HTTP port identically. If you do not configure the portsidentically, the host software will not connect to the Universal Print Server. This setting changes theVDA on Citrix Virtual Apps and Desktops. In addition, youmust change the default port on the Univer‑sal Print Server.
By default, the port number is set to 8080.
Valid port numbers must be in the range of 0 to 65535.
Universal Print Servers for load balancing
This setting lists theUniversal Print Servers tobeused to loadbalanceprinter connections establishedat session launch, after evaluating other Citrix printing policy settings. To optimize printer creationtime, Citrix recommends that all print servers have the same set of shared printers. There is no upperlimit to the number of print servers which can be added for load balancing.
This setting also implements print server failover detection and printer connections recovery. Theprint servers are checked periodically for availability. If a server failure is detected, that server isremoved from the load balancing scheme, and printer connections on that server are redistributedamong other available print servers. When the failed print server recovers, it is returned to the loadbalancing scheme.
Click Validate Servers to check that each server is a print server, that the server list doesn’t containduplicate server names, and that all servers have an identical set of shared printers installed. Thisoperation may take some time.
Universal Print Servers out‑of‑service threshold
This setting specifies how long the loadbalancer shouldwait for an unavailable print server to recoverbefore it determines that the server is permanently offline and redistributes its load to other availableprint servers.
By default, the threshold value is set to 180 (seconds).
© 1999–2022 Citrix Systems, Inc. All rights reserved. 633

Citrix Virtual Apps and Desktops
Universal printing policy settings
April 14, 2021
The Universal Printing section contains policy settings for managing universal printing.
Universal printing EMF processingmode
This setting controls the method of processing the EMF spool file on the Windows user device.
By default, EMF records are spooled directly to the printer.
When adding this setting to a policy, select an option:
• Reprocess EMFs for printer forces the EMF spool file to be reprocessed and sent through the GDIsubsystemon the user device. You can use this setting for drivers that require EMF reprocessingbut that might not be selected automatically in a session.
• Spool directly to printer, when used with the Citrix Universal print driver, ensures the EMFrecords are spooled and delivered to the user device for processing. Typically, these EMFspool files are injected directly to the client’s spool queue. For printers and drivers that arecompatible with the EMF format, this is the fastest printing method.
Universal printing image compression limit
This setting specifies themaximum quality and theminimum compression level available for imagesprinted with the Citrix Universal print driver.
By default, the image compression limit is set to Best quality (lossless compression).
If No Compression is selected, compression is disabled for EMF printing only.
When adding this setting to a policy, select an option:
• No compression• Best quality (lossless compression)• High quality• Standard quality• Reduced quality (maximum compression)
When adding this setting to a policy that includes theUniversal printing optimization defaults setting,be aware of the following:
• If the compression level in the Universal printing image compression limit setting is lower thanthe level defined in theUniversal printing optimization defaults setting, images are compressedat the level defined in the Universal printing image compression limits setting.
© 1999–2022 Citrix Systems, Inc. All rights reserved. 634

Citrix Virtual Apps and Desktops
• If compression is disabled, the Desired image quality and Enable heavyweight compression op‑tions of the Universal printing optimization defaults setting have no effect in the policy.
Universal printing optimization defaults
This setting specifies the default values for printing optimization when the universal print driver iscreated for a session.
• Desired image quality specifies the default image compression limit applied to universal print‑ing. By default, Standard Quality is enabled, meaning that users can only print images usingstandard or reduced quality compression.
• Enableheavyweight compressionenablesordisables reducingbandwidthbeyond thecompres‑sion level set by Desired image quality, without losing image quality. By default, heavyweightcompression is disabled.
• Image and Font Caching settings specify whether or not to cache images and fonts that appearmultiple times in the print stream, ensuring each unique image or font is sent to the printer onlyonce. By default, embedded images and fonts are cached. Note that these settings apply onlyif the user device supports this behavior.
• Allow non‑administrators to modify these settings specifies whether or not users can changethe default print optimization settings within a session. By default, users are not allowed tochange the default print optimization settings.
Note: All of these options are supported for EMF printing. For XPS printing, only the Desired imagequality option is supported.
When adding this setting to a policy that includes the Universal printing image compression limit set‑ting, be aware of the following:
• If the compression level in the Universal printing image compression limit setting is lower thanthe level defined in theUniversal printing optimization defaults setting, images are compressedat the level defined in the Universal printing image compression limits setting.
• If compression is disabled, the Desired image quality and Enable heavyweight compression op‑tions of the Universal printing optimization defaults setting have no effect in the policy.
Universal printing preview preference
This setting specifies whether or not to use the print preview function for auto‑created or genericuniversal printers.
By default, print preview is not used for auto‑created or generic universal printers.
When adding this setting to a policy, select an option:
• Do not use print preview for auto‑created or generic universal printers
© 1999–2022 Citrix Systems, Inc. All rights reserved. 635

Citrix Virtual Apps and Desktops
• Use print preview for auto‑created printers only• Use print preview for generic universal printers only• Use print preview for both auto‑created and generic universal printers
Universal printing print quality limit
This setting specifies the maximum dots per inch (dpi) available for generating printed output in asession.
By default, No Limit is enabled, meaning users can select the maximum print quality allowed by theprinter to which they connect.
If this setting is configured, it limits the maximum print quality available to users in terms of outputresolution. Both the print quality itself and the print quality capabilities of the printer to which theuser connects are restricted to the configured setting. For example, if configured to Medium Resolu‑tion (600 DPI), users are restricted to printing output with amaximumquality of 600 DPI and the PrintQuality setting on the Advanced tab of the Universal Printer dialog box shows resolution settings onlyup to and including Medium Quality (600 DPI).
When adding this setting to a policy, select an option:
• Draft (150 DPI)• Low Resolution (300 DPI)• Medium Resolution (600 DPI)• High Resolution (1200 DPI)• No Limit
Security policy settings
April 14, 2021
The Security section contains the policy setting for configuring session encryption and encryption oflogon data.
SecureICAminimum encryption level
This setting specifies theminimum level atwhich to encrypt session data sent between the server anda user device.
Important: For theVirtualDeliveryAgent7.x, thispolicy settingcanbeusedonly toenable theencryp‑tion of the logon data with RC5 128‑bit encryption. Other settings are provided only for backwardscompatibility with legacy versions of Citrix Virtual Apps and Desktops.
© 1999–2022 Citrix Systems, Inc. All rights reserved. 636
Citrix Virtual Apps and Desktops
For the VDA 7.x, encryption of session data is set using the basic settings of the VDA’s Delivery Group.If Enable Secure ICA is selected for the Delivery Group, session data is encrypted using RC5 (128 bit)encryption. If Enable Secure ICA is not selected for the Delivery Group, session data is encryptedwithBasic encryption.
When adding this setting to a policy, select an option:
• Basic encrypts the client connection using a non‑RC5 algorithm. It protects the data streamfrom being read directly, but it can be decrypted. By default, the server uses Basic encryptionfor client‑server traffic.
• RC5 (128 bit) logon only encrypts the logon data using RC5 128‑bit encryption and the clientconnection using Basic encryption.
• RC5 (40 bit) encrypts the client connection using RC5 40‑bit encryption.• RC5 (56 bit) encrypts the client connection using RC5 56‑bit encryption.• RC5 (128 bit) encrypts the client connection using RC5 128‑bit encryption.
The settings you specify for client‑server encryption can interact with any other encryption settingsin your environment and your Windows operating system. If a higher priority encryption level is seton either a server or user device, the settings you specify for published resources can be overridden.
You can raise encryption levels to further secure communications and message integrity for certainusers. If a policy requires a higher encryption level, Citrix Receivers using a lower encryption level aredenied connection.
SecureICAdoes not performauthentication or check data integrity. Toprovide end‑to‑end encryptionfor your site, use SecureICA with TLS encryption.
SecureICA does not use FIPS‑compliant algorithms. If this is an issue, configure the server and CitrixReceivers to avoid using SecureICA.
SecureICA uses the RC5 block cipher as described in RFC 2040 for confidentiality. The block size is 64bits (a multiple of 32‑bit word units). The key length is 128 bits. The number of rounds is 12.
Server limits policy settings
April 14, 2021
The Server Limits section contains the policy setting for controlling idle connections.
Server idle timer interval
This settingdetermines, inmilliseconds, how longanuninterrupteduser session ismaintained if thereis no input from the user.
© 1999–2022 Citrix Systems, Inc. All rights reserved. 637

Citrix Virtual Apps and Desktops
By default, idle connections are not disconnected (server idle timer interval = 0). Citrix recommendssetting this value to a minimum of 60000 milliseconds (60 seconds).
To display the policy, selectMultiple Versions, clear the Single‑session OS versions, and then selectServer Limits.
Note
When this policy setting is used, an “Idle timer expired” dialog box might appear to users whenthe session has been idle for the specified time. Citrix policy settings don’t control this Microsoftdialog box message. For more information, see http://support.citrix.com/article/CTX118618.
Session limits policy settings
April 14, 2021
The Session Limits section contains policy settings that control how long sessions remain connectedbefore they are forced to log off.
Important:
The settings described in this article donot apply toWindowsServer VDAs. Formore informationabout configuring session time limits for Server VDAs, see Microsoft KB ‑ Session Time Limits.
Disconnected session timer
This setting enables or disables a timer that specifies how long a disconnected, locked desktop re‑mains locked before the session is logged off. If this timer is enabled, the disconnected session islogged off when the timer expires.
By default, disconnected sessions are not logged off.
Disconnected session timer interval
This setting specifies how many minutes a disconnected, locked desktop can remain locked beforethe session is logged off.
By default, the time period is 1,440 minutes (24 hours).
Session connection timer
This setting enables or disables a timer that specifies themaximumduration of an uninterrupted con‑nection between a user device and a desktop. If this timer is enabled, the session is disconnected or
© 1999–2022 Citrix Systems, Inc. All rights reserved. 638
Citrix Virtual Apps and Desktops
logged off when the timer expires. The Microsoft End session when time limits are reached settingdetermines the next state for the session.
By default, this timer is disabled.
Session connection timer interval
This setting specifies the maximum number of minutes for an uninterrupted connection between auser device and a desktop.
By default, the maximum duration is 1,440 minutes (24 hours).
Session idle timer
This setting enables or disables a timer that specifies how long an uninterrupted user device connec‑tion to a desktop is maintained if the user supplies no input. When this timer expires, the session isplaced in the disconnected state and the Disconnected session timer applies. If the Disconnectedsession timer is disabled, the session is not logged off.
By default, this timer is enabled.
Session idle timer interval
This setting specifies how many minutes an uninterrupted user device connection to a desktop ismaintained if there is no input from the user.
By default, idle connections are maintained for 1,440 minutes (24 hours).
Session reliability policy settings
April 14, 2021
The session reliability section contains policy settings for managing session reliability connections.
Session reliability connections
This setting allows or prevents sessions to remain open during a loss of network connectivity. Sessionreliability, along with auto client reconnection, allows users to reconnect automatically to their CitrixWorkspace app sessions after recovering from network disruptions. By default, session reliability isAllowed.
© 1999–2022 Citrix Systems, Inc. All rights reserved. 639

Citrix Virtual Apps and Desktops
For Citrix Workspace app 1808 and later and Citrix Receiver for Windows 4.7 and later, the settings inStudio are enforced on the client. Citrix Receiver Group Policy Object on the clients is overridden byStudio policy. Updates to these policies in Studio synchronize session reliability from server to client.
Note:
• Citrix Receiver for Windows 4.7 and later and Citrix Workspace apps for Windows ‑ Set thepolicy in Studio.
• Citrix Receivers for Windows earlier than 4.7 ‑ Set policies in Studio and the Citrix ReceiverGroup Policy Object template on the client for consistent behavior.
Session reliability keeps sessions active and on the user’s screen when network connectivity is inter‑rupted. Users continue to see the application that they are using until network connectivity resumes.
By using session reliability, the session remains active on the server. To indicate that connectivity islost, the user display becomes opaque. The user might see a frozen session during the interruptionand can resume interacting with the application when the network connection is restored. Sessionreliability reconnects users without reauthentication prompts.
If you use both session reliability and auto client reconnect, the two features work in sequence. Ses‑sion reliability closes (or disconnects) the user session after the amount of time specified in the ses‑sion reliability timeout setting. After that, the auto client reconnect settings take effect, attemptingto reconnect the user to the disconnected session.
By default, session reliability is Allowed.
To disable session reliability:
1. Start Citrix Studio.2. Open the Session Reliability connections policy.3. Set the policy to Prohibited.
Session reliability port number
This setting specifies the TCP port number for incoming session reliability connections.
By default, the port number is set to 2598.
To change the session reliability port number:
1. Start Citrix Studio.2. Open the Session reliability port number policy.3. Edit the port number.4. ClickOK.
© 1999–2022 Citrix Systems, Inc. All rights reserved. 640
Citrix Virtual Apps and Desktops
Session reliability timeout
This setting specifies the length of time, in seconds, the session reliability proxy waits for a user toreconnect before allowing the session to be disconnected.
Although you can extend the amount of time a session is kept open, this feature is a convenience anddoesn’t prompt the user for reauthentication. The longer a session is open, the chances increase thata user might leave the device unattended and potentially accessible to unauthorized users.
By default, the timeout is set to 180 seconds, or three minutes.
To change session reliability timeout:
1. Start Citrix Studio.2. Open the Session reliability timeout policy.3. Edit the timeout value.4. ClickOK.
Session watermark policy settings
April 14, 2021
The session watermark section contains policy settings to configure this feature.Enabling this feature causes a significant rise in the network bandwidth and CPU usage by the VDAmachine. We recommend that you configure the sessionwatermark for selected VDAmachines basedon your available hardware resources.
Important
Enable session watermark for the other watermark policy settings to be effective. To achieve abetter user experience, don’t enable more than two watermark text items.
Enable session watermark
Whenyouenable this setting, the sessiondisplayhas anopaque textualwatermarkdisplaying session‑specific information. The other watermark settings depend on this one being enabled.
By default, the session watermark is disabled.
Include client IP address
When you enable this setting, the session displays the current client IP address as a watermark.
By default, Include client IP address is disabled.
© 1999–2022 Citrix Systems, Inc. All rights reserved. 641

Citrix Virtual Apps and Desktops
Include connection time
When you enable this setting, the session watermark displays a connect time. The format is yyyy/m‑m/dd hh:mm. The time displayed is based on the system clock and time zone.
By default, Include connection time is disabled.
Include logon user name
When you enable this setting, the session displays the current logon user name as a watermark. Thedisplay format is USERNAME@DOMAINNAME. We recommend that the user name is a maximum of20 characters. When a user name is more than 20 characters, excessively small character fonts ortruncation might occur and lessen the watermark effectiveness.
By default, Include logon user name is enabled.
Include VDA host name
When you enable this setting, the session displays the VDA host name of the current ICA session as awatermark.
By default, Include VDA host name is enabled.
Include VDA IP address
When you enable this setting, the session displays the VDA IP address of the current ICA session as awatermark.
By default, VDA IP address is disabled.
Session watermark style
This setting controls whether you display a single watermark text label or multiple labels. ChooseMultiple or Single from the Value drop‑downmenu.
Multiple displays five watermark labels in the session. One in the center and four in the corners.
Single displays a single watermark label in the center of the session.
By default, Session watermark style is Multiple.
Watermark custom text
This setting specifies a custom text string (for example, the corporate name) to display in the sessionwatermark. When you configure a non‑empty string, it displays the text in a new line appending other
© 1999–2022 Citrix Systems, Inc. All rights reserved. 642

Citrix Virtual Apps and Desktops
information enabled in the watermark.The watermark custom text maximum is 25 Unicode characters. If you configure a longer string, it istruncated to 25 characters.
There is no default text.
Watermark transparency
You can specify watermark opacity from 0 through 100. The larger the value specified, the moreopaque the watermark.
By default, the value is 17.
Time zone control policy settings
April 14, 2021
The Time Zone Control section contains policy settings related to using local time in sessions.
Estimate local time for legacy clients
This setting enables or disables estimating the local time zone of user devices that send inaccuratetime zone information to the server.
By default, the server estimates the local time zone when necessary.
This setting is intended for use with legacy Citrix Receivers or ICA clients that do not send detailedtime zone information to the server. When used with Citrix Receivers that send detailed time zoneinformation to the server, such as supported versions of Citrix Receiver for Windows, this setting hasno effect.
Restore desktop OS time zone on session disconnect or logoff
This setting determines whether or not the time zone setting for a Single‑session OS VDA is restoredto the machine’s original time zone when the user disconnects or logs off. If you enable this setting,the VDA restores themachine’s time zone to its original setting when the user disconnects or logs off.For this setting to take effect, set theUse local time of client toUse client time zone.
By default, this setting is enabled.
© 1999–2022 Citrix Systems, Inc. All rights reserved. 643
Citrix Virtual Apps and Desktops
Use local time of client
This setting determines the time zone setting of the user session. The choices are the time zone of theuser session (server time zone) or the time zone of the user device (client time zone).
By default, the time zone of the user session is used.
For this setting to take effect, enable the Allow time zone redirection setting in the Group Policy Edi‑tor. The setting is inLocal ComputerPolicy >ComputerConfiguration >AdministrativeTemplates>WindowsComponents >RemoteDesktopServices >RemoteDesktopSessionHost >Device andResource Redirection.
If the VDA is a Single‑session OS VDA running on a Multi‑session OS, configure the local user rightChange the time zone to Everyone. This user right can be found in the Local Computer Policy >Computer Configuration > Windows Settings > Security Settings > Local Policies > User RightsAssignment.
Note:
In a Single‑session OS, Users are included in the User Rights Assignment Change the timezone, though not in a Multi‑session OS. In a Multi‑session OS, the time zone synchronizesusing the following group policy: Computer Configuration\Administrative Templates\WindowsComponents\Remote Desktop Services\Remote Desktop Session Host\Device and ResourceRedirection\Allow timezone redirection. This policy doesn’t apply when the Server is not aRemote Desktop Session Host in the Multi‑session OS VDA (installed with the /ServerVDIcommand). In a Multi‑session OS, by default and by design, users don’t have the local right tochange the time zone.
TWAIN devices policy settings
April 14, 2021
The TWAIN devices section contains policy settings related to mapping client TWAIN devices, such asdigital cameras or scanners, and optimizing image transfers from server to client.
Note
TWAIN 2.0 is supported with Citrix Receiver for Windows 4.5.
Client TWAIN device redirection
This setting allows or prevents users from accessing TWAIN devices on the user device from imageprocessing applications hosted on servers. By default, TWAIN device redirection is allowed.
© 1999–2022 Citrix Systems, Inc. All rights reserved. 644
Citrix Virtual Apps and Desktops
The following policy settings are related:
• TWAIN compression level• TWAIN device redirection bandwidth limit• TWAIN device redirection bandwidth limit percent
TWAIN compression level
This setting specifies the level of compression of image transfers from client to server. Use Low forbest image quality, Medium for good image quality, or High for low image quality. By default, mediumcompression is applied.
USB devices policy settings
April 14, 2021
TheUSB devices section contains policy settings for managing file redirection for USB devices.
Client USB device optimization rules
Client USB device optimization rules can be applied to devices to disable optimization, or to changethe optimization mode.
When a user plugs in aUSB input device, the host checks if theUSBpolicy settings allow the device. Ifthe device is allowed, the host then checks the Client USB device optimization rules for the device.If no rule is specified, then the device is not optimized. Capturemode (04) is the recommendedmodefor signature devices. For other devices which have degraded performance over higher latency, ad‑ministrators can enable Interactivemode (02). See descriptions of the availablemodes in the table inthis article.
Good to know
• For the use of Wacom signature pads and tablets, we recommend that you disable the screensaver. Steps on how to disable the screen saver are at the end of this section.
• Support for the optimization of Wacom STU signature pads and tablets series of products hasbeen preconfigured in the installation of Citrix Virtual Apps and Desktops policies.
• Signature devices work across Citrix Virtual Apps and Desktops and do not require a driver tobe used as a signature device. Wacom hasmore software that can be installed to customize thedevice further. See http://www.wacom.com/.
© 1999–2022 Citrix Systems, Inc. All rights reserved. 645

Citrix Virtual Apps and Desktops
• Drawing tablets. Certain drawing input devices might present as an HID device on PCI/ACPIbuses and are not supported. Attach these devices on a USB host controller on the client to beredirected inside a Citrix Virtual Desktops session.
Policy rules take the format of tag=value expressions separated bywhitespace. The following tags aresupported:
Tag Name Description
Mode The optimization mode is supported for inputdevices for class=03. Supportedmodes are: Nooptimization ‑ value 01. Interactive mode ‑value 02. Recommended for devices such aspen tablets and 3D Promice. Capture mode ‑value 04. Preferred for devices such assignature pads.
VID Vendor ID from the device descriptor, as a fourdigit hexadecimal number.
PID Product ID from the device descriptor, as a fourdigit hexadecimal number.
REV Revision ID from the device descriptor, as afour digit hexadecimal number.
Class Class from either the device descriptor or aninterface descriptor.
SubClass Subclass from either the device descriptor oran interface descriptor.
Prot Protocol from either the device descriptor oran interface descriptor.
Examples
Mode=00000004 VID=067B PID=1230 class=03 #Input device operating in capture mode
Mode=00000002 VID=067B PID=1230 class=03 #Input device operating in interactive mode (default)
Mode=00000001 VID=067B PID=1230 class=03 #Input device operating without any optimization
Mode=00000100 VID=067B PID=1230 # Device setup optimization disabled (default)
Mode=00000200 VID=067B PID=1230 # Device setup optimization enabled
© 1999–2022 Citrix Systems, Inc. All rights reserved. 646
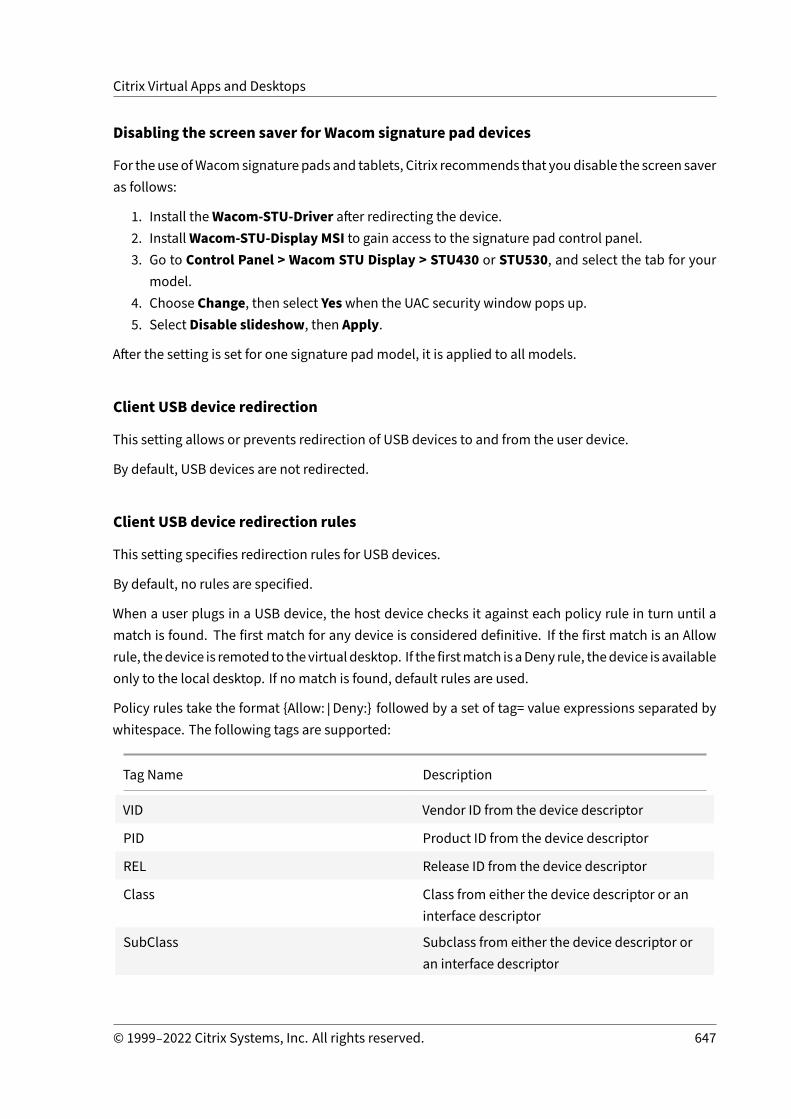
Citrix Virtual Apps and Desktops
Disabling the screen saver for Wacom signature pad devices
For theuseofWacomsignaturepads and tablets, Citrix recommends that youdisable the screen saveras follows:
1. Install theWacom‑STU‑Driver after redirecting the device.2. InstallWacom‑STU‑Display MSI to gain access to the signature pad control panel.3. Go to Control Panel > Wacom STU Display > STU430 or STU530, and select the tab for your
model.4. Choose Change, then select Yeswhen the UAC security window pops up.5. Select Disable slideshow, then Apply.
After the setting is set for one signature padmodel, it is applied to all models.
Client USB device redirection
This setting allows or prevents redirection of USB devices to and from the user device.
By default, USB devices are not redirected.
Client USB device redirection rules
This setting specifies redirection rules for USB devices.
By default, no rules are specified.
When a user plugs in a USB device, the host device checks it against each policy rule in turn until amatch is found. The first match for any device is considered definitive. If the first match is an Allowrule, thedevice is remoted to thevirtual desktop. If the firstmatch is aDeny rule, thedevice is availableonly to the local desktop. If no match is found, default rules are used.
Policy rules take the format {Allow:|Deny:} followed by a set of tag= value expressions separated bywhitespace. The following tags are supported:
Tag Name Description
VID Vendor ID from the device descriptor
PID Product ID from the device descriptor
REL Release ID from the device descriptor
Class Class from either the device descriptor or aninterface descriptor
SubClass Subclass from either the device descriptor oran interface descriptor
© 1999–2022 Citrix Systems, Inc. All rights reserved. 647
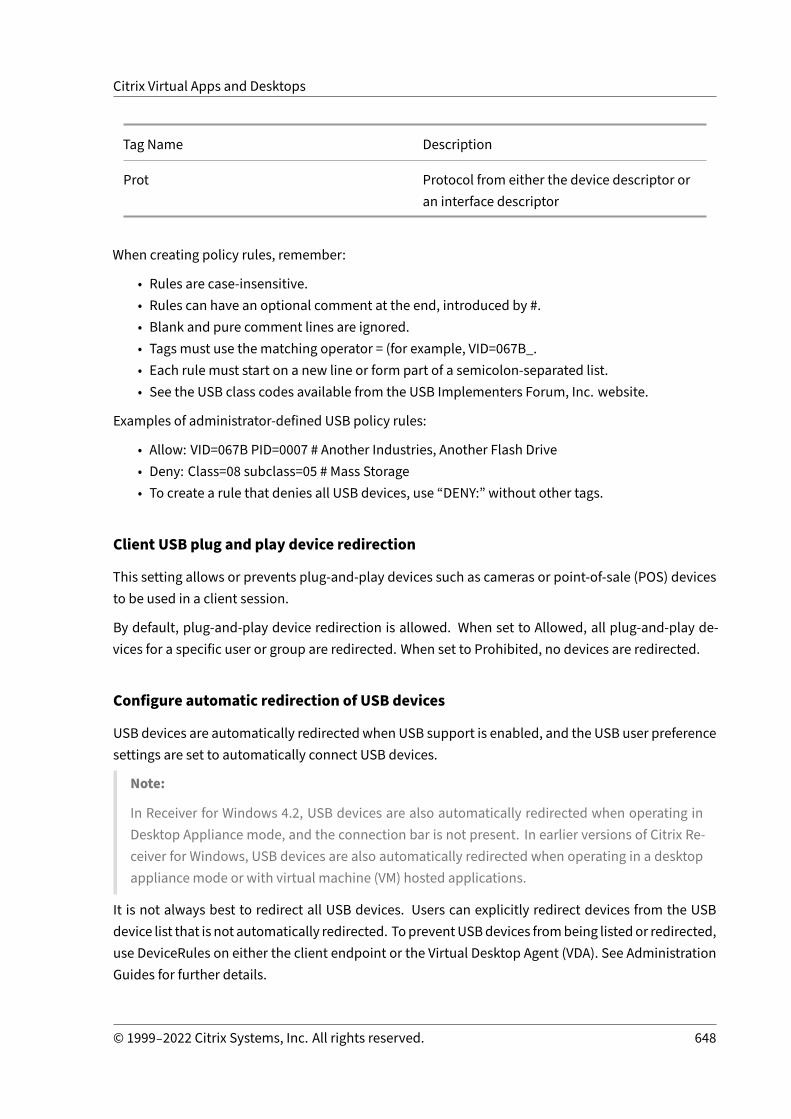
Citrix Virtual Apps and Desktops
Tag Name Description
Prot Protocol from either the device descriptor oran interface descriptor
When creating policy rules, remember:
• Rules are case‑insensitive.• Rules can have an optional comment at the end, introduced by #.• Blank and pure comment lines are ignored.• Tags must use the matching operator = (for example, VID=067B_.• Each rule must start on a new line or form part of a semicolon‑separated list.• See the USB class codes available from the USB Implementers Forum, Inc. website.
Examples of administrator‑defined USB policy rules:
• Allow: VID=067B PID=0007 # Another Industries, Another Flash Drive• Deny: Class=08 subclass=05 # Mass Storage• To create a rule that denies all USB devices, use “DENY:” without other tags.
Client USB plug and play device redirection
This setting allows or prevents plug‑and‑play devices such as cameras or point‑of‑sale (POS) devicesto be used in a client session.
By default, plug‑and‑play device redirection is allowed. When set to Allowed, all plug‑and‑play de‑vices for a specific user or group are redirected. When set to Prohibited, no devices are redirected.
Configure automatic redirection of USB devices
USB devices are automatically redirected when USB support is enabled, and the USB user preferencesettings are set to automatically connect USB devices.
Note:
In Receiver for Windows 4.2, USB devices are also automatically redirected when operating inDesktop Appliance mode, and the connection bar is not present. In earlier versions of Citrix Re‑ceiver for Windows, USB devices are also automatically redirected when operating in a desktopappliance mode or with virtual machine (VM) hosted applications.
It is not always best to redirect all USB devices. Users can explicitly redirect devices from the USBdevice list that is not automatically redirected. TopreventUSBdevices frombeing listedor redirected,use DeviceRules on either the client endpoint or the Virtual Desktop Agent (VDA). See AdministrationGuides for further details.
© 1999–2022 Citrix Systems, Inc. All rights reserved. 648

Citrix Virtual Apps and Desktops
Caution:
Using Registry Editor incorrectly can cause serious problems that might require you to reinstallyour operating system. Citrix cannot guarantee that problems resulting from the incorrect useof Registry Editor can be solved. Use Registry Editor at your own risk. Be sure to back up theregistry before you edit it.
User preferences settings for auto redirection of USB devices
Policy:
1. Open Local Group Policy Editor and go to Administrative Templates > Citrix Components >Citrix Receiver > Remoting client devices > Generic USB Remoting.
2. OpenNewUSB Devices, select Enabled, and clickOK.3. Open Existing USB Devices, select Enabled, and clickOK.
Citrix Receiver:
1. Go to Citrix Receiver Preferences > Connections.2. Ensure that the following options are selected:
• When a session starts, connect devices automatically• When a new device is connected while a session is running, connect the device automati‑cally.
3. ClickOK.
All the registry keys and the policy changes are applied to the Windows client device.
Plain USB printers redirection
The best solution for plain USB printers is to use the dedicated Universal Printer Driver and virtualchannel to perform printing. By default, plain USB printers are not automatically redirected.
Plain printers are detected using heuristics, and it is expected that advanced printers with scanningfunctions for example, might need to be redirected using USB support to work completely.
Use this registry to configure whether plain printers are automatically redirected:
HKEY_LOCAL_MACHINE\SOFTWARE\Citrix\ICA Client\GenericUSB\Devices
Name: AutoRedirectPrinters
Type: DWORD
Data: 00000000
The default value is 0 (does not automatically redirect). Changing the value to any number greaterthan zero enables USB support to redirect plain USB printers.
© 1999–2022 Citrix Systems, Inc. All rights reserved. 649

Citrix Virtual Apps and Desktops
You can also deploy Active Directory policies to this registry key and override the non‑policy value ifboth are present:
HKEY_LOCAL_MACHINE\SOFTWARE\Policies\Citrix\ICA Client\GenericUSB\Devices
Name: AutoRedirectAudio
Type: DWORD
Data: 00000000
Plain audio devices redirection
Like plain printers, the best user experience is achieved using the dedicated audio virtual channel ofICA to send audio data from plain audio devices. However, youmight need to redirect some specialtydevices using USB support. Heuristics are used to determine which devices are plain audio devices.
Use this registry to configure whether plain audio devices are automatically redirected:
HKEY_LOCAL_MACHINE\SOFTWARE\Citrix\ICA Client\GenericUSB\Devices
Name: AutoRedirectAudio
Type: DWORD
Data: 00000000
The default is set to 0 (does not automatically redirect). Changing the value to non‑zero, redirectsplain USB audio devices with USB support.
You can use Active Directory policies to deploy this value to the registry key and override the non‑policy value if both are present:
HKEY_LOCAL_MACHINE\SOFTWARE\Policies\Citrix\ICA Client\GenericUSB\Devices
Name: AutoRedirectVideo
Type: DWORD
Data: 00000000
Plain storage devices (mass storage device) redirection
For plain storage devices, you achieve the best user experience using the dedicated virtual channel,such as client drive mapping that also performs optimization. In addition to simple reading or writ‑ing files, to perform certain special tasks like burning a CD/DVD or accessing encrypted file systemsdevices, the device might still need to be redirected using generic USB support.
Heuristics are used to determine which devices are plain storage devices. Use this registry key to con‑figure whether plain storage devices are automatically redirected:
© 1999–2022 Citrix Systems, Inc. All rights reserved. 650

Citrix Virtual Apps and Desktops
HKEY_LOCAL_MACHINE\SOFTWARE\Citrix\ICA Client\GenericUSB\Devices
Name: AutoRedirectStorage
Type: DWORD
Data: 00000000
The default is set to 0 (does not automatically redirect). Changing the value to non‑zero, redirectsplain USB storage devices using generic USB support.
YoucanalsouseActiveDirectorypolicies todeploy this value to the following registry keyandoverridethe non‑policy value if both are present:
HKEY_LOCAL_MACHINE\SOFTWARE\Policies\Citrix\ICA Client\GenericUSB\Devices
Name: AutoRedirectStorage
Type: DWORD
Data: 00000000
Note:
Read only access to the plain storage device is not configurable if you are using generic USB sup‑port, while it is configurable if using CDM.
USB flash drives with hardware encryption redirection
USB flash drives with hardware encryption typically consist of an encrypted storage partition and asecond utility partition that contains a utility for unlocking the encrypted partition. For USB FlashDrive devices, achieve the best user experience using the dedicated client drive mapping/dynamicthumbdrive mapping HDX virtual channel that also performs optimization.
Generic USB redirection is necessary for non‑Windows clients (for example, Linux clients) and clientswhere the customer has restricted (locked down) user access to local functions on the client. GenericUSB redirection can redirect any USB storage device without hardware encryption into both Single‑session OS and Multi‑session OS VDA sessions.
Before Citrix Virtual Apps andDesktop 7 1808, USB flash driveswith hardware encryption could not beredirected in any useful way into Single‑session OS or Multi‑session OS VDA sessions. A new featureenhancement introduced inCitrix VirtualAppsandDesktop71808supportsgenericUSBredirectionofUSB flash drives with hardware encryption into Single‑session OS andMulti‑session OS VDA sessions.After the device is redirected, none of its drives appear on the local client. So, if unlocking the drive isrequired, perform it in the session. This feature requires Windows update KB4074590.
© 1999–2022 Citrix Systems, Inc. All rights reserved. 651

Citrix Virtual Apps and Desktops
Plain still image devices (scanners and digital cameras)
For plain still image devices, achieve the best user experience using the dedicated virtual channel(such as the TWAIN virtual channel) that also performs optimization. These devices must adhere toindustry standards. If a device is non‑compliant or if it is not used according to the original intentions,generic USB redirection might be the only way to use the device. Heuristics are used to determinewhich devices are plain still image devices.
Use this registry key to configure whether plain still image devices are automatically redirected:
HKEY_LOCAL_MACHINE\SOFTWARE\Citrix\ICA Client\GenericUSB\Devices
Name: AutoRedirectImage
Type: DWORD
Data: 00000000
The default is set to 0 (does not automatically redirect). Changing the value to non‑zero, redirectsplain USB still image devices with generic USB.
You can also use Active Directory policies to deploy this value to this registry key and override thenon‑policy value if both are present:
HKEY_LOCAL_MACHINE\SOFTWARE\Policies\Citrix\ICA Client\GenericUSB\Devices
Name: AutoRedirectImage
Type: DWORD
Data: 00000000
Device specific settings
The heuristics used to select Citrix optimizable devices (such as printers, audio, video, storage, andstill image devices) do not alwaysmatchwhat youwant. Youmightwant to control automatic redirec‑tion of devices that are not listed above. You can control automatic redirection on a device specificbasis.
As an example, theDemoTech 2,000 bar code reader doesn’t need to be redirected usingUSB support.It has a vendor identifier of 12AB and a product identifier of 5678. These hexadecimal numbers canbe found in Device Manager.
To prevent this being automatically redirected, create this device specific registry key:
HKEY_LOCAL_MACHINE\SOFTWARE\Citrix\ICA Client\GenericUSB\Devices\VID12AB PID5678
Name: AutoRedirect
Type: DWORD
© 1999–2022 Citrix Systems, Inc. All rights reserved. 652

Citrix Virtual Apps and Desktops
Data: 00000000
A value of 0 prevents the device from being automatically redirected. A non‑zero value indicates thatthedevicemustbeconsidered forautomatic redirection (subject touserpreferences). There is a singlespace character between the vendor and product identifiers.
You can also deploy this value using Active Directory policies to this registry key. It overrides the non‑policy value if both are present:
HKEY_LOCAL_MACHINE\SOFTWARE\Policies\Citrix\ICA Client\GenericUSB\Devices\VID12ABPID5678
Name: AutoRedirect
Type: DWORD
Data: 00000000
Device specific AutoRedirect settings take precedence over themore general AutoRedirectXXX valuesexplained above. The default heuristics for Citrix optimized devices might misinterpret a device asgeneric. Therefore, set the device specific AutoRedirect value to 1 to redirect it automatically.
Virtual channel allow list policy settings
April 14, 2021
This setting enables the use of an allow list that specifies which virtual channels are allowed to beopened in an ICA session.
When disabled, all virtual channels are allowed.
When enabled, only Citrix virtual channels are allowed.
To use custom or third‑party virtual channels, add the virtual channels to the list. To add a virtualchannel to the list, enter the virtual channel name followed by a comma, and then the path to theprocess that accesses the virtual channel. More executable paths can be listed, and the paths areseparated by commas.
For example,
CTXCVC1,C:\VC1\vchost.exe
CTXCVC2,C:\VC2\vchost.exe,C:\Program Files\Third Party\vcaccess.exe
By default, virtual channel allow lists are disabled.
© 1999–2022 Citrix Systems, Inc. All rights reserved. 653

Citrix Virtual Apps and Desktops
Note:
If you’re using the HDX RealTime Optimization Pack for Skype for Business, add the virtual chan‑nel to the allow list. For more information, see the HDX RealTime Optimization Pack documen‑tation.
For more information about virtual channels, see ICA virtual channels.
Visual display policy settings
April 14, 2021
The Visual Display section contains policy settings for controlling the quality of images sent from vir‑tual desktops to the user device.
Preferred color depth for simple graphics
This policy setting is available in VDA versions 7.6 FP3 and later. The 8‑bit option is available in VDAversions 7.12 and later.
This settingmakes it possible to lower color depth atwhich simple graphics are sent over thenetwork.Lowering to 8‑bit or 16‑bit per pixel potentially improves responsiveness over low bandwidth connec‑tions, at the cost of a slight degradation in image quality. The 8‑bit color depth is not supportedwhenthe Use video codec for compression policy setting is set to For the entire screen.
The default preferred color depth is 24‑bits per pixel.
VDAs fall back to 24‑bit (default) color depth if the 8‑bit setting is applied on VDA version 7.11 andearlier.
Target frame rate
This setting specifies themaximumnumber of frames per second sent from the virtual desktop to theuser device.
By default, the maximum is 30 frames per second.
Setting a high number of frames per second (for example, 30) improves the user experience, but re‑quires more bandwidth. Decreasing the number of frames per second (for example, 10) maximizesserver scalability at the expenseof user experience. For user deviceswith slowerCPUs, specify a lowervalue to improve the user experience.
The maximum supported frame rate per second is 60.
© 1999–2022 Citrix Systems, Inc. All rights reserved. 654
Citrix Virtual Apps and Desktops
Visual quality
This setting specifies the desired visual quality for images displayed on the user device.
By default, this setting is Medium.
To specify the quality of images, choose one of the following options:
• Low ‑ Recommended for bandwidth‑constrained networks where visual quality can be sacri‑ficed for interactivity
• Medium ‑ Offers the best performance and bandwidth efficiency in most use cases• High ‑ Recommended if you require visually lossless image quality• Build to lossless ‑ Sends lossy images to the user device during periods of high network activityand lossless images after network activity reduces. This setting improves performance overbandwidth‑constrained network connections
• Always lossless ‑ When preserving image data is vital, select Always lossless to ensure lossydata is never sent to the user device. For example, when displaying X‑ray images where no lossof quality is acceptable.
Moving images policy settings
April 14, 2021
The Moving Images section contains settings that enable you to remove or alter compression for dy‑namic images.
Minimum image quality
Note: For the Virtual Delivery Agent 7.x, this policy setting applies only when the Legacy graphicsmode policy setting is enabled.
This setting specifies the minimum acceptable image quality for Adaptive Display. The less compres‑sion used, the higher the quality of images displayed. Choose from Ultra High, Very High, High, Nor‑mal, or Low compression.
By default, this is set to Normal.
Moving image compression
This setting specifies whether or not Adaptive Display is enabled. Adaptive Display automatically ad‑justs the image quality of videos and transitional slides in slide shows based on available bandwidth.With Adaptive Display enabled, users should see smooth‑running presentations with no reduction inquality.
© 1999–2022 Citrix Systems, Inc. All rights reserved. 655
Citrix Virtual Apps and Desktops
By default, Adaptive Display is enabled.
For VDA versions 7.0 through 7.6, this setting applies only when Legacy graphicsmode is enabled. ForVDA versions 7.6 FP1 and later, this setting applies when Legacy graphics mode is enabled, or whenthe legacy graphics mode is disabled and a video codec is not used to compress graphics.
When legacy graphics mode is enabled, the session must be restarted before policy changes take ef‑fect. Adaptive Display is mutually exclusive with Progressive Display; enabling Adaptive Display dis‑ables Progressive Display and vice versa. However, both Progressive Display and Adaptive Displaycan be disabled at the same time. Progressive Display, as a legacy feature, is not recommended forXenApp or XenDesktop. Setting Progressive threshold Level will disable Adaptive Display.
Progressive compression level
Note: For the Virtual Delivery Agent 7.x, this policy setting applies only when the Legacy graphicsmode policy setting is enabled.
This setting provides a less detailed but faster initial display of images.
By default, no progressive compression is applied.
Themore detailed image, defined by the normal lossy compression setting, appearswhen it becomesavailable. Use Very High or Ultra High compression for improved viewing of bandwidth‑intensivegraphics such as photographs.
For progressive compression to be effective, its compression levelmust be higher than the Lossy com‑pression level setting.
Note: The increased level of compression associated with progressive compression also enhancesthe interactivity of dynamic images over client connections. The quality of a dynamic image, such asa rotating three‑dimensional model, is temporarily decreased until the image stopsmoving, at whichtime the normal lossy compression setting is applied.
The following policy settings are related:
• Progressive compression threshold value• Progressive heavyweight compression
Progressive compression threshold value
Note: For the Virtual Delivery Agent 7.x, this policy setting applies only when the Legacy graphicsmode policy setting is enabled.
This setting represents themaximumbandwidth in kilobits per second for a connection to which pro‑gressive compression is applied. This is applied only to client connections under this bandwidth.
By default, the threshold value is 2147483647 kilobits per second.
© 1999–2022 Citrix Systems, Inc. All rights reserved. 656

Citrix Virtual Apps and Desktops
The following policy settings are related:
• Progressive compression threshold value• Progressive heavyweight compression
Target minimum frame rate
This setting specifies the minimum frame rate per second the system attempts to maintain, for dy‑namic images, under low bandwidth conditions.
By default, this is set to 10fps.
For VDA versions 7.0 through 7.6, this setting applies only when Legacy graphics mode is enabled.For VDA versions 7.6 FP1 and later, this setting applies when the Legacy graphics mode is disabled orenabled.
Still images policy settings
April 14, 2021
The Still Images section contains settings that enable you to remove or alter compression for staticimages.
Extra color compression
This setting enables or disables the use of extra color compression on images delivered over clientconnections that are limited in bandwidth, improving responsiveness by reducing the quality of dis‑played images.
By default, extra color compression is disabled.
Whenenabled, extracolor compression isappliedonlywhen theclient connectionbandwidth isbelowthe Extra color compression threshold value. When the client connection bandwidth is above thethreshold value or Disabled is selected, extra color compression is not applied.
Extra color compression threshold
Note: For the Virtual Delivery Agent 7.x, this policy setting applies only when the Legacy graphicsmode policy setting is enabled.
This setting represents themaximum bandwidth in kilobits per second for a connection belowwhichextra color compression is applied. If the client connectionbandwidthdropsbelow the set value, extracolor compression, if enabled, is applied.
© 1999–2022 Citrix Systems, Inc. All rights reserved. 657

Citrix Virtual Apps and Desktops
By default, the threshold value is 8192 kilobits per second.
Heavyweight compression
Note: For the Virtual Delivery Agent 7.x, this policy setting applies only when the Legacy graphicsmode policy setting is enabled.
This setting enables or disables reducing bandwidth beyond progressive compression without losingimage quality by using a more advanced, but more CPU‑intensive, graphical algorithm.
By default, heavyweight compression is disabled.
If enabled, heavyweight compression applies to all lossy compression settings. It is supported onCitrix Workspace app but has no effect on other plug‑ins.
The following policy settings are related:
• Progressive compression level• Progressive compression threshold value
Lossy compression level
Note: For the Virtual Delivery Agent 7.x, this policy setting applies only when the Legacy graphicsmode policy setting is enabled.
This setting controls the degree of lossy compression used on images delivered over client connec‑tions that are limited in bandwidth. In such cases, displaying images without compression can beslow.
By default, medium compression is selected.
For improved responsiveness with bandwidth‑intensive images, use high compression. Where pre‑serving image data is vital; for example, when displaying X‑ray images where no loss of quality is ac‑ceptable, youmay not want to use lossy compression.
Related policy setting: Lossy compression threshold value
Lossy compression threshold value
Note: For the Virtual Delivery Agent 7.x, this policy setting applies only when the Legacy graphicsmode policy setting is enabled.
This setting represents themaximumbandwidth in kilobits per second for a connection towhich lossycompression is applied.
By default, the threshold value is 2147483647 kilobits per second.
© 1999–2022 Citrix Systems, Inc. All rights reserved. 658

Citrix Virtual Apps and Desktops
Adding the Lossy compression level setting to a policy and including no specified threshold can im‑prove the display speed of high‑detail bitmaps, such as photographs, over a LAN.
Related policy setting: Lossy compression level
WebSockets policy settings
April 14, 2021
The WebSockets section contains policy settings for accessing virtual desktops and hosted applica‑tions using the Citrix Workspace app for HTML5. The WebSockets feature increases security and re‑duces overhead by conducting two‑way communication between browser‑based applications andservers. The feature does so without opening multiple HTTP connections.
WebSockets connections
This setting allows or prohibits WebSockets connections.
By default, WebSocket connections are prohibited.
WebSockets port number
This setting identifies the port for incoming WebSocket connections.
By default, the value is 8008.
WebSockets trusted origin server list
This setting provides a comma‑separated list of trusted origin servers, usually the Citrix Workspaceapp for Web, expressed as URLs. The server accepts only WebSockets connections originating fromone of these addresses.
By default, the wildcard * is used to trust all Citrix Workspace app for Web URLs.
If you choose to type an address in the list, use this syntax:
<protocol>://<Fully qualified domain name of host>:[port]
The protocol must be HTTP or HTTPS. If the port is not specified, port 80 is used for HTTP and port443 is used for HTTPS.
The wildcard * can be used within the URL, except as part of an IP address (10.105..).
© 1999–2022 Citrix Systems, Inc. All rights reserved. 659

Citrix Virtual Apps and Desktops
Loadmanagement policy settings
April 14, 2021
The Load Management section contains policy settings for enabling and configuring load manage‑ment between servers delivering Windows Multi‑session OSmachines.
For information about calculating the load evaluator index, see CTX202150.
Concurrent logon tolerance
This setting specifies the maximum number of concurrent logons a server can accept.
By default, this is set to 2.
When this setting is enabled, load balancing tries to avoid having more than the specified number oflogons active on a Server VDA at the same time. However, the limit is not strictly enforced. To enforcethe limit (and cause concurrent logons that exceed the specified number to fail), create the followingregistry key:
HKLM\Software\Citrix\DesktopServer\LogonToleranceIsHardLimitType: DWORDValue: 1
CPU usage
This setting specifies the level of CPU usage, as a percentage, at which the server reports a full load.When enabled, the default value at which the server reports a full load is 90%.
By default, this setting is disabled and CPU usage is excluded from load calculations.
CPU usage excluded process priority
This setting specifies the priority level at which a process’ CPU usage is excluded from the CPU Usageload index.
By default, this is set to Below Normal or Low.
Disk usage
This setting specifies the disk queue length atwhich the server reports a 75% full load. When enabled,the default value for disk queue length is 8.
By default, this setting is disabled and disk usage is excluded from load calculations.
© 1999–2022 Citrix Systems, Inc. All rights reserved. 660

Citrix Virtual Apps and Desktops
Maximum number of sessions
This setting specifies the maximum number of sessions a server can host. When enabled, the defaultsetting for maximum number of sessions a server can host is 250.
By default, this setting is enabled.
Memory usage
This setting specifies the level of memory usage, as a percentage, at which the server reports a fullload. When enabled, the default value at which the server reports a full load is 90%.
By default, this setting is disabled andmemory usage is excluded from load calculations.
Memory usage base load
This setting specifies an approximation of the base operating system’s memory usage and defines, inMB, the memory usage below which a server is considered to have zero load.
By default, this is set to 768 MB.
Profile management policy settings
April 14, 2021
The Profile Management section contains policy settings for enabling Profile Management and speci‑fying which groups to include in and exclude from Profile Management processing.
Other information (such as the names of the equivalent .ini file settings and which version of ProfileManagement is required for a policy setting) is available in Profile Management policies.
Advanced policy settings
April 14, 2021
Enablemulti‑session write‑back for FSLogix Profile Container
ProfileManagement provides a solution to save changes inmulti‑session scenarios for FSLogix ProfileContainer. If the same user launches multiple sessions on different machines, changes made in each
© 1999–2022 Citrix Systems, Inc. All rights reserved. 661

Citrix Virtual Apps and Desktops
session are synchronized and saved to FSLogix Profile Container. You can use themulti‑sessionwrite‑back feature by implementing the Enable multi‑session write‑back for FSLogix Profile Containerpolicy. If the policy is not configured here or in the .ini file, the default value (Disabled) is used.
Number of retries when accessing locked files
Sets the number of retries when accessing locked files.
If this policy is disabled, the default value of five retries is used. If this policy is not configured here,the value from the .ini file is used. If this policy is not configured here or in the .ini file, the defaultvalue is used.
Process Internet cookie files on logoff
Somedeployments leave extra Internet cookies that are not referencedby the file Index.dat. The extracookies left in the file system after sustained browsing can lead to profile bloat. Enable this policy toforce processing of Index.dat and remove the extra cookies. The policy increases logoff times, so onlyenable it if you experience this issue.
If this policy is not configured here, the value from the .ini file is used. If this policy is not configuredhere or in the .ini file, no processing of Index.dat takes place.
Disable automatic configuration
Profile Management examines any Citrix Virtual Desktops environment, for example for the presenceof personal vDisks, and configures Group Policy accordingly. Only Profile Management policies in theNot Configured state are adjusted, so any customizations you have made are preserved. This featurespeeds up deployment and simplifies optimization. No configuration of the feature is necessary, butyou can disable automatic configuration when upgrading (to retain settings from earlier versions) orwhen troubleshooting. Automatic configuration does not work in Citrix Virtual Apps or other environ‑ments.
You can regard automatic configuration as a dynamic configuration checker that automatically con‑figures the default policy settings according to environments at runtime. It eliminates the need toconfigure the settings manually. Runtime environments include:
• Windows OS• Windows OS versions• Presence of Citrix Virtual Desktops• Presence of personal vDisks
Automatic configuration might change the following policies if the environment changes:
• Active write back
© 1999–2022 Citrix Systems, Inc. All rights reserved. 662

Citrix Virtual Apps and Desktops
• Always cache• Delete locally cached profiles on logoff• Delay before deleting cached profiles• Profile streaming
See the following table for the default status of the policies above on different OSs:
Multi‑session OS Single‑session OS
Active write back Enabled Disabled if personal vDisk is inuse; otherwise, enabled.
Always cache Disabled Disabled if personal vDisk is inuse; otherwise, enabled.
Delete locally cached profileson logoff
Enabled Disabled if personal vDisk is inuse or if Citrix VirtualDesktops is assigned or ifCitrix Virtual Desktops is notinstalled; otherwise, enabled.
Delay before deleting cachedprofiles
0 seconds 60 seconds if user changesare not persistent; otherwise,0 seconds.
Profile streaming Enabled Disabled if personal vDisk is inuse; otherwise, enabled.
However, with automatic configuration disabled, all policies above default to Disabled.
Important:
Personal vDisk is deprecated. For details, see Remove PVD, AppDisks, and unsupported hosts.
Starting with Profile Management 1909, you can have an improved experience with the Start menuonWindows 10 (version 1607 and later) andWindows Server 2016 and later. This is achieved throughautomatic configuration of the following policies:
• Add “Appdata\Local\Microsoft\Windows\Caches”and“Appdata\Local\Packages” to “Folders toMirror”
• Add “Appdata\Local\Microsoft\Windows\UsrClass.Dat*” to “Files to synchronize”
If this setting is not configured here, the value from the .ini file is used.
If this setting is not configured here or in the .ini file, automatic configuration is turned on so ProfileManagement settings might change if the environment changes.
© 1999–2022 Citrix Systems, Inc. All rights reserved. 663

Citrix Virtual Apps and Desktops
Log off user if a problem is encountered
If this policy is disabled or not configured, users are given a temporary profile if a problem is encoun‑tered (for example, the user store is unavailable). If it is enabled, an error message is displayed andusers are logged off. This setup can simplify troubleshooting of the problem.
If this setting is not configured here, the value from the .ini file is used.
If this setting is not configured here or in the .ini file, a temporary profile is provided.
Customer Experience Improvement Program
By default, the Customer Experience Improvement Program is enabled to help improve the qualityand performance of Citrix products by sending anonymous statistics and usage information.
If this setting is not configured here, the value from the .ini file is used.
Enable search index roaming for Outlook
Allow user‑based Outlook search experience by automatically roaming Outlook search data alongwith user profile. This requires extra spaces in the user store to store search index for Outlook.
Youmust log off and then log on again for this policy to take effect.
Outlook search index database – backup and restore
This setting configures what Profile Management does during logon when the Enable search indexroaming for Outlook is enabled.
If this setting is enabled, Profile Management saves a backup of the search index database each timethe database is mounted successfully on logon. Profile Management treats the backup as the goodcopy of the search index database. When an attempt to mount the search index database fails be‑cause the database becomes corrupted, Profile Management automatically reverts the search indexdatabase to the last known good copy.
Note: Profile Management deletes the previously saved backup after a new backup is saved success‑fully. The backup consumes the available storage space of the VHDX files.
Basic policy settings
April 14, 2021
The Basic settings section contains policy settings relating to the basic configuration of Profile Man‑agement.
© 1999–2022 Citrix Systems, Inc. All rights reserved. 664

Citrix Virtual Apps and Desktops
Enable Profile Management
By default, to facilitate deployment, Profile Management does not process logons or logoffs. EnableProfile Management only after carrying out all other setup tasks and testing how Citrix user profilesperform in your environment.
If this policy is not configured here, the value from the .ini file is used. If this policy is not configuredhere or in the .ini file, Profile Management does not process Windows user profiles in any way.
Processed groups
Both computer local groups and domain groups (local, global, and universal) can be used. Domaingroups should be specified in the format: DOMAIN NAME\GROUP NAME.
If this policy is configured here, Profile Management processes only members of these user groups.If this policy is disabled, Profile Management processes all users. If this policy is not configured here,the value from the .ini file is used. If this policy is not configured here or in the .ini file, members of alluser groups are processed.
Excluded groups
You can use computer local groups and domain groups (local, global, and universal) to prevent partic‑ular user profiles from being processed. Specify domain groups in the form DOMAIN NAME\ GROUPNAME.
If this setting is configured here, Profile Management excludes members of these user groups. If thissetting is disabled, Profile Management does not exclude any users. If this setting is not configuredhere, the value from the .ini file is used. If this setting is not configured here or in the .ini file, nomembers of any groups are excluded.
Process logons of local administrators
Specifies whether logons of members of the BUILTIN\Administrators group are processed. If this pol‑icy is disabled or not configured on multi‑session operating systems (such as Citrix Virtual Apps en‑vironments), Profile Management assumes that logons by domain users, but not local administra‑tors, must be processed. On single‑session operating systems (such as Citrix Virtual Desktops envi‑ronments), local administrator logons are processed. This policy allows domain users with local ad‑ministrator rights, typically Citrix Virtual Desktops userswith assigned virtual desktops, to bypass anyprocessing, log on, and troubleshoot the desktop experiencing problems with Profile Management.
Note: Domain users’ logons may be subject to restrictions imposed by group membership, typicallyto ensure compliance with product licensing.If this policy is disabled, Profile Management does not process logons by local administrators. If this
© 1999–2022 Citrix Systems, Inc. All rights reserved. 665
Citrix Virtual Apps and Desktops
policy is not configured here, the value from the .ini file is used. If this policy is not configured here orin the .ini file, administrators are not processed.
Path to user store
Sets the path to the directory (the user store) inwhich the user settings (registry changes and synchro‑nized files) are saved.
The path can be:
• A relative path. It must be relative to the home directory (which is typically configured as the#homeDirectory# attribute for a user in Active Directory).
• A UNC path. It typically specifies a server share or a DFS namespace.• Disabled or unconfigured. In this case, a value of #homeDirectory#\Windows is assumed.
The following types of variables can be used for this policy:
• System environment variables enclosed in percent signs (for example, %ProfVer%). Systemenvironment variables generally require extra setup.
• Attributes of the Active Directory user object enclosed in hashes (for example, #sAMAccount‑Name#).
• Profile Management variables. For more information, see the Profile Management variablesproduct document.
User environment variables cannot be used, except for %username% and %userdomain%. You canalso create custom attributes to define organizational variables such as location or users fully. At‑tributes are case‑sensitive.
Examples:
• \server\share#sAMAccountName#stores theuser settings to theUNCpath \server\share\JohnSmith(if #sAMAccountName# resolves to JohnSmith for the current user)
• \server\profiles$\%USERNAME%.%USERDOMAIN%!CTX_OSNAME!!CTX_OSBITNESS! might ex‑pand to \server\profiles$\JohnSmith.DOMAINCONTROLLER1\Win8x64
Important: Whichever attributes or variables you use, check that this policy expands to the folderone level higher than the folder containing NTUSER.DAT. For example, if this file is containedin \server\profiles$\JohnSmith.Finance\Win8x64\UPM_Profile, set the path to the user store as\server\profiles$\JohnSmith.Finance\Win8x64 (not the \UPM_Profile subfolder).
For more information on using variables when specifying the path to the user store, see the followingtopics:
• Share Citrix user profiles onmultiple file servers• Administer profiles within and across OUs• High availability and disaster recovery with Profile Management
© 1999–2022 Citrix Systems, Inc. All rights reserved. 666

Citrix Virtual Apps and Desktops
If Path to user store is disabled, the user settings are saved in the Windows subdirectory of the homedirectory.
If this policy is disabled, the user settings are saved in the Windows subdirectory of the home direc‑tory. If this policy is not configured here, the value from the .ini file is used. If this policy is not config‑ured here or in the .ini file, the Windows directory on the home drive is used.
Migrate user store
Specifies the path to the folder where the user settings (registry changes and synchronized files) werepreviously saved (the user store path that you previously used).
If this setting is configured, the user settings stored in the previous user store are migrated to thecurrent user store specified in the “Path to user store” policy.
The path can be an absolute UNC path or a path relative to the home directory.
In both cases, you can use the following types of variables: system environment variables enclosed inpercent signs and attributes of the Active Directory user object enclosed in hash signs.
Examples:
• The folder Windows\\%ProfileVer% stores the user settings in a subfolder called Windows\W2K3of the user store (if%ProfileVer% is a systemenvironment variable that resolves toW2K3).
• \\server\share\##SAMAccountName## stores the user settings to the UNC path \\server\share\<JohnSmith> (if ##SAMAccountName## resolves to JohnSmith for the current user).
In the path, you can use user environment variables except %username% and%userdomain%.
If this setting is disabled, the user settings are saved in the current user store.
If this setting is not configured here, the corresponding setting from the .ini file is used.
If this setting is not configured here or in the .ini file, the user settings are saved in the current userstore.
Active write back
Files and folders (but not registry entries) that are modified can be synchronized to the user store inthe middle of a session, before logoff.
If this policy is not configured here, the value from the .ini file is used. If this policy is not configuredhere or in the .ini file, it is enabled.
Offline profile support
This policy allows profiles to synchronize with the user store at the earliest possible opportunity. Itis aimed at laptop or mobile device users who roam. When a network disconnection occurs, profiles
© 1999–2022 Citrix Systems, Inc. All rights reserved. 667

Citrix Virtual Apps and Desktops
remain intact on the laptop or device even after rebooting or hibernating. Asmobile users work, theirprofiles are updated locally and are eventually synchronized with the user store when the networkconnection is re‑established.
If this policy is not configured here, the value from the .ini file is used. If this policy is not configuredhere or in the .ini file, offline profiles are disabled.
Active write back registry
Use this policy along with “Active write back.” Registry entries that aremodified can be synchronizedto the user store in the middle of a session.
If you do not configure this setting here, the value from the .ini file is used.
If you do not configure this setting here or in the .ini file, active write back registry is disabled.
Offline profile support
Enables the offline profiles feature. This is intended for computers that are commonly removed fromnetworks, typically laptops or mobile devices not servers or desktops.
If this setting is not configured here, the value from the .ini file is used.
If this setting is not configured here or in the .ini file, offline profile support is disabled.
Cross‑platform policy settings
April 14, 2021
The Cross‑Platform section contains policy settings relating to configuring the Profile Managementcross‑platform settings feature.
Enable cross‑platform settings
By default, to facilitate deployment, cross‑platform settings are disabled. Turn on processing by en‑abling this policy but only after thorough planning and testing of this feature.
If this policy is not configured here, the value from the .ini file is used. If this policy is not configuredhere or in the .ini file, no cross‑platform settings are applied.
© 1999–2022 Citrix Systems, Inc. All rights reserved. 668

Citrix Virtual Apps and Desktops
Cross‑platform settings user groups
Enter one or more Windows user groups. For example, you might use this policy to process only theprofiles from a test user group. If this policy is configured, the cross‑platform settings feature of Pro‑file Management processes only members of these user groups. If this policy is disabled, the featureprocesses all of the users specified by the Processed groups policy.
If this policy is not configured here, the value from the .ini file is used. If this policy is not configuredhere or in the .ini file, all user groups are processed.
Path to cross‑platform definitions
Identifies thenetwork locationof thedefinition files that youcopied fromthedownloadpackage. Thispathmust be a UNC path. Usersmust have read access to this location, and administratorsmust havewrite access to it. The locationmust be aServerMessageBlock (SMB) or Common Internet File System(CIFS) file share.
If this policy is not configured here, the value from the .ini file is used. If this policy is not configuredhere or in the .ini file, no cross‑platform settings are applied.
Path to cross‑platform settings store
Sets the path to the cross‑platform settings store, the folder in which users’ cross‑platform settingsare saved. Users must have write access to this area. The path can be an absolute UNC path or a pathrelative to the home directory.
This area is the common area of the user store where profile data shared by multiple platforms islocated. Users must have write access to this area. The path can be an absolute UNC path or a pathrelative to the home directory. You can use the same variables as for Path to user store.
If this policy is disabled, the path Windows\PM_CP is used. If this policy is not configured here, thevalue from the .ini file is used. If this policy is not configured here or in the .ini file, the default value isused.
Source for creating cross‑platform settings
Specifies a platform as the base platform if this policy is enabled in that platform’s OU. This policymigrates data from the base platform’s profiles to the cross‑platform settings store.
Each platform’s own set of profiles are stored in a separate OU. You must decide which platform’sprofile data to use to seed the cross‑platform settings store. It is referred to as the base platform. Ifthe cross‑platform settings store contains a definition file with no data, or the cached data in a single‑platformprofile is newer than the definition’s data in the store, ProfileManagementmigrates the datafrom the single‑platform profile to the store unless you disable this policy.
© 1999–2022 Citrix Systems, Inc. All rights reserved. 669

Citrix Virtual Apps and Desktops
Important:
If this policy is enabled in multiple OUs, or multiple user or machine objects, the platform thatthe first user logs on to becomes the base profile.By default this policy is Enabled.
File system policy settings
April 14, 2021
The File System section contains policy settings for configuring which files and directories in a usersprofile are synchronized between the systemwhere the profile is installed and the user store.
Exclusions policy settings
April 14, 2021
The Exclusions section contains policy settings for configuring which files and directories in a usersprofile are excluded from the synchronization process.
Exclusion list ‑ files
List of files that are ignored during synchronization. File names must be paths relative to the userprofile (%USERPROFILE%). Wildcards are allowed and are applied recursively.
Examples:
• Desktop\Desktop.ini ignores the file Desktop.ini in the Desktop folder• %USERPROFILE%*.tmp ignores all files with the extension .tmp in the entire profile• AppData\Roaming\MyApp*.tmp ignoresall fileswith theextension .tmp inonepart of theprofile
If this policy is disabled, no files are excluded. If this policy is not configured here, the value from the.ini file is used. If this policy is not configured here or in the .ini file, no files are excluded.
Enable Default Exclusion List ‑ directories
Default list of directories ignored during synchronization. Use this policy to specify GPO exclusiondirectories without having to fill them in manually.
© 1999–2022 Citrix Systems, Inc. All rights reserved. 670
Citrix Virtual Apps and Desktops
If youdisable thispolicy, ProfileManagementdoesnotexcludeanydirectoriesbydefault. If youdonotconfigure this policy here, ProfileManagement uses the value from the .ini file. If you do not configurethis policy here or in the .ini file, Profile Management does not exclude any directories by default.
Exclusion list ‑ directories
List of folders that are ignored during synchronization. Folder namesmust be specified as paths rela‑tive to the user profile (%USERPROFILE%).
Example:
• Desktop ignores the Desktop folder in the user profile
If this policy is disabled, no folders are excluded. If this policy is not configured here, the value fromthe .ini file is used. If this policy is not configured here or in the .ini file, no folders are excluded.
Logon Exclusion Check
This setting configures what Profile Management does if a profile in the user store contains excludedfiles or folders.
If this setting is disabled or set to the default value of “Synchronize excluded files or folders on logon,”Profile Management synchronizes these excluded files or folders from the user store to local profilewhen a user logs on.
If this setting is set to “Ignore excluded files or folders on logon,” Profile Management ignores theexcluded files or folders in the user store when a user logs on.
If this setting is set to “Delete excluded files or folder on logon,” Profile Management deletes the ex‑cluded files or folders in the user store when a user logs on.
If this setting is not configured here, the value from the .ini file is used.
If this setting is not configured here or in the .ini file, the excluded files or folders are synchronizedfrom the user store to a local profile when a user logs on.
Large File Handling ‑ Files to be created as symbolic links
To improve logon performance and to process large‑size files, a symbolic link is created instead ofcopying files in this list.
You can use wildcards in policies that refer to files; for example, !ctx_localappdata!\Microsoft\Outlook\*.OST.
To process the offline folder file (*.ost) ofMicrosoftOutlook,make sure that theOutlook folder is notexcluded for Profile Management.
Those files cannot be accessed in multiple sessions simultaneously.
© 1999–2022 Citrix Systems, Inc. All rights reserved. 671

Citrix Virtual Apps and Desktops
Synchronization policy settings
April 14, 2021
The Synchronization section contains policy settings for specifying which files and folders in a usersprofile are synchronized between the system on which the profile is installed and the user store.
Directories to synchronize
Profile Management synchronizes each user’s entire profile between the system it is installed on andthe user store. It is not necessary to include subfolders of the user profile by adding them to this list.
Paths on this list must be relative to the user profile.
Example:
• Desktop\exclude\include ensures that the subfolder called include is synchronized even if thefolder called Desktop\exclude is not
Disabling this policy has the same effect as enabling it and configuring an empty list.
If this policy is not configured here, the value from the .ini file is used. If this policy is not configuredhere or in the .ini file, only non‑excluded folders in the user profile are synchronized.
Files to synchronize
Profile Management synchronizes each user’s entire profile between the system it is installed on andthe user store. It is not necessary to include files in the user profile by adding them to this list.
This policy canbeused to include files belowexcluded folders. Pathson this listmustbe relative to theuser profile. Wildcards can be used but are only allowed for file names. Wildcards cannot be nestedand are applied recursively.
Examples:
• AppData\Local\Microsoft\Office\Access.qat specifies a file below a folder that is excluded in thedefault configuration
• AppData\Local\MyApp*.cfg specifies all files with the extension .cfg in the profile folder App‑Data\Local\MyApp and its subfolders
Disabling this policy has the same effect as enabling it and configuring an empty list.
If this policy is not configured here, the value from the .ini file is used. If this policy is not configuredhere or in the .ini file, only non‑excluded files in the user profile are synchronized.
© 1999–2022 Citrix Systems, Inc. All rights reserved. 672
Citrix Virtual Apps and Desktops
Folders tomirror
This policy canhelp solve issues involving any transactional folder (also knownas a referential folder).That folder contains interdependent files, where one file references others. Mirroring folders allowsProfile Management to process a transactional folder and its contents as a single entity, avoiding pro‑file bloat. For example, you can mirror the Internet Explorer cookies folder so that Index.dat is syn‑chronizedwith the cookies that it indexes. In these situations the “lastwritewins.” So files inmirroredfolders that havebeenmodified inmore thanone session are overwrittenby the last update, resultingin loss of profile changes.
For example, consider how Index.dat references cookies while a user browses the Internet. If a userhas two Internet Explorer sessions, each on a different server, and they visit different sites in eachsession, cookies from each site are added to the appropriate server. When the user logs off from thefirst session (or in the middle of a session, if the active write back feature is configured), the cookiesfrom the second sessionmust replace those cookies from the first session. However, instead they aremerged, and the references to the cookies in Index.dat become out of date. Further browsing in newsessions results in repeatedmerging and a bloated cookie folder.
Mirroring the cookie folder solves the issue by overwriting the cookies with those cookies from thelast session each time the user logs off. So Index.dat stays up‑to‑date.
If this policy is not configured here, the value from the .ini file is used. If this policy is not configuredhere or in the .ini file, no folders are mirrored.
Profile container
A profile container is a VHDX‑based profile solution that lets you specify the folders to be containedin the profile disk. The profile container attaches the profile disk containing those folders, thus elimi‑nating the need to save a copy of the folders to the local profile. Doing so decreases logon times.
To use a profile container, enable this policy and add the relative paths of the folders to the list. Werecommend that you include the folders containing large cache files to the list. For example, add theCitrix Files content cache folder to the list: AppData\Local\Citrix\Citrix Files\PartCache.
There are two scenarios to be aware of:
• Profile container does not support simultaneous access by multiple sessions.• Profile container does not support containing the entire profile.
If this policy is not configured here, the value from the .ini file is used. If this policy is not configuredhere or in the .ini file, it is disabled.
© 1999–2022 Citrix Systems, Inc. All rights reserved. 673

Citrix Virtual Apps and Desktops
Folder redirection policy settings
April 14, 2021
The Folder Redirection section contains policy settings that specify whether to redirect folders thatcommonly appear in profiles to a shared network location.
Grant administrator access
This setting enables an administrator to access the contents of a user’s redirected folders.
Note:
This setting grants permissions to administrators who have complete and unrestricted access tothe domain.
By default, this setting is disabled and users are granted exclusive access to the contents of their redi‑rected folders.
Include domain name
This setting enables the inclusionof the%userdomain%environment variable as part of theUNCpathspecified for redirected folders.
By default, this setting is disabled and the %userdomain% environment variable is not included aspart of the UNC path specified for redirected folders.
AppData(Roaming) policy settings
April 14, 2021
TheAppData(Roaming) sectioncontainspolicy settings for specifyingwhether to redirect thecontentsthe AppData(Roaming) folder to a shared network location.
AppData(Roaming) path
This setting specifies the network location to which the contents of the AppData(Roaming) folder areredirected.
By default, this setting is disabled and no location is specified.
If this setting is not configured here, Profile management does not redirect the specified folder.
© 1999–2022 Citrix Systems, Inc. All rights reserved. 674

Citrix Virtual Apps and Desktops
Redirection settings for AppData(Roaming)
This setting specifies how to redirect the contents of the AppData(Roaming) folder.
By default, contents are redirected to a UNC path.
If this setting is not configured here, Profile management does not redirect the specified folder.
Contacts policy settings
April 14, 2021
The Contacts section contains policy settings for specifying whether to redirect the contents the Con‑tacts folder to a shared network location.
Contacts path
This setting specifies the network location towhich the contents of the Contacts folder are redirected.
By default, this setting is disabled and no location is specified.
If this setting is not configured here, Profile Management does not redirect the specified folder.
Redirection settings for Contacts
This setting specifies how to redirect the contents of the Contacts folder.
By default, contents are redirected to a UNC path.
If this setting is not configured here, Profile Management does not redirect the specified folder.
Desktop policy settings
April 14, 2021
The Desktop section contains policy settings for specifying whether to redirect the contents the Desk‑top folder to a shared network location.
Desktop path
This setting specifies the network location to which the contents of the Desktop folder are redirected.
By default, this setting is disabled and no location is specified.
If this setting is not configured here, Profile Management does not redirect the specified folder.
© 1999–2022 Citrix Systems, Inc. All rights reserved. 675

Citrix Virtual Apps and Desktops
Redirection settings for Desktop
This setting specifies how to redirect the contents of the Desktop folder.
By default, contents are redirected to a UNC path.
If this setting is not configured here, Profile Management does not redirect the specified folder.
Documents policy settings
April 14, 2021
The Documents section contains policy settings for specifying whether to redirect the contents theDocuments folder to a shared network location.
Documents path
This setting specifies the network location to which files in the Documents folder are redirected.
By default, this setting is disabled and no location is specified.
If this setting is not configured here, Profile Management does not redirect the specified folder.
The Documents path setting must be enabled not only to redirect files to the Documents folder, butalso to redirect files to the Music, Pictures, and Videos folders.
Redirection settings for Documents
This setting specifies how to redirect the contents of the Documents folder.
By default, contents are redirected to a UNC path.
To control how to redirect the contents of the Documents folder, choose one of the following options:
• Redirect to the following UNC path. Redirects content to the UNC path specified in the Docu‑ments path policy setting.
• Redirect to the users home directory. Redirects content to the users home directory, typicallyconfigured as the #homeDirectory# attribute for a user in Active Directory.
If this setting is not configured here, Profile Management does not redirect the specified folder.
Downloads policy settings
April 14, 2021
© 1999–2022 Citrix Systems, Inc. All rights reserved. 676

Citrix Virtual Apps and Desktops
The Downloads section contains policy settings that specify whether to redirect the contents theDownloads folder to a shared network location.
Downloads path
This setting specifies the network location to which files in the Downloads folder are redirected.
By default, this setting is disabled and no location is specified.
If this setting is not configured here, Profile Management does not redirect the specified folder.
Redirection settings for Downloads
This setting specifies how to redirect the contents of the Downloads folder.
By default, contents are redirected to a UNC path.
If this setting is not configured here, Profile Management does not redirect the specified folder.
Favorites policy settings
April 14, 2021
The Favorites section contains policy settings that specify whether to redirect the contents the Fa‑vorites folder to a shared network location.
Favorites path
This setting specifies the network location towhich the contents of the Favorites folder are redirected.
By default, this setting is disabled and no location is specified.
If this setting is not configured here, Profile Management does not redirect the specified folder.
Redirection settings for Favorites
This setting specifies how to redirect the contents of the Favorites folder.
By default, contents are redirected to a UNC path.
If this setting is not configured here, Profile Management does not redirect the specified folder.
© 1999–2022 Citrix Systems, Inc. All rights reserved. 677

Citrix Virtual Apps and Desktops
Links policy settings
April 14, 2021
TheLinks sectioncontainspolicy settings that specifywhether to redirect the contents theLinks folderto a shared network location.
Links path
This setting specifies the network location to which the contents of the Links folder are redirected.
By default, this setting is disabled and no location is specified.
If this setting is not configured here, Profile Management does not redirect the specified folder.
Redirection settings for Links
This setting specifies how to redirect the contents of the Links folder.
By default, contents are redirected to a UNC path.
If this setting is not configured here, Profile Management does not redirect the specified folder.
Music policy settings
April 14, 2021
The Music section contains policy settings that specify whether to redirect the contents the Musicfolder to a shared network location.
Music path
This setting specifies the network location to which the contents of the Music folder are redirected.
By default, this setting is disabled and no location is specified.
If this setting is not configured here, Profile Management does not redirect the specified folder.
Redirection settings for Music
This setting specifies how to redirect the contents of the Music folder.
By default, contents are redirected to a UNC path.
To control how to redirect the contents of the Music folder, choose one of the following options:
© 1999–2022 Citrix Systems, Inc. All rights reserved. 678
Citrix Virtual Apps and Desktops
• Redirect to the following UNC path. Redirects content to the UNC path specified in the Musicpath policy setting.
• Redirect relative to Documents folder. Redirects content to a folder relative to the Documentsfolder.
To redirect content to a folder relative to the Documents folder, the Documents path setting must beenabled.
If this setting is not configured here, Profile Management does not redirect the specified folder.
Pictures policy settings
April 14, 2021
ThePictures section contains policy settings that specifywhether to redirect the contents thePicturesfolder to a shared network location.
Pictures path
This setting specifies the network location to which the contents of the Pictures folder are redirected.
By default, this setting is disabled and no location is specified.
If this setting is not configured here, Profile Management does not redirect the specified folder.
Redirection settings for Pictures
This setting specifies how to redirect the contents of the Pictures folder.
By default, contents are redirected to a UNC path.
To control how to redirect the contents of the Pictures folder, choose one of the following options:
• Redirect to the following UNC path. Redirects content to the UNC path specified in the Picturespath policy setting.
• Redirect relative to Documents folder. Redirects content to a folder relative to the Documentsfolder.
To redirect content to a folder relative to the Documents folder, the Documents path setting must beenabled.
If this setting is not configured here, Profile Management does not redirect the specified folder.
© 1999–2022 Citrix Systems, Inc. All rights reserved. 679

Citrix Virtual Apps and Desktops
Saved Games policy settings
April 14, 2021
The Saved Games section contains policy settings that specify whether to redirect the contents theSaved Games folder to a shared network location.
Redirection settings for Saved Games
This setting specifies how to redirect the contents of the Saved Games folder.
By default, contents are redirected to a UNC path.
If this setting is not configured here, Profile Management does not redirect the specified folder.
Saved Games path
This setting specifies the network location to which the contents of the Saved Games folder are redi‑rected.
By default, this setting is disabled and no location is specified.
If this setting is not configured here, Profile Management does not redirect the specified folder.
Start menu policy settings
April 14, 2021
The Start Menu section contains policy settings that specify whether to redirect the contents the StartMenu folder to a shared network location.
Redirection settings for Start Menu
This setting specifies how to redirect the contents of the Start Menu folder.
By default, contents are redirected to a UNC path.
If this setting is not configured here, Profile Management does not redirect the specified folder.
Start Menu path
This setting specifies the network location to which the contents of the Start Menu folder are redi‑rected.
© 1999–2022 Citrix Systems, Inc. All rights reserved. 680
Citrix Virtual Apps and Desktops
By default, this setting is disabled and no location is specified.
If this setting is not configured here, Profile Management does not redirect the specified folder.
Searches policy settings
April 14, 2021
The Searches section contains policy settings that specify whether to redirect the contents theSearches folder to a shared network location.
Redirection settings for Searches
This setting specifies how to redirect the contents of the Searches folder.
By default, contents are redirected to a UNC path.
If this setting is not configured here, Profile Management does not redirect the specified folder.
Searches path
This setting specifies the network location towhich the contents of the Searches folder are redirected.
By default, this setting is disabled and no location is specified.
If this setting is not configured here, Profile Management does not redirect the specified folder.
Video policy settings
April 14, 2021
The Video section contains policy settings that specify whether to redirect the contents the Videofolder to a shared network location.
Redirection settings for Video
This setting specifies how to redirect the contents of the Video folder.
By default, contents are redirected to a UNC path.
To control how to redirect the contents of the Video folder, choose one of the following options:
© 1999–2022 Citrix Systems, Inc. All rights reserved. 681

Citrix Virtual Apps and Desktops
• Redirect to the following UNC path. Redirects content to the UNC path specified in the Videopath policy setting.
• Redirect relative to Documents folder. Redirects content to a folder relative to the Documentsfolder.
To redirect content to a folder relative to the Documents folder, the Documents path setting must beenabled.
If this setting is not configured here, Profile Management does not redirect the specified folder.
Video path
This setting specifies the network location to which the contents of the Video folder are redirected.
By default, this setting is disabled and no location is specified.
If this setting is not configured here, Profile Management does not redirect the specified folder.
Log policy settings
April 14, 2021
The Log section contains policy settings that configure Profile Management logging.
Active Directory actions
This setting enables or disables verbose logging of actions performed in Active Directory.
By default, this setting is disabled.
When enabling this setting, make sure the Enable logging setting is also enabled.
If this setting is not configured here, the value from the .ini file is used.
If this setting is not configured here or in the .ini file, errors and general information are logged.
Common information
This setting enables or disables verbose logging of common information.
By default, this setting is disabled.
When enabling this setting, make sure the Enable logging setting is also enabled.
If this setting is not configured here, the value from the .ini file is used.
If this setting is not configured here or in the .ini file, errors and general information are logged.
© 1999–2022 Citrix Systems, Inc. All rights reserved. 682

Citrix Virtual Apps and Desktops
Commonwarnings
This setting enables or disables verbose logging of common warnings.
By default, this setting is disabled.
When enabling this setting, make sure the Enable logging setting is also enabled.
If this setting is not configured here, the value from the .ini file is used.
If this setting is not configured here or in the .ini file, errors and general information are logged.
Enable logging
This settings enables or disables Profile management logging in debug (verbose logging) mode.In debug mode, extensive status information is logged in the log files located in “%System‑Root%\System32\Logfiles\UserProfileManager”.
By default, this setting is disabled and only errors are logged.
Citrix recommends enabling this setting only if you are troubleshooting Profile management.
If this setting is not configured here, the value from the .ini file is used.
If this setting is not configured here or in the .ini file, only errors are logged.
File system actions
This setting enables or disables verbose logging of actions performed in the file system.
By default, this setting is disabled.
When enabling this setting, make sure the Enable logging setting is also enabled.
If this setting is not configured here, the value from the .ini file is used.
If this setting is not configured here or in the .ini file, errors and general information are logged.
File system notifications
This setting enables or disables verbose logging of file systems notifications.
By default, this setting is disabled.
When enabling this setting, make sure the Enable logging setting is also enabled.
If this setting is not configured here, the value from the .ini file is used.
If this setting is not configured here or in the .ini file, errors and general information are logged.
© 1999–2022 Citrix Systems, Inc. All rights reserved. 683

Citrix Virtual Apps and Desktops
Logoff
This setting enables or disables verbose logging of user logoffs.
By default, this setting is disabled.
When enabling this setting, make sure the Enable logging setting is also enabled.
If this setting is not configured here, the value from the .ini file is used.
If this setting is not configured here or in the .ini file, errors and general information are logged.
Logon
This setting enables or disables verbose logging of user logons.
By default, this setting is disabled.
When enabling this setting, make sure the Enable logging setting is also enabled.
If this setting is not configured here, the value from the .ini file is used.
If this setting is not configured here or in the .ini file, errors and general information are logged.
Maximum size of the log file
This setting specifies the maximum permitted size for the Profile Management log file, in bytes.
By default, this is set to 1048576 bytes (1MB).
Citrix recommends increasing the size of this file to 5 MB or more, if you have sufficient disk space. Ifthe log file grows beyond the maximum size, an existing backup of the file (.bak) is deleted, the logfile is renamed to .bak, and a new log file is created.
The log file is created in %SystemRoot%\System32\Logfiles\UserProfileManager.
If this setting is not configured here, the value from the .ini file is used.
If this setting is not configured here or in the .ini file, the default value is used.
Path to log file
This setting specifies an alternative path to save the Profile Management log file.
By default, this setting is disabled and log files are saved in the default location: %System‑Root%\System32\Logfiles\UserProfileManager.
The path can point to a local drive or a remote network‑based drive (UNC path). Remote paths can beuseful in large distributed environments but they may create significant network traffic, which maybe inappropriate for log files. For provisioned, virtual machines with a persistent hard drive, set a
© 1999–2022 Citrix Systems, Inc. All rights reserved. 684
Citrix Virtual Apps and Desktops
local path to that drive. This ensures log files are preserved when the machine restarts. For virtualmachineswithout a persistent hard drive, setting a UNC path allows you to retain the log files, but thesystem account for the machines must have write access to the UNC share. Use a local path for anylaptops managed by the offline profiles feature.
If a UNC path is used for log files, Citrix recommends that an appropriate access control list is appliedto the log file folder to ensure that only authorized user or computer accounts can access the storedfiles.
If this setting is not configured here, the value from the .ini file is used.
If this setting isnot configuredhereor in the .ini file, thedefault location%SystemRoot%\System32\Logfiles\UserProfileManageris used.
Personalized user information
This setting enables or disables verbose logging of personalized user information.
By default, this setting is disabled.
When enabling this setting, make sure the Enable logging setting is also enabled.
If this setting is not configured here, the value from the .ini file is used.
If this setting is not configured here or in the .ini file, errors and general information are logged.
Policy values at logon and logoff
This setting enables or disables verbose logging of policy values when a user logs on and off.
By default, this setting is disabled.
When enabling this setting, make sure the Enable logging setting is also enabled.
If this setting is not configured here, the value from the .ini file is used.
If this setting is not configured here or in the .ini file, errors and general information are logged.
Registry actions
This setting enables or disables verbose logging of actions performed in the registry.
By default, this setting is disabled.
When enabling this setting, make sure the Enable logging setting is also enabled.
If this setting is not configured here, the value from the .ini file is used.
If this setting is not configured here or in the .ini file, errors and general information are logged.
© 1999–2022 Citrix Systems, Inc. All rights reserved. 685

Citrix Virtual Apps and Desktops
Registry differences at logoff
This setting enables or disables verbose logging of any differences in the registry when a user logs off.
By default, this setting is disabled.
When enabling this setting, make sure the Enable logging setting is also enabled.
If this setting is not configured here, the value from the .ini file is used.
If this setting is not configured here or in the .ini file, errors and general information are logged.
Profile handling policy settings
April 14, 2021
The Profile handling section contains policy settings that specify how Profile Management handlesuser profiles.
Delay before deleting cached profiles
This setting specifies an optional extension to the delay, in minutes, before Profile Managementdeletes locally cached profiles at logoff.
A value of 0 deletes the profiles immediately at the end of the logoff process. Profile Managementchecks for logoffs every minute, so a value of 60 ensures that profiles are deleted between one andtwo minutes after users log off (depending on when the last check occurred). Extending the delay isuseful if you know that a process keeps files or the user registry hive open during logoff. With largeprofiles, this can also speed up logoff.
By default, this is set to 0 and Profile Management deletes locally cached profiles immediately.
When enabling this setting, ensure the Delete locally cached profiles on logoff is also enabled.
If this setting is not configured here, the value from the .ini file is used.
If this setting is not configured here or in the .ini file, profiles are deleted immediately.
Delete locally cached profiles on logoff
This setting specifies whether locally cached profiles are deleted after a user logs off.
When this setting is enabled, a user’s local profile cache is deleted after they have logged off. Citrixrecommends enabling this setting for terminal servers.
By default, this setting is disabled and a users local profile cache is retained after they log off.
© 1999–2022 Citrix Systems, Inc. All rights reserved. 686

Citrix Virtual Apps and Desktops
If this setting is not configured here, the value from the .ini file is used.
If this setting is not configured here or in the .ini file, cached profiles are not deleted.
Local profile conflict handling
This setting configures how Profile Management behaves if a user profile exists both in the user storeand as a local Windows user profile (not a Citrix user profile).
By default, Profile Management uses the local Windows profile, but does not change it in any way.
To control how Profile Management behaves, choose one of the following options:
• Use local profile. Profile Management uses the local profile, but does not change it in any way.• Delete local profile. Profile Management deletes the local Windows user profile, and then im‑ports the Citrix user profile from the user store.
• Rename local profile. Profile Management renames the local Windows user profile (for backuppurposes) and then imports the Citrix user profile from the user store.
If this setting is not configured here, the value from the .ini file is used.
If this setting is not configured here or in the .ini file, existing local profiles are used.
Migration of existing profiles
This setting specifies the typesofprofilemigrated to theuser storeduring logon if auserhasnocurrentprofile in the user store.
ProfileManagement canmigrateexistingprofiles “on the fly”during logon if auserhasnoprofile in theuser store. After this, the user store profile is used by Profile Management in both the current sessionand any other session configured with the path to the same user store.
By default, both local and roaming profiles are migrated to the user store during logon.
To specifies the types of profile migrated to the user store during logon, choose one of the followingoptions:
• Local and roaming profiles• Local• Roaming• None (Disabled)
If you select None, the system uses the existing Windows mechanism to create new profiles, as if in aenvironment where Profile Management is not installed.
If this setting is not configured here, the value from the .ini file is used.
If this setting is not configured here or in the .ini file, existing local and roaming profiles aremigrated.
© 1999–2022 Citrix Systems, Inc. All rights reserved. 687

Citrix Virtual Apps and Desktops
Automatic migration of existing application profiles
This setting enables or disables the automatic migration of existing application profiles across dif‑ferent operating systems. The application profiles include both the application data in the AppDatafolder and the registry entries under HKEY_CURRENT_USER\SOFTWARE. This setting can be useful incases where you want to migrate your application profiles across different operating systems.
For example, suppose you upgrade your operating system (OS) fromWindows 10 version 1803 toWin‑dows 10 version 1809. If this setting is enabled, Profile Management automatically migrates the exist‑ing application settings toWindows 10 version 1809 the first time eachuser logs on. As a result, the ap‑plicationdata in the AppData folder and the registry entries underHKEY_CURRENT_USER\SOFTWAREare migrated.
If there are multiple existing application profiles, Profile Management performs the migration in thefollowing order of priority:
1. Profiles of the same OS type (single‑session OS to single‑session OS and multi‑session OS tomulti‑session OS).
2. Profiles of the same Windows OS family; for example, Windows 10 to Windows 10, or WindowsServer 2016 to Windows Server 2016).
3. Profiles of an earlier version of the OS; for example, Windows 7 to Windows 10, or WindowsServer 2012 to Windows 2016.
4. Profiles of the closest OS.
Note: You must specify the short name of the OS by including the variable “!CTX_OSNAME!” in theuser store path. Doing so lets Profile Management locate the existing application profiles.
If this setting is not configured here, the setting from the .ini file is used.
If this setting is not configured here or in the .ini file, it is disabled by default.
Path to the template profile
This setting specifies the path to the profile you want Profile Management to use as a template tocreate new user profiles.
The specified pathmust be the full path to the folder containing the NTUSER.DAT registry file and anyother folders and files required for the template profile.
Note: Donot includeNTUSER.DAT in thepath. Forexample,with the file \\myservername\myprofiles\template\ntuser.dat,set the location as \\myservername\myprofiles\template.
Use absolute paths, which can be either UNC paths or paths on the local machine. Use the latter, forexample, to specify a template profile permanently on a Citrix Provisioning Services image. Relativepaths are not supported.
© 1999–2022 Citrix Systems, Inc. All rights reserved. 688

Citrix Virtual Apps and Desktops
Note: This setting does not support expansion of Active Directory attributes, system environmentvariables, or the %USERNAME% and%USERDOMAIN% variables.
By default, this setting is disabled and new user profiles are created from the default user profile onthe device where a user first logs on.
If this setting is not configured here, the value from the .ini file is used.
If this setting is not configured here or in the .ini file, no template is used.
Template profile overrides local profile
This setting enables the template profile to override the local profile when creating new user profiles.
If a user has no Citrix user profile, but a local Windows user profile exists, by default the local profileis used (and migrated to the user store, if this is not disabled). Enabling this policy setting allows thetemplate profile to override the local profile used when creating new user profiles.
If this setting is not configured here, the value from the .ini file is used.
If this setting is not configured here or in the .ini file, no template is used.
Template profile overrides roaming profile
This settingenables the templateprofile tooverridea roamingprofilewhencreatingnewuserprofiles.
If a user has no Citrix user profile, but a roaming Windows user profile exists, by default the roamingprofile is used (and migrated to the user store, if this is not disabled). Enabling this policy settingallows the template profile to override the roaming profile used when creating new user profiles.
If this setting is not configured here, the value from the .ini file is used.
If this setting is not configured here or in the .ini file, no template is used.
Template profile used as a Citrix mandatory profile for all logons
This setting enables Profile Management to use the template profile as the default profile for creatingall new user profiles.
By default, this setting is disabled and new user profiles are created from the default user profile onthe device where a user first logs on.
If this setting is not configured here, the value from the .ini file is used.
If this setting is not configured here or in the .ini file, no template is used.
© 1999–2022 Citrix Systems, Inc. All rights reserved. 689
Citrix Virtual Apps and Desktops
Registry policy settings
April 14, 2021
The Registry section contains policy settings that specify which registry keys are included or excludedfrom Profile Management processing.
Exclusion list
List of registry keys in the HKCU hive which are ignored during logoff.
Example: Software\Policies
If this policy is disabled, no registry keys are excluded. If this policy is not configured here, the valuefrom the .ini file is used. If this policy is not configured here or in the .ini file, no registry keys areexcluded.
Inclusion list
List of registry keys in the HKCU hive that are processed during logoff.
Example: Software\Adobe.
If this policy is enabled, only keys on this list are processed. If this policy is disabled, the completeHKCU hive is processed. If this policy is not configured here, the value from the .ini file is used. If thispolicy is not configured here or in the .ini file, all of HKCU is processed.
Enable Default Exclusion List ‑ Profile Management 5.5
Default list of registry keys in the HKCU hive that are not synchronized to the user’s profile. Use thispolicy to specify GPO exclusion files without having to fill them in manually.
If you disable this policy, Profile Management does not exclude any registry keys by default. If youdo not configure this policy here, Profile Management uses the value from the .ini file. If you do notconfigure this policy here or in the .ini file, Profile Management does not exclude any registry keys bydefault.
NTUSER.DAT backup
Enables a backup of the last known good copy of NTUSER.DAT and rollback in case of corruption.
If you do not configure this policy here, Profile Management uses the value from the .ini file. If you donot configure this policy here or in the .ini file, Profile Management does not back up NTUSER.DAT.
© 1999–2022 Citrix Systems, Inc. All rights reserved. 690

Citrix Virtual Apps and Desktops
Streamed user profiles policy settings
April 14, 2021
The Streamed user profiles section contains policy settings that specify how Profile Management pro‑cesses streamed user profiles.
Always cache
This setting specifies whether or not Profile Management caches streamed files as soon as possibleafter a user logs on. Caching files after a user logs on saves network bandwidth, enhancing the userexperience.
Use this setting with the Profile streaming setting.
By default, this setting is disabled and streamed files are not cached as soon as possible after a userlogs on.
If this setting is not configured here, the value from the .ini file is used.
If this setting is not configured here or in the .ini file, it is disabled.
Always cache size
This setting specifies a lower limit, in megabytes, on the size of files that are streamed. Profile Man‑agement caches any files this size or larger as soon as possible after a user logs on.
By default, this is set to 0 (zero) and the cache entire profile feature is used. When the cache entireprofile feature is enabled, Profile Management fetches all profile contents in the user store, after auser logs on, as a background task.
If this setting is not configured here, the value from the .ini file is used.
If this setting is not configured here or in the .ini file, it is disabled.
Profile streaming
This setting enables and disables the Citrix streamed user profiles feature. When enabled, files andfolders contained in a profile are fetched from the user store to the local computer onlywhen they areaccessed by users after they have logged on. Registry entries and files in the pending area are fetchedimmediately.
By default, profile streaming is disabled.
If this setting is not configured here, the value from the .ini file is used.
If this setting is not configured here or in the .ini file, it is disabled.
© 1999–2022 Citrix Systems, Inc. All rights reserved. 691

Citrix Virtual Apps and Desktops
Streamed user profile groups
This setting specifies which user profiles within an OU are streamed, based on Windows user groups.
When enabled, only user profileswithin the specified user groups are streamed. All other user profilesare processed normally.
By default, this setting is disabled and all user profiles within an OU are processed normally.
If this setting is not configured here, the value from the .ini file is used.
If this setting is not configured here or in the .ini file, all user profiles are processed.
To enable profile streaming exclusion
Whenprofile streaming exclusion is enabled, ProfileManagement does not stream folders in the exclu‑sion list, and all the folders are fetched immediately from the user store to the local computer whena user logs on.
For more information, see Stream user profiles.
Timeout for pending area lock files
This setting specifies the number of days after which users’ files are written back to the user storefrom the pending area, in the event that the user store remains locked when a server becomes unre‑sponsive. This prevents bloat in thepending area andensures the user store always contains themostup‑to‑date files.
By default, this is set to 1 (one) day.
If this setting is not configured here, the value from the .ini file is used.
If this setting is not configured here or in the .ini file, the default value is used.
User personalization policy settings
April 14, 2021
To enablemounting of user layers within the Virtual Delivery Agents, use configuration parameters tospecify:
• Where on the network to access the user layers.• How large any new user layer disks can grow.
To do so, these two policies appear in the list of available policies:
© 1999–2022 Citrix Systems, Inc. All rights reserved. 692

Citrix Virtual Apps and Desktops
• User Layer Repository Path ‑ Enter a path in the format ‘\server name or address\folder name’in the Value field.
• User Layer Size GB ‑ Change the default value of 0 to the maximum size (in GB) that the userlayer can grow. If you keep the default value, the maximum user layer size is 10 GB.
Note:
Changing the User Layer Size in the policy does not change the size of existing layers.
Default layer size is 0.
For more information, see User personalization layer.
Virtual Delivery Agent policy settings
April 14, 2021
TheVirtual Delivery Agent (VDA) section contains policy settings that control communicationbetweenthe VDA and controllers for a site.
Important: The VDA requires information provided by these settings to register with a Delivery Con‑troller, if you are not using the auto‑update feature. Because this information is required for registra‑tion, youmust configure the following settings using the Group Policy Editor, unless you provide thisinformation during the VDA installation:
• Controller registration IPv6 netmask• Controller registration port• Controller SIDs• Controllers• Only use IPv6 controller registration• Site GUID
Controller registration IPv6 netmask
This policy setting allows administrators to restrict the VDA to only a preferred subnet (rather thana global IP, if one is registered). This setting specifies the IPv6 address and network where the VDAwill register. The VDA will register only on the first address that matches the specified netmask. Thissetting is valid only if the Only use IPv6 controller registration policy setting is enabled.
By default this setting is blank.
Controller registration port
Use this setting only if the Enable auto update of controllers setting is disabled.
© 1999–2022 Citrix Systems, Inc. All rights reserved. 693

Citrix Virtual Apps and Desktops
This setting specifies the TCP/IP port number the VDA uses to register with a Controller when usingregistry‑based registration.
By default, the port number is set to 80.
Controller SIDs
Use this setting only if the Enable auto update of controllers setting is disabled.
This setting specifies a space‑separated list of controller Security Identifiers (SIDs) the VDA uses toregister with a Controller when using registry‑based registration. This is an optional setting whichmay be used with the Controllers setting to restrict the list of Controllers used for registration.
By default, this setting is blank.
Controllers
Use this setting only if the Enable auto update of controllers setting is disabled.
This setting specifies a space‑separated list of controller Fully Qualified Domain Names (FQDNs) theVDA uses to register with a Controller when using registry‑based registration. This is an optional set‑ting that may be used with the Controller SIDs setting.
By default, this setting is blank.
Enable auto update of controllers
This setting enables the VDA to register with a Controller automatically after installation.
After the VDA registers, the Controller with which it registered sends a list of the current controllerFQDNs and SIDs to the VDA. The VDA writes this list to persistent storage. Each Controller also checksthe Site database every 90 minutes for Controller information; if a Controller has been added or re‑moved since the last check, or if a policy change has occurred, the Controller sends updated lists toits registered VDAs. The VDA will accept connections from all the Controllers in the most recent list itreceived.
By default, this setting is enabled.
Only use IPv6 controller registration
This setting controls which form of address the VDA uses to register with the Controller:
• Whenenabled, theVDA registerswith theControllerusing themachine’s IPv6address. When theVDA communicates with the Controller, it uses the following address order: global IP address,Unique Local Address (ULA), link‑local address (if no other IPv6 addresses are available).
© 1999–2022 Citrix Systems, Inc. All rights reserved. 694
Citrix Virtual Apps and Desktops
• When disabled, the VDA registers and communicates with the Controller using the machine’sIPv4 address.
By default, this is setting is disabled.
Site GUID
Use this setting only if the Enable auto update of controllers setting is disabled.
This setting specifies the Globally Unique Identifier (GUID) of the site the VDA uses to register with aController when using Active Directory‑based registration.
By default, this setting is blank.
HDX 3D Pro policy settings
April 14, 2021
The HDX 3D Pro section contains policy settings for enabling and configuring the image quality con‑figuration tool for users. The tool enables users to optimize use of available bandwidth by adjustingin real time the balance between image quality and responsiveness.
Enable lossless
This setting specifies whether or not users can enable and disable lossless compression using theimage quality configuration tool. By default, users are not given the option to enable lossless com‑pression.
When a user enables lossless compression, the image quality is automatically set to the maximumvalue available in the image configuration tool. By default, either GPU or CPU‑based compressioncan be used, according to the capabilities of the user device and the host computer.
HDX 3D Pro quality settings
This setting specifies the minimum and maximum values that define the range of image quality ad‑justment available to users in the image quality configuration tool.
Specify image quality values of between 0 and 100, inclusive. The maximum value must be greaterthan or equal to the minimum value.
© 1999–2022 Citrix Systems, Inc. All rights reserved. 695
Citrix Virtual Apps and Desktops
Monitoring policy settings
April 14, 2021
TheMonitoring section contains policy settings for process, resourcemonitoring, and application fail‑ure monitoring.
The scope of these policies can be defined based on the Site, Delivery Group, type of Delivery Group,organizational unit, and tags.
Policies for process and resourcemonitoring
Each data point for CPU, memory, and processes is collected from the VDA and stored on the Mon‑itoring database. Sending the data points from the VDA consumes network bandwidth and storingthem consumes considerable space on themonitoring database. If you do not want tomonitor eitherresource data or process data or both for a specific scope (for example, a specific delivery group ororganizational unit), it is recommended to disable the policy.
Enable process monitoring
Enable this setting to allow monitoring of processes running on machines with VDAs. Statistics suchas CPU and memory use are sent to the Monitoring Service. The statistics are used for real‑time noti‑fications and historical reporting in Director.
The default for this setting is Disabled.
Enable resourcemonitoring
Enable this setting to allow monitoring of critical performance counters on machines with VDAs.Statistics (such as CPU and memory use, IOPS and disk latency data) are sent to the MonitoringService. The statistics are used for real‑time notification and historical reporting in Director.
The default for this setting is Enabled.
Scalability
The CPU and memory data is pushed to the database from each VDA at 5‑minute intervals; processdata (if enabled) ispushed to thedatabaseat10‑minute intervals. IOPSanddisk latencydata ispushedto the database at 1‑hour intervals.
© 1999–2022 Citrix Systems, Inc. All rights reserved. 696

Citrix Virtual Apps and Desktops
CPU andmemory data
CPU and memory data is enabled by default. The data retention values are as follows (Platinum li‑cense):
Data granularity Number of Days
5 Minute Data 1 Day
10 Minute Data 7 Days
Hourly Data 30 Days
Daily Data 90 Days
IOPS and disk latency data
IOPS and disk latency data is enabled by default. The data retention values are as follows (Platinumlicense):
Data granularity Number of Days
Hourly Data 3 Days
Daily Data 90 Days
With the data retention settings as above, approximately 276 KB of disk space is required to store theCPU, memory, IOPS and disk latency data for one VDA over a period of one year.
Number of machines Approximate storage required
1 276 KB
1K 270 MB
40K 10.6 GB
Process data
Processdata isdisabledbydefault. It is recommended toenableprocessdataonasubsetofmachineson a need basis. The default data retention settings for the process data is as follows:
© 1999–2022 Citrix Systems, Inc. All rights reserved. 697
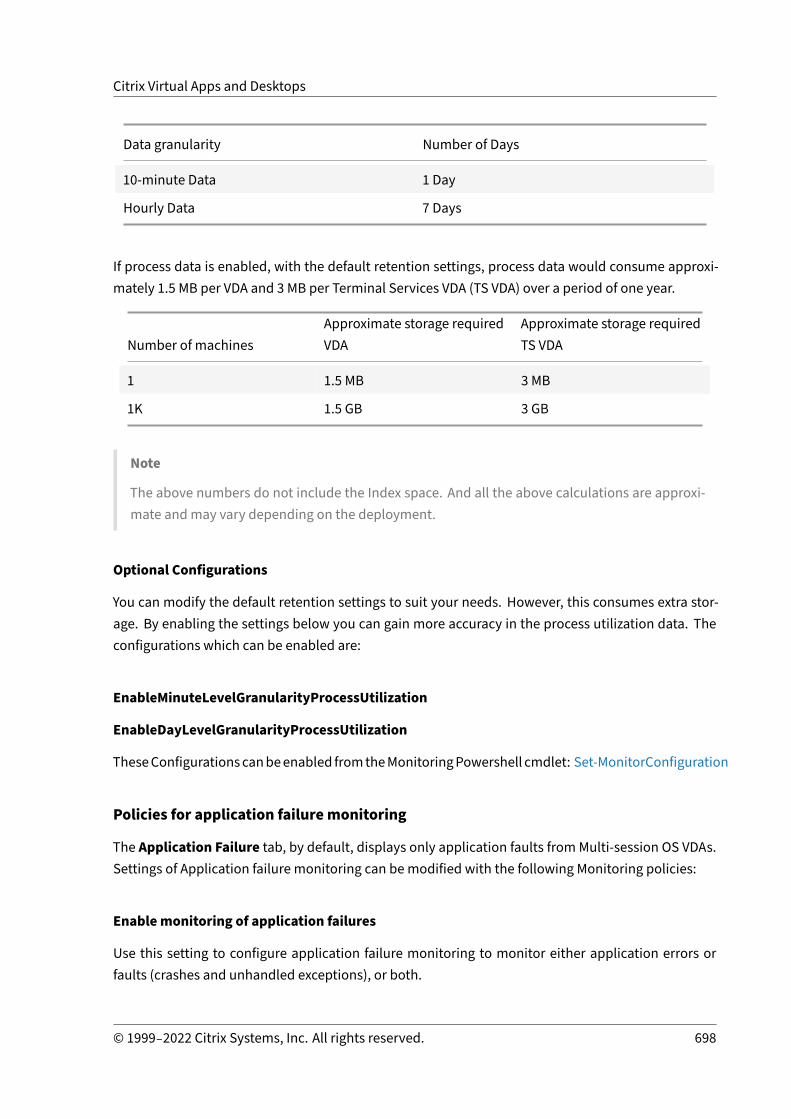
Citrix Virtual Apps and Desktops
Data granularity Number of Days
10‑minute Data 1 Day
Hourly Data 7 Days
If process data is enabled, with the default retention settings, process data would consume approxi‑mately 1.5 MB per VDA and 3 MB per Terminal Services VDA (TS VDA) over a period of one year.
Number of machinesApproximate storage requiredVDA
Approximate storage requiredTS VDA
1 1.5 MB 3 MB
1K 1.5 GB 3 GB
Note
The above numbers do not include the Index space. And all the above calculations are approxi‑mate andmay vary depending on the deployment.
Optional Configurations
You can modify the default retention settings to suit your needs. However, this consumes extra stor‑age. By enabling the settings below you can gain more accuracy in the process utilization data. Theconfigurations which can be enabled are:
EnableMinuteLevelGranularityProcessUtilization
EnableDayLevelGranularityProcessUtilization
TheseConfigurationscanbeenabled fromtheMonitoringPowershell cmdlet: Set‑MonitorConfiguration
Policies for application failuremonitoring
The Application Failure tab, by default, displays only application faults fromMulti‑session OS VDAs.Settings of Application failure monitoring can bemodified with the following Monitoring policies:
Enablemonitoring of application failures
Use this setting to configure application failure monitoring to monitor either application errors orfaults (crashes and unhandled exceptions), or both.
© 1999–2022 Citrix Systems, Inc. All rights reserved. 698
Citrix Virtual Apps and Desktops
Disable application failure monitoring by setting the Value toNone.The default for this setting is Application faults only.
Enablemonitoring of application failures on Single‑session OS VDAs
By default, failures only from applications hosted on the Multi‑session OS VDAs are monitored. Tomonitor Single‑session OS VDAs, set the policy to Allowed.The default for this setting is Prohibited.
List of applications excluded from failuremonitoring
Specify a list of applications that are not to be monitored for failure.By default this list is empty.
Storage planning tips
Grouppolicy. If you arenot interested inmonitoring theResourceDataor ProcessData, either or bothcan be turned off using the group policy. Formore information, see the Group Policy section of Createpolicies.
Data grooming. The default data retention settings can bemodified to groom the data early and freeup storage space. For more information on grooming settings, see Data granularity and retention inAccessing data using the API.
Virtual IP policy settings
April 14, 2021
Important:
Windows 10 Enterprise multi‑session doesn’t support Remote Desktop IP Virtualization (VirtualIP) andwedon’t support Virtual IP nor virtual loopback onWindows 10 Enterprisemulti‑session.
The Virtual IP section contains policy settings that control whether sessions have their own virtualloopback address.
Virtual IP loopback support
When this setting is enabled, each session has its own virtual loopback address. When disabled, ses‑sions do not have individual loopback addresses.
By default, this setting is disabled.
© 1999–2022 Citrix Systems, Inc. All rights reserved. 699
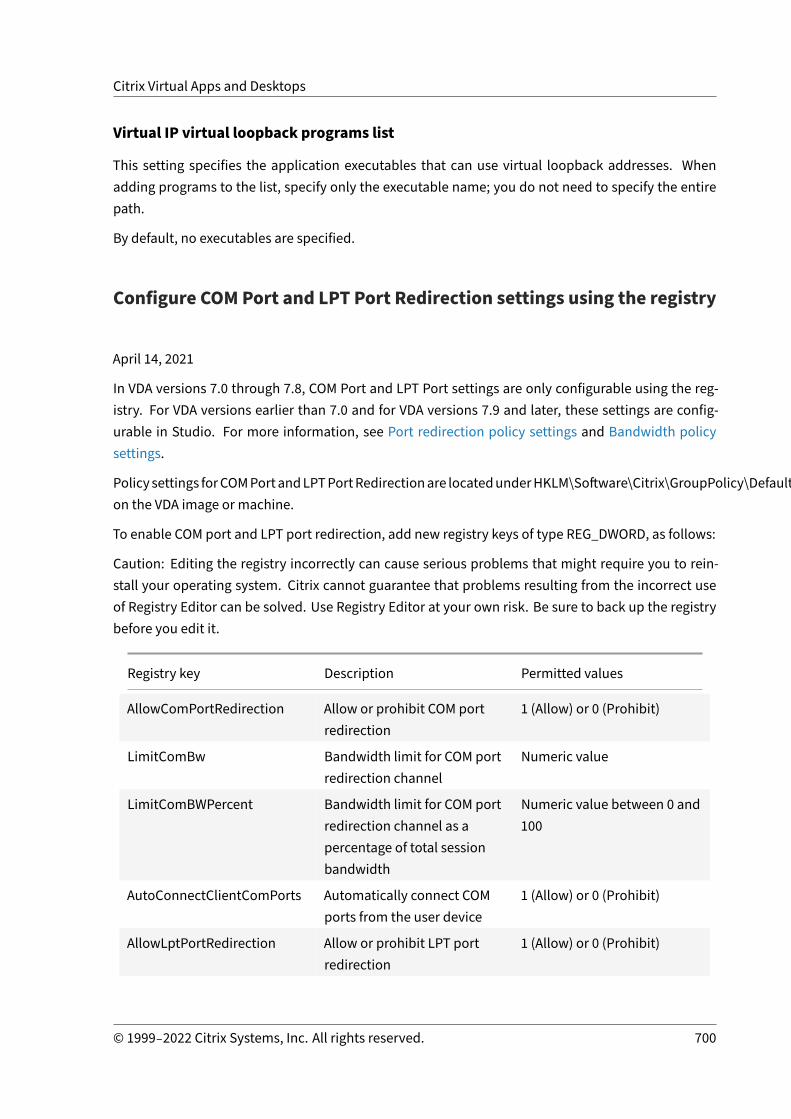
Citrix Virtual Apps and Desktops
Virtual IP virtual loopback programs list
This setting specifies the application executables that can use virtual loopback addresses. Whenadding programs to the list, specify only the executable name; you do not need to specify the entirepath.
By default, no executables are specified.
Configure COM Port and LPT Port Redirection settings using the registry
April 14, 2021
In VDA versions 7.0 through 7.8, COM Port and LPT Port settings are only configurable using the reg‑istry. For VDA versions earlier than 7.0 and for VDA versions 7.9 and later, these settings are config‑urable in Studio. For more information, see Port redirection policy settings and Bandwidth policysettings.
Policy settings forCOMPortandLPTPortRedirectionare locatedunderHKLM\Software\Citrix\GroupPolicy\Defaults\Deprecatedon the VDA image or machine.
To enable COM port and LPT port redirection, add new registry keys of type REG_DWORD, as follows:
Caution: Editing the registry incorrectly can cause serious problems that might require you to rein‑stall your operating system. Citrix cannot guarantee that problems resulting from the incorrect useof Registry Editor can be solved. Use Registry Editor at your own risk. Be sure to back up the registrybefore you edit it.
Registry key Description Permitted values
AllowComPortRedirection Allow or prohibit COM portredirection
1 (Allow) or 0 (Prohibit)
LimitComBw Bandwidth limit for COM portredirection channel
Numeric value
LimitComBWPercent Bandwidth limit for COM portredirection channel as apercentage of total sessionbandwidth
Numeric value between 0 and100
AutoConnectClientComPorts Automatically connect COMports from the user device
1 (Allow) or 0 (Prohibit)
AllowLptPortRedirection Allow or prohibit LPT portredirection
1 (Allow) or 0 (Prohibit)
© 1999–2022 Citrix Systems, Inc. All rights reserved. 700
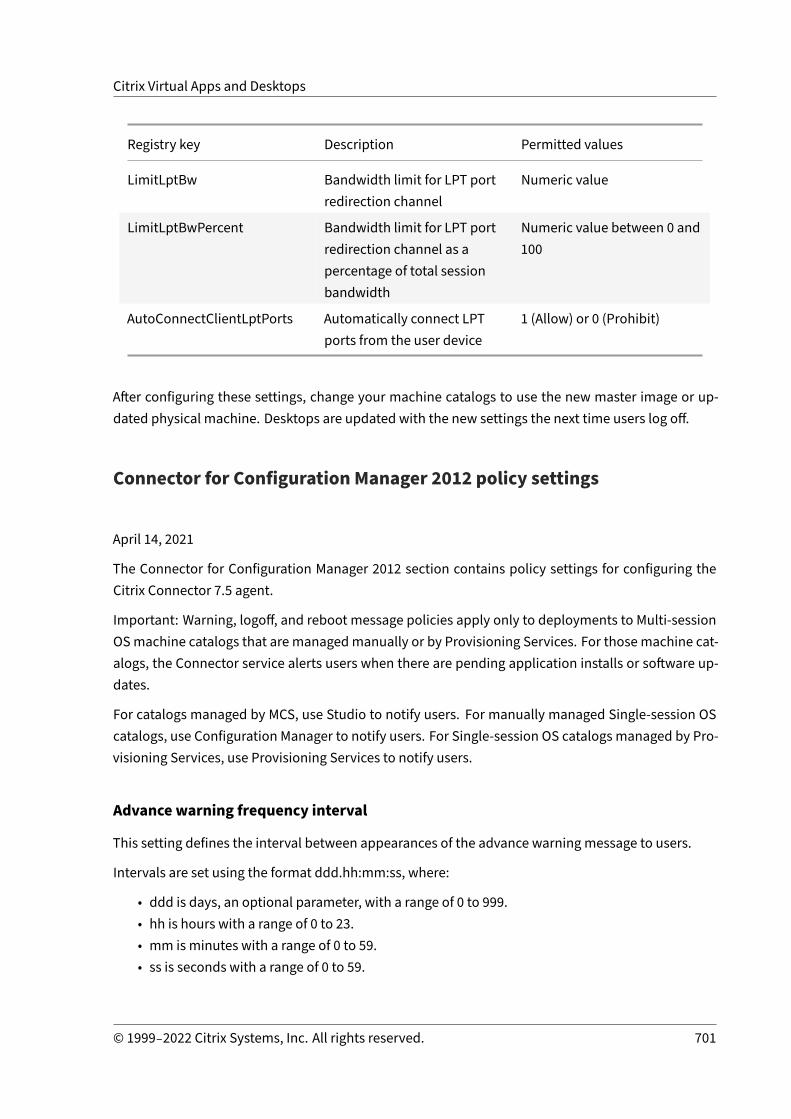
Citrix Virtual Apps and Desktops
Registry key Description Permitted values
LimitLptBw Bandwidth limit for LPT portredirection channel
Numeric value
LimitLptBwPercent Bandwidth limit for LPT portredirection channel as apercentage of total sessionbandwidth
Numeric value between 0 and100
AutoConnectClientLptPorts Automatically connect LPTports from the user device
1 (Allow) or 0 (Prohibit)
After configuring these settings, change your machine catalogs to use the new master image or up‑dated physical machine. Desktops are updated with the new settings the next time users log off.
Connector for Configuration Manager 2012 policy settings
April 14, 2021
The Connector for Configuration Manager 2012 section contains policy settings for configuring theCitrix Connector 7.5 agent.
Important: Warning, logoff, and reboot message policies apply only to deployments to Multi‑sessionOSmachine catalogs that are managedmanually or by Provisioning Services. For thosemachine cat‑alogs, the Connector service alerts users when there are pending application installs or software up‑dates.
For catalogs managed by MCS, use Studio to notify users. For manually managed Single‑session OScatalogs, use Configuration Manager to notify users. For Single‑session OS catalogs managed by Pro‑visioning Services, use Provisioning Services to notify users.
Advance warning frequency interval
This setting defines the interval between appearances of the advance warning message to users.
Intervals are set using the format ddd.hh:mm:ss, where:
• ddd is days, an optional parameter, with a range of 0 to 999.• hh is hours with a range of 0 to 23.• mm is minutes with a range of 0 to 59.• ss is seconds with a range of 0 to 59.
© 1999–2022 Citrix Systems, Inc. All rights reserved. 701

Citrix Virtual Apps and Desktops
By default, the interval setting is 1 hour (01:00:00).
Advance warningmessage box body text
This setting contains the editable text of the message to users notifying them of upcoming softwareupdates or maintenance that requires them to log off.
By default, the message is: {TIMESTAMP} Please save your work. The server will go offline for mainte‑nance in {TIMELEFT}
Advance warningmessage box title
This setting contains the editable text of the title bar of the advance warning message to users.
By default, the title is: Upcoming Maintenance
Advance warning time period
This setting defines how far before maintenance the advance warning message first appears.
The time is set using the format ddd.hh:mm:ss, where:
• ddd is days, an optional parameter, with a range of 0 to 999.• hh is hours with a range of 0 to 23.• mm is minutes with a range of 0 to 59.• ss is seconds with a range of 0 to 59.
By default, the setting is 16 hours (16:00:00), indicating that the first advance warning message ap‑pears approximately 16 hours before maintenance.
Final force logoffmessage box body text
This setting contains the editable text of the message alerting users that a forced logoff has begun.
By default, the message is: The server is currently going offline for maintenance
Final force logoffmessage box title
This setting contains the editable text of the title bar of the final force logoffmessage.
By default, the title is: Notification From IT Staff
© 1999–2022 Citrix Systems, Inc. All rights reserved. 702
Citrix Virtual Apps and Desktops
Force logoff grace period
This setting defines the period of time between notifying users to log off and the implementation ofthe forced logoff to process the pending maintenance.
The time is set using the format ddd.hh:mm:ss, where:
• ddd is days, an optional parameter, with a range of 0 to 999.• hh is hours with a range of 0 to 23.• mm is minutes with a range of 0 to 59.• ss is seconds with a range of 0 to 59.
By default, the force logoff grace period setting is 5 minutes (00:05:00).
Force logoffmessage box body text
This setting contains the editable text of themessage telling users to save their work and log off priorto the start of a forced logoff.
By default, the message contains the following: {TIMESTAMP} Please save your work and log off. Theserver will go offline for maintenance in {TIMELEFT}
Force logoffmessage box title
This setting contains the editable text of the title bar of the force logoffmessage.
By default, the title is: Notification From IT Staff
Image‑managedmode
The Connector agent automatically detects if it is running on amachine clonemanaged by Provision‑ing Services orMCS. The agent blocks ConfigurationManager updates on image‑managed clones andautomatically installs the updates on the master image of the catalog.
After a master image is updated, use Studio to orchestrate the reboot of MCS catalog clones. TheConnector Agent automatically orchestrates the reboot of PVS catalog clones during ConfigurationManager maintenance windows. To override this behavior so that software is installed on catalogclones by Configuration Manager, change Image‑managedmode to Disabled.
Rebootmessage box body text
This setting contains the editable text of the message notifying users when the server is about to berestarted.
By default, the message is: The server is currently going offline for maintenance
© 1999–2022 Citrix Systems, Inc. All rights reserved. 703

Citrix Virtual Apps and Desktops
Regular time interval at which the agent task is to run
This setting determines how frequently the Citrix Connector agent task runs.
The time is set using the format ddd.hh:mm:ss, where:
• ddd is days, an optional parameter, with a range of 0 to 999.• hh is hours with a range of 0 to 23.• mm is minutes with a range of 0 to 59.• ss is seconds with a range of 0 to 59.
By default, the regular time interval setting is 5 minutes (00:05:00).
Manage
April 14, 2021
Managing a Citrix Virtual Apps and Desktops site covers various items and tasks.
Licensing
A valid connection to the Citrix License Server is required when you create a site. Later, you can com‑plete several licensing tasks fromStudio, including adding licenses, changing license types ormodels,and managing license administrators. You can also access the License Administration Console fromStudio.
Applications
Manage applications in Delivery Groups and optionally, Application Groups.
Zones
In a geographically disperse deployment, you can use zones to keep applications and desktops closerto end users, which can improve performance. When you install and configure a site, all Controllers,machine catalogs, and host connections are in one primary zone. Later, you can use Studio to createsatellite zones containing those items. After your site has more than one zone, you will be able toindicate in which zone any newly created machine catalogs, host connections, or added Controllerswill be placed. You can also move items between zones.
Connections and resources
If you are using a hypervisor or other service to host machines that deliver applications and desktopsto users, you create your first connection to that hypervisor or other service when you create a site.The storage and network details for that connection form its resources. Later, you can change thatconnection and its resources, and create more connections. You can also manage the machines thatuse a configured connection.
© 1999–2022 Citrix Systems, Inc. All rights reserved. 704

Citrix Virtual Apps and Desktops
Local Host Cache
Local Host Cache allows connection brokering operations in a site to continue when the connectionbetween a Delivery Controller and the site database fails.
Virtual IP and virtual loopback
The Microsoft virtual IP address feature provides a published application with a unique dynamicallyassigned IP address for each session. The Citrix virtual loopback feature allows you to configure ap‑plications that depend on communications with localhost to use a unique virtual loopback addressin the localhost range.
Delivery Controllers
This article contains considerations and procedures when adding and removing Controllers from asite. It also describes how to move Controllers to another zone or site, and how to move a VDA toanother site.
VDA registration with Controllers
Before a VDA can help deliver applications and desktops, it must register (establish communication)with a Controller. Controller addresses can be specified in several ways, which are described in thisarticle. It is critical that VDAs have current information as Controllers are added,moved, and removedin the site.
Sessions
Maintaining session activity is critical to providing the best user experience. Several features can op‑timize the reliability of sessions, reduce inconvenience, downtime, and loss of productivity.
• Session reliability• Auto Client Reconnect• ICA Keep‑Alive• Workspace control• Session roaming
Use search in Studio
When you want to view information about machines, sessions, machine catalogs, applications, orDelivery Groups in Studio, use the flexible search feature.
Tags
Use tags to identify items such as machines, applications, groups, and policies. You can then tailorcertain operations to apply on to items with a specific tag.
IPv4/IPv6
Citrix Virtual Apps and Desktops supports pure IPv4, pure IPv6, and dual‑stack deployments that useoverlapping IPv4 and IPv6 networks. This article describes and illustrates these deployments. It alsodescribes the Citrix policy settings that control the use of IPv4 or IPv6.
© 1999–2022 Citrix Systems, Inc. All rights reserved. 705
Citrix Virtual Apps and Desktops
User profiles
By default, Citrix Profile Management is installed automatically when you install a VDA. If you use thisprofile solution, review this article for general information. See the Profile Management documenta‑tion for details.
Collect Citrix Diagnostic Facility (CDF) traces
The CDFControl utility is an event tracing controller or consumer for capturing Citrix Diagnostic Facil‑ity (CDF) trace messages displayed from various Citrix tracing providers. It is made to troubleshootcomplex Citrix related issues, parse filter support, and collect performance data.
Citrix Insight Services
Citrix Insight Services (CIS) is a Citrix platform for instrumentation, telemetry, and business insightgeneration.
Citrix Scout
Citrix Scout collects diagnostics and runs health checks. You can use the results for proactivemainte‑nance in your Citrix Virtual Apps and Desktops deployment. Citrix offers comprehensive, automatedanalysis of diagnostics collections through Citrix Insight Services. You can also use Scout to trou‑bleshoot issues, on your own or with Citrix Support guidance.
Licensing
April 14, 2021
Note:
Studio and Director do not support Citrix License Server VPX.
FromStudio, you canmanage and track licensing, if the license server is in the samedomain as Studioor in a trusted domain. For information about other licensing tasks, see the licensing documentationand Multi‑type licensing.
Youmust be a full license administrator to complete the tasks described in this article, except for view‑ing license information. To view license information in Studio, an administratormust have at least theRead Licensing delegated administration permission; the built‑in Full Administrator and Read‑OnlyAdministrator roles have that permission.
The following table lists the supported editions and license models:
© 1999–2022 Citrix Systems, Inc. All rights reserved. 706

Citrix Virtual Apps and Desktops
Products Editions License models
Citrix Virtual Apps Premium, Advanced,Standard
Concurrent
Citrix Virtual Desktops Premium, Advanced,Standard
User/Device and Concurrent
For more information, see Concurrent licenses and User/device licenses.
The following table lists theminimum supported license versions for Citrix Virtual Apps and Desk‑tops, XenApp, and XenDesktop.
Current releaseMinimum supported LicenseServer version MSI installer version
2006 11.16.3.0 Build 28000 16.0.0.28000
2003 11.16.3.0 Build 28000 16.0.0.28000
1912 11.16.3.0 Build 28000 16.0.0.28000
1909 11.16.3.0 Build 28000 16.0.0.28000
1906 11.15.0.0 Build 24100 15.4.0.24100
1903 11.15.0.0 Build 24100 15.4.0.24100
1811 11.15.0.0 Build 24100 15.4.0.24100
1808 11.15.0.0 Build 24100 15.4.0.24100
7.18 11.15.0.0 Build 24100 15.4.0.24100
Long Term Service ReleaseMinimum supported LicenseServer version MSI installer version
1912 LTSR 11.16.3.0 Build 28000 16.0.0.28000
1912 LTSR CU1 11.16.3.0 Build 28000 16.0.0.28000
7.15 LTSR 11.14.0.1 Build 21103 14.2.0.21103
7.6 LTSR 11.14.0.1 Build 21103 14.2.0.21103
Important:
Weno longer support License Server for Windows versions older than 11.14.0.1 Build 22103 (MSI
© 1999–2022 Citrix Systems, Inc. All rights reserved. 707
Citrix Virtual Apps and Desktops
Installer Version 14.2.0.22103).
View license information
Select Configuration > Licensing in the Studio navigation pane. A summary of license usage andsettings for the Site is displayedwith a list of all the licenses currently installed on the specified licenseserver.
Ensure that the licensing settings for the site, which include the product type, license edition, andlicensing model, match the licenses your configured License Server uses. If not, you might have todownload or allocate your exiting licenses to match the site’s license settings.
Download and install a license from Citrix using Studio
1. Select Configuration > Licensing in the Studio navigation pane.2. Select Allocate Licenses in the Actions pane.3. Type the License Access Code, which is supplied in an email from Citrix after licenses are pur‑
chased or renewed.4. Select a product and chooseAllocate Licenses. All the licenses available for that product are al‑
located and downloaded. After you allocate and download all the licenses for a specific LicenseAccess Code, you cannot use that License Access Code again. To perform other transactionswith that code, log on to My Account.
Add licenses that are stored on your local computer or on the network
1. Select Configuration > Licensing in the Studio navigation pane.2. Select Add Licenses in the Actions pane.3. Browse to a license file and add it to the license server.
Change the license server
1. Select Configuration > Licensing in the Studio navigation pane.2. Select Change License Server in the Actions pane.3. Type the address of the license server in the formname:port, where thename is aDNS,NetBIOS,
or IP address. If you do not specify a port number, the default port (27000) is used.
Select the type of license to use
• When configuring the Site, after you specify the license server, you are prompted to select thetype of license to use. If there are no licenses on the server, the option to use the product for a30‑day trial period without a license is automatically selected.
© 1999–2022 Citrix Systems, Inc. All rights reserved. 708

Citrix Virtual Apps and Desktops
• If there are licenses on the server, their details are displayed and you can select one of them.Or, you can add a license file to the server and then select that one.
Change the product edition and licensingmodel
1. Select Configuration > Licensing in the Studio navigation pane.2. Select Edit Product Edition in the Actions pane.3. Update the appropriate options.
To access the License Administration Console, in the Actions pane, select License AdministrationConsole. The console either appears immediately, or if the dashboard is configured as password‑protected, you are prompted for License Administration Console credentials. For details about howto use the console, see the licensing documentation.
Add a licensing administrator
1. Select Configuration > Licensing in the Studio navigation pane.2. Select the Licensing Administrators tab in the middle pane.3. Select Add licensing administrator in the Actions pane.4. Browse to the user you want to add as an administrator and choose permissions.
Change a licensing administrator’s permissions or delete a licensing administrator
1. Select Configuration > Licensing in the Studio navigation pane.2. Select the Licensing Administrators tab in the middle pane and then select the administrator.3. Select either Edit licensing administrator or Delete licensing administrator in the Actions
pane.
Add a licensing administrator group
1. Select Configuration > Licensing in the Studio navigation pane.2. Select the Licensing Administrators tab in the middle pane.3. Select Add licensing administrator group in the Actions pane.4. Browse to the group you want to act as licensing administrators and choose permissions.
Adding an Active Directory Group gives licensing administrator permissions to the users withinthat group.
Change a licensing administrator group’s permissions or delete a licensingadministrator group
1. Select Configuration > Licensing in the Studio navigation pane.
© 1999–2022 Citrix Systems, Inc. All rights reserved. 709

Citrix Virtual Apps and Desktops
2. Select the Licensing Administrators tab in the middle pane and then select the administratorgroup.
3. Select either Edit licensing administrator group or Delete licensing administrator group inthe Actions pane.
Multi‑type licensing
April 14, 2021
Multi‑type licensing supports consumptionofdifferent license types fordelivery groupsona singleCit‑rix Virtual Apps and Desktops site. Type is a single combination of Product ID (XDT orMPS) andModel(UserDevice or Concurrent). The delivery groups must use the same Product Edition (PLT/Premiumor ENT/Advanced) as configured at the site level. Be aware of the special considerations at the end ofthis article when looking to configure multi‑type licensing for your Citrix Virtual Apps and Desktopsdeployments.
If multi‑type licensing is not configured, different license types can be used only when configured forseparate sites. The delivery groups use the site license. For important notification limitations whenmulti‑type licensing is configured, see Special considerations.
To determine the delivery groups that consume the different types of licenses, use these Broker Pow‑erShell cmdlets:
• New‑BrokerDesktopGroup• Set‑BrokerDesktopGroup
© 1999–2022 Citrix Systems, Inc. All rights reserved. 710

Citrix Virtual Apps and Desktops
• Get‑BrokerDesktopGroup
To install licenses, use:
• Citrix Studio• Citrix Licensing Manager• citrix.com
Customer Success Services dates are specific to each license file and to each product and model. De‑livery groups set differently might have different Customer Success Services dates than each other.
License compatibility matrix
This table details old product names, new product names, and the associated feature names. Thefour compatibility columns specify which product and license model combinations are compatiblefor multi‑type licensing. For example, all types with an X under column 1 are compatible. CCU andCCS stand for concurrent licenses and UD is user/device licenses.
Broker PowerShell SDK
The DesktopGroup object has these two properties you can manipulate using the associated New‑BrokerDesktopGroup and Set‑BrokerDesktopGroup cmdlets.
© 1999–2022 Citrix Systems, Inc. All rights reserved. 711

Citrix Virtual Apps and Desktops
Name Value Restriction
LicenseModel A parameter (Concurrent orUserDevice) specifying thelicensing model for the group.If none is specified, thesite‑wide license model isused.
If the feature toggle isdisabled, attempting to set aproperty fails.
ProductCode A text string of XDT (for CitrixVirtual Desktops) or MPS (forCitrix Virtual Apps) specifyingthe licensing Product ID forthe group. If none isspecified, the site‑wideproduct code is used.
If the feature toggle isdisabled, attempting to set aproperty fails.
For more information about the LicenseModel and ProductCode, see about_Broker_Licensing.
New‑BrokerDesktopGroup
Creates a desktop group for managing the brokering of groups of desktops. For more information onthis cmdlet, see https://citrix.github.io/delivery‑controller‑sdk/Broker/New‑BrokerDesktopGroup/.
Set‑BrokerDesktopGroup
Disables or enables an existing broker desktop group or alters its settings. For more information onthis cmdlet, see https://citrix.github.io/delivery‑controller‑sdk/Broker/Set‑BrokerDesktopGroup/
Get‑BrokerDesktopGroup
Retrieves desktop groupsmatching the specified criteria. The output of the Get‑BrokerDesktopGroupcmdlet includes the ProductCode and LicenseModel properties of the group. If the properties havenot been set using New‑ BrokerDesktopGroup or Set‑BrokerDesktopGroup, null values are returned.If null, the site‑wide license model and product code are used. For more information on this cmdlet,see https://citrix.github.io/delivery‑controller‑sdk/Broker/Get‑BrokerDesktopGroup/.
© 1999–2022 Citrix Systems, Inc. All rights reserved. 712
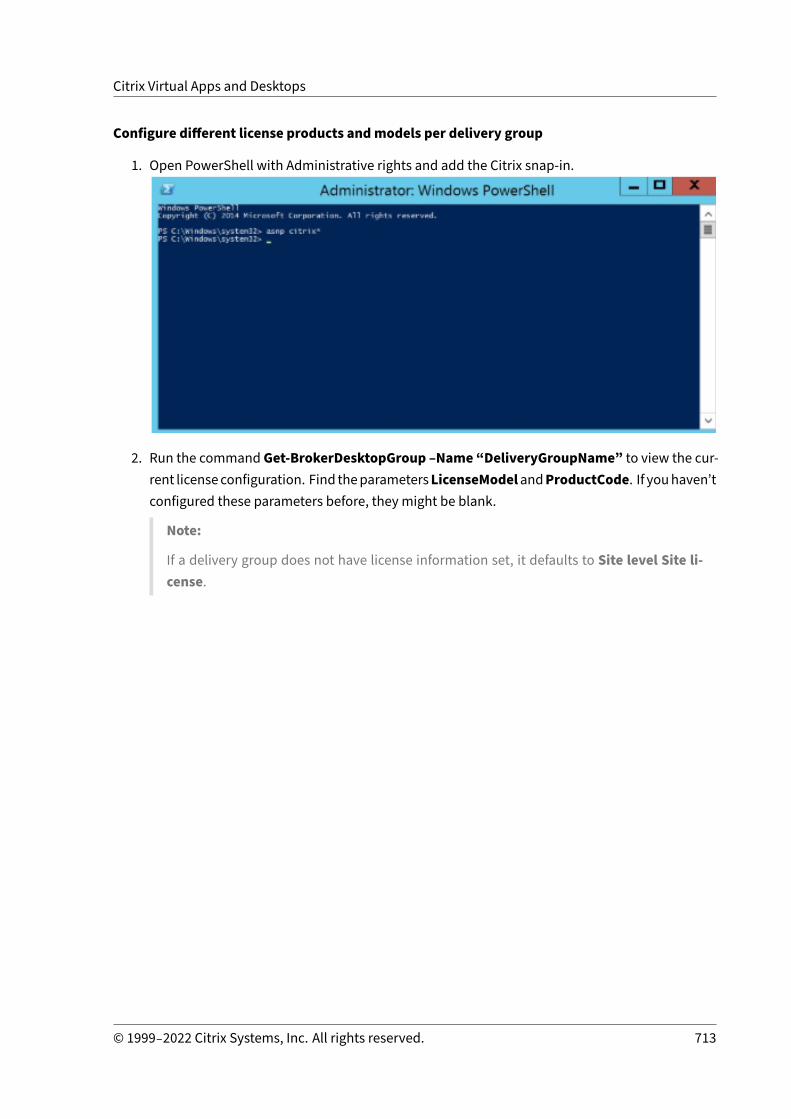
Citrix Virtual Apps and Desktops
Configure different license products andmodels per delivery group
1. Open PowerShell with Administrative rights and add the Citrix snap‑in.
2. Run the command Get‑BrokerDesktopGroup –Name “DeliveryGroupName” to view the cur‑rent licenseconfiguration. Find theparametersLicenseModelandProductCode. If youhaven’tconfigured these parameters before, they might be blank.
Note:
If a delivery group does not have license information set, it defaults to Site level Site li‑cense.
© 1999–2022 Citrix Systems, Inc. All rights reserved. 713

Citrix Virtual Apps and Desktops
3. Change the license model by running the command: Set‑BrokerDesktopGroup –Name“DeliveryGroupName” –LicenseModel LicenseModel.
© 1999–2022 Citrix Systems, Inc. All rights reserved. 714

Citrix Virtual Apps and Desktops
4. Change the license product by running the command: Set‑BrokerDesktopGroup –Name“DeliveryGroupName” –ProductCode ProductCode.
5. Enter the commandGet‑BrokerDesktopGroup –Name“DeliveryGroupName” to validate thechanges.
Note:
You cannotmix andmatch editions in the same site. For example, Premiumand Advancedlicenses. Multiple sites are required if you have licenses with different editions.
© 1999–2022 Citrix Systems, Inc. All rights reserved. 715

Citrix Virtual Apps and Desktops
6. Remove the license configuration by running the same Set‑BrokerDesktopGroup commandsas described in previous steps, and set the value to $null.
Note:
Studio doesn’t display the license configuration for each delivery group. Use PowerShellto view the current configuration.
© 1999–2022 Citrix Systems, Inc. All rights reserved. 716

Citrix Virtual Apps and Desktops
Example
This PowerShell cmdlet example illustrates setting multi‑type licensing for two existing deliverygroups and creates and sets a third delivery group.
To see the license product and license model associated with a delivery group, use the Get‑BrokerDesktopGroup PowerShell cmdlet.
1. We set the first delivery group for XenApp and Concurrent.
Set‑BrokerDesktopGroup ‑Name “Delivery group for Citrix Virtual Apps PremiumConcur‑rent” ‑ProductCode MPS ‑LicenseModel Concurrent
2. We set the second delivery group for XenDesktop and Concurrent.
Set‑BrokerDesktopGroup ‑Name “Delivery group for Citrix Virtual Desktops PremiumConcurrent” ‑ProductCode XDT ‑LicenseModel Concurrent
© 1999–2022 Citrix Systems, Inc. All rights reserved. 717

Citrix Virtual Apps and Desktops
3. We create and set the third delivery group for XenDesktop and UserDevice.
New‑BrokerDesktopGroup ‑Name “Delivery group for Citrix Virtual Desktops PremiumUserDevice” ‑PublishedName “MyDesktop” ‑DesktopKind Private ‑ProductCode XDT‑LicenseModel UserDevice
Special considerations
Multi‑type licensing has different functionality than regular Citrix Virtual Apps andDesktops licensing.
There are no alerts and notifications from Director or Studio for delivery groups configured to use atype that differs from the site configuration:
• No information when nearing license limits or the trigger or expiry of the supplemental graceperiod.
• No notification when a specific group has a problem.
Delivery groups configured formulti‑type licenses consumeONLY that license type and don’t fall backto the site configuration when fully consumed.
Though Citrix Virtual Apps Standard and Citrix Virtual Desktops Standard license edition names indi‑cate that they are both Standard, they are not the same edition. Multi‑type licensing is not availablewith Citrix Virtual Apps Standard and Citrix Virtual Desktop Standard licenses.
FAQ for licensing
April 14, 2021
Note:
• For business continuity resources related to the COVID‑19 pandemic, see CTX27055.
• For general information about maintaining business continuity, see Business continuity —on demand.
• For more information about the current Citrix License Server, see Licensing.
Citrix licensing
How can I get my license file?
We send the license access code in an email. There are three ways to generate license files using thelicense access code:
• The Manage Licenses toolbox from your My Account page on citrix.com
© 1999–2022 Citrix Systems, Inc. All rights reserved. 718

Citrix Virtual Apps and Desktops
• Citrix Studio to allocate your purchase and the license file automatically installs on your CitrixLicense Server.
• Citrix Licensing Manager within the Citrix License Server to allocate your purchase and installyour license file.
For more information, see Licensing in the Citrix Licensing documentation and Licensing in the CitrixVirtual Apps and Desktop documentation.
What TCP ports does Citrix licensing use?
• License Server port number is 27000• Vendor daemon port number is 7279• Management console web port is 8082• Web Service for Licensing port is 8083
What is the Citrix License Server?
The Citrix License Server is a system that allows licenses to be shared across the network. For moreinformation, see Licensing operations overview.
Can I virtualize or cluster the Citrix License Server?
Yes. You can virtualize or cluster theCitrix License Server. Formore information, seeClustered LicenseServers.
What benefits are available tome if I virtualize the Citrix License Server?
Virtualizing the Citrix License Server provides a redundant solution. That solution allows for mobilitybetweenmultiple physical servers without the need for downtime.
Are there any limitations to consider if I virtualize the Citrix License Server?
No.
Does the Citrix License Server manage all the licenses for my Citrix Virtual Apps and Desktopdeployment?
The Citrix License Server manages all licenses you receive for Citrix Virtual Apps and Desktop, exceptlicenses in the Premium Edition used with Citrix Gateway. License servers built in to the networkappliances as required for those security‑oriented network devices manage those licenses.
© 1999–2022 Citrix Systems, Inc. All rights reserved. 719

Citrix Virtual Apps and Desktops
What is the Citrix Licensing Manager?
The Citrix Licensing Manager enables downloading and allocation of license files from the LicenseServer on which you installed the Citrix Licensing Manager. The Citrix Licensing Manager is the rec‑ommended License Server management method, which enables the following:
• Short code registration of the License Server to Citrix Cloud and easy removal of registration.• Configure user and group accounts.• Use the dashboard to display installed, in‑use, expired and available licenses, and CustomerSuccess Services dates.
• Export license use data for use in reporting.• Configure the historical use data retention period. Default data retention period is 180 days.• Simplified installation of license files on the License Server using a license access code or down‑loaded file.
• Enable and disable the supplemental grace period.• Configure Customer Experience Improvement Program (CEIP) and Call Home.• Automatically or manually checks for Customer Success Services renewal licenses and notifiesyou or installs the licenses if found.
• Notifies you of the License Server state ‑ Missing startup license, time issues, uploader failures.• Modify these ports:
– License Server (default 27000)– Vendor Daemon (default 7279)– Web Services for Licensing (default 8083)
For more information, see Citrix Licensing Manager.
Where is the Citrix License Administration Console?
The License Administration Console is no longer supported andwas removed from the License Serverversion 11.16.6. We recommend you use the Citrix Licensing Manager.
You can use Studio tomanage and track licensing, provided the License Server is in the same domainas Studio, or in a trusted domain.
For more information, see Citrix Licensing Manager.
What is the license assignment period?
The license assignment period is the term that a Citrix Virtual Apps and Desktops license is assignedto a user or device. The default license assignment period is 90 days.
© 1999–2022 Citrix Systems, Inc. All rights reserved. 720

Citrix Virtual Apps and Desktops
How do I know howmany licensesmy organization has purchased?
All purchased licenses are available to review and access at any time (24x7) from your secureManageLicenses toolbox on yourMy Account page on https://www.citrix.com.
How do I know howmany licenses are in use at any time?
The Citrix Licensing Manager and Studio provide details on real time license use.
License Server disaster recovery andmaintenance
For information about disaster recovery and maintenance of your License Server, see Disaster recov‑ery andmaintenance in the Citrix Licensing documentation.
Citrix Virtual Apps and Desktops licensing
How is Citrix Virtual Apps and Desktops licensed?
The Citrix Virtual Apps and Desktops licensing offers user/device and concurrent license models.
User/device:
The flexible user/device model aligns with:
• Enterprise‑wide desktop usage.• Underlying Microsoft desktop virtualization licensing.• Concurrent licensing for customers with users needing only occasional access to their virtualdesktops and apps.
User/device licensing gives users access to their virtual desktops and apps from an unlimited num‑ber of devices. Device licenses give an unlimited number of user’s access to their virtual desktopsand apps from a single device. This approach provides you with maximum flexibility and improvesalignment with Microsoft desktop virtualization licensing.
Important:
You can’t manually allocate licenses to a user or device. The License Server or cloud serviceassigns licenses. With user/device licensing, once a license is assigned it can’t be assigned toanother user until after 90 days of inactivity.
Concurrent:
Concurrent licensesallowoneconnection toanunlimitednumberof virtual appsanddesktops foranyuser and any device. A license is consumed only during an active session. If the session disconnectsor is terminated, the license is checked back into the pool.
© 1999–2022 Citrix Systems, Inc. All rights reserved. 721

Citrix Virtual Apps and Desktops
For more information about user/device licensing, see User/device licenses and concurrent licensessee, Concurrent licenses.
Is it possible to try Citrix Virtual Apps and Desktops before purchasing licenses?
Yes. You can download the Citrix Virtual Apps and Desktops software and run it in trial mode. Trialmode lets you use Citrix Virtual Apps and Desktops on‑premises for 30 days, for 10 connections, with‑out a license.
Citrix Virtual Apps and Desktops Services for Citrix Cloud is available for trial service based on ap‑proval. Check with your Citrix representative for further details.
How does Citrix define concurrency for Citrix Virtual Apps and Desktops?
The Citrix Virtual Apps and Desktops concurrent model allows one connection to an unlimited num‑ber of virtual apps and desktops for any user and any device. A license is consumed only during anactive session. If the session disconnects or is terminated, the license is checked back into the poolfor reissue.
Can I deploymultiple editions of Citrix Virtual Apps and Desktops licenses on a commonLicense Server?
Yes. The License Server manages licenses for both Citrix Virtual Apps and Desktops simultaneously.We recommend that you install the latest License Server version. If you are unsure if your LicenseServer version is current, verify it by comparing your versionwith the number on the Citrix downloadssite.
Can a single site use both Citrix Virtual Apps and Citrix Virtual Apps and Desktops licenses?
Depending on the version, a single Citrix Virtual Apps or Citrix Virtual Apps and Desktops site can sup‑port both licensing models ‑ user/device or concurrent. A single Citrix Virtual Apps or Citrix VirtualApps and Desktops site can support only one edition. For more information, see Multi‑type licensing.
Theminimum versions that supportmulti‑type licensing are XenApp and XenDesktop 7.15 Long TermService Release (LTSR) and Citrix Virtual Apps and Desktops 7 1808.
Can I select Citrix Virtual Apps concurrent as a product model if I have Citrix Virtual Apps andDesktops user/device or Citrix Virtual Apps and Desktops concurrent licenses installed on theLicense Server?
If you use Citrix Virtual Apps as a feature of Citrix Virtual Apps andDesktops Advanced or PremiumEdi‑tion, your Citrix Virtual Apps licensemodel is the same as your Advanced or Premium Edition of Citrix
© 1999–2022 Citrix Systems, Inc. All rights reserved. 722

Citrix Virtual Apps and Desktops
Virtual Apps and Desktops. If you have purchased Citrix Virtual Apps and Desktops, configure yourlicensing as Citrix Virtual Apps and Desktops even if you plan to use only the Citrix Virtual Apps func‑tionality. Select Citrix Virtual Apps as a product model only if you have Citrix Virtual Apps concurrentstandalone licenses installed on the License Server.
What product components are included with each Citrix Virtual Apps and Citrix Virtual Appsand Desktops edition?
For a full feature matrix by edition, see Citrix Virtual Apps and Desktops features.
How do I license Citrix Virtual Desktops environments in compliance with the Citrix VirtualApps and Desktops EULA?
To deploy Citrix Virtual Apps and Desktops under the user/device or the concurrent license model incompliance with the Citrix Virtual Apps and Desktops EULA, apply the license files to your LicenseServer. The License Server then controls and monitors license compliance. We recommend that youconfigure yourproduct basedonwhat youpurchased. For example, if youpurchaseCitrix Virtual Appsand Desktops Premium but only want to use the Citrix Virtual Apps feature, configure the product toCitrix Virtual Apps and Desktops to meet compliance. For more information, see the Product LicenseCompliance Center.
How do I license Citrix Virtual Apps environments in compliance with the Citrix Virtual AppsEULA?
To deploy Citrix Virtual Apps under the concurrent licensemodel in compliance with the Citrix VirtualApps EULA, apply the license files to your License Server. The License Server then controls andmoni‑tors license compliance.
Is there a licensing requirement for Citrix Virtual Apps and Desktops Servicing Options: LongTerm Service Release (LTSR) or Current Release (CR)?
Citrix Virtual Apps and Desktops Servicing Options, such as Long‑Term Service Release, are a bene‑fit of the Customer Success Services program. You must have active Customer Success Services toqualify for the benefits of LTSR. For more information, see [Citrix Virtual Apps, Citrix Virtual Apps andDesktops, and Citrix Hypervisor Servicing Options.
How do the Secure Browser Standard Service pooled hours work?
When you purchase a minimum of 25 users of the service, you receive 5000 of hours of rights to usethe service, pooled across all users. Subsequent purchases of user rights don’t increase the pooled
© 1999–2022 Citrix Systems, Inc. All rights reserved. 723
Citrix Virtual Apps and Desktops
hours entitlement. To increase the entitlement of service hours, buy add‑on packs.
Can I use Remote PC Access with CCU licenses?
Yes.
For information about Remote PC Access, see Remote PC Access.
User or device licenses
How does Citrix allocate licenses to users in the user/device licensingmodel?
With theuser/device licensemodel, the License Server assigns the license to auniqueuser ID. It allowsthat single user unlimited connections from unlimited devices. If a user connects to a desktop ordevice, the user requires one license assigned to that user to access a virtual desktop or application.The License Server or cloud service assigns the license. You can’t assign these licensesmanually. Thelicense is assigned to the user, not the shared device. Once a license is assigned, it can’t be assignedto another user until after 90 days of inactivity.
How does Citrix define a licensed device in the user/device licensingmodel?
A licensed device requires a unique endpoint device ID. Under the user/device model, a device is anypiece of equipment that you authorized for use by any individuals to access instances of Citrix VirtualApps and Desktops. For a shared device, a single Citrix Virtual Apps and Desktops user/device licensecan support multiple users that share the device. For example, a shared device can be a classroomworkstation or a clinical workstation in a hospital.
Can I convert my Citrix Virtual Desktops Standard Edition concurrent licenses to theuser/devicemodel?
You cannot convert Citrix Virtual Desktops Standard Edition concurrent licenses to Citrix Virtual Desk‑tops Standard Edition user/device licenses. Similarly, you cannot convert Citrix Virtual Desktops Stan‑dard Edition user/device licenses to Citrix Virtual Desktops Standard Edition concurrent licenses.
If you have Citrix Virtual Desktops Standard Edition concurrent licenses and youwant the user/devicelicense model, upgrade to either Citrix Virtual Apps and Desktops Advanced or Premium Edition.
© 1999–2022 Citrix Systems, Inc. All rights reserved. 724

Citrix Virtual Apps and Desktops
FromTo Standardconcurrent
To Standarduser/device
To Advanceduser/device
To Premiumuser/device
Citrix VirtualDesktopsStandard Editionconcurrentlicenses
N/A Concurrent touser/deviceconversion NOTallowed
You cannotconvert licensemodels, but youcan upgrade toCitrix VirtualApps andDesktopsAdvanced orPremiumEdition.
You cannotconvert licensemodels, but youcan upgrade toCitrix VirtualApps andDesktopsAdvanced orPremiumEdition.
Citrix VirtualDesktopsStandard Editionuser/devicelicenses
User/device toconcurrentconversion NOTallowed
N/A N/A N/A
How does concurrent licensing work differently from user/device licensing?
We base concurrent licensing on concurrent device connections. A concurrent license is in use onlywhenadevicehasestablishedanactiveconnection. Once theconnectionends, theconcurrent licensereturns to the license pool for immediate use. We recommend this licensing model for occasionalusage. User/device licenses are leased for a period and are not available for other users until the leaseexpires.
Under the user/devicemodel, can we allocate licenses to both users and devices in the sameenterprise?
Yes. Both types can be present in the same enterprise. The License Server optimally assigns licensesto users or devices based on usage. You can’t assign these licenses manually.
How do I decide howmany users or devices to license?
Assess the use case requirements to determine the appropriate number of licenses. User/device li‑censing enables unlimited access to unlimited virtual desktops and virtual apps from an unlimitednumber of devices. Concurrent licensing enables unlimited access to unlimited virtual desktops andvirtual apps from a single device that an unlimited number of users can use. Consider the followingformula:
© 1999–2022 Citrix Systems, Inc. All rights reserved. 725
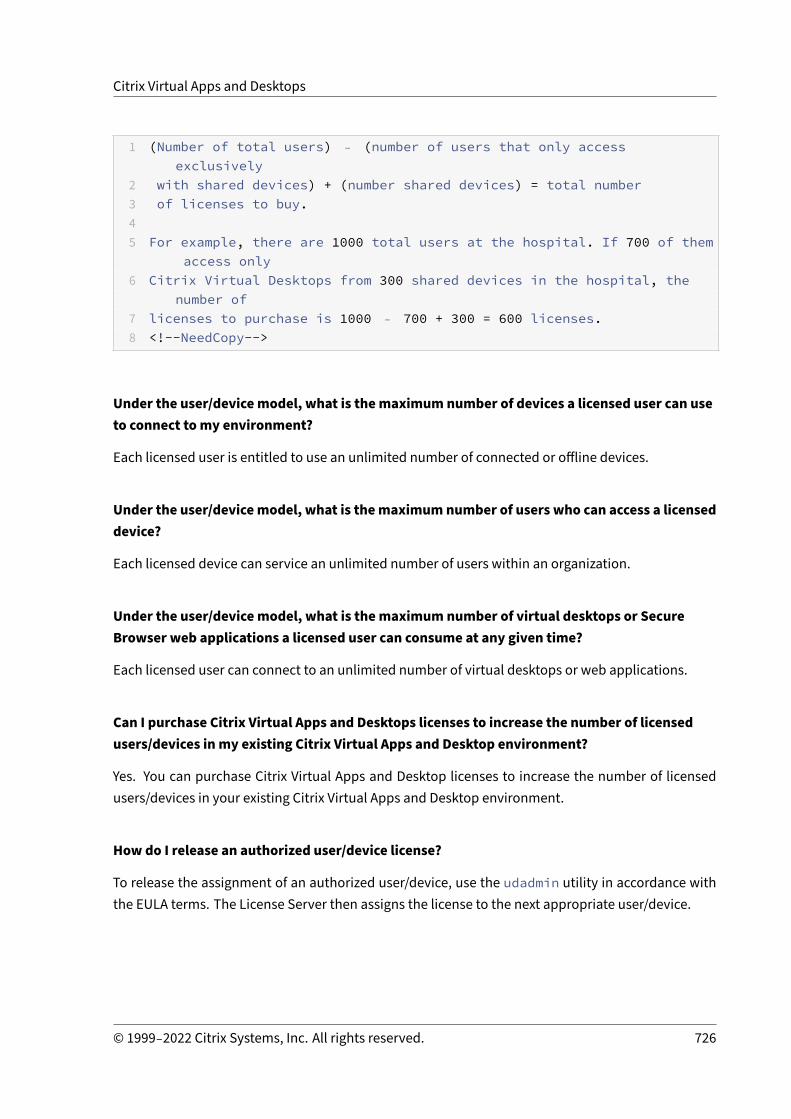
Citrix Virtual Apps and Desktops
1 (Number of total users) – (number of users that only accessexclusively
2 with shared devices) + (number shared devices) = total number3 of licenses to buy.45 For example, there are 1000 total users at the hospital. If 700 of them
access only6 Citrix Virtual Desktops from 300 shared devices in the hospital, the
number of7 licenses to purchase is 1000 – 700 + 300 = 600 licenses.8 <!--NeedCopy-->
Under the user/devicemodel, what is themaximum number of devices a licensed user can useto connect tomy environment?
Each licensed user is entitled to use an unlimited number of connected or offline devices.
Under the user/devicemodel, what is themaximumnumber of users who can access a licenseddevice?
Each licensed device can service an unlimited number of users within an organization.
Under the user/devicemodel, what is themaximum number of virtual desktops or SecureBrowser web applications a licensed user can consume at any given time?
Each licensed user can connect to an unlimited number of virtual desktops or web applications.
Can I purchase Citrix Virtual Apps and Desktops licenses to increase the number of licensedusers/devices inmy existing Citrix Virtual Apps and Desktop environment?
Yes. You can purchase Citrix Virtual Apps and Desktop licenses to increase the number of licensedusers/devices in your existing Citrix Virtual Apps and Desktop environment.
How do I release an authorized user/device license?
To release the assignment of an authorized user/device, use the udadmin utility in accordance withthe EULA terms. The License Server then assigns the license to the next appropriate user/device.
© 1999–2022 Citrix Systems, Inc. All rights reserved. 726

Citrix Virtual Apps and Desktops
What happens if I exceedmy purchased user/device license count?
User/device licenses include a 10% overdraft, which is included when licenses are generated. Theoverdraft is also included in the installed license count. If the usage spike exceeds the installed countincluding overdraft, access for more users is denied. Purchase and deploy a new license to enableaccess for more users.
If all licenses are in use, including the license overdraft, the supplemental grace period enables unlim‑ited connections to a product. The supplemental grace period gives you time to determine why youexceeded the maximum license count and to purchase more licenses without disrupting your users.This period lasts until 15 days elapses or you install more retail licenses, whichever comes first. Formore information, see Supplemental grace period.
Directordisplays thegraceperiod states. Formore information, seePanels on theDirectorDashboard.
What is themaximum number of virtual applications a licensed user can consume at any giventime?
Each licensed user can connect to an unlimited number of virtual applications.
What happens if a licensed user leavesmy organization?
When an existing licensed user leaves your organization, you can release the departing user’s licensewithout notifying Citrix. Use theudadminutility to release the license. If you don’t release the license,the License Server automatically releases any license after 90 days of inactivity. This information issubject to the terms specified in the EULA.
What happens if a licensed user is absent for a protracted period?
If an existing licensed user is absent for a protracted period, you can release the license without no‑tifying Citrix, so that it becomes available for reassignment. Use the udadmin utility to release thelicense.
What happens if we replace a licensed device inmy organization?
If you replace an existing licensed device, you can release the license without notifying Citrix so thatit becomes available for reassignment. Use the udadmin utility to release the license.
What happens if a licensed device is out of service for an extended period?
When an existing licensed device is out of service for an extended period, you can release the licensewithout notifying Citrix, so that it becomes available for reassignment. Use the udadmin utility to
© 1999–2022 Citrix Systems, Inc. All rights reserved. 727

Citrix Virtual Apps and Desktops
release the licenses. If you don’t release the license, the License Server automatically releases anylicense after 90 days of inactivity. This information is subject to the terms specified in the EULA.
Can I switch user licenses to device licenses and conversely after I’ve assigned the licenses to adevice or user?
Yes. This changehappens automatically. The LicenseServer assigns licenses to either users or devicesbased on usage patterns. If usage patterns change, the License Server might switch the assignmentbased on the new usage. The License Server always assigns licenses in the most economical fashionfor the customer. Also, the License Server monitors licenses to identify unused licenses after their 90‑day assignment period. You can reassign licenses identified as unused after the 90‑day assignmentperiod to other users or devices.
Concurrent licenses
Under the concurrent model, what is themaximum number of virtual desktops a Citrix VirtualApps and Desktops licensed user can consume at any given time?
An endpoint can service many users and allows for unlimited connections.
Can I deploy concurrent licenses from a previous version of Citrix Virtual Apps and Desktopsand new user/device or concurrent licenses to a single License Server?
Yes. You can continue to use the same License Server to support user/device or concurrent licenseddeployments.
Can I deploy concurrent licenses and user/device or concurrent licenses to a single LicenseServer?
Yes. You can continue to use the same License Server to support concurrent and user/device or con‑current licensed deployments.
Do Citrix Virtual Apps and Desktops Advanced and Premium editions include Citrix VirtualApps concurrent licenses?
Citrix Virtual Apps and Desktops Advanced and Premium user/device licenses include concurrent Cit‑rix Virtual Apps licenses for compatibility only. These concurrent licenses are for use only with earlierproduct versions that are incompatiblewith user/device licenses. Use of the concurrent compatibilitylicenses included with user/device licenses is permissible only with these versions ‑ XenApp versionsearlier than 6.5 and XenDesktop versions earlier than 5.0 Service Pack 1.
© 1999–2022 Citrix Systems, Inc. All rights reserved. 728

Citrix Virtual Apps and Desktops
What happens if I exceedmy purchased concurrent license count?
If all licenses are in use, the supplemental grace period enables unlimited connections to a product.The supplemental grace period gives you time to determine why you exceeded themaximum licensecount and to purchase more licenses without disrupting your users. This period lasts until 15 dayselapses or you install more retail licenses, whichever comes first. For more information, see Supple‑mental grace period.
Directordisplays thegraceperiod states. Formore information, seePanels on theDirectorDashboard.
Overdraft licenses
How do I get overdraft licenses?
License overdraft is included in all user/device licenses. When you purchase user/device licenses, youreceive a 10% overdraft. The overdraft becomes available after you allocate all your purchased andevaluation licenses. We offer the overdraft feature as a convenience, not as a license entitlement. Ifyou use the overdraft licenses often, we suggest you purchase more licenses.
How can I identify a license overdraft?
You can view usage information, including the number of licenses in overdraft in the Citrix LicensingManager. Studio also contains overdraft usage information.
What happens when an overdraft license is consumed?
A license is assigned from your installed licenses to enable access to your Citrix Virtual Apps and Desk‑tops environment. This overdraft license provides as much access and functionality as your otherlicenses.
Can I get an alert whenmy overdraft licenses are consumed?
Currently, there are no specific alerts provided when overdraft licenses are consumed.
How long can an overdraft license be consumed?
Purchase any overdraft licenses used within 30 days of the first use.
Other product‑specific licensing information
• Citrix ADC• Citrix Cloud
© 1999–2022 Citrix Systems, Inc. All rights reserved. 729
https://docs.citrix.com/en-us/licensing/current-release/license-types.html#supplemental-grace-period

Citrix Virtual Apps and Desktops
• Citrix Endpoint Management• Citrix Gateway• Citrix Hypervisor• Citrix Licensing
Applications
April 14, 2021
Introduction
If your deployment uses only Delivery Groups (and not Application Groups), you add applications tothe Delivery Groups. If you also have Application Groups, generally you should add applications tothe Application Groups. This guidance provides easier administration. An application must alwaysbelong to at least one Delivery Group or Application Group.
In the Add Applications wizard, you can select one or more Delivery Groups, or one or more Appli‑cation Groups, but not both. Although you can later change an application’s group association (forexample, moving an application from an Application Group to a Delivery Group), best practice dis‑courages adding that complexity. Keep your applications in one type of group.
When you associate an application with more than one Delivery Group or Application Group, a visi‑bility issue can occur if you do not have sufficient permission to view the application in all of thosegroups. In such cases, either consult an administrator with greater permissions or have your scopeextended to include all the groups to which the application is associated.
If youpublish twoapplicationswith the samename (perhaps fromdifferent groups) to the sameusers,change the Application name (for user) property in Studio; otherwise, users will see duplicate namesin Citrix Workspace app.
You can change an application’s properties (settings) when you add it, or later. You can also changethe application folder where the application is placed, either when you add the application, or later.
For details, see:
• Create Delivery Groups• Create Application Groups• Tags
© 1999–2022 Citrix Systems, Inc. All rights reserved. 730

Citrix Virtual Apps and Desktops
Add applications
You can add applications when you create a Delivery Group or Application Group; those proceduresare detailed in the Create Delivery Groups and Create Application Groups articles. The following pro‑cedure describes how to add applications after you create a group.
Good to know:
• You cannot add applications to Remote PC Access Delivery Groups.• You cannot use the Add Application wizard to remove applications from Delivery Groups or Ap‑plication Groups. That is a separate operation.
To add one or more applications:
1. Select Applications in the Studio navigation pane and then select Add Applications in the Ac‑tions pane.
2. The Add Applications wizard launches with an Introduction page, which you can remove fromfuture launches of this wizard.
3. Thewizard guides you through theGroups, Applications, and Summary pages described below.When you are done with each page, click Next until you reach the Summary page.
Alternatives to step 1 if you want to add applications to a single Delivery Group or Application Group:
• To add applications to only one Delivery Group, in step 1, select Delivery Groups in the Studionavigation pane, then select a Delivery Group in themiddle pane, and then select Add Applica‑tions in the Actions pane. The wizard will not display the Groups page.
• To add applications to only one Application Group, in step 1, select Applications in the Studionavigation pane, then select anApplicationGroup in themiddle pane, and then select theAddApplications entry under the ApplicationGroup’s name in the Actions pane. Thewizardwill notdisplay the Groups page.
Groups
This page lists all theDeliveryGroups in the Site. If youhave also createdApplicationGroups, the pagelists theApplicationGroupsandDeliveryGroups. Youcanchoose fromeither group, but not frombothgroups. In other words, you cannot add applications to an Application Group and a Delivery Groupat the same time. Generally, if you are using Application Groups, applications should be added toApplication Groups rather than Delivery Groups.
When adding an application, you must select the check box next to at least one Delivery Group (orApplication Group, if available) because every application must always be associated with at leastone group
© 1999–2022 Citrix Systems, Inc. All rights reserved. 731
Citrix Virtual Apps and Desktops
Applications
Click the Add dropdown to display the application sources.
• From Start menu: Applications that are discovered on a machine in the selected DeliveryGroups. When you select this source, a newpage launcheswith a list of discovered applications.Select the check boxes of applications to add, and then click OK.
This source cannot be selected if you (1) selected Application Groups that have no associatedDelivery Groups, (2) selected Application Groups with associated Delivery Groups that containnomachines, or (3) selected a Delivery Group containing nomachines.
• Manually defined: Applications located in the Site or elsewhere in your network. When youselect this source, a new page launches where you type the path to the executable, workingdirectory, optional command line arguments, and display names for administrators and users.After entering this information, click OK.
• Existing: Applications previously added to the Site. When you select this source, a new pagelaunches with a list of discovered applications. Select the check boxes of applications to addand then click OK.
This source cannot be selected If the Site has no applications.
• App‑V: Applications in App‑V packages. When you select this source, a new page launcheswhere you select the App‑V server or the Application Library. From the resulting display, se‑lect the checkboxes of applications to add, and then click OK. For more information, see theApp‑V article.
This source cannot be selected if App‑V is not configured for the Site.
• ApplicationGroup: ApplicationGroups. Whenyou select this source, a newpage launcheswitha list of Application Groups. (Although the display also lists the applications in each group, youcan select only the group, not individual applications.) All current and future applications in theselected groups will be added. Select the check boxes of Application Groups to add, and thenclick OK.
This source cannot be selected if (1) there are no Application Groups, or (2) if the selected De‑livery Groups do not support Application Groups (for example, Delivery Groups with staticallyassignedmachines).
As noted in the table, some sources in the Add dropdown cannot be selected if there is no valid sourceof that type. Sources that are incompatible (for example, you cannot add Application Groups to Appli‑cation Groups) are not included in the dropdown. Applications that have already been added to thegroups you chose cannot be selected.
To add an application from an assigned AppDisk, select From Start menu. If the application is notavailable there, selectManually defined and provide the details. If a folder access error occurs, con‑figure the folder as “shared” and try to add the application throughManually defined again.
© 1999–2022 Citrix Systems, Inc. All rights reserved. 732
Citrix Virtual Apps and Desktops
You can change an application’s properties (settings) from this page, or later.
By default, applications you add are placed in the application folder named Applications. You canchange the application from this page, or later. If you try to add an application and onewith the samename already exists in the same folder, you are prompted to rename the application you’re adding.You can accept the newnameoffered, or decline and then rename the application or select a differentfolder. For example, if “app” already exists in the Applications folder, and you attempt to add anotherapplication named “app” to that folder, the new name “app_1” will be offered.
Summary
If you are adding 10 or fewer applications, their names are listed in Applications to add. If you areadding more than 10 applications, the total number is specified.
Review the summary information and then click Finish.
Change an application’s group association
After adding an application, you can change the Delivery Groups and Application Groups with whichthe application is associated.
You can use drag‑and‑drop to associate an applicationwith an additional group. This is an alternativeto using commands in the Actions pane.
If anapplication is associatedwithmore thanoneDeliveryGroupormore thanoneApplicationGroup,grouppriority can used to specify the order inwhichmultiple groups are checked to find applications.By default, all groups are priority 0 (the highest). Groups at the same priority are load balanced.
An application can be associated with Delivery Groups containing shared (not private) machines thatcan deliver applications. You can also select Delivery Groups containing sharedmachines that deliverdesktops only, if (1) the Delivery Group contains sharedmachines andwas createdwith a XenDesktop7.x version earlier than 7.9, and (2) you have Edit Delivery Group permission. The Delivery Group typeis automatically converted to “desktops and applications” when the properties dialog is committed.
1. SelectApplications in the Studio navigation pane and then select the application in themiddlepane.
2. Select Properties in the Actions pane.3. Select the Groups page.4. To add a group, click the Add dropdown and select Application Groups or Delivery Groups.
(If you have not created any Application Groups, the only entry will be Delivery Groups.) Thenselect one ormore available groups. Groups that are incompatible with the application, or thatare already associated with the application, cannot be selected.
© 1999–2022 Citrix Systems, Inc. All rights reserved. 733

Citrix Virtual Apps and Desktops
5. To remove a group, select one or more groups and then click Remove. If removing group asso‑ciation would result in the application no longer being associated with any Application Groupor Delivery Group, you will be alerted that the application will be deleted.
6. To change the priority of a group, select the group and then click Edit Priority. Select a priorityvalue and then clickOK.
7. When you are finished, click Apply to apply the changes and leave the window open, or clickOK to apply the changes and close the window.
Duplicate, enable or disable, rename, or delete an application
The following actions are available:
• Duplicate: You might want to duplicate an application to create a different version with differ‑ent parameters or properties. When you duplicate an application, it is automatically renamedwith a unique suffix and placed adjacent to the original. You might also want to duplicate anapplication and then add it to a different group. (After duplicating, the easiest way to move anapplication is using drag‑and‑drop.)
• Enable or disable: Enabling and disabling an application is a different action than enablingand disabling a Delivery Group or Application Group.
• Rename: You can rename only one application at a time. If you try to rename an applicationand one with the same name already exists in the same folder or group, you are prompted tospecify a different name.
• Delete: Deleting an application removes it from the Delivery Groups and Application Groupswith which it was associated, but not from the source that was used to add the application orig‑inally. Deleting an application is a different action than removing it from a Delivery Group orApplication Group.
To duplicate, enable or disable, rename, or delete an application:
1. Select Applications in the Studio navigation pane.2. Select one or more applications in the middle pane and then select the appropriate task in the
Actions pane.3. Confirm the action, when prompted.
Remove applications from a Delivery Group
An application must be associated (belong) with at least one Delivery Group or Application Group. Ifyou attempt to remove an application from a Delivery Group that would remove that application’sassociation with any Delivery Group or Application Group, you are notified that the application willbe deleted if you continue. When that happens, if you want to deliver that application, youmust addit again from a valid source.
© 1999–2022 Citrix Systems, Inc. All rights reserved. 734

Citrix Virtual Apps and Desktops
1. Select Delivery Groups in the Studio navigation pane.2. Select a Delivery Group. In the lower middle pane, select the Applications tab and then the
application you want to remove.3. Select Remove Application from the Actions pane.4. Confirm the removal.
Remove applications from an Application Group
An application must belong to at least one Delivery Group or Application Group. If you attempt toremove an application from an Application Group that will result in that application no longer belong‑ing to any Delivery Group or Application Group, you are notified that the application will be deleted ifyou continue. When that happens, if you want to deliver that application, youmust add it again froma valid source.
1. Select Applications in the Studio navigation pane.2. Select the Application Group in the middle pane, and then select one or more applications in
the middle pane.3. Select Remove from Application Group in the Actions pane.4. Confirm the removal.
Change application properties
You can change the properties of only one application at a time.
To change the properties of an application:
1. Select Applications in the Studio navigation pane.2. Select an application and then select Edit Application Properties in the Actions pane.3. Select the page containing the property you want to change.4. When you are finished, click Apply to apply any hanges you made and keep the window open,
or clickOK to apply changes tand close the window.
In the following list, the page is shown in parentheses.
Property Page
Category/folder where application appears inCitrix Workspace app
Delivery
Command line arguments; see Passparameters to published applications
Location
Delivery Groups and Application Groups wherethe application is available
Groups
© 1999–2022 Citrix Systems, Inc. All rights reserved. 735

Citrix Virtual Apps and Desktops
Property Page
Description Identification
File extensions and file type association: whichextensions the application opensautomatically
File Type Association
Icon Delivery
Keywords for StoreFront Identification
Limits; see Configure application limits Delivery
Name: the names seen by the user and by theadministrator
Identification
Path to executable; see Pass parameters topublished applications
Location
Shortcut on user’s desktop: enable or disable Delivery
Visibility: limits which users can see theapplication in Citrix Workspace app; aninvisible application can still be started; tomake it unavailable as well as invisible, add itto a different group
Limit Visibility
Working directory Location
Application changesmay not take effect for current application users until they log off their sessions.
Configure application limits
Configure application limits to help manage application use. For example, you can use applicationlimits tomanage the number of users accessing an application simultaneously. Similarly, applicationlimits can be used to manage the number of simultaneous instances of resource‑intensive applica‑tions, this can help maintain server performance and prevent deterioration in service.
This feature limits the number of application launches that are brokered by the Controller (for ex‑ample, from Citrix Workspace app and StoreFront), and not the number of running applications thatcould be launched by other methods. This means that application limits assist administrators whenmanaging concurrent usage, but do not provide enforcement in all scenarios. For example, applica‑tion limits cannot be applied when the Controller is in leased connection mode.
By default, there is no limit on how many application instances can run at the same time. There areseveral application limit settings; you can configure any or all:
© 1999–2022 Citrix Systems, Inc. All rights reserved. 736

Citrix Virtual Apps and Desktops
• The maximum number of concurrent instances of the application by all users in the DeliveryGroup.
• One instance of the application per user in the Delivery Group.• The maximum number of concurrent instances of the application per machine (PowerShellonly).
If a limit is configured, an error message is generated when a user attempts to launch an instance ofthe application that will exceed the configured limit. If more than one limit is configured, an error isreported when the first limit is reached.
Examples using application limits:
• Maximum number of simultaneous instances limit: In a Delivery Group, you configure themaximum number of simultaneous instances of application Alpha to 15. Later, users in thatDelivery Group have 15 instances of that application running at the same time. If any user inthat Delivery Group now attempts to launch Alpha, an error message is generated, and Alpha isnot launched because it would exceed the configured simultaneous application instance limit(15).
• One‑instance‑per‑user application limit: In another Delivery Group, you enable theone‑instance‑per‑user option for application Beta. User Tony launches application Beta suc‑cessfully. Later in the day, while that application is still running in Tony’s session, he attemptsto launch another instance of Beta. An error message is generated and Beta is not launchedbecause it would exceed the one‑instance‑per‑user limit.
• Maximumnumber of simultaneous instances and one‑instance‑per‑user limits: In anotherDelivery Group, you configure a maximum number of simultaneous instances of 10 and enablethe one‑instance‑per‑user option for application Delta. Later, when ten users in that DeliveryGroup each have an instance of Delta running, any other user in that Delivery Group who triesto launch Delta will receive an error message, and Delta will not be launched. If any of the tencurrent Delta users attempt to launch a second instance of that application, they will receive anerror message and second instance will not be launched.
• Maximum number of simultaneous instances per machine, and using tag restrictions: Ap‑plication Charlie has licensing and performance requirements that dictatehowmany instancescan be running at the same time on a specific server, as well as howmany instances can be run‑ning simultaneously across all servers in the Site.
The application instances per machine limit affects any server in the Site (not just machines ina particular Delivery Group). Let’s say your Site has three servers. For application Charlie, youconfigure the app instancespermachine limit to 2. So, nomore than six instances of applicationCharlie will be allowed to launch site‑wide. (That’s a limit of two instances of Charlie on each ofthe three servers.)
To restrict an application’s usage to only certain machines within a Delivery Group (inaddition
© 1999–2022 Citrix Systems, Inc. All rights reserved. 737

Citrix Virtual Apps and Desktops
to limiting the instances on all machines Site‑wide), use the tagging functionality for those ma‑chines, and configure themaximumnumber of instances permachine limitfor that application.
If application instances are also launched by methods other than Controller brokering (for example,while a Controller is in outage mode) and configured limits are exceeded, users will not be able tolaunch additional instances until they close sufficient instances to no longer exceed the limits. Theinstances that exceeded the limit will not be forcibly shut down; theywill be allowed to continue untiltheir users close them.
If you disable session roaming, then disable the one‑instance‑per‑user application limit. If you enablethe one‑instance‑per‑user application limit, do not configure either of the two values that allow newsessions on new devices. For information about roaming, see the Sessions article.
To configure the maximum instances per Delivery Group limit, and the one‑instance‑per‑user limit:
1. Select Applications in the Studio navigation pane and then select an application.
2. Select the Edit Application Properties in the Actions pane.
3. On the Delivery page, choose one of the following options.
• Allowunlimiteduseof theapplication. There isno limit to thenumberof instances runningat the same time. This is the default.
• Set limits for the application. There are two limit types; specify either or both.– Specify the maximum number of instances that can run concurrently– Limit to one instance of the application per user
4. ClickOK to apply the change and close the dialog box, or Apply to apply the change and leaveethe dialog box open.
To configure the maximum instances per machine limit (PowerShell only):
• In PowerShell (using the Remote PowerShell SDK for Citrix Cloud deployments, or the Power‑Shell SDK for on‑premises deployments), enter the appropriate BrokerApplication cmdlet withthe MaxPerMachineInstances parameter.
• For guidance, use the Get‑Help cmdlet. For example:
Get-Help Set-BrokerApplication –Parameter MaxPerMachineInstances
Pass parameters to published applications
Use the Location page of an application’s properties to enter the command line and pass parametersto published applications.
When you associate a published application with file types, the symbols “%*” (percent and star sym‑bols enclosed in double quotationmarks) are appended to the end of the command line for the appli‑cation. These symbols act as a placeholder for parameters passed to user devices.
© 1999–2022 Citrix Systems, Inc. All rights reserved. 738

Citrix Virtual Apps and Desktops
If a published application does not launch when expected, verify that its command line contains thecorrect symbols. By default, parameters supplied by user devices are validated when the symbols“%*” are appended. For published applications that use customized parameters supplied by the userdevice, the symbols “%**” are appended to the command line to bypass command‑line validation. Ifyou do not see these symbols in a command line for the application, add themmanually.
If the path to the executable file includes directory names with spaces (such as “C:\Program Files”),enclose the command line for the application in double quotation marks to indicate that the spacebelongs in the command line. To do this, add double quotation marks around the path, and anotherset of double quotationmarks around the%* symbols. Be sure to include a spacebetween the closingquotation mark for the path and the opening quotation mark for the %* symbols.
For example, the command line for the published application Windows Media Player is:
“C:\Program Files\Windows Media Player\mplayer1.exe” “%*”
Manage application folders
By default, new applications you add to Delivery Groups are placed in a folder named Applications.You can specify a different folder when you create the Delivery Group, when you add an application,or later.
Good to know:
• You cannot rename or delete the Applications folder, but you can move all the applications itcontains to other folders you create.
• A folder name can contain 1‑64 characters. Spaces are permitted.• Folders can be nested up to five levels.• Folders do not have to contain applications; empty folders are allowed.• Folders are listed alphabetically in Studio unless youmove them or specify a different locationwhen you create them.
• You can have more than one folder with the same name, as long as each has a different parentfolder. Similarly, you can havemore than one application with the same name, as long as eachis in a different folder.
• You must have View Applications permission to see the applications in folders, and you musthaveEdit ApplicationProperties permission for all applications in the folder to remove, rename,or delete a folder that contains applications.
• Mostof the followingprocedures request actionsusing theActionspane inStudio. Alternatively,you can use right‑clickmenus or drag and drop. For example, if you create ormove a folder in alocation you did not intend, you can drag/drop it to the correct location.
To manage application folders, select Applications in the Studio navigation pane. Use the followinglist for guidance.
© 1999–2022 Citrix Systems, Inc. All rights reserved. 739

Citrix Virtual Apps and Desktops
• To view all folders (excluding nested folders): Click Show all above the folder list.• To create a folder at the highest level (not nested): Select the Applications folder. To placethe new folder under an existing folder other than Applications, select that folder. Then, selectCreate Folder in the Actions pane. Enter a name.
• To move a folder: Select the folder and then selectMove Folder in the Actions pane. You canmove only one folder at a time unless the folder contains nested folders. (The easiest way tomove a folder is to use drag and drop.)
• To rename a folder: Select the folder, and then select Rename Folder in the Actions pane.Enter a name.
• To delete a folder: Select the folder, and then select Delete Folder in the Actions pane. Whenyou delete a folder that contains applications and other folders, those objects are also deleted.Deleting an application removes the application assignment from the Delivery Group; it doesnot remove it from themachine.
• To move applications into a folder: Select one or more applications. Then, select Move Ap‑plication in the Actions pane. Select the folder.
You can also place applications you are adding in a specific folder (even a new one) on the Appli‑cation page of the Create Delivery Group and Create Application Group wizards. By default, addedapplications go in the Applications folder; click Change to select or create a folder.
Control local launch of applications on published desktops
Whenusers launch a published application fromwithin a published desktop, you can control whetherthe application is launched in that desktop session or as a published application in the same DeliveryGroup. By default, the application in the published desktop session is launched. In PowerShell (us‑ing the Remote PowerShell SDK in Citrix Cloud deployments or the PowerShell SDK in on‑premisesdeployments), you can change this action.
In theNew‑Broker Application or Set‑BrokerApplication cmdlet, use the LocalLaunchDisabled option.For example:
Set-BrokerApplication -LocalLaunchDisabled <Boolean>
By default, this option’s value is false (‑LocalLaunchDisabled $false). When launching a publishedapplication fromwithin a published desktop, the application is launched in that desktop session.
If you set the option’s value to true (‑LocalLaunchDisabled $true), the published application islaunched. This creates a separate, additional session from the published desktop (using CitrixWorkspace app for Windows) to the published application.
Requirements and limits:
• This option applies only to published desktops and applications in the same Delivery Group.• The application’s ApplicationType value must be HostedOnDesktop.
© 1999–2022 Citrix Systems, Inc. All rights reserved. 740
Citrix Virtual Apps and Desktops
• This option is available only through the appropriate PowerShell SDK. It is not currently avail‑able in the Studio graphical interface.
• This option requires minimum: StoreFront 3.14, Citrix Receiver for Windows 4.11, and DeliveryController 7.17.
Universal Windows Platform Apps
April 14, 2021
Citrix Virtual Apps and Desktops supports the use of Universal Windows Platform (UWP) apps withVDAs on Windows 10 and Windows Server 2016 machines. For information about UWP apps, see thefollowing Microsoft documentation:
• What is a Universal Windows Platform (UWP) app?• Distribute offline apps• Guide to Universal Windows Platform (UWP) apps
The term Universal Apps is used throughout this article to refer to UWP apps.
Requirements and limitations
Universal Apps are supported for VDAs on Windows 10 and Windows Server 2016 machines.
VDAs must be minimum version 7.11.
The followingCitrix Virtual Apps andDesktops features are either not supportedor limitedwhenusingUniversal Apps:
• File type association is not supported.• Local App Access is not supported.• Dynamic preview: If apps running in the session overlap, the preview shows the default icon.The Win32 APIs used for Dynamic Preview are not supported in Universal Apps.
• Action Center remoting: Universal Apps can use the Action Center for displaying the messagesin the session. Redirect these messages to the endpoint to display them to the user.
Launching Universal apps and non‑Universal apps from same server is not supported for Windows10 VDAs. For Windows Server 2016, Universal apps and non‑Universal apps should be in separateDelivery Groups or Application Groups.
All Universal Apps installed on the machine are enumerated; therefore, Citrix recommends disablinguser access to the Windows Store. This prevents the Universal Apps installed by one user from beingaccessed by a different user.
© 1999–2022 Citrix Systems, Inc. All rights reserved. 741
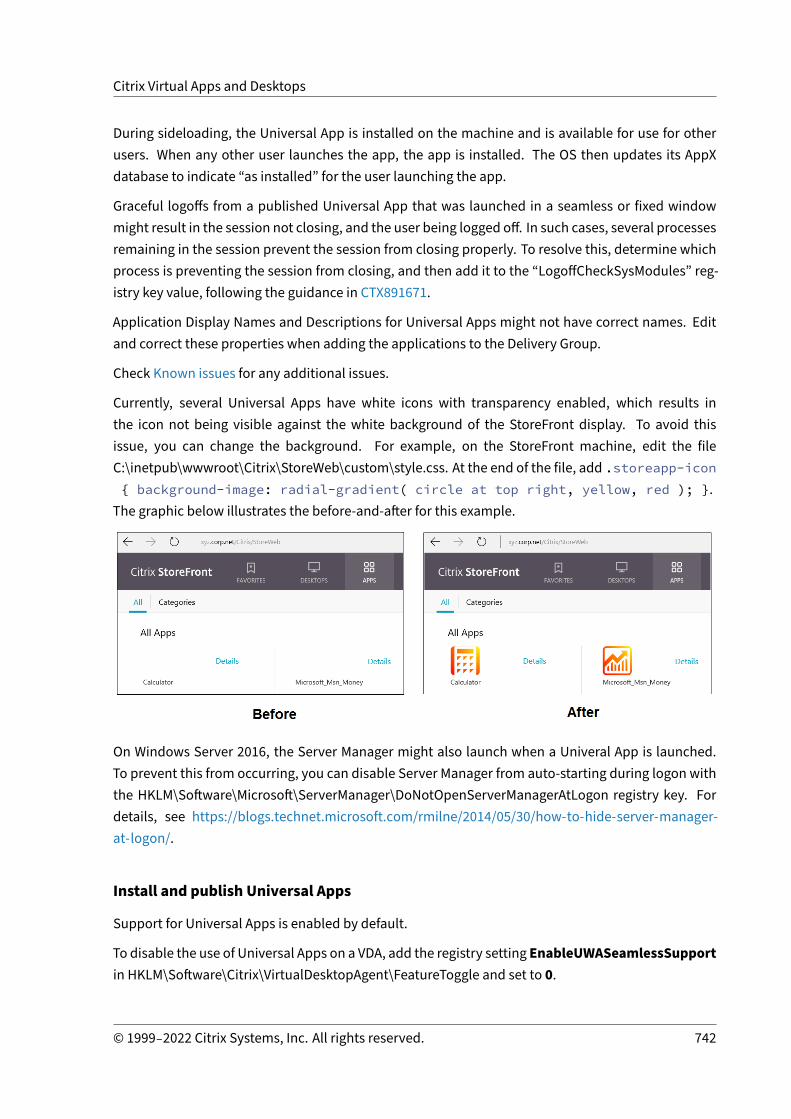
Citrix Virtual Apps and Desktops
During sideloading, the Universal App is installed on the machine and is available for use for otherusers. When any other user launches the app, the app is installed. The OS then updates its AppXdatabase to indicate “as installed” for the user launching the app.
Graceful logoffs from a published Universal App that was launched in a seamless or fixed windowmight result in the session not closing, and the user being logged off. In such cases, several processesremaining in the session prevent the session from closing properly. To resolve this, determine whichprocess is preventing the session from closing, and then add it to the “LogoffCheckSysModules” reg‑istry key value, following the guidance in CTX891671.
Application Display Names and Descriptions for Universal Apps might not have correct names. Editand correct these properties when adding the applications to the Delivery Group.
Check Known issues for any additional issues.
Currently, several Universal Apps have white icons with transparency enabled, which results inthe icon not being visible against the white background of the StoreFront display. To avoid thisissue, you can change the background. For example, on the StoreFront machine, edit the fileC:\inetpub\wwwroot\Citrix\StoreWeb\custom\style.css. At the end of the file, add .storeapp-icon{ background-image: radial-gradient( circle at top right, yellow, red ); }.
The graphic below illustrates the before‑and‑after for this example.
On Windows Server 2016, the Server Manager might also launch when a Univeral App is launched.To prevent this from occurring, you can disable Server Manager from auto‑starting during logon withthe HKLM\Software\Microsoft\ServerManager\DoNotOpenServerManagerAtLogon registry key. Fordetails, see https://blogs.technet.microsoft.com/rmilne/2014/05/30/how‑to‑hide‑server‑manager‑at‑logon/.
Install and publish Universal Apps
Support for Universal Apps is enabled by default.
To disable the use of Universal Apps on a VDA, add the registry setting EnableUWASeamlessSupportin HKLM\Software\Citrix\VirtualDesktopAgent\FeatureToggle and set to 0.
© 1999–2022 Citrix Systems, Inc. All rights reserved. 742

Citrix Virtual Apps and Desktops
To install one ormore Universal Apps on VDAs (or amaster image), use one of the followingmethods:
• Complete an offline install from the Windows Store for Business, using a tool such as Deploy‑ment Image Servicing and Management (DISM) to deploy the apps to the desktop image. Formore information, see Online and offline apps.
• Sideload the apps. For more information, see Sideload LOB apps in Windows 10.
To add (publish) one or more Universal Apps in Citrix Virtual Apps or Citrix Virtual Desktops:
1. After the Universal Apps are installed on the machine, add the Universal Apps to a DeliveryGroup or Application Group. You can do this when you create a group, or later. On the Ap‑plications page, in the Addmenu, select From Start menu.
2. When the applications list appears, select the Universal Apps you want to publish.
3. Continue with the wizard or close the edit dialog.
Uninstall Universal Apps
When youuninstall a Universal Appwith a command such asRemove-AppXPackage, the item is unin‑stalledonly foradministrators. To remove theapp fromthemachinesofuserswhomayhave launchedand used the app, you must run the removal command on each machine. You cannot uninstall theAppX package from all users’ machines with one command.
Zones
April 14, 2021
Deployments that span widely dispersed locations connected by a WAN can face challenges due tonetwork latency and reliability. There are two options that mitigate those challenges:
• Deploy multiple sites, each with their own SQL Server site database.
This option is recommended for large enterprise deployments. Multiple sites aremanaged sep‑arately, and each requires its own SQL Server site database. Each site is a separate Citrix VirtualApps deployment.
• Configure multiple zones within a single site.
Configuring zones can help users in remote regions connect to resources without necessarilyforcing their connections to traverse large segments of the WAN. Using zones allows effectivesitemanagement from a single Citrix Studio console, Citrix Director, and the site database. Thissaves the costs of deploying, staffing, licensing, and operating more sites containing separatedatabases in remote locations.
© 1999–2022 Citrix Systems, Inc. All rights reserved. 743

Citrix Virtual Apps and Desktops
Zones can be helpful in deployments of all sizes. You can use zones to keep applications anddesktops closer to end users, which improves performance. A zone can have one or more Con‑trollers installed locally for redundancy and resiliency, but it is not required.
Thenumberof Controllers configured in the site canaffect theperformanceof someoperations,such as adding newControllers to the site itself. To avoid this, we recommend that you limit thenumber of zones in your Citrix Virtual Apps or Citrix Virtual Desktops site to nomore than 50.
When the network latency of your zones is more than 250 ms RTT, we recommend that you de‑ploy multiple sites instead of zones.
Throughout this article the term local refers to the zonebeingdiscussed. For example, “AVDA registerswith a local Controller” means that a VDA registers with a Controller in the zone where the VDA islocated.
Zones in this release are similar, but not identical to zones in XenApp version 6.5 and earlier. For exam‑ple, in this implementation of zones, there are no data collectors. All Controllers in the site communi‑cate with one site database in the primary zone. Also, failover and preferred zones work differently inthis release.
Zone types
A site always has one primary zone. It can also optionally have one or more satellite zones. Satellitezones can be used for disaster recovery, geographically distant data centers, branch offices, a cloud,or an availability zone in a cloud.
Primary zone:
The primary zone has the default name “Primary”. This zone contains the SQL Server site database(and high availability SQL servers, if used), Studio, Director, Citrix StoreFront, Citrix License Server,and Citrix Gateway. Always keep the site database in the primary zone.
The primary zone should have at least two Controllers for redundancy. The primary zone can haveVDAs with applications that are tightly coupled with the database and infrastructure.
Satellite zone:
A satellite zone contains one or more VDAs, Controllers, StoreFront servers, and Citrix Gatewayservers. Under normal operations, Controllers in a satellite zone communicate directly with thedatabase in the primary zone.
A satellite zone, particularly a large one, might also contain a hypervisor that is used to provision andstore machines for that zone. When you configure a satellite zone, you can associate a hypervisor orother service connectionwith it. (Be sure any catalogs that use that connection are in the same zone.)
A site can have satellite zones of different configurations, based on your unique needs and environ‑ment. The following figure illustrates a primary zone and examples of satellite zones.
© 1999–2022 Citrix Systems, Inc. All rights reserved. 744

Citrix Virtual Apps and Desktops
In the illustration:
• Primary zone: Contains two Controllers, Studio, Director, StoreFront, License Server, and thesite database (plus high availability SQL Server deployments). The Primary zone also containsseveral VDAs and a Citrix Gateway.
• Satellite zone 1: VDAs with Controller: Satellite zone 1 contains a Controller, VDAs, and aStoreFront server. VDAs in this satellite zone register with the local Controller. The local Con‑troller communicates with the site database and license server in the primary zone.
If the WAN fails, the Local Host Cache feature allows the Controller in the satellite zone to con‑tinue brokering connections to VDAs in that zone. Such a deployment can be effective in anoffice where workers use a local StoreFront site and the local Controller to access their localresources.
• Satellite zone 2: VDAswith redundant Controllers: Satellite zone 2 contains two Controllers,VDAs, and a StoreFront server. This is themost resilient zone type, offering protection against asimultaneous failure of the WAN and one of the local Controllers.
Where VDAs register andwhere Controllers fail over
In a site containing primary and satellite zones, with VDAs at minimum version 7.7:
© 1999–2022 Citrix Systems, Inc. All rights reserved. 745

Citrix Virtual Apps and Desktops
• A VDA in the primary zone registers with a Controller in the primary zone. A VDA in the primaryzone never attempts to register with a Controller in a satellite zone.
• A VDA in a satellite zone registers with a local Controller, if possible. (This is considered the pre‑ferredController.) If no local Controllers are available (for example, because they cannot acceptmore VDA registrations or they have failed), the VDA will attempt to register with a Controller inthe primary zone. In this case, the VDA stays registered in the primary zone, even if a Controllerin a satellite zone becomes available again. A VDA in a satellite zone never attempts to registerwith a Controller in another satellite zone.
• When auto‑update is enabled for VDA discovery of Controllers, and you specify a list of Con‑troller addresses during VDA installation, a Controller is randomly selected from that list forinitial registration (regardless of which zone the Controller resides in). After the machine withthat VDA is restarted, the VDA will start to prefer registering with a Controller in its local zone.
• If a Controller in a satellite zone fails, it fails over to another local Controller, if possible. If nolocal Controllers are available, it fails over to a Controller in the primary zone.
• If you move a Controller in or out of a zone, and auto‑update is enabled, VDAs in both zonesreceive updated lists indicating which Controllers are local and which are in the primary zone,so they knowwith whom they can register and accept connections from.
• If youmovea catalog to another zone, the VDAs in that catalog re‑registerwith Controllers in thezone where youmoved the catalog. (When youmove a catalog to another zone, make sure thiszone and the zone with the associated host connection are well connected. If there is limitedbandwidth or high‑latency, move the host connection to the same zone containing the associ‑ated machine catalog.)
If all Controllers in the primary zone fail:
• Studio cannot connect to the site.• Connections to VDAs in the primary zone cannot be made.• Site performance degrades until the Controllers in the primary zone become available.
For sites containing VDA versions earlier than 7.7:
• A VDA in a satellite zone accepts requests from Controllers in their local zone and the primaryzone. (VDAs at minimum version 7.7 can accept Controller requests from other satellite zones.)
• A VDA in a satellite zone registers with a Controller in the primary zone or the local zone at ran‑dom. (VDAs at minimum version 7.7 prefer the local zone.)
Zone preference
To use the zone preference feature, you must be using minimum StoreFront 3.7 and Citrix Gateway11.0‑65.x.
In a multi‑zone site, the zone preference feature offers the administrator more flexibility to controlwhich VDA is used to launch an application or desktop.
© 1999–2022 Citrix Systems, Inc. All rights reserved. 746

Citrix Virtual Apps and Desktops
How zone preference works
There are three forms of zone preference. You might prefer to use a VDA in a particular zone, basedon:
• Where the application’s data is stored. This is referred to as the application home.• The location of the user’s home data, such as a profile or home share. This is referred to as theuser home.
• The user’s current location (where the Citrix Workspace app is running). This is referred to asthe user location.
The following graphic shows an example multi‑zone configuration.
In this example, VDAs are spread among three satellite zones, but they are all in the same DeliveryGroup. Therefore, the broker might have a choice which VDA to use for a user launch request. Thisexample indicates there are several locations where users can be running their Citrix Workspace appendpoints:
• User A is using a device with Citrix Workspace app in satellite zone 1.
• User B is using a device in satellite zone 2.
• A user’s documents can be stored in various locations.
– Users A and B use a share based in satellite zone 1.
© 1999–2022 Citrix Systems, Inc. All rights reserved. 747
Citrix Virtual Apps and Desktops
– User C uses a share from satellite zone C.– One of the published applications uses a database located in satellite zone 1.
You associate a user or applicationwith a zone by configuring a home zone for the user or application.The broker in the Delivery Controller then uses those associations to help select the zone where asession will be launched, if resources are available. You can:
• Configure the home zone for a user by adding a user to a zone.• Configure the home zone for an application by editing the application properties.
Auseroranapplicationcanhaveonlyonehomezoneata time. (Anexception forusers canoccurwhenmultiple zonemembershipsoccurbecauseofuser groupmembership; see the “Other considerations”section. However, even in this case, the broker uses only one home zone.)
Although zone preferences for users and applications can be configured, the broker selects only onepreferred zone for a launch. The default priority order for selecting the preferred zone is applicationhome>user home>user location. You can restrict the sequence; see Tailoring zonepreference. Whena user launches an application:
• If that application has a configured zone association (an application home), then the preferredzone is the home zone for that application.
• If the application does not have a configured zone association, but the user has a configuredzone association (a user home), then the preferred zone is the home zone for that user.
• If neither the application nor the user has a configured zone association, then the preferredzone is the zone where the user is running a Citrix Workspace app instance (the user location).If that zone is not defined, a random VDA and zone selection is used. Load balancing is appliedto all VDAs in the preferred zone. If there is no preferred zone, load balancing is applied to allVDAs in the Delivery Group.
Tailoring zone preference
When you configure (or remove) a home zone for a user or an application, you can also further restricthow zone preference is used.
• Mandatory user home zone use: In a Delivery Group, you can specify that a sessions launch inthe user’s home zone (if configured), with no failover to another zone if the home zone doesn’thave available resources. This restriction is helpful when you must avoid the risk of copyinglarge profiles or data files between zones. In other words, you would rather deny a sessionlaunch than to launch the session in a different zone.
• Mandatory application home zone use: Similarly, when you configure a home zone for anapplication, you can indicate that the applicationbe launchedonly in that zone,with no failoverto a different zone if resources are not available in the application’s home zone.
• No application home zone, and ignore configured user home zone: If you do not specify ahomezone for anapplication, youcanalso indicate thatnoconfigureduser zonesbeconsidered
© 1999–2022 Citrix Systems, Inc. All rights reserved. 748

Citrix Virtual Apps and Desktops
when launching that application. For example, you might prefer that users run an applicationon a VDA near their device, using the user location zone preference, even though some usersmight have a different home zone.
How preferred zones affect session use
When a user launches an application or desktop, the broker prefers using the preferred zone ratherthan using an existing session.
If the user launching an application or desktop already has a session that is suitable for the resourcebeing launched (for example, that can use session sharing for an application, or a session that is al‑ready running the resource being launched), but that session is running on a VDA in a zone other thanthe preferred zone for the user/application, then the system might create a new session. This satis‑fies launching in the correct zone (if it has available capacity), ahead of reconnecting to a session in aless‑preferred zone for that user’s session requirements.
To prevent an orphan session that can no longer be reached, reconnection is allowed to existing dis‑connected sessions, even if they are in a non‑preferred zone.
The order of desirability for sessions to satisfy a launch is:
1. Reconnect to an existing session in the preferred zone.2. Reconnect to an existing disconnected session in a zone other than the preferred zone.3. Start a new session in the preferred zone.4. Reconnect to a connected existing session in a zone other than the preferred zone.5. Start a new session in a zone other than the preferred zone.
Other zone preference considerations
• If you configure a home zone for a user group (such as a security group), that group’s users(through direct or indirect membership) are associated with the specified zone. However, auser can be a member of multiple security groups, and therefore might have a different homezone configured through other group membership. In such cases, determination of that user’shome zone can be ambiguous.
If a user has a configured home zone that was not acquired through group membership, that zone isused for zone preference. Any zone associations acquired through groupmembership are ignored.
If the user has multiple different zone associations acquired solely through group membership, thebroker chooses among the zones randomly. Once the broker makes this choice, that zone is used forsubsequent session launches, until the user’s groupmembership changes.
• The user location zone preference requires detection of Citrix Workspace app on the endpointdevice by the Citrix Gateway through which that device is connecting. The Citrix Gatewaymust
© 1999–2022 Citrix Systems, Inc. All rights reserved. 749
Citrix Virtual Apps and Desktops
be configured to associate ranges of IP addresses with particular zones, and discovered zoneidentity must be passed through StoreFront to the Controller.
For more information about zone preference, see Zone preference internals.
Considerations, requirements, and best practice
• You can place the following items in a zone: Controllers, machine catalogs, host connections,users, and applications. If a catalog uses a host connection, be sure the catalog and the connec‑tion are in the same zone. (However, with a low‑latency high‑bandwidth connection available,they can be in different zones.)
• When you place items in a satellite zone it affects how the site interacts with them and withother objects related to them.
– When Controllers are placed into a satellite zone, it is assumed that those machines havegood (local) connectivity to hypervisors and VDAs in the same zone. Controllers in thatsatellite zone are then used in preference to Controllers in the primary zone for handlingthose hypervisors and VDAmachines.
– When a hypervisor connection is placed into a satellite zone, it is assumed that all the hy‑pervisors managed via that hypervisor connection also reside in that satellite zone. Con‑trollers in that satellite zone are then used in preference to Controllers in the primary zonewhen communicating with that hypervisor connection.
– When a machine catalog is placed into a satellite zone, it is assumed that all the VDA ma‑chines in that catalog are in the satellite zone. Local Controllers are used in preference toControllers in the primary zone when attempting to register with the site, after the Con‑troller list auto‑update mechanism has activated after the first registration of each VDA.
– Citrix Gateway instances can also be associated with zones. This is done as part of theStoreFront Optimal HDX Routing configuration rather than, as for the other elements de‑scribed here, as part of the site configuration. When a Citrix Gateway is associated with azone, it is preferred to be used when HDX connections to VDA machines in that zone areused.
• When you create a production site and then create the first catalog andDelivery Group, all itemsare in the primary zone – you cannot create satellite zones until after you complete that initialsetup. (If you create an empty site, the primary zone will initially contain only a Controller. Youcan create satellite zones before or after creating a catalog and Delivery Group.)
• When you create the first satellite zone containing one ormore items, all other items in your siteremain in the primary zone.
• Theprimary zone isnamed ‘Primary’bydefault; youcanchange thatname. Although theStudiodisplay indicates which zone is the primary zone, it is best practice to use an easily identifiable
© 1999–2022 Citrix Systems, Inc. All rights reserved. 750
Citrix Virtual Apps and Desktops
name for the primary zone. You can reassign the primary zone (that is, make another zone theprimary zone), but it should always contain the site database and any high availability servers.
• Always keep the site database in the primary zone.
• After you create a zone, you can later move items from one zone to another. This flexibilityallows you to potentially separate items thatwork best in close proximity. For example,movinga catalog to adifferent zone than the connection (host) that creates themachines in the catalog,can affect performance. Consider potential unintended effects before moving items betweenzones. Keep a catalog and the host connection it uses in the same zone, or in zones which arewell connected (for example, via a low‑latency and high‑bandwidth network).
• For optimal performance, install Studio and Director only in the primary zone. If you want an‑other Studio instance in a satellite zone (for example, a satellite zone containing Controllersto use as failover if the primary zone becomes inaccessible), run Studio as a locally publishedapplication. You can also access Director from a satellite zone because it is a web application.
• Ideally, Citrix Gateway in a satellite zone is used for user connections coming into that zone fromother zones or external locations, although you can use it for connections within the zone.
• Remember: To use the zonepreference feature, youmust be usingminimumStoreFront 3.7 andCitrix Gateway 11.0‑65.x.
Connection quality limits
The Controllers in the satellite zone perform SQL interactions directly with the site database. Thisimposes some limits on the quality of the link between the satellite zone and the primary zone con‑taining the site database. The specific limits are relative to the number of VDAs and user sessions onthose VDAs that are deployed in the satellite zone. So satellite zones with only a few VDAs and ses‑sions can function with a poorer‑quality connection to the database than satellite zones with largenumbers of VDAs and sessions.
For more information, see Latency and SQL Blocking Query Improvements.
The impact of latency on brokering performance
Although zones allow users to be on higher‑latency links, providing that there is a local broker, the ad‑ditional latency inevitably impacts end‑user experience. Formostwork that users do, they experienceslowness caused by round trips between Controllers in the satellite zone and the site database.
For launching applications, extra delays occur while the session brokering process identifies suitableVDAs to send session launch requests to.
© 1999–2022 Citrix Systems, Inc. All rights reserved. 751

Citrix Virtual Apps and Desktops
Create andmanage zones
A Full Administrator can perform all zone creation and management tasks. However, you can alsocreateacustomrole thatallowsyou tocreate, edit, ordeleteazone. Moving itemsbetweenzonesdoesnot require zone‑related permissions (except zone read permission); however, you must have editpermission for the items you are moving. For example, to move a catalog from one zone to another,youmust have edit permission for that catalog. For more information, see Delegated administration.
If you use Citrix Provisioning: The Citrix Provisioning console is not aware of zones, so Citrix rec‑ommends using Studio to create catalogs for satellite zones. Create the catalog in Studio, specifyingthe correct satellite zone. Then use the Citrix Provisioning console to provisionmachines in that cata‑log. (If you create the catalog using the Citrix Provisioningwizard, the catalog is placed in the primaryzone. You will have to use Studio to move it to the satellite zone later.)
Create a zone
1. Select Configuration > Zones in the Studio navigation pane.2. Select Create Zone in the Actions pane.3. Enter a name for the zone, and a description (optional). The name must be unique within the
site.4. Select the items to place in the new zone. You can filter or search the list of items from which
you can select. You can also create an empty zone; simply do not select any items.5. Click Save.
As an alternative to this method, you can select one or more items in Studio and then select CreateZone in the Actions pane.
Change a zone name or description
1. Select Configuration > Zones in the Studio navigation pane.2. Select a zone in the middle pane and then select Edit Zone in the Actions pane.3. Change the zone name, description, or both. If you change the name of the primary zone,make
sure the zone remains easily identifiable as the primary zone.4. ClickOK or Apply.
Move items from one zone to another zone
1. Select Configuration > Zones in the Studio navigation pane.2. Select a zone in the middle pane, and then select one or more items.3. Either drag the items to the destination zone or selectMove Items in the Actions pane and then
specify which zone to move them to.
© 1999–2022 Citrix Systems, Inc. All rights reserved. 752

Citrix Virtual Apps and Desktops
A confirmation message lists the items you selected and asks if you are sure you want to move all ofthem.
Remember: When a catalog uses a host connection to a hypervisor or other service, place both thecatalog and the connection in the same zone. Otherwise, performance can be affected. If you moveone, move the other, too.
Delete a zone
A zonemust be empty before it can be deleted. You cannot delete the primary zone.
1. Select Configuration > Zones in the Studio navigation pane.2. Select a zone in the middle pane.3. Select Delete Zone from the Actions pane. If the zone is not empty (it contains items), you are
asked to choose the zone where those items will be moved.4. Confirm the deletion.
Add a home zone for a user
Configuring a home zone for a user is also known as adding a user to a zone.
1. SelectConfiguration>Zones in theStudionavigationpaneand thenselect a zone in themiddlepane.
2. Select Add Users to Zone in the Actions pane.3. In theAddUsers to Zone dialog box, clickAdd and then select the users and user groups to add
to the zone. If you specify users who already have a home zone, a message offers two choices:Yes = add only those users you specified who do not have a home zone;No = return to the userselection dialog.
4. ClickOK.
For users with a configured home zone, you can require that sessions launch only from their homezone:
1. Create or edit a Delivery Group.2. On the Users page, select the Sessions must launch in a user’s home zone, if configured
check box.
All sessions launched by a user in that Delivery Groupmust launch frommachines in that user’s homezone. If a user in the Delivery Group does not have a configured home zone, this setting has no effect.
Remove a home zone for a user
This procedure is also known as removing a user from a zone.
© 1999–2022 Citrix Systems, Inc. All rights reserved. 753

Citrix Virtual Apps and Desktops
1. SelectConfiguration>Zones in theStudionavigationpaneand thenselect a zone in themiddlepane.
2. Select Remove Users from Zone in the Actions pane.3. In the Add Users to Zone dialog box, click Remove and then select the users and groups to
remove from the zone. This action removes the users only from the zone; those users remain inthe Delivery Groups and Application Groups to which they belong.
4. Confirm the removal when prompted.
Manage home zones for applications
Configuring a home zone for an application is also known as adding an application to a zone. Bydefault, in a multi‑zone environment, an application does not have a home zone.
An application’s home zone is specified in the application’s properties. You can configure applicationproperties when you add the application to a group or later.
• When creating a Delivery Group, creating an Application Group, or adding applications to exist‑ing groups, select Properties on the Applications page of the wizard.
• To change an application’s properties after the application is added, select Applications in theStudio navigation pane. Select an application and then select Edit Application Properties inthe Actions pane.
On the Zones page of the application’s properties/settings:
• If you want the application to have a home zone:– SelectUse the selected zone to decide radio button and then select the zone.– If you want the application to launch only from the selected zone (and not from any otherzone), select the check box under the zone selection.
• If you do not want the application to have a home zone:– Select the Do not configure a home zone radio button.– If you do not want the broker to consider any configured user zones when launching thisapplication, select the check box under the radio button. In this case, neither applicationor user home zones are used to determine where to launch this application.
Other actions that include specifying zones
After you create at least one satellite zone, you can specify a zone when you add a host connection orcreate a catalog.
Usually, the primary zone is the default. When using Machine Creation Services to create a catalog,the zone that is configured for the host connection is automatically selected.
If the site contains no satellite zones, the primary zone is assumed and the zone selection box doesnot appear.
© 1999–2022 Citrix Systems, Inc. All rights reserved. 754

Citrix Virtual Apps and Desktops
Connections and resources
April 14, 2021
Important:
AsofCitrix Virtual AppsandDesktops72006, if your currentdeploymentusesanyof the followingtechnologies or host types, you can upgrade your deployment to the current release only afterremoving items that use those technologies.
• Personal vDisks (PvDs)• AppDisks• Public cloudhost types: AmazonWebServices (AWS), Citrix CloudPlatform,MicrosoftAzureClassic, Microsoft Azure Resource Manager
For details, see Remove PVD, AppDisks, and unsupported hosts.
Introduction
You can optionally create your first connection to hosting resources when you create a Site. Later,you can change that connection and create other connections. Configuring a connection includesselecting the connection type from among the supported hypervisors. The storage and network youselect from the resources for that connection.
ReadOnly Administrators can view connection and resource details. Youmust be a Full Administratorto perform connection and resource management tasks. For details, see Delegated administration.
Where to find information about connection types
You can use the supported virtualization platforms to host and manage machines in your Citrix Vir‑tual Apps or Citrix Virtual Desktops environment. The System requirements article lists the supportedtypes.
For details, see the following information sources:
• Citrix Hypervisor (formerly XenServer):
– Citrix Hypervisor virtualization environments.– Citrix Hypervisor documentation.
• Nutanix Acropolis:
– Nutanix virtualization environments.– Nutanix documentation.
• VMware:
© 1999–2022 Citrix Systems, Inc. All rights reserved. 755

Citrix Virtual Apps and Desktops
– VMware virtualization environments.– VMware product documentation.
• Microsoft Hyper‑V:
– Microsoft System Center Virtual Machine Manager virtualization environments article.– Microsoft documentation.
Host storage
A storageproduct is supportedwhenmanagedbya supportedhypervisor. Citrix Support assists thosestorage product vendors in troubleshooting and resolving issues, and document those issues in theknowledge center, as needed.
When provisioning machines, data is classified by type:
• Operating system (OS) data, which includes master images.• Temporary data. This data includes all non‑persistent data written to MCS‑provisioned ma‑chines, Windows page files, user profile data, and any data that is synchronized with ShareFile.This data is discarded each time amachine restarts.
Providing separate storage for each data type can reduce load and improve performance on each stor‑age device, making best use of the host’s available resources. It also enables appropriate storage tobe used for the different data types – persistence and resilience ismore important for some data thanothers.
Storage can be shared (located centrally, separate from any host, used by all hosts) or local to a hy‑pervisor. For example, central shared storage can be one or more Windows Server 2012 clusteredstorage volumes (with or without attached storage), or an appliance from a storage vendor. The cen‑tral storage might also provide its own optimizations such as hypervisor storage control paths anddirect access through partner plug‑ins.
Storing temporary data locally avoids having to traverse the network to access shared storage. It alsoreduces load on the shared storage device. Shared storage can bemore costly, so storing data locallycan lower expenses. These benefits must be weighed against the availability of sufficient storage onthe hypervisor servers.
When you create a connection, you choose one of two storagemanagementmethods: storage sharedby hypervisors, or storage local to the hypervisor.
Whenusing local storageononeormoreCitrixHypervisorhosts for temporarydata storage,makesurethat each storage location in the pool has a unique name. (To change a name in XenCenter, right‑clickthe storage and edit the name property.)
© 1999–2022 Citrix Systems, Inc. All rights reserved. 756

Citrix Virtual Apps and Desktops
Storage shared by hypervisors
The storage shared by hypervisors method stores data that needs longer‑term persistence centrally,providing centralized backup, andmanagement. That storage holds the OS disks.
When you select this method, you can choose whether to use local storage (on servers in the samehypervisor pool) for temporary machine data. This method does not require persistence or as muchresilience as the data in the shared storage, referred to as the temporary data cache. The local diskhelps reduce traffic to the main OS storage. This disk is cleared after every machine restart. The diskis accessed through a write‑through memory cache. If you use local storage for temporary data, theprovisioned VDA is tied to a specific hypervisor host. If that host fails, the VM cannot start.
Exception: Microsoft System Center Virtual Machine Manager does not allow temporary data cachedisks on local storage when using Clustered Storage Volumes (CSV).
Create a connection to store temporary data locally, then enable and configure nondefault values foreach VM’s cache disk size and memory size. The default values are tailored to the connection type,and are sufficient for most cases. For details, see Create Machine Catalogs.
The hypervisor can also provide optimization technologies through read caching of the disk imageslocally. For example, Citrix Hypervisor offers IntelliCache, which reduces network traffic to the centralstorage.
Storage local to the hypervisor
The storage local to the hypervisor method stores data locally on the hypervisor. With this method,master images and other OS data are transferred to the hypervisors in the Site. This process occursfor initial machine creation and future image updates. This process results in significant traffic on themanagement network. Image transfers are also time‑consuming, and the images become availableto each host at a different time.
Create a connection and resources
You can optionally create the first connection when you create the Site. The Site creation wizard con‑tains the connection‑related pages described in the following sections.
If you are creating a connection after you create the Site, start with step 1.
Important:The host resources (storage and network) must be available before you create a connection.
1. Select Configuration > Hosting in the Studio navigation pane.2. Select Add Connections and Resources in the Actions pane.
© 1999–2022 Citrix Systems, Inc. All rights reserved. 757

Citrix Virtual Apps and Desktops
3. The wizard guides you through the following pages (specific page content depends on the se‑lected connection type). After completing each page, click Next until you reach the Summarypage.
Connection
On the Connection page:
• To create a connection select Create a new Connection. To create a connection based on thesamehost configuration as anexisting connection, selectUseanexistingConnectionand thenchoose the relevant connection
• Select the hypervisor you are using in the Connection type field.• The connection address and credentials fields differ, depending on the selected connectiontype. Enter the requested information.
• Enter a connection name. This name appears in Studio.• Choose the tool you use to create virtual machines: Studio tools (such as Machine CreationServices or Citrix Provisioning) or other tools.
© 1999–2022 Citrix Systems, Inc. All rights reserved. 758

Citrix Virtual Apps and Desktops
Storagemanagement
For information about storage management types andmethods, see Host storage.
If you are configuring a connection to a Hyper‑V or VMware host, browse to and then select a clustername. Other connection types do not request a cluster name.
Select a storage management method: storage shared by hypervisors or storage local to the hypervi‑sor.
• If you choose storage shared by hypervisors, indicate if you want to keep temporary data onavailable local storage. (You can specify nondefault temporary storage sizes in theMachine Cat‑alogs that use this connection.) Exception: When using Clustered Storage Volumes (CSV), Mi‑crosoft System Center Virtual Machine Manager does not allow temporary data cache disks onlocal storage. Configuring that storage management setup in Studio fails.
If you use shared storage in a Citrix Hypervisor pool, indicate if youwant to use IntelliCache to reducethe load on the shared storage device. See Use IntelliCache for Citrix Hypervisor connections.
© 1999–2022 Citrix Systems, Inc. All rights reserved. 759

Citrix Virtual Apps and Desktops
Storage selection
For more information about storage selection, see Host storage.
Select at least one host storage device for each available data type. The storagemanagementmethodyou selected on the previous page affects which data types are available for selection on this page.Select at least one storage device for each supported data type before you can proceed to the nextpage in the wizard.
The lower portion of the Storage Selection page containsmore configuration options if you selectedeither of the following on the previous page.
• If youchose storage sharedbyhypervisors andenabled theOptimize temporarydataonavail‑able local storage check box, you can select which local storage devices to use for temporarydata.
Thenumberof currently selected storagedevices is shown (in theprecedinggraphic, “1 storagedeviceselected”). When you hover over that entry, the selected device names appear.
1. Click Select to change the storage devices to use.2. In the Select Storage dialog box, select or clear the storage device check boxes, and then click
OK.
© 1999–2022 Citrix Systems, Inc. All rights reserved. 760

Citrix Virtual Apps and Desktops
Network
On the Network page, enter a name for the resources. This name appears in Studio to identify thestorage and network combination associated with the connection.
Select one or more networks that the VMs use.
Summary
On the Summary page, review your selections. When you’re done, click Finish.
Remember: Storing temporary data locally allows you to configure nondefault values for temporarydata storage when you create the Machine Catalog containing machines using this connection. SeeCreate Machine Catalogs.
Edit connection settings
Do not use this procedure to rename a connection or to create a connection. Those connections aredifferentoperations. Change theaddressonly if the currenthostmachinehasanewaddress. Enteringan address to a different machine breaks the connection’s Machine Catalogs.
You cannot change the GPU settings for a connection, because Machine Catalogs accessing this re‑source must use an appropriate GPU‑specific master image. Create a connection.
1. Select Configuration > Hosting in the Studio navigation pane.2. Select the connection and then select Edit Connection in the Actions pane.3. Follow the guidance for the settings available when you edit a connection.4. When you are finished, click Apply to apply any changes youmade and keep the window open,
or clickOK to apply changes and close the window.
Connection Properties page:
• To change the connection address and credentials, select Edit settings and then enter the newinformation.
• To specify the high‑availability servers for a Citrix Hypervisor connection, select Edit HAservers. Citrix recommends that you select all servers in the pool to allow communicationwith Citrix Hypervisor if the pool master fails.
Advanced page:
• For a Microsoft System Center ConfigurationManager (ConfMgr) Wake on LAN connection type,which is used with Remote PC Access, enter ConfMgr Wake Proxy, magic packets, and packettransmission information.
• The throttling threshold settings enable you to specify a maximum number of power actionsallowed on a connection. These settings can help when power management settings allow too
© 1999–2022 Citrix Systems, Inc. All rights reserved. 761

Citrix Virtual Apps and Desktops
many or too fewmachines to start at the same time. Each connection type has specific defaultvalues that are appropriate for most cases and should not be changed.
• The Simultaneous actions (all types) setting specifies two values: a maximum absolute num‑ber that can occur simultaneously on this connection, and a maximum percentage of all ma‑chines that use this connection. You must specify both absolute and percentage values. Theactual limit applied is the lower of the values.
For example, in a deployment with 34 machines, if Simultaneous actions (all types) is set toan absolute value of 10 and a percentage value of 10, the actual limit applied is 3 (that is, 10percent of 34 rounded to the nearest whole number, which is less than the absolute value of 10machines).
• TheMaximum new actions per minute is an absolute number. There is no percentage value.
• Enter information in the Connection options field only under the guidance of a Citrix Supportrepresentative or explicit documentation instructions.
Turnmaintenancemode on or off for a connection
Turning on maintenance mode for a connection prevents any new power action from affecting anymachine stored on the connection. Users cannot connect to a machine when it is in maintenancemode. If users are already connected, maintenance mode takes effect when they log off.
1. Select Configuration > Hosting in the Studio navigation pane.2. Select the connection. To turn maintenance mode on, select Turn On Maintenance Mode in
the Actions pane. To turn maintenance mode off, select Turn OffMaintenance Mode.
You can also turn maintenance mode on or off for individual machines. Also, you can turn mainte‑nance mode on or off for machines in Machine Catalogs or Delivery Groups.
Delete a connection
Deleting a connection can result in the deletion of large numbers ofmachines and loss of data. Ensurethat user data on affectedmachines is backed up or no longer required.
Before deleting a connection, ensure that:
• All users are logged off from themachines stored on the connection.• No disconnected user sessions are running.• Maintenance mode is turned on for pooled and dedicatedmachines.• All machines in Machine Catalogs used by the connection are powered off.
AMachineCatalogbecomesunusablewhenyoudelete a connection that is referencedby that catalog.If this connection is referenced by a catalog, you have the option to delete the catalog. Before youdelete a catalog, make sure it is not used by other connections.
© 1999–2022 Citrix Systems, Inc. All rights reserved. 762

Citrix Virtual Apps and Desktops
1. Select Configuration > Hosting in the Studio navigation pane.2. Select the connection and then select Delete Connection in the Actions pane.3. If this connection has machines stored on it, you are asked whether the machines should be
deleted. If they are to be deleted, specify what should be donewith the associated Active Direc‑tory computer accounts.
Rename or test a connection
1. Select Configuration > Hosting in the Studio navigation pane.2. Select the connection and then select Rename Connection or Test Connection in the Actions
pane.
Viewmachine details on a connection
1. Select Configuration > Hosting in the Studio navigation pane.2. Select the connection and then select ViewMachines in the Actions pane.
The upper pane lists the machines accessed through the connection. Select a machine to view itsdetails in the lower pane. Session details are also provided for open sessions.
Use the search feature to find machines quickly. Either select a saved search from the list at the topof the window, or create a search. You can either search by typing all or part of themachine name, oryou can build an expression to use for an advanced search. To build an expression, click Unfold, andthen select from the lists of properties and operators.
Managemachines on a connection
1. Select Configuration > Hosting in the Studio navigation pane.2. Select a connection and then select ViewMachines in the Action pane.3. Select one of the following in the Actions pane. Some actions are not available, depending on
the machine state and the connection host type.
Action Description
Start Starts the machine if it is powered off orsuspended.
Suspend Pauses the machine without shutting it down,and refreshes the list of machines.
Shut down Requests the operating system to shut down.
Force shut down Forcibly powers off the machine, and refreshesthe list of machines.
© 1999–2022 Citrix Systems, Inc. All rights reserved. 763

Citrix Virtual Apps and Desktops
Action Description
Restart Requests the operating system to shut downand then start the machine again. If theoperating system cannot comply, the desktopremains in its current state.
Enable maintenance mode Temporarily stops connections to a machine.Users cannot connect to a machine in thisstate. If users are connected, maintenancemode takes effect when they log off. (You canalso turn maintenance mode on or off for allmachines accessed through a connection, asdescribed above.)
Remove from Delivery Group Removing a machine from a Delivery Groupdoes not delete it from the Machine Catalogthat the Delivery Group uses. You can remove amachine only when no user is connected to it.Turn onmaintenance mode to temporarilyprevent users from connecting while you areremoving the machine.
Delete When you delete a machine, users no longerhave access to it, and the machine is deletedfrom the Machine Catalog. Before deleting amachine, ensure that all user data is backed upor no longer required. You can delete amachine only when no user is connected to it.Turn onmaintenance mode to temporarilystop users from connecting while you aredeleting the machine.
For actions that involvemachine shutdown, if themachine does not shut downwithin 10minutes, it ispowered off. If Windows attempts to install updates during shutdown, there is a risk that themachineis powered off before the updates are complete.
Edit storage
You can display the status of servers that are used to store operating system and temporary data forVMs that use a connection. You can also specify which servers to use for storage of each data type.
© 1999–2022 Citrix Systems, Inc. All rights reserved. 764

Citrix Virtual Apps and Desktops
1. Select Configuration > Hosting in the Studio navigation pane.2. Select the connection and then select Edit Storage in the Actions pane.3. In the left pane, select the data type: operating system, or temporary.4. Select or clear the checkboxes for one or more storage devices for the selected data type.5. ClickOK.
Each storage device in the list includes its name and storage status. Valid storage status values are:
• In use: The storage is being used for creating machines.• Superseded: The storage is beingusedonly for existingmachines. Nonewmachines are addedin this storage.
• Not in use: The storage is not being used for creating machines.
If you clear the check box for a device that is currently In use, its status changes to Superseded. Ex‑isting machines will continue to use that storage device (and can write data to it), so it is possible forthat location to become full even after it stops being used for creating machines.
Delete, rename, or test resources
1. Select Configuration > Hosting in the Studio navigation pane.2. Select the resource and then select the appropriate entry in the Actions pane: Delete
Resources, Rename Resources, or Test Resources.
Connection timers
You can use policy settings to configure three connection timers:
• Maximum connection timer: Determines the maximum duration of an uninterrupted connec‑tion between a user device and a virtual desktop. Use the Session connection timer and Ses‑sion connection timer interval policy settings.
• Connection idle timer: Determines how long an uninterrupted user device connection to avirtual desktop is maintained if there is no input from the user. Use the Session idle timer andSession idle timer interval policy settings.
• Disconnect timer: Determines how long a disconnected, locked virtual desktop can remainlockedbefore the session is loggedoff. Use theDisconnected session timer andDisconnectedsession timer interval policy settings.
When you update any of these settings, ensure they are consistent across your deployment.
See the policy settings documentation for more information.
© 1999–2022 Citrix Systems, Inc. All rights reserved. 765

Citrix Virtual Apps and Desktops
Local Host Cache
April 14, 2021
To ensure that the Citrix Virtual Apps and Desktops site database is always available, Citrix recom‑mends starting with a fault‑tolerant SQL Server deployment, by following high availability best prac‑tices from Microsoft. (For supported SQL Server high availability features, see Databases.) However,network issues and interruptions can result in users not being able to connect to their applications ordesktops.
The Local Host Cache feature allows connection brokering operations in a site to continue when anoutage occurs. An outage occurs when the connection between a Delivery Controller and the sitedatabase fails in an on‑premises Citrix environment.
As of XenApp and XenDesktop 7.16, the connection leasing feature (a predecessor high availabilityfeature in earlier releases) was removed from the product, and is no longer available.
Data content
Local Host Cache includes the following information, which is a subset of the information in themaindatabase:
• Identities of users and groups who are assigned rights to resources published from the site.• Identities of userswhoare currently using, orwhohave recently used, published resources fromthe site.
• Identities of VDAmachines (including Remote PC Access machines) configured in the site.• Identities (names and IP addresses) of client Citrix Receiver machines being actively used toconnect to published resources.
It also contains information for currently active connections that were established while the maindatabase was unavailable:
• Results of any client machine endpoint analysis performed by Citrix Receiver.• Identities of infrastructure machines (such as NetScaler Gateway and StoreFront servers) in‑volved with the site.
• Dates and times and types of recent activity by users.
How it works
The following graphic illustrates the Local Host Cache components and communication paths duringnormal operations.
© 1999–2022 Citrix Systems, Inc. All rights reserved. 766

Citrix Virtual Apps and Desktops
During normal operations
• The principal broker (Citrix Broker Service) on a Controller accepts connection requests fromStoreFront. The broker communicates with the site database to connect users with VDAs thatare registered with the Controller.
• TheCitrixConfigSynchronizerService (CSS) checkswith thebroker approximately everyminuteto see if any changes weremade. Those changes can be administrator‑initiated (such as chang‑ing a delivery group property) or system actions (such as machine assignments).
• If a configuration change occurred since the previous check, the CSS synchronizes (copies) in‑formation to a secondary broker on the Controller. (The secondary broker is also known as theHigh Availability Service.)
All configuration data is copied, not just items that changed since the previous check. The CSSimports the configuration data into a Microsoft SQL Server Express LocalDB database on theController. This database is referred to as the Local Host Cache database. The CSS ensures thatthe information in the Local Host Cache databasematches the information in the site database.The Local Host Cache database is re‑created each time synchronization occurs.
Microsoft SQL Server Express LocalDB (used by the Local Host Cache database) is installed au‑tomatically when you install a Controller. (You can prohibit this installed when installing a Con‑troller from the command line.) The Local Host Cache database cannot be shared across Con‑trollers. You do not need to back up the Local Host Cache database. It is recreated every time aconfiguration change is detected.
© 1999–2022 Citrix Systems, Inc. All rights reserved. 767

Citrix Virtual Apps and Desktops
• If no changes have occurred since the last check, no data is copied.
The following graphic illustrates the changes in communications paths if the principal broker losescontact with the site database (an outage begins).
During an outage
When an outage begins:
• The secondary broker starts listening for and processing connection requests.• When the outage begins, the secondary broker does not have current VDA registration data, butwhen a VDA communicates with it, a registration process is triggered. During that process, thesecondary broker also gets current session information about that VDA.
• While the secondary broker is handling connections, the Brokering Principal continues tomon‑itor the connection. When the connection is restored, the Brokering Principal instructs the sec‑ondarybroker to stop listening for connection information, and theBrokeringPrincipal resumesbrokering operations. The next time a VDA communicates with the Brokering Principal, a reg‑istration process is triggered. The secondary broker removes any remaining VDA registrationsfrom the previous outage. The CSS resumes synchronizing information when it learns that con‑figuration changes have occurred in Citrix Cloud.
In the unlikely event that an outage begins during a synchronization, the current import is discardedand the last known configuration is used.
The event log provides information about synchronizations and outages.
© 1999–2022 Citrix Systems, Inc. All rights reserved. 768
Citrix Virtual Apps and Desktops
There is no time limit imposed for operating in outage mode.
The transition between normal and outage mode does not affect existing sessions. It affects only thelaunching of new sessions.
You can also intentionally trigger an outage. See Force an outage for details about why and how to dothis.
Sites withmultiple Controllers
Among its other tasks, the CSS routinely provides the secondary broker with information about allControllers in the zone. (If your deployment does not contain multiple zones, this action affects allControllers in the site.) Having that information, each secondary broker knows about all peer sec‑ondary brokers running on other Controllers in the zone.
The secondary brokers communicate with each other on a separate channel. Those brokers use analphabetical list of FQDN names of the machines they’re running on to determine (elect) which sec‑ondary broker will be broker operations in the zone if an outage occurs. During the outage, all VDAsregister with the elected secondary broker. The non‑elected secondary brokers in the zone activelyreject incoming connection and VDA registration requests.
If anelected secondarybroker fails duringanoutage, another secondarybroker is elected to takeover,and VDAs register with the newly elected secondary broker.
During an outage, if a Controller is restarted:
• If that Controller is not the elected broker, the restart has no impact.• If that Controller is the elected broker, a different Controller is elected, causing VDAs to register.After the restarted Controller powers on, it automatically takes over brokering, which causesVDAs to register again. In this scenario, performance can be affected during the registrations.
If you power off a Controller during normal operations and then power it on during an outage, LocalHost Cache cannot be used on that Controller if it is elected as the broker.
The event logs provide information about elections.
What is unavailable during an outage, and other differences
There is no time limit imposed for operating in outage mode. However, Citrix recommends restoringconnectivity as quickly as possible.
During an outage
• You cannot use Studio or run PowerShell cmdlets.• Hypervisor credentials cannot be obtained from the Host Service. All machines are in the un‑known power state, and no power operations can be issued. However, VMs on the host that arepowered‑on can be used for connection requests.
© 1999–2022 Citrix Systems, Inc. All rights reserved. 769
Citrix Virtual Apps and Desktops
• An assigned machine can be used only if the assignment occurred during normal operations.New assignments cannot be made during an outage.
• Automatic enrollment and configuration of Remote PC Access machines is not possible. How‑ever, machines that were enrolled and configured during normal operation are usable.
• Server‑hosted applications and desktop users might use more sessions than their configuredsession limits, if the resources are in different zones.
• Users can launch applications and desktops only from registered VDAs in the zone containingthe currently active/elected secondarybroker. Launches across zones (froma secondarybrokerin one zone to a VDA in a different zone) are not supported during an outage.
• If a site database outage occurs before a scheduled restart begins for VDAs in a delivery group,the restarts begin when the outage ends. This can have unintended results. For more informa‑tion, see Scheduled restarts delayed due to database outage.
Application and desktop support
Local Host Cache supports server‑hosted applications and desktops, and static (assigned) desktops.
Local Host Cache supports desktop VDAs in pooled delivery groups, as follows:
• By default, power‑managed desktop VDAs in pooled delivery groups (created by MCS or CitrixProvisioning) that have the ShutdownDesktopsAfterUse property enabled are placed intomaintenance mode when an outage occurs. You can change this default, to allow those desk‑tops to be used during an outage.
However, you cannot rely on the power management during the outage. (Power managementresumes after normal operations resume.) Also, those desktops might contain data from theprevious user, because they have not been restarted.
• To override the default behavior, it must be enabled site‑wide and for each affected deliverygroup. Run the following PowerShell cmdlets.
Site‑wide:
Set-BrokerSite -ReuseMachinesWithoutShutdownInOutageAllowed $true
For each affected delivery group, run the following PowerShell command:
Set-BrokerDesktopGroup -Name "name"-ReuseMachinesWithoutShutdownInOutage$true
Enabling this feature in the site and the delivery groups does not affect how the configuredShutdownDesktopsAfterUse property works during normal operations.
© 1999–2022 Citrix Systems, Inc. All rights reserved. 770

Citrix Virtual Apps and Desktops
RAM size considerations
The LocalDB service can use approximately 1.2 GB of RAM (up to 1 GB for the database cache, plus 200MB for running SQLServer Express LocalDB). The secondary broker canuse up to 1GBof RAM if an out‑age lasts for an extended interval withmany logons occurring (for example, 12 hours with 10K users).These memory requirements are in addition to the normal RAM requirements for the Controller, soyoumight need to increase the total amount of RAM capacity.
If youuse a SQLServer Express installation for the site database, the serverwill have two sqlserver.exeprocesses.
CPU core and socket configuration considerations
A Controller’s CPU configuration, particularly the number of cores available to the SQL Server ExpressLocalDB, directly affects Local Host Cache performance, even more than memory allocation. ThisCPU overhead is observed only during the outage period when the database is unreachable and thesecondary broker is active.
While LocalDBcanusemultiple cores (up to 4), it’s limited toonly a single socket. Addingmore socketswill not improve the performance (for example, having 4 sockets with 1 core each). Instead, Citrixrecommends using multiple sockets with multiple cores. In Citrix testing, a 2x3 (2 sockets, 3 cores)configuration provided better performance than 4x1 and 6x1 configurations.
Storage considerations
As users access resources during an outage, the LocalDB grows. For example, during a logon/logofftest running at 10 logons per second, the database grew by 1 MB every 2‑3 minutes. When normaloperation resumes, the local database is recreated and the space is returned. However, sufficientspace must be available on the drive where the LocalDB is installed to allow for the database growthduring an outage. Local Host Cache also incurs more I/O during an outage: approximately 3 MB ofwrites per second, with several hundred thousand reads.
Performance considerations
During an outage, one secondary broker handles all the connections, so in sites (or zones) that loadbalance among multiple Controllers during normal operations, the elected secondary broker mightneed to handle many more requests than normal during an outage. Therefore, CPU demands will behigher. Every secondary broker in the site (zone) must be able to handle the additional load imposedby the Local Host Cache database and all of the affected VDAs, because the secondary broker electedduring an outage can change.
VDI limits:
© 1999–2022 Citrix Systems, Inc. All rights reserved. 771

Citrix Virtual Apps and Desktops
• In a single‑zoneVDI deployment, up to10,000VDAs canbehandledeffectively during anoutage.• In amulti‑zone VDI deployment, up to 10,000 VDAs in each zone can be handled effectively dur‑ing an outage, to amaximumof 40,000 VDAs in the site. For example, each of the following sitescan be handled effectively during an outage:
– A site with four zones, each containing 10,000 VDAs.– A site with seven zones, one containing 10,000 VDAs, and six containing 5,000 VDAs each.
During an outage, loadmanagement within the site can be affected. Load evaluators (and especially,session count rules) can be exceeded.
During the time it takes all VDAs to register with a secondary broker, that servicemight not have com‑plete information about current sessions. So, a user connection request during that interval can re‑sult in a new session being launched, even though reconnection to an existing session was possible.This interval (while the “new” secondary broker acquires session information from all VDAs duringre‑registration) is unavoidable. Sessions that are connected when an outage starts are not impactedduring the transition interval, but new sessions and session reconnections might be.
This interval occurs whenever VDAs must register:
• An outage starts: Whenmigrating from a principal broker to a secondary broker.• Secondary broker failure during an outage: Whenmigrating froma secondary broker that failedto a newly elected secondary broker.
• Recovery from an outage: When normal operations resume, and the principal broker resumescontrol.
You can decrease the interval by lowering the Citrix Broker Protocol’s HeartbeatPeriodMs registryvalue (default = 600000 ms, which is 10 minutes). This heartbeat value is double the interval the VDAuses for pings, so the default value results in a ping every 5 minutes.
For example, the following command changes the heartbeat to five minutes (300000 milliseconds),which results in a ping every 2.5 minutes:
New-ItemProperty -Path HKLM:\SOFTWARE\Citrix\DesktopServer -Name HeartbeatPeriodMs-PropertyType DWORD –Value 300000
Use caution when changing the heartbeat value. Increasing the frequency results in greater load onthe Controllers during both normal and outage modes.
The interval cannot be eliminated entirely, no matter how quickly the VDAs register.
The time it takes to synchronize between secondary brokers increases with the number of objects(such as VDAs, applications, groups). For example, synchronizing 5000 VDAsmight take 10minutes ormore to complete.
© 1999–2022 Citrix Systems, Inc. All rights reserved. 772

Citrix Virtual Apps and Desktops
Differences from XenApp 6.x releases
Although this Local Host Cache implementation shares the name of the Local Host Cache feature inXenApp 6.x and earlier XenApp releases, there are significant improvements. This implementation ismore robust and immune to corruption. Maintenance requirements are minimized, such as eliminat‑ing the need for periodic dsmaint commands. This Local Host Cache is an entirely different imple‑mentation technically.
Manage Local Host Cache
For Local Host Cache to work correctly, the PowerShell execution policy on each Controller must beset to RemoteSigned, Unrestricted, or Bypass.
SQL Server Express LocalDB
The Microsoft SQL Server Express LocalDB software that Local Host Cache uses is installed automat‑ically when you install a Controller or upgrade a Controller from a version earlier than 7.9. Only thesecondary broker communicates with this database. You cannot use PowerShell cmdlets to changeanything about this database. The LocalDB cannot be shared across Controllers.
TheSQLServer Express LocalDBdatabase software is installed regardlessofwhether LocalHostCacheis enabled.
To prevent its installation, install or upgrade the Controller using the XenDesktopServerSetup.exe command, and include the /exclude "Local Host Cache Storage (LocalDB)" option.However, keep inmind that the Local Host Cache feature will not workwithout the database, and youcannot use a different database with the secondary broker.
Installation of this LocalDB database has no effect on whether you install SQL Server Express for useas the site database.
For information about replacing an earlier SQL Server Express LocalDB version with a newer version,see Replace SQL Server Express LocalDB.
Default settings after product installation and upgrade
Duringanew installationofCitrix VirtualAppsandDesktops (minimumversion7.16), LocalHostCacheis enabled.
After an upgrade (to version 7.16 or later), Local Host Cache is enabled if there are fewer than 10,000VDAs in the entire deployment.
© 1999–2022 Citrix Systems, Inc. All rights reserved. 773

Citrix Virtual Apps and Desktops
Enable and disable Local Host Cache
• To enable Local Host Cache, enter:
Set-BrokerSite -LocalHostCacheEnabled $true
To determine whether Local Host Cache is enabled, enter Get-BrokerSite. Check that theLocalHostCacheEnabled property is True.
• To disable Local Host Cache, enter:
Set-BrokerSite -LocalHostCacheEnabled $false
Remember: As of XenApp and XenDesktop 7.16, connection leasing (the feature that preceded LocalHost Cache beginning with version 7.6) was removed from the product, and is no longer available.
Verify that Local Host Cache is working
To verify that Local Host Cache is set up and working correctly:
• Ensure that synchronization imports complete successfully. Check the event logs.• Ensure that the SQL Server Express LocalDB database was created on each Delivery Controller.This confirms that the secondary broker can take over, if needed.
– On the Delivery Controller server, browse to C:\Windows\ServiceProfiles\NetworkService.
– Verify that HaDatabaseName.mdf and HaDatabaseName_log.ldf are created.• Force an outage on the Delivery Controllers. After you’ve verified that Local Host Cache works,remember to place all the Controllers back into normal mode. This can take approximately 15minutes.
Event logs
Event logs indicate when synchronizations and outages occur. In event viewer logs, outage mode isreferred to as HAmode.*
Config Synchronizer Service:
During normal operations, the following events can occur when the CSS imports the configurationdata into the Local Host Cache database using the Local Host Cache broker.
• 503: The Citrix Config Sync Service received an updated configuration. This event indicates thestart of the synchronization process.
• 504: The Citrix Config Sync Service imported an updated configuration. The configuration im‑port completed successfully.
• 505: The Citrix Config Sync Service failed an import. The configuration import did not completesuccessfully. If a previous successful configuration is available, it is used if an outage occurs.
© 1999–2022 Citrix Systems, Inc. All rights reserved. 774
Citrix Virtual Apps and Desktops
However, it will be out‑of‑date from the current configuration. If there is no previous configu‑ration available, the service cannot participate in session brokering during an outage. In thiscase, see the Troubleshoot section, and contact Citrix Support.507: The Citrix Config Sync Service abandoned an import because the system is in outagemodeand the LocalHost Cachebroker is beingused for brokering. The service receivedanewconfigu‑ration, but the import was abandoned because an outage occurred. This is expected behavior.
High Availability Service:
This service is also known as the Local Host Cache broker.
• 3502: An outage occurred and the Local Host Cache broker is performing brokering operations.• 3503: An outage was resolved and normal operations have resumed.• 3504: Indicates which Local Host Cache broker is elected, plus other Local Host Cache brokersinvolved in the election.
Force an outage
Youmight want to deliberately force an outage.
• If your network is going up anddown repeatedly. Forcing an outage until the network issues areresolved prevents continuous transition between normal and outagemodes (and the resultingfrequent VDA registration storms).
• To test a disaster recovery plan.• To help ensure that Local Host Cache is working correctly.• While replacing or servicing the site database server.
To force an outage, edit the registry of each server containing a Delivery Controller. In HKLM\Software\Citrix\DesktopServer\LHC, create and set OutageModeForced as REG_DWORD to1. This setting instructs the Local Host Cache broker to enter outage mode, regardless of the state ofthe database. Setting the value to 0 takes the Local Host Cache broker out of outage mode.
To verify events, monitor the Current_HighAvailabilityService log file in C:\ProgramData\Citrix\WorkspaceCloud\Logs\Plugins\HighAvailabilityService.
Troubleshoot
Several troubleshooting tools are available when a synchronization import to the Local Host Cachedatabase fails and a 505 event is posted.
CDF tracing: Contains options for the ConfigSyncServer and BrokerLHC‘modules. Those options,along with other broker modules, will likely identify the problem.
Report: If a synchronization import fails, you can generate a report. This report stops at the objectcausing the error. This report feature affects synchronization speed, so Citrix recommends disabling
© 1999–2022 Citrix Systems, Inc. All rights reserved. 775

Citrix Virtual Apps and Desktops
it when not in use.
To enable and produce a CSS trace report, enter the following command:
New-ItemProperty -Path HKLM:\SOFTWARE\Citrix\DesktopServer\LHC -NameEnableCssTraceMode -PropertyType DWORD -Value 1
The HTML report is posted at C:\Windows\ServiceProfiles\NetworkService\AppData\Local\Temp\CitrixBrokerConfigSyncReport.html.
After the report is generated, enter the following command to disable the reporting feature:
Set-ItemProperty -Path HKLM:\SOFTWARE\Citrix\DesktopServer\LHC -NameEnableCssTraceMode -Value 0
Export the broker configuration: Provides the exact configuration for debugging purposes.
Export-BrokerConfiguration | Out-File <file-pathname>
For example, Export-BrokerConfiguration | Out-File C:\\BrokerConfig.xml.
Virtual IP and virtual loopback
April 14, 2021
Important:
Windows 10 Enterprise multi‑session doesn’t support Remote Desktop IP Virtualization (VirtualIP) andwedon’t support Virtual IP nor virtual loopback onWindows 10 Enterprisemulti‑session.
These features are valid only for supportedWindows servermachines. They do not apply toWindowsdesktop OSmachines.
The Microsoft virtual IP address feature provides a published application with a unique dynamically‑assigned IP address for each session. The Citrix virtual loopback feature allows you to configure appli‑cations that depend on communications with localhost (127.0.0.1 by default) to use a unique virtualloopback address in the localhost range (127.*).
Certain applications, such as CRM and Computer Telephony Integration (CTI), use an IP address foraddressing, licensing, identification, or other purposes and thus require a unique IP address or aloopback address in sessions. Other applications may bind to a static port, so attempts to launchadditional instances of an application in amultiuser environment will fail because the port is alreadyin use. For such applications to function correctly in a Citrix Virtual Apps environment, a unique IPaddress is required for each device.
Virtual IP and virtual loopback are independent features. You can use either or both.
Administrator action synopsis:
© 1999–2022 Citrix Systems, Inc. All rights reserved. 776
Citrix Virtual Apps and Desktops
• To useMicrosoft virtual IP, enable and configure it on theWindows server. (Citrix policy settingsare not needed.)
• To use Citrix virtual loopback, configure two settings in a Citrix policy.
Virtual IP
Whenvirtual IP is enabledandconfiguredon theWindowsserver, eachconfiguredapplication runningin a session appears to have a unique address. Users access these applications on a Citrix Virtual Appsserver in the same way they access any other published application. A process requires virtual IP ineither of the following cases:
• The process uses a hard‑coded TCP port number• The process uses Windows sockets and requires a unique IP address or a specified TCP portnumber
To determine if an application needs to use virtual IP addresses:
1. Obtain the TCPView tool from Microsoft. This tool lists all applications that bind specific IP ad‑dresses and ports.
2. Disable the Resolve IP Addresses feature so that you see the addresses instead of host names.3. Launch the application and use TCPView to seewhich IP addresses and ports are opened by the
application and which process names are opening these ports.4. Configure any processes that open the IP address of the server, 0.0.0.0, or 127.0.0.1.5. To ensure that an application does not open the same IP address on a different port, launch an
additional instance of the application.
HowMicrosoft Remote Desktop (RD) IP virtualization works
• Virtual IP addressing must be enabled on the Microsoft server.
For example, in a Windows Server 2008 R2 environment, from Server Manager, expand RemoteDesktop Services > RD Session Host Connections to enable the RD IP Virtualization feature andconfigure the settings to dynamically assign IP addresses using theDynamicHost ConfigurationProtocol (DHCP) serveronaper‑sessionorper‑programbasis. See theMicrosoftdocumentationfor instructions.
• After the feature is enabled, at session start‑up, the server requests dynamically‑assigned IPaddresses from the DHCP server.
• TheRD IPVirtualization featureassigns IP addresses to remotedesktopconnectionsper‑sessionor per‑program. If you assign IP addresses for multiple programs, they share a per‑session IPaddress.
• After an address is assigned to a session, the session uses the virtual address ratherthan the primary IP address for the system whenever the following calls are made:
© 1999–2022 Citrix Systems, Inc. All rights reserved. 777

Citrix Virtual Apps and Desktops
bind¸closesocket¸connect, WSAConnect, WSAAccept, getpeername, getsockname, sendto,WSASendTo, WSASocketW, gethostbyaddr, getnameinfo, getaddrinfo
When using the Microsoft IP virtualization feature within the Remote Desktop session hosting config‑uration, applications are bound to specific IP addresses by inserting a “filter” component betweenthe application and Winsock function calls. The application then sees only the IP address it shoulduse. Any attempt by the application to listen for TCP or UDP communications is bound to its allocatedvirtual IP address (or loopback address) automatically, and any originating connections opened bythe application originate from the IP address bound to the application.
In functions that return an address (such as GetAddrInfo(), which is controlled by a Windows policy),if the local host IP address is requested, virtual IP looks at the returned IP address and changes it tothe virtual IP address of the session. Applications that attempt to get the IP address of the local serverthrough such name functions see only the unique virtual IP address assigned to that session. This IPaddress is oftenused in subsequent socket calls, such as bindor connect. Formore information aboutWindows policies, see RDS IP Virtualization in Windows Server.
Often, an application requests to bind to a port for listening on the address 0.0.0.0. When an applica‑tion does this and uses a static port, you cannot launch more than one instance of the application.The virtual IP address feature also looks for 0.0.0.0 in these call types and changes the call to listen onthe specific virtual IP address, which enablesmore than one application to listen on the same port onthe same computer because they are all listening on different addresses. The call is changed only if itis in an ICA session and the virtual IP address feature is enabled. For example, if two instances of anapplication running in different sessions both try to bind to all interfaces (0.0.0.0) and a specific port(such as 9000), they are bound to VIPAddress1:9000 and VIPAddress2:9000 and there is no conflict.
Virtual loopback
Enabling the Citrix virtual IP loopback policy settings allows each session to have its own loopbackaddress for communication. When an application uses the localhost address (default = 127.0.0.1) ina Winsock call, the virtual loopback feature simply replaces 127.0.0.1 with 127.X.X.X, where X.X.X is arepresentation of the session ID + 1. For example, a session ID of 7 is 127.0.0.8. In the unlikely eventthat the session ID exceeds the fourth octet (more than 255), the address rolls over to the next octet(127.0.1.0), to the maximum of 127.255.255.255.
A process requires virtual loopback in either of the following cases:
• The process uses the Windows socket loopback (localhost) address (127.0.0.1)• The process uses a hard‑coded TCP port number
Use the virtual loopback policy settings for applications that use a loopback address for interprocesscommunication. No additional configuration is required. Virtual loopback has no dependency onVirtual IP, so you do not have to configure the Microsoft server.
© 1999–2022 Citrix Systems, Inc. All rights reserved. 778

Citrix Virtual Apps and Desktops
• Virtual IP loopback support. When enabled, this policy setting allows each session to have itsown virtual loopback address. This setting is disabled by default. The feature applies only toapplications specified with the Virtual IP virtual loopback programs list policy setting.
• Virtual IP virtual loopback programs list. This policy setting specifies the applications that usethe virtual IP loopback feature. This setting applies only when the Virtual IP loopback supportpolicy setting is enabled.
Related feature
You can use the following registry settings to ensure that virtual loopback is given preference overvirtual IP; this is called preferred loopback. However, proceed with caution:
• Use preferred loopback only if both Virtual IP and virtual loopback are enabled; otherwise, youmay have unintended results.
• Editing the registry incorrectly cancause seriousproblems thatmay require you to reinstall youroperating system. Citrix cannot guarantee thatproblems resulting fromthe incorrect useofReg‑istry Editor can be solved. Use Registry Editor at your own risk. Be sure to back up the registrybefore you edit it.
Run regedit on the servers where the applications reside.
• HKEY_LOCAL_MACHINE\SOFTWARE\Wow6432Node\Citrix\VIP• Name: PreferLoopback, Type: REG_DWORD, Data: 1• Name: PreferLoopbackProcesses, Type: REG_MULTI_SZ, Data: <list of processes>
Delivery Controllers
April 14, 2021
The Delivery Controller is the server‑side component that is responsible for managing user access,plus brokering and optimizing connections. Controllers also provide the Machine Creation Servicesthat create desktop and server images.
A Site must have at least one Controller. After you install the initial Controller, you can addmore Con‑trollers when you create a Site, or later. There are two primary benefits from having more than oneController in a Site.
• Redundancy: As best practice, a production Site should always have at least two Controllerson different physical servers. If one Controller fails, the others can manage connections andadminister the Site.
© 1999–2022 Citrix Systems, Inc. All rights reserved. 779

Citrix Virtual Apps and Desktops
• Scalability: As Site activity grows, so does CPUutilization on the Controller and database activ‑ity. Additional Controllers provide the ability to handle more users and more applications anddesktop requests, and can improve overall responsiveness.
Each Controller communicates directly with the Site database. In a Site withmore than one zone, theControllers in every zone communicate with the Site database in the primary zone.
Important:
Do not change the computer name or the domain membership of a Controller after the site isconfigured.
How VDAs register with Controllers
Before a VDA can be used, it must register (establish communication) with a Delivery Controller in theSite. For information about VDA registration, see VDA registration with Controllers.
Add, remove, or move Controllers
To add, remove, or move a Controller, you must have the server role and database role permissionslisted in the Databases article.
Installing a Controller on a node in an SQL clustering or SQLmirroring installation is not supported.
When you add a Delivery Controller to a site, be sure to add logon credentials for that machine to anyreplica SQL Servers that you use for high availability.
If your deployment uses database mirroring:
• Before adding, removing, or moving a Controller, ensure that the principal and mirroreddatabases are both running. In addition, if you are using scripts with SQL Server ManagementStudio, enable SQLCMDmode before executing the scripts.
• To verify mirroring after adding, removing, or moving a Controller, run the PowerShell Get‑configdbconnection cmdlet to ensure that the Failover Partner has been set in the connectionstring to the mirror.
After you add, remove, or move a Controller:
• If auto‑update is enabled, the VDAswill receive an updated list of Controllerswithin 90minutes.• If auto‑update isnotenabled, ensure that theControllerpolicy settingorListOfDDCs registrykeyare updated for all VDAs. After moving a Controller to another Site, update the policy setting orregistry key on both Sites.
© 1999–2022 Citrix Systems, Inc. All rights reserved. 780

Citrix Virtual Apps and Desktops
Add a Controller
You can add Controllers when you create a Site and later. You cannot add Controllers installed withan earlier version of this software to a Site that was created with this version.
1. Run the installer on a server containing a supported operating system. Install the Delivery Con‑troller component and any other core components youwant. Complete the installationwizard.
2. If you have not yet created a Site, launch Studio; you are prompted to create a Site. On theDatabases page in the Site creation wizard, click the Select button and then add the address ofthe server where you installed the additional Controller.
If you plan to generate scripts that will initialize the databases, add the Controllers before yougenerate the scripts.
3. If you have already created a Site, point Studio to the server where you installed the additionalController. Click Scale your deployment and enter the Site address.
Remove a Controller
Removing a Controller from a Site does not uninstall the Citrix software or any other component; itremoves the Controller from the database so that it can no longer be used to broker connections andperformother tasks. If you removeaController, youcan later add it back to the sameSiteor toanotherSite. A Site requires at least one Controller, so you cannot remove the last one listed in Studio.
When you remove aController fromaSite, the Controller logon to the database server is not removed.This avoidspotentially removinga logon that isusedbyotherproducts’ serviceson the samemachine.The logonmust be removedmanually if it is no longer required; the securityadmin server role permis‑sion is needed to remove the logon.
Important:
Do not remove the Controller from Active Directory until after you remove it from the Site.
1. Make sure the Controller is powered on so that Studio loads in less than one hour. Once Studioloads the Controller you want to remove, power off the Controller when prompted to do so.
2. SelectConfiguration>Controllers in theStudionavigationpaneand then select theControlleryou want to remove.
3. Select Remove Controller in the Actions pane. If you do not have the correct database rolesand permissions, you are offered the option of generating a script that allows your databaseadministrator to remove the Controller for you.
4. You might need to remove the Controller’s machine account from the database server. Beforedoing this, check that another service is not using the account.
After using Studio to remove a Controller, traffic to that Controller might linger for a short amount oftime to ensure proper completion of current tasks. If you want to force the removal of a Controller
© 1999–2022 Citrix Systems, Inc. All rights reserved. 781
Citrix Virtual Apps and Desktops
in a very short time, Citrix recommends you shut down the server where it was installed, or removethat server from Active Directory. Then, restart the other Controllers on the Site to ensure no furthercommunication with the removed Controller.
Move a Controller to another zone
If your Site containsmore than one zone, you canmove a Controller to a different zone. See the Zonesarticle for information about how this can affect VDA registration and other operations.
1. SelectConfiguration>Controllers in theStudionavigationpaneand then select theControlleryou want to move.
2. SelectMove in the Actions pane.3. Specify the zone where you want to move the Controller.
Move a Controller to another Site
You cannot move a Controller to a Site that was created with an earlier version of this software.
1. On the Site where the Controller is currently located (the old Site), select Configuration > Con‑trollers in the Studio navigation pane and then select the Controller you want to move.
2. Select Remove Controller in the Actions pane. If you do not have the correct database rolesand permissions, you are offered the option of generating a script that allows someone withthose permissions (such as a database administrator) to remove the Controller for you. A Siterequires at least one Controller, so you cannot remove the last one listed in Studio.
3. On the Controller you are moving, open Studio, reset the services when prompted, select Joinexisting site, and enter the address of the new Site.
Move a VDA to another Site
If a VDA was provisioned using Citrix Provisioning or is an existing image, you can move a VDA to an‑other Site (from Site 1 to Site 2) when upgrading, or when moving a VDA image that was created ina test Site to a production Site. VDAs provisioned using Machine Creation Services (MCS) cannot bemoved fromoneSite to another becauseMCSdoesnot support changing the ListOfDDCs aVDAchecksto registerwithaController; VDAsprovisionedusingMCSalwayscheck theListOfDDCsassociatedwiththe Site in which they were created.
There are two ways to move a VDA to another Site: using the installer or Citrix policies.
Installer
Run the installer and add a Controller, specifying the FQDN (DNS entry) of a Controller in Site 2.
Specify Controllers in the installer only when the Controllers policy setting is not used.
© 1999–2022 Citrix Systems, Inc. All rights reserved. 782

Citrix Virtual Apps and Desktops
Group Policy Editor
The following example moves multiple VDAs between Sites.
1. Create a policy in Site 1 that contains the following settings, then filter the policy to the DeliveryGroup level to initiate a staged VDAmigration between the Sites.
• Controllers: Containing FQDNs (DNS entries) of one or more Controllers in Site 2.• Enable auto update of Controllers: set to disabled.
2. Each VDA in the Delivery Group is alerted within 90 minutes of the new policy. The VDA ignoresthe list of Controllers it receives (because auto‑update is disabled); it selects one of the Con‑trollers specified in the policy, which lists the Controllers in Site 2.
3. When the VDA successfully registers with a Controller in Site 2, it receives the Site 2 ListOfDDCsand policy information, which has auto‑update enabled by default. Since the Controller withwhich the VDA was registered in Site 1 is not on the list sent by the Controller in Site 2, the VDAre‑registers, choosing among the Controllers in the Site 2 list. From then on, the VDA is automat‑ically updated with information from Site 2.
VDA registration
April 14, 2021
IntroductionNote:
In an on‑premises environment, VDAs registerwith aDelivery Controller. In a Citrix Cloud serviceenvironment, VDAs registerwithaCloudConnector. In ahybrid environment, someVDAs registerwith a Delivery Controller while others register with a Cloud Connector.
Before a VDA can be used, it must register (establish communication) with one ormore Controllers orCloud Connectors on the site. The VDA finds a Controller or Connector by checking a list called theListofDDCs. The ListOfDDCs on a VDA contains DNS entries that point that VDA to Controllers or CloudConnectors on the site. For load balancing, the VDA automatically distributes connections across allControllers or Cloud Connectors in the list.
Why is VDA registration so important?
• From a security perspective, registration is a sensitive operation. You’re establishing a connec‑tion between the Controller or Cloud Connector and the VDA. For such a sensitive operation,the expected behavior is to reject the connection if everything is not in perfect shape. You are
© 1999–2022 Citrix Systems, Inc. All rights reserved. 783
Citrix Virtual Apps and Desktops
effectively establishing two separate communication channels: VDA to Controller or Cloud Con‑nector, and Controller or Cloud Connector to VDA. The connection uses Kerberos, so time syn‑chronization and domain membership issues are unforgiving. Kerberos uses Service PrincipalNames (SPNs), so you cannot use load balanced IP\hostname.
• If a VDA does not have accurate and current Controller or Cloud Connector information as youadd and remove Controllers or Cloud Connectors, the VDA might reject session launches thatare brokered by an unlisted Controller or Cloud Connector. Invalid entries can delay the startupof the virtual desktop system software. A VDAwon’t accept a connection from an unknown anduntrusted Controller or Cloud Connector.
In addition to the ListOfDDCs, the ListOfSIDs (Security IDs) indicateswhichmachines in the ListOfDDCsare trusted. The ListOfSIDs can be used to decrease the load on Active Directory or to avoid possiblesecurity threats from a compromised DNS server. For more information, see ListOfSIDs.
If a ListOfDDCs specifies more than one Controller or Cloud Connector, the VDA attempts to connectto them in random order. In an on‑premises deployment, the ListOfDDCs can also contain Controllergroups. The VDA attempts to connect to each Controller in a group before moving to other entries inthe ListOfDDCs.
Citrix Virtual Apps and Desktops automatically tests the connectivity to configured Controllers orCloud Connectors during VDA installation. Errors are displayed if a Controller or Cloud Connectorcannot be reached. If you ignore a warning that a Controller or Cloud Connector cannot be contacted(or when you do not specify Controller or Cloud Connector addresses during VDA installation),messages remind you.
Methods for configuring Controller or Cloud Connector addresses
The administrator chooses the configuration method to use when the VDA registers for the first time(the initial registration). During the initial registration, a persistent cache is createdon the VDA. Duringsubsequent registrations, the VDA retrieves the list of Controllers or Cloud Connectors from this localcache, unless a configuration change is detected.
The easiest way to retrieve that list during subsequent registrations is by using the auto‑update fea‑ture. Auto‑update is enabled by default. For more information, see Auto‑update.
There are several methods for configuring Controller or Cloud Connector addresses on a VDA.
• Policy‑based (LGPO or GPO)• Registry‑based (manual, Group Policy Preferences (GPP), specified during VDA installation)• Active Directory OU‑based (legacy OU discovery)• MCS‑based (personality.ini)
You specify the initial registration method when you install a VDA. (If you disable auto‑update, themethod you select during VDA installation is used for subsequent registrations.)
© 1999–2022 Citrix Systems, Inc. All rights reserved. 784

Citrix Virtual Apps and Desktops
The following graphic shows the Delivery Controller page of the VDA installation wizard.
Policy‑based (LGPO\GPO)
Citrix recommends using GPO for initial VDA registration. It has the highest priority. (Although auto‑update is listed as the highest priority, auto‑update is used only after the initial registration.) Policy‑based registration offers the centralizing advantages of using Group Policy for configuration.
To specify this method, complete both of the following steps:
• On the Delivery Controller page in the VDA installation wizard, select Do it later (advanced).The wizard reminds you several times to specify Controller addresses, even though you’re notspecifying them during VDA installation. (VDA registration is that important.)
• Enable or disable policy‑based VDA registration through Citrix policy with the VirtualDelivery Agent Settings > Controllers setting. (If security is your top priority, usethe Virtual Delivery Agent Settings > Controller SIDs setting.)
This setting is stored under HKLM\Software\Policies\Citrix\VirtualDesktopAgent (ListOfDDCs).
© 1999–2022 Citrix Systems, Inc. All rights reserved. 785

Citrix Virtual Apps and Desktops
Registry‑based
To specify this method, complete one of the following steps:
• On theDeliveryControllerpage in theVDA installationwizard, selectDo itmanually. Then, en‑ter the FQDN of an installed Controller and then click Add. If you’ve installedmore Controllers,add their addresses.
• For a command‑line VDA installation, use the /controllers option and specify the FQDNs of theinstalled Controllers or Cloud Connectors.
This information is stored in registry value ListOfDDCs under registry key HKLM\Software\Citrix\VirtualDesktopAgent or HKLM\Software\Wow6432Node\Citrix\VirtualDesktopAgent.
You can also configure this registry keymanually or use Group Policy Preferences (GPP). This methodmight be preferable to the policy‑based method (for example, if you want conditional processing ofdifferent Controllers or Cloud Connectors, such as: use XDC‑001 for computer names that begin withXDW‑001‑).
Update theListOfDDCs registry key, which lists the FQDNs of all the Controllers or CloudConnectorsin the site. (This key is the equivalent of the Active Directory site OU.)
HKEY_LOCAL_MACHINE\Software\Citrix\VirtualDesktopAgent\ListOfDDCs (REG_SZ)
If the HKEY_LOCAL_MACHINE\Software\Citrix\VirtualDesktopAgent registry locationcontains both the ListOfDDCs and FarmGUID keys, ListOfDDCs is used for Controller or CloudConnector discovery. FarmGUID is present if a site OU was specified during VDA installation. (Thismight be used in legacy deployments.)
Optionally, update the ListOfSIDs registry key (for more information, see ListOfSIDs:
HKEY_LOCAL_MACHINE\Software\Citrix\VirtualDesktopAgent\ListOfSIDs (REG_SZ)
Remember: If you also enable policy‑based VDA registration through Citrix policy, that overrides set‑tings you specify during VDA installation, because it is a higher‑priority method.
Active Directory OU‑based (legacy)
This method is supported primarily for backward compatibility and is not recommended. If you’restill using it, Citrix suggests changing to another method.
To specify this method, complete both of the following steps:
• On the Delivery Controller page in the VDA installation wizard, select Choose locations fromActive Directory.
• Use the Set-ADControllerDiscovery.ps1 script (available on every Controller). Also, con‑figure the FarmGuid registry entry on each VDA to point to the right OU. This setting can beconfigured using Group Policy.
© 1999–2022 Citrix Systems, Inc. All rights reserved. 786

Citrix Virtual Apps and Desktops
For details, see Active Directory OU‑based discovery.
MCS‑based
If you plan to use only MCS to provision VMs, you can instruct MCS to set up the list of Controllersor Cloud Connectors. This feature works with auto‑update. When creating the catalog, MCS injectsthe list of Controllers or Cloud Connectors into the Personality.ini file during initial provisioning.Auto‑update keeps the list current.
This method is not recommended for use in large environments. You can use this method if you:
• Have a small environment• Will not move VDAs between sites• Use only MCS to provision VMs• Don’t want to use Group Policy
To specify this method, on the Delivery Controller page in the VDA installation wizard, select LetMachine Creation Services do it.
Recommendations
As best practice:
• Use the Group Policy registration method for initial registration.
• Use auto‑update (enabled by default) to keep your list of Controllers up‑to‑date.
• In a multi‑zone deployment, use Group Policy for initial configuration (with at least two Con‑trollers or Cloud Connectors). Point VDAs to Controllers or Cloud Connectors local to (in) theirzone. Use auto‑update to keep them up‑to‑date. Auto‑update automatically optimizes theListOfDDCs for VDAs in satellite zones.
• Listmore than one controller on the ListOfDDCs registry key, separated by a space, to preventregistration issues if a Controller is not available. For example:
1 DDC7x.xd.local DDC7xHA.xd.local23 32-bit: HKEY_LOCAL_MACHINE \Software\Citrix\VirtualDesktopAgent\
ListOfDDCs45 HKEY_LOCAL_MACHINE \Software\Citrix\VirtualDesktopAgent\
ListOfDDCs (REG_SZ)6 <!--NeedCopy-->
• Ensure all values listed under ListOfDDCsmap to a valid fully qualified domain name to preventstartup registration delays.
© 1999–2022 Citrix Systems, Inc. All rights reserved. 787

Citrix Virtual Apps and Desktops
Auto‑update
Auto‑update (introduced in XenApp and XenDesktop 7.6) is enabled by default. It is themost efficientmethod for keeping your VDA registrations up‑to‑date. Although not used for initial registration, theauto‑update software downloads and stores the ListOfDDCs in a persistent cache on the VDA wheninitial registration occurs. This process is done for each VDA. The cache also holds machine policyinformation, which ensures that policy settings are retained across restarts.
Auto‑update is supported when using MCS or Citrix Provisioning to provision machines, except forCitrix Provisioning server‑side cache. Server‑side cache is not a common scenario because there is nopersistent storage for auto‑update cache.
To specify this method:
• Enable or disable auto‑update through a Citrix policy containing the setting VirtualDelivery Agent Settings > Enable auto update of Controllers. This setting isenabled by default.
How it works:
• Each time a VDA re‑registers (for example, after a machine restart), the cache is updated. EachController or Cloud Connector also checks the site database every 90minutes. If a Controller orCloudConnector has beenaddedor removed since the last check, or if a policy changeoccurredthat affects VDA registration, the Controller or Cloud Connector sends an updated list to its reg‑istered VDAs and the cache is updated. The VDA accepts connections from all the Controllers orCloud Connectors in its most recently cached list.
• If a VDA receives a list that does not include the Controller or Cloud Connector it is registeredwith (in other words, that Controller or Cloud Connector was removed from the site), the VDAre‑registers, choosing among the Controllers or Cloud Connectors in the ListOfDDCs.
Example:
• A deployment has three Controllers: A, B, and C. A VDA registers with Controller B (which wasspecified during VDA installation).
• Later, two Controllers (D and E) are added to the site. Within 90minutes, VDAs receive updatedlists and then accept connections from Controllers A, B, C, D, and E. (The load is not spreadequally to all Controllers until the VDAs are restarted.)
• Later still, Controller B is moved to another site. Within 90 minutes, VDAs in the original sitereceive updated lists because there has been a Controller change since the last check. The VDAthat originally registeredwith Controller B (which is no longer on the list) re‑registers, choosingamong the Controllers in the current list (A, C, D, and E).
In amulti‑zone deployment, auto‑update in a satellite zone automatically caches all local Controllersfirst. All Controllers in the primary zone are cached in a backup group. If no local Controllers in thesatellite zone are available, registration is attempted with Controllers in the primary zone.
© 1999–2022 Citrix Systems, Inc. All rights reserved. 788

Citrix Virtual Apps and Desktops
As shown in the following example, the cache file contains hostnames and a list of Security IDs (ListOf‑SIDs). The VDA does not query SIDs, which reduces the Active Directory load.
You can retrieve the cache file with a WMI call. However, it is stored in a location that’s readable onlyby the SYSTEM account.
Important:
This information is providedonly for information purposes. DONOTMODIFY THIS FILE. Anymod‑ifications to this file or folder results in an unsupported configuration.
Get-WmiObject -Namespace “Root\Citrix\DesktopInformation” -Class “Citrix_VirtualDesktopInfo” -Property “PersistentDataLocation”
If you need tomanually configure the ListOfSIDs for security reasons (as distinct from reducing ActiveDirectory load), you cannot use the auto‑update feature. For details, see ListOfSIDs.
Exception to auto‑update priority
Although auto‑update usually has the highest priority of all VDA registration methods and overridessettings for other methods, there is an exception. The NonAutoListOfDDCs elements in the cachespecify the initial VDA configuration method. Auto‑update monitors this information. If the initialregistration method changes, the registration process skips auto‑update, and uses the next‑highestconfigured priority method. This process can be helpful when you move a VDA to another site (forexample, during disaster recovery).
Configuration considerations
Consider the following when configuring items that can affect VDA registration.
Controller or Cloud Connector addresses
Regardless of which method you use to specify Controllers or Cloud Connectors, Citrix recommendsusing an FQDN address. An IP address is not considered a trusted configuration, because it’s easier to
© 1999–2022 Citrix Systems, Inc. All rights reserved. 789

Citrix Virtual Apps and Desktops
compromise an IP than a DNS record. If you populate the ListOfSIDs manually, you can use an IP in aListOfDDCs. However, FQDN is still recommended.
Load balancing
As noted earlier, the VDA automatically distributes connections across all Controllers or Cloud Con‑nectors in the ListOfDDCs. Failover and load balancing functionality is built into the Citrix BrokeringProtocol (CBP). If you specifymultiple Controllers or Cloud Connectors in your configuration, registra‑tion automatically fails over between them, if needed. With auto‑update, automatic failover occursautomatically for all VDAs.
For security reasons, you cannot use anetwork loadbalancer, suchasCitrix ADC. VDA registrationusesKerberos mutual authentication, where the client (VDA) must prove its identity to the service (Con‑troller). However, the Controller or Cloud Connector must prove its identity to the VDA. This meansthat the VDA and the Controller or Cloud Connector are acting as server and client at the same time.As noted at the beginning of this article, there are two communications channels: VDA to Controller/‑Cloud Connector and Controller/Cloud Connector to VDA.
A component in this process is called Service Principal Name (SPN), which stored as a property inan Active Directory computer object. When your VDA connects to a Controller or Cloud Connector, itmust specify “who” it wants to communicate with. This address is an SPN. If you use a load‑balancedIP, mutual Kerberos authentication correctly recognizes that the IP does not belong to the expectedController or Cloud Connector.
For more information, see:
• Introduction to Kerberos• Mutual authentication using Kerberos
Auto‑update replaces CNAME
The auto‑update feature replaces the CNAME (DNS alias) function from XenApp and XenDesktop ver‑sions earlier than 7.x. CNAME functionality is disabled, beginning with XenApp and XenDesktop 7.Use auto‑update instead of CNAME. (If youmust use CNAME, see CTX137960. For DNS aliasing toworkconsistently, do not use both auto‑update and CNAME at the same time.)
Controller/Cloud Connector groups
In certain scenarios, you might want to process Controllers or Cloud Connectors in groups, with onegroup being preferred and the other group used for a failover if all Controllers/Cloud Connectors fail.Remember that Controllers or Cloud Connectors are randomly selected from the list, so grouping canhelp enforce preferential use.
© 1999–2022 Citrix Systems, Inc. All rights reserved. 790

Citrix Virtual Apps and Desktops
These groups are intended for use within a single site (not multiple sites).
Use parentheses to specify groups of Controllers/Cloud Connectors. For example, with four Con‑trollers (two primary and two backups), a grouping might be:
(XDC-001.cdz.lan XDC-002.cdz.lan)(XDC-003.cdz.lan XDC-004.cdz.lan)
In this example, the Controllers in the first group (001 and 002) are processed first. If both fail, Con‑trollers in the second group (003 and 004) are processed.
For XenDesktop 7.0 or higher, there is an extra step you need to perform to use Registration Groupsfeature. You need to Prohibit the Enable Auto Update of Controller policy from Citrix Studio.
ListOfSIDs
The list of Controllers that a VDA can contact for registration is the ListOfDDCs. A VDAmust also knowwhich Controllers to trust; VDAs do not automatically trust the Controllers in the ListOfDDCs. TheListOfSIDs (Security IDs) identify the trusted Controllers. VDAs attempt to register only with trustedControllers.
In most environments, the ListOfSIDs is generated automatically from the ListOfDDCs. You can use aCDF trace to read the ListOfSIDs.
Generally, there is no need tomanually modify the ListOfSIDs. There are several exceptions. The firsttwo exceptions are no longer valid because newer technologies are available.
• Separate roles for Controllers: Before zones were introduced in XenApp and XenDesktop 7.7,the ListOfSIDs was manually configured when only a subset of Controllers was used for regis‑tration. For example, if you were using XDC‑001 and XDC‑002 as XML brokers, and XDC‑003 andXDC‑004 for VDA registration, you specified all Controllers in the ListOfSIDs, and XDC‑003 andXDC‑004 in the ListOfDDCs. This is not a typical or recommended configuration. Do not use it innewer environments. Instead, use zones.
• Reducing Active Directory load: Before the auto‑update feature was introduced in XenAppand XenDesktop 7.6, the ListOfSIDs was used to reduce the load on domain controllers. By pre‑populating the ListOfSIDs, the resolution from DNS names to SIDs could be skipped. However,the auto‑update feature removes the need for this work, because this persistent cache containsSIDs. Citrix recommends keeping the auto‑update feature enabled.
• Security: In some highly secured environments, the SIDs of trusted Controllers weremanuallyconfigured to avoid possible security threats from a compromised DNS server. However, if youdo this, you must also disable the auto‑update feature. Otherwise, the configuration from per‑sistent cache is used.
So, unless you have a specific reason, do not modify the ListOfSIDs.
If youmustmodify the ListOfSIDs, create a registry key named ListOfSIDs (REG_SZ) under HKLM\Software\Citrix\VirtualDesktopAgent. The value is a list of trusted SIDs, separated by spaces
© 1999–2022 Citrix Systems, Inc. All rights reserved. 791

Citrix Virtual Apps and Desktops
if you have more than one.
In the following example, one Controller is used for VDA registration (ListOfDDCs), but twoControllersare used for brokering (List OfSIDs).
Troubleshoot VDA registration issues
As noted previously, a VDAmust be registeredwith aDelivery Controller or CloudConnector to be con‑sidered when launching brokered sessions. Unregistered VDAs can result in underutilization of other‑wise available resources. There are various reasons a VDAmight not be registered, many of which anadministrator can troubleshoot. Studio provides troubleshooting information in the catalog creationwizard, and after you create a Delivery Group.
• Identifying issues duringmachine catalog creation: In the catalog creationwizard, after youadd existing machines, the list of computer account names indicates whether each machineis suitable for adding to the catalog. Hover over the icon next to each machine to display aninformative message about that machine.
If themessage identifies a problematicmachine, you can either remove thatmachine (using theRemovebutton), or add themachine. For example, if amessage indicates that informationwasnot obtained about a machine (perhaps because it had never registered), you might choose toadd the machine anyway.
A catalog’s functional level controls which product features are available to machines in thecatalog. Using features introduced in new product versions might require a new VDA. Setting afunctional level makes all features introduced in that version (and later, if the functional leveldoes not change) available tomachines in the catalog. However, machines in that catalog withan earlier VDA version will not be able to register.
• Identifying issues after creating Delivery Groups: After you create a Delivery Group, Studiodisplays details about machines associated with that group.
The details pane for a Delivery Group indicates the number of machines that should be regis‑tered but are not. In other words, there might be one or more machines that are powered onand not inmaintenancemode, but are not currently registeredwith a Controller. When viewing
© 1999–2022 Citrix Systems, Inc. All rights reserved. 792
Citrix Virtual Apps and Desktops
a “not registered, but should be” machine, review the Troubleshoot tab in the details pane forpossible causes and recommended corrective actions.
More information about troubleshooting VDA registration
• For more information about functional levels, see VDA versions and functional levels.
• For more information about VDA registration troubleshooting, see CTX136668.
• You can also use theCitrix Health Assistant to troubleshoot VDA registration and session launch.For details, see CTX207624.
Sessions
April 14, 2021
Maintaining session activity is critical to providing the best user experience. Losing connectivity dueto unreliable networks, highly variable network latency, and range limitations of wireless devices canlead to user frustration. Being able tomove quickly betweenworkstations and access the same set ofapplications each time they log on is a priority for many mobile workers such as health‑care workersin a hospital.
The features described in this article optimize the reliability of sessions, reduce inconvenience, down‑time, and loss of productivity; using these features,mobile users can roamquickly andeasily betweendevices.
You can also log a user off of a session, disconnect a session, and configure session prelaunch andlinger; see Manage Delivery Groups.
Session reliability
Session Reliability keeps sessions active and on the user’s screen when network connectivity is inter‑rupted. Users continue to see the application they are using until network connectivity resumes.
This feature is especially useful for mobile users with wireless connections. For example, a user witha wireless connection enters a railroad tunnel and momentarily loses connectivity. Ordinarily, thesession is disconnected and disappears from the user’s screen, and the user has to reconnect to thedisconnected session. WithSessionReliability, the session remainsactiveon themachine. To indicatethat connectivity is lost, the user’s display freezes and the cursor changes to a spinning hourglassuntil connectivity resumes on the other side of the tunnel. The user continues to access the displayduring the interruptionandcan resume interactingwith theapplicationwhen thenetwork connectionis restored. Session Reliability reconnects users without reauthentication prompts.
© 1999–2022 Citrix Systems, Inc. All rights reserved. 793
Citrix Virtual Apps and Desktops
Citrix Workspace app users cannot override the Controller setting.
You can use Session Reliability with Transport Layer Security (TLS). TLS encrypts only the data sentbetween the user device and Citrix Gateway.
Enable and configure Session Reliability with the following policy settings:
• The Session reliability connections policy setting allows or prevents session reliability.• The Session reliability timeout policy setting has a default of 180 seconds, or threeminutes. Al‑though you can extend the amount of time Session Reliability keeps a session open, this featureis designed for user convenience and therefore does not prompt the user for reauthentication.As you extend the amount of time a session is kept open, chances increase that a user may getdistracted and walk away from the user device, potentially leaving the session accessible tounauthorized users.
• Incoming session reliability connections use port 2598, unless you change the port number inthe Session reliability port number policy setting.
• If you do not want users to be able to reconnect to interrupted sessions without having to reau‑thenticate, use the Auto Client Reconnect feature. You can configure the Auto client reconnectauthentication policy setting to prompt users to reauthenticate when reconnecting to inter‑rupted sessions.
If you use both Session Reliability and Auto Client Reconnect, the two features work in sequence.Session Reliability closes, or disconnects, the user session after the amount of time you specify in theSession reliability timeout policy setting. After that, the Auto Client Reconnect policy settings takeeffect, attempting to reconnect the user to the disconnected session.
Auto Client Reconnect
With the Auto Client Reconnect feature, Citrix Workspace app can detect unintended disconnectionsof ICA sessions and reconnect users to the affected sessions automatically. When this feature is en‑abled on the server, users do not have to reconnect manually to continue working.
For application sessions, Citrix Workspace app attempts to reconnect to the session until there is asuccessful reconnection or the user cancels the reconnection attempts.
For desktop sessions, CitrixWorkspace app attempts to reconnect to the session for a specified periodof time, unless there is a successful reconnection or the user cancels the reconnection attempts. Bydefault, this period of time is fiveminutes. To change this period of time, edit this registry on the userdevice:
HKLM\Software\Citrix\ICA Client\TransportReconnectRetryMaxTimeSeconds;DWORD;<seconds>
where seconds is the number of seconds after which no more attempts are made to reconnect thesession.
© 1999–2022 Citrix Systems, Inc. All rights reserved. 794

Citrix Virtual Apps and Desktops
Enable and configure Auto Client Reconnect with the following policy settings:
• Auto client reconnect: Enables or disables automatic reconnection by Citrix Workspace appafter a connection has been interrupted.
• Auto client reconnect authentication: Enables or disables the requirement for user authenti‑cation after automatic reconnection.
• Auto client reconnect logging: Enables or disables loggingof reconnection events in the eventlog. Logging is disabled by default. When enabled, the server’s system log captures informa‑tion about successful and failed automatic reconnection events. Each server stores informationabout reconnection events in its own system log; the site does not provide a combined log ofreconnection events for all servers.
Auto Client Reconnect incorporates an authentication mechanism based on encrypted user creden‑tials. When a user initially logs on, the server encrypts and stores the user credentials inmemory, andcreates and sends a cookie containing the encryption key to Citrix Workspace app. Citrix Workspaceapp submits the key to the server for reconnection. The server decrypts the credentials and submitsthem toWindows logon for authentication. When cookies expire, usersmust reauthenticate to recon‑nect to sessions.
Cookies are not used if you enable the auto client reconnection authentication setting. Instead, usersare presented with a dialog box to users requesting credentials when Citrix Workspace app attemptsto reconnect automatically.
For maximum protection of user credentials and sessions, use encryption for all communication be‑tween clients and the Site.
Disable Auto Client Reconnect on Citrix Workspace app for Windows by using the icaclient.adm file.For more information, see the documentation for your Citrix Workspace app for Windows version.
Settings for connections also affect Auto Client Reconnect:
• By default, Auto Client Reconnect is enabled through policy settings at the Site level, as de‑scribed above. User reauthentication is not required. However, if a server’s ICA TCP connec‑tion is configured to reset sessions with a broken communication link, automatic reconnectiondoes not occur. Auto Client Reconnectworks only if the server disconnects sessionswhen thereis a broken or timed out connection. In this context, the ICA TCP connection refers to a server’svirtual port (rather than an actual network connection) that is used for sessions on TCP/IP net‑works.
• Bydefault, the ICATCPconnectionona server is set todisconnect sessionswithbrokenor timedout connections. Disconnected sessions remain intact in systemmemory and are available forreconnection by Citrix Workspace app.
• The connection can be configured to reset or log off sessions with broken or timed‑out con‑nections. When a session is reset, attempting to reconnect initiates a new session; rather thanrestoring a user to the same place in the application in use, the application is restarted.
© 1999–2022 Citrix Systems, Inc. All rights reserved. 795

Citrix Virtual Apps and Desktops
• If the server is configured to reset sessions, Auto Client Reconnect creates a new session. Thisprocess requires users to enter their credentials to log on to the server.
• Automatic reconnection can fail if Citrix Workspace app or the plug‑in submits incorrect au‑thentication information, whichmight occur during an attack or the server determines that toomuch time has elapsed since it detected the broken connection.
ICA Keep‑Alive
Enabling the ICA Keep‑Alive feature prevents broken connections from being disconnected. Whenenabled, if the server detects no activity (for example, no clock change, no mouse movement, noscreen updates), this feature prevents Remote Desktop Services fromdisconnecting that session. Theserver sends keep‑alive packets every few seconds to detect if the session is active. If the session isno longer active, the server marks the session as disconnected.
Important:
ICA Keep‑Alive works only if you are not using Session Reliability. Session Reliability has its ownmechanisms to prevent broken connections from being disconnected. Configure ICA Keep‑Aliveonly for connections that do not use Session Reliability.
ICA Keep‑Alive settings override keep‑alive settings that are configured in Microsoft Windows GroupPolicy.
Enable and configure ICA Keep‑Alive with the following policy settings:
• ICA keep alive timeout: Specifies the interval (1‑3600 seconds) used to send ICA keep‑alivemessages. Do not configure this option if you want your network monitoring software to closeinactive connections in environments where broken connections are so infrequent that allow‑ing users to reconnect to sessions is not a concern.
The default interval is 60 seconds: ICA Keep‑Alive packets are sent to user devices every 60 sec‑onds. If a user device does not respond in 60 seconds, the status of the ICA sessions changes todisconnected.
• ICA keep alives: Sends or prevents sending ICA keep‑alive messages.
Workspace control
Workspace control lets desktops and applications follow a user from one device to another. Thisability to roam enables a user to access all desktops or open applications from anywhere simplyby logging on, without having to restart the desktops or applications on each device. For example,workspace control can assist health‑care workers in a hospital who need to move quickly among dif‑ferent workstations and access the same set of applications each time they log on. If you configure
© 1999–2022 Citrix Systems, Inc. All rights reserved. 796

Citrix Virtual Apps and Desktops
workspace control options to allow it, theseworkers candisconnect frommultiple applications at oneclient device and then reconnect to open the same applications at a different client device.
Workspace control affects the following activities:
• Logging on: By default, workspace control enables users to reconnect automatically to all run‑ning desktops and applicationswhen logging on, bypassing the need to reopen themmanually.Through workspace control, users can open disconnected desktops or applications, as well asany that are active on another client device. Disconnecting fromadesktopor application leavesit running on the server. If you have roaming users who need to keep some desktops or applica‑tions running on one client device while they reconnect to a subset of their desktops or applica‑tions on another client device, you can configure the logon reconnection behavior to open onlythe desktops or applications that the user disconnected from previously.
• Reconnecting: After logging on to the server, users can reconnect to all of their desktops orapplications at any time by clicking Reconnect. By default, Reconnect opens desktops or ap‑plications that are disconnected, plus any that are currently running on another client device.You can configure Reconnect to open only those desktops or applications that the user discon‑nected from previously.
• Logging off: For users opening desktops or applications through StoreFront, you can configurethe Log Off command to log the user off from StoreFront and all active sessions together, or logoff from StoreFront only.
• Disconnecting: Users can disconnect from all running desktops and applications at once, with‑out needing to disconnect from each individually.
Workspace control is available only for Citrix Workspace app users who access desktops and appli‑cations through a Citrix StoreFront connection. By default, workspace control is disabled for virtualdesktop sessions, but is enabled for hosted applications. Session sharing does not occur by defaultbetween published desktops and any published applications running inside those desktops.
User policies, client drive mappings, and printer configurations change appropriately when a usermoves to a new client device. Policies andmappings are applied according to the client device wheretheuser is currently loggedon to the session. For example, if a health careworker logs off fromaclientdevice in the emergency room of a hospital and then logs on to a workstation in the hospital’s x‑raylaboratory, the policies, printer mappings, and client drive mappings appropriate for the session inthe x‑ray laboratory go into effect at the session startup.
You can customize which printers appear to users when they change locations. You can also controlwhether users can print to local printers, how much bandwidth is consumed when users connect re‑motely, and other aspects of their printing experiences.
For information about enabling and configuring workspace control for users, see the StoreFront doc‑umentation.
© 1999–2022 Citrix Systems, Inc. All rights reserved. 797

Citrix Virtual Apps and Desktops
Session roaming
By default, sessions roam between client devices with the user. When the user launches a sessionand then moves to another device, the same session is used and applications are available on bothdevices. The applications follow, regardless of the device or whether current sessions exist. In manycases, printers and other resources assigned to the application also follow.
While this default behavior offersmany advantages, it might not be ideal in all cases. You can preventsession roaming using the PowerShell SDK.
Example 1: A medical professional is using two devices, completing an insurance form on a desktopPC, and looking at patient information on a tablet.
• If session roaming is enabled, both applications appear on both devices (an applicationlaunched on one device is visible on all devices in use). This might not meet securityrequirements.
• If session roaming is disabled, the patient record does not appear on the desktop PC, and theinsurance form does not appear on the tablet.
Example 2: A production manager launches an application on the PC in his office. The device nameand location determine which printers and other resources are available for that session. Later in theday, he goes to an office in the next building for a meeting that will require him to use a printer.
• If session roaming is enabled, the productionmanager would probably be unable to access theprinters near the meeting room, because the applications he launched earlier in his office re‑sulted in the assignment of printers and other resources near that location.
• If session roaming is disabled, when he logs on to a different machine (using the same creden‑tials), a new session is started, and nearby printers and resources will be available.
Configure session roaming
To configure session roaming, use the following entitlement policy rule cmdlets with the “SessionRe‑connection” property. Optionally, you can also specify the “LeasingBehavior” property.
For desktop sessions:
Set-BrokerEntitlementPolicyRule <Delivery-Group-name> -SessionReconnection<value> -LeasingBehavior Allowed|Disallowed
For application sessions:
Set-BrokerAppEntitlementPolicyRule <Delivery-Group-name> -SessionReconnection<value> -LeasingBehavior Allowed|Disallowed
Where value can be one of the following:
• Always: Sessions always roam, regardless of the client device and whether the session is con‑nected or disconnected. This is the default value.
© 1999–2022 Citrix Systems, Inc. All rights reserved. 798

Citrix Virtual Apps and Desktops
• DisconnectedOnly: Reconnect only to sessions that are already disconnected; otherwise,launch a new session. (Sessions can roam between client devices by first disconnecting them,or usingWorkspace Control to explicitly roam them.) An active connected session fromanotherclient device is never used; instead, a new session is launched.
• SameEndpointOnly: A user gets a unique session for each client device they use. This com‑pletely disables roaming. Users can reconnect only to the samedevice thatwas previously usedin the session.
The “LeasingBehavior” property is described below.
Effects from other setting:
Disabling session roaming is affected by the application limit “Allow only one instance of the applica‑tion per user” in the application’s properties in the Delivery Group.
• If you disable session roaming, then disable the “Allow only one instance…” application limit.• If you enable the “Allow only one instance …” application limit, do not configure either of thetwo values that allow new sessions on new devices.
Logon interval
If a virtual machine containing a desktop VDA closes before the logon process completes, you canallocate more time to the process. The default for 7.6 and later versions is 180 seconds (the defaultfor 7.0‑7.5 is 90 seconds).
On the machine (or the master image used in a machine catalog), set the following registry key:
Key:HKLM\SOFTWARE\Citrix\PortICA
• Value: AutoLogonTimeout• Type: DWORD• Specify a decimal time in seconds, in the range 0‑3600.
If you change amaster image, update the catalog.
This settingappliesonly toVMswithdesktop (workstation) VDAs. Microsoftcontrols the logon timeoutonmachines with server VDAs.
Use Search in Studio
April 14, 2021
Use the Search feature to view information about specific machines, sessions, machine catalogs, ap‑plications, or Delivery Groups.
© 1999–2022 Citrix Systems, Inc. All rights reserved. 799
Citrix Virtual Apps and Desktops
1. Select Search in the Studio navigation pane.
You cannot search within the machine catalogs or Delivery Groups tabs using the Search box.Use the Search node in the navigation pane.
To display additional search criteria in the display, click the plus sign next to the Search drop‑down fields. Remove search criteria by clicking the minus button.
2. Enter the name or use the drop‑down list to select another search option for the item youwantto find.
3. Optionally, save your search by selecting Save as. The search appears in the Saved searcheslist.
Alternatively, click the Expand Search icon (dual downward angle brackets) to display a menu ofsearchproperties. You canperformanadvanced searchbybuilding an expression from thepropertiesin the menu.
Tips to enhance a search:
• To display additional characteristics to include in the display onwhich you can search and sort,right click any column and select Select columns.
• To locate a user device connected to a machine, use Client (IP) and Is, and enter the device IPaddress.
• To locate active sessions, use Session State, Is, and Connected.• To list all of the machines in a Delivery Group, select Delivery Groups in the navigation pane,then select the group, and then select ViewMachines in the Actions pane.
Tags
April 14, 2021
Introduction
Tags are strings that identify items such as machines, applications, desktops, Delivery Groups, Ap‑plication Groups, and policies. After creating a tag and adding it to an item, you can tailor certainoperations to apply to only items that have a specified tag.
• Tailor search displays in Studio.
For example, to display only applications that have been optimized for testers, create a tagnamed “test” and then add (apply) it to those applications. You can now filter the Studio searchwith the tag “test”.
© 1999–2022 Citrix Systems, Inc. All rights reserved. 800

Citrix Virtual Apps and Desktops
• Publish applications fromanApplicationGroupor specific desktops fromaDelivery Group, con‑sidering only a subset of the machines in selected Delivery Groups. This is called a tag restric‑tion.
With tag restrictions, you can use your existing machines for more than one publishing task,saving the costs associated with deploying and managing additional machines. A tag restric‑tion can be thought of as subdividing (or partitioning) the machines in a Delivery Group. Itsfunctionality is similar, but not identical, to worker groups in XenApp releases earlier than 7.x.
Using an Application Group or desktops with a tag restriction or can be helpful when isolatingand troubleshooting a subset of machines in a Delivery Group.
• Schedule periodic restarts for a subset of machines in a Delivery Group.
Using a tag restriction for machines enables you to use new PowerShell cmdlets to configuremultiple restart schedules for subsets of machines in a Delivery Group. For examples and de‑tails, see Manage Delivery Groups.
• Tailor the application (assignment) of Citrix policies to a subset ofmachines in Delivery Groups,Delivery Group types, or OUs that have (or do not have) a specified tag.
For example, if you want to apply a Citrix policy only to the more powerful workstations, adda tag named “high power” to those machines. Then, on the Assign Policy page of the CreatePolicywizard, select that tag and also the Enable checkbox. You can also add a tag to a DeliveryGroup and then apply a Citrix policy to that group. For details, see Create policies.
You can apply tags to:
• Machines• Applications• Machine catalogs (PowerShell only; see Tags onmachine catalogs)• Delivery Groups• Application Groups
You can configure a tag restriction can be configuredwhen creating or editing the following in Studio:
• A desktop in a shared Delivery Group• An Application Group
Tag restrictions for a desktop or an Application Group
A tag restriction involves several steps:
• Create the tag and then add (apply) it to machines.• Create or edit a group with the tag restriction (in other words, “restrict launches to machineswith tag x”).
© 1999–2022 Citrix Systems, Inc. All rights reserved. 801

Citrix Virtual Apps and Desktops
A tag restrictionextends thebroker’smachine selectionprocess. Thebroker selects amachine fromanassociated Delivery Group subject to access policy, configured user lists, zone preference, and launchreadiness, plus the tag restriction (if present). For applications, the broker falls back to other Deliv‑ery Groups in priority order, applying the samemachine selection rules for each considered DeliveryGroup.
Example 1: Simple layout
This example introduces a simple layout that uses tag restrictions to limit which machines will beconsidered for certain desktop and application launches. The site has one shared Delivery Group,one published desktop, and one Application Group configured with two applications.
• Tags have been added to each of the three machines (VDA 101‑103).• The desktop in the shared Delivery Group was created with a tag restriction named “Red,” sothat desktop can be launched only onmachines in that Delivery Group that have the tag “Red”:VDA 101 and 102.
• The Application Groupwas createdwith the “Orange” tag restriction, so each of its applications(Calculator and Notepad) can be launched only on machines in that Delivery Group that havethe tag “Orange”: VDA 102 and 103.
Machine VDA 102 has both tags (Red and Orange), so it can be considered for launching the applica‑tions and the desktop.
Example 2: More complex layout
This example contains several Application Groups that were createdwith tag restrictions. This resultsin the ability to delivermore applicationswith fewermachines thanwould otherwise beneeded if youused only Delivery Groups.
How to configure example 2 shows the steps used to create and apply the tags, and then configurethe tag restrictions in this example.
© 1999–2022 Citrix Systems, Inc. All rights reserved. 802

Citrix Virtual Apps and Desktops
This example uses ten machines (VDA 101‑110), one Delivery Group (D01), and three ApplicationGroups (A100, A200, A300). By applying tags to each machine and then specifying tag restrictionswhen creating each Application Group:
• Accounting users in the group can access the apps they need on five machines (VDA 101–105)• CAD designers in the group can access the apps they need on five machines (VDA 106‑110)• Users in the group who need Office applications can access the Office apps on ten machines(VDA 101‑110)
Only ten machines are used, with only one Delivery Group. Using Delivery Groups alone (withoutApplication Groups) would require twice as many machines, because a machine can belong to onlyone Delivery Group.
Manage tags and tag restrictions
Tags are created, added (applied), edited, and deleted from selected items through theManage Tagsaction in Studio.
(Exception: Tags used for policy assignments are created, edited, and deleted through the ManageTags action in Studio; however, tags are applied (assigned) when you create the policy. See Createpolicies for details.)
© 1999–2022 Citrix Systems, Inc. All rights reserved. 803

Citrix Virtual Apps and Desktops
Tag restrictions are configured when you create or edit desktops in Delivery Groups, and when youcreate and edit Application Groups.
Use the Manage Tags dialogs in Studio
In Studio, select the items youwant to apply a tag to (one ormoremachines, applications, a desktop,a Delivery Group, or an Application Group) and then select Manage Tags in the Actions pane. TheManage Tags dialog box lists all the tags that have been created in the Site, not just for the items youselected.
• A check box containing a checkmark indicates that tag has already been added to the selecteditems. (In the screen capture below, the selectedmachine has the tag named “Tag1” applied.)
• If you selected more than one item, a check box containing a hyphen indicates that some, butnot all selected items have that tag added.
© 1999–2022 Citrix Systems, Inc. All rights reserved. 804

Citrix Virtual Apps and Desktops
The following actions are available from theManageTagsdialogbox. Be sure to reviewCautionswhenworking with tags.
• To create a tag:
Click Create. Enter a name and description. Tag names must be unique and are not case‑sensitive. Then click OK. (Creating a tag does not automatically apply it to any items you haveselected. Use the check boxes to apply the tag.)
• To add (apply) one ormore tags:
Enable the check box next to the tag name. If you selected multiple items and the check boxnext to a tag contains a hyphen (indicating that some, but not all selected items already havethe tag applied), changing it to a check mark affects all of the selectedmachines.
If you attempt to add a tag to one or more machines, and that tag is currently used as a re‑striction in an Application Group, you are warned that the action can result in making thosemachines available for launch. If that’s what you intended, proceed.
• To remove one ormore tags:
Clear the check box next to the tag name. If you selectedmultiple items and the check box nextto a tag contains a hyphen (indicating that some, but not all selected items already have the tagapplied), clearing the check box removes the tag from all of the selectedmachines.
If you attempt to remove a tag from a machine that is using that tag as a restriction, you arewarned that the action can affect which machines are considered for launch. If that’s what youintended, proceed.
• To edit a tag:
Select a tag and then click Edit. Enter a new name and/or description. You can edit only onetag at a time.
• To delete one ormore tags:
Select the tags and then click Delete. The Delete Tag dialog box indicates how many itemscurrently use the selected tags (for example “2 machines”). Click an item to display more infor‑mation. For example, clicking a “2machines” itemdisplays the names of the twomachines thathave that tag applied. Confirm whether you want to delete the tags.
You cannot use Studio to delete a tag that is used as a restriction. You must first edit the Appli‑cation Group and remove the tag restriction or select a different tag.
When you’re done in the Manage Tags dialog box, click Save.
To see if a machine has any tags applied: Select Delivery Groups in the navigation pane. Select a De‑livery Group in themiddle pane and then selectViewMachines in the Actions pane. Select amachinein the middle pane and then select the Tags tab on the Details pane below.
© 1999–2022 Citrix Systems, Inc. All rights reserved. 805

Citrix Virtual Apps and Desktops
Manage tag restrictions
Configuring a tag restriction is a multi‑step process: You first create the tag and add/apply it to ma‑chines. Then, you add the restriction to the Application Group or the desktop.
• Create and apply the tag:
Create the tag and then add (apply) it to themachines thatwill be affectedby the tag restriction,using theManage Tags actions described above.
• To add a tag restriction to an Application Group:
Create or edit the Application Group. On the Delivery Groups page, select Restrict launches tomachines with the tag and then select the tag from the dropdown.
• To change or remove the tag restriction on an Application Group:
Edit the group. On the Delivery Groups page, either select a different tag from the dropdown orremove the tag restriction entirely by clearing Restrict launches tomachines with the tag.
• To add a tag restriction to a desktop:
Create or edit a Delivery Group. Click Add or Edit on the Desktops page. In the Add Desktopdialog box, selectRestrict launches tomachineswith the tag and then select the tag from themenu.
• To change or remove the tag restriction on a Delivery Group:
Edit the group. On the Desktops page, click Edit. In the dialog box, either select a differenttag from the dropdown or remove the tag restriction entirely by clearing Restrict launches tomachines with the tag.
Cautions whenworking with tags
A tag applied to an item can be used for different purposes, so keep in mind that adding, removing,and deleting a tag can have unintended effects. You can use a tag to sort machine displays in theStudio search field. You can use the same tag as a restriction when configuring an Application Groupor a desktop, whichwill limit launch consideration to onlymachines in specified Delivery Groups thathave that tag.
If you attempt to add a tag to one or more machines after that tag has been configured as a tag re‑striction for a desktop or an Application Group, Studiowarns you that adding that tagmightmake themachines available for launching additional applications or desktops. If that is what you intended,proceed. If not, you can cancel the operation.
For example, let’s say you create an Application Group with the “Red” tag restriction. Later, you addseveral other machines in the same Delivery Groups used by that Application Group. If you then at‑tempt to add the “Red” tag to thosemachines, Studiowill display amessage similar to: “The tag “Red”
© 1999–2022 Citrix Systems, Inc. All rights reserved. 806

Citrix Virtual Apps and Desktops
is used as a restriction on the following Application Groups. Adding this tag might make the selectedmachines available to launch applications in this Application Group.” You can then confirm or canceladding that tag to those additional machines.
Similarly, if a tag is being used in an Application Group to restrict launches, Studio warns that youcannot delete the tag until you remove it as a restriction by editing the group. (If you were allowed todelete a tag that’s used as a restriction in an Application Group, that could result in allowing applica‑tions to launch on all machines in the Delivery Groups associated with the Application Group.) Thesame prohibition against deleting a tag applies if the tag is currently being used as a restriction fordesktop launches. After you edit the Application Group or desktops in the Delivery Group to removethat tag restriction, you can delete the tag.
All machines may not have the same sets of applications. A user may belong to more than one Appli‑cation Group, each with a different tag restriction and different or overlapping sets of machines fromDelivery Groups. The following table lists howmachine considerations are decided.
When an application has been added toThesemachines in the selected DeliveryGroups are considered for launch
One Application Group with no tag restriction Any machine
One Application Group with tag restriction A Machines that have tag A applied
Two Application Groups, one with tagrestriction A and the other with tag restriction B
Machines that have tag A and tag B; if none areavailable, thenmachines that have tag A or tagB
Two Application Groups, one with tagrestriction A and the other with no tagrestriction
Machines that have tag A; if none are available,then any machine
If you used a tag restriction in amachine restart schedule, any changes youmake that affect tag appli‑cations or restrictions affect the next machine restart cycle. It does not affect any restart cycles thatis in progress while the changes are being made.
How to configure example 2
The following sequence shows the steps to create and apply tags, and then configure tag restrictionsfor the Application Groups illustrated in the second example above.
VDAs and applications have already been installed on themachines and the Delivery Group has beencreated.
Create and apply tags to the machines:
© 1999–2022 Citrix Systems, Inc. All rights reserved. 807

Citrix Virtual Apps and Desktops
1. In Studio, select Delivery Group D01 and then select ViewMachines in the Action pane.2. Select machines VDA 101‑105 and then selectManage Tags in the Actions pane.3. In the Manage Tags dialog box, click Create and then create a tag named CADApps. ClickOK.4. Click Create again and create a tag named OfficeApps. ClickOK.5. While still in the Manage Tags dialog box, add (apply) the newly‑created tags to the selected
machines by enabling the check boxes next to each tag’s name (CADApps and OfficeApps), andthen close the dialog box.
6. Select Delivery Group D01, select ViewMachines in the Action pane.7. Select machines VDA 106‑110 and then selectManage Tags in the Actions pane.8. In the Manage Tags dialog box, click Create and then create a tag named AcctgApps. ClickOK.9. Apply thenewly‑createdAcctgApps tag and theOfficeApps tag to the selectedmachinesby click‑
ing the check boxes next to each tag’s name, and then close the dialog box.
Create the Application Groups with tag restrictions.
1. In Studio, selectApplications in thenavigationpaneand then selectCreateApplicationGroupin the Actions pane. The Create Application Group wizard launches.
2. On theDeliveryGroupspageof thewizard, selectDeliveryGroupD01. SelectRestrict launchestomachines with tag and then select the AcctgApps tag from the dropdown.
3. Complete the wizard, specifying the accounting users and the accounting applications. (Whenadding the application, choose the “From Start menu” source, which will search for the appli‑cation on the machines that have the AcctgApps tag.) On the Summary page, name the groupA100.
4. Repeat the preceding steps to create Application Group A200, specifying machines that havethe CADApps tag, plus the appropriate users and applications.
5. Repeat steps to create Application Group A300, specifying machines that have the OfficeAppstag, plus the appropriate users and applications.
Tags onmachine catalogs
You can use tags on machine catalogs. The overall sequence of creating a tag and then applying it toa catalog is the same as described previously. However, applying tags to catalogs is supported onlythrough the PowerShell interface. You cannot use Studio to apply a tag to a catalog or remove a tagfrom a catalog. Catalog displays in Studio do not indicate if a tag is applied.
Summary: You can use Studio or PowerShell to create or delete a tag for use on a catalog. You mustuse PowerShell to apply the tag to the catalog.
Here are some examples of using tags with catalogs:
• A Delivery Group has machines from several catalogs, but you want an operation (such as arestart schedule) to affect only themachines in a specific catalog. Applying a tag to that catalogaccomplishes that.
© 1999–2022 Citrix Systems, Inc. All rights reserved. 808

Citrix Virtual Apps and Desktops
• In anApplicationGroup, youwant to limit application sessions tomachines in a specific catalog.Applying a tag to that catalog accomplishes that.
Affected PowerShell cmdlets:
• You can pass catalog objects to cmdlets such as Add-BrokerTag and Remove-BrokerTag.• Get-BrokerTagUsage shows howmany catalogs contain tags.• Get-BrokerCatalog has a property named Tags.
For example, the following cmdlets add a tag named fy2018 to the catalog named acctg:Get-BrokerCatalog -Name acctg | Add-BrokerTag fy2018. (The tag was previouslycreated using either Studio or PowerShell.)
See the PowerShell cmdlet help for additional guidance and syntax.
More information
Blog post: How to assign desktops to specific servers.
IPv4/IPv6 support
April 14, 2021
This release supports pure IPv4, pure IPv6, anddual‑stack deployments that use overlapping IPv4 andIPv6 networks.
The following components support only IPv4. All others support IPv4 and IPv6.
• Citrix Provisioning• Citrix Hypervisor• Virtual Delivery Agents (VDAs) not controlled by theOnly use IPv6 Controller registration pol‑icy setting
IPv6 communications are controlled with two VDA connection‑related Citrix policy settings.
• Primary setting that enforces the use of IPv6: Only use IPv6 Controller registration.
This policy setting controls which form of address the VDA uses to register with the DeliveryController.
When enabled, the VDA registers and communicates with the Controller using a single IPv6 ad‑dress chosen in the following precedence: global IP address, Unique Local Address (ULA), link‑local address (only if no other IPv6 addresses are available).
When disabled, the VDA registers and communicates with the Controller using the machine’sIPv4 address. This is the default value.
© 1999–2022 Citrix Systems, Inc. All rights reserved. 809
Citrix Virtual Apps and Desktops
If a team frequently uses an IPv6network, publish thedesktops andapplications for those usersbased on an image or Organizational Unit (OU) that has theOnly use IPv6 Controller registra‑tion policy setting enabled.
If a team frequently uses an IPv4network, publish thedesktops andapplications for those usersbased on an image or OU that has the Only use IPv6 Controller registration policy settingdisabled.
• Dependent setting that defines an IPv6 netmask: Controller registration IPv6 netmask.
A machine can have multiple IPv6 addresses. This policy setting allows administrators to re‑strict the VDA to only a preferred subnet, rather than a global IP, if one is registered. This settingspecifies the network where the VDA registers. The VDA registers only on the first address thatmatches the specified netmask.
This setting is valid onlywhen the *Only use IPv6 Controller registration policy setting is enabled.Default = Empty string
Deployment considerations
If your environment contains both IPv4 and IPv6 networks, create separate delivery group configura‑tions for IPv4‑only clients and for the clientswhocanaccess the IPv6network. Consider usingnaming,manual Active Directory group assignment, or SmartAccess filters to differentiate users.
Session reconnection might fail if the connection starts on an IPv6 network, and then you try to con‑nect again from a client that has only IPv4 access.
User profiles
April 14, 2021
Bydefault, Citrix ProfileManagement is installed silently onmaster imageswhenyou install theVirtualDelivery Agent, but you do not have to use Profile Management as a profile solution.
To suit your users’ varying needs, you can use Citrix Virtual Apps and Desktops policies to apply differ‑ent profile behavior to the machines in each Delivery Group. For example, one Delivery Group mightrequire Citrix mandatory profiles, whose template is stored in one network location, while anotherDelivery Group requires Citrix roaming profiles stored in another locationwith several redirected fold‑ers.
• If other administrators in your organization are responsible for Citrix Virtual Apps and Desktopspolicies, workwith them to ensure that they set any profile‑relatedpolicies across yourDeliveryGroups.
© 1999–2022 Citrix Systems, Inc. All rights reserved. 810
Citrix Virtual Apps and Desktops
• Profile Management policies can also be set in Group Policy, in the Profile Management .ini file,and locally on individual virtualmachines. Thesemultiple ways of defining profile behavior areread in the following order:
1. Group Policy (.adm or .admx files)2. Citrix Virtual Apps and Desktops policies in the Policy node3. Local policies on the virtual machine that the user connects to4. Profile Management .ini file
For example, if you configure the same policy in both Group Policy and the Policy node, thesystem reads the policy setting in Group Policy and ignores the Citrix Virtual Apps and Desktopspolicy setting.
Whichever profile solution you choose, Director administrators can access diagnostic information andtroubleshoot user profiles. For more information, see the Director documentation.
Automatic configuration
The desktop type is automatically detected, based on the Virtual Delivery Agent installation and, inaddition to the configuration choices you make in Studio, sets Profile Management defaults accord‑ingly.
The policies that ProfileManagement adjusts are shown in the following table. Any non‑default policysettings are preserved and are not overwritten by this feature. Consult the Profile Management doc‑umentation for information about each policy. The types of machines that create profiles affect thepolicies that are adjusted. The primary factors are whether machines are persistent or provisioned,and whether they are shared bymultiple users or dedicated to just one user.
Persistent systems have some type of local storage, the contents of which can be expected to persistwhen the system turns off. Persistent systemsmight employ storage technology such as SANs to pro‑vide local disk mimicking. In contrast, provisioned systems are created “on the fly” from a base diskand some type of identity disk. Local storage is usually mimicked by a RAM disk or network disk, thelatter often provided by a SAN with a high speed link. The provisioning technology is generally Cit‑rix Provisioning or Machine Creation Services (or a third‑party equivalent). Sometimes provisionedsystems have persistent local storage. These are classed as persistent.
Together, these two factors define the following machine types:
• Bothpersistent anddedicated – Examples are single‑sessionOSmachineswith a static assign‑ment and persistent local storage that are created with Machine Creation Services, desktopswith persistent storage that are created with VDI‑in‑a‑Box, physical workstations, and laptops
• Both persistent and shared – Examples are Multi‑session OS machines that are created withMachine Creation Services
© 1999–2022 Citrix Systems, Inc. All rights reserved. 811

Citrix Virtual Apps and Desktops
• Both provisioned and dedicated – Examples are Single‑session OS machines with a static as‑signment but without persistent storage that are created with Citrix Provisioning
• Both provisioned and shared – Examples are Single‑session OS machines with a random as‑signment that are createdwith Citrix Provisioning and desktopswithout persistent storage thatare created with VDI‑in‑a‑Box
The following Profile Management policy settings are suggested guidelines for the different machinetypes. They work well in most cases, but you might want to deviate from them as your deploymentrequires.
Important:
Delete locally cached profiles on logoff, Profile streaming, and Always cache are enforcedby the auto‑configuration feature. Adjust the other policies manually.
Persistent machines
Policy Both persistent and dedicated Both persistent and shared
Delete locally cached profileson logoff
Disabled Enabled
Profile streaming Disabled Enabled
Always cache Enabled (note 1) Disabled (note 2)
Active write back Disabled Disabled (note 3)
Process logons of localadministrators
Enabled Disabled (note 4)
Provisionedmachines
PolicyBoth provisioned anddedicated Both provisioned and shared
Delete locally cached profileson logoff
Disabled (note 5) Enabled
Profile streaming Enabled Enabled
Always cache Disabled (note 6) Disabled
Active write back Enabled Enabled
Process logons of localadministrators
Enabled Enabled (note 7)
© 1999–2022 Citrix Systems, Inc. All rights reserved. 812
Citrix Virtual Apps and Desktops
1. BecauseProfile streaming is disabled for thismachine type, theAlwayscache setting is alwaysignored.
2. Disable Always cache. However, you can ensure that large files are loaded into profiles as soonas possible after logon by enabling this policy and using it to define a file size limit (in MB). Anyfile this size or larger is cached locally as soon as possible.
3. Disable Active write back except to save changes in profiles of users who roam between CitrixVirtual Apps servers. In this case, enable this policy.
4. Disable Process logons of local administrators except for Hosted Shared Desktops. In thiscase, enable this policy.
5. Disable Delete locally cached profiles on logoff. This setting retains locally cached profiles.Because the machines are reset at logoff but are assigned to individual users, logons are fasterif their profiles are cached.
6. Disable Always cache. However, you can ensure that large files are loaded into profiles as soonas possible after logon by enabling this policy and using it to define a file size limit (in MB). Anyfile this size or larger is cached locally as soon as possible.
7. Enable Process logons of local administrators except for profiles of users who roam betweenCitrix Virtual Apps and Desktops servers. In this case, disable this policy.
Folder redirection
Folder redirection lets you store user data on network shares other than the location where the pro‑files are stored. Folder redirection reduces profile size and load time but it might impact networkbandwidth. Folder redirection does not require that Citrix user profiles are employed. You can chooseto manage user profiles on your own, and still redirect folders.
Configure folder redirection using Citrix policies in Studio.
• Ensure that the network locations used to store the contents of redirected folders are availableand have the correct permissions. The location properties are validated.
• Redirected folders are set up on the network and their contents populated from users’ virtualdesktops at logon.
Configure folder redirection using only Citrix Policies or Active Directory Group Policy Objects, notboth. Configuring folder redirection using bothpolicy enginesmight result in unpredictable behavior.
Advanced folder redirection
In deployments with multiple operating systems (OSs), youmight want some of a user’s profile to beshared by each OS. The rest of the profile is not shared and is used only by one OS. To ensure a consis‑tent user experience across the OSs, you need a different configuration for each OS, that is, advancedfolder redirection. For example, different versions of an application running on two OSs might need
© 1999–2022 Citrix Systems, Inc. All rights reserved. 813

Citrix Virtual Apps and Desktops
to read or edit a shared file, so you decide to redirect it to a single network location where both ver‑sions can access it. Alternatively, because the Start Menu folder contents are structured differentlyin two OSs, you decide to redirect only one folder, not both. This approach separates the Start Menufolder and its contents on each OS, ensuring a consistent experience for users.
If your deployment requires advanced folder redirection, you must understand the structure of yourusers’ profile data and determine which parts of it can be shared between OSs. Unpredictable behav‑ior can result unless folder redirection is used correctly.
To redirect folders in advanced deployments:
• Use a separate Delivery Group for each OS.• Understandwhere your virtual applications, including thoseonvirtual desktops, storeuserdataand settings, and understand how the data is structured.
• For shared profile data that can safely roam (because it is structured identically in each OS),redirect the containing folders in each Delivery Group.
• For non‑shared profile data that cannot roam, redirect the containing folder in only one of theDesktop Groups, typically the onewith themost usedOS or the onewhere the data ismost rele‑vant. Alternatively, for non‑shared data that cannot roam between OSs, redirect the containingfolders on both systems to separate network locations.
Example advanced deployment
The deployment has applications, including versions of Microsoft Outlook and Internet Explorer, run‑ning on Windows 10 desktops and applications, including other versions of Outlook and Internet Ex‑plorer, delivered by Windows Server 2019. You have already set up two Delivery Groups for the twoOSs. Users want to access the same set of Contacts and Favorites in both versions of the two appli‑cations.
Important: The following decisions and advice are valid for the OSs and deployment described. Inyour organization, the folders you choose to redirect and whether your decide to share them dependon various factors that are unique to your specific deployment.
• Using policies applied to the Delivery Groups, you choose the following folders to redirect.
Folder Redirected in Windows 10?Redirected in Windows Server2019?
My Documents Yes Yes
Application Data No No
Contacts Yes Yes
Desktop Yes No
Downloads No No
© 1999–2022 Citrix Systems, Inc. All rights reserved. 814

Citrix Virtual Apps and Desktops
Folder Redirected in Windows 10?Redirected in Windows Server2019?
Favorites Yes Yes
Links Yes No
My Music Yes Yes
My Pictures Yes Yes
My Videos Yes Yes
Searches Yes No
Saved Games No No
Start Menu Yes No
• For the shared, redirected folders:
– After analyzing the structure of the data saved by the different versions of Outlook andInternet Explorer, you decide it is safe to share the Contacts and Favorites folders.
– You know the structure of the My Documents, My Music, My Pictures, and My Videosfolders is standard across OSs. So it is safe to store these folders in the same networklocation for each Delivery Group.
• For the non‑shared, redirected folders:
– You do not redirect the Desktop, Links, Searches, or Start Menu folder in the WindowsServerDeliveryGroupbecausedata in these folders is organizeddifferently in the twoOSs.It therefore cannot be shared.
– Toensurepredictablebehavior of this non‑shareddata, you redirect it only in theWindows10 Delivery Group. Windows 10 are used more often by users in their day‑to‑day work.Users only occasionally access the applications delivered by the Windows Server. Also, inthis case the non‑shared data is more relevant to a desktop environment rather than anapplication environment. For example, desktop shortcuts are stored in theDesktop folderandmight be useful if they originate from aWindows 10machine but not from aWindowsServer machine.
• For the non‑redirected folders:
– You do not want to clutter your servers with users’ downloaded files, so you choose not toredirect the Downloads folder
– Data from individual applications can cause compatibility and performance issues, so youdecide not to redirect the Application Data folder
For more information, see folder redirection.
© 1999–2022 Citrix Systems, Inc. All rights reserved. 815
Citrix Virtual Apps and Desktops
Folder redirection and exclusions
In Citrix Profile Management (but not in Studio), a performance enhancement allows you to preventfolders from being processed using exclusions. If you use this feature, do not exclude any redirectedfolders. The folder redirection and exclusion features work together. Ensuring no redirected foldersare excluded allows Profile Management to move them back into the profile folder structure and pre‑serves data integrity if you later decide not to redirect them. Formore information on exclusions, seeInclude and exclude items.
Collect a Citrix Diagnostic Facility (CDF) trace at system startup
April 14, 2021
The CDFControl utility is an event tracing controller or consumer for capturing Citrix Diagnostic Facil‑ity (CDF) trace messages displayed from various Citrix tracing providers. It is made to troubleshootcomplex Citrix related issues, parse filter support, and collect performance data. To download theCDFControl utility, see CTX111961.
Use the Local System account
To use the Local System account for the CDF COM server service, complete the following steps:
1. Click Run from the Startmenu.2. Type services.msc in the dialog box and clickOK.3. Select the Citrix Diagnostics Facility COM Server service and choose Properties.4. Click the Log On tab and enable the Local System account. Then clickOK.
© 1999–2022 Citrix Systems, Inc. All rights reserved. 816

Citrix Virtual Apps and Desktops
5. Restart the service.
Collect a trace at system startup
To collect a CDF trace at system startup, refer to the procedure:
1. Start CDFControl and selectOptions from the Toolsmenu.
2. Specify the trace file path in the Startup trace file path for capturing startup trace section.Then click Save.
© 1999–2022 Citrix Systems, Inc. All rights reserved. 817
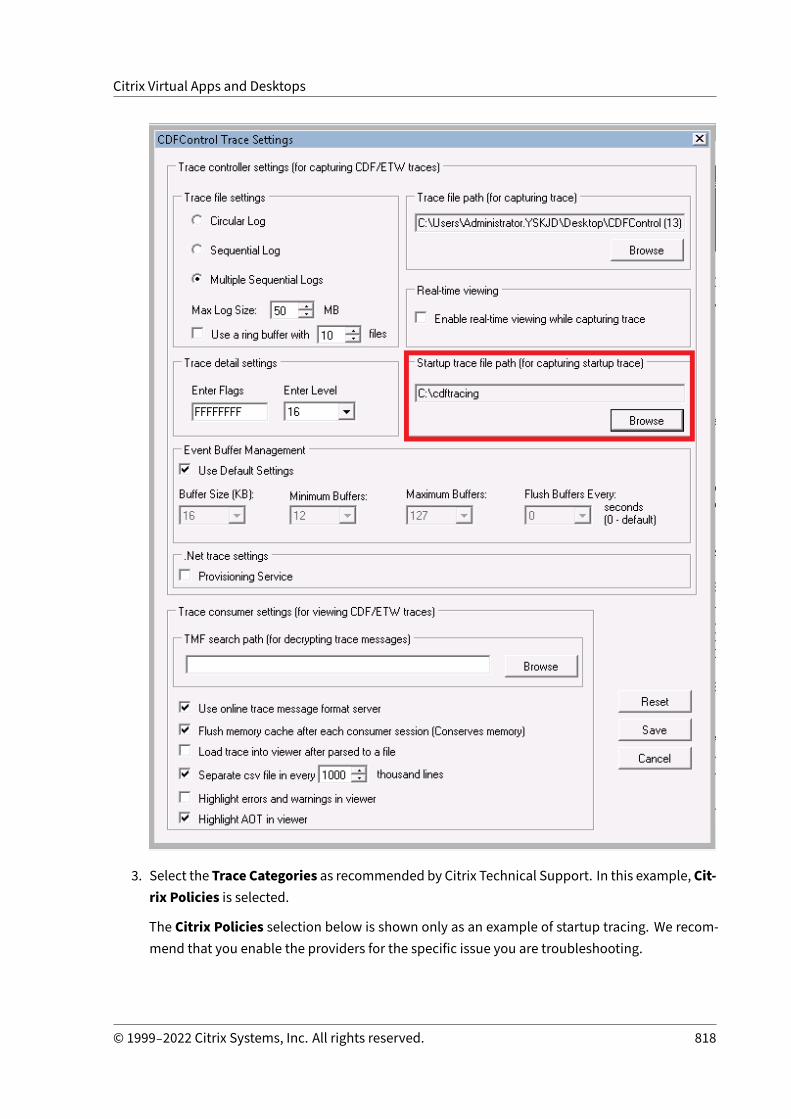
Citrix Virtual Apps and Desktops
3. Select the Trace Categories as recommended by Citrix Technical Support. In this example, Cit‑rix Policies is selected.
The Citrix Policies selection below is shown only as an example of startup tracing. We recom‑mend that you enable the providers for the specific issue you are troubleshooting.
© 1999–2022 Citrix Systems, Inc. All rights reserved. 818

Citrix Virtual Apps and Desktops
4. With administrator privileges, select Startup Tracing and click Enable from the Toolsmenu.
After selecting Enable, the animated bar starts scrolling. This does not affect the procedure.Continue to Step 5.
5. Close the CDFControl utility and restart the system after the Startup Tracing is enabled.
6. Start theCDFControlutility. After the systemrestarts and theerror appears, disable theStartupTracing option by selecting Disable.
Disable the Startup Tracing option by selecting Startup Tracing from the Toolsmenu and click‑ing Disable as described in Steps 4 and 5.
7. Stop the Citrix Diagnostics Facility COM server service.
8. Collect the trace log file (.etl) for analysis in the specified file path by following the Steps 1 and2.
9. Start the Citrix Diagnostics Facility COM server service.
Citrix Insight Services
April 14, 2021
Citrix Insight Services (CIS) is a Citrix platform for instrumentation, telemetry, and business insightgeneration. Its instrumentation and telemetry capabilities enable technical users (customers, part‑
© 1999–2022 Citrix Systems, Inc. All rights reserved. 819

Citrix Virtual Apps and Desktops
ners, and engineers) to self‑diagnose and fix problems and optimize their environments. For detailsand the latest information about CIS and how it works, see https://cis.citrix.com (Citrix account cre‑dentials required).
All informationuploaded toCitrix is used for troubleshooting anddiagnostic purposes, and improvingthe quality, reliability, and performance of products, subject to:
• Citrix Insight Services Policy at https://cis.citrix.com/legal• Citrix Privacy Policy at https://www.citrix.com/about/legal/privacy.html
This Citrix Virtual Apps and Desktops release supports the following technologies.
• Citrix Virtual Apps and Desktops install and upgrade analytics• Citrix Customer Experience Improvement Program (CEIP)• Citrix Call Home• Citrix Scout
In addition to (and separate from) CIS and Citrix Analytics: Google Analytics are collected (and lateruploaded) automatically when you install (or upgrade) Studio. After installing Studio, you can changethis setting with the registry key HKLM\Software\Citrix\DesktopStudio\GAEnabled. A value of 1 en‑ables collection and upload, 0 disables collection and upload.
Install and upgrade analytics
When you use the full‑product installer to deploy or upgrade Citrix Virtual Apps and Desktops compo‑nents, anonymous information about the installation process is gathered and stored on themachinewhere you are installing/upgrading the component. This data is used to help Citrix improve its cus‑tomers’ installation experiences.
The information is stored locally under %ProgramData%\Citrix\CTQs.
Automatic uploadof this data is enabled by default in both the graphical and command line interfacesof the full‑product installer.
• You can change the default value in a registry setting. If you change the registry setting beforeinstalling/upgrading, that value is used when you use the full‑product installer.
• You can override the default setting if you install/upgrade with the command line interface byspecifying an option with the command.
Control automatic uploads:
• Registry setting that controls automatic upload of install/upgrade analytics (default = 1):
– Location: HKLM:\Software\Citrix\MetaInstall– Name: SendExperienceMetrics– Value: 0 = disabled, 1 = enabled
© 1999–2022 Citrix Systems, Inc. All rights reserved. 820

Citrix Virtual Apps and Desktops
• Using PowerShell, the following cmdlet disables automatic upload of install/upgrade analytics:
1 New-ItemProperty -Path HKLM:\SOFTWARE\Citrix\MetaInstall -NameSendExperienceMetrics -PropertyType DWORD -Value 0
2 <!--NeedCopy-->
• To disable automatic uploads with the XenDesktopServerSetup.exe or XenDesktopV‑DASetup.exe command, include the /disableexperiencemetrics option.
To enable automatic uploads with the XenDesktopServerSetup.exe or XenDesktopV‑DASetup.exe command, include the /sendexperiencemetrics option.
Citrix Customer Experience Improvement Program
When you participate in the Citrix Customer Experience Improvement Program (CEIP), anonymousstatistics and usage information are sent to Citrix to help Citrix improve the quality and performanceof Citrix products. For more information, see https://more.citrix.com/XD‑CEIP.
Enrollment during Site creation or upgrade
You are automatically enrolled in CEIP when you create a Site (after you install the first Delivery Con‑troller). The first upload of data occurs approximately seven days after you create the Site. You canstop your participation at any timeafter creating theSite. Select theConfigurationnode in theStudionavigation pane (Product Support tab) and follow the guidance.
When you upgrade a Citrix Virtual Apps and Desktops deployment:
• If you upgrade froma version that did not support CEIP, you are asked if youwant to participate.• If you upgrade from a version that supported CEIP, and participation was enabled, CEIP is en‑abled in the upgraded Site.
• If you upgrade from a version that supported CEIP, and participation was disabled, CEIP is dis‑abled in the upgraded Site.
• If you upgrade from a version that supported CEIP, and participation is unknown, you are askedif you want to participate.
The collected information is anonymous, so it cannot be viewed after it is uploaded to Citrix InsightServices.
Enrollment when installing a VDA
By default, you are automatically enrolled in CEIP when you install a Windows VDA. You can changethis default in a registry setting. If you change the registry setting before installing the VDA, that valueis used.
© 1999–2022 Citrix Systems, Inc. All rights reserved. 821
Citrix Virtual Apps and Desktops
Registry setting that controls automatic enrolment in CEIP (default = 1):
Location: HKLM: \Software\Citrix\Telemetry\CEIPName: EnabledValue: 0 = disabled, 1 = enabled
Bydefault, theEnabledproperty ishidden in the registry. When it remainsunspecified, theautomaticupload feature is enabled.
Using PowerShell, the following cmdlet disables enrollment in CEIP:
1 New-ItemProperty -Path HKLM:\SOFTWARE\Citrix\Telemetry\CEIP -NameEnabled -PropertyType DWORD -Value 0
2 <!--NeedCopy-->
The collected runtime datapoints are periodically written as files to an output folder (default %pro‑gramdata%/Citrix/VdaCeip).
The first upload of data occurs approximately seven days after you install the VDA.
Enrollment when installing other products and components
You can also participate in CEIP when you install related Citrix products, components, and technolo‑gies, such as Citrix Provisioning, AppDNA, Citrix License Server, Citrix Workspace app for Windows,Universal Print Server, and Session Recording. See their documentation for details about installationand participation default values.
Citrix Call Home
When you install certain components and features in Citrix Virtual Apps and Desktops, you are offeredthe opportunity to participate in Citrix Call Home. Call Home collects diagnostic data and then peri‑odically uploads telemetry packages containing that data directly to Citrix Insight Services (viaHTTPSon default port 443) for analysis and troubleshooting.
In Citrix Virtual Apps and Desktops, Call Home runs as a background service under the name CitrixTelemetry Service. For more information, see https://more.citrix.com/XD‑CALLHOME.
The Call Home scheduling functionality is also available in Citrix Scout. For details, see Citrix Scout.
What is collected
Citrix Diagnostic Facility (CDF) tracing logs information that can be useful for troubleshooting. CallHome collects a subset of CDF traces that can be helpful when troubleshooting common failures, forexample, VDA registrationsandapplication/desktop launches. This technology is knownasalways‑ontracing (AOT). AOT logs are saved todisk at C:\Users\CitrixTelemetryService\Appdata\Local\CitrixAOT.
© 1999–2022 Citrix Systems, Inc. All rights reserved. 822

Citrix Virtual Apps and Desktops
Call Home does not collect any other Event Tracing for Windows (ETW) information, nor can it be con‑figured to do so.
Call Home also collects other information, such as:
• Registries created by Citrix Virtual Apps and Desktops under HKEY_LOCAL_MACHINE\SOFTWARE\Citrix.
• Windows Management Instrumentation (WMI) information under the Citrix namespace.• List of processes running.• Crash dumps of Citrix processes that are stored in %PROGRAM DATA%\Citrix\CDF.• Installation andupgrade information. This can include the full productmetainstaller log, failingMSI logs, output from the MSI log analyzer, StoreFront logs, Licensing compatibility check logs,and results from preliminary site upgrade tests.
The trace information is compressedas it is collected. TheCitrix Telemetry Service retains amaximumof 10 MB of compressed recent trace information, with a maximum time limit of eight days.
• Compressing data allows Call Home tomaintain a small footprint on the VDA.• Traces are held in memory to avoid IOPs on provisionedmachines.• The trace buffer uses a circular mechanism to retain traces in memory.
Call Home collects the key datapoints listed in Call Home key datapoints.
Configure andmanage summary
You can enroll in Call Homewhen using the full‑product installation wizard or later, using PowerShellcmdlets. When you enroll, by default, diagnostics are collected and uploaded to Citrix every Sundayat approximately 3:00 AM, local time. The upload is randomized with a two hour interval from thespecified time. This means an upload using the default schedule occurs between 3:00 AM and 5:00AM.
If you do not want to upload diagnostic information on a scheduled basis (or if you want to change aschedule), you can use PowerShell cmdlets tomanually collect and upload diagnostics or store themlocally.
When you enroll in scheduled Call Home uploads andwhen youmanually upload diagnostic informa‑tion to Citrix, you provide Citrix account or Citrix Cloud credentials. Citrix exchanges the credentialsfor an upload token that is used to identify the customer and upload the data. The credentials are notsaved.
When an upload occurs, a notification is emailed to the address associated with the Citrix account.
If you enable Call Home when you install a component, you can disable it later.
© 1999–2022 Citrix Systems, Inc. All rights reserved. 823

Citrix Virtual Apps and Desktops
Prerequisites
• The machine must be running PowerShell 3.0 or later.• The Citrix Telemetry Service must be running on the machine.• The system variable PSModulePath must be set to Telemetry’s install path, for example,C:\Program Files\Citrix\Telemetry Service\.
Enable Call Home during component installation
During VDA installation or upgrade: When you install or upgrade a Virtual Delivery Agent using thegraphical interface in the full‑product installer, you are asked if you want to participate in Call Home.There are two options:
• Participate in Call Home.• Do not participate in Call Home.
If you’re upgrading a VDA and previously enrolled in Call Home, that wizard page does not appear.
During Controller installation or upgrade: When you install or upgrade a Delivery Controller usingthe graphical interface, you are asked if youwant to participate in Call Home. There are three options:
When you’re installing a Controller, you cannot configure information on the Call Home page in the in‑stallationwizard if that server has an ActiveDirectory GPOwith the policy setting “Log on as a service”applied. For details, see CTX218094.
If you’re upgrading a Controller and previously enrolled in Call Home, you’re not asked about partici‑pating.
PowerShell cmdlets
The PowerShell help provides comprehensive syntax, including descriptions of cmdlets and parame‑ters that are not used in these common use cases.
To use a proxy server for uploads, see Configure a proxy server.
• Enable scheduled uploads: Diagnostic collections are automatically uploaded to Citrix. If youdo not enter additional cmdlets for a custom schedule, the default schedule is used.
1 $cred = Get-Credential2 Enable-CitrixCallHome -Credential $cred3 <!--NeedCopy-->
To confirm that scheduled uploads are enabled, enter Get-CitrixCallHomeGet-CitrixCallHome. If enabled, the return is IsEnabled=True and IsMasterImage=False.
© 1999–2022 Citrix Systems, Inc. All rights reserved. 824

Citrix Virtual Apps and Desktops
• Enable scheduled uploads formachines created from amaster image: Enabling scheduleduploads in a master image eliminates having to configure each machine that is created in themachine catalog.
Enable-CitrixCallHome -Credential $cred -MasterImage
To confirm that scheduled uploads are enabled, enter Get‑CitrixCallHome. If enabled, the re‑turn is IsEnabled=True and IsMasterImage=True.
• Create a custom schedule: Create a daily or weekly schedule for diagnostic collections anduploads.
1 $timespan = New-TimeSpan – Hours hours -Minutes minutes2 Set-CitrixCallHomeSchedule – TimeOfDay $timespan – DayOfWeek day
-UploadFrequency {3 Daily|Weekly }45 <!--NeedCopy-->
Examples:
The following cmdlet creates a schedule to bundle and upload data at 10:20 every evening. TheHours parameter uses a 24‑hour clock. When the UploadFrequency parameter value is Daily, theDayOfWeek parameter is ignored, if specified.
1 $timespan – New-TimeSpan – Hours 22 – Minutes 202 Set-CitrixCallHomeSchedule – TimeOfDay $timespan -UploadFrequency Daily3 <!--NeedCopy-->
To confirm the schedule, enter Get-CitrixCallHomeSchedule. In the preceding example, it re‑turns StartTime=22:20:00, DayOfWeek=Sunday (ignored), Upload Frequency=Daily.
The following cmdlet creates a schedule to bundle and upload data at 10:20 every Wednesdayevening.
1 $timespan – New-TimeSpan – Hours 22 – Minutes 202 Set-CitrixCallHomeSchedule – TimeOfDay $timespan – DayOfWeek Wed -
UploadFrequency Weekly3 <!--NeedCopy-->
To confirm the schedule, enter Get-CitrixCallHomeSchedule. In the preceding example, it re‑turns StartTime=22:20:00, DayOfWeek=Wednesday, Upload Frequency=Weekly.
Disable Call Home
You can disable Call Home using a PowerShell cmdlet or through Citrix Scout.
© 1999–2022 Citrix Systems, Inc. All rights reserved. 825

Citrix Virtual Apps and Desktops
AOT logs are collected and saved to disk, even when Call Home scheduled uploads are disabled.(When scheduled uploads are disabled, AOT logs are not automatically uploaded to Citrix.) You candisable the collection and local storage of AOT logs.
Disable Call Homewith PowerShell
After running the following cmdlet, diagnostic data will not be uploaded to Citrix automatically. (Youcan still upload diagnostic data using Citrix Scout or telemetry PowerShell cmdlets.)
Disable-CitrixCallHome
To confirm that Call Home is disabled, enter Get-CitrixCallHome. If disabled, the return isIsEnabled=False and IsMasterImage=False.
Disable a collection schedule using Citrix Scout
To disable a diagnostic collection schedule using Citrix Scout, follow the guidance in Schedule collec‑tions. In step 3, clickOff to cancel the schedule for the selectedmachines.
Disable collection of AOT logs
After running the following cmdlet (with the Enabled field set to false), AOT logs will not be col‑lected.
Enable-CitrixTrace -Listen‘{ “trace”:{ “enabled”:false,“persistDirectory”:“C:\Users\Public”,”maxSizeBytes”:1000000, “sliceDurationSeconds”:300 } }’
The Listen parameter contains arguments in JSON format.
Configure a proxy server for Call Home uploads
Complete the following tasks on the machine where Call Home is enabled. Example diagrams in thefollowing procedure contain server address and port 10.158.139.37:3128. Your informationwill differ.
1. Add proxy server information in your browser. In Internet Explorer, select Internet Options >Connections > LAN settings. Select Use a proxy server for your LAN” and enter the proxyserver address and port number.
2. In PowerShell, run netsh winhttp import proxy source=ie.
© 1999–2022 Citrix Systems, Inc. All rights reserved. 826

Citrix Virtual Apps and Desktops
3. Using a text editor, edit the TelemetryService.exe config file, which is located in C:\ProgramFiles\Citrix\Telemetry Service. Add the information shown in the red box.
4. Restart the Telemetry Service.
Run the Call Home cmdlets in PowerShell.
Manually collect and upload diagnostic information
You can use the CIS website to upload a diagnostic information bundle to CIS. You can also use Pow‑erShell cmdlets to collect and upload diagnostic information to CIS.
To upload a bundle using the CIS website:
1. Log on to Citrix Insight Services using your Citrix account credentials.2. SelectMyWorkspace.3. SelectHealthcheck and then navigate to the location of your data.
CIS supports several PowerShell cmdlets that manage data uploads. This documentation covers thecmdlets for two common cases:
• Use the Start-CitrixCallHomeUpload cmdlet to manually collect and upload a diagnosticinformation bundle to CIS. (The bundle is not saved locally.)
• Use the Start-CitrixCallHomeUpload cmdlet to manually collect data and store a diag‑nostic information bundle locally. This allows you to preview the data. Later, use the Send-CitrixCallHomeBundle cmdlet to manually upload a copy of that bundle to CIS. (The datayou originally saved remains locally.)
The PowerShell help provides comprehensive syntax, including descriptions of cmdlets and parame‑ters that are not used in these common use cases.
© 1999–2022 Citrix Systems, Inc. All rights reserved. 827
Citrix Virtual Apps and Desktops
When you enter a cmdlet to upload data to CIS, you are prompted to confirm the upload. If the cmdlettimes out before the upload completes, check the status of the upload in the system event log. Theupload request might be rejected if the service is already performing an upload.
Collect data and upload bundle to CIS:
1 Start-CitrixCallHomeUpload [-Credential] PSCredential [-InputPathstring] [-Description string] [-IncidentTime string] [-SRNumberstring] [-Name string] [-UploadHeader string] [-AppendHeaders string] [-Collect string] [<CommonParameters>]
2 <!--NeedCopy-->
Collect data and save it locally:
1 Start-CitrixCallHomeUpload -OutputPath <String> [-InputPath string] [-Description string] [-IncidentTime string] [-SRNumber string] [-Namestring] [-UploaderHeader string] [-AppendHeaders string] [-Collectstrings] [<CommonParameters>]
2 <!--NeedCopy-->
The following parameters are valid:
• Credential: Directs the upload to CIS.
• InputPath: Location of zip file to include in the bundle. This might be an additional file thatCitrix Support requests. Be sure to include the .zip extension.
• OutputPath: Location where the diagnostic information is saved. This parameter is requiredwhen saving Call Home data locally.
• Description and Incident Time: Free form information about the upload.
• SRNumber: Citrix Technical Support incident number.
• Name: Name that identifies the bundle.
• UploadHeader: JSON‑formatted string specifying the upload headers uploaded to CIS.
• AppendHeaders: JSON‑formatted string specifying the appended headers uploaded to CIS.
• Collect: JSON‑formatted string specifying which data to collect or omit, in the form {‘collec‑tor’:{‘enabled’:Boolean}}, where Boolean is true or false.Valid collector values are:
– ‘wmi’– ‘process’– ‘registry– ‘crashreport’– ‘trace’
© 1999–2022 Citrix Systems, Inc. All rights reserved. 828

Citrix Virtual Apps and Desktops
– ‘file’– ‘msi’– ‘localdata’– ‘sitedata’– ‘sfb’
By default, all collectors except ‘sfb’ are enabled.
The ‘sfb’ collector is designed to be used on demand to diagnose Skype for Business issues. Inaddition to the ‘enabled’ parameter, the ‘sfb’ collector supports the ‘account’ and ‘accounts’parameters to specify target users. Use one of the forms:
– “‑Collect “{‘sfb’:{‘account’:’domain\\user1’}}”– “‑Collect “{‘sfb’:{‘accounts’:[‘domain\\user1’, ‘domain\\user2’]}}”
• Common Parameters: See the PowerShell help.
Upload data that was previously saved locally:
Send-CitrixCallHomeBundle -Credential <PSCredentia\> -Path string [<CommonParameters>]
The Path parameter specifies the location of the previously saved bundle.
Examples:
The following cmdlet requests an upload of Call Home data (excluding data from the WMI col‑lector) to CIS. This data relates to registration failures of Citrix Provisioning VDAs, which werenoted at 2:30 PM for Citrix Support case 123456. In addition to the Call Home data, the file“c:\Diagnostics\ExtraData.zip” is incorporated into the uploaded bundle.
1 C:\PS\>Start-CitrixCallHomeUpload -InputPath "c:\Diagnostics\ExtraData.zip" -Description "Registration failures with Citrix ProvisioningVDAs" -IncidentTime "14:30" -SRNumber 123456 -Name "RegistrationFailure-021812016" -Collect "{
2 'wmi':{3 'enabled':false }4 }5 " -UploadHeader "{6 'key1':'value1' }7 " -AppendHeaders "{8 'key2':'value2' }9 "
10 <!--NeedCopy-->
The following cmdlet saves Call Home data related to Citrix Support case 223344, noted at 8:15 AM.The data saved in the file mydata.zip on a network share. In addition to the Call Home data, the file“c:\Diagnostics\ExtraData.zip” will be incorporated into the saved bundle.
© 1999–2022 Citrix Systems, Inc. All rights reserved. 829
Citrix Virtual Apps and Desktops
1 C:\PS\>Start-CitrixCallHomeUpload -OutputPath \\mynetwork\myshare\mydata.zip -InputPath "c:\Diagnostics\ExtraData.zip" -Description "Diagnostics for incident number 223344" -IncidentTime "8:15" -SRNumber 223344
2 <!--NeedCopy-->
The following cmdlet uploads the data bundle you saved earlier.
1 $cred=Get-Credential2 C:\PS>Send-CitrixCallHomeBundle – Credential $cred -Path \\mynetwork\
myshare\mydata.zip3 <!--NeedCopy-->
Citrix Scout
April 14, 2021
Introduction
Citrix Scout collects diagnostics and runshealth checks. Youcanuse the results tomaintain yourCitrixVirtual Apps and Desktops deployment. Citrix offers comprehensive, automated analysis of diagnos‑tics collections through Citrix Insight Services. You can also use Scout to troubleshoot issues, on yourown or with Citrix Support guidance.
You canupload collection files to Citrix for analysis and guidance fromCitrix Support. Or, you can savea collection locally for your own review, and then later upload the collection file to Citrix for analysis.
Scout offers the following procedures:
• Collect: Runs a one‑time diagnostics collection on machines you select in a site. You can theneither upload the file to Citrix or save it locally.
• Trace & Reproduce: Starts a manual trace on the machines you select. Then you re‑createissues on those machines. After re‑creating the issue, the trace is stopped. Scout then collectsother diagnostics and uploads the file to Citrix, or saves the file locally.
• Schedule: Schedules diagnostics collections to occur daily or weekly at a specified time on themachines you select. The file is automatically uploaded to Citrix.
• Health Check: Runs checks that gauge the health and availability of the site and its compo‑nents. You can run health checks for Delivery Controllers, Virtual Delivery Agents (VDAs), Store‑Front servers, and Citrix License Servers. If issues are found during the checks, Scout provides
© 1999–2022 Citrix Systems, Inc. All rights reserved. 830

Citrix Virtual Apps and Desktops
a detailed report. Each time Scout starts, it checks for updated health check scripts. If new ver‑sions are available, Scout downloads them automatically, for use the next time health checksare run.
Note:
TheTrace&Reproduce,Schedule, andHealthCheckprocedures are currently not available forLinux VDA.
The graphical interface described in this article is the primary way to use Scout. Alternatively, youcan use PowerShell to configure one‑time or scheduled diagnostic collections and uploads. See CallHome.
Where to run Scout:
• In an on‑premises deployment, run Scout from a Delivery Controller to capture diagnosticsor run checks on one or more Virtual Delivery Agents (VDAs), Delivery Controllers, StoreFrontservers, and License Servers. You can also run Scout from a VDA to collect local diagnostics.
• In a Citrix Cloud environment that uses the Citrix Virtual Apps and Desktops service, run Scoutfrom a VDA to collect local diagnostics.
The log for the Scout application is stored in C:\ProgramData\Citrix\TelemetryService\ScoutUI.log. This file can be used for troubleshooting.
What is collected
The diagnostics collected by Scout include Citrix Diagnostic Facility (CDF) trace log files. A subset ofCDF traces called Always‑on Tracing (AOT) is also included. AOT information canbe helpfulwhen trou‑bleshooting common issues such as VDA registrations and application/desktop launches. No otherEvent Tracing for Windows (ETW) information is collected.
The collection includes:
• Registry entries created by Citrix Virtual Apps and Desktops under HKEY_LOCAL_MACHINE\SOFTWARE\Citrix.
• Windows Management Instrumentation (WMI) information under the Citrix namespace.• Processes that are running.• Crash dumps of Citrix processes that are stored in %PROGRAMDATA%\Citrix\CDF.• Citrix policy information, in CSV format.• Installation and upgrade information. The collection can include the full product metainstallerlog, failing MSI logs, output from the MSI log analyzer, StoreFront logs, Licensing compatibilitycheck logs, and results from preliminary site upgrade tests.
About trace information:
• The trace information is compressedas it is collected, keeping a small footprint on themachine.
© 1999–2022 Citrix Systems, Inc. All rights reserved. 831

Citrix Virtual Apps and Desktops
• On each machine, the Citrix Telemetry Service keeps compressed recent trace information fora maximum of eight days.
• Beginning with Citrix Virtual Apps and Desktops 7 1808, AOT traces are saved to the localdisk by default. (In earlier versions, traces were held in memory.) Default path = C:\Users\CitrixTelemetryService\AppData\Local\CitrixAOT.
• Beginning with Citrix Virtual Apps and Desktops 7 1811, AOT traces saved to network shares arecollected with other diagnostics.
• You can modify the maximum size (default = 10 MB) and slice duration, using the Enable-CitrixTrace cmdlet or the HKEY_LOCAL_MACHINE\SOFTWARE\Citrix\TelemetryDefaultListen registry string.
• Traces append to the file until the file reaches 10% of MaxSize.
For a list of the datapoints that Scout collects, see Call Home key datapoints.
Scout configuration
Scout can be configured to work on Linux VDAs. For more information on Linux VDA and telemetry,see Integrate with the Citrix Telemetry Service
The Linux VDA might automatically change the ctxtelemetry socket port or the port for telemetryservice. If so, youmust configure the port manually.
1. Navigate to C:\Program Files\Citrix\Telemetry Service2. Open the ScoutUI.exe.config file.3. Change the value for LinuxVDATelemetryServicePort or LinuxVDATelemetryWakeupPort towhat
was configured on the Linux VDA:
• <add key="LinuxVDATelemetryServicePort"value="7502"/>• <add key="LinuxVDATelemetryWakeupPort"value="7503"/>
1. Save the changes and close the file.2. Open Scout again to ensure it loads the latest configuration.
About health checks
Health check data is stored in folders under C:\ProgramData\Citrix\TelemetryService\.
Site health checks
Site health checks are included in the Environment Test Service, which provides a comprehensiveevaluation of the FlexCast Management Architecture (FMA) services. In addition to checking for ser‑vice availability, these checks look for other health indicators such as database connections.
© 1999–2022 Citrix Systems, Inc. All rights reserved. 832

Citrix Virtual Apps and Desktops
Site health checks run on Delivery Controllers. Depending on your site’s size, these checks can takeup to an hour to complete.
Delivery Controller configuration checks
Aspart of the site health checks. Delivery Controller configuration checks verifywhether the followingissues exist, based on Citrix recommendations for Virtual Apps and Desktops sites:
• One or more Delivery Controllers are in a failed state.• There is only one Delivery Controller in the site.• Delivery Controllers are of different versions.
In addition to meeting the permissions and requirements for health checks, Delivery Controller con‑figuration checks require:
• At least one Controller powered on.• The Broker Service running on a Controller.• A working connection from the Controller to the site database.
VDA health checks
VDA health checks identify possible causes for common VDA registration, session launch, and timezone redirection issues.
For registration on the VDA, Scout checks:
• VDA software installation• VDAmachine domain membership• VDA communication port availability• VDA service status• Windows firewall configuration• Communication with Controller• Time sync with Controller• VDA registration status
For session launch on VDAs, Scout checks:
• Session launch communication port availability• Session launch services status• Session launch Windows firewall configuration• VDA Remote Desktop Services Client Access Licenses• VDA application launch path
For time zone redirection on VDAs, Scout checks:
• Windows hotfix installation
© 1999–2022 Citrix Systems, Inc. All rights reserved. 833

Citrix Virtual Apps and Desktops
• Citrix hotfix installation• Microsoft group policy settings• Citrix group policy settings
StoreFront health checks
StoreFront checks verify:
• Citrix Default Domain service is running• Citrix Credential Wallet service is running• Connection from the StoreFront server to Active Directory port 88• Connection from the StoreFront server to Active Directory port 389• Base URL has a valid FQDN• Correct IP address from the base URL can be retrieved• IIS application pool is using .NET 4.0• Whether the certificate is bound to the SSL port for the host URL• Whether the certificate chain is complete• Whether the certificates have expired• Whether a certificate is expiring soon (within 30 days)
License Server checks
License Server checks verify:
• License Server connection from the Delivery Controller• License Server firewall remote access status• Citrix Licensing service status• License Server grace period state• License Server ports connection• Whether the Citrix vendor daemon (CITRIX) is running• Whether system clocks are synchronized• Whether the Citrix Licensing service is running under the Local Service account• Presence of the CITRIX.opt file• Customer Success Services eligibility date• Citrix License Server Update• Whether the License Server certificate is in the Delivery Controller’s trusted root store
In addition to meeting the permissions and requirements for health checks, the License Server mustbe joined to a domain. Otherwise, the License Server is not discovered.
© 1999–2022 Citrix Systems, Inc. All rights reserved. 834
Citrix Virtual Apps and Desktops
Run health checks
TheHealthCheckprocedure comprises selectingmachines, starting the checking, and then reviewingthe results report.
1. Launch Scout. From the machine’s Start menu, select Citrix > Citrix Scout. On the openingpage, clickHealth Check.
2. Select machines. Click Find machine to discover machines. The Select machines page listsall the VDAs, Delivery Controllers, and License Servers discovered in the site. You can filter thedisplay by machine name. Select the check box next to each machine you want to collect diag‑nostics from, and then click Continue.
To add other component types (such as StoreFront servers and VDA machines), see Addmachines manually and Import VDA machines. You cannot manually add Citrix ProvisioningServers or License Servers.
Scout automatically launches verification tests on each selectedmachine,making sure itmeetsthe criteria listed in Verification tests. If verification fails, a message is posted in the Status col‑umn, and that machine’s check box is cleared. You can either:
• Resolve the issue and then select the machine’s check box again. This triggers a retry ofthe verification tests.
• Skip that machine (leave its check box unselected). Health checks are not run for thatmachine.
When the verification tests complete, click Continue.
3. Run the health checks on the selected machines. The summary lists the machines where thetests run (the machines you selected that passed the verification tests). Click Start Checking.
During and after checking:
• The Status column indicates the current checking state for a machine.• To stop all in‑progress checks, click Stop Checking in the lower right corner of the page.(You can’t cancel a singlemachine’s health check, only all selectedmachines. Informationfrommachines that have completed the checks is kept.
• When the checks complete for all selected machines, the Stop Checking button in thelower right corner changes to Done.
• If a check fails, you can click Retry in the Action column.• If a check completes with no issues found, the Action column is empty.• If a check finds issues, click View Details to show the results.• After the check completes for all selectedmachines, don’t clickBack. (If you do, the checkresults are lost.)
4. When the checks complete, click Done to return to the Scout opening page.
© 1999–2022 Citrix Systems, Inc. All rights reserved. 835

Citrix Virtual Apps and Desktops
Heath check results
For report‑generating Citrix checks, the reports contain:
• Time and date when the results report was generated• Machines that were checked• Conditions that the check looked for on the targetedmachines
Permissions and requirements
Permissions:
• To collect diagnostics:
– You must be a local administrator and domain user for each machine from which you’recollecting diagnostics.
– Youmust have permission to write to the LocalAppData directory on eachmachine.
• To run health checks:
– Youmust be a member of the domain users group.– You must be either a full administrator or have a custom role with read‑only and Run En‑vironment Tests permissions for the site.
• Use Run as administratorwhen launching Scout.
For eachmachine fromwhich you collect diagnostics or run health checks:
• Scout must be able to communicate with the machine.• File and printer sharing must be turned on.• PSRemoting and WinRM must be enabled. The machine must also be running PowerShell 3.0or later.
• The Citrix Telemetry Service must be running on the machine.• Windows Management Infrastructure (WMI) access must be enabled on the machine.• To set a schedule for diagnostic collection, the machine must be running a compatible Scoutversion.
Do not use the dollar sign ($) in user names specified in pathnames. It prevents the collection of diag‑nostic information.
Scout runs verification tests on the machines you select, to make sure these requirements are met.
The Telemetry Service for Windows runs on Network Service.
© 1999–2022 Citrix Systems, Inc. All rights reserved. 836

Citrix Virtual Apps and Desktops
The AOT Trace Folder is saved in C:\ProgramData\Citrix\TelemetryService\CitrixAOT.
Only users in the Administrator group, System, and Telemetry Service SID have permission to accessthe HKEYLOCALMACHINE:SOFTWARE\Citrix\Telemetry registry.
The Telemetry Service SID remains in the Performance Log Users group after uninstalling TelemetryService, but you can remove it manually.
© 1999–2022 Citrix Systems, Inc. All rights reserved. 837

Citrix Virtual Apps and Desktops
Verification tests
Before a diagnostic collection or health check starts, verification tests run automatically for each se‑lected machine. These tests make sure that the requirements are met. If a test fails for a machine,Scout displays a message, with suggested corrective actions.
• Scout cannot reach this machine ‑ Ensure that:
– Themachine is powered‑on.– The network connection is working properly. (This can include verifying that your firewallis properly configured.)
– File and printer sharing is turned on. See the Microsoft documentation for instructions.
• EnablePSRemotingandWinRM ‑ You can enable PowerShell remoting andWinRMat the sametime. Using Run as administrator, run the Enable-PSRemoting cmdlet. For details, see theMicrosoft help for the cmdlet.
• Scout requires PowerShell 3.0 (minimum) ‑ Install PowerShell 3.0 (or later) on the machine,and then enable PowerShell remoting.
© 1999–2022 Citrix Systems, Inc. All rights reserved. 838
Citrix Virtual Apps and Desktops
• Unable to access LocalAppData directory on this machine ‑ Ensure that account has permis‑sion to write to the LocalAppData directory on the machine.
• Cannot locate Citrix Telemetry Service ‑ Ensure that the Citrix Telemetry Service is installedand started on the machine.
• Cannot get schedule ‑ Upgrade the machine to (minimum) XenApp and XenDesktop 7.14.
• WMI is not running on the machine ‑ Ensure that Windows Management Instrumentation(WMI) access is enabled.
• WMI connections blocked ‑ Enable WMI in the Windows Firewall service.
• Newer version of Citrix Telemetry Service required ‑ (Version is checked only for Collect andTrace & Reproduce.) Upgrade the Telemetry Service version on the machine (see Install andupgrade). If youdonot upgrade the service, thatmachine is not included in theCollectorTrace& Reproduce actions.
• Scout cannot connect to the systemd socket on this machine ‑ Ensure that:
– Port 7503 is open. Verify that the systemd ctxtelemetry.socket is listening on port 7503 onthemachine. Theportmightbedifferent if thectxtelemetry.socketporthasbeenchanged.See Scout configuration to adjust ports.
– The network connection is working properly. (This might include verifying that your fire‑wall is properly configured.)
• The Linux VDA Telemetry Service is not started on this machine ‑ Ensure that:
– Port 7502 is open. Verify that the Linux VDA Telemetry Service is installed and started onthe machine. The port might be different if the telemetry service port has been changed.See Scout configuration to adjust ports.
– The network connection is working properly. (This might include verifying that your fire‑wall is properly configured.)
Version compatibility
This version of Scout (3.x) is intended to be run on Citrix Virtual Apps and Desktops (or minimum Xe‑nApp and XenDesktop 7.14) Controllers and VDAs.
An earlier version of Scout is provided with XenApp and XenDesktop versions earlier than 7.14. Forinformation about that earlier version, see CTX130147.
If you upgrade a Controller or VDA earlier than 7.14 to version 7.14 (or a later supported version), theearlier version of Scout is replaced with the current version.
© 1999–2022 Citrix Systems, Inc. All rights reserved. 839

Citrix Virtual Apps and Desktops
Feature Scout 2.23 Scout 3.0
Support Citrix Virtual Appsand Desktops (plus XenAppand XenDesktop 7.14 through7.18)
Yes Yes
Support XenDesktop 5.x,7.1–7.13
Yes No
Support XenApp 6.x, 7.5 to7.13
Yes No
Delivered with product 7.1–7.13 Beginning with 7.14
Can be downloaded from CTXarticle
Yes No
Capture CDF traces Yes Yes
Capture Always‑on‑Traces(AOT)
No Yes
Allow collection of diagnosticdata
Up to 10 machines at once (bydefault)
Unlimited (subject toresource availability)
Allow diagnostic data to besent to Citrix
Yes Yes
Allow diagnostic data to besaved locally
Yes Yes
Support Citrix Cloudcredentials
No Yes
Support Citrix credentials Yes Yes
Support proxy server foruploads
Yes Yes
Adjust schedules N/A Yes
Script support Command line (localController only)
PowerShell using Call Homecmdlets (any machine withthe Telemetry Serviceinstalled)
Health checks No Yes
© 1999–2022 Citrix Systems, Inc. All rights reserved. 840
Citrix Virtual Apps and Desktops
Install and upgrade
By default, Scout is installed or upgraded automatically as part of the Citrix Telemetry Service whenyou install or upgrade a VDA or a Controller.
If you omit the Citrix Telemetry Service when you install a VDA, or remove the service later, runTelemetryServiceInstaller_xx.msi from the x64\Virtual Desktop Components orx86\Virtual Desktop Components folder on the Citrix Virtual Apps and Desktops installationmedia.
When you select the Collect or Trace & Reproduce action, you’re notified if a machine is running anolder version of the Citrix Telemetry Service. Citrix recommends using the latest supported version.If you don’t upgrade the Telemetry Service on that machine, it is not included in the Collect or Trace& Reproduce actions. To upgrade the Telemetry Service, use the same procedure as installing it.
Upload authorization
If you plan to upload diagnostic collections to Citrix, you must have a Citrix or Citrix Cloud account.(These are the credentials you use to access Citrix downloads or access the Citrix Cloud Control Cen‑ter.) After your account credentials are validated, a token is issued.
• If youauthenticatewithaCitrix account, the token‑issuingprocess isn’t visible. Yousimplyenteryour account credentials. After Citrix validates the credentials, you can then continue in theScout wizard.
• If you authenticate with a Citrix Cloud account, you click a link to access Citrix Cloud usingHTTPS with your default browser. After you enter your Citrix Cloud credentials, the token isdisplayed. Copy the token and then paste it into Scout. You can then continue in the Scoutwizard.
The token is stored locally on the machine where you’re running Scout. To enable use of that tokenthe next time you runCollect or Trace&Reproduce, select the Store token and skip this step in thefuture check box.
You must reauthorize each time you select Schedule on the Scout opening page. You cannot use astored token when creating or changing a schedule.
Use a proxy for uploads
If you want to use a proxy server to upload collections to Citrix, you can instruct Scout to use theproxy settings configured for your browser’s Internet Properties. Alternatively, you can specify theproxy server’s IP address and port number.
© 1999–2022 Citrix Systems, Inc. All rights reserved. 841

Citrix Virtual Apps and Desktops
Findmachine
For the Collect, Trace & Reproduce, and Schedule procedures, Scout lists the Controllers and VDAsit discovers automatically.
When you run Scout Health Check fromDelivery Controller, click Findmachine to discovermachines,including delivery controllers, VDAs, license servers, and StoreFront servers.
When you run Scout Health Check from a domain‑joined machine which is not Delivery Controller,Scout cannot discover machines automatically. You need to add machines manually or import VDAmachines.
Addmachinesmanually
After Scout lists the Controllers and VDAs it discovers, you can manually add other machines in thedeployment, such as StoreFront servers, License Servers, and Citrix Provisioning servers.
When running health checks:
• Citrix License Servers in the domain are discovered automatically. You cannot add LicenseServers manually.
• Health checks do not currently support Citrix Provisioning servers.
On any Scout page that lists the discoveredmachines, click + Addmachine. Type the FQDNof thema‑chine youwant to add, and then clickContinue. Repeat to add othermachines, as needed. (Althoughentering a DNS alias instead of an FQDN can appear valid, the health checks might fail.)
Manually added machines always appear at the top of the machines list, above the discovered ma‑chines.
An easyway to identify amanually addedmachine is the red delete button on the right end of the row.Only manually addedmachines have that button. Discoveredmachines don’t.
To remove a manually added machine, click the red button on the right end of the row. Confirm thedeletion. Repeat to delete other manually addedmachines.
Scout remembersmanually addedmachinesuntil you remove them. Whenyoucloseand then reopenScout, the manually addedmachines are still listed at the top of the list.
CDF traces are not collectedwhenusingTrace&ReproduceonStoreFront servers. However, all othertrace information is collected.
Import VDAmachines
You can import VDAmachines in the deployment when running health checks.
© 1999–2022 Citrix Systems, Inc. All rights reserved. 842
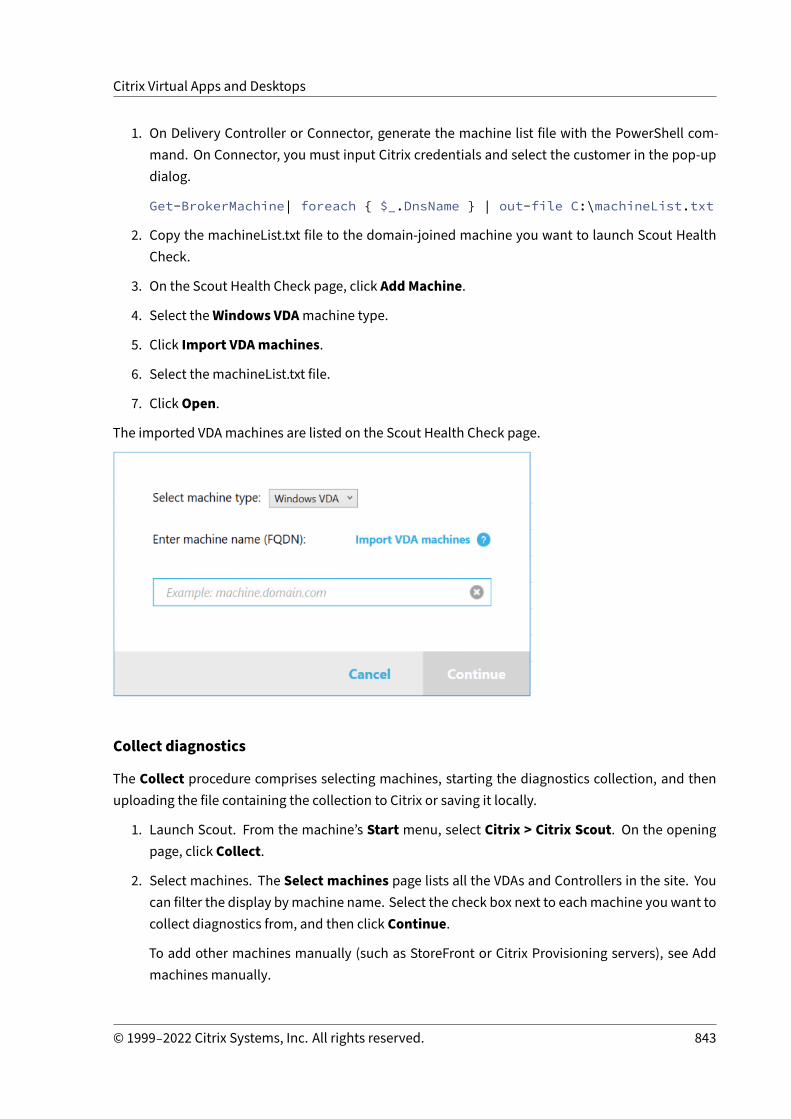
Citrix Virtual Apps and Desktops
1. On Delivery Controller or Connector, generate the machine list file with the PowerShell com‑mand. On Connector, you must input Citrix credentials and select the customer in the pop‑updialog.
Get-BrokerMachine| foreach { $_.DnsName } | out-file C:\machineList.txt
2. Copy the machineList.txt file to the domain‑joined machine you want to launch Scout HealthCheck.
3. On the Scout Health Check page, click AddMachine.
4. Select theWindows VDAmachine type.
5. Click Import VDAmachines.
6. Select the machineList.txt file.
7. ClickOpen.
The imported VDAmachines are listed on the Scout Health Check page.
Collect diagnostics
The Collect procedure comprises selecting machines, starting the diagnostics collection, and thenuploading the file containing the collection to Citrix or saving it locally.
1. Launch Scout. From the machine’s Start menu, select Citrix > Citrix Scout. On the openingpage, click Collect.
2. Select machines. The Select machines page lists all the VDAs and Controllers in the site. Youcan filter the display bymachine name. Select the check box next to eachmachine youwant tocollect diagnostics from, and then click Continue.
To add other machines manually (such as StoreFront or Citrix Provisioning servers), see Addmachines manually.
© 1999–2022 Citrix Systems, Inc. All rights reserved. 843

Citrix Virtual Apps and Desktops
Scout automatically launches verification tests on each selectedmachine, ensuring itmeets thecriteria listed in Verification tests. If verification fails, amessage is posted in the Status column,and that machine’s check box is unselected. You can either:
• Resolve the issue and then select the machine’s check box again. This triggers a retry ofthe verification tests.
• Skip that machine (leave its check box unselected). Diagnostics won’t be collected fromthat machine.
When the verification tests complete, click Continue.
3. Collectdiagnostics. The summary lists all themachines fromwhichdiagnosticswill be collected(the machines you selected that passed the verification tests). Click Start Collecting.
During collection:
• The Status column indicates the current collection state for a machine.• To stop an in‑progress collection on a single machine, click Cancel in the Action columnfor that machine.
• To stop all in‑progress collections, click Stop Collection in the lower right corner of thepage. Diagnostics frommachines that have completed collection are kept. To resume thecollection, click Retry in the Action column for eachmachine.
• When the collection completes for all selected machines, the Stop Collection button inthe lower right corner changes to Continue.
• To collect diagnostics again, click Collect Again in that machine’s Action column. Thenewer collection overwrites the earlier.
• If a collection fails, you can click Retry in the Action column. Only successful collectionsare uploaded or saved.
• After the collection completes for all selected machines, don’t click Back. (If you click it,the collection is lost.)
When the collection completes, click Continue.
4. Save or upload the collection. Choosewhether to upload the file to Citrix, or save it on the localmachine.
If you choose to upload the file now, continue with Step 5.
If you choose to save the file locally:
• A Windows Save dialog box appears. Navigate to the desired location.• When the local save completes, the pathname of the file is displayed and linked. You canview the file. You can upload the file later to Citrix. See CTX136396.
Click Done to return to the Scout opening page. You don’t need to complete any further stepsin this procedure.
© 1999–2022 Citrix Systems, Inc. All rights reserved. 844

Citrix Virtual Apps and Desktops
5. Authenticate for uploads and optionally specify a proxy. For details, see Upload authorization.
• If you haven’t authenticated through Scout, continue with this step.• If youhaveauthenticated throughScout, the storedauthorization token is usedbydefault.If this is what you want to do, select this option and click Continue. You aren’t promptedfor credentials for this collection. Continue with Step 6.
• If you authenticated previously, but want to reauthorize and get a new token, clickChange/Reauthorize and continue with this step.
Choosewhetheryouwant touseCitrix credentialsorCitrixCloudcredentials toauthenticate theupload. Click Continue. The credentials page appears only if you’re not using a stored token.
On the credentials page:
• If youwant touseaproxy server for the file upload, clickConfigureproxy. You can instructScout to use the proxy settings configured for your browser’s internet properties. Or, youcan enter the proxy server’s IP address and port number. Close the proxy dialog box.
• For a Citrix Cloud account, clickGenerate token. Your default browser launches to a CitrixCloud page where a token is displayed. Copy the token, and then paste it on the Scoutpage.
• For a Citrix account, enter your credentials.
When you’re done, click Continue.
6. Enter information about the upload.
• The name field contains the default name for the file for the collected diagnostics. Thissuffices formost collections, although you can change the name. (If you delete the defaultname and leave the name field empty, the default name is used.)
• Optionally, specify an 8‑digit Citrix Support case number.• In the optionalDescription field, describe the issue and indicatewhen the issue occurred,if applicable.
When you’re done, click Start Upload.
During theupload, the lower leftportionof thepage approximates thepercentageof the uploadthat has completed. To cancel an in‑progress upload, click Stop Upload.
When the upload completes, the URL of its location is displayed and linked. You can follow thelink to the Citrix location to view the analysis of the upload, or you can copy the link.
Click Done to return to the Scout opening page.
Trace and reproduce
The Trace and Reproduce procedure comprises selecting machines, starting a trace, reproducing is‑sues, completing the diagnostics collection, and then uploading the file to Citrix, or saving it locally.
© 1999–2022 Citrix Systems, Inc. All rights reserved. 845

Citrix Virtual Apps and Desktops
This procedure is similar to the standard Collect procedure. However, it allows you to start a trace onmachines and then re‑create issues on those machines. All diagnostics collections include AOT traceinformation. This procedure adds CDF traces to help troubleshooting.
1. Launch Scout. From the machine’s Start menu, select Citrix > Citrix Scout. On the openingpage, click Trace & Reproduce.
2. Select machines. The Select machines page lists all the VDAs and Controllers in the site. Youcan filter the display bymachine name. Select the check box next to eachmachine youwant tocollect traces and diagnostics from. Then click Continue.
To add other machines manually (such as StoreFront or Citrix Provisioning servers), see Addmachines manually.
Scout automatically launches verification tests on each selectedmachine,making sure itmeetsthe criteria listed in Verification tests. If verification fails for a machine, a message is posted inthe Status column, and that machine’s check box is unselected. You can either:
• Resolve the issue and then select the machine’s check box again. This triggers a retry ofthe verification tests.
• Skip that machine (leave its check box unselected). Diagnostics and traces are not col‑lected from that machine.
When the verification tests complete, click Continue.
3. Start the trace. The summary lists all the machines fromwhich traces are collected. Click StartTracing.
On one or more of the selected machines, reproduce the issues you experienced. Trace collec‑tion continueswhile you’re doing that. When you’re done reproducing the issue, clickContinuein Scout. That stops the trace.
After you stop the trace, indicate whether you reproduced the issue during the trace.
4. Collect diagnostics frommachines. Click Start Collecting. During collection:
• The Status column indicates the current collection state for a machine.• To stop an in‑progress collection on a single machine, click Cancel in the Action columnfor that machine.
• To stop all in‑progress collections, click Stop Collection in the lower right corner of thepage. Diagnostics frommachines that have completed collection are kept. To resume thecollection, click Retry in the Action column for eachmachine.
• When the collection completes for all selected machines, the Stop Collection button inthe lower right corner changes to Continue.
• To collect diagnostics again from amachine, click Collect Again in that machine’s Actioncolumn. The newer collection overwrites the earlier.
© 1999–2022 Citrix Systems, Inc. All rights reserved. 846

Citrix Virtual Apps and Desktops
• If a collection fails, you can click Retry in the Action column. Only successful collectionsare uploaded or saved.
• After the collection completes for all selected machines, don’t click Back. (If you do, thecollection is lost.)
When the collection completes, click Continue.
5. Save or upload the collection. Choose whether to upload the file to Citrix or save it locally.
If you choose to upload the file now, continue with Step 6.
If you choose to save the file locally:
• A Windows Save dialog box appears. Select the desired location.• When the local save completes, the pathname of the file is displayed and linked. You canview the file. Remember: You can upload the file later fromCitrix; see CTX136396 for CitrixInsight Services.
Click Done to return to the Scout opening page. You don’t need to complete any further stepsin this procedure.
6. Authenticate for uploads and optionally specify proxy. Review Upload authorization for detailsof this process.
• If you haven’t authenticated through Scout, continue with this step.• If you authenticated through Scout, the stored authorization token is used by default. Ifthis what you want to do, choose this option and click Continue. You aren’t prompted forcredentials for this collection. Continue with Step 7.
• If you previously authenticated, but want to reauthorize and get a new token, clickChange/Reauthorize and continue with this step.
Choosewhetheryouwant touseCitrix credentialsorCitrixCloudcredentials toauthenticate theupload. Click Continue. The credentials page appears only if you’re not using a stored token.
On the credentials page:
• If youwant touseaproxy server for the file upload, clickConfigureproxy. You can instructScout to use the proxy settings configured for your browser’s Internet Properties. Or, youcan enter the proxy server’s IP address and port number. Close the proxy dialog box.
• For a Citrix Cloud account, click Generate token. Your default browser launch to a CitrixCloud page where a token is displayed. Copy the token, and then paste it on the Scoutpage.
• For a Citrix account, enter your credentials.
When you’re done, click Continue.
7. Provide information about the upload.
Enter upload details:
© 1999–2022 Citrix Systems, Inc. All rights reserved. 847

Citrix Virtual Apps and Desktops
• The name field contains the default name for the file for the collected diagnostics. Thissuffices formost collections, although you can change the name. (If you delete the defaultname and leave the name field empty, the default name is used.)
• Optionally, specify an 8‑digit Citrix Support case number.• In the optional Description field, describe the issue and indicate when the issue occurred,if applicable.
When you’re done, click Start Upload.
During the upload, the lower left portion of the page approximates what percentage of the up‑load has completed. To cancel an in‑progress upload, click Stop Upload.
When the upload completes, the URL of its location is displayed and linked. You can follow thelink to the Citrix location to view the analysis of the upload, or you can copy the link.
Click Done to return to the Scout opening page.
Schedule collectionsNote:
You can currently schedule collections, but not health checks.
The Schedule procedure comprises selecting machines and then setting or canceling the schedule.Scheduled collections are automatically uploaded to Citrix. (You can save scheduled collections lo‑cally using the PowerShell interface. See Citrix Call Home.)
1. Launch Scout. From the machine’s Start menu, select Citrix > Citrix Scout. On the openingpage, click Schedule.
2. Select machines. All the VDAs and Controllers in the site are listed. You can filter the display bymachine name.
When you installed VDAs and Controllers using the graphical interface, if you set a Call Homeschedule (see Citrix Call Home), Scout displays those settings, by default. You can use this ver‑sion of Scout to start scheduled collections for the first time, or change a previously configuredschedule.
Although you enabled/disabled Call Home on a per‑machine basis during component installa‑tion, a schedule configured in Scout affects all the machines you select.
Select the check box next to eachmachine you want to collect diagnostics from, and then clickContinue.
To add other machines manually (such as StoreFront or Citrix Provisioning servers), see Addmachines manually.
© 1999–2022 Citrix Systems, Inc. All rights reserved. 848

Citrix Virtual Apps and Desktops
Scout automatically launches verification tests on each of the selected machines, making sureit meets the criteria in Verification tests. If verification fails for a machine, a message is postedin the Status column, and that machine’s check box is unselected. You can either:
• Resolve the issue and then select the machine’s check box again. This triggers a retry ofthe verification tests.
• Skip that machine (leave its check box unselected). Diagnostics (or traces) are not col‑lected from that machine.
When the verification tests complete, click Continue.
The summary page lists the machines to which schedules are applied. Click Continue.
3. Set the schedule. Indicate when you want diagnostics to be collected. Remember: The sched‑ule affects all selectedmachines.
• To configure a weekly schedule for the selected machines, clickWeekly. Choose the dayof the week. Enter the time of day (24‑hour clock) for the collection to begin.
• To configure a daily schedule for the selectedmachines, click Daily. Enter the time of day(24‑hour clock) for the collection to begin.
• To cancel an existing schedule for the selectedmachines (and not replace it with another),clickOff. This cancels any schedule that was previously configured for those machines.
Click Continue.
4. Authenticate foruploadsandoptionally specifyaproxy. ReviewUploadauthorization fordetailsof this process. Remember: You cannot use a stored token to authenticate when working witha Scout schedule.
Choose whether you want to use Citrix credentials or Citrix Cloud credentials to authenticatethe upload. Click Continue.
On the credentials page:
• If youwant touseaproxy server for the file upload, clickConfigureproxy. You can instructScout to use the proxy settings configured for your browser’s Internet Properties. Or, youcan enter the proxy server’s IP address and port number. Close the proxy dialog box.
• For a Citrix Cloud account, clickGenerate token. Your default browser launches to a CitrixCloud page where a token is displayed. Copy the token, and then paste it on the Scoutpage.
• For a Citrix account, enter your credentials.
When you’re done, click Continue.
Review the configured schedule. Click Done to return to the Scout opening page.
During a collection, each selected machine’s Windows application log contains entries aboutthe collection and upload.
© 1999–2022 Citrix Systems, Inc. All rights reserved. 849

Citrix Virtual Apps and Desktops
Datamasking
The diagnostic information collected using Citrix Scout might contain security‑sensitive information.The Citrix Scout data masking feature allows you to mask sensitive data in diagnostics files beforeuploading them to Citrix.
Scout data masking is configured to mask the IP address, machine names, domain names, usernames, hypervisor names, Delivery Group names, catalog names, application names, and SIDs.
Note:
CDF traces are encrypted and cannot be masked.
Linux VDA logs are compressed to .tar.gz2 format and cannot be masked.
Collect new diagnostics and perform datamasking
To use the Citrix Scout data masking feature, launch Scout from the command line.
1. In Windows, open the command prompt as an administrator.2. Go to the directory where Scout is installed: cd C:\Program Files\Citrix\Telemetry
Service.3. Launch Scout: ScoutUI.exe datamasking.4. Click Collect or Trace & Reproduce to collect diagnostics.5. After the collection completes, select Enable datamasking. This option is enabled by default.6. Configure the data mask. You can use the default rules or customize the rules.7. Select whether to upload or save the diagnostics collection.
• If you select Upload the diagnostics collection to Citrix, masked diagnostics files areuploaded to Citrix.
• If you select Save the diagnostics collection on your local machine, both the originalandmasked diagnostics are saved to the specified location.
Perform datamasking on existing diagnostics
1. In Windows, open the command prompt as an administrator.2. Go to the directory where Scout is installed: cd C:\Program Files\Citrix\Telemetry
Service.3. Launch Scout directly in data masking mode: ScoutUI.exe datamasking filePath.4. Select “Enable data masking” to continue. This option is enabled by default.5. Configure the data mask. You can run data masking with the default rules or customize the
rules.6. Select whether to upload or save the diagnostics collection.
• If you select Upload the diagnostics collection to Citrix, masked diagnostics files areuploaded to Citrix.
© 1999–2022 Citrix Systems, Inc. All rights reserved. 850

Citrix Virtual Apps and Desktops
• If you select Save the diagnostics collection on your local machine, both the originalandmasked diagnostics are saved to the specified location.
Masked data file andmapping file locations
After you have uploaded or saved the diagnostics collection, click the link to open the original andmasked diagnostics, and open the mapping information file.
Usage data collection
When you use Scout, Citrix uses Google Analytics to collect anonymous usage data to be used forfuture product features and improvements. Data collection is enabled by default.
To change usage data collection and upload, click the Settings gear in the Scout UI. You can thenchoose whether to send the information by selecting Yes orNo and then clicking Save.
Monitor
April 14, 2021
Administrators and help desk personnel can monitor Citrix Virtual Apps and Desktops Sites using avariety of features and tools. Using these tools, you canmonitor:
• User sessions and session use• Logon performance• Connections andmachines, including failures
© 1999–2022 Citrix Systems, Inc. All rights reserved. 851
Citrix Virtual Apps and Desktops
• Load evaluation• Historical trends• Infrastructure
Citrix Director
Director is a real‑timeweb tool that you can use tomonitor and troubleshoot, and to perform supporttasks for end users.
For details, see the Director articles.
Configuration Logging
Configuration Logging allows administrators to keep track of administrative changes to a Site. Con‑figuration Logging can help administrators diagnose and troubleshoot problems after configurationchanges are made, assist change management and track configurations, and report administrationactivity.
You can view and generate reports about logged information from Studio. You can also view loggeditems in Director with the Trend View to provide notifications of configuration changes. This featureis useful for administrators who do not have access to Studio.
The Trends View gives historical data of configuration changes over a period of time so administratorscan assess what changes were made to the Site, when they were made, and who made them to findthe cause of an issue. This view sorts configuration information into three categories:
• Connection Failures• Failed Single‑session Machines• Failed Multi‑session Machines
For details about how to enable and configure Configuration Logging, see Configuration Logging. TheDirector articles describe how to view logged information from that tool.
Event logs
Services within Citrix Virtual Apps and Desktops log events that occur. Event logs can be used tomon‑itor and troubleshoot operations.
For details, see Event logs. Individual feature articles might also contain event information.
Configuration logging
April 14, 2021
© 1999–2022 Citrix Systems, Inc. All rights reserved. 852

Citrix Virtual Apps and Desktops
Configuration logging captures site configuration changes and administrative activities to thedatabase. You can use the logged content to:
• Diagnose and troubleshoot problems after configuration changes are made; the log provides abreadcrumb trail
• Assist changemanagement and track configurations• Report administration activity
You set configuration logging preferences, display configuration logs, and generate HTML and CSVreports from Citrix Studio. You can filter configuration log displays by date ranges and full text searchresults. Mandatory logging, when enabled, prevents configuration changes from being made unlessthey can be logged. With appropriate permission, you can delete entries from the configuration log.You cannot use the configuration logging feature to edit log content.
Configuration logging uses a PowerShell SDK and the Configuration Logging Service. The Configura‑tion Logging Service runs on every Controller in the site. If one Controller fails, the service on anotherController automatically handles logging requests.
By default, the configuration logging feature is enabled, and uses the database that is created whenyou create the site (the site configuration database). You can specify a different location for thedatabase. The configuration logging Database supports the same high availability features as thesite configuration Database.
Access to configuration logging is controlled through delegated administration, with the Edit LoggingPreferences and View Configuration Logs permissions.
Configuration logs are localized when they are created. For example, a log created in English is readin English, regardless of the locale of the reader.
What is logged
Configuration changes and administrative activities initiated from Studio, Director, and PowerShellscripts are logged. Examples of logged configuration changes includeworkingwith (creating, editing,deleting assigning):
• Machine catalogs• Delivery groups (including changing power management settings)• Administrator roles and scopes• Host resources and connections• Citrix policies through Studio
Examples of logged administrative changes include:
• Power management of a virtual machine or a user desktop• Studio or Director sending a message to a user
© 1999–2022 Citrix Systems, Inc. All rights reserved. 853

Citrix Virtual Apps and Desktops
The following operations are not logged:
• Autonomic operations such as pool management power‑on of virtual machines.• Policy actions implemented through the Group Policy Management Console (GPMC); use Mi‑crosoft tools to view logs of those actions.
• Changes made through the registry, direct access of the database, or from sources other thanStudio, Director, or PowerShell.
• When thedeployment is initialized, configuration loggingbecomes availablewhen the first Con‑figuration Logging Service instance registerswith theConfiguration Service. Therefore, the veryearly stages of configuration are not logged (for example, when the database schema is ob‑tained and applied, when a hypervisor is initialized).
Manage configuration logging
By default, configuration logging uses the database that is createdwhen you create a site (also knownas the site configuration database). Citrix recommends that you use a separate location for the con‑figuration logging database (and the monitoring database) for the following reasons:
• The backup strategy for the configuration logging database is likely to differ from the backupstrategy for the site configuration database.
• The volume of data collected for configuration logging (and the Monitoring Service) might ad‑versely affect the space available to the site configuration database.
• It splits the single point of failure for the three databases.
Product editions that do not support configuration logging do not have a Logging node in Studio.
Enable and disable configuration logging andmandatory logging
By default, configuration logging is enabled, andmandatory logging is disabled.
1. Select Logging in the Studio navigation pane.
2. SelectPreferences in theActionspane. The configuration loggingdialogbox containsdatabaseinformation and indicates whether configuration logging and mandatory logging are enabledor disabled.
3. Select the desired action:
To enable configuration logging, select Enable. This is the default setting. If the database can‑not be written to, the logging information is discarded, but the operation continues.
Todisable configuration logging, selectDisable. If loggingwaspreviously enabled, existing logsremain readable with the PowerShell SDK.
To enable mandatory logging, select Prevent changes to the site configuration when thedatabase is not available. No configuration change or administrative activity that is normally
© 1999–2022 Citrix Systems, Inc. All rights reserved. 854
Citrix Virtual Apps and Desktops
logged is allowed unless it can be written in the configuration logging database. You can en‑ablemandatory logging only when configuration logging is enabled (when Enable is selected).If the Configuration Logging Service fails, and high availability is not in use, mandatory loggingis assumed. In such cases, operations that would normally be logged are not performed.
To disablemandatory logging, selectAllowchangeswhen to the site configurationwhen thedatabase is not available. Configuration changes and administrative activities are allowed,even if the configuration logging database cannot be accessed. This is the default setting.
Change the configuration logging database location
You cannot change the database location when mandatory logging is enabled, because the locationchange includes a brief disconnect interval that cannot be logged.
1. Create a database server, using a supported SQL Server version.2. Select Logging in the Studio navigation pane.3. Select Preferences in the Actions pane.4. In the Logging Preferences dialog box, select Change logging database.5. In the Change Logging Database dialog box, specify the location of the server containing the
new database server. See Database address formats for valid formats.6. To allow Studio to create the database, clickOK. When prompted, clickOK, and the database is
created automatically. Studio attempts to access the database using the current Studio user’scredentials. If that fails, you are prompted for the database user’s credentials. Studio then up‑loads the database schema to the database. (The credentials are retained only during databasecreation.)
7. To create the database manually, click Generate database script. The generated script in‑cludes instructions for manually creating the database. Ensure that the database is empty andthat at least one user has permission to access and change the database before uploading theschema.
The configuration logging data in the previous database is not imported to the new database. Logscannot be aggregated from both databases when retrieving logs. The first log entry in the new con‑figuration logging database indicates that a database change occurred, but it does not identify theprevious database.
Display configuration log content
When initiating configuration changes and administrative activities, the high level operations createdby Studio and Director are listed in the upper middle pane in Studio. A high level operation resultsin one or more service and SDK calls, which are low level operations. When you select a high leveloperation in the upper pane, the lower pane displays the low level operations.
© 1999–2022 Citrix Systems, Inc. All rights reserved. 855

Citrix Virtual Apps and Desktops
If an operation fails before completion, the log operationmight not be completed in the database. Forexample, a start record will have no corresponding stop record. In such cases, the log indicates thatthere ismissing information. When youdisplay logs based on time ranges, incomplete logs are shownif the data in the logs matches the criteria. For example, if all logs for the last five days are requestedand a log exists with a start time in the last five days but has no end time, it is included.
When using a script that calls PowerShell cmdlets, if you create a low level operation without specify‑ing a parent high level operation, configuration logging creates a surrogate high level operation.
To display configuration log content, select Logging in the Studio navigation pane. By default, thecenter pane lists the log content chronologically (newest entries first), separated by date. You can:
• Sort the display by column heading.• Filter the display by specifying a day interval, or entering text in the Search box. To return tothe standard display after using search, clear the text in the Search box.
Generate reports
You can generate CSV and HTML reports containing configuration log data.
• TheCSV report contains all the loggingdata froma specified time interval. Thehierarchical datain the database is flattened into a single CSV table. No aspect of the data has precedence in thefile. No formatting is used and no human readability is assumed. The file (named MyReport)contains the data in a universally consumable format. CSV files are often used for archivingdata or as a data source for a reporting or data manipulation tool such as Microsoft Excel.
• The HTML report provides a human‑readable form of the logging data for a specified time inter‑val. It provides a structured, navigable view for reviewing changes. An HTML report comprisestwo files, named Summary and Details. Summary lists high level operations: when each opera‑tion occurred, by whom, and the outcome. Clicking a Details link next to each operation takesyou to the low level operations in the Details file, which provides additional information.
To generate a configuration log report, select Logging in the Studio navigation pane, and then selectCreate custom report in the Actions pane.
• Select the date range for the report.• Select the report format: CSV, HTML, or both.• Browse to the location where the report should be saved.
Delete configuration log content
To delete the configuration log, you must have certain delegated administration and SQL Serverdatabase permissions.
© 1999–2022 Citrix Systems, Inc. All rights reserved. 856
Citrix Virtual Apps and Desktops
• Delegated administration: You must have a delegated administration role that allows the de‑ployment configuration to be read. The Full administrator role has this permission. A customrole must have Read Only or Manage selected in the Other permissions category.
To create a backup of the configuration logging data before deleting it, the custom role mustalso have Read Only or Manage selected in the Logging Permissions category.
• SQLServerdatabase: Youmust have aSQL server loginwith permission todelete records fromthe database. There are two ways to do this:
– Use a SQL Server database login with a sysadmin server role, which allows you to performany activity on the database server. Alternatively, the serveradmin or setupadmin serverroles allow you to perform deletion operations.
– If your deployment requires additional security, use a non‑sysadmin database loginmapped to a database user who has permission to delete records from the database.
1. In SQL Server Management Studio, create a SQL Server login with a server role otherthan ‘sysadmin.’
2. Map the login to a user in the database. SQL Server automatically creates a user in thedatabase with the same name as the login.
3. In Database role membership, specify at least one of the role members for thedatabase user: ConfigurationLoggingSchema_ROLE or dbowner.
For more information, see the SQL Server Management Studio documentation.
To delete the configuration logs:
1. Select Logging in the Studio navigation pane.2. Select Delete logs in the Actions pane.3. You are asked if you want to create a backup of the logs before they are deleted. If you choose
to create a backup, browse to the location where the backup archive is saved. The backup iscreated as a CSV file.
After the configuration logs are cleared, the log deletion is the first activity posted to the empty log.That entry provides details about who deleted the logs, and when.
Event logs
April 14, 2021
The following articles list and describe events that can be logged by serviceswithin Citrix Virtual Appsand Desktops.
This information is not comprehensive. Readers should check individual featurearticles for additionalevent information.
© 1999–2022 Citrix Systems, Inc. All rights reserved. 857
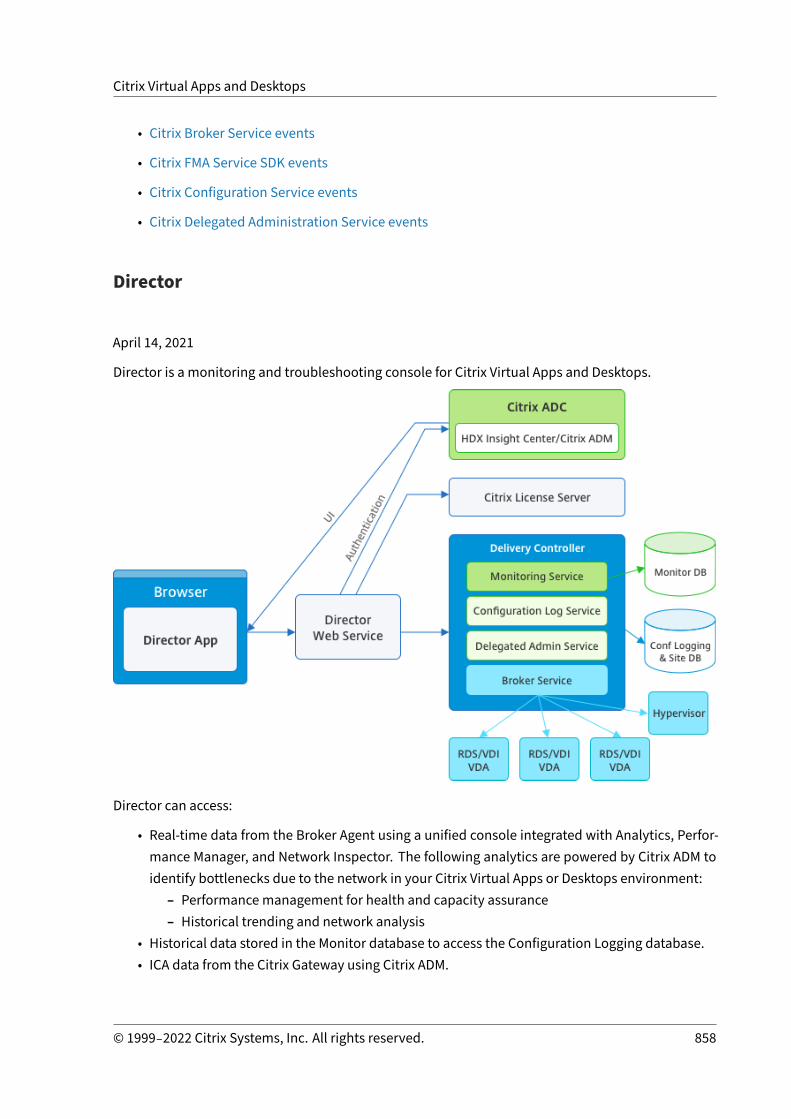
Citrix Virtual Apps and Desktops
• Citrix Broker Service events
• Citrix FMA Service SDK events
• Citrix Configuration Service events
• Citrix Delegated Administration Service events
Director
April 14, 2021
Director is a monitoring and troubleshooting console for Citrix Virtual Apps and Desktops.
Director can access:
• Real‑time data from the Broker Agent using a unified console integrated with Analytics, Perfor‑mance Manager, and Network Inspector. The following analytics are powered by Citrix ADM toidentify bottlenecks due to the network in your Citrix Virtual Apps or Desktops environment:
– Performancemanagement for health and capacity assurance– Historical trending and network analysis
• Historical data stored in the Monitor database to access the Configuration Logging database.• ICA data from the Citrix Gateway using Citrix ADM.
© 1999–2022 Citrix Systems, Inc. All rights reserved. 858

Citrix Virtual Apps and Desktops
– Gain visibility into the end‑user experience for virtual applications, desktops, andusers forCitrix Virtual Apps or Desktops.
– Correlate network data with application data and real‑time metrics for effective trou‑bleshooting.
– Integrate with Citrix Virtual Desktop 7 Director monitoring tool.
Director uses a troubleshooting dashboard that provides real‑time and historical health monitoringof theCitrix Virtual Apps orDesktops Site. This feature allows you to see failures in real time, providinga better idea of what the end users are experiencing.
For more information regarding the compatibility of Director features with Delivery Controller (DC),VDA and any other dependent components, see Feature compatibility matrix.
Note:
With the disclosure of theMeltdown and Spectre speculative execution side‑channel vulnerabili‑ties, Citrix recommends that you install relevantmitigationpatches. Thesepatchesmight impactSQL Server performance. For more information, see the Microsoft support article, Protect SQLServer from attacks on Spectre and Meltdown side‑channel vulnerabilities. Citrix recommendsthat you test the scale and plan yourworkloads before rolling out the patches in your productionenvironments.
Director is installed by default as a website on the Delivery Controller. For prerequisites and otherdetails, see the System requirements documentation for this release. For specific information on theinstallation and configuration of Director, see Install and configure Director.
Log on to Director
The Director website is at https or http://<Server FQDN>/Director.
If one of the Sites in a multi‑site deployment is down, the logon takes a little longer while it attemptsto connect to the Site that is down.
Use Director with PIV smart card authentication
Director now supports Personal Identity Verification (PIV) based smart card authentication to log on.This feature is useful for organizations and government agencies that use smart card based authenti‑cation for access control.Smart card authentication requires specific configuration on the Director server and in the Active Di‑rectory. The configuration steps are detailed in Configure PIV smart card authentication.
Note:
Smart card authentication is supported only for users from the same Active Directory domain.
© 1999–2022 Citrix Systems, Inc. All rights reserved. 859
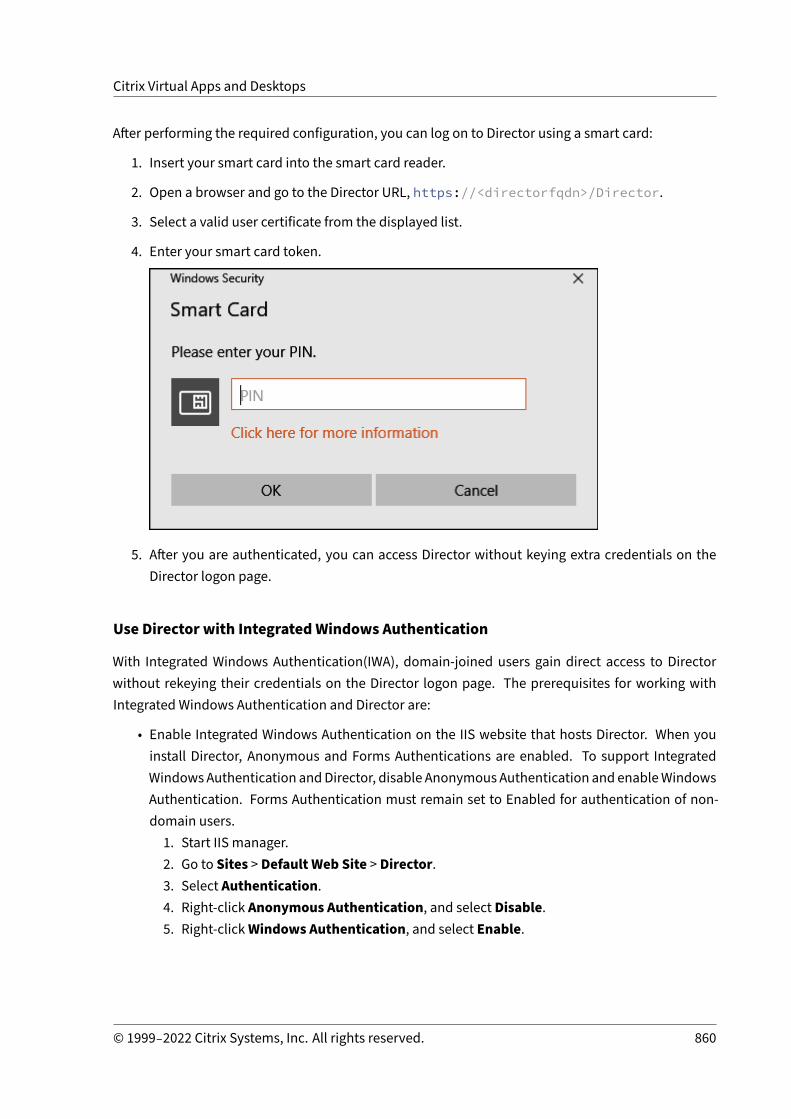
Citrix Virtual Apps and Desktops
After performing the required configuration, you can log on to Director using a smart card:
1. Insert your smart card into the smart card reader.
2. Open a browser and go to the Director URL, https://<directorfqdn>/Director.
3. Select a valid user certificate from the displayed list.
4. Enter your smart card token.
5. After you are authenticated, you can access Director without keying extra credentials on theDirector logon page.
Use Director with IntegratedWindows Authentication
With Integrated Windows Authentication(IWA), domain‑joined users gain direct access to Directorwithout rekeying their credentials on the Director logon page. The prerequisites for working withIntegrated Windows Authentication and Director are:
• Enable Integrated Windows Authentication on the IIS website that hosts Director. When youinstall Director, Anonymous and Forms Authentications are enabled. To support IntegratedWindows Authentication andDirector, disable Anonymous Authentication and enableWindowsAuthentication. Forms Authentication must remain set to Enabled for authentication of non‑domain users.1. Start IIS manager.2. Go to Sites > Default Web Site > Director.3. Select Authentication.4. Right‑click Anonymous Authentication, and select Disable.5. Right‑clickWindows Authentication, and select Enable.
© 1999–2022 Citrix Systems, Inc. All rights reserved. 860

Citrix Virtual Apps and Desktops
• Configure Active Directory delegation permission for the Director machine. Configuration isonly required if Director and the Delivery Controller are installed on separate machines.1. On the Active Directory machine, open the Active Directory Management Console.2. In the Active DirectoryManagement Console navigate toDomainName >Computers. Se‑
lect the Director machine.3. Right‑click and select Properties.4. In Properties, select the Delegation tab.5. Select the option, Trust this computer for delegation to any service (Kerberos only).
• The browser that is used to access Director must support Integrated Windows Authentication.Additional configuration stepsmight be required in Firefox and Chrome. Formore information,refer to the browser documentation.
• The Monitoring Service must be running Microsoft .NET Framework 4.5.1 or a later supportedversion listed in the System Requirements for Director. For more information, see System Re‑quirements.
When a user logs off Director or if the session times out, the logon page is displayed. From the logonpage, the user can set the Authentication type to Automatic logon orUser credentials.
Interface views
Director provides different views of the interface tailored to particular administrators. Product per‑missions determine what is displayed and the commands available.
For example, help desk administrators see an interface tailored to help desk tasks. Director allowshelp desk administrators to search for the user reporting an issue and display activity associatedwiththatuser. Forexample, statusof theuser’s applicationsandprocesses. Theycan resolve issuesquicklyby performing actions such as ending an unresponsive application or process, shadowing operationson the user’s machine, restarting the machine, or resetting the user profile.
In contrast, full administrators see and manage the entire Site and can perform commands for mul‑tiple users and machines. The Dashboard provides an overview of the key aspects of a deployment,such as the status of sessions, user logons, and the Site infrastructure. Information is updated everyminute. If issues occur, details appear automatically about the number and type of failures that haveoccurred.
© 1999–2022 Citrix Systems, Inc. All rights reserved. 861

Citrix Virtual Apps and Desktops
Formore information about the various roles and their permissions in Director, see Delegated Admin‑istration and Director
Usage data collection by Google Analytics
The Director Service starts using Google Analytics to collect usage data anonymously after Director isinstalled. Statistics regarding the usage of the Trends pages andOData API call analytics are collected.Analytics collection complieswith the Citrix Privacy Policy. Data collection is enabled bydefaultwhenyou install Director.
To opt out of the Google Analytics data collection, edit the registry key on themachinewhere Directoris installed. If the registry key doesn’t exist, create and set it to the desired value. Refresh the Directorinstance after changing the registry key value.
Caution: Using the Registry Editor incorrectly can cause serious problems that might require you toreinstall your operating system. Citrix cannot guarantee that problems resulting from the incorrectuse of the Registry Editor can be solved. Use the Registry Editor at your own risk. Citrix recommendsthat you back up Windows Registry before changing it.
Location: HKEY_LOCAL_MACHINE\Software\Citrix\Director
Name: DisableGoogleAnalytics
Value: 0 = enabled(default), 1 = disabled
You can use the following PowerShell cmdlet to disable data collection by Google Analytics:
1 New-Item HKLM:\SOFTWARE\Citrix -Name Director23 New-ItemProperty HKLM:\SOFTWARE\Citrix\Director -Name
DisableGoogleAnalytics -PropertyType DWORD -Value 1
New features guide
Director has an in‑product guide that uses Pendo to give an insight into the new features released inthe current version of Director. The quick overview coupled with appropriate in‑product messageshelps you understand what’s new in the product.
To opt out of this feature, edit the registry key, as described below on the machine where Director isinstalled. If the registry key doesn’t already exist, create and set it to the desired value. Refresh theDirector instance after changing the registry key value.
Caution:
Using the Registry Editor incorrectly can cause serious problems that might require you to rein‑
© 1999–2022 Citrix Systems, Inc. All rights reserved. 862

Citrix Virtual Apps and Desktops
stall your operating system. Citrix cannot guarantee that problems resulting from the incorrectuse of the Registry Editor can be solved. Use the Registry Editor at your own risk. Citrix recom‑mends that you back up Windows Registry before changing it.
Location: HKEY_LOCAL_MACHINE\Software\Citrix\Director
Name: DisableGuidedHelp
Value: 0 = enabled(default), 1 = disabled
You can use the following PowerShell cmdlet to disable the in‑product guide:
1 New-Item HKLM:\SOFTWARE\Citrix -Name Director23 New-ItemProperty HKLM:\SOFTWARE\Citrix\Director -Name DisableGuidedHelp
-PropertyType DWORD -Value 1
Install and configure
April 14, 2021
Install Director
Install Director using the full product ISO Installer for Citrix Virtual Apps and Desktops, which checksfor prerequisites, installs any missing components, sets up the Director website, and performs basicconfiguration. For prerequisites and other details, see the System requirements documentation forthis release. This release of Director is not compatible with Virtual Apps deployments earlier than 6.5or Virtual Desktops deployments earlier than 7.The default configuration provided by the ISO installer handles typical deployments. If Director wasnot included during installation, use the ISO installer to add Director. To add any additional compo‑nents, rerun the ISO installer and select the components to install. For information on using the ISOinstaller, see Install core components in the installation documentation. Citrix recommends that youinstall using the full product ISO installer only, not the .MSI file.
When Director is installed on the Controller, it is automatically configuredwith localhost as the serveraddress, and Director communicates with the local Controller by default. To install Director on a ded‑icated server that is remote from a Controller, you are prompted to enter the FQDN or IP address of aController.
© 1999–2022 Citrix Systems, Inc. All rights reserved. 863

Citrix Virtual Apps and Desktops
Note:
Click Add to add the Controller to be monitored.
Director communicates with that specified Controller by default. Specify only one Controller addressfor each site that you monitor. Director automatically discovers all other Controllers in the same siteand falls back to those other Controllers if the Controller you specified fails.
Note:
Director does not load balance among Controllers.
To secure the communications between the browser and theWeb server, Citrix recommends that youimplement TLS on the IIS website hosting Director. Refer to the Microsoft IIS documentation for in‑structions. Director configuration is not required to enable TLS.
Deploy and configure Director
When Director is used in an environment containing more than one site, be sure to synchronize thesystem clocks on all the servers where Controllers, Director, and other core components are installed.Otherwise, the sites might not display correctly in Director.
© 1999–2022 Citrix Systems, Inc. All rights reserved. 864
Citrix Virtual Apps and Desktops
Important:
To protect the security of user names and passwords sent using plain text through the network,allow Director connections using only HTTPS, and not HTTP. Certain tools are able to read plaintext user names and passwords in HTTP (unencrypted) network packets, which can create a po‑tential security risk for users.
Configure permissions
To log on to Director, administrators with permissions for Director must be Active Directory domainusers andmust have the following rights:
• Read rights in all Active Directory forests to be searched (see Advanced configuration).• Configured Delegated Administrator roles (see delegated administration and Director).• To shadowusers, administratorsmustbe configuredusingaMicrosoftgrouppolicy forWindowsRemote Assistance. In addition:
– When installing VDAs, ensure that the Windows Remote Assistance feature is enabled onall user devices (selected by default).
– When you install Director on a server, ensure that Windows Remote Assistance is installed(selected by default). However, it is disabled on the server by default. The feature doesnot need to be enabled for Director to provide assistance to end users. Citrix recommendsleaving the feature disabled to improve security on the server.
– To enable administrators to initiate Windows Remote Assistance, grant them the requiredpermissions by using the appropriate Microsoft Group Policy settings for Remote Assis‑tance. For information, see CTX127388: How to Enable Remote Assistance for DesktopDirector.
Advanced configuration
April 14, 2021
Director can supportmulti‑forest environments spanning a forest configurationwhere users, DeliveryControllers (DCs), VDAs, and Directors are located in different forests. This requires proper setup oftrust relationships among the forests and configuration settings.
Recommended configuration in amulti‑forest environment
The recommendedconfiguration requires creationofoutgoingand incoming forest trust relationshipsamong the forests with domain‑wide authentication.
© 1999–2022 Citrix Systems, Inc. All rights reserved. 865

Citrix Virtual Apps and Desktops
The trust relationship from theDirector enables you to troubleshoot issues in user sessions, VDAs, andDelivery Controllers located in different forests.
Advancedconfiguration required forDirector to supportmultiple forests is controlled through settingsdefined in Internet Information Services (IIS) Manager.
Important:
When you change a setting in IIS, the Director service automatically restarts and logs off users.
To configure advanced settings using IIS:
1. Open the Internet Information Services (IIS) Manager console.2. Go to the Director website under the Default website.3. Double‑click Application Settings.4. Double‑click a setting to edit it.5. Click Add to add a new setting.
Director uses Active Directory to search for users and to look upmore user andmachine information.By default, Director searches the domain or forest in which:
• The administrator’s account is a member.• The Director web server is a member (if different).
Director attempts to perform searches at the forest level using the Active Directory global catalog. Ifyou do not have permissions to search at the forest level, only the domain is searched.
Searching or looking up data from another Active Directory domain or forest requires that you ex‑plicitly set the domains or forests to be searched. Configure the following Applications setting to theDirector website in the IIS Manager:
© 1999–2022 Citrix Systems, Inc. All rights reserved. 866
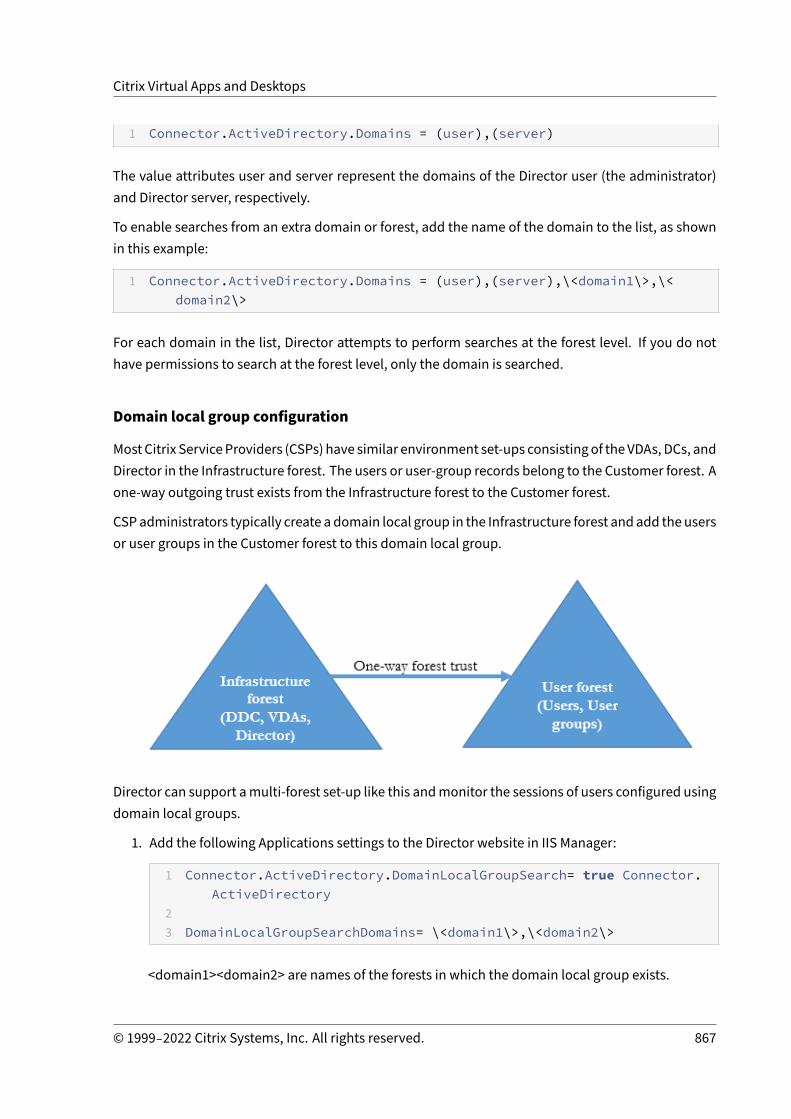
Citrix Virtual Apps and Desktops
1 Connector.ActiveDirectory.Domains = (user),(server)
The value attributes user and server represent the domains of the Director user (the administrator)and Director server, respectively.
To enable searches from an extra domain or forest, add the name of the domain to the list, as shownin this example:
1 Connector.ActiveDirectory.Domains = (user),(server),\<domain1\>,\<domain2\>
For each domain in the list, Director attempts to perform searches at the forest level. If you do nothave permissions to search at the forest level, only the domain is searched.
Domain local group configuration
MostCitrix ServiceProviders (CSPs) have similar environment set‑ups consistingof the VDAs, DCs, andDirector in the Infrastructure forest. The users or user‑group records belong to the Customer forest. Aone‑way outgoing trust exists from the Infrastructure forest to the Customer forest.
CSP administrators typically create a domain local group in the Infrastructure forest and add the usersor user groups in the Customer forest to this domain local group.
Director can support amulti‑forest set‑up like this andmonitor the sessions of users configured usingdomain local groups.
1. Add the following Applications settings to the Director website in IIS Manager:
1 Connector.ActiveDirectory.DomainLocalGroupSearch= true Connector.ActiveDirectory
23 DomainLocalGroupSearchDomains= \<domain1\>,\<domain2\>
<domain1><domain2> are names of the forests in which the domain local group exists.
© 1999–2022 Citrix Systems, Inc. All rights reserved. 867

Citrix Virtual Apps and Desktops
2. Assign the domain local group to delivery groups in Citrix Studio.
3. Restart IIS and log on to Director again for the changes to take effect. Now, Director canmonitorand show the sessions of these users.
Add sites to Director
If Director is already installed, configure it to work with multiple sites. To do this, use the IIS ManagerConsole on each Director server to update the list of server addresses in the application settings.
Add an address of a Controller from each site to the following setting:
1 Service.AutoDiscoveryAddresses = SiteAController,SiteBController2 <!--NeedCopy-->
SiteAController and SiteBController are the addresses of Delivery Controllers from twodifferent sites.
Disable the visibility of running applications in the Activity Manager
By default, the Activity Manager in Director displays a list of all running applications for a user’s ses‑sion. This information is viewed by all administrators that have access to the Activity Manager featurein Director. For Delegated Administrator roles, this includes Full Administrator, delivery group Admin‑istrator, and Help Desk Administrator.
Toprotect theprivacyof users and theapplications theyare running, youcandisable theApplicationstab to list running applications.
Warning:
Editing the registry incorrectly can cause serious problems that might require you to reinstallyour operating system. Citrix does not guarantee that problems resulting from the incorrect useof the Registry Editor can be solved. Use the Registry Editor at your own risk. Be sure to back upthe registry before you edit it.
1. On theVDA,modify the registrykeyatHKEY_LOCAL_MACHINE\Software\Citrix\Director\TaskManagerDataDisplayed.By default, the key is set to 1. Change the value to 0, which means the information is not col‑lected from the VDA and hence not displayed in the Activity Manager.
2. On the server with Director installed, modify the setting that controls the visibility of runningapplications. By default, the value is “true” which allows visibility of running applications inthe Applications tab. Change the value to “false” which disables visibility. This option affectsonly the Activity Manager in Director, not the VDA.Modify the value of the following setting:UI.TaskManager.EnableApplications = false
© 1999–2022 Citrix Systems, Inc. All rights reserved. 868

Citrix Virtual Apps and Desktops
Important:
To disable the view of running applications, make both changes to ensure that the data is notdisplayed in the Activity Manager.
Configure PIV smart card authentication
April 14, 2021
This article lists the configuration required on theDirector Server and in Active Directory to enable thesmart card authentication feature.
Note:
Smart card authentication is supported only for users from the same Active Directory domain.
Director server configuration
Perform the following configuration steps on the Director server:
1. Install and enable the Client Certificate Mapping Authentication. Follow the Client Certifi‑cate Mapping authentication using Active Directory instructions in the Microsoft document,Client Certificate Mapping Authentication.
2. Disable Forms Authentication on the Director site.
Start IIS Manager.
Go to Sites > Default Web Site > Director.
Select Authentication.
Right‑click Forms Authentication, and select Disable.
© 1999–2022 Citrix Systems, Inc. All rights reserved. 869
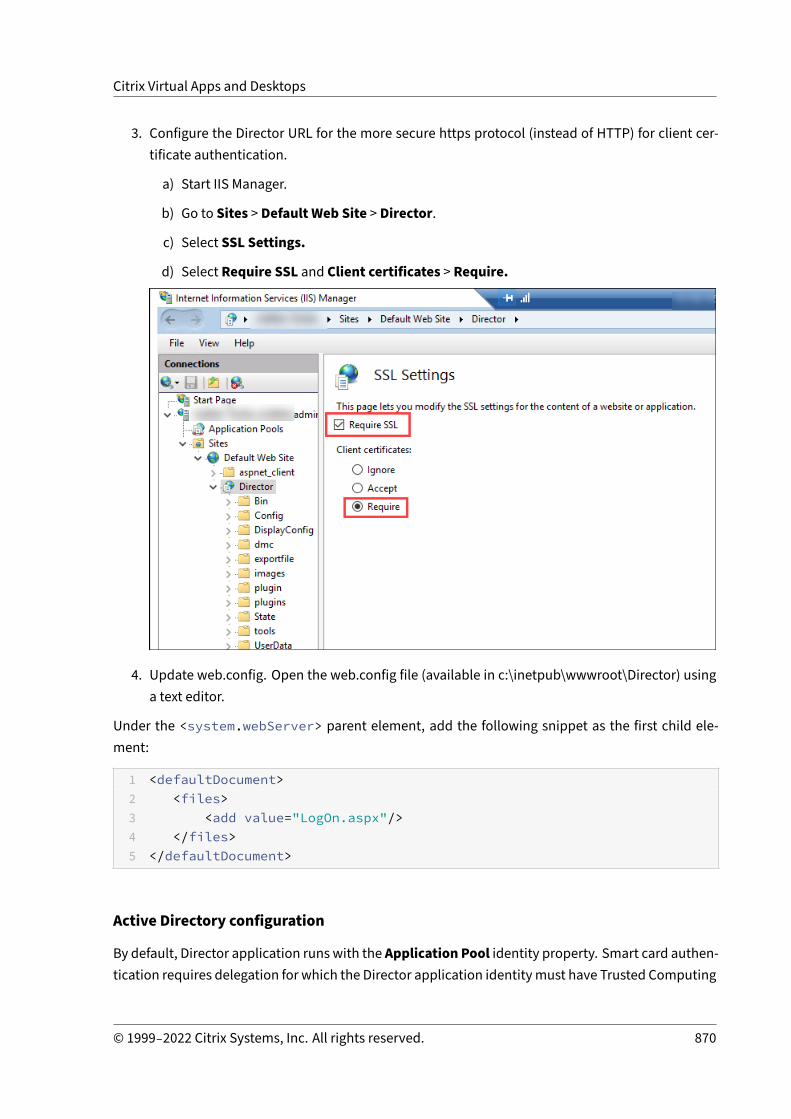
Citrix Virtual Apps and Desktops
3. Configure the Director URL for the more secure https protocol (instead of HTTP) for client cer‑tificate authentication.
a) Start IIS Manager.
b) Go to Sites > Default Web Site > Director.
c) Select SSL Settings.
d) Select Require SSL and Client certificates > Require.
4. Update web.config. Open the web.config file (available in c:\inetpub\wwwroot\Director) usinga text editor.
Under the <system.webServer> parent element, add the following snippet as the first child ele‑ment:
1 <defaultDocument>2 <files>3 <add value="LogOn.aspx"/>4 </files>5 </defaultDocument>
Active Directory configuration
By default, Director application runs with the Application Pool identity property. Smart card authen‑tication requires delegation for which the Director application identitymust have Trusted Computing
© 1999–2022 Citrix Systems, Inc. All rights reserved. 870

Citrix Virtual Apps and Desktops
Base (TCB) privileges on the service host.
Citrix recommends that, you create a separate service account for Application Pool identity. Createthe service account and assign TCB privileges as per the instructions in the MSDN Microsoft article,Protocol Transition with Constrained Delegation Technical Supplement.
Assign the newly created service account to the Director application pool. The following figure showsthe properties dialog of a sample service account, Domain Pool.
Configure the following services for this account:
• Delivery Controller: HOST, HTTP• Director: HOST, HTTP• Active Directory: GC, LDAP
To configure,
1. In the user account properties dialog, click Add.
2. In the Add Services dialog, click Users or Computers.
3. Select the Delivery Controller host name.
4. From the Available services list, select HOST and HTTP Service Type.
© 1999–2022 Citrix Systems, Inc. All rights reserved. 871

Citrix Virtual Apps and Desktops
Similarly, add Service Types for Director and Active Directory hosts.
Firefox browser configuration
To use the Firefox browser, install the PIV driver available at OpenSC 0.17.0. For installation and con‑figuration instructions, see Installing OpenSC PKCS#11 Module in Firefox, Step by Step.For information on the usage of the smart card authentication feature in Director, see theUseDirectorwith PIV based smart card authentication section in the Director article.
Configure network analysis
April 14, 2021
Note:The availability of this feature depends on your organization’s license and your administratorpermissions.
Director integrates with Citrix ADM to provide network analysis and performancemanagement:
• Network analysis uses HDX Insight reports from Citrix ADM to provide an application and desk‑top contextual view of the network. With this feature, Director provides advanced analytics of
© 1999–2022 Citrix Systems, Inc. All rights reserved. 872
Citrix Virtual Apps and Desktops
ICA traffic in your deployment.• Performance management provides historical retention and trend reporting. With historicalretention of data versus the real‑time assessment, you can create Trend reports, including ca‑pacity and health trending.
After you enable this feature in Director, HDX Insight reports provide Director with additional informa‑tion:
• TheNetwork tab in the Trends page shows latency andbandwidth effects for applications, desk‑tops, and users across your entire deployment.
• The User Details page shows latency and bandwidth information specific to a particular usersession.
Limitations:
• In theTrends view,HDXconnection logondata is not collected for VDAs earlier than7. For earlierVDAs, the chart data is displayed as 0.
To enable network analysis, you must install and configure Citrix ADM in Director. Director requiresCitrix ADMVersion 11.1 Build 49.16 or later. MAS is a virtual appliance that run on the Citrix XenServer.Using network analysis, Director communicates and gathers the information that is related to yourdeployment.
For more information, see the Citrix ADM documentation.
Note:Citrix NetScaler Insight Center has reached its End of Maintenance date as of 15 May 2018. SeetheCitrix ProductMatrix. IntegrateDirectorwithCitrix ADM for network analysis. Tomigrate yourNetScaler Insight Center to Citrix ADM, see Migrate from NetScaler Insight Center to Citrix ADM.
1. On the server where Director is installed, locate the DirectorConfig command line toolin C:\inetpub\wwwroot\Director\tools, and run it with parameter /confignetscaler from acommand prompt.
2. Whenprompted, enter the Citrix ADMmachine name (FQDNor IP address), the user name, pass‑word, HTTPS connection type (preferred over HTTP), and choose Citrix ADM integration.
3. To verify the changes, log off and log back on.
Delegated administration and Director
April 14, 2021
Delegated administration uses three concepts: administrators, roles, and scopes. Permissions arebased on an administrator’s role and the scope of this role. For example, an administrator might be
© 1999–2022 Citrix Systems, Inc. All rights reserved. 873

Citrix Virtual Apps and Desktops
assigned a Help Desk administrator role where the scope involves responsibility for end‑users at onesite only.
For information about creating delegated administrators, see the main delegated administration ar‑ticle.
Administrative permissions determine the Director interface presented to administrators and thetasks they can perform. Permissions determine:
• The views the administrator can access, collectively referred to as a view.• The desktops, machines, and sessions that the administrator can view and interact with.• The commands the administrator can perform, such as shadowing a user’s session or enablingmaintenance mode.
The built‑in roles and permissions also determine how administrators use Director:
Administrator Role Permissions in Director
Full Administrator Full access to all views and can perform allcommands, including shadowing a user’ssession, enabling maintenance mode, andexporting trends data.
Delivery group Administrator Full access to all views and can perform allcommands, including shadowing a user’ssession, enabling maintenance mode, andexporting trends data.
Read Only Administrator Can access all views and see all objects inspecified scopes and global information. Candownload reports from HDX channels and canexport Trends data using the Export option inthe Trends view. Cannot perform any othercommands or change anything in the views.
© 1999–2022 Citrix Systems, Inc. All rights reserved. 874
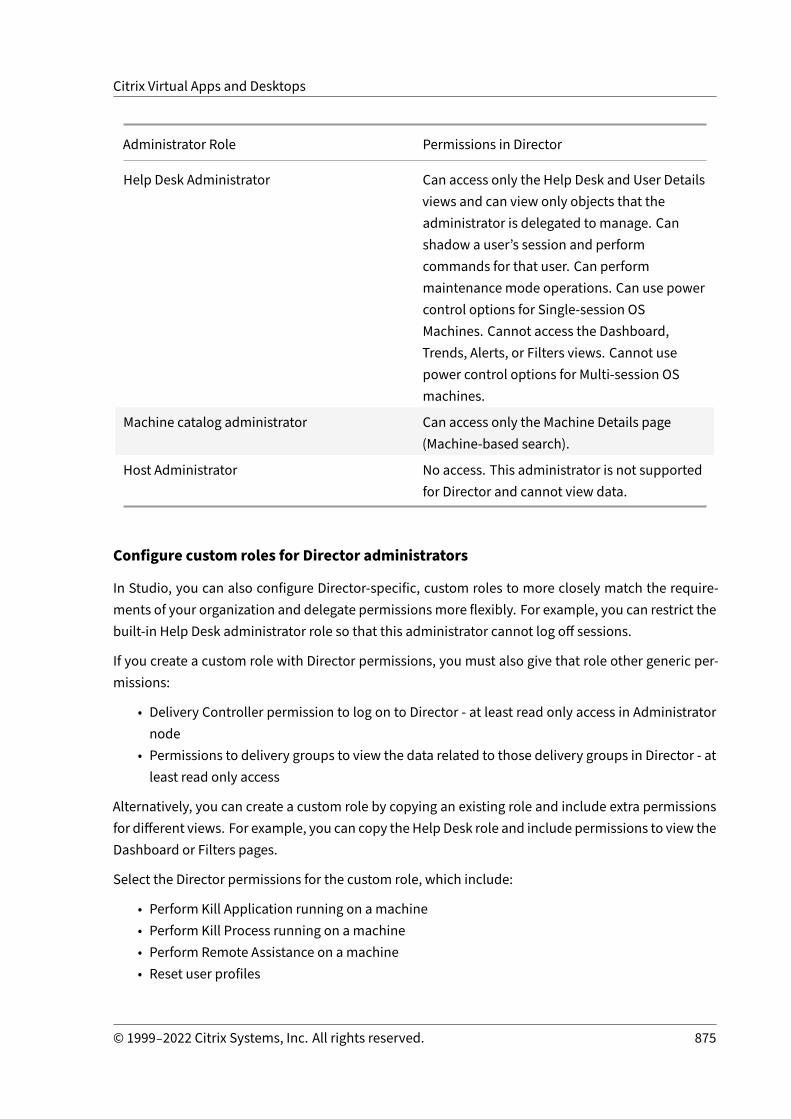
Citrix Virtual Apps and Desktops
Administrator Role Permissions in Director
Help Desk Administrator Can access only the Help Desk and User Detailsviews and can view only objects that theadministrator is delegated to manage. Canshadow a user’s session and performcommands for that user. Can performmaintenance mode operations. Can use powercontrol options for Single‑session OSMachines. Cannot access the Dashboard,Trends, Alerts, or Filters views. Cannot usepower control options for Multi‑session OSmachines.
Machine catalog administrator Can access only the Machine Details page(Machine‑based search).
Host Administrator No access. This administrator is not supportedfor Director and cannot view data.
Configure custom roles for Director administrators
In Studio, you can also configure Director‑specific, custom roles to more closely match the require‑ments of your organization and delegate permissionsmore flexibly. For example, you can restrict thebuilt‑in Help Desk administrator role so that this administrator cannot log off sessions.
If you create a custom role with Director permissions, you must also give that role other generic per‑missions:
• Delivery Controller permission to log on to Director ‑ at least read only access in Administratornode
• Permissions to delivery groups to view the data related to those delivery groups in Director ‑ atleast read only access
Alternatively, you can create a custom role by copying an existing role and include extra permissionsfor different views. For example, you can copy the Help Desk role and include permissions to view theDashboard or Filters pages.
Select the Director permissions for the custom role, which include:
• Perform Kill Application running on amachine• Perform Kill Process running on amachine• Perform Remote Assistance on amachine• Reset user profiles
© 1999–2022 Citrix Systems, Inc. All rights reserved. 875
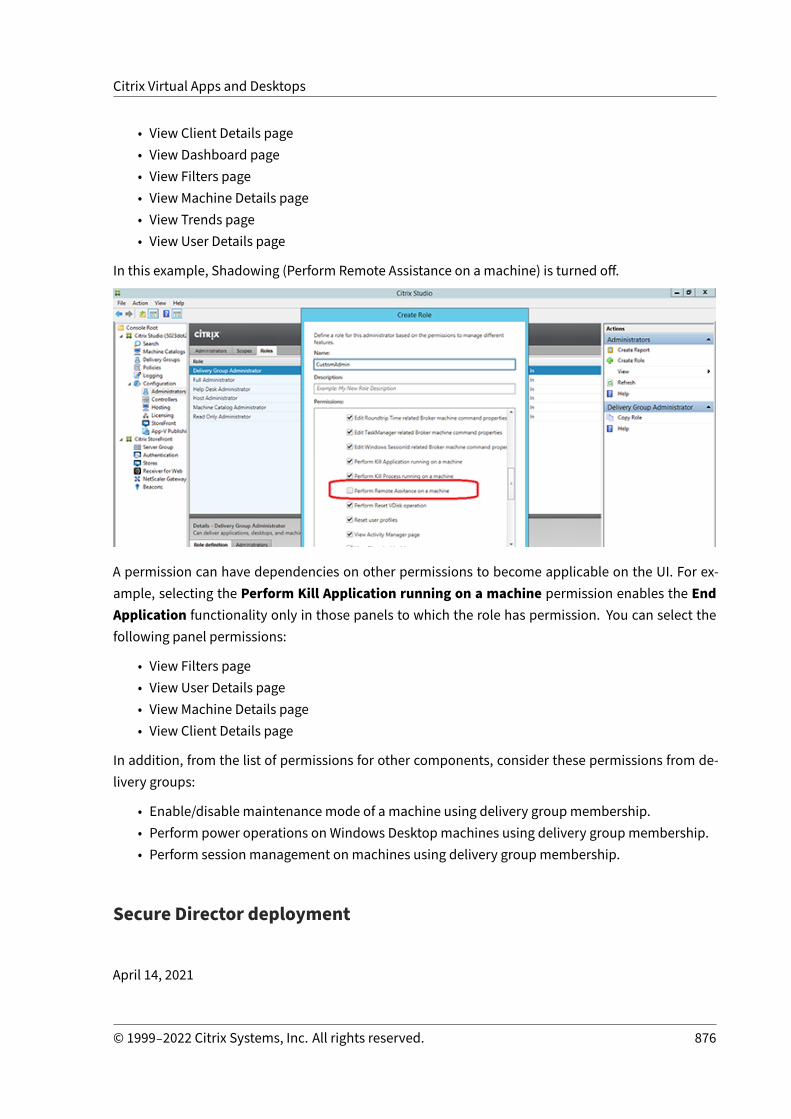
Citrix Virtual Apps and Desktops
• View Client Details page• View Dashboard page• View Filters page• View Machine Details page• View Trends page• View User Details page
In this example, Shadowing (Perform Remote Assistance on amachine) is turned off.
A permission can have dependencies on other permissions to become applicable on the UI. For ex‑ample, selecting the Perform Kill Application running on a machine permission enables the EndApplication functionality only in those panels to which the role has permission. You can select thefollowing panel permissions:
• View Filters page• View User Details page• View Machine Details page• View Client Details page
In addition, from the list of permissions for other components, consider these permissions from de‑livery groups:
• Enable/disable maintenance mode of a machine using delivery groupmembership.• Perform power operations on Windows Desktopmachines using delivery groupmembership.• Perform session management onmachines using delivery groupmembership.
Secure Director deployment
April 14, 2021
© 1999–2022 Citrix Systems, Inc. All rights reserved. 876
Citrix Virtual Apps and Desktops
This article highlights areas that might have an impact on system security when deploying and con‑figuring Director.
Configure Microsoft Internet Information Services (IIS)
You can configure Director with a restricted IIS configuration.
File name extensions
You can disallow unlisted file name extensions.
Director requires these file name extensions in Request Filtering:
• .aspx• .css• .html• .js• .png• .svc• .png• .json• .woff• .woff2• .ttf
Director requires the following HTTP verbs in Request Filtering. You can disallow unlisted verbs.
• GET• POST• HEAD
Director does not require:
• ISAPI filters• ISAPI extensions• CGI programs• FastCGI programs
Important:
• Director requires Full Trust. Do not set the global .NET trust level to High or lower.• Director maintains a separate application pool. To modify the Director settings, select theDirector site andmodify.
© 1999–2022 Citrix Systems, Inc. All rights reserved. 877

Citrix Virtual Apps and Desktops
Configure user rights
When Director is installed, its application pools are granted the following:
• Log on as a service logon right• Adjustmemory quotas for a process,Generate security audits, andReplace a process leveltoken privileges
The rights and privileges mentioned are normal installation behavior when application pools are cre‑ated.
You do not need to change these user rights. These privileges are not used by Director and are auto‑matically disabled.
Director communications
In a production environment, use the Internet Protocol security (IPsec) or HTTPS protocols to securethe data passing between Director and your servers.
IPsec is a set of standard extensions to the Internet Protocol that provides authenticated and en‑crypted communications with data integrity and replay protection. Since IPsec is a network‑layerprotocol set, higher level protocols can use it without modification. HTTPS uses the Transport LayerSecurity (TLS) protocols to provide strong data encryption.
Note:
• Citrix strongly recommends that you do not enable unsecured connections to Director in aproduction environment.
• Secure communications from Director require configuration for each connection sepa‑rately.
• The SSL protocol is not recommended. Use the more secure TLS protocol instead.• Secure your communications with Citrix ADC using TLS, not IPsec.
To secure communications between Director and Citrix Virtual Apps and Desktops servers (for moni‑toring and reports), refer to Data Access Security.
To secure communications between Director and Citrix ADC (for Citrix Insight), refer to Configure net‑work analysis.
To secure communications between Director and License server, refer to Secure the License Adminis‑tration Console.
Director security separation
You can deploy any web applications in the same web domain (domain name and port) as Director.However, any security risks in those web applications can potentially reduce the security of your Di‑
© 1999–2022 Citrix Systems, Inc. All rights reserved. 878
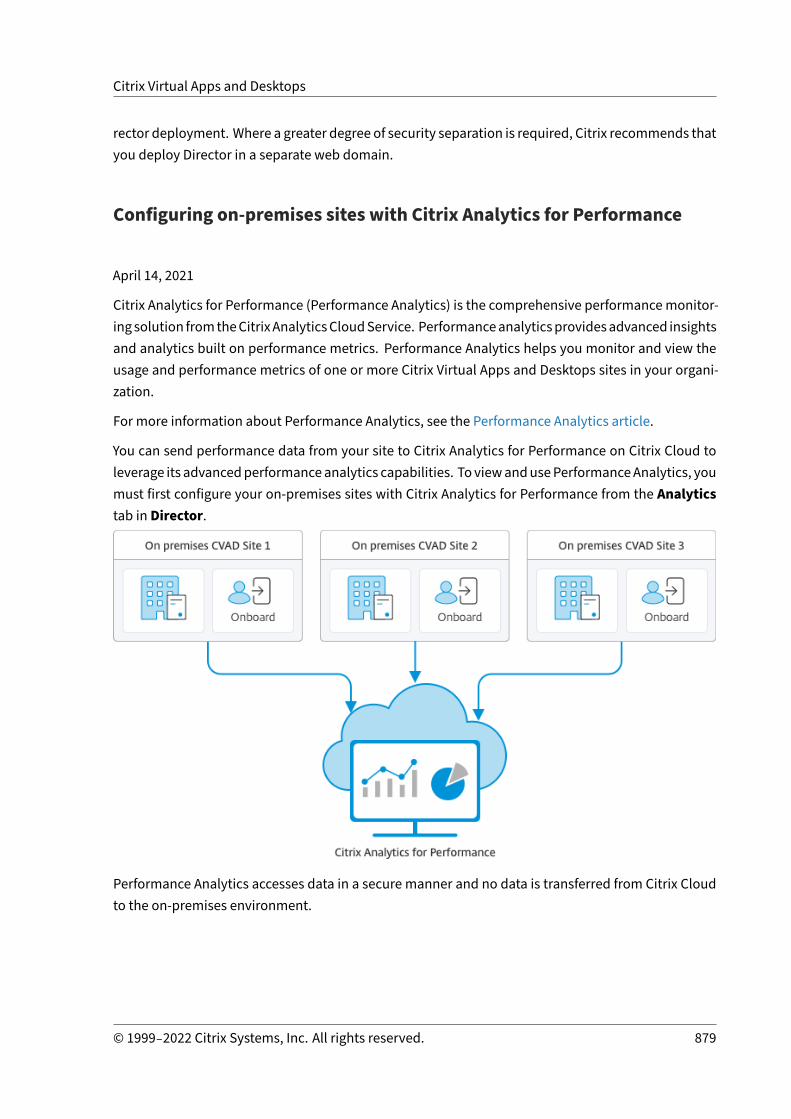
Citrix Virtual Apps and Desktops
rector deployment. Where a greater degree of security separation is required, Citrix recommends thatyou deploy Director in a separate web domain.
Configuring on‑premises sites with Citrix Analytics for Performance
April 14, 2021
Citrix Analytics for Performance (Performance Analytics) is the comprehensive performancemonitor‑ing solution fromtheCitrixAnalyticsCloudService. Performanceanalyticsprovidesadvanced insightsand analytics built on performance metrics. Performance Analytics helps you monitor and view theusage and performance metrics of one or more Citrix Virtual Apps and Desktops sites in your organi‑zation.
For more information about Performance Analytics, see the Performance Analytics article.
You can send performance data from your site to Citrix Analytics for Performance on Citrix Cloud toleverage its advancedperformanceanalytics capabilities. To viewandusePerformanceAnalytics, youmust first configure your on‑premises sites with Citrix Analytics for Performance from the Analyticstab in Director.
Performance Analytics accesses data in a secure manner and no data is transferred from Citrix Cloudto the on‑premises environment.
© 1999–2022 Citrix Systems, Inc. All rights reserved. 879

Citrix Virtual Apps and Desktops
Prerequisites
To configure Performance Analytics from Director, no new components need to be installed. Ensurethat the following requirements are met:
• You must have a subscription for Citrix Analytics for Performance. This subscription can be ei‑ther as a stand‑alone offering or bundled along with Citrix Analytics for Security. To subscribeto Citrix Analytics for Performance, see Citrix Analytics for Performance.
• Your Delivery Controller and Director are on version 1909 or later. For more information, seeFeature compatibility matrix.
• Access to theAnalytics tab toperform this configuration is available for full administrators only.
• ForPerformanceAnalytics toaccessperformancemetrics, outbound internet access is availableon all Delivery Controllers and themachines on which Director is installed. Specifically, ensureaccessibility to the following URLs:
– Citrix Key Registration: https://*.citrixnetworkapi.net/– Citrix Cloud: https://*.citrixworkspacesapi.net/– Citrix Analytics: https://*.cloud.com/– Microsoft Azure: https://*.windows.net/
Note:In case, Delivery Controllers andDirectormachines arewithin an intranet andoutbound internetaccess is via a proxy server, the usedefaultproxy field in the config file controls the outboundaccess of Director and Monitor Service.
Configuration and communication with Performance Analytics requires the usedefaultproxyfield to be set to true. Also, the proxy server must whitelist the preceding list of URLs. It is pos‑sible the policies in effect set this field to false. In this case, you must manually set the field totrue on the Director machine, in the Director web.config file. And on the Delivery Controller, inthe Citrix.Monitor.exe.config file.
Take a backup of the config files before youmake the changes. Restart theMonitoring service onthe Delivery Controller for the changes to be affected.
• You have an active Citrix Cloud entitlement for Performance Analytics.
• Your Citrix Cloud account is an Administrator account with rights to the Product RegistrationExperience. For more information about administrator permissions, see Modify AdministratorPermissions.
Configuration steps
After you have verified the prerequisites, do the following:
© 1999–2022 Citrix Systems, Inc. All rights reserved. 880

Citrix Virtual Apps and Desktops
1. Log on to Director as a full administrator and select the site which you want to configure withPerformance Analytics.
2. Click the Analytics tab. The Configuration page is displayed.
3. Review the steps, select the terms of service, and then click Get Started.
4. Review the prerequisites and ensure that they are met. Review the site Details.
5. Click Connect Site to start the configuration process.
6. A unique 8‑digit registration code is generated to be used to register this site with Citrix Cloud.
© 1999–2022 Citrix Systems, Inc. All rights reserved. 881
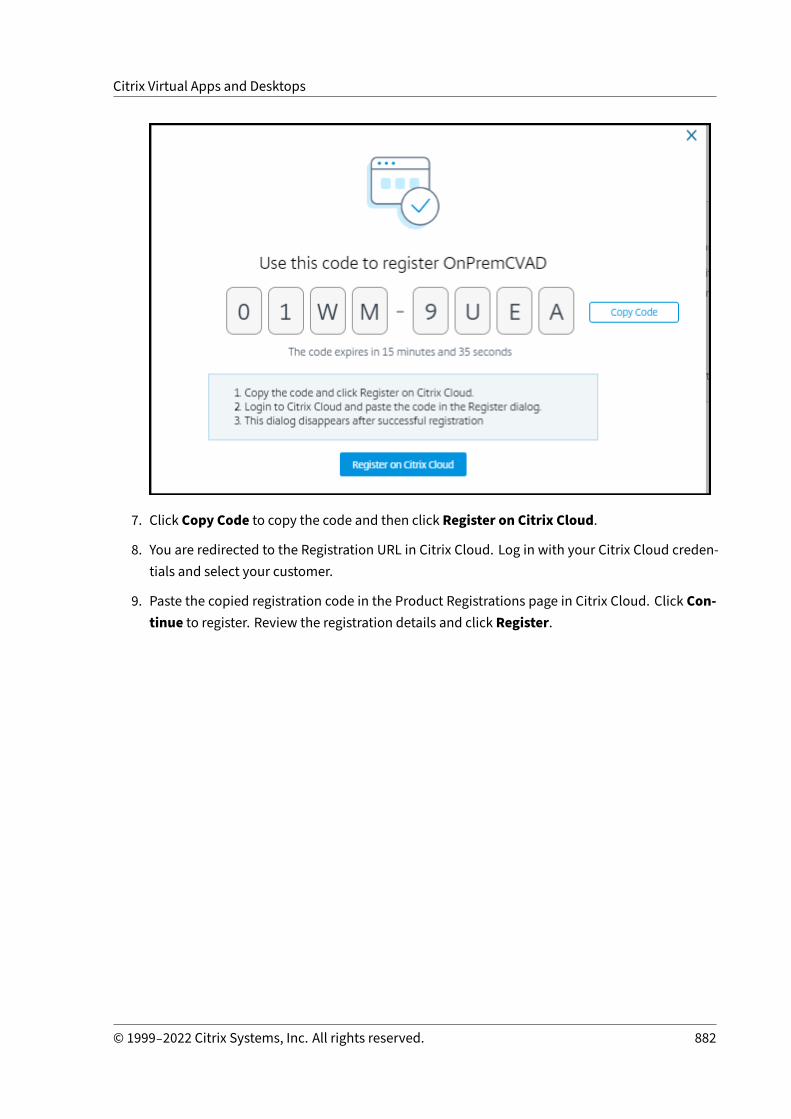
Citrix Virtual Apps and Desktops
7. Click Copy Code to copy the code and then click Register on Citrix Cloud.
8. You are redirected to the Registration URL in Citrix Cloud. Log in with your Citrix Cloud creden‑tials and select your customer.
9. Paste the copied registration code in the Product Registrations page in Citrix Cloud. Click Con‑tinue to register. Review the registration details and click Register.
© 1999–2022 Citrix Systems, Inc. All rights reserved. 882
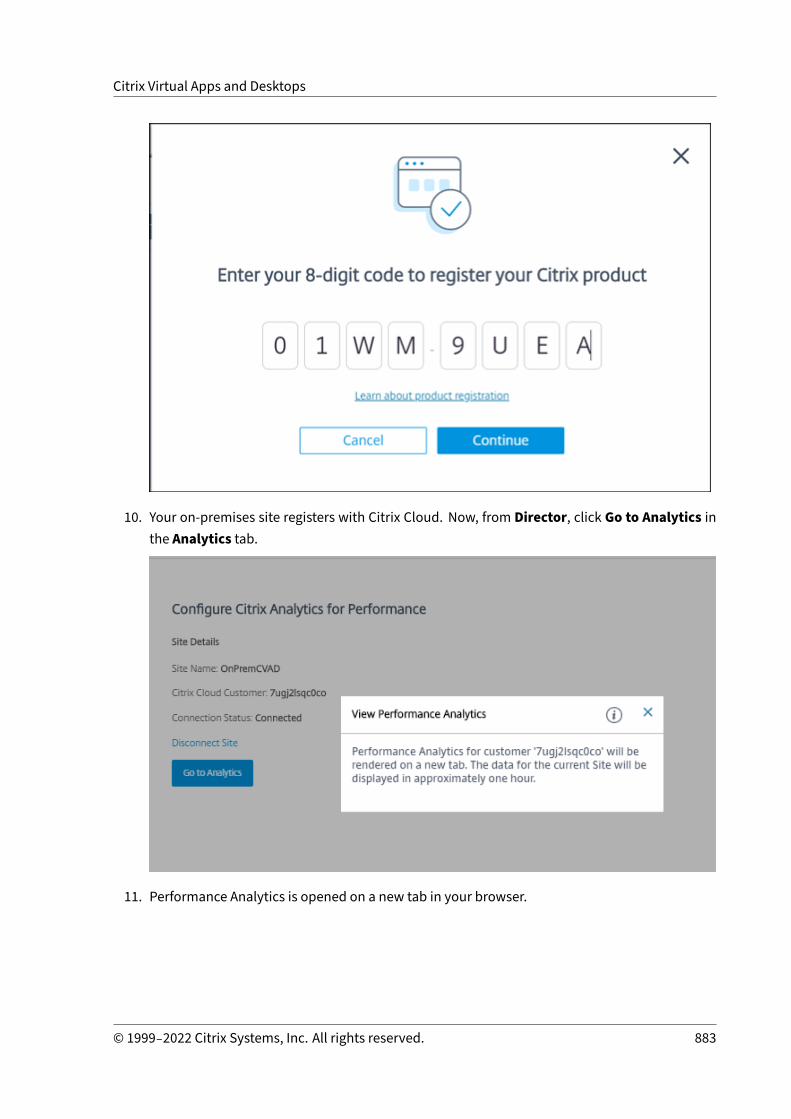
Citrix Virtual Apps and Desktops
10. Your on‑premises site registers with Citrix Cloud. Now, from Director, click Go to Analytics inthe Analytics tab.
11. Performance Analytics is opened on a new tab in your browser.
© 1999–2022 Citrix Systems, Inc. All rights reserved. 883

Citrix Virtual Apps and Desktops
If your Citrix Cloud session has expired, you might be redirected to the Citrix.com or My Citrixaccount logon page.
12. To register multiple sites with Performance Analytics, repeat the preceding configuration stepsfor each site from Director. Metrics for all configured sites are displayed on the PerformanceAnalytics dashboard.
In case youhavemore thanoneDirector instance runningper site, configure fromanyoneDirec‑tor instance. All other Director instances connected to the site are updated at the next refreshafter the configuration process.
13. Todisconnect your site fromCitrix Cloud, clickDisconnect Site. This optiondeletes the existingconfiguration.
Notes:
The first time you configure a site, events from the site might take some time (approxi‑mately an hour) to be processed; causing a delay in the display of metrics on the Perfor‑mance Analytics dashboard. Thereafter, events refresh at regular intervals.
Upon disconnect, data transmission from the old account continues for some time untilthe events from the new account are transmitted. For approximately one hour after datatransmission stops, analytics related to the old account remain displayed on the Perfor‑mance Analytics Dashboard.
Upon expiry of entitlement to the Citrix Analytics service, it takes up to a day to stop send‑ing the site metrics to Performance Analytics.
Site Analytics
April 14, 2021
© 1999–2022 Citrix Systems, Inc. All rights reserved. 884
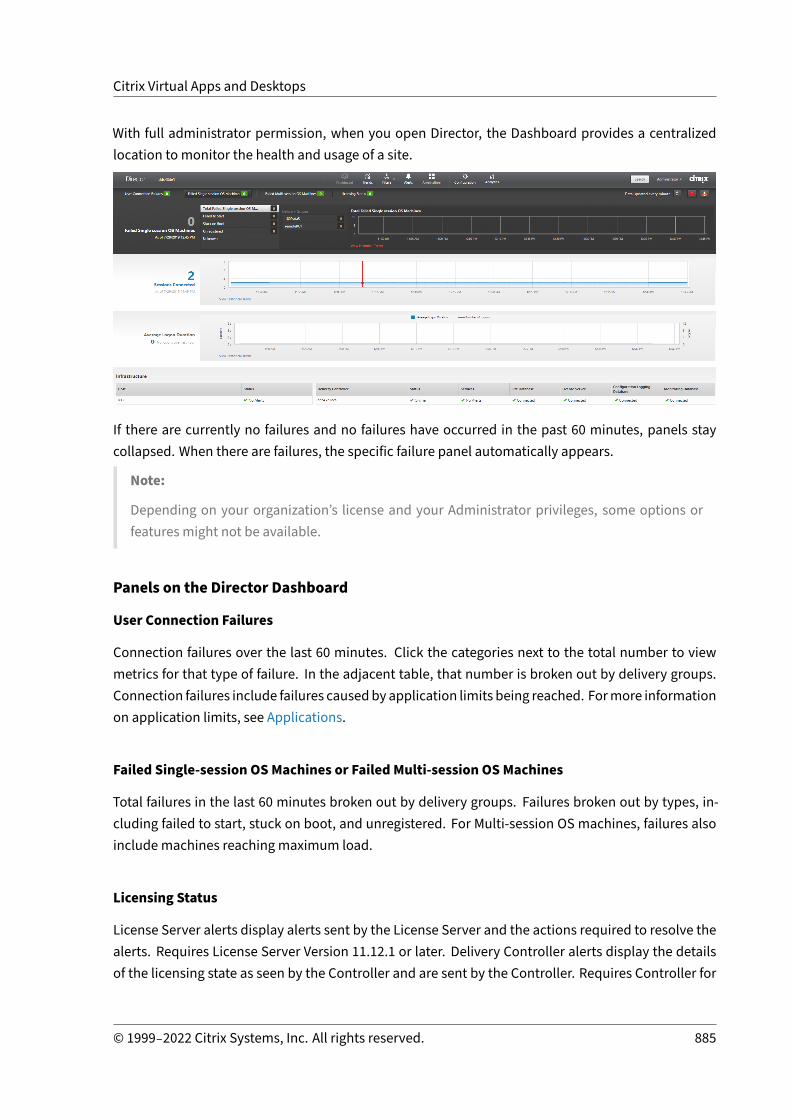
Citrix Virtual Apps and Desktops
With full administrator permission, when you open Director, the Dashboard provides a centralizedlocation to monitor the health and usage of a site.
If there are currently no failures and no failures have occurred in the past 60 minutes, panels staycollapsed. When there are failures, the specific failure panel automatically appears.
Note:
Depending on your organization’s license and your Administrator privileges, some options orfeatures might not be available.
Panels on the Director Dashboard
User Connection Failures
Connection failures over the last 60 minutes. Click the categories next to the total number to viewmetrics for that type of failure. In the adjacent table, that number is broken out by delivery groups.Connection failures include failures causedby application limits being reached. Formore informationon application limits, see Applications.
Failed Single‑session OSMachines or Failed Multi‑session OSMachines
Total failures in the last 60 minutes broken out by delivery groups. Failures broken out by types, in‑cluding failed to start, stuck on boot, and unregistered. For Multi‑session OS machines, failures alsoinclude machines reaching maximum load.
Licensing Status
License Server alerts display alerts sent by the License Server and the actions required to resolve thealerts. Requires License Server Version 11.12.1 or later. Delivery Controller alerts display the detailsof the licensing state as seen by the Controller and are sent by the Controller. Requires Controller for
© 1999–2022 Citrix Systems, Inc. All rights reserved. 885

Citrix Virtual Apps and Desktops
XenApp 7.6 or XenDesktop 7.6 or later. You can set the threshold for alerts in Studio. Licensing statusdisplayed in Delivery Controllers > Details > Product Editions > PLT indicates Premium and notPlatinum.
Grace State
Director displays one of the following grace states. This information is fetched from the Delivery Con‑troller.
1. Not Active: Not in any type of grace period. Normal licensing limits apply.
2. Out of Box Grace: 10 connections for the first 30 days after a new installation when pointing toa license server with no licenses.
3. Supplemental Grace: When all licenses are consumed, a 15 day grace period is provided forbusiness continuity until new licenses are added, or consumption is reduced. Unlimited con‑nections are allowed during the supplemental grace period. Users are not affected. Warningsshown in Director cannot be dismissed until the supplemental grace period expires or is reset.
4. EmergencyGrace: Comes intoeffectwhen the license server is unreachableor the license infor‑mation cannot be fetched while brokering a connection. Emergency grace is valid for 30 days.Users are not affected. Errors shown in Director cannot be dismissed until the license server isreachable.
5. Grace Expired: Emergency Grace or the supplemental grace period has expired.
For more information, see License overdraft and Supplemental grace period.
Sessions Connected
Connected sessions across all delivery groups for the last 60 minutes.
Average Logon Duration
Logon data for the last 60 minutes. The large number on the left is the average logon duration acrossthe hour. Logon data for VDAs earlier than XenDesktop 7.0 is not included in this average. For moreinformation, see Diagnose user logon issues.
Infrastructure
Lists your site’s infrastructure ‑ hosts and Controllers. For infrastructure from Citrix Hypervisor orVMware, you can view performance alerts. For example, you can configure XenCenter to generate per‑formance alerts when CPU, network I/O, or disk I/O usage go over a specified threshold on amanagedserver or virtual machine. By default, the alert repeat interval is 60 minutes, but you can configure
© 1999–2022 Citrix Systems, Inc. All rights reserved. 886

Citrix Virtual Apps and Desktops
this as well. For details, see the XenCenter Performance Alerts section in the Citrix Hypervisor prod‑uct documentation.
Note:
If no icon appears for a particular metric, this indicates that this metric is not supported by thetype of host you are using. For example, no health information is available for System CenterVirtual Machine Manager (SCVMM) hosts, AWS and CloudStack.
Continue to troubleshoot issues using these options (which are documented in the following sec‑tions):
• Control user machine power
• Prevent connections to machines
Monitor sessions
If a session becomes disconnected, it is still active and its applications continue to run, but the userdevice is no longer communicating with the server.
Action Description
View a user’s currently connectedmachine orsession
From the Activity Manager and User Detailsviews, view the user’s currently connectedmachine or session and a list of all machinesand sessions to which this user has access. Toaccess this list, click the session switcher iconin the user title bar. For more information, seeRestore sessions.
View the total number of connected sessionsacross all delivery groups
From the Dashboard, in the SessionsConnected pane, view the total number ofconnected sessions across all delivery groupsfor the last 60 minutes. Then click the largetotal number, which opens the Filters view,where you can display graphical session databased on selected delivery groups and rangesand usage across delivery groups.
© 1999–2022 Citrix Systems, Inc. All rights reserved. 887

Citrix Virtual Apps and Desktops
Action Description
End idle sessions The Sessions Filters view displays data relatedto all active sessions. Filter the sessions basedon Associated User, delivery group, SessionState, and Idle Time greater than a thresholdtime period. From the filtered list, selectsessions to log off or disconnect. For moreinformation, see Troubleshoot applications.
View data over a longer period of time On the Trends view, select the Sessions tab todrill down tomore specific usage data forconnected and disconnected sessions over alonger period of time (that is, session totalsfrom earlier than the last 60 minutes). To viewthis information, click View historical trends.
Note:
If the user device is running a legacy Virtual Delivery Agent (VDA), such as a VDA earlier than ver‑sion 7, or a Linux VDA, Director cannot display complete information about the session. Instead,it displays a message that the information is not available.
Desktop Assignment Rules limitation:Citrix Studio allows assignment ofmultipleDesktopAssignmentRules (DAR) for different users or usergroups to a single VDA in the delivery group. StoreFront displays the assigned desktop with the cor‑responding Display Name as per the DAR for the logged in user. However, Director does not supportDARs and displays the assigned desktop using the delivery group name regardless of the logged inuser. As a result, you cannot map a specific desktop to a machine in Director.You can map the assigned desktop displayed in StoreFront to the delivery group name displayed inDirector using the following PowerShell command:
1 Get-BrokerDesktopGroup | Where-Object {2 $\_.Uid -eq (Get-BrokerAssignmentPolicyRule | Where-Object {3 $\_.PublishedName -eq "\<Name on StoreFront\>" }4 ).DesktopGroupUid }5 | Select-Object -Property Name, Uid
Session transport protocol
View the transport protocol in use for the HDX connection type for the current session in the SessionDetails panel. This information is available for sessions launched on VDAs Version 7.13 or later.
© 1999–2022 Citrix Systems, Inc. All rights reserved. 888
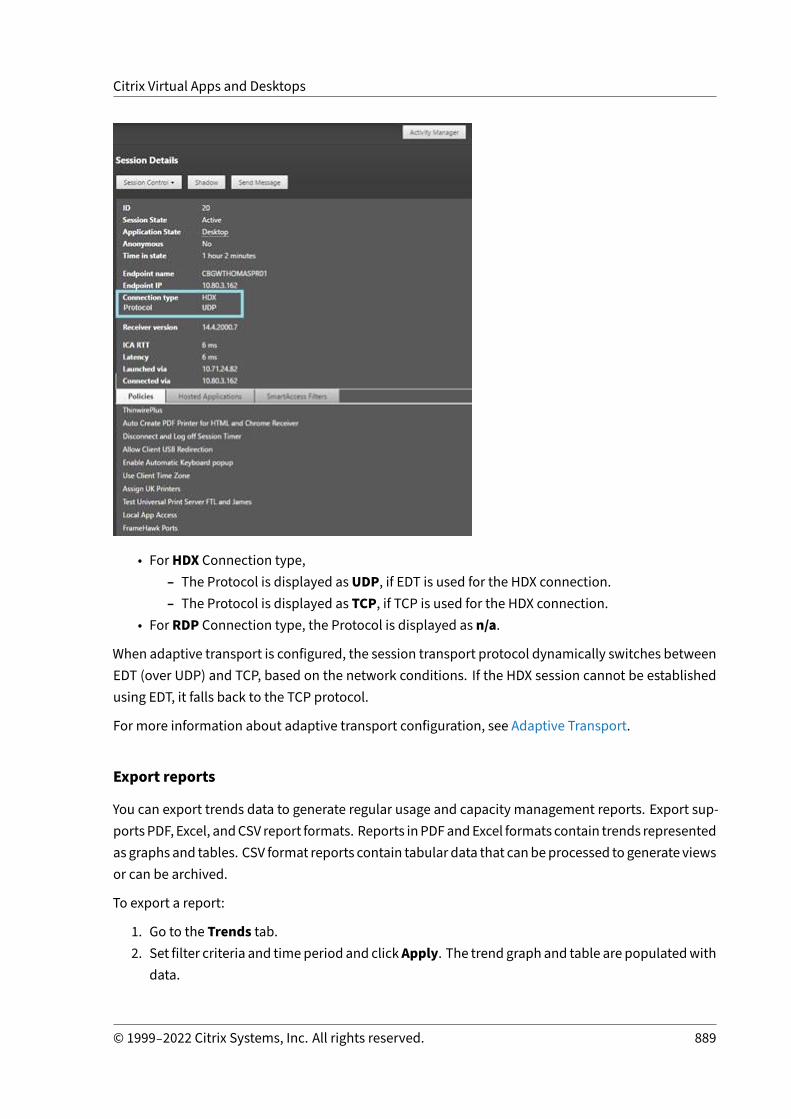
Citrix Virtual Apps and Desktops
• ForHDX Connection type,– The Protocol is displayed asUDP, if EDT is used for the HDX connection.– The Protocol is displayed as TCP, if TCP is used for the HDX connection.
• For RDP Connection type, the Protocol is displayed as n/a.
When adaptive transport is configured, the session transport protocol dynamically switches betweenEDT (over UDP) and TCP, based on the network conditions. If the HDX session cannot be establishedusing EDT, it falls back to the TCP protocol.
For more information about adaptive transport configuration, see Adaptive Transport.
Export reports
You can export trends data to generate regular usage and capacity management reports. Export sup‑portsPDF, Excel, andCSV report formats. Reports inPDFandExcel formats contain trends representedas graphs and tables. CSV format reports contain tabular data that canbeprocessed to generate viewsor can be archived.
To export a report:
1. Go to the Trends tab.2. Set filter criteria and timeperiod and clickApply. The trend graph and table are populatedwith
data.
© 1999–2022 Citrix Systems, Inc. All rights reserved. 889
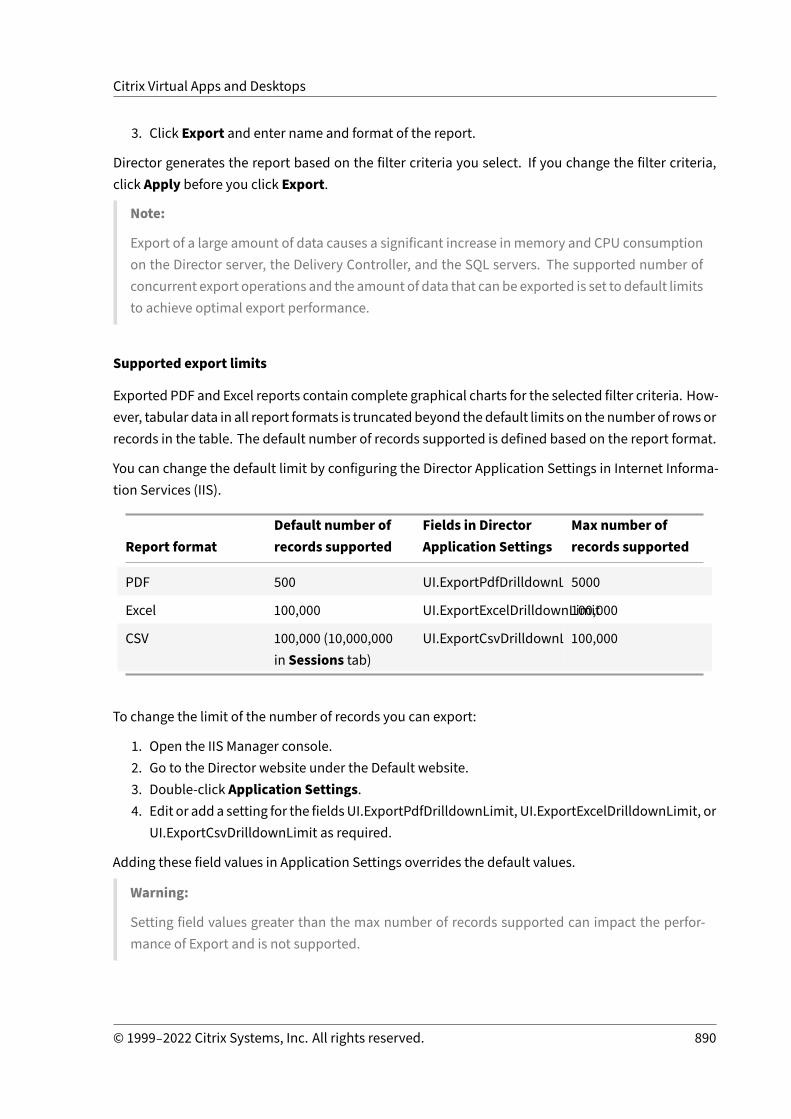
Citrix Virtual Apps and Desktops
3. Click Export and enter name and format of the report.
Director generates the report based on the filter criteria you select. If you change the filter criteria,click Apply before you click Export.
Note:
Export of a large amount of data causes a significant increase in memory and CPU consumptionon the Director server, the Delivery Controller, and the SQL servers. The supported number ofconcurrent export operations and the amount of data that can be exported is set to default limitsto achieve optimal export performance.
Supported export limits
Exported PDF and Excel reports contain complete graphical charts for the selected filter criteria. How‑ever, tabular data in all report formats is truncated beyond the default limits on the number of rows orrecords in the table. The default number of records supported is defined based on the report format.
You can change the default limit by configuring the Director Application Settings in Internet Informa‑tion Services (IIS).
Report formatDefault number ofrecords supported
Fields in DirectorApplication Settings
Max number ofrecords supported
PDF 500 UI.ExportPdfDrilldownLimit5000
Excel 100,000 UI.ExportExcelDrilldownLimit100,000
CSV 100,000 (10,000,000in Sessions tab)
UI.ExportCsvDrilldownLimit100,000
To change the limit of the number of records you can export:
1. Open the IIS Manager console.2. Go to the Director website under the Default website.3. Double‑click Application Settings.4. Edit or add a setting for the fieldsUI.ExportPdfDrilldownLimit, UI.ExportExcelDrilldownLimit, or
UI.ExportCsvDrilldownLimit as required.
Adding these field values in Application Settings overrides the default values.
Warning:
Setting field values greater than the max number of records supported can impact the perfor‑mance of Export and is not supported.
© 1999–2022 Citrix Systems, Inc. All rights reserved. 890

Citrix Virtual Apps and Desktops
Error Handling
This section gives you information on dealing with errors that you might encounter during Exportoperation.
• Director has timed out
This error can occur due to network issues or high resource usage on the Director server or with theMonitor Service.
The default timeout duration is 100 seconds. To increase the timeout duration of the Director Ser‑vice, set the value of Connector.DataServiceContext.Timeout field in Director Application Settingsin Internet Information Services (IIS):
1. Open the IIS Manager console.
2. Go to the Director website under the Default website.
3. Double‑click Application Settings.
4. Edit the value Connector.DataServiceContext.Timeout.
• Monitor has timed out
This error can occur due to network issues or high resource usage with the Monitor Service or on theSQL server.
To increase the timeout duration of the Monitor Service, run the following PowerShell commands onthe Delivery Controller:
1 asnp Citrix.*2 Get-MonitorConfiguration3 Set-MonitorConfiguration -MonitorQueryTimeoutSeconds <timeout value>
• Max concurrent Export or Preview operations ongoing
Director supportsone instanceof Export orPreview. If youget theMaxconcurrentExportorPreviewoperations ongoing error, try the next Export operation again later.
It is possible to increase the number of concurrent Export or Preview operations, however this canimpact the performance of Director and is not supported:
1. Open the IIS Manager console.
2. Go to the Director website under the Default website.
3. Double‑click Application Settings.
4. Edit the valueUI.ConcurrentExportLimit.
• Insufficient disk space in Director
© 1999–2022 Citrix Systems, Inc. All rights reserved. 891

Citrix Virtual Apps and Desktops
Each Export operation requires amaximumof 2GBharddisk space in theWindowsTemp folder. RetryExport after clearing space or adding more hard disk space on the Director server.
Monitor hotfixes
To view the hotfixes installed on a specificmachine VDA (physical or VM), choose theMachine Detailsview.
Control user machine power states
To control the state of themachines that you select in Director, use the Power Control options. Theseoptions are available for Single‑session OSmachines, but might not be available for Multi‑session OSmachines.
Note:
This functionality is not available for physical machines or machines using Remote PC Access.
Command Function
Restart Performs an orderly (soft) shutdown of the VMand all running processes are haltedindividually before restarting the VM. Forexample, select machines that appear inDirector as “failed to start,” and use thiscommand to restart them.
Force Restart Restarts the VM without first performing anyshut‑down procedure. This command works inthe same way as unplugging a physical serverand then plugging it back in and turning it backon.
Shut Down Performs an orderly (soft) shutdown of the VM.All running processes are halted individually.
Force Shutdown Shuts down the VMwithout first performingany shut‑down procedure. This commandworks in the same way as unplugging aphysical server. It might not always shut downall running processes, and you risk losing dataif you shut down a VM in this way.
© 1999–2022 Citrix Systems, Inc. All rights reserved. 892

Citrix Virtual Apps and Desktops
Command Function
Suspend Suspends a running VM in its current state andstores that state in a file on the default storagerepository. This option allows you to shutdown the VM’s host server and later, afterrebooting it, resume the VM, returning it to itsoriginal running state.
Resume Resumes a suspended VM and restores itsoriginal running state.
Start Starts a VM when it is off (also called a coldstart).
If power control actions fail, hover the mouse over the alert, and a pop‑up message appears withdetails about the failure.
Prevent connections tomachines
Usemaintenancemode to prevent new connections temporarily while the appropriate administratorperformsmaintenance tasks on the image.
When you enablemaintenancemode onmachines, no new connections are allowed until you disableit. If users are currently logged on, maintenancemode takes effect as soon as all users are logged off.For users who do not log off, send a message informing them that machines will be shut down at acertain time, and use the power controls to force the machines to shut down.
1. Select the machine, such as from the User Details view, or a group of machines in the Filtersview.
2. SelectMaintenance Mode, and turn on the option.
If a user tries to connect to an assigned desktop while it is in maintenance mode, a message appearsindicating that the desktop is unavailable. No new connections can be made until you disable main‑tenance mode.
Application Analytics
The Applications tab displays application‑based analytics in a single, consolidated view to help an‑alyze and manage application performance efficiently. You can gain valuable insight into the healthand usage information of all applications published on the site. It shows metrics such as the probe
© 1999–2022 Citrix Systems, Inc. All rights reserved. 893

Citrix Virtual Apps and Desktops
results, number of instances per application, and faults and errors associated with the published ap‑plications. For more information, see the Application Analytics section in Troubleshooting Applica‑tions.
Alerts and notifications
April 14, 2021
Alerts are displayed in Director on the dashboard and other high level views with warning and criticalalert symbols. Alerts are available for Premium licensed sites. Alerts update automatically everyminute; you can also update alerts on demand.
Awarning alert (amber triangle) indicates that thewarning threshold of a condition has been reachedor exceeded.
A critical alert (red circle) shows that the critical threshold of a condition has been reached or ex‑ceeded.
You can view more detailed information on alerts by selecting an alert from the sidebar, clicking theGo to Alerts link at the bottom of the sidebar or by selecting Alerts from the top of the Director page.
In the Alerts view, you can filter and export alerts. For example, Failed Multi‑session OSmachines fora specific Delivery Group over the last month, or all alerts for a specific user. For more information,see Export reports.
© 1999–2022 Citrix Systems, Inc. All rights reserved. 894

Citrix Virtual Apps and Desktops
Citrix alerts
Citrix alerts are alertsmonitored in Director that originate from Citrix components. You can configureCitrix alerts within Director in Alerts > Citrix Alerts Policy. As part of the configuration, you can setnotifications tobe sent by email to individuals andgroupswhenalerts exceed the thresholds youhaveset up. For more information on setting up Citrix Alerts, see Create alerts policies.
Smart alert policies
A set of built‑in alert policies with predefined threshold values is available for Delivery Groups andMulti‑session OS VDA scope. This feature requires Delivery Controller(s) version 7.18 or later. You canmodify the threshold parameters of the built‑in alert policies in Alerts > Citrix Alerts Policy.Thesepolicies are createdwhen there is at leastonealert target ‑aDeliveryGrouporaMulti‑sessionOSVDA defined in your site. Additionally, these built‑in alerts are automatically added to a new deliverygroup or a Multi‑session OS VDA.
In case you upgrade Director and your site, the alert policies from your previous Director instance arecarried over. Built‑in alert policies are created only if no corresponding alert rules exist in the Monitordatabase.
For the threshold values of the built‑in alert policies, see the Alerts policies conditions section.
© 1999–2022 Citrix Systems, Inc. All rights reserved. 895

Citrix Virtual Apps and Desktops
SCOM alerts
SCOMalerts display alert information fromMicrosoftSystemCenter 2012OperationsManager (SCOM)to provide a more comprehensive indication of data center health and performance within Director.For more information, see the Configure SCOM alerts integration section.
The number of alerts displayed next to the alerts icons before you expand the sidebar are the com‑bined sum of Citrix and SCOM alerts.
Create alerts policies
© 1999–2022 Citrix Systems, Inc. All rights reserved. 896
Citrix Virtual Apps and Desktops
To create a new alerts policy, for example, to generate an alert when a specific set of session countcriteria is met:
1. Go to Alerts > Citrix Alerts Policy and select, for example, Multi‑session OS Policy.2. Click Create.3. Nameanddescribe the policy, then set the conditions that have to bemet for the alert to be trig‑
gered. For example, specify Warning and Critical counts for Peak Connected Sessions, Peak Dis‑connected Sessions, and Peak Concurrent Total Sessions. Warning values must not be greaterthan Critical values. For more information, see Alerts policies conditions.
4. Set the Re‑alert interval. If the conditions for the alert are stillmet, the alert is triggered again atthis time interval and, if set up in the alert policy, an email notification is generated. A dismissedalert does not generate an email notification at the re‑alert interval.
5. Set the Scope. For example, set for a specific Delivery Group.6. In Notification preferences, specify who should be notified by email when the alert is triggered.
You have to specify an email server on the Email Server Configuration tab in order to set emailNotification preferences in Alerts Policies.
7. Click Save.
Creating a policy with 20 or more Delivery Groups defined in the Scope might take approximately 30seconds to complete the configuration. A spinner is displayed during this time.
Creating more than 50 policies for up to 20 unique Delivery Groups (1000 Delivery Group targets intotal) might result in an increase in response time (over 5 seconds).
Moving a machine containing active sessions from one Delivery Group to another might trigger erro‑neous Delivery Group alerts that are defined using machine parameters.
Alerts policies conditions
Find below the alert categories, recommended actions tomitigate the alert, and built‑in policy condi‑tions if defined. The built‑in alert policies are defined for alert and realert intervals of 60 minutes.
Peak Connected Sessions
• Check Director Session Trends view for peak connected sessions.• Check to ensure that there is enough capacity to accommodate the session load.• Add newmachines if needed
Peak Disconnected Sessions
• Check Director Session Trends view for peak disconnected sessions.• Check to ensure that there is enough capacity to accommodate session load.
© 1999–2022 Citrix Systems, Inc. All rights reserved. 897

Citrix Virtual Apps and Desktops
• Add newmachines if needed.• Log off disconnected sessions if needed
Peak Concurrent Total Sessions
• Check Director Session Trends view in Director for peak concurrent sessions.• Check to ensure that there is enough capacity to accommodate session load.• Add newmachines if needed.• Log off disconnected sessions if needed
CPU
Percentage of CPU usage indicates the overall CPU consumption on the VDA, including that of theprocesses. You cangetmore insight into theCPUutilizationby individual processes from theMachinedetails page of the corresponding VDA.
• Go toMachineDetails >ViewHistoricalUtilization>Top10Processes, identify theprocessesconsuming CPU. Ensure that process monitoring policy is enabled to initiate collection of pro‑cess level resource usage statistics.
• End the process if necessary.
• Ending the process causes unsaved data to be lost.
• If all is working as expected, add additional CPU resources in the future.
Note:
The policy setting, Enable resource monitoring is allowed by default for the monitoringof CPU andmemory performance counters onmachines with VDAs. If this policy setting isdisabled, alertswith CPUandmemory conditions are not triggered. Formore information,see Monitoring policy settings
Smart policy conditions:
– Scope: Delivery Group, Multi‑session OS scope– Threshold values: Warning ‑ 80%, Critical ‑ 90%
Memory
Percentage of Memory usage indicates the overall memory consumption on the VDA, including thatof the processes. You can get more insight into the memory usage by individual processes from theMachine details page of the corresponding VDA.
© 1999–2022 Citrix Systems, Inc. All rights reserved. 898

Citrix Virtual Apps and Desktops
• Go toMachineDetails >ViewHistoricalUtilization>Top10Processes, identify theprocessesconsuming memory. Ensure that process monitoring policy is enabled to initiate collection ofprocess level resource usage statistics.
• End the process if necessary.
• Ending the process causes unsaved data to be lost.
• If all is working as expected, add additional memory in the future.
Note:
The policy setting, Enable resourcemonitoring, is allowed by default for the monitoringof CPU andmemory performance counters onmachines with VDAs. If this policy setting isdisabled, alertswith CPUandmemory conditions are not triggered. Formore information,see Monitoring policy settings
Smart policy conditions:
– Scope: Delivery Group, Multi‑session OS scope– Threshold values: Warning ‑ 80%, Critical ‑ 90%
Connection Failure Rate
Percentage of connection failures over the last hour.
• Calculated based on the total failures to total connections attempted.• Check Director Connection Failures Trends view for events logged from the Configuration log.• Determine if applications or desktops are reachable.
Connection Failure Count
Number of connection failures over the last hour.
• Check Director Connection Failures Trends view for events logged from the Configuration log.• Determine if applications or desktops are reachable.
ICA RTT (Average)
Average ICA round‑trip time.
• Check Citrix ADM for a breakdown of the ICA RTT to determine the root cause. For more infor‑mation, see Citrix ADM documentation.
• If Citrix ADM is not available, check the Director User Details view for the ICA RTT and Latency,and determine if it is a network problem or an issue with applications or desktops.
© 1999–2022 Citrix Systems, Inc. All rights reserved. 899

Citrix Virtual Apps and Desktops
ICA RTT (No. of Sessions)
Number of sessions that exceed the threshold ICA round‑trip time.
• Check Citrix ADM for the number of sessions with high ICA RTT. Formore information, see CitrixADM documentation.
• If Citrix ADM is not available, work with the network team to determine the root cause.
Smart policy conditions:
– Scope: Delivery Group, Multi‑session OS scope– Threshold values: Warning ‑ 300ms for 5 ormore sessions, Critical ‑ 400ms for 10 ormoresessions
ICA RTT (% of Sessions)
Percentage of sessions that exceed the average ICA round‑trip time.
• Check Citrix ADM for the number of sessions with high ICA RTT. Formore information, see CitrixADM documentation.
• If Citrix ADM is not available, work with the network team to determine the root cause.
ICA RTT (User)
ICA round‑trip time that is applied to sessions launched by the specified user. The alert is triggered ifICA RTT is greater than the threshold in at least one session.
Failed Machines (Single‑session OS)
Number of failed Single‑session OSmachines. Failures can occur for various reasons as shown in theDirector Dashboard and Filters views.
• Run Citrix Scout diagnostics to determine the root cause. For more information, see Trou‑bleshoot user issues.
Smart policy conditions:
– Scope: Delivery Group scope– Threshold values: Warning ‑ 1, Critical ‑ 2
Failed Machines (Multi‑session OS)
Number of failed Multi‑session OS machines. Failures can occur for various reasons as shown in theDirector Dashboard and Filters views.
© 1999–2022 Citrix Systems, Inc. All rights reserved. 900

Citrix Virtual Apps and Desktops
• Run Citrix Scout diagnostics to determine the root cause.
Smart policy conditions:
– Scope: Delivery Group, Multi‑session OS scope– Threshold values: Warning ‑ 1, Critical ‑ 2
Average Logon Duration
Average logon duration for logons that occurred over the last hour.
• Check the Director Dashboard to get up‑to‑date metrics regarding the logon duration. A largenumber of users logging in during a short timeframe can increase the logon duration.
• Check the baseline and break down of the logons to narrow down the cause. Formore informa‑tion, see Diagnose user logon issues
Smart policy conditions:
– Scope: Delivery Group, Multi‑session OS scope– Threshold values: Warning ‑ 45 seconds, Critical ‑ 60 seconds
Logon Duration (User)
Logon duration for logons for the specified user that occurred over the last hour.
Load Evaluator Index
Value of the Load Evaluator Index over the last 5 minutes.
• CheckDirector forMulti‑sessionOSMachines thatmight have apeak load (Max load). ViewbothDashboard (failures) and Trends Load Evaluator Index report.
Smart policy conditions:
– Scope: Delivery Group, Multi‑session OS scope– Threshold values: Warning ‑ 80%, Critical ‑ 90%
Hypervisor Alerts Monitoring
Director displays alerts to monitor hypervisor health. Alerts from Citrix Hypervisor and VMwarevSphere help monitor hypervisor parameters and states. The connection status to the hypervisor isalso monitored to provide an alert if the cluster or pool of hosts is rebooted or unavailable.
To receive hypervisor alerts, ensure that a hosting connection is created in Citrix Studio. For moreinformation, see Connections and resources. Only these connections are monitored for hypervisoralerts. The following table describes the various parameters and states of Hypervisor alerts.
© 1999–2022 Citrix Systems, Inc. All rights reserved. 901
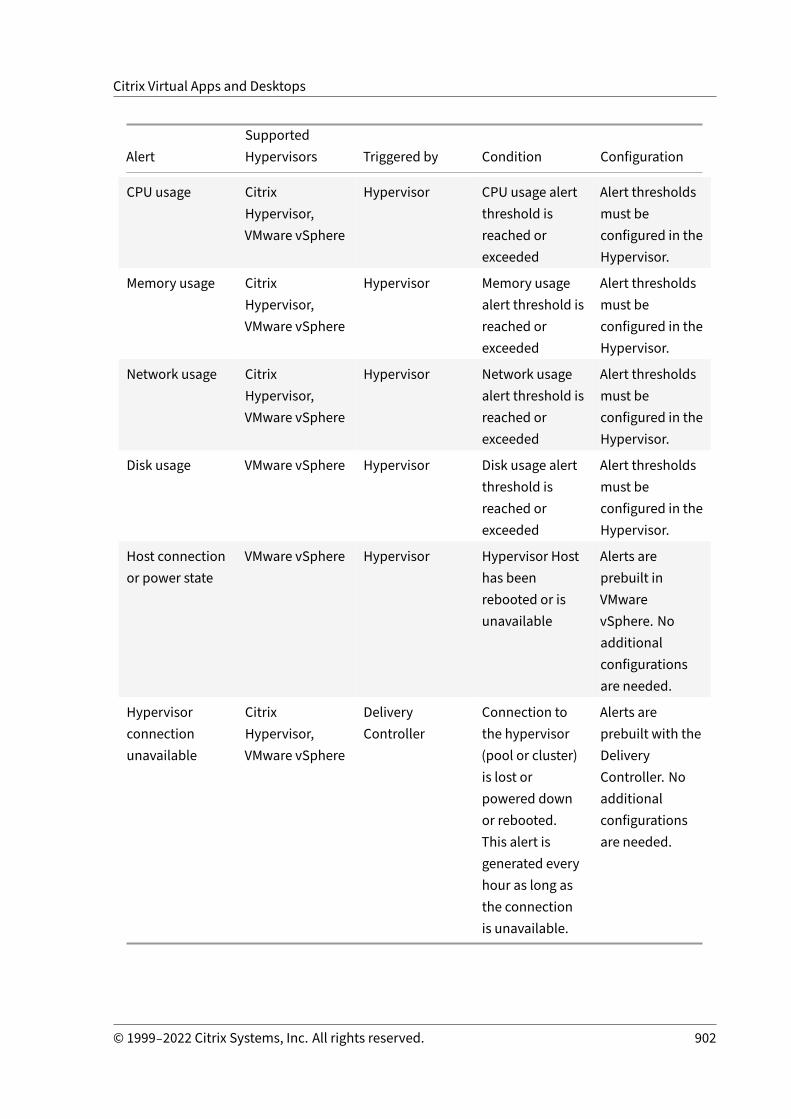
Citrix Virtual Apps and Desktops
AlertSupportedHypervisors Triggered by Condition Configuration
CPU usage CitrixHypervisor,VMware vSphere
Hypervisor CPU usage alertthreshold isreached orexceeded
Alert thresholdsmust beconfigured in theHypervisor.
Memory usage CitrixHypervisor,VMware vSphere
Hypervisor Memory usagealert threshold isreached orexceeded
Alert thresholdsmust beconfigured in theHypervisor.
Network usage CitrixHypervisor,VMware vSphere
Hypervisor Network usagealert threshold isreached orexceeded
Alert thresholdsmust beconfigured in theHypervisor.
Disk usage VMware vSphere Hypervisor Disk usage alertthreshold isreached orexceeded
Alert thresholdsmust beconfigured in theHypervisor.
Host connectionor power state
VMware vSphere Hypervisor Hypervisor Hosthas beenrebooted or isunavailable
Alerts areprebuilt inVMwarevSphere. Noadditionalconfigurationsare needed.
Hypervisorconnectionunavailable
CitrixHypervisor,VMware vSphere
DeliveryController
Connection tothe hypervisor(pool or cluster)is lost orpowered downor rebooted.This alert isgenerated everyhour as long asthe connectionis unavailable.
Alerts areprebuilt with theDeliveryController. Noadditionalconfigurationsare needed.
© 1999–2022 Citrix Systems, Inc. All rights reserved. 902

Citrix Virtual Apps and Desktops
Note:
For more information about configuring alerts, see Citrix XenCenter Alerts or VMware vCenterAlerts.
Email notification preference can be configured underCitrix Alerts Policy > site Policy >HypervisorHealth. The threshold conditions for Hypervisor alert policies can be configured, edited, disabled, ordeleted from the hypervisor only and not from Director. However, modifying email preferences anddismissing an alert can be done in Director.
Important:
• Alerts triggered by the Hypervisor are fetched and displayed in Director. However, changesin the life cycle/state of the Hypervisor alerts are not reflected in Director.
• Alerts that are healthy or dismissed or disabled in the Hypervisor console continues to ap‑pear in Director and have to be dismissed explicitly.
• Alerts that are dismissed in Director are not dismissed automatically in the Hypervisor con‑sole.
A newAlert category calledHypervisorHealthhas been added to enable filtering only the hypervisoralerts. These alerts are displayed once the thresholds are reached or exceeded. Hypervisor alerts canbe:
• Critical—critical threshold of the hypervisor alarm policy reached or exceeded• Warning—warning threshold of the hypervisor alarm policy reached or exceeded• Dismissed—alert no longer displayed as an active alert
© 1999–2022 Citrix Systems, Inc. All rights reserved. 903

Citrix Virtual Apps and Desktops
This feature requires Delivery Controller version 7 1811 or later. If you are using an older version ofDirector with sites 7 1811 or later, only the hypervisor alert count is displayed. To view the alerts, youmust upgrade Director.
Configure SCOM alerts integration
SCOM integration with Director lets you view alert information from SCOM on the Dashboard and inother high‑level views in Director.
SCOM alerts are displayed on‑screen alongside Citrix alerts. You can access and drill down into SCOMalerts from SCOM tab in the side bar.
You can view historical alerts up to one month old, sort, filter, and export the filtered information toCSV, Excel, and PDF report formats. For more information, see Export reports.
SCOM integration uses remote PowerShell 3.0 or later to query data from the SCOM ManagementServer and it maintains a persistent runspace connection in the user’s Director session. Director andSCOM server must have the same PowerShell version.
The requirements for SCOM integration are:
• Windows Server 2012 R2• System Center 2012 R2 Operations Manager• PowerShell 3.0 or later (PowerShell version on Director and the SCOM server must match)• Quad Core CPU with 16 GB RAM (recommended)• A primaryManagement Server for SCOMmust be configured in the Director web.config file. Youcan do this using the DirectorConfig tool.
Citrix recommends that the Director administrator account is configured as a SCOM Operator role sothat full alert information can be retrieved in Director. If this is not possible, a SCOM administratoraccount can be configured in the web.config file using the DirectorConfig tool.
© 1999–2022 Citrix Systems, Inc. All rights reserved. 904

Citrix Virtual Apps and Desktops
Citrix further recommends that you do not configure more than 10 Director administrators per SCOMManagement Server to ensure optimal performance.
On the Director server:
1. Type Enable‑PSRemoting to enable PowerShell remoting.
2. Add the SCOM Management Server to the TrustedHosts list. Open a PowerShell prompt andexecute the following command(s):
• Get the current list of TrustedHosts
Get‑ItemWSMAN:\localhost\Client\TrustedHosts
• Add the FQDN of the SCOM Management Server to the list of TrustedHosts. <Old Values>represents the existing set of entries returned from Get‑Item cmdlet.
Set‑Item WSMAN:\localhost\Client\TrustedHosts ‑Value “<FQDN SCOM ManagementServer>,<Old Values>”
3. Configure SCOM using the DirectorConfig tool.
C:\inetpub\wwwroot\Director\tools\DirectorConfig.exe /configscom
On the SCOMManagement server:
1. Assign Director administrators to a SCOM administrator role.
a) Open the SCOMManagement console and go to Administration > Security >User Roles.
b) InUserRoles, youcancreateanewUserRoleormodify anexistingone. Thereare four cate‑gories of SCOMoperator roles that define the nature of access to SCOMdata. For example,a Read‑Only role does not see the Administration pane and cannot discover or managerules, machines or accounts. An Operator role is a full administrator role.
Note:
The following operations are not available if the Director administrator is assigned toa non‑operator role:If there are multiple management servers configured and the primary managementserver is not available, the Director administrator cannot connect to the secondarymanagement server. The primarymanagement server is the server configured in theDirector web.config file, that is the same server as the one specified with the Direc‑torConfig tool in step 3 above. The secondarymanagement servers are peermanage‑ment servers of the primary server.
While filtering alerts, the Director administrator cannot search for the alert source.This requires an operator level permission.
c) To modify any User Role, right‑click on the role, then click Properties.
© 1999–2022 Citrix Systems, Inc. All rights reserved. 905
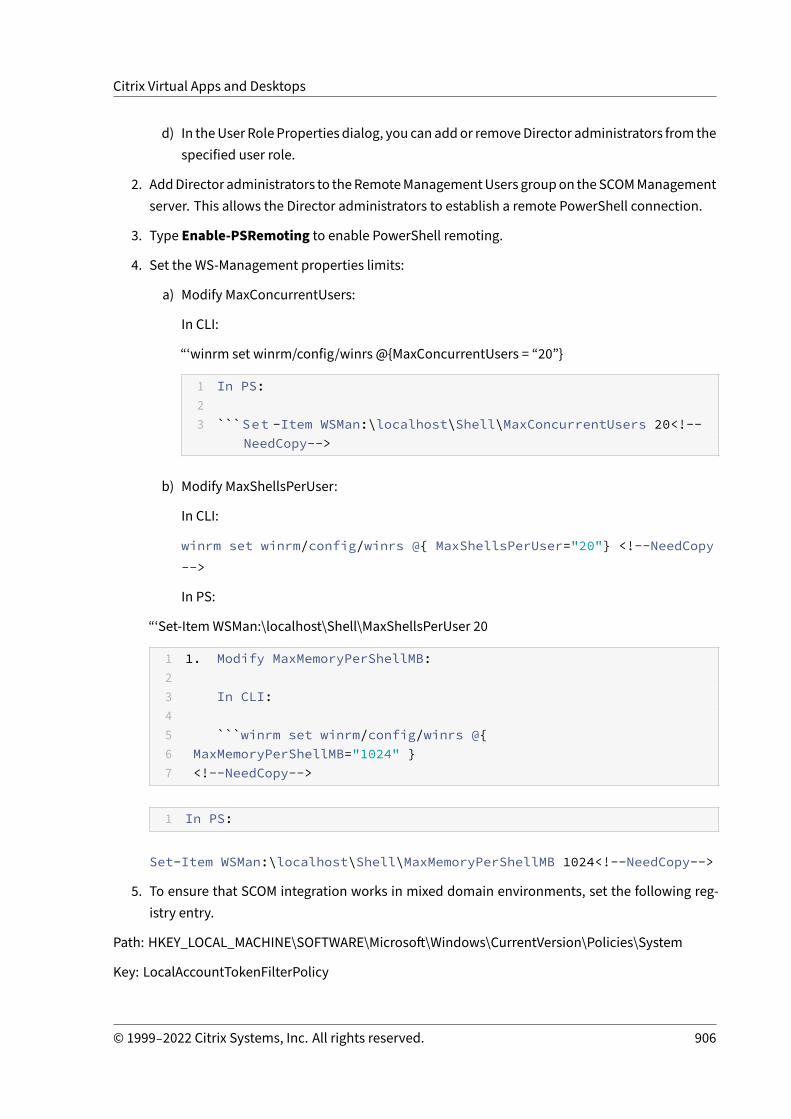
Citrix Virtual Apps and Desktops
d) In theUser Role Properties dialog, you canaddor removeDirector administrators from thespecified user role.
2. AddDirector administrators to theRemoteManagementUsers groupon theSCOMManagementserver. This allows the Director administrators to establish a remote PowerShell connection.
3. Type Enable‑PSRemoting to enable PowerShell remoting.
4. Set the WS‑Management properties limits:
a) Modify MaxConcurrentUsers:
In CLI:
“‘winrm set winrm/config/winrs @{MaxConcurrentUsers = “20”}
1 In PS:23 ```Set -Item WSMan:\localhost\Shell\MaxConcurrentUsers 20<!--
NeedCopy-->
b) Modify MaxShellsPerUser:
In CLI:
winrm set winrm/config/winrs @{ MaxShellsPerUser="20"} <!--NeedCopy-->
In PS:
“‘Set‑ItemWSMan:\localhost\Shell\MaxShellsPerUser 20
1 1. Modify MaxMemoryPerShellMB:23 In CLI:45 ```winrm set winrm/config/winrs @{6 MaxMemoryPerShellMB="1024" }7 <!--NeedCopy-->
1 In PS:
Set-Item WSMan:\localhost\Shell\MaxMemoryPerShellMB 1024<!--NeedCopy-->
5. To ensure that SCOM integration works in mixed domain environments, set the following reg‑istry entry.
Path: HKEY_LOCAL_MACHINE\SOFTWARE\Microsoft\Windows\CurrentVersion\Policies\System
Key: LocalAccountTokenFilterPolicy
© 1999–2022 Citrix Systems, Inc. All rights reserved. 906
Citrix Virtual Apps and Desktops
Type: DWord
Value: 1
Caution: Editing the registry incorrectly can cause serious problems that might require you to rein‑stall your operating system. Citrix cannot guarantee that problems resulting from the incorrect useof Registry Editor can be solved. Use Registry Editor at your own risk. Be sure to back up the registrybefore you edit it.
Once SCOM integration is set up youmight see themessage “Cannot get the latest SCOM alerts. Viewthe Director server event logs for more information”. The server event logs help identify and correctthe problem. Causes can include:
• Loss of network connectivity at the Director or SCOMmachine.• The SCOM service is not available or too busy to respond.• Failed authorization due to a change in permissions for the configured user.• An error in Director while processing the SCOM data.• PowerShell version mismatch between Director and SCOM server.
Filter data to troubleshoot failures
April 14, 2021
When you click numbers on the Dashboard or select a predefined filter from the Filters menu, theFilters view opens to display data based on the selectedmachine or failure type.
Predefined filters cannot be edited, but you can save a predefined filter as a custom filter and thenmodify it. Also, you can create custom filtered views ofmachines, connections, sessions, and applica‑tion instances across all delivery groups.
1. Select a view:
• Machines. Select Single‑session OS Machines or Multi‑session OS Machines. These viewsshow the number of configured machines. The Multi‑session OS Machines tab also in‑cludes the load evaluator index, which indicates the distribution of performance countersand tool tips of the session count if you hover over the link.
• Sessions. You can also see the session count from the Sessions view. Use the idle timemeasurements to identify sessions that are idle beyond a threshold time period.
• Connections. Filter connections by different time periods, including last 60 minutes, last24 hours, or last 7 days.
• Application Instances. This view displays the properties of all application instances onVDAs of Server and Single‑session OS. The session idle time measurements are availablefor Application instances on VDAs of Multi‑session OS.
© 1999–2022 Citrix Systems, Inc. All rights reserved. 907

Citrix Virtual Apps and Desktops
Note:
If you have launched Desktop sessions on VDAs installed on aWindows 10 1809 computer,the Activity Manager in Director might sometimes display Microsoft Edge and Office as ac‑tively running applications while they are actually running only in the background.
2. For Filter by, select the criteria.
3. Use the additional tabs for each view, as needed, to complete the filter.
4. Select extra columns, as needed, to troubleshoot further.
5. Save and name your filter.
6. To access filters from multiple Director servers, store the filters on a shared folder accessiblefrom those servers:
• The shared folder must have modify permissions for accounts on the Director server.• The Director servers must be configured to access the shared folder. To configure, run IISManager. In Sites > Default Web Site > Director\ > Application Settings, modify theService.UserSettingsPath setting to reflect the UNC path of the shared folder.
7. To open the filter later, from the Filtersmenu, select the filter type (Machines, Sessions, Con‑nections, or Application Instances), and then select the saved filter.
8. Click Export to export the data to CSV format files. Data of up to 100,000 records can be ex‑ported. This feature is available in Delivery Controller version 1808 and later.
9. If needed, for Machines or Connections views, use power controls for all the machines youselect in the filtered list. For the Sessions view, use the session controls or option to send mes‑sages.
10. In the Machines and Connections views, click the Failure Reason of a failed machine or con‑nection to get a detailed description of the failure and actions recommended to troubleshootthe failure. The failure reasons and the recommended actions for Machine and Connection fail‑ures are available in the Citrix Director 7.12 Failure Reasons Troubleshooting Guide.
11. In the Machines view, click a machine name link to go to the corresponding Machine Detailspage. This page displays the details of themachine, provides power controls, displays the CPU,memory, disk monitoring, and GPUmonitoring graphs. Also, click View Historical Utilizationto see the resource utilization trends for the machine. For more information, see Troubleshootmachines.
12. In the Application Instances view, sort or filter based on Idle Time greater than a thresholdtimeperiod. Select the idle application instances to end. Log offorDisconnect of an applicationinstance ends all active application instances in the same session. For more information, seeTroubleshoot applications. The Application Instances filter page and idle time measurements
© 1999–2022 Citrix Systems, Inc. All rights reserved. 908

Citrix Virtual Apps and Desktops
in the Sessions filter pages are available if Director, Delivery Controllers, and VDAs are version7.13 or later.
Note:Citrix StudioallowsassignmentofmultipleDesktopAssignmentRules (DAR) fordifferentusersoruser groups to a single VDA in the delivery group. StoreFront displays the assigned desktopwiththe corresponding Display Name as per the DAR for the logged in user. However, Director doesnot support DARs and displays the assigned desktop using the delivery group name regardlessof the logged in user. As a result, you cannot map a specific desktop to a machine in Director.To map the assigned desktop displayed in StoreFront to the delivery group name displayed inDirector, use the following PowerShell command:
1 Get-BrokerDesktopGroup | Where-Object {2 $\_.Uid -eq (Get-BrokerAssignmentPolicyRule | Where-Object {3 $\_.PublishedName -eq "\<Name on StoreFront\>" }4 ).DesktopGroupUid }5 | Select-Object -Property Name, Uid6 <!--NeedCopy-->
Monitor historical trends across a site
April 14, 2021
The Trends view accesses historical trend information of each site for the following parameters:
• sessions• connection failures• machine failures• logon performance• load evaluation• capacity management• machine usage• resource utilization• network analysis for each site.
To locate this information, click the Trendsmenu.
The zoom‑in drill down feature lets you navigate through trend charts by zooming in on a time period(clicking a data point in the graph) and drilling down to see the details associatedwith the trend. Thisfeature enables you to better understand the details of who or what is affected by the trends beingdisplayed.
To change the default scope of each graph, apply a different filter to the data.
© 1999–2022 Citrix Systems, Inc. All rights reserved. 909

Citrix Virtual Apps and Desktops
Choose a time period for which you require the historical trend information. Time period availabilitydepends on your Director deployment as follows:
• Trend reports of up to Last year (365 days) are available in Premium licensed sites.• Trend reports of up to Last month (31 days) are available in Advanced licensed sites.• Trend reports of up to Last 7 days in non‑Premium and non‑Advanced licensed sites.
Note:
• In all Director deployments, sessions, failures, and logon performance trend informationare available as graphs and tables when the time period is set to Last month (Ending now)or shorter. When the time period is chosen as Last month with a custom ending date or asLast year, the trend information is available as graphs but not as tables.
• Grooming retention values of the Monitor Service control the trends data availability. Thedefault values are available in Data granularity and retention. Customers on Premium li‑censed sites can change the grooming retention to their desired number of retention days.
• The following parameters in IIS Manager control the range of custom ending dates avail‑able for selection and can be customized. However, the data availability for selected datesdepends on the grooming retention setting for the specific metric being measured.
Parameter Default values
UI.TrendsLast2HoursRange 3
UI.TrendsLast24HoursRange 32
UI.TrendsLast7DaysRange 32
UI.TrendsLastMonthRange 365
Available trends
View trends for sessions: From the Sessions tab, select the Delivery Group and time period to viewmore detailed information about the concurrent session count.
The Session Auto Reconnect column displays the number of auto reconnects in a session. Auto re‑connect is enabled when the Session Reliability or the Auto Client Reconnect policies are in effect.When there is a network interruption on the endpoint, the following policies come into effect:
• Session reliability comes into effect (by default for 3minutes) where the Citrix Receiver or CitrixWorkspace app tries to connect to the VDA.
• Auto client reconnect comes into effect between 3 and 5 minutes where the client tries to con‑nect to the VDA.
Both reconnects are captured and displayed to the user. This information can take a maximum time
© 1999–2022 Citrix Systems, Inc. All rights reserved. 910

Citrix Virtual Apps and Desktops
of 5 minutes to appear on the Director UI after the reconnect has occurred.
The auto reconnect information helps you view and troubleshoot network connections having inter‑ruptions, and also analyze networks having a seamless experience. You can view the number of re‑connects for a specific Delivery Group or time period selected in the Filters. A drilldown provides ad‑ditional information like Session Reliability or Auto Client Reconnect, time stamps, Endpoint IP, andEndpoint Name of the machine where Workspace app is installed.
By default, logs are sorted by the event time stamps in descending order. This feature is availablefor Citrix Workspace app for Windows, Citrix Workspace app for Mac, Citrix Receiver for Windows, andCitrix Receiver forMac. This feature requires Delivery Controller version 7 1906 or later, and VDAs 1906or later.
For more information about session reconnections, see Sessions.
For more information about policies, see Auto client reconnect policy settings and Session reliabilitypolicy settings.
Sometimes, the auto reconnect data might not appear in Director for the following reasons:
• Workspace app is not sending auto reconnect data to VDA.• VDA is not sending data to the monitor service.• Delivery Controllers discard VDA payloads as they might not have the corresponding sessions.
Note:
Sometimes, the client IP address might not be obtained correctly if certain Citrix Gateway poli‑cies are set.
View trends for connection failures: From the Failures tab, select the connection, machine type,failure type, Delivery Group, and time period to view a graph containing more detailed informationabout the user connection failures across your site.
View trends for machine failures: From the Single‑session OS Machine Failures tab or Multi‑session OS Machines tab, select the failure type, Delivery Group, and time period to view a graphcontaining more detailed information about the machine failures across your site.
View trends for logon performance: From the Logon Performance tab, select the Delivery Groupand time period to view a graph containing more detailed information about the duration of user lo‑gon times across your site andwhether the number of logons affects the performance. This view alsoshows the average duration of the logon phases, such as brokering duration and VM start time.This data is specifically for user logons and does not include users trying to reconnect from discon‑nected sessions.The table below the graph shows Logon Duration by User Session. You can choose the columns todisplay and sort the report by any of the columns.For more information, see Diagnose user logon issues
© 1999–2022 Citrix Systems, Inc. All rights reserved. 911

Citrix Virtual Apps and Desktops
View trends for load evaluation: From the Load Evaluator Index tab, view a graph containingmoredetailed information about the load that is distributed among Multi‑session OS machines. The filteroptions for this graph include the Delivery Group or Multi‑session OS machine in a Delivery Group,Multi‑session OS machine (available only if the Multi‑session OS machine in a Delivery Group wasselected), and range.
View hosted applications usage: The availability of this feature depends on your organization’s li‑cense.From the Capacity Management tab, select the Hosted Applications Usage tab, select the DeliveryGroup and time period to view a graph displaying peak concurrent usage and a table displaying appli‑cation based usage. From the Application Based Usage table, you can choose a specific applicationto see details and a list of users who are using, or have used, the application.
View Single‑session and Multi‑session OS usage: The Trends view shows the usage of Single‑session OS by site and by Delivery Group. When you select Site, usage is shown per Delivery Group.When you select Delivery Group, usage is shown per User.The Trends view also shows the usage of Multi‑session OS by site, by Delivery Group, and byMachine.When you select Site, usage is shown per Delivery Group. When you select Delivery Group, usage isshown per Machine and per User. When Machine is selected usage is shown per User.
View virtual machine usage: From theMachine Usage tab, select Single‑session OS Machines orMulti‑session OS Machines to obtain a real‑time view of your VM usage, enabling you to quickly as‑sess your site’s capacity needs.Single‑sessionOSavailability ‑ displays the current stateof Single‑sessionOSmachines (VDIs) byavail‑ability for the entire site or a specific Delivery Group.Multi‑session OS availability ‑ displays the current state of Multi‑session OS machines by availabilityfor the entire site or a specific Delivery Group.
Note:The number of machines displayed in Available Counter includes machines in maintenancemode.
View resource utilization: From the Resource Utilization tab, select Single‑session OS Machinesor Multi‑session OS Machines to obtain insight into historical trends data for CPU and memory us‑age, and IOPS and disk latency for each VDI machine for better capacity planning.This feature requires Delivery Controllers and VDAs version 7.11 or later.Graphs show data for average CPU, average memory, average IOPS, disk latency, and peak concur‑rent sessions. You can drill down to the machine, and view data and charts for the top 10 processesconsuming CPU. Filter by Delivery Group and Time period. CPU,memory usage, and peak concurrentsessions graphs are available for the last 2 hours, 24 hours, 7 days,month, and year. The average IOPSand disk latency graphs are available for the last 24 hours, month, and year.
© 1999–2022 Citrix Systems, Inc. All rights reserved. 912

Citrix Virtual Apps and Desktops
Note:
• The Monitoring policy setting, Enable Process Monitoring, must be set to Allowed to col‑lect and display data in the Top 10 Processes table on theHistoricMachineUtilization page.The policy is set to Prohibited by default. All resource utilization data is collected by de‑fault. This canbedisabled using theEnableResourceMonitoringpolicy setting. The tablebelow the graphs shows the resource utilization data per machine. For more information,see Monitoring policy settings.
• Average IOPS shows the daily averages. Peak IOPS is calculated as the highest of the IOPSaverages for the selected time range. (An IOPS average is the hourly average of IOPS col‑lected during the hour on the VDA).
View network analysis data: The availability of this feature depends on your organization’s licenseand your administrator permissions. This feature requires Delivery Controllers version 7.11 or later.
From the Network tab, monitor your network analysis, which provides a user, application, and desk‑top contextual view of the network. With this feature, Director provides advanced analytics of ICAtraffic in your deployment through HDX Insight reports from Citrix ADM. For more information, seeConfigure network analysis
View application failures: The Application Failures tab displays failures associated with the pub‑lished applications on the VDAs.
This feature requires Delivery Controllers and VDAs version 7.15 or later. Single‑session OS VDAs run‑ning Windows Vista and later, and Multi‑session OS VDAs running Windows Server 2008 and later aresupported.For more information, see Historical application failure monitoring.
By default, only application faults fromMulti‑session OS VDAs are displayed. You can set themonitor‑ing of application failures by using Monitoring policies. For more information, see Monitoring policysettings.
View application probe results: The Application Probe Results tab displays the results of probefor applications that have been configured for probing in the Configuration page. Here, the stage oflaunch during which the application launch failure occurred is recorded.
This feature requires Delivery Controller(s) and VDAs version 7.18 or later. For more information seeApplication probing.
Create customized reports: TheCustomReports tab provides a user interface for generating CustomReports containing real‑time and historical data from the Monitoring database in tabular format.
This feature requires Delivery Controller(s) version 7.12 or later.
From the list of previously saved Custom Report queries, you can click Run and download to exportthe report in CSV format, clickCopyOData to copy and share the corresponding OData query, or click
© 1999–2022 Citrix Systems, Inc. All rights reserved. 913

Citrix Virtual Apps and Desktops
Edit to edit the query.You can create a new Custom Report query based onmachines, connections, sessions, or applicationinstances. Specify filter conditions based on fields such as machine, Delivery Group, or time period.Specify additional columns required in your Custom Report. Preview displays a sample of the reportdata. Saving the Custom Report query adds it to the list of saved queries.
YoucancreateanewCustomReportquerybasedonacopiedODataquery. Todo this, select theODataQuery option and paste the copied OData query. You can save the resultant query for execution later.
Note:Thecolumnnames inPreviewandExport report generatedusingODataqueries arenot localized,but appear in English.
The flag icons on the graph indicate significant events or actions for that specific time range. Hoverthe mouse over the flag and click to list events or actions.
Note:
• HDX connection logon data is not collected for VDAs earlier than 7. For earlier VDAs, thechart data is displayed as 0.
• Delivery Groups deleted in Citrix Studio are available for selection in the Director Trendsfilters until data related to them are groomed out. Selecting a deleted Delivery Group dis‑plays graphs for available data until retention. However, the tables don’t show data.
• Moving a machine containing active sessions from one Delivery Group to another causesthe Resource Utilization and Load Evaluator Index tables of the new Delivery Group todisplay metrics consolidated from the old and new Delivery Groups.
Troubleshoot deployments
April 14, 2021
As a help desk administrator, you can search for the user reporting an issue and display details of ses‑sions or applications associated with that user. Similarly, search for machines or endpoints whereissues are reported. Resolve issues quickly by monitoring the relevant metrics and performing suit‑able actions.
Available actions include:
• Ending an unresponsive application or process• Shadowing operations on the user’s machine• Logging off an unresponsive session• Restarting the machine• Putting a machine into maintenance mode
© 1999–2022 Citrix Systems, Inc. All rights reserved. 914

Citrix Virtual Apps and Desktops
• Resetting the user profile
Troubleshoot applications
April 14, 2021
Application Analytics
The Applications view displays application‑based analytics in a single, consolidated view to help an‑alyze and manage application performance efficiently. You can gain valuable insight into the healthand usage information of all applications published on the site. The default view helps identify thetop running applications.This feature requires Delivery Controllers Version 7.16 or later and VDAs Version 7.15 or later.
The Probe Result column displays the result of application probing run in the last 24 hours. Clickthe probe result link to see more details in the Trends > Application Probe Results page. For moredetails on how to configure application probes, see Application Probing.
The Instances column displays usage of the applications. It indicates the number of application in‑stances currently running (both connected and disconnected instances). To troubleshoot further,click the Instances field to see the corresponding Application Instances filters page. Here, you canselect application instances to log off or disconnect.
Note:
For custom scope administrators, Director does not display application instances created underapplication groups. To view all application instances, youmust be a full administrator. Formoreinformation, see Knowledge Center article CTX256001.
© 1999–2022 Citrix Systems, Inc. All rights reserved. 915
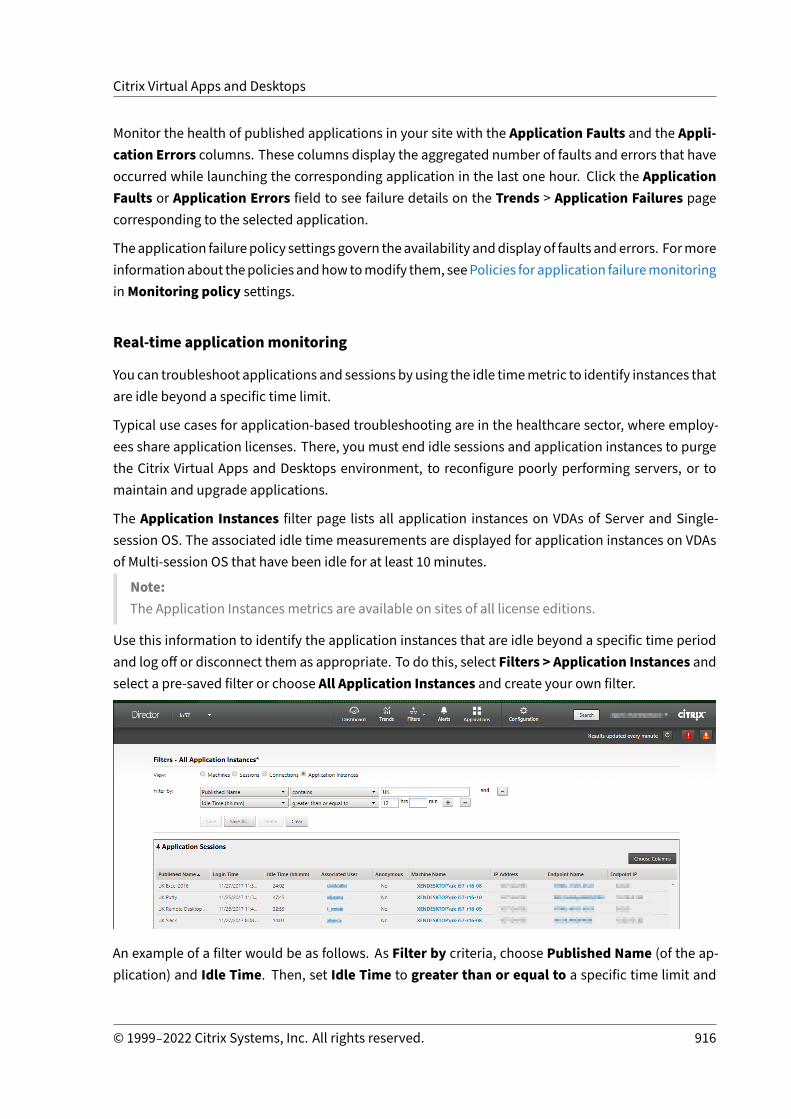
Citrix Virtual Apps and Desktops
Monitor the health of published applications in your site with the Application Faults and the Appli‑cation Errors columns. These columns display the aggregated number of faults and errors that haveoccurred while launching the corresponding application in the last one hour. Click the ApplicationFaults or Application Errors field to see failure details on the Trends > Application Failures pagecorresponding to the selected application.
Theapplication failurepolicy settings govern theavailability anddisplayof faults anderrors. Formoreinformationabout thepolicies andhowtomodify them, seePolicies for application failuremonitoringinMonitoring policy settings.
Real‑time applicationmonitoring
You can troubleshoot applications and sessions by using the idle timemetric to identify instances thatare idle beyond a specific time limit.
Typical use cases for application‑based troubleshooting are in the healthcare sector, where employ‑ees share application licenses. There, you must end idle sessions and application instances to purgethe Citrix Virtual Apps and Desktops environment, to reconfigure poorly performing servers, or tomaintain and upgrade applications.
The Application Instances filter page lists all application instances on VDAs of Server and Single‑session OS. The associated idle time measurements are displayed for application instances on VDAsof Multi‑session OS that have been idle for at least 10 minutes.
Note:The Application Instances metrics are available on sites of all license editions.
Use this information to identify the application instances that are idle beyond a specific time periodand log off or disconnect them as appropriate. To do this, select Filters > Application Instances andselect a pre‑saved filter or choose All Application Instances and create your own filter.
An example of a filter would be as follows. As Filter by criteria, choose Published Name (of the ap‑plication) and Idle Time. Then, set Idle Time to greater than or equal to a specific time limit and
© 1999–2022 Citrix Systems, Inc. All rights reserved. 916

Citrix Virtual Apps and Desktops
save the filter for reuse. From the filtered list, select the application instances. Select option to sendmessagesor fromtheSessionControldrop‑down, chooseLogoff orDisconnect toend the instances.
Note:Logging off or disconnecting an application instance logs off or disconnects the current session,thereby ending all application instances that belong to the same session.
You can identify idle sessions from theSessions filter page using the session state and the session idletimemetric. Sort by the Idle Time column or define a filter to identify sessions that are idle beyond aspecific time limit. Idle time is listed for sessions on VDAs of Multi‑session OS that have been idle forat least 10 minutes.
The Idle time is displayed asN/Awhen the session or application instance
• has not been idle for more than 10 minutes,• is launched on a VDA of Single‑session OS, or• is launched on a VDA running Version 7.12 or earlier.
Historical application failuremonitoring
The Trends ‑> Application Failures tab displays failures associated with the published applicationson the VDAs.
Application failure trends are available for the last 2 hours, 24 hours, 7 days, andmonth for Premiumand Advanced licensed sites. They are available for the last 2 hours, 24 hours, and 7 days for otherlicense types. The application failures that are logged to the Event Viewer with source “ApplicationErrors” are monitored. Click Export to generate reports in CSV, Excel, or PDF formats
The grooming retention settings for application failure monitoring, GroomApplicationErrorsReten‑tionDays and GroomApplicationFaultsRetentionDays are set to one day by default for both Premiumand non‑Premium licensed sites. You can change this setting using the PowerShell command:
© 1999–2022 Citrix Systems, Inc. All rights reserved. 917

Citrix Virtual Apps and Desktops
PowerShell command Set-MonitorConfiguration -\<setting name\> \<value\><!--NeedCopy-->
The failures are displayed as Application Faults or Application Errors based on their severity. TheApplication Faults tabdisplays failures associatedwith loss of functionality or data. ApplicationErrorsindicate problems that are not immediately relevant; they signify conditions that might cause futureproblems.
You can filter the failures based on Published Application Name, Process Name orDelivery Group,and Time Period. The table displays the fault or error code and a brief description of the failure. Thedetailed failure description is displayed as a tooltip.
Note:Thepublishedapplicationname is displayedas “Unknown”when the corresponding applicationname cannot be derived. This typically occurs when a launched application fails in a desktopsession or when it fails due to an unhandled exception caused by a dependent executable.
By default, only faults of applications hosted on Multi‑session OS VDAs are monitored. You can mod‑ify the monitoring settings through the Monitoring Group Policies: Enable monitoring of applicationfailures, Enablemonitoring of application failures on Single‑session OS VDAs, and List of applicationsexcluded from failure monitoring. For more information, see Policies for application failure monitor‑ing in Monitoring policy settings.
The Trends > Application Probe Results page displays the results of application probing run in thesite for the last 24 hours and 7 days. For more details on how to configure application probes, seeApplication Probing.
© 1999–2022 Citrix Systems, Inc. All rights reserved. 918

Citrix Virtual Apps and Desktops
Application probing
April 14, 2021
Application probing automates the process of checking the health of Citrix Virtual Apps that are pub‑lished in a site. The results of application probing are available in Director.
Requirements:
• Delivery Controller runs version 7.18 or later.• Endpoint machines running probe agents are Windows machines with Citrix Receiver for Win‑dows Version 4.8 or later, or Citrix Workspace app for Windows (formerly Citrix Receiver for Win‑dows) Version 1808 or later. Workspace app for Unified Windows Platform (UWP) is not sup‑ported.
• Director and StoreFront support the default form‑based authentication.
User accounts/permissions required to run Application Probing:
• A unique StoreFront user to probe on each endpointmachine. The StoreFront user need not bean administrator; the probes can run in a non‑admin context.
• User accountswithWindows administrator permissions to install and configure the Citrix ProbeAgent on the endpoint machines
• A full administrator user account or a custom role with the following permissions. Reusing ex‑isting user accounts for application probing might log off from the users’ active sessions.
– Delivery group permissions:
* Read‑only– Director permissions:
* Create\Edit\Remove Alert Email Server Configuration ‑ if the email server is not al‑ready configured
* Create\Edit\Remove Probe Configurations
* View Configurations page
* View Trends page
Configure Application Probing
You can schedule your application probes to run during off‑peak hours across multiple geographies.The comprehensive probe results can help to troubleshoot issues related to the applications, hostingmachine or connection before the users experience them.
Step 1: Install and configure the Citrix Probe Agent
The Citrix Probe Agent is a Windows executable that simulates the actual application launch by theuser through StoreFront. It tests application launches as configured in Director and reports back the
© 1999–2022 Citrix Systems, Inc. All rights reserved. 919

Citrix Virtual Apps and Desktops
results to Director.
1. Identify endpoint machines fromwhere you want to run application probing.
2. Users with administrative privileges can install and configure the Citrix Probe Agent on the end‑point machine. Download the Citrix Probe Agent executable available at https://www.citrix.com/downloads/citrix‑virtual‑apps‑and‑desktops/components/app‑probe‑agent.html
3. Start the agent and configure your StoreFront Receiver for Web credentials. Configure a uniqueStoreFront user on each endpointmachine. The credentials are encrypted and stored securely.
Note:To access the site to be probed from outside the network, type the login URL for CitrixGateway in the StoreFront URL field. Citrix Gateway automatically routes the request tothe corresponding site StoreFront URL. This feature is available for Citrix Gateway version12.1 and later (RfWebUI theme), and Delivery Controllers 1811 and later.
4. In the Configure To Display Probe Result tab, enter your Director credentials, and click Vali‑date.
© 1999–2022 Citrix Systems, Inc. All rights reserved. 920

Citrix Virtual Apps and Desktops
5. Select your site and clickNext.
Step 2: Configure Application Probing in Director
1. Go to Configuration > Application Probe Configuration.
2. Create a probe and choose:
• the applications to be probed,• the endpoint machines on which the probemust run,• the email addresses towhich the failureprobe results are sent (configure your email serverin Alerts ‑> Email Server Configuration), and
• the time of the day atwhich the probemust run (as per the local time zone of the endpointmachine).
After configuration in Director, the agent takes 10 minutes before it is ready to start probing.Then, it runs configured probes starting the next hour.
© 1999–2022 Citrix Systems, Inc. All rights reserved. 921

Citrix Virtual Apps and Desktops
Step 3: Probe execution
The agent runs application probing as per the probe configuration it fetches from Director periodi‑cally. It launches selected applications serially using StoreFront. The agent reports the results backto Director via the Monitor database. Failures are reported in five specific stages:
• StoreFront Reachability ‑ configured StoreFront URL is not reachable.• StoreFront Authentication ‑ configured StoreFront credentials are invalid.• StoreFront Enumeration ‑ StoreFront Enumerate applications list does not contain the appli‑cation to be probed.
• ICA download ‑ the ICA file is not available.• Application launch – the application cannot be launched.
Step 4: View probe results
You can view the latest probe results in the Applications page.
© 1999–2022 Citrix Systems, Inc. All rights reserved. 922
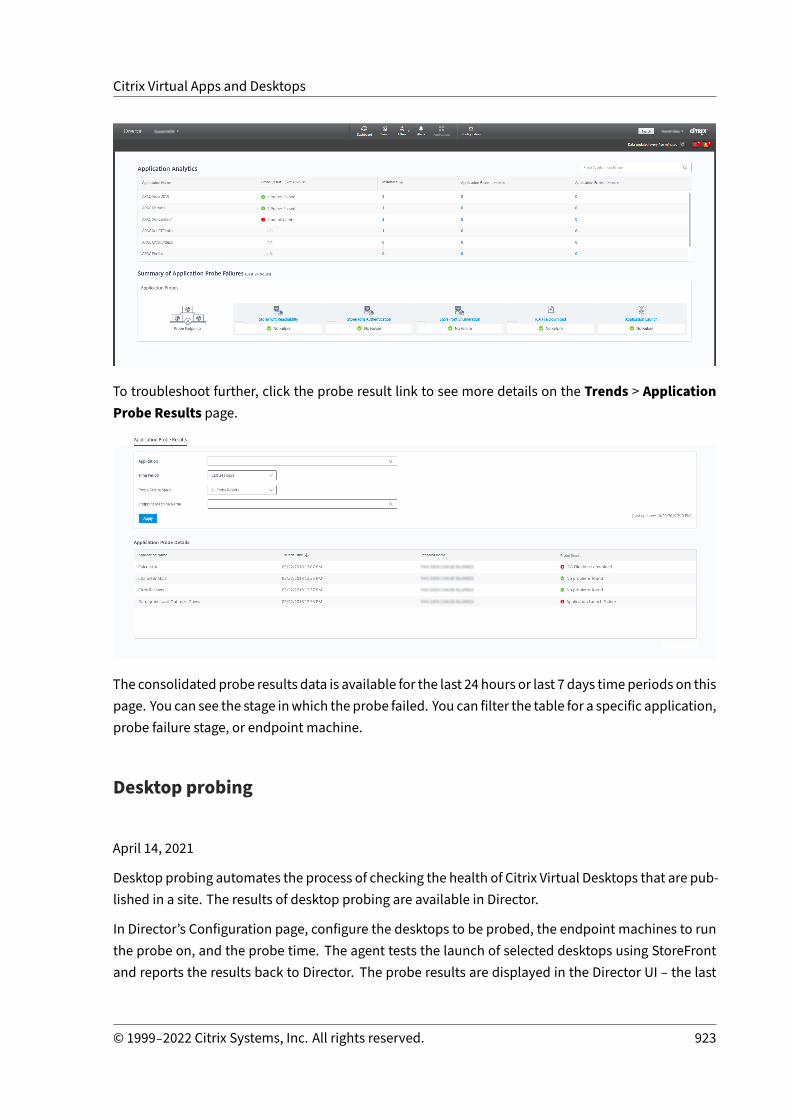
Citrix Virtual Apps and Desktops
To troubleshoot further, click the probe result link to see more details on the Trends > ApplicationProbe Results page.
The consolidated probe results data is available for the last 24 hours or last 7 days timeperiods on thispage. You can see the stage inwhich the probe failed. You can filter the table for a specific application,probe failure stage, or endpoint machine.
Desktop probing
April 14, 2021
Desktop probing automates the process of checking the health of Citrix Virtual Desktops that are pub‑lished in a site. The results of desktop probing are available in Director.
In Director’s Configuration page, configure the desktops to be probed, the endpoint machines to runthe probe on, and the probe time. The agent tests the launch of selected desktops using StoreFrontand reports the results back to Director. The probe results are displayed in the Director UI – the last
© 1999–2022 Citrix Systems, Inc. All rights reserved. 923
Citrix Virtual Apps and Desktops
24‑hours’ data on the Applications page and historical probe data on the Trends > Probe Results >Desktop Probe Results page. Here, you can see the stage when the probe failure occurred ‑ Store‑Front Reachability, StoreFront Authentication, StoreFront Enumeration, ICA download, or Desktoplaunch. The failure report is sent to the configured email addresses. You can schedule your desktopprobes to runduringoff‑peakhours acrossmultiple geographies. The comprehensive results canhelpto proactively troubleshoot issues related to provisioned desktops, hostingmachines or connectionsbefore the users experience them. Desktop probing is available for Premium licensed sites. This fea‑ture requires Delivery Controllers version 7 1906 or later and Probe Agent 1903 or later.
Requirements:
• Delivery Controller runs version 1906 or later.• Endpoint machines running probe agents are Windows machines with Citrix Receiver for Win‑dows Version 4.8 or later, or Citrix Workspace app for Windows (formerly Citrix Receiver for Win‑dows) Version 1906 or later. Workspace app for Unified Windows Platform (UWP) is not sup‑ported.
• Director and StoreFront support the default form‑based authentication.
User accounts or permissions required to run Desktop probing:
• A unique StoreFront user to probe on each endpointmachine. The StoreFront user need not bean administrator; the probes can run in a non‑admin context.
• User accountswithWindows administrator permissions to install and configure the Citrix ProbeAgent on the endpoint machines
• A full administrator user account or a custom role with the following permissions. Reusing nor‑mal user accounts for desktop probing might log off from the users’ active sessions.
– Delivery group permissions:
* Read‑only– Director permissions:
* Create, Edit, Remove Alert Email Server Configuration ‑ if the email server is not al‑ready configured
* Create, Edit, Remove Probe Configurations
* View Configurations page
* View Trends page
Configure desktop probing
You can schedule your desktop probes to run during off‑peak hours acrossmultiple geographies. Thecomprehensive probe results can help to troubleshoot issues related to the desktops, hosting ma‑chine or connection before the users experience them.
© 1999–2022 Citrix Systems, Inc. All rights reserved. 924

Citrix Virtual Apps and Desktops
Step 1: Install and configure the Citrix Probe Agent
The Citrix Probe Agent is a Windows executable that simulates the actual desktop launch by the userthrough StoreFront. It tests desktop launches as configured in Director and reports back the resultsto Director.
1. Identify endpoint machines fromwhere you want to run desktop probing.
2. Users with administrative privileges can install and configure the Citrix Probe Agent on the end‑point machine. Download the Citrix Probe Agent executable available at https://www.citrix.com/downloads/citrix‑virtual‑apps‑and‑desktops/components/app‑probe‑agent.html
3. Start the agent and configure your StoreFront Receiver for Web credentials. Configure a uniqueStoreFront user on each endpointmachine. The credentials are encrypted and stored securely.
Note:
To access the site to be probed from outside the network, type the Citrix Gateway loginpage URL in the StoreFront URL field. Citrix Gateway automatically routes the request tothe corresponding site StoreFront URL. This feature is available for Citrix Gateway version12.1 or later, and Delivery Controllers 1811 or later.
4. In the Configure To Display Probe Result tab, enter your Director credentials, and click Vali‑date.
© 1999–2022 Citrix Systems, Inc. All rights reserved. 925
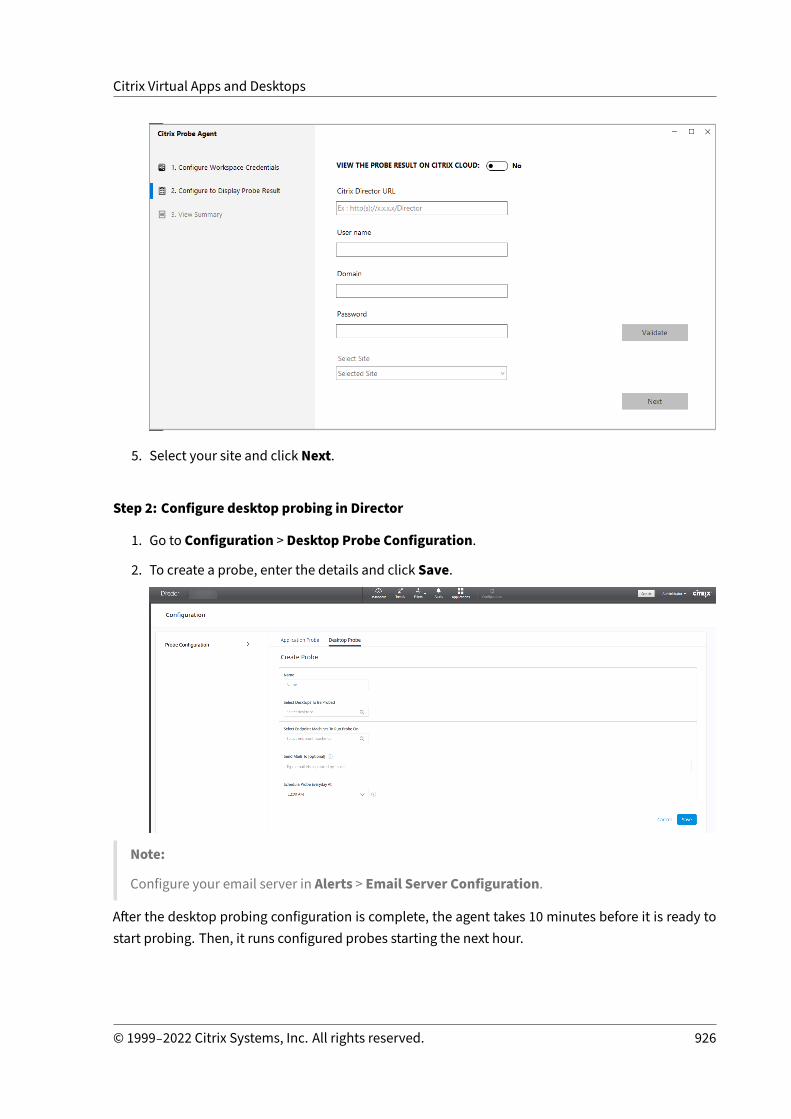
Citrix Virtual Apps and Desktops
5. Select your site and clickNext.
Step 2: Configure desktop probing in Director
1. Go to Configuration > Desktop Probe Configuration.
2. To create a probe, enter the details and click Save.
Note:
Configure your email server in Alerts > Email Server Configuration.
After the desktop probing configuration is complete, the agent takes 10 minutes before it is ready tostart probing. Then, it runs configured probes starting the next hour.
© 1999–2022 Citrix Systems, Inc. All rights reserved. 926

Citrix Virtual Apps and Desktops
Step 3: Probe execution
The agent runs desktop probing as per the probe configuration it fetches from Director periodically.It launches selected desktops serially using StoreFront. The agent reports the results back to Directorvia the Monitor database. Failures are reported in five specific stages:
• StoreFront Reachability ‑ the configured StoreFront URL is not reachable.• StoreFront Authentication ‑ the configured StoreFront credentials are invalid.• StoreFront Enumeration ‑ StoreFront Enumerate desktops list does not contain the desktop tobe probed.
• ICA download ‑ the ICA file is not available.• Desktop launch – the desktop cannot be launched.
Step 4: View probe results
You can view the latest probe results in the Desktops page.
To troubleshoot further, click the probe result link to see more details on the Trends >Probe Results> Desktop Probe Results page.
© 1999–2022 Citrix Systems, Inc. All rights reserved. 927

Citrix Virtual Apps and Desktops
The consolidatedprobe results data is available for the last 24hours or last 7days’ timeperiodson thispage. You can see the stage in which the probe failed. You can filter the table for a specific desktop,probe failure stage, or endpoint machine.
Troubleshootmachines
April 14, 2021
Note:Citrix Health Assistant is a tool to troubleshoot configuration issues in unregistered VDAs. Thetool automates several health checks to identify possible root causes for VDA registration failuresand issues in session launch and time zone redirection configuration. The Knowledge Centerarticle, Citrix Health Assistant ‑ Troubleshoot VDA Registration and Session Launch contains theCitrix Health Assistant tool download and usage instructions.
The Filters >Machines view in the Director console displays themachines configured in the site. TheMulti‑session OS Machines tab includes the load evaluator index, which indicates the distribution ofperformance counters and tooltips of the session count if you hover over the link.
Click the Failure Reason columnof a failedmachine to get a detailed description of the failure and ac‑tions recommended to troubleshoot the failure. The failure reasonsand the recommendedactions formachine and connection failures are available in theCitrix Director 7.12 FailureReasonsTroubleshoot‑ing Guide.
Click the machine name link to go to theMachine Details page.
The Machine Details page lists the machine details, infrastructure details, and details of the hotfixesapplied on the machine.
© 1999–2022 Citrix Systems, Inc. All rights reserved. 928

Citrix Virtual Apps and Desktops
Machine‑based real‑time resource utilization
TheMachine Utilization panel displays graphs showing real‑time utilization of CPU andmemory. Inaddition, disk and GPU monitoring graphs are available for sites with Delivery Controllers and VDAversions 7.14 or later.
Disk monitoring graphs, average IOPS, and disk latency are important performance measurementsthat help youmonitor and troubleshoot issues related to VDA disks. The Average IOPS graph displaysthe average number of reads and writes to a disk. Select Disk Latency to see a graph of the delaybetween a request for data and its return from the disk, measured in milliseconds.
SelectGPUUtilization to see percentage utilization of the GPU, the GPUmemory, and of the Encoderand the Decoder to troubleshoot GPU‑related issues on Server or Single‑session OS VDAs. The GPUUtilization graphs are available only for VDAs running 64‑bit Windows with NVIDIA Tesla M60 GPUs,and running Display Driver version 369.17 or later.The VDAsmust haveHDX 3DPro enabled to provide GPU acceleration. Formore information, see GPUacceleration for Windows Single‑session OS and GPU acceleration for Windows Multi‑session OS.When a VDA accesses more than one GPU, the utilization graph displays the average of the GPU met‑rics collected from the individual GPUs. The GPUmetrics are collected for the entire VDA and not forindividual processes.
Machine‑based historical resource utilization
In theMachine Utilization panel, click View Historical Utilization to view the historical usage of re‑sources on the selectedmachine.
© 1999–2022 Citrix Systems, Inc. All rights reserved. 929

Citrix Virtual Apps and Desktops
The utilization graphs include critical performance counters of CPU, memory, peak concurrent ses‑sions, average IOPS, and disk latency.
Note:The Monitoring policy setting, Enable Process Monitoring, must be set to Allowed to collect,and display data in the Top 10 Processes table on the Historic Machine Utilization page. Thecollection is prohibited by default.
The CPU andmemory utilization, average IOPS, and disk latency data is collected by default. You candisable the collection by using the Enable Resource Monitoring policy setting.
© 1999–2022 Citrix Systems, Inc. All rights reserved. 930

Citrix Virtual Apps and Desktops
1. From the Machine Utilization panel in the Machine Details view, select View Historical Uti‑lization.
2. In theHistorical Machine Utilization page, set Time Period to view usage for the last 2 hours,24 hours, 7 days, month, or year.
Note:Average IOPS and disk latency usage data are available only for the last 24 hours, month,and year ending now. Custom end time is not supported.
3. Click Apply and select the required graphs.
4. Hoveroverdifferent sectionsof thegraph toviewmore information for the selected timeperiod.
For example, if you select Last 2 hours, the baseline period is the 2 hours prior to the selected timerange. View the CPU, memory, and session trend over the last 2 hours and the baseline time. If youselect Last month, the baseline period is the previous month. Select to view the Average IOPS anddisk latency over the last month and the baseline time.
1. Click Export to export the resource utilization data for the selected period. For more informa‑tion, see Export reports section in Monitor Deployments.
© 1999–2022 Citrix Systems, Inc. All rights reserved. 931

Citrix Virtual Apps and Desktops
2. Below the graphs, the table lists the top 10 processes based on CPU ormemory utilization. Youcan sort by any of the columns, which show Application Name, User Name, Session ID, AverageCPU, Peak CPU, AverageMemory, andPeakMemory over the selected time range. The IOPS andDisk Latency columns cannot be sorted.
Note:The session ID for system processes is displayed as “0000”.
3. To view the historical trend on the resource consumption of a particular process, drill into anyof the Top 10 processes.
Machine Console access
You can access the consoles of Single‑session and Multi‑session OS machines hosted on XenServerVersion 7.3 and later directly from Director. This way, you don’t require XenCenter to troubleshootissues on XenServer hosted VDAs. For this feature to be available:
• Delivery Controller of Version 7.16 or later is required.• The XenServer hosting themachinemust be of Version 7.3 or later andmust be accessible fromthe Director UI.
To troubleshoot a machine, click the Console link in the corresponding Machine Details panel. Afterauthentication of the host credentials youprovide, themachine console opens in a separate tab usingnoVNC, a web‑based VNC client. You now have keyboard andmouse access the console.
© 1999–2022 Citrix Systems, Inc. All rights reserved. 932
Citrix Virtual Apps and Desktops
Note:
• This feature is not supported on Internet Explorer 11.• If the mouse pointer on the machine console is misaligned, see CTX230727 for steps to fixthe issue.
• Director launches console access in a new tab, ensure that your browser settings allowpop‑ups.
• For security reasons, Citrix recommends that you install SSL certificates on your browser.
Microsoft RDS license health
You can view the status of Microsoft RDS license in the Machine Details panel in theMachine Detailsand theUser Details page for Multi‑session OSmachines.
© 1999–2022 Citrix Systems, Inc. All rights reserved. 933

Citrix Virtual Apps and Desktops
One of the following messages is displayed:
• License available• Not configured properly (warning)• License error (error)• Incompatible VDA version (error)
Note:The RDS license health status for machines under grace period with valid license displays a Li‑cense availablemessage in green. Renew your license before they expire.
For warning and error messages, hover over the info icon to view additional information as given in
© 1999–2022 Citrix Systems, Inc. All rights reserved. 934

Citrix Virtual Apps and Desktops
the following table.
Message Type Messages in Director
Error Available for VDAs version 7.16 and later.
Error New RDS connections are not allowed.
Error RDS licensing has exceeded its grace period.
Error A License Server is not configured for therequired OS level with the Per Device ClientAccess licensing type.
Error The configured License Server is incompatiblewith the RDS Host OS level with the Per DeviceClient Access licensing type.
Warning Personal Terminal Server is not a valid RDSlicensing type in a Citrix Virtual Apps andDesktops deployment.
Warning Remote Desktop for Administration is not avalid licensing type in a Citrix Virtual Apps andDesktops deployment.
Warning An RDS licensing type is not configured.
Warning The Domain Controller or License Server isunreachable with the Per User Client AccessRDS licensing type.
Warning With the Per Device Client Access licensingtype, the Client Device license cannot bedetermined since the license server for therequired OS level is unreachable.
Note:This feature is applicable only for Microsoft RDS CAL (Client Access License).
Troubleshoot user issues
April 14, 2021
Use the Director’sHelp Desk view (Activity Manager page) to view information about the user:
© 1999–2022 Citrix Systems, Inc. All rights reserved. 935

Citrix Virtual Apps and Desktops
• Check for details about the user’s logon, connection, and applications.• Shadow the user’s machine.• Record the ICA session.• Troubleshoot the issue with the recommended actions in the following table, and, if needed,escalate the issue to the appropriate administrator.
Troubleshooting tips
User issue Suggestions
Logon takes a long time or fails intermittentlyor repeatedly
Diagnose user logon issues
Session startup takes a long time or failsintermittently or repeatedly
Diagnose session startup issues
Application is slow or does not respond Resolve application failures
Connection failed Restore desktop connections
Session is slow or not responding Restore sessions
Record sessions Record sessions
Video is slow or poor quality Run HDX channel system reports
Note:To make sure that the machine is not in maintenance mode, from the User Details view, reviewthe Machine Details panel.
Search tips
When you type the user’s name in a Search field, Director searches for users in the Active Directory forusers across all sites configured to support Director.
When you type a multiuser machine name in a Search field, Director displays the Machine Details forthe specified machine.
When you type an endpoint name in a Search field, Director uses the unauthenticated (anonymous)and authenticated sessions that are connected to a specific endpoint, which enables troubleshoot‑ing unauthenticated sessions. Ensure that endpoint names are unique to enable troubleshooting ofunauthenticated sessions.
The search results also include users who are not currently using or assigned to a machine.
• Searches are not case‑sensitive.
© 1999–2022 Citrix Systems, Inc. All rights reserved. 936

Citrix Virtual Apps and Desktops
• Partial entries produce a list of possible matches.• After you type a few letters of a two‑part name (user name, family name and first name, or dis‑play name), separated by a space, the results include matches for both strings. For example, ifyou type jo rob, the results might include strings such as “John Robertson” or Robert, Jones.
To return to the landing page, click the Director logo.
Access Citrix Insight Services
You can access Citrix Insight Services (CIS) from theUser drop‑down list in Director to access extra di‑agnostic insights. The data available in CIS comes from sources including Call Home and Citrix Scout.
Upload troubleshooting information to Citrix Technical Support
Run Citrix Scout from a single Delivery Controller or VDA to capture key data points and Citrix Diag‑nostics Facility (CDF) traces to troubleshoot selected computers. Scout offers the ability to securelyupload the data to the CIS platform to assist Citrix Technical Support on troubleshooting. Citrix Tech‑nical Support uses the CIS platform to reduce the time to resolve customer‑reported issues.
Scout is installed with Citrix Virtual Apps and Desktops components. Depending on the version ofWindows, Scout appears in the Windows Start menu or Start Screen when you install or upgrade toCitrix Virtual Apps and Desktops.
To start Scout, from the Start menu or Start Screen, select Citrix > Citrix Scout.
For information on using and configuring Scout, and for FAQ, see CTX130147.
Diagnose session startup issues
April 14, 2021
In addition to the logon process phases mentioned in the Diagnose user logon issues section, Direc‑tor displays the session startup duration. This is divided into Workspace App Session Startup andVDA Session Startup duration on the User Details page andMachine Details pages. These two dura‑tions further contain individual phases whose startup durations are also displayed. This data helpsyou to understand and troubleshoot high session startup duration. Further, the time duration foreach phase involved in the session startup helps in troubleshooting issues associated with individualphases. For example, if the Drive Mapping time is high, you can check to see whether all the validdrives are mapped correctly in the GPO or script. This feature is available on Delivery Controller ver‑sion 7 1906 and later and VDAs 1903 and later.
© 1999–2022 Citrix Systems, Inc. All rights reserved. 937

Citrix Virtual Apps and Desktops
Prerequisites
Ensure that the following prerequisites are met for session startup duration data to be displayed:
• Delivery Controller 7 1906 or later.• VDA 1903 or later.• Citrix End User Experience Monitoring (EUEM) service must be running on the VDA.
Limitations
The following limitations apply when Director displays the session startup duration data.
• Session startup duration is available only for HDX sessions.• For session launches from iOS and Android OS, only VDA Startup Duration is available.• IFDCD is available only when Workspace App is detected while launching from a browser.• For session launches frommacOS, IFDCD is available for Workspace App 1902 or later only.• For session launches from Windows OS, IFDCD is available for Workspace app 1902 and later.For earlier versions, IFDCD is displayed for only app launches from the browser withWorkspaceapp detected.
Notes:
• If you face issues in the sessions startup duration display after the prerequisites are met,view the Director server and VDA logs as described in CTX130320.For shared sessions (multiple applications launched in the same session), the WorkspaceAppStartupmetrics are displayed for the latest connection or the latest application launch.
• Some metrics in VDA Session Startup are not applicable on reconnects. In such cases, amessage is displayed.
© 1999–2022 Citrix Systems, Inc. All rights reserved. 938

Citrix Virtual Apps and Desktops
Workspace App session startup phases
Session Startup Client Duration (SSCD)
When this metric is high, it indicates a client‑side issue that is causing long start times. Review subse‑quent metrics to determine the probable root cause of the issue. SSCD starts as close as possible tothe time of the request (mouse click). It ends when the ICA connection between the client device andVDA has been established. In the case of a shared session, this duration is much smaller, as much ofthe setup costs associatedwith the creation of a new connection to the server are not incurred. At thefollowing level down, there are several detailed metrics available.
ICA File Download Duration (IFDCD)
This is the time taken for the client to download the ICA file from the server. The overall process is asfollows:
1. The user clicks a resource (application or desktop) in the Workspace Application.2. A request from the user is sent to the StoreFront through the Citrix Gateway (if configured),
which sends the request to the Delivery Controller.3. The Delivery Controller finds an availablemachine for the request and sends themachine infor‑
mation andother details to StoreFront. Also, StoreFront requests and receives a one‑time ticketfrom the Secure Ticket Authority.
4. StoreFront generates an ICA File and sends it to the user via Citrix Gateway (if configured).
IFDCD represents the time it takes for the complete process (steps 1–4). The IFDCD duration stopscounting when the client receives the ICA file.
LPWD is the StoreFront component of the process.
If IFDCD is high (but LPWD is normal), the server‑side processing of the launch was successful, butthere were communication issues between the client device and the StoreFront. This results fromnetwork issues between the twomachines. So you can troubleshoot potential network issues first.
Launch PageWeb Server Duration (LPWD)
This is the time taken to process the launch page (launch.aspx) on the StoreFront. If LPWD is high,there might be a bottleneck on the StoreFront.
Possible causes include:
• High load on the StoreFront. Try to identify the cause of the slowdown by checking the InternetInformation Services (IIS) logs and monitoring tools, Task Manager, Performance Monitor andso on.
© 1999–2022 Citrix Systems, Inc. All rights reserved. 939
Citrix Virtual Apps and Desktops
• StoreFront is having issues communicating with other components such as the Delivery Con‑troller. Check if the network connection between StoreFront and Delivery Controller is slow orsome Delivery Controllers are down or overloaded.
Name ResolutionWeb Server Duration (NRWD)
This is the time taken by the Delivery Controller to resolve the name of a published application/desk‑top to a VDA Machine IP Address.
When this metric is high, it indicates that the Delivery Controller is taking a long time to resolve thename of a published application to an IP address.
Possible causes include a problem on the client, issues with the Delivery Controller, such as the Deliv‑ery Controller being overloaded, or a problemwith the network link between them.
Ticket ResponseWeb Server Duration (TRWD)
This duration indicates the time it takes to get a ticket (if necessary) from the Secure Ticket Authority(STA) Server or Delivery Controller. When this duration is high, it indicates that the STA server or theDelivery Controller are overloaded.
Session Look‑up Client Duration (SLCD)
This duration represents the time taken to query every session to host the requested published appli‑cation. The check is performed on the client to determinewhether an existing session can handle theapplication launch request. The method used depends on whether the session is new or shared.
Session Creation Client Duration (SCCD)
This duration represents the time taken to create a session, from themomentwfica32.exe (or a similarequivalent file) is launched to the time when the connection is established.
VDA session startup phases
Session Startup VDA Duration (SSVD)
This duration is the high‑level server‑side connection start‑upmetric that encompasses the time VDAtakes to perform the entire start‑up operation. When thismetric is high, it indicates that there is a VDAissue increasing session start times. This includes the time spent on the VDA performing the entirestart‑up operation.
© 1999–2022 Citrix Systems, Inc. All rights reserved. 940

Citrix Virtual Apps and Desktops
Credentials Obtention VDA Duration (COVD)
The time taken for the VDA to obtain the user credentials.
This duration can increase artificially if a user fails to provide credentials in a timely manner. So, it isnot included in the VDA Startup Duration. This time is likely to be a significant only if manual login isbeing used and the server side credentials dialog is displayed (or if a legal notice is displayed beforelogin commences).
Credentials Authentication VDA Duration (CAVD)
This is the time taken by the VDA to authenticate the user’s credentials against the authenticationprovider. They can be Kerberos, Active Directory, or a Security Support Provider Interface (SSPI).
Group Policy VDA Duration (GPVD)
This duration is the time taken to apply group policy objects during logon.
Login Script Execution VDA Duration (LSVD)
This is the time taken by the VDA to run the user’s login scripts.
Considermaking asynchronous the user or group’s login scripts. Consider optimizing any applicationcompatibility scripts or use environment variables instead.
Profile Load VDA Duration (PLVD)
This is the time taken by the VDA to load the user’s profile.
If this duration is high, consider yourUser Profile configuration. Roamingprofile size and location con‑tribute to slow session starts. When a user logs on to a session where Terminal Services roaming pro‑files andhome folders are enabled, the roamingprofile contents and access to that folder aremappedduring the logon. This takes extra resources. Sometimes, this can consume significant amount of theCPU usage. Consider using the Terminal Services home folders with redirected personal folders tomitigate this problem. In general, consider using Citrix Profile Management to manage user profilesin Citrix environments. If you are using Citrix Profile Management and have slow logon times, checkif your antivirus software is blocking the Citrix Profile Management tool.
Printer Creation VDA Duration (PCVD)
This is the time taken for the VDA tomap the user’s client printers synchronously. If the configurationis set for printer creation to be performed asynchronously, the value is not recorded for PCVD as itdoes not impact completion of the session startup.
© 1999–2022 Citrix Systems, Inc. All rights reserved. 941

Citrix Virtual Apps and Desktops
Excessive time spent inmappingprinters is often the result of the printer auto creationpolicy settings.The number of printers added locally on the users’ client devices and your printing configuration candirectly affect your session start times. When a session starts, Citrix Virtual Apps andDesktops have tocreate every locallymappedprinter on the client device. Consider reconfiguring your printingpoliciesto reduce the number of printers that get created, specifically when users have many local printers.To do this, edit the Printer Auto creation policy in Delivery Controller and Citrix Virtual Apps and Desk‑tops.
Drive Mapping VDA Duration (DMVD)
This is the time taken by the VDA to map the user’s client drives, devices, and ports.
Ensure that your basepolicies include settings todisable unused virtual channels. For example, audioor COM port mapping, to optimize the ICA protocol and improve overall session performance.
Application/Desktop Launch VDA Duration (ALVD/DLVD)
Thisphase is a combinationofUserinit andShell duration. Whenauser logson toaWindowsmachine,winlogon runs userinit.exe. Usernit.exe runs logon scripts, re‑establishes network connections, andthen starts Explorer.exe. Userinit represents the duration between the start of userinit.exe to the startof the user interface for the virtual desktop or application. The Shell duration is the time between theinitialization of the user interface to the time the user receives keyboard andmouse control.
Session Creation VDA Duration (SCVD)
This time includes any miscellaneous delay in session creation time on VDA.
Diagnose user logon issues
April 14, 2021
Use Logon Duration data to troubleshoot user logon issues.
Logon duration ismeasured only for initial connections to a desktop or app using HDX. This data doesnot include users trying to connect with Remote Desktop Protocol or reconnect from disconnectedsessions. Specifically, logon duration is notmeasuredwhen a user initially connects using a non‑HDXprotocol and reconnects using HDX.
In the User Details view, the duration is displayed as a number value. Below this number, the time thelogon occurred is displayed and a graph of the phases of the logon process.
© 1999–2022 Citrix Systems, Inc. All rights reserved. 942

Citrix Virtual Apps and Desktops
As users logon to Citrix Virtual Apps and Desktops, the Monitor Service tracks the phases of the logonprocess. The phases begin from the time the user connects from Citrix Workspace app to the timewhen the desktop is ready to use.
The large number on the left is the total logon time. This is calculated by combining the time spentestablishing the connection and obtaining a desktop from the Delivery Controller with the time spentto authenticate and log on to a virtual desktop. The duration information is presented in seconds (orfractions of seconds).
Prerequisites
Ensure that the following prerequisites are met for logon duration data and drilldowns to appear:
1. Install Citrix User Profile Manager and Citrix User Profile Manager WMI Plugin on the VDA.2. Ensure that the Citrix Profile Management Service is running.3. For XenApp and XenDesktop sites 7.15 and earlier, disable the GPO setting, Do not process the
legacy run list.4. Audit process tracking must be enabled for Interactive Session drilldown.5. For GPO drilldown, increase the size of Group Policy operational logs.
Notes:
• Logon duration is supported only on the default Windows shell (explorer.exe) and not oncustom shells.
• Logon duration for Remote PC Access is available only when Citrix User Profile Managerand the Citrix User Profile Manager WMI Plugin are installed as extra components dur‑ing Remote PC Access installation. For more information, see Step 4 in Remote PC Accessconfiguration and sequence considerations.
Steps to troubleshoot user logon issues
1. From theUser Details view, troubleshoot the logon state using the Logon Duration panel.• If the user is logging on, the view reflects the process of logging on.• If the user is logged on, the Logon Duration panel displays the time it took for the user tolog on to the current session.
2. Examine the phases of the logon process.
Logon process phases
Brokering
Time taken to decide which desktop to assign to the user.
© 1999–2022 Citrix Systems, Inc. All rights reserved. 943

Citrix Virtual Apps and Desktops
VM start
If the session requires a machine start, VM start is the time taken to start the virtual machine.
HDX connection
Time taken to complete the steps required in setting up the HDX connection from the client to thevirtual machine.
Authentication
Time taken to complete authentication to the remote session.
GPOs
If Group Policy settings are enabled on the virtual machines, this is the time taken to applygroup policy objects during logon. The drill‑down of the time taken to apply each policy asper the CSEs (Clients‑Side Extension) is available as a tooltip when you hover on the GPO bar.
Click Detailed Drilldown to see a table with the policy status, and the corresponding GPO name.The time durations in the drilldown represent the CSE processing time only and do not add up to thetotal GPO time. You can copy the drill‑down table for further troubleshooting or use in reports. TheGPO time for the policies is retrieved from Event Viewer logs. The logs can get overwritten dependingon the memory allocated for the operational logs (default size is 4 MB). For more information aboutincreasing the log size for the operational logs, see the Microsoft TechNet article Configuring theEvent Logs.
© 1999–2022 Citrix Systems, Inc. All rights reserved. 944
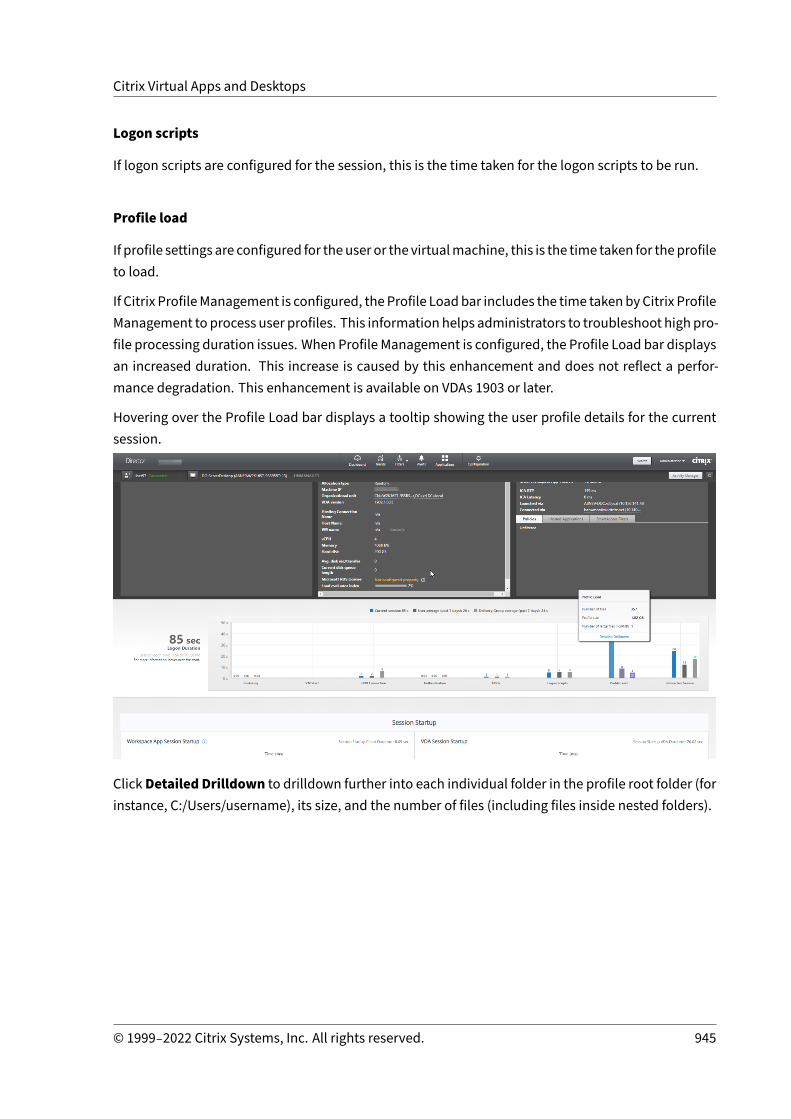
Citrix Virtual Apps and Desktops
Logon scripts
If logon scripts are configured for the session, this is the time taken for the logon scripts to be run.
Profile load
If profile settings are configured for theuser or the virtualmachine, this is the time taken for theprofileto load.
If Citrix ProfileManagement is configured, the Profile Loadbar includes the time takenbyCitrix ProfileManagement to process user profiles. This information helps administrators to troubleshoot high pro‑file processing duration issues. When Profile Management is configured, the Profile Load bar displaysan increased duration. This increase is caused by this enhancement and does not reflect a perfor‑mance degradation. This enhancement is available on VDAs 1903 or later.
Hovering over the Profile Load bar displays a tooltip showing the user profile details for the currentsession.
ClickDetailed Drilldown to drilldown further into each individual folder in the profile root folder (forinstance, C:/Users/username), its size, and the number of files (including files inside nested folders).
© 1999–2022 Citrix Systems, Inc. All rights reserved. 945

Citrix Virtual Apps and Desktops
Profile drilldown is available on Delivery Controller version 7 1811 or later and VDAs 1811 or later.Using the profile drilldown information, you can resolve issues involving a high profile load time. Youcan:
• Reset the user profile• Optimize the profile by removing unwanted large files• Reduce the number of files to reduce the network load• Use profile streaming
By default, all folders in the profile root are displayed in the drilldown. To hide folder visibility, editthe following registry value on the VDAmachine:
Warning:
Adding and editing the registry incorrectly can cause serious problems that might require youto reinstall your operating system. Citrix does not guarantee that problems resulting from theincorrect use of Registry Editor can be solved. Use Registry Editor at your own risk. Be sure toback up the registry before you edit it.
1. On theVDA,addanewregistry valueProfileFoldersNameHiddenatHKEY_LOCAL_MACHINE\Software\Citrix\Director\2. Set the value to 1. This value must be a DWORD (32‑bit) value. Folder names visibility is now
disabled.3. To make the folder names visible again, set the value to 0.
Note:You can use GPO or PowerShell commands to apply the registry value change on multiple ma‑chines. For more information about using GPO to deploy registry changes, see the blog.
© 1999–2022 Citrix Systems, Inc. All rights reserved. 946

Citrix Virtual Apps and Desktops
Additional information
• Profile drilldown does not consider redirected folders.• The NTUser.dat files in the root folder might not be visible to end users. However, they are in‑cluded in the profile drilldown and displayed in the list of files in Root Folder.
• Certain hidden files in the AppData folder are not included in Profile drilldown.• Number of files and profile size datamight notmatchwith the data in the Personalization paneldue to certain Windows limitations.
Interactive Session
This is the time taken to “hand off” keyboard and mouse control to the user after the user profilehas been loaded. It is normally the longest duration out of all the phases of the logon process andis calculated as Interactive Session duration = Desktop Ready Event Timestamp (EventId 1000on VDA) ‑ User Profile Loaded Event Timestamp (EventId 2 on VDA). Interactive Session has threesubphases: Pre‑userinit, Userinit, and Shell. Hover over Interactive Session to see a tooltip showingthe following:
• subphases• time taken for each subphase• total cumulative time delay between these subphases• link to documentation.
Note:
This feature is available on VDAs 1811 and later. If you have launched sessions on sites earlierthan 7.18 and then upgraded to 7.18 or later, a ‘Drilldown unavailable due to server error’ mes‑sage is displayed. However, if you have launched sessions after upgrading, no error message isdisplayed.
To view the time duration of each subphase, enable Audit process tracking on the VM (VDA). When theAudit process tracking is disabled (default), the time duration of Pre‑userinit and the combined timeduration of Userinit and Shell are displayed. You can enable Audit process tracking through a GroupPolicy Object (GPO) as follows:
1. Create a GPO and edit it using the GPO editor.2. Go to Computer Configuration > Windows Settings > Security Settings > Local Policies >
Audit Policy.3. On the right pane, double‑click Audit process tracking.4. Select Success and click OK.5. Apply this GPO to the required VDAs or Group.
For more information about Audit process tracking and enabling or disabling it, see Audit processtracking in the Microsoft documentation.
© 1999–2022 Citrix Systems, Inc. All rights reserved. 947
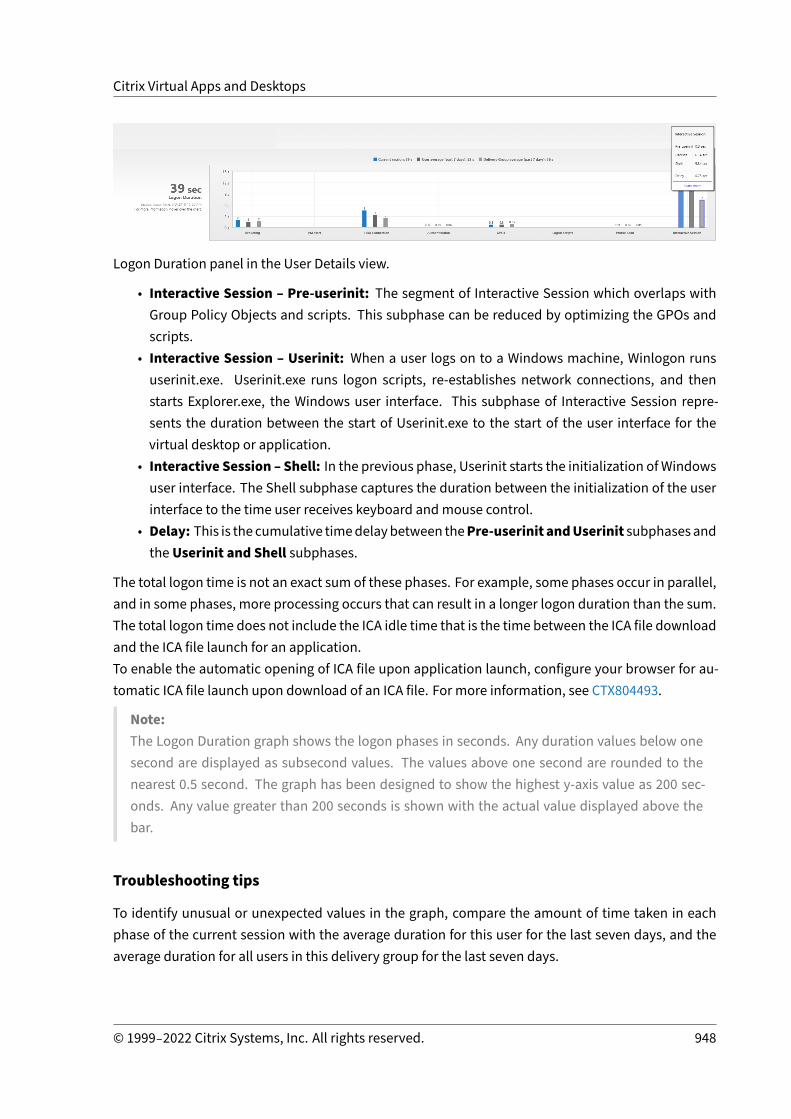
Citrix Virtual Apps and Desktops
Logon Duration panel in the User Details view.
• Interactive Session – Pre‑userinit: The segment of Interactive Session which overlaps withGroup Policy Objects and scripts. This subphase can be reduced by optimizing the GPOs andscripts.
• Interactive Session – Userinit: When a user logs on to a Windows machine, Winlogon runsuserinit.exe. Userinit.exe runs logon scripts, re‑establishes network connections, and thenstarts Explorer.exe, the Windows user interface. This subphase of Interactive Session repre‑sents the duration between the start of Userinit.exe to the start of the user interface for thevirtual desktop or application.
• Interactive Session – Shell: In the previous phase, Userinit starts the initialization of Windowsuser interface. The Shell subphase captures the duration between the initialization of the userinterface to the time user receives keyboard andmouse control.
• Delay: This is the cumulative timedelaybetween thePre‑userinit andUserinit subphases andtheUserinit and Shell subphases.
The total logon time is not an exact sum of these phases. For example, some phases occur in parallel,and in some phases, more processing occurs that can result in a longer logon duration than the sum.The total logon time does not include the ICA idle time that is the time between the ICA file downloadand the ICA file launch for an application.To enable the automatic opening of ICA file upon application launch, configure your browser for au‑tomatic ICA file launch upon download of an ICA file. For more information, see CTX804493.
Note:The Logon Duration graph shows the logon phases in seconds. Any duration values below onesecond are displayed as subsecond values. The values above one second are rounded to thenearest 0.5 second. The graph has been designed to show the highest y‑axis value as 200 sec‑onds. Any value greater than 200 seconds is shown with the actual value displayed above thebar.
Troubleshooting tips
To identify unusual or unexpected values in the graph, compare the amount of time taken in eachphase of the current session with the average duration for this user for the last seven days, and theaverage duration for all users in this delivery group for the last seven days.
© 1999–2022 Citrix Systems, Inc. All rights reserved. 948
Citrix Virtual Apps and Desktops
Escalate as needed. For example, if the VM startup is slow, the issuemight be in the hypervisor, so youcan escalate it to the hypervisor administrator. Or, if the brokering time is slow, you can escalate theissue to the site administrator to check the load balancing on the Delivery Controller.
Examine unusual differences, including:
• Missing (current) logon bars• Major discrepancy between the current duration and this user’s average duration. Causes in‑clude:
– A new application was installed.– An operating system update occurred.– Configuration changes were made.– Profile size of the user is high. In this case, the Profile Load is high.
• Major discrepancy between the user’s log on numbers (current and average duration) and thedelivery group average duration.
If needed, click Restart to observe the user’s logon process to troubleshoot issues, such as VM Startor Brokering.
Shadow users
April 14, 2021
FromDirector, use the shadow user feature to view or work directly on a user’s virtual machine or ses‑sion. You can shadow both Windows or and Linux VDAs. The user must be connected to the machinethat you want to shadow. Verify this by checking the machine name listed in the user title bar.
Director launches shadowing in a new tab, update your browser settings to allow pop‑ups from theDirector URL.
Access the shadowing feature from the User Details view. Select the user session, and click Shadowin the Activity Manager view or the Session Details panel.
Shadowing Linux VDAs
Shadowing is available for LinuxVDAsVersion7.16or and later running theRHEL7.3orUbuntuVersion16.04 Linux distributions.
Note:
• The VDAmust be accessible from the Director UI for shadowing towork. Hence, shadowingis possible only for Linux VDAs in the same intranet as the Director client.
• Director uses FQDN to connect to the target Linux VDA. Ensure that the Director client can
© 1999–2022 Citrix Systems, Inc. All rights reserved. 949

Citrix Virtual Apps and Desktops
resolve the FQDN of the Linux VDA.• The VDAmust have the python websockify and x11vnc packages installed.• noVNC connection to the VDA uses the WebSocket protocol. By default, ws:// WebSocketprotocol is used. For security reasons, Citrix recommends that you use the secure wss://protocol. Install SSL certificates on each Director client and Linux VDA.
Follow the instructions in Session Shadowing to configure your VDA for shadowing.
1. After you click Shadow, the shadowing connection initializes and a confirmation prompt ap‑pears on the user device.
2. Instruct the user to click Yes to start the machine or session sharing.3. The administrator can only view the shadowed session.
ShadowingWindows VDAs
Windows VDA sessions are shadowed using Windows Remote Assistance. Enable the User WindowsRemote Assistance feature while installing the VDA. For more information, see Enable or Disable fea‑tures.
1. After you click Shadow, the shadowing connection initializes and a dialog box prompts you toopen or save the .msrc incident file.
2. Open the incident file with the Remote Assistance Viewer, if not already selected by default. Aconfirmation prompt appears on the user device.
3. Instruct the user to click Yes to start the machine or session sharing.4. For more control, ask the user to share keyboard andmouse control.
Streamline Microsoft Internet Explorer browsers for shadowing
Configure your Microsoft Internet Explorer browser to automatically open the downloaded MicrosoftRemote Assistance (.msra) file with the Remote Assistance client.
To do this, you must enable the Automatic prompting for file downloads setting in the Group Policyeditor:
Computer Configuration > Administrative Templates > Windows Components > Internet Explorer >Internet Control Panel > Security Page > Internet Zone > Automatic prompting for file downloads.
By default, this option is enabled for sites in the Local intranet zone. If the Director site is not in theLocal intranet zone, consider manually adding the site to this zone.
Sendmessages to users
April 14, 2021
© 1999–2022 Citrix Systems, Inc. All rights reserved. 950
Citrix Virtual Apps and Desktops
From Director, send a message to a user who is connected to one or more machines. Use this featureto send immediate notices about administrative actions such as impending desktop maintenance,machine logoffs and restarts, and profile resets.
1. In the Activity Manager view, select the user and click Details.2. In the User Details view, locate the Session Details panel and click Send Message.3. Type your message information in the Subject and Message fields, and click Send.
If themessage is sent successfully, a confirmationmessage appears in Director. Themessage appearsin the user’s machine.
If the message is not sent successfully, an error message appears in Director. Troubleshoot the prob‑lemaccording to the errormessage. When you have finished, type the subject andmessage text againand click Try again.
Resolve application failures
April 14, 2021
In the Activity Manager view, click the Applications tab. You can view all the applications on all ma‑chines to which this user has access, including local and hosted applications for the currently con‑nectedmachine, and the status of each.
Note:
If the Applications tab is grayed out, contact an administrator with the permission to enable thetab.
The list includes only those applications that were launched within the session.
For Multi‑session OS machines and Single‑session OS machines, applications are listed for each dis‑connected session. If the user is not connected, no applications are displayed.
Action Description
End the application that is not responding Choose the application that is not respondingand click End Application. Once theapplication is terminated, ask the user tolaunch it again.
© 1999–2022 Citrix Systems, Inc. All rights reserved. 951

Citrix Virtual Apps and Desktops
Action Description
End processes that are not responding If you have the required permission, click theProcesses tab. Select a process that is relatedto the application or using a high amount ofCPU resources or memory, and click EndProcess. However, if you do not have therequired permission to terminate the process,attempting to end a process fails.
Restart the user’s machine For Single‑session OSmachines only, for theselected session, click Restart. Alternatively,from the Machine Details view, use the powercontrols to restart or shut down the machine.Instruct the user to log on again so that youcan recheck the application. For Multi‑sessionOSmachines, the restart option is notavailable. Instead, log off from the user and letthe user log on again.
Put the machine into maintenance mode If the machine’s image needs maintenance,such as a patch or other updates, put themachine into maintenance mode. From theMachine Details view, click Details and turn onthe maintenance mode option. Escalate to theappropriate administrator.
Restore desktop connections
April 14, 2021
From Director, check the user’s connection status for the current machine in the user title bar.
If the desktop connection failed, the error that caused failure is displayed and can help you decidehow to troubleshoot.
Action Description
Ensure that the machine is not in maintenancemode
On the User Details page, make suremaintenance mode is turned off.
© 1999–2022 Citrix Systems, Inc. All rights reserved. 952

Citrix Virtual Apps and Desktops
Action Description
Restart the user’s machine Select the machine and click Restart. Use thisoption if the user’s machine is unresponsive orunable to connect. For example, when themachine is using an unusually high amount ofCPU resources, which canmake the CPUunusable.
Restore sessions
April 14, 2021
If a session becomes disconnected, it is still active and its applications continue to run, but the userdevice is no longer communicating with the server.
In the User Details view, troubleshoot session failures in the Session Details panel. You can view thedetails of the current session, indicated by the session ID.
Action Description
End applications or processes that are notresponding
Click the Applications tab. Select anyapplication that is not responding and clickEnd Application. Similarly, select anycorresponding process that is not respondingand click End Process. Also, end processesthat are consuming an unusually high amountof memory or CPU resources, which canmakethe CPU unusable.
Disconnect the Windows session Click Session Control and then selectDisconnect. This option is available only forbrokered Multi‑session OSmachines. Fornon‑brokered sessions, the option is disabled.
Log off from the user’s session Click Session Control and then select Log Off.
To test the session, the user can attempt to log back on to it. You can also shadow the user to moreclosely monitor this session.
© 1999–2022 Citrix Systems, Inc. All rights reserved. 953
Citrix Virtual Apps and Desktops
Run HDX channel system reports
April 14, 2021
In theUserDetails view, check the status of theHDX channels on theuser’smachine in theHDXpanel.This panel is available only if the user machine is connected using HDX.
If amessage appears indicating that the information is not currently available, wait for oneminute forthe page to refresh, or select the Refresh button. HDX data takes a little longer to update than otherdata.
Click an error or warning icon for more information.
Tip:
You can view information about other channels in the same dialog box by clicking the left andright arrows in the left corner of the title bar.
HDX channel system reports are usedmainly by Citrix Support to troubleshoot further.
1. In the HDX panel, click Download System Report.2. You can view or save the .xml report file.
• To view the .xml file, click Open. The .xml file appears in the same window as the Directorapplication.
• To save the .xml file, click Save. TheSaveAswindowappears, prompting you for a locationon the Director machine to download the file to.
Reset a user profile
April 14, 2021
Caution:
When a profile is reset, the user’s folders and files are saved and copied to the new profile. How‑ever, most user profile data is deleted (for example, the registry is reset and application settingsmight be deleted).
1. FromDirector, search for the user whose profile youwant to reset and select this user’s session.2. Click Reset Profile.3. Instruct the user to log off from all sessions.4. Instruct the user to log back on. The folders and files that were saved from the user’s profile are
copied to the new profile.
© 1999–2022 Citrix Systems, Inc. All rights reserved. 954
Citrix Virtual Apps and Desktops
Important:
If the user has profiles on multiple platforms (such as Windows 8 and Windows 7), instruct theuser to log back on first to the same desktop or app that the user reported as a problem. Thisensures that the correct profile is reset. If the profile is a Citrix user profile, the profile is alreadyreset by the time the user’s desktop appears. If the profile is a Microsoft roaming profile, thefolder restoration might still be in progress for a brief time. The user must stay logged on untilthe restoration is complete.
The preceding steps assume you are using Citrix Virtual Desktops (Desktop VDA). If you are using CitrixVirtual Desktops (Server VDA) you need to be logged on to perform the profile reset. The user thenneeds to log off, and log back on to complete the profile reset.
If the profile is not successfully reset (for example, the user cannot successfully log back on to themachine or some of the files are missing), youmust manually restore the original profile.
The folders (and their files) from the user’s profile are saved and copied to the new profile. They arecopied in the listed order:
• Desktop• Cookies• Favorites• Documents• Pictures• Music• Videos
Note:
In Windows 8 and later, cookies are not copied when profiles are reset.
How reset profiles are processed
Any Citrix user profile or Microsoft roaming profile can be reset. After the user logs off and you selectthe reset command (either in Director or using the PowerShell SDK), Director first identifies the userprofile in use and issues an appropriate reset command. Director receives the information throughProfile Management, including information about the profile size, type, and logon timings.
This diagram illustrates the process following the user logon, when a user profile is reset.
© 1999–2022 Citrix Systems, Inc. All rights reserved. 955

Citrix Virtual Apps and Desktops
The reset command issuedbyDirector specifies theprofile type. TheProfileManagement service thenattempts to reset a profile of that type and looks for the appropriate network share (user store). If theuser is processed by Profile Management, but receives a roaming profile command, it is rejected (orthe opposite way).
1. If a local profile is present, it is deleted.
2. The network profile is renamed.
3. The next action depends on whether the profile being reset is a Citrix user profile or a Microsoftroaming profile.
© 1999–2022 Citrix Systems, Inc. All rights reserved. 956

Citrix Virtual Apps and Desktops
For Citrix user profiles, the new profile is created using the Profile Management import rules.The foldersare copiedback to thenetworkprofile, and theuser can logonnormally. If a roamingprofile is used for the reset, any registry settings in the roamingprofile are preserved in the resetprofile. You can configure Profile Management so that a template profile overrides the roamingprofile, if necessary.
For Microsoft roaming profiles, Windows creates a new profile, and when the user logs on, thefolders are copiedback to theuserdevice. When theuser logsoffagain, thenewprofile is copiedto the network store.
Tomanually restore a profile after a failed reset
1. Instruct the user to log off from all sessions.2. Delete the local profile if one exists.3. Locate the archived folder on the network share that contains the date and time appended to
the folder name, the folder with a .upm_datestamp extension.4. Delete the current profile name. That is, the one without the upm_datestamp extension.5. Rename the archived folder using the original profile name. That is, remove the date and time
extension. You have returned the profile to its original, pre‑reset state.
To reset a profile using PowerShell SDK
You can reset a profile using the Broker PowerShell SDK.
New‑BrokerMachineCommand
Creates a command queued for delivery to a specific user, session, or machine. For more in‑formation about this cmdlet, see https://citrix.github.io/delivery‑controller‑sdk/Broker/New‑BrokerMachineCommand/.
Examples
See the following examples for details about how to use the PowerShell cmdlets to reset a profile:
Reset a Profile Management profile
• Suppose you want to reset the profile for user1. Use the New‑BrokerMachineCommand Power‑Shell command. For example:
– New-BrokerMachineCommand -Category UserProfileManager -CommandName"ResetUpmProfile"-DesktopGroups 1 -CommandData $byteArray -SendTriggerlogon -user domain1\user1
© 1999–2022 Citrix Systems, Inc. All rights reserved. 957

Citrix Virtual Apps and Desktops
Important:
The CommandData $byteArraymust be in the following format: <SID>[,<backup path>].If you do not provide the backup path, Profile Management generates a backup folder named bycurrent date and time.
Reset a Windows roaming profile
• Supposeyouwant to reset the roamingprofile foruser1. Use theNew‑BrokerMachineCommandPowerShell command. For example:
– New-BrokerMachineCommand -Category UserProfileManager -CommandName"ResetRoamingProfile"-DesktopGroups 1 -CommandData $byteArray -
SendTrigger logon -user domain1\user1
Record sessions
April 14, 2021
You can record ICA sessions using the Session Recording controls from theUser Details andMachineDetails screen in Director. This feature is available for customers on Premium sites.
To configure Session Recording on Director using the DirectorConfig tool, see the Configure Directorto use the Session Recording Server section in Create and activate recording policies.The Session Recording controls are available in Director only if the logged in user has the permissiontomodify the Session Recording policies. This permission can be set on the Session Recording Autho‑rization console as described in Create and activate recording policies.
Note:Changes made to the Session Recording settings through Director or the Session Recording Pol‑icy console take effect starting from the subsequent ICA session.
Session Recording controls in Director
You can enable Session Recording for a specific user on the Activity Manager or the User Detailsscreen. Subsequent sessions are recorded for the specific user on all supported servers.
You can:
• Turn ON (with notification) ‑ the user is notified about the session being recorded on logging onto the ICA session.
• Turn ON (without notification) ‑ the session is recorded silently without notifying the user.• Turn OFF ‑ disable recording of sessions for the user.
© 1999–2022 Citrix Systems, Inc. All rights reserved. 958

Citrix Virtual Apps and Desktops
The Policies Panel displays the name of the active Session Recording policy.
You can enable Session Recording for a specific machine from the Machine Details page. Subsequentsessions on the machine are recorded. TheMachine Details panel displays the status of the SessionRecording policy for the machine.
Feature compatibility matrix
April 14, 2021
Citrix Director 7 2006 is compatible with:
• Citrix Virtual Apps and Desktops 7 2003 and later• Citrix Virtual Apps and Desktops 7 1912 LTSR
© 1999–2022 Citrix Systems, Inc. All rights reserved. 959

Citrix Virtual Apps and Desktops
Within each site, although you can use Director with earlier versions of Delivery Controller, all thefeatures in the latest version of Director might not be available. Citrix recommends having Director,Delivery Controller, and the VDAs at the same version.
Note:
After you upgrade a Delivery Controller, you are prompted to upgrade the site when you openStudio. For more information, see the Upgrade Sequence section in Upgrade a deployment.
The first time you log in after a Director upgrade, a version check is performed on the configured sites.If any site is running a version of the Controller earlier than that of Director, amessage appears on theDirector console, recommending a site upgrade. Additionally, as long as the version of the site is olderthan that of Director, a note remains displayed on the Director Dashboard indicating this mismatch.
Specific Director featureswith theminimumversion of Delivery Controller (DC), VDA and other depen‑dent components required along with License Edition are listed below.
Director Version FeatureDependencies ‑ minversion required Edition
1909 Configure on‑premsites with CitrixAnalytics forPerformance
DC 7 1906 and VDA1906
All
1906 Session AutoReconnect
DC 7 1906 and VDA1906
All
1906 Session startupduration
DC 7 1906 and VDA1903
All
1906 Desktop probing DC 7 1906 and CitrixProbe Agent 1903
Premium
7.9 and later Citrix ProfileManagementDuration in ProfileLoad
VDA 1903 All
1811 Profile Drilldown DC 7 1811 and VDA1811
All
1811 Hypervisor AlertsMonitoring
DC 7 1811 Premium
1811 Application probing DC 7 1811 and CitrixApplication ProbeAgent 1811
Premium
© 1999–2022 Citrix Systems, Inc. All rights reserved. 960

Citrix Virtual Apps and Desktops
Director Version FeatureDependencies ‑ minversion required Edition
1811 Microsoft RDS licensehealth
DC 7 1811 and VDA7.16
All
1811 Key RTOP Datadisplay
DC 7 1811 and VDA1808
Premium
1808 Export of Filters data DC 7 1808 All
1808 Interactive Sessiondrill down
DC 7 1808 and VDA1808
All
1808 GPO drill down DC 7 1808 and VDA1808
All
1808 Machine historicaldata available usingOData API
DC 7 1808 All
7.18 Application probing DC 7.18 Premium (formerlyPlatinum)
7.18 Smart alert policies DC 7.18 Premium (formerlyPlatinum)
7.18 Health Assistant link None All
7.18 Interactive Sessiondrill‑down
None All
7.17 PIV smart cardauthentication
None All
7.16 Application Analytics DC 7.16 and VDA 7.15 All
7.16 OData API V.4 DC 7.16 All
7.16 Shadow Linux VDAusers
VDA 7.16 All
7.16 Domain local groupsupport
None All
7.16 Machine consoleaccess
DC 7.16 All
7.15 Application failuremonitoring
DC 7.15 and VDA 7.15 All
7.14 Application‑centrictroubleshooting
DC 7.13 and VDA 7.13 All
© 1999–2022 Citrix Systems, Inc. All rights reserved. 961
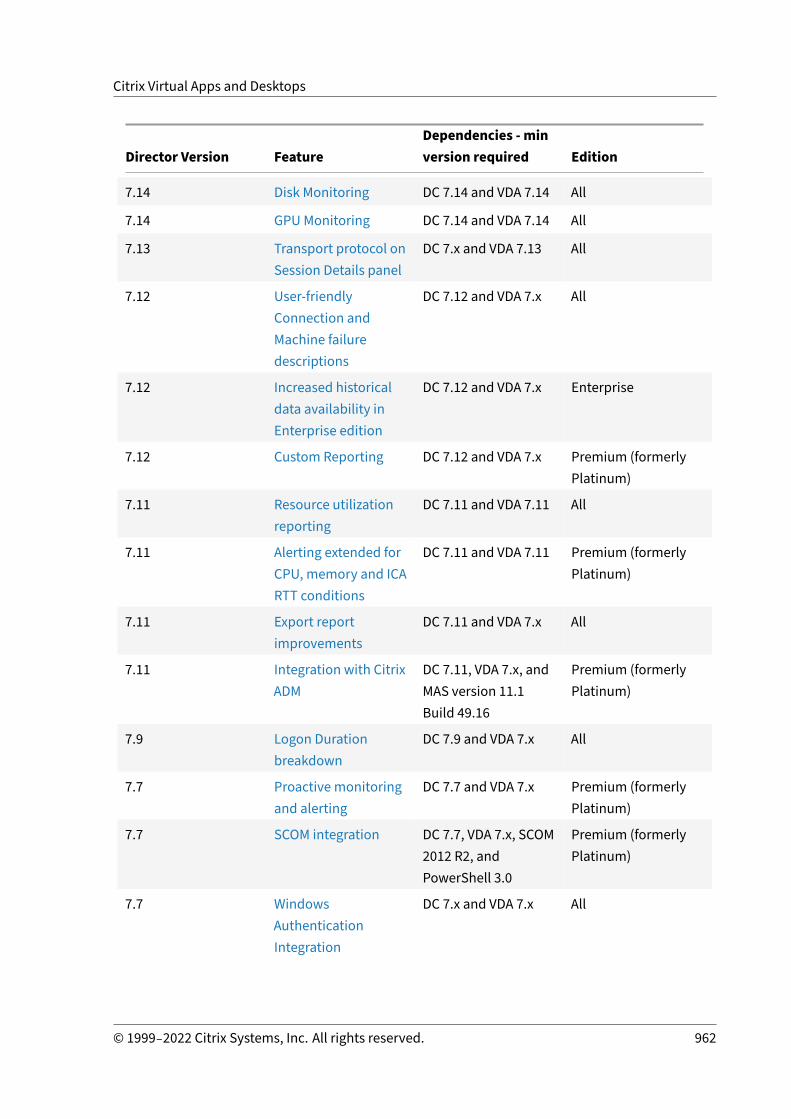
Citrix Virtual Apps and Desktops
Director Version FeatureDependencies ‑ minversion required Edition
7.14 Disk Monitoring DC 7.14 and VDA 7.14 All
7.14 GPU Monitoring DC 7.14 and VDA 7.14 All
7.13 Transport protocol onSession Details panel
DC 7.x and VDA 7.13 All
7.12 User‑friendlyConnection andMachine failuredescriptions
DC 7.12 and VDA 7.x All
7.12 Increased historicaldata availability inEnterprise edition
DC 7.12 and VDA 7.x Enterprise
7.12 Custom Reporting DC 7.12 and VDA 7.x Premium (formerlyPlatinum)
7.11 Resource utilizationreporting
DC 7.11 and VDA 7.11 All
7.11 Alerting extended forCPU, memory and ICARTT conditions
DC 7.11 and VDA 7.11 Premium (formerlyPlatinum)
7.11 Export reportimprovements
DC 7.11 and VDA 7.x All
7.11 Integration with CitrixADM
DC 7.11, VDA 7.x, andMAS version 11.1Build 49.16
Premium (formerlyPlatinum)
7.9 Logon Durationbreakdown
DC 7.9 and VDA 7.x All
7.7 Proactive monitoringand alerting
DC 7.7 and VDA 7.x Premium (formerlyPlatinum)
7.7 SCOM integration DC 7.7, VDA 7.x, SCOM2012 R2, andPowerShell 3.0
Premium (formerlyPlatinum)
7.7 WindowsAuthenticationIntegration
DC 7.x and VDA 7.x All
© 1999–2022 Citrix Systems, Inc. All rights reserved. 962

Citrix Virtual Apps and Desktops
Director Version FeatureDependencies ‑ minversion required Edition
7.7 Single‑session andMulti‑session OSUsage
DC 7.7 and VDA 7.x Premium (formerlyPlatinum)
7.6.300 Support forFramehawk virtualchannel
DC 7.6 and VDA 7.6 All
7.6.200 Session recordingintegration
DC 7.6 and VDA 7.x Premium (formerlyPlatinum)
7 HDX Insightintegration
DC 7.6, VDA 7.x, andCitrix ADM
Premium (formerlyPlatinum)
Data granularity and retention
April 14, 2021
Aggregation of data values
The Monitor Service collects various data, including user session usage, user logon performance de‑tails, session load balancing details, and connection and machine failure information. Data is aggre‑gated differently depending on its category. Understanding the aggregation of data values presentedusing the OData Method APIs is critical to interpreting the data. For example:
• Connected Sessions and Machine Failures occur over a period. Therefore, they are exposed asmaximums over a time period.
• LogOn Duration is a measure of the length of time, therefore is exposed as an average over atime period.
• LogOn Count and Connection Failures are counts of occurrences over a period, therefore areexposed as sums over a time period.
Concurrent data evaluation
Sessions must be overlapping to be considered concurrent. However, when the time interval is 1minute, all sessions in that minute (whether they overlap) are considered concurrent. The size of theinterval is so small that the performance overhead involved in calculating the precision is not worth
© 1999–2022 Citrix Systems, Inc. All rights reserved. 963
https://docs.citrix.com/en-us/citrix-virtual-apps-desktops/2006/director//site-analytics/trends.html
https://docs.citrix.com/en-us/citrix-virtual-apps-desktops/2006/director//site-analytics/trends.html
Citrix Virtual Apps and Desktops
the value added. If the sessions occur in the same hour, but not in the same minute, they are notconsidered to overlap.
Correlation of summary tables with raw data
The data model represents metrics in two different ways:
• The summary tables represent aggregate views of themetrics in perminute, hour, and day timegranularities.
• The raw data represents individual events or current state tracked in the session, connection,application, and other objects.
When attempting to correlate data across API calls or within the data model itself, it is important tounderstand the following concepts and limitations:
• No summary data for partial intervals. Metrics summaries are designed to meet the needsof historical trends over long periods of time. These metrics are aggregated into the summarytable for complete intervals. There are no summary data for a partial interval at the beginning(oldest available data) of the data collection nor at the end. When viewing aggregations of aday (Interval=1440), this means that the first andmost recent incomplete days do not have anydata. Although raw data might exist for those partial intervals, it is never summarized. You candetermine the earliest and latest aggregate interval for a particular data granularity by pullingthe min and max SummaryDate from a particular summary table. The SummaryDate columnrepresents the start of the interval. TheGranularity column represents the length of the intervalfor the aggregate data.
• Correlating by time. Metrics are aggregated into the summary table for complete intervals asdescribed in the preceding section. They can be used for historical trends, but raweventsmightbemore current in the state thanwhat has been summarized for trendanalysis. Any time‑basedcomparison of summary to raw data must consider that there are no summary data for partialintervals that might occur or for the beginning and ending of the time period.
• Missed and latent events. Metrics that are aggregated into the summary table might beslightly inaccurate if events are missed or latent to the aggregation period. Although theMonitor Service attempts to maintain an accurate current state, it does not go back in time torecompute aggregation in the summary tables for missed or latent events.
• Connection High Availability. During connection HA, there will be gaps in the summary datacounts of current connections, but the session instances will still be running in the raw data.
• Data retention periods. Data in the summary tables is retained on a different grooming sched‑ule from the schedule for raw event data. Data might be missing because it has been groomedaway fromsummaryor raw tables. Retentionperiodsmight alsodiffer for different granularitiesof summary data. Lower granularity data (minutes) is groomedmore quickly than higher gran‑ularity data (days). If data ismissing fromone granularity due to grooming, it might be found ina higher granularity. Since the API calls only return the specific granularity requested, receiving
© 1999–2022 Citrix Systems, Inc. All rights reserved. 964

Citrix Virtual Apps and Desktops
no data for one granularity does notmean that the data doesn’t exist for a higher granularity forthe same time period.
• Time zones. Metrics are stored with UTC time stamps. Summary tables are aggregated onhourly time zone boundaries. For time zones that don’t fall on hourly boundaries, there mightbe some discrepancy as to where data is aggregated.
Granularity and retention
The granularity of aggregated data retrieved by Director is a function of the time (T) span requested.The rules are as follows:
• 0 < T <= 1 hour uses per‑minute granularity• 0 < T <= 30 days uses per‑hour granularity• T > 31 days uses per‑day granularity
Requesteddata thatdoesnotcome fromaggregateddatacomes fromthe rawSessionandConnectioninformation. This data tends to grow fast, and therefore has its own grooming setting. Groomingensures that only relevant data is kept long term. This ensures better performance whilemaintainingthegranularity required for reporting. CustomersonPremium licensed sites canchange thegroomingretention to their desired number of retention days, otherwise the default is used.
To access the settings, run the following PowerShell commands on the Delivery Controller:
1 asnp Citrix.*2 Get-MonitorConfiguration3 Set-MonitorConfiguration -<setting name> <value>4 <!--NeedCopy-->
Setting nameAffectedgrooming
Default valuePremium (days)
Default valuenon‑Premium(days)
1 GroomSessionsRetentionDaysSession andConnectionrecordsretention afterSessiontermination
90 7
2 GroomFailuresRetentionDaysMachineFailureLogand Connection‑FailureLogrecords
90 7
© 1999–2022 Citrix Systems, Inc. All rights reserved. 965

Citrix Virtual Apps and Desktops
Setting nameAffectedgrooming
Default valuePremium (days)
Default valuenon‑Premium(days)
3 GroomLoadIndexesRetentionDaysLoadIndexrecords
90 7
4 GroomDeletedRetentionDaysMachine,Catalog,DesktopGroup,and Hypervisorentities thathave aLifecycleState of‘Deleted’. Thisalso deletes anyrelated Session,SessionDetail,Summary,Failure, orLoadIndexrecords.
90 7
5 GroomSummariesRetentionDaysDesktopGroupSummary,FailureLogSum‑mary, andLoadIndexSum‑mary records.Aggregated data‑ dailygranularity.
90 7
6 GroomMachineHotfixLogRetentionDaysHotfixes appliedto the VDA andControllermachines
90 90
7 GroomMinuteRetentionDaysAggregated data‑ minutegranularity
3 3
8 GroomHourlyRetentionDaysAggregated data‑ hourlygranularity
32 7
© 1999–2022 Citrix Systems, Inc. All rights reserved. 966

Citrix Virtual Apps and Desktops
Setting nameAffectedgrooming
Default valuePremium (days)
Default valuenon‑Premium(days)
9 GroomApplicationInstanceRetentionDaysApplicationInstance history
90 0
10 GroomNotificationLogRetentionDaysNotification Logrecords
90
11 GroomResourceUsageRawDataRetentionDaysResourceutilization data ‑raw data
1 1
12 GroomResourceUsageMinuteDataRetentionDaysResourceutilizationsummary data ‑minutegranularity
7 7
13 GroomResourceUsageHourDataRetentionDaysResourceutilizationsummary data ‑hour granularity
30 7
14 GroomResourceUsageDayDataRetentionDaysResourceutilizationsummary data ‑day granularity
90 7
15 GroomProcessUsageRawDataRetentionDaysProcessutilization data ‑raw data
1 1
16 GroomProcessUsageMinuteDataRetentionDaysProcessutilization data ‑minutegranularity
3 3
17 GroomProcessUsageHourDataRetentionDaysProcessutilization data ‑hour granularity
7 7
18 GroomProcessUsageDayDataRetentionDaysProcessutilization data ‑day granularity
30 7
© 1999–2022 Citrix Systems, Inc. All rights reserved. 967

Citrix Virtual Apps and Desktops
Setting nameAffectedgrooming
Default valuePremium (days)
Default valuenon‑Premium(days)
19 GroomSessionMetricsDataRetentionDaysSession metricsdata
1 1
20 GroomMachineMetricDataRetentionDaysMachine metricsdata
3 3
21 GroomMachineMetricDaySummaryDataRetentionDaysMachine metricssummary data
90 7
22 GroomApplicationErrorsRetentionDaysApplication errordata
1 1
23 GroomApplicationFaultsRetentionDaysApplicationfailure data
1 1
Caution:
Modifying values on the Monitor Service database requires restarting the service for the new val‑ues to take effect. You are advised to make changes to the Monitor Service database only underthe direction of Citrix Support.
The settings GroomProcessUsageRawDataRetentionDays, GroomResourceUsageRawDataRetention‑Days, and GroomSessionMetricsDataRetentionDays are limited to their default values of 1, whileGroomProcessUsageMinuteDataRetentionDays is limited to its default value of 3. The PowerShellcommands to set these values have been disabled, as the process usage data tends to grow quickly.Also, license based retention settings are as follows:
• Premium licensed sites ‑ you canupdate the grooming retention settings above to anynumberof days.
• Advanced licensed sites ‑ the grooming retention for all settings is limited to 31 days.• All other sites ‑ the grooming retention for all settings is limited to 7 days.
Exceptions:
• GroomApplicationInstanceRetentionDays can be set only in Premium licensed sites.• GroomApplicationErrorsRetentionDays andGroomApplicationFaultsRetentionDays are limitedto 31 days in Premium licensed sites.
Retaining data for long periods will have the following implications on table sizes:
• Hourly data. If hourly data is allowed to stay in the database for up to two years, a site of 1000delivery groups can cause the database to grow as follows:
© 1999–2022 Citrix Systems, Inc. All rights reserved. 968

Citrix Virtual Apps and Desktops
1000 delivery groups x 24 hours/day x 365 days/year x 2 years = 17,520,000 rowsof data. The per‑formance impact of such a large amount of data in the aggregation tables is significant. Giventhat the dashboard data is drawn from this table, the requirements on the database servermight be large. Excessively large amounts of data might have a dramatic impact on perfor‑mance.
• Session and event data. This is the data that is collected every time a session is started anda connection/reconnection is made. For a large site (100 K users), this data grows fast. Forexample, two years’ worth of these tables would gather more than a TB of data, requiring ahigh‑end enterprise‑level database.
Third party notices
April 14, 2021
This release of Citrix Virtual Apps and Desktops may include third‑party software licensed under theterms defined in the following documents:
• Citrix Virtual Apps and Desktops Third Party Notices (PDF Download)
• Non‑Commercial Software Disclosures For FlexNet Publisher 2017 (11.15.0.0) (PDF Download)
• FlexNet Publisher Documentation Supplement Third Party and Open Source Software used inFlexNet Publisher 11.15.0 (PDF Download)
SDKs and APIs
April 14, 2021
Several SDKsandAPIs areavailablewith this release. Fordetails, seeDeveloperDocumentation. Fromthere, you can access programming information for:
• Delivery Controller• Monitor Service OData• StoreFront
The Citrix Group Policy SDK allows you to display and configure Group Policy settings and filters. Ituses a PowerShell provider to create a virtual drive that corresponds to themachine and user settingsand filters. The provider appears as an extension toNew‑PSDrive. To use the Group Policy SDK, eitherStudio or the Citrix Virtual Apps and Desktops SDKmust be installed. See Group Policy SDK for moreinformation.
© 1999–2022 Citrix Systems, Inc. All rights reserved. 969

Citrix Virtual Apps and Desktops
Delivery Controller SDK
The SDK comprises several PowerShell snap‑ins that are installed automatically when you install aDelivery Controller or Studio.
Permissions: You must run the shell or script using an identity that has Citrix administration rights.Althoughmembers of the local administrators group on the Controller automatically have full admin‑istrative privileges to allow Citrix Virtual Apps or Citrix Virtual Desktops to be installed, Citrix recom‑mends that for normal operation, you create Citrix administrators with the appropriate rights, ratherthan use the local administrators account.
To access and run the cmdlets:
1. Start a shell in PowerShell: Open Studio, select the PowerShell tab, and then click LaunchPowerShell.
2. To use SDK cmdletswithin scripts, set the execution policy in PowerShell. Formore informationabout PowerShell execution policy, see the Microsoft documentation.
Note:
The current SDK installs as both a PowerShell snap‑in and a PowerShell module.
With the addition of the module functionality, you can use this SDK’s cmdlets without apreceding Add-PSSnapin (or asnp) cmdlet.
For associated components’ SDKs (such as Citrix Licensing, Citrix Provisioning, and Store‑Front) that install only as a snap‑in, using their cmdlets still requires a preceding Add-PSSnapin (or asnp).
If you want to use this SDK through the snap‑in, continue with the next step.
3. Add the snap‑ins you require into the PowerShell environment using the Add -PSSnapincmdlet in the Windows PowerShell console.
V1 and V2 denote the version of the snap‑in. XenDesktop 5 snap‑ins are version 1. Citrix VirtualApps and Desktops, and earlier XenDesktop 7 version snap‑ins are version 2. For example, toinstall Citrix Virtual Apps and Desktops snap‑ins, type Add-PSSnapin Citrix.ADIdentity.Admin.V2. To import all of the cmdlets, type: Add-PSSnapin Citrix.*.Admin.V*
After adding the snap‑ins, you can access the cmdlets and their associated help.
To see the current Citrix Virtual Apps and Desktops PowerShell cmdlet help:
1. FromthePowerShell console, add theCitrix snap‑ins: Add –PSSnapin Citrix.*.Admin.V*.2. Follow the instructions in The Windows PowerShell ISE.
© 1999–2022 Citrix Systems, Inc. All rights reserved. 970

Citrix Virtual Apps and Desktops
Group Policy SDK
To use the Group Policy SDK, either Studio or the Citrix Virtual Apps and Desktops SDK must in in‑stalled.
Toadd theGroupPolicySDK, typeAdd-PSSnapin citrix.common.grouppolicy. (Toaccesshelp,type: help New-PSDrive -path localgpo:/)
To create a virtual drive and load itwith settings, typeNew-PSDrive <Standard Parameters> [-PSProvider] CitrixGroupPolicy -Controller <string> where the Controller string is thefully qualified domain name of a Controller in the Site you want to connect to and load settings from.
Monitor Service OData
The Monitor API allows access to the Monitor Service data using Version 3 or 4 of the OData API. Youcan create customizedmonitoring and reporting dashboards based on data queried from theMonitorService data. OData V.4 is based on the ASP.NETWeb API and supports aggregation queries. Formoreinformation, see the Monitor Service OData API.
© 1999–2022 Citrix Systems, Inc. All rights reserved. 971

LocationsCorporate Headquarters | 851 Cypress Creek Road Fort Lauderdale, FL 33309, United StatesSilicon Valley | 4988 Great America Parkway Santa Clara, CA 95054, United States
© 2022 Citrix Systems, Inc. All rights reserved. Citrix, the Citrix logo, and other marks appearing herein are property of
Citrix Systems, Inc. and/or one or more of its subsidiaries, andmay be registered with the U.S. Patent and Trademark
Office and in other countries. All other marks are the property of their respective owner(s).
Citrix Product Documentation | docs.citrix.com February 10, 2022