Affymetrix GeneChip® Operating Software Server Installation ...
392
P/N 701419 Rev. 2 Affymetrix GeneChip ® Operating Software Server Installation & Administration Guide
-
Upload
khangminh22 -
Category
Documents
-
view
5 -
download
0
Transcript of Affymetrix GeneChip® Operating Software Server Installation ...

Affymetrix GeneChip® Operating Software Server Installation & Administration Guide
P/N 701419 Rev. 2

For research use only.
Not for use in diagnostic procedures.
Trademarks
Affymetrix®, ®, GeneChip®, HuSNP®, GenFlex®, Flying Objective™, CustomExpress®, CustomSeq®, NetAffx™, Tools To Take You As Far As Your Vision®, The Way Ahead™, Powered by Affymetrix™, and GeneChip-compatible™, are trademarks of Affymetrix, Inc.
All other trademarks are the property of their respective owners.
Limited License Notice
Limited License. Subject to the Affymetrix terms and conditions that govern your use of Affymetrix products, Affymetrix grants you a non-exclusive, non-transferable, non-sublicensable license to use this Affymetrix product only in accordance with the manual and written instructions provided by Affymetrix. You understand and agree that except as expressly set forth in the Affymetrix terms and conditions, that no right or license to any patent or other intellectual property owned or licensable by Affymetrix is conveyed or implied by this Affymetrix product. In particular, no right or license is conveyed or implied to use this Affymetrix product in combination with a product not provided, licensed or specifically recommended by Affymetrix for such use.
Patents
Software products may be covered by one or more of the following patents: U.S. Patent No's. 5,733,729; 5,795,716; 5,974,164; 6,066,454; 6,090,555, 6,185,561, 6,188,783, 6,223,127; 6,228,593; 6,229,911; 6,242,180; 6,308,170; 6,361,937; 6,420,108; 6,484,183; 6,505,125; 6,510,391; 6,532,462; 6,546,340; 6,687,692; 6,607,887; and other U.S. or foreign patents.
Copyright
©2006 Affymetrix, Inc. All rights reserved.

i
Contents
CHAPTER 1 Introduction 3
ABOUT THE MANUAL 3
USING THE MANUAL 5
TECHNICAL SUPPORT 7
CHAPTER 2 GCOS Server Overview 11
NEW IN GCOS SERVER 1.4 11
INTRODUCTION TO GCOS SERVER 11
CHAPTER 3 Requirements 17
SERVER CONFIGURATION 17
HARDWARE AND SOFTWARE REQUIREMENTS 17
HARDWARE CONFIGURATIONS 19
PERSONNEL REQUIREMENTS FOR GCOS SERVER INSTALLATION AND MAINTENANCE 22
CHAPTER 4 Planning Your Server Installation 27
INSTALLATION CHECKLISTS 27
NEW GCOS SERVER 1.4 INSTALLATIONS 28
UPGRADING EARLIER VERSIONS OF GCOS TO GCOS 1.4 33

ii
CHAPTER 5 GCOS Server Installation/Upgrade Recovery 43
RECOVERING FROM AN UNSUCCESSFUL INSTALLATION 43
CHAPTER 6 Installing and Configuring Microsoft Windows®
2000 Server49
ACTIVE DIRECTORY 49
CONFIGURING MICROSOFT WINDOWS 2000 SERVER 50
CHAPTER 7 Microsoft SQL Server 2000 Installation and
Configuration61
INSTALLING MICROSOFT SQL SERVER 2000 61
INSTALLING SERVICE PACK 3A FOR MICROSOFT SQL SERVER 2000 75
CONFIGURING MICROSOFT SQL SERVER 2000 76
CHAPTER 8 Oracle® 10.2.0.1 Installation and Configuration
91
INSTALLATION OVERVIEW 91
INSTALLING ORACLE 10.2.0.1 ON THE SERVER 91
CONFIGURING ORACLE 10.2.0.1 98
CREATING AN ORACLE SERVICE NAME 100

iii
CHAPTER 9 Oracle® 8i to 10g Upgrade and Configuration
111
UPGRADE OVERVIEW 111
BASIC UPGRADE PATH 111
ADVANCED UPGRADE PATH 141
CHAPTER 10 GCOS Server Software Installation and Configuration161
INSTALLING GCOS SERVER 1.4 FOR ORACLE 10.2.0.1 161
INSTALLING GCOS SERVER 1.4 FOR MICROSOFT SQL SERVER 2000 174
CHAPTER 11 GCOS Server Software Upgrade and
Configuration187
UPGRADING GCOS SERVER FOR ORACLE 187
UPGRADING GCOS SERVER FOR SQL SERVER 194
CHAPTER 12 Configuring the GCOS Services 205
REQUIREMENTS FOR USING THE GCOS SERVICES 205
CONFIGURING THE GCOS SERVICE SETTINGS 207
SELECTING THE GCOS SERVICES OPTIONS 213
SETTING THE START/STOP SERVICE POLICY 217

iv
CHAPTER 13 Post-Server Installation Verification 231
POST-SERVER INSTALLATION CHECKLIST 231
CHAPTER 14 Library Files 243
INSTALLING NEW LIBRARY FILES ON THE SERVER RUNNING THE GCOS SERVER SOFTWARE 243
INSTALLING LIBRARIES CREATED PRIOR TO GCOS SERVER 1.4 250
CHAPTER 15 Troubleshooting 255
TROUBLESHOOTING QUESTIONS 255
GCOS SERVER TROUBLESHOOTING 256
FILES SECURITY 264
LIBRARY FILES TROUBLESHOOTING 265
LIBRARY MIGRATION PROGRAM 266
DCOM TROUBLESHOOTING 268
CHAPTER 16 GCOS Server Administration 281
USERS 281
GCOS SERVER DATABASES 281
DATA DIRECTORIES 284

v
GCOS SERVER SYNC 286
AFFX DIAGNOSTIC TOOL 293
CHAPTER 17 Managing Microsoft SQL Server 2000 Databases
321
OVERVIEW OF PERFORMANCE TUNING 321
PERFORMANCE TUNING MICROSOFT SQL SERVER 2000 FOR WINDOWS 2000 321
PERFORMANCE TUNING MICROSOFT SQL SERVER FOR GCOS SERVER 322
MANAGING DATABASES 323
DATABASE MAINTENANCE 333
DELETING A MICROSOFT SQL SERVER PUBLISH DATABASE 333
CHAPTER 18 Managing Oracle® Databases 337
A METHODICAL APPROACH 337
PERFORMANCE TUNING ORACLE FOR WINDOWS 2000 337
PERFORMANCE TUNING ORACLE FOR GCOS SERVER 338
ORACLE PUBLISHING 339
MANAGEMENT OF INDEXES 342
MANAGING DATABASES 343
DELETING AN ORACLE PUBLISH DATABASE 348

vi
CHAPTER 19 GeneChip® Publishing Service 355
GENECHIP® PUBLISHING SERVICE AND CONTROL PANEL APPLET 355
CHAPTER 20 Data Source Name Descriptions 361
ODBC DSNS ON THE SERVER RUNNING GCOS SERVER SOFTWARE 361
Index 381

Chapter 1
Introduction
Chapter 1

3
Introduction
This chapter provides a general overview of the Affymetrix GeneChip® Operating Software (GCOS) Server Installation and Administration Guide.
About the Manual
This manual is written as an installation and administration guide for Affymetrix software and related third-party software. The Affymetrix GeneChip® Operating Software Server 1.4 application requires the following third-party software:
• Microsoft Internet Explorer 6.0 with SP1
• SQL Server 2000 with SP3a (MDAC 2.71a SP1 automatically updated by this) or Oracle® 10.2.0.1 (requires MDAC 2.7 SP1 to be applied separately)
• Windows 2000 Server with SP4
These software versions have been qualified and tested with the GCOS Server software. Using different versions of software, including service packs, may adversely affect the performance and functionality of the GCOS Server.
GCOS Server is a sophisticated data solution and has many factors involved in its installation and maintenance. To obtain the maximum benefit from GCOS Server, it is essential to understand its complexity. This manual explains:
• What GCOS Server is.
• What it can do.
• How to prepare for its installation and maintenance.
The manual:
• Helps you install your new GCOS Server system or upgrade an existing version.
• Contains an installation checklist to help you verify that each step is completed.
• Provides additional support chapters if more details are needed.

4 Affymetrix® GCOS Server Installation and Administration Guide
INSTALLATION INFORMATION
The GCOS Server Installation and Administration Guide provides the following installation information:
• Requirements
• Preparation of a GCOS server installation
• GCOS server installation checklist
• Database installation and configuration
• Server software component installation and configuration
• GCOS server post-installation checklist
• Troubleshooting
ADMINISTRATION INFORMATION
The GCOS Server Installation and Administration Guide provides the following administration information:
• Adding and deleting New Users
• Database Administration for GCOS Server
• Database Administration for Microsoft SQL Server and Oracle® databases
• Data Source Name Descriptions
ON-LINE DOCUMENTATION
The GCOS Server 1.4 installation CD includes an electronic version of this user’s guide. The on-line documentation is presented in Adobe®
Please be sure to back up all data prior to upgrading the server.
GCOS Server 1.4 only works with the GCOS 1.0 and the latest
version of GCOS Manager.

chapter 1 | Introduction 5
Acrobat® format (a .pdf file) and is readable with the Adobe® Acrobat® Reader software, available free from Adobe at http://www.adobe.com. The electronic user’s guide is printable, searchable, and fully indexed.
Using the Manual
This manual is designed to help System Administrators, Database Administrators, and experienced technical personnel install and maintain a server system. It assumes that the person(s) using this guide has in-depth technical knowledge of Microsoft Windows® 2000 and SQL Server or Oracle® database administration.
CONVENTIONS USED
Various conventions are used throughout the manual to help illustrate the procedures described. Explanations of these conventions are provided below.
Steps
Instructions for procedures are written in a step format. Immediately following the step number is the action to be performed. Following the response additional information pertaining to the step may be found and is presented in paragraph format.
For example:
1. Click Yes to continue.The Delete task proceeds. In the lower right pane the status is displayed. To view more information pertaining to the delete task, right-click Delete and select View Task Log from the shortcut menu.
Font Styles
Bold fonts indicate names of commands, buttons, options or titles within a dialog box. When asked to enter specific information, such input appears in italics within the procedure being outlined.

6 Affymetrix® GCOS Server Installation and Administration Guide
For example:
1. To select another server, enter the server name in the Oracle Alias box.
2. Enter Tutorial in the Publish Database box, then click Register.The Tutorial database is available to DMT.
Screen Captures
The steps outlining procedures are frequently supplemented with screen captures to further illustrate the instructions given.
Additional Comments
Throughout the manual, text and procedures are occasionally accompanied by special notes. These additional comments are and their meanings are described below.
The screen captures depicted in this manual may not exactly match
the windows displayed on your screen.
Information presented in Tips provide helpful advice or shortcuts
for completing a task.
The Note format presents information pertaining to the text or
procedure being outlined.
This note type flags important information that should be
considered prior to proceeding with the outlined task.

chapter 1 | Introduction 7
Technical Support
Affymetrix provides technical support to all licensed users via phone or E-mail. To contact Affymetrix Technical Support:
Caution notes advise you that the consequence(s) of an action may
be irreversible and/or result in lost data.
Warnings alert you to situations where physical harm to person or
damage to hardware is possible.
Affymetrix, Inc.
3380 Central Expressway
Santa Clara, CA 95051 USA
E-mail: [email protected]
Tel: 1-888-362-2447 (1-888-DNA-CHIP)
Fax: 1-408-731-5441

8 Affymetrix® GCOS Server Installation and Administration Guide
Affymetrix UK Ltd.,
Voyager, Mercury Park,
Wycombe Lane, Wooburn Green,
High Wycombe HP10 0HH
United Kingdom
UK and Others Tel: +44 (0) 1628 552550
France Tel: 0800919505
Germany Tel: 01803001334
E-mail: [email protected]
Tel: +44 (0) 1628 552550
Fax: +44 (0) 1628 552585
Affymetrix Japan, K. K.
Mita NN Bldg
16 Floor, 4-1-23 Shiba,
Minato-ku, Tokyo 108-0014
Japan
Tel: +81 (03) 5730-8222
Fax: +81 (03) 5730-8201
www.affymetrix.com

Chapter 2
GCOS Server Overview
Chapter 2

11
GCOS Server Overview
The power of Affymetrix technology results in a new data management challenge. Probe array experiments quickly generate vast quantities of data that need to be stored, organized, and subsequently accessed for further experimental analysis. GCOS Server provides centralized probe array data storage where it can be easily organized and searched. When compared to file-based or multiple-computer-type storage systems, GCOS Server software provides the most efficient and versatile data storage solution.
New in GCOS Server 1.4
GCOS Server 1.4 provides services that help you automate your data management:
• GCOS Analysis Service performs cell intensity analyses.If you are using GCOS with a networked GCOS Server, you can run the Analysis Service on the workstation or the server.
• GCOS Transfer Service lets you automate the archiving of DAT files when the analysis of the DAT files is set to occur on the client.
Introduction to GCOS Server
GCOS Server is a database application that provides data capturing, tracking, and analysis functions from a centralized infrastructure. Data stored on the client’s local hard drive through GCOS can now be stored on a server through GCOS Server. GCOS Server provides project and experiment setup capabilities. With this tracking functionality, you can easily determine the status of an experiment. The GCOS Server application can be accessed through GeneChip Operating Software (GCOS) where the user can open image data, run the fluidics station, and scan probe arrays. With this capability, data
GCOS 1.4 server can be used in a mixed mode. For example,
GCOS 1.2 client and GCOS 1.3 client can connect up to the
same GCOS 1.4 server

12 Affymetrix® GCOS Server Installation and Administration Guide
are stored at a centralized location and can be accessed from any machine.
PROBE ARRAY DATA FLOW
GCOS Server enables users to track experiments and processes. Its database stores and manages GeneChip® probe array data. Users may access any experiment data from any workstation on the network through GCOS Server. A user with access to GCOS Server can register samples, set up experiments, and analyze data. The GCOS Server application processes experiment data through a workflow based tracking system that enables you to follow an experiment's status from sample preparation through analysis. The software also tracks experiment names, sample projects, sample types, reagents, analysis parameters, and other fields.
You can only operate the fluidics station and scanner through the
workstation physically connected to the instruments.

chapter 2 | GCOS Server Overview 13
Figure 2.1
GeneChip® probe array data flow
GCOS Server: Provide centralized data storage and security

14 Affymetrix® GCOS Server Installation and Administration Guide
DATA SECURITY
GCOS Server incorporates data security from Windows 2000 and uses the Windows 2000 user logon name to verify access to the GCOS Server database. A user can only access the GCOS Server database if they have been granted permission from the GCOS Server Administrator.
This security protects data from unauthorized changes. A user who creates, generates, and analyzes an experiment is the original owner of the data. Depending on the roles granted, a user who is not the owner of the original data can have read access, and can also create new analyses without overwriting the original data. The roles granted to users allow or restrict the ability to overwrite, delete, or manipulate data.
The Affymetrix® Analysis Data Model (AADM) publish database is password protected. The password protection controls access to the publish database and ensures that only privileged users can publish and mine data.
When the file security feature is enabled, the files that reside in the shared folder of the server that runs GCOS Server software are secured using the NTFS file system security. This prevents unauthorized users from viewing, editing, deleting, or moving data files.
SUMMARY
After the data have been processed and the analyses are completed, users can publish their data into a secure publish database.
The GCOS Server enables multiple users:
• simultaneous access to a publish database from any workstation on the network
• the ability to generate large data warehouses of experimental results

Chapter 3
Requirements
Chapter 3

17
Requirements
The GCOS Server System consists of several different factors essential to configuring and maintaining a fully functional system. GCOS Server requires specific hardware and software components along with trained personnel to manage the system. This chapter discusses all such requirements.
Server Configuration
The GCOS Server is configured as a one server configuration. In this configuration, the GCOS Server data and databases reside on one server (Table 3.1). This includes the AADM publish databases. This must be a dedicated server.
Hardware and Software Requirements
The GCOS Server application requires hardware that either meets or exceeds what is listed below. The software that is required must be the specific version indicated, otherwise there may be an adverse affect on the system installation, performance, and functionality.
It is highly recommended that the GCOS Server is not configured
as a domain controller.
Table 3.1
Data and databases on a server
Server
Process database and other GCOS Server databases
GCOS Server data
AADM administration database
AADM publish database

18 Affymetrix® GCOS Server Installation and Administration Guide
GCOS SERVER HARDWARE AND THIRD-PARTY SOFTWARE
REQUIREMENTS)
To run GCOS Server software (Part # 690035):
• The Standard Server is a Windows 2000-based system with the following specifications:
Dell® PowerEdge 6600 Server tower configuration, four 3.0 GHz/4MB cache Xeon processors, 4 GB RAM, 4x73 GB hard drives in a RAID configuration, 3.5” floppy drive, 24x IDE CD-ROM, 17” monitor.
• TCP/IP Network Protocol
• 100 megabit, switched, full duplex network
• Microsoft Windows® 2000 Server with Service Pack 4
• Internet Explorer 6.0 with Service Pack 1
• One of the following database applications:
- Oracle® (10.2.0.1) for Microsoft Windows® 2000 Server (Oracle installations require MDAC 2.7 SP1 to be installed separately)
- Microsoft SQL Server 2000 with Service Pack 3a (MDAC 2.71a SP1 is installed as part of the SQL Server SP3a)
GCOS SERVER CLIENT SYSTEM HARDWARE AND THIRD-PARTY
SOFTWARE REQUIREMENTS
See the latest requirements in the Affymetrix GeneChip® Operating System User’s Guide.

chapter 3 | Requirements 19
GCOS SERVER INSTRUMENT CLIENT SYSTEM HARDWARE AND THIRD-
PARTY SOFTWARE REQUIREMENTS
See the latest requirements in the Affymetrix GeneChip® Operating System User’s Guide.
Hardware Configurations
GCOS Server can be configured in many different ways. To improve your performance, you need to determine the type of database to be used, the amount of data to be generated, the number of users accessing the system, etc. To help with your options, Oracle and Microsoft SQL Server databases perform better when I/O is spread across as many physical disks as possible. Consider using a RAID (Redundant Array of Inexpensive Disks) with Oracle databases. When used effectively, RAID delivers two desirable characteristics for an Oracle environment:
• Single points of I/O failure are eliminated
• I/O performance is improved
All software versions are U.S. English versions only.
The hardware recommendation is based upon a site generating and
processing large amounts of probe arrays, using high density array
types, accessing the server with a large number of clients, and
intending for good performance. For more details about hardware
requirements, please contact Technical Support. (See TechnicalSupport, on page 7.)

20 Affymetrix® GCOS Server Installation and Administration Guide
RAID LEVELS
The R in RAID stands for redundant, which means you need more than one disk. Table 3.2 explains the different RAID levels. Keep in mind that the numbers are used strictly to differentiate one level from another. RAID level 5 is not necessarily better than RAID level 1. A discussion of each RAID level in relation to Windows 2000 follows.
RAID 0 – Stripe Sets
RAID 0 is supported by NTFS in the form of stripe sets. When a stripe set is created, the data are spread over multiple disks in an effort to improve I/O performance. It is true that performance is improved; however, this is not fault-tolerant. RAID 0 increases your exposure to failure. If one disk drive fails, you lose all your data.
Instrument systems will only operate on Microsoft Windows® 2000
Professional (SP4) workstations or Windows XP workstations with
Service Pack 1 or higher. These systems will no longer run on
Windows NT 4.0. All software versions are U.S. English versions
only. Oracle client utilities must match the corresponding version of
the Oracle database installed on the server.
Table 3.2
RAID levels
RAID Level Explanation
Level 0 Striping: two or more physical disk drives combined into one logical device. Data is written across all physical drives.
Level 1 Mirroring: two physical disk drives contain the same information. Data are written redundantly to both drives.
Level 5 Striping with parity: parity information is broken into segments and stored across multiple physical disks along with the data.

chapter 3 | Requirements 21
RAID 1 – Disk Mirroring
RAID 1 is used for fault tolerance. When a partition is mirrored, the data resides on two separate disk drives, eliminating a single point of failure. If one disk drive fails, data are still available. Microsoft Windows® 2000 allows mirroring of the system or boot partition. RAID 1 delivers very good read/ write performance, and performance does not suffer in the event of a disk failure. RAID 1 can be very expensive since a fully mirrored system requires twice the physical disk space that is normally required.
RAID 5 – Stripe Sets with Parity
RAID 5 is the most cost-effective fault-tolerant solution. In a stripe set with parity, I/O is evenly distributed across multiple drives. Parity information is stored redundantly on all the drives where one parity stripe block is stored for each stripe. The parity information allows data to be reconstructed instantly in the event of a disk failure.
If a disk drive should fail, the system continues to run and the files continue to be accessible. However, read and write performance are slowed as the system must recalculate the parity information each time to reconstruct the data.
Stripe sets with parity yields highly adequate write performance and excellent read performance since the data are spread over multiple drives. This configuration works well for Oracle and Microsoft SQL Server databases since the database activity usually involves reading from disk. Read performance increases even more if each disk has its own controller.
USING RAID WITH A MICROSOFT SQL SERVER DATABASE
When using RAID with a Microsoft SQL Server database, you need to determine where the files will reside on which disk. This depends on the number of disks you have and the size of your SQL Server database. For more details on configuration and performance, refer to Chapter 17, Managing Microsoft SQL Server 2000 Databases, on page 319.

22 Affymetrix® GCOS Server Installation and Administration Guide
USING RAID WITH AN ORACLE DATABASE
When using RAID with an Oracle database, you need to determine what types of files should go on which types of disk. This depends on the number of disks you have and the size of your Oracle database.
If generating a large amount of data and performance is important, it is recommended that you use a RAID system.
For more details on configuration and performance, refer to Chapter 18, Managing Oracle® Databases, on page 335.
Personnel Requirements for GCOS Server Installation and Maintenance
The GCOS Server system is a sophisticated platform for large-scale institutional data management. Like other centralized resources, it requires dedicated human resources for efficient operation and maintenance.
Table 3.3 outlines the staffing requirements and responsibilities to maintain an in-house GCOS Server system.

chapter 3 | Requirements 23
Table 3.3
GCOS Server staffing requirements and responsibilities
Role Responsibilities
System Administrator or Information Technology (IT) Personnel
Preparation and installation of serverConfiguration of serverNetwork protocol and network integrationServer back-upHard disk space availability (data archiving)Additional client installation and configurationTroubleshooting
Database Administrator (DBA) Installation of database softwareConfiguration of database softwareDatabase conversionDatabase maintenancePerformance tuningTroubleshooting

24 Affymetrix® GCOS Server Installation and Administration Guide

Chapter 4
Planning Your Server Installation
Chapter 4

27
Planning Your Server Installation
This section of the manual assists in the preparation of your GCOS Server installation. Before installing any software, it is recommended that you familiarize yourself with all of the software and installation documentation in this manual and other referenced manuals. The required personnel should consult with one another to determine the hardware needed and who will install and configure the operating system, database software, GCOS Server application, and client software.
Installation Checklists
To assist with your installation, the manual provides installation checklists for the software and hardware configuration used. To determine which installation checklist to follow, answer the following questions:
• Is this a new GCOS Server installation or is it an upgrade?
• Will the database be Microsoft SQL Server 2000 or Oracle® 10.2.0.1?
After answering these questions, choose the appropriate installation section below as each scenario has a different installation procedure. Follow the steps to install the GCOS Server application for:
• New GCOS Server installation:
- Oracle database. Refer to New GCOS Server 1.4 with Oracle 10.2.0.1, on page 29.
- Microsoft SQL Server 2000 database. Refer to New GCOS Server 1.4 with SQL Server 2000, on page 31.
• Upgrading previous version of GCOS Server to GCOS Server 1.4:
- Oracle database. Refer to Upgrade to GCOS Server 1.4 with Oracle 10.2.0.1, on page 34.
- Microsoft SQL Server 2000 database. Refer to Upgrade to GCOS Server 1.4 with SQL 2000, on page 37.
The installation scenario is also presented in Table 4.1.

28 Affymetrix® GCOS Server Installation and Administration Guide
New GCOS Server 1.4 Installations
This section contains the checklists for new GCOS Server 1.4 installation for:
• Oracle database. Refer to New GCOS Server 1.4 with Oracle 10.2.0.1, on page 29.
• Microsoft SQL Server 2000 database only. Refer to New GCOS Server 1.4 with SQL Server 2000, on page 31.
All software versions detailed in this manual have been thoroughly
evaluated and tested by Affymetrix personnel. Do not change or
modify any software prior to consulting with Affymetrix Technical
Support for recommendations.
It is highly recommended that the server running the GCOS Server
software is not configured as a domain controller.
Table 4.1
GCOS Server installation scenarios
Current Configuration GCOS Server 1.4 Configuration Reference
None Oracle® database page 29
None Microsoft SQL Server 2000 database
page 31
Oracle database Oracle database page 33
Microsoft SQL Server 2000 database
Microsoft SQL Server 2000 database page 37

chapter 4 | Planning Your Server Installation 29
NEW GCOS SERVER 1.4 WITH ORACLE 10.2.0.1
This section contains the checklist for a new GCOS Server installation using Oracle 10.2.0.1. All data and publishing components will reside on one server.
This installation requires the following sets of steps:
1. Install and Configure Microsoft Windows® 2000 Server (see below)
2. Install Required Third Party Software (see page 30)
3. Install and Configure Oracle 10.2.0.1 Database Software (see page 30)
4. Install and Configure GCOS Server 1.4 (see page 30)
5. Install Client Software (see page 30)
Install and Configure Microsoft Windows® 2000 Server
1. Install Microsoft Windows 2000 Server. Refer to Installing and Configuring Microsoft Windows® 2000 Server, on page 49.
2. Install Service Pack 4 for Windows 2000 Server. Refer to Installing and Configuring Microsoft Windows® 2000 Server, on page 49.
3. Create and add ‘AffyTS’ or a Local Administrator account and enter a password. Refer to Create Local Administrative Account, on page 50.
4. Create and add ‘GCOS Server Users’ Local Group. Refer to Create Local Group, on page 54.
5. Add the login names of the GCOS Server Users to the Global Group.
6. Add ‘AffyTS’ (or local administrator account created in step Step 3) and the Global Group as members of the ‘GCOS Server Users’ Local Group. Refer to Create Local Group, on page 54.
7. Login as ‘AffyTS’, or local administrator account created, and proceed with the following items on the checklist.
This is only an example of a local administrator account. It is
recommended that you name your own local administrator.

30 Affymetrix® GCOS Server Installation and Administration Guide
Install Required Third Party Software
8. Install MDAC 2.7 Service Pack 1.
9. Install Internet Explorer 6.0 Service Pack 1.
Install and Configure Oracle 10.2.0.1 Database Software
10. Install Oracle 10.2.0.1 for Windows 2000. Refer to Installation Overview, on page 91.
11. Configure Oracle 10.2.0.1 by creating an alias. Refer to Configuring Oracle 10.2.0.1, on page 98.
12. Verify connectivity to alias with SQL Plus.
Install and Configure GCOS Server 1.4
13. Install the GCOS Server 1.4 software. Refer to Installing GCOS Server 1.4 for Oracle 10.2.0.1, on page 161.
14. Verify post-installation of GCOS Server. Refer to Chapter 13, Post-Server Installation Verification, on page 229.
15. GCOS Server 1.4 server installation completed.
16. Install library files on the server. Refer to Installing New Library Files on the Server Running the GCOS Server Software, on page 243.
17. Server installation, configuration, and verification completed.
Install Client Software
18. Install Oracle 10.2.0.1 client utilities on the client.
Before installing GCOS Server 1.4, verify that the installation user:
• Has local administrative privileges
• Is a member of the ‘GCOS Server Users’ local group.
• Is a domain member

chapter 4 | Planning Your Server Installation 31
19. Create a local alias on the client connecting to the local server that runs the GCOS Server software. Refer to Creating an Oracle Service Name, on page 100.
20. Install client software on a workstation. Refer to the Affymetrix® GCOS User’s Guide.
21. Test client. Refer to the appendix on Client Testing in the Affymetrix® GCOS User’s Guide.
22. GCOS Server and client application installations completed, configured, and tested.
NEW GCOS SERVER 1.4 WITH SQL SERVER 2000
This section contains the checklist for a new GCOS Server installation using Microsoft SQL Server 2000. All data and publishing components will reside on one server.
The installation requires the following sets of steps:
1. Install and Configure Microsoft Windows 2000 Server (see below)
2. Install Required Third Party Software (see page 32)
3. Install and Configure Microsoft SQL Server 2000 Database Software (see page 32)
4. Install and Configure GCOS Server 1.4 (see page 33)
5. Install Client Software (see page 33)
Install and Configure Microsoft Windows 2000 Server
1. Install Microsoft Windows 2000 Server. Refer to Installing and Configuring Microsoft Windows® 2000 Server, on page 49.
2. Install Service Pack 4 for Windows 2000 Server. Refer to Installing and Configuring Microsoft Windows® 2000 Server, on page 49.
3. Create and add ‘AffyTS’ or a Local Administrator account and enter a password. Refer to Create Local Administrative Account, on page 50.

32 Affymetrix® GCOS Server Installation and Administration Guide
4. Create and add ‘GCOS Server Users’ Local Group. Refer to Create Local Group, on page 54.
5. Add the login names of the GCOS Server Users to the Global Group.
6. Add ‘AffyTS’ (or local administrator account from Step 3.) and the Global Group as members of the ‘GCOS Server Users’ Local Group. Refer to Create Local Group, on page 54.
7. Login as ‘AffyTS’ or a Local Administrator account and proceed with the following items on the checklist.
Install Required Third Party Software
8. Install Internet Explorer 6.0 Service Pack 1.
Install and Configure Microsoft SQL Server 2000
Database Software
9. Install Microsoft SQL Server 2000 for Windows 2000. Refer to Microsoft SQL Server 2000 Installation and Configuration, on page 61.
10. Install Service Pack 3a for Microsoft SQL Server 2000. Refer to Installing Service Pack 3a for Microsoft SQL Server 2000, on page 75.
11. Configure SQL Server 2000. Refer to Configuring Microsoft SQL Server 2000, on page 76.
This is only an example of a local administrator account. It is
recommended that you name your own local administrator.
MDAC 2.71a Service Pack 1 is required. It is automatically installed
by SQL Server Service Pack 3a in a subsequent step.

chapter 4 | Planning Your Server Installation 33
Install and Configure GCOS Server 1.4
12. Install the GCOS Server 1.4 Server application. Refer to Installing GCOS Server 1.4 for Microsoft SQL Server 2000, on page 174.
13. Verify post-installation of GCOS Server. Refer to Chapter 13, Post-Server Installation Verification, on page 229.
14. GCOS Server 1.4 server installation completed.
15. Install library files on the server. Refer to Installing New Library Files on the Server Running the GCOS Server Software, on page 243.
16. Server installation, configuration, and verification completed.
Install Client Software
17. Install client software on a workstation. Refer to the Affymetrix® GCOS User’s Guide.
18. Test client. Refer to the appendix on Client Testing in the Affymetrix® GCOS User’s Guide.
19. GCOS Server and client application installations completed, configured, and tested.
Upgrading Earlier Versions of GCOS to GCOS 1.4
You can upgrade GCOS Server 1.0, 1.2, and 1.3 to GCOS Server 1.4:
• Upgrade to GCOS Server 1.4 with Oracle 10.2.0.1 (see below)
• Upgrade to GCOS Server 1.4 with SQL 2000 (see below)
Before installing GCOS Server 1.4, verify that the installation user:
• Has local administrative privileges
• Is a member of the ‘GCOS Server Users’ local group.
• Is a domain member

34 Affymetrix® GCOS Server Installation and Administration Guide
UPGRADE TO GCOS SERVER 1.4 WITH ORACLE 10.2.0.1
This section contains the checklist to upgrade an existing GCOS Oracle system. All data and publishing components will reside on one local server.
This upgrade requires the following sets of steps:
1. Verify Previous GCOS Version Configuration (see below)
2. Install Third Party Software and Service Packs (see page 35)
3. Upgrade Oracle 8i to Oracle 10.2.0.1 (see page 35)
4. Upgrade GCOS Server to GCOS Server 1.4 (see page 36)
5. Install Client Software (see page 36)
Verify Previous GCOS Version Configuration
1. Verify Service Pack 4 Windows 2000 Server.
It is highly recommended that experiments be cleared from the
workflow queue prior to upgrading to GCOS Server 1.4. If
experiments are not removed from the queue, data may be missing
or inaccessible.
Backup all data, databases and registry settings before upgrading.
It is highly recommended to backup the entire server before making
any modifications.
Before installing GCOS, verify that the installation user:
• Has local administrative privileges
• Is a member of the ‘GCOS Server Users’ local group on the
server
• Is a domain member

chapter 4 | Planning Your Server Installation 35
2. What is the name of the local server that runs the GCOS Server software:
3. What is the name of the Domain on which the server running GCOS installServer software resides:
4. What is the name of the Global Group that contains the GCOS Server Users:
5. What is the name of the Local Group (usually ‘GCOS Server Users’):
6. Verify that TCP/IP Network Protocol is installed and configured.
7. Verify that the FTP service has been removed.
8. Verify that the local administrator account ‘AffyTS’ or a local admin exists.
Install Third Party Software and Service Packs
9. Verify that ‘AffyTS’ or a local administrator account and the Global Group are members of the Local Group (for example, ‘GCOS Server Users’).
10. Login as ‘AffyTS’ or local administrator and proceed with the following items on the checklist.
11. Backup all data, databases, and registry settings.
12. Install MDAC 2.7 Service Pack 1.
13. Install Internet Explorer 6.0 Service Pack 1.
Upgrade Oracle 8i to Oracle 10.2.0.1
14. Upgrade the Oracle database software. Refer to Oracle® 8i to 10g Upgrade and Configuration, on page 111
This is only an example of a local administrator account. It is
recommended that you name your own local administrator.

36 Affymetrix® GCOS Server Installation and Administration Guide
Upgrade GCOS Server to GCOS Server 1.4
15. Verify that no one is connected to the server running the GCOS Server software.
16. Go to the ODBC control panel and verify that the system DSNs <name>_AffyPub are connected to a valid database for Publish databases.
17. Verify connectivity to alias with SQL Plus.
18. Upgrade the GCOS Server 1.4 application. Refer to Upgrading GCOS Server for Oracle, on page 187.
19. Verify post-installation of GCOS Server. Refer to Chapter 13, Post-Server Installation Verification, on page 229.
20. GCOS Server 1.4 installation completed.
21. Upgrade library files on the server. Refer to Installing New Library Files on the Server Running the GCOS Server Software, on page 243.
22. Server installation, configuration, and verification completed.
Install Client Software
23. Install Oracle 10.2.0.1 client utilities on the client.
24. Create a local alias on the client pointing to the local server that
The library migration will run automatically as the last step of the
installation.
Before installing GCOS, verify that the installation user:
• Has local administrative privileges
• Is a member of the ‘GCOS Server Users’ local group on the
server
• Is a domain member

chapter 4 | Planning Your Server Installation 37
runs the GCOS Server software. Refer to Creating an Oracle Service Name, on page 100.
25. Install client software on a workstation. Refer to the Affymetrix® GCOS User’s Guide.
26. Test client. Refer to the appendix on Client Testing in the Affymetrix® GCOS User’s Guide.
27. GCOS Server and client application installations completed, configured, and tested.
UPGRADE TO GCOS SERVER 1.4 WITH SQL 2000
This section contains the checklist to upgrade an existing GCOS installation running Microsoft SQL Server 2000. All data and publishing components will reside on one local server.
This upgrade requires the following sets of steps:
1. Verify Previous GCOS Version Configuration (see below)
2. Install Third Party Software and Service Packs (see page 38)
3. Upgrade and Configure GCOS Server 1.4 (see page 39)
4. Install Client Software (see page 39)
It is highly recommended that experiments be cleared from the
workflow monitor queue prior to upgrading to GCOS Server 1.4. If
experiments are not removed from the queue, data may be missing
or inaccessible.
Back up all data, databases, and registry settings before upgrading.
It is highly recommended to backup the entire server before
making any modifications.

38 Affymetrix® GCOS Server Installation and Administration Guide
Verify Previous GCOS Version Configuration
1. Verify Microsoft Windows 2000 Server is installed.
2. What is the name of the local server that runs the GCOS Server software:
3. What is the name of the domain that the server running the GCOS Server software resides on:
4. What is the name of the Global Group that contains the GCOS Server users:
5. What is the name of the Local Group (usually ‘GCOS Server Users’) on the LIMS server:
6. Verify that TCP/IP Network Protocol is installed and configured.
7. Verify that the FTP service has been removed.
8. Verify that the local administrator account ‘AffyTS’ or a local admin exists.
9. Verify that the 'AffyTS' or local administrator account and the Global Group are members of the Local Group (i.e., 'GCOS Server Users').
10. Log in as 'AffyTS' or local admin account and proceed with the following items on the checklist.
Install Third Party Software and Service Packs
11. Backup all data, databases and registry settings.
12. Install Windows 2000 Server Service Pack 4.
This is only an example of a local administrator account. It is
recommended that you name your own local administrator.

chapter 4 | Planning Your Server Installation 39
13. Install Internet Explorer 6.0 with Service Pack 1.
14. Install Service Pack 3a for Microsoft SQL Server 2000. Refer to Installing Service Pack 3a for Microsoft SQL Server 2000, on page 75.
15. Configure Microsoft SQL Server 2000. Refer to Configuring Microsoft SQL Server 2000, on page 76.
Upgrade and Configure GCOS Server 1.4
16. Verify that no one is connected to the server running the GCOS Server software.
17. Verify that Microsoft SQL Server 2000 is started.
18. Go to the ODBC control panel and verify that the system DSNs <name>_AffyPub are connected to a valid database for publishing databases.
19. Upgrade the GCOS Server 1.4 software. Refer to Upgrading GCOS Server for SQL Server, on page 194.
20. Verify post-installation of GCOS Server. Refer to Chapter 13, Post-Server Installation Verification, on page 229.
21. GCOS Server 1.4 server installation completed.
22. Verify that library files have been updated.
23. Server installation, configuration, and verification completed.
Install Client Software
24. Install client software on a workstation. Refer to the Affymetrix® GCOS User’s Guide.
Before installing GCOS, verify that the installation user
• Has local administrative privileges
• Is a member of the ‘GCOS Server Users’ local group on the
server
• Is a domain member

40 Affymetrix® GCOS Server Installation and Administration Guide
25. Test client. Refer to the appendix on Client Testing in the Affymetrix® GCOS User’s Guide.
26. GCOS Server and client application installations completed, configured and tested.

Chapter 5
GCOS Server Installation/Upgrade Recovery
Chapter 5

43
GCOS Server Installation/Upgrade Recovery
Recovering From an Unsuccessful Installation
An installation may be unsuccessful due to unforeseen circumstances such as network failures, power failures, corrupted data, incorrect parameter settings, or other reasons. The log files located in the system TEMP directory will log the failure message.
If an unsuccessful installation is encountered, there is a way to recover. The recovery steps depend on the database that is being used and whether it is an upgrade or a new installation. Follow the path that matches your installation and database configuration:
• New GCOS Server 1.4 with Microsoft SQL Server 2000 Installation, on page 43
• New GCOS Server 1.4 with Oracle 10.2.0.1 Installation, on page 44
• Microsoft SQL Server 2000 & Oracle 10.2.0.1 Upgrades, on page 45
• Reinstalling GCOS Server 1.4 Server Components Only, on page 45
NEW GCOS SERVER 1.4 WITH MICROSOFT SQL SERVER 2000
INSTALLATION
If you are performing a new installation of GCOS Server 1.4 with Microsoft SQL Server 2000 and the installation is unsuccessful, it is possible to recover from the installation. To restart the installation, follow the steps outlined below.
1. Stop the installation. Use Task Manager to end any installation processes.
2. Review the DBinstallMessage.log file and correct any listed problems before proceeding.
3. Launch Enterprise Manager for Microsoft SQL Server.
4. Expand the Databases folder.
5. Delete the LIMS3 database.
The log files are located where the system TEMP directory is set.

44 Affymetrix® GCOS Server Installation and Administration Guide
6. Expand the Security folder.
7. Select the Login folder.
8. Delete the LIMS3 user if it exists.
9. Exit Enterprise Manager.
10. Bring up the ODBC Control Panel.
11. Select the System DSN tab.
12. Remove the LIMS3 DSN if it exists.
13. Exit the ODBC Control Panel window.
14. Re-run the GCOS Server 1.4 installation by double-clicking setup.exe.
NEW GCOS SERVER 1.4 WITH ORACLE 10.2.0.1 INSTALLATION
If you are performing a new installation of GCOS Server 1.4 with Oracle® 10.2.0.1 and the installation is unsuccessful, it is possible to recover from the installation. To restart the installation, follow the steps outlined below.
1. Stop the installation. Use Task Manager to end any installation processes.
2. Review the DBinstallMessage.log file and correct any listed problems before proceeding.
3. Launch Oracle Enterprise Manager.
4. Expand the Storage folder.
5. Expand the Tablespaces folder.
6. Highlight the tablespaces named LIMS3, right-click and select Remove.
7. Expand the Security folder.
8. Expand the Users folder.
9. Right-click the LIMS3 user and select Remove.
10. Exit Enterprise Manager.

chapter 5 | GCOS Server Installation/Upgrade Recovery 45
11. Using Windows Explorer, remove the physical files for the LIMS3 database.
12. Bring up the ODBC Control Panel.
13. Select the System DSN tab.
14. Remove the LIMS3 DSN, if it exists.
15. Exit the ODBC Control Panel window.
16. Re-run the GCOS Server 1.4 installation by double-clicking setup.exe.
MICROSOFT SQL SERVER 2000 & ORACLE 10.2.0.1 UPGRADES
If this is an upgrade from an earlier version of GCOS and the installation is unsuccessful, it is possible to recover from the installation. To restart the installation, follow the steps outlined below.
1. Stop the installation. Use Task Manager to end any installation processes.
2. Review the DBinstallMessage.log file and correct any listed problems before proceeding.
3. Re-run the GCOS Server 1.4 installation by double-clicking setup.exe.
REINSTALLING GCOS SERVER 1.4 SERVER COMPONENTS ONLY
After the GCOS Server 1.4 software has been installed, the components are located on X:\GCOS Server\components directory. If for some reason components are corrupted or missing, the GCOS Server 1.4 server installation can be run again.
To install components only, follow the steps below.
1. Insert the GCOS Server 1.4 CD-ROM.
2. If the autorun feature does not start the program:
A. Click Start → Run.

46 Affymetrix® GCOS Server Installation and Administration Guide
B. Type <cd drive letter>:\setup.exe.
C. Click OK.The Affymetrix® GCOS Server software setup window appears (Figure 5.1).
3. Click GCOS Server 1.4 Components Only.The install copies and registers files.
4. After the components are reinstalled, restart the system.
Figure 5.1
Affymetrix® GCOS Server software setup window

Chapter 6
Installing and Configuring Microsoft Windows® 2000 Server
Chapter 6

49
Installing and Configuring Microsoft Windows® 2000 Server
Numerous configuration settings are required during the installation of Windows 2000 Server. Therefore, working with a member of your internal computer support or information technology group is recommended.
Follow the Microsoft Windows 2000 Server Installation Guide to install the software.
Before configuring Windows 2000, Service Pack 4 is required. Install Windows 2000 Server Service Pack 4 from the appropriate CD.
Active Directory
If the server running the GCOS Server software must be configured as a domain controller, Active Directory must also be installed. The default installation will function properly with GCOS Server. The Active Directory is used to organize information about network objects such as shares, users, printers, etc. so users can find the resources they need. Active Directory also provides a single point of administration for network administrators. There are many configurations that can be modified in Active Directory.
MIXED MODE VS. NATIVE MODE
If Active Directory is used, verify that Mixed Mode is used and not Native. Mixed mode means that an environment consists of both Microsoft Windows 2000 and NT systems. Since the instrument workstation will need to run on Windows 2000, it is recommended to set Active Directory to Mixed Mode.
It is highly recommended that the server running the GCOS Server
software is not configured as a Primary Domain Controller (PDC) or
Backup Domain Controller (BDC). It must be a stand alone member
server.

50 Affymetrix® GCOS Server Installation and Administration Guide
DIRECTORY PERMISSIONS
GCOS Server Users will need access to read, write, and execute on the directories of the server that runs the GCOS Server software. If permissions are changed for Active Directory, access to some of the shares may not be accessible for the users. When making modifications, verify that after a setting has been made, connection to the server running the GCOS Server software is still functional.
It is highly recommended that if any changes are made in Active Directory that these changes be logged.
NETWORK SETTINGS
If users experience slow connection to the server, verify that the Domain Controller and DNS are properly configured and registered with other Domain Controllers within the network.
Configuring Microsoft Windows 2000 Server
Configuring Microsoft Windows 2000 Server requires the following sets of steps:
1. Create Local Administrative Account, below
2. Add Local Administrative Account to Administrative Group, on page 52
3. Create Local Group, on page 54
4. Configure Regional Settings, on page 56
CREATE LOCAL ADMINISTRATIVE ACCOUNT
A user with local administrative privileges needs to log on to the server to complete the following steps.
Add a User
1. Click Start → Settings → Control Panel → Administrative Tools → Computer Management.

chapter 6 | Installing and Configuring Microsoft Windows® 2000 Server 51
2. Expand Local Users and Groups (Figure 6.1).
3. Highlight Users.
4. Select Action → New User... from the menu bar.The New User dialog box appears.
5. Enter the following:- Username: AffyTS
- Full Name: Affymetrix Technical Support
- Description: Local Affymetrix GCOS Server Administration
- Password: <password>
- Confirm Password: <password>
Figure 6.1
Computer Management window - Users view
This is an example of a local administrator user. We highly
recommend creating a local admin user of your choice for security
reasons.

52 Affymetrix® GCOS Server Installation and Administration Guide
6. Select the Password Never Expires option. Clear User Must Change Password at Next Logon (Figure 6.2).
7. Click Create, then click Close.
ADD LOCAL ADMINISTRATIVE ACCOUNT TO ADMINISTRATIVE GROUP
1. In the Computer Management window (Start → Settings → Control Panel → Administrative Tools → Computer Management), highlight Groups.A list of groups appears in the right pane.
2. Double-click the Administrators group (Figure 6.3).
Figure 6.2
New User dialog box

chapter 6 | Installing and Configuring Microsoft Windows® 2000 Server 53
3. Click Add to include the ‘AffyTS’ or a local administrator account login to the local group.
4. Highlight ‘AffyTS’ or a local administrator account from the local machine.
5. Click Add, then click OK.
6. Click OK from the Administrator Properties dialog box.
Figure 6.3
Computer Management window - Groups view

54 Affymetrix® GCOS Server Installation and Administration Guide
CREATE LOCAL GROUP
1. In the Computer Management window (Start → Settings → Control Panel → Administrative Tools → Computer Management), highlight Groups.A list of groups appears in the right pane.
2. Select Action → New Group from the menu bar (Figure 6.5).
Figure 6.4
Administrators Properties window - adding members to the Administrators group

chapter 6 | Installing and Configuring Microsoft Windows® 2000 Server 55
3. Enter the following:- Group Name: GCOS Server Users
- Description: Affymetrix GCOS Server Users
4. Click Add... to add users into the local group.
5. Highlight ‘AffyTS’ or a local administrator account from local machine, click Add.
6. Add the Domain Global Group that contains the established users of Affymetrix® GCOS Server by repeating the above steps and selecting the correct domain and group. This allows the users to access the server that runs the GCOS Server software.
7. Click Add.
8. Click OK.
Figure 6.5
New Local Group dialog box

56 Affymetrix® GCOS Server Installation and Administration Guide
9. Click Create, then click Close.
CONFIGURE REGIONAL SETTINGS
Regional Settings must be set to Western Europe and United States. This is the default locale setting. If this is not set to the proper value, GCOS Server software will not install. An error message will appear during the GCOS Server installation and must be changed to the proper setting.
The Locale is set in Computer Management on the server.
Figure 6.6
New Group window - adding members
GCOS Server Users
Affymetrix GCOS Server Users

chapter 6 | Installing and Configuring Microsoft Windows® 2000 Server 57
Figure 6.7
Regional Options dialog box
Use this to setthe system default location

58 Affymetrix® GCOS Server Installation and Administration Guide
Figure 6.8
Computer Management window
Should look like this

Chapter 7
Microsoft SQL Server 2000 Installation and Configuration
Chapter 7

61
Microsoft SQL Server 2000 Installation and Configuration
This section describes the installation and configuration of Microsoft SQL Server 2000. If you plan to use Microsoft SQL Server 2000, follow this section to install and configure the SQL Server database.
Installing Microsoft SQL Server 2000
Before installing Microsoft SQL Server 2000, login to the system using the AffyTS login or the local administrator login created. Installation of Microsoft SQL Server 2000 can be completed using the defaults given by the install program unless noted below. Refer to the Microsoft SQL Server Introduction Manual provided with the Microsoft SQL Server 2000 software. For the specific installation steps that apply to GCOS Server, see Detailed Installation Overview, on page 61.
Prerequisites:
• Windows 2000 Server Service Pack 4
• Internet Explorer 6.0 Service Pack 1
DETAILED INSTALLATION OVERVIEW
This section outlines a new Microsoft SQL Server 2000 installation.
Internet Explorer 6.0 SP 1 is required prior to installing Microsoft
SQL Server 2000. This is a Microsoft requirement.
Depending on the server setup, prompts may appear to inactivate
services during install. If this happens, stop the active service
before continuing with the installation.

62 Affymetrix® GCOS Server Installation and Administration Guide
1. Insert the SQL Server 2000 CD-ROM.The SQL Server 2000 setup window appears and continues with the installation (Figure 7.1).
The Welcome window appears (Figure 7.2).
The screen captures depicted in this section may not exactly match
the windows displayed on your screen.
Figure 7.1
Microsoft® SQL Server 2000 setup window

chapter 7 | Microsoft SQL Server 2000 Installation and Configuration 63
2. Click Next.The Computer Name window appears (Figure 7.3).
Figure 7.2
Welcome window

64 Affymetrix® GCOS Server Installation and Administration Guide
3. Select Local Computer.
4. Click Next. The Installation Selection window appears (Figure 7.4).
Figure 7.3
Computer Name window

chapter 7 | Microsoft SQL Server 2000 Installation and Configuration 65
5. Select Create a new Instance of SQL Server, or install Client Tools.
6. Click Next.The User Information window appears (Figure 7.5).
Figure 7.4
Installation Selection window

66 Affymetrix® GCOS Server Installation and Administration Guide
7. In the User Information window, enter the following: - Name: <enter your name>
- Company: <enter your company name>
8. Click Next.License Agreement window appears (Figure 7.6).
Figure 7.5
User Information window

chapter 7 | Microsoft SQL Server 2000 Installation and Configuration 67
9. Read the agreement and click Yes to accept the terms.The Installation Definition window appears (Figure 7.7).
Figure 7.6
Software License Agreement window

68 Affymetrix® GCOS Server Installation and Administration Guide
10. Select Server and Client Tools.
11. Click Next.The Instance Name window appears (Figure 7.8).
Figure 7.7
Installation Type window

chapter 7 | Microsoft SQL Server 2000 Installation and Configuration 69
12. Leave the Instance Name blank. Select Default and click Next.Setup Type window appears (Figure 7.9).
Figure 7.8
Instance Name window

70 Affymetrix® GCOS Server Installation and Administration Guide
13. Select Typical setup type.
14. Click Browse and define the location for the Program Files and Data Files.
15. Click Next.The Services Accounts window appears (Figure 7.10).
Figure 7.9
Setup Type option box
Performance can be improved by placing the data on a separate
physical hard drive.

chapter 7 | Microsoft SQL Server 2000 Installation and Configuration 71
16. In the Services Accounts window, select the following:- Use the same account for each service. Auto start SQL
Service.
- Use the Local System Account.
17. Click Next.The Authentication Mode window appears (Figure 7.11).
Figure 7.10
Services Accounts window

72 Affymetrix® GCOS Server Installation and Administration Guide
18. Select the Mixed Mode option.
19. Add password for sa login:- Enter password: <enter password for the sa user>
- Confirm password: <reenter the password to confirm>
20. Click Next.The Start Copying Files window appears (Figure 7.12).
Figure 7.11
Authentication Mode window

chapter 7 | Microsoft SQL Server 2000 Installation and Configuration 73
21. Click Next.The Choose Licensing Mode window appears (Figure 7.13).
Figure 7.12
Start Copying Files window

74 Affymetrix® GCOS Server Installation and Administration Guide
22. Select the appropriate licensing mode for your system.
23. Click Continue.A series of message windows appear informing you the status of the migration and installation.Microsoft SQL Server 2000 installs MDAC 2.71a SP 1. Program files are copied and scripts are run for installation.
The installation takes several minutes. When complete the Setup Complete window appears (Figure 7.14).
Figure 7.13
Choose Licensing Mode window

chapter 7 | Microsoft SQL Server 2000 Installation and Configuration 75
24. Select Yes, I want to restart my computer now.
25. Click Finish.The system reboots.
Installing Service Pack 3a for Microsoft SQL Server 2000
Before configuring Microsoft SQL Server 2000, Service Pack 3a is required. Run the install program from the media containing Service Pack 3a for SQL Server 2000.
Figure 7.14
Setup Complete window
Many new Microsoft SQL installations include Service Pack 3a. If
not included in the CD-ROM used, run the installer.

76 Affymetrix® GCOS Server Installation and Administration Guide
CHECKING FOR SERVICE PACK 3A
To verify if Service Pack 3a has been installed, follow the steps below:
1. Launch regedit.
2. Browse in regedit to: HKLM\Software\Microsoft\MSSQLServer\MSSQLServer\Current Version\CSD Version
3. Check the last three digits to verify that they are “761.”
Configuring Microsoft SQL Server 2000
After installing Microsoft SQL Server 2000 with Service Pack 3a, the following configuration/options must be set prior to the installation of GCOS Server 1.4. If a configuration is not discussed in this section, the default setting is used.
The following items need to be modified or added:
1. Autostart SQL Server – enabled.
2. Network Protocols – set to Multi-protocol.
3. Memory – Use dynamic settings.
4. Security – use SQL Server and Windows.
5. Maximum concurrent user connections – ∅ (∅ = unlimited).
6. SA (System Administrator) – set the password for the SA account.
7. GCOS Server Global Group – add to the Logins in Security.
8. Increasing Tempdb – Must be set to at least 100 MB.
DETAILED CONFIGURATION OVERVIEW
This section describes the above steps mentioned in greater detail with the associated diagram.
The following items are configured in the Enterprise Manager Utility

chapter 7 | Microsoft SQL Server 2000 Installation and Configuration 77
window:
• Autostart SQL Server service
• Memory
• Security
• User Connections
1. To configure the above settings, bring up SQL Server Enterprise Manager. Select Start → Programs → SQL Server 2000 → Enterprise Manager.
2. Click the plus (+) sign of the SQL Server Group to list the name of the servers.
3. Highlight the LIMS server name, right-click and select Properties.The SQL Server Properties window appears (Figure 7.15).The General tab is forward.

78 Affymetrix® GCOS Server Installation and Administration Guide
4. Verify that the Autostart SQL Server option is selected. All other options should be unchecked.Enabling the Autostart SQL Server option allows the service to start automatically upon restart of the server.
5. Click the Network Configuration... button located at the bottom of the screen.The SQL Server Network Utility window appears (Figure 7.16).
Figure 7.15
SQL Server Properties dialog box

chapter 7 | Microsoft SQL Server 2000 Installation and Configuration 79
6. Select Multiprotocol from the Disabled protocols list and click Enable .Multiprotocol is added to the Enabled protocols list.
7. Click OK.The SQL Server Properties window appears with the General tab forward.
Figure 7.16
SQL Server Network Utility window
Figure 7.17
SQL Server Network Utility message window

80 Affymetrix® GCOS Server Installation and Administration Guide
Memory
1. Click the Memory tab.The Memory tab of the SQL Server Properties window appears (Figure 7.18).
This configuration defines the amount of memory allocated to the SQL Server database from the operating system. The values are represented in Megabytes.
The memory can be set using a dynamic or fixed memory setting. For dynamic, a Minimum to Maximum amount of memory can be adjusted. Refer to the “Memory” section of the SQL Server Books online. For GCOS Server, it is recommended to set memory to dynamically configure SQL Server memory.
Figure 7.18
Memory tab of the SQL Server Properties window

chapter 7 | Microsoft SQL Server 2000 Installation and Configuration 81
Security
1. Click the Security tab.The Security tab of the SQL Server Properties window appears (Figure 7.19).
For the GCOS Server, SQL Server and Windows is used. This should be the security setting selected.
2. Select SQL Server and Windows.
User Connections
1. Select the Connections tab (Figure 7.20).
2. For the configuration of GCOS Server, set the Maximum concurrent user connections to 0. Setting this to 0 means an
Figure 7.19
Security tab of the SQL Server Properties window

82 Affymetrix® GCOS Server Installation and Administration Guide
unlimited number of simultaneous connections can be made. Use the user connections option to specify the maximum number of simultaneous user connections allowed on Microsoft SQL Server. Because user connections is dynamic (self-configuring option), the SQL Server database adjusts the maximum number of user connections automatically as needed, up to the maximum value allowable. In most cases, you should not need to change the value for this option.
3. Click OK.
Figure 7.20
Connections tab of the SQL Server Properties window

chapter 7 | Microsoft SQL Server 2000 Installation and Configuration 83
Logins
Modify SA Account
1. Launch Enterprise Manager.
2. Expand the server.
3. Expand the Security folder.
4. Select Logins.
5. Double-click the SA account and enter a password for the account, then click OK.This is required for the GCOS Server installation.
6. To confirm the password, enter it again. Click OK (Figure 7.21).
7. Click OK to exit out of the window.
Figure 7.21
SQL Server Login Properties - SA Properties window

84 Affymetrix® GCOS Server Installation and Administration Guide
Grant Permissions to the GCOS Server Users Global
Group
1. To grant permissions to the group, expand the Security Folder.
2. Click Logins.
3. Right-click anywhere in the right hand pane and select New Login from the shortcut menu that appears (Figure 7.22).
The SQL Server Login Properties window appears (Figure 7.23).
Figure 7.22
Right-click for shortcut menu - add New Login

chapter 7 | Microsoft SQL Server 2000 Installation and Configuration 85
4. On the General tab complete the following:
A. Name: Enter the name of the Global Group which contains the GCOS Server Users.
B. In the Authentication section: select Windows NT authentication.
C. Domain: enter the name of the Domain where the Global Group resides.
5. Click OK.
Figure 7.23
SQL Server Login Properties - New Login Window

86 Affymetrix® GCOS Server Installation and Administration Guide
Tempdb
Increase the size of Tempdb to be at least 200 MB.
1. To increase the size of Tempdb, launch Enterprise Manager, click the plus (+) sign of the server name. The list expands.
2. Click the plus (+) sign of the Databases folder, then right-click tempdb and select properties.The tempdb Properties window appears with the General tab forward (Figure 7.24).
3. Click the Data Files tab.
4. In the Space Allocated (MB) field, change the current size to 200.
5. Click the Transaction Log tab.
Figure 7.24
Tempdb database properties window

chapter 7 | Microsoft SQL Server 2000 Installation and Configuration 87
6. In the Space Allocated (MB) field, change the current size to 25 (Figure 7.25).
7. Click OK.
8. Exit out of Enterprise Manager.Microsoft SQL Server 2000 is now configured.
9. Stop and start the SQL Server service so the changes will take place.
Figure 7.25
Transaction Log tab

88 Affymetrix® GCOS Server Installation and Administration Guide

Chapter 8
Oracle® 10.2.0.1 Installation and Configuration
Chapter 8

91
Oracle® 10.2.0.1 Installation and Configuration
This section describes the installation and configuration of Oracle® 10.2.0.1. A qualified Oracle DBA should be responsible for installing and configuring the Oracle software.
Installation Overview
Installation of Oracle 10.2.0.1 for Microsoft Windows can be completed using the defaults given by the install program. Due to the large number of configurations and options that can be set up during the installation of Oracle 10.2.0.1, it is recommended that the software be installed by a qualified DBA.
Installing Oracle 10.2.0.1 on the Server
If using Oracle® 10.2.0.1, the Oracle 10.2.0.1 Client Utilities must
also be installed on the client. The GCOS Server application will not
function properly with different Oracle versions used.
If using a Windows 2000 Active Directory Domain, the Oracle®
authentication service must be set to ‘NONE’ rather than the ‘NTS’
default setting. In the SQLNET.ORA file, set:
sqlnet.authentication_services=(NONE).
The screen captures depicted in this section may not exactly match
the windows displayed on your screen.

92 Affymetrix® GCOS Server Installation and Administration Guide
INSTALLING ORACLE 10.2.0.1
1. Insert the Oracle 10.2.0.1 CD into the CD-ROM drive.Autorun starts the CD and the Select Installation Method window appears (Figure 8.1).
2. Select Basic Installation and enter the following information or use the defaults:
3. Click Next.
Figure 8.1
Installation Method window
Oracle Home Location Directory for installation.
Installation Type Enterprise Edition
Create Starter Database Select
Global Database Name Enter name for database, for example, “orcl.”
Database Password
Confirm Password

chapter 8 | Oracle® 10.2.0.1 Installation and Configuration 93
The Product-Specific Prerequisite Checks window opens (Figure 8.2).
This window displays the results of system checks. If the system doesn’t pass the check, consult with an Oracle DBA before proceeding with the installation.
4. Click Next.The Summary window appears (Figure 8.3).
Figure 8.2
Product-specific Prerequisite Checks window

94 Affymetrix® GCOS Server Installation and Administration Guide
5. Review the data in the Summary window and click Install.The copying of files begins for the installation.The installation continues (Figure 8.4). This process takes several minutes. Do not stop the Oracle installation.
Figure 8.3
Summary window
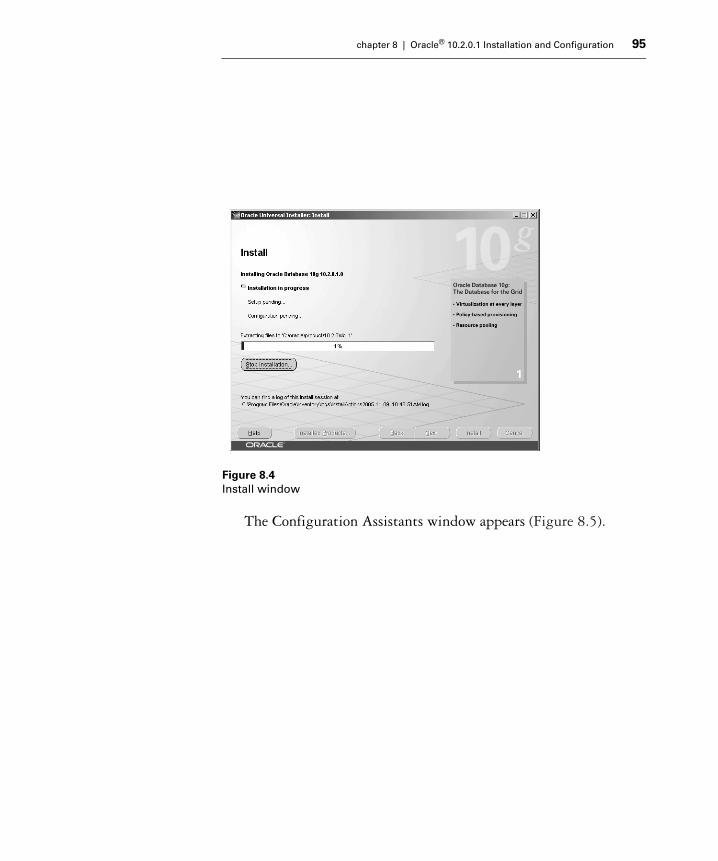
chapter 8 | Oracle® 10.2.0.1 Installation and Configuration 95
The Configuration Assistants window appears (Figure 8.5).
Figure 8.4
Install window

96 Affymetrix® GCOS Server Installation and Administration Guide
6. Read the information in the window and click Next.A Database Creation Process status window appears (Figure 8.6).
Figure 8.5
Configuration Assistants window

chapter 8 | Oracle® 10.2.0.1 Installation and Configuration 97
The window displays the progress of database creation. When the process is complete the Database Creation Complete window appears (Figure 8.7).
7. Click OK to finish the installation.
Figure 8.6
Database Creation Progress window
Figure 8.7
Database Creation Complete window

98 Affymetrix® GCOS Server Installation and Administration Guide
After files and databases are created, the End of Installation window appears (Figure 8.8).
8. Click Exit.Oracle 10g installation is complete.
9. Reboot the server.
Configuring Oracle 10.2.0.1
After installing Oracle 10.2.0.1, it is important that the configuration be completed as instructed. Without the proper configuration, the software may not run as efficiently as it could.
The Oracle DBA must add or modify the following initialization parameters prior to installing GCOS Server 1.4. These minimum parameters settings are important for the GCOS Server 1.4 installation.
Figure 8.8
End of Installation window

chapter 8 | Oracle® 10.2.0.1 Installation and Configuration 99
Run the commands to change the parameters:ALTER SYSTEM SET query_rewrite_enabled = 'TRUE' SCOPE=SPFILE;ALTER SYSTEM SET query_rewrite_integrity = 'trusted' SCOPE=SPFILE;ALTER SYSTEM SET sql_version = 'NATIVE' SCOPE=SPFILE;ALTER SYSTEM SET compatible='10.2.0.1.0' SCOPE=SPFILE;ALTER SYSTEM SET optimizer_features_enable = '10.2.0.1' SCOPE=SPFILE;
ORACLE DATA INFORMATION
The following information is needed before installing the GCOS Server 1.4 software. As mentioned earlier, a qualified DBA should be installing and configuring the Oracle database.
Table 8.1
Parameter Requirements
Parameter Name Minimum
Required
Description
query_rewrite_enabled TRUE Allows rewrite of queries using materialized views if enabled. This saves 'join' information.
optimizer_features_enable 10.2.0.1 Optimizer plan compatibility parameter
query_rewrite_integrity trusted Perform rewrite using materialized views with desired integrity. This must be set to 'trusted' for the GCOS Server function indexes to operate. DO NOT use 'enforced' option!
sql_version NATIVE SQL language version parameter for compatibility issues.
compatible 10.2.0.1 Database will be completely compatible with this software version.
After updating the parameters, stop and start the service to make
Oracle use the new parameter values.

100 Affymetrix® GCOS Server Installation and Administration Guide
1. Name of local server (that runs the GCOS Server software) Oracle alias (must be the same name as local server that runs the GCOS Server software):
2. Name of local server (that runs the GCOS Server software) Oracle instance:
3. DBA login name on local server:
Creating an Oracle Service Name
Before installing the GCOS Server 1.4 software, an Oracle service name must be created and established on the server. To create an Oracle service name use the Net Manager.
ORACLE 10.2.0.1 SERVICE NAME CONFIGURATION
To create an Oracle service name:
1. Select Start → Programs → <Oracle directory> → Configuration and Migration Tools → Net Manager.The Oracle Net Manager window appears (Figure 8.9).

chapter 8 | Oracle® 10.2.0.1 Installation and Configuration 101
2. Expand Local.
3. Highlight Service Naming, then from the menubar select Edit → Create.The Net Service Name Wizard Welcome window appears (Figure 8.10).
Figure 8.9
Oracle® Net Manager window

102 Affymetrix® GCOS Server Installation and Administration Guide
4. Enter the Net Service Name (which is the alias name).The name must be the same name as the local server that runs the GCOS Server software.
5. Click Next.The Protocol window appears (Figure 8.11).
Figure 8.10
Welcome window

chapter 8 | Oracle® 10.2.0.1 Installation and Configuration 103
6. Select TCP/IP (Internet Protocol).
7. Click Next.The Protocol Settings window appears (Figure 8.12).
Figure 8.11
Protocol window

104 Affymetrix® GCOS Server Installation and Administration Guide
The Host Name is the name of the local server that runs the GCOS Server software.The Port Number is left as the default value 1521, unless it has been changed.
8. Click Next.The Service window appears (Figure 8.13).
Figure 8.12
Protocol Settings window

chapter 8 | Oracle® 10.2.0.1 Installation and Configuration 105
9. Select (Oracle10g) Service Name option. Enter the name of the Oracle database instance on the local server that runs the GCOS Server software.
10. Click Next.The Test window appears (Figure 8.14).
Figure 8.13
Service window

106 Affymetrix® GCOS Server Installation and Administration Guide
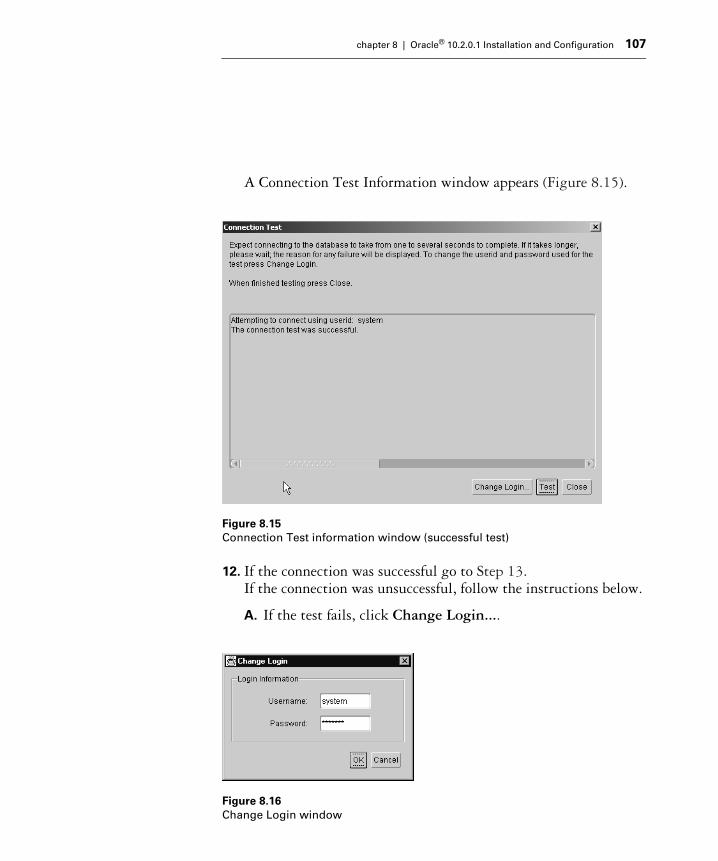
11. Click Test... to test the alias created.
Figure 8.14
Test window
chapter 8 | Oracle® 10.2.0.1 Installation and Configuration 107
A Connection Test Information window appears (Figure 8.15).
12. If the connection was successful go to Step 13.If the connection was unsuccessful, follow the instructions below.
A. If the test fails, click Change Login....
Figure 8.15
Connection Test information window (successful test)
Figure 8.16
Change Login window

108 Affymetrix® GCOS Server Installation and Administration Guide
B. Enter Username and Password, then click OK.
C. Repeat Step 11.
13. Click Close.
14. Click Finish.
15. Save the configuration settings.
If your test was unsuccessful, verify that your listener is listening for
your alias. Otherwise, refer to question 24, on page 261.

Chapter 9
Oracle® 8i to 10g Upgrade and Configuration
Chapter 9

111
Oracle® 8i to 10g Upgrade and Configuration
This chapter covers the upgrade of Oracle® 8i to Oracle 10g, which is required when upgrading an earlier version of GCOS Server to GCOS Server 1.4.
Upgrade Overview
There are two options for upgrading Oracle 8i to Oracle 10g:
• Basic Upgrade Path (see below)
• Advanced Upgrade Path (see page 141)
Installation of Oracle 10.2.0.1 for Microsoft Windows can be completed using the different options given by the install program. Due to the large number of configurations and options that can be set up during the installation of Oracle 10.2.0.1, it is recommended that the software be installed by a qualified DBA.
Basic Upgrade Path
The Oracle 10g basic upgrade path uses the following sets of steps:
1. Back up the Oracle database(s).
2. Verify that the initial extent in the system tablespace is set to 64K or less.For more information, see Verify Tablespace Settings, on page 112.
If using Oracle® 10.2.0.1, the Oracle 10.2.0.1 Client Utilities must
also be installed on the client. The GCOS Server application will not
function properly with different Oracle versions used.
If using a Windows 2000 Active Directory Domain, the Oracle®
authentication service must be set to ‘NONE’ rather than the ‘NTS’
default setting. In the SQLNET.ORA file, set:
sqlnet.authentication_services=(NONE).

112 Affymetrix® GCOS Server Installation and Administration Guide
3. Upgrade the database software to Oracle 10g.For more information, see Upgrade the Oracle software, on page 113.
4. Upgrade the database to Oracle 10g.For more information, see Upgrade the Database, on page 116.
5. Delete the Oracle 8i Service Name and listener using Net8 Assistant.For more information, see Delete the 8i Service Name and Listener, on page 126.
6. Go to windows services panel and stop the listener and set to manual.For more information, see Stop the 8g Listener and Set to Manual Start, on page 129.
7. Create the 10g listener.For more information, see Create the 10g Listener, on page 130.
8. Create the 10g Service Name.For more information, see Create the 10g Service Name, on page 133.
VERIFY TABLESPACE SETTINGS
Prior to upgrading to Oracle 10.2, verify that the initial extent in the system tablespace is set to 64K or less.
Perform the following steps to make the changes:
1. Launch Oracle Enterprise Manager.
2. Expand the Storage.
3. Browse to SYSTEM tablespace.
4. Click on Storage tab.
5. Change the initial, next, and minimum extent to 64K.
Refer to the Oracle documentation for more information.

chapter 9 | Oracle® 8i to 10g Upgrade and Configuration 113
UPGRADE THE ORACLE SOFTWARE
To upgrade the database software:
1. Insert the Oracle10g CD into the CD-ROM drive.Autorun starts the CD and the Installation Method window appears (Figure 9.1).
2. Click Next.The Produce-Specific Prerequisite Checks window appears (Figure 9.2).
Before upgrading Oracle 8i, you must back up the Oracle database.
You will need to install Oracle client utilities for 10.2 on the clients
after performing this upgrade.
Figure 9.1
Select Installation Method window

114 Affymetrix® GCOS Server Installation and Administration Guide
3. Review the results and click Next to proceed with the upgrade.If problems have been found an upgrade warning box appears (Figure 9.3).
4. Click Yes.The Summary window appears (Figure 9.4).
Figure 9.2
Product-Specific Prerequisite Checks window
Figure 9.3
Upgrade warning box

chapter 9 | Oracle® 8i to 10g Upgrade and Configuration 115
5. Review the summary and click Install.The Install window appears (Figure 9.5).
Figure 9.4
Summary window
Figure 9.5
Install window

116 Affymetrix® GCOS Server Installation and Administration Guide
The window displays the progress of the installation.
6. When the installation is completed, click Next.The End of Installation window opens (Figure 9.6).
7. Review the information and click Exit to exit the software upgrade.
UPGRADE THE DATABASE
To upgrade the database:
1. Select Start → Programs → <Oracle directory> → Configuration and Migration Tools → Database Upgrade Assistant.The Database Upgrade Assistant: Welcome window appears (Figure 9.7).
Figure 9.6
End of Installation window

chapter 9 | Oracle® 8i to 10g Upgrade and Configuration 117
2. Click Next.The Databases window appears (Figure 9.8).
Figure 9.7
Database Upgrade Assistant: Welcome window

118 Affymetrix® GCOS Server Installation and Administration Guide
3. Select the database you wish to upgrade and click Next.The Database Upgrade Assistant window displays a notice of problems (Figure 9.9).
Figure 9.8
Databases window
Figure 9.9
Database Upgrade Assistant notice

chapter 9 | Oracle® 8i to 10g Upgrade and Configuration 119
4. Click Yes to continue the upgrade.The SYSAUX Tablespace window appears (Figure 9.10).
Use the default values unless your Oracle DBA recommends otherwise.
5. Click Next.The Recompile Invalid Objects window appears (Figure 9.11).
Figure 9.10
SYSAUX Tablespace window

120 Affymetrix® GCOS Server Installation and Administration Guide
Use the default value unless your Oracle DBA recommends otherwise.
6. Click Next.The Backup window appears (Figure 9.12).
Figure 9.11
Recompile Invalid Objects window

chapter 9 | Oracle® 8i to 10g Upgrade and Configuration 121
7. Select I would like this tool to back up the database and click Next.You should use this tool to back up the database. By doing so, if for any reason the upgrade fails, the upgrade can be run again without the need to rebuild Oracle 8i.The Management Options window opens (Figure 9.13).
Figure 9.12
Backup window

122 Affymetrix® GCOS Server Installation and Administration Guide
Select the default options unless your Oracle DBA recommends otherwise.
8. Click Next.The Database Credential window appears (Figure 9.14).
Figure 9.13
Management Options window

chapter 9 | Oracle® 8i to 10g Upgrade and Configuration 123
To use the same password for all accounts:
A. Select Use the Same Password.
B. Enter the password in the Password and Confirm Password boxes
To use different passwords for different accounts:
A. Select Use Different Passwords.
B. Enter the password for each account in the Password and Confirm Password columns.
9. Click Next.The Upgrade Summary window appears (Figure 9.15).
Figure 9.14
Database Credentials window

124 Affymetrix® GCOS Server Installation and Administration Guide
10. Review the summary and click Finish.The Upgrade Progress window appears (Figure 9.16).
Figure 9.15
Upgrade Summary window
Figure 9.16
Progress window

chapter 9 | Oracle® 8i to 10g Upgrade and Configuration 125
The Upgrade Progress window displays the progress of the upgrade.
11. When the upgrade is complete click OK.The Upgrade Results window appears (Figure 9.17).
12. Review the results and click Close.The End of Installation window appears (Figure 9.18).
Figure 9.17
Upgrade Results window

126 Affymetrix® GCOS Server Installation and Administration Guide
13. Click Exit.
14. Restart the computer.
DELETE THE 8I SERVICE NAME AND LISTENER
1. Launch Net8 Assistant (Start → Programs → (Oracle Home) → Network Administration → Net8 Assistant).The Net8 Assistant window appears (Figure 9.19).
Figure 9.18
End of Installation window

chapter 9 | Oracle® 8i to 10g Upgrade and Configuration 127
2. Expand Local.
3. Expand Service Naming (Figure 9.20).
Figure 9.19
Net8 Assistant Window

128 Affymetrix® GCOS Server Installation and Administration Guide
4. Highlight the alias name under the Service Naming (i.e.: name of the server).
5. From the menu bar, select Edit → Delete (Figure 9.21).
6. Delete the alias.
Figure 9.20
Service Naming Window

chapter 9 | Oracle® 8i to 10g Upgrade and Configuration 129
7. Expand Listeners.
8. Highlight the listener name.
9. From the menu bar, select Edit → Delete.
10. Delete the listener.
11. Save the configuration settings and close the window.
STOP THE 8G LISTENER AND SET TO MANUAL START
To stop the 8g listener and set it to manual start:
1. Click the Microsoft Windows® Start button , then select Settings → Control Panels.The Control Panels window opens.
Figure 9.21
Deletion window

130 Affymetrix® GCOS Server Installation and Administration Guide
2. Click the Administrative Tools Icon.The Administrative Tools window opens.
3. Click the Services icon.The Services window opens.
4. Double-click on the 8i listener service and click-stop.
5. Set the Startup Type to Manual.
6. Close the Services window.
CREATE THE 10G LISTENER
To create the 10g listener:
1. Launch Configuration Assistant (Start → Programs → (Oracle Home) → Configuration and Migration Tools → Net Configuration Assistant).The Welcome window opens (Figure 9.22).
2. Select Listener Configuration. Click Next.The Listener Configuration, Listener window opens (Figure 9.23).
Figure 9.22
Listener Configuration window

chapter 9 | Oracle® 8i to 10g Upgrade and Configuration 131
3. Select Add. Click Next.The Listener Configuration, Listener Name window opens (Figure 9.24).
4. Enter the Listener name (i.e.: LISTENER). Click Next.
Figure 9.23
Add Listener window
Figure 9.24
Listener Name window

132 Affymetrix® GCOS Server Installation and Administration Guide
The Listener Configuration, Select Protocol window opens (Figure 9.25).
5. The selected protocol is TCP. Click Next.The TCP/IP Protocol window appears (Figure 9.26).
Figure 9.25
Select Protocol window
Figure 9.26
TCP/IP Protocol window

chapter 9 | Oracle® 8i to 10g Upgrade and Configuration 133
6. Select the Use the standard port number of 1521 option. Click Next.The Listener Configurations, More Listeners? window opens (Figure 9.27).
7. Select No when prompted to configure another listener. Click Next.The Listener is added.
CREATE THE 10G SERVICE NAME
To create an Oracle 10g service name:
1. Select Start → Programs → <Oracle directory> → Configuration and Migration Tools → Net Manager.The Oracle Net Manager window appears (Figure 9.28).
Figure 9.27
More Listeners window

134 Affymetrix® GCOS Server Installation and Administration Guide
2. Expand Local.
3. Highlight Service Naming, then from the menubar select Edit → Create.The Net Service Name Wizard Welcome window appears (Figure 9.29).
Figure 9.28
Oracle® Net Manager window

chapter 9 | Oracle® 8i to 10g Upgrade and Configuration 135
4. Enter the Net Service Name (which is the alias name).The name must be the same name as the local server that runs the GCOS Server software.
5. Click Next.The Protocol window appears (Figure 9.30).
Figure 9.29
Welcome window

136 Affymetrix® GCOS Server Installation and Administration Guide
6. Select TCP/IP (Internet Protocol).
7. Click Next.The Protocol Settings window appears (Figure 9.31).
Figure 9.30
Protocol window

chapter 9 | Oracle® 8i to 10g Upgrade and Configuration 137
The Host Name is the name of the local server that runs the GCOS Server software.The Port Number is left as the default value 1521, unless it has been changed.
8. Click Next.The Service window appears (Figure 9.32).
Figure 9.31
Protocol Settings window

138 Affymetrix® GCOS Server Installation and Administration Guide
9. Select (Oracle10g) Service Name option. Enter the name of the Oracle database instance on the local server that runs the GCOS Server software.
10. Click Next.The Test window appears (Figure 9.33).
Figure 9.32
Service window

chapter 9 | Oracle® 8i to 10g Upgrade and Configuration 139
11. Click Test... to test the alias created.
Figure 9.33
Test window

140 Affymetrix® GCOS Server Installation and Administration Guide
A Connection Test Information window appears (Figure 9.34).
12. If the connection was successful go to Step 13.If the connection was unsuccessful, follow the instructions below.
A. If the test fails, click Change Login....
Figure 9.34
Connection Test information window (successful test)
Figure 9.35
Change Login window

chapter 9 | Oracle® 8i to 10g Upgrade and Configuration 141
B. Enter Username and Password, then click OK.
C. Repeat Step 11.
13. Click Close.
14. Click Finish.
15. Save the configuration settings.
Advanced Upgrade Path
The Oracle 10g advanced upgrade path uses the following sets of steps:
1. Back up the Oracle database(s).
2. Verify that the initial extent in the system tablespace is set to 64K or less.For more information, see Verify Tablespace Settings, on page 112.
3. Upgrade the Oracle database software and database.
4. Delete the Oracle 8i Service Name using the Net8 Assistant.For more information, see Delete the 8i Service Name and Listener, on page 126
5. Delete the Oracle 8i listener using the Net8 Configuration Assistant.For more information see Delete the 8i Service Name and Listener, on page 126.
6. Go to the Windows services panel and stop the listener and set to manual. For more information, see Stop the 8g Listener and Set to Manual Start, on page 129.
7. Create the 10g Service Name.For more information, see Create the 10g Service Name, on page 133.
If your test was unsuccessful, verify that your listener is listening for
your alias. Otherwise, refer to question 24, on page 261.

142 Affymetrix® GCOS Server Installation and Administration Guide
You will need to install Oracle client utilities for 10.2 on the client computers.
UPDATE THE SOFTWARE AND DATABASE USING THE ADVANCED OPTION
To upgrade the database software and database:
1. Verify that the initial extent in the system tablespace is set to 64K or less (see page 112).
2. Insert the Oracle10g CD into the CD-ROM drive.Autorun starts the CD and the Installation Method window appears (Figure 9.36).
3. Click Next.The Select Installation Type window appears (Figure 9.37).
Before upgrading Oracle 8i, you must back up the Oracle database.
Figure 9.36
Select Installation Method window

chapter 9 | Oracle® 8i to 10g Upgrade and Configuration 143
4. Click Next.The Specify Home Details window appears (Figure 9.38).
Figure 9.37
Installation Type window

144 Affymetrix® GCOS Server Installation and Administration Guide
5. Enter a name and path for the installation and click Next.
6. Choose a path that is different than the Oracle 8i path (per Oracle’s recommendation).The Product-Specific Prerequisite Checks window appears (Figure 9.39).
Figure 9.38
Specify Home Details window

chapter 9 | Oracle® 8i to 10g Upgrade and Configuration 145
This window displays the results of system checks. If the system doesn’t pass the check, consult with an Oracle DBA before proceeding with the installation.
7. Click Next.The Upgrade an Existing Database window appears (Figure 9.40).
Figure 9.39
Product-Specific Prerequisite Checks window

146 Affymetrix® GCOS Server Installation and Administration Guide
8. Select the following options:
A. Select Yes to perform upgrade now.
B. Select Upgrade an Existing Database.
C. Select the database to upgrade.
9. Click Next.The Summary window appears (Figure 9.41).
Figure 9.40
Upgrade an Existing Database window

chapter 9 | Oracle® 8i to 10g Upgrade and Configuration 147
10. Review the summary and click Install.The Install window appears (Figure 9.42).
Figure 9.41
Summary window
Figure 9.42
Install window

148 Affymetrix® GCOS Server Installation and Administration Guide
The window indicates when the installation is complete.
11. In the Install window, click Next.The Oracle Net Configuration Assistant: Welcome window appears (Figure 9.43).
12. Select Perform Typical Configuration and click Next.The Upgrade Information window appears (Figure 9.44).
Figure 9.43
Net Configuration Assistant: Welcome window

chapter 9 | Oracle® 8i to 10g Upgrade and Configuration 149
13. Confirm the data in the Upgrade Information window and click Next.
The Database Upgrade Assistant window displays a notice (Figure 9.45).
Figure 9.44
Upgrade Information window
Figure 9.45
Database Upgrade Assistant notice window

150 Affymetrix® GCOS Server Installation and Administration Guide
14. Click Yes to continue the upgrade.The SYSAUX Tablespace window appears (Figure 9.46).
Use the default values unless your Oracle DBA recommends otherwise.
15. Click Next.The Recompile Invalid Objects window appears (Figure 9.47).
Figure 9.46
SYSAUX Tablespace window

chapter 9 | Oracle® 8i to 10g Upgrade and Configuration 151
Use the default value unless your Oracle DBA recommends otherwise.
16. Click Next.The Backup window appears (Figure 9.48).
Figure 9.47
Recompile Invalid Objects window

152 Affymetrix® GCOS Server Installation and Administration Guide
17. Select I would like this tool to back up the database and click Next.Users should select the option to use this tool to back up the database. If for any reason the upgrade fails, the upgrade can be run again without the need to rebuild Oracle 8i.The Management Options window opens (Figure 9.49).
Figure 9.48
Backup window

chapter 9 | Oracle® 8i to 10g Upgrade and Configuration 153
Select the default options unless your Oracle DBA recommends otherwise.
18. Click Next.The Database Credential window appears (Figure 9.50).
Figure 9.49
Management Options window

154 Affymetrix® GCOS Server Installation and Administration Guide
To use the same password for all accounts:
A. Select Use the Same Password.
B. Enter the password in the Password and Confirm Password boxes
To use different passwords for different accounts:
A. Select Use Different Passwords.
B. Enter the password for each account in the Password and Confirm Password columns.
19. Click Next.The Upgrade Summary window appears (Figure 9.51).
Figure 9.50
Database Credentials window

chapter 9 | Oracle® 8i to 10g Upgrade and Configuration 155
20. Review the summary and click Finish.The Upgrade Progress window appears (Figure 9.52).
Figure 9.51
Upgrade Summary window
Figure 9.52
Progress window

156 Affymetrix® GCOS Server Installation and Administration Guide
The Upgrade Progress window indicates when the upgrade is complete.
21. Click OK.The Upgrade Results window appears (Figure 9.53).
22. Review the results and click Next.The End of Installation window appears (Figure 9.54).
Figure 9.53
Upgrade Results window

chapter 9 | Oracle® 8i to 10g Upgrade and Configuration 157
23. Click Exit.
24. Restart the computer.
25. Delete the Oracle 8i service name and listener using the Net8 Configuration Assistant (see page 126).
26. Go to Services panel and stop the 8i listener and set Startup Type to Manual (see page 129).
27. Launch Oracle 10g Net Manager and expand the Service Naming (Figure 9.55).
Figure 9.54
End of Installation window

158 Affymetrix® GCOS Server Installation and Administration Guide
28. Highlight the orcl Service Name and rename it to match the Host Name.
29. Save the Network configuration and exit.
Figure 9.55
Net Manager

Chapter 1
0 GCOS Server Software Installation and Configuration
Chapter 1
0
161
GCOS Server Software Installation and Configuration
This section of the manual guides you through the GCOS Server 1.4 server installation for:
• Installing GCOS Server 1.4 for Oracle 10.2.0.1 (see page 161)
• Installing GCOS Server 1.4 for Microsoft SQL Server 2000 (see page 174)
During a new GCOS Server installation, the installation process creates multiple databases that are used for the GCOS Server software. This is determined by the configurations answered by the installer.
The following databases are created:
1. LIMSAdmin
2. LIMS3
3. AADM
4. GeneInfo
5. DataMiningInfo
The installation then copies and registers the GCOS Server 1.4 components.
See the procedures for:
• Installing GCOS Server 1.4 for Oracle 10.2.0.1, on page 161
• Installing GCOS Server 1.4 for Microsoft SQL Server 2000, on page 174
Installing GCOS Server 1.4 for Oracle 10.2.0.1
This section outlines a new GCOS Server 1.4 installation for Oracle 10.2.0.1.
Before installing GCOS Server 1.4, please make sure that
undo_management in Oracle is set to AUTO.
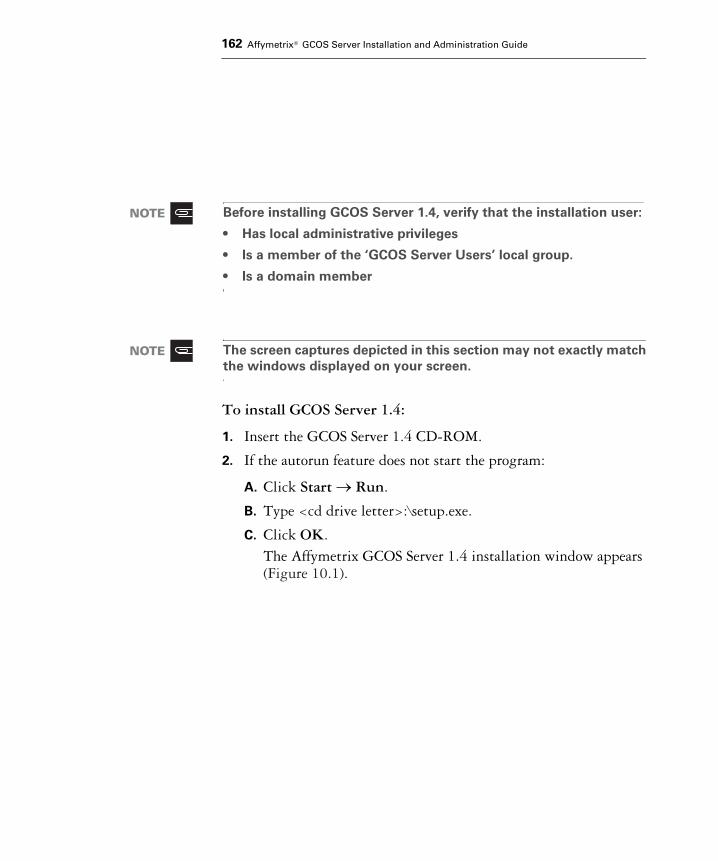
162 Affymetrix® GCOS Server Installation and Administration Guide
To install GCOS Server 1.4:
1. Insert the GCOS Server 1.4 CD-ROM.
2. If the autorun feature does not start the program:
A. Click Start → Run.
B. Type <cd drive letter>:\setup.exe.
C. Click OK.The Affymetrix GCOS Server 1.4 installation window appears (Figure 10.1).
Before installing GCOS Server 1.4, verify that the installation user:
• Has local administrative privileges
• Is a member of the ‘GCOS Server Users’ local group.
• Is a domain member
The screen captures depicted in this section may not exactly match
the windows displayed on your screen.

chapter 10 | GCOS Server Software Installation and Configuration 163
.
3. Click Full Install (Oracle).The Welcome window appears (Figure 10.2).
4. Click Next.Several Software License Agreement windows appear (Figure 10.3).
Figure 10.1
GeneChip® GCOS Server 1.4 installation window
Figure 10.2
Welcome window

164 Affymetrix® GCOS Server Installation and Administration Guide
5. Read the information and click Yes if you accept the terms of the agreement.The Customer Information window appears (Figure 10.4).
6. Enter the customer information and the serial number located on the product registration card.
Figure 10.3
Software License Agreement window
Figure 10.4
Customer Information window

chapter 10 | GCOS Server Software Installation and Configuration 165
7. Click Next.The Choose Destination Location window appears (Figure 10.5).
This window allows you to choose a location for:- GCOS Program location
- GCOS Data location
- GCOS Database location.
The default paths is C:\GCOS Server.
8. To install to a different location click the Browse button and select the desired path.
9. Click Next.The Select Driver window appears (Figure 10.6).
Figure 10.5
Choose Destination Location window

166 Affymetrix® GCOS Server Installation and Administration Guide
10. Select an Oracle 10g ODBC driver from the drivers listed.
11. Click Next.The System Account Password window appears (Figure 10.7).
12. Enter the password for the Oracle System User and click Next.The Change Password window opens (Figure 10.8).
Figure 10.6
Select Driver window
Figure 10.7
System Account Password window

chapter 10 | GCOS Server Software Installation and Configuration 167
13. Enter a new password for the GCOS database in the Password and Confirm Password boxes and click Next.The Oracle Configuration Parameters window appears (Figure 10.9).- Green: required values met
- Red: required values not met
Figure 10.8
Change Password window
For more information regarding a specific parameter, click the
parameter name and review the information in the description box
below.

168 Affymetrix® GCOS Server Installation and Administration Guide
14. If a parameter is red:
A. Change the parameter values without exiting the GCOS Server install.
B. Stop and restart the Oracle service.
C. Click Refresh in the install program.
D. Review parameters. If the parameters are still not met go back to step Step 14 Step A.
15. Click Next. The GCOS Security window appears (Figure 10.10).
Figure 10.9
GCOS Server Installation - Oracle Configuration Parameters window

chapter 10 | GCOS Server Software Installation and Configuration 169
The GCOS Publish Server should be the local server name.
16. Enter the following for the Security Information:- Select local group to share: This is usually ‘GCOS Server
Users’. If different, select the correct Local Group.
- Select global group: This is the Global Group within the Local Group. Select the group that contains the GCOS Server users.Do not select an individual user.
17. Click Next.The installation program verifies the Oracle information entered.
Figure 10.10
GCOS Security window
Use the Refresh button if the Global Group was not added to the
Local Group. Add the Global Group using Administrative Tools. Click
Refresh to update the list to continue with the installation.

170 Affymetrix® GCOS Server Installation and Administration Guide
A series of databases are created. This process takes a few minutes. The databases are created in the following order:- LIMSAdmin database created
- LIMS3 database created
- AADM database created
- GeneInfo database created
- DataMiningInfo database created
After creating the databases, the GCOS Server 1.4 components are copied and registered. The GCOS Service Settings window appears (Figure 10.11).
The window has the following controls:
Figure 10.11
GCOS Service Settings window
Domain Domain on the network to which the GCOS Server is assigned.
User The network user ID assigned to the user.
Password User’s password.
Run As Local System Not available on GCOS Server.
Apply Applies the entered changes.
Cancel Closes the window without applying the changes.

chapter 10 | GCOS Server Software Installation and Configuration 171
18. Select the Domain\User you wish to use from the drop-down list and enter the password for that user.The analysis /transfer service must be reconfigured to run as a user who has admin rights on the local machine and is in the GCOS Administrator's role on the GCOS Server if file security is enabled. The list is populated automatically with a list of users who have the above mentioned rights. If File Security is not enabled, you can click Cancel to run services under local system account.
19. Click Apply.The selected options are applied.
The Setup Complete window appears (Figure 10.12).
For more information about the requirements for the User, see
Requirements for Using the GCOS Services, on page 205.
If you press the Cancel button, then the service can be reconfigured
using the procedure described in Configuring the GCOS ServiceSettings on a GCOS Server, on page 211.
If File security has been enabled, then it is important to configure
the Analysis Services before using GCOS 1.4 with this server from
any client. Failure to configure the analysis services will cause the
.cel file generation to fail.

172 Affymetrix® GCOS Server Installation and Administration Guide
20. Click Finish.
21. Restart your computer (required).After the server is restarted, the GCOS Server File Security window appears (Figure 10.13).
Figure 10.12
Setup Complete window

chapter 10 | GCOS Server Software Installation and Configuration 173
22. If you do not want the server to secure the \\GCLIMS\Data folder through the GCOS Server file security feature, choose the Disable File Security option and click Apply.If you want the server to secure the \\GCLIMS\Data folder through the GCOS Server file security feature, enter the following information:- Domain\User: <select the secure user from the drop-down
list.
- Password: <enter password for the secure user>
The secure user should be:- A local administrator
- A domain member
23. Click Exit to complete the installation.
Figure 10.13
GCOS Server File Security window

174 Affymetrix® GCOS Server Installation and Administration Guide
Installing GCOS Server 1.4 for Microsoft SQL Server 2000
This section outlines the steps for a new GCOS Server 1.4 installation for Microsoft SQL Server 2000.
To install GCOS Server 1.4:
1. Insert the GCOS Server 1.4 CD-ROM.
2. If the autorun feature does not start the program:
A. Click Start → Run.
B. Type <cd drive letter>:\setup.exe
C. Click OK.The GeneChip® GCOS Server software setup window appears (Figure 10.14).
Before installing GCOS Server 1.4, verify that the installation user:
• Has local administrative privileges
• Is a member of the ‘GCOS Server Users’ local group.
• Is a domain member
The screen captures depicted in this section may not exactly match
the windows displayed on your screen.

chapter 10 | GCOS Server Software Installation and Configuration 175
3. Click Full Install (SQL Server).The Welcome window appears (Figure 10.15).
4. Click Next.The Software License Agreement window appears (Figure 10.16).
Figure 10.14
Affymetrix® GCOS Server software setup window
Figure 10.15
Welcome window

176 Affymetrix® GCOS Server Installation and Administration Guide
5. Read the information and click Yes if you accept the terms of the agreement.The Customer Information window appears (Figure 10.17).
6. Enter the customer information and the serial number from the product registration card.
Figure 10.16
License Information window
Figure 10.17
Customer information window

chapter 10 | GCOS Server Software Installation and Configuration 177
7. Click Next to continue.The Choose Destination Location window appears (Figure 10.18).
This window allows you to choose a location for:- GCOS Program location
- GCOS Data location
- GCOS Database location.
The default path for Program location is C:\GCOS Server.
8. To install to a different location click the Browse button and select the desired path.
9. Click Next to continue.The Select Driver window appears (Figure 10.19).
Figure 10.18
Choose Destination Location window

178 Affymetrix® GCOS Server Installation and Administration Guide
10. Select the SQL Server ODBC driver and click Next.The SA Account Password window appears (Figure 10.20).
11. Enter the password for SQL Server admin (sa) account.
12. The Change Password window appears (Figure 10.21).-
Figure 10.19
Select ODBC Driver window
Figure 10.20
SA Account Password window
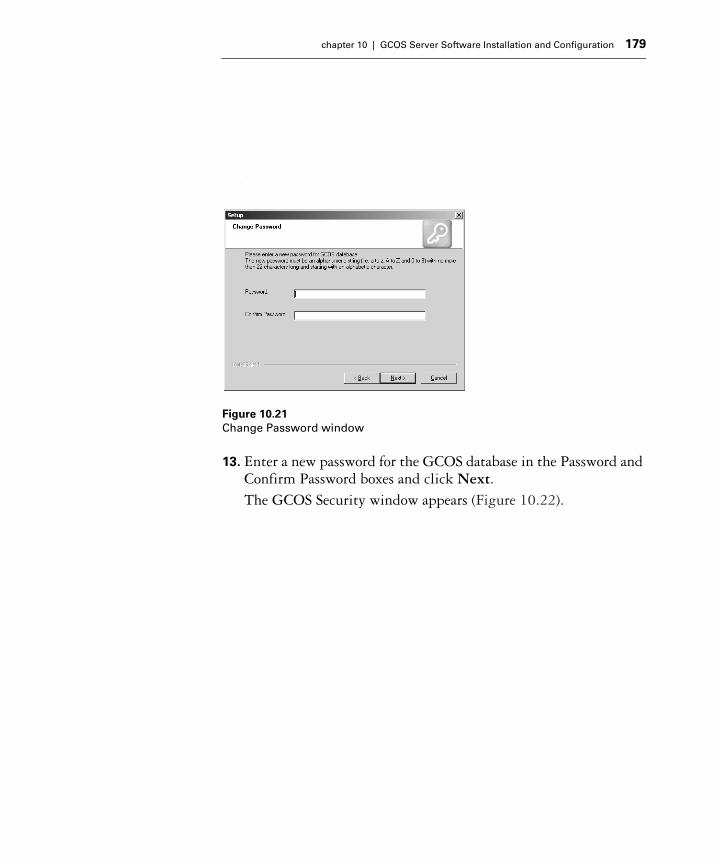
chapter 10 | GCOS Server Software Installation and Configuration 179
-
13. Enter a new password for the GCOS database in the Password and Confirm Password boxes and click Next.The GCOS Security window appears (Figure 10.22).
Figure 10.21
Change Password window

180 Affymetrix® GCOS Server Installation and Administration Guide
The GCOS Publish Server should be the local server name.
14. Enter the following for the Security Information:- Select local group to share: This is usually ‘GCOS Server
Users’. If different, select the correct Local Group.
- Select global group: This is the Global Group within the Local Group. Select the group that contains the GCOS Server users. Do not select an individual user.
15. Click Next.
Figure 10.22
GCOS Security window
The username and password allow the client applications to connect
to the GCOS Server system.
Use the Refresh button if the Global Group was not added to the
Local Group. Add the Global Group using Administrative Tools. Click
Refresh to update the list to continue with the installation.

chapter 10 | GCOS Server Software Installation and Configuration 181
A series of databases are created. This process takes a few minutes. The databases are created in the following order:- LimsAdmin
- LIMS3
- AADM
- GeneInfo
- DataMiningInfo
After creating the databases, the GCOS Server 1.4 components are copied and registered. The GCOS Service Settings window appears (Figure 10.23).
The window has the following controls:
Figure 10.23
GCOS Service Settings window
Domain Domain on the network to which the GCOS Server is assigned.
User The network user ID assigned to the user.
Password User’s password.
Run As Local System Not available on GCOS Server.
Apply Applies the entered changes.
Cancel Closes the window without applying the changes.

182 Affymetrix® GCOS Server Installation and Administration Guide
16. Select the Domain\User you wish to use from the drop-down list and enter the password for that user.The analysis /transfer service must be reconfigured to run as a user who has admin rights on the local machine and is in the GCOS Administrator's role on the GCOS Server. The list is populated automatically with a list of users who have the above mentioned rights.
17. Click Apply.The selected options are applied.The Setup Complete window appears (Figure 10.24).
For more information about the requirements for the User, see
Requirements for Using the GCOS Services, on page 205.
If you press the Cancel button, then the service can be reconfigured
using the procedure described in Configuring the GCOS ServiceSettings on a GCOS Server, on page 211.
If File security has been enabled, then it is important to configure
the Analysis Services before using GCOS 1.4 with this server from
any client. Failure to configure the analysis services will cause the
.cel file generation to fail

chapter 10 | GCOS Server Software Installation and Configuration 183
18. Click Finish.
19. Restart your computer (required).After the server is restarted, the GCOS Server File Security window appears (Figure 10.25).
Figure 10.24
Setup Complete window

184 Affymetrix® GCOS Server Installation and Administration Guide
20. If you do not want the server to secure the \\GCLIMS\Data folder through the GCOS Server file security feature, choose the Disable File Security option and click Apply.If you want the server to secure the \\GCLIMS\Data folder through the GCOS Server file security feature, enter the following information:- Domain\User: <select the secure user from the drop-down
list.
- Password: <enter password for the secure user>
The secure user should be:- A local administrator
- A domain member
21. Click Exit to complete the installation.
Figure 10.25
GCOS Server File Security window

Chapter 1
1 GCOS Server Software Upgrade and Configuration
Chapter 1
1
187
GCOS Server Software Upgrade and Configuration
This section describes the procedures for:
• Upgrading GCOS Server for Oracle (see below)
• Upgrading GCOS Server for SQL Server (see page 194)
Upgrading GCOS Server for Oracle
PREREQUISITES FOR GCOS UPGRADE WITH ORACLE
1. Verify that Oracle 10.2.0.1 is installed on the server. For more information, see Chapter 9, Oracle® 8i to 10g Upgrade and Configuration, on page 111.
2. Verify that Oracle Instance is running. Run SQL Plus and login to the instance, i.e. ORCL, using the system administrator username.
3. Verify Alias is set up. Login using the alias <server name>.
4. The Oracle alias MUST be the same as the server name.
When upgrading the GCOS 1.4 services, during the install for the
new services, you will be asked to select a user who is:
• in the GCOS Administrators role
• A member of the Administrators group (the Administrators
group must have “Services start/stop” privileges on the server)
If you do not enter the information during the install, you can do so
at a later time.
If File security is ON, then the CEL files will not be generated until
the services have been configured properly.

188 Affymetrix® GCOS Server Installation and Administration Guide
5. The analysis service items that have completed are deleted from the LIMS Admin database by a job that runs in the background, every minute.
It is highly recommended that experiments be cleared from the workflow queue prior to upgrading to GCOS Server 1.4. If experiments are not removed from the queue, data may be missing or inaccessible. It is also highly recommended that all open projects be completed prior to upgrading.
UPGRADING GCOS SERVER FOR AN ORACLE SERVER
To upgrade to GCOS Server 1.4:
1. Insert the GCOS Server 1.4 CD-ROM. If the auto run feature does not start the program:
A. Click Start → Run in the Windows taskbar.
The Run dialog box appears (Figure 11.1).
Before installing GCOS Server 1.4, verify that the installation user:
• Has local administrative privileges
• Is a member of the ‘GCOS Server Users’ local group
• Is a domain member
The screen captures depicted in this section may not exactly match
the windows displayed on your screen.

chapter 11 | GCOS Server Software Upgrade and Configuration 189
B. Type <cd drive letter>:\setup.exe
C. Click OK. The Affymetrix® GCOS Server Installation window appears (Figure 11.2).
2. Click Update. The Welcome window appears (Figure 11.3).
Figure 11.1
Run dialog box
Figure 11.2
GCOS Server Update window

190 Affymetrix® GCOS Server Installation and Administration Guide
3. Click Next.The License Agreement window opens (Figure 11.4).
4. Review the terms of the license agreement and click Next.The Customer Information window opens (Figure 11.5).
Figure 11.3
Welcome window
Figure 11.4
License Agreement window

chapter 11 | GCOS Server Software Upgrade and Configuration 191
5. Enter your customer information and the serial number located on the product registration card.The GCOS Select Driver window opens (Figure 11.6).
6. Select the appropriate Oracle 10g driver for your update and click Next.The System Account Password window opens (Figure 11.7).
Figure 11.5
Customer Information window
Figure 11.6
Select Driver window

192 Affymetrix® GCOS Server Installation and Administration Guide
7. Enter the password for the system account and click Next.Several status messages appear indicating when services are stopped, files are copied, components are registered and databases are updated.When the upgrade is complete the GCOS Service Settings window appears (Figure 11.8).
Figure 11.7
System Account Password window
Figure 11.8
GCOS Service Settings window

chapter 11 | GCOS Server Software Upgrade and Configuration 193
The window has the following controls:
8. Select the Domain\User you wish to use from the drop-down list and enter the password for that user.The analysis /transfer service must be reconfigured to run as a user who has admin rights on the local machine and is in the GCOS Administrator's role on the GCOS Server. The list is populated automatically with a list of users who have the above mentioned rights.
9. Click Apply.
Domain Domain on the network to which the GCOS Server is assigned.
User The network user ID assigned to the user.
Password User’s password.
Run As Local System Not available on GCOS Server.
Apply Applies the entered changes.
Cancel Closes the window without applying the changes.
For more information about the requirements for the User, see
Requirements for Using the GCOS Services, on page 205.
If you press the Cancel button, then the service can be reconfigured
using the procedure described in Configuring the GCOS ServiceSettings on a GCOS Server, on page 211.
If File security has been enabled, then it is important to configure
the Analysis Services before using GCOS 1.4 with this server from
any client. Failure to configure the analysis services will cause the
.cel file generation to fail.

194 Affymetrix® GCOS Server Installation and Administration Guide
When the update is completed the Setup Completed window appears (Figure 11.9).
10. Click Finish.The install will prompt to reboot the server so the installation can complete.
Upgrading GCOS Server for SQL Server
Figure 11.9
Setup Completed window
When installing the GCOS 1.4 services, during the install for the
new services, you will be asked to select a user who is:
• in the GCOS Administrators role
• A member of the Administrators group (the Administrators
group must have “Services start/stop” privileges on the server)
If you do not enter the information during the install, you can do so
at a later time.

chapter 11 | GCOS Server Software Upgrade and Configuration 195
PREREQUISITES FOR GCOS UPGRADE WITH SQL SERVER
Verify SQL Server is running by using the SQL Server Service Manager tool or the control panel services applet.
UPGRADING GCOS SERVER FOR SQL SERVER
It is highly recommended that experiments be cleared from the workflow queue prior to upgrading to GCOS Server 1.4. If experiments are not removed from the queue, data may be missing or inaccessible. It is also highly recommended that all open projects be completed prior to upgrading.
Before upgrading to GCOS Server 1.4, verify that the installation user has local administrative privileges and is a member of the 'GCOS Users' local group.
If File security is ON, then the CEL files will not be generated until
the services have been configured properly.
Before installing GCOS Server 1.4, verify that the installation user:
• Has local administrative privileges
• Is a member of the ‘GCOS Server Users’ local group
• Is a domain member
The screen captures depicted in this section may not exactly match
the windows displayed on your screen.

196 Affymetrix® GCOS Server Installation and Administration Guide
To upgrade to GCOS Server 1.4 for SQL Server:
1. Insert the GCOS Server 1.4 CD-ROM. If the auto run feature does not start the program:
A. Click Start → Run in the Windows taskbar.
The Run dialog box appears (Figure 11.10).
B. Type <cd drive letter>:\setup.exe
C. Click OK. The Affymetrix® GCOS Server Installation window appears (Figure 11.11).
Figure 11.10
Run dialog box
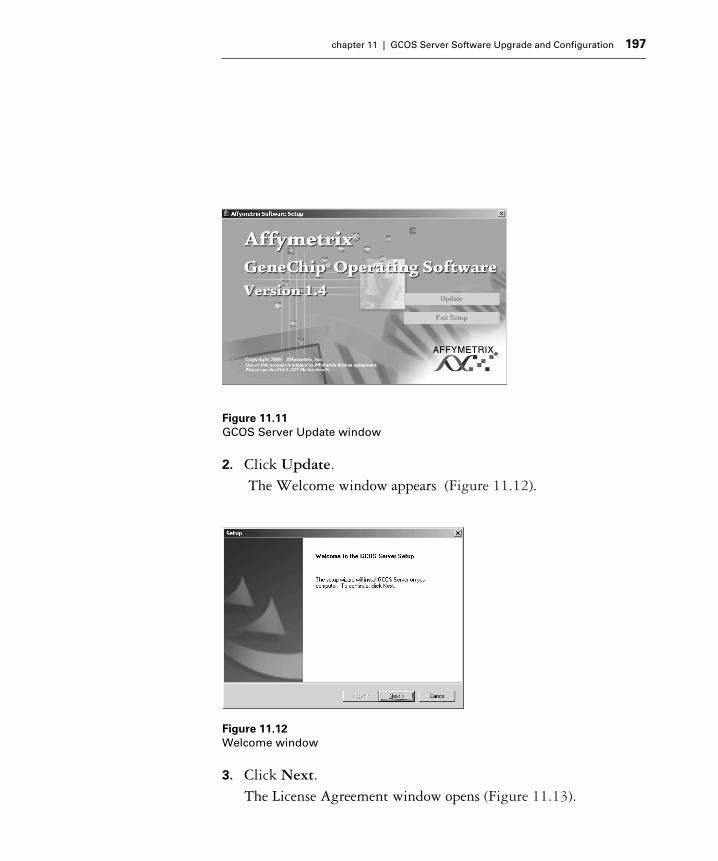
chapter 11 | GCOS Server Software Upgrade and Configuration 197
2. Click Update. The Welcome window appears (Figure 11.12).
3. Click Next.The License Agreement window opens (Figure 11.13).
Figure 11.11
GCOS Server Update window
Figure 11.12
Welcome window

198 Affymetrix® GCOS Server Installation and Administration Guide
4. Review the terms of the license agreement and click Next.The Customer Information window opens (Figure 11.14).
5. Enter your customer information and the serial number located on the product registration card.
Figure 11.13
License Agreement window
Figure 11.14
Customer Information window

chapter 11 | GCOS Server Software Upgrade and Configuration 199
The GCOS Select Driver window opens (Figure 11.15).
6. Select the SQL Server driver for your update and click Next.The sa account Password window opens (Figure 11.16).
7. Enter the password for the system account (sa) and click Next.
Figure 11.15
Select Driver window
Figure 11.16
sa Password window

200 Affymetrix® GCOS Server Installation and Administration Guide
Several status messages appear indicating when services are stopped, files are copied, components are registered and databases are updated.The GCOS Service Settings window opens (Figure 11.17).
The window has the following controls:
8. Select the Domain\User you wish to use from the drop-down list and enter the password for that user.The analysis /transfer service must be reconfigured to run as a user who has admin rights on the local machine and is in the GCOS Administrator's role on the GCOS Server. The list is populated automatically with a list of users who have the above mentioned rights.
Figure 11.17
GCOS Service Settings window
Domain Domain on the network to which the GCOS Server is assigned.
User The network user ID assigned to the user.
Password User’s password.
Run As Local System Not available on GCOS Server.
Apply Applies the entered changes.
Cancel Closes the window without applying the changes.

chapter 11 | GCOS Server Software Upgrade and Configuration 201
9. Click Apply.When the update is completed the Setup Completed window appears (Figure 11.18).
For more information about the requirements for the User, see
Requirements for Using the GCOS Services, on page 205.
If you press the Cancel button, then the service can be reconfigured
using the procedure described in Configuring the GCOS ServiceSettings on a GCOS Server, on page 211.
If File security has been enabled, then it is important to configure
the Analysis Services before using GCOS 1.4 with this server from
any client. Failure to configure the analysis services will cause the
.cel file generation to fail
Figure 11.18
Setup Completed window

202 Affymetrix® GCOS Server Installation and Administration Guide
10. Click Finish.The install will prompt to reboot the server so the installation can complete.

Chapter 1
2 Configuring the GCOS Services
Chapter 1
2
205
Configuring the GCOS Services
GCOS provides services that help you automate your data management:
• GCOS Analysis Service performs cell intensity analyses.If you are using GCOS with a networked GCOS Server, you can run the Analysis Service on the workstation or the server.
• GCOS Transfer Service lets you automate the archiving of DAT files.
This section describes:
• The requirements for using the Analysis and Transfer services (see below)
• How to configure the GCOS Service settings (see page 207)
• How to select the GCOS Service options (see page 213)
• How to set the Start/Stop Service policies so that the services will run (see page 217)
Requirements for Using the GCOS Services
In order to use the GCOS Analysis and Transfer services you will need to:
• Have a valid domain user and password set up with the necessary privileges (see Domain User Requirements, below).
• For analysis on the client: The service has to be configured on the client to run as:
(i) a user in the GCOS administrator role on GCOS server.(ii) a member of the Administrators Group with privileges to
Start/Stop services as part of the user's local system policies, i.e., have the “Log on as service” privilege.
The GCOS Transfer Service cannot be used when working with a
GCOS Server and when analysis is set to be done on the remote
server. Use GCOS Manager to archive the data.

206 Affymetrix® GCOS Server Installation and Administration Guide
(iii) a member of the Administrators group.
• For analysis on the server: The service has to be configured on the GCOS Server.
The service has to be configured on the server to run as: (i) a user in the GCOS administrator role on GCOS server.(ii) a member of the administrators group with privileges to Start/
Stop services as part of the user's local system policies, i.e., Have the “Log on as service” privilege.
(iii) a member of the Adminstrators group.
• For archiving data to a Universal Naming Convention (UNC) location, the transfer service has to be configured to run as a user that has access to the UNC path.
By default, the installation sets the services to run under the local system account. This default is suitable for access to local machine resources only and will prevent the data transfer and analysis services from accessing UNC paths and other network resources. On a GCOS Server, the service should not be configured to run under the SYSTEM account if file security has been turned ON or if the client is on Windows XP Service Pack 2 or higher. Please refer to the Windows XP Service Pack 2 technical note to configure the services to work with a Windows XP SP2 GCOS Client.
DOMAIN USER REQUIREMENTS
If you wish to allow the transfer and analysis service to access network resources and/or GCOS Server resources, you need to supply a valid domain user and password that meets the following requirements:
• Has privileges sufficient to access the network resources (shares, folders, files), that all users on the machine will require.
• Has privileges sufficient to access the process database objects and be a member of a role that will allow access for all users on the machine, when the machine is acting as the client of a GCOS Server.

chapter 12 | Configuring the GCOS Services 207
• Has privileges to Start/Stop services as part of the user's local system policies.
• Is a member of the local Administrators group.
A user who is in the 'GCOS Administrator' role on the server meets these requirements.
Configuring the GCOS Service Settings
After you have set up the domain user with the necessary privileges and policies, you need to set the GCOS Service settings.
The analysis and transfer service on the workstation use the same
settings. Any change to one service is applied automatically to the
other service. The transfer service does not work on GCOS Server.

208 Affymetrix® GCOS Server Installation and Administration Guide
You can configure the settings for:
• A system configured to work with a GCOS Server
• A GCOS Server
Refer to the flow chart (Figure 12.1) for an overview of the GCOS services options.
Figure 12.1
Flow chart for setting the GCOS Service Options
Start GCOS UI and open Defaults dialog
box
Is Clientconfigured to work
with server?
Does user want to analyze CEL on
local workstation?
Does user want to archive to UNC
path?
On the client open dialog to
change Svc settings
Go to the server and change analysis
Svc settings
NoRun as System
YesEnter a domain user
who has access to UNC
Yes
Yes
No
No
If archiving, enter a domain user who has
access to UNC

chapter 12 | Configuring the GCOS Services 209
CONFIGURING THE GCOS SERVICE SETTINGS ON A CLIENT CONFIGURED
TO WORK WITH GCOS SERVER
To set the GCOS Service Settings on a client configured with GCOS Server:
1. Click the Defaults button in the shortcut window; or Select Tools → Defaults from the menu bar.The Defaults dialog box opens (Figure 12.2).
2. Click the Archive Settings or Analysis Settings tab of the dialog box.
3. Click the GCOS Service Settings button .The GCOS Service Settings dialog box appears (Figure 12.3).
Figure 12.2
Defaults dialog box, Analysis Settings tab

210 Affymetrix® GCOS Server Installation and Administration Guide
The dialog box has the following controls:
4. Select the Domain/User you wish to use from the drop-down list and enter the password for that user.The analysis /transfer service must be reconfigured to run as a user who has admin rights on the local machine and is in the GCOS Administrator's role on the GCOS Server. The list is populated automatically with a list of users who have the above mentioned rights.
Figure 12.3
GCOS Service Settings dialog box
Domain Domain on the network to which the GCOS Server is assigned.
User The network user ID assigned to the user.
Password User’s password.
Run As Local System When this is selected, the service will run under the NT SYSTEM account.
Apply Applies the entered changes.
Cancel Closes the dialog box without applying the changes.

chapter 12 | Configuring the GCOS Services 211
5. Click Apply.The selected options are applied.If you see the following error message (Figure 12.4):
A. Review the requirements for using the GCOS Services (see page 205).
B. Change the Start/Stop Services policies and other settings on your system as necessary (see page 217).
CONFIGURING THE GCOS SERVICE SETTINGS ON A GCOS SERVER
After you have set up the domain user with the necessary privileges and policies, you need to set the GCOS Service settings.
To set the GCOS Service Settings on the GCOS Server:
1. Click the Microsoft Windows® Start button , then select Settings → Control Panels.The Control Panel window opens (Figure 12.5).
For more information about the requirements for the User, see
Requirements for Using the GCOS Services, on page 205.
Figure 12.4
Error message

212 Affymetrix® GCOS Server Installation and Administration Guide
2. Double-click the GeneChip Analysis and Transfer icon.The GCOS Service Settings dialog box opens (Figure 12.6).
Figure 12.5
Control Panel
Figure 12.6
GCOS Service Settings dialog box

chapter 12 | Configuring the GCOS Services 213
The dialog box controls are described on page 210.
3. Select the Domain/User you wish to use from the drop-down list and enter the password for that user.If file security is ON, the service has to run under a user who has admin rights on the GCOS Server and is in the GCOS Administrator's role on the GCOS Server. The list is populated automatically with a list of users who have the above mentioned rights.
4. Click Apply.The selected options are applied.
Selecting the GCOS Services Options
After you have configured the GCOS Service settings, you can select the GCOS options to:
• Perform CEL Intensity analyses on the workstation or GCOS Server using the Analysis Service (see below).
• Archive the DAT files after scanning using the Transfer Service (see page 215).
For more information about the requirements for the User, see
Requirements for Using the GCOS Services, on page 205.
The GCOS Transfer Service cannot be used when working with a
GCOS Server and when analysis is set to be done on the remote
server. Use GCOS Manager to archive the data.
Any changes applied to the transfer service will be applied
automatically to the analysis service on the client machine. There is
no transfer service on the GCOS Server.

214 Affymetrix® GCOS Server Installation and Administration Guide
CELL INTENSITY ANALYSIS OPTIONS
If you are using GCOS with the GCOS Server, you can perform the analysis of DAT files to produce CEL files on the GCOS Server or the instrument workstation using the GCOS Analysis Service.
To change the Analysis Service options:
1. In the Settings shortcut bar, click the Defaults button ; orSelect Tools → Defaults from the menu bar.The Defaults dialog box appears.
2. Click the Analysis Settings tab (Figure 12.7).
You must have a domain user with the proper privileges and
policies set up to use the cell intensity analysis options on the
GCOS Server. For more information about the requirements, see
Requirements for Using the GCOS Services, on page 205.
Figure 12.7
Defaults dialog box, Analysis Settings tab
Cell intensity analysis options

chapter 12 | Configuring the GCOS Services 215
3. Select the desired option from the radio buttons:- Analyze intensity data on local workstation.
- Analyze intensity data on GCOS server.
4. Click OK.The selected changes are applied.
You can track the progress of the intensity data analyses and file archiving in the CEL Analysis and Data Transfer window.
See the GCOS Software Client Manual for information about the other settings of the Analysis Settings tab and the CEL Analysis and Data Transfer window.
SETTING ARCHIVING OPTIONS FOR DAT FILES
DAT files may be stored locally or to a network location using the GCOS Transfer Service. A JPG format file lets you view the image for basic QC purposes.
The Analysis settings are active only when GCOS is being used with
the GCOS Server option.
If the analysis / transfer service on the client is running under the
windows local SYSTEM account, then the “Analyze data on local
workstation” radio button is disabled.
The GCOS Transfer Service cannot be used when working with a
GCOS Server and when analysis is set to be done on the remote
server. Use GCOS Manager to archive the data.

216 Affymetrix® GCOS Server Installation and Administration Guide
To change the Transfer Service options:
1. In the Settings shortcut bar, click the Defaults button ; orSelect Tools → Defaults from the menu bar.The Defaults dialog box appears.
2. Click the Archive Settings (Figure 12.8).
3. Select the Archive data after scan checkbox to archive the DAT files.
4. Enter a location in the Archive data location box; orClick the Browse button and select a directory for the archived files.The software will not allow a Universal Naming Convention (UNC) network location if the transfer service is running under the local SYSTEM account.
Figure 12.8
Defaults dialog box, Archive Settings tab
If the service is configured to run as a user who does not have
access to a networked location, the auto-archive will fail.

chapter 12 | Configuring the GCOS Services 217
5. Click OK.The selected changes are applied.
You can track the progress of the intensity data analyses and file archiving in the CEL Analysis and Data Transfer window.
You can view the JPG file in the Image Window (see the GCOS Client Software Manual for more information).
The archived data can be unarchived and made available using the Unarchive command in GCOS Manager. See the GCOS Client Software Manual for more information.
Setting the Start/Stop Service Policy
Both the user running the control applet and the specified 'Run As' user must be members of the Administrator’s group with Start/Stop services as part of the user's local system policies. You will see a warning when trying to configure the system if you do not have these policies set correctly (Figure 12.9).
Experiments that make use of automation must bypass the analysis
service and data transfer service. All analysis in experiments that
make use of automation must occur on the GCOS server when
working in server mode.
Automation can only be used in conjunction with expression arrays.

218 Affymetrix® GCOS Server Installation and Administration Guide
You will need to set the Start/Stopping Service policy so that your domain user is in the group with these privileges, as explained in this section.
You do this in two sets of steps:
1. Check to see if you have administrator privileges on the computer and get them added if necessary (see below).
2. Add the Administrators group to the Start/Stop Services policy (see Adding the Administrators Group to the Start/Stop Service Policy, on page 220).
After you have done these steps, you can set the GCOS Service options and configure the GCOS software (see Configuring the GCOS Service Settings, on page 207).
CHECKING ADMINISTRATOR PRIVILEGES
To check to see if you are in the administrators group on the computer:
1. Right-click on the My Computer icon and select Manage from the pop-up menu.The Computer Management window opens (Figure 12.10).
Figure 12.9
Error message
If domain-level policy settings are defined, they override the local
policy settings. You will need to get the domain administrator to
change the domain-level policy settings in this case.

chapter 12 | Configuring the GCOS Services 219
The window has a data tree on the left side with different objects. Some parent objects may have child objects. The left side displays a list of the child objects or other contents for the object selected in the data tree.
2. Select System Tools → Local Users and Groups → Groups in the tree.A list of groups appears on the Name box on the right side of the window (Figure 12.10).
3. Click Administrators in the list.The Administrators Properties dialog box opens (Figure 12.11).
Figure 12.10
Computer Management window

220 Affymetrix® GCOS Server Installation and Administration Guide
4. Make sure your domain and user name are in the Members list. If not, see your local CIS personnel to get your account added.
ADDING THE ADMINISTRATORS GROUP TO THE START/STOP SERVICE
POLICY
After making sure that you are in the Administrators group, you can add the Administrators group to the Start/Stop Service policy.
1. Click the Microsoft Windows® Start button , then select Settings → Control Panels.The Control Panels window opens (Figure 12.12).
Figure 12.11
Administrators Properties dialog box
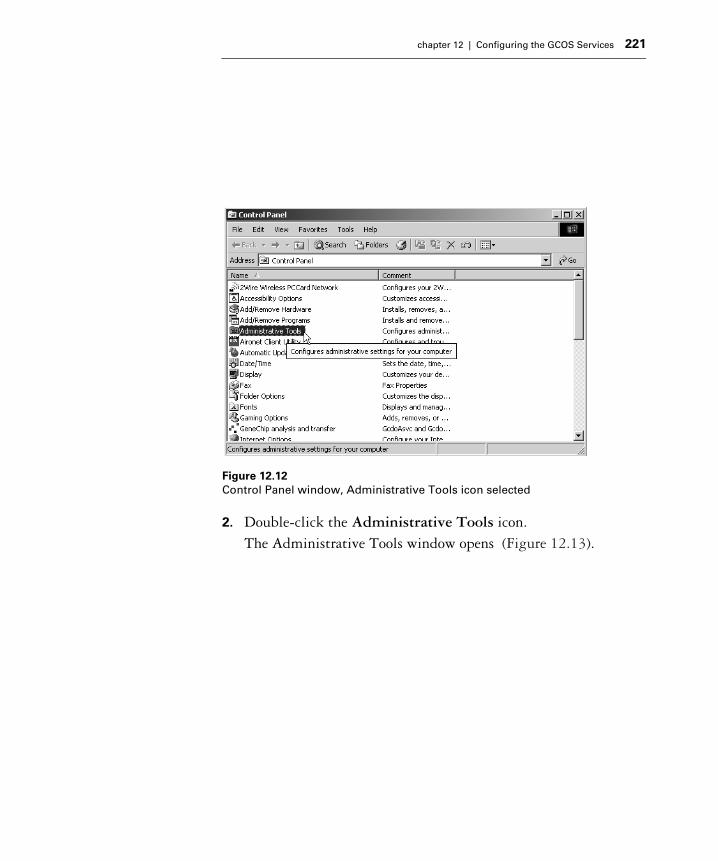
chapter 12 | Configuring the GCOS Services 221
2. Double-click the Administrative Tools icon.The Administrative Tools window opens (Figure 12.13).
Figure 12.12
Control Panel window, Administrative Tools icon selected

222 Affymetrix® GCOS Server Installation and Administration Guide
3. Double-click on the Local Security Policy icon.The Local Security Policy window opens (Figure 12.14).
Figure 12.13
Administrative Tools window
Figure 12.14
Local Security Settings window

chapter 12 | Configuring the GCOS Services 223
The data tree on the left side of the window displays a list of objects. An object may itself have child objects. The right side of the window displays child objects or other content for the object selected in the data tree.
4. In the Security Settings tree, select Local Policies → User Rights Assignment.A list of user’s rights policies are displayed in the right-hand side of the window (Figure 12.14) with the following information:
5. Double-click on the Log On as a Service policy.The Local Security Policy Setting dialog box for Log On as a Service opens (Figure 12.15).
Policy Unique ID for the policy.
Local Setting Users or groups assigned to the local policy settings.
Effective Setting Users or groups assigned to the domain-level policy settings (overrides the local policy settings).
If domain-level policy settings are defined and displayed in the
Effective Settings, they override the local policy settings. You will
need to get the domain administrator to change the domain-level
policy settings in this case.

224 Affymetrix® GCOS Server Installation and Administration Guide
This dialog box lists the users and groups assigned to that policy.
6. Click the Add button.The Select Users or Groups dialog box opens (Figure 12.16).
Figure 12.15
Local Security Policy Setting dialog box
If domain-level policy settings are defined, they override the local
policy settings. You will need to get the domain administrator to
change the domain-level policy settings in this case.

chapter 12 | Configuring the GCOS Services 225
The Look In drop-down box displays a list of domains.The Name box displays a list of the available users and groups in the selected domain.The bottom box displays users and groups selected for adding to a policy.
7. Select the Administrators group.
8. Click the Add button in the Select Users or Groups dialog box.The Administrators group is displayed in the lower box (Figure 12.17).
Figure 12.16
Select Users or Groups dialog box

226 Affymetrix® GCOS Server Installation and Administration Guide
9. Click the OK button in the Select Users or Groups dialog box.The Select Users or Groups dialog box closes, and the Administrators group is displayed in the Local Security Policy Settings dialog box (Figure 12.18).
Figure 12.17
Select Users or Groups, administrator’s group selected

chapter 12 | Configuring the GCOS Services 227
10. Click the OK button on the Local Security Policy Setting dialog box.
11. The dialog box closes, and the Administrators group is displayed in the Local Security Settings window, Log on as a Service policy (Figure 12.19).
Figure 12.18
Local Security Policy Setting, Administrators group added

228 Affymetrix® GCOS Server Installation and Administration Guide
12. Close the Local Security Settings dialog box.
Figure 12.19
Local Security Settings dialog box, Administrators group added to Log On as a Service policy

Chapter 1
3 Post-Server Installation Verification
Chapter 1
3
231
Post-Server Installation Verification
This section provides a checklist to use after the server software has been installed. The checklist helps you verify that all software components and settings have been configured properly.
Post-Server Installation Checklist
Login to the server as a local administrator.
SERVICES AND TASK MANAGER
1. Start → Settings → Control Panel.
A. GeneChip® Publishing and GCOS Analysis Settings Control Panel Applets exists.
B. Verify the GeneChip® Publishing Applet and the GCOS Analysis Settings Applets have the status of active.
C. If gcdoservice, gcdoasvc, and gcdofsvc are not started, start the services in the services control panel.
D. If the gcdoservice, gcdoasvc, and gcdofsvc are not started, try starting them up. If they does not start, follow the steps below:
❑ Reboot the server
❑ After the server is rebooted, check to see if gcdoservice, gcdoasvc, and gcdofsvc are is started
❑ If the service is not started, bring up Windows Explorer
❑ Go to the GCOS Server4 directory (where GCOS Server is installed)
❑ Select the Components directory
❑ In the Components directory, double-click on gcdoreg.bat file to register the GCOS Server gcdo components
❑ After gcdoreg.bat is executed, verify in the Services Control Panel that gcdoservice, gcdoasvc, and gcdofsvc are is started

232 Affymetrix® GCOS Server Installation and Administration Guide
2. Verify the following Services are started:- If using an Oracle database, verify the following:
1) Oracle Listener -started
2) OracleService - started- If using Microsoft SQL Server: MSSQL Server started
DATA DIRECTORIES AND ACCESS PERMISSIONS
3. Verify that the GeneChipDB and GeneChipDBDevices directories are created. Location x:\GeneChipDB and x:\GeneChipDBDevices.
4. For upgrades only: Verify data and data files exists in GeneChipDB and GeneChipDBDevices directories.
5. Verify that the GeneChipDB directory is shared with the share name “GCLIMS”. (Highlight GeneChipDB in Windows 2000 Explorer, right-click and select Sharing).
6. Verify permissions to the GCLIMS share is granted to the local group (i.e. “LIMS Users”) (Highlight GeneChipDB in Windows 2000 Explorer; right-click and select Sharing; click Permissions).
7. Verify that the drive where GCOS Server 1.4 is installed, the GCOS Server users have access to read, write and execute permissions.
8. Verify that the drive where the database application is installed, the GCOS Server users have access to read, write and execute permissions.
ODBC REGISTRY SETTINGS
9. Verify that the following ODBC DSNs are created (Start → Programs → Administrative Tools → Data Source (ODBC). Select the System DSN tab:Microsoft SQL Server Databases Only- <AADM server name>_SQL_GATC

chapter 13 | Post-Server Installation Verification 233
- LIMS3
Oracle Databases Only- <alias name>_ORCL_AADM
- LIMS3
- GeneInfo (if upgrade)
REGISTRY SETTINGS
10. Registry settings.Verify the following value into the registry:- HKEY_LOCAL_MACHINE\System\CurrentControlSet\Contro
l\Session Manager\SubSystems\Windows:
- SharedSection = 1024, 3072,512 This is recommended by Microsoft to allow more clients to connect (not users, but clients). There should only be one entry of 512. If there are two entries (i.e. 1024,3072,512,512) remove one of the 512 entries and reboot the server.
MICROSOFT SQL SERVER
11. If using Microsoft SQL Server 2000, verify the items listed below. (If not using Microsoft SQL Server 2000, go to Step 12).
A. Verify that the following databases are created:(Enterprise Manager → Expand SQL Server Group → Expand GCOS Server → Expand Databases folder).
❑ DataMiningInfo
❑ AADM
❑ LIMS3
❑ GeneInfo
❑ LimsAdmin

234 Affymetrix® GCOS Server Installation and Administration Guide
B. For upgrades only: Verify that Publish databases and DSNs are present.
ORACLE 10.2.0.1
12. If using Oracle 10.2.0.1, verify the items listed below.
A. Verify that the databases/tablespaces are created:
❑ LIMS3_DATA
❑ LIMS3_INDEX
❑ DATAMININGINFO_DATA_1
❑ DATAMININGINFO_INDEX_1
❑ GATC_DATA_1
❑ GENEINFO_DATA_1
❑ GENEINFO_INDEX_1
❑ LIMSADMIN_DATA_1
❑ LIMSADMIN_INDEX_1
B. Verify in registry:❑ HKEY_LOCAL_MACHINE\Software\ODBC\odbc.ini
C. Highlight <alias name>_ORCL_GATC (this is the Oracle ODBC DSN created). Verify that the following string values are listed. If not, add the following string values:
FILES SECURITY VERIFICATION
13. Verify Local Security Settings For File Security Use. This is found in the Control Panel in the Administrative Tools Folder.
Windows NT
HOST_OS WinNT4HOST_SQLLOAD sqlldrNote: String values are case-sensitive

chapter 13 | Post-Server Installation Verification 235
A. Start the Local security Policy Settings applet .
B. Click on the User Rights Assignment folder under Local Policies (Figure 13.1).
C. Verify that the following policies have the “Administrators” group as part of their effective settings column:
❑ Take ownership of files or other objects
❑ Create a token object
❑ Act as part of the operating system
❑ Log on as a service
14. Check the \\GCLIMS\DATA share.
A. If file security was not selected, you should have access to this folder using the Explorer.
B. If you have selected file security and assigned a secured user (other than yourself), you should NOT have access to this folder using the Explorer.
15. If File Security is selected, verify that File and Publishing Service Log On Settings For the File Security User. This is found in the Control Panel in the Administrative Tools folder.
Figure 13.1
Local Security Settings

236 Affymetrix® GCOS Server Installation and Administration Guide
A. Start the Services applet .
B. Check that GCDOFSVC and GCDOSERVICE are running under the secured user account (Figure 13.2).
16. Verify backup user rights to the \\GCLIMS\Data share when using file security.Even though a user does not have read or write permissions on the \\GCLIMS\Data directory or the files contained in that folder, it is possible for the user to have backup rights on the server that runs the GCOS Server software, and therefore, use a backup utility to backup files from the network. To insure the correct user(s) have backup rights to \\GCLIMS\Data:
Figure 13.2
GcdoFSVC Properties

chapter 13 | Post-Server Installation Verification 237
A. Run gpedit.msc from the command prompt.
B. Expand the tree and double-click Back up files and directories as shown in Figure 13.3.
C. Uncheck Local Policy Settings for users in the listed groups who should not have backup rights (Figure 13.4).
Figure 13.3
Group Policy window

238 Affymetrix® GCOS Server Installation and Administration Guide
D. Click OK.
E. Click Add and select a user or group to add users who should have backup rights from the \\GCLIMS\Data share. This is done by checking Local Policy Settings for the user(s) (Figure 13.5).
Figure 13.4
Example local security policy setting

chapter 13 | Post-Server Installation Verification 239
F. Click OK.
G. From a command prompt, type: secedit /refreshpolicy machine_policy /enforce
H. Reboot the server.
Figure 13.5
Example local security policy setting
If group (domain level) policy is enforced, please work with your
domain administrator to get the settings mentioned above.

240 Affymetrix® GCOS Server Installation and Administration Guide

Chapter 1
4 Library Files
Chapter 1
4
243
Library Files
This section of the manual explains how to install library files on the server and the client. The same library file CD is listed on both systems. Follow the correct section when installing library files.
The library file installation takes a while to install, especially if all library files are selected. Therefore, we recommend only installing the library files that you need. If you are unsure, install the Hu6800 library file first to continue with the testing of the system.
After the initial testing, contact the GCOS Server Users regarding which library files need to be installed. The installation takes a long time as many tables are updated with probe array type information and description information.
Installing New Library Files on the Server Running the GCOS Server Software
We recommend only installing the library files that you need. The
library file installation takes a long time as the description files for
each probe array type are quite large.
Library files must be installed on both the client and the server that
runs the GCOS Server software.
The library files must be installed for new GCOS Server
installations. If this is an upgrade, the library files must be updated
to populate the database with new algorithm parameters.
The screen captures depicted in this section may not exactly match
the windows displayed on your screen.

244 Affymetrix® GCOS Server Installation and Administration Guide
1. Insert the Affymetrix® Library Files CD-ROM.
2. If the autorun feature does not start the program:
A. Click Start → Run.
B. Type <cd drive letter>:\setup.exe.
C. Click OK.The Setup window appears (Figure 14.1).
Setup Options:- Full Library Install: Select this option for a new GCOS Server
install and/or new probe array types to be installed.
- Exit Setup: Exits from the library install.
3. Click Full Library Install.The Welcome window appears (Figure 14.2).
Figure 14.1
Affymetrix® Library Files setup window

chapter 14 | Library Files 245
4. Click Next.The Choose Protocol Files Location window appears (Figure 14.3).
Figure 14.2
Library Files Setup window

246 Affymetrix® GCOS Server Installation and Administration Guide
5. Select the default location or click Browse to select another folder.
6. Click Next.The Select Probe Array Types window appears (Figure 14.4).
Figure 14.3
Choose Protocol Files Location window

chapter 14 | Library Files 247
7. Select the library files to be installed.By default the install program selects all library files not installed.
8. Click Next.The Start Copying Files window appears (Figure 14.5).This verifies that the library files listed are installed.
Figure 14.4
Library files probe array selection window

248 Affymetrix® GCOS Server Installation and Administration Guide
9. Click Next.The library file installation begins. A series of message windows appear informing you that specific library files are being installed (Figure 14.6).
The Gene Description database takes a few minutes to install. Do not stop the installation. It continues to the next library file.If the probe array type contains sequence information, the
Figure 14.5
Start Copying files window
Figure 14.6
Message window

chapter 14 | Library Files 249
information is installed. When finished a Setup Complete window appears (Figure 14.7).
10. Click Finish.A text file containing the installation audit report is displayed showing statistics for array information loaded (Figure 14.8). This file should be left for future reference.
11. Click Exit Setup.
Figure 14.7
Setup Complete window

250 Affymetrix® GCOS Server Installation and Administration Guide
Installing Libraries Created Prior to GCOS Server 1.4
If you need to run a pre-GCOS Server/GCOS library install, such as a LIMS/MAS custom library released in December 2002, you will need to run the new migration program included with the GCOS Server installation CDs. This is required for an upgrade or a new GCOS Server install because the old MAS/LIMS library installation CD does not contain all of the required parameters to run GCOS Server or GCOS.
When you install your LIMS/MAS library on an GCOS Server/GCOS system, the install copies required files, such as the CIF, to the hard drive. The old installer also inserts descriptions, sequences, and annotations. However, the MASL:LIMS library installer does not update all required attributes and parameters that GCOS Server and GCOS now require.
Figure 14.8
Audit report

chapter 14 | Library Files 251
Running the migration program, immediately after installing older libraries, updates the attributes and parameters to make them compatible with GCOS Server and GCOS. This is a required step which must be run prior to creating a new experiment.

252 Affymetrix® GCOS Server Installation and Administration Guide

Chapter 1
5 Troubleshooting
Chapter 1
5
255
Troubleshooting
This section of the manual helps you troubleshoot problems that you may encounter during installation or administration of the server and the different software products on the clients.
It will also help you with some basic troubleshooting techniques and what information should be gathered to help Technical Support provide a resolution to a potential problem you may experience.
Troubleshooting Questions
Some basic tests may quickly reveal the cause of the problems. It is important to isolate the problem down to a particular area. Some questions to answer before calling Technical Support for help:
• Is it a client or a server problem?
• If server, has anything changed? Addition of software? Addition of network functions? Restoring of databases?
• Run the GCOS Server Diagnostic utility on the server. Refer to AFFX Diagnostic Tool, on page 293.
• Check the Event log.
• Check the SQL Server log (if using a Microsoft SQL Server database).
• Check the Oracle alert log (if using an Oracle® database).
• Which database is being accessed?
• Is there enough free space available?
• Can you reproduce the problem? What steps were taken?
• What is the exact error message?
• If client, does it happen on all clients?
• Does it happen with a particular user or all users?
• What has changed on the client?
• Is the user logged onto the correct domain? Does the user have permissions to access GCOS Server?

256 Affymetrix® GCOS Server Installation and Administration Guide
• Can you write to the publish database?
• Can you access other databases?
• Is the DSN configured properly?
• Is the alias configured properly? (if using an Oracle® database).
GCOS Server Troubleshooting
INSTALLATION
1. When installing the GCOS Server software, it copies the files. However, the error message “Unable to move error –115 or –119” appears.Verify in task manager that all gcdo*.* processes are not running on the server. If the processes are running, kill the processes through a command line or reboot the machine so the processes are not running. Restart the installation after the processes are not present.
2. Unable to select the database device path location in the GCOS Server installation window. The pull-down window is blank. Why?In order to upgrade as system, there must be enough space available on the device drive.
3. The Gcdoservice does not exist in the services control panel. How do I start the service?Register the service key by bringing up the DOS prompt. Change the directory: x:\GCOS Server30\component (where GCOS Server is installed) and enter the following: gcdoservice -service.
4. I chose a single user instead of a global group within the domain. Can I change this?This can be done by a DBA. This needs to be changed in the

chapter 15 | Troubleshooting 257
LimsAdmin database. Select the tables and modify the users table in SQL. If using an Oracle database, run queries to update the users table.
5. I selected an incorrect Oracle driver during the installation. What do I do to change this?You will need to modify the registry to correct this configuration. HKLM\software\ODBC\ODBC.ini
6. After installing GCOS Server 1.4, the GeneChipDB.ini file is blank. Why?The local administrator account login installing the server that runs the GCOS Server software must be part of the LIMS User local group.The GeneChipDB.ini file will need to be re-created.
7. SQL Server gave me the following error message after entering my information.
Verify that the login name and password are correct. Verify that the password is set in SQL Server for the sa. Verify that the SQL services are running.
8. Some of the components are not registered. How do I register them?Do not register components individually. Run the gcdoreg.bat file that is located at x:\GCOS Server\component on the server.
Figure 15.1
Error Message

258 Affymetrix® GCOS Server Installation and Administration Guide
Double-click the gcdoreg.bat file and the components will be registered. Verify that the gcdoservice is started after registering the components.
9. When trying to load the GCOS Server CD, the message “Incorrect Function” is displayed.The CD cannot be read on that CD-ROM drive. Insert it into another drive and share the drive to be accessed by the computer that cannot read the disk.
10. When installing GCOS Server 1.4, the Oracle parameter screen appears. How do I get the green light for the ‘undersized rollback segments’? I adjust the rollback segments, but it does not make a difference.Using Oracle DBA Studio, select the Rollback Segments. Note the size of the tablespaces that make up the Rollback Segments (i.e.: Rollback_data, etc.). These tablespaces need enough space to hold all rollback segments expanded to their largest size.
11. During the installation of GCOS Server 1.4, the Administrator logon window appears and I click OK. However, an error message appears “Verify that the password is correct. Verify that the alias is correct.” What does this mean?The error message indicates that the password entered is incorrect or the Oracle alias was not created. To correct the problem, enter the correct password.If the Oracle alias is not created, create the alias and then click OK to continue.
12. When installing GCOS Server 1.4 for an Oracle database, the Oracle parameter screen appears. Some parameters have a green button light and some have a red button light. What does that mean?The Oracle parameter screen indicates required parameter values for the installation. If the value is met, a green button light appears. If the value is not met, a red button light appears.

chapter 15 | Troubleshooting 259
For the parameters which are not met, change the values using DBA Studio.
13. When installing GCOS Server 1.4, why must a Local Group be selected?The Local Group is to store the Global Group which contains the GCOS Server users. The Global Group resides on the domain of the server. Users are added to the group in order to access GCOS Server.
14. When I enter the Rollback_Data table name, the error message “table doesn’t exist”The tablespace does not exist. Enter the correct rollback tablespace name and try again.
15. When installing GCOS Server 1.4, I select the path location on the network, it will not let me install on the network drive, why is that?GCOS Server 1.4 is a local application only. It cannot be installed on a network drive. The software must be installed on a local drive on the server.
16. During the GCOS Server 1.4 install an error occurs displaying the message “msvcp60.dll missing”The installation needs msvcp60.dll in order to proceed with the installation. This .dll is part of the Windows operating system. If the .dll is not present, the install will not run.
DB CONVERSION
17. After installing GCOS Server 1.4, the gcdoservice will not start. What is wrong?The gcdoservice may have been corrupted or not installed properly. To resolve this issue, follow the steps listed below:- Bring up Windows Explorer

260 Affymetrix® GCOS Server Installation and Administration Guide
- Go to the GCOS Server40 directory (where GCOS Server is installed)
- Select the Components directory
- In the Components directory, double click on gcdoreg.bat file to register the LIMS gcdo components
- After gcdoreg.bat is executed, verify in the Services Control Panel that gcdoservice is started
PASSWORDS
18. Unable to connect to SQL. It keeps asking me for a password for ‘sa’ and I do not have one.The installation program requires a password for the ‘sa’ user in SQL. Edit the ‘sa’ login in SQL Server by providing a password and then continue on with the GCOS Server installation.
ORACLE SETTINGS
19. How many Oracle aliases do I need to create?Local server running GCOS Server software only: One Oracle alias created on the server that runs the GCOS Server software.
20. The installation program is unable to connect to the Oracle database after entering the information. What do I do?Verify the system name and password entered are correct. Use the TNSPING Oracle utility to confirm that the Oracle alias is correctly configured.Verify that the correct Rollback table name, Temporary table name and Database alias names are correct and exist in the Oracle database.
21. I cannot get the red-light for Tablespace to turn green in the Oracle Parameters dialog.Keep in mind that the tablespace must be able to expand to hold

chapter 15 | Troubleshooting 261
all rollback segments within itself. The calculation takes into account each rollback's initial size, then adds the Next Extent size multiplied by the number of extents allowed (Value). If the Value (number of extents allowed) is too high, the equation will calculate a figure larger than the available space.Also remember that for the 'System' tablespace, GCOS Server is looking for 'AVAILABLE' space, not just total space.
22. Why doesn’t my ROLES tab appear?If using a Windows 2000 Active Directory Domain, the Oracle authentication service must be set to ‘NONE’ rather than the ‘NTS’ default setting. In the SQLNET.ORA file, set: sqlnet.authentication_services=(NONE). Restart Oracle to complete the change.
23. My GCOS Server system is experiencing a general slowness.This could be caused by index files having a lot of 'deleted' rows. You should periodically rebuild index files if you do a lot of purging. This is because the 'deleted' index items still occupy rows, which the Oracle scans must continue to sort through. When the index is rebuilt, the rows marked 'deleted' are physically removed, allowing indexes to run more efficiently.Also, see the chapter on Oracle Administration for other tuning recommendations.
24. My updated Oracle Listener will not respond.A prior version of the Oracle Listener may be running. Note that Control Panel → Services indications are not reliable. To check the status, use: LSNRCTL.EXE.Make sure the listener is pointing to Oracle 10.2.0.1. If it is pointing to Oracle 8.1.7:
1. Go to the Control Panel → Services window.
2. Stop the 8i listener.
3. Start the 10g listener.

262 Affymetrix® GCOS Server Installation and Administration Guide
For information on starting and creating listeners, refer to:- Delete the 8i Service Name and Listener, on page 126
- Create the 10g Listener, on page 130
RBS PARAMETERS / INIT.ORA
25. What do the red and green lights mean in the installation of a server that runs the GCOS Server software for an Oracle database?The red and green lights are status indicators for minimum Oracle parameter requirements. If these parameters are not met (red light), the installation cannot proceed. To resolve the issues, change the parameter values using DBA Studio.Refer to the Oracle 10.2.0.1 guide for changing parameters. The INIT.ora file is no longer used in Oracle 10.2.0.1.
PUBLISHING
26. Unable to publish data. The server task window displays that it is in the queue and says “wait”.Verify that the publishing service is active in the server task window of GCOS 1.4. If the service is stopped, contact the system administrator to start the gcdoservice on the server that runs the GCOS Server software.Verify the times that publishing is set to run. It is possible that it is set to publish data at certain times only.
27. Unable to publish. Error message “Existing item exist with no overwrite set.” What does this mean?The file(s) selected to be published already exist in the publish database. If you wish to overwrite what is already in the database, select the “Overwrite Data” option to republish existing data.
28. I am able to publish the .exp file, however the .cel file gives me the message “Failed to publish <name>.cel: Bulkloading to

chapter 15 | Troubleshooting 263
MEASUREMENT_ELEMENT_RESULT table failed. Verify all AADM ODBC DSN registry values exist.” When using an Oracle database, this will occur if the rollback segments are full or if the settings are not set up properly. Verify the configuration of the AADM ODBC DSN as well as view the Oracle alert log for error messages.Verify that all rollback segments are online.Check the Event Log for additional error messages.
29. I am unable to publish. What can I check?- Verify that there is enough free space available on the root of
the c:\drive. This is necessary to create temporary files.
- Verify that the database is not full.
- View the Oracle alert log (if using an Oracle database)
30. Unable to publish the .chp file. The user is able to publish any .exp and .cel files, however, when publishing the .chp file, the error message, “Failed to publish x.chp: SQL Command Failure.”This is possibly due to a probe array type that has been installed and published. However, a new probe array with the same name containing new probe information was installed. The probe set names were changed and therefore do not match and that is why the .chp file with the new probe array information cannot be published.Workaround: Delete the data that is published from that probe array type. Reanalyze that existing .chp files and publish again.
31. Publishing continues to fail on an Oracle publish database due to timeout errors.Run the ODBC Data Sources applet from Administrative Tools in the Control Panel and select the system data source for the particular publish database. Remove the check mark from the Enable Query Timeout check box and click OK to turn off the timeout checking.

264 Affymetrix® GCOS Server Installation and Administration Guide
Files Security
1. During the installation or removal of file security through the file security configuration dialog, a message indicating that services failed to start and that rebooting the machine is required to correct the problem?This message normally occurs when the file security service or the publishing service could not be correctly stopped or started by the service control manager process of Windows 2000 and a reboot is required to clear the error condition.
Figure 15.2
Oracle8 ODBC Driver Setup window

chapter 15 | Troubleshooting 265
Library Files Troubleshooting
INSTALLATION
1. During the library file installation on the server, it shows that the task is “not responding” in task manager. What is wrong?The library file installation is responding. During this time, it is writing the gene descriptions and sequence information into the databases. This will take a while depending on the number of probe arrays selected. Do not stop or cancel the task.
2. After an upgrade, the library files update installation is run. The installation completes very fast. Is this correct?Yes. The update copies the *.cif file in the X:\GeneChipDB\Library directory and adds new parameters to the database. Descriptions and sequences are not installed.Verify that the ODBC DSN (for GeneInfo database) is set up properly and configured to connect to the server that runs the GCOS Server software.
3. After adding the ‘pre-GCOS Server’ libraries that were not on the system during the GCOS Server upgrade, I still cannot use these libraries. Why?You must run the ‘library migrate’ program when adding previous libraries, such as older custom libraries. The library migrate is in the migrate folder of the new library CD or the GCOS Server install CD.

266 Affymetrix® GCOS Server Installation and Administration Guide
Library Migration Program
FUNCTIONS ON SERVER
The library migration program does the following for pre-installed arrays only:
• Adds parameters to allow use of the GeneChip® Scanner 3000.
• Adds controls for assays.
• Inserts the MIAME template information.
• Updates part numbers for installed arrays to maximize barcode features.
• Updates analysis parameters for gridding and CEL generation.
• Update information from pre-installed libraries so that they work in the GCOS/GCOS Server environment.
FUNCTIONS ON CLIENT
The library migration program does the following steps. The user must point to the directory where existing library files reside when prompted.
• Adds parameters to allow using the GeneChip® Scanner 3000.
• Adds controls for assays.
• Inserts the MIAME template information.
• Updates part numbers for installed arrays to maximize barcode features.
• Updates analysis parameters for gridding and CEL generation.
The migration program is run automatically at the end of the LIMS
3.0 to GCOS Server 1.4 upgrade.

chapter 15 | Troubleshooting 267
• Copies parameters from currently installed CIF files to the DBMS where they can be accessed by GCOS.
INSTALLING OLDER PRE-GCOS SERVER/GCOS LIBRARIES AFTER GCOS
SERVER/GCOS UPGRADE
Installing Libraries Created Prior to GCOS Server 1.4
If you need to run a pre-GCOS Server/GCOS library file install, such as a LIMS/MAS custom library released in December 2002, you will need to run the new migration program included with the GCOS Server installation CDs. This needs to occur regardless of whether this was an upgrade or new GCOS Server install. This is because the old MAS/LIMS library installation CD does not contain all of the required parameters that GCOS Server and GCOS now require.
Running the migration program, immediately after installing older libraries, updates the attributes and parameters to make them compatible with GCOS Server and GCOS. This is a required step which must be run prior to creating a new experiment.
INSTALLING PRE-GCOS VERSION LIBRARIES (LIMS 3.0 LIBRARIES) ON THE
CLIENT
In order to install LIMS 3.0 version libraries (pre-June 2003 libraries) on a GCOS client, you must complete the following four steps.
1. Run ToggleLIMS3LibrarySupport.exe file by double-clicking the file. (The ToggleLIMS3LibrarySupport.exe file is located in the directory where GOCS was installed.) This enables the older library installer and temporarily disables GCOS.
2. Install the old version library.
3. Run the ToggleLIMS3LibrarySupport.exe file by double-clicking
The migration program is NOT run automatically at the end of the
MAS to GCOS upgrade for client.

268 Affymetrix® GCOS Server Installation and Administration Guide
the file again. This enables GCOS and disables the old library installer. GCOS cannot be run until this step is completed.
4. Run the library migrate program (from the subdirectory 'Migrate' contained in the GCOS Server install CD, or a new version library install CD).
FUNCTIONS NOT PERFORMED BY MIGRATION
Note that the migration program is not a library installation program.
• No sequences are installed or copied to DBMS.
• No annotations are installed or copied to DBMS.
• No descriptions are installed or copied to DBMS.
• No new CIF files are created on hard drive (although existing ones are moved to a new location).
DCOM Troubleshooting
SERVER RUNNING THE GCOS SERVER SOFTWARE
1. Check the Event Viewer on the server for any messages logged.
2. Verify that the DCOM settings are configured properly on the server and the client.
3. Launch DCOM (Start → Run → Type dcomcnfg) (Figure 15.3).
Figure 15.3
Running DCOM

chapter 15 | Troubleshooting 269
4. Click OK.The Distributed COM Configuration Properties window appears (Figure 15.4).
5. Click the Default Security tab (Figure 15.5).
Figure 15.4
DCOM window

270 Affymetrix® GCOS Server Installation and Administration Guide
6. In the Default Access Permissions section, click Edit Default… (Figure 15.6).
Figure 15.5
Default Security Tab
Figure 15.6
Access Permission
Click on Edit Default…Click on Edit Default

chapter 15 | Troubleshooting 271
The Registry Value Permissions window appears (Figure 15.7).
7. Verify the following names are in the Registry Value Permissions window.- INTERACTIVE
- SYSTEM
- LIMS Users (name of the Local Group)
8. If the above names are not listed, click Add… Highlight the name of the user to be added and click Add. Click OK.
9. Click OK to exit the Registry Value Permissions window.
10. In the Default Launch Permissions section, click Edit Default… (Figure 15.8).
Figure 15.7
Users and Groups in the Access Permission

272 Affymetrix® GCOS Server Installation and Administration Guide
The Registry Value Permissions window appears (Figure 15.9).
11. Verify that the following names are in the Registry Value Permissions window:- INTERACTIVE
Figure 15.8
Launch Permission
Figure 15.9
Registry Value Permissions
Click on Edit Default…Click on Edit Default

chapter 15 | Troubleshooting 273
- SYSTEM
- LIMS Users (name of the Local Group)
12. If the above names are not listed, click Add… Highlight the name of the user to be added and click Add. Click OK.
13. Click OK to exit the Registry Value Permissions window.
14. Click the Default Properties Tab.
15. Verify that Provide additional security for reference tracking is unchecked (Figure 15.10).
16. Click OK to exit DCOM.
CLIENT WORKSTATION
1. Launch DCOM (Start → Run → type dcomcnfg) (Figure 15.11).
Figure 15.10
Default Properties
uncheckedunchecked

274 Affymetrix® GCOS Server Installation and Administration Guide
2. Click OK.The Distributed COM Configuration Properties window appears (Figure 15.12).
3. Select GCDOAdmin from the Application list (Figure 15.13).
Figure 15.11
Running DCOM
Figure 15.12
DCOM window

chapter 15 | Troubleshooting 275
4. Double-click GCDOAdmin and select the Security tab (Figure 15.14).
Figure 15.13
Default Security Tab

276 Affymetrix® GCOS Server Installation and Administration Guide
5. Select Edit... in the Use custom access permissions window.The Registry Value Permissions window appears (Figure 15.15).
Figure 15.14
Access Permission
Figure 15.15
Users and Groups in the Access Permission

chapter 15 | Troubleshooting 277
6. Verify the following names are in the Registry Value Permissions window.- INTERACTIVE
- SYSTEM
- LIMS Users (name of the Local Group)
- NETWORK
7. If the above names are not listed, click Add… Highlight the name of the user to be added and click Add. Click OK.
8. Click OK to exit the Registry Value Permissions window.
9. Select Edit... in the Use launch access permissions window (Figure 15.16).
The Registry Value Permissions window appears (Figure 15.17).
Figure 15.16
Launch Permission

278 Affymetrix® GCOS Server Installation and Administration Guide
10. Verify that the following names are in the Registry Value Permissions window:- INTERACTIVE
- SYSTEM
- LIMS Users (name of the Local Group)
11. If the above names are not listed, click Add… Highlight the name of the user to be added and click Add. Click OK.
12. Click OK to exit the Registry Value Permissions window.
13. Click OK again.
14. Repeat the above step for each GCDO component application.
15. Click OK to exit DCOM.
Figure 15.17
Registry Value Permissions

Chapter 1
6 GCOS Server Administration
Chapter 1
6
281
GCOS Server Administration
Users
ADDING NEW USERS OR DELETING USERS
To provide access for new GCOS Server users, contact your System Administrator to add the user’s logon name into the GCOS Server Global Group. Once added, the new user will be able to access the GCOS Server system.
To delete users from the GCOS Server system, the System Administrator will need to delete the user’s logon name in the GCOS Server Global Group. After the user is deleted, the user’s logon name will not be able to access the GCOS Server database information.
GCOS Server Databases
The GCOS Server system installs and creates databases that are used to store experimental and analysis data. Explanations of the databases and the names of the files are provided below.
LIMS3
The LIMS3 Process database is the GCOS Server ‘process’ database that stores all the sample, experiment and file properties. Along with this information, parameters from sample preparation, hybridization, scanning and analysis information are also stored. There is only one process database on a server.
Database name:LIMS3Microsoft SQL Server:Database file name: LIMS3_dat.mdfTransaction logfile name: LIMS3_log.ldfOracle® System:Tablespace names: LIMS3_DATALIMS3_INDEX

282 Affymetrix® GCOS Server Installation and Administration Guide
Datafile names: LIMS3_DATALIMS3_INDEX
DATAMININGINFO
The DataMiningInfo database stores the settings, queries and preferences for users of the Affymetrix® Data Mining Tool. There is only one DataMiningInfo database on a server. Data is inserted into the DataMiningInfo database when users save queries or change preferences in the Data Mining Tool application.
Database name: DataMiningInfoMicrosoft SQL Server:Database file name:DataMiningInfo_dat.mdf Transaction log file name: DataMiningInfo_log.ldfOracle System:Tablespace names: DATAMININGINFO_DATA_1DATAMININGINFO_INDEX_1Datafile name: DATAMININGINFO_DATA_1DATAMININGINFO_INDEX_1
AADM ADMINISTRATION
This database stores procedures for creating new publish databases. There is only one AADM database. No new data is inserted in the AADM Administration database.
Database name:GATCMicrosoft SQL Server:Database file name:GATC_DATA.mdfTransaction log file name:GATC_log.ldfOracle System:Tablespace name:GATC_DATA_1Datafile name:GATC_DATA_1

chapter 16 | GCOS Server Administration 283
GENEINFO
The GeneInfo database stores information about the probe sets on the arrays, including sequences, descriptions, annotations and links to external sites. There is only one GeneInfo database on a server. Data is inserted in the GeneInfo database when users save annotations in the Data Mining Tool and when new GCOS Server library information is installed on the server.
Database Name: GeneInfoMicrosoft SQL Server:Database file name: GeneInfo_dat.mdf Transaction log file name:GeneInfo_log.ldfOracle System:Tablespace names: GENEINFO_DATA_1GENEINFO_INDEX_1Datafile name:GENEINFO_DATA_1GENEINFO_INDEX_1
LIMSADMIN
The LIMSAdmin database stores the publishing queue and Roles information for the GCOS Manager. There is only one LIMSAdmin database on a server. Data is inserted in the LIMSAdmin database when new users or permissions are added or changed in the GCOS Server Manager Tool. Data insertion also occurs when new items are added to the publishing queue from the GCOS Publish window.
Database name:LIMSAdminMicrosoft SQL Server:Database file name:LIMSAdmin_dat.mdfTransaction log file name:LIMSAdmin_log.ldf

284 Affymetrix® GCOS Server Installation and Administration Guide
Oracle System:Tablespace names:LIMSADMIN_DATA_1LIMSADMIN_INDEX_1Datafile names:LIMSADMIN_DATA_1LIMSADMIN_INDEX_1
PUBLISH DATABASE
The publish database stores the analysis results in a relation model (AADM database), rather than flat files. There can be several publish databases on the system at any time and the databases can grow very large. Data is inserted into a publish database through the Publish operation in the GCOS Manager.
Database name: The name of the database is assigned at the time of creation by the user.Microsoft SQL Server:Database file name:database name_DATA.mdfIndex file name:database name_INDEX.mdfTransaction log file name:database name_LOG.ldfOracle System:Refer to Tablespace Naming Conventions Used in the AADM Publish Database, on page 339.
Data Directories
SERVER DATA DIRECTORIES
The server files are installed on the local hard drive of the server. The installation of these files are located below:
GCOS Server File Directory
For a new install, X:\GCOS Server (where x: is the drive letter)
For an upgrade, X:\Lims30 (where x: is the drive letter)

chapter 16 | GCOS Server Administration 285
The sub-directory is:
1. Components – Stores the components for the GCOS Server software.
2. Script – Location for the log files and scripts for the databases.
GCOS Server Data Directories
X:\GeneChipDB (where x: is the drive letter)
The two sub-directories are:
1. Data – Stores the files that make up an experiment. Files are .cel, .chp and .dat.
2. Library – Stores the files that contain the information for data analysis. Files are .cif, .cdf, .psi and .msk files.X:\GeneChipDBDevices (where x: is the drive letter) – Stores the physical database device files.
CLIENT DATA DIRECTORIES
The client files are installed on the local hard drive. The location of these files are listed below:
GCOS File Directory
X:\GeneChip (where x is the drive where the software is installed).
Affy_Data\Library – location for the library files installed on the specific client.
Affy_Protocol – location for the fluidics protocols installed on the specific client.
Affy_Data\Data – this directory stores experiments, images and analysis files (.exp, .dat, .chp, .rpt)
TestData (this directory can be any name) – if you are upgrading from MAS, this directory stores the data files for experiments, images and analysis files (.exp, .dat, .cel, .chp, .rpt) when using file-mode (no server running the GCOS Server software)

286 Affymetrix® GCOS Server Installation and Administration Guide
TempData - if you are upgrading from MAS, this directory is used to store the .dat image during a scan. When the scan is complete, the image is transferred to the server running the GCOS Server software.
There may also be additional directories to store data locally.
GCOS Server Sync
GCOS Server Sync is the utility that updates a new encrypted DBMS password into the registry, overwriting the old password. Whenever the database password is changed, either in an Oracle or in a Microsoft SQL Server 2000 database, the GCOS Server Sync utility must be run. You can use GCOS Server Sync utility for two types of databases.
• GCOS Server System Databases
• Publish Databases
CHANGING THE PASSWORDS FOR ORACLE DATABASES
If the password is changed for one database in an Oracle system, other than the publish database, it must also be changed for the other GCOS Server databases:
• LimsAdmin
• Lims3
• GeneInfo
• gatc
• DataMiningTool
After changing all the passwords, run the GCOS Server Sync utility in order for the database password to be synchronized with the encrypted registry value.
Files in the TestData directory must be imported into GCOS before
these files can be seen in the data tree and used.

chapter 16 | GCOS Server Administration 287
To change the password:
1. Launch Oracle Enterprise Manager.The DBA Studio window appears.Click on the Administration Tab (Figure 16.1).
2. Click Users in the Users & Privileges section.The Users window opens (Figure 16.2).
Figure 16.1
Enterprise Manager: Administration tab
Click to edit user

288 Affymetrix® GCOS Server Installation and Administration Guide
3. Select the desired user and click Edit. The Edit User window is displayed (Figure 16.3).
Figure 16.2
Users window
Select user to edit in this column
Click Edit after selecting user

chapter 16 | GCOS Server Administration 289
4. Type in the new password in the Enter Password and Confirm Password boxes.
5. Click Apply.
6. Repeat these steps for all other Affymetrix databases if changing a password for a database other than a publish database.
7. After changing the password in the GCOS Server System Databases, run the GCOS Server Sync Utility, as described in Running GCOS Server Sync, on page 292.
Figure 16.3
Edit User window
Type in the new password
Click Apply

290 Affymetrix® GCOS Server Installation and Administration Guide
CHANGING PASSWORDS FOR MICROSOFT SQL SERVER 2000 DATABASE
The password can be changed for the process database (LIMS3) or the publish databases. After changing the password, run the GCOS Server Sync utility to synchronize the database password with the application.
To change the password for Microsoft SQL Server 2000:
1. Select Start → Programs → SQL Server 2000 → Enterprise Manager.
2. Expand the (+) to expand server running the GCOS Server software.
3. Expand the Security folder.
4. Click Logins.In the right pane, select LIMS3 user (if changing the process database password, otherwise select a publish database) (Figure 16.4).

chapter 16 | GCOS Server Administration 291
5. Double-click LIMS3, or the selected database. SQL Server Login Properties window appears (Figure 16.5).
Figure 16.4
Security Folder - Logins

292 Affymetrix® GCOS Server Installation and Administration Guide
6. Enter the Password.
7. Click OK.
8. Re-enter the Password to confirm.
9. Click OK.
10. After changing the password for the selected database, run the GCOS Server Utility, as described in Running GCOS Server Sync, on page 292.
RUNNING GCOS SERVER SYNC
The GCOS Server Sync utility must be run if the password for the process database, and/or publish database has been changed.
1. Select Start → Programs → Affymetrix → GCOS Server →
Figure 16.5
SQL Server Login Properties window

chapter 16 | GCOS Server Administration 293
GCOS ServerSync.If no shortcut is available, this must be launched from the folder where the file is located.Affymetrix Synchronize GCOS Server Database Password window appears with User Name and Password (Figure 16.6).
2. Select GCOS Server System Databases (for the process database) or the Publish Database name, (whichever password must be synchronized).
3. Enter the new Password and click OK.The new encrypted password is synchronized in the system.
4. Repeat steps Step 2 and Step 3 if multiple database password changes have been made. If there is an error, verify that the password is entered correctly and matches the password entered in the database application.
AFFX Diagnostic Tool
The AFFX Diagnostic tool is used to gather information about the registry, DCOM settings, database information and operating system information. This is a read-only application. Users cannot edit or make changes, however, they can save the results to the text file which will be saved as GCOS Server.log. If any of these contain improper information, the icon becomes a red circle.
Figure 16.6
Affymetrix Synchronize LIMS Database Password window

294 Affymetrix® GCOS Server Installation and Administration Guide
The Server Management for the server running the GCOS Server software has four main components:
• Registry Information
• DCOM Information
• DBMS Information
• OS Information
Figure 16.7
AFFX Diagnostic Tool window

chapter 16 | GCOS Server Administration 295
Running AFFX Diagnostic Tool
1. Click Start → Programs → Affymetrix → GCOS Server → AffxDiagnostic.The Log In window appears (Figure 16.8).
2. Enter the following information:Microsoft SQL Server- User: sa (name of database administrator)
- Password: <password for database system administrator>
- Server: name of the server running the GCOS Server software
Oracle System - User: system (name of database administrator)
- Password: <password for database system administrator>
- Alias: <Oracle alias name>
The AFFX Diagnostic Tool - Configuration Settings window appears (Figure 16.7).
SAVE THE INFORMATION
1. To save all information, select File → Save As from the menu bar.The Save As dialog box appears.
2. Select the path location to save the file. Click Save.The information begins to save. This process takes several minutes.
Figure 16.8
Log In window

296 Affymetrix® GCOS Server Installation and Administration Guide
REGISTRY INFORMATION
The Registry Information reads the information from the MS Windows Registry Editor. The information is read from: HKEY_LOCAL_MACHINE\Software\Affymetrix\GeneChip\Database hive.
1. Click Registry Information.The registry information is displayed. The rows can be sorted alphabetically by clicking the column headers, such as Key Name, Value, or Information.If any of the registry settings are missing, a red circle appears on
Figure 16.9
Registry Information window

chapter 16 | GCOS Server Administration 297
the key name.Additional information is displayed in the Information column, if applicable.
DCOM INFORMATION
The DCOM Information reads the components and security settings configured on the server through the Distributed COM Configuration Properties window.
1. Click DCOM Information.The DCOM Properties settings are displayed by reading the HKEY_LOCAL_MACHINE\Software\Microsoft\OLE registry hive.

298 Affymetrix® GCOS Server Installation and Administration Guide
2. Expand DCOM Information by clicking the (+).
Figure 16.10
DCOM Information window

chapter 16 | GCOS Server Administration 299
The following information is displayed:- COM Components
- Security Settings
3. Click COM Components.The message “Please wait while determining registration status of COM Components” appears.The GCOS Server components are displayed with the component name, file type, COM type (if it is registered), the ClassID and the ProgID. These components are registered in DCOM.
Figure 16.11
DCOM Information window

300 Affymetrix® GCOS Server Installation and Administration Guide
The rows can be sorted alphabetically by clicking the column headers, such as Components, File Types, etc.If a component is not registered, a red circle appears on the icon. The component can be registered by double-clicking the component. A message appears indicating the registration status of the component.
4. Click Security Settings.The message “Please wait while determining security settings of DCOM Components” appears.
Figure 16.12
COM Components window

chapter 16 | GCOS Server Administration 301
The Affymetrix components appear along with the permissions set.
The Security Settings reads component and type of permissions granted.
Click a specific component to list the users that have access to that
component.
Figure 16.13
DCOM Security Settings window

302 Affymetrix® GCOS Server Installation and Administration Guide
DBMS INFORMATION
The DBMS Information reads the publish and process databases.
1. Click DBMS Information. The database information regarding tables, DSNs, database names, etc...., is displayed. If an incorrect password was previously entered, it will prompt for a password.
Figure 16.14
SQL Database Configuration Information

chapter 16 | GCOS Server Administration 303
2. Expand DBMS Information by clicking the (+).The following information is displayed:- Publish Databases
- Process Databases
If there is a missing database, extra database, or missing database
information, a red circle icon appears on the database.
Figure 16.15
DBMS Information window

304 Affymetrix® GCOS Server Installation and Administration Guide
3. Click Publish Databases.The list of publish databases and the AADM database appears. The view displays the DSN values pertaining to the databases.
4. Expand the Publish Databases by clicking the (+).Only the list of publish databases appears. The AADM database does not appear in the expanded list as it only applies when DSN information is displayed.
5. Select a publish database.
Figure 16.16
Publish Databases window

chapter 16 | GCOS Server Administration 305
6. From the menu bar, select Database to access the options:- Show Tables
- Show Devices
- Show Primary Keys
- Show Foreign Keys
- Show Indexes
- Show Options
7. To display the list of tables, select Show Tables from the Database menu, or expand the publish database by clicking the (+).The list of tables is displayed.

306 Affymetrix® GCOS Server Installation and Administration Guide
8. Select Databases → Show Devices.The devices which make up the publish database are displayed along with the device name, path location and device size.
Figure 16.17
Publish Database Tables window

chapter 16 | GCOS Server Administration 307
9. Select Databases → Show Primary Keys.The Primary Keys are displayed for the selected publish database.
Figure 16.18
Publish Data Device Name window

308 Affymetrix® GCOS Server Installation and Administration Guide
10. Select Databases → Show Foreign Keys.The Foreign Keys are displayed for the selected publish database.
Figure 16.19
Primary Keys window

chapter 16 | GCOS Server Administration 309
11. Select Databases → Show Indexes.The database indexes information is displayed for the selected publish database.
Figure 16.20
Foreign Keys window

310 Affymetrix® GCOS Server Installation and Administration Guide
12. Select Databases → Show Options.The database options settings are read from the database application and displayed.
Figure 16.21
Database Indexes window

chapter 16 | GCOS Server Administration 311
13. To test connectivity to a publish database, from the menu bar select Tools → Select Database Connectivity.
14. Enter the appropriate password for the publish database.If correct, a message is displayed indicating that the connectivity is successful.If incorrect, a message is displayed indicating that the connectivity was unsuccessful.
Figure 16.22
Database Options window

312 Affymetrix® GCOS Server Installation and Administration Guide
15. Click Process Databases.The list expands and five databases are listed:- LIMS3
- LimsAdmin
- GeneInfo
- DataMiningInfo
- GATC
Figure 16.23
Process Database window

chapter 16 | GCOS Server Administration 313
16. Select a database and, from the menu bar select Database → Tables Primary Keys.The tables are displayed for the selected database.
17. Select Databases → Show Devices.Information about device name, path location and device size is displayed.
18. Select Databases → Show Primary Keys.The Primary Keys are displayed for the selected database.
19. Select Databases → Show Foreign Keys.The Foreign Keys are displayed for the selected database.
20. Select Databases → Show Indexes.The Indexes are displayed for the selected database.
21. Select Databases → Show Options.The database options settings are read from the database application and displayed.
22. To test connectivity to a process database, from the menu bar select Tools → Select Database Connectivity.
23. Enter the appropriate password for the process database.If correct, a message is displayed indicating that the connectivity is successful.If incorrect, a message is displayed indicating that the connectivity was unsuccessful.
OS INFORMATION
The OS Information displays the operating system information along with components and available hard disk space.

314 Affymetrix® GCOS Server Installation and Administration Guide
1. Click OS Information.The OS Information is displayed with system name, version, etc.
2. Expand OS Information by clicking the (+).
Figure 16.24
OS Information window

chapter 16 | GCOS Server Administration 315
The following information is displayed:- GCOS Server Components
- Disk Information
- Logical Drives
Figure 16.25
OS Information window
If any OS Information is missing, a red circle icon appears on the
property.

316 Affymetrix® GCOS Server Installation and Administration Guide
3. Click GCOS Server Components.The GCOS Server Components are displayed, along with size, type, version, etc.
4. Click Disk Information.
Figure 16.26
GCOS Server Components window
If any GCOS Server components are not correct, a red circle icon is
displayed along with additional details in the information column.

chapter 16 | GCOS Server Administration 317
The local drives on the system are displayed with information about hard disk capacity, free space in GB and percentage free.
5. Click Logical Drives.The list of Logical drives and disk type is displayed.
Figure 16.27
Disk Information window

318 Affymetrix® GCOS Server Installation and Administration Guide
Figure 16.28
Logical Drives window

Chapter 1
7 Managing Microsoft SQL Server 2000 Databases
Chapter 1
7
321
Managing Microsoft SQL Server 2000 Databases
Overview of Performance Tuning
The goal of performance tuning is to minimize the response time for each query and to maximize the throughput of the entire database server by minimizing network traffic, disk I/O and CPU time. This goal is achieved through understanding application requirements and the logical and physical structure of the data.
To most effectively optimize your Microsoft SQL Server performance, you must identify the areas that will yield the largest performance increases over the widest variety of situations and focus analysis on those areas.
While other system-level performance issues, such as memory, hardware and so on, are certainly candidates for study, experience shows that the performance gain from these areas is often incremental. Generally, Microsoft SQL Server automatically manages available hardware resources, reducing the need for extensive system-level manual tuning.
Performance Tuning Microsoft SQL Server 2000 for Windows 2000
Microsoft SQL Server 2000 automatically tunes many of the server configuration options, therefore requiring little, if any, tuning by a system administrator. Although these configuration options can be modified by the system administrator, it is generally recommended that they are left at their default values, allowing SQL Server to automatically tune itself based on run-time conditions.
However, if necessary, the following components can be configured to optimize server performance:
• SQL Server Memory
• I/O subsystem
• Microsoft Windows 2000 options

322 Affymetrix® GCOS Server Installation and Administration Guide
Performance Tuning Microsoft SQL Server for GCOS Server
This section of the manual presents several performance adjustments that you can take advantage of to help the server running the GCOS Server software perform at an optimum level. There are a number of methods and tools available for tuning SQL Server 2000 to improve performance. Performance tuning is a matter of monitoring the resources available to SQL Server and reorganizing these resources based on loads seen during peak usage. The necessary resources and the way to allocate them are specific to each installation. A brief configuration description of the resources that are the most significant for publishing are illustrated below.
In the previous versions of GCOS Server, the SQL Server database stored information in two devices: Data and Log. To improve performance of the publishing feature, the information is now divided into three devices. With this separation, reading and writing of data is improved which helps decrease amount of time it takes to publish data.
DATA DEVICE
The Data Device stores the data that is published into the Publish AADM database. This data is accessed when using the Affymetrix® Data Mining Tool application for data analysis. The name of this device is <publish database name>_DATA.mdf
RECOMMENDED PERFORMANCE TUNING INFORMATION
These are suggestions that can help improve the performance of the server running the GCOS Server software.
• Separate all devices SQL Server uses. For example, place the data device, index device and log device each on their own individual physical disk. The separation of these files improves the performance by allowing the drive heads to perform read only or

chapter 17 | Managing Microsoft SQL Server 2000 Databases 323
write only operations during the majority of the publishing operation.
• Placing both the index device and log device on the same disk can slow performance since there is a lot of read and write activity being performed.
• Large RAID 5 arrays can perform almost as fast as multiple, smaller RAID 1 arrays when publishing single items. Performance decreases when publishing multiple items in parallel when using large RAID 5 arrays (how much the process degrades and how many parallel tasks the system can handle depends on other factors).
Managing Databases
As the Microsoft SQL Server database grows with data, the DBA will need to manage the databases. There is maintenance involved for expanding databases, backing up and restoring databases, and other database administration needed to maintain a fully functional system.
EXPANDING DATABASES
Microsoft SQL Server can expand a database automatically, according to growth parameters defined when the database was created. Allocating additional file space on an existing database file or allocating space on another new file can also manually expand the database. You may need to expand the data or transaction log space if the existing files are becoming full. If a database has already exhausted the space allocated to it and cannot grow automatically, error 1105 appears.
When expanding a database, you must increase the size of the database by at least 1 megabyte (MB). Permission to expand a database defaults to the database owner and is automatically transferred with database ownership. When a database is expanded, the new space is made immediately available to either the data or transaction log file, depending on which file was expanded.

324 Affymetrix® GCOS Server Installation and Administration Guide
To Increase a Database Manually
1. Launch Enterprise Manager (Start → Programs → SQL Server 2000 → Enterprise Manager).
2. Click the plus (+) sign of name of the server that runs the GCOS Server software to expand the list.
3. Click the plus (+) sign of the Databases Folder.
4. Select and right-click the database to expand. Select Properties.The Database Properties window appears (Figure 17.1).
5. Click the Space Allocated (MB) field. It shows the current size of the database. To change this, enter the new size of the database and
Figure 17.1
The Selected database properties window

chapter 17 | Managing Microsoft SQL Server 2000 Databases 325
click OK (Figure 17.2).
The database size is comprised of all devices (data, log, index, etc.).
BACKING UP DATABASES
Backing up a database makes a copy of a database, which can be used to restore the database if it is lost. Backing up a database copies everything in the database, including any needed portions of the transaction log.
The transaction log is a sequence record of all the modifications that
Figure 17.2
Changing the size of the database
The number entered in the Space Allocated field is the final size of
the database. For example, the Data Device is set to 100. You want
to increase this to 200. Enter 200 in the Space Allocated field. This
increases the device by 100 MB, however, the final size of the
database is 200 MB. The value entered is the final size of the
database.

326 Affymetrix® GCOS Server Installation and Administration Guide
have occurred in a database and which transaction were modified. The transaction log is used during recovery operations to roll forward completed transactions and roll back (undo) uncompleted transactions. Backing up a transaction log backs up only the changes that have occurred in the transaction log since the transaction log was last backed up.
A backup operates like a snapshot taken of a database or transaction log:
• A database backup records the complete state of the data in the database at the time the backup operation completes.
• A transaction log backup records the state of the transaction log at the time the backup operation starts.
To Create a Database Backup
1. Expand the SQL Server Group; then expand the server that runs the GCOS Server software.
2. Expand Databases folder.
3. Right-click the selected database, select All Tasks and then click Backup Database... (Figure 17.3).

chapter 17 | Managing Microsoft SQL Server 2000 Databases 327
4. On the General tab, in Name, enter the backup set name (Figure 17.4).
5. In Description, enter a description of the backup set (this is optional).
6. Under Backup, select Database - complete.
7. Under Destination, click Add... to add an existing or create a new backup device, or click Remove to remove a backup device from the list of backup devices to be used. (Enter backup file name).
8. In the SQL Server Backup dialog box, under Overwrite, select: - Append to media to append the backup to any existing
backups on the backup device.
- Overwrite existing media to overwrite any existing backups on the backup device.
Figure 17.3
Selecting the Backup database feature
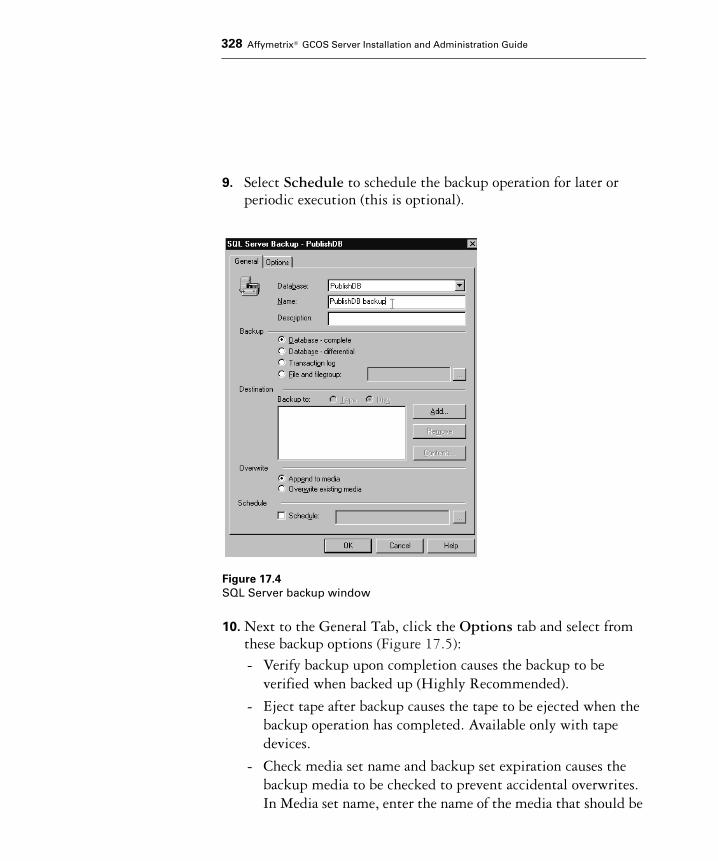
328 Affymetrix® GCOS Server Installation and Administration Guide
9. Select Schedule to schedule the backup operation for later or periodic execution (this is optional).
10. Next to the General Tab, click the Options tab and select from these backup options (Figure 17.5): - Verify backup upon completion causes the backup to be
verified when backed up (Highly Recommended).
- Eject tape after backup causes the tape to be ejected when the backup operation has completed. Available only with tape devices.
- Check media set name and backup set expiration causes the backup media to be checked to prevent accidental overwrites. In Media set name, enter the name of the media that should be
Figure 17.4
SQL Server backup window
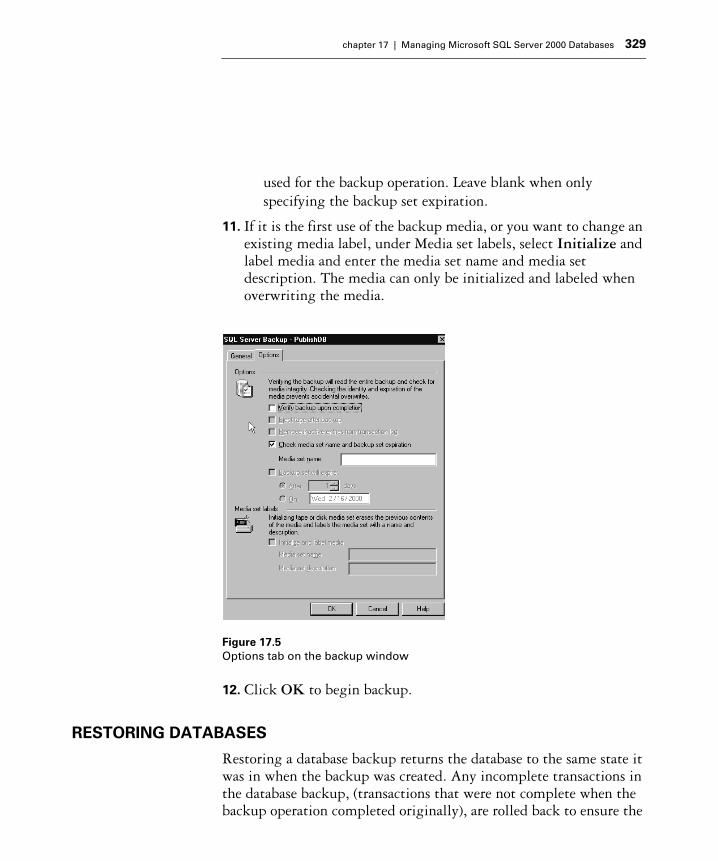
chapter 17 | Managing Microsoft SQL Server 2000 Databases 329
used for the backup operation. Leave blank when only specifying the backup set expiration.
11. If it is the first use of the backup media, or you want to change an existing media label, under Media set labels, select Initialize and label media and enter the media set name and media set description. The media can only be initialized and labeled when overwriting the media.
12. Click OK to begin backup.
RESTORING DATABASES
Restoring a database backup returns the database to the same state it was in when the backup was created. Any incomplete transactions in the database backup, (transactions that were not complete when the backup operation completed originally), are rolled back to ensure the
Figure 17.5
Options tab on the backup window

330 Affymetrix® GCOS Server Installation and Administration Guide
database remains consistent.
Restoring a transaction log backup reapplies all completed transactions that are in the transaction log to the database. When applying a transaction log backup, SQL Server reads forward through the transaction log, rolling forward all the transactions on the transaction log. When SQL Server reaches the end of the transaction log, it has re-created the exact state of the database at the time the backup operation started. The restore operation then rolls back all transactions that were incomplete when the backup operation started.
To Restore a Database Backup
1. Expand a server group; then expand a server.
2. Expand Databases, right-click the database, select All Tasks and then click Restore Database....
3. In Restore as database, enter or select the name of the database to restore if different from the default displayed. To restore the database with a new name, enter the new name of the database (Figure 17.7).
Figure 17.6
Launching Restore Database window

chapter 17 | Managing Microsoft SQL Server 2000 Databases 331
4. From the General tab, select Database.
5. In the First backup to restore drop-down list, select the backup set to restore.
6. Select the database backup to restore in the Restore list,OROn the Options tab, in Restore as, enter the new name or location for each database file comprising the database backup (Figure 17.8).
Figure 17.7
Restore Database window

332 Affymetrix® GCOS Server Installation and Administration Guide
7. On the Options tab, select one:- Leave database operational. No additional transaction logs can
be restored if no further transaction log or differential database backups are to be applied.
- Leave database nonoperational, but able to restore additional transaction logs if another transaction log or differential database backup is to be applied.
- Leave database read-only and able to restore additional transaction logs if no data is to be populated into the database.
8. Click OK to begin restore.
Figure 17.8
Restore Database Options Tab window

chapter 17 | Managing Microsoft SQL Server 2000 Databases 333
Database Maintenance
After a database has been created and data have been added in the database, maintenance must be performed. An example is to backup the databases on a regular basis. Monitoring the database usage is essential to maintaining end-users a functional database.
Microsoft SQL Server 2000 provides the Database Maintenance Plan Wizard for automating many tasks. To access the Database Maintenance Plan Wizard, launch Enterprise Manager.
From the menu bar, select Tools → Database Maintenance Planner…
Follow the steps in the wizard to help with the maintenance.
Other items to monitor are:
• Database space
• Performance
• Number of user connections
• Memory allocated to SQL Server
Deleting a Microsoft SQL Server Publish Database
If a database has been created by mistake or for some reason you do not want to use the database anymore, it can be removed from the system.
To Delete a Microsoft SQL Server Publish Database
1. Launch Enterprise Manager.
2. Select the Publish database to delete.
3. Highlight the database and right-click. Select Delete.
4. Click ‘Yes’ if you are sure you want to delete the database.
It is highly recommend that the database be backed up prior to
proceeding.

334 Affymetrix® GCOS Server Installation and Administration Guide
The database and its files are deleted.
5. Delete the <publish database>_AffyPub DSN from the server that runs the GCOS Server software. To do this:
A. Double-click ODBC Data Sources in the Control Panel.
B. Click System DSN.
C. Highlight the DSN to remove.
D. Click Remove. Click OK.

Chapter 1
8 Managing Oracle® Databases
Chapter 1
8
337
Managing Oracle® Databases
A Methodical Approach
A methodological approach works best for tuning a system.
1. Determine why you want to tune the system. Is there a single, specific problem such as publishing? Or could the system benefit from a more comprehensive, overall tuning effect?
2. Monitor the system and interpret the results. Use your interpretations to determine the cause of the problem.
3. When a problem is identified, determine changes that can be implemented to solve the problem.
4. Apply proposed changes one at a time. Do not apply all of them at the same time.
5. If a change results in a favorable performance improvement, keep it. If it doesn’t, back out the change and try something else.
Performance Tuning Oracle for Windows 2000
If your Windows 2000 server is going to be used exclusively as a database server, it makes sense to tune the operating system accordingly. This means adjusting priorities, removing items from memory that are not used and stopping any nonessential processing activities. This section of the manual presents several performance adjustments that you can take advantage of.
REMOVING UNNECESSARY NETWORK PROTOCOLS
Since we only use TCP/IP protocols, additional network protocols only occupy valuable memory. There is no reason to keep them if they are not used.
1. Right-click My Network Places and select Properties.

338 Affymetrix® GCOS Server Installation and Administration Guide
2. Right-click Local Area Lan Connection and select Properties to view installed protocols.
3. Uninstall any unnecessary protocols.
4. You may be asked to reboot the server.
Performance Tuning Oracle for GCOS Server
This section of the manual presents several performance adjustments that you can take advantage of to help the server running the GCOS Server software perform at an optimum level. There are a number of methods and tools available for tuning Oracle databases to improve performance. Performance tuning always starts with monitoring the resources available to the Oracle database and reorganizing these resources based on loads seen during peak usage. The necessary resources and the way to allocate them are specific to each installation. A brief configuration description of the resources that are the most significant for publishing are illustrated below.
Figure 18.1
Local Area Connection Properties window

chapter 18 | Managing Oracle® Databases 339
Oracle Publishing
Publish databases store the analysis results in a relation model rather than in flat files. There can be several publish databases on the system at any time and they can grow very large quickly. Data are inserted into a publish database through the Publish function in the GCOS application.
TABLESPACE NAMING CONVENTIONS USED IN THE AADM PUBLISH
DATABASE
Each publish database contains fifteen tablespaces named as follows:
<schema name>_[DATA, INDEX]_[1-6]<scheme name>_TEMP_[1-3]
As implied by the names, the *_DATA_* tablespaces hold table segments and the *_INDEX_* spaces hold index segments. The *_TEMP_* tablespaces hold temporary tables created during the publish operation.
Each tablespace consists of one or more datafiles depending on the tablespace and on the initial size of the database (i.e. SMALL or LARGE). Table 18.1 gives an example of the datafiles created when a GATC publish database is created:
Table 18.1
Datafiles
SMALL (initial size: ~ 7GB) LARGE (initial size: ~ 13GB)
<schema name>_DATA_1_1 <schema name>_DATA_1_1
<schema name>_DATA_2_1 <schema name>_DATA_2_1
<schema name>_DATA_2_2
<schema name>_DATA_3_1 <schema name>_DATA_3_1
<schema name>_DATA_3_2
<schema name>_DATA_4_1 <schema name>_DATA_4_1
<schema name>_DATA_5_1 <schema name>_DATA_5_1
<schema name>_DATA_6_1 <schema name>_DATA_6_1

340 Affymetrix® GCOS Server Installation and Administration Guide
All datafiles are created in a single directory on disk. In addition, each DATA and INDEX tablespace and datafile is set to auto extend when filled. The maximum number of extents for each is set to 100 and the ‘Next Size’ is set to the ‘Initial size’.
GATC Administration: Stores procedures for creating new publish databases. There is only one GATC Administration database on a server. No new data is inserted in the GATC Administration database.
Database name: GATCData file/tablespace: GATC_DATA_1
ORACLE PUBLISHING PROCESS
The publishing procedures used in GCOS Server 1.4 may require certain configuration changes to existing Oracle installations. These configuration modifications are discussed below, along with potential issues that can arise based on the system configuration, available server
<schema name>_INDEX_1_1 <schema name>_INDEX_1_1
<schema name>_INDEX_2_1 <schema name>_INDEX_2_1
<schema name>_INDEX_2_2
<schema name>_INDEX_3_1 <schema name>_INDEX_3_1
<schema name>_INDEX_3_2
<schema name>_INDEX_4_1 <schema name>_INDEX_4_1
<schema name>_INDEX_5_1 <schema name>_INDEX_5_1
<schema name>_INDEX_6_1 <schema name>_INDEX_6_1
<schema name>_INDEX_6_2
<schema name>_TEMP_1_1 <schema name>_TEMP_1_1
<schema name>_TEMP_2_1 <schema name>_TEMP_2_1
<schema name>_TEMP_3_1 <schema name>_TEMP_3_1
Table 18.1
Datafiles
SMALL (initial size: ~ 7GB) LARGE (initial size: ~ 13GB)

chapter 18 | Managing Oracle® Databases 341
resources and the number of users expected on the system.
To insert data in an Oracle database:
1. Raw data files are used to create temporary files for bulk loading (using SQL *Loader).
2. Temporary files are loaded into tables created in the temporary tablespaces of the database (TEMP_1 is used for experiment and analysis information, TEMP_2 is used for library information and TEMP_3 is used for mapping information).
3. The data in the temporary tables are transferred to the permanent tables with INSERT-SELECT sql statements.
4. The temporary tables and files are deleted.
ISSUES TO WATCH WITH THE GCOS SERVER PUBLISHING METHOD
1. Tablespaces for the temporary tables.
When creating a new publish AADM database, GCOS Server creates 3 tablespaces for temporary tables (schemaname_TEMP_1, schemaname_TEMP_2 and schemaname_TEMP_3). These three tablespaces are approximately 200-400MB in size when created and should not need to be expanded. If users are unable to create temporary tables, verify that the tablespaces are not full and that the appropriate quotas for the tablespaces have been granted.
• If the tablespaces are full, users should stop submitting publish requests and wait for the existing requests to finish (do not stop current processes). After all outstanding requests have finished, view the contents of the temp tablespaces. If the tablespaces are full of temporary tables, delete the temporary tables and retry any publish requests that failed. Under normal operating conditions,
Monitor the Oracle alert file for indications that checkpoints are not
completing. This is an indication that the log files are too small or
not enough log files. If necessary, create more redo log files or
increase the size of the existing log files.

342 Affymetrix® GCOS Server Installation and Administration Guide
these temporary tables are deleted when the publish operation has completed.
• If the number of concurrent publishing tasks allowed on the server is large (i.e.: greater than 8), the tablespaces can fill quickly simply because of the number of temporary tables being created. It is unlikely that a server can process more than 2 or 3 simultaneous publishing operations without significantly tuning disk I/O and memory. If the tablespaces are filling because of the number of concurrent publish operations, reduce the number of publishing tasks allowed on the server. This setting is configured through the GeneChip® Publishing applet in the Control Panel
on the server. For more information, see Chapter 19, GeneChip® Publishing Service, on page 355.
Drive Space
The new publish method sets the datafiles and tablespaces to auto extend (this is automatically set for all tables, indexes, tablespaces and datafiles during the database creation process). As users publish more data, the datafiles automatically expand to hold the data. The large size of some of the datafiles may cause the drives to fill before expected.
Management of Indexes
To view a list of all the indexes on a table:
• Select table_name, index_name from dba_indexes where table_name='ABS_GENE_EXPRESSION_RESULT' and Table_owner='PUBLISH2'(Publish2 is the name of the database)
Monitor for any errors indicating the temporary tables could not be
created. This can indicate that the temporary tablespaces are full
and not being cleaned out properly, or that they are too small for
the number of users publishing concurrently.

chapter 18 | Managing Oracle® Databases 343
To view the specific columns of indexes for a given table:
• select index_name, column_name, column_position from dba_ind_columns where table_name='ABS_GENE_EXPRESSION_RESULT' and Table_owner='PUBLISH2'order by index_name, column_position
There are 2 methods to rebuild the index
1. DROP INDEX <index_name> and CREATE INDEX <index_name> again
2. ALTER INDEX <index_name> REBUILD
The advantage of approach #1 is that extra tablespace is not needed. The advantage of approach #2 is that it is faster, however additional tablespace is required to keep 2 indexes during command execution and rollback segment are used as well.
Managing Databases
As the Oracle database grows with data, the DBA will need to manage the databases. There is maintenance involved for backing up and restoring databases and other database administration needed to maintain a fully functional system.
ORACLE ENTERPRISE MANAGER
Oracle Enterprise Manager allows you to manage the databases.
The Administration tab (Figure 18.2) has options for modifying or deleting databases.

344 Affymetrix® GCOS Server Installation and Administration Guide
In the Database Administration section there are options that allow you to modify or delete tablespaces, data files, rollback segments, etc.
In the Schema section there are options that allow you to view or modify tables, indexes, etc. In particular, in the Users & Privileges section, there are options that allow you to view and modify user’s roles and profiles.
The Maintenance tab allows you to back up a database, restore it, etc. (see below for more information).
BACKING UP DATABASES
Backing up a database makes a copy of a database, which can be used
Figure 18.2
Oracle Enterprise Manager: Administration tab

chapter 18 | Managing Oracle® Databases 345
to restore the database if it is lost. Backing up a database copies everything in the database.
The Maintenance tab of Oracle Enterprise Manager, under High Availability: Backup/Recovery, allows you to administer your database backup and recovery environment:
• Schedule Backup - Provides an intuitive graphical user interface for Backup.
• Perform Recovery - Provides a method to recover. Refer to your Oracle 10.2.0.1 documentation to assure that you are doing proper backup.
Figure 18.3
Oracle Enterprise Manager, Maintenance tab

346 Affymetrix® GCOS Server Installation and Administration Guide
DATABASE MAINTENANCE
After a database has been created and data has been added in the database, maintenance must be performed. An example is to backup the databases on a regular basis. Monitoring the database usage is essential to maintaining a functional database for end-users.
The Users of the ‘Publish’ database schema (i.e. ORCL_TEST) should be connecting to <schema>_DATA_1 as a default tablespace. Temporary tablespace should be set as their <temporary tablespace name>_DATA.
\
There will be <schema>_Data/Index/Temp_# tablespaces created for
All the Indexes of all the tables contained in database schema
should be ‘Valid’ status mode. If any of the Indexes of the Publish
database created using the GCOS Manager are in ‘Direct load’
status, publish will not function properly. This could mean that
there is a duplicate record. Try to re-publish an experiment (could be
any) in order to fix the status of the indexes back to ‘Valid’ state.
A user is created every time a new publish database is created.
Username will be the same name as the publish database, since
they are the schema owners.
The schema owner of the Publish database will only be granted the
privilege of ‘Connect’ and ‘Create Table’. That user will not be
granted the privileges of any Admin Options. ‘Admin Option’ when
checked, allows the user to grant the system privileges to other
users or roles. By default, Admin Option is disabled. ‘Default’ when
checked, establishes the role as a default for the user upon system
logon.

chapter 18 | Managing Oracle® Databases 347
each publish database created. Each tablespace created by GCOS Manager should have a default quota size of ‘Unlimited’. This is true since our tablespace will auto-extend as the database grows.
TABLESPACE OPERATIONS
Using the contents of the Tablespaces folder, you can create, edit, or drop a tablespace, add a datafile or rollback segment, take a tablespace off - or online, make a tablespace read-only or writable, and set tablespace storage parameters.
DATAFILE OPERATIONS
With the contents of the Datafiles folder, you can create a datafile or a clone of a datafile, edit a datafile and take a datafile off - or online.
GATC user is created during the GCOS Server install, when you
select ‘Oracle or SQL’ option for Publish databases. The Users of the
GATC database schema should be connecting to ‘GATC_DATA_1’ as
a default tablespace. There will be only one default tablespace
created for GATC user. Temporary tablespace should be set as their
<temporary tablespace name>_DATA.
: The Tablespaces will consist of:
GATC_DATA_1
<Publish Database Name>_DATA_# (1-6)
<Publish database name>_INDEX_# (1-6)
<Publish database name>_TEMP_# (1-3)
<Rollback>_DATA
<Temporary>_DATA
USER_DATA
SYSTEM

348 Affymetrix® GCOS Server Installation and Administration Guide
Deleting an Oracle Publish Database
If a database has been created by mistake or for some reason the database is not needed anymore, it can be removed from the system. using the Oracle Enterprise Manager:
1. Select the Administration tab in Oracle Enterprise Manager (Figure 18.4).
2. Under Database Administration: Storage, select Tablespaces.The Tablespaces window opens (Figure 18.5).
Figure 18.4
Oracle Enterprise Manager, Administration tab
Click to open Tablespaces window
Click to delete user

chapter 18 | Managing Oracle® Databases 349
3. Select the 15 tablespaces for the Publish Database and click the Delete button.The tablespaces are deleted and the Tablespace window is closed.
4. From the Enterprise Manager: Maintenance tab, under Schema: Users and Privileges, select Security.
5. Delete the user named, <database name>.
6. Restart your computer or stop and start the Oracle service.
Figure 18.5
Tablespaces window
Tablespaces for deletion
350 Affymetrix® GCOS Server Installation and Administration Guide
7. Using Windows Explorer, delete the 15 physical data files.
8. Delete the System DSN from the ODBC Manager on the server named <database>_AffyPub (if applicable).
The above steps can be performed through the Oracle user interface.
If you prefer to run a script to build the statements to drop all the primary, unique and foreign keys you are trying to drop:
select 'alter table '|| owner || '.' || table_name,'drop constraint ' || constraint_name || ';'from dba_constraintswhere owner like 'xx%'and constraint_type <> 'C';
Change the xx% to the name or partial name of your database. The output from this script will be a set of drop statements which, when you run them, will drop all constraints in this database. Then the next script will create SQL statements to drop the tablespaces.
select 'drop tablespace ' || tablespace_name || ' including contents;'
from dba_tablespaces
where tablespace_name like 'xx%';
Again just run the statements that are created from this statement.
Dropping the User
Here is a statement to build the drop command:
select 'drop user ' || username || ' cascade;' from dba_users where username like 'xx%'
Just run the statements that are created from this statement and restart the Oracle service.
At this point, you have to physically delete the datafiles and you may need to wait to do this.

chapter 18 | Managing Oracle® Databases 351
DELETING THE DSN
The <publish database>_AffyPub DSN must be removed. Use the ODBC Manager to remove the DSN.

352 Affymetrix® GCOS Server Installation and Administration Guide

Chapter 1
9 GeneChip® Publishing Service
Chapter 1
9
355
GeneChip® Publishing Service
GeneChip® Publishing Service and Control Panel Applet
As part of the GCOS Server 1.4 installation, a service is added to the server. This service, displayed as GcdoService in the Windows 2000 Task Manager, also has a Control Panel applet that allows the service to be configured for the specific requirements and capabilities of the server.
The configurable portions of the service include an active time period and a concurrent publishing thread count. The applet also indicates the current status of the service, although stopping or starting the service is still controlled through the Service applet in the Control Panel.
Figure 19.1
Service Applet dialog box

356 Affymetrix® GCOS Server Installation and Administration Guide
HOW THE SERVICE WORKS
When users of the GCOS application submit a publish request, information is added to the LimsAdmin database on the server. This information contains a Task ID (task) and a list of items to publish (task items). The publishing service scans the database and when a new task is identified, it launches a process that publishes the requested task items. A single process is started for each group of task items submitted by a user, up to the maximum number of tasks shown in the applet. If more tasks are submitted than the applet allows for, the additional tasks wait on the service queue until an active task completes. If the system time is not between the Start and Stop times shown in the applet, the service waits until the Start time to launch new tasks. If tasks are active when the Stop time passes, the current tasks continue to publish until all task items are completed and then wait for the Start time to continue with the next task.
In the event that the server is restarted while tasks are active, the service scans the queue for the tasks that were active at the time of the restart and continue where it left off.
Publishing Activation Time Period
The Publishing Activation Time Period is used to hold all publish items in the service queue until the window opens to allow publishing. This serves two major functions:
1. It allows the system administrator to keep the publishing service from locking database files so nightly backups can be performed.
2. It can be used to hold all publish operations until after hours so the publish load on the server and database does not interfere with other daily operations.
There is only one window that can be configured, so make sure that it encompasses only the hours during which publishing should occur. Also remember that any active tasks at the Stop end of the window will continue to completion, so it may be necessary to allow extra time after the close of the window for the active tasks to complete before a backup is performed.

chapter 19 | GeneChip® Publishing Service 357
To configure the time window, double-click the GeneChip®
Publishing icon in the Control Panel to launch the applet. Set the Start and Stop times and click Apply. The applet closes and the time window is set.
By default, the start and stop times are set the same, meaning publishing occurs 24 hours each day. If the start is set to 8:00 AM and the stop time is set to 5:00 PM, publishing would occur between the hours of 8:00 AM and 5:00 PM daily.
Concurrent Publishing Limit
The Concurrent Publishing Limit allows system administrators to increase the number of concurrent publishing tasks that can be running at any time. The applet allows for a limit of 16 tasks, although this is far higher than any current server can manage.
The following table lists suggested task limits based on the power and configuration of the server. These limits are only guides and are based on a system that is used primarily for publishing and GeneChip® data storage. If a large number of users are planning on using the Affymetrix® Data Mining Tool application, the number of publishing tasks may need to be reduced to decrease the load on the server.
Setting the number of tasks too high reduces the performance of
the server and may make it unstable or unusable. Only increase this
number if the system can handle the load. For most systems, 1 or 2
tasks are all that is necessary.
Table 19.1
Number / Size of processors Disk Configuration Maximum Number
of Tasks
2 processors, any speed All (All SQL Server publish installations1) 1

358 Affymetrix® GCOS Server Installation and Administration Guide
4 processors, 500 MHz and up RAID 5 for database files and data, or RAID 1 with separate drivers for all database files and data (Oracle only2).
2
4 processors, 500 MHz and up RAID 1 with separate drives for all database files and data (Oracle only2)
3
1 It is recommended that you limit the number of tasks that are running on a system with publish databases created in Oracle. MS SQL Server does not allow the multiple publishing tasks to occur. If using Oracle, leave the setting at 1 when datafiles have not been divided across several physical drives.
2 This configuration is only possible with Oracle and requires that the indexes, data, temporary tables, rollback segments and redo logs are on separate physical drives and sufficient memory has been allocated to Oracle.
Table 19.1
Number / Size of processors Disk Configuration Maximum Number
of Tasks

Chapter 2
0 Data Source Name Descriptions
Chapter 2
0
361
Data Source Name Descriptions
Several different system ODBC DSNs are used by the GCOS Server application, as well as several DSNs on the client machines. The different DSNs and settings are required for many of the functions to work properly, including publishing data, creating a new Publish database on the server, and running the Affymetrix® Data Mining Tool (DMT) on the client. The specifics of each DSN and the related settings are described to aid system administrators and others who may be maintaining the servers and clients.
ODBC DSNs on the Server Running GCOS Server Software
The server that runs GCOS Server software consists of specific DSNs created during the GCOS Server installation and library files installation. These DSNs are associated with the specific databases created to store the appropriate data in each database.
The system DSNs created by the GCOS Server installation are:
1. LIMS3 - process database
2. <server name>_SQL_GATC (if using SQL, server name is where the AADM database resides)
3. <alias name>_ORCL_GATC (alias name is where the GATC database resides on an Oracle system)
The System DSN created by the library files installation is:
GeneInfo
The System DSNs created by the GCOS Manager software on the server are:
1. <publish database name>_AffyPubThese DSNs pertain to AADM Databases. The next section describes the different DSNs and the configurations that should be
Creating an ODBC System DSN requires Administrative privileges
on the local machine.

362 Affymetrix® GCOS Server Installation and Administration Guide
set. Refer to the appropriate section if you are using SQL Server or an Oracle database.
MICROSOFT SQL SERVER DSNS
GATC Administration Database DSN
The GATC administration database has a System DSN named gatc associated with it. This DSN is used for creating new publish GATC databases as well as some administrative tasks performed on an existing database. It can be configured to point to the local server or to a remote Microsoft Windows server. All the configuration settings are made during the installation of the GCOS Server system, but additional servers may become available at a later time, requiring additional configuration.
• The GATC DSN has a specific naming convention that must be followed. The basic DSN for SQL Server is <server name>_SQL_GATC.
Because of the variability of the ODBC wizards, the exact place in the configuration dialog boxes where these settings are configured is not consistent.
Several settings in the ODBC configuration are not required, or cannot be set from different versions of the ODBC wizard.
If there are any modifications that need to be made, below are the steps. The Server DSNs should not need any changes.

chapter 20 | Data Source Name Descriptions 363
The GATC Administration SQL Server ODBC DSN requires the following settings:
• Data Source Name – This is <server name>_SQL_GATC. The <server name> is the name of the server where the GATC administration database is installed (Figure 20.1).
• Server – This is the name of the server where the GATC administration database resides.
• Click Next.
• Login ID and Password – The Login ID and Password should both be set to the password of choice. If a different login ID or password was used during the Affymetrix® GCOS Server installation, change these to match. Any authentication option should be set to use SQL Server authentication, not Microsoft Windows authentication (Figure 20.2).
Figure 20.1
Data Source Name window

364 Affymetrix® GCOS Server Installation and Administration Guide
2. Click Next.- Default database – This can be set to AADM, but is not
required (Figure 20.3).
3. Click Next.
Figure 20.2
SQL Server authentication window
Figure 20.3
Select the appropriate database window

chapter 20 | Data Source Name Descriptions 365
- Translation method – The perform translation character data should be selected.
4. Click Finish.
5. Click Test Data Source (Figure 20.5).
Figure 20.4
Translation window

366 Affymetrix® GCOS Server Installation and Administration Guide
Figure 20.5
Test Data Source window

chapter 20 | Data Source Name Descriptions 367
6. Click OK.
7. Click OK again to return to the main ODBC window.
GeneInfo Database DSN
The GeneInfo database DSN is created and used when installing the library file information. It includes probe set descriptions and other probe array information. It must point to the local server where GCOS Server software is installed.
Because of the variability of the ODBC wizards, the exact place in the configuration dialog boxes where these settings are configured is not consistent.
Several settings in the ODBC configuration are not required, or cannot be set from different versions of the ODBC wizard.
If there are any modifications that need to be made, below are the steps. The Server DSNs should not need any changes.
Figure 20.6
Test Completed window

368 Affymetrix® GCOS Server Installation and Administration Guide
The GeneInfo SQL Server ODBC DSN requires the following settings:
• Data Source Name – This is GeneInfo.
• Server – This is the name of the server where the Affymetrix® GCOS Server software resides.
• Authentication – The authentication option should be set to use SQL Server authentication, not Microsoft Windows NT® authentication. Login id and password are selected by the system administrator.
• Default database – This must be set to GeneInfo.
LIMS3 Database DSN
The LIMS3 database DSN is created and used when installing the library files. This database stores the experimental data information.
Because of the variability of the ODBC wizards, the exact place in the configuration dialog boxes where these settings are configured is not consistent.
Several settings in the ODBC configuration are not required, or cannot be set from different versions of the ODBC wizard.
If there are any modifications that need to be made, below are the steps. The Server DSNs should not need any changes.
The LIMS3 SQL Server ODBC DSN requires the following settings:
• Data Source Name – This is LIMS3.
• Server – This is the name of the server where the Affymetrix® GCOS Server software resides.
• Authentication – The authentication option should be set to use Microsoft SQL Server authentication, not Microsoft Windows NT® authentication. Login id and password are selected by the system administrator.
• Default database – This must be set to LIMS3.

chapter 20 | Data Source Name Descriptions 369
Publish Database DSNs
Each publish database that is created adds an additional ODBC DSN to the server that runs GCOS Server software. These DSNs also follow a specific naming convention, specifically <publish database name>_AffyPub. If the creation of the DSN fails or if a DSN needs to be recreated, the following information can be used to manually create the DSN.
Because of the variability of the ODBC wizards, the exact place in the configuration dialog boxes where these settings are configured is not consistent.
Several settings in the ODBC configuration are not required, or cannot be set from different versions of the ODBC wizard.
If there are any modifications that need to be made, below are the steps. The Server DSNs should not need any changes.
The Publish database SQL Server ODBC DSN requires the following settings:
• Data Source Name – This is the name of the publish database. Naming convention is <publish database name>_AffyPub.
• Server – This is the name of the server where the publish database was created. If the publish databases are on a separate server, make sure to enter the publish server name, not the name of the server that runs Affymetrix® GCOS Server software.
• Authentication – The authentication option should be set to use Microsoft SQL Server authentication, not Microsoft Windows NT® authentication. Login ID and password are selected by the system administrator.
• Default database – This must be set to the name of the Publish database.
Master DSN
The Master DSN is created and used for connectivity purposes. It must point to the local server where the GCOS Server software is installed.

370 Affymetrix® GCOS Server Installation and Administration Guide
This DSN should not require changing.
Because of the variability of the ODBC wizards, the exact place in the configuration dialog boxes where these settings are configured is not consistent.
Several settings in the ODBC configuration are not required, or cannot be set from different versions of the ODBC wizard.
If there are any modifications that need to be made, below are the steps. The Server DSNs should not need any changes.
The Master SQL Server ODBC DSN requires the following settings:
• Data Source Name – This is named Master.
• Server – This is the name of the local server where the GCOS Server software is installed.
• Authentication – The authentication option should be set to use Microsoft SQL Server authentication. The login ID and password are selected by the system administrator.
• Default database – This can be set to GATC, but is not required.
• Translation method – The Perform translation character data should be selected.
MasterGATC DSN
The MasterGATC DSN is created and used when a remote GATC server is selected for the installation. It must point to the remote server where the GATC databases will reside. This DSN should not require changing and resides on the local server that runs the GCOS Server software. This DSN is used to connect to the remote server.
Because of the variability of the ODBC wizards, the exact place in the configuration dialog boxes where these settings are configured is not consistent.
Several settings in the ODBC configuration are not required, or cannot be set from different versions of the ODBC wizard.
If there are any modifications that need to be made, below are the steps. The Server DSNs should not need any changes.

chapter 20 | Data Source Name Descriptions 371
The Master SQL Server ODBC DSN requires the following settings:
• Data Source Name – This is named MasterGATC.
• Server – This is the name of the remote server where the GATC databases will reside.
• Authentication – The authentication option should be set to use SQL Server authentication. The login ID and password are selected by the system administrator.
• Default database – This can be set to GATC, but is not required.
• Translation method – The Perform translation character data should be selected.
ORACLE DSNS
GATC Administration Database
The GATC administration database has a System DSN named gatc associated with it. This DSN is used for creating new publish GATC databases as well as some administrative tasks performed on an existing database. It can be configured to point to the local server or to a remote Windows NT server. All the configuration settings are made during the installation of the GCOS Server system, but additional servers may become available at a later time, requiring additional configuration.
The GATC DSN has a specific naming convention that must be followed.
• For an Oracle system, the DSN is <server alias>_ORCL_GATC where GATC database resides.
• The <server alias> is defined on the server that runs Affymetrix® GCOS Server software and not the remote Oracle server (if they are different servers).
• In addition to the ODBC DSN, additional registry entries are necessary for Oracle installations.

372 Affymetrix® GCOS Server Installation and Administration Guide
The configuration of an Oracle DSN for the GATC Administration database requires two distinct steps:
1. Creating the ODBC DSN, and
2. Adding the information in the system registry about the machine where the GATC administration database is stored.
Because of the variability of the ODBC wizards, the exact place in the configuration dialog boxes where these settings are configured is not consistent.
Several settings in the ODBC configuration are not required, or cannot be set from different versions of the ODBC wizard.
If there are any modifications that need to be made, below are the steps. The Server DSNs should not need any changes.
The GATC Administration Oracle ODBC DSN requires the following settings:
• Data Source Name – This is the <local server alias>_ORCL_GATC. The <local server alias> is defined on the server that runs Affymetrix® GCOS Server software and specifies the server where the GATC Administration database is installed.
• SQL Net Connect String – This is the local server alias of the server where the GATC Administration database is installed.
Registry Settings for Oracle GATC Administration
Database
Additional registry entries are changed. The following table shows the required settings and sample entries. The location of the registry key on the server than runs Affymetrix® GCOS Server software is:
HKEY_LOCAL_MACHINE\Software\ODBC\odbc.ini.
Under this key, all the configured ODBC connections are listed.

chapter 20 | Data Source Name Descriptions 373
• Highlight the Oracle ODBC DSN created and add the following string values (if they are not already there):
GeneInfo Database
The GeneInfo database DSN is created and used when installing the library file information. It includes probe set descriptions and other probe array information. It must point to the local server where GCOS Server software is installed.
LIMS3 Database DSN
The LIMS3 database DSN is created and used when installing the library files. This database stores the experimental data information.
Because of the variability of the ODBC wizards, the exact place in the configuration dialog boxes where these settings are configured is not consistent.
Several settings in the ODBC configuration are not required, or cannot be set from different versions of the ODBC wizard.
If there are any modifications that need to be made, below are the steps. The Server DSNs should not need any changes.
The LIMS3 database Oracle ODBC DSN requires the following
Windows 2000 with Oracle® 10.2.0.1
HOST_OS WinNT4
HOST_SQLLOAD sqlldr
The registry keys and values are case-sensitive.

374 Affymetrix® GCOS Server Installation and Administration Guide
settings:
• Data Source Name – This is LIMS3.
• SQL Net Connect String – This is the server alias.
Publish Database DSNs
Each publish database that is created adds an additional ODBC DSN to the server that runs the Affymetrix® GCOS Server software. These DSNs also follow a specific naming convention, specifically <publish database name>_AffyPub. If the creation of the DSN fails or if a DSN needs to be recreated, the following information can be used to manually create the DSN.
Because of the variability of the ODBC wizards, the exact place in the configuration dialog boxes where these settings are configured is not consistent.
Several settings in the ODBC configuration are not required, or cannot be set from different versions of the ODBC wizard.
If there are any modifications that need to be made, below are the steps. The Server DSNs should not need any changes.
The Publish database Oracle ODBC DSN requires the following settings:
• Data Source Name – This is <publish database name>_AffyPub.
• SQL Net Connect String – This is the server alias. The server alias is defined on the server that runs Affymetrix® GCOS Server software and specifies the server where the publish database was created (this should be the same alias used for the GATC Administration DSN).
In addition to the ODBC Wizard information, two additional registry entries are necessary for the DSN. The location of the registry key is HKEY_LOCAL_MACHINE\Software\ODBC\odbc.ini on the server that runs Affymetrix® GCOS Server software. Find Oracle ODBC DSN created above (<publish database name>_AffyPub), and add the following string values (if they are not present):

chapter 20 | Data Source Name Descriptions 375
<Local Server> DSN
The <Local Server> (the name of the server that runs GCOS Server software) DSN is created and used for connectivity purposes. It must point to the local server where the GCOS Server software is installed. This DSN should not require changing.
Because of the variability of the ODBC wizards, the exact place in the configuration dialog boxes where these settings are configured is not consistent.
Several settings in the ODBC configuration are not required, or cannot be set from different versions of the ODBC wizard.
If there are any modifications that need to be made, below are the steps. The Server DSNs should not need any changes.
The <Local Server> Oracle ODBC DSN requires the following settings:
• Data Source Name – Name of the local server.
• Service Name – Name of the local alias (same name as the local server).
String Value Name Value
PWD encrypted valueUID <publish database name>Alias <name of the alias>

376 Affymetrix® GCOS Server Installation and Administration Guide
The following are the only necessary fields (Figure20.7).
<Remote GATC Server> DSN
The <Remote GATC Server> (the name of the Remote Server) DSN is created and used when a remote GATC server is selected for the installation. It must point to the remote server where the GATC databases will reside. This DSN should not require changing and resides on the local server that runs GCOS Server software.
Because of the variability of the ODBC wizards, the exact place in the configuration dialog boxes where these settings are configured is not consistent.
Several settings in the ODBC configuration are not required, or cannot be set from different versions of the ODBC wizard.
If there are any modifications that need to be made, below are the steps. The Server DSNs should not need any changes.
The <Remote Server> Oracle ODBC DSN requires the following settings:
• Data Source Name – Name of the remote server.
Figure 20.7
Oracle ODBC Driver Setup window

chapter 20 | Data Source Name Descriptions 377
• Service Name – Name of the remote alias (same name as the remote server).

378 Affymetrix® GCOS Server Installation and Administration Guide

Index


381
Index
AAADM Administration data-
base 282
Active Directory 49
adding Administrators group 220
adding users 281
Administrators group
adding 220
Affymetrix
GeneChip data flow 13Technical Support 7
alias
creating an Oracle 100–108
Analysis Service 214
archiving options for DAT files 215
Ccell intensity analysis options
selecting 214
change password 286–289
client data directories 285
configuring
Oracle 98Oracle data information 99SQL Server 2000 76–87Windows 2000 server 50–58
local administrative account 50–54
local group 54–56regional settings 56
DDAT file archiving options
setting 215
data directories
client data 285server data 284
data flow 12, 13
data security 14
data source name descriptions 361–377
database management
Oraclebacking up 344maintenance 346
SQL Server 2000backing up 325–329expanding 323–325maintenance 333restoring 329–332
databases
AADM Administration 282DataMiningInfo 282GeneInfo 283LIMS3 281LIMSAdmin 283publish 284SQL Server 2000
backing up 325–329expanding 323–325GCOS Server performance tuning 322–323
maintenance 333performance tuning over-view 321
restoring 329–332SQL Server 2000 for Windows 2000performance tuning 321
SQL Server 2000 publish data-basedelete 333–334
DataMiningInfo database 282
DB conversion
troubleshooting 259
DBMS information 302–313
DCOM information 297–301
DCOM troubleshooting
client workstation 273–278GCOS Server 268–273
delete
Oracle publish database 348–351
SQL Server 2000 publish data-
base 333–334
delete users 281
documentation
conventions used 5on-line 4
domain user requirements
for GCOS Services 206
DSN 361
EEnterprise Manager 287
Oracle 287, 343
Ffiles security
post-server installation verifi-cation 234
troubleshooting 264
GGATC administration 340
GCOS Analysis Service 214
GCOS Server
configuration typesrequirements 17
data security 14hardware configurations 19hardware requirements 18new install for Oracle 29, 161–173
new install for SQL Server 174new install on SQL Server 2000 31, 174–184
overview 11personnel requirements 22upgrade for Oracle 34, 187upgrade for SQL Server 37, 194
GCOS Server Diagnostic utility 293DBMS information 302–313DCOM information 297–301OS information 313–318

382 Affymetrix® GCOS Server Installation and Administration Guide
registry information 296save information 295
GCOS Server installation
troubleshooting 256–259
GCOS Server Sync 286change password
SQL Server 2000 290–292Oracle database 286–289running 292
GCOS Service Settings
configuring for client 209configuring for server 211
GCOS Services
requirements for using 205Start/Stop Service policies 217
adding Administrators group 220
checking administrator priv-ileges 218
GCOS Transfer Service 215
GeneChip Publishing Service 355–358
GeneInfo database 283
Hhardware configurations 19
hardware requirements 17
Iindex management 342
installation
pre-install questions 27recovery from unsuccessful install 43–46
installation scenarios 28
installing
library files 243–250library files created prior to GCOS Server 1.0 250
new GCOS Server for Oracle 29, 161–173
new GCOS Server for SQL Server 174
new GCOS Server on SQL Server 2000 31, 174–184
new GCOS Server SQL server 31
Oracleoverview 91–98, 111
Service Pack 3a for SQL Serv-er 2000 75
SQL Server 2000overview 61
Windows 2000 Server 49
Llibrary file install
libraries created prior to GCOS Server 1.0 267
library files
installing 243–250troubleshooting 265
library files created prior to
GCOS Server 1.0
installing 250
library migration program
functions not performed by migration 268
functions on client 266functions on server 266
LIMS3 database 281
LIMSAdmin database 283
logins
SQL Server 2000 83
Mmanual
on-line 4using 5
memory
SQL Server 2000 80
Nnew GCOS Server SQL Server
2000 install 31
OODBC
server DSNs 361
ODBC registry settings
post-server installation verifi-cation 232
on-line documentation 4
Oracle 287configuring 98
data information 99creating a service name 133creating an alias 100–108data information 99delete publish database 348–351
Enterprise Manager 343index management 342installation overview 91–98, 111
new GCOS Server install 29, 161–173
performance tuningWindows 2000 337
post-server installation verifi-cation 234
publishing 339–342GATC administration 340issues 341publishing process 340tablespace naming conven-tions 339
Schema Manager 346upgrading GCOS Server 34, 187
Oracle database
change password 286–289management
backing up 344maintenance 346
Oracle settings
troubleshooting 260
Oracle upgrade 111advanced option 141basic 111
OS information 313–318

Index 383
overview of GCOS Server 11
Ppassword
change for Oracle database 286–289
change for SQL Server 2000 database 290–292
passwords
troubleshooting 260
permissions
SQL Server 2000 84
personnel requirements 22
post-server installation check-
list
files security 234ODBC registry settings 232Oracle 234registry settings 233services and task manager 231SQL Server 233
publish database 284Oracle
delete 348–351
publishing
Oracle 339–342GATC administration 340issues 341publishing process 340tablespace naming conven-tions 339
troubleshooting 262–264
RRAID
levels 20with MS SQL Server 21with Oracle database 22
RBS parameters/INIT.ORA
troubleshooting 262
recovery
unsuccessful installation 43–46
registry information 296
registry settings
post-server installation verifi-cation 233
requirements
hardware and software 17personnel 22
SSchema Manager 346
security
files 234SQL Server 2000 81
selecting cell intensity analysis
options 214
server data directories 284
service name
creating an Oracle 133
Service Pack 3a
installing for SQL Server 2000 75
services and task manager
post-server installation verifi-cation 231
setting DAT file archiving op-
tions 215
software requirements 17
SQL
new GCOS Server 31
SQL Server
new GCOS Server install 174post-server installation verifi-cation 233
upgrading GCOS Server 37, 194
SQL Server 2000
backing up databases 325–329change database password 290–292
configuring 76–87logins 83memory 80permissions 84
security 81tempdb 86–87user connections 81
database maintenance 333expanding databases 323–325GCOS Server performance tuning 322–323
installation overview 61installing
Service Pack 3a 75new GCOS Server install 31, 174–184
publish databasedelete 333–334
restoring databases 329–332Windows 2000
performance tuning 321
SQL Server 2000 databases
performance tuning overview 321
Start/Stop Service policies
checking administrator privi-leges 218
for GCOS Services 217adding Administrators group 220
Ttechnical support 7
tempdb
SQL Server 2000 86–87
Transfer Service 215
troubleshooting
basic questions 255DB conversion 259DCOM
client workstation 273–278GCOS Server 268–273
files security 264GCOS Server installation 256–259
library files 265library files installation 265Oracle settings 260passwords 260

384 Affymetrix® GCOS Server Installation and Administration Guide
publishing 262–264RBS parameters/INIT.ORA 262
Uupgrading GCOS Server for Or-
acle 34, 187
upgrading GCOS Server for
SQL Server 37, 194
upgrading Oracle 111advanced option 141basic 111
user connections
SQL Server 2000 81
users
adding 281deleting 281
WWindows 2000
Oracle performance tuning 337
Windows 2000 Server
configuring 50–58local administrative account 50–54
local group 54–56regional settings 56
installing 49