a user's guide to the care, documentation, interpretation and ...
98
a user’s guide to the care, documentation, interpretation and display of dress
-
Upload
khangminh22 -
Category
Documents
-
view
5 -
download
0
Transcript of a user's guide to the care, documentation, interpretation and ...

a user’s guide to the care, documentation, interpretation and display
of dress

2
First published 2012. Revised April 2013, August 2014Museum of Applied Arts and Sciences500 Harris Street, Ultimo NSW 2007
© Museum of Applied Arts and Sciences
Authors Lindie Ward, Kate Chidlow, Sarah Pointon
Editors Karla Bo Johnson, Judith Matheson
Desktop publishing Anne Slam
Conservation photographers Nitsa Yioupros, Michael Myers
Regional Services manager Rebecca Pinchin
Publications manager Judith Matheson
Printing Lindsay Yates Group
Front cover Detail of cotton drill corset, late 1880s. Powerhouse Museum collection, gift of Berlei-Hestia, 1982. A8211/1.
Photo by Sue Stafford
Back cover left to right, top to bottomVelvet Afghan jacket, early 1890s, Broken Hill Migrant Heritage Committee • Photo of three boys in black velveteen suits, 1928, Griffith Pioneer Park Museum • Possum skin cloak from the Hunter region of NSW, about 1840, Smithsonian National Museum of National History. Photo by Smithsonian Photographic Services • Photo of Selina Nicholls in her wedding dress, 1909, Port Macquarie Historical Society • Audrey Capuano’s stars and stripes jumper, about 1945, Australian National Maritime Museum • Detail from dress uniform of a NSW Lancer, 1895–1903, Richmond River Historical Society • Bessie Rouse’s crimson silk outfit, mid 1870s, Hamilton Rouse Hill Trust Collection, Historic Houses Trust of NSW. Photo by Alex Kershaw • Photo of Isabella Cooke in her wedding dress, 1883, Alstonville Plateau Historical Society • Woman’s outfit, 1880s, National Museum of Australia. Photo by National Museum of Australia • Detail of Marjorie Florence Smith’s painted chiffon and sequinned ‘flapper’ dress, late 1920s, The Cavalcade of History and Fashion • Depression-era Manly Warringah rugby league jersey, 1930s, Warringah Council • Photo of dancers in Carmen Miranda costumes, 1946, Museum of Riverina • William Charles Wentworth’s court outfit, 1855–65, Historic Houses Trust of NSW. Photo by Historic Houses Trust of NSW • Photo of Ute Bierbaumer in lederhosen, 1943, Albury Library Museum • Blue silk dress, early 1840s, Meroogal collection, Historic Houses Trust of NSW. Photo by Alex Kershaw
Any statement or advice expressed in this publication is made in good faith but on the basis that the Powerhouse Museum is not liable to any person for any damage or loss which may occur in respect to taking action or advice referred to in this publication. While every effort has been made to ensure that the material is accurate and up-to-date, you should exercise your own independent skill and judgement.
CopyrightThis work is copyright. Apart from any use as permitted under the Copyright Act no part of this publication may be reproduced, transmitted or stored in any form, electronic or otherwise, without written permission from the publisher.

3
Contents*
Introduction .......................................................................................................................................................... 5Dress: a future for its past • Curriculum perspectives
1. Getting started ............................................................................................................................................ 14
2. Photographs ................................................................................................................................................ 16 Uploading photographs • Simple conservation photography and documentation
• Dressing a mannequin • Image copyright • Taking photographs with limited resources
3. Garment details ........................................................................................................................................... 29 Textile timeline • Historical silhouettes
4. Trimmings/decorations .............................................................................................................................. 35
5. Gender and dress ........................................................................................................................................ 36
6. Fibre/weave ................................................................................................................................................ 37 What fabric is it? • Dyes
7. Manufacture ................................................................................................................................................ 39
8. Cut ................................................................................................................................................................ 41
9. Fastenings ................................................................................................................................................... 42
10. Stiffening/lining/padding ........................................................................................................................... 45
11. Measuring a garment ................................................................................................................................. 46
12. History and provenance ............................................................................................................................... 48 History and provenance • Be a detective — links to discovering more about your garment
14. Additional materials ................................................................................................................................... 51 Scanning photographs and documents
15. Condition ...................................................................................................................................................... 63 Identifying types of damage • Steaming a garment
16. Statement of significance ............................................................................................................................ 71 Unravelling significance
AppendicesFrequently asked questions ................................................................................................................................. 74Frequently asked technical questions ................................................................................................................ 77Glossary ............................................................................................................................................................... 78Products and suppliers list .................................................................................................................................. 87Other websites ..................................................................................................................................................... 95
* The contents of this booklet are ordered to correspond with the sections of the Australian Dress Register garment entry form. Note, there are no notes for section 13.

4
This sequinned costume with net skirt was worn by Australian performer Annette Kellerman, who became an international celebrity in the early 1900s. This costume may have been for the silent film Neptune’s daughter in 1914. Powerhouse Museum collection, gift of the Dennis Wolanski Library, Sydney Opera House, 2000. 2000/66/23

5
Introduction
The Australian Dress Register is a collaborative, online project about dress in NSW. The register aims to document significant and well provenanced men’s, women’s and children’s garments and associated accessories including shoes, hats, underwear or shawls that make up a complete outfit. While the plan is to eventually take the register nationwide, the project has begun with clothing relating to NSW up to 1945.
The immediate benefits of creating a collaborative online database are enormous. The register allows museums large and small, and private and family collectors, to share information about significant garments in their collections with the wider community. Many of these items, particularly those belonging to small regional organisations, have been little known or appreciated until now because their caretakers have not had either the resources, opportunity, or the necessary skills to document and digitise their collections.
To support the Australian Dress Register, the Powerhouse Museum developed this compendium of resources for participating organisations comprising information sheets, technical advice, glossaries, timelines and a products and suppliers list. There are guidelines on how to assess significance as well as how to document such details as trimmings and decoration, fibre/weave, manufacture, cut, fastenings, stiffening, lining and padding, measurements, and condition reports as well as history and provenance and any supporting material such as old photos or letters. Also included is advice on how to photograph and display garments. A separate document included with this booklet is a template for entering information about your garment on the register. All the information contained in this booklet is also available online as downloadable PDFs.
Rebecca Pinchin, the Powerhouse’s regional services manager, explains the importance of this new initiative: ”The Australian Dress Register is a democratic, collaborative structure that encourages communities to document their own collections. It’s a partnership — we‘ve provided the training and the resources for them to showcase their garments. It’s the first time we’ve had the opportunity to compare
and contrast material across small and diverse collections in the state. Already, useful connections have emerged between garments in far-flung places that have enhanced our knowledge of the history of dress in NSW. This is a model that has implications for the way we will work and document collections in the future.”
One of the reasons dress was chosen for the register is because it is increasingly fragile, and often hard to display. The 1945 cut-off date was chosen so that initial effort could be concentrated on 19th-century garments that are rare or in poor condition before it is too late. In local communities, descendants can often provide the family stories, letters or photographs associated with a particular garment. The focus is not just on ‘Sunday best’ but also work clothes and every day.
It is these stories that are especially compelling, says Powerhouse curator Lindie Ward who helped develop the criteria for the register. “It’s not just about the clothes, it’s the very personal stories about people’s lives and their communities that the clothing reveals. What we wear is such an intimate part of our lives and by documenting each garment in detail we can uncover stories that wouldn’t otherwise be told.”
The long-term benefits of the Australian Dress Register to a range of users are unlimited. Potential users of the site, apart from participating museums and local community groups, include family and regional historians, academics, students and teachers across disciplines as varied as medicine and nutrition to sociology and migration, theatre and film designers, clothing and textile designers and manufacturers as well as shoemakers, milliners and other craftspeople. Transcripts of talks by fashion historian and academic Margaret Maynard, and educators Dr Christine Hatton and Julie King present a range of possibilities and opportunities to use the register.
To explore this wonderful new site go to australiandressregister.org and use the resources in this booklet to help you document the garments in your collection and submit the entries to the Australian Dress Register.

6
Dress: a future for its past*Margaret Maynard, Associate Professor, University of Queensland
Why do clothes matter? Whatever term we use — clothing, fashion or costume — dress is an engaging thing. Using 19th century colonial examples I want to discuss how we might ensure their significance beyond collecting items and keeping them safe. Every garment, actual, pictured or described, conveys something fascinating about how people lived, interacted, role-played and communicated. The challenge for us is to discover what stories garments might tell about acts of making and wearing including movement, touch, sight and even sound. We ensure the future of dress by trying to understand all facets of clothing even though we may never fully comprehend what it meant to be attired this way. It is tricky work but we should never underestimate its usefulness. Dress anchors us to people and their lives.
Images as storytellers
Visual records of 19th century dress were created in different media: drawings, paintings, fashion plates, photographs, even sculpture. They were made for particular reasons and for particular audiences so all images have a built-in rationale. I would argue, that we should never take an image at face value. The coloured engraving after Nicholas Chevalier for the Illustrated Australian News in 1865 called Christmas in Australia is a good example of this. It is a joyous, but very carefully staged picnic showing middle class men, women and children, relaxing, playing games and other activities. It shows their pets, and some odd flora, a topsy-turvy celebration of a northern hemisphere event in hot weather. Anything unpleasant or untoward is nowhere to be seen. Importantly it depicts fashion as up-to-date, standards of dress for men a little relaxed for out of doors. There is a top hat there. I am not sure what it is doing. It’s certainly not being worn. This is a splendid but clearly exaggerated image, even a form of propaganda to illustrate colonial life at its best, perhaps to show overseas relatives what Christmas was like far from the ‘old country’. There is always an agenda behind any image.
An advertisement from the trade publication the Australian Store Keepers’ Journal of 1895 is another illustration of this. It is for Australian-made
Kangaratta boots and shoes using a new treatment to make kangaroo skin look like glacé kid, encouraging the so-called ideal women to use these ‘perfect’ products that are ‘soft as a glove, strong as steel’. What I think is important about an image like this is that we look beyond it. Boot and shoemaking was one of Australia’s most successful garment industries at the end of the 19th century and at the time was rapidly mechanising although, as far as I know, fairly little Australian footwear remains in collections. Always vulnerable to the influx of imports, particularly of American shoes, it was important to market the local product against the foreign. This advert urges us to look at how the shoe and bootmaking industries were pushing Australian goods. It is interesting to compare this to today when we see so much local manufacturing of garments like footwear going offshore.
All images have tales to tell. A ‘winter outfit’ appears in the earliest Australian fashion photograph advertisement that I have found. It is by a photographer called Poul Poulson, who was also a portrait painter, and it appears in a Brisbane news-sheet called The Princess in 1889. It is an advert for Finney Isles, Brisbane’s largest department store at the time. The name of the broadsheet and its society pages tells us this was elite fashion. In the same issue of the magazine is a photograph of a stylish aesthetic gown that shows Brisbane, an alleged fashion outpost, to be reasonably up-to-date with overseas styles.
If we take another print as it stands, this time of a natty lady’s tennis costume of 1885, we might miss its real interest. It was sold via the mail order pattern service of Melbourne’s Madame Johanna Weigel. It required 10 yards of 27 inch material and it specified that it could be made either in the richest of fabrics or the least expensive. What it shows is an awareness of customers’ financial situations and that fashion with easy-to-follow instructions was available to all Australian women everywhere. It tells us about the constrictions of playing tennis before the advent of Rational clothing — personally I wouldn’t want to play in those little high heels. Rational clothes that come in soon after this were much more masculinised and it is quite

7
interesting that Madame Weigel advertised a pattern for ladies’ tennis bloomers ten years later. The genteel lady in the Weigel image wears heeled shoes. These are nice to compare with the exquisite pair of 1886 British-made woman’s no slip tennis shoes, in the Powerhouse Museum Box collection, with tan morocco leather uppers and lined with white kid.
Weigel was a German dress designer who established a pattern publishing business with her husband about 1878–79. She had her business offices in a number of Australian cities having previously worked in the US with McCalls. Her husband apparently did the drawings, so they were a team. She started Australia’s first fashion magazine called Weigel’s Journal of Fashion in 1881. Juliette Peers who has done work on her says that by 1916, one million of her patterns were sold annually throughout Australia, the South Pacific and South-East Asia. She is one of a number of enterprising women who set up businesses with their husbands in Australia. This is a fascinating and under researched area of Australian dress. I have an example of a woman corset maker in Brisbane who did much the same thing but under her husband’s name. She was Sarah Jenyns. The company was believed to have been run by her husband but in fact it was Sarah who was doing all the hard work behind the scenes.
Any account of 19th century dress must look beyond the middle classes. Even the most mundane dress has significance although surviving working class clothing is scarce and very difficult to research.
Everyday clothing can be intriguing. I am fascinated by it. A quirky example is a photograph of Joseph and Mary Ann Jewell in 1868 wearing sealskin clothing. This information comes from an essay written in 2007 by Jennifer Quérée on Castaway Clothing. But what does this dress mean? Quérée tells us these were Australian survivors of an American shipwreck in 1866 in the Auckland Islands located in New Zealand’s subantarctic. They were en route between Australia and Cape Horn. Losing most of their clothes they were later rescued wearing homemade, hand cured, sealskin clothing and what looks like American-style moccasins. One of the first problems they faced on the islands was that their clothing wore out and they were very concerned with maintaining respectability, so they set about making these extraordinary clothes. It was probably very difficult material to work with. Mary Jewell was by trade a dressmaker. In some sense, her clothing has vague shadows of contemporary fashion. An interesting thing about Mary Ann was that she later made quite
a bit of money in Melbourne talking about her ordeal. She was a good Victorian publicist wearing this strange outfit for her lectures and selling copies of her photograph.
There are things that we will never know about clothing, especially when worn by the underclasses or by a race other than European. An example is Charles Walters’ 1865 photograph of a family at Coranderrrk Aboriginal Mission, the nearest mission to Melbourne. It was a showplace that attracted photographers and scientists to go and observe local people. There are many images of inhabitants, taken by Walters, some which stressed their uncivilised state and others apparently done with their input and agreement. For instance, it is recorded that they were quite happy to have themselves photographed climbing trees, which was one of their traditional practices. This image fits contemporary views of Indigenous peoples progressing towards European notions of civilisation. So there is emphasis on homes, neatness and cooperation, although in some ways I feel they are quite uneasy before the camera’s gaze. Many of these images were subsequently engraved and undesirable elements doctored out. The men are in rough slops and caps and the women in crinolines, a curious anachronism. But we have no exact knowledge of what Indigenous people felt about European clothing. The mission did not supply these outfits. The inmates bought them, apparently using the proceeds of selling vegetables. Did the photographer coerce the sitters into wearing the garments, did they prefer it to customary attire, was it more useful or practical for them? For now we have no idea.
The museum as teller of tales
Museums and archives collecting dress have a great responsibility. These days there are tight rationales for acquisitions and exhibition topics with much focus on documentation and catering to audience needs and expectations. The substantial information that the Powerhouse has about dress on the web is a marvellous fulfilment of this responsibility. I for one am so pleased that we can have such ready access to this information.
The Powerhouse owns an interesting Marsden family dress of about 1835. It is a fascinating item worn either by Elizabeth, wife of Reverend Marsden when she was about 60 or by her daughter Ann: it is not clear. There is an unusual front opening remade possibly from an earlier gown, perhaps because Elizabeth had a stroke or it may have helped Ann breastfeed. But the fabric does seem bold for a 60-year-old pastor’s wife so the dress is a bit of a mystery. We need to know much more about things

8
like age and colonial dress. In my view, areas for further research are endless.
Any dress collection tells of different values placed on items at various times. In the past there has been a tendency to collect and exhibit singular high society items or examples from known designers. Collecting has mostly focused on women’s attire, often their best dress usually for weddings or other special occasions like the Maria Traill dress in the Powerhouse Museum. But all collections are uneven, limiting the narrative a gallery can tell.
When talking to curator Roger Leong about his Black in fashion: mourning to night exhibition (2008) at the National Gallery of Victoria, he said that he began with what he had in his collection and was startled to find that they had no 19th century men’s costume. This is revealing. Australian men’s dress has been extremely poorly researched and poorly collected as well, except for military uniform, the latter perhaps not surprising.
We do have lively images of men, like one by S T Gill called Sly grog shanty. It is dated 1869 and a retrospective, remembered view of life on the goldfields in the 1850s. It is a picturesque view with cheery clothing (over cheery, I would think) and few, if any, comparable clothes like these exist. Such items of working dress usually wore out.
Dress exhibitions must provide a stimulating, intellectual environment for the public but also balance information and delight. The question is should they be as historically accurate as possible, should we strive endlessly for the minutiae of historical detail? Alternatively, should they offer us some kind of intense, telling and experiential moment? High fashion’s exceptional quality is always popular. But it is important to show other kinds of dress as well. The debate about how to display clothing is of ongoing concern. It will be something that all curators have considered at one time or another. It is important to keep dress relevant and engage public interest. This inevitably comes about with stories told and worthwhile viewing experiences.
Many past exhibitions have focused on chronology or on themes like the National Gallery of Victoria’s Hatches, matches and dispatches show of 1987. This was a very elegant exhibition centred on wedding dresses and christening robes, and because they are so well represented in the collection this was a most suitable exhibition to have. Museums tend to have their own recognisable style of approach. The spare elegance of National Gallery of Victoria’s exhibits always raises clothing to an art form, such as a 1910, single piece,
wedding gown in the 1987 show. The dress is of ivory charmeuse silk, worn by Annie White in Carlton, Victoria. The catalogue tells us a fair bit about the family and the event, and the curator attempted a context by including a photograph of the dress as worn. But in the exhibition there was no larger sense of how the less well-off might have dressed for their weddings and funerals. In this case, I got the impression that the aesthetic of the exhibition smoothed over the wider social landscape.
This said, new and daring ways of exhibiting dress are giving clothes renewed life and provoking thought in unexpected ways. Etiquette of public places about 1870 is a book displayed at the exhibition Noble Rot: an alternative view of fashion held at Como House in 2006 curated by Robyn Healy in conjunction with the National Trust of Australia (Victoria). Robyn used the Trust collection as a fragmented trail of objects scattered through the house. It reversed the standard selection criteria of the ‘best clothes’ and she used soiled, incomplete, stained and mended items. For example, there was discarded underwear and there were 19th century wedding dresses strewn across the breakfast room in an inappropriate manner for the period. Trespassing on the past was the intention but in fact the curator manufactured a different form of past where precise historical context was under challenge. This is not necessarily a bad thing. But I think you can only do it as long as you know what the original context really was.
Dress and its contexts
We value-add to dress by close looking and informed learning. Apart from what we can tell about fabric and the shape and style of garments, we must acknowledge that material objects have life histories. They have signs of wear, they have stains, they have alterations, they travel through periods of life and move through phases of use from special events, to being left in the wardrobe, to being borrowed or sometimes remade. These traces and movements are part of their history and demonstrate that context does not just mean one moment of time. Context is something that is always changing. We must remember that garments have continuing museological lives as well as an original context.
We are so lucky if a garment is as well documented as Maria Traill’s machine stitched, brocade and satin evening dress, which is in the Powerhouse collection and dated between 1878 and 1882. Maria was from a well-connected family, and this dress probably worn to a party or a ball just before or after her wedding in 1881. She married a sheep farmer.

9
Perhaps it was made by a Sydney dressmaker from a commercial pattern or perhaps taken from a fashion print. The dress is indicative of her social status because of the train. The bodice was let out soon after being worn, evidence of gaining weight or another wearer. Photographs show Maria was quite fashion conscious, so it would be very useful to further research social events and etiquette at the time. We could perhaps find out about commercial pattern distribution in NSW, the dressmaking trades, where fabric was acquired and how prevalent remaking of good quality garments was.
Many museum collections own unprovenanced items. I am sure it is a headache for those who run museums and it is a major frustration for all researchers. I recently reviewed a thesis on dress and photographs in the Nelson Provincial Museum in the South Island of New Zealand and almost nothing that the researcher was working with was provenanced. A promenade dress worn by a Miss Forsythe from that museum is a typical example. It comes from the Brown collection of 6000 photographs taken between 1865–92. But nothing is dated. Even so, and to her credit, this researcher built up a fascinating contextualised story of the society in which the dress she was dealing with was made and worn. Her thesis has great worth. We shouldn’t just throw up our hands in despair when something is unprovenanced. I think that is a big mistake.
Sometimes we have to piece together historical evidence as best we can, as with convict dress, which is a fairly under researched subject. There is much dispute about dates, how garments were constructed, names or types of stitches, edgings, dyes, what garments were called, what the classes of convicts wore and the meanings of some stamps and markings. Two items from the Tasmanian Museum and Art Gallery are worth considering: a felted wool cap with the Board of Ordinance stamp and a particoloured jacket neither dated. We know almost nothing about these kinds of clothes. Convict garments in public collections do not adequately reflect the full range of clothing issued. They don’t represent the early transportation period, men’s lightweight summer clothing, female dress, and they over represent particoloured clothing which was introduced in 1814 by Governor Macquarie. After 1822 this particoloured clothing was usually yellow and black when controls in prisons became stricter. What would be quite marvellous would be a comprehensive exhibition of all extant convict dress. I know there have been small exhibitions. But we should put it all together even if only on the web and try to piece it into some kind of social context.
I have worked with dress, everyday clothing and fashion, for the past four decades, mostly Australian dress. But there is so much work to do. I recently edited the Australian, New Zealand and the Pacific Islands volume of the Berg Encyclopaedia of World Dress and Fashion and what was extremely surprising was that I could not find anybody to write on Australian sport and dress. You’d think they would be falling off the rafters. I asked three people in the end to pool their knowledge and with my input as well, we were able to piece together a solid essay. However, the fact is that we have many topics in Australia that simply have not been researched. One illustration the researchers came up with was a photograph of the Melbourne football club (AFL) in 1895 with players in uniform laced waistcoats. Today we like to look at the tight jerseys of athletic AFL players. It seems that the players were quite rakish in the 19th century too.
I will end by discussing a splendid detail from an 1886 painting called Derby Day by Carl Kahler. Australian racing was linked to the social calendar then as it is today. Women were expected to attend meets in their most fashionable clothes and men in formal outfits. This picture tells us much about social management of upper middle class fashion. But pride of place, as you would expect, still goes to the horse. The story it tells is the epitome of stylish dress, imagined if not worn: a fashion plate view of a day at the races. Yet our business is to ask more of this image. We shouldn’t just accept it as a straightforward illustration. For instance, who were the working people who supported this kind of event: the grooms and trainers, those who made the gowns, tailored the outfits, the footwear and millinery? The picture has social information but it is only partial evidence. In my view, it is essential to extend our research skills. Here I include everybody who works in museums and all kinds of external researchers. We need to look extremely closely at garments plus acquire allied pictorial and documentary evidence, even make educated guesses in order to build up a narrative of wearers, makers, social class, sites of purchase and so on — thus bringing the whole sociocultural context of dress to life.
Our challenge today is to use research plus creatively informed thinking (the latter must be stressed) to assist garments, at every level and in every medium to tell their own story. It is here I believe their future lies.
* Edited transcript of a paper presented to the Australian Dress Register seminar, 10 November 2008.

10
From Kindergarten through to Year 12, the three areas of the NSW drama curriculum involve making drama, performing drama & critically studying, particularly in the senior years, or appreciating drama in the junior years. Throughout their schooling students are required to reflect on their own drama making and performance in drama. There are many different types of drama students can study over that time but the two key drama forms or contexts are improvisation and playbuilding. The main premise is that school students learn about the art form by making the art form. In drama, improvisation and playbuilding involves students learning how to collaboratively create and present plays of their own invention. Within these processes they learn to take on roles; they learn to explore and enact stories; and walk inside the shoes of others; they learn to manipulate the elements of drama; and they also learn to collaborate to devise pieces of theatre for different audiences and for different purposes.
‘Costume’ in the context of drama is connected to the theatrical experience. It is an important means of communicating role and dramatic situation to an audience. It also gives information to an audience about relationships within the play such as how characters are linked by colour or design as well as crucial contextual information such as the place and time depicted onstage. In drama teaching we also use costume as role signifiers or symbols that can drive the dramatic action. Hats and shawls are very common pieces of costume in the drama classroom particularly in primary school because they can be adapted and used to become all sorts of characters that drive the storytelling and the drama along.
In K–6 costumes give students and audience character information and help the children to adopt roles, tell their stories and engage in the fiction. Students might select something from the dress up box (they will not be making them), or something from home (such as mum’s old clothes) to bring to life a role or character in the classroom. Students would then appreciate their drama work as they make decisions about appropriate clothes for a particular character and reflect on the way
Curriculum perspectives: K–12 Drama*Dr Christine Hatton, Drama Advisor K–12, Curriculum K–12 Directorate,
NSW Department of Education and Training
costume communicated particular ideas to their audience.
In their study of drama in Years 7–10 we see a growing sophistication in the way that students approach the artwork. Their creative processes, performance work and critical analysis are more sophisticated. At these stages the drama syllabus focuses on more explicit learning about the particular theatrical function of costume and how costume design works alongside the other design elements such as lighting design, set design, sound design and even promotional design in terms of publicising key aspects of a production to a potential audience. The drama study becomes more specialised and students start to look at characterisation and acting technique more specifically and how costume can enliven and embolden their performances.
This growing sophistication continues into Year 11 and 12 drama. There is a specific study of costume design as an artistic process in itself. Students might consider how a designer might get the creative stimulation to create a design piece that suits a particular production or director’s vision. Study in drama at senior level also involves a more detailed study of acting as a craft and performance from different theatrical traditions. Class work focuses more deeply on the analysis of context, form and performance conventions. In senior drama students consider questions such as: when did this play occur? Where did it occur? What is the particular social milieu and political context that informed this work? What techniques have been used to engage the audience in the performance? For their HSC Drama Individual Project students can choose to complete a costume design project, where they must select play text from a given list and then create a series of costume designs for an imagined production. In the Group Performance component of the HSC Drama course students must playbuild in small groups and create a short piece of original theatre for live performance. They also complete a written exam where they write about particular plays and performances drawing upon their knowledge and their experiences of the plays in performance.

11
So what kinds of things could drama teachers and students use the ADR for?
Obviously it serves as a great resource for costume design and research for students. It is particularly nice to have a local body of material for students to look at. For me the most exciting thing about the ADR as a resource is what it offers as means of triggering ideas for playbuilding for students as they make their own theatrical works. For us in drama the stories behind the garments are really exciting. We could explore what kinds of personal narratives are highlighted by these garments, and these could be starting points for playbuilding for different audiences — school-based, for festivals and also for curriculum-based work. The stories behind the garments provide us with a real sense of the local, the everyday and the particular. These are interesting triggers that teachers could use as starting points for all kinds of drama work from Years K–12. The arts act as a critical medium for generating dialogue about who we are and how we represent ourselves. I can see drama works created by students based on what they find in the ADR. In the field of contemporary theatre and also in the HSC Drama Course Prescriptions there is a huge new interest in stories and storytelling and in particular a new form of theatre called ‘Verbatim Theatre’ which HSC students are just starting to study for the first time. These are stories taken from communities and developed into plays.
Dialogue is based on the verbatim transcripts from people who experienced various events in their communities. The interest in personal stories and the contexts in which people live their lives are very rich starting points for drama. I can also see lots of possibilities for cross curricula work between different Key Learning Areas using drama and the arts as a way of exploring the leaps of imagination we and our students get when we learn about these garments.
Another thing is that students and teachers have new access through the register to regional stories. Students in government schools in particular now have access to online resources and environments with the recent statewide laptop rollout. The laptops have become part of our classrooms and students can open them and connect with each other and with materials like these in ways that they have never been able to do before. With technology we can bring alive the information and the stories of these garments and students can learn from these stories. In drama these garments can fuel students’ imaginations and their creative work. So it is about how far our imaginations can take us in terms of using a web-based register like this one.
* Edited transcript of a paper presented to the Stitching up the past: progressing the Australian Dress Register seminar, 16 November 2009.

12
The ADR provides fantastic access to information beyond the museum in a way that offers flexibility to the user. The provision of online resources is very valuable to students, particularly those at a distance. The register offers students connectedness on two levels: firstly in terms of accessibility and secondly to allow them to tap into resources in their local community that they were previously unaware of. Just by going onto the ADR myself I was able to identify an object designed and created by a dressmaker in Port Macquarie that was worn by a local identity in Port Macquarie. Students looking at that object would be able to perhaps find it in their community and become more aware of objects in their community. It is also an excellent resource for teachers.
The greatest significance of the ADR will be for students and teachers of Textiles but I will briefly outline some of the other applications it will be put to. In K–6 students study Science and Technology and the focus is on designing and making. Certainly one of the areas they look at is the area of products. It is feasible that a school may look at the products of dress and fashion so they may use the ADR to locate some examples from a particular period and then examine what were the technological influences on that particular garment.
In Years 7–8 students study of Technology is mandatory and they continue their studies from primary on the built environment, information and communication, and products. While it may be unusual for schools to focus on fashion, some schools could do that and in some instances they might like to look at historical influences, so it is a possible resource for students and teachers.
Another possible use is for students of computing — Information and Software Technology students, and Information Processes and Technology in the HSC who study databases. This would be a wonderful database for them to look at as it has a really interesting user base for them to pitch to and has people inputting data, the interface has to be friendly for a broad range of people to look at and it would be a great case study for them to study from a computing perspective.
Curriculum perspectives: K–12 Design and Technology*Julie King, Senior Curriculum Advisor Technology 7–12,
NSW Department of Education and Training
I suppose the main focus is our textile students and this is where it will be a really rich resource. Recently the Commonwealth has funded the digital education revolution and that has meant a rollout of 93 000 laptops for Year 9 students in NSW. There will be a continual rollout of these over the next three years. While the wireless network is not there yet it will be by 2010, and this really opens up opportunities for teachers to tap into this great resource.
Some examples of how you could use the ADR in schools are, firstly that it could be a template for analysis — a structure has been created for the people who will be inputting data, and students could use this structure as a template, or they could analyse an item of clothing, particularly one that has significance for them. This is a really powerful way of increasing student connectedness with their learning and it provides them with a framework that has been provided by an authoritative institution like the Powerhouse Museum and gives them a world sense of something that is applicable and is appreciated by the broader community.
The object descriptions could assist students in creating their own descriptions of clothing they are designing. Sometimes it is a struggle for teachers to get students to give enough detail about what they are designing and if teachers can give a model that is the established way of giving a description in the broader community then they may be more willing to engage in completing a more substantive piece of analysis.
Students could also analyse the statements of significance and then they could write, modify, enhance them in some way, not to go on the register but to give them some assessment. The description of the statement in the register describes it as historic, aesthetic, scientific, social and spiritual features and this relates directly to the significance of textiles in the Textiles Technology and Textiles and Design syllabuses. If you are asking students the question that occurs in the register ‘What makes the garment important?’ that is a really excellent opportunity for students to draw

13
together those aspects of history, style, technology and social context that they can perceive from the registrations available. It is also a really valuable literacy exercise. You are providing a scaffold, providing an audience and you are also providing modelled examples. It always helps for someone outside the classroom to say this is the way things are presented in the real world.
Where a statement of significance has not been provided in the ADR then students could do some research and look at the stories and see if they can establish more information. Also, looking towards the stories is valuing the importance of those stories in establishing provenance.
Last year we worked with the Multicultural unit doing a project titled Culture and Design Virtual Gallery. That project required students to select a piece of textile or a textile object from their family and to describe why that was of significance to them. This would be another layer you could add to that particular project to show that this is the type of thing you do to establish provenance and to incorporate some historical aspects into learning. Those stories have been collected and housed on a Culture and Design Virtual Gallery website and other students are able to access that. It might be really nice to tap into the ADR website, having a look at the Culture and Design Virtual Gallery and have students work on one of their own inspired by the two examples.
The ADR could also provide inspiration for the design of a textile project and that is a very important use. It provides a range of different types of objects with a different emphasis. That might be an interesting starting point for a student for a major textiles project. The Major Textile Project is selected from five categories and two of those are
Apparel and Costume. The ADR would provide examples that would inspire either of those categories. The objects on the ADR also model descriptions and that level of detail would allow students to analyse and describe their own Major Textile Project with that kind of detail and emphasise points that they might have not thought of in their own description. They could also consider the impact of geographical location, available resources and workers’ skills on the clothing and that would cause them to consider these things in the design of clothing of a particular era and area.
In Years 9–10 students learn about historical perspectives of textiles including historical periods, technological advances and social events. They learn to recognise design features of textiles from different periods of history and identify these features in contemporary designs. That cross fertilisation of historical and contemporary design is a strong point raised in the Textiles Technology syllabus. You could combine that activity with other Powerhouse Museum resources such as the Electronic Swatchbook and Sourcing the Muse collection, and with the ADR you have a really powerful suite of resources that demonstrate the link between historical and contemporary design.
The Technology unit would like to thank the Powerhouse Museum for inviting us to work on this project, and we look forward to working with you in the future in identifying some implementation strategies and promotion of the resource, which I think will be invaluable to students.
* Edited transcript of a paper presented to the Stitching up the past: progressing the Australian Dress Register seminar, 16 November 2009.

14
What garments should I put on the Australian Dress Register (ADR)?
We are looking for well provenanced men’s, women’s and children’s dress from NSW, prior to 1945. Garments are chosen for their significance, which refers to the historic, aesthetic, technical and social values associated with a garment. There is no limit to the number of entries that can be provided by an organisation or private individual but it is recommended that only one entry is undertaken at a time. Generally when there is information on the provenance of a garment and a range of associated material (photographs, stories etc) it will ensure an interesting entry. Poor condition is not a reason to exclude a garment but it means it will need to be photographed on a sloped backboard rather than on a mannequin. As it is a visual website, the quality of the photographs is important. The register is a wonderful way of providing access to a garment which may be rarely seen by the public due to its fragility, the remoteness of a museum or because it is held in a private collection.
Where to start — create an object file
In order to help you decide which garment/s to put on the Australian Dress Register, it is recommended that you create an object file (pictured right). This is where you collate as much information as you can about the garment. During the process of creating an object file, your research will give you a better understanding of the importance of a garment and its significance to your collection. Copy relevant information on the person or family; the place where they lived or worked; their contribution to the community; or associations with particular places and events. Also explore holdings of historic photographs and records of births, marriages and deaths if relevant. Talk to former volunteers or office bearers who may remember when the object was donated or if it underwent restoration. Track down family members or former donors for more information.
What is an object file?
An object file is simply a folder containing all the relevant information about an object stored in a standardised format. This information might otherwise be scattered in various files, computer
1.1 Getting started
databases, records and archives. It is a reference point for anything to do with the object, and contains all the organisation’s knowledge about the item, its provenance, history, significance and life cycle since it came into the collection. Object files are the starting point for significance assessment, possible conservation treatment and interpretation for display. Generally each object has its own object file, but a similar group of items may share a single file, or a group of related items from the one donor.
How are object files used?
• To catalogue objects and develop statements of significance.
• To document the history and memories around an item, passing on the story of the item to the next generation of custodians.
• To assist conservators in conservation planning and treatment.
• To develop object labels for interpretation or exhibitions.
• For all aspects of management of the item and collection, including storage, security, valuations etc.
What goes in an object file?
Anything relevant to understanding the garment, its history, significance and what has happened to it in the museum. Object files may include:
1. Documents• Donor details: name, address, phone number.• Acquisition information: date acquired, bill of
sale, purchase receipts, invoices, object number.

15
2. Agreements• Gift agreements: also called ‘deed of gift’. This
notes the transfer of ownership to the museum, with corresponding letters of acknowledgement and a thankyou letter.
• Copyright licences: decide at time of acquisition if the museum has exclusive or non-exclusive use of copyright and put it in writing.
• Loan agreements: either for incoming or outgoing loans, made between museums or from individuals to museums.
3. Cataloguing information• A catalogue sheet, detailing the physical
description of a garment.• Photos of the garment, the maker and owner. • Notes or information from the donor, preferably
written by the donor.• Notes from conversations with people who know
about the garment and remember seeing it or similar items in use.
• Family information/family trees.• Any correspondence relating to the garment.• Digital images, audio and videotapes of people
talking about the garment.• A statement of significance and all the references
and research that help to form the statement of significance. Provenance and production information feed into an understanding of why a garment is significant. See ‘16.1 Unravelling significance’ and ‘Other websites’ (Significance 2.0) information sheets on the resources page of the ADR website.
4. Production information• Information and photos about the maker or
manufacturer and the place it was made.• Information about the design and the process of
making the garment.• Information about the industry and how it was
made or used.• Copies of historic photos, paintings or drawings
showing similar garments in use.• Information and photos about similar garments
in other collections, museums, similar organisations or in private ownership. CAN (Collections Australia Network) is a useful source of information.
5. Condition• A condition report — this records the condition of
a garment when it enters the museum and also when the garment is put on and taken off display, when a garment is loaned and received back. Taking clear photos of the garment from all angles shows the condition effectively.
• For any conservation work, including before and after photos, notes about the fabric removed or
replaced, the conservation process and materials used, the date the work was done and by whom. Save samples of what has been removed or replaced, and samples of the new material added to the object. NB: always assess significance before any conservation work to the garment. The statement of significance helps to guide treatment decisions.
• Items that come with the garment that could cause damage, such as rusty safety pins, paperclips or acidic tags, should be removed, stored in a plastic bag, labelled and put in the object file.
• Information about the exhibition history of the garment: exhibition venue and duration, environmental conditions, travelling displays, a copy of label text, and a photo of the garment on display.
• Loans — write a new condition report for incoming and outgoing loans. Using photographs is a very good idea in case of damage.
6. References• Copies of all kinds of historical and contemporary
references from books, retail trade catalogues, newspapers, letters, local histories, oral histories etc.
• If the garment has been published or referred to in a newspaper or magazine article, include a copy for reference.
Storing object files
Object files should be kept in a fireproof cabinet in a secure designated place. The object file should not leave the museum or organisation. If working on object research at home, always make a duplicate file. Keep both files by transferring information as it is developed. Mark the duplicate file so it isn’t confused with the museum’s original records.
It is advisable to hold the files in acid-free folders with a label, accession number and photo marked clearly on the cover. Documents created by the museum should be on acid-free paper with museum letterhead. It is good to make a duplicate copy of all original documents for the file. When examining an object, it is safer to take notes using a pencil, then transfer the notes in pen or on the computer before adding to the file. If you have acidic items in your file such as photos, original papers or newspapers, if possible store them separately in mylar envelopes or plastic sleeves.
An object file is always a work in progress, information is added whenever anything comes to light, or when the object is conserved or displayed. Keep adding notes to the object file as information comes to hand.

16
This is where images of the object are stored as well as any historic photos. There are other areas in the form to upload close-up photographs of the condition of the garment or any manufacture labels, dockets, diagrams or newspaper/magazine articles. Up to ten photographs may be uploaded here.
The first photo will be the one that is used to identify the image on the register, so it should be a clear photo of the front of the whole dress. It is important to get good quality images for the Australian Dress Register. Please also refer to the ‘2.2 Simple conservation photography and documentation’ information sheet.
Very large image files are good and can be up to 30 megabytes. High quality images will enable people to zoom in and get a closer look at specific parts of the garment. Images must be in JPEG format (not TIFF).
Where possible, make sure:
• you include a front, back and side image of the garment, if appropriate
• the garment is entirely within the frame of the photograph
• the different parts of the garment are recognisable
• you use a tripod
• for black or white dresses, you can change the exposure to reveal more details of the dress.
You may also like to scan in a sketch of the dress to show the details.
2.1 Uploading photographs
Captions
Record details of the photograph, including content, date taken, the photographer’s details etc. You can edit captions at any stage.
How to upload digital photos
1. Click ‘browse’ to locate image from your files or computer desktop.
2. Enter caption.
3. Select the image file and press enter.
To upload photos printed from film, you will need to scan them into an electronic format.

17
Conservation photography is more than just producing a good image, it is about recording accurate information on the condition of an object. With correct lighting, conservation photography will reveal a wide range of information about the structure, method of construction and condition of an object, showing all its flaws. Good photographic images record the condition of the object at that point in time. If the object deteriorates over time or is damaged later, the photos are useful in distinguishing the new damage from the old. Photographic documentation becomes part of the permanent record for an object.
The type of information that is useful to record along with the photo includes: the date, the artist, maker or designer, title of the object, which aspect of the object is photographed (eg inside left armhole), the image file number and whether the photo is taken before or after treatment.
Materials needed
• Digital camera• Tripod• Studio flash lights if possible (reasonably priced
lighting kits are available from camera stores)• Grey paper or cloth background • Grey board
Prior to photography
• Always ensure the object is securely supported and not exposed to too much light.
• Check the camera is ready and charged.• Use a suitable background to bring out the
subject matter.• Conservation photography records stationary
objects, so it is good to have your camera on a tripod. If you are not using the auto setting on your camera, use a slow shutter speed and a high aperture eg f11, f16, f32. This will give you a greater depth of field (depth of focus).
2.2 Simple conservation photography and documentation
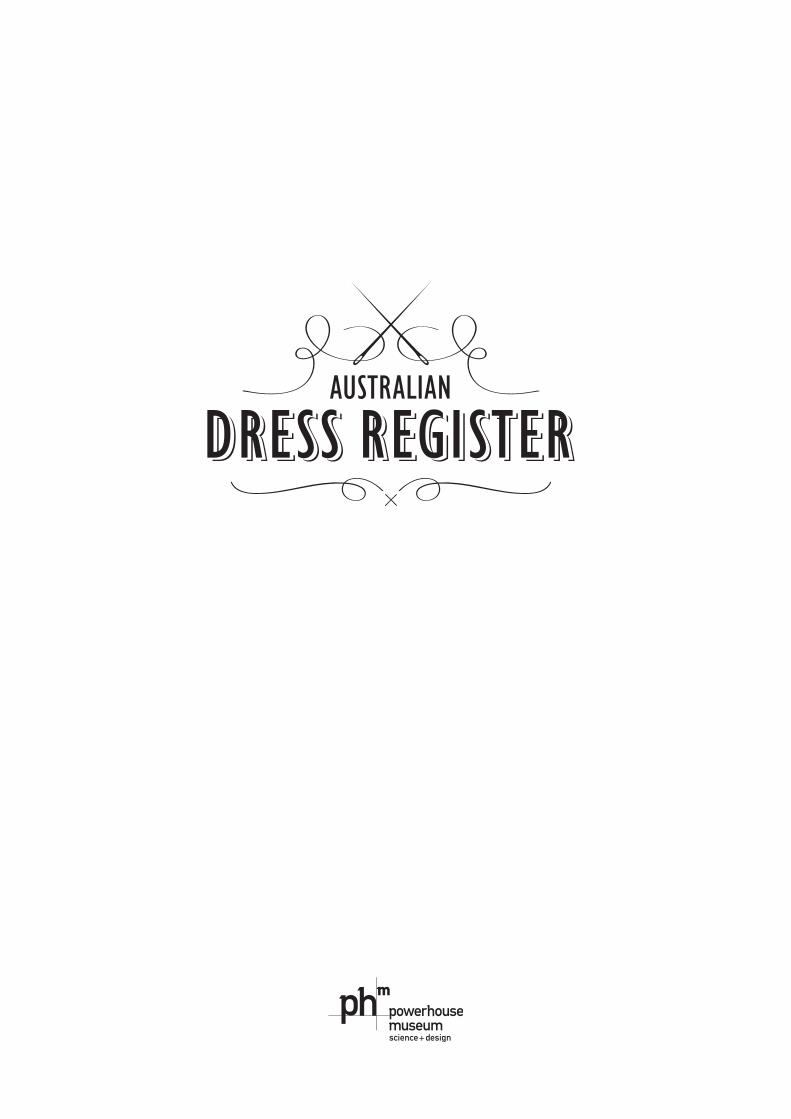
Studio set up
1. This photograph shows an 18th century open robe taken in a studio for publication purposes. The studio lighting makes the dress look dramatic, but it does not reveal many details about the condition of the dress.
2. 3⁄4 back view of studio lit open robe (publication shot).
18
3. The same dress photographed in a studio for conservation purposes. The lighting is even from top to bottom and shows many more details in the dress structure.
4. Back view of open robe with conservation photography.
cameraOR
soft boxes can be used in same position
as above
reflector reflector
light light
5. Diagram of studio set up. 6. This studio set up shows the studio lights positioned for conservation photography. To achieve even lighting, place the lights on either side of the camera/tripod. Both lights should be placed equidistant, facing the object at a 45’ angle.

19
7. Use available room light to photograph the object if you do not have access to a studio and lights. You can use a suitable background material to isolate the subject matter. The colour grey is often used as it doesn’t distract from the object. Place a grey cloth or paper on the wall and drape it onto the floor. Place the mannequin on top of this.
8. An alternative method is to place the mannequin on a plain cloth or board in front of a clean wall. The board or cloth will stop the garment from getting dirt on the hem during photography. Wear socks to stop dirt getting on the board.
9. If a garment is too fragile to be dressed on a mannequin, it can be placed on a sloped backboard to be photographed. The slope will prevent the image being fore-shortened (distorted).
1–4. Open robe, silk brocade/metal thread, France, about 1775. Powerhouse Museum collection, purchased 1985. 85/854. 1–2. Studio photos by Andrew Frolows9. Men’s convict jacket, felted wool, 1855–80. Powerhouse Museum collection, gift of the Royal Australian Historical Society, 1984. A9762

20
Adjusting the colour balance for a digital camera
Digital cameras have a white balance (WB) function. If you are not very experienced with photography, it is best to use the auto setting on a digital camera. The white balance will then work automatically. If you are more confident with your camera, you can manually set the WB according to the environment ie day light, cloudy, flash, fluorescent (use the picture icons on your camera).
Lighting
• Studio flash lights give the best results. Set the WB to the daylight icon as studio flash mimics day light.
• Available/ambient light can also give good results. Use the auto setting or adjust the white balance. A tripod must be used for this method because you will need a long exposure.
• The inbuilt flash from your camera can be used if the room lighting is inadequate. Beware of hot spots from reflective materials when using a flash.
Photo documentation
As a picture tells a thousand words, photos are the best way of showing the condition of an object. In conservation photography, all aspects of an object are photographed, ie the front, back, inside, top and bottom, if relevant. You can also do close ups of damaged areas.
When you have printed your photos, you can add extra information about the object using waterproof, fine textas. Rather than draw on the actual print, you can stick a piece of mylar (clear plastic) to the top edge of the print. The mylar can be lifted up so that you can see the object without the textas. With colour coding, you can draw on more details of the condition onto the mylar overlay. For instance, all holes in a dress could be circled in blue texta, all frayed areas could be circled in green texta. This is a very effective way of recording the condition of an object.
David Jones women’s cream jacket and skirt, 1911–15. Powerhouse Museum collection, gift in the memory of Norah Aideen Lees McManus, 1999. 99/91/1–1
(Left) Photo with mylar overlay, attached at top edge with double sided tape. Areas of damage are indicated with textas, using colour coding.
(Right) The original photo can still be viewed when the mylar overlay is lifted up.

21
2.3 Dressing a mannequin
Displaying a dress on a properly fitted mannequin not only presents it to the public. The process of display also reveals details about the garment’s style, shape and history that might not be apparent when it is lying flat in a box.
The display process can tell us how a garment was cut, how it was made and when, whether it has been altered, what undergarments might have been used and many more interesting facts. There is also personal information such as the size of the wearer, the glass of Madeira that she spilt and how she had to move the buttons — could this signal pregnancy or growing older?
Examination
• Firstly the garment should be placed on a clean table in a good light. Careful study will be rewarding.
• Check the seams — are they hand or machine sewn?
• Is whalebone or other materials inserted in channels around the waist or at the neck?
• Is the garment lined (this will make it stronger for display)?
• Check for stains, alterations and signs of weak areas.
• Study trimmings, piping, lace etc.
When the details have been exhausted and if the garment is found to be strong enough, dressing it carefully on a mannequin will reveal features that assist in dating. This is best done by two people with clean hands or wearing cotton gloves. Each person can have one hand on the hem of the garment and one hand at the top.
As you carefully handle the garment the hem length will tell you how the skirt should drape. The garment will, in a way, speak for itself.
Recommended materials
• Pantihose (white, skin tone or black)• A soft cotton petticoat • Polyester wadding • Cotton tape • Scissors, needle and thread• Washed cotton jersey• Tape measure• A tulle petticoat with cotton waistband secured in
place with velcro on each end• Tulle and scrunched acid free tissue can be used
for extra padding
Preparation
1. Measure dress dimensions to make sure it can fit onto the mannequin.
2. Make a petticoat by machine sewing 2–3 metres of tulle onto a cotton tape waistband. Sew hook side of Velcro to one end of the cotton waistband. Sew the fluffy side of Velcro to the other end of the waistband.
3. Sew small jersey cushions and pads with polyester wadding. Attach cotton ties to secure pads to mannequin where necessary.
4. Breast inserts can be made by cutting off a pantihose at the knee. Place polyester wadding into the toe section of the pantihose. Twist the pantihose, then pull the pantihose over the ‘breast’. Twist the pantihose again and pull the pantihose over again. Inserts can then be sewn in place.
5. To make the arms, stuff a pantihose leg with a roll of polyester wadding. Twist at the top and sew onto the top of the shoulder area.
Some rough dating guidelines1850s Very full skirt (crinoline) and drooping shoulders.1865 The skirt drapes towards the back with a train and sits flatter at the front. If the skirt is set too
far to the front you will find the hem drags on the ground.1870 The skirt is straight at the front with a very large high bustle at the back and train.1880 Shoulders are higher, the skirt front is narrow, with a small low bustle and train.1890s Shoulders squarer with raised sleeve head, skirt flaring out at the hem.

22
1. Use a clean workspace and place a freshly laundered fabric cover onto a tailor-style mannequin. Adjust the height of the mannequin to fit the dress.
2. Stitch polyester wadding to mannequin to form correct silhouette for that period and garment size.
3. Cover the wadding on the torso with pantihose. This helps to provide a smooth surface and keeps the wadding in place.
4. Start to layer the petticoat(s).

23
5. Layering petticoats.
6. Velcro fastening simplifies the work as waistband of petticoat is adjustable.
7. Cover the coarse tulle petticoats with a soft cotton petticoat. 8. Add bustle pads and extra padding if needed.

24
9. Mannequin ready for dressing. 10. Carefully place the skirt over the petticoat.
11. Back view of mannequin. 12. Front view of mannequin.

25
13. Gently fasten the bodice/dress up, taking care not to cause any tension to the fabric, garment or fastenings.
14. Front view completed.
Day dress, 1885. Powerhouse Museum collection, purchased 1985. 85/440–1:2
For a video demonstration, go online. http://www.australiandressregister.org/resources/video/how-to-dress-a-mannequin/

26
Copyright of images
It is important that all images uploaded to this register have copyright clearance. For the reproduction of an image to be legal, the copyright owner must grant permission for the photograph to be reproduced and made available to the public via this website.
The Copyright Act 1968 contains provisions that determine who owns copyright in different types of works, and for how long. For photographs, the general rule is that the person who took the photo is the owner of copyright unless there is a contrary agreement. There are, however, several exceptions to this rule including photographs taken by
employees, those produced by the government or commissioned photographs.
Generally, copyright in photographs lasts for the life of the photographer plus 70 years, but all photographs taken before 1 January 1955 are now out of copyright in Australia.
Further information on copyright is available on the Australian Copyright Council’s website http://www.copyright.org.au/publications/infosheets.htm.
Below is a possible format for the copyright approval of images.
2.4 Image copyright
Copyright approval form
I, (name) , as the copyright owner of the image/s
of (object) , agree for the images to be used on the
Australian Dress Register, as set out in the terms and conditions.
Signature
Date
Please keep this completed form for your reference.

27
This information sheet supports the video ‘2.5 AV Taking photographs with limited resources’. It has been made to demonstrate how to get good photos that reveal clear details of the fabric and the condition. In the video, conservation photographer, Nitsa Yioupros is giving the demonstration, Kate Chidlow, textile conservator is assisting her.
The video was made at the Illawarra Museum and we would like to thank them for kindly letting us film two of their dresses for this video.
Please also refer to ‘2.1 Uploading photographs’ and ‘2.2 Simple conservation photography and documentation’ for some tips on how to take good photographs of garments.
Equipment needed
• Camera• Tripod (essential for slow shutter times)• Available light (a good flood of even light)• A large piece of white board such as corflute to
reflect light off • A grey cloth or sheet for the background• A mannequin (for dresses in reasonable condition)• A sturdy board (for photographing fragile dresses) • A crate to slope the board on• Grey fabric to cover the sloped backboard • A ladder
Setting up
Step 1: Look at your camera manualThe first thing Nitsa recommends is to consult your camera manual. Most people look at it once when they first buy their camera and never again, but it is the key to getting better photographs.
Step 2: Setting the correct compressionTurn to the compression section of your manual. This will show you options for obtaining higher quality images. You do this by changing the compression to fine or superfine. Note that the images will be larger so you won’t get as many shots on your camera card.
Step 3: Setting the resolutionThe more pixels you have, the better your image will be, so set the resolution to large. When you load them into your computer, save the images at 300 dpi (dots per inch) for good print publications and web use.
Step 4: Shooting in auto modeTurn your camera dial to auto and this will adjust everything automatically (auto white balance, aperture and shutter speed).
Step 5: Shooting in manual mode (necessary for black and white garments)Sometimes using the automatic setting on your camera will not give you the best result. This is particularly true of black dresses where the photos tend to be underexposed or white dresses, where the photos tend to be overexposed. To improve your photo, you can manually set the white balance, aperture and shutter speed. It is essential that you use a tripod for this type of photography due to slow shutter speeds. Turn to ‘shooting in manual mode’ in your camera manual.
Step 6: Setting the white balance There are two options for setting the white balance to get the correct colour. You can set your white balance to AWB (automatic white balance) in manual shooting if you have more than one light source in the room. However, if there is only one light source, you can select the appropriate icons on your camera, eg fluoro, daylight, tungsten.
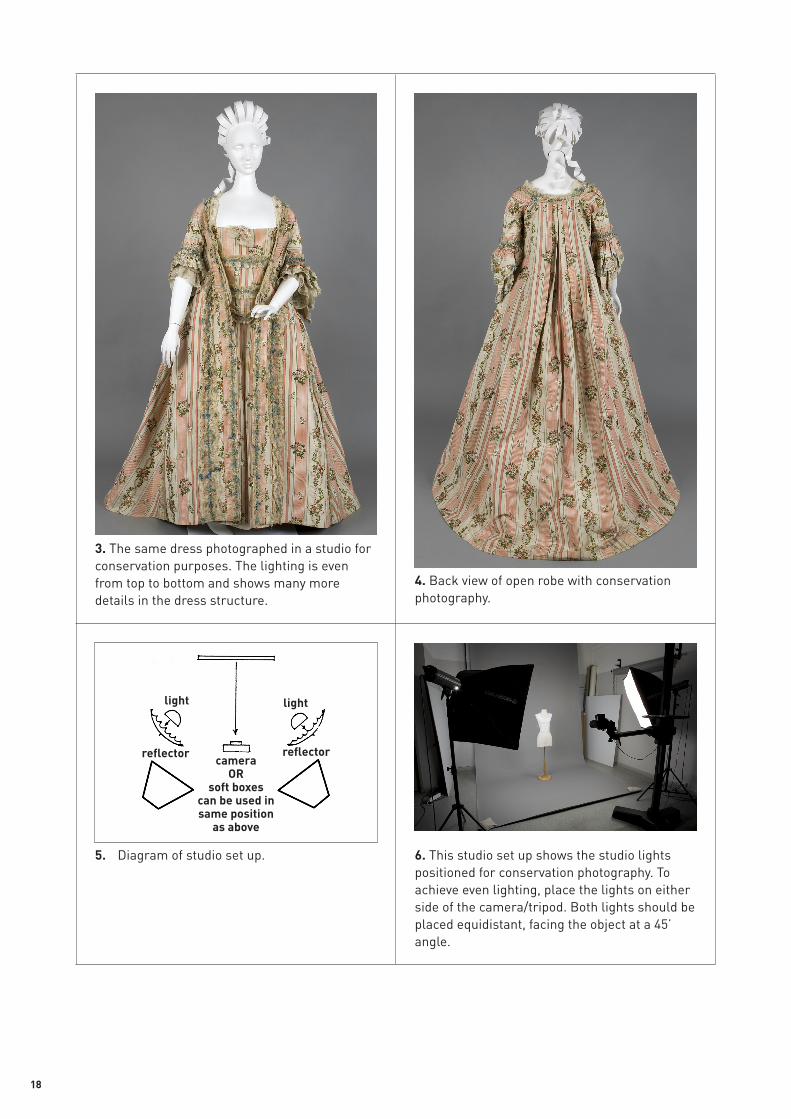
Step 7: Aperture This is an adjustable lens opening that lets light into the camera. The size of the openings are called f-stops. The f-stop affects the depth of field (area of focus). This is the range of distance from the camera in which things will be in focus. The wider the aperture, the narrower the depth of field. The depth of field is particularly important when photographing three-dimensional objects.
• A wide aperture (f2.8) gives a shallow depth of field (less will be in focus).
• A mid aperture (f5.6 or f8) gives a good depth of field (most things will be in focus).
• A small aperture (f16 or above) gives an excellent depth of field.
2.5 Taking photographs with limited resources
28
Step 8: Shutter speedThe shutter speed controls the length of time the light hits the image plane in the camera. The higher the shutter speed number, the faster the shutter. It can range from 1/500th of a second to minutes. Most photos are taken between 1/60th and 1/125th of a second. When shooting with available light indoors, you will need a much slower shutter speed, so use a tripod to hold your camera still.
Tips
Shooting options — bracketing It is always wise to bracket your shots. This means you select an f-stop and shutter speed you are happy with and then take another two photos (one f-stop above and one f-stop below), eg if you shoot on f8, take another photo at f11 and another at f5.6. View the image on your camera and keep shooting until you get a satisfactory result which shows detail on the garment. You can then select the best exposed image after you have viewed them on a computer screen.
Under and overexposingIt may be easier to select aperture priority mode which allows you to set the f-stop but will automatically adjust the shutter speed for you. When photographing a white dress, choose an f-stop you are happy with. You will probably need to underexpose your shot as less light is needed on white objects, so raise your f-stop by one or more. With a black dress, you may need to overexpose your shot as more light is needed, so lower your f-stop by one.
f2.8 — short depth of field. The small area of sharpness/focus is only in the foreground on the right-hand sleeve, the lace on the left shoulder is blurred.
f5.6 — medium depth of field. The area of focus has increased in the foreground to midway across the back and part of the left sleeve.
The circles represent the aperture (f-stop) and the arrows indicate the depth of field (focus).
f16 — long depth of field. The area of focus is sharp from the right sleeve in the foreground across to the left sleeve in the background.
Dress, worn by Elizabeth Cabrera (nee Shelley), Sydney, 1896. Powerhouse Museum collection, gift of Alan Cabrera, 1982. A8338
For a video demonstration, go online. http://www.australiandressregister.org/resources/video/photographing-a-garment/

29
Short title
The title should be clear and express the most important thing about the object briefly and succinctly.
It should be expressed in common language, be flexible and easy to understand.
When an object has a title already this should be included and indicated using single quotation marks, for example, ‘Delphos’ dress by Mariano Fortuny.
Please don’t include date or place names in the short title because this information has a separate field.
Registration number
This is the number assigned to the object by the institution or organisation in whose collection it belongs.
It is not relevant to garments in private collections and can be left blank.
Description
For all clothing items excluding hats, shoes and flat textile items such as scarves and shawls. See ‘Glossary’ for many dressmaking terms.
Order of description:
1. Start with what the object is at its most basic level, ie a dress, an ensemble, pair of trousers, a jacket and what it’s predominantly made of and colour.
A sentence which includes a general description including the parts, for example, an ensemble is made up of a bodice, skirt and hat, or jacket, waistcoat and trousers.
2. Then from top to bottom — ie neckline, bodice, sleeves, waist, skirt.
• Neckline: what kind of neckline does it have — round, square? And what kind of collar does it have — turn down, sailor?
• Sleeves: does it have sleeves and what kind — short, long, full, straight, puff, leg of mutton? Do the sleeves have cuffs and what do they fasten with?
• Chest: does it stop at the waist or extend to the hip? If the garment is a jacket, is it single or double-breasted?
• Waist: is the waist defined? If so, is it high or low? Is it gathered? Does it have darts or a waistband?
• Pockets: are there any pockets? Sometimes they are small and hidden. If so, where are they? Breast, side seam or at hip level? Are they internal or external? What kind of pockets are they — patch, slash, welt? Do any of the pockets have flaps? Do they fasten?
• Skirt: is it full? Does it have a bustle? Are there any pleats or gathering? What length is the skirt, eg floor length or ankle length? Does it have a train?
• Trousers: are they wide or narrow? Knee breeches or long?
3. Decoration.
How is the decoration applied to the fabric — printed, appliquéd, embroidered, beaded?
What does it consist of and what are the patterns or motifs used?
4. Fastenings.
Where does the garment open for ease of dressing? Centre front, back, side etc?
What are the fastenings made from? For example, metal, jet, glass, celluloid.
3.1 Garment details

30
Hints and tips
1. When describing ‘left’ or ‘right’, it is always from the wearer’s perspective and not the viewer’s. This is crucial as it determines the gender of the garment. It is called ‘proper left’ or ‘proper right’.
2. It is good to provide as much information as possible. If you have information that can’t be confirmed write ‘possibly’, for example, dress may be made of cotton or may have been made by Aunt Jessie, use ‘possibly made of cotton’ or ‘possibly made by Aunt Jessie’.
3. Only include the physical aspects of the object in the description.
For example
The following is a description of a woollen wedding gown worn by Hannah Palser Prior for her marriage to Alfred Adlam, Kelso, near Bathurst, NSW, Australia, in 1882.
The wedding dress is made from fine cream coloured wool with silk satin and gauze trim, silk bustle and train. The dress has a satin and wool stand collar and a panel of ruched satin at each side of the front. It is trimmed with a spray of wax orange blossom at the front neck. The centre front opens to the hip and fastens with 18 satin covered buttons. The fitted bodice extends below the waist (known as a cuirasse bodice). The long sleeves are set into the armholes with satin piping and are finished with rows of satin ruching at the cuff. The straight skirt features many rows of the horizontally ruched woollen fabric that finishes with three rows of pleated frills at the hem. An asymmetrical pleated wool sash is attached across the front of skirt from the right side and trimmed with satin. The train, attached to the bustle at the back of the dress, is also trimmed at the hem with three rows of pleated frills. The dress is both machine and hand sewn.
Exact date or date range
If you know a specific date for an object, enter that date, for example, you know the dress was made for a wedding in 1880.
If you don’t know a specific year the garment was made, provide an approximate date range, for example, 1875–85. Use this date range format instead of, for example, about 1880.
Wedding dress. Powerhouse Museum collection, gift of Anne Schofield, 1981. A8070. Photo by Penelope Clay

31
5000 BCE Cultivation of flax, Nile Valley, Mesopotamia
4500 BCE Vertical loom, spindle and woven fabrics, Egypt
Cultivation of hemp, South-East Asia
3000 BCE Cultivation of cotton, Indus region, India
2640 BCE Development of sericulture and spinning, China
2500 BCE Dyed fabrics, India
2000 BCE Cultivation of wool, Mesopotamia
436 BCE Asbestos, used as lamp wicks, Greece
1 BCE Drawloom, warp yarns hence variety of patterns, Egypt
300 Dacca muslin, India
1197 The Law of Cloth fixed a standard for manufacture, size and quality of woollen fabric in Britain
1490 Leonardo da Vinci invents spinning wheel
1530 Continuous spinning wheel, Johann Jürgen, Germany
1535 Denier system for silk introduced, France
1545 Steel needles being used
1575 Pile weaving introduced, India
1589 Stocking frame invented by William Lee, England
1664 Robert Hooke speculates copying silk fibres
1670 First commercial stocking frame, England
1681 Ready-made clothing concept, England
1700s Bleach linen fabrics with horse chestnut extract
1733 Flying shuttle invented, John Kay, England
1742 First cotton mill, Birmingham, England
1743 Three-colour printing machine by Keen & Platt, England
1750–60 Dropbox loom, Robert Kay, England
1764 Spinning jenny, James Hargreaves, England
1769 Water frame, Sir Richard Arkwright, water powered loom
Silk point net invented by Robert Frost
1770s Introduction of perpetual carding, based on idea of Lewis Paul
1775 First warp knitting machine, England
1779 The spinning mule, Samuel Crompton, England, based on spinning jenny and water frame, to make fine muslins
1783 Roller printing, Thomas Bell, Scotland
1784 Ropemaking machine, Richard March, England
1785 Claude-Louis Berthollet uses chlorine as bleach, France
Charles Taylor develops turkey red dye
1785 First power loom, machine comb, Edmund Cartwright
1787 John Kendrew and Thomas Porthouse of Darlington, England, patented mill or machine for spinning yarn from hemp, tow, flax or wool
1789 Liquid chlorine bleach (Javelle water), Paris
1792 Cotton gin, Eli Whitney, USA, start of US prosperity
1790s Spinning mule now using 400 spindles
1799 New bleaching powder, MacIntosh & Tennant, Scotland
1801 John Macarthur established merino flock, Australia
1806 Jacquard loom, Joseph Marie, France
1808 Bobbin net machine invented by John Heathcote, England
1813 John Levers invents Levers loom for machine lace, England
1820 Thomas Hancock patents rubber elastic, England
1821 Bauwens & Didelot machine to dress silk, France
3.2 Textile timeline

32
1825 Wet spinning of linen, Thomas Kay, England
1828 Blackburn loom by William Dickinson, England
1830 Bartholemy Thimonier invents chain stitch machine, France
Brass hooks and eyes
1833 Robert Owen forms trade union, Scotland
1834 Walter Hunt invents lockstitch machine
1837 First elastic sided boot, Joseph Sparkes Hall, England
1838 Flax hackling machine, J Wordsworth
1840 Snap fasteners
1846 Josue Heilmann invents cotton comb, England
Elias Howe patents lockstitch machine
1849 Walter Hunt invented safety pin, US
1850s Miracle fastener or snap fastener, US
1853 James Noble and George Edmund Donisthorpe invent Noble comb for wool
1854 First textile mill in Bombay
1855 Artificial silk produced by Aydemars
1856 Synthetic aniline purple dye invented by William Perkin, England
1859 Opening of Suez Canal
1859–63 Raschel invents flat bedknitting machine
1864 Fully fashioned knitting machine, William Cotton, England
Introduction of circular knitting
1867 Diamonds discovered in South Africa
1870s Chemical lace or guipure machine lace invented
1880 Metric numbering system introduced for wool, France
1889 Chardonnet silk, man-made by Count Chardonnet, France
1890 Mercerising process invented by Horace Lowe, England
1892 Viscose discovered by Cross, Bevan & Beadle, England
1893 Whitcomb Judson invents zipper, Chicago, US
1900 Chlorination of wool, shrink and felt proof
1904 Viscose production, artificial fibres, Courtauld, England
1905 Textile mills switch to electric power, England
1913 Zipper used by US army
1921 Acetate, British Celanese Ltd
1924 The name rayon was adopted in the US
1928 Crease proof cotton developed by Broadhurst, Lee & Co, England
Dry-cleaning with white spirit, William Joseph Stoddard, US
1930 Hydrogen peroxide used as bleach
1931 Glass fibres used in textiles
1934 Polyvynl chloride (PVC), Shia Viscosa, Italy
1938 Nylon, DuPont, US
1940 First nylon stockings
1941 Polyester fibres discovered, Dickson & Whinfield, England
1946 Lurex, Dow Chemical Co, US
1948 Velcro invented by George de Mestral, Switzerland
1951 Modacrylic fibres, Union Carbide Chemical Co, US
1953 Polyester fibres, DuPont, US
1954 Dr A J Farnworth develops washable non-iron wool fabrics, Australia
Triacetate fibres, Celanese, England
1956 Polynosic rayon, Tachikawa, Japan
Lycra, DuPont, US (first elastic fibre not based on rubber)
1967 Carbon fibres developed

33
3.3 Historical silhouettes
Silhouettes from the Powerhouse Museum collection illustrating style changes
1. 1775–80Silk brocade open robe, with sac back draping from the shoulders.
2. 1790–1810 Irish muslin day dress with silk spencer illustrating high waisted fashion from Regency period.
3. 1822 Muslin gown worn by Ann Marsden to a Government House Ball.
4. 1834 Ann Haslingden’s wedding dress. The waist is lower and the skirt a rounder shape.
5. 1835–45 Mens woollen suit, the first black and grey fashion for men.
6. 1860–70 Womens silk taffeta dress with drooped shoulders, high waist, crinoline and wide skirt.

34
All Powerhouse Museum collection. 1. Female, purchased 1985. 85/854; male, purchased 1986. 86/299. 2. Dress, gift of Audrey Twynam Horn, 1987. 87/821; spencer, gift of Winifred Watkins, 1962. H6934. 3. Gift of the Royal Australian Historical Society, 1981. A7882. 4. Gift of Mrs J Campbell, 1987. 87/533. 5. Purchased 1987. 87/1249. 6. Womens dress, purchased 1986. 86/237; girls dress, purchased 1981. A7692. 7. Gift of William Hudson Shaw, 1968. P2768. 8. Gift of the Fashion Group, 1974. A6356. 9. Gift of Mrs H E Atkinson, 1996. 96/69/1. 10. Purchased 1987. 87/305. 11. Womens dress, purchased 1959. H5964; fan, gift of Anne Schofield, 1980. A7471. 12. Purchased 1959. H5996. Photos by Penelope Clay, Sue Stafford, Andrew Frolows
7. 1870 Photograph of Margaret Preston showing back drape and train.
8. 1870–79Silk bodice of dress shows corseted body shape.
9. 1883 Silk gown with bustle and train.
10. 1880–90 Mourning gown, with drape at front and train at back.
11. 1895–1901Belle Époque tea-gown by Jays of London, illustrating a particularly feminine style with full skirt and soft fabrics.
12. 1905–10 Evening gown showing the new drooped front waistline and layering of translucent fabrics.

35
You may need to re-enter information already outlined in the description. Explain the details in the notes field, for example, the specific type of lace and where it is on the garment.
4.1 Trimmings/decorations
Piping
Piping is cord encased in a strip of bias cut fabric and sewn into the seam of a garment. Piping creates a decorative effect, strengthens the seam and helps seams to sit properly. This is particularly useful along curved seams which receive a lot of wear and tear.
Piping is often seen around the neck, armholes and waistline. It was used on seams from the early 1820s. Piping is rarely found on silk or muslin dresses before 1822.
Tucking
A tuck is a fold or pleat in the fabric of a garment, held in place by stitches. Tucks are made on the right side of the garment. Very narrow tucks are called pintucks.
Tucks were very popular as decoration throughout the 19th century. Tucking can be used as decoration or to conceal extra fabric. Tucks enabled a garment to be made wider or longer, for example, to adjust a garment for a growing child. By removing the tucks, a garment could be ‘let down’.
An example of fine piping on silk.
Dress (detail) worn by Anne Marsden in 1822. Powerhouse Museum collection, gift of the Royal Australian Historical Society, 1981. A7882–1

36
Most cultures differentiate between men’s and women’s dress. These differences may be seen in fabric, colour and style, as well as in the accessories that accompany clothing. In western culture this differentiation has gradually evolved. During the 19th century the differences between men’s and women’s clothing became more pronounced. Men abandoned the coloured silks and satins, embroideries and lace that they had worn for centuries. The trouser suit, typically in muted colours, became the ubiquitous male outfit.
In the 1920s, after World War I, it became fashionable for women to take on a boyish appearance, cutting their hair short, flattening their chests and wearing calf length, shift dresses. Trousers, previously only male attire, very gradually became acceptable for women.
Buttoning up
Men’s coats and jackets button left over right. This is inherited from the days when a man drew his sword with his right hand from his left side. The buttons were placed on the right-hand side so that the fabric didn’t catch as he drew his sword. A woman’s jacket, coat or bodice fastens on the other side, ie her right side over left.
Pockets
During the 19th century externally visible pockets on men’s clothing were widespread and could be accentuated, for example, by a handkerchief or watch chain in a breast pocket. In contrast, women’s pockets had been a separate item in the 18th century, worn under aprons or inside skirts. In the 19th century they generally remained hidden from view in the seams and folds of their clothing. Discrete pockets were considered more feminine and therefore appropriate for ladies.
Children
For much of the 19th century infant’s dress did not reflect gender distinctions. Both boys and girls wore long white dresses until they could walk. Toddlers wore shorter loose fitting dresses. From the age of two or three until the age of five or six, children wore pinafores, dresses or suits
5.1 Gender and dress
with short skirts, however differences in material and trim were used to make gender distinctions. Boy’s dresses buttoned up the front and girls up the back.
Between the ages of five and seven, boys were dressed in short trousers and they were given their first short haircut. This was known as ‘breeching’. Between 1890 and 1920 children’s clothing became more gender specific. Around the end of the 19th century boys began to be put directly into trouser suits rather than skirted suits.
Colour
Today particular colours are often associated with gender differentiation. However this was not always the case, colour conventions have varied over time. For example, blue for boys and pink for girls, was not common prior to the 1920s.
Margaret Moore Smail and her children, 1858, oil on canvas by J Backler; Mitchell Library, State Library of NSW. Margaret Smail with her seven-year-old son and five-year-old daughter.

37
One garment may feature several different fabrics. Please list each one.
1. Colour 2. Fibre, eg cotton, silk 3. Weave, eg damask, brocade 4. Location for all parts included in this record
Fibres are woven, knitted, crocheted or bonded together in different ways to produce fabric. Fibres are hair like strands and are the smallest visible component of any textile product. Wool, silk, cotton and linen are common natural fibres. Man-made fibres are produced using chemical substances.
Fibres are spun together to create yarn. Yarn is longer, thicker and stronger than fibres. Yarns are knitted or woven together to make particular weaves. Blended weaves are made from yarn which contains more than one type of fibre, for example, cotswool is made from both cotton and wool fibres.
Yarns can be interlaced in many different ways to create different weaves. The way a yarn is interlaced determines what type of weave is produced. In this way, one fibre can be turned into many different types of weave.
Common weaves include:
Twill weave: twill weave fabric has a diagonal line effect along the fabric. These fabrics are stronger than plain weave fabrics.
An example of twill weave.
Plain weave: this is the simplest method of weaving. The warp and weft threads alternate with each other. One warp thread goes under a weft thread and over the next.
Men’s silk waistcoat with cotton lining (detail), 1850–60, England. Powerhouse Museum collection, gift of Rex Irwin, 1991. 91/398
Satin weave: in satin weave the diagonal line of the twill weave is not visible. There are long warp yarns between the wefts, making the warp yarns more visible on the surface of the fabric. These yarns reflect light giving the fabric a shine. The yarn used to make satin weave has less of a twist.
Bodice (detail), pale green silk, 1880. Powerhouse Museum collection, purchased 1959. H6041
6.1 What fabric is it?

38
Natural dye
Until the mid 19th century all dyes came from the natural world. There are three types of natural dyes, those from plants, animals and minerals.
Madder dye was widely used in the 19th century and was made from the root of the madder plant. To make the dye, the roots of the plant were washed, dried and ground into a powder. It was used to produce red, orange, rust and brown colours. It was the base of the very popular ‘turkey red’ colour. Madder was used until the mid 1850s when a synthetic substitute was developed.
Another plant based dye was woad, which was used to dye fabric blue. In the 1600s, woad was replaced by indigo, a very colourfast plant based dye from India.
Indigo was well known to the ancient Egyptians and Indians. The East India Company imported large amounts of indigo in the 1600s and the woad industry diminished.
Mineral dyes produced many colours including: Prussian blue, manganese bronze, chrome yellow,
6.2 Dyes
orange, blue, or green, antimony orange, iron buff and teal green. Ochre is a mineral dye obtained from iron oxide found in red dirt.
An example of animal dye is royal purple or Tyrian purple, which was extracted from the murex sea snail. It took so many snails to produce a small amount of dye only royalty could afford it.
Synthetic dye
William Perkins discovered the first synthetic dye in 1856 while searching for a cure for malaria. It was an aniline dye developed from coal tar and was named mauve. By 1870 this synthetic version had overrun the use of natural dyes made from madder.
The discovery of mauve sparked the rapid development of synthetic dyes. By 1880 a rich red dye could be made synthetically. Synthetic indigo was invented as early as 1880, but its commercial use was delayed until 1897 and had replaced the use of natural indigo by the 1920s. During the 20th century thousands of new synthetic colours were developed.
An example of synthetic dye. Womens silk day dress, 1870–79. Powerhouse Museum collection, gift of the Fashion Group, 1974. A6356
An example of the natural dye indigo. Womens embroidered cotton and wool shirt, Philippines, 1910–60. Powerhouse Museum collection, purchased 1994. 94/3/2

39
You can tick a combination of types of manufacture, for example, a garment may have both hand and machine sewing.
In the notes field please explain the details of the manufacture, for example, where on the garment is the hand stitching and where is the machine stitching.
7.1 Manufacture
Lockstitchmachine
Backstitchby hand
Chainstitchby hand
Different types of stitching found in garments
Front of cloth Back of cloth
Seam inspection on right side to identify stitching
Machine stitched seam Hand stitched seam
Look at the details of the garment’s manufacture. You can learn a lot by examining specific techniques and stitching, for example, you may discover the garment was made by the same seamstress as another item in your collection or that the seamstress was left-handed.

40
Manufacturer’s label
Five photographs may be added here.
Manufacturer’s labels are of great importance, for example, they may show the street the seamstress worked on. As well as providing an image, write in the notes field exactly what text (note upper and lower case) and images are on the label.
Label information:
DOUCET 21 RUE DE LA PAIX
PARIS
Women’s silk bodice (detail), Doucet, Paris, France, 1896. Powerhouse Museum collection, purchased 1959. H6008
Alterations
Describe any alterations made to the garment, including repairs. Check different threads used on seams. Note whether these stitches were done by hand or machine and whether they involve additional fabric.
Alterations lend interesting provenance information, for example, they could reveal a garment worn by several generations, mother to daughter, or adjustments to accommodate pregnancy, old age etc.
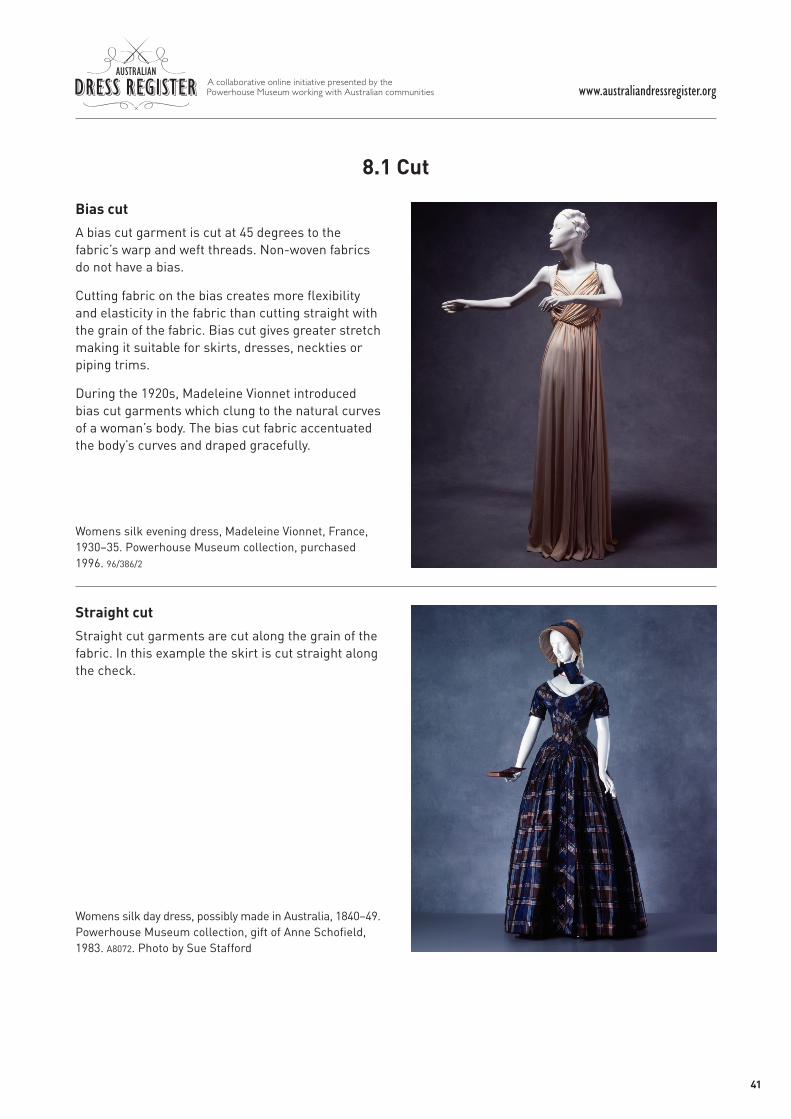
41
Bias cut
A bias cut garment is cut at 45 degrees to the fabric’s warp and weft threads. Non-woven fabrics do not have a bias.
Cutting fabric on the bias creates more flexibility and elasticity in the fabric than cutting straight with the grain of the fabric. Bias cut gives greater stretch making it suitable for skirts, dresses, neckties or piping trims.
During the 1920s, Madeleine Vionnet introduced bias cut garments which clung to the natural curves of a woman’s body. The bias cut fabric accentuated the body’s curves and draped gracefully.
8.1 Cut
Straight cut
Straight cut garments are cut along the grain of the fabric. In this example the skirt is cut straight along the check.
Womens silk day dress, possibly made in Australia, 1840–49. Powerhouse Museum collection, gift of Anne Schofield, 1983. A8072. Photo by Sue Stafford
Womens silk evening dress, Madeleine Vionnet, France, 1930–35. Powerhouse Museum collection, purchased 1996. 96/386/2

42
Hook and eye
A hook and eye fastener consists of a blunt hook that passes through either a small handworked eyelet hole or loop, or a metal eyelet or bar, which are sewn to opposite parts of a garment. Hooks and eyes are used to close garments and provide strength. They range in size and are often used in groups.
Hook and eyes.
This form of fastening was in use in England from the 14th century, known as ‘crochets and loops’. Early hooks and eyes were made of hammered flat iron. Throughout the 18th century hooks and eyes were made of copper. Around 1830, they began to be made of brass. In the 1840s wire drawn hooks were in vogue and were made from brass or iron wire. Handworked eyelet holes or loops preceded metal eyelets and bars. Straight metal eyes were common in the 19th century, particularly when placed adjacent to the boning on bodices. Hooks and eyes mainly featured on outerclothes, since underclothes were fastened by more comfortable tapes, ties and buttons that would withstand laundering.
In the 1890s the size and style of hooks and eyes diversified. Strong hooks were essential for weighty closures on capes, skirts and trouser waistbands, while lighter hooks were needed at necklines or on underclothing.
Triple wire strand hooks appeared in the early 1900s. From 1900–10 hooks and eyes were used to attach the skirt to the bodice at the waistband. Curved metal eyes became more popular in the 20th century. In the 1920s the fashion for straight shapeless dresses reduced the amount of fastenings needed.
Lacing
Lacing is a method of closing or fastening a garment by pulling a lace through eyelets or around hooks to draw the edges of a garment together. A lace could be a ribbon or cord. Lacing is commonly found on corsets to draw the two sides together. Until the 1840s, the eyelets were worked by hand. From the 1840s stronger metal eyelets were in use.
Drawstring
A drawstring is a cord, ribbon or thread which can be drawn through a channel on a garment. It is pulled and tied to form a closing. It is used to secure loose fabric and hold a garment in place. Drawstrings can be found on the bound edges of necklines, wrists or waists. From the 1790s to 1820 very small drawstrings were used around the neckline of fine muslin gowns. Prior to the 1860s small drawstrings were sometimes used to draw in the waist.
Poppers/press studs
Press studs, also known as snap fasteners or ‘poppers’, are a pair of interlocking discs. They are attached to separate parts of a garment and snapped together to fasten. Press studs can be sewn onto or punched into fabric.
The two components of a press stud.
They were first patented in 1885 by German inventer Heribert Bauer as a fastener for men’s trousers. The early versions of the press stud had an S-shaped spring in the top disc instead of an indentation.
Press studs were sometimes covered in silk to make them invisible. In the early 20th century ‘poppers’ were mounted, evenly spaced on thick satin ribbon which could be bought by the yard and sewn onto the closing edges of garments.
9.1 Fastenings

43
Buttons
Buttons are discs, knobs or balls used as fastenings or for ornamentation. Buttons draw parts of a garment together by being slipped through a buttonhole or a loop. Buttons can be manufactured from many different materials, both natural and synthetic, such as ivory, shell, bone, horn, wood, glass, metal and plastic.
Shell (left) and plastic buttons.
Though buttons and toggles were used for many hundreds of years, the buttonhole appeared in Europe around 1200, copied from the Turks and Mongols by returning crusaders. By 1250 a Button Makers Guild was established in France.
By the mid 14th century, buttons had become very popular. Tailors produced garments with many buttons and buttonholes. The button’s popularity spread across Europe, with monarchs adorning themselves with literally thousands of buttons. In the 16th century, Puritans condemned buttons as sinful and the number of buttons used diminished a little. In response, button-makers made increasingly detailed and elaborate buttons.
Filigree metal button.
Button fashions varied over time. For example, before 1825 men’s trousers had one button of bone or metal on each side of the fall front. From 1825, two buttons began to appear on each side.
From the 1860s, the black glass or jet button was made fashionable by Queen Victoria who wore them in mourning for Prince Albert.
In the 1860s, the first buttons were made from celluloid, an early plastic. Dresses dating from 1865–75 often have beaded buttons. From this time linen covered buttons were popular for underwear.
Cloth covered flat buttons.
During the 1870s, there was a ‘buttoning-up’ fashion and men’s coats were made to button up high on the chest. This fashion encouraged the production of fancy buttons of mohair, silk, ivory, horn or black vulcanite.
As ivory became increasingly expensive in the 19th century, button manufacturers started to make buttons from the nut of a South American palm tree that resembled genuine ivory. This is known as vegetable ivory or corozo.
In Europe buttons were mass produced from the 19th century. The United States became the leading manufacturer after the first world war.
At the turn of the 20th century picture and novelty buttons were in vogue. Mechanisation meant they no longer had to be handpainted, but could be printed en masse. New moulding processes enabled buttons to be made in all shapes and sizes.
Main types of buttons
• Flat or sew-through buttons have two or four holes in their centre through which thread is sewn to attach the button.
• Covered buttons consist of a circular shape, covered in fabric, crimped to a back with a shank attached.
• Worked or cloth buttons can be made from embroidered or crocheted stitches over a dome or ring known as a form.

44
• Shank buttons have a solid visible surface with a pierced shank at the back through which the thread is sewn. In garments to be laundered, a shank button was attached through an embroidered eyelet hole with a metal clip on the inside of the garment.
Shank buttons and clip.
Shank button top and bottom.
Specific types of 18th and 19th century buttons
• Basket button — buttons covered in an interlacing pattern. Sometimes made of metal, they were used in the 18th and 19th centuries and were especially fashionable on men’s coats.
• Dorset thread button — a button made from a wire ring covered with white cotton threads which radiated from the centre and were kept flat. They were used from 1700 to about 1830 and are usually found on underclothes.
• Horn or bone button — buttons moulded from horn and bone were easily carved and used from the 18th century.
• Shell button — polished pearl shell buttons can be distinguished from plastic by the colours and roughness of the back.
Shell button, top and underside.
• Snail button — 18th century button trimmed with French knots and used on men’s coats and waistcoats.
Zipper
In 1851 Elias Howe patented the ‘Automatic, Continuous Clothing Closure’ a forerunner to the zipper, but it was never marketed. In 1913 Gideon Sundback, head designer at the Universal Fastener Company, developed the modern zipper. He improved on Whitcom Judson’s ‘Clasp Locker’, invented in 1893, by increasing the number of fastening elements per inch. After further improvements it was patented as the ‘Separable Fastener’ in 1917.
At first zippers were made of brass and predominantly used as a closure on boots for the US army. The name ‘zipper’ appeared after the Goodrich Company added the fastener to a pair of rubber boots and called it the ‘Zipper Boot’ after the buzzing noise and speed of the closure.
In the 1920s and 1930s, some clergy were opposed to zippers as they allowed one to take one’s clothes off too quickly! Thus clothing with zippers was seen as inappropriate for women and was not fully accepted until the 1940s.
A campaign in the 1930s promoted zippers for children’s wear, highlighting their ease of use. Zippers slowly increased in popularity for children’s clothes in the 1920s and 30s.
During the 1930s, zippers began to appear on skirts and dresses and on trouser flies from 1935, though men were reticent in accepting them. Tailors disliked zipper flies and created the fly front, a fold of cloth to hide the zipper. Designer Elsa Schiaparelli championed the use of the zipper in couture, adding bold zippers as features of her designs from 1935.
In the mid 1930s colourful plastic zippers became available. In 1934 Yoshida Kogyo Kabushililaisha (YKK) was created. YKK became the world’s largest manufacturer of zippers.
By World War II, zippers were widely used in Europe and North America. Following the war they spread to the rest of the world and ceased to be a novelty.
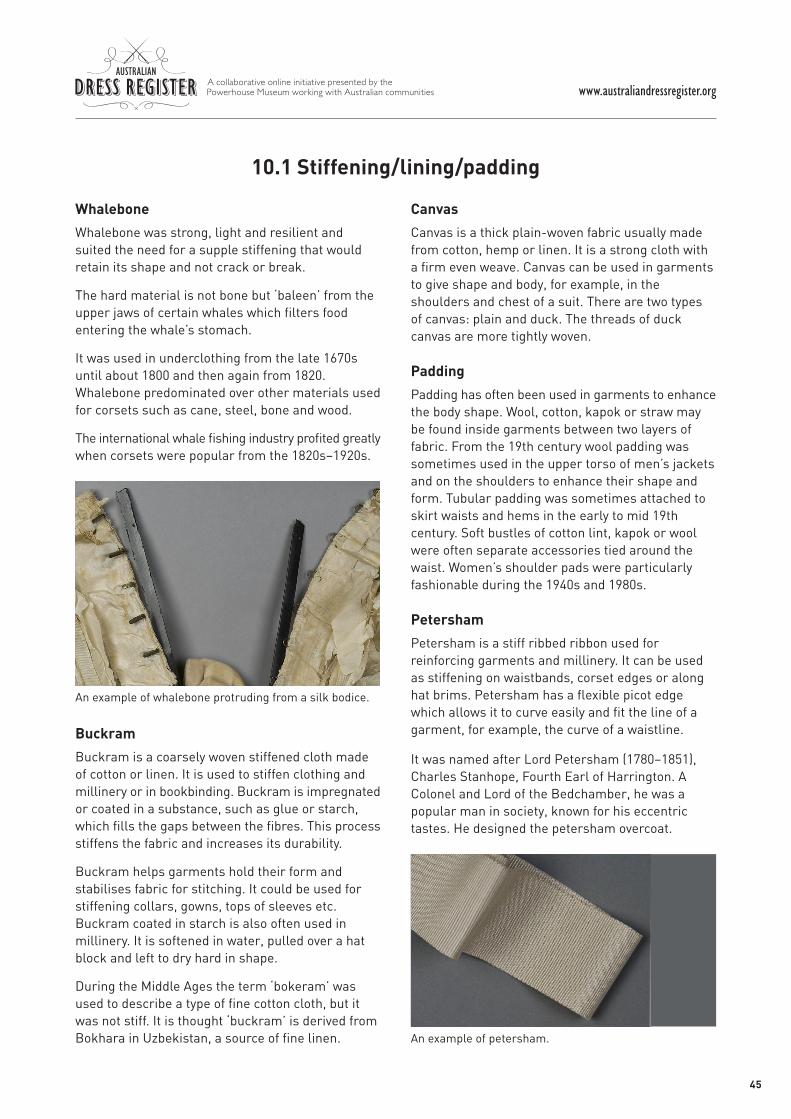
45
Whalebone
Whalebone was strong, light and resilient and suited the need for a supple stiffening that would retain its shape and not crack or break.
The hard material is not bone but ‘baleen’ from the upper jaws of certain whales which filters food entering the whale’s stomach.
It was used in underclothing from the late 1670s until about 1800 and then again from 1820. Whalebone predominated over other materials used for corsets such as cane, steel, bone and wood.
The international whale fishing industry profited greatly when corsets were popular from the 1820s–1920s.
An example of whalebone protruding from a silk bodice.
Buckram
Buckram is a coarsely woven stiffened cloth made of cotton or linen. It is used to stiffen clothing and millinery or in bookbinding. Buckram is impregnated or coated in a substance, such as glue or starch, which fills the gaps between the fibres. This process stiffens the fabric and increases its durability.
Buckram helps garments hold their form and stabilises fabric for stitching. It could be used for stiffening collars, gowns, tops of sleeves etc. Buckram coated in starch is also often used in millinery. It is softened in water, pulled over a hat block and left to dry hard in shape.
During the Middle Ages the term ‘bokeram’ was used to describe a type of fine cotton cloth, but it was not stiff. It is thought ‘buckram’ is derived from Bokhara in Uzbekistan, a source of fine linen.
Canvas
Canvas is a thick plain-woven fabric usually made from cotton, hemp or linen. It is a strong cloth with a firm even weave. Canvas can be used in garments to give shape and body, for example, in the shoulders and chest of a suit. There are two types of canvas: plain and duck. The threads of duck canvas are more tightly woven.
Padding
Padding has often been used in garments to enhance the body shape. Wool, cotton, kapok or straw may be found inside garments between two layers of fabric. From the 19th century wool padding was sometimes used in the upper torso of men’s jackets and on the shoulders to enhance their shape and form. Tubular padding was sometimes attached to skirt waists and hems in the early to mid 19th century. Soft bustles of cotton lint, kapok or wool were often separate accessories tied around the waist. Women’s shoulder pads were particularly fashionable during the 1940s and 1980s.
Petersham
Petersham is a stiff ribbed ribbon used for reinforcing garments and millinery. It can be used as stiffening on waistbands, corset edges or along hat brims. Petersham has a flexible picot edge which allows it to curve easily and fit the line of a garment, for example, the curve of a waistline.
It was named after Lord Petersham (1780–1851), Charles Stanhope, Fourth Earl of Harrington. A Colonel and Lord of the Bedchamber, he was a popular man in society, known for his eccentric tastes. He designed the petersham overcoat.
An example of petersham.
10.1 Stiffening/lining/padding

46
• Gently place the garment on a flat surface for measuring.
• Use a soft tape measure and a lead pencil to record measurements.
• Measurements are taken in millimetres.• Not all measurement fields will be relevant to
every garment. You will have some blanks.• Girth measurements for the register are taken
on the inside of the garment to give information about the wearer’s size. If you measure the waist, hips or neck on the outside, the result may be considerably larger.
• If there is confusion about where the dimensions are taken, put this in the notes field, for example, there may be a very low neck or three-quarter sleeve.
11.1 Measuring a garment
We have chosen the following measurements for the Australian Dress Register
Neck Chest Waist
Hip Cuff Hem circumference
Girth
If the part opens, measure from the point of fastenings such as button to buttonhole, hook to eye.
• When measuring, for example, front waist to hem, measure the waist from the centre of the waistband, ie where the waist actually is.
• Fabric width (selvedge to selvedge) — if you find a width of fabric that has a selvedge on each side, you know that this is the width of the manufactured cloth. Often in a skirt or coat this can indicate where and when the fabric was made and can be used to compare with other garments. Selvedges that feature a contrasting coloured thread along the length can indicate the origin or date of the fabric.
• For attachments (such as buttons) on cuffs, waistbands etc, measure from the centre of the button around to the centre of the buttonhole, not to the fabric edge.
Waist: a line of coloured cross-stitches hand stitched on a waistband indicate the centre front.

47
Front neck to hem
Front waist to hem
Back neck to hem
Back waist to hem
Outside legSleeve length
Inside leg
Vertical
Horizontal
Neck to sleeve head
Across back Underarm to underarm (at back)
Underarm to underarm (at back): if there are no side seams, lay the closed bodice on a flat surface, then measure across the back from the base of one armhole to the other.
For a video demonstration, go online.http://www.australiandressregister.org/resources/video/measuring-a-garment/

48
Provenance refers to an object’s source, its history of ownership and use from the time it was created to the present. Provenance includes the entire life of the garment.
Details of provenance include:• where the object was made or discovered• who made it• who has owned the object• what has it been used for.
Documentary evidence of provenance such as original receipts, newspaper clippings and photographs add to an object’s historical value. Any information related to an object is a valuable contribution to that object’s history.
Historical context
Historical context refers to the interrelated conditions in history in which something existed. Answers to the following questions can help establish historical context.
• What was happening at this particular time and place?
• What sort of society was it? • What were their beliefs or values?• What were the roles of men and women at the time?
Labels and the information they provide should be carefully documented. Women’s silk bodice (detail), Doucet, Paris, France, 1896. Powerhouse Museum collection, purchased 1959. H6008
This register includes items that have originated from or travelled overseas, but garments should have some connection to NSW.
The outfit may have been owned by or worn by several people. Please record all known owners and wearers of the garments.
Tracking family histories can be helpful. By looking at appropriate age and contemporary fashions, you can determine who could or could not have worn the garment.
Include maiden names where possible, as these are useful for tracking family histories.
Date or date range
If you know a specific date for an object, enter that date, for example, you know the dress was worn for a wedding in 1880.
If you don’t know a specific year, provide an approximate date range eg 1875–85. Use this date range format instead of, for example, about 1880.
Cost
If known, how much did the garment cost? Indicate if this was the price to purchase the item ready made or the price paid for the materials. This may include threads, trimmings, fabric or dressmaker/tailor costs.
If known, the price paid for the garment in recent times is also of interest, for example, the price a collector paid at auction.
Where possible, indicate the date a particular price was paid.
Resources
For further information on researching provenance and history. Significance 2.0: a guide to assessing the significance of collections, Collections Council of Australia, http://www.environment.gov.au/heritage/publications/significance2-0/.
12.1 History and provenance

49
One of the most important elements of the story of a garment is its provenance — especially information about its original owner. Sometimes it can be illuminating to consider the details of the life of that original wearer, and to try to discover when and where they lived, who was in their family and what they did with their lives.
Sometimes garments have been passed down with excellent documentation and information about the original wearer, but sometimes no more than a name, or the name of a parent or spouse, is known.
Family history research is an excellent way to approach filling in biographical details about the original owners of your garments. This type of research is not restricted to people researching their own ancestors; it can be a very effective mode of research for any historical project.
If you are interested in filling in the details about the lives surrounding your dress register entry, there are some very useful websites and archives that can help you — as well as some family history guides.
Family history guides
The best way to get started with family history research is to have a look at one of the many excellent family history guides available on the internet. Some of these relate to archives based in NSW, and others are general guides for anyone in the country to use. We have listed the ones we think will be most helpful for your Australian Dress Register entry, but it is by no means an exhaustive list.
• State Library of NSW, http://www.sl.nsw.gov.au/services/family_history/
• State Records NSW, http://www.records.nsw.gov.au/state-archives/resources-for/historians/family-historians
• National Library of Australia, http://www.nla.gov.au/family-history/genealogy-selected-websites
• National Archives of Australia, http://www.naa.gov.au/collection/family-history/
• History Trust of South Australia, http://www.history.sa.gov.au/chu/programs/museums_grants_help_sheets.html
12.2 Be a detective — links to discovering more about your garment
Places to go
Once you have looked through a guide to family history research, you will be well equipped to approach family history research. Many guides advise doing initial research on the web, but if you are not comfortable with the using the internet, there are places you can go to begin your search.
There are two major repositories of family history archives for the whole of NSW, the State Library and the State Archives. However, there are also excellent local studies and family history libraries across NSW which also have comprehensive archives and expert librarians who can assist you in accessing other, wider, databases.
Local historical societies can also be extremely helpful, and can often be visited in person or contacted remotely if the history of your garment relates to a region far from you. Societies such as the Wagga Wagga and District Historical Society are more than happy to help researchers and often have access to lots of family information about people from their region.
Hilda Smith’s descendants, assembled in 2007 at Griffith Pioneer Park Museum for the unveiling of her restored satin gown which has been entered onto the Australian Dress Register. Seated in the centre is her daughter, Mrs Gladys Myott, who donated the gown to the Griffith Pioneer Park Museum.

50
• State Records NSW Western Sydney Records Centre (WSRC) 143 O’Connell Street Kingswood NSW 2747
• State Library of NSW Macquarie Street Sydney NSW 2000
• Parramatta Local Studies and Family History Library
346A Church Street Parramatta NSW 2150
Websites with information on family history
If you are comfortable with internet research, there are two websites that will be invaluable tools for your Australian Dress Register entry.
• NSW Registry of Births, Deaths and Marriages, http://www.bdm.nsw.gov.au/familyHistory/familyHistory.htm
Even if you cannot make it out to an archive for copies of birth or death certificates, the NSW Births, Death and Marriages website provides a basic level of information for free and is an easy way to order copies of these documents (although this does require a fee).
• The Church of Jesus Christ of Latter-Day Saints, https://familysearch.org/
The information on this website can be a great deal more detailed than is available on the NSW Registry of Births, Deaths and Marriages site, and it is all freely available. However, the information must come with the caveat that it has been filled in by individual family historians, and cannot be considered to have a guarantee of total accuracy (although it is accurate the vast majority of the time).
Other resources
The National Library of Australia provides online access to historical issues of Australian newspapers, which can also be a very valuable source of family history information (often through obituaries), if you have already established some firm dates and places of interest.
• http://trove.nla.gov.au/newspaper

51
What is scanning and why is it useful?
A scanner is like a photocopy machine. It makes copies of photos and documents, but instead of creating another piece of paper, it creates a digital image which is viewed on a computer screen. Copying original photographs into a digital format is important because photos deteriorate over time, particularly the early colour photos from the 1970s that many of us put into sticky photo albums. By scanning photographs, we can capture what they look like now before they deteriorate further. We can even digitally enhance them so that they reveal more detail than the fading original photo does. It is recommended to display copies of original photos and store your originals in a safe and dry environment. Photos and paper should not be stored in cardboard boxes or acidic paper as they will cause photos to become more acidic and deteriorate faster. It is best to store photos in an
14.1 Scanning photographs and documents
acid-free photo album with photo corners or store them in mylar or acid-free envelopes in acid-free boxes. See our ‘Products and suppliers list’ information sheet on where to buy these archival products.
Digital images have many purposes and can be:
• used for display and access, instead of using original photos which can be safely stored away in an acid-free environment
• displayed on the web, giving potentially worldwide access to your collection
• sent in an email• used in a PowerPoint presentation• reproduced onto paper or photographic paper• used to enhance an original photo by cropping,
enlarging or manipulating the image to reveal more details.
What to look for in a scanner?
Scanners have come down in price in the last few years and it is possible to pick up a very good one for about $300. If possible, avoid the 3-in-1s (printer, scanner, copier) as they have more components, each with the potential to break down. They also have less scanning tools in them.
The scanner used in the Powerhouse Museum Conservation department.

52
Before scanning
Take off bracelets and rings as these might get in the way when you are scanning and can scratch the glass plate of the scanner. This glass can’t be replaced, so you need to take care of it. It is good to keep the glass clean of dust and sticky particles that may come off the back of a photo. Use surgical wipes to clean the glass plate after every few scans.
Cleaning the screen.
Placing your photo or document for scanning
Turn on your scanner, then place a photo facedown on the scanning bed, near the centre rather than the top edge (it is easier to manipulate the crop later). Handle older photographs with great care as they can sometimes be bowed and the emulsion may crack if you put weight on top of it too quickly. Gently place a piece of grey neutral card over the photo, then slowly close the lid. The grey card reduces the glare from the white surface under the lid. It will give a cleaner scan and can help you colour match the grey with the histogram option in the scanning program.
Place the photo straight on the scanner bed.Place a grey card on top of the photo.

53
Opening up the scanning software
Go to your computer and open the scanning software that comes with the scanner. A fairly standard scanner layout is pictured below. Choose professional mode (A) as it gives you more tools to work with than the home or auto mode.
A. Professional mode setting
B. Current settingC. Colour modeD. DPI (dots per inch)E. Document sizeF. ScaleG. HistogramH. MaskI. PreviewJ. Scan
A
B
C
D
E
F
G
H
I J

54
Preview
Once you have placed your photo on the scanner bed and opened the scanning software, press the preview button (I).
The scanner will make a quick scan of your image. You can then make adjustments to the scan using the options on the scanning page (see page 3, C–J) until you are happy with it.
Cropping
If you are not using any image manipulation software then you will need to crop the photo at this point with the marquee tool (K) provided with this scanner software. It is not possible to straighten the scan with the marquee tool, so make sure your photo is placed straight on the scanner bed. Leave a little grey border around the photo to frame it.
If you use image manipulation software such as Adobe Photoshop, Adobe Elements, Picasso or Picassa, you can straighten and manipulate the photo later (see page 10).
Click the marquee tool, then place a cursor (a cross shape) in the top left corner and drag it to the bottom right corner to create a marquee around the photo (see red broken line in photo). Hit enter to crop the image.
K
K. Crop: use the marquee tool.

55
Image type — set the colour mode
Always set the mode to colour (C), even if you are scanning black and white photos. This is because black and white images have many grey tones that are picked up better with the colour mode setting.
Resolution — know your needs
Digital images are made up of pixels. Resolution is measured in dots per inch (dpi) or pixels per inch (ppi). To produce a scan, set the resolution to 300 dpi (D). This will give you a sharp master image that can be used for multiple purposes. You will be able to make high quality prints at this resolution. Save this as a master image (TIFF), and then make another compressed copy as a (JPEG) which can be used for emails, web and general use. High resolution images can be converted to low resolution images but low resolution images can never be converted to high resolution images.
Illustrations/diagrams. Set the resolution to 1200 dpi and it must be saved as a TIFF file. This is because JPEGs are not suitable with text, large blocks of colour or simple shapes because crisp lines will blur and colours can shift.
Document size (also known as output size or target size)
It is important to scan photos at a large enough size (E). Many scanning hours can be wasted if scans are inadvertently made too small.
The standard size for museum archives is: 10 x 8" TIFF at 300 dpi, Adobe RGB, which should take up about 25 MB (megabytes) of storage. Note: 25 MB also reads as 25 000 KB (kilobytes).
For very clear information on how to change your images and files size to suit your needs, go to: http://www.jiscdigitalmedia.ac.uk/stillimages/advice/print-size-and-file-size-calculator.
For another option on file sizing, go to: http://graphicssoft.about.com/od/photoshop/l/bllps502d.htm and http://graphicssoft.about.com/od/photoshop/l/bllps502x5.htm.
Scale
Each photo should be scaled at 100% (F). The smaller the scale, the smaller the image will be. It is best to go as large as is practical.
If you scan four photos at once, set the scale at 400%. This will take a few minutes to scan. If you did one scan of four small photos at 100%, you would end up with very small images (each image would be less than 25%). Scan the images at 400% and then crop them individually so that each image will be about 100%. Any photo that is smaller than a postcard should be scanned at 200–300% (at 300 dpi).

56
Histograms — colour correction levels
Scanned images can often appear too dark or washed out on screen. Choose the histogram option (G) to alter the light levels to bring out the details in the photograph. Move the triangles at the bottom of the graph to alter the tones and the light levels of the scan.
A histogram chart for adjusting light levels. Move the triangles to make adjustments.
Mask
It’s confusing, but in digital terminology, unsharp mask means to sharpen.
All digital images need a bit of sharpening so make sure this box is ticked (H) before you scan.
Ready to scan
Once you have made your adjustments, you can press the scan button (J). This does a slow reading of the image and captures all the details in the photo.

57
Saving your image
Once an image is scanned, it needs to be saved. Go to file, save as on your computer to save it and specify what mode you want. It is recommended to always save a scanned image as a TIFF file as they are large, incorruptible image files that are very good for archiving. TIFFs take up a lot of storage space, so it is wise to store them on an external hard drive. You can buy 1-2 terabyte hard drives for about $100 and you can store approximately 5000 TIFF images on them. Storing the TIFFs on an external drive will free up the hard drive in your computer and provide a separate back-up for your photos.
DVDs and CDs are not recommended for photo storage. They can be used to move digital files from one computer to another but they won’t last in the long term. As technology changes so quickly, the images stored on DVDs and CDs are unlikely to be able to be opened and viewed in ten years time. Hard drives are a much safer option.
After you have saved your scanned image as a TIFF file you can then hit save as and save it as a JPEG for email, web and general use.
TIFF file saving
Go to save in your menu bar. Name the scan in the prefix box (L). Then choose TIFF from the drop down menu in the image format/type box (M). Make sure the start number is on 001 (N) when you begin your scans.
Next, go to browse (O) and then select where you will place the scan, eg desktop, internal or external drive etc.
L
M
O
N
Make the scan a TIFF, name and number it.
Save the file to a folder or the desktop.

58
Check the size of the TIFF file under the image size menu to see that it is the right size.
JPEG file saving
It is also recommended that you save each image as a JPEG file as well. This is because they are much smaller, which is very important when you are viewing your image on screen (email, web and general use). JPEG or jpg, is known as a ‘lossy’ format. It compresses files to save space but during the saving process it will lose about 10% of its information. Every time you save it, the file loses a little bit more information and image quality is reduced. A standard 4 x 5" (20–30 cm) JPEG photo should be around 5 MB (5 000 KB).
Choose the JPEG option and save it into a folder.

59
Press Save As and make a copy. Save it as a large file or maximum setting (P) JPEG Options box.
P
P. Choose large file or maximum in the JPEG options dialog box.
Open the folder where the two scans are saved, one is a TIFF and one is a JPEG with their corresponding kilobytes/megabyte sizes. You can go to the thumbnails icon (Q) and click on details to find the size of your image.
Q
The two scans in their folder, one is a TIFF and one is a JPEG. Note the different file sizes.

60
The completed scan.
Using image manipulation software for labelling or more image enhancement
Photoshop, Elements and other image manipulation software will allow you to enhance your image. It is often used in museums because you can place a white box under a scanned photo to write in registration details, name of object and the date. You can also clean up foxing stains, reduce crack lines and straighten a crooked scanned photo.
A good imaging software that will give you more scanning scope includes: Adobe Photoshop, Adobe Photoshop Elements (a basic version of Photoshop), Paint Shop Pro or iPhoto Express. There is also a free scanning software you can download onto your computer called Picasa, http://picasa.google.com/. A very reasonably priced, simple photo editing program is: http://www.photoeditx.com/?hop=witelizard.

61
Cropping in Photoshop or other image manipulation software
Once you have saved a scan, open up your image manipulation software. To crop, use the crop tool and draw a marquee (broken line) around the image (R), leaving a little border around the image to frame it. You can straighten the image with the crop tool.
For numbering purposes, you can make a text box underneath the image. To do this, drag the middle point at the bottom of the marquee a little further down the screen. Use the text tool (S) to write the registration number, date etc.
Once you have finished, press save and override your existing (un-manipulated) file.
R
S
R. Crop tool. S. Text tool: use this tool to write the image number and date here in black font.

62
Bulk scanning
The Setting box (B) can be a useful tool if you need to scan lots of similar photos.
If you are scanning a lot of photos that have the same measurements or resolution or similar colour levels, you could go to the Settings drop down box and save those details.
For example, all your b&w 4x5” photos at 300 dpi could be saved as Setting 1.
If you then scanned a different batch of 10x8" colour photos at 300 dpi, you could save that as Setting 2.
For speed, you can save those settings in case you have similar photos.

63
Condition of object
The physical strength and stability of an object can be broadly identified as follows:
Excellent: as new condition, with little or no sign of use.
Good: some signs of wear but physically sound. Minor physical damage such as staining, surface dirt. Dress can be placed on a mannequin for photography and display.
Fair: minor damage, some losses or deterioration. Handle with extra caution. Dress can be placed on a mannequin for photography or display for a short period of time.
Poor: wear, damage, brittleness, stains, large losses. Handle as little as possible. Dress should not be placed on a mannequin for photography or display. Instead, photograph dress on a gently sloped backboard (see the ‘2.2 Simple conservation photography and documentation’ information sheet).
Types of damage
Discolouration: a change of hue from the original colour, often uneven. Leather jewellery case, 1860–70. Purchased 1994. 94/156/1–2
Frayed: an edge of fabric that has worn away, with loose and broken threads. Boys fancy dress cream satin waistcoat (detail), 1900. Gift of M K Cowdery, 1984. A10711–2
15.1 Identifying types of damage
Holes: a perforation, an area where something is missing. Cotton embroidered dress (detail), Afghanistan, 1965. Purchased 1980. 92/1794
Stained: a substance lying in the fibres of the fabric, causing discolouration and may cause degradation. Silk day dress (detail), 1845. Gift of Anne Schofield, 1981. A8072
Worn: fabric that shows signs of damage through being worn or used. Silk, leather, wood ballet shoes, 1960–75, worn by Ruth Galene. Gift of the Sydney Opera House Trust, 1998. 98/30/1–1:2
Definitions of terms

64
Fading: a colour shift in pigments or dyes, usually from exposure to light, especially ultraviolet. Cotton sunbonnet, 1935. Gift of Ms Anne Fairbairn, 1988. 88/828
Dirt: dirt of any kind which has accumulated on the surface or is embedded in the fabric. French leather glove, 1930–45. Gift of Mr Ray Freeman, 1992. 92/366–1
Paint: pigment mixed with a binder which adheres to the surface it is applied to. Vellum, paint and ivory fan (detail), 1800s. Gift of Christian R Thornett, 1967. A5419
Stretched: pulled beyond the original shape. Wedding ensemble, silk garters, 1925. Gift of Lyndall Russell, 1984. A9865–4:5
Iron stains/foxing: small, rust coloured stains scattered throughout a fabric. Child’s cotton top (detail), 1920–30. Gift of Alma Trappel, 1992. 92/1758
Distorted/warped: a deformation in the weave or structure of the fabric. Postman’s hat, cabbage tree grass, 1900. Gift of Australia Post, NSW Headquarters, 1998. 98/2/68
Dust: loose fine particles on the surface which can become embedded in the fabric.

65
Parts missing: losses of warp and/or weft threads. Tent band (detail), Central Asia, 1850–1900. Gift of Cito and Lyn Cessna, 1996. 96/295/1
Torn: a break in the fabric resulting from tension. Creased: a line or ridge of fabric caused by folding or crushing. Crochet and ivory parasol, England, 1840. Purchased 1985. 85/113
Brittle: easily cracked, broken, weak or inflexible. Cream satin wedding dress (detail), 1925. Gift of Lyndall Russell, 1984. A9865–1
Scratched: physical surface damage which is narrow or sharp-edged. A leather box for a mourning bracelet 1850–1900. Gift of Lady Hurley, 1983. A9416–2
Water damage: as water dries on fabric, surface dirt can be carried by the water to the edge of the wet section. When it dries, a ring of dirt can be left around the original stain. Water can also cause dyes to bleed; stitches to break; adhesives to dissolve or corrosion on metal attachments. Cotton temple hanging, Bali, 1940–50. Purchased 1982. A8485
Evidence of repairs: examine carefully for any signs of repairs, patches, darning, alterations etc and take a close-up photograph. The repair is part of the history of the dress. Remove pins and safety pins from dress to stop corrosion but note where they have been taken from and store separately. Boy’s fancy dress costume (detail), 1900. Gift of M K Cowdery, 1984. A10711–2

66
Insect damage: insects thrive in dark environments where they can feed, lay eggs and pupate undisturbed. They often like damp still areas, food scraps, dirt and dust. With good housekeeping, it is possible to keep insects at bay without using chemicals. Insects attracted to textiles and other organic materials are: carpet beetles, case making moth, common clothes moth, silverfish and cockroaches. Women’s woollen vest (detail). Purchased 1997. 97/92/8–48/L
Mould damage: moulds are plant organisms that surround us. They lie dormant until there is enough moisture in the air and don’t need sunlight to grow. Mould spores feed on organic materials such as: adhesives, cotton, fur, linen, paper, rayon, silk, wool and even on metal. Moulds will grow if the relative humidity is at least 65%. Summer cotton day dress (detail). Purchased 1959. H5986–1
Unless otherwise stated, all objects are part of the Powerhouse Museum collection.
Links to other websites
Insect damageFor monitoring, identifying, controlling infestations, reducing chemicals and freezing pests.
Integrated Pest Management Working Group, http://www.museumpests.net.
National Parks Service, Museum Management Program, US Department of the Interior, http://www.nps.gov/history/museum/publications/MHI/CHAP5.pdf.
Mould damageInformation on humidity and preventing mould growth. Conserve O Grams (see 3.4). National Parks Service, Museum Management Program, US Department of the Interior, http://www.nps.gov/history/museum/publications/conserveogram/cons_toc.html.
Surface cleaningBefore an object is put into storage, it should be brush vacuumed to remove dust and dirt from it. Do not surface clean very fragile objects. Powerhouse Museum, http://www.powerhousemuseum.com/pdf/preservation/brush-vaccum.pdf.
How to care for textilesFor general information about how to care for textiles, such as light and humidity control, storage, handling and display. Canadian Conservation Institute, http://www.cci-icc.gc.ca/caringfor-prendresoindes/articles/423-eng.aspx.
Conservation products and suppliersPowerhouse Museum, http://www.powerhouse museum.com/pdf/preservation/products_and_suppliers.pdf.
How to pad a coathanger for storagePowerhouse Museum, http://www.powerhouse museum.com/pdf/preservation/padded_ coathanger.pdf.

67
At the Powerhouse Museum, wrinkled garments that go on display are steamed rather than ironed. This is because the heat and pressure from an iron can speed the rate deterioration of textiles and can be harmful to older fabrics. The moisture and humidity from a steamer relaxes the creases in fabrics. Steaming can be safely used on most fabrics and will not leave scorch marks. Steaming also helps to remove old odours from a garment. It is not recommended on garments with: unstable dyes; sequins; metallic threads; metal buttons; mouldy or very fragile fabrics.
Most commercial steamers have a water container at the base with a flexible rubber tube that carries the steam into the nozzle. A long metal vertical rod is attached from the base and has a hook at the top. The hook is used to hang garments on coathangers or the steaming nozzle. It is advisable to always use distilled or filtered water instead of tap water as this will prevent salts and minerals building up in the steamer.
Caution
Steam can burn if it hits the skin, so keep the steam jet away from your body and wear long sleeves when steaming. Keep your hands away from the hot parts of the steamer. Keep the steamer away from children and never immerse the steamer in water. When you have finished steaming, unplug it and wait until it has cooled down before you dismantle the hose and pole. It should never be stored with water in it, so drain and clean each part to prevent rusting. Periodically check for signs of leakage in the body and the hose.
Assessment
Before you begin, you will need to assess whether a garment is strong enough to be steamed. For example, fabric such as very acidic silk that crumbles when you touch it, should not be steamed. You will also have difficulty with crepe weaves as they will shrink unevenly under steam. If a garment is strong enough to be displayed on a mannequin, it is best to steam it when it is dressed on the mannequin. Place a drop cloth under the garment if the skirt drapes onto the floor, to protect it from soiling. If a garment isn’t strong enough to go on a mannequin, but is able to be steamed, lie it flat on a
15.2 Steaming a garment
table and support it with tulle or acid-free tissue rolls when you steam it.
Technique
Once the water is boiling, steam will begin to rise. Hold the nozzle about 20–25 cm away from the textile. Work your way methodically and slowly over the garment. A jersey covered dacron ball can be used underneath the garment to help open out the creases and allow the steam into the folds in the fabric. The length of time it takes to steam a garment depends on how wrinkled the fabric is and on the thickness of the fabric.
How to steam
In the following photos, textile conservator Suzanne Chee is steaming an evening dress.
‘Bird’ evening dress by Michelle Jank, 2008. Powerhouse Museum collection, gift of Michelle Jank, 2010. 2010/23/1

68
1. An assistant lifts up the skirt so that Suzanne can steam the white lining fabric first. Suzanne works her way around the skirt lining in this way.
2. To make the padded ball, place a piece of polyester dacron wadding onto a piece of jersey and sew into a ball shape. These balls can be made in a variety of sizes to fit into difficult spaces, eg cuffs or sleeves.
3. Once the lining is finished, the skirt is lowered so that Suzanne can steam it. She takes the padded ball and places it under the skirt.
4. The padded ball helps open out the creases so the steam can work its way in. Check the dacron ball for traces of dirt or dye transference. If dye is visible on the jersey, you should stop steaming. If dirt is visible, you may need to change the jersey.

69
5–8. Suzanne carefully and methodically steams around the whole garment.
6.
7. 8.

70
Items not recommended for steaming
Unstable dyes: do not steam a garment with unstable dyes. Circus clown costume, 1880–1940. Purchased 1995. 95/28/12–1
Fragile and crepe weave garments: garments that are very fragile or have crepe weaves should not be steamed. Circus costume, 1910–40. Purchased 1995. 95/28/13
A
Metal buttons: when steaming a garment with metal buttons, cover the buttons in acid-free tissue paper (A) or cotton cloth to protect them from the steam. Gentlemen’s court dress coat. Gift of D Brown, 1963. H7376–1
B
Metallic thread: metallic thread also needs to be protected from steam. If the metallic thread areas can be isolated, cover them in acid-free tissue paper or cotton cloth (B) during steaming. If there is metallic thread all over the garment, do not steam it. Gentlemen’s court dress coat. Gift of D Brown, 1963. H7376–1
Sequins: do not steam sequins. Old sequins are made from gelatin. Girl’s ensemble, Beril Jents, 1987. Gift of Beril Jents, 1988. 88/231–2
Decoration: this mermaid’s tail has too much decoration on it to steam. Mermaid costume, Annette Kellerman, 1906–40. Gift of the Dennis Wolanski Library, Sydney Opera House, 2000. 2000/66/4
Unless otherwise stated, all objects are part of the Powerhouse Museum collection.

71
16.1 Unravelling significance
As you have progressed through your dress register entry you have been encouraged to think of all possible aspects of your garment. You will have developed some ideas about why this garment is an important one, to your collection, or to the wider historical context.
Discussion with donors, museum colleagues, family and those interested in the history of the community, not necessarily costume lovers, can be very helpful. Other people may lend a variety of perspectives to the significance of your garment. The garment can be assessed and written up as a group effort. For more information go to the Collections Council of Australia website, http://www.environment.gov.au/heritage/publications/significance2-0/.
When you write a significance statement, imagine how you would enthuse a young person about this garment, someone who knows nothing about it or its history. Ask yourself questions that the person might ask you. You need to pull together all aspects of the information you have collected in a general way so it reads easily and tells a story. It should start with a paragraph of about 100 words that describes and sums up the garment’s physical appearance and historical context. Further detail can then be added to the significance statement to help with a broader understanding of its importance.
Good luck and don’t let the formal term ‘statement of significance’ dampen your creativity! Here are some examples to inspire you.
Port Macquarie Historical SocietyStatement by Debbie Sommers (5/02/09)
This is an historically and socially significant and highly valued object within the Port Macquarie Historical Society’s extensive costume collection. It was made by a local woman Maude Keena for the marriage of Lena Nicholls to Joe Campbell in 1909.
The dress is beautifully designed and made. It has a number of fine details and was made using both machine and hand stitching. It is an excellent example of a local woman’s sewing and embroidery skills and evidences the high quality of those skills. Unfortunately, the silk fabric used is contributing to the fragility of the costume. It is a rare provenanced costume within the collection from the early 20th century. The maker of the dress and the costs of the
fabric used were recorded by the owner/donor and this information adds to the significance of the dress. The silk voile cost 2/6 per yard, trimming on the bodice cost 1/6 per yard, material over shoulder 1/2 per yard and Mrs Keena charged 1 pound to make the garment.
A wedding photograph of the couple held in the Port Macquarie Historical Society collection also records the dress (see back cover). Lena Campbell was a well known local woman who worked hard for a number of local community groups including the Red Cross, the Women’s Agricultural Security Production Service (WASPS) and the Presbyterian Church. Later in life she was a foundation member of the Port Macquarie Croquet Club.
This wedding dress is an important object to interpret and reference marriage and rights of passage themes, women’s crafts and sewing skills, women’s fashion of the early 20th century and textiles — their uses and storage.

72
Historic Houses Trust of NSWStatement by Maria Martin and Lindie Ward (20/11/09)
This black silk satin bodice about 1885 was worn by Bessie Rouse (1843–1924) who was mistress of Rouse Hill House from her marriage in 1874 to Edwin Stephen Rouse (1849–1931) until her death 50 years later.
The bodice is part of the extensive Rouse Hill House & Farm museum collection of garments and accessories from about 1870 until the early 1990s — men’s, women’s, children’s and even dolls’ clothes. Rouse Hill House is one of the oldest continually occupied houses in Australia, the property being crammed with more than 20 000 objects expressing the realities, hopes and dreams of six generations in rural NSW.
This low square necked evening bodice features in a photograph of Bessie Rouse taken in 1887. Close scrutiny reveals that it was originally styled with a high round neck suited to mourning wear, and later altered by lowering the neckline and replacing the earlier sleeves with lace-inset three quarter sleeves. Whalebones are inserted on each side of the front to assist in creating a crisp shape. At the centre back the bodice features dovetail pleats to enhance the waistline and sit fashionably over a bustle skirt, which no longer survives.
Exceptionally well provenanced, the bodice survives in the house where it was possibly worn, stored, remodelled, repaired, laundered and even played with for dress-ups by children of later generations. It survives with a multitude of family possessions including sewing implements and supplies, dress and hat trims, women’s magazines that may well have inspired it, photographs that record it worn by Bessie Rouse, invoices from the maker Madame Bernice Beattie that also possibly record it along with her label inside the bodice, something not often used by Sydney dressmakers at this time.
Alterations to the bodice from a more austere style possibly designed for family mourning to the elegant evening bodice photographed on Bessie effectively document a standard practice in Victorian times, the redesign and recycling of garments. This stemmed from a respect for quality materials, a desire to update and conform to the latest fashion trends from overseas, a high regard for personal resourcefulness and a great reluctance to waste anything.
A later history might be found in the fabric of the bodice too as some of Bessie Rouse’s descendants loved playing dress-ups and staging amateur theatrics using especially kept discarded garments. Subsequent alterations, therefore, might reflect this convivial aspect of later Rouse and Terry family history.
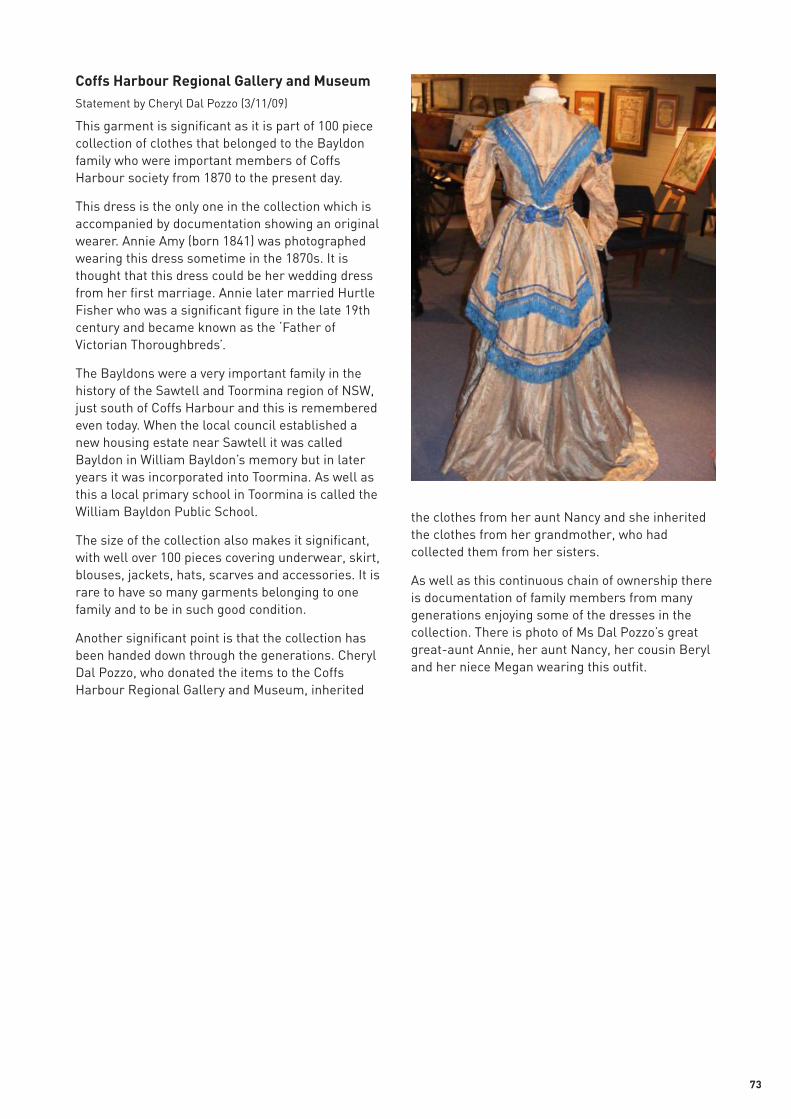
73
Coffs Harbour Regional Gallery and MuseumStatement by Cheryl Dal Pozzo (3/11/09)
This garment is significant as it is part of 100 piece collection of clothes that belonged to the Bayldon family who were important members of Coffs Harbour society from 1870 to the present day.
This dress is the only one in the collection which is accompanied by documentation showing an original wearer. Annie Amy (born 1841) was photographed wearing this dress sometime in the 1870s. It is thought that this dress could be her wedding dress from her first marriage. Annie later married Hurtle Fisher who was a significant figure in the late 19th century and became known as the ‘Father of Victorian Thoroughbreds’.
The Bayldons were a very important family in the history of the Sawtell and Toormina region of NSW, just south of Coffs Harbour and this is remembered even today. When the local council established a new housing estate near Sawtell it was called Bayldon in William Bayldon’s memory but in later years it was incorporated into Toormina. As well as this a local primary school in Toormina is called the William Bayldon Public School.
The size of the collection also makes it significant, with well over 100 pieces covering underwear, skirt, blouses, jackets, hats, scarves and accessories. It is rare to have so many garments belonging to one family and to be in such good condition.
Another significant point is that the collection has been handed down through the generations. Cheryl Dal Pozzo, who donated the items to the Coffs Harbour Regional Gallery and Museum, inherited
the clothes from her aunt Nancy and she inherited the clothes from her grandmother, who had collected them from her sisters.
As well as this continuous chain of ownership there is documentation of family members from many generations enjoying some of the dresses in the collection. There is photo of Ms Dal Pozzo’s great great-aunt Annie, her aunt Nancy, her cousin Beryl and her niece Megan wearing this outfit.

74
What are the benefits of being on the register or using the register?The Australian Dress Register (ADR) is a collaborative, online project about dress in Australia. It includes men’s, women’s and children’s clothing ranging from the special occasion to the everyday. Museums and private collectors are encouraged to research their garments and share the stories and photographs while the information is still available and within living memory.
The register supports the garments remaining in their locations, while providing virtual access via the website. Once you have entered the dress it will be available for all to share, compare and discuss online. By sharing this information with the wider community, people from all over the world can learn about dress history.
An important outcome is to provide information for non-commercial educational purposes to as broad an audience as possible. The potential audience includes students and teachers from a variety of disciplines, museums and local communities, family and regional historians, theatre/film industry, designers, clothing and textile manufacturers, shoemakers, costumiers, milliners, embroiderers, lace makers, artists and academics.
Benefits for the organisations who participate include discovery and recognition of the significance of their collections, training and skills development in the care and documentation of dress and museum best practice, as well as providing corroborating support for grant and funding applications.
The register also offers world wide access to stored garments that are not on display. For private or family collectors, the register offers wider access to a garment that would only be viewed by a small number of people.
What is meant by Australian dress?‘Dress’ is used as a generic term for all garments with their accessories, whether formal or informal, for men, women or children. It includes performance costume, occupational dress and uniforms. Australian dress refers to garments made or worn in Australia or which have an Australian provenance.
The first phase of the ADR was to capture the garments with a New South Wales provenance and a cut-off date of 1945. The ADR has now expanded to include any dress from around the world that has Australian provenance.
What is on the register?The ADR documents significant and well provenanced men’s, women’s and children’s dress in or relating to Australia. An entry can include the accessories associated with the garment, for example, shoes, bag, hat, shawl, coat, underwear that were worn as the entire outfit.
How do I know if my garment is significant enough to go on the register?Significance refers to the historic, aesthetic, technical and social values associated with an item of dress and its place in a community. A well provenanced garment in poor condition may be
Frequently asked questions
Traditional Macedonian apron, 1920–30, private owner.

75
more significant than a very beautiful one without accompanying information. As the dress is not going on display, the condition is not as important, so this may affect your choice. Dress to go on the register should include all aspects of clothing, including normal daily life and occupations.
You may like to browse the register before deciding what to contribute yourself. Wedding dresses are often stored carefully and passed down through generations but not many everyday garments survive long term, so those that do may be more significant than a wedding dress. It is envisaged that a broad range of dress will be included. Discussions with regional coordinators may assist in this decision making. The ADR team will review entries before they go online and may request additional information before uploading the registration.
Will I have to show people the actual dress?The register is an online database that can be shared with people from all over the world. It is not about physical access to the objects. The ownership and/or location of the dress entries can be withheld for security reasons if you wish.
How many garments can I register?There is no limit to the number of entries that can be provided by an organisation or private individual. It is recommended that only one entry is undertaken at a time and that only those garments which are the most significant in your collection be considered for entry on the register.
Can I put a hat or a pair of shoes on the register?The primary focus is dress and accompanying accessories so such items can be added but only as accessories to an outfit. However, if an accessory has an exceptional story behind it and supporting material, it can be put on the register.
Do I need to photograph the dress?Yes. Good clear photographs of the garments are essential for the online database. There are information sheets and videos that demonstrate how to prepare clothing for display on a mannequin and how to photograph it in a studio or in situ in a museum where space might be tight. If a garment is too fragile to place on a mannequin, there is information on how to photograph it on a sloped backboard. Please do not consider photographing a garment on a person as this may cause damage. Associated material can also be included in entries, such as historic photographs, scans of purchase receipts, wedding certificates, or press reports. Close-up details and photographs of the inside of a garment are interesting to view.
I have a wedding dress which belonged to my grandmother. Can I put it on the register?Wedding dresses can be included as long as they are accompanied by good documentation and images.
Can I get help if I need it?To assist with your entry, the register includes a user’s guide to the care, documentation, interpretation and display of dress. This is in online and book format. The whole spectrum of assessing, handling, photographing, storing and displaying dress in small collections is explained. Regional
Flag dress, 1918, Tinonee Historical Society.

76
partners also host workshops held at strategic locations across the state in order to assist with putting your entries on the register. To purchase the user’s guide, go to http://www.powerhousemuseum.com/publications/.
Can I register a dress when I don’t have a computer or can’t access the internet?Yes, we can send you an ADR Resources book and a blank entry form for you to fill in. You can post the form back to us, along with your photos (scans or digital copies, no originals please). If a scanner is not available, good mobile phone images may be useful. The ADR team can enter the information onto the register for you. The form and information sheets are also available on the resources page on the website.
How can my organisation be involved? You can be involved by:
• registering significant example/s of Australian dress in your collection
• hosting a workshop associated with the program• supporting contributors in your area• becoming a state or interstate partner in the
project.
How can students and volunteers be involved in the project?Students and volunteers can gain valuable experience in regional museums and galleries assisting with research. Information about makers, family and community history will greatly enhance ADR entries. Documentation for the register also improves standards for the organisations involved. The wealth of information available on the register is a useful resource for teachers across the curriculum.
Who manages the register?The Museum of Applied Arts and Sciences (MAAS)has initiated the project and hosts the website. Decisions regarding the development are managed by a committee with representation from across the sector and include those who contribute and use the site. The day-to-day operation of the site is coordinated by staff from the curatorial, conservation, registration and regional programs departments in the MAAS. Training and support with the entry of data is provided by the MAAS, with assistance from regional volunteer coordinators. If you wish to access this support contact us at [email protected].
Do all the garments on the ADR belong to the MAAS?No. There has been some confusion about who owns the entries on the register. Only a few of the ADR entries are from the Museum’s own collection. The majority of entries belong to contributors from private, family and public collections.
How do I contact the Australian Dress Register?Email: [email protected] Phone: (02) 9217 0220Freecall (NSW only): 1800 882 092Post: Australian Dress Register, c/- Museum of Applied Arts and Sciences, 500 Harris Street, Ultimo NSW 2007.
Diver’s suit, 1914–52, Lady Denman Heritage Complex.

77
How do I save?There are numerous save buttons to make saving your data easy. You can use the save buttons on the right-hand side of the form. This will save the entire content of the form. You do not need to press save individually for each field. Once you have saved, the screen will jump back to where you were previously on the form. If you have not completed all the fields simply close and return to the form later. Some fields may not be relevant for your garment and can be left blank. There are a few fields that are mandatory and they are marked with a red asterisk. When you have completed your entry, tick the ‘submit for inclusion’ box at the end of the form.
Can I access the internet while I am working on an entry?You can easily access the internet while working on an entry. How you do this will depend on the type of internet browser you are using. When using Firefox or Internet Explorer 7 you can press ‘ctrl’ and then ‘tab’ to open a new internet tab. For older versions of Explorer press ‘ctrl’ and then ‘N’ to open a new window. For Macintosh computers, the browser Safari has tab browsing. Press ‘Apple’ and then ‘T’ to open a new tab. You can select a tab along the top of the screen, below the toolbar.
Will terms entered on the form affect whether people will find the item in a search? There are lots of possible ways to search through the data entered into this register. However, it is helpful to be consistent and for this reason dates must be entered in a structured way. The search engine will also be able to search through the free text in the notes fields. Search terms will not be case sensitive.
How big can my images be?Images can be up to 30 megabytes. Images need to be in JPEG format as this is internet friendly. You will be able to upload PDFs as well.
How do I get hard copies such as photographic prints (from film) or newspaper articles onto the website?Hard copies will need to be scanned for the website. Your local library or photo shop could assist you with this if you do not have a scanner. If this is not possible, you can send us copies (not originals) and we can scan them for you.
Frequently asked technical questions
How many images can I include?There is a limit of 10 images in the initial photo section. Note that the first photo will be the item’s thumbnail image. There are three other sections where photos can be uploaded for specific purposes, for example, condition. There is a limit of five photos in each of these sections.
Can I edit my photographs, their captions or replace them if I get better images?You are able to edit your photograph choices. You can also switch the order of photos and edit captions.
Will links to photos be affected if I move the image file in my computer?Images in the register will not be affected if the source file is moved. The image file is uploaded physically to the database not linked to an individual computer. However, do note that links you add to your entry may be broken. This is an ongoing problem on the internet. Think about the links you wish to add and question whether they will be maintained.
Can I print off a blank form so I can work on the entry away from the computer?You can print a blank form and complete the data entry by hand. Then enter the date at your convenience online or if you prefer, post or scan your handwritten form to us and we will enter it.
Can I print off a copy of my entry for the Museum file?Yes, there is a printable version.
How many users can an institution have?Several users can be issued if necessary. All the users from a single institution will be able to see that institution’s entries.
Can users change their passwords?Users are able to change their own passwords. Passwords need to be strong. This means they need to include both text and numbers. Usernames and passwords are case sensitive.
What if I forget my password? Contact us and we can issue you another one.
Can I delete an entry?Yes. There is the ability to delete entries. Be careful, entries are not retrievable.

78
A
Aesthetic dress Style of dress for men and women adopted by a small group of English reformers of the 1880s. Features of women’s dress include the elimination of restrictive corseting and bustles, larger looser sleeves and more fluid lines.
Afternoon dress 1. Term used during the 19th century in England and Australia to indicate a woman’s dress suitable for visiting in the afternoons. 2. In the 20th century it indicates a semi-formal woman’s dress, frequently full length in the 1920s and 1930s, suitable for a garden party or formal tea. Usually worn with a large picture hat.
AppliquéDecorative layer of fabric applied to the surface of a garment or on net by hand or machine.
Art DecoStyling of 1915–30 with geometric lines and strong colours.
Art NouveauStyle that is organic in colouring and shaping, often seen in women’s dresses from 1900–20 and earlier in glass and furniture.
B
BackingCotton or linen fabric cut as one with the fabric of a garment to strengthen and support it from inside.
BanyanMan’s silk or fancy printed fabric dressing gown with eastern styling.
BasqueNarrow horizontal band attached from the waist down, often cut on the bias.
Belle ÉpoqueWoman’s fashion style, 1890–1910, that is typified by a narrow waist and voluptuous bust and hipline, also referred to as the S-bend.
Glossary
BespokeGarment or accessories made specifically to a person’s measurements.
Bias bindingCotton tape cut on the bias grain that will lie flat on curved necklines, hems and seams.
Bias cutGarments cut at 45° to the warp and weft of the fabric to create a special drape effect that is figure-hugging and often considered seductive.
Bias grainThe diagonal grain of the fabric. To get the true grain a corner of the fabric is drawn up at 45˚ to the selvedge. Sometimes described as ‘on the cross’.
BindingBias or straight cut tape that is used to cover the raw edge of a garment, hem or seam.
Blazer1. A navy blue single or double breasted man’s jacket often with gold buttons and insignia of club allegiance on the breast pocket, worn in the 20th century. 2. A brightly striped, single breasted, sports jacket, eg rowing, cricket, with coloured piping around the edges. Worn after play in 19th and 20th centuries.
Bloomer costumeWomen’s cycling costume worn by Amelia Bloomer with wide trouser legs. Amelia Bloomer (1818–94) was an American women’s rights and temperance advocate whose name became associated with bloomers.
BloomersVoluminous, knee-length pants that fasten just below or just above the knee. Worn by women as undergarments in the 1920s and 1930s.
BoaLong, narrow, scarf worn around the neck from 1829, and especially fashionable in 1890s, 1920s and 1970s. Made of feathers, pleated silk, fur or swansdown.
BoleroA short sleeved collarless jacket extending to just below the breast for men and women.
79
BoningWhalebone, metal or turkey quill (USA) inserted into corsets, bodices or collars to create a fashionable and rigid shape.
Braids– Diamanté. String of diamond-like clear glass
stones used to trim women’s garments, 20th century.
– Gimp. Thread or cord used to define the edge of a pattern, especially in lace.
– Rickrack. Cotton braid woven in zigzag form available in different widths.
– Russia braid. Double-cored braid covered in silk or rayon.
BreechesA pair of men’s pants extending to and fastening just below the knee, which preceded the men’s fashion for long trousers or pantaloons. They were practical when horseriding was the main means of transport.
Bullion workA very specialised style of embroidery of Turkish origin which uses gold threads and fine gold coils to create dense gold embroidery, often seen on 19th century military jackets and formal diplomatic uniforms for men.
BustleArtificial shaping mechanism for women to accentuate the skirt at the back waist formed by metal rings, horsehair or padding and attached around the waist, fashionable from 1870–75 and then 1883–91.
Bustle dressWoman’s dress with fabric draped up at the back over a separate bustle framework and trimmed with a bow or small peplum.
C
Cabbage-tree hatA hat woven from the plaited palm fronds of the cabbage tree palm and worn by Australians in the 19th and early 20th centuries. Cabbage tree palms can be found along the Victorian, NSW and Queensland coastlines. The leaves were cut in strips, bleached and plaited.
CamisoleA cotton blouse often with short sleeve which is worn between a woman’s corset and her bodice to protect the bodice from stray whalebones and sweat.
CapeSleeveless outerwear garment often with collar and front fastening, usually extending to the waist. Mostly worn by women.
ChemiseWoman’s loose shift worn against the skin, under the corset, sleeveless, 19th century.
ChemisetteFalse blouse front of cambric, tulle or muslin fabric worn as fill-in for low-necked gown in 18th and 19th centuries.
Circular skirtA skirt that is cut from a circle or half circle of fabric with a central hole the size of the waist.
CloakVoluminous sleeveless outerwear garment with collar and front fastening extending to the ankles. Commonly worn by horseriders for many centuries as it covers the rider as well as the back of the horse.
CollarsNeckpieces with defined edge which go around neck and decorate the neckline.– Fall collar. Collar with part that falls down from
the neck.– Sailor collar. Starts at centre front and extends
to a wide square back.– Shawl collar. Collar that goes around the neck
but does not have lapels.– Stand collar. Collar that stands vertically from
shoulder often parallel to neck.
CombinationsUnderwear that combines a camisole bodice and pantaloons in one garment. For practical purposes this required an open crotch seam.
CordA number of threads or yarns twisted together into a strong, rope-like length.
Crinoline1. A wide, bias tape made from woven horsehair which is ‘uncrushable’. It was used to hold out a petticoat when skirts became fuller in the 1840s. 2. Subsequently the term was used for very large skirts without horsehair that were popular from 1840 to 1860s. They were then stiffened with steel, cane and whalebone that collapsed when the wearer sat down.
CummerbundMan’s separate wide waistband, usually in fancy silk, that covers the join between waistband of his trousers and shirt and fastens at the back.

80
D
DartA tapering fold sewn into fabric to create a three-dimensional shaping to a garment.
Dolman coatA coat or cape for men or women with sleeves that have the appearance of a cape. Widely worn in the 1870s and 1880s.
Dress-improverA small sausage-like bustle used by women in the 1850s.
DungareesWorkwear consisting of a pair of thick cotton denim pants usually with adjustable bib and brace used for manual work.
E
EmbroiderySurface decoration added to fabric by machine or needlework to enhance the fabric.– Bullion work. Coiled silver or gold wire cut into
short lengths and threaded through the centre like beads and sewn into embroidered designs for garments. Very fine examples are seen on Turkish embroidery and on military uniforms.
– Tambour work. Chain stitch embroidery made with a tambour hook or chain stitch machine. It is hard to differentiate between the two.
Empire lineA high waistline created by attaching the skirt just under the bustline popularised by Empress Josephine during the French Napoleonic Empire (1804–14).
Empire waistA shortened waistline created by a high seam just below the bustline.
EngageantesDetachable linen or cotton sleeves which are removed for laundering. Often made of lace or fine cambric and worn from the 17th to the mid 19th century. The term can also apply to any detachable linen or lace bodice trim.
EpaulettesStraps that are attached across the shoulder to signify rank in military and other uniforms. They may be simple with one button or very elaborate, with gold fringing.
F
Fabrics – Argyle. The argyle pattern of diamonds in a
diagonal checkerboard arrangement is derived from the tartan of Clan Campbell of Argyll in western Scotland. It was much used in the football dress of the early 1900s, both for jerseys and for the long socks needed for the plus-fours trouser fashion of the day.
– Artificial silk. The first successful artificial silks were developed in the 1890s of cellulose (wood) fibre and marketed as art silk or viscose. In 1924, the name of the fibre was officially changed in the US to rayon, although the term viscose continued to be used in Europe.
– Basket weave. Is identified by its checkerboard-like appearance made of clusters of two or more warp and weft threads woven together.
– Batiste. A cotton muslin that has a wiry finish, popular in the 1820s and 1830s.
– Bombasine. A material used for mourning because it was often made in black. It has a dull, twilled surface. The warp was silk and the weft was worsted wool.
– Broadcloth. Material made from very fine merino wool woven into a wide fabric (115–130 cm) with a fine twill weave.
– Calico. Plain weave cotton.– Cambric. Very fine weave cotton often used for
underwear.– Cashmere. Originally made from Tibetan goat, it
is a very fine, good quality wool that is soft to the touch.
– Challis. Fine woollen, twill fabric often printed. Can be mixed with silk or cotton.
– Chenille. Thread with velvet pile usually silk, used as a decorative braid especially in the 1890s.
– Chiffon. Very lightweight semitransparent fabric woven from tightly twisted silk.
– Crepe. Made from highly twisted cotton, silk or wool or sometimes a mixture, which has a crimped surface due to the excessive twist. Many varieties, eg crepe chiffon, crepe de chine.
– Dimity. Figured cotton cloth that has a raised stripe.
– Doeskin. Cloth made from botany wool. It had a very close weave and a smooth face. It was shrunk to give its final appearance.
– Drill. Very heavy cotton or linen fabric often with a twill weave.
– Faille. A weave used on silk that gives a very fine, 45° angled rib effect.
– Felt. Fabric made from woollen fibres that have been tangled, shrunk and matted to form a non-woven material.
81
– Gauze. Fine, transparent, plain weave fabric.– Kerseymere. A very closely woven wool cloth.– Lawn. Plain weave, smooth and delicate textile,
originally of linen but now chiefly cotton.– Marcella, marseilla. Material used for waistcoats
that was usually of a quilted, plain weave fabric.– Merino. A thin, twill, woollen cloth.– Mourning crepe. Collective term for black fabrics
worn for funerals or mourning. During the 19th and early 20th century deep mourning or black was worn for six months to a year after the death of a close member of the family. Half mourning, often purple or lavender colour, was worn for six months longer.
– Nankeen. Handwoven, cotton fabric from Nanking in China. It was supplied by the East India Company during the 19th century.
FallThe front opening of men’s breeches or trousers, so named from about 1730 onwards. Whole falls were square-shaped flaps that extended across the front to the side seams. Small or split falls meant a smaller central flap that covered only the centre front of the garment. After 1840, the fall was also called a spair.
Fastenings – Button stand. The band on either side of a shirt
or jacket front opening, holding buttons on one side and buttonholes on the other.
– Frogging. Fancy looped cord work especially on military uniforms incorporating loops, buttonholes and buttons for fastenings.
– Hook and eye. Metal wire hook and straight or arched eye that connects one part of a garment to another, often to facilitate ease of dressing.
– Lacing. Cord or ribbon threaded through holes in a garment to fasten. The holes can be hand stitched or reinforced with metal eyelets.
– Zipper. Fastener consisting of parallel rows of metal teeth that join together when a central gadget passes over them.
FeathersBird feathers were frequently used as trimming on hats, fans, bags and clothing throughout the 18th, 19th and 20th centuries.– Aigrette. 1. Extremely long, delicate white feathers with
plume at the tip, from the egret, a member of the heron family — a long-legged wading bird that became almost extinct from the demand of these feathers. Popular in the 1920s.
2. Jewelled ornament imitating feathers, attached to a headband worn in the 1920s.
Fibres – Angora. Angora wool or Angora fibre is the
downy, silky coat produced by the Angora rabbit, approximately 12–16 microns in diameter.
– Cotton. A plant that produces a pod or ‘bol’ filled with fine, white fibres.
– Flax. A plant with long fibres spun to make linen.– Mohair. Mohair fibre is taken from the Angora
goat, approximately 25–45 microns. It is durable, resilient and dyes exceptionally well.
– Silk. A fine thread extruded by the silkworm in making its cocoon.
FichuSee neckwear.
Flapper dressWoman’s shapeless evening shift falling from the shoulders to knee-length or below. First worn in the late 1920s, it was a dramatic change in silhouette for women and was often lavishly decorated with beads, embroidery, sequins or fringing for evening.
FlapsNon-structural piece of doubled fabric often concealing an opening or pocket.
FlareIncreasing the width of fabric in seams that create fullness towards the hem as in sleeves, pants, skirts or jackets.
FlounceA narrow length of circular, bias-cut or straight cut fabric gathered and attached to a garment, to decorate the hem of a skirt, neckline or sleeve.
FrillNarrow length of fabric or lace with a finished edge gathered to form a ruffle and attached as trimming to a dress or blouse.
Frock1. A man’s coat with a turned down collar, fashionable for country wear at the end of the 18th century, later to become the standard man’s frock coat of the 19th century.2. Woman’s dress, 1925–55 (Australia).
FroggingSee fastenings.
G
GatherDraw fabric up with stitched threads to create fullness.

82
GimpLace trim made from a fine narrow braid of silk.
GirdleA scanty, belt-shaped textile for men and/or women. From 1910 to the late 1960s, girdles were considered essential garments by many women. They created a rigid, controlled figure that was seen as respectable and modest.
GoreA vertical panel of a skirt that widens towards the hem, eg four-gored skirt. In the 19th century gores were cut so that the straight grain was seamed against the bias, to hold the seam firmly.
GrainThe direction of the warp and the weft threads in woven fabric.
Guipure laceSee lace.
GussetUsually a square or diamond-shaped piece of material inserted to allow movement in a particular area such as the underarm or crotch.
H
Habit shirtFalse blouse that fills in a low-necked bodice. It consists of a neck detail front and back and is tied at the waist.
Haute coutureVery high quality, bespoke dressmaking identified with France.
HollandFabric that was used for linings and backings, usually made from unbleached linen with a polished surface.
Homburg hatHard felt hat with a dent in the crown, introduced by Edward VII in 1889.
HourglassA (nearly) symmetric female body shape wide at its ends and narrow in the middle achieved by corsetry. Description associated with the Belle Époque style that favoured a tiny waist and voluptuous bust and hipline.
I
J
JetDense form of black lignite coal obtained from decomposed driftwood found at Whitby on the Yorkshire coast of England. Jet became popular in the 19th century when it was associated with mourning jewellery and clothing.
JodhpursRiding breeches, taking their name from a former state in northwest India. Jodhpurs are very full from the hip to the knee, billowing out at the sides in a semicircle, and skin-tight from knee to ankle. They are finished with a cuff or kept in place with a foot strap.
K
L
LaceA textile with a pattern of holes created by hand or machine.– Bedfordshire. A continuous bobbin lace featuring
plaits, crinkled linen stitch, bar-like wheatears and braided scalloped edge.
– Blonde. Lace that is made from unbleached silk. Popular in the first half of the 19th century, eg Maltese and Chantilly laces.
– Bobbin lace. Made by crossing and plaiting lengths of thread, which are wound on bobbins to manage them. As the work progresses, the weaving is held in place with pins set in a lace pillow, the placement of the pins is usually determined by a pattern or pricking pinned on the pillow. The wider the lace, the more bobbins are used.
– Branscombe. A popular style of Devon lace which connects machine woven tapes with buttonhole stitch covered bars. It can be almost completely filled with fancy filling stitches and decorated with needle woven wheels.
– Broderie anglaise. A white embroidery on white cotton with a pattern of punched holes and tiny scalloped edges. Machines were able to copy this very effectively.
– Chantilly lace. A French, black, silk continuous bobbin lace. Very popular in 1830 this lace worked into a delicate design of flowers on a fine worked, net ground. It has a thick thread around the edge of the embroidered floral motifs called a cordonnet. Machine copies are often very hard to distinguish.
– Crochet. Made with a crochet hook which creates a pattern of interlocking chevrons. It can be used to imitate needle lace but the chevron patterns at the back will identify it.

83
– Guipure lace. Large, often floral patterned lace, held together with bridges and bars, sometimes known as chemical lace. Stitching is made on sacrificial fabric that is chemically removed.
– Machine lace. This became very sophisticated in the 19th century with a range of different machines for specific purposes. Knitting machines allowed the use of many needles to create complex patterns and large widths. Machine-made lace can be identified by fuzzy filling stitches and cloth work; a horizontal and vertical grid effect on net; a zigzag stitching effect; wheatears have centre crossing; stitches look directional; embroidery repeats in broderie anglaise have exit and entry points identical in each motif.
– Maltese lace. Silk bobbin lace with Maltese crosses made up of four triangles as part of its design, often a glossy cream colour. Flat petal-like wheatears are also a feature. The manufacture was initiated in the 1830s in Malta to provide work for impoverished Maltese women and orphans. The designs were based on 17th century Genoese and Italian peasant laces.
– Needle lace. Is created using a needle and thread to meticulously hand stitch hundreds of stitches in a pattern to form the lace itself. The pattern is marked out on a parchment or oiled cloth.
– Tambour. This uses a tiny hook to embroider patterns on net or fine muslin in chain stitch. Difficult to distinguish from machine chain stitch.
– Tape lace. This uses pre-made tape to define the design, folded at curves and corners. The needleworked bars will be the same weight of thread as in the tape if this is good quality. Tape lace can be extremely rough.
Lengths– Ankle length. Length that clears the floor by a
few inches, revealing the foot and ankle.– Calf length. Hem of skirt, dress or coat reaching
below the knee at the widest part of the calf.– Full length. Floor length.– Hip length. Popular length for jackets and
bodices for men and women, ending at hipbone.– Knee length. Shirt or coat reaching to the middle
of the kneecap or to the top of the knee.– Three-quarter length. Woman’s coat or jacket
approximately halfway between hip and thigh.
LiningFabric, often silk or synthetic, cut to a similar shape as a garment and attached on the inside to cover seams and assist with dressing, eg for jacket.
Louis heels A medium-high heel that curves in at the middle. Inspired by shoes worn by King Louis XIV (1643–1715).
M
MantleHooded cloak with silk tassels worn by women as an outer garment in the mid and late 19th century. It is usually waist or hip length and made of light woollen materials.
Monobosom silhouetteShape of bodices worn in the first decade of the 20th century. Garments are cut with a full, pouched front section that makes the wearer appear to have one single large breast.
Morning dress1. Formal daytime attire for men consisting of striped trousers, cutaway coat, ascot tie and sometimes top hat. 2. In the 19th century the term used for any woman’s dress suitable for wear in the morning — for visiting, shopping or at home — as differentiated from a more formal afternoon dress. Also called morning gown or morning robe. 3. In early 20th century the term used for a house dress of inexpensive fabric.
Mother-of-pearlShiny, iridescent shell lining of the pearl oyster, abalone or other molluscs used for buttons and jewellery.
Mourning dressClothing, usually black, worn for funerals or during the mourning period after the funeral. During the 19th and 20th centuries, custom prescribed not only colours and fabrics, but also stages and gradations of mourning. Men were required to wear a black armband. Widows had to wear deep mourning, black crepe covered dresses worn with black accessories, for a year and one day. Other female relatives wore deep mourning for varying periods of time depending on their relationship to the deceased. After the mourning period, the next stage was half mourning, which usually consisted of black, grey or purple costume with touches of white.
Queen Victoria’s strict observance of mourning after the death of Prince Albert in 1861 helped promote a vogue for black garments, particularly crepe. Caps, hats, coats, dresses, stockings, veils, mantles, gloves and blouses were available in black crepe muslin, gauze, cotton and wool. Jet jewellery was also worn. The fashion for mourning clothes had almost disappeared by the end of the 19th century.

84
MuffWarm tubular covering for the hands and open at each end. Often made of fur or rich fabrics, usually round or oblong in many sizes and sometimes with concealed inner pockets. Carried by women and usually matched to material of coat or trimming. Popular in the late 19th century and were also used to carry personal items and as a form of decoration. The handbag began to replace the muff in the early 20th century.
N
Necklines– Boat neck. A shallow curved neckline that
extends to each shoulder.– Décolletage. A neckline for women that reveals
some part of the breast.– High. Neckline at or above collarbones.– Off the shoulder. Falls below the shoulders, may
or may not have sleeves.– Sweetheart. Shaped like the top half of a heart.
Neckwear– Bandana. Cotton print neckerchief worn casually
by men in 19th century.– Cravat. Forerunner of the bowtie and the necktie.
Usually made from a band of material that is wrapped around the neck and tied in a variety of ways, 19th century.
– Fichu. Neckwear usually consisting of a large square of muslin folded diagonally to form a triangle and worn in the 18th century. As time progressed, it became more elaborate — shaped to fit neck, trimmed with ruffles, lace and ruching. Frequently fastened or tied in front with hanging ends. Continued to be worn until about 1871. Soft muslin or lace neck square which tucks into dress or ties at front.
– Jabot. Late 19th century woman’s decorative neck accessory of fine lawn or lace held in place with a brooch or attached to a neckband.
– Kerchief. Tucked into neck; across the front tying at the back with back point, 1780s; across neck and tucked into high waist belt, 1785–1800.
– Neckerchief. Pinned high over bosom, 1756, 1796; knotted in front, 1775.
– Shawl. Square or rectangular piece of material worn loosely over shoulders or across back and over arms.
– Steinkerk. From the end of 17th century, a carelessly knotted cravat as worn in the 1692 battle of Steinkerk when French soldiers who were suddenly called to fight, had no time to tie them carefully. Worn by men and women.
– Stole. Long rectangular piece of material worn across back and over arms. Often worn with evening wear.
– Tucker. Part blouse with fancy neckline possibly tying around body to go under another bodice.
Norfolk jacketA fashionable, men’s belted jacket in the 1870s that became fashionable for women in the 1890s.
O
Open robeTerm used in the 19th century for floor-length dress often silk brocade which opens at front to reveal an ornamental underskirt or petticoat. Worn in England and Europe, 1750–90.
P
PannierStructure of metal, whalebone or willow worn by women under 18th century skirts to extend the width of the skirt at the side while leaving the front and back flat. This provided a flat panel where boldly scaled woven patterns or rich embroidery could be fully appreciated.
PassementerieA variety of stylised braids and fringes very popular in 1815–30 and 1870–90. They were often made from small, shaped, wooden beads covered with fine, untwisted silk thread.
PelisseA woman’s long empire line silk winter coat from the early 19th century trimmed with military braids imitating dress of 17th century Hussar mercenaries. It was usually worn open to reveal a dress or gown beneath.
PeplumA short overskirt or ruffle attached at the waistline of a jacket, blouse or dress.
Petticoat1. Highly decorated skirt worn with an open robe 1750–90.2. Skirt-like undergarment worn for warmth or to give the skirt or dress the desired fashionable shape.
PinstripeSingle thread warp of contrasting colour creating a fine stripe in fabric often used in men’s suiting, eg pinstripe suit.

85
PipingA fine cord is set into a bias fabric tape and stitched into seams to strengthen and give them a crisper finish. Sometimes used in several colours as a decorative element.
Pleating– Box pleat. Double pleat formed by two facing
folds meeting in the centre underneath the pleat.– Cartridge pleating. A type of pleating that used
two or three rows of evenly and widely spaced gathering threads forming tube-like gathers when drawn up and used to gather a large quantity of fabric into a small width.
– Inverted pleat. The reverse of a box pleat.– Knife pleats. Sharply pressed flat pleats going in
same direction.
Plus-foursMen’s trousers that extend 4 inches (10 cm) below the knee (and thus 4 inches longer than traditional knickerbockers, hence the name). As they allow freedom of movement, they have been traditionally used for sport from the 1860s, particularly golf.
PolonaiseA woman’s overskirt pulled back and looped up at the sides to form a large drape or puff. Used to describe a boned bodice and overskirt looped up by drawstrings at hips and back to form three large puffs, thereby revealing the petticoat or underskirt in the second half of the 18th century.
Princess lineFitted dress from the 1880s without a waist seam, shaped by vertical seams over bust, waist and hips. Named after Princess Alexandra, wife of Edward VII. Often worn with a bustle at the back.
ProvenanceInformation about an object pertaining to its origin, source, history and ownership.
Q
R
Riding habitWoman’s riding outfit with a fitted tailored jacket and an asymmetrical skirt cut to accommodate a side-saddle. Skirt has a loop to lift it when walking.
Ruching1. Trimming made by pleating a strip of lace, ribbon, net, fine muslin, or silk with stitching in centre so that it ruffles on both sides. 2. Contemporary usage also applies the term to clothing with large rippled areas formed by gathering.
RuffleStrip of cloth, lace or ribbon gathered along one edge or cut in a curve to produce a flounce. Used to trim neckline, wrist or hem of clothing. See also flounce.
S
SacqueDeep back pleats that fall from the neck to the heels on women’s 18th century open robes.
SashMan or woman’s loose, fabric belt often tied in a knot or bow.
ScarfDecorative or utilitarian accessory worn draped around the shoulders, the neck, or over the head for warmth or adornment. May be square, oblong or triangular and made of knitted, crocheted or woven fabric.
SelvedgeDense edge of woven fabric formed during weaving. Sometimes carries a coloured thread.
ShawlLarge square or rectangular piece of cloth worn around the shoulders, loosely tied in front, over the bust.
Sleeves– Bishop. Fuller in the lower forearm, then
gathered at the wrists into a wide cuff.– Cap sleeve. A very short sleeve that just covers
the shoulders and has a very small seam or none at all at the underarm junction.
– Dolman sleeve. A form of kimono sleeve that has a low underarm. Cut as an extension of the bodice of a dress, blouse or jacket, the dolman sleeve is designed without a socket for the shoulder, thus creating a deep, wide armhole that reaches from the waist to a narrowed wrist. This type of sleeve was popular during the 1930s and is also known as a batwing sleeve.
– Juliet. Long fitted sleeve with a puff at the top.– Leg-of-mutton. Sleeve with gathered full top
tapering to a snug fit at the forearm.– Magyar. Sleeve which is cut integrally with the
body of the garment, the two sections being joined from neck to wrist over the shoulder and from side seam to wrist.
– Puff (wide). Short sleeve gathered into a band to create a gentle round shape.
– Raglan. Sleeve joined to the bodice of a coat or dress by diagonal seams from the neck to under the arms at front and back.
– Set in. One or two-piece sleeve gathered or eased at the shoulder into a bodice armhole.

86
SmockingFabric precisely gathered to create cartridge-like pleats that are subsequently embroidered. Seen on men’s work smocks from the early 18th century.
StaysA corset stiffened with whalebone, metal or plastic to reduce the waist size or support the back.
SweepWoollen braid attached to the hem of a skirt to protect the fine fabric from chafing on the ground.
T
Tea-gownIn the mid 19th century women wore pre-dinner gowns which were simply structured to allow corsets to be loosened or removed underneath. By the 1870s the tea-gown was an elaborate affair, often long sleeved, high waisted and full at the back and made of chiffon, muslin, silk or satin and trimmed with lace ruffles and ribbons. Many tea-gowns have elaborate trains.
TrainBack skirt extension worn by women formally and for weddings from the 19th century.
Trimmings– Bugle beads. Tubular beads used for
ornamentation.– Lace. See the lace entry in the glossary; Lace
Study Centre at http://www.powerhousemuseum.com/lacestudycentre/.
U
V
W
WaistbandBand of fabric, usually interfaced, attached to waistline of bodice, skirt or pants and fastened to hold garment firmly around waist.
WaistcoatSleeveless man’s garment which buttons up the front and is usually worn over a shirt and under a jacket.
Waistline1. Narrowest part of torso.2. Horizontal seam joining the top and the skirt of a dress if the garment is made in two pieces. Waistlines are not necessarily located at the anatomical waist.– Empire. High-waisted effect with seam placed
directly under bust. This was the predominant waistline placement for the late 18th century to 1820s during Empire and Directoire periods in France, and has been popular periodically since then for women’s dresses, coats and lingerie. It derives from attempts to imitate the styles of the ancient Greeks and Romans.
– Natural waist. Belt or seam placed at narrowest part of the torso.
Walking dressThe full costume of the 19th century walking dress always included bonnets, caps or veils, an outer garment or wrap, and gloves.
WarpLengthwise direction in fabric, or yarns that are tied onto the loom and run lengthwise and parallel to the selvage.
WeftCrosswise or horizontal yarn in woven fabric, that runs at right angles to the selvage. These threads are wound on a shuttle to be woven into the warp threads.
WhaleboneUsed to stiffen parts of women’s stays and dresses. Made from the comb-like plates of keratin whales use to filter plankton. See ‘10.1 Stiffening/lining/padding’ information sheet.
X
Y
Z

87
CONSERVATION • INFORMATION SHEET
Products and suppliers list
This information sheet alphabetically lists many products used in conservation practise. The suppliers details are listed after the products list (page 90).
Products Suppliers
Acid-free adhesives Archival Survival, Blackwoods, Conservation Resources, Talas, Winterbottom, Zetta Florence
Acid-free board Archival Survival, The Art Shop, Artscene, Canson Australia, Conservation Resources, Kadmium, The Stalley Box Co, Talas, Zetta Florence
Acid-free boxes, envelopes, folders, wallets,
Albox Australia, Archival Survival, Conservation Resources, The Stalley Box Co, Talas, Zetta Florence
Acid-free cardboard rolls Archival Survival
Acid-free paper/acid-free tissue Albox Australia, Archival Survival, Artscene, Conservation Resources, The Stalley Box Co, Talas, Zetta Florence
Acrylic — UV-absorbing Plastral
Archival filing/storage sleeves Archival Survival, Barcond Promura, Conservation Resources, Talas, Zetta Florence
Art supplies The Art Shop, Artscene, Canson Australia, Kadmium
Blotting paper Archival Survival, Artscene, Canson Australia, Conservation Resources
Bookbinding supplies, coverings Amazing Paper, Artscene, Talas, Winterbottom Products
Boxes — acid-free, polypropylene Albox Australia, Archival Survival, Conservation Resources, The Stalley Box Co, Talas, Zetta Florence
Bubblewrap — archival Archival Survival
Ceramic wax (for display) Archival Survival, Talas
Charcoal cloth Archival Survival, Talas
Cleaning cloths Archival Survival, Conservation Resources, Zetta Florence
Coathangers Shops for Shops
Conservation tools Archival Survival, Conservation Resources, Fine Science Tools, Talas, Zetta Florence
Coreflute Archival Survival, Artscene, Conservation Resources, Corex Plastics, Mulford Plastics
Corrosion prohibitor (Intercept) Talas, Under-Raps
Corrosion remover Archival Survival

88
Products Suppliers
Cotton buds (bulk) Livingstone International, VWR International
Cotton tape Archival Survival, Conservation Resources, Talas, Zetta Florence
Dacron wadding Haberdashery stores (check it is not treated with Ultrafresh mould inhibitor)
Detergent — orvus, triton, vulpex Archival Survival, Talas, The Textile Restoration Studio
Disaster recovery Conservation Resources, Damp Solutions Australia, Preservation Australia, Steamatic
Display panels/cases Designcraft, Graphic Art Mart, Interium, Tashco
Dust brushes, dust bunnys Archival Survival, Conservation Resources, Talas, Zetta Florence
Environmental equipment Conservation Resources, Dick Smith, Jaycar Electronics, Talas, VWR International
Erasers Archival Survival, Artscene, Conservation Resources, Kadmium, Zetta Florence
Foam —cell-aire, ethafoam Archival Survival, Clark Rubber (pool noodles), Metro Foam Products, Sekisui Pilon, Thermotec
Framing materials Artscene, Canson Australia, Spacepac Industries, Sydney Art and Framing Supplies
Gloves — cotton Archival Survival, Conservation Resources, Livingstone International, Rowe Scientific, Zetta Florence
Gloves — latex, nitrile Archival Survival, Conservation Resources, Livingstone International, Rowe Scientific, VWR International
Hanging devices — cable, crimper, swages
Arcus Wire Group, fishing supply stores, Interium
Humidity and temperature indicator cards
Archival Survival, Conservation Resources, Zetta Florence
Humidity control Damp Solutions Australia, Dick Smith, Jaycar, Steamatic, The Textile Restoration Studio, VWR International
Hygrometer — digital (temp and RH)
Dick Smith, Jaycar
Insects see pest management
Japanese paper Artscene, Canson Australia, Talas
Kunst-stoff (perspex cleaner) Archival Survival
Labels — archival Archival Survival, Conservation Resources, Zetta Florence
Laboratory supplies/equipment Biolab, Capital Medical Supplies, John Morris Scientific, Livingstone International, Rowe Scientific, VWR International
Leather detergent Talas

89
Products Suppliers
Light meters Archival Survival, Conservation Resources, Dick Smith, John Morris Scientific, Talas
Mannequins Mei & Picchi, Museum Mannequins, United Displays, Wacoal Corporation
Mylar Archival Survival, Conservation Resources, Mulford Plastics, Rowe Scientific, Talas, Zetta Florence
OH&S equipment Blackwoods, Drager Safety Pacific, Harry Daines, Livingstone International, Rowe Scientific, Seton Aust, Talas, VWR International
Paper towels — lint free, reinforced (Roar wipers)
Kimberly-Clark
Paperweights Archival Survival, Zetta Florence
Paraloid Archival Survival, Conservation Resources
Perspex cleaner see Kunst-stoff
Pest management — sticky traps Agserve, Archival Survival, Conservation Resources, The Textile Restoration Studio
pH strips, pens Archival Survival, Conservation Resources, Rowe Scientific, Talas
Photographic storage Albox Australia, Archival Survival, Barcond Promura, Conservation Resources, The Photo Album Shop, Talas, Zetta Florence
Pins — insect, specimen Archival Survival, The Textile Restoration Studio
Polyethylene/polypropylene — bags, boxes, straps
Albox Australia, Allplastic Engineering, Archival Survival, Barcond Promura, Conservation Resources, Spacepac Industries, Talas
Qubelock framing systems Spacepac Industries
Reemay Archival Survival, Conservation Resources, Zetta Florence
Rods and fittings — stainless steel Interium
Silica gel Archival Survival, Conservation Resources, Talas, Zetta Florence
Silicon tubing ERA Polymers, Jehbco Silicon
Spatulas Conservation Resources, Fine Science Tools, Rowe Scientific, Talas
Sponges — soot removal, surface cleaning
Archival Survival, Conservation Resources, The Textile Restoration Studio, Zetta Florence
Storage cabinets BAC Systems, Dexion, Versatile Storage Systems
Tape — acid-free, double-sided Archival Survival, Artscene, Conservation Resources, Harry Daines, Talas, Zetta Florence
Tape — cotton Archival Survival, Conservation Resources, Zetta Florence
Textile conservation fabrics Talas, The Textile Restoration Studio
90
Products Suppliers
Textile detergent — orvus paste Archival Survival
Thermohygrograph see humidity
Thermohygrograph charts, pens Miller Graphic
Threads — cotton, linen, polyester, silk
Quality haberdashery stores, The Textile Restoration Studio, Zetta Florence
Time capsules Archival Survival
Tissue see acid-free tissue
Tubs, trays, trolleys Moore Equipment, Spacepac Industries
Tweezers Fine Science Tools, Rowe Scientific, Talas, The Textile Restoration Studio
Tyvek Archival Survival, Conservation Resources, Zetta Florence
UV-absorbing acrylic Plastral
UV-absorbing filters for fluorescent lights
Conservation Resources, Media Vision
UV light meter Archival Survival, Conservation Resources, Talas
Vacuum cleaners — large and mini, attachment kits
Conservation Resources, Godfreys Vacuum Cleaner Specialists, Talas, The Textile Restoration Studio
Velcro Harry Daines, Velcro Australia
Wax — microcrystalline, renaissance
Archival Survival
Workshops — conservation Preservation Australia
Suppliers
Supplier’s name Address Contact details
Agserv 6/105 Derby St, Silverwater NSW 2128
02 9647 2111 www.agservaustralia.com
Albox Australia 56 Nth Terrace, Kent Town SA 5067
1300 555 717 www.albox.com.au
Allplastic Engineering 20/380 Eastern Valley Way, Chatswood NSW 2067
02 9417 6111 www.allplastics.com.au
Amazing Paper 184 Enmore Road, Enmore NSW 2042
02 9519 8237 www.amazingpaper.com.au
Archival Survival 1300 781 199 www.archivalsurvival.com.au
91
Supplier’s name Address Contact details
Arcus Wire Group PO Box 208, Botany NSW 1455
02 9666 5900 www.arcuswire.com
The Art Shop Unit 4, 21 Power Rd, Bayswater Vic 3153
1800 444 419 www.theartshop.com.au
Artscene 912 Victoria Road, West Ryde NSW 2114
02 9807 6900 www.artscene.com.au
BAC Systems 193–195 Power St, Glendenning NSW 2761
02 9675 3645 www.bacsystems.com.au
Barcond Promura PO Box 204, Hornsby NSW 1630
02 9457 7323 www.barcond.com.au
Biolab 5 Caribbean Dr, Scoresby VIC 3179
1300 735 292 www.biolabgroup.com
Blackwoods 13 73 23 www.blackwoods.com.au
Canson Australia 13–19 Keysborough Rd, Keysborough VIC 3173
03 9701 8266 www.canson.com.au
Charles Parsons & Co PO Box 444, Strawberry Hills NSW 2012
02 9910 4100 www.charlesparsons.com
Clark Rubber Various stores 13 80 90 www.clarkrubber.com.au
Conservation Resources PO Box 210, Enmore NSW 2042
1300 651 408 www.conservationresources.com.au
Corex Plastics 261–267 Frankston- Dandenong Rd, Dandenong VIC 3175
03 9238 1300 www.corex.net.au
Damp Solutions Australia 1300 353 043 www.dampsolutions.com.au
Designcraft 8 Tralee St, Hume ACT 2620
02 6290 4989 0423 023 735 www.designcraft.net.au
Dexion 23 Tattersall Rd, Kings Park NSW 2148
1800 100 050 www.dexion.com.au
Dick Smith Various stores 1300 366 644 www.dicksmith.com.au
Drager Safety Pacific 97/45 Gilby Rd, Mt Waverley VIC 3149
1800 800 327 www.draeger.com.au
ERA Polymers Locked Bag 7005, Banksmeadow NSW 1455
02 9666 3788 www.erapol.com.au
Fine Science Tools 49 (0) 6221 905 050 www.finescience.de

92
Supplier’s name Address Contact details
Godfreys Vacuum Cleaner Specialists
Various stores 1800 815 270 www.godfreys.com.au
Graphic Art Mart 1/22 Loyalty Rd, North Rocks NSW 2151
02 8843 0299 www.gamart.com.au
Harry Daines 175 Botany Rd, Waterloo NSW 2017
02 9699 3977 www.harrydaines.com.au
Interium PO Box 789, Beaconsfield Vic 3807
1300 307 071 www.interium.com.au
Jaycar Various stores 1800 022 888 www.jaycar.com.au
Jehbco Silicon 24 William St, Brookvale NSW 2100
02 9905 9611 www.jehbco.com.au
John Morris Scientific 61–63 Victoria Ave, Chatswood NSW 2067
02 9496 4200 www.johnmorris.com.au
Kadmium 80b Bay Street, Broadway NSW 2007
02 9212 2669 www.kadmium.com.au
Kimberly-Clark c/o Officemax Aus
20 Worth St, Chullora NSW 2190
02 8732 0222 www.kimberly-clark.com.au/en
The Kyoto Costume Institute 103, Shichi-jo Goshonouchi Minamimachi, Shimogyo-ku, Kyoto, 600–8864 Japan
+81 (75) 321 9221 www.kci.or.jp/exhibitions/ mannequin_e.html
Livingstone International 106–116 Epsom Rd, Rosebery NSW 2018
1300 727 203 www.livingstone.com.au
Mediavision Australia Lee UV 226
4 Monash Rd, Gladesville NSW 2111
02 9816 4055 www.mediavision.com.au
Mei & Picchi 41–43 Parramatta Rd, Annandale NSW 2038
02 9550 2544 www.meipicchi.com
Metro Foam Products 15 Fariola St, Silverwater NSW 2128
02 9748 8588 www.metrofoam.com.au
Miller Graphic (D+N Engineeering)
226 Alexandra Parade East, Clifton Hill Vic 3068
03 9481 2022 www.millergraphic.com.au
Moore Equipment Unit B4, 3–29 Birnie Ave, Lidcombe NSW 2141
1300 836 831 www.mooreequipment.com.au
Mulford Plastics Unit 22 Slough Business Park, Holker St, Silverwater NSW 2128
02 9911 8111 www.mulford.com.au
Museum Mannequins — Lindie Ward
6 King St, Balmain NSW 2041
0425 261 201 www.museum-mannequins.net
The Photo Album Shop 15/12–14 Beaumont Rd, Mt Kuring-gai NSW 2080
02 9457 7322 www.photoalbumshop.com

93
Supplier’s name Address Contact details
Plastral 130 Denison St, Hillsdale NSW 2036
02 9695 3200 www.plastral.com.au
Preservation Australia PO Box 210, Enmore NSW 2042
1300 651 408 www.preservationaustralia.com.au
Rowe Scientific State branches www.rowe.com.au
Sekisui Pilon 1–5 Parraweena Rd, Taren Point NSW 2229
02 9525 9880 www.sekisuipilon.com.au
Seton Aust Pty Ltd 2 Bellevue Circuit, Greystanes NSW 2145
1800 651 173 www.seton.com.au
Shops for Shops 573 Gardeners Rd, Mascot NSW 2020
02 8338 6488 www.shopforshops.com
Spacepac Industries 39 Ellen St, Wollongong NSW 2500
1300 763 444 www.spacepac.com.au
The Stalley Box Co PO Box 330, Hindmarsh SA 5007
08 8340 2155 www.thestalleyboxcompany.com
Steamatic Various locations 1300 783 262 www.steamatic.com.au
Sydney Art and Framing Supplies Unit 5/49 Derby St, Silverwater NSW 2128
02 9648 1118 www.artandframing.com.au
Talas 330 Morgan Ave, Brooklyn New York 11211 USA
212 219 0770 www.talasonline.com
Tashco PO Box 476, Lara Vic 3212
03 5274 1133 www.tashcosystems.com.au
The Textile Restoration Studio (Restore Products)
2 Talbot Rd, Bowden, Altrincham, Cheshire, UK WA14 3JD
0161 928 0026 www.textilerestoration.co.uk
Thermotec 168 Carrington St, Revesby NSW 2212
1300 727 083 www.thermotec.com.au
Under-Raps 15 Irvine Dr, Malaga WA 6090
08 9248 8900 www.underraps.com.au
United Displays Unit 5, 67 Lords Rd, Leichhardt NSW 2040
02 9560 6222 www.uniteddisplays.com.au
Velcro Australia PO Box 2133, Fountain Gate Vic 3805
03 9703 2466 www.velcro.com.au
Versatile Storage Systems 7 Cameron Pl, Orange NSW 2800
02 6362 5533 www.versatilestorage.com.au
VWR International Pty Ltd Unit 1/31 Archimedes Place, Murarrie QLD 4172
1300 727 696 https://au.vwr.com/app/Home

94
Supplier’s name Address Contact details
Winterbottom Products 5/16–18 Powers Rd, Seven Hills NSW 2147
02 9674 3200 0418 440 009 www.winterbottom.net
Zetta Florence 197 Brunswick St, Fitzroy VIC 3065
03 9417 6211 www.zettaflorence.com.au
Please note: the contact details listed in this resource were correct at the time of publication.
This information sheet is part of a series developed by Powerhouse Museum Conservation department 500 Harris St Ultimo Sydney + PO Box K346 Haymarket NSW 1238 + www.powerhousemuseum.com + Telephone (02) 9217 0273 +
Facsimile (02) 9217 0498 + Email [email protected]
The Powerhouse Museum, part of the Museum of Applied Arts and Sciences also incorporating Sydney Observatory, the Powerhouse Discovery Centre and the NSW Migration Heritage Centre, is a NSW government cultural institution.
© 2013 Trustees of the Museum of Applied Arts and Sciences

95
Costume care
Guidelines for costume. International Council of Museums, Costume Committee, http://www.costume-committee.org/index.php?option=com_content&view=article&id=16&Itemid=21.
Curatorial care of textile objects. Museum handbook, National Park Service, Museum Management Program, US Department of the Interior, http://www.nps.gov/history/museum/publications/MHI/Appendix%20K.pdf.
Textiles. Caring for your treasures, American Institute for Conservation of Historic and Artistic Works, http://www.conservation-us.org/_data/n_0001/resources/live/textiles.pdf.
How to care for textiles. Canadian Conservation Institute, http://www.cci-icc.gc.ca/caringfor-prendresoindes/articles/423-eng.aspx.
Conservation
CARE Conservation search engine. An online search engine that focuses on a wide variety of conservation topics and issues. Powerhouse Museum, http://www.powerhousemuseum.com/conservation/resources.php.
Instruction videosHow to dress a mannequin. http://www.australiandressregister.org/resources/video/how-to-dress-a-mannequin/.
Photographing a garment in a museum with a standard digital camera. http://www.australiandressregister.org/resources/video/photographing-a-garment/.
Measuring a garment. http://www.australiandressregister.org/resources/video/measuring-a-garment/.
Storing a garment in a large storage box. http://www.australiandressregister.org/resources/video/storing-a-garment-large/.
Storing a garment in a small storage box. http://www.australiandressregister.org/resources/video/storing-a-garment-small/.
Fibre/fabric
Textile dictionary. Internet Centre For Canadian Fashion and Design, http://www.ntgi.net/ICCF&D/textile.htm.
Synthetic fibres in costume collections. Conserve O Gram, National Park Service, Museum Management Program, US Department of the Interior, http://www.nps.gov/history/museum/publications/conserveogram/16-04.pdf.
Electronic swatchbook. Powerhouse Museum, http://www.powerhousemuseum.com/electronicswatchbook/.
Family history
How to trace your family tree. NSW Registry of Births Deaths and Marriages, http://www.bdm.nsw.gov.au/familyHistory/howToTraceYouFamTree.htm.
Lace Study Centre
View our lace collection from all over the world and visit our online resources. Powerhouse Museum, www.powerhousemuseum.com/lacestudycentre/.
Copyright
Information sheets. Australian Copyright Council, http://www.copyright.org.au/publications/infosheets.htm.
Assessing object significance
Significance 2.0: a guide to assessing the significance of collections, Collections Council of Australia, http://www.environment.gov.au/heritage/publications/significance2-0/.
State Records
Can you date this photograph? Archives Outside, State Records NSW, http://archivesoutside.records.nsw.gov.au/can-you-date-this-photograph/.
Other websites
Please note: the websites throughout this book were available and suitable at the time of publication.
Links to other websites are inserted for convenience and do not constitute endorsement of material at those sites, or any associated organisation, product or service.

96

The Australian Dress Register is a collaborative, online project about dress in New South Wales pre 1945. This includes men’s, women’s and children’s clothing ranging from the special occasion to the everyday. Museums and private collectors are encouraged to research their garments and share the stories and photographs while the information is still available and within living memory. The register encourages people to consider their collections very broadly and share what they know about members of their community, what they wore and life in the past. This provides access to a world wide audience while keeping their garments in their relevant location.
This booklet provides all the information and resources you will need to help you document the garments in your collection and submit the entries to the Australian Dress Register.
Australian Dress Register, Powerhouse Museum, Sydney + PO Box K346 Haymarket NSW 1238 Australia + Telephone (02) 9217 0220 + Facsimile (02) 9217 0355 + Email [email protected]
The Powerhouse Museum, part of the Museum of Applied Arts and Sciences also incorporating Sydney Observatory, the Powerhouse Discovery Centre and the NSW Migration Heritage Centre, is a NSW government cultural institution. © 2012 Trustees of the Museum of Applied Arts and Sciences.