EQAXF01BXSI EQAXF01BXWI INA PANDUAN PENGGUNA 1 · 2 10 Trouble Shooting 12 Customer Care pencegahan...
32
EQAXF01BXSI EQAXF01BXWI INA PANDUAN PENGGUNA 1
Transcript of EQAXF01BXSI EQAXF01BXWI INA PANDUAN PENGGUNA 1 · 2 10 Trouble Shooting 12 Customer Care pencegahan...

EQAXF01BXSI
EQAXF01BXWI
INA
PANDUAN PENGGUNA 1

Terima kasih telah memilih Electrolux. Panduan ini mengandung semua informasi yang Anda butuhkan untuk menggunakan dispenser air Anda dengan aman dan benar. Silahkan baca semua instruksi sebelum menggunakan alat, dan simpan panduan ini di tempat yang aman untuk referensi di masa mendatang. Jangan lepaskan label pelat peringkat, yang melampirkan label identifikasi perekat yang berisi kode, nomer model, pabrikan, dan informasi lainnya. Label ini akan digunakan oleh perwakilan servis resmi ELECTROLUX jika dispenser air Anda perlu diservis.
Pemberitahuan Lingkungan
take the appliance to the nearest WEEE collecting
agents, where available.
agents.
Bahan kemasan yang digunakan dapat didaur ulang.
Kami menyarankan Anda memisahkan plastik,
kertas, kardus dan berikan kepada agen daur ulang.
Untuk membantu melestarikan lingkungan, refrigeran
yang digunakan dalam produk ini adalah R13a
(Hydrofluorocarbon - HFC), yang tidak
mempengaruhi lapisan ozon dan berdampak kecil
pada efek rumah kaca.
Menurut pedoman WEEE (Limbah Peralatan Listrik
dan Elektronik), limbah dari perangkat listrik dan
elektroik harus dikumpulkan secara terpisah. jika
Anda perlu membuang alat ini di masa depan, jangan
membuangnya dengan sisa sampah domestik Anda.
Sebagai gantinya, harap bawa alat ke agen
pengumpul WEEE terdekat, jika tersedia.
2
10
Trouble Shooting 12
Customer Care
properties incident.
d
power
To avoid danger of suffocation, keep plastic bag away from babies and children.
Keep ventilation openings, in the appliance enclosure or in the built-in structure, clear of obstruction.
Do not use mechanical devices or other means to accelerate the defrosting process, other than those recommended by the manufacturer.
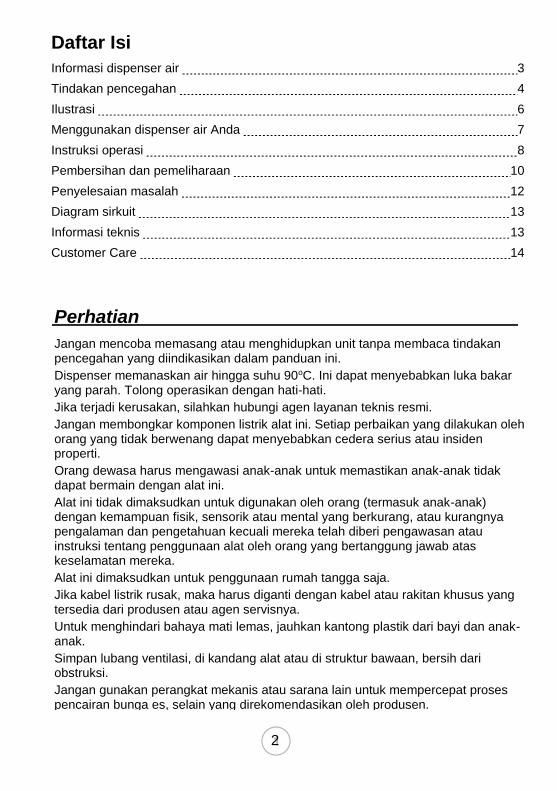
Informasi dispenser air 3
Tindakan pencegahan 4
Ilustrasi 6
Menggunakan dispenser air Anda 7
Instruksi operasi 8
Pembersihan dan pemeliharaan 10
Penyelesaian masalah 12
Diagram sirkuit 13
Informasi teknis 13
Customer Care 14
Jangan mencoba memasang atau menghidupkan unit tanpa membaca tindakan pencegahan yang diindikasikan dalam panduan ini.
Dispenser memanaskan air hingga suhu 90oC. Ini dapat menyebabkan luka bakar yang parah. Tolong operasikan dengan hati-hati.
Jika terjadi kerusakan, silahkan hubungi agen layanan teknis resmi.
Jangan membongkar komponen listrik alat ini. Setiap perbaikan yang dilakukan oleh orang yang tidak berwenang dapat menyebabkan cedera serius atau insiden properti.
Orang dewasa harus mengawasi anak-anak untuk memastikan anak-anak tidak dapat bermain dengan alat ini.
Alat ini tidak dimaksudkan untuk digunakan oleh orang (termasuk anak-anak) dengan kemampuan fisik, sensorik atau mental yang berkurang, atau kurangnya pengalaman dan pengetahuan kecuali mereka telah diberi pengawasan atau instruksi tentang penggunaan alat oleh orang yang bertanggung jawab atas keselamatan mereka.
Alat ini dimaksudkan untuk penggunaan rumah tangga saja.
Jika kabel listrik rusak, maka harus diganti dengan kabel atau rakitan khusus yang tersedia dari produsen atau agen servisnya.
Untuk menghindari bahaya mati lemas, jauhkan kantong plastik dari bayi dan anak-anak.
Simpan lubang ventilasi, di kandang alat atau di struktur bawaan, bersih dari obstruksi.
Jangan gunakan perangkat mekanis atau sarana lain untuk mempercepat proses pencairan bunga es, selain yang direkomendasikan oleh produsen.
Perhatian
Daftar Isi

1. This unit is designed for drinkable water only. Put bottles as specified inside
the cabinet before using.
3. The dispenser can satisfy the need for hot water, cold water, room
temperature water and water as a mixture of the cold water and room
temperature water.
4. With the adoption of distinctive thermal isolation technology, this unit can
minimize thermal exchange between hot, room temperature and cold water.
5. Do not store explosive substances such as aerosol cans with a flammable propellant in this appliance.
6. Regional restrictions
The heating method of machine can be only used in the lower than 1500m elevations.
1. Unit ini dirancang hanya untuk air minum. Masukan botol sebagaimana ditentukan dalam kabinet sebelum menggunakan.
2. Unit ini harus digunakan dalam lingkungan dengan suhu mulai dari 10oC hingga 43oC dengan kelembaban relatif tidak lebih tinggi dari 90%.
3. Dispenser dapat memenuhi kebutuhan akan air panas, air dingin, air suhu kamar dan air sebagai campuran air dingin dan air suhu kamar.
4. Dengan adopsi teknologi isolasi termal yang khas, unit ini dapat meminimalkan pertukaran panas antara panas, suhu ruang dan air dingin.
5. Jangan simpan bahan peledak seperti kaleng aerosol dengan propelan yang mudah terbakar di alat ini.
6. Batasan regional. Metode pemanasan mesin hanya dapat digunakan di ketinggian lebih rendah dari 1500m.
Informasi dispenser air
3. Recommend to install the anti-tilt bracket at the
back side of this water dispenser to prevent
the dispenser from falling down which could
cause injury.(Fig. 6)
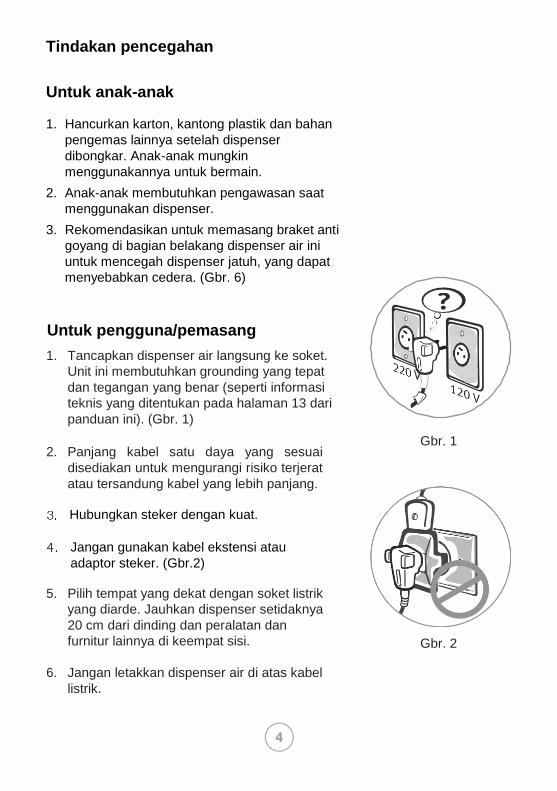
1. Tancapkan dispenser air langsung ke soket.
Unit ini membutuhkan grounding yang tepat
dan tegangan yang benar (seperti informasi
teknis yang ditentukan pada halaman 13 dari
panduan ini). (Gbr. 1)
2. Panjang kabel satu daya yang sesuai
disediakan untuk mengurangi risiko terjerat
atau tersandung kabel yang lebih panjang.
Jangan gunakan kabel ekstensi atau
adaptor steker. (Gbr.2)
5. Pilih tempat yang dekat dengan soket listrik
yang diarde. Jauhkan dispenser setidaknya
20 cm dari dinding dan peralatan dan
furnitur lainnya di keempat sisi.
6. Jangan letakkan dispenser air di atas kabel
listrik.
Gbr. 1
Gbr. 2
Untuk anak-anak 1. Hancurkan karton, kantong plastik dan bahan
pengemas lainnya setelah dispenser
dibongkar. Anak-anak mungkin
menggunakannya untuk bermain.
2. Anak-anak membutuhkan pengawasan saat
menggunakan dispenser.
3. Rekomendasikan untuk memasang braket anti
goyang di bagian belakang dispenser air ini
untuk mencegah dispenser jatuh, yang dapat
menyebabkan cedera. (Gbr. 6)
Untuk pengguna/pemasang
Tindakan pencegahan
Hubungkan steker dengan kuat.

Gbr. 3
10. Simpan unit di tempat yang kering, dan
jauhkan dari sinar matahari langsung.
Jangan letakkan mesin di atas kertas atau
busa. Jangan letakkan benda apapun yang
mudah terbakar di samping mesin ini. (Gbr.
4)
until the water can flow out from the hot water
spout when the hot water button be activated.
12. Cabut unit ketika unit tidak akan digunakan
untuk waktu yang lama karena alasan
menghemat listrik.
14. Jangan gunakan organic liquids polishing
chemical untuk membersihkan mesin.
15. Thermostat untuk mengontrol suhu telah
diatur oleh produsen. Tidak perlu
menyesuaikannya sendiri.
Gbr. 4
Gbr. 5
(Fig. 5)
(Fig. 3)
8. Use the switch when turning the heating/
cooling On/Off. Locate on the left back
side of water dispenser.(page 6)
7. Jangan menarik atau memasukkan steker
dengan tangan basah untuk menghindari
kejutan listrik. (Gbr. 3)
8. Gunakan saklar saat memutar
pemanas/pendingin ON/OFF. Temukan di sisi
kiri belakang dispenser air. (Halaman 6)
9. Jangan kencangkan, memutar atau ikat kabel
daya. Jika kabel daya rusak, harus diganti oleh
produsen, teknisi servis atau orang yang
berkualifikasi untuk mencegah risiko apa pun.
11. Untuk menghindari kerusakan pada unit, jangan hubungkan kabel listrik atau hidupkan saklar pemanas hingga air dapat mengalir keluar dari cerat air panas ketika tombol air panas diaktifkan.
13. Jangan pernah membalikkan unit atau memiringkannya lebih dari 45o. (Gbr. 5)

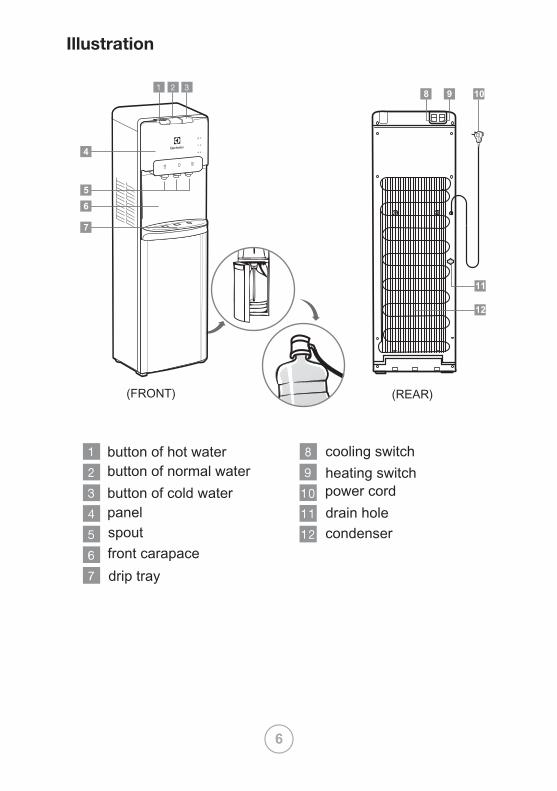
tombol air panas
tombol air biasa
tombol air dingin
panel
cerat
tempurung depan
baki tetesan
saklar pendinginan
saklar pemanas
kabel daya
lubang pembuangan
kondensator
(FRONT)
8 9 10
11
12
Ilustrasi

near a grounded socket. Do not plug in power cord yet.
front carapace.
Memasang kit Bracket lantai (Gbr.6)
1. Gunakan sekrup 13 mm untuk memperbaiki
braket pemasangan di sisi wajan dasar.
2. Bor lubang sekrup (6 mm) di lantai.
3. Masukkan jangkar sekrup (colokan dinding) ke dalam lubang yang dibor.
4. Pindahkan dispenser air, sejajarkan lubang
braket pemasangan dengan lubang sekrup
lantai.
5. Masukkan sekrup 25mm ke dalam lubang sekrup
braket pemasangan.
6. Kencangkan sekrup.
Gbr. 6
1. Buka pintu kabinet.
2. Tempatkan botol segar di luar kabinet.
3. Lepaskan seluruh tutup plastik dari atas
botol.
4. Bersihkan bagian luar botol baru dengan kain.
5. Tempatkan rakitan probe ke dalam botol.
6. Geser kerah dengan kepala ke bawah
hingga klik di tempatnya.
7. Geser botol ke kabinet dan tutup pintu.
Gbr. 7
Menggunakan dispenser air Anda
Meletakkan dispenser
1. Tempatkan dispenser dengan tegak.
2. Letakkan dispenser pada permukaan yang keras dan rata di lokasi yang teduh dan sejuk di dekat soket yang diarde. Jangan pasang kabel daya.
3. Posisikan dispenser sehingga bagian belakang setidaknya 20 cm dari dinding dan ada jarak setidaknya 20 cm di kedua sisi.
Merakit
1. Gabungkan baki tetesan dan rakitan kisi ke dalam karapas depan.
Instalasi Mesin
Memasang botol air

socket.
approximate 12 minutes to fill the tanks
for the first time. During this period the
pump will run continuously. This is normal.
Gbr. 8
Gbr. 9
switches
one liter
Menyediakan listrik
Colokkan kabel ke soket yang dibumikan
dengan benar.
Pada saat ini, pompa akan mulai
memindahkan air dari botol ke tangki
panas dan dingin. Diperlukan waktu sekitar
12 menit untuk mengisi tangki untuk
pertama kalinya. Selama periode ini,
pompa akan terus bekerja. Ini normal.
Instruksi Operasi
Aktifkan pemanasan dan pendinginan
Unit ini tidak akan mengeluarkan air
panas atau dingin sampai saklar
diaktifkan.
Untuk mengaktifkan, tekan sisi atas
saklar daya untuk memulai pemanasan
dan pendinginan air.
- Jika Anda tidak ingin memanaskan air,
tekan bagian bawah tombol merah.
- Jika Anda tidak ingin mendinginkan air,
tekan bagian bawah tombol hijau
Dispensing air Unit ini telah diuji dan disterilkan sebelum
pengepakan dan pengiriman. Selama
transit, debu dan bau dapat terakumulasi
di dalam tangki dan saluran. Dispenser
dan buang setidaknya satu liter air
sebelum minum air apapun.

After setup, it will take up to approximate
1 hour get water to maximum cold
Gbr.10
Push the red child lock button from
right to left and press hot water button downward to start hot water flow.
Gbr.11
button
button
button
button
button
Dispensing air dingin Setelah pengaturan, diperlukan waktu sekitar 1 jam untuk mendapatkan air hingga suhu dingin maksimum. Selama ini, kompresor bisa berjalan terus menerus. ini normal.
1. Posisikan botol, gelas, teko atau panci masak di bawah cerat.
2. Tekan tombol air dingin ke bawah untuk memulai aliran air dingin.
3. Lepaskan tombol setelah level pengisian yang diinginkan tercapai.
Dispensing air normal
1. Posisikan botol, gelas, teko atau panci
masak di bawah cerat.
2. Tekan tombol air normal ke bawah untuk
memulai aliran air normal.
3. Lepaskan tombol setelah level pengisian
yang diinginkan tercapai.
Dispensing air panas Setelah pengaturan, air panas akan tersedia dalam 15-20 menit.
1. Posisikan botol, gelas, teko atau panci masak di bawah cerat.
2. Tekan tombol penguncian anak warna merah dari kanan ke kiri dan tekan tombol air panas ke bawah untuk memulai aliran air panas.
3. Lepaskan tombol setelah level pengisian yang diinginkan tercapai.

A flashing orange light on your function lights alerts you
orange
cabinet door.
Gbr.12
Place probe assembly into bottle. Slide collar with head down
until it clicks in place.
Pembersihan dan pemeliharaan
1. Unit ini telah didesinfektan ke pabrik, namun, disarankan untuk membersihkan dispenser sebelum digunakan awal.
2. Ikuti langkah “menggunakan dispenser air
Anda” di halaman 7.
3. Pastikan cabut dispenser air sebelum
dibersihkan.
4. Dispense air dari masing-masing cerat
sampai tidak ada air mengalir keluar dari
cerat.
5. Tempatkan ember besar di bawah lubang
pembuangan yang ada di belakang dispenser air,
kemudian lepaskan tutup saluran pembuangan
dan tiriskan air.
6. Setelah pengeringan selesai, tutup lubang
pembuangan dengan tutup saluran.
7. Ikuti “menggunakan dispenser air Anda” di
halaman 7 untuk menggunakan dispenser air
secara normal.
Gbr. 13
Menukar botol Lampu yang berkedip pada lampu fungsi Anda memberi tahu Anda ketika botol Anda kosong. mengganti botol secepat mungkin. Jangan membuang air panas, dingin atau dingin jika lampu orange berkedip saat Anda dapat mengosongkan tangki dan menyebabkan dispenser terlalu panas.
Tempatkan botol segar di luar lemari. Hapus seluruh tutup plastik dari
bagian atas botol. bersihkan bagian luar botol baru dengan kain.
Tempatkan perakitan probe ke dalam botol. Geser kerah dengan kepala
ke bawah hingga terkunci pada tempatnya.
Geser botol ke dalam kabinet dan tutup pintunya.
Buka pintu kabinet.
Geser botol kosong keluar dari kabinet.
Hapus perakitan probe dari botol kosong.
Sisihkan botol kosong tersebut.

Gbr. 14
Campurkan 1 galon air dengan setengah pon kristal asam sitrat, masukkan ke dalam mesin dan pastikan air dapat mengalir keluar dari cerat air panas ketika tombol air panas diaktifkan. Hidupkan daya dan air panas, 30 menit kemudian, tiriskan cairan dan bersihkan dengan air dua atau tiga kali. Umumnya ini harus dilakukan setiap enam bulan.
Bahaya Scald Hati-hati dengan air panas yang keluar
ketika menekan air panas dan mengalirkan air dari lubang pembuangan.
Kebocoran Air Penutup penguras yang longgar dapat menyebabkan kebocoran air dan
kerusakan lantai. Kencangkan sebelum digunakan dalam jangka panjang.
Bahaya Sengatan Listrik Cabut dispenser air sebelum membersihkan dan menyeka air
tumpah pada unit.
Bahaya Scald Dispenser memanaskan air hingga suhu 194°F (90°C).
Suhu air di atas 125°F (52°C) dapat menyebabkan luka bakar atau panas yang parah. Anak-anak, orang cacat dan orang tua berisiko tinggi tersiram air panas. Anak-anak harus diawasi oleh orang dewasa ketika menggunakan produk ini.
CAUTION
CAUTION
WARNING
WARNING
Sanitasi
Mesin harus didesinfeksi dengan
disinfektan yang dibeli secara terpisah
dari toko obat atau pasar sesuai
dengan instruksi manual disinfektan
dan kemudian bersihkan dengan air
(lihat instruksi pembersihan dan
pengeringan).
Umumnya, ini harus dilakukan setiap
tiga bulan.
Jangan pernah membongkar mesin ini sendiri untuk menghindari risiko merusak mesin.
Untuk menghilangkan deposit mineral

Dispenser air tidak berfungsi
• Pastikan dispenser air terhubung dengan benar ke soket yang berfungsi dan
tombol pemanas / pendingin disetel ON.
Air bocor
• Cabut dispenser air, keluarkan botol dan ganti dengan yang baru.
• Pastikan tutup saluran di sisi belakang dispenser air cukup kencang.
Tidak ada air yang keluar dari cerat
• Pastikan botol tidak kosong, jika kosong, ganti dengan yang baru.
• Pastikan untuk sepenuhnya menekan kontrol tombol push.
• Pastikan tabung koneksi di dalam unit tidak longgar..
Air dingin tidak dingin
• Pastikan dispenser air terhubung dengan benar ke soket yang berfungsi.
• Pastikan tombol pendingin berwarna hijau diatur ON.
• Tunggu hingga indikator COOLING mati, secara umum diperlukan waktu sekitar
1 jam untuk mendinginkan air.
• Pastikan bagian belakang dispenser air setidaknya berjarak 20 cm dari
dinding dan ada aliran udara bebas di semua sisi dispenser air.
Air panas tidak panas
• Pastikan dispenser air terhubung dengan benar ke soket yang berfungsi.
• Pastikan tombol pemanas berwarna merah diatur ON.
• Tunggu sampai indikator HEATING mati, secara umum dibutuhkan 15 ~ 20
menit untuk memanaskan air.
Dispenser berisik
• Pastikan dispenser air ditempatkan pada permukaan yang tenang dan padat.
• Operasi ON dan OFF kompresor akan terjadi untuk mengontrol air dingin sebagai
spesifikasi, itu normal.
• Pompa akan bekerja untuk memompa air ke dalam tangki ketika air keran, itu normal.
Air berasa
• Debu dan bau terkumpul di dalam tangki, buang air waduk dan ganti botol
dengan yang baru.
• Bersihkan dispenser air atau descale menurut "Pembersihan dan pemeliharaan".
Terkadang ketika air dibagikan selama lebih dari 2 menit, pompa gagal
mengambil jumlah air yang dibutuhkan, dalam hal ini, lampu indikator kekurangan
air pada panel kontrol akan menyala. Jika ini terjadi, buka saja pintu kabinet, lalu
tutup, dan tunggu selama 2 menit, kemudian dispenser akan kembali
mengeluarkan air.
Penyelesaian masalah
Sebelum menghubungi perwakilan layanan Anda, periksa item berikut:
Untuk menghindari kecelakaan, matikan catu daya sebelum operasi sesuai
dengan instruksi berikut.

EQAXF01BXSI
EQAXF01BXWI
Cooling Power 100W 100W 420W 420W
1.0A 1.0A 32 32
N/A N/A L310mmxW374mmxH1040mm L310mmxW374mmxH1040mm
14.7kg 14.7kg
Catatan: Data teknis di atas didasarkan pada metode pengujian standar, lihat GB/T 22090-2008
L
EARTH1
1 P1 EART
H N
1 P2
1
CON1 7 6 5
L_COMP
1 P4
3 2 1
CN7
CP7 CON5
CON
LED2 LED3 LED4
CON1 CON2 CON4
CON
N_COMP
EARTH2
EARTH
PUM
L_HEATER1 KEY1
L_HEATER2
FLOAT
N_HEATER2 KEY2
GND
GND
HEATER
Hot Thermostat 2
N_HEATER1
1
2
1
2
1
2
1
2
CO
OL
NT
C
HO
T
NT
C
1
2
CO
OL
S
W
HE
AT
S
W
3
4
1
2
3
DO
OR
SW
Diagram sirkuit
Informasi Teknis

Customer Care
Thailand
Call Center Tel : (+66 2) 725 9000
Electrolux Thailand Co.,Ltd.
Electrolux Building
14th Floor 1910 New Petchburi Road,
Bangkapi,Huay Kwang, Bangkok 10310
Office Tel : (+66 2) 7259100
Office Fax : (+66 2) 7259299
Email : [email protected]
Indonesia
Jl. Abdul Muis No. 34
Petojo Selatan, Gambir
Jakarta 10160
Fax
Vietnam
Domestic Toll Free : 1800-58-88-99
Tel : (+84 8) 3910 5465
Electrolux Vietnam Ltd.
Floor 9th, A&B Tower
76 Le Lai street - Ben Thanh Ward - District 1
Ho Chi Minh City đVietnam
Office Tel : (+84 8) 3910 5465
Office Fax : (+84 8) 3910 5470
Email : [email protected]
Malaysia
Domestic Toll Free : 1300-88-11-22
Electrolux Home Appliances Sdn. Bhd.
Unit T2-7, 7th Floor, Tower 2 , Jaya33 Hyperoffice,
No. 3, Jalan Semangat, Seksyen 13,
46100 Petaling Jaya, Selangor
Office Tel : (+60 3) 7843 5999
Office Fax : (+60 3) 7955 5511
Email : [email protected]
Philippines
Domestic Toll Free : 1-800-10-845-care 2273
Customer Care Hotline : (+63 2) 845 care 2273
Electrolux Philippines, Inc.
10th Floor. W5th Avenue Building
5th Avenue Corner 32nd Street
Bonifacio Global City,
Taguig Philippines 1634
Trunkline: +63 2 737- 4756
Website : www.electrolux.com.ph
Email : [email protected]
Singapore
CUSTOMER CARE HOTLINE : (+65) 6507 8699
Electrolux S.E.A. Pte Ltd.
11 Lorong 3 Toa Payoh
Jackson Square, Block B, #01-13/14/15
Singapore 319579
Office Tel : (+65) 6507 8900
Office Fax : (+65) 6356 5489
Email : [email protected]


EQAXF01BXSIEQAXF01BXWI
USER MANUAL 1EN

Thank you for choosing ELECTROLUX. This manual contains
Welcome
Environmental Notice
1
all the information you need to safely and correctly use your water dispenser. Please read all the instructions prior to using the appliance, and keep this manual in a secure place for future reference. Do not remove the rating plate label which attached adhesive identification label containing the code, model number, manufacturer and other information. This label will be used by an ELECTROLUX authorized service representative in the event that your water dispenser needs service.
The packaging material used is recyclable. We recommend that you separate plastic, paper and cardboard and give them to recycling agents. To help preserve the environment, the refrigerant used in this product is R134a (Hydrofluorocarbon - HFC), which does not affect the ozone layer and has little impact on the greenhouse effect. According to WEEE (Waste of Electrical and Electronic Equipment) guidelines, waste from electrical and electronic devices should be collected separately. If you need to remove of this appliance in the future, do not throw it away with the rest of your domestic garbage. Instead, please take the appliance to the nearest WEEE collecting agents, where available.

12
10
Do not try to install or turn on the unit without having read the indicated safety precautions in this manual.The dispenser heats water to a temperature of 90°C. It can cause severe scalding. Please operate it carefully.In case of damage, please contact an authorized technical service agent. Do not disassemble the electrical parts of this appliance. Any repairs done by an unauthorized person may cause serious injuries or properties incident. The adult should supervise the children in order to make sure the children can not play with the appliance. The appliance is not intended for use by persons(including children) with reduced physical, sensory or mental capabilities, or lack of experience and knowledge, unless they have been given supervision or instruction concerning use of the appliance by a person responsible for their safety. This appliance is intended to be household used only. If the power cord is damaged, it must be replaced by a special cord or assembly available from the manufacturer or its service agent.To avoid danger of suffocation, keep plastic bag away from babies and children. Keep ventilation openings, in the appliance enclosure or in the built-in structure, clear of obstruction.Do not use mechanical devices or other means to accelerate the defrosting process, other than those recommended by the manufacturer.
Water dispenser information .........................................................
Precautions .................................................................................
I l lustration ...................................................................................
Using your water dispenser ...........................................................
Cleaning and maintenance .................................................................
Trouble Shooting .............................................................................
Circuit diagram ...............................................................................
Technical Information .......................................................................
Customer Care ...............................................................................
Operation instructions .......................................................................
Contents
Attention
43
6
7
8
13
13
14
2
5. Do not store explosive substances such as aerosol cans with a flammable propellant in this appliance.
1. This unit is designed for drinkable water only. Put bottles as specified inside
2. This unit should be used in an environment with temperatures ranging from10°C to 43°C with a relative humidity not higher than 90%.
the cabinet before using.
3. The dispenser can satisfy the need for hot water, cold water, room temperature water and water as a mixture of the cold water and room temperature water.
4. With the adoption of distinctive thermal isolation technology, this unit can minimize thermal exchange between hot, room temperature and cold water.
The heating method of machine can be only used in the lower than 1500m elevations.
6. Regional restrictions
Water dispenser information
3

Do not use an extension cord or plug adaptor.(Fig.2)
Fig. 1
Fig. 2
1. Plug the water dispenser directly into the socket. The unit requires proper grounding and the correct voltage (as technical information specified on page 13 of this manual).(Fig. 1)
2. An appropriate length of power-supply cord
3. Connect the plug firmly.
4.
is provided to reduce the risks of becoming entangled in, or tripping over a longer cord.
6. Do not place the water dispenser sitting over the power cord.
3. Recommend to install the anti-tilt bracket at the
1. Destroy the carton, plastic bag and other
2. Children require supervision when using the
back side of this water dispenser to prevent
dispenser.
packing materials after the dispenser is unpacked. Children might use them for play.
the dispenser from falling down which could cause injury.(Fig. 6)
5. Choose a place that is near a grounded electrical socket. Keep the dispenser at least 20cm away from walls and other appliances and furniture on all 4 sides.
Precautions
For children
For the user/installer
4

8. Use the switch when turning the heating/
9. Do not fasten, twist or tie the power cord. if
7. Do not pull out or insert the plug with wet
cooling On/Off. Locate on the left back
hands to avoid electric shock.(Fig. 3)
side of water dispenser.(page 6)
the power cord is damaged, it should be replaced by the manufacturer, service technician or a qualified person to prevent any risk.
10. Keep the unit in a dry place and away from
11. To avoid damage to the unit, do not plug the
direct sunlight. Do not place the machine on paper or foam. Do not place anything flammable beside this machine.(Fig. 4)
12. Unplug the unit when the unit will not be used for a long period for the reason of saving electricity.
14. Never use organic liquids polishing chemical
13. Never turn the unit upside down or tilt itmore than 45°.(Fig. 5)
to clean the machine.
15. The thermostat to control temperature has been set up by There is no manufacturer.need to adjust it yourself.
Fig. 3
Fig. 4
Fig. 5
power cord or turn on the heating switchuntil the water can flow out from the hot water spout when the hot water button be activated.
5
button of cold water
button of hot water
(FRONT) (REAR)
button of normal water
panelspoutfront carapace
condenser
power cord
cooling switch
drip tray
heating switch
10
11
8
12
9
4
65
7
drain hole
Illustration
6

near a grounded socket. Do not plug in power cord yet.
Fig. 6
Installing the floor Bracket kit(Fig.6)
Water dispenser
Bracket
Head
Collar
The hole for tighten screw
1. Place dispenser upright.2. Locate dispenser on a hard and level surface in a cool shaded location
at least 20 cm of clearance on both sides.3. Position dispenser so the back is at least 20 cm from wall and there are
1. Snap drip tray and grid assembly into front carapace.
1. Use 13 mm screw to fix the fixing bracket on the side of base pan.
2. Drill out a screw hole(6 mm) on the floor. 3. Insert a screw anchor (wall plug) into the drilled hole. 4. Move water dispenser, Align fixing bracket hole
with screw hole of the floor. 5. Put the 25mm screw into the screw hole of fixing
bracket. 6. Tighten the screw.
1 1 12-3
4-5 6
Fig. 7
1. Open cabinet door.2. Place fresh bottle outside of cabinet.3. Remove the entire plastic cap from top of bottle.4. Clean outside of new bottle with a cloth.5. Place probe assembly into bottle.6. Slide collar with head down until it clicks in place. 7. Slide bottle into cabinet and close door.
Using your water dispenserLocate dispenser
Assemble
Machine Installation
Install water bottle
7

Fig. 8
Plug cord into a properly grounded socket.At this time the pump will begin to move water from the bottle to the hot and cold tanks. It will take up to approximate 12 minutes to fill the tanks for the first time. During this period the pump will run continuously. This is normal.
Fig. 9
Provide electricity
This unit will not dispense hot or cold water until the switches are activated.To activate, push top side of power switches in to start heating and cooling water.- If you do not want to heat water,
push bottom side of red switch in.- If you do not want to cool water,
push bottom side of green switch in;
This unit has been tested and sanitized prior to packing and shipping. During transit dust and odors can accumulate in the tank and lines. Dispense and dispose at least one liter of water to prior to drinking any water.
Activate heating and cooling
Dispensing water
Operation Instructions
8
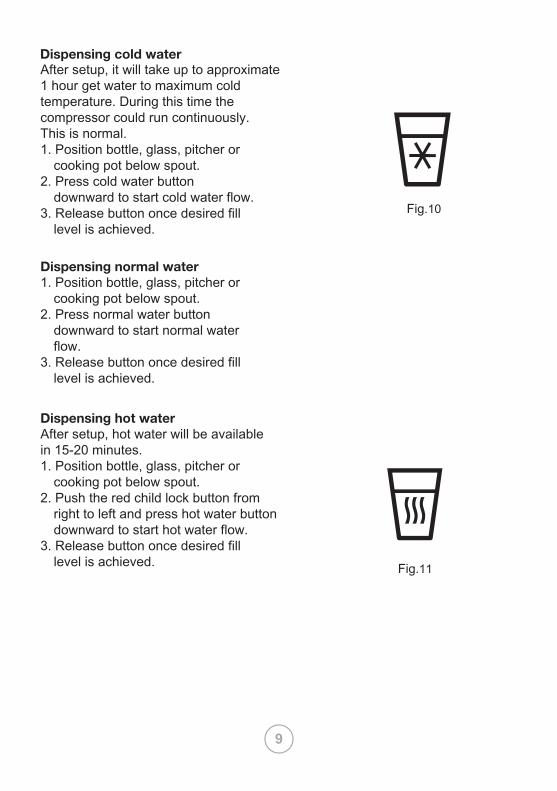
Fig.10
Fig.11
After setup, it will take up to approximate 1 hour get water to maximum cold temperature. During this time thecompressor could run continuously.This is normal.1. Position bottle, glass, pitcher or
cooking pot below spout. 2. Press cold water button
downward to start cold water flow.3. Release button once desired fill
level is achieved.
1. Position bottle, glass, pitcher or cooking pot below spout.
2. Press normal water button downward to start normal water flow.
3. Release button once desired filllevel is achieved.
Dispensing cold water
Dispensing normal water
After setup, hot water will be available in 15-20 minutes.1. Position bottle, glass, pitcher or
cooking pot below spout. 2. Push the red child lock button from
right to left and press hot water button downward to start hot water flow.
3. Release button once desired filllevel is achieved.
Dispensing hot water
9

Cleaning and maintenance
Fig.12
Fig.13
A flashing orange light on your function lights alerts you when your bottle is empty. Replace the bottle as soon as possible. Do not dispense hot, cool or cold water if the orange light is flashing as you could empty the tanks and cause the dispenser to overheat.1. Open the cabinet door.2. Slide empty bottle out of cabinet.3. Remove probe assembly from empty bottle.4. Set empty bottle aside. 5. Place fresh bottle outside of cabinet. Remove entire plastic cap from top of bottle. Clean outside of new bottle with a cloth.6. Place probe assembly into bottle. Slide collar with head down
until it clicks in place.7. Slide bottle into cabinet and close door.
1. The unit has been factory disinfected, however, it is advisable to clean the dispenser prior to initial use.
2. Follow the step of “using your water dispenser “ on page 7
3. Make sure unplug the water dispenser before cleaning.
4. Dispense water from each spout till no water flow out from spout.
5. Place a large bucket beneath the drain hole which is on the back of water dispenser, then remove the drain cap and drain out water.
6. Once draining finished, close the drain hole with drain cap.
7. Follow “using your water dispenser “ on page 7 to use the water dispenser normally.
Changing bottles
10
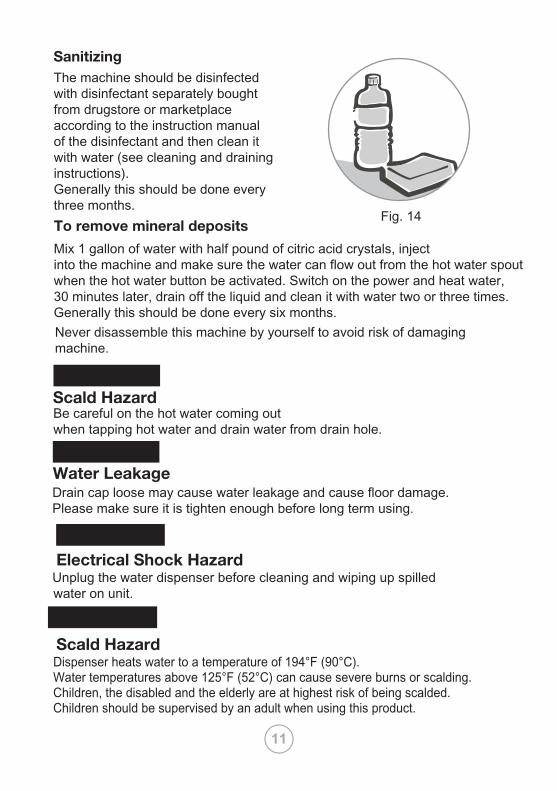
Fig. 14
Drain cap loose may cause water leakage and cause floor damage. Please make sure it is tighten enough before long term using.
Unplug the water dispenser before cleaning and wiping up spilled water on unit.
Be careful on the hot water coming out
Never disassemble this machine by yourself to avoid risk of damaging machine.
when tapping hot water and drain water from drain hole.
Scald Hazard
Electrical Shock Hazard
Water Leakage
WARNING
CAUTION
Sanitizing
To remove mineral deposits
CAUTION
WARNING
Scald HazardDispenser heats water to a temperature of 194°F (90°C). Water temperatures above 125°F (52°C) can cause severe burns or scalding.Children, the disabled and the elderly are at highest risk of being scalded. Children should be supervised by an adult when using this product.
Mix 1 gallon of water with half pound of citric acid crystals, inject into the machine and make sure the water can flow out from the hot water spout when the hot water button be activated. Switch on the power and heat water, 30 minutes later, drain off the liquid and clean it with water two or three times. Generally this should be done every six months.
The machine should be disinfected with disinfectant separately bought from drugstore or marketplace according to the instruction manual of the disinfectant and then clean it with water (see cleaning and draining instructions).Generally this should be done every three months.
11

Water dispenser does not work• Make sure the water dispenser is properly connected to a working socket and
the heating/cooling switches are set ON.Water is leaking• Unplug the water dispenser, remove bottle and replace with new one.• Make sure the drain cap at the back side of water dispenser is tighten enough.No water is coming from the spout• Make sure the bottle is not empty, if empty, replace it with new one.• Make sure to completely depress the pushbutton controls.• Make sure the connection tube inside the unit is not loose.Cold water is not cold• Make sure the water dispenser is properly connected to a working socket• Make sure the green cooling switch is set ON.• Wait until the COOLING indicator turns off, it takes up to approximate 1 hour to
cool the water in general.• Make sure the back of the water dispenser is at least 20 cm away from a wall
and there is free airflow on all sides of the water dispenser.Hot water is not hot• Make sure the water dispenser is properly connected to a working socket.• Make sure the red heating switch is set ON.• Wait until the HEATING indicator turns off, it takes 15~20 minutes to heat the
water in general.Dispenser is noisy• Make sure water dispenser is placed on placid and solid surface.• Compressor on and off operation will happen to control the cold water as
specification, it is normal.• Pump will working to pump water into the tank when tap water, it is normal.Water tastes• Dust and odor be accumulated in the tank, dispose the reservoir water and
replace bottle with a new one.• Sanitize water dispenser or descale according to “Cleaning and maintenance”.
To avoid accident, cut off the power supply before operation according to the following instruction.Sometimes when water is dispensed for more than 2 minutes, the pump fails to take the necessary amount of water, in this case the lack of water indicator light on control panel will turn on. If this happens, just open the cabinet door, then close it, and wait for 2 minutes, then the dispenser will return to dispense water.
Trouble Shooting
Before calling your service representative check the following items:
12

Remarks: Above technical data is based on standard testing method, refer to GB/T 22090-2008
Technical Information
Circuit diagram
EQAXF01BXSI
100W220V-240V~ 50/60Hz
4L/h(≥90°C)
≤90%1.0A
R134a/32gST,TN/A
2L/h(≤10°C)10-43°C
L310mmxW374mmxH1040mm L310mmxW374mmxH1040mm
420W100W
220V-240V~ 50/60Hz
4L/h(≥90°C)
≤90%1.0A
R134a/32gST,TN/A
2L/h(≤10°C)10-43°C
420W
14.7kg
Cooling PowerPower supply
Hot Water
Relative HumidityCooling CurrentRefrigerantClimate ClassCooling Cabinet Temperature
Cold WaterRoom Temperature Operation
Product Dimension
Heating Power
Net Weight 14.7kg
EQAXF01BXWIModel
13
LED2 LED3 LED41234567CON1
CN7
7654321
CON5
CP7
COMP
1 P4
1 P3
1 P2
1 P1
EARTHKEY1
Hot Thermostat 1
KEY2
Hot Thermostat 2HEATER
1 2CON5 1 2CON3 1 2
CON1
1 2
CON2
1 2 3 4
CON4
GND
EARTH
L
N
1 2 3
CON6
GND
POWER BOARD
COOL
NTC
HOT
NTC
COOL
SW
HEAT
SW
DOOR
SWFLOATPUM
DISPLAY BOARD
N_COMP
N_HEATER1
N_HEATER2L_HEATER2L_HEATER1
EARTH2
EARTH1
L_COMP
Customer Care
ThailandCall Center Tel : (+66 2) 725 9000Electrolux Thailand Co.,Ltd.Electrolux Building14th Floor 1910 New Petchburi Road,Bangkapi,Huay Kwang, Bangkok 10310Office Tel : (+66 2) 7259100Office Fax : (+66 2) 7259299Email : [email protected]
IndonesiaCall Center 08041119999 (semi tollfree) PT. Electrolux Indonesia Jl. Abdul Muis No. 34 Petojo Selatan, Gambir Jakarta 10160 Office TelFax Email
VietnamDomestic Toll Free : 1800-58-88-99Tel : (+84 8) 3910 5465Electrolux Vietnam Ltd.Floor 9th, A&B Tower76 Le Lai street - Ben Thanh Ward - District 1Ho Chi Minh City đVietnamOffice Tel : (+84 8) 3910 5465Office Fax : (+84 8) 3910 5470Email : [email protected]
MalaysiaDomestic Toll Free : 1300-88-11-22Electrolux Home Appliances Sdn. Bhd.Unit T2-7, 7th Floor, Tower 2 , Jaya33 Hyperoffice,No. 3, Jalan Semangat, Seksyen 13,46100 Petaling Jaya, SelangorOffice Tel : (+60 3) 7843 5999Office Fax : (+60 3) 7955 5511Email : [email protected]
PhilippinesDomestic Toll Free : 1-800-10-845-care 2273Customer Care Hotline : (+63 2) 845 care 2273Electrolux Philippines, Inc.10th Floor. W5th Avenue Building5th Avenue Corner 32nd StreetBonifacio Global City,Taguig Philippines 1634Trunkline: +63 2 737- 4756Website : www.electrolux.com.phEmail : [email protected]
SingaporeCUSTOMER CARE HOTLINE : (+65) 6507 8699Electrolux S.E.A. Pte Ltd.11 Lorong 3 Toa PayohJackson Square, Block B, #01-13/14/15Singapore 319579Office Tel : (+65) 6507 8900Office Fax : (+65) 6356 5489Email : [email protected]
14
: (+6221) 508 17300: (+6221) 508 17399 : [email protected]