


Bahasa
Halaman
Hukum

A Code Structure Visualization Tool for Groovy
___________________________________
A Thesis
Presented to
the Faculty of the Department of Computer Science
University of Houston
___________________________________
In Partial Fulfillment
of the Requirements for the Degree
Master of Science
___________________________________
By
Manas K. Saha
December 2013
ii
A Code Structure Visualization Tool for Groovy
________________________________ Manas K. Saha
APPROVED:
________________________________ Dr. Venkat Subramaniam
________________________________ Dr. Shishir Shah
________________________________ Dr. Uma Rammurthy
Baylor College of Medicine 77030
________________________________ Dr. Jaspal Subhlok
________________________________ Dr. Dan Wells, Dean, College of Natural Sciences And Mathematics

iii
Acknowledgments
I would like to gratefully and sincerely thank Dr. Venkat Subramaniam for his
guidance, understanding, and patience.
I would like to thank my committee members, Dr. Shishir Shah, Dr. Jaspal
Subhlok, and Dr Uma Rammurthy, for their input, valuable discussions and
accessibility. I am also thankful to the Department of Computer Science, University
of Houston.
I would like to thank my family members, especially my wife, Balaka Saha,
and my daughter Meghna for supporting and encouraging me to pursue this degree.
Without my wife’s encouragement, I would not have finished the degree.
iv
A Code Structure Visualization Tool for Groovy
An Abstract of a Thesis
Presented to
the Faculty of the Department of Computer Science
University of Houston
In Partial Fulfillment
of the Requirements for the Degree
Master of Science
By
Manas K. Saha
December 2013
v
Abstract
Real world systems often turn complex by nature. Dealing with complexity
takes great amount of effort and time. A visualization tool can help to understand the
code structure and ease the efforts.
This work is an attempt to build a tool to visualize the code structure. The
code structure of a program is represented by an Abstract Syntax Tree (AST). A
language like Groovy provides easy way to tap into that structure. Furthermore,
features like metaprogramming can help to easily decipher the structural information.
That makes Groovy a natural choice for creating such a tool on the Java Virtual
Machine (JVM).
The visualization tool we developed as a part of this thesis shows the
hierarchical structure of the entire program as well as just selected parts of a large
complex code. Using its features, programmers can visually navigate the code
structure to inspect and understand how the program is organized. The tool not only
displays the structure, but also can dynamically display the structure altered using
compile time metaprogramming.
vi
Contents Acknowledgments ............................................................................................................................................ iii Abstract ................................................................................................................................................................. v List of Figures ................................................................................................................................................... vii List of Code Examples ................................................................................................................................. viii Chapter 1 Introduction ................................................................................................................. 1 1.1 Objective ................................................................................................................................................... 1 1.2 Motivation ................................................................................................................................................ 2 1.3 Organization of thesis ......................................................................................................................... 3
Chapter 2 Code Exploration using Metaprogramming ...................................................... 4 2.1 Scope of Compile Time Metaprogramming .................................................................................. 4 2.2 Working with Compile Time Metaprogramming ........................................................................ 5 2.3 Using Transformation to Read Groovy code ................................................................................. 7 2.4 Benefits of Metaprogramming ............................................................................................................ 8
Chapter 3 Groovy Multimethods ............................................................................................. 10 3.1 From Polymorphism to Multimethods ..................................................................................... 10 3.2 Why Multimethods ? ......................................................................................................................... 12 3.3 Exploring code without Multimethods ..................................................................................... 13 3.4 Exploring AST with Multimethods ............................................................................................. 18
Chapter 4 Building Tree Structure with Groovy Builder ................................................ 25 4.1 Why Builders? ....................................................................................................................................... 25 4.2 Writing the Builder .............................................................................................................................. 26 4.3 Utilizing the Builder within an Application ................................................................................ 30 4.4 Performance of the Tool .................................................................................................................... 36
Chapter 5 Demonstration of the Visualization Tool ......................................................... 38 5.1 Visual Organization ............................................................................................................................. 38 5.2 Visualizing the Class Components ................................................................................................. 40 5.3 Navigating to a Class Through its References ........................................................................... 43 5.4 Visualization of Compile Time Code Modification ................................................................. 44
Chapter 6 Conclusion and Future Work ............................................................................... 51 6.1 Conclusion .............................................................................................................................................. 51 6.2 Future Work ........................................................................................................................................... 52
6.2.1 Exploring Code Structure to Package Level ...................................................................... 52 6.2.2 Improving Performance of the Tool ..................................................................................... 53 6.2.3 Extending the Tool to Use any JVM Language ................................................................ 53 6.2.4 Integrating with IDEs ................................................................................................................ 54
References ........................................................................................................................................ 55
vii
List of Figures Figure 4-1 Compilation time vs number of lines 37 Figure 5-1 Visualization tool displaying the source name 39 Figure 5-2 Visualization tool displaying the source, class, constructor, method, and
property 40 Figure 5-3 The visualization of the constructor for the Engine class 41 Figure 5-4 The visualization of the methods of Car class 42 Figure 5-5 Visualization of the engine property of the Car class 43 Figure 5-6 Navigating to the Engine class on click the reference node 44 Figure 5-7 The visualizer showing the Engine class methods 46 Figure 5-8 Visualizer shows that method call for the checkEngine() has been injected
within the startEngine() and stopEngine() methods 49
viii
List of Code Examples Listing 2-1 A simple representative of edu.uh.cs.astviewer.ExploreAST.groovy 5 Listing 2-2 sample1/Sample.goovy 6 Listing 2-3 Output when sample/Sample.groovy explored by the simple representative of
edu.uh.cs.astviewer.ExploreAST 7 Listing 3-1 A Java Sample code 10 Listing 3-2 sample/Sample2.goovy 13 Listing 3-3 Code snippet to look into ASTNode and ClassNode 14 Listing 3-4 Code snippet to investigate the MethodNode 14 Listing 3-5 Snippet to explore the method call 14 Listing 3-6 Snippet to recognize the object that invokes the method call 15 Listing 3-7 Snippet to explore the argument in a method call 15 Listing 3-8 Snippet to explore the declaration statement 15 Listing 3-9 Implementation of ExploreAST class without using multimethods 16 Listing 3-10 Output when visit() method invoked. 17 Listing 3-11 Implementation of the visit() method 18 Listing 3-12 Method to explore the class node. 19 Listing 3-13 Implementation of the buildDetails() method 19 Listing 3-14 The explore method for processing method node 19 Listing 3-15 The explore method for processing the expression statements 20 Listing 3-16 The explore() method for processing method calls 20 Listing 3-17 Explore method for processing the argument(s) of a method call 21 Listing 3-18 Explore method for processing a ConstantExpression 21 Listing 3-19 Explore method() for processing a VariableExpression 21 Listing 3-20 Explore() method for processing DeclarationExpression 21 Listing 3-21 Implementation of the class ExploreAST with Groovy multimethods 22 Listing 3-22 Output observed on execution of the ExploreAST class in Listing 3-21 23 Listing 4-1 The structural organization of sample code in Listing 3-2 26 Listing 4-2 Code example of Groovy closure, depicted from reference 1 27 Listing 4-3 A simple implementation of Groovy methodMissing() method 28 Listing 4-4 Output observed on execution of the script contains Listing 4-1 and Listing 4-3 28 Listing 4-5 sampleTree.groovy: The complete script containing the builder class and Listing
4-1 29 Listing 4-6 Output received when the script in Listing 4-5 is executed. 29 Listing 4-7 Modified ExploreAST class for generating the closure with AST information 31 Listing 4-8 Implementation of class Node 33 Listing 4-9 TreeBuilder an implementation of the builder 33 Listing 4-10 Implementation of the toString() method for class Node 34 Listing 4-11 Output of the data structure created by storing the AST information. 35 Listing 5-1 Groovy program Sample3.groovy 38 Listing 5-2 The InterceptorAST class implementing an example of Execute Around Pattern
Methods through compile time metaprogramming 47
Chapter 1 Introduction
Recognizing code structure is a key to grok the internal complexity of code. A
tool for code structure visualization will help us to understand the system better and to
explore the interaction among its components.
In this thesis we will explore a tool to visualize programs written in the Groovy
programming language. There are similar tools for other languages like C++, Java, etc.
Doxygen is a useful tool for exploring the C++ and Java code. It generates class diagrams
and allows navigation through the classes via hyperlinks. nWire is another great tool for
understanding the overall project. It's useful to explore objects from a top view and also
drill down to specific associations. Besides Java, nWire has version for supporting
dynamic languages like PHP. There are also tools like BOUML, which show code using
UML notations.
1.1 Objective
The Groovy programming language, which interoperates with Java and
Java libraries, is an exiting addition to the Java world. Groovy has all the good of the
Java language with richer support for object-oriented and functional style of
programming.
In this thesis I build a tool to visualize the code structure of programs written in
Groovy. I choose Groovy since it has the potential to become a prominent candidate on
the Java system. Groovy as a language provides rich API and the flexibility of dynamic
typing which is important to consider in the process of building such a tool.
2
1.2 Motivation
Real world systems often get complex by nature. Dealing with complexity takes
great amount of effort and time. To understand a piece of code one needs to understand
the domain details and the implementation details. The domain details present
themselves as inherent business complexity while the implementation details often
manifest as accidental complexity. A good software system design should manage
complexity well, hide inherent complexities, and minimize accidental complexities.
Size of code can be a blockade for understanding the code structure. Large code
hinders the readability and puts a challenge in understanding code structure. Part of code
complexity is how various components are interconnected with each other and how they
interact to solve the business problem. These problems can be sorted with an effective
visualization of code.
When code is large, it is sensible to concentrate on certain sections rather than the
whole code. A visualization technique should be able to display partial code, as little or
as much as we desire. To understand the inter relations among the code components any
visualization should successfully map the class components to their respective class.
Building such a tool that helps to understand code complexity, through successful
visualization of code structure, involves capturing of code information, analyzing
structure and creating fruitful visual presentation. Achieving those through writing code
is challenging and resolving these challenges are inspirational throughout this thesis
work.
The tool I am presenting is capable of bringing small portions of code while other
portion remains hidden until the developer/reviewer wants to see it. It successfully maps

3
class component to elucidate the internal relations and is able to reflect changes to the
code structure including any compile time transformation.
1.3 Organization of thesis
In the present chapter we discussed the objective and motivation of this work. The
rest of the thesis is organized as follows.
The Abstract Syntax structure (AST) is the backbone of this work. In chapter 2
we will discuss, what is the AST, how it is useful in this particular work, how we can
utilize it, and why it is beneficial to use over other possible solutions.
In chapter 3 we will discuss Groovy multimethod techniques. We will see how
multimethods empowers the polymorphism and helps to write dynamic code.
We will discuss the importance of builders in chapter 4 and will explain how
builder can ease the creation of hierarchical tree structure.
In chapter five we will demonstrate our visualization tool and learn about the
features.
Finally we will conclude and discuss some possible future work for this tool, in
chapter 6.
4
Chapter 2 Code Exploration using Metaprogramming
Metaprogramming [1] refers to programming that can generate or manipulate
code of its own or other programs. In other words, metaprogramming is writing programs
that write programs. It is an extremely powerful technique and dynamic languages like
Groovy empowers it more. Metaprogramming can manipulate programs either at
compile time or at runtime and Groovy provides options for both.
The visualization tool created in this thesis is a Groovy program that can interpret
and analyze other Groovy programs. The tool greatly benefits from the meta
programming capability of the Groovy Programming language.
2.1 Scope of Compile Time Metaprogramming
To determine code structure, we could write a parser and write further code to
identify classes and the class components. Fortunately this complexity is not necessary in
Groovy as it already provides a powerful mechanism through its compile time
metaprogramming-API.
Compile time metaprogramming depends on Abstract Syntax Tree (AST)
Transformations. ASTs are data structures that the compiler creates by analyzing the
syntax and have invaluable information for further compilation steps [2]. The Groovy
AST Transformation API allows access to the AST of code at various phases of
compilation [3, 4].
The visualization tool uses the AST Transformation API to traverse through the
AST. Though it is possible to both read and manipulate the AST, this tool makes use of
5
only the read facilities. It reads through the AST at the final phase when the AST is
already populated with all the possible information of the program structure.
2.2 Working with Compile Time Metaprogramming When the Groovy compiler is invoked, it looks for jar files that contain AST
transformations. For quick identification of such jar files, the Groovy compiler either
depends on annotations in the code or will look to a special manifest file named META-
INF/services/org.codehaus.groovy.transform.ASTTransformation in each jar file in the
classpath.
The manifest file used by the visualization tool has the entry edu.uh.cs.astviewer.
ExploreAST. This entry points that edu.uh.cs.astviewer.ExploreAST is a class that
contains AST transformations. The transformation class specifies the compilation phase
when the transformation should take place and implements the ASTTransformation
interface. The navigation of the AST will be implemented in its visit() method [5] as
shown in Listing 2-1, which is an extremely simple, and short representative of
edu.uh.cs.astviewer.ExploreAST class. Utilizing this class we can read a few things about
the code structure of any Groovy program.
Listing 2-1: A simple representative of edu.uh.cs.astviewer.ExploreAST.groovy
- package edu.uh.cs.astviewer - - import org.codehaus.groovy.transform.* - import org.codehaus.groovy.control.* - import org.codehaus.groovy.ast.* - - @GroovyASTTransformation(phase = CompilePhase.CANONICALIZATION) - - class ExploreAST implements ASTTransformation {
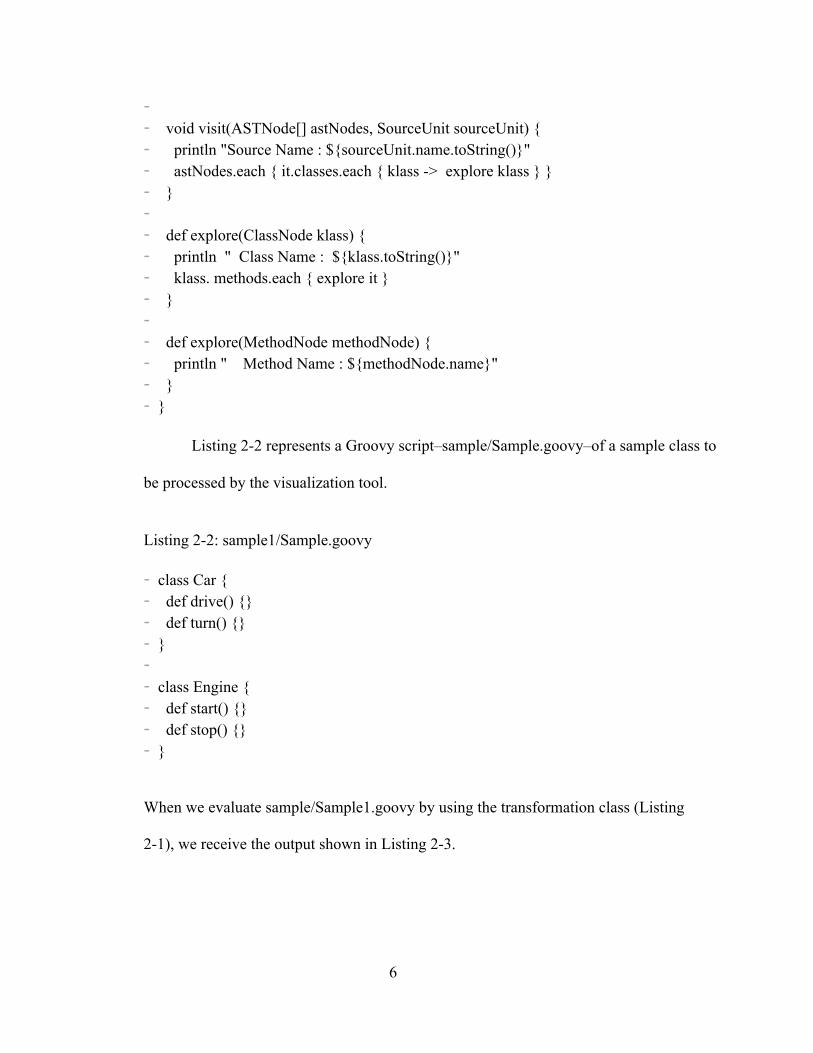
6
- - void visit(ASTNode[] astNodes, SourceUnit sourceUnit) { - println "Source Name : ${sourceUnit.name.toString()}" - astNodes.each { it.classes.each { klass -> explore klass } } - } - - def explore(ClassNode klass) { - println " Class Name : ${klass.toString()}" - klass. methods.each { explore it } - } - - def explore(MethodNode methodNode) { - println " Method Name : ${methodNode.name}" - } - }
Listing 2-2 represents a Groovy script–sample/Sample.goovy–of a sample class to
be processed by the visualization tool.
Listing 2-2: sample1/Sample.goovy
- class Car { - def drive() {} - def turn() {} - } - - class Engine { - def start() {} - def stop() {} - }
When we evaluate sample/Sample1.goovy by using the transformation class (Listing
2-1), we receive the output shown in Listing 2-3.
7
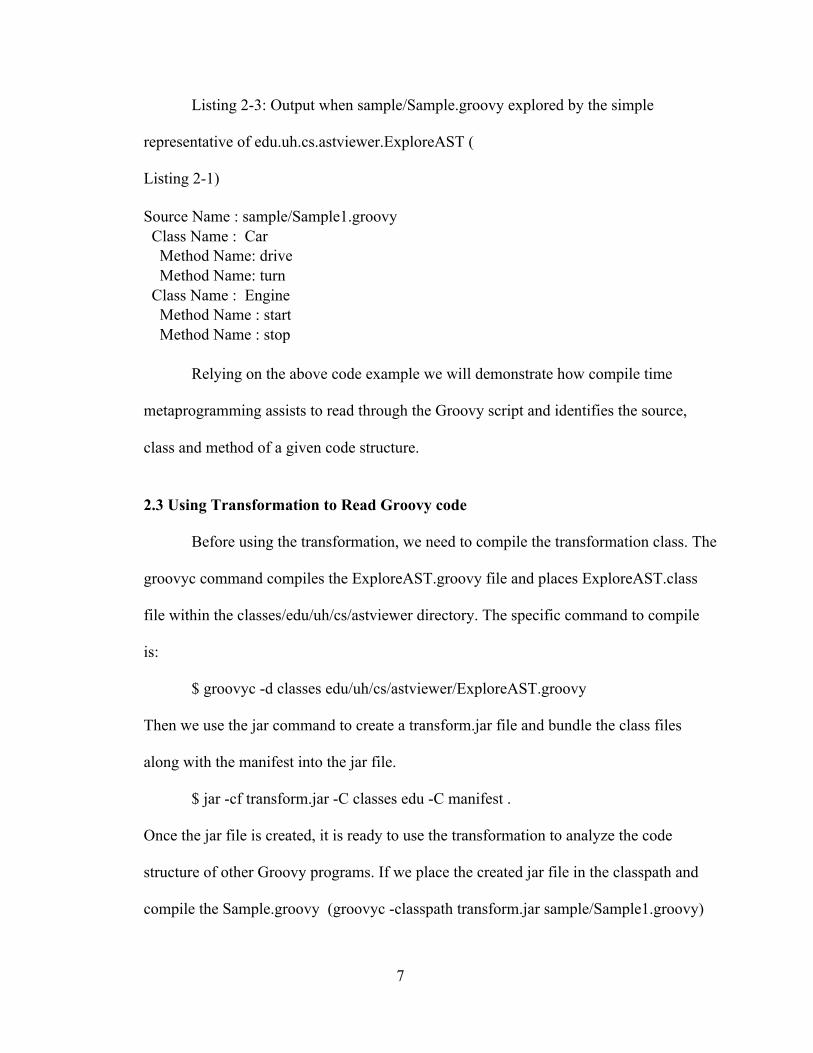
Listing 2-3: Output when sample/Sample.groovy explored by the simple
representative of edu.uh.cs.astviewer.ExploreAST (
Listing 2-1) Source Name : sample/Sample1.groovy Class Name : Car Method Name: drive Method Name: turn Class Name : Engine Method Name : start Method Name : stop Relying on the above code example we will demonstrate how compile time
metaprogramming assists to read through the Groovy script and identifies the source,
class and method of a given code structure.
2.3 Using Transformation to Read Groovy code
Before using the transformation, we need to compile the transformation class. The
groovyc command compiles the ExploreAST.groovy file and places ExploreAST.class
file within the classes/edu/uh/cs/astviewer directory. The specific command to compile
is:
$ groovyc -d classes edu/uh/cs/astviewer/ExploreAST.groovy
Then we use the jar command to create a transform.jar file and bundle the class files
along with the manifest into the jar file.
$ jar -cf transform.jar -C classes edu -C manifest .
Once the jar file is created, it is ready to use the transformation to analyze the code
structure of other Groovy programs. If we place the created jar file in the classpath and
compile the Sample.groovy (groovyc -classpath transform.jar sample/Sample1.groovy)
8
we will reveal the output, mentioned in Listing 2-3.
When the Groovy compiler identifies a transformation class, it anticipates the
implementation of the ASTTransformation interface and invokes the visit() method of the
transformation class. The visit() method provides two parameters, an array of ASTNodes
and a SourceUnit. The array contains the collection of nodes, typically classes that are
candidates for transformation. In this example, the transformation will be applied after
the CANONICALIZATION phase of the compiler, which has been indicated in the
ExploreAST.groovy by a special annotation GroovyASTTransformation.
With in the visit() method, we used the SourceUnit parameter and output the
source name. Next, we iterate through the ASTNode array, which is a collection of the
instances of ClassNode [6] . ClassNode again is a collection of instances of FieldNode,
MethodNode and ConstructorNode. From root to leaf, each level of nodes in the tree
contain array of nodes of the next level. From a node, we can drill down deep and can
explore the complete structure of that node and its child components. By gradual
inspection of all the nodes, we are progressively able to interpret the complete code
structure of Groovy programs.
In our code example, the visit method calls explore(ClassNode klass) and passes
the instances of ClassNode to it. The explore(ClassNode klass) method prints the name
of the class and calls explore(MethodNode methodNode) and passes the instances of
MethodNode to it. Finally, the explore(MethodNode methodNode) method prints the
name of the methods of the class.
2.4 Benefits of Metaprogramming
The simple metaprogramming example in Listing 2-1 demonstrated how compile
9
time metaprogramming can enable us to traverse through the class structure of Groovy
programs. The advantage of using metaprogramming over writing custom code lies in the
fact that it removes the burden of writing parsers and maintaining cumbersome custom
code. This approach relies on the power of the Groovy language to generate the structural
information about a Groovy program and thus helps to develop resilient and concise
code.
In this chapter we saw that compile time metaprogramming is an efficient way to
develop a program with the purpose of reading and analyzing other programs. Writing
custom code that can explore other programs is complicated. It involves the challenges of
deciphering correct algorithm, testing, and maintaining the code. The robust Groovy
metaprogramming-API does all the heavy lifting under the curtain and allows us to
concentrate on the implementation of the features of the tool. The API is simple but
writing code to use the API is not easy. In the next chapter we will discuss about
multimethods, and how the multimethods are helpful to use the API.

10
Chapter 3 Groovy Multimethods
In the last chapter we have seen that information regarding programs are available
within the AST. We will utilize Groovy multimethods to write fluent and elegant code to
decipher information from the AST. Throughout this chapter we will learn about
multimethods and will demonstrate how to use this efficient technique.
3.1 From Polymorphism to Multimethods
Object oriented programming achieves much of its strength through
polymorphism. But for statically typed languages, object oriented programming is single
dispatch; that is, just one designated object determines which method to invoke.
Languages like Java indulge inheritance to accomplish polymorphism and force us to
conform to a structure, thus constraint polymorphism to a single dispatch. Conceptually,
polymorphism is a more general technique and should allow a target object and all the
arguments of a method call to determine the correct method to invoke. Let us see some
code example to illustrate how Java polymorphism is limited to single dispatch.
Listing 3-1 is a Java code example of a polymorphic method call.
Listing 3-1: A Java Sample code
1. public class Main { 2. public static void main(String[] args) { 3. useFoo( new B() ); 4. } 5. public static void useFoo(A instance){ 6. instance.foo(10); 7. instance.foo(10.56); 8. } 9. }

11
10. public class A { 11. public void foo(double number) {} 12. } 13. public class B extends A { 14. public void foo (int number) { 15. System.out.println(" Printing an Integer " + number); 16. } 17. public void foo (double number) { 18. System.out.println(" Printing a Decimal " + number); 19. } 20. }
A is a base class with a method foo() that accepts a parameter of type double. In the
derived class B we overload method foo() with two distinct implementations. In the first
implementation foo() accepts a parameter of type int ( Listing 3-1 , Line 14) and the
second foo() accepts a parameter of type double ( Listing 3-1, line 17). In the Main class
we make two polymorphic invocation of foo() (Listing 3-1, Line 6,7) from method
useFoo(). In the first instance we invoke foo() on object of class B and pass an integer to
foo(). In the second instance we pass a decimal number (type double) when foo() is
invoked on the same object. When we execute this code, Java produces the following
output.
$ Printing a Decimal 10.0 $ Printing a Decimal 10.56
Though we passed an int at the first call, it prints a decimal as the output. That is, in both
the calls the second implementation that receives a double is invoked. This mischief is
the outcome of Java’s adherences to a hierarchal structural model. The method called at
runtime has to take decimal as a parameter because that’s what class A —the base—has
defined. So, the compiler treats the int as double.
12
Groovy recognizes the peril of this “premature optimization.” Being a
dynamically typed language Groovy is not obliged to conform to a particular structure
and can elevate the object oriented programming to multiple method dispatch. If the same
code example shown in Listing 3-1 is executed by Groovy (Groovy can execute most
Java code), it will elegantly pick the correct implementation not only based on the object
on which the method is invoked but also on the parameters sent to the call. Since the
method dispatching depends on both the target and the parameter(s) sent to the call, it is
known as multiple dispatch or multimethods. Following is the output when the code in
Listing 3-1 is executed by Groovy.
$ Printing an Integer 10 $ Printing a Decimal 10.56
3.2 Why Multimethods ?
Earlier we discussed how AST nodes hold the collection of instances of different
subclasses of class ASTNode [7]. In general programs can be deployed with vast possible
syntax, style, and design. Therefore the ASTNode would have numerous probable AST
subclass combinations. In other words we cannot expect any precise pattern or flow in the
AST structure. To explore the AST structures we need to develop resilient code to
manage the varying assembly of AST. Developing elegant and fluent code is
challenging, as the unpredictable nature of code structure may tempt us to write more and
more conditional statements, nested statements, instance type checking, etc.
13
Traditional coding style generates lot of smelly code with shrinking readability,
are hard to maintain, and will often break. We can overcome these challenges and write
elegant, fluent code by utilizing Groovy multimethod techniques to explore the AST.
3.3 Exploring code without Multimethods
In earlier chapter we have seen that in order to explore the AST we need to
implement the ASTTransformation interface through the implementation of the visit()
method. Lets first utilize traditional coding techniques to implement the visit() method
and observe the problems involved with the practice. Then we will utilize Groovy
multimethods to see how we can avoid the code smell.
Listing 3-2 is a sample Groovy code that we want to explore with the AST
transformation.
Listing 3-2: sample/Sample2.goovy
- class Car { - def drive() { println 'driving'} - def turn(direction) { println direction} - } - - class Engine { - def start() {} - def stop() {def speed = 0} - }
We have learned that the visit() method has two arguments namely ASTNode and
SourceUnit. We get source information by utilizing SourceUnit, and we reach ClassNode
by investigating ASTNode, similarly we reach MethodNode by exploring ClassNode.
14
Following code snippet in (Listing 3-3) will explore the class and method nodes of
sample/sample2.groovy (Listing 3-2).
Listing 3-3: Code snippet to look into ASTNode and ClassNode
- println "source : ${sourceUnit.name.toString()}" - astNodes. each { - it.classes.each { klass -> println "-class ${klass.toString()}" - klass.methods.each { method -> println " -Method : ${method.name}" - }
As we examine the MethodNode we observe method components and the properties of
the method. To explore the method components we first consider its statements property
and finally the expressions of the statement. Following code snippet in Listing 3-4
demonstrate how we can reach to the subclasses that can reveal the method components.
Listing 3-4: Code snippet to investigate the MethodNode
- - method.code.statements.each { statement -> // process the statement } -
The ‘statements’ (Listing 3-4) have several kinds of expression and by examining
them we acquire information about various method components. For the sample example
in Listing 3-2 we will find method calls to ‘println’ within the turn() and drive() method.
To intercept these method calls we further look into MethodCallExpression. We
developed the following code snippet to intercept the method calls.
Listing 3-5: Snippet to explore the method call
- if ( statement.expression instanceof MethodCallExpression) { - println " -Method call: ${statement.expression.methodAsString}" - }
Similarly, to investigate the object responsible for method call and the
argument(s) sent to the method call, we inspect the instance of VariableExpression and
15
ConstantExpression class. The method call ‘println’ within drive() method passes a
constant value whereas the ‘println’ method call within turn() method passes a variable.
In both the occasions, ‘this’ object invokes the method ‘println.’ The following two
snippets (Listing 3-6, Listing 3-7) will decipher the information respectively about the
invoking object and the argument(s) passed to the method call.
Listing 3-6: Snippet to recognize the object that invokes the method call
- if ( statement.expression.objectExpression instanceof VariableExpression) - println " -Object : ${statement.expression.objectExpression.variable}" Listing 3-7: Snippet to explore the argument in a method call
- statement.expression.arguments.each {argument -> - - if ( argument instanceof ConstantExpression) - println " -Argument : ${argument.text}" - - else if (argument instanceof VariableExpression) - println " -Argument : ${argument.text}" - }
There is a declaration statement for the variable ‘speed’ in the method stop() that is
assigned a value of zero. This declaration can be interpreted by inspecting the
DeclarationExpression. The following code snippet in Listing 3-8 illustrates it.
Listing 3-8: Snippet to explore the declaration statement
- if ( statement.expression instanceof DeclarationExpression) { - println " -Declaration : ${statement.expression.text}" - }
The complete code for the visit() method is given in
Listing 3-9
16
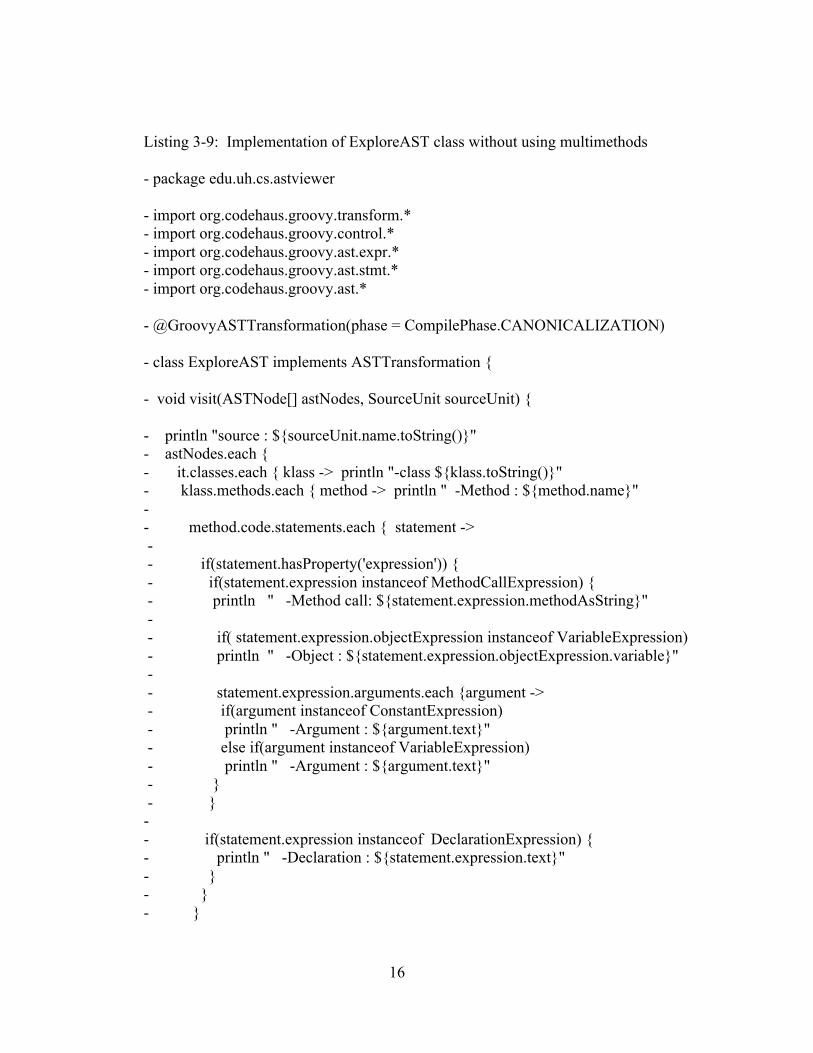
Listing 3-9: Implementation of ExploreAST class without using multimethods
- package edu.uh.cs.astviewer - import org.codehaus.groovy.transform.* - import org.codehaus.groovy.control.* - import org.codehaus.groovy.ast.expr.* - import org.codehaus.groovy.ast.stmt.* - import org.codehaus.groovy.ast.* - @GroovyASTTransformation(phase = CompilePhase.CANONICALIZATION) - class ExploreAST implements ASTTransformation { - void visit(ASTNode[] astNodes, SourceUnit sourceUnit) { - println "source : ${sourceUnit.name.toString()}" - astNodes.each { - it.classes.each { klass -> println "-class ${klass.toString()}" - klass.methods.each { method -> println " -Method : ${method.name}" - - method.code.statements.each { statement -> - - if(statement.hasProperty('expression')) { - if(statement.expression instanceof MethodCallExpression) { - println " -Method call: ${statement.expression.methodAsString}" - - if( statement.expression.objectExpression instanceof VariableExpression) - println " -Object : ${statement.expression.objectExpression.variable}" - - statement.expression.arguments.each {argument -> - if(argument instanceof ConstantExpression) - println " -Argument : ${argument.text}" - else if(argument instanceof VariableExpression) - println " -Argument : ${argument.text}" - } - } - - if(statement.expression instanceof DeclarationExpression) { - println " -Declaration : ${statement.expression.text}" - } - } - }
17
- } - } - } - } - }
When we execute the following commands we compile the class ExploreAST,
create the manifest jar, and compile sample/sample2.groovy with the jar file in its class
path.
$ groovyc -d classes edu/uh/cs/astviewer/ExploreAST.groovy
$ jar -cf transform.jar -C classes edu -C manifest .
groovyc -classpath transform.jar sample/Sample2.groovy
On compilation the visit method will be invoked and will produce the following output.
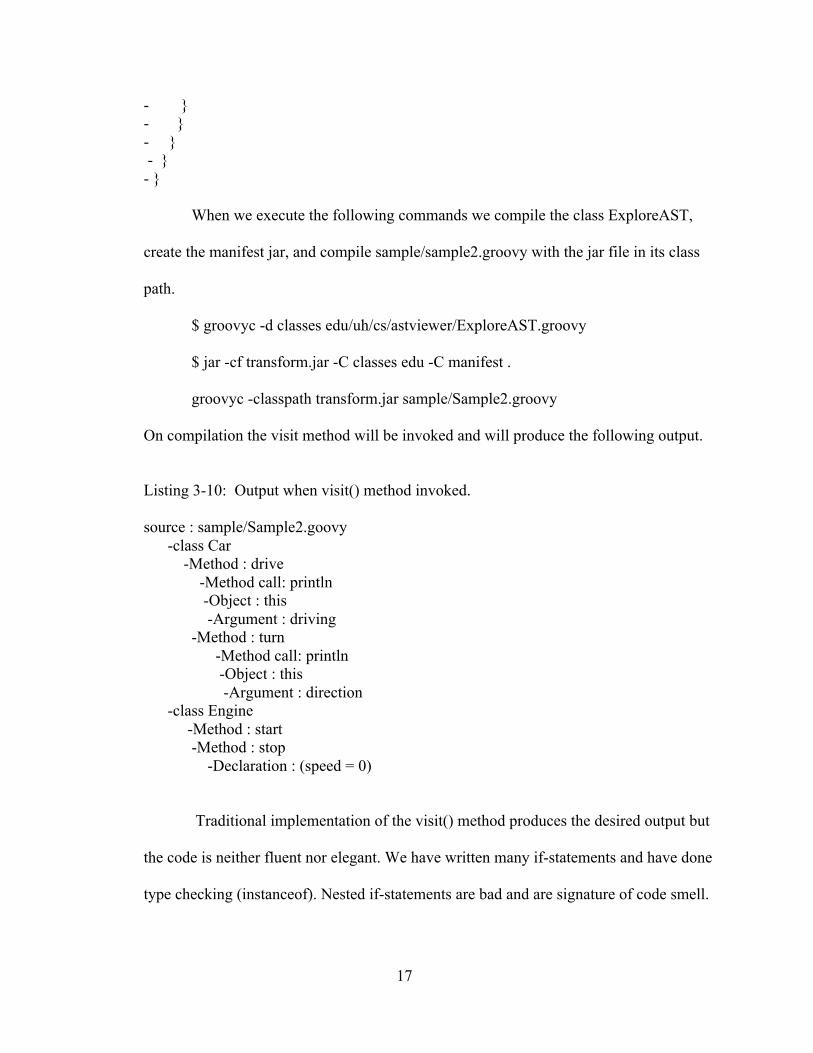
Listing 3-10: Output when visit() method invoked. source : sample/Sample2.goovy -class Car -Method : drive -Method call: println -Object : this -Argument : driving -Method : turn -Method call: println -Object : this -Argument : direction -class Engine -Method : start -Method : stop -Declaration : (speed = 0)
Traditional implementation of the visit() method produces the desired output but
the code is neither fluent nor elegant. We have written many if-statements and have done
type checking (instanceof). Nested if-statements are bad and are signature of code smell.
18
As more class components appear code becomes clumsier and eventually would be hard
to read or understand. Type checking is a bad practice and a serious violation of good
coding principles. This code is not extensible, hard to maintain, and will frequently fail.
As we are trying to explore other Groovy programs, we need to make the visit()
method robust. Thus to explore the AST we need a technique that would dynamically
decide which subclasses of class ASTNode to investigate without needing instance type
checks and using conditional statements. In the next section we will understand how we
can achieve that by utilizing the multimethods.
3.4 Exploring AST with Multimethods
We will apply Groovy multimethod techniques to explore the same sample code
in Listing 3-2 and will eliminate the clutters in the code. The code will not interpret the
type of instance, rather it will dynamically identify the appropriate ASTNode subclass
and fetch the essential information. We may still require a few conditional statements, but
nested conditional statements will completely disappear. As an outcome we will develop
fluent code that is supple enough to succeed through the unpredictable construction of
AST.
Let us glance through the code. The visit() method is shown in Listing 3-11. It
unravels the class nodes and propels those to appropriate method call. It also prints the
source name, but for visualization tool we will not need the print statements. The print
statements are used as a customary to prove that the code is doing the needful.
Listing 3-11: Implementation of the visit() method
- void visit(ASTNode[] astNodes, SourceUnit sourceUnit) { -
19
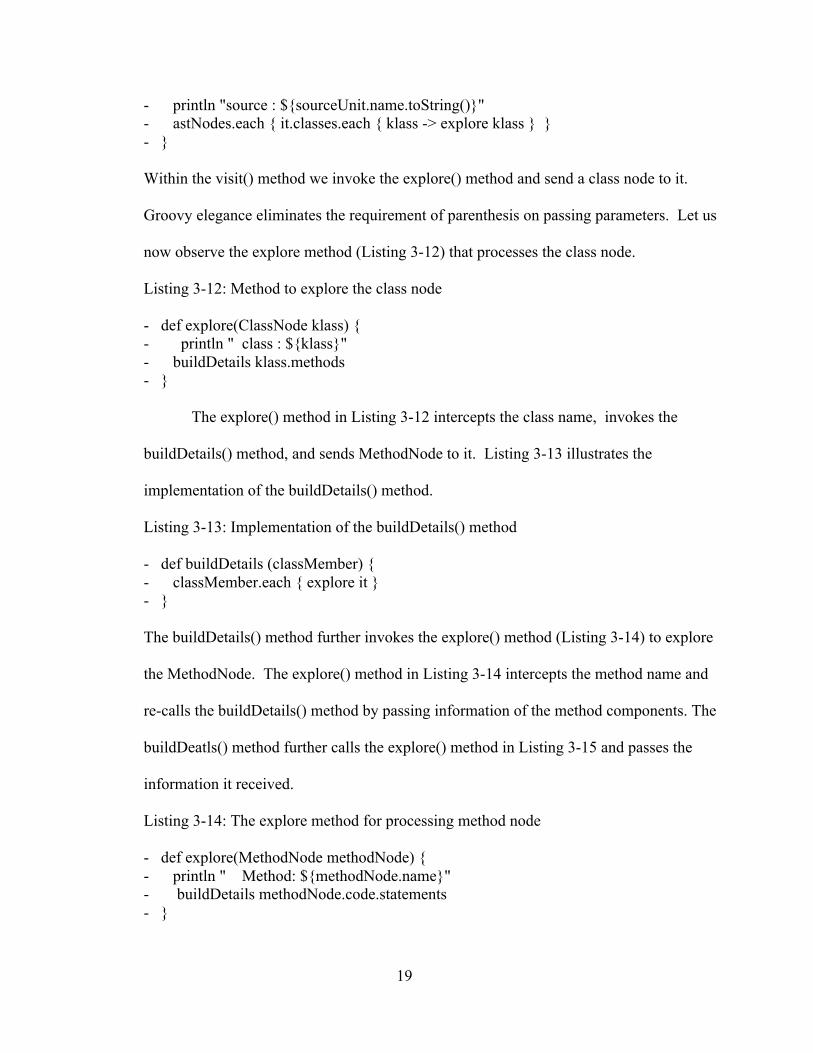
- println "source : ${sourceUnit.name.toString()}" - astNodes.each { it.classes.each { klass -> explore klass } } - } Within the visit() method we invoke the explore() method and send a class node to it.
Groovy elegance eliminates the requirement of parenthesis on passing parameters. Let us
now observe the explore method (Listing 3-12) that processes the class node.
Listing 3-12: Method to explore the class node
- def explore(ClassNode klass) { - println " class : ${klass}" - buildDetails klass.methods - } The explore() method in Listing 3-12 intercepts the class name, invokes the
buildDetails() method, and sends MethodNode to it. Listing 3-13 illustrates the
implementation of the buildDetails() method.
Listing 3-13: Implementation of the buildDetails() method
- def buildDetails (classMember) { - classMember.each { explore it } - } The buildDetails() method further invokes the explore() method (Listing 3-14) to explore
the MethodNode. The explore() method in Listing 3-14 intercepts the method name and
re-calls the buildDetails() method by passing information of the method components. The
buildDeatls() method further calls the explore() method in Listing 3-15 and passes the
information it received.
Listing 3-14: The explore method for processing method node - def explore(MethodNode methodNode) { - println " Method: ${methodNode.name}" - buildDetails methodNode.code.statements - }
20
Listing 3-15: The explore method for processing the expression statements
- def explore(ExpressionStatement expression) { - explore expression.expression - }
Both the drive() and turn() method in Listing 3-2, have method call to ‘println.’ To
intercept the method call the explore() method (Listing 3-15) will invoke another
implementation of the explore() method, as shown in Listing 3-16.
Listing 3-16: The explore() method for processing method calls - def explore(MethodCallExpression methodCallExpression) { - println " Method Call: ${methodCallExpression.methodAsString}" - explore methodCallExpression.arguments - explore methodCallExpression.objectExpression - }
The explore() method in Listing 3-16 will intercept the name of the called method from
MethodCallExpression node. It invokes the explore() method in Listing 3-17 to intercept
the argument(s) of the method call. The explore method() in Listing 3-17 traverses
through the argument(s) and dynamically invokes either the implementation in Listing
3-18 or Listing 3-19. For the drive() method in Listing 3-2 the method call ‘println’
receives a constant value (‘driving’) and thus the explore() method in Listing 3-18 will
be invoked. Whereas in the turn() method the ‘println’ method call receives a variable
(direction) and thus the explore() method in Listing 3-19 will be invoked. In the similar
way, to intercept the invoking object, the explore() method in Listing 3-16 will
dynamically decide to invoke between the explore() methods in Listing 3-18 and Listing
3-19.
21
Listing 3-17: Explore method for processing the argument(s) of a method call - def explore(ArgumentListExpression argumentListExpression) { - if(argumentListExpression.expressions.size()>0) { - println ' Arguments' - argumentListExpression.expressions.each{explore it} - } } Listing 3-18: Explore method for processing a ConstantExpression - def explore(ConstantExpression constantExpression){ - println " constant ${constantExpression.text} : ${constantExpression.type} " - } Listing 3-19: Explore method() for processing a VariableExpression - def explore(VariableExpression variableExpression) { - println " variable ${variableExpression.text} : ${variableExpression.type} " - } We learned how to intercept the method calls by using the multimethod
techniques. Let us now see how to intercept one other type of method component namely
the declaration statement. We have a declaration statement within the method stop() of
the Engine class (Listing 3-2) .To interpret the declaration statement the implementation
of the explore() method in Listing 3-20 will be invoked. The explore() method in Listing
3-20 will further invoke the explore() method in Listing 3-18 and/or Listing 3-19.
Listing 3-20 shows the implementation of the explore() method that accepts
DeclarationExpression.
Listing 3-20: Explore() method for processing DeclarationExpression - def explore(DeclarationExpression declarationExpression) { - println " Declaration : ${declarationExpression.text}" - explore declarationExpression.leftExpression
22
- explore declarationExpression.rightExpression - } In the buildDetails() method we utilized the power of Groovy dynamic typing.
We did not specify the type for the parameters of the buildDetails() method. It accepts
any ASTNode subclass and dynamically picks up and transfer the responsibility to the
appropriate implementation of the explore method(). Notice the conciseness of the code
and single precise responsibility of the methods. Throughout the above discussion we
saw how the Groovy multimethods techniques exalt the ability of code to invoke the
correct method. We are not inferring the type anymore; rather we are using the power of
multimethods to dynamically invoke the applicable implementation of the explore()
method. The complete class that implements the ASTTransformation interface is given in
Listing 3-21.
Listing 3-21: Implementation of the class ExploreAST with Groovy multimethods
- package edu.uh.cs.astviewer - import org.codehaus.groovy.transform.* - import org.codehaus.groovy.control.* - import org.codehaus.groovy.ast.expr.* - import org.codehaus.groovy.ast.stmt.* - import org.codehaus.groovy.ast.* - - @GroovyASTTransformation(phase = CompilePhase.CANONICALIZATION) - - class ExploreAST implements ASTTransformation { - - void visit(ASTNode[] astNodes, SourceUnit sourceUnit) { - println "source : ${sourceUnit.name.toString()}" - astNodes.each { - it.classes.each { explore it } - } - } - - def buildDetails (classMember) { - classMember.each { - explore it - } - } -
23
- def explore(ClassNode klass) { - println " class : ${klass}" - buildDetails klass.methods - } - - def explore(ExpressionStatement expression) { - explore expression.expression - } - - def explore(DeclarationExpression declarationExpression) { - println " Declaration : ${declarationExpression.text}" - explore declarationExpression.leftExpression - explore declarationExpression.rightExpression - } - - def explore(MethodNode methodNode) { - println " Method: ${methodNode.name}" - buildDetails methodNode.code.statements - } - def explore(MethodCallExpression methodCallExpression) { - println " Method Call: ${methodCallExpression.methodAsString}" - println " Object: " - explore methodCallExpression.objectExpression - explore methodCallExpression.arguments - } - - def explore(ArgumentListExpression argumentListExpression) { - if(argumentListExpression.expressions.size()>0) { - println ' Arguments' - argumentListExpression.expressions.each{explore it} - } - } - - def explore(ConstantExpression constantExpression){ - println " constant ${constantExpression.text} : ${constantExpression.type} " - } - - def explore(VariableExpression variableExpression) { - println " variable ${variableExpression.text} : ${variableExpression.type} " - } - - }
When we execute the above class (using mentioned steps earlier, compiling the
class, creating the manifest jar, and compiling sample/sample2.groovy with the jar file in
its class path) we will see the output as in Listing 3-22.
Listing 3-22: Output observed on execution of the ExploreAST class in Listing 3-21
source : sample/Sample2.goovy class : Car
24
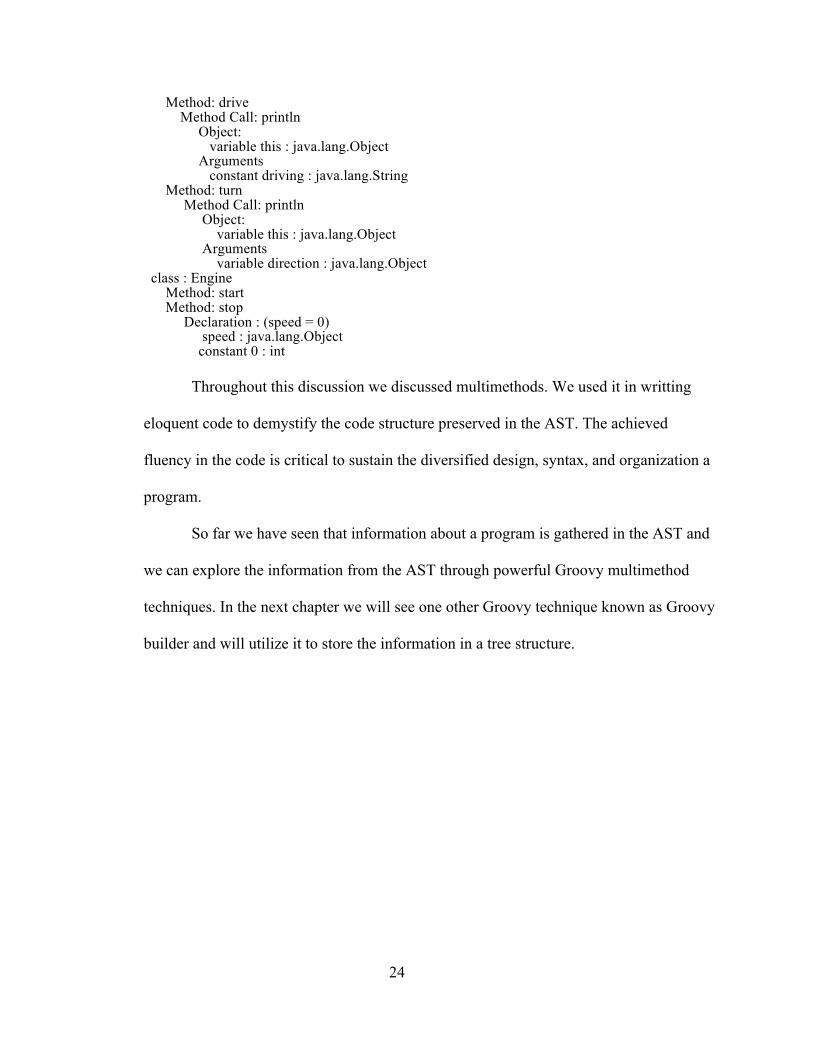
Method: drive Method Call: println Object: variable this : java.lang.Object Arguments constant driving : java.lang.String Method: turn Method Call: println Object: variable this : java.lang.Object Arguments variable direction : java.lang.Object class : Engine Method: start Method: stop Declaration : (speed = 0) speed : java.lang.Object constant 0 : int Throughout this discussion we discussed multimethods. We used it in writting
eloquent code to demystify the code structure preserved in the AST. The achieved
fluency in the code is critical to sustain the diversified design, syntax, and organization a
program.
So far we have seen that information about a program is gathered in the AST and
we can explore the information from the AST through powerful Groovy multimethod
techniques. In the next chapter we will see one other Groovy technique known as Groovy
builder and will utilize it to store the information in a tree structure.
25
Chapter 4 Building Tree Structure with Groovy Builder
In the last two chapters we have seen that the information regarding a program are
available within the AST and we can utilize Groovy multimethods to write fluent code to
decipher the information. In this chapter we will build a tree structure with Groovy
builders to store the information.
4.1 Why Builders?
Builders make easy the construction of complex instances. As an example, it may
be straightforward to order a pizza off the menu, but it takes more effort to customize the
toppings. We may have to say to the waiter (builder) "We like a veggie pizza; large, add
extra cheese, onions, and mushroom on it." A similar scenario applies to build a HTML
Document Object Model (DOM), where we would have to create nodes and attributes to
dynamically specify various parts of a HTML page. Builder can ease the effort of
creating such complex objects.
Groovy provides builders to build XML, HTML, DOM, Swing, etc. Following
the leads of the built-in builders, we will utilize Groovy metaprogramming techniques to
write our own builder. The code structure of a program is a hierarchal tree structure. We
need to preserve the tree structure when we store the information of a program collected
in an AST. Both the information and the structural organization are needed to effectively
display the code structure in the visualization tool.
Our builder will create the required tree structure and store the retrieved
information for easy access.
26
4.2 Writing the Builder
We will write a builder to organize a tree structure from the AST information of a
program. Let us use the same example mentioned in Listing 3-2 to demonstrate the
technique. The code structure in Listing 3-2 can be organized in a hierarchal nested
structure as shown in Listing 4-1. We define a variable ‘structure’ and assign the nested
structure to it.
Listing 4-1: The structural organization of sample code in Listing 3-2
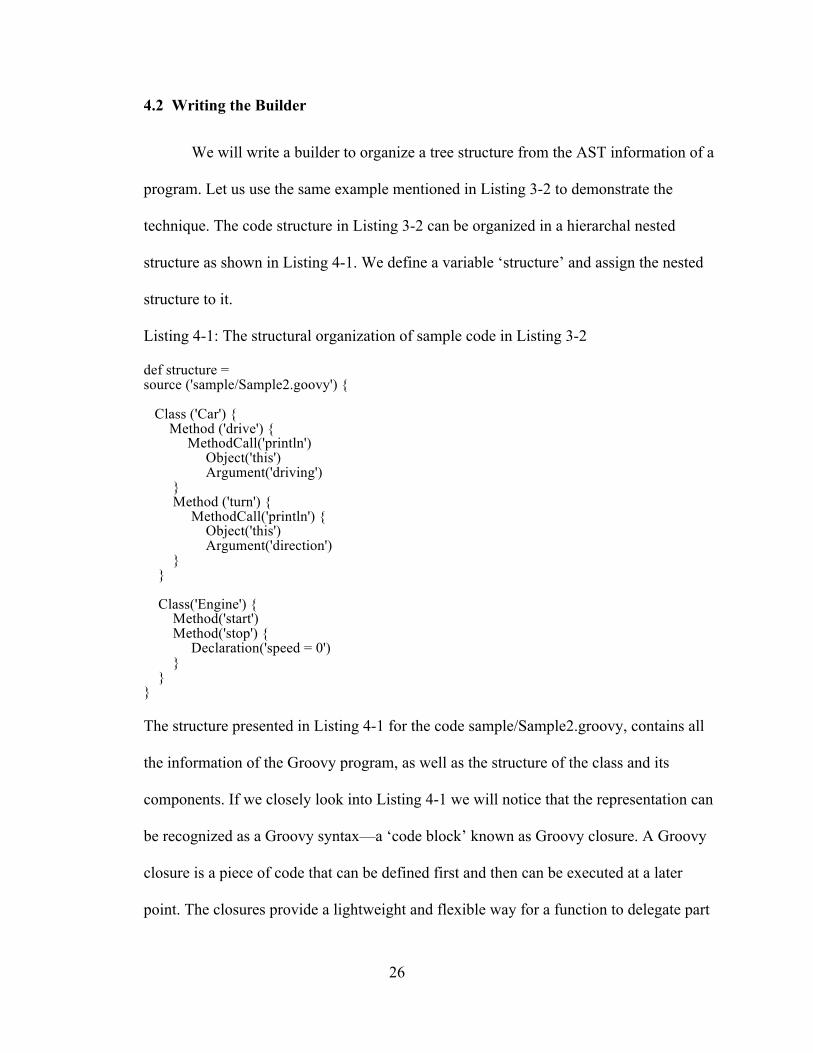
def structure = source ('sample/Sample2.goovy') { Class ('Car') { Method ('drive') { MethodCall('println') Object('this') Argument('driving') } Method ('turn') { MethodCall('println') { Object('this') Argument('direction') } } Class('Engine') { Method('start') Method('stop') { Declaration('speed = 0') } } } The structure presented in Listing 4-1 for the code sample/Sample2.groovy, contains all
the information of the Groovy program, as well as the structure of the class and its
components. If we closely look into Listing 4-1 we will notice that the representation can
be recognized as a Groovy syntax—a ‘code block’ known as Groovy closure. A Groovy
closure is a piece of code that can be defined first and then can be executed at a later
point. The closures provide a lightweight and flexible way for a function to delegate part
27
of its implementation logic. Let us see an example depicted from [1].
Listing 4-2: Code example of Groovy closure, depicted from reference 1 def totalSelectValues(n, closure) { total = 0 for(i in 1..n) { if (closure(i)) {total += i } } total } print "Total of even numbers from 1 to 10 is " println totalSelectValues(10) { it % 2 == 0 } print "Total of odd numbers from 1 to 10 is " println totalSelectValues(10) { it % 2 != 0}
In this example the method totalSelectValues() iterates from 1 to n. For each
value it invokes the closure, checks whether the value is even or odd, and finally
evaluate the ‘total.’ As a result, for the first call, the totalSelectValues() method totals the
even numbers and in second call it totals the odd numbers.
The closure we defined in Listing 4-1 contains several method calls. Instead of
writing the individual methods we will implement the Groovy methodMissing() method.
Groovy executes the methodMissing() method if it does not find a particular method. We
leverage this feature to make the code extensible.
For the purpose of this discussion we print the name of method and the
parameter(s) of the method called from the methodMissing() method. To execute the
nested structure in Listing 4-1, we check within the methodMissing() method, if a
method call receives a closure or not. If a closure exists we will execute the closure
which will eventually call the methodMissing() method again. In Listing 4-3, we show
the implementation of a simple methodMissing() method.
28
Listing 4-3: A simple implementation of Groovy methodMissing() method
def methodMissing( String name, args){ print "-${name} " println args[0].toString() if( args.length > 0 && args[-1] instanceof Closure ) { def childClosure = args[-1] childClosure.delegate = this childClosure() } } If we now add the methodMissing() method to the script ‘sampleTree.groovy’ and
execute it, we will observe the output mentioned in Listing 4-4.
Listing 4-4: Output observed on execution of the script contains Listing 4-1 and Listing 4-3 -source sample/Sample2.goovy -Class Car -Method drive -MethodCall println -Object this -Argument driving -Method turn -MethodCall println -Object this -Argument direction -Class Engine -Method start -Method stop -Declaration speed = 0
Notice that we received an output with all source components in the correct
hierarchal order. We are almost there; we are missing the identification of the parent and
child relationships we saw in the presentation in Listing 4-1. For that we need to identify
the depth of a particular component within the tree. We can do it simply by holding a
variable and adjusting its value accordingly. We can organize the build() method and
methodMissing() method within a class named TreeBuilder. The complete class is
shown in Listing 4-5.
29
Listing 4-5: The TreeBuilder class class TreeBuilder { int depth = 0 def build(closure) { closure.delegate = this closure() } def methodMissing(String name, args){ depth++ depth.times{print ' ' } print "-${name} " println args[0] if(args.length>0 && args[-1] instanceof Closure) { def childClosure = args[-1] childClosure.delegate = this childClosure() } depth-- } }
If we invoke the build() method and pass the closure in Listing 4-1 to it, we will
observe the output (Listing 4-6) that contains the name of the components as well as the
structural details involved in the presentation (Listing 4-1).
Listing 4-6: Output received when the script in Listing 4-5 is executed. -source sample/Sample2.goovy -Class Car -Method drive -MethodCall println -Object this -Argument driving -Method turn -MethodCall println -Object this -Argument direction -Class Engine -Method start -Method stop -Declaration speed = 0

30
Here, we printed the information with space(s) in front of the information. The
number of spaces is equal to the depth of the tree where the information is attached. In
actual application we will store the information in a tree data structure. We will use the
variable ‘depth’ to identify the depth of the tree. We also need to identify the parent
component of a particular component, which can be done by identifying the last
component in the previous depth of the tree. We will discuss all those in the next section.
4.3 Utilizing the Builder within an Application
We have seen that if we organize the AST information as a Groovy closure, we
can print the AST information as a tree structure by using the builder in Listing 4-5. The
next challenge is to create the closure within the ExploreAST class (Listing 3-21). We
mentioned earlier that we have the print statements purely for information purpose. We
will replace the print statements with the code that accumulates the AST information into
a string. Then we can evaluate the gathered information in a Groovy shell to generate the
closure, which can then be passed to the builder mentioned in Listing 4-5. Let us modify
the ExploreAST class (Listing 3-21) to generate the closure from the AST information.
The modification is simple. We introduce a few simple methods getStart(),
getEnd(), getLinebreak(), node(), and buildNode(). The getStart(), getEnd(), and
getLinebreak() methods concatenate the open parenthesis (‘{’) , close parenthesis (‘}’),
and ‘line-break’, respectively, to the evolving String. The node() method concatenates
the AST information. The buildNode() method invokes the getLinebreak() method and
the node() method. We replace the earlier print statements from the visit() and explore()
methods with the getStart(), buildNode(), and getEnd() methods. Listing 4-7 shows the
31
modified ExploreAST class. We ignore the imports and the groovy transformation, as
they are the same as mentioned in Listing 3-21.
Listing 4-7: Modified ExploreAST class for generating the closure with AST information 1. class ExploreAST implements ASTTransformation { 2. def buildString = ''<<'' 3. def getStart() { buildString << '{' } 4. def getEnd() { buildString << '}' } 5. def getLinebreak() { buildString << '\n' } 6. def node(info) { buildString << info } 7. def buildDetails (classMember) { classMember.each { explore it }}
8. def buildNode(info) { 9. linebreak 10. info = info.replace("\\", "/").trim() 11. node " buildNode ('$info') " 12. linebreak 13. }
14. void visit(ASTNode[] astNodes, SourceUnit sourceUnit) { 15. buildNode "source : ${sourceUnit.name.toString()}" 16. start 17. astNodes.each { it.classes.each { explore it }} 18. end 19. def closure = new GroovyShell().evaluate( "def closure = { $buildString }") 20. new TreeBuilder().build closure 21. }
22. def explore(ClassNode klass) { 23. buildNode "class : ${klass.toString()}" 24. start 25. buildNode 'Methods' 26. start 27. buildDetails klass.methods 28. end 29. end 30. }
31. def explore(ExpressionStatement expression) { explore expression.expression }
32. def explore(DeclarationExpression declarationExpression) { 33. buildNode "Declaration : ${declarationExpression.text}" 34. start 35. explore declarationExpression.leftExpression 36. explore declarationExpression.rightExpression 37. end 38. }
39. def explore(MethodNode methodNode) { 40. buildNode methodNode.name 41. start 42. buildDetails methodNode.code.statements
32
43. end 44. }
45. def explore(MethodCallExpression methodCallExpression) { 46. buildNode 'Method Call' 47. start 48. buildNode methodCallExpression.methodAsString 49. explore methodCallExpression.arguments 50. explore methodCallExpression.objectExpression 51. end 52. } 53. def explore(ArgumentListExpression argumentListExpression) { 54. if(argumentListExpression.expressions.size()>0) { 55. buildNode 'Arguments' 56. start 57. argumentListExpression.expressions.each{explore it} 58. end 59. } 60. }
61. def explore(ConstantExpression constantExpression){ 62. buildNode "constant ${constantExpression.text} : ${constantExpression.type} " 63. }
64. def explore(VariableExpression variableExpression) { 65. buildNode "variable ${variableExpression.text} : ${variableExpression.type} " 66. } 67. }
The lines numbered 3 to 6 in Listing 4-7 show the implementation of the getStart(),
getEnd(), getLinebreak(), and node() methods, respectively. The lines numbered 8
through 13 show the implementation of the buildDetails() methods. Within the
implementations of the explore() method we use those methods to build up the string.
Line 19 shows how we can transform the string to a Groovy closure. We pass the closure
to the build() method as shown in the line 20. On execution of this code we observe
similar output as shown in Listing 4-6.
Now let us replace the print statements in the builder shown in Listing 4-5 and
save the information in a tree data structure. To create the tree data structure we
33
implement the class Node that holds an array (children) of its own type as shown in
Listing 4-8.
Listing 4-8: Implementation of class Node
class Node { def info def layerDepth List<Node> children = [] def arrangeNodeByLayers(List<Node> nodeQ , List<Node> nodeList = []) { nodeList.addAll(nodeQ.collect { it }) def children = nodeQ*.children.flatten() children ? arrangeNodeByLayers(children, nodeList) : nodeList } def collectNodesByCondition(condition) { arrangeNodeByLayers([this]).findAll (condition) } }
The class Node contains two properties ‘info’ and ‘layerDepth.’ The ‘info’ holds the
information we explored from the AST. The ‘layerDepth’ holds the depth of the Node
within the tree structure. The arrangeNodeByLayers() method creates a collection of
arrays. Each of theses arrays contain the Nodes at a particular depth within the tree. The
collectNodesByCondition() method returns all the nodes within a depth of the tree. We
will modify our builder to use the class Node. The modified implementation of the
builder is shown in Listing 4-9
Listing 4-9: TreeBuilder an implementation of the builder
1. class TreeBuilder { 2. Node root 3. def depth = 0 4. def build(Closure closure) { 5. closure.delegate = this 6. closure() 7. root 8. }
34
9. def methodMissing(String name, args) { 10. depth++
11. if(root) { 12. def result = root.collectNodesByCondition() { it.layerDepth == depth - 1 } 13. if(!result) throw new RuntimeException('Root should not have sibling') 14. result.last().children << new Node(info: args[0], layerDepth: depth) 15. } 16. else { 17. root = new Node(info: args[0], layerDepth : depth) 18. } 19. if(args[-1] instanceof Closure) { 20. def nextLayerClosure = args[-1] 21. nextLayerClosure.delegate = this 22. nextLayerClosure() 23. }
24. depth-- 25. } 26. } The builder (Listing 4-9) is similar to the earlier implementation in Listing 4-5. The only
difference are the lines 11 through 18 where the methodMissing() method uses the Node
class to store the AST information. If a root Node exists we identify the parent Node and
add a new node as its child (line 14) else we create a root Node and store the information
(line 17). Any attempt to create an adjacent Node to the root Node is prevented by
throwing an error in the line numbered 13. If we now execute our ExploreAST class we
will create a tree data structure that holds the AST information of a program. We can add
a toString() method to the Node class to print the data structure we created. The
implementation of toString() method is shown in Listing 4-10.
Listing 4-10: Implementation of the toString() method for class Node
def treeString(padding) { def childrenTree = children*.treeString(padding + ' ').join('') "$padding-$info\n$childrenTree" } def String toString() { treeString("") }
35
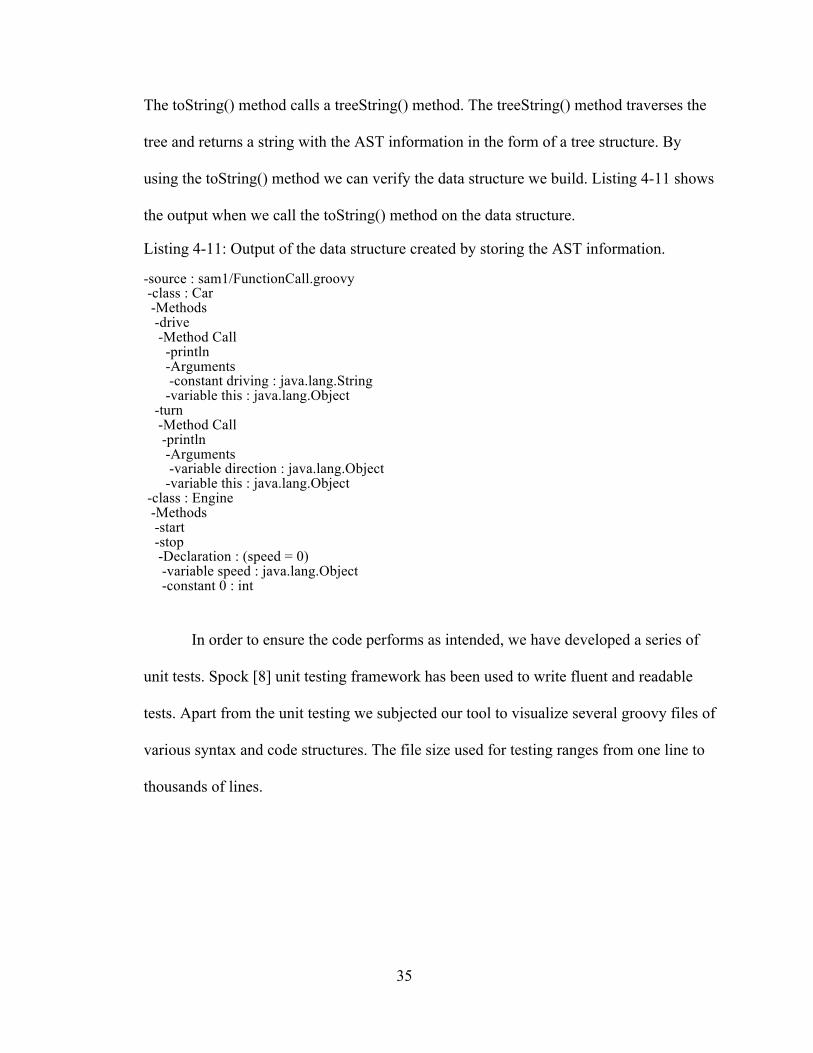
The toString() method calls a treeString() method. The treeString() method traverses the
tree and returns a string with the AST information in the form of a tree structure. By
using the toString() method we can verify the data structure we build. Listing 4-11 shows
the output when we call the toString() method on the data structure.
Listing 4-11: Output of the data structure created by storing the AST information. -source : sam1/FunctionCall.groovy -class : Car -Methods -drive -Method Call -println -Arguments -constant driving : java.lang.String -variable this : java.lang.Object -turn -Method Call -println -Arguments -variable direction : java.lang.Object -variable this : java.lang.Object -class : Engine -Methods -start -stop -Declaration : (speed = 0) -variable speed : java.lang.Object -constant 0 : int
In order to ensure the code performs as intended, we have developed a series of
unit tests. Spock [8] unit testing framework has been used to write fluent and readable
tests. Apart from the unit testing we subjected our tool to visualize several groovy files of
various syntax and code structures. The file size used for testing ranges from one line to
thousands of lines.

36
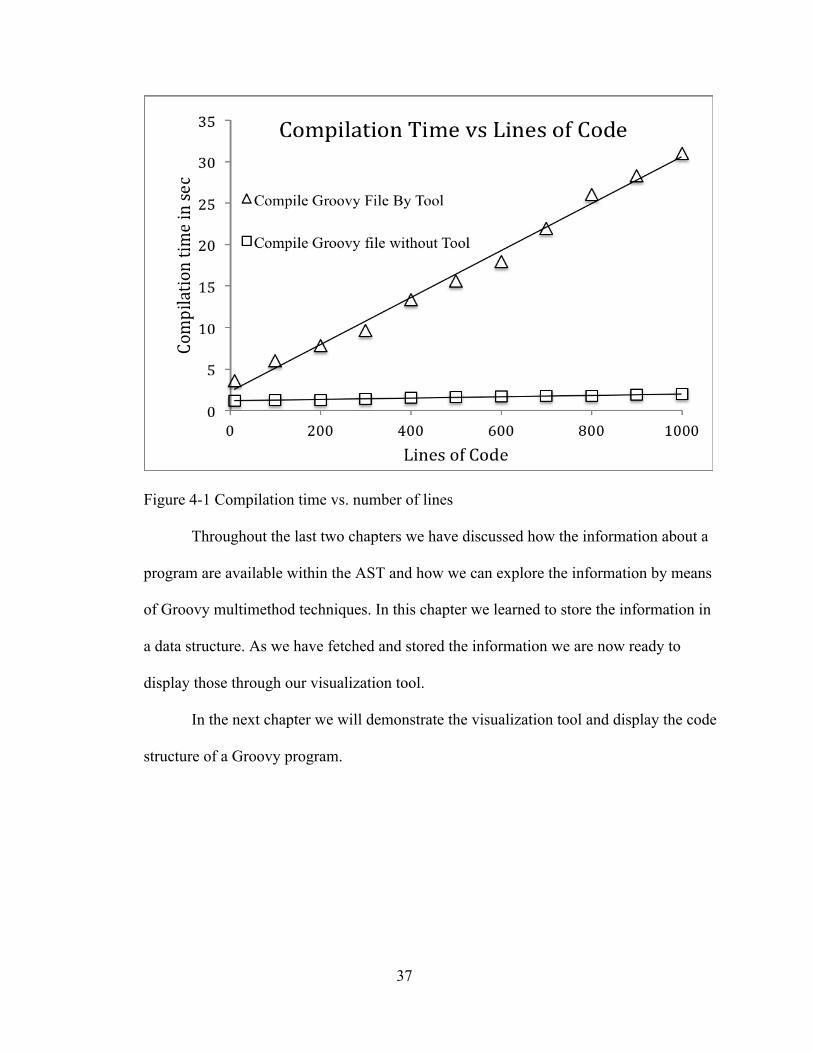
4.4 Performance of the Tool
We already know that the tool depends on the compilation phases and utilizes the
AST as the source of information of a code structure. The compilation phase is critical
and is the measure of the performance of the tool. To analyze the performance of the tool
we measured the compilation time for groovy files of different size ranges from ten to
thousands of lines. The compilation time is measured with and without the involvement
of the tool. When the compilation happens through tool, it compile the targeted Groovy
file and also invoke the visit() method. This consequently decipher the required
information from the AST. Figure 4-1 is a plot of the compilation time versus number of
lines of code. The compilation time was determined on a Mac OS X, 2.4 GHz Intel Core
2 Duo processor with 4 GB RAM, using Groovy version 2.1.7. Figure 4-1 indicates that
the compilation time is proportional to the number of lines of code in both the scenarios.
The compilation time increases slowly with file size when the tool is not involved. The
compilation time for ten lines of code is 1.2 seconds whereas for thousand lines of code is
2 seconds. Comparatively, compilation time increases faster when compilation is invoked
through the tool. For ten lines of code it takes 3.6 seconds and for one thousand lines it
takes the tool approximately 30 seconds to finish the compilation process. The reason for
this performance degradation is the tool is analyzing and building various details on the
code structure.
As the tool depends on AST, which resides in the main memory, it is logical to
observe the memory utilization. We did not perform any studies on memory utilization as
part of this thesis, however, for a file size of a thousand lines, we did not run into any
memory related issues.
37
Figure 4-1 Compilation time vs. number of lines
Throughout the last two chapters we have discussed how the information about a
program are available within the AST and how we can explore the information by means
of Groovy multimethod techniques. In this chapter we learned to store the information in
a data structure. As we have fetched and stored the information we are now ready to
display those through our visualization tool.
In the next chapter we will demonstrate the visualization tool and display the code
structure of a Groovy program.
38
Chapter 5 Demonstration of the Visualization Tool
In the previous chapters we completed all the required activities to gather the
information of Groovy programs. In this chapter we will demonstrate the visualization
tool to display the code structure.
5.1 Visual Organization
We discussed back in Chapter 1 the benefits of visualizing the code structure. We
have implemented all the underlying code to create the structure; it is time to do the final
visualization. Let’s start with an example to visualize the code structure of a Groovy
program as shown in Listing 5-1.
Listing 5-1: Groovy program Sample3.groovy
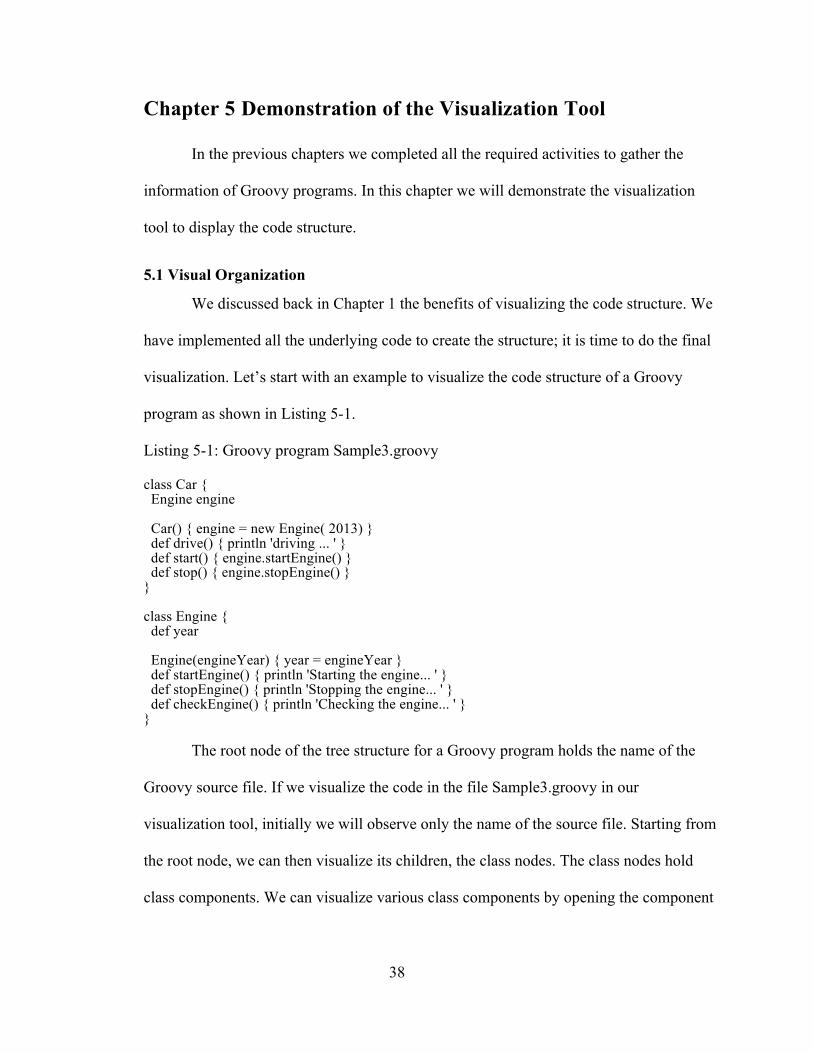
class Car { Engine engine Car() { engine = new Engine( 2013) } def drive() { println 'driving ... ' } def start() { engine.startEngine() } def stop() { engine.stopEngine() } } class Engine { def year Engine(engineYear) { year = engineYear } def startEngine() { println 'Starting the engine... ' } def stopEngine() { println 'Stopping the engine... ' } def checkEngine() { println 'Checking the engine... ' } } The root node of the tree structure for a Groovy program holds the name of the
Groovy source file. If we visualize the code in the file Sample3.groovy in our
visualization tool, initially we will observe only the name of the source file. Starting from
the root node, we can then visualize its children, the class nodes. The class nodes hold
class components. We can visualize various class components by opening the component
39
nodes. Let us start visualizing the code in Sample3.groovy through the visualization tool.
Figure 5-1 shows the name of the source when we open Sample3.groovy in the tool.
Figure 5-1 Visualization tool displaying the source name
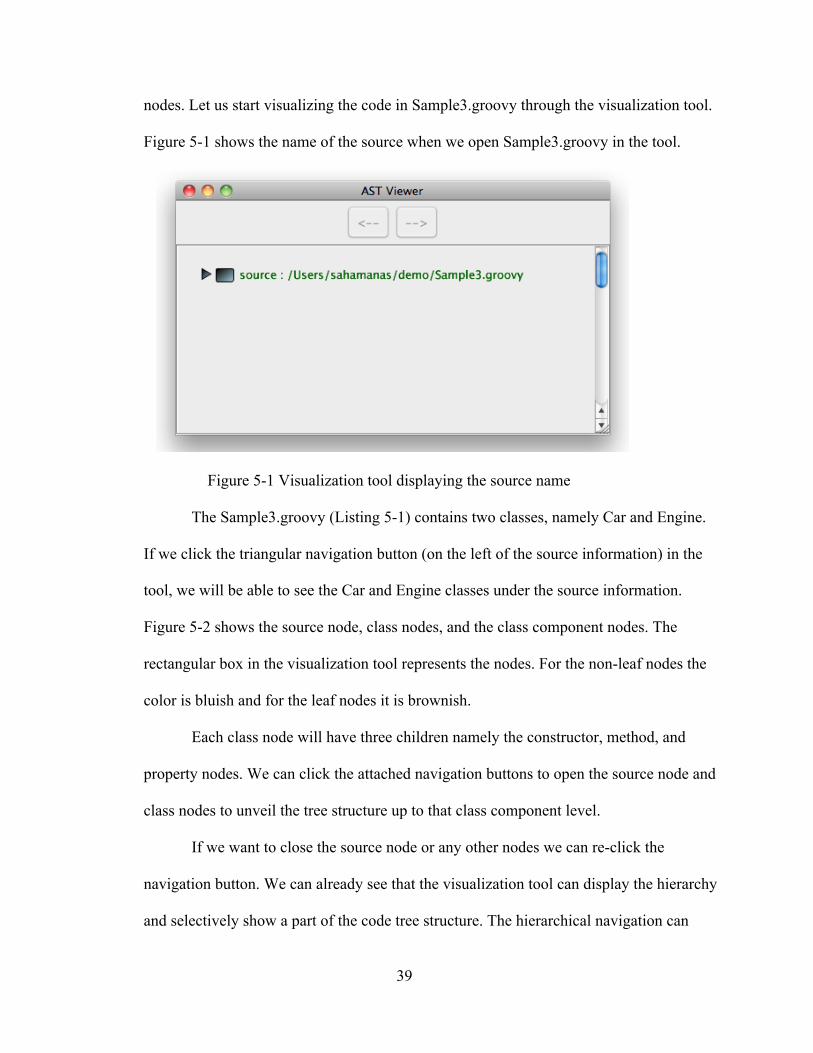
The Sample3.groovy (Listing 5-1) contains two classes, namely Car and Engine.
If we click the triangular navigation button (on the left of the source information) in the
tool, we will be able to see the Car and Engine classes under the source information.
Figure 5-2 shows the source node, class nodes, and the class component nodes. The
rectangular box in the visualization tool represents the nodes. For the non-leaf nodes the
color is bluish and for the leaf nodes it is brownish.
Each class node will have three children namely the constructor, method, and
property nodes. We can click the attached navigation buttons to open the source node and
class nodes to unveil the tree structure up to that class component level.
If we want to close the source node or any other nodes we can re-click the
navigation button. We can already see that the visualization tool can display the hierarchy
and selectively show a part of the code tree structure. The hierarchical navigation can
40
help to understand the relations between the components of a program. The selective
display feature is particularly important when the code is large and we want to
concentrate on a particular section rather than the complete code.
Figure 5-2 Visualization tool displaying the source, class, constructor, method, and property
5.2 Visualizing the Class Components
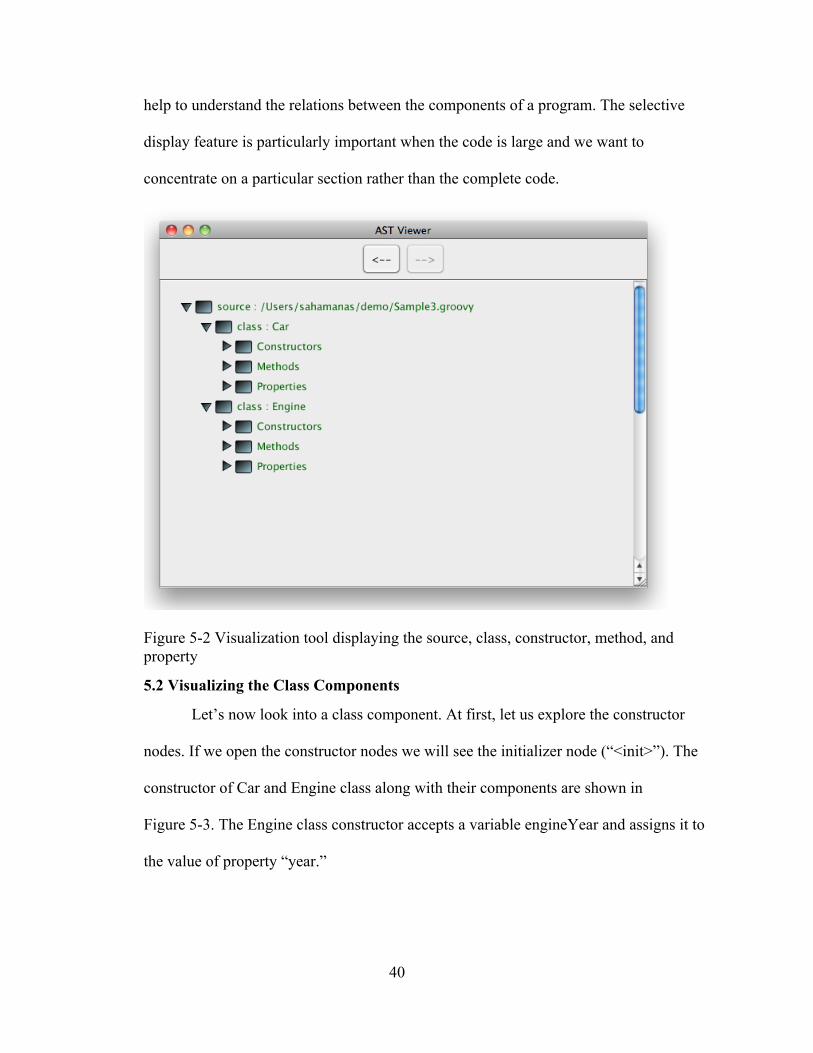
Let’s now look into a class component. At first, let us explore the constructor
nodes. If we open the constructor nodes we will see the initializer node (“<init>”). The
constructor of Car and Engine class along with their components are shown in
Figure 5-3. The Engine class constructor accepts a variable engineYear and assigns it to
the value of property “year.”
41
Under the initializer node of the Car class there is a binary expression. The left
side of the expression is a variable “engine” and the right side is a call to the Engine class
constructor. Clicking the Constructor Call node will display the “Argument” node. If we
explore the “Argument” node there is a leaf node that displays the argument passed to the
constructor of the Engine class. The value of the argument is a constant int value of 2013.
Figure 5-3 The visualization of the constructor for the Engine class
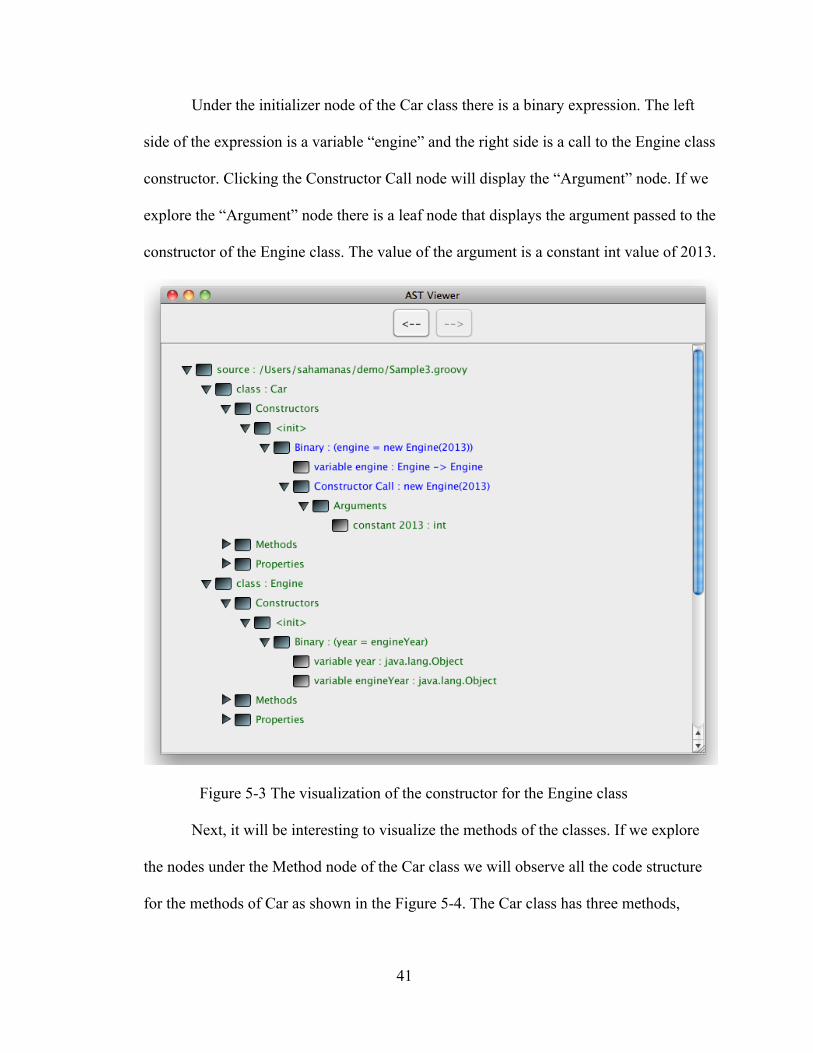
Next, it will be interesting to visualize the methods of the classes. If we explore
the nodes under the Method node of the Car class we will observe all the code structure
for the methods of Car as shown in the Figure 5-4. The Car class has three methods,
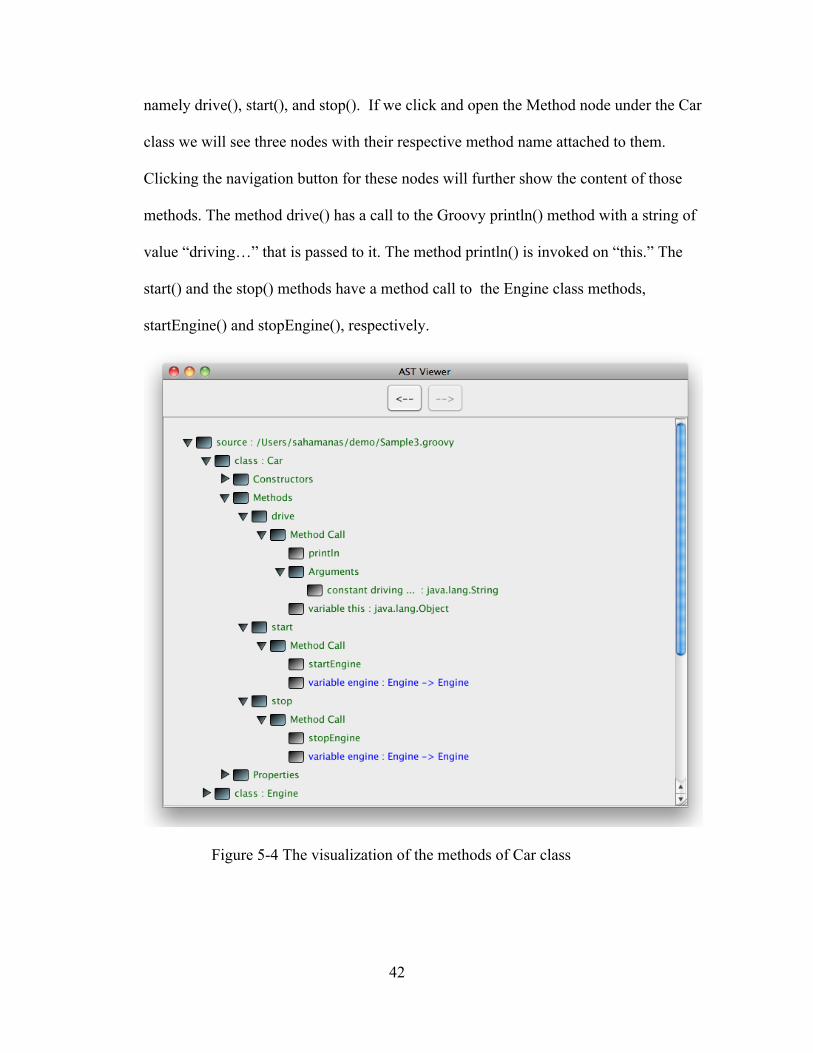
42
namely drive(), start(), and stop(). If we click and open the Method node under the Car
class we will see three nodes with their respective method name attached to them.
Clicking the navigation button for these nodes will further show the content of those
methods. The method drive() has a call to the Groovy println() method with a string of
value “driving…” that is passed to it. The method println() is invoked on “this.” The
start() and the stop() methods have a method call to the Engine class methods,
startEngine() and stopEngine(), respectively.
Figure 5-4 The visualization of the methods of Car class

43
Next we let us see the properties of the Car class. The Car class has a property
named engine. The property engine has only been initialized as a variable of type Engine.
It is assigned to an Engine class object through the constructor as we have visualized
earlier in Figure 5-3. Figure 5-5 displays the property engine in the visualization tool.
We explored the Car class methods and properties through our visualization tool.
We will visualize the methods of the Engine class in a different context (Section 5.4
Figure 5-7). We can explore the properties for the Engine class by opening the properties
node. The Engine class has a property namely “year.”
Figure 5-5 Visualization of the engine property of the Car class
If we want to go back to a previous display we can do so using the back button
placed on the top portion of the visualizer. Similarly, we can move forward by using the
forward button.
5.3 Navigating to a Class Through its References
In the last two sections we have seen how the code structure can be displayed in
an organized fashion. We explored through the tree structure to visualize the components
of a Groovy program.
44
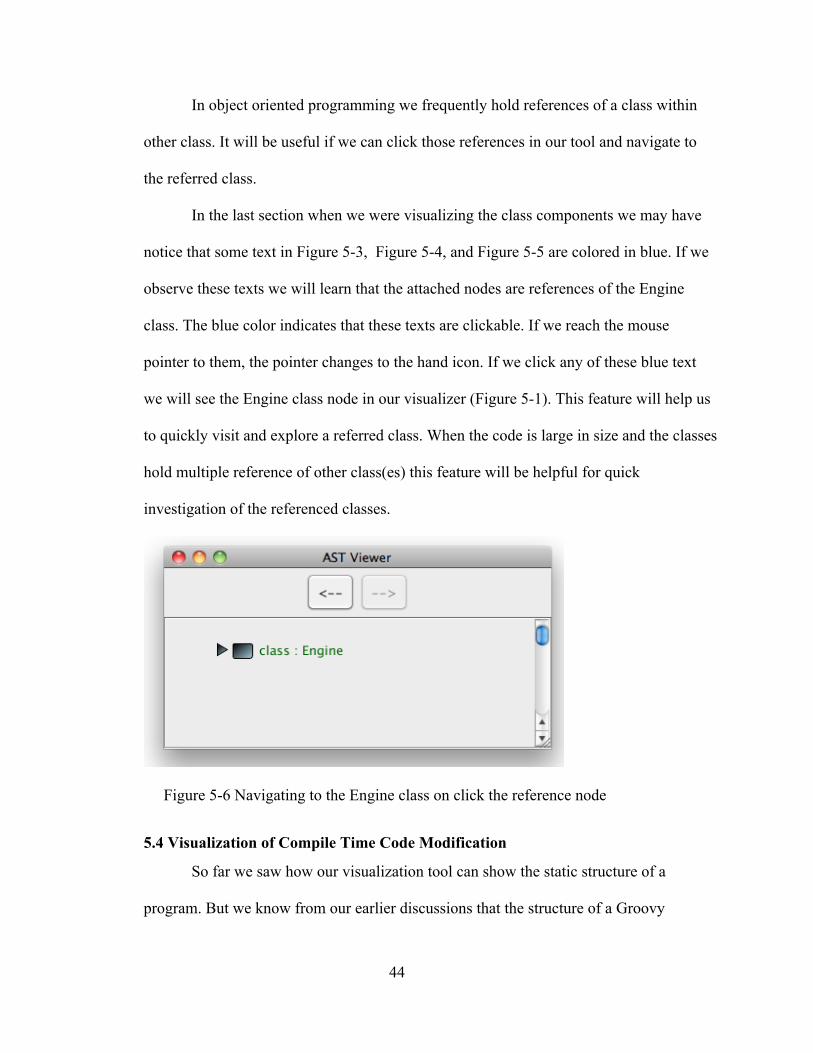
In object oriented programming we frequently hold references of a class within
other class. It will be useful if we can click those references in our tool and navigate to
the referred class.
In the last section when we were visualizing the class components we may have
notice that some text in Figure 5-3, Figure 5-4, and Figure 5-5 are colored in blue. If we
observe these texts we will learn that the attached nodes are references of the Engine
class. The blue color indicates that these texts are clickable. If we reach the mouse
pointer to them, the pointer changes to the hand icon. If we click any of these blue text
we will see the Engine class node in our visualizer (Figure 5-1). This feature will help us
to quickly visit and explore a referred class. When the code is large in size and the classes
hold multiple reference of other class(es) this feature will be helpful for quick
investigation of the referenced classes.
Figure 5-6 Navigating to the Engine class on click the reference node
5.4 Visualization of Compile Time Code Modification
So far we saw how our visualization tool can show the static structure of a
program. But we know from our earlier discussions that the structure of a Groovy
45
program is dynamic, it can be modified using AST Transformation. Our tool is quite
capable of showing the additions and modifications done using AST as well, as we will
see in this section.
We will see through an example how we can implement the ASTTransformation
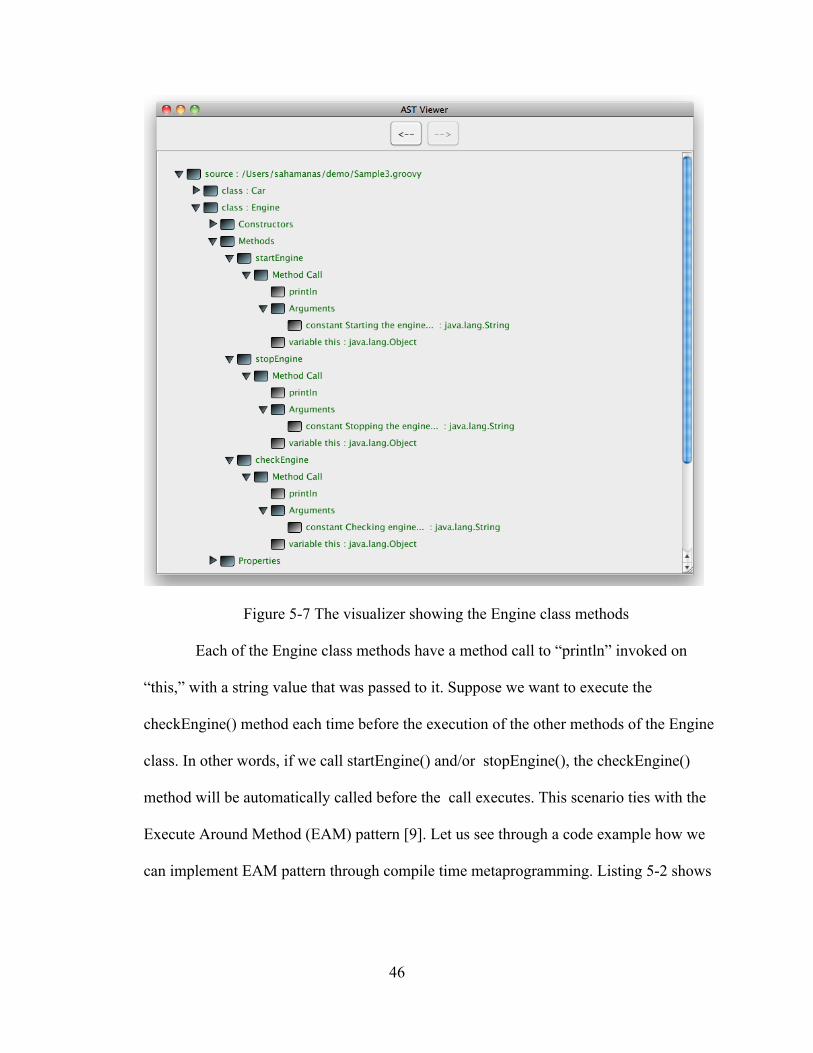
interface to manipulate Sample3.groovy in Listing 5-1. The Engine class mentioned in
Sample3.groovy have three methods, namely the startEngine(), stopEngine(), and
checkEngine(). Before we modify those methods let us visualize them through our tool.
Figure 5-7 shows all the three Engine class methods with their implementation details.
Once we modify them at compile time we will again visualize them and observe the
change.
46
Figure 5-7 The visualizer showing the Engine class methods
Each of the Engine class methods have a method call to “println” invoked on
“this,” with a string value that was passed to it. Suppose we want to execute the
checkEngine() method each time before the execution of the other methods of the Engine
class. In other words, if we call startEngine() and/or stopEngine(), the checkEngine()
method will be automatically called before the call executes. This scenario ties with the
Execute Around Method (EAM) pattern [9]. Let us see through a code example how we
can implement EAM pattern through compile time metaprogramming. Listing 5-2 shows
47
the implementation of a class InterceptorAST that injects the checkEngine() method to the
startEngine() and stopEngine() methods.
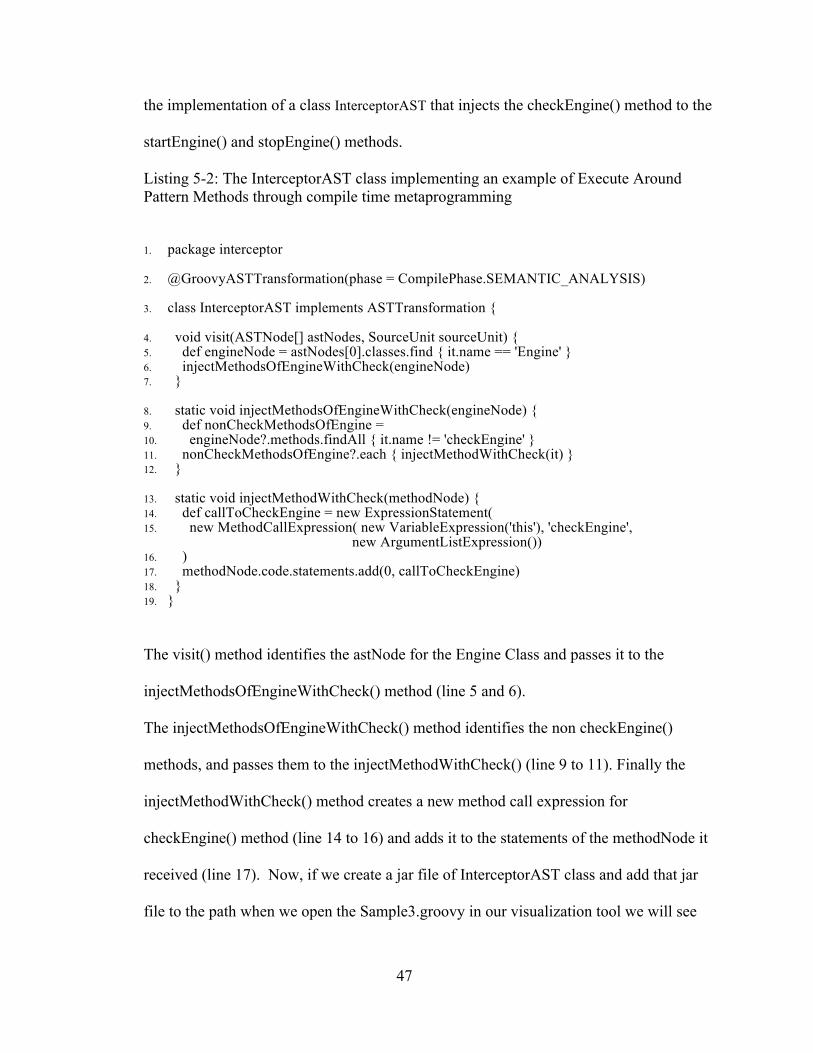
Listing 5-2: The InterceptorAST class implementing an example of Execute Around Pattern Methods through compile time metaprogramming
1. package interceptor 2. @GroovyASTTransformation(phase = CompilePhase.SEMANTIC_ANALYSIS) 3. class InterceptorAST implements ASTTransformation { 4. void visit(ASTNode[] astNodes, SourceUnit sourceUnit) { 5. def engineNode = astNodes[0].classes.find { it.name == 'Engine' } 6. injectMethodsOfEngineWithCheck(engineNode) 7. } 8. static void injectMethodsOfEngineWithCheck(engineNode) { 9. def nonCheckMethodsOfEngine = 10. engineNode?.methods.findAll { it.name != 'checkEngine' } 11. nonCheckMethodsOfEngine?.each { injectMethodWithCheck(it) } 12. }
13. static void injectMethodWithCheck(methodNode) { 14. def callToCheckEngine = new ExpressionStatement( 15. new MethodCallExpression( new VariableExpression('this'), 'checkEngine', new ArgumentListExpression()) 16. ) 17. methodNode.code.statements.add(0, callToCheckEngine) 18. } 19. }
The visit() method identifies the astNode for the Engine Class and passes it to the
injectMethodsOfEngineWithCheck() method (line 5 and 6).
The injectMethodsOfEngineWithCheck() method identifies the non checkEngine()
methods, and passes them to the injectMethodWithCheck() (line 9 to 11). Finally the
injectMethodWithCheck() method creates a new method call expression for
checkEngine() method (line 14 to 16) and adds it to the statements of the methodNode it
received (line 17). Now, if we create a jar file of InterceptorAST class and add that jar
file to the path when we open the Sample3.groovy in our visualization tool we will see
48
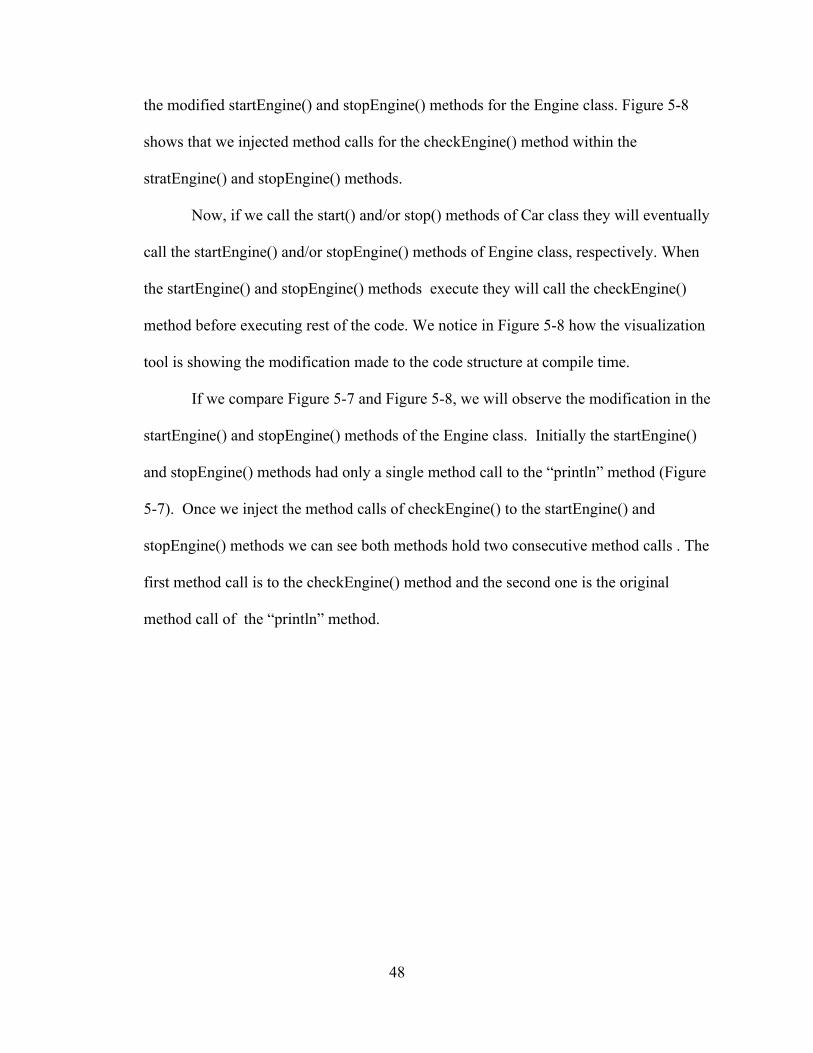
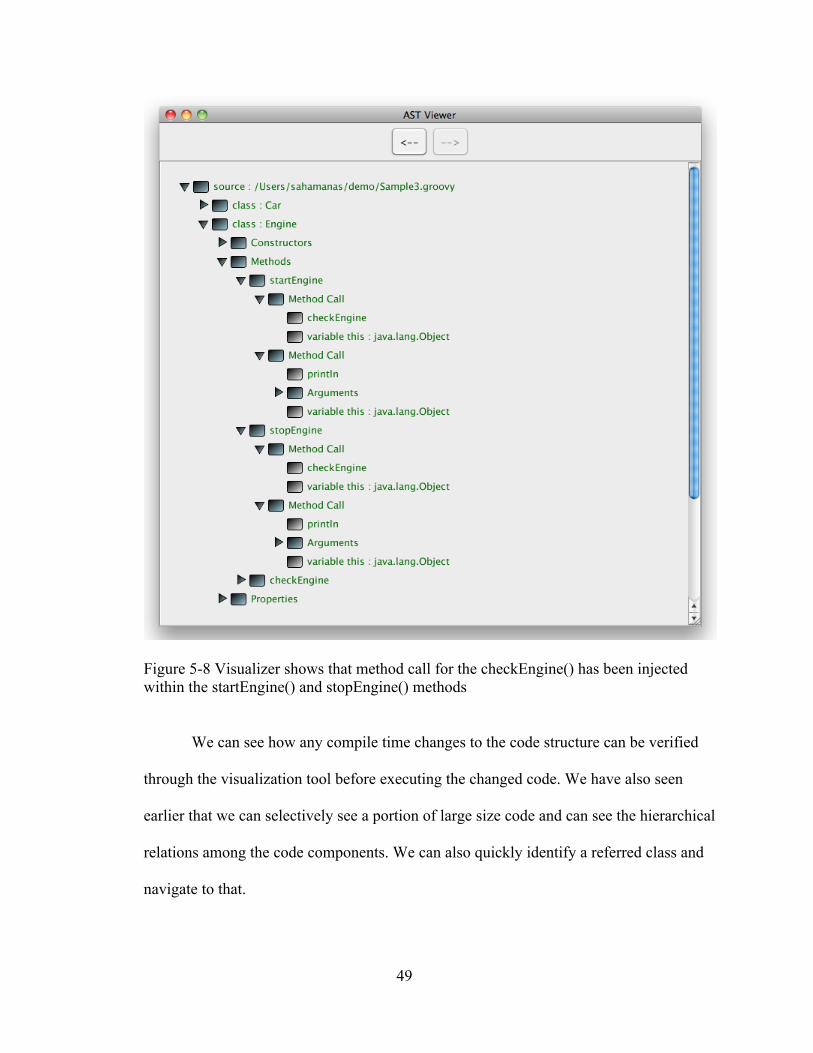
the modified startEngine() and stopEngine() methods for the Engine class. Figure 5-8
shows that we injected method calls for the checkEngine() method within the
stratEngine() and stopEngine() methods.
Now, if we call the start() and/or stop() methods of Car class they will eventually
call the startEngine() and/or stopEngine() methods of Engine class, respectively. When
the startEngine() and stopEngine() methods execute they will call the checkEngine()
method before executing rest of the code. We notice in Figure 5-8 how the visualization
tool is showing the modification made to the code structure at compile time.
If we compare Figure 5-7 and Figure 5-8, we will observe the modification in the
startEngine() and stopEngine() methods of the Engine class. Initially the startEngine()
and stopEngine() methods had only a single method call to the “println” method (Figure
5-7). Once we inject the method calls of checkEngine() to the startEngine() and
stopEngine() methods we can see both methods hold two consecutive method calls . The
first method call is to the checkEngine() method and the second one is the original
method call of the “println” method.
49
Figure 5-8 Visualizer shows that method call for the checkEngine() has been injected within the startEngine() and stopEngine() methods
We can see how any compile time changes to the code structure can be verified
through the visualization tool before executing the changed code. We have also seen
earlier that we can selectively see a portion of large size code and can see the hierarchical
relations among the code components. We can also quickly identify a referred class and
navigate to that.

50
We demonstrate through this chapter that we can effectively visualize a code
structure through our visualization tool. In the next chapter we will conclude and
understand the future scope of this work.
51
Chapter 6 Conclusion and Future Work
In the previous chapter we visualized the structure of a Groovy program. So far
we have seen the tool in action and discussed the details of how we built it. In this
chapter we will summarize the work and discuss the possibilities for some future work.
6.1 Conclusion
Real world software systems are complex. Understanding the code is critical to
maintain, extend, and/or analyze a software system. It takes time and effort to understand
the code structure. An effective visualization of code structure can help to understand it
better.
To build a visualizer we need to recognize the code structure of a program. We
can determine the code structure, by writing a parser and write further code to identify
classes and the class components. However, the AST holds the information about a
program and Groovy conveniently provides an API to explore the information. This
allowed us to take the advantage of metaprograming to decipher the information from
AST and remove the burden of writing and maintaining cumbersome custom code.
Even though AST contains all the required information and the provided API is
simple, writing code to use the API is not easy. In general programs are developed with
diverse syntax, style, and design. As a result the ASTNode would have the combination
of numerous probable AST subclasses.
Developing elegant and fluent code becomes challenging, as the unpredictable
combination of AST nodes may tempt us to write conditional statements, nested
52
statements, instance type checking, etc. Using the Groovy multimethod techniques we
managed to avoid these problem.
Once we explored the AST and collected the information of a program we need to
organize the information in a hierarchical tree structure. Builders provide ease to
construct a structure and so we wrote a builder to organize the information in a tree
structure.
The visualization tool we developed can effectively address the issues involved in
understanding the code structure. Our tool shows the hierarchy of the code structure and
it not only displays the entire program’s structure, but also permits us to inspect a
selected portion of it. The visualization tool has advanced navigation feature and it can
also effectively show any compile time modification to a program.
6.2 Future Work
The current implementation of the visualization tool helped us illustrate the power
of Groovy AST transformations and how we can use it to visualize the structure of a
program. The tool however has some limitations. In this section we will discuss some
ways in which it can be improved.
6.2.1 Exploring Code Structure to Package Level
Right now the visualization tool works with just one Groovy file. In any real
project, we have to deal with not only multiple Groovy files, but also multiple
directories where the files may be stored. Further more, software applications typically
span multiple packages. For a tool to be useful it needs to handle these kind of
situations.
53
The first improvement for this tool, should we continue to develop it, would be to
enhance the input to the tool. Instead of merely providing a single file, we would ask the
tool to work with a hierarchy of directories so it can analyze all the files and can show
the code structure of the whole project.
6.2.2 Improving Performance of the Tool
We have earlier seen tool’s execution time increase with the size of the input file.
The reason for this performance degradation is the tool is analyzing and building
various details on the code structure. While we've not focused on improving the
performance in this thesis, a future work may be to re-implement the core parts in Java
to speed up the execution.
6.2.3 Extending the Tool to Use any JVM Language
The visualization tool was build to work with Groovy programs. One of the
benefits of programming on the Java ecosystem is the ability to mix multiple languages:
Java, Groovy, Scala, Closure, etc. It would be nice for the visualization tool to visualize
code written not just in Groovy but using any language on the JVM.
As desirable as this goal is, it may be rather ambitious. The tool relies heavily on
the AST transformation, which is applied during the compilation phase of Groovy code.
To explore other JVM language we have to compile the source code and investigate
their AST. The present strategy of gathering the information does not provide the
flexibility to work with the AST of other JVM languages. Further research is needed in
this area to explore these possibilities.

54
6.2.4 Integrating with IDEs
In all the examples we saw so far, we ran the tool from command line. In a typical
enterprise, programmers use a combination of tools, command line, various IDEs like
Eclipse, intelliJ IDEA, Net Beans, etc. It would be helpful to integrate the visualization
tool with IDEs. Programmers can then check and navigate the structure of their code
while working on a project. Any code to modify a program at compile time can be
verified by looking at the code structure before executing the modified code.
To integrate the tool with the IDEs we need to develop a plugin for the IDEs.
Writing plugins for IDEs has its own challenge and we may have to write custom
plugins for different IDE. Further effort is necessary to explore these possibilities.
55
References
1. Venkat Subramaniam “Programming Groovy 2: Dynamic Productivity for the Java
Developer ” Pragmatic Press, 2013
2. http://en.wikipedia.org/wiki/Abstract_syntax_tree 3. http://joesgroovyblog.blogspot.com/2011/09/ast-transformations-compiler-phases-
and.html 4. http://groovy.codehaus.org/ 5. http://groovy.codehaus.org/Compile-time+Metaprogramming+AST+Transformations 6. http://groovy.codehaus.org/api/org/codehaus/groovy/ast/ClassNode.html 7. http://groovy.codehaus.org/api/org/codehaus/groovy/ast/ASTNode.html 8. https://code.google.com/p/spock/ 9. Kent Beck “Smalltalk Best Practice Patterns” Prentice-Hall, 1997, page 37
Top Related
Copyright © 2022 FDOKUMEN

