ZBRUSH MODELLING - ProfessorKlein
116
3dworld.creativebloq.com June 2015 #195 MASTER THE ART OF PHOTOREAL Nick Gaul shares his complete process for ZBrush and V-Ray HAIR & SKIN ROBOT DESIGN FREE VIDEO TUTORIALS! GET STARTED IN UNREAL ENGINE 4 The secret behind Chappie's success WORTH £14.99 FREE BOOK! 228 pages of pro tutorials START YOUR CG CAREER BETTER PORTFOLIOS COLLEGE PROFILES EXPERT ADVICE ZBRUSH MODELLING Add detail to your armoured characters with NoiseMaker
-
Upload
khangminh22 -
Category
Documents
-
view
0 -
download
0
Transcript of ZBRUSH MODELLING - ProfessorKlein

3dworld.creativebloq.comJune 2015
#195
master the art of
photorealNick Gaul shares his complete process for ZBrush and V-Rayhair & skin
robot design
Free video tutorials! get started in unreal engine 4
The secret behind Chappie's success
worth £14.99
Free book! 228 pages of pro tutorials
start your Cg Career better portfolios
college profilesexpert advice
zbrush modellingAdd detail to your armoured characters with NoiseMaker

SubScribe & SAVe up to 59%Now you can get the best of both worlds!
Subscribe to 3D World and get both the print
and digital editions.Turn to page 32!
From lifelike portraits to interiors,discover the art of photorealism
fAcebookwww.facebook.com/3dworldmagazine
twitter@3DWorldMag
WelcomeEditor’s
Take a long look at Nick Gaul’s amazing cover – you can create that render this issue.
On page 52 Nick will guide you through creating hair and skin, as well as lighting and
rendering a lifelike portrait. There’s more photorealism skills this issue too; on page 102 the Wonder Vision artists explain how they created a complex motorbike render and on page 68 Fernando Gasperin shares
his techniques for rendering a realistic arch-viz interior. Finally, if you’re set on
breaking into the CG industry then turn to page 75, where you can read profiles for the best colleges as well as advice from leading
art directors on how to impress and land your dream job!
Ian Dean, [email protected]
webSite3dworld.creativebloq.com
3 3D WorlD June 2015 3dworld.creativebloq.com
warrior armour Jong-Keun Kim reveals
how to add detail to your ZBrush character
sculpts, on page 62
Free!
Video And ASSetS
Turn to page 6

4 3D WorlD June 2015 3dworld.creativebloq.com
Our complete line-up for this month’s 3D World
ContentsIssue 195
6 Free downloadsGet your hands on 4GB of assets via our Vault download system
8 artist showcaseDiscover the best new digital art
17 community18 the bIg IssueWhat’s the best way to train in VFX?
26 short cutsThe making of Wrapped
34 In focus: troll gunnerSimulate dry brush painting
38 artist Q&aAll your software queries solved
Feature44 profIle: Angelo fernAndes46 stAndIng up for chAppIe
51 tutorials Improve your CG skills
75 career kickstarter College profiles and career advice
94 3d maker Explore 3D print art and trends
101 develop Theory, research and reviews
regulars7 next Month 32 subscrIptIons 87 coMpetItIon
22 the eMbAssy vfx The Vancouver studio creating its own tools
8 ArtIst showcAse Discover the most outstanding new creative work from the CG art community
digital subscriptions
Get the latest magazine for free in our new offer or
download a back issue on iPad and iPhone today!
www.bit.ly/3dworld-app
34 In focus: troll gunnerSimulate a dry brush painted miniature
44 profIle IntervIewAngelo Fernandes’ shares his creations
46 Meet chAppIe Get the lowdown on the feature’s VFX

5 3D WorlD June 2015 3dworld.creativebloq.com
develop102 MAke A showrooM bIke Master the art of creating photoreal renders with big CAD data
106 creAte A fleet of plAnesJavert Valbarrshows the potential of HitFilm 3 Pro’s particle simulator
108 extend fIlM sets wIth v-rAyBalance CG and and compositing work for realistic results
reviews110 MAyA 2016 Antony Ward reviews the new update to Autodesk’s popular software
112 Arnold for cIneMA 4dSteve Jarratt looks at the much anticipated plug-in
113 substAnce desIgner 5How does the new texture creation and compositing tool rate?
114 My InspIrAtIonPaul Schleicher’s VFX career
tutorials52 creAte photoreAl portrAIts Learn how to get the most from your modelling and rendering
60 creAte destructIon Rob Redman explains how to break apart objects in Cinema 4D
62 chArActer sculptsUse ZBrush’s NoiseMaker plug-in to add complex details to warrior armour
66 cgI for AdvertIsIng pArt 3 Master merging pictures with 3D generated environments
68 renderIng InterIorsFernando Gasperin shows how to develop photoreal scenes for arch-viz
52 creAte A photoreAl portrAIt Master V-Ray 3.0, as Nick Gaul explains his entire process to modelling and rendering
112 Arnold for cIneMA 4dThe hotly anticipated plug-in is finally here
102 creAtIng A photoreAl MotorbIke Wonder Vision’s Joseph Thomas explains optimising a CGI pipeline for photoreal renders
98 delIcAcy And drAMA 3D artist Paul Liaw’s eclectic portfolio
96 creAte A 3d prInted AwArdLearn how to develop your own trophy
62 chArActer sculpts Add complex detail to warrior armour
3d maker94 3d prIntshowKerry Hogarth on why this is the place to see the latest in 3D design
96 MAke A 3d prInted AwArd Aiman Akhtar talks through his process for developing a trophy
98 delIcAcy And drAMA 3D artist Paul Liaw shares his vast and varied portfolio career kickstarter
76 bucks new unIversItyExplore the ground-breaking programmes on offer
80 your vfx cAreerOne industry expert shares the key ingredients to success
82 MedIA desIgn schoolTrain in a real-world studio environment to kickstart your career
84 peArson college londonDiscover the programmes designed with and for industry
88 lAnd your dreAM jobExpert guidance on how to get your big break in the industry
92 how to be A greAt leAderExecutive coach Mickey Rogers shares her top tips for creatives
new3d printsection
cg careerspecialissue 110 MAyA 2016Autodesk’s impressive new upgrade

video+files learn Ue4 Two complete Digital-Tutors video courses
scene files+Hdri+mesH create a pHotoreal portraitDownload Nick’s resource files, including the high-res mesh and layered shader
Book+video+files 3ds maxGet the 228 page book and video training
video destrUctionDownload Cinema 4D video training
Base mesH ZBrUsH detailsGet your project files for Kim’s tutorial
video vfx trainingFollow the training for HitFilm 3 Pro
in the vault
Get the files to follow Nick’s
tutorial!
Follow the link to download your free files www.creativebloq.com/vault/3dw195
freeresources
4gb of video &
files
get your resourcesYou’re three steps away from this issue’s video training and files…
1. Go to the website Type this into your browser’s address bar:
www.creativebloq.com/vault/3dw195
2. Find the Files You want Search the list of free resources to find
the video and files you want.
3. download what You need Click the Download buttons and your
files will save to your PC or Mac.
Plus!there are more files, art and resources waiting online…
Video Take a walkthrough Fernando Gasperin’s arch-viz interior.
Files Download the training for this issue’s Artist Q&A tutorials.
wiPs Download the extra tutorial images to accompany Showcase.
artwork Download the professional finished art from this issue’s artists.
6 3D WorlD June 2015 3dworld.creativebloq.com

editorial
editor Ian Dean
art editor Darren Phillips
operations editor Felicity Barr
groUp content editor Tom May
commissioning editors Martin Cooper,
Beren Neale, Julia Sagar
staff writers Sammy Maine,
Henry Winchester, Alice Pattillo
contributors
Jeroen Aerts, Aiman Akhtar, Cirstyn Bech-Yagher,
Amedeo Beretta, Simon Edwards, Francesca
Forzoni, Fernando Gasperin, Nick Gaul,
Jack M Gilson, Mike Griggs, Iñaki González,
Kerrie Hughes, Steve Jarratt, Jong Keun-Kim,
Kuksoom Middleton, Christiano Mariano Pires,
Rob Redman, Mickey Rogers, Joseph Thomas,
Antony Ward, Alvin Weetman
ManageMent
content & marketing director Nial Ferguson
Head of content & marketing, pHotograpHy,
creative & design Matthew Pierce
groUp editor-in-cHief Dan Oliver
groUp art director Rodney Dive
advertising
accoUnt manager Suzanne Smith
+44 (0) 207 042 4122 [email protected]
Production & distribution
prodUction controller Marie Quilter
prodUction manager Mark Constance
printed in tHe Uk By:
William Gibbons & Sons Ltd on behalf of Future.
distriBUted By:
Seymour Distribution Ltd ,
2 East Poultry Avenue,
London EC1A 9PT,
Tel: 0207 429 4000
overseas distriBUtion By:
Seymour International
circulation
trade marketing manager Juliette Winyard
07551 150 984 [email protected]
licensing
international director
Regina Erak [email protected]
+44 (0)1225 442244 Fax +44 (0)1225 732275
subscriPtions
Uk reader order line & enqUiries:
0844 848 2852
overseas reader order line & enqUiries:
+44 (0)1604 251045
online enqUiries:
www.myfavouritemagazines.co.uk
email: [email protected]
Visit www.yourfuturejob.com
All contents copyright © 2015 Future Publishing Limited or published under licence. All rights reserved. No part of this magazine may be reproduced, stored, transmitted or used in any way without the prior written permission of the publisher. Future Publishing Limited (company number 2008885) is registered in England and Wales. Registered office: Registered office: Quay House, The Ambury, Bath, BA1 1UA. All information contained in this publication is for information only and is, as far as we are aware, correct at the time of going to press. Future cannot accept any responsibility for errors or inaccuracies in such information. You are advised to contact manufacturers and retailers directly with regard to the price and other details of products or services referred to in this publication. Apps and websites mentioned in this publication are not under our control. We are not responsible for their contents or any changes or updates to them. If you submit unsolicited material to us, you automatically grant Future a licence to publish your submission in whole or in part in all editions of the magazine, including licensed editions worldwide and in any physical or digital format throughout the world. Any material you submit is sent at your risk and, although every care is taken, neither Future nor its employees, agents or subcontractors shall be liable for loss or damage.
contact us3d world Magazine
fUtUre pUBlisHing Quay House, The Ambury,
Bath, BA1 1UA
telephone: +44 (0) 1225 442244 email: [email protected]: 3dworld.creativebloq.com
facebook: www.facebook.com/3dworldmagazinetwitter: @3DWorldMag
Future is an award-winning international media group and leading digital business. We reach more than 49 million international consumers a month and create world-class content and advertising solutions for passionate consumers online, on tablet & smartphone and in print.
Future plc is a public company quoted on the London Stock Exchange (symbol: FUTR).www.futureplc.com
Chief executive Zillah Byng-Maddick Non-executive chairman Peter AllenChief financial officer Richard Haley
Tel +44 (0)207 042 4000 (London)Tel +44 (0)1225 442 244 (Bath)
Discover how to create incredible VFX
next Month
issue 196
issue 196 on sale 20 maywe go behind the scenes at ilm!
SubScribe today: www.bit.ly/3dworld-subs
free!Marvel
book
sUBscriBe
today to get
yoUr next issUe!
www.bit.ly/3dworld-subs
© 2015 Marvel. All Rights Reserved.
7 3D WorlD June 2015 3dworld.creativebloq.com

The sand is the soul and the beauty of the artwork – we were depending on it
to bring the piece together
8 3D WorlD June 2015 www.facebook.com/3dworldmagazine
showcase
artist
get published
email your Cg art [email protected]
The best digital art from the CG community
showcase
Visit the online Vault to download extra process art for these projects:
www.3dworldmag.com/vault/3dw195

Let’s pLay poLoWith a tight deadline this precise piece was
created in just 20 days
9 3D WorlD June 2015 www.facebook.com/3dworldmagazine
artwork for ogilvy & mather, delhi, india
artists: pramod Kumar, Vinay Vikram singhsoftware: ZBrush, 3ds Max, photoshop
With over 10 years’ experience in 3D game art and development, working with the likes of THQ, Yukes, Microsoft, SOE and Eidos, Pramod Kumar and Vinay Vikram Singh are dab-hands when it comes to creating engaging and unique work.
Despite the tight deadline for this particular project, the pair crafted a meticulous piece in just 20 days. “The most challenging part was to create the bursting/flowing sand,” explains Vinay. “We realised after trying various methods that using particle systems was very time consuming and the right placement of the sand was not coming out well. Rendering was taking too much time, so we used Photoshop to place the sand burst in the desired areas. Even though the process was manual and tedious, it was worth applying as the result was what we and the client wanted,” he continues. Pramod adds, “After rendering in V-Ray we composited the sand particles and dust in the final image using Photoshop.”
Creating the players in ZBrush, they used the Transpose Master for the desired pose of each player. “We then decimated the mesh using Decimation Master to retain the details with a lower polygon count,” Pramod explains.
fyiYou can see more of Pramod and Vinay’s work at www.twinbrains.in
3d world view
The many hours Pramod and Vinay spent in Photoshop
were definitely worth it. The effect of the sand bursts really
is fantastic!
feliCity barrProduction Editor

10 3D WorlD June 2015 www.facebook.com/3dworldmagazine
showcase
robotsartist: aazeddine serghinisoftware: Maya, V-Ray, Mari, UVLayout, photoshop
“I’m a 3D generalist, so my experience covers modelling, texturing, shading, lighting, rendering and compositing,” explains Aazeddine Serghini, a Morroco-based creative who is currently studying at Infodesign. Inspired by Goro Fujita and Ian McQue, Robots is a small homage to the former.
“I begin by building the entire scene with basic objects to have the overall composition and perspective that I’m looking for,” he explains. “After I get the desired result with base models, I lock my camera and start adding details for each piece. The first object I started was the robot.”
Spending five hours each day, the piece took around five days to finish, with the lighting aspect his favourite of the project. “My lighting technique is to assign a grey shader with 200 for RGB to the whole scene – that helps me to focus on how every piece of light will behave in the scene. For this project I used five V-Ray Rectangular lights and two Sphere lights for the interior and a Dome light with HDRI for the exterior.”
Once he had composed the image in Photoshop, Aazeddine finished it off with some glow effects in the windows and door with some colour correction.
fyiYou can see more of Aazeddine’s work at www.artstation.com/artist/electrozddin
3d world view
Aazeddine’s lighting technique has
certainly paid off and I especially like how
the glow effect in the window is picked up in the robot’s eyes.
darren phillips
Art Editor
I based the piece on concept art by the great artist Goro Fujita


12 3D WorlD June 2015 www.facebook.com/3dworldmagazine
showcase
orphan and the Jeweller
artist: Wulingsoftware: Maya, ZBrush, Mari, photoshop
As an artist inspired by all things Anime, 3D enthusiast Wuling’s rendering obsession led her to recreate some of her favourite characters. Soon she began creating her own stories, taking her time (this piece took her around 200 days), and learning techniques as she went along. “I’m just doing what I love,” she says. “Working more and working harder gives me the courage to always try new things.”
The Orphan and the Jeweller deviates from Wuling’s Anime obsession and focuses on her love of gaming, namely Diablo III. “It’s a very attractive game. The main character Covetous Shen is the man sitting in the image. I chose the gorgeous fashion from the middle ages and combined different colours and textures to get that old-age effect.” Researching haunted houses and the chamber of secrets, Wuling added animal specimens, spider’s webs and magic books to complete her ancient atmosphere.
“The process of doing it was a massive learning curve,” she concludes. “I hope one day that doing stuff like this will help me to produce my best work.”
fyiYou can see more of Wuling’s work by visiting www.blog.sina.com.cn/wulinghappy
3d world view
“The tone of this scene is wonderful,
you focus in the jewel and light and only later spot the thief
approaching!”
feliCity barrProduction Editor
I’ve always wanted to use CG to showcase my
favourite characters

14 3D WorlD June 2015 www.facebook.com/3dworldmagazine
showcasethe starry nightartist: Daniel D’avilasoftware: ZBrush, DynaMesh, ZRemesher, Marvelous Designer, after effects, photoshop
Vincent van Gogh inspired artists into the 20th century and beyond. One such artist is Daniel D’Avila, who created The Starry Night.
“After the concept was created with doodles and sketches, I began to build its form in ZBrush, DynaMesh and ZRemesher. I exported the optimised model and maps (Displacement, Normal, Diffuse, Cavity) to Modo and started on lighting,” Daniel explains. His hair was modelled in Modo and his clothes in Marvelous Designer, which produced a natural look. “I’m always pushing my limits and learning all I can, including my recent studies in Marvelous Designer. You can only produce the best results if you understand how the garment and real clothes are made; their patterns, seam lines, folds.”
For the final compositing, After Effects was used for depth of field and Photoshop for colour corrections and post-production work.
fyiYou can see more of Daniel’s work by visiting www.davilastudio.com
3d world view
“A studied use of Marvelous Designer
to give life to Vincent van Gogh’s luna
adventures.”
ian deanEditor
feeLing inspiReDThe Starry Night was created as a homage
to one of Daniel’s favourite painters, Vincent van Gogh
The Starry Night is a mix of Van Gogh’s own
world with a kind of Little Prince mood to it

15 3D WorlD June 2015 www.facebook.com/3dworldmagazine
elizabeth and skyhook
artist: Kay Chosoftware: ZBrush, 3ds Max, V-Ray, photoshop
“Although I have a full-time job, I’m very willing to make time for my personal artwork,” says Kay Cho, a South Korea-based artist who’s love of gaming often inspires his work.
“When I was introduced to 3D, I was working for an interior design company. Since then I’ve pursued what I love to do: games. Experience is my strength because I’ve done a lot of subcontract work for games like Aion, Icarus and Point Blank. Currently I do 3D modelling for game characters at Softnyx.” Also inspired by artists Michael Knowland, Hugues Giboire and Pawel Mielniczuk, Elizabeth and Skyhook took four months to create and is an example of his character-driven work.
Using 3ds Max for the hair and fur, and V-Ray for rendering, Kay Cho’s favourite part is the sculpting process. “I start to sculpt right away with ZBrush and do rendering using displacement map, diffuse map, bump map, specular map and so on, and then complete by composing them.”
fyi You can see more of Kay Cho’s work at www.artstation.com/artist/kuki0404_10kg
3d world view
“Kay’s photoreal interpretation of
Elizabeth is a fantastic render, the detail in the hair and the
tone of her skin is amazing.”
darren phillipsArt Editor
I’ve always loved sculpting characters – it helps me to learn new things

20 thunderbirds are goHow Milk is bringing back the classic
18 the big issue What’s the best way to train in VFX?
22 the embassy vfxVancouver studio on developing its own tools
24 maKing a monsterHow Leviathan was brought to life
29 if the shoe fits MPC discusses the making of Cinderella
26 short cuts: wrappedThe film turning NYC into a floral wilderness
30 Lightwave to the rescueThe software saving a world heritage site
28 american sniperMPC share how VFX made all the difference
34 in focus: troLL gunner Simulate a dry brush painted miniature look
News and views from around the international CG community
CommunityCONtENtS
17 3D WorlD June 2015 3dworld.creativebloq.com
GEt publiShEdEmail yOur CG art [email protected]
Visit the online Vault to download extra process art for these projects:
www.creativebloq.com/vault/3dw195
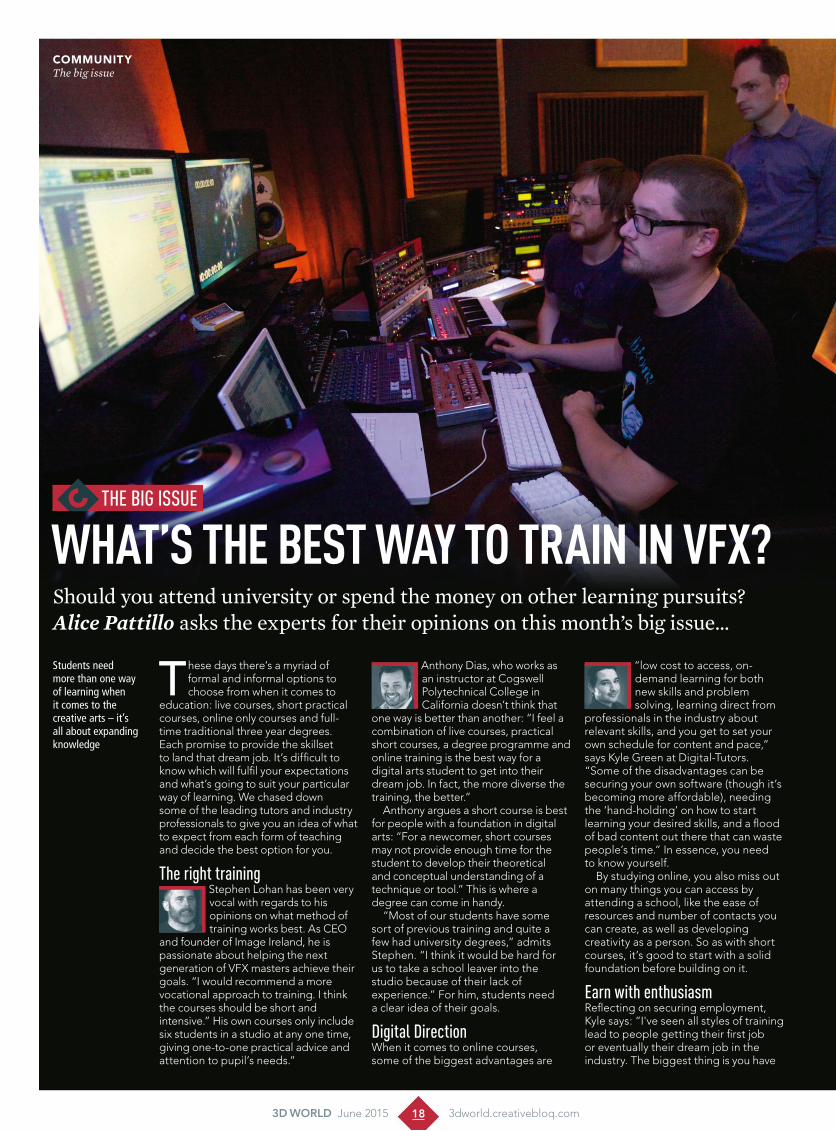
These days there’s a myriad of formal and informal options to choose from when it comes to
education: live courses, short practical courses, online only courses and full-time traditional three year degrees. Each promise to provide the skillset to land that dream job. It’s difficult to know which will fulfil your expectations and what’s going to suit your particular way of learning. We chased down some of the leading tutors and industry professionals to give you an idea of what to expect from each form of teaching and decide the best option for you.
The right trainingStephen Lohan has been very vocal with regards to his opinions on what method of training works best. As CEO
and founder of Image Ireland, he is passionate about helping the next generation of VFX masters achieve their goals. “I would recommend a more vocational approach to training. I think the courses should be short and intensive.” His own courses only include six students in a studio at any one time, giving one-to-one practical advice and attention to pupil’s needs.”
Anthony Dias, who works as an instructor at Cogswell Polytechnical College in California doesn’t think that
one way is better than another: “I feel a combination of live courses, practical short courses, a degree programme and online training is the best way for a digital arts student to get into their dream job. In fact, the more diverse the training, the better.”
Anthony argues a short course is best for people with a foundation in digital arts: “For a newcomer, short courses may not provide enough time for the student to develop their theoretical and conceptual understanding of a technique or tool.” This is where a degree can come in handy.
“Most of our students have some sort of previous training and quite a few had university degrees,” admits Stephen. “I think it would be hard for us to take a school leaver into the studio because of their lack of experience.” For him, students need a clear idea of their goals.
Digital DirectionWhen it comes to online courses, some of the biggest advantages are
Should you attend university or spend the money on other learning pursuits? Alice Pattillo asks the experts for their opinions on this month’s big issue…
What’s the best Way to train in VFX?
Students need more than one way of learning when it comes to the creative arts – it’s all about expanding knowledge
The big issue
“low cost to access, on-demand learning for both new skills and problem solving, learning direct from
professionals in the industry about relevant skills, and you get to set your own schedule for content and pace,” says Kyle Green at Digital-Tutors. “Some of the disadvantages can be securing your own software (though it’s becoming more affordable), needing the ‘hand-holding’ on how to start learning your desired skills, and a flood of bad content out there that can waste people’s time.” In essence, you need to know yourself. By studying online, you also miss out on many things you can access by attending a school, like the ease of resources and number of contacts you can create, as well as developing creativity as a person. So as with short courses, it’s good to start with a solid foundation before building on it.
earn with enthusiasmReflecting on securing employment, Kyle says: “I've seen all styles of training lead to people getting their first job or eventually their dream job in the industry. The biggest thing is you have
18 3D WorlD June 2015 3dworld.creativebloq.com
CommunityThe big issue

Kyle GreenDirector of creative content, Digital-Tutorswww.digitaltutors.com
“Some things to consider before applying to a school are: the financial considerations, the quality of the programme and the talent they’re producing. Make sure they have the right creative track for you, and you’re ready for the move, wherever it may take you. Having a degree will in no way be a disadvantage, unless the required courses take you away from what you should be focusing on (you’ll still be more cultured, at least). In the end, it all comes down to your reel or portfolio, and the skills behind it. Find what works for you and keep testing. Just stay passionate and roll with the punches.”
Anthony DiAsVisual director, Cogswell MediaWorkswww.cogswell.edu
“Once you have a solid foundation in a certain topic, you should be able to pick up new related skills and tools much faster than when you first started out. But simply learning a tool doesn’t mean you have learned how to make art. I studied art and animation and was one class short of receiving an AA degree in animation at West Valley College before I transferred to pursue a four-year degree in digital audio technology at Cogswell College. The training I received at West Valley was a great start, but it would not have been enough to get into the animation industry without further training.”
stephen lohAnCEO and founder, Image Irelandwww.imageireland.ie
“Is it morally OK to ask a student to pay up to $100,000 over a three year period so they can get a job that does not exist? There are now numerous examples of students who find themselves in an economic straight jacket before they embark on their journey through life. Surely a short, more intensive course in their chosen subject at the outset would be a much better solution. If they are unhappy with their choice there is room for financial manoeuvring to enable them to correct their path. That said, from a life experience point of view I do think that a three year college experience helps students mature – and some need this.”
The biggest thing is you have to be passionate aboutyour creative profession
Kyle Green, Digital-Tutors
inDusTry insiDers Thoughts & opinions from the experts
Online courses, when paired with practical, live courses, can give
students what they need to truly become
career-worthy
to be passionate about your creative profession and never get complacent.” He believes with learning online (just like Digital-Tutors) or in a school, it eventually just comes down to the quality and speed of your work. “No matter where you learn, it could be one or a mix of all options, if you have the passion and drive you can make that
dream a reality. It won’t always be a smooth road, but no profession is and you just have to keep getting back up. Find the training that works best for you and experiment.”
Stephen explains he only takes on students who have a clear goal of what they want to achieve and where to specialise – many of whom have studied a three year degree. “I myself have a degree and a master’s that, looking back, taught me very little compared
to my industry experience. A course that has say, been written in 2014 for a 2015 start and a finish of 2018. That is a four year turnover. This is way too long in an industry that is led by software application development. I’m a strong advocate of college for live experience and short, intensive courses which are industry led for career development.”
However, he does note that in Ireland the standard of VFX degrees is poor: “I am aware that Bournemouth college has attracted students from Ireland over the years and the work I’ve seen from there has always been of a high standard.”
But no matter what, enthusiasm is key. “Education is just one part of being successful,” Kyle reminds us. “No matter the industry, how serious you are about learning, your drive and passion and so many other factors play in to being successful. You can never stop learning or you’re going to be passed up and you’ll only sell yourself short. You’ve got to be serious about it, but also take yourself lightly; people don’t want to work with rude – for lack of a better word – people (even that is a tip to being successful).”
FyiFor more information and advice on VFX courses and careers turn to page 75.
19 3D WorlD June 2015 3dworld.creativebloq.com
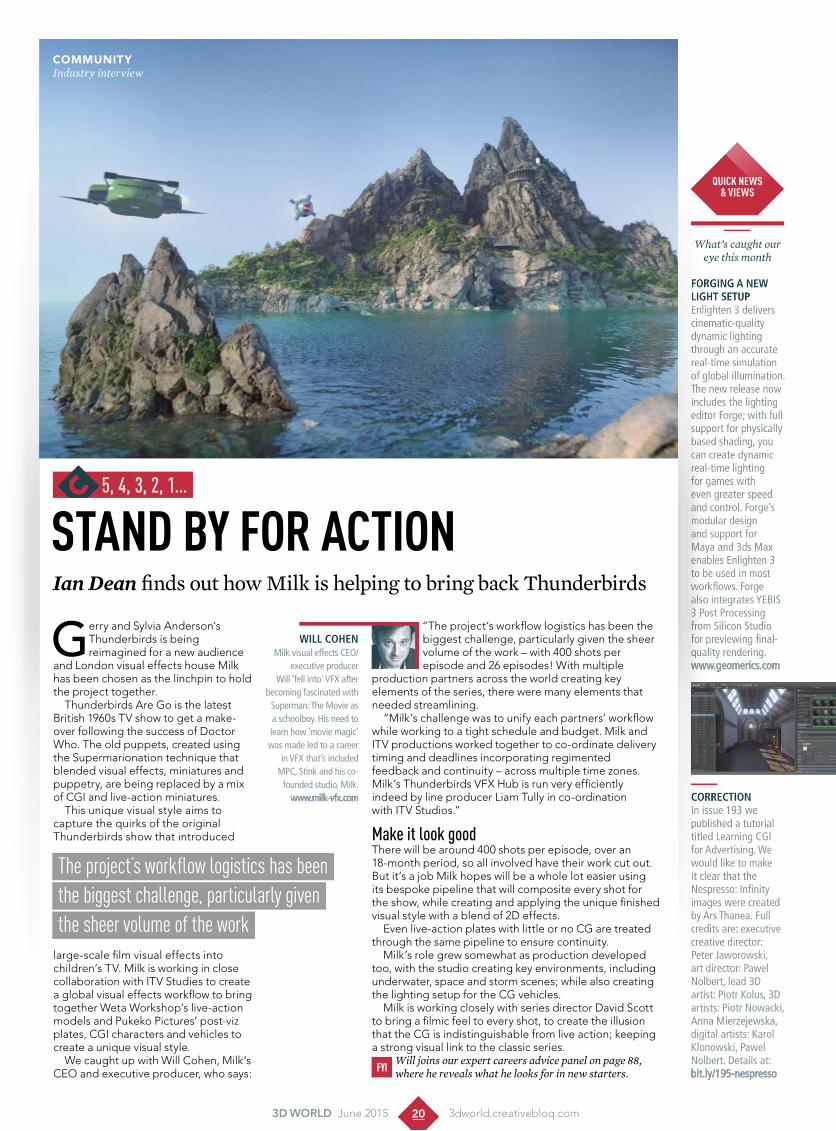
Stand by for actionIan Dean finds out how Milk is helping to bring back Thunderbirds
Gerry and Sylvia Anderson’s Thunderbirds is being reimagined for a new audience
and London visual effects house Milk has been chosen as the linchpin to hold the project together.
Thunderbirds Are Go is the latest British 1960s TV show to get a make-over following the success of Doctor Who. The old puppets, created using the Supermarionation technique that blended visual effects, miniatures and puppetry, are being replaced by a mix of CGI and live-action miniatures.
This unique visual style aims to capture the quirks of the original Thunderbirds show that introduced
large-scale film visual effects into children’s TV. Milk is working in close collaboration with ITV Studies to create a global visual effects workflow to bring together Weta Workshop’s live-action models and Pukeko Pictures’ post-viz plates, CGI characters and vehicles to create a unique visual style.
We caught up with Will Cohen, Milk’s CEO and executive producer, who says:
“The project’s workflow logistics has been the biggest challenge, particularly given the sheer volume of the work – with 400 shots per episode and 26 episodes! With multiple
production partners across the world creating key elements of the series, there were many elements that needed streamlining.
“Milk’s challenge was to unify each partners’ workflow while working to a tight schedule and budget. Milk and ITV productions worked together to co-ordinate delivery timing and deadlines incorporating regimented feedback and continuity – across multiple time zones. Milk’s Thunderbirds VFX Hub is run very efficiently indeed by line producer Liam Tully in co-ordination with ITV Studios.”
Make it look goodThere will be around 400 shots per episode, over an 18-month period, so all involved have their work cut out. But it’s a job Milk hopes will be a whole lot easier using its bespoke pipeline that will composite every shot for the show, while creating and applying the unique finished visual style with a blend of 2D effects.
Even live-action plates with little or no CG are treated through the same pipeline to ensure continuity.
Milk’s role grew somewhat as production developed too, with the studio creating key environments, including underwater, space and storm scenes; while also creating the lighting setup for the CG vehicles.
Milk is working closely with series director David Scott to bring a filmic feel to every shot, to create the illusion that the CG is indistinguishable from live action; keeping a strong visual link to the classic series.
fyiWill joins our expert careers advice panel on page 88, where he reveals what he looks for in new starters.
Will CohenMilk visual effects CEO/
executive producerWill ‘fell into’ VFX after
becoming fascinated with Superman: The Movie as a schoolboy. His need to learn how ‘movie magic’ was made led to a career
in VFX that’s included MPC, Stink and his co-
founded studio, Milk.www.milk-vfx.com
Forging a neW light setupEnlighten 3 delivers cinematic-quality dynamic lighting through an accurate real-time simulation of global illumination.The new release now includes the lighting editor Forge; with full support for physically based shading, you can create dynamic real-time lighting for games with even greater speed and control. Forge’s modular design and support for Maya and 3ds Max enables Enlighten 3 to be used in most workflows. Forge also integrates YEBIS 3 Post Processing from Silicon Studio for previewing final-quality rendering.www.geomerics.com
CorreCtionIn issue 193 we published a tutorial titled Learning CGI for Advertising. We would like to make it clear that the Nespresso: Infinity images were created by Ars Thanea. Full credits are: executive creative director: Peter Jaworowski, art director: Pawel Nolbert, lead 3D artist: Piotr Kolus, 3D artists: Piotr Nowacki, Anna Mierzejewska, digital artists: Karol Klonowski, Pawel Nolbert. Details at:bit.ly/195-nespresso
quick newS& viewS
What’s caught our eye this month
5, 4, 3, 2, 1…
The project’s workflow logistics has been the biggest challenge, particularly giventhe sheer volume of the work
CommunityIndustry interview
20 3D WorlD June 2015 3dworld.creativebloq.com


There’s no shortage of VFX studios in Canada right now. So what makes The Embassy VFX stand out
from the crowd? Well, two things.Firstly, it’s a small company – but
defiantly so. And secondly, despite its size, it puts a strong focus on customised tools.
“We go between about 20 and 40 here – and plan to keep it that way,” explains producer Danielle Kinsey.
“Once you grow too large and start to have satellite offices, you lose that ability to foster the creative process and information starts to break down.”
At the company’s heart is a core team, many of whom have been there since the beginning. “They’re trained as generalists, so we don’t always get caught up in certain parts of the pipeline being very specific to a certain artist. We have artists that are very flexible and used to being quite artistic and sometimes in charge of a shot in its entirety.”
Staying small does mean they’ll never have the resources and capacity of an MPC or Framestore. But The Embassy makes up some ground here
by developing its own custom software. They started doing this around four years ago, explains president and co-founder, Winston Helgason.
“We’d just finished Cowboys and Aliens,” he recalls. “We’d been doing a lot of stuff where our pipeline was XSI
and we were rendering in mental ray. We were also porting a lot of stuff into Houdini to do the effects work. But getting the tools to talk to each other was becoming so much work.”
So The Embassy’s current CTO, Ran Sariel, started writing custom tools for them to quickly export out of XSI and into Houdini. “It used to take an artist half a day to pack up the scene and get stuff across. And there’d still be issues where the cameras didn’t match up, etc. But Ran just fixed all that stuff for us.”
“Then he started writing custom daily makers and things like that,” Winston continues. “So when an artist finishes a comp, the stuff is already being processed and created as a daily, and then it can be sent down to a client immediately for review. It’s all very automated and that’s helped us to be more efficient.”
the embassy VFX: small but perFectly FormedThe Vancouver studio tells Tom May how it keeps its artists happy and why it develops its own tools
LOCATION Vancouver, Canada
TEAM SIZE 20-40
kNOwN fOr
VFX, animation, and live-action production for both feature film
and advertising
studiostatistics
DANIELLE kINSEyDanielle returned to The Embassy VFX as producer in January
2014, having previously worked there as VFX production manager
between 2011 and 2012. She has also
worked at ILM, Image Engine and MPC.
theembassyvfx.com
wINSTON HELgASON
President of The Embassy VFX,
Winston Helgason co-founded the company
in 2002. He previously worked at Rainmaker
Digital Imaging. theembassyvfx.com
studio profile
22 3D WorlD June 2015 3dworld.creativebloq.com
CommunityStudio profile
The boutique Canadian studio celebrates being small and nimble, and wishes to stay that way

oFFice brieFingFounded in 2002, originally to focus on commercial visual effects, The Embassy VFX has worked on advertising campaigns for Citroën, Nike, Mercedes-Benz, Chevrolet and GMC. Director Neill Blomkamp is among the original founding partners. In recent years the company has extended its activities to include TV and movie work, most notably Iron Man and District 9, for which it was nominated for an Academy Award. In 2015 it was again Oscar-nominated for their work on Captain America: The Winter Soldier.
Another source of efficiency is The Embassy’s high rate of artist retention, adds CG supervisor Michael Blackbourn.
“We have this core bunch of people that know each other’s strengths and know their own roles really well,” he explains. “This makes it easier for the company to take on new challenges
and take risks in bidding, because you have this confidence in your core staff.”
It also means they can be nimble. “For instance, when Marvel had a bit of an emergency and needed some suit shots from Iron Man 3 at short notice, we handled it without any problems because we’d worked on Iron Man, Iron Man 2, and all kinds of robot movies… and all the people who’d worked on them were still here.”
But The Embassy’s not just about TV and movie work. It was originally founded in 2002 as a commercials facility, and that remains a key focus to this day. “Recently we did a BMW commercial which was probably the funnest thing I’ve got to work on,” enthuses Winston. “We directed it, we produced it; we got to take an M4 to a big, open piece of tarmac, and had Daniel Craig’s stunt double driving the thing. It was a hoot!”
In short, as far as The Embassy is concerned, if it ain’t broke, don’t fix it. “We continue to get great commercial work and great film work,” says Winston. “We can’t compete with the larger shops in Vancouver doing 1,000 shots, but we can do a chunk of that movie just as well as they can. We’re pretty strong technically for a house our size. So we’re really happy where we are.”
FyiTo see more of The Embassy VFX's work, visit www.theembassyvfx.com
PErCy JACkSON: SEA Of MONSTErSEmbassy created a beautiful animated sequence of the myth of
Kronos, played out with stained glass figures, for the latest movie in the fantasy franchise. Led by VFX supervisor David Casey, the scene
was rendered in full stereoscopic 3D.
studioportFolio
MICHAEL BLACkBOurN
The VFX artist has worked as CG supervisor
at The Embassy VFX since 2006, having
previously served as an airborne infantryman in
Italy for the US Army. theembassyvfx.com
ELySIuMThe Embassy created some of the more elaborate weapons for Neill Blomkamp’s sci-fi epic, including a futuristic flechette gun,
expelling bullets that split mid-air into multiple projectiles. Under the supervision of VFX supervisor Stephen Pepper, the weapons were
created in Houdini and rendered in Mantra.
BMw M4: uLTIMATE rACETrACkAn aircraft carrier was turned into a race track for this high-octane
spot to promote the BMW M4. Directed by The Embassy’s Ozan Biron, working alongside VFX supervisor David Casey, the environments
were CG but the driving was real.
We have this core bunch of people that know each other’s strengths and know
their own roles really well
23 3D WorlD June 2015 3dworld.creativebloq.com

Making of a MonsterColin Thomas explains how he brought CG life to the titular creature in Hollywood game-changer, The Leviathan
industry interview
Last issue we brought you Oscar-winning tips on how to pitch your movie. But it seems there’s a brand
new way to get your project green-lit: simply create your own teaser trailer and share it on YouTube.
That’s exactly what Irish filmmaker Ruairi Robinson did, releasing a concept teaser for his proposed sci-fi epic The Leviathan. And once it had gone viral, Hollywood came knocking. It’s now on course to become a major Fox movie, written by Simon Kinberg and executive produced by Neill Blomkamp.
The project’s success is thanks in part to the modelling work of senior character artist Colin Thomas, who was working at Jordu Shell’s studio in Chatsworth, California, at the time.
“Jordu mentioned Ruairi Robinson was doing a short and that he’d like me to do the 3D modeling of the giant
sky whale,” Colin explains. “I was really hesitant as the pressure of bringing one of Jordu’s creatures into CG was so immense.” Adding to the pressure,
Colin ThomasColin currently works
as a character artist at LA-based video game
company Naughty Dog. www.artstation.com/
artist/colinthomas
this was the first foray into modeling for films for the artist, known for his high-quality character models for the games industry. “My first instinct was to tell them no,” he admits. “But ultimately it was a great honour that I couldn’t turn down.”
Creative processColin used a combination of several tools including Mudbox/ZBrush for sculpting and Maya for modelling.
“I started the sculpt in Mudbox as well as detailing the body of the creature then later on I created the hairs (with help from my buddy Maxence Fleuret) in ZBrush using FiberMesh,” he explains. “I later retopoligised the model in TopoGun and reprojected all the details with ZBrush.”
Jordu’s maquette was intricate both in colour and details, which made it a great source for reference. “However, due to the limitations in the size of
CommunityIndustry interview
The short offers a brief glimpse into a fascinating sci-fi world
24 3D WorlD June 2015 3dworld.creativebloq.com

the maquette, the level of detail needed to show off the scale in 3D required additional references. So we referenced real life whales and other sea critters for details and things we could pull from.”
The epic creature took several months to complete during many late nights and weekends, as Colin had a day job at Insomniac Games at the time. “The part that took the longest was just covering the immense
size of the creature with appropriate skin details, that if done correctly will sell the scale of the Leviathan. I went back and forth getting feedback from Ruairi and making tweaks constantly to get the feeling to match Jordu’s maquette. I took the time to stay as faithful as possible while making the necessary changes to get it prepared for CG.”
fYi Watch the film’s teaser trailer at youtube.com/watch?v=s-45NTlgp-o
References of real life whales and other sea creatures were used to get the details
Pixar suPPort Makes renderMan essentialIt’s been almost a year since Pixar invited us to a demo in London of the new RenderMan RIS, along with news of its free non-commercial release. And only now (as of late March) has the renderer finally been released for free for the public, to download at www.renderman.pixar.com.
Good things come to those who wait, however, as Pixar has spent that time fine-tuning and developing RIS, with help from Disney and Pixar studios, as well as the likes of Double Negative who used the beta to create complex VFX for the forthcoming Ant-Man.
In an early test the Double Negative team created 40 shots in a week with just five people. One test scene using Exodus as an example, didn’t render in RenderMan 18 but worked in RIS – taking nine minutes to render.
With clients on board Pixar is happy, but keen to develop RenderMan RIS further for users. New additions include the Disney Denoiser, developed for Pixar’s new movie Finding Dory, and points to continued support – as Disney’s studios (including ILM and LucasArts) develop additional features for RIS they will make their way into the freely available release.
Pixar is also geared to support RIS now, at release. Currently there’s over five hours of video training available at the site, www.renderman.how, as well as 50 shaders, preset lighting rigs and even a free model to download and use under the Stirling! Automobile rendering in RIS category, by archimage3d.
RenderMan RIS is available for free now, for non-commercial use or on license at £435. There’s a new daily rental and cloud rendering license coming soon too, so there really is no excuse not to consider trying RIS.
For a free 3D World tutorial on using RenderMan RIS visit our website at: www.bit.ly/195-renderman.
I was really hesitant as the pressure of bringing oneof Jordu’s creatures into
CG was so immense
25 3D WorlD June 2015 3dworld.creativebloq.com
get publishedemail your short [email protected]
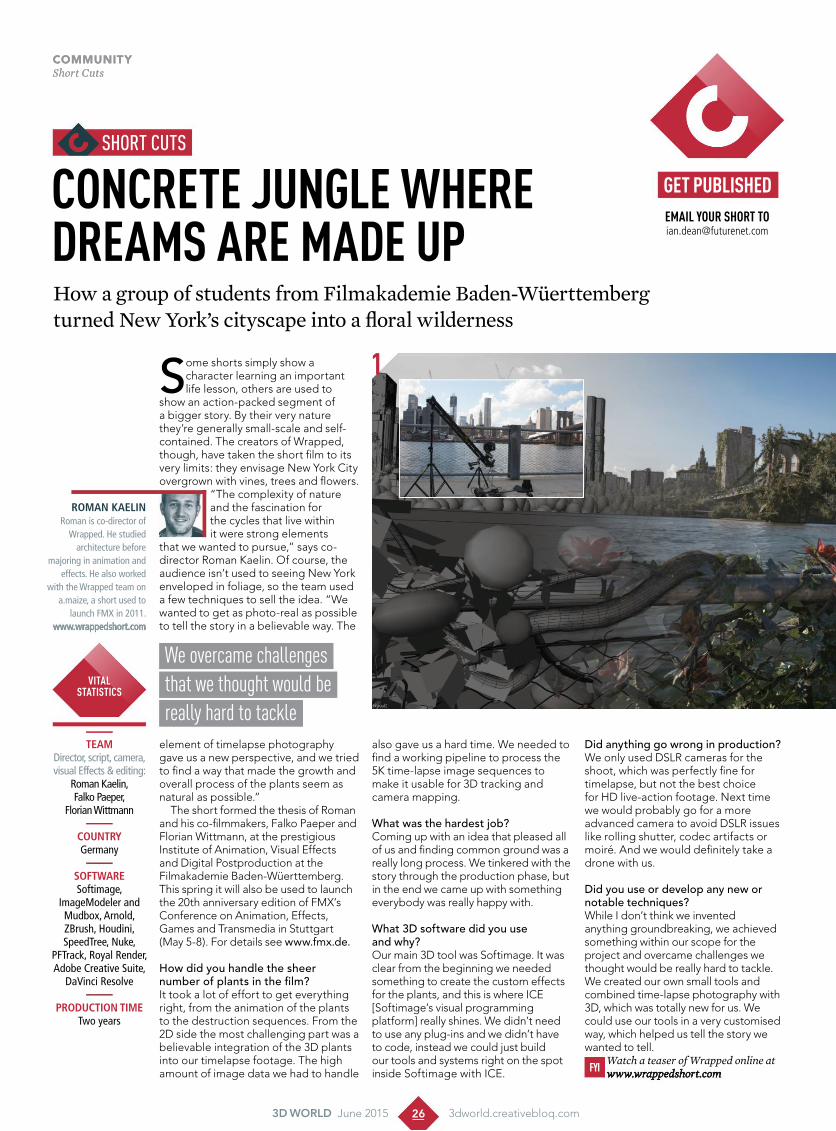
Some shorts simply show a character learning an important life lesson, others are used to
show an action-packed segment of a bigger story. By their very nature they’re generally small-scale and self-contained. The creators of Wrapped, though, have taken the short film to its very limits: they envisage New York City overgrown with vines, trees and flowers.
“The complexity of nature and the fascination for the cycles that live within it were strong elements
that we wanted to pursue,” says co-director Roman Kaelin. Of course, the audience isn’t used to seeing New York enveloped in foliage, so the team used a few techniques to sell the idea. “We wanted to get as photo-real as possible to tell the story in a believable way. The
element of timelapse photography gave us a new perspective, and we tried to find a way that made the growth and overall process of the plants seem as natural as possible.”
The short formed the thesis of Roman and his co-filmmakers, Falko Paeper and Florian Wittmann, at the prestigious Institute of Animation, Visual Effects and Digital Postproduction at the Filmakademie Baden-Wüerttemberg. This spring it will also be used to launch the 20th anniversary edition of FMX’s Conference on Animation, Effects, Games and Transmedia in Stuttgart (May 5-8). For details see www.fmx.de. How did you handle the sheer number of plants in the film?It took a lot of effort to get everything right, from the animation of the plants to the destruction sequences. From the 2D side the most challenging part was a believable integration of the 3D plants into our timelapse footage. The high amount of image data we had to handle
also gave us a hard time. We needed to find a working pipeline to process the 5K time-lapse image sequences to make it usable for 3D tracking and camera mapping.
What was the hardest job?Coming up with an idea that pleased all of us and finding common ground was a really long process. We tinkered with the story through the production phase, but in the end we came up with something everybody was really happy with.
What 3D software did you use and why?Our main 3D tool was Softimage. It was clear from the beginning we needed something to create the custom effects for the plants, and this is where ICE [Softimage’s visual programming platform] really shines. We didn’t need to use any plug-ins and we didn’t have to code, instead we could just build our tools and systems right on the spot inside Softimage with ICE.
Did anything go wrong in production?We only used DSLR cameras for the shoot, which was perfectly fine for timelapse, but not the best choice for HD live-action footage. Next time we would probably go for a more advanced camera to avoid DSLR issues like rolling shutter, codec artifacts or moiré. And we would definitely take a drone with us.
Did you use or develop any new or notable techniques?While I don’t think we invented anything groundbreaking, we achieved something within our scope for the project and overcame challenges we thought would be really hard to tackle. We created our own small tools and combined time-lapse photography with 3D, which was totally new for us. We could use our tools in a very customised way, which helped us tell the story we wanted to tell.
FyiWatch a teaser of Wrapped online at www.wrappedshort.com
ConCrete jungle where dreams are made upHow a group of students from Filmakademie Baden-Wüerttemberg turned New York’s cityscape into a floral wilderness
Roman Kaelin Roman is co-director of
Wrapped. He studied architecture before
majoring in animation and effects. He also worked
with the Wrapped team on a.maize, a short used to
launch FMX in 2011.www.wrappedshort.com
TeamDirector, script, camera, visual Effects & editing:
Roman Kaelin, Falko Paeper,
Florian Wittmann
counTRyGermany
SofTwaReSoftimage,
ImageModeler and Mudbox, Arnold, ZBrush, Houdini, SpeedTree, Nuke,
PFTrack, Royal Render, Adobe Creative Suite,
DaVinci Resolve
pRoducTion Time Two years
vitalstatistiCs
We overcame challengesthat we thought would be really hard to tackle
1
short cuts
26 3D WorlD June 2015 3dworld.creativebloq.com
CommunityShort CutsCommunityShort Cuts

5
7
6
4
1 We shot the time-lapse footage on a motorised slider but the wind slightly moved the camera, so we had to stabilise and track the shot.
2 We tracked and back projected the sequence in 3D, then had to model a big portion of the city – giving more attention to detail to the foreground.
5 We timed the animation of blooming flowers to work well with the next shot. We offset the distributed instances through ICE in the actual scene.
4 The lighting had to be matched exactly to moving shadows in the time-lapse plate. We had to cover the sun whenever it was obscured by clouds.
6 The same technique used for the flowers was applied to generating leaves along the growing ivy. The background was filled with trees instanced through ICE.
7 Sometimes we had up to 50 mask channels in one shot. We still had a lot of control when comping and could accentuate certain elements.
3 Elements were taken into SpeedTree where we’d built trees around the geometry. In Softimage we simulated the smaller elements, like ivy.
2
organic growthAt first, developing tools in Softimage ICE to grow plants seemed tedious and difficult, but it came together nicely once we got the hang of it. We tried to copy the growth and animation as closely as possible from nature. At first we didn’t know what the outcome would be as we had to wait for the simulation to run for a while and see if it worked in different shots. We’d then go back and tweak it to find the sweet spot and really push it to what we wanted. Sometimes we’d start a simulation before lunch and it would run past what we needed, but it was interesting how it still kind of worked and grew over a whole building in a natural way.
3
27 3D WorlD June 2015 3dworld.creativebloq.com
28 3D WorlD June 2015 3dworld.creativebloq.com
MPC has realisM in its sightsIan Dean speaks with MPC’s Greg Butler to discover how the hidden VFX of American Sniper made all the difference
Taking on the key VFX shots for Clint Eastwood’s American Sniper offered MPC a unique challenge,
to create photoreal CG hidden from the audience; to create scenes that would be too expensive or dangerous to film.
“I’ve worked on many films where the VFX work is front and centre. No matter how realistic the work may be,
the audience is always completely aware that they are watching something that never existed,” explains MPC’s VFX supervisor Greg Butler. “On a film like American Sniper, it needed to be the opposite. Most of our work was creating shot elements that were too difficult or expensive to do in front of a camera.”
The MPC team created set extensions and enhancements to various forward operating base scenes. This allowed the shots to have greater scale and activity than the location footage allowed for.
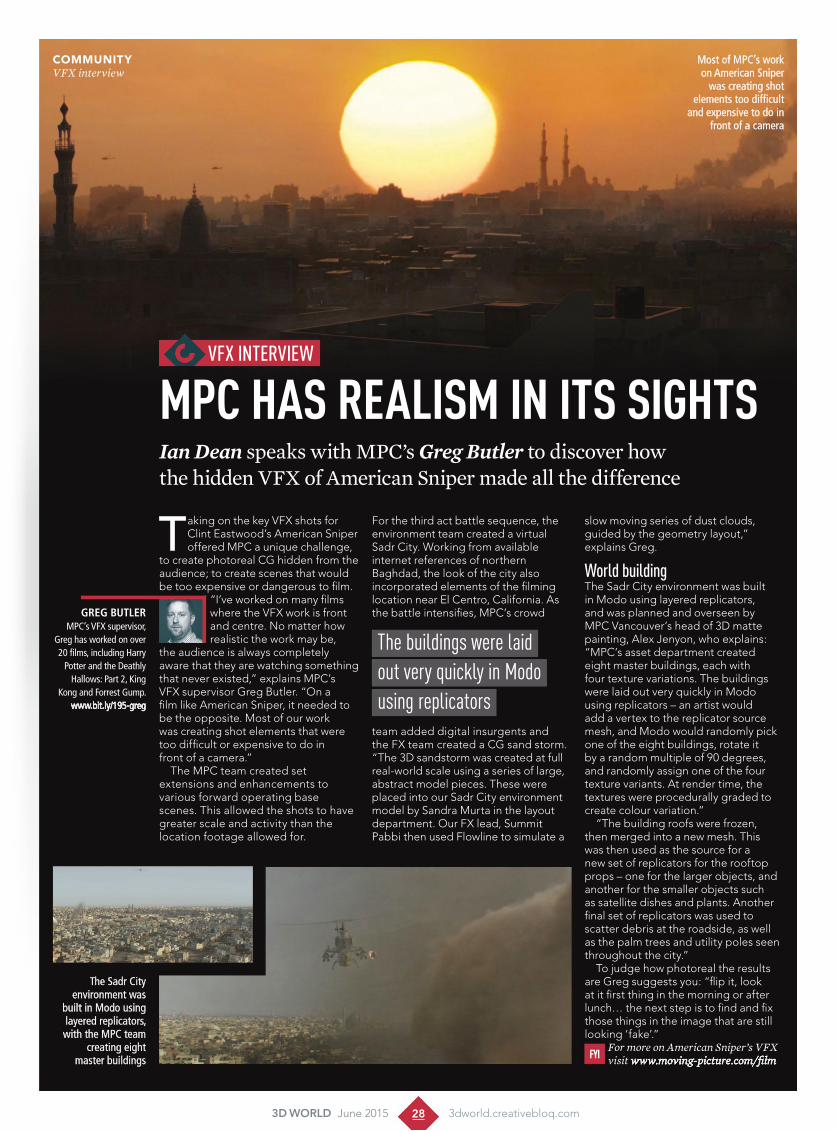
For the third act battle sequence, the environment team created a virtual Sadr City. Working from available internet references of northern Baghdad, the look of the city also incorporated elements of the filming location near El Centro, California. As the battle intensifies, MPC’s crowd
team added digital insurgents and the FX team created a CG sand storm. “The 3D sandstorm was created at full real-world scale using a series of large, abstract model pieces. These were placed into our Sadr City environment model by Sandra Murta in the layout department. Our FX lead, Summit Pabbi then used Flowline to simulate a
slow moving series of dust clouds, guided by the geometry layout,” explains Greg.
World buildingThe Sadr City environment was built in Modo using layered replicators, and was planned and overseen by MPC Vancouver’s head of 3D matte painting, Alex Jenyon, who explains: “MPC’s asset department created eight master buildings, each with four texture variations. The buildings were laid out very quickly in Modo using replicators – an artist would add a vertex to the replicator source mesh, and Modo would randomly pick one of the eight buildings, rotate it by a random multiple of 90 degrees, and randomly assign one of the four texture variants. At render time, the textures were procedurally graded to create colour variation.”
“The building roofs were frozen, then merged into a new mesh. This was then used as the source for a new set of replicators for the rooftop props – one for the larger objects, and another for the smaller objects such as satellite dishes and plants. Another final set of replicators was used to scatter debris at the roadside, as well as the palm trees and utility poles seen throughout the city.”
To judge how photoreal the results are Greg suggests you: “flip it, look at it first thing in the morning or after lunch… the next step is to find and fix those things in the image that are still looking ‘fake’.”
FYiFor more on American Sniper’s VFX visit www.moving-picture.com/film
GreG ButlerMPC’s VFX supervisor,
Greg has worked on over 20 films, including Harry
Potter and the Deathly Hallows: Part 2, King
Kong and Forrest Gump.www.bit.ly/195-greg
Most of MPC’s work on American Sniper
was creating shot elements too difficult
and expensive to do in front of a camera
The Sadr City environment was
built in Modo using layered replicators, with the MPC team
creating eight master buildings
VFX interVieW
CommunityVFX interview
The buildings were laid out very quickly in Modo using replicators
MPC’s fairytale endingIan Dean finds out how MPC took Cinderella to the ball
While success at the box office made director Kenneth Branagh the talk of Tinseltown,
it was the VFX that enabled this new live-action version of Cinderella to be the belle of the Hollywood ball.
Given the film features everything from creature work to large digital
environments, there were plenty of challenges to overcome, including the famous pumpkin transformation.
“We went through quite a few different conceptual changes until we settled for the idea of the greenhouse
exploding into particles of dust, which would then collect together to forge the carriage,” says VFX supervisor Patrick Ledda. “We destroyed the greenhouse and the pumpkin procedurally with our proprietary destruction tool, Kali. We then ran many particle and fluid simulations on top of the broken pieces to give the effect that the solid chunks were vaporised into magical golden
dust before they materialised to form the frame and shell of the carriage. We built an exact digital replica, which our technical animation team stripped apart to hand animate the various parts so that it felt like the carriage was self assembling in an organic and elegant way.
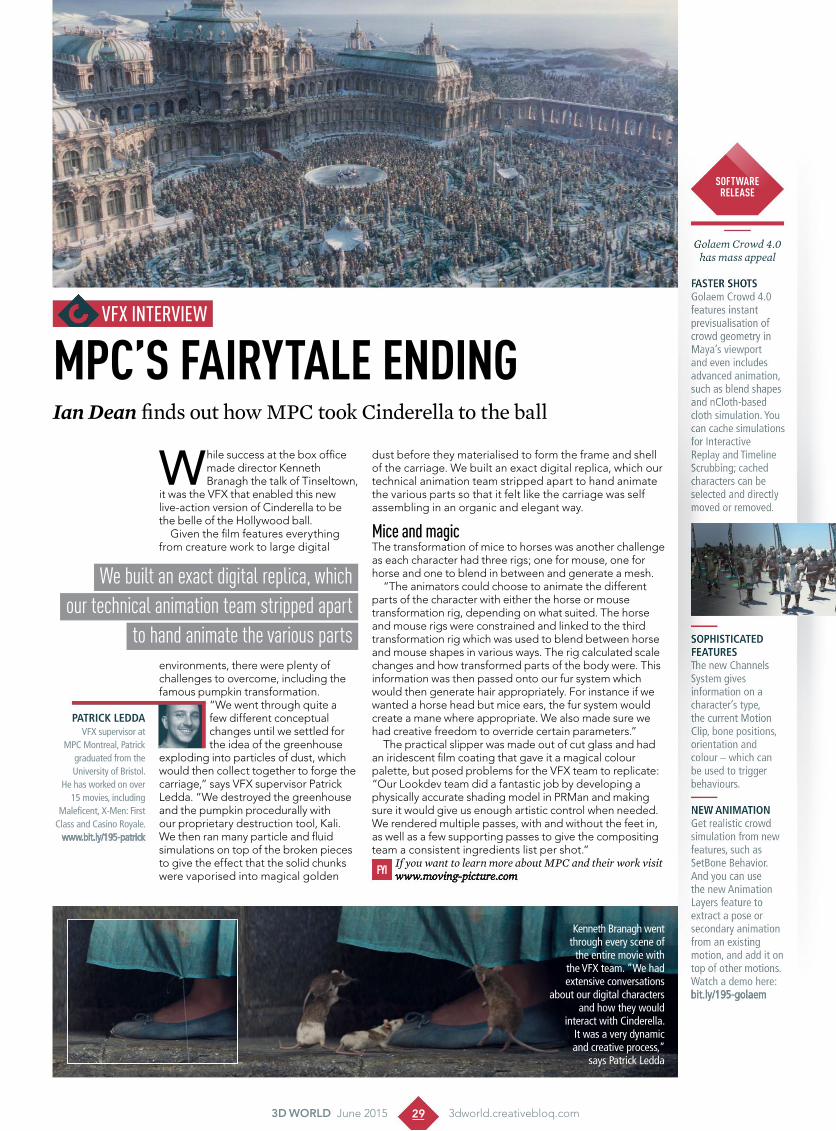
Mice and magicThe transformation of mice to horses was another challenge as each character had three rigs; one for mouse, one for horse and one to blend in between and generate a mesh.
“The animators could choose to animate the different parts of the character with either the horse or mouse transformation rig, depending on what suited. The horse and mouse rigs were constrained and linked to the third transformation rig which was used to blend between horse and mouse shapes in various ways. The rig calculated scale changes and how transformed parts of the body were. This information was then passed onto our fur system which would then generate hair appropriately. For instance if we wanted a horse head but mice ears, the fur system would create a mane where appropriate. We also made sure we had creative freedom to override certain parameters.”
The practical slipper was made out of cut glass and had an iridescent film coating that gave it a magical colour palette, but posed problems for the VFX team to replicate: “Our Lookdev team did a fantastic job by developing a physically accurate shading model in PRMan and making sure it would give us enough artistic control when needed. We rendered multiple passes, with and without the feet in, as well as a few supporting passes to give the compositing team a consistent ingredients list per shot.”
fyiIf you want to learn more about MPC and their work visit www.moving-picture.com
Patrick LeddaVFX supervisor at
MPC Montreal, Patrick graduated from the University of Bristol.
He has worked on over 15 movies, including
Maleficent, X-Men: First Class and Casino Royale.
www.bit.ly/195-patrick
Faster shotsGolaem Crowd 4.0 features instant previsualisation of crowd geometry in Maya’s viewport and even includes advanced animation, such as blend shapes and nCloth-based cloth simulation. You can cache simulations for Interactive Replay and Timeline Scrubbing; cached characters can be selected and directly moved or removed.
soPhisticated FeaturesThe new Channels System gives information on a character’s type, the current Motion Clip, bone positions, orientation and colour – which can be used to trigger behaviours.
New aNimatioNGet realistic crowd simulation from new features, such as SetBone Behavior. And you can use the new Animation Layers feature to extract a pose or secondary animation from an existing motion, and add it on top of other motions. Watch a demo here: bit.ly/195-golaem
software release
Golaem Crowd 4.0 has mass appeal
VFX InterVIew
We built an exact digital replica, whichour technical animation team stripped apart
to hand animate the various parts
Kenneth Branagh went through every scene of
the entire movie with the VFX team. ”We had extensive conversations
about our digital characters and how they would
interact with Cinderella. It was a very dynamic and creative process,”
says Patrick Ledda
29 3D WorlD June 2015 3dworld.creativebloq.com

from modernist to modernAlice Pattillo discovers how LightWave helped UNESCO save a world heritage site for future generations
Villa Tugendhat, the pioneering 1930s prototype of modern European architecture, has a
new lease of (digital) life thanks to LightWave and Unity. InterMoca’s digital artists were set the demanding task of transferring the building into a digital world, with the Czech Republic’s three-story villa now available to tour in real time, on mobile and other desktop devices.
“The visualisation was a first of kind, just like the villa,” Bob notes, and it took two years for his team to
develop the pipeline: “Our workflow, in the work published to date was Images>Photoshop>reference textures. Photos/Videos>LightWave with LWCad (modelling and baking of light cast radiosity and reflections>3D-Coat (additional texturing)>LightWave (export to FBX)>Unity.”
With the building being famed for its exacting detail, it was crucial for Robert and his team to make a true
representation: “We took literally thousands of high-resolution raw 18M pixel images with a Canon 7D, and additional video references to capture how materials worked – from flat to glancing angles, for fresnel effects and so forth. This wasn’t intended necessarily for the first implementation, but perhaps for a future version when the real-time rendering hardware and software is better for mobile devices,” he recalls.
Mobile methodologyThe most challenging aspect of the project was to get the visualisation to work on 1GB of memory, so it could be fully functioning on a mobile smart device. “The Galaxy Note 2 was our target,” says Robert. “This was made a lot harder by the limitations of OpenGL ES2. With OpenGL ES3, there is much better and more efficient texture compression and we would love to have had that possibility. Mirrors also are very hard on a mobile device with Unity and OpenGL ES2.”
To achieve a footprint small enough to allow full function on mobile platforms, the team had to split important textures into high frequency tile UVs and low frequency pre-baked radiosity city cast light maps. For more plain or single, large textures, they could bake in the colour cast to the texture. “The key was to use LightWave colour space pipeline so we could get everything toned in HDR right in the LightWave viewport to match photos before exporting to Unity,” says Robert. “This kind of work is far harder than game texturing and film asset texturing where you are not restricted so much on texture sizes. Getting something to work real time in such a small footprint that was true to the source was a massive challenge,” he continues.
Despite the project being a considerable undertaking, Robert says he is forging ahead: “Now we have done it and developed the pipeline and specific skills, we could do a similar job in a fraction of the time. We would like to tackle the Gaudi House in Barcelona, as it is almost the exact opposite architecturally speaking.”
fYiFor more information about the UNESCO project visit www.bit.ly/195-unesco
RobeRt GReenyeRRobert is CEO of
InterMoca, a company developing cutting edge
systems and software for the high-end animation, film and games markets
in the Czech Republic.www.bit.ly/195-intermoca
AwARd winneRCreative studio, Imaginary Forces, has won the 2015 SXSW Excellence in Title Design Award for the WGN America network’s Manhattan TV series. Watch the winning sequence here: www.vimeo.com/102685630.
CinemA 4d is vitAlImaginary Forces relied on several key features in Cinema 4D to ensure the Manhattan title design achieved the illustrated diagrammatic design they wanted. Jeremy Cox, Imaginary Forces’ art director, explains: “After experimenting with how the sequence would animate, we created a test using Cinema 4D where we were able to not only 3D animate the diagrams on the paper, but successfully model and animate the papers sliding around.
evolvinG the AnimAtion“Using Cineware to import cameras and animated nulls into our After Effects comps gave us the ability to easily update the content of these pages as the animation evolved, and allowed us to replace the content on the pieces of paper without re-rendering the 3D elements.”
event news
Imaginary Forces wins at SXSW 2015
Arch-viz project
Tour the Villa on desktops and mobile devices
“In the unpublished technical level, we have
added Skanect to capture the machinery of that
floor before modelling in 3D-Coat or LW with LWCAD,” says Robert
30 3D WorlD June 2015 3dworld.creativebloq.com
CommunityArch-viz project


32 3D WorlD June 2015 www.3dworld.creativebloq.com
SUBSCRIBE to 3D WoRlDRead what matteRs to you when
and wheRe you want Whether you want 3D World delivered to your door, device, or both
each month, we have three great options to choose from.Choose your subscription package today…
Stay up to date with the latest news, trends and techniques, and get exclusive access to video tutorials,
with every issue delivered to your door.
pRint fRom £27.49 digital fRom £19.99
offER opEn to Uk & ovERSEaS REaDERS
Instant digital access on your Apple or Android device, our digital edition features interactive image galleries,
movie trailers, behind-the-scene films and more!

33 3D WorlD June 2015 www.3dworld.creativebloq.com
GEt thE ComplEtE 3D WoRlD paCkaGE
pRint & digital bundle fRom £32.99Your subscription will continue at £32.99 every 6 months - SAVING 30%
on the shop price and giving you a 83% discount on a digital subscription.
Never miss an issue, with delivery to your door and your device.Enjoy huge savings, the best value for money, a money-back guarantee
and instant digital access when you subscribe today!
Best Value
Bundle!save upto 59%
TERMS AND CONDITIONS Prices and savings quoted are compared to buying full-priced UK print and digital issues. You will receive 13 issues in a year. If you are dissatisfied in any way you can write to us or call us to cancel your subscription at any time and we will refund you for all un-mailed issues. Prices correct at point of print and subject to change. For full terms and conditions please visit: http://myfavm.ag/magterms. Offer ends 15 June 2015.
two easy ways to subscribe today…Online myfavouritemagazines.co.uk/3dwsubs
Call 0844 848 2852 (Please quote: PRINT15, DIGITAL15, BUNDLE15)
By drawing on his childhood love of fantasy miniatures, Spanish artist Albert Ramon Puig began
creating Troll Gunner and his Crew, and in doing so devised a technique to replicate the dry brush painting style of miniature modellers.
“I used the ZBrush polypainting technique, because it was like painting real miniatures,” says Albert,
who searched for ideas and techniques that would help simulate the look of a real-life Warhammer miniature. This led him to discover the tutorials of Pablo Muñoz (Pablander), who shared
his process for setting up lights and rendering in ZBrush, to give the model the look of feeling like wet clay or soft, sculpted lead. “All of my 3D skills are self-taught, based on tutorials,” Albert explains.
The artist says he’s always been inspired by the art from the 80s and 90s, by artists such as Paul Bonner, Frank Frazetta and Syd Mead. Albert shares the background to Troll Gunner and his Crew: “On the other hand,” he adds, “I am inspired by Warhammer and Rackham miniatures, Blizzard games such as World of Warcraft and Starcraft. Moreover, I have been
influenced by sci-fi movies such as Alien, Outland and Blade Runner.”
With these influences in mind, gathering references for Troll Gunner and his Crew, Albert’s first task was fairly easy. “I started by looking for fantasy references, miniatures and sculptures, such as Warhammer and Rackham miniatures. After this process, I jumped into ZBrush to start the scene. From the beginning, I decided to make the entire project in ZBrush so I didn’t need to do a baking process. For example, there’s no need for UVs.”
FYISee more of Albert’s work at www.albertrp.weebly.com
The makIng oF Troll gunner and hIs CrewAlbert Ramon Puig shares techniques for simulating the look of a dry brush painted miniature
Albert rAmon Puig
Albert works at Gameloft Barcelona as a 2D artist
and UI designer. He’s self-taught with experience in
advertising and media.albertrp.weebly.com
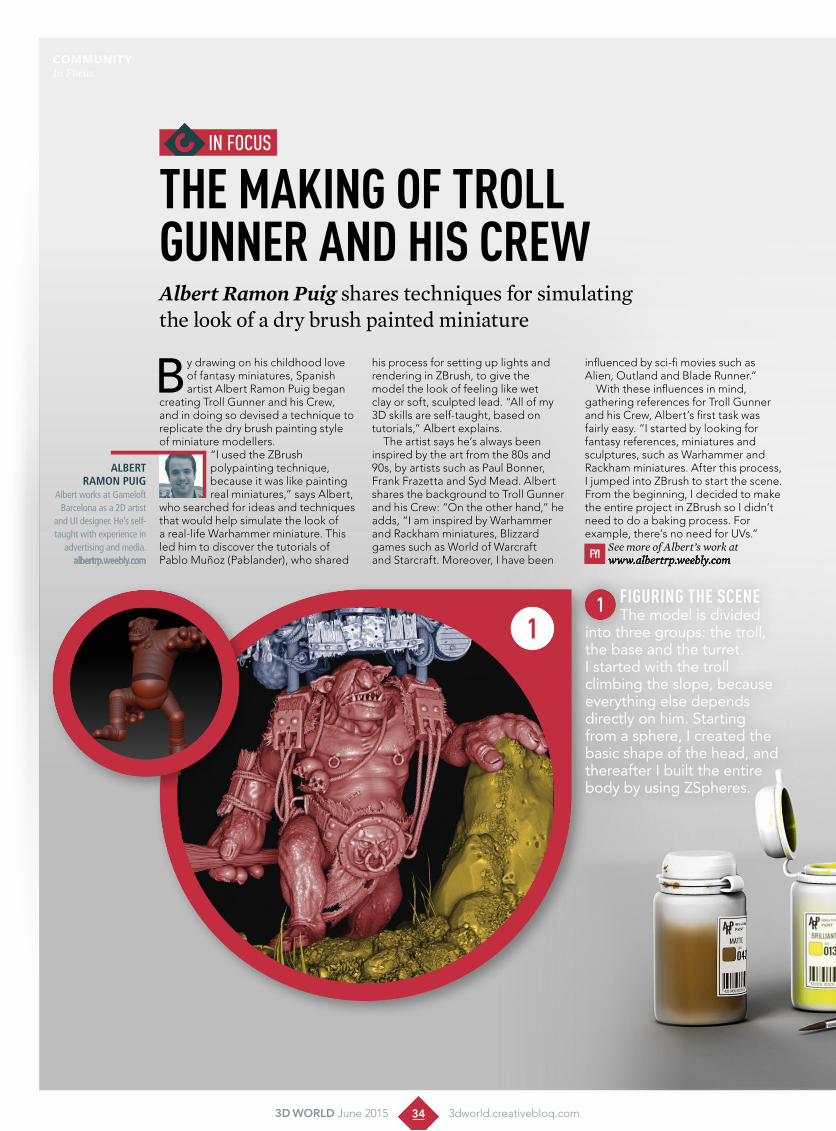
1 FIgurIng The sCeneThe model is divided
into three groups: the troll, the base and the turret. I started with the troll climbing the slope, because everything else depends directly on him. Starting from a sphere, I created the basic shape of the head, and thereafter I built the entire body by using ZSpheres.
in focus
34 3D WorlD June 2015 3dworld.creativebloq.com
CommunityIn Focus
1
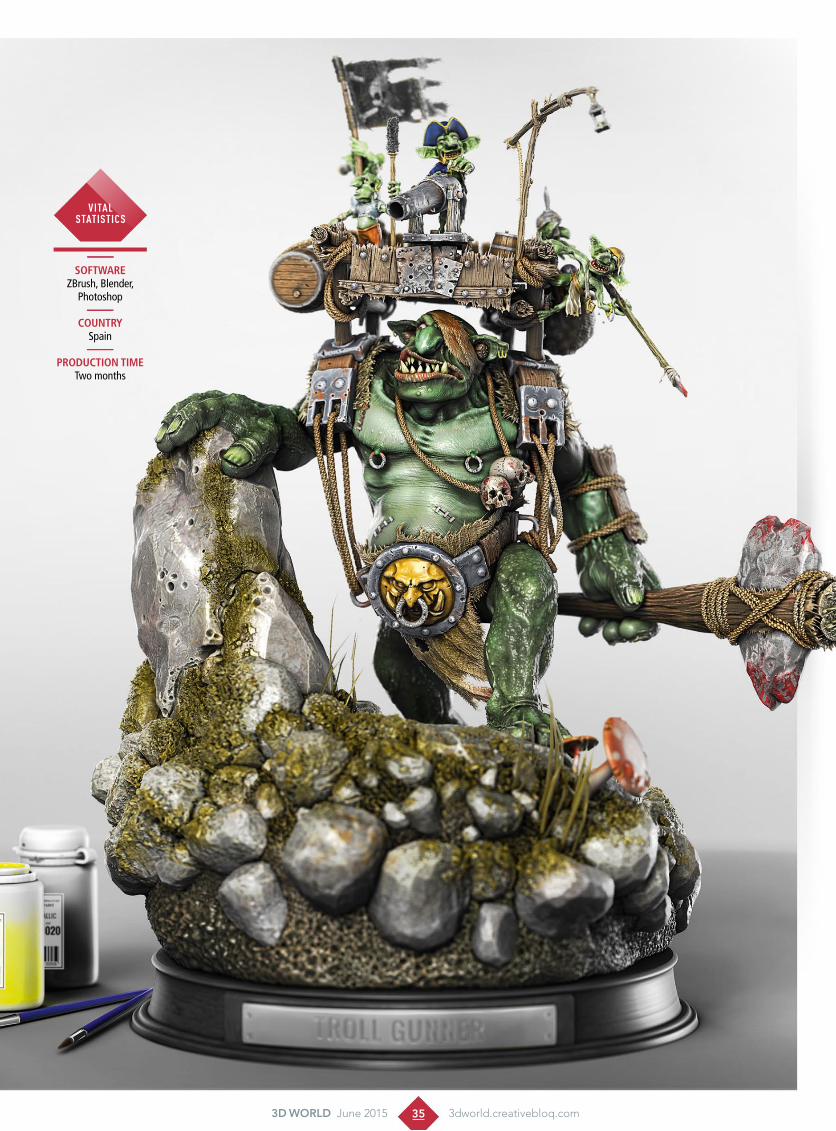
SoftwAreZBrush, Blender,
Photoshop
Country Spain
ProduCtion timeTwo months
VITalsTaTIsTICs
35 3D WorlD June 2015 3dworld.creativebloq.com

4 PreParaTIon For The PaInTIng
Once I had finished the model, I started to look for textures: wood, metal, oxide, skins, and so forth. I prepared several alphas in Photoshop to be used in ZBrush, providing more detail to the model. Additionally, for the colour palette I looked for references from the drawings of Paul Bonner and Warhammer miniatures.
3 CreaTIng The base
For the base, I started by collecting references from miniatures and dioramas. To achieve the miniature effect I also added some paint pots and paint brushes, which gives the impression my troll has been hand painted. I used the ZBrush IMM brushes to make the small rocks.
2 modellIng The goblInOnce I finished the basic mesh of the troll,
I created all the props in Blender and applied the detail in ZBrush for use later. For the goblins, I did not use ZSpheres. Instead, I made a basic low-poly model and used this as a base for all the other goblins. For the ropes, I used splines over the decimated model in Blender, before adding displacement textures to achieve a good finish in ZBrush.
43
2
36 3D WorlD June 2015 3dworld.creativebloq.com
CommunityIn Focus

8
7
6
6 PaInTIng The TurreT sCene
The turret with goblins is a scene in itself. The goblin located in the cannon is about to fire it, the next one is looking at him with a worried face, while a projectile slips out of the other goblin’s hands. I painted these characters with more saturated colours to highlight them. I was inspired by the Snotlings’ war machines of Warhammer. Each of the goblins is unique and was started from a low-poly mesh, made in Blender.
5 PaInTIng oF The model
I started painting all the pieces with basic colours, as if it were a real figure. Then I used Mask Selection in ZBrush to give a finish similar to the miniatures. I used the Mask By Cavity option to simulate the dry brush technique of the miniatures painting. This technique highlights all areas with more relief, and used with Mask PeaksAndValleys simulates the tinted effect seen in miniatures, so that all the deeper areas become darkened.
7 lIghTIng and renderIng
This was another major element of the project that took me longer than expected. I used the WetClay tutorial of Pablander, which basically explains how to combine the use of matcaps and standard materials for a better finish. You can read the full tutorial here: www.bit.ly/195-wetclay.
8 ComPosITIon In PhoToshoP
After a long wait for the render (I was working from a laptop), and following the aforementioned tutorial, I created the entire composition in Photoshop. To give the feeling that it was a miniature, I exaggerated the depth of field and applied some finishing touches and colour correction.
5
37 3D WorlD June 2015 3dworld.creativebloq.com
EXPERT PANEL
Mike GriggsMike is a UK-based freelance 3D, VFX and mograph artist, who has
been polishing pixels since 1995 for broadcast and commercial projects. www.creativebloke.com
Jack M GilsonWith over eight years’ experience in video game art, Jack is
currently working on next-generation mobile games in Berlin.www.jmgilson.co.uk
Rob RedmanRob runs a 3D animation and VFX studio, working for clients ranging from
governments to rock stars. He’s also an industry commentator and trainer.www.pariahstudios.co.uk
Get in touch
EmAiL youR quEsTioNs [email protected]
Francesca ForzoniFrankie is a 3D artist and visualiser in London. She has recently moved
from working in post-production to branding and packaging. www.francescaforzoni.com Your software queries solved
by our CG experts
Q&AARTisT
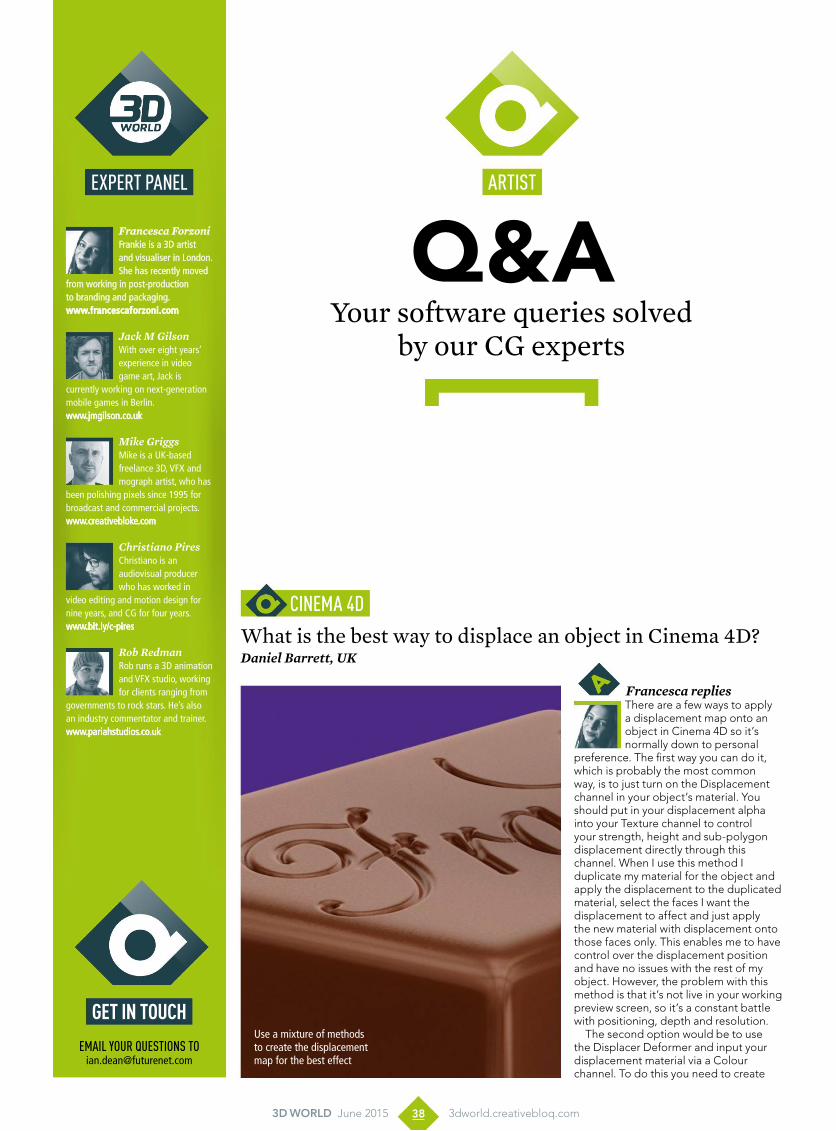
Francesca repliesThere are a few ways to apply a displacement map onto an object in Cinema 4D so it’s normally down to personal
preference. The first way you can do it, which is probably the most common way, is to just turn on the Displacement channel in your object’s material. You should put in your displacement alpha into your Texture channel to control your strength, height and sub-polygon displacement directly through this channel. When I use this method I duplicate my material for the object and apply the displacement to the duplicated material, select the faces I want the displacement to affect and just apply the new material with displacement onto those faces only. This enables me to have control over the displacement position and have no issues with the rest of my object. However, the problem with this method is that it’s not live in your working preview screen, so it’s a constant battle with positioning, depth and resolution.
The second option would be to use the Displacer Deformer and input your displacement material via a Colour channel. To do this you need to create
What is the best way to displace an object in Cinema 4D?Daniel Barrett, UK
ciNEmA 4D
Use a mixture of methods to create the displacement map for the best effect
Christiano PiresChristiano is an audiovisual producer who has worked in
video editing and motion design for nine years, and CG for four years.www.bit.ly/c-pires
38 3D WorlD June 2015 3dworld.creativebloq.com
a new material, turn on Colour only, and pop your displacement alpha into Texture. Create a Null object and put this new material onto the Null. Create a Displacer Deformer and make it a child of the object you’re displacing, click Shading in your Attribute manager, set your Channel to Colour, and in your Texture Tag, drag and drop your newly made texture from your Null object in there. So this will take your texture and use whichever channel you have put in your displacement map, in this case we used the Colour channel. The issue I have with this method is that you have to subdivide your object a crazy amount to get smooth high-resolution embossing, which slows down render times and can be a real pain if you need to alter your object at a later time.
The third and final way I’ve created a displacement on an object is a combination of the two approaches above. Create your texture for your object, and duplicate it. Apply your displacement as normal through your displacement channel in your second material. Add a selection tag to the faces you want to apply your displacement onto and add your material here. So
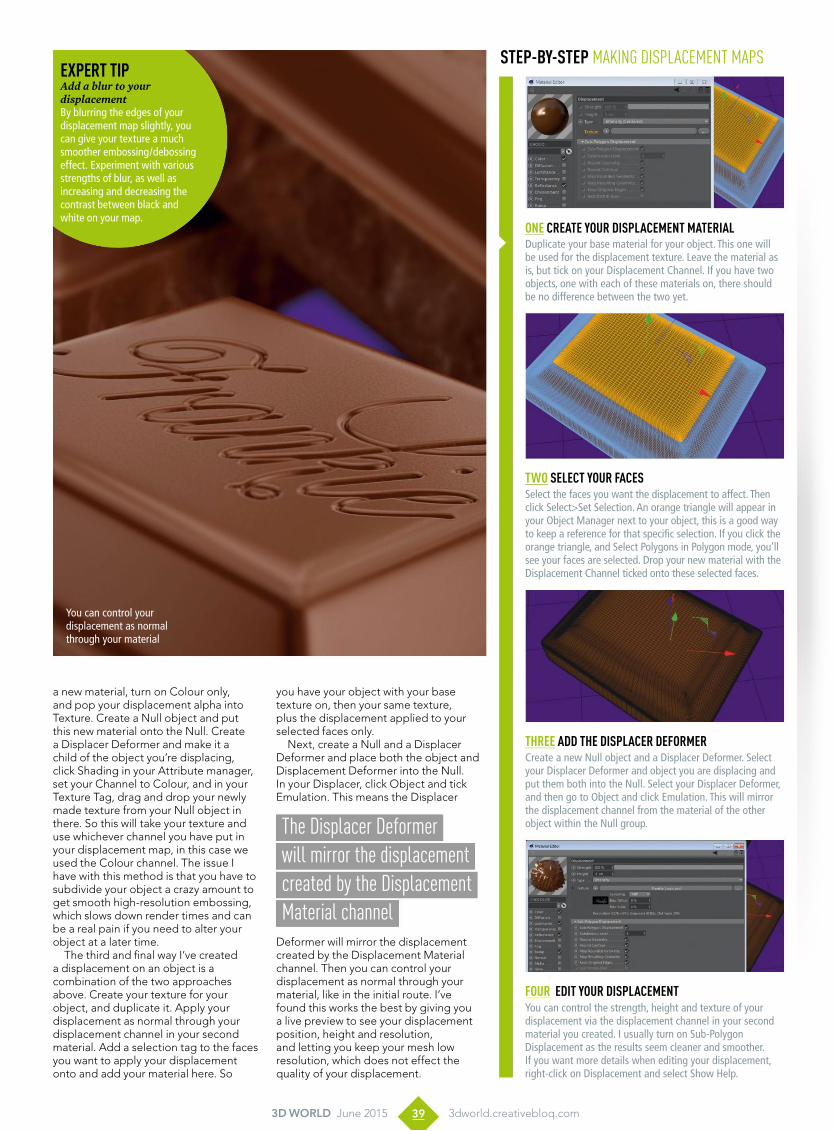
three Add the displAcer deformerCreate a new Null object and a Displacer Deformer. Select your Displacer Deformer and object you are displacing and put them both into the Null. Select your Displacer Deformer, and then go to Object and click Emulation. This will mirror the displacement channel from the material of the other object within the Null group.
two select your fAcesSelect the faces you want the displacement to affect. Then click Select>Set Selection. An orange triangle will appear in your Object Manager next to your object, this is a good way to keep a reference for that specific selection. If you click the orange triangle, and Select Polygons in Polygon mode, you’ll see your faces are selected. Drop your new material with the Displacement Channel ticked onto these selected faces.
one creAte your displAcement mAteriAlDuplicate your base material for your object. This one will be used for the displacement texture. Leave the material as is, but tick on your Displacement Channel. If you have two objects, one with each of these materials on, there should be no difference between the two yet.
four edit your displAcementYou can control the strength, height and texture of your displacement via the displacement channel in your second material you created. I usually turn on Sub-Polygon Displacement as the results seem cleaner and smoother. If you want more details when editing your displacement, right-click on Displacement and select Show Help.
step-by-step
The Displacer Deformer will mirror the displacement created by the Displacement Material channel
Making DisplaceMenT Maps
you have your object with your base texture on, then your same texture, plus the displacement applied to your selected faces only.
Next, create a Null and a Displacer Deformer and place both the object and Displacement Deformer into the Null. In your Displacer, click Object and tick Emulation. This means the Displacer
Deformer will mirror the displacement created by the Displacement Material channel. Then you can control your displacement as normal through your material, like in the initial route. I’ve found this works the best by giving you a live preview to see your displacement position, height and resolution, and letting you keep your mesh low resolution, which does not effect the quality of your displacement.
expert tipAdd a blur to your displacementBy blurring the edges of your displacement map slightly, you can give your texture a much smoother embossing/debossing effect. Experiment with various strengths of blur, as well as increasing and decreasing the contrast between black and white on your map.
You can control your displacement as normal through your material
39 3D WorlD June 2015 3dworld.creativebloq.com
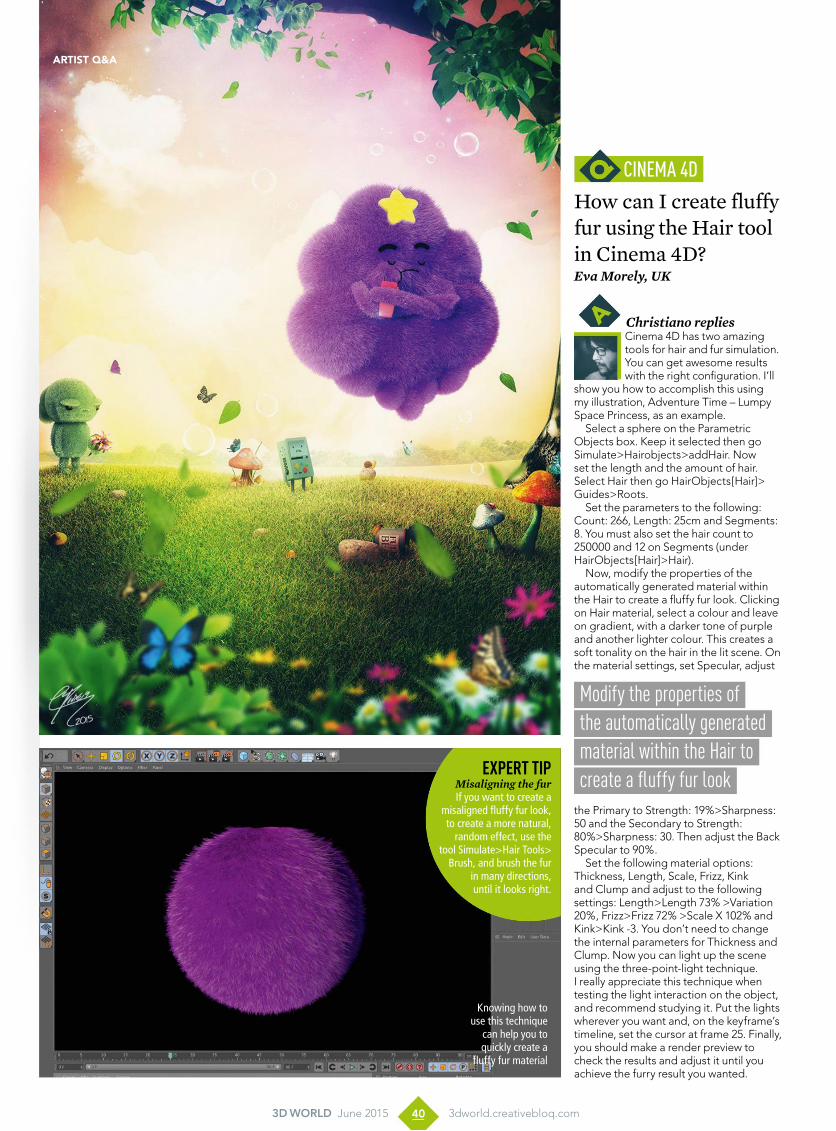
How can I create fluffy fur using the Hair tool in Cinema 4D? Eva Morely, UK
ciNEmA 4D
Artist Q&A
Christiano repliesCinema 4D has two amazing tools for hair and fur simulation. You can get awesome results with the right configuration. I’ll
show you how to accomplish this using my illustration, Adventure Time – Lumpy Space Princess, as an example.
Select a sphere on the Parametric Objects box. Keep it selected then go Simulate>Hairobjects>addHair. Now set the length and the amount of hair. Select Hair then go HairObjects[Hair]> Guides>Roots.
Set the parameters to the following: Count: 266, Length: 25cm and Segments: 8. You must also set the hair count to 250000 and 12 on Segments (under HairObjects[Hair]>Hair).
Now, modify the properties of the automatically generated material within the Hair to create a fluffy fur look. Clicking on Hair material, select a colour and leave on gradient, with a darker tone of purple and another lighter colour. This creates a soft tonality on the hair in the lit scene. On the material settings, set Specular, adjust
the Primary to Strength: 19%>Sharpness: 50 and the Secondary to Strength: 80%>Sharpness: 30. Then adjust the Back Specular to 90%.
Set the following material options: Thickness, Length, Scale, Frizz, Kink and Clump and adjust to the following settings: Length>Length 73% >Variation 20%, Frizz>Frizz 72% >Scale X 102% and Kink>Kink -3. You don’t need to change the internal parameters for Thickness and Clump. Now you can light up the scene using the three-point-light technique. I really appreciate this technique when testing the light interaction on the object, and recommend studying it. Put the lights wherever you want and, on the keyframe’s timeline, set the cursor at frame 25. Finally, you should make a render preview to check the results and adjust it until you achieve the furry result you wanted.
Modify the properties of the automatically generated material within the Hair to create a fluffy fur look expert tip
Misaligning the furIf you want to create a
misaligned fluffy fur look, to create a more natural,
random effect, use the tool Simulate>Hair Tools>
Brush, and brush the fur in many directions, until it looks right.
Knowing how to use this technique
can help you to quickly create a
fluffy fur material
40 3D WorlD June 2015 3dworld.creativebloq.com

Mike repliesOne of the biggest challenges about being a professional CG artist is managing client changes. Rendering is both
time- and cost-intensive so it needs to be minimised as much as possible, without sacrificing quality. A good example is where video needs to be placed into rendered scenes, such as sci-fi graphics or CG walkthroughs. While the optimum solution would be to render the video as a texture into the final 3D pass, this means that if the client wants to change the video at the last minute (which happens a lot), the entire scene needs to be re-rendered.
To work around this, the video screens can be composited in most compositing programmes. However, if the screen is curved, the quickest way is to use a compositor with a built-in 3D system, such as Nuke.
In the Modo scene, render the screen as black with enough diffuse that it can pick up shadows. Group the Modo scene so the screen objects are separate from other background objects, which can be used as a matte object. Export this as an Alembic file from Modo. In Nuke, import the backplate render, and the Alembic scene and the video to be used. When importing the Alembic into Nuke using a ReadGeo node, make sure to make a parent object of each mesh you want as a separate element in Nuke, and press the Create Parents in Separate Nodes button.
Add a Nuke scene node and connect the Alembic camera to it. Attach the screen graphic to the relevant Alembic screen mesh and add a scanline render node to the scene node, so that when added to a merge node with the rendered 3D baseplate in the background, your screen graphic should now be in place on the curved screen.
How do I composite curved video screens using Modo and Nuke?Joe Loveday, UK
moDo | NukE
Nuke enables you to ensure the video is aligned with the 3D render
You should experiment with Nuke’s compositing tools, such as glow, to try to integrate the video more into the backplate
expert tipUse Nuke’s power
Now that the screen is aligned with the 3D render, start to use
Nuke’s advanced compositing tools to make the video integrate
more into the backplate, using nodes such as the glow.
Create new render passes in Modo, such as depth, which
can be used in Nuke to create haze or
depth of field.
if the screen is curved, the quickest way is to use a
compositor with a built-in 3D system, such as nuke
41 3D WorlD June 2015 3dworld.creativebloq.com
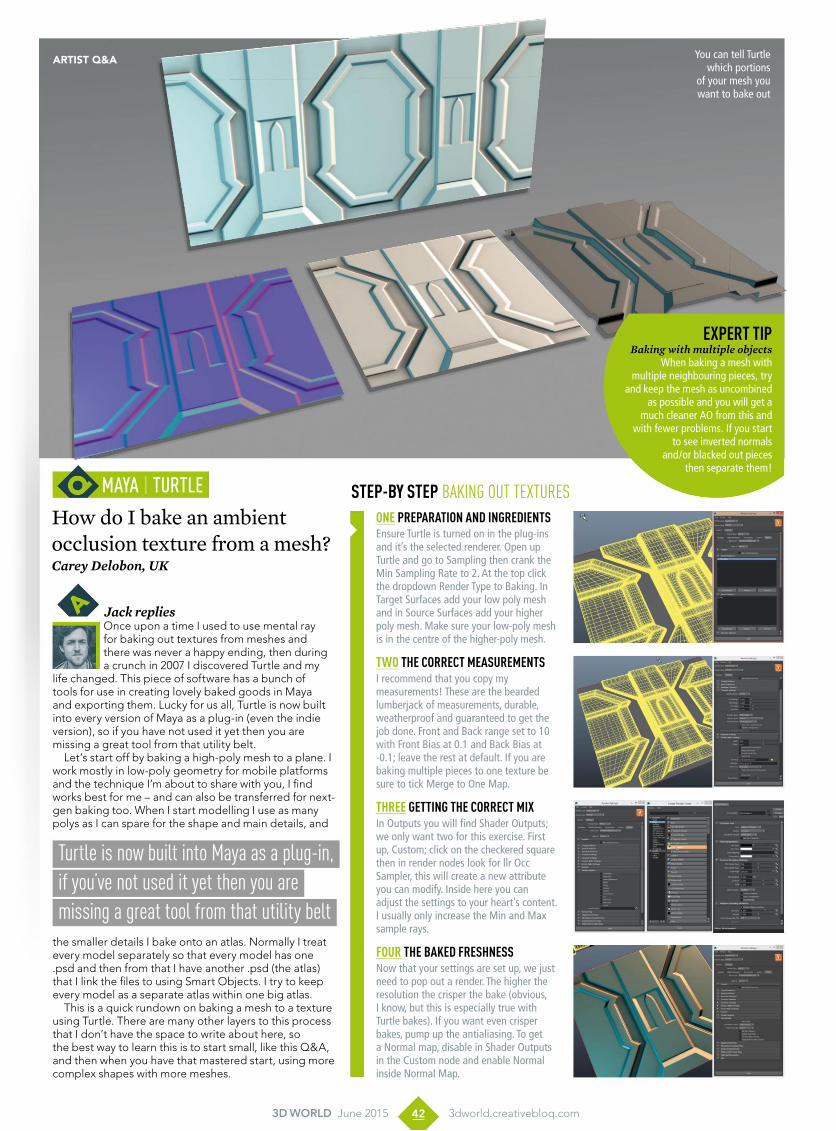
Jack repliesOnce upon a time I used to use mental ray for baking out textures from meshes and there was never a happy ending, then during a crunch in 2007 I discovered Turtle and my
life changed. This piece of software has a bunch of tools for use in creating lovely baked goods in Maya and exporting them. Lucky for us all, Turtle is now built into every version of Maya as a plug-in (even the indie version), so if you have not used it yet then you are missing a great tool from that utility belt.
Let’s start off by baking a high-poly mesh to a plane. I work mostly in low-poly geometry for mobile platforms and the technique I’m about to share with you, I find works best for me – and can also be transferred for next-gen baking too. When I start modelling I use as many polys as I can spare for the shape and main details, and
the smaller details I bake onto an atlas. Normally I treat every model separately so that every model has one .psd and then from that I have another .psd (the atlas) that I link the files to using Smart Objects. I try to keep every model as a separate atlas within one big atlas.
This is a quick rundown on baking a mesh to a texture using Turtle. There are many other layers to this process that I don’t have the space to write about here, so the best way to learn this is to start small, like this Q&A, and then when you have that mastered start, using more complex shapes with more meshes.
How do I bake an ambient occlusion texture from a mesh? Carey Delobon, UK
mAyA | TuRTLEone prepArAtion And inGredientsEnsure Turtle is turned on in the plug-ins and it’s the selected renderer. Open up Turtle and go to Sampling then crank the Min Sampling Rate to 2. At the top click the dropdown Render Type to Baking. In Target Surfaces add your low poly mesh and in Source Surfaces add your higher poly mesh. Make sure your low-poly mesh is in the centre of the higher-poly mesh.
two the correct meAsurementsI recommend that you copy my measurements! These are the bearded lumberjack of measurements, durable, weatherproof and guaranteed to get the job done. Front and Back range set to 10 with Front Bias at 0.1 and Back Bias at -0.1; leave the rest at default. If you are baking multiple pieces to one texture be sure to tick Merge to One Map.
three GettinG the correct mixIn Outputs you will find Shader Outputs; we only want two for this exercise. First up, Custom; click on the checkered square then in render nodes look for llr Occ Sampler, this will create a new attribute you can modify. Inside here you can adjust the settings to your heart’s content. I usually only increase the Min and Max sample rays.
four the bAked freshnessNow that your settings are set up, we just need to pop out a render. The higher the resolution the crisper the bake (obvious, I know, but this is especially true with Turtle bakes). If you want even crisper bakes, pump up the antialiasing. To get a Normal map, disable in Shader Outputs in the Custom node and enable Normal inside Normal Map.
step-by step
expert tipBaking with multiple objects
When baking a mesh with multiple neighbouring pieces, try
and keep the mesh as uncombined as possible and you will get a
much cleaner AO from this and with fewer problems. If you start
to see inverted normals and/or blacked out pieces
then separate them!
Turtle is now built into Maya as a plug-in, if you’ve not used it yet then you are missing a great tool from that utility belt
You can tell Turtle which portions
of your mesh you want to bake out
baking ouT TexTures
Artist Q&A
42 3D WorlD June 2015 3dworld.creativebloq.com

Rob repliesThe key to this sort of thing is to think about what your toy, or any other product, represents and to treat it accordingly.
Rather than wrapping an HDRI around the scene, think a little more carefully about what it is you want to do.
For my example, I created this little superhero toy, who, despite still donning his outfit, is perhaps beyond his prime.
With that premise in mind, I decided to light my vinyl toy character less like a glossy brochure render – with lots of slick, carefully placed highlights and bounce cards – and more like a portrait shoot.
The model was built using Cinema 4D, as was a simple cyclorama backdrop, which is something you would find in any photographer’s studio.
After creating the character and setting the background, I increased the scale of the toy to 1.8m tall. Increasing the scale at this stage really helps as I intend to use Maxwell Render for the final image, and scale is vital to success.
The real key to this kind of thing is to get the lights and camera right,
because we instinctively expect certain things from a photograph.
I started off by setting a focal length for my camera of 50mm. This is a wide portrait lens, but works for the model. Next, I built three soft boxes. These are simple planes with light-emitting materials applied. A white overhead light, which is quite large, a warm key light and a cool rim light. So essentially a typical three-point setup, although I pushed the rim light to be more blue, for effect.
Finally, I added in some of the imperfections that photographers remove, such as dust on the lens and a little vignetting. Although it makes the image less ‘perfect’ I think it sells the believability and enhances the look of the render as a studio portrait – as was my intention in the first place.
How can I make my vinyl toy renders look more striking? Solomon Firth, US
mAXwELL RENDER
expert tipThink photographically
Looking at books and/or magazines about photography will help immensely if you are
stuck for good ways to light your scenes, especially
as so many renderers use real-world settings for
their cameras.
Lighting the plump, old, superhero model like a portrait photo helps to bring the render to life
The real key to this kind of thing is to get the lights and camera right, as we expect certain things from a photo
43 3D WorlD June 2015 3dworld.creativebloq.com3D WorlD June 2015 3dworld.creativebloq.com
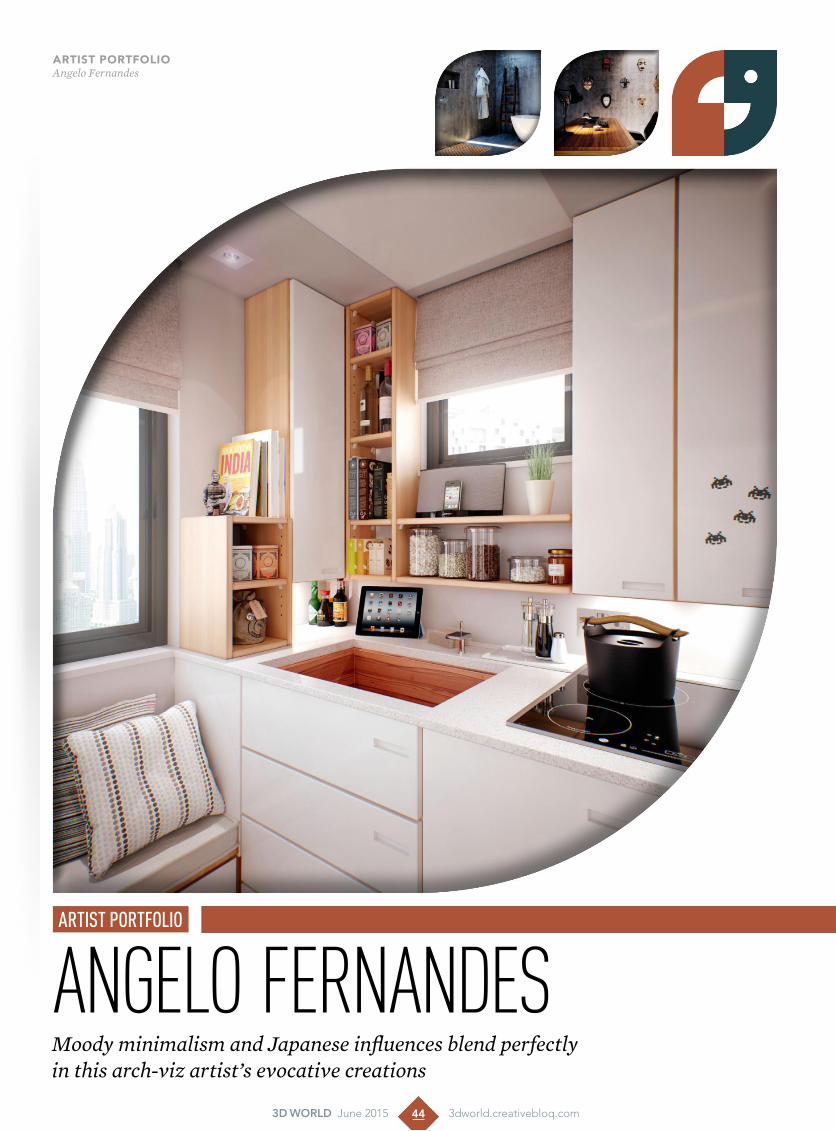
Moody minimalism and Japanese influences blend perfectly in this arch-viz artist’s evocative creations
Angelo FernAndesArtist portfolio
featureMeet the artistartist portfolioAngelo Fernandes
44 3D WorlD June 2015 3dworld.creativebloq.com

A rch-viz has always been a passion of Angelo Fernandes, who was originally inspired by architectural photography
from the likes of Hélène Binet.“The way she captures the shapes and how she plays with light is just astonishing and inspiring,” he enthuses. This drew Angelo to the
idea of recreating in 3D everything he loved in that kind of photography, but having total control over light, space, angles and so forth. “The possibility of creating everything from scratch and to imagine spaces that didn’t exist was simply too tempting to ignore.”
3ds Max is his main tool of choice, although he sometimes uses ZBrush or Marvelous Designer for specific tasks. “I normally start blocking on 3ds Max, just to explore shapes and the space itself – almost as if I’m brainstorming,” he explains. “After that I experiment with some lighting options just to test some possibilities and that’s when I normally start to search for references to gather material and information.”
taking inspirationOver the years he’s learned the importance of references. “Our memory is not good enough to make it through all the details a good render needs. References for light, details, reflections, material connections and all sorts of information not only helps to make it more real, but also works as a source of inspiration.”
Once he’s happy with the project, Angelo renders the cameras using V-Ray and jumps to post-production, for which he uses Fusion and Photoshop. “All my works have at least a curves correction,” he adds.
The images shown here are from personal projects, but Angelo also works as a senior artist at Visual Method, where he creates photorealistic images for various clients. “I’m responsible for taking the images from start to completion, working with in-house stylists and art direction along the way,” he explains.
“A large part of our work is marketing images for interiors, which the studio has a strong reputation in. Our approach is the same as if we were doing a location photoshoot, so one of our concerns is to recreate light in the most natural way, which has filtered into some of my personal projects as well.”
In both commercial and personal projects, Angelo says he seeks inspiration far and wide.
“Anything can be a source of inspiration. When I’m walking on the street I like to observe buildings, looking for a different perspective – especially if it’s a place that I pass frequently. The light of street lamps or neons on the walls and floor are always a trigger for me. A wooden floor that has a different grain or reflection, the way the light casts a shadow, sometimes a specific shape – all those things inspire me,” he enthuses.
“I remember when I was playing The Last of Us I started sketching a post-apocalyptic project, although unsuccessfully. A few months ago I saw a circle-shape door and then created a Japanese interior scene. And as another
example, I made my last work – the Writer’s Home project – because I loved the Ex Machina movie decor so much. As soon I got home I immediately started blocking it.”
Right now he’s working on an exterior night scene. “I saw a picture of an Amsterdam house floating in a river,” he explains. “The photo was so interesting that I immediately saved it in my reference folder. The dark mood and the shapes of the house got my attention and based on that I’m now creating a set of modular houses that are connected through a wooden deck. With this project I’m looking to improve my exterior scenes and lighting them with an HDRI.”
FYIFind out more about Angelo's work at www.angelofernandes.com
Job TiTleSenior 3D artist
sofTware
3ds Max, V-Ray, Fusion, Photoshop, ZBrush, Marvelous
Designer
CounTryPortugal
VItalStatIStIcS
arTisT ProfileAngelo Fernandes is currently working at
Visual Method as senior 3D artist and works
mainly with architects and interior designers
for arch-viz, but also with design agencies
to create product renderings.
angelofernandes.com
Artist insightSetting the moodInspired by the decor of Ex Machina, this moody scene plays with composition, light and materials
“The idea behind Writer’s Home was to create a minimalist house for a successful writer. This character’s given up dealing with people and passes his days reading and writing horror and sci-fi stories. He’s into minimal architecture and not too keen on fancy interior design. This image was my first for the project. It started as a test drive for mood, composition, light and materials. I was looking to create a template and apply it to the rest of this set but it ended up being one of my favourite shots, so I kept it. As a starting point I was inspired by the decor of Ex Machina, which was partly shot at the Juvet Hotel. But as I progressed I developed my own ideas and experimented. One of my goals was to imagine a whole different mood that would distinguish itself from my previous works. I think I achieved it. I like the overall dark tone and the light on the walls that give a contrast against the concrete.”
dinner is served TaiPei KiTChen fuTurisTiC KiTChen
Angelo’s most recent project the Writer’s Home,
was inspired by the Ex Machina movie decor
The possibility of creating everything from scratch and to imagine spaces that didn’t exist was simply too tempting to ignore
45 3D WorlD June 2015 3dworld.creativebloq.com

featureChappie VFX
Beren Neale discovers how VFX studio Image
Engine brought Chappie, and director Neill
Blomkamp’s robot dystopia, to the silver screen
46 3D WorlD June 2015 3dworld.creativebloq.com
Born out of Weta Workshop
concepts around the time
of Neill Blomkamp’s feature
debut District 9, Chappie’s
tale of the little man standing
up to a repressive futuristic
regime thematically fits right
in with District 9 and Elysium.
The workflow that Neill’s go-to
studios Weta and Image Engine took was
totally different though. Armed with Weta’s
concepts for Chappie – and Neill’s own 3D
design of the robot Moose – Image Engine
created 3D designs, ensuring that the rigging
would result in a range of real-to-life motion.
Then back in New Zealand Weta started 3D
printing around 20 lifesize Chappies in various
stages of wear, receiving the robot’s final
design from the legs up.
“From an asset development
perspective, one of the main
differences on Chappie compared
to Elysium was this building process
with Weta,” recalls Image Engine’s asset
supervisor Barry Poon. “On Elysium, we built
the 3D versions of the droids based off of
Weta Workshop’s practical models. On
Chappie, Weta created 2D designs of Moose
and Chappie first, which were then used as
the starting point for Image Engine’s 3D
builds. Once Neill approved our 3D models,
we sent them to Weta to build the practical
versions.” This process allowed them to
iron out any kinks as far as motion limitations
based on the design, well before the
practical versions were actually built. “It also
gave Neill a chance to see the characters in a
3D space and make some design changes,”
Barry continues.
The mechanised police force, from which
Chappie is liberated and reprogrammed in
the film, take on the same two-legged design
that was in Blomkamp’s earlier short films,
Tetra Vaal and Tempbot.
The fidelity the artists were able
to achieve was just as true to
the original performance
Chris Harvey, VFX supervisor, Image Engine
Barry poon
Barry is an asset supervisor
at Image Engine, where he’s
worked on projects such as
Elysium and Zero Dark.
www.bit.ly/195-barry-poon
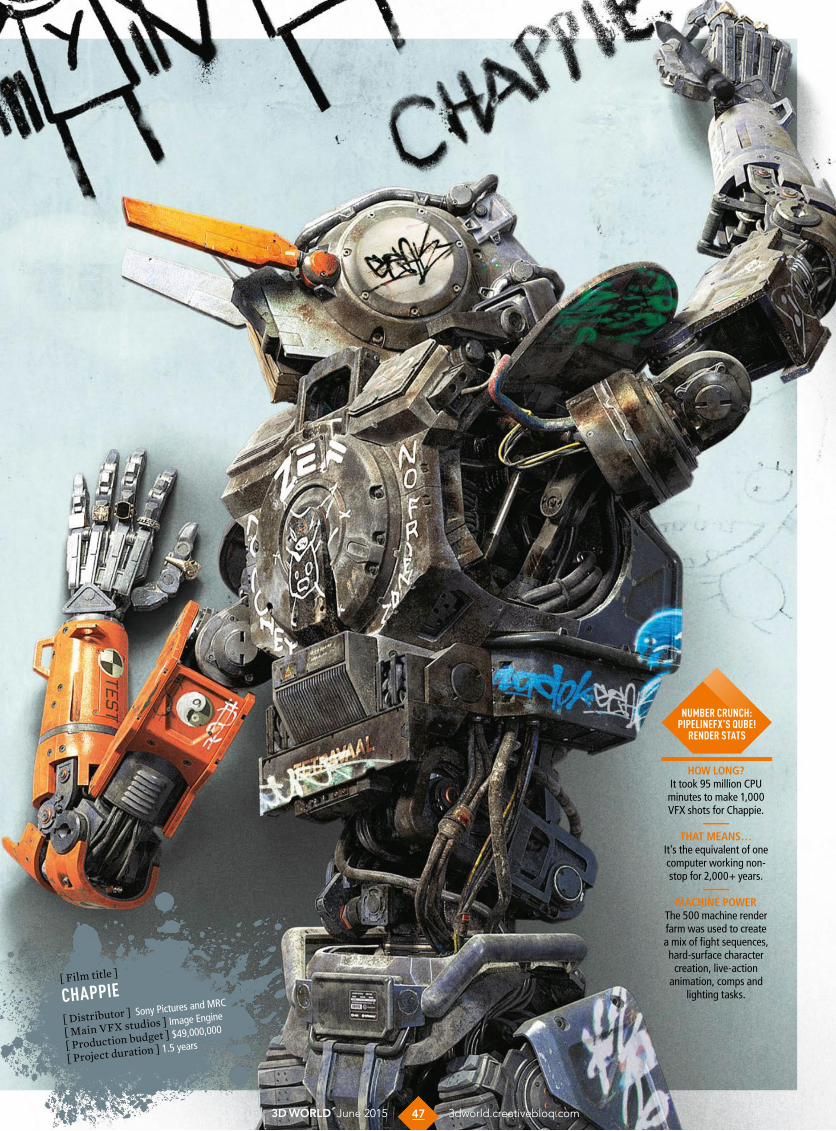
How long? It took 95 million CPU minutes to make 1,000 VFX shots for Chappie.
THaT means…It's the equivalent of one computer working non-stop for 2,000+ years.
macHine power The 500 machine render farm was used to create a mix of fight sequences, hard-surface character
creation, live-action animation, comps and
lighting tasks.
NumBer cruNch:PiPeliNeFX's QuBe!
reNder stats
47 3D WorlD June 2015 3dworld.creativebloq.com47 3D WorlD June 2015 3dworld.creativebloq.com
[ Film title ]
chaPPie[ Distributor ] Sony Pictures and MRC
[ Main VFX studios ] Image Engine
[ Production budget ] $49,000,000
[ Project duration ] 1.5 years

on, anticipate issues we were going to have to deal with, so we were able to be far more proactive rather than the typical reactive nature you often have to deal with. It also gave us a literal boot camp that we ran every single animator through as they ramped onto the show.”
That was just the start of it. Image Engine put in the hours to research and sort out the minutiae of Chappie’s mechanics and locomotion before sending Weta their final designs. “It is a great process to have this back and forth creative development with Neill so early in the project,” says Barry. “By the time we were done Chappie had turned into by far the most complex digital asset myself or Image Engine has ever had to deal with.”
Image Engine worked primarily in Maya, Houdini, 3Delight, Nuke, ZBrush, Mari and Shotgun. The latter of which Chris says, “might seem strange but it’s heavily utilised and integrated in our artist workflow.” In addition to this, Image Engine used their staple of proprietary software, including Gaffer – their app for scene generation, shading, rendering and compositing. There was also a number of new tech that they created.
“We added an advanced shader layering system that allows for realistic soft transitions between material properties,” says Chris, “and Photoshop-like adjustment layers allowing for globally affecting the various shading
feeling THe HeaTHigh frame rates and close proximity made this fire simulation particularly challenging.
HigH impacTA custom ”magic” curl noise function was written to build upon the Houdini Pyro tools in order to achieve the results seen here.
emoTive scene The FX simulations together with some skilled compositing gave us a spectacular climax to an emotional sequence.
48 3D WorlD June 2015 3dworld.creativebloq.com
By the time we were done Chappie had turned
into by far the most complex digital asset myself
or Image Engine has ever had to deal with Barry Poon, asset supervisor, Image Engine
Weta‘s 2D designs of Chappie were used as a starting point for Image Engine‘s 3D builds
“One significant difference to working on the previous films was the addition of a ‘post-viz’ aspect,” says VFX supervisor Chris Harvey.
Basically Neill did not want to screen the film
with a shot that contained Chappie actor,
Sharlto Copley. He wanted the audience,
even in the earliest test screenings to see
Chappie as Chappie.”What this meant was a lot of work in a
ridiculously short deadline. Filming, with Sharlto acting in a grey suit, ended in January
and Chris and co had to have Chappie in place
for the first audience viewing in mid-March.
Chris describes the work as “quick and dirty”
animation with a “dumbed down” version of
the final Chappie asset in all the shots. “While
a tall order, it was extremely beneficial for the
film on both sides,” he says. “For Neill and the
editors it gave a much more representative
look of what would be seen. For us, we got
very early access to everything we would later
be dealing with and allowed us, to very early
featureChappie VFX
cHris HarveyChris is a VFX supervisor at
Image Engine. His credits
include Battleship, R.I.P.D. and Fast & Furious 6.
www.bit.ly/195-harvey
[ VFX insight ]
FlamBoyaNt cocktail
A stunt performer actually did get a molotov
cocktail thrown at him and it did ignite, but
in the end (because of the tight integration
needed with Chappie and his physical space)
we could only use it as reference to match.
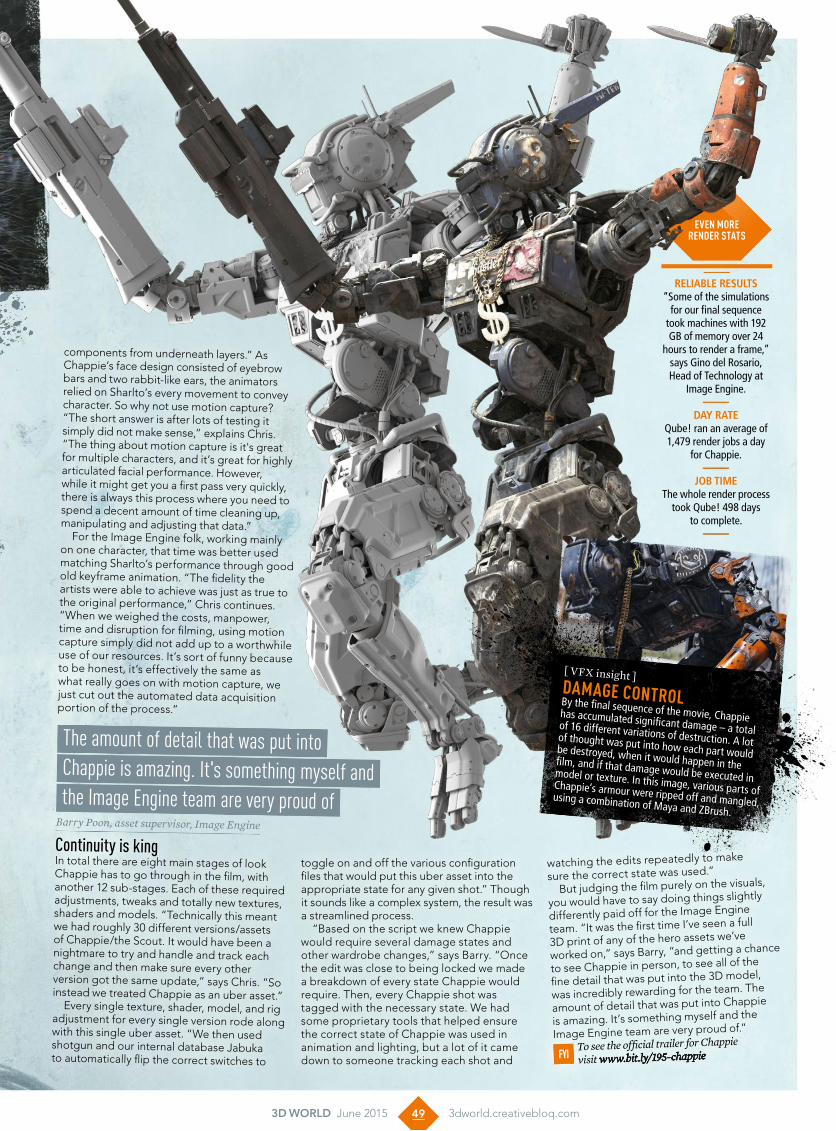
components from underneath layers.” As Chappie’s face design consisted of eyebrow bars and two rabbit-like ears, the animators relied on Sharlto’s every movement to convey character. So why not use motion capture? “The short answer is after lots of testing it simply did not make sense,” explains Chris. “The thing about motion capture is it's great for multiple characters, and it’s great for highly articulated facial performance. However, while it might get you a first pass very quickly, there is always this process where you need to spend a decent amount of time cleaning up, manipulating and adjusting that data.”
For the Image Engine folk, working mainly on one character, that time was better used matching Sharlto’s performance through good old keyframe animation. “The fidelity the artists were able to achieve was just as true to the original performance,” Chris continues. “When we weighed the costs, manpower, time and disruption for filming, using motion capture simply did not add up to a worthwhile use of our resources. It’s sort of funny because to be honest, it’s effectively the same as what really goes on with motion capture, we just cut out the automated data acquisition portion of the process.”
Continuity is king In total there are eight main stages of look Chappie has to go through in the film, with another 12 sub-stages. Each of these required adjustments, tweaks and totally new textures, shaders and models. “Technically this meant we had roughly 30 different versions/assets of Chappie/the Scout. It would have been a nightmare to try and handle and track each change and then make sure every other version got the same update,” says Chris. “So instead we treated Chappie as an uber asset.”
Every single texture, shader, model, and rig adjustment for every single version rode along with this single uber asset. “We then used shotgun and our internal database Jabuka to automatically flip the correct switches to
toggle on and off the various configuration files that would put this uber asset into the appropriate state for any given shot.” Though it sounds like a complex system, the result was a streamlined process.
“Based on the script we knew Chappie would require several damage states and other wardrobe changes,” says Barry. “Once the edit was close to being locked we made a breakdown of every state Chappie would require. Then, every Chappie shot was tagged with the necessary state. We had some proprietary tools that helped ensure the correct state of Chappie was used in animation and lighting, but a lot of it came down to someone tracking each shot and
watching the edits repeatedly to make
sure the correct state was used.”
But judging the film purely on the visuals,
you would have to say doing things slightly
differently paid off for the Image Engine
team. “It was the first time I’ve seen a full
3D print of any of the hero assets we’ve
worked on,” says Barry, “and getting a chance
to see Chappie in person, to see all of the
fine detail that was put into the 3D model,
was incredibly rewarding for the team. The
amount of detail that was put into Chappie
is amazing. It’s something myself and the
Image Engine team are very proud of.”
FyiTo see the official trailer for Chappie
visit www.bit.ly/195-chappie
49 3D WorlD June 2015 3dworld.creativebloq.com
The amount of detail that was put intoChappie is amazing. It's something myself andthe Image Engine team are very proud of
Barry Poon, asset supervisor, Image Engine
[ VFX insight ]damage coNtrolBy the final sequence of the movie, Chappie has accumulated significant damage – a total of 16 different variations of destruction. A lot of thought was put into how each part would be destroyed, when it would happen in the film, and if that damage would be executed in model or texture. In this image, various parts of Chappie’s armour were ripped off and mangled, using a combination of Maya and ZBrush.
reliaBle resulTs “Some of the simulations
for our final sequence took machines with 192 GB of memory over 24
hours to render a frame,” says Gino del Rosario, Head of Technology at
Image Engine.
Day raTeQube! ran an average of 1,479 render jobs a day
for Chappie.
JoB Time The whole render process
took Qube! 498 days to complete.
eveN more reNder stats

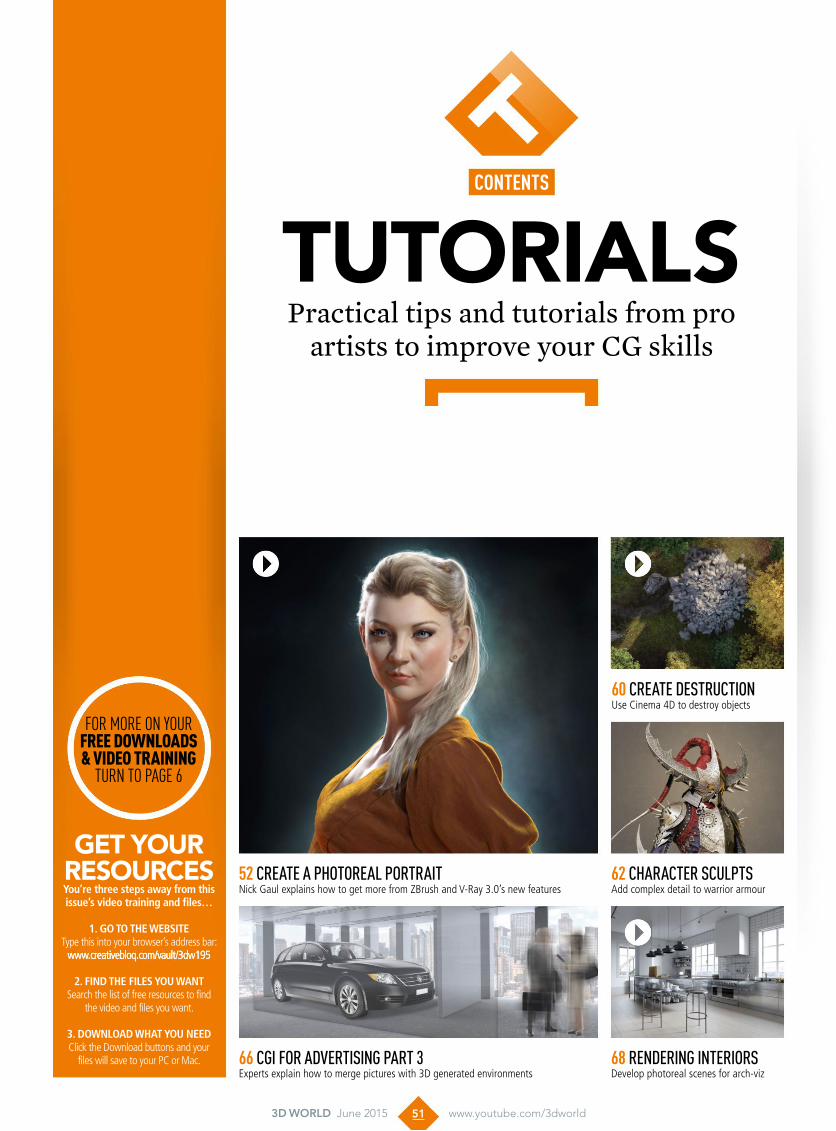
Practical tips and tutorials from pro artists to improve your CG skills
TuTorials
66 cgi for advertising part 3Experts explain how to merge pictures with 3D generated environments
68 rendering interiorsDevelop photoreal scenes for arch-viz
62 character sculptsAdd complex detail to warrior armour
52 create a photoreal portraitNick Gaul explains how to get more from ZBrush and V-Ray 3.0’s new features
60 create destructionUse Cinema 4D to destroy objects
Contents
For more on your free downloads & video training
turn to page 6
geT your resourcesYou’re three steps away from this issue’s video training and files…
1. Go to the website Type this into your browser’s address bar:
www.creativebloq.com/vault/3dw195
2. Find the Files You want Search the list of free resources to find
the video and files you want.
3. download what You need Click the Download buttons and your
files will save to your PC or Mac.
51 3D WorlD June 2015 www.youtube.com/3dworld
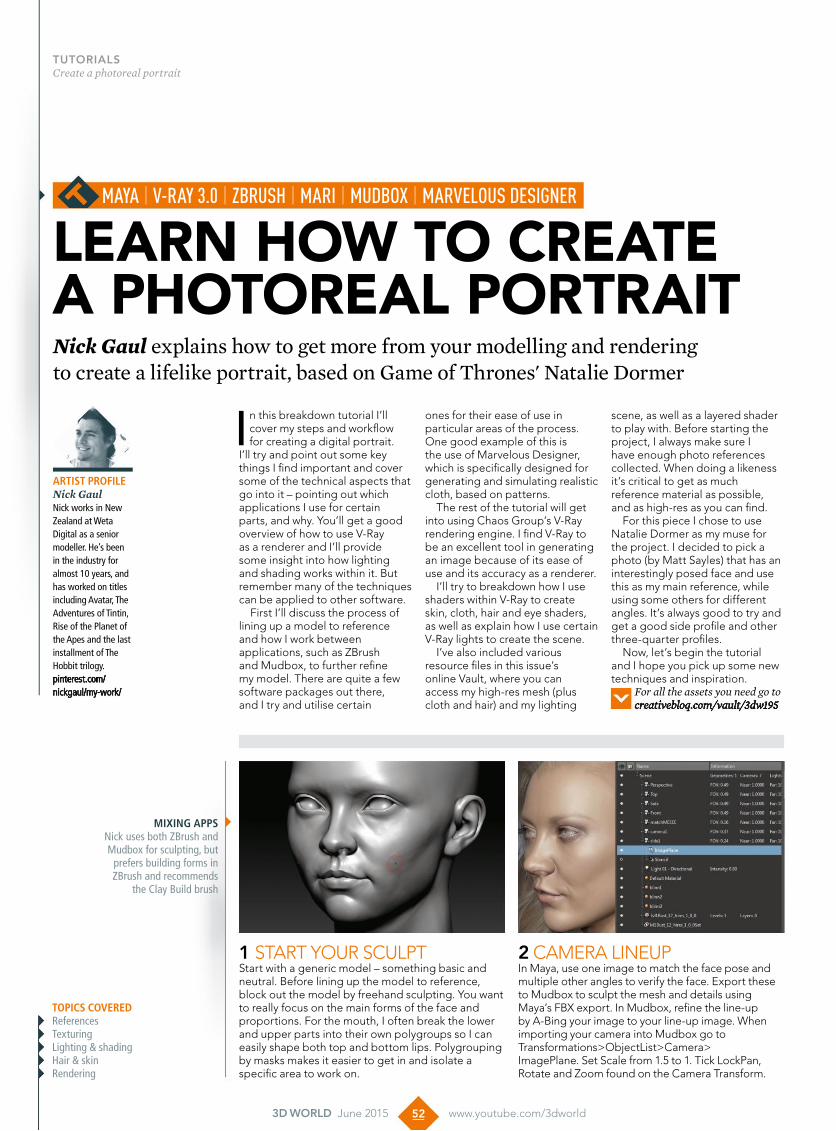
learn how to Create a photoreal portraitNick Gaul explains how to get more from your modelling and rendering to create a lifelike portrait, based on Game of Thrones' Natalie Dormer
In this breakdown tutorial I’ll cover my steps and workflow for creating a digital portrait.
I’ll try and point out some key things I find important and cover some of the technical aspects that go into it – pointing out which applications I use for certain parts, and why. You’ll get a good overview of how to use V-Ray as a renderer and I’ll provide some insight into how lighting and shading works within it. But remember many of the techniques can be applied to other software.
First I’ll discuss the process of lining up a model to reference and how I work between applications, such as ZBrush and Mudbox, to further refine my model. There are quite a few software packages out there, and I try and utilise certain
ones for their ease of use in particular areas of the process. One good example of this is the use of Marvelous Designer, which is specifically designed for generating and simulating realistic cloth, based on patterns.
The rest of the tutorial will get into using Chaos Group’s V-Ray rendering engine. I find V-Ray to be an excellent tool in generating an image because of its ease of use and its accuracy as a renderer.
I’ll try to breakdown how I use shaders within V-Ray to create skin, cloth, hair and eye shaders, as well as explain how I use certain V-Ray lights to create the scene.
I’ve also included various resource files in this issue’s online Vault, where you can access my high-res mesh (plus cloth and hair) and my lighting
scene, as well as a layered shader to play with. Before starting the project, I always make sure I have enough photo references collected. When doing a likeness it’s critical to get as much reference material as possible, and as high-res as you can find.
For this piece I chose to use Natalie Dormer as my muse for the project. I decided to pick a photo (by Matt Sayles) that has an interestingly posed face and use this as my main reference, while using some others for different angles. It’s always good to try and get a good side profile and other three-quarter profiles.
Now, let’s begin the tutorial and I hope you pick up some new techniques and inspiration.
For all the assets you need go to creativebloq.com/vault/3dw195
Maya | V-Ray 3.0 | ZBRush | MaRi | MudBox | MaRVelous designeR
1 STaRT YOuR SCulpTStart with a generic model – something basic and neutral. Before lining up the model to reference, block out the model by freehand sculpting. You want to really focus on the main forms of the face and proportions. For the mouth, I often break the lower and upper parts into their own polygroups so I can easily shape both top and bottom lips. polygrouping by masks makes it easier to get in and isolate a specific area to work on.
2 CaMeRa lINeupIn Maya, use one image to match the face pose and multiple other angles to verify the face. export these to Mudbox to sculpt the mesh and details using Maya’s FBX export. In Mudbox, refine the line-up by a-Bing your image to your line-up image. When importing your camera into Mudbox go to Transformations>Objectlist>Camera> Imageplane. Set Scale from 1.5 to 1. Tick lockpan, Rotate and Zoom found on the Camera Transform.
Topics coveredReferencesTexturingLighting & shadingHair & skinRendering
52 3D WorlD June 2015 www.youtube.com/3dworld
TuTorialsCreate a photoreal portrait
ArTisT profileNick GaulNick works in New Zealand at Weta Digital as a senior modeller. He’s been in the industry for almost 10 years, and has worked on titles including Avatar, The Adventures of Tintin, Rise of the Planet of the Apes and the last installment of The Hobbit trilogy.pinterest.com/nickgaul/my-work/
Mixing AppsNick uses both ZBrush and Mudbox for sculpting, but
prefers building forms in ZBrush and recommends
the Clay Build brush

phoToreAl resulTsNick shows how to
achieve better render results using V-Ray
53 3D WorlD June 2015 www.youtube.com/3dworld
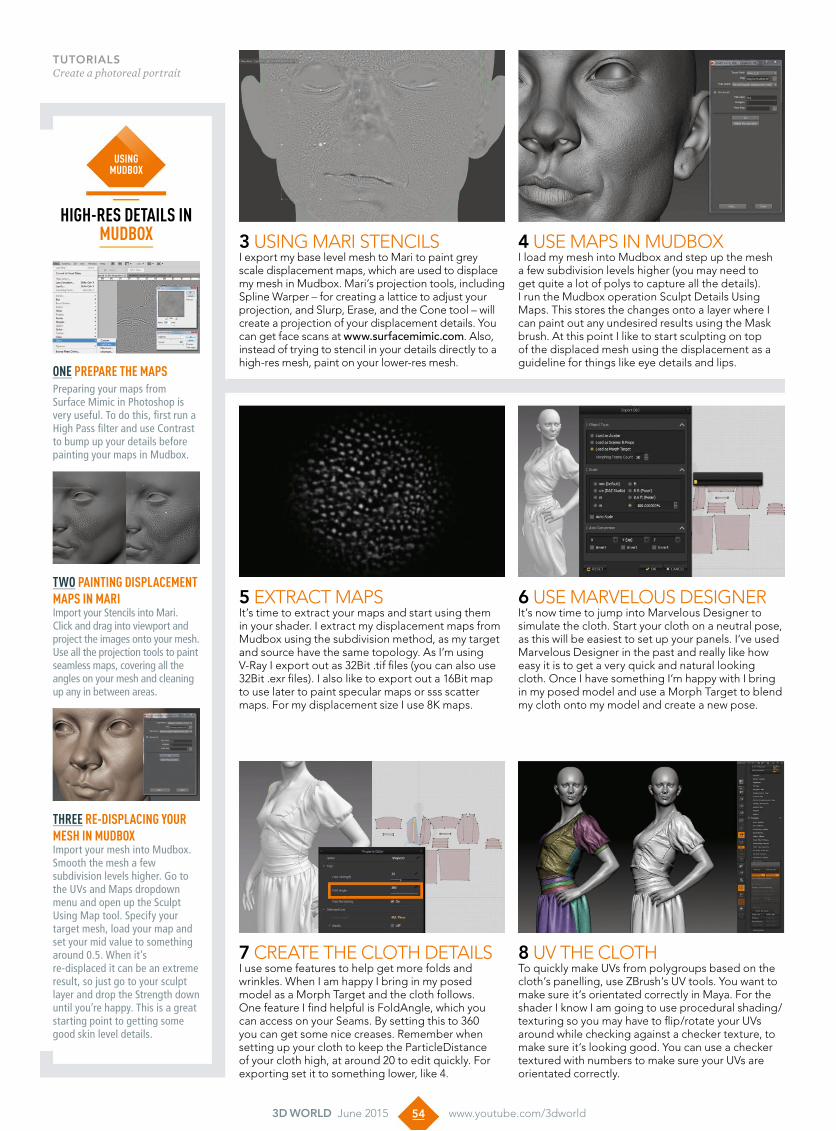
Two PainTing disPlacemenT maPs in mariImport your Stencils into Mari. Click and drag into viewport and project the images onto your mesh. Use all the projection tools to paint seamless maps, covering all the angles on your mesh and cleaning up any in between areas.
Three re-disPlacing your mesh in mudboxImport your mesh into Mudbox. Smooth the mesh a few subdivision levels higher. Go to the UVs and Maps dropdown menu and open up the Sculpt Using Map tool. Specify your target mesh, load your map and set your mid value to something around 0.5. When it’s re-displaced it can be an extreme result, so just go to your sculpt layer and drop the Strength down until you’re happy. This is a great starting point to getting some good skin level details.
high-res deTails in mudbox
using mudbox
one PrePare The maPsPreparing your maps from Surface Mimic in Photoshop is very useful. To do this, first run a High Pass filter and use Contrast to bump up your details before painting your maps in Mudbox.
3 uSING MaRI STeNCIlSI export my base level mesh to Mari to paint grey scale displacement maps, which are used to displace my mesh in Mudbox. Mari’s projection tools, including Spline Warper – for creating a lattice to adjust your projection, and Slurp, erase, and the Cone tool – will create a projection of your displacement details. You can get face scans at www.surfacemimic.com. also, instead of trying to stencil in your details directly to a high-res mesh, paint on your lower-res mesh.
4 uSe MapS IN MuDBOXI load my mesh into Mudbox and step up the mesh a few subdivision levels higher (you may need to get quite a lot of polys to capture all the details). I run the Mudbox operation Sculpt Details using Maps. This stores the changes onto a layer where I can paint out any undesired results using the Mask brush. at this point I like to start sculpting on top of the displaced mesh using the displacement as a guideline for things like eye details and lips.
6 uSe MaRVelOuS DeSIGNeRIt’s now time to jump into Marvelous Designer to simulate the cloth. Start your cloth on a neutral pose, as this will be easiest to set up your panels. I’ve used Marvelous Designer in the past and really like how easy it is to get a very quick and natural looking cloth. Once I have something I’m happy with I bring in my posed model and use a Morph Target to blend my cloth onto my model and create a new pose.
8 uV The ClOThTo quickly make uVs from polygroups based on the cloth’s panelling, use ZBrush’s uV tools. You want to make sure it’s orientated correctly in Maya. For the shader I know I am going to use procedural shading/texturing so you may have to flip/rotate your uVs around while checking against a checker texture, to make sure it’s looking good. You can use a checker textured with numbers to make sure your uVs are orientated correctly.
5 eXTRaCT MapS It’s time to extract your maps and start using them in your shader. I extract my displacement maps from Mudbox using the subdivision method, as my target and source have the same topology. as I’m using V-Ray I export out as 32Bit .tif files (you can also use 32Bit .exr files). I also like to export out a 16Bit map to use later to paint specular maps or sss scatter maps. For my displacement size I use 8K maps.
7 CReaTe The ClOTh DeTaIlSI use some features to help get more folds and wrinkles. When I am happy I bring in my posed model as a Morph Target and the cloth follows. One feature I find helpful is Foldangle, which you can access on your Seams. By setting this to 360 you can get some nice creases. Remember when setting up your cloth to keep the particleDistance of your cloth high, at around 20 to edit quickly. For exporting set it to something lower, like 4.
54 3D WorlD June 2015 www.youtube.com/3dworld
TuTorialsCreate a photoreal portrait
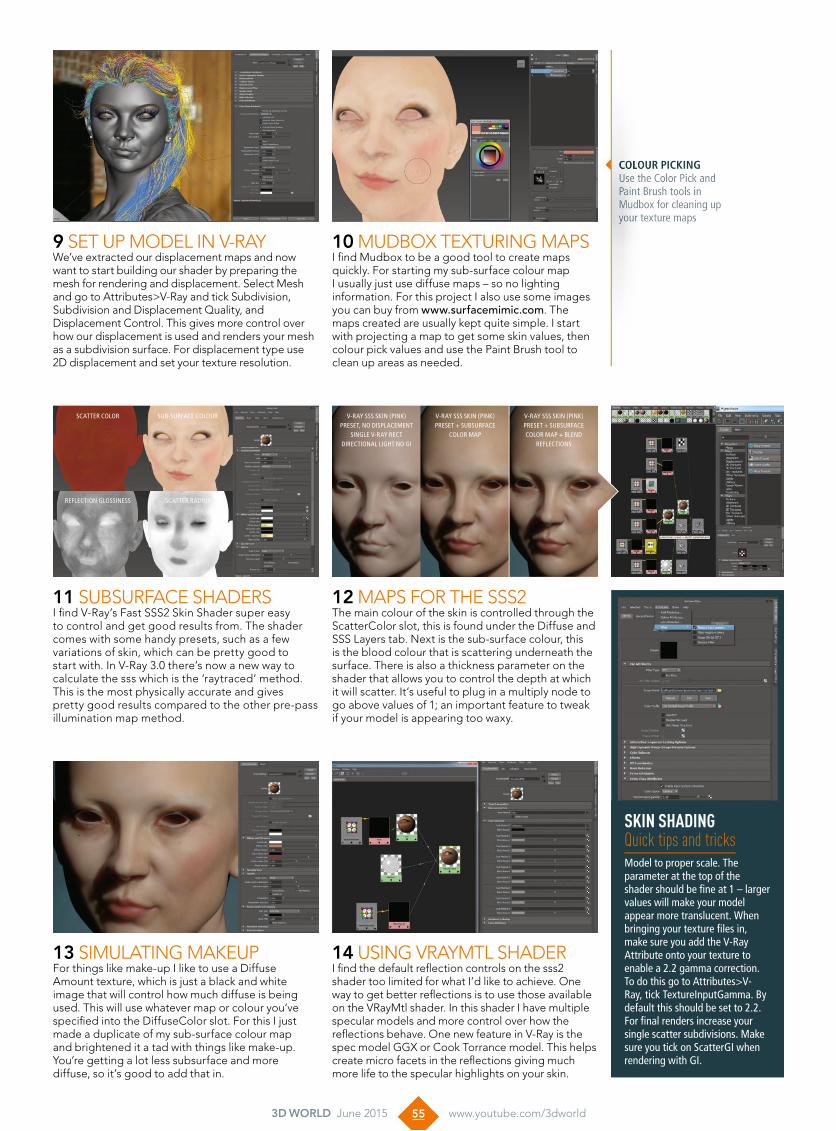
colour pickingUse the Color Pick and Paint Brush tools in Mudbox for cleaning up your texture maps
skin shading Quick tips and tricksModel to proper scale. The parameter at the top of the shader should be fine at 1 – larger values will make your model appear more translucent. When bringing your texture files in, make sure you add the V-Ray Attribute onto your texture to enable a 2.2 gamma correction. To do this go to Attributes>V-Ray, tick TextureInputGamma. By default this should be set to 2.2. For final renders increase your single scatter subdivisions. Make sure you tick on ScatterGI when rendering with GI.
V-RAy SSS SkIN (PINk) PReSeT, No DISPLACeMeNT
SINGLe V-RAy ReCT DIReCTIoNAL LIGHT No GI
SCATTeR CoLoR SUB-SURFACe CoLoUR
ReFLeCTIoN GLoSSINeSS SCATTeR RADIUS
V-RAy SSS SkIN (PINk) PReSeT + SUBSURFACe
CoLoR MAP
V-RAy SSS SkIN (PINk) PReSeT + SUBSURFACe CoLoR MAP + BLeND
ReFLeCTIoNS
10 MuDBOX TeXTuRING MapSI find Mudbox to be a good tool to create maps quickly. For starting my sub-surface colour map I usually just use diffuse maps – so no lighting information. For this project I also use some images you can buy from www.surfacemimic.com. The maps created are usually kept quite simple. I start with projecting a map to get some skin values, then colour pick values and use the paint Brush tool to clean up areas as needed.
9 SeT up MODel IN V-RaYWe’ve extracted our displacement maps and now want to start building our shader by preparing the mesh for rendering and displacement. Select Mesh and go to attributes>V-Ray and tick Subdivision, Subdivision and Displacement Quality, and Displacement Control. This gives more control over how our displacement is used and renders your mesh as a subdivision surface. For displacement type use 2D displacement and set your texture resolution.
12 MapS FOR The SSS2The main colour of the skin is controlled through the ScatterColor slot, this is found under the Diffuse and SSS layers tab. Next is the sub-surface colour, this is the blood colour that is scattering underneath the surface. There is also a thickness parameter on the shader that allows you to control the depth at which it will scatter. It’s useful to plug in a multiply node to go above values of 1; an important feature to tweak if your model is appearing too waxy.
11 SuBSuRFaCe ShaDeRSI find V-Ray’s Fast SSS2 Skin Shader super easy to control and get good results from. The shader comes with some handy presets, such as a few variations of skin, which can be pretty good to start with. In V-Ray 3.0 there’s now a new way to calculate the sss which is the ‘raytraced’ method. This is the most physically accurate and gives pretty good results compared to the other pre-pass illumination map method.
13 SIMulaTING MaKeupFor things like make-up I like to use a Diffuse amount texture, which is just a black and white image that will control how much diffuse is being used. This will use whatever map or colour you’ve specified into the DiffuseColor slot. For this I just made a duplicate of my sub-surface colour map and brightened it a tad with things like make-up. You’re getting a lot less subsurface and more diffuse, so it’s good to add that in.
14 uSING VRaYMTl ShaDeRI find the default reflection controls on the sss2 shader too limited for what I’d like to achieve. One way to get better reflections is to use those available on the VRayMtl shader. In this shader I have multiple specular models and more control over how the reflections behave. One new feature in V-Ray is the spec model GGX or Cook Torrance model. This helps create micro facets in the reflections giving much more life to the specular highlights on your skin.
55 3D WorlD June 2015 www.youtube.com/3dworld
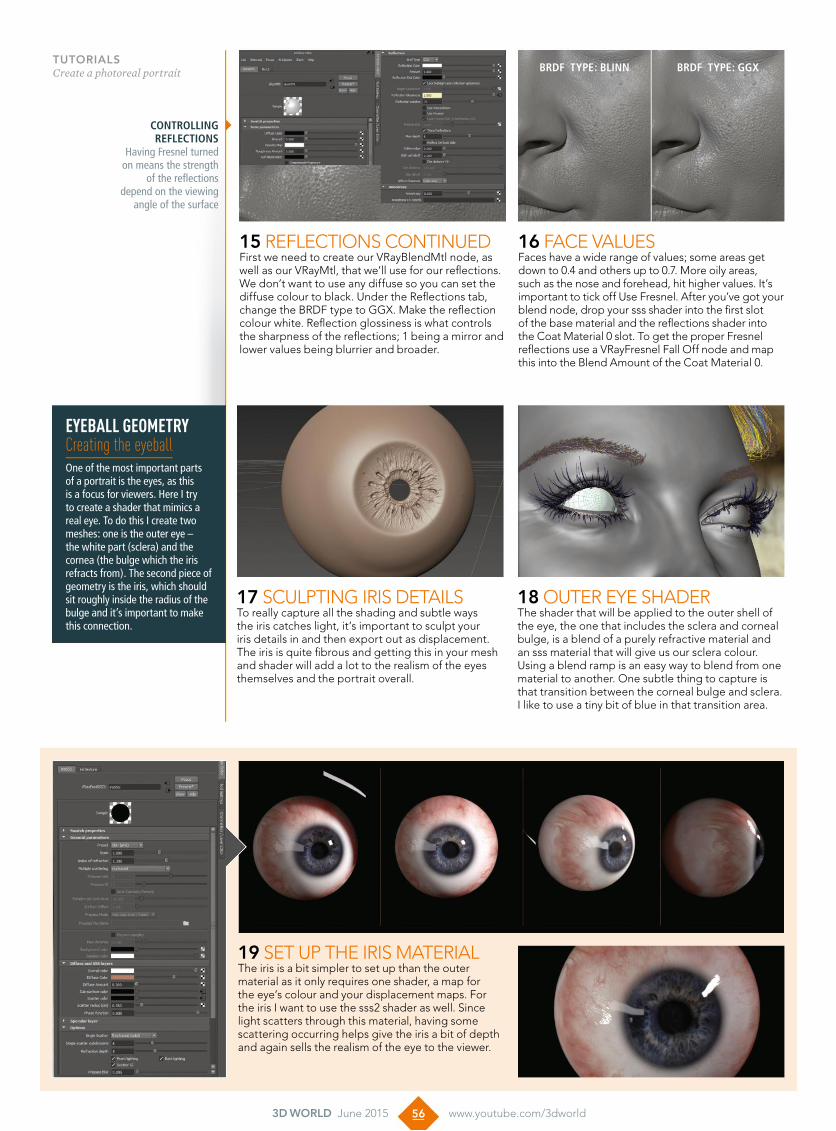
conTrolling reflecTions
Having Fresnel turned on means the strength
of the reflections depend on the viewing
angle of the surface
Brdf Type: Blinn Brdf Type: ggx
15 ReFleCTIONS CONTINueDFirst we need to create our VRayBlendMtl node, as well as our VRayMtl, that we’ll use for our reflections. We don’t want to use any diffuse so you can set the diffuse colour to black. under the Reflections tab, change the BRDF type to GGX. Make the reflection colour white. Reflection glossiness is what controls the sharpness of the reflections; 1 being a mirror and lower values being blurrier and broader.
19 SeT up The IRIS MaTeRIalThe iris is a bit simpler to set up than the outer material as it only requires one shader, a map for the eye’s colour and your displacement maps. For the iris I want to use the sss2 shader as well. Since light scatters through this material, having some scattering occurring helps give the iris a bit of depth and again sells the realism of the eye to the viewer.
18 OuTeR eYe ShaDeRThe shader that will be applied to the outer shell of the eye, the one that includes the sclera and corneal bulge, is a blend of a purely refractive material and an sss material that will give us our sclera colour. using a blend ramp is an easy way to blend from one material to another. One subtle thing to capture is that transition between the corneal bulge and sclera. I like to use a tiny bit of blue in that transition area.
16 FaCe ValueSFaces have a wide range of values; some areas get down to 0.4 and others up to 0.7. More oily areas, such as the nose and forehead, hit higher values. It’s important to tick off use Fresnel. after you’ve got your blend node, drop your sss shader into the first slot of the base material and the reflections shader into the Coat Material 0 slot. To get the proper Fresnel reflections use a VRayFresnel Fall Off node and map this into the Blend amount of the Coat Material 0.
17 SCulpTING IRIS DeTaIlSTo really capture all the shading and subtle ways the iris catches light, it’s important to sculpt your iris details in and then export out as displacement. The iris is quite fibrous and getting this in your mesh and shader will add a lot to the realism of the eyes themselves and the portrait overall.
56 3D WorlD June 2015 www.youtube.com/3dworld
TuTorialsCreate a photoreal portrait
eyeball geomeTry Creating the eyeballone of the most important parts of a portrait is the eyes, as this is a focus for viewers. Here I try to create a shader that mimics a real eye. To do this I create two meshes: one is the outer eye – the white part (sclera) and the cornea (the bulge which the iris refracts from). The second piece of geometry is the iris, which should sit roughly inside the radius of the bulge and it’s important to make this connection.
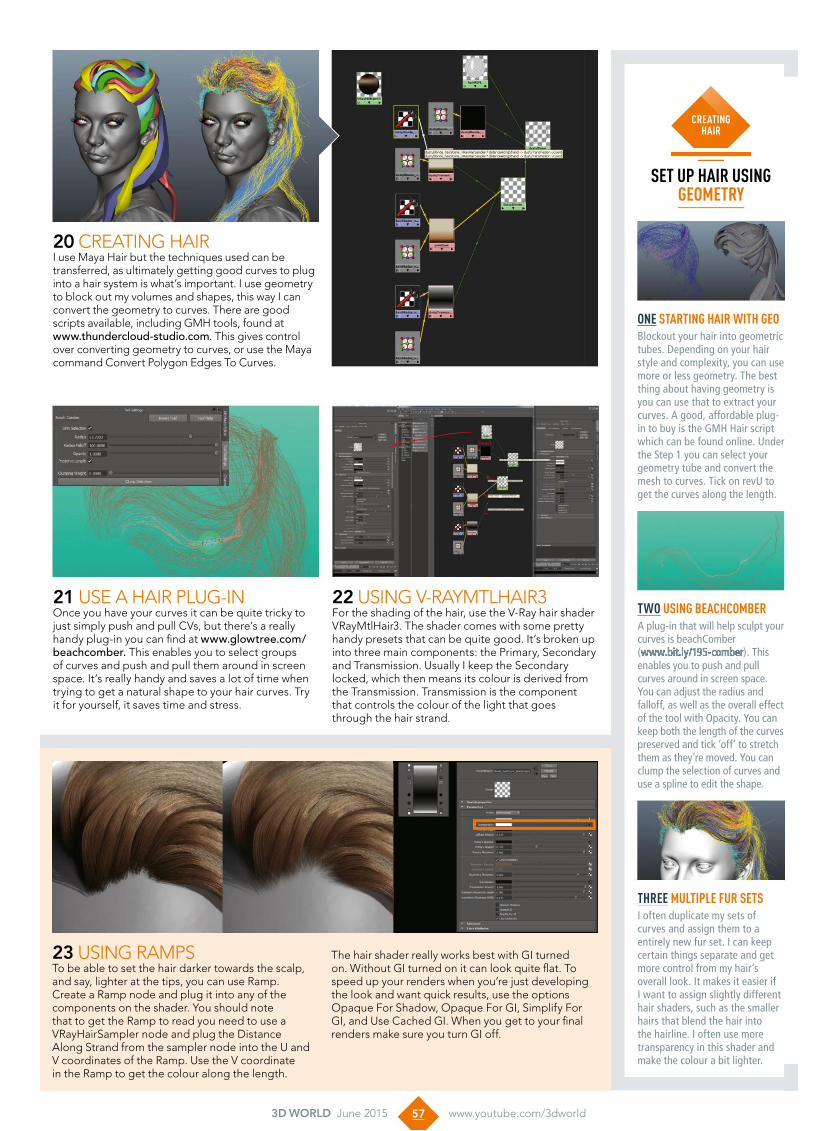
20 CReaTING haIRI use Maya hair but the techniques used can be transferred, as ultimately getting good curves to plug into a hair system is what’s important. I use geometry to block out my volumes and shapes, this way I can convert the geometry to curves. There are good scripts available, including GMh tools, found at www.thundercloud-studio.com. This gives control over converting geometry to curves, or use the Maya command Convert polygon edges To Curves.
22 uSING V-RaYMTlhaIR3For the shading of the hair, use the V-Ray hair shader VRayMtlhair3. The shader comes with some pretty handy presets that can be quite good. It’s broken up into three main components: the primary, Secondary and Transmission. usually I keep the Secondary locked, which then means its colour is derived from the Transmission. Transmission is the component that controls the colour of the light that goes through the hair strand.
The hair shader really works best with GI turned on. Without GI turned on it can look quite flat. To speed up your renders when you’re just developing the look and want quick results, use the options Opaque For Shadow, Opaque For GI, Simplify For GI, and use Cached GI. When you get to your final renders make sure you turn GI off.
21 uSe a haIR pluG-INOnce you have your curves it can be quite tricky to just simply push and pull CVs, but there’s a really handy plug-in you can find at www.glowtree.com/beachcomber. This enables you to select groups of curves and push and pull them around in screen space. It’s really handy and saves a lot of time when trying to get a natural shape to your hair curves. Try it for yourself, it saves time and stress.
23 uSING RaMpSTo be able to set the hair darker towards the scalp, and say, lighter at the tips, you can use Ramp. Create a Ramp node and plug it into any of the components on the shader. You should note that to get the Ramp to read you need to use a VRayhairSampler node and plug the Distance along Strand from the sampler node into the u and V coordinates of the Ramp. use the V coordinate in the Ramp to get the colour along the length.
Two using beachcomber A plug-in that will help sculpt your curves is beachComber (www.bit.ly/195-comber). This enables you to push and pull curves around in screen space. you can adjust the radius and falloff, as well as the overall effect of the tool with opacity. you can keep both the length of the curves preserved and tick ‘off’ to stretch them as they’re moved. you can clump the selection of curves and use a spline to edit the shape.
Three mulTiPle fur seTsI often duplicate my sets of curves and assign them to a entirely new fur set. I can keep certain things separate and get more control from my hair’s overall look. It makes it easier if I want to assign slightly different hair shaders, such as the smaller hairs that blend the hair into the hairline. I often use more transparency in this shader and make the colour a bit lighter.
seT uP hair using geomeTry
creaTing hair
one sTarTing hair wiTh geoBlockout your hair into geometric tubes. Depending on your hair style and complexity, you can use more or less geometry. The best thing about having geometry is you can use that to extract your curves. A good, affordable plug-in to buy is the GMH Hair script which can be found online. Under the Step 1 you can select your geometry tube and convert the mesh to curves. Tick on revU to get the curves along the length.
57 3D WorlD June 2015 www.youtube.com/3dworld

hAndy v-rAy seTTings V-Ray comes with a great Frame Buffer that you can tick in your VRayCommon
tab. V-Ray comes with a few options for your
sampler type, too
24 haIR ReFleCTIONSI find I don’t get enough specular control using the hair shader alone, so just like the skin, I apply some extra reflections using the VRayBlend node. I find the BRDF type GGX worked good on the hair reflections. To get a better highlight shape I use anisotropy to combine the two shaders: VRayhair3 and VRayMt. For extra reflections use the VRayFresnel node in the Blend amount. Make sure your VRayhair3 is your Base Material and your VRayMtl is the Coat Material.
28 RIM lIGhT SeTupThe rim light is placed behind the character and points at the render camera. Get this light to graze the model on one side, giving a nice profile. I use bounce cards, or geometry surrounding my character, to bounce back indirect light or colour. here I use a plane assigned with an orange coloured diffuse material to bounce orange light back onto my character. Note, under the Options tab tick Invisible or your lights will show up in the render.
27 SeTTING up hDRI lIGhTThe VRay Dome light is used to establish realistic environment lighting and is used for image based lighting. To use an hDRI texture tick use Dome Tex and apply your texture to the Dome Tex slot. Be sure to apply the Texture Resolution. The VRayDomet can flatten the image, so use it at a low intensity. To move the position of the VRayDome, go to the VRayplaceenvTex node by selecting your dome light and then open the attribute editor.
25 lIGhTING SeTupI use VRayRect and VRayDome lights. The VRayRect is a rectangular area light. One of the first rectangular lights I create is my ‘key’ light, the highest intensity light in my scene that creates a lot of my shadowing. I’m aiming for a hard three-quarter angle so I try and get some nice shadows to outline the face. For this light you want a fairly small sized area, emitting a lot of light, or for it to be intense – almost like a flash.
29 The pROGReSSIVe ReNDeRThe progressive renderer means you see an overall image straight away that refines/samples over time. I use minimum and maximum samples between 1-100, and turn the noise threshold to 0, so the image will try and sample out all the noise it can. To speed up renders adjust the noise threshold to 0.1; the higher the value, the more noise and quicker the render. Turning the max render time to 0 will allow it to run until it hits all its samples.
26 SeTTING up MaIN lIGhTS Start with three basic lights: fill, key and rim. For the fill, use a texture to get more interesting reflections in the eyes by going down to the Textures tab and tick on use RectTex, and drop your texture in the RectTex slot. I went to www.bit.ly/195-hdrlabs, which is an excellent source for getting textures to use for lighting. For hDRI images I went with a window image. I use this window texture to produce some more realistic reflections in my character’s eyes.
VRAy MTL HAIR3 + VRAy MTL ReFLeCTIoNS
TRANSMISSIoN CoNTRIBUTIoN
(MoRe eVIDeNT IN BACk LIGHTING)
key + FILL + No GI
DeFAULT SHADeR SeTTINGSWITH CoLoUR MAP RAMP
VRAy MTL HAIR3 + VRAy MTL ReFLeCTIoNS
key key + eye FILL
key + eye FILL + RIM
key + eye FILL + RIM +DoMe
key + eye FILL + RIM +DoMe + BoUNCe
key + FILL + DoMe + RIM + GI
key + FILL + DoMe + RIM + GI + BoUNCe LIGHT
Adding exTrA color wiTh Bounce geo
no Bounce
geo
58 3D WorlD June 2015 www.youtube.com/3dworld
TuTorialsCreate a photoreal portrait
creaTing hair Hair shading tricksPlug a black and white Ramp into the transparency. This is useful to fade the roots of the hairs slightly to avoid that plugged look. When starting, work with a simple scene, like a sphere with some low density fur on it, as this helps you to experiment with settings to use in your final shader. If there’s issues seeing how each of the hair parameters works, it can be useful to assign a bright colour to one of the parameters.
Preferred lighT The rectangular lightyou can control the direction parameters on the VRayRect. Using the directional parameter narrows the light into a ‘beam’. From this I get a nice contrast in my skin shadows. The VRayRect U/V sizes is directly related to how bright the light will be, which is multiplied by the Intensity Multiplier. one feature to note is the sampling subdivisions. Starting out I keep my sample subdivisions quite low, at around 10, then for a final render I bump them up to 50.
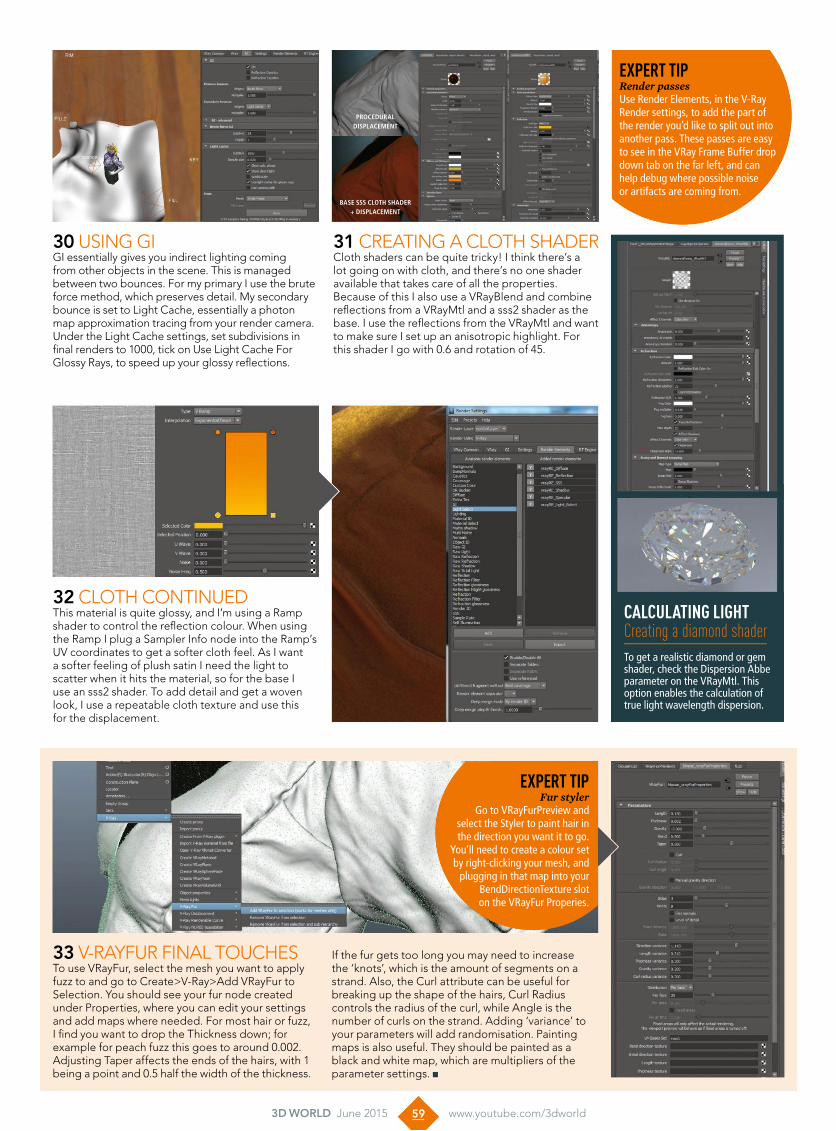
30 uSING GIGI essentially gives you indirect lighting coming from other objects in the scene. This is managed between two bounces. For my primary I use the brute force method, which preserves detail. My secondary bounce is set to light Cache, essentially a photon map approximation tracing from your render camera. under the light Cache settings, set subdivisions in final renders to 1000, tick on use light Cache For Glossy Rays, to speed up your glossy reflections.
32 ClOTh CONTINueDThis material is quite glossy, and I’m using a Ramp shader to control the reflection colour. When using the Ramp I plug a Sampler Info node into the Ramp’s uV coordinates to get a softer cloth feel. as I want a softer feeling of plush satin I need the light to scatter when it hits the material, so for the base I use an sss2 shader. To add detail and get a woven look, I use a repeatable cloth texture and use this for the displacement.
31 CReaTING a ClOTh ShaDeRCloth shaders can be quite tricky! I think there’s a lot going on with cloth, and there’s no one shader available that takes care of all the properties. Because of this I also use a VRayBlend and combine reflections from a VRayMtl and a sss2 shader as the base. I use the reflections from the VRayMtl and want to make sure I set up an anisotropic highlight. For this shader I go with 0.6 and rotation of 45.
exPerT TiPRender passesUse Render elements, in the V-Ray Render settings, to add the part of the render you’d like to split out into another pass. These passes are easy to see in the VRay Frame Buffer drop down tab on the far left, and can help debug where possible noise or artifacts are coming from.
calculaTing lighT Creating a diamond shaderTo get a realistic diamond or gem shader, check the Dispersion Abbe parameter on the VRayMtl. This option enables the calculation of true light wavelength dispersion.
33 V-RaYFuR FINal TOuCheSTo use VRayFur, select the mesh you want to apply fuzz to and go to Create>V-Ray>add VRayFur to Selection. You should see your fur node created under properties, where you can edit your settings and add maps where needed. For most hair or fuzz, I find you want to drop the Thickness down; for example for peach fuzz this goes to around 0.002. adjusting Taper affects the ends of the hairs, with 1 being a point and 0.5 half the width of the thickness.
If the fur gets too long you may need to increase the ‘knots’, which is the amount of segments on a strand. also, the Curl attribute can be useful for breaking up the shape of the hairs, Curl Radius controls the radius of the curl, while angle is the number of curls on the strand. adding ‘variance’ to your parameters will add randomisation. painting maps is also useful. They should be painted as a black and white map, which are multipliers of the parameter settings.
procedurAl displAceMenT
BAse sss cloTh shAder + displAceMenT
59 3D WorlD June 2015 www.youtube.com/3dworld
exPerT TiPFur styler
Go to VRayFurPreview and select the Styler to paint hair in the direction you want it to go.
you’ll need to create a colour set by right-clicking your mesh, and
plugging in that map into your BendDirectionTexture slot on the VRayFur Properies.
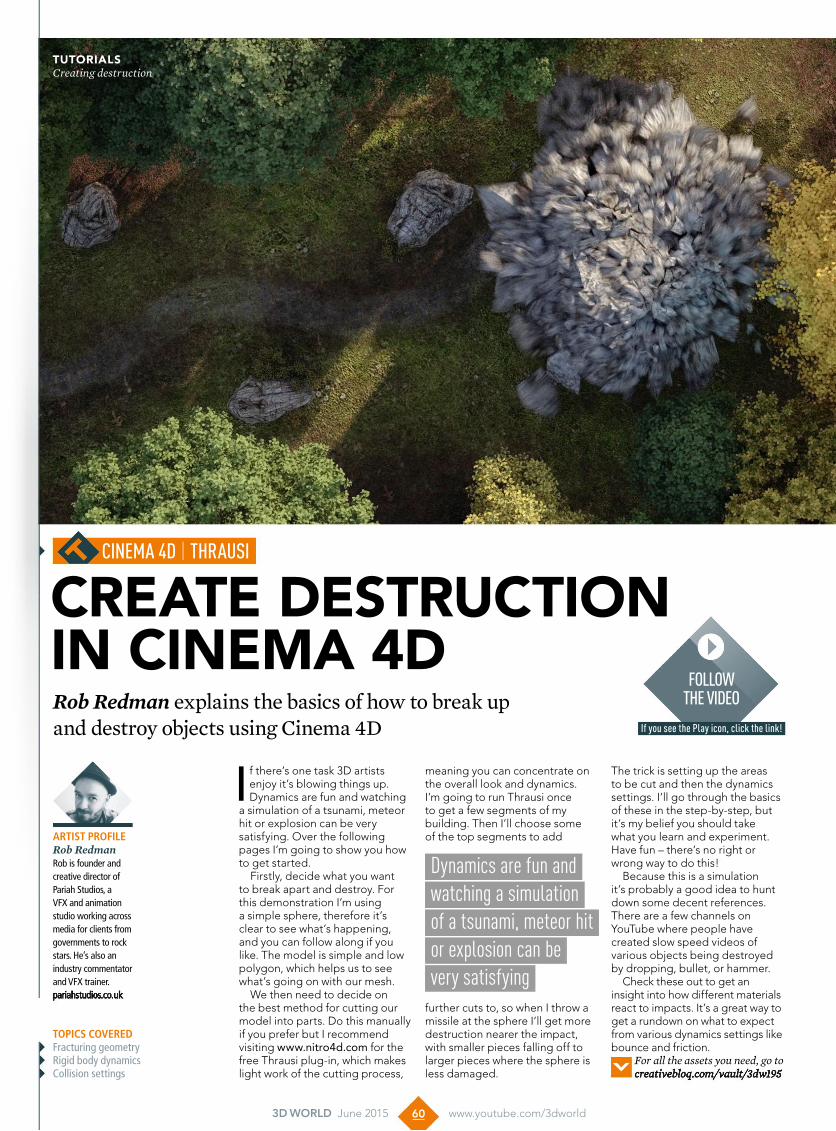
Dynamics are fun and watching a simulation of a tsunami, meteor hit or explosion can bevery satisfying
FollowThe video
if you see the Play icon, click the link!
create Destruction in cinema 4DRob Redman explains the basics of how to break up and destroy objects using Cinema 4D
I f there’s one task 3D artists enjoy it’s blowing things up. Dynamics are fun and watching
a simulation of a tsunami, meteor hit or explosion can be very satisfying. Over the following pages I’m going to show you how to get started.
Firstly, decide what you want to break apart and destroy. For this demonstration I’m using a simple sphere, therefore it’s clear to see what’s happening, and you can follow along if you like. The model is simple and low polygon, which helps us to see what’s going on with our mesh.
We then need to decide on the best method for cutting our model into parts. Do this manually if you prefer but I recommend visiting www.nitro4d.com for the free Thrausi plug-in, which makes light work of the cutting process,
meaning you can concentrate on the overall look and dynamics. I’m going to run Thrausi once to get a few segments of my building. Then I’ll choose some of the top segments to add
further cuts to, so when I throw a missile at the sphere I’ll get more destruction nearer the impact, with smaller pieces falling off to larger pieces where the sphere is less damaged.
The trick is setting up the areas to be cut and then the dynamics settings. I’ll go through the basics of these in the step-by-step, but it’s my belief you should take what you learn and experiment. Have fun – there’s no right or wrong way to do this!
Because this is a simulation it’s probably a good idea to hunt down some decent references. There are a few channels on YouTube where people have created slow speed videos of various objects being destroyed by dropping, bullet, or hammer.
Check these out to get an insight into how different materials react to impacts. It’s a great way to get a rundown on what to expect from various dynamics settings like bounce and friction.
For all the assets you need, go to creativebloq.com/vault/3dw195
cinema 4d | Thrausi
Topics coveredFracturing geometryRigid body dynamicsCollision settings
60 3D WorlD June 2015 www.youtube.com/3dworld
tutorialsCreating destruction
ArTisT profileRob RedmanRob is founder and creative director of Pariah Studios, a VFX and animation studio working across media for clients from governments to rock stars. He’s also an industry commentator and VFX trainer.pariahstudios.co.uk

Thrausi is one of my preferred choices tobreak geometry as it does lots of the legwork
ExpErt tipKeyframing dynamicsOn occasion you might find you have a chunk that doesn’t move, because it doesn’t quite interact. Keyframe the trigger to ’immediately’ on the impact frame and this will be fixed.
4 sOFTWare DOes THe WOrkThrausi is one of my preferred choices to break geometry as it does lots of the legwork. In this case it groups all the chunks under a fracture object and applies material tags to the object, including a separate material for the original outside surface polygons – making it quick and easy to define the models. I add a bright interior for clarity. as the plug-in adds tags to each chunk, it’s simple to manage the final look with minimal work.
6 aDD a CannOn BallFinally, I need to add a rigid Body Tag to my smaller sphere. It will now drop and as soon as it hits the fractured sphere you’ll see the pieces start to break apart. all that’s left now is to play with the dynamics settings to get the look you want. I’ve decreased the bounce for all my objects, as well as increased the friction and the mass, helping the pieces behave as though they are heavier.
3 CreaTIng THe DeTaIlsWith your main chunks cut, you can select them individually and run Thrausi again. I use a setting of 12 and break the pieces nearest the top (where I want my impact to be) again. I then repeat the process, cutting the uppermost parts into tiny pieces, to the point where the impact will almost be creating dust – as well as a few smaller fragments. I use the Voronoi option for all my cuts, as it generates natural looking pieces.
5 rIgID BODY DYnamICs Tagssimilar to how it added the material tags, Thrausi also applies what it thinks is the correct tag to the parent fracture object. actually, it guesses correctly based on my needs, and I now have a rigid Body Tag. If I right-click on the ground/floor object and add a simulation tags/collider tag, I can press Play and watch my sphere fall apart – quite violently. The first step to fixing this is to change the trigger to On Collision.
1 InITIal geOmeTrY CHOICesI’m keeping things simple, so it’s clear in the screenshots what’s happening. I’m going to use a small sphere to break apart a bigger one. The technique is exactly the same no matter what you want to destroy – from the standing stone in the main image to an entire city. keep in mind that Thrausi cuts into volume, so if you have a house to explode make sure you model walls to avoid the rooms being filled.
2 sPlIT OBJeCT TO DesTrOYThis is where the fun starts. select the sphere (or other object you want to break) and choose Thrausi from the Plugins menu. The key here is to help the end result look more realistic, so start with a low number of pieces and use the Voronoi option to get better looking breaks. What you are trying to do is create a few larger chunks of the sphere, which you can then go in and run the plug-in on again.
collision problemsIf your collision tag doesn’t work, or effect all pieces, then increase the size increment under the trigger type
mATeriAlsI suggest applying contrasting materials while you’re working, to help you see what’s happening
Follow
rob’s nExt
cinEma 4d tutorial
Issue 196, on sale 20 May
click To PlaY videowww.bit.ly/195-cinema4d
61 3D WorlD June 2015 www.youtube.com/3dworld

Add detAil to your chArActer sculptsJong-Keun Kim explains how to add complex detail to this warrior's armour using alpha masks and ZBrush's NoiseMaker plug-in
In this tutorial, I will explore how to add complex details to a digital character in ZBrush
and Photoshop. The basis for the tutorial is this warrior character, which is based on an inspiring piece of concept art by Dean Holdeen (www.holdeen.com).
The first thing that I considered was how to translate the concept into 3D. I created the character by speed sculpting in ZBrush, then brought it into Maya to retopologise – good topology and edge flow are important for character models.
With the base model completed, I began to add details. ZBrush
is very powerful for this kind of work. By using Alphas, Masks and the NoiseMaker plug-in, you can achieve fantastic results. By working in Layers, and adjusting the Layer Intensity, you can adjust the effect of individual details.
Once the detailing is complete, I will explain how to set up lights, and explore some useful techniques to use when working with ZBrush’s BPR (Best Preview Render).
Finally, I will explain how to use multi-pass rendering in order to generate the render passes necessary to create the final image. We will render several
passes, including surface colour, reflections, ambient occlusion and z-depth.
I imagined the warrior had just returned from a battlefield with the bloodstained weapon. I will show you how to achieve this final look in Photoshop.
The walkthrough printed in the magazine provides an overview of the process, but you will need to experiment with the techniques set out here for yourself. In the download accompanying the tutorial, you can find my base mesh to help you get started.
For all the assets you need go to creativebloq.com/vault/3dw195
Maya | ZBrush | noiseMaker | PhotoshoP
1 BAse MODeLThe first step is to sketch the overall form of the character in ZBrush. The topology of the model doesn’t need to be perfect at this stage, because it isn’t going to be the final mesh. When you’re happy with the overall shape of the character, optimise the model using Decimation Master. This enables you to export a lower-poly .obj file that you can import into Maya and retopologise.
2 seT uP uVsBefore you can create high-resolution detail on the model, it needs uVs. Plan how the uVs will be laid out before you begin, considering how they will be used in ZBrush. We will be using ZBrush’s surface Noise feature to generate patterns, and the direction of the uVs will dictate their orientation. When you are finished, save the uV unwrapped model as an .obj file and import it back into ZBrush.
ExpErt tipUse ZTools
If you don’t have enough RAM to work
on the entire model in ZBrush, split the
different body parts (head, arms, body, legs)
into separate ZTools.
Topics coveredModellingRenderingPost-production
62 3D WorlD June 2015 www.youtube.com/3dworld
TuTorialsDetailing characters
ArTisT profileJong-Keun KimJong-Keun Kim majored in industrial design in South Korea, then moved into the games industry. He currently works as a character artist at Gameloft in Montreal.www.sites.google.com/site/jkkimcg
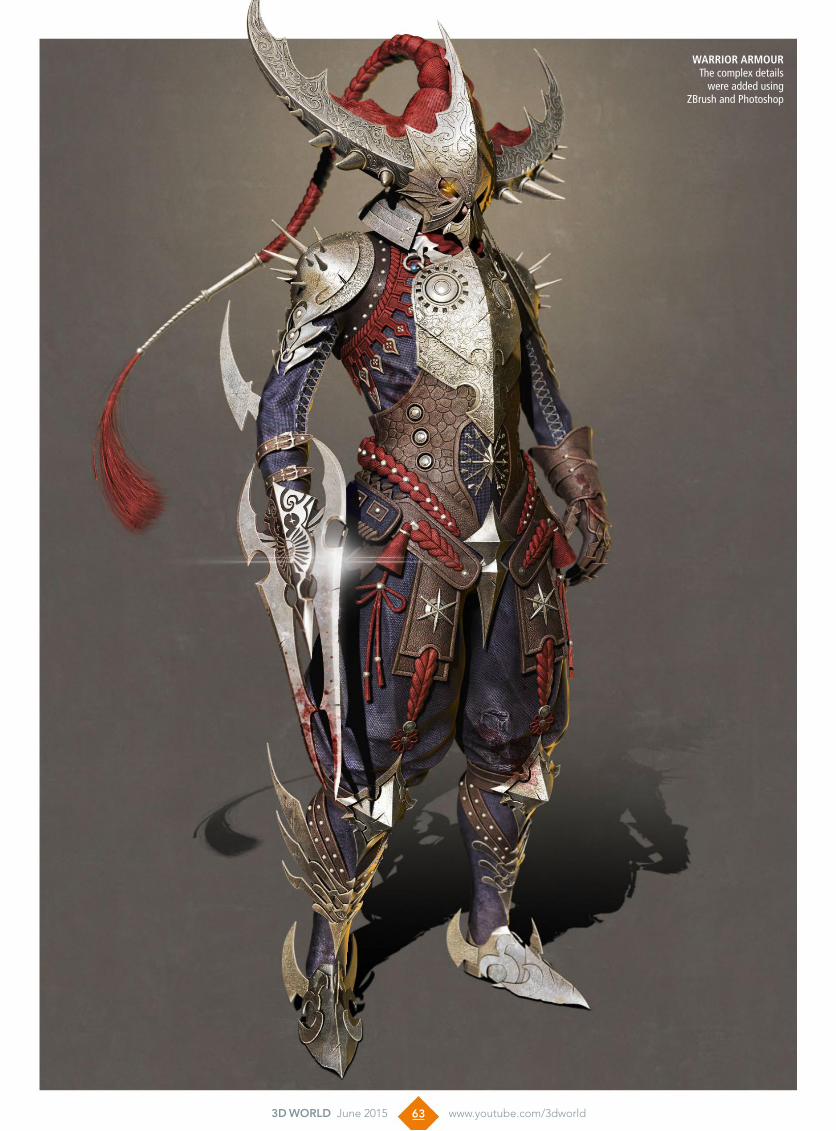
wArrior Armour The complex details
were added using ZBrush and Photoshop
63 3D WorlD June 2015 www.youtube.com/3dworld

armour dEtails working with layErsStart by stacking up the layers as follows; light layers (Screen) are at the top, followed by dirt (Overlay), shadow (Multiply), reflection (Overlay), cavity (Overlay), colour (Multiply), and AO layer (Normal). I use SketchShaded, SketchShaded2, SketchShaded3 and SketchShaded4 materials for the cavity maps. When you combine the layers in Photoshop, the separated light layers have the advantage of easily changing the colour and the intensity of the layer. I change the colour of the rim light layer to yellow in order to match the yellowish background. When you finish the basic compositing, create a new layer in Overlay Blending mode. Paint over the layer with black and white to enhance your final image and then add dirt layers. Finally, put the z-depth image into the Alpha channel and use the Lens Blur in the Filter.
ZBrush is very powerful for this kind of work.
By using Alphas, Masks and the NoiseMaker
plug-in you canachieve fantastic results
4 DeTAIL THe HeLMeTLoad your completed mask texture into ZBrush by pressing Alpha On/Off in the NoiseMaker window. Go to surface>Noise and the NoiseMaker pop-up should appear. Press the uV button at the top, instead of the default 3D. Apply the mask texture (Alpha On/Off). ensure your mesh has enough subdivisions and is at the highest level. In the surface sub-palette select MaskByNoise. use Tool>Deformation>Inflate to create the pattern in 3D.
3 PAINT A MAsk TexTuReexport a uV snapshot from Maya’s uV Texture editor (Polygons>uV snapshot). use this as a guide for painting masks corresponding to the patterns you want to apply to the model’s surface. In Photoshop, create a new 4,096 x 4,096-pixel document. Import the uV snapshot. Create a new layer, move it beneath the uV snapshot layer, and paint your masks onto it in white. Find free patterns to use as a base: www.all-free-download.com/free-vector.
6 sCuLPT FOLDsBefore sculpting clothes, collect reference images to work from. sculpt at different subdivision levels, using the standard brush with Lazy Mouse (stroke>Lazy Mouse) turned on, and going to the highest subdivision level for small or sharp folds. Once the basic shapes of the wrinkles are established, clean up the meshes. Turn symmetry on (Transform>Activate symmetry) in most areas to speed up workflow; then modify the folds asymmetrically to add final details.
8 DeTAIL ACCessORIesIn the concept art, the hair didn’t look real so I found reference images of fabric. To recreate this effect use NoiseMaker’s stripes generator (open the NoiseMaker pop-up, press NoisePlug and select stripes from the left list). Adjust the generator settings and move, scale and rotate the uVs of the meshes to match your references. You may need to create different details on different layers (Tool>Layers) and use the Layer Intensity sliders to modify the effect.
5 DeTAIL THe ARMOuRThe armour is detailed in a similar way: once you’ve loaded the .obj file in ZBrush, create a greyscale mask image in Photoshop, import it into ZBrush as a custom alpha, then select Tool>Masking>Mask By Alpha. Go to Tool>Deformation>Inflate and adjust the slider to control the amplitude of the deformation. You may need to sharpen (Masking>sharpenMask) or blur (Masking>BlurMask) the mask to achieve the effect you want.
7 DeTAIL THe LeATHeRYou don’t need to spend time sculpting wrinkles on the leather part of the armour, since the material is very thick here. Instead, you can add borders and patterns in the same way as in step 5: draw masks by hand in Photoshop, import them as custom alphas, activate Mask By Alpha, and use Tool>Deformation>Inflate to deform the surface of the model – adjusting the slider to control the amplitude of the deformation.
64 3D WorlD June 2015 www.youtube.com/3dworld
TuTorialsDetailing characters

cApTion heAderCaption body text xxx xxx xxx xxx xxxxxx xx xxx xxx xxx xxxxxx xx xxx xxx xxx xxxxxx xx xxx xxx xxx xxxxxx xx xxx xxx xxx xxxxxx x
10 HIGH-FRequeNCY DeTAILWhen you have sculpted the main scratches, add some asymmetrical details to make the effect more realistic. Again, you can use NoiseMaker with a custom mask texture to do this. Create a new layer on which to work so that you can adjust the intensity of the details later. Press the NoisePlug button in the NoiseMaker pop-up and pick a noise generator from the list. I used Weave here. Again, the details you generate make use of the model’s uVs.
9 DAMAGe AND sCRATCHesThe warrior’s armour would have dents and scratches in it, inflicted by his enemies. At this stage, I usually sculpt scratches with the standard brush, working from large to small scratches to achieve a realistic result. The ClipCurve brush is another useful tool for deep scratches. It doesn’t change the topology of your model; it clips away the part of the mesh inside the shaded edge of the curve. To use it, [Ctrl]+[shift]-click the brush icon and select ClipCurve.
12 LIGHTING AND ReNDeRINGI used a basic three-point lighting setup with key, rim and fill lights for this scene – adjusting the intensity of lights and colour. Prepare for rendering by setting the document resolution (in the Document palette, turn off the Pro button, set Width and Height sliders and press Resize). In the Persp button in the Draw palette, adjust the Angle Of View slider to control the strength of the perspective effect. The setting works like the focal length of a lens. I used an Angle Of View of 150.
14 COMPOsITe THe IMAGeIn a new Photoshop document, import all the passes you just rendered as separate layers. In a new layer, add a neutral background with a colour temperature appropriate to the character. Begin experimenting with layer blending modes to adjust the look of the image. You can use layer masks to hide parts of layers without having to erase it. To add some depth to the image, paste the depth pass you generated in ZBrush into an alpha channel and use Filter>Blur>Lens Blur.
ExpErt tipExtra layersTry adding extra Photoshop layers to enhance your composited image by creating dirt and noise on the body, blood stains on the weapon, and lens flare.
11 CHeCk THe sILHOueTTeFinally, go over the character’s silhouette and make any tweaks necessary. (If you apply the Flat Color material to the model before you start, it makes it easier to focus on the silhouette.) You may need to add further details, or change the character’s pose. Try to find a pose that fits the concept art from the beginning of the project, and decide on the camera view from which you want to render the final image. It should reflect the warrior’s personality.
13 ReNDeR PAssesZAppLink (Document>ZAppLink properties>save views) lets you store your custom views. save and load them when you want to render. If your document looks too big, press the AAHalf button in the Document palette. To render the image in BPR mode, go to the Render palette then BPR RenderPass>BPR. The options below the BPR button: Depth, shadow, AmOc (ambient occlusion) etc let you export individual passes. experiment with settings and materials.
65 3D WorlD June 2015 www.youtube.com/3dworld

Shading and rendering is completed in passes so we have full control over the compositing stage
Teaching cgi for adverTisingIn the third part of the series Iñaki González and Salvador Bolarín explore merging pictures with 3D generated environments
So far, we’ve covered a whole CGI scene with coffee capsules and a mobile
phone twist, and a building block made with playing cards being blown away using dynamic simulations and rendered over a real background plate. Camera matching, modelling, lighting, shading, rendering and compositing techniques have all been explained.
Now we’re going to generate a complete CGI environment where a picture of a car taken in a studio will be merged with a complete 3D generated environment. The idea comes from a Taylor James campaign for Audi.
The only difference from the original will be instead of merging a 3D object into a background plate we will do it the other way around.
With our background plate as reference the camera’s set up and we start blocking the base geometry and modelling from camera view. This technique is used to build film set extensions.
Once the basic geometry is created, details need to be added. Textures are created and we light match the actual office space, adding light sources for every direct light appearing in the scene. Shading and rendering is completed in passes so that
we have full control over the compositing stage.
Learning to ‘cheat’ and understanding how physical material responds to light is key to making any CGI hyperrealistic as there will be times when we do not have enough time to make expensive and physically accurate renders, and will need to get the same results by ‘faking’ stuff in our software, in this case I always use LightWave.
If traditional techniques such as drawing, photography and physics are taught prior to CGI, then the learning path will be much less painful and the results will be considerably better. It’s always good to have a grounding in the foundations of photography and art to aid your CG work.
For all the assets you need go to creativebloq.com/vault/3dw195
Topics coveredModellingLightingShadingRenderingCompositing
ArTisT profileSalvador BolarínSalvador is a photographer and CGI artist also running CGI, rreative retouching and photography courses.leonardblum.com
ArTisT profileIñaki González Iñaki is a CGI artist who specialises in photoreal rendering techniques and runs CGI, creative retouching and photography courses.leonardblum.com
LightWave 2015 | PhotoshoP cs2
TuTorialsCGI for advertising
66 3D WorlD June 2015 www.youtube.com/3dworld
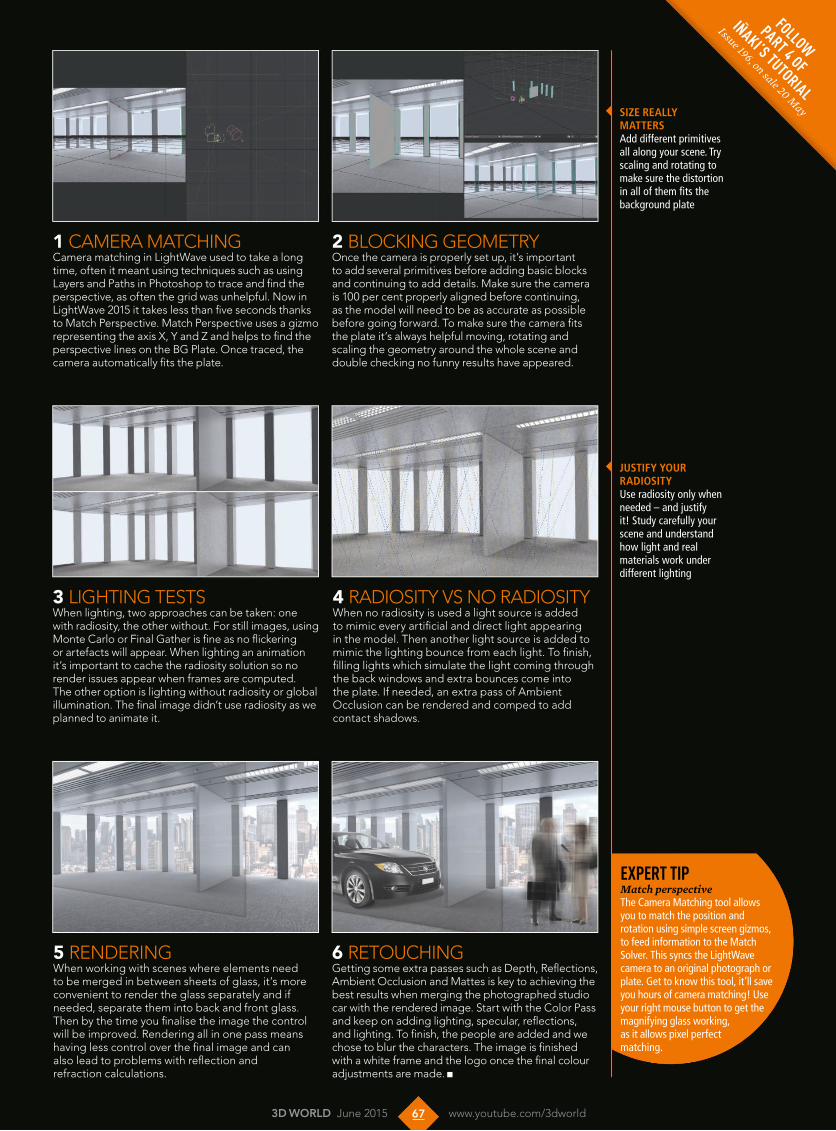
ExpErt tipMatch perspectiveThe Camera Matching tool allows you to match the position and rotation using simple screen gizmos, to feed information to the Match Solver. This syncs the LightWave camera to an original photograph or plate. Get to know this tool, it’ll save you hours of camera matching! Use your right mouse button to get the magnifying glass working, as it allows pixel perfect matching.
4 RADIOSITy vS NO RADIOSITyWhen no radiosity is used a light source is added to mimic every artificial and direct light appearing in the model. Then another light source is added to mimic the lighting bounce from each light. To finish, filling lights which simulate the light coming through the back windows and extra bounces come into the plate. If needed, an extra pass of Ambient Occlusion can be rendered and comped to add contact shadows.
3 LIGhTING TeSTSWhen lighting, two approaches can be taken: one with radiosity, the other without. For still images, using Monte Carlo or Final Gather is fine as no flickering or artefacts will appear. When lighting an animation it’s important to cache the radiosity solution so no render issues appear when frames are computed. The other option is lighting without radiosity or global illumination. The final image didn’t use radiosity as we planned to animate it.
5 ReNDeRINGWhen working with scenes where elements need to be merged in between sheets of glass, it’s more convenient to render the glass separately and if needed, separate them into back and front glass. Then by the time you finalise the image the control will be improved. Rendering all in one pass means having less control over the final image and can also lead to problems with reflection and refraction calculations.
1 CAMeRA MATChINGCamera matching in LightWave used to take a long time, often it meant using techniques such as using Layers and Paths in Photoshop to trace and find the perspective, as often the grid was unhelpful. Now in LightWave 2015 it takes less than five seconds thanks to Match Perspective. Match Perspective uses a gizmo representing the axis X, y and Z and helps to find the perspective lines on the BG Plate. Once traced, the camera automatically fits the plate.
2 BLOCkING GeOMeTRyOnce the camera is properly set up, it’s important to add several primitives before adding basic blocks and continuing to add details. Make sure the camera is 100 per cent properly aligned before continuing, as the model will need to be as accurate as possible before going forward. To make sure the camera fits the plate it’s always helpful moving, rotating and scaling the geometry around the whole scene and double checking no funny results have appeared.
6 ReTOuChINGGetting some extra passes such as Depth, Reflections, Ambient Occlusion and Mattes is key to achieving the best results when merging the photographed studio car with the rendered image. Start with the Color Pass and keep on adding lighting, specular, reflections, and lighting. To finish, the people are added and we chose to blur the characters. The image is finished with a white frame and the logo once the final colour adjustments are made.
size reAlly mATTersAdd different primitives all along your scene. Try scaling and rotating to make sure the distortion in all of them fits the background plate
JusTify your rAdiosiTyUse radiosity only when needed – and justify it! Study carefully your scene and understand how light and real materials work under different lighting
Follow
part 4 oF
iñaki’s tutorial
Issue 196, on sale 20 May
67 3D WorlD June 2015 www.youtube.com/3dworld

TuTorialsRendering interiors
Techniques To RendeR RealisTic inTeRioRsFernando Gasperin offers tips and advice to create convincing photoreal scenes for arch-viz
Over the next few pages I’ll try to cover the concepts, techniques and insights
used for the creation of the Reflection Project by Blackhaus, based on my personal experience.
When it comes to a realistic approach there’s no secret formula that guides us through the process of creating compelling and convincing realistic images. Achieving these is a result of different areas of expertise and a lot of observation.
To be able to create realistic images you should have a good understanding of what you are creating. Observe the world that surrounds you, perceive how your subject works, how the light embraces it and understand the shape of it – that’s really essential.
After this initial observation you should be able to organise your main references for the project. I tend to base my search on great photographers who have similar images to those I’m looking to achieve. This helps me along the process when judging my lighting, materials, composition, and so forth.
As a personal choice, I try to keep my workflow as close as possible to the traditional photography concepts, as it gives me real flexibility translating my photography knowledge into 3D spaces.
Thanks to V-Ray this ‘knowledge transferring’ is very smooth. You have basically all the parameters you’re used to in your dispose, with the benefit of being able to handle several issues much easier than a photographer would face with a real location.
For this tutorial, I plan to focus on the kitchen shoot development, and I’ll try to give you an insight into what helped me during the creation process. You can also download a video of the final project from this issue’s online Vault. I hope you enjoy!
For all the assets you need go to creativebloq.com/vault/3dw195
V-Ray | PhotoshoP
Topics coveredModellingCompositionLightingTexturingRendering
68 3D WorlD June 2015 www.youtube.com/3dworld
ArTisT profileFernando GasperinBrazilian Fernando is owner of Blackhaus, a specialised studio creating high-end digital sets. He’s worked for seven years in the CGI industry and specialises in lighting, post-production and photographic direction.blackhaus.com.br

Adding reAlismTo give your rendering
more sense of realism, you can add post-production
‘lens imperfections,’ to help mimic reality. For example, in Photoshop you can use Lens Correction to mimic
chromatic aberration effect
1 COnCePT DesIgnThe Reflection Project started as a case study to improve my skills as an artist and show our capabilities as a studio developing our main services (images, interior project and video). The entire concept was built around scandinavian and Brazilian design for the interiors and an American loft apartment for structure. From the start, I was looking for a photorealism aesthetic, then I tried working with real scale models and references to guide me through the process.
2 ReFeRenCesThe reference step is one of the most important in your creative process and it’s essential when pursuing photorealism. This step will guide you through the process of creating materials and textures and showing visually how light works, as well as a lot of imperceptible and important details that help you enhance the sensation of realism in your scenes.
watchthe Video
if you see the Play icon,click the link it!
69 3D WorlD June 2015 www.youtube.com/3dworld
click to Play Videowww.bit.ly/195-arch-viz
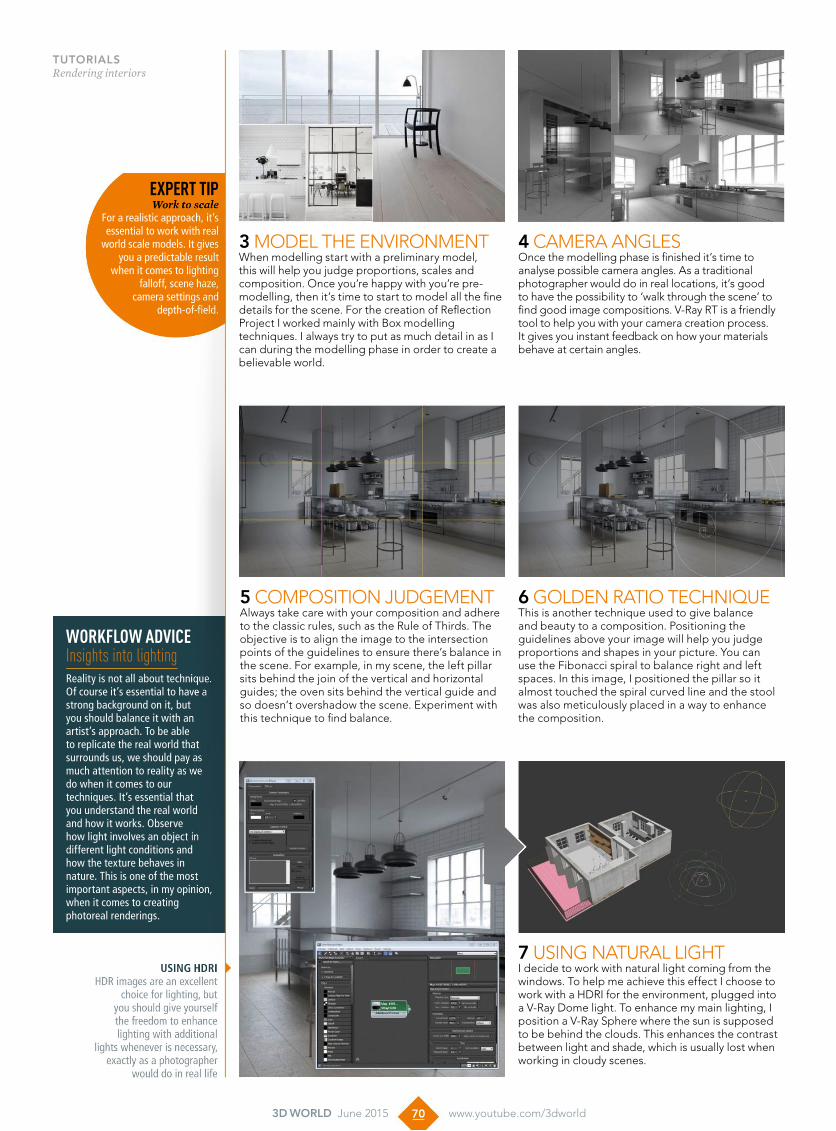
Using HdriHDR images are an excellent
choice for lighting, but you should give yourself the freedom to enhance lighting with additional
lights whenever is necessary, exactly as a photographer
would do in real life
TuTorialsRendering interiors
4 CAmeRA AnglesOnce the modelling phase is finished it’s time to analyse possible camera angles. As a traditional photographer would do in real locations, it’s good to have the possibility to ‘walk through the scene’ to find good image compositions. V-Ray RT is a friendly tool to help you with your camera creation process. It gives you instant feedback on how your materials behave at certain angles.
3 mODel The enVIROnmenTWhen modelling start with a preliminary model, this will help you judge proportions, scales and composition. Once you’re happy with you’re pre-modelling, then it’s time to start to model all the fine details for the scene. For the creation of Reflection Project I worked mainly with Box modelling techniques. I always try to put as much detail in as I can during the modelling phase in order to create a believable world.
7 usIng nATuRAl lIghTI decide to work with natural light coming from the windows. To help me achieve this effect I choose to work with a hDRI for the environment, plugged into a V-Ray Dome light. To enhance my main lighting, I position a V-Ray sphere where the sun is supposed to be behind the clouds. This enhances the contrast between light and shade, which is usually lost when working in cloudy scenes.
6 gOlDen RATIO TeChnIqueThis is another technique used to give balance and beauty to a composition. Positioning the guidelines above your image will help you judge proportions and shapes in your picture. You can use the Fibonacci spiral to balance right and left spaces. In this image, I positioned the pillar so it almost touched the spiral curved line and the stool was also meticulously placed in a way to enhance the composition.
5 COmPOsITIOn JuDgemenTAlways take care with your composition and adhere to the classic rules, such as the Rule of Thirds. The objective is to align the image to the intersection points of the guidelines to ensure there’s balance in the scene. For example, in my scene, the left pillar sits behind the join of the vertical and horizontal guides; the oven sits behind the vertical guide and so doesn’t overshadow the scene. experiment with this technique to find balance.
ExpErt tipWork to scale
For a realistic approach, it’s essential to work with real
world scale models. It gives you a predictable result
when it comes to lighting falloff, scene haze,
camera settings and depth-of-field.
70 3D WorlD June 2015 www.youtube.com/3dworld
WorkfloW advicE Insights into lighting Reality is not all about technique. Of course it’s essential to have a strong background on it, but you should balance it with an artist’s approach. To be able to replicate the real world that surrounds us, we should pay as much attention to reality as we do when it comes to our techniques. It’s essential that you understand the real world and how it works. Observe how light involves an object in different light conditions and how the texture behaves in nature. This is one of the most important aspects, in my opinion, when it comes to creating photoreal renderings.
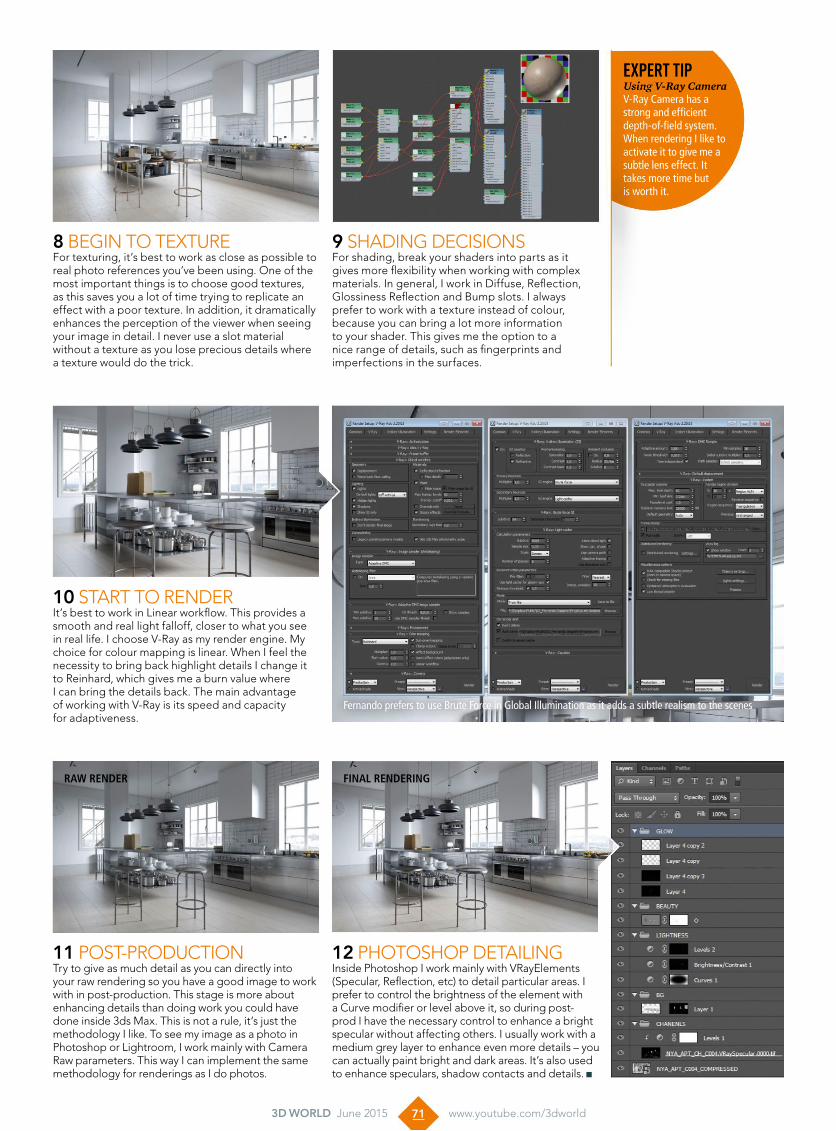
9 shADIng DeCIsIOnsFor shading, break your shaders into parts as it gives more flexibility when working with complex materials. In general, I work in Diffuse, Reflection, glossiness Reflection and Bump slots. I always prefer to work with a texture instead of colour, because you can bring a lot more information to your shader. This gives me the option to a nice range of details, such as fingerprints and imperfections in the surfaces.
8 BegIn TO TexTuReFor texturing, it’s best to work as close as possible to real photo references you’ve been using. One of the most important things is to choose good textures, as this saves you a lot of time trying to replicate an effect with a poor texture. In addition, it dramatically enhances the perception of the viewer when seeing your image in detail. I never use a slot material without a texture as you lose precious details where a texture would do the trick.
ExpErt tipUsing V-Ray CameraV-Ray Camera has a strong and efficient depth-of-field system. When rendering I like to activate it to give me a subtle lens effect. It takes more time but is worth it.
10 sTART TO RenDeRIt’s best to work in linear workflow. This provides a smooth and real light falloff, closer to what you see in real life. I choose V-Ray as my render engine. my choice for colour mapping is linear. When I feel the necessity to bring back highlight details I change it to Reinhard, which gives me a burn value where I can bring the details back. The main advantage of working with V-Ray is its speed and capacity for adaptiveness.
11 POsT-PRODuCTIOn Try to give as much detail as you can directly into your raw rendering so you have a good image to work with in post-production. This stage is more about enhancing details than doing work you could have done inside 3ds max. This is not a rule, it’s just the methodology I like. To see my image as a photo in Photoshop or lightroom, I work mainly with Camera Raw parameters. This way I can implement the same methodology for renderings as I do photos.
12 PhOTOshOP DeTAIlIngInside Photoshop I work mainly with VRayelements (specular, Reflection, etc) to detail particular areas. I prefer to control the brightness of the element with a Curve modifier or level above it, so during post-prod I have the necessary control to enhance a bright specular without affecting others. I usually work with a medium grey layer to enhance even more details – you can actually paint bright and dark areas. It’s also used to enhance speculars, shadow contacts and details.
rAw render finAl rendering
Fernando prefers to use Brute Force in Global Illumination as it adds a subtle realism to the scenes
71 3D WorlD June 2015 www.youtube.com/3dworld

Master Unreal engine 4
Download these two FREE video courses to get started in Unreal Engine 4
Together with Digital-Tutors we’re pleased to present two full video courses that cover creating
interactivity and lighting in Unreal Engine 4.Epic’s game development tool is now free
to download at www.unrealengine.com so now is the time to jump in and start learning this software so you can create your own video games.
The two tutorial courses include over two hours of easy-to-follow video, instructions from the author to guide you through these beginner courses, and all the UE4 resource files you need to complete them.
These are FREE to all readers for a limited time by simply visiting www.creativebloq.com/vault/3dw195.
For more inspiration and CG art training, visit www.digitaltutors.com
72 3D WorlD June 2015 www.youtube.com/3dworld
Artist profileJoshua KinneyJosh is a full-time instructor at Digital-Tutors and has experience designing and creating renders of characters and been involved in the creative direction of characters, enemies, and NPCs for video games. digitaltutors.com
free
2 hoUrs of video
Download your free
training at
www.crea
tiveb
loq.com
/vault/
3dw195

InTRoDUcTIon To BlUEpRInT In UnREal EngInE 4
InTRoDUcTIon To lIghTIng In UnREal EngInE 4
In this series of tutorials you are going to learn the basics of creating interactivity in Unreal Engine 4, and without having to write a single line of code. We will start off by learning about the Blueprint Editor interface and will also cover what blueprints can do for us. after that, you’ll learn all the basics by creating a simple level Blueprint and find out
how to interact with objects in a specific level. once you’ve mastered this we’ll move onto the class Blueprints, which are an extremely helpful asset new to the Unreal Engine. These class Blueprints are self-contained objects with interactive properties that you will be able to reuse across all of your levels.
In this series of tutorials you’ll discover everything you need to know in order to begin the lighting phase of your game projects. To begin, you’ll learn how to place and manipulate lights. Then we will discuss the most important properties used to light amazing levels in Unreal Engine 4. after this, you’ll learn about light mobility, which is essential
to understand in order to create beautiful levels that are not taxing on the game’s performance. Following this, you’ll dive a little deeper into some of the advanced properties and what to watch out for when using them. Finally, we’ll wrap up this training by showing you how to utilise light functions to create a flickering light.
digital tUtorsCreative and tech trainingDigital-Tutors, a Pluralsight company, develops award-winning training solutions for emerging digital artists and designers using a unique teaching approach designed by university educators and industry professionals. Recognised as the largest resource for online creative and tech training, Digital-Tutors delivers fun project-driven training for students, hobbyists, and professionals using the latest creative software. Training is available for creative subjects and software in 3D animation, video and VFX, game development, design, CAD and web. For more information visit www.digitaltutors.com
video tutoriAlLearn how to create interactivity and lighting in Unreal Engine 4 with this free video course
73 3D WorlD June 2015 www.youtube.com/3dworld
Unreal 4 makes it so easy and user friendly to build your environments

The caTegories The 3D World CG Awards 2015 will feature the following:
creaTive awards• Best VFX feature film scene
• VFX short film of the year
• CG animated feature of the year
• CG animated short of the year
• Best CG commercial campaign
• Arch-viz animation of the year
• Arch-viz still of the year
• CG video game of the year: in-game
• CG video game of the year: promotion
Technology awards• New application of the year
• Software update of the year
• Plug-in of the year
• Software innovation of the year
• Hardware innovation of the year
• 3D print innovation of the year (new)
communiTy award• Live Event of the year
• 3D World Hall of Fame
sponsored by
sponsored by
Nominations Close 22 May 2015
call for nominaTionsWe invite you to join us for the CG Awards 2015, a celebration of
the most amazing art and technology that has been created over the
past year in the world of animation, computer hardware and VFX
Nominate now at www.thecgawards.com

3D WorlD June 2015 3dworld.creativebloq.com75
80 your vfx careerWhat are the key ingredients to success?
88 land your dream jobExpert advice on getting your big break
82 media design schoolThe place to start your creative career
92 how to be a great leaderExecutive coach Mickey Rogers’ top tips
76 bucks new universityGround-breaking programmes for students
84 Pearson college londonCourses designed with and for industry
Contents
Discover the best creative schools and ways to land your dream job
KicKstart your career
the pro GUIDe to
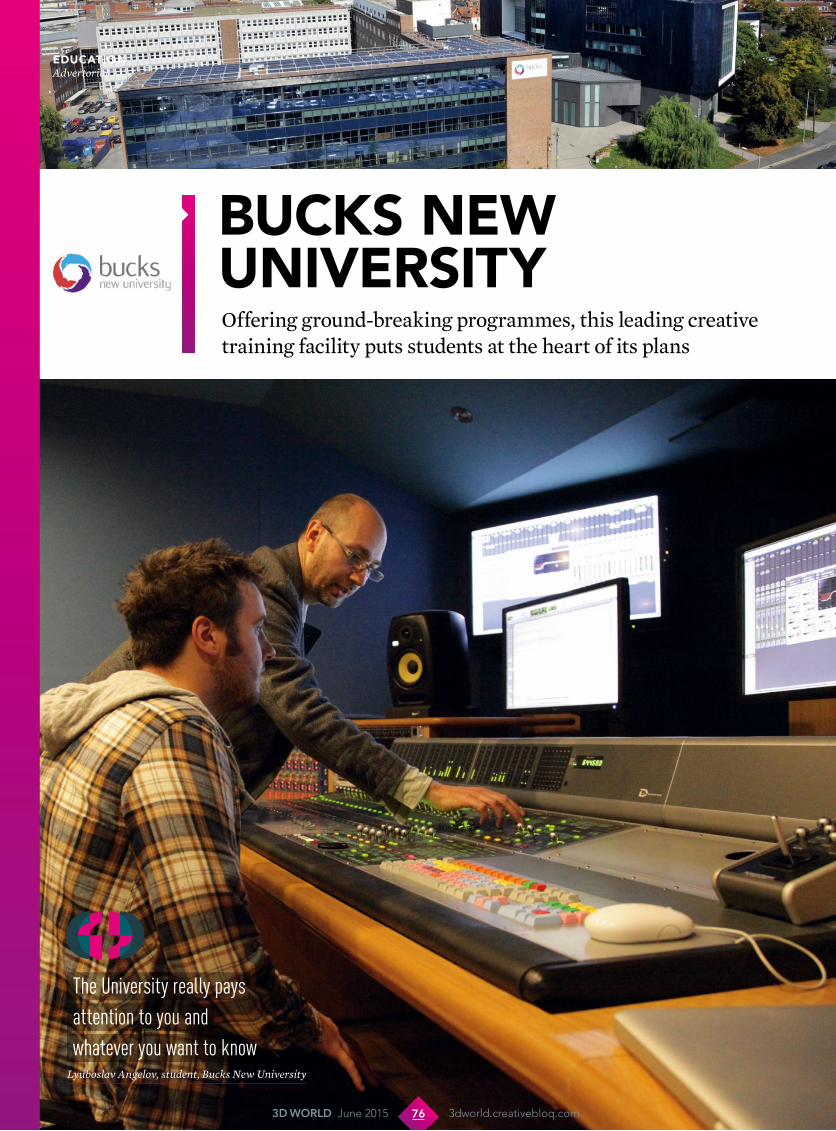
Bucks New uNiversityOffering ground-breaking programmes, this leading creative training facility puts students at the heart of its plans
educatioNAdvertorial
The University really pays attention to you and whatever you want to know
Lyuboslav Angelov, student, Bucks New University
76 3D WorlD June 2015 3dworld.creativebloq.com

Building a successful career in the ever-growing and highly competitive creative world is no easy task. Aware
of this, Buckinghamshire New University offers ground-breaking training, professional lecturer expertise and a strong industry network, ensuring its students have the vital skills and knowledge needed to succeed in the creative sector.
With specially developed courses in animation, visual effects and independent games design, Bucks puts the needs of its students first, offering first-class facilities and programmes ensuring pupils are industry-ready.
“We have a focus on character and creature animation that is unique in higher education in the UK,” says Alex Williams MA (Oxon), co-course
leader BA (Hons) Animation and Visual Effects and course leader for MA 3D Animation. “We also benefit from a range of other media disciplines that complement our animation course, such as sound design, film and TV, audio and music production, acting and
performance, graphic design and games design – all under one roof. This creates a critical mass of talent and excellence in creative media.”
One artist currently taking full advantage of Bucks’ quality training is first year BA (Hons) Animation and Visual Effects student Lyuboslav Angelov. As well as the facilities on offer, it was the university’s clear focus on its students that prompted Angelov to apply.
“The thing about Bucks is that you’re provided with feedback from students currently attending the course and, for me, that was one of
the main reasons I chose to attend,” he says. “The university really pays attention to you and whatever you want to know. Apart from liking the course, the fact that I got so much
information impressed me and made me realise that the university really cares about their students and that played a big part in my decision making.”
Multiple optionsLike many aspiring creatives, Angelov had a clear career goal in mind when joining Bucks: to become a visual effects artist. However, the comprehensive training courses have since made him re-evaluate. “The beauty of this course is that you get to explore the whole production pipeline when it comes to CGI,” he explains. “This gives you the opportunity to explore other areas in the field and, as it turns out, you might find something that you like even more. In my case, I am starting to enjoy animation more and more, and I wouldn’t be surprised if by the end of the course I decide to become an animator.”
With a focus on teaching all the important aspects of production – from concept to final render, encompassing development, pre-production, production and post – Bucks provides its students with as broad a range of skills and knowledge of the creative industries as possible.
Top of the class In order to fully support its comprehensive training programmes, the university also boasts some seriously impressive equipment. “Students at Bucks benefit from state-of-the-art facilities such as green
locationHigh Wycombe,
Buckinghamshire, England
number of studentsFaculty of Design, Media
& Mangement, 3,819
websitewww.bucks.ac.uk
vitalstatistics
Architectural render by Kris Michalski, recent graduate, BA (Hons) Animation and Visual Effects
Bucks New University provides its students with superb equipment, such as green screen (below)
Qualifications offered BA (Hons) Animation and Visual Effects BA (Hons) Independent Games Design MA 3D Animation
alex williamsAlex is leader of the under and
postgraduate animation and visual effects courses. He’s also
a cartoonist and animator.www.bucks.ac.uk
lyuboslav angelovLyuboslav is a first year student
on the BA (Hons) Animation and Visual Effects course at
Bucks New University. www.bucks.ac.uk
77 3D WorlD June 2015 3dworld.creativebloq.com

undivided attentionThe university and its lecturers put students at the heart of each training programme, carefully planning lectures and dedicating time to developing students’ skills. “Lectures are divided into three categories: theory, practice and workshop,” animation and visual effects student Lyuboslav Angelov says. “We might do theory and practice in one session or either one. Each lesson the tutor presents a technique and carefully guides each student through it. That’s what I like most about the teaching methods, the personal time with the tutor. Workshop sessions are exactly that – your work’s analysed and you get invaluable feedback.”
screen, sound design studios, recording booths and performance studios – all housed in our modern gateway media hub,” Alex explains.
And, once again making students the priority, the facilities have been designed to ensure ease of use and maximum creative results. “The university offers a large range of equipment, specifically designed for students on each course,” Lyuboslav says. “But, even better, you have the ability to collaborate with other students from different courses related to what you have to do. You need sound design? Walk down the corridor and you are in a room full of sound design students with all the equipment needed to produce professional quality audio. The same goes for film and TV students – it’s just amazing.”
Supporting the next generation of artists With a unique blend of practical and academic content, Bucks provides budding creative professional with everything they need to be work and industry-ready. “Buckinghamshire New University has a long and well established history of meeting the employment and training needs for the creative industries,” says head of school, media production and performance,
monika dzikowiczBucks’ animators do everything from 2D animation and 3D work to stop motion
charlotte richardsonCharlotte skillfully creates a scary lizard
man using 3ds Max
allan delealAllan’s character animation masters the
art of acting and facial expressions
Frazer Mackenzie. “Animation and visual effects are part of a much broader cluster of interrelated training areas at Bucks. All our
course development starts with talking to the industry and ensuring that we meet their needs for the next generation of creative industry professionals. Our role as a university is to provide the academic structure that wraps around those needs, as opposed to the other way round. Expanding online learning ensures we continue to meet those needs, crucially extending our ability to train and support creative industry professionals no matter where they are in the world.”
fYiTo learn more about the courses on offer visit www.bucks.ac.uk/animation
educatioNAdvertorial
bucks new universitY student projects
frazer mackenzieFrazer is head of school for media production &
performance. He’s also a media consultant and music producer.
www.bucks.ac.uk
GueST STar: LyuboSLav anGeLovThis is a shot from Lyuboslav Angelov’s human locomotion project on the Bucks New University BA (Hons) Animation and Visual Effects project in year one. It is an example of the type of work students can expect to carry out during the course and was produced as an assessed exercise as part of the first year animation segment of the degree.
78 3D WorlD June 2015 3dworld.creativebloq.com


Blockbusters featuring impressive CGI have made
VFX more widely known
educationCareer advice
Artist profileAmedeo BerettaAmedeo is a module leader for the six month visual effects for film course at Met Film School. metfilmschool.co.uk©
2011
Uni
vers
al P
ictu
res.
All R
ighr
s Re
serv
ed.
VFX is one of a handful of professions where technical knowledge and
creativity are required in equal measuresAmedeo Beretta, module leader, Met Film School
80 3D WorlD June 2015 3dworld.creativebloq.com
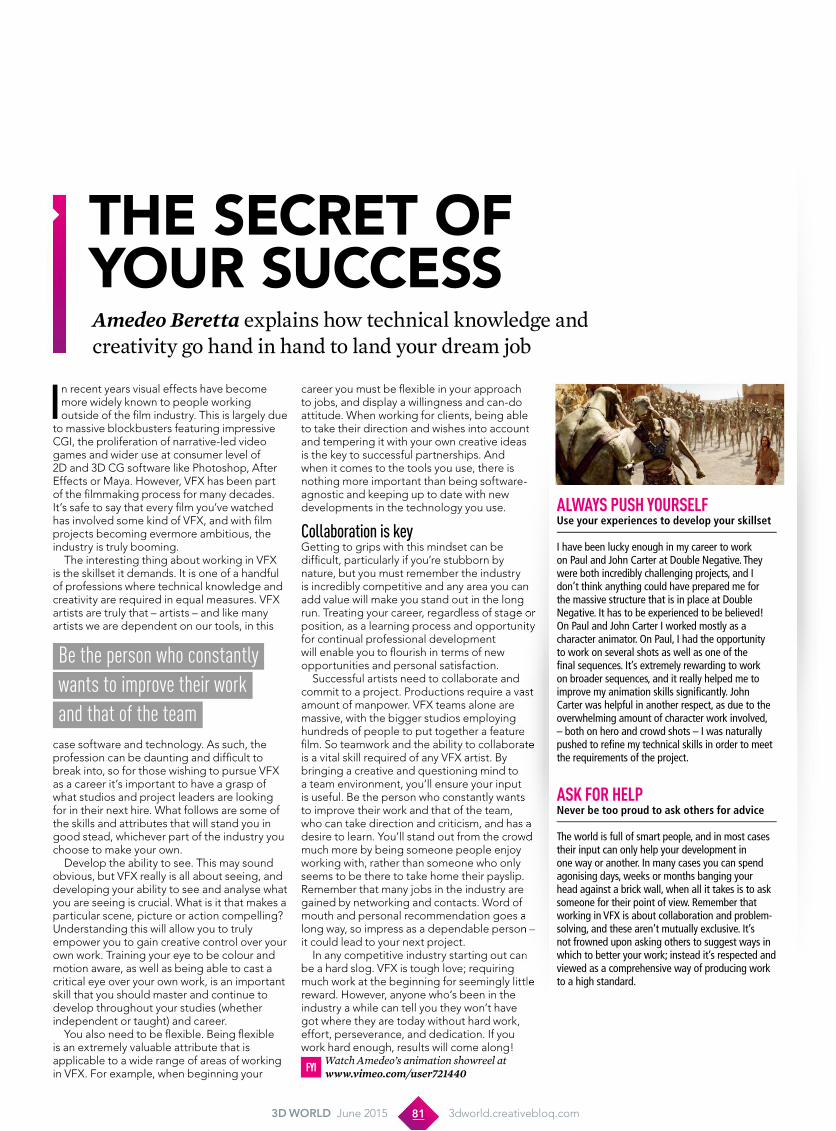
the secret of your successAmedeo Beretta explains how technical knowledge and creativity go hand in hand to land your dream job
In recent years visual effects have become more widely known to people working outside of the film industry. This is largely due
to massive blockbusters featuring impressive CGI, the proliferation of narrative-led video games and wider use at consumer level of 2D and 3D CG software like Photoshop, After Effects or Maya. However, VFX has been part of the filmmaking process for many decades. It’s safe to say that every film you’ve watched has involved some kind of VFX, and with film projects becoming evermore ambitious, the industry is truly booming.
The interesting thing about working in VFX is the skillset it demands. It is one of a handful of professions where technical knowledge and creativity are required in equal measures. VFX artists are truly that – artists – and like many artists we are dependent on our tools, in this
case software and technology. As such, the profession can be daunting and difficult to break into, so for those wishing to pursue VFX as a career it’s important to have a grasp of what studios and project leaders are looking for in their next hire. What follows are some of the skills and attributes that will stand you in good stead, whichever part of the industry you choose to make your own.
Develop the ability to see. This may sound obvious, but VFX really is all about seeing, and developing your ability to see and analyse what you are seeing is crucial. What is it that makes a particular scene, picture or action compelling? Understanding this will allow you to truly empower you to gain creative control over your own work. Training your eye to be colour and motion aware, as well as being able to cast a critical eye over your own work, is an important skill that you should master and continue to develop throughout your studies (whether independent or taught) and career.
You also need to be flexible. Being flexible is an extremely valuable attribute that is applicable to a wide range of areas of working in VFX. For example, when beginning your
career you must be flexible in your approach to jobs, and display a willingness and can-do attitude. When working for clients, being able to take their direction and wishes into account and tempering it with your own creative ideas is the key to successful partnerships. And when it comes to the tools you use, there is nothing more important than being software-agnostic and keeping up to date with new developments in the technology you use.
Collaboration is key Getting to grips with this mindset can be difficult, particularly if you’re stubborn by nature, but you must remember the industry is incredibly competitive and any area you can add value will make you stand out in the long run. Treating your career, regardless of stage or position, as a learning process and opportunity for continual professional development will enable you to flourish in terms of new opportunities and personal satisfaction.
Successful artists need to collaborate and commit to a project. Productions require a vast amount of manpower. VFX teams alone are massive, with the bigger studios employing hundreds of people to put together a feature film. So teamwork and the ability to collaborate is a vital skill required of any VFX artist. By bringing a creative and questioning mind to a team environment, you’ll ensure your input is useful. Be the person who constantly wants to improve their work and that of the team, who can take direction and criticism, and has a desire to learn. You’ll stand out from the crowd much more by being someone people enjoy working with, rather than someone who only seems to be there to take home their payslip. Remember that many jobs in the industry are gained by networking and contacts. Word of mouth and personal recommendation goes a long way, so impress as a dependable person – it could lead to your next project.
In any competitive industry starting out can be a hard slog. VFX is tough love; requiring much work at the beginning for seemingly little reward. However, anyone who‘s been in the industry a while can tell you they won’t have got where they are today without hard work, effort, perseverance, and dedication. If you work hard enough, results will come along!
FYI Watch Amedeo’s animation showreel at www.vimeo.com/user721440
Be the person who constantly wants to improve their work and that of the team
Ask For help Never be too proud to ask others for advice
AlwAYs push YourselF Use your experiences to develop your skillset
The world is full of smart people, and in most cases their input can only help your development in one way or another. In many cases you can spend agonising days, weeks or months banging your head against a brick wall, when all it takes is to ask someone for their point of view. Remember that working in VFX is about collaboration and problem-solving, and these aren’t mutually exclusive. It’s not frowned upon asking others to suggest ways in which to better your work; instead it’s respected and viewed as a comprehensive way of producing work to a high standard.
I have been lucky enough in my career to work on Paul and John Carter at Double Negative. They were both incredibly challenging projects, and I don’t think anything could have prepared me for the massive structure that is in place at Double Negative. It has to be experienced to be believed! On Paul and John Carter I worked mostly as a character animator. On Paul, I had the opportunity to work on several shots as well as one of the final sequences. It’s extremely rewarding to work on broader sequences, and it really helped me to improve my animation skills significantly. John Carter was helpful in another respect, as due to the overwhelming amount of character work involved, – both on hero and crowd shots – I was naturally pushed to refine my technical skills in order to meet the requirements of the project.
81 3D WorlD June 2015 3dworld.creativebloq.com

Media design school Featuring real-world studio environments and first-class facilities, Media Design School is the best place to start your creative career
There’s no such thing as a gentle introduction to the world of visual effects. In this fast-paced and ever-
growing industry, artists must be prepared to hit the ground running, and studying at Media Design School will arm you with the skills necessary to do exactly that. With a focus on photorealistic VFX, facilities at Media
Design School emulate a real-world studio environment to ensure its graduates are industry-ready.
Senior lecturer Oliver Hilbert explains: “The students are educated around the entire filmmaking process, which we do
by involving them in a professional-level film production. They work alongside professional direction, production management, on-set crews, and are given professional quality shots to work on. The key is that the project is being produced to serve them, though. It is created to allow them to show what they are capable of.”
Recipe for successThis real-world approach clearly serves Media Design attendees well, with students last year gaining international recognition for animated short Over the Moon, which picked up a string of accolades, including the Jury Special Award at Siggraph Asia 2014. A clear recipe for success, the school is currently in the final stages of new production, Escargore, a film about a group of snails that find themselves out of their element and in a whole lot of trouble.
“The project was created to allow 22 students in the third year class to cut their teeth on a larger scale short film production,” says Oliver. “The teams are made up of three specialisations; character animators, general TDs and compositors. It is quite common though for students to contribute outside of those roles to help keep the production progressing.”
With facilities and training such as this, it’s not hard to see how Media Design School has gained the title of New Zealand’s most awarded tertiary institution for digital and creative technology qualifications. Its comprehensive approach to visual effects education makes Media Design School students sought after by some of the world’s leading VFX studios, evident from its previous graduates having gone on to work on blockbuster films including King Kong, Avatar, and The Hobbit.
FYIFind more information about Media Design School at www.mediadesignschool.com
location92 Albert St, Auckland,
New Zealand
number of students125 (enrolled on Bachelor
of Art and Design)
placement rate85 per cent
websitemediadesignschool.com
vItalstatIstIcs
QualIFIcatIons oFFered
undergraduate degrees Bachelor of Art and Design Graduate Diploma in Creative Technologies, specialising in 3D Animation or Visual Effects
educationAdvertorial
oliver HilbertOliver has worked in CG for
15 years. He joined Media Design School in 2009 where he’s developed and delivered training and produced many
award-winning films. www.revilo3d.com
Escargore is a snail horror comedy currently being made by Media Design School
Guest staR: escaRGoRe Described by Director Oliver Hilbert as a “snail horror comedy,” this short film certainly isn’t slow in pace. Escargore follows a group of snails that find themselves in a whole lot of trouble. Check out Media Design School’s Vimeo channel (vimeo.com/mdsnz) to watch Escargore, as well as a range of other student-produced short films.
82 3D WorlD June 2015 3dworld.creativebloq.com

Create your future
Games
Graphic Design
3D Animation & Visual Effects
Creative Advertising
Interactive
Motion Graphics
www.mediadesignschool.comFor more information, check out:
Media Design School is New Zealand’s most awarded tertiary institute for digital and creative technology qualifications

Pearson College londonChoose a programme designed with and for industry at this top educational facility
eduCationAdvertorial
Francesco GiuGliano & Brett BoneMaya and Nuke were fully utilised to bring
project ‘K’og’ to life.
Zlaten del castillo‘Castle in a Head’ was created with Maya, Mudbox, Photoshop, RealFlow and Nuke.
niGel timmsNigel’s first project, created in Maya, was a model of an orrery of the solar
Pearson college lonDon stuDent Projects
We combine studio-based project work with intense tuition to help students develop their craft
Dr Ian Palmer, School of Creative Industries
84 3D WorlD June 2015 3dworld.creativebloq.com

I f your goal is to become a world-class creative, Pearson College London has everything required to set you on the right
path. Established in 2012 and having acquired leading visual effects academy Escape Studios a year later, Pearson College London provides top quality, industry-led education to the next generation of visual artists.
The college boasts some hugely successful alumni, with ‘Escapees’ having worked on video games and blockbusters including Interstellar, Gravity and Guardians of the Galaxy.
Designed with the industry, the range of courses on offer here ensures your first step to a successful creative career.
“We’ve started with a blank sheet of paper and been working with industry leaders, including artists from Framestore, Double Negative
and Sony, to design something truly fit-for-purpose to develop the next generation of movers and shakers,” says Dr Ian Palmer.
“From the beginning of the programme, we combine studio-based project work with intense tuition to help students develop their craft, and to reflect how people will work in the industry,” continues Ian. “With regular input from current professionals, both in terms of briefs to work to and in feedback sessions to help shape their practice, students will begin to feel part of the industry from the day they set foot in the studio.”
Pearson College London offers full degrees and shorter, more intensive courses in film, video and games, making CG and VFX training accessible. One student taking full advantage is Nigel Timms. Currently studying
3D for Visual Effects at Pearson College London, Nigel is now halfway through his 18-week training programme. “I essentially left my previous career working in radiology to make a big change,” Nigel explains. “And the length of the course at Pearson College London meant I could accelerate this change by cramming in a lot of new information and practice into such a short space of time. Also Escape’s main reason for keeping the courses short – namely to stay up-to-date with in-practice workflows and techniques – made sense to me. Escape also has great links with industry partners and that’s sure to be a benefit when the time comes to start looking for work.”
No matter what the course, each and every student has access to the latest industry software releases and top-quality workstations. “We work closely with the software developers to stay ahead of the game, with our tutors getting access to pre-release versions to make sure we’re ready when there’s a major change in the feature set or user interface,” Ian continues.
A focus on the futureWhile the focus at Pearson College London and Escape Studios has traditionally been on post-production, the staff are also very aware of keeping with the times in this evolving field.
“As the industry moved towards a more integrated approach, with CG being an essential element throughout the production, then so have we,” says Ian. “We’re still very much about the ‘art’ side of the industry at the moment, hence the BA/MA degrees, rather than the programming. But, of course, this ‘art’ gets produced in a highly technical environment, so the students live and breathe the technology.”
Whether it’s a degree or a short, intensive course that you’re looking for, Pearson College London has something for everyone.
“With Escape Studios’ 14 years experience delivering the best VFX and CG tuition in Europe, combined with Pearson College London’s expertise in developing academic content and programmes, we have developed degrees that offer something new and innovative whilst delivering what the industry needs,” Ian concludes.
FYITo learn more about the courses on offer visit www.pearsoncollegelondon.ac.uk
locationShepherds West, Rockley Road, London, W14 0DA
numBer oF students1,507 graduates since
2009, 141 current students
weBsite pearsoncollegelondon.
ac.uk/creative
vItalstatIstIcs
College alumni have gone to work on blockbusters like Guardians of the Galaxy
QualIFIcatIons oFFereD
underGraduate deGrees BA (Hons) The Art of Visual Effects* BA (Hons) The Art of Video Games* BA (Hons) The Art of Computer Animation* These programmes are also available as four-year Integrated Masters. * Subject to validation.
PostGraduate deGrees PG Cert / MA Visual Effects Production (3D) PG Cert / MA Visual Effects Production (Compositing) MA Game Art* * Subject to validation.
short courses Full time Compositing for Visual Effects – 12 weeks 3D for Visual Effects – 12 weeks Advanced Compositing for Visual Effects – 18 weeks Advanced 3D for Visual Effects – 18 weeks Advanced Video Games Art Production – 18 weeks
Part time Compositing for Visual Effects (Evening Course) – 20 weeks Producing for Visual Effects (Evening Course) – 2 weeks Introduction to Houdini (Evening Course) – 4 weeks Motion Graphics (Evening Course) – 12 weeks 3D Foundation – 30 weeks
online Compositing for Visual Effects – 40 weeks 3D Foundation – 30 weeks 3D for Visual Effects – 60 weeks
dr ian PalmerDeputy Vice Principal for the
School of Creative Industries, Dr Ian Palmer has also been
a chair and board member of many TV industry panels.
Follow Ian on Twitter€@dripster
oPen DaYsOne of the best ways to apply to Pearson College London is to attend an Open Day, says Dr Ian Palmer. “For all our programmes we’re more interested in applicants showing us what they can do and having a real passion for the subject rather than formal qualifications alone. For our undergraduate courses we expect people interested in studying with us to come to the one of our applicant days. This works in two ways: it’ll give people a chance to meet some of the tutors and experience the way our programmes work to see if it’s right for them, and it gives us a chance to see how they work in a creative environment so we’re sure they will benefit from our unique programmes.” For more information on Pearson College London Open Days visit www.pearsoncollegelondon.ac.uk/opendays
85 3D WorlD June 2015 3dworld.creativebloq.com


find the ibook hereThe new iPad and Mac version,
are available at this link:www.bit.ly/195-animate
Win The ne w
ibook worTh$29.99
The iBook contains hours of video tuition
and advice from the must-read
book series
Win copies of RichaRd Williams’ iBook animation tRaining!
How would you like a triple Oscar winner as your personal animation instructor? That’s what Richard
Williams is offering with his new iBook version of the classic training book, The Animator’s Survival Kit, in which the renowned animator passes on insights gained over 50 years spent working in the industry.
The man behind Who Framed Roger Rabbit? and the title sequences for the Pink Panther movies, shows you everything you need to know about the fundamental principles of animation for any medium – from feature films and TV series to video games and online work.
The Animator’s Survival Kit iBook edition combines video lessons with over 100 specially animated examples from the Animator’s Survival Kit DVD edition.
The new iBook edition should be seen as the expanded edition of the classic series as it features new pieces to camera Richard has filmed to put his tuition into context. This digital edition also includes newly released short animations, also by Richard, including a nine minute film called, ‘Circus Drawings’
Aimed at professionals and students, The Animator’s Survival Kit iBook edition, covers a broad range of subjects, starting with the basics and building up to more complex animations. Along the way, Richard explores how different creatures and objects move, and demonstrates specific work methods used to make characters live, think and act on screen.
fYiFor more by Richard Williams watch www.bit.ly/making-who-framed-roger
Five copies of new iBook, The Animator’s Survival Kit, by the legendary Oscar-winning animator, are up for grabs this issue
This issue, we’re giving away five copies of The Animator’s Survival Kit iBook
edition, by the artist Richard Williams. Each iBook would normally cost $29.99. To enter, fill out our online entry form, which can be found at this web link:
www.futurecomps.co.uk/ibook The winners will be chosen at random after the closing date of 20 May 2015.
TERMS AND CONDITIONSBy entering this contest, you warrant that you have read and agree to this
competition’s terms and conditions. You can find them on the entry page on our
website (www.bit.ly/comp-terms).
HoW to enteR
87 3D WorlD June 2015 3dworld.creativebloq.com
free pRize dRaW!
Win RichaRd Williams’ iBook:
the animatoR’s suRvival kit
enter at www.futurecomps.co.uk/ibook
Prize draw
The new iBook contains content
from the legendary book series.
Contents include:
• Starting right • Timing and spacing • Working methods • More timing,
more spacing • Building walks • Flexibility in a walk • Sneaks, runs, and
animal action • Flexibility • Overlapping action
and weight • Takes • Vibrates • Accents• Dialogue 1 • Dialogue 2 • Giving the
performance • Putting it all together
What’sincluded?

3D WorlD June 2015 3dworld.creativebloq.com88
FeatureLand your dream job
Art directors from film, commercials and animation reveal what it
takes to get a break in the VFX industry
Land your dream job
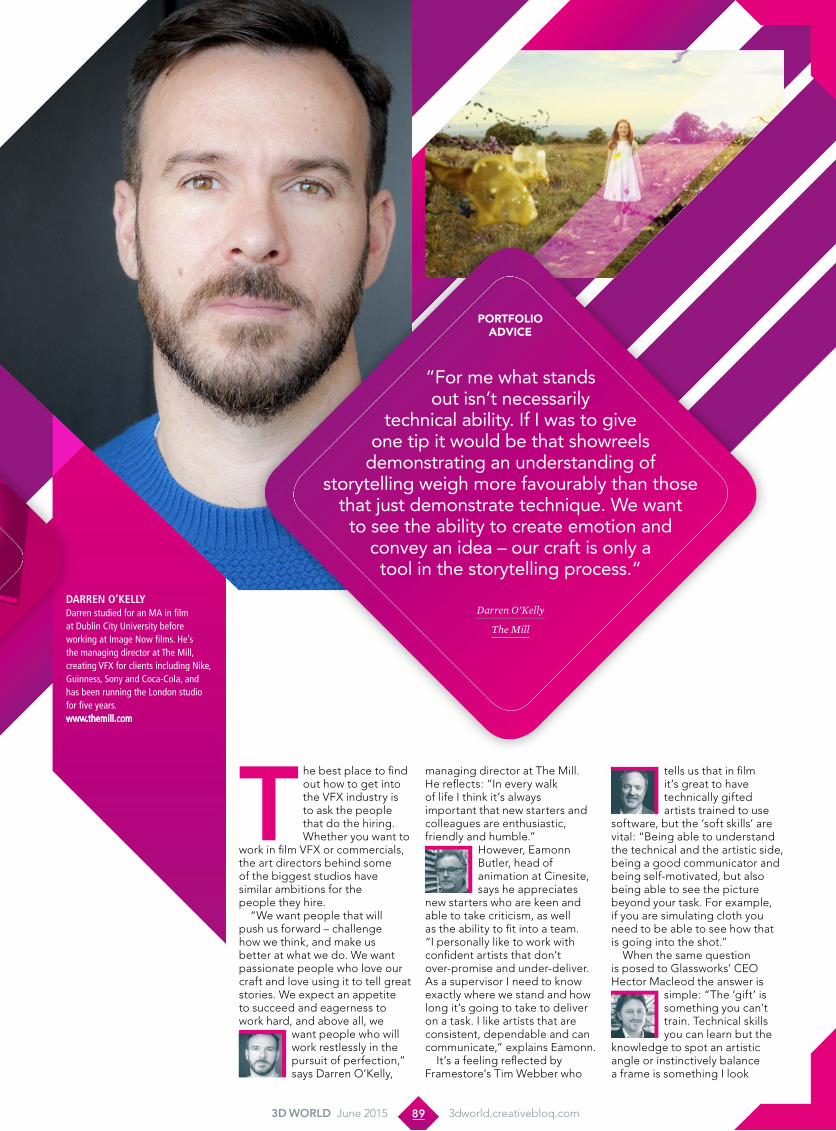
managing director at The Mill. He reflects: “In every walk of life I think it’s always important that new starters and colleagues are enthusiastic, friendly and humble.”
However, Eamonn Butler, head of animation at Cinesite, says he appreciates
new starters who are keen and able to take criticism, as well as the ability to fit into a team. “I personally like to work with confident artists that don’t over-promise and under-deliver. As a supervisor I need to know exactly where we stand and how long it’s going to take to deliver on a task. I like artists that are consistent, dependable and can communicate,” explains Eamonn.
It’s a feeling reflected by Framestore’s Tim Webber who
Darren O’KellyDarren studied for an MA in film at Dublin City University before working at Image Now films. He’s the managing director at The Mill, creating VFX for clients including Nike, Guinness, Sony and Coca-Cola, and has been running the London studio for five years. www.themill.com
The best place to find out how to get into the VFX industry is to ask the people that do the hiring. Whether you want to
work in film VFX or commercials, the art directors behind some of the biggest studios have similar ambitions for the people they hire.
“We want people that will push us forward – challenge how we think, and make us better at what we do. We want passionate people who love our craft and love using it to tell great stories. We expect an appetite to succeed and eagerness to work hard, and above all, we
want people who will work restlessly in the pursuit of perfection,” says Darren O’Kelly,
tells us that in film it’s great to have technically gifted artists trained to use
software, but the ‘soft skills’ are vital: “Being able to understand the technical and the artistic side, being a good communicator and being self-motivated, but also being able to see the picture beyond your task. For example, if you are simulating cloth you need to be able to see how that is going into the shot.”
When the same question is posed to Glassworks’ CEO Hector Macleod the answer is
simple: “The ‘gift’ is something you can’t train. Technical skills you can learn but the
knowledge to spot an artistic angle or instinctively balance a frame is something I look
3D WorlD June 2015 3dworld.creativebloq.com89
PortFoLio advice
“For me what stands out isn’t necessarily
technical ability. If I was to give one tip it would be that showreels
demonstrating an understanding of storytelling weigh more favourably than those
that just demonstrate technique. We want to see the ability to create emotion and
convey an idea – our craft is only a tool in the storytelling process.“
Darren O’Kelly
The Mill
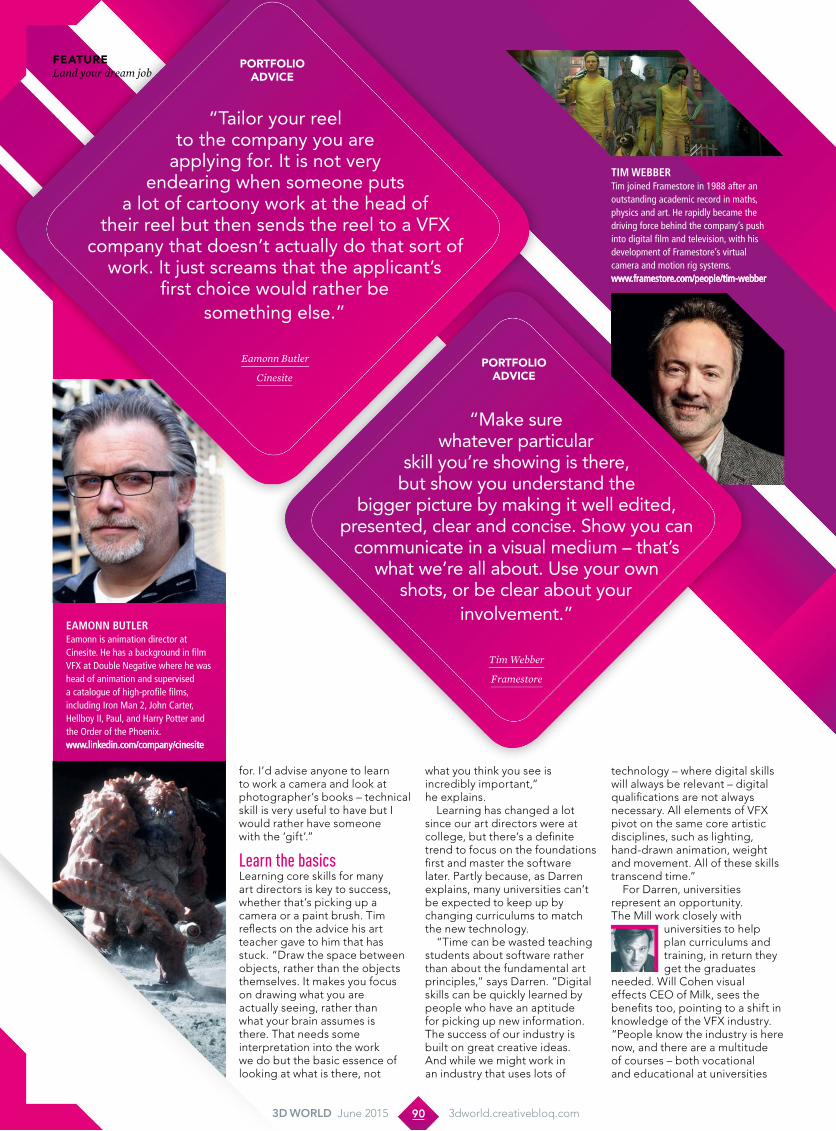
FeatureLand your dream job
for. I’d advise anyone to learn to work a camera and look at photographer’s books – technical skill is very useful to have but I would rather have someone with the ‘gift’.”
Learn the basicsLearning core skills for many art directors is key to success, whether that’s picking up a camera or a paint brush. Tim reflects on the advice his art teacher gave to him that has stuck. “Draw the space between objects, rather than the objects themselves. It makes you focus on drawing what you are actually seeing, rather than what your brain assumes is there. That needs some interpretation into the work we do but the basic essence of looking at what is there, not
what you think you see is incredibly important,” he explains.
Learning has changed a lot since our art directors were at college, but there’s a definite trend to focus on the foundations first and master the software later. Partly because, as Darren explains, many universities can’t be expected to keep up by changing curriculums to match the new technology.
“Time can be wasted teaching students about software rather than about the fundamental art principles,” says Darren. “Digital skills can be quickly learned by people who have an aptitude for picking up new information. The success of our industry is built on great creative ideas. And while we might work in an industry that uses lots of
technology – where digital skills will always be relevant – digital qualifications are not always necessary. All elements of VFX pivot on the same core artistic disciplines, such as lighting, hand-drawn animation, weight and movement. All of these skills transcend time.”
For Darren, universities represent an opportunity. The Mill work closely with
universities to help plan curriculums and training, in return they get the graduates
needed. Will Cohen visual effects CEO of Milk, sees the benefits too, pointing to a shift in knowledge of the VFX industry. “People know the industry is here now, and there are a multitude of courses – both vocational and educational at universities
eamOnn ButlerEamonn is animation director at Cinesite. He has a background in film VFX at Double Negative where he was head of animation and supervised a catalogue of high-profile films, including Iron Man 2, John Carter, Hellboy II, Paul, and Harry Potter and the Order of the Phoenix.www.linkedin.com/company/cinesite
3D WorlD June 2015 3dworld.creativebloq.com90
tim WeBBerTim joined Framestore in 1988 after an outstanding academic record in maths, physics and art. He rapidly became the driving force behind the company’s push into digital film and television, with his development of Framestore’s virtual camera and motion rig systems.www.framestore.com/people/tim-webber
“Make sure whatever particular
skill you’re showing is there, but show you understand the
bigger picture by making it well edited, presented, clear and concise. Show you can
communicate in a visual medium – that’s what we’re all about. Use your own
shots, or be clear about your involvement.”
Tim Webber
Framestore
PortFoLio advice
PortFoLio advice
“Tailor your reel to the company you are
applying for. It is not very endearing when someone puts
a lot of cartoony work at the head of their reel but then sends the reel to a VFX
company that doesn’t actually do that sort of work. It just screams that the applicant’s
first choice would rather be something else.”
Eamonn Butler
Cinesite

HectOr macleODHector set up his own photography studio after leaving school and caught the business bug. After learning how to really run a company while at MPC, in 1995 he established Glassworks, which has expanded into a business employing 100 full-time staff over three European cities.www.glassworks.co.uk
and colleges that were never there before. Plus a real positive is the active stimulation by the government to create a larger talent pool with schemes such as the ones run by Creative Skillset.”
You don’t need to break the bank either, “I’m excited by the latest wave of online animation courses like iAnimate,” says Eamonn. “They teach professional workflow, as well as the principles of animation and they are achieving very high standards indeed.”
Hector agrees, saying he often has to “break graduates down like ponies” in order for new starters to understand the real world of a studio. “I have an issue with it [formal university courses], I like Escape and Ealing Studio [Met Film School].”
If education isn’t for you, then why not go it alone and turn to social media to create your own IP and projects, in order to get noticed and maybe build your own studio? “Our Talent team check out content and look out for new talent on all platforms, including Vimeo and YouTube,” says Darren.
Create your own content It’s certainly a way to go, and with most studios searching the web for new talent – a good calling card. “Developing your own stuff is very educational as it forces you to learn/try other disciplines within CG,” says Eamonn. “I like to see artists making their own films because it shows me that they understand what it’s all about. In VFX we make amazing images but that imagery is used to tell a story. The story is king!”
Finally, keep in mind everyone starts somewhere, even Oscar-winning art directors. Darren remembers his first day at The Mill, sitting on the studio’s immaculate designer sofa in their old reception waiting to start his career: “I was really scared – there was an Oscar two feet away from me!
My advice for the first week is to be on time. And the trick is to come back in the following Monday! Once you’ve figured out what’s going on (at least a bit) – it’s truly awe-inspiring to see such phenomenal talent at work – and know you’re part of it! Also ask people for advice – they’ll be only too keen to help. Everyone has been you at one stage.”
FYIWhy not send your portfolios to us at [email protected]
3D WorlD June 2015 3dworld.creativebloq.com91
Will cOHenMilk CEO/executive producerWill ‘fell into’ VFX after becoming fascinated with Superman as a schoolboy. His need to learn how ‘movie magic’ was made led to a career in the VFX industry that’s included MPC, Stink as well as his co-founded studio, Milk.www.bit.ly/195-will-cohen
I always think that my generation – the second generation of VFX artists and producers – have a responsibility to learn from those who have gone before us. They laid the foundations for us, invented and
explored and set down the challenge. We learn from the new generation of talent, the brightest young minds, the new generation of digital pioneers who share our passion for great ideas beautifully realised. They
come into our industry with fresh perspectives and inspire us with new techniques and great creative ideas. It is by only by listening, questioning and challenging that we can continue to be better, to push the industry on.
Keep learnIngthe mill’s Darren O’Kelly believes we should never stop
PortFoLio advice
“Only use your very best work in it.
Best doesn’t always mean super-polished but the crucial
thing is that it simply displays talent.”
Will Cohen
Milk

The imporTance of leadershipExecutive coach Mickey Rogers shares her advice for becoming a great leader and how clear thinking will improve your career
There are so many definitions of leadership, theories on leadership or ways of leading that your head spins.
There is no one type of leader or one way of leading. So much depends on the situation, the background of the person and the time in the production cycle. I think that there are four key ingredients that make a good leader in our industry.
Be authentic; it’s crucial you have a good understanding of your own values and what’s important to you. For example, Walt Disney laid the foundations for his empire from the very beginning. He maintained a consistent belief in a set of core values – a passionate belief in creative imagination, a fanatical attention to detail, optimistic view of life and the preservation of the Disney magic. Some people may consider Disney the evil empire, but there‘s no doubt about what the company represents.
Have a clear vision; a great leader is able to articulate what the goal is for their team, with passion. They need to be able to create a
compelling vision that inspires. It doesn’t need to be an elaborate production. It can be very simple, like Steve Job’s vision for Apple to “put a computer into the hands of everyday people.”
Create a great team environment; our business is all about collaboration and teamwork. For example, after being booted
out of Disney, Jeffrey Katzenberg started DreamWorks. He realised that the authoritarian decision-making style he used at Disney wasn’t productive for his new company. He now acknowledges that a leader is only as strong as his followers.
Learn to manage differences; as any great leader knows, conflict is a necessary part of a collaborative venture. In fact, you can tell a well-oiled team if there is open disagreement, rather than just simmering resentment. A good leader ensures that there is a safe environment for his team to argue, and suggest better ways of doing things without that being a threat to their leadership and the wellbeing of the team. This is especially true in an environment where the majority of workers are freelance.
We can learn this important lesson from Steven Spielberg. “The one ingredient I bring to all of my films is the ability to listen to anybody who has a good idea on the production. I’m very collaborative, from a very young age my parents taught me probably the most valuable lesson of my life – sometimes it is better not to talk but to listen.”
FYIFor more information on Mickey and career advice go to www.mrogersmedia.com
You can tell a well-oiled team if there is open disagreement rather than just simmering resentment
Mickey Rogers, executive coach and author
educaTionAdvertorial
Artist profileMickey Rogers
Mickey has worked in the creative industries for over
20 years and is one of the leading international executive coaches in the entertainment industry. Her book, From Start to
Screen: The Essential Guide to Pitching Creative
Ideas, is available now.www.mrogersmedia.com
Copy
right
© D
ream
Wor
ks. A
ll Ri
ghts
Res
ever
ed
92 3D WorlD June 2015 3dworld.creativebloq.com

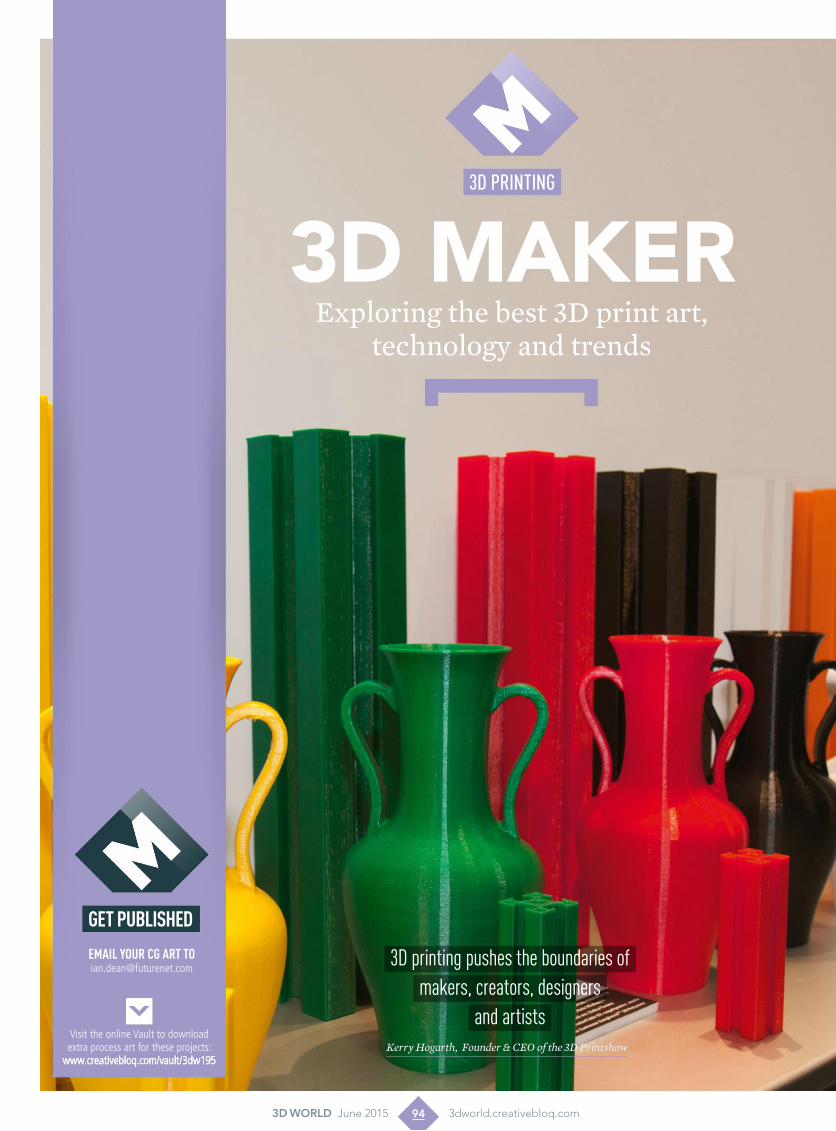
Exploring the best 3D print art, technology and trends
3d maker3d printing
get published
email your Cg art [email protected]
Visit the online Vault to download extra process art for these projects:
www.creativebloq.com/vault/3dw195
3D printing pushes the boundaries of makers, creators, designers
and artistsKerry Hogarth, Founder & CEO of the 3D Printshow
94 3D WorlD June 2015 3dworld.creativebloq.com
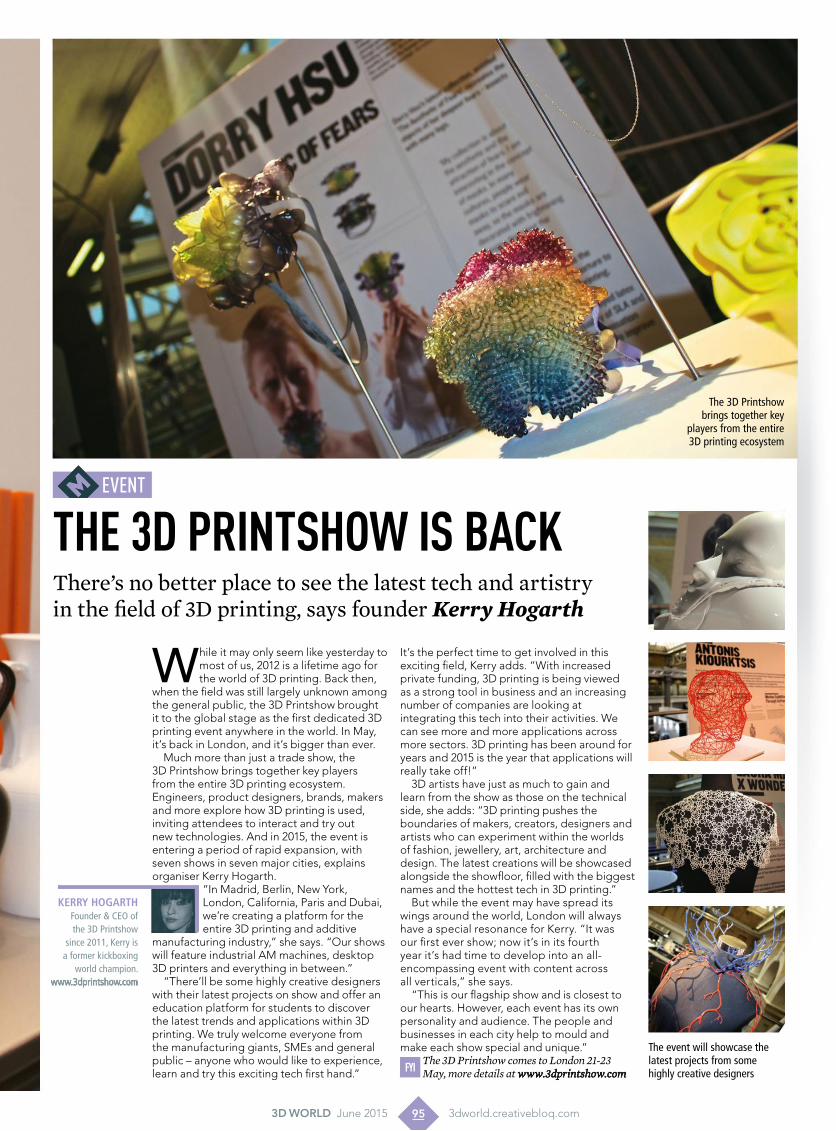
the 3d printshow is baCk
While it may only seem like yesterday to most of us, 2012 is a lifetime ago for the world of 3D printing. Back then,
when the field was still largely unknown among the general public, the 3D Printshow brought it to the global stage as the first dedicated 3D printing event anywhere in the world. In May, it’s back in London, and it’s bigger than ever.
Much more than just a trade show, the 3D Printshow brings together key players from the entire 3D printing ecosystem. Engineers, product designers, brands, makers and more explore how 3D printing is used, inviting attendees to interact and try out new technologies. And in 2015, the event is entering a period of rapid expansion, with seven shows in seven major cities, explains organiser Kerry Hogarth.
“In Madrid, Berlin, New York, London, California, Paris and Dubai, we’re creating a platform for the entire 3D printing and additive
manufacturing industry,” she says. “Our shows will feature industrial AM machines, desktop 3D printers and everything in between.”
“There’ll be some highly creative designers with their latest projects on show and offer an education platform for students to discover the latest trends and applications within 3D printing. We truly welcome everyone from the manufacturing giants, SMEs and general public – anyone who would like to experience, learn and try this exciting tech first hand.”
It’s the perfect time to get involved in this exciting field, Kerry adds. “With increased private funding, 3D printing is being viewed as a strong tool in business and an increasing number of companies are looking at integrating this tech into their activities. We can see more and more applications across more sectors. 3D printing has been around for years and 2015 is the year that applications will really take off!”
3D artists have just as much to gain and learn from the show as those on the technical side, she adds: “3D printing pushes the boundaries of makers, creators, designers and artists who can experiment within the worlds of fashion, jewellery, art, architecture and design. The latest creations will be showcased alongside the showfloor, filled with the biggest names and the hottest tech in 3D printing.”
But while the event may have spread its wings around the world, London will always have a special resonance for Kerry. “It was our first ever show; now it’s in its fourth year it’s had time to develop into an all-encompassing event with content across all verticals,” she says.
“This is our flagship show and is closest to our hearts. However, each event has its own personality and audience. The people and businesses in each city help to mould and make each show special and unique.”
FyiThe 3D Printshow comes to London 21-23 May, more details at www.3dprintshow.com
Kerry HogartHFounder & CEO of the 3D Printshow
since 2011, Kerry is a former kickboxing
world champion. www.3dprintshow.com
www.xxxxxxxx.com
There’s no better place to see the latest tech and artistry in the field of 3D printing, says founder Kerry Hogarth
The 3D Printshow brings together key
players from the entire 3D printing ecosystem
The event will showcase the latest projects from some highly creative designers
event
95 3D WorlD June 2015 3dworld.creativebloq.com

Create your own 3D PrinteD awarDAiman Akhtar shows how to develop and create a printed trophy, inspired by our very own 3D awards
This month, I was tasked with trophy development for 3D World’s own CG awards. I’ve created a few award
trophies in the short time since 3D printing has become more accessible – ranging from a formal company conference to a bowling tournament. There are a few patterns in the development process of a trophy and I break it down into three stages: pre-visualisation, presentation, and print considerations.
The pre-visualisation stage can vary as the client might know exactly what they want or they might need you to concept for them. Work with your client to guide them into all the new possibilities of 3D printing for a compelling design. However, it’s also important to let them know what asks are impossible. This is a case of “seeing is believing” so show them your reference, ideas and sketches. Design decisions should be made at this stage, including whether to
print a base or just the award, whether to have the trophy hollowed out or solid, and how to incorporate text.
Often clients will want to see a presentation of what their award will look like before they
sign off on the print. Your composition should focus on their award and the background should be kept simple. Use lighting to your advantage to really sell the model and make it look pretty. Since most clients want award trophies printed in metal, throw in a lot of nice
Aiman has created several award trophies for a range of companies and events and says he enjoys the process as much as those winning the awards
Artist profileAiman AkhtarCharacter artist Aiman enjoys creating personal, digital artworks and continues to work on various freelance projects. He’s also a beta tester for Adobe’s 3D print tools and continues to experiment with the technology.www.aiman3d.com
The key print consideration is cost.Metal is expensive and preciousmetals are rare. Do your researchto give your client choices
3d print tutorial
96 3D WorlD June 2015 3dworld.creativebloq.com
3d makerCreate a 3D award

one overall ShaPeMatch the 2D concept provided by your client and present the overall shape in 3D before you spend time with the details. Seeing their design with dimension may already trigger changes to their concept. In this case, particular attention was needed to decide the smoothness of the trophy edges. You will notice that the bottom edge is a sharp cut while the sides are smooth to the touch. I tend to keep renders a base grey material at this stage in order to prevent material distraction.
four Cut out workflowAfter creating my thickened logo, in the Subtool palette I used the mirror command to flip it and then in the Brush palette selected Create Insert Mesh. I held [Alt] to invert the logo as I dragged the new insert mesh into place on my base trophy model. This logo insert mesh will show up inverted and you can see it better by clicking Double in the Display properties of the tool. Once happy with the logo placement, I clicked on Tool>Dynamesh>Create Shell, which hollowed the model out.
two to BaSe or not to BaSeThat is the question, and here I tried a few variations before deciding this time I didn’t need a base. The determining factor was design intent. The base should be secondary to the award and not overshadow the trophy. The melting base here could have an unintended symbolic interpretation and the wire frame weave was too complicated and drew your eye away from the trophy. Remember, a base can always be printed later on and keyed to fit the award perfectly.
five emBoSS workflowOther details such as the text could not be cut through as it would leave areas like the centre of the D, (in 3D), floating with no support. I decided to deboss these details and this was done by creating a 3D World logo Subtool similar to step 3. I then inserted and pushed that Subtool slightly into the base cube and clicked on Dynamesh>Sub. I needed to undo and redo this step several times pushing the logo to various depths until I was happy with the final result.
Six DeCimate anD iterateWith the award trophy model complete, I went to Decimation Master to bring down the geometry resolution for print. I then used the 3D Print Exporter to test the print at various sizes and get quotes from various online 3D print services, including Shapeways, Sculpteo and i.materialise. As you can see from the thumbnail, at too small a scale, the detail text such as “inspiring artists” becomes suspect, and might not print. This will help you decide the ideal scale for print.
three logo/text CreationTo begin my detailing, I created an alpha in ZBrush from the vector logo provided and used the Standard brush with a high z-intensity to pull the shape out of a subdivided plane. I then used the Slice tool and held [Ctrl] as I dragged my mouse to cut the plane into its own Polygroup. Next I hid the plane group and clicked the Delete Hidden button. Finally, I closed holes on the remaining logo and ran the smooth operation under the Deformations tab to slightly round the edges.
DeSign ProjeCt: Create a 3D PrinteD awarD Software: ZBrush
follow aiman’S
next tutorial
Issue 196 on sale 20 May
The two most common and affordable printing technologies, Fused Deposit Modelling (FDM) and Stereolithography (SLA), primarily use plastic and resin. Printing in metal requires more expensive and precision technologies, which creates an expensive barrier to entry for most local hubs and 3D print shops. Composite metal powders can be harnessed to print by using Selective Laser Sintering (SLS) and metal alloys by Direct Metal Laser Sintering (DMLS), as well as Electron Beam Melting (EBM), Robocasting, and Selective Laser Melting (SLM).
Shop around to get the best deal; Shapeways, Sculpteo, i.materialise, and ExOne all print and cast in metal and for now they’re your best bet.
Beyond the technology, the metal alloy itself is expensive and precious metals such as silver, gold and platinum are rare.
Most companies that print precious metals limit you to a miniature scale, perfect for jewellery but not ideal for trophies. This leaves you with stainless steel, brass, bronze, iron, and tungsten. This tier can print at a larger scale and be polished to reveal a shine. Don’t forget about the metal composite materials such as alumide and metallic plastic, as well as the metal lookalike option – printing in a paintable resin and spray painting it gold. There is also the option of printing in wax and sending it over to a local foundry for the traditional lost-wax casting process.
Know your options for printing in MetalChoose the right materials and technology for your metal prints
reflections but lead their eye to the central feature or logo in the design. Showing a client some 3D renders of their award with various material finishes allow print talks to begin. The key print consideration is cost. Metal is expensive and precious metals are rare. Do your research to give your client choices at various price ranges, including metal powder composites and lookalikes.
3D printing is at a stage where designers have to teach the client about the process as they design. Very often, the client won’t know their budget or the options available to them so it’s a project where you have to work with them and guide them to the final result.
Metal jobs can drag a bit longer, but personally I’ve enjoyed creating custom 3D printed awards as much as those who would enjoy receiving them.
fyiVisit The CG Awards 2015 site and nominate now www.thecgawards.com
97 3D WorlD June 2015 3dworld.creativebloq.com
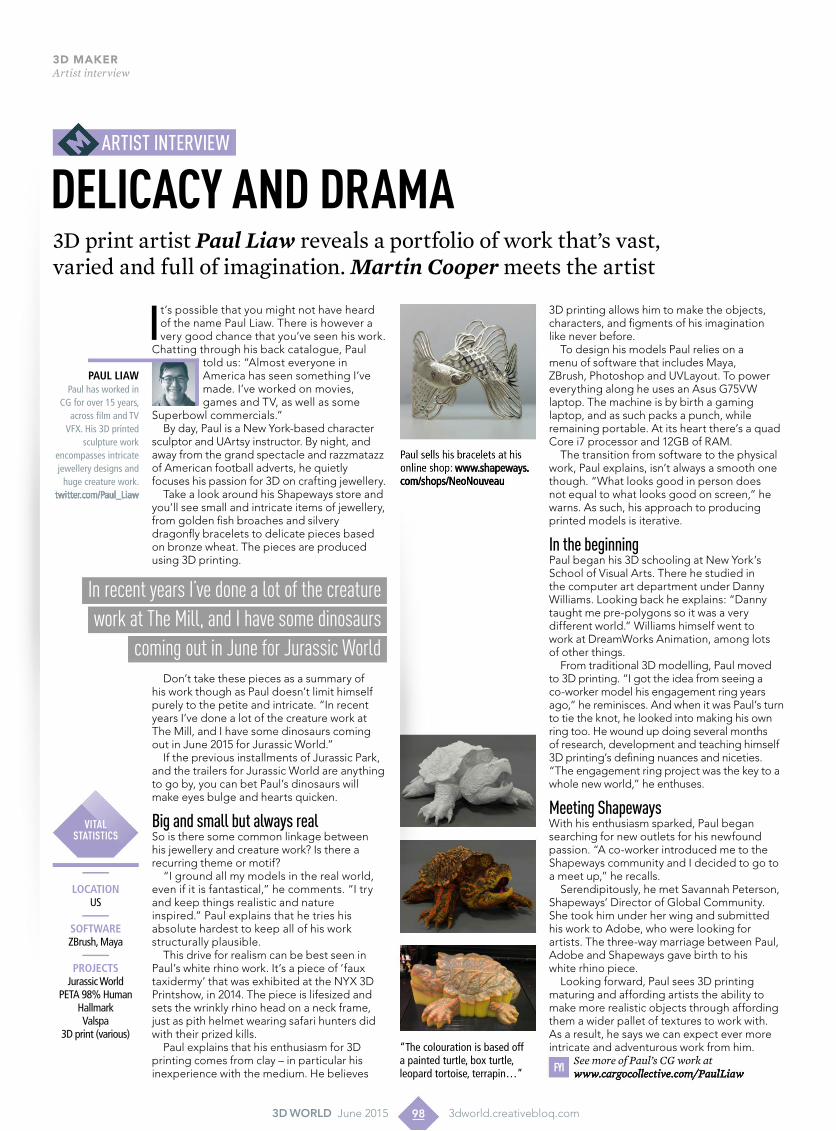
Paul sells his bracelets at his online shop: www.shapeways.com/shops/NeoNouveau
“The colouration is based off a painted turtle, box turtle, leopard tortoise, terrapin…”
Delicacy anD Drama3D print artist Paul Liaw reveals a portfolio of work that’s vast, varied and full of imagination. Martin Cooper meets the artist
I t’s possible that you might not have heard of the name Paul Liaw. There is however a very good chance that you’ve seen his work.
Chatting through his back catalogue, Paultold us: “Almost everyone in America has seen something I’ve made. I’ve worked on movies, games and TV, as well as some
Superbowl commercials.” By day, Paul is a New York-based character
sculptor and UArtsy instructor. By night, and away from the grand spectacle and razzmatazz of American football adverts, he quietly focuses his passion for 3D on crafting jewellery.
Take a look around his Shapeways store and you’ll see small and intricate items of jewellery, from golden fish broaches and silvery dragonfly bracelets to delicate pieces based on bronze wheat. The pieces are produced using 3D printing.
Don’t take these pieces as a summary of his work though as Paul doesn’t limit himself purely to the petite and intricate. “In recent years I’ve done a lot of the creature work at The Mill, and I have some dinosaurs coming out in June 2015 for Jurassic World.”
If the previous installments of Jurassic Park, and the trailers for Jurassic World are anything to go by, you can bet Paul’s dinosaurs will make eyes bulge and hearts quicken.
Big and small but always real So is there some common linkage between his jewellery and creature work? Is there a recurring theme or motif?
“I ground all my models in the real world, even if it is fantastical,” he comments. “I try and keep things realistic and nature inspired.” Paul explains that he tries his absolute hardest to keep all of his work structurally plausible.
This drive for realism can be best seen in Paul’s white rhino work. It’s a piece of ‘faux taxidermy’ that was exhibited at the NYX 3D Printshow, in 2014. The piece is lifesized and sets the wrinkly rhino head on a neck frame, just as pith helmet wearing safari hunters did with their prized kills.
Paul explains that his enthusiasm for 3D printing comes from clay – in particular his inexperience with the medium. He believes
3D printing allows him to make the objects, characters, and figments of his imagination like never before.
To design his models Paul relies on a menu of software that includes Maya, ZBrush, Photoshop and UVLayout. To power everything along he uses an Asus G75VW laptop. The machine is by birth a gaming laptop, and as such packs a punch, while remaining portable. At its heart there’s a quad Core i7 processor and 12GB of RAM.
The transition from software to the physical work, Paul explains, isn’t always a smooth one though. “What looks good in person does not equal to what looks good on screen,“ he warns. As such, his approach to producing printed models is iterative.
In the beginning Paul began his 3D schooling at New York’s School of Visual Arts. There he studied in the computer art department under Danny Williams. Looking back he explains: “Danny taught me pre-polygons so it was a very different world.” Williams himself went to work at DreamWorks Animation, among lots of other things.
From traditional 3D modelling, Paul moved to 3D printing. “I got the idea from seeing a co-worker model his engagement ring years ago,“ he reminisces. And when it was Paul’s turn to tie the knot, he looked into making his own ring too. He wound up doing several months of research, development and teaching himself 3D printing’s defining nuances and niceties. “The engagement ring project was the key to a whole new world,” he enthuses.
Meeting Shapeways With his enthusiasm sparked, Paul began searching for new outlets for his newfound passion. “A co-worker introduced me to the Shapeways community and I decided to go to a meet up,” he recalls.
Serendipitously, he met Savannah Peterson, Shapeways’ Director of Global Community. She took him under her wing and submitted his work to Adobe, who were looking for artists. The three-way marriage between Paul, Adobe and Shapeways gave birth to his white rhino piece.
Looking forward, Paul sees 3D printing maturing and affording artists the ability to make more realistic objects through affording them a wider pallet of textures to work with. As a result, he says we can expect ever more intricate and adventurous work from him.
Fyi See more of Paul’s CG work at www.cargocollective.com/PaulLiaw
In recent years I’ve done a lot of the creature work at The Mill, and I have some dinosaurs
coming out in June for Jurassic World
Paul liaw Paul has worked in
CG for over 15 years, across film and TV
VFX. His 3D printed sculpture work
encompasses intricate jewellery designs and
huge creature work. twitter.com/Paul_Liaw
locationUS
softwareZBrush, Maya
ProjectsJurassic World
PETA 98% HumanHallmarkValspa
3D print (various)
vitalstatistics
artISt IntervIew
3d MakerArtist interview
98 3D WorlD June 2015 3dworld.creativebloq.com
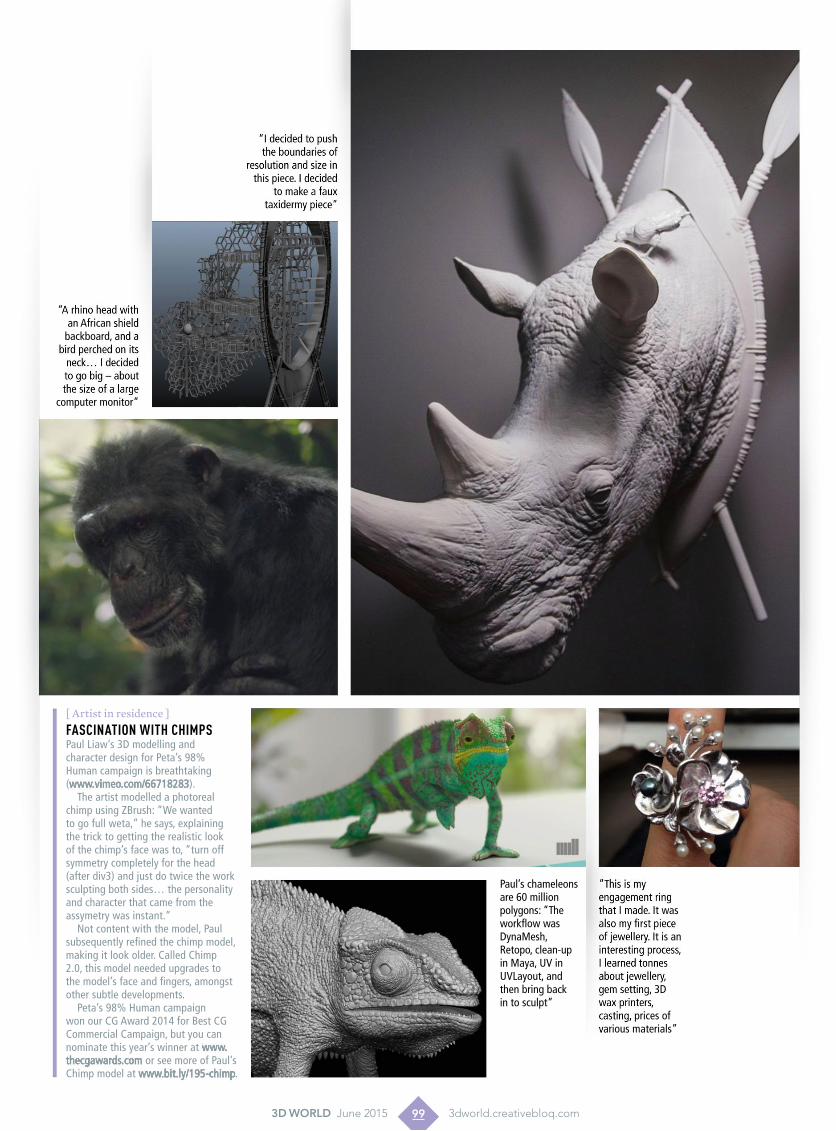
“A rhino head with an African shield
backboard, and a bird perched on its
neck… I decided to go big – about the size of a large
computer monitor“
“I decided to push the boundaries of
resolution and size in this piece. I decided
to make a faux taxidermy piece”
“This is my engagement ring that I made. It was also my first piece of jewellery. It is an interesting process, I learned tonnes about jewellery, gem setting, 3D wax printers, casting, prices of various materials”
Paul’s chameleons are 60 million polygons: “The workflow was DynaMesh, Retopo, clean-up in Maya, UV in UVLayout, and then bring back in to sculpt”
[ Artist in residence ]
Fascination with chimpsPaul Liaw’s 3D modelling and character design for Peta’s 98% Human campaign is breathtaking (www.vimeo.com/66718283).
The artist modelled a photoreal chimp using ZBrush: ”We wanted to go full weta,” he says, explaining the trick to getting the realistic look of the chimp’s face was to, “turn off symmetry completely for the head (after div3) and just do twice the work sculpting both sides… the personality and character that came from the assymetry was instant.”
Not content with the model, Paul subsequently refined the chimp model, making it look older. Called Chimp 2.0, this model needed upgrades to the model’s face and fingers, amongst other subtle developments.
Peta’s 98% Human campaign won our CG Award 2014 for Best CG Commercial Campaign, but you can nominate this year’s winner at www.thecgawards.com or see more of Paul’s Chimp model at www.bit.ly/195-chimp.
99 3D WorlD June 2015 3dworld.creativebloq.com


106 creating a fleet of aeroplanesJavert Valbarr shows the potential of HitFilm 3 Pro’s particle simulator
110 maya 2016Autodesk’s impressive new upgrade
102 make a showroom bikeCreate photoreal renders with CAD data
108 integration techniquesHow PostPanic extend scenes using V-Ray
114 my inspirationPaul Schleicher’s journey to VFX professional
112 arnold for cinema 4dThe much anticipated plug-in is finally here
113 substance designer 5How does the new texture creation tool rate?
Theory, research and reviews plus industry insights from today’s experts
DevelopContents
101 3D WorlD June 2015 twitter.com/3DWorldMag
Get publishedemail your CG art [email protected]
Visit the online Vault to download extra process art for these projects:
www.creativebloq.com/vault/3dw195
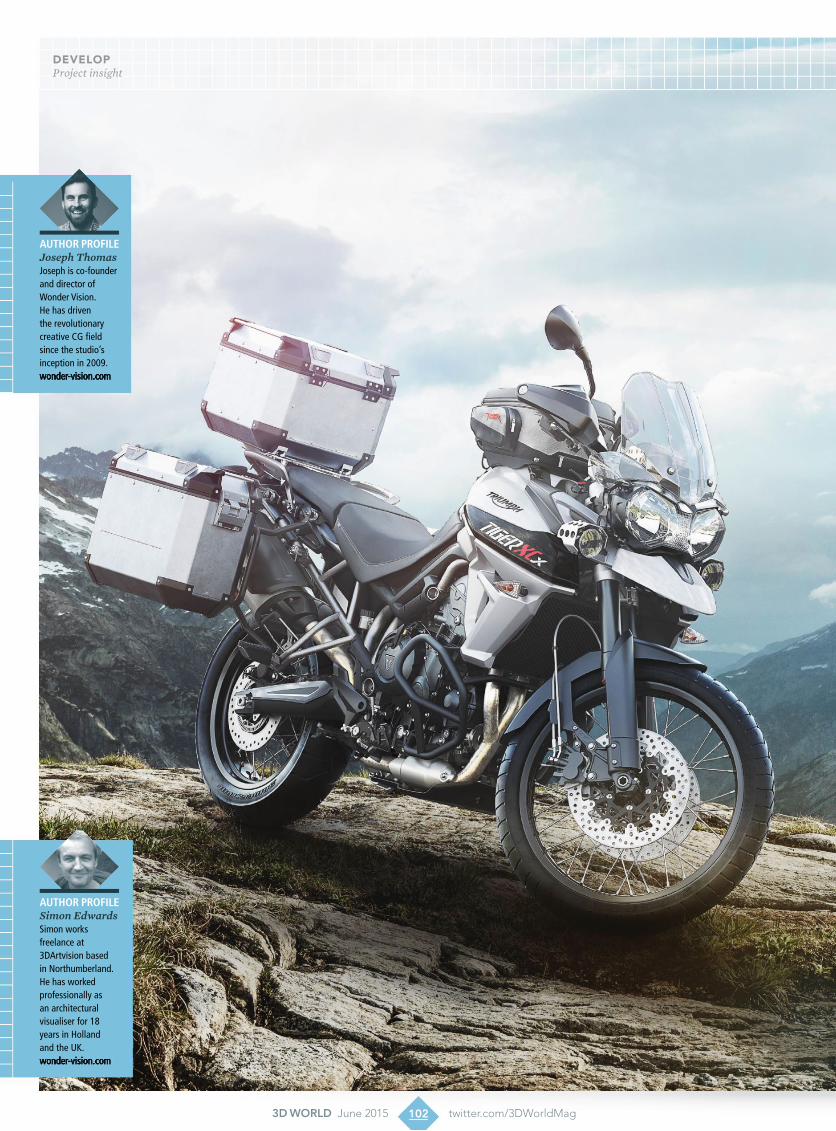
Author profileSimon EdwardsSimon works freelance at 3DArtvision based in Northumberland. He has worked professionally as an architectural visualiser for 18 years in Holland and the UK.wonder-vision.com
Author profileJoseph ThomasJoseph is co-founder and director of Wonder Vision. He has driven the revolutionary creative CG field since the studio’s inception in 2009.wonder-vision.com
102 3D WorlD June 2015 twitter.com/3DWorldMag
developProject insight
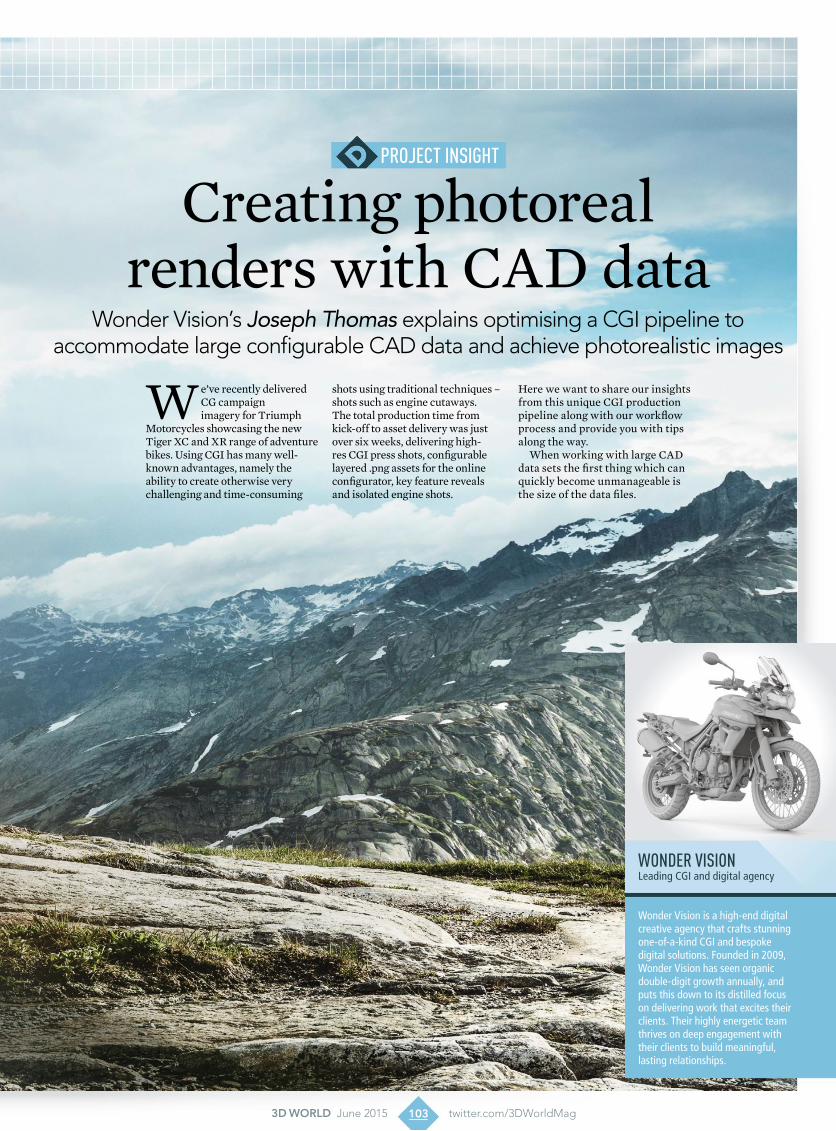
project insight
Creating photoreal renders with CAD data
We’ve recently delivered CG campaign imagery for Triumph
Motorcycles showcasing the new Tiger XC and XR range of adventure bikes. Using CGI has many well-known advantages, namely the ability to create otherwise very challenging and time-consuming
shots using traditional techniques – shots such as engine cutaways. The total production time from kick-off to asset delivery was just over six weeks, delivering high-res CGI press shots, configurable layered .png assets for the online configurator, key feature reveals and isolated engine shots.
Here we want to share our insights from this unique CGI production pipeline along with our workflow process and provide you with tips along the way.
When working with large CAD data sets the first thing which can quickly become unmanageable is the size of the data files.
Wonder Vision’s Joseph Thomas explains optimising a CGI pipeline to accommodate large configurable CAD data and achieve photorealistic images
Wonder Vision is a high-end digital creative agency that crafts stunning one-of-a-kind CGI and bespoke digital solutions. Founded in 2009, Wonder Vision has seen organic double-digit growth annually, and puts this down to its distilled focus on delivering work that excites their clients. Their highly energetic team thrives on deep engagement with their clients to build meaningful, lasting relationships.
Wonder VisionLeading CGI and digital agency
103 3D WorlD June 2015 twitter.com/3DWorldMag

We worked closely with Triumph to find the optimum data quality to file size ratio before exporting/ importing full bike data.
We had the best results using either .stp or .iges files. The data
was split into small sub-assemblies, for example frame, bodywork, engine, and built around a common reference system. Once the CAD sub-assemblies were imported into our parametric CAD package we could begin to optimise the data.
Our optimisation process involves adjusting the quality of the visible surface data and stripping out unseen geometry to reduce the file size.
Adding the details We increase the quality of the surface data for visualisation using a number of techniques. Most importantly we add a small radius or fillet to take away any sharp edges. This small fillet will pick up a highlight and add realism to the final renderings.
Rather than re-modelling corrupt or basic geometry items, such as straps and soft goods that don’t have highly detailed CAD data, just block basic shapes to outline their position and presence on the bike.
We remodel these items in 3ds Max. Polygon modelling allows us to carve in the finer details, such as material creases and fabric stitching.
Next we need to add gravity to the bike so the suspension is slightly compressed, as a result of the weight of the bike. This effects the rear wheel position and swing arm, which helps add to the photorealism.
The final stage is to increase the surface quality settings for the export. We export the optimised MXS data into Maxwell Render Studio. We find Maxwell Render gives the greatest levels of control, freedom and consistency with the scene set-up.
FYIFor more about Wonder Vision go to www.wonder-vision.com
For a typical bike we’ll export 120 .mxs files for render production
You can pick up more insights into Wonder Vision’s
process for creating photoreal
CG for this Triumph project
at the link:www.bit.ly/195-
triumph
what atrIumph
When working with large CAD data setsthe first thing which can quickly become
unmanageable is the size of the data files
process: creatIng photorealIstIc rendersSimon Edwards explains how to create a realistic showroom bike model
one FIle reFerencIngIt’s vital to develop a coherent file structure. This minor point has saved many hours when revisiting projects. I matched the same component naming system and file structure as the native CAD data. This ensures I’m talking the same language as the client before we start. It is essential to use a common reference coordinate system for the CAD data. Any potential, revised or updated CAD data that may be required and added to the assembly will then snap into the correct intended position.
two cad data conversIonLarge automotive data sets often contain a blend of 3D data modelled in a variety of dimension-driven parametric and 3D poly packages – from CAD hard surface data to 3D scanned data and low poly data. It‘s worth spending time working on the most efficient data file conversion process, to bring the data into your CG application and/or render engine. I look for the optimum file size to data quality/editability ratio. In my experience I have the best results importing .stp or .iges files, importing them into Maxwell Studio ready .mxs files.
three cad data optermIsatIonAdding finer details – such as a small radius to soften the hard sharp edges – adds to the photorealism. The edge will then be picked up during rendering and shown with a subtle highlight. Some features in the CAD data set will not be representative of the final component, for example the data may not be available as it will come directly from a supplier, so a ‘fit sleeve’ will be present in its place. In this case I then remodel the components in 3ds Max.
Four remodellIng soFt ItemsI remodel all the soft items such as the seat, luggage and straps in 3ds Max, creating a high poly UVd mesh suitable for close-up detailed rendering. This process allows you to carve in the organic forms and elements, such as fabric creases, folds and seams. These items are modelled using a mixture of reference images, technical drawings and product samples. I create custom UV maps in 3ds Max ready to snap the bespoke textures into place within the Maxwell Render material application.
step bY step
104 3D WorlD June 2015 twitter.com/3DWorldMag
developProject insight

seven lIghtIngThe lighting process is key to outputting photorealistic CGI and it’s where the CG bike really starts to come to life. Here I decided to light each shot individually using a combination of emitter planes, HDRI light studio and Maxwell Fire to preview the lighting process in real time. Due to the size of the bike data I preview the images through Maxwell Fire with only the main reflective components visible, for example the bodywork, wheels and windscreen. This speeds up the voxilization and preview process dramatically.
ten post-productIonThe final stage is to retouch the rendered layers and cut out the accessories, adding them as separate configurable layers above the base layers. I start retouching the stripped down base bikes and their colourways, alpha masking out the backgrounds, and adding custom shadow passes to the floor. The accessories are then comped and retouched into the base bikes, matching brightness contrasts and colour balances. Finally, I set up the layer comps for all accessories and export the final .png layers.
eIght render composItIonI always present a range of camera compositions that best showcase the features of the bike. At this stage I group the front wheel and handlebars in a sub configuration group. This allows me to rotate these components together around a pivot coordinate system. This gives the impression the front wheel isn’t perfectly straight, adding realism to certain shots. With the composition confirmed I run low-res test renders to check all materials and lighting are perfected before running the final high-quality production images.
nIne render productIonIncrease the final render settings and export the packaged Maxwell .mxs scene file into the internal render hub. With all referenced files within one folder this limits the potential for asset tracking problems. This is an area on the network where our final scenes are temporally queued, ready to be racked on our purpose built internal render farm. We export an .mxs file for every base bike, colourway and accessory layer. For the accessory layers we process a region of the render to keep render times to an absolute minimum.
FIve materIal creatIonUsing reference photos and physical samples, create high-res custom texture maps. To achieve photorealism create imperfection maps, such as dirt, oil stains and light wear. Don’t overdo this as the CGI is intended to showcase a showroom bike model, but adding subtleties sells the realism. All textures are referenced within the scene so an update in material finish can be controlled with an image texture change. Use lab measured IOR values for all IOR values to achieve maximum accuracy.
sIx materIal applIcatIonWith all geometry suppressed, each component is unsuppressed and individually materialled, taking time to ensure texture maps are correctly scaled on the component. At this point I have Maxwell Render’s Fire activated to ensure the final appearance of the renders are truly representative of the physical component. Constantly tweak the material properties during this process to improve the real-time preview renders. I consider the manual input and consistent tweaking an essential part of perfecting the CGI.
105 3D WorlD June 2015 twitter.com/3DWorldMag

project insight
Create a fleet of aeroplanes
FXHome’s latest software impressively packs multiple features into one
Our favourite picks would be the 3D
Camera Projection, turning images into photoreal
3D scenes, over 20 new effects
and Pro Denoiser, which cleans up
images with ease. www.hitfilm.com/
pro/whats-new
New for Hitfilm
3 ProHitFilm 3 Pro is a
revolutionary visual effects compositing
software developed by FXHome that manages to pack so many features into one, it should really be considered as an all-in-one video production suite.
The software’s unique layout combines a Non-linear editing timeline editor with the ability to create composite shots for powerful post-production creations. Plug-ins are not necessary as HitFilm 3 Pro contains over 180 2D effects, an industry-standard particle simulator, a truly unified 3D compositing space, the ability to
import and animate 3D models, and professional green screen keying technology.
Included with the software is Academy Award-winning planar tracking from Imagineer Systems, providing time-saving mask tracking and 3D camera solving.
In addition to these great features, the HitFilm community is both a highly active and friendly crowd. Sites like YouTube and the HitFilm forums are filled with tutorials from enthusiastic users of the software, who range from students and indie filmmakers to even professional visual effects studios.
In this six-step tutorial I will be creating a fleet of aeroplanes using HitFilm 3 Pro’s particle simulator, which has the ability to use actual 3D models for each individual element. I’ll show you how to set up the environment: a picture of the sky wrapped into a globe that reacts realistically to camera movement. We’ll go over setting up lighting for the scene, adding colour correction and effects to enhance realism, and finally how to keyframe camera movement so you can start making your own cinematic shorts.
fYiFor all the assets you need go to creativebloq.com/vault/3dw195
Javert Valbarr uses HitFilm 3 Pro’s particle simulator to speedily create a fleet of aeroplanes
Author profileJavert ValbarrJavert is an aspiring VFX compositor and has been creating his original tutorials for HitFilm since 2011. He is currently majoring in electronic media at the University of Cincinnati. inscapedigital.com
106 3D WorlD June 2015 twitter.com/3DWorldMag
developProject insight
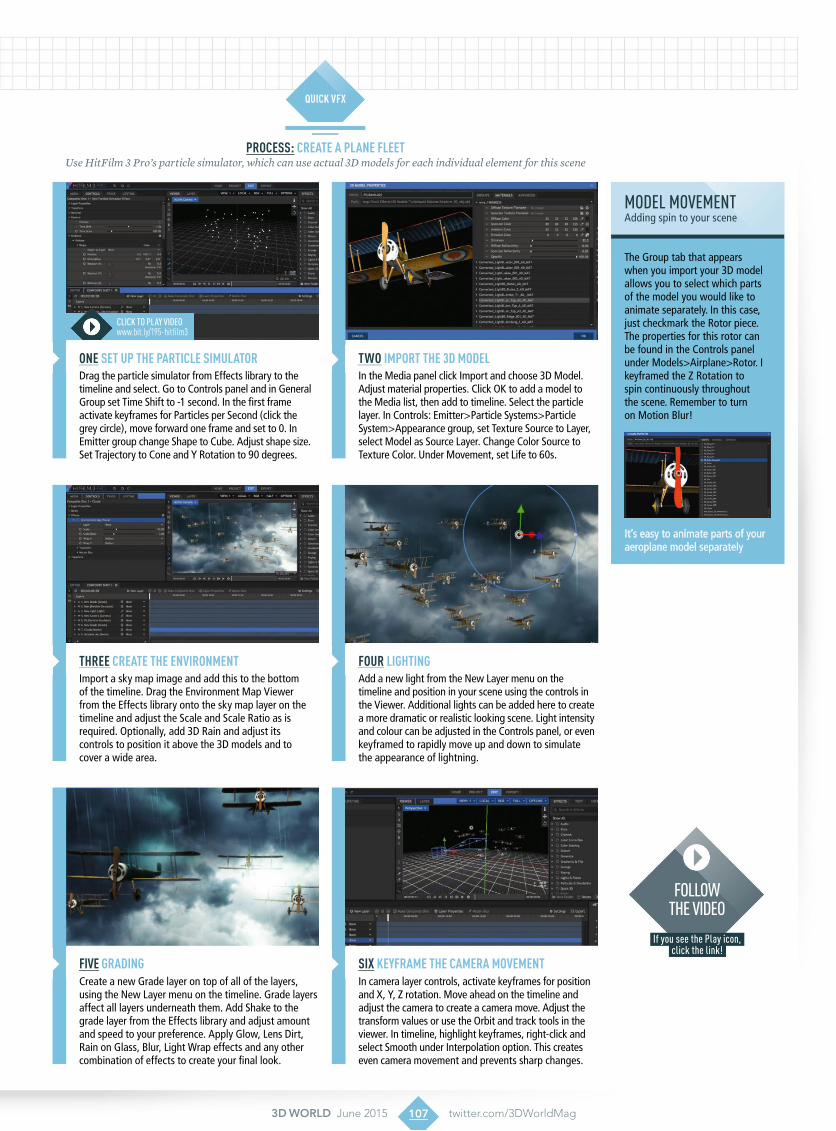
Process: create a PlaNe fleetUse HitFilm 3 Pro’s particle simulator, which can use actual 3D models for each individual element for this scene
oNe set uP tHe Particle simulatorDrag the particle simulator from Effects library to the timeline and select. Go to Controls panel and in General Group set Time Shift to -1 second. In the first frame activate keyframes for Particles per Second (click the grey circle), move forward one frame and set to 0. In Emitter group change Shape to Cube. Adjust shape size. Set Trajectory to Cone and Y Rotation to 90 degrees.
two imPort tHe 3D moDelIn the Media panel click Import and choose 3D Model. Adjust material properties. Click OK to add a model to the Media list, then add to timeline. Select the particle layer. In Controls: Emitter>Particle Systems>Particle System>Appearance group, set Texture Source to Layer, select Model as Source Layer. Change Color Source to Texture Color. Under Movement, set Life to 60s.
tHree create tHe eNviroNmeNtImport a sky map image and add this to the bottom of the timeline. Drag the Environment Map Viewer from the Effects library onto the sky map layer on the timeline and adjust the Scale and Scale Ratio as is required. Optionally, add 3D Rain and adjust its controls to position it above the 3D models and to cover a wide area.
four ligHtiNgAdd a new light from the New Layer menu on the timeline and position in your scene using the controls in the Viewer. Additional lights can be added here to create a more dramatic or realistic looking scene. Light intensity and colour can be adjusted in the Controls panel, or even keyframed to rapidly move up and down to simulate the appearance of lightning.
five graDiNgCreate a new Grade layer on top of all of the layers, using the New Layer menu on the timeline. Grade layers affect all layers underneath them. Add Shake to the grade layer from the Effects library and adjust amount and speed to your preference. Apply Glow, Lens Dirt, Rain on Glass, Blur, Light Wrap effects and any other combination of effects to create your final look.
six KeYframe tHe camera movemeNtIn camera layer controls, activate keyframes for position and X, Y, Z rotation. Move ahead on the timeline and adjust the camera to create a camera move. Adjust the transform values or use the Orbit and track tools in the viewer. In timeline, highlight keyframes, right-click and select Smooth under Interpolation option. This creates even camera movement and prevents sharp changes.
The Group tab that appears when you import your 3D model allows you to select which parts of the model you would like to animate separately. In this case, just checkmark the Rotor piece. The properties for this rotor can be found in the Controls panel under Models>Airplane>Rotor. I keyframed the Z Rotation to spin continuously throughout the scene. Remember to turn on Motion Blur!
model movementAdding spin to your scene
It’s easy to animate parts of your aeroplane model separately
Followthe video
if you see the play icon,click the link!
click to plAY videowww.bit.ly/195-hitfilm3
107 3D WorlD June 2015 twitter.com/3DWorldMag
QuicK vfx
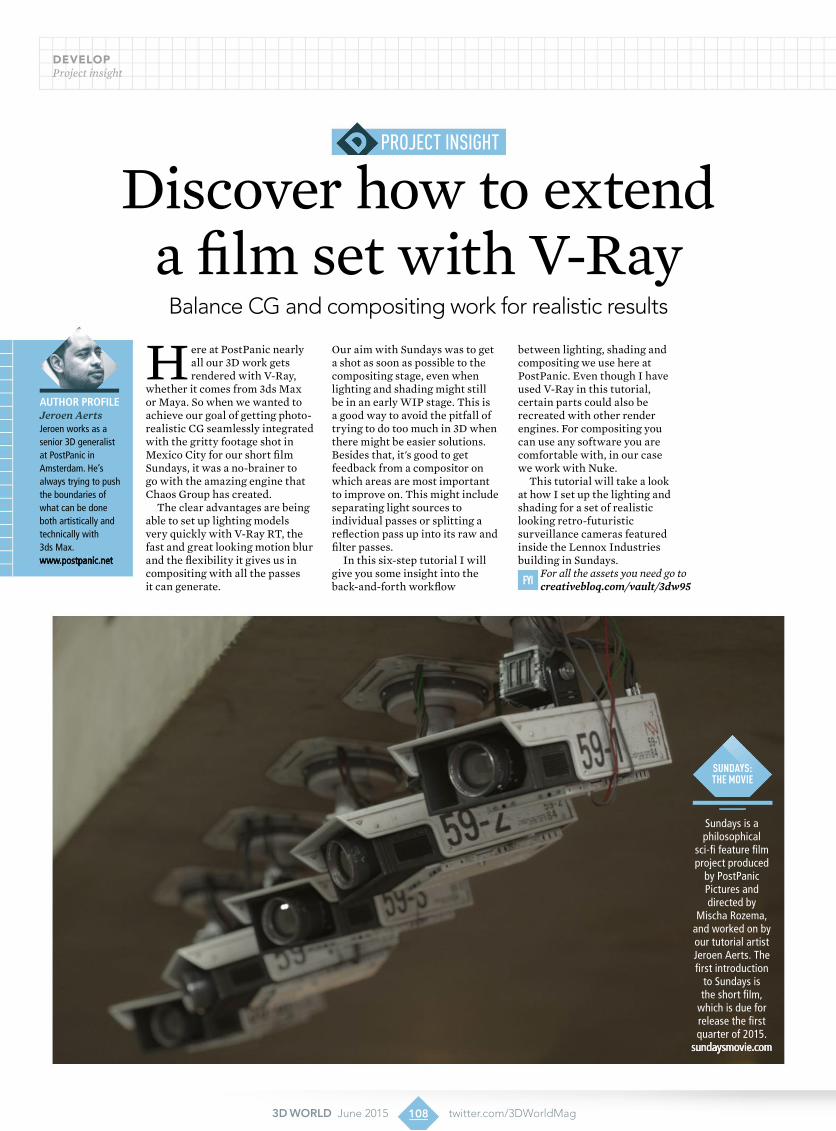
project insight
Discover how to extend a film set with V-Ray
Sundays is a philosophical
sci-fi feature film project produced
by PostPanic Pictures and directed by
Mischa Rozema, and worked on by our tutorial artist Jeroen Aerts. The first introduction
to Sundays is the short film,
which is due for release the first quarter of 2015.
sundaysmovie.com
SundayS: the movie
Here at PostPanic nearly all our 3D work gets rendered with V-Ray,
whether it comes from 3ds Max or Maya. So when we wanted to achieve our goal of getting photo-realistic CG seamlessly integrated with the gritty footage shot in Mexico City for our short film Sundays, it was a no-brainer to go with the amazing engine that Chaos Group has created.
The clear advantages are being able to set up lighting models very quickly with V-Ray RT, the fast and great looking motion blur and the flexibility it gives us in compositing with all the passes it can generate.
Our aim with Sundays was to get a shot as soon as possible to the compositing stage, even when lighting and shading might still be in an early WIP stage. This is a good way to avoid the pitfall of trying to do too much in 3D when there might be easier solutions. Besides that, it's good to get feedback from a compositor on which areas are most important to improve on. This might include separating light sources to individual passes or splitting a reflection pass up into its raw and filter passes.
In this six-step tutorial I will give you some insight into the back-and-forth workflow
between lighting, shading and compositing we use here at PostPanic. Even though I have used V-Ray in this tutorial, certain parts could also be recreated with other render engines. For compositing you can use any software you are comfortable with, in our case we work with Nuke.
This tutorial will take a look at how I set up the lighting and shading for a set of realistic looking retro-futuristic surveillance cameras featured inside the Lennox Industries building in Sundays.
FyiFor all the assets you need go to creativebloq.com/vault/3dw95
Balance CG and compositing work for realistic results
Author profileJeroen AertsJeroen works as a senior 3D generalist at PostPanic in Amsterdam. He’s always trying to push the boundaries of what can be done both artistically and technically with 3ds Max.www.postpanic.net
108 3D WorlD June 2015 twitter.com/3DWorldMag
developProject insight

ProceSS: Set extenSionSeamlessly integrate photo-realistic CG with authentic and gritty footage
one Set uP hdri with v-ray rtThe first step is to get a rough idea of the lighting you want to use, in this case it’s mostly driven by the HDR shot on location. Even when using image based lighting there is plenty of room for artistic control. Think about adding more or less contrast and saturation to certain areas to achieve the look you have in mind. To get a good idea of what the lighting is doing, I like to render with a diffuse off-white shader.
two Setting uP baSe materialSOnce I’m happy with how the lighting looks I will start making some base materials for the shot. For this particular shot I made a black painted metal, a white painted metal, a chrome-like material with a rough surface, and a grey plastic. Again, with V-Ray RT, it’s fast to give these materials the look and feel you’re after because you can just play with all the settings and get near instant feedback.
three reFining ShaderSAfter creating a strong base for the look of the shot I will quickly start assigning the materials to the objects on the camera. At this stage there was a lot of freedom in creating a look I liked, so I just experimented with some different colour schemes. Once this is done it’s a good idea to get the diffuse textures in place, whether this is by painting or using existing maps, as they may drive the maps used for reflection, bump, and so on.
Four baSic render PaSSeSAround this stage I’ll start switching from RT to the main V-Ray renderer as this will be used for the final output. It’s also good for checking once in a while if the results are the same, since some options are not fully supported in RT. For this shot I used Irradiance Mapping with the High preset and that didn’t require much tweaking. The Render Elements are very straightforward: GI, reflection, AO, z-depth and some IDs for masking.
Five comPoSiting renderSIt might be tricky to get tight and dark enough contact shadows with GI – some engines have difficulty doing this; so I usually add an ambient occlusion pass to my beauty renders. I also rendered the glass for the lenses as a separate element as I don’t want everything behind it to sit in the refraction pass. This gives more control over the look of the inside of the lenses without having to render additional masks refracted through the glass.
Six additional PaSSeS to aFFect environmentSometimes all you need to integrate 3D into footage is a basic shadow and AO pass, but for this shot I wanted to have a bit more accurate GI so to solve this I made two passes. The first one has just the ceiling lit by my HDR. The second is the same but also has the cameras generating GI. By dividing these two passes it’s possible to extract the pure GI contribution of the cameras and apply this to footage.
When setting up the initial lighting, try making a few different setups. Make a lighting setup as best you can and then start over with a new idea/concept. It’s so fast to do this with V-Ray RT you could probably make three setups in 30 minutes if the geometry is not too heavy. Then compare them, maybe talk to someone else about it and decide which is best for the shot you are working on. This technique obviously works best when a shot is full CG and you have more freedom in setting up the lights.
initial lighting setupCompare a variety of lighting setups for best results
Just as what we render is affected by the environment, so should the environment be affected by what we render
Gi
No Gi
109 3D WorlD June 2015 twitter.com/3DWorldMag
vFx guide

Author profileAntony WardFor over two decades Antony Ward, Creative Director at antCGi Ltd has been provoking pixels. In that time he has worked for many top studios and written three technical manuals. www.antcgi.com
Software review
Maya 2016
The new Mudbox based sculpting tools work well and are a much needed addition. Hopefully texture painting comes nextImprovements
to Viewport 2.0 mean more shader attributes can be viewed without the need for a test render
price £3,100 (buy) £155 (monthly licence) £390 (quarterly licence) £1,240 (annual licence) | compAny Autodesk | website www.autodesk.co.uk
It’s been an interesting 12 months. Since the release of Maya 2015 I have been
fortunate enough to become part of the Maya Beta programme. This has allowed me to watch as the application has slowly morphed into its present state, while also giving me the opportunity to test any new features and suggest changes along the way.
Now the time has come for it to be signed off, sealed and delivered
to customers. But is it worth the upgrade cost? Although there are a host of enhancements and added tools, this time around Autodesk haven’t bolted on any large, fancy new features as has been the trend with previous releases.
Instead, they have chosen to focus more on what’s already inside the application, enhancing and improving many of the tools and workflows already familiar to its users. Personally, I think this is great news and I for one am happy they have chosen to focus their energies on improving what’s already a great tool.
On loading Maya 2016 the first thing you will notice is the new, cleaner user interface. Everything has had a facelift with simplified icons and reorganised menus, but this isn’t just for cosmetic reasons. The new UI is completely scalable, making it ideal for higher resolution displays like the Surface Pro 3 or Cintiq Companion 2. Now you no longer need to squint at
tiny icons if you’re working on a tablet and the beauty of it is, it’s customisable.
Take note Adobe with your limited 200 per cent scale, Autodesk have outdone you by offering us the option to match the systems DPI or change the scale via 25 per cent increments. This may not mean a lot to many of you,
but to those of us who work on the move, this is a godsend.
Next up is a feature which has long been overdue an update: the sculpting tools. Gone are the tired artisan brushes which no one ever really used. In Maya 2016 Autodesk have brought in part of the Mudbox engine allowing you to use 18 of its key brushes and tools.
If it continues this trend with futurebuilds then Maya could wellbecome the 3D app to beat
110 3D WorlD June 2015 twitter.com/3DWorldMag
developSoftware review
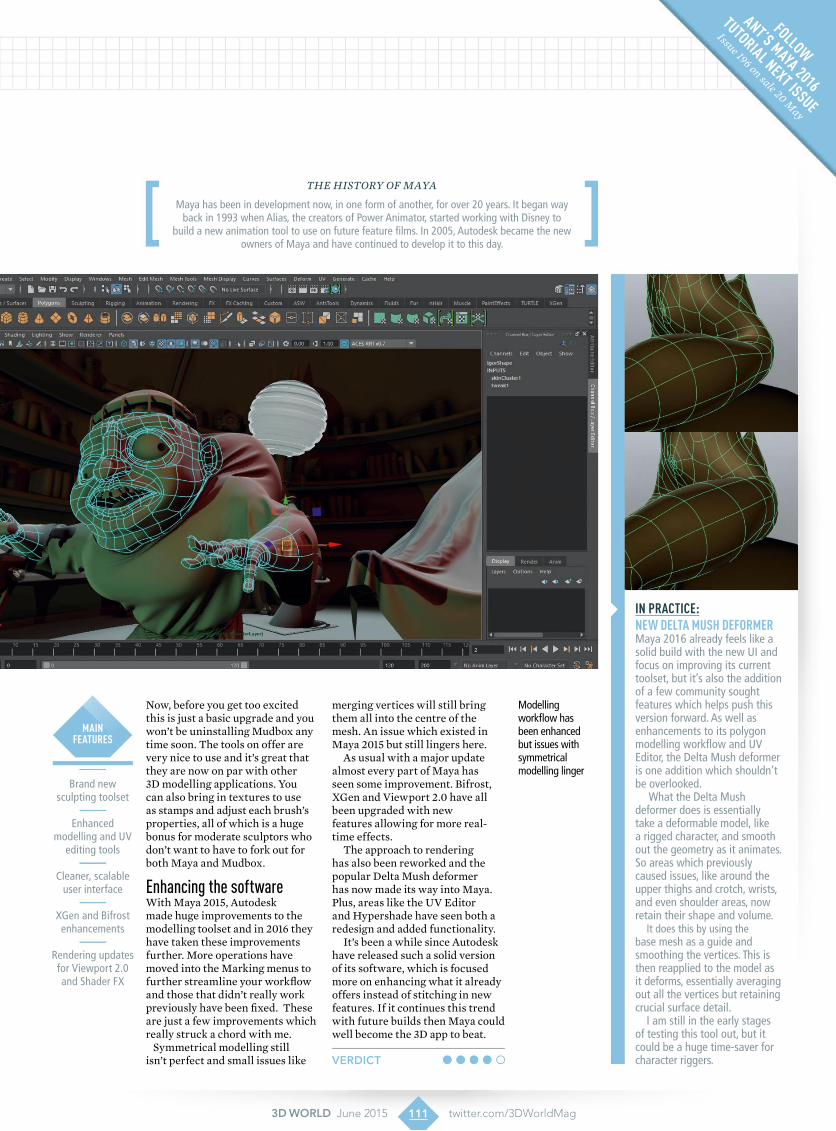
VerDict
Brand new sculpting toolset
Enhanced modelling and UV
editing tools
Cleaner, scalable user interface
XGen and Bifrost enhancements
Rendering updates for Viewport 2.0 and Shader FX
Main Features
Now, before you get too excited this is just a basic upgrade and you won’t be uninstalling Mudbox any time soon. The tools on offer are very nice to use and it’s great that they are now on par with other 3D modelling applications. You can also bring in textures to use as stamps and adjust each brush’s properties, all of which is a huge bonus for moderate sculptors who don’t want to have to fork out for both Maya and Mudbox.
enhancing the softwareWith Maya 2015, Autodesk made huge improvements to the modelling toolset and in 2016 they have taken these improvements further. More operations have moved into the Marking menus to further streamline your workflow and those that didn’t really work previously have been fixed. These are just a few improvements which really struck a chord with me. Symmetrical modelling still isn’t perfect and small issues like
merging vertices will still bring them all into the centre of the mesh. An issue which existed in Maya 2015 but still lingers here.
As usual with a major update almost every part of Maya has seen some improvement. Bifrost, XGen and Viewport 2.0 have all been upgraded with new features allowing for more real-time effects.
The approach to rendering has also been reworked and the popular Delta Mush deformer has now made its way into Maya. Plus, areas like the UV Editor and Hypershade have seen both a redesign and added functionality.
It’s been a while since Autodesk have released such a solid version of its software, which is focused more on enhancing what it already offers instead of stitching in new features. If it continues this trend with future builds then Maya could well become the 3D app to beat.
in practice: neW DeLta Mush DeFOrMerMaya 2016 already feels like a solid build with the new UI and focus on improving its current toolset, but it’s also the addition of a few community sought features which helps push this version forward. As well as enhancements to its polygon modelling workflow and UV Editor, the Delta Mush deformer is one addition which shouldn’t be overlooked.
What the Delta Mush deformer does is essentially take a deformable model, like a rigged character, and smooth out the geometry as it animates. So areas which previously caused issues, like around the upper thighs and crotch, wrists, and even shoulder areas, now retain their shape and volume.
It does this by using the base mesh as a guide and smoothing the vertices. This is then reapplied to the model as it deforms, essentially averaging out all the vertices but retaining crucial surface detail.
I am still in the early stages of testing this tool out, but it could be a huge time-saver for character riggers.
Modelling workflow has been enhanced but issues with symmetrical modelling linger
111 3D WorlD June 2015 twitter.com/3DWorldMag
The hiSTory of Maya
Maya has been in development now, in one form of another, for over 20 years. It began way back in 1993 when Alias, the creators of Power Animator, started working with Disney to
build a new animation tool to use on future feature films. In 2005, Autodesk became the new owners of Maya and have continued to develop it to this day.
FOLLOW
ant’s Maya 2016
tutOriaL next issue
issue 196 on sale 20 May

arnold’s evolution
A bridge between Arnold and Cinema 4D was first mooted in the summer of 2013, instigated by Daniel Hinnies of Ugly Kids. After a year of development, it became an official Solid Angle product, and was
demoed at Siggraph 2014. As a well-known and
production-proven renderer, Arnold is another important addition to C4D’s armoury.
Software review
Arnold for Cinema 4DPrice €£1,000, £875, $1,300 (per licence or render node) | comPany Solid Angle | website www.solidangle.com
Fast, memory efficient raytracing
renderer
Interactive preview renderer
Renders C4D hair, splines, and
particles
Supports TurbulenceFD and
X-Particles plug-ins
Renders volumetrics including OpenVDB
Main Features
The renderer responsible for films like Gravity, Guardians of the Galaxy, Elysium and
Pacific Rim is finally available to Cinema 4D users, and for a version 1.0, Arnold comes pretty fully-formed and feature-rich. The plug-in is nicely implemented within C4D and, barring a few interface niggles, provides a workflow that is easy to adapt to, with its node-based shader network and fast interactive preview renderer.
Naturally there are limitations to a rendering system bolted onto a host app: your huge collection of C4D material presets is redundant, while native features such as the ground plane, physical sky object, instances and so on also don’t work.
However, it does support C4D’s hair, splines and particles, as well as the TurbulenceFD and X-Particles plug-ins, and also renders OpenVDB volumes. Arnold is also great with large datasets, and provides its own procedural instancing system.
As expected from a production-proven system like this, Arnold provides a lot of control over the final output, plus an extensive set of AOVs (Arbitrary Output Variables) or render passes. It comes with 23 built-in, with standard things like shadow, depth and normal passes, to
cputime and raycount, allowing you to debug complex scenes.
Arnold’s key benefit is the ease of creation of its physically based shaders, built using the node network and tweaked in Materials Editor. The shading and lighting process is sped up immeasurably by the IPR, which effectively removes the whole test-render workflow. But while Arnold is undeniably fast,
it’s not magic. Like any system, when you load it up with complex shaders, high AA values and volumetrics, render speed takes a hit – significantly at times. This is because Arnold never cheats; it’s doing full-on, brute-force global illumination rendering, and while it does it very quickly it still has a lot to calculate. Fortunately, it’s quite easy to dial up or down the quality and tweak your scenes by allocating rays and sampling where they’re needed.
Arnold is a serious production tool and comes at a hefty price. It’s also not really ideal for solo artists, for whom the brute-force approach can sometimes be too slow.
However, studios that can throw the power of a render farm at it will love the end results, which are wonderfully precise and realistic. Work is ongoing to further improve Arnold’s integration with C4D, but it’s off to a very impressive start.
The shading and lighting process is sped up immeasurably by the IPR
Verdict
author ProfileSteve JarrattSteve has been into CG for many years. He’s a regular contributor to 3D World and edited the magazine for a period of two years. bit.ly/steve-jarratt
112 3d World June 2015 twitter.com/3DWorldMag
developSoftware review
Arnold is great at handling heavy scenes, and with the right assets can produce breathtaking results

Software review
Substance Designer 5Price $149 (Indie) $590 (Pro) | comPany Allegorithmic | website www.allegorithmic.com
Tri-Planar Projection node
Bevel node
Animated textures
Dependency manager
Good UI enhancements
Main Features
Substance Designer is a procedural texture creation and compositing tool that
uses a non-destructive, non-linear workflow built around a node graph. This approach to texture or shader creation provides the user with speed and great versatility.
Recently released, Substance Designer 5 is packed with new features and workflow enhancements, ranging from a pixel processor to dynamic gradients and new blending modes, in addition to new baking functionality, a Dependency manager and template-functionality.
One of the standout features is the new Tri-Planar Projection node: This new World Space Normal and Position-map-based node projects your input, which it bases on your baked maps, over seams when applying dirt or other masks, thereby freeing some of the time painstakingly spent on seam paintovers and map-tweaks.
The vector node and animated textures are also strong, new
features, but there’s one that I was very happy to see: The new bevel node, which enables you to create hard or smooth surface detail on your normal map from scratch, nDo-style, which gives you the opportunity to bypass high-poly bakes in order to generate normal surface details.
The new Mask builder is also worth mentioning, as it enables you to create your own custom mask based on the existing mask generation filters, and so helps you make your item’s wear and tear look even more unique.
There are some new, handy additions to the interface as well: The Blend node now has
Photoshop-type Overlay and Divide modes; the New Substance dialog has been given user-created Template functionality, especially handy for pipeline-teams; and there now is a Dependency manager, which lets you see, and find, which components of your package are missing, giving you the option to locate or relocate the missing item before you load it.
There are few minor issues with this release: It still has no GoZ-type bridge to Painter or other apps, and the Substance Library UI could use a better, or deeper filter organisation option.
All in all, if you’re looking to add a new, standalone tool to your texturing toolkit, Substance Designer 5 offers a lot more functionality for less money than Genetica, for example. Add the baking and the shader export functionality, and it looks like Substance Designer is in a class entirely of its own.
The Tri-Planar Projection node frees up some of the time spent on seam paintovers/map-tweaks
Verdict
author ProfileCirstyn Bech-YagherCirstyn is a freelance CG artist and educator, with over a decade’s experience in 3D, focusing on modelling and texturing. northern-studios.com
the industry standard for PBr texturing
Used across the board in places ranging from indie artists to FunCom to Disney, Allegorithmic’s Substance Designer is a 3D texture creation and compositing tool that enables you to create fully procedural or hybrid textures or shaders. The node-graph
approach allows for speed and versatility in your texturing approach.
113 3d World June 2015 twitter.com/3DWorldMag
The workflow lets you tweak or alter anything, anytime, anywhere in your node graphs, which in turn will update to any node your update is connected to
Extensively used in gaming and media studios,
Substance Designer is dedicated to
texturing 3D items and environments
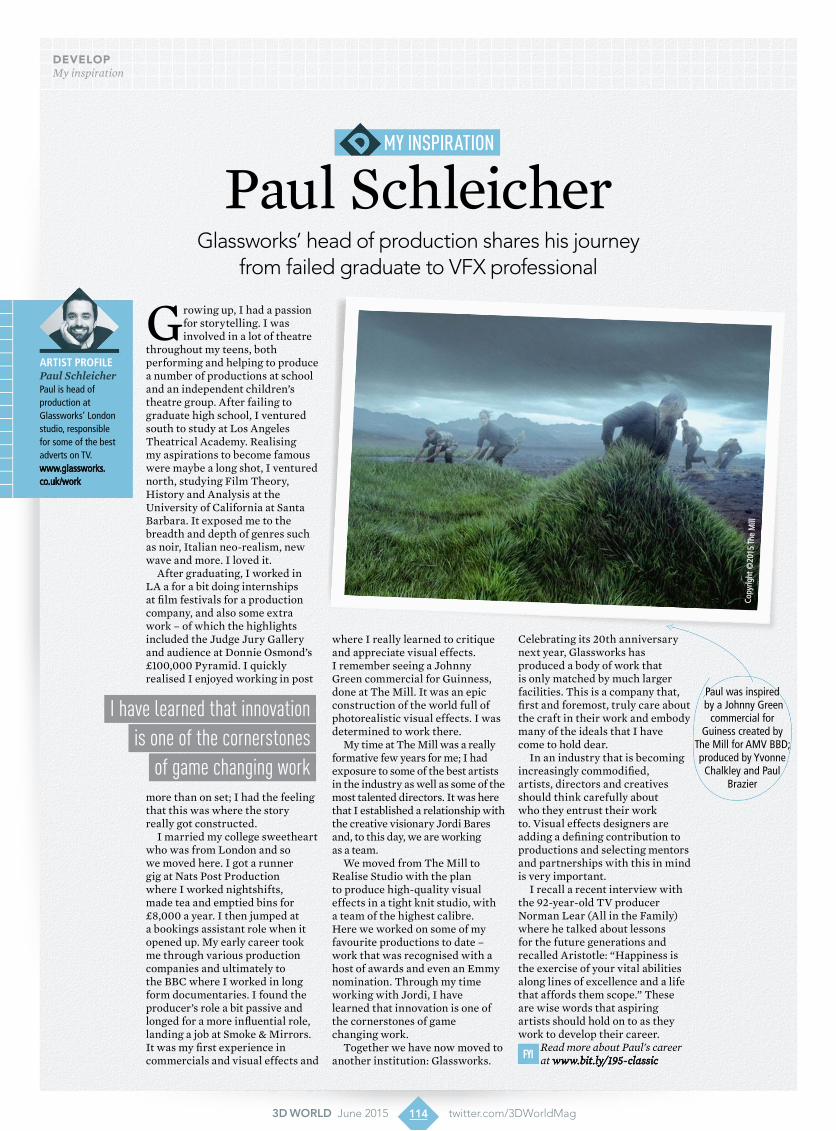
My inspiration
Paul SchleicherGlassworks’ head of production shares his journey
from failed graduate to VFX professional
developMy inspiration
Growing up, I had a passion for storytelling. I was involved in a lot of theatre
throughout my teens, both performing and helping to produce a number of productions at school and an independent children’s theatre group. After failing to graduate high school, I ventured south to study at Los Angeles Theatrical Academy. Realising my aspirations to become famous were maybe a long shot, I ventured north, studying Film Theory, History and Analysis at the University of California at Santa Barbara. It exposed me to the breadth and depth of genres such as noir, Italian neo-realism, new wave and more. I loved it.
After graduating, I worked in LA a for a bit doing internships at film festivals for a production company, and also some extra work – of which the highlights included the Judge Jury Gallery and audience at Donnie Osmond’s £100,000 Pyramid. I quickly realised I enjoyed working in post
more than on set; I had the feeling that this was where the story really got constructed.
I married my college sweetheart who was from London and so we moved here. I got a runner gig at Nats Post Production where I worked nightshifts, made tea and emptied bins for £8,000 a year. I then jumped at a bookings assistant role when it opened up. My early career took me through various production companies and ultimately to the BBC where I worked in long form documentaries. I found the producer’s role a bit passive and longed for a more influential role, landing a job at Smoke & Mirrors. It was my first experience in commercials and visual effects and
where I really learned to critique and appreciate visual effects. I remember seeing a Johnny Green commercial for Guinness, done at The Mill. It was an epic construction of the world full of photorealistic visual effects. I was determined to work there.
My time at The Mill was a really formative few years for me; I had exposure to some of the best artists in the industry as well as some of the most talented directors. It was here that I established a relationship with the creative visionary Jordi Bares and, to this day, we are working as a team.
We moved from The Mill to Realise Studio with the plan to produce high-quality visual effects in a tight knit studio, with a team of the highest calibre. Here we worked on some of my favourite productions to date – work that was recognised with a host of awards and even an Emmy nomination. Through my time working with Jordi, I have learned that innovation is one of the cornerstones of game changing work.
Together we have now moved to another institution: Glassworks.
I have learned that innovation is one of the cornerstones
of game changing work
ARTIST pRofIlePaul SchleicherPaul is head of production at Glassworks’ London studio, responsible for some of the best adverts on TV.www.glassworks.co.uk/work
Celebrating its 20th anniversary next year, Glassworks has produced a body of work that is only matched by much larger facilities. This is a company that, first and foremost, truly care about the craft in their work and embody many of the ideals that I have come to hold dear.
In an industry that is becoming increasingly commodified, artists, directors and creatives should think carefully about who they entrust their work to. Visual effects designers are adding a defining contribution to productions and selecting mentors and partnerships with this in mind is very important.
I recall a recent interview with the 92-year-old TV producer Norman Lear (All in the Family) where he talked about lessons for the future generations and recalled Aristotle: “Happiness is the exercise of your vital abilities along lines of excellence and a life that affords them scope.” These are wise words that aspiring artists should hold on to as they work to develop their career.
FYIRead more about Paul's career at www.bit.ly/195-classic
Paul was inspired by a Johnny Green
commercial for Guiness created by
The Mill for AMV BBD; produced by Yvonne
Chalkley and Paul Brazier
Copy
right
©20
15 T
he M
ill
114 3D WorlD June 2015 twitter.com/3DWorldMag


9000