
Von Duprin 98/9949 Concealed Vertical Device Installation ...
16
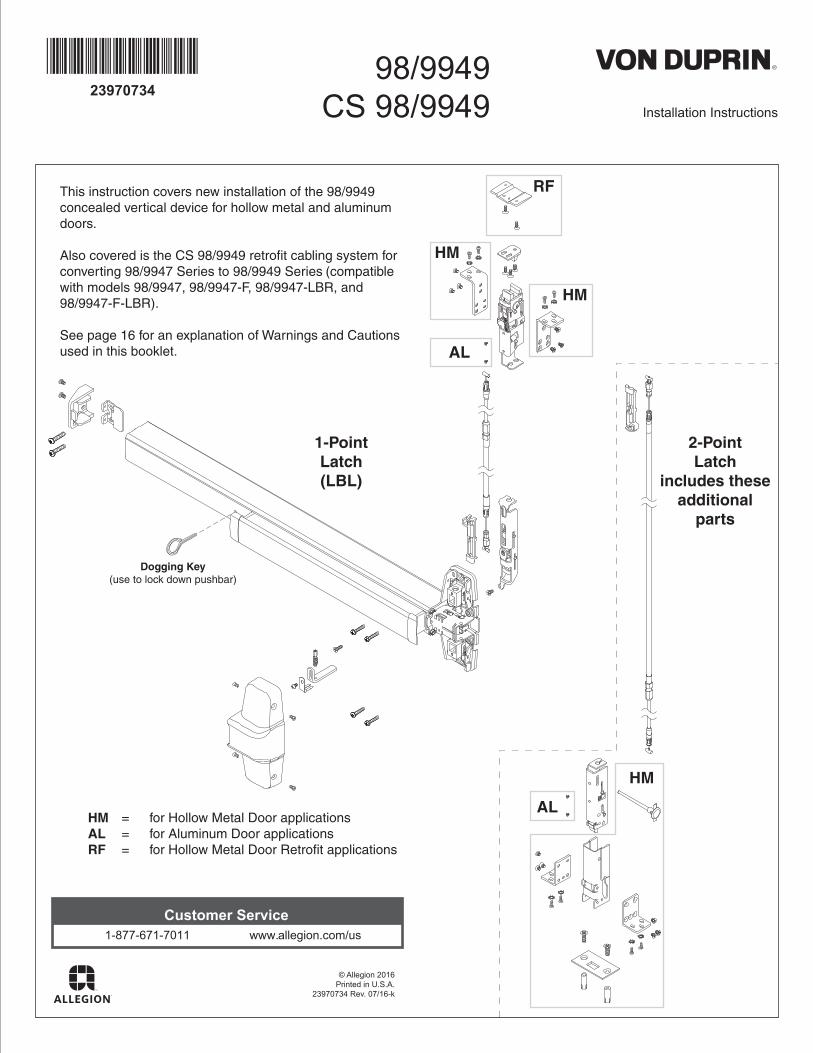
*23970734* 23970734 Installation Instructions 98/9949 CS 98/9949 © Allegion 2016 Printed in U.S.A. 23970734 Rev. 07/16-k Customer Service 1-877-671-7011 www.allegion.com/us 2-Point Latch includes these additional parts 1-Point Latch (LBL) AL HM HM AL HM = for Hollow Metal Door applications = for Aluminum Door applications = for Hollow Metal Door Retrofit applications HM AL RF RF This instruction covers new installation of the 98/9949 concealed vertical device for hollow metal and aluminum doors. Also covered is the CS 98/9949 retrofit cabling system for converting 98/9947 Series to 98/9949 Series (compatible with models 98/9947, 98/9947-F, 98/9947-LBR, and 98/9947-F-LBR). See page 16 for an explanation of Warnings and Cautions used in this booklet. Dogging Key (use to lock down pushbar)
-
Upload
khangminh22 -
Category
Documents
-
view
0 -
download
0
Transcript of Von Duprin 98/9949 Concealed Vertical Device Installation ...
*23970734*23970734
Installation Instructions
98/9949 CS 98/9949
© Allegion 2016Printed in U.S.A.
23970734 Rev. 07/16-k
Customer Service1-877-671-7011 www.allegion.com/us
2-PointLatch
includes theseadditional
parts
1-PointLatch(LBL)
AL
HM
HM
AL
HM
= for Hollow Metal Door applications = for Aluminum Door applications = for Hollow Metal Door Retrofit applications
HMALRF
RFThis instruction covers new installation of the 98/9949 concealed vertical device for hollow metal and aluminum doors.
Also covered is the CS 98/9949 retrofit cabling system for converting 98/9947 Series to 98/9949 Series (compatiblewith models 98/9947, 98/9947-F, 98/9947-LBR, and98/9947-F-LBR).
See page 16 for an explanation of Warnings and Cautionsused in this booklet.
Dogging Key(use to lock down pushbar)

2
CABLE IDENTIFICATION
CABLE COMPONENTS
Identify Cables and Locations. !1
Door opening height is distance from bottom of frame header to finished floor.
³⁄₈" Standard undercut
¹⁄₈"Top of door
to frame
Standard centerline
39⁵⁄₈"
For easy identification, each cable is labeled with part number and location.
A
B
6' 0" - 6' 10"
6' 10" - 8' 0"
8' 0" - 9' 2" 47250176
47250175
47250179
47250178Standard
Sizes
47250398 47250403
9' 2" - 10' 4"
10' 4" - 11' 6"
11' 6" - 12' 8" 47250400
47250399
47250405
47250404
47250177 47250180
12' 8" - 13' 10"
13' 10" - 15' 0" 47250402 47250407
47250401 47250406
Top Cable (Red)A
CABLE IDENTIFICATION
HOLLOW METAL ANDALUMINUM DOORS
Door Opening Height Bottom Cable (White)
B*
Based on standard centerline of 39⁵⁄₈" from finished floor*
NOTE: For retrofit installations, begin at Step 19.
ConduitLock
Casing Cap
Conduit CoreWire
EndFitting Nut
EndFitting
Large Diameter Conduit
Conduit Lock Nut
Cable Snap
Cable Snap
Conduit Bolt
Sizing Spacer Hook
Sizing Spacer
CABLE SIZING PREPARATIONAlign Sizing Tape to Horizontal Device Center Line as shown. For Bottom Cable Sizing (if applicable), Align Sizing Tape to Bottom Edge of Door.
2
Device
BOTTOM CABLE SIZINGBOTTOM CABLE SIZING RHR
LHR
TOP CABLE SIZINGTOP CABLE SIZING RHR
LHR
Top Cable sizing
Bottom Cable sizing
RHR Shown
Sizing Spacer
Top of door
For 2-Point Latch Only
Use cable components diagram above for reference.

3
CABLE SIZING
Loosen Conduit Lock Nut ¹⁄₂ Turn. At Opposite End of Cable, Pull Casing Cap to Line on Tape.
conduit lock nut
aTOW
AR
DS
TOP
OF D
OO
R
4
Hand TightenConduit Lock Nut.
5
end fitting
While Holding End Fitting in Place with Pliers, Fully Tighten End Fitting Nut with Wrench.
⁵⁄₁₆"
9
To Size Top Cable, Align Sizing Spacer Hook to Top Edge of Door.
3
hook
TOP EDGE
OF DOOR
Cut Core Wire Flush with End Fitting.
10
Snap Sizing Spacer onto Large Diameter Conduit for Storage.
11
For 2-Point Latch Only
To Size Bottom Cable, Align Sizing Spacer Hook to Top Edge of Door as before, and Repeat Steps 3 thru 10.
Repeat Steps 3 thru 10
12
Caution: Do not remove sizing spacer from cable assembly until indicated.
Remove Warning Label. While Pulling Core Wire Tight, Hand Tighten End Fitting Nut.
7
Wrench Tighten ConduitLock Nut ¹⁄₄ Turn.
⁷⁄₁₆"
⁷⁄₁₆"¹⁄₄" turn
6
WARNINGFailure to properly tighten conduit lock nut will result in device malfunction and
possible lock in or lock out situation.
Caution: Do not overtighten.
8 RemoveSizing Spacer. (Do not discard.)
b (Pull here)
end fitting nut
b
c
TOP EDGE
OF DOOR
a
WARNINGFailure to properly tighten end fitting nut will result in
device malfunction and possible lock in or lock out
situation.
Once tightened down, end fitting nut can’t be
loosened or readjusted.

4
Determine if Bottom Latch Retraction Adjustment is Necessary. For 2-Point Latch Only
a. Flex the cable into an L-shape as shown to simulate the installed condition of the latches.
16
a. Lock top latch. Flex the cable into an L-shape as before.
b. Push against flat side of bottom latchbolt. Latchboltshould NOT release.
If latchbolt releases, return conduit to position marked in Step 17a. Repeat bottom latch retraction adjustment.
Confirm Bottom Deadlatching. For 2-Point Latch Only
18
bottom latch(locked)
push
top latch(hold-openposition)
bottom latch(retracted)
¹⁄₁₆"
flush
press
b. To determine whether an adjustment is required, actuate the top latch to the hold-open position by pressing down on the connecting rod. Bottom latch should retract to within ¹⁄₁₆" of flush. If it does not, an adjustment is necessary.
If no adjustment is needed, proceed to Step 18.
connecting rod
CAUTIONAdjustment must be made while the top
latch is in the hold-open position.
CAUTIONCritical step
CAUTIONIf no bottom latch retraction adjustment was necessary, yet the bottom latch won't deadlatch, contact technical support.
a. Use a permanent marker or tape to mark position of bottom cable conduit.
b. Loosen conduit lock nut so conduit is free to slide.
c. Pull until (1) extra wrap of conduit can be seen(1 wrap = ¹⁄₈").
⁷⁄₁₆"⁷⁄₁₆"
Adjust Bottom Latch Retraction (if necessary). For 2-Point Latch Only
17
WARNINGFailure to properly tighten
conduit lock nut will result in device malfunction and
possible lock in or lock out situation.
Caution: Do not overtighten.
CAUTIONAdjustment must be made
while the top latch is in the hold-open position.
The conduit lock is used to make this adjustment.
e. Repeat Step 16. Confirm bottom latch now retracts to within ¹⁄₁₆" of flush.
d. Hand tighten conduit lock nut.
f. If not, loosen conduit lock nut, pull out an additional wrap of conduit, and hand tighten conduit lock nut.
g. Wrench tighten conduit lock nut ¹⁄₄ turn.
⁷⁄₁₆"
⁷⁄₁₆"
¹⁄₄" turn
d
g
c
b
a
CABLE INSTALLATION
Install Top Cable.
a. There is an end fitting on one end of the red cable. Position this end to clip on center slide.
c. Push cable snap against center slide to secure cable.
b. Pull cable into clip to snap it into place.
d. Follow steps (a) thru (c) to install opposite end of red cable to top latchin the position marked red.
d
cable snap
c
Redclip end fitting
a
b
Caution: Ensure cable end is fully
seated in clip.
14
CorrectOrientation
Wrong End
Caution: Ensure cable end is fully
seated in clip.
center slide
top latch
For 2-Point Latch Only
a. There is an end fitting on one end of the white cable. Install this end tothe remaining top latch position (marked as white).
b. Install opposite end of white cable to bottom latch.
b
aWhiteWhite
end fitting
CorrectOrientation
Wrong End
Caution: Ensure cable end is fully
seated in clip.
bottom latch
Flip Top Cable.13 Install Bottom Cable.15
Caution: After sizing, TOP cable must be flipped 180° before installing. See tag.
Cable Removal
A cable removal tool was included with device. Slot in tool fits over cable, holding tabs down. Pull on cable snap to loosen cable for removal.
slot
cable snap
b
a
(If the cable was installed in wrong position)

5
Determine if Bottom Latch Retraction Adjustment is Necessary. For 2-Point Latch Only
a. Flex the cable into an L-shape as shown to simulate the installed condition of the latches.
16
a. Lock top latch. Flex the cable into an L-shape as before.
b. Push against flat side of bottom latchbolt. Latchboltshould NOT release.
If latchbolt releases, return conduit to position marked in Step 17a. Repeat bottom latch retraction adjustment.
Confirm Bottom Deadlatching. For 2-Point Latch Only
18
bottom latch(locked)
push
top latch(hold-openposition)
bottom latch(retracted)
¹⁄₁₆"
flush
press
b. To determine whether an adjustment is required, actuate the top latch to the hold-open position by pressing down on the connecting rod. Bottom latch should retract to within ¹⁄₁₆" of flush. If it does not, an adjustment is necessary.
If no adjustment is needed, proceed to Step 18.
connecting rod
CAUTIONAdjustment must be made while the top
latch is in the hold-open position.
CAUTIONCritical step
CAUTIONIf no bottom latch retraction adjustment was necessary, yet the bottom latch won't deadlatch, contact technical support.
a. Use a permanent marker or tape to mark position of bottom cable conduit.
b. Loosen conduit lock nut so conduit is free to slide.
c. Pull until (1) extra wrap of conduit can be seen(1 wrap = ¹⁄₈").
⁷⁄₁₆"⁷⁄₁₆"
Adjust Bottom Latch Retraction (if necessary). For 2-Point Latch Only
17
WARNINGFailure to properly tighten
conduit lock nut will result in device malfunction and
possible lock in or lock out situation.
Caution: Do not overtighten.
CAUTIONAdjustment must be made
while the top latch is in the hold-open position.
The conduit lock is used to make this adjustment.
e. Repeat Step 16. Confirm bottom latch now retracts to within ¹⁄₁₆" of flush.
d. Hand tighten conduit lock nut.
f. If not, loosen conduit lock nut, pull out an additional wrap of conduit, and hand tighten conduit lock nut.
g. Wrench tighten conduit lock nut ¹⁄₄ turn.
⁷⁄₁₆"
⁷⁄₁₆"
¹⁄₄" turn
d
g
c
b
a

6
With Door Laying Flat, Draw Horizontal Device Center Line ( ).
RHR shown(LHR uses same cutout and hole
orientation)
Align Plastic Template and Mark Door.
If Retrofit Installation
a. Remove device from existing door.
b. Remove existing door.
c. Remove and discard existing strikes.
C aligns with center of holeL
NOTE: Centerline is predetermined by cutout. If no cutout exists, refer to Step 22 to determine centerline.
2³⁄₄" Backset Plastic
Template
NOTE: This hole is to be ¹⁄₂" diameter (disregard larger center hole of plastic template).
19
20
21
22 If Necessary, Prepare Door Cutouts.
RHR LHR
¹⁄₂"
1"
2³⁄₄" Backset
4¹⁄₄" Min. Stile
⁷⁄₈"
2¹⁵⁄₁₆"
5⁷⁄₈"
Latch
Device
1⁵⁄₈"
¹³⁄₁₆"
1³⁄₄"
3³⁄₄"
39⁵⁄₈" to finished
floor¹⁄₂" Dia.
(Omit for EO, DT, & TL)
Push side of door, RHR shown

7
RHR LHR
¹⁄₄" Dia.
3¹⁄₂"
⁹⁄₃₂"
⁹⁄₁₆"
Latch
Device
Push side of door, RHR shown
If Necessary, Prepare 2 Center Slide Holes.
¹⁄₄" Dia.82° Csk to ³⁄₈" Dia.
Push Side Only(this hole is positioned to the left of centerline
for both RHR and LHR)
Prepare 4 Holes per Plastic Template.
Surface Mount(metal doors only)
#25
#10-24
Sex Bolts or 990 Trims
¹⁄₄" (device side)
¹³⁄₃₂" (trim side)OR
23 24
Assemble Latch Mounting Brackets.
BottomFor 2-Point Latch Only
³⁄₄" mounting shown
Top
3/4"
1/4"
3/4"
1/4"
1/4"3/4"
Depth from top edge of door to the channel
25Hollow Metal Only
10-32 x ¹⁄₄"
10-32 x ¹⁄₄"

8
Prepare Bottom of Door for Latch Mounting.
Latch
1¹⁄₂"2¹⁄₄"
⁷⁄₃₂" Dia. x282˚ Csk to ³⁄₈" Dia.
Push Side of Door
Aluminum For 2-Point Latch Only
If Using 696/697 Thru-Bolting Trim, Remove Center Slide Mounting Nut.
Prepare Top of Door for Latch Mounting.
Latch
1¹⁄₂"3⁷⁄₁₆"⁷⁄₃₂" Dia. x282˚ Csk to ³⁄₈" Dia.
Push Side of Door
Prepare Access Hole for Bottom Latch Adjustment Pin.
3¹⁵⁄₁₆"
⁵⁄₈" from push side of door
Bottom of Door Door EdgeRHR
⁵⁄₈" from push
side of door
Door EdgeLHR
³⁄₄" Dia.hole
4¹⁄₄" depth clearance required
Door Door
Hollow Metal For 2-Point Latch Only
If Necessary, Prepare Door for Top Strike Cutout.
1¹⁄₄"
⁹⁄₁₆"
Cut out material this side only
Latch
Push side of door, RHR shown
26
27
28
29
30
Remove Screw from Center Slide.31
32
Aluminum Only
Slide Latch and Center Slide Assembly thru Door.
Top
Top
1-Point Latch (LBL)
2-Point Latch
Hollow Metal Door application shown
NOTE: Confirm top latch (and bottom latch, if applicable) is in correct orientation before proceeding.
NOTE: It is normal for the cable to bend inside the door, forcing the latch outward.
Holes should face push side (notch side) of door
Notch
Holes should face push side (notch side) of door
Holes should face push side (notch side) of door
Thru-bolting trim uses standoffs (697DT trim shown)
mounting nut has left-handed threading
³⁄₈" socketwith ¹⁄₄" drive
center slide mounting
nut
This screw will be used to secure center slide to door in Step 33.

9
Secure Center Slide to Door.
Secure center slide to door by lightly tightening lower screw.
Align upper hole visually.
Insert small screwdriver into upper hole to prevent center slide from rotating.
Fully tighten lower screw.
b
c
d
Align Bottom Latch and Install Mounting Screws. Aluminum For 2-Point Latch Only
Install Bottom Latch Mounting Bracket Assembly. Hollow Metal For 2-Point Latch Only
NOTE: Use 2 screws per bracket (center hole not used for this application).
#25
#10-24
10-24 x ¹⁄₂"
NOTE: Confirm correct orientation of assembly before proceeding. Open side of housing should face pull side of door.
Secure Top Latch with 2 Screws.
10-32 x ¹⁄₄"
10-32 x ¹⁄₄"
33 34
35
36
Aluminum Only
If using³⁄₄" undercut door
¹⁄₄" spacer blocks (2)are required
Spacer Block Kit(24231516)
purchased separately
Push Side(Notch Side)
of Door
a10-24 x ³⁄₈"

10
Hang Door on Frame.
Insert Latch Adjustment Pin to Hold Bottom Latch in Place.
Pin must go thru both sides of bracket
Hollow Metal For 2-Point Latch Only
Bottom edge of latch housing
should be flush with bottom of door (for
³⁄₈" standard undercut)
Squeeze tabs on cap, then insert pin
Assemble pin
a b
If Necessary, Cut Device.
Cover PlateFlush
Door
1¹⁄₂" (38 mm)RecommendedJa
mb
Jamb
Temporarily Remove Anti-Rattle Clip
If Necessary, Remove NL Drive Screw.
With the NL drive screw removed, key locks and unlocks lever, knob, or thumb piece. For the trims listed below, REMOVE NL drive screw.
996L 696TP 990TP 996K 697TP
With the NL drive screw installed, key retracts latch bolt. DO NOT remove NL drive screw for the following applications:
NL, EO, DT trims and 98/99-2 double cylinder devices (i.e. TP-2, L-2, and K-2).
If the trim being installed is "BE" (i.e. 996L-BE), the trim lock tumbler on the back of the device must be in the UP position before device is installed. This allows the trim to be unlocked at all times.
*
*996L-BE*996K-BE
*E996L*E996L-BE
*696TP-BE*697TP-BE
*990TP-BE
NL drive screw Factory installed on back of center case
CorrectOrientation(RHR shown)
IncorrectOrientation
trim locktumbler in UP position
If necessary, remove drive screw and rotate cam until trim lock tumbler is in UP position, then reinstall drive screw
360˚
Secure Top Latch Mounting Bracket.
#25
#10-24
10-24 x ¹⁄₂"
NOTE: Use 2 screws per bracket (center hole not used for this application).
NOTE: It is normal for the cable to bend inside the door, forcing the latch outward as shown here.
37
38
39
40
41
Hollow Metal Only
Caution: For 2-point latches, bottom latch cannot be in locked position while hanging door on frame. Latch must be retracted.

11
Attach Center Case to Door.
Surface Mount(metal doors only)
Sex Bolts
Thru-bolting Trim
(1³⁄₄" door) 10-24 x 1³⁄₈"
(2¹⁄₄" door) 10-24 x 1⁷⁄₈"
(1³⁄₄" door) 10-24 x 1"
(2¹⁄₄" door) 10-24 x 1¹⁄₂"
Install Top Center Slide Screw.
NOTE: If using 696/697 trim, this screw will pass thru top center slide hole and secure directly into trim during Step 43.
Mark and Prepare 2 Holes.
b
Surface Mount (metal doors only)
Sex Bolts
¹⁄₄" (device side)
¹³⁄₃₂" (trim side)
OR
#25 #10-24
c
a
Install End Cap Bracket and End Cap.
Surface Mount or Sex Bolts (1³⁄₄" door) 10-24 x ³⁄₄"
Sex Bolts (2¹⁄₄" door) 10-24 x 1¹⁄₈"
10-16 x ³⁄₈"
10-24 x 1"
10-24 x 1¹⁄₄"
OR
42
43
44
45

12
Prepare Floor for Bottom Strike.
⁷⁄₈" 1" 1"
⁷⁄₈"
¹⁄₂"
³⁄₈" Dia. x 1¹⁄₄" Deep2 places
Chisel out pocket¹⁄₂" Deep
Latch
Hollow Metal For 2-Point Latch Only
Push Side
Pull Side
Install Bottom Strike.
Clear holes of debris, then drop in anchors (slotted end first)
Secure the anchors using a hammer and punch
Install strike plate and secure with 2 screws
a
c
349 Bottom Strike
Hollow Metal For 2-Point Latch Only
b IMPORTANT: Anchors must be below flush.
If New Installation, Prepare Door Frame for Top Strike.
Install 2 Top Strike Screws Using the Slot Features on the Strike.
If Retrofit Installation, Install Steel Cover Plate to Cover Existing 338 Strike Opening in Accordance with the Frame Manufacturer’s Fire Listing.
ba
Edgeof
stop
¹⁄₂"Use strike to
mark locationof 2 holes
Latch
Metal
Wood
#25 x ¹⁄₂" Deep x2
#10-24
¹⁄₈" Drill Pilot 1" Deep x2
OR
249 Top Strike
10-24 x ¹⁄₂"
#10 x 1¹⁄₂"
¹⁄₄-20 x ³⁄₄"
10-24 x ¹⁄₂"
Retrofit installation
(metal)
(wood)
Strike Filler Plate (24230914)purchased separately
46
47
48
49
50

13
Prepare Threshold. Aluminum For 2-Point Latch Only
a. After closing door with bottom latch installed, mark location wherebottom latch bolt is contacting the threshold.
b. Drill a ³⁄₄" diameter hole in the threshold.
Stop
³⁄₄" Dia.
Latch
Latch bolt
Install Lift Finger and Retainer Clip.
Slide L-shaped lift finger thru block in device center case and then into center slide
Insert adjustment screw and rotate clockwise with screwdriver to raise lift finger until it is snug against block
slot
For 2-Point Latch Only
Push cable to the side so it does not interfere with lift finger.
Lift finger must pass below locking tumbler(back of center case shown for clarity)
cb
NOTE: Lift finger installation must be performed while the latches are in the extended (latched) position.
Adjust Lift Finger.
NOTE: Lift finger adjustment must be performed while the latches are in the extended (latched) position.
e
d
f
Loosen retainerclip screw
Tighten retainer clip screw
Secure lift finger and retainer clip with screw
Install retainer clip against lift finger, snapping it into the slot of the adjustment screw
It may be necessary to back out adjustment screw a couple turns to see slot.
Lift finger must insert into center slide here
51
52
53
While maintaining downward pressure,turn adjustment screw counterclockwise tolower lift finger to point where top latchunlocks with pushpad depressedhalfway
8-32 x ⁵⁄₁₆"
b
a
c
a. Lock top latch.
b. Push down on top latchbolt. Latchboltshould NOT release.
Confirm Top Deadlatching. 54
top latch(locked)
push
a
block
If latchbolt releases, Loosen retainer clip screw. Rotate adjustment screw
clockwise a couple turns to raise lift finger. Retighten retainer clip screw.

14
1. Remove mortise cylinder cam and reinstall in reverse (Figure 1).2. Insert key and rotate cam to install the cylinder to the cover plate (Figure 2).3. Remove key to slide cover plate in position in the mechanism case.
Std. mortise cylinder
Mortise cylinder cam
Std. mortise cylinder
Mortise cylinder cam
CD function conversion
Dogging procedure
Turn cylinder key approximately ¹⁄₈ turn for standard dogging
Depress pushbar
Figure 1
Figure 2
Std. mortise cylinder
Offset toward pushbar
Dogging plate cover
Cylinder collar
Cylinder locking washer Cylinder
locking nut
Mechanism case
OPTIONAL EQUIPMENTCD (CYLINDER DOGGING)
Adjust Top Strike as Necessary, then Install the Third Strike Screw to Fix the Strike Position.
Metal
Wood
#25 x ¹⁄₂" Deep
#10-24
¹⁄₈" Drill Pilot 1" Deep
OR
(metal)10-24 x ¹⁄₂"
(wood)#10 x 1¹⁄₂"
56
Install Center Case Cover.
Remove protective film from pushbar
57
8-18 x ³⁄₈"
Perform Functional Test of Door.
For 2-Point Latch Only
a. Depress pushbar. Door should begin to open when pushbar is nearlyfully depressed. If necessary, refer to Step 53 to readjust lift finger.
b. With door closed, top latch should be secure.
c. With door closed, bottom latch should be secure.
d. Confirm that bottom latch does not drag against floor when door is opened.
If this occurs, remove latch adjustment pin and raise latch, then reinsert pin in next notch.
Pin must go thru both sides of bracket
Hollow Metal For 2-Point Latch Only
Squeeze tabs on cap before reinserting pin
To remove pin, slide a screwdriver beneath the latch adjustment pin cap
55

15
1. Remove mortise cylinder cam and reinstall in reverse (Figure 1).2. Insert key and rotate cam to install the cylinder to the cover plate (Figure 2).3. Remove key to slide cover plate in position in the mechanism case.
Std. mortise cylinder
Mortise cylinder cam
Std. mortise cylinder
Mortise cylinder cam
CD function conversion
Dogging procedure
Turn cylinder key approximately ¹⁄₈ turn for standard dogging
Depress pushbar
Figure 1
Figure 2
Std. mortise cylinder
Offset toward pushbar
Dogging plate cover
Cylinder collar
Cylinder locking washer Cylinder
locking nut
Mechanism case
OPTIONAL EQUIPMENTCD (CYLINDER DOGGING)

16
WARNINGS AND CAUTIONS
Caution: Cautions indicate a condition that may cause equipment or property damage only.
WARNINGWarnings indicate potentially hazardous conditions, which if not
avoided or corrected, may cause death or serious injury.
CAUTIONCautions indicate potentially hazardous conditions, which if
not avoided or corrected, may cause minor or moderate injury. Cautions may also warn against unsafe practices.