Veritas™ Volume Replicator Web GUI Administrator's Guide
101
Veritas™ Volume Replicator Web GUI Administrator's Guide AIX 5.0 Maintenance Pack 3
-
Upload
khangminh22 -
Category
Documents
-
view
1 -
download
0
Transcript of Veritas™ Volume Replicator Web GUI Administrator's Guide
Veritas™ Volume ReplicatorWeb GUI Administrator'sGuide
AIX
5.0 Maintenance Pack 3
Veritas™ Volume Replicator Web GUI Administrator'sGuide
The software described in this book is furnished under a license agreement and may be usedonly in accordance with the terms of the agreement.
Product Version: 5.0 MP3
Document version: 5.0MP3.0
Legal NoticeCopyright © 2008 Symantec Corporation. All rights reserved.
Symantec, the Symantec Logo, Veritas Storage Foundation and Veritas are trademarks orregistered trademarks of Symantec Corporation or its affiliates in the U.S. and othercountries. Other names may be trademarks of their respective owners.
This Symantec product may contain third party software for which Symantec is requiredto provide attribution to the third party (“Third Party Programs”). Some of the Third PartyPrograms are available under open source or free software licenses. The License Agreementaccompanying the Software does not alter any rights or obligations you may have underthose open source or free software licenses. Please see the Third Party Legal Notice Appendixto this Documentation or TPIP ReadMe File accompanying this Symantec product for moreinformation on the Third Party Programs.
The product described in this document is distributed under licenses restricting its use,copying, distribution, and decompilation/reverse engineering. No part of this documentmay be reproduced in any form by any means without prior written authorization ofSymantec Corporation and its licensors, if any.
THE DOCUMENTATION IS PROVIDED "AS IS" AND ALL EXPRESS OR IMPLIED CONDITIONS,REPRESENTATIONS AND WARRANTIES, INCLUDING ANY IMPLIED WARRANTY OFMERCHANTABILITY, FITNESS FOR A PARTICULAR PURPOSE OR NON-INFRINGEMENT,ARE DISCLAIMED, EXCEPT TO THE EXTENT THAT SUCH DISCLAIMERS ARE HELD TOBE LEGALLY INVALID. SYMANTEC CORPORATION SHALL NOT BE LIABLE FOR INCIDENTALOR CONSEQUENTIAL DAMAGES IN CONNECTION WITH THE FURNISHING,PERFORMANCE, OR USE OF THIS DOCUMENTATION. THE INFORMATION CONTAINEDIN THIS DOCUMENTATION IS SUBJECT TO CHANGE WITHOUT NOTICE.
The Licensed Software and Documentation are deemed to be commercial computer softwareas defined in FAR 12.212 and subject to restricted rights as defined in FAR Section 52.227-19"Commercial Computer Software - Restricted Rights" and DFARS 227.7202, "Rights inCommercial Computer Software or Commercial Computer Software Documentation", asapplicable, and any successor regulations. Any use, modification, reproduction release,performance, display or disclosure of the Licensed Software and Documentation by the U.S.Government shall be solely in accordance with the terms of this Agreement.

Symantec Corporation20330 Stevens Creek Blvd.Cupertino, CA 95014
http://www.symantec.com

Technical SupportSymantec Technical Support maintains support centers globally. TechnicalSupport’s primary role is to respond to specific queries about product featuresand functionality. The Technical Support group also creates content for our onlineKnowledge Base. The Technical Support group works collaboratively with theother functional areas within Symantec to answer your questions in a timelyfashion. For example, the Technical Support group works with Product Engineeringand Symantec Security Response to provide alerting services and virus definitionupdates.
Symantec’s maintenance offerings include the following:
■ A range of support options that give you the flexibility to select the rightamount of service for any size organization
■ Telephone and Web-based support that provides rapid response andup-to-the-minute information
■ Upgrade assurance that delivers automatic software upgrade protection
■ Global support that is available 24 hours a day, 7 days a week
■ Advanced features, including Account Management Services
For information about Symantec’s Maintenance Programs, you can visit our Website at the following URL:
http://www.symantec.com/techsupp/
Contacting Technical SupportCustomers with a current maintenance agreement may access Technical Supportinformation at the following URL:
http://www.symantec.com/business/support/index.jsp
Before contacting Technical Support, make sure you have satisfied the systemrequirements that are listed in your product documentation. Also, you should beat the computer on which the problem occurred, in case it is necessary to replicatethe problem.
When you contact Technical Support, please have the following informationavailable:
■ Product release level
■ Hardware information
■ Available memory, disk space, and NIC information
■ Operating system

■ Version and patch level
■ Network topology
■ Router, gateway, and IP address information
■ Problem description:
■ Error messages and log files
■ Troubleshooting that was performed before contacting Symantec
■ Recent software configuration changes and network changes
Licensing and registrationIf your Symantec product requires registration or a license key, access our technicalsupport Web page at the following URL:
http://www.symantec.com/techsupp/
Customer serviceCustomer service information is available at the following URL:
http://www.symantec.com/techsupp/
Customer Service is available to assist with the following types of issues:
■ Questions regarding product licensing or serialization
■ Product registration updates, such as address or name changes
■ General product information (features, language availability, local dealers)
■ Latest information about product updates and upgrades
■ Information about upgrade assurance and maintenance contracts
■ Information about the Symantec Buying Programs
■ Advice about Symantec's technical support options
■ Nontechnical presales questions
■ Issues that are related to CD-ROMs or manuals

Maintenance agreement resourcesIf you want to contact Symantec regarding an existing maintenance agreement,please contact the maintenance agreement administration team for your regionas follows:
[email protected] and Japan
[email protected], Middle-East, and Africa
[email protected] America and Latin America
Additional enterprise servicesSymantec offers a comprehensive set of services that allow you to maximize yourinvestment in Symantec products and to develop your knowledge, expertise, andglobal insight, which enable you to manage your business risks proactively.
Enterprise services that are available include the following:
These solutions provide early warning of cyber attacks, comprehensive threatanalysis, and countermeasures to prevent attacks before they occur.
Symantec Early Warning Solutions
These services remove the burden of managing and monitoring security devicesand events, ensuring rapid response to real threats.
Managed Security Services
Symantec Consulting Services provide on-site technical expertise fromSymantec and its trusted partners. Symantec Consulting Services offer a varietyof prepackaged and customizable options that include assessment, design,implementation, monitoring, and management capabilities. Each is focused onestablishing and maintaining the integrity and availability of your IT resources.
Consulting Services
Educational Services provide a full array of technical training, securityeducation, security certification, and awareness communication programs.
Educational Services
To access more information about Enterprise services, please visit our Web siteat the following URL:
http://www.symantec.com
Select your country or language from the site index.
Technical Support . . . . . . . . . . . . . . . . . . . . . . . . . . . . . . . . . . . . . . . . . . . . . . . . . . . . . . . . . . . . . . . . . . . . . . . . . . . . . . . . . . . . . . . . . . . . . . . 4
Chapter 1 Getting started . . . . . . . . . . . . . . . . . . . . . . . . . . . . . . . . . . . . . . . . . . . . . . . . . . . . . . . . . . . . . . . . . . . . . 11
Introduction .... . . . . . . . . . . . . . . . . . . . . . . . . . . . . . . . . . . . . . . . . . . . . . . . . . . . . . . . . . . . . . . . . . . . . . . . . . . . . 11Features of VRW ..... . . . . . . . . . . . . . . . . . . . . . . . . . . . . . . . . . . . . . . . . . . . . . . . . . . . . . . . . . . . . . . . . . . . . . 11Web browser requirements ... . . . . . . . . . . . . . . . . . . . . . . . . . . . . . . . . . . . . . . . . . . . . . . . . . . . . . . . . . 12Veritas Volume Replicator on the Web .... . . . . . . . . . . . . . . . . . . . . . . . . . . . . . . . . . . . . . . . . . 13Related Veritas documents ... . . . . . . . . . . . . . . . . . . . . . . . . . . . . . . . . . . . . . . . . . . . . . . . . . . . . . . . . . 13Role-based administration .... . . . . . . . . . . . . . . . . . . . . . . . . . . . . . . . . . . . . . . . . . . . . . . . . . . . . . . . . . 13
Features available with the operator role ... . . . . . . . . . . . . . . . . . . . . . . . . . . . . . . . . . 14
Chapter 2 Setting up replication . . . . . . . . . . . . . . . . . . . . . . . . . . . . . . . . . . . . . . . . . . . . . . . . . . . . . . . . . 15
About setting up replication .... . . . . . . . . . . . . . . . . . . . . . . . . . . . . . . . . . . . . . . . . . . . . . . . . . . . . . . . 15Overview of setting up replication .... . . . . . . . . . . . . . . . . . . . . . . . . . . . . . . . . . . . . . . . . . . . . . . . 15
Example scenario ... . . . . . . . . . . . . . . . . . . . . . . . . . . . . . . . . . . . . . . . . . . . . . . . . . . . . . . . . . . . . . . . . 16Creating a Replicated Data Set ... . . . . . . . . . . . . . . . . . . . . . . . . . . . . . . . . . . . . . . . . . . . . . . . . . . . . . 16
Creating a Primary RVG of the RDS .... . . . . . . . . . . . . . . . . . . . . . . . . . . . . . . . . . . . . . . . 17Adding a Secondary to the RDS .... . . . . . . . . . . . . . . . . . . . . . . . . . . . . . . . . . . . . . . . . . . . . . 20
Adding a bunker Secondary to the RDS .... . . . . . . . . . . . . . . . . . . . . . . . . . . . . . . . . . . . . . . . . 25Add Bunker: Prerequisites panel ... . . . . . . . . . . . . . . . . . . . . . . . . . . . . . . . . . . . . . . . . . . . . 25Add Bunker: Bunker Host, DiskGroup and Protocol panel ... . . . . . . . . . . . 25Add Bunker: Confirmation panel ... . . . . . . . . . . . . . . . . . . . . . . . . . . . . . . . . . . . . . . . . . . . . 26
Synchronizing the Secondary and starting replication .... . . . . . . . . . . . . . . . . . . . . 27Setting up replication using automatic synchronization .... . . . . . . . . . . . . 27Setting up replication using full synchronization .... . . . . . . . . . . . . . . . . . . . . . 28Setting up replication using block-level backup and
checkpoint ... . . . . . . . . . . . . . . . . . . . . . . . . . . . . . . . . . . . . . . . . . . . . . . . . . . . . . . . . . . . . . . . . . . . 29Setting up replication using difference-based
synchronization .... . . . . . . . . . . . . . . . . . . . . . . . . . . . . . . . . . . . . . . . . . . . . . . . . . . . . . . . . . . . 30Setting up replication when data volumes are initialized with
zeroes ... . . . . . . . . . . . . . . . . . . . . . . . . . . . . . . . . . . . . . . . . . . . . . . . . . . . . . . . . . . . . . . . . . . . . . . . . . . . . . . . 31
Contents

Chapter 3 Viewing configuration and status information . . . . . . . . . . . . . 33
About viewing configuration and status information .... . . . . . . . . . . . . . . . . . . . . . . 33Viewing summary information .... . . . . . . . . . . . . . . . . . . . . . . . . . . . . . . . . . . . . . . . . . . . . . . . . . . . 33
Managing Summary view .... . . . . . . . . . . . . . . . . . . . . . . . . . . . . . . . . . . . . . . . . . . . . . . . . . . . . 34Replicated Data Sets view .... . . . . . . . . . . . . . . . . . . . . . . . . . . . . . . . . . . . . . . . . . . . . . . . . . . . . 35
Viewing detailed information about the RDS .... . . . . . . . . . . . . . . . . . . . . . . . . . . . . . . . . . 37RDS detail view - Summary tab .... . . . . . . . . . . . . . . . . . . . . . . . . . . . . . . . . . . . . . . . . . . . . . 37RDS detail view - Primary tab .... . . . . . . . . . . . . . . . . . . . . . . . . . . . . . . . . . . . . . . . . . . . . . . . 40RDS detail view - Secondaries tab .... . . . . . . . . . . . . . . . . . . . . . . . . . . . . . . . . . . . . . . . . . . 43RDS detail view - Bunker tab .... . . . . . . . . . . . . . . . . . . . . . . . . . . . . . . . . . . . . . . . . . . . . . . . . 47RDS detail view - Clusters tab .... . . . . . . . . . . . . . . . . . . . . . . . . . . . . . . . . . . . . . . . . . . . . . . . 49RDS detail view - Alerts tab .... . . . . . . . . . . . . . . . . . . . . . . . . . . . . . . . . . . . . . . . . . . . . . . . . . . 50
Information displayed in RDS views .... . . . . . . . . . . . . . . . . . . . . . . . . . . . . . . . . . . . . . . . . . . . . 50Conventions for the RDS icons .... . . . . . . . . . . . . . . . . . . . . . . . . . . . . . . . . . . . . . . . . . . . . . . 50Conventions for the RVG icons .... . . . . . . . . . . . . . . . . . . . . . . . . . . . . . . . . . . . . . . . . . . . . . 50Primary RVG states ... . . . . . . . . . . . . . . . . . . . . . . . . . . . . . . . . . . . . . . . . . . . . . . . . . . . . . . . . . . . . . 51Secondary RVG data status ... . . . . . . . . . . . . . . . . . . . . . . . . . . . . . . . . . . . . . . . . . . . . . . . . . . . 52Replication Status ... . . . . . . . . . . . . . . . . . . . . . . . . . . . . . . . . . . . . . . . . . . . . . . . . . . . . . . . . . . . . . . . 52
Chapter 4 Administering Veritas Volume Replicator . . . . . . . . . . . . . . . . . . . . . . 55
About administering Veritas Volume Replicator ... . . . . . . . . . . . . . . . . . . . . . . . . . . . . . 55Administering data volumes .... . . . . . . . . . . . . . . . . . . . . . . . . . . . . . . . . . . . . . . . . . . . . . . . . . . . . . . 55
Associating volumes to a Replicated Data Set ... . . . . . . . . . . . . . . . . . . . . . . . . . . . 56Resizing a data volume in a Replicated Data Set ... . . . . . . . . . . . . . . . . . . . . . . . . 58Dissociating a data volume from its Replicated Data Set ... . . . . . . . . . . . . . 59
Administering replication .... . . . . . . . . . . . . . . . . . . . . . . . . . . . . . . . . . . . . . . . . . . . . . . . . . . . . . . . . . . 61Changing the replication settings ... . . . . . . . . . . . . . . . . . . . . . . . . . . . . . . . . . . . . . . . . . . . 61Starting replication to a Secondary .... . . . . . . . . . . . . . . . . . . . . . . . . . . . . . . . . . . . . . . . 63Pausing replication to a Secondary .... . . . . . . . . . . . . . . . . . . . . . . . . . . . . . . . . . . . . . . . . 65Resuming replication to a Secondary .... . . . . . . . . . . . . . . . . . . . . . . . . . . . . . . . . . . . . . 66Stopping replication to a Secondary .... . . . . . . . . . . . . . . . . . . . . . . . . . . . . . . . . . . . . . . 67Changing the IP addresses used for replication .... . . . . . . . . . . . . . . . . . . . . . . . . 68
Administering the Replicated Data Set ... . . . . . . . . . . . . . . . . . . . . . . . . . . . . . . . . . . . . . . . . . . 69Removing a Secondary from a Replicated Data Set ... . . . . . . . . . . . . . . . . . . . . 69Removing a Bunker from a Replicated Data Set ... . . . . . . . . . . . . . . . . . . . . . . . . . 70Removing a Primary RVG .... . . . . . . . . . . . . . . . . . . . . . . . . . . . . . . . . . . . . . . . . . . . . . . . . . . . . 71
Administering checkpoints ... . . . . . . . . . . . . . . . . . . . . . . . . . . . . . . . . . . . . . . . . . . . . . . . . . . . . . . . . . 72Creating checkpoints ... . . . . . . . . . . . . . . . . . . . . . . . . . . . . . . . . . . . . . . . . . . . . . . . . . . . . . . . . . . . 73Ending checkpoints ... . . . . . . . . . . . . . . . . . . . . . . . . . . . . . . . . . . . . . . . . . . . . . . . . . . . . . . . . . . . . . 73Viewing checkpoints ... . . . . . . . . . . . . . . . . . . . . . . . . . . . . . . . . . . . . . . . . . . . . . . . . . . . . . . . . . . . . 74Deleting checkpoints ... . . . . . . . . . . . . . . . . . . . . . . . . . . . . . . . . . . . . . . . . . . . . . . . . . . . . . . . . . . . 74
Administering the SRL .... . . . . . . . . . . . . . . . . . . . . . . . . . . . . . . . . . . . . . . . . . . . . . . . . . . . . . . . . . . . . . . 75
Contents8
Protecting from SRL overflow .... . . . . . . . . . . . . . . . . . . . . . . . . . . . . . . . . . . . . . . . . . . . . . . 76Incrementally synchronizing the Secondary after SRL
overflow .... . . . . . . . . . . . . . . . . . . . . . . . . . . . . . . . . . . . . . . . . . . . . . . . . . . . . . . . . . . . . . . . . . . . . . 76Resizing the SRL .... . . . . . . . . . . . . . . . . . . . . . . . . . . . . . . . . . . . . . . . . . . . . . . . . . . . . . . . . . . . . . . . . 78
Chapter 5 Transferring the Primary role . . . . . . . . . . . . . . . . . . . . . . . . . . . . . . . . . . . . . . . . . . . 81
About transferring the Primary role ... . . . . . . . . . . . . . . . . . . . . . . . . . . . . . . . . . . . . . . . . . . . . . 81Migrating the Primary role ... . . . . . . . . . . . . . . . . . . . . . . . . . . . . . . . . . . . . . . . . . . . . . . . . . . . . . . . . . 81
Migrate Role: Prerequisites panel ... . . . . . . . . . . . . . . . . . . . . . . . . . . . . . . . . . . . . . . . . . . . 83Migrate Role: Summary panel ... . . . . . . . . . . . . . . . . . . . . . . . . . . . . . . . . . . . . . . . . . . . . . . . . 83
Taking over from an original Primary .... . . . . . . . . . . . . . . . . . . . . . . . . . . . . . . . . . . . . . . . . . . 83Takeover dialog window .... . . . . . . . . . . . . . . . . . . . . . . . . . . . . . . . . . . . . . . . . . . . . . . . . . . . . . . 84
Failing back to the original Primary .... . . . . . . . . . . . . . . . . . . . . . . . . . . . . . . . . . . . . . . . . . . . . . 85Failing back using fast-failback synchronization .... . . . . . . . . . . . . . . . . . . . . . . 86Failing back using difference-based synchronization .... . . . . . . . . . . . . . . . . 88
Using a bunker for disaster recovery .... . . . . . . . . . . . . . . . . . . . . . . . . . . . . . . . . . . . . . . . . . . . 90Updating the Secondary from the bunker ... . . . . . . . . . . . . . . . . . . . . . . . . . . . . . . . . 91Activating a bunker in an RDS .... . . . . . . . . . . . . . . . . . . . . . . . . . . . . . . . . . . . . . . . . . . . . . . 92Deactivating a bunker ... . . . . . . . . . . . . . . . . . . . . . . . . . . . . . . . . . . . . . . . . . . . . . . . . . . . . . . . . . . 92
Appendix A Troubleshooting VRW . . . . . . . . . . . . . . . . . . . . . . . . . . . . . . . . . . . . . . . . . . . . . . . . . . . . . . . . . 95
About troubleshooting VRW ..... . . . . . . . . . . . . . . . . . . . . . . . . . . . . . . . . . . . . . . . . . . . . . . . . . . . . . 95Application page is not displayed in the browser ... . . . . . . . . . . . . . . . . . . . . . . . . . . . . . 95
Message .... . . . . . . . . . . . . . . . . . . . . . . . . . . . . . . . . . . . . . . . . . . . . . . . . . . . . . . . . . . . . . . . . . . . . . . . . . . . 95Problem .... . . . . . . . . . . . . . . . . . . . . . . . . . . . . . . . . . . . . . . . . . . . . . . . . . . . . . . . . . . . . . . . . . . . . . . . . . . . 95Solution .... . . . . . . . . . . . . . . . . . . . . . . . . . . . . . . . . . . . . . . . . . . . . . . . . . . . . . . . . . . . . . . . . . . . . . . . . . . . 96
Missing buttons on certain wizards ... . . . . . . . . . . . . . . . . . . . . . . . . . . . . . . . . . . . . . . . . . . . . . . 96Problem .... . . . . . . . . . . . . . . . . . . . . . . . . . . . . . . . . . . . . . . . . . . . . . . . . . . . . . . . . . . . . . . . . . . . . . . . . . . . 97Solution .... . . . . . . . . . . . . . . . . . . . . . . . . . . . . . . . . . . . . . . . . . . . . . . . . . . . . . . . . . . . . . . . . . . . . . . . . . . . 97
Log in redirects the user back to the login page .... . . . . . . . . . . . . . . . . . . . . . . . . . . . . . . 97Problem .... . . . . . . . . . . . . . . . . . . . . . . . . . . . . . . . . . . . . . . . . . . . . . . . . . . . . . . . . . . . . . . . . . . . . . . . . . . . 97Solution .... . . . . . . . . . . . . . . . . . . . . . . . . . . . . . . . . . . . . . . . . . . . . . . . . . . . . . . . . . . . . . . . . . . . . . . . . . . . 97
Index . . . . . . . . . . . . . . . . . . . . . . . . . . . . . . . . . . . . . . . . . . . . . . . . . . . . . . . . . . . . . . . . . . . . . . . . . . . . . . . . . . . . . . . . . . . . . . . . . . . . . . . . . . . . . . . . . . . . 99
9Contents

Contents10
Getting started
This chapter includes the following topics:
■ Introduction
■ Features of VRW
■ Web browser requirements
■ Veritas Volume Replicator on the Web
■ Related Veritas documents
■ Role-based administration
IntroductionVeritas Volume Replicator Web Console (VRW) is a Web-based graphical userinterface that enables you to create, manage, and administer Veritas VolumeReplicator (VVR) configurations using a Web browser. The Veritas VolumeReplicator Web GUI Administrator’s Guide (this guide) provides information onconfiguring, and administering VVR using VRW. It describes the features andoptions available in VRW and enables you to start using VRW. This guide alsoprovides information on how to perform advanced VRW configuration tasks. Thetroubleshooting section enables you to recover from problems that you mayencounter while using VRW.
This guide is supplemental to the Veritas Volume Replicator Administrator’sGuide, which you should read before using VRW.
Features of VRWVRW includes the following features:
1Chapter
■ VRW ViewsVRW provides views that display information about the selected VVR objectsand the VVR environments. For example, the Summary view displays a list ofReplicated Data Sets (RDSs) present on the selected hosts and the replicationstatus for each RDS, whereas the RDS view displays details of the RDS and itsstatus.
■ Web-Based WizardsVRW provides Web-based wizards to perform VVR administrative tasks,including creating the Primary, adding a Secondary, starting replication, andperforming migration to change the Primary role. Each wizard providesinstructions to enable you to perform its tasks from start to finish.
■ Centralized Management of VVRVVR can be centrally managed through the Storage Foundation ManagementServer. For more information, see the documentation for Storage FoundationManagement Server.
■ Managing User RolesVRW supports the roles provided by SF Management Server. A user withAdministrator access rights can assign to users and user groups one of thepredefined roles: Guest, Operator, and Administrator.See “Role-based administration” on page 13.
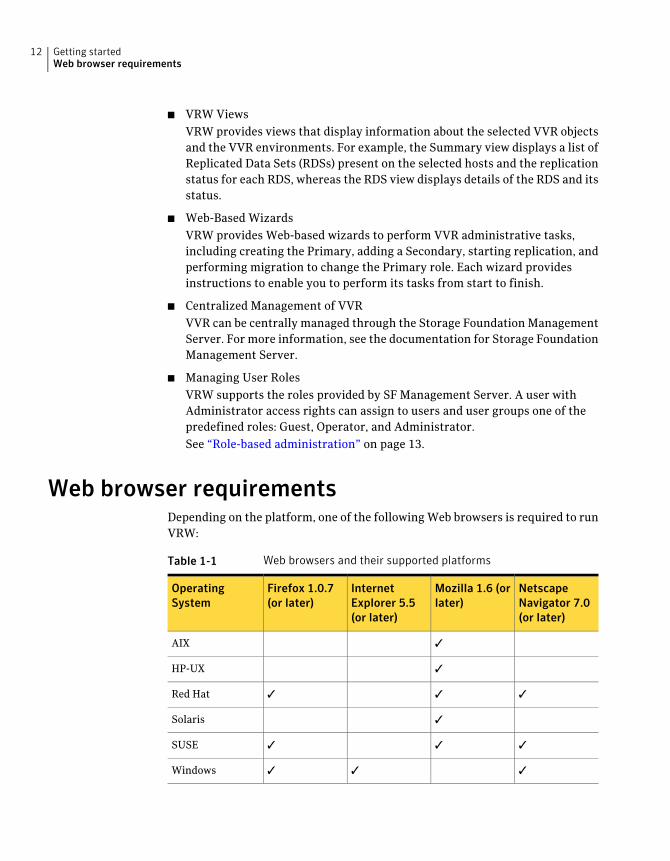
Web browser requirementsDepending on the platform, one of the following Web browsers is required to runVRW:
Table 1-1 Web browsers and their supported platforms
NetscapeNavigator 7.0(or later)
Mozilla 1.6 (orlater)
InternetExplorer 5.5(or later)
Firefox 1.0.7(or later)
OperatingSystem
✓AIX
✓HP-UX
✓✓✓Red Hat
✓Solaris
✓✓✓SUSE
✓✓✓Windows
Getting startedWeb browser requirements
12
Your browser must support either JScript 5.5 (provided with Microsoft InternetExplorer 6 or later) or JavaScript 1.2 (provided with Netscape Navigator 7.x).Additionally, for Internet Explorer, Secure Sockets Layer (SSL) 3.0 ActiveXscripting must be enabled.
If you are using pop-up blockers (including Yahoo Toolbar or Google Toolbar),either disable them or configure them to accept pop-ups from the Web Server towhich you will connect. Note that pop-up blocking is enabled by default in Netscape7.2.
Note: For Internet Explorer 6.0 on Windows 2003 (Server and Advanced Server),set the default Intranet zone security level to MEDIUM or lower.
Veritas Volume Replicator on the WebFor comprehensive, up-to-date information about the Veritas Volume Replicatorproduct offerings, visit the Veritas Web site:
http://www.veritas.com/Products/www?c=product&refId=3
Related Veritas documentsFor more information on any of the topics presented in this guide, refer to theVeritas Volume Replicator (VVR) or the Veritas Volume Manager (VxVM)documentation sets.
See the Veritas Storage Foundation Release Notes for more information on thesedocumentation sets.
Role-based administrationAuthorization is access control. It determines which activities a user or group canperform on a particular managed host or disk group.
When a user is created, the user is assigned to a specific security role. The usermay be assigned different roles on different hosts.
A user can be assigned one of following roles:
■ Administrator: A user assigned to this role has complete access to the system.The root user on a host is automatically granted Administrator privileges forthat host. These privileges cannot be changed.
13Getting startedVeritas Volume Replicator on the Web

■ Operator: A user assigned to this role can perform some managementoperations, such as performing backups, administrating the database, andmaking some limited configuration changes.A user with the operator role can also view the objects in the network and printreports.See “Features available with the operator role” on page 14.
■ Guest: A user assigned to this role cannot make any changes to theconfiguration. A Guest can view the objects in the network and print reports.All authenticated users by default belong to this group.
Features available with the operator roleThe following features are accessible to Operators:
■ Start Replication
■ Stop Replication
■ Pause Replication
■ Resume Replication
■ Start Checkpoint
■ Delete Checkpoint
■ End Checkpoint
■ Replay DCM
■ Set Replication Attributes
Getting startedRole-based administration
14
Setting up replication
This chapter includes the following topics:
■ About setting up replication
■ Overview of setting up replication
■ Creating a Replicated Data Set
■ Adding a bunker Secondary to the RDS
■ Synchronizing the Secondary and starting replication
■ Setting up replication when data volumes are initialized with zeroes
About setting up replicationYou can configure Veritas Volume Replicator (VVR) using Volume Replicator WebConsole (VRW). VVR enables you to set up replication either when the data volumesare zero initialized or contain valid data, and when the application is running orstopped.
Before setting up a Replicated Data Set, lay out your VVR configuration.
Follow the best practices or recommendations listed to ensure successfulconfiguration of VVR.
See the Veritas Volume Replicator Administrator’s Guide for details.
Overview of setting up replicationTo configure and set up replication, perform the following tasks in the orderpresented below:
■ Creating a Replicated Data Set
2Chapter

■ Synchronizing the Secondary and starting replication
Note: The procedure to set up replication is the same either when the applicationis running or stopped, unless noted otherwise.
Example scenarioThis chapter explains how to use Volume Replicator Web Console (VRW) to setup a simple VVR configuration under different situations with the help ofexamples. The examples explain the procedure to set up a VVR configurationcontaining one Primary and one Secondary. However, VRW enables you to createand set up VVR configurations containing multiple Secondary hosts. The exampleconfiguration looks like this:
Primary Host name: seattle
hrdgDisk_group
hr_rvgPrimary RVG
rlk_london_hr_rvgPrimary RLINK to Secondary london
hr_dv01Primary data volume #1
hr_dv02Primary data volume #2
hr_srlPrimary SRL volume
Secondary Host name: london
hrdgDisk group
hr_rvgSecondary RVG
rlk_seattle_hr_rvgSecondary RLINK to Primary seattle
hr_dv01Secondary data volume #1
hr_dv02Secondary data volume #2
hr_srlSecondary SRL volume
Creating a Replicated Data SetTo create a Replicated Data Set (RDS) using VRW, perform the following tasks inthe order listed below:
Setting up replicationCreating a Replicated Data Set
16
■ Creating a Primary RVG of the RDS
■ Adding a Secondary to the RDS
■ Adding a bunker Secondary to the RDS
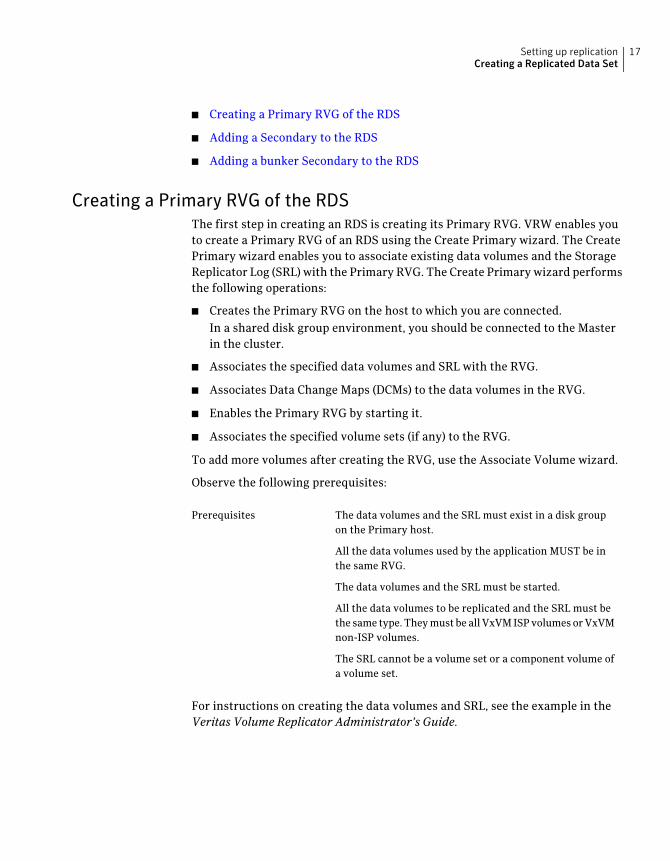
Creating a Primary RVG of the RDSThe first step in creating an RDS is creating its Primary RVG. VRW enables youto create a Primary RVG of an RDS using the Create Primary wizard. The CreatePrimary wizard enables you to associate existing data volumes and the StorageReplicator Log (SRL) with the Primary RVG. The Create Primary wizard performsthe following operations:
■ Creates the Primary RVG on the host to which you are connected.In a shared disk group environment, you should be connected to the Masterin the cluster.
■ Associates the specified data volumes and SRL with the RVG.
■ Associates Data Change Maps (DCMs) to the data volumes in the RVG.
■ Enables the Primary RVG by starting it.
■ Associates the specified volume sets (if any) to the RVG.
To add more volumes after creating the RVG, use the Associate Volume wizard.
Observe the following prerequisites:
The data volumes and the SRL must exist in a disk groupon the Primary host.
All the data volumes used by the application MUST be inthe same RVG.
The data volumes and the SRL must be started.
All the data volumes to be replicated and the SRL must bethe same type. They must be all VxVM ISP volumes or VxVMnon-ISP volumes.
The SRL cannot be a volume set or a component volume ofa volume set.
Prerequisites
For instructions on creating the data volumes and SRL, see the example in theVeritas Volume Replicator Administrator’s Guide.
17Setting up replicationCreating a Replicated Data Set

To create a Primary RVG of an RDS
1 From the Configuration task pane of any view, select Create Primary.
In a shared disk group environment, you must be connected to the Masternode of the cluster in order to create a Primary.
2 Select the volume type. If the data volumes to be replicated were createdusing Intelligent Storage Provisioning, select the checkbox ThevolumesareVxVM ISP volumes. Click Next.
3 Complete the RVG Name and Disk Group panel, and then click Next.
See “Create Primary Wizard: Specify RVG Name and Disk Group panel”on page 19.
4 Complete the Data Volume Selection page, and then click Next.
See “Create Primary Wizard: Data Volume Selection panel” on page 19.
5 Complete the SRL Volume Selection page.
See “Create Primary Wizard: SRL Volume Selection panel” on page 20.
6 Click Finish to proceed with the creation of the Primary RVG.
■ To make any changes to the RVG name or to select a different disk group,click Back.
■ To exit the Create Primary wizard and cancel the Create Primary operation,click Cancel.
After the Primary RVG is created, the following message displays in a window:
The Primary RVG is created on seattle.
7 Click OK in the Result page.
Create Primary Wizard: Prerequisites panelUse the Create Primary wizard to create a Primary RVG, which is the first step increating an RDS. The Create Primary wizard enables you to associate existingdata volumes and the Storage Replicator Log (SRL) with the Primary RVG. Reviewthe Prerequisites panel and indicate the type of volumes.
See “Creating a Primary RVG of the RDS” on page 17.
An RVG cannot contain both VxVM ISP volumes andnon-VxVM ISP volumes. Select the checkbox if the RVG willinclude VxVM ISP volumes. If this option is selected, thesubsequent Create Primary wizard panels only display VxVMISP volumes.
The volumes are VxVM ISPvolumes
Setting up replicationCreating a Replicated Data Set
18
Create Primary Wizard: Specify RVG Name and Disk GrouppanelUse this panel to specify the name for the Primary RVG that you are creating, andthe name of the disk group.
See “Creating a Primary RVG of the RDS” on page 17.
Displays the name of the host. This field is not editable.Host Name
Enter a name for the Primary RVG. The RDS name is the same asthe RVG name. A valid RDS name must contain only alpha-numericcharacters, underscores, dashes, or periods. The length of thename must be between 1 and 31 characters long. It cannot beginwith a dash or a period, or end with a period.
For example, hr_rvg.
RVG (RDS) Name
From the drop-down list, select the name of the disk group, thatis, the disk group that contains the SRL and the data volumes tobe associated with the Primary RVG. For example, hrdg.
The disk group is either shared or private.
Note: If the checkbox The volumes are VxVM ISP volumes wasselected on the previous page, the list only displays disk groupsthat contain VxVM ISP data volumes.
Disk Group
Create Primary Wizard: Data Volume Selection panelUse the Data Volume Selection panel to select the data volumes to be associatedto the Primary RVG.
Displays the name of the host. This field is not editable.Host Name
Displays the name of the RDS. This field is not editable.RVG (RDS) Name
19Setting up replicationCreating a Replicated Data Set
Select one or more data volumes or volume sets to be to bereplicated. The selected data volumes are associated to the PrimaryRVG. All of the data volumes used by the application MUST beincluded in the same RVG.
To select multiple data volumes from the list, hold down the CTRLkey and click the names of the required data volumes.
To select a range of data volumes, select the first data volume inthe range, hold down the SHIFT key, and then click the last namein the range. For example, hr_dv01 and hr_dv02.
For volume sets, the list displays the volume set name. The listdoes not display the names of the component volumes, because acomponent volume cannot be associated to an RVG. Select thevolume set name to associate all of its component volumes to theRVG.
Note: If the checkbox The volumes are VxVM ISP volumes wasselected on the first page, the list only displays VxVM ISP datavolumes.
Data Volumes
Create Primary Wizard: SRL Volume Selection panelUse the SRL Volume Selection panel to select the volume to be associated as theStorage Replication Log (SRL) for the Primary RVG.
Select the volume that is to be configured as the SRL. For example,hr_srl. The list does not display volume sets or component volumesof a volume set, because they cannot be used for the SRL volume.The SRL size must be at least 110MB.
Note: If the checkbox The volumes are VxVM ISP volumes wasselected on the first panel, the list only displays VxVM ISPvolumes.
Replication Log
Create Primary Wizard: Confirmation panelUse the Confirmation panel to review the configuration for the Primary RVG tobe created. Click Finish to create the Primary.
Adding a Secondary to the RDSTo add a Secondary RVG to the RDS, use the Add Secondary wizard from any hostthat is already a part of the RDS.
Setting up replicationCreating a Replicated Data Set
20
Note: If the RDS consists of only the Primary host, use the Add Secondary wizardthat is available from the Primary. Do not use the Add Secondary wizard from theSecondary host that you want to add to the RDS.
The host to which you are connected is referred to as the local host, and the nameof the RVG on the local host is referred to as the local RVG. The local RVGrepresents the RDS to which it belongs, and the RDS is referred by its local RVGname.
When adding the Secondary, the Add Secondary wizard performs the followingoperations:
■ Creates and adds a Secondary RVG with the same name as the Primary RVG,to the specified RDS on the Secondary host. By default, the Secondary RVG isadded to the disk group with the same name as the Primary disk group. Youcan specify a different disk group by using the options provided in the AddSecondary wizard.
■ Adds DCMs to the Primary and Secondary data volumes if they do not haveDCMs. If any of the data volumes or the SRL on the Secondary has a DRL, theDRL is removed before the data volume or SRL is associated with the RVG.
■ Associates to the Secondary RVG existing data volumes of the same namesand sizes as the Primary data volumes; it also associates an existing volumewith the same name as the Primary SRL, as the Secondary SRL.
■ Creates and associates Primary and Secondary RLINKs with default RLINKnames rlk_remotehost_rvgname. The wizard enables you to specify differentnames for the Primary and Secondary RLINKs.
Before creating and adding the Secondary RVG to the specified RDS, do thefollowing:
■ The Secondary data volumes and the SRL must be in the same disk group onthe Secondary. Use a disk group with the same name as the Primary disk group,if possible.
■ Create data volumes with the same names and sizes as the Primary datavolumes.
■ Create an SRL with the same name and size as the Primary SRL.
■ Make sure the /etc/vx/vras/.rdg file contains the Primary disk group ID.
For details, see the Veritas Volume Replicator Administrator’s Guide.To display the Primary disk group ID, log on to the Primary host and issue thefollowing command:
# vxprint -l diskgroup
21Setting up replicationCreating a Replicated Data Set

To add a Secondary to an RDS
1 Navigate to the detail view of the RDS to which you want to add the SecondaryRVG.
2 From the Configuration task pane, select Add Secondary.
3 Review the prerequisites. Click Next.
See “Add Secondary Wizard: Prerequisites panel” on page 23.
4 Complete the Primary and Secondary Host Names page, and then click Next.
See “Add Secondary Wizard: Primary and Secondary Host Names panel”on page 23.
5 In the RLINKs and Secondary Disk Group Names panel, the default valuesfor the Primary RLINK, Secondary RLINK, and the Secondary Disk Groupdisplay. To accept the default values, click Next.
If required, change the values for the Primary RLINK, Secondary RLINK, andthe Secondary Disk Group by completing the RLINKs and Secondary DiskGroup Names page, and then click Next.
See “Add Secondary Wizard: RLINKs and Secondary Disk Group Names panel”on page 24.
6 Click Finish to add the Secondary RVG.
■ To make any changes, click Back.
The Add Secondary operation succeeds if the SRL and data volumes with therequired properties are available in the specified Secondary disk group.
7 Click OK on the Result page. The Secondary RVG view for the newly addedSecondary RVG is displayed.
Warning: If the data volumes on the Primary contain valid data, you mustsynchronize the Secondary data volumes with the Primary data volumesbefore replicating to the Secondary.
See “Synchronizing the Secondary and starting replication” on page 27.
If the data volumes are initialized with zeroes, set up replication as described.
See “Setting up replication when data volumes are initialized with zeroes”on page 31.
If required, add a bunker Secondary.
See “Adding a bunker Secondary to the RDS” on page 25.
Setting up replicationCreating a Replicated Data Set
22
Add Secondary Wizard: Prerequisites panelUse the Add Secondary wizard to create a Secondary RVG on the Secondary hostand add it to the specified RDS. Use the Add Secondary wizard from any host thatis already a part of the RDS.
Review the Prerequisites panel and proceed to the next step only after theprerequisites are met.
See “Adding a Secondary to the RDS” on page 20.
Add Secondary Wizard: Primary and Secondary Host NamespanelUse the Primary and Secondary Host Names panel to specify the host names orIP addresses for the Primary and Secondary hosts in the RDS.
Displays the name of the RDS. This field cannot be edited.RDS
Enter a host name or specify the IP address that is to be used forreplication. The Primary host name must be resolvable andreachable from the Secondary host. For example, seattle. If youentered the IP address, it must be reachable from the Secondaryhost.
A valid Host name must contain only alpha-numeric characters,underscores, dashes, or periods. The length of the name must bebetween 1 and 31 characters long. It cannot begin with a dash ora period, or end with a period.
Primary Host
Enter a host name or specify the IP address that can be used forreplication. The Secondary host name must be resolvable andreachable from the Primary host. For example, london. If youentered the IP address, it must be reachable from the Primaryhost.
A valid Host name must contain only alpha-numeric characters,underscores, dashes, or periods. The length of the name must bebetween 1 and 31 characters long. It cannot begin with a dash ora period, or end with a period.
Secondary Host
See “Adding a Secondary to the RDS” on page 20.
23Setting up replicationCreating a Replicated Data Set
Add Secondary Wizard: RLINKs and Secondary Disk GroupNames panelUse the RLINKs and Secondary Disk Group Names panel to change the values forthe Primary RLINK, Secondary RLINK, and the Secondary Disk Group names. Ifno changes are required, click Next to accept the default values.
Displays the name of the RDS. This field cannot be edited.RDS
The default RLINK name is in the formrlk_remotehost_rvgname . Enter another Primary RLINKname if the default name is not appropriate.
A valid RLINK name must contain only alpha-numeric characters,underscores, dashes, or periods. The length of the name must bebetween 1 and 31 characters long. It cannot begin with a dash ora period, or end with a period.
Primary RLINK
The default RLINK name is in the form rlk_remotehost_rvgname.Enter another Secondary RLINK name if the default name is notappropriate.
A valid RLINK name must contain only alpha-numeric characters,underscores, dashes, or periods. The length of the name must bebetween 1 and 31 characters long. It cannot begin with a dash ora period, or end with a period.
Secondary RLINK
By default, the Secondary Disk Group box displays the name ofthe Primary disk group. This will be used as the name of the diskgroup on the Secondary that is to contain the Secondary RVG. Ifthe default name is not appropriate, enter another Secondary diskgroup name. This disk group must contain the SRL and datavolumes that are to be associated with the Secondary RVG that isbeing created.
A valid disk group name must contain only alpha-numericcharacters, underscores, dashes, or periods. The length of thename must be between 1 and 31 characters long. It cannot beginwith a dash or a period, or end with a period.
Secondary Disk Group
See “Adding a Secondary to the RDS” on page 20.
Add Secondary Wizard: Confirmation panelUse the Confirmation panel to review the configuration for the Secondary RVGto be added. Click Finish to add the Secondary RVG.
See “Adding a Secondary to the RDS” on page 20.
Setting up replicationCreating a Replicated Data Set
24
Adding a bunker Secondary to the RDSUse the Add Bunker wizard to add a bunker Secondary to the RDS. After addingthe bunker Secondary, you can proceed with synchronizing the Secondary andstarting replication.
See “Synchronizing the Secondary and starting replication” on page 27.
To add a bunker Secondary to the RDS
1 Select the name of the Primary for which you want to create the bunkerSecondary. For example, hr_rvg.
2 Choose Replication >AddBunker. The Add Bunker wizard is displayed.
3 Review the information on the Prerequisites panel, then click Next.
4 Complete the Add Bunker wizard page.
See “Add Bunker: Bunker Host, DiskGroup and Protocol panel” on page 25.
5 In the next page, the message indicates the result of the add bunker operation.If the operation of adding the bunker Secondary was successful the pagedisplays a success message.
If the operation fails, the page displays the failure message and lists thepossible reasons of failure in the Result Details area. Read the details carefullyand take appropriate corrective action. For more information about the error,note down the Unique Message Identifier (UMI) that is displayed with theerror message, and then refer to the Veritas Technical Services knowledgebase.
6 Click Finish. The Add Bunker wizard sets the same default values that areset by the Add Secondary wizard.
Add Bunker: Prerequisites panelUse the Add Bunker dialog window to add a bunker Secondary to the RDS.
Review the information on the Prerequisites panel, and proceed to the next steponly after the prerequisites are met.
See “Adding a bunker Secondary to the RDS” on page 25.
Add Bunker: Bunker Host, DiskGroup and Protocol panelUse the Bunker Host, DiskGroup and Protocol page to specify the host names,disk group, and protocol to use when adding a bunker Secondary to the RDS.
25Setting up replicationAdding a bunker Secondary to the RDS
Displays the name of the RDS for which you are adding the bunker.This field cannot be edited.
Example: hr_rvg
RDS
Enter a host name or specify the IP address that can be used forreplication. The Primary host name must be resolvable andreachable from the Bunker host. For example, seattle. If youentered the IP address, it must be reachable from the bunker host.The Replication IP column in the Secondary RVG view displaysthe value of the Primary host.
Primary Host
Enter a host name or specify the IP address that can be used forreplication. The Bunker host name must be resolvable andreachable from the Primary host. For example, portland. If youentered the IP address, it must be reachable from the Primaryhost. The Replication IP column in the Primary RVG view displaysthe value of the Bunker host.
Bunker Host
If the name of the bunker disk group is other than the default,enter the correct name.
If the protocol is UDP or TCP, the disk group usually is the sameas the disk group of the Primary RVG. For STORAGE protocol, thebunker disk group has a different name than the disk group forthe Primary RVG, because both disk groups will be imported onthe Primary host.
The bunker disk group must contain the SRL that is to beassociated with the Secondary bunker RVG that is being added.
Bunker DiskGroup
Indicates the network connectivity between the bunker Secondaryand the Primary. UDP is selected by default.
If the bunker is replicating over IP, set the protocol to UDP or TCP.If the storage is directly accessible by the Primary, for example,DAS or NAS, set the protocol to STORAGE.
Select UDP, TCP, or STORAGE.
Protocol
Add Bunker: Confirmation panelConfirm the attributes for the operation. Click Finish to add the bunker Secondaryto the RDS.
See “Adding a bunker Secondary to the RDS” on page 25.
Setting up replicationAdding a bunker Secondary to the RDS
26
Synchronizing the Secondary and starting replicationBefore starting replication, the Secondary data volumes must be synchronizedwith the Primary data volumes. You can use VRW to synchronize the Secondarywith the Primary with one of the following methods:
■ Automatic synchronizationSee “Setting up replication using automatic synchronization” on page 27.
Note: For component volumes of a volume set, use Start Replication with theUsing Autosync option to synchronize the RVG.
■ Full synchronizationSee “Setting up replication using full synchronization” on page 28.
■ Block-level tape backupSee “Setting up replication using block-level backup and checkpoint” on page 29.
■ Difference-based synchronizationSee “Setting up replication using difference-based synchronization” on page 30.
For more information on the methods to synchronize the Secondary and choosingthe appropriate method to synchronize the Secondary, see the Veritas VolumeReplicator Administrator’s Guide.
Setting up replication using automatic synchronizationYou can synchronize the Secondary using automatic synchronization when thedata volumes contain data and when the application is active or inactive.
The instructions in this section assume that the RDS has been created.
See “Creating a Replicated Data Set” on page 16.
Using the automatic synchronization option enables you to automaticallysynchronize the Secondary data volumes with the Primary data volumes in anRDS and start replication; automatic synchronization makes the Secondary datavolumes up to date with the Primary data volumes.
Replication to another Secondary can be started only after this automaticsynchronization completes. Automatic synchronization copies the data on thePrimary to the Secondary over the network using the Data Change Map (DCM).To use automatic synchronization, each data volume in the RVG must have anassociated Data Change Map (DCM).
27Setting up replicationSynchronizing the Secondary and starting replication

To set up replication using automatic synchronization
1 Navigate to Replication Status or Replication Settings sections of one of thefollowing views:
■ the main Summary view
■ the Secondaries tab of the RDS view
■ the Summary tab of the RDS view
2 Select the Secondary to be synchronized, select Start Replication from thedrop-down list, and click Go.
3 In the Start Replication dialog box, selectUsingAutomaticsynchronizationto synchronize the Secondary and start replication using automaticsynchronization.
4 ClickFinish. A message displays the status of your request to start replication.
5 Click OK. The RDS view for hr_rvg on seattle displays the status ofreplication at this time. At any time, refresh the view to display the currentstatus of replication.
Setting up replication using full synchronizationYou can synchronize the Secondary using full synchronization with checkpointwhen the application is active or inactive.
The instructions in this section assume that the RDS has been created.
See “Creating a Replicated Data Set” on page 16.
To set up replication using full synchronization
1 Synchronize the Secondary using the following command:
# vradmin -g diskgroup -c checkpt_name -full syncrvg \
local_rvgname sec_hostname....
2 After the synchronization completes, use the Start Replication wizard to startreplication to the Secondary with the checkpoint.
3 In the Start Replication dialog box, select Using checkpoint.
From the drop-down menu, select the checkpoint name which you enteredin step 1.
Setting up replicationSynchronizing the Secondary and starting replication
28

4 ClickFinish. A message displays the status of your request to start replication.
5 Click Ok. The Secondary RVG view for hr_rvg on seattle displays the statusof replication at this time. At any time, refresh the view to get the currentstatus of replication.
If you specified multiple Secondary hosts in step 1, repeat step 2 throughstep 5 to start replication for each Secondary RVG.
Setting up replication using block-level backup and checkpointYou can synchronize the Secondary using block-level backup and checkpointwhen the application is active or inactive. The instructions in this section assumethat the RDS has been created.
See “Creating a Replicated Data Set” on page 16.
To set up replication using block-level backup and checkpoint
1 In the Primary tab for the RDS view, in the Primary RVG section, select StartCheckpoint to start a checkpoint on the Primary.
2 In the Start Checkpoint dialog box, enter a name for the checkpoint and clickFinish. Note down the checkpoint name you entered, for example,checkpt_ddmmyyyy.
3 Perform a block-level backup of the data volumes in the Primary RVG.
4 Select EndCheckpoint to end the Primary checkpoint when the backup iscomplete.
5 To confirm that you want to end the checkpoint, click Finish.
6 Restore the backup to the Secondary data volumes.
7 When step 6 is completed, check whether the checkpoint you created is stillvalid in the Primary detail view. Refresh the view: if the checkpoint statusshows Completed, the checkpoint is valid. If it shows another status, it mayhave overflowed or otherwise not be valid. Repeat step 1 to step 6.
8 Use the Start Replication wizard to start replication.
9 In the Start Replication dialog box, select Using Checkpoint. From thedrop-down menu, select the checkpoint created above. This uses the selectedcheckpoint to synchronize the Secondary and start replication.
10 ClickFinish. A message displays the result of your request to start replication.
29Setting up replicationSynchronizing the Secondary and starting replication
11 ClickOk. The Secondaries tab of the RDS view for hr_rvg on seattle displaysthe current replication status, for the replication that has just been started.At any time, refresh the view to display the current status of replication.
12 In the Secondaries tab of the RDS view, check whether the consistent flagis set in the Data Status column for the Primary RLINK. The RLINK becomesconsistent only after the data contained in the checkpoint is sent to theSecondary.
If the Secondary is consistent, the synchronization was successful. If thecheckpoint overflows before the Secondary becomes consistent, thesynchronization failed. Increase the size of the SRL, and then repeat step 1to step 11.
For instructions on resizing the SRL, see the Veritas Volume ReplicatorAdministrator’s Guide.
It is likely that there might be writes beyond the checkpoint that are yet tobe sent to the Secondary after the consistent flag is set on the RLINK. In theRDS view, check Status to find out whether the RLINK is up to date.
The same backup and the corresponding checkpoint can be used to set upadditional Secondary hosts while the checkpoint is still valid. If a checkpointhas overflowed, its corresponding backup cannot be used to resynchronizethe Secondary using that checkpoint. Eventually, any checkpoint becomesSTALE and unusable. VRW does not display a warning to indicate if acheckpoint becomes unusable. However, the status of the checkpoint isdisplayed in the Primary tab of the RDS view.
See “Viewing detailed information about the RDS” on page 37.
Setting up replication using difference-based synchronizationYou can synchronize the Secondary using difference-based synchronization withcheckpoint when the application is active or inactive.
The instructions in this section assume that the RDS has been created.
See “Creating a Replicated Data Set” on page 16.
To set up replication using difference-based synchronization
1 Synchronize the Secondary using the following command:
# vradmin -g diskgroup -c checkpt_name syncrvg \
local_rvgname sec_hostname....
2 After the synchronization completes, use the Start Replication wizard to startreplication to the Secondary with the checkpoint.
Setting up replicationSynchronizing the Secondary and starting replication
30

3 In the Start Replication dialog box, select Using checkpoint and select thecheckpoint name from the drop-down menu. This uses the selected checkpointto synchronize the Secondary and start replication.
4 ClickFinish. A message displays the result of your request to start replication.
5 Click Close. The Secondary RVG view for hr_rvg on seattle displays thestatus of replication at this time. At any time, refresh the view to get thecurrent status of replication.
If you specified multiple Secondary hosts in step 1, repeat step 2 throughstep 5 to start replication for each Secondary RVG.
Setting up replication when data volumes areinitialized with zeroes
Because the Primary data volumes are initialized with zeroes, the data on theSecondary node need not be synchronized with the Primary. However, werecommend that you zero initialize the Secondary data volumes. The instructionsin this section assume that the RDS has been created.
See “Creating a Replicated Data Set” on page 16.
Use the Resynchronization is not required option to start replication only whenthe Primary data volumes are zero initialized or when the contents of the volumeson the Primary and Secondary are identical and the application is inactive.
Note:Do not start the application or mount the file system before completing step5.
To set up replication when data volumes are initialized with zeroes
1 Navigate to the Managing Summary view, the Secondaries tab of the RDSview or the Summary tab of the RDS view.
2 In the Replication Settings section, select the Secondary to be synchronized,and select Start Replication from the drop-down list.
3 In the Start Replication dialog box, selectResynchronizationisnotrequired.
4 ClickFinish. A message displays the result of your request to start replication.
5 Click OK. The RDS view for hr_rvg on seattle is automatically refreshed todisplay the replication status at a particular point in time.
After replication is started, start the application on the Primary.
31Setting up replicationSetting up replication when data volumes are initialized with zeroes

Setting up replicationSetting up replication when data volumes are initialized with zeroes
32
Viewing configuration andstatus information
This chapter includes the following topics:
■ About viewing configuration and status information
■ Viewing summary information
■ Viewing detailed information about the RDS
■ Information displayed in RDS views
About viewing configuration and status informationVolume Replicator Web Console (VRW) enables you to get information about theVVR environment using the views. The Replicated Data Sets view displaysconsolidated information about the Replicated Data Sets (RDSs) in a VeritasVolume Replicator (VVR) environment; the other views provide detailedinformation about the selected object.
Viewing summary informationThe Volume Replicator Web Console provides summary information about VVRobjects in the following views:
■ Managing Summary view
■ Replicated Data Sets view
■ RDS detail view - Summary tab
3Chapter
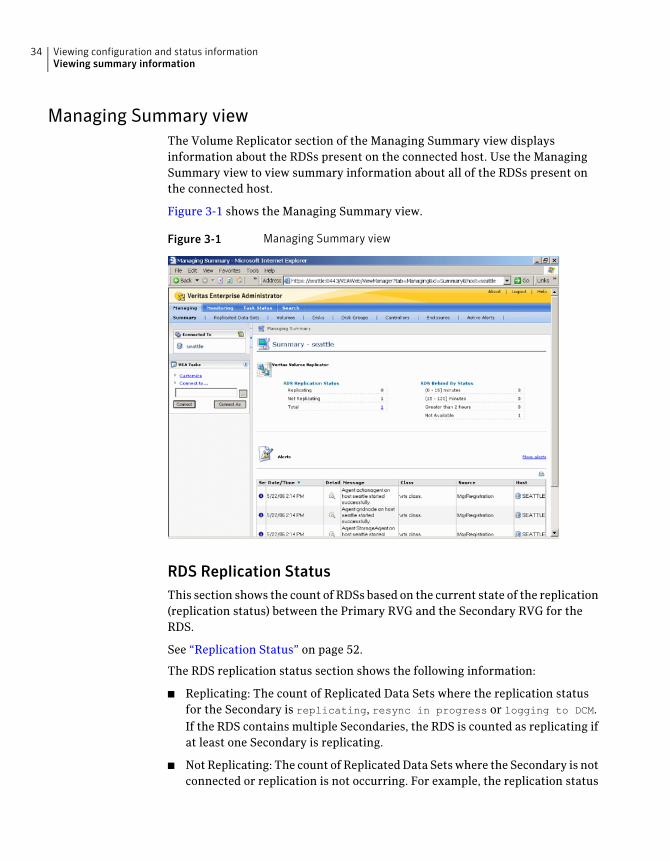
Managing Summary viewThe Volume Replicator section of the Managing Summary view displaysinformation about the RDSs present on the connected host. Use the ManagingSummary view to view summary information about all of the RDSs present onthe connected host.
Figure 3-1 shows the Managing Summary view.
Figure 3-1 Managing Summary view
RDS Replication StatusThis section shows the count of RDSs based on the current state of the replication(replication status) between the Primary RVG and the Secondary RVG for theRDS.
See “Replication Status” on page 52.
The RDS replication status section shows the following information:
■ Replicating: The count of Replicated Data Sets where the replication statusfor the Secondary is replicating, resync in progress or logging to DCM.If the RDS contains multiple Secondaries, the RDS is counted as replicating ifat least one Secondary is replicating.
■ Not Replicating: The count of Replicated Data Sets where the Secondary is notconnected or replication is not occurring. For example, the replication status
Viewing configuration and status informationViewing summary information
34
is not replicating or paused by user. If the RDS contains multipleSecondaries, the RDS is counted as not replicating only if none of itsSecondaries is replicating. RDSs that have no Secondary, or that are missinga Primary, are counted as not replicating.
RDS Behind By StatusThis section shows the count of Replicated Data Sets based on the amount of timethe Secondary is behind the Primary. If the RDS contains multiple Secondaries,the Behind-By status reflects the status of the most up-to-date Secondary for thatRDS.
■ (0-15] minutes: The Secondary is up-to-date, or the last write that the Secondaryreceived from the Primary was less than fifteen minutes ago.
■ (15 - 120] minutes: The last write that the Secondary received from the Primarymore than fifteen minutes (inclusive) ago but less than two hours ago.
■ Greater than 2 hours: The last write that the Secondary received from thePrimary was more than two hours ago.
■ Not Available: indicates the Behind-By status is not available. The status maynot be available if the RDS has no Secondary, or if the Secondary is paused orstopped.
Alerts sectionDisplays configuration problems in an RDS, if any. The alerts section displays theRDS name together with a brief description about the configuration error.
Replicated Data Sets viewSelect Replicated Data Sets in the Managing Summary pane to display theReplicated Data Sets view. The Replicated Data Sets view includes the followingtabs:
■ Replicated Data Sets view - Summary tab
■ Replicated Data Sets view - Alerts tab
Replicated Data Sets view - Summary tabThe Summary tab of the RDSs view provides summary information about eachRDS on the connected host, including the replication status, the logging status,and the names of the Primary and Secondary hosts.
Figure 3-2 shows the Summary tab of the RDSs view
35Viewing configuration and status informationViewing summary information

Figure 3-2 Summary tab of the RDSs view
Replicated Data SetsThe Replicated Data Sets section displays the following information:
The RDS icon and the name of the RDS. The RDS name is anavigation link to the RDS view.
See Table 3-1 on page 50.
Name
The name of the Primary host. If the Primary has not beenconfigured correctly, this field is blank and the word unknown isdisplayed in the replication status column.
Primary
The name of the Secondary host or bunker Secondary host.Secondary/Bunker
The replication status to the Secondary in text format.
See Table 3-5 on page 53.
The replication status n/a means that the RDS is configuredincorrectly and the Primary is not known. A text message alsodisplays if a Secondary does not exist.
Replication Status
Indicates the size of the writes remaining to bring the Secondaryup-to-date with the Primary.
Behind By (Size)
Viewing configuration and status informationViewing summary information
36
Indicates the elapsed time since the last write that the Secondaryreceived from the Primary.
Behind By (Time)
Shows the replication mode, either synchronous orasynchronous.
Current Mode
Indicates whether the RDS is currently using the SRL or the DCM.Current Logging
Shows either the percentage of the SRL that is full or thepercentage of the DCM that is dirty.
% Log Usage
Displays configuration problems in the RDS, if any.Alert
Shows the Data Status of the Secondary RVG.
See Table 3-4 on page 52.
Data Status
The name of the Secondary disk group.
For a shared disk group, (Shared) displays after the name.
Secondary Disk Group
Replicated Data Sets view - Alerts tabThe Alerts tab of the RDSs view displays information about any configurationerrors for the RDSs that reside on the connected host. The Alerts tab displays theRDS name together with a brief description about the configuration error.
Viewing detailed information about the RDSFrom the Replicated Data Sets Summary view, you can navigate to the followingdetailed views:
■ RDS detail view - Summary tab
■ RDS detail view - Primary tab
■ RDS detail view - Bunker tab
■ RDS detail view - Clusters tab
■ RDS detail view - Alerts tab
RDS detail view - Summary tabThe Summary tab of the RDS view displays information about the Primary RVG,replication status of the Secondary RVG, and the data volumes in the RDS. Usethis view to administer replication and data volumes. From the Managing Summaryview, click on the RDS name to display the Summary tab of the RDS view. For
37Viewing configuration and status informationViewing detailed information about the RDS
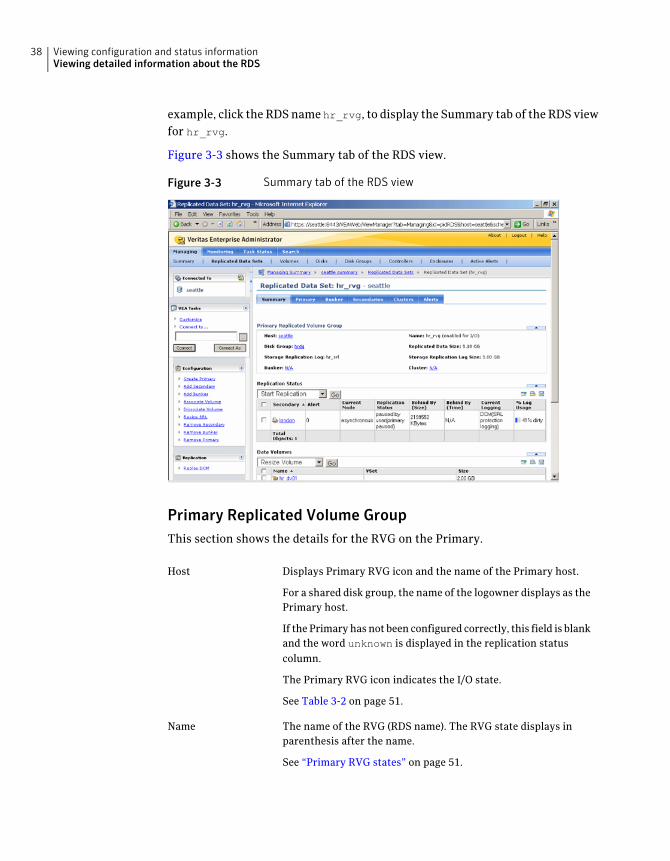
example, click the RDS name hr_rvg, to display the Summary tab of the RDS viewfor hr_rvg.
Figure 3-3 shows the Summary tab of the RDS view.
Figure 3-3 Summary tab of the RDS view
Primary Replicated Volume GroupThis section shows the details for the RVG on the Primary.
Displays Primary RVG icon and the name of the Primary host.
For a shared disk group, the name of the logowner displays as thePrimary host.
If the Primary has not been configured correctly, this field is blankand the word unknown is displayed in the replication statuscolumn.
The Primary RVG icon indicates the I/O state.
See Table 3-2 on page 51.
Host
The name of the RVG (RDS name). The RVG state displays inparenthesis after the name.
See “Primary RVG states” on page 51.
Name
Viewing configuration and status informationViewing detailed information about the RDS
38
The name of the Primary disk group.
For a shared disk group, (Shared) displays after the name.
Disk Group
The total size of the replicated data volumes in the RDS. If avolume set is associated to the RDS, the size includes the totalsize of each of the component volumes of the volume set inaddition to the total size of any independent volumes.
Replicated Data Size
The name of the Primary SRL.Storage ReplicationLog
The size of the SRL.Storage ReplicationLog Size
The name of the bunker host. Displays N/A if the RDS does notcontain a bunker.
Bunker
The name of the cluster if the Primary RVG uses a shared diskgroup. Select the cluster name to view details about the cluster.
Cluster
Replication statusDisplays the status-related information of each Secondary in the selected RDS.This section displays the following information:
Displays the Secondary RVG icon and the name of the Secondaryhost.
For a shared disk group, the name of the logowner displays as theSecondary host.
The Secondary RVG icon indicates the configuration state.
See Table 3-2 on page 51.
Secondary
Shows the data status.
See Table 3-4 on page 52.
Data status
Shows the replication status.
See “Replication Status” on page 52.
Replication status
Shows the replication mode, either synchronous orasynchronous.
Current mode
Shows either the percentage of the SRL that is full or thepercentage of the DCM that is dirty.
% Log Usage
39Viewing configuration and status informationViewing detailed information about the RDS
Indicates the size of the writes remaining to bring the Secondaryup-to-date with the Primary.
Behind By (Size)
Indicates the elapsed time since the last write that the Secondaryreceived from the Primary.
Behind By (Time)
Indicates whether the SRL or DCM is currently in use (with respectto the Secondary),
Current Logging
Alert messages display if there is a problem with the configuration.For example, an alert message displays when there is someconfiguration error in the RDS.
Alert
The name of the Secondary disk group.
For a shared disk group, (Shared) displays after the name.
Disk Group
Data volumesDisplays the data volumes associated with the Primary RVG or the SecondaryRVG, if the Primary RVG is not present in the selected RDS. This section lists thefollowing information for each data volume:
Name of the data volume and the status icon.Name
Displays the name of the volume set, if the volume is a componentvolume of a volume set. DisplaysN/A, if the volume is an independentvolume.
Vset
Size of the data volume.Size
Yes or No depending on whether a DCM is associated to the datavolume.
DCM
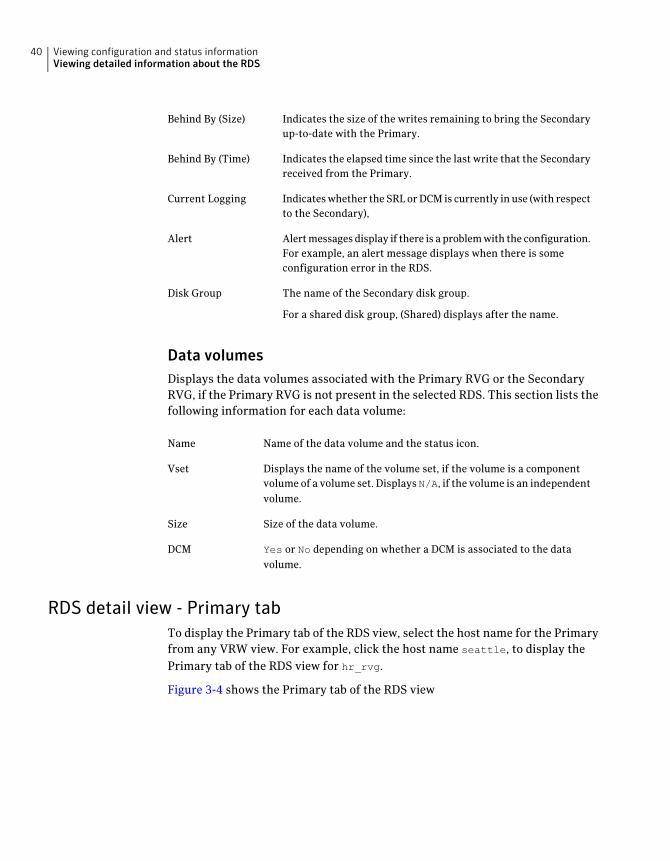
RDS detail view - Primary tabTo display the Primary tab of the RDS view, select the host name for the Primaryfrom any VRW view. For example, click the host name seattle, to display thePrimary tab of the RDS view for hr_rvg.
Figure 3-4 shows the Primary tab of the RDS view
Viewing configuration and status informationViewing detailed information about the RDS
40
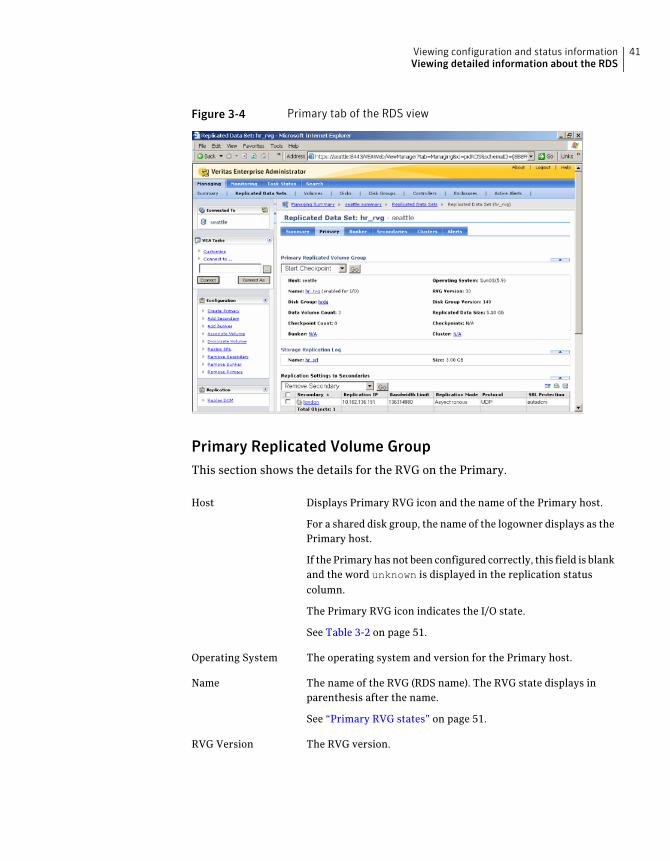
Figure 3-4 Primary tab of the RDS view
Primary Replicated Volume GroupThis section shows the details for the RVG on the Primary.
Displays Primary RVG icon and the name of the Primary host.
For a shared disk group, the name of the logowner displays as thePrimary host.
If the Primary has not been configured correctly, this field is blankand the word unknown is displayed in the replication statuscolumn.
The Primary RVG icon indicates the I/O state.
See Table 3-2 on page 51.
Host
The operating system and version for the Primary host.Operating System
The name of the RVG (RDS name). The RVG state displays inparenthesis after the name.
See “Primary RVG states” on page 51.
Name
The RVG version.RVG Version
41Viewing configuration and status informationViewing detailed information about the RDS

The name of the Primary disk group.
For a shared disk group, (Shared) displays after the name.
Disk Group
The disk group version for the RVG.Disk Group Version
The number of data volumes in the RVG. If the RVG includes avolume set, the data volume count includes the number of thecomponent volumes in the volume set in addition to the numberof independent volumes.
Data Volume Count
The total size of the replicated data volumes in the RDS. If avolume set is associated to the RDS, the size includes the totalsize of each of the component volumes of the RDS in addition tothe total size of any independent volumes.
Replicated Data Size
The number of Primary checkpoints on the RVG.Checkpoint count
The names and information about each Prmary checkpoint.
The information includes usage, % of log used, and the status ofthe checkpoint (started or complete).
Checkpoints
The name of the bunker host. Displays N/A if the RDS does notcontain a bunker.
Bunker
The name of the cluster if the Primary RVG uses a shared diskgroup. Select the cluster name to view details about the cluster.
Cluster
Storage Replication LogThis section displays the following information about the Storage ReplicationLog:
The name of the SRL volume.Name
The size of the SRL volume.Size
Replication Settings to SecondariesThis section shows the details about the replication settings for each SecondaryRVG.
Displays Secondary RVG icon and the name of the Secondary host.
For a shared disk group, the name of the logowner displays as theSecondary host.
Secondary
Viewing configuration and status informationViewing detailed information about the RDS
42

Name of the remote host and the IP address of the host inparenthesis.
Replication IP
Transport protocol being used for replication.Protocol
Shows the bandwidth limit for VVR if specified, or none.Bandwidth Limit
Displays synchronous or asynchronous.Replication Mode
Displays autodcm, dcm, override, off, or fail.SRL Protection
Displays override, off, or fail depending on the chosen option.Latency Protection
Number of updates in the SRL before the protection becomesinactive and updates succeed.
Latency Low Mark
Specifies the maximum number of waiting updates in the SRLbefore the protection becomes active and updates stall or fail.
Latency High Mark
Data volumesDisplays the data volumes associated with the Primary RVG or the SecondaryRVG, if the Primary RVG is not present in the selected RDS.
This section lists the following information for each data volume:
Name of the data volume.Name
Displays the name of the volume set, if the volume is a componentvolume of a volume set. Displays N/A, if the volume is an independentvolume.
Vset
Size of the data volume.Size
Yes or No depending on whether a DCM is associated to the datavolume.
DCM
RDS detail view - Secondaries tabThe Secondaries tab of the RDS detail view shows detailed information about theSecondaries within an RVG. To get to the Secondaries tab of the RDS detail view,click on a Secondary name from the Summary tab of the RDSs view or the Primarytab of the RDS view.
Figure 3-5 shows the Secondaries tab of the RDS detail view.
43Viewing configuration and status informationViewing detailed information about the RDS

Figure 3-5 Secondaries tab of the RDS detail view
The Secondaries tab of the RDS view displays the following information:
Replication statusDisplays the status-related information of each Secondary in the selected RDS.
This section displays the following information:
Displays the Secondary RVG icon and the name of the Secondaryhost.
For a shared disk group, the name of the logowner displays as theSecondary host.
The Secondary RVG icon indicates the configuration state.
See Table 3-2 on page 51.
Secondary
Shows the data status.
See Table 3-4 on page 52.
Data status
Shows the replication status.
See “Replication Status” on page 52.
Replication status
Shows the replication mode, either synchronous or asynchronous.Current mode
Viewing configuration and status informationViewing detailed information about the RDS
44
Shows either the percentage of the SRL that is full or thepercentage of the DCM that is dirty.
% Log Usage
Indicates the size of the writes remaining to bring the Secondaryup-to-date with the Primary.
Behind By (Size)
Indicates the elapsed time since the last write that the Secondaryreceived from the Primary.
Behind By (Time)
Indicates whether the SRL or DCM is currently in use (with respectto the Secondary),
Current Logging
Alert messages display if there is a problem with the configuration.For example, an alert message displays when there is someconfiguration error in the RDS.
Alert
The name of the Secondary disk group.
For a shared disk group, (Shared) displays after the name.
Disk Group
Secondary Replicated Volume GroupThis section shows the details for the RVG on the Secondary.
Displays the name of the Secondary host.
For a shared disk group, the name of the logowner displays as theSecondary host.
The Secondary RVG icon indicates the configuration state.
See Table 3-2 on page 51.
Host
The name of the RVG (RDS name). The RVG state displays inparenthesis after the name.
See “Primary RVG states” on page 51.
Name
The name of the Secondary disk group.
For a shared disk group, (Shared) displays after the name.
Disk Group
The disk group version for the RVG.Disk Group Version
The RVG version.RVG Version
The operating system and version for the Secondary host.Operating System
45Viewing configuration and status informationViewing detailed information about the RDS
The number of data volumes in the Secondary RVG. If the RVGincludes a volume set, the data volume count includes the numberof the component volumes in the volume set in addition to thenumber of independent volumes.
Data Volume Count
The total size of the replicated data volumes in the RDS. If avolume set is associated to the RDS, the size includes the totalsize of each of the component volumes of the RDS in addition tothe total size of any independent volumes.
Replicated Data Size
The name of the bunker host. Displays N/A if the RDS does notcontain a bunker.
Bunker
The name of the cluster if the Secondary RVG uses a shared diskgroup. Select the cluster name to view details about the cluster.
Cluster
Storage Replication LogThis section displays the following information about the Storage ReplicationLog:
The name of the SRL volume.Name
The size of the SRL volume.Size
Replication settings to PrimaryThis section shows the details about the replication settings to the Primary forthe specified Secondary RVG.
Name of the PrimaryPrimary
The IP address of the host.Replication IP
Transport protocol being used for replication.Protocol
Shows the bandwidth limit for VVR if specified, or none.Bandwidth Limit
Displays synchronous or asynchronous.Replication Mode
Displays autodcm, dcm, override, off, or fail.SRL Protection
Displays override, off, or fail depending on the chosen option.Latency Protection
Number of updates in the SRL before the protection becomesinactive and updates succeed.
Latency Low Mark
Viewing configuration and status informationViewing detailed information about the RDS
46

Specifies the maximum number of waiting updates in the SRLbefore the protection becomes active and updates stall or fail.
Latency High Mark
Data volumesDisplays the data volumes associated with the Secondary RVG. This section liststhe following information for each data volume:
Name of the data volume and volume status icon.Name
Displays the name of the volume set, if the volume is a componentvolume of a volume set. DisplaysN/A, if the volume is an independentvolume.
Vset
Size of the data volume.Size
Yes or No depending on whether a DCM is associated to the datavolume.
DCM
RDS detail view - Bunker tabThe bunker tab of the RDS view shows detailed information about the bunker forthe RDS. To get to the bunker tab, click on a Bunker Secondary name from theSummary RDSs view or the Primary RDS view.
The bunker tab displays the following information:
Bunker replication statusDisplays the status-related information of each Bunker in the selected RDS. Thissection displays the following information:
Displays the Secondary RVG icon and the name of the Secondaryhost.
For a shared disk group, the name of the logowner displays as theSecondary host.
The Secondary RVG icon indicates the configuration state.
See Table 3-2 on page 51.
Bunker
Shows the data status.
See Table 3-4 on page 52.
Data status
Shows the replication status.
See “Replication Status” on page 52.
Replication status
47Viewing configuration and status informationViewing detailed information about the RDS
Shows the replication mode, either synchronous or asynchronous.Current mode
Shows either the percentage of the SRL that is full or thepercentage of the DCM that is dirty.
% Log Usage
Indicates the size of the writes remaining to bring the Secondaryup-to-date with the Primary.
Behind By (Size)
Indicates the elapsed time since the last write that the Secondaryreceived from the Primary.
Behind By (Time)
Indicates whether the SRL or DCM is currently in use (with respectto the Secondary),
Current Logging
Alert messages display if there is a problem with the configuration.For example, an alert message displays when there is someconfiguration error in the RDS.
Alert
The name of the Bunker disk group.
For a shared disk group, (Shared) displays after the name.
Disk Group
Bunker Replicated Volume GroupThis section shows the details for the RVG on the bunker.
Displays Secondary RVG icon and the name of the Secondary host.
For a shared disk group, the name of the logowner displays as theSecondary host.
The Secondary RVG icon indicates the configuration state.
See Table 3-2 on page 51.
Host
The name of the RVG (RDS name). The RVG state displays inparenthesis after the name.
See “Primary RVG states” on page 51.
Name
The name of the Bunker disk group.
For a shared disk group, (Shared) displays after the name.
Disk Group
The disk group version for the RVG.Disk Group Version
The RVG version.RVG Version
The operating system and version for the Secondary host.Operating System
The name of the cluster if the Secondary RVG uses a shared diskgroup. Select the cluster name to view details about the cluster.
Cluster
Viewing configuration and status informationViewing detailed information about the RDS
48

Storage Replication LogThis section displays the following information about the Storage ReplicationLog:
The name of the SRL volume.Name
The size of the SRL volume.Size
Replication settings to PrimaryThis section shows the details about the replication settings to the Primary forthe specified Secondary RVG.
Name of the PrimaryPrimary
The IP address of the host.Replication IP
Transport protocol being used for replication.Protocol
Shows the bandwidth limit for VVR if specified, or none.Bandwidth Limit
Displays synchronous or asynchronous.Replication Mode
Displays autodcm, dcm, override, off, or fail.SRL Protection
Displays override, off, or fail depending on the chosen option.Latency Protection
Number of updates in the SRL before the protection becomesinactive and updates succeed.
Latency Low Mark
Specifies the maximum number of waiting updates in the SRLbefore the protection becomes active and updates stall or fail.
Latency High Mark
RDS detail view - Clusters tabThe Clusters tab shows the cluster information if the Primary RVG or theSecondary RVG has a shared disk group. From the Summary RDSs view or RDSdetail view, click on the name of a Primary RVG or Secondary RVG using a shareddisk group to see the Clusters tab of the RDS detail view.
Cluster informationThis section shows the details about the cluster for the specified RDS.
Name of the cluster and status icon.Name
49Viewing configuration and status informationViewing detailed information about the RDS
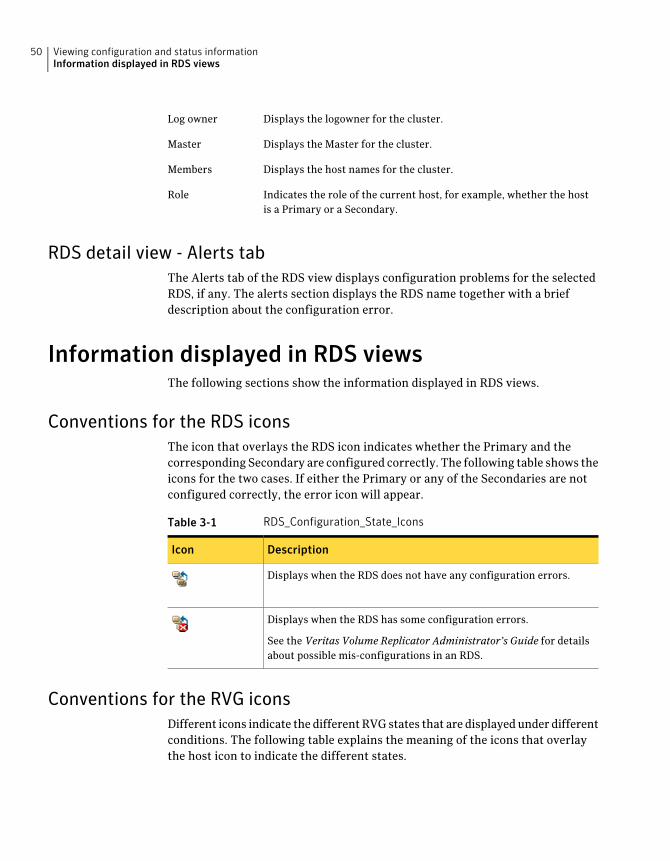
Displays the logowner for the cluster.Log owner
Displays the Master for the cluster.Master
Displays the host names for the cluster.Members
Indicates the role of the current host, for example, whether the hostis a Primary or a Secondary.
Role
RDS detail view - Alerts tabThe Alerts tab of the RDS view displays configuration problems for the selectedRDS, if any. The alerts section displays the RDS name together with a briefdescription about the configuration error.
Information displayed in RDS viewsThe following sections show the information displayed in RDS views.
Conventions for the RDS iconsThe icon that overlays the RDS icon indicates whether the Primary and thecorresponding Secondary are configured correctly. The following table shows theicons for the two cases. If either the Primary or any of the Secondaries are notconfigured correctly, the error icon will appear.
Table 3-1 RDS_Configuration_State_Icons
DescriptionIcon
Displays when the RDS does not have any configuration errors.
Displays when the RDS has some configuration errors.
See the Veritas Volume Replicator Administrator’s Guide for detailsabout possible mis-configurations in an RDS.
Conventions for the RVG iconsDifferent icons indicate the different RVG states that are displayed under differentconditions. The following table explains the meaning of the icons that overlaythe host icon to indicate the different states.
Viewing configuration and status informationInformation displayed in RDS views
50
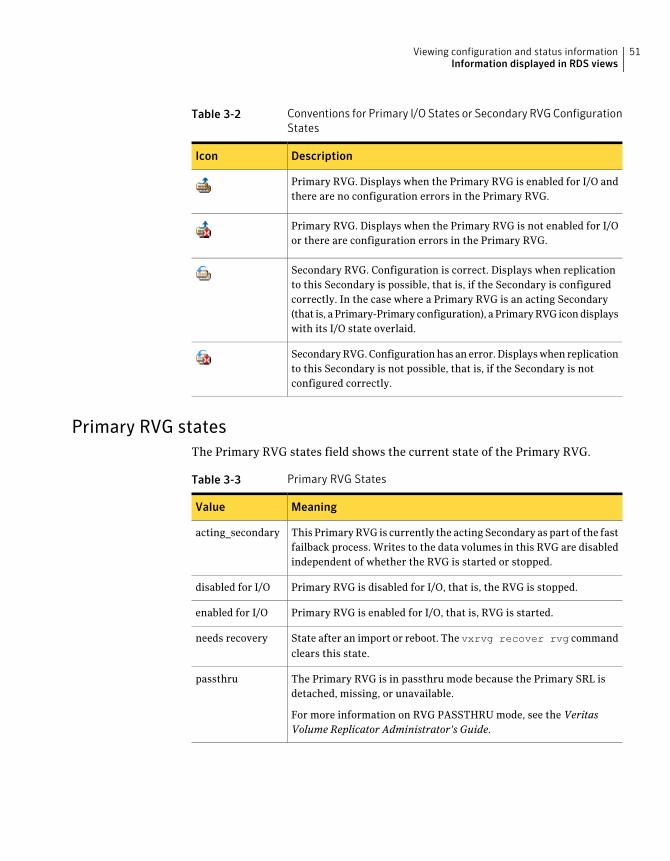
Table 3-2 Conventions for Primary I/O States or Secondary RVGConfigurationStates
DescriptionIcon
Primary RVG. Displays when the Primary RVG is enabled for I/O andthere are no configuration errors in the Primary RVG.
Primary RVG. Displays when the Primary RVG is not enabled for I/Oor there are configuration errors in the Primary RVG.
Secondary RVG. Configuration is correct. Displays when replicationto this Secondary is possible, that is, if the Secondary is configuredcorrectly. In the case where a Primary RVG is an acting Secondary(that is, a Primary-Primary configuration), a Primary RVG icon displayswith its I/O state overlaid.
Secondary RVG. Configuration has an error. Displays when replicationto this Secondary is not possible, that is, if the Secondary is notconfigured correctly.
Primary RVG statesThe Primary RVG states field shows the current state of the Primary RVG.
Table 3-3 Primary RVG States
MeaningValue
This Primary RVG is currently the acting Secondary as part of the fastfailback process. Writes to the data volumes in this RVG are disabledindependent of whether the RVG is started or stopped.
acting_secondary
Primary RVG is disabled for I/O, that is, the RVG is stopped.disabled for I/O
Primary RVG is enabled for I/O, that is, RVG is started.enabled for I/O
State after an import or reboot. The vxrvg recover rvg commandclears this state.
needs recovery
The Primary RVG is in passthru mode because the Primary SRL isdetached, missing, or unavailable.
For more information on RVG PASSTHRU mode, see the VeritasVolume Replicator Administrator’s Guide.
passthru
51Viewing configuration and status informationInformation displayed in RDS views
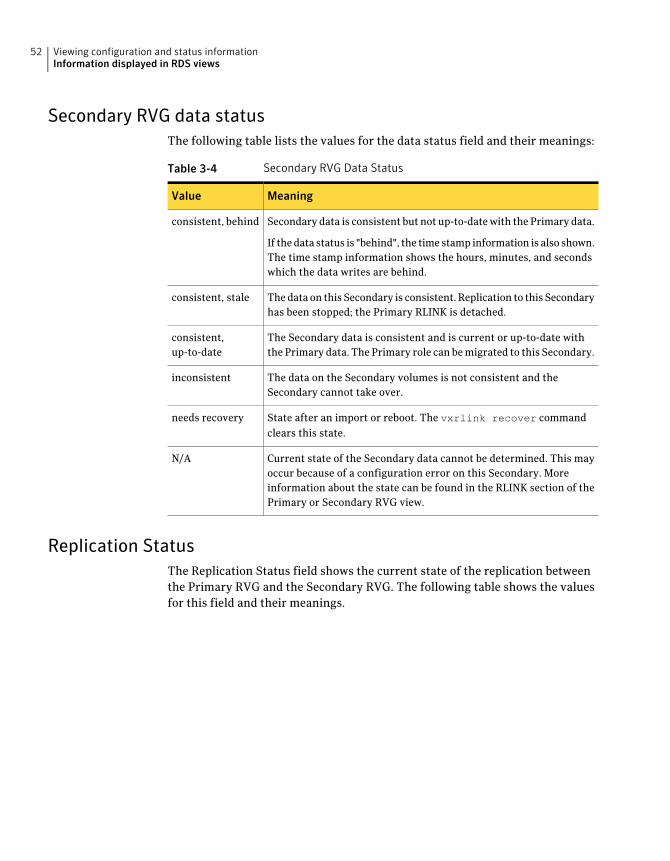
Secondary RVG data statusThe following table lists the values for the data status field and their meanings:
Table 3-4 Secondary RVG Data Status
MeaningValue
Secondary data is consistent but not up-to-date with the Primary data.
If the data status is "behind", the time stamp information is also shown.The time stamp information shows the hours, minutes, and secondswhich the data writes are behind.
consistent, behind
The data on this Secondary is consistent. Replication to this Secondaryhas been stopped; the Primary RLINK is detached.
consistent, stale
The Secondary data is consistent and is current or up-to-date withthe Primary data. The Primary role can be migrated to this Secondary.
consistent,up-to-date
The data on the Secondary volumes is not consistent and theSecondary cannot take over.
inconsistent
State after an import or reboot. The vxrlink recover commandclears this state.
needs recovery
Current state of the Secondary data cannot be determined. This mayoccur because of a configuration error on this Secondary. Moreinformation about the state can be found in the RLINK section of thePrimary or Secondary RVG view.
N/A
Replication StatusThe Replication Status field shows the current state of the replication betweenthe Primary RVG and the Secondary RVG. The following table shows the valuesfor this field and their meanings.
Viewing configuration and status informationInformation displayed in RDS views
52

Table 3-5 Replication Status
MeaningValue
DCM is active for this Secondary, that is, new updates on Primary aretracked using DCM for this Secondary. The following information maybe displayed:
needs dcm resynchronization—To continue replication, resynchronizethe Secondary using DCM resynchronization.
See “Incrementally synchronizing the Secondary after SRL overflow”on page 76.
needs failback synchronization—To continue replication, start failbacksynchronization to this Secondary.
See “Failing back using fast-failback synchronization” on page 86.
See the Veritas Volume Replicator Administrator’s Guide.
logging to DCM
This Primary RVG is acting as Secondary as part of the fast failbackprocess. To continue replication, start failback resynchronization onthe new Primary.
needs failbacksynchronization
Data is not being replicated to Secondary because Primary RLINK isin needs recovery state. Primary RLINK needs to be recovered beforereplication can resume.
not replicating
Replication to Secondary paused because of some administrativeaction that results in the following states:
primary paused—Primary RLINK is paused.
secondary paused—Secondary RLINK is paused.
paused by user
Replication to Secondary paused because of the following errors:
secondary config error—Secondary has some configuration error.
secondary log error—Secondary SRL has an I/O error.
See the Veritas Volume Replicator Administrator’s Guide for moreinformation on interpreting RLINK flags.
paused due toerror
Replication to Secondary is paused because of some network problem.paused due tonetworkdisconnection
connected—Replication can take place if there are updates on thePrimary data volumes.
replicating
53Viewing configuration and status informationInformation displayed in RDS views

Table 3-5 Replication Status (continued)
MeaningValue
Resynchronization to the Secondary is in progress.
autosync—Resynchronization type is autosync.
dcm resynchronization—Resynchronization after an SRL overflow.
failback synchronization—Resynchronization using failback logging.
resync in progress
Resynchronization to Secondary paused because of someadministrative action that results in the following states:
primary paused—Primary RLINK is paused.
secondary paused—Secondary RLINK is paused.
resync paused byuser
Resynchronization to Secondary paused because of the followingerrors:
secondary config error—Secondary has some configuration error.
secondary log error—Secondary SRL has an I/O error.
See the Veritas Volume Replicator Administrator’s Guide for moreinformation on interpreting RLINK flags.
resync paused dueto error
Resynchronization to Secondary is paused because of some networkproblem.
resync paused dueto networkdisconnection
Replication to Secondary is stopped because of the following:
primary detached—Primary RLINK is detached.
secondary detached—Secondary RLINK is detached.
stopped
The replication status cannot be determined.
More information about the replication status can be found in thePrimary or Secondary RVG view.
N/A
Viewing configuration and status informationInformation displayed in RDS views
54
Administering VeritasVolume Replicator
This chapter includes the following topics:
■ About administering Veritas Volume Replicator
■ Administering data volumes
■ Administering replication
■ Administering the Replicated Data Set
■ Administering checkpoints
■ Administering the SRL
About administering Veritas Volume ReplicatorVolume Replicator Web Console (VRW) enables you to administer Veritas VolumeReplicator (VVR) Secondary hosts, data volumes, and volumes from any host ina Replicated Data Set (RDS). VRW provides Web-based wizards that enable youto perform various tasks on an RDS. The specified tasks are performed on all thehosts.
Administering data volumesVRW enables you to administer data volumes from any host in an RDS. You canperform the following volume administration tasks using VRW:
■ Associating volumes to a Replicated Data Set
■ Resizing a data volume in a Replicated Data Set
4Chapter
■ Dissociating a data volume from its Replicated Data Set
The VRW wizards that manage volume operations perform the operations on allRVGs in the RDS. The host from which the wizard is accessed is referred to as thelocal host. The name of the RVG on the local host represents the name of the RDSto which it belongs.
Note: If the associating or dissociating volume operation fails on any of the hostsin the RDS, the original configuration remains unchanged.
Associating volumes to a Replicated Data SetUse the Associate Volume wizard to associate a volume or a volume set to aReplicated Data Set (RDS) even when replication is in progress. This commandassociates the selected volumes to all the RVGs of the RDS. For each volume youare associating, ensure that volumes of the same name and same length exist onall the hosts in the RDS. You must create volumes of the required layout on thePrimary and the Secondary.
Before associating volumes, the Associate Volume wizard displays a warning andprompts the user to confirm whether or not the Primary and Secondary volumescontain the same data.
To verify that the Primary and Secondary volumes contain the same data, see theinformation provided in the Veritas Volume Replicator Administrator’s Guide.
Observe the following prerequisites:
Create volumes of the same name and length as the Primaryvolume on all the hosts in the RDS.
Verify that the volumes to be associated are inactive.
Synchronize the volumes.
Prerequisites
To associate a volume to an RDS
1 Select the RDS detail view for the RDS for which the data volume is to beassociated.
2 From the Configuration menu in the task pane, select Associate Volume.
3 In the Volume Selection page, select the name of a data volume or a volumeset to be associated to the RDS. Click Next.
See “Associate Volume: Select Volume panel” on page 57.
Administering Veritas Volume ReplicatorAdministering data volumes
56
4 In the confirmation page, check the box to indicate that the prerequisiteshave been met and clickNext. If the operation is successful, a message displaysto indicate that each data volume has been successfully associated to eachcorresponding RVG in the RDS.
See “Associate Volume: Confirmation panel” on page 57.
5 In the summary page, click Finish.
6 VRW attempts the operation and displays the Result panel. Click OK.
Associate Volume: Select Volume panelUse the Associate Volume wizard to associate a data volume or a volume set toan RDS, even when replication is in progress. This operation associates the selectedvolumes to all the RVGs of the RDS.
For each volume you are associating, ensure that volumes of the same name andsame length exist on all the hosts in the RDS. You must create volumes of therequired layout on the Primary and the Secondary.
Displays the name of the RDS to which you are adding volumes.This field cannot be edited.
RDS
Select the name of a data volume or volume set to be associatedto the RDS. For a volume set, you cannot associate an individualcomponent volume of the volume set to the RDS, unless it is acomponent of a volume set that is already associated to the RDS.You can associate the entire volume set to the RDS, whichassociates all of the volumes in the volume set to the RDS.However, if there are component volumes that do not need to bereplicated, you can remove them from the RDS later with theDissociate Volume task.
Data Volumes
Associate Volume: Confirmation panelThe Primary and Secondary volumes should contain the same data before thevolumes are associated to the RDS. Before associating volumes, the AssociateVolume wizard displays a warning and prompts the user to confirm whether ornot the Primary and Secondary volumes contain the same data.
Observe the following prerequisites:
Displays the prerequisites for associating volumes to an RDS. Thisfield cannot be edited.
Prerequisites
57Administering Veritas Volume ReplicatorAdministering data volumes
Check the box to indicate that the prerequisites have been met.Do not check the checkbox until you are certain that theprerequisites are actually met. Otherwise, associating the volumesmay result in the Secondary having unusable data.
Prerequisites are met
Associate Volume: Summary panelConfirm the attributes for the operation. Click Finish to associate the volumes.
Resizing a data volume in a Replicated Data SetUse the Resize Volume task to resize a data volume associated to a ReplicatedData Set (RDS) even when replication is in progress. The Resize Volume taskresizes the specified data volume in all the RVGs in an RDS.
Important notes for resizing a data volume:
■ If the Primary data volume contains a file system, then resizing the data volumealso resizes the file system.
■ If replication to any Secondary RVG is in progress, resizing the volume pausesthe Secondary, resizes the Primary data volume, and then resumes replication.
■ If resizing the volume fails on any of the hosts in the RDS, original volumesizes are not restored. The volumes sizes won’t match on the Primary and thecorresponding Secondary hosts. To correct the mismatch, correct the errorcondition, run the Resize Volume wizard again to resize the volume, and resumereplication.
■ When you increase the size of a data volume, the newly added portions on thePrimary and Secondary volumes are not synchronized.
Observe the following prerequisites:
The data volume must exist in the disk group and beassociated with the RVGs for all hosts in the RDS.
Make sure there is enough space in the disk group on thePrimary and the Secondary to increase the size of a datavolume.
Prerequisites:
To resize a data volume in an RDS
1 Select the RDS detail view for the RDS for which the data volume is to beresized.
2 Select the data volume to be resized.
3 Select Resize Volume in the drop-down list and click Go.
Administering Veritas Volume ReplicatorAdministering data volumes
58
4 View the Warnings page and click Next.
5 Complete the Resize Volume Options page.
See “Resize Volume: Volume Selection panel” on page 59.
6 Click Finish to process the Resize Volume request.
7 Click Ok in the Result panel.
Resize Volume: Warnings panelUse the Resize Volume wizard to resize a data volume associated to an RDS, evenwhen replication is in progress. The Resize Volume task resizes the specified datavolume in all the RVGs in an RDS.
Review the warnings and click Next to continue.
Resize Volume: Volume Selection panelUse this panel to specify the data volume to be resized.
Displays the name of the RDS for which the data volume is tobe resized. This field cannot be edited.
RDS
Select the name of the data volume to be resized. For example,hr_dv01.
Data Volume
Specify the size for the data volume.
The default size unit is megabytes. To specify a size unit, selecteither kilobytes, or gigabytes from the drop-down list.
New Size
Select the checkbox to force the resize volume operation.Force resize volume evenif it may result in loss ofdata
Resize Volume: Summary panelConfirm the attributes for the operation. Click Finish to resize the volumes.
Dissociating a data volume from its Replicated Data SetPerform the Dissociate Volume task to remove data volumes from an RDS. TheDissociate Volume task only dissociates the data volumes from the RVGs in anRDS and does not delete them.
The Dissociate Volume task removes the specified data volumes from the RDS ineither of the following conditions:
59Administering Veritas Volume ReplicatorAdministering data volumes
■ When replication is in progress that is, the RLINKs are in the CONNECT state.
■ When replication is stopped, that is, the RLINKs are detached. To stopreplication, use Stop Replication.
Note: If you want the data volumes on the Primary and the Secondary to beconsistent after they are dissociated, stop the application and make sure that theRLINKs are up to date before dissociating a data volume from its RDS.
To dissociate a data volume from its RDS even when the Primary RVG has notbeen stopped, select the Dissociate the data volume even if the Primary RVG hasnot been stopped option from the Dissociate Volume dialog box.
To dissociate a data volume from its RDS
1 Select any view for the RDS for which the data volume is to be dissociated.
2 In the Data Volumes section, select the volume.
3 Select Dissociate Volume from the drop-down list and click Go.
4 Complete the Dissociate Volume dialog, and click Next.
See “Dissociate Volume dialog ” on page 60.
5 Click Next.
6 On the Confirmation page, click Finish to dissociate the volume.
7 On the Result page, Click OK. VRW updates and displays the RDS or RVGview from which you accessed the Dissociate Volume task.
Dissociate Volume dialogUse this dialog window to remove data volumes from an RDS. The DissociateVolume task only dissociates the data volumes from the RVGs in an RDS and doesnot delete them.
Displays the name of the RDS for which you are dissociatingthe data volumes. This field cannot be edited.
RDS
Select the name of the data volume or volume set to bedissociated from the RDS.
For a volume set, you can dissociate the entire volume set oryou can dissociate a component volume from the RDS.Dissociating a component volume removes the volume fromthe RDS but does not remove it from the volume set.
Data Volume
Administering Veritas Volume ReplicatorAdministering data volumes
60
Select this option to force removal of a data volume. Werecommend that the applications and the Primary RVG bestopped before dissociating any data volumes.
Option:
Dissociate the data volumeeven if the Primary RVGhas not been stopped
Dissociate Volume: Summary panelUse this dialog window to remove data volumes from an RDS. Review the summaryinformation and click Finish to remove the data volumes.
Administering replicationVRW enables you to administer Secondary hosts from any host in the RDS. Youcan perform the following replication tasks using VRW:
■ Changing the replication settings
■ Pausing replication to a Secondary
■ Resuming replication to a Secondary
■ Stopping replication to a Secondary
■ Changing the IP addresses used for replication
The replication tasks are independent of the host from which they are accessedand can be accessed from any host in an RDS. The host on which the task islaunched is referred to as the local host. The name of the RVG on the local hostrepresents the RDS name to which it belongs.
Changing the replication settingsThis section describes how to change the VVR replication attributes according toyour requirements. The Change Replication Settings task enables you to set thefollowing VVR replication attributes:
■ Replication mode
■ Latency protection
■ SRL protection
■ Replication protocol
■ Bandwidth limit
■ Packet size
61Administering Veritas Volume ReplicatorAdministering replication

For details on selecting the appropriate option for each replication attribute, seethe Veritas Volume Replicator Administrator’s Guide.
Note that the replication settings are applied to both the Primary and theSecondary.
To change replication settings to a Secondary in an RDS
1 In the Secondaries detail view of the RDS, in the Replication Settings toPrimary section, select the Primary.
OR
In the Primary detail view of the RDS, in the Replication Settings to theSecondaries section, select the Secondary.
2 Select ChangeReplication Settings and click Go.
3 Complete the Change Replication Settings page.
See “Change Replication Settings” on page 62.
4 Click Finish to change the replication settings for the selected Secondary. Amessage indicates whether the operation succeeded or failed.
In the Result page, click OK. The Secondary RVG view displays the newreplication settings.
Change Replication SettingsUse this dialog window to change replication settings. To use the replicationsettings effectively in your environment, it is important to understand how eachreplication setting effects replication when the Primary and Secondary areconnected and disconnected.
Select the appropriate Secondary from the drop-down list.Secondary
The current replication mode is displayed by default. From thedrop-down list, select the required mode of replication.
To set the replication to synchronous mode, selectSynchronous-override.
To set the replication to asynchronous mode, select Asynchronous.
Replication Mode
Asynchronous,Synchronous-override
Administering Veritas Volume ReplicatorAdministering replication
62

From the drop-down list, select the required value to change theSRL protection mode.
To enable SRL protection, select autodcm, dcm, or override.
To disable SRL protection, select off. If you disable SRL protection,the SRL is allowed to overflow.
For details on selecting the fail option, see Veritas VolumeReplicator Administrator’s Guide.
SRL Protection
autodcm, dcm, off,override
To enable latency protection and limit the number of waitingupdates in the SRL, select override. When you select override thewizard displays the fields Latency Low Mark and Latency HighMark with default values of 9950 and 10000 respectively.
To disable latency protection, select off. This does not limit thenumber of waiting updates in the SRL. To enable latency protectionand limit the number of waiting updates in the SRL, select override.
For details on selecting the override or fail option, see VeritasVolume Replicator Administrator’s Guide.
Latency Protection
override, off
Displays only if Latency Protection is set to override. Enter thenumber of writes in the SRL at which the protection must becomeinactive and writes must succeed.
Latency Low Mark
Displays only if Latency Protection is set to override. Enter thenumerical limit above which you do not want the number ofupdates waiting in the SRL to grow. Must be specified whenLatency Protection is set to override.
Latency High Mark
Displays the current network protocol used for replication. Selectthe desired protocol from the drop-down list.
Protocol
Enter a value, or the word none. Select the desired units from thedrop-down list. The minimum value is 56 kbps.
Bandwidth Limit
The default is 8400 bytes. The minimum value is 1300 bytes andthe maximum value is 65464 bytes.
Packet Size
Starting replication to a SecondaryUse Start Replication to start replication to a Secondary. When you start replicationto a Secondary, the data volumes on the Secondary must be synchronized withthe data volumes on the Primary. For this reason, the Start Replication task isdescribed in conjunction with the synchronization procedures.
See “Synchronizing the Secondary and starting replication” on page 27.
63Administering Veritas Volume ReplicatorAdministering replication
Start Replication dialogUse the Start Replication dialog to start replication to a Secondary. When youstart replication to a Secondary, the data volumes on the Secondary must besynchronized with the data volumes on the Primary. For this reason, the StartReplication task is described in conjunction with the synchronization procedures.Understanding the method used to start the replication is critical in order tocorrectly and efficiently start the replication.
See “Synchronizing the Secondary and starting replication” on page 27.
Tip: Resynchronization is not required when the Primary data volumes are emptyor when the contents of the volumes on the Primary and Secondary are identicaland the application is inactive.
Complete the Start Replication dialog according to the method of synchronization:
Displays the name of the RDS for which you are startingreplication. This field cannot be edited.
For example, hr_rvg
RDS
Select the name of the Secondary to which you are startingreplication.
Secondary
Select this option to automatically synchronize the Secondarydata volumes with the Primary data volumes in an RDS and startreplication; automatic synchronization makes the Secondary datavolumes up to date with the Primary data volumes.
Replication to another Secondary can be started only after thisautomatic synchronization completes.
Automatic synchronization copies the data on the Primary to theSecondary over the network using the Data Change Map (DCM).To use automatic synchronization, each data volume in the RVGmust have an associated Data Change Map (DCM).
Note: For component volumes of a volume set, use StartReplication with the Using Autosync option to synchronize theRVG.
Using automaticsynchronization
Use this option to start replication only when the Primary datavolumes are zero initialized or when the contents of the volumeson the Primary and Secondary are identical and the applicationis inactive.
Resynchronization isnot required
Administering Veritas Volume ReplicatorAdministering replication
64
This option enables you to start replication with a checkpoint.This option is used in conjunction with full synchronization,block-level tape backup, or difference-based synchronization ofPrimary data volumes with the Secondary data volumes.
Select the checkpoint name that was created during thesynchronization. This uses the selected checkpoint to startreplication. If no checkpoints are available, this field displays Nousable checkpoints.
Using checkpoint
See “Setting up replication using automatic synchronization” on page 27.
See “Setting up replication using full synchronization” on page 28.
See “Setting up replication using block-level backup and checkpoint” on page 29.
See “Setting up replication using difference-based synchronization” on page 30.
Pausing replication to a SecondaryUse Pause Replication to pause replication to a specific Secondary in an RDS. ThePause Replication task temporarily pauses replication between the Primary andSecondary. The pause is initiated from the Primary and is independent of the hostfrom which the command is entered. Pausing replication from the Primary enablesyou to perform administrative tasks, such as making changes to the networkconnecting two nodes.
During a pause, the Primary continues to log writes to the SRL but does not sendthe writes to the Secondary. The network session between the Primary andSecondary on behalf of the RLINK is broken. A resume re-establishes thePrimary-Secondary network session and enables writes to continue from the pointof the pause. If there is volume activity during the pause, synchronous RLINKsare forced to become asynchronous. A previously synchronous RLINK remainsasynchronous after the resume until it catches up.
To pause replication to a Secondary
1 Navigate to the Secondaries detail view or the Summary view of the requiredRDS.
2 In the Replication Status section, select the Secondary.
3 Select PauseReplication, and click Go.
4 In the Pause Replication dialog box, click Finish to pause replication. Amessage indicates whether the operation succeeded or failed.
5 In the Result page, click OK. The Secondary RVG view displays the newreplication status.
65Administering Veritas Volume ReplicatorAdministering replication

Pause Replication dialogUse Pause Replication to pause replication to a specific Secondary in an RDS.
Displays the name of the RDS for which you are pausing replication.This field cannot be edited. For example, hr_rvg
RDS
Select the name of the Secondary to which you are pausing replication.Secondary
Resuming replication to a SecondaryUse Resume Replication to resume replication between the Primary and a specificpaused Secondary in an RDS. After replication resumes, the state of the Primaryand Secondary RLINKs changes to CONNECT to indicate that replication hasresumed. To check the state of RLINKs, check the RLINK section in the PrimaryRVG view.
If the Secondary has been paused for a long period of time, the SRL may haveoverflowed and the Secondary may need to be resynchronized by replaying theDCM or by another method.
To resume replication to a Secondary
1 Navigate to the Secondaries detail view or the Summary view of the requiredRDS.
2 In the Replication Status section, select the Secondary.
3 Select ResumeReplication, and click Go.
4 In the Resume Replication Summary page, clickFinish to resume replication.A message indicates whether the operation succeeded or failed.
5 In the Result page, click OK. The Secondary RVG view displays the newreplication status.
Resume Replication dialogUse Resume Replication to resume replication between the Primary and a specificpaused Secondary in an RDS.
Displays the name of the RDS for which you are resuming replication.This field cannot be edited. For example, hr_rvg.
RDS
Select the name of the Secondary to which you are resumingreplication.
Secondary
Administering Veritas Volume ReplicatorAdministering replication
66
Stopping replication to a SecondaryUse Stop Replication from any host in an RDS to stop replication between thePrimary and a specified Secondary.
The Stop Replication task fails if the Primary and Secondary RLINKs are not upto date. The dialog box provides an option to stop replication to a Secondary whenthe RLINKs are not up to date.
Do not use the Stop Replication task to temporarily stop replication; instead, usePause Replication.
Note:Stopping replication when the RLINKs are not up to date requires a completeresynchronization of the data volumes.
To stop replication to a Secondary
1 Navigate to the Secondaries detail view or the Summary view of the requiredRDS.
2 In the Replication Status section, select the Secondary.
3 Select StopReplication, and click Go.
4 Complete the Stop Replication dialog box.
See “Stop Replication dialog” on page 67.
5 Click Finish to stop replication. A message indicates whether the stopreplication operation succeeded or failed.
6 In the Result page, click OK. The Secondaries detail view displays the newreplication status.
Stop Replication dialogUse Stop Replication from any host in an RDS to stop replication between thePrimary and a specified Secondary.
Displays the name of the RDS for which you are stoppingreplication. This field cannot be edited. For example, hr_rvg
RDS
Select the Secondary to which you are stopping replication.Secondary
Select the checkbox to stop replication to the Secondary when theSecondary is not up-to-date. Stopping replication when theSecondary is not up-to-date also stops tracking of writes to theSRL with respect to the Secondary. Starting replication again latermay require a complete resynchronization of the data volumes.
Stop replication evenwhen the Secondary isnot up-to-date
67Administering Veritas Volume ReplicatorAdministering replication
Changing the IP addresses used for replicationUse Change IP to change the IP addresses used for replication to a specificSecondary in an RDS.
Observe the following prerequisites:
The new host names must be configured for properresolution on both the Primary and Secondary sites.
The Secondary must be reachable from the Primary eitherthrough the previous network, the new network, or boththe networks.
If the previous network is no longer available, the changeIP task will fail if you are not currently connected to thePrimary host.
Prerequisites
To change the replication IP
1 In the Secondaries tab of the RDS detail view of the RDS, in the ReplicationSettings to Primary section, select the Secondary for which you want to changethe replication IP.
OR
In the Primary tab of the RDS detail view of the RDS, in the ReplicationSettings to the Secondaries section, select the Secondary for which you wantto change the replication IP.
2 Select Change IP and click Go.
3 In the Change IP dialog box, enter a value for a new Primary or a newSecondary, or both. The value can be either a host name or an IP address.
See “Change IP” on page 68.
4 ClickFinish to change the replication IP for the selected Secondary. A messageindicates whether the operation succeeded or failed.
5 In the Result page, click OK. The RVG view displays the new replicationsettings.
Change IPUse this dialog window to change the IP address used for replication. Enter a valuefor a new Primary or a new Secondary, or both. The value can be either a hostname or an IP address.
Administering Veritas Volume ReplicatorAdministering replication
68
Displays the name of the RDS for which you are changing the IPaddress. This field cannot be edited. For example, hr_rvg
RDS
Displays the name of the Secondary RVG for the selected RDS. Tochange the IP address for another Secondary, select it from thedrop-down list.
Secondary
Enter a value for a new Primary. The value can be either a host nameor an IP address. A valid Host name must contain only alpha-numericcharacters, underscores, dashes, or periods. The length of the namemust be between 1 and 31 characters long. It cannot begin with a dashor a period, or end with a period.
New Primary
Enter a value for a new Secondary. The value can be either a host nameor an IP address. A valid Host name must contain only alpha-numericcharacters, underscores, dashes, or periods. The length of the namemust be between 1 and 31 characters long. It cannot begin with a dashor a period, or end with a period.
New Secondary
Administering the Replicated Data SetThis section describes the following tasks:
■ Removing a Secondary from a Replicated Data Set
■ Removing a Bunker from a Replicated Data Set
■ Removing a Primary RVG
Removing a Secondary from a Replicated Data SetUse Remove Secondary to remove a Secondary RVG from the RDS to which itbelongs. Before performing this operation, you must stop replication to thespecified Secondary.
The Remove Secondary operation is irreversible.
The Remove Secondary task performs the following operations:
■ Dissociates the data volumes and SRL from the Secondary RVG.
Note: The Remove Secondary task does not delete data volumes and the SRL;it only dissociates them from the Secondary RVG.
■ Removes the Secondary RVG from its RDS.
■ Deletes the Secondary RVG.
69Administering Veritas Volume ReplicatorAdministering the Replicated Data Set

■ Deletes the Primary and Secondary RLINKs.
Observe the following prerequisites:
Stop replication to the Secondary that is to be removed.
See “Stopping replication to a Secondary” on page 67.
Prerequisites
To remove a Secondary from an RDS
1 Navigate to the Secondaries tab of the RDS view of the RDS for which theSecondary is to be removed.
2 In the task pane, under Configuration, select Remove Secondary.
3 In the Remove Secondary dialog box, click Finish to remove the Secondary.A message indicates whether the Remove Secondary operation succeeded orfailed.
4 In the Result page, click Ok. The RDSs view or Summary tab of the RDS viewdisplays the new RDS configuration. If the removed RVG was on the localhost, VRW displays the Summary tab, which no longer shows the RDS inwhich the removed RVG belonged. Otherwise, VRW displays the current RDSsview.
Remove Secondary dialog windowUse this dialog window to remove a Secondary RVG from the RDS to which itbelongs. Before performing this operation, you must stop replication to thespecified Secondary.
Displays the name of the RDS from which you are removing theSecondary RVG. This field cannot be edited.
RDS
Select the Secondary RVG to be removed.Secondary
Removing a Bunker from a Replicated Data SetUse Remove Bunker to remove a Bunker Secondary RVG from the RDS to whichit belongs. You must stop replication to the bunker before removing it.
The Remove Bunker operation is irreversible.
Observe the following prerequisites:
Administering Veritas Volume ReplicatorAdministering the Replicated Data Set
70
Stop replication to the Bunker Secondary that is to beremoved.
See “Stopping replication to a Secondary” on page 67.
Prerequisites
To remove a Bunker Secondary from an RDS
1 Navigate to the Bunker tab of the RDS view of the RDS for which the Bunkeris to be removed.
2 In the task pane, under Configuration, select Remove Bunker.
3 In the Remove Secondary dialog box, click Finish to remove the Secondary.A message indicates whether the Remove Secondary operation succeeded orfailed.
4 In the Result page, click Ok. The RDSs view or Summary tab of the RDS viewdisplays the new RDS configuration. If the removed RVG was on the localhost, VRW displays the Summary tab, which no longer shows the RDS inwhich the removed RVG belonged. Otherwise, VRW displays the current RDSsview.
Remove Bunker dialog windowUse Remove Bunker wizard to remove a bunker Secondary from the RDS. Youmust stop replication to the bunker before removing it.
The Remove Bunker task is irreversible.
Displays the name of the RDS from which you are removing the bunkerSecondary. This field cannot be edited.
RDS
Displays the name of the bunker to be removed. This field cannot beedited.
Bunker Host
Removing a Primary RVGUse Remove Primary to remove a Primary RVG from an RDS and thus delete thecorresponding RDS.
Observe the following prerequisite for deleting a Primary RVG:
■ All Secondaries in the RDS must be removed.See “Removing a Secondary from a Replicated Data Set” on page 69.
The Remove Primary task performs the following by default:
■ Dissociates the data volumes and SRL from the Primary RVG.
■ Removes the Primary RVG.
71Administering Veritas Volume ReplicatorAdministering the Replicated Data Set

The Remove Primary task does not delete data volumes or the SRL from the VeritasVolume Manager configuration.
To remove a Primary RVG
1 Navigate to the Summary tab or the Primary tab of the RDS view of the RDSfrom which to remove the Primary RVG.
2 In the task pane, under Configuration, select Remove Primary.
3 In the Remove Primary dialog box, if required, select the "Force removal ofthe Primary RVG even if it is not yet stopped" checkbox.
4 Click Finish. A message indicates whether the Remove Primary operationsucceeded or failed.
5 In the Result page, click OK. The Summary tab or Primary tab of the RDSview displays the new RDS configuration. If the removed RVG was on thelocal host, VRW displays the Summary tab, which no longer shows the RDSin which the removed RVG belonged. Otherwise, VRW displays the currentRDSs view.
Remove Primary dialog windowUse this dialog window to remove a Primary RVG from the RDS to which it belongsand then delete the RDS. Before performing this operation, remove all Secondariesfrom the RDS. The Remove Primary operation also dissociates all data volumesand the SRL before removing the Primary.
Displays the name of the RDS from which you are removing thePrimary RVG. This field cannot be edited.
RDS
Check this option to force the removal of the Primary RVG evenif the application is still active or even if the Primary RVG is notyet stopped.
Force removal of thePrimary RVG
Administering checkpointsThis section describes the following tasks:
■ Creating checkpoints
■ Ending checkpoints
■ Viewing checkpoints
■ Deleting checkpoints
Administering Veritas Volume ReplicatorAdministering checkpoints
72

Creating checkpointsVRW enables you to create Primary checkpoints. Primary checkpoints areassociated with a Primary RVG. You can create a maximum of 46 checkpoints.
Checkpoints cannot be nested. A started checkpoint must be ended before a newone can be started.
To start a checkpoint
1 Select the Primary tab of the RDS detail view.
2 Select Start Checkpoint and click Go.
3 In the Start Checkpoint dialog box, enter a checkpoint name and clickFinish.A message displays the status of the checkpoint.
4 Click OK.
Create CheckpointUse this dialog window to create a Primary checkpoint. Primary checkpoints areassociated with a Primary RVG. You can create a maximum of 46 checkpoints.
Displays the name of the RDS for which you are creating thecheckpoint. This field cannot be edited. For example, hr_rvg
RDS
Enter the name to be used for the Primary checkpoint. A validcheckpoint name must contain only alpha-numeric characters,underscores, dashes, or periods. The length of the name must bebetween 1 and 19 characters long. It cannot begin with a dash ora period, or end with a period. For example, my_checkpt
Checkpoint Name
Ending checkpointsVRW enables you to end a checkpoint. For example, if a checkpoint was startedbefore a tape backup on the Primary, end the checkpoint when the tape backupcompletes on the Primary. The checkpoint can then be used to restore the tapeon the Secondary.
You must end any checkpoint that is started before creating a new checkpoint.
To end a checkpoint
1 Select the Primary tab of the RDS detail view.
2 Select EndCheckpoint and click Go.
73Administering Veritas Volume ReplicatorAdministering checkpoints
3 In the End Checkpoint dialog box, click Finish to confirm that you want toend the checkpoint which is currently started. A message displays the statusof the checkpoint.
4 Click Ok.
End CheckpointUse this dialog window to end a checkpoint.
Displays the name of the RDS for which the checkpoint is to be ended.This field cannot be edited. For example, my_rvg.
RDS
Displays the name of the checkpoint that has been started. This fieldcannot be edited.
For example:
my_checkpt (Started, Usage=0, % Log=0)
Checkpoint
Viewing checkpointsCheckpoints are displayed in the Primary tab of the RDS detail view for the RDS.
Indicates the number of checkpoints available.Checkpoint Count
Lists each checkpoint, and displays usage, % of log used, and thestatus of the checkpoint (started or complete).
Checkpoints
Deleting checkpointsVRW enables you to delete an existing checkpoint. Checkpoints can be deletedafter they are no longer needed. If you reach the maximum number of checkpoints,you must delete a checkpoint before adding a new one. You can create a maximumof 46 checkpoints.
To delete a checkpoint
1 Select the Primary tab of the RDS detail view.
2 Select Delete Checkpoint.
3 In the Delete Checkpoint dialog box, select the checkpoint from the drop-downbox. Select the option box if the checkpoint has not been checkpoint endedand you still want to delete it.
See “Delete Checkpoint” on page 75.
Administering Veritas Volume ReplicatorAdministering checkpoints
74
4 ClickFinish. A message displays the status of the checkpoint delete operation.
5 Click OK.
Delete CheckpointUse this dialog window to delete an existing checkpoint.
Displays the name of the RDS for which you are deleting thecheckpoint. This field cannot be edited. For example, hr_rvg
RDS
Select the checkpoint to be deleted from the drop-down listof existing checkpoints. For example,
hr_rvg
If no checkpoint exists, the following message displays:
There is no checkpoint to be deleted.
Checkpoint Name
Select this option to force removal of a checkpoint.Delete checkpoint even ifit is not yet checkended ornot yet over flowed
Administering the SRLThe size of the SRL is critical to the performance of replication. When the SRLoverflows for a particular Secondary, the Secondary becomes out of date until acomplete resynchronization with the Primary is performed. Becauseresynchronization is a time-consuming process and during this time the data onthe Secondary cannot be used, it is important to prevent the SRL from overflowing.Hence, when initially configuring VVR, determine an appropriate size for the SRL.The maximum size of the SRL can be derived from various criteria, however, thesize of the SRL volume cannot be less than 110 MB. If the size that you havespecified for the SRL is less than 110MB, VVR displays a message that promptsyou to specify a value that is equal to or greater then 110 MB.
For more information, see "Sizing the SRL" in the Veritas Volume ReplicatorPlanning and Tuning Guide.
It is possible that an SRL of an appropriate size overflows because of changes inthe environment. This section describes how to protect from SRL overflows andadminister VVR if the SRL overflows.
75Administering Veritas Volume ReplicatorAdministering the SRL
Protecting from SRL overflowTo avoid complete synchronization of Secondary in the case of an SRL overflow,VVR provides autodcm or dcm mode of SRL protection.
For more information, see "Protection Against SRL Overflow—srlprot attribute"in the Veritas Volume Replicator Administrator’s Guide.
To enable SRL protection, each data volume in the RDS must have an associatedDCM.
For more information, see "Associating a Data Change Map to a Data Volume" inthe Veritas Volume Replicator Administrator’s Guide.
See “Changing the replication settings” on page 61.
Incrementally synchronizing the Secondary after SRL overflowThe default protection mode for the SRL is autodcm and every data volume in theRVG must have a DCM. When the SRL fills up, whether the RLINK is connectedor not, DCM logging is activated and a bit corresponding to the region of the updateis turned on for every incoming update. When you are ready to replay the DCM,start the DCM resynchronization process. To start the resynchronization, use theReplay DCM wizard.
Note that you can also use the cache or cache size parameters with the ReplayDCM wizard. If you specify these attributes, the wizard first creates aspace-optimized snapshot of the Secondary data volumes before starting theresynchronization. Data is transmitted to the Secondaries only after all the RLINKstaking part in the resynchronization have connected. All the Secondaries takingpart in the resynchronization must remain connected for the resynchronizationto continue. The resynchronization will pause if any of the Secondary RLINKs arepaused. During DCM resynchronization, VVR does not maintain the order ofupdates to the Secondary. As a result, the Secondary remains inconsistent untilthe resynchronization operation is complete. Note that if the Primary becomesunavailable during the time the resynchronization is taking place, the applicationscannot be restarted on the Secondary.
If the Secondary data volumes are mirrored, you can break off mirrors to retainconsistent (though out-of-date) copies of data until the resynchronization iscomplete. However, to overcome this problem, create snapshots of the Secondarydata volumes before the resynchronization starts.
The cache attribute specifies a name for the precreated cache object, on whichthe snapshots for the volumes in the specified RVG will be created. The cachesizeattribute specifies a default size for the cache object with respect to the source
Administering Veritas Volume ReplicatorAdministering the SRL
76

volume. You can specify only one of these attributes at one time with the ReplayDCM wizard to create one cache object for each snapshot.
If you do not specify either of these options then the Replay DCM wizardresynchronizes the Secondary data volumes without creating the snapshots.
Replay DCM starts replay of a DCM that is active because of an SRL overflow orfailback logging. Replay occurs on all RLINKs on which the dcm_logging flag isset. If any of these RLINKs are disconnected or paused, replay DCM is delayeduntil this condition clears on all RLINKs.
Observe the following prerequisite for incrementally resynchronizing theSecondary:
The RVG must have the dcm_logging flag set.Prerequisites
To incrementally resynchronize the Secondary
1 From any view of the RDS for which the resynchronization is to be started,in the task bar, under Replication, select ReplayDCM.
2 Select one of the options on the Summary page.
See “Replay DCM Wizard” on page 77.
3 Click Finish to start the incremental synchronization.
Refresh the RDS view to monitor the progress of the incrementalsynchronization. The RDS view shows how much data is left to send to eachSecondary that is being resynchronized.
Replay DCMWizardUse Replay DCM to start replay of a DCM that is active because of an SRL overflowor failback logging. Replay occurs on all RLINKs on which the dcm_logging flagis set. If any of these RLINKs are disconnected or paused, replay DCM is delayeduntil this condition clears on all RLINKs.
Select Cache Name and specify the name for a pre-created cache objecton which the snapshots for the data volumes in the Secondary RVGwill be created.
Cache Name
Select Cache Size and specify a default size for the cache object withrespect to the source volume. The default is Megabytes. Select anotherunit from the drop-down menu, if necessary.
Cache Size
77Administering Veritas Volume ReplicatorAdministering the SRL
Use this option if you have a consistent mirror of the Secondary datavolumes and do not need to use snapshots, in which case break off themirror first so that a consistent copy of the data is available in casesomething went wrong during the resynchronization.
none
Resizing the SRLThe size of the SRL is critical to the performance of replication. When initiallyconfiguring VVR, carefully determine an appropriate size for the SRL. If the SRLoverflows for a particular Secondary, the Secondary becomes out of date andinconsistent until a complete resynchronization with the Primary is performed.Because resynchronization is a time-consuming process and during this time thedata on the Secondary cannot be used, the SRL needs to be an appropriate size toprevent the SRL from overflowing.
If the SRL needs to be resized, use the Resize SRL dialog window to increase thesize of the SRL. The SRL can be increased while the application is active or whilereplication is in progress.
Note: This operation is irreversible because the SRL size can only be resized to alarger size.
Observe the following prerequisites:
Make sure there is enough space in the disk group on thePrimary to increase the size of the SRL.
Prerequisites
To resize the SRL
1 From any view of the RDS for which the resynchronization is to be started,in the task bar, under Configuration, select Resize SRL.
2 Complete the Resize SRL dialog box, and click Next.
See “Resize SRL dialog window” on page 78.
3 Click Finish.
4 Click Ok.
Resize SRL dialog windowUse the Resize SRL dialog window to increase the size of the SRL. The SRL can beincreased while the application is active or while replication is in progress.
Administering Veritas Volume ReplicatorAdministering the SRL
78
Note: This operation is irreversible because the SRL size can only be resized to alarger size.
Displays the name of the SRL volume to be resized. This field cannotbe edited.
SRL
Displays the name of the RDS which contains the SRL. This field cannotbe edited.
RDS
Enter the required size. The default size unit is megabytes. To specifya size unit, select kilobytes or gigabytes from the drop-down list.
The minimum size of the SRL volume is 110 MB. The maximum sizeof the SRL can be derived from various criteria.
Note: This operation is irreversible because the SRL size can only beresized to a larger size.
New Size
Resize SRL dialog window: confirmation panelConfirm the attributes for the operation. Click Finish to resize the SRL.
79Administering Veritas Volume ReplicatorAdministering the SRL

Administering Veritas Volume ReplicatorAdministering the SRL
80

Transferring the Primaryrole
This chapter includes the following topics:
■ About transferring the Primary role
■ Migrating the Primary role
■ Taking over from an original Primary
■ Failing back to the original Primary
■ Using a bunker for disaster recovery
About transferring the Primary roleThe Volume Replicator Web Console (VRW) wizards enable you to transfer thePrimary role from a healthy or failed Primary to another in an RDS. VRW providesthe following methods to transfer the Primary role:
■ Migrating the Primary role
■ Taking over from an original Primary
■ Failing back to the original Primary
For details about each method, see theVeritasVolumeReplicatorAdministrator’sGuide.
Migrating the Primary roleMigration involves transferring a healthy Primary of a Replicated Data Set (RDS)to a Secondary when the application involved in replication is inactive. Migration
5Chapter
of a Primary to a Secondary is useful when the Primary must be brought downfor reasons such as maintenance or to make the application active on anothernode.
Use the Migrate task to migrate the role of a healthy Primary to a specifiedSecondary. The Migrate task performs the following functions:
■ Migrates the Primary role of an RDS to the Secondary RVG.
■ Converts the Secondary RVG to the Primary RVG.
■ Converts the original Primary of the RDS to Secondary in the RDS.
■ Reconfigures only the original Primary and the new Primary.
Note: If an RDS contains multiple Secondaries, VRW does not automaticallyreconfigure the additional Secondary hosts as Secondary hosts of the new Primary.If required, you can reconfigure the additional Secondary hosts as Secondaryhosts of the new Primary using the VVR command-line interface.
If the Migrate task fails on any of the hosts, the original configuration is restored.
Before migrating the Primary, be sure the following prerequisites are met:
The data volumes in the RDS must be inactive; that is, anyapplications that use the Primary data volumes must bestopped.
All active Secondaries (attached RLINKs) must be up-to-date.
All RLINKs to the Secondary must be in the CONNECT state.
Prerequisites
To migrate a healthy Primary
1 Stop all the applications that are involved in replication. For example, if theapplication is a file system, unmount it.
2 Verify that the RLINKs are up to date by checking the replication status inthe RDS view. The Replication Status of the Secondary must be UP-TO-DATE.The Migrate operation fails if:
■ the Primary attached RLINKs are not in the UP TO DATE and CONNECTstate.
■ the data volumes are active.
3 Navigate to the Summary view, Primary tab of the RDS view or Secondariestab of the RDS view for the RDS.
4 In the Role Change section of the task pane, select Migrate.
Transferring the Primary roleMigrating the Primary role
82
5 In the Migration dialog box, select a Secondary to which you want to migratethe Primary role, and then click Next.
6 On the Summary page, click Finish. A message indicates whether themigration succeeded or failed.
7 In the Result page, click Close. The Primary RVG view for the new Primaryis displayed. By default, the migration operation starts replication from thenew Primary.
8 Restart the application. Because the application was stopped before themigration, an application recovery is not required. To start the applicationbefore enabling replication, perform the following steps:
■ Pause replication.
■ Start the application.
■ Resume replication.
Migrate Role: Prerequisites panelUse the Migrate dialog window to migrate the Primary role from the Primary hostto a Secondary host.
Displays the name of the RDS for which you are migrating the Primaryrole. This field cannot be edited. Example hr_rvg
RDS
Select a Secondary to which you want to migrate the Primary role.The selected Secondary must be up-to-date. After the migration, thisSecondary becomes the new Primary, and the original Primarybecomes the Secondary. Example london
Secondary
Migrate Role: Summary panelView the configuration. Click Finish to migrate the Primary.
Taking over from an original PrimaryThe takeover procedure involves transferring the Primary role from an originalPrimary to a Secondary. When the original Primary fails or is destroyed becauseof a disaster, the takeover procedure enables you to convert a consistent Secondaryto a Primary. The takeover of a Primary role by a Secondary is useful when thePrimary experiences unscheduled downtimes or is destroyed because of a disaster.
83Transferring the Primary roleTaking over from an original Primary

Use the takeover procedure to transfer the Primary role from an original Primaryto a Secondary. The takeover task must be performed on the Secondary host. Thetakeover task fails when performed on a Primary host.
The takeover procedure performs the following functions on the RDS to whichthe original Primary belongs:
■ Converts the Secondary RVG to a Primary RVG.
■ Removes the original Primary from the RDS.
■ Enables the fast-failback feature on the new Primary depending on the failbackoption that you select from the Takeover wizard. Each data volume in theSecondary RVG must have an associated Data Change Map (DCM) to enablefast failback with or without the autofailback.See “Takeover dialog window” on page 84.
To take over from the original Primary to the Secondary
1 Make sure that the data volumes on the Secondary host have associated DCMsif you want to use the fast failback logging feature.
2 Navigate to the Summary tab, Primary tab, or Secondaries tab of the RDSview of the RDS.
3 In the Role Change section of the task pane, select Takeover. The Takeoverdialog box enables you to convert the selected Secondary to be the newPrimary.
4 Complete the Takeover Options page.
See “Takeover dialog window” on page 84.
5 Click Finish to proceed with the Takeover operation. A message displays toindicate whether the takeover succeeded or failed.
6 Click Ok.
7 Verify whether fast-failback is enabled. If it is, the dcm_logging flag isdisplayed in the Flags column of the Primary RLINK in Primary RVG view.
8 If the takeover succeeds, start the application on the new Primary. Startingthe applications on the new Primary after a takeover may require anapplication recovery to be run.
Takeover dialog windowUse this dialog window to transfer the Primary role from an original Primary toa Secondary. The Takeover dialog window enables you to specify the method youplan to use for failing back to the original Primary. We recommend that you use
Transferring the Primary roleTaking over from an original Primary
84

the fast failback synchronization method to synchronize the original Primarywith the new Primary.
See “Failing back using fast-failback synchronization” on page 86.
The Takeover dialog box provides the following options to fail back to the originalPrimary:
Displays the name of the RDS. This field cannot be edited.RDS
This is the default. Use this option when you want to incrementallysynchronize the new Primary with the original Primary. Thisoption enables fast failback; however, the original Primary is notautomatically converted to a Secondary after reboot. Tosynchronize the data volumes on the original Primary and convertthe original Primary to a Secondary, use the Replay Failback Logtask on the new Primary.
Fast failback
The Auto fast failback option enables you to automaticallysynchronize the original Primary when it becomes available. Thisoption converts the original Primary to a Secondary when theoriginal Primary becomes available after an unexpected failure.It also uses the DCM to automatically synchronize the datavolumes on the original Primary, which is now the new Secondary,using fast failback. Each Secondary data volume must have anassociated DCM.
Auto fast failback
Use the No fast failback option to change the role from Secondaryto Primary without enabling fast failback. Select this option if youare sure that the original Primary will not recover or if most ofthe data on the new Primary is going to change while the originalPrimary is unavailable. This option does not automaticallysynchronize the original Primary. You must synchronize theoriginal Primary after it becomes available either usingdifference-based synchronization or full synchronization. Usethe vradmin syncrvg command to synchronize the originalPrimary using difference-based synchronization or fullsynchronization.
See the Veritas Volume Replicator Administrator’s Guide fordetails.
No fast failback
Failing back to the original PrimaryAfter an unexpected failure, a failed Primary host might become available andfind that one of its Secondary hosts has been promoted to a Primary as a resultof a takeover. A takeover happens when a Secondary of the original Primary takes
85Transferring the Primary roleFailing back to the original Primary

over the Primary role because of an unexpected outage of the original Primary.The process of transferring the Primary role back to the original Primary is calledfailback.
VRW provides the following methods to fail back to the original Primary:
■ Failing back using fast-failback synchronization
■ Failing back using difference-based synchronization
Note: We recommend that you use the fast failback synchronization method.
For a comparison of fast failback versus difference-based synchronization, seethe Veritas Volume Replicator Administrator’s Guide.
Failing back using fast-failback synchronizationBefore using the fast-failback synchronization method to fail back to the originalPrimary, verify whether the fast-failback feature was enabled when taking overthe Primary role.
For more information about the fast-failback feature, see the chapter "Transferringthe Primary Role" in the Veritas Volume Replicator Administrator’s Guide.
To fail back to the original Primary using fast-failback synchronization
1 Synchronize the data volumes on the original Primary, which is now the newSecondary, with the data volumes on the new Primary using the ReplayFailback Log dialog box. Do not perform this step if Auto-fast failback isselected in the Takeover dialog box during the takeover.
2 Stop the application on the new Primary.
3 Migrate the Primary Role to the original or failed Primary.
See “Migrating the Primary role” on page 81.
Example—failing back to the original Primary using fastfailbackIn this example, the Primary host seattle has restarted after an unexpectedfailure. After the failure, the Primary role was taken over by the Secondary hostlondon. Each data volume on the Secondary londonhas a Data Change Map (DCM)associated with it and fast failback is enabled on londonby selecting the Auto-fastfailback option in the Takeover dialog box.
Transferring the Primary roleFailing back to the original Primary
86
An application is running on london and incoming writes are logged to its DCM.This example shows how to fail back to the original Primary seattle using thefast-failback feature.
To fail back to the original Primary london using fast failback
1 Navigate to the Summary, Primary, or Secondaries tab of the RDS view of theRDS.
2 In the Role Change section of the task pane, select Replay Failback Log.
3 Complete the Replay Failback Log dialog box.
See “Replay Failback Log dialog box” on page 87.
4 Click Finish.
The Replay Failback Log wizard synchronizes the data volumes in the newSecondary RVGhr_rvgonseattlewith the data volumes in the new PrimaryRVGhr_rvgonlondonusing the fast-failback feature. This step is not requiredif Auto fast failback was selected in the Takeover dialog box when takingover from the original Primary.
5 Click OK. You can check the status of the synchronization using the RDSSummary view. Refresh the view to ensure the latest status is displayed.When the synchronization completes, go to the next step.
6 At a convenient time, stop the application on the new Primary london.
7 Migrate the Primary role from the new Primary host london to the originalPrimary host seattle using the Migration task.
See “Migrating the Primary role” on page 81.
Replication from the original Primary seattle to the original Secondarylondon is started by default after the migration is completed.
Replay Failback Log dialog boxUse the Replay Failback Log wizard to synchronize the data volumes in the newSecondary RVG with the data volumes in the new Primary RVG using thefast-failback feature.
Select Cache Size and specify a default size for the cache object.The default is Megabytes. Select another unit from the drop-downmenu, if necessary.
Cache Size
Select Cache Name and specify the name for a pre-created cacheobject.
Cache Name
87Transferring the Primary roleFailing back to the original Primary
Select this option if you are not using a cache.None
Failing back using difference-based synchronizationThis section describes failing back using difference-based synchronization.
To fail back to the original Primary using difference-based synchronization
1 Convert the original Primary to a Secondary using the Make Secondary task.
2 See “Converting a Primary to a Secondary” on page 88.
3 Synchronize the data volumes on the original Primary with the data volumeson the new Primary using the checkpoint option of the vradmin syncrvg
command to synchronize the original Primary using difference-basedsynchronization.
See the Veritas Volume Replicator Administrator’s Guide for details.
4 Start replication to the new Secondary with the checkpoint by completingthe Start Replication task.
See “Synchronizing the Secondary and starting replication” on page 27.
5 Stop the application on the new Primary london.
6 Migrate the Primary role from the new Primary host london to the originalPrimary host seattle. Replication from the original Primary seattle to theoriginal Secondary london is started by default.
See “Migrating the Primary role” on page 81.
Converting a Primary to a SecondaryUse the Make Secondary task to convert an original Primary to a Secondary. TheMake Secondary task can be launched from the original Primary only when oneof its Secondary hosts has taken over the Primary role.
The Make Secondary task is used in the failback procedure to fail back to theoriginal Primary. When the original Primary restarts, use the Make Secondarytask to convert the original Primary to a new Secondary. Stop the application ifthe application restarts automatically when the Primary restarts.
Note: Use the Make Secondary task to fail back to the original Primary only if Nofast failback was selected during the takeover from the original Primary.
Transferring the Primary roleFailing back to the original Primary
88

To convert an original Primary to a Secondary
1 Navigate to the Summary, Primary, or Secondaries tab of the RDS view of theRDS on the Primary host, which is the original Primary that failed and is nowrestarted.
2 In the Role Change section of the task pane, select Make Secondary.
3 Complete the Make Secondary page.
See “Make Secondary dialog window” on page 89.
4 Click Finish to convert the original Primary to a Secondary. A messagedisplays to indicate whether the takeover succeeded or failed.
5 Click Ok.
Make Secondary dialog windowUse this dialog window to convert an original Primary to a Secondary. The MakeSecondary task is part of the procedure to fail back to the original Primary. Afterthe original Primary recovers, the RDS is in a Primary-Primary configuration.The original Primary is converted to be a Secondary to the new Primary.
The Make Secondary task is only used if the No fast failback option was selectedduring the takeover of the original Primary.
Displays the name of the RDS which contains the original Primary.This field cannot be edited. Example: hr_rvg
RDS
From the drop-down list, select the name of the original Primary tobe converted to a Secondary.
If the name of the original Primary is not available in the drop-downlist, type it into the field.
A value in the entry field takes precedence over the selected value inthe selection box.
Secondary
Example: Failing back using difference-based synchronizationIn this example, the Primary host londonhas restarted after an unexpected failure.After the failure, the Secondary host seattlehas manually taken over the Primaryrole. This example shows how to fail back to the original Primary london usingdifference-based synchronization.
89Transferring the Primary roleFailing back to the original Primary

To fail back using difference-based synchronization
1 From the RDS or RVG view, chooseMakeSecondary, and complete the MakeSecondary page. Note: In the NewPrimary field, select or enter london.
See “Converting a Primary to a Secondary” on page 88.
The Make Secondary task converts the original Primary RVG hr_rvg onseattle to the Secondary RVG of the new Primary london.
2 Synchronize the data volumes on the original Primary with the data volumeson the new Primary using the checkpoint option of the vradmin syncrvg
command to synchronize the original Primary using difference-basedsynchronization.
See the Veritas Volume Replicator Administrator’s Guide for details.
The Synchronize RVG task synchronizes the data volumes in the RVG hr_rvg
onseattlewith the data volumes on the new Primary RVGhr_rvgonlondon
using the difference-based synchronization and checkpoint.
3 Start replication to the Secondary RVG (original Primary) hr_rvg on seattle
from the new Primary RVG hr_rvg on london.
4 In the Start Replication page, select the Using checkpoint option, and selectthe checkpoint checkpt_presync from the drop-down list.
5 Stop the applications on the new Primary london.
6 Migrate the Primary role from the new Primary host london to the originalPrimary host seattle using Migrate.
See “Migrating the Primary role” on page 81.
Replication from the original Primary seattle to the original Secondarylondon is started by default after the migration is completed.
Using a bunker for disaster recoveryIf the Primary fails, update the Secondary from the bunker.
See Updating the Secondary from the bunker
After the Secondary is up-to-date, the Secondary can take over the role of thePrimary.
See “Taking over from an original Primary” on page 83.
When the Primary recovers, fail back to the original Primary.
See “Failing back to the original Primary” on page 85.
Transferring the Primary roleUsing a bunker for disaster recovery
90
Updating the Secondary from the bunkerWhen disaster strikes and the Primary goes down, the Secondary can be updatedusing the bunker.
Note: If the Primary SRL has overflowed for a Secondary, or if the Secondary isinconsistent because it is resynchronizing, you cannot use the correspondingbunker SRL to recover the Secondary. Because the bunker does not have datavolumes, it cannot use DCM to track overflows.
To update the Secondary from the bunker
1 If replication to the bunker SRL uses the STORAGE protocol, import the diskgroup containing the bunker SRL onto the bunker node and then recover itusing either the Veritas Volume Manager CLI or the Veritas Volume ManagerGUI.
For instructions, see the Veritas VolumeManager Administrator’s Guide orthe Veritas VolumeManager Online Help.
2 Activate the bunker using the Activate Bunker task.
See “Activating a bunker in an RDS” on page 92.
3 Start replication to the Secondary from the bunker using the Start Replicationtask.
See “Synchronizing the Secondary and starting replication” on page 27.
If you have more than one Secondary using this bunker, repeat the StartReplication task for each Secondary.
4 Monitor the status of the replication from bunker to Secondary using theRDS view.
5 When the Secondary is up-to-date, stop replication to the Secondary.
See “Stopping replication to a Secondary” on page 67.
All the replays from the bunker must have been stopped before you deactivatethe bunker.
Do not proceed to step 6 until the replication is stopped.
6 After the bunker has been used to transfer data to the secondary and is notneeded any more, deactivate the bunker using the Deactivate Bunker task.
See “Deactivating a bunker” on page 92.
The Secondary is now up-to-date and can take over as Primary.
See “Taking over from an original Primary” on page 83.
91Transferring the Primary roleUsing a bunker for disaster recovery
Activating a bunker in an RDSUse the Activate Bunker task to convert the bunker Secondary from receivingmode (Secondary) to replicating mode (Primary).
To activate a bunker in an RDS
1 Make sure you have logged on to the Bunker host. To log on to a host fromVRW, choose File > Connect and specify the name of the host to which youwant to connect.
2 In any view, select the Bunker host name from the view, and then chooseActivate Bunker from the Role Change menu in the task pane.
3 ClickFinish. A message indicates whether the activate bunker task succeededor failed.
See “Using a bunker for disaster recovery” on page 90.
See “Deactivating a bunker” on page 92.
Activate BunkerUse the Activate Bunker task to convert the bunker Secondary from receivingmode (Secondary) to replicating mode (Primary).
Displays the name of the RDS. This field cannot be edited. Example:my_rvg.
RDS
Displays the name of the bunker to be activated. This field cannot beedited. Example: my_bunker.
Bunker Host
Deactivating a bunkerUse the Deactivate Bunker task to deactivate the bunker after the bunker has beenused to transfer data to the Secondary and it is not needed for any more replays.
Note: Deactivate the bunker only after all the replays from the bunker have beenstopped.
Transferring the Primary roleUsing a bunker for disaster recovery
92
To deactivate a bunker in an RDS
1 Make sure you have logged on to the Bunker host. To log on to a host fromVRW, choose File > Connect and specify the name of the host to which youwant to connect.
2 In any view, select the Bunker host name from the view, and then chooseDeactivate Bunker from the Role Change menu in the task pane.
3 Click Finish. A message indicates whether the deactivate bunker tasksucceeded or failed.
Deactivate BunkerUse the Deactivate Bunker task to deactivate the bunker after the bunker has beenused to transfer data to the Secondary and it is not needed for any more replays.
Note: Deactivate the bunker only after all the replays from the bunker have beenstopped.
Displays the name of the RDS. This field cannot be edited. Examplemy_rvg
RDS
Displays the name of the bunker to be deactivated. This field cannotbe edited.
Bunker Host
93Transferring the Primary roleUsing a bunker for disaster recovery

Transferring the Primary roleUsing a bunker for disaster recovery
94

Troubleshooting VRW
This appendix includes the following topics:
■ About troubleshooting VRW
■ Application page is not displayed in the browser
■ Missing buttons on certain wizards
■ Log in redirects the user back to the login page
About troubleshooting VRWThis chapter describes the errors that may occur when using VRW and thesolutions to recover from these errors.
Application page is not displayed in the browserThis section describes an error that may occur when using VRW and the solutionsto recover from this error.
MessageThe following message displays:
The page cannot be displayed.
ProblemYou may get this error message after you have specified the URLhttp://london:8443/vvr in the address field of your browser.
AAppendix
SolutionThis section provides a workaround.
To recover from the page display error
1 Determine if the client on which the browser is running has http and https
connection to the server running VRTSweb.
C:\> ping london
Unknown host london.
The messageUnknown host london. displays if there is no connection betweenthe client and the server running VRTSweb.
Establish the connection and reconfigure the client so that the client can pingthe VRTSweb server.
2 Determine the port numbers configured for use by VRTSweb.
# /opt/VRTSweb/bin/webgui listports
8181 http
8443 https
By default, VRTSweb is configured to use the port number 8181 (for HTTP)and 8443 (for HTTPS) as shown in the example.
3 Make sure that VRTSweb is running by issuing the following command:
# /opt/VRTSweb/bin/monitorApp VEAWeb
Web Application "VEAWeb" is OFFLINE
The message Web Application "VEAWeb" is OFFLINE displays if theVRTSweb is not running. If the VRTSweb is offline, bring it online by startingVRW.
# /opt/VRTSob/webgui/veaw start
Wait for VRTSweb to start and for the VVR application to be loaded.
4 Enter the URL using the port number that is displayed in step 2.
Missing buttons on certain wizardsThis section describes an error that may occur when using VRW and the solutionsto recover from this error.
Troubleshooting VRWMissing buttons on certain wizards
96
ProblemCertain buttons may be not be visible on some wizards and dialog windows.
SolutionChange font size for your browser, or use the scroll bars until the buttons arevisible.
Log in redirects the user back to the login pageThis section describes an error that may occur when using VRW and the solutionsto recover from this error.
ProblemAttempting to log in redirects the user back to the login page, although user IDand password are correct. This is due to a limitation with Internet Explorer (IE),if the host name contains any underscores.
SolutionUse one of the following workarounds, listed in order of preference:
■ Create an alternate host name.Edit the /etc/hosts file on the UNIX machine to have an alternate host namewithout any underscores. Also, on the Windows client running IE, edit thehosts file to contain the alternate host name. Use this alternate host name inthe URL.
■ Use Netscape instead of IE.
■ In IE, use the IP address in the URL, instead of the host name.
97Troubleshooting VRWLog in redirects the user back to the login page

Troubleshooting VRWLog in redirects the user back to the login page
98
Aactivating a bunker 92Add Secondary wizard 20adding a bunker
using VVR VEA 25Associate Volume wizard 56automatic synchronization 27AutoSync 27
Bbandwidth limit
changing 61Bunker Secondary
removing 70bunker Secondary
activating 92adding
using VVR VEA 25deactivating 92
Ccheckpoint attach
using 29checkpoint option 28, 31checkpoints
creating 73deleting 74ending 29viewing 74
Create Primary wizard 17
Ddata volumes
dissociating 59deactivating a bunker 92detailed views 37dissociate data volumes from an RDS 59Dissociate Volume wizard 59
Eending a checkpoint 29errors, page display problem 95example
scenario 16examples
failing back using difference-basedsynchronization 89
failing back using fast failback 86
Ffailback
fast failback 85recommended method 85using Make Secondary wizard 88
failback options 84failing back
difference-based synchronization 90fast-failback synchronization 86overview 85
fast failback 85force attach 31
IIP addresses, changing 68
Llatency high mark
changing 63viewing 43, 47, 49
latency low markchanging 63viewing 43, 46, 49
latency protectionchanging 61
MMake Secondary wizard 88Migrate wizard 82
Index
NNo fast-failback option 85
Ppacket size
changing 61page display problems 95Pause Replication wizard 65pausing replication 65Primary
deleting 71Primary RVG
prerequisites for creating 17transferring role 81
RRDS
administering volumes 55associating volumes 56creating 16icons 51pausing replication 65removing a bunker 70removing a Secondary 69removing data volumes 59resizing data volumes 58status information 36stopping replication 67transferring RVG roles 81
RDS statesPrimary RVGs 51
Remove Bunker wizard 70Remove Primary wizard 71Remove Secondary wizard 69removing a Secondary RVG 69replication
overview of setting up 15pausing 65resuming 66stopping 67
replication modechanging 61
replication protocolchanging 61
replication settingsbandwidth limit 61packet size 61replication mode 61
replication settings (continued)replication protocol 61SRL protection 61
Resize Volume wizard 58resizing data volumes 58Resume Replication wizard 66RVG
icons 50RVG states
Primary RVGs 50
SSecondary
adding to RDS 20removing 69removing bunker 70
Secondary RVGpausing replication 65removing a Secondary 69stopping replication 67
SRL protectionchanging 61
Stop Replication wizard 67Summary view 34synchronization
difference-based 88synchronize Secondary
methods 27synchronizing Secondary
automatic synchronization 27
TTakeover wizard 84Taking over from a failed Primary 84tasks
Deactivate Bunker 92
Uusing checkpoint option 28, 31
Vviews
Summary view 34volumes
adding to Secondary RVG 21administering 55associating to an RDS 56removing from an RDS 59
Index100

volumes (continued)resizing 58
VRW tasksActivate Bunker 92
VVR VEA wizardsAdd Bunker 25
WWeb wizards
Add Secondary 20Associate Volume 56Create Primary 17Dissociate Volume 59Make Secondary 88Migrate 82Pause Replication 65Remove Bunker 70Remove Secondary 69Resize Volume 58Resume Replication 66Stop Replication 67Takeover 84
101Index