User Manual - Advanced Security LLC
21
User Manual IFTTT using Uplink Remote 4134682 1 January 25, 2019
-
Upload
khangminh22 -
Category
Documents
-
view
1 -
download
0
Transcript of User Manual - Advanced Security LLC
User Manual
IFTTT using Uplink Remote
4134 682
1
Jan u ar y 2 5, 201 9

User Ma nua l
4134 682 Rev 1 Ja nua ry 25, 2 019 2
Limitations of Liability This manual is provided “as is”. Sierra Wireless makes no warranties of any kind, either expressed or implied, including any implied warranties of merchantability, fitness for a particular purpose, or noninfringement. The recipient of the manual shall endorse all risks arising from its use.
The information in this manual is subject to change without notice and does not represent a commitment on the part of Sierra Wireless. SIERRA WIRELESS AND ITS AFFILIATES SPECIFICALLY DISCLAIM LIABILITY FOR ANY AND ALL DIRECT, INDIRECT, SPECIAL, GENERAL, INCIDENTAL, CONSEQUENTIAL, PUNITIVE OR EXEMPLARY DAMAGES INCLUDING, BUT NOT LIMITED TO, LOSS OF
PROFITS OR REVENUE OR ANTICIPATED PROFITS OR REVENUE ARISING OUT OF THE USE OR INABILITY TO USE ANY SIERRA WIRELESS PRODUCT, EVEN IF SIERRA WIRELESS AND/OR ITS AFFILIATES HAS BEEN ADVISED OF THE POSSIBILITY OF SUCH DAMAGES OR THEY ARE FORESEEABLE OR FOR CLAIMS BY ANY THIRD PARTY.
Notwithstanding the foregoing, in no event shall Sierra Wireless and/or its affiliates aggregate liability arising under or in connection with the Sierra Wireless product, regardless of the number of events, occurrences, or claims giving rise to liability, be in excess of the price paid by the purchaser for the Sierra
Wireless product.
Copyright © 2018 Sierra Wireless. All rights reserved.
Trademarks Sierra Wireless®, Uplink®, and the Sierra Wireless and Open AT logos are registered trademarks of Sierra Wireless, Inc. or one of its subsidiaries.
Windows® and Windows Vista® are registered trademarks of Microsoft Corporation.
All other trademarks are the property of their respective owners.

User Ma nua l
4134 682 Rev 1 Ja nua ry 25, 2 019 3
Contact Information Sales information and technical support, including warranty and returns
Web: uplink.com/contact-us/ Uplink toll-free number: 1-888-9-UPLINK 8:00 am to 8:00 pm EST
Corporate and product information Web: sierrawireless.com uplink.com
Sales information and technical support, including warranty and returns
Web: sierrawireless.com/company/contact-us Global toll-free number: 1-877-687-7795
Corporate and product information Web: sierrawireless.com
Document History Version Date Updates
1.0 January 15, 2019 Creation

4134 682 Rev 1 Ja nua ry 25, 2 019 4
Contents 1. OVERVIEW ......................................................................................................................... 7
Supported Devices ............................................................................................................................................ 7
Recommended Reading ................................................................................................................................... 7
2. GETTING STARTED ............................................................................................................ 8
Prerequisites ....................................................................................................................................................... 8
What does IFTTT Mean .................................................................................................................................... 9
Setting Up Your Panel....................................................................................................................................... 9
Selecting Your First Applet ........................................................................................................................... 10
3. IFTTT APPLETS USING UPLINK REMOTE ........................................................................ 12
Applet List ......................................................................................................................................................... 12
4. CREATE YOUR OWN APPLET IN IFTTT ............................................................................ 17
5. MANAGE UR APPLETS ON IFTTT ..................................................................................... 19
Edit a Connection ............................................................................................................................................ 19
Edit an Applet ................................................................................................................................................... 19
Delete an Applet .............................................................................................................................................. 20
6. IMPORTANT THINGS TO KNOW ...................................................................................... 21

4134 682 Rev 1 Ja nua ry 25, 2 019 5
List of Figures Figure 1: Uplink Remote Home Page on IFTTT .................................................................... 8
Figure 2: Username and Password for Uplink Remote .......................................................... 9
Figure 3: Select an Applet ................................................................................................... 10
Figure 4: Turn On the Applet to Begin Setup ....................................................................... 10
Figure 5: Applet FIelds - Example ....................................................................................... 11
Figure 6: Formatted Spreadsheet Row ............................................................................... 18
4134 682 Rev 1 Ja nua ry 25, 2 019 6
List of Tables Table 1: Available Uplink Remote Applets ........................................................................... 12

4134 682 Rev 1 Ja nua ry 25, 2 019 7
1. Overview IFTTT with Uplink Remote allows you to control your panel remotely with applets that are easy to use
and create. Want to arm or disarm your panel at a specific time? Want to receive text messages or emails every time something triggers an alert? Want to change the thermostat temperature when you arm your system? Want to create your own spreadsheet log of alarm events? These things are all possible with IFTTT and a supported Uplink device.
Supported Devices
The following devices can be used with IFTTT and the Uplink Remote applets.
• US: 5500EZ, LTE30EX, and CDMAEZ
• CANADA: 5500EZCN and LTE30EXCN
Recommended Reading
• Uplink Remote User Guide

4134 682 Rev 1 Ja nua ry 25, 2 019 8
2. Getting Started Here’s what you need to know to get started with Uplink Remote on IFTTT including Prerequisites, the
meaning of IFTTT, setting up your panel and configuring an applet.
Figure 1: Uplink Remote Home Page on IFTTT
Prerequisites
• Notify your dealer that you want to use IFTTT.
• Uplink Remote Advance subscription (your dealer will make sure this is set and explain any)
• Uplink Remote username and password.
• IFTTT Account.
• Supported Device – See Overview.
User Ma nua l Get t ing S ta r ted
4134 682 Rev 1 Ja nua ry 25, 2 019 9
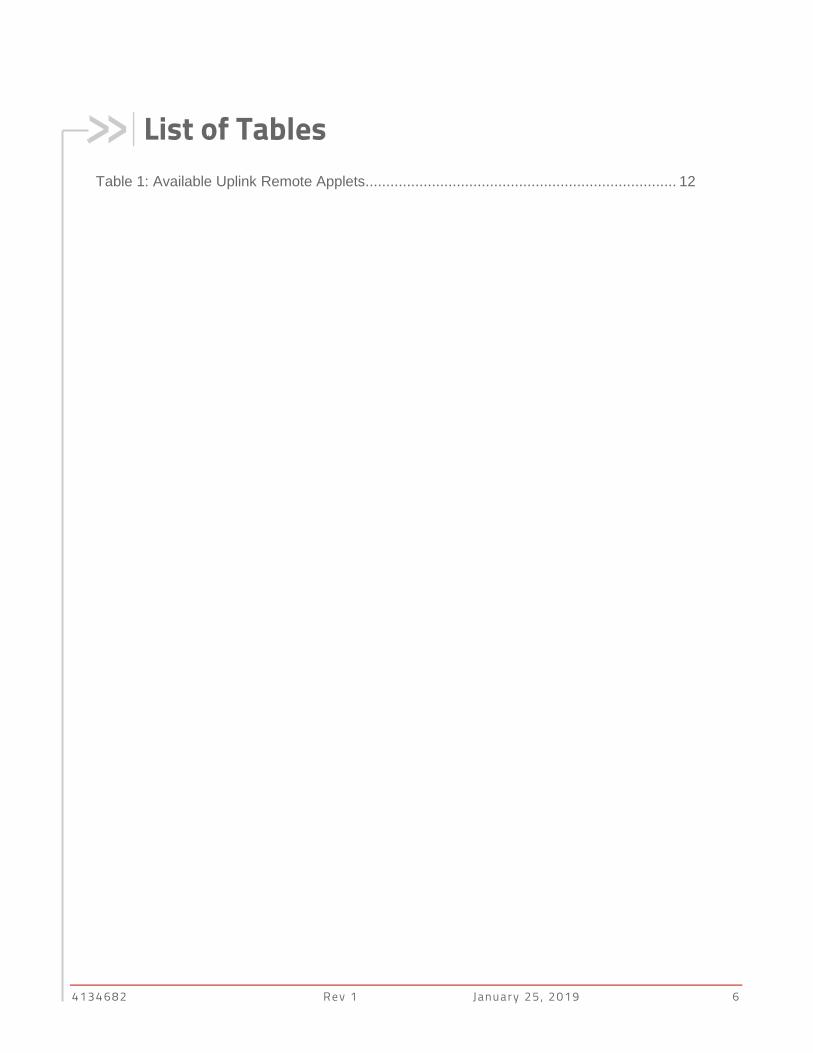
What does IFTTT Mean
If This Then That is a simple conditional statement. You supply the THIS and the THAT.
For example:
If ARM then Email - This would send an email to an email address when you arm the system. There is an existing applet for this. You just have to tell the applet where to send the email when you
configure the applet. -or- If The Alarm Panel has Triggered an Alert then Send an SMS Message. – This would text you in the event the alarm panel triggers an alert. There is an existing applet for this, too! You just have to tell
the applet what number to text when you configure the applet.
Setting Up Your Panel
1. Go to https://ifttt.com/uplinkremote
2. Login to IFTTT.
3. From the Uplink Remote service URL you visited in step 1, select the Connect button.
4. Enter your Uplink Remote Username and Password.
Figure 2: Username and Password for Uplink Remote
5. Now you can select an existing app or create a new applet.

User Ma nua l Get t ing S ta r ted
4134 682 Rev 1 Ja nua ry 25, 2 019 10
Note: This document provides a very brief look at creating apps. If you want to create your own apps, you will want to review the IFTTT help.
Selecting Your First Applet
On the Uplink Remote Home page below the Uplink Remote banner, you will see a list of applets we’ve provided.
1. Just click an applet panel to get started customizing it.
2. Once you have selected the app, enter or customize the available options.
3. Click Turn On.
The Works With section tells you what works with
the app. In this example, it’s Gmail.
If you want more information about the app, click
the How it Works link below the app settings.
Figure 3: Select an Applet
Figure 4: Turn On the Applet to Begin Setup

User Ma nua l Get t ing S ta r ted
4134 682 Rev 1 Ja nua ry 25, 2 019 11
4. On the Configure screen, you will see common fields (A, B, and F) and fields that are specific to the applet (C, D, and E):
a. Select whether you want to receive a notification
each time the applet runs. (A)
b. Review your alarm panel identification number.
Most people will have only one unit. (B)
c. Enter the information specific to this applet
(C, D, and E.).
d. Click the Save button (F).
Figure 5: Applet FIelds - Example

4134 682 Rev 1 Ja nua ry 25, 2 019 12
3. IFTTT Applets using Uplink Remote Uplink Remote provides a large number of applets for you to configure. Each applet has different
requirements and works with different devices and apps. Due to the number of options available, specific instructions are not provided in this document. You must login with your Uplink Remote credentials before you can setup your device.
Applet List
Uplink Remote provides the applets described below. If the applet works with more than the panel (Nest, Gmail, Google Sheets, etc.), the details will be provided under the Works With column.
Table 1: Available Uplink Remote Applets
Applet Name Description Works with
Arm my alarm system Arm the alarm system. Button Widget
Disarm my alarm system Disarm the alarm system. Button Widget
Arm my system with Amazon's Alexa
Talk to Amazon Alexa and tell her to arm your system using your voice. Say: Alexa trigger arm my security system.
Please note that Amazon Alexa do not have
all the same passcode protections you normally use when manually arming and disarming your alarm system; we strongly
recommend using unique phrases and codewords. You must use the phrase "Alexa trigger" plus your unique phrase. An example would be: Alexa trigger arm my
Amazon Alexa

User Ma nua l I FT T T Ap p le ts us i ng Up l i n k Remo t e
4134 682 Rev 1 Ja nua ry 25, 2 019 13
Applet Name Description Works with
security system with code System Secure 2019.
Disarm my system with Amazon's Alexa
Talk to Amazon Alexa and tell her to disarm your system using your voice. Say: Alexa trigger disarm my security system.
Please note that Amazon Alexa do not have all the same passcode protections you normally use when manually arming and
disarming your alarm system; we strongly recommend using unique phrases and codewords. You must use the phrase "Alexa trigger" plus your unique phrase. An
example would be: Alexa trigger disarm my security system with code System Secure 2019.
Amazon Alexa
Arm your system at a
specific day and time Choose certain days and times to automatically arm your alarm system.
Date & Time Default: weekdays at 8:00 AM
Disarm your system at a
specific day and time Choose certain days and times to automatically disarm your alarm system.
Date & Time Default: weekdays at 6:00 PM
Change the temperature when I get home
When you disarm your system between 4 PM and 7 PM, automatically set the temperature on the thermostat at the same
Nest Thermostat

User Ma nua l I FT T T Ap p le ts us i ng Up l i n k Remo t e
4134 682 Rev 1 Ja nua ry 25, 2 019 14
Applet Name Description Works with
time. If you disarm outside of this timeframe, your thermostat is not notified.
Change the temperature when I leave for the day
When you arm your system between 7 AM and 9 AM, automatically set the temperature on the thermostat at the same
time. If you arm outside of this timeframe, your thermostat is not notified.
Nest Thermostat
Get an email when a new Uplink Applet is published
As new features are added to IFTTT, get notified about new Applets that we publish.
Email, Gmail
Get an email when Uplink
publishes a new trigger or action
When we publish new triggers or actions,
get notified by email.
Email, Gmail
Get a notification when a
new Uplink Applet is published
As new features are added to IFTTT, get
notified about new Applets that we publish.
Notifications
Get a notification when
Uplink publishes a new trigger or action
When we publish new triggers or actions,
get notified on phone.
Notifications
Send me an Email if my
system is disarmed
Receive an email notification if the security
system is disarmed.
Email, Gmail
Send me an Email if my system is armed
Receive an email notification if the security system is armed.
Email, Gmail

User Ma nua l I FT T T Ap p le ts us i ng Up l i n k Remo t e
4134 682 Rev 1 Ja nua ry 25, 2 019 15
Applet Name Description Works with
Send me an Email if my system triggers an alert
Receive an email notification if the security system triggers an alert.
Email, Gmail
Notify my phone if the system generates an alert
Receive alerts on your phone from the alarm system.
Notifications
Notify my phone if the system is armed
Receive alerts on your phone if the alarm system is armed.
Notifications
Notify my phone if the
system is disarmed
Receive alerts on your phone if the alarm
system is disarmed.
Notifications
Text me if my system is armed
Receive a text message if the security system is armed.
SMS
Text me if my system is disarmed
Receive a text message if the security system is disarmed.
SMS
Text me if my system triggers an alert
Receive a text message if the security system triggers an alert.
SMS
Email others if the system
is armed
Use your personal email to send a notice to
up to 5 recipients that the system has been armed.
Gmail
Email others if the system
is disarmed
Use your personal email to send a notice to
up to 5 recipients that the system has been disarmed.
Gmail

User Ma nua l I FT T T Ap p le ts us i ng Up l i n k Remo t e
4134 682 Rev 1 Ja nua ry 25, 2 019 16
Applet Name Description Works with
Email others if the system triggers an alert
Use your personal email to send a notice to up to 5 recipients that the system has
generated an alert.
Gmail
Turn off my lights when the panel is armed
Automatically turn off your lights at the same time when arming the panel.
LIFX, iHome Control, Philips Hue, SmartThings
Turn on my lights when the panel is disarmed
Automatically turn on the lights whenever you disarm your alarm panel.
LIFX, iHome Control, Philips Hue, SmartThings
Turn on my lights when there is an alarm
Turn on all the lights if the alarm is triggered.
LIFX, iHome Control, Philips Hue, SmartThings

4134 682 Rev 1 Ja nua ry 25, 2 019 17
4. Create Your Own Applet in IFTTT You can also create your own applet. Full Instructions are not included due to the wide variety of
options available, but we will provide an example to help you understand the process.
Follow the IFTTT structure and select the THIS (what should cause the action) and the THAT (what should happen when that action occurs).
Example: If you wanted to create your own log of all alerts, you might use Google Sheets and create
the following IFTTT statement:
If Uplink Remote alarm panel triggers an alert then add a row to Your Google Drive spreadsheet.
Note: To create a log for all alarm panel actions you can track in IFTTT, you would create three separate applets (one for alerts, one for arming, and one for disarming).
To create this applet, you would do the following:
1. On the My Applets screen, select Create Applet.
2. Select +this from “if +this then that.”
3. Select Uplink Remote service.
4. Choose a Trigger: Click alarm panel has triggered an alert.
5. Select Create Trigger.
6. Select +That.
7. Select the Google Sheets action service.
8. Connect Google Sheets to IFTTT, if necessary.
9. Select the action (in this case, it is Add row to spreadsheet).

User Ma nua l Crea te Yo ur Ow n Ap p l et i n I F T TT
4134 682 Rev 1 Ja nua ry 25, 2 019 18
10. Enter the spreadsheet name.
11. Create the formula for the Formatted Row.
Figure 6: Formatted Spreadsheet Row
a. Click Add ingredient and select the Notification Date.
b. Insert a | (as instructed below the field).
c. Click Add Ingredient and select Message.
12. Select the Google Drive folder path.
13. Select Create Action.
14. Review the If This Then That phrase you created.
15. Select whether to receive notifications when this applet runs. Green means Yes.
16. Click Finish.
17. Test the feature. You may need to make changes to the information you selected (Google Drive
path, for example).
You can find help for creating your own apps to use with Uplink by going to IFTTT’s website: https://help.ifttt.com/

4134 682 Rev 1 Ja nua ry 25, 2 019 19
5. Manage UR Applets on IFTTT
Edit a Connection
If you change your Uplink Remote password, you will need to update your connection.
1. Go to https://ifttt.com/uplinkremote/
2. If necessary, log in.
3. Select Settings on the Uplink Remote home page.
4. Select Edit Connection.
5. Enter your current Uplink Remote username and password.
Edit an Applet
1. Select an applet.
2. Select the settings Gear icon in the right corner of the applet.
3. On the Configure screen: Make any necessary changes. To change the If Then statement, edit the first box.

User Ma nua l Ma na g e U R Ap p le ts o n I F T TT
4134 682 Rev 1 Ja nua ry 25, 2 019 20
• You might do this to change the email address or phone number if you are receiving email or SMS notifications.
4. Select Save.
Delete an Applet
1. Select an applet.
2. Select the settings Gear icon in the right corner of the applet.
3. Scroll down to the bottom of the Configure screen and click Delete.

4134 682 Rev 1 Ja nua ry 25, 2 019 21
6. Important Things to Know • Disconnecting from the Uplink Remote Service on the Settings screen may cause you to lose
your applets.
• If you lose or delete an applet in error and recreate it, you must use a different phrase or wait 24 hours to recreate certain applets such as those working with Google Assistant.
• If your Uplink Remote password is changed, you will need to update your credentials for the
Uplink Remote IFTTT service. See Edit a Connection.
• Voice arm and disarm services such as Alexa are not secure as they do not require your system code to arm or disarm your security system. Please be aware of this risk if you choose to use
these applets or create a similar applet. We strongly recommend using unique phrases and codewords. An example would be “Alexa trigger arm my security system with code System Secure 2019.”