Unit -1: Introduction - VP & RPTP Science College
33
US04SBCA21 – Multimedia Technology Unit-1 BCA SEM VI Page 1 of 4 Unit -1: Introduction Multimedia Definition “Multimedia can be defined as the technology engaging a variety of media, including text, audio, video, graphics and animation, either separately or in combination, using computers, to communicate ideas or to distribute information.” Or “Multimedia is compelling communication, Education, Entertainment and Reference that appeals to all sense.” Various Facets of Multimedia Any one or more of the following media and/or a combination of these are general engaged in all multimedia projects: 1. Audio 2. Text 3. Graphics 4. Animation 5. Video Audio: Speeches, music and other types of sound. Audio element is generally used o enhance the usual multimedia environment, but in some cases may become more effective than all other media. Text: The usual text with some differences as compared to the print media. Since computer display a variety of fonts, in innumerable colors and combinations, multiple fonts in beautiful colors and background features in almost all of the multimedia titles. Graphics: Pictures, photographic image and other art works. Animation: The artificial movements of texts or objects, created in virtual environments, using specialized software packages. It is the most interesting part of multimedia. Video: The actual video clips that could be embedded right over the applications and can be played back.
-
Upload
khangminh22 -
Category
Documents
-
view
5 -
download
0
Transcript of Unit -1: Introduction - VP & RPTP Science College

US04SBCA21 – Multimedia Technology Unit-1
BCA SEM VI Page 1 of 4
Unit -1: Introduction Multimedia Definition “Multimedia can be defined as the technology engaging a variety of media, including text,
audio, video, graphics and animation, either separately or in combination, using computers, to
communicate ideas or to distribute information.”
Or
“Multimedia is compelling communication, Education, Entertainment and Reference that
appeals to all sense.”
Various Facets of Multimedia Any one or more of the following media and/or a combination of these are general engaged in
all multimedia projects:
1. Audio
2. Text
3. Graphics
4. Animation
5. Video
Audio: Speeches, music and other types of sound. Audio element is generally used o enhance
the usual multimedia environment, but in some cases may become more effective than all
other media.
Text: The usual text with some differences as compared to the print media. Since computer
display a variety of fonts, in innumerable colors and combinations, multiple fonts in beautiful
colors and background features in almost all of the multimedia titles.
Graphics: Pictures, photographic image and other art works.
Animation: The artificial movements of texts or objects, created in virtual environments,
using specialized software packages. It is the most interesting part of multimedia.
Video: The actual video clips that could be embedded right over the applications and can be
played back.
US04SBCA21 – Multimedia Technology Unit-1
BCA SEM VI Page 2 of 4
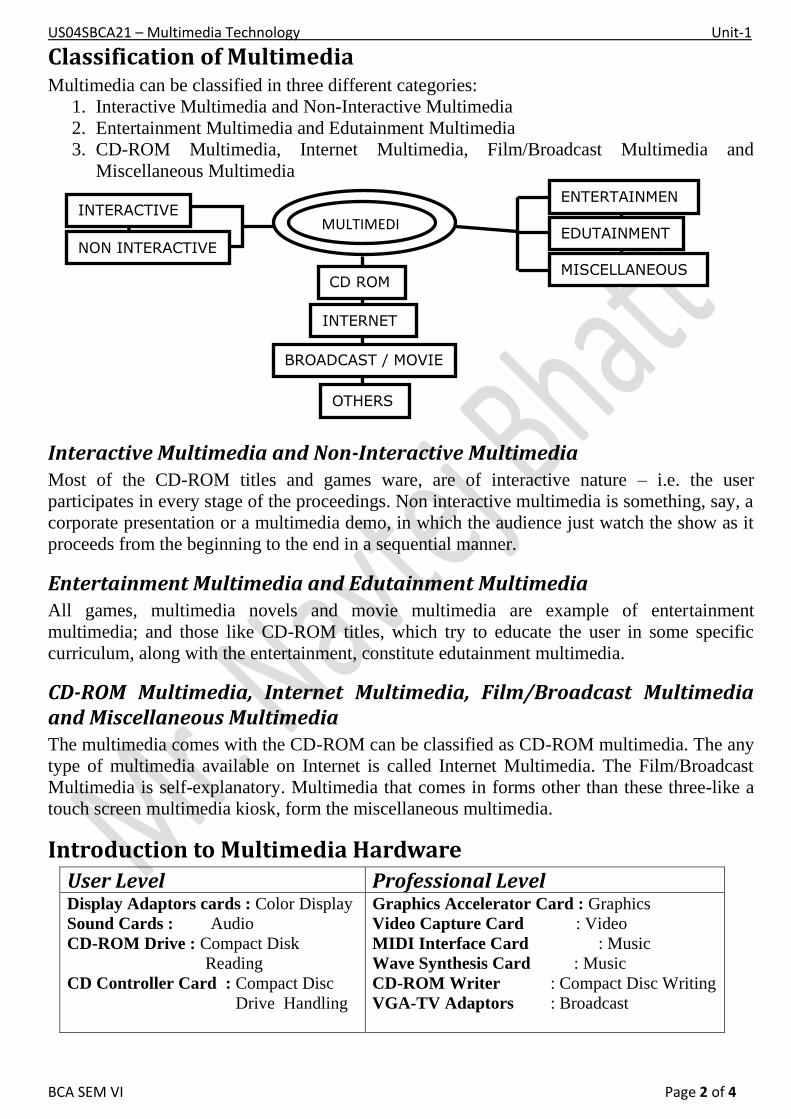
Classification of Multimedia Multimedia can be classified in three different categories:
1. Interactive Multimedia and Non-Interactive Multimedia
2. Entertainment Multimedia and Edutainment Multimedia
3. CD-ROM Multimedia, Internet Multimedia, Film/Broadcast Multimedia and
Miscellaneous Multimedia
Interactive Multimedia and Non-Interactive Multimedia Most of the CD-ROM titles and games ware, are of interactive nature – i.e. the user
participates in every stage of the proceedings. Non interactive multimedia is something, say, a
corporate presentation or a multimedia demo, in which the audience just watch the show as it
proceeds from the beginning to the end in a sequential manner.
Entertainment Multimedia and Edutainment Multimedia All games, multimedia novels and movie multimedia are example of entertainment
multimedia; and those like CD-ROM titles, which try to educate the user in some specific
curriculum, along with the entertainment, constitute edutainment multimedia.
CD-ROM Multimedia, Internet Multimedia, Film/Broadcast Multimedia and Miscellaneous Multimedia The multimedia comes with the CD-ROM can be classified as CD-ROM multimedia. The any
type of multimedia available on Internet is called Internet Multimedia. The Film/Broadcast
Multimedia is self-explanatory. Multimedia that comes in forms other than these three-like a
touch screen multimedia kiosk, form the miscellaneous multimedia.
Introduction to Multimedia Hardware
User Level Professional Level Display Adaptors cards : Color Display
Sound Cards : Audio
CD-ROM Drive : Compact Disk
Reading
CD Controller Card : Compact Disc
Drive Handling
Graphics Accelerator Card : Graphics
Video Capture Card : Video
MIDI Interface Card : Music
Wave Synthesis Card : Music
CD-ROM Writer : Compact Disc Writing
VGA-TV Adaptors : Broadcast
CD ROM
INTERNET
BROADCAST / MOVIE
OTHERS
MULTIMEDIA
INTERACTIVE
NON INTERACTIVE
ENTERTAINMENT
EDUTAINMENT
MISCELLANEOUS

US04SBCA21 – Multimedia Technology Unit-1
BCA SEM VI Page 3 of 4
• The Display Adaptor Cards or ‘The Color Cards’ are responsible for the color
display of your monitor.
• The Sound Cards or the Audio Cards manage almost all possible kinds of audio.
• The CD-ROM Drives read compact discs which are the usual storage medium.
• The CD Controller Cards handle CD-ROM Drives and are usually supplied along
with the drives.
• The Graphics Accelerator Cards enhance your color display and their presence can
be better perceived.
• The Video Capture Cards can ‘capture’ video signals either directly from a camcorder
or through the video cassette recorder.
• The MIDI Interface Cards negotiate with a wide range of Electronic Instruments and
Music Key Boards.
• The Wave Synthesis Cards which are big brothers of MIDI can actually produce some
digital music and other Audio special effects.
• CD-ROM Writer can write or Record Multimedia Data over a special Writable
Compact Disc.
• VGA to TV Adaptors basically convert computer signals to Television Signals that
can either be viewed or broadcasted.
A Typical Multimedia System Configuration Processor: Minimum, an Intel Pentium 133 MHz microprocessor or equivalent; an MMX
technology based 200 MHz Pentium processor or its equivalent may be all the better and 233
MHz MMX Pentium processor or its equivalent would be ideal.
Display: Minimum, a 14” color monitor with 256+ colors at 640*480 resolutions. This
implies that the Monitor Video Card or the Color Card should have a minimum DRAM of
512KB or higher.
RAM: Minimum 16MB; 32 MB is highly Recommended; 64MB or more would be ideal.
Hard Disk: Minimum 1.2 GB. Since most of the multimedia titles install only the main
executable modules into the hard disk and retain almost all of the sound and video clips on the
CD-ROM, this space is quite comfortable for an average user.
CD-ROM Drive: Minimum a ten speed drive also called a 10X Drive – which implies that
the Data Transfer Rate is 1500KB/Sec with an access time of around 200 milliseconds or less,
controlled by a SCSI or IDE interface card. 16X CD Drive would be better and 24X CD
Drives are ideal comparisons.
Sound Card: Minimum, a 16 bit card with 8 nodal syntheses, supported by a 4 watt/4 ohm
stereo speaker and a microphone; 32 Bit Sound Card with Audio Wave technology would be
better.
Multimedia Software The term ‘multimedia software’ is very conceptual in its nature, encompassing a wide variety
of tools, applications, packages, drives and utilities. Following are the varieties of Multimedia
Software:
1. Device Driver Software
2. Run Time Libraries and Players
3. Tools, Packages and Utilities meant for Editing Multimedia Data
4. Multimedia Application Software

US04SBCA21 – Multimedia Technology Unit-1
BCA SEM VI Page 4 of 4
Device Driver Software: The hardware multimedia peripherals mainly do the job of
analog to digital conversion or vice versa. Driver software or Device Drivers, basically
provide the necessary software interface required for the interactions between the system and
the peripherals. Also, the command issued for the peripherals at the software level are
interpreted in the electronic language, only by the driver software. Without the relevant
drivers, the operating system fails to recognize the new multimedia hardware peripherals and
will not function.
Run Time Libraries and Players: Run Time Libraries and Players are meant for
handling the actual multimedia files. For example, an Audio Player can play back a digital
Audio file. Players are those programs that install their own set of program group and icons, in
the operating system environment. On the other hand, run time library files just add a line to
the existing Media Player Program.
Tools, Packages and Utilities meant for Editing Multimedia Data: These
varieties of software are, perhaps, the costliest in the lot. This software enables the designer to
create entirely new Media file or edit/manipulate the existing media files. The options and
capabilities available with the software may vary, depending upon the quality of the product.
The variety of tools and packages available in this category, invites further classifications and
subdivisions.
• Tools and packages meant for handling one Media type exclusively.
• Tools and packages meant for handling more than one Media type.
• Tools and packages meant for Multimedia Authoring.
• Tools and packages meant for authoring and Media editing.
Multimedia Application Software: A brief Sub-Classification at this stage is of
immense significance to us, for a better understanding of this category of multimedia
software:
a) Reference Multimedia
b) Training and Classroom Multimedia
c) Gaming and Entertainment Multimedia
d) Presentation Multimedia
e) Kiosk Multimedia
f) Miscellaneous
Reference Multimedia: These titles are mostly issued as CD-ROMs, which serve as data
banks, on a variety of topics.
Training and Classroom Multimedia: Popularly known as the CBT (Computer Based
Training/Tutorials) uses Multimedia technology to teach some academic curriculum.
Gaming and Entertainment Multimedia: It includes all games, adventures and other related
stuff that uses multimedia technology.
Presentation Multimedia: It uses this technology for Corporate or Boardroom presentations.
Some of them may include CBT – but one distinguishing characteristic of this kind of
software is that they are generally presented using LCD or other presentation display system.
Kiosk Multimedia: It have been exclusively developed for public access – in places like
hotels, airports etc. – for providing information in an interactive manner.
Miscellaneous Multimedia: It includes all other applications that don’t come under any of
these categories.

1
Unit-2: Working with Audio, Text
Multimedia Audio
Digital Audio (Need for digital Audio)
The primary purpose of digitizing the sound samples is to make the multimedia computer
understand and understand with audio signals.
Digital audio has its own advantages over its predecessor, over analog audio.
1. Digital audio is less susceptible to degradation or distorting, because the entire
transmission and all other transaction processes take place as electronic signals,
avoiding the intervention of air or any other mediums. Thus, the quality of the parent
signal is maintained, throughout.
2. Editing audio with computers make cutting, pasting and manipulating of the parent
signals, very easy. And also, a lot of special effects like the ‘echo’ can be artificially
added, without the need of any other hardware.
3. Digital audio is of superior quality during reproductions, because of non-intervention of
air and other loss incurring mediums.
4. Digital audio can be stored as digital data, in reliable mediums like the CD-ROM, thus
extending their shelf life to more than fifty years on an average without losses.
As with other forms of digitizing, digital audio files are constructed by receiving analog
signals, taking out samples of the same at certain intervals and reconstructing the pattern
using zeroes and ones.
Sound Card Fundamentals
Audio Synthesis Technology
The process by which a sound card creates music is called the sound synthesis or the audio
synthesis.
There are two fundamentals types of sound synthesis technology
1. FM Synthesis is rather an old technique and outdated – by blending around with a range
of frequency modulations, the earlier sound cards managed to produce audio that tried
to resemble the original analog sound data. Unfortunately, the final outputs sounded
much like “electronically generated” audio pulses and were not quite natural. Just
because of low costs the cards became popular.
2. Wavetable Synthesis is a total revision over the FM synthesis technology – the sound is
almost similar to that coming out of original musical instruments. It is indeed only a
reproduction of data recorded from original instruments. Sound cards with wavetable

2
synthesis technology are bundled with a wide variety of built-in sound samples of
various music instruments. When a note from a particular instrument is played, the card
actually looks up for an equivalent in its wide collection of digital audio samples and
reconstructs the sound with that models. Thus, the resulting sounds are much better
than their FM counterparts.
Sound Card Functionalities
1. Audio playback – including speech, music and MIDI (Synthesized Musical Notes).
2. CD audio playback – playing audio CDs from CD-ROM
3. Adjusting your output speakers from optimum volume, bass, undertone etc – much like
a Tape recorder.
4. Audio amplification – for direct input to the speakers. No need for external amplification
circuits.
5. Recording music from sources like tape recorders and microphone.
6. Recording MIDI notes directly from sources like keyboards and synthesizers using
optional MIDI connectors’ cables and providing an interface between the instrument
and the underlying multimedia system.
7. Synthesizer music creation using Audio Wave Technology
8. Wave sound file editing and adding audio special effects like reverb.
9. Providing an interface between the IDE or SCSI controlled CD-ROMs and Sound cards.
10. Providing an interface between the Joystick and the CD-ROMs / Sound card.
Audio Jacks and Connectors
Jacks are single hole connecting interfaces on the Audio cards. They allow you to attach
different devices to your card. The variety of devices for which the connectivity extends.
AWE 32 has four such jacks, are:
1. Line in Jack: This Jack allows you to connect your tape recorder or disc player to your
sound card, mainly for recording and also for playback.
2. Microphone in Jack: This Jack allows you to connect your microphone to your sound
card for voice or instrument recording.
3. Line out Jack: This Jack allows you to bypass the card’s internal amplification system and
divert the out coming audio directly to external amplifiers/ speakers.
4. Speaker out Jack: This Jack allows you to connect the speakers for audio output from
the card’s built in amplifier. This built in amplifier has a maximum output power of four

3
watts per channel from four-ohm speakers and two watts per channel from eight-ohm
speakers.
The connectors are also interfacing on the sound card that allow you to attach other devices
to your audio cards. But connectors are not single hole interfaces like jacks. They have a
series of pins, depending upon the device with which they are trying to establish
connectivity.
1. CD Audio connector: This connector enables you to connect your audio card to CD-ROM
drive using the CD audio cable. This connector allows audio signals to be transferred
from your music CDs in your CD-ROM drive to the Audio card.
2. IDE CD-ROM data connector: This connector allows you to connect your audio card to
an IDE controlled CD-ROM drive using a CD-ROM data cable. This connection is a
mandatory for the sound card to recognize and play music in multimedia CD titles.
3. Joystick / MIDI connector: This connector allows you to connect a Joystick and a MIDI
kit, simultaneously to your sound card.
4. Memory Module expansion slots: This slot allows you to install Memory Chips on your
audio card so that you have more RAM (additional memory) for your MIDI instrument
samples.
5. Modem connector: This connector enables you to connect your audio card to any
modem card that has got the necessary interface.
6. PC speaker connector: This provides connectivity that’s fairly easy to establish. It
enables you to redirect the sounds that normally come out of the PC speakers to your
sound card.
Audio Editing
Need for audio editing
Need for sound editing arises due to one or more of the following reasons.
1. With analog audio source, it’s extremely difficult to control the external environment.
Even after taking almost care during the recording process, it may not be possible to
avoid all the external disturbances and noises.
2. Every analog audio source is characterized by inconsistency. The very same lady, reading
out the same sentence after practicing ten times, may commit mistakes during
recording.
3. It is almost impossible to add some special effects to the original recording.

4
4. Controlling the audio time duration, is extremely difficult with the original sound
sources. Often, the recording is either a bit short or a long! This factor becomes
particularly important in presentation shows and animated movies.
Audio editing terminology
In a typical audio editing environment, the following operations are frequently performed:
1. Trimming
Every recording is usually associated with a blank space for a few seconds before and /
or after the required sound. The process of removing these blank spaces, is called
Trimming.
Removal of blank spaces, apart from reducing the audio file size considerably, enables
perfect time matching and further editing operation easy.
2. Splicing
Splicing process refers to removal of unwanted sounds that have crept in, during the
recordings. This is also accomplished by means of ‘cut-file’ feature in the editing
programs.
3. Reassembling
One may want to assemble several stray pieces of audio together, to make up a single
file. This process, accomplished by ‘cutting’, ’copying’, and ‘pasting’ sound clips, is called
reassembling.
4. Volume control
Increasing or decreasing the volume of either portions or whole of the recorded audio
clips, is called volume control.
5. Time stretching
Some time, we need to either stretch or contract the sound clips, to suit the particular
time slot.
6. Fade ins and Fade outs
This is the process of smoothing out the beginning and the end of audio files, for gradual
transition effects.
7. Resampling
This is the process of reducing the sound quality from 32 Bit recordings to 16 Bit or from
16 Bit to 8 Bit – thus, reducing the quality of the recorded audio a bit and reducing the
ultimate file size.

5
Multimedia Text
Designing Text for Multimedia
Designing multimedia texts involves controlling two very important characteristics of
multimedia texts: Display and Content.
Display deals with the ‘How’ parameters of multimedia texts – like ‘How the text is going to be
represented at a given place, which font is going to be used to represent this text, and with
what colour’ etc.
On the other hand, content answers ‘what’ parameters – like ‘what is the text that is going to
be represented here’ etc?
Effect of Poor text display design
• The poor display will directly affect to the interface of the project. The
immediate impression created in mind of the user will not be effective. In some
case poor text display may become the main cause of the failure of the project.
• Generally, the design parameters have been manipulated intelligently depending
upon their context.
Effect of Poor text content design
• The poor content fall to impress the user and result in loss of interest in the
whole project. Careful attentions should be paid, not only to the language, but
also to ease of expressions.
• The content design must be proper to produce the effective result.
Hypermedia
Hypermedia is a well-defined structural arrangement of information in the form of Audio, Video,
Text, Animation and Graphics pertaining to particular topic, with relevant linkages in between
them.
For example, let us try to list out various forms of information available on the title: “Oceans”:
• Various facts about Oceans, as texts.
• The Oceanic underwater photographs.
Multimedia Text
Display Content

6
• Ocean sounds.
• An underwater video clip of some ocean.
Now, a multimedia title on Oceans, tries to link all these stray bits of information in one
integral platform, using hypermedia methodology, like this:
When the user is reading some scientific facts about the sea shells- with a simple mouse
click, he can view a photograph of the same. He may even try to listen to some actual
underwater audio recordings, as he proceeds.
Hypertext
Text based information, interlinked by means of relevant hyperlinks between various sub topics.
Those words, which carry hyper linkages to other sub topics are called ‘Hot Words’ and are
usually distinguished from other normal texts, either by a different font colour or by different
text styles and underlines.
Hypertexts, enable the multimedia producer, to arrange the information into meaningful groups
and present them easily.

1
Unit-3: Working with Graphics and Video
Multimedia Graphics
Basic concepts of colour displays
The most important is The Number of colors and the resolution of the display system.
Number of Colours
Every colour display system is capable of handling only a limited number of colours, at any
given point of time. Systems with bare minimum configuration can manage to show up to 16
different colours, for any given images, whereas those with high configurations can throw up to
16 million colours in a single screen or even more.
This total number of colour that could be handled by the monitor depends upon the memory
capacity of the Video Controller Card (the card which serves as the interface between the
computer and the display device) – known as the VRAM (Video Random Access Memory).
The screen is made up of small dots, called pixels. The colours that are to be displayed by each
pixel, at any fraction of time, are stored as colour data inside the VRAM. The total number of
colours that could be displayed by the system at any point of time, depends upon the amount
of colour data that could be stored inside the VRAM.
The following set of standard number of colours that could be deployed for multi-colour display
purposes:
1 bit per pixel -2 colours
4 Bits per pixel -16 colours
8 Bits per pixel -256 colors (Known as 8-bit color)
16 Bits per
pixel
-65,536 colors (Known as 16-bit color)
24 Bits per
pixel
-16.7 million colors (known as 24-bit color or “True colour”)
The total number of colours that could be displayed on the screen, decide the quality of the
pictures that will be displayed, to a significant extent.
Colour Resolution
the entire screen is made up of small dots called pixels. Now, how many such pixels are there
on the screen, at any given point of time – is known as the resolution of the monitor. Even
these dots are stored as resolution data inside, VRAM. The VRAM space has to be shared by
colour data and the resolution data, in proper proportions.

2
VRAM Requirement for various colours and resolutions
Resolution Colours
8 Bit 16 Bit 24 Bit
640*480 300KB 600KB 900KB
800*600 470KB 940KB 1.4MB
1024*768 768KB 1.5MB 2.3MB
1280*1024 1.3MB 2.6MB 3.8MB
Minimum Resolution requirement for various monitor sizes
Monitor Size Resolution
14’’ 640*480 OR 800*600
15’’ 640*480 OR 800*600
17’’ 800*600 OR 1024*768
21’’ 1024*768 OR 1600*1200
(Actual picture elements that are present on the monitor are also called Pixels, but to
distinguish them from logical Pixels, we will call them Actual Pixels)
The following sets of standards resolutions, are generally employed:
640 Rows and 480 Columns of Pixels (Known as 640*480 resolution)
800 Rows and 600 Columns of Pixels (Known as 800*600resolution)
1024 Rows and 768 Columns of Pixels (Known as 1024*768 resolution)
1280 Rows and 1024 Columns of Pixels (Known as 1280*1024 resolution)
1600 Rows and 1200 Columns of Pixels (Known as 1600*1200 resolution)
The resolution of the screen decides the size of the picture on the screen.
3
Monitor video modes
the combination of resolution and total number of colours is usually called the Video Mode or
Colour Mode of the monitor.
We have the following popular combinations:
0.5 MB – 640*480 with 8 Bit colour and 800*600 with 8-bit color.
1 MB – 640*480 with 24-bit color and 800*600 with 16-bit color.
2 MB – 1024*786 with 16 nit colour and 1280*1024 with 8-bit color.
Colour Monitors
Apart from resolution and number of colours, monitors are controlled by two other
parameters: Dot Pitch and Monitor Refresh Rates.
Colour monitors and their parameters
Dot pitch
The Dot Pitch is the parameter that ultimately governs the sharpness of the colour monitor. It’s
actually the physical distance between two actual picture elements (Actual pixels) on the
monitor and is measured in millimeters. Normally, a Dot Pitch of 0.28 mm should be sufficient
for all 14’’ and 15’’ monitors. For higher sizes, typically a Dot Pitch of 0.26 mm or lesser, is most
suitable.
Monitor refresh rate
If we are to imagine the entire screen to be made up of rows of picture elements (Actual pixels)
, and the screen display at any second as a series of illuminations of such rows, then the
monitor refresh rate signifies the speed with which every line is illuminated, one after another,
and is measured in terms of Hertz(Hz). The typical refresh rates employed, range between 60
Hz and 90 Hz.
Graphics in multimedia projects
Graphics and digital images are used in multimedia projects, to serve two main purposes:
1. For creating / enhancing the interface design (called Interface Design Graphics)
2. For disseminating information, relevant to the project (called Content Design Graphics)

4
Interface design graphics and content design graphics
Interface Design Graphics
For creating / enhancing the interface design
The user interface of a multimedia project is the display that projects itself before the user. This
interface, for any project, has to be simple as well as attractive so as to attract the user to
explore further.
Relevant photograph or images can be added in the background, and text can be made to
appear over them.
Graphics used for interface design purposes differ from that used for content presentation, in
the following respects:
• They may or may not be related directly to the multimedia project under
development. i.e. these pictures may not have any relevance in the present
context or even the theme of the project, but yet, may manage to find a place
just for the purpose of enhancing the interface.
• They are usually manipulated in many different combinations so that the actual
picture is almost lost because, backgrounds should not attract more attention of
the user, than the actual contents.
Content Design Graphics
For disseminating (Distributing) information, relevant to the project
Content design graphics are those photographs, clip arts and other kinds of still images that are
directly related to the topic under development and are generally used to illustrate or explain, a
point or information that’s under current discussions.
Each and every screen of almost all kinds of multimedia projects is designed to contain at least
one image that’ll pertain to the topic under discussion. Other images and pictures related to
the topic may be linked by means of hot spots and hyperlinks.
Multimedia Video
Need of Video in multimedia Projects.
• The Project has certain relevant sequences/ material that can be video graphed.
• The Project has certain sequences/ material that cannot be produced (or not
economical to produce) with the help of computer animation.
• The Project has to be made more attractive with video or
• The Project has live lectures/ Demonstrations/ other prerecorded material to be
incorporated.

5
Problems with multimedia Videos
• Video clippings are costly to produce and manipulate, rather than any other media type
• Videos are least flexible elements, difficult to edit and manipulate video clipping.
• Unlike multimedia graphics, videos are not readily available and may have to be
produced exclusively for the project.
• It’s virtually impossible to control the individual elements/ objects of a video clipping,
with coding and programming.
Full Motion Video
• Television is said to handle video frames at 30fps (frames per second) in NTSC (National
Television Standard Connection) systems and at around 25 fps in PAL (Phase Alteration
Line) system.
• This result in very quick transmission of frames from one sequence to another
ultimately producing a very smooth movement of objects video-graphed.
• But multimedia video cannot display so many numbers of frames in one second,
because of the limitation of the processor and many other technical factors.
• So, what it does is to select every alternate frame that makes up the video (like 1st, 3rd,
5th frames etc.) so the speed is around 15-20 fps. But the video is jerky somewhere.
• But if the size of frames is reduced roughly around 1/6 the size of a 640*480 resolution
of monitor, then the computer can play digital videos back at 25 or 30 fps. This is called
“Full Motion Videos: - meaning that the motion is pretty smooth – comparable to
Television.
Full Screen Video
• All multimedia videos are quarter screen videos or even lesser. Because, with any of the
codec standards. If we are to provide full screen videos, the motion will be affected very
seriously.
• The videos may not occupy a quarter of 14’’ monitor screen. But it is divided 640 by
4:160; and 480 by 4 again:120, some video card manufacturers call this 160*120 size as
a quarter screen video. Whereas the ultimate area of this ‘psudo’ quarter screen is
actually a quarter of a quarter screen. i.e. around 1/16th of monitor area.

6
• However, technology has vastly improved over the years, and we can hope to see some
real quarter screen motion videos.
Digital Video Production Techniques
Shooting the sequences
Shooting can be proceeded with the help of video cameras or camcorders. The following points
should be kept during the shooting process:
1. Decide the Video Broadcast Standard. (NTSC, PAL and SECAM, In India PAL and in US
NTSC broadcast standard is used.)
2. Decide the video recording format. Recording format can be defined as the way or
methodology adopted for recording the video signals on the video tape. (there are VHS,
S-VHS, U Matic, Hi-8, Betacam SP and the superior Component Digital/Composite Digital
recording formats)
3. Maintain even lighting in shooting and maintain minimum number of colours in the
scene, as far as possible.
4. Try to keep the camera stationary as far as possible throughout the shooting sequence.
If needed, make the movements slowly and carefully so that the resulting video signal
doesn’t look shaky.
5. Keep the light levels to the maximum. The best choice would be to shoot on sunlight, as
far as possible. In case of indoor shootings, use two to three good flood lights, that
illuminates the entire room evenly across the walls.
6. Don’t make long “swings” or incessant position shift they may become difficult to edit.
7. Finally, it’s far better for all real time multimedia projects to depend on video
professionals for such recording purpose.

7
Video Capture techniques and video capture Boards A Video Capture Board is a special electronic circuitry that’s capable of converting analog video
signals to digital video signals. Once converted, these files can be handled like any other data
file, by that software that recognize video files.
A Typical Video Capture Board is Quadrant’s Q-Motion card. It is a 16-bit video capture and
playback system. There are a series of cards under the Q-Motion like Q-Motion 100, 125, 100,
115, etc.
Characteristics of these different series of cards:
1. Higher Screen Size- Full Motion Video Capture
It is capable of capturing high quality full motion video (at 30 frames per second) at very
good screen sizes.
2. High Rate of Frame Capture
The card captures video signals at 30 frames per second, so that the movement of video
graphed objects look more realistic. NTSC Broadcast signals adopt only this frame rate:
60 fields per second.
3. Compression- Decompression Algorithms
Q-Motion Doesn’t adopt MPEG algorithms directly, instead it uses Motion JPEG, for
compression and playback. Motion JPEG algorithm is also capable of Full Screen Video
Capture/ display at 30 frames per second.
4. Video Standards Compatibility
Q-Motion is compatible with NTSC, PAL and SECAM Broadcast video Standards – the
three most common standards adopted in television broadcast.
5. Accommodating Video Recording Formats
Q-Motion is compatible with normal composite video and the high-quality S-VHS video
inputs. These formats are meant for consumer quality video and not for professional
broadcasts. All lower end VCRs or Camcorders, that you are trying to use, will most
probably adopt only these formats and Q-Motion can effortlessly accommodate the
same.
All the above-mentioned features are common for almost all Q-Motion series of cards. Digital
video files recorded with these cards can be easily converted to ‘.mpg’ files, without much
losses and can be used in multimedia projects, directly, after the required editing.
Editing Video
Under frame mode
• Select to the Frame you want to ‘Cut’ or ‘Copy’ by clicking over it in the frame bar. The
current frame window displayed the same.
• Select the ‘Cut Frame’ or ‘Copy Frame’ command from the ‘Edit’ Menu The Frame is cut
or copied to the clipboard.

8
• Select to the Frame, over which you want to paste the cut / copied frame by clicking
over the same. If it’s in a different video file, open the file and select the same.
• Select the ‘Paste’ command from the ‘Edit’ Menu. The Frame is pasted over the selected
frame.
Under Time Mode
• Select to the Frame(s) you want to ‘Cut’ or ‘Copy’ by extending the selection bar over
the desired number of frames.
• Select the ‘Cut Segment’ or ‘Copy Segment’ command from the ‘Edit’ Menu. The
Frame(s) are cut or copied to the clipboard.
• Select to the frame(s), over which you want to paste the cut/ copied frame(s) by
selecting the same with the selection Bar. If it’s in a different video file, open the file and
select the Frame(s).
• Select the ‘Paste’ command from the ‘Edit’ Menu. The Frame(s) are pasted in the
desired locations.
Resizing video sequence
Resizing operation results in reduction or enlargement of the entire sequence- every frame
is enlarged or contracted. The option can be exercised only for the entire video sequence.
Cropping video sequence
Cropping operation results in cutting out the required portion of the selected frame(s). This
results in loss of frame data and should be employed, only if a selected region of the entire
file has to be cut as a separate movie leaving the rest.
Embedding sound clips with video files The sound embedding process goes as below:
1. As you open a valid digital video file, a dialog box is displayed showing the audio streams
associated with the file.
2. If you just want to edit the audio stream already embedded in the video file, just click
“OK” button. The audio stream pattern is displayed as in any other sound editing
environment and you can proceed with the sound editing process.
3. If you want to replace the audio stream, with some other audio track, click on “Import
Audio Stream” Button. The audio file is opened and displayed. Then click on red “Play”
button to make the video to play in synchronization with the audio stream you have just
imported.
4. If you don’t want to use pre-recorded audio files and want to record something new,
click on the “Create New Audio Stream” button. All embedded audio in the video file, is
removed and the video file can now accommodate your new recording.

Unit 4 US04SBCA21
Compiled By: Navtej Bhatt V.P. & R.P.T.P. Science College P a g e | 1
Computer Animation Fundamentals
Introduction Computerized Animation is most dynamic form of Multimedia. Animation technology was
born well over a century before computers, but it was only after the introduction of the
latter technology, that the former was able to achieve dizzy (faint) heights, in the recent
past.
In the past, conventional animation techniques took a lot of time, money and effort even
a small bit of movement of a teddy bear demanded strenuous (laborious) effort on the
part of the patient animators who painted frames of drawings one by one and only the
great movie makers like MGM and Television giants like Hanna Barbara! Time Warner
could make out some successful ventures.
Of course, the greatest name that comes to the minds many when we discuss animations,
the undisputed leader of the industry is Walt Disney Inc. of USA, who was able to carve
out (create) a niche (position) in either segments.
After the introduction of computerization into animation technology, many could hope to
try out some Mickey Mouse or Tom and Jerry on his own little PC.
Walt Disney quickly adapted to computerization and maintained its lead with classics like
the "Toy Story" - the first 3-Dimensional film in the history of motion picture cinema to be
completed well within the frontiers of a few muscular silicon graphics machines.
And now, the technology is establishing itself as a billion-dollar industry, throughout the
world. The technology of computerized animation is vast and complex but our aim,
primarily here, is to concentrate on the part of Animation with respect to multimedia
technology. Let us get down to business.
Animation in Multimedia Projects
Animations were incorporated into multimedia, primarily because of the major limitation
of graphics: the latter is not capable of providing dynamic movements.
For example, to show a balloon floating in this thin air, all that the graphics can provide,
at its best, is a digital Photograph of the same. But with Animations, the balloon comes
alive right in front of our eyes, in all its gentleness and fervor (feeling). Understood the
point?
Computer animations may be employed for one or more of the following reasons:
• To explain a concept or a point, in better detail. For example, in books that work
series’ "Home Survival Toolkit" CD ROM, to illustrate various concept associated
with household hardware etc., the developers make extensive use of computer
animations to explain things like how to hold a cutting pliers and proceed with the
work. Such detailed illustrations help the viewers to develop unambiguous
understanding of the concept under discussion, in a better light.
• To illustrate something that cannot be photographed or video graphed.
• To substitute multimedia text based elaborate discussion or explanations.
• To make the proceedings, rich and colorful. Usually, the first few frames of almost
all the multimedia titles Begin with an ornate (complex) 3D animation, to produce
some 'cinematic' effects, in the beginning of the title. Of course, good titles
maintain the initial interest generated, throughout the proceedings with various
kinds of text and object animations.

Unit 4 US04SBCA21
Compiled By: Navtej Bhatt V.P. & R.P.T.P. Science College P a g e | 2
Computer Animations – various classifications The term 'Computer Animation' refers to literally any kind of animation created using
computers. Whereas, by 'Multimedia Animations’, we mean those that can be put to use in
multimedia titles. Needless to mention here, that not all types of computer animations are
meant for multimedia projects. A simple classification of various types of computerized
animations will be of great interest to us, at this stage.
CLASSIFICATION -I Cell or Frame Animation and Object Animation. This classification is perhaps the most
fundamental one for all types of animations. Even in Non-Computerized Animation
techniques, this classification exists.
CELL ANIMATION In Cell or Frame animation, the entire animation sequence is split up into different Frames
(in other words, still images). When all these images are displayed in sequence, they
seem to move. When this kind of shuffling between the pictures, is fast enough to make
fool the human eye (at around 25 to 30 frames per second) - we see a fully-fledged
animated movie.
OBJECT ANIMATION In object animation, a general picture, which doesn't change with time, is maintained as a
backdrop (background) and an object or two are moved over this background.
Mere, the motion sequence of the object alone is calculated and generated, and hence the
name -Object Animation. This type of animation is particular to multimedia projects and
many can be seen using them throughout the proceedings.'1'
In Windows 95, you can witness lots of these types of animations - like the one generated
when you try to move a large file, from one drive to other.
CLASSIFICATION-II It contains Two dimensional and three-dimensional animations. This classification is
perhaps, very important, particularly with respect to computerized animations. In fact, the
classification is based on the number of planes in which you create your Animations - is it
one or two?
TWO DIMENSIONAL ANIMATIONS Animations created in two dimensional planes are called 2D animations. Two dimensional
planes are characterized by two axes that define any point in that plane. All old Mickey
and Donald cartoons can be treated as 2D animations, as far as computers are concerned.
In other words, if you want to create something similar to Mickey and Donald crew, you
will necessarily be creating them all in a 2D plane.
THREE DIMENSIONAL ANIMATIONS
Animations created in three dimensional environments, characterized by more than one
plane are called 3D animations. In fact, a 3D environment is referred to as 'Space' in
computer terminology, because the very space that surrounds you is three dimensional
because, to define any point in space, you will need three axes and three points!
3 Dimensional animations bring more 'reality and environment' into the animations. 'Toy
story' is an example for 3D animation. Dinosaurs of Jurassic Park were created only with
some high-end 3D packages.

Unit 4 US04SBCA21
Compiled By: Navtej Bhatt V.P. & R.P.T.P. Science College P a g e | 3
CLASSIFICATION – III It contains Movie Animation, Television Animation, Multimedia Animation and Internet
Animation. Though this classification is based only on the media in which the stuff
(material) is delivered, the mode of delivery actually forces several technical and
qualitative differences between them - that they invite exclusive classification.
MOVIE ANIMATION
Movie Animation, being the costliest, is also the best among the lot. True, those High-end
Silicon Graphic Machines and exclusive software are just beyond the reach of a common
man but the capabilities of this "posh" goodies are just unimaginable. 'Sky is the Limit' -
claim Silicon Graphic users, with pride. If my prophesy (prediction) is to come true, one
can expect to see a wholly digital movie, cast entirely with 3D computer actors and
nobody in live - within the dawn of the next century!
TELEVISION ANIMATION
Television Animation, though not much different from the movies, allows lower end
systems and software to participate in the excitement, mainly because of the degradation
of picture quality as well as the size as compared to movies. Of course, if a particular
animation in a television show is extremely realistic - I'd have use silicon graphics, again.
MULTIMEDIA ANIMATION
Multimedia animations are those that are used for multimedia projects and CD-ROMs.
Though there are no instinctive (natural) attributes that characterize multimedia
animations from others. Usually, with many multimedia titles, much lower-level entities
even those from DOS machines are acceptable.
Multimedia animations can be further sub-classified into Content Development Animations
and Interface Design Animations. As the name implies, Content Design Animations are
directly related to the project's topic and are used to explain a concept or two, in detail,
with the help of animations. On the other hand, Interface Design animations are used only
to enhance the Interface Design Graphics further, with some animations - most of them
being object animations. All flying titles and texts, in any multimedia tide are examples of
flying texts.
INTERNET ANIMATION
Internet animations are those that are used in all web pages throughout the net. Small
bits of animations, like a glowing button, add more color to the page contents and retain
better viewership.
As with other forms of internet data, since files sizes become extremely important in the
web because of the downloading time associated - they are necessarily small bits of
animation clipses. Other distinctive characteristics of this family of animations are Lower
Animation window size, transparency and the capability of being embedded in Web pages
and with standard Web browsers like Netscape's Navigator. Fortunately, some of the
fundamental animations that are useful for almost all types of web applications are
available free, on a number of sites, throughout the net.
CLASSIFICATION -IV Programmed Animation and Compiled Animation. This classification is based on the way in
which the animation is generated from the computer. As far as the computer is
concerned, the animation can be identified as a separate animation file (which has been
developed under an exclusive animation environment) that can be played back using the
relevant Media Drivers or simple as a series of codes (i.e., a Computer Program), which,
when executed under the relevant system software, results in animation.

Unit 4 US04SBCA21
Compiled By: Navtej Bhatt V.P. & R.P.T.P. Science College P a g e | 4
In general, these technicalities are hidden from the user, and the project's installation
program takes care of configuration your system properly, to play back the animations
without a hitch.
PROGRAMMED ANIMATIONS
Every animation can be thought of as a series of drawing commands that are drawn over
the screen at incredible (unbelievable), speeds so as to produce the illusion of seamless
movements of meaningful figures - across the screen. Such animations are called
programmed animations.
The animation developer has to conceive his animation as a group of codes, under the
relevant system environment, and start programming the animation accordingly.
Programmed animations are difficult to develop and comprehend but at times, they can
produce some fine sequences that cannot be imagined or developed under any other
specialized environment! The programming environment for developing these types of
animations will most probably be the authoring environment of the multimedia project
under development.
COMPILED ANIMATION
Compiled animations are those that have been compiled in some specialized environment
and have been stored as some form of Video/Animation files that can be played back
using some Runtime Players and/or Driver Software. In animation terminology,
compilation is referred to as "Rendering".
Every Animations package/environment its own way of storing the animation data i.e., the
file formats, and generally they are not compatible with each other. The decision to adopt
a particular file format is largely decided by the issues like quality of the animation,
compatibility with the authoring environment etc.
Not all authoring environments support all animation file formats. In some cases, this
problem becomes a serious limitation because, it's always better to use the animation
environment's exclusive file format best results instead of converting to some other file
format and embedding it in the multimedia project.
CLASSIFICATION V It contains Game Animation, Morph Animations etc. Both Game Animations and Morph
Animations come under the miscellaneous category - they have peculiar characteristics of
their own and necessarily from a distinctive class of computer animations.
GAME ANIMATIONS
Game animations are particularly characterized by online simulation of movements and
response - for example, in the famous Multimedia Game - "Waterloo" - as you mouse click
on the battlefields, the characters immediately proceed to that place. Such simulations
demand programmed animation codes, so as to react according to the user's input.
MORPH ANIMATION
Morph animations are very famous among the multimedia enthusiasts. One picture,
seamlessly transforming itself to another, is really exciting to watch. Morph animations,
surprisingly enjoy such a huge popularity that they are used even in many movies and
some professional animation schools include 'Morphing' as an exclusive section in their
curriculum.
2D and 3D Animation Techniques A professional animation development is a sequential and well-defined process. In some
cases, a step or two may overlap or neglected altogether, but the general process is
almost similar between different development environments.

Unit 4 US04SBCA21
Compiled By: Navtej Bhatt V.P. & R.P.T.P. Science College P a g e | 5
We will address the topic in two phases - the first one on various steps involved before
the development of the actual animation sequence and the next on the actual animation
development process because. Phase I is almost the same for both 2D and 3D
environments.
The entire discussion takes up one example for illustration: For an edutainment title on
chemistry, a simple chemical reaction, the formation of Water from Hydrogen and
Oxygen, is illustrated by way of Multimedia Animations.
Phase I – Preliminary Procedures Phase I of the multimedia animation process is all about the preliminary procedures involved, well before the development of the actual animation process.
Nonprofessional programmers either do not know these steps or willingly avoid them to
save time - but more often, they are forced to edit the developed animations again and
again in some worst cases may redevelop the entire animation sequence, right from the
scratch!
The step-I involved are as follows:
Step 1 - Conceptualizing
The given situation or concept, which has to be expressed through the multimedia
animation, has to be developed as an animation concept. By animation concept, we mean
an approximate imagination of the actual animation sequence that's going to be
developed.
All wild imaginations cannot become acceptable animations. Experienced people like the
project manager, actually participate in this concept development, which is the very heart
of the multimedia animation under production. In our example, the sequence can be
conceptualized as:
‘Atomic structures of the elements involved in the reaction exhibited as 2D or 3D models
move close together and exchange their positions to form the resulting compound.’
Step 2 – Story Boarding
Story Boarding is a very simple yet; intuitive technique which when used properly will
result in very good results in relatively short periods of time. It's the name given to that
concept of visualizing the 'animation 'sequence to be developed as various frames and
exhibiting the same, roughly, in paper.
The main frames of the animation sequence are
Frame 1 - first element enters the picture
Frame 2 - second element enters the picture
Frame 3 - the two combine together
Frame 4 - the resulting compound is displayed
Now, the story board I will decide which element has to come from the right side, which one from the left side, how they will combine and form the compound. It's better to adopt
even minute details like the background color system and camera angles etc. so that the sequence can be developed by the animators, without much ambivalence (difficulty).
Generally, more than one person is involved in story board development, so that ideas pour out freely. Once the story board is ready, the multimedia animation sequence is all
set to progress to next step.

Unit 4 US04SBCA21
Compiled By: Navtej Bhatt V.P. & R.P.T.P. Science College P a g e | 6
Step 3 - Modulating or Capsuling
Modulating is the process of dividing the animation work involved into meaningful parts or
and allocate the work between the animators. Obviously, this step is not necessary for
simple animations but is required for complex scenes. Usually in 3D environments,
modeling and rendering are recognized as different modules of work, and plans are made
accordingly.
Step 4 – Keyframing
Keyframes, in any animation sequence, can be defined as those frames in which, the
movements of objects mature from one stage to another i.e., in between Keyframes the
movements of objects are simple. Identification of keyframes helps the animators, to
proceed with the sequence in a very methodical manner after stage - and also smoother
integration of various parts of an animation stream.
The portions, in between keyframes, arc called 'Slots'. The slots are of varying lengths,
depending upon the movements of the object under animation. In our example, the
keyframes will be...
• The frame in which, first element enters the picture.
• The frame in which, first element reaches a point, near the center, on the left-hand
side
• The frame in which, second element enters the picture.
• The frame in which, second element reaches a point, near the center, on the right-
hand side.
• The frame in which, the two come together.
• The frame in which, the resulting compound is displayed...
Step 5 – Planning
In case extensive animations are involved in a particular project, it's important to plan the
entire animation development process.
In typical multimedia projects, Critical Paths i.e., those activities which if delayed, result in
the total delay of the project) are recognized well before the production of the title
because of the complexity involved in making various kinds of media ready, and
integrating them into meaningful forms. Animation planning may involve Modelling
planning, Rendering Planning, Format conversion planning etc. Kindly note that even a
simple 2-minute animation Rendering may take up several hours of intense computing
processes.
Phase II – Animation Development Process Multimedia Animation development process involves putting one's hands right over the
Mouse or Graphic Tablets and start creating the characters. We will follow up the same
example, the Chemical Reaction - for illustration purposes.
Depending upon the environment (2D or 3D) and the particular animation package used,
the process may vary, but in general same sequence of operations is used.
Two-Dimensional Animation Environment
1. Decide the total number of frames to be engaged for the particular
animation sequence. The more the number of frames, the better because, with
gradual transition, the movements of the objects tend to be natural and smooth.
2. Identify the key frames. They are important points in an animation sequence,
wherein the movements of the object(s) mature. Identifying the keyframes,

Unit 4 US04SBCA21
Compiled By: Navtej Bhatt V.P. & R.P.T.P. Science College P a g e | 7
involves pin pointing the exact frames, which will have key frame graphics, drawn
on them.
3. Develop the key frames. Development involves drawing the actual figures over
the frames, using one or more of the drawing tools available in the environment.
Sometimes, it may be felt that the drawing tools supported by the animation
environment are simply not enough. In such cases, the frames can be stored as
individual bitmaps and manipulated using any of the advanced image editing
software till the desired results are obtained.
4. The frames in between the keyframes are now developed to complete the
animation. At this stage, weather we have adopted the right number of frames for
each slot, becomes evident. Unwanted slots, if any, can be easily removed.
5. Once all the frames of a particular slot have been completed, they have to be
played back using the ‘play animation’ command in the development environment.
6. Process 4 and 5 are repeated continuously till all the slots i.e., all the frames in
between all of the key frames are developed. Now, the individual slots may have to
be integrated seamlessly, to complete the required animation sequence.
7. After integration, the entire animation sequence is ready for playback and testing.
Once all these editing operations are over, the animation is ready to be
linked/embedded in the multimedia project under production.
8. The last stage is the process of actually linking/embedding the animation clip into
the project. If the animation file format is not supported directly, then the format
may have to be converted.
Three-Dimensional Animation Environment
Three-dimensional animation environment is much different from its counterpart and may
turn out to be complex or simple depending upon the type of animation we are trying to
develop.
The steps involved are as follows:
Step 1 – Modelling
Development of necessary three-dimensional models is the first step in 3 D animation
process. Three dimensional models are necessarily the various spaces coordinates of a
particular object in a 3 D universe.
To represent a rectangular block, such as the book, 8 3D coordinates are required,
because, once these co-ordinates are known, the software can connect all these points
with the help of straight lines, thus completing the object.
When a simple box, connected necessarily by means of straight lines, itself is demanding
8 coordinates to be represented as 3-dimensional, data, then, one can very well imagine
the complexity involved in complicated models.
To extend the flexibility of modelling environment, developers have come out with several
techniques all, necessarily in the form of complex mathematical 3D curve equations so
that many more characters can be modeled within the animation environment the most
prominent among them being the spline equations.
A spline is basically a curve equation. Several such spines, when put together, can
represent complex surfaces.
There are several types of spines. Some of the basic equations used among them are:
Linear spines, Cardinal spines, Bezier spines. B-spines and Non-Uniform Rational B-spline.
The last type is currently, being adopted in all professional packages and is known by a
more popular name: NURBS.

Unit 4 US04SBCA21
Compiled By: Navtej Bhatt V.P. & R.P.T.P. Science College P a g e | 8
In case, the models are so complex that they simply cannot be defined with curve
equations, the 3D modelers finally resort to 3D probes, which, with the help of laser
sensors arranged in all the 3 axes, capture the 3-dimensional data making them available
for the 3D environment.
In this case, however, solid model, preferably in wood, has to be cut out first, whose
profiles are traced back by the probes.
What all these mean and how they actually represent the complex 3D surfaces, is a
subject that's well beyond the scope of this text.
Astonishingly (surprisingly) all those dinosaurs like T-rex, that make our nerves chill for a
moment or two in the silver screen, are simply mathematical equations.
Usually in all three-dimensional environments, the fundamental shapes like boxes,
spheres, cylinders, cones etc. are readily available, and can be developed to required size,
with a few mouse clicks and by combining a series of such shapes using Boolean
operations like add and subtract, one can intelligently develop relatively complex shapes.
We saw several commercial 3D software packages available in the market, for different
platforms. One distinctive characteristic between them is the modelling capabilities
directly supported by the system. With lower end systems, the capabilities are limited,
mainly because of their inability to handle voluminous 3D data. On the other hand,
muscular Silicon Graphic machines carry exclusive processors for modelling purposes that
handle thousands of 3D polygons online, almost effortlessly.
Modelling is the most important step in 3D animation sequence development. For
example, I've used of 3 standard spheres that replace the circles of the earlier 2D
sequence.
Step 2 – Lighting and Cameras
With 3D environments, we have 'lights' and 'cameras' on the artificial1 universe. Both of
them are similar to that which we use in our daily life but with some difference.
"Lights', in any 3D scene, are used to illuminate the objects to the required visibility. The
luminescence, color and various other characteristics of light are controllable.
There can be more than one light, in any scene. And with some advanced software, the
light intensities can even have negative value, so that they: actually 'absorb' light from
the environment.
There are various types of lights, like ‘Spot lights’, ‘Ambient lights’ etc. The behavior of
light, over an object, is affected by the 'material characteristics' of the object.
'Cameras', in a 3D environment are used to 'view' the objects that are placed in 3D scene.
The objects can view or rendered even, without a camera, but the latter is more important
for animating the scene, in the desired sequence. For example, cameras can be used to
'walk through' a 3D model of the building, to generate an illusion that the viewer is
actually taking a walk inside the building.
When an object has to be viewed at several angles, instead of rotating the object, it's
much easier to rotate the camera at desired angles and take 'shots'.
Cameras, like lights, do possess several attributes like the field of view and focus that
decide the ultimate behavior of the camera. There can be more than one camera, in a
particular scene, in many of the animation environments.
Step 3 – Material application and Texture Mapping
This concept again, is unique to 3D environments. Almost all the professional software for
3D allows developers to set 'material attributes' to the objects in 3D space. For example,
one can 'apply' gold's properties to a model, so that it behaves like gold, during rendering.

Unit 4 US04SBCA21
Compiled By: Navtej Bhatt V.P. & R.P.T.P. Science College P a g e | 9
Explicit characteristics of gold like shininess, reflectivity and refractivity, can be controlled
so that when lights fall on the model, they be-have accordingly. Texture mapping is still
more interesting: it's the technique of applying 2D images over 3D models.
For example, particular 3D flooring in a model house can be 'wrapped up' with marble
textures, so that, the floor looks 'terribly real' during rendering process. This capability
actually extends the realism involved with 3D models to Utopian heights.
Step 4 – Key framing and Animating
Though the fundamental concept of key framing is same as that of 2D, in 3D
environments, the treatment is, by and large, different mainly because of the ability of
professional 3D software, to develop the frames in between key frames on their own. It's
one of the phenomenal characteristics of 3D software over 2D in many cases, this not only
results in saving time, but also enables smoother animation in-between the key frames,
because, the object's movements in-between the key frames are mathematically
calculated and developed.
It's enough if the developer gives the starting point and the, ending point of the animated
object. The software interpolates the movements and develops the animation. Though the
task sounds easy, certain points like identification of Keyframes become much more
important. For example, there's no flexibility to increase or decrease the number of
frames in between the key frames. In case the given numbers of frames are too small, the
movements appear artificial and in the other case, the movements may become too slow.
So, much care has to be taken in identifying the Keyframes as well as deciding the slot
length.
Once the key frames are ready, the object can be animated. Here again, 3D
environment's animation capabilities are far superior to that of 2D, and the developer can
take their full advantage. For example, inverse kinematics in most of the 3D packages,
allows you to 'connect' various polygons- say, the limbs of a man; when the developer
'pulls' the hand, the rest of the body responds naturally, so that he need not bother about
animation each and every part of & model.
And more professional studios use motion capture, for more natural body movements in
which, the live actions of a human are captured, using some electronic circuitry, stored as
animation data, and applied over the models to simulate the movements.
In some other cases, even two-dimensional spines can be used to 'define' the path, in
which the camera will move. For example, in a building walkthrough, instead of moving
the camera to each and every position, a spline can be drawn and the camera can be
made to follow up the path of the spline, in some given number of frames and thus
animating the sequence.
Thus, the flexibility of tools available with animating are immense, and have to be
carefully chosen and applied, to complete the development process.
Step 4- Rendering
Rendering, in 3D jargons refers to the process of finally applying the lights, material,
camera and animations to a particular 3D scene, frame by frame, and capturing the
output as individual images. These images will be the frames, which, when displayed in
sequence, will result in animation of that particular object.
Rendering is the final stage of any animation development process, and should be
employed after all other processes are over because, once rendered, the frames cannot be
modified or edited.
To provide the user with a look and feel of how the rendered-animations will finally look,
almost all the software provides a sneak preview of the frames, which help the developer
to proceed with any modifications, if needed.

Unit 4 US04SBCA21
Compiled By: Navtej Bhatt V.P. & R.P.T.P. Science College P a g e | 10
Rendering, depending upon the size of the animation, the complexity of frames and the
system hardware used for rendering, may extend well above a few, busy computing hours
or so. So, it has to be very well planned, before execution.
Step 5 – Linking and Embedding
This process is almost similar to that in 2 dimensional animations. The necessary
animation clipses are either linked or embedded into the multimedia project, in the
required places. As before, proper care should be taken to ensure that losses do not occur
during file format conversions, if any.
Names of Animation Software Tools
Animation Software for 2D Animation • DOS Platform
o KINETIX’S ANIMATOR PRO • WINDOWS PLATFORM
o KINETIX’S ANIMATOR STUDIO • WINDOWS NT PLATFORM
o MICROSOFT’S TOONZ
Animation Software for 3D Animation • DOS PLATFORM
o KINETIX’S 3D STUDIO
• WINDOWS 95 o LIGHTEAVE 3D
o CALIGIRI’S TRUE SPACE o ASYMMETRIX INSTANT 3D AND 3D FX o COREL’S DREAM 3D
• WINDOWS NT o KINETIX’S 3D STUDIO MX
o MICROSOFT’S SOFTIMAGE • APPLE MACINTOSH
o MACROMEDIA’S EXTREME 3D
o STRATA’S STUDIO PRO o GOMARK DESIGN’S FAMILY OF 3D SOFTWARE
• SILICON GRAPHICS o ALIAS’ WAVEFRONT o MICROSOFT’S SOFTIMAGE
Multimedia Project
“A Typical software project, using multimedia technology with specific aim of disseminating explicit information to a well-defined homogeneous or heterogeneous
market segment, using various media technologies and interactivity can be called as a Multimedia Project.”
Multimedia Project can be differentiated from all other types of computer projects, in the
following respects;
1. Artistic capabilities become equally important as that of the programming expertise,
demanded for the project.
2. The software tools, utilities and the programming environment as a whole tends to be far different from that of the environmental ones, though some integrity is
maintained at the system software level and the OS.

Unit 4 US04SBCA21
Compiled By: Navtej Bhatt V.P. & R.P.T.P. Science College P a g e | 11
3. Interaction between various media is involved, and thus, the nature of interactivity
between the user and the project is of different nature.
4. Different varieties of skills are required to effectively tackle different media engaged
in the project. Thus, in most cases, people other than those who claim to know computer programming, most or all of them being artistes of some kind or other, are involved in the project.
5. Finally, the market segment generally tends to be highly heterogeneous mixture, particularly for those CD ROM projects, developed for the general public.
Various facets of project design and development Multimedia Project Design and development involves:
1. General Content Design/ Development
2. Navigation Structure Design/ Development 3. Media Content Design/ Development
4. Interface Design/ Development 5. Storyboarding Techniques 6. Program Development or Authoring
7. Delivery Design / Development
Media content design and development • Media Content, refers to those portions of information in a particular project, that
are going to use any media other than plain text.
• Thus, all audio clipses, graphics, animations and video clipses developed for a
particular project, can be called as media content. One distinguishing characteristic of media content, is that- all of them are content design media files and not interface design stuff. i.e., these media clipses bear direct relevance to the project
under development.
• Media content design involves one major decision criteria: i.e., decisions regarding which media type is to be used for a particular sequence or ‘Frame’.
• Normally, in all multimedia projects, an interesting confrontation exists between various kinds of media involved, and rounding upon a particular media type for a
particular sequence, may turn out to be a complicated exercise than you’d imagined earlier.
• The usual pairs of conflicting teams are: o Audio vs. Graphics
o Animation vs. Graphics o Video vs. Animation o Video vs. Graphics
• Each media makes its own distinctive impact amongst the minds of the users,
which must be kept in mind before deciding upon a particular media type.

Unit 4 US04SBCA21
Compiled By: Navtej Bhatt V.P. & R.P.T.P. Science College P a g e | 12
Interface design and development process of Multimedia Project
• The front end of the project, that projects itself before the user, is called ‘Interface’ and designing the same is called ‘Interface Designing’.
• The Multimedia information, that’s available in various forms, has to be presented in an amicable manner to the user.
• One of the basic characteristics of interface design, is that is has to be developed,
exclusively for the potential market segment, the title is aiming at. Particularly, if the title is meant for general public, great care has to be taken, to hide all those
programming intricacies and provides a simple and lucid front end that doesn’t confuse them.
• It’s only with the help of interface design, that, one producer distinguishes his title
from others because the nature of media contents is almost the same – a few ‘.wav’ audio files, ‘.avi’ video files and many other bitmapped graphics – the way in which
they are presented, does the magic. • The Interface design includes:
o Backdrops
o Buttons and Icons o Animated backdrops
Multimedia Authoring
Authoring can be defined as the process of developing a software program that will accept
all the media elements involved with the multimedia project under production, put them
up in their respective places as advocated by the story board of the project & evolved as
an integrated source of information many times supplemented by the interactivity
provided by means of navigation paths.
How Multimedia Programming is differing from Multimedia Authoring 1. Multimedia software projects, using any typical programming environment/
language or tool and making use of various system level commands to handle various media files and integrate them
2. Packages, that will, in turn, be used by multimedia professionals to handle or
develop some kind of media or other or to integrate them in a sequential manner.
3. Multimedia authoring refers to that process of developing a multimedia project
using specialized packages and utilities exclusively meant for this purpose.
4. For example, developing a multimedia project title, using visual C++ or developing a graphics editing software package like paint shop pro can be called as multimedia
programming.
5. Similarly, developing a multimedia project title using Asymetrix’s “Multimedia
Toolbook” can be called as multimedia authoring.

Unit 4 US04SBCA21
Compiled By: Navtej Bhatt V.P. & R.P.T.P. Science College P a g e | 13
Authoring Methodologies Multimedia Authoring Methodologies are:
1. Frames or Page based Authoring Tools
2. Time based Authoring Tools and 3. Icon based Authoring Tools
Frame or Page based Authoring Tools
• These tools let you to arrange the contents of the multimedia project as individual
frames, and the project is ultimately delivered as a “Book” or collection of frames or
pages.
• Every page of the book may contain many media elements inkling sounds, videos
and animations. As the user or consumer proceeds with project, the pages progress
– in sequence, as determined by the user interaction. Individual pages can be liked
so that it’s possible to move over from one page to another related page without
constraints.
• This type of authoring methodology is best suited for those projects, whose
contents can be arranged as individual sequences or frames – one independent of
another, as far as possible.
• Asymetrix’s Multimedia Toolbook is one of the several commercial Authoring Tools,
that makes use of this methodology, for authoring.
Time based Authoring Tools
• Time based Authoring tools allow the designer to arrange various media elements
and events of the multimedia project sequentially along a well-defined time line. As
the time advances, from zero seconds the events also begin to occur, one after
another.
• The events may include media files updating and playback as well as transition of
information, from one portion to another. The speed at which these transitions
occur, can also be accurately controlled.
• These tools take the help of a software timer which is a typical clock that starts at
the beginning of the project and graduates’ minute after minute. The events
happen, one after another following this timer.
• Macromedia’s Director is an example for multimedia authoring system that makes
use of this methodology.
Icon based Authoring Tools
• These tools allow each and every event and elements belonging to a particular
multimedia project, to be arranged sequentially in the form of icons. These icons
are arranged as per the basic Nav Map structure adopted and are driven from one
phase to other, by means of events.
• Icon based tools are mainly meant for not so professional authors to handle – even
complicated flow of information. Though the degree of control enjoyed by the
author is relatively on the lower side, projects can be quickly created and delivered
which is why they are used even by professional, when the project is simple.
• One of the leading products in this category, is macromedia’s authorware.

Unit 4 US04SBCA21
Compiled By: Navtej Bhatt V.P. & R.P.T.P. Science College P a g e | 14
Characteristics of authoring tools Common Characteristics of authoring tools are as follows:
1. Media Handling Features
2. Bundled media library
3. Mapping features
4. Programming features and environment
5. Segmentation functionality
6. Compilation feature and Runtime players
7. Media Embedding feature
Media Handling Features
Many of the authoring environments and packages come bundled with programs for
handling some of the media supported by multimedia technology. These programs, apart from eliminating the need for buying some other packages for handling that media under consideration also offer best compatibility of the media files with the
authoring environment packages.
For example, some authoring package comes with a utility to edit and manipulate
MIDI audio files.
Bundled media library
Almost all of the Authoring Tool- particularly the CD-ROM versions contain lot of Media Clipses- most of them being royalty free. These media clipses usually
include: • All general-purpose digital sounds
• Photo libraries
• Clip arts
• Animation clipses
• Some video clipses
Mapping features
Some Authoring tools contain their own system for performing such organizing
functions. i.e., instead of starting from the scratch on a paper, these tools provide
some interface with the help of which a flow chart or a story board can be easily
developed.
Programming features and environment
The nature of these scripting languages that come bundled with the authoring environment or platforms are conceptually, almost the same though the syntax varies widely.
Some are bestowed with lower-level system functions and certain others are not.
For example, Asymetrix openscript doesn’t support windows media control interface
commands directly – but when the multimedia resource kit for toolbook, operation
environment becomes very powerful with all lower-level commands.
Segmentation functionality
No multimedia project can be expected to be completed in one go because of the sheer volume of work involved and the complexity associated with authoring process.

Unit 4 US04SBCA21
Compiled By: Navtej Bhatt V.P. & R.P.T.P. Science College P a g e | 15
In actual multimedia production environments, the project progress from stage
after stage in a sequential manner. These individual groups of frames or elements
of a project are called segments of a project. The number of segments in a project
is determined by the size of the project and the professionals involved with
authoring.
Compilation feature and Runtime players
Some authoring environments let the user to create stand-alone ‘.exe’ programs of
the project so that the project could be delivered easily without revealing the
underlying source code, and the others come bundled with their own ‘Runtime
Player’ programs that recognize the media sequences and playback the same.
Media Embedding feature
Some authoring tools let the users to embed the media files directly into the project so that they need not be disturbing along with the main program.
If the media files are just linked and are not embedded, they have to be distributed
along with the main program, so that they are read and played back at the
appropriate places during runtime.