UNIT 1 Introduction to Multimedia Elements 1.1 Learning ...
57
UNIT 1 Introduction to Multimedia Elements 1.1 Learning objectives To know about what is multimedia. To elaborate history of multimedia. Discuss about elements of multimedia. To know about components of multimedia. To discuss multimedia hardware and software. To know multimedia applications. 1.2 What is multimedia Multimedia means that computer information can be represented through audio, video, and animation in addition to traditional media (i.e., text, graphics/drawings, images). Multimedia is the field concerned with the computer controlled integration of text, graphics, drawings, still and moving images (Video), animation, audio, and any other media where every type of information can be represented, stored, transmitted and processed digitally. Multimedia is a media that uses multiple form of information content and information processing. 1.3 Hypermedia and Hypermedia Hypertext: Hypertext is a text which contains links to other texts. The term was invented by Ted Nelson around 1965. Information is linked and cross-referenced in many different ways and is widely available to end users. Hypermedia: Hypermedia is not constrained to be textbased. It can include other media, e.g., graphics, images, and especially the continuous media – sound and video. 1.4 History of Multimedia Since the late 1970s, desktop computers used in the home and office have evolved into sophisticated systems that help us get our jobs done, deliver information ,and provide entertainment. Presents a timeline of some of the key technologies that have contributed to the evolution of multimedia computers. Do not worry if some of these terms, especially the ones pertaining to hardware , seems unfamiliar to you right now, because they will be discussed in detail later in this book. The main point is multimedia technology did not happen overnight. Multimedia technology has changed the way we look at computers. The first computers were seen as single-purpose machines that solved incredibly complex mathematical problems. During the 1960s , mainframe computers were used to manage large corporate databases and financial systems. The 1970s saw computer terminals throughout an organization being used for publishing and information management. The 1980s brought the desktop computer so everyone could have a computer at his or desk for word processing, spreadsheets, and even games. Bringing the computer to the individual in the office, the home, and the classroom meant looking at the computer as more than just a fancy typewriter or automated bookkeeper.
-
Upload
khangminh22 -
Category
Documents
-
view
5 -
download
0
Transcript of UNIT 1 Introduction to Multimedia Elements 1.1 Learning ...
UNIT 1 Introduction to Multimedia Elements
1.1 Learning objectives
To know about what is multimedia.
To elaborate history of multimedia.
Discuss about elements of multimedia.
To know about components of multimedia.
To discuss multimedia hardware and software.
To know multimedia applications.
1.2 What is multimedia
Multimedia means that computer information can be represented through audio, video, and
animation in addition to traditional media (i.e., text, graphics/drawings, images).
Multimedia is the field concerned with the computer controlled integration of text, graphics,
drawings, still and moving images (Video), animation, audio, and any other media where every
type of information can be represented, stored, transmitted and processed digitally.
Multimedia is a media that uses multiple form of information content and information
processing.
1.3 Hypermedia and Hypermedia
Hypertext: Hypertext is a text which contains links to other texts. The term was invented by Ted
Nelson around 1965. Information is linked and cross-referenced in many different ways and is
widely available to end users.
Hypermedia: Hypermedia is not constrained to be textbased. It can include other media, e.g.,
graphics, images, and especially the continuous media – sound and video.
1.4 History of Multimedia
Since the late 1970s, desktop computers used in the home and office have evolved into
sophisticated systems that help us get our jobs done, deliver information ,and provide
entertainment. Presents a timeline of some of the key technologies that have contributed to the
evolution of multimedia computers. Do not worry if some of these terms, especially the ones
pertaining to hardware , seems unfamiliar to you right now, because they will be discussed in
detail later in this book. The main point is multimedia technology did not happen overnight.
Multimedia technology has changed the way we look at computers. The first computers were
seen as single-purpose machines that solved incredibly complex mathematical problems. During
the 1960s , mainframe computers were used to manage large corporate databases and financial
systems. The 1970s saw computer terminals throughout an organization being used for
publishing and information management. The 1980s brought the desktop computer so everyone
could have a computer at his or desk for word processing, spreadsheets, and even games.
Bringing the computer to the individual in the office, the home, and the classroom meant looking
at the computer as more than just a fancy typewriter or automated bookkeeper.
In the mid 1980s and into the 1990s, computer developers started looking at how computers
could be used a s never before. At the same time, advances in technology brought about:
1. Faster desktop computers
2. Increased working memory capacity in computers
3. Higher data storage capacity in disk drives and CD-ROMs
4. Digital audio and video
5. Graphic operating systems that worked by pointing and clicking at objects on the screen
instead of having to remember cryptic command sequences such as “dir .exe” to find a program
6. Local and wide area networks that connected users to the world
7. Thousands of applications ranging from word procesors to a myriad of multimedia products
that have changed the workplace, classroom,and the home.
Computer developers started looking to multimedia – the delivery of information using text,
pictures, audio, and video—as a way to utilize computers in a uniquely personal way.
Multimedia computers could be used to increase efficiency and productivity on the job, provide
information at out fingertips in the home, and help students learn more effectively both in and
out of the classroom. These personal gains meant that people would see computers as practical
and useful tools in their everyday lives.
Since the late 1980s, multimedia technology and applications have found many places in our
lives:
At home where a wide variety of games and reference products such as encyclopedias and
cookbooks are put to use
At the office where marketing presentations and training are essential how to get a new job
done
At school where interactive software programs assist students in learning mathematics,
science, and new languages
In shopping malls where interactive computer terminals, called kiosks, help us to design
greeting cards or to find out where specific stores are located
As you can see , the impact of multimedia technology on our daily lives is often more than
we realize. The bottom line is that if there is a need to inform, teach, or entertain multimedia
technology can play a key role.
1.5 Elements of Multimedia
Text
Whether or not they have used a computer ,most people are familiar with text. Text is the
basis for word processing programs and is still the fundamental information used in many
multimedia programs. In fact ,many multimedia applications are based on the conversion of a
book to a computerized form. This conversion gives the user immediate access to the text and
lets him or her display pop-up windows , which give definitions of certain words. Multimedia
applications also enable the user to instantly display information related to a certain topic that
is being viewed. Most powerfully ,the computerized form of a book allows the user to look
up information quickly (without referring to the index or table of contents).The Windows
operating environment gives the user an almost infinite range of expressing text. As a
multimedia programmer ,you can choose what font to display text in ,how big (or small) it
should be ,and what color it should be displayed in .By displaying text in more than one
format ,the message a multimedia application is trying to portray can be made more
understandable.
Audio Sound
The integration of audio sound into a multimedia application can provide the user with
information not possible through any other method of communication .Some types of
information can't be conveyed effectively without using sound. It is nearly impossible ,for
example ,to provide an accurate textual description of the bear of a heart or the sound of the
ocean. Audio sound can also reinforce the user's understanding of information presented in
another type of media. For example ,a narration might describe what is being seen in an
animation clip. This can enhance the understanding of what the application is all about and
lead to better comprehension. Experts in learning have found that presenting information
using more than one sense aids in later retention of the information. Most importantly ,it can
also make the information more interesting to the user.
Static Graphics lmages
When you imagine graphics images you probably think of "still" images-that is ,images such
as those in a photograph or drawing. There is no movement in these types of picture. Static
graphics images are an important part of multimedia because humans are visually oriented.
As the old Chinese proverb goes ,"A picture is worth a thousand words."Windows is also a
visual environment. This makes displaying graphics images easier than it would be in a
DOS-based environment. Static graphics images have a number of formats and can be
created in a number of different ways. Just as you can see an unlimited number of
photographs or pictures ,the types of static graphics images that you can include in a
multimedia application are almost unlimited.
Animation
Animation refers to moving graphics images. The movement of somebody giving CPR
makes it much easier to learn cardiopulmonary resuscitation ,rather than just viewing a static
picture. Just as a static graphics image is a powerful form of communication ,such is the case
with animation. Animation is especially useful for illustrating concepts that involve
movement. Such concepts as playing a guitar or hitting a golf ball are difficult to illustrate
using a single photograph ,or even a series of photographs ,and even more difficult to explain
using text. Animation makes it easier to portray these aspects of your multimedia application.
Full-Motion Video
Full-motion video ,such as the images portrayed in a television ,can add even more to a
multimedia application. Although full-motion video may sound like an ideal way to add a
powerful message to a multimedia application ,it is nowhere near the quality you would
expect after watching television. Full-motion video is still in its beginning stages on PCs ,and
it is limited in resolution and size. Even with advanced methods of data compression ,full-
motion video can suck up hard disk space faster than water falls when poured out of a bucket.
1.6 Advantages of Multimedia
It is very user-friendly. It doesn’t take much energy out of the user, in the sense that you
can sit and watch the presentation, you can read the text and hear the audio.
It is multi sensorial. It uses a lot of the user’s senses while making use of multimedia,
for example hearing, seeing and talking.
It is integrated and interactive. All the different mediums are integrated through the
digitisation process.
Interactivity is heightened by the possibility of easy feedback. It is flexible. Being
digital, this media can easily be changed to fit different situations and audiences.
It can be used for a wide variety of audiences, ranging from one person to a whole group.
1.7 Disadvantages of Multimedia
Information overload. Because it is so easy to use, it can contain too much information at
once.
It takes time to compile. Even though it is flexible, it takes time to put the original draft
together.
It can be expensive. As mentioned in one of my previous posts, multimedia makes use of
a wide range of resources, which can cost you a large amount of money.
Too much makes it unpractical. Large files like video and audio has an effect of the
time it takes for your presentation to load. Adding too much can mean that you have to
use a larger computer to store the files
1.8 Components of Multimedia
Capture devices
- Video Camera, Video Recorder, Audio Microphone, Keyboards, mice, graphics tablets, 3D
input devices, tactile sensors, VR devices. Digitising/Sampling Hardware
Storage Devices
-- Hard disks, CD-ROMs, Jaz/Zip drives, DVD, etc
Communication Networks
-- Ethernet, Token Ring, FDDI, ATM, Intranets, Internets.
Computer Systems
-- Multimedia Desktop machines, Workstations, MPEG/VIDEO/DSP Hardware
Display Devices
-- CD-quality speakers, HDTV,SVGA, Hi-Res monitors, Colour printers etc.
1.9 Multimedia Hardware
System Devices
Memory and Storage Devices
Input Devices
Output Devices
Communication Devices
System Devices
Microprocessor – Heart of the computer. – Microprocessor is the one that performs the
computer operations.
Motherboard – Device in the computer that contains the computer’s basic circuitry and
other components. – Contains computer components like microprocessor, memory, basic
input/output system (BIOS), expansion slots and interconnecting circuitry.
Memory and storage devices
RAM (Random Access Memory) – Primary memory that locates the operating system,
application programs and data in current use. – It is called “random access” any storage
location can be accessed directly or randomly. – Much faster than the hard disk, floppy
disk and the CD ROM. – RAM is a short term memory storage device, hard disk is the
long term memory storage device.
Hard Disk – Stores and provides access to large amounts of data on electro magnetically
charged surface. – Contains a part called disk cache which is responsible for improving
the time it takes to read from or write to a hard disk. – Other type of hardware cache
inside a computer is cache memory. – Cache stores something temporarily.
Compact Disc (CD) – Small medium that can store data pertaining to audio, video, text
and other information in digital form. – Are Read-Only devices, however newer
technology allow users to record as well. Can store data in the form of text, graphics and
sound – There are a few types of CD ROMs:
•CD Recordable (CD-R) Once data recording is completed, it becomes CDROM which
data cannot be deleted or edited.
•CD-Rewritable (CD-RW)
Input Devices
Keyboard – is the primary text input device for your computer. – Its role became limited
to dealing with text and for some commands only. – Contain certain function keys, such
as escape key, tab, cursor movement keys and shift and control keys
Mouse – A small device that you move across a pad in order to point to a place on a
display screen and thus execute a command by clicking it. – Is an integral part of any
personal computer. A cable connects the mouse to the computer.
Microphone – is another input device that can interpret dictation. – Also enable us to
input sound like the keyboard is used for text.
Digital camera – A device that records stores photographic images in digital form that
can be fed to a computer as the impressions are recorded and stored in the camera to be
loaded into the computer.
Output Devices
Printer – a device, which on receiving the signal from computer transfers the information
to paper .
Monitor – is a device for display. – It is just like a television set and is measured
diagonally from two opposing corners of the picture tube. – The standard monitor size is
14 inches. Very large monitors can measure 21 inches diagonal or greater.
Amplifier – An electronic device that increases the power of a signal. – Amplifiers are
used in audio equipments. They are also called power amplifiers. – Speakers with built-in
amplifiers have become an integral part of the computers today. – Important for any
multimedia project.
Communication Devices
Modem – A device that modulates digital signals going out from a computer or other
digital device to analog signals and then demodulates the analog signal to convert it to a
digital signal to be inputted in a computer. – Modems help your computer to connect to a
network.
Other Hardware device
Video capture – Is one of the most important hardware to be used for multimedia work on
a personal computer. – Video-capture results will depend on the performance and
capacity of all of the components of your system working together. – Video capture from
analog devices like video camera requires a special video capture card that converts the
analog signals into digital form and compresses the data.
Sound Card – A device that attaches to the motherboard to enable the computer to input,
process, and deliver sound. – The sound card generates sounds; records sound from
analog devices by converting them to digital mode and reproduce sound for a speaker by
reconverting them to analog mode.
Video Adapter – Device that provides extended capability to a computer in terms of
video. – The better the video adapter, the better is the quality of the picture you see. – A
high quality video adapter is a must while designing a multimedia project.
1.10 Multimedia Software
Painting and drawing tools
3-D Modeling and animation tools
Image editing tools
Sound editing tools
Animation video and Digital movie
Word processors
A computer application used for the production (including composition, editing, formatting, and
possibly printing) of any sort of printable material. Other word processing applications include: –
Microsoft Office Word –
WordPerfect –
OpenOffice.org Writer –
Graphic package
A program that allows you to create graphic figures and other things. • Graphic Packages Applications include: –
Photoshop
Illustrator
Paint Shop Pro
MS paint
Audio software package
A program used to edit and modify audio clips. • Audio Software Packages examples include: –
Audacity
WavePad Sound Editor
GoldWave
Power Sound Editor
Wavosaur
Video software package
Video Software packages examples include: –
Adobe Systems
Premiere Elements (Mac OS X, Windows)
iMovie (Mac OS X) – Sony Vegas Movie Studio (Windows)
Windows Movie Maker (Windows)
Clesh (Java on Mac OS X, windows, linux)
Animation software
Animation softwares include: –
2D Animation Software:
Toon Boom Studio 4
Animationish
Flip Boom
Flash
After Effects
CreaToon
Toon Boom Digital Pro
1.11Applications of Multimedia
Multimedia in Entertainment
Multimedia in entertainment application aims at diverting users that is engaging them in
some or the other activity. The activities include listening to music, watching a video,
playing games, participating in an interactive story, meeting people at virtual environment
etc. Higher interactivity, mobility, content awareness is major roles played by the
multimedia application software. Multimedia is specially used in movie making and
animations. Multimedia games are a popular past time and software programmes are also
available in either CD-ROMs (or) on-line. Few video games are also uses multimedia
features. Multimedia application that allows users to actively participate is called Interactive
multimedia. Digital recording material may be just as durable and instantly reproducible
with perfect copies every time.
Multimedia in Business
Training, informational, promotional material, sales presentation point-of-sales displays that
allow for consumer integration and communication within and outside the organization are
all common applications of multimedia in the business world. Multimedia presentation for
many applications can be highly portable particularly in the case of CD-ROMs, DVD-ROMs
and video tapes. The equipment required to produce these presentations are relatively
common place (or) otherwise easy to access. Existing presentation uses Grab-keep-Attention
in advertising. Business-to-Business and inter office communication are often developed by
creative service firms. For advance multimedia presentation beyond symbols, slide shows to
sell idea live-up training, commercial multimedia developer may be hired to design
Government services and non professional services applications as well.
Multimedia in software
Software Engineers may use multimedia in computer from entertainment to training such as
military industrial training, designing digital games; it can be used as a learning process.
This multimedia software’s are created by professionals and software engineers.
Multimedia in Education and Training
In education, multimedia is used to produce Computer Based Training and providing
reference books like Encyclopedia and Alma’s. Computer based training leads the users go
through the CD of the presentation text about particular and associated information in
various formats. The combination of education and entertainment gives us edutainment [i.e.,
education with entertainment and entertainment with education.]. The idea of Media
Convergence is also becoming a major factor in the field of higher education. Separate
technologies have been defined such as voice, data and video that shares resources and
interact with each other synergistically creating new efficiencies. Media convergence is
rapidly changing the curriculum in Universities all over the world. Along with all these
things it is also changing the availability of jobs required skills, savvy technological skills.
E-learning
Electronic Learning has become a very good communication [interaction] media between
students and teachers. Several lines of research evolved the possibility for learning and
instructions are nearly endless. There are two categories which link the students and
teachers. One- those which can be used to convey the subject content, such as print
materials, video tapes and audio tapes, television computer based course ware, CD-ROM
etc. the other- those which permit communication between teacher and students such as
audio, video conferencing, tele-conferencing and internet.
VERY SHORT QUESTIONS
1. What is multimedia?
2. What is hypermedia?
3. What is hypertext?
4. What do you mean by multimedia hardware and software?
5. Name the elements of multimedia.
6. Name components of multimedia.
SHORT QUESTIONS
1. Mention two advantages of multimedia.
2. Mention two disadvantages of multimedia
3. Elaborate multimedia elements in brief.
4. Elaborate history of multimedia.
LONG QUESTIONS
1. Mention four applications of multimedia.
2. What is multimedia hardware?
3. What are multimedia software?
4. Explain multimedia elements.
5. What are the advantages and disadvantages of multimedia?
UNIT 2 Content and Project Planning, Designing and Development
2.1 Learning Objectives
To know about planning steps and process in multimedia..
To know about data compression.
Elaborate types of images.
To discuss about text encoding and audio encoding.
2.2 Planning steps and process
Defining the Goal: The Goal of a multimedia application is defined by the scope of work,
which is a written description of the proposed multimedia project. The scope of work
clarifies your ideas and goals regarding the proposed project. It also helps the
development team members to visualize the basic objectives of the programme.
Outlining: Once the goal and the objectives of the programme are clear, the next step is to
create Outline of the project. An interactive multimedia presentation may not necessary
be Linear presentation like a slide show or a video programme. It has the capacity of
Branching. The outline of a programme represents branching in a Multimedia
Programme. The content specialist does the outlining. Developing an outline for an
interactive multimedia project is almost the same as that of developing an outline for a
chapter of the book. However, the outlining of Multimedia structure is translated into
branches or points of decision on the screen. Even the main outlining headings may
become options available to the user in the main menu of the Multimedia presentation
program with sub-heading becoming the Sub-Menu entries.
Logic flow chart: The logic flow chart is an important component of an Interactive
Multimedia Programme. A logic flow chart is a graphical road map of the proposed
application. The Authoring team takes the help of this flowchart to produce the final
multimedia Application. The complexity of these flow charts is dependent on the
applications being Developed. The flowcharts, which illustrate games, are among the
most complex flowcharts.
Program storyboard: The storyboard is a graphical representation of the proposed
multimedia project. The storyboard is an extension of ideas presented in the programme
script. It is presented with a series of templates used for various purposes.
These templates are very useful information and help the developer to keep a production
log or history of the work. They also help in keeping track of the production design and
help in identifying the design parameters for the application development.
Planning for creation of multimedia building blocks: The development of multimedia
building blocks is an extensive process and requires a number of production steps. In the
planning phase of it, the basic script or content of this element is defined. The content
specialist may be requested to provide such information. Availability of already available
resources should also be indicated at this level.
Copyright Issue and Its Management: While designing multimedia application, copyright
issue plays a crucial role because of two fundamental reasons.
Multimedia involves use of multiple media each of that media element may be
protected under the copyright laws.
Original multimedia works are also protected by copyrights.
The Copyright laws protect the works like Printed or Electronic text forms
, computer software, Musical works, Dramatic works ,Dances and mime works ,
Pictorial, graphics, and sculptural works , Motion picture etc. Therefore, it is
important that during the planning phase you sort the copyright issues relating to
getting permissions of using copyright material from its owner.
Defining the Production Schedule: A Timeline, defining the activities needed the person
responsible for each activity and the start/end time of each activity should be developed.
This establishes the standard with which to compare progress, ascertain deviations from
plan and take timely corrective action.
Devising a Technical Plan: A technical plan addresses the needs of the production and the
needs of the end user. It defines how an end user will experience the project and
accordingly lays down the system requirement conditions like screen requirement, CD-
ROM speed, memory requirement and hard disk requirement.
Project Budgeting: Once the project timeline or schedule is ready, the next step is to
prepare the project budget. This is essential as time and money are not infinite resources.
Planning the Structure: It involves the following steps:
Defining the goals and objectives of the proposed multimedia title
Describing the content of the title
Developing the application script
Translating the application script into an outline
Translating the outline into a logic flow chart
Developing the storyboard for each screen
Hardware Issues: For any multimedia production it is imperative to consider and finalize
the "tools" and equipment necessary to develop and play back the application. Hardware
issues include deciding, securing the fastest CPU and RAM and largest monitors that is
affordable, sufficient disk storage for all working files and records, file sharing for
collaborative work via networks or e-mail and establishing a file back-up system.
Authoring Software Selection: Selection of appropriate authoring software depends on
team expertise, funds required to acquire new software and to train the manpower and
what are the demands of the new title being developed. Two most widely used authoring
applications today are Macromedia Director and Macromedia Authorware.
2.3 Data Compression
Data compression is used everywhere. Different file types use compressed data. Without
data compression a 3-minute song would be over 100Mb in size while a 10-minute video
would be over 1Gb in size. Data compression shrinks big files into much smaller ones. It
does this by getting rid of unneeded data while retaining the information in the file.
Data compression is a decrease in the number of bits required to illustrate data. Compressing
data can conserve storage capacity, accelerate file transfer, and minimise costs for hardware
storage and network capacity.
Data Compression Methods
There are two kinds of compression: Lossless and Lossy. Lossy compression loses data while
lossless compression keeps all the data. With lossless compression we don’t get rid of any data,
instead it is based on smart ways to encode the data. With lossy compression we get rid of data,
which is why we need to distinguish data from information.
Lossless compression allows the reinstatement of a file to its original state, without the loss
of a single bit of data, when the file is uncompressed. Lossless compression is the usual
approach with executables, as well as text and spreadsheet files, where the loss of words or
numbers would change the information. Lossless compression can compress the data
whenever redundancy is present. Therefore, lossless compression takes advantage of data
redundancy
.Lossy compression permanently removes bits of data that are redundant, insignificant or
unnoticeable. Lossy compression is suitable with graphics, audio, video and images, where
the deletion of some data bits has little or no apparent effect on the illustration of the content.
In lossy compression, message becomes more efficient by getting rid of unwanted data.
Lossy compression lessens the data while retaining more information.
Graphics image compression can be either lossy or lossless. Graphic image file formats are
usually developed to compress information since the files tend to be big. JPEG is an image
file format that promotes lossy image compression. Formats such as GIF and PNG use
lossless compression.
2.4 Types of images
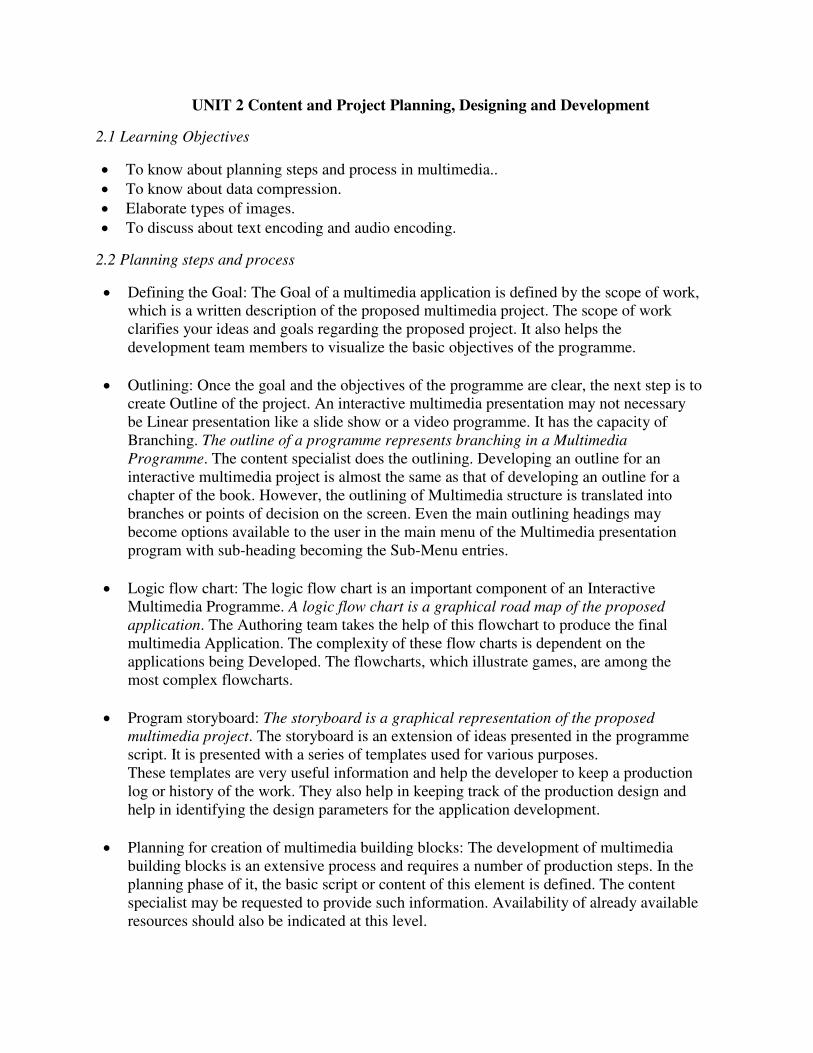
Raster images, also known as bitmaps, are comprised of individual pixels of color. Each color
pixel contributes to the overall image.
Raster images might be compared to pointillist paintings, which are composed with a series of
individually-colored dots of paint. Each paint dot in a pointillist painting might represent a single
pixel in a raster image. When viewed as an individual dot, it’s just a color; but when viewed as a
whole, the colored dots make up a vivid and detailed painting. The pixels in a raster image work
in the same manner, which provides for rich details and pixel-by-pixel editing.
Raster images are capable of rendering complex, multi-colored visuals, including soft color
gradients. Digital cameras create raster images, and all the photographs you see in print and
online are raster images.
There are different types of raster files: JPG, GIF, and PNG are examples, and each file type has
its own nuances.
Raster images are ideal for photo editing and creating digital paintings in programs such
as Photoshop and GIMP , and they can be compressed for storage and web optimized images.
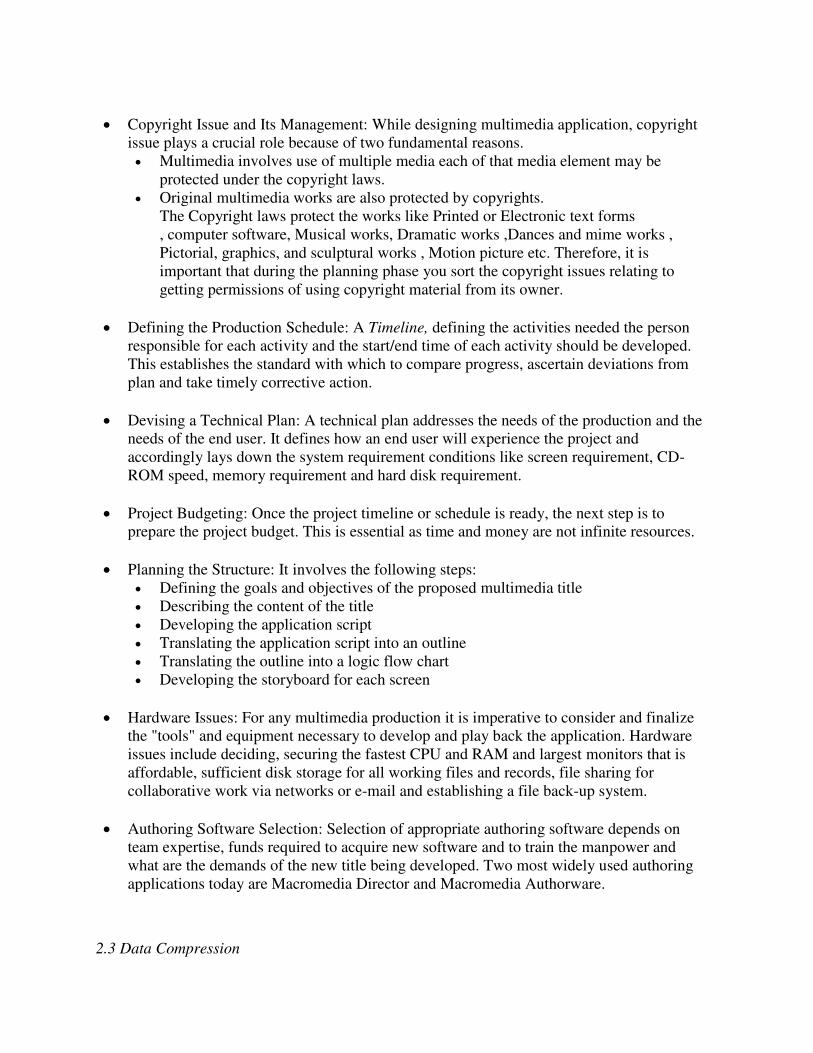
How you can use a given raster image depends on its size and quality. Quality is often dictated
by how many pixels are contained in an inch, expressed as pixels-per-inch or ppi; as well as the
overall dimensions of the image, also expressed as pixels (for example, 5,000 pixels wide by
2,500 pixels high).
The greater the ppi and dimensional measurements, the higher the quality. Most printing projects
require images to be at least 300ppi, for example.
Let’s say you’re printing a brochure, and you need a background image to span the entire
unfolded interior: 8.5”x11”. Your background image should be at least 2,550 pixels wide (8.5
inches) by 3,300 pixels tall (11 inches) with a resolution of 300ppi.
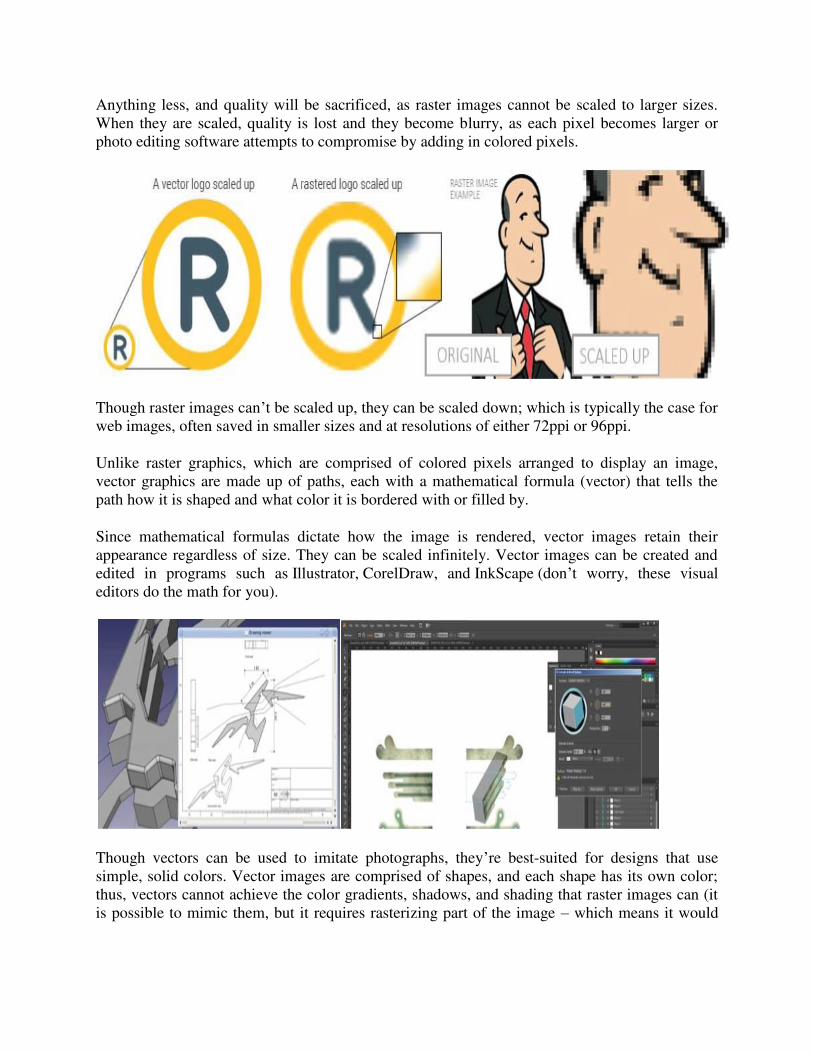
Anything less, and quality will be sacrificed, as raster images cannot be scaled to larger sizes.
When they are scaled, quality is lost and they become blurry, as each pixel becomes larger or
photo editing software attempts to compromise by adding in colored pixels.
Though raster images can’t be scaled up, they can be scaled down; which is typically the case for
web images, often saved in smaller sizes and at resolutions of either 72ppi or 96ppi.
Unlike raster graphics, which are comprised of colored pixels arranged to display an image,
vector graphics are made up of paths, each with a mathematical formula (vector) that tells the
path how it is shaped and what color it is bordered with or filled by.
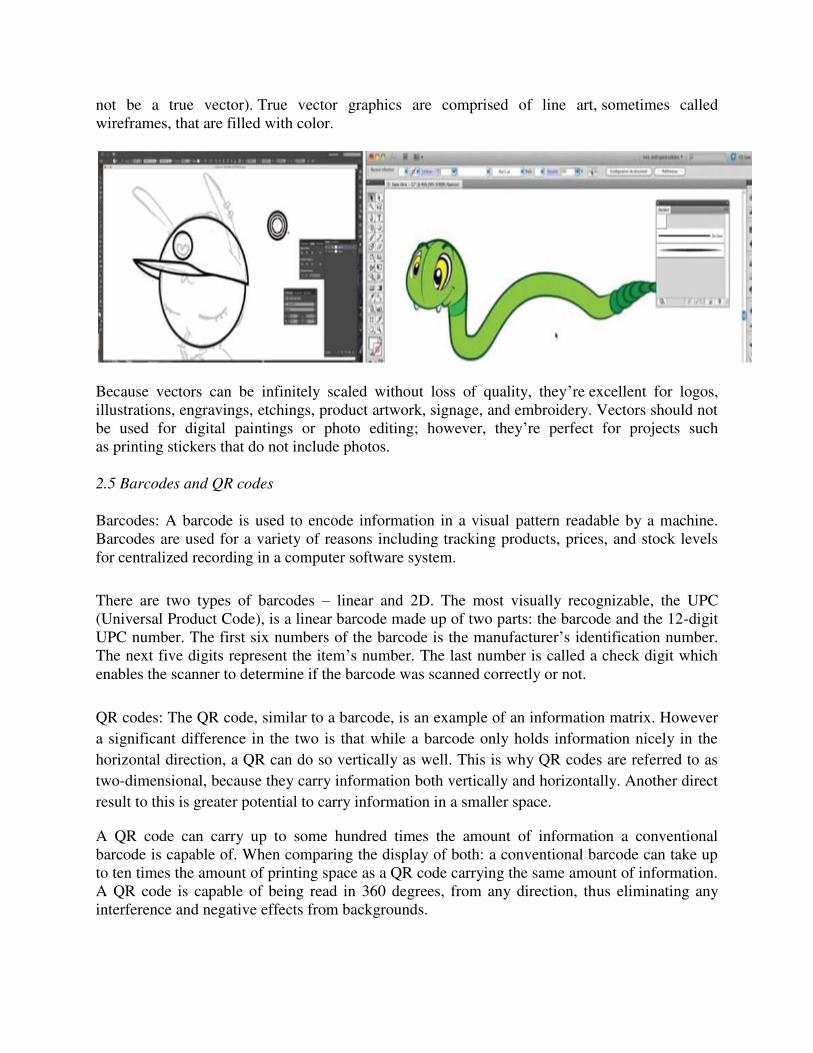
Since mathematical formulas dictate how the image is rendered, vector images retain their
appearance regardless of size. They can be scaled infinitely. Vector images can be created and
edited in programs such as Illustrator, CorelDraw, and InkScape (don’t worry, these visual
editors do the math for you).
Though vectors can be used to imitate photographs, they’re best-suited for designs that use
simple, solid colors. Vector images are comprised of shapes, and each shape has its own color;
thus, vectors cannot achieve the color gradients, shadows, and shading that raster images can (it
is possible to mimic them, but it requires rasterizing part of the image – which means it would
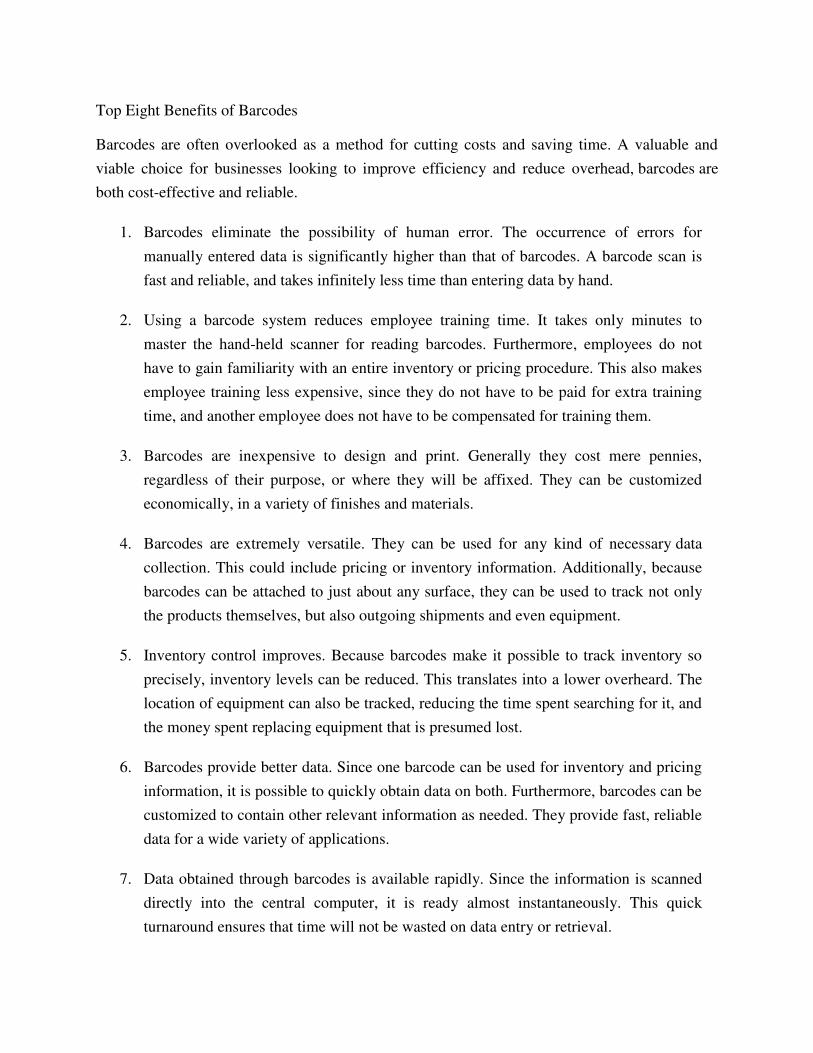
not be a true vector). True vector graphics are comprised of line art, sometimes called
wireframes, that are filled with color.
Because vectors can be infinitely scaled without loss of quality, they’re excellent for logos,
illustrations, engravings, etchings, product artwork, signage, and embroidery. Vectors should not
be used for digital paintings or photo editing; however, they’re perfect for projects such
as printing stickers that do not include photos.
2.5 Barcodes and QR codes
Barcodes: A barcode is used to encode information in a visual pattern readable by a machine.
Barcodes are used for a variety of reasons including tracking products, prices, and stock levels
for centralized recording in a computer software system.
There are two types of barcodes – linear and 2D. The most visually recognizable, the UPC
(Universal Product Code), is a linear barcode made up of two parts: the barcode and the 12-digit
UPC number. The first six numbers of the barcode is the manufacturer’s identification number.
The next five digits represent the item’s number. The last number is called a check digit which
enables the scanner to determine if the barcode was scanned correctly or not.
QR codes: The QR code, similar to a barcode, is an example of an information matrix. However
a significant difference in the two is that while a barcode only holds information nicely in the
horizontal direction, a QR can do so vertically as well. This is why QR codes are referred to as
two-dimensional, because they carry information both vertically and horizontally. Another direct
result to this is greater potential to carry information in a smaller space.
A QR code can carry up to some hundred times the amount of information a conventional
barcode is capable of. When comparing the display of both: a conventional barcode can take up
to ten times the amount of printing space as a QR code carrying the same amount of information.
A QR code is capable of being read in 360 degrees, from any direction, thus eliminating any
interference and negative effects from backgrounds.
Top Eight Benefits of Barcodes
Barcodes are often overlooked as a method for cutting costs and saving time. A valuable and
viable choice for businesses looking to improve efficiency and reduce overhead, barcodes are
both cost-effective and reliable.
1. Barcodes eliminate the possibility of human error. The occurrence of errors for
manually entered data is significantly higher than that of barcodes. A barcode scan is
fast and reliable, and takes infinitely less time than entering data by hand.
2. Using a barcode system reduces employee training time. It takes only minutes to
master the hand-held scanner for reading barcodes. Furthermore, employees do not
have to gain familiarity with an entire inventory or pricing procedure. This also makes
employee training less expensive, since they do not have to be paid for extra training
time, and another employee does not have to be compensated for training them.
3. Barcodes are inexpensive to design and print. Generally they cost mere pennies,
regardless of their purpose, or where they will be affixed. They can be customized
economically, in a variety of finishes and materials.
4. Barcodes are extremely versatile. They can be used for any kind of necessary data
collection. This could include pricing or inventory information. Additionally, because
barcodes can be attached to just about any surface, they can be used to track not only
the products themselves, but also outgoing shipments and even equipment.
5. Inventory control improves. Because barcodes make it possible to track inventory so
precisely, inventory levels can be reduced. This translates into a lower overheard. The
location of equipment can also be tracked, reducing the time spent searching for it, and
the money spent replacing equipment that is presumed lost.
6. Barcodes provide better data. Since one barcode can be used for inventory and pricing
information, it is possible to quickly obtain data on both. Furthermore, barcodes can be
customized to contain other relevant information as needed. They provide fast, reliable
data for a wide variety of applications.
7. Data obtained through barcodes is available rapidly. Since the information is scanned
directly into the central computer, it is ready almost instantaneously. This quick
turnaround ensures that time will not be wasted on data entry or retrieval.
8. Barcodes promote better decision making. Because data is obtained rapidly and
accurately, it is possible to make more informed decisions. Better decision making
ultimately saves both time and money.
Both inexpensive and user-friendly, barcodes provide an indispensable tool for tracking a variety
of data, from pricing to inventory. The ultimate result of a comprehensive barcoding system is
reduction in overhead.
2.6 Text encoding
A character encoding tells the computer how to interpret raw zeroes and ones into real
characters. It usually does this by pairing numbers with characters. Words and sentences in text
are created from characters and these characters are grouped into a character set. There are many
different types of character encodings floating around at present, but the ones we deal most
frequently with are ASCII, 8-bit encodings, and Unicode-based encodings.
ASCII
American Standard Code for Information Interchange (ASCII) is a character-encoding scheme
and it was the first character encoding standard. It is a code for representing English characters
as numbers, with each letter assigned a number from 0 to 127. Most modern character-encoding
schemes are based on ASCII, though they support many additional characters. It is a single byte
encoding only using the bottom 7 bits. In an ASCII file, each alphabetic, numeric, or special
character is represented with a 7-bit binary number
ANSI (American National Standards Institute) codes are standardized numeric or alphabetic
codes issued by the American National Standards Institute to ensure uniform identification of
geographic entities through all federal government agencies. It has served as coordinator of the
U.S. private sector, voluntary standardization system for more than 90 years. This is essentially
an extension of the ASCII character set in that it includes all the ASCII characters with an
additional 128 character codes. ASCII just defines a 7 bit code page with 128 symbols. ANSI
extends this to 8 bit and there are several different code pages for the symbols 128 to 255.
Unicode
Unicode is a standard which defines the internal text coding system in almost all operating
systems used in computers at present, whether it is Windows, Unix, Macintosh, Linux or
whatever, because Unicode can handle characters for almost all modern languages and even
some ancient languages at the same time, as long as the client has fonts for the particular
language installed in his system.
UTF
Unicode assigns each character a unique number, or code point. It defines two mapping methods,
the UTF (Unicode Transformation Format) encodings, and the UCS (Universal Character Set)
encodings. Unicode-based encodings implement the Unicode standard and include UTF-8, UTF-
16 and UTF-32/UCS-4. They go beyond 8-bits and support almost every language in the world.
UTF-8 is gaining traction as the dominant international encoding of the web. UTF-8, UTF-16
and UTF-32 are probably the most commonly used encodings.
UTF-8 - uses 1 byte to represent characters in the ASCII set, two bytes for characters in several
more alphabetic blocks, and three bytes for the rest of the BMP. Supplementary characters use 4
bytes.
UTF-16 - uses 2 bytes for any character in the BMP, and 4 bytes for supplementary characters.
UTF-32 - uses 4 bytes for all characters.
2.7 Audio encoding
Audio encoding is just simply translating audio signals to digital. By nature, audio is analog
signal. Your voice is analog, any sound you hear is analog. Now for this signal to be able to
transmitted over the internet or any digital medium, it should of course be converted to digital
signal. Analog signals are in the form of waveforms, whereas digital signals are in binary form,
with bits of 0s and 1s. To be able to be interpreted by the computer, an analog signal should be
converted to a digital signal. Various formats of digital audio are MP3, WAV, OGG, etc. Now
what the audio encoder does is it simply converts your analog audio signal to digital audio
signal. On the technical side, audio encoding involves sampling of the analog signal per given
time (around a few milliseconds ideally), holding the sampled value, comparing it to a certain
threshold voltage. The sampled voltages are then converted to binary values. To make it simple,
just imagine you have a handwritten text on a paper. Then you encode it on a computer, then you
become the encoder. In the case of audio, a device, listens to the audio, and converts it to a
format readable by your computer. Audio encoding is the process of converting your audio
signal into a format readable by your computer, which is then can be transmitted through a
digital transmission medium.
VERY SHORT QUESTIONS
Name types of images.
Name steps in planning and process of multimedia.
What is QR codes?
What are barcodes?
SHORT QUESTIONS
What is lossy compression?
What is lossless compression?
What are barcodes and qrcodes?
What are the benfits of barcodes?

LONG QUESTIONS
What is data compression? Explain.
What is text and audio encoding?
Explain types of images?
UNIT 3 Photoshop
3.1 Learning objectives
To know about photoshop features.
To elaborate image selection tools.
To discuss image editing tools.
Working with layers and channels.
Elaborate filters in photoshop.
3.2 What is photoshop?
Adobe Photoshop is a raster graphics editor developed and published by Adobe
Inc. for Windows and macOS. It was originally created in 1988 by Thomas and John Knoll.
Since then, this software has become the industry standard not only in raster graphics editing, but
in digital art as a whole.
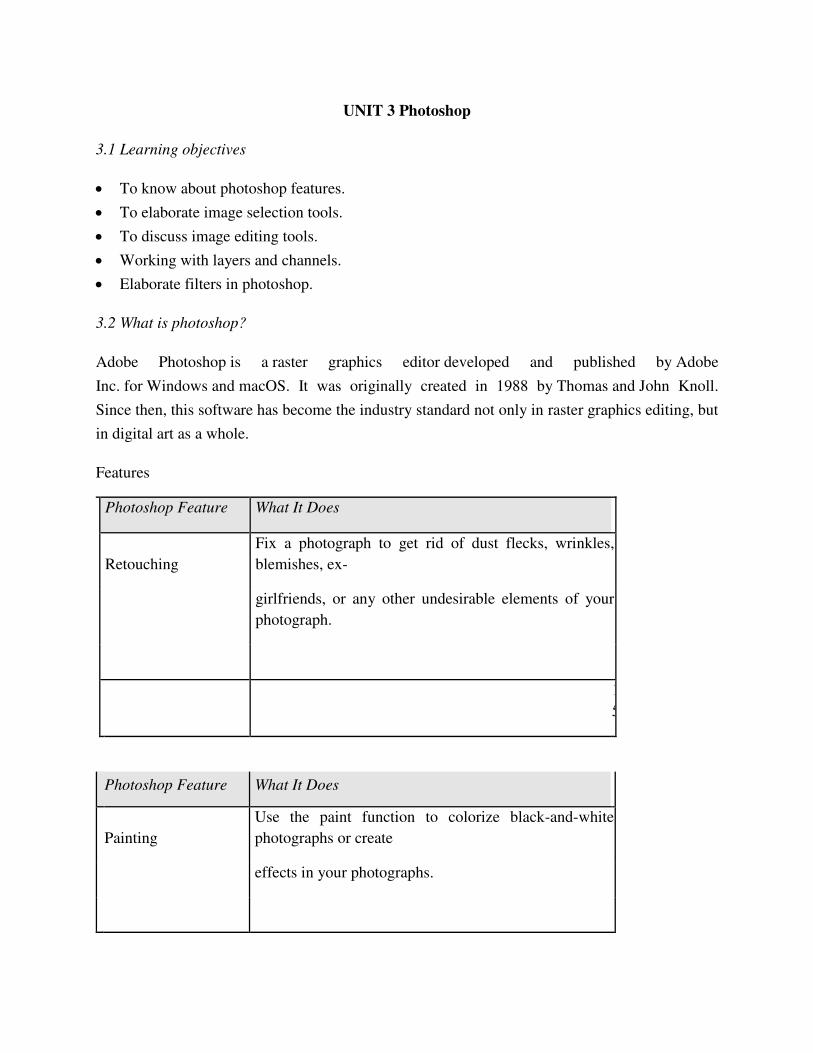
Features
Photoshop Feature What It Does
Retouching
Fix a photograph to get rid of dust flecks, wrinkles,
blemishes, ex-
girlfriends, or any other undesirable elements of your
photograph.
1
5
Photoshop Feature What It Does
Painting
Use the paint function to colorize black-and-white
photographs or create
effects in your photographs.
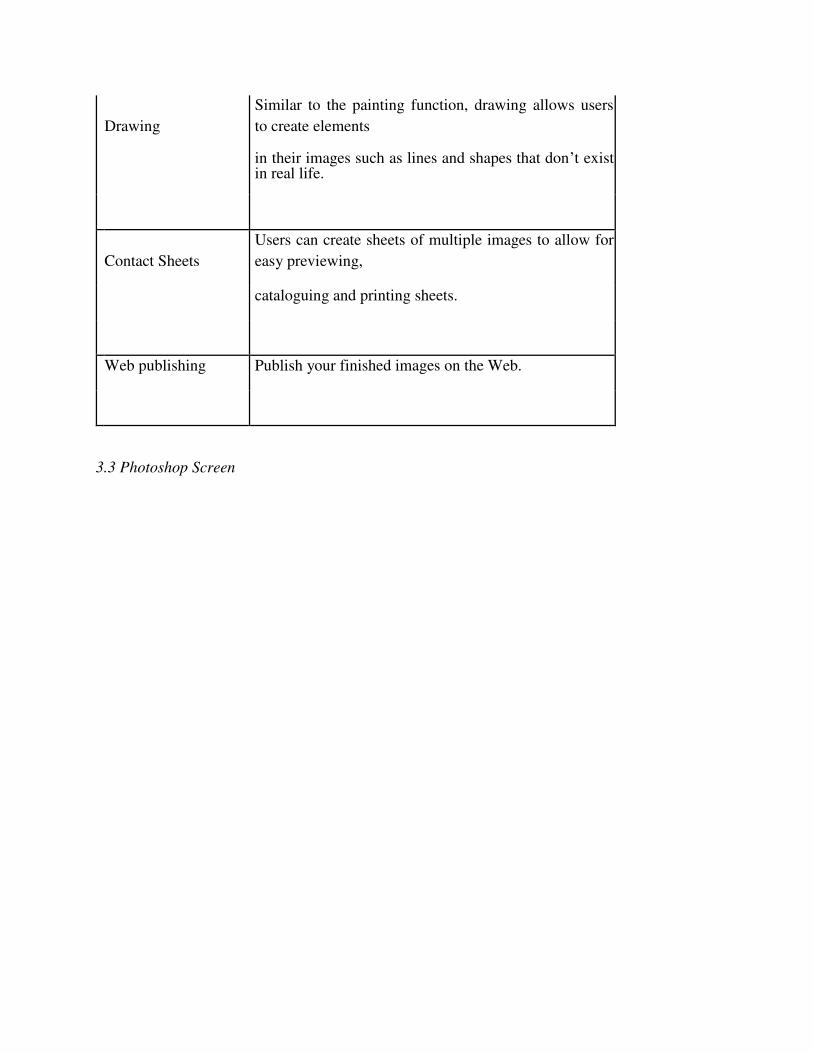
Drawing
Similar to the painting function, drawing allows users
to create elements
in their images such as lines and shapes that don’t exist in real life.
Contact Sheets
Users can create sheets of multiple images to allow for
easy previewing,
cataloguing and printing sheets.
Web publishing Publish your finished images on the Web.
3.3 Photoshop Screen
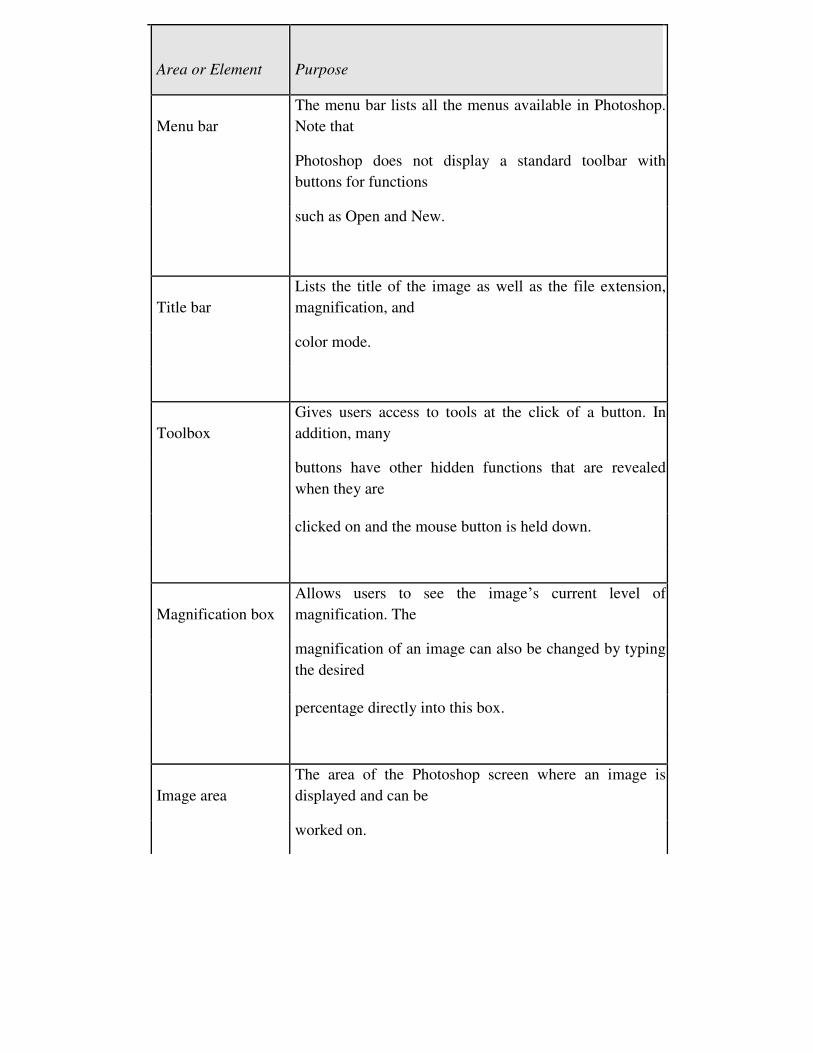
Area or Element Purpose
Menu bar
The menu bar lists all the menus available in Photoshop.
Note that
Photoshop does not display a standard toolbar with
buttons for functions
such as Open and New.
Title bar
Lists the title of the image as well as the file extension,
magnification, and
color mode.
Toolbox
Gives users access to tools at the click of a button. In
addition, many
buttons have other hidden functions that are revealed
when they are
clicked on and the mouse button is held down.
Magnification box
Allows users to see the image’s current level of
magnification. The
magnification of an image can also be changed by typing
the desired
percentage directly into this box.
Image area
The area of the Photoshop screen where an image is
displayed and can be
worked on.
Area or Element Purpose
Palettes
Palettes contain a variety of functions and can be opened
or closed at will,
depending on whether you need a certain palette’s tool
set. There are
many different palettes in Photoshop and most palettes contain more than
one tab.
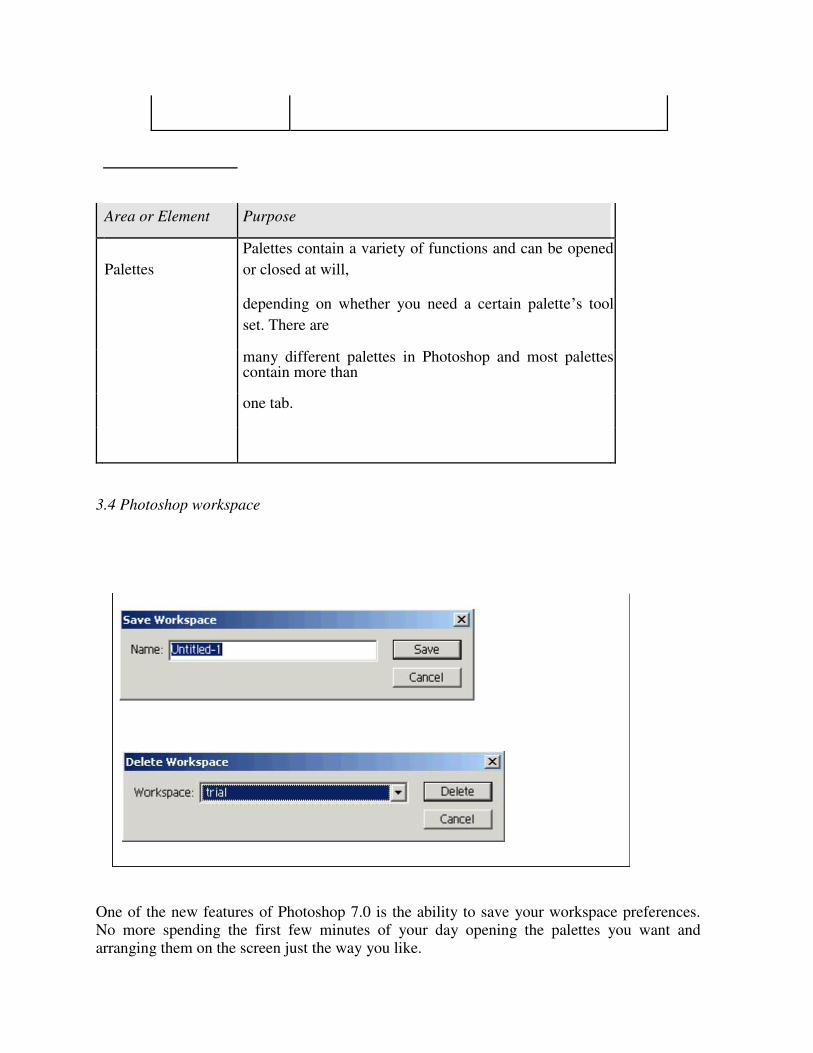
3.4 Photoshop workspace
One of the new features of Photoshop 7.0 is the ability to save your workspace preferences. No more spending the first few minutes of your day opening the palettes you want and arranging them on the screen just the way you like.
1. Open the Layers, Channels, History, and Brushes palettes. Arrange them in any order on the screen.
Now let’s make sure that Photoshop remembers how we want our workspace arranged.
2. Click Window Workspace Save Workspace.
Now give your workspace a name. You can create individual workspaces for individual projects. Your saved workspaces will be available by clicking Window Workspace. The name you gave your workspace will be listed at the bottom of the Workspace menu.
3. Type My Workspace in the Save Workspace dialog box and click Save.
You can delete saved workspaces once you’re done with them too.
4. Click Window Workspace Delete Workspace.
The Delete Workspace dialog box appears with a dropdown list of workspaces.
5. Choose the My Workspace option and click Delete.
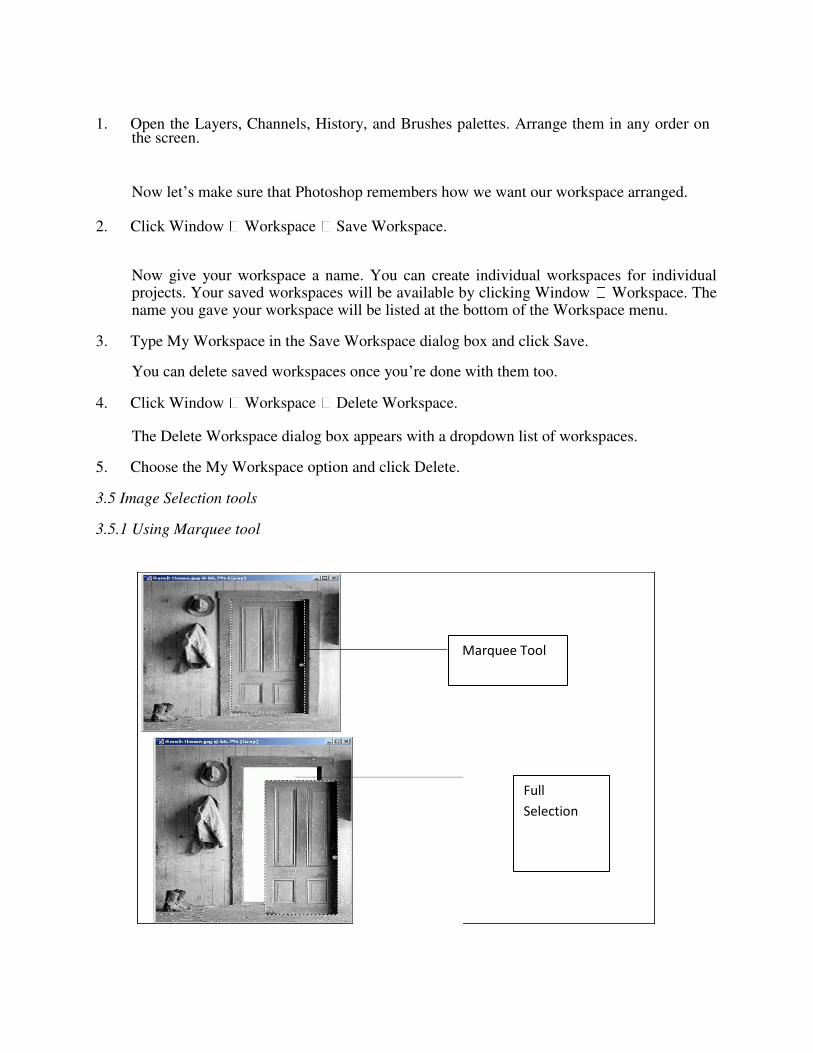
3.5 Image Selection tools
3.5.1 Using Marquee tool
Marquee Tool
Full
Selection
You can use any of the four marquee tools to select pixels. In this lesson, you will use the Rectangular Marquee tool to select part of an image.
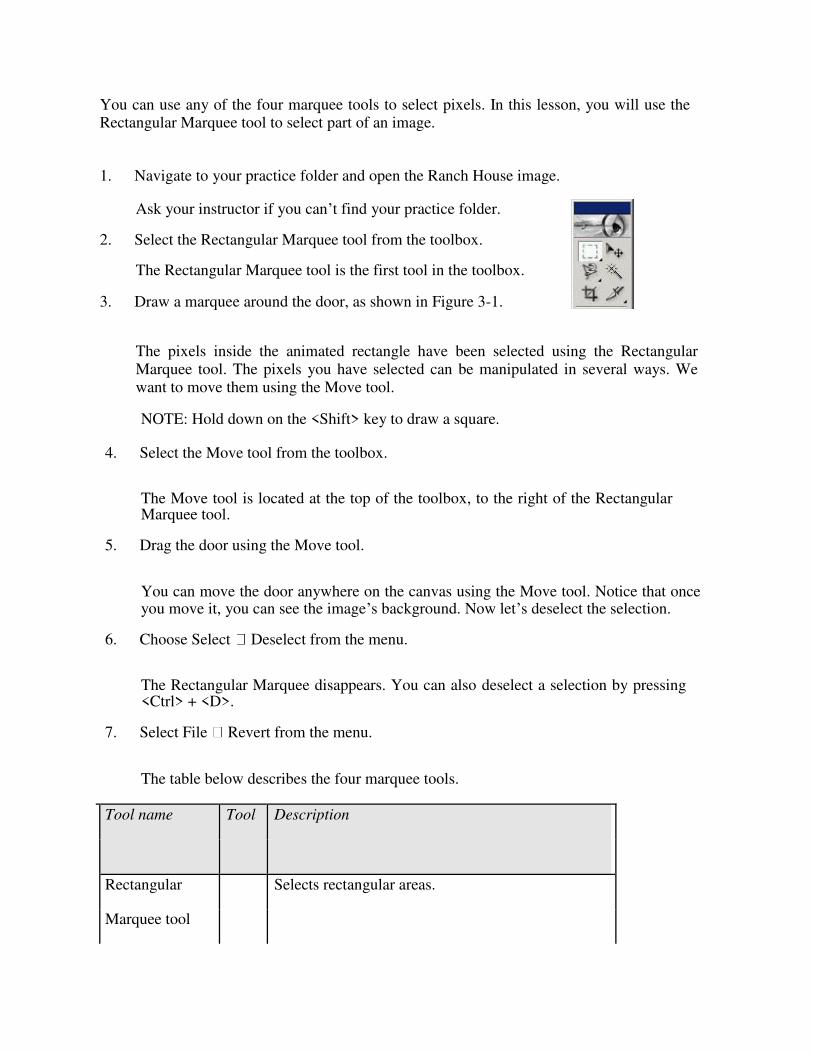
1. Navigate to your practice folder and open the Ranch House image.
Ask your instructor if you can’t find your practice folder.
2. Select the Rectangular Marquee tool from the toolbox.
The Rectangular Marquee tool is the first tool in the toolbox.
3. Draw a marquee around the door, as shown in Figure 3-1.
The pixels inside the animated rectangle have been selected using the Rectangular Marquee tool. The pixels you have selected can be manipulated in several ways. We want to move them using the Move tool.
NOTE: Hold down on the <Shift> key to draw a square.
4. Select the Move tool from the toolbox.
The Move tool is located at the top of the toolbox, to the right of the Rectangular Marquee tool.
5. Drag the door using the Move tool.
You can move the door anywhere on the canvas using the Move tool. Notice that once you move it, you can see the image’s background. Now let’s deselect the selection.
6. Choose Select Deselect from the menu.
The Rectangular Marquee disappears. You can also deselect a selection by pressing <Ctrl> + <D>.
7. Select File Revert from the menu.
The table below describes the four marquee tools.
Tool name Tool Description
Rectangular Selects rectangular areas.
Marquee tool
Elliptical
Marquee Selects rounded areas, like circles or ovals.
tool
Single Row Selects a single row of pixels.
Marquee tool
Single Column Selects a single column of pixels.
Marquee tool
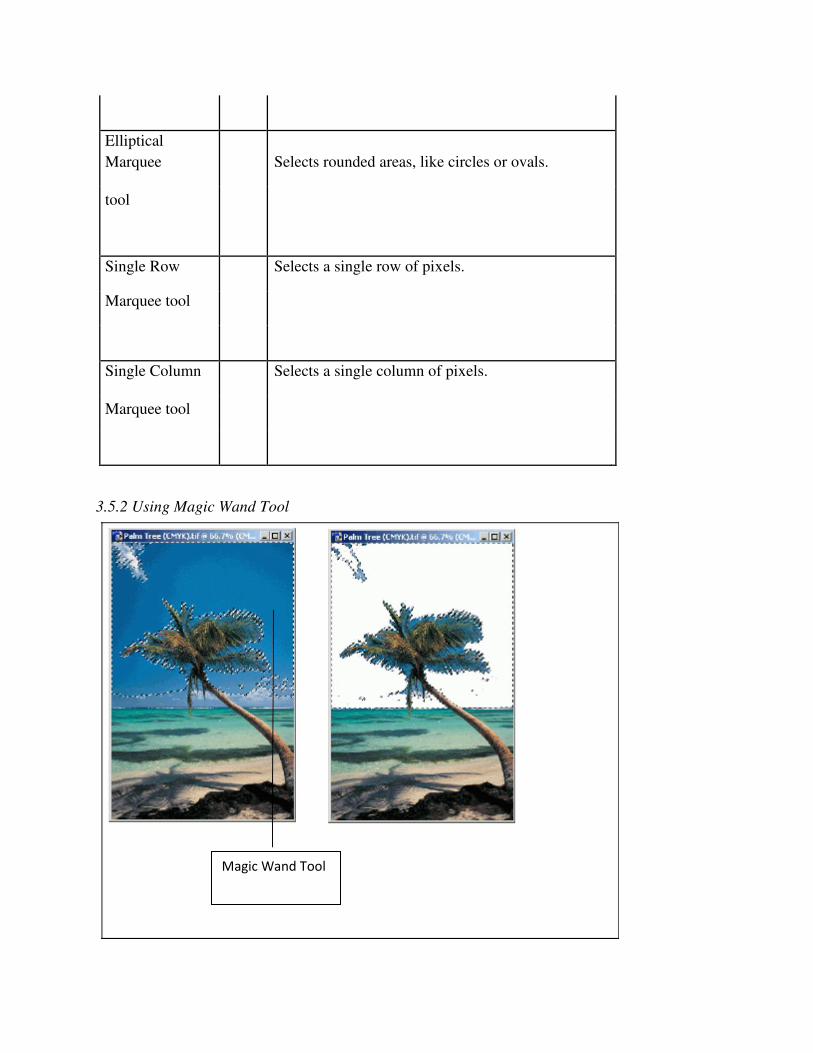
3.5.2 Using Magic Wand Tool
Magic Wand Tool
The Magic Wand tool selects similarly colored pixels in an image. Unlike the marquee tools, the Magic Wand tool does not let you draw a box around an area you want to select. Instead, you must specify a range of colors.
Because the Magic Wand tool looks at color values, it works best with image’s that have large
areas of a single color. An image with a blue sky, for instance, would be a good candidate for the Magic Wand tool.
1. Make sure the Palm Tree image is open.
Ask your instructor if you can’t find your Palm Tree image.
2. Select the Magic Wand tool from the toolbox.
The Magic Wand is located on the right side of the toolbox, second tool from the top.
3. Enter 50 in the Tolerance field box, located in the options bar.
The tolerance you enter can be anywhere from 0 to 255. As you raise the tolerance, the Magic Wand tool selects a wider range of colors.
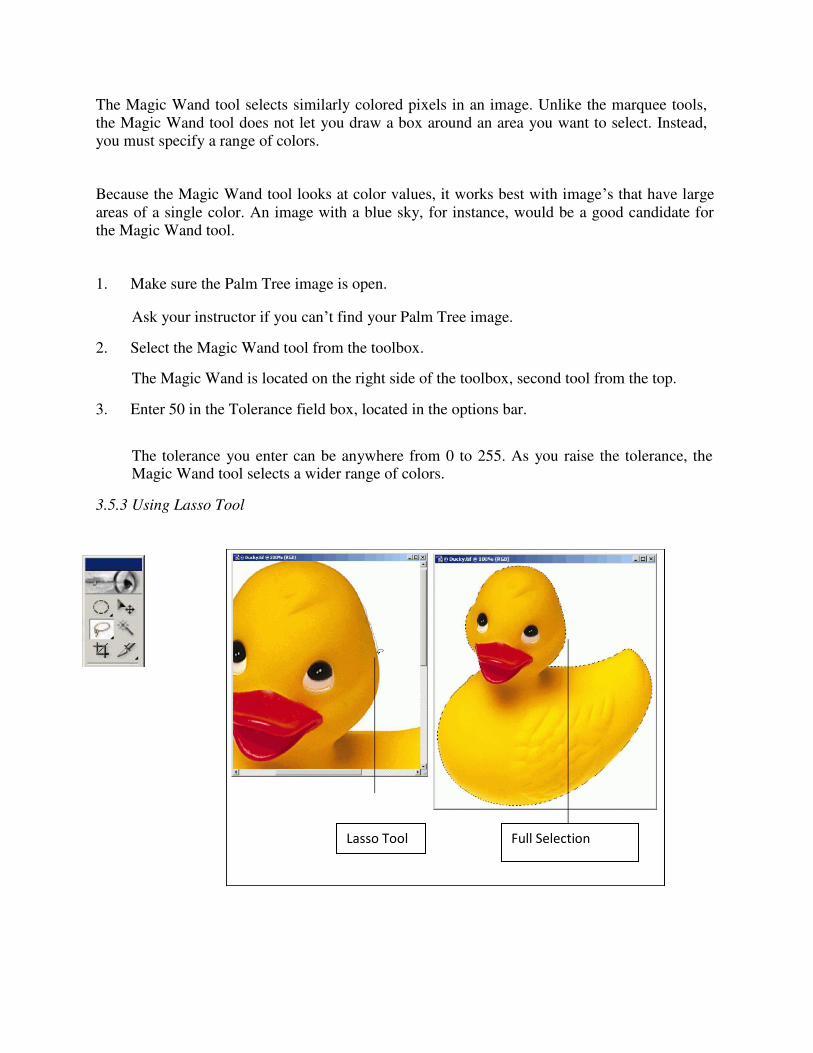
3.5.3 Using Lasso Tool
Lasso Tool Full Selection
The marquee tools are great for selecting rectangles and ovals. But what if you want to select a less geometrically friendly area?
The Lasso tool allows you to select irregularly shaped areas within an image. Using the Lasso tool is a bit like tracing an object with a pen—it requires lots of patience and a steady hand. The
two other lasso tools—each covered in separate lessons—make the process of tracing around a
selection easier.
1. Make sure the Ducky image is open.
Ask your instructor if you can’t find the Ducky image.
2. Select the Lasso tool from the toolbox.
The Lasso tool is located on the left side of the toolbox, second tool from the top.
3. Use the Lasso tool to trace an outline around the duck.
When you use the Lasso tool, you are drawing a freehand selection. Drawing freehand can
be tough—no matter how slowly you trace, you might always feel like your selection is
imprecise. You might find it helpful to zoom in to get a better view of the area you’re
tracing. If you mess up, your best bet is to deselect the entire selection by pressing <Ctrl>
+ <D> and then start over. Continue tracing around the duck until you reach your starting
point.
When you reach the starting point, release the mouse.
You just complete the selection. You could perform any operation you would normally perform on a selection. You can also add to or subtract from the selection using any of the selection tools.
NOTE: If you do not trace back to the starting point, Photoshop will draw a straight line from the last point you traced back to the starting point.
Press <Delete> to erase the selection.
If you did a good job tracing the selection, you shouldn’t see any parts of the duck after you press the delete key.
Select File Revert from the menu.
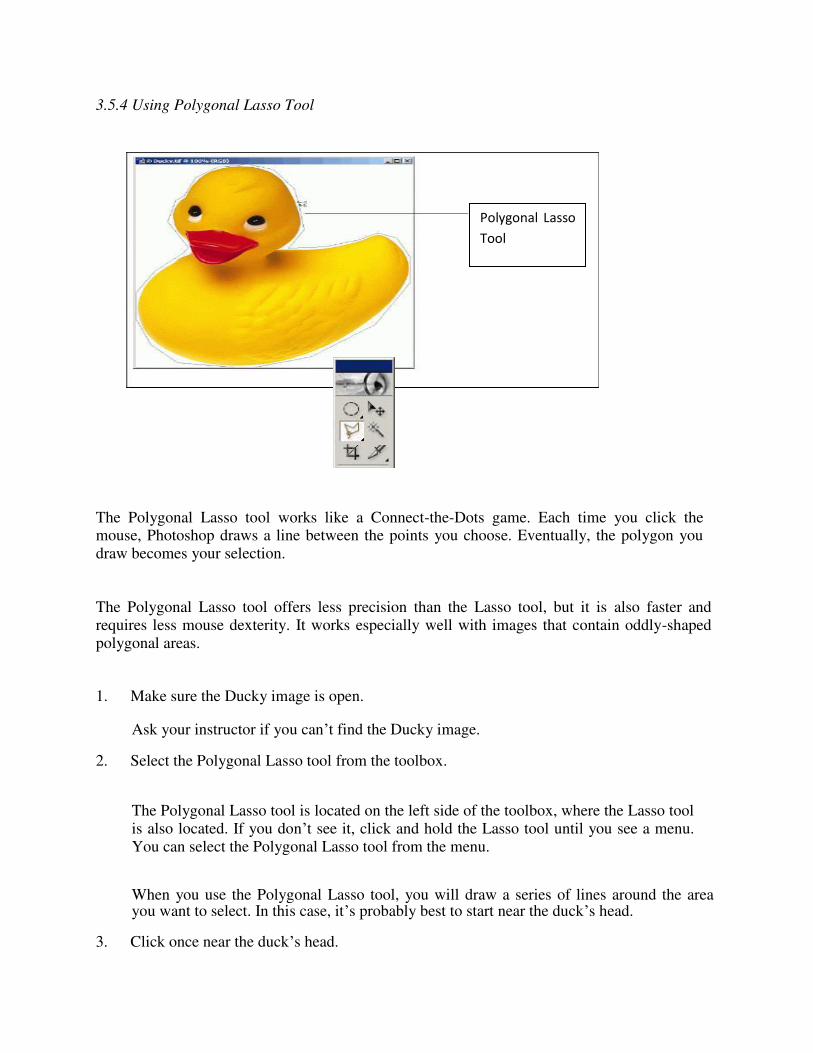
3.5.4 Using Polygonal Lasso Tool
The Polygonal Lasso tool works like a Connect-the-Dots game. Each time you click the mouse, Photoshop draws a line between the points you choose. Eventually, the polygon you draw becomes your selection.
The Polygonal Lasso tool offers less precision than the Lasso tool, but it is also faster and requires less mouse dexterity. It works especially well with images that contain oddly-shaped polygonal areas.
1. Make sure the Ducky image is open.
Ask your instructor if you can’t find the Ducky image.
2. Select the Polygonal Lasso tool from the toolbox.
The Polygonal Lasso tool is located on the left side of the toolbox, where the Lasso tool is also located. If you don’t see it, click and hold the Lasso tool until you see a menu. You can select the Polygonal Lasso tool from the menu.
When you use the Polygonal Lasso tool, you will draw a series of lines around the area you want to select. In this case, it’s probably best to start near the duck’s head.
3. Click once near the duck’s head.
Polygonal Lasso
Tool
Make sure you don’t click on the duck itself, since we want to trace around the duck.
Now you need to choose a point near your original point and click there.
Click a point near the starting point.
Photoshop draws a line connecting the two points where you just clicked. You have begun making your selection. Continue this process until you have traced around the entire duck.
Continue clicking around the duck until you reach the starting point.
As you trace around the duck, notice that the more points you click, the more detailed your selection becomes. If you mess up, your best bet is to deselect the entire selection by pressing <Ctrl> + <D> and then start over.
When have reached the starting point, click once.
Photoshop completes the selection.
Select File Revert from the menu.
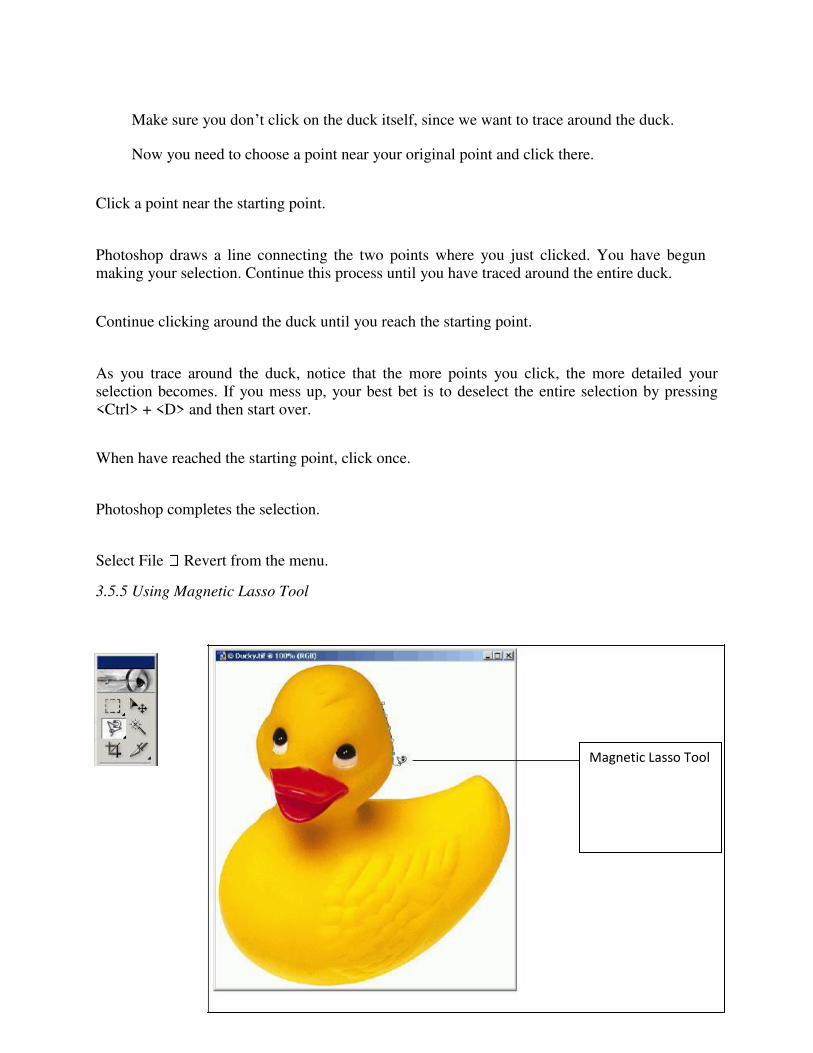
3.5.5 Using Magnetic Lasso Tool
Magnetic Lasso Tool
The Magnetic Lasso tool is the smartest of the lasso tools. It works by identifying areas with well-defined edges and then tracing a selection. You can calibrate the Magnetic Lasso tool using the options bar.
1. Make sure the Ducky image is open.
Ask your instructor if you can’t find the Ducky image.
2. Select the Magnetic Lasso tool from the toolbox.
The Magnetic Lasso tool is located on the left side of the toolbox, where the Lasso tool is also located. If you don’t see it, click and hold the Lasso tool until you see a menu. You
can select the Magnetic Lasso tool from the menu.
The Magnetic Lasso tool works by tracing edges, which are areas with high contrast.
Assuming your image has areas of high contrast, all you have to do is offer a little
guidance; Photoshop does most of the work for you. As you trace, tiny boxes called
anchor points appear along the selection. You can add your own anchor points by clicking
the mouse. You can also adjust the precision of the Magnetic Lasso tool using the options
bar.
Width: The number of nearby pixels the lasso analyses when it traces a selection.
Edge Contrast: The amount of contrast that must be present before the lasso will trace an edge.
Frequency: The frequency of the anchor points.
3. Click once near the duck’s head.
4. Now all you have to do is guide the mouse around the duck.
5. Trace an outline around the duck until you reach the starting point.
6. You can click the mouse a few times along the way in order to create additional anchor points. You will find this option is especially useful as you trace around the duck’s neck.
When have reached the starting point, click once.
Photoshop completes the selection.
7. Select File Revert from the menu.
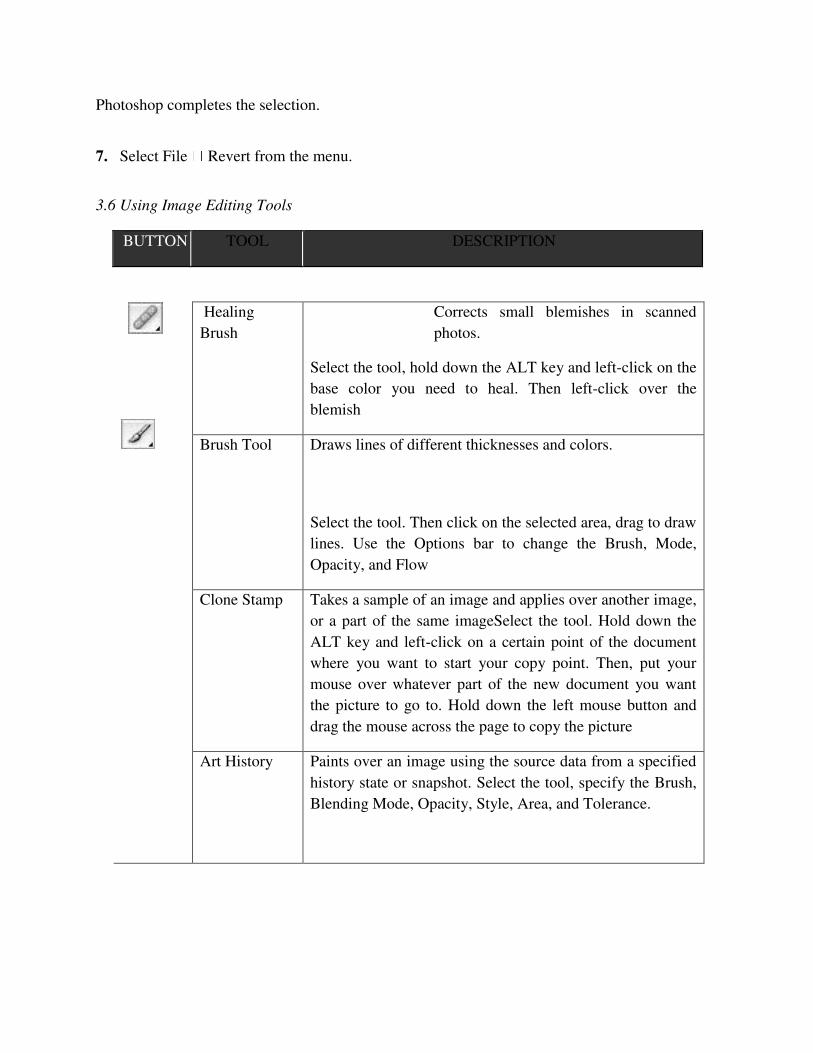
3.6 Using Image Editing Tools
BUTTON TOOL DESCRIPTION
Healing
Brush
Corrects small blemishes in scanned
photos.
Select the tool, hold down the ALT key and left-click on the
base color you need to heal. Then left-click over the
blemish
Brush Tool Draws lines of different thicknesses and colors.
Select the tool. Then click on the selected area, drag to draw
lines. Use the Options bar to change the Brush, Mode,
Opacity, and Flow
Clone Stamp Takes a sample of an image and applies over another image,
or a part of the same imageSelect the tool. Hold down the
ALT key and left-click on a certain point of the document
where you want to start your copy point. Then, put your
mouse over whatever part of the new document you want
the picture to go to. Hold down the left mouse button and
drag the mouse across the page to copy the picture
Art History Paints over an image using the source data from a specified
history state or snapshot. Select the tool, specify the Brush,
Blending Mode, Opacity, Style, Area, and Tolerance.
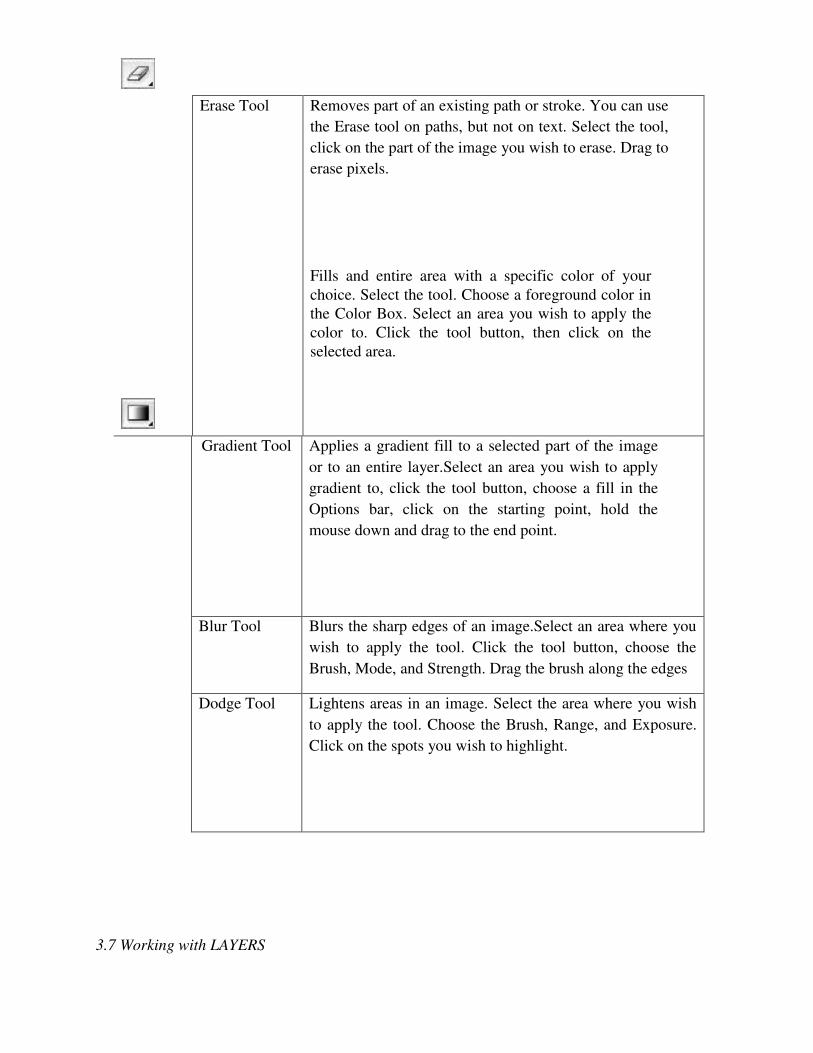
Erase Tool Removes part of an existing path or stroke. You can use
the Erase tool on paths, but not on text. Select the tool,
click on the part of the image you wish to erase. Drag to
erase pixels.
Fills and entire area with a specific color of your
choice. Select the tool. Choose a foreground color in
the Color Box. Select an area you wish to apply the
color to. Click the tool button, then click on the
selected area.
Gradient Tool Applies a gradient fill to a selected part of the image
or to an entire layer.Select an area you wish to apply
gradient to, click the tool button, choose a fill in the
Options bar, click on the starting point, hold the
mouse down and drag to the end point.
Blur Tool Blurs the sharp edges of an image.Select an area where you
wish to apply the tool. Click the tool button, choose the
Brush, Mode, and Strength. Drag the brush along the edges
Dodge Tool Lightens areas in an image. Select the area where you wish
to apply the tool. Choose the Brush, Range, and Exposure.
Click on the spots you wish to highlight.
3.7 Working with LAYERS
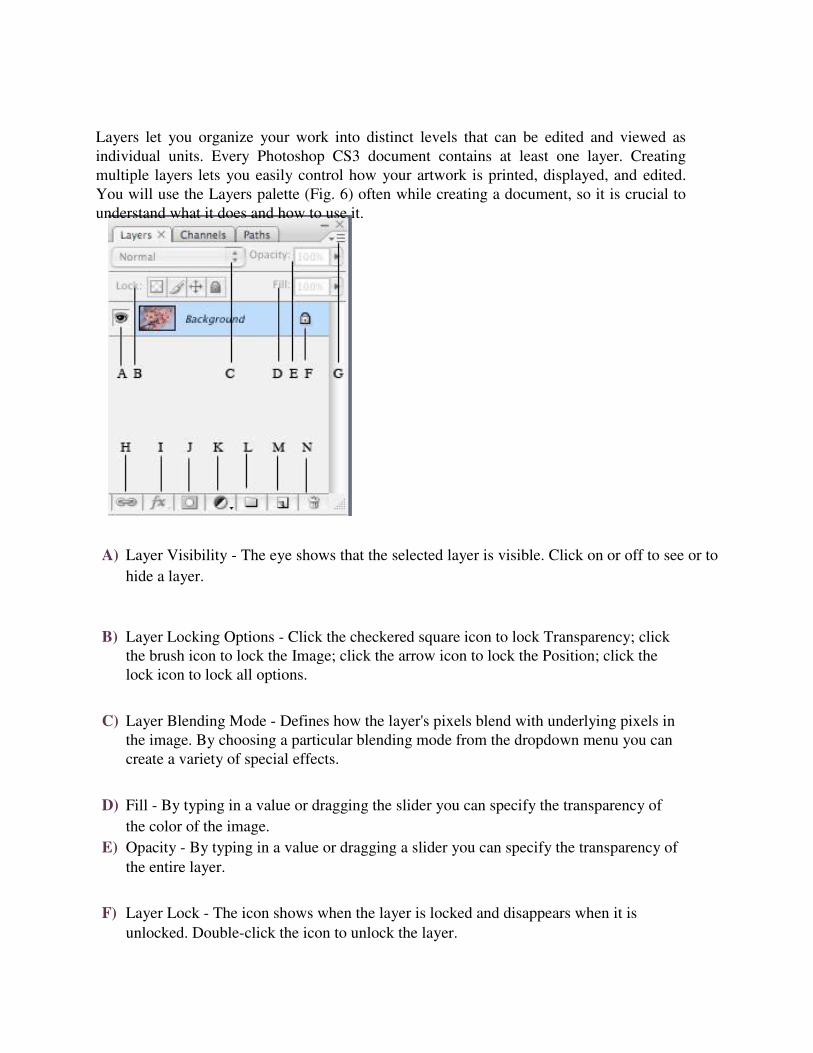
Layers let you organize your work into distinct levels that can be edited and viewed as
individual units. Every Photoshop CS3 document contains at least one layer. Creating
multiple layers lets you easily control how your artwork is printed, displayed, and edited.
You will use the Layers palette (Fig. 6) often while creating a document, so it is crucial to
understand what it does and how to use it.
A) Layer Visibility - The eye shows that the selected layer is visible. Click on or off to see or to
hide a layer.
B) Layer Locking Options - Click the checkered square icon to lock Transparency; click
the brush icon to lock the Image; click the arrow icon to lock the Position; click the
lock icon to lock all options.
C) Layer Blending Mode - Defines how the layer's pixels blend with underlying pixels in
the image. By choosing a particular blending mode from the dropdown menu you can
create a variety of special effects.
D) Fill - By typing in a value or dragging the slider you can specify the transparency of
the color of the image.
E) Opacity - By typing in a value or dragging a slider you can specify the transparency of
the entire layer.
F) Layer Lock - The icon shows when the layer is locked and disappears when it is
unlocked. Double-click the icon to unlock the layer.

G) Layer Options Menu - Click the black triangle to see the following options: New Layer,
Duplicate Layer, Delete Layer, Layer Properties, etc. Some of the options are presented
as icons at the bottom of the Layers palette.
H) Link Layers – Can be used to link layers together.
I) Layer Styles - If a layer has a style, an "F" icon shows at the bottom of the Layers
palette. Click the little black triangle to see style options.
J) Layer Mask - A grayscale image, with parts painted in black hidden, parts painted in
white showing, and parts painted in gray shades showing in various levels of
transparency.
K) Layer Set - This option helps to organize images with multiple layers. Click the
icon to create a folder for several layers.
L) Create New Fill or Adjustment Layer - Have the same opacity and blending mode
options as image layers and can be rearranged, deleted, hidden, and duplicated in the
same manner as image layers. Click the icon and select an option to create a new fill or
adjustment layer.
M) Create New Layer - Click this icon to create a new layer.
N) Delete Layer - To delete a layer, select a layer in the Layers palette and drag it to the
trash can icon; or, select a layer and click the icon.
3.8 Working with channels
Channels are grayscale images that store different types of information:
Color information channels are created automatically when you open a new image. The
image’s color mode determines the number of color channels created. For example, an RGB
image has a channel for each color (red, green, and blue) plus a composite channel used for
editing the image.
Alpha channels store selections as grayscale images. You can add alpha channels to create
and store masks, which let you manipulate or protect parts of an image.
Spot color channels specify additional plates for printing with spot color inks. An image can
have up to 56 channels. All new channels have the same dimensions and number of pixels as
the original image.
The file size required for a channel depends on the pixel information in the channel. Certain file
formats, including TIFF and Photoshop formats, compress channel information and can save

space. The size of an uncompressed file, including alpha channels and layers, appears as the
right-most value in the status bar at the bottom of the window when you choose Document Sizes
from the pop-up menu.
3.8.1 Channels panel overview
The Channels panel lists all channels in the image—composite channel first (for RGB, CMYK,
and Lab images). A thumbnail of the channel’s contents appears to the left of the channel name;
the thumbnail is automatically updated as you edit the channel.
3.8.2 Display the Channels panel
Choose Windows > Channels.
3.8.3 Resize or hide channel thumbnails
Choose Panel Options from the Channels panel menu. Click a thumbnail size or click None to
turn off the display of thumbnails.
Viewing thumbnails is a convenient way of tracking channel contents; however, turning off the
display of thumbnails can improve performance.
3.8.4 Show or hide a channel
You can use the Channels panel to view any combination of channels in the document window.
For example, you can view an alpha channel and the composite channel together to see how
changes made in the alpha channel relate to the entire image.
Click in the eye column next to the channel to show or hide that channel. (Click the composite
channel to view all default color channels. The composite channel is displayed whenever all the
color channels are visible.)
3.8.5 Show color channels in color
Individual channels are displayed in grayscale. In RGB, CMYK, or Lab images, you can view
the individual channels in color. (In Lab images, only the a and b channels appear in color.) If
more than one channel is active, the channels always appear in color.
You can change the default to show the individual color channels in color. When a channel is
visible in the image, an eye icon appears to its left in the panel.
Do one of the following:
In Windows, choose Edit > Preferences > Interface.
In Mac OS, choose Photoshop > Preferences > Interface.
Select Show Channels In Color, and click OK.
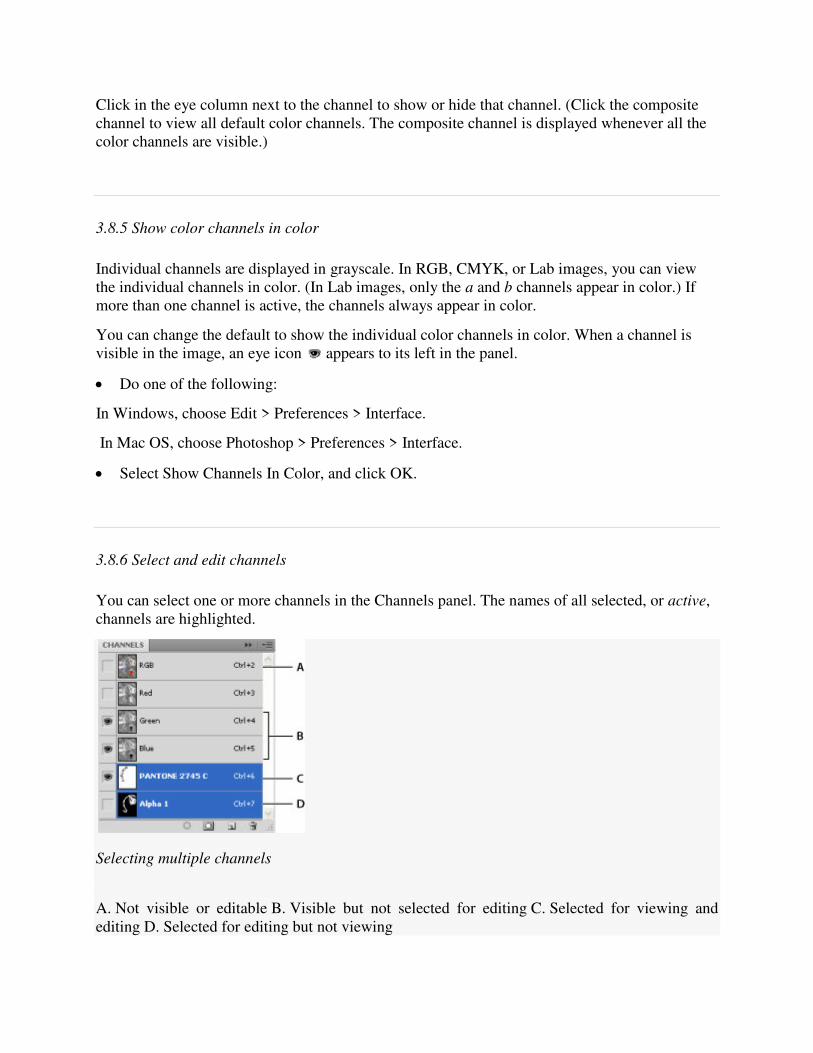
3.8.6 Select and edit channels
You can select one or more channels in the Channels panel. The names of all selected, or active,
channels are highlighted.
Selecting multiple channels
A. Not visible or editable B. Visible but not selected for editing C. Selected for viewing and
editing D. Selected for editing but not viewing
To select a channel, click the channel name. Shift-click to select (or deselect) multiple
channels.
To edit a channel, select it and then use a painting or editing tool to paint in the image. You
can paint on only one channel at a time. Paint with white to add the selected channel’s color
at 100% intensity. Paint with a value of gray to add the channel’s color at a lower intensity.
Paint with black to fully remove the channel’s color.
3.8.7 Rearrange and rename alpha and spot channels
You can move alpha or spot channels above the default color channels only if the image is in
Multichannel mode (Image > Mode > Multichannel). For information about that mode’s
limitations, see Multichannel mode.
To change the order of alpha or spot channels, drag the channel up or down in the Channels
panel. When a line appears in the position you want, release the mouse button.
Note:
Spot colors are overprinted in the order of their appearance from top to bottom in the Channels
panel.
To rename an alpha or spot channel, double-click the channel’s name in the Channels panel,
and enter a new name.
3.8.8 Delete a channel
You may want to delete spot or alpha channels you no longer need before saving an image.
Complex alpha channels can substantially increase the disk space required for an image.
1. In Photoshop, select the channel in the Channels panel and do one of the following:
Alt-click (Windows) or Option-click (Mac OS) the Delete icon .
Drag the channel name in the panel to the Delete icon.
Choose Delete Channel from the Channels panel menu.
Click the Delete icon at the bottom of the panel, and then click Yes.
3.9 Filters in photoshop
Adobe Photoshop is a powerful graphics tool that allows users to create unique images with ease.
Using filters is one of the easiest yet most powerful functions of this dynamic application. Filters
allow users to manipulate images with the click of a mouse.
Artistic Filters
This set of filters includes colored pencil, paint daubs, smudge stick, watercolor, cutout and
underpainting. Using one of these filters will make your image look like it was created by an
artist.
Distort Filters
Another set of filters lets you distort your image in creative ways. The distort filters include
ocean ripple, glass, spherize, twirl, wave and zigzag.
Texture Filters
One of the more popular sets of filters in Photoshop is the texture group. It allows you to
manipulate your image by adding textures to it, including grain, stained glass and patchwork.
Stylize Filters
Another popular set of filters is called the "stylize" group. It allows users to stylize their image
by embossing, diffusing, extruding, solarizing, finding the edges and a few other distinct options.
Sketch Filters
The sketch group of filters makes your image appear to be created by an artist. It includes chalk,
charcoal, graphic pen, plaster, stamp and water paper.
VERY SHORT QUESTIONS
1. What is photshop?
2. Name image selction tools?
3. Name image editing tools?
4. Name the types of marquee tool.
5. What are the types of filters in photoshop?
SHORT QUESTIONS
1. What are the features of photoshop?
2. Discuss about photoshop features.
3. Discus about Lasso tools?
4. What is magic wand tool?
5. Discuss about photoshop workshop.
LONG QUESTIONS
1. what are image editing tools? Explain
2. How channels are used in photoshop?
3. What are filters? Explain its types?
4. What are images selection tools? explain
Unit 4 Multimedia Authoring Tools
4.1 Learning Objectives
To discuss about multimedia authoring tools.
To know about painting tools in macromedia flash
To know about drawing tools in macromedia flash
Discuss working with timeline
Discuss types of animation
Elaborate working with sound in flash
4.2 Multimedia Authoring Tools
There are 3 types of authoring tools and they are as follows:
1. Card and page based tools
2. Icon based- event driven tools
3. Time based tools
Now let us discuss these three authoring tools in details along with their required software, their
corresponding advantages and disadvantages.
Card and page based tools:
This tool provides a simple and easily understandable metaphor for organizing multimedia
elements. It contains media objects such as buttons, text files and graphic objects. It provides
facilities for linking objects to pages (or) cards. The software required is Hyper card and Linked
card tool box.
Advantages:
Easy to understand
Easy to use
Easy to link metaphor1=screen1=card1= page1
It consumes very less time for developing an application.
Disadvantages:
Few applications run only on one platform.
Card and page tools are not powerful as unique stand alone.
Icon based- event driven tools:
Icons (or) object based tools are the simplest event driven authoring object. Its provision of
simple branching has the ability to go to another section of multimedia production. Multimedia
elements and interaction are organized in the flowchart. A flow chart can be build by dragging
appropriate icons from a library and then dropping them in the required field finally adding
multimedia elements to it. The software required is Icon Author and Author ware.
Advantages:
It has a clear structure [appropriately designed flow charts].
Easy to edit and update the elements.
Disadvantages:
Learning process is very difficult.
Very expensive in nature.
Time based tools:
Time based tools are best suited for a message with a beginning and an end so that a message can
be passed within a stipulated time period. Few time based tools facilitate navigation and
interactive control. It has the branching technique so that different loops can be formed for
different multimedia applications and time period can be set for these individual applications.
The software required is Adobe’s Directors.
Advantages:
These tools are good for creating animation.
Branching, user control interactivity.
Disadvantages:
Steep learning curve for advance features.
Music and sound files embedded in Flash movies increases the file size and increases the
download time.
Very expensive.
4.3 Using Painting Tool
4.3.1 Using Brush Tool
The Brush Tool is used to paint with brushlike strokes and to fill enclosed areas. Unlike the
Pencil Tool, which creates a single, solid line, the Brush Tool creates filled shapes with outlines
of zero thickness. (This is easily demonstrated by painting a stroke with the Brush, then choosing
a new color for the Ink Bottle, and then clicking that brushed line with the Ink Bottle. The Brush
line of zero thickness will acquire the line thickness and color from the Ink Bottle if there were
no line, the Ink Bottle would be unable to alter the stroke in this manner.) The fills can be solid
colors, gradients, or fills derived from bitmaps. Additionally, the Brush Tool options permit you
to paint in unusual ways: You can choose to paint in front of or behind an element, or you can
apply paint only within a specific filled area, or within a selection. The Brush Mode option drop-
down reveals five painting modes that are amazingly useful for a wide range of effects when
applying brush strokes: Paint Normal, Paint Fills, Paint Behind, Paint Selection, and Paint Inside,
as shown below.
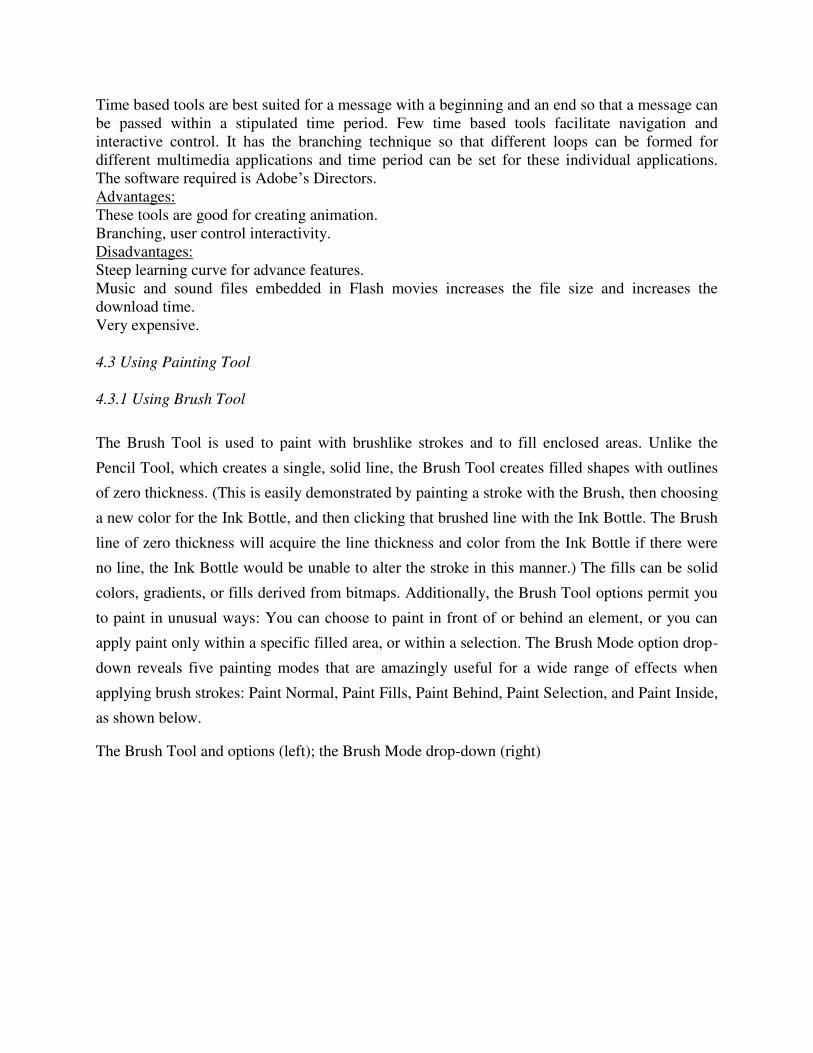
The Brush Tool and options (left); the Brush Mode drop-down (right)
Depending on whether you have a pressure-sensitive tablet connected to your computer, four or
five options appear in the Options Tray when the Brush Tool is active.
The Use Pressure option which only appears if you have a pressure-sensitive tablet attached to
your computer and the Brush Mode are both unique to the Brush Tool. The Lock Fill option is
common to both the Brush Tool and the Paint Bucket. Although similar to Stroke Weight and
Line Style, the Brush Size and Brush Shape drop-downs are also fairly unique to the Brush Tool.
In the following sections, we run through all of the Brush options just to make certain that we’re
clear on all points, even if there is some review.
To choose or change the Brush Color, either click the Fill Color button on the Toolbox, or use
the Fill Panel. Because the Brush Tool creates filled shapes with outlines of zero thickness, the
Stroke Color button is defunct when the Brush Tool is active.
Using the Brush Mode option
The Brush Mode option is a drop-down menu with five modes for applying brush strokes: Paint
Normal, Paint Fills, Paint Behind, Paint Selection, and Paint Inside.
Used in conjunction with selections, the Brush Modes option yields a broad range of
sophisticated paint masking capabilities.The following images depict various ways in which the
Brush Modes interact with drawn and painted elements. The base image is a solid gray rounded
rectangle drawn with a black, hatched outline. Three white lines of various widths are drawn on
top of the gray fill of the rectangle.
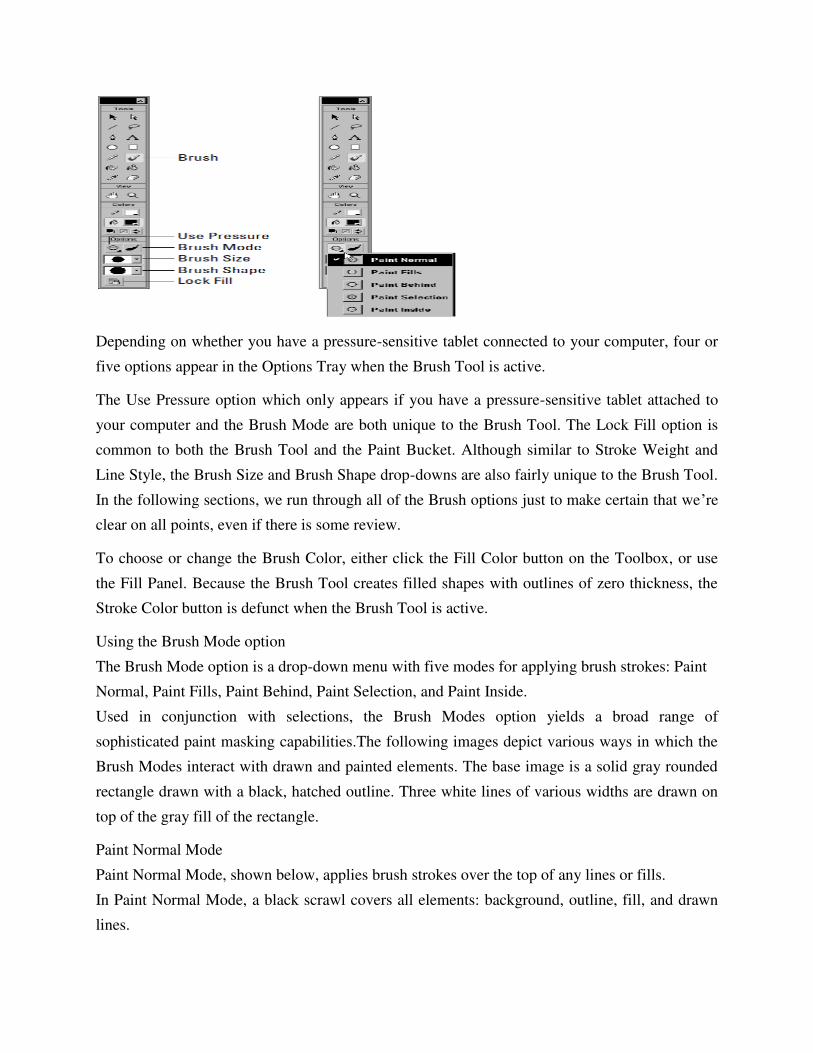
Paint Normal Mode
Paint Normal Mode, shown below, applies brush strokes over the top of any lines or fills.
In Paint Normal Mode, a black scrawl covers all elements: background, outline, fill, and drawn
lines.
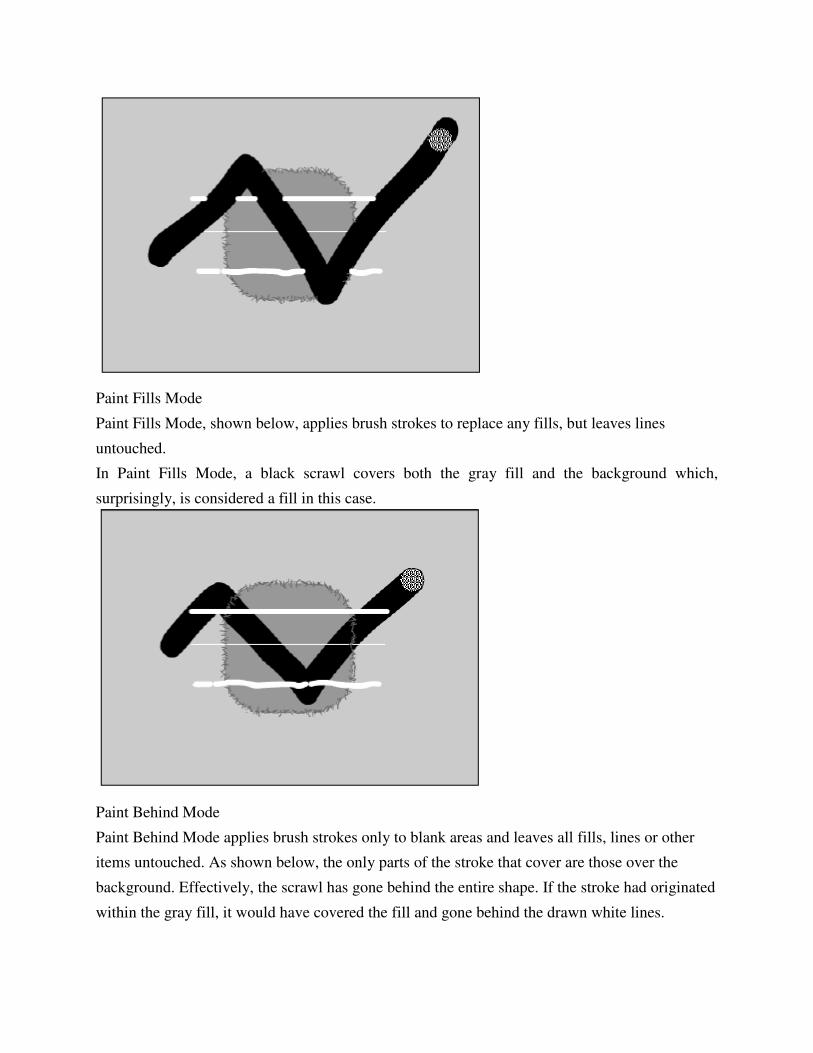
Paint Fills Mode
Paint Fills Mode, shown below, applies brush strokes to replace any fills, but leaves lines
untouched.
In Paint Fills Mode, a black scrawl covers both the gray fill and the background which,
surprisingly, is considered a fill in this case.
Paint Behind Mode
Paint Behind Mode applies brush strokes only to blank areas and leaves all fills, lines or other
items untouched. As shown below, the only parts of the stroke that cover are those over the
background. Effectively, the scrawl has gone behind the entire shape. If the stroke had originated
within the gray fill, it would have covered the fill and gone behind the drawn white lines.
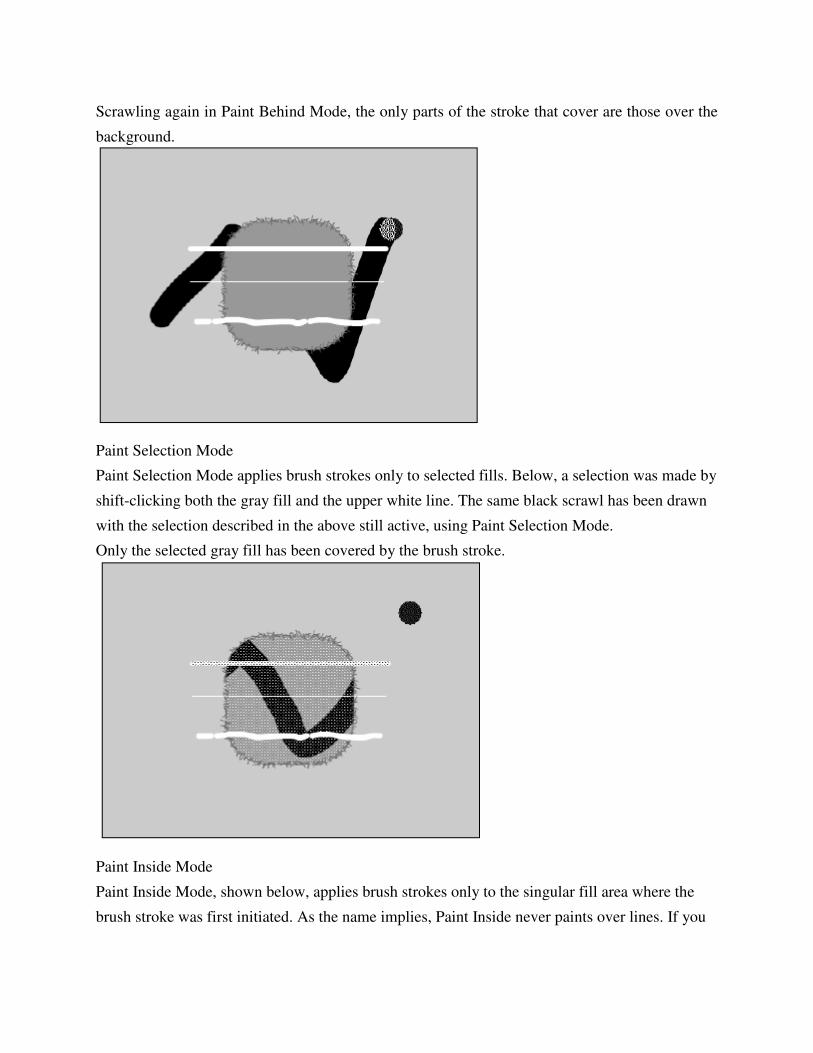
Scrawling again in Paint Behind Mode, the only parts of the stroke that cover are those over the
background.
Paint Selection Mode
Paint Selection Mode applies brush strokes only to selected fills. Below, a selection was made by
shift-clicking both the gray fill and the upper white line. The same black scrawl has been drawn
with the selection described in the above still active, using Paint Selection Mode.
Only the selected gray fill has been covered by the brush stroke.
Paint Inside Mode
Paint Inside Mode, shown below, applies brush strokes only to the singular fill area where the
brush stroke was first initiated. As the name implies, Paint Inside never paints over lines. If you
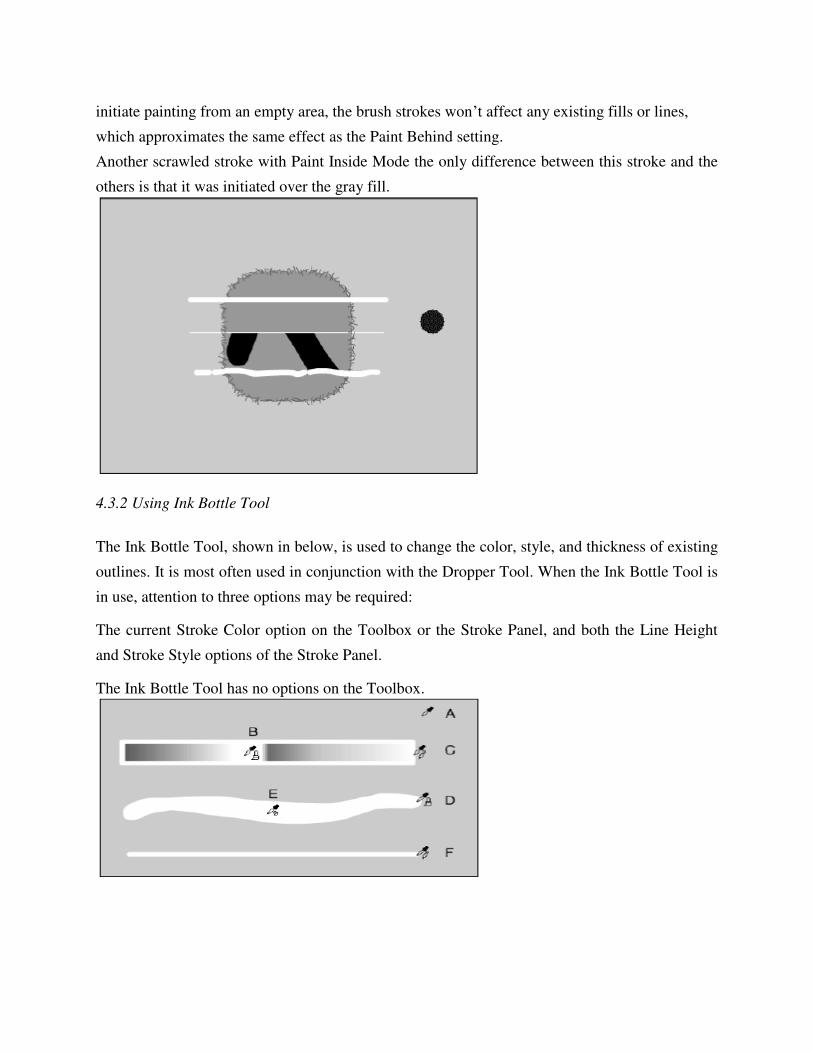
initiate painting from an empty area, the brush strokes won’t affect any existing fills or lines,
which approximates the same effect as the Paint Behind setting.
Another scrawled stroke with Paint Inside Mode the only difference between this stroke and the
others is that it was initiated over the gray fill.
4.3.2 Using Ink Bottle Tool
The Ink Bottle Tool, shown in below, is used to change the color, style, and thickness of existing
outlines. It is most often used in conjunction with the Dropper Tool. When the Ink Bottle Tool is
in use, attention to three options may be required:
The current Stroke Color option on the Toolbox or the Stroke Panel, and both the Line Height
and Stroke Style options of the Stroke Panel.
The Ink Bottle Tool has no options on the Toolbox.
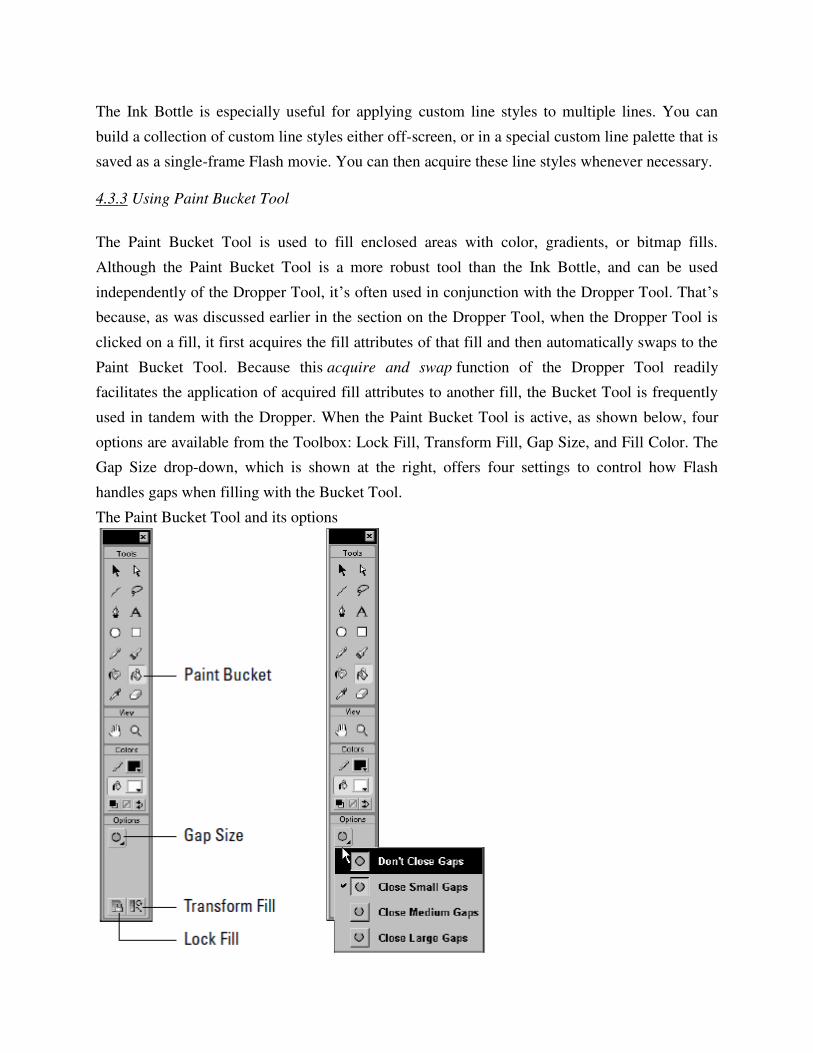
The Ink Bottle is especially useful for applying custom line styles to multiple lines. You can
build a collection of custom line styles either off-screen, or in a special custom line palette that is
saved as a single-frame Flash movie. You can then acquire these line styles whenever necessary.
4.3.3 Using Paint Bucket Tool
The Paint Bucket Tool is used to fill enclosed areas with color, gradients, or bitmap fills.
Although the Paint Bucket Tool is a more robust tool than the Ink Bottle, and can be used
independently of the Dropper Tool, it’s often used in conjunction with the Dropper Tool. That’s
because, as was discussed earlier in the section on the Dropper Tool, when the Dropper Tool is
clicked on a fill, it first acquires the fill attributes of that fill and then automatically swaps to the
Paint Bucket Tool. Because this acquire and swap function of the Dropper Tool readily
facilitates the application of acquired fill attributes to another fill, the Bucket Tool is frequently
used in tandem with the Dropper. When the Paint Bucket Tool is active, as shown below, four
options are available from the Toolbox: Lock Fill, Transform Fill, Gap Size, and Fill Color. The
Gap Size drop-down, which is shown at the right, offers four settings to control how Flash
handles gaps when filling with the Bucket Tool.
The Paint Bucket Tool and its options
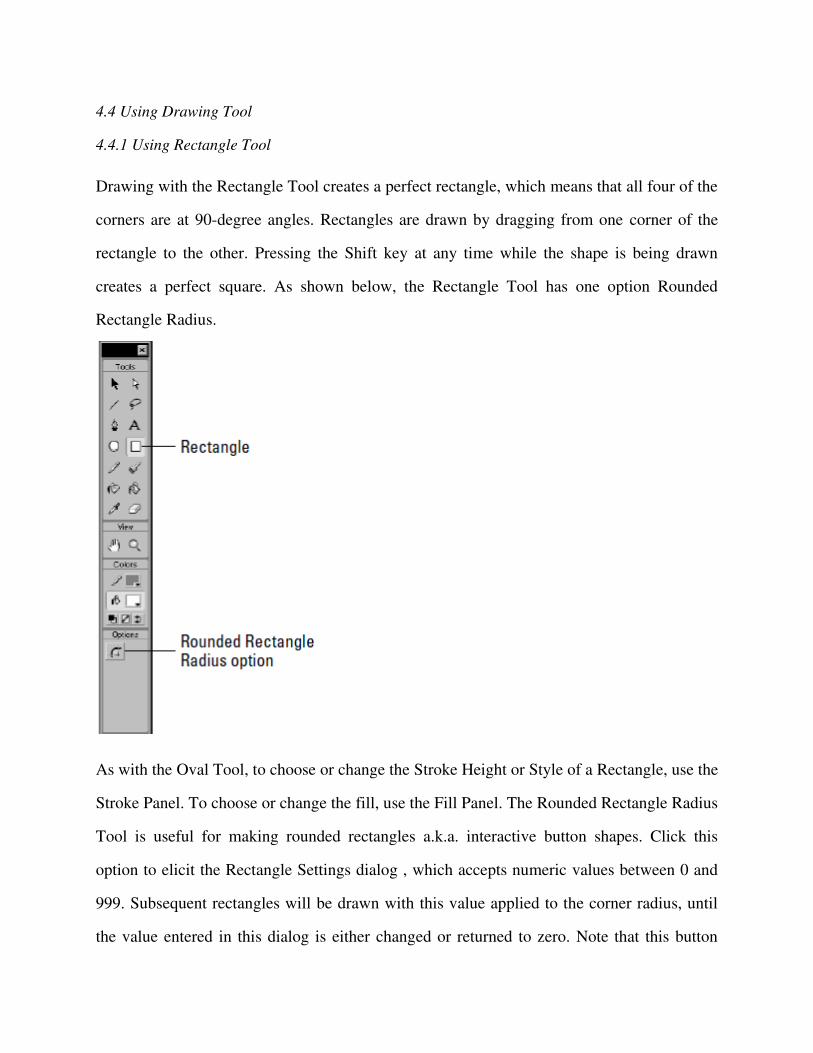
4.4 Using Drawing Tool
4.4.1 Using Rectangle Tool
Drawing with the Rectangle Tool creates a perfect rectangle, which means that all four of the
corners are at 90-degree angles. Rectangles are drawn by dragging from one corner of the
rectangle to the other. Pressing the Shift key at any time while the shape is being drawn
creates a perfect square. As shown below, the Rectangle Tool has one option Rounded
Rectangle Radius.
As with the Oval Tool, to choose or change the Stroke Height or Style of a Rectangle, use the
Stroke Panel. To choose or change the fill, use the Fill Panel. The Rounded Rectangle Radius
Tool is useful for making rounded rectangles a.k.a. interactive button shapes. Click this
option to elicit the Rectangle Settings dialog , which accepts numeric values between 0 and
999. Subsequent rectangles will be drawn with this value applied to the corner radius, until
the value entered in this dialog is either changed or returned to zero. Note that this button
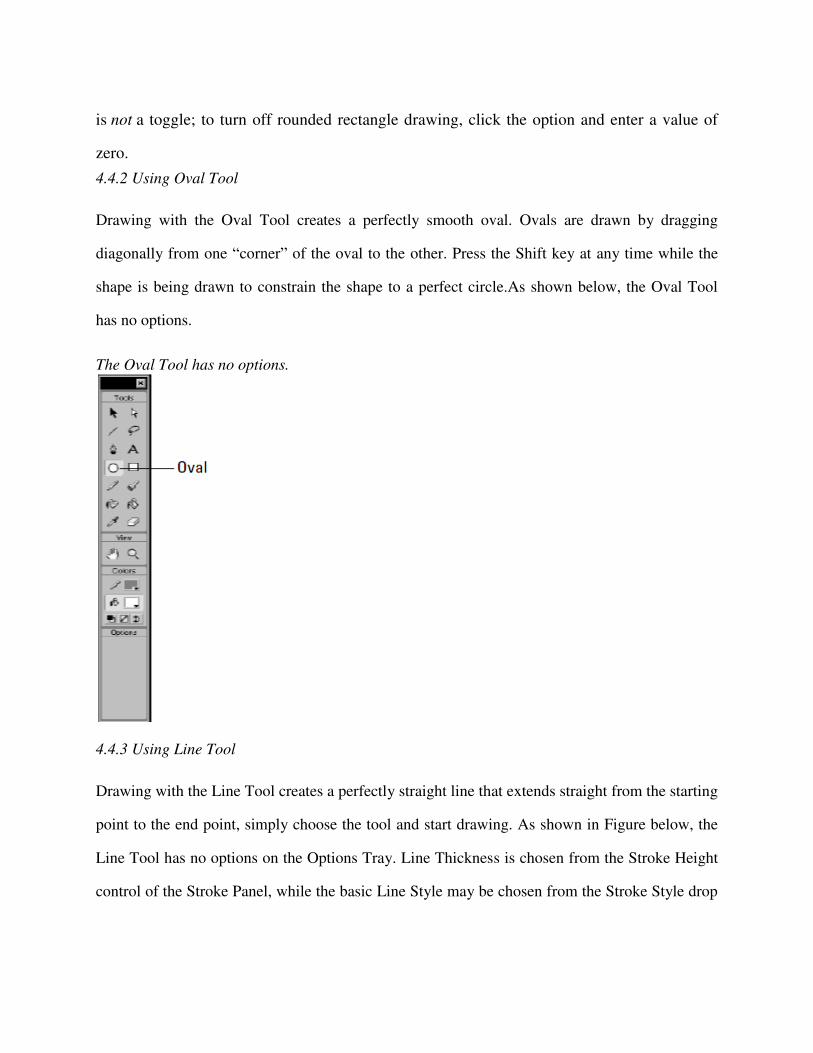
is not a toggle; to turn off rounded rectangle drawing, click the option and enter a value of
zero.
4.4.2 Using Oval Tool
Drawing with the Oval Tool creates a perfectly smooth oval. Ovals are drawn by dragging
diagonally from one “corner” of the oval to the other. Press the Shift key at any time while the
shape is being drawn to constrain the shape to a perfect circle.As shown below, the Oval Tool
has no options.
The Oval Tool has no options.
4.4.3 Using Line Tool
Drawing with the Line Tool creates a perfectly straight line that extends straight from the starting
point to the end point, simply choose the tool and start drawing. As shown in Figure below, the
Line Tool has no options on the Options Tray. Line Thickness is chosen from the Stroke Height
control of the Stroke Panel, while the basic Line Style may be chosen from the Stroke Style drop
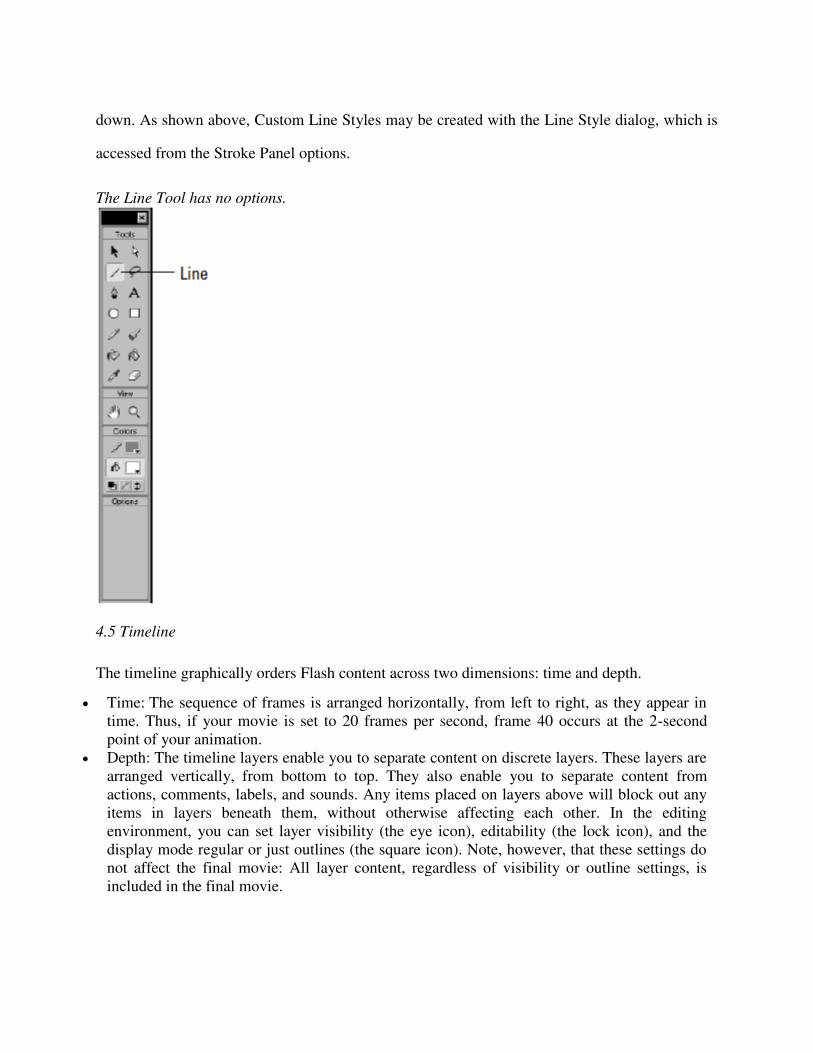
down. As shown above, Custom Line Styles may be created with the Line Style dialog, which is
accessed from the Stroke Panel options.
The Line Tool has no options.
4.5 Timeline
The timeline graphically orders Flash content across two dimensions: time and depth.
Time: The sequence of frames is arranged horizontally, from left to right, as they appear in
time. Thus, if your movie is set to 20 frames per second, frame 40 occurs at the 2-second
point of your animation.
Depth: The timeline layers enable you to separate content on discrete layers. These layers are
arranged vertically, from bottom to top. They also enable you to separate content from
actions, comments, labels, and sounds. Any items placed on layers above will block out any
items in layers beneath them, without otherwise affecting each other. In the editing
environment, you can set layer visibility (the eye icon), editability (the lock icon), and the
display mode regular or just outlines (the square icon). Note, however, that these settings do
not affect the final movie: All layer content, regardless of visibility or outline settings, is
included in the final movie.
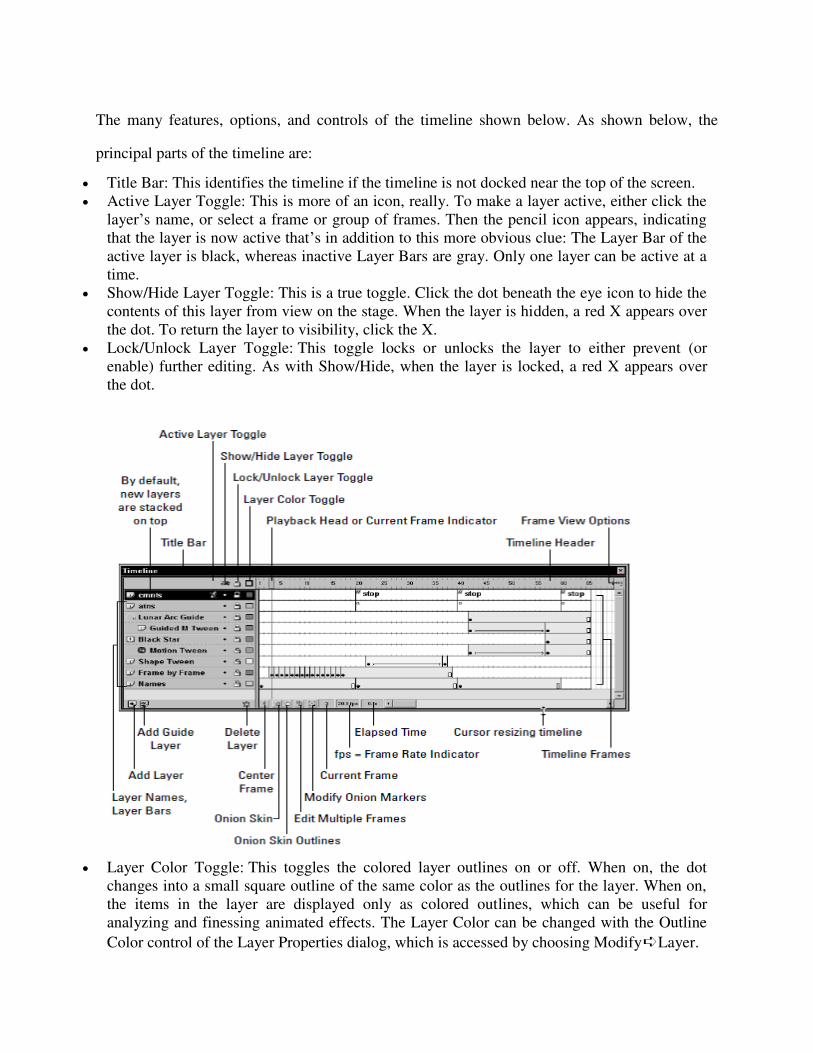
The many features, options, and controls of the timeline shown below. As shown below, the
principal parts of the timeline are:
Title Bar: This identifies the timeline if the timeline is not docked near the top of the screen.
Active Layer Toggle: This is more of an icon, really. To make a layer active, either click the
layer’s name, or select a frame or group of frames. Then the pencil icon appears, indicating
that the layer is now active that’s in addition to this more obvious clue: The Layer Bar of the
active layer is black, whereas inactive Layer Bars are gray. Only one layer can be active at a
time.
Show/Hide Layer Toggle: This is a true toggle. Click the dot beneath the eye icon to hide the
contents of this layer from view on the stage. When the layer is hidden, a red X appears over
the dot. To return the layer to visibility, click the X.
Lock/Unlock Layer Toggle: This toggle locks or unlocks the layer to either prevent (or
enable) further editing. As with Show/Hide, when the layer is locked, a red X appears over
the dot.
Layer Color Toggle: This toggles the colored layer outlines on or off. When on, the dot
changes into a small square outline of the same color as the outlines for the layer. When on,
the items in the layer are displayed only as colored outlines, which can be useful for
analyzing and finessing animated effects. The Layer Color can be changed with the Outline
Color control of the Layer Properties dialog, which is accessed by choosing Modify➪Layer.
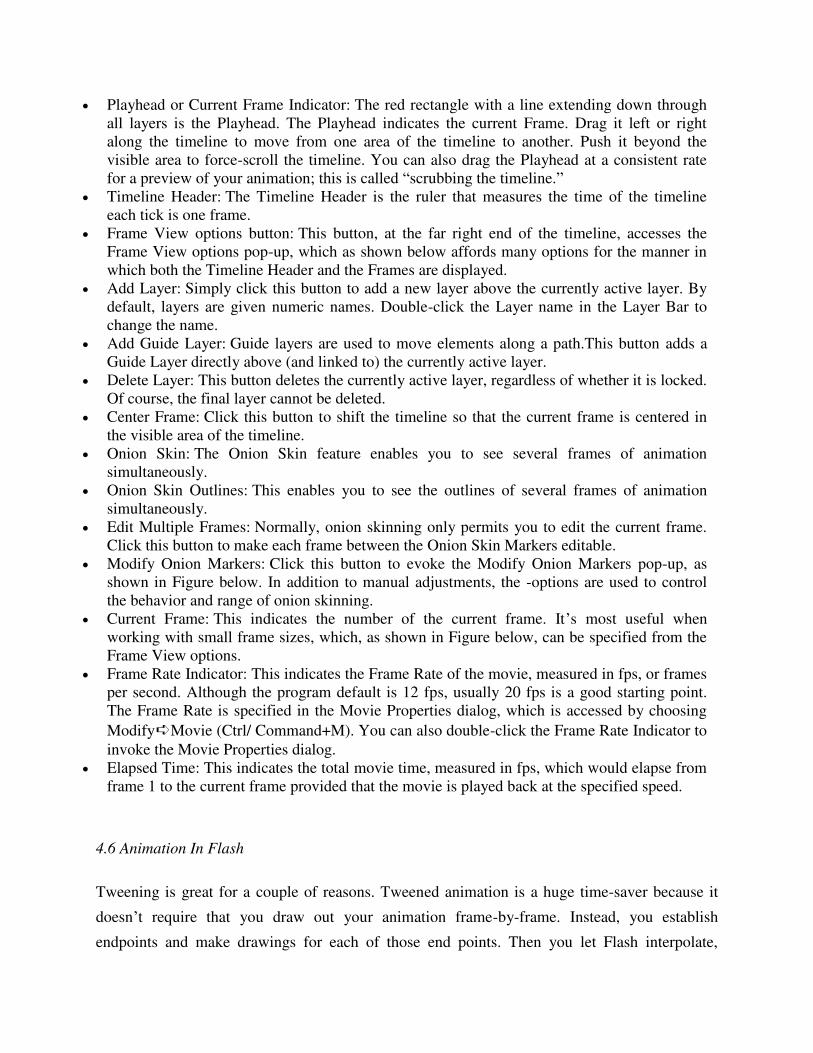
Playhead or Current Frame Indicator: The red rectangle with a line extending down through
all layers is the Playhead. The Playhead indicates the current Frame. Drag it left or right
along the timeline to move from one area of the timeline to another. Push it beyond the
visible area to force-scroll the timeline. You can also drag the Playhead at a consistent rate
for a preview of your animation; this is called “scrubbing the timeline.”
Timeline Header: The Timeline Header is the ruler that measures the time of the timeline
each tick is one frame.
Frame View options button: This button, at the far right end of the timeline, accesses the
Frame View options pop-up, which as shown below affords many options for the manner in
which both the Timeline Header and the Frames are displayed.
Add Layer: Simply click this button to add a new layer above the currently active layer. By
default, layers are given numeric names. Double-click the Layer name in the Layer Bar to
change the name.
Add Guide Layer: Guide layers are used to move elements along a path.This button adds a
Guide Layer directly above (and linked to) the currently active layer.
Delete Layer: This button deletes the currently active layer, regardless of whether it is locked.
Of course, the final layer cannot be deleted.
Center Frame: Click this button to shift the timeline so that the current frame is centered in
the visible area of the timeline.
Onion Skin: The Onion Skin feature enables you to see several frames of animation
simultaneously.
Onion Skin Outlines: This enables you to see the outlines of several frames of animation
simultaneously.
Edit Multiple Frames: Normally, onion skinning only permits you to edit the current frame.
Click this button to make each frame between the Onion Skin Markers editable.
Modify Onion Markers: Click this button to evoke the Modify Onion Markers pop-up, as
shown in Figure below. In addition to manual adjustments, the -options are used to control
the behavior and range of onion skinning.
Current Frame: This indicates the number of the current frame. It’s most useful when
working with small frame sizes, which, as shown in Figure below, can be specified from the
Frame View options.
Frame Rate Indicator: This indicates the Frame Rate of the movie, measured in fps, or frames
per second. Although the program default is 12 fps, usually 20 fps is a good starting point.
The Frame Rate is specified in the Movie Properties dialog, which is accessed by choosing
Modify➪Movie (Ctrl/ Command+M). You can also double-click the Frame Rate Indicator to
invoke the Movie Properties dialog.
Elapsed Time: This indicates the total movie time, measured in fps, which would elapse from
frame 1 to the current frame provided that the movie is played back at the specified speed.
4.6 Animation In Flash
Tweening is great for a couple of reasons. Tweened animation is a huge time-saver because it
doesn’t require that you draw out your animation frame-by-frame. Instead, you establish
endpoints and make drawings for each of those end points. Then you let Flash interpolate,

or tween, the changes between them. Tweening also minimizes file size because you do not have
to save the contents for each frame in the animation.
Because you only define the contents of the frames at each end point, Flash only has to save
those contents, plus the values for the changes between the end points. Two kinds of tweens can
be created in Flash Shape Tweens and Motion Tweens each with its own unique characteristics.
The Frames Panel
To work with tweens, you need to become familiar with the Frames Panel, shown below, which
is used for choosing the kind of tween and for assigning the properties for each tween.
Additionally, the Frames Panel is used for adding labels and comments to keyframes, which is
most often associated with ActionScripting operations.
The Frames Panel, in three configurations: as a Label maker (A), when used for assigning
properties for a Shape Tween (B), and when assigning properties for a Motion Tween (C).
4.6.1 Shape tweening
Shape tweening is useful for morphing basic shapes between end points. Flash can only shape
tween shapes, so don’t even try to shape tween a group, symbol, or editable text it won’t work.
You can shape tween multiple shapes on a layer, but for the sake of organization it’s clearer (and
advised!) that each shape be put on its own layer. This makes it much easier to return to the
animation later and to make changes, because it can be nearly impossible to figure out what’s
going on if a number of tweens share the same layer. Shape tweening also enables you to tween
colors.
You can see the progression across seven frames because onion skinning has been activated
below shows. Although this appears similar to the frame-by-frame example as shown below, the
two animations play quite differently. Here are the steps for creating a Shape Tween:
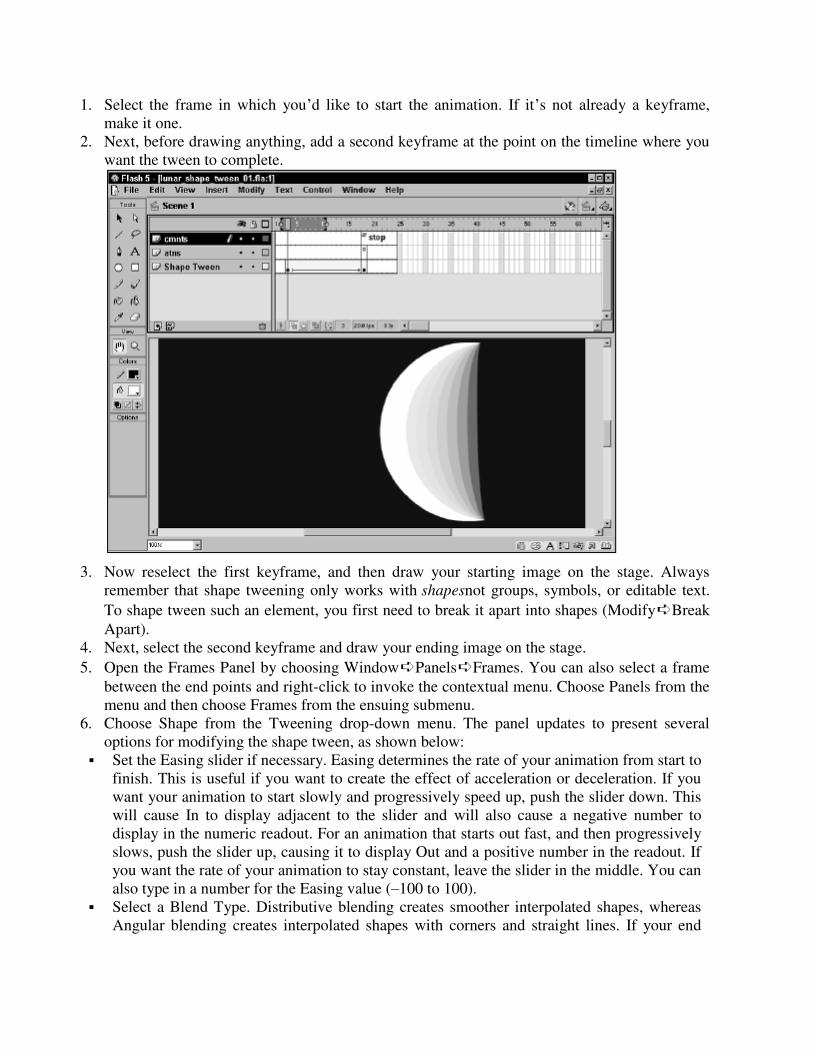
1. Select the frame in which you’d like to start the animation. If it’s not already a keyframe,
make it one.
2. Next, before drawing anything, add a second keyframe at the point on the timeline where you
want the tween to complete.
3. Now reselect the first keyframe, and then draw your starting image on the stage. Always
remember that shape tweening only works with shapesnot groups, symbols, or editable text.
To shape tween such an element, you first need to break it apart into shapes (Modify➪Break
Apart).
4. Next, select the second keyframe and draw your ending image on the stage.
5. Open the Frames Panel by choosing Window➪Panels➪Frames. You can also select a frame
between the end points and right-click to invoke the contextual menu. Choose Panels from the
menu and then choose Frames from the ensuing submenu.
6. Choose Shape from the Tweening drop-down menu. The panel updates to present several
options for modifying the shape tween, as shown below:
Set the Easing slider if necessary. Easing determines the rate of your animation from start to
finish. This is useful if you want to create the effect of acceleration or deceleration. If you
want your animation to start slowly and progressively speed up, push the slider down. This
will cause In to display adjacent to the slider and will also cause a negative number to
display in the numeric readout. For an animation that starts out fast, and then progressively
slows, push the slider up, causing it to display Out and a positive number in the readout. If
you want the rate of your animation to stay constant, leave the slider in the middle. You can
also type in a number for the Easing value (–100 to 100).
Select a Blend Type. Distributive blending creates smoother interpolated shapes, whereas
Angular blending creates interpolated shapes with corners and straight lines. If your end
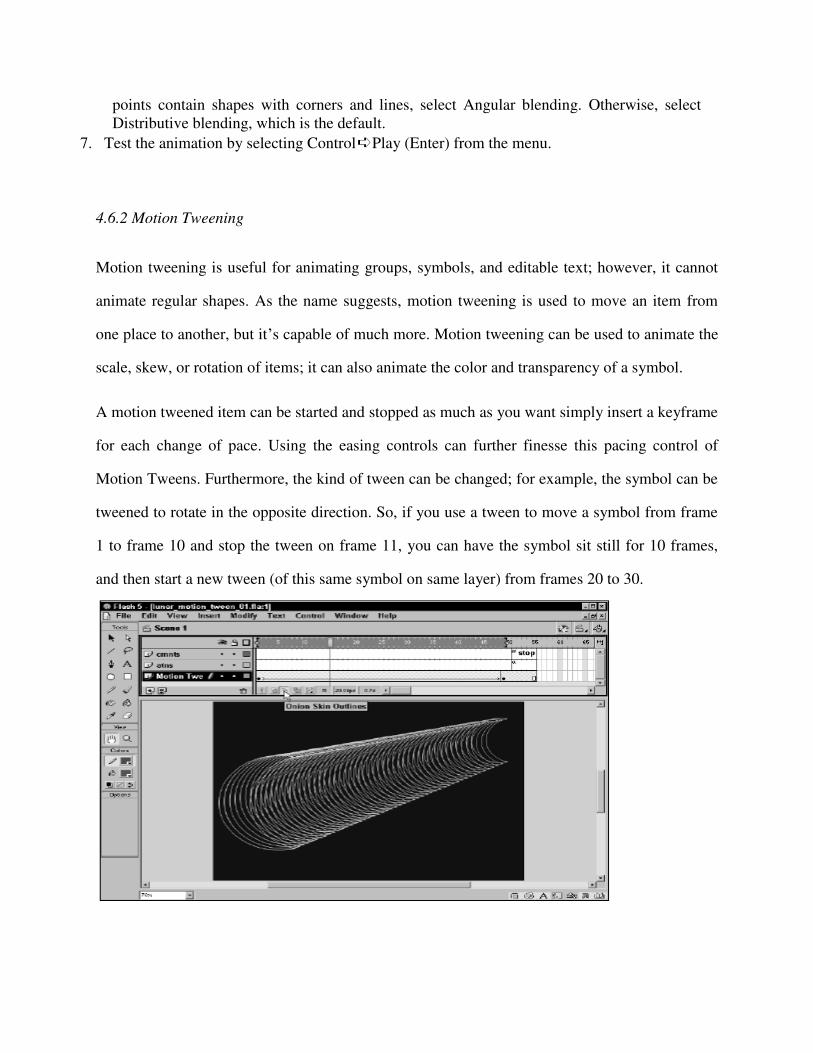
points contain shapes with corners and lines, select Angular blending. Otherwise, select
Distributive blending, which is the default.
7. Test the animation by selecting Control➪Play (Enter) from the menu.
4.6.2 Motion Tweening
Motion tweening is useful for animating groups, symbols, and editable text; however, it cannot
animate regular shapes. As the name suggests, motion tweening is used to move an item from
one place to another, but it’s capable of much more. Motion tweening can be used to animate the
scale, skew, or rotation of items; it can also animate the color and transparency of a symbol.
A motion tweened item can be started and stopped as much as you want simply insert a keyframe
for each change of pace. Using the easing controls can further finesse this pacing control of
Motion Tweens. Furthermore, the kind of tween can be changed; for example, the symbol can be
tweened to rotate in the opposite direction. So, if you use a tween to move a symbol from frame
1 to frame 10 and stop the tween on frame 11, you can have the symbol sit still for 10 frames,
and then start a new tween (of this same symbol on same layer) from frames 20 to 30.
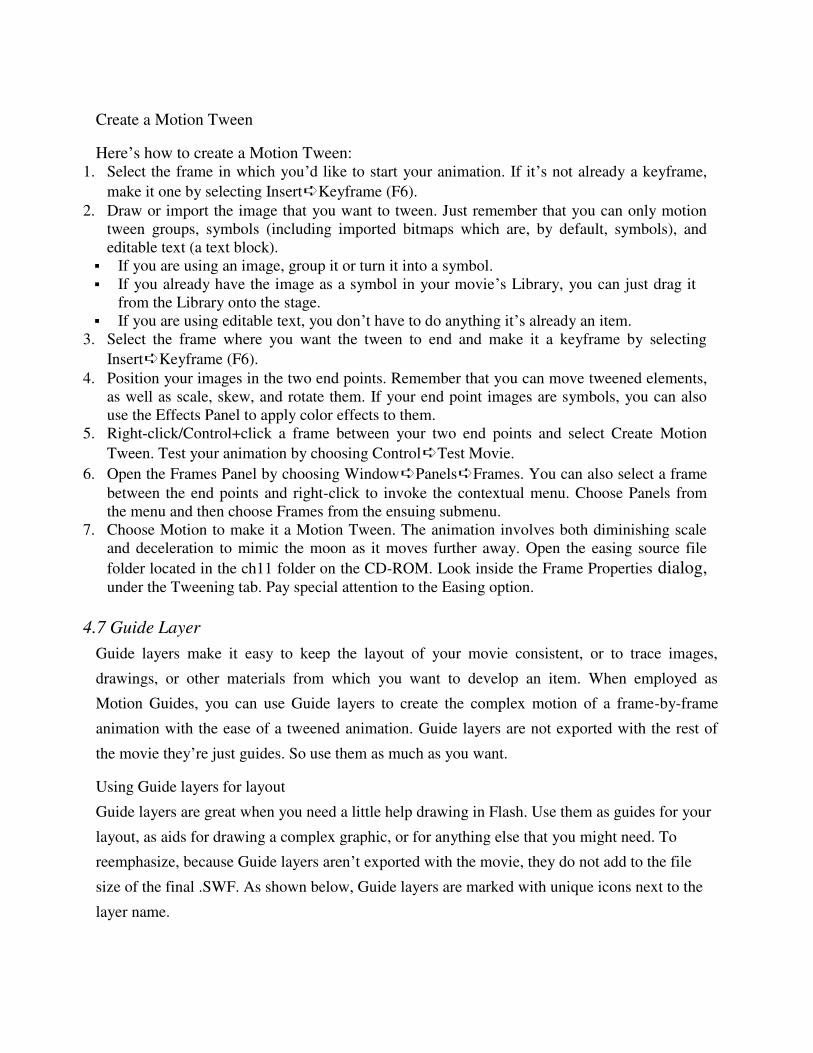
Create a Motion Tween
Here’s how to create a Motion Tween: 1. Select the frame in which you’d like to start your animation. If it’s not already a keyframe,
make it one by selecting Insert➪Keyframe (F6).
2. Draw or import the image that you want to tween. Just remember that you can only motion
tween groups, symbols (including imported bitmaps which are, by default, symbols), and
editable text (a text block).
If you are using an image, group it or turn it into a symbol.
If you already have the image as a symbol in your movie’s Library, you can just drag it
from the Library onto the stage.
If you are using editable text, you don’t have to do anything it’s already an item.
3. Select the frame where you want the tween to end and make it a keyframe by selecting
Insert➪Keyframe (F6).
4. Position your images in the two end points. Remember that you can move tweened elements,
as well as scale, skew, and rotate them. If your end point images are symbols, you can also
use the Effects Panel to apply color effects to them.
5. Right-click/Control+click a frame between your two end points and select Create Motion
Tween. Test your animation by choosing Control➪Test Movie.
6. Open the Frames Panel by choosing Window➪Panels➪Frames. You can also select a frame
between the end points and right-click to invoke the contextual menu. Choose Panels from
the menu and then choose Frames from the ensuing submenu.
7. Choose Motion to make it a Motion Tween. The animation involves both diminishing scale
and deceleration to mimic the moon as it moves further away. Open the easing source file
folder located in the ch11 folder on the CD-ROM. Look inside the Frame Properties dialog, under the Tweening tab. Pay special attention to the Easing option.
4.7 Guide Layer
Guide layers make it easy to keep the layout of your movie consistent, or to trace images,
drawings, or other materials from which you want to develop an item. When employed as
Motion Guides, you can use Guide layers to create the complex motion of a frame-by-frame
animation with the ease of a tweened animation. Guide layers are not exported with the rest of
the movie they’re just guides. So use them as much as you want.
Using Guide layers for layout
Guide layers are great when you need a little help drawing in Flash. Use them as guides for your
layout, as aids for drawing a complex graphic, or for anything else that you might need. To
reemphasize, because Guide layers aren’t exported with the movie, they do not add to the file
size of the final .SWF. As shown below, Guide layers are marked with unique icons next to the
layer name.
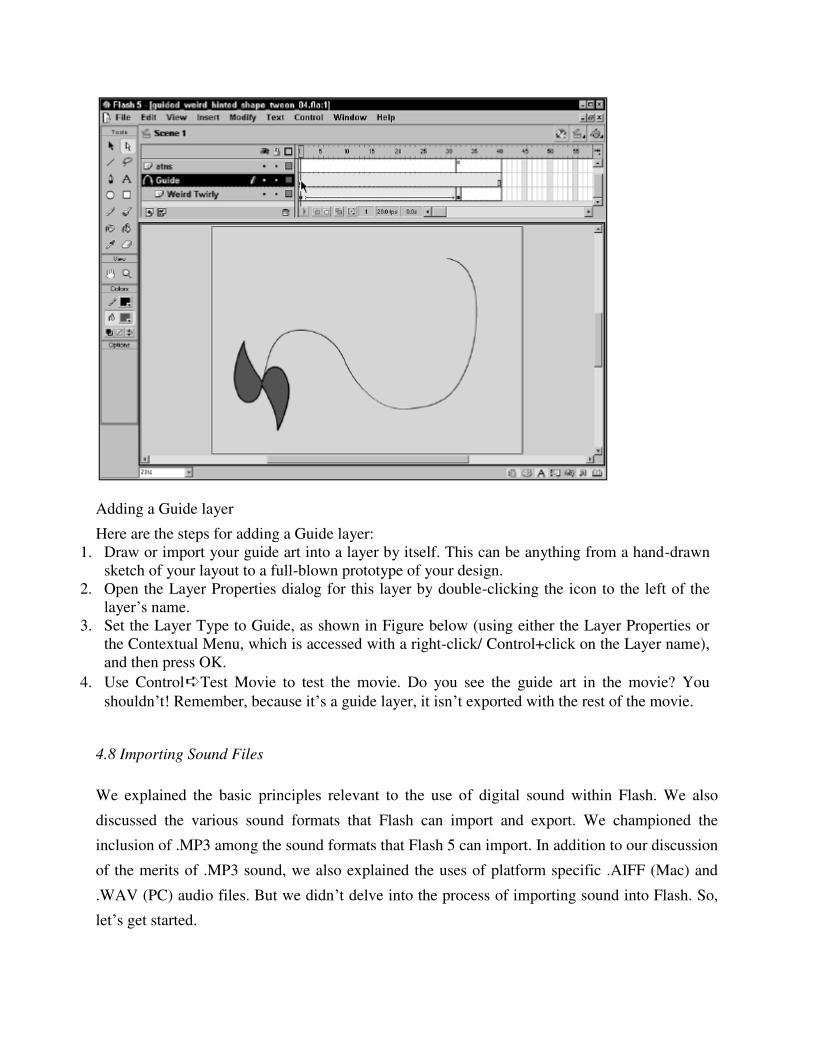
Adding a Guide layer
Here are the steps for adding a Guide layer:
1. Draw or import your guide art into a layer by itself. This can be anything from a hand-drawn
sketch of your layout to a full-blown prototype of your design.
2. Open the Layer Properties dialog for this layer by double-clicking the icon to the left of the
layer’s name.
3. Set the Layer Type to Guide, as shown in Figure below (using either the Layer Properties or
the Contextual Menu, which is accessed with a right-click/ Control+click on the Layer name),
and then press OK.
4. Use Control➪Test Movie to test the movie. Do you see the guide art in the movie? You
shouldn’t! Remember, because it’s a guide layer, it isn’t exported with the rest of the movie.
4.8 Importing Sound Files
We explained the basic principles relevant to the use of digital sound within Flash. We also
discussed the various sound formats that Flash can import and export. We championed the
inclusion of .MP3 among the sound formats that Flash 5 can import. In addition to our discussion
of the merits of .MP3 sound, we also explained the uses of platform specific .AIFF (Mac) and
.WAV (PC) audio files. But we didn’t delve into the process of importing sound into Flash. So,
let’s get started.
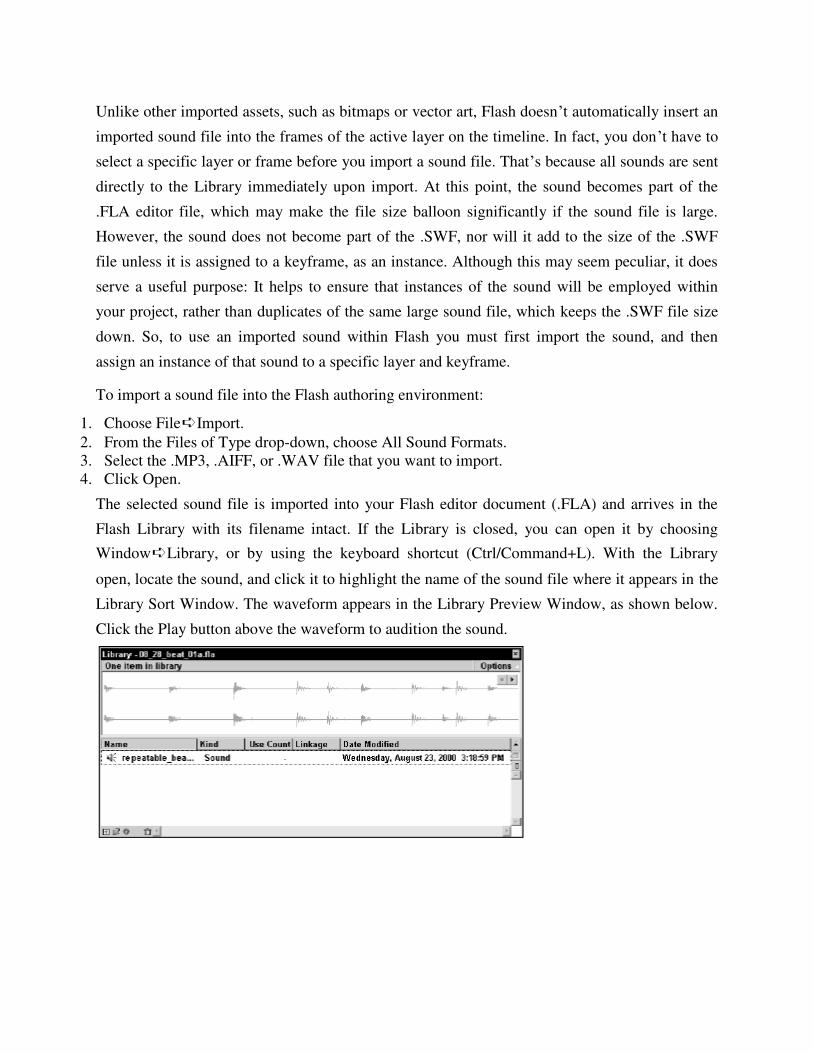
Unlike other imported assets, such as bitmaps or vector art, Flash doesn’t automatically insert an
imported sound file into the frames of the active layer on the timeline. In fact, you don’t have to
select a specific layer or frame before you import a sound file. That’s because all sounds are sent
directly to the Library immediately upon import. At this point, the sound becomes part of the
.FLA editor file, which may make the file size balloon significantly if the sound file is large.
However, the sound does not become part of the .SWF, nor will it add to the size of the .SWF
file unless it is assigned to a keyframe, as an instance. Although this may seem peculiar, it does
serve a useful purpose: It helps to ensure that instances of the sound will be employed within
your project, rather than duplicates of the same large sound file, which keeps the .SWF file size
down. So, to use an imported sound within Flash you must first import the sound, and then
assign an instance of that sound to a specific layer and keyframe.
To import a sound file into the Flash authoring environment:
1. Choose File➪Import.
2. From the Files of Type drop-down, choose All Sound Formats.
3. Select the .MP3, .AIFF, or .WAV file that you want to import.
4. Click Open.
The selected sound file is imported into your Flash editor document (.FLA) and arrives in the
Flash Library with its filename intact. If the Library is closed, you can open it by choosing
Window➪Library, or by using the keyboard shortcut (Ctrl/Command+L). With the Library
open, locate the sound, and click it to highlight the name of the sound file where it appears in the
Library Sort Window. The waveform appears in the Library Preview Window, as shown below.
Click the Play button above the waveform to audition the sound.
VERY SHORT QUESTIONS
1. Name some authoring tools.
2. Name some drawing tools in flash.
3. Name some painting tools in flash
4. What are the types of animation?
5. What is shape tweening?
SHORT QUESTIONS
1. What is frame by frame animation?
2. What is tweening and its types?
3. What is guide layer?
4. How we can import sounds in flash?
5. What is oval tool.
LONG QUESTIONS
1. Explain drawing tools in flash.
2. Explain painting tools in flash.
3. What is animation? How it is applied in flash?
4. What is timeline in flash? Explain its working.