Turbo-Plus VI.41 16-bit Installation Guide Copyright April, 1985 (C ...
32
Turbo-Plus VI.41 16-bit Installation Guide Copyright April, 1985 (C) 1985 by Microserve, Inc. Microserve, Inc. 276 Fifth Avenue New York, N.Y. 10001
-
Upload
khangminh22 -
Category
Documents
-
view
3 -
download
0
Transcript of Turbo-Plus VI.41 16-bit Installation Guide Copyright April, 1985 (C ...
Turbo-Plus VI.41 16-bit Installation Guide
Copyright
April, 1985
(C) 1985 by Microserve, Inc.
Microserve, Inc.276 Fifth Avenue
New York, N.Y. 10001

Turbo-Plus VI.41 16-bit Instal1 ation Guide
TABLE OP CONTENTS1] Introduction ..... ................................... .. . 1-1
Overview .................... . ........................ 1-2Checklist ....... ..................................... 1-3
23 Turbo-Plus Modules .................. ................... 2-1Program Modules .... ........................ ........ 2-1Beloc&t&ble and executable program files ............ 2-2Relocatable subroutine files .... .................. 2-3.GEN and .PAR files ................ .................. 2-3System function files .............................. 2-3
3] Installing Turbo-PI us ....... .......................... 3-1Generating executable programs ...................... 3-1System generation ...... 3-1Generating a new system master ................ ...... 3-1Generating new slaves ......... 3-5
43 Installing Background Batch ............................ 4-1Overview ............. 4-1Patching ............. 4-1Slave generation ...... 4-3
51 AppendixModifying a Slave Circuit Driver for Turbo-Plus ..... A-l
TurboDOS is a trademark of Software 2000, Inc. Turbo-Plus is a trademark of Microserve, Inc.

Turbo-Plus VI.41 16-bit Installation Guide

Turbo-Plus VI.41 16-bit Installation Guide
INTRODUCTIONThis Installation Guide describes the procedure for
generating a configuration of Turbo-Plus in a system which includes 16-bit boards.
For information on the 8-bit installation, refer to the 8- bit Installation Guide to Turbo-Plus. For information on using the package refer to the User *s Guide to Turbo-Plus. That document includes an overview of the package, and instructions on using each command.
Turbo-Plus is designed with the ability to be patched to run on systems with different search drives. Since it needs to know what drive this is, it is set up as a patchable parameter. Thus, most of Turbo-Plus’s modules are distributed as relocatable (.0) files, so that parameters may be ’plugged in’ in the installation procedure using the TurboDOS symbolic patch facility described in the Configuration Guide to TurboDOS.
Section 2 of this guide briefly describes all of the modules sent as part of the 16-bit Turbo-Plus package, and explains where on the system they should be placed.
Section 3 describes the installation procedure for generating a customized version of Turbo-Plus excluding the background batch processor, which involves some extra steps.
Section 4 describes the installation procedure for the 16- b t. background batch processor.
1-1

Turbo-Plus VI.41 16-bit Installation Guide
OverviewTurbo-Plus makes extensive use of the TurboDOS User Defined
Function (TurboDOS call 0x29) and follows the USBSUP calling protocol, outlined in your TurboDOS 1.41 update notes, and in Appendix G of the 8-bit installation manual. Therefore. if you wish to add your own functions with this call, it is imperative that you also follow the USBSUP protocol, which has been adopted by Software 2000 as the standard TurboDOS method.
SerializationEach copy of Turbo-Plus is serialized to be run only on a
■no T> + ■? /*ii T ot» T i i n n a no + ■? nrf p iro + am •Pin a e a n l o 1 rmmVi a t** V A A W W W hr W U A Mg 0^ 0 V W AM a A M 0 0 0 A A » A AA UIU 00 A
coincides with that of the operating system on which it is to be run. None of the modules in Turbo-Plus will run on any system with a serial number different that its own.
1-2
Turbo-Plus VI.41 16-bit Installation Guide
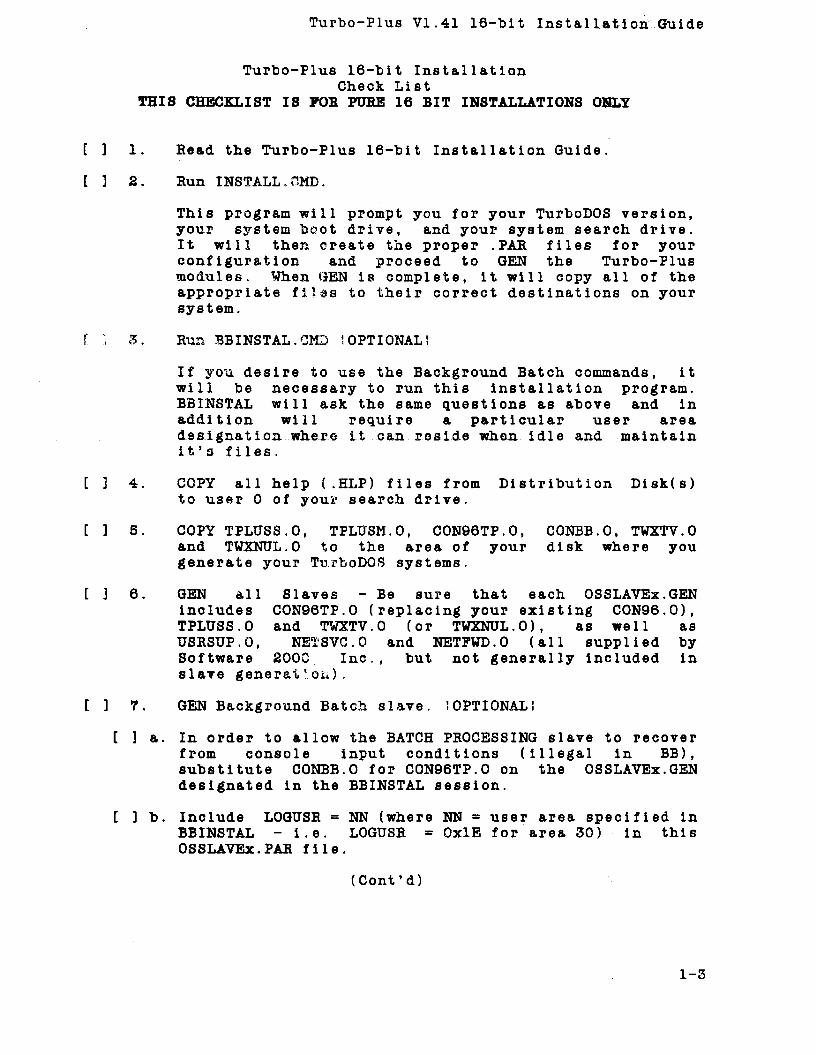
Turbo-Plus 16-bit Installation Check List
THIS CHECKLIST IS FOB FUBE 16 BIT INSTALLATIONS ONLY
[ ] 1. Bead the Turbo-Plus 16-bit Installation Guide.[ ] 2. Bun INSTALL.OMD.
This program will prompt you for your TurboDOS version, your system boot drive, and your system search drive. It will then create the proper .PAR files for your configuration and proceed to GEN the Turbo-Plus modules. When GEN is complete, it will copy all of the appropriate files to their correct destinations on your system.
f j 3. Bun BBINSTAL.CMD ! OPTIONAL!If you desire to use the Background Batch commands, it will be necessary to run this installation program. BBINSTAL will ask the same questions as above and in addition will require a particular user area ..&e.sAgnat.i-au...wh&T..e it can reside when idle and maintain it’s files.
[ 3 4.
[ 3 5.
[ 3 6 .
COPY all help (.HLP) files from to user 0 of your search drive.
Distribution Disk(s)
COPY TPLUSS.O, TPLUSM.O, C0N96TP.0, CONBB.O, TWXTV.O and TWXNUL.0 to the area of your disk where you generate your TurboDOS systems.GEN all Slaves - Be sure that each OSSLAVEx.GEN includes C0N96TP.0 (replacing your existing C0N96.0), TPLUSS.O and TWXTV.O (or TWXNUL. 0), as well asUSBSUP.O, NETSVC.0 and NETFWD.O (all supplied by Software 2000, Inc., but not generally included inslave general’on).
[ ] 7. GEN Background Batch slave. »OPTIONAL![ ] a. In order to allow the BATCH PBOCESSING slave to recover
from console input conditions (illegal in BB), substitute CONBB.O for C0N96TP.0 on the OSSLAVEx.GEN designated in the BBINSTAL session.
[ ] b. Include LOGUSB = NN (where NN - user area specified inBBINSTAL - i.e. LOGUSB = OxlE for area 30) in thisOSSLAVEx.PAB file.
(Cont’d)
1-3

Turbo-Plus VI.41 16-bit Installation Guide
[ ] 8. If you are running a 16-bit master, GEN the master( OSMASTER.SYS).Be sure to include TPLUSM.O as well as USRSTJP.O, NETFWD.0, NETREQ.0 and MSGFMT.0 (supplied by Software 2000, Inc.) in the OSMASTER.GEN file.
[ ] 9. Reset and test your system. You should first noticethe new Turbo-Plus LOGON program if everything is properly installed.
1-4

Turbo-Plus VI.41 16-bit Installation Guide
Turbo-Plus Modules16 bit Turbo-Plus will arrive on two sides of one CP/M
format single-sided single-density diskette. Side one contains all of the relocatable modules; side two contains .DO, .GEM, and .PAR files used to generate your Turbo-Plus installation.Program ModulesSide one contains three types of files:
1) Relocatable program files:Those files which constitute the main bodies of the Turbo-Plus utility programs.
2) Relocatable subroutine files:Those files which contain subroutines called by the programs above.
3 ) System function files:Files containing extensions to the normal set of TurboDOS operating system calls which must be genned into the operating system.
Side two contains all of the supporting files used for generating your installed version of Turbo-Plus. This includes .GEN and .PAR files for your programs, auxiliary data files, two installation .GMD files, and .DO files referenced by the install programs.
2-1

Turbo-Plus VI.41 16-bit Installation Guide
Relocatable and executable program filesThese are all of the files containing the assembled source
code for the Turbo-Plus utilities. They are distributed in relocatable form, to allow the patching of parameters.DIRDUMP.O Program which gives a master directory of any disk,
sorted by user area.
Q O O Program which moves users to a user area specified by a user-defined name.
GONAME.0 Utility which allows users to define names for user areas on the system.
HELP. 0 TurboDuS on-line help facility providing help on all TurboDOS and Turbo-Plus commands. Users may add their own help files.
LOCATE.0 Utility to search certain or all system drives forgiven file or template.
LOG. 0 Utility to make entries in a date and time stamped log file.
LOGOFF.0 Enhanced version of system logoff, notifying users of pending mail, and displaying system bulletins.
LOGON.0 Enhanced version of system logon, notifying users of pending mail, displaying system bulletins, and providing additional levels of security.
MAIL.0 TurboDOS mail facility to allow electronic mail to be sent among users on the system.
MASTER.0 Enhanced version of the TurboDOS ’MASTER’ command, providing better control of access to the master.
PROFILE.0 Program to maintain USERID.SYS file.RESET.0 Program to reset a slave from another slave.STATUS.0 Facility to continuously monitor activity of system
users, printers, and buffers.TWX.O TWX facility to allow users to send immediate
messages to other consoles on the system.USER.0 Allows user to change user areas. Performs the
same function as the TurboDOS USER command of versions 1.3 and earlier.
WHO. 0 System status facility to display all current users on the system, processes they are running and other current system characteristics.
02i02

Turbo-Plus VI.41 16-bit Installatton Guide
Relocatable subroutine filesA number of routines are shared by various program modules. They include the following files:
DBUFF.0 LOGDAT.0 PTABLE.O TPDATE.O
GBUFF.0 MBÜFF.0 TABLES.G TPSCAN.O
LOGCHK.OMROUTE.OTPMOD.O
System function filesThese files must be moved to the user area on the system where your system’s .GEN and .PAR files reside, and where your system generation takes place. Some of them must be genned into your system in order for Turbo-Plus to work. There are six such files, all on side 1:
TPLUSS,0 TPLUSM.OTWXNUL.Q TWXTV.OC0N96TP.0 CONBB.0
.GEN and .PAR filesThese files are necessary to patch the modules to work under your system configuration.All of the following programs have .GEN files, some of which are accompanied by .PAR files:
DIRDTJMPLOCATEMAILSTATUS
GOLOGMASTERTUX
GONAMELOGOFFPROFILEUSER
HELPLOGONRESETWHO
The following files are necessary for the installation procedure:TPLUS6,DO INSTALL.CMD
2-3

Turbo-Plus VI.41 16-bit Installation Guide
2-4
Turbo-Plus VI.41 16-bit Installation Guide
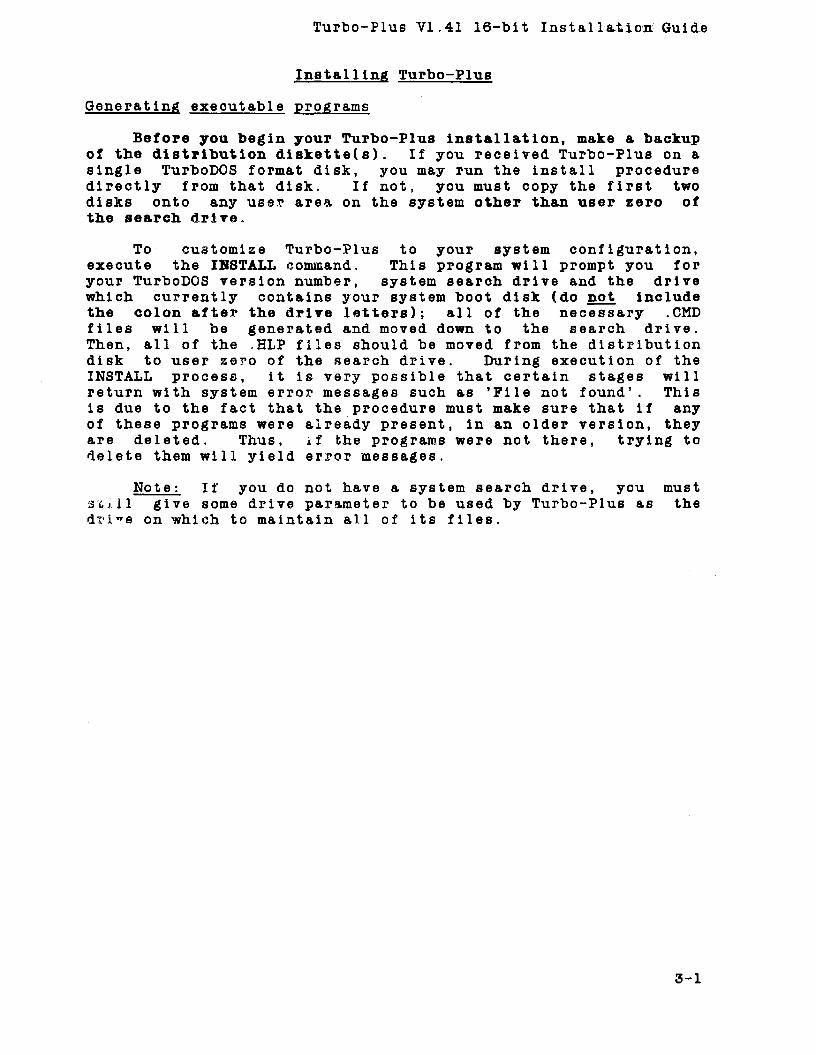
Instal1ing Turbo-Plus Generating executable programs
Before you begin your Turbo-Plus installation, make a backup of tbe distribution diskette(s). If you received Turbo-Plus on a single TurboDOS format disk, you may run the install procedure directly from that disk. If not, you must copy the first two disks onto any user area on the system other than user zero of the search drive.
To customize Turbo-Plus to your system configuration, execute the INSTALL command. This program will prompt you for your TurboDOS version number, system search drive and the drive which currently contains your system boot disk (do not include the colon after the drive letters); all of the necessary .CMD files will be generated and moved down to the search drive. Then, all of the .HLP files should be moved from the distribution disk to user zero of the search drive. During execution of the INSTALL process, it is very possible that certain stages will return with system error messages such as ’File not found5. This is due to the fact that the procedure must make sure that if any of these programs were already present, in an older version, they are deleted. Thus, if the programs were not there, trying to delete them will yield error messages.
Note: If you do not have a system search drive, you must still give some drive parameter to be used by Turbo-Plus as the dri^e on which to maintain all of its files.
Turbo-Plus VI.41 16-bit Installation Guide
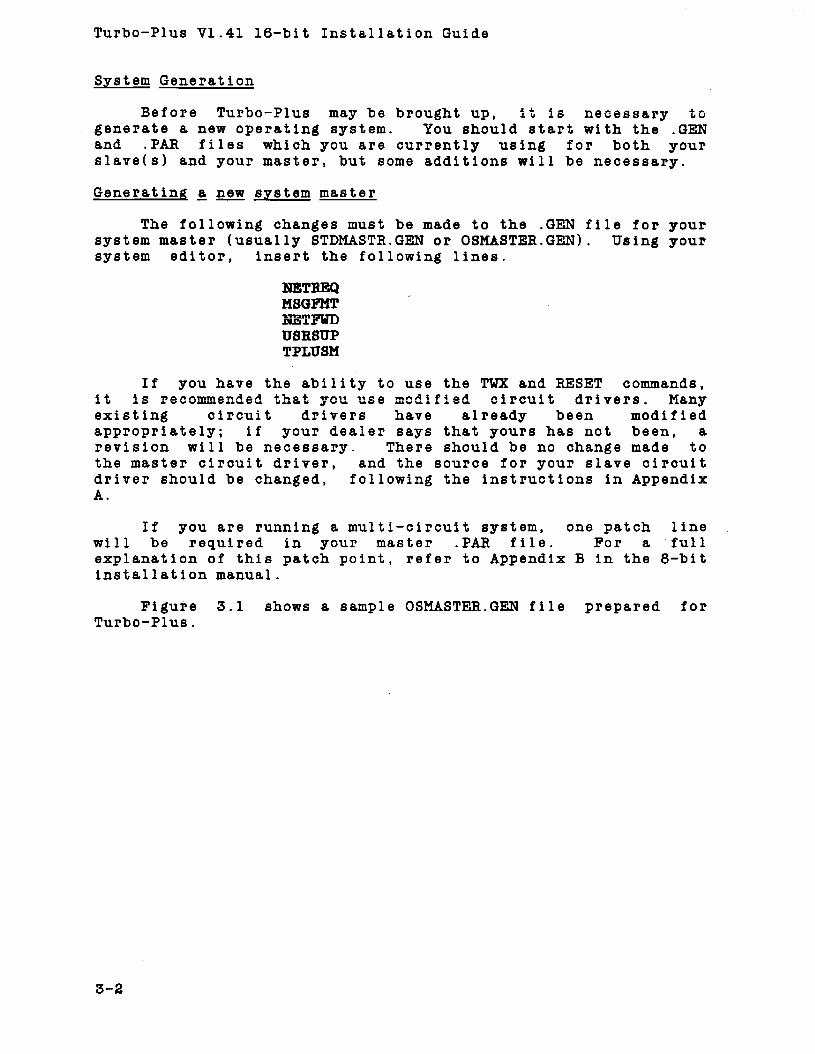
System GenerationBefore Turbo-Plus may be brought up, it is necessary to
generate a new operating system. You should start with the .GEN and .PAR files which you are currently using for both your slave(s) and your master, but some additions will be necessary.Generating a new system master
The following changes must be made to the .GEN file for your system master (usually STDMASTR.GEN or OSMASTER.GEN). Using your system editor, insert the following lines.
NETREQMSGFMTNETFWDUSRSUPTPLUSM
If you have the ability to use the TWX and RESET commands, it is recommended that you use modified circuit drivers. Many existing circuit drivers have already been modified appropriately; if your dealer says that yours has not been, a revision will be necessary. There should be no change made to the master circuit driver, and the source for your slave circuit driver should be changed, following the instructions in Appendix A.
If you are running a multi-circuit system, one patch line will be required in your master .PAR file. For a full explanation of this patch point, refer to Appendix B in the 8-bit installation manual.
Figure 3.1 shows a sample OSMASTER.GEN file prepared for Turbo-Plus.
3-2

STDMASTRNETFWDNETREQMSGFMTHDWNITUSBSTJPTPLTJSMCONREMLSTPARLSTETXLSTTABSPDXXXBRTXXXRTCXXXDSKXXXDST58PDSKHHKMCDXXX
COMPATNMBSVCNMBXXXNMBMBSNMBUFSNMBRPSPATXXXDSKAST
PTRAST
MEMRESDSPPAT
AUTXJSRQUEASTSRHDRV ETXBR =
Turbo-Plus VI.41 16-bit Installation Guide
Figure 3.1Sample OSMASTER.GEN file
; STANDARD NETWORK MASTER CONFIGURATION ; NETWORK MESSAGE FORWARDING ; NETWORK REQUEST PROCESSOR ; NETWORK MESSAGE FORMAT TABLE ; HARDWARE INITIALIZATION ; USER FUNCTION MAIN CALLING MODULE ; TURBO-PLUS FUNCTION EXTENSIONS ; REMOTE MASTER CONSOLE ; DRIVER FOR HIGH SPEED PRINTER ; DRIVER FOR LETTER QUALITY PRINTER ; DRIVER FOR HIGH SPEED PRINTER EXPANDING TABS ; SERIAL & PARALLEL DRIVERS ; BAUD-RATE TABLES ; REAL-TIME CLOCK DRIVER ; FLOPPY DISK DRIVER ; FLOPPY DISK SPECIFICATION TABLES ; HARD DISK DRIVER ; MASTER CIRCUIT DRIVER
OxFO99OxlBOxlOOxlB
Figure 3.2Samp1e OSMASTER.PAR file
; Compatibility flags ; Number of slaves; Number of slaves (9); Number of message buffers (27); 16 I/O buffers; Number of network reply packets (27)
0x60,0x62,0x64,0x66,0x68,0x6A,0x6C,0x6E,0x70; Slave Port assignment table
001DSKDRA,01,DSKDRA,00,DSKDRB,01,DSKDRB,02,DSKDRB,03,DSKDRB, 04,DSKDRB,05,DSKDRB,06,DSKDRB,07,DSKDRB,08,DSKDRB,09,DSKDRB, OxOA,DSKDRB,OxOB,DSKDRB
; Disk assignment table:A,B = floppy drives
; C-N = Winchester disk00,LSTDRA,01,LSTDRB,00,LSTDRC
Printer assignment table:A - High speed with raw output B = Letter quality with raw output C = High speed w/ formatted output
Reserved memory above TPA(0x1000)1,2,0,0,0,0,0,0,0,0,0
De-Spool
: 0x80« 00,(0),00,(0)= 8 OxOE
00
table: Printer A — > Printer B — >
Log master on to (0),00,(0),00,(0)
Queue A Queue Buser 0, privileged00,(0),00,(0),00, (0)
Define eight valid queues (A-H)System search drive = HBaud rate on Printer B = 9600
3-3
Turbo-Plus VI.41 16-bit Installation Guide
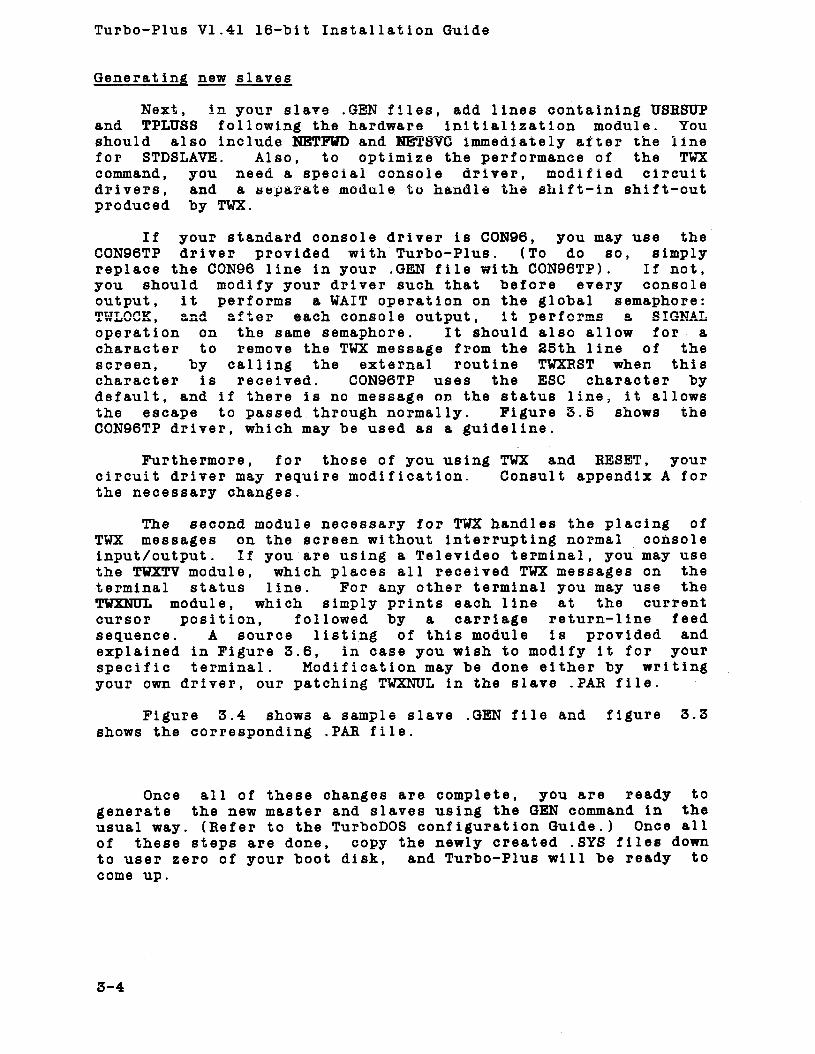
Generating new slavesNext, in your slave .GEN files, add lines containing USR8UP
and TPLUSS following the hardware initialization module. You should also include NÊTFWD and NETSVG immediately after the line for STDSLAVE. Also, to optimize the performance of the TWX command, you need a special console driver, modified circuit drivers, and a separate module to handle the shift-in shift-out produced by TWX.
If your standard console driver is C0N96, you may use the C0N96TP driver provided with Turbo-Plus. (To do so, simply replace the C0N96 line in your .GEN file with C0N96TP). If not, you should modify your driver such that before every consoleoutput, it performs a WAIT operation on the global semaphore:TWLOCK, and after each console output, it performs a SIGNAL operation on the same semaphore. It should also allow for a character to remove the TWX message from the 25th line of the screen, by calling the external routine TWXRST when this character is received. C0N96TP uses the ESC character by default, and if there is no message on the status line, it allowsthe escape to passed through normally. Figure 5.5 shows theC0N96TP driver, which may be used as a guideline.
Furthermore, for those of you using TWX and RESET, your circuit driver may require modification. Consult appendix A for the necessary changes.
The second module necessary for TWX handles the placing of TWX messages on the screen without interrupting normal console input/output. If you are using a Televideo terminal, you may use the TWXTV module, which places all received TWX messages on the terminal status line. For any other terminal you may use the TWXNUL module, which simply prints each line at the current cursor position, followed by a carriage return-line feed sequence. A source listing of this module is provided and explained in Figure 3.6, in case you wish to modify it for your specific terminal. Modification may be done either by writing your own driver, our patching TWXNUL in the slave .PAR file.
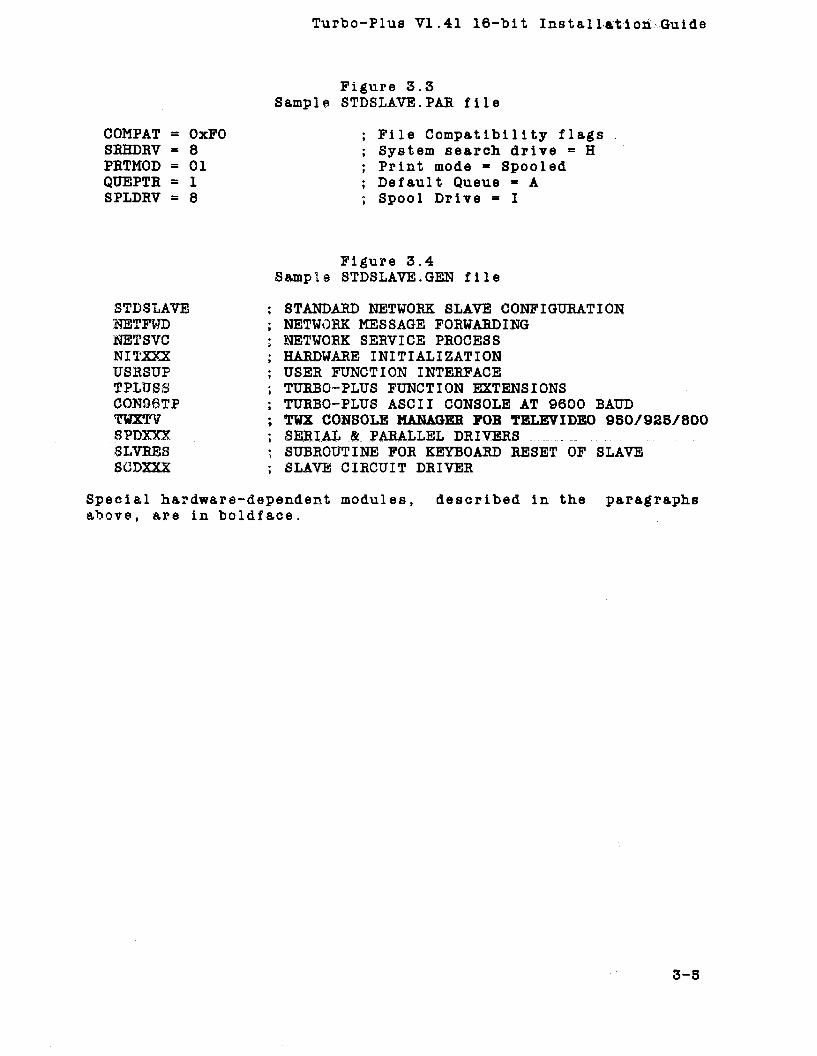
Figure 3.4 shows a sample slave .GEN file and figure 3.3 shows the corresponding .PAR file.
Once all of these changes are complete, you are ready to generate the new master and slaves using the GEN command in the usual way. (Refer to the TurboDOS configuration Guide.) Once all of these steps are done, copy the newly created .SYS files down to user zero of your boot disk, and Turbo-Plus will be ready to come up.
3-4
Turbo-Plus VI.41 16-bit InstallationGuide
Figure 3.3Sample STDSLAVE.PAH file
COMPAT = OxFO ; File Compatibility flagsSEHDRV = 8 ; System search drive = HPRTMOD = 01 ; Print mode = SpooledQUEPTR = 1 ; Default Queue = ASPLDRV = 8 ; Spool Drive = I
Figure 3.4Sample STDSLAVE.GEN file
STDSLAVE ; STANDARD NETWORK SLAVE CONFIGURATIONNETFWD ; NETWORK MESSAGE FORWARDINGNETSVC ; NETWORK SERVICE PROCESSNITXXX ; HARDWARE INITIALIZATIONXJSRSUP ; USER FUNCTION INTERFACETPLUSS ; TURBO-PLUS FUNCTION EXTENSIONSC0N96TP ; TURBO-PLUS ASCII CONSOLE AT 9600 BAUDTWXT? ; TWX CONSOLE MANAGER FOR TELEVIDEO 950/925/800SPDXXX i SERIAL& PARALLEL DRIVERS8LVRES ; SUBROUTINE FOR KEYBOARD RESET OF SLAVESCDXXX ; SLAVE CIRCUIT DRIVER
Special hardware-dependent modules, described in the paragraphs above, are in boldface.
3-5

Turbo-Plus VI.41 16-bit Installation Guide
Figure 3.5Sample Turbo-Plus Console Driver
C0N96TP: TURBODOS OPERATING SYSTEM NULL CONSOLE DRIVER COPYRIGHT 1984, SOFTWARE 2000, INC.Page 1
COPYRIGHT 1984, SOFTWARE 2000, INC. VERSION: 01/03/84
Edit History: JBG : 24-Aug-83 : Revised for TurboDOS VI.30 JBG : 12-Mar-84 : 16 bit conversion completed JBG : 3-Dec-84 : Clear status line logic added
MÖDULJS ”C0N96t ±'” ;MOd uLüí NAMbí¿INCLUDE "DREQUATE” ; DRIVER SYMBOLIC EQUIVALENCES9 LOC Data# ;LOCATE IN DATA SEGMENTCONBR: : BYTE 0x8E ;CONSOLE BAUD RATE CODE (9600 BAUD)R25CHR:
BYTE OxlB ; RESTORE 25TH LINE CHARACTERFFCHR : : BYTE AFF ;FORM FEED CHARACTERINITC: BYTE 0 ;INITIALIZATION COMPLETE FLAGEFLAG: BYTE 0BCOUNT: BYTE 0SCOUNT : WORD 09 LOC Code# ;LOCATE IN CODE SEGMENTCONDR_: :MOV AL,INITC ; GET INIT COMPLETE FLAG
TEST AL, AL ; INITIALIZATION COMPLETE FLAG SET?JNZ __CDRV ; IF SO, CONTINUEGALL INIT ; ELSE, INITIALIZE CONSOLE CHANNEL
__CDRV: MOV AL, DL ; GET FUNCTION NUMBERSUB AL, =8 ; FUNCTION NUMBER=8?JNZJMP
NSOCONSO ; IF SO, ERROR SHIFT OUT
__NSO :DEC AL ; FUNCTION NUMBER-9?JNZJMP
NS I CONS I ; IF SO, ERROR SHIFT IN
__NS I :DEC AL ; FUNCTION NUMBER = 10?JNZJMP
NOPTOPT ; IF SO, JUMP TO OPTIMIZED OUTPUT ROUTINE
__NOPT:MOV AL, DL ; GET BACK IN AOR AL, AL ; IF 0, GO TO CONSTATJZ CONST 9 •
DEC AL ; IF 1, CONINJZ CONIN 9 •
DEC AL ; IF 2, CONOUT
3-6
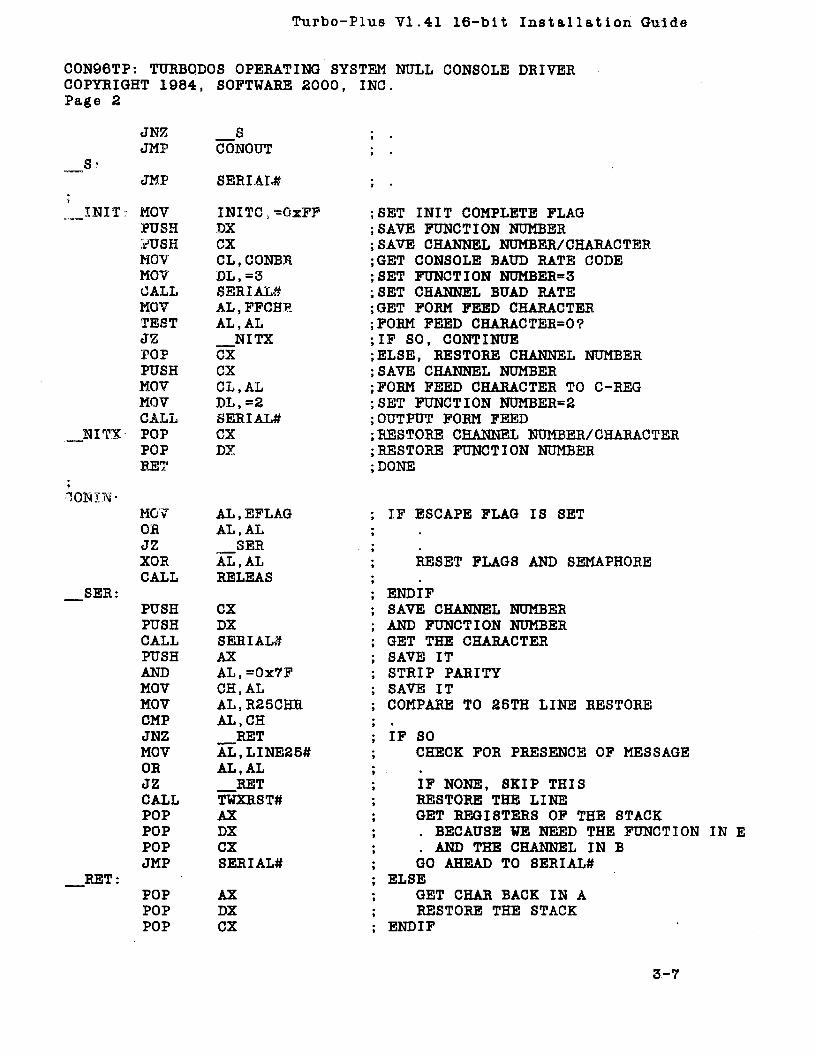
Turbo-Plus VI.41 16-bit Installation Guide
C0N96TP: TURBODOS OPERATING SYSTEM NULL CONSOLE DRIVER COPYRIGHT 1984, SOFTWARE 2000, INC.Page 2
JNZ 8JMP CONOUT
s*JMP SERIAL#
.INIT: MOV INITC ,“OxFFPUSH DXPUSH CXMOV CL,CONBRMOV DL, =3GALL SERIAL#MOV AL.FFCHRTEST AL,ALJZ NITXPOP CXPUSH CXMOV CL, ALMOV DL,= 2CALL SERIAL#
HITX: POP CXPOPRET
DX
ININcMOV AL.EFLAGOR AL, ALJZ __SERXOR AL, ALCALL RELEAS
SER:PUSH CXPUSH DXCALL SERIAL#PUSH AXAND AL,-0x7FMOV CH, ALMOV AL,R25CHRCMP AL, CHJNZ RETMOV AL,LINE25#OR AL, ALJZ RETCALL TWXRST#POP AXPOP DXPOP CXJMP SERIAL#
RET:POP AXPOP DXPOP CX
;SET INIT COMPLETE FLAG ;SAVE FUNCTION NUMBER ;SAVE CHANNEL NUMBER/CHARACTER ;GET CONSOLE BAUD RATE CODE ;SET FUNCTION NUMBER=3 ;SET CHANNEL BUAD RATE ;GET FORM FEED CHARACTER ;FORM FEED CHARACTER=0 ?;IF SO, CONTINUE;ELSE, RESTORE CHANNEL NUMBER;SAVE CHANNEL NUMBER;FORM FEED CHARACTER TO C-REG;SET FUNCTION NUMBER=2;OUTPUT FORM FEED;RESTORE CHANNEL NUMBER/CHARACTER;RESTORE FUNCTION NUMBER; DONE
IF ESCAPE FLAG IS SET
RESET FLAGS AND SEMAPHORE END IFSAVE CHANNEL NUMBER AND FUNCTION NUMBER GET THE CHARACTER SAVE IT STRIP PARITY SAVE ITCOMPARE TO 25TH LINE RESTORE IF SO
CHECK FOR PRESENCE OF MESSAGEIF NONE, SKIP THISRESTORE THE LINEGET REGISTERS OF THE STACK. BECAUSE WE NEED THE FUNCTION IN E. AND THE CHANNEL IN BGO AHEAD TO SERIAL#
ELSEGET CHAR BACK IN A RESTORE THE STACK
ENDIF
3-7
Turbo-Plus VI.41 16-bit Installation Guide
C0N96TP: TURBODOS OPERATING SYSTEM NULL CONSOLE DRIVER COPYRIGHT 1984, SOFTWARE 2000, INC.Page 3
RET ■ RETURNCONST:
MOV AL.EFLAG IF ESCAPE FLAG IS SETOR AL, ALJZ SERPUSH BX SAVE HLMOV BX,SCOUNT CHECK CON STAT COUNTINC BX BUMP ITMOV SCOUNT,BX SAVE NEW STAT COUNTMOV AL, BH IF 0OR AL, BLJNZ NRCALL RELEAS RELEASE ESCAPE FLAG
__NR:POP BX
END IFRESTORE HL
__SER:PUSH CX
END IFSAVE CHANNEL NUMBER
CALL SERIAL# AND GO TO SERIALPOP DX GET CHANNEL NUMBER BACK IN DOR AL, AL IF NOTHING AVAILABLE, JUST RETURNJNZ __CRET *
__C:PUSH AX SAVE REGISTERS FOR RETURNPUSH CXAND CL,=0x7F STRIP PARITYMOV CH, CL SAVE ITMOV AL,R25CHR COMPARE TO 25TH LINE RESTORECMP AL, CH *JNZ RST IF SOMOV AL, LINES5# CHECK FOR PRESENCE OF MESSAGEOR AL, ALJZ RST IF NONE, SKIP THIS'CALL TWXRST# RESTORE THE LINEMOV CH, DH GET CHANNEL NUMBER BACK IN BMOV DL, =1 CALL CONIN TO FLUSH THE BYTECALL SERIAL#POP CX GET REGISTERS OFF STACKPOP AX *XOR AL, AL FLAG NO CHARACTER AVAILABLEJMP __RET ELSE
__RST : *POP CX RESTORE REGISTERS NORMALLYPOP AX *
__RET: END IFRET RETURN
RELEAS:MOV EFLAG,AL » •MOV BCOUNT,AL > •
3-8

Turbo-Plus VI.41 16-bit Installation Guide
C0N96TP: TURBODOS OPERATING SYSTEM NULL CONSOLE DRIVERINC.
Page 4SAVE REGISTERS
RELEASE CONSOLERESTORE REGISTERS
END IF RETURN
CONOUT:
NSEQ :
NESC :
CONT:
IT 1984, SOFTWARE 20C
PUSH CXPUSH DXPUSH BXMOV BX.&TWLOCK#CALL SIGNAL#POP BXPOP DXPOP CXRET
MOV AL.EFLAGOR AL, ALJZ NSEQMOV AL,BCOUNTDEC ALMOV BCOUNT,ALJNZ __CONTMOV EFLAG,ALJM? ___CONTMOV AL, CLAND AL,=Ox?FCMP AL,-OxlBJNZ NESCOR AL,=OxFFMOV EFLAG,ALINC ALMOV WORD SCOUNTPUSH CXPUSH DXPUSH BXMOV BX,&TWLOCK#CALL WAIT#POP BXPOP DXPOP CXMOV AL, CLAND AL,=0x7FCMP AL,=OxlBJNZ NE2MOV AL, =6MOV BCOUNT,ALOR AL,=OxFFMOV EFLAG,ALINC ALMOV BYTE SCOUNTMOV SCOUNT+1,AL
NES:
IF WE ARE IN THE MIDDLE OF AN ESCAPE SEQU
GET BYTE COUNTER DECREMENT IT STORE IT IF IT’S ZERO
TURN OFF ESCAPE FLAG END IF
ELSEGET BYTE IN A STRIP PARITY CHECK FOR ESCAPE IF ESCAPE
SET FLAG
AND INITIALIZE STAT COUNTER END IFSAVE REGISTERS
WAIT FOR CONSOLE FREE RESTORE REGISTERS
END IFGET BYTE IN A STRIP PARITY IF IT’S AN ESCAPE
INITIALIZE BYTE COUNTERSET FLAGAND INITIALIZE STAT COUNT
ENDIF
3-9

Turbo-Plus VI.41 16-bit Installation Guide
C0N96TP: TURBODOS OPERATING SYSTEM NULL CONSOLE DRIVER COPYRIGHT 1984, SOFTWARE 2000, INC.Page 5
NR:
OPT:
NR:
NSEQ:
NR1 :
CONSO: CONSI:
CALL SERIAL# ; PRINT THE BYTEMOV AT,, EFLAG ; CHECK ESCAPE FLAGOR a l ’a l ; IF IT WAS NOT SETJZ __NRRET ;PUSH CX ; SAVE REGISTERSPUSH DX ! ,PUSH BX ! *MOV BX, &TWLOCK# ; RELEASE CONSOLEn A T T WA4JJJ o t nvr at«0 X VXXM AXlTT I ,
POP BX ; RESTORE REGISTERSPOP DX ! . *POP CX ; ENDIFRET ; RETURN
JMP SERIAL#MOV AL,TWLOCK# 9 LOOK AT TWX LOCKOR AL, AL 9 IF IN USE, RETURN UNSUCCESSFULJNZ __NRRET 9
MOV AL,EFLAG 9 ELSE, IF IN MIDDLE OF ESCAPE SEQUENCEOR AL, ALJZ NSEQ 9 •XOR AL, AL 9 RETURN UNSUCCESSFULRET 9 *
9 ELSE IF THE CHARACTER IS AN ESCAPEMOV AL, CL 9 #AND AL,=0x7F 9SUB AL,sAESC 9 RETURN UNSUCCESSFULJNZ __NR1RETJMP SERIAL#
9
9 ELSE, JUST DO THE OUTPUT
CALL DMS# ;POSITION TO NEXT LINE BYTE ACR,ALF,0 RET ;DONE
END

Turbo-Plus VI.41 16-bit Installation Guide
Figure 3.6TWX Null Console Manager
TWXNUL: Turbo-Plus TWXNUL driver Copyright 1985, Microserve, Inc.Page 1
* Default Shi Ít-In/Shi ft-Out controlsî
ÁUTHOR: Jim Gabriel1» Microserve, Inc .; Edit History: JBG : 24-Aug-83 : Revised for TurboDOS VI.30* JBG : 12~Mar-84 : 16 bit conversion completed; JBG : 25-Nov-84 : 1.41 equates added; JBG : 3-Dec-84 : Clear status line logic added
MODULE "TWXNUL”¿INCLUDE ’’DREQUATE”#INCLUDE "TEQUATE”
TjOC Data#LINE25: :
BYTE ÛSICODE: :
BYTE ACB,ALF,OxOO,0x00,0x00,0x00,0x00,0x00,0x00,0x00SOCODE: :
BYTE ACB,ALF,0x00 ,0x00,0x00,0x00,0x00,0x00,0x00,0x00RSTOOD: :
BYTE 0,0,0,0,0,0, 0,0,0,0«
LûC Code#TWXSI::
PUSHF ; SAVE FLAGSPUSH AX ; SAVE REGISTERSPUSH CX ! *PUSH DX J tPUSH BX J ,MOV BX,&SIC0DE ; SET HL FOB SHIFT INJMPS SCONT
TWXSO: :PUSHF ; SAVE FLAGSPUSH AX ; SAVE REGISTERSPUSH CX 9 *PUSH DX * *PUSH BX ? •OB AL,=0xFF ; SIGNAL THAT A MESSAGE IS PRESENTMOV LINE25.AL J #MOV BX,&S0C0DE ; SET HL FOB SHIFT OUTJMPS SCONT J .
3-11

Turbo-Plus VI.41 16-bit Installation Guide
TWXNUL: Turbo-Plus TWXNUL driver Copyright 1985, Microserve, Inc. Page 2TWXRST: :
PUSHF SAVE FLAGSPUSH AX SAVE REGISTERSPUSH CX *PUSH DX *PUSH BX *XOR AL, AL SIGNAL THAT NO MESSAGE ISMOV LINE25,AL #MOV BX,&RSTCOD SET HL FOR SHIFT OUT
9fl/iAvrm - o o u m ;
MOV DH,CONAST# GET CONSOLE CHANNEL IN DCLOOP: FOR EACH BYTE DO
MOV AL,[BX] GET BYTE IN EOR AL, AL .JZ SRET «MOV DL.ALMOV CL,=COMOUT SET PARM FOR CONOUTPUSH DX SAVE CHANNEL NUMBERPUSH BX SAVE POINTERXOR AL, AL *CALL XTNTRY# SEND TO COM CHANNELPOP BX RESTORE POINTERPOP DX RESTORE CH NO.INC BX INCREASE POINTERJMP CLOOP END DO
SRET: POP BX RESTORE REGISTERSPOP DXPOP CXPOPPOPFRET
AXRETURN
END
3-12
Turbo-Plus VI.41 16-bit Installation Guide
To modify this driver you may either write your own, or use the symbolic patch facility. The primary reason to write your own would be to perform operations other than a simple console output of a string of bytes, such as code to also keep track of the cursor position before the message.
If you wish to do this, the module must meet the following specifications: It must have the global entry points TWXSI,which will be called before every TWX line, to position the cursor as desired; TWXSO, which will be called after every TWX line, to restore the cursor; and TWXRST, which will be called to remove the TWX message from the 25th line. All console output must be done via calls to the comm channel, which is defined in register DH upon entry to the routine.
If your only modifications involve changing the string of bytes to be sent out before and after each message, it will probably be more convenient to use the TurboDOS symbolic patch facility. The routine allows for up to ten bytes to be patched at locations SICODE, SOCODE, and HSTCOD for the sequences to be sent out before the message, after the message, and to remove the message respectively. For example, if you wish to send out five bells and a clear screen at the beginning, five bells a n d a carriage return-l'ine feed sequence at the end, and an ESCAPE, control-G sequence to remove the message, your .PAH file for the slave could be patched as follows, using TWXNUX:
SICODE * 0x07,0x07,0x07,0x07,0x07,0x00 SOCODE = 0x07,0x07,0x07,0x07,0x07,0x0D,0x0A HSTCOD = OxlB,0x07
However, if you are using one type of terminal frequently, it may be easiest to write a special driver for it, even if it only involves changing the bytes, so that you need not change every .PAR file which you use. An example of such a driver is TWXTV, shown in Figure 3.7, written for the Televideo 800, 925, and 950 terminals. This driver is designed to take advantage of the status line of the terminal. All TWX messages will appear on this line, leaving the ussr’s screen intact.
3-13

Turbo-Plus VI.41 16-bit Installation Guide
Figure 3.7TWX Televideo Console Manager
TWXTY: Turbo-Plus TWXTV driver Copyright 1985, Microserve, Inc.Page 1
Shift-In/Shift-Qut controls for Televideo 925/950/800 seriesAUTHOR: Jim Gabriel
Microserve, Inc.Edit History: JBG :
JBG : JBG : JBG :
24- Aug-83 12-Mar-8425- N0V-84 3-Dec-84
MODULE ”TWXTV”¿INCLUDE #INCLUDE
”DREQUATE””TEQUATE”
9 LOC Data#LINE25: SICODE:
BYTE 0
Revised for TurboDOS VI.30 18 bit conversion completed 1.41 equates added Clear status line logic added
BYTE ABEL,AESC,0x67,AESC,0x66,AESC,0x47,0x3C,0x00,0x00SOCODE::
BYTE ACR,0x00,0x00,0x00,0x00,0x00,0x00,0x00,0x00,0x00RSTCOD::
BYTE AESC,0x68,0,0,0,0,0,0,0,0LOC Code#
TWXSI : :PUSHFPUSH AXPUSH CXPUSH DXPUSH BXMOV BX,&SIC0DEJMPS SCONT
TWXSO: :PUSHFPUSH AXPUSH CXPUSH DXPUSH BXOR AL,=0xFFMOV LINE25.ALMOV BX, &S0C0DEJMPS SCONT
SAVE FLAGS SAVE REGISTERS
SET HL FOR SHIFT IN
SAVE FLAGS SAVE REGISTERS
SIGNAL THAT A MESSAGE IS PRESENT SET HL FOR SHIFT OUT
3-14

Turbo-Plus VI.41 16-bit Installation Guide
TWXTV: Turbo-Plus TWXTV driver Copyright 1985, Microserve, Inc. Page 2TWXRST:
scorn
CLOD?
SRET:
PUSHF SAVE FLAGSPUSH AX SAVE REGISTERSPUSH CX *PUSH DX *PUSH BXXOR AL.AL SIGNAL THAT NO MESSAGEMOV LINE85,ALMOV BX,&RSTCOD SET HL FOR SHIFT OUT
MOV DH,CONAST# GET CONSOLE CHANNEL IN FOR EACH BYTE DO
MOV AL,[BX] GET BYTE IN EOB AL, AL *JZ SRETMOV DL, AL #MOV CL,=COKOUT SET PARM FOR CONOUTPUSH DX SAVE CHANNEL NUMBERPUSH BX SAVE POINTERXOR AL, ALCALL XTNTRY# SEND TO COM CHANNELPOP BX RESTORE POINTERPOP DX RESTORE CH NO.INC BX INCREASE POINTERJMP CLOOP END DOPOP BX RESTORE REGISTERSPOP DX •
POP CXPOP AXPOPF *RET RETURN
END
3-15

Turbo-Plus VI.41 16-bit Installation Guide
3-16
Turbo-Plus VI.41 16-bit Installation Guide
INSTALLING BACKGROUND BATCHOverview
The Turbo-Plus Background Batch System operates on its own dedicated slave board. It requires a number of .CMD files and related data files. It allows job scheduling, maintains a log of batch operation, and offers utilities to list current and pending jobs and to delete jobs.
The batch system requires two user areas: one on the system boot disk, and another on any drive on the system. Furthermore, it requires the presence of supporting .CMD files in user 0 of the system search drive. All of the modules can be easily installed in any user area using the background batch installation program, BBINSTAL.Patching
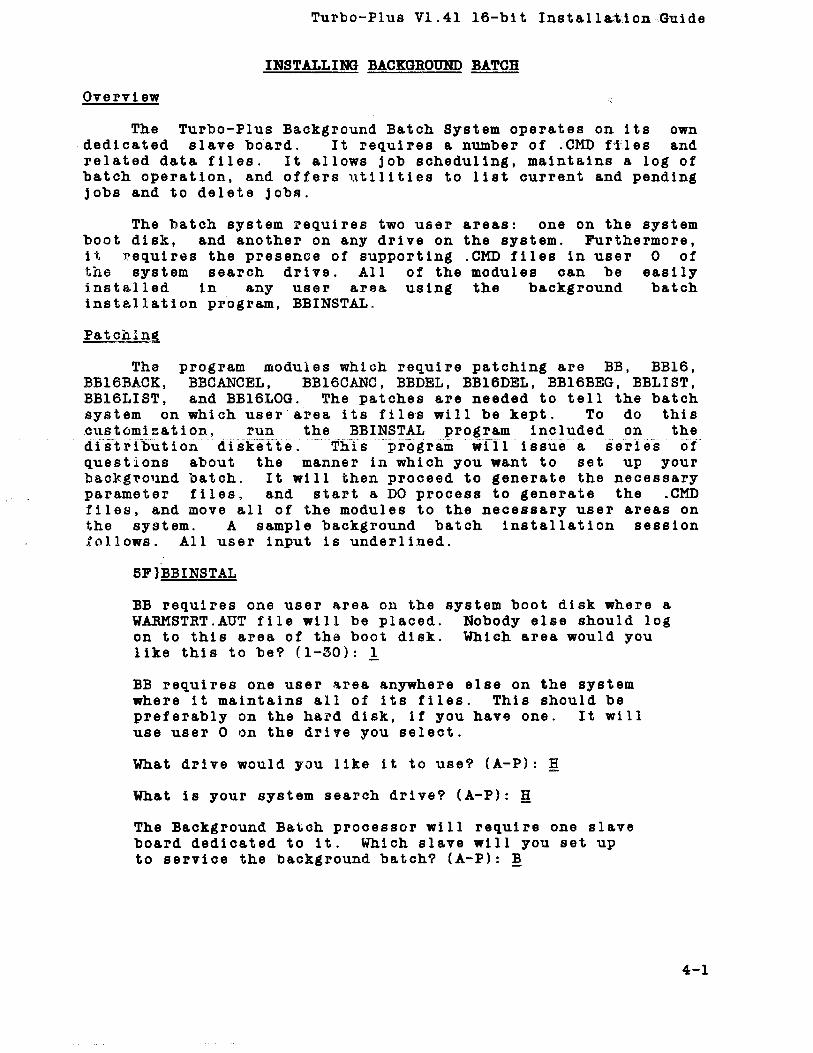
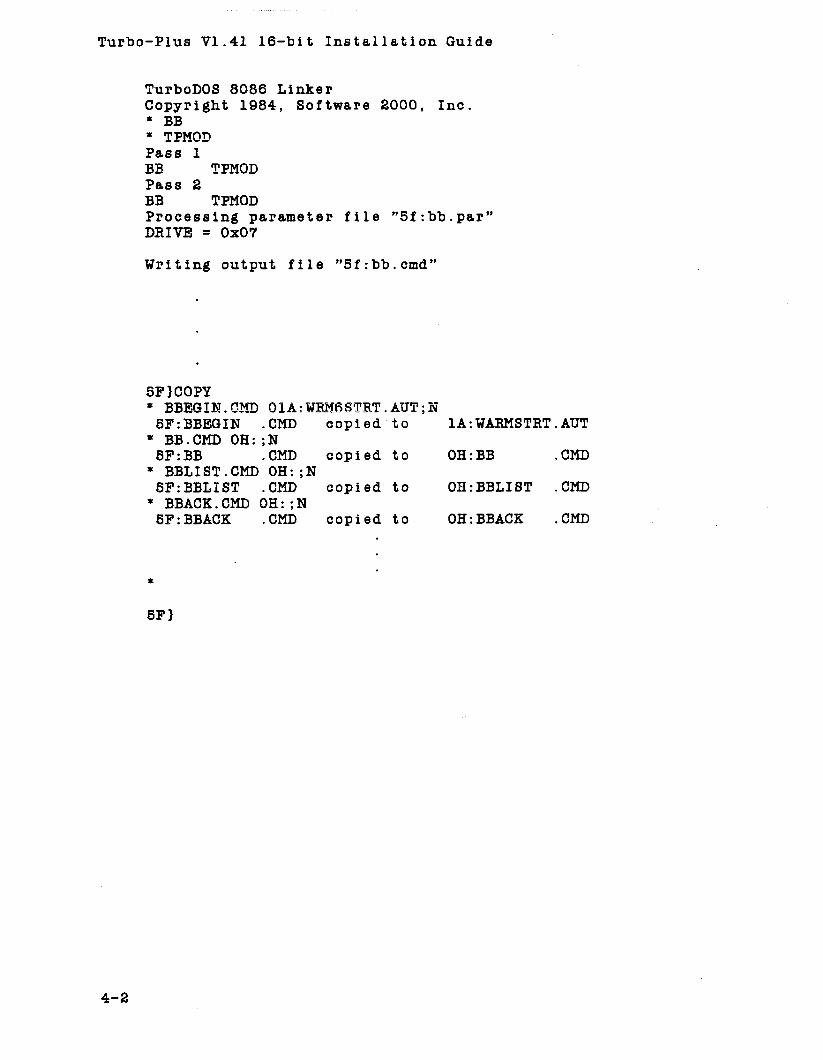
The program modules which require patching are BB, BB16, BB16BACK, BBCANCEL, BB16CANC, BBDEL, BB16DEL, BB16BEG, BBLIST, BB16LIST, and BB16L0G. The patches are needed to tell the batchsystem on which user area its files will be kept. To do thiscustomisation, run the BBINSTAL program included on the distribution diskette. T h i s ’programwill issuea series of questions about the manner in which you want to set up yourbackground batch. It will then proceed to generate the necessary parameter files, and start a DO process to generate the .CMD files, and move all of the modules to the necessary user areas on the system. A sample background batch installation session follows. All user input is underlined.
5F)BBINSTALBB requires one user area on the system boot disk where a WARMSTRT.AUT file will be placed. Nobody else should log on to this area of the boot disk. Which area would you like this to be? (1-30): 1
BB requires one user area anywhere else on the system where it maintains all of its files. This should be preferably on the hard disk, if you have one. It will use user 0 on the drive you select.What drive would you like it to use? (A-P): HWhat is your system search drive? (A-P): HThe Background Batch processor will require one slave board dedicated to it. Which slave will you set up to service the background batch? (A-P): B
4-1
Turbo-Plus VI.41 16-bit Installation Guide
TurboDOS 8086 LinkerCopyright 1984, Software 2000, Inc.* BB* TPMOD Pass 1BB TPMODPass 2BB TPMODProcessing parameter file ”5f:bb.par DRIVE = 0x07Writing output file ”5f:bb.cmd”
5P1C0PY* BBEGIN.CMD 01A:WRM6STRT.AUT:N5F:BBEGIN .CMD copied to
* BB.CMD OH:;N8F:BB .CMD copied to* BBLIST.CMD OH:;N8F:BBLIST .CMD copied to* BBACK.CMD OH:;N5F:BBACK .CMD copied to
1A :WARMSTRT.AUT OH:BB .CMD 0H:BBLIST .CMD OH:BBACK .CMD
6F }
4-2

Turbo-Plus VI.41 16-bit Instal 1 ation Guide
Slave GenerationFinally, a number of modifications to your system generation
must be completed:Two changes must be made in the system .SYS files: First, a
new slave must be generated for the batch system. This slave should have one change made in its .GEN file: Replace its console driver (typically C0N96) with CONBB.O, also supplied on user 0 of the installation disk. The slave’s .FAR file should be changed so that the slave recognizes the default warmstart filename as ’WRM6STRT.AUT’ , by inserting the patch WABMFN = ’WRM6STRT’ .Furthermore, the LOGTTSR parameter should be included, setting up the slave to log automatically onto the user area containing WRM6STRT.AUT. (E.g. If you choose to warmstart into user 1 of the boot drive, the patch should be LOGUSR = 1.) It is also advisable to have this slave printing to some remote queue or to file, rather than directly to a printer or to console, since in the latter two cases it would be easy to lose desired output produced by any jobs running in the batch processor. This is accomplished via the PRTMOD and QUEPTR parameters documented in the TurboDOS Configuration Guide. This slave must then be generated into the system master file, by changing the slave table, NMBSLV parameter, andNMBXXX parameter (where XXX is the particular slave.) The new slave and master must be generated in the normal system generation manner, and the Turbo-Plus batch system will be ready for operation upon system reset.
4-3

Turbo-Plus VI.41 16-bit Installation Guide
4-4

Turbo-Plus VI.41 16-bit Installation Guide
Appendix AModifying a Slave Circuit Driver for Turbo-Plus
If you are using slave boards with incorrect circuit drivers, it is highly recommended that you patch the slave circuit driver source code (SCD???.A) in order to use TWX and BESET commands.
The change to be made occurs at the end of the interrupt service routine in the circuit driver. If the last two lines ofyour routine are:
STI ; Enable InterruptsBETI ; Return
replace them with:JMP ISKXIT# ; Jump to ISR exit
If the last two lines of that routine are different, contact yourdealer.
A-l