Toon Boom Storyboard Pro 20 User Guide
1106
TOON BOOM ANIMATION INC. 4200 Saint-Laurent, Suite 1020 Montreal, Quebec, Canada H2W 2R2 +1 514 278 8666 [email protected] toonboom.com Toon Boom Storyboard Pro 20 User Guide
-
Upload
khangminh22 -
Category
Documents
-
view
1 -
download
0
Transcript of Toon Boom Storyboard Pro 20 User Guide

TOON BOOM ANIMATION INC.4200 Saint-Laurent, Suite 1020Montreal, Quebec, CanadaH2W 2R2
+1 514 278 [email protected]
Toon BoomStoryboard Pro 20
User Guide
Legal NoticesToon Boom Animation Inc.4200 Saint-Laurent, Suite 1020Montreal, Quebec, CanadaH2W 2R2
Tel: +1 514 278 8666Fax: +1 514 278 2666
toonboom.com
Disclaimer
The content of this document is the property of Toon Boom Animation Inc. and is copyrighted. Any reproduction in whole or in part is strictly prohibited.
The content of this document is covered by a specific limited warranty and exclusions and limit of liability under the applicable License Agreement as supplemented by the special terms and conditions for Adobe®Flash® File Format (SWF). For details, refer to the License Agreement and to those special terms and conditions.
Trademarks
Toon Boom® is a registered trademark. Storyboard Pro™ and the Toon Boom logo are trademarks of Toon Boom Animation Inc. All other trademarks of the property of their respective owners.
Publication Date
03-26-2021
Copyright © 2021 Toon Boom Animation Inc., a Corus Entertainment Inc. company. All rights reserved.
1
Storyboard Pro 20 User Guide
Table of Contents
Table of ContentsTable of Contents 2
Chapter 1: Introduction 22
Chapter 1: Installing Toon Boom Storyboard Pro 23
Chapter 2: Projects 28
Starting Toon Boom Storyboard Pro 29
Creating Projects 31
Creating Projects from the Welcome Screen 32
Creating Projects from the File Menu 33
Creating a Project from a Final Draft Script 35
Creating Projects from Harmony Scenes 41
Creating Custom Resolutions 43
Opening Projects 45
About Saving 52
Saving Projects 53
Saving Projects as a Single File 54
Recovering A Project Saved in Storyboard Pro Packed File Format From The Cache 57
Auto-saving Your Project 58
Saving Several Versions of a Project 59
Deleting Old Project Versions 61
About Project Optimization 63
Optimizing Projects 64
Optimizing Drawings 65
Optimization Best Practices 66
Plain Vector Versus Texture Brush 67
Bitmap Import Optimization 68
Flattening Drawings 69
About Project Backup 70
Backing Up Projects 71
Restoring Backups 72
2
About Project Properties 73
About the File Structure of a Storyboard Pro Project 74
Chapter 3: Interface 78
Changing the Theme Colours 80
Changing the User Interface Language 81
About Menus 83
About Views 84
Adding Views 86
Renaming a View 88
Closing Views 89
Moving Views 90
Resizing Views 91
Expanding or Collapsing Views 92
About Toolbars 93
Adding and Closing Toolbars 94
Moving Toolbars 95
Customizing Toolbars 96
About Workspaces 98
Loading Workspaces 100
Creating a Workspace 101
Renaming a Workspace 102
Saving a Workspace 103
Deleting a Workspace 104
Showing and Hiding Workspaces 105
Reordering the Workspace List 106
Restoring the Default Workspace 107
Interface Navigation 108
Chapter 4: Storyboard Structure 112
About Scenes 114
Creating Scenes 115
3
Storyboard Pro 20 User Guide
Table of Contents
Importing Images as Scenes 118
Deleting Scenes 120
Renaming Scenes 121
Locking and Unlocking Names 123
Splitting Scenes 124
Selecting All Panels 126
Flipping Scenes 127
Expanding and Collapsing Scenes 129
Working with a Collapsed Scene 130
About Panels 131
Creating Panels 132
Renaming Panels 135
Deleting Panels 137
Duplicating Panels 138
Moving Panels 139
Customizing the Panel Colour 142
Copying and Pasting Panels Between Projects 144
About Sequences 148
Creating Sequences 149
Renaming Sequences 152
Removing Sequences 154
Joining and Splitting Sequences 155
Selecting All Panels in a Sequence 157
About Acts 158
Enabling Acts 159
Starting New Acts 160
Joining Acts 162
Selecting All Panels in an Act 163
Automatically Inserting Images as Acts, Scenes, Panels and Layers 164
Setting a Default Layer Layout for New Panels 168
4
Regenerating Thumbnails 169
Chapter 5: Script and Captions 170
Writing a Script in Storyboard Pro 172
Changing the Text Format in the Script and in Captions 173
Setting the Default Caption Format 177
Importing a Script 178
About Caption Fields 180
Adding Captions 181
Renaming Captions 184
Deleting Captions 185
Saving the Caption Layout as Default 186
Expanding and Collapsing Captions 187
Hiding Captions 188
Adding Text to Captions 189
Searching Text in Captions 192
Searching and Replacing Text in Captions 194
About Editing a Project's Captions in a Spreadsheet Editor 197
Exporting Captions to CSV 198
Editing a CSV File Exported by Storyboard Pro 201
Importing Captions from a CSV File 202
Adding Sketch Captions 204
About Spell Checking 207
Enabling and Disabling Automatic Spell Checking 209
Changing the Language Dictionary for Spell Checking 210
Finding and Correcting Spelling Mistakes 212
Adding Words to the Personal Dictionary 216
Removing Words from the Personal Dictionary 218
Chapter 6: Layers 220
Viewing the List of Layers 221
About Layer Types 224
5
Storyboard Pro 20 User Guide

Table of Contents
Adding Layers 226
Selecting Layers 227
Duplicating Layers 228
Renaming Layers 229
Deleting Layers 230
Copying Layers 231
Reordering Layers 233
Grouping Layers 236
Showing and Hiding Layers 238
Locking and Unlocking Layers 240
Transforming Layers 242
Resetting Transformations 245
Merging Layers 246
Changing Layer Opacity 249
Converting a Template or Group to a Drawing Layer 250
Converting Layers between Bitmap and Vector Layers 251
Setting Textured Vector Brush Resolution 253
Setting the Resolution of Bitmap Layers 255
Importing Images as Layers 257
Vectorizing Images on Import 261
Chapter 7: Drawing 266
About Drawing Tools 267
About the Brush Tool 272
Drawing with the Brush Tool 274
Creating a Solid Brush 276
Creating a Textured Brush 280
Configuring a Textured Brush Tip 281
Adding a Brush Tip 285
Renaming Brush Tips 287
Deleting Brush Tips 288
6
Exporting Brush Tips 289
Importing Brush Tips 291
Changing the Brush Tip Display 293
Configuring Smoothing for a Textured Brush 294
Configuring Antialiasing and Transparency for a Textured Brush 295
Configuring a Textured Brush with a Dual Tip 297
Configuring a Brush with a Paper Texture 300
Adding a Paper Texture 302
Renaming a Paper Texture 304
Deleting Paper Textures 306
Exporting Paper Textures 308
Importing Paper Textures 310
Changing the Paper Texture Display 312
About Brush Presets 313
Creating a Brush Preset 314
Selecting a Brush Preset 315
Updating a Brush Preset 316
Renaming a Brush Preset 317
Deleting a Brush Preset 318
Exporting Brush Presets 319
Importing Brush Presets 320
Changing the Brush Preset Display 321
Painting with the Stencil Brush tool 322
About the Brush Tool Modes 327
About the Pencil Tool 331
Drawing with the Pencil Tool 332
Converting Pencil Lines to Brush Strokes 334
Using Pencil Presets 335
Creating a Pencil 340
About Pencil Line Textures 343
7
Storyboard Pro 20 User Guide
Table of Contents
Drawing with Pencil Textures 344
Applying Texture to a Pencil Line 346
Editing a Pencil Line's Texture 348
About the Pencil Tool Modes 350
About the Rectangle, Ellipse and Line Tools 353
Drawing lines with the Line Tool 354
Drawing Curved Lines with the Line Tool 355
Drawing shapes with the Rectangle or Ellipse tools 358
About the Rectangle, Ellipse and Line Tool Modes 359
About the Polyline Tool 364
Drawing with the Polyline Tool 365
About the Polyline Tool Modes 366
About the Stamp Tool 369
Creating a Stamp 371
Creating a Multi-Drawing Stamp 373
Configuring a Stamp 376
Updating a Stamp 382
Drawing with the Stamp Tool 384
Renaming Stamps 386
Deleting Stamps 387
Exporting Stamps 388
Importing Stamps 389
Changing The Way Stamps Are Displayed 390
Stamp Tool Modes 391
About the Eraser Tool 392
Erasing 393
Creating a Solid Eraser 395
Creating a Textured Eraser 399
About Eraser Presets 401
Creating an Eraser Preset 402
8
Selecting an Eraser Preset 403
Updating a Brush Preset 404
Renaming an Eraser Preset 405
Deleting a Brush Preset 406
Exporting Eraser Presets 407
Importing Eraser Presets 408
Changing the Brush Preset Display 409
About Eraser Tool Modes 410
About the Select Tool 412
Selecting Artwork with the Select Tool 413
Transforming Artwork with the Select Tool. 414
Copying Artwork on Multiple Panels 418
Editing Artwork on Multiple Panels 420
Flattening a Selection 422
Grouping Objects 423
Converting Strokes 424
Using the Select by Colour Tool 425
About the Select Tool Modes 426
About the Cutter Tool 428
Cutting Artwork 429
About the Cutter Tool Modes 434
About the Contour Editor Tool 437
Reshaping with the Contour Editor Tool 438
Smoothing a Selection 441
About the Contour Editor Tool Modes 442
About the Centerline Editor 445
Reshaping Brush Strokes Using the Centerline Editor 447
Centerline Editor Tool Modes 451
About the Perspective Tool 452
Deforming a Drawing Using the Perspective Tool 453
9
Storyboard Pro 20 User Guide
Table of Contents
About the Perspective Tool Modes 454
About the Text Tool 456
Adding Text 457
Formatting Text 458
Resizing the Text Box 461
Breaking Text 462
About Tool Presets 463
Creating Tool Presets 464
Updating Tool Presets 467
Deleting Tool Presets 468
Importing and Exporting Tool Presets 469
Locking the Tool Preset Layer Selection 470
About Drawing Space Navigation 471
Zooming the Stage View 472
Panning the Stage View 473
Rotating the Stage View 474
About Drawing Space Efficiency 475
Displaying the Grid 476
Using the Light Table 478
About Onion Skin 479
Enabling the Onion Skin 480
Setting the Amount of Neighbouring Panels to Include in Onion Skin 481
Enabling Onion Skin for the Current Layer Only 483
Excluding Layers from the Onion Skin 485
Flipping Through Onion Skin-Enabled Panels 487
Selecting Specific Panels to Include in Onion Skin 488
About Quick Swap Shortcut 489
Antialiasing OpenGL Lines 490
Changing the Drawing Tool Cursor 492
About Pen Stabilization 493
10
Using Drawing Tool Stabilization 495
About Pen Pressure Curve Customization 497
Customizing the Pen Pressure Curve 498
About Alignment Guides 501
Adding Alignment Guides 502
Moving Alignment Guides 503
Snapping to Alignment Guides 504
Locking and Unlocking Alignment Guides 505
Hiding and Displaying Alignment Guides 506
Clearing Alignment Guides 507
About Drawing Guides 508
Adding Drawing Guides 515
Selecting the Active Drawing Guide 517
Renaming Drawing Guides 519
Editing Drawing Guides 521
Adjusting a Ruler Drawing Guide 522
Adjusting a Square Grid Drawing Guide 524
Adjusting an Isometric Perspective Drawing Guide 526
Adjusting a 1-Point Perspective Drawing Guide 529
Adjusting a 2-Points Perspective Drawing Guide 531
Adjusting a 3-Points Perspective (Bird's-Eye View) Drawing Guide 533
Adjusting a 3-Points Perspective (Worm's Eye View) Drawing Guide 535
Adjusting a 3-Points Perspective (Horizontal Pan) Drawing Guide 537
Adjusting the 3-Points Perspective (Vertical Pan) Drawing Guide 539
Adjusting a 4-Points Continuous Perspective Drawing Guide 541
Adjusting a 4-Points Perspective (Vertical Pan) Drawing Guide 543
Adjusting a 5-Points Perspective (Fisheye) Drawing Guide 546
Locking Guides to Prevent Editing Them 548
Drawing with Drawing Guides 549
Locking Drawing Strokes to a Specific Axis 551
11
Storyboard Pro 20 User Guide
Table of Contents
Drawing Freehand Perspective with Drawing Guides 552
Viewing Drawing Guide Reference Lines 553
Minimizing Guide Cursor Axes Display 554
Erasing Using Drawing Guides 555
Enabling and Disabling Drawing Guides 556
Reordering Drawing Guide Lists 557
Cutting and Pasting Drawing Guides 558
Copying & Pasting Drawing Guides 559
Exporting and Importing Drawing Guides 560
Deleting Drawing Guides 561
Automatically Filling Drawings with a Matte 562
Blurring Artwork 566
Sharing Drawings 568
Chapter 8: Colour 570
About Colour Swatches 571
Changing the Current Colour 572
Adding Colour Swatches 575
Renaming Colour Swatches 577
Deleting Colour Swatches 578
Creating Gradients 579
Sharing Colour Palettes 580
About Colour Tools 581
About the Paint Tool 582
About Painting Modes 583
Painting 584
Using the Dropper Tool 586
Using the Edit Gradient - Texture Tool 588
Using the Close Gap Tool 591
About Colour Models 593
Opening the Model View 594
12
Importing and Deleting Models 595
Navigating the Model View 597
Using Models 598
Chapter 9: Timing 602
About the Panel Duration 603
Changing the Panel Duration 604
Setting the Panel's In and Out Point 608
Splitting a Panel at the Current Frame 610
Locking the Scene Duration 611
Selecting All Panels Forward 613
About Animatic Editing Mode 614
Enabling and Disabling Animatic Editing Mode 615
Adjusting the In-Point and Out-Point of Panels in Animatic Editing Mode 616
Moving Panels In Gaps 620
Rippling Panels in Animatic Editing Mode 621
Clearing and Deleting Panels in Animatic Editing Mode 622
About Playback 625
Playing Back the Animatic 626
High Quality Playback 627
About Markers 630
Creating Markers on a Current Frame 631
Deleting Markers 632
Editing Markers 633
Displaying Marker Tooltips 636
Moving Markers 637
Exporting Markers to Toon Boom Harmony 638
Chapter 10: Animation 640
Animating Layers 641
Moving the Pivot Point of a Drawing Layer 647
Adding Ease-In and Ease-Out to a Layer Animation 650
13
Storyboard Pro 20 User Guide
Table of Contents
Copying and Pasting Keyframes 653
Spreading the Layer Motion 656
About Animation Functions 657
Tweaking an Animation Path 660
Chapter 11: Camera 666
About the Stage and Camera Views 667
Positioning the Camera 668
Resetting the Camera 670
Copying and Pasting the Camera 671
About Camera Movements 674
Adding Keyframes 676
Deleting Keyframes 680
Animating Keyframes 681
Timing Keyframes 684
Spreading Camera Motions Across Panels 686
Adding Ease-In and Ease-Out to a Camera Animation 687
Snapping Keyframes to Sound Clips 689
Syncing Keyframes 690
About the Camera Path 691
Adding Control Points 693
Deleting Control Points 695
Adjusting the Curve of a Camera Movement 696
Pinning Layer to Camera 698
Chapter 12: 3D 700
About Staging in 3D Space 701
Converting the Current Scene to 3D 702
Resetting the Current Scene to 2D 703
Viewing Objects from the Top and Side 704
Positioning 2D Objects in 3D Space 705
Moving Layers in the 3D Space and Maintaining their Size 710
14

Drawing on 2D Layers in a 3D Space 712
Navigating the 3D Space 713
About 3D Objects 716
Importing 3D Objects to your Project Library 717
About Adding 3D Models to 3D Scenes 719
About the Scale Factor of 3D Objects 720
Setting the Scale Factor for a 3D Model 722
Determining the Scale Factor for a 3D model 724
Setting the Default Scale Factor for 3D Models 726
Adding a 3D Object to a Panel in a 3D Scene 727
Positioning, Rotating and Scaling 3D Objects 728
Positioning, Rotating and Scaling 3D Sub-Objects 731
Resetting a 3D Object's Position 734
Animating 3D Objects 736
Separating 3D Sub-Objects for Animation 740
Creating 2D Layers on Surface of 3D Objects 743
Snapping to Surface or Ground 744
Changing the Display Mode of 3D Objects 747
Replacing a 3D Object in your Project 749
About Adding 3D Models to 2D Scenes 750
Adding a 3D Object as a Rendered Image in a 2D Scene 751
Repositioning a Rendered 3D Model in a 2D Scene 755
About 3D Camera Movements 759
Animating the 3D Camera 761
Aligning 2D Layers with a 3D Camera 764
Chapter 14: Sound 766
About Audio Tracks 767
Adding Audio Tracks 768
Importing Audio Tracks 769
Renaming Audio Tracks 770
15
Storyboard Pro 20 User Guide
Table of Contents
Reordering Audio Tracks 771
Deleting Audio Tracks 772
Muting Audio Tracks 773
Using Solo Mode with Audio Tracks 774
Locking Audio Tracks 775
Enabling and Disabling Audio Track Synchronization 777
About Sound Clips 780
Importing Sound Clips 781
Recording Sound Clips 785
Adding Effects 787
Deleting Sound Clips 790
Moving Sound Clips 791
Adjusting the In and Out Points of Sound Clips 792
Snapping Sound Clips 794
Copying and Pasting Sound Clips 795
Splitting a Sound Clip 797
Selecting All Sound Clips 798
Marking Sound Clips with Colours 799
Searching Sound Clips 801
About Sound Playback and Display 803
Enabling Audio Playback 804
Enabling Audio Scrubbing 805
Displaying Waveforms 806
Changing the Audio Track Height 807
Showing or Hiding the Sound Clip Name 808
About Volume & Gain 809
Displaying Volume Envelope 810
Adjusting Volume 811
Changing Speed or Duration 813
Interpolating the Volume of Sound Clips 814
16
Setting the Audio Gain for Sound Clips 817
Chapter 15: Video and Image Clips 820
About Video Clip Format 821
About Video Tracks 824
Adding Video Tracks 825
Renaming Video Tracks 826
Reordering Video Tracks 827
Deleting Video Tracks 828
Hiding and Displaying Video Tracks 829
Using Solo Mode with Video Tracks 831
Locking Video Tracks 832
Enabling and Disabling Video Track Synchronization 834
Changing the Video Track Height 837
About Video Clips 838
Importing Image and Video Clips 839
Creating an Image Clip and editing a Drawing 844
Linking Clips 847
Deleting Video Clips 848
Moving Video Clips 849
Adjusting the In and Out Points of Video Clips 850
Snapping Video Clips 852
Copying and Pasting Video Clips 853
Splitting a Video Clip 855
Displaying Thumbnails 856
Changing the Alpha Type of a Video Clip 857
Transforming Video Clips 859
Change the Opacity of Video Clips 863
About Video Clip Animation 864
Animating Video Clips 865
Adding Ease-In and Ease-Out to a Video Clip Animation 867
17
Storyboard Pro 20 User Guide
Table of Contents
Moving Video Clip Keyframes 869
Copying and Pasting Video Clip Animation Keyframes 870
Chapter 16: Transitions 872
Adding Transitions 874
Deleting Transitions 876
Changing the Transition Type 877
Changing the Transition Duration 879
Chapter 17: Libraries 880
About Library Folders 881
Creating Libraries 882
Adding Libraries 884
Renaming Folders 885
Closing Libraries and Deleting Folders 886
Refreshing Libraries 888
About Templates 889
Creating Templates 890
Importing Templates 896
Deleting Templates 901
Browsing a Template's Content 902
Generating Thumbnails 904
Searching Libraries 907
About Importing Files 909
Importing Images 910
Importing Audio Files 911
Importing Flash Movies (SWF) 912
Importing Harmony Templates 913
Importing 3D Objects 915
Chapter 18: Pitching the Storyboard 918
Accessing and Exiting the Pitch Mode Workspace 919
Displaying Captions 920
18
Customizing Captions 921
Navigating the Storyboard 922
Drawing Revisions 923
Recording Voice Annotations 926
Navigating the Storyboard 928
Chapter 19: Storyboard Supervision 930
About Track Changes 931
Tracking Changes 932
Validating Changes 934
About Voice Annotations 936
Recording Voice Annotations 937
Playing Voice Annotations 938
Deleting Voice Annotations 939
About Project Management 940
Splitting your Project into Two Projects 941
Extracting Parts of your Project into Other Projects 944
About Linked Projects 947
Adding a Linked Project 949
Checking and Updating the Status of Linked Projects 950
Merging Changes from a Linked Project 951
Relinking a Missing Linked Project 953
Removing a Linked Project 954
Merging Storyboard Projects 955
Inserting a Project's Scenes into the Current Project 958
Merging Projects and Replacing Scenes in the Current Project 959
Merging Modified Panels from an Extracted Project 962
Chapter 20: Exporting 966
About Exporting to Portable Document Format (.pdf) 967
Setting Up the PDF Export 968
Exporting to PDF 971
19
Storyboard Pro 20 User Guide

Table of Contents
Creating Custom PDF Layout Profiles 976
Exporting Custom PDF Profiles 977
Importing PDF Profiles 979
About Exporting Movie Files 981
Exporting a Movie 982
Configuring Movie Settings for QuickTime Movies on Windows 989
Configuring Movie Settings for QuickTime Movies on macOS 993
Configuring Movie Settings for Windows Media Video 995
Exporting an Image Sequence 997
Exporting a Flash Movie (.swf) 1002
Exporting Harmony Scenes 1007
Importing Harmony Scenes to a Harmony Database 1014
Exporting Layout Images 1018
Exporting Bitmap Images 1023
Exporting the Current Frame as a Bitmap Image 1031
Exporting an EDL, AAF or XML Sequence 1032
Configuring Movie Settings for QuickTime Movies on Windows for EDL/AAF/XML Sequences 1041
Configuring Movie Settings for QuickTime Movies on macOS for EDL/XML/AAF Sequences 1043
Configuring Movie Settings for Windows Media Video for EDL/XML/AAF Sequences 1045
Exporting 3D Animation (FBX) Files 1046
Exporting Sound Files 1048
Exporting Project Metadata in CSV Format 1051
About Advanced Export Techniques 1055
About File Naming Patterns 1056
Enabling and Disabling Layers for Export 1058
About Snapshots 1059
Adding Snapshot Markers 1061
Change Snapshot Frame 1062
Setting the Main Snapshot in a Panel 1063
Deleting Snapshot Markers 1064
20
Chapter 21: Conformation 1066
About XML Conformation 1068
About AAF Conformation 1069
Exporting for Conformation 1071
Importing an Edited XML or AAF Sequence back for Conformation 1080
Chapter 22: Scripting Guide 1082
Creating Scripts 1084
Editing a Script Packaged with Storyboard Pro 1087
Checking Script Syntax 1089
Testing a Script 1090
Debugging Scripts 1092
Using the Scripting Sandbox 1094
Importing Scripts 1095
Deleting Scripts 1097
Restoring a Storyboard Pro Script 1098
Using an External Script Editor 1099
Storing Scripts in a Custom Directory 1101
Adding Scripts as Toolbar Buttons 1104
21
Storyboard Pro 20 User Guide

Chapter 1: Introduction
Chapter 1: IntroductionThe user guide provides step by step guidance on how to use every core functionality in Storyboard Pro for their intended task.
NOTE
For more detailed descriptions of the many options, buttons and menu items available in the Storyboard Pro user interface, refer to the Reference Guide. For descriptions of the many preferences available in the Preferences dialog, refer to the Preference Guide.
22
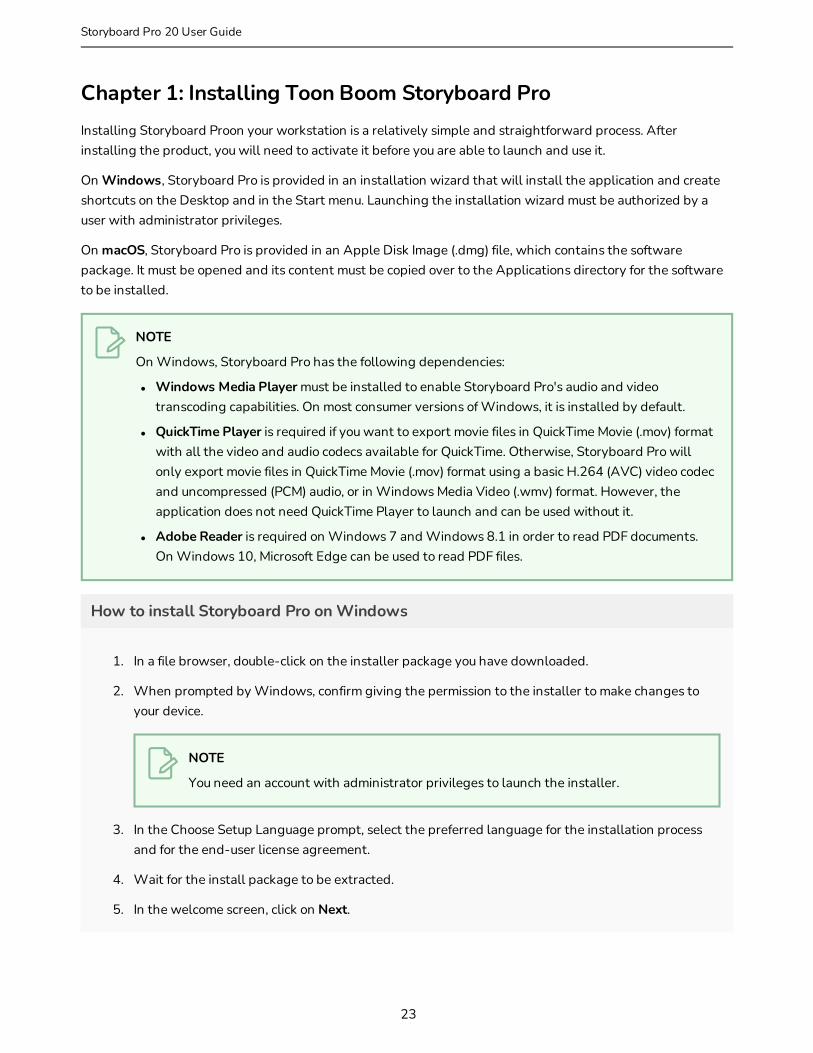
Chapter 1: Installing Toon Boom Storyboard ProInstalling Storyboard Proon your workstation is a relatively simple and straightforward process. After installing the product, you will need to activate it before you are able to launch and use it.
On Windows, Storyboard Pro is provided in an installation wizard that will install the application and create shortcuts on the Desktop and in the Start menu. Launching the installation wizard must be authorized by a user with administrator privileges.
On macOS, Storyboard Pro is provided in an Apple Disk Image (.dmg) file, which contains the software package. It must be opened and its content must be copied over to the Applications directory for the software to be installed.
NOTE
On Windows, Storyboard Pro has the following dependencies:
l Windows Media Player must be installed to enable Storyboard Pro's audio and video transcoding capabilities. On most consumer versions of Windows, it is installed by default.
l QuickTime Player is required if you want to export movie files in QuickTime Movie (.mov) format with all the video and audio codecs available for QuickTime. Otherwise, Storyboard Pro will only export movie files in QuickTime Movie (.mov) format using a basic H.264 (AVC) video codec and uncompressed (PCM) audio, or in Windows Media Video (.wmv) format. However, the application does not need QuickTime Player to launch and can be used without it.
l Adobe Reader is required on Windows 7 and Windows 8.1 in order to read PDF documents. On Windows 10, Microsoft Edge can be used to read PDF files.
How to install Storyboard Pro on Windows
1. In a file browser, double-click on the installer package you have downloaded.
2. When prompted by Windows, confirm giving the permission to the installer to make changes to your device.
NOTE
You need an account with administrator privileges to launch the installer.
3. In the Choose Setup Language prompt, select the preferred language for the installation process and for the end-user license agreement.
4. Wait for the install package to be extracted.
5. In the welcome screen, click on Next.
23
Storyboard Pro 20 User Guide
Chapter 1: Installing Toon Boom Storyboard Pro
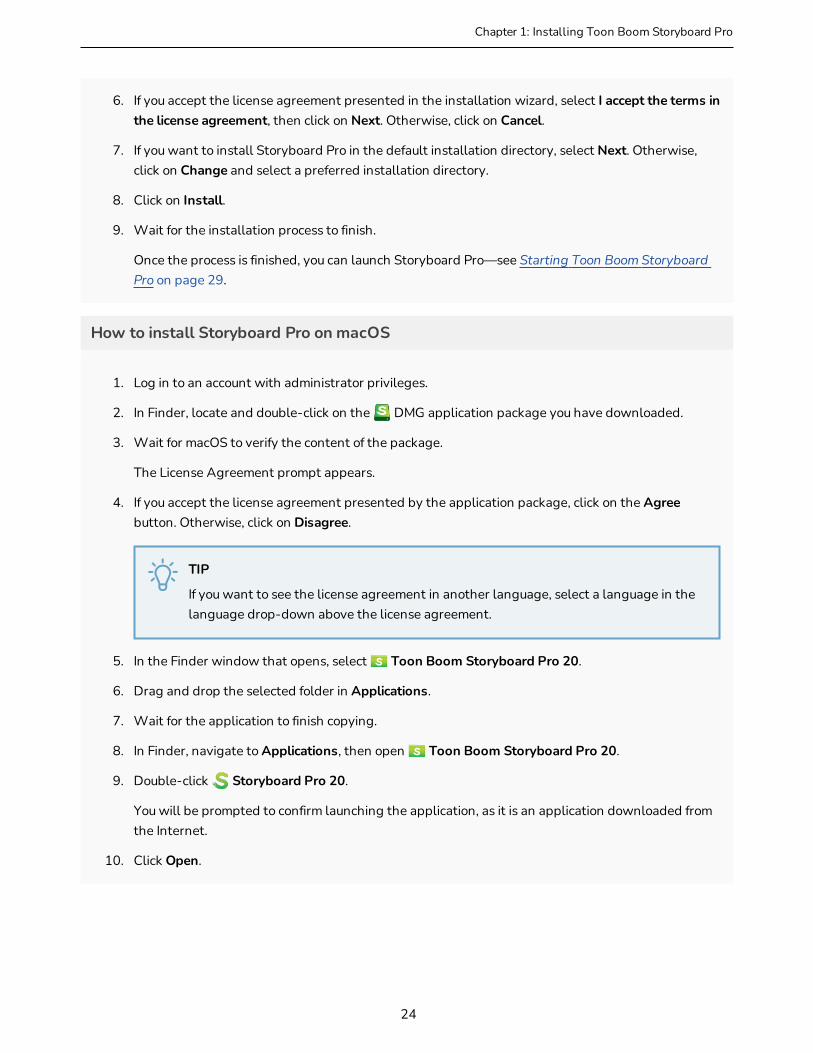
6. If you accept the license agreement presented in the installation wizard, select I accept the terms in the license agreement, then click on Next. Otherwise, click on Cancel.
7. If you want to install Storyboard Pro in the default installation directory, select Next. Otherwise, click on Change and select a preferred installation directory.
8. Click on Install.
9. Wait for the installation process to finish.
Once the process is finished, you can launch Storyboard Pro—see Starting Toon Boom Storyboard Pro on page 29.
How to install Storyboard Pro on macOS
1. Log in to an account with administrator privileges.
2. In Finder, locate and double-click on the DMG application package you have downloaded.
3. Wait for macOS to verify the content of the package.
The License Agreement prompt appears.
4. If you accept the license agreement presented by the application package, click on the Agree button. Otherwise, click on Disagree.
TIP
If you want to see the license agreement in another language, select a language in the language drop-down above the license agreement.
5. In the Finder window that opens, select Toon Boom Storyboard Pro 20.
6. Drag and drop the selected folder in Applications.
7. Wait for the application to finish copying.
8. In Finder, navigate to Applications, then open Toon Boom Storyboard Pro 20.
9. Double-click Storyboard Pro 20.
You will be prompted to confirm launching the application, as it is an application downloaded from the Internet.
10. Click Open.
24
Either one the following will occur:
l If this version of Storyboard Pro is already activated, it will launch immediately.
l If Storyboard Pro is not yet activated, you will be prompted to give administrator privileges to the application. This is because Storyboard Pro is attempting to launch License Wizard, which requires administrator privileges to activate Storyboard Pro. For information on how to activate Storyboard Pro, refer to the Activation Documentation available online at the following address:
docs.toonboom.com/help/activation
How to install QuickTime Player
l Go to the following address and follow the instructions:
l Windows: apple.com/quicktime/download/pc
l macOS: apple.com/quicktime/download/mac
How to install Adobe Reader
l Go to the following address and follow the instructions:
l Windows: adobe.com/support/downloads/pc
l macOS: adobe.com/support/downloads/mac
How to install Windows Media Player
l Windows Media Player is pre-installed on most versions of Windows, but may be disabled. Follow these steps to make sure it is enabled.
1. From the Start menu search bar, search for Control Panel and launch the Control Panel.
2. From the Control Panel, go to Programs > Turn Windows features on or off.
3. In the list of Windows features, find and expand the Media Features option. Windows Media Player should listed under Media Features. If either of these options are not listed, see below.
4. Ensure both the Media Features and Windows Media Player check boxes are checked.
5. Click OK.
25
Storyboard Pro 20 User Guide

Chapter 1: Installing Toon Boom Storyboard Pro
6. Wait for the installation to finish.
7. Restart Windows.
l If Media Features or Windows Media Player is not listed in the available features, make sure your edition of Windows supports it. If it does, it may be added by installing the Media Feature Pack for Windows. To do this, click on the link corresponding to your version of Windows and follow the instructions:
l Media Feature Pack for Windows 7: https://www.microsoft.com/download/details.aspx?id=16546
l Media Feature Pack for Windows 8: https://www.microsoft.com/download/details.aspx?id=30685
l Media Feature Pack for Windows 10: https://www.microsoft.com/download/details.aspx?id=48231
26

27
Storyboard Pro 20 User Guide

Chapter 2: Projects
Chapter 2: ProjectsAll projects created with Storyboard Pro are independent and local to the computer. There are a few different ways to create and open projects. You can create a project from the Welcome screen, File menu, Final Draft script, or Toon Boom Harmony scenes.
28

Starting Toon Boom Storyboard ProT-SBFND-002-001
You can run Toon Boom Storyboard Pro on Windows and macOS.
How to start Storyboard Pro
1. Do one of the following, depending on your operating system:
l Windows: Do one of the following:
l On the desktop, double-click Storyboard Pro 20
l Open the Start menu and, in the list of programs, select Storyboard Pro 20 > Storyboard Pro 20.
l macOS: In Finder, proceed to Applications > Toon Boom Storyboard Pro 20 and double-click Storyboard Pro 20.
Storyboard Pro launches and displays the following screen. If you want to explore, go ahead and click one of the buttons. Otherwise, click Close.
A second Welcome screen displays.
29
Storyboard Pro 20 User Guide

Chapter 2: Projects
30

Creating ProjectsWhen creating projects, you have the choice of using the Welcome screen or the File menu in Storyboard Pro. You can also create a project from a Final Draft script or from Harmony scenes.
31
Storyboard Pro 20 User Guide
Chapter 2: Projects
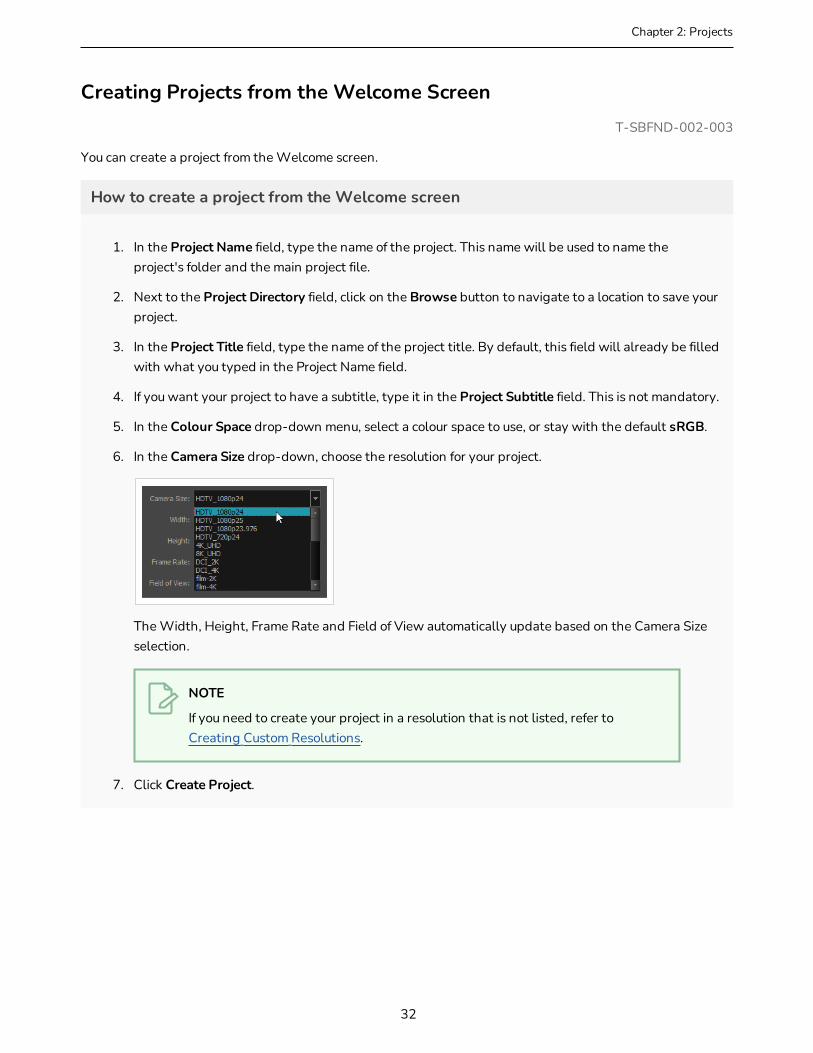
Creating Projects from the Welcome ScreenT-SBFND-002-003
You can create a project from the Welcome screen.
How to create a project from the Welcome screen
1. In the Project Name field, type the name of the project. This name will be used to name the project's folder and the main project file.
2. Next to the Project Directory field, click on the Browse button to navigate to a location to save your project.
3. In the Project Title field, type the name of the project title. By default, this field will already be filled with what you typed in the Project Name field.
4. If you want your project to have a subtitle, type it in the Project Subtitle field. This is not mandatory.
5. In the Colour Space drop-down menu, select a colour space to use, or stay with the default sRGB.
6. In the Camera Size drop-down, choose the resolution for your project.
The Width, Height, Frame Rate and Field of View automatically update based on the Camera Size selection.
NOTE
If you need to create your project in a resolution that is not listed, refer to Creating Custom Resolutions.
7. Click Create Project.
32
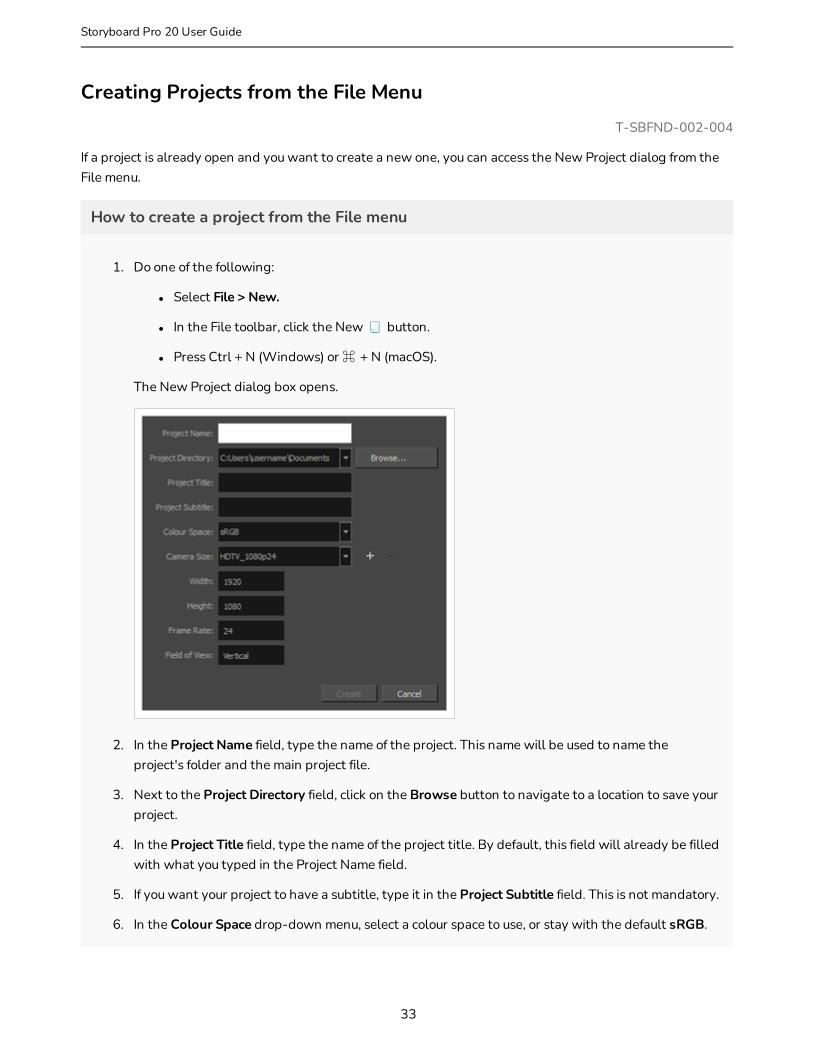
Creating Projects from the File MenuT-SBFND-002-004
If a project is already open and you want to create a new one, you can access the New Project dialog from the File menu.
How to create a project from the File menu
1. Do one of the following:
l Select File > New.
l In the File toolbar, click the New button.
l Press Ctrl + N (Windows) or ⌘ + N (macOS).
The New Project dialog box opens.
2. In the Project Name field, type the name of the project. This name will be used to name the project's folder and the main project file.
3. Next to the Project Directory field, click on the Browse button to navigate to a location to save your project.
4. In the Project Title field, type the name of the project title. By default, this field will already be filled with what you typed in the Project Name field.
5. If you want your project to have a subtitle, type it in the Project Subtitle field. This is not mandatory.
6. In the Colour Space drop-down menu, select a colour space to use, or stay with the default sRGB.
33
Storyboard Pro 20 User Guide

Chapter 2: Projects
7. In the Camera Size drop-down, choose the resolution for your project.
The Width, Height, Frame Rate and Field of View automatically update based on the Camera Size selection.
NOTE
If you need to create your project in a resolution that is not listed, refer to Creating Custom Resolutions.
8. Click Create.
34
Creating a Project from a Final Draft ScriptT-SBADV-001-001
Storyboarding and script writing go hand-in-hand. Storyboard Pro allows you to use your Final Draft script to create a new Storyboard Pro project. You can use the structure of your script to automatically generate all the scenes, panels and transitions in your project, and insert all the scene headings, characters, dialogues and actions into the appropriate caption fields for each generated panel.
The following steps provide detailed instructions on how to import a typical Final Draft script and automatically break it down into scenes and panels. Since scripts are never really written on a "per-panel" basis, and every script is paced and structured differently, you may have to try different settings to get optimal results, and you may have to combine or split some of the automatically generated panels manually to best fit the pace of your story.
NOTES
l Storyboard Pro has a preference to use Live Action terminology instead of Animation terminology, available in the General tab of the preferences dialog. With this preference, the following terminology is replaced in the Storyboard Pro user interface:
l The term Scene becomes Shot.
l The term Sequence becomes Scene.
The steps below will specify the term for both terminology preferences where applicable.
l If you are using Final Draft 7 or earlier, you must export your script in .xml format using Tagger, as the native file format of Final Draft 7 and earlier (.fdr) is not supported by Storyboard Pro.
How to create project from a Final Draft script
1. From the top menu, select File > New From Final Draft Script.
The Import from Final Draft dialog opens.
2. Click on the Browse button.
3. In the file browser, locate and select your Final Draft script, then click on Open.
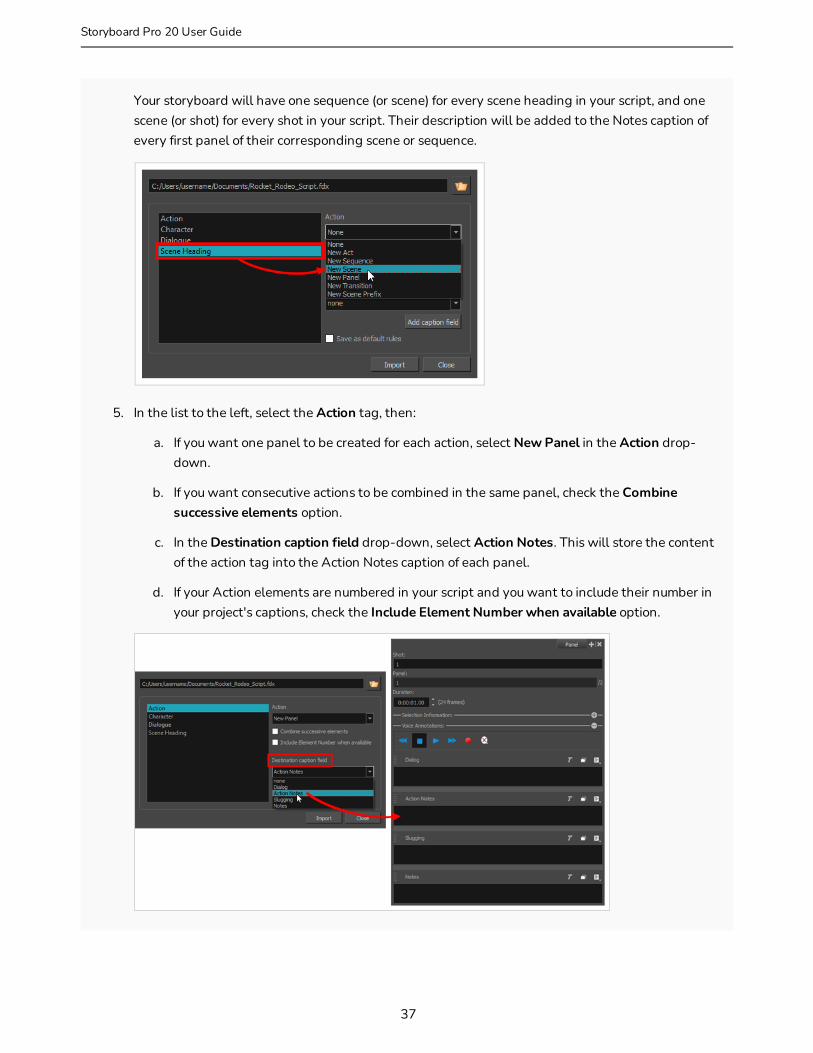
Once your script is loaded, the types of tags contained in your script will appear in the list to the left. You will have to indicate to Storyboard Pro what to do with each of these tags when generating your project.
35
Storyboard Pro 20 User Guide

Chapter 2: Projects
4. If your script is structured with scene headings, but not shots, do the following:
a. In the list to the left, select Scene Heading.
b. In the Action drop-down, select New Scene (animation terminology) or New Shot (live action terminology).
c. In the Destination caption field drop-down, select Notes.
d. If your Scene Heading elements are numbered in your script and you want to include their number in your project's captions, check the Include Element Number when available option.
Your storyboard will have one scene (or shot) for every scene heading in your script, and the scene's description will be added to the Notes caption of every first panel of every scene.
If your script is structured with both scene headings and shots, do the following:
a. In the list to the left, select Scene Heading.
b. In the Action drop-down, select New Sequence (animation terminology) or New Scene (live action terminology).
c. In the Destination caption field drop-down, select Notes.
d. If your Scene Heading elements are numbered and you want to include their number in your project's captions, check the Include Element Number when available option.
e. In the list to the left, select Shot.
f. In the Action drop-down, select New Scene (animation terminology) or New Shot (live action terminology).
g. In the Destination caption field drop-down, select Notes.
h. If your Shot elements are numbered in your script and you want to include their number in your project's captions, check the Include Element Number when available option.
36
Your storyboard will have one sequence (or scene) for every scene heading in your script, and one scene (or shot) for every shot in your script. Their description will be added to the Notes caption of every first panel of their corresponding scene or sequence.
5. In the list to the left, select the Action tag, then:
a. If you want one panel to be created for each action, select New Panel in the Action drop-down.
b. If you want consecutive actions to be combined in the same panel, check the Combine successive elements option.
c. In the Destination caption field drop-down, select Action Notes. This will store the content of the action tag into the Action Notes caption of each panel.
d. If your Action elements are numbered in your script and you want to include their number in your project's captions, check the Include Element Number when available option.
37
Storyboard Pro 20 User Guide
Chapter 2: Projects
6. In the list to the left, select the Character tag, if any, then:
a. If you want one panel to be created for each dialogue, select New Panel in the Action drop-down.
b. In the Destination caption field drop-down, select Dialogue.
c. If your Character elements are numbered in your script and you want to include their number in your project's captions, check the Include Element Number when available option.
7. In the list to the left, select the Parenthetical tag, if any and:
a. In the Destination caption field drop-down, select Dialogue.
b. If your Parenthetical elements are numbered in your script and you want to include their number in your project's captions, check the Include Element Number when available option.
8. In the list to the left, select the Dialogue tag, if any:
a. In the Destination caption field drop-down, select Dialogue.
b. If your Dialogue elements are numbered in your script and you want to include their number in your project's captions, check the Include Element Number when available option.
9. In the list to the left, select the Transition tag, if any:
a. In the action drop-down, select New Transition.
Overall, if your script is structured with scene headings, but not shots, the following settings are suggested:
Action (Animation Terminology)
Action (Live Action Terminology)
Destination caption field
Action New Panel New Panel Action Notes
Character New Panel New Panel Dialogue
Dialogue None None Dialogue
Parenthetical None None Dialogue
Scene Heading New Scene New Shot Notes
38

Action (Animation Terminology)
Action (Live Action Terminology)
Destination caption field
Transition New Transition New Transition None
And if your script is structured with scene headings and shots, the following settings are suggested:
Action (Animation Terminology)
Action (Live Action Terminology)
Destination Caption Field
Action New Panel New Panel Action Notes
Character New Panel New Panel Dialogue
Dialogue None None Dialogue
Parenthetical None None Dialogue
Scene Heading New Sequence New Scene Notes
Shot New Scene New Shot Notes
Transition New Transition New Transition None
NOTE
Depending on the way your script is structured and on how much the action or dialogue drive the pace, you might have to try creating a project with your script using different options to get the best storyboard structure for your needs. In the end, it is likely that you will have to split or combine some of the automatically generated panels.
10. If you want to make the currently selected parameters default, check the Save as default rules checkbox.
11. Click Import.
The New Project dialog appears.
39
Storyboard Pro 20 User Guide

Chapter 2: Projects
12. In the New Project dialog, enter the name, location, title and resolution for your project.
NOTE
For more information on creating a new Storyboard Pro project, see Creating Projects on page 31.
13. If the currently opened project was not saved, confirm whether you want to save it.
Your new project is created, with scenes and panels automatically created and their captions filled with excerpts from your script, based on the settings you selected.
40

Creating Projects from Harmony ScenesYou can create a project from Harmony scenes. Before you do this, in Harmony, you must mark the frames you want to use as panels in your project. Frames must be marked in an annotation column called "EM". For each marked frame, a panel is created in Storyboard Pro. If you don't mark your frames, the first frame of each Harmony scene will be used.
You must group all your different Harmony scenes in one folder. Storyboard Pro will create one scene per Harmony scene. If your Harmony scene contains several EM markers in the annotation column, Storyboard Pro will create multiple panels within the scene.
How to create a project from Harmony scenes
1. From the top menu, select File > New from Harmony Scenes.
The New Project dialog box opens.
2. In the Project Name field, type the name of the project. This name will be used to name the project's folder and the main project file.
3. Next to the Project Directory field, click on the Browse button to navigate to a location to save your project.
4. In the Project Title field, type the name of the project title. By default, this field will already be filled with what you typed in the Project Name field.
5. If you want your project to have a subtitle, type it in the Project Subtitle field. This is not mandatory.
6. In the Colour Space drop-down menu, select a colour space to use, or stay with the default sRGB.
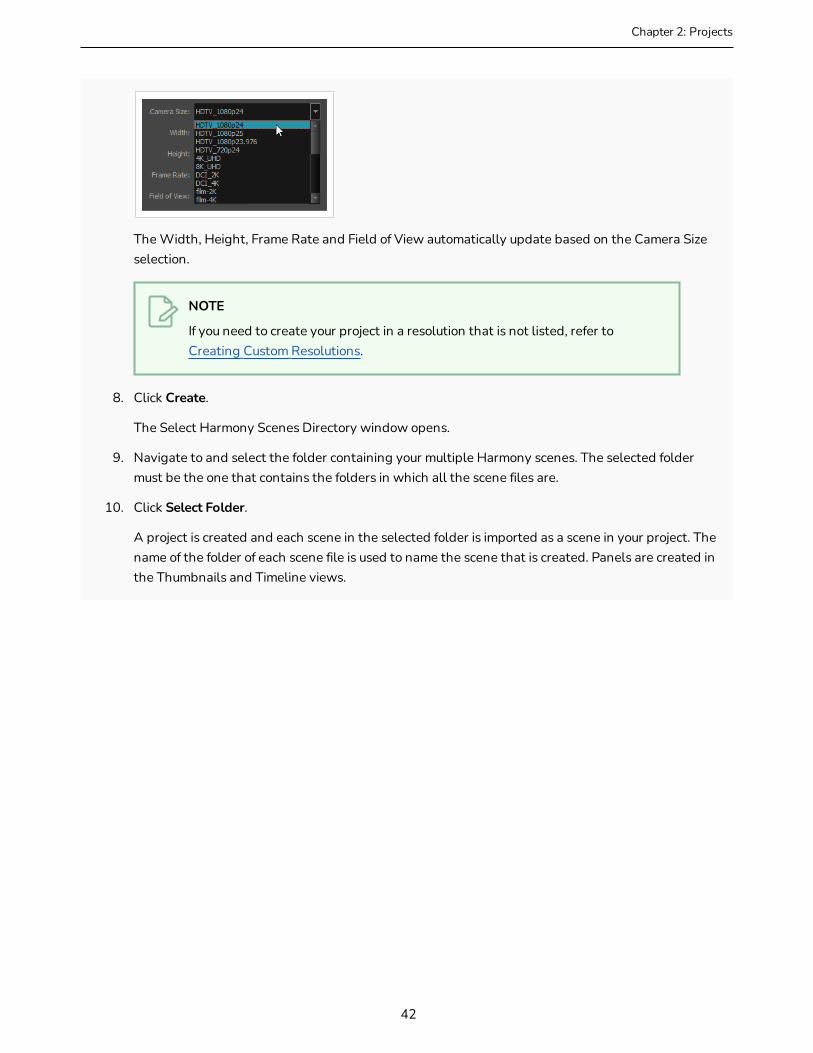
7. In the Camera Size drop-down, choose the resolution for your project.
41
Storyboard Pro 20 User Guide
Chapter 2: Projects
The Width, Height, Frame Rate and Field of View automatically update based on the Camera Size selection.
NOTE
If you need to create your project in a resolution that is not listed, refer to Creating Custom Resolutions.
8. Click Create.
The Select Harmony Scenes Directory window opens.
9. Navigate to and select the folder containing your multiple Harmony scenes. The selected folder must be the one that contains the folders in which all the scene files are.
10. Click Select Folder.
A project is created and each scene in the selected folder is imported as a scene in your project. The name of the folder of each scene file is used to name the scene that is created. Panels are created in the Thumbnails and Timeline views.
42
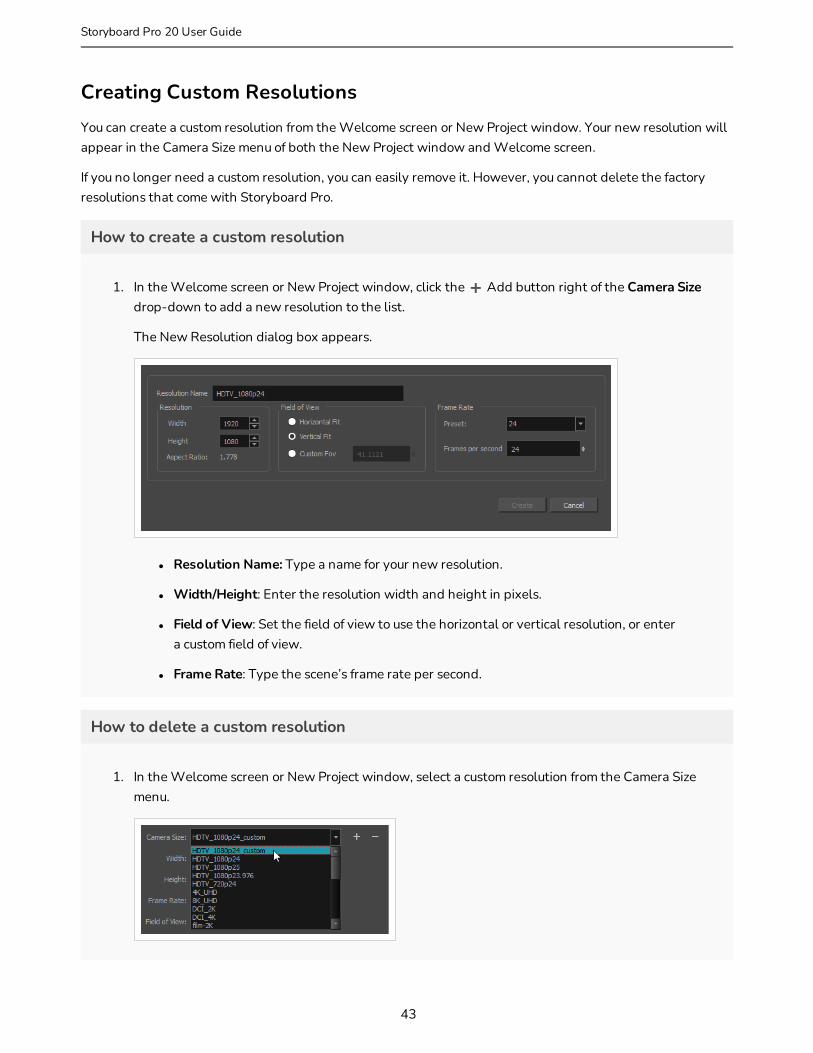
Creating Custom ResolutionsYou can create a custom resolution from the Welcome screen or New Project window. Your new resolution will appear in the Camera Size menu of both the New Project window and Welcome screen.
If you no longer need a custom resolution, you can easily remove it. However, you cannot delete the factory resolutions that come with Storyboard Pro.
How to create a custom resolution
1. In the Welcome screen or New Project window, click the Add button right of the Camera Size drop-down to add a new resolution to the list.
The New Resolution dialog box appears.
l Resolution Name: Type a name for your new resolution.
l Width/Height: Enter the resolution width and height in pixels.
l Field of View: Set the field of view to use the horizontal or vertical resolution, or enter a custom field of view.
l Frame Rate: Type the scene’s frame rate per second.
How to delete a custom resolution
1. In the Welcome screen or New Project window, select a custom resolution from the Camera Size menu.
43
Storyboard Pro 20 User Guide

Chapter 2: Projects
2. Click the Remove button.
The selected custom resolution is deleted from the list.
44

Opening ProjectsT-SBFND-002-006
Existing projects can be opened from the Welcome screen when you start Storyboard Pro. If you already have a project open, you can open another project from the File menu.
NOTE
Starting from Storyboard Pro 7, Storyboard Pro is not able to open and convert projects in the legacy project format created by Storyboard 1.
How to open a project from the Welcome screen
1. Start Storyboard Pro.
2. Dismiss the first Welcome screen.
The second welcome screen appears.
3. In the project you want to open is in the Recent Projects section, select this project to open it instantly.
4. If the project you want to open is not in the Recent Projects section, click Open Projects... in the bottom-right corner of the dialog.
The Open Project dialog appears.
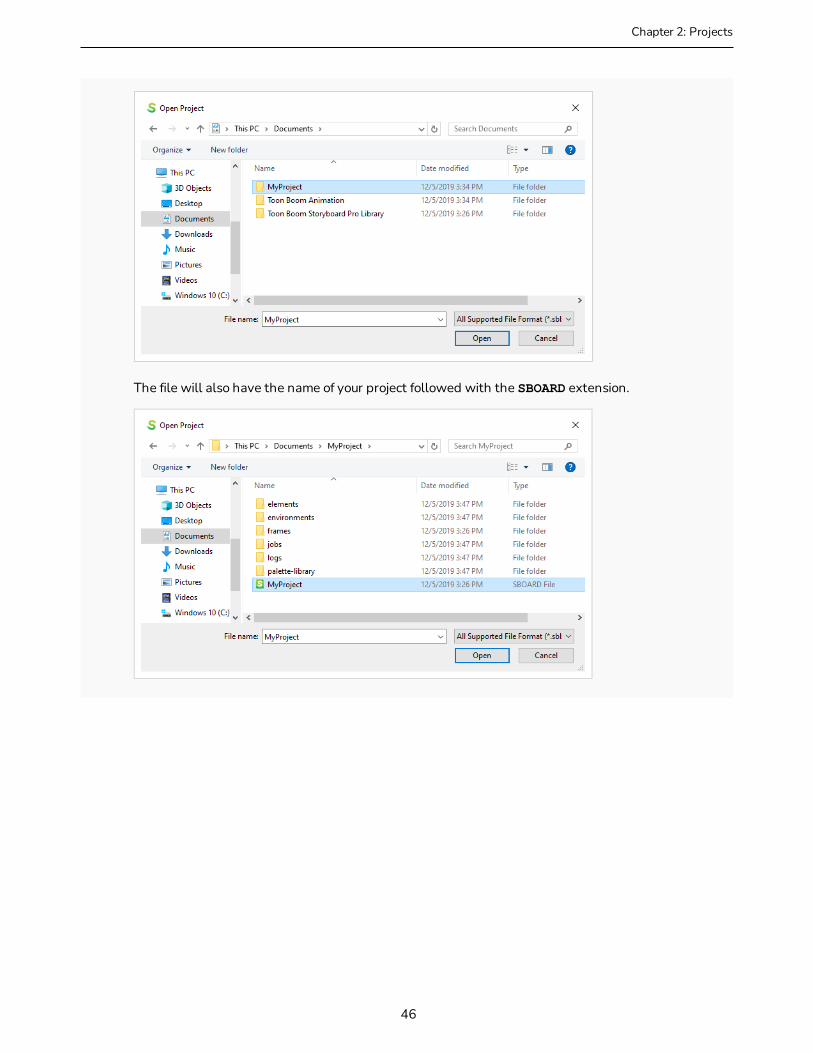
5. Browse to the location of your project, select it and click Open.
If your project was saved in the regular Storyboard Pro Project format, it will be inside a folder named after your project name.
45
Storyboard Pro 20 User Guide
Chapter 2: Projects
The file will also have the name of your project followed with the SBOARD extension.
46

NOTE
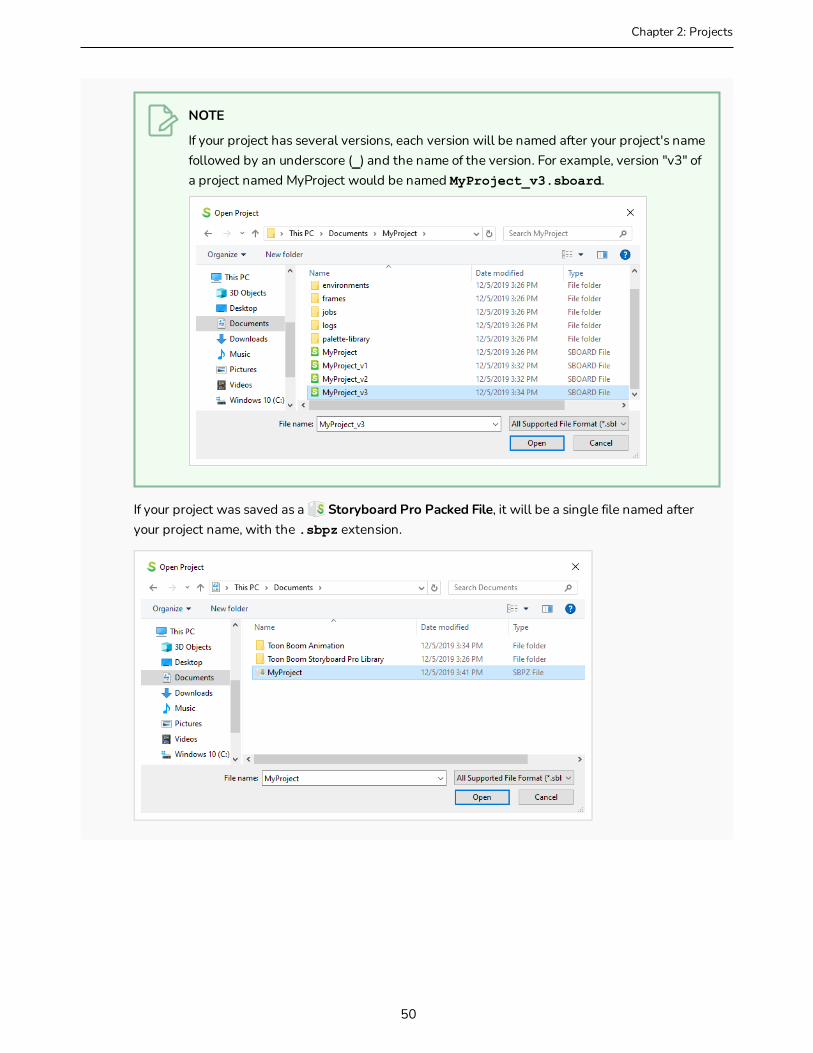
If your project has several versions, each version will be named after your project's name followed by an underscore (_) and the name of the version. For example, version "v3" of a project named MyProject would be named MyProject_v3.sboard.
If your project was saved as a Storyboard Pro Packed File, it will be a single file named after your project name, with the .sbpz extension.
47
Storyboard Pro 20 User Guide
Chapter 2: Projects
NOTE
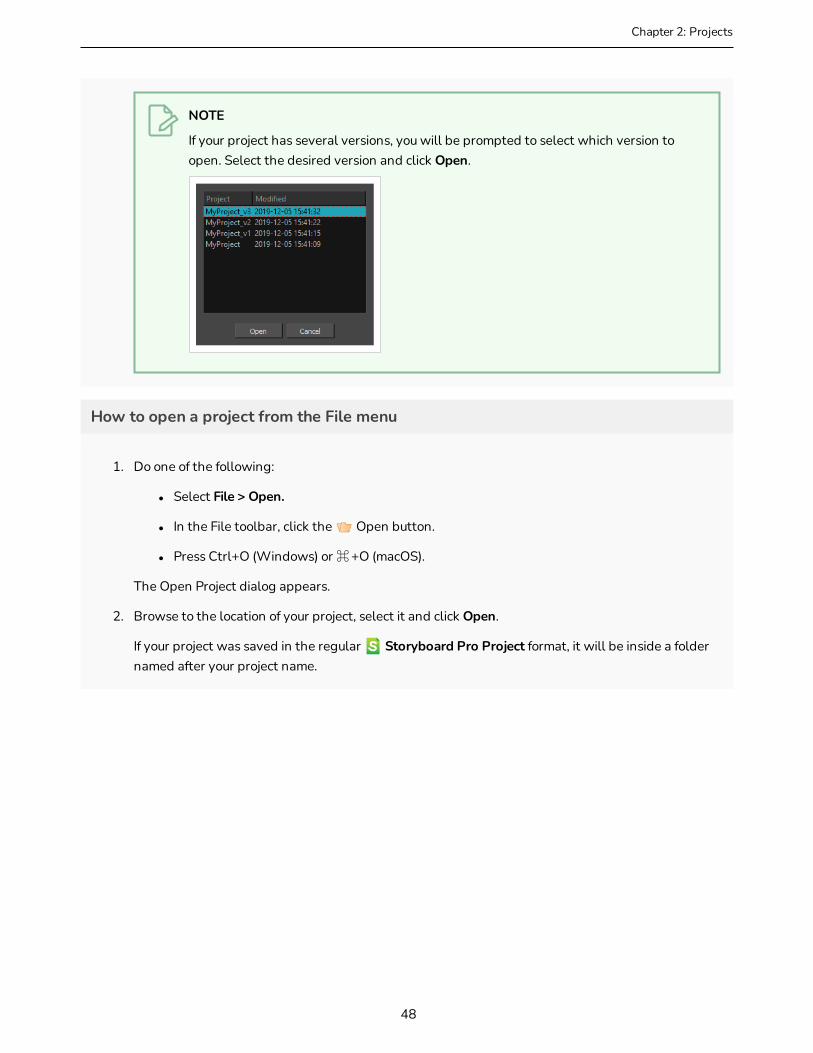
If your project has several versions, you will be prompted to select which version to open. Select the desired version and click Open.
How to open a project from the File menu
1. Do one of the following:
l Select File > Open.
l In the File toolbar, click the Open button.
l Press Ctrl+O (Windows) or ⌘+O (macOS).
The Open Project dialog appears.
2. Browse to the location of your project, select it and click Open.
If your project was saved in the regular Storyboard Pro Project format, it will be inside a folder named after your project name.
48
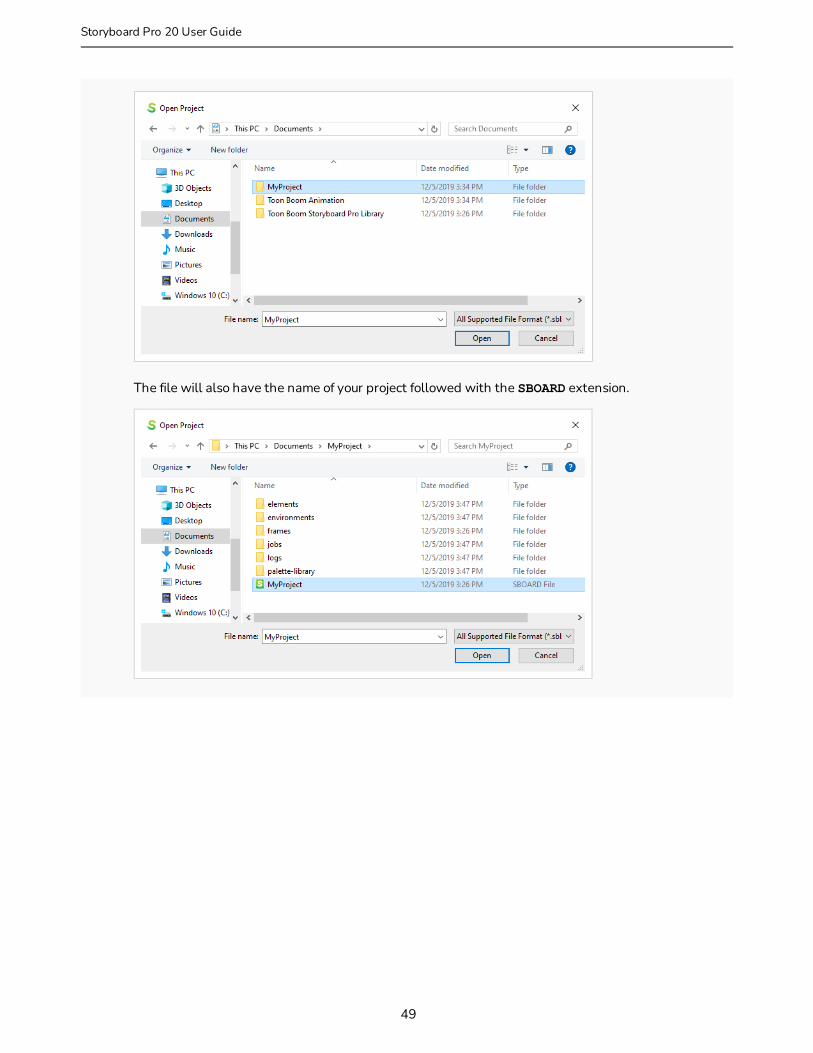
The file will also have the name of your project followed with the SBOARD extension.
49
Storyboard Pro 20 User Guide
Chapter 2: Projects
NOTE
If your project has several versions, each version will be named after your project's name followed by an underscore (_) and the name of the version. For example, version "v3" of a project named MyProject would be named MyProject_v3.sboard.
If your project was saved as a Storyboard Pro Packed File, it will be a single file named after your project name, with the .sbpz extension.
50
NOTE
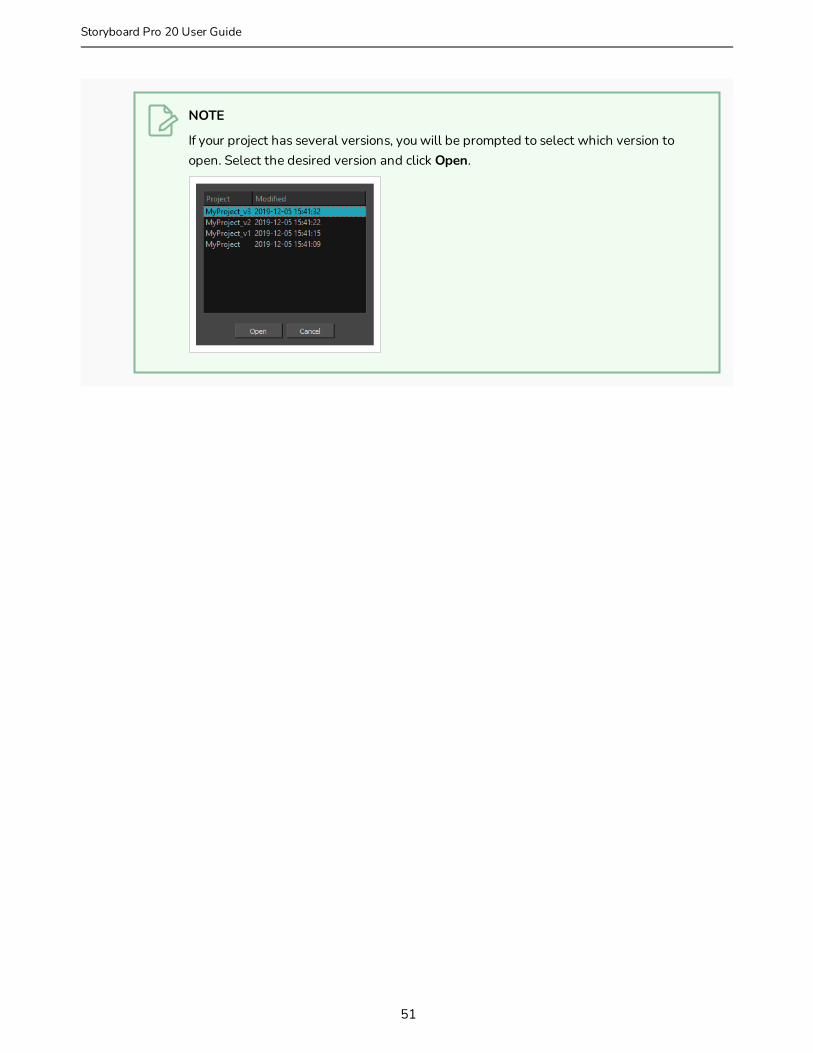
If your project has several versions, you will be prompted to select which version to open. Select the desired version and click Open.
51
Storyboard Pro 20 User Guide
Chapter 2: Projects
About SavingIt is important to regularly save your project. To make sure you don't forget, you can configure Storyboard Pro to automatically save your project at a specific interval.
To save the current state of a project as a new one, you can use the Save As command. The Save As window prompts you to give a new name and choose a different location to this project before saving it. This will create a complete project directory for the new project.
If you want to keep several versions of your project without making copies of all of its content, you can also save your project as a new version. This simply reates a new .sboard file inside your project directory. Each .sboard file can serve as a separate version of your project. All .sboard files for a given project share the same drawings, sound clips, video clips and the same palette. What is preserved in each .sboard file is the structure of panels, scenes, sequences, acts, layers, the timing of panels, layer and camera animations, sound and video tracks and the placements of clips inside them.
A Storyboard Pro project is composed of many small files. Each drawing in a project is a file, which may result in projects containing over 10,000 files. This can quickly fill your storage solution with a high number of files, straining the file system and backup process. You can reduce the number of files and protect the integrity of projects by saving (packing) the project in a single file. A packed project file is appended with the .sbpz extension.
52
Saving ProjectsYou can save your projects as is or save them as a new copy.
How to save a project
l Select File > Save.
l Press Ctrl + S (Windows/Linux) or ⌘ + S (macOS).
How to save a project as a copy (Save As)
1. Select File > Save As.
2. In the Save As dialog box, browse to the location of the new archive and give the copy of the project a new name.
3. Click Save.
53
Storyboard Pro 20 User Guide

Chapter 2: Projects
Saving Projects as a Single FileT-SBADV-003-005
A Storyboard Pro project is composed of many small files. Each drawing in a project is a file, which may result in projects containing over 10,000 files. This can quickly fill your storage solution with a high number of files, straining the file system and backup process.
You can reduce the number of files and protect the integrity of projects by saving (packing) the project in a single file. A packed project file is appended with the .sbpz extension.
The location of your packed file (*.sbpz) does not have to be in the same place as your current project file. For example, you can save the packed file on your company’s server and save the current version on your local computer.
You can open a packed file in the usual way by using the File > Open command or by double clicking the file in the Explorer (Windows) or Finder (macOS). The packed file extracts to a temporary folder on your computer.
l Windows: \Users\[username]\Documents\Toon Boom Animation\StoryboardPro Project Cache
l macOS: /Users/[username]/Documents/Toon Boom Animation/StoryboardPro Project Cache
When opening a project in Storyboard Pro, you can select an .sbpz file (the packed project); this file will be updated when you perform a Save and Pack. If you opened an .sboard project, you can perform a Save As to a packed format, after which that file (the packed/zipped one) will be updated by the Save and Pack.
NOTE
- Unpacked projects do not appear in the list of recent projects, so you don't accidentally open the project in the cache.- Multiple users cannot open the same packed project at the same time.- When working with a packed project and you have Storyboard Pro set to automatically save your project, Autosave, it is saved to the project cache.
How to set your project to save as a single file
1. Do one of the following to open the Preferences dialog:
l Windows:
l In the top menu, select Edit > Preferences.
l Press Ctrl + U.
54
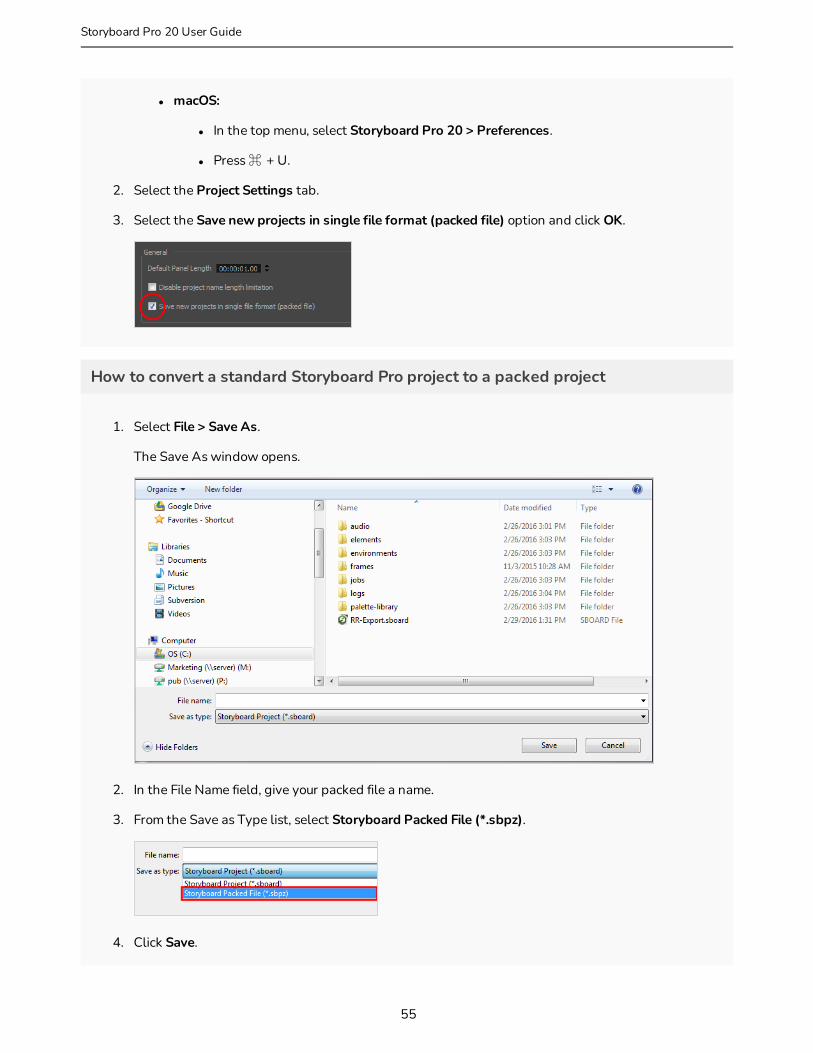
l macOS:
l In the top menu, select Storyboard Pro 20 > Preferences.
l Press ⌘ + U.
2. Select the Project Settings tab.
3. Select the Save new projects in single file format (packed file) option and click OK.
How to convert a standard Storyboard Pro project to a packed project
1. Select File > Save As.
The Save As window opens.
2. In the File Name field, give your packed file a name.
3. From the Save as Type list, select Storyboard Packed File (*.sbpz).
4. Click Save.
55
Storyboard Pro 20 User Guide
Chapter 2: Projects
The project is saved and zipped to the location you specified.
How to save an unpacked project
1. Do one of the following:
l Select File > Save to save the project to your local cache.
l Select File > Save and Pack to pack the project to the location you specified for your packed project.
The unpacked project is saved and packed to the original zipped project file.
NOTE
If the project already has a file, save the project locally using the Save command , then save to the zip file using the Save and Pack command.
56
Recovering A Project Saved in Storyboard Pro Packed File Format From The Cache
T-SBADV-003-006
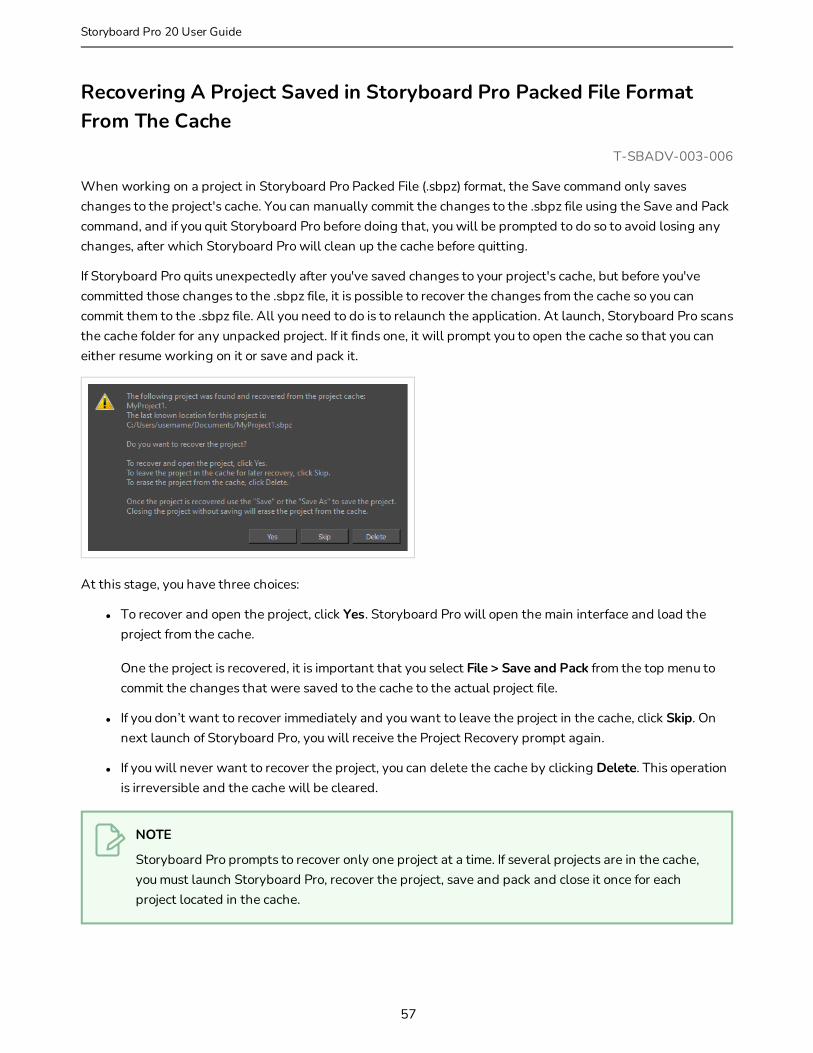
When working on a project in Storyboard Pro Packed File (.sbpz) format, the Save command only saves changes to the project's cache. You can manually commit the changes to the .sbpz file using the Save and Pack command, and if you quit Storyboard Pro before doing that, you will be prompted to do so to avoid losing any changes, after which Storyboard Pro will clean up the cache before quitting.
If Storyboard Pro quits unexpectedly after you've saved changes to your project's cache, but before you've committed those changes to the .sbpz file, it is possible to recover the changes from the cache so you can commit them to the .sbpz file. All you need to do is to relaunch the application. At launch, Storyboard Pro scans the cache folder for any unpacked project. If it finds one, it will prompt you to open the cache so that you can either resume working on it or save and pack it.
At this stage, you have three choices:
l To recover and open the project, click Yes. Storyboard Pro will open the main interface and load the project from the cache.
One the project is recovered, it is important that you select File > Save and Pack from the top menu to commit the changes that were saved to the cache to the actual project file.
l If you don’t want to recover immediately and you want to leave the project in the cache, click Skip. On next launch of Storyboard Pro, you will receive the Project Recovery prompt again.
l If you will never want to recover the project, you can delete the cache by clicking Delete. This operation is irreversible and the cache will be cleared.
NOTE
Storyboard Pro prompts to recover only one project at a time. If several projects are in the cache, you must launch Storyboard Pro, recover the project, save and pack and close it once for each project located in the cache.
57
Storyboard Pro 20 User Guide

Chapter 2: Projects
Auto-saving Your ProjectWhile you're working, it is a good idea to save your projects often. By default, Storyboard Pro does not automatically save, but it is possible to configure Storyboard Pro to automatically save your work periodically. This will ensure that your work is always saved.
How to configure Storyboard Pro to save your project automatically
1. In the Preferences dialog box, select the Advanced tab.
2. In the Memory section, move the Auto-save slider to the right to set the interval of time (in minutes) at which your work will be automatically saved. The minimum amount of time is 10 minutes, which means Storyboard Pro will save your work every 10 minutes. The maximum is 360 minutes (6 hours).
3. Click OK.
58
Saving Several Versions of a ProjectYou can save several versions of your project without making copies of the entire project.
When you save a "version" of your project, what you are saving is a copy of your animatic's structure, timing, camera movements, layer animations, audio tracks and video tracks into a different file in your project, allowing you to keep the state of your project at the last time you saved it as a sort of back-up file.
However, the drawings, audio files and video files themselves are shared by all versions of a given project. This means for example that if you make changes to a specific drawing in one version of a project, this change will affect the same drawing in other versions of the same project.
To understand this concept better, you can refer to the tables in About the File Structure of a Storyboard Pro Project on page 74. Essentially, saving a new version of your project saves a new .sboard and .aux file within your project's directory.
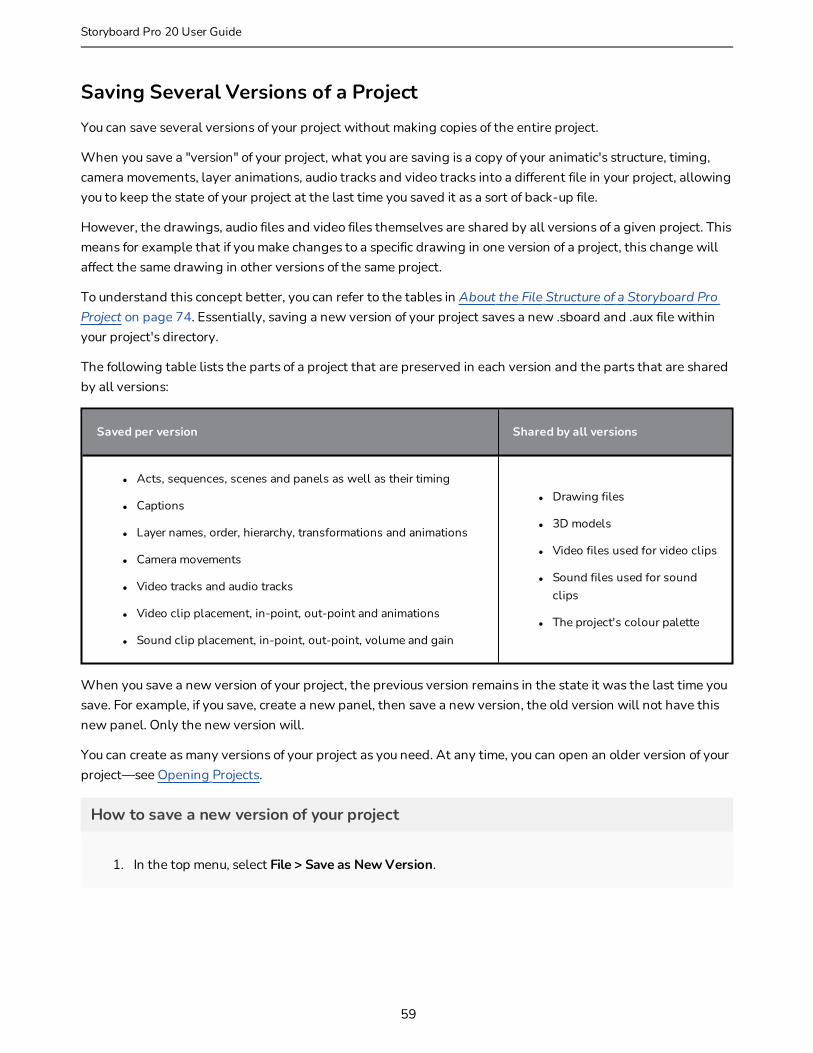
The following table lists the parts of a project that are preserved in each version and the parts that are shared by all versions:
Saved per version Shared by all versions
l Acts, sequences, scenes and panels as well as their timing
l Captions
l Layer names, order, hierarchy, transformations and animations
l Camera movements
l Video tracks and audio tracks
l Video clip placement, in-point, out-point and animations
l Sound clip placement, in-point, out-point, volume and gain
l Drawing files
l 3D models
l Video files used for video clips
l Sound files used for sound clips
l The project's colour palette
When you save a new version of your project, the previous version remains in the state it was the last time you save. For example, if you save, create a new panel, then save a new version, the old version will not have this new panel. Only the new version will.
You can create as many versions of your project as you need. At any time, you can open an older version of your project—see Opening Projects.
How to save a new version of your project
1. In the top menu, select File > Save as New Version.
59
Storyboard Pro 20 User Guide
Chapter 2: Projects
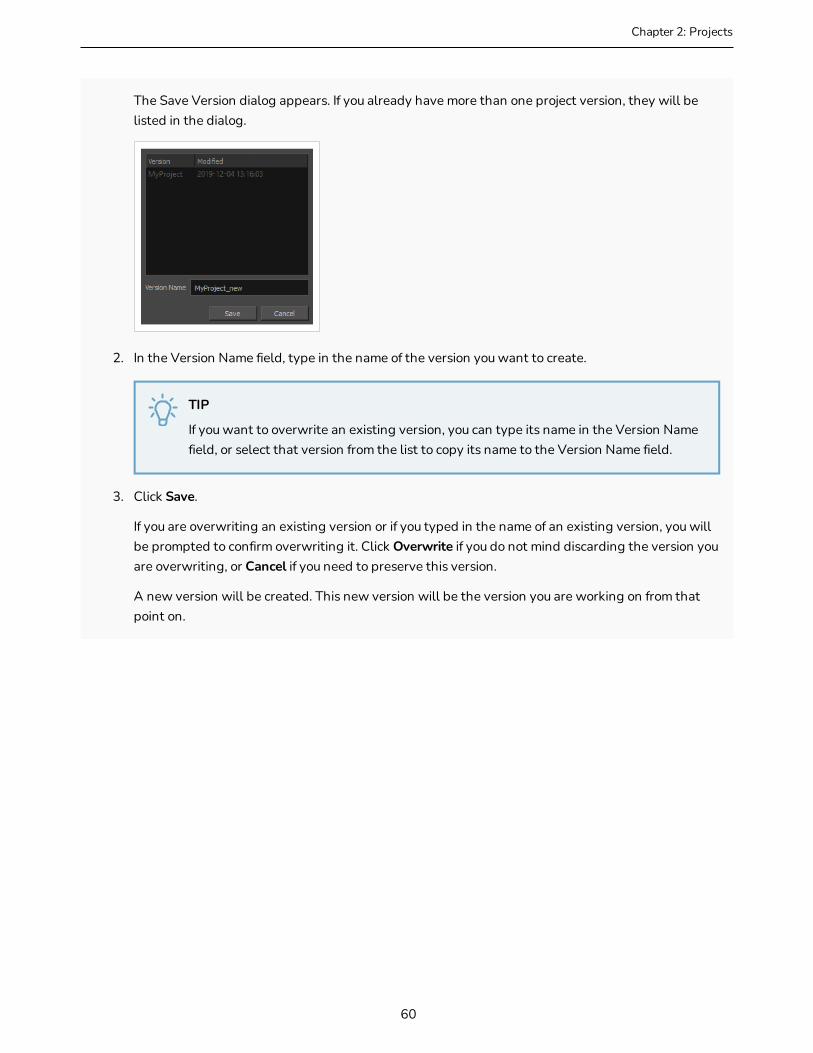
The Save Version dialog appears. If you already have more than one project version, they will be listed in the dialog.
2. In the Version Name field, type in the name of the version you want to create.
TIP
If you want to overwrite an existing version, you can type its name in the Version Name field, or select that version from the list to copy its name to the Version Name field.
3. Click Save.
If you are overwriting an existing version or if you typed in the name of an existing version, you will be prompted to confirm overwriting it. Click Overwrite if you do not mind discarding the version you are overwriting, or Cancel if you need to preserve this version.
A new version will be created. This new version will be the version you are working on from that point on.
60
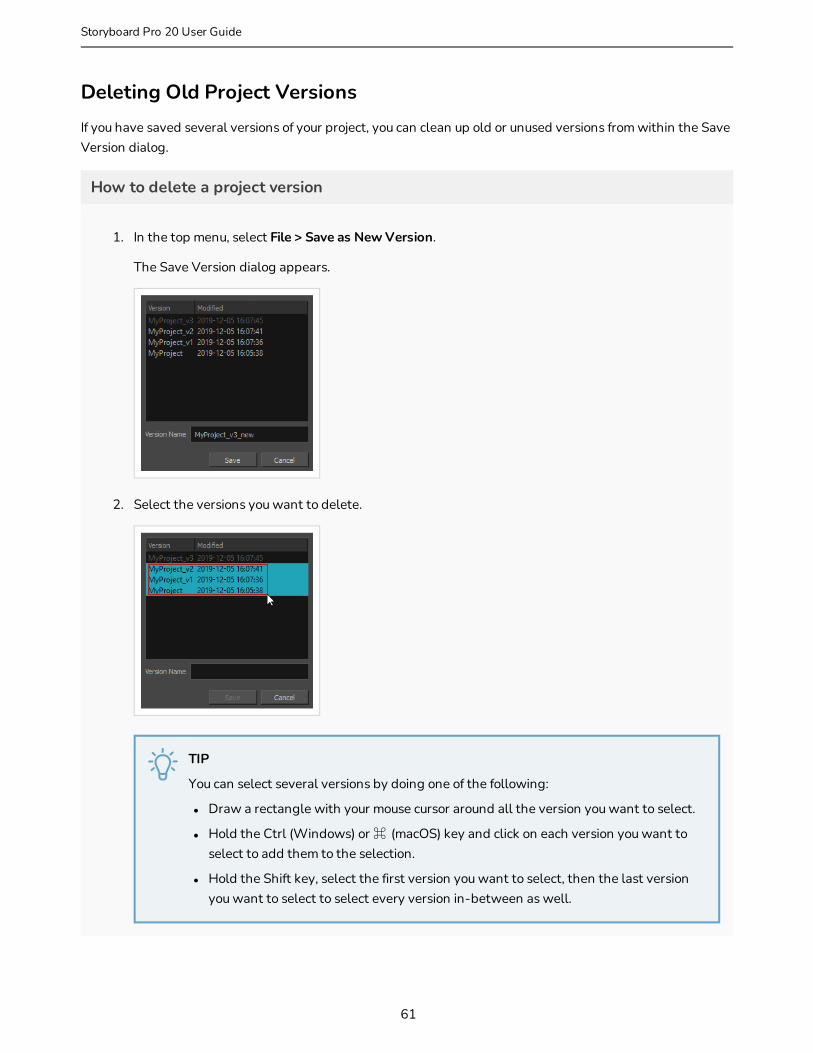
Deleting Old Project VersionsIf you have saved several versions of your project, you can clean up old or unused versions from within the Save Version dialog.
How to delete a project version
1. In the top menu, select File > Save as New Version.
The Save Version dialog appears.
2. Select the versions you want to delete.
TIP
You can select several versions by doing one of the following:
l Draw a rectangle with your mouse cursor around all the version you want to select.
l Hold the Ctrl (Windows) or ⌘ (macOS) key and click on each version you want to select to add them to the selection.
l Hold the Shift key, select the first version you want to select, then the last version you want to select to select every version in-between as well.
61
Storyboard Pro 20 User Guide
Chapter 2: Projects
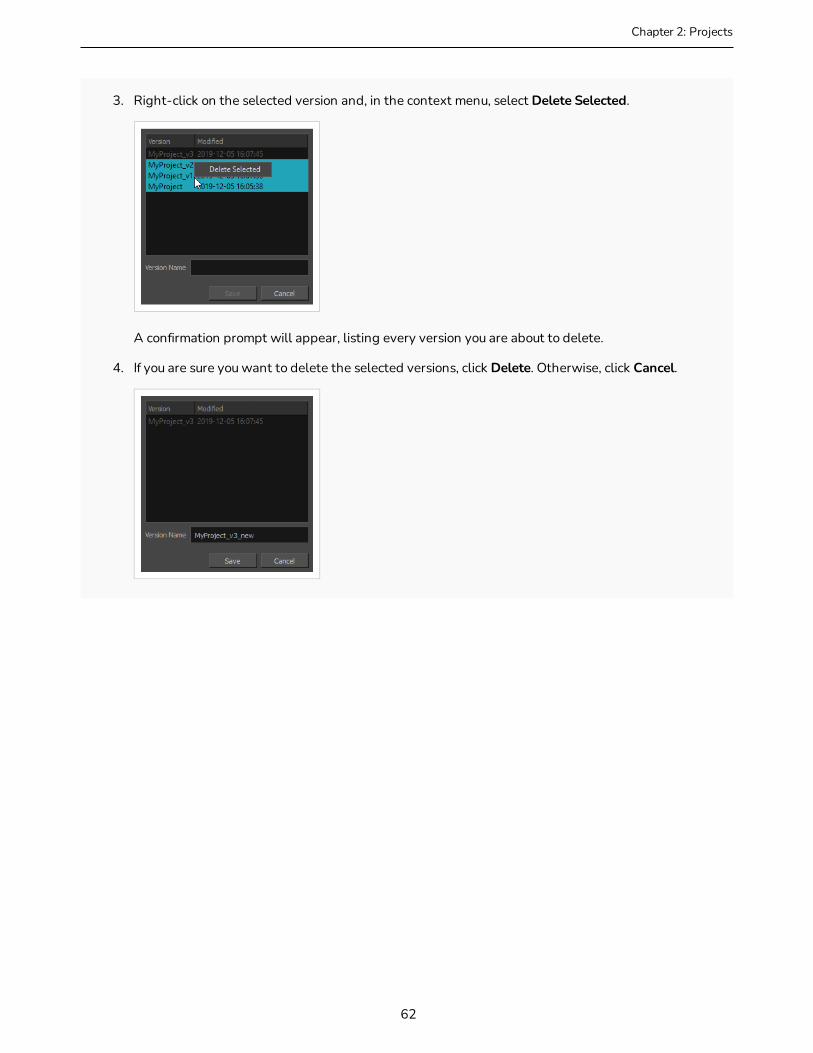
3. Right-click on the selected version and, in the context menu, select Delete Selected.
A confirmation prompt will appear, listing every version you are about to delete.
4. If you are sure you want to delete the selected versions, click Delete. Otherwise, click Cancel.
62
About Project OptimizationT-SBFND-002-007
If you are concerned with file size and speed, there are a few things you can do to optimize your project.
NOTE
Toon Boom Storyboard Pro has an optimized file structure that reduces the number of folders. For this reason, once a project is saved in this version, it can no longer be opened in Storyboard Pro 2. However, Toon Boom Storyboard Pro is fully backwards compatible and will open files created by older versions of Storyboard Pro.
63
Storyboard Pro 20 User Guide
Chapter 2: Projects
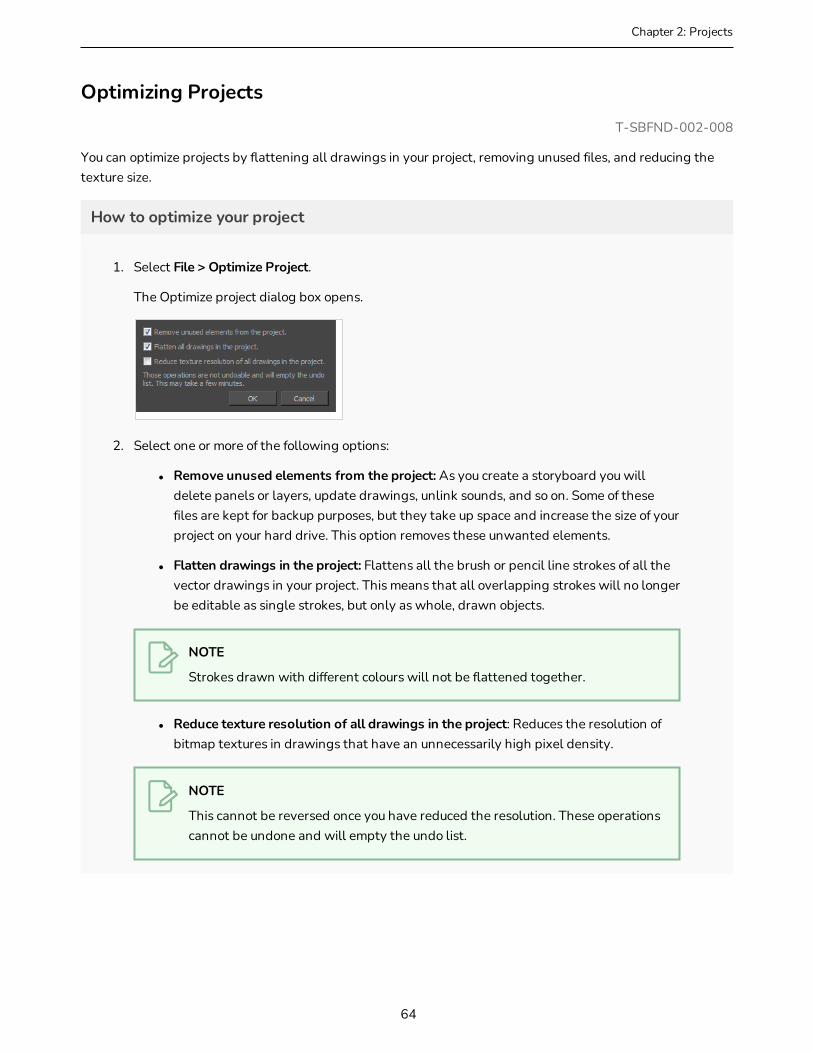
Optimizing ProjectsT-SBFND-002-008
You can optimize projects by flattening all drawings in your project, removing unused files, and reducing the texture size.
How to optimize your project
1. Select File > Optimize Project.
The Optimize project dialog box opens.
2. Select one or more of the following options:
l Remove unused elements from the project: As you create a storyboard you will delete panels or layers, update drawings, unlink sounds, and so on. Some of these files are kept for backup purposes, but they take up space and increase the size of your project on your hard drive. This option removes these unwanted elements.
l Flatten drawings in the project: Flattens all the brush or pencil line strokes of all the vector drawings in your project. This means that all overlapping strokes will no longer be editable as single strokes, but only as whole, drawn objects.
NOTE
Strokes drawn with different colours will not be flattened together.
l Reduce texture resolution of all drawings in the project: Reduces the resolution of bitmap textures in drawings that have an unnecessarily high pixel density.
NOTE
This cannot be reversed once you have reduced the resolution. These operations cannot be undone and will empty the undo list.
64
Optimizing DrawingsT-SBFND-002-009
When using any of the playback options in Storyboard Pro, the software must calculate the positioning of all the *.tvg (Toon Boom vector graphics) files. This is the file format created from all your drawing strokes. This calculation tends to slow down the rate of playback. There is, however, a way to circumvent this problem.
There is a second file format, *.tvgo (Toon Boom vector graphic optimized), that has all the pixel position information pre-calculated. Using these drawings should significantly speed up playback.
How to optimize playback and create optimized drawngs
1. Select Edit > Preferences.
The Preferences dialog box opens.
2. From the Advanced tab, under the Optimized Playback section, select the Use Optimized Drawings option.
3. Select the Asynchronous Drawing Loading option to optimize playback. There are cases in which, during playback, the software may encounter a particularly texture-heavy or complex panel. When this happens, and this option is deselected, there will be a pause in playback while the frame loads. If you select this option, then playback will continue and the drawings will load as soon as they are available. You may notice a short blink while the drawing loads.
4. Select the Preload Drawings option to enhance playback further by loading drawings in memory before you reach them during playback. Storyboard Pro will determine which, between the two options, has more drawings to preload and use the appropriate option during playback.
l Number of Frames to Preload: Storyboard Pro looks ahead for the number of frames, and checks to see how many drawings are used. Each layer on each panel is a drawing. If you have many short panels, then you will have more drawings than if you had one long panel.
l Number of Panels to Preload: Storyboard Pro looks ahead for the specified number of panels to determine the number of drawings in those panels. Keep in mind that each layer on each panel is a drawing. If you have long panels, then it will want to look ahead several panels, instead of the specified number of frames.
5. Click OK.
6. Select File > Create Optimized Drawings.
65
Storyboard Pro 20 User Guide

Chapter 2: Projects
Optimization Best PracticesT-SBFND-002-010
When working in Storyboard Pro, there are some best practices you should follow to keep the file size low and playback speed fast.
66
Plain Vector Versus Texture Brush
T-SBFND-002-011
When you draw on a layer, all the strokes that you create with the Brush tool are vector elements. There are two kinds of brushes:
l Plain Brushes: By default, the Brush tool creates vector strokes filled with either a colour or a gradient. Vector strokes use a very small amount of memory and can be used rapidly because they do not contain any pixel information, only mathematical functions.
l Texture Brushes: This type of brush also produces a vector contour for its strokes, but is filled with a bitmap texture. These textures allows you to produce drawings that have natural looking brush strokes that resemble lines drawn using a crayon or airbrush.
Because you are using a bitmap image mapped inside vector strokes, texture brushes use much more memory and processing time than brush strokes filled with colour. Therefore if you want to make your file size lighter and drawing speed faster, use only regular brushes to draw scenes. If you choose to use texture brushes, is it important to use a reasonable size bitmap for the texture brush.
NOTE
When you use a bitmap layer instead of a vector layer, individual vector strokes are not created. Instead, individual pixels are laid down, recording information about the RGBA of each pixel. Because of this, when working with lots of shading and lots of different textures or colours, the bitmap layer is actually more efficient than the texture brush on the vector layer—see Drawing on page 266.
67
Storyboard Pro 20 User Guide
Chapter 2: Projects
Bitmap Import Optimization
T-SBFND-002-012
Storyboard Pro allows you to create storyboards by importing scanned images or bitmaps drawn in another software. During the import process, images are vectorized and placed in a new scene in a vector bounding box as a bitmap fill. The bitmap image’s resolution can affect your project’s file size and the speed at which Storyboard Pro functions while handling your project. When importing bitmaps into a storyboard, there is rarely a need to use a high resolution as it will not increase the quality of your PDF or animatic. You should import bitmaps with a resolution close to the project resolution. For example, in an NTSC project, using a bitmap with a 720 x 480 resolution or a 72 dpi quality will be fine.
68
Flattening Drawings
T-SBFND-002-013
In Storyboard Pro, strokes inside a vector layer are independent. You can select a specific stroke and edit its position, scale, rotation, skew, colour and so on, whenever you want. However, this flexibility increases the amount of memory and resources used, especially when you have a lot of strokes in your drawing (which frequently happens when sketching).
You can flatten all drawings at the same time. However, you can retain partial flexibility and still minimize file size and resources needed by consciously flattening certain drawings as you draw, or even by selecting them after you have drawn them. You can take all strokes of the same colour with overlapping areas on the same layer and flatten them to create a single drawing with a vector contour.
Pencil lines of the same colour can be flattened together. If there are several colours used for the line, multiple line sets will be created. Pencil line size does not affect the flatten.
When you use the Flatten option in the Tools menu, Storyboard Pro automatically crops all textures, reducing the drawing size by removing the texture area which is not visible.
How to flatten strokes as you draw
1. From the Tools toolbar, select the Brush tool.
2. In the Tool Properties view, click the Auto-Flatten button.
3. In the Stage view, sketch your first drawing.
The strokes are automatically flattened.
How to flatten an existing drawing
1. From the Tools toolbar, select the Select tool.
2. In the Stage view, select a group of strokes.
l If you do not select a group of strokes, the entire layer will be flattened.
l You can select multiple layers, so they are flattened individually.
3. Select Tools > Flatten or press Alt + Shift + F.
69
Storyboard Pro 20 User Guide
Chapter 2: Projects
About Project BackupT-SBADV-001-002
As you work on your storyboard project, it is always a good idea to save continuously. At the end of each workday, it is even better to back up your work. The difference between backing up and saving is that a backup is a compressed version of your project. Backing up your work provides a safety net against corrupted files and allows you to have several versions of your project at different stages, in case you need to go back and work from an earlier point in the production.
70

Backing Up ProjectsT-SBADV-001-003
The place where you save your backup file (*.sbbkp) does not necessarily have to be the same place where you have your current project file saved. For example, you can save the backup on your company’s server, even though the current version is saved somewhere on your computer.
How to back up the current version of your Storyboard Pro project
1. Select File > Backup Storyboard.
The Create Storyboard Backup window opens.
2. Browse for a location on your computer to save this backup file. You can also rename it with a date or version number.
3. Click Save.
An *.sbbkp file is created and saved in the assigned location.
71
Storyboard Pro 20 User Guide
Chapter 2: Projects
Restoring BackupsT-SBADV-001-004
At times, you may need to restore a backup of a project you are working on.
How to restore and open a backup file
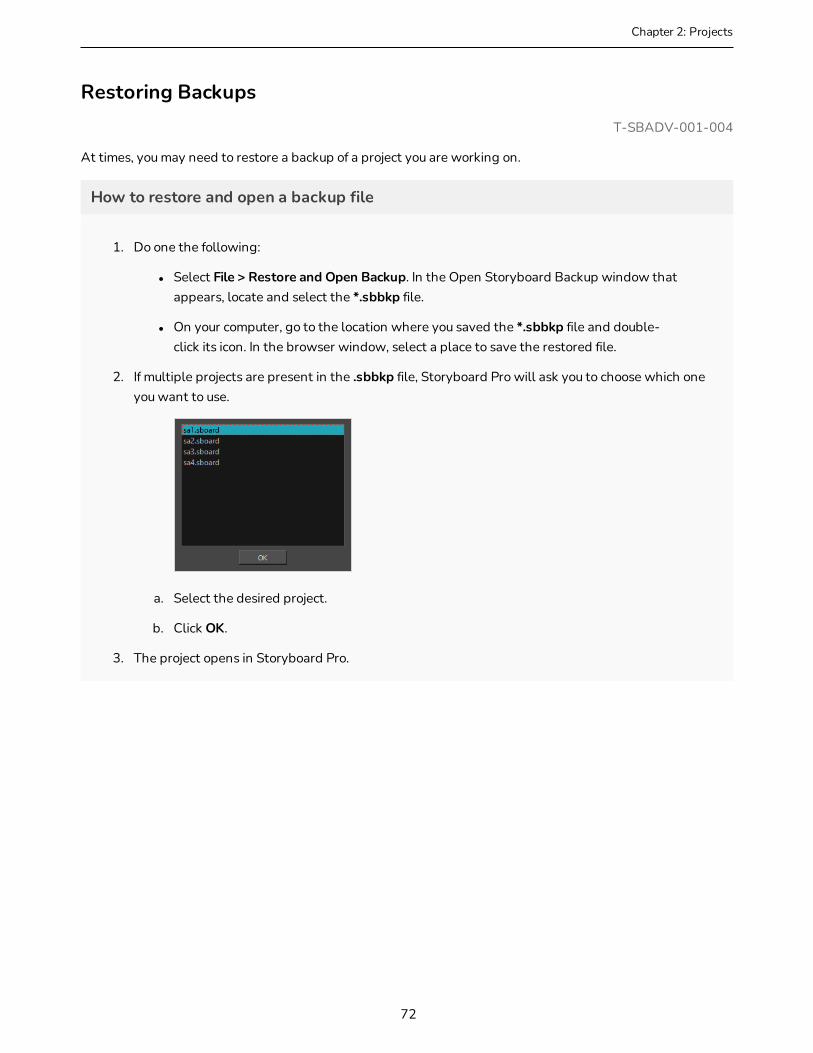
1. Do one the following:
l Select File > Restore and Open Backup. In the Open Storyboard Backup window that appears, locate and select the *.sbbkp file.
l On your computer, go to the location where you saved the *.sbbkp file and double-click its icon. In the browser window, select a place to save the restored file.
2. If multiple projects are present in the .sbbkp file, Storyboard Pro will ask you to choose which one you want to use.
a. Select the desired project.
b. Click OK.
3. The project opens in Storyboard Pro.
72
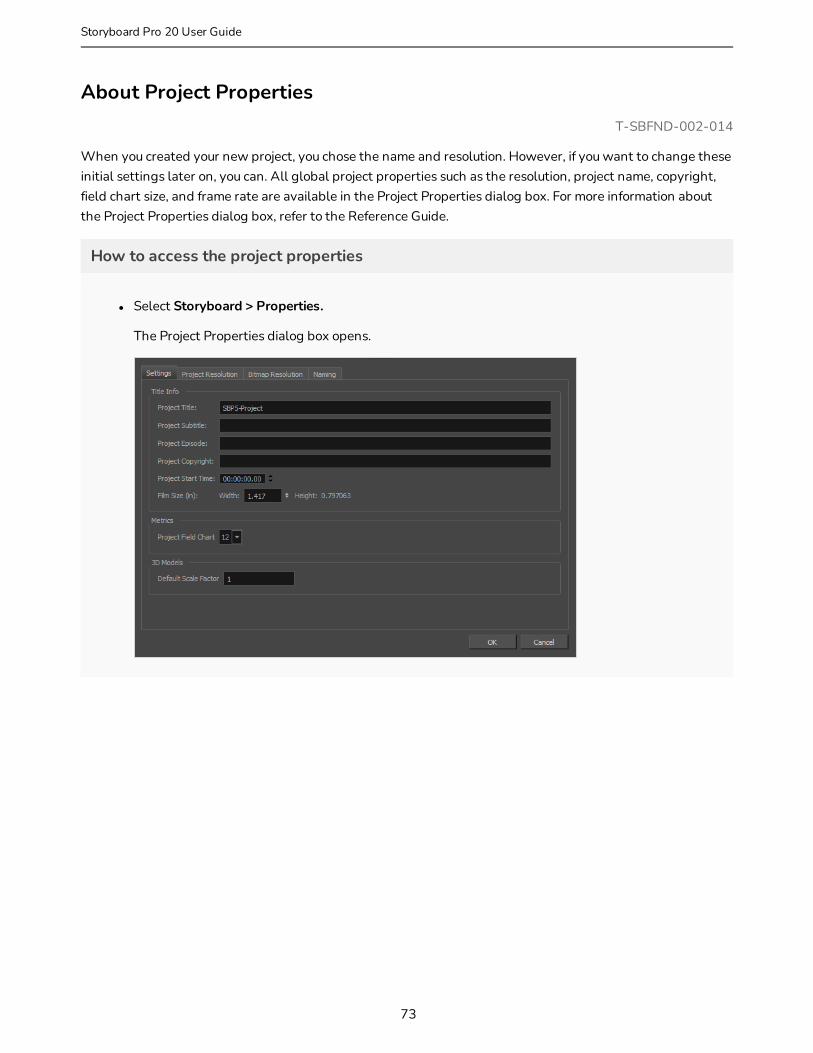
About Project PropertiesT-SBFND-002-014
When you created your new project, you chose the name and resolution. However, if you want to change these initial settings later on, you can. All global project properties such as the resolution, project name, copyright, field chart size, and frame rate are available in the Project Properties dialog box. For more information about the Project Properties dialog box, refer to the Reference Guide.
How to access the project properties
l Select Storyboard > Properties.
The Project Properties dialog box opens.
73
Storyboard Pro 20 User Guide
Chapter 2: Projects
About the File Structure of a Storyboard Pro ProjectA Storyboard Pro project is composed of several files. The drawings and colour palettes are not embedded in the project. They are separate linked files. Therefore, if you want to archive or share a project, you must do so in a way that preserves all the files in the project along with their folder structure.
NOTE
You can also save your project into a single file that acts as an archive containing all of your project's files—see Saving Projects as a Single File on page 54.
The Storyboard Pro project folder contains many files and folders. Storyboard Pro uses the same structure for a Storyboard Pro project as Toon Boom Storyboard Pro does for scenes. Hence, some files and folders may not seem useful in the context of a Storyboard Pro project.
Files in a Storyboard Pro project
File Contents
ProjectName.sboard
The actual project file. You can double-click on this file to open it in Storyboard Pro.
If your project has several versions, there will be one file with only the name of the project in it, which is the original version, and one file for each additional version that was saved. Those versions will be named as such:
ProjectName_VersionName.sboard
NOTE
Each time you save, a back-up of this file before saving is created, named ProjectName.sboard~.
ProjectName.sboard.lock
This file is created when opening a project, and discarded when closing it. Storyboard Pro uses it to detect if the project is currently open in another instance of Storyboard Pro before opening it.
NOTE
If Storyboard Pro quits unexpectedly, this file will remain in the project folder. Hence, when you relaunch Storyboard Pro and try opening the project again, Storyboard Pro will warn you that the project is already open, even though it is not.
ProjectName.sboard.thumbnails A cache of the thumbnails for each panel in your project.
74
File Contents
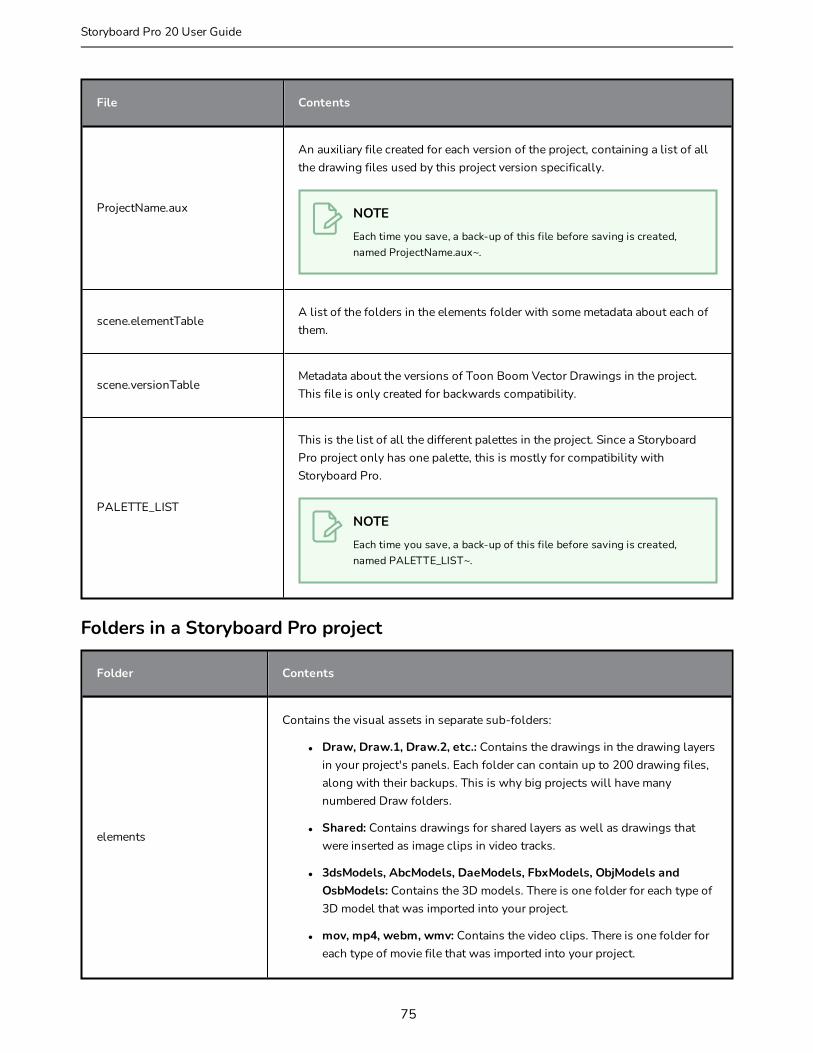
ProjectName.aux
An auxiliary file created for each version of the project, containing a list of all the drawing files used by this project version specifically.
NOTE
Each time you save, a back-up of this file before saving is created, named ProjectName.aux~.
scene.elementTableA list of the folders in the elements folder with some metadata about each of them.
scene.versionTableMetadata about the versions of Toon Boom Vector Drawings in the project. This file is only created for backwards compatibility.
PALETTE_LIST
This is the list of all the different palettes in the project. Since a Storyboard Pro project only has one palette, this is mostly for compatibility with Storyboard Pro.
NOTE
Each time you save, a back-up of this file before saving is created, named PALETTE_LIST~.
Folders in a Storyboard Pro project
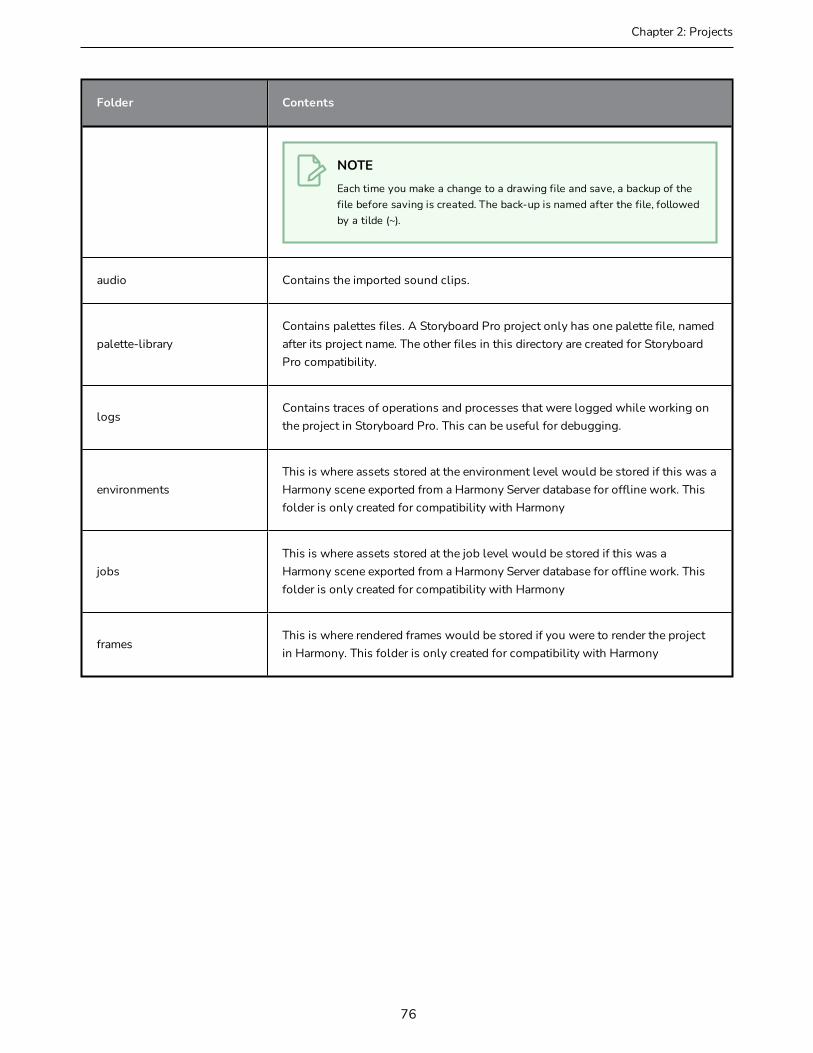
Folder Contents
elements
Contains the visual assets in separate sub-folders:
l Draw, Draw.1, Draw.2, etc.: Contains the drawings in the drawing layers in your project's panels. Each folder can contain up to 200 drawing files, along with their backups. This is why big projects will have many numbered Draw folders.
l Shared: Contains drawings for shared layers as well as drawings that were inserted as image clips in video tracks.
l 3dsModels, AbcModels, DaeModels, FbxModels, ObjModels and OsbModels: Contains the 3D models. There is one folder for each type of 3D model that was imported into your project.
l mov, mp4, webm, wmv: Contains the video clips. There is one folder for each type of movie file that was imported into your project.
75
Storyboard Pro 20 User Guide
Chapter 2: Projects
Folder Contents
NOTE
Each time you make a change to a drawing file and save, a backup of the file before saving is created. The back-up is named after the file, followed by a tilde (~).
audio Contains the imported sound clips.
palette-libraryContains palettes files. A Storyboard Pro project only has one palette file, named after its project name. The other files in this directory are created for Storyboard Pro compatibility.
logsContains traces of operations and processes that were logged while working on the project in Storyboard Pro. This can be useful for debugging.
environmentsThis is where assets stored at the environment level would be stored if this was a Harmony scene exported from a Harmony Server database for offline work. This folder is only created for compatibility with Harmony
jobsThis is where assets stored at the job level would be stored if this was a Harmony scene exported from a Harmony Server database for offline work. This folder is only created for compatibility with Harmony
framesThis is where rendered frames would be stored if you were to render the project in Harmony. This folder is only created for compatibility with Harmony
76

77
Storyboard Pro 20 User Guide
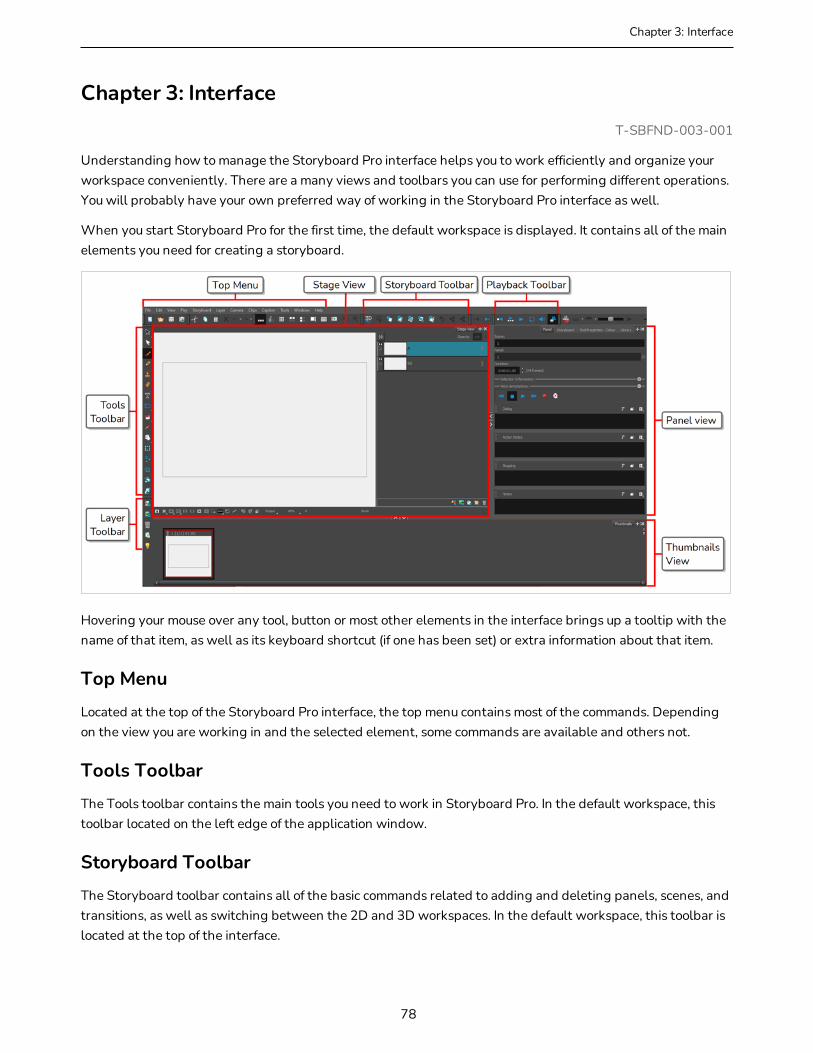
Chapter 3: Interface
Chapter 3: InterfaceT-SBFND-003-001
Understanding how to manage the Storyboard Pro interface helps you to work efficiently and organize your workspace conveniently. There are a many views and toolbars you can use for performing different operations. You will probably have your own preferred way of working in the Storyboard Pro interface as well.
When you start Storyboard Pro for the first time, the default workspace is displayed. It contains all of the main elements you need for creating a storyboard.
Hovering your mouse over any tool, button or most other elements in the interface brings up a tooltip with the name of that item, as well as its keyboard shortcut (if one has been set) or extra information about that item.
Top Menu
Located at the top of the Storyboard Pro interface, the top menu contains most of the commands. Depending on the view you are working in and the selected element, some commands are available and others not.
Tools Toolbar
The Tools toolbar contains the main tools you need to work in Storyboard Pro. In the default workspace, this toolbar located on the left edge of the application window.
Storyboard Toolbar
The Storyboard toolbar contains all of the basic commands related to adding and deleting panels, scenes, and transitions, as well as switching between the 2D and 3D workspaces. In the default workspace, this toolbar is located at the top of the interface.
78
Playback Toolbar
The Playback toolbar lets you play back your storyboard. When you create an animatic with transitions and sound, you can play it back in real time in the Stage view to check the timing.
In the default workspace, this toolbar is located at the top of the interface.
Thumbnails View
The Thumbnails View displays all the panels of your project in chronological order. You can use this view to navigate through your storyboard, rearrange panels and scenes, and select the panel to display in the Stage view.
By default, it is not possible to draw in the Thumbnails view and there are no browsing buttons. But you can change these settings in the Preferences dialog box.
Stage View
The Stage view are the centre of operations in Storyboard Pro. In these views, you can build, draw, paint, animate the camera, create layers, and see your results.
Panel View
The Panel view displays the different captions related to the current panel, the in, out and duration, and lets you play any voice annotations related to the panel.
NOTE
By default, when you modify the workspace, it is automatically saved. You can restore the default workspaces by selecting Windows > Restore Default Workspace. You can prevent this behaviour by deselecting the Save Workspace option in the Preferences dialog box—see General Preferences in the Preferences Guide.
79
Storyboard Pro 20 User Guide
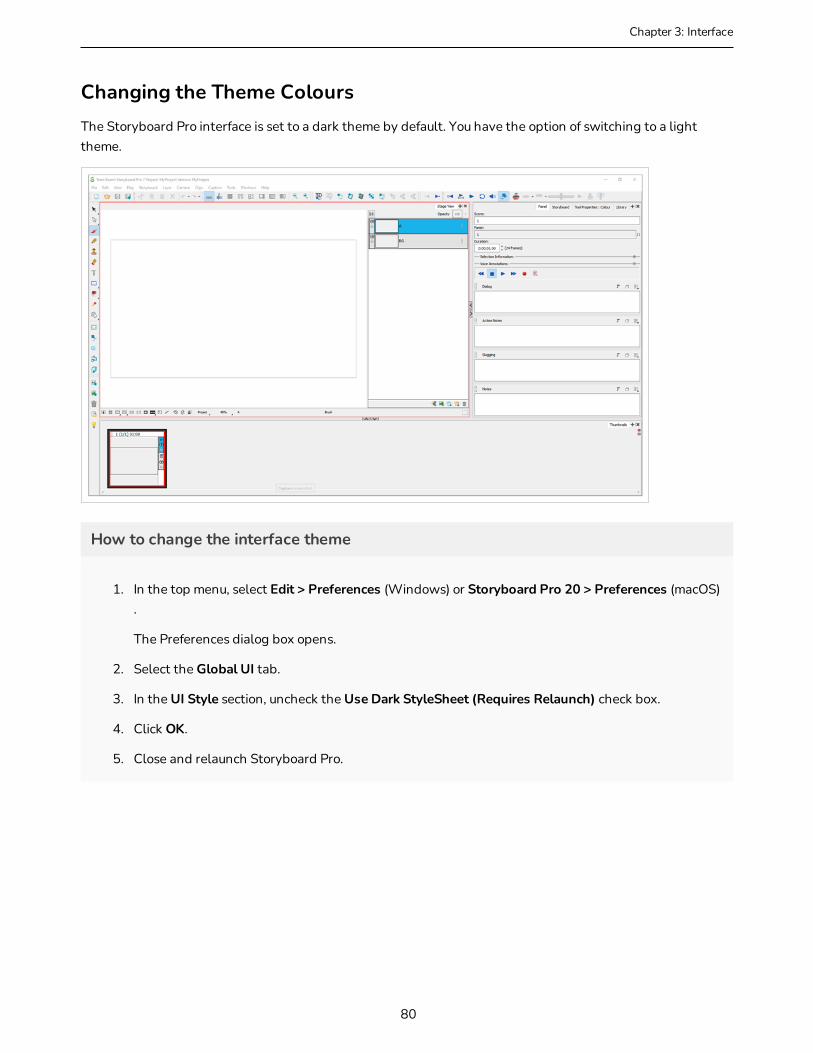
Chapter 3: Interface
Changing the Theme ColoursThe Storyboard Pro interface is set to a dark theme by default. You have the option of switching to a light theme.
How to change the interface theme
1. In the top menu, select Edit > Preferences (Windows) or Storyboard Pro 20 > Preferences (macOS) .
The Preferences dialog box opens.
2. Select the Global UI tab.
3. In the UI Style section, uncheck the Use Dark StyleSheet (Requires Relaunch) check box.
4. Click OK.
5. Close and relaunch Storyboard Pro.
80
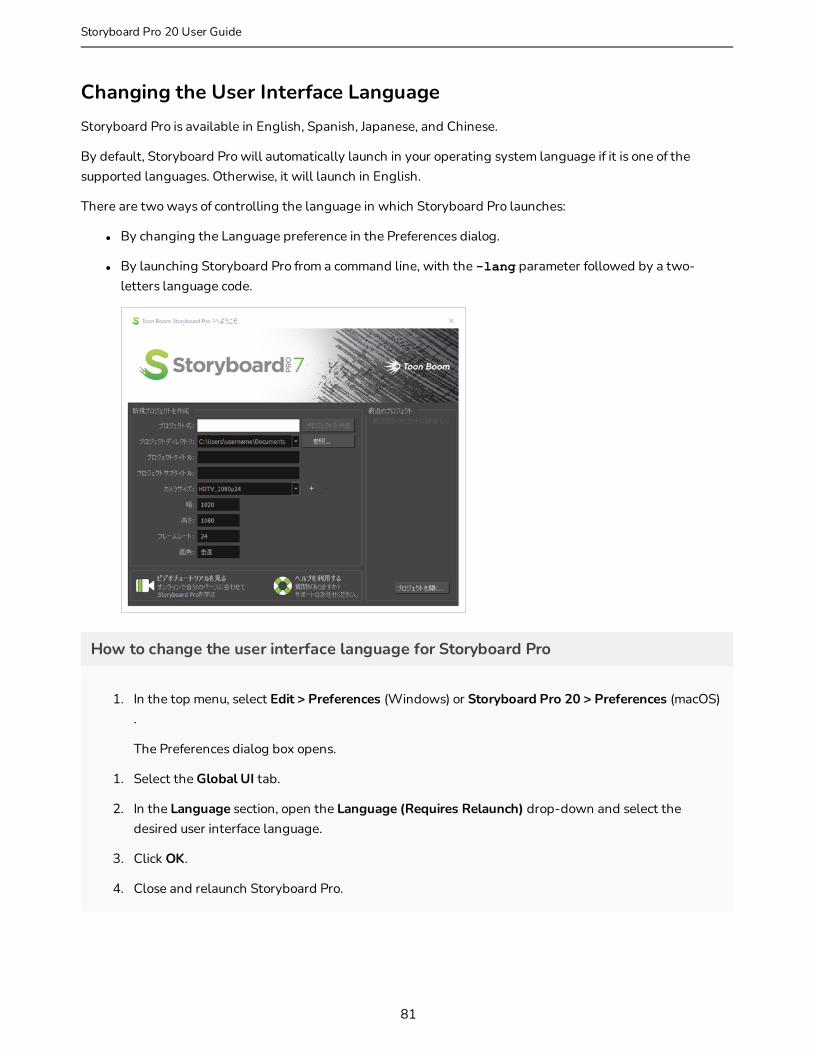
Changing the User Interface LanguageStoryboard Pro is available in English, Spanish, Japanese, and Chinese.
By default, Storyboard Pro will automatically launch in your operating system language if it is one of the supported languages. Otherwise, it will launch in English.
There are two ways of controlling the language in which Storyboard Pro launches:
l By changing the Language preference in the Preferences dialog.
l By launching Storyboard Pro from a command line, with the -lang parameter followed by a two-letters language code.
How to change the user interface language for Storyboard Pro
1. In the top menu, select Edit > Preferences (Windows) or Storyboard Pro 20 > Preferences (macOS) .
The Preferences dialog box opens.
1. Select the Global UI tab.
2. In the Language section, open the Language (Requires Relaunch) drop-down and select the desired user interface language.
3. Click OK.
4. Close and relaunch Storyboard Pro.
81
Storyboard Pro 20 User Guide

Chapter 3: Interface
How to start Storyboard Pro in a specific user interface language from the command line
1. Open a Command Prompt or Terminal window.
2. Type in the following command, including the quotation marks, but don't press Enter/Return yet.
l Windows: "C:\Program Files (x86)\Toon Boom Animation\Toon Boom Storyboard Pro 20\win64\bin\StoryboardPro.exe"
l macOS: "/Applications/Toon Boom Storyboard Pro 20/Storyboard Pro 20.app/Contents/MacOS/Storyboard Pro"
3. Type a space, then type the following parameter depending on which language you want to launch Storyboard Pro in:
l English: -lang en
l Chinese: -lang zh
l Japanese: -lang ja
l Spanish: -lang es
4. Press Enter/Return.
Storyboard Pro will launch in the specified language.
82
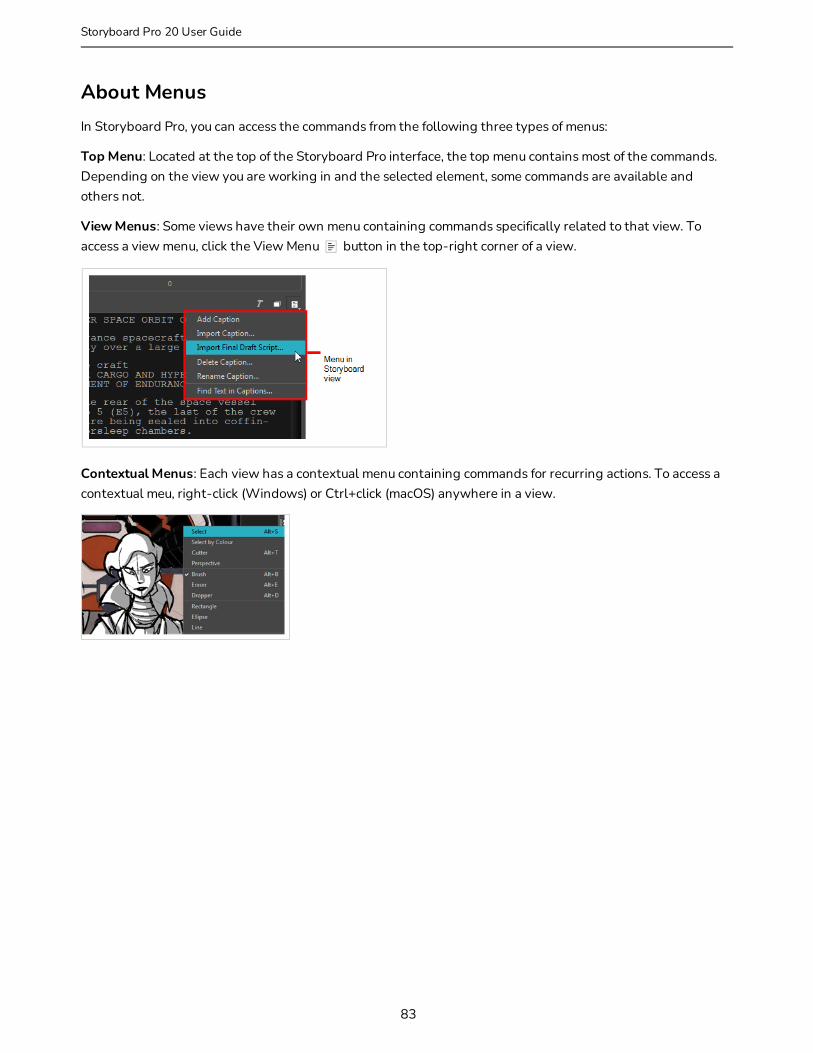
About MenusIn Storyboard Pro, you can access the commands from the following three types of menus:
Top Menu: Located at the top of the Storyboard Pro interface, the top menu contains most of the commands. Depending on the view you are working in and the selected element, some commands are available and others not.
View Menus: Some views have their own menu containing commands specifically related to that view. To access a view menu, click the View Menu button in the top-right corner of a view.
Contextual Menus: Each view has a contextual menu containing commands for recurring actions. To access a contextual meu, right-click (Windows) or Ctrl+click (macOS) anywhere in a view.
83
Storyboard Pro 20 User Guide
Chapter 3: Interface
About ViewsT-SBFND-003-002
The Storyboard Pro user interface is comprised of different views, each one designed for a specific purpose. You can modify the location and accessibility of the views by adding a new view as a tab or as a window. You can also swap the view locations around, as well as do the following:
l Add a view
l Tab a view
l Dock a view
l Undock a view
l Rename a view
l Close a view
l Move a view
l Resize a view
l Collapse a view
l Expand a view
For details about the views in Storyboard Pro, see Reference Guide.
Here is a complete list of the views available in Storyboard Pro.
l 3D Schematic
l Camera
l Colour
l Function Editor
l Guides
l Layers
l Library
l Message Log
l Panel
l Panel PDF Options
l PDF Export
l Pitch Mode
l Script Editor
84

l Side
l Stage
l Storyboard
l Thumbnails
l Timeline
l Tool Properties
l Top
85
Storyboard Pro 20 User Guide

Chapter 3: Interface
Adding ViewsT-SBFND-003-002
Views contain specific groupings of features and can be positioned anywhere on your screen. You can tab, dock, and undock a view.
The Colour view is a bit different than other views in Storyboard Pro. By default, the Colour view is part of the Tool Properties view, not a separate view on its own. If you have chosen to separate the two views and want to reintegrate them into one view, select Windows > Restore Default Workspace.
How to add a view
1. Do one of the following:
l Select Windows and then select a view from the list.
l In Panel view, click the View Menu button and select a view from the list.
How to dock a view
l Drag the window’s tab onto the Panel view and drop it in the tab area.
The view is added to the Panel view.
86
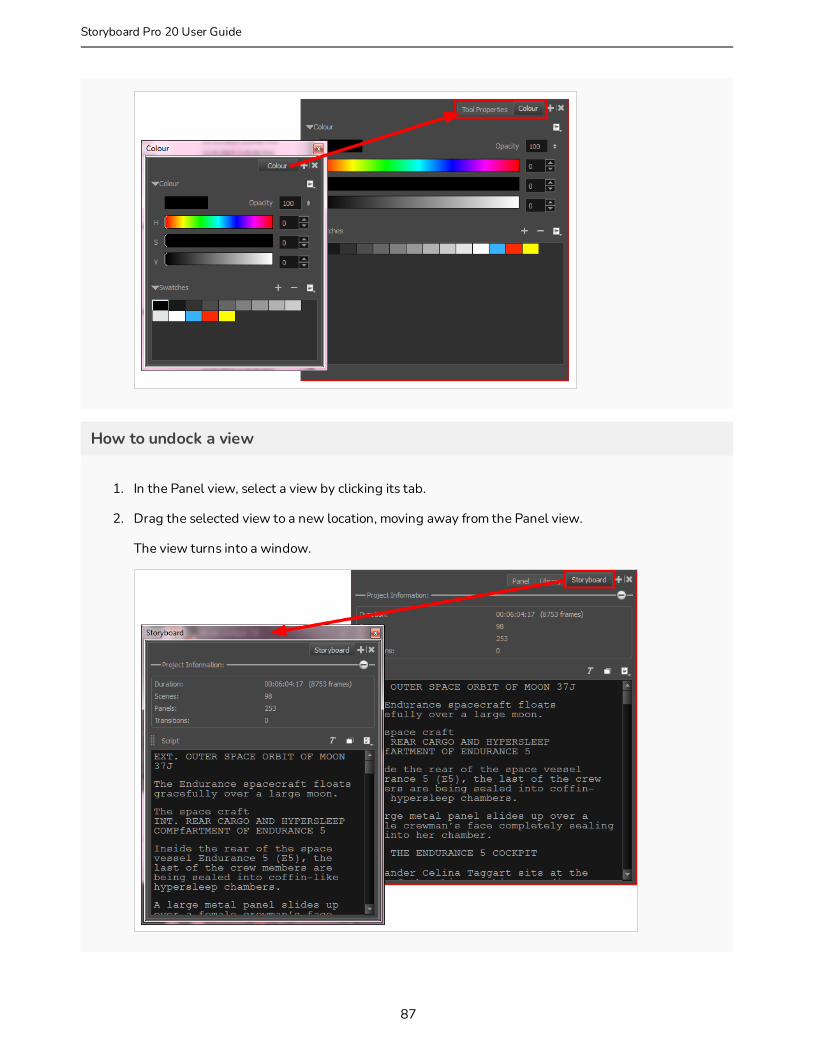
How to undock a view
1. In the Panel view, select a view by clicking its tab.
2. Drag the selected view to a new location, moving away from the Panel view.
The view turns into a window.
87
Storyboard Pro 20 User Guide

Chapter 3: Interface
Renaming a ViewT-SBFND-003-003
You can rename a view for convenience. When you do, the new name remains in effect as long as the view stays open. Once you close and reopen the view, its name, as displayed on the tab, will revert to the default name.
How to rename a view
1. In the view to rename, click the View Menu button.
2. Select Rename Tab from the list.
The Rename View Tab dialog box opens.
3. Type a new name for the tab you want to rename and click OK.
88

Closing ViewsT-SBFND-003-003
If there are views in your workspace that you do not use, you can close them to streamline your space.
How to close a view
1. In the view to close, click the Close View button.
2. If there are several tabs, press Shift and click the Close View button.
All the tabs are closed at the same time.
NOTE
Don't forget, you can restore the default workspace at any time by selecting Windows > Restore Default Layout.
89
Storyboard Pro 20 User Guide
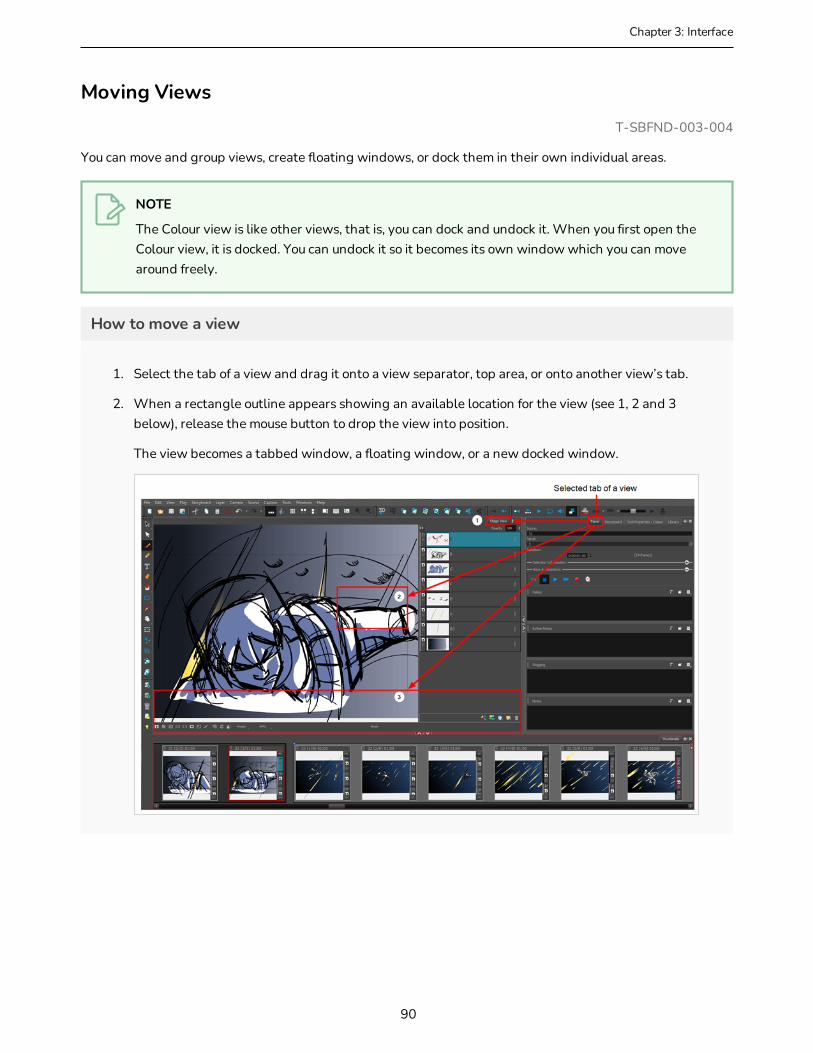
Chapter 3: Interface
Moving ViewsT-SBFND-003-004
You can move and group views, create floating windows, or dock them in their own individual areas.
NOTE
The Colour view is like other views, that is, you can dock and undock it. When you first open the Colour view, it is docked. You can undock it so it becomes its own window which you can move around freely.
How to move a view
1. Select the tab of a view and drag it onto a view separator, top area, or onto another view’s tab.
2. When a rectangle outline appears showing an available location for the view (see 1, 2 and 3 below), release the mouse button to drop the view into position.
The view becomes a tabbed window, a floating window, or a new docked window.
90

Resizing ViewsT-SBFND-003-005
By resizing a view, you can customize your workspace. You can change the width and height of the views in the workspace.
How to resize a view
1. Position your cursor at the edge of the view you want to resize.
2. When you see the Resizing cursor, drag the side of the window to the desired width or height.
91
Storyboard Pro 20 User Guide

Chapter 3: Interface
Expanding or Collapsing ViewsT-SBFND-003-006
By temporarily expanding or collapsing a view, you can manipulate the workspace to suit your workflow. The expanded or collapsed state of a view will be saved as part of the workspace modifications.
How to expand or collapse a view
1. On the edge of the view you want to hide, click the Expand/Collapse button.
The view is collapsed and only the Expand/Collapse button is visible.
2. Click the Expand/Collapse button to display the view again.
92
About ToolbarsT-SBFND-003-007
The Storyboard Pro interface contains toolbars that quicky give you you access many useful tools. You can add, move and remove toolbars in your workspace.
These toolbars are available in Storyboard Pro.
l Camera
l Clips and Tracks
l Coordinate
l Edit
l File
l Layer
l Navigation
l Onion Skin
l Playback
l Scripting
l Storyboard
l View
l Workspace
l Tool Presets
l Tools
93
Storyboard Pro 20 User Guide

Chapter 3: Interface
Adding and Closing ToolbarsT-SBFND-003-007
You can easily add a toolbar to your workspace or close one you don't use very often.
How to add a toolbar
‣ Select Windows > Toolbars > the toolbar to add.
How to close a toolbar
‣ Select Windows > Toolbars > the toolbar to close.
94

Moving ToolbarsT-SBFND-003-008
You can move toolbars and place them at the top of the interface or beside a view.
How to move a toolbar
1. Select the toolbar to move by clicking its anchor point and dragging it to a toolbar area at the top or side of the interface.
As you drag the toolbar, a rectangle outline appears to indicate the available locations for the toolbar.
2. Release the toolbar to drop it into position.
95
Storyboard Pro 20 User Guide
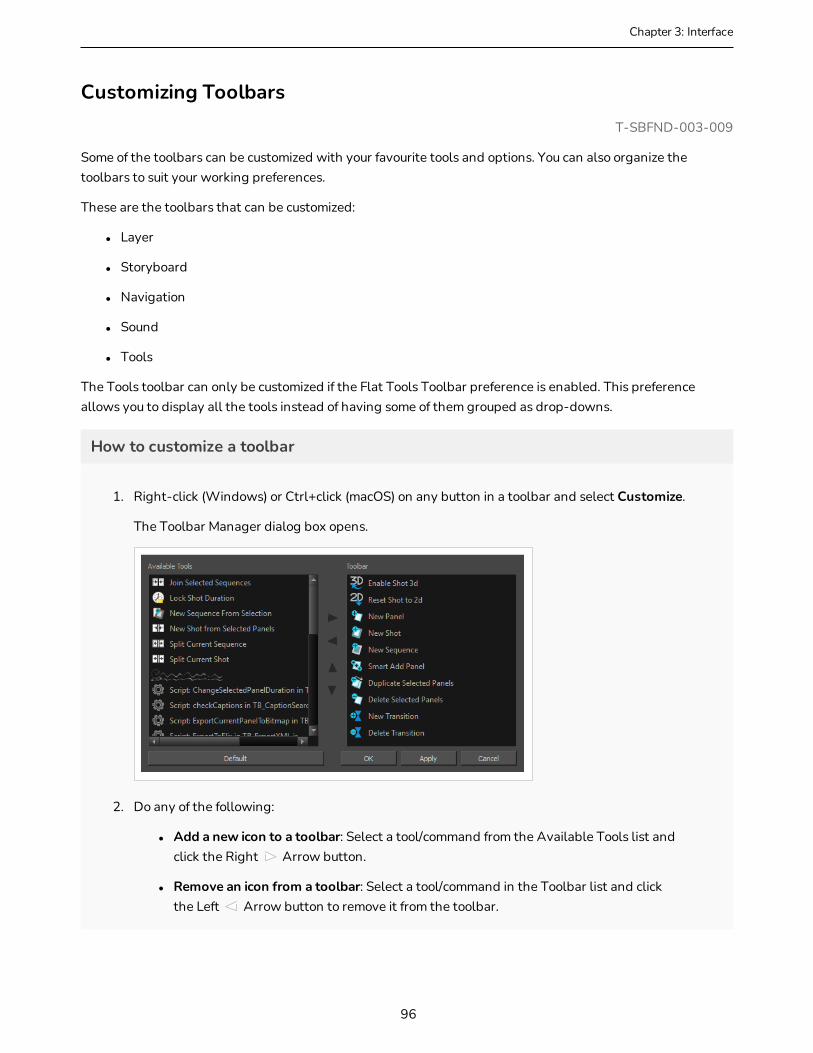
Chapter 3: Interface
Customizing ToolbarsT-SBFND-003-009
Some of the toolbars can be customized with your favourite tools and options. You can also organize the toolbars to suit your working preferences.
These are the toolbars that can be customized:
l Layer
l Storyboard
l Navigation
l Sound
l Tools
The Tools toolbar can only be customized if the Flat Tools Toolbar preference is enabled. This preference allows you to display all the tools instead of having some of them grouped as drop-downs.
How to customize a toolbar
1. Right-click (Windows) or Ctrl+click (macOS) on any button in a toolbar and select Customize.
The Toolbar Manager dialog box opens.
2. Do any of the following:
l Add a new icon to a toolbar: Select a tool/command from the Available Tools list and click the Right Arrow button.
l Remove an icon from a toolbar: Select a tool/command in the Toolbar list and click the Left Arrow button to remove it from the toolbar.
96

l Reorder icons in a toolbar: Select a tool/command in the Toolbar list and click the Up or Down Arrow buttons to reposition it.
3. Click Apply to apply the changes without closing the Toolbar Manager dialog box or click OK to apply the changes and close the window.
How to enable the Flat Tools Toolbar preference
1. Open the Preferences dialog box by do:
l Select File > Preferences (Windows) or Storyboard Pro > Preferences (macOS).
l Press Ctrl + U (Windows) or ⌘ + , (macOS).
2. Select the Global UI tab.
3. In the Toolbars section, select the Flat Tool Toolbar option.
4. Restart Storyboard Pro. Once the software is restarted, you can customize the Tools toolbar.
97
Storyboard Pro 20 User Guide
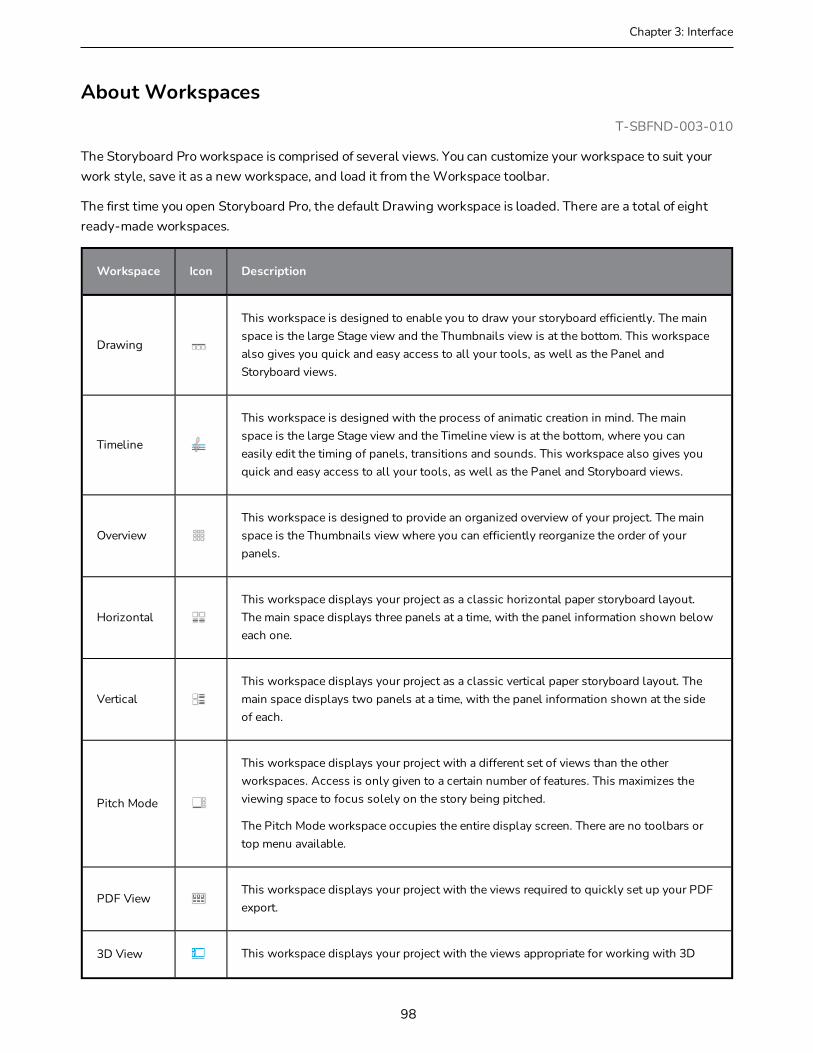
Chapter 3: Interface
About WorkspacesT-SBFND-003-010
The Storyboard Pro workspace is comprised of several views. You can customize your workspace to suit your work style, save it as a new workspace, and load it from the Workspace toolbar.
The first time you open Storyboard Pro, the default Drawing workspace is loaded. There are a total of eight ready-made workspaces.
Workspace Icon Description
Drawing
This workspace is designed to enable you to draw your storyboard efficiently. The main space is the large Stage view and the Thumbnails view is at the bottom. This workspace also gives you quick and easy access to all your tools, as well as the Panel and Storyboard views.
Timeline
This workspace is designed with the process of animatic creation in mind. The main space is the large Stage view and the Timeline view is at the bottom, where you can easily edit the timing of panels, transitions and sounds. This workspace also gives you quick and easy access to all your tools, as well as the Panel and Storyboard views.
OverviewThis workspace is designed to provide an organized overview of your project. The main space is the Thumbnails view where you can efficiently reorganize the order of your panels.
HorizontalThis workspace displays your project as a classic horizontal paper storyboard layout. The main space displays three panels at a time, with the panel information shown below each one.
VerticalThis workspace displays your project as a classic vertical paper storyboard layout. The main space displays two panels at a time, with the panel information shown at the side of each.
Pitch Mode
This workspace displays your project with a different set of views than the other workspaces. Access is only given to a certain number of features. This maximizes the viewing space to focus solely on the story being pitched.
The Pitch Mode workspace occupies the entire display screen. There are no toolbars or top menu available.
PDF ViewThis workspace displays your project with the views required to quickly set up your PDF export.
3D View This workspace displays your project with the views appropriate for working with 3D
98
Workspace Icon Description
objects, including the Camera, Top, Timeline, and Layers views.
When you create or change any of the customer workspaces, the file are stored in a folder called Toon Boom Storyboard Pro. You can copy this folder if you want to use the same workspaces on a different computer.
l Windows:
l C:\Users\[user_name]\AppData\Roaming\Toon Boom Animation\Toon Boom Storyboard Pro \20100-layouts-xml
l macOS: On macOS, the Library folder is a hidden folder. To display the display the folder, hold down the Alt key when displaying Finder's Go menu.
l /Users/[user_name]/Library/Preferences/Toon Boom Animation/Toon Boom Storyboard Pro/20100-layouts-xml
99
Storyboard Pro 20 User Guide
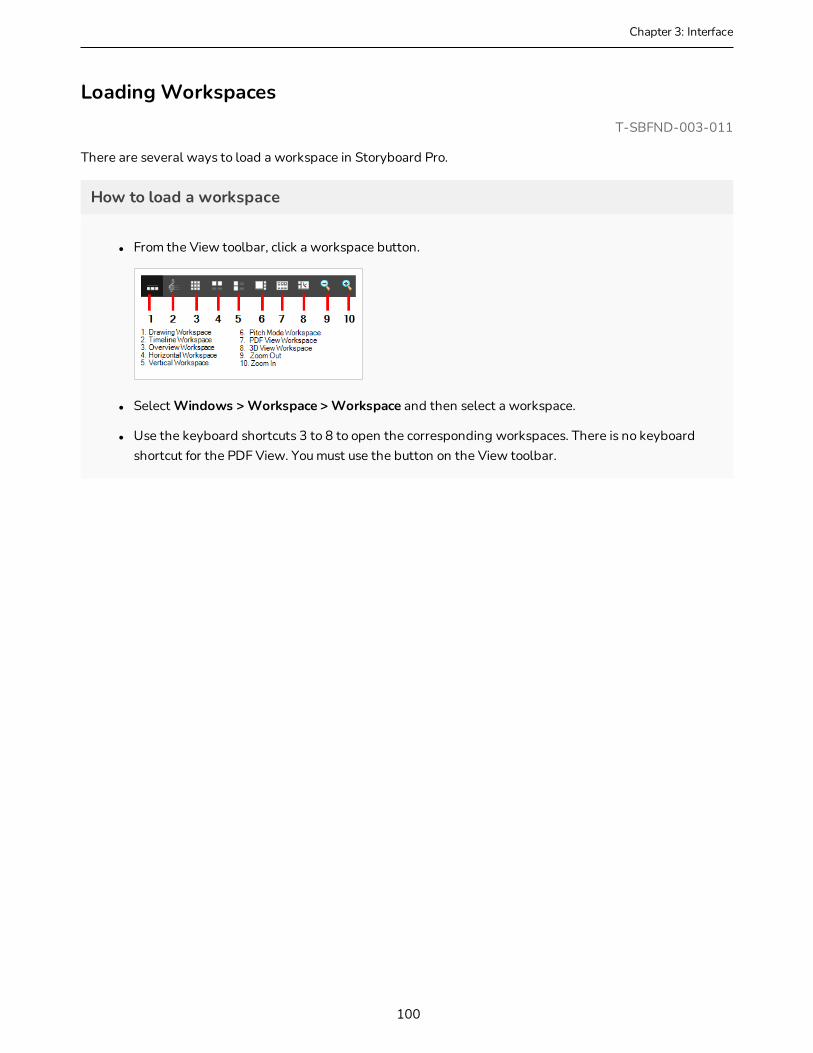
Chapter 3: Interface
Loading WorkspacesT-SBFND-003-011
There are several ways to load a workspace in Storyboard Pro.
How to load a workspace
l From the View toolbar, click a workspace button.
l Select Windows > Workspace > Workspace and then select a workspace.
l Use the keyboard shortcuts 3 to 8 to open the corresponding workspaces. There is no keyboard shortcut for the PDF View. You must use the button on the View toolbar.
100

Creating a WorkspaceUsing the Workspace Manager, you can modify, create, delete, rename, and reorder workspaces. You can create a new workspace from an existing one and modify it to suit your needs.
How to create a new workspace
1. Do one of the following:
l Select Windows > Workspace > Workspace Manager.
l Select Windows > Toolbars > Workspace and in the Workspace toolbar, click the Workspace Manager button.
2. In the Available Workspaces list, select an existing workspace.
3. At the bottom of the Available Workspaces list, click the Add button to add a workspace.
4. Select the new workspace you created, then click Rename and give it a new name.
5. Select the new workspace and click the Right Arrow button to send it to the Workspace toolbar.
6. Click OK
101
Storyboard Pro 20 User Guide
Chapter 3: Interface
Renaming a WorkspaceYou can rename an existing workspace in the Workspace Manager.
How to rename a workspace
1. Do one of the following:
l Select Windows > Workspace > Workspace Manager.
l Select Windows > Toolbars > Workspace and in the Workspace toolbar, click the Workspace Manager button.
2. From the Available Workspaces column, select a workspace to rename.
3. Click the Rename button.
4. Type in a new name for the workspace.
102
Saving a WorkspaceStoryboard Pro automatically saves the changes made to a workspace. This means that when you resize, move around, add or delete views, your workspace will be automatically saved in its current state.
You can save a workspace manually, or as a new version to avoid overwriting the current one.
How to save a workspace manually
l Select Windows > Workspace > Save Workspace.
How to save your workspace as a new version
1. Select Windows > Workspace > Save Workspace As.
The Save Workspace As dialog box opens.
2. Type in a name for the workspace.
103
Storyboard Pro 20 User Guide
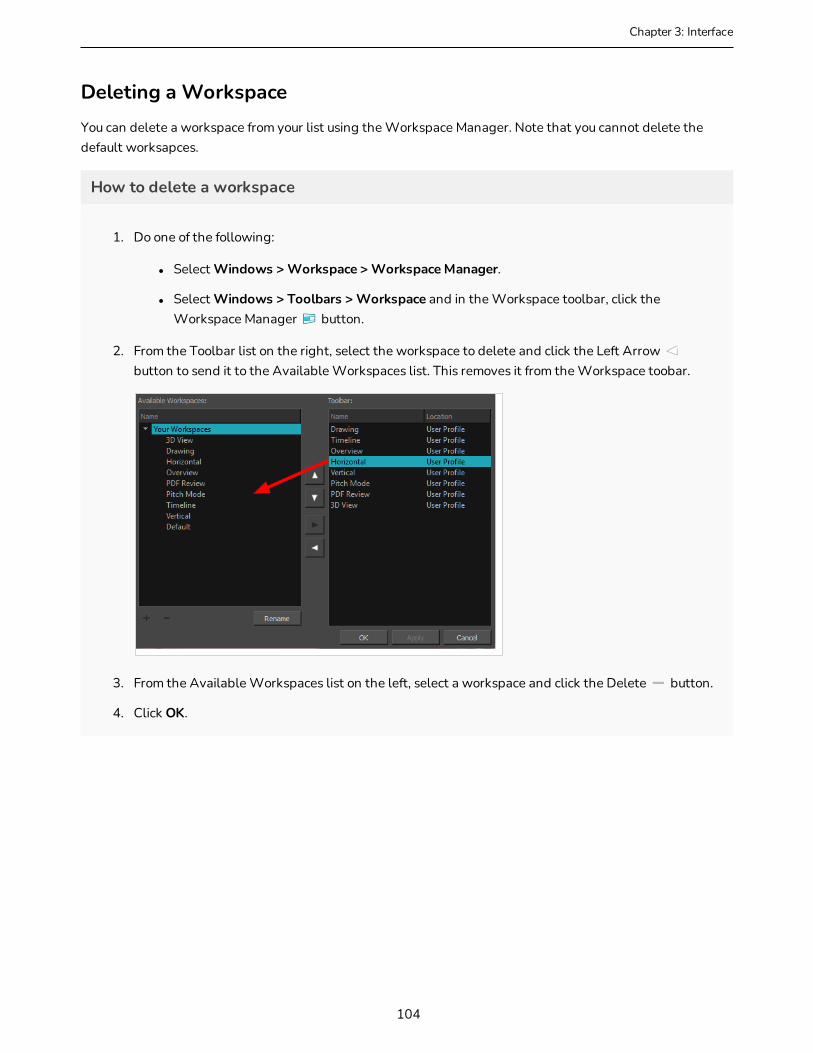
Chapter 3: Interface
Deleting a WorkspaceYou can delete a workspace from your list using the Workspace Manager. Note that you cannot delete the default worksapces.
How to delete a workspace
1. Do one of the following:
l Select Windows > Workspace > Workspace Manager.
l Select Windows > Toolbars > Workspace and in the Workspace toolbar, click the Workspace Manager button.
2. From the Toolbar list on the right, select the workspace to delete and click the Left Arrow button to send it to the Available Workspaces list. This removes it from the Workspace toobar.
3. From the Available Workspaces list on the left, select a workspace and click the Delete button.
4. Click OK.
104

Showing and Hiding WorkspacesYou can show and hide selected workspaces from the Workspace toolbar’s drop-down menu.
How to show a workspace
1. Do one of the following:
l Select Windows > Workspace > Workspace Manager.
l Select Windows > Toolbars > Workspace and in the Workspace toolbar, click the Workspace Manager button.
2. In the Available Workspaces list, select the workspace to be displayed. Click the Right Arrow button to send it to the Workspace toolbar.
How to hide a workspace
1. Do one of the following:
l Select Windows > Workspace > Workspace Manager.
l Select Windows > Toolbars > Workspace and in the Workspace toolbar, click the Workspace Manager button.
2. In the Workspace Manager, select the workspace to be hidden. Click the Left Arrow button to send it to the Available Workspaces list.
105
Storyboard Pro 20 User Guide

Chapter 3: Interface
Reordering the Workspace ListYou can edit the order that the available workspaces are listed in the Workspace toolbar’s drop-down menu.
How to reorder the workspace list
1. Do one of the following:
l Select Windows > Workspace > Workspace Manager.
l Select Windows > Toolbars > Workspace and in the Workspace toolbar, click the Workspace Manager button.
2. From the Toolbar list, select the workspace to be reordered and click the Up or Down Arrow buttons to move it up or down.
106

Restoring the Default WorkspaceT-SBFND-003-012
You can restore the modified workspaces to their original default layout. This is particularly useful if you have closed several views or moved toolbars.
How to restore the default workspace
l Select Windows > Restore Default Workspace.
107
Storyboard Pro 20 User Guide
Chapter 3: Interface
Interface NavigationWith the help of menu commands and keyboard shortcuts, some views let you navigate their content by zooming in, zooming out, panning and rotating them. You can also reset the zoom level, pan and rotation angle of these views as needed.
The navigation commands in the table below can be used in the following views, with some exceptions:
l Stage
l Camera
l Timeline
l Function Editor
l Side and Top
TIP
Keyboard shortcuts can be customized. You can view, search for and change keyboard shortcuts for Storyboard Pro in the Keyboard Shortcuts dialog. To access the Keyboard shortcuts dialog:
l Windows: In the top menu, select Edit > Keyboard Shortcuts.
l macOS: In the top menu, select Storyboard Pro 20 > Keyboard Shortcuts.
Command Action Access Methods
Zoom InZooms in the view.
View > Zoom In
Press 2
Roll the mouse wheel up (except in the Timeline view)
Zoom OutZooms out the view.
View > Zoom Out
Press 1
Roll the mouse wheel down (except in the Timeline view)
Zoom In or OutZooms in or out of the view.
Roll the middle mouse button up or down.
Hold down the Spacebar and the middle mouse button while dragging the mouse up or down.
Pan
Moves the view horizontally or
Hold down the Spacebar and drag in the direction you want to pan the view.
108

Command Action Access Methods
vertically.
Reset Pan
Resets the view’s pan to its default position.
View > Reset Pan
Press Shift + N
Reset View
Resets the view to its default position.
View > Reset View
Press Shift + M
The Reset View button at the bottom of the Stage and Camera views.
Reset Rotation
Resets the view’s rotation to its default position.
View > Reset Rotation
Press Shift + X
Reset Zoom
Resets the view’s zoom to its default position.
View > Reset Zoom
Press Shift + Z
Rotate ViewRotates the view left or right.
While holding Ctrl + Alt (Windows) or ⌘ + Alt (macOS), click and drag the rotating disc to rotate it clockwise or counterclockwise.
3D Rotate View
Rotates the view in any direction. This is only available in the Stage view, if the scene is 3D-enabled.
While holding Ctrl + Shift (Windows) or Shift + ⌘ (macOS), click and drag the stage to rotate it in any direction.
Rotate 30 CW Rotates the View > Rotate View CW
109
Storyboard Pro 20 User Guide
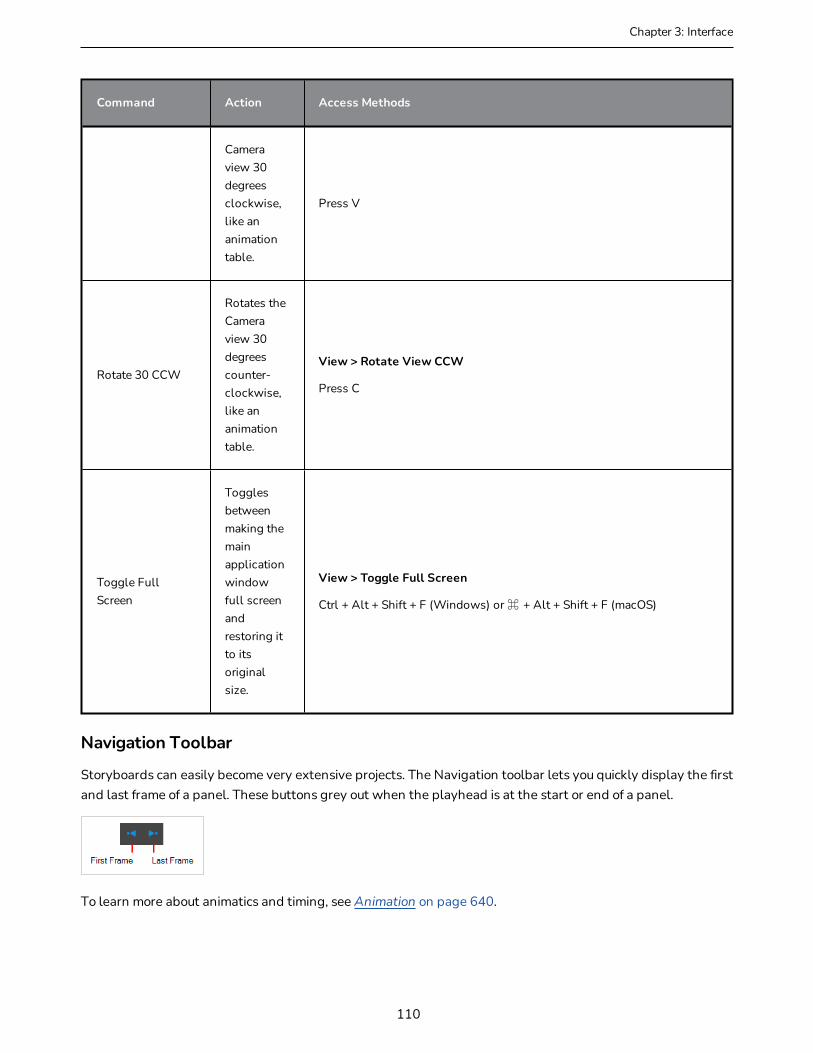
Chapter 3: Interface
Command Action Access Methods
Camera view 30 degrees clockwise, like an animation table.
Press V
Rotate 30 CCW
Rotates the Camera view 30 degrees counter-clockwise, like an animation table.
View > Rotate View CCW
Press C
Toggle Full Screen
Toggles between making the main application window full screen and restoring it to its original size.
View > Toggle Full Screen
Ctrl + Alt + Shift + F (Windows) or ⌘ + Alt + Shift + F (macOS)
Navigation Toolbar
Storyboards can easily become very extensive projects. The Navigation toolbar lets you quickly display the first and last frame of a panel. These buttons grey out when the playhead is at the start or end of a panel.
To learn more about animatics and timing, see Animation on page 640.
110
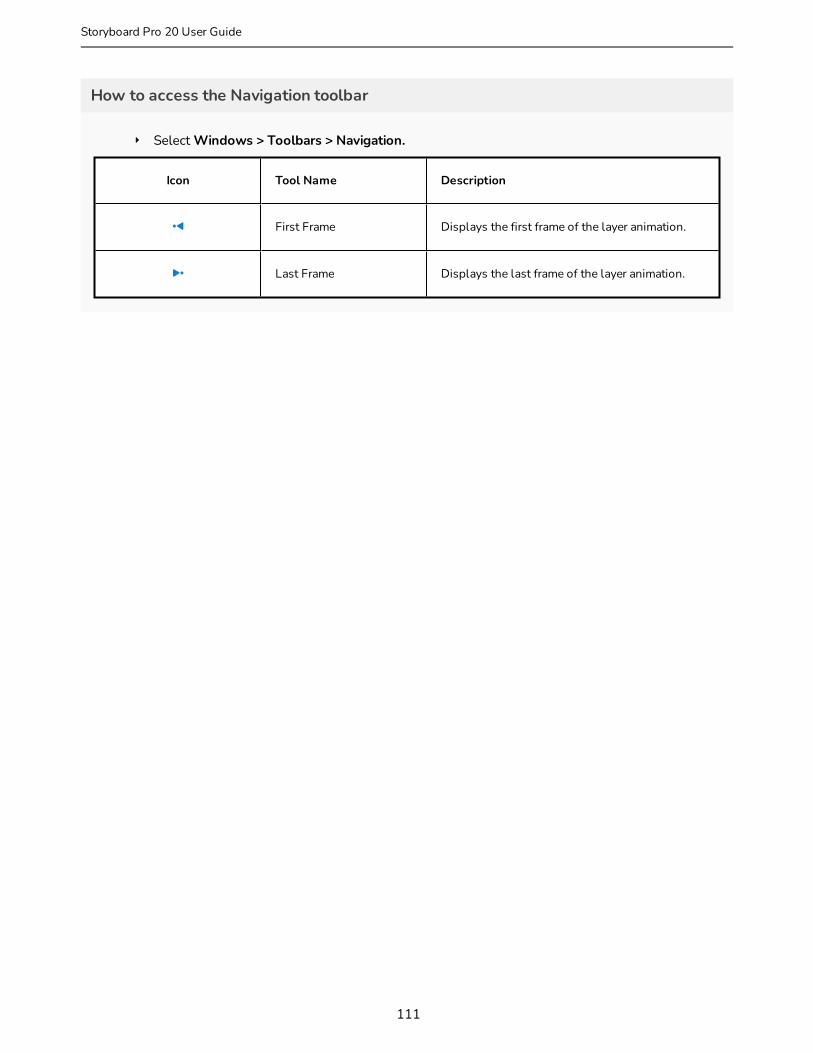
How to access the Navigation toolbar
‣ Select Windows > Toolbars > Navigation.
Icon Tool Name Description
First Frame Displays the first frame of the layer animation.
Last Frame Displays the last frame of the layer animation.
111
Storyboard Pro 20 User Guide
Chapter 4: Storyboard Structure
Chapter 4: Storyboard StructureT-SBFND-005-001
To build and organize your storyboard project, you will use panels, scenes, sequences, and acts. You have many options to customize these project elements in order to keep things clear and organized.
Below are examples of panels, scenes, sequences and acts in the Thumbnails and Timeline views.
1. A panel represents an action. You can use multiple panels whenever you need more than one drawing to clearly express the acting within a scene. It is the white rectangle representing the camera view. By default the current panel will be highlighted in red in the Thumbnails view.
2. A scene is composed of one or several panels. In animation, whenever the camera angle changes, you should create a new scene. In live action, this is called a shot.In other words, if your action goes from a mid shot to a close shot, each of these shot should be a different scene. By default, a grey rectangle connects the different panels of a scene together.
3. A sequence is a series of scenes that should be grouped together. Usually, scenes are grouped together by location. For example, all the scenes that are taking place in one location, should be in the same sequence and as soon as there is a change of location, it should be a new sequence. by default, a blue line connects the different scenes of a sequence together.
4. An act is composed of one or several scenes and sequences. An act usually represents a story arc. It can be a certain time lapse in the story. For example, all the scenes in the first half of a TV series are one act, and the second act is after the commercial break. As for movies, live action, or even video games, there could have several different story arcs. In Storyboard Pro, a purple flag shows the beginning of a new act.
112

113
Storyboard Pro 20 User Guide

Chapter 4: Storyboard Structure
About ScenesT-SBFND-005-002
In live-action productions, scene changes occur when the location of the action changes, such as from the bedroom to the living room, from the living room to outside, from outside to across town. In traditional animation, every time a painted background has to be changed or the camera cuts, a scene change is required, even if the characters are in the same location. For example, two characters could be talking face-to-face in a forest, however the trees behind each character would be different as the shot cuts from one character to the other. Each shot would require a new scene. A sequence of these scenes taking place in the same location could be referred to as an act.
In Storyboard Pro, panels in the same scene are grouped together by a dark grey bounding box.
You can:
l Create new scenes
l Delete scenes
l Rename scenes
l Lock and unlock scene and panel names
l Split scenes
l Select all panels in a scene
114
Creating ScenesT-SBFND-005-003
When you create a new scene, it is usually added after a selected scene, but you can make the new scene appear before it. You can also create a new scene from a series of selected panels within a scene and then separate them as a new one.
How to create a new scene
1. Do one of the following:
l In the Storyboard toolbar, click the Add Scene button.
l Select Storyboard > Create Scene.
A new panel is created in the Timeline immediately after the current shot. The new panel is contained in a separate grey box.
Each scene is assigned a number. When you create a scene at the end of your project, Storyboard Pro automatically assigns it the number that comes right after the number of the last scene. If you try to insert a scene between two existing scenes, you will be prompted to indicate how this new scene should be named, and if scenes after the new scene should be re-numbered.
How to insert a scene between two existing scenes
1. Select any panel the scene after which the new scene should be inserted.
115
Storyboard Pro 20 User Guide

Chapter 4: Storyboard Structure
2. Do one of the following:
l In the Storyboard toolbar, click the New Scene button.
l Right-click on a panel and select New Scene.
l In the top menu, select Storyboard > New > New Scene.
The Rename Scene dialog appears.
3. Do one of the following:
l If you want the new scene to have a suffix, to indicate that it was inserted between existing scenes, you do not have to edit any of the fields. The New name field already contains the name of the currently selected scene followed by a letter suffix. For example, if you tried inserting a scene before scenes 2 and 3, Storyboard Pro will name the new scene 2_A by default.
l If you want the scene to have the number after the number of the currently selected scene, and to renumber all subsequent scenes accordingly, enter this number in the New Name field. For example, if you're inserting a scene between scenes 2 and 3, type 3 in the New Name field. Then, in the Renaming Rule for Subsequent Scene dropdown menu, select Renumber Scenes.
4. If you intend to use the same options whenever you insert a scene, check the Do not show this dialog automatically option.
5. Click OK.
A new scene, containing one blank panel, is added after the current scene, numbered according to your selected settings.
116
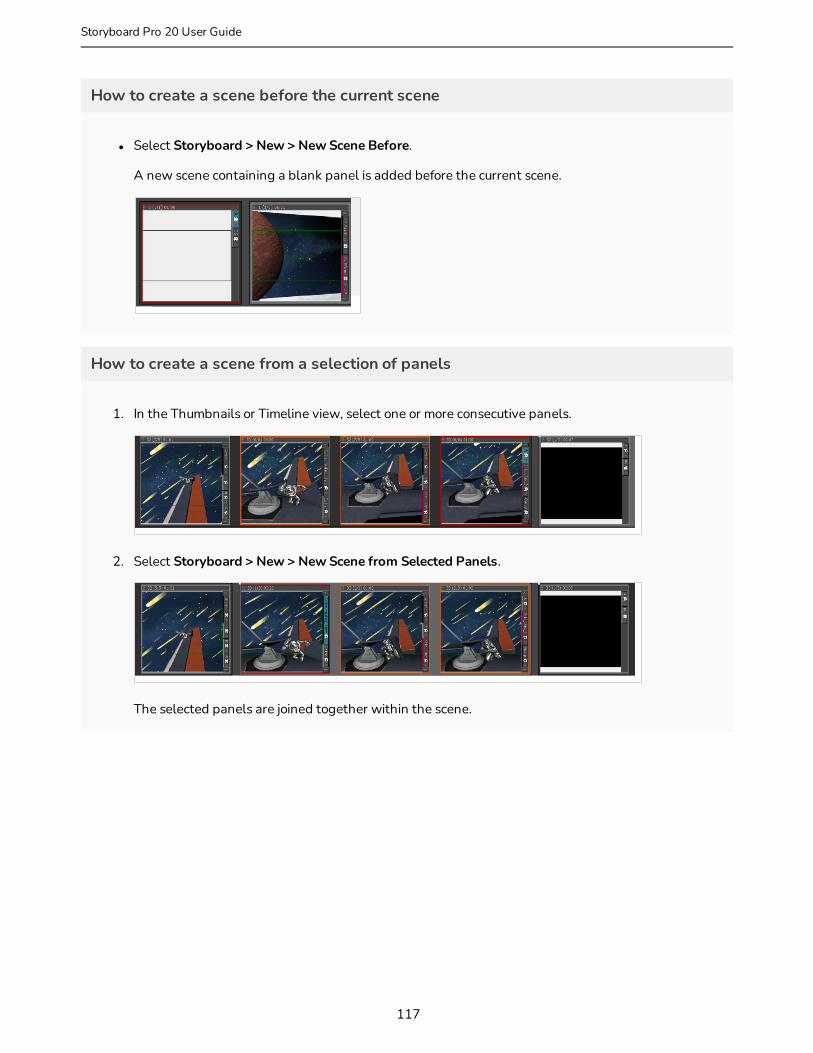
How to create a scene before the current scene
l Select Storyboard > New > New Scene Before.
A new scene containing a blank panel is added before the current scene.
How to create a scene from a selection of panels
1. In the Thumbnails or Timeline view, select one or more consecutive panels.
2. Select Storyboard > New > New Scene from Selected Panels.
The selected panels are joined together within the scene.
117
Storyboard Pro 20 User Guide
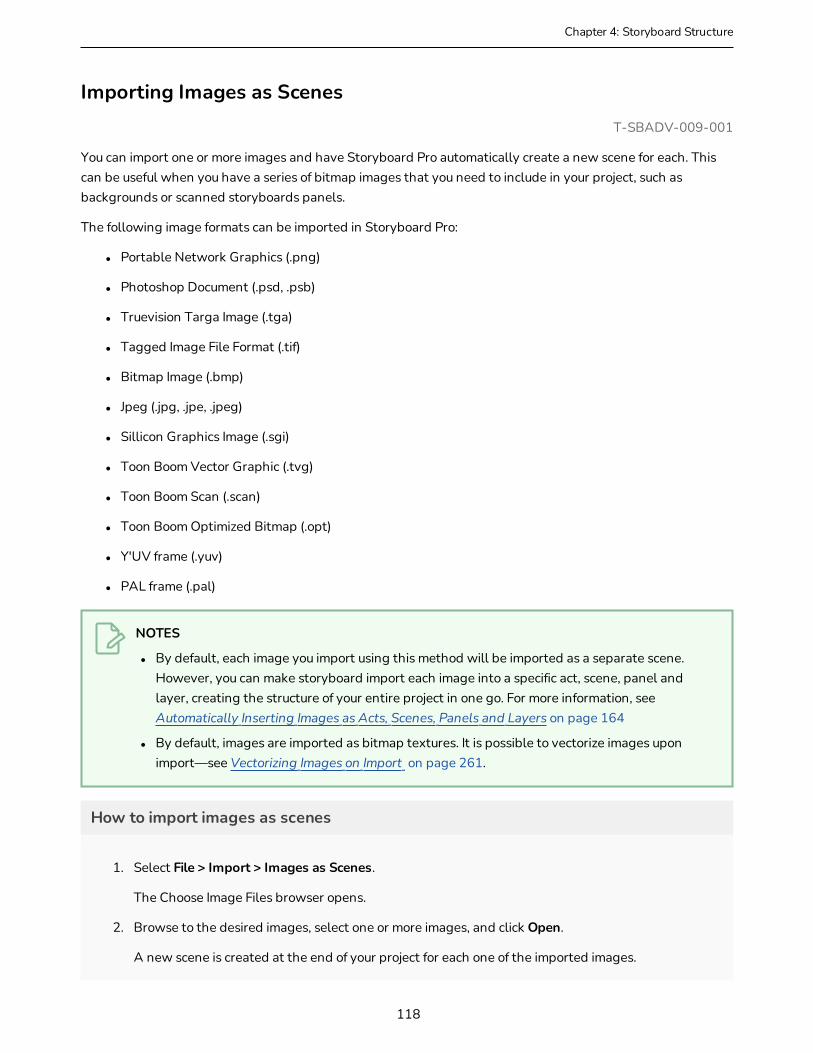
Chapter 4: Storyboard Structure
Importing Images as ScenesT-SBADV-009-001
You can import one or more images and have Storyboard Pro automatically create a new scene for each. This can be useful when you have a series of bitmap images that you need to include in your project, such as backgrounds or scanned storyboards panels.
The following image formats can be imported in Storyboard Pro:
l Portable Network Graphics (.png)
l Photoshop Document (.psd, .psb)
l Truevision Targa Image (.tga)
l Tagged Image File Format (.tif)
l Bitmap Image (.bmp)
l Jpeg (.jpg, .jpe, .jpeg)
l Sillicon Graphics Image (.sgi)
l Toon Boom Vector Graphic (.tvg)
l Toon Boom Scan (.scan)
l Toon Boom Optimized Bitmap (.opt)
l Y'UV frame (.yuv)
l PAL frame (.pal)
NOTES
l By default, each image you import using this method will be imported as a separate scene. However, you can make storyboard import each image into a specific act, scene, panel and layer, creating the structure of your entire project in one go. For more information, see Automatically Inserting Images as Acts, Scenes, Panels and Layers on page 164
l By default, images are imported as bitmap textures. It is possible to vectorize images upon import—see Vectorizing Images on Import on page 261.
How to import images as scenes
1. Select File > Import > Images as Scenes.
The Choose Image Files browser opens.
2. Browse to the desired images, select one or more images, and click Open.
A new scene is created at the end of your project for each one of the imported images.
118
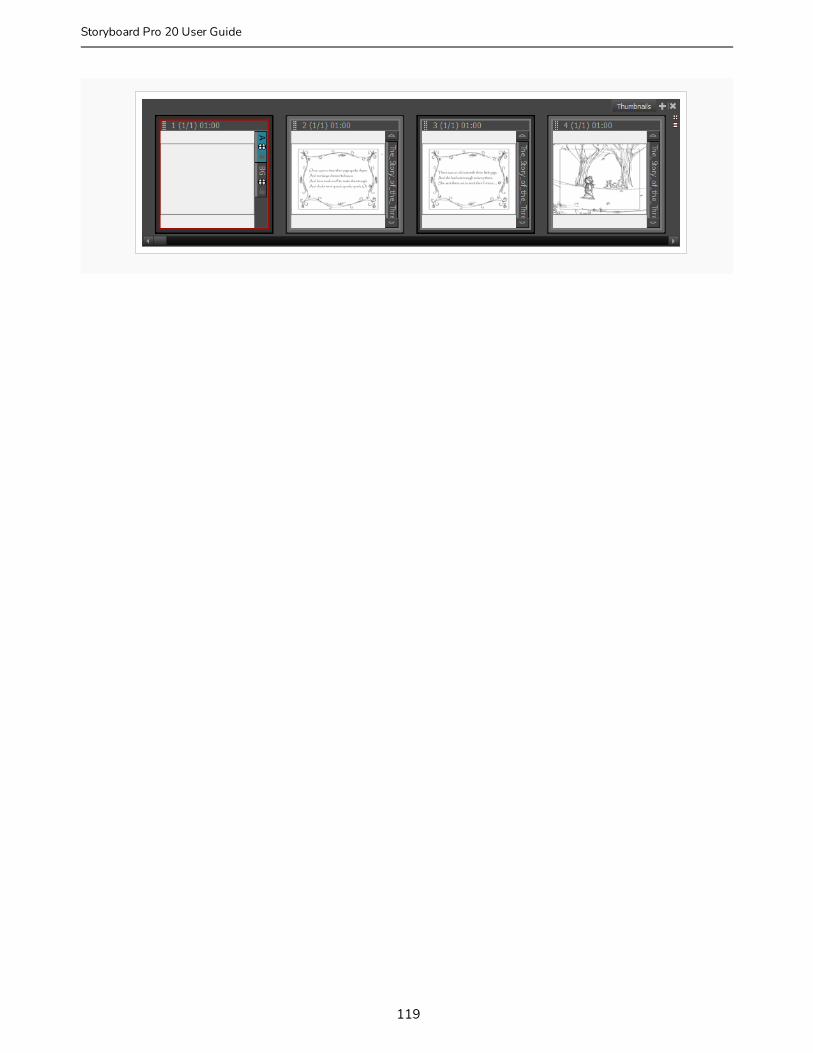
119
Storyboard Pro 20 User Guide
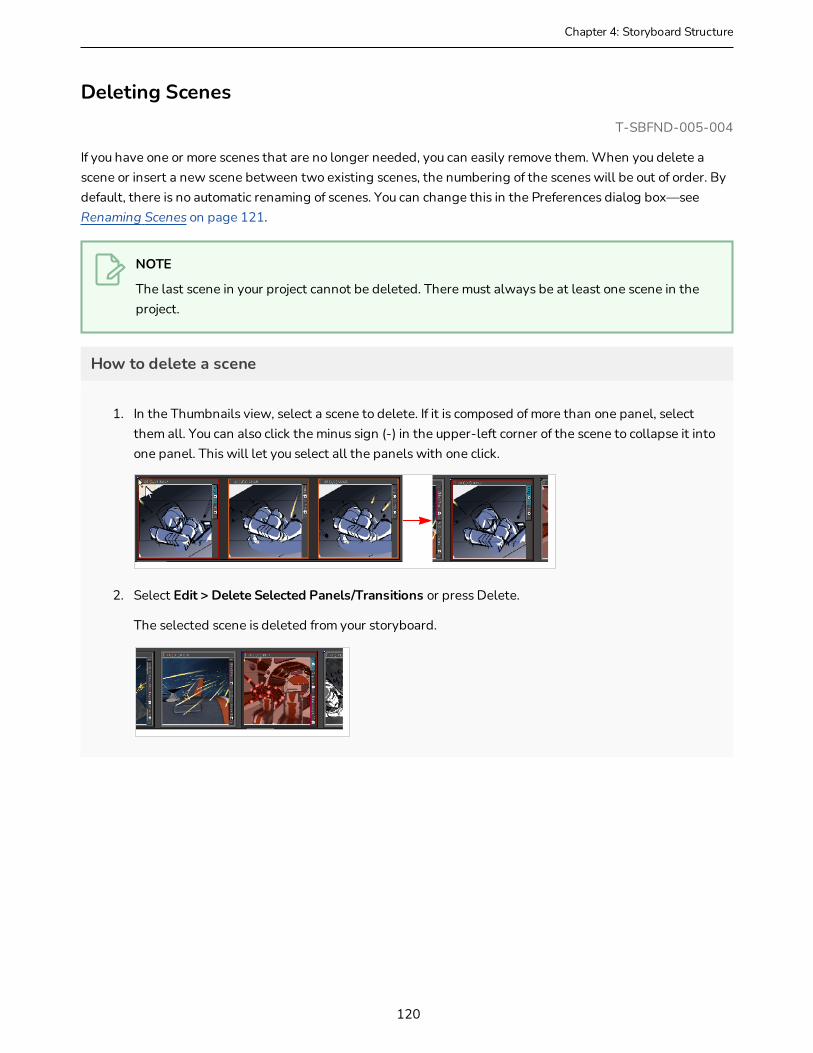
Chapter 4: Storyboard Structure
Deleting ScenesT-SBFND-005-004
If you have one or more scenes that are no longer needed, you can easily remove them. When you delete a scene or insert a new scene between two existing scenes, the numbering of the scenes will be out of order. By default, there is no automatic renaming of scenes. You can change this in the Preferences dialog box—see Renaming Scenes on page 121.
NOTE
The last scene in your project cannot be deleted. There must always be at least one scene in the project.
How to delete a scene
1. In the Thumbnails view, select a scene to delete. If it is composed of more than one panel, select them all. You can also click the minus sign (-) in the upper-left corner of the scene to collapse it into one panel. This will let you select all the panels with one click.
2. Select Edit > Delete Selected Panels/Transitions or press Delete.
The selected scene is deleted from your storyboard.
120

Renaming ScenesT-SBFND-005-005
When you start moving scenes and panels around, the Rename Scene dialog box automatically opens and prompts you to rename them every time. You can also rename selected scenes as needed, using the Rename Scene command or the Panel view.
How to rename scenes with the Rename Scene command
1. In the Thumbnails view, select a scene to rename.
2. Select Storyboard > Rename Scene.
The Rename Scene dialog box opens.
3. In the New name field, type the new name for the selected scene. You can type either a number or a name.
4. Use the Renaming Rule for Subsequent Scene menu and determine if the next scenes should be renamed. The Renumbered Scene Names section displays the current and new names for all the scenes that will be affected by the renaming process.
121
Storyboard Pro 20 User Guide

Chapter 4: Storyboard Structure
l Current Scene Only:Renames only the selected scene.
l Renumber Scenes:Renumbers the current scene, as well as all the scenes that follow.
l Renumber Selected Scenes: Renumbers the first selected scene of a multiselection, as well as all the following scenes that are part of the selection.
l Renumber Prefix Only: Renumbers the scenes' numerical prefixes beginning at the selected scene. The new name must be a numerical value.
5. Select the Reset Panel Name option to reset all panel names according to the current panel time automatic increment rule.
6. Select the Do not show this dialog automatically option to prevent it from automatically opening every time you move scenes around.
How to rename a scene using the Panel view
1. In the Thumbnails view, select a scene to rename.
2. In the Panel view, type the new name or number for your scene in the Scene field.
3. Press Enter to validate the scene name or number.
If the name is invalid or already used by another scene, a warning message will appear. If this happens, use the Rename command to rename all subsequent scenes.
122
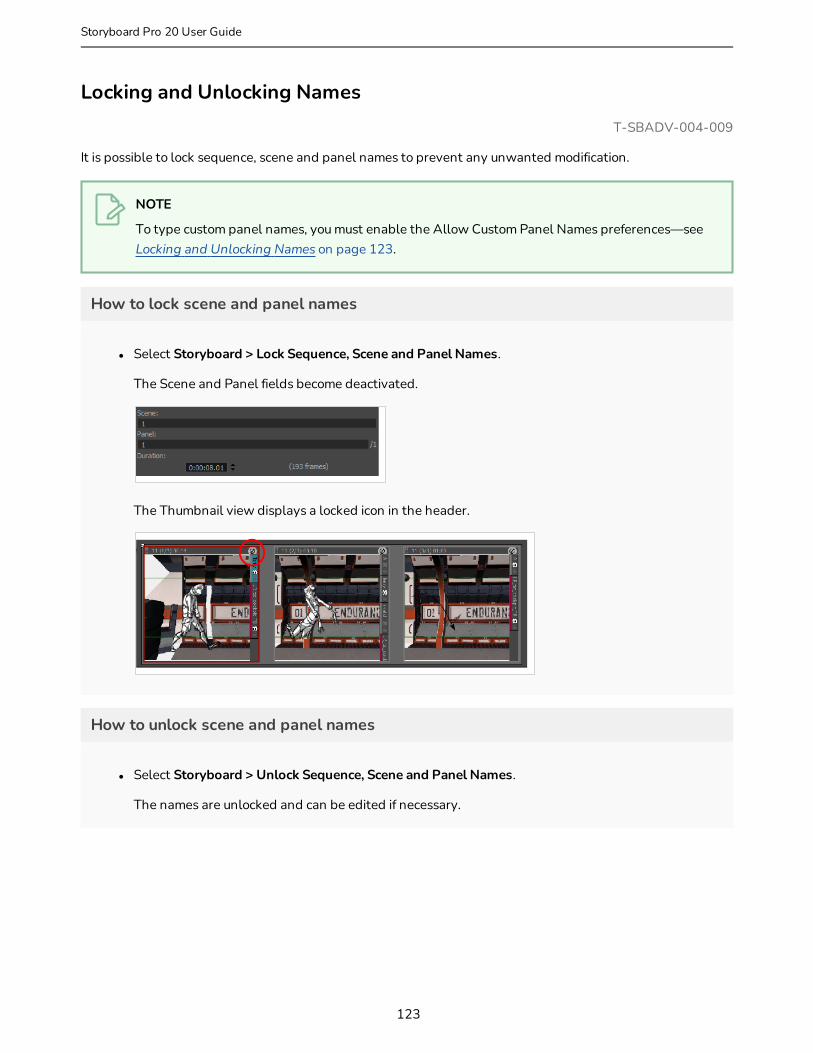
Locking and Unlocking NamesT-SBADV-004-009
It is possible to lock sequence, scene and panel names to prevent any unwanted modification.
NOTE
To type custom panel names, you must enable the Allow Custom Panel Names preferences—see Locking and Unlocking Names on page 123.
How to lock scene and panel names
l Select Storyboard > Lock Sequence, Scene and Panel Names.
The Scene and Panel fields become deactivated.
The Thumbnail view displays a locked icon in the header.
How to unlock scene and panel names
l Select Storyboard > Unlock Sequence, Scene and Panel Names.
The names are unlocked and can be edited if necessary.
123
Storyboard Pro 20 User Guide
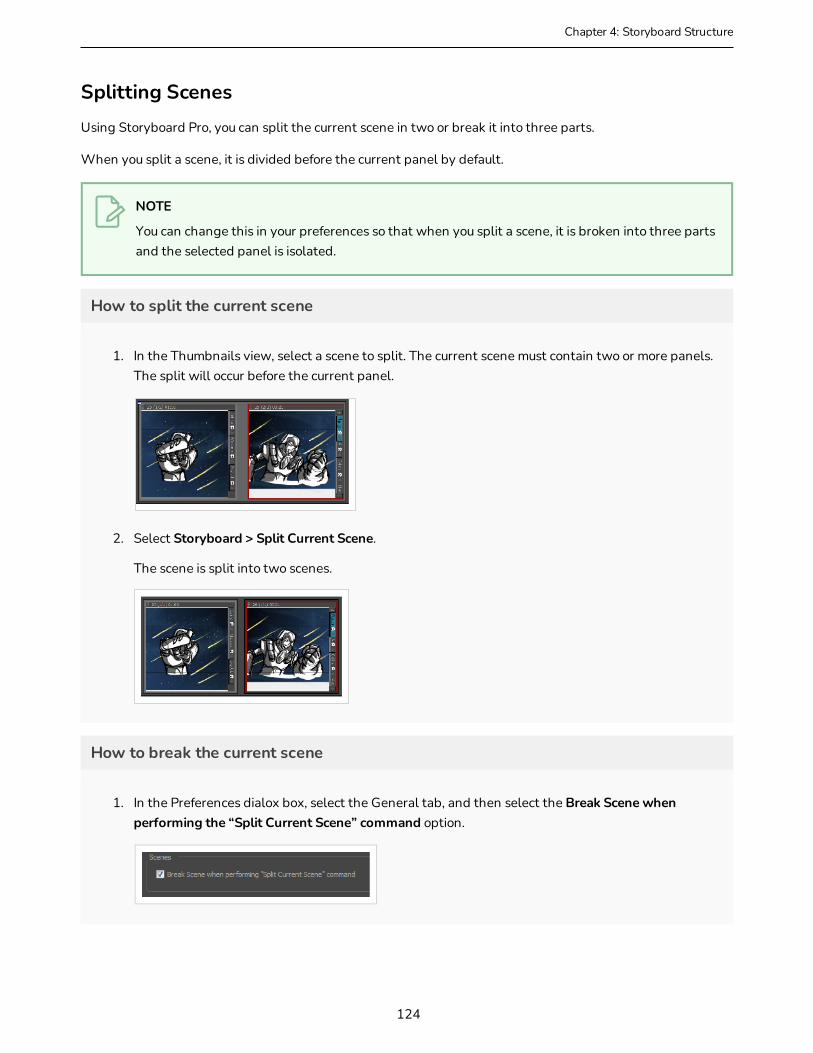
Chapter 4: Storyboard Structure
Splitting ScenesUsing Storyboard Pro, you can split the current scene in two or break it into three parts.
When you split a scene, it is divided before the current panel by default.
NOTE
You can change this in your preferences so that when you split a scene, it is broken into three parts and the selected panel is isolated.
How to split the current scene
1. In the Thumbnails view, select a scene to split. The current scene must contain two or more panels. The split will occur before the current panel.
2. Select Storyboard > Split Current Scene.
The scene is split into two scenes.
How to break the current scene
1. In the Preferences dialox box, select the General tab, and then select the Break Scene when performing the “Split Current Scene” command option.
124
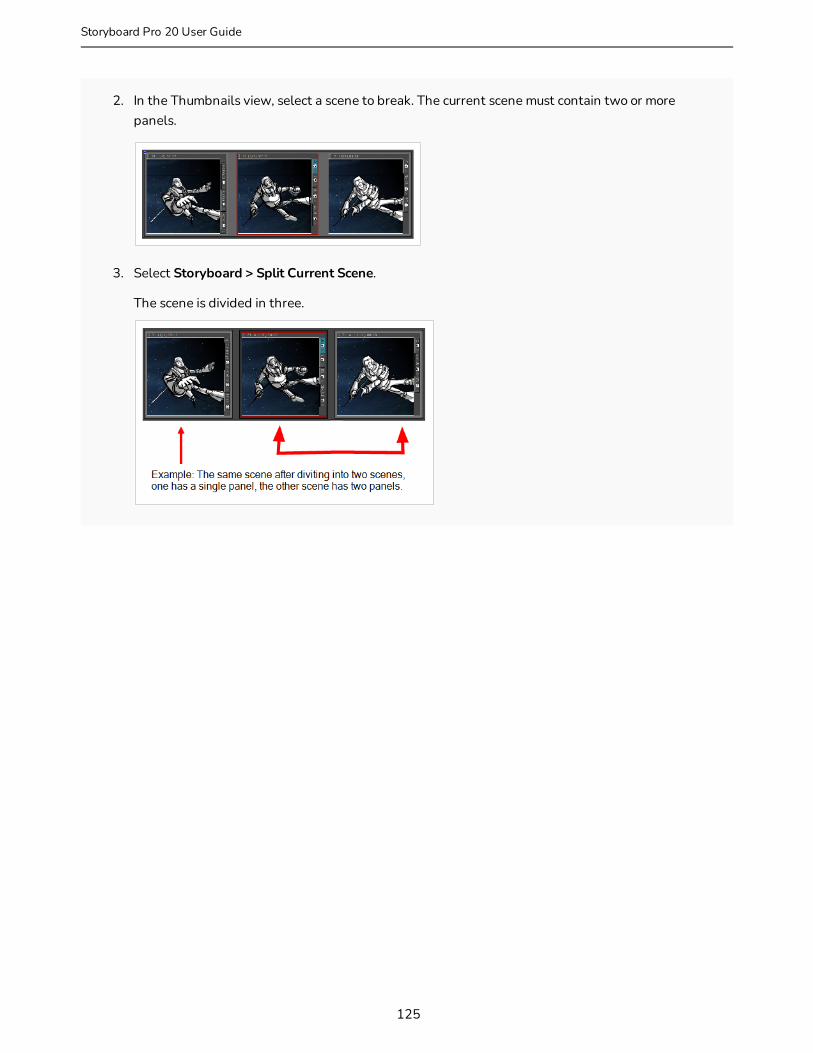
2. In the Thumbnails view, select a scene to break. The current scene must contain two or more panels.
3. Select Storyboard > Split Current Scene.
The scene is divided in three.
125
Storyboard Pro 20 User Guide
Chapter 4: Storyboard Structure
Selecting All PanelsT-SBADV-004-010
You can select all the panels in a scene, using the Select All Panels in Scene command.
NOTE
You can also double-click on a panel's header to select all panels in the scene.
How to select all the panels of a scene
1. In the Thumbnails or Timeline view, select one panel inside the scene you want to select all panels from.
2. Select Edit > Select All Panels in Scene.
126
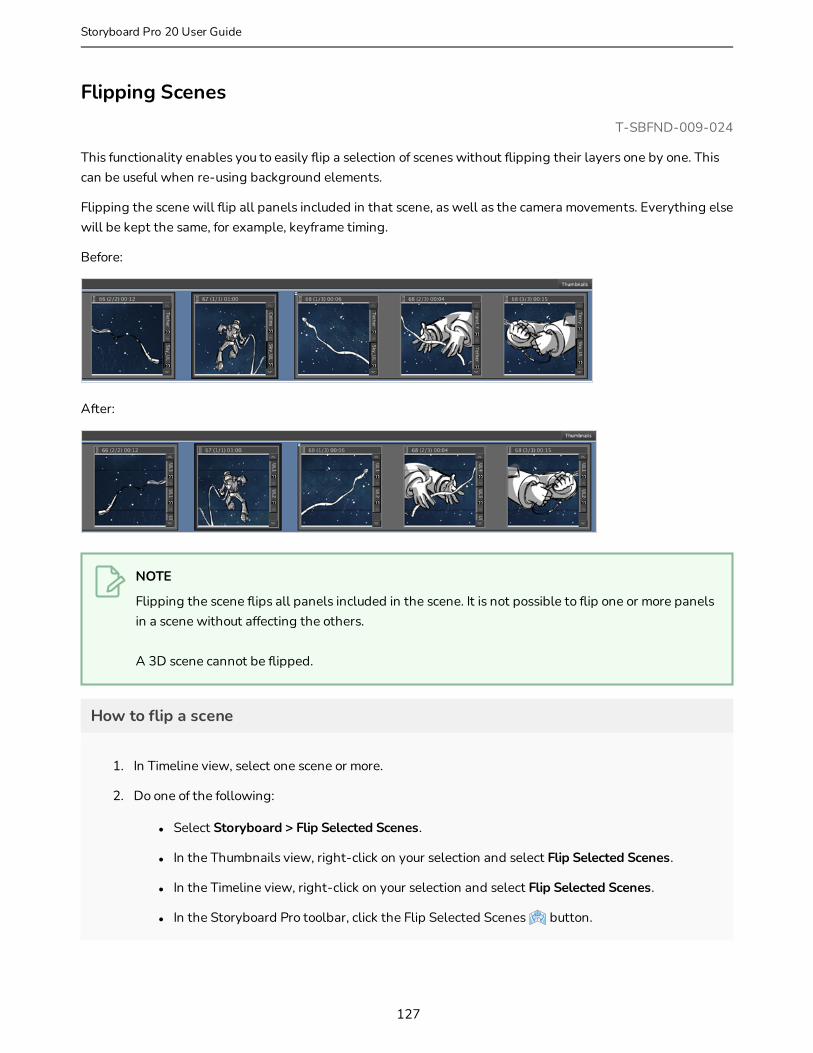
Flipping ScenesT-SBFND-009-024
This functionality enables you to easily flip a selection of scenes without flipping their layers one by one. This can be useful when re-using background elements.
Flipping the scene will flip all panels included in that scene, as well as the camera movements. Everything else will be kept the same, for example, keyframe timing.
Before:
After:
NOTE
Flipping the scene flips all panels included in the scene. It is not possible to flip one or more panels in a scene without affecting the others.
A 3D scene cannot be flipped.
How to flip a scene
1. In Timeline view, select one scene or more.
2. Do one of the following:
l Select Storyboard > Flip Selected Scenes.
l In the Thumbnails view, right-click on your selection and select Flip Selected Scenes.
l In the Timeline view, right-click on your selection and select Flip Selected Scenes.
l In the Storyboard Pro toolbar, click the Flip Selected Scenes button.
127
Storyboard Pro 20 User Guide

Chapter 4: Storyboard Structure
l Use the Flip Selected Scenes shortcut.
128
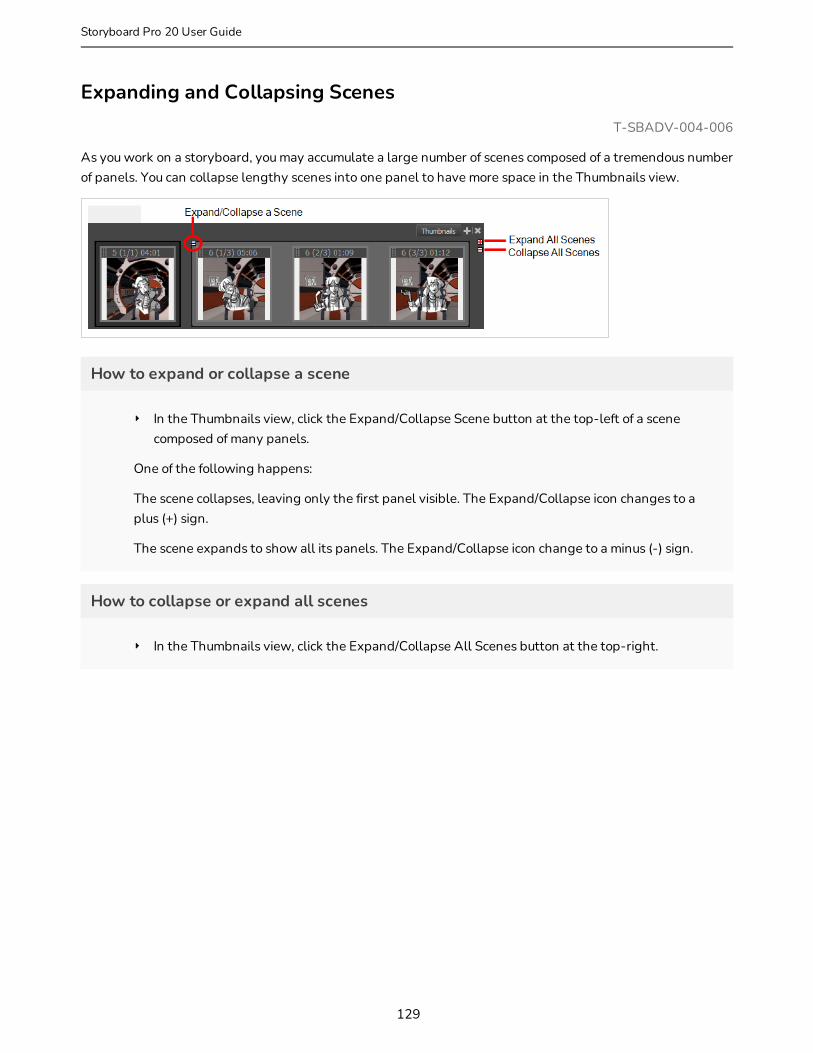
Expanding and Collapsing ScenesT-SBADV-004-006
As you work on a storyboard, you may accumulate a large number of scenes composed of a tremendous number of panels. You can collapse lengthy scenes into one panel to have more space in the Thumbnails view.
How to expand or collapse a scene
‣ In the Thumbnails view, click the Expand/Collapse Scene button at the top-left of a scene composed of many panels.
One of the following happens:
The scene collapses, leaving only the first panel visible. The Expand/Collapse icon changes to a plus (+) sign.
The scene expands to show all its panels. The Expand/Collapse icon change to a minus (-) sign.
How to collapse or expand all scenes
‣ In the Thumbnails view, click the Expand/Collapse All Scenes button at the top-right.
129
Storyboard Pro 20 User Guide
Chapter 4: Storyboard Structure
Working with a Collapsed SceneWhen your scene is collapsed, you can still work in the Timeline view. However when you select a panel, the entire scene is selected, not just one panel. This means that you cannot work only on a single panel in the Timeline view; you must first expand the collapsed scene.
IMPORTANT
If you try to delete a panel in a collapsed scene, the entire scene will be deleted. You cannot delete a single panel.
130

About PanelsT-SBFND-005-006
Your scenes (shots) should comprise as many panels as needed to show the actions taking place. With Storyboard Pro, you can easily create many panels.
By default, you can find this information on the top of each panel:
You can:
l Create a panel
l Delete a panel
l Rename panels
l Duplicate a panel
l Move panels
l Customize the panel colour
131
Storyboard Pro 20 User Guide

Chapter 4: Storyboard Structure
Creating PanelsT-SBFND-005-007
When you create a new panel, it is added after the current panel.However, you can create a new panel before the current panel. You can also create a new panel that contains elements (layers) from another panel.
How to add a panel to a scene
1. In the Thumbnails view, select the panel after which you want to insert a new panel.
2. Do one of the following:
l In the Storyboard toolbar, click the New Panel button.
l In the top menu, select Storyboard > New > New Panel.
l Press P.
A new panel is added to the storyboard and is part of the same scene as the current panel.
How to create a new panel before a selected panel
1. In the Thumbnails view, select a panel.
132

2. Select Storyboard > New > New Panel Before.
A new panel is added before the selected panel and is inside the same scene.
How to use create a new panel that contain elements from another panel
1. In the Thumbnails view, select the panel that contains the elements you want duplicate into the new panel.
2. Do one of the following:
l Select Storyboard > Smart Add Panel.
l In the Storyboard toolbar, click the Smart Add Panel button.
The Smart Add Panel dialog box opens.
3. Select the layers that contain elements you want to copy into the new panel.
4. Select the Add default layer if missing option to create the default layers in the new panel if they are not part of the Smart Add Panel selection list.
133
Storyboard Pro 20 User Guide
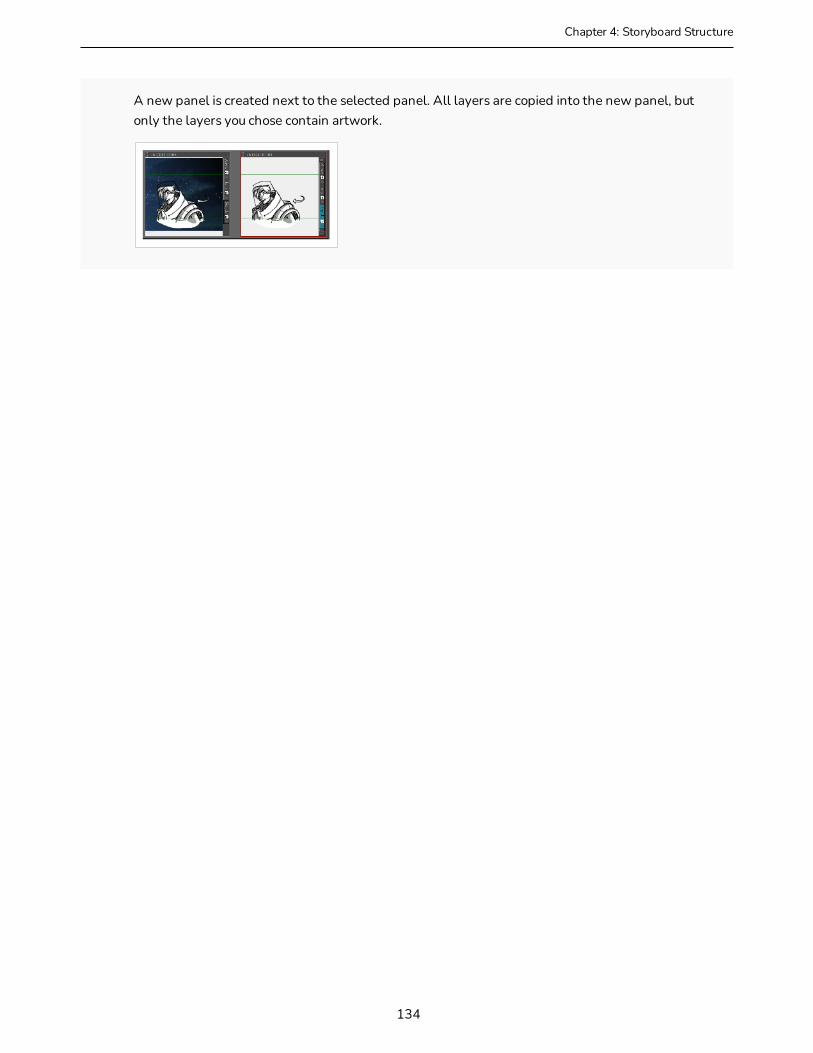
Chapter 4: Storyboard Structure
A new panel is created next to the selected panel. All layers are copied into the new panel, but only the layers you chose contain artwork.
134
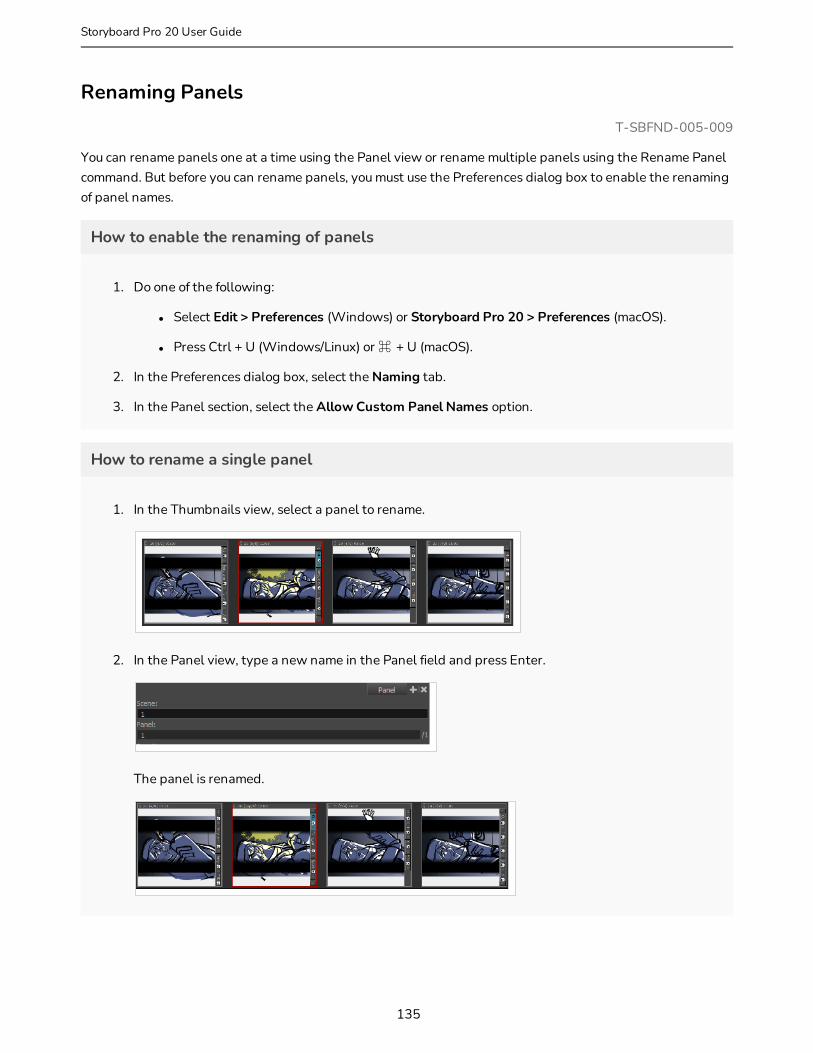
Renaming PanelsT-SBFND-005-009
You can rename panels one at a time using the Panel view or rename multiple panels using the Rename Panel command. But before you can rename panels, you must use the Preferences dialog box to enable the renaming of panel names.
How to enable the renaming of panels
1. Do one of the following:
l Select Edit > Preferences (Windows) or Storyboard Pro 20 > Preferences (macOS).
l Press Ctrl + U (Windows/Linux) or ⌘ + U (macOS).
2. In the Preferences dialog box, select the Naming tab.
3. In the Panel section, select the Allow Custom Panel Names option.
How to rename a single panel
1. In the Thumbnails view, select a panel to rename.
2. In the Panel view, type a new name in the Panel field and press Enter.
The panel is renamed.
135
Storyboard Pro 20 User Guide

Chapter 4: Storyboard Structure
How to rename multiple panels
1. In the Thumbnails view, select a panel to rename.
2. Select Storyboard > Rename Panel.
The Rename Panel dialog box opens.
3. Type a new name in the New name field.
4. You can use the Renaming Rule for Subsequent Panel menu to determine if the next scenes should be renamed:
l Current Panel Only: Renames only the selected panel.
l Renumber Panels: Renumbers the current panel, as well as all panels that follow.
l Renumber Selected Panels: Renumbers the first selected panel of a multiselection, as well as all following panels that are part of the multiselection.
l Renumber Prefix Only: Renumbers the panels’ numerical prefixes beginning at the selected scene. The new name must be a numerical value.
The Renumbered Panel Names section displays a list of the panels that will be renamed, their old names and the new names.
136

Deleting PanelsT-SBFND-005-008
If there are panels you no longer need, you can simply delete them. Note that it is impossible to have an empty project as there is a minimum of one panel.
How to delete panels
1. In the Thumbnails view, select one or more panels to delete.
2. Do one of the following:
l In the Storyboard toolbar, click the Delete Selected Panels button.
l Select Edit > Delete Panel.
l Press Delete.
The selected panels are deleted from your storyboard.
137
Storyboard Pro 20 User Guide
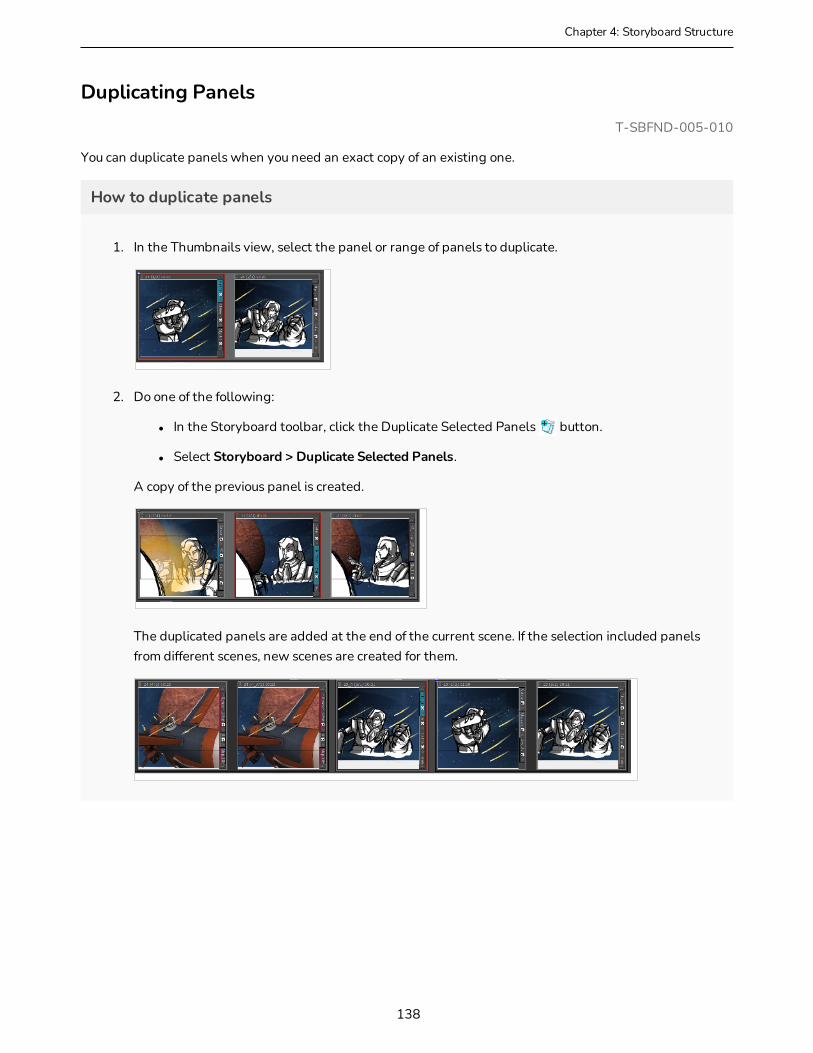
Chapter 4: Storyboard Structure
Duplicating PanelsT-SBFND-005-010
You can duplicate panels when you need an exact copy of an existing one.
How to duplicate panels
1. In the Thumbnails view, select the panel or range of panels to duplicate.
2. Do one of the following:
l In the Storyboard toolbar, click the Duplicate Selected Panels button.
l Select Storyboard > Duplicate Selected Panels.
A copy of the previous panel is created.
The duplicated panels are added at the end of the current scene. If the selection included panels from different scenes, new scenes are created for them.
138

Moving PanelsT-SBFND-005-011
You can easily move panels in the Thumbnails and Timeline views to reorder, separate, or join them. Joining panels will make them part of the same scene.
You can reorder panels by clicking on the drag and drop handle in the top left corner of the panel, then dragging the panel between the two panels where you want it to be moved. A red line will appear between two panels near your mouse cursor to indicate where the panel will be moved.
TIP
If you want to move several panels together, you can select them together, then click and drag the drag and drop handle of any panel in the selection. To select several panels in the Thumbnails view, do one of the following:
l Draw a rectangle in the Thumbnails view around all the panels you want to select.
l While holding Shift, click on the first panel you want to add to your selection, then on the last panel you want to add to your selection. Every panel in-between will also be selected.
l While holding Ctrl (Windows) or ⌘ (macOS), click on each panel that you want to add to your selection.
If you move a panel to the space between two scenes, you have the option of attaching the panel to the scene before or after this space, or to drop it into its own new scene. Where the scene will end up depends on how close to either scene you drop it. The red line that appears between the two scenes will indicate whether it will be attached to the scene before or after the space where the panel is being dropped, or moved to its own new scene.
139
Storyboard Pro 20 User Guide

Chapter 4: Storyboard Structure
You can join selected panels with another scene. Just drag the panel onto the edge of the scene you want it to attach to, and drop it when you see a right-facing or left-facing bracket appear.
To reorder selected panels in the Timeline view, drag and drop them when you see a green bracket or green shape.
You can drag and drop a selection to remove it from a scene. Just drag the selection out and drop it between two scenes when you see a rounded green rectangle shape appear.
How to drag and drop panels
1. In the Thumbnails or Timeline view, select one or more panels to move.
140
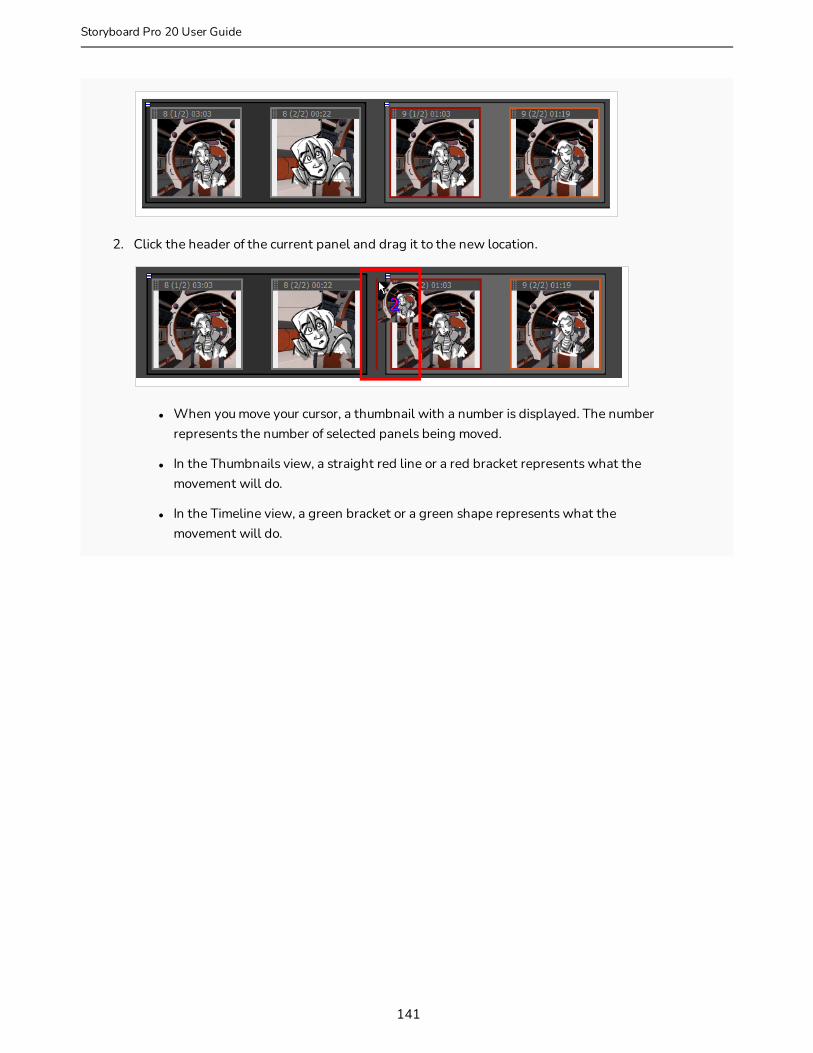
2. Click the header of the current panel and drag it to the new location.
l When you move your cursor, a thumbnail with a number is displayed. The number represents the number of selected panels being moved.
l In the Thumbnails view, a straight red line or a red bracket represents what the movement will do.
l In the Timeline view, a green bracket or a green shape represents what the movement will do.
141
Storyboard Pro 20 User Guide
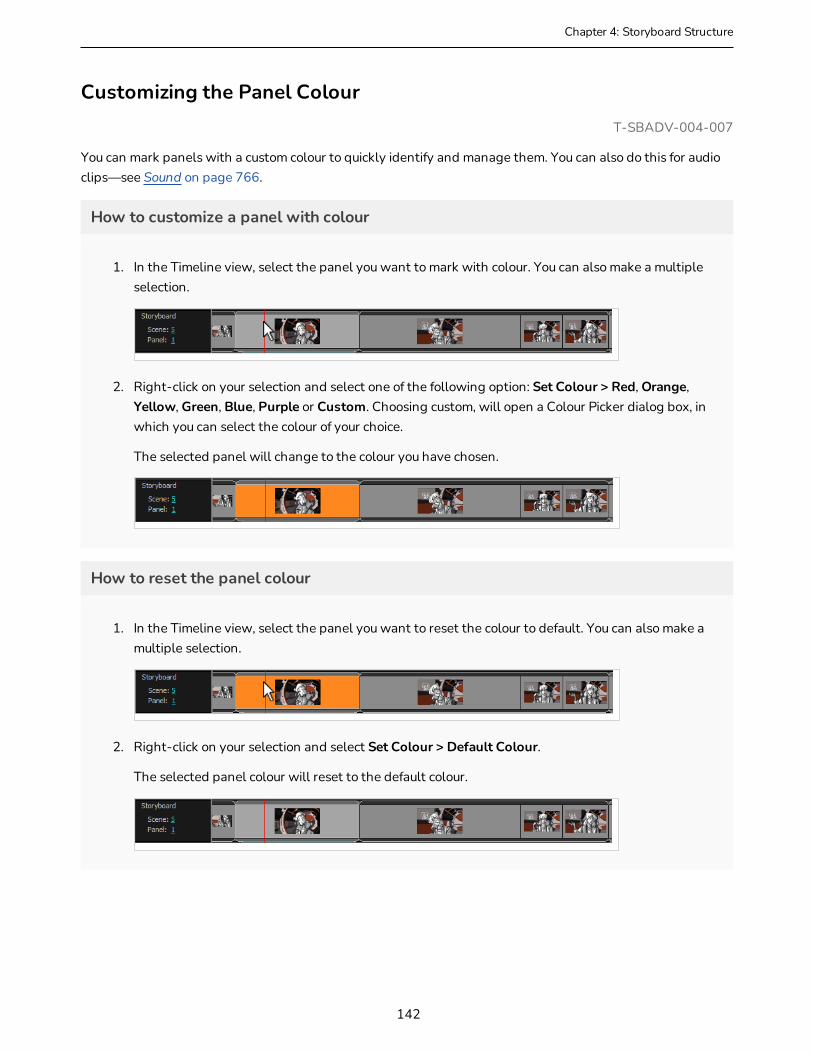
Chapter 4: Storyboard Structure
Customizing the Panel ColourT-SBADV-004-007
You can mark panels with a custom colour to quickly identify and manage them. You can also do this for audio clips—see Sound on page 766.
How to customize a panel with colour
1. In the Timeline view, select the panel you want to mark with colour. You can also make a multiple selection.
2. Right-click on your selection and select one of the following option: Set Colour > Red, Orange, Yellow, Green, Blue, Purple or Custom. Choosing custom, will open a Colour Picker dialog box, in which you can select the colour of your choice.
The selected panel will change to the colour you have chosen.
How to reset the panel colour
1. In the Timeline view, select the panel you want to reset the colour to default. You can also make a multiple selection.
2. Right-click on your selection and select Set Colour > Default Colour.
The selected panel colour will reset to the default colour.
142

NOTE
The default colour of panels is grey. However, you can change this value in the Preferences dialog box.
143
Storyboard Pro 20 User Guide
Chapter 4: Storyboard Structure
Copying and Pasting Panels Between ProjectsBy opening two projects at the same time, you can copy and paste panels between projects, allowing you to reuse your assets more efficiently. To do this, you can simply launch two instances of Storyboard Pro, open the source project in one instance, the destination project in the other instance, and copy and paste between both instances.
NOTE
On Windows, you can launch two instances of Storyboard Pro by launching it from the desktop or Start menu twice. On macOS, you must launch Storyboard Pro from the Finder application in order to be able to launch two instances of it. If you attempt to launch Storyboard Pro from the dock twice, it will only launch it once.
How to launch two instances of Storyboard Pro
1. Do the following twice:
l On Windows: Open the Start menu, then select All Programs > Storyboard Pro 20 > Storyboard Pro 20.
l On macOS: Open Finder, then go to Applications > Toon Boom Storyboard Pro 20 > Storyboard Pro 20.
How to copy and paste panels between two projects
1. Launch two instances of Storyboard Pro, and open your first project in the first instance, and your second project in the second instance.
144
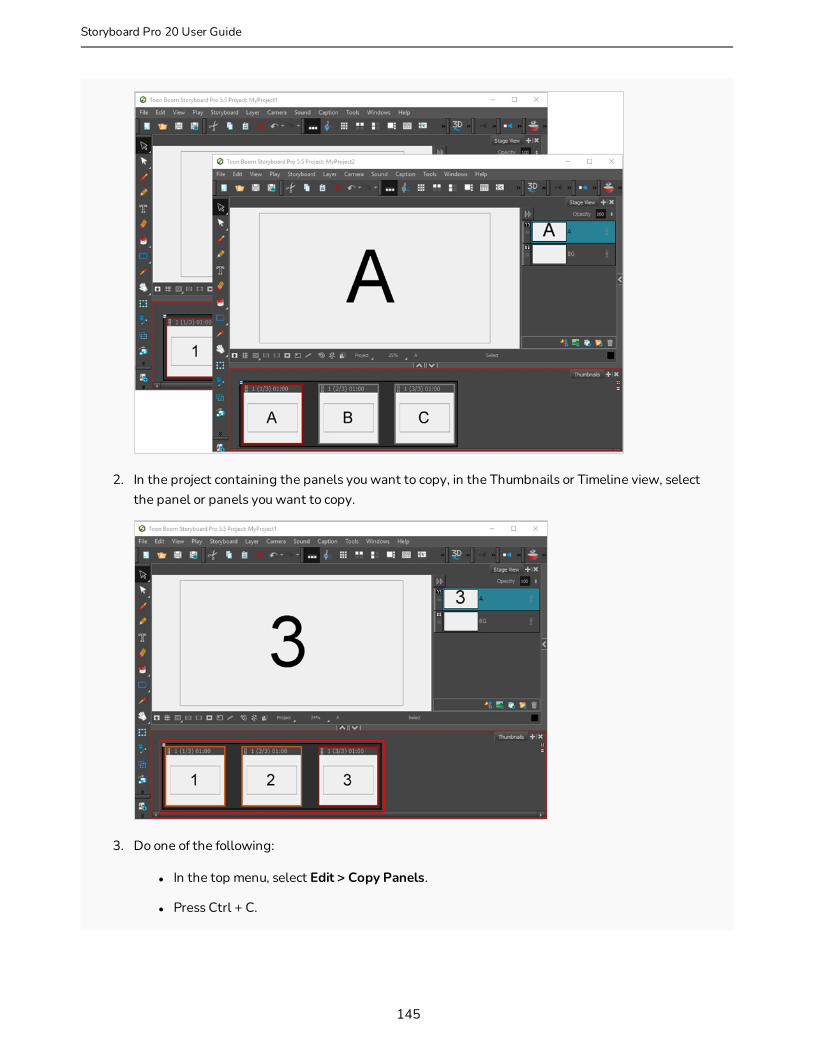
2. In the project containing the panels you want to copy, in the Thumbnails or Timeline view, select the panel or panels you want to copy.
3. Do one of the following:
l In the top menu, select Edit > Copy Panels.
l Press Ctrl + C.
145
Storyboard Pro 20 User Guide
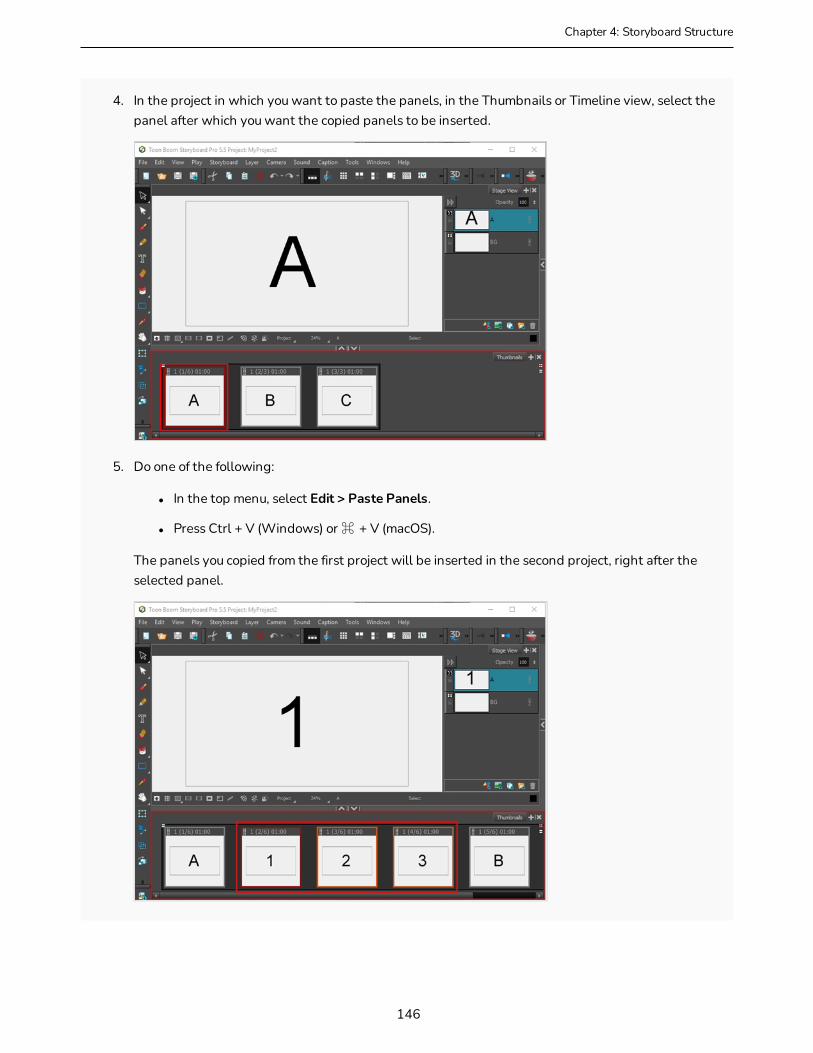
Chapter 4: Storyboard Structure
4. In the project in which you want to paste the panels, in the Thumbnails or Timeline view, select the panel after which you want the copied panels to be inserted.
5. Do one of the following:
l In the top menu, select Edit > Paste Panels.
l Press Ctrl + V (Windows) or ⌘ + V (macOS).
The panels you copied from the first project will be inserted in the second project, right after the selected panel.
146

NOTE
If you pasted the panels between two scenes, it will create a new scene and prompt you to decide how the new scene and subsequent scenes should be named—see Creating Scenes on page 115.
147
Storyboard Pro 20 User Guide

Chapter 4: Storyboard Structure
About SequencesT-SBADV-004-011
A sequence is a particular section of the story composed by one or several scenes that has a unity in either time or its location. Scenes that are contained in different sequences can have the same name. Like scenes, panels, and acts, you can manipulate the sequences of your story while you are building your storyboard.
You can:
l Create a sequence
l Remove all sequences
l Rename a sequence
l Split and join sequences
l Select all panels in a sequence
148
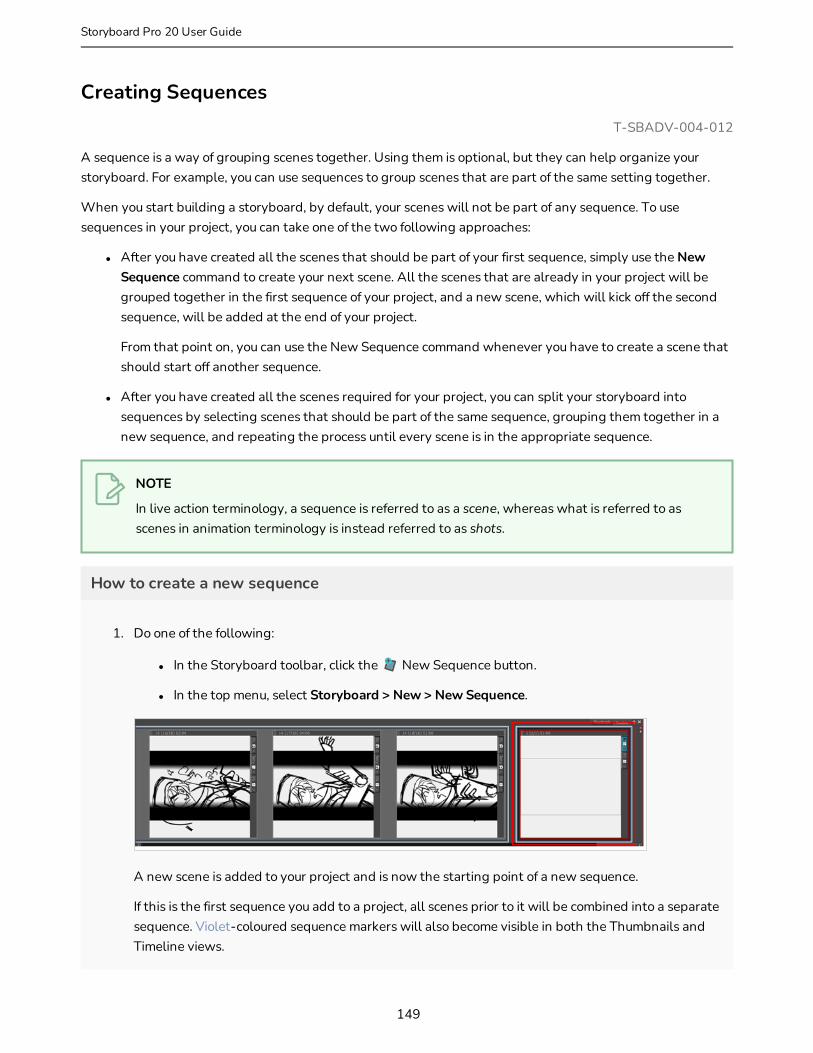
Creating SequencesT-SBADV-004-012
A sequence is a way of grouping scenes together. Using them is optional, but they can help organize your storyboard. For example, you can use sequences to group scenes that are part of the same setting together.
When you start building a storyboard, by default, your scenes will not be part of any sequence. To use sequences in your project, you can take one of the two following approaches:
l After you have created all the scenes that should be part of your first sequence, simply use the New Sequence command to create your next scene. All the scenes that are already in your project will be grouped together in the first sequence of your project, and a new scene, which will kick off the second sequence, will be added at the end of your project.
From that point on, you can use the New Sequence command whenever you have to create a scene that should start off another sequence.
l After you have created all the scenes required for your project, you can split your storyboard into sequences by selecting scenes that should be part of the same sequence, grouping them together in a new sequence, and repeating the process until every scene is in the appropriate sequence.
NOTE
In live action terminology, a sequence is referred to as a scene, whereas what is referred to as scenes in animation terminology is instead referred to as shots.
How to create a new sequence
1. Do one of the following:
l In the Storyboard toolbar, click the New Sequence button.
l In the top menu, select Storyboard > New > New Sequence.
A new scene is added to your project and is now the starting point of a new sequence.
If this is the first sequence you add to a project, all scenes prior to it will be combined into a separate sequence. Violet-coloured sequence markers will also become visible in both the Thumbnails and Timeline views.
149
Storyboard Pro 20 User Guide

Chapter 4: Storyboard Structure
How to create a new sequence from a selection
1. In the Thumbnails or Timeline view, select all the scenes you want to put into a new sequence. To do this, while holding Shift, click on the first scene to be part of the new sequence, then on the last scene to be part of the new sequence. This selects every scene between the scenes you clicked on, inclusively.
2. Do one of the following:
a. In the top menu, select Storyboard > New > New Sequence from Selection.
b. Right-click on the selection, then select New Sequence from Selection.
Your selection becomes a new sequence.
If this is the first sequence you add to your project, all the scenes before the selection will be grouped together into a separate sequence, and all the scenes after the selection will be grouped together into another sequence. Violet-coloured sequence markers will become visible in both the Thumbnails and Timeline views.
NOTE
Sequences must include whole scenes. If you only select some of the panels in a scene, the whole scene will be included in the sequence.
How to enable the Automatically Create New Sequence preference
1. Do one of the following:
‣ Select Edit > Preferences (Windows) or Storyboard Pro > Preferences (macOS).
‣ Press Ctrl + U (Windows) or ⌘ + , (macOS).
2. In the Preferences dialog box, click the General tab.
150

3. In the General section, select the Automatically Create New Sequence option.
151
Storyboard Pro 20 User Guide
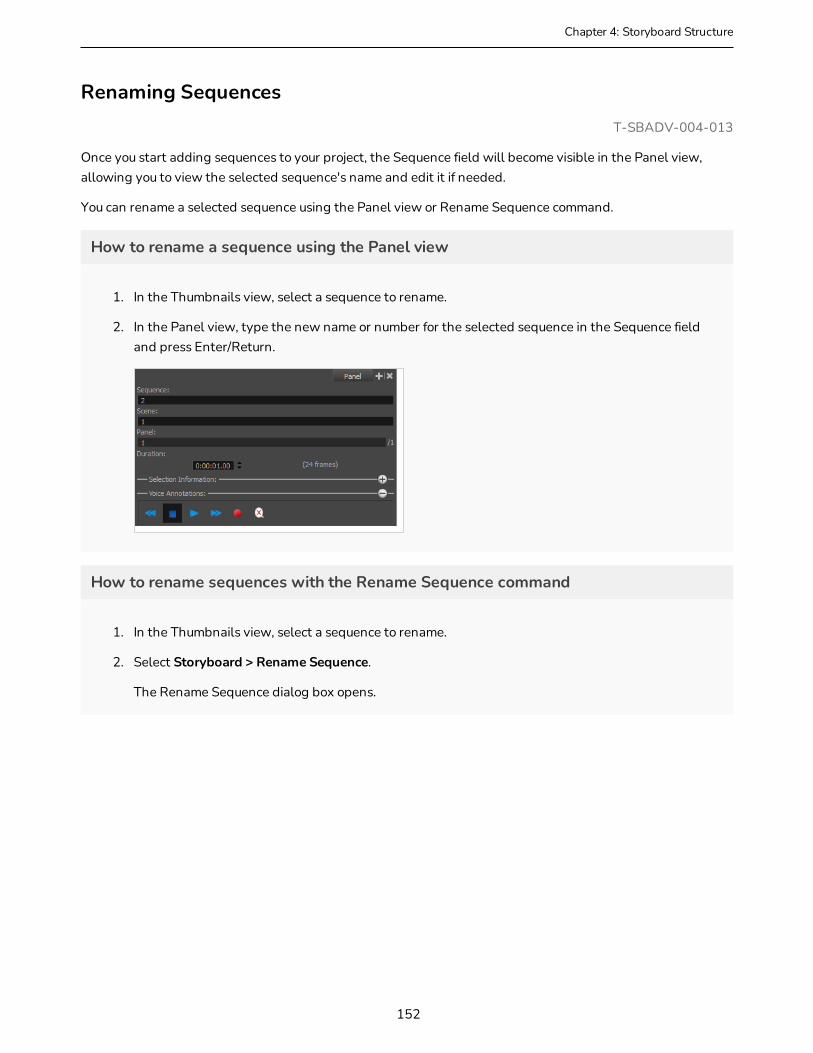
Chapter 4: Storyboard Structure
Renaming SequencesT-SBADV-004-013
Once you start adding sequences to your project, the Sequence field will become visible in the Panel view, allowing you to view the selected sequence's name and edit it if needed.
You can rename a selected sequence using the Panel view or Rename Sequence command.
How to rename a sequence using the Panel view
1. In the Thumbnails view, select a sequence to rename.
2. In the Panel view, type the new name or number for the selected sequence in the Sequence field and press Enter/Return.
How to rename sequences with the Rename Sequence command
1. In the Thumbnails view, select a sequence to rename.
2. Select Storyboard > Rename Sequence.
The Rename Sequence dialog box opens.
152
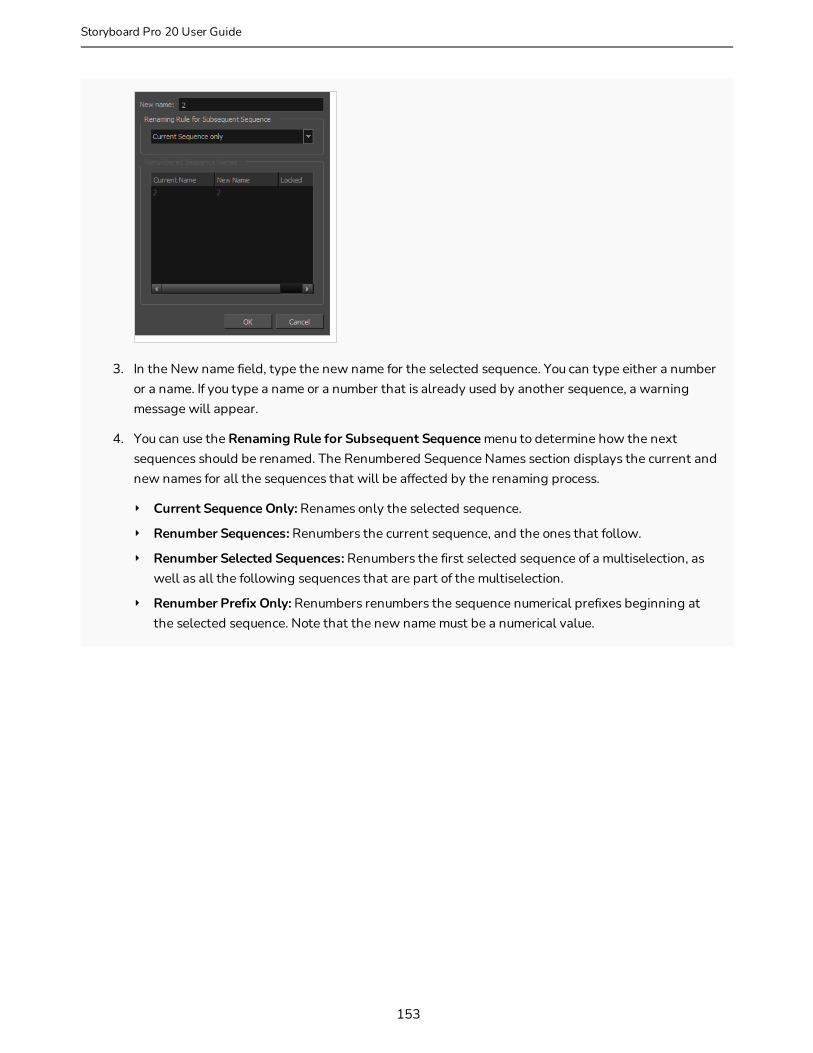
3. In the New name field, type the new name for the selected sequence. You can type either a number or a name. If you type a name or a number that is already used by another sequence, a warning message will appear.
4. You can use the Renaming Rule for Subsequent Sequence menu to determine how the next sequences should be renamed. The Renumbered Sequence Names section displays the current and new names for all the sequences that will be affected by the renaming process.
‣ Current Sequence Only: Renames only the selected sequence.
‣ Renumber Sequences: Renumbers the current sequence, and the ones that follow.
‣ Renumber Selected Sequences: Renumbers the first selected sequence of a multiselection, as well as all the following sequences that are part of the multiselection.
‣ Renumber Prefix Only: Renumbers renumbers the sequence numerical prefixes beginning at the selected sequence. Note that the new name must be a numerical value.
153
Storyboard Pro 20 User Guide
Chapter 4: Storyboard Structure
Removing SequencesT-SBADV-004-014
The sequences in your project can all be removed at the same time.
How to remove all sequences from a project
l Select Storyboard > Remove All Sequences from Project.
All sequences are removed from your project.
154

Joining and Splitting SequencesT-SBADV-004-015
Two sequences can be joined using the Join Selected Sequences command. A sequence can also be split in two.
How to join sequences
1. In the Thumbnails or Timeline view, select two consecutive sequences.
2. Select Storyboard > Join Selected Sequences.
The selected sequences are joined as one.
How to split a sequence
1. In the Thumbnails or Timeline view, select the scene before the sequence to be split.
2. Select Storyboard > Split Current Sequence.
155
Storyboard Pro 20 User Guide
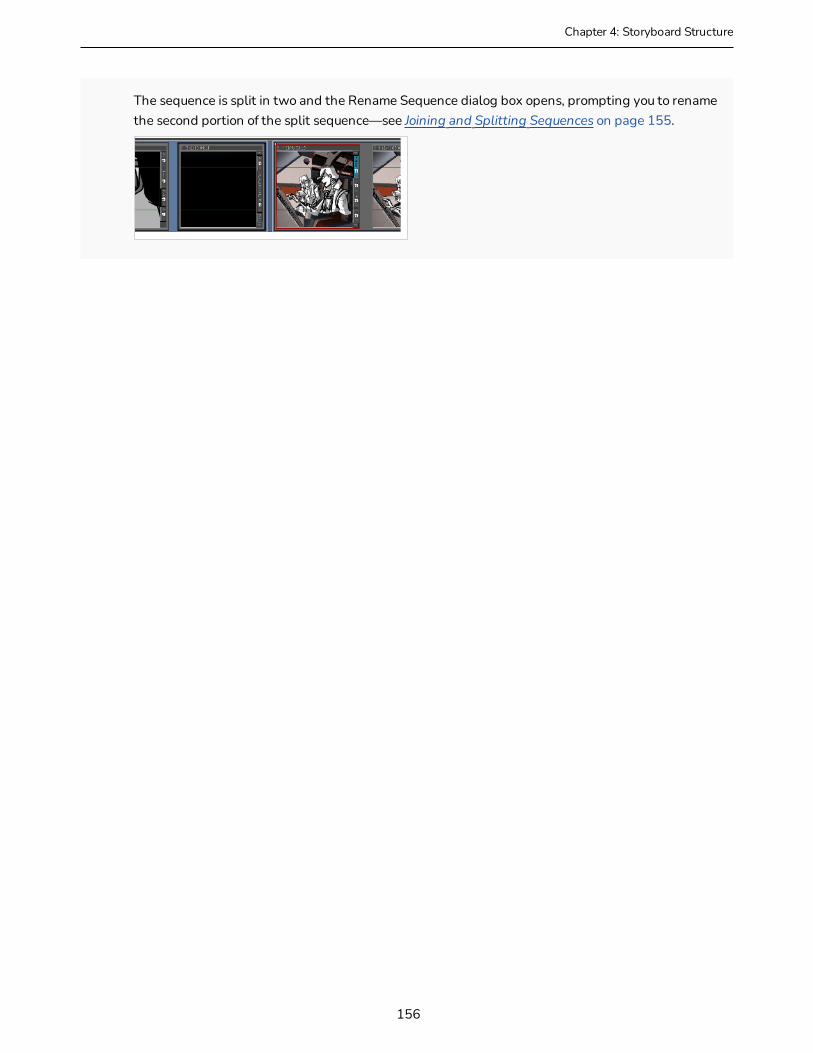
Chapter 4: Storyboard Structure
The sequence is split in two and the Rename Sequence dialog box opens, prompting you to rename the second portion of the split sequence—see Joining and Splitting Sequences on page 155.
156
Selecting All Panels in a SequenceT-SBADV-004-016
You can select all the panels of a sequence simultaneously.
How to select all the panels in a sequence
1. In the Thumbnails or Timeline view, select a panel in the sequence you want to select all panels from.
2. Select Edit > Select All Panels in Sequence.
157
Storyboard Pro 20 User Guide

Chapter 4: Storyboard Structure
About ActsT-SBADV-004-017
An act is a particular section of the story delimited by a particular event or mood.
For example, a story could be constructed in three acts:
l Act 1: The initial situation, character introduction.
l Act 2: The journey.
l Act 3: The resolution.
Like scenes, panels and sequences, you can manipulate acts when building your storyboard. To add acts to your storyboard, you must first enable the option.
You can:
l Enable acts
l Create an act
l Join acts
158
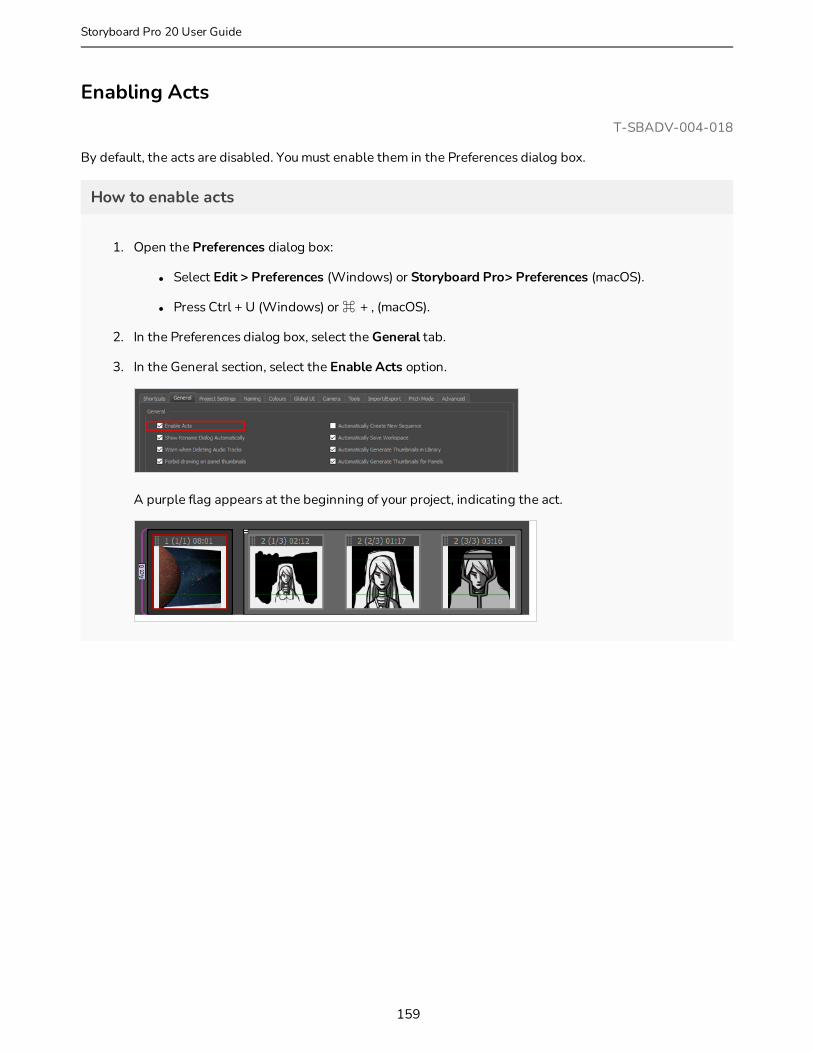
Enabling ActsT-SBADV-004-018
By default, the acts are disabled. You must enable them in the Preferences dialog box.
How to enable acts
1. Open the Preferences dialog box:
l Select Edit > Preferences (Windows) or Storyboard Pro> Preferences (macOS).
l Press Ctrl + U (Windows) or ⌘ + , (macOS).
2. In the Preferences dialog box, select the General tab.
3. In the General section, select the Enable Acts option.
A purple flag appears at the beginning of your project, indicating the act.
159
Storyboard Pro 20 User Guide
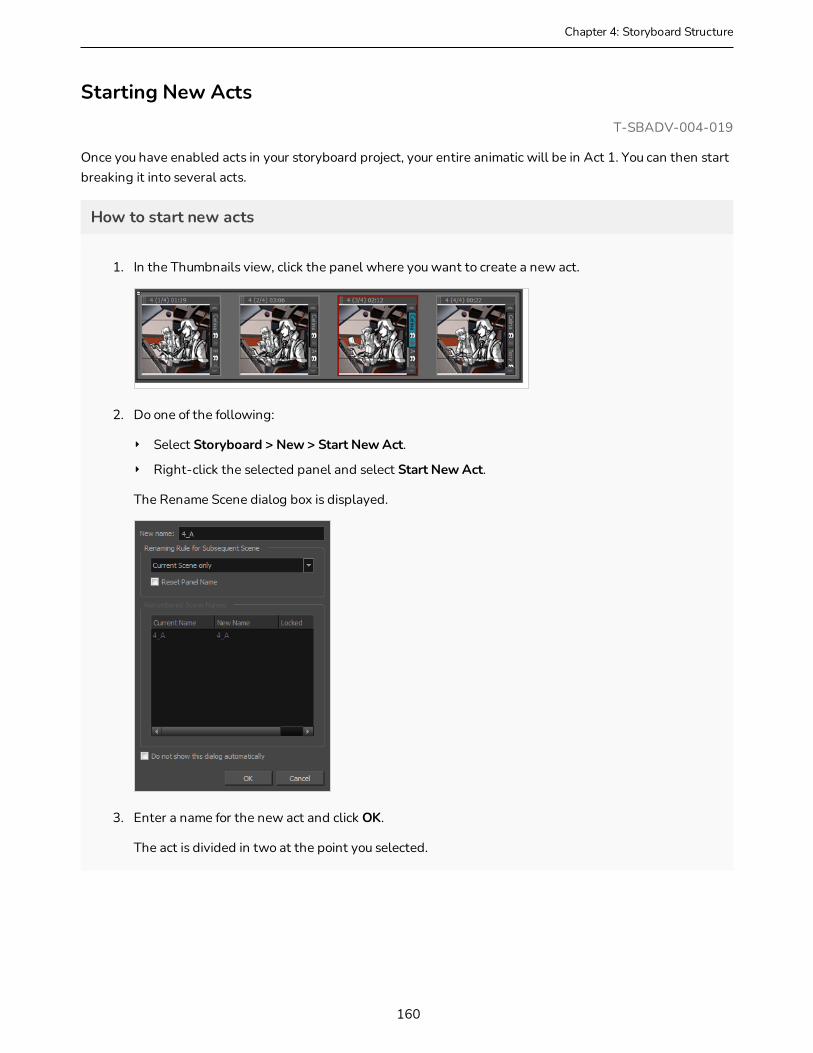
Chapter 4: Storyboard Structure
Starting New ActsT-SBADV-004-019
Once you have enabled acts in your storyboard project, your entire animatic will be in Act 1. You can then start breaking it into several acts.
How to start new acts
1. In the Thumbnails view, click the panel where you want to create a new act.
2. Do one of the following:
‣ Select Storyboard > New > Start New Act.
‣ Right-click the selected panel and select Start New Act.
The Rename Scene dialog box is displayed.
3. Enter a name for the new act and click OK.
The act is divided in two at the point you selected.
160
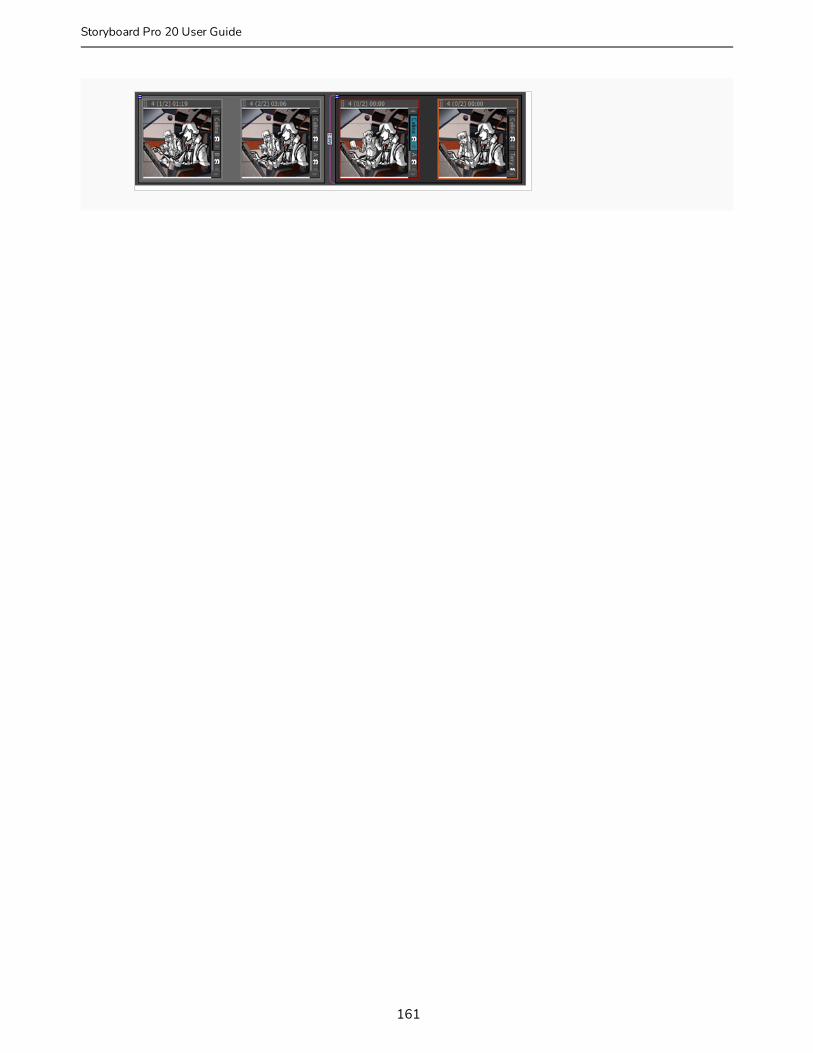
161
Storyboard Pro 20 User Guide
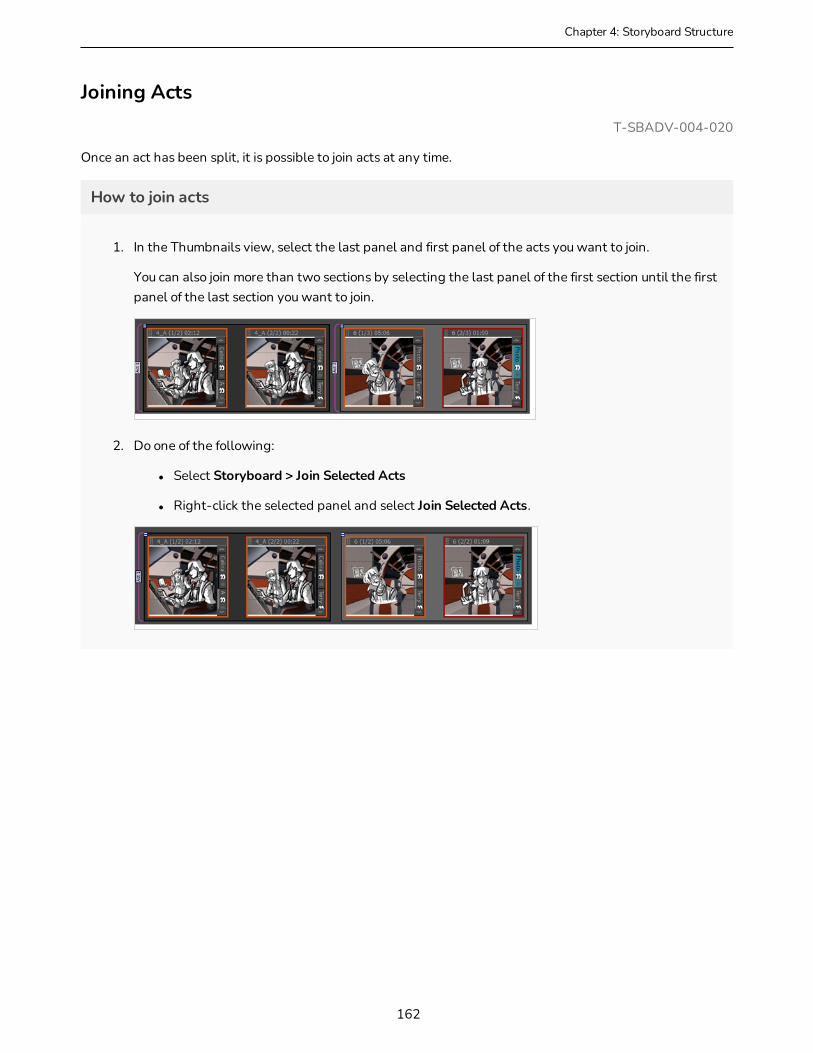
Chapter 4: Storyboard Structure
Joining ActsT-SBADV-004-020
Once an act has been split, it is possible to join acts at any time.
How to join acts
1. In the Thumbnails view, select the last panel and first panel of the acts you want to join.
You can also join more than two sections by selecting the last panel of the first section until the first panel of the last section you want to join.
2. Do one of the following:
l Select Storyboard > Join Selected Acts
l Right-click the selected panel and select Join Selected Acts.
162
Selecting All Panels in an ActT-SBADV-004-021
You can select all the panels of an act simultaneously.
How to select all panels in an act
1. In the Thumbnails or Timeline view, select a panel contained in the act in which you want to select all the panels.
2. Select Edit > Select All Panels in Act.
163
Storyboard Pro 20 User Guide
Chapter 4: Storyboard Structure
Automatically Inserting Images as Acts, Scenes, Panels and LayersWhen using the Import Images as Scenes dialog, it is possible to automatically insert each image you import into the right act, sequence, scene and panel. You can do this to generate new acts, scenes and panels from images, or to automatically inset images in the existing act, scene and panel. It is even possible to insert multiple images in the same
This can be accomplished by naming your images using the following pattern:
<ProjectName>-A#-S#-E#-P#-L<LayerName>.<extension>
Here is how the pattern works:
l <ProjectName>: This is the name of the project. This string will not be inserted into the Storyboard Pro project, but it is mandatory.
l A: Indicates the act the image will be placed in. Replace the # with the number of the act.
l S: Indicates the scene the image will be placed in. Replace the # with the number or name of the scene the image should be inserted to.
l E: This parameter is optional. If you want to insert the same image into a series of consecutive scenes, you can use this parameter to indicate the last scene in which to include the image. The image will be inserted in every scene starting with the one specified by the S parameter and ending with the one specified by the E parameter. Replace the # with the number or name of the last scene this image should be inserted in.
l P: This parameter is optional. It indicates which panel the image will be placed in. Replace the # with the number of the panel in the scene.
l L: This parameter is optional. It indicates the name of the layer the image will be placed in. Replace <LayerName> with the number of the layer in the scene.
IMPORTANT
Do not use spaces in your file names. If you want to use several words in the project, scene or layer name, you can separate each word with an underscore (_).
164
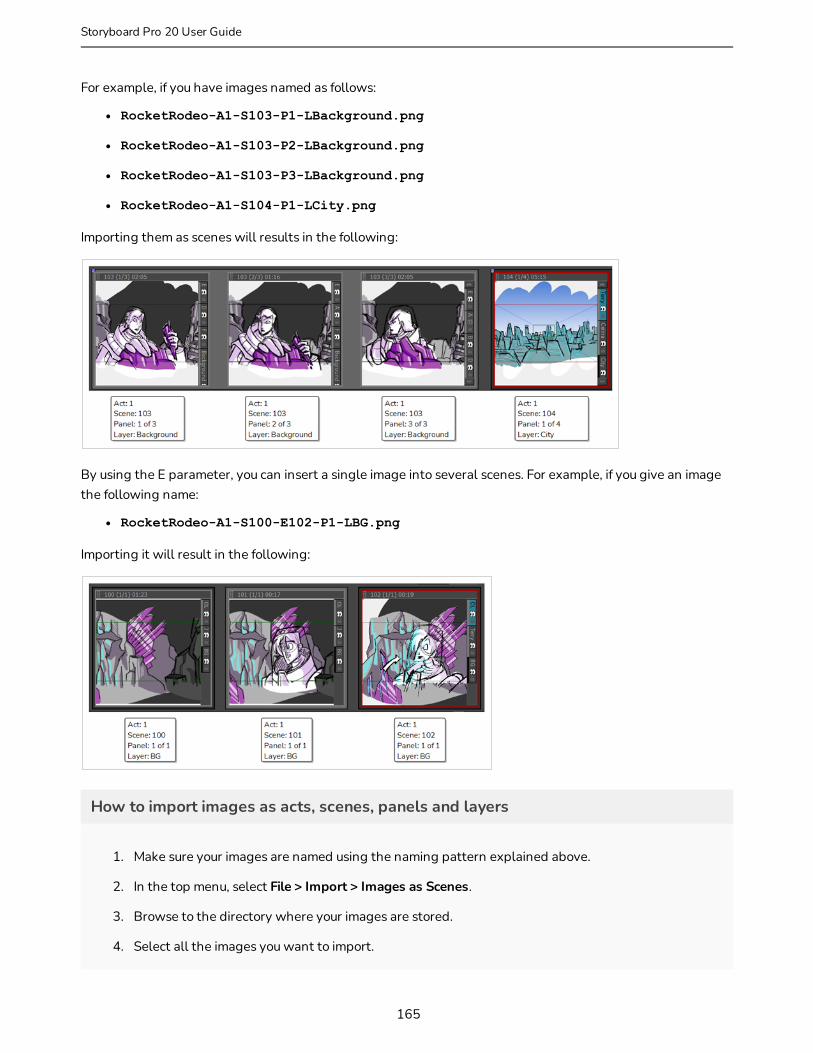
For example, if you have images named as follows:
l RocketRodeo-A1-S103-P1-LBackground.png
l RocketRodeo-A1-S103-P2-LBackground.png
l RocketRodeo-A1-S103-P3-LBackground.png
l RocketRodeo-A1-S104-P1-LCity.png
Importing them as scenes will results in the following:
By using the E parameter, you can insert a single image into several scenes. For example, if you give an image the following name:
l RocketRodeo-A1-S100-E102-P1-LBG.png
Importing it will result in the following:
How to import images as acts, scenes, panels and layers
1. Make sure your images are named using the naming pattern explained above.
2. In the top menu, select File > Import > Images as Scenes.
3. Browse to the directory where your images are stored.
4. Select all the images you want to import.
165
Storyboard Pro 20 User Guide
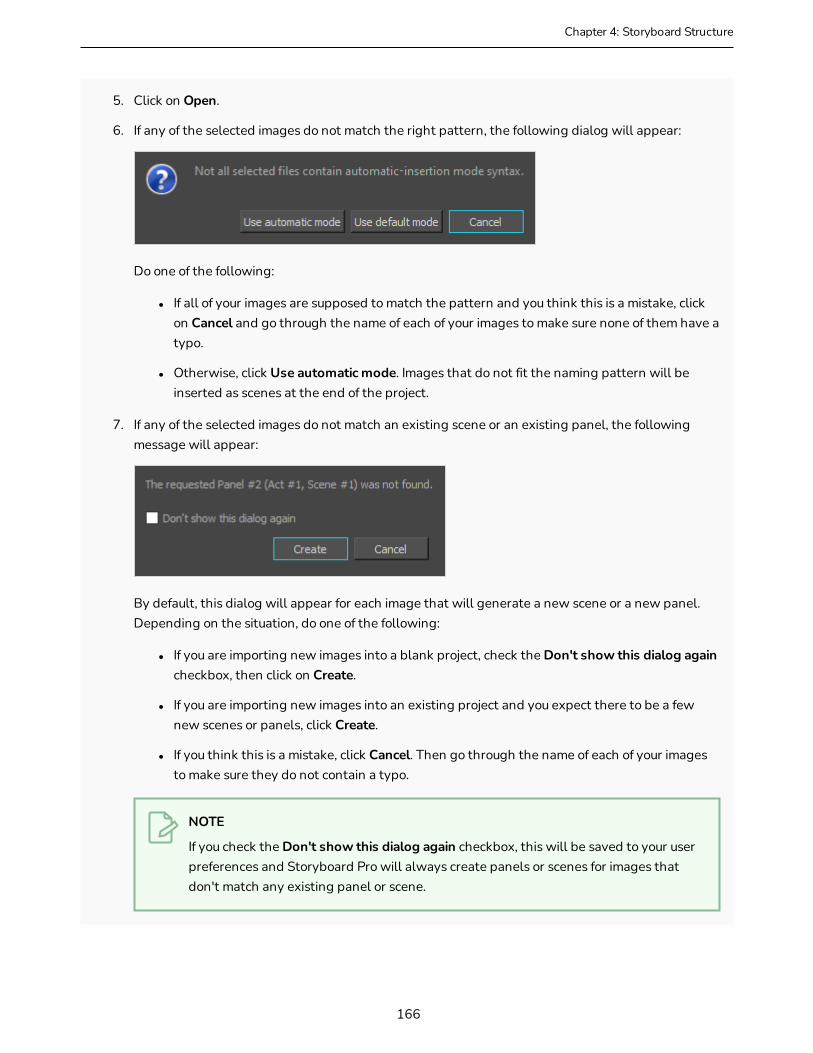
Chapter 4: Storyboard Structure
5. Click on Open.
6. If any of the selected images do not match the right pattern, the following dialog will appear:
Do one of the following:
l If all of your images are supposed to match the pattern and you think this is a mistake, click on Cancel and go through the name of each of your images to make sure none of them have a typo.
l Otherwise, click Use automatic mode. Images that do not fit the naming pattern will be inserted as scenes at the end of the project.
7. If any of the selected images do not match an existing scene or an existing panel, the following message will appear:
By default, this dialog will appear for each image that will generate a new scene or a new panel. Depending on the situation, do one of the following:
l If you are importing new images into a blank project, check the Don't show this dialog again checkbox, then click on Create.
l If you are importing new images into an existing project and you expect there to be a few new scenes or panels, click Create.
l If you think this is a mistake, click Cancel. Then go through the name of each of your images to make sure they do not contain a typo.
NOTE
If you check the Don't show this dialog again checkbox, this will be saved to your user preferences and Storyboard Pro will always create panels or scenes for images that don't match any existing panel or scene.
166

8. If any of the selected images match the name of an existing layer, the following message will appear:
By default, this dialog will appear for each image that matches an existing layer in your project. Depending on the situation, do one of the following:
l If you don't want to see this dialog each time an image you import matches an existing layer in your project, check the Don't show this dialog again checkbox.
l If you want to add the image as a new layer and keep the one with a matching name, click on Keep. The new image will be added, but will be renamed.
l If you want the image to replace the existing layer, click on Remove. The existing layer will be removed and the image will be added as a new layer.
NOTE
If you check the Don't show this dialog again checkbox, the choice you made will be saved in your user preferences and Storyboard Pro will always use this choice every time this situation occurs.
The selected images will be inserted into their corresponding act, scene, panel and layers.
167
Storyboard Pro 20 User Guide
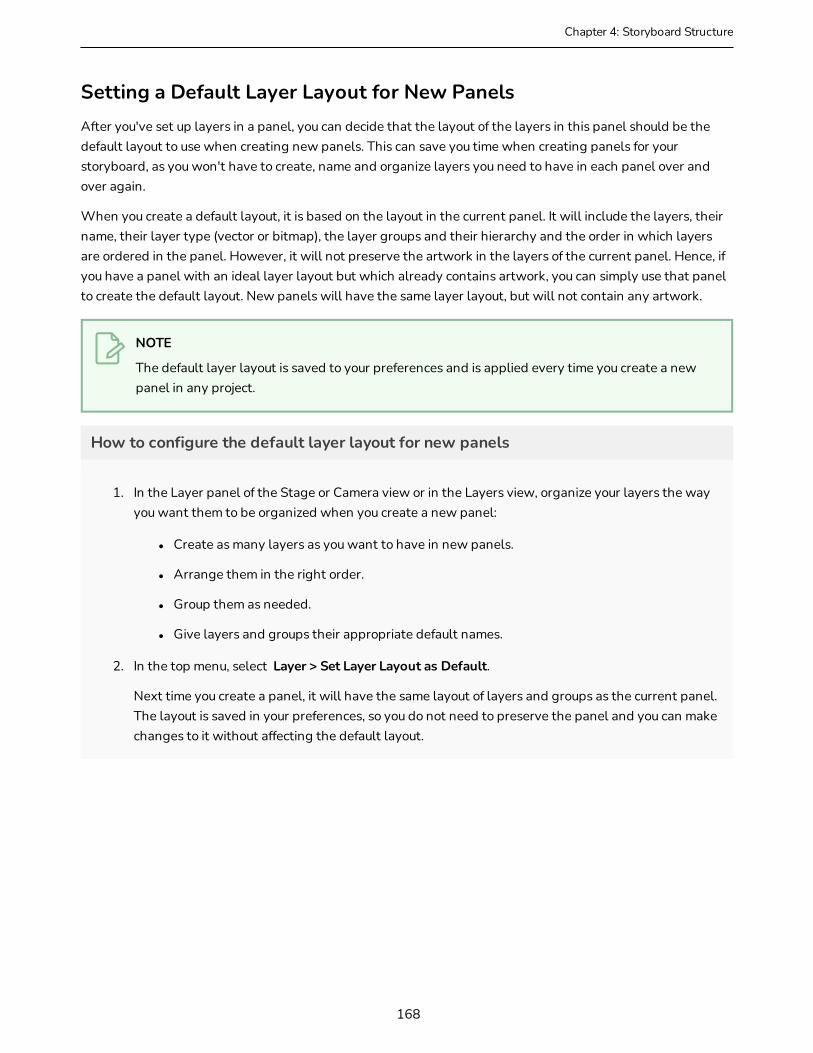
Chapter 4: Storyboard Structure
Setting a Default Layer Layout for New PanelsAfter you've set up layers in a panel, you can decide that the layout of the layers in this panel should be the default layout to use when creating new panels. This can save you time when creating panels for your storyboard, as you won't have to create, name and organize layers you need to have in each panel over and over again.
When you create a default layout, it is based on the layout in the current panel. It will include the layers, their name, their layer type (vector or bitmap), the layer groups and their hierarchy and the order in which layers are ordered in the panel. However, it will not preserve the artwork in the layers of the current panel. Hence, if you have a panel with an ideal layer layout but which already contains artwork, you can simply use that panel to create the default layout. New panels will have the same layer layout, but will not contain any artwork.
NOTE
The default layer layout is saved to your preferences and is applied every time you create a new panel in any project.
How to configure the default layer layout for new panels
1. In the Layer panel of the Stage or Camera view or in the Layers view, organize your layers the way you want them to be organized when you create a new panel:
l Create as many layers as you want to have in new panels.
l Arrange them in the right order.
l Group them as needed.
l Give layers and groups their appropriate default names.
2. In the top menu, select Layer > Set Layer Layout as Default.
Next time you create a panel, it will have the same layout of layers and groups as the current panel. The layout is saved in your preferences, so you do not need to preserve the panel and you can make changes to it without affecting the default layout.
168

Regenerating ThumbnailsT-SBADV-004-008
You can get the most up-to-date thumbnails in the Thumbnails view. As you draw, a series of small images (thumbnails) is generated. These thumbnails are automatically refreshed based on the refresh duration you set in the Preferences dialog box (Advanced tab, Delay Before Updating Thumbnails parameter).
You can choose update thumbnails immediately. This deletes all cached thumbnails in the Thumbnails and Timeline views, and forces new thumbnails to be regenerated.
How to regenerate all thumbnails
1. Select File > Regenerate All Thumbnails.
2. In the dialog box that opens, click Yes.
IMPORTANT
This cannot be undone. All existing thumbnail images in the Library will be deleted.
All thumbnails are deleted and replaced with the regenerated ones.
169
Storyboard Pro 20 User Guide
Chapter 5: Script and Captions
Chapter 5: Script and CaptionsT-SBFND-006-002
Storyboard Pro supports two types of fields for storing and breaking up your project's script:
l The Script field is a field in the Storyboard view in which you can type, or import, your entire project's script. A Storyboard Pro project has only one Script field.
l Caption fields are special text fields for storing information such as dialogue, actions, scene information, scrubbing information and any other type of relevant information for each of your storyboard's panels. Each panel in your project has its own caption fields, and each field is used for a different type of information. The types of caption fields used by your project can be customized.
You can write or import your project's script into the Script field of the Storyboard view, which is a single text field for your entire project:
Then, you can fill up the caption fields for each panel in your storyboard using the Panel view. The Panel view allows you to view and edit the content of the caption fields for the currently selected panel.
170

171
Storyboard Pro 20 User Guide

Chapter 5: Script and Captions
Writing a Script in Storyboard ProYou can type the script for your storyboard directly into the Script field of the Storyboard view.
NOTE
The Script field is a special caption field for your entire project. Other caption fields in Storyboard Pro are used to store captions for each panel in your storyboard. The Script field and panel caption fields work exactly the same, except that the Script field is located in the Storyboard view, and other caption fields are located in the Panel view.
How to type the script for your Storyboard Pro project
1. Open the Storyboard view. By default, it will be in the right pane of your workspace.
2. Click the inside of the text field.
3. Start typing your script.
172
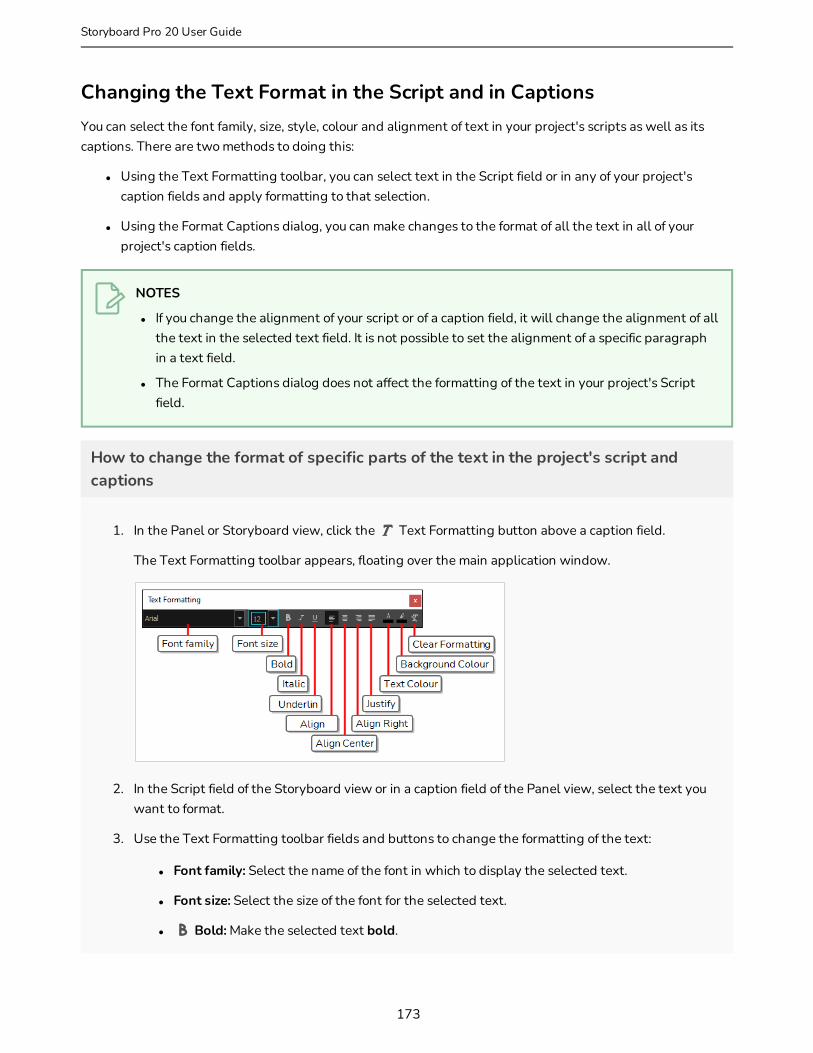
Changing the Text Format in the Script and in CaptionsYou can select the font family, size, style, colour and alignment of text in your project's scripts as well as its captions. There are two methods to doing this:
l Using the Text Formatting toolbar, you can select text in the Script field or in any of your project's caption fields and apply formatting to that selection.
l Using the Format Captions dialog, you can make changes to the format of all the text in all of your project's caption fields.
NOTES
l If you change the alignment of your script or of a caption field, it will change the alignment of all the text in the selected text field. It is not possible to set the alignment of a specific paragraph in a text field.
l The Format Captions dialog does not affect the formatting of the text in your project's Script field.
How to change the format of specific parts of the text in the project's script and captions
1. In the Panel or Storyboard view, click the Text Formatting button above a caption field.
The Text Formatting toolbar appears, floating over the main application window.
2. In the Script field of the Storyboard view or in a caption field of the Panel view, select the text you want to format.
3. Use the Text Formatting toolbar fields and buttons to change the formatting of the text:
l Font family: Select the name of the font in which to display the selected text.
l Font size: Select the size of the font for the selected text.
l Bold: Make the selected text bold.
173
Storyboard Pro 20 User Guide
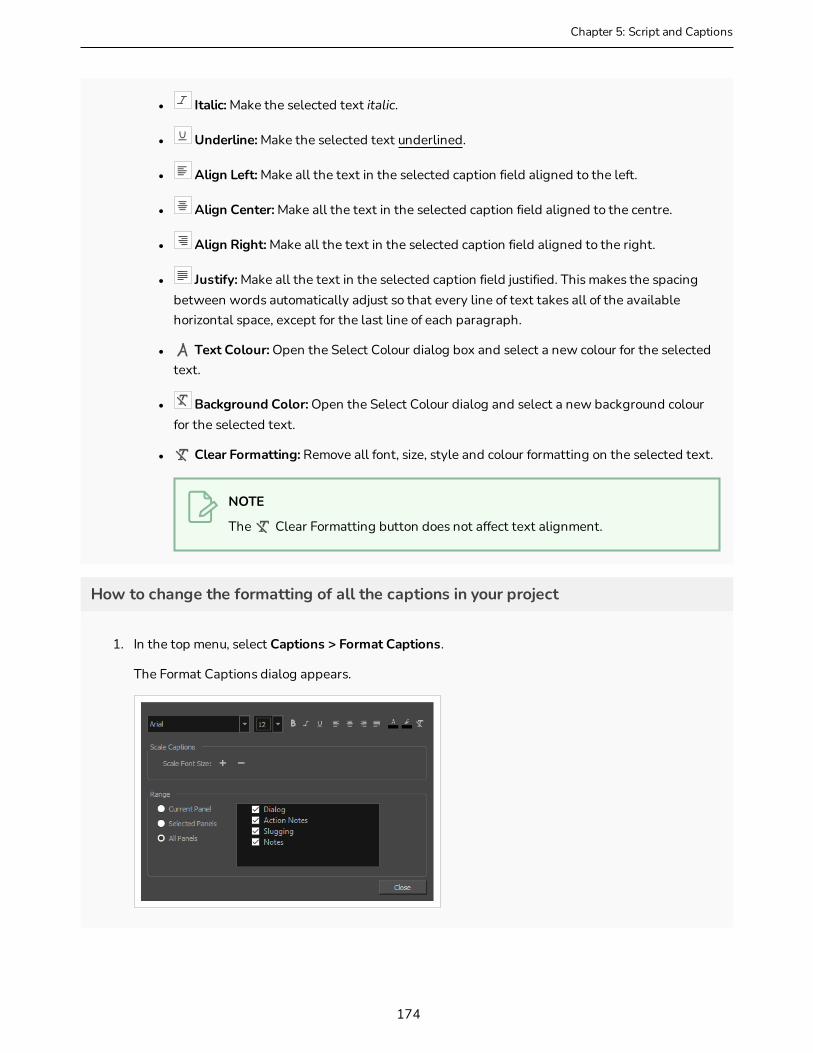
Chapter 5: Script and Captions
l Italic: Make the selected text italic.
l Underline: Make the selected text underlined.
l Align Left: Make all the text in the selected caption field aligned to the left.
l Align Center: Make all the text in the selected caption field aligned to the centre.
l Align Right: Make all the text in the selected caption field aligned to the right.
l Justify: Make all the text in the selected caption field justified. This makes the spacing between words automatically adjust so that every line of text takes all of the available horizontal space, except for the last line of each paragraph.
l Text Colour: Open the Select Colour dialog box and select a new colour for the selected text.
l Background Color: Open the Select Colour dialog and select a new background colour for the selected text.
l Clear Formatting: Remove all font, size, style and colour formatting on the selected text.
NOTE
The Clear Formatting button does not affect text alignment.
How to change the formatting of all the captions in your project
1. In the top menu, select Captions > Format Captions.
The Format Captions dialog appears.
174

IMPORTANT
Any changes made to the format of captions in your project using this dialog will take effect immediately on all the captions in all of the panels specified in the Range section of this dialog, and will override any local formatting.
2. In the Range section of the dialog, select the range of panels for which you want to reformat captions:
l To reformat the text in the caption fields of a specific panel, select Current Panel. Then, in the Thumbnails or Timeline view, select which panel for which you want to reformat the captions.
l To reformat the text in the caption fields of several specific panels, select Selected Panels. Then, in the Thumbnails or Timeline view, select all the panels for which you want to reformat the captions.
TIPS
To select several panels, do one of the following:
l While holding Ctrl (Windows) or ⌘ (macOS), click on each panel you want to add to your selection.
l While holding Shift, click on the first panel you want to add to your selection, then on the last panel you want to add to your selection. Both panels you clicked on and every panel in-between will be added to the selection.
l To reformat the text in the caption fields of all the panels in your project, select All Panels.
3. In the list of caption fields inside the Range section, make sure that all the caption fields that you want to reformat are checked, and that all the caption fields for which you want to preserve the current formatting are unchecked.
4. In the text formatting controls at the top of the dialog, do all that applies:
l To change the font of all the captions in the specified range, select that font in the Font family drop-down.
l To specify a new font-size for all the captions in the specified range, select or type in that font size in the Font size drop-down.
l To make all the text in the specified range bold, click Bold once.
l To make all the bold text in the specified range not bold, click Bold twice.
175
Storyboard Pro 20 User Guide
Chapter 5: Script and Captions
l To make all the text in the specified range italic, click Italic once.
l To make all the italic text in the specified range not italic, click Italic twice.
l To make all the text in the specified range underlined, click Underline once.
l To make all the underlined text in the specified range not underlined, click Underline twice.
l To make all the captions in the specified range aligned to the left, click Align Left.
l To make all the captions in the specified range aligned to the centre, click Align Center.
l To make all the captions in the specified range aligned to the right, click Align Right.
l To make all the captions in the specified range justified, click Justify. This will make the spacing between words automatically adjust so that every line of text takes all of the available horizontal space, except for the last line of each paragraph.
l To change the text colour of all the text in the specified range, click on the Text Colour button and, in the Select Colour dialog, select the desired colour for the text, then click OK.
l To change the background colour of all the text in the specified range, click on the Background Colour button and, in the Select Colour dialog, select the desired colour for the text, then click OK.
l To remove all the formatting in the specified range, click on the Clear Formatting button. All the text in the range will be the same font, size, style and color.
NOTE
The Clear Formatting button does not affect text alignment.
5. In the Scale Captions section, do one of the following:
l To make all of the text in the selected range proportionally bigger, click Scale up point size.
l To make all the text in the selected range proportionally smaller, click Scale down point size.
176
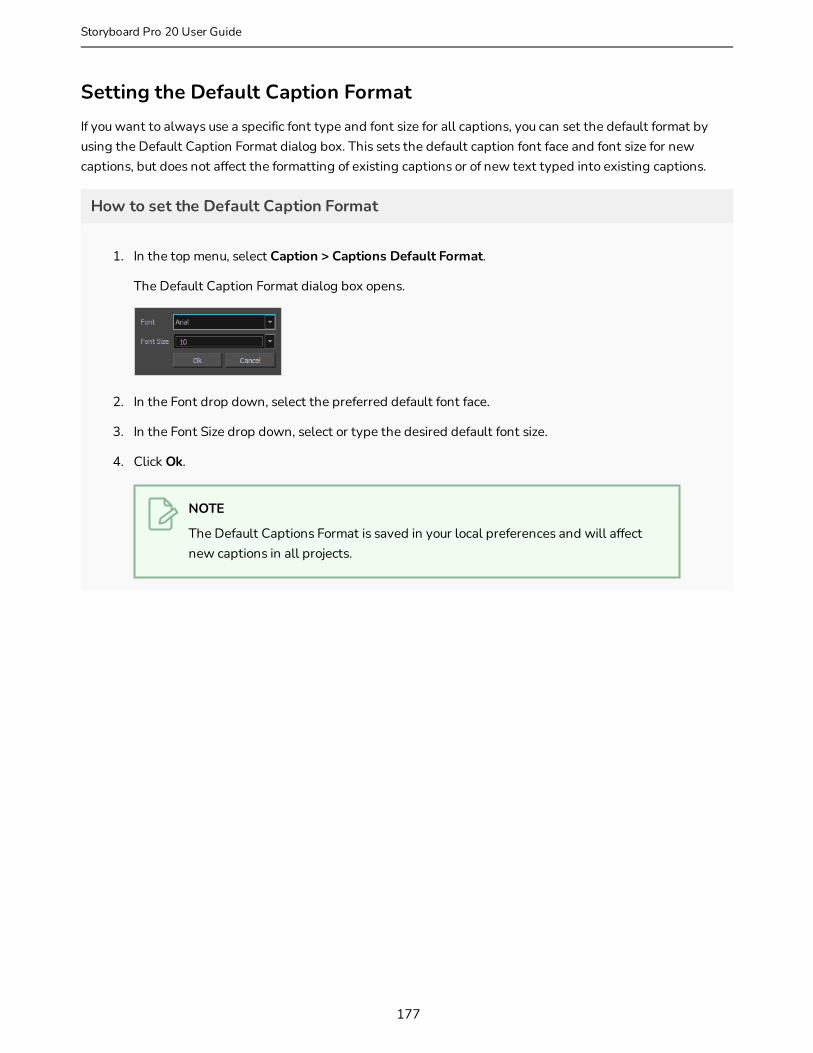
Setting the Default Caption FormatIf you want to always use a specific font type and font size for all captions, you can set the default format by using the Default Caption Format dialog box. This sets the default caption font face and font size for new captions, but does not affect the formatting of existing captions or of new text typed into existing captions.
How to set the Default Caption Format
1. In the top menu, select Caption > Captions Default Format.
The Default Caption Format dialog box opens.
2. In the Font drop down, select the preferred default font face.
3. In the Font Size drop down, select or type the desired default font size.
4. Click Ok.
NOTE
The Default Captions Format is saved in your local preferences and will affect new captions in all projects.
177
Storyboard Pro 20 User Guide
Chapter 5: Script and Captions
Importing a ScriptT-SBFND-006-001
If you already have a script written for your project, you can import it into Storyboard Pro.
You can import a script in plain text (.txt), Rich Text Format (.rtf) or Final Draft XML (.fdx) directly into the Script field of the Storyboard view.
TIP
If you have a properly structured script in Final Draft XML format, you can generate a new project based on your script in which empty scenes and panels are automatically generated based on the structure of your script, and in which the caption fields of your panels are automatically filled with excerpts from your script. For more information, see Creating a Project from a Final Draft Script on page 35.
How to import a script into your Storyboard Pro project
1. In the Storyboard view, click the Menu button just over the right side of the text field and:
l If your script is in plain text (.txt) or Rich Text Format (.rtf), select Import Caption.
l If your script is in Final Draft XML (.fdx) format, select Import Final Draft Script.
2. In the file browser, locate and select your script file, then click on Open.
The script appears in the Script caption field.
178

179
Storyboard Pro 20 User Guide

Chapter 5: Script and Captions
About Caption FieldsT-SBFND-006-003
Storyboard Pro allows you to store information of various types for each panel in your project via captions, which can be viewed and edited in the Panel view.
Each panel in a project has its own caption fields in which you can enter information specific to that panel. By default, a Storyboard Pro project will have the following types of captions:
l Dialogue: The lines of dialogue spoken by the characters in the current panel.
l Action Notes: The actions performed by the characters in the current panel.
l Slugging: Notes regarding the timing of dialogues and actions in the current panel. These can be added while creating the storyboard to give instructions on how to create the animatic.
l Notes: Any relevent information about the current panel or the current scene, such as the scene heading, the characters and props, ambient sounds, background and foreground actions, continuity notes or, if working on a live action project, the cast, crew, props or material required to complete the shot.
It is possible to customize the caption fields your project uses. You can add new caption fields, remove, hide, rename or reorder existing caption fields, adjust the amount of space each field occupies in the Panel view, etc.
While each panel has its own captions, the types of caption field themselves are saved at the project level. This means that the amount of caption fields, their names and their order are determined for your entire project. If you add a new caption field, every panel in your project will have this new caption field, but it will be empty and you will get to fill it up separately for each panel. Likewise, if you delete a caption field, it will be deleted for every panel in your project, even in panels where that caption field contains text.
NOTE
While the Storyboard view only has one caption field by default, the Script field, this caption field the same was as the caption fields in the Panel view, meaning that you can also add new caption fields to the Storyboard view, rename them and reorder them and delete them as needed.
180

Adding CaptionsIn each panel, there are four caption fields: Dialogue, Action Notes, Slugging and Notes. If you need to enter more information, you can add a new caption for your panels. The new caption will be available for every panel in your storyboard.
In the Storyboard view, by default, there is only one caption field which is called Script. If you need to, you can add more captions to this view such as production notes. These captions are only for reference and will not be exported.
Just like in a traditional storyboard, you can add drawn indications to a panel’s caption. For this, you need to add a Sketch caption to your panel.
NOTE
You cannot add a sketch caption to the Storyboard view.
How to add a panel caption field
1. Open the Panel view.
2. Do one of the following:
l In the Panel view, click the Menu button above any caption field and select Add Caption.
l In the top menu, select Caption > Add Caption to Panels.
The Choose Field Name dialog box opens.
3. Type a name for your new caption field and click OK.
The new caption field appears below the existing ones. In the example below, the new caption field is named "SFX".
181
Storyboard Pro 20 User Guide

Chapter 5: Script and Captions
How to add captions in the Storyboard view
1. Open the Storyboard view.
2. Do one of the following:
l In the Panel view, click the Menu button above the Script caption field and select Add Caption.
l Select Caption > Add Caption to Storyboard.
The Choose Field Name dialog box opens.
3. Type a name for your new Caption field and click OK.
The new caption field appears below the Script caption field . In the following example, the new caption is named "Director Notes".
182
183
Storyboard Pro 20 User Guide
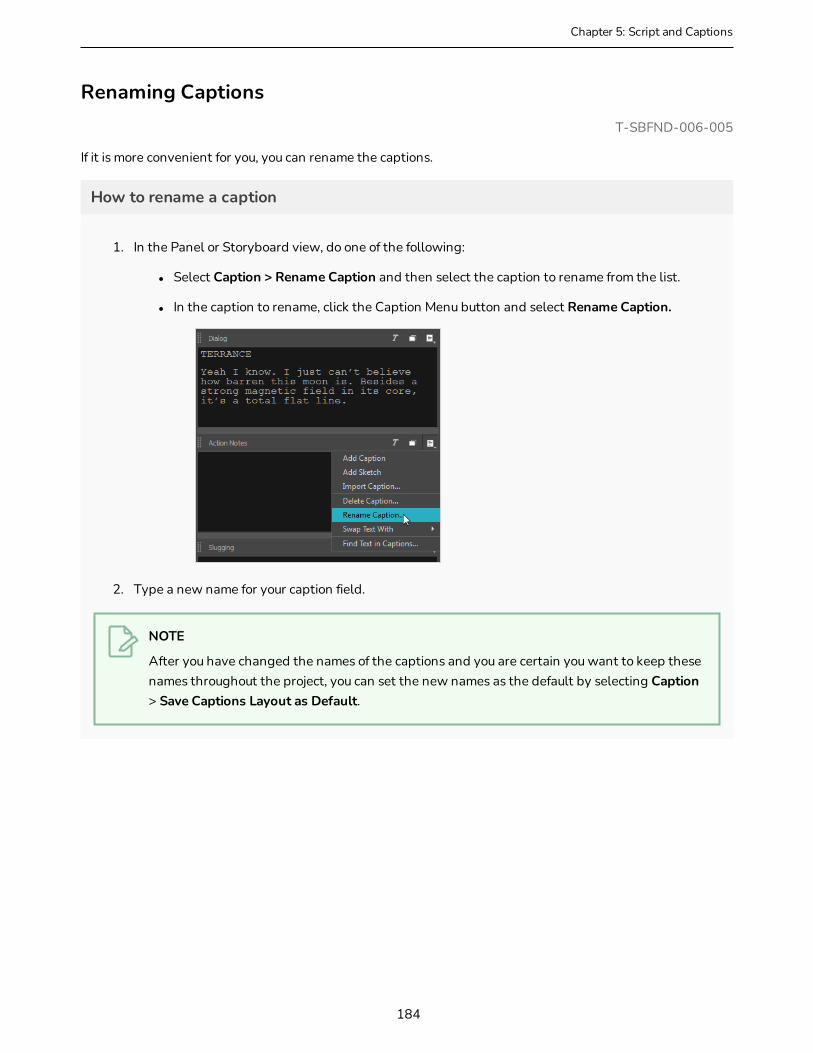
Chapter 5: Script and Captions
Renaming CaptionsT-SBFND-006-005
If it is more convenient for you, you can rename the captions.
How to rename a caption
1. In the Panel or Storyboard view, do one of the following:
l Select Caption > Rename Caption and then select the caption to rename from the list.
l In the caption to rename, click the Caption Menu button and select Rename Caption.
2. Type a new name for your caption field.
NOTE
After you have changed the names of the captions and you are certain you want to keep these names throughout the project, you can set the new names as the default by selecting Caption > Save Captions Layout as Default.
184
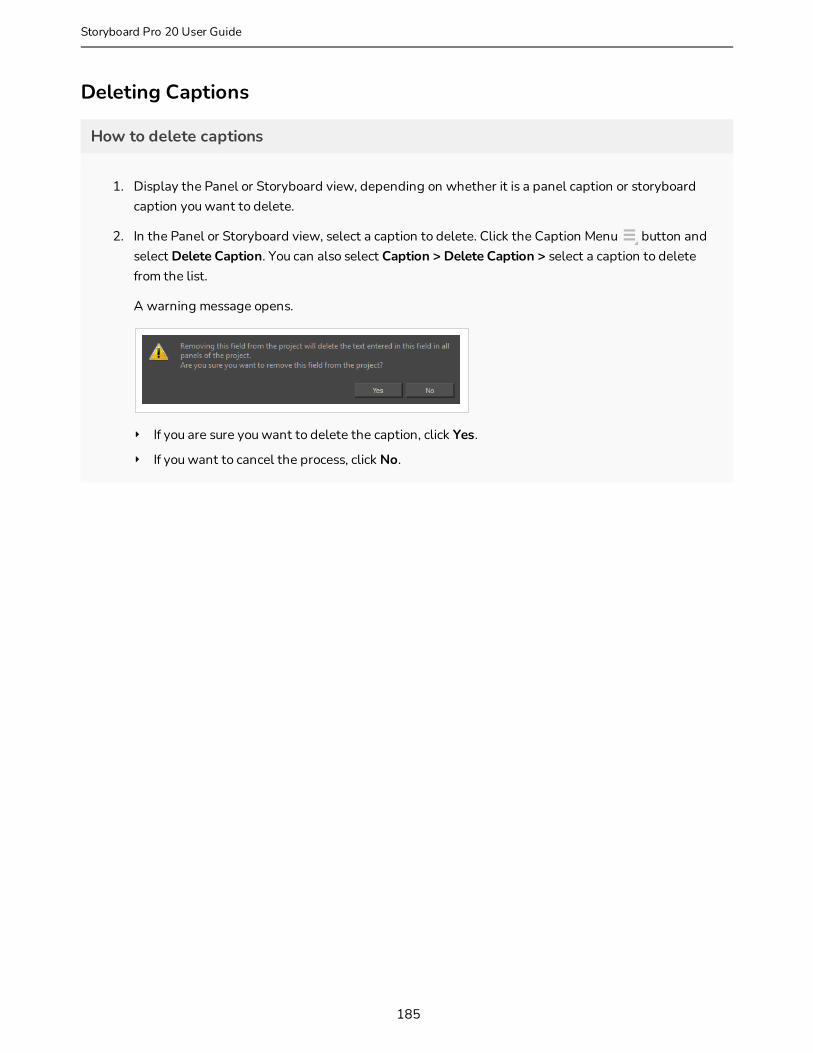
Deleting Captions
How to delete captions
1. Display the Panel or Storyboard view, depending on whether it is a panel caption or storyboard caption you want to delete.
2. In the Panel or Storyboard view, select a caption to delete. Click the Caption Menu button and select Delete Caption. You can also select Caption > Delete Caption > select a caption to delete from the list.
A warning message opens.
‣ If you are sure you want to delete the caption, click Yes.
‣ If you want to cancel the process, click No.
185
Storyboard Pro 20 User Guide

Chapter 5: Script and Captions
Saving the Caption Layout as DefaultT-SBADV-004-003
If you want the current layout of your caption fields to be the default layout for all your future Storyboard Pro projects, you can save it as the default layout for captions.
This will save:
l The amount of caption fields.
l The name of each caption field.
l Their order of the caption fields.
Any project you create from this point on will have this caption field configuration.
The default caption layout also includes any caption field you might have added to the Storyboard view. Additionally, if you have any sketch field in the current panel, that will be added to the default layout as well, meaning that every panel you create will have its own sketch field.
How to save the caption layout as default
1. In the top menu, select Caption > Save Captions Layout as Default.
186
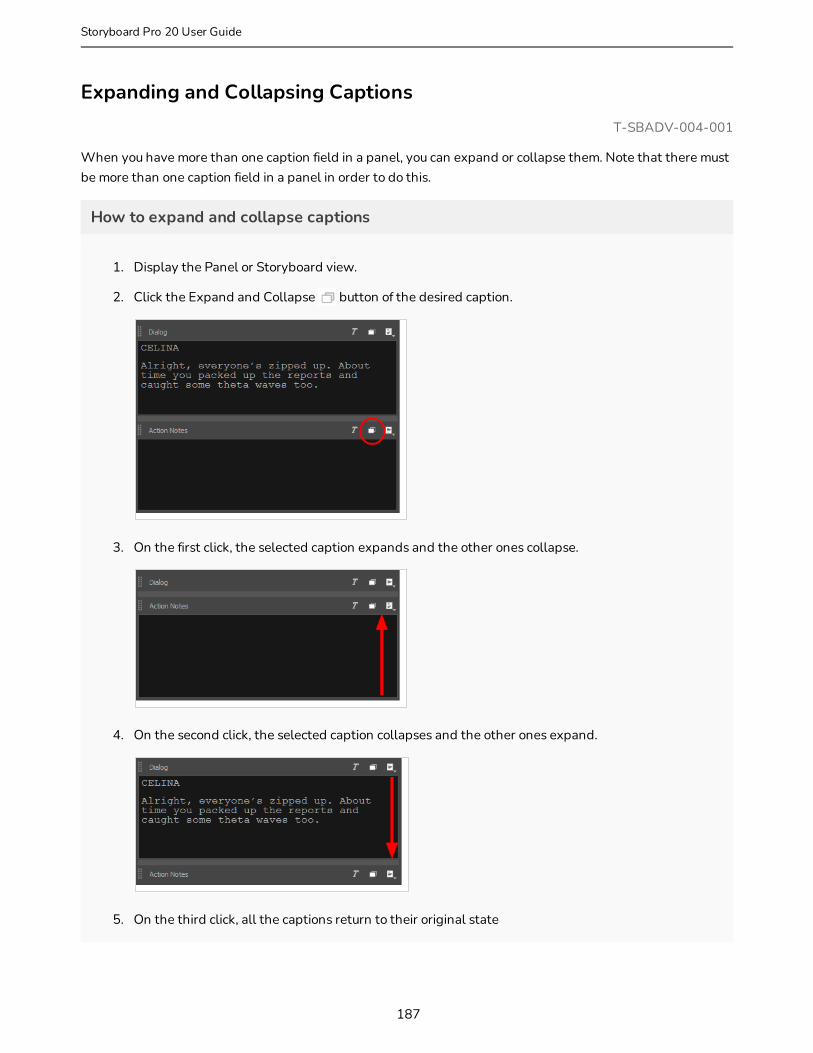
Expanding and Collapsing CaptionsT-SBADV-004-001
When you have more than one caption field in a panel, you can expand or collapse them. Note that there must be more than one caption field in a panel in order to do this.
How to expand and collapse captions
1. Display the Panel or Storyboard view.
2. Click the Expand and Collapse button of the desired caption.
3. On the first click, the selected caption expands and the other ones collapse.
4. On the second click, the selected caption collapses and the other ones expand.
5. On the third click, all the captions return to their original state
187
Storyboard Pro 20 User Guide
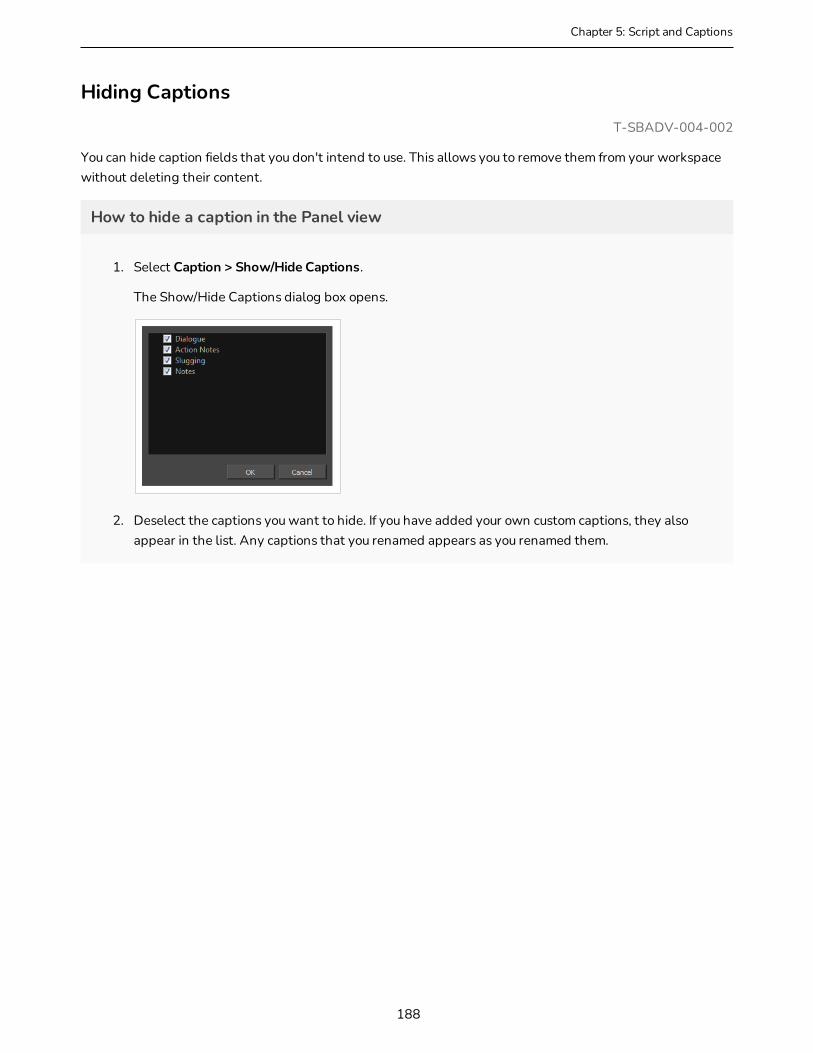
Chapter 5: Script and Captions
Hiding CaptionsT-SBADV-004-002
You can hide caption fields that you don't intend to use. This allows you to remove them from your workspace without deleting their content.
How to hide a caption in the Panel view
1. Select Caption > Show/Hide Captions.
The Show/Hide Captions dialog box opens.
2. Deselect the captions you want to hide. If you have added your own custom captions, they also appear in the list. Any captions that you renamed appears as you renamed them.
188

Adding Text to CaptionsT-SBFND-006-004
There are several ways to add text to a Caption field, and editing it is very easy. The quickest and easiest way to add text to the caption fields is to drag and drop it. For example, if you imported a script into the Script caption field of the Storyboard view, you can select the text you need and drop it in the desired panel’s caption field.
If you did not import a script or if you want to add more text, you can simply type in the needed instructions and information into the caption field.
How to type text into a panel caption
1. In the Thumbnails or Timeline view, select the panel for which you want to type captions.
2. Open the Panel view. By default, it will be in the right pane of your workspace.
3. Click inside the caption field you want to type in.
4. Start typing the caption.
How to drag and drop text from the script into caption fields
1. Switch to the Vertical workspace by doing one of the following:
189
Storyboard Pro 20 User Guide
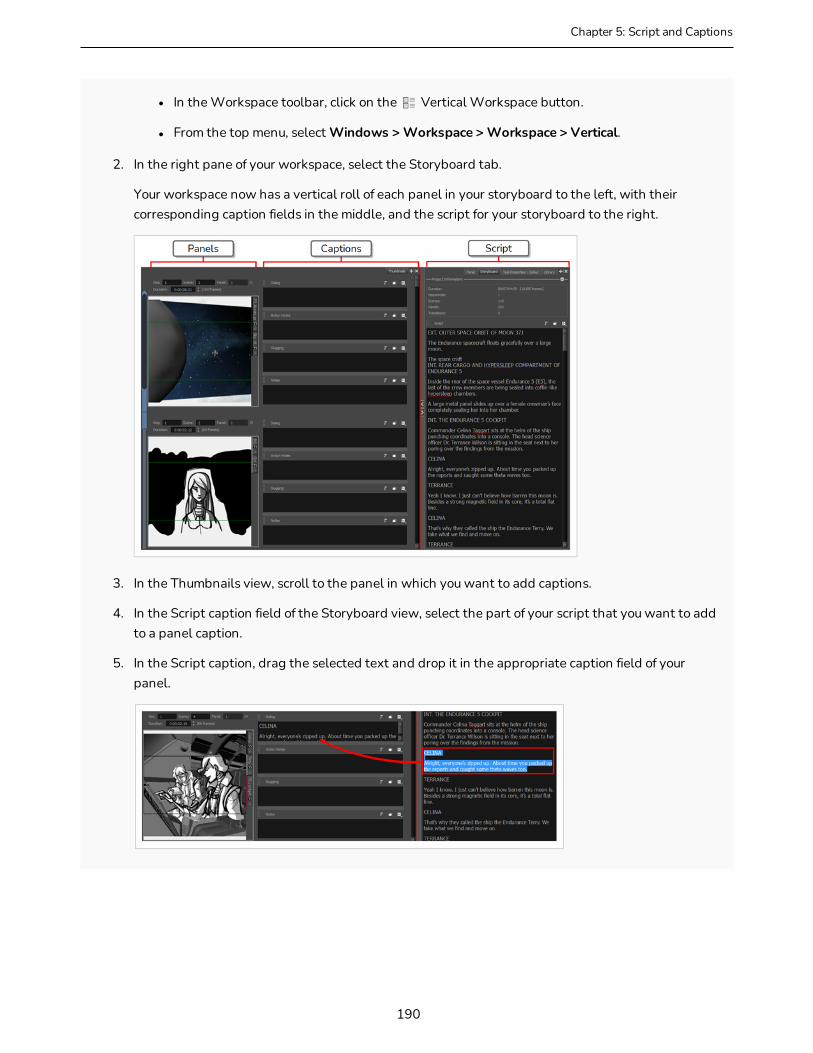
Chapter 5: Script and Captions
l In the Workspace toolbar, click on the Vertical Workspace button.
l From the top menu, select Windows > Workspace > Workspace > Vertical.
2. In the right pane of your workspace, select the Storyboard tab.
Your workspace now has a vertical roll of each panel in your storyboard to the left, with their corresponding caption fields in the middle, and the script for your storyboard to the right.
3. In the Thumbnails view, scroll to the panel in which you want to add captions.
4. In the Script caption field of the Storyboard view, select the part of your script that you want to add to a panel caption.
5. In the Script caption, drag the selected text and drop it in the appropriate caption field of your panel.
190

6. Repeat this until you have copied all the necessary text for each of your panels into their caption fields.
TIP
You can also drag and drop text from any panel caption to another panel caption, or from a panel caption to the script.
7. Once you are done, you can restore the workspace you were using by selecting it from the Workspace toolbar or from the top menu. For example, the default workspace is the Drawing workspace. To restore this workspace, do one of the following:
l In the Workspace toolbar, click on the Drawing Workspace button.
l In the top menu, select Windows > Workspace > Drawing.
191
Storyboard Pro 20 User Guide
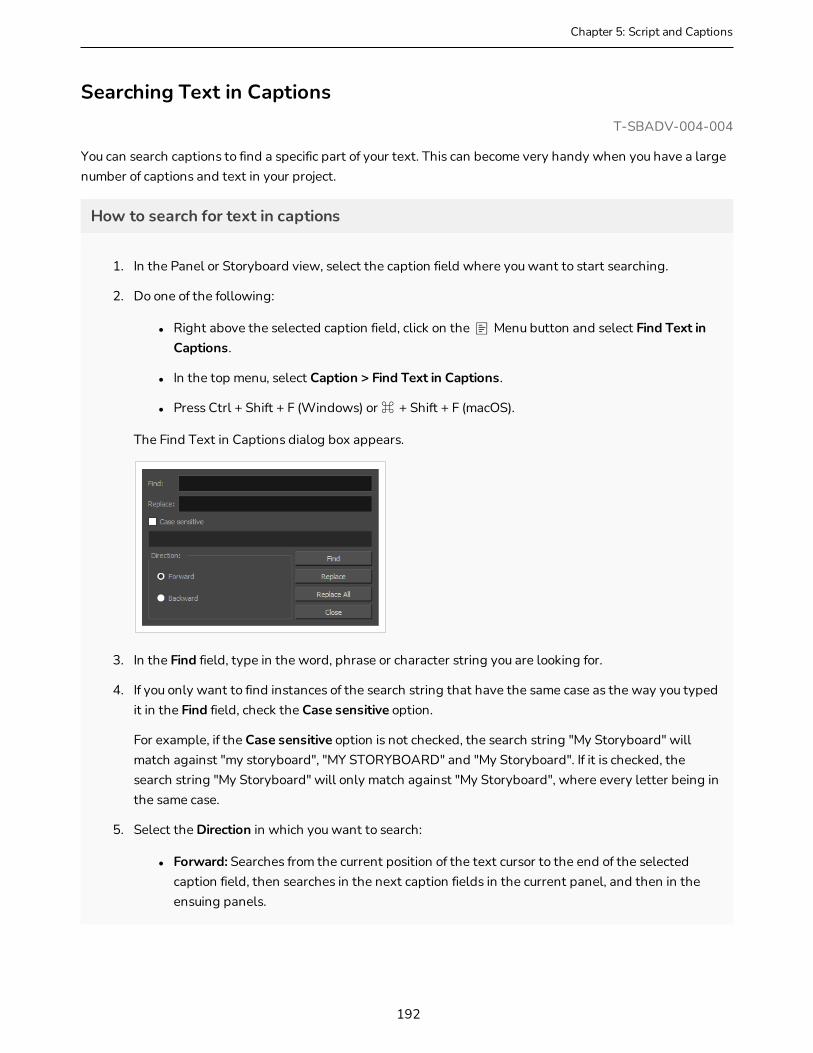
Chapter 5: Script and Captions
Searching Text in CaptionsT-SBADV-004-004
You can search captions to find a specific part of your text. This can become very handy when you have a large number of captions and text in your project.
How to search for text in captions
1. In the Panel or Storyboard view, select the caption field where you want to start searching.
2. Do one of the following:
l Right above the selected caption field, click on the Menu button and select Find Text in Captions.
l In the top menu, select Caption > Find Text in Captions.
l Press Ctrl + Shift + F (Windows) or ⌘ + Shift + F (macOS).
The Find Text in Captions dialog box appears.
3. In the Find field, type in the word, phrase or character string you are looking for.
4. If you only want to find instances of the search string that have the same case as the way you typed it in the Find field, check the Case sensitive option.
For example, if the Case sensitive option is not checked, the search string "My Storyboard" will match against "my storyboard", "MY STORYBOARD" and "My Storyboard". If it is checked, the search string "My Storyboard" will only match against "My Storyboard", where every letter being in the same case.
5. Select the Direction in which you want to search:
l Forward: Searches from the current position of the text cursor to the end of the selected caption field, then searches in the next caption fields in the current panel, and then in the ensuing panels.
192

l Backward: Searches from the current position of the text cursor to the beginning of the caption field, and then searches in the previous caption fields in the current panel, and then in previous panels.
6. Click Find.
The first instance of the search string that is found will be made visible and will be highlighted in blue.
7. Click Find again to locate the next instance of the search string that can be found in your project.
193
Storyboard Pro 20 User Guide

Chapter 5: Script and Captions
Searching and Replacing Text in CaptionsUsing the Find Text in Captions dialog box, you can search for a specific string of text in all of your project's captions, and replace that string with a different string. You can either cherry pick which instances of the strings get replaced, or instantly replace all instances of the search string in your project with the replacement string.
How to search for text in captions
1. In the Panel or Storyboard view, select the caption field where you want to start searching.
2. Do one of the following:
l Right above the selected caption field, click on the Menu button and select Find Text in Captions.
l In the top menu, select Caption > Find Text in Captions.
l Press Ctrl + Shift + F (Windows) or ⌘ + Shift + F (macOS).
The Find Text in Captions dialog box appears.
3. In the Find field, type in the word, phrase or character string you are looking for.
4. In the Replace field, type in the word, phrase or character string you want to replace the search string with.
5. If you only want to find instances of the search string that have the same case as the way you typed it in the Find field, check the Case sensitive option.
For example, if the Case sensitive option is not checked, the search string "My Storyboard" will match against "my storyboard", "MY STORYBOARD" and "My Storyboard". If it is checked, the search string "My Storyboard" will only match against "My Storyboard", where every letter being in the same case.
6. Select the Direction in which you want to search:
194
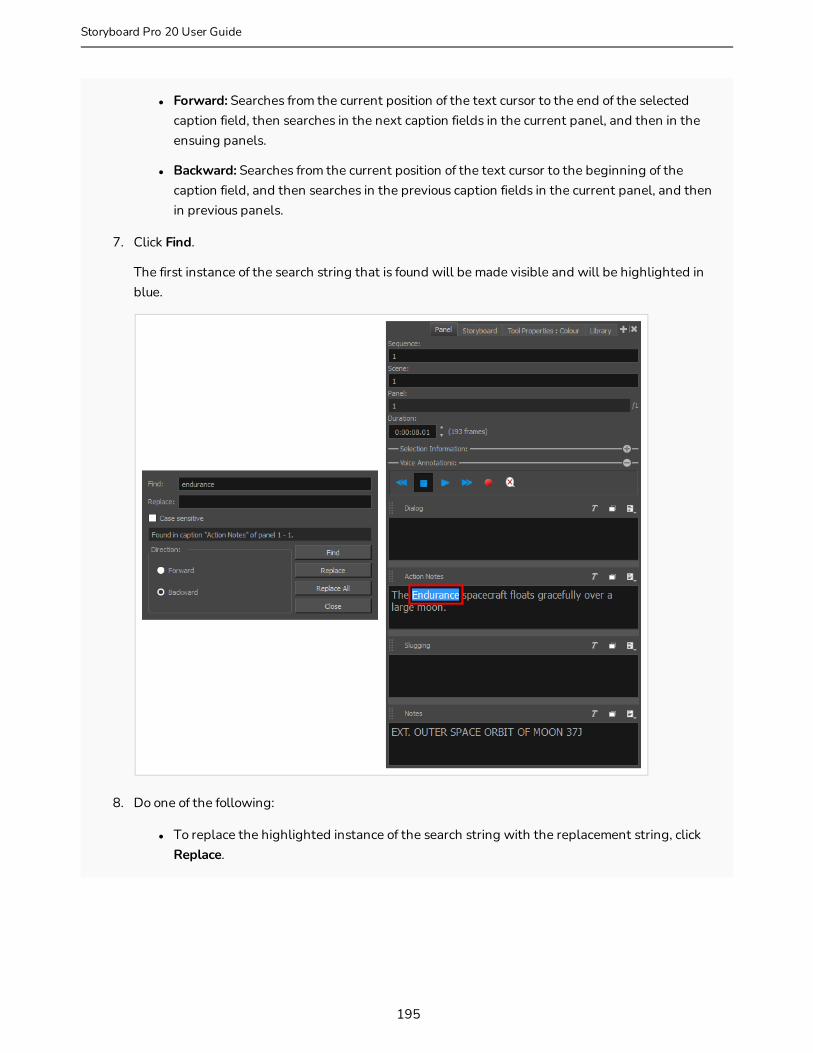
l Forward: Searches from the current position of the text cursor to the end of the selected caption field, then searches in the next caption fields in the current panel, and then in the ensuing panels.
l Backward: Searches from the current position of the text cursor to the beginning of the caption field, and then searches in the previous caption fields in the current panel, and then in previous panels.
7. Click Find.
The first instance of the search string that is found will be made visible and will be highlighted in blue.
8. Do one of the following:
l To replace the highlighted instance of the search string with the replacement string, click Replace.
195
Storyboard Pro 20 User Guide

Chapter 5: Script and Captions
NOTE
This will replace the highlighted instance of the search string, and then it will instantly find and jump to the next instance of the search string.
l To skip this instance and find the next instance of the search string, click Find again.
l To replace all instances of the search string in your project with the replacement string, click Replace All.
196
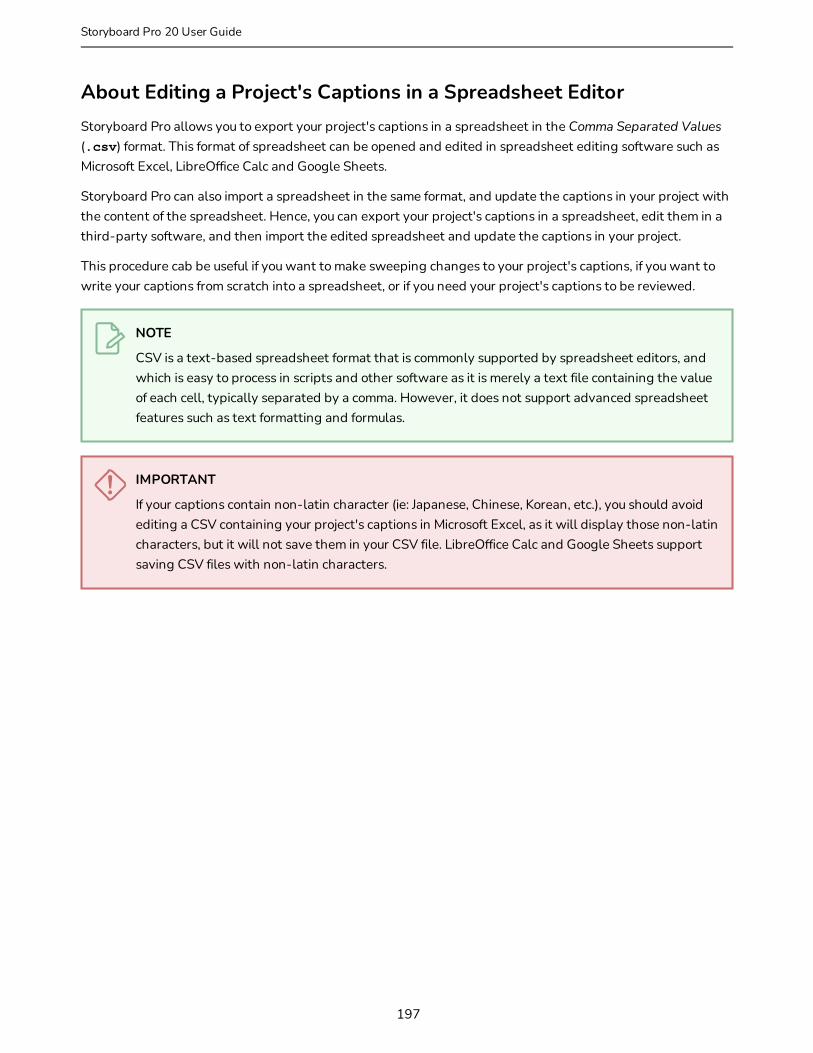
About Editing a Project's Captions in a Spreadsheet EditorStoryboard Pro allows you to export your project's captions in a spreadsheet in the Comma Separated Values (.csv) format. This format of spreadsheet can be opened and edited in spreadsheet editing software such as Microsoft Excel, LibreOffice Calc and Google Sheets.
Storyboard Pro can also import a spreadsheet in the same format, and update the captions in your project with the content of the spreadsheet. Hence, you can export your project's captions in a spreadsheet, edit them in a third-party software, and then import the edited spreadsheet and update the captions in your project.
This procedure cab be useful if you want to make sweeping changes to your project's captions, if you want to write your captions from scratch into a spreadsheet, or if you need your project's captions to be reviewed.
NOTE
CSV is a text-based spreadsheet format that is commonly supported by spreadsheet editors, and which is easy to process in scripts and other software as it is merely a text file containing the value of each cell, typically separated by a comma. However, it does not support advanced spreadsheet features such as text formatting and formulas.
IMPORTANT
If your captions contain non-latin character (ie: Japanese, Chinese, Korean, etc.), you should avoid editing a CSV containing your project's captions in Microsoft Excel, as it will display those non-latin characters, but it will not save them in your CSV file. LibreOffice Calc and Google Sheets support saving CSV files with non-latin characters.
197
Storyboard Pro 20 User Guide
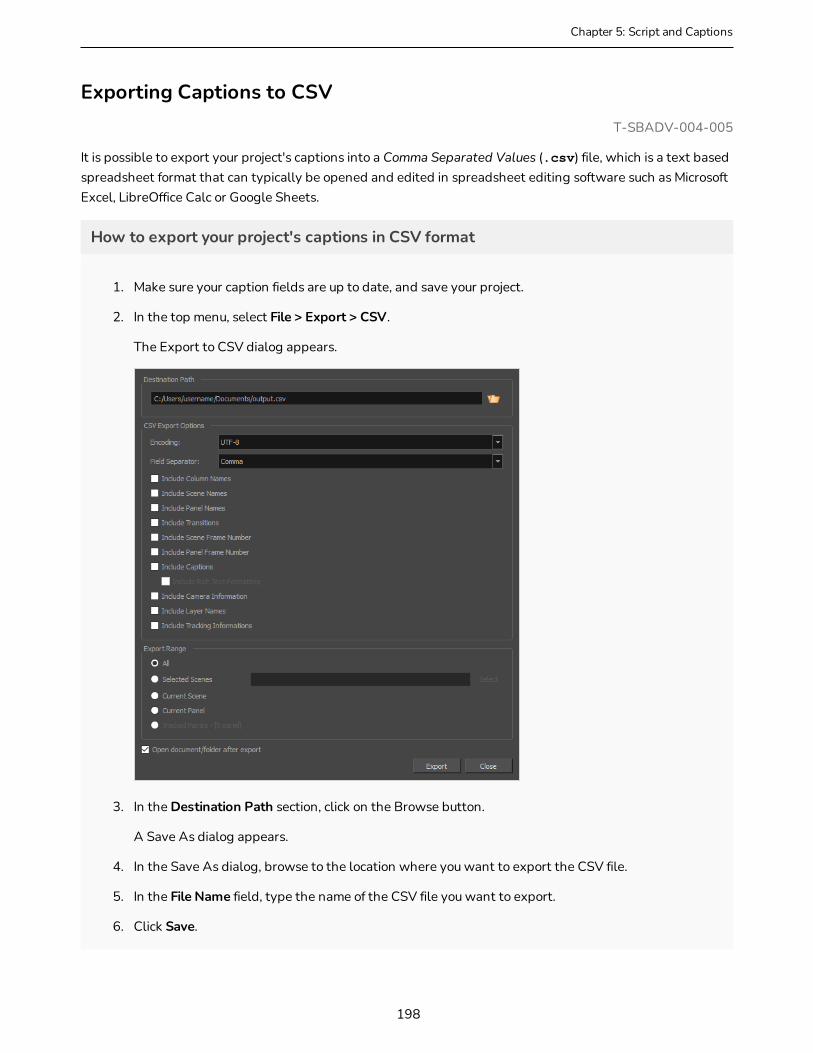
Chapter 5: Script and Captions
Exporting Captions to CSVT-SBADV-004-005
It is possible to export your project's captions into a Comma Separated Values (.csv) file, which is a text based spreadsheet format that can typically be opened and edited in spreadsheet editing software such as Microsoft Excel, LibreOffice Calc or Google Sheets.
How to export your project's captions in CSV format
1. Make sure your caption fields are up to date, and save your project.
2. In the top menu, select File > Export > CSV.
The Export to CSV dialog appears.
3. In the Destination Path section, click on the Browse button.
A Save As dialog appears.
4. In the Save As dialog, browse to the location where you want to export the CSV file.
5. In the File Name field, type the name of the CSV file you want to export.
6. Click Save.
198
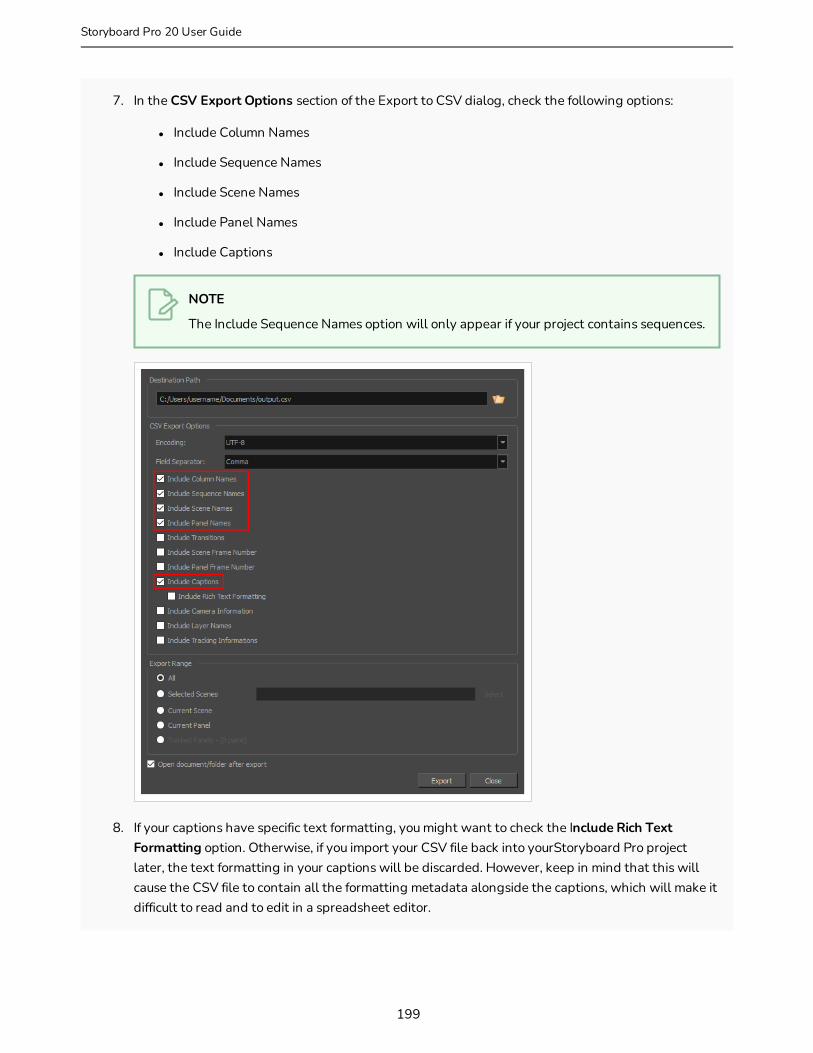
7. In the CSV Export Options section of the Export to CSV dialog, check the following options:
l Include Column Names
l Include Sequence Names
l Include Scene Names
l Include Panel Names
l Include Captions
NOTE
The Include Sequence Names option will only appear if your project contains sequences.
8. If your captions have specific text formatting, you might want to check the Include Rich Text Formatting option. Otherwise, if you import your CSV file back into yourStoryboard Pro project later, the text formatting in your captions will be discarded. However, keep in mind that this will cause the CSV file to contain all the formatting metadata alongside the captions, which will make it difficult to read and to edit in a spreadsheet editor.
199
Storyboard Pro 20 User Guide
Chapter 5: Script and Captions
9. Click Export.
The CSV file will be saved at the specified location.
NOTE
When you open the CSV file in a spreadsheet editor, you may be prompted to provide the following information:
l Character Set/Encoding: This is the name of the character set selected in the Encoding drop-down of the Export to CSV dialog. By default, it is set to UTF-8.
l Seperated by/Separator: This is the character used to separate the fields, which can be selected in the Field Separator drop-down of the Export to CSV dialog. By default, this is set to comma (,).
l String delimiter: This should always be set to quotation marks/quotes (")
200

Editing a CSV File Exported by Storyboard ProHow to open and edit a CSV file in an external spreadsheet editor is up to the software you choose to use. The most commonly used spreadsheet editors that support CSV files are Microsoft Excel, LibreOffice Calc and Google Sheets.
The following are guidelines to follow when using a spreadsheet editor to edit your CSV file:
l Microsoft Excel will display but will not save non-latin characters (ie: Chinese, Japanese, Korean, etc.) to CSV format. Hence, if you want to edit your CSV file in a spreadsheet editor and your captions use non-latin characters, you must use LibreOffice Calc or Google Sheets instead.
l If you want to use another software, test it first by opening the exported CSV file in your software, saving it as a copy and importing the copy back into your Storyboard Pro project to see if it causes any unexpected issue.
l You can open a CSV file directly in Microsoft Excel and LibreOffice Calc. To open a CSV file in Google Sheets, you must upload it to your drive, view it, then click Open with Google Sheets near the top.
l When opening the CSV file, you may be prompted to provide the following information:
l Character Set / File Origin / Encoding: This is the name of the character set selected in the Encoding drop-down of the Export to CSV dialog. The default Encoding for CSV files exported by Storyboard Pro is UTF-8.
l Delimited or Fixed Width: CSV files exported by Storyboard Pro are always delimited.
l Separators / Delimiters: This is the character used to separate the fields, which can be selected in the Field Separator drop-down of the Export to CSV dialog. By default, CSV files exported by Storyboard Pro are separated by commas (,).
l String Delimiter / Text Qualifier: CSV files exported by Storyboard Pro use double-quotes (").
l In the spreadsheet, line breaks in the captions will be represented by the new line symbol \n.
l Microsoft Excel and LibreOffice Calc may prompt you to save the file using their own spreadsheet format, as those formats support storing more information than the CSV format. However, Storyboard Pro can only import spreadsheets in CSV format. Hence, you must confirm that you want to save your spreadsheet in CSV format.
l Google Sheets will automatically save your spreadsheet in XLSX format when you make any change to it. You can still export the modified sheet in CSV format by selecting File > Download > Comma separated values (.csv, current sheet) from the top menu.
201
Storyboard Pro 20 User Guide

Chapter 5: Script and Captions
Importing Captions from a CSV FileOnce you have made changes to the captions in the CSV file exported from your project, you can import it back into your project. Storyboard Pro will find each caption field in your CSV file that contains different text that its corresponding caption field in your Storyboard Pro project, and will import the updated captions from the CSV file into your project.
How to update the captions in your projects using an edited CSV file
1. Open the Storyboard Pro project you want to update.
2. In the top menu, select File > Update Captions from CSV.
The Import CSV dialog appears.
3. Click on the Browse button right of the file name field.
The Select CSV File dialog appears.
4. Browse to the folder that contains your CSV file and select it.
5. Click Open.
6. In the Import CSV dialog, click Import.
The Report section will fill up with information about each caption in your project that has been
202

updated.
203
Storyboard Pro 20 User Guide
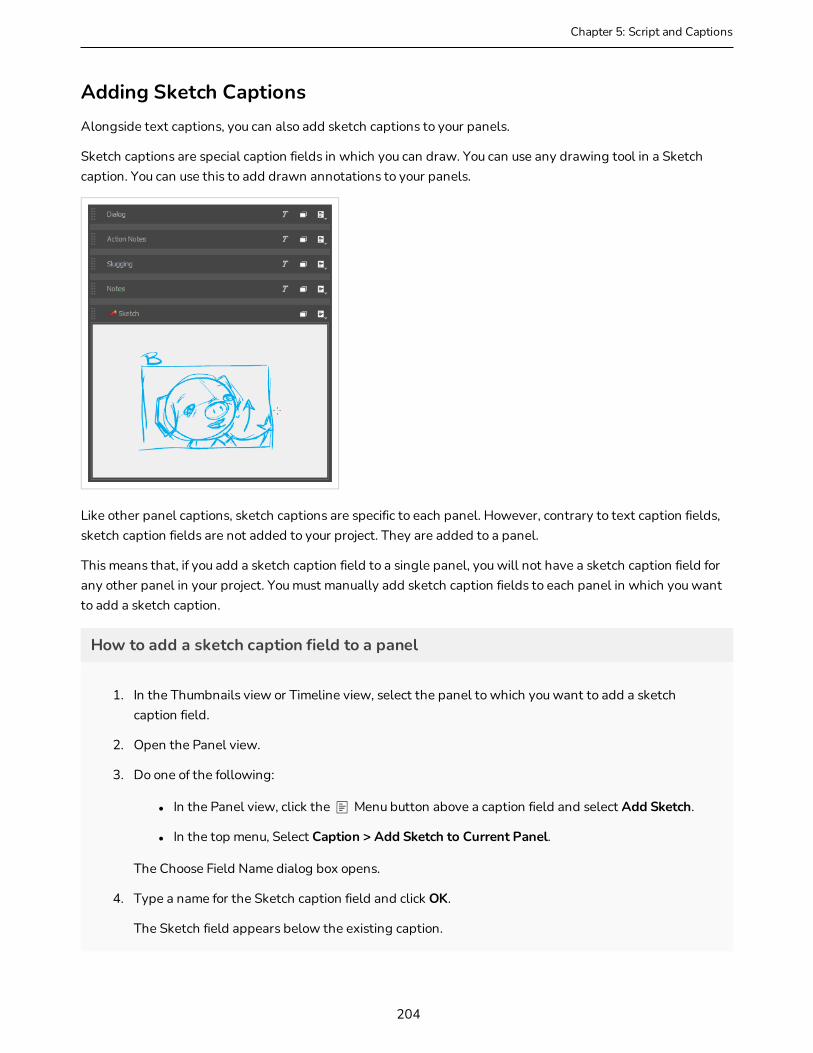
Chapter 5: Script and Captions
Adding Sketch CaptionsAlongside text captions, you can also add sketch captions to your panels.
Sketch captions are special caption fields in which you can draw. You can use any drawing tool in a Sketch caption. You can use this to add drawn annotations to your panels.
Like other panel captions, sketch captions are specific to each panel. However, contrary to text caption fields, sketch caption fields are not added to your project. They are added to a panel.
This means that, if you add a sketch caption field to a single panel, you will not have a sketch caption field for any other panel in your project. You must manually add sketch caption fields to each panel in which you want to add a sketch caption.
How to add a sketch caption field to a panel
1. In the Thumbnails view or Timeline view, select the panel to which you want to add a sketch caption field.
2. Open the Panel view.
3. Do one of the following:
l In the Panel view, click the Menu button above a caption field and select Add Sketch.
l In the top menu, Select Caption > Add Sketch to Current Panel.
The Choose Field Name dialog box opens.
4. Type a name for the Sketch caption field and click OK.
The Sketch field appears below the existing caption.
204
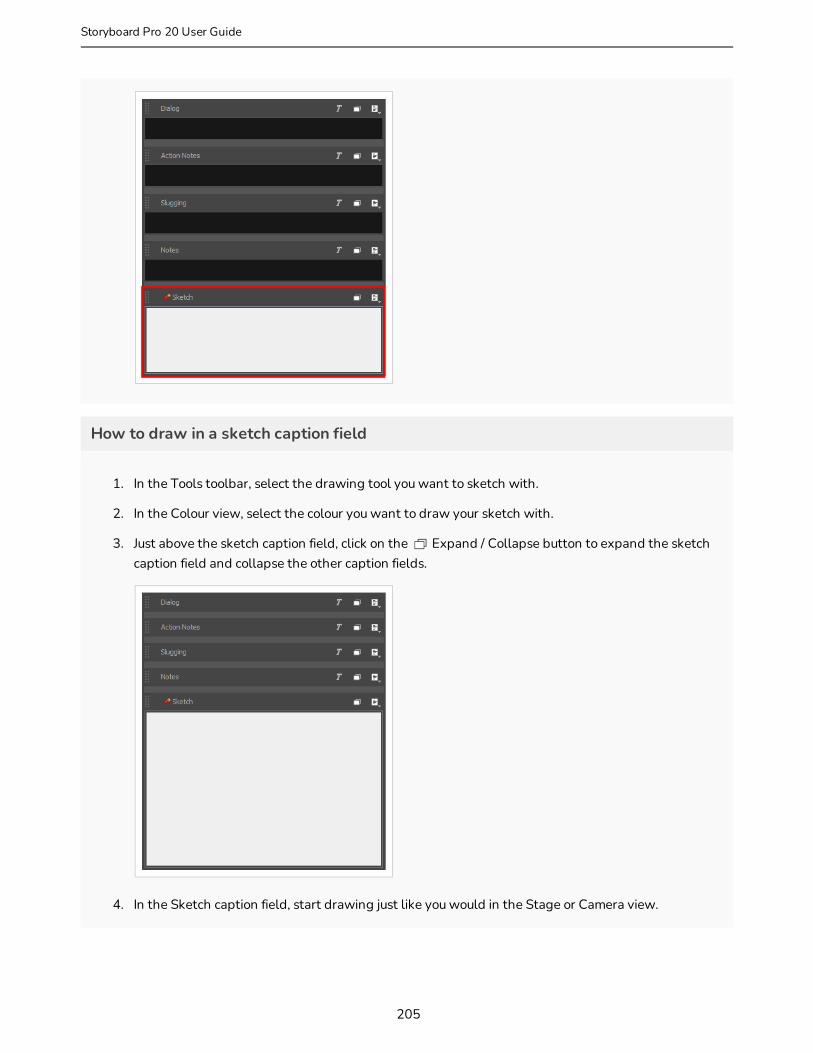
How to draw in a sketch caption field
1. In the Tools toolbar, select the drawing tool you want to sketch with.
2. In the Colour view, select the colour you want to draw your sketch with.
3. Just above the sketch caption field, click on the Expand / Collapse button to expand the sketch caption field and collapse the other caption fields.
4. In the Sketch caption field, start drawing just like you would in the Stage or Camera view.
205
Storyboard Pro 20 User Guide
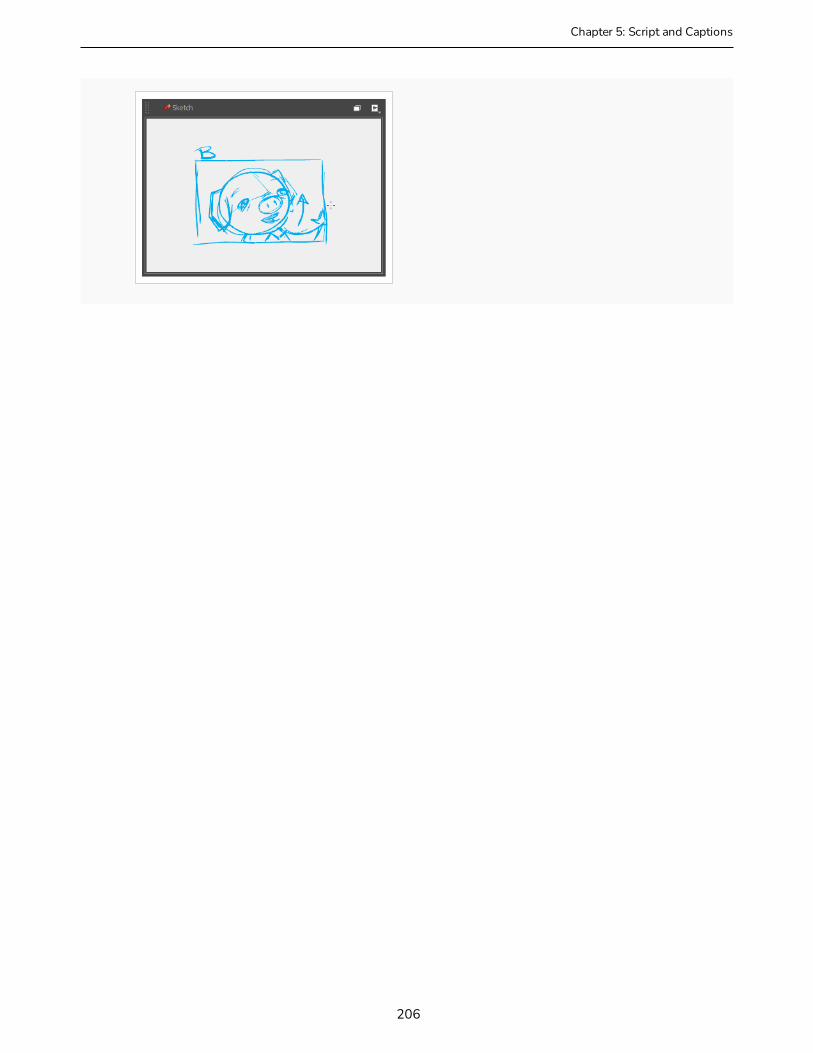
Chapter 5: Script and Captions
206
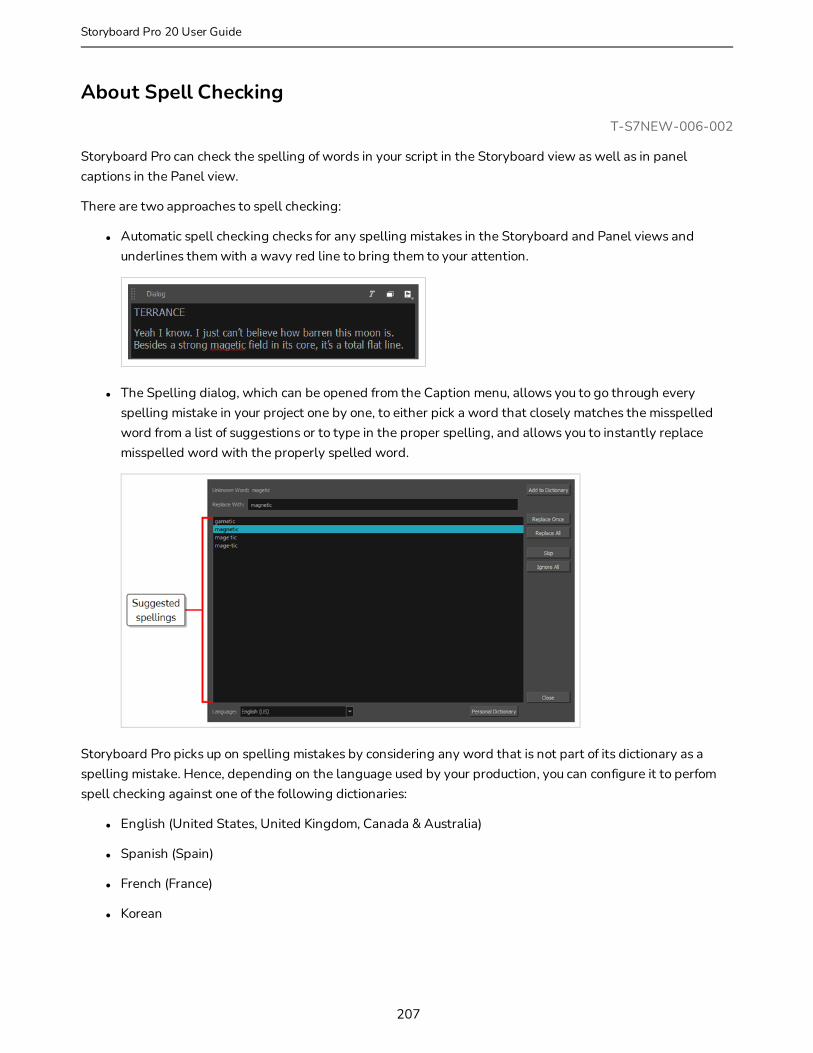
About Spell CheckingT-S7NEW-006-002
Storyboard Pro can check the spelling of words in your script in the Storyboard view as well as in panel captions in the Panel view.
There are two approaches to spell checking:
l Automatic spell checking checks for any spelling mistakes in the Storyboard and Panel views and underlines them with a wavy red line to bring them to your attention.
l The Spelling dialog, which can be opened from the Caption menu, allows you to go through every spelling mistake in your project one by one, to either pick a word that closely matches the misspelled word from a list of suggestions or to type in the proper spelling, and allows you to instantly replace misspelled word with the properly spelled word.
Storyboard Pro picks up on spelling mistakes by considering any word that is not part of its dictionary as a spelling mistake. Hence, depending on the language used by your production, you can configure it to perfom spell checking against one of the following dictionaries:
l English (United States, United Kingdom, Canada & Australia)
l Spanish (Spain)
l French (France)
l Korean
207
Storyboard Pro 20 User Guide

Chapter 5: Script and Captions
l Portuguese (Brasil & Portugal)
l Russian
Because the spell checking feature of Storyboard Pro considers any word that isn't in its selected dictionary to be a spelling mistake, Storyboard Pro may detect spelling mistakes where there aren't, such as with proper nouns, abbreviations, and words that were made up for your production's narrative universe. To remedy this, Storyboard Pro allows you to add words that it detects as misspelled to your personal dictionary, after which it will no longer consider them spelling mistakes.
If the language used by your production is not listed above, you can simply disable automatic spell checking. This is recommended, as otherwise Storyboard Pro will consider almost every word in your script and captions to be misspelled.
208
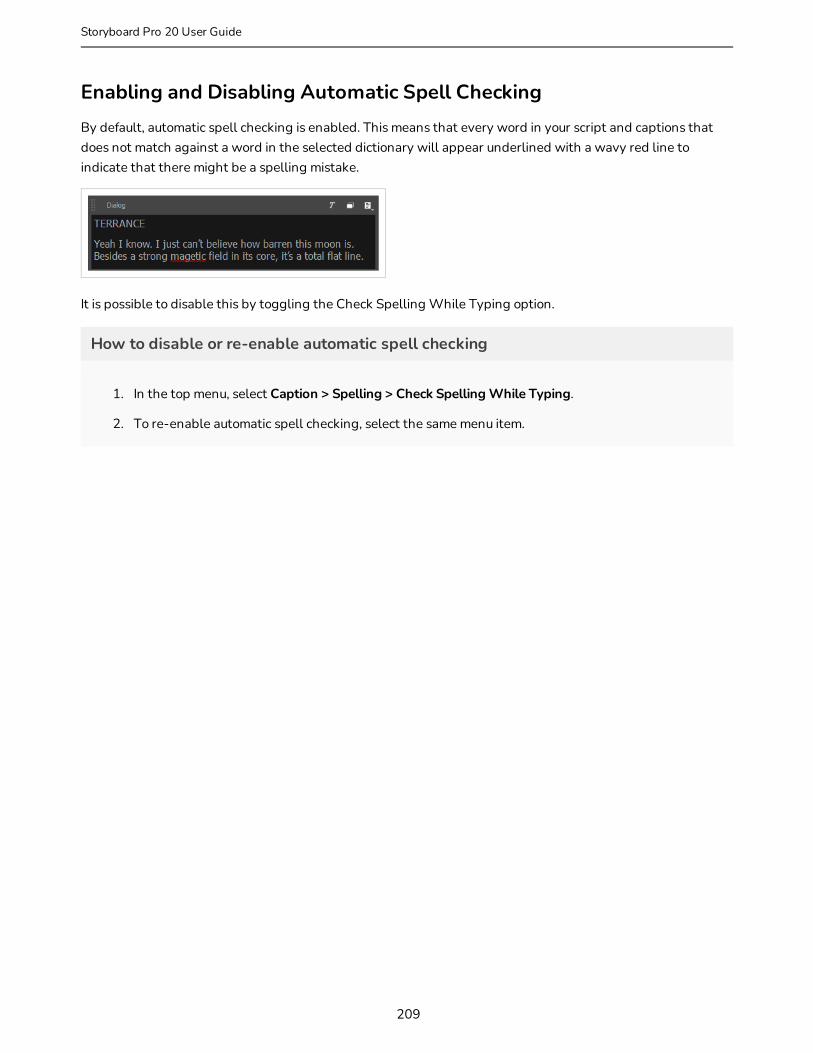
Enabling and Disabling Automatic Spell CheckingBy default, automatic spell checking is enabled. This means that every word in your script and captions that does not match against a word in the selected dictionary will appear underlined with a wavy red line to indicate that there might be a spelling mistake.
It is possible to disable this by toggling the Check Spelling While Typing option.
How to disable or re-enable automatic spell checking
1. In the top menu, select Caption > Spelling > Check Spelling While Typing.
2. To re-enable automatic spell checking, select the same menu item.
209
Storyboard Pro 20 User Guide

Chapter 5: Script and Captions
Changing the Language Dictionary for Spell CheckingIf you use automatic spell checking, you will need the dictionary used by Storyboard Pro to match the language in which you are typing your script and captions. Otherwise, almost every word in your script and captions will be considered by Storyboard Pro as a spelling mistake.
Storyboard Pro supports spell-checking in the following languages:
l English (United States, United Kingdom, Canada & Australia)
l Spanish (Spain)
l French (France)
l Korean
l Portuguese (Brasil & Portugal)
l Russian
If you are typing your script and captions in a language that is not listed above, it is recommended to disable automatic spell checking instead—see Enabling and Disabling Automatic Spell Checking.
NOTE
By default, spell checking is done in English (US) if you launch Storyboard Pro for the first time in English and in Spanish (ES) if you launch Storyboard Pro for the first time in Spanish.
If you launch Storyboard Pro for the first time in Chinese or Japanese, no dictionary will be selected by default, and you will have to select a dictionary to enable spell checking. Storyboard Pro does not have Chinese and Japanese dictionaries.
How to change the dictionary used for automatic spell checking
1. In the top menu, select Captions > Spelling > Spell Check.
The Spelling dialog appears.
210
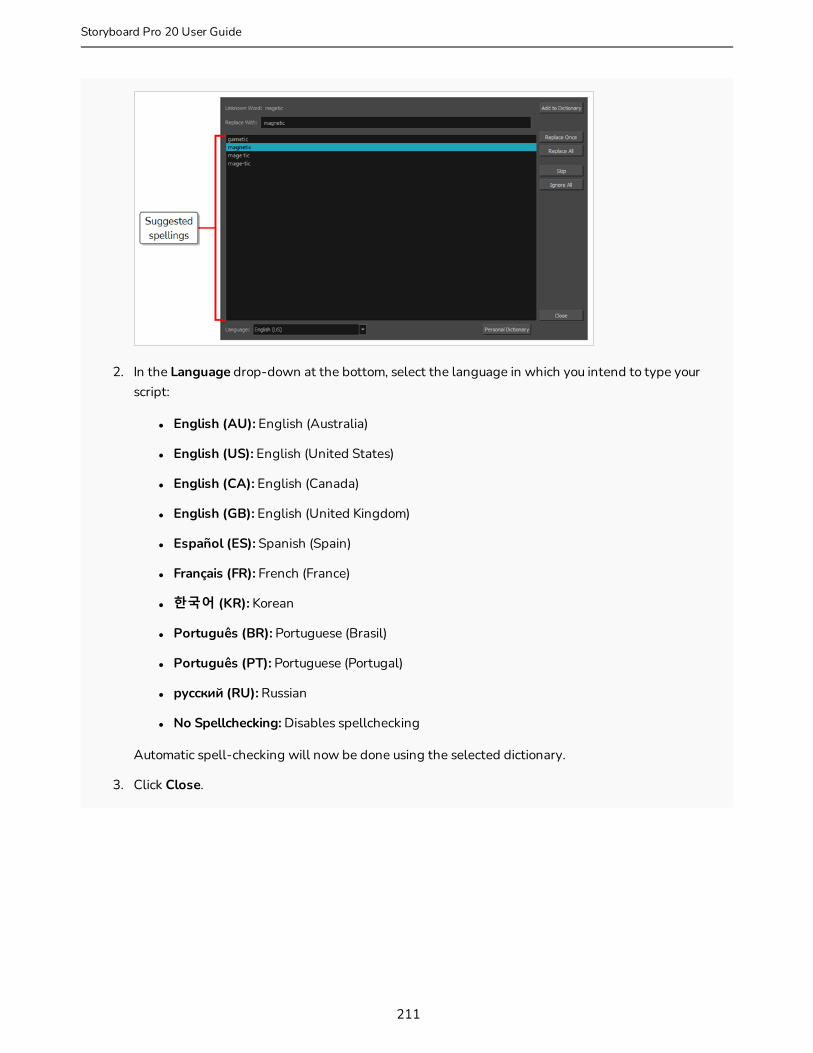
2. In the Language drop-down at the bottom, select the language in which you intend to type your script:
l English (AU): English (Australia)
l English (US): English (United States)
l English (CA): English (Canada)
l English (GB): English (United Kingdom)
l Español (ES): Spanish (Spain)
l Français (FR): French (France)
l 한국어 (KR): Korean
l Português (BR): Portuguese (Brasil)
l Português (PT): Portuguese (Portugal)
l русский (RU): Russian
l No Spellchecking: Disables spellchecking
Automatic spell-checking will now be done using the selected dictionary.
3. Click Close.
211
Storyboard Pro 20 User Guide
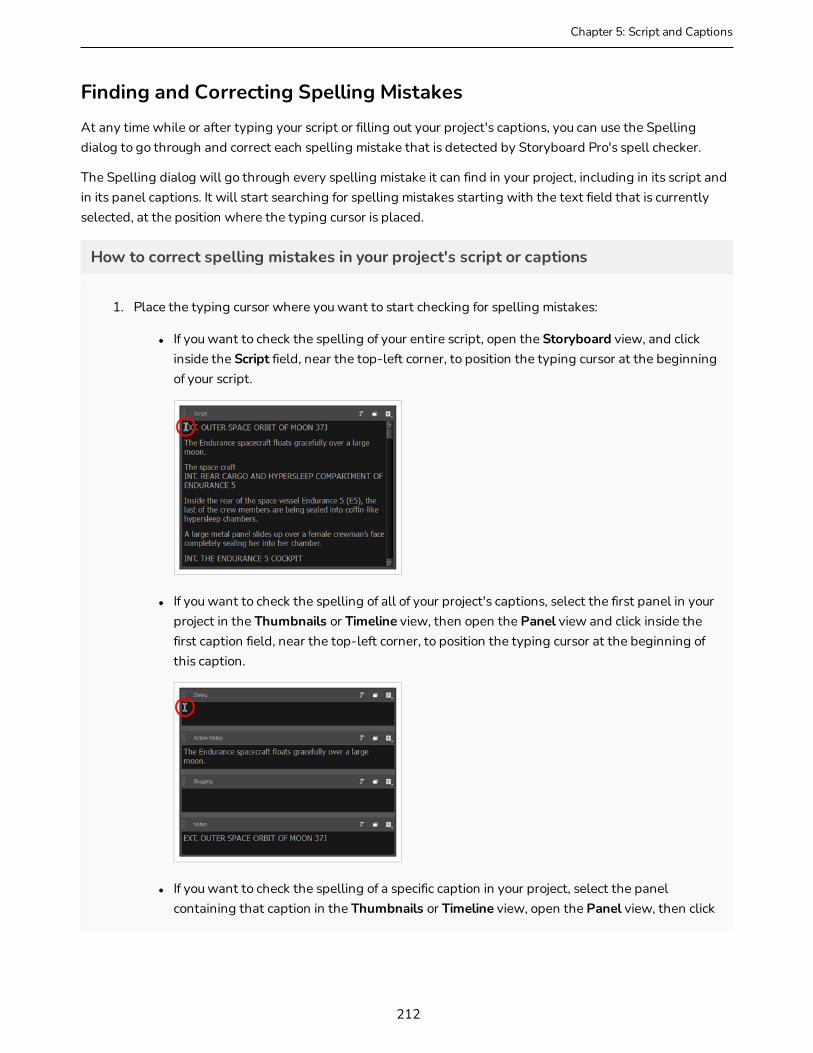
Chapter 5: Script and Captions
Finding and Correcting Spelling MistakesAt any time while or after typing your script or filling out your project's captions, you can use the Spelling dialog to go through and correct each spelling mistake that is detected by Storyboard Pro's spell checker.
The Spelling dialog will go through every spelling mistake it can find in your project, including in its script and in its panel captions. It will start searching for spelling mistakes starting with the text field that is currently selected, at the position where the typing cursor is placed.
How to correct spelling mistakes in your project's script or captions
1. Place the typing cursor where you want to start checking for spelling mistakes:
l If you want to check the spelling of your entire script, open the Storyboard view, and click inside the Script field, near the top-left corner, to position the typing cursor at the beginning of your script.
l If you want to check the spelling of all of your project's captions, select the first panel in your project in the Thumbnails or Timeline view, then open the Panel view and click inside the first caption field, near the top-left corner, to position the typing cursor at the beginning of this caption.
l If you want to check the spelling of a specific caption in your project, select the panel containing that caption in the Thumbnails or Timeline view, open the Panel view, then click
212

inside the caption field you want to check, near the top-left corner, to position the typing cursor at the beginning of this caption.
l If you just want to see the spelling suggestions for a specific misspelled word, simply highlight that word.
2. In the top menu, select Captions > Spelling > Spell Check.
The Spelling dialog will appear. The first word it finds in your script or captions that does not exist in its dictionary will be selected in the Storyboard or Panel view. It will also appear in the Spelling dialog, next to the label Unknown Word:.
Suggestions for how to spell the word, if any exist, will be listed in the list below. The first suggestion in the list will be selected and will also appear in the Replace With: field.
213
Storyboard Pro 20 User Guide

Chapter 5: Script and Captions
3. If your script and captions are not written in the language selected in the Language drop-down, open this drop-down and select the appropriate dictionary among the following:
l English (AU): English (Australia)
l English (US): English (United States)
l English (CA): English (Canada)
l English (GB): English (United Kingdom)
l Español (ES): Spanish (Spain)
l Français (FR): French (France)
l 한국어 (KR): Korean
l Português (BR): Portuguese (Brasil)
l Português (PT): Portuguese (Portugal)
l русский (RU): Russian
l No Spellchecking: Disables spellchecking
4. For each spelling mistake picked up by the Spelling dialog, do one of the following:
l To correct this specific instance of the word, either select the proper spelling in the spelling suggestion list, or type in the proper spelling in the Replace With: field, then click Replace Once.
l To replace all instances of this word that you have spelled this way in your project with the proper spelling, either select the proper spelling in the spelling suggestion list, or type in the proper spelling in the Replace With: field, then click on Replace All.
NOTE
This will replace the spelling of the selected word in your script and all of your project's captions.
l To skip correcting this word and jump to the next spelling mistake, click Skip.
l To ignore every instance of this word that is spelled in this specific way, click Ignore All.
214

NOTE
Storyboard Pro will ignore instances of this spelling mistake for the remainder of the session. Next time you launch Storyboard Pro, it will resume picking up on this spelling mistake.
l If the word is spelled properly and you don't want the Spelling dialog to pick up on it in the future, click Add to Dictionary. This will add the word to your personal dictionary, preventing Storyboard Pro from considering it a spelling mistake in the future.
Each time you take an action on a spelling mistake, the Spelling dialog will instantly jump to the next spelling mistake it finds as it cycles through your project's script and captions.
Once all the spelling mistakes have been fixed, the Uknown Word: field will display No errors found.
5. Once you are done checking the spelling in your project, click Close.
215
Storyboard Pro 20 User Guide
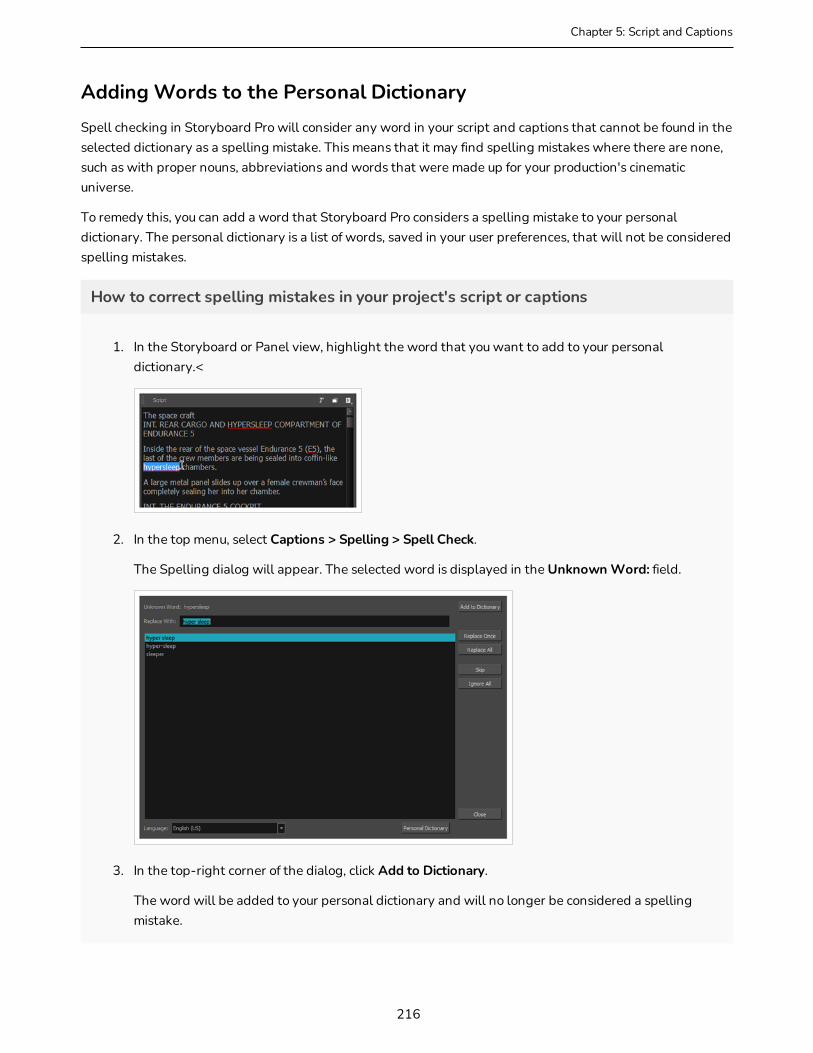
Chapter 5: Script and Captions
Adding Words to the Personal DictionarySpell checking in Storyboard Pro will consider any word in your script and captions that cannot be found in the selected dictionary as a spelling mistake. This means that it may find spelling mistakes where there are none, such as with proper nouns, abbreviations and words that were made up for your production's cinematic universe.
To remedy this, you can add a word that Storyboard Pro considers a spelling mistake to your personal dictionary. The personal dictionary is a list of words, saved in your user preferences, that will not be considered spelling mistakes.
How to correct spelling mistakes in your project's script or captions
1. In the Storyboard or Panel view, highlight the word that you want to add to your personal dictionary.<
2. In the top menu, select Captions > Spelling > Spell Check.
The Spelling dialog will appear. The selected word is displayed in the Unknown Word: field.
3. In the top-right corner of the dialog, click Add to Dictionary.
The word will be added to your personal dictionary and will no longer be considered a spelling mistake.
216

4. Click Close.
217
Storyboard Pro 20 User Guide
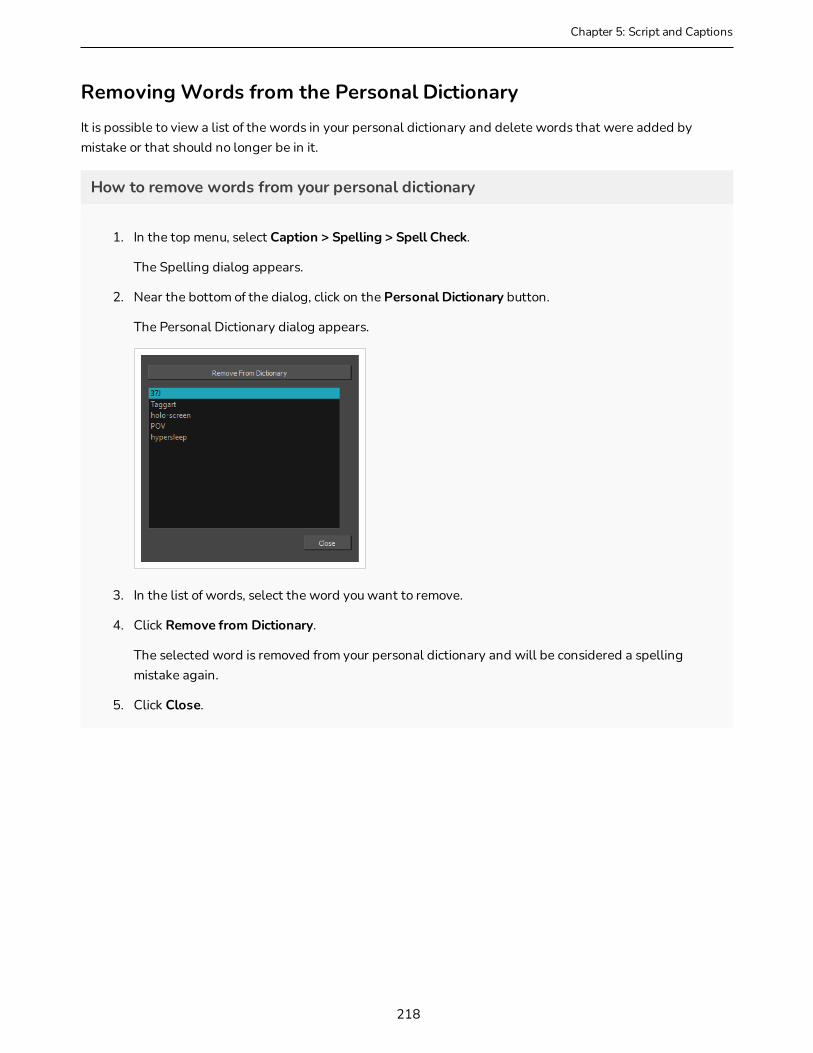
Chapter 5: Script and Captions
Removing Words from the Personal DictionaryIt is possible to view a list of the words in your personal dictionary and delete words that were added by mistake or that should no longer be in it.
How to remove words from your personal dictionary
1. In the top menu, select Caption > Spelling > Spell Check.
The Spelling dialog appears.
2. Near the bottom of the dialog, click on the Personal Dictionary button.
The Personal Dictionary dialog appears.
3. In the list of words, select the word you want to remove.
4. Click Remove from Dictionary.
The selected word is removed from your personal dictionary and will be considered a spelling mistake again.
5. Click Close.
218

219
Storyboard Pro 20 User Guide

Chapter 6: Layers
Chapter 6: LayersT-SBFND-007-001
Storyboard Pro allows you to work with layers. Each panel in your project has its own list of layers, each of which can contain a separate drawing.
Composed together, the layers make the drawing that appears in your panel. Working with layers allows you to keep separate elements in your panels, such as backgrounds, characters and props, into separate drawing spaces, as well as to manipulate or animate them if needed.
When you create a new project, or add a new scene or panel to your project, the panel will always have two layers by default: A character or prop layer (A) and a background layer (BG). You can add as many layers as you need to a panel, and you can also rename, reorder and delete layers.
Once your layer list is set up for your panel, you can start drawing on each layers. To draw on a specific layer, simply select this layer in the Layer panel, the Thumbnails view or the Layers view. When you use a drawing tool in the Stage view, the artwork you create or edit is always the one in the currently selected layer. Hence, you must always mind which layer is selected when drawing or editing your artwork.
A layer in a panel can be copied into your library then added to another panel. Hence, drawing your scene elements on multiple layers can allow you to reuse drawings when a later panel or scene features the same element.
220

Viewing the List of LayersThe go-to way of selecting and managing layers in a panel is to use the Layer panel, which is, by default, in the right section of the Stage and Camera views.
However, it is also possible to add the Layers view to your workspace, which works the same way. You can then hide the Layer panel by clicking on its Collapse button in its top-left corner, leaving more space to work in the Stage and Camera views.
You can also manage layers using the Thumbnails view. If the size of the Thumbnails view is big enough, each panel in it will have a vertical list of layers on its right edge, which allows you to scroll through and select layers. Left of the Thumbnails view, under the Tools toolbar, is a Layer toolbar, which allows you to add and remove layers to the selected panel.
221
Storyboard Pro 20 User Guide

Chapter 6: Layers
There are several ways to display layers in Storyboard Pro. The two main ways are in the Layer panel of the Stage and Camera views, and the Layers view. Both views display a thumbnail of each layer, followed by their name and some toggle buttons to control the behavior of your layers.
How to view or hide layers in the Stage or Camera view
1. In the Stage or Camera view, do one of the following:
l If the Layer panel is displayed, click on the Collapse button in its top-left corner to collapse the panel.
l If the Layer panel is hidden, click on the Expand button in the top-right corner of the view to display the panel.
How to view layers in the Layers view
1. Do one of the following:
222
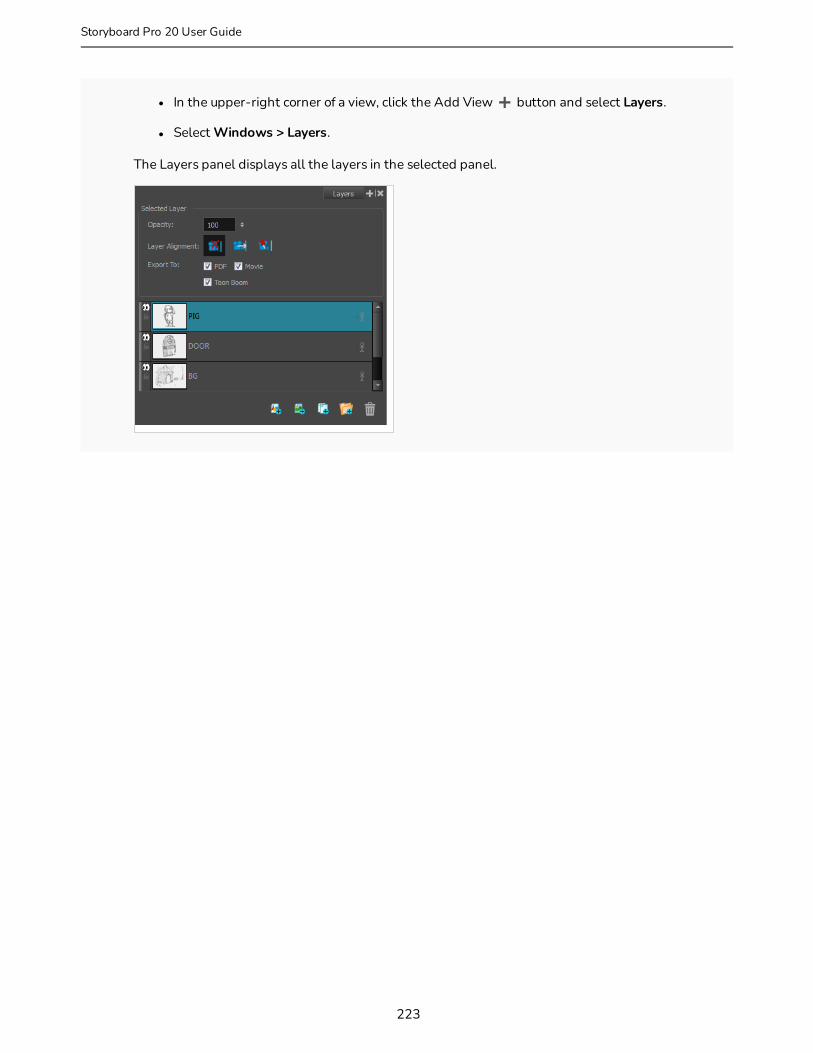
l In the upper-right corner of a view, click the Add View button and select Layers.
l Select Windows > Layers.
The Layers panel displays all the layers in the selected panel.
223
Storyboard Pro 20 User Guide

Chapter 6: Layers
About Layer TypesT-SBFND-007-002
Storyboard Pro supports four types of layers: Vector drawing layers, bitmap drawing layers, 3D layers and groups.
l Vector Layers: Vector drawings are made of points and curves that compose the contours of the shapes of the artwork, along with the colour or textures these shapes are filled with. Hence, the artwork in vector layers can be scaled up and zoomed in without losing quality, unless they contain a texture.
When drawing on a vector layer, each drawing stroke and pencil line is a separate object which can be manipulated individually. You can select single drawing strokes, then move them around and transform them, even if drawing strokes were applied over them. Additionally, because drawing strokes are made of points and curves, it is possible to edit their shape, making it easy to make corrections and changes to your artwork.
l Bitmap Layers: Bitmap drawings are composed of a grid of pixels, which are small points that each have a single solid colour. Bitmap drawing tools allow you to lay on brush strokes onto a single flat canvas, and to tweak your artwork by the pixel if needed.
When you draw on a bitmap layer, each brush or pencil stroke is composited into the canvas, so it remains a single drawing that can only be painted or erased upon, but which does not allow you to tweak individual parts of it.
Bitmap artwork can only be scaled up or zoomed in on as much as their pixel density allows without losing picture quality. By default, bitmap artwork has a pixel density of 100%, which is only enough to
224

display the artwork without zooming in on it or scaling it up, otherwise Storyboard Pro must generate new pixels within the artwork, which is liable to make it look blurry or pixelated.
Hence, you might want to set the required pixel density for your bitmap artwork, based on whether you'll need to zoom on it or scale it up, before you start drawing on a bitmap layer—see Setting the Resolution of Bitmap Layers on page 255.
l 3D Layers: When you import a 3D model into your library, adding it to a panel will store the model into a 3D layer. You can then manipulate and animate the 3D model, just like you can with a drawing layer.
l Group: A group can contain several layers of any type. Just like you can transform and animate a layer, you can also transform and animate a group. Transformations and animations applied to a group will affect every layer inside the group simultaneously—see Grouping Layers on page 236.
In the Layer panel of the Stage or Camera view, layers can be quickly identified by their type by referring to the small colour bar on their left edge.
225
Storyboard Pro 20 User Guide

Chapter 6: Layers
Adding LayersT-SBFND-007-003
By default, a panel contains a background (BG) and a drawing layer (A), but you can add as many layers as you need to each panel in your project.
NOTE
When adding a layer, you must decide if you need to add a vector layer or a bitmap layer. In most use cases, vector layers are preferable. For more information on layer types and how to choose the right type of layer to add, see About Layer Types on page 224.
How to add a layer to a panel
1. In the Thumbnails or Timeline view, select the panel to which you want to add a new layer.
2. In the Layer panel of the Stage or Camera view, the Layers view or the Thumbnails view, select the layer over which you want to create a new layer.
3. Do one of the following:
l Click on the Add Vector Layer or Add Bitmap Layer button. These buttons are located at the bottom of the Layer panel in the Stage and Camera views, at the bottom of the Layers view and in the Layer toolbar.
l In the top menu, select Layer > New > Vector Layer or New Bitmap Layer.
NOTE
If you added a bitmap layer, and you intend to scale it up or zoom in on it, make sure to increase its pixel density before you start drawing on it—see Setting the Resolution of Bitmap Layers on page 255.
226
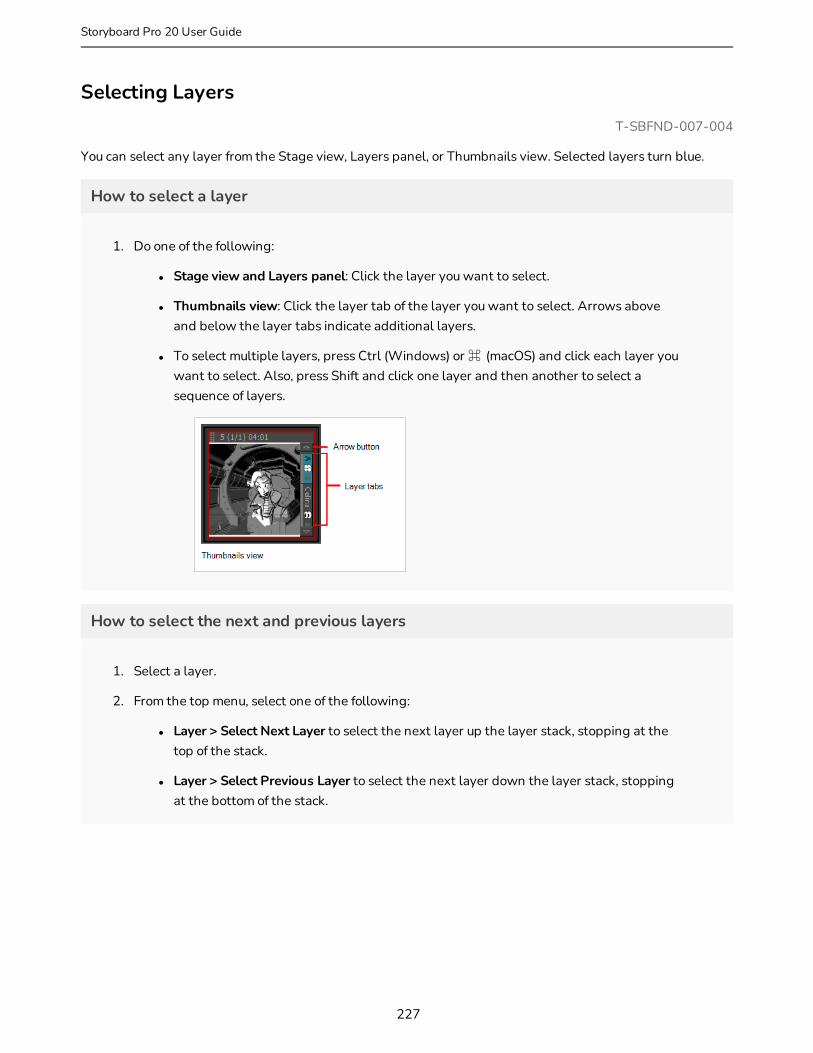
Selecting LayersT-SBFND-007-004
You can select any layer from the Stage view, Layers panel, or Thumbnails view. Selected layers turn blue.
How to select a layer
1. Do one of the following:
l Stage view and Layers panel: Click the layer you want to select.
l Thumbnails view: Click the layer tab of the layer you want to select. Arrows above and below the layer tabs indicate additional layers.
l To select multiple layers, press Ctrl (Windows) or ⌘ (macOS) and click each layer you want to select. Also, press Shift and click one layer and then another to select a sequence of layers.
How to select the next and previous layers
1. Select a layer.
2. From the top menu, select one of the following:
l Layer > Select Next Layer to select the next layer up the layer stack, stopping at the top of the stack.
l Layer > Select Previous Layer to select the next layer down the layer stack, stopping at the bottom of the stack.
227
Storyboard Pro 20 User Guide
Chapter 6: Layers
Duplicating LayersDuplicating layers is a quick way to perform a quick copy and paste in one operation. Unlike copying a layer, you cannot paste multiple copies of a layer on other panels. Duplicating layers is only available within one panel. Duplicated layers retain their names and are appended with a number.
How to duplicate a layer
1. Select a layer and do one of the following:
‣ Right-click the layer and select Duplicate Selected Layers.
‣ In the Stage view, Layers panel or Layers toolbar, click the Duplicate Selected Layer button.
‣ Select Layer > Duplicate Layers.
228

Renaming LayersT-SBFND-007-006
When layers are named appropriately, you can work faster and keep track of all the layers.
How to rename a layer
1. Select the panel with the layer you want to rename.
2. Do one of the following:
l Select Layer > Rename Layers.
l Right-click the layer’s tab and select Rename Layer.
l Double-click the layer tab.
3. In the Change Layer Name dialog box, type in a new name for the layer.
229
Storyboard Pro 20 User Guide

Chapter 6: Layers
Deleting LayersT-SBFND-007-005
You can delete layers that you do not need to avoid cluttering the layer list.
How to delete a layer from a panel
1. In the Layer panel of the Stage or Camera view, the Layers view or the Thumbnails view, select the layer you want to delete.
2. Do one of the following:
l Click on the Delete Selected Layers button. This button is located at the bottom of the Layer panel in the Stage and Camera views, at the bottom of the Layers view and in the Layer toolbar.
l Right-click the layer and select Delete Layers.
l In the top menu, select Layer > Delete Layers.
230
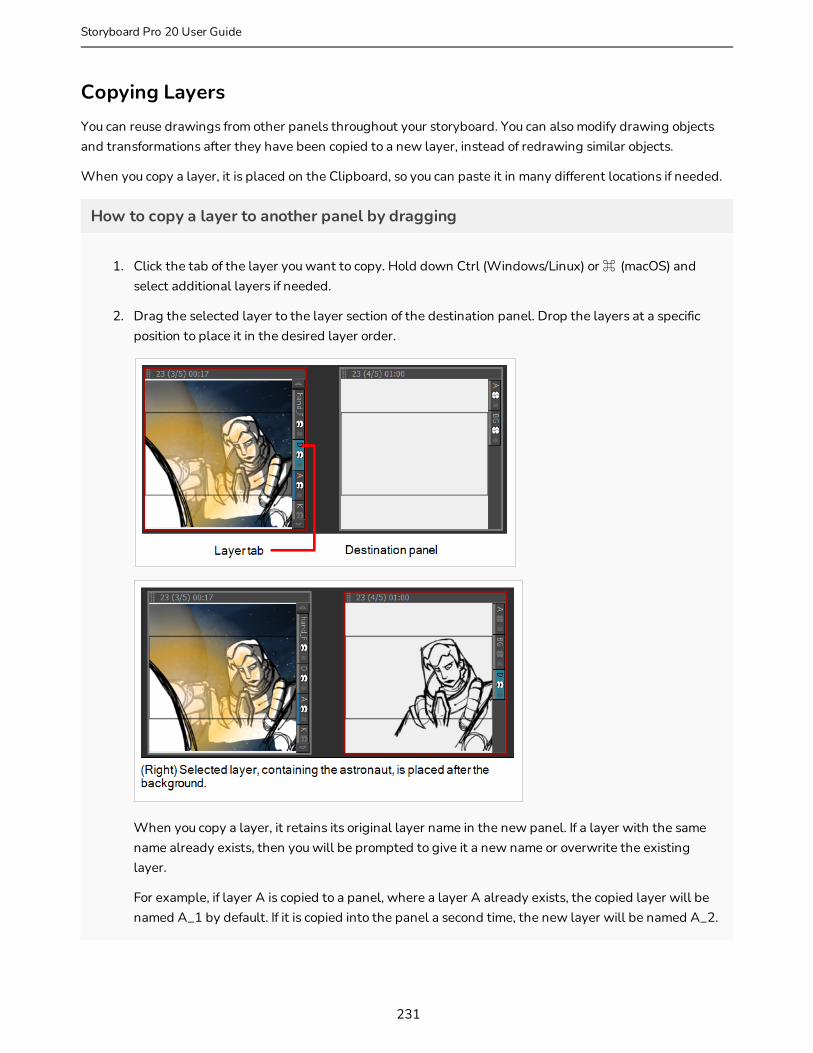
Copying LayersYou can reuse drawings from other panels throughout your storyboard. You can also modify drawing objects and transformations after they have been copied to a new layer, instead of redrawing similar objects.
When you copy a layer, it is placed on the Clipboard, so you can paste it in many different locations if needed.
How to copy a layer to another panel by dragging
1. Click the tab of the layer you want to copy. Hold down Ctrl (Windows/Linux) or ⌘ (macOS) and select additional layers if needed.
2. Drag the selected layer to the layer section of the destination panel. Drop the layers at a specific position to place it in the desired layer order.
When you copy a layer, it retains its original layer name in the new panel. If a layer with the same name already exists, then you will be prompted to give it a new name or overwrite the existing layer.
For example, if layer A is copied to a panel, where a layer A already exists, the copied layer will be named A_1 by default. If it is copied into the panel a second time, the new layer will be named A_2.
231
Storyboard Pro 20 User Guide

Chapter 6: Layers
How to copy a layer to another panel by using copy and paste
1. Select the layer you want to copy. Hold down Ctrl (Windows/Linux) or ⌘ (macOS) and select additional layers if needed.
2. Do one of the following:
‣ Select Layer > Copy Layers. Select the destination panel, and from the top menu, select Layer > Paste Layers.
‣ Right-click the layer tab and select Copy Selected Layers. Select the destination panel, right-click the layer tab and select Paste Layer.
232

Reordering LayersLayers can be rearranged to bring them closer to the front or back in relation to the other layers in a panel. For example, if you want to have a character move to the front of a shot, you can move the character layer above the others. In Storyboard Pro, the layers at the top of the list are displayed above the other layers in the Stage view. The layer order will be reflected in the final export.
There are several different ways to change the order of layers in a panel. You can reorder layers by selecting a layer and dragging it to a new location, or reorder layers through the Layers menu. You can drop a layer into collapsed groups.
How to arrange a layer by dragging
1. Select a layer to move.
2. Drag the layer above or below other layers to change their display priority in the Stage view.
How to arrange a layer using the Layers menu
1. Select a layer to modify.
2. Select one of the following:
‣ Layer > Arrange > Bring Layer to Front to move the selected layer in front of all other layers in the current panel.
‣ Layer > Arrange > Bring Layer to Forward to move the selected layer up one spot in the current panel.
233
Storyboard Pro 20 User Guide

Chapter 6: Layers
‣ Layer > Arrange > Send Layer to Back to move the selected behind all other layers in the current panel.
‣ Layer > Arrange > Bring Layer Backward to move the selected layer down one spot in the current panel.
NOTE
If you changed the Z-depth, it supecedes the layer order.
How to drop a layer into collapsed group
1. Select a layer to drop.
234
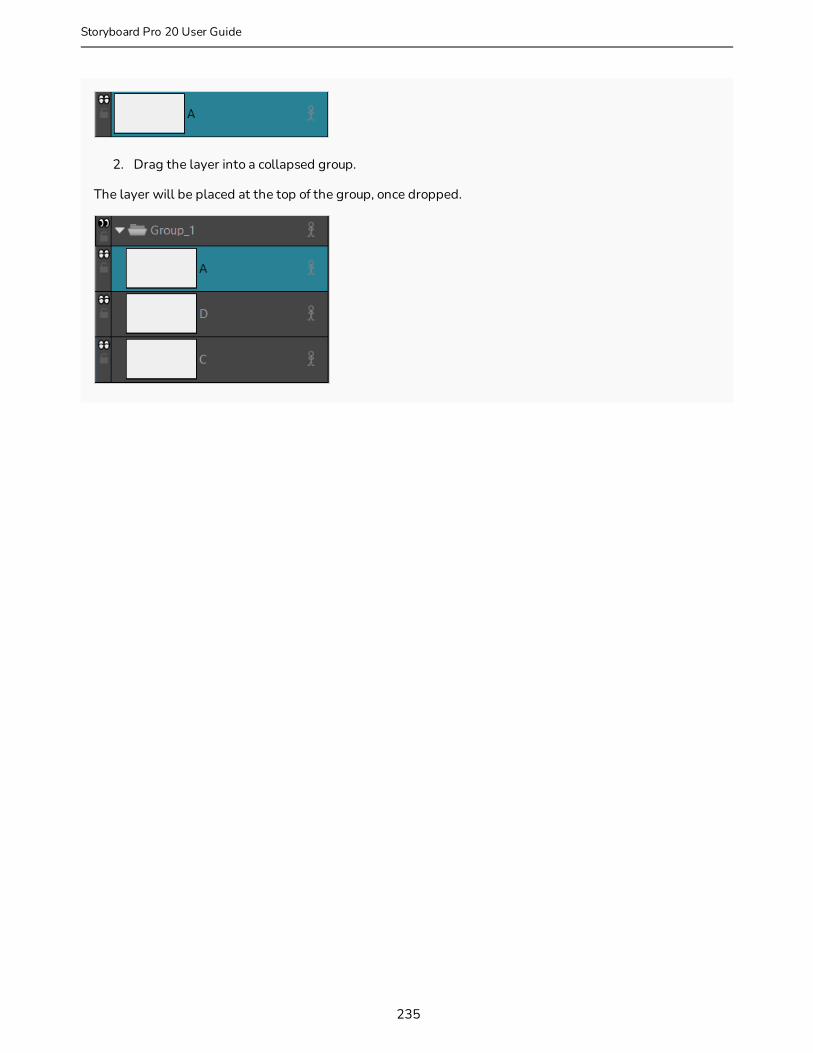
2. Drag the layer into a collapsed group.
The layer will be placed at the top of the group, once dropped.
235
Storyboard Pro 20 User Guide
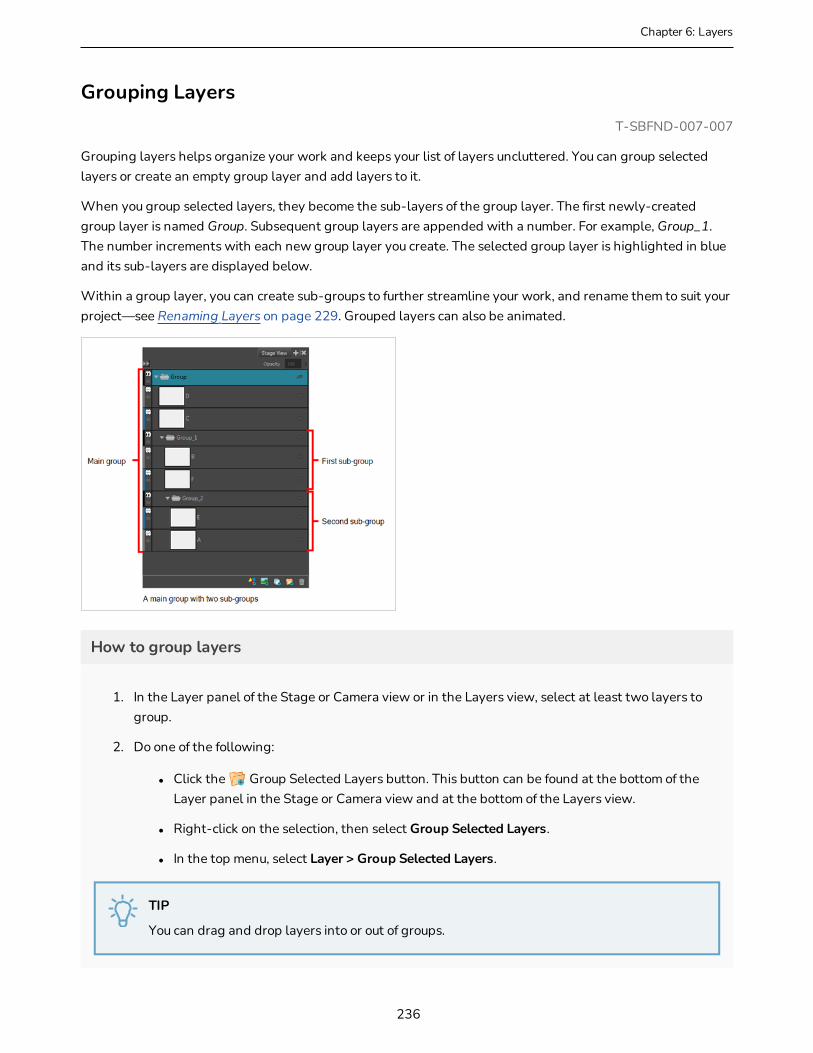
Chapter 6: Layers
Grouping LayersT-SBFND-007-007
Grouping layers helps organize your work and keeps your list of layers uncluttered. You can group selected layers or create an empty group layer and add layers to it.
When you group selected layers, they become the sub-layers of the group layer. The first newly-created group layer is named Group. Subsequent group layers are appended with a number. For example, Group_1. The number increments with each new group layer you create. The selected group layer is highlighted in blue and its sub-layers are displayed below.
Within a group layer, you can create sub-groups to further streamline your work, and rename them to suit your project—see Renaming Layers on page 229. Grouped layers can also be animated.
How to group layers
1. In the Layer panel of the Stage or Camera view or in the Layers view, select at least two layers to group.
2. Do one of the following:
l Click the Group Selected Layers button. This button can be found at the bottom of the Layer panel in the Stage or Camera view and at the bottom of the Layers view.
l Right-click on the selection, then select Group Selected Layers.
l In the top menu, select Layer > Group Selected Layers.
TIP
You can drag and drop layers into or out of groups.
236
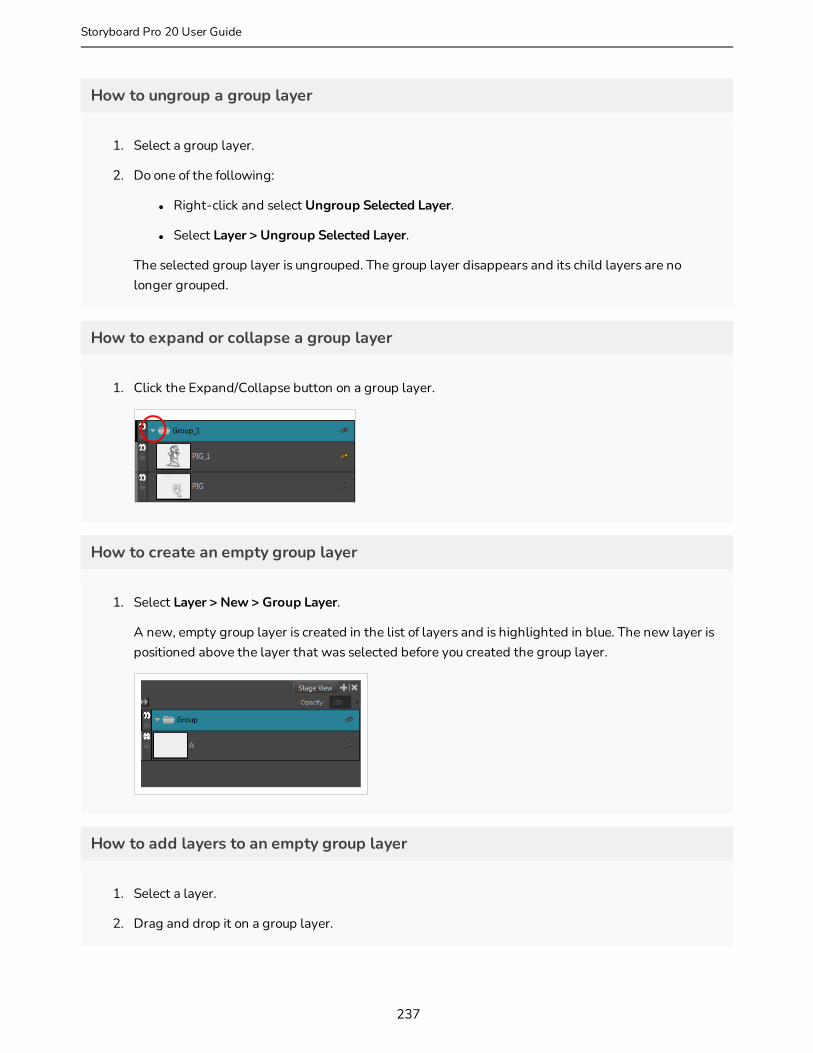
How to ungroup a group layer
1. Select a group layer.
2. Do one of the following:
l Right-click and select Ungroup Selected Layer.
l Select Layer > Ungroup Selected Layer.
The selected group layer is ungrouped. The group layer disappears and its child layers are no longer grouped.
How to expand or collapse a group layer
1. Click the Expand/Collapse button on a group layer.
How to create an empty group layer
1. Select Layer > New > Group Layer.
A new, empty group layer is created in the list of layers and is highlighted in blue. The new layer is positioned above the layer that was selected before you created the group layer.
How to add layers to an empty group layer
1. Select a layer.
2. Drag and drop it on a group layer.
237
Storyboard Pro 20 User Guide
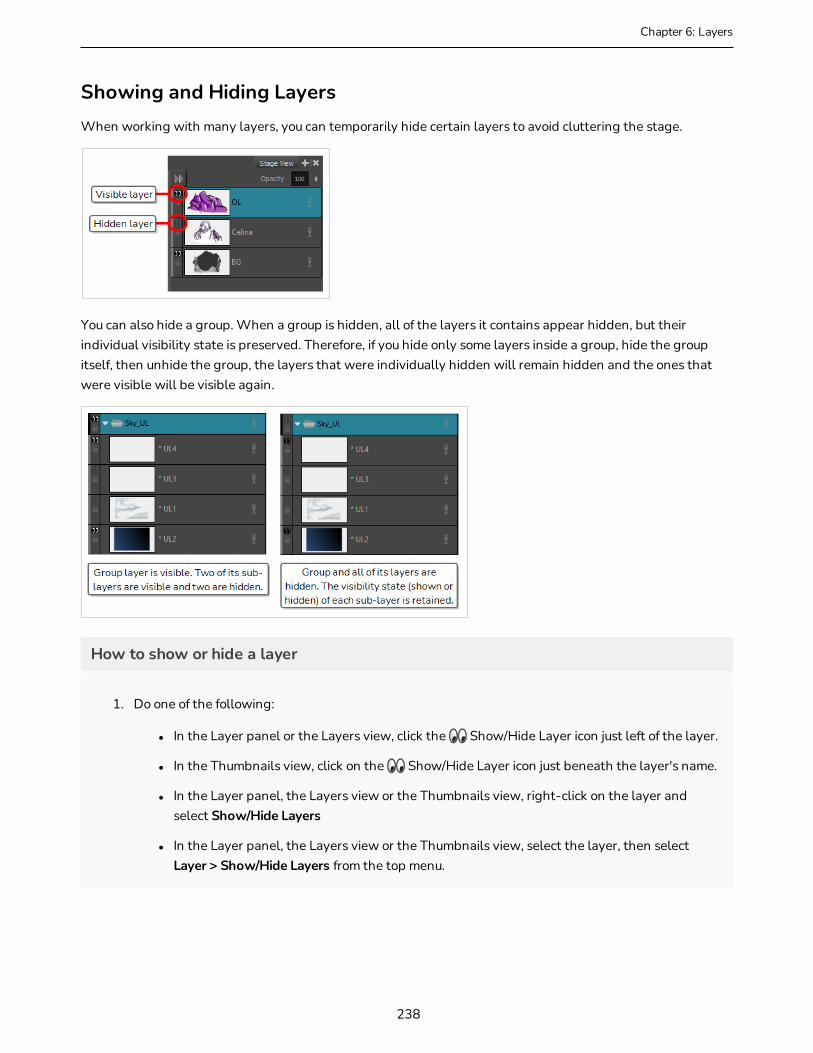
Chapter 6: Layers
Showing and Hiding LayersWhen working with many layers, you can temporarily hide certain layers to avoid cluttering the stage.
You can also hide a group. When a group is hidden, all of the layers it contains appear hidden, but their individual visibility state is preserved. Therefore, if you hide only some layers inside a group, hide the group itself, then unhide the group, the layers that were individually hidden will remain hidden and the ones that were visible will be visible again.
How to show or hide a layer
1. Do one of the following:
l In the Layer panel or the Layers view, click the Show/Hide Layer icon just left of the layer.
l In the Thumbnails view, click on the Show/Hide Layer icon just beneath the layer's name.
l In the Layer panel, the Layers view or the Thumbnails view, right-click on the layer and select Show/Hide Layers
l In the Layer panel, the Layers view or the Thumbnails view, select the layer, then select Layer > Show/Hide Layers from the top menu.
238
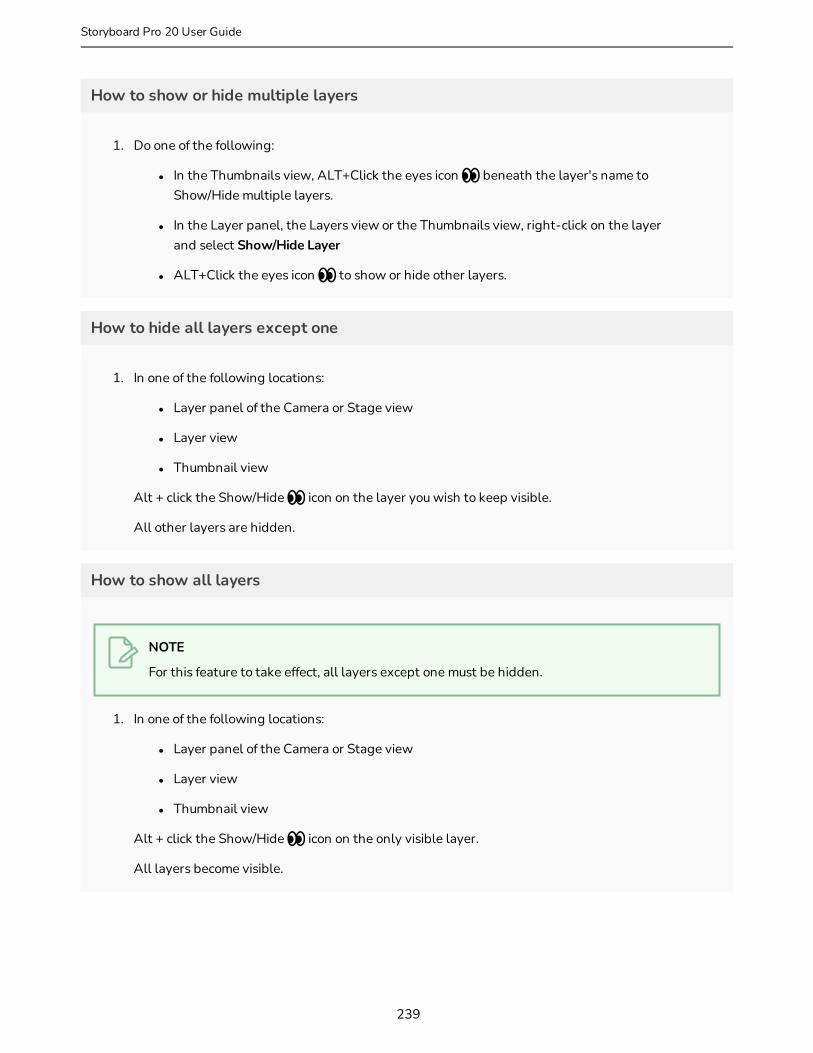
How to show or hide multiple layers
1. Do one of the following:
l In the Thumbnails view, ALT+Click the eyes icon beneath the layer's name to Show/Hide multiple layers.
l In the Layer panel, the Layers view or the Thumbnails view, right-click on the layer and select Show/Hide Layer
l ALT+Click the eyes icon to show or hide other layers.
How to hide all layers except one
1. In one of the following locations:
l Layer panel of the Camera or Stage view
l Layer view
l Thumbnail view
Alt + click the Show/Hide icon on the layer you wish to keep visible.
All other layers are hidden.
How to show all layers
NOTE
For this feature to take effect, all layers except one must be hidden.
1. In one of the following locations:
l Layer panel of the Camera or Stage view
l Layer view
l Thumbnail view
Alt + click the Show/Hide icon on the only visible layer.
All layers become visible.
239
Storyboard Pro 20 User Guide
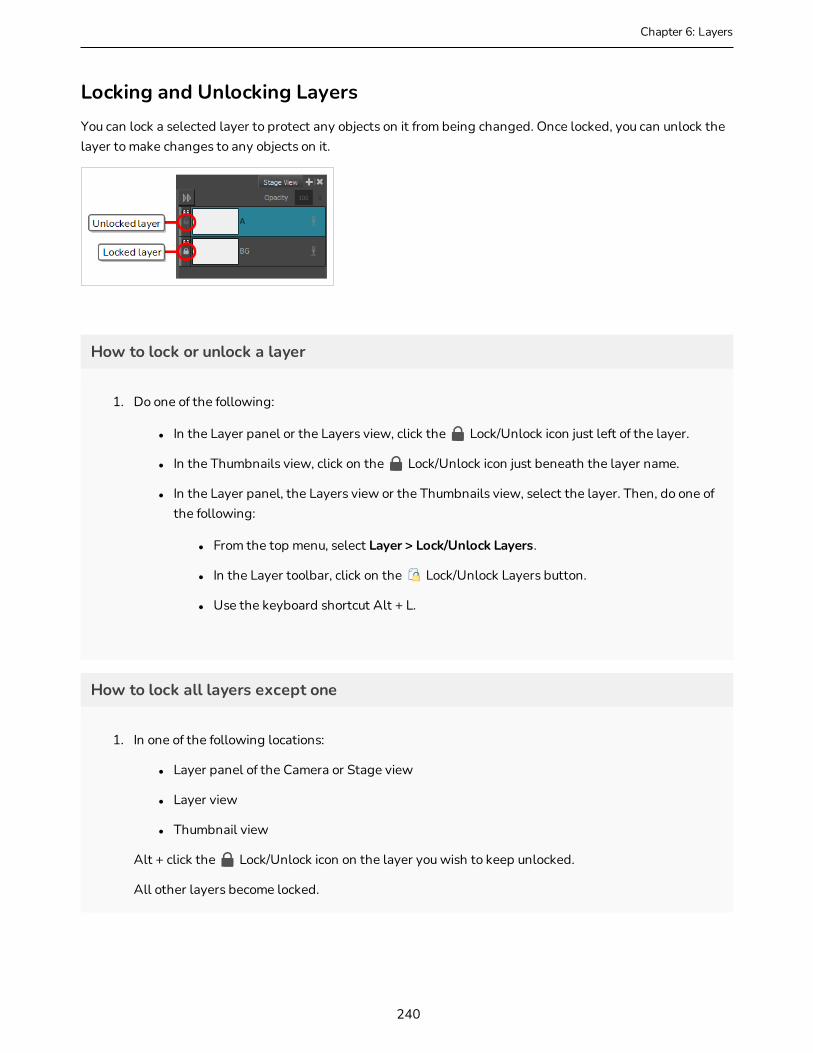
Chapter 6: Layers
Locking and Unlocking LayersYou can lock a selected layer to protect any objects on it from being changed. Once locked, you can unlock the layer to make changes to any objects on it.
How to lock or unlock a layer
1. Do one of the following:
l In the Layer panel or the Layers view, click the Lock/Unlock icon just left of the layer.
l In the Thumbnails view, click on the Lock/Unlock icon just beneath the layer name.
l In the Layer panel, the Layers view or the Thumbnails view, select the layer. Then, do one of the following:
l From the top menu, select Layer > Lock/Unlock Layers.
l In the Layer toolbar, click on the Lock/Unlock Layers button.
l Use the keyboard shortcut Alt + L.
How to lock all layers except one
1. In one of the following locations:
l Layer panel of the Camera or Stage view
l Layer view
l Thumbnail view
Alt + click the Lock/Unlock icon on the layer you wish to keep unlocked.
All other layers become locked.
240
How to unlock all layers
NOTE
For this feature to take effect, all layers except one must be locked.
1. In one of the following locations:
l Layer panel of the Camera or Stage view
l Layer view
l Thumbnail view
Alt + click the Lock/Unlock icon on the only unlocked layer.
All layers become unlocked.
241
Storyboard Pro 20 User Guide
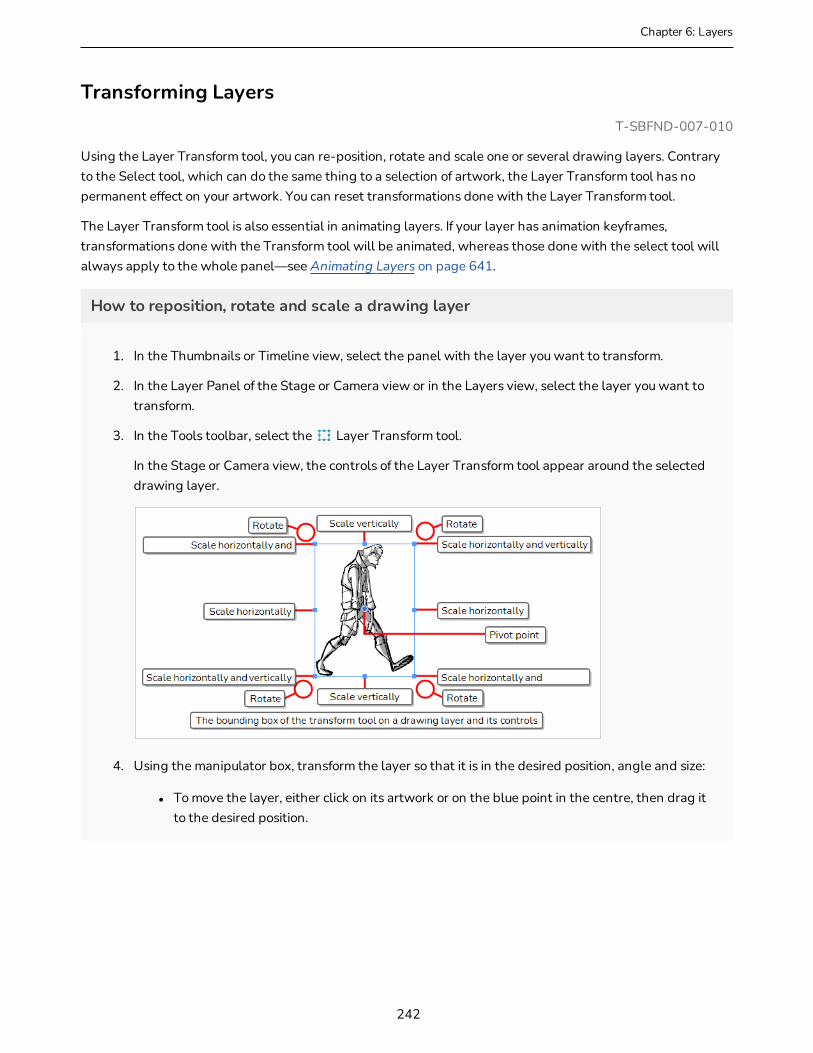
Chapter 6: Layers
Transforming LayersT-SBFND-007-010
Using the Layer Transform tool, you can re-position, rotate and scale one or several drawing layers. Contrary to the Select tool, which can do the same thing to a selection of artwork, the Layer Transform tool has no permanent effect on your artwork. You can reset transformations done with the Layer Transform tool.
The Layer Transform tool is also essential in animating layers. If your layer has animation keyframes, transformations done with the Transform tool will be animated, whereas those done with the select tool will always apply to the whole panel—see Animating Layers on page 641.
How to reposition, rotate and scale a drawing layer
1. In the Thumbnails or Timeline view, select the panel with the layer you want to transform.
2. In the Layer Panel of the Stage or Camera view or in the Layers view, select the layer you want to transform.
3. In the Tools toolbar, select the Layer Transform tool.
In the Stage or Camera view, the controls of the Layer Transform tool appear around the selected drawing layer.
4. Using the manipulator box, transform the layer so that it is in the desired position, angle and size:
l To move the layer, either click on its artwork or on the blue point in the centre, then drag it to the desired position.
242

TIPS
l If you are having trouble dragging the layer by its artwork, you can also click and drag on the blue point in the centre. However, this point may be obstructed by the layer's pivot point . If that is the case, you can click and drag on the pivot point to move it out of the way, then click and drag on the centre point to move the layer.
l You can also nudge the selection by using the arrow keys on your keyboard.
l You can also enter specific coordinates in the Horizontal Offset and Vertical Offset fields in the Tool Properties view.
l To scale the layer, click on one of the squares at the edges or corners of the manipulator box and drag them to stretch or shrink the drawing.
TIPS
l You can preserve the horizontal and vertical proportions of the selection by holding the Shift key.
l You can also enter specific scale percentages in the Horizontal Scale and Vertical Scale fields in the Tool Properties view.
243
Storyboard Pro 20 User Guide
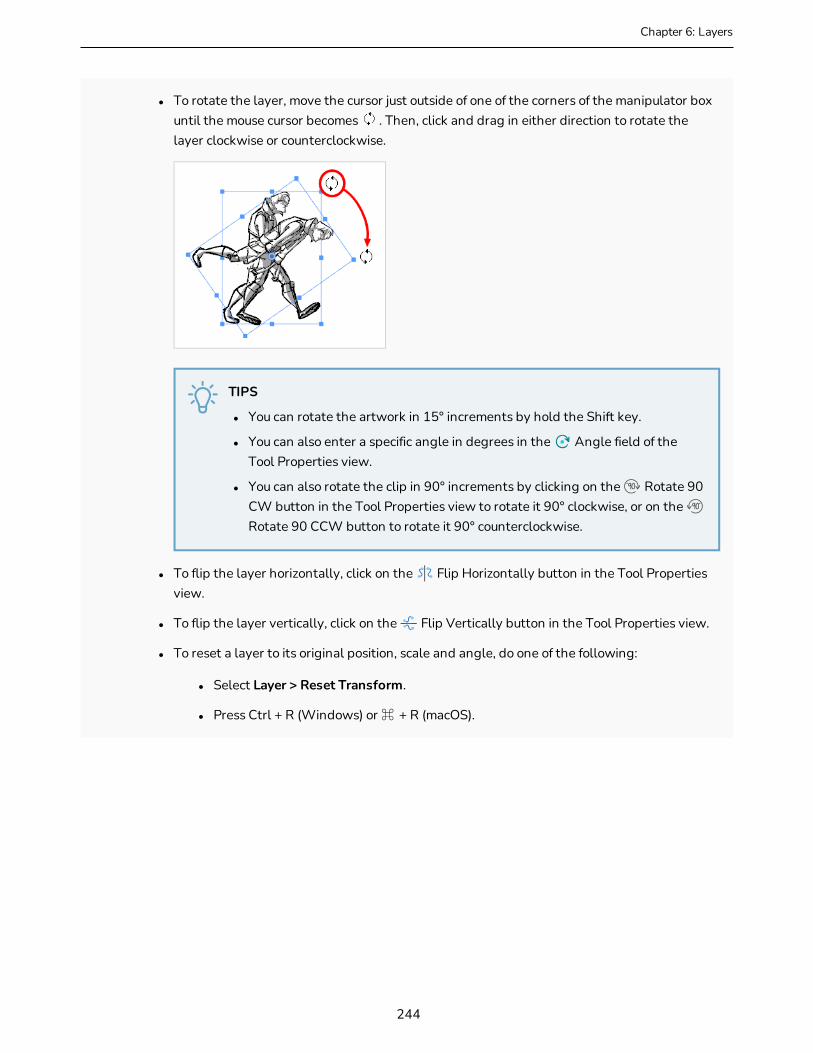
Chapter 6: Layers
l To rotate the layer, move the cursor just outside of one of the corners of the manipulator box until the mouse cursor becomes . Then, click and drag in either direction to rotate the layer clockwise or counterclockwise.
TIPS
l You can rotate the artwork in 15° increments by hold the Shift key.
l You can also enter a specific angle in degrees in the Angle field of the Tool Properties view.
l You can also rotate the clip in 90° increments by clicking on the Rotate 90 CW button in the Tool Properties view to rotate it 90° clockwise, or on the Rotate 90 CCW button to rotate it 90° counterclockwise.
l To flip the layer horizontally, click on the Flip Horizontally button in the Tool Properties view.
l To flip the layer vertically, click on the Flip Vertically button in the Tool Properties view.
l To reset a layer to its original position, scale and angle, do one of the following:
l Select Layer > Reset Transform.
l Press Ctrl + R (Windows) or ⌘ + R (macOS).
244

Resetting TransformationsWhen you no longer need a layer's transformation, you can easily reset the layer to its original position, scale and angle.
How to reset layer animation back to its default state
1. In the Layer panel of the Stage or Camera view or in the Layers view, select the transformed layer.
2. Do one of the following:
l Select Layer > Reset Transform.
l Press Ctrl + R (Windows) or ⌘ + R (macOS).
245
Storyboard Pro 20 User Guide
Chapter 6: Layers
Merging LayersT-SBFND-007-008
There are three ways to merge layers. You can quickly merge the current layer down with the layer just below it, you can quickly merge a selection of layers or you can merge specific layers with specific parameters with the Merge Layers dialog box. The resulting layer will be a single drawing layer, which you can edit and animate like any other drawing layer.
Using the Merge Layers dialog box gives you more control over the result of the merge. You can pick a name for the resulting layer, specify whether it is a vector or bitmap layer, select source layers, and more.
NOTE
l When merging layers, the animation on all layers being merged is discarded.
l If you quickly merge a bitmap layer with a vector layer, the resulting layer will be a bitmap layer.
l Layers containing a 3D object cannot be merged.
l The artwork in hidden layers is not added to the merged artwork.
How to quickly merge one layer with the layer below it
1. Select the topmost of the two layers you wish to merge.
2. Do one of the following:
l Right-click and select Merge Down.
l Press Ctrl + E (Windows) or ⌘ + E (macOS)
l In the top menu, select Layer > Merge Down.
How to quickly merge a selection of layers
1. Select the layers to merge.
2. Do one of the following:
l Right-click and select Merge Selected Layers.
l Select Layer > Merge Selected Layers.
246

How to merge layers using the Merge Layers dialog box
1. Select the layers to merge.
2. Do one of the following:
l Right-click and select Merge Layers.
l Select Layer > Merge Layers.
The Merge Layers dialog box opens.
3. In the Name field, enter a name for the merged layer.
4. Select one of the following:
l Vector Layer: Makes the merged layer a vector layer. If there are bitmap layers in your selection, they will be converted to vector rectangles with a bitmap texture inside them.
l Bitmap Layer: Makes the merged layer a bitmap layer. If there were vector layers in your selection, they will be converted to bitmap.
5. If your merged layer is bitmap, set the Bitmap Layer Canvas parameters.
l Resolution Factor: The proportions of bitmap pixels to store in the drawing for each pixel that is visible when the drawing is not zoomed in or scaled up. You should increase this parameter if you intend to scale up or zoom in on the drawing.
l Width Factor/Width: The width of the bitmap layer's canvas relative to the width of the stage.
247
Storyboard Pro 20 User Guide

Chapter 6: Layers
l Height Factor/Height: The height of the bitmap layer's canvas, relative to the height of the stage.
6. If you want to discard the layers being merged together to only have the merged layer, check the Delete Source Layers option. If you want to preserve the layers being merged along with the merged layer, uncheck this option.
7. If you want invisible layers that are part of the selected layers to also be discarded, check the Remove Invisible Layers option. Since invisible layers do not get added to the merged artwork, this option is unchecked by default.
8. Click OK.
248
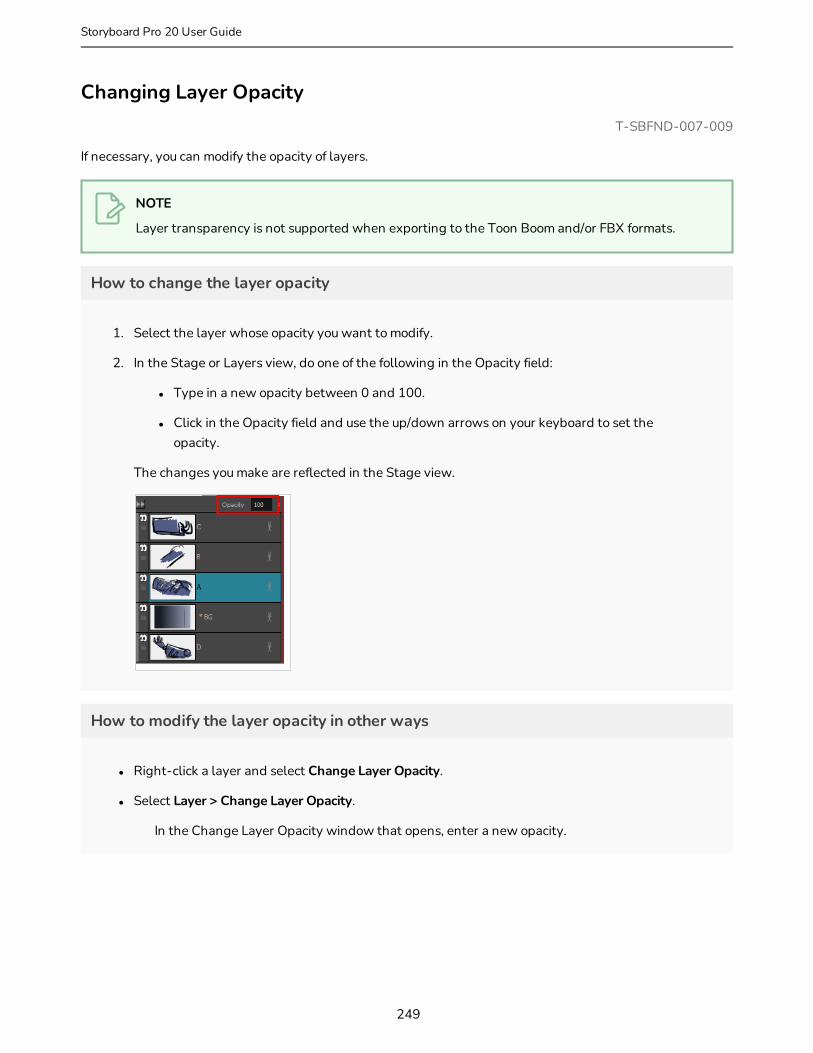
Changing Layer OpacityT-SBFND-007-009
If necessary, you can modify the opacity of layers.
NOTE
Layer transparency is not supported when exporting to the Toon Boom and/or FBX formats.
How to change the layer opacity
1. Select the layer whose opacity you want to modify.
2. In the Stage or Layers view, do one of the following in the Opacity field:
l Type in a new opacity between 0 and 100.
l Click in the Opacity field and use the up/down arrows on your keyboard to set the opacity.
The changes you make are reflected in the Stage view.
How to modify the layer opacity in other ways
l Right-click a layer and select Change Layer Opacity.
l Select Layer > Change Layer Opacity.
In the Change Layer Opacity window that opens, enter a new opacity.
249
Storyboard Pro 20 User Guide
Chapter 6: Layers
Converting a Template or Group to a Drawing LayerIf you have imported an animated template or a template containing multiple elements, for example, a template created in Harmony, or a template made from importing a Flash Movie (.swf) file, you might not be able to edit it with the drawing tools. This is because the template is not a simple drawing layer.
To remedy this, you can convert layers that contain templates into simple drawing layers. Likewise, you can convert a group of drawing layers to a single drawing layer using the same method.
NOTES
l In Storyboard Pro, a drawing layer can only contain one drawing for the whole panel, whereas a template may be animated and contain several frames with different drawings in each frame. If you convert an animated template to a drawing, the appearance of the template at current frame will be used to generate a static drawing layer.
l Converting a template or a group to a drawing will discard any 3D object they contain.
How to convert a template layer or a group layer to a drawing layer
1. If your template is an animated template, move the timeline playhead to the frame which you want to use to make the drawing layer.
2. Select the layer in which the template was imported or the group layer you wish to convert.
3. Do one of the following:
l Right-click the selected layer and select Convert to Drawing.
l In the top menu, select Layer > Convert to Drawing.
The selection is converted to a simple drawing layer, which you can now edit freely with the Storyboard Pro drawing tools.
250

Converting Layers between Bitmap and Vector LayersT-SBADV-007-002
You can convert a vector layer to a bitmap layer, and you can convert a bitmap layer to a vector layer.
If you convert a vector layer to a bitmap layer, the vector artwork will be rasterized into a bitmap image. Hence, the artwork will no longer be scalable and you will only be able to draw, paint or erase over it.
Since bitmap layers have a canvas size and a pixel density, you will be prompted to choose the canvas size and pixel density of the layer when converting vector artwork to bitmap artwork.
If you convert a bitmap layer to a vector layer, the bitmap artwork will be stored in a vector rectangle with a bitmap texture. This artwork will still technically be bitmap artwork, but any artwork you draw on that layer from that point on will be vector artwork.
How to convert a bitmap layer to a vector layer
1. Select one or several bitmap layers.
2. Do one of the following:
l Right-click the selected layer and select Convert to Vector Layer.
l In the top menu, select Layer > Convert to Vector Layer.
The layer is converted to a vector layer, as indicated by its colour in the layer list.
How to convert a vector layer to a bitmap layer
1. Select one or more layers to convert.
2. Do one of the following:
l Right-click the selected layer and select Convert to Bitmap Layer.
l In the top menu, select Layer > Convert to Bitmap Layer.
251
Storyboard Pro 20 User Guide

Chapter 6: Layers
If your layer was a vector layer, you will need to enter some parameters for the bitmap layer it will be converted to. The Choose Bitmap Layer resolution dialog appears.
3. Select a canvas size and pixel density for the new bitmap layer and click OK.
The following message appears.
4. Click OK.
The layer is converted to a bitmap layer, as indicated by its colour in the layer list.
252
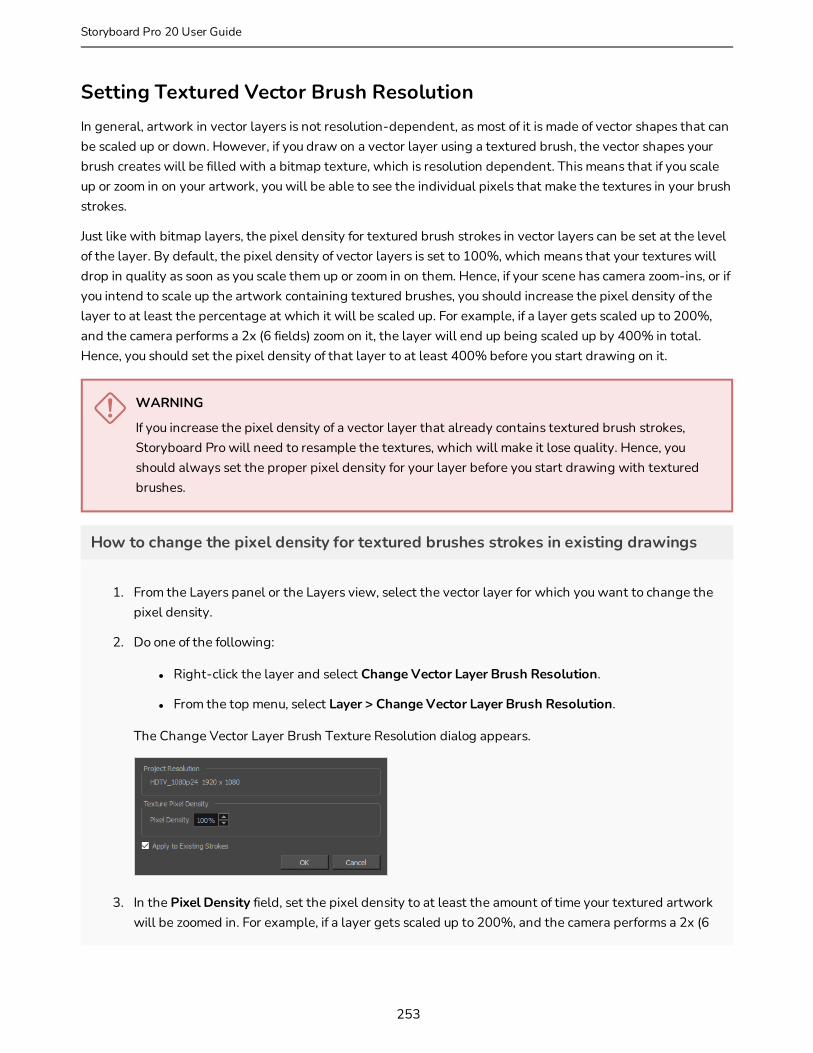
Setting Textured Vector Brush ResolutionIn general, artwork in vector layers is not resolution-dependent, as most of it is made of vector shapes that can be scaled up or down. However, if you draw on a vector layer using a textured brush, the vector shapes your brush creates will be filled with a bitmap texture, which is resolution dependent. This means that if you scale up or zoom in on your artwork, you will be able to see the individual pixels that make the textures in your brush strokes.
Just like with bitmap layers, the pixel density for textured brush strokes in vector layers can be set at the level of the layer. By default, the pixel density of vector layers is set to 100%, which means that your textures will drop in quality as soon as you scale them up or zoom in on them. Hence, if your scene has camera zoom-ins, or if you intend to scale up the artwork containing textured brushes, you should increase the pixel density of the layer to at least the percentage at which it will be scaled up. For example, if a layer gets scaled up to 200%, and the camera performs a 2x (6 fields) zoom on it, the layer will end up being scaled up by 400% in total. Hence, you should set the pixel density of that layer to at least 400% before you start drawing on it.
WARNING
If you increase the pixel density of a vector layer that already contains textured brush strokes, Storyboard Pro will need to resample the textures, which will make it lose quality. Hence, you should always set the proper pixel density for your layer before you start drawing with textured brushes.
How to change the pixel density for textured brushes strokes in existing drawings
1. From the Layers panel or the Layers view, select the vector layer for which you want to change the pixel density.
2. Do one of the following:
l Right-click the layer and select Change Vector Layer Brush Resolution.
l From the top menu, select Layer > Change Vector Layer Brush Resolution.
The Change Vector Layer Brush Texture Resolution dialog appears.
3. In the Pixel Density field, set the pixel density to at least the amount of time your textured artwork will be zoomed in. For example, if a layer gets scaled up to 200%, and the camera performs a 2x (6
253
Storyboard Pro 20 User Guide

Chapter 6: Layers
fields) zoom on it, the layer will end up being scaled up by 400% in total. Hence, you should set the pixel density of that layer to at least 400% before you start drawing on it.
4. If your layer already contains textured brush strokes, and you want the texture in these brush strokes to be resampled to fit this new Pixel Density setting, check the Apply to Existing Strokes option.
5. Click OK.
254
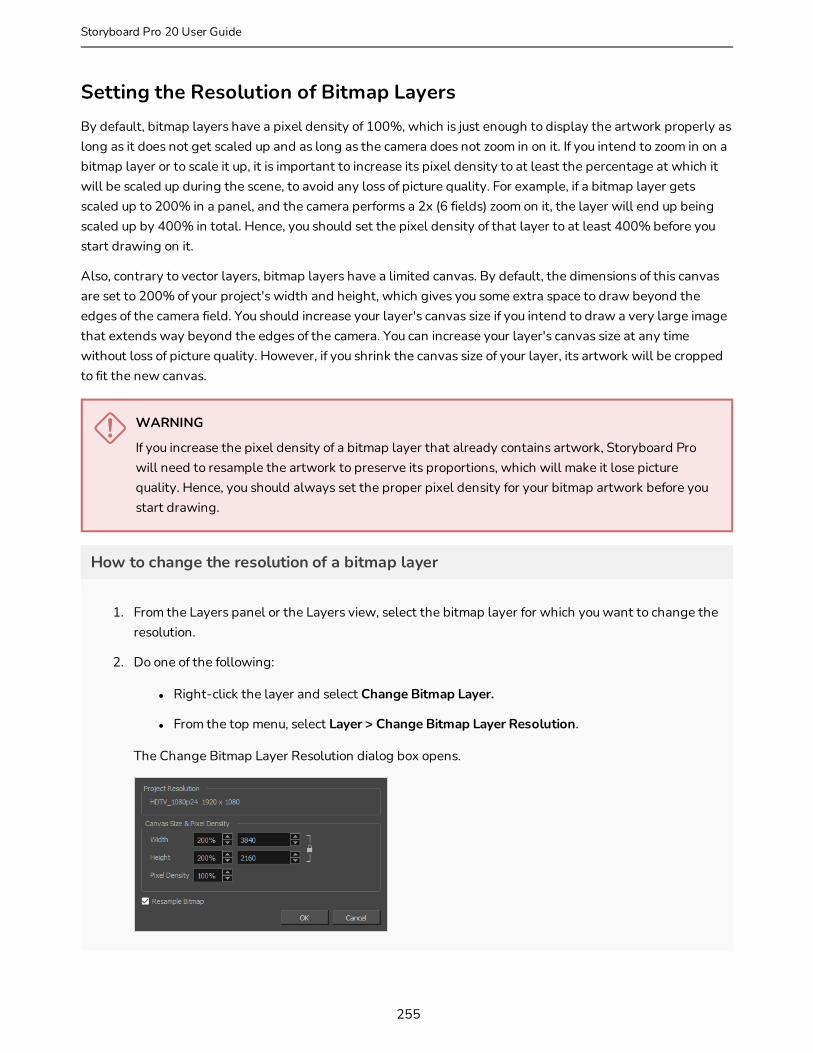
Setting the Resolution of Bitmap LayersBy default, bitmap layers have a pixel density of 100%, which is just enough to display the artwork properly as long as it does not get scaled up and as long as the camera does not zoom in on it. If you intend to zoom in on a bitmap layer or to scale it up, it is important to increase its pixel density to at least the percentage at which it will be scaled up during the scene, to avoid any loss of picture quality. For example, if a bitmap layer gets scaled up to 200% in a panel, and the camera performs a 2x (6 fields) zoom on it, the layer will end up being scaled up by 400% in total. Hence, you should set the pixel density of that layer to at least 400% before you start drawing on it.
Also, contrary to vector layers, bitmap layers have a limited canvas. By default, the dimensions of this canvas are set to 200% of your project's width and height, which gives you some extra space to draw beyond the edges of the camera field. You should increase your layer's canvas size if you intend to draw a very large image that extends way beyond the edges of the camera. You can increase your layer's canvas size at any time without loss of picture quality. However, if you shrink the canvas size of your layer, its artwork will be cropped to fit the new canvas.
WARNING
If you increase the pixel density of a bitmap layer that already contains artwork, Storyboard Pro will need to resample the artwork to preserve its proportions, which will make it lose picture quality. Hence, you should always set the proper pixel density for your bitmap artwork before you start drawing.
How to change the resolution of a bitmap layer
1. From the Layers panel or the Layers view, select the bitmap layer for which you want to change the resolution.
2. Do one of the following:
l Right-click the layer and select Change Bitmap Layer.
l From the top menu, select Layer > Change Bitmap Layer Resolution.
The Change Bitmap Layer Resolution dialog box opens.
255
Storyboard Pro 20 User Guide

Chapter 6: Layers
3. In the Width and Height fields, enter the percentage for the dimensions of the bitmap canvas, relative to the camera frame. By default, these settings are set to 200%, which means the dimensions of the canvas are twice the ones of the camera frame, giving you extra space to draw beyond the edges and pan your artwork, if needed.
4. In the Pixel Density field, set the pixel density to at least the amount of time your bitmap artwork will be zoomed in. For example, if a layer gets scaled up to 200%, and the camera performs a 2x (6 fields) zoom on it, the layer will end up being scaled up by 400% in total. Hence, you should set the pixel density of that layer to at least 400% before you start drawing on it.
5. If your layer already contains artwork, and you want it to be resampled to fit the new Pixel Density setting, check the Resample Bitmap option.
NOTE
If you leave this option unchecked, your artwork will be scaled up if you decrease the pixel density, or scaled down if you increase it.
6. Click OK.
256
Importing Images as LayersT-SBADV-009-003
If you have bitmap images that you want to use for a panel, you can import them as layers inside the panel. You can them use them as they are in the panel, or use them as references, draw over them in a different layer, then hide or discard them. This is typically useful if you have backgrounds and overlays ready for the panel you are working on, or if you want to use a reference image to help you draw.
The following image formats can be imported in Storyboard Pro:
l Portable Network Graphics (.png)
l Photoshop Document (.psd, .psb)
l Truevision Targa Image (.tga)
l Tagged Image File Format (.tif)
l Bitmap Image (.bmp)
l Jpeg (.jpg, .jpe, .jpeg)
l Sillicon Graphics Image (.sgi)
l Toon Boom Vector Graphic (.tvg)
l Toon Boom Scan (.scan)
l Toon Boom Optimized Bitmap (.opt)
l Y'UV frame (.yuv)
l PAL frame (.pal)
NOTES
l By default, images are imported as bitmap textures. It is possible to vectorize images upon import—see Vectorizing Images on Import on page 261.
l Storyboard Pro does not support import of 8-bit CMYK or 16-bit RGB or CMYK format PSD files. You can currently import only 8-bit RGBA format PSD files.
How to import images as layers in a panel using the Import Images dialog
1. In the Thumbnails or Timeline view, select the panel to which you want to import images.
2. In the top menu, select File > Import > Images as Layers.
The Choose Image Files dialog box opens.
257
Storyboard Pro 20 User Guide

Chapter 6: Layers
3. Browse to the directory containing the images to import.
4. Select the images to import.
TIP
You can select multiple files by doing one of the following:
l While pressing Ctrl (Windows/Linux) or ⌘ (macOS), click on each file you want to select.
l While pressing Shift, click on the first file you want to select, then one the last file you want to select to select every file in-between.
5. Click Open.
6. If you selected a Photoshop Document (.psd) file with multiple layers, a message will appear giving you the option to import each layer separately.
l Click Yes to import each layer in the document as its own layer in the panel.
l Click No to import the entire document as a single layer in the panel.
A layer is created in your panel, containing the imported image. If you selected more than one image, each image will be imported into its own layer, in alphanumerical order.
How to import images as layers in a panel using drag & drop
1. Open an Explorer (Windows) or Finder (macOS) window.
258
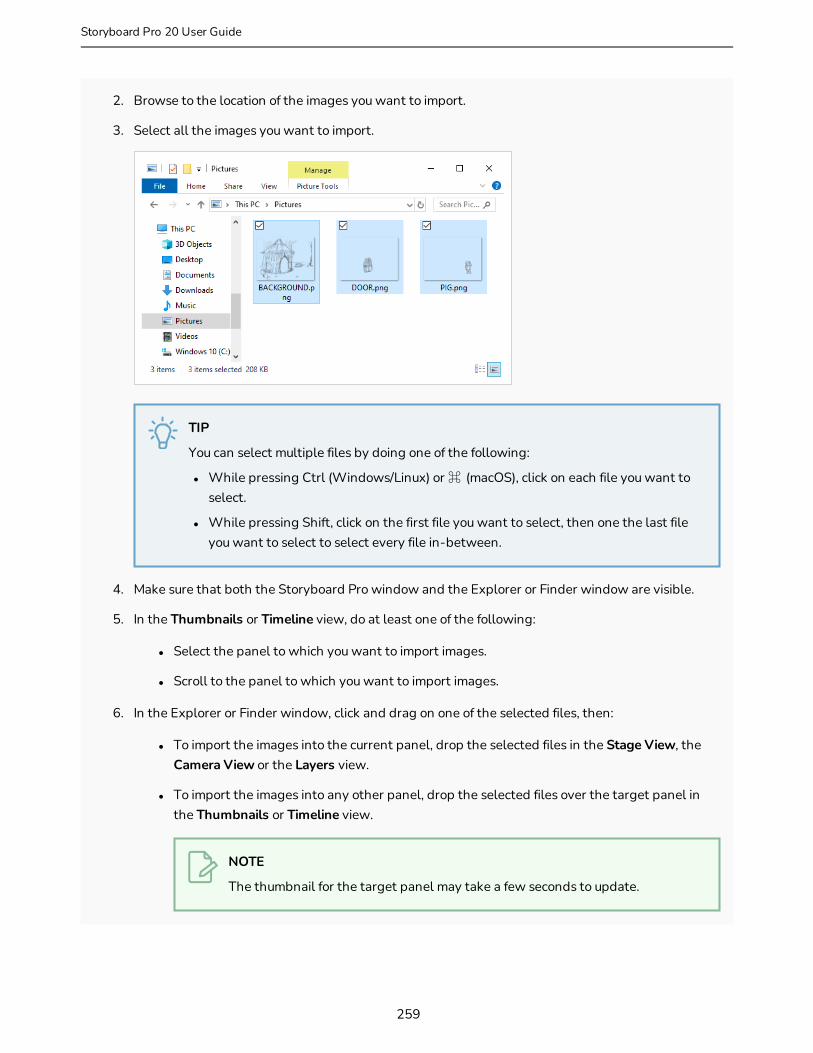
2. Browse to the location of the images you want to import.
3. Select all the images you want to import.
TIP
You can select multiple files by doing one of the following:
l While pressing Ctrl (Windows/Linux) or ⌘ (macOS), click on each file you want to select.
l While pressing Shift, click on the first file you want to select, then one the last file you want to select to select every file in-between.
4. Make sure that both the Storyboard Pro window and the Explorer or Finder window are visible.
5. In the Thumbnails or Timeline view, do at least one of the following:
l Select the panel to which you want to import images.
l Scroll to the panel to which you want to import images.
6. In the Explorer or Finder window, click and drag on one of the selected files, then:
l To import the images into the current panel, drop the selected files in the Stage View, the Camera View or the Layers view.
l To import the images into any other panel, drop the selected files over the target panel in the Thumbnails or Timeline view.
NOTE
The thumbnail for the target panel may take a few seconds to update.
259
Storyboard Pro 20 User Guide
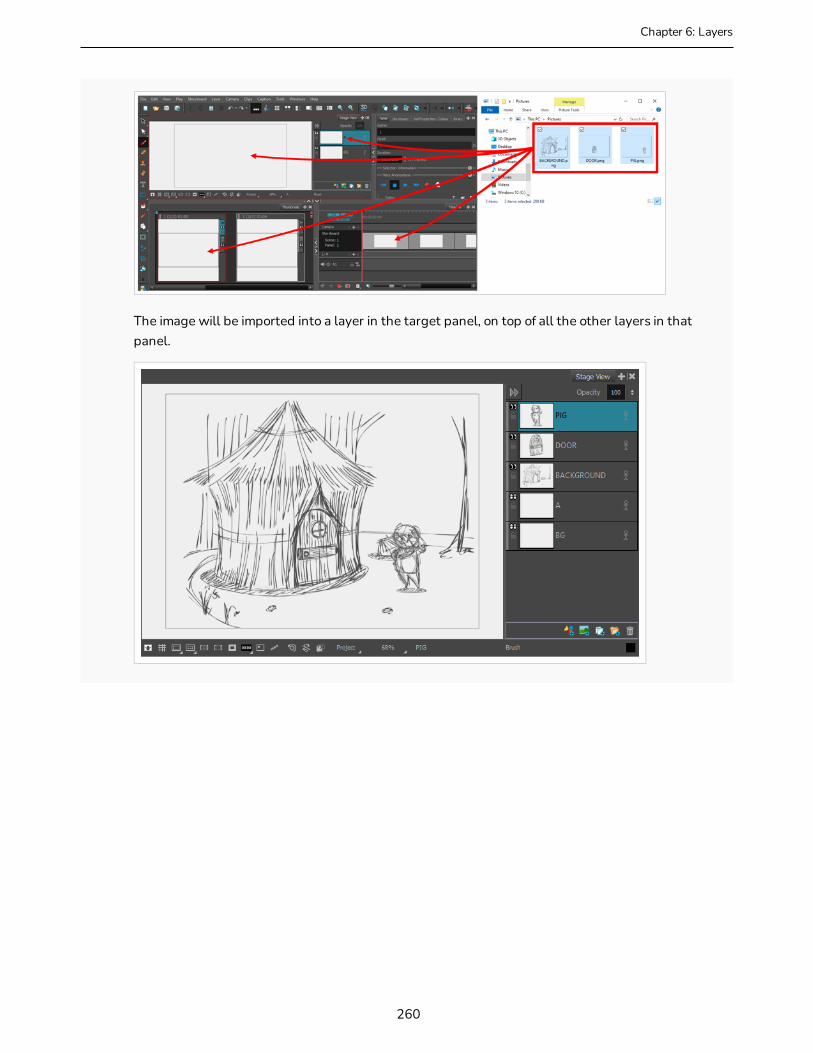
Chapter 6: Layers
The image will be imported into a layer in the target panel, on top of all the other layers in that panel.
260

Vectorizing Images on Import T-SBADV-009-004
By default, when you import an image into your project using either the Import Image as Layers or Import Images as Scenes commands, the imported images will be vectorized in colour and fit the camera frame. The image resulting from a colour vectorization will appear exactly as the original picture.
With the Storyboard Pro, more options are available which give you better control over the vectorization of imported images. To access these options, you must first select the Display Vectorize Options Dialog option in the Preferences dialog box.
How to set the vectorization options
1. Do one of the following to open the Preferences dialog:
l Windows:
l In the top menu, select Edit > Preferences.
l Press Ctrl + U.
l macOS:
l In the top menu, select Storyboard Pro 20 > Preferences.
l Press ⌘ + U.
2. In the User Preferences dialog box, select the Import/Export tab.
3. Select the Display Vectorize Options Dialog option.
4. Select File > Import > Images as Layers.
5. In the browser that opens, select an image to import.
The Import Images dialog box opens.
261
Storyboard Pro 20 User Guide

Chapter 6: Layers
The preview area displays the original image on the left and the resulting image on the right. The preview of the resulting image automatically updates each time you modify a parameter.
6. In the Import Options section, set the following parameters:
l As Bitmap Layer: Preserves the exact look of the imported images and imports it in a bitmap layer.
262
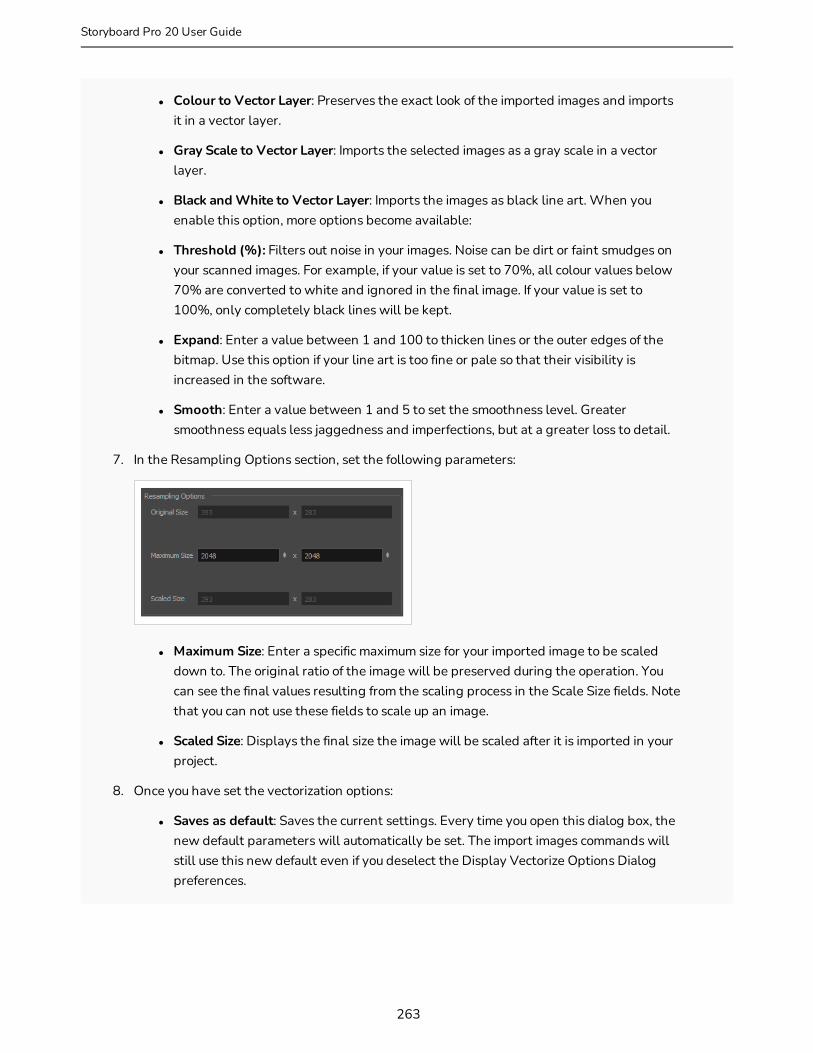
l Colour to Vector Layer: Preserves the exact look of the imported images and imports it in a vector layer.
l Gray Scale to Vector Layer: Imports the selected images as a gray scale in a vector layer.
l Black and White to Vector Layer: Imports the images as black line art. When you enable this option, more options become available:
l Threshold (%): Filters out noise in your images. Noise can be dirt or faint smudges on your scanned images. For example, if your value is set to 70%, all colour values below 70% are converted to white and ignored in the final image. If your value is set to 100%, only completely black lines will be kept.
l Expand: Enter a value between 1 and 100 to thicken lines or the outer edges of the bitmap. Use this option if your line art is too fine or pale so that their visibility is increased in the software.
l Smooth: Enter a value between 1 and 5 to set the smoothness level. Greater smoothness equals less jaggedness and imperfections, but at a greater loss to detail.
7. In the Resampling Options section, set the following parameters:
l Maximum Size: Enter a specific maximum size for your imported image to be scaled down to. The original ratio of the image will be preserved during the operation. You can see the final values resulting from the scaling process in the Scale Size fields. Note that you can not use these fields to scale up an image.
l Scaled Size: Displays the final size the image will be scaled after it is imported in your project.
8. Once you have set the vectorization options:
l Saves as default: Saves the current settings. Every time you open this dialog box, the new default parameters will automatically be set. The import images commands will still use this new default even if you deselect the Display Vectorize Options Dialog preferences.
263
Storyboard Pro 20 User Guide

Chapter 6: Layers
l Do not show this dialog again: Deselects the Display Vectorize Options dialog option in the Preferences dialog box directly from here.
264

265
Storyboard Pro 20 User Guide

Chapter 7: Drawing
Chapter 7: DrawingStoryboard Pro has many powerful tools, views, and features for sketching, drawing and animating with ease. This chapter describes the main assets needed when drawing , as well as tips on how to start and use these tools efficiently.
266

About Drawing ToolsT-SBFND-008-001
Drawing Tools
The two main drawing tools in Storyboard Pro are the Brush tool and the Pencil tool. Depending on the drawing style you want to achieve, you may prefer to work with vector or bitmap layers.
On vector layers, it is possible to draw with pencil lines, textured pencil lines, vector brushes and textured vector brushes. While pencil lines are vector centrelines to which you can add thickness, brush strokes are solid vector shapes filled with a colour, and textured brush strokes are brush strokes filled with a bitmap texture that filter out their colour.
On bitmap layers, you can only draw using solid or textured bitmap brushes. Hence, while vector layers are more flexible because they allow you to easily manipulate and tweak parts of your artwork, they can also accommodate more art styles.
However, if you use a textured brush on a vector layer, your brush strokes will have a bitmap texture. This means that, just like with artwork in bitmap layers, attempting to tweak or resize a textured brush stroke will require Storyboard Pro to resample the texture, which is liable to make it lose picture quality, unless its texture resolution was sufficiently increased before you started drawing.
One pitfall of using textured brushes on vector drawings is that, while bitmap drawings are always made of a single flat canvas, vector brush strokes are kept as separate objects. This means that laying on a lot of textured brush strokes on a vector drawing will require Storyboard Pro to store the texture for each of these strokes, and to composite them together in real time to display your drawing. This can cause texture-heavy vector
267
Storyboard Pro 20 User Guide
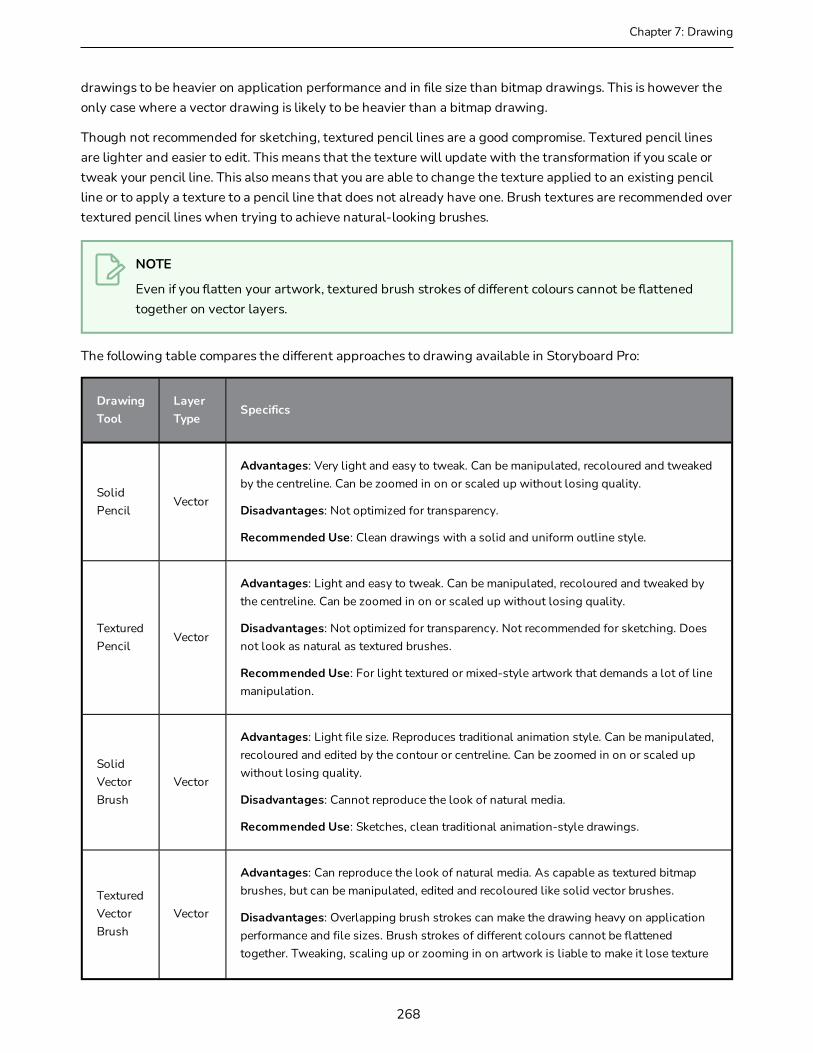
Chapter 7: Drawing
drawings to be heavier on application performance and in file size than bitmap drawings. This is however the only case where a vector drawing is likely to be heavier than a bitmap drawing.
Though not recommended for sketching, textured pencil lines are a good compromise. Textured pencil lines are lighter and easier to edit. This means that the texture will update with the transformation if you scale or tweak your pencil line. This also means that you are able to change the texture applied to an existing pencil line or to apply a texture to a pencil line that does not already have one. Brush textures are recommended over textured pencil lines when trying to achieve natural-looking brushes.
NOTE
Even if you flatten your artwork, textured brush strokes of different colours cannot be flattened together on vector layers.
The following table compares the different approaches to drawing available in Storyboard Pro:
Drawing Tool
Layer Type
Specifics
Solid Pencil
Vector
Advantages: Very light and easy to tweak. Can be manipulated, recoloured and tweaked by the centreline. Can be zoomed in on or scaled up without losing quality.
Disadvantages: Not optimized for transparency.
Recommended Use: Clean drawings with a solid and uniform outline style.
Textured Pencil
Vector
Advantages: Light and easy to tweak. Can be manipulated, recoloured and tweaked by the centreline. Can be zoomed in on or scaled up without losing quality.
Disadvantages: Not optimized for transparency. Not recommended for sketching. Does not look as natural as textured brushes.
Recommended Use: For light textured or mixed-style artwork that demands a lot of line manipulation.
Solid Vector Brush
Vector
Advantages: Light file size. Reproduces traditional animation style. Can be manipulated, recoloured and edited by the contour or centreline. Can be zoomed in on or scaled up without losing quality.
Disadvantages: Cannot reproduce the look of natural media.
Recommended Use: Sketches, clean traditional animation-style drawings.
Textured Vector Brush
Vector
Advantages: Can reproduce the look of natural media. As capable as textured bitmap brushes, but can be manipulated, edited and recoloured like solid vector brushes.
Disadvantages: Overlapping brush strokes can make the drawing heavy on application performance and file sizes. Brush strokes of different colours cannot be flattened together. Tweaking, scaling up or zooming in on artwork is liable to make it lose texture
268

Drawing Tool
Layer Type
Specifics
quality.
Recommended Use: For light bitmap-style textured artwork or mixed-style artwork.
Textured Bitmap Brush
Bitmap
Advantages: Can reproduce the look of natural media. Better performance and lighter file size than texture-heavy vector artwork. Can be edited pixel by pixel.
Disadvantages: Brush strokes are always flattened together and cannot be modified individually. Can only be drawn or erased upon. Scaling up or zooming in on artwork is liable to make it lose picture quality.
Recommended Use: Texture-heavy bitmap artwork.
Here are the drawing tools available in Storyboard Pro, followed by the types of layer on which they are supported. If you are editing a vector layer, then all of the tools are available to you. If you are drawing on a bitmap layer, some tools are not available. When tools are not available, they are grayed out in the Tools toolbar.
Icon Tool NameVector Layer
Bitmap Layer
Select ✓ ✓
Select by Colour ✓
Cutter ✓ ✓
Contour Editor ✓
Centerline Editor ✓
Perspective ✓
Edit Gradient/Texture ✓
269
Storyboard Pro 20 User Guide
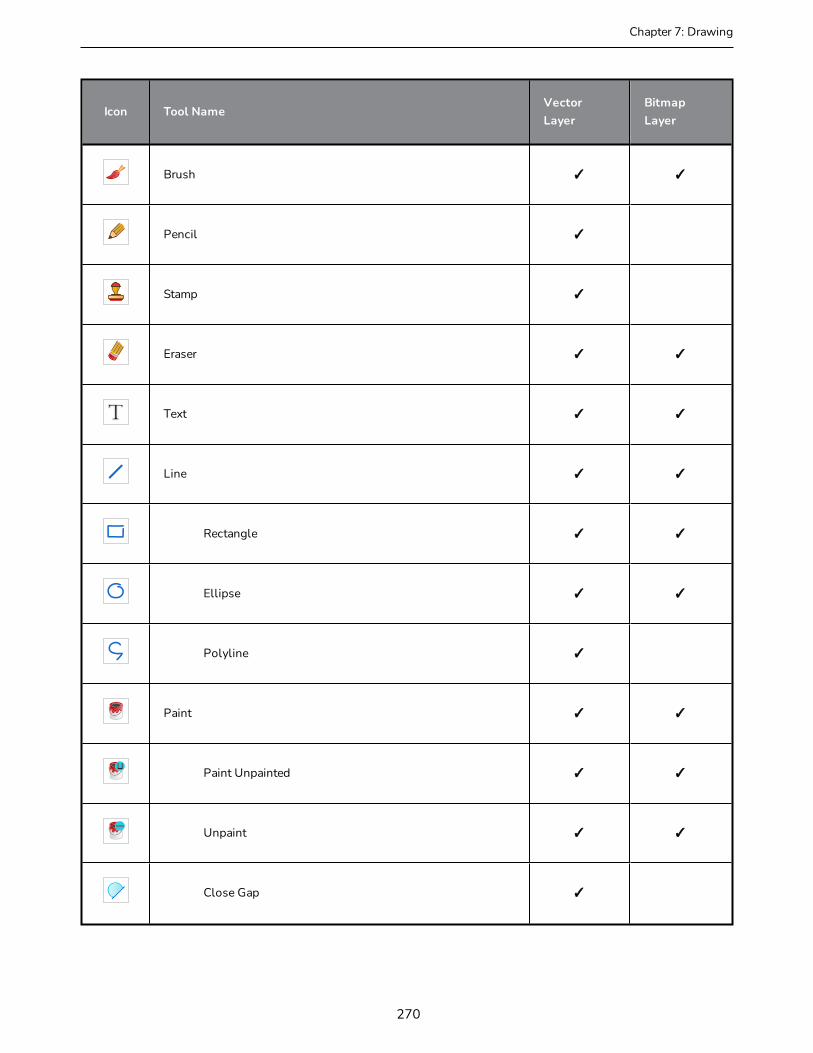
Chapter 7: Drawing
Icon Tool NameVector Layer
Bitmap Layer
Brush ✓ ✓
Pencil ✓
Stamp ✓
Eraser ✓ ✓
Text ✓ ✓
Line ✓ ✓
Rectangle ✓ ✓
Ellipse ✓ ✓
Polyline ✓
Paint ✓ ✓
Paint Unpainted ✓ ✓
Unpaint ✓ ✓
Close Gap ✓
270
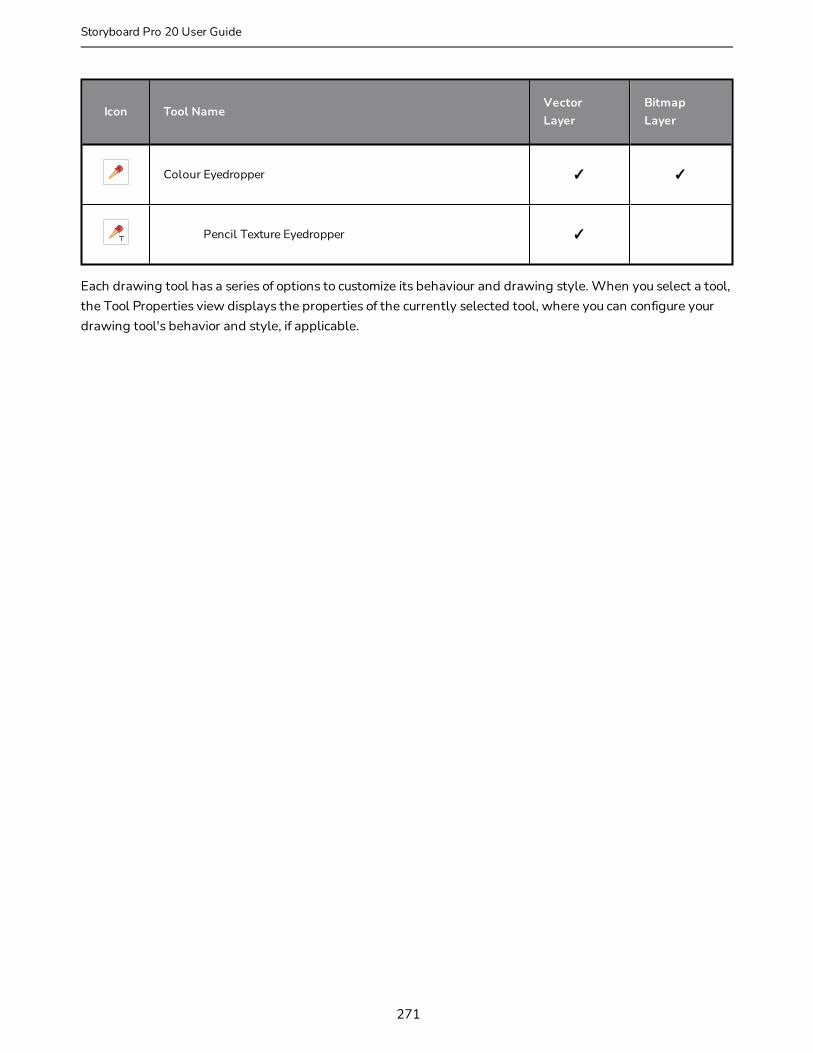
Icon Tool NameVector Layer
Bitmap Layer
Colour Eyedropper ✓ ✓
Pencil Texture Eyedropper ✓
Each drawing tool has a series of options to customize its behaviour and drawing style. When you select a tool, the Tool Properties view displays the properties of the currently selected tool, where you can configure your drawing tool's behavior and style, if applicable.
271
Storyboard Pro 20 User Guide

Chapter 7: Drawing
About the Brush ToolThe Brush tool allows you to draw by creating shapes based on your drawing strokes and filling them with colour or textures. When used with a tablet, it is pressure sensitive, just like a real life brush.
You can use the Brush tool on both Vector or Bitmap layers. In either case, the Brush tool can be made to create solid or textured brush strokes with almost the same capabilities. The main difference is that, on bitmap layers, your brush strokes are fully bitmap, and are always flattened into the canvas, whereas on vector layers, your brush strokes are made of a vector contour with a bitmap fill, and are kept as separate drawing objects that can be manipulated individually. This has the following implications:
l Textured artwork is easier to edit and tweak on vector layers, as you can manipulate textured brush strokes with the Select Tool, the Contour Editor and the Centerline Editor.
l On a bitmap layer, very texture-heavy artwork may turn out to be lighter, both in terms of performance and file size, than on a vector layer.
l Erasing textured artwork with a textured eraser will look more natural on a bitmap layer than on a vector layer—see Creating a Textured Eraser on page 399.
272
NOTE
Should you choose to draw on bitmap layers, or to draw on vector layers with textured brushes, you should mind that your artwork will be resolution dependent. By default, the pixel density of bitmap and textured artwork is 100%, meaning that zooming in or scaling up your artwork will make it appear pixelated. To increase the pixel density of your artwork and prevent it from appearing pixelated, see Setting Textured Vector Brush Resolution on page 253 if you are working on a vector layer, and Setting the Resolution of Bitmap Layers on page 255 if you are working on a bitmap layer.
273
Storyboard Pro 20 User Guide
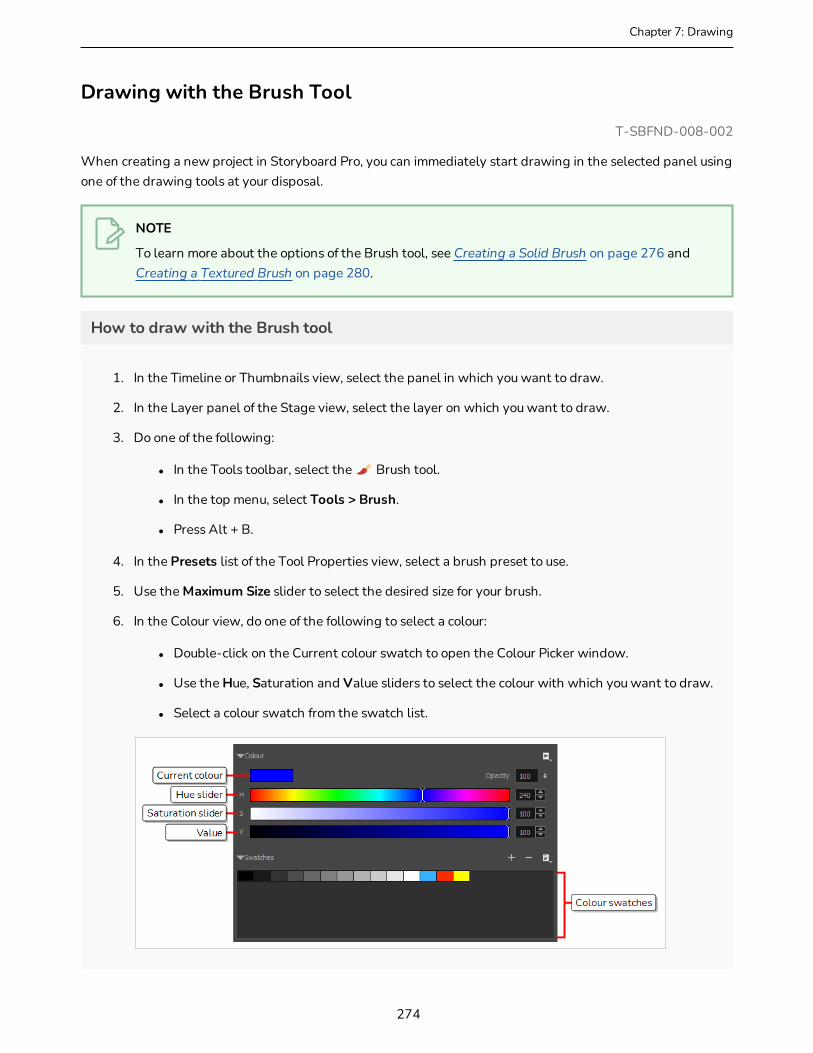
Chapter 7: Drawing
Drawing with the Brush Tool
T-SBFND-008-002
When creating a new project in Storyboard Pro, you can immediately start drawing in the selected panel using one of the drawing tools at your disposal.
NOTE
To learn more about the options of the Brush tool, see Creating a Solid Brush on page 276 and Creating a Textured Brush on page 280.
How to draw with the Brush tool
1. In the Timeline or Thumbnails view, select the panel in which you want to draw.
2. In the Layer panel of the Stage view, select the layer on which you want to draw.
3. Do one of the following:
l In the Tools toolbar, select the Brush tool.
l In the top menu, select Tools > Brush.
l Press Alt + B.
4. In the Presets list of the Tool Properties view, select a brush preset to use.
5. Use the Maximum Size slider to select the desired size for your brush.
6. In the Colour view, do one of the following to select a colour:
l Double-click on the Current colour swatch to open the Colour Picker window.
l Use the Hue, Saturation and Value sliders to select the colour with which you want to draw.
l Select a colour swatch from the swatch list.
274

7. In the Stage view, draw a brush stroke.
TIPS
l You can quickly adjust the size of the selected drawing tool by pressing and holding the O key, then clicking and dragging in the drawing space. If you are using a tablet pen, doing this with the eraser tip of your pen will adjust the size of the Eraser tool, regardless of which drawing tool is selected.
l If you press and hold the Shift key before or while drawing, you will draw a straight line.
l If you press and hold the Shift and Alt keys before or while drawing, you will draw a straight horizontal or vertical line.
l If you press and hold the Ctrl (Windows/Linux) or ⌘ (macOS) key while drawing, your drawing stroke will turn into a closed shape.
l If you press and hold Alt before drawing a stroke, and start drawing near existing artwork, the start of your drawing stroke will connect to that artwork.
l If you press and hold Alt while drawing a stroke, and end your drawing stroke near existing artwork, the end of that drawing stroke will connect to that artwork.
275
Storyboard Pro 20 User Guide

Chapter 7: Drawing
Creating a Solid Brush
When drawing with the Brush tool on a vector layer, you can use either solid vector brushes or textured vector brushes. By default, your brush will be a solid vector brush. A solid vector brush creates a vector shape and simply fills it with the selected colour, making lightweight, simple crisp strokes.
A solid vector brush's tip can be shaped like a circle, a diamond or a square, and can be configured to have a specific size, aspect ratio and angle. Also, solid vector brushes can be automatically smoothed by Storyboard Pro as you draw.
If you are drawing on a bitmap layer, you can only use textured brushes. You can create a textured brush that makes solid looking strokes, but they can not be automatically smoothed by Storyboard Pro, nor can they tweaked with vector tools such as the Contour Editor. For more information, see About Layer Types on page 224.
How to create a solid vector brush
1. In the Tools toolbar, select the Brush or Eraser tool.
2. In the Tool Properties view, click the arrow button to open the Brush/Eraser Properties dialog.
The Brush Properties dialog opens.
276
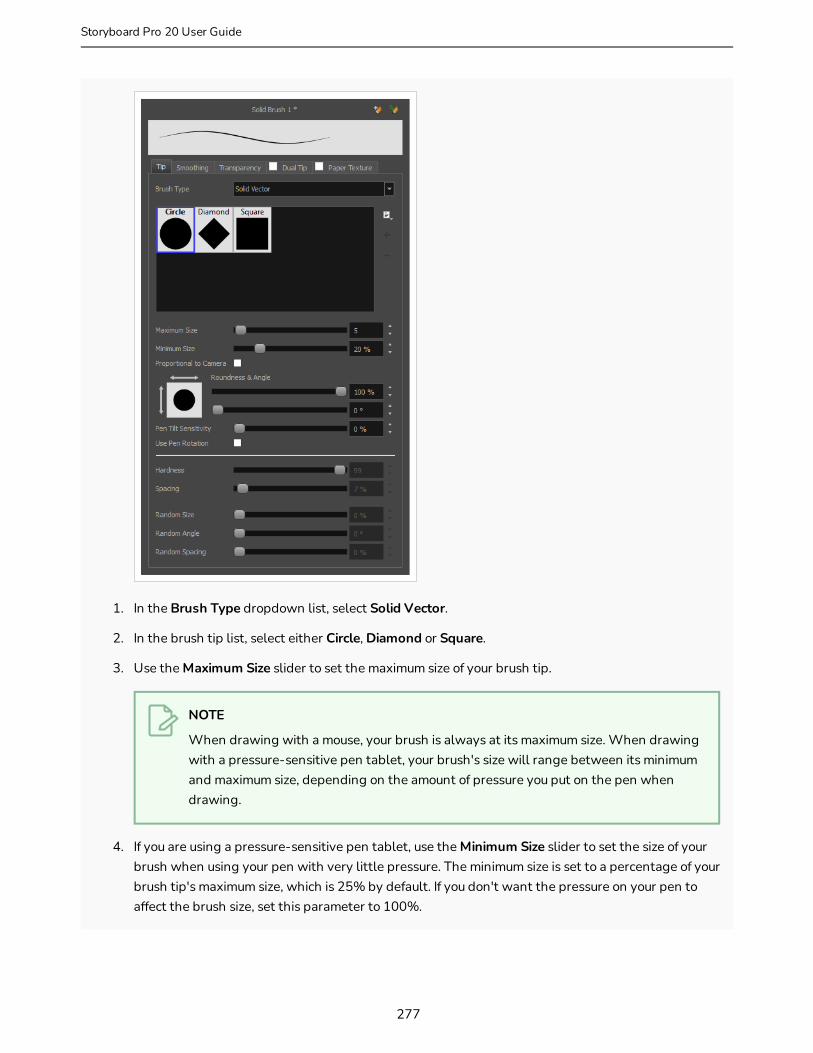
1. In the Brush Type dropdown list, select Solid Vector.
2. In the brush tip list, select either Circle, Diamond or Square.
3. Use the Maximum Size slider to set the maximum size of your brush tip.
NOTE
When drawing with a mouse, your brush is always at its maximum size. When drawing with a pressure-sensitive pen tablet, your brush's size will range between its minimum and maximum size, depending on the amount of pressure you put on the pen when drawing.
4. If you are using a pressure-sensitive pen tablet, use the Minimum Size slider to set the size of your brush when using your pen with very little pressure. The minimum size is set to a percentage of your brush tip's maximum size, which is 25% by default. If you don't want the pressure on your pen to affect the brush size, set this parameter to 100%.
277
Storyboard Pro 20 User Guide
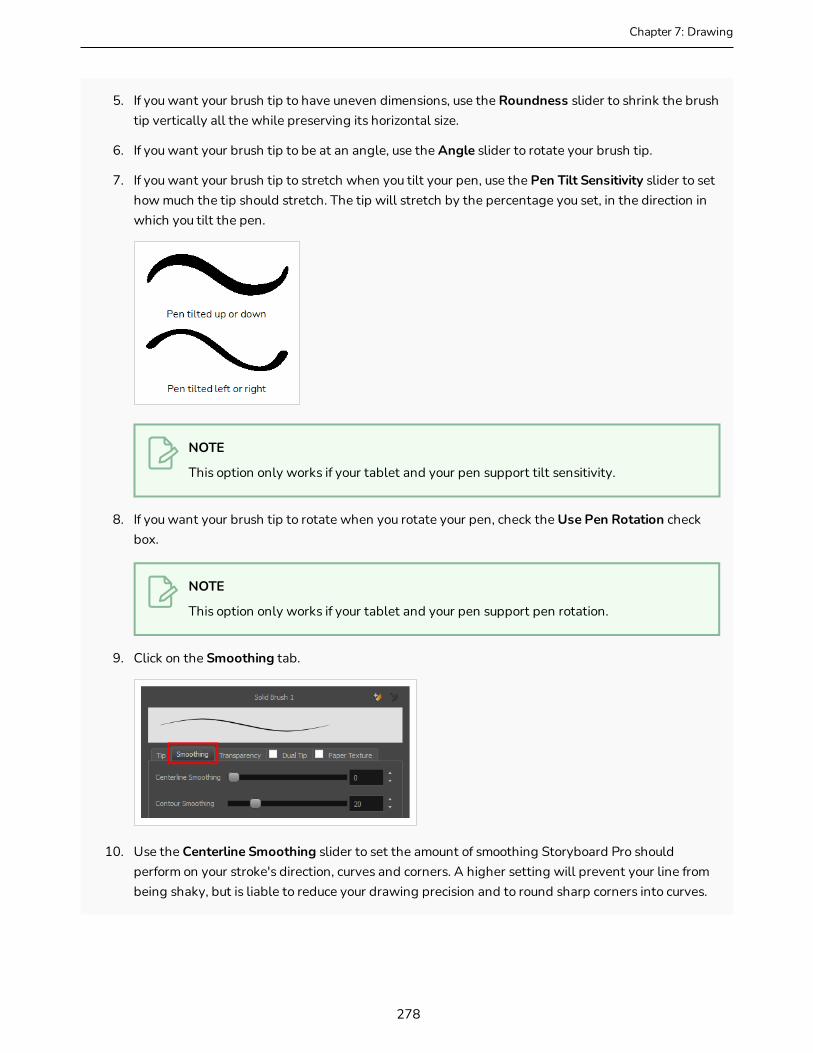
Chapter 7: Drawing
5. If you want your brush tip to have uneven dimensions, use the Roundness slider to shrink the brush tip vertically all the while preserving its horizontal size.
6. If you want your brush tip to be at an angle, use the Angle slider to rotate your brush tip.
7. If you want your brush tip to stretch when you tilt your pen, use the Pen Tilt Sensitivity slider to set how much the tip should stretch. The tip will stretch by the percentage you set, in the direction in which you tilt the pen.
NOTE
This option only works if your tablet and your pen support tilt sensitivity.
8. If you want your brush tip to rotate when you rotate your pen, check the Use Pen Rotation check box.
NOTE
This option only works if your tablet and your pen support pen rotation.
9. Click on the Smoothing tab.
10. Use the Centerline Smoothing slider to set the amount of smoothing Storyboard Pro should perform on your stroke's direction, curves and corners. A higher setting will prevent your line from being shaky, but is liable to reduce your drawing precision and to round sharp corners into curves.
278

11. Use the Contour Smoothing slider to set the amount of smoothing Storyboard Pro should perform on your stroke's contour. A higher setting will round sharp corners and reduce the amount of control points for the resulting vector shape.
12. Either close or set aside the Brush Properties dialog.
13. In the Stage view, start drawing to test your brush settings.
279
Storyboard Pro 20 User Guide

Chapter 7: Drawing
Creating a Textured Brush
Using textured brushes, you can create an infinite range of fuzzy, textured and watercolour lines. You can use bitmap brush tips, adjust your line's hardness and opacity, combine two tips and apply a paper texture to your brush strokes so as to adapt the Brush tool to a variety of art styles and create natural-looking brush strokes.
When drawing on a vector layer, brushes are solid vector brushes by default. You can however create a textured vector brush which combines both Storyboard Pro's vector and bitmap drawing capabilities. You can tweak textured vector brush strokes using various vector editing tools such as the Contour Editor,the Perspective tool and the Envelope tool, and Storyboard Pro will resample the textures inside your brush strokes with each modification.
If you are drawing on a bitmap layer, your brush is always textured. You can configure a textured brush to look crisp and solid if desired, but brush strokes on bitmap layers cannot be tweaked or smoothed.
280

Configuring a Textured Brush Tip
The Brush tool supports two types of brush tips: Solid and Textured. Solid brush tips are plain shapes that can be used to draw vector shapes filled with a solid color, whereas textured brush tips are bitmap images with various shapes and opacity levels that can be used to create natural-looking brush strokes.
Solid brush tips are not customizable. The selection is limited to either a circle, diamond or square-shaped brush tip, the proportions and angle of which can be adjusted. While Storyboard Pro also comes bundled with preset textured brush tips, it is also possible to create and use your own textured brush tips.
How to configure a textured brush tip
1. In the Tools toolbar, select the Brush tool or press Alt + B.
2. In the Tool Properties view, click the Arrow button to open the Brush Properties view.
3. If you are drawing on a vector layer, set the Brush Type to Textured Vector to enable the textured brush options. If you are drawing on a bitmap layer, the textured brush options are always enabled.
281
Storyboard Pro 20 User Guide
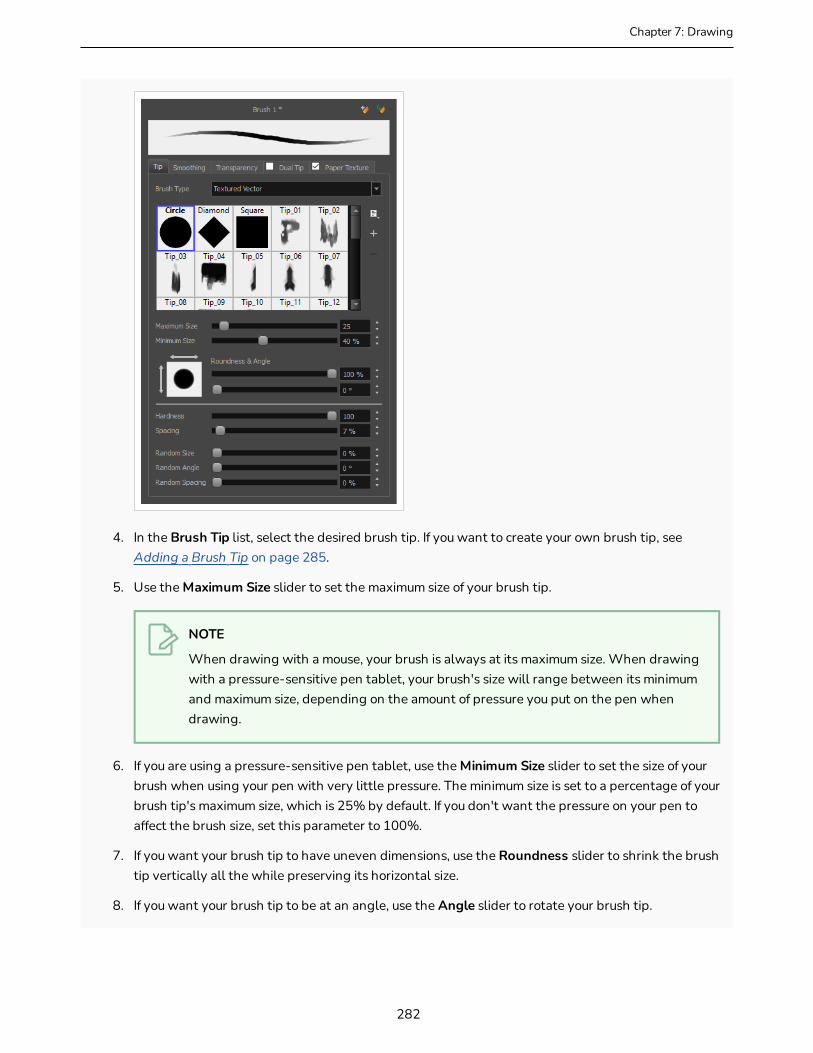
Chapter 7: Drawing
4. In the Brush Tip list, select the desired brush tip. If you want to create your own brush tip, see Adding a Brush Tip on page 285.
5. Use the Maximum Size slider to set the maximum size of your brush tip.
NOTE
When drawing with a mouse, your brush is always at its maximum size. When drawing with a pressure-sensitive pen tablet, your brush's size will range between its minimum and maximum size, depending on the amount of pressure you put on the pen when drawing.
6. If you are using a pressure-sensitive pen tablet, use the Minimum Size slider to set the size of your brush when using your pen with very little pressure. The minimum size is set to a percentage of your brush tip's maximum size, which is 25% by default. If you don't want the pressure on your pen to affect the brush size, set this parameter to 100%.
7. If you want your brush tip to have uneven dimensions, use the Roundness slider to shrink the brush tip vertically all the while preserving its horizontal size.
8. If you want your brush tip to be at an angle, use the Angle slider to rotate your brush tip.
282
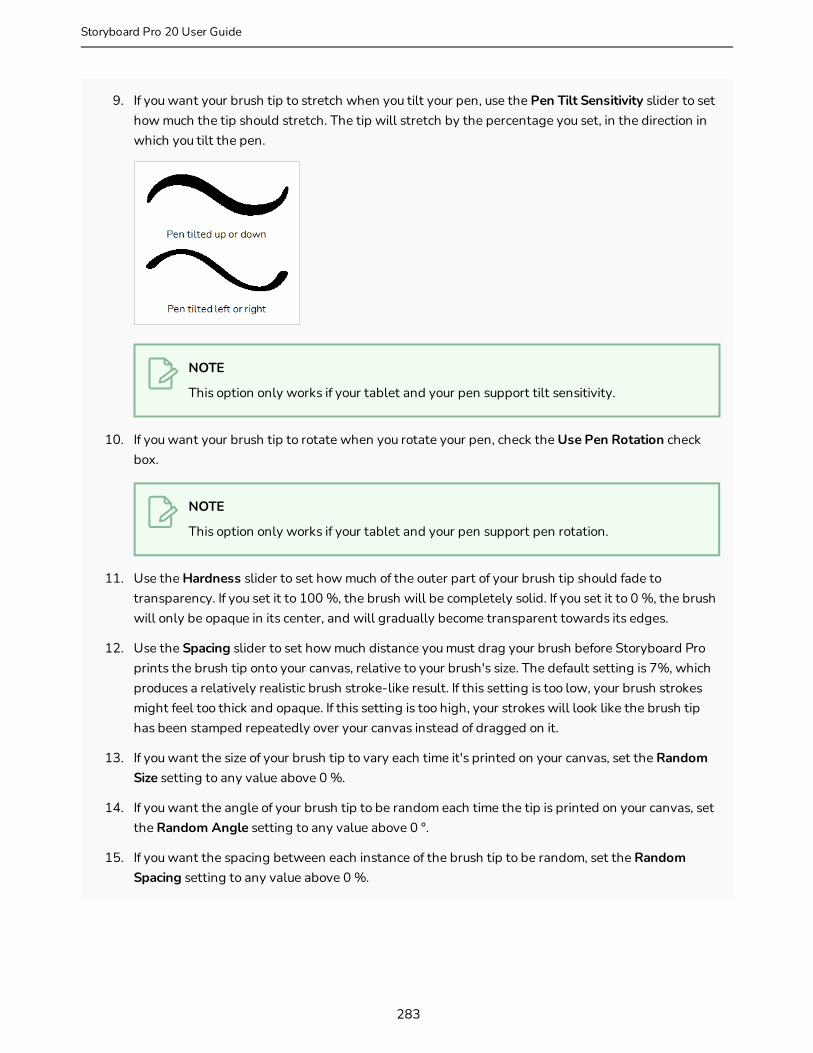
9. If you want your brush tip to stretch when you tilt your pen, use the Pen Tilt Sensitivity slider to set how much the tip should stretch. The tip will stretch by the percentage you set, in the direction in which you tilt the pen.
NOTE
This option only works if your tablet and your pen support tilt sensitivity.
10. If you want your brush tip to rotate when you rotate your pen, check the Use Pen Rotation check box.
NOTE
This option only works if your tablet and your pen support pen rotation.
11. Use the Hardness slider to set how much of the outer part of your brush tip should fade to transparency. If you set it to 100 %, the brush will be completely solid. If you set it to 0 %, the brush will only be opaque in its center, and will gradually become transparent towards its edges.
12. Use the Spacing slider to set how much distance you must drag your brush before Storyboard Pro prints the brush tip onto your canvas, relative to your brush's size. The default setting is 7%, which produces a relatively realistic brush stroke-like result. If this setting is too low, your brush strokes might feel too thick and opaque. If this setting is too high, your strokes will look like the brush tip has been stamped repeatedly over your canvas instead of dragged on it.
13. If you want the size of your brush tip to vary each time it's printed on your canvas, set the Random Size setting to any value above 0 %.
14. If you want the angle of your brush tip to be random each time the tip is printed on your canvas, set the Random Angle setting to any value above 0 °.
15. If you want the spacing between each instance of the brush tip to be random, set the Random Spacing setting to any value above 0 %.
283
Storyboard Pro 20 User Guide

Chapter 7: Drawing
16. If you want the spacing between each instance of the brush tip to be random, set the Random Spacing setting to any value above 0 %.
17. In the Stage view, start drawing to test your brush settings.
284
Adding a Brush Tip
In the Brush or Eraser Properties dialog, you will find a set of default brush tips which are bundled with Storyboard Pro, but you can also create your own brush tips, then export your collection or import an existing set.
To make your own brush tip, you must first create an image file containing the brush tip, either in Storyboard Pro or in a third party software, like Adobe Photoshop, then import it into Storyboard Pro. A brush tip must be a greyscale image. Colors in brush tips are not acknowledged by Storyboard Pro, as brush tips only use the colour you are painting with in Storyboard Pro. Your brush tip should also not contain transparency, as Storyboard Pro determines the brush tip's transparency based on its black, white and grey levels. Its black parts will appear 100% opaque, its white parts will appear 100% transparent, and its grey parts will appear semitransparent.
You can import brush tips in any image format supported by Storyboard Pro. It is recommended to create brush tips in a resolution ranging from 100 x 100 pixels to 400 x 400 pixels.
Brush tips are shared between the brush tool and the eraser tool. Like paper textures and brush presets, paper textures are saved in your preferences. You can also export your brush tips into an .xml file, and import them on a different workstation, allowing you to share your brush tips between the different people collaborating on your project.
How to add a brush tip
1. In the Tools toolbar, select the Brush or Eraser tool.
2. In the Tool Properties view, click the arrow button to open the Brush/Eraser Properties dialog.
3. If you are drawing on a vector layer, set the Brush Type to Textured Vector if you are using the brush tool or the Eraser Type to Textured Eraser or Textured, Preserve Vector if you are using the eraser tool.
4. Do one of the following:
l Click on the Paper Texture menu icon and select Add.
l Click the Add Paper Texture button.
285
Storyboard Pro 20 User Guide

Chapter 7: Drawing
5. In the file browser window, navigate to the location of your texture image file and select it.
6. Click Open to import the file into the Paper Texture library.
By default, an imported texture is given the name of the image file.
286

Renaming Brush Tips
You can rename your bitmap brush tips to keep your list organized.
How to rename a brush tip
1. In the Tools toolbar, select the Brush or Eraser tool.
2. In the Tool Properties view, click the arrow button to open the Brush/Eraser Properties dialog.
3. If you are drawing on a vector layer, set the Brush Type to Textured Vector if you are using the brush tool or the Eraser Type to Textured Eraser or Textured, Preserve Vector if you are using the eraser tool.
4. Select the brush tip you wish to rename.
5. Click on the Paper Texture menu icon and select Rename.
6. In the Rename dialog box that appears, type in the new name of the brush tip.
7. Click OK.
287
Storyboard Pro 20 User Guide

Chapter 7: Drawing
Deleting Brush Tips
You can delete unnecessary brush tips to keep your list organized.
How to delete a brush tip
1. In the Tools toolbar, select the Brush or Eraser tool.
2. In the Tool Properties view, click the arrow button to open the Brush/Eraser Properties dialog.
3. If you are drawing on a vector layer, set the Brush Type to Textured Vector if you are using the brush tool or the Eraser Type to Textured Eraser or Textured, Preserve Vector if you are using the eraser tool.
4. Select the brush tip you wish to delete.
5. Do one of the following:
l Click on the Paper Texture menu icon and select Delete.
l Click the Delete button.
NOTE
You can delete any brush tip in the Paper Texture library, including the default paper textures, except for the three solid brush tips: Circle, Diamond and Square. Also, brush tips will not get deleted if they are used in a brush preset.
288
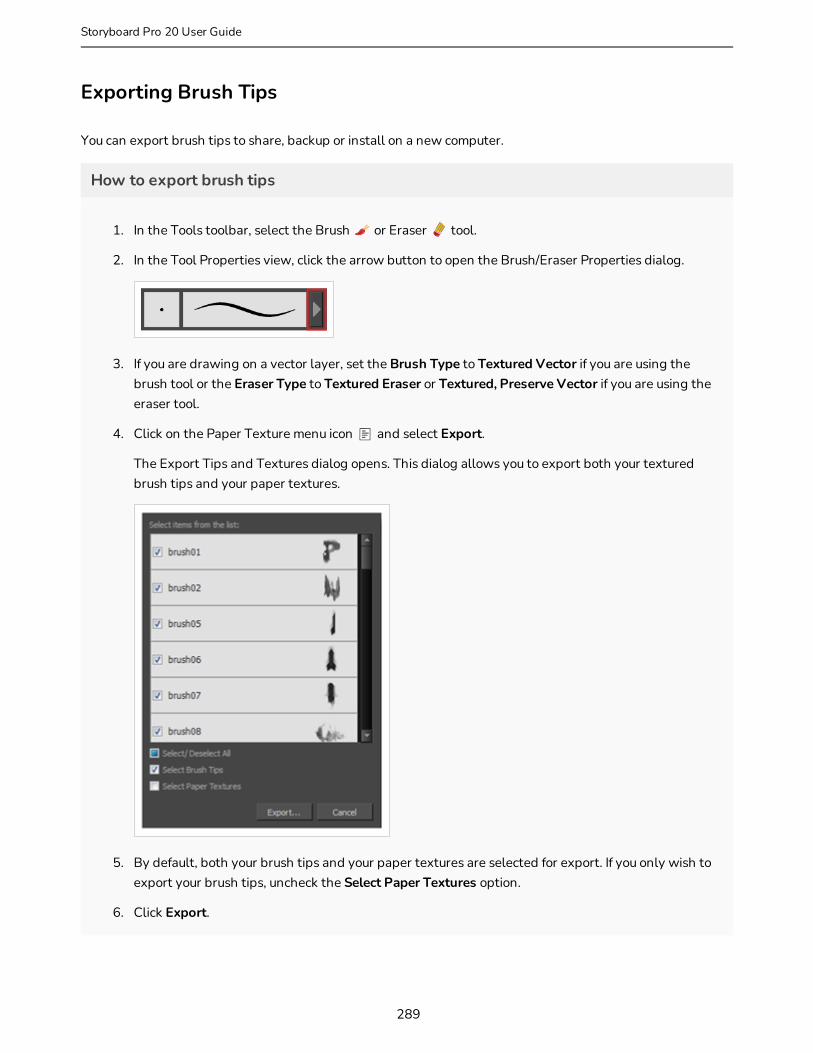
Exporting Brush Tips
You can export brush tips to share, backup or install on a new computer.
How to export brush tips
1. In the Tools toolbar, select the Brush or Eraser tool.
2. In the Tool Properties view, click the arrow button to open the Brush/Eraser Properties dialog.
3. If you are drawing on a vector layer, set the Brush Type to Textured Vector if you are using the brush tool or the Eraser Type to Textured Eraser or Textured, Preserve Vector if you are using the eraser tool.
4. Click on the Paper Texture menu icon and select Export.
The Export Tips and Textures dialog opens. This dialog allows you to export both your textured brush tips and your paper textures.
5. By default, both your brush tips and your paper textures are selected for export. If you only wish to export your brush tips, uncheck the Select Paper Textures option.
6. Click Export.
289
Storyboard Pro 20 User Guide

Chapter 7: Drawing
7. In the Export Textures window that appears, browse to a location where you want save the .xml file and give it a name.
8. Click Save.
290
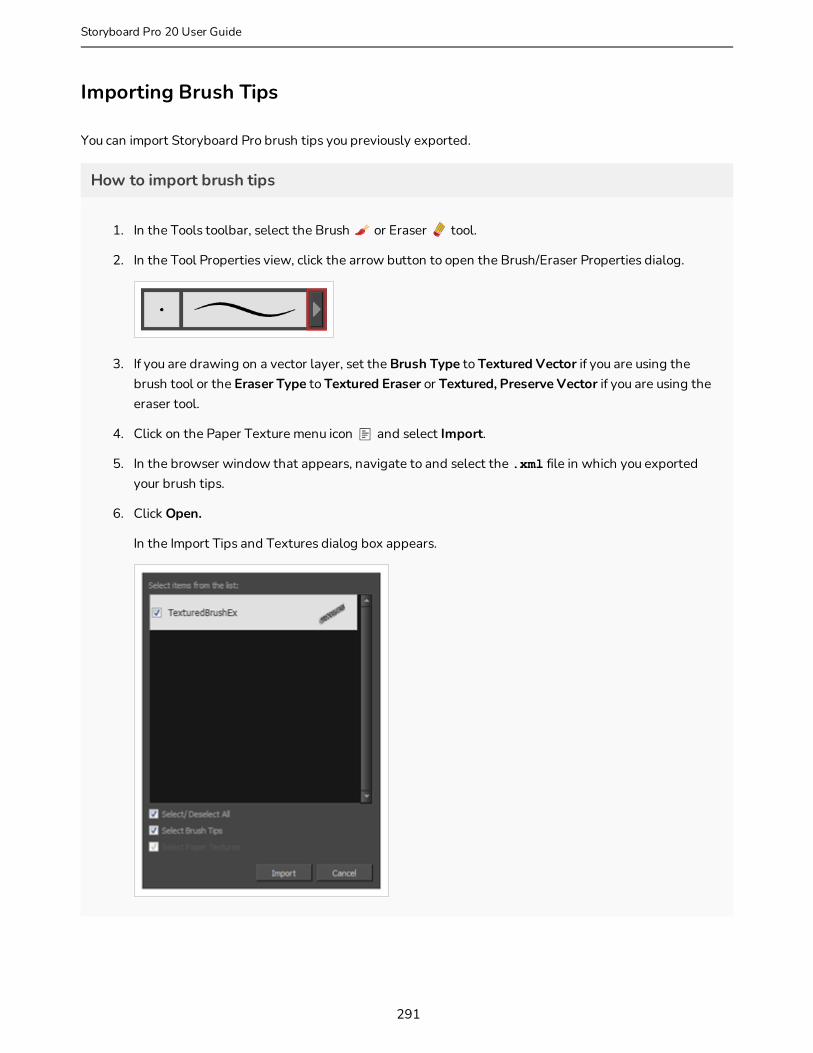
Importing Brush Tips
You can import Storyboard Pro brush tips you previously exported.
How to import brush tips
1. In the Tools toolbar, select the Brush or Eraser tool.
2. In the Tool Properties view, click the arrow button to open the Brush/Eraser Properties dialog.
3. If you are drawing on a vector layer, set the Brush Type to Textured Vector if you are using the brush tool or the Eraser Type to Textured Eraser or Textured, Preserve Vector if you are using the eraser tool.
4. Click on the Paper Texture menu icon and select Import.
5. In the browser window that appears, navigate to and select the .xml file in which you exported your brush tips.
6. Click Open.
In the Import Tips and Textures dialog box appears.
291
Storyboard Pro 20 User Guide

Chapter 7: Drawing
7. If the selected .xml file also contains paper textures, they will be selected for import along with the brush tips by default. If you wish to only import the paper textures, uncheck the Select Paper Textures option.
8. Click Import.
The imported brush tips appear in the Brush Tips Library.
292

Changing the Brush Tip Display
You can display your preset list as thumbnails or a list.
How to change the Brush Tips thumbnail display
1. In the Tools toolbar, select the Brush or Eraser tool.
2. In the Tool Properties view, click the arrow button to open the Brush/Eraser Properties dialog.
3. If you are drawing on a vector layer, set the Brush Type to Textured Vector if you are using the brush tool or the Eraser Type to Textured Eraser or Textured, Preserve Vector if you are using the eraser tool.
1. Click on the Brush Tips menu icon .
2. Select one of the following options:
l Small Thumbnail: Displays brush tips in a grid of small thumbnails.
l Large Thumbnail: Displays brush tips in a grid of large thumbnails with their name. The default view setting.
l List View: Displays brush tips in a list, with their name on the left and their texture on the right of each row.
293
Storyboard Pro 20 User Guide
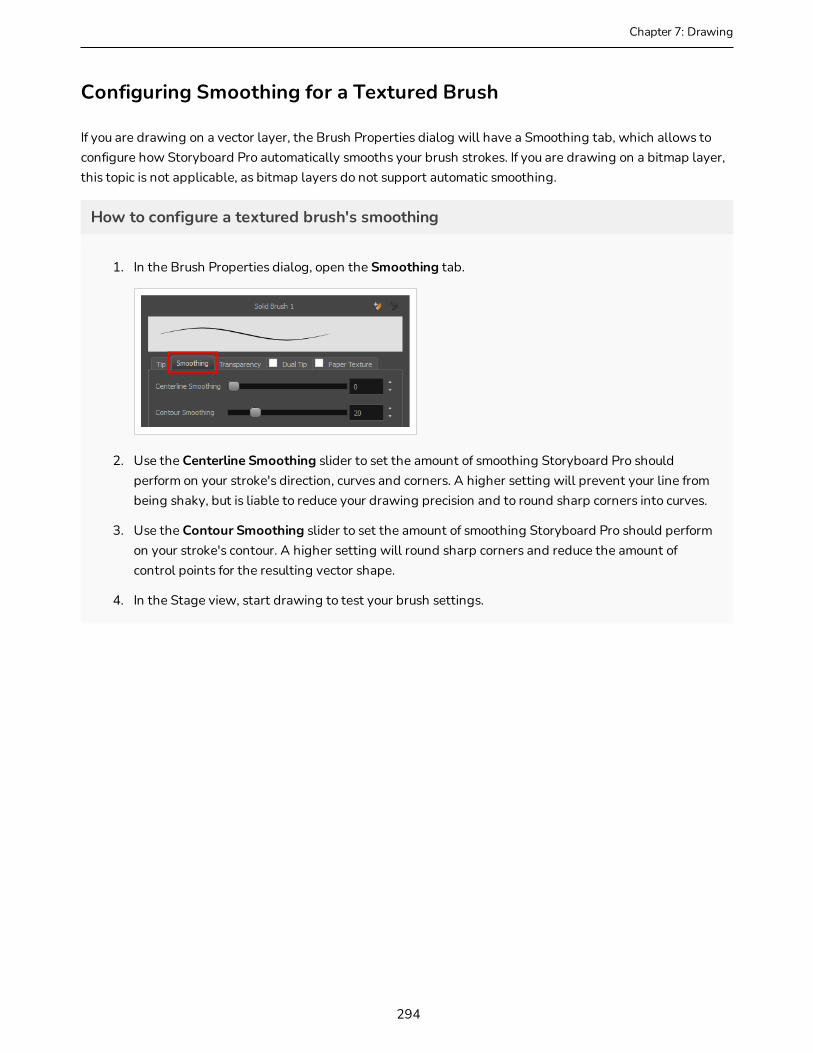
Chapter 7: Drawing
Configuring Smoothing for a Textured Brush
If you are drawing on a vector layer, the Brush Properties dialog will have a Smoothing tab, which allows to configure how Storyboard Pro automatically smooths your brush strokes. If you are drawing on a bitmap layer, this topic is not applicable, as bitmap layers do not support automatic smoothing.
How to configure a textured brush's smoothing
1. In the Brush Properties dialog, open the Smoothing tab.
2. Use the Centerline Smoothing slider to set the amount of smoothing Storyboard Pro should perform on your stroke's direction, curves and corners. A higher setting will prevent your line from being shaky, but is liable to reduce your drawing precision and to round sharp corners into curves.
3. Use the Contour Smoothing slider to set the amount of smoothing Storyboard Pro should perform on your stroke's contour. A higher setting will round sharp corners and reduce the amount of control points for the resulting vector shape.
4. In the Stage view, start drawing to test your brush settings.
294
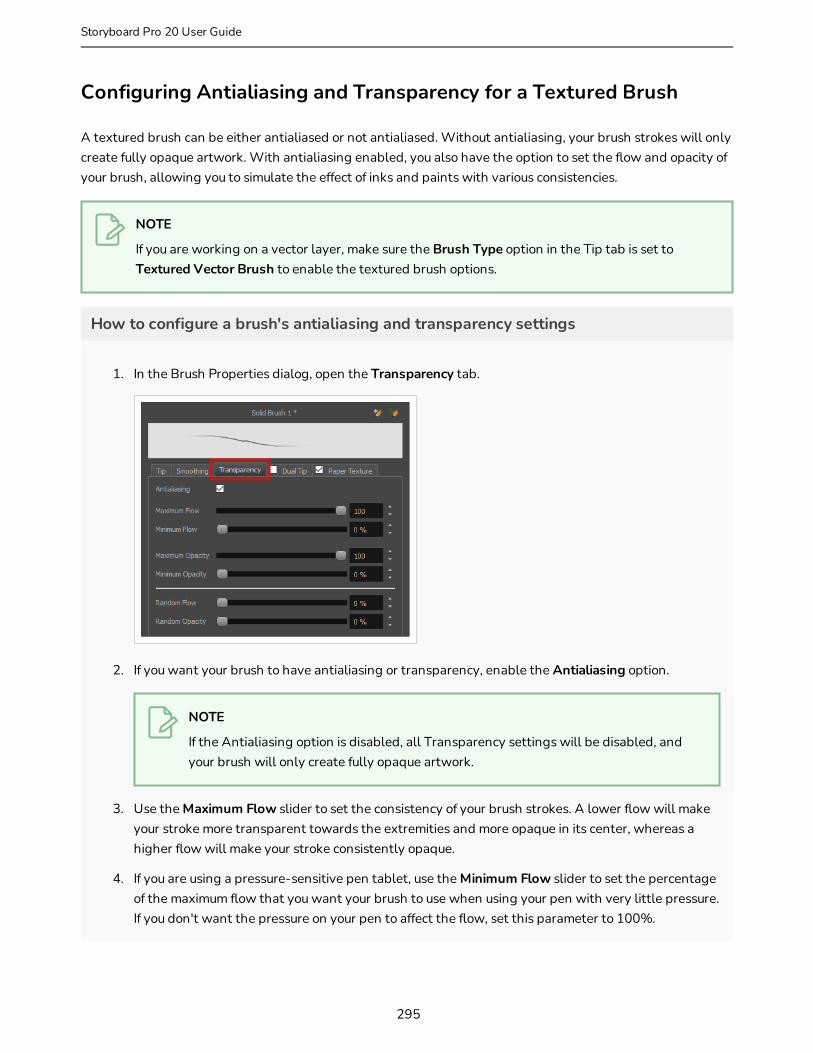
Configuring Antialiasing and Transparency for a Textured Brush
A textured brush can be either antialiased or not antialiased. Without antialiasing, your brush strokes will only create fully opaque artwork. With antialiasing enabled, you also have the option to set the flow and opacity of your brush, allowing you to simulate the effect of inks and paints with various consistencies.
NOTE
If you are working on a vector layer, make sure the Brush Type option in the Tip tab is set to Textured Vector Brush to enable the textured brush options.
How to configure a brush's antialiasing and transparency settings
1. In the Brush Properties dialog, open the Transparency tab.
2. If you want your brush to have antialiasing or transparency, enable the Antialiasing option.
NOTE
If the Antialiasing option is disabled, all Transparency settings will be disabled, and your brush will only create fully opaque artwork.
3. Use the Maximum Flow slider to set the consistency of your brush strokes. A lower flow will make your stroke more transparent towards the extremities and more opaque in its center, whereas a higher flow will make your stroke consistently opaque.
4. If you are using a pressure-sensitive pen tablet, use the Minimum Flow slider to set the percentage of the maximum flow that you want your brush to use when using your pen with very little pressure. If you don't want the pressure on your pen to affect the flow, set this parameter to 100%.
295
Storyboard Pro 20 User Guide

Chapter 7: Drawing
5. Use the Maximum Opacity slider to set the maximum opacity of your brush strokes.
6. If you are using a pressure-sensitive pen tablet, use the Minimum Opacity slider to set the percentage of the maximum opacity that you want your brush to use when using your pen with very little pressure. If you don't want the pressure on your pen to affect the opacity, set this parameter to 100%.
7. If you want the Flow of your brush to be randomized, set the Random Flow setting to any value over 0 %.
8. If you want the Opacity of your brush to be randomized, set the Random Opacity setting to any value over 0 %.
9. In the Stage view, start drawing to test your brush settings.
296
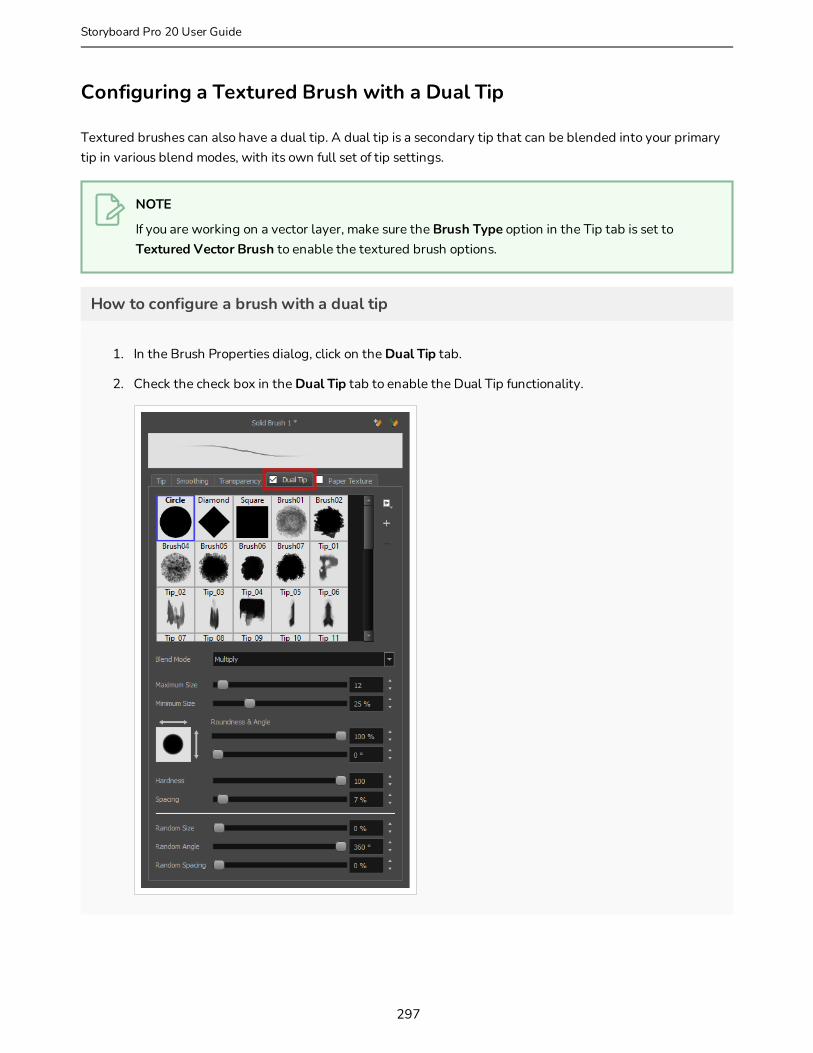
Configuring a Textured Brush with a Dual Tip
Textured brushes can also have a dual tip. A dual tip is a secondary tip that can be blended into your primary tip in various blend modes, with its own full set of tip settings.
NOTE
If you are working on a vector layer, make sure the Brush Type option in the Tip tab is set to Textured Vector Brush to enable the textured brush options.
How to configure a brush with a dual tip
1. In the Brush Properties dialog, click on the Dual Tip tab.
2. Check the check box in the Dual Tip tab to enable the Dual Tip functionality.
297
Storyboard Pro 20 User Guide
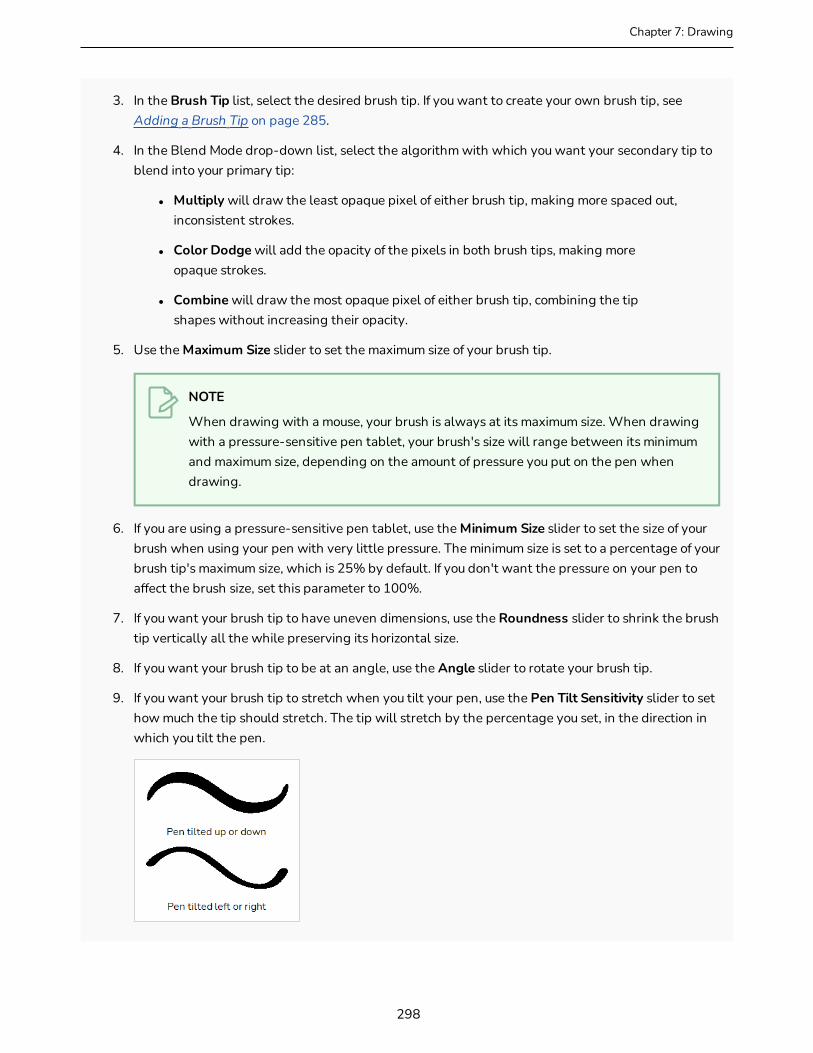
Chapter 7: Drawing
3. In the Brush Tip list, select the desired brush tip. If you want to create your own brush tip, see Adding a Brush Tip on page 285.
4. In the Blend Mode drop-down list, select the algorithm with which you want your secondary tip to blend into your primary tip:
l Multiply will draw the least opaque pixel of either brush tip, making more spaced out, inconsistent strokes.
l Color Dodge will add the opacity of the pixels in both brush tips, making more opaque strokes.
l Combine will draw the most opaque pixel of either brush tip, combining the tip shapes without increasing their opacity.
5. Use the Maximum Size slider to set the maximum size of your brush tip.
NOTE
When drawing with a mouse, your brush is always at its maximum size. When drawing with a pressure-sensitive pen tablet, your brush's size will range between its minimum and maximum size, depending on the amount of pressure you put on the pen when drawing.
6. If you are using a pressure-sensitive pen tablet, use the Minimum Size slider to set the size of your brush when using your pen with very little pressure. The minimum size is set to a percentage of your brush tip's maximum size, which is 25% by default. If you don't want the pressure on your pen to affect the brush size, set this parameter to 100%.
7. If you want your brush tip to have uneven dimensions, use the Roundness slider to shrink the brush tip vertically all the while preserving its horizontal size.
8. If you want your brush tip to be at an angle, use the Angle slider to rotate your brush tip.
9. If you want your brush tip to stretch when you tilt your pen, use the Pen Tilt Sensitivity slider to set how much the tip should stretch. The tip will stretch by the percentage you set, in the direction in which you tilt the pen.
298
NOTE
This option only works if your tablet and your pen support tilt sensitivity.
10. If you want your brush tip to rotate when you rotate your pen, check the Use Pen Rotation check box.
NOTE
This option only works if your tablet and your pen support pen rotation.
11. Use the Hardness slider to set how much of the outer part of your brush tip should fade to transparency. If you set it to 100 %, the brush will be completely solid. If you set it to 0 %, the brush will only be opaque in its center, and will gradually become transparent towards its edges.
12. Use the Spacing slider to set how much distance you must drag your brush before Storyboard Pro prints the brush tip onto your canvas, relative to your brush's size. The default setting is 7%, which produces a relatively realistic brush stroke-like result. If this setting is too low, your brush strokes might feel too thick and opaque. If this setting is too high, your strokes will look like the brush tip has been stamped repeatedly over your canvas instead of dragged on it.
13. If you want the size of your brush tip to vary each time it's printed on your canvas, set the Random Size setting to any value above 0 %.
14. If you want the angle of your brush tip to be random each time the tip is printed on your canvas, set the Random Angle setting to any value above 0 °.
15. If you want the spacing between each instance of the brush tip to be random, set the Random Spacing setting to any value above 0 %.
16. If you want the spacing between each instance of the brush tip to be random, set the Random Spacing setting to any value above 0 %.
17. In the Stage view, start drawing to test your brush settings.
299
Storyboard Pro 20 User Guide

Chapter 7: Drawing
Configuring a Brush with a Paper Texture
Paper textures are bitmap textures that you can apply to your brush strokes as you draw. They act as transparency filters that are tiled over your brush strokes to make them look grainy, as if you were drawing on a rough paper surface. While Storyboard Pro comes bundled with preset paper textures, it is also possible to create and use your own paper textures.
How to configure a brush with a paper texture
1. In the Brush Properties dialog, click on the Paper Texture tab.
2. Check the check box in the Paper Texture tab to enable paper textures.
300
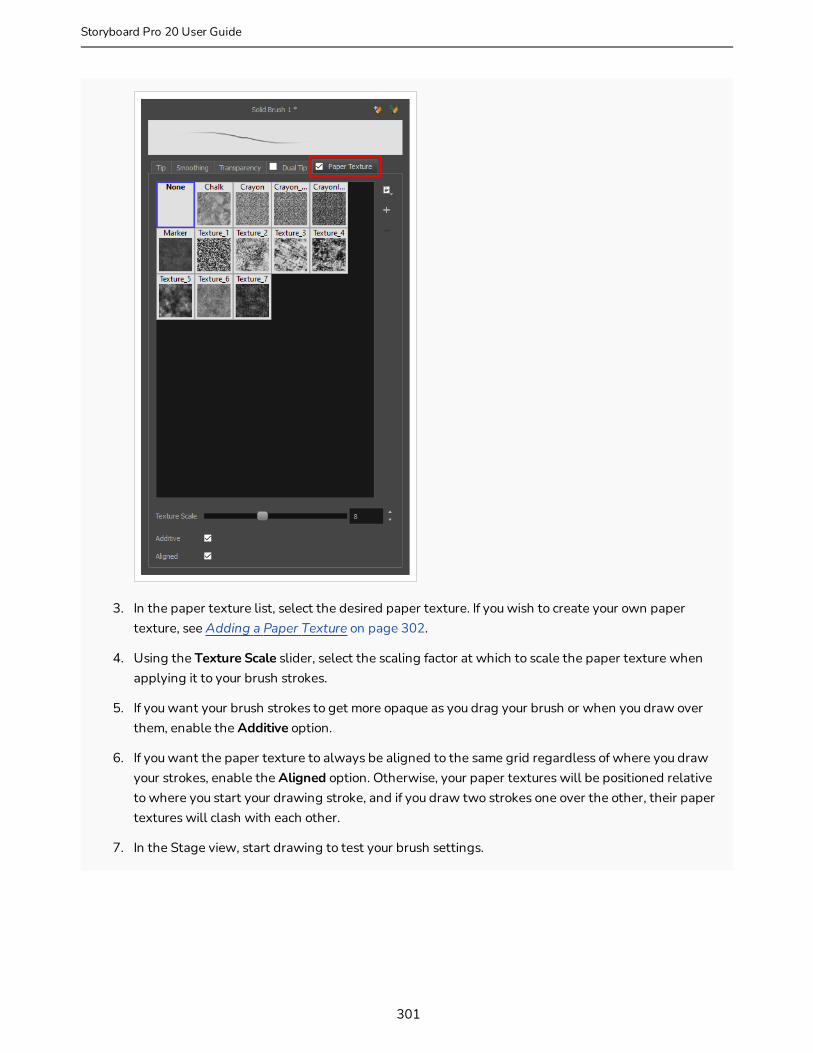
3. In the paper texture list, select the desired paper texture. If you wish to create your own paper texture, see Adding a Paper Texture on page 302.
4. Using the Texture Scale slider, select the scaling factor at which to scale the paper texture when applying it to your brush strokes.
5. If you want your brush strokes to get more opaque as you drag your brush or when you draw over them, enable the Additive option.
6. If you want the paper texture to always be aligned to the same grid regardless of where you draw your strokes, enable the Aligned option. Otherwise, your paper textures will be positioned relative to where you start your drawing stroke, and if you draw two strokes one over the other, their paper textures will clash with each other.
7. In the Stage view, start drawing to test your brush settings.
301
Storyboard Pro 20 User Guide
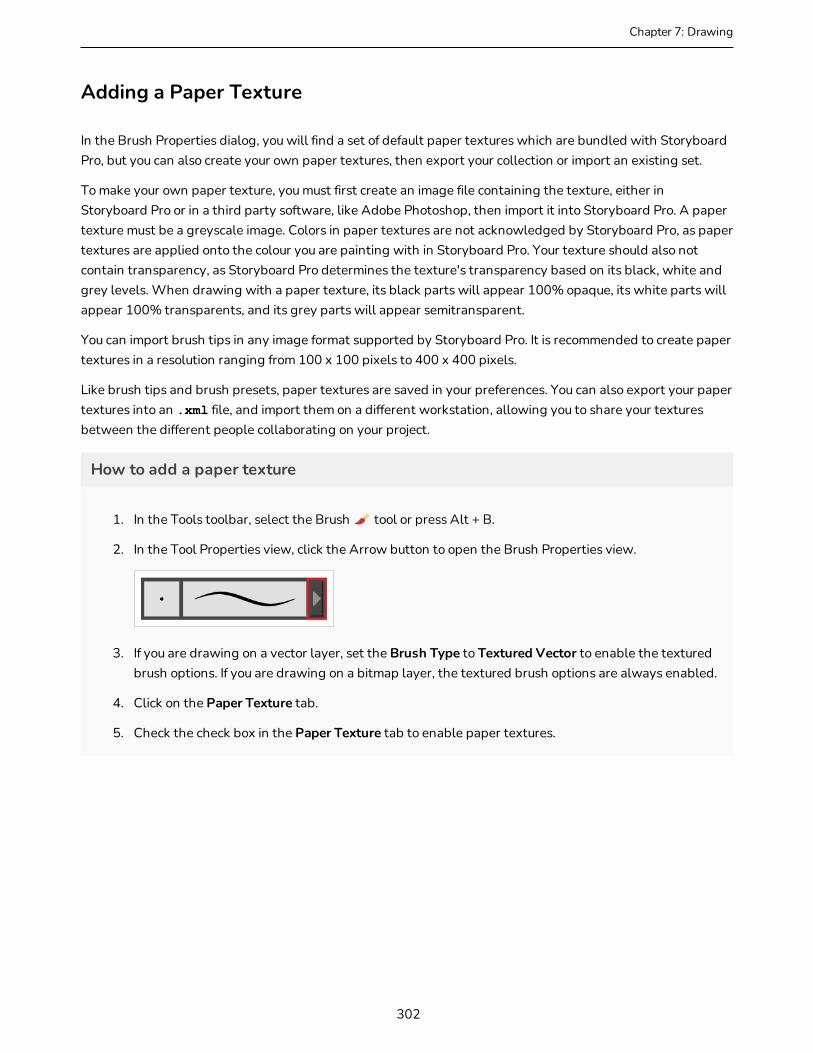
Chapter 7: Drawing
Adding a Paper Texture
In the Brush Properties dialog, you will find a set of default paper textures which are bundled with Storyboard Pro, but you can also create your own paper textures, then export your collection or import an existing set.
To make your own paper texture, you must first create an image file containing the texture, either in Storyboard Pro or in a third party software, like Adobe Photoshop, then import it into Storyboard Pro. A paper texture must be a greyscale image. Colors in paper textures are not acknowledged by Storyboard Pro, as paper textures are applied onto the colour you are painting with in Storyboard Pro. Your texture should also not contain transparency, as Storyboard Pro determines the texture's transparency based on its black, white and grey levels. When drawing with a paper texture, its black parts will appear 100% opaque, its white parts will appear 100% transparents, and its grey parts will appear semitransparent.
You can import brush tips in any image format supported by Storyboard Pro. It is recommended to create paper textures in a resolution ranging from 100 x 100 pixels to 400 x 400 pixels.
Like brush tips and brush presets, paper textures are saved in your preferences. You can also export your paper textures into an .xml file, and import them on a different workstation, allowing you to share your textures between the different people collaborating on your project.
How to add a paper texture
1. In the Tools toolbar, select the Brush tool or press Alt + B.
2. In the Tool Properties view, click the Arrow button to open the Brush Properties view.
3. If you are drawing on a vector layer, set the Brush Type to Textured Vector to enable the textured brush options. If you are drawing on a bitmap layer, the textured brush options are always enabled.
4. Click on the Paper Texture tab.
5. Check the check box in the Paper Texture tab to enable paper textures.
302

1. In the Brush Properties dialog, do one of the following:
l From the Paper Texture menu, select Add.
l Click the Add Paper Texture button.
2. In the browser window that appears, navigate to where you saved your texture file.
3. Click Open to import the file into the Paper Texture library.
By default, an imported texture is given the name of the image file.
303
Storyboard Pro 20 User Guide

Chapter 7: Drawing
Renaming a Paper Texture
You can rename your paper textures to keep your list organized.
How to rename a paper texture
1. In the Tools toolbar, select the Brush tool or press Alt + B.
2. In the Tool Properties view, click the Arrow button to open the Brush Properties view.
3. If you are drawing on a vector layer, set the Brush Type to Textured Vector to enable the textured brush options. If you are drawing on a bitmap layer, the textured brush options are always enabled.
4. Click on the Paper Texture tab.
5. Check the check box in the Paper Texture tab to enable paper textures.
6. Select the texture you want to rename.
7. Click on the Paper Texture menu icon and select Rename.
304
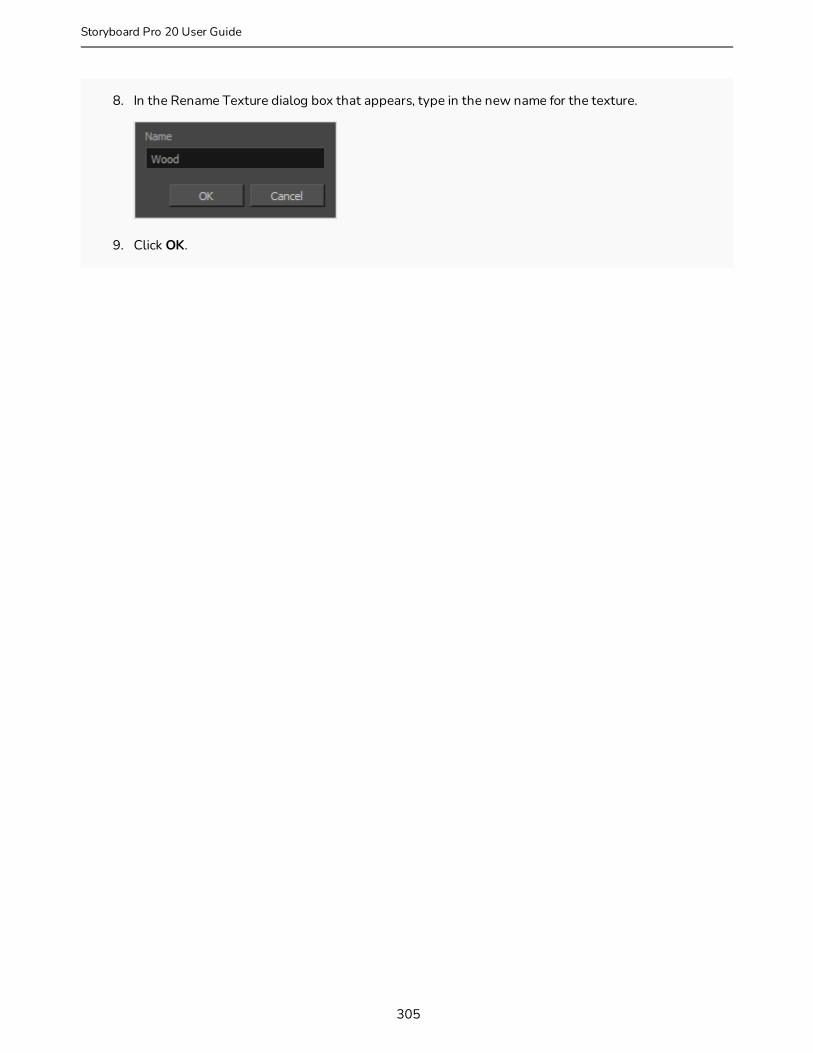
8. In the Rename Texture dialog box that appears, type in the new name for the texture.
9. Click OK.
305
Storyboard Pro 20 User Guide
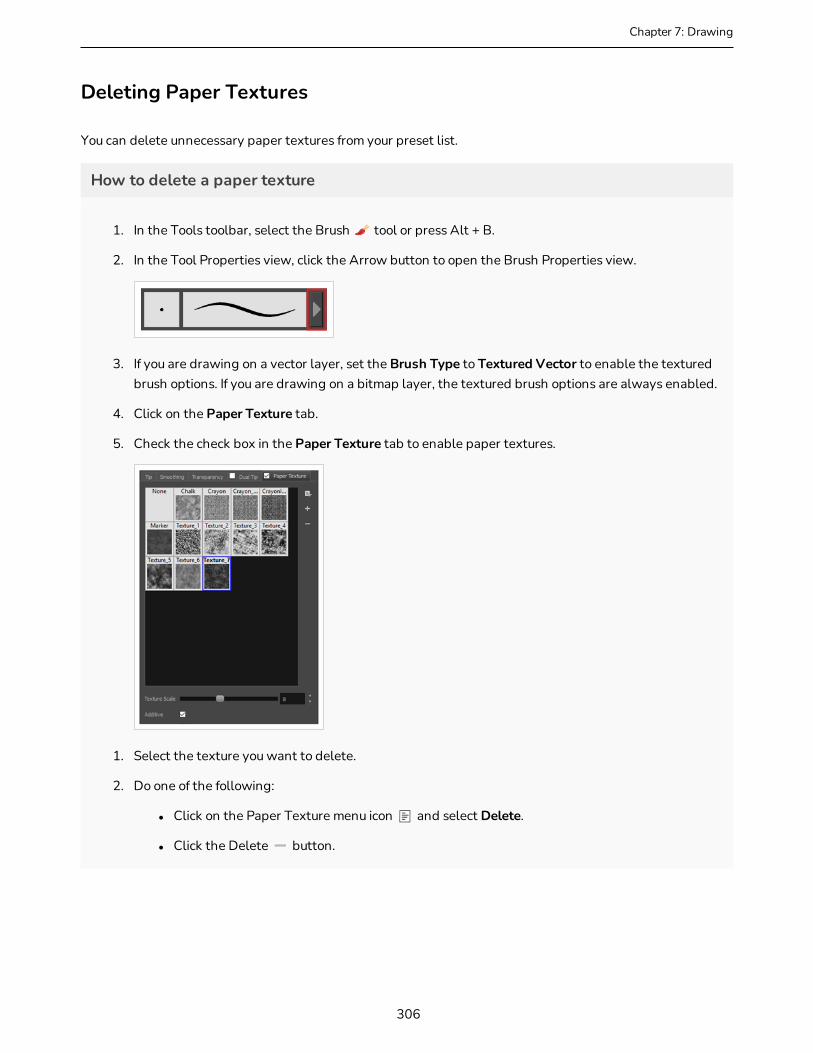
Chapter 7: Drawing
Deleting Paper Textures
You can delete unnecessary paper textures from your preset list.
How to delete a paper texture
1. In the Tools toolbar, select the Brush tool or press Alt + B.
2. In the Tool Properties view, click the Arrow button to open the Brush Properties view.
3. If you are drawing on a vector layer, set the Brush Type to Textured Vector to enable the textured brush options. If you are drawing on a bitmap layer, the textured brush options are always enabled.
4. Click on the Paper Texture tab.
5. Check the check box in the Paper Texture tab to enable paper textures.
1. Select the texture you want to delete.
2. Do one of the following:
l Click on the Paper Texture menu icon and select Delete.
l Click the Delete button.
306
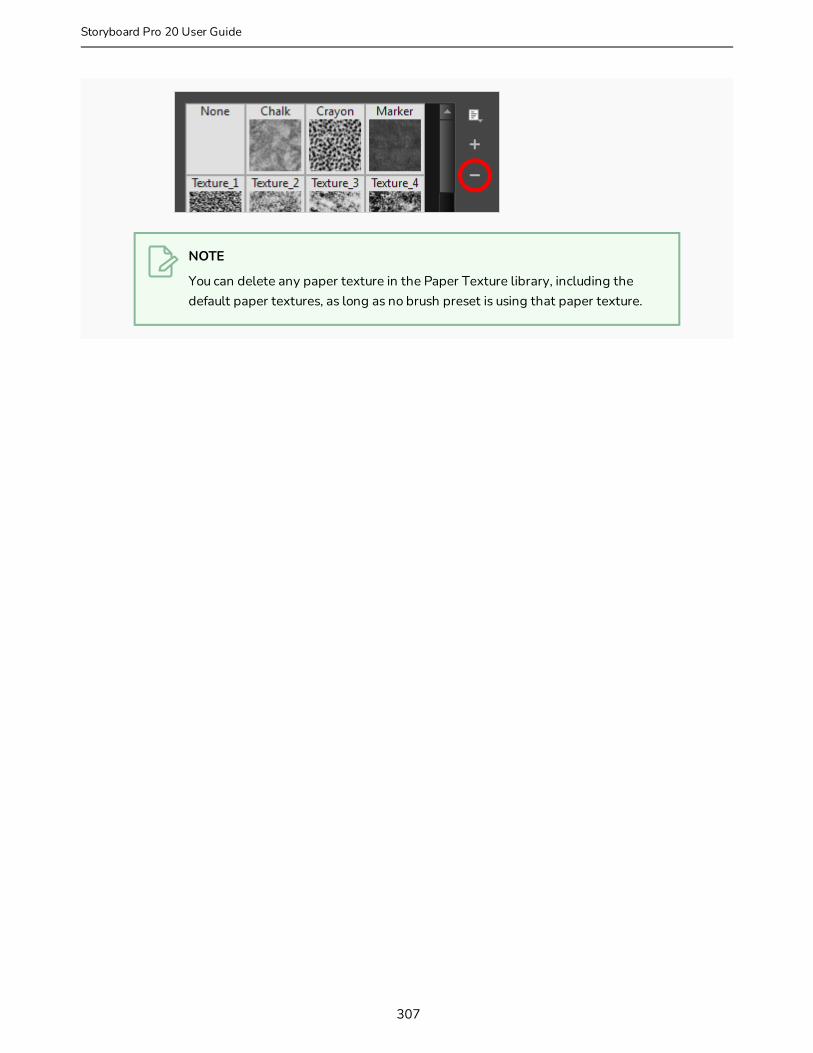
NOTE
You can delete any paper texture in the Paper Texture library, including the default paper textures, as long as no brush preset is using that paper texture.
307
Storyboard Pro 20 User Guide

Chapter 7: Drawing
Exporting Paper Textures
You can export paper textures into an .xml file which will contain their name and bitmap texture. This can be useful if you wish to back up or share your paper textures.
How to export paper textures
1. In the Tools toolbar, select the Brush tool or press Alt + B.
2. In the Tool Properties view, click the Arrow button to open the Brush Properties view.
3. If you are drawing on a vector layer, set the Brush Type to Textured Vector to enable the textured brush options. If you are drawing on a bitmap layer, the textured brush options are always enabled.
4. Click on the Paper Texture tab.
5. Check the check box in the Paper Texture tab to enable paper textures.
6. Click on the Paper Texture menu icon and select Export.
The Export Tips and Textures dialog opens. This dialog allows you to export both your textured brush tips and your paper textures.
308
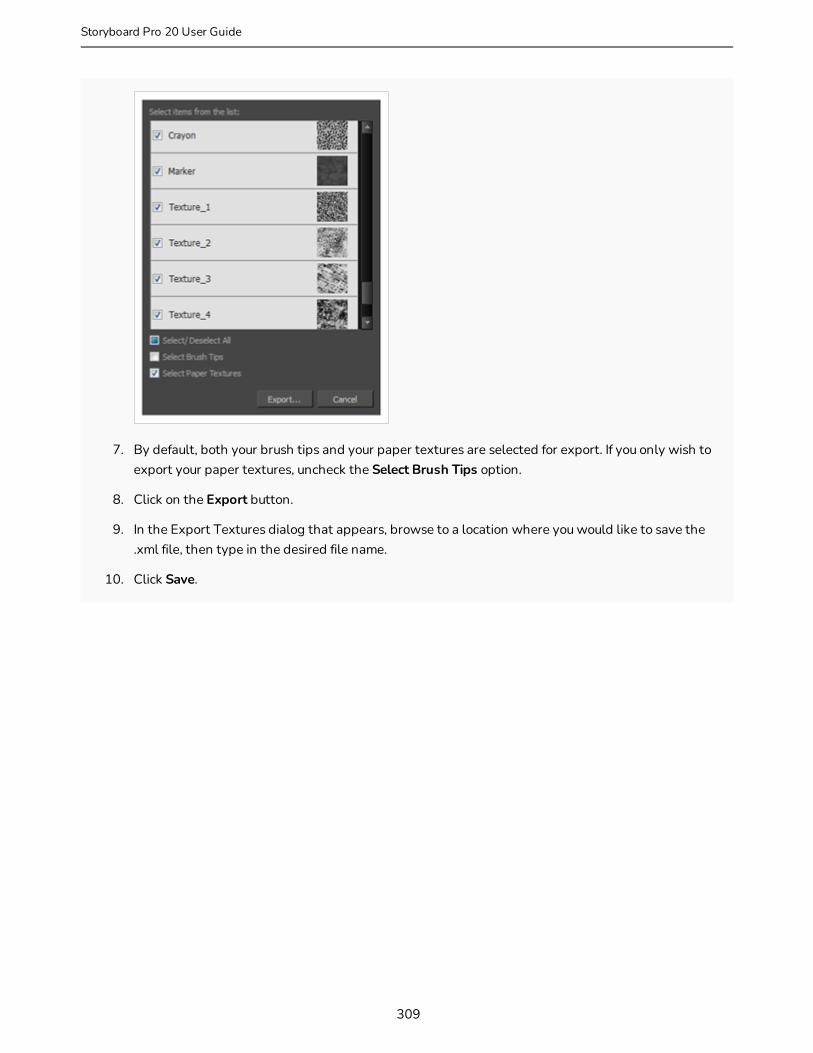
7. By default, both your brush tips and your paper textures are selected for export. If you only wish to export your paper textures, uncheck the Select Brush Tips option.
8. Click on the Export button.
9. In the Export Textures dialog that appears, browse to a location where you would like to save the .xml file, then type in the desired file name.
10. Click Save.
309
Storyboard Pro 20 User Guide
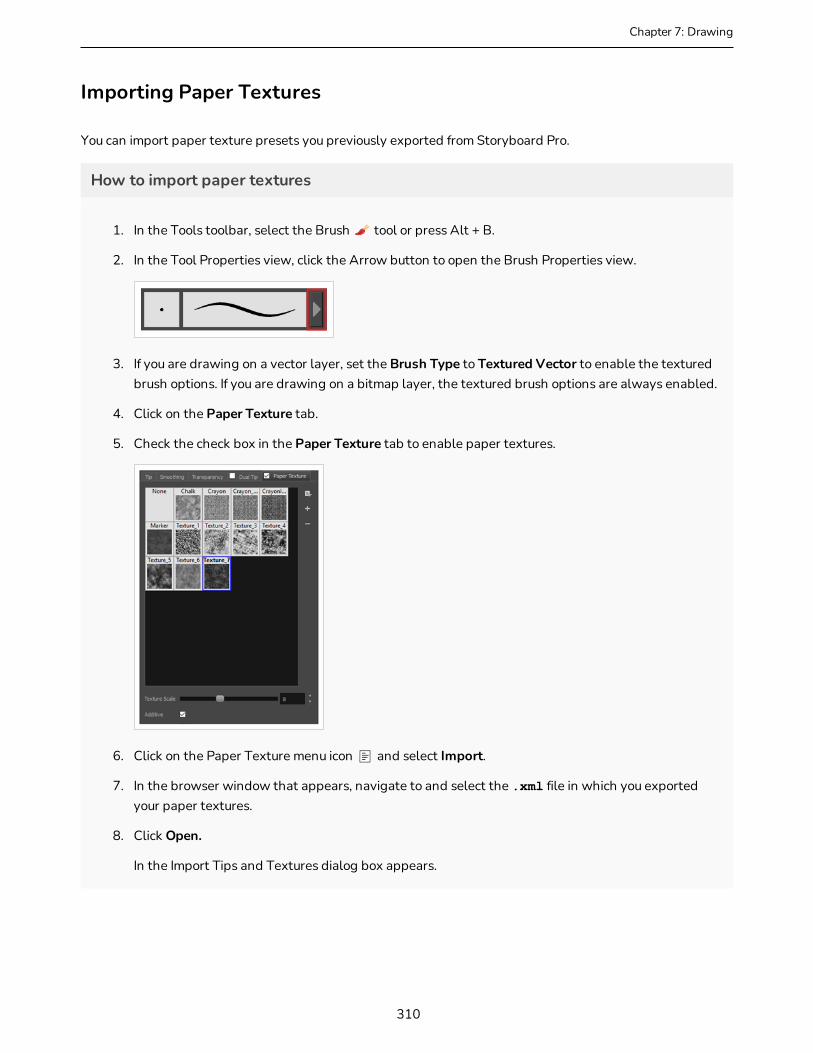
Chapter 7: Drawing
Importing Paper Textures
You can import paper texture presets you previously exported from Storyboard Pro.
How to import paper textures
1. In the Tools toolbar, select the Brush tool or press Alt + B.
2. In the Tool Properties view, click the Arrow button to open the Brush Properties view.
3. If you are drawing on a vector layer, set the Brush Type to Textured Vector to enable the textured brush options. If you are drawing on a bitmap layer, the textured brush options are always enabled.
4. Click on the Paper Texture tab.
5. Check the check box in the Paper Texture tab to enable paper textures.
6. Click on the Paper Texture menu icon and select Import.
7. In the browser window that appears, navigate to and select the .xml file in which you exported your paper textures.
8. Click Open.
In the Import Tips and Textures dialog box appears.
310
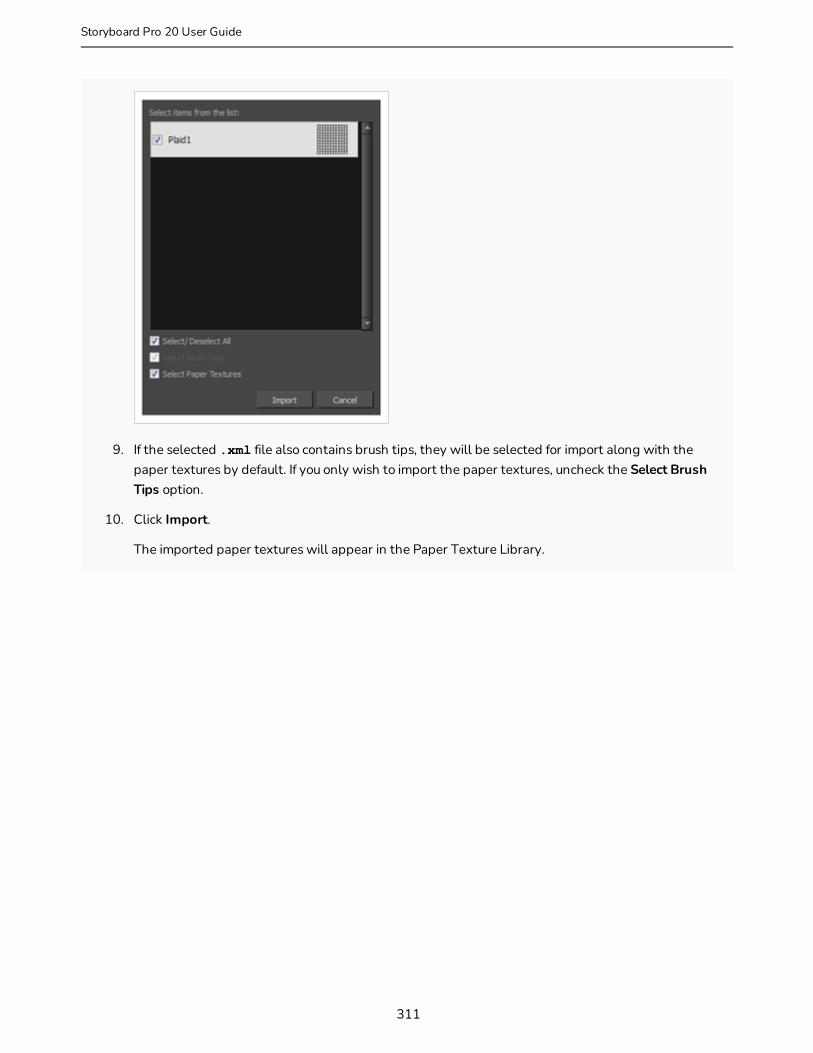
9. If the selected .xml file also contains brush tips, they will be selected for import along with the paper textures by default. If you only wish to import the paper textures, uncheck the Select Brush Tips option.
10. Click Import.
The imported paper textures will appear in the Paper Texture Library.
311
Storyboard Pro 20 User Guide
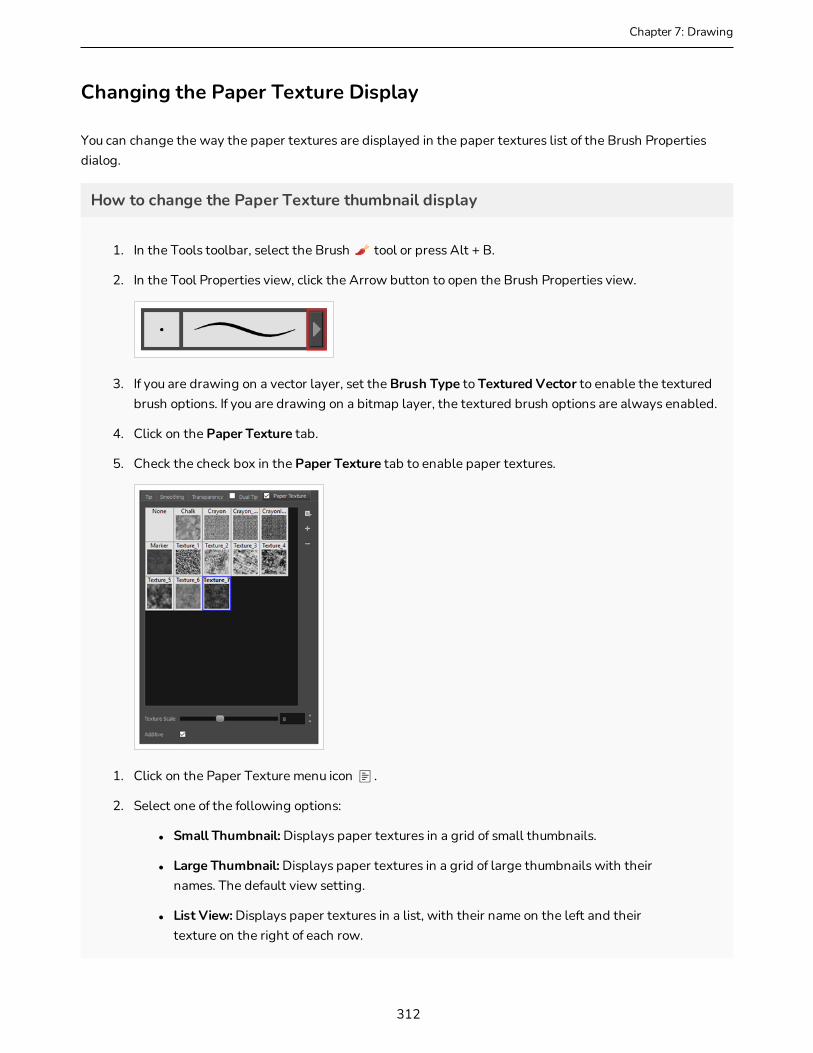
Chapter 7: Drawing
Changing the Paper Texture Display
You can change the way the paper textures are displayed in the paper textures list of the Brush Properties dialog.
How to change the Paper Texture thumbnail display
1. In the Tools toolbar, select the Brush tool or press Alt + B.
2. In the Tool Properties view, click the Arrow button to open the Brush Properties view.
3. If you are drawing on a vector layer, set the Brush Type to Textured Vector to enable the textured brush options. If you are drawing on a bitmap layer, the textured brush options are always enabled.
4. Click on the Paper Texture tab.
5. Check the check box in the Paper Texture tab to enable paper textures.
1. Click on the Paper Texture menu icon .
2. Select one of the following options:
l Small Thumbnail: Displays paper textures in a grid of small thumbnails.
l Large Thumbnail: Displays paper textures in a grid of large thumbnails with their names. The default view setting.
l List View: Displays paper textures in a list, with their name on the left and their texture on the right of each row.
312
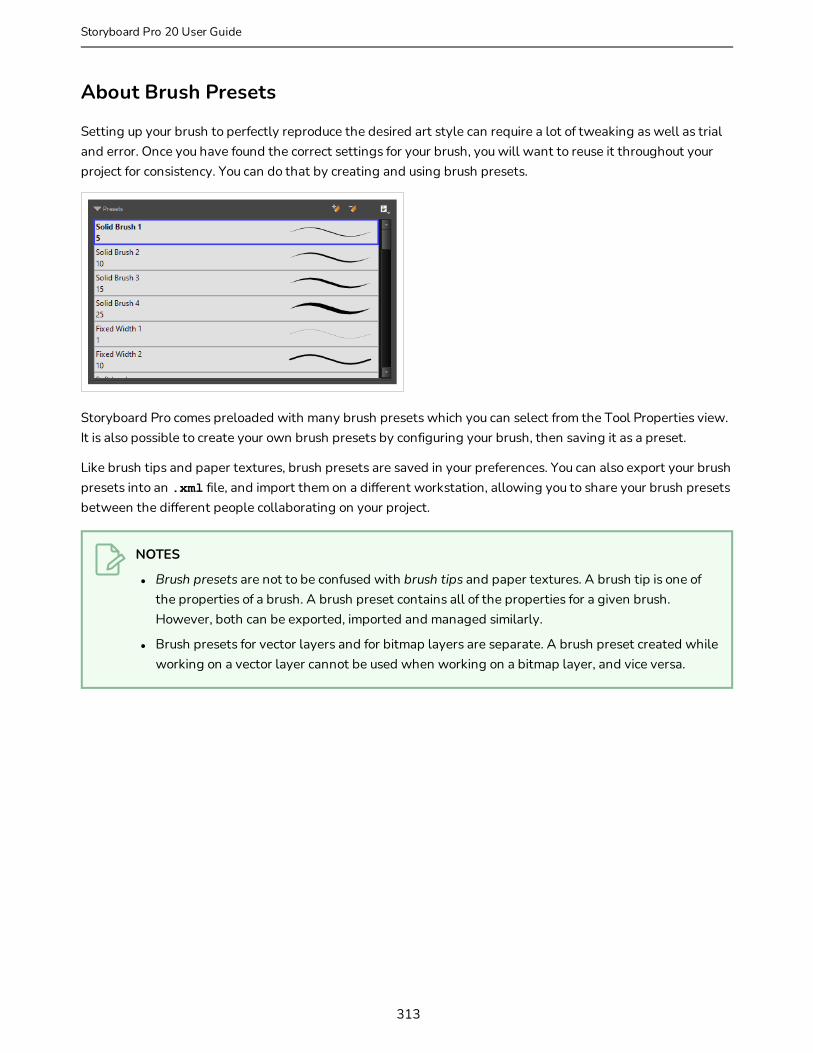
About Brush Presets
Setting up your brush to perfectly reproduce the desired art style can require a lot of tweaking as well as trial and error. Once you have found the correct settings for your brush, you will want to reuse it throughout your project for consistency. You can do that by creating and using brush presets.
Storyboard Pro comes preloaded with many brush presets which you can select from the Tool Properties view. It is also possible to create your own brush presets by configuring your brush, then saving it as a preset.
Like brush tips and paper textures, brush presets are saved in your preferences. You can also export your brush presets into an .xml file, and import them on a different workstation, allowing you to share your brush presets between the different people collaborating on your project.
NOTES
l Brush presets are not to be confused with brush tips and paper textures. A brush tip is one of the properties of a brush. A brush preset contains all of the properties for a given brush. However, both can be exported, imported and managed similarly.
l Brush presets for vector layers and for bitmap layers are separate. A brush preset created while working on a vector layer cannot be used when working on a bitmap layer, and vice versa.
313
Storyboard Pro 20 User Guide
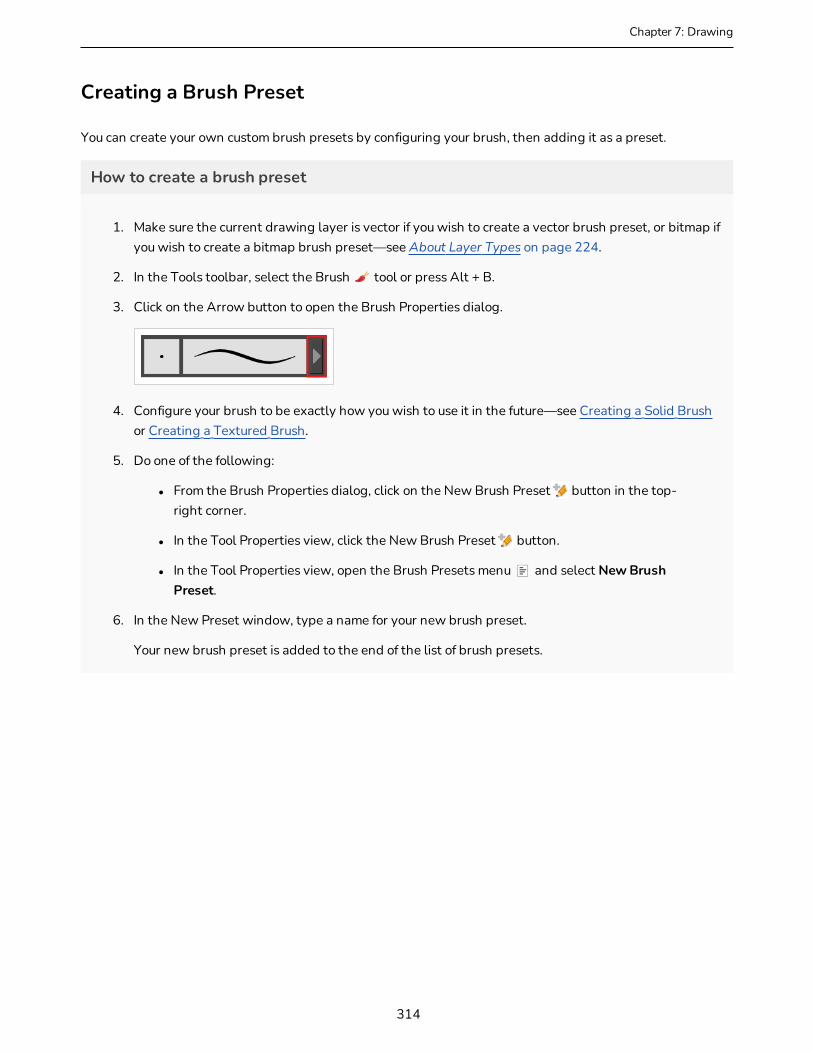
Chapter 7: Drawing
Creating a Brush Preset
You can create your own custom brush presets by configuring your brush, then adding it as a preset.
How to create a brush preset
1. Make sure the current drawing layer is vector if you wish to create a vector brush preset, or bitmap if you wish to create a bitmap brush preset—see About Layer Types on page 224.
2. In the Tools toolbar, select the Brush tool or press Alt + B.
3. Click on the Arrow button to open the Brush Properties dialog.
4. Configure your brush to be exactly how you wish to use it in the future—see Creating a Solid Brush or Creating a Textured Brush.
5. Do one of the following:
l From the Brush Properties dialog, click on the New Brush Preset button in the top-right corner.
l In the Tool Properties view, click the New Brush Preset button.
l In the Tool Properties view, open the Brush Presets menu and select New Brush Preset.
6. In the New Preset window, type a name for your new brush preset.
Your new brush preset is added to the end of the list of brush presets.
314
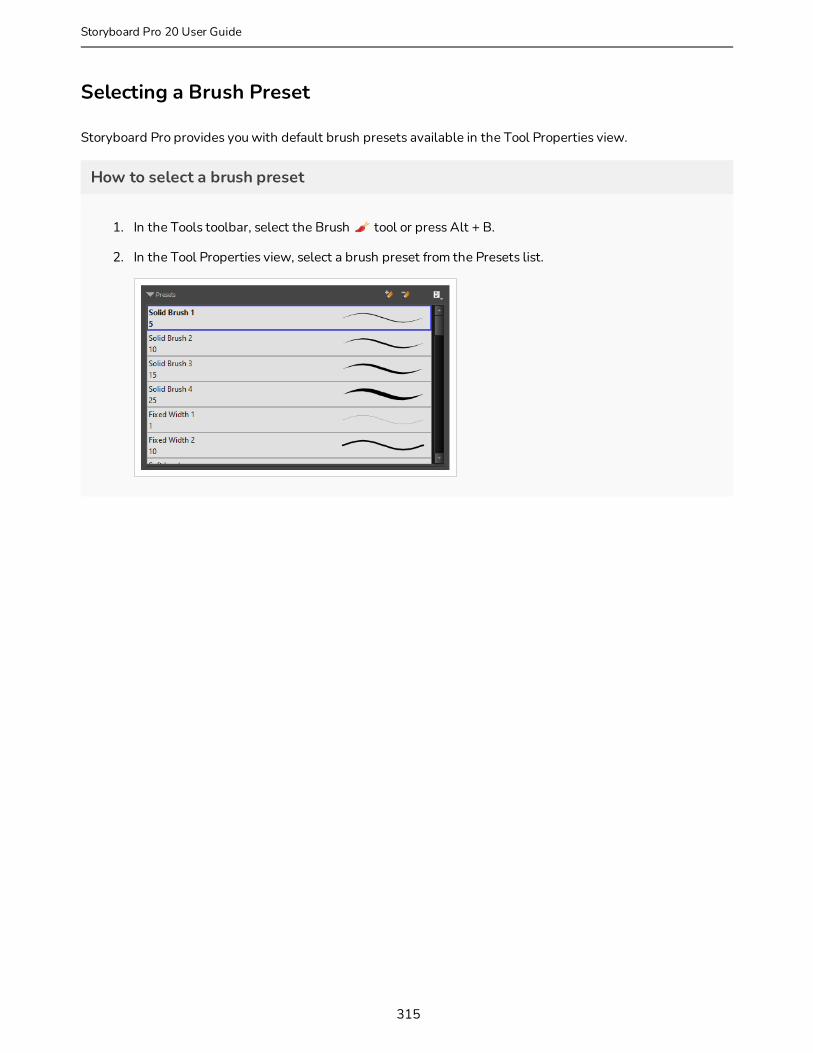
Selecting a Brush Preset
Storyboard Pro provides you with default brush presets available in the Tool Properties view.
How to select a brush preset
1. In the Tools toolbar, select the Brush tool or press Alt + B.
2. In the Tool Properties view, select a brush preset from the Presets list.
315
Storyboard Pro 20 User Guide

Chapter 7: Drawing
Updating a Brush Preset
If you want to modify the settings of an existing custom preset, you can do so by adjusting the parameters in the Tool Properties view, then updating your preset with your brush current's parameters.
How to update a brush preset
1. In the Tools toolbar, select the Brush tool or press Alt + B.
1. In the Tool Properties view, select the Brush Preset you wish to update.
2. Click on the Arrow button to open the Brush Properties view.
3. Configure your brush to be exactly how you wish to use it in the future—see Creating a Solid Brush or Creating a Textured Brush.
4. Click on the Update Brush Preset button in the upper-right corner of the Brush Properties dialog.
316
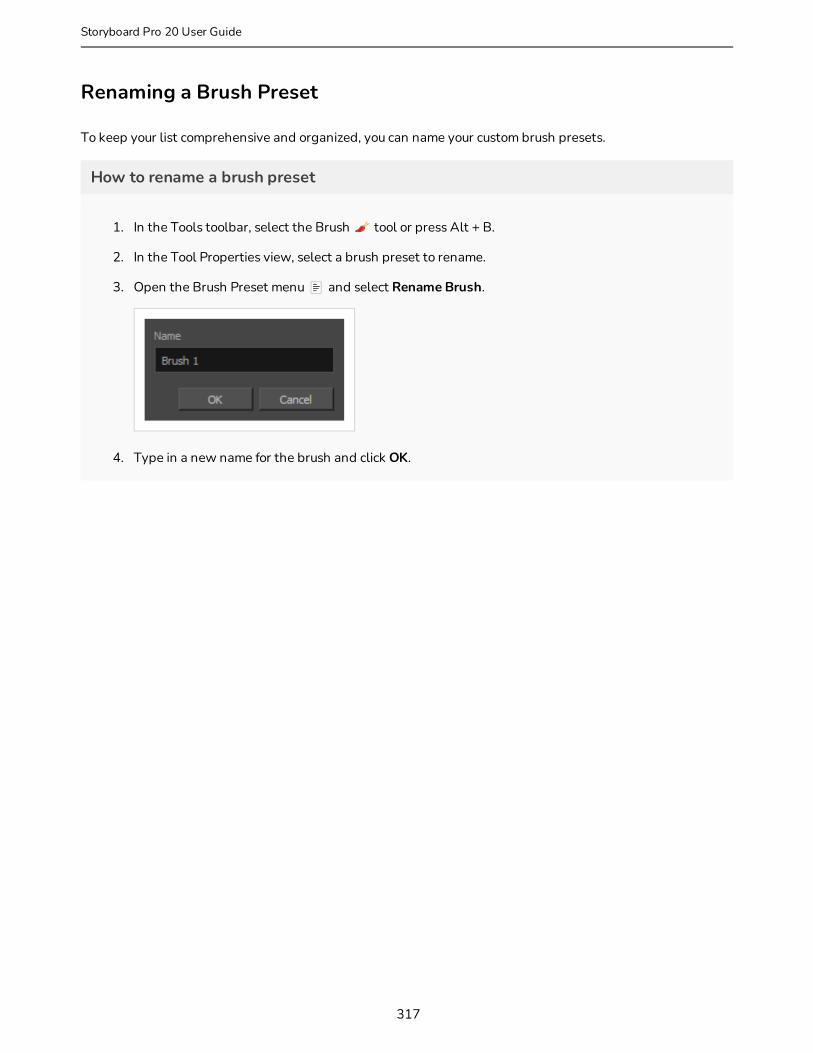
Renaming a Brush Preset
To keep your list comprehensive and organized, you can name your custom brush presets.
How to rename a brush preset
1. In the Tools toolbar, select the Brush tool or press Alt + B.
2. In the Tool Properties view, select a brush preset to rename.
3. Open the Brush Preset menu and select Rename Brush.
4. Type in a new name for the brush and click OK.
317
Storyboard Pro 20 User Guide

Chapter 7: Drawing
Deleting a Brush Preset
You can keep your preset list clean by deleting unwanted custom presets.
How to delete a brush preset
1. In the Tools toolbar, select the Brush tool or press Alt + B.
2. In the Tool Properties view, select the brush preset you want to delete.
3. Do one of the following:
l Click the Delete Brush button.
l Open the Brush Preset menu and select Delete Brush.
318
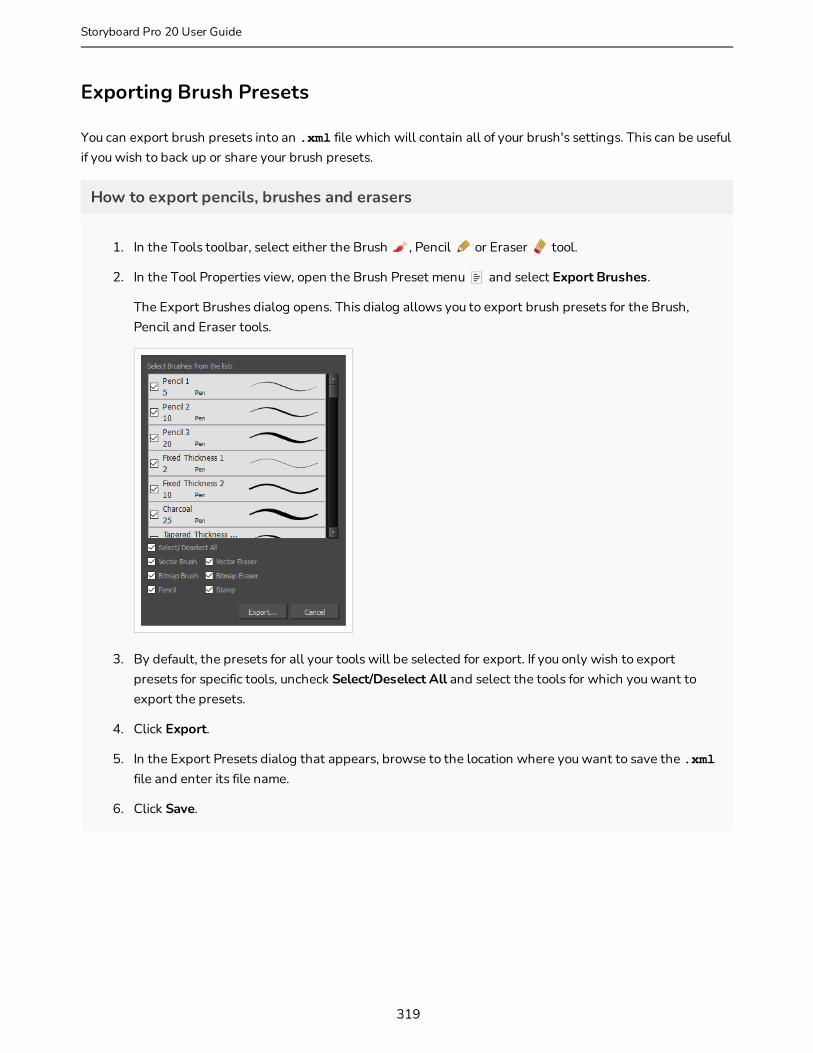
Exporting Brush Presets
You can export brush presets into an .xml file which will contain all of your brush's settings. This can be useful if you wish to back up or share your brush presets.
How to export pencils, brushes and erasers
1. In the Tools toolbar, select either the Brush , Pencil or Eraser tool.
2. In the Tool Properties view, open the Brush Preset menu and select Export Brushes.
The Export Brushes dialog opens. This dialog allows you to export brush presets for the Brush, Pencil and Eraser tools.
3. By default, the presets for all your tools will be selected for export. If you only wish to export presets for specific tools, uncheck Select/Deselect All and select the tools for which you want to export the presets.
4. Click Export.
5. In the Export Presets dialog that appears, browse to the location where you want to save the .xml file and enter its file name.
6. Click Save.
319
Storyboard Pro 20 User Guide

Chapter 7: Drawing
Importing Brush Presets
You can import brush presets that you previously exported from Storyboard Pro.
How to import pencils, brushes and erasers
1. In the Tools toolbar, select either the Brush , Pencil or Eraser tool.
2. In the Tool Properties view, open the Brush Preset menu and select Import Brushes.
3. In the browser window that appears, navigate to and select the .xml file in which you exported your brush presets.
4. Click Open.
The Import Brushes dialog box opens.
5. By default, the presets for any tools included in the file will be selected for import. If you only wish to import presets for specific tools, uncheck Select/Deselect All and select the tools for which you want to export the presets
6. Click Import.
The imported brush, eraser and pencil styles will appear in the Presets list.
320

Changing the Brush Preset Display
You can display your preset list as thumbnails or a list.
How to change the way presets are previewed in the Tool Properties view
1. In the Tool Properties view, open the Brush Presets menu.
2. Select one of the following options:
l Small Thumbnail: Displays presets in a grid of small thumbnails with a preview of their tip.
l Large Thumbnail: Displays presets in a grid of big thumbnails, with their name and a preview of their tip.
l Stroke View: Displays presets in a list, with their name and a preview of a stroke done with each preset.
321
Storyboard Pro 20 User Guide
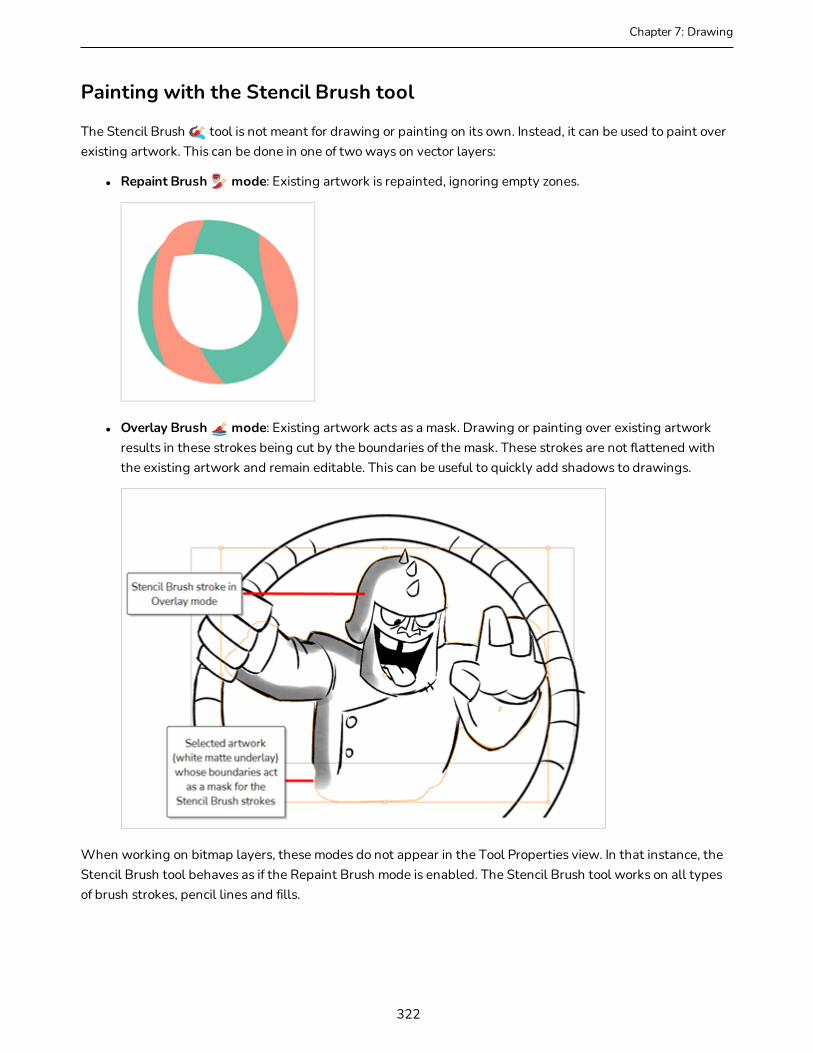
Chapter 7: Drawing
Painting with the Stencil Brush tool
The Stencil Brush tool is not meant for drawing or painting on its own. Instead, it can be used to paint over existing artwork. This can be done in one of two ways on vector layers:
l Repaint Brush mode: Existing artwork is repainted, ignoring empty zones.
l Overlay Brush mode: Existing artwork acts as a mask. Drawing or painting over existing artwork results in these strokes being cut by the boundaries of the mask. These strokes are not flattened with the existing artwork and remain editable. This can be useful to quickly add shadows to drawings.
When working on bitmap layers, these modes do not appear in the Tool Properties view. In that instance, the Stencil Brush tool behaves as if the Repaint Brush mode is enabled. The Stencil Brush tool works on all types of brush strokes, pencil lines and fills.
322

How to repaint with the Stencil Brush tool
1. In the Tools toolbar, click and hold on the Brush tool to display the menu beneath and select the Stencil Brush tool, or use the keyboard shortcut Alt + X.
2. In the Tool Properties view, customize the brush as desired (size, colour).
3. In the Tool Properties view, click on the Repaint Brush Mode button.
4. In the Stage or Camera view, draw or paint over existing artwork.
The artwork is repainted, ignoring empty zones.
How to create an overlay with the Stencil Brush tool
1. In the Tools toolbar, click and hold on the Brush tool to display the menu beneath and select the Stencil Brush tool, or use the keyboard shortcut Alt + X.
2. In the Tool Properties view, customize the brush as desired (size, texture, colour).
3. In the Tool Properties view, click on the Overlay Brush Mode button.
4. In the Stage or Camera view, draw or paint over existing artwork.
323
Storyboard Pro 20 User Guide
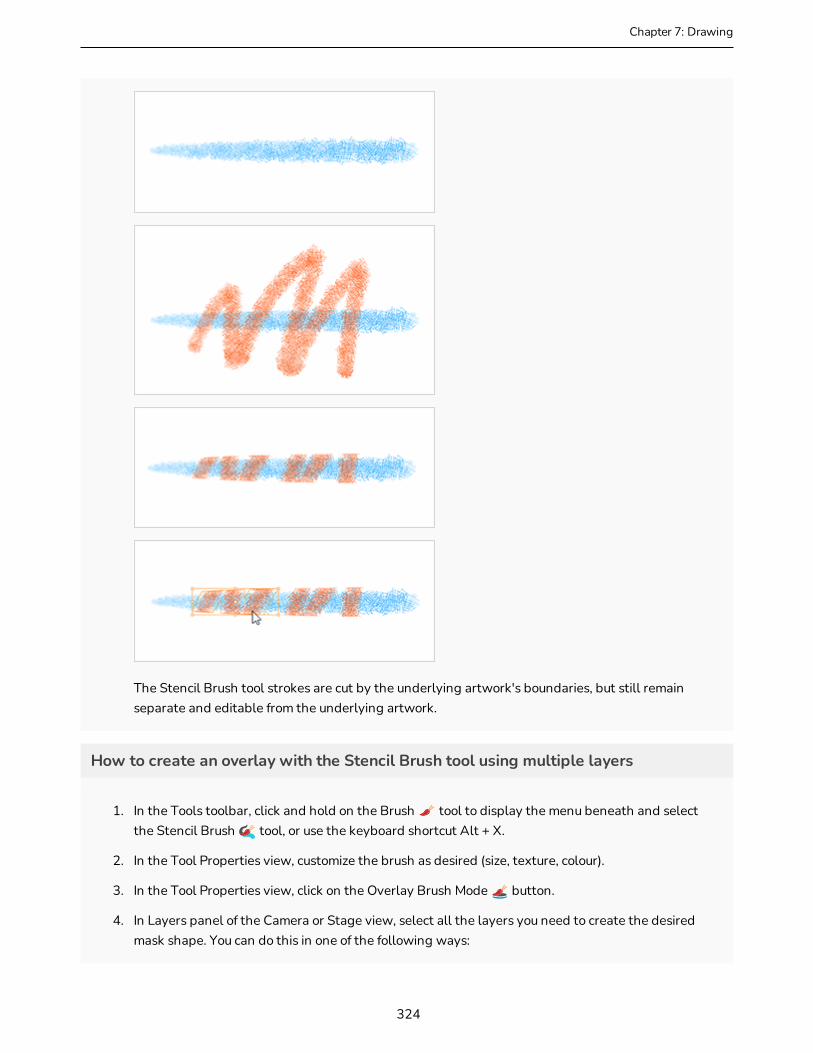
Chapter 7: Drawing
The Stencil Brush tool strokes are cut by the underlying artwork's boundaries, but still remain separate and editable from the underlying artwork.
How to create an overlay with the Stencil Brush tool using multiple layers
1. In the Tools toolbar, click and hold on the Brush tool to display the menu beneath and select the Stencil Brush tool, or use the keyboard shortcut Alt + X.
2. In the Tool Properties view, customize the brush as desired (size, texture, colour).
3. In the Tool Properties view, click on the Overlay Brush Mode button.
4. In Layers panel of the Camera or Stage view, select all the layers you need to create the desired mask shape. You can do this in one of the following ways:
324
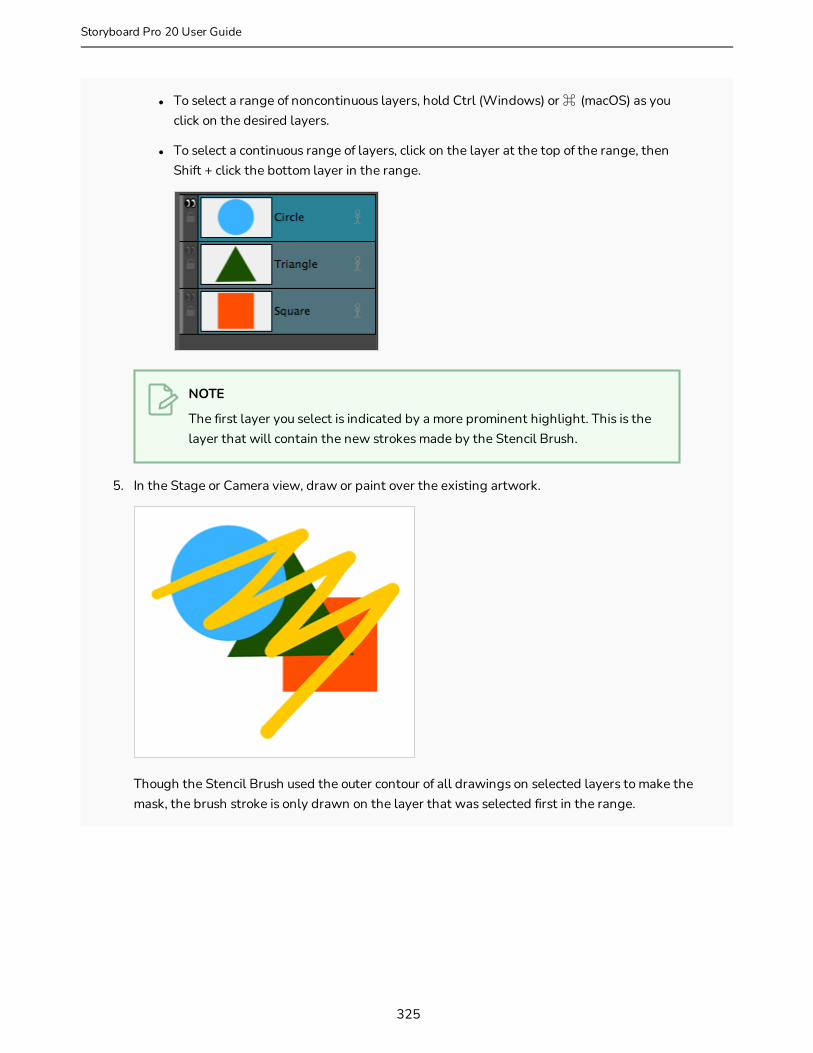
l To select a range of noncontinuous layers, hold Ctrl (Windows) or ⌘ (macOS) as you click on the desired layers.
l To select a continuous range of layers, click on the layer at the top of the range, then Shift + click the bottom layer in the range.
NOTE
The first layer you select is indicated by a more prominent highlight. This is the layer that will contain the new strokes made by the Stencil Brush.
5. In the Stage or Camera view, draw or paint over the existing artwork.
Though the Stencil Brush used the outer contour of all drawings on selected layers to make the mask, the brush stroke is only drawn on the layer that was selected first in the range.
325
Storyboard Pro 20 User Guide
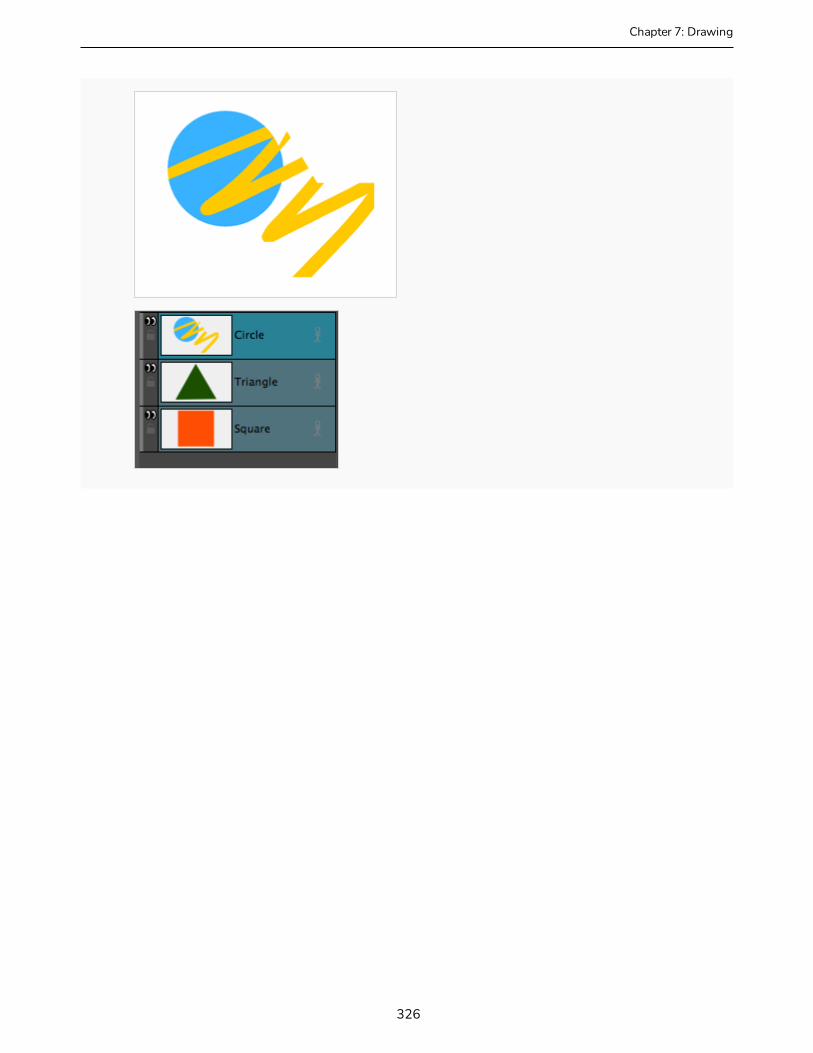
Chapter 7: Drawing
326
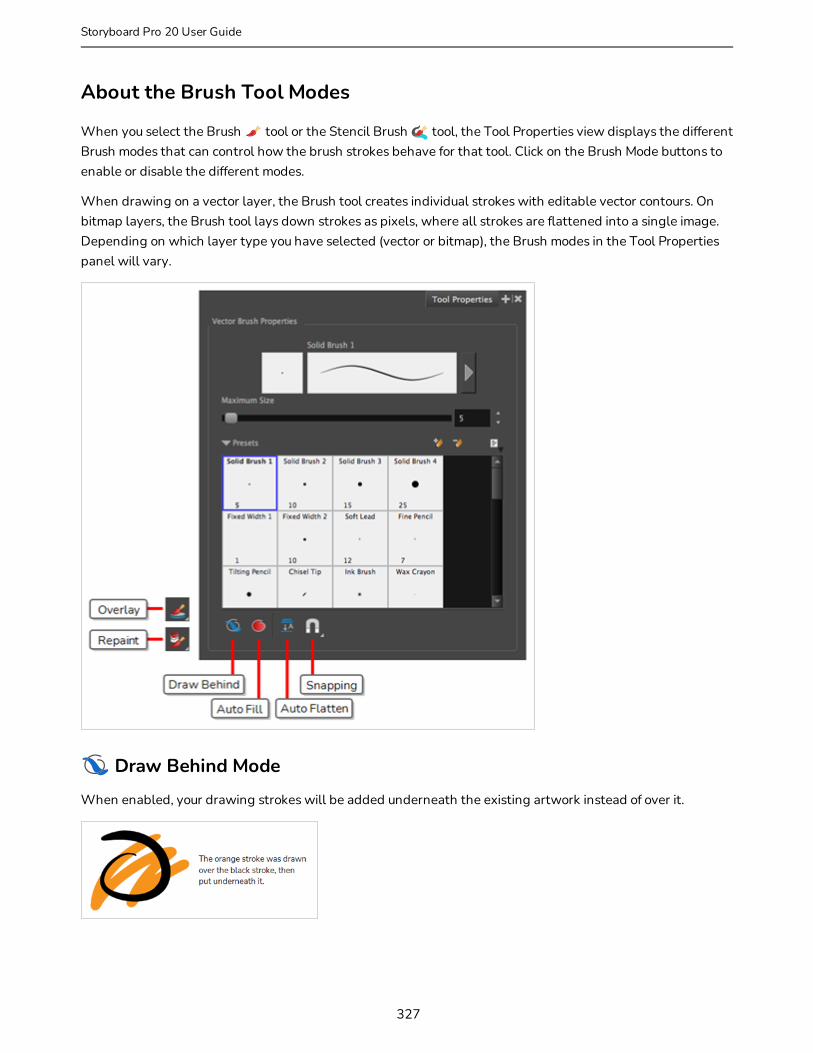
About the Brush Tool Modes
When you select the Brush tool or the Stencil Brush tool, the Tool Properties view displays the different Brush modes that can control how the brush strokes behave for that tool. Click on the Brush Mode buttons to enable or disable the different modes.
When drawing on a vector layer, the Brush tool creates individual strokes with editable vector contours. On bitmap layers, the Brush tool lays down strokes as pixels, where all strokes are flattened into a single image. Depending on which layer type you have selected (vector or bitmap), the Brush modes in the Tool Properties panel will vary.
Draw Behind Mode
When enabled, your drawing strokes will be added underneath the existing artwork instead of over it.
327
Storyboard Pro 20 User Guide
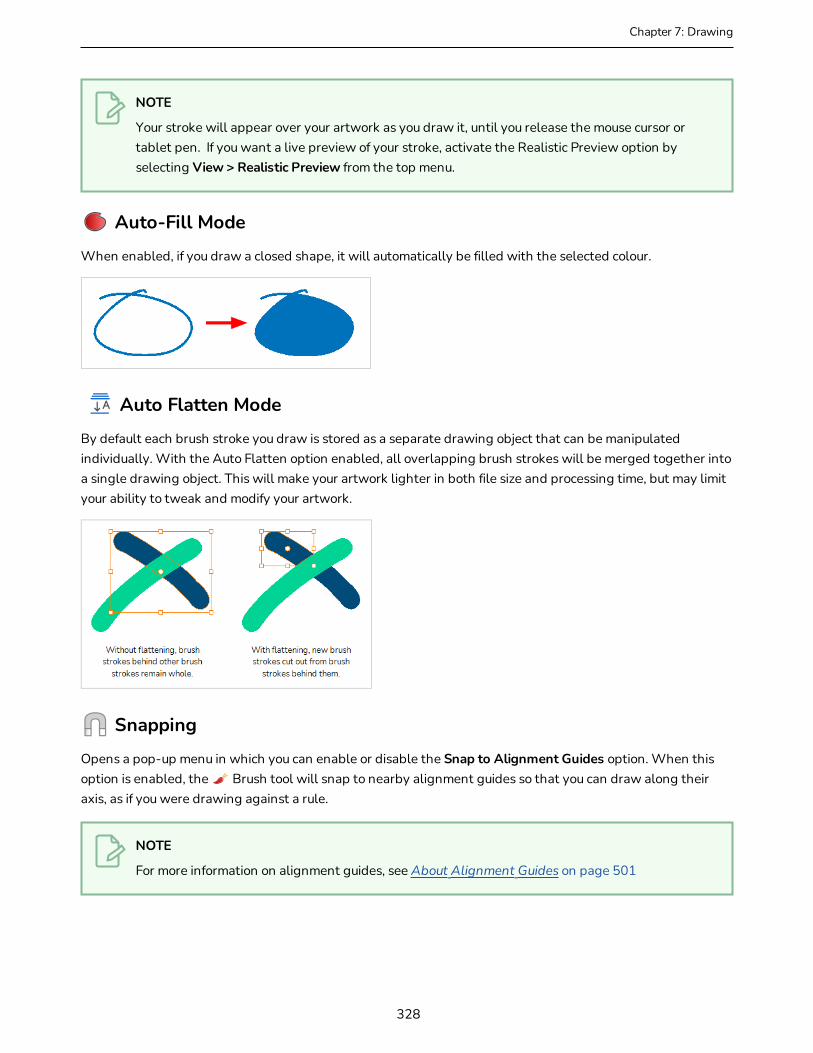
Chapter 7: Drawing
NOTE
Your stroke will appear over your artwork as you draw it, until you release the mouse cursor or tablet pen. If you want a live preview of your stroke, activate the Realistic Preview option by selecting View > Realistic Preview from the top menu.
Auto-Fill Mode
When enabled, if you draw a closed shape, it will automatically be filled with the selected colour.
Auto Flatten Mode
By default each brush stroke you draw is stored as a separate drawing object that can be manipulated individually. With the Auto Flatten option enabled, all overlapping brush strokes will be merged together into a single drawing object. This will make your artwork lighter in both file size and processing time, but may limit your ability to tweak and modify your artwork.
Snapping
Opens a pop-up menu in which you can enable or disable the Snap to Alignment Guides option. When this option is enabled, the Brush tool will snap to nearby alignment guides so that you can draw along their axis, as if you were drawing against a rule.
NOTE
For more information on alignment guides, see About Alignment Guides on page 501
328

Overlay
NOTE
Only available if the Stencil Brush tool and a vector layer are selected.
In this mode, existing artwork form the boundaries of a mask by having their layers selected. Drawing or painting over existing artwork results in these strokes being cut by the boundaries of the mask. These strokes are not flattened with the existing artwork and remain editable. This can be useful to quickly add shadows to drawings.
Repaint
NOTE
Only available if the Stencil Brush tool and a vector layer are selected.
In this mode, existing artwork is repainted, ignoring empty zones.
329
Storyboard Pro 20 User Guide
Chapter 7: Drawing
330
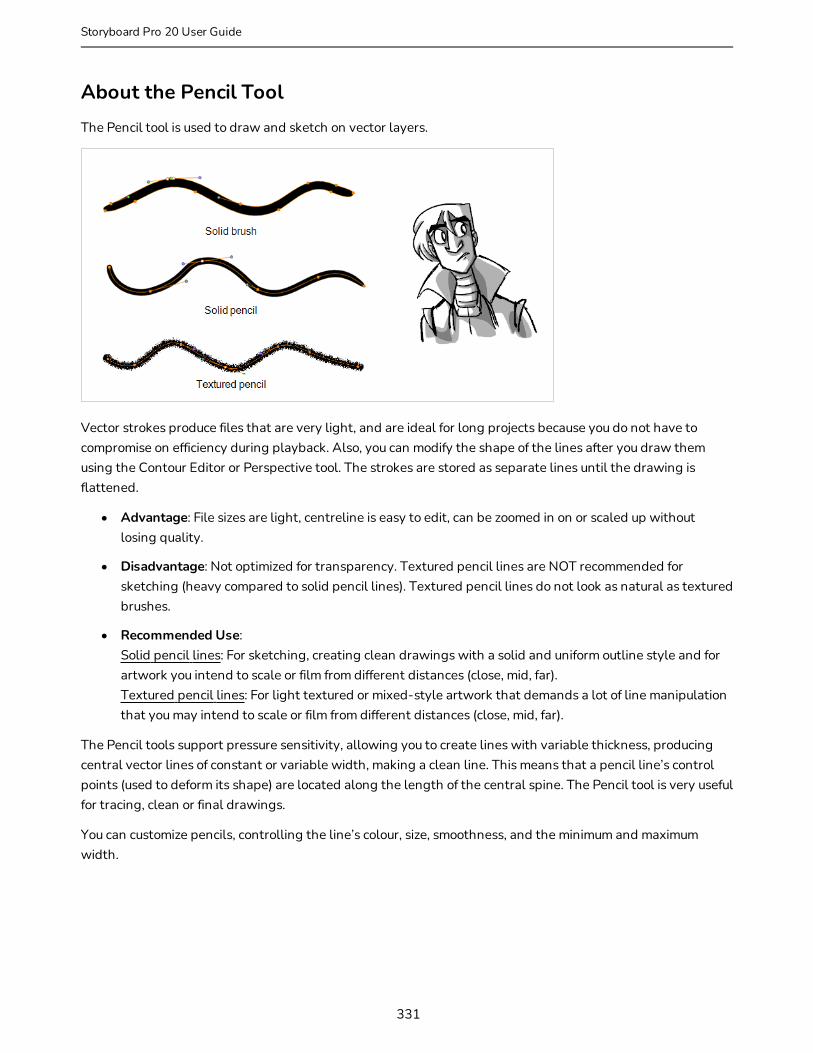
About the Pencil ToolThe Pencil tool is used to draw and sketch on vector layers.
Vector strokes produce files that are very light, and are ideal for long projects because you do not have to compromise on efficiency during playback. Also, you can modify the shape of the lines after you draw them using the Contour Editor or Perspective tool. The strokes are stored as separate lines until the drawing is flattened.
• Advantage: File sizes are light, centreline is easy to edit, can be zoomed in on or scaled up without losing quality.
• Disadvantage: Not optimized for transparency. Textured pencil lines are NOT recommended for sketching (heavy compared to solid pencil lines). Textured pencil lines do not look as natural as textured brushes.
• Recommended Use: Solid pencil lines: For sketching, creating clean drawings with a solid and uniform outline style and for artwork you intend to scale or film from different distances (close, mid, far). Textured pencil lines: For light textured or mixed-style artwork that demands a lot of line manipulation that you may intend to scale or film from different distances (close, mid, far).
The Pencil tools support pressure sensitivity, allowing you to create lines with variable thickness, producing central vector lines of constant or variable width, making a clean line. This means that a pencil line’s control points (used to deform its shape) are located along the length of the central spine. The Pencil tool is very useful for tracing, clean or final drawings.
You can customize pencils, controlling the line’s colour, size, smoothness, and the minimum and maximum width.
331
Storyboard Pro 20 User Guide
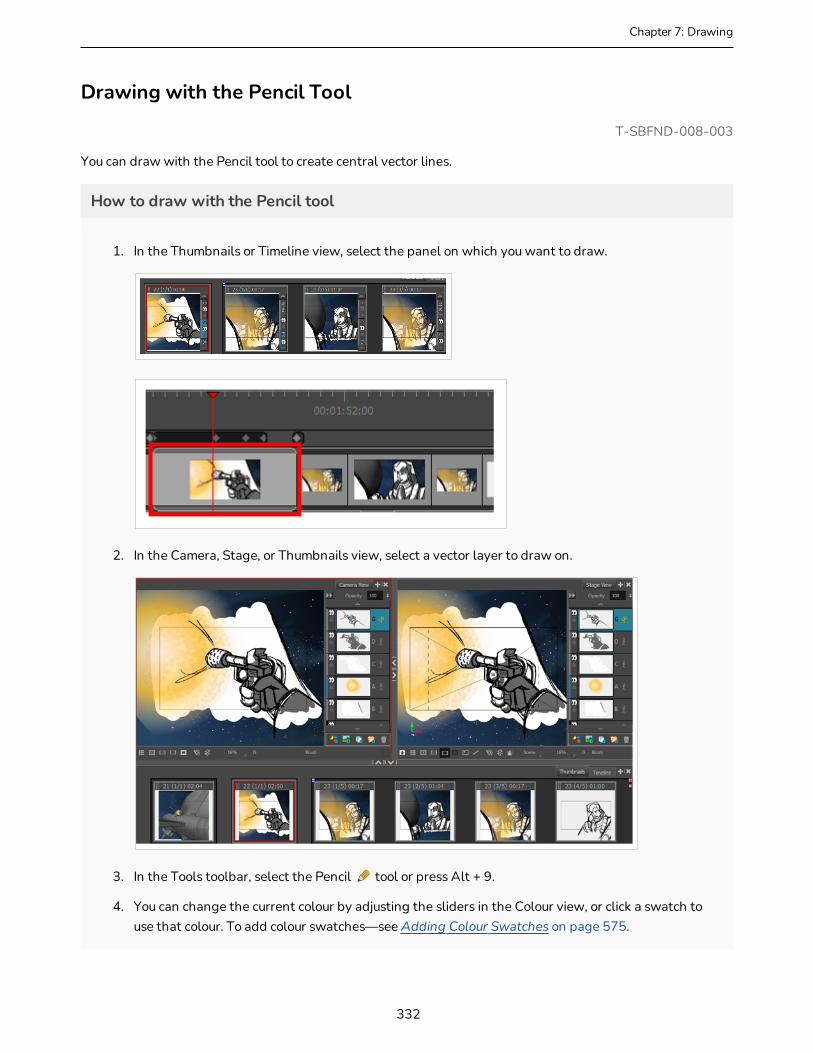
Chapter 7: Drawing
Drawing with the Pencil Tool
T-SBFND-008-003
You can draw with the Pencil tool to create central vector lines.
How to draw with the Pencil tool
1. In the Thumbnails or Timeline view, select the panel on which you want to draw.
2. In the Camera, Stage, or Thumbnails view, select a vector layer to draw on.
3. In the Tools toolbar, select the Pencil tool or press Alt + 9.
4. You can change the current colour by adjusting the sliders in the Colour view, or click a swatch to use that colour. To add colour swatches—see Adding Colour Swatches on page 575.
332
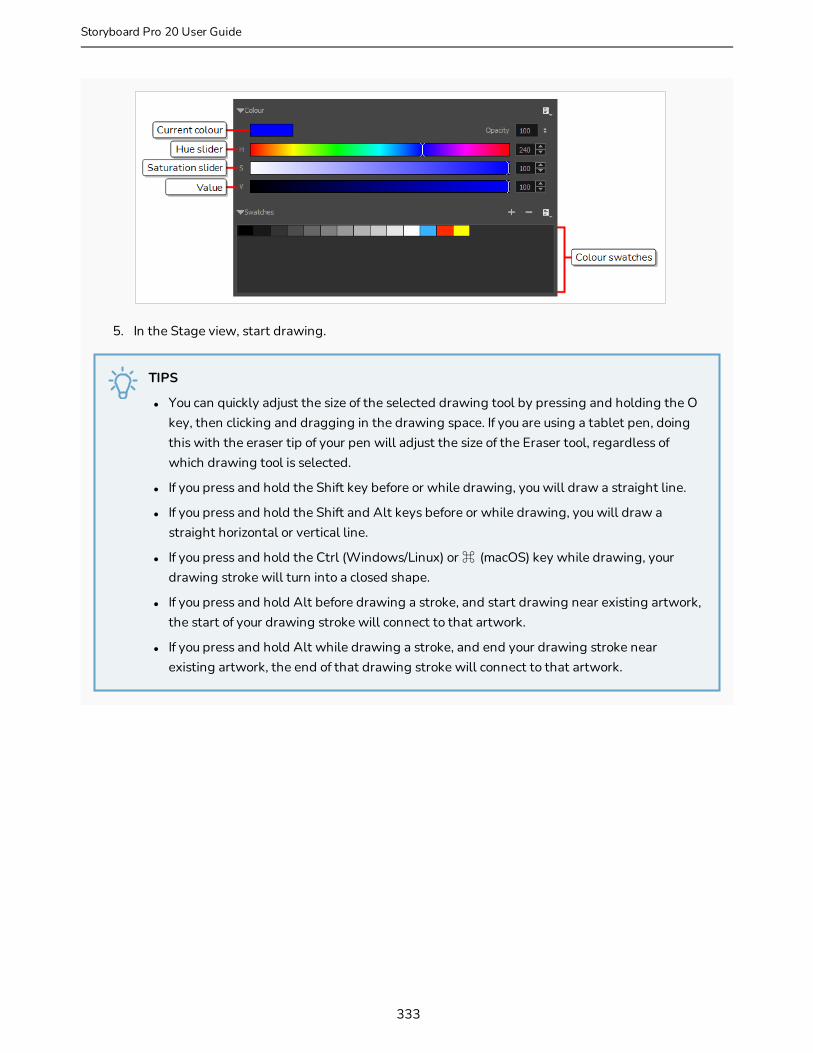
5. In the Stage view, start drawing.
TIPS
l You can quickly adjust the size of the selected drawing tool by pressing and holding the O key, then clicking and dragging in the drawing space. If you are using a tablet pen, doing this with the eraser tip of your pen will adjust the size of the Eraser tool, regardless of which drawing tool is selected.
l If you press and hold the Shift key before or while drawing, you will draw a straight line.
l If you press and hold the Shift and Alt keys before or while drawing, you will draw a straight horizontal or vertical line.
l If you press and hold the Ctrl (Windows/Linux) or ⌘ (macOS) key while drawing, your drawing stroke will turn into a closed shape.
l If you press and hold Alt before drawing a stroke, and start drawing near existing artwork, the start of your drawing stroke will connect to that artwork.
l If you press and hold Alt while drawing a stroke, and end your drawing stroke near existing artwork, the end of that drawing stroke will connect to that artwork.
333
Storyboard Pro 20 User Guide
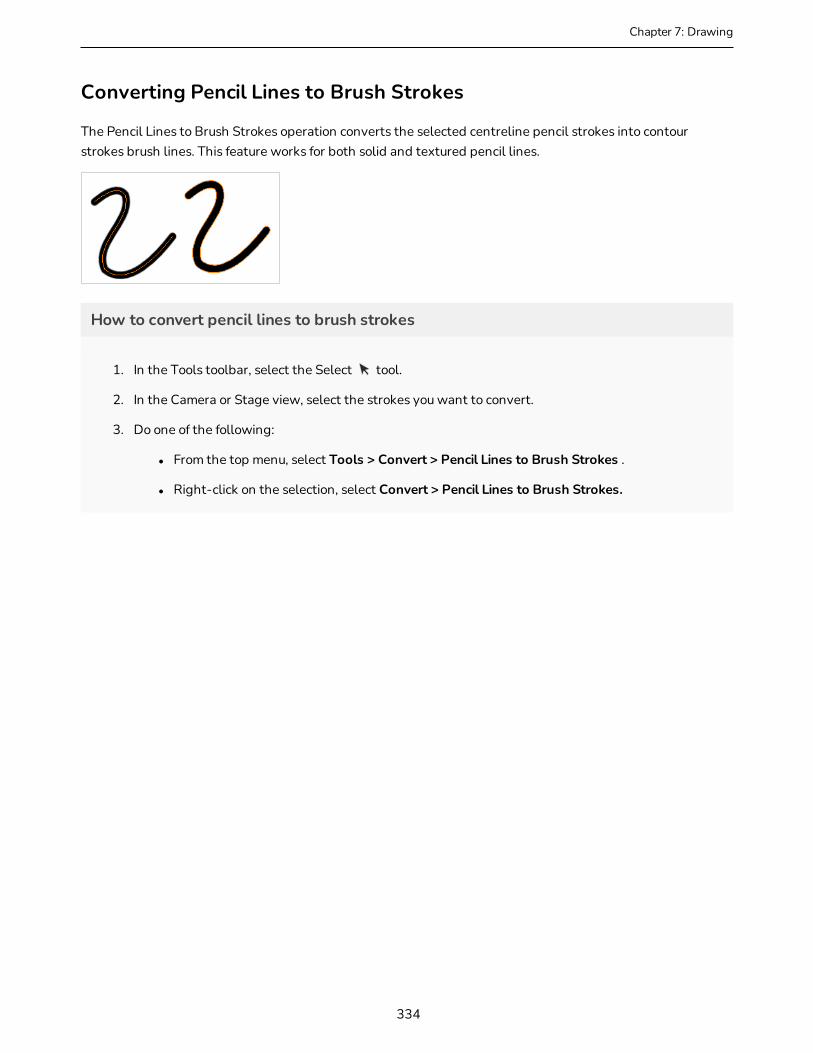
Chapter 7: Drawing
Converting Pencil Lines to Brush Strokes
The Pencil Lines to Brush Strokes operation converts the selected centreline pencil strokes into contour strokes brush lines. This feature works for both solid and textured pencil lines.
How to convert pencil lines to brush strokes
1. In the Tools toolbar, select the Select tool.
2. In the Camera or Stage view, select the strokes you want to convert.
3. Do one of the following:
l From the top menu, select Tools > Convert > Pencil Lines to Brush Strokes .
l Right-click on the selection, select Convert > Pencil Lines to Brush Strokes.
334
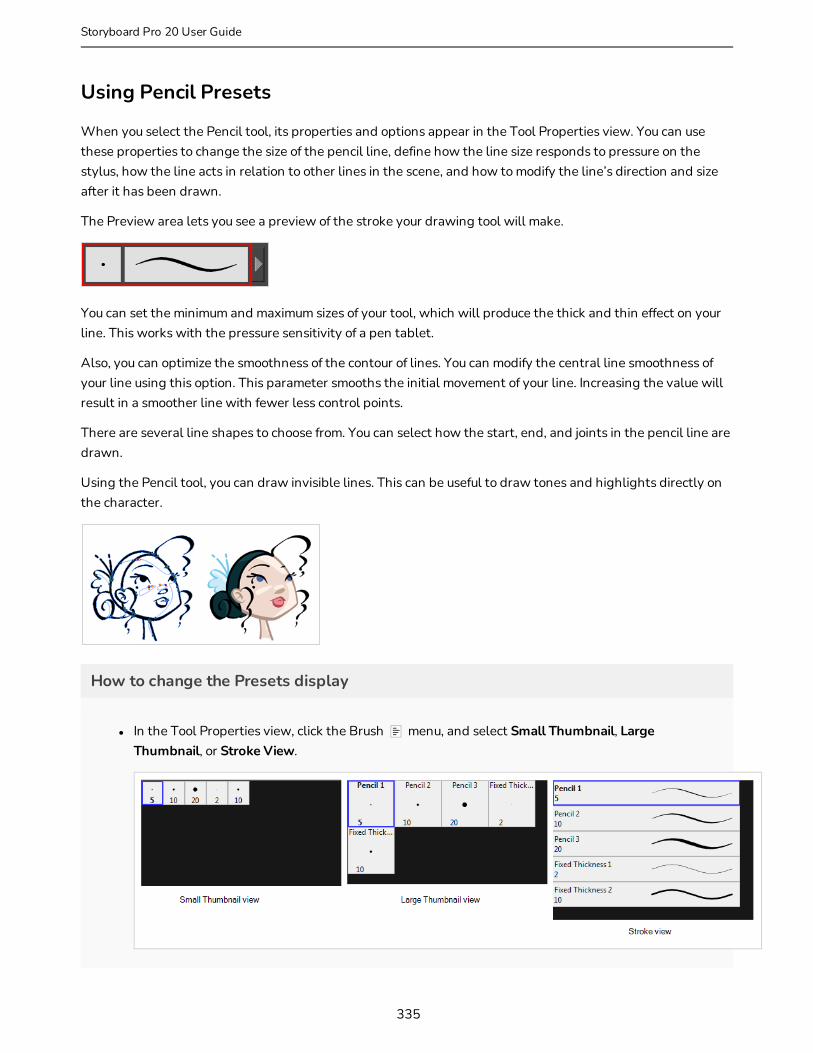
Using Pencil Presets
When you select the Pencil tool, its properties and options appear in the Tool Properties view. You can use these properties to change the size of the pencil line, define how the line size responds to pressure on the stylus, how the line acts in relation to other lines in the scene, and how to modify the line’s direction and size after it has been drawn.
The Preview area lets you see a preview of the stroke your drawing tool will make.
You can set the minimum and maximum sizes of your tool, which will produce the thick and thin effect on your line. This works with the pressure sensitivity of a pen tablet.
Also, you can optimize the smoothness of the contour of lines. You can modify the central line smoothness of your line using this option. This parameter smooths the initial movement of your line. Increasing the value will result in a smoother line with fewer less control points.
There are several line shapes to choose from. You can select how the start, end, and joints in the pencil line are drawn.
Using the Pencil tool, you can draw invisible lines. This can be useful to draw tones and highlights directly on the character.
How to change the Presets display
l In the Tool Properties view, click the Brush menu, and select Small Thumbnail, Large Thumbnail, or Stroke View.
335
Storyboard Pro 20 User Guide

Chapter 7: Drawing
How to select a pencil style
l In the Tool Properties, select a pencil style from the Presets section.
How to add a pencil preset
1. Click the Add Brush button. The new pencil style appears in the list of presets.
How to rename a pencil preset
1. In the Tool Properties view, select a pencil to rename.
2. From the Brush menu, select Rename Brush.
3. Type in a new name for the pencil.
How to delete a pencil preset
1. In the Tool Properties view, select a pen to delete.
2. Do one of the following:
336

‣ Click the Delete Brush button.
‣ From the Brush menu, select Delete Brush.
How to export pencils, brushes and erasers
1. In the Tools toolbar, select either the Brush , Pencil or Eraser tool.
2. In the Tool Properties view, open the Brush Preset menu and select Export Brushes.
The Export Brushes dialog opens. This dialog allows you to export brush presets for the Brush, Pencil and Eraser tools.
3. By default, the presets for all your tools will be selected for export. If you only wish to export presets for specific tools, uncheck Select/Deselect All and select the tools for which you want to export the presets.
4. Click Export.
5. In the Export Presets dialog that appears, browse to the location where you want to save the .xml file and enter its file name.
6. Click Save.
How to import pencils, brushes and erasers
1. In the Tools toolbar, select either the Brush , Pencil or Eraser tool.
2. In the Tool Properties view, open the Brush Preset menu and select Import Brushes.
337
Storyboard Pro 20 User Guide
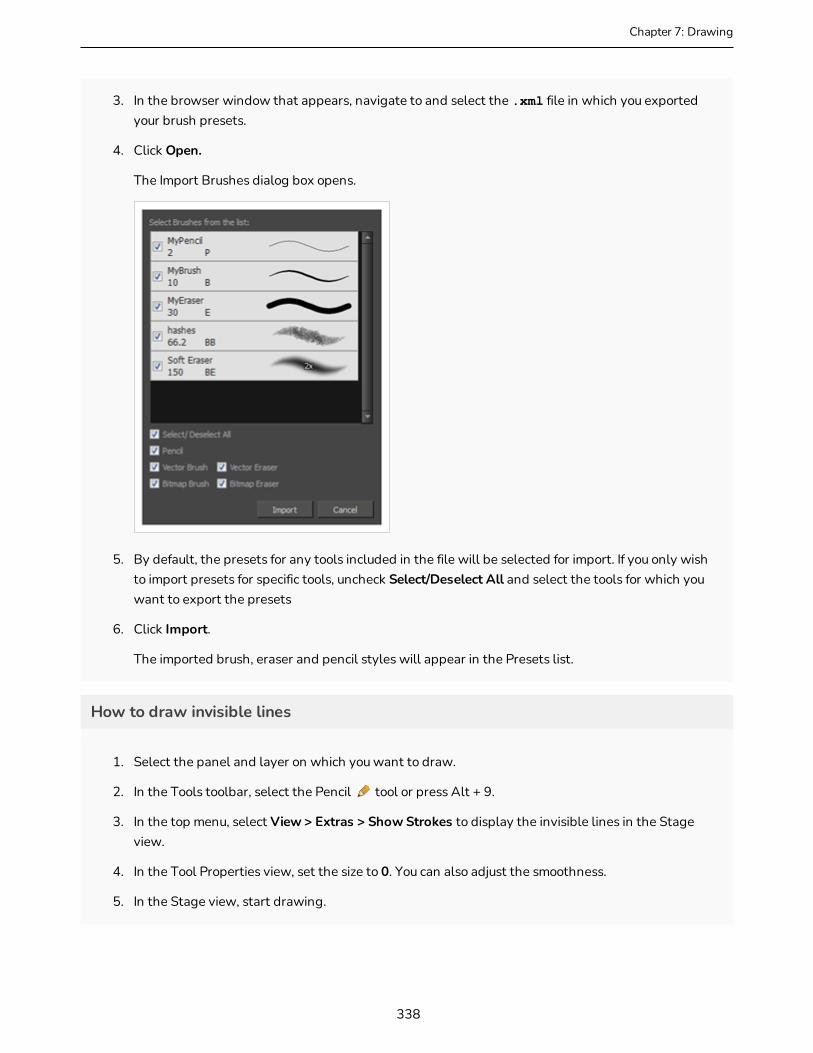
Chapter 7: Drawing
3. In the browser window that appears, navigate to and select the .xml file in which you exported your brush presets.
4. Click Open.
The Import Brushes dialog box opens.
5. By default, the presets for any tools included in the file will be selected for import. If you only wish to import presets for specific tools, uncheck Select/Deselect All and select the tools for which you want to export the presets
6. Click Import.
The imported brush, eraser and pencil styles will appear in the Presets list.
How to draw invisible lines
1. Select the panel and layer on which you want to draw.
2. In the Tools toolbar, select the Pencil tool or press Alt + 9.
3. In the top menu, select View > Extras > Show Strokes to display the invisible lines in the Stage view.
4. In the Tool Properties view, set the size to 0. You can also adjust the smoothness.
5. In the Stage view, start drawing.
338

6. You can modify the stroke shape with the Contour Editor tool—see About the Contour Editor Tool on page 437.
339
Storyboard Pro 20 User Guide
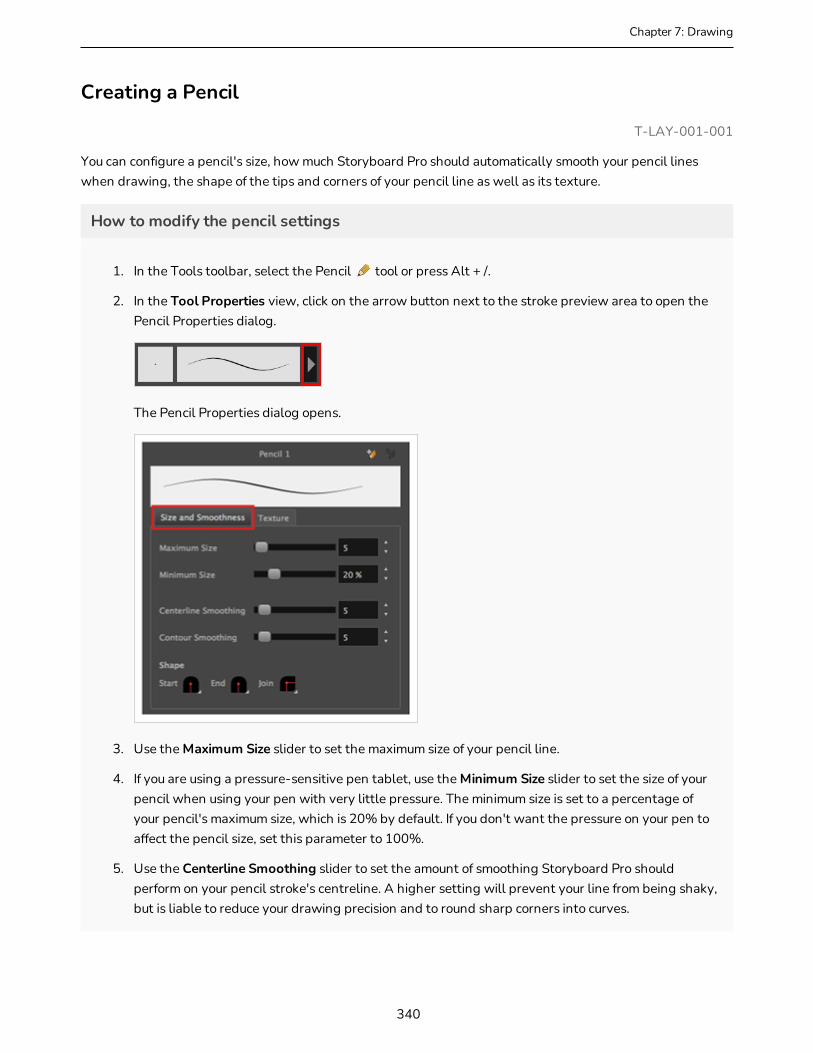
Chapter 7: Drawing
Creating a Pencil
T-LAY-001-001
You can configure a pencil's size, how much Storyboard Pro should automatically smooth your pencil lines when drawing, the shape of the tips and corners of your pencil line as well as its texture.
How to modify the pencil settings
1. In the Tools toolbar, select the Pencil tool or press Alt + /.
2. In the Tool Properties view, click on the arrow button next to the stroke preview area to open the Pencil Properties dialog.
The Pencil Properties dialog opens.
3. Use the Maximum Size slider to set the maximum size of your pencil line.
4. If you are using a pressure-sensitive pen tablet, use the Minimum Size slider to set the size of your pencil when using your pen with very little pressure. The minimum size is set to a percentage of your pencil's maximum size, which is 20% by default. If you don't want the pressure on your pen to affect the pencil size, set this parameter to 100%.
5. Use the Centerline Smoothing slider to set the amount of smoothing Storyboard Pro should perform on your pencil stroke's centreline. A higher setting will prevent your line from being shaky, but is liable to reduce your drawing precision and to round sharp corners into curves.
340
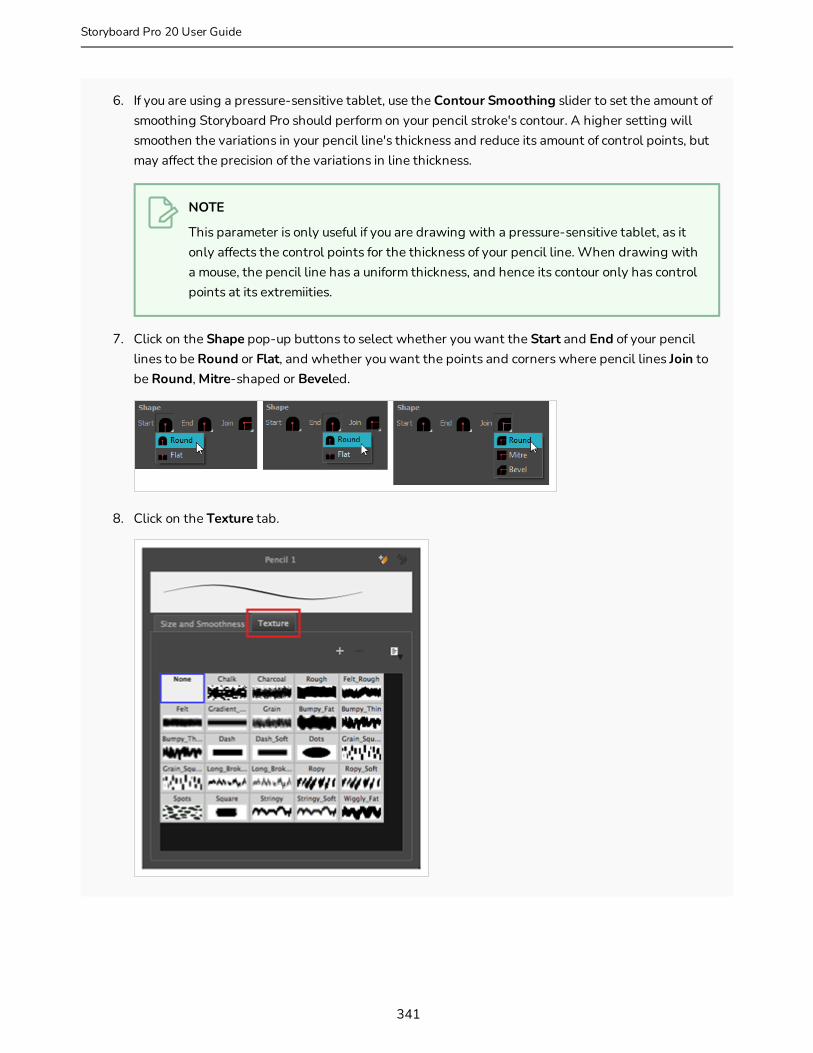
6. If you are using a pressure-sensitive tablet, use the Contour Smoothing slider to set the amount of smoothing Storyboard Pro should perform on your pencil stroke's contour. A higher setting will smoothen the variations in your pencil line's thickness and reduce its amount of control points, but may affect the precision of the variations in line thickness.
NOTE
This parameter is only useful if you are drawing with a pressure-sensitive tablet, as it only affects the control points for the thickness of your pencil line. When drawing with a mouse, the pencil line has a uniform thickness, and hence its contour only has control points at its extremiities.
7. Click on the Shape pop-up buttons to select whether you want the Start and End of your pencil lines to be Round or Flat, and whether you want the points and corners where pencil lines Join to be Round, Mitre-shaped or Beveled.
8. Click on the Texture tab.
341
Storyboard Pro 20 User Guide

Chapter 7: Drawing
9. If you want your pencil line to have a texture, select the desired pencil line texture from the pencil line texture library. Otherwise, select None. For more information on pencil line textures, see About Pencil Line Textures on page 343.
10. Either close or set aside the Pencil Properties dialog.
11. In the Camera or Drawing view, start drawing to test your pencil settings.
342
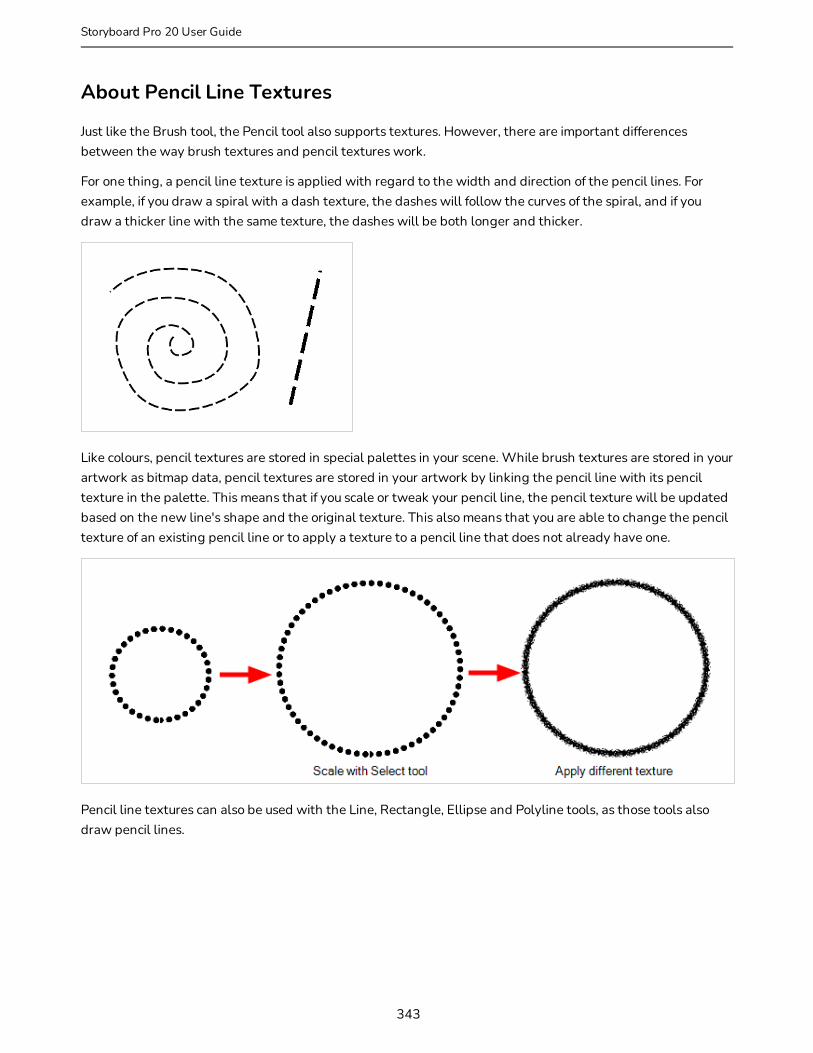
About Pencil Line Textures
Just like the Brush tool, the Pencil tool also supports textures. However, there are important differences between the way brush textures and pencil textures work.
For one thing, a pencil line texture is applied with regard to the width and direction of the pencil lines. For example, if you draw a spiral with a dash texture, the dashes will follow the curves of the spiral, and if you draw a thicker line with the same texture, the dashes will be both longer and thicker.
Like colours, pencil textures are stored in special palettes in your scene. While brush textures are stored in your artwork as bitmap data, pencil textures are stored in your artwork by linking the pencil line with its pencil texture in the palette. This means that if you scale or tweak your pencil line, the pencil texture will be updated based on the new line's shape and the original texture. This also means that you are able to change the pencil texture of an existing pencil line or to apply a texture to a pencil line that does not already have one.
Pencil line textures can also be used with the Line, Rectangle, Ellipse and Polyline tools, as those tools also draw pencil lines.
343
Storyboard Pro 20 User Guide
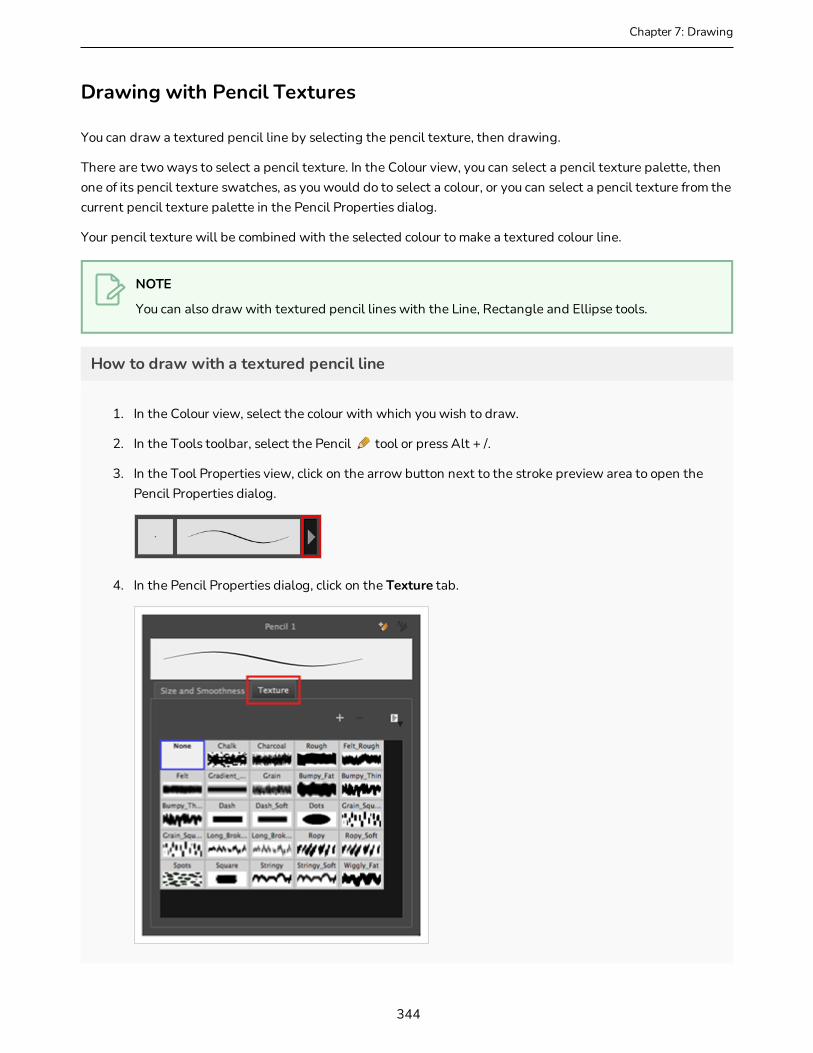
Chapter 7: Drawing
Drawing with Pencil Textures
You can draw a textured pencil line by selecting the pencil texture, then drawing.
There are two ways to select a pencil texture. In the Colour view, you can select a pencil texture palette, then one of its pencil texture swatches, as you would do to select a colour, or you can select a pencil texture from the current pencil texture palette in the Pencil Properties dialog.
Your pencil texture will be combined with the selected colour to make a textured colour line.
NOTE
You can also draw with textured pencil lines with the Line, Rectangle and Ellipse tools.
How to draw with a textured pencil line
1. In the Colour view, select the colour with which you wish to draw.
2. In the Tools toolbar, select the Pencil tool or press Alt + /.
3. In the Tool Properties view, click on the arrow button next to the stroke preview area to open the Pencil Properties dialog.
4. In the Pencil Properties dialog, click on the Texture tab.
344
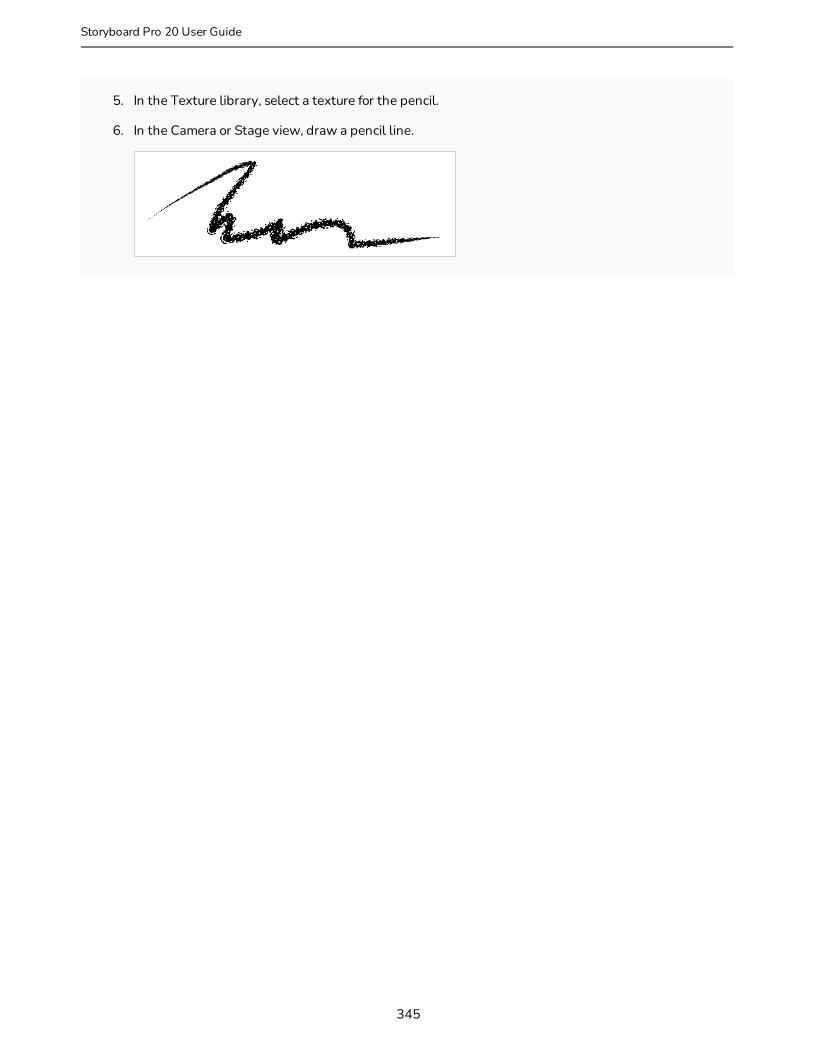
5. In the Texture library, select a texture for the pencil.
6. In the Camera or Stage view, draw a pencil line.
345
Storyboard Pro 20 User Guide

Chapter 7: Drawing
Applying Texture to a Pencil Line
You can apply a pencil texture to an existing pencil line. You can also change a textured pencil line's texture by following the same steps.
NOTE
You can also apply pencil line textures on artwork created with the Line, Rectangle, Ellipse and Polyline tools.
How to apply a pencil line texture to an existing pencil line using the Tool Properties view
1. In the Tools toolbar, select the Select tool or press Alt + S.
2. In the Stage or Camera view, select a pencil line.
3. In the Tool Properties view, scroll down to the pencil texture library panel.
4. Select the pencil texture you wish to apply.
5. The selected pencil line now uses the selected pencil line texture.
346

347
Storyboard Pro 20 User Guide
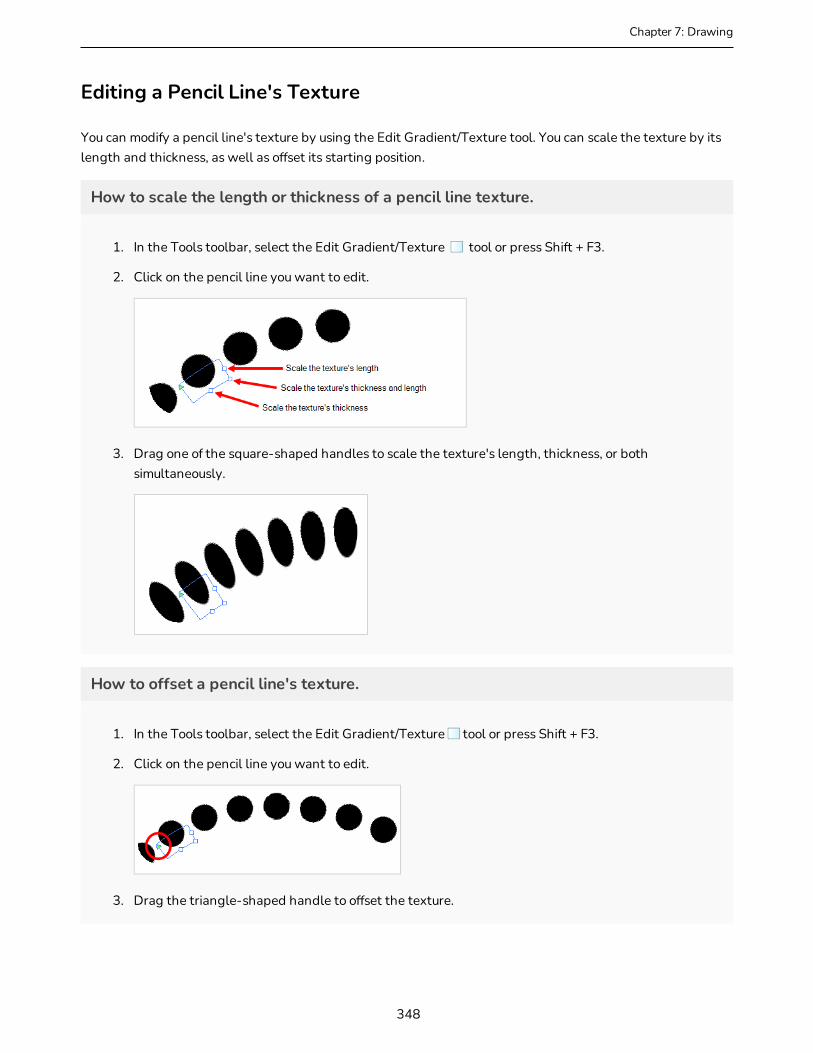
Chapter 7: Drawing
Editing a Pencil Line's Texture
You can modify a pencil line's texture by using the Edit Gradient/Texture tool. You can scale the texture by its length and thickness, as well as offset its starting position.
How to scale the length or thickness of a pencil line texture.
1. In the Tools toolbar, select the Edit Gradient/Texture tool or press Shift + F3.
2. Click on the pencil line you want to edit.
3. Drag one of the square-shaped handles to scale the texture's length, thickness, or both simultaneously.
How to offset a pencil line's texture.
1. In the Tools toolbar, select the Edit Gradient/Texture tool or press Shift + F3.
2. Click on the pencil line you want to edit.
3. Drag the triangle-shaped handle to offset the texture.
348

349
Storyboard Pro 20 User Guide

Chapter 7: Drawing
About the Pencil Tool Modes
The Pencil tool allows you to draw simple contour lines that are defined by their centerline and their thickness.
When you select the Pencil tool, the Tool Properties view displays the different Pencil modes that control how the pencil line is drawn.
Draw Behind Mode
When enabled, your drawing strokes will be added underneath the existing artwork instead of over it.
NOTE
Your stroke will appear over your artwork as you draw it, until you release the mouse cursor or tablet pen. If you want a live preview of your stroke, activate the Realistic Preview option by selecting View > Realistic Preview from the top menu.
350
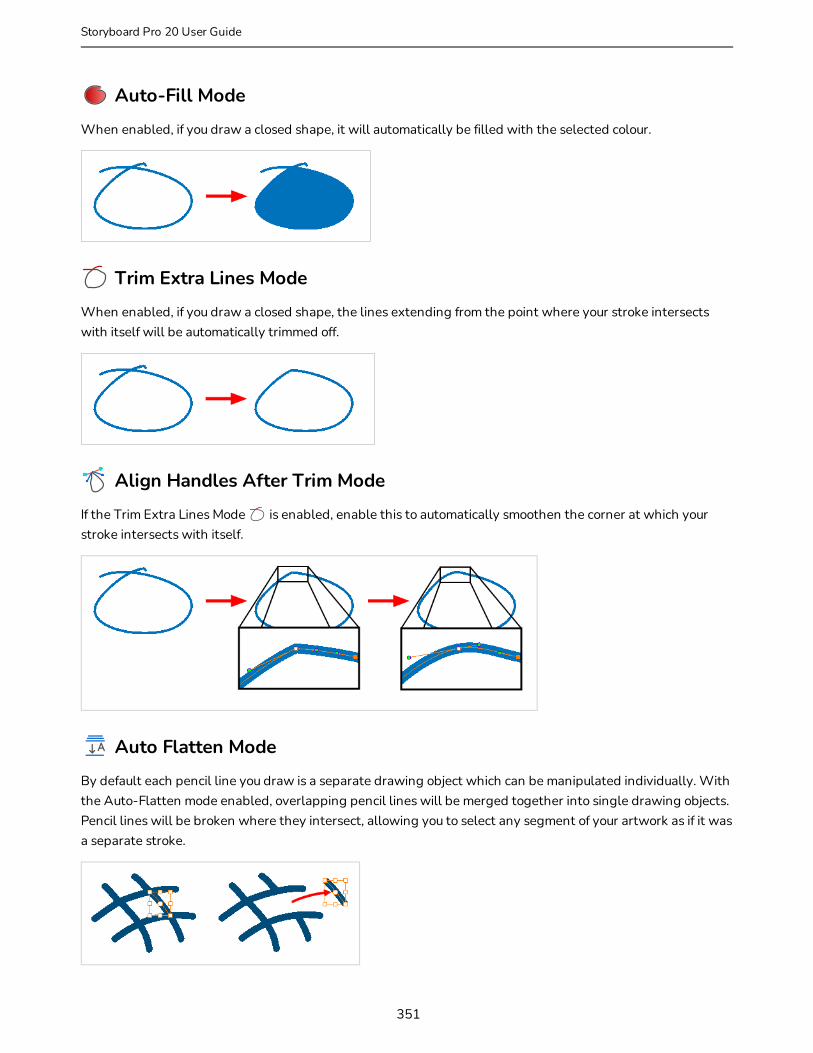
Auto-Fill Mode
When enabled, if you draw a closed shape, it will automatically be filled with the selected colour.
Trim Extra Lines Mode
When enabled, if you draw a closed shape, the lines extending from the point where your stroke intersects with itself will be automatically trimmed off.
Align Handles After Trim Mode
If the Trim Extra Lines Mode is enabled, enable this to automatically smoothen the corner at which your stroke intersects with itself.
Auto Flatten Mode
By default each pencil line you draw is a separate drawing object which can be manipulated individually. With the Auto-Flatten mode enabled, overlapping pencil lines will be merged together into single drawing objects. Pencil lines will be broken where they intersect, allowing you to select any segment of your artwork as if it was a separate stroke.
351
Storyboard Pro 20 User Guide
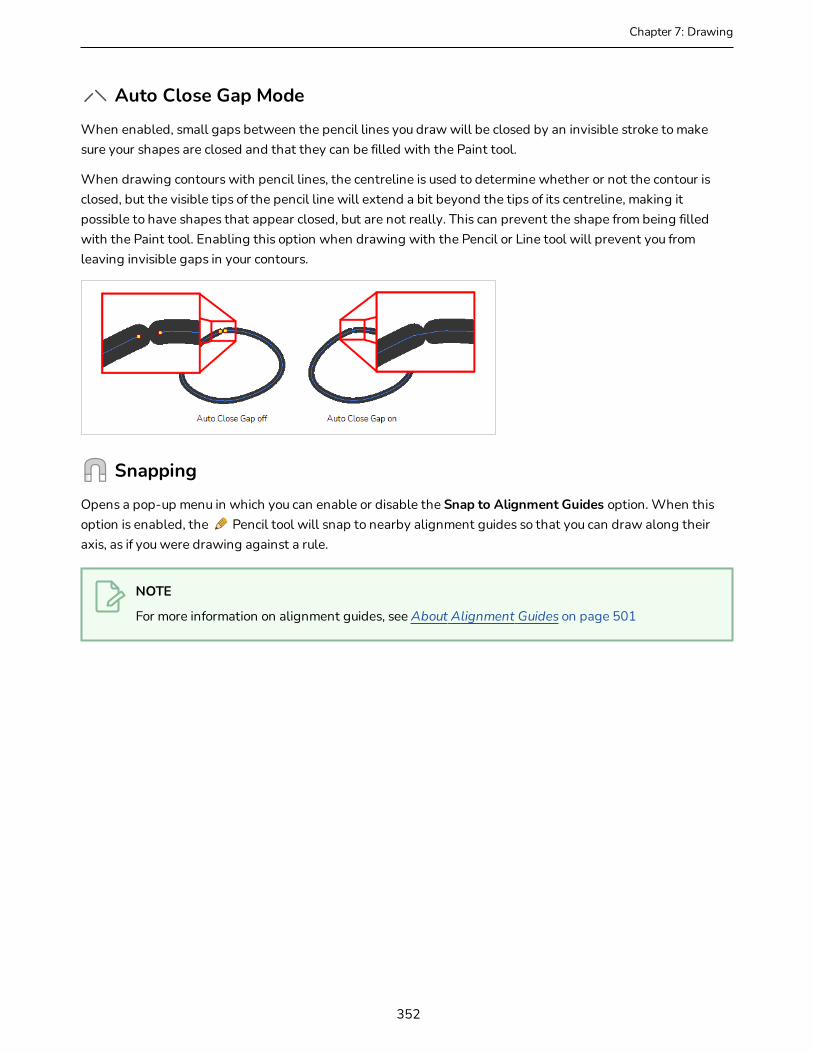
Chapter 7: Drawing
Auto Close Gap Mode
When enabled, small gaps between the pencil lines you draw will be closed by an invisible stroke to make sure your shapes are closed and that they can be filled with the Paint tool.
When drawing contours with pencil lines, the centreline is used to determine whether or not the contour is closed, but the visible tips of the pencil line will extend a bit beyond the tips of its centreline, making it possible to have shapes that appear closed, but are not really. This can prevent the shape from being filled with the Paint tool. Enabling this option when drawing with the Pencil or Line tool will prevent you from leaving invisible gaps in your contours.
Snapping
Opens a pop-up menu in which you can enable or disable the Snap to Alignment Guides option. When this option is enabled, the Pencil tool will snap to nearby alignment guides so that you can draw along their axis, as if you were drawing against a rule.
NOTE
For more information on alignment guides, see About Alignment Guides on page 501
352
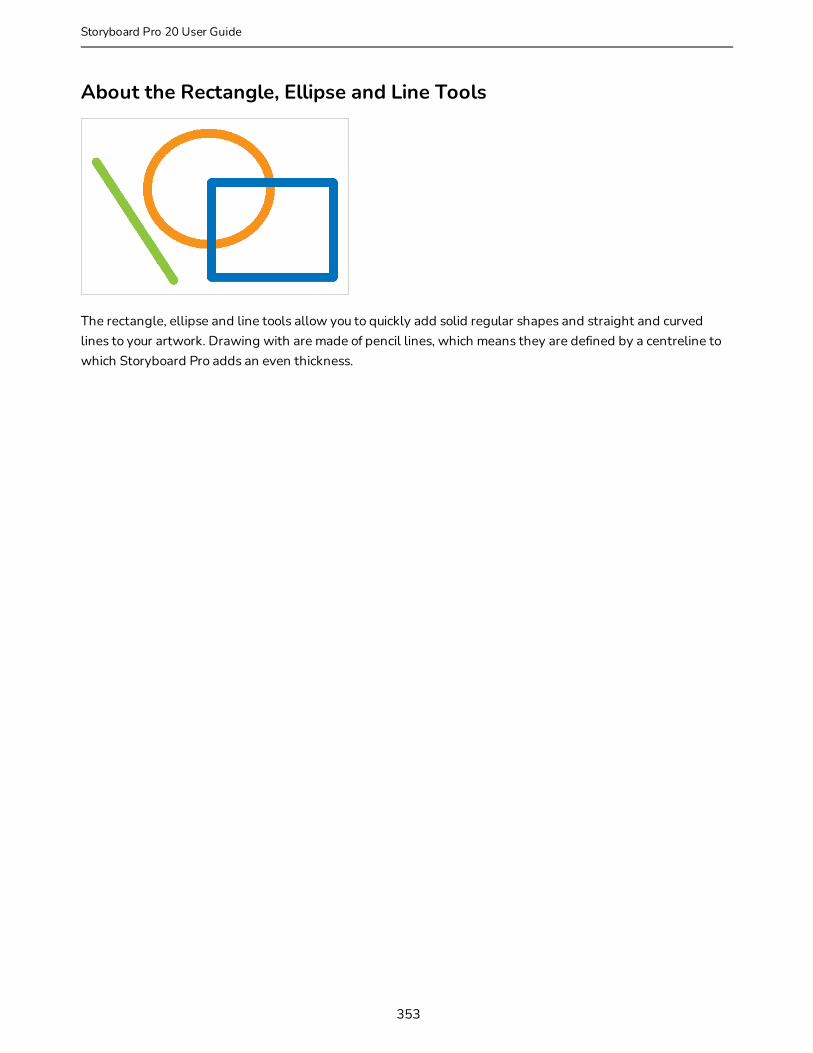
About the Rectangle, Ellipse and Line Tools
The rectangle, ellipse and line tools allow you to quickly add solid regular shapes and straight and curved lines to your artwork. Drawing with are made of pencil lines, which means they are defined by a centreline to which Storyboard Pro adds an even thickness.
353
Storyboard Pro 20 User Guide
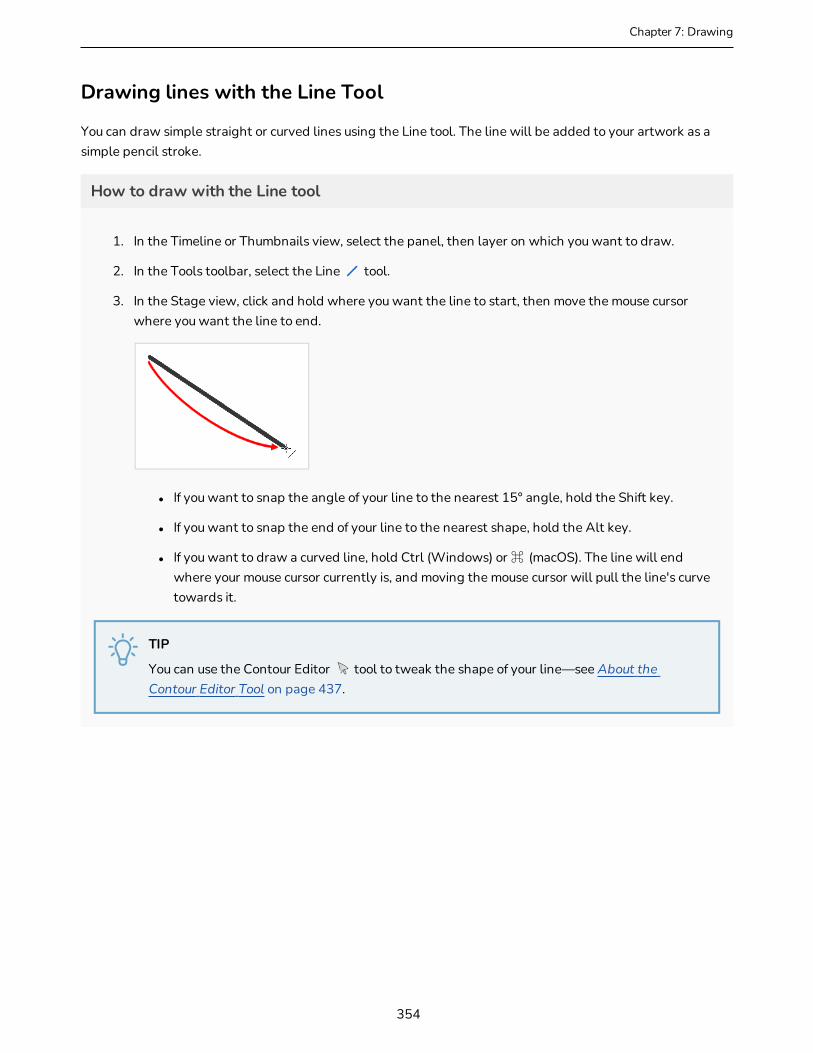
Chapter 7: Drawing
Drawing lines with the Line Tool
You can draw simple straight or curved lines using the Line tool. The line will be added to your artwork as a simple pencil stroke.
How to draw with the Line tool
1. In the Timeline or Thumbnails view, select the panel, then layer on which you want to draw.
2. In the Tools toolbar, select the Line tool.
3. In the Stage view, click and hold where you want the line to start, then move the mouse cursor where you want the line to end.
l If you want to snap the angle of your line to the nearest 15° angle, hold the Shift key.
l If you want to snap the end of your line to the nearest shape, hold the Alt key.
l If you want to draw a curved line, hold Ctrl (Windows) or ⌘ (macOS). The line will end where your mouse cursor currently is, and moving the mouse cursor will pull the line's curve towards it.
TIP
You can use the Contour Editor tool to tweak the shape of your line—see About the Contour Editor Tool on page 437.
354

Drawing Curved Lines with the Line Tool
The Line tool allows you to draw curved lines very quickly by drawing a straight line, then defining its curve right after.
There are three ways to do this:
l In Straight Line Mode, the default mode of the Line tool, you can press and hold the Ctrl (Windows) or ⌘ (macOS) key while drawing a line to define a simple curve for it.
l In Curved Line Mode, after drawing a line, you are prompted to move the mouse cursor or tablet pen and click once to define the line’s curve.
l In S Curve Line Mode, after drawing a line, you are prompted to click once to position the line’s first Bezier handle, and then once more to position its second Bezier handle.
NOTE
You can also define the curve of an existing line using the Contour Editor tool—see About the Contour Editor Tool on page 437.
How to draw a curved line in Straight Line Mode
1. In the Tools toolbar, select the Line tool.
2. In the Tool Properties view, click Straight Line Mode.
3. In the Stage or Camera view, click and drag to draw a line, but don’t release the mouse button or tablet pen.
4. While holding the mouse button or tablet pen down, press and hold the Ctrl (Windows) or ⌘ (macOS) key.
5. Move the mouse or pen in the general direction of the desired curve.
6. When the curve looks as intended, release the mouse button or pen to preserve it.
355
Storyboard Pro 20 User Guide

Chapter 7: Drawing
How to draw a curved line in Curve Line Mode
1. In the Tools toolbar, select the Line tool.
2. In the Tool Properties view, click Curve Line Mode.
3. In the Stage or Camera view, click and drag to draw a line, then release the mouse button or tablet pen.
4. Move the mouse or pen in the general direction of the desired curve.
5. When the curve looks as intended, click to preserve it.
How to draw a curved line in S Curve Line Mode
1. In the Tools toolbar, select the Line tool.
2. In the Tool Properties view, click Curve Line Mode.
3. In the Stage or Camera view, click and drag to draw a line, then release the mouse button or tablet
356

pen.
4. Move the mouse cursor or pen where you want the curve’s first Bezier handle (from the start of the line) to be positioned, then click.
5. Move the mouse cursor or pen where you want the curve’s second Bezier handle (from the end of the line) to be positioned, then click.
357
Storyboard Pro 20 User Guide

Chapter 7: Drawing
Drawing shapes with the Rectangle or Ellipse tools
You can draw rectangles, squares, ellipses and circles using the Rectangle and Ellipse tools. The shapes will be added to your artwork using pencil lines.
How to draw with the Rectangle or Ellipse tool
1. In the Timeline or Thumbnails view, select the panel and layer on which you want to draw.
2. In the Tools toolbar, select the Rectangle or Ellipse tool.
3. In the Stage view, click and hold where you want one of the corners of your shape to be, then move the mouse cursor where you want the opposing corner of the shape to be.
TIPS
l To draw a perfect square or circle (with equal width and height), hold the Shift key. You can also enable the Draw Square or Draw Circle option in the Tool Properties view.
l To draw the rectangle or ellipse from its centre instead of its corner, hold the Alt key.
358
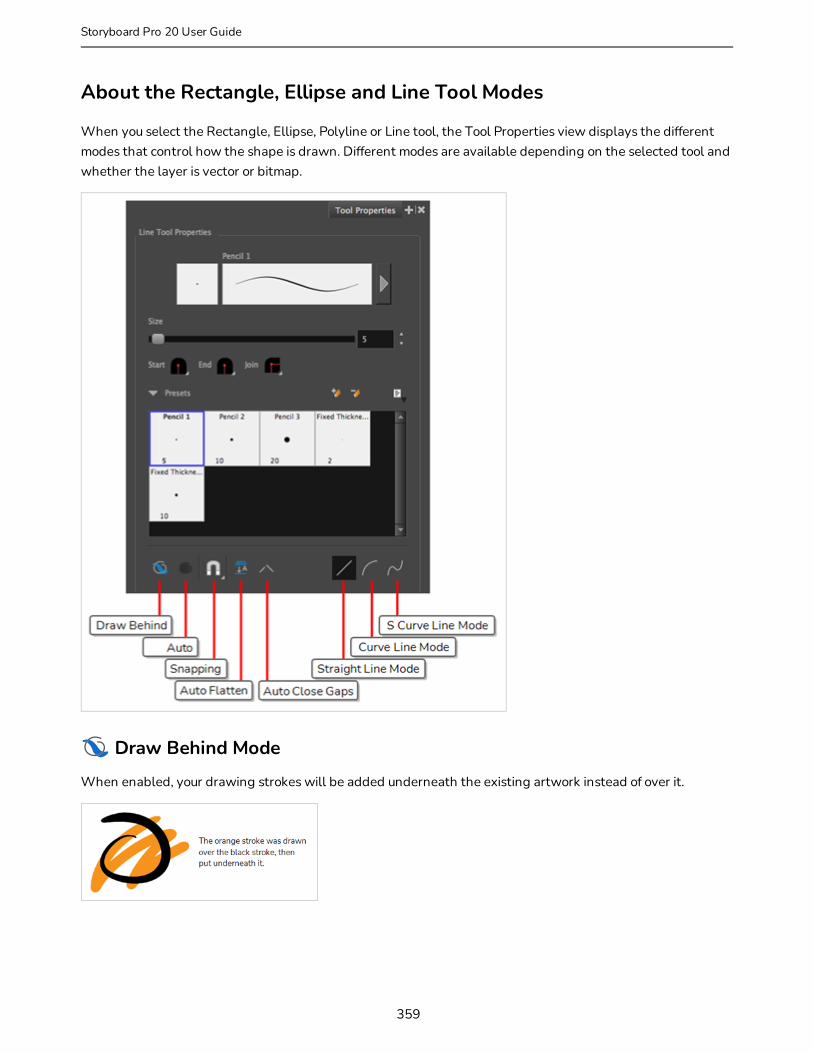
About the Rectangle, Ellipse and Line Tool Modes
When you select the Rectangle, Ellipse, Polyline or Line tool, the Tool Properties view displays the different modes that control how the shape is drawn. Different modes are available depending on the selected tool and whether the layer is vector or bitmap.
Draw Behind Mode
When enabled, your drawing strokes will be added underneath the existing artwork instead of over it.
359
Storyboard Pro 20 User Guide

Chapter 7: Drawing
NOTE
Your stroke will appear over your artwork as you draw it, until you release the mouse cursor or tablet pen. If you want a live preview of your stroke, activate the Realistic Preview option by selecting View > Realistic Preview from the top menu.
Auto Fill Mode
When enabled, the shape you draw is automatically filled with the selected colour. By default, drawing a shape only creates its outlines.
NOTE
This option is not available with the Line tool, as it is not a closed shape.
Snapping
l Snap to Contour: When enabled, while you're drawing, the mouse cursor will automatically snap to the nearby contours of existing artwork, allowing you to draw shapes that connect with other parts of your drawing.
NOTE
If you draw a line with the Line tool and make its tip snap to a contour or another control point in your artwork, they will be locked together. You can then manipulate both simultaneously using the Contour Editor tool. You can also separate two drawing strokes that have been snapped together by selecting one of them with the Select tool and moving it away.
360

l Snap to Alignment Guides: While drawing, the drawing tool will snap against nearby alignment guides—see About Alignment Guides on page 501.
l Snap and Align: When enabled, while you're drawing, the mouse cursor will automatically align with the edges of strokes and shapes in your artwork, allowing you to draw shapes that align with parts of your drawing.
Auto Flatten Mode
By default each pencil line you draw is a separate drawing object which can be manipulated individually. With the Auto-Flatten mode enabled, overlapping pencil lines will be merged together into single drawing objects. Pencil lines will be broken where they intersect, allowing you to select any segment of your artwork as if it was a separate stroke.
Auto Close Gap Mode
When enabled, small gaps between the pencil lines you draw will be closed by an invisible stroke to make sure your shapes are closed and that they can be filled with the Paint tool.
When drawing contours with pencil lines, the centreline is used to determine whether or not the contour is closed, but the visible tips of the pencil line will extend a bit beyond the tips of its centreline, making it possible to have shapes that appear closed, but are not really. This can prevent the shape from being filled with the Paint tool. Enabling this option when drawing with the Pencil or Line tool will prevent you from leaving invisible gaps in your contours.
361
Storyboard Pro 20 User Guide
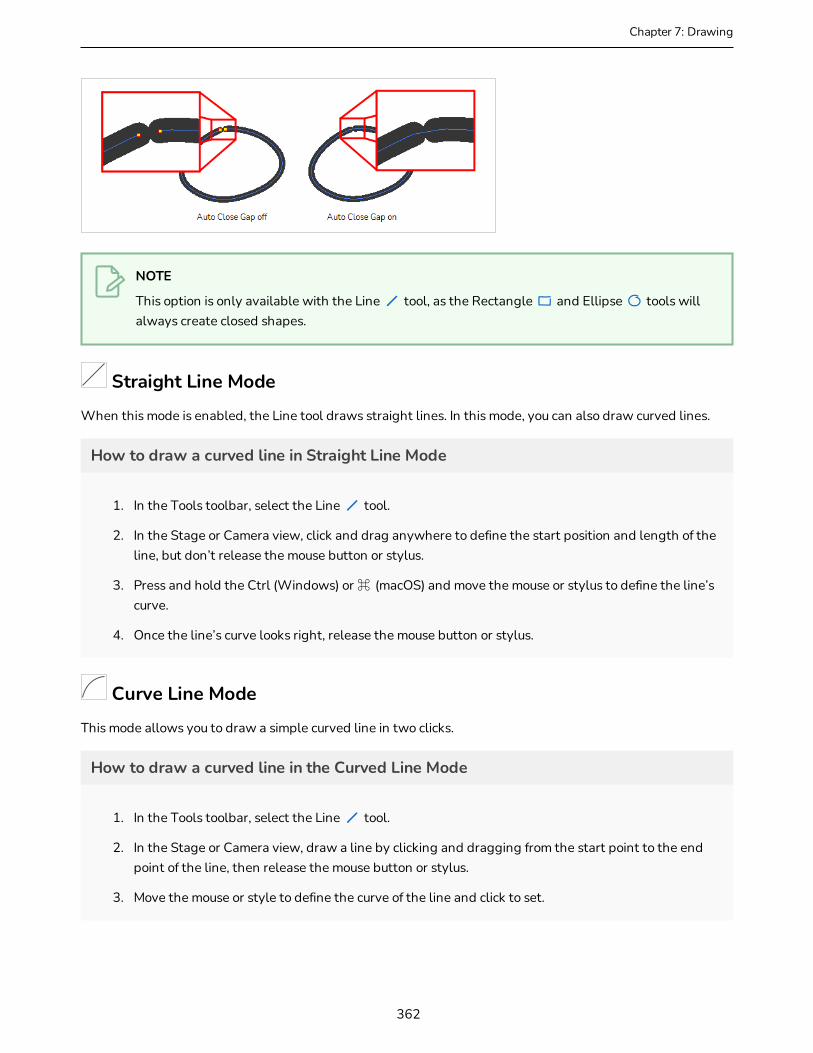
Chapter 7: Drawing
NOTE
This option is only available with the Line tool, as the Rectangle and Ellipse tools will always create closed shapes.
Straight Line Mode
When this mode is enabled, the Line tool draws straight lines. In this mode, you can also draw curved lines.
How to draw a curved line in Straight Line Mode
1. In the Tools toolbar, select the Line tool.
2. In the Stage or Camera view, click and drag anywhere to define the start position and length of the line, but don’t release the mouse button or stylus.
3. Press and hold the Ctrl (Windows) or ⌘ (macOS) and move the mouse or stylus to define the line’s curve.
4. Once the line’s curve looks right, release the mouse button or stylus.
Curve Line Mode
This mode allows you to draw a simple curved line in two clicks.
How to draw a curved line in the Curved Line Mode
1. In the Tools toolbar, select the Line tool.
2. In the Stage or Camera view, draw a line by clicking and dragging from the start point to the end point of the line, then release the mouse button or stylus.
3. Move the mouse or style to define the curve of the line and click to set.
362
S Curve Line Mode
When this mode is enabled, the Line tool draws an S-shaped line.
How to draw an S-shaped curve in the S Curve Line Mode
1. In the Tools toolbar, select the Line tool.
2. In the Stage or Camera view, draw a line by clicking and dragging from the start point to the end point of the line, then release the mouse or stylus.
3. Move the mouse or stylus to define the initial curve and click to set.
4. Move the mouse or stylus again to change the curve from the mid point and click again to set.
363
Storyboard Pro 20 User Guide

Chapter 7: Drawing
About the Polyline ToolThe Polyline tool allows you to create a line or a shape composed of multiple segments by defining each point in the shape one by one. This tool works similarly to the Pen tool in picture editing software.
The most basic approach to using the Polyline tool is to simply click where you want each point constituting your line or shape to be created. Straight line segments will appear between each point you create, making a segmented line or a straight shape.
If you want your line or shape to have curves, you can then click and drag on the line segments using the Contour Editor tool to make them into curves.
Using a more advanced method, you can create curved lines directly with the Polyline tool. To do this, you must hold the mouse button down and drag the mouse cursor when you click to create a point. This will create the point's Bezier handles, which will influence the curve for the segment before and after this point. Hence, as you drag out these Bezier handles, you can see the influence it has on the line segment you just created, but you won't get to see its influence on the next line segment you create until you create the next point.
Regardless of how you use the Polyline tool, you can always tweak the lines and shapes you have created using the Contour Editor tool. Using both tools together allows you to create complex straight and curved shapes with all the precision you need.
364
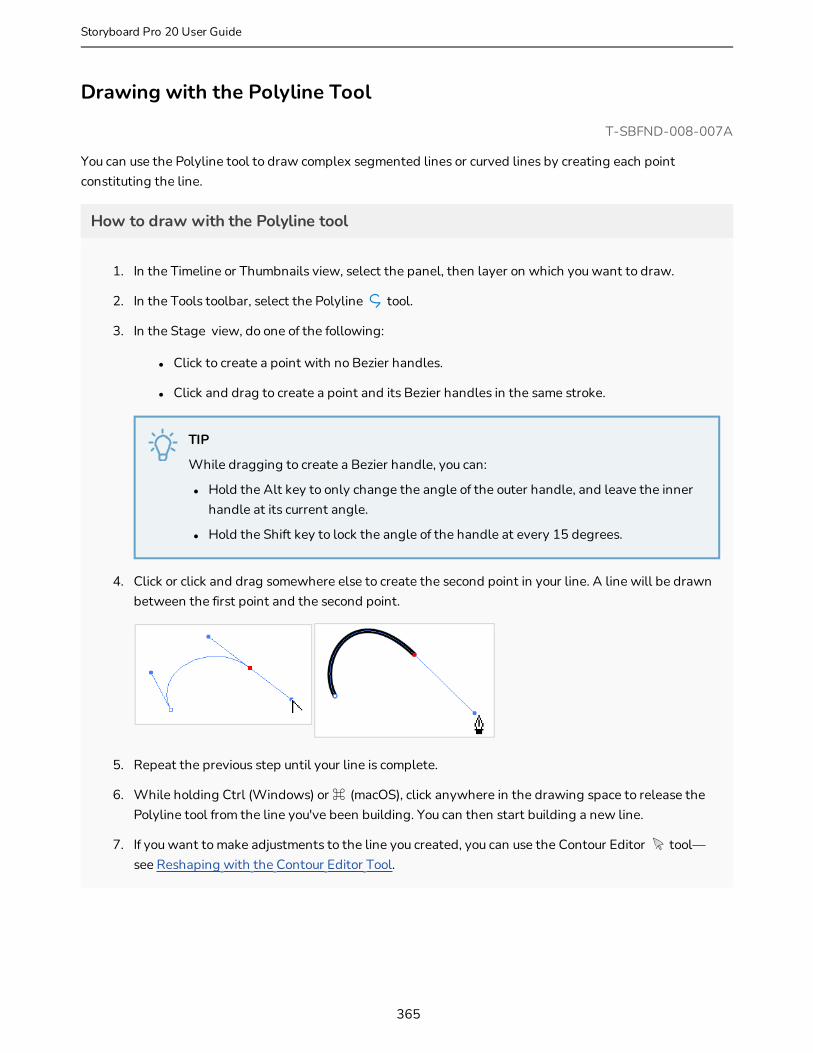
Drawing with the Polyline Tool
T-SBFND-008-007A
You can use the Polyline tool to draw complex segmented lines or curved lines by creating each point constituting the line.
How to draw with the Polyline tool
1. In the Timeline or Thumbnails view, select the panel, then layer on which you want to draw.
2. In the Tools toolbar, select the Polyline tool.
3. In the Stage view, do one of the following:
l Click to create a point with no Bezier handles.
l Click and drag to create a point and its Bezier handles in the same stroke.
TIP
While dragging to create a Bezier handle, you can:
l Hold the Alt key to only change the angle of the outer handle, and leave the inner handle at its current angle.
l Hold the Shift key to lock the angle of the handle at every 15 degrees.
4. Click or click and drag somewhere else to create the second point in your line. A line will be drawn between the first point and the second point.
5. Repeat the previous step until your line is complete.
6. While holding Ctrl (Windows) or ⌘ (macOS), click anywhere in the drawing space to release the Polyline tool from the line you've been building. You can then start building a new line.
7. If you want to make adjustments to the line you created, you can use the Contour Editor tool—see Reshaping with the Contour Editor Tool.
365
Storyboard Pro 20 User Guide
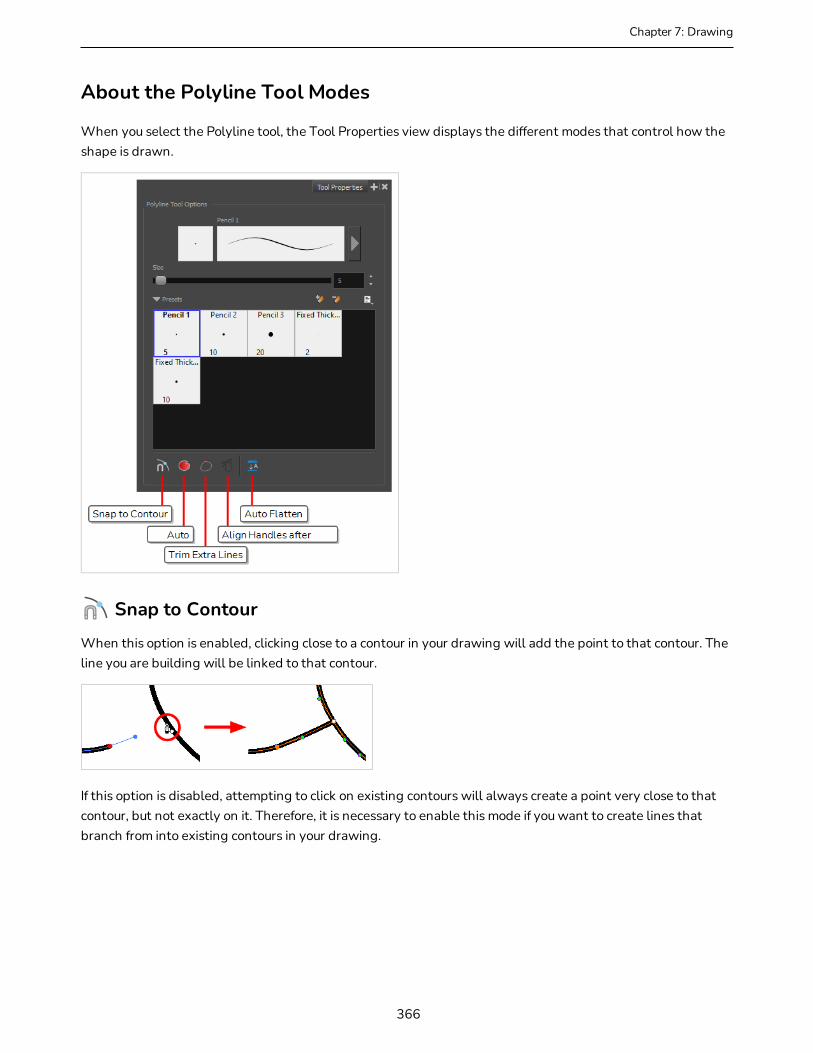
Chapter 7: Drawing
About the Polyline Tool Modes
When you select the Polyline tool, the Tool Properties view displays the different modes that control how the shape is drawn.
Snap to Contour
When this option is enabled, clicking close to a contour in your drawing will add the point to that contour. The line you are building will be linked to that contour.
If this option is disabled, attempting to click on existing contours will always create a point very close to that contour, but not exactly on it. Therefore, it is necessary to enable this mode if you want to create lines that branch from into existing contours in your drawing.
366

NOTE
If you draw a line with the Line tool and make its tip snap to a contour or another control point in your artwork, they will be locked together. You can then manipulate both simultaneously using the
Contour Editor tool. You can also separate two drawing strokes that have been snapped together by selecting one of them with the Select tool and moving it away.
Auto-Fill Mode
When enabled, if you draw a closed shape, it will automatically be filled with the selected colour.
Trim Extra Lines Mode
When enabled, if you draw a closed shape, the lines extending from the point where your stroke intersects with itself will be automatically trimmed off.
Align Handles After Trim Mode
If the Trim Extra Lines Mode is enabled, enable this to automatically smoothen the corner at which your stroke intersects with itself.
Auto Flatten Mode
By default each pencil line you draw is a separate drawing object which can be manipulated individually. With the Auto-Flatten mode enabled, overlapping pencil lines will be merged together into single drawing objects.
367
Storyboard Pro 20 User Guide

Chapter 7: Drawing
Pencil lines will be broken where they intersect, allowing you to select any segment of your artwork as if it was a separate stroke.
368
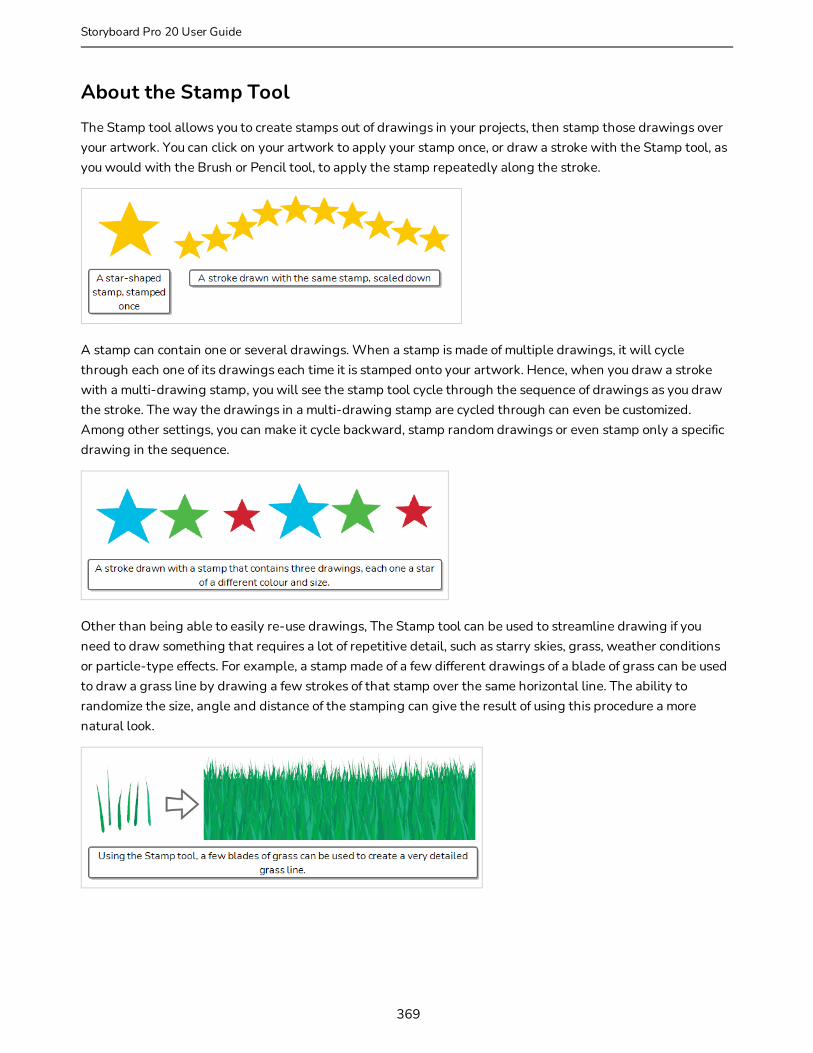
About the Stamp ToolThe Stamp tool allows you to create stamps out of drawings in your projects, then stamp those drawings over your artwork. You can click on your artwork to apply your stamp once, or draw a stroke with the Stamp tool, as you would with the Brush or Pencil tool, to apply the stamp repeatedly along the stroke.
A stamp can contain one or several drawings. When a stamp is made of multiple drawings, it will cycle through each one of its drawings each time it is stamped onto your artwork. Hence, when you draw a stroke with a multi-drawing stamp, you will see the stamp tool cycle through the sequence of drawings as you draw the stroke. The way the drawings in a multi-drawing stamp are cycled through can even be customized. Among other settings, you can make it cycle backward, stamp random drawings or even stamp only a specific drawing in the sequence.
Other than being able to easily re-use drawings, The Stamp tool can be used to streamline drawing if you need to draw something that requires a lot of repetitive detail, such as starry skies, grass, weather conditions or particle-type effects. For example, a stamp made of a few different drawings of a blade of grass can be used to draw a grass line by drawing a few strokes of that stamp over the same horizontal line. The ability to randomize the size, angle and distance of the stamping can give the result of using this procedure a more natural look.
369
Storyboard Pro 20 User Guide

Chapter 7: Drawing
NOTES
l To learn more about the Stamp tool properties, see the Reference Guide
l The Stamp tool replaces the Dynamic Brush option of the Brush tool in Storyboard Pro 5.5 and earlier.
370

Creating a Stamp
T-SBADV-005-012C
You can create a stamp by drawing the artwork for your stamp, then selecting it and creating a stamp preset.
How to create a stamp
1. Create a vector layer in which you will draw the artwork for your stamp by doing one of the following:
l In the Layer panel, the Layer toolbar or the Layers view, click on Add Vector Layer .
l In the top menu, select Layer > New > Vector Layer.
2. In the new vector layer, draw the artwork with which you want to create a stamp.
3. Do one of the following:
l If you want to create a stamp with all the artwork in the layer, select this layer in the Layer panel, the Layers view or the Thumbnails view.
l If you want to create a stamp with part of the artwork in the layer, select the Select tool in the Tools toolbar, then select the parts of the artwork you want to have in your stamp—see Selecting Artwork with the Select Tool on page 413.
4. In the Tools toolbar, select the Stamp tool.
371
Storyboard Pro 20 User Guide

Chapter 7: Drawing
5. In the Tool Properties view, click on the New Preset button.
6. In the New Preset dialog, type the desired name for your new stamp.
7. Click OK.
A stamp containing the selected artwork is added to the Presets list for the Stamp tool. You can now draw with the Stamp tool using this stamp.
NOTE
Once your stamp has been created, you can delete the artwork you used to create it from your project. The artwork in your stamps will be saved in your preferences.
372

Creating a Multi-Drawing Stamp
You can create a stamp containing a series of drawings. All you need to do is create each drawing you want to add to your stamp in a separate layer, then create a stamp with these layers selected. The resulting stamp will cycle through each one of these drawings as you use it.
How to create a multi-drawing stamp
1. In the current panel, create one vector layer for each drawing you want to have in your stamp, by doing one of the following:
l In the Layer panel, the Layer toolbar or the Layers view, click on Add Vector Layer .
l In the top menu, select Layer > New > Vector Layer.
NOTE
You do not have to worry about the order in which the layers are for now, as you can decide in which order each layer is added to your stamp later.
2. In the first layer you have created, create the first drawing you want to have in the drawing sequence of your stamp.
3. In the second layer you have created, create the second drawing you want to have in the drawing sequence of your stamp.
4. Repeat until you have created every drawing you want to have in the drawing sequence of your stamp.
373
Storyboard Pro 20 User Guide

Chapter 7: Drawing
5. In the Layer panel of the Layers view, select all the layers you want to have in your stamp. The order in which you select the layers will affect the order in which the drawings are sequenced in your stamp, hence:
l If you want the drawing sequence to go from the bottommost layer to the topmost layer, click on the bottommost layer then, while holding Shift, click on the topmost layer. This will select all layers between the layers you clicked inclusively, in order from bottom to top.
l If you want the drawing sequence to go from the topmost layer to the bottommost layer, click on the topmost layer then, while holding Shift, click on the bottommost layer. This will select all layers between the two layers you clicked inclusively, in order from top to bottom.
l If you want to create a sequence going through the drawings in your layers in a more specific order, press and hold the Ctrl key, and click on each layer you want to add to your stamp, in the order in which you want them to be in the sequence.
l If you want to exclude any of the selected layers from your sequence, hold Ctrl and click on each one of the selected layers you want to exclude to unselected them.
6. In the Tools toolbar, select the Stamp tool.
7. In the Tool Properties view, click on New Preset.
The New Preset dialog appears.
8. In the New Preset dialog, type the desired name for your new stamp.
374
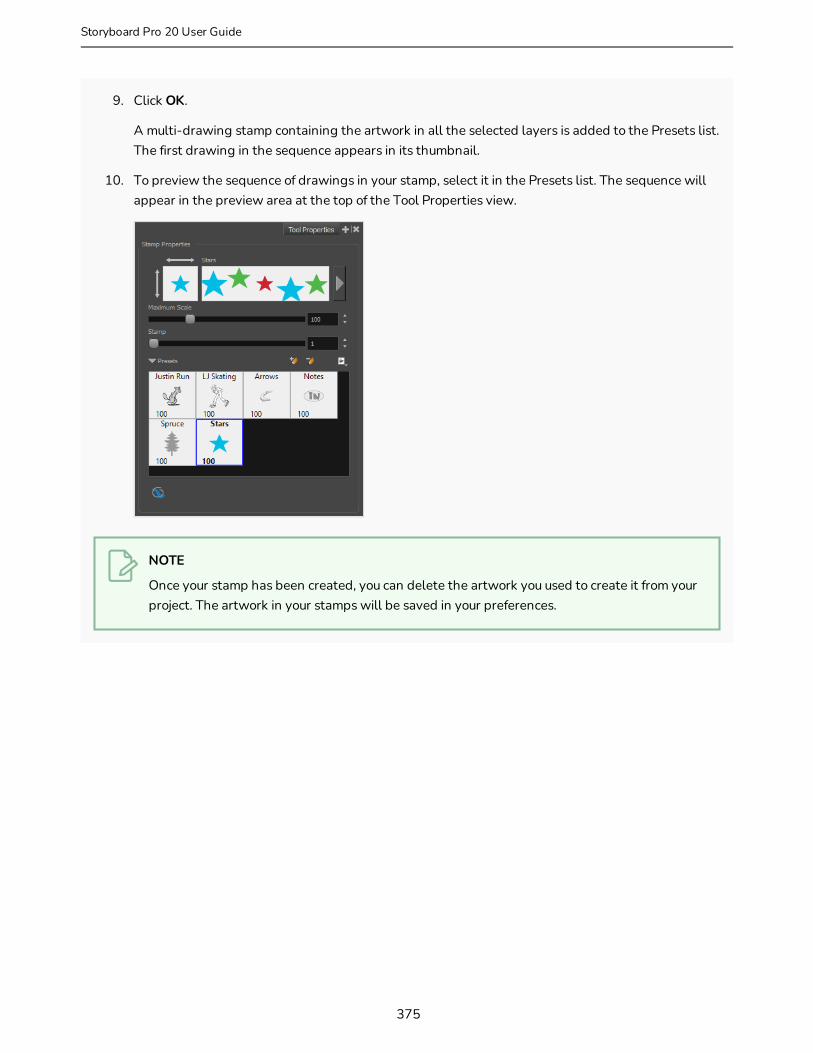
9. Click OK.
A multi-drawing stamp containing the artwork in all the selected layers is added to the Presets list. The first drawing in the sequence appears in its thumbnail.
10. To preview the sequence of drawings in your stamp, select it in the Presets list. The sequence will appear in the preview area at the top of the Tool Properties view.
NOTE
Once your stamp has been created, you can delete the artwork you used to create it from your project. The artwork in your stamps will be saved in your preferences.
375
Storyboard Pro 20 User Guide

Chapter 7: Drawing
Configuring a Stamp
When drawing a stroke with the stamp tool, the way the stamp is applied in terms of size, angle, spacing can be customized.
How to configure the size, pressure sensitivity, roundness, angle and spacing of a stamp
1. In the Presets list of the Tool Properties view, select the stamp that you want to configure.
2. In the Tool Properties view, just right of the stroke preview area, click on the Show Extended Properties button.
The Stamp Properties dialog opens.
3. If you want to adjust the size of the stamp, change the Maximum Scale setting until you obtain the desired size.
376

NOTE
The Scale of a stamp is relative to the original size of the drawing used to create the stamp. At 100% scale, the stamp added to your artwork will be the same size as its original drawing.
4. If you're using a pressure-sensitive pen tablet and want the size of the stamp to depend on the amount of pressure you put on your pen, reduce the Minimum Scale setting.
5. If you would like to flip the stamp horizontally, click on the two-ended horizontal arrow over the stamp thumbnail. If you would like to flip the stamp vertically, click on the two-ended vertical arrow left of the stamp thumbnails.
6. If your stamp is round or square, and you would like it to appear flat or squished, reduce the Roundness parameter. This will scale down the stamp vertically.
7. If you want your stamp to be added to your artwork at an angle, change the Angle parameter. This setting rotates the stamp counterclockwise, on a 360 degrees scale.
8. If you want to change the amount of space between each stamp when you draw a stroke with the Stamp tool, adjust the Spacing parameter.
9. If you want the current settings to be saved to your stamp preset, click on the Update Brush Preset button at the top-right corner of the Stamp Properties dialog.
377
Storyboard Pro 20 User Guide

Chapter 7: Drawing
NOTE
You can use the Stamp tool with the currently selected settings without updating your preset.
You can randomize the size, angle and spacing of the stamp. This will make the Stamp tool apply a randomly picked value to these parameters every time it applies a stamp to your artwork.
How to randomize the size, angle and spacing of a stamp
1. In the Presets list of the Tool Properties view, select the stamp that you want to configure.
2. In the Tool Properties view, just right of the stroke preview area, click on the Show Extended Properties button.
The Stamp Properties dialog opens.
3. If you want the size of the stamp to be randomized every time the stamp is added to your artwork, decrease the Minimum Scale setting, then increase the Random Size setting.
378
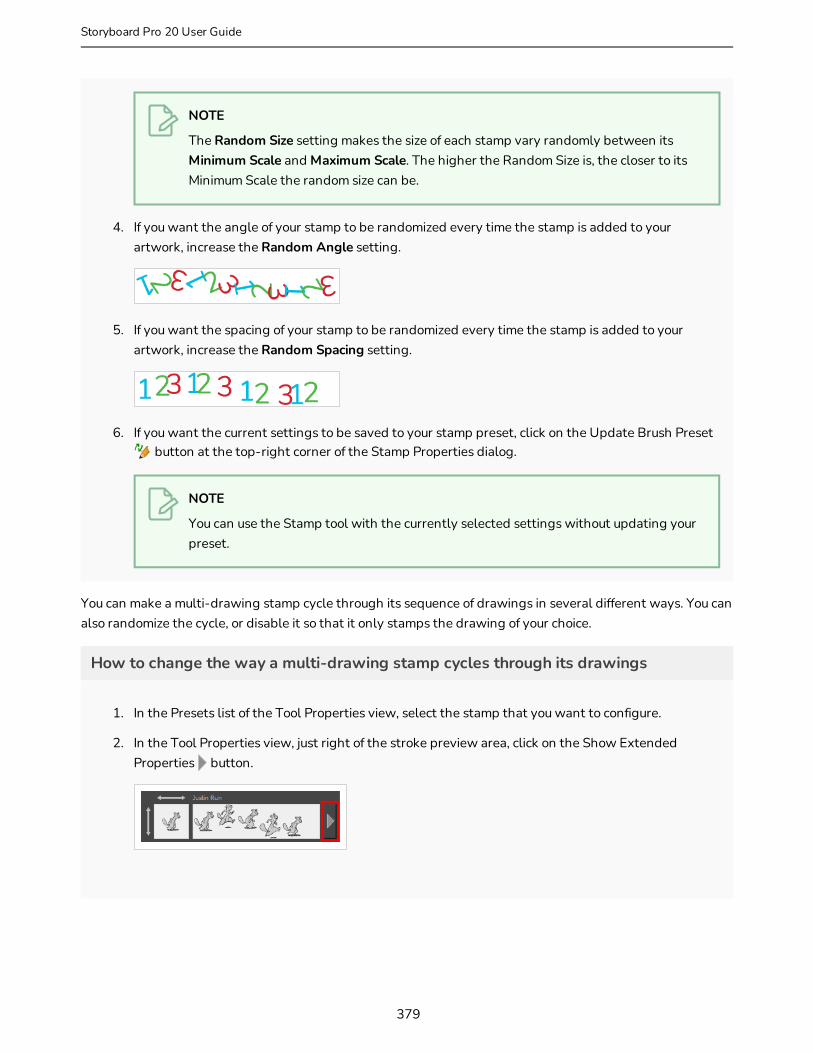
NOTE
The Random Size setting makes the size of each stamp vary randomly between its Minimum Scale and Maximum Scale. The higher the Random Size is, the closer to its Minimum Scale the random size can be.
4. If you want the angle of your stamp to be randomized every time the stamp is added to your artwork, increase the Random Angle setting.
5. If you want the spacing of your stamp to be randomized every time the stamp is added to your artwork, increase the Random Spacing setting.
6. If you want the current settings to be saved to your stamp preset, click on the Update Brush Preset button at the top-right corner of the Stamp Properties dialog.
NOTE
You can use the Stamp tool with the currently selected settings without updating your preset.
You can make a multi-drawing stamp cycle through its sequence of drawings in several different ways. You can also randomize the cycle, or disable it so that it only stamps the drawing of your choice.
How to change the way a multi-drawing stamp cycles through its drawings
1. In the Presets list of the Tool Properties view, select the stamp that you want to configure.
2. In the Tool Properties view, just right of the stroke preview area, click on the Show Extended Properties button.
379
Storyboard Pro 20 User Guide
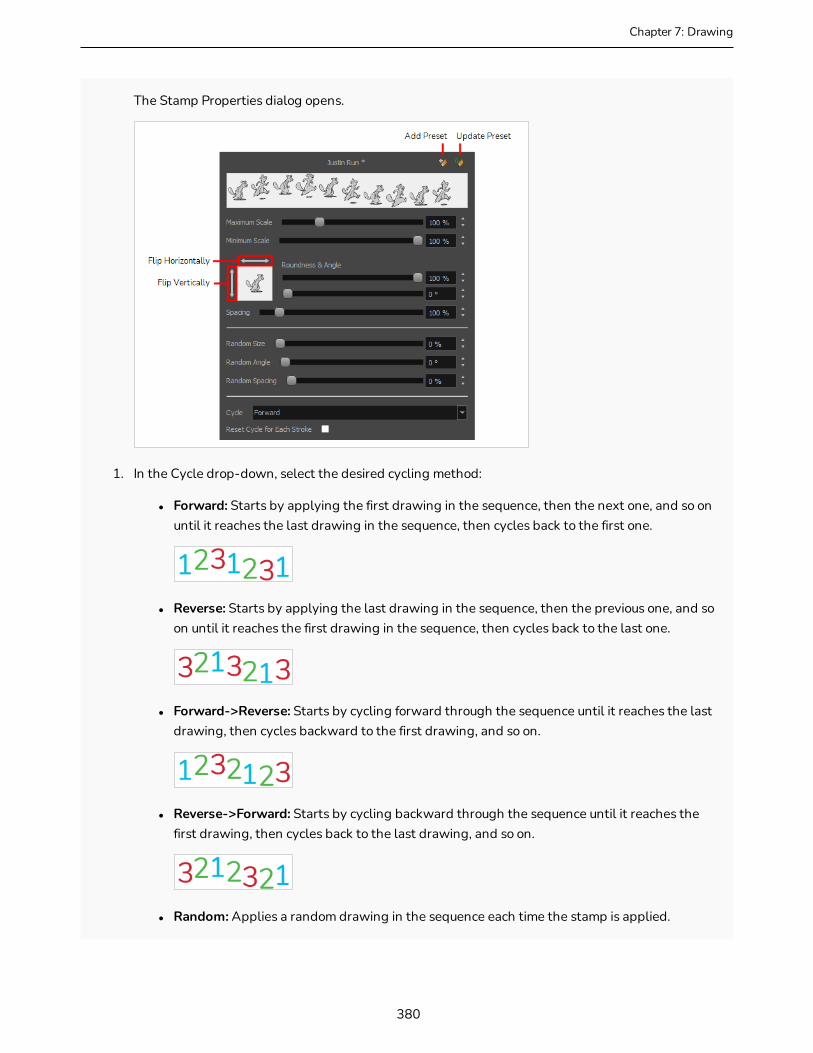
Chapter 7: Drawing
The Stamp Properties dialog opens.
1. In the Cycle drop-down, select the desired cycling method:
l Forward: Starts by applying the first drawing in the sequence, then the next one, and so on until it reaches the last drawing in the sequence, then cycles back to the first one.
l Reverse: Starts by applying the last drawing in the sequence, then the previous one, and so on until it reaches the first drawing in the sequence, then cycles back to the last one.
l Forward->Reverse: Starts by cycling forward through the sequence until it reaches the last drawing, then cycles backward to the first drawing, and so on.
l Reverse->Forward: Starts by cycling backward through the sequence until it reaches the first drawing, then cycles back to the last drawing, and so on.
l Random: Applies a random drawing in the sequence each time the stamp is applied.
380
l Hold: Applies a single one of the drawings in the sequence over and over again.
2. If you selected the Hold option, select which one of the stamps in the sequence you wish to stamp onto your artwork by changing the Stamp setting in the Tool Properties view. For example, if you only want to stamp the second drawing in the sequence, set the Stamp setting to 2.
3. If you want the cycle to restart at the beginning of each one of your drawing strokes, enable the Reset Cycle for Each Stroke option.
4. If you want the current settings to be saved to your stamp preset, click on the Update Brush Preset button at the top-right corner of the Stamp Properties dialog.
NOTE
You can use the Stamp tool with the currently selected settings without updating your preset.
381
Storyboard Pro 20 User Guide
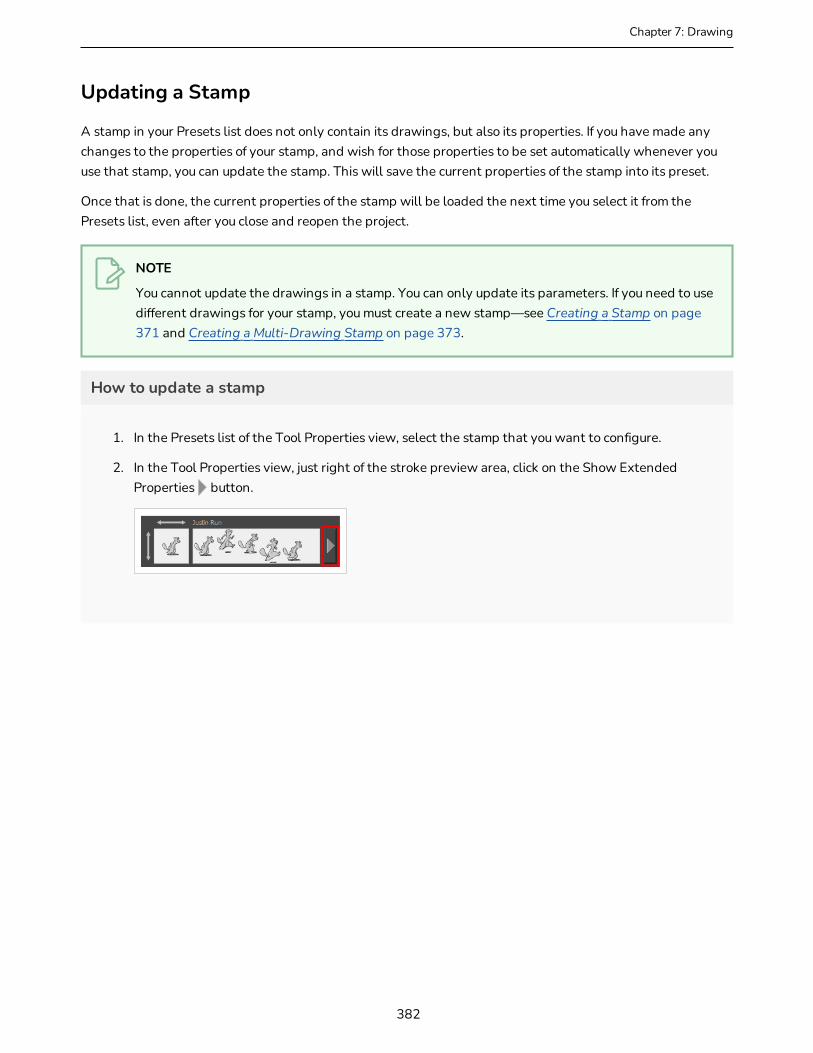
Chapter 7: Drawing
Updating a Stamp
A stamp in your Presets list does not only contain its drawings, but also its properties. If you have made any changes to the properties of your stamp, and wish for those properties to be set automatically whenever you use that stamp, you can update the stamp. This will save the current properties of the stamp into its preset.
Once that is done, the current properties of the stamp will be loaded the next time you select it from the Presets list, even after you close and reopen the project.
NOTE
You cannot update the drawings in a stamp. You can only update its parameters. If you need to use different drawings for your stamp, you must create a new stamp—see Creating a Stamp on page 371 and Creating a Multi-Drawing Stamp on page 373.
How to update a stamp
1. In the Presets list of the Tool Properties view, select the stamp that you want to configure.
2. In the Tool Properties view, just right of the stroke preview area, click on the Show Extended Properties button.
382

The Stamp Properties dialog opens.
3. In the Stamp Properties dialog, adjust the settings of your stamp as desired—see Configuring a Stamp on page 376.
4. In the top-right corner of the Stamp Properties dialog, click on the Update Preset button.
The selected stamp properties will be loaded whenever you select this stamp, even after you close and reopen your project.
383
Storyboard Pro 20 User Guide

Chapter 7: Drawing
Drawing with the Stamp Tool
Once you have created a stamp, you can start drawing with it. You can either stamp it into your artwork once at a time, or draw strokes with the tool, making it apply the stamp repeatedly onto your artwork along your strokes.
How to draw with the Stamp tool
1. In the Layer panel of the Stage or Camera view or the Layers view, select the layer on which you want to apply the stamp.
2. In the Tools toolbar, select the Stamp tool.
3. In the Tool Properties view, select a stamp from the Presets list—see Creating a Stamp on page 371 and Creating a Multi-Drawing Stamp on page 373.
4. Move the mouse cursor over the Stage or Camera view. You will see the stamp under your mouse cursor as it will be applied into your artwork. If you want to adjust the size in which it will be applied, adjust the Maximum Scale setting in the Tool Properties view.
5. By default, your stamp will be applied at an even size, angle and distance. Also, if your stamp is a multi-drawing stamp, it will cycle through its drawings in their original order. If you want your stamp to be applied with different parameters, see Configuring a Stamp on page 376.
6. In the Stage or Camera view, do one of the following:
l To apply the stamp once, simply click where you want to apply it.
l To draw a stroke along which the stamp is applied multiple times, simply draw a stroke with
384

the tool as you would with the Brush or Pencil tool.
TIPS
l If your stamp has multiple drawings in it, you can select which drawings to stamp by using the Stamp slider in the Tool Properties view. You can also cycle through the stamp's drawings by pressing the Left Arrow and Right Arrow keys.
l You can quickly adjust the size of the selected drawing tool by pressing and holding the O key, then clicking and dragging in the drawing space. If you are using a tablet pen, doing this with the eraser tip of your pen will adjust the size of the Eraser tool, regardless of which drawing tool is selected.
l If you press and hold the Shift key before or while drawing, you will draw a straight line.
l If you press and hold the Shift and Alt keys before or while drawing, you will draw a straight horizontal or vertical line.
l If you press and hold the Ctrl (Windows/Linux) or ⌘ (macOS) key while drawing, your drawing stroke will turn into a closed shape.
385
Storyboard Pro 20 User Guide
Chapter 7: Drawing
Renaming Stamps
You can rename stamps you have created to make them easier to identify in the Presets list.
How to rename a stamp.
1. In the Tools toolbar, select the Stamp tool.
2. In the Presets list of the Tool Properties view, select the stamp you want to rename.
3. Open the Brush Presets menu, then select Rename Brush.
4. In the Rename Brush dialog, enter the new name for your stamp.
5. Click OK.
The stamp's new name updates in the Presets list.
386

Deleting Stamps
You can delete stamps you no longer need from the Presets list.
How to delete a stamp.
1. In the Tools toolbar, select the Stamp tool.
2. In the Presets list of the Tool Properties view, select the stamp you want to delete.
3. Click on the Delete Brush button just above the Presets list.
The stamp is removed from the Presets list.
387
Storyboard Pro 20 User Guide

Chapter 7: Drawing
Exporting Stamps
You can export stamps you have created to keep a backup of them, or to import them for use in another project.
How to export stamps
1. In the Tools toolbar, select the Stamp tool.
2. In the Tool Properties view, open the Brush Preset menu and select Export Brushes.
The Export Brushes dialog opens. This dialog allows you to export brush presets for the Brush, Pencil, Eraser and Stamp tools.
3. By default, the presets for all your tools will be selected for export. If you only wish to export your stamps, uncheck Select/Deselect All, then check Stamp.
4. Click on Export.
A save dialog appears.
5. Browse to the location where you want to save the .xml file that will contain your presets.
6. Enter the desired file name for your presets file.
7. Click on Save.
388
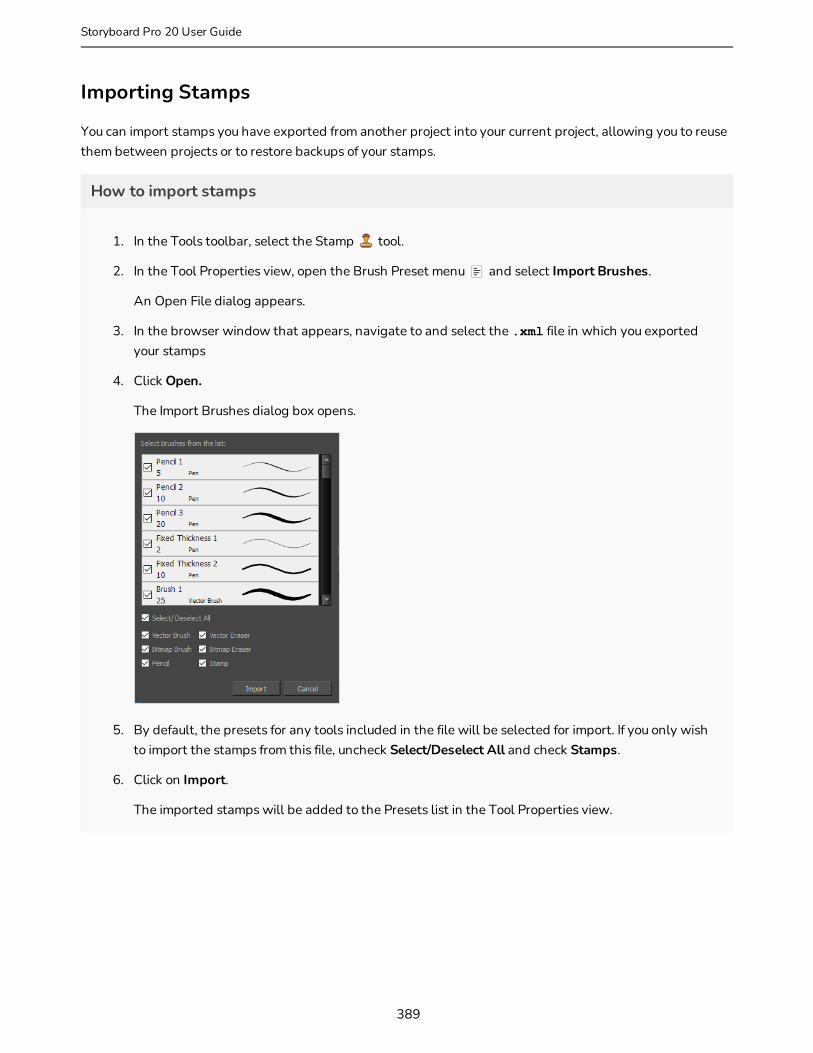
Importing Stamps
You can import stamps you have exported from another project into your current project, allowing you to reuse them between projects or to restore backups of your stamps.
How to import stamps
1. In the Tools toolbar, select the Stamp tool.
2. In the Tool Properties view, open the Brush Preset menu and select Import Brushes.
An Open File dialog appears.
3. In the browser window that appears, navigate to and select the .xml file in which you exported your stamps
4. Click Open.
The Import Brushes dialog box opens.
5. By default, the presets for any tools included in the file will be selected for import. If you only wish to import the stamps from this file, uncheck Select/Deselect All and check Stamps.
6. Click on Import.
The imported stamps will be added to the Presets list in the Tool Properties view.
389
Storyboard Pro 20 User Guide
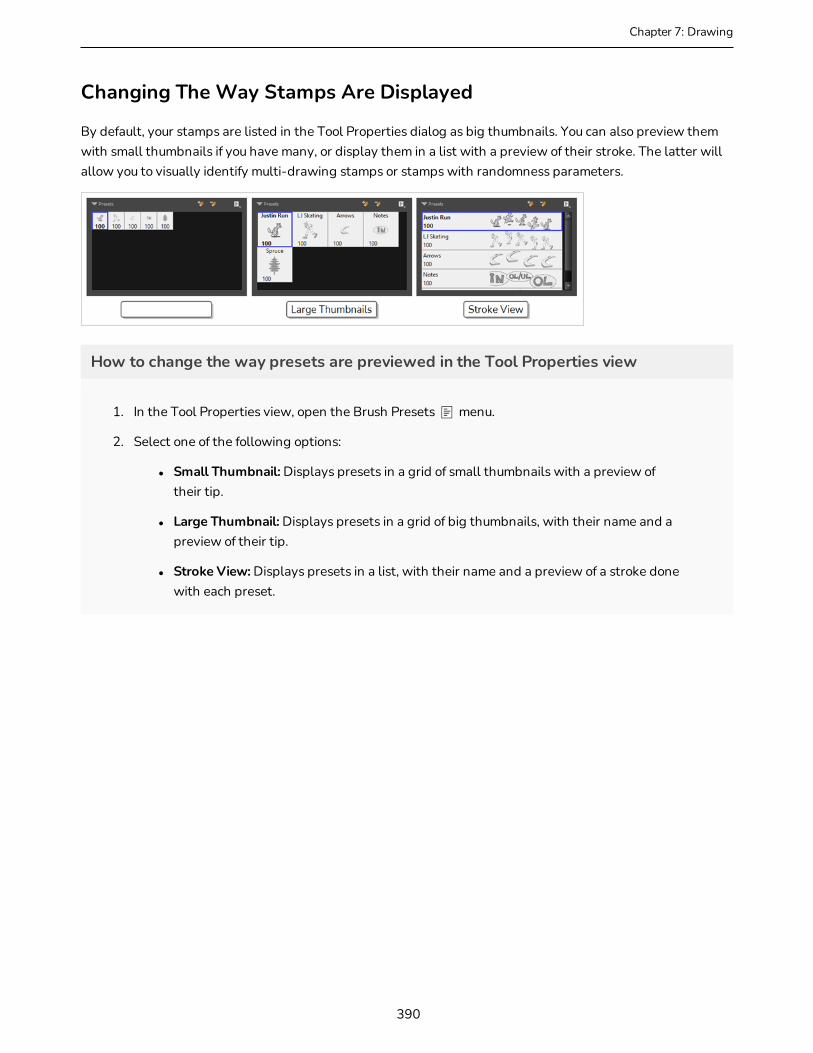
Chapter 7: Drawing
Changing The Way Stamps Are Displayed
By default, your stamps are listed in the Tool Properties dialog as big thumbnails. You can also preview them with small thumbnails if you have many, or display them in a list with a preview of their stroke. The latter will allow you to visually identify multi-drawing stamps or stamps with randomness parameters.
How to change the way presets are previewed in the Tool Properties view
1. In the Tool Properties view, open the Brush Presets menu.
2. Select one of the following options:
l Small Thumbnail: Displays presets in a grid of small thumbnails with a preview of their tip.
l Large Thumbnail: Displays presets in a grid of big thumbnails, with their name and a preview of their tip.
l Stroke View: Displays presets in a list, with their name and a preview of a stroke done with each preset.
390

Stamp Tool Modes
When you select the Stamp tool, its properties are displayed in the Tool Properties view.
Draw Behind Mode
When enabled, your drawing strokes will be added underneath the existing artwork instead of over it.
NOTE
Your stroke will appear over your artwork as you draw it, until you release the mouse cursor or tablet pen. If you want a live preview of your stroke, activate the Realistic Preview option by selecting View > Realistic Preview from the top menu.
391
Storyboard Pro 20 User Guide
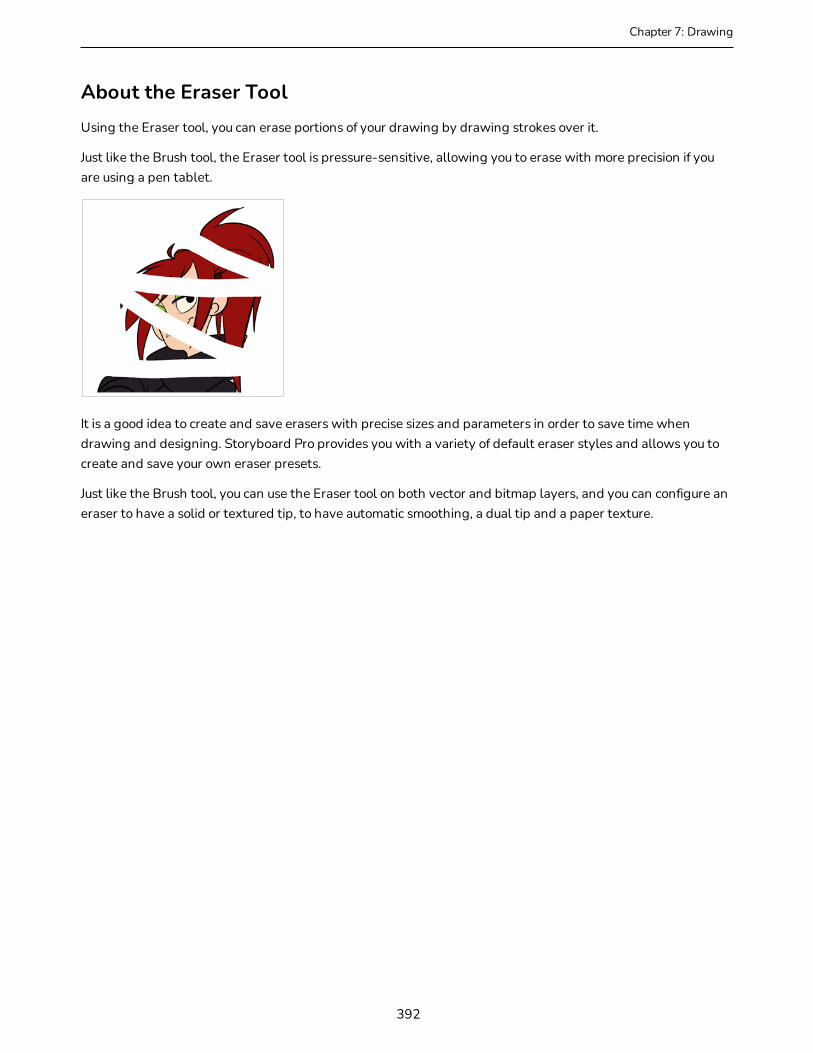
Chapter 7: Drawing
About the Eraser ToolUsing the Eraser tool, you can erase portions of your drawing by drawing strokes over it.
Just like the Brush tool, the Eraser tool is pressure-sensitive, allowing you to erase with more precision if you are using a pen tablet.
It is a good idea to create and save erasers with precise sizes and parameters in order to save time when drawing and designing. Storyboard Pro provides you with a variety of default eraser styles and allows you to create and save your own eraser presets.
Just like the Brush tool, you can use the Eraser tool on both vector and bitmap layers, and you can configure an eraser to have a solid or textured tip, to have automatic smoothing, a dual tip and a paper texture.
392
Erasing
With the Eraser tool, you can erase parts of drawings.
How to erase with the Eraser tool
1. In the Thumbnails or Timeline view, select the panel where you want to erase.
2. In the Thumbnails or Stage view, select a layer.
3. Do one of the following:
l In the Tools toolbar, select the Eraser tool
l Use the keyboard shortcut Alt + E.
l Flip over your tablet pen so that the rounded end is now touching the tablet.
4. In the Presets list of the Tool Properties view, select a brush preset to use.
NOTE
To learn how to create an Eraser preset, see Creating a Solid Eraser on page 395 and Creating a Textured Eraser on page 399.
5. In the Tool Properties view, set the Maximum Size to the desired Eraser size.
You can also adjust the Eraser size using the keyboard shortcuts [ Decrease Brush Size and ] Increase Bush Size. The numerical value for the Maximum Size updates automatically in the Tool Properties panel.
NOTE
If you are drawing with a mouse, your strokes will always be at their maximum size. If you are using a pressure-sensitive tablet, your strokes will vary in size depending on the pressure of your pen, ranging between 25% to 100% of the maximum size.
6. In the Stage view, start erasing.
393
Storyboard Pro 20 User Guide

Chapter 7: Drawing
TIPS
l You can quickly adjust the size of the selected drawing tool by pressing and holding the O key, then clicking and dragging in the drawing space. If you are using a tablet pen, doing this with the eraser tip of your pen will adjust the size of the Eraser tool, regardless of which drawing tool is selected.
l If you press and hold the Shift key before or while drawing, you will draw a straight line.
l If you press and hold the Shift and Alt keys before or while drawing, you will draw a straight horizontal or vertical line.
394
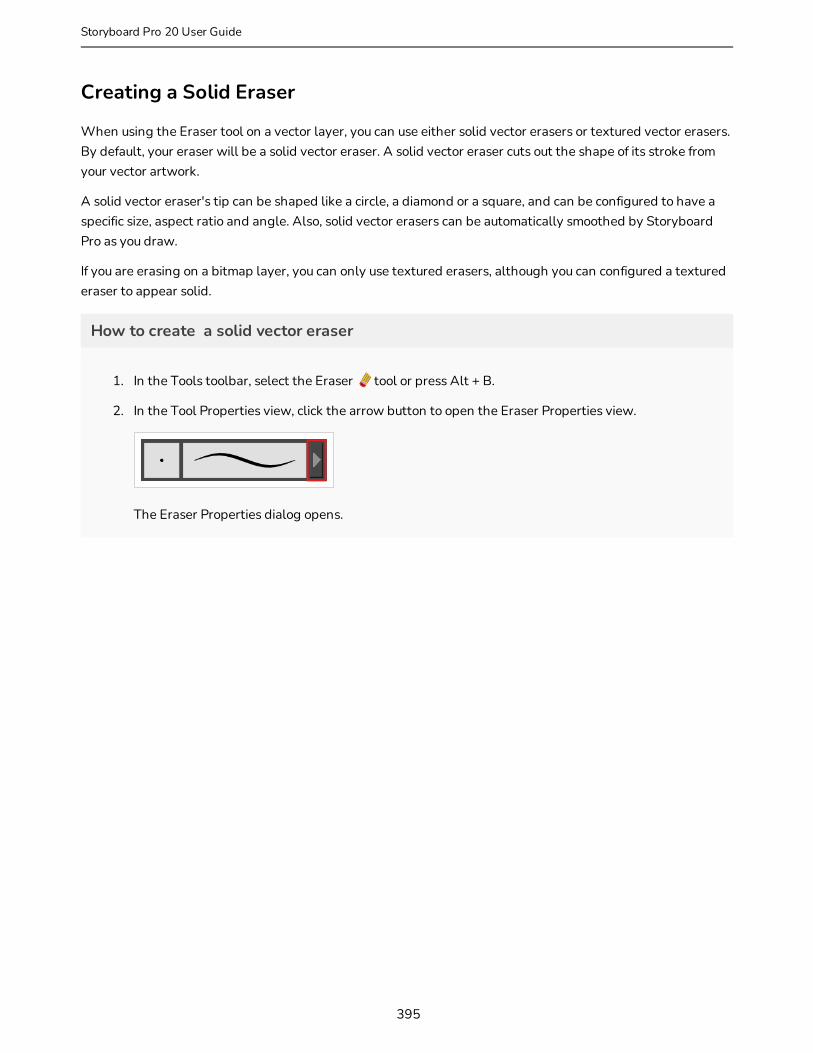
Creating a Solid Eraser
When using the Eraser tool on a vector layer, you can use either solid vector erasers or textured vector erasers. By default, your eraser will be a solid vector eraser. A solid vector eraser cuts out the shape of its stroke from your vector artwork.
A solid vector eraser's tip can be shaped like a circle, a diamond or a square, and can be configured to have a specific size, aspect ratio and angle. Also, solid vector erasers can be automatically smoothed by Storyboard Pro as you draw.
If you are erasing on a bitmap layer, you can only use textured erasers, although you can configured a textured eraser to appear solid.
How to create a solid vector eraser
1. In the Tools toolbar, select the Eraser tool or press Alt + B.
2. In the Tool Properties view, click the arrow button to open the Eraser Properties view.
The Eraser Properties dialog opens.
395
Storyboard Pro 20 User Guide
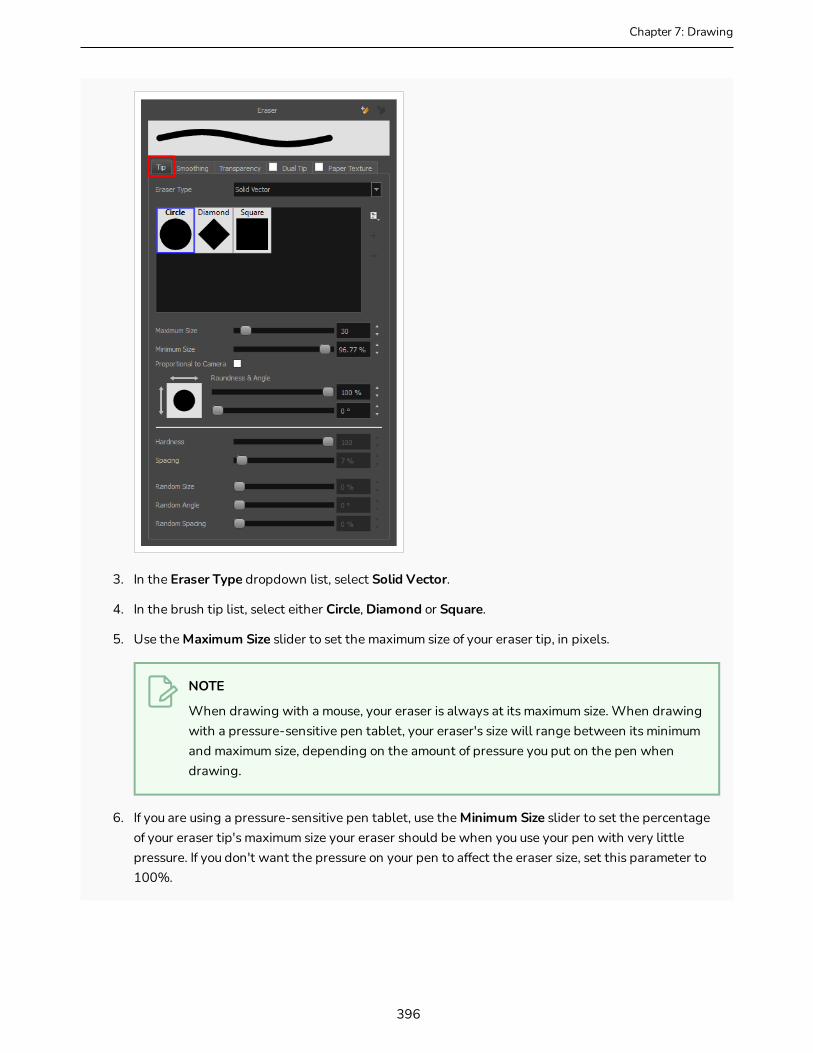
Chapter 7: Drawing
3. In the Eraser Type dropdown list, select Solid Vector.
4. In the brush tip list, select either Circle, Diamond or Square.
5. Use the Maximum Size slider to set the maximum size of your eraser tip, in pixels.
NOTE
When drawing with a mouse, your eraser is always at its maximum size. When drawing with a pressure-sensitive pen tablet, your eraser's size will range between its minimum and maximum size, depending on the amount of pressure you put on the pen when drawing.
6. If you are using a pressure-sensitive pen tablet, use the Minimum Size slider to set the percentage of your eraser tip's maximum size your eraser should be when you use your pen with very little pressure. If you don't want the pressure on your pen to affect the eraser size, set this parameter to 100%.
396
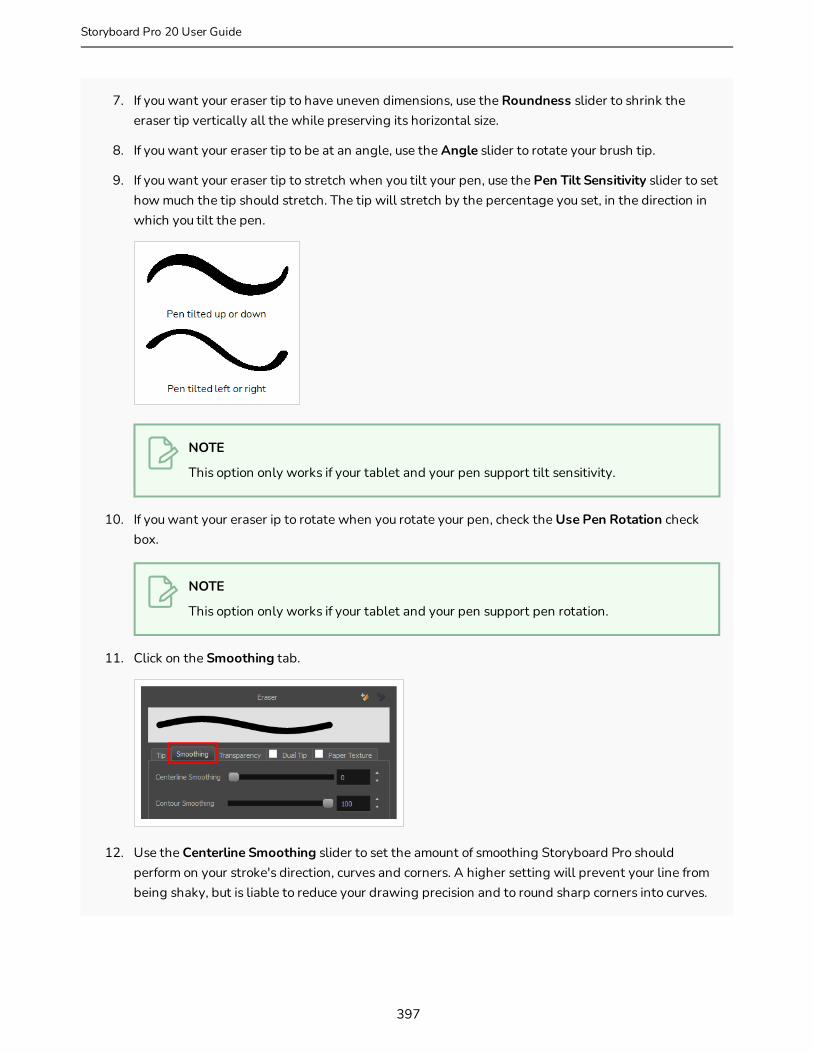
7. If you want your eraser tip to have uneven dimensions, use the Roundness slider to shrink the eraser tip vertically all the while preserving its horizontal size.
8. If you want your eraser tip to be at an angle, use the Angle slider to rotate your brush tip.
9. If you want your eraser tip to stretch when you tilt your pen, use the Pen Tilt Sensitivity slider to set how much the tip should stretch. The tip will stretch by the percentage you set, in the direction in which you tilt the pen.
NOTE
This option only works if your tablet and your pen support tilt sensitivity.
10. If you want your eraser ip to rotate when you rotate your pen, check the Use Pen Rotation check box.
NOTE
This option only works if your tablet and your pen support pen rotation.
11. Click on the Smoothing tab.
12. Use the Centerline Smoothing slider to set the amount of smoothing Storyboard Pro should perform on your stroke's direction, curves and corners. A higher setting will prevent your line from being shaky, but is liable to reduce your drawing precision and to round sharp corners into curves.
397
Storyboard Pro 20 User Guide

Chapter 7: Drawing
13. Use the Contour Smoothing slider to set the amount of smoothing Storyboard Pro should perform on your stroke's contour. A higher setting will round sharp corners and reduce the amount of control points for the resulting vector shape.
14. Either close or set aside the Eraser Properties dialog.
15. In the Camera or Drawing view, start erasing to test your eraser settings.
398
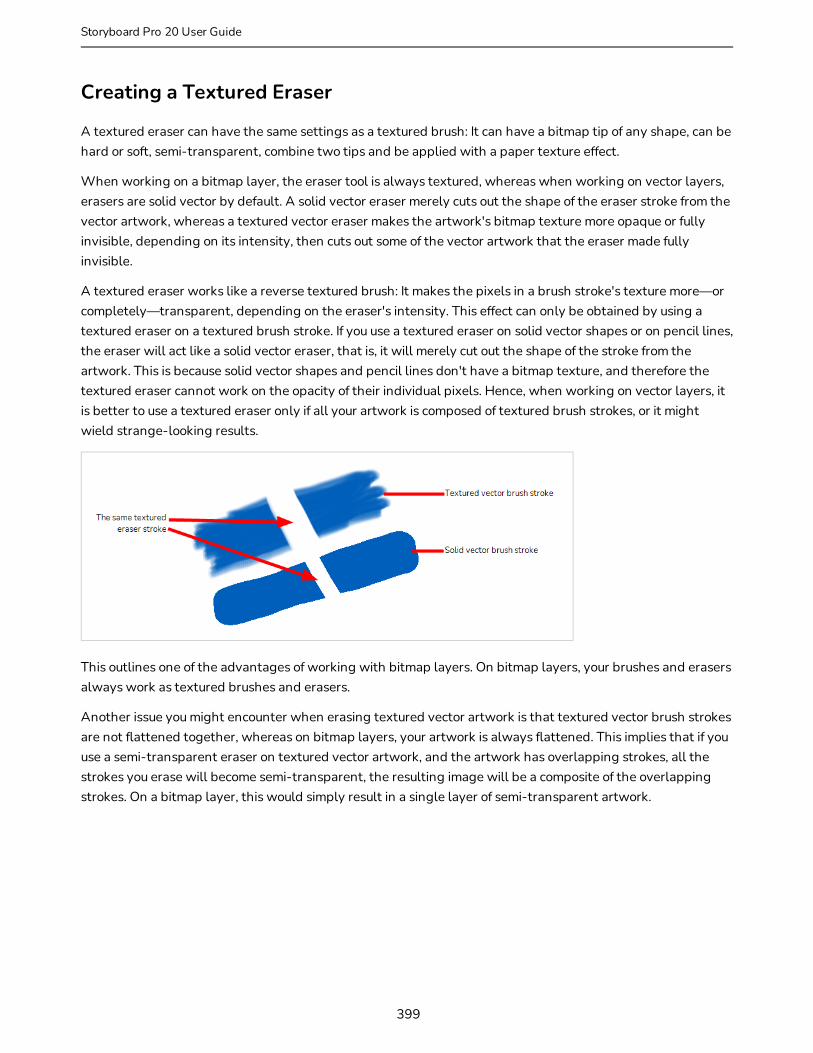
Creating a Textured Eraser
A textured eraser can have the same settings as a textured brush: It can have a bitmap tip of any shape, can be hard or soft, semi-transparent, combine two tips and be applied with a paper texture effect.
When working on a bitmap layer, the eraser tool is always textured, whereas when working on vector layers, erasers are solid vector by default. A solid vector eraser merely cuts out the shape of the eraser stroke from the vector artwork, whereas a textured vector eraser makes the artwork's bitmap texture more opaque or fully invisible, depending on its intensity, then cuts out some of the vector artwork that the eraser made fully invisible.
A textured eraser works like a reverse textured brush: It makes the pixels in a brush stroke's texture more—or completely—transparent, depending on the eraser's intensity. This effect can only be obtained by using a textured eraser on a textured brush stroke. If you use a textured eraser on solid vector shapes or on pencil lines, the eraser will act like a solid vector eraser, that is, it will merely cut out the shape of the stroke from the artwork. This is because solid vector shapes and pencil lines don't have a bitmap texture, and therefore the textured eraser cannot work on the opacity of their individual pixels. Hence, when working on vector layers, it is better to use a textured eraser only if all your artwork is composed of textured brush strokes, or it might wield strange-looking results.
This outlines one of the advantages of working with bitmap layers. On bitmap layers, your brushes and erasers always work as textured brushes and erasers.
Another issue you might encounter when erasing textured vector artwork is that textured vector brush strokes are not flattened together, whereas on bitmap layers, your artwork is always flattened. This implies that if you use a semi-transparent eraser on textured vector artwork, and the artwork has overlapping strokes, all the strokes you erase will become semi-transparent, the resulting image will be a composite of the overlapping strokes. On a bitmap layer, this would simply result in a single layer of semi-transparent artwork.
399
Storyboard Pro 20 User Guide
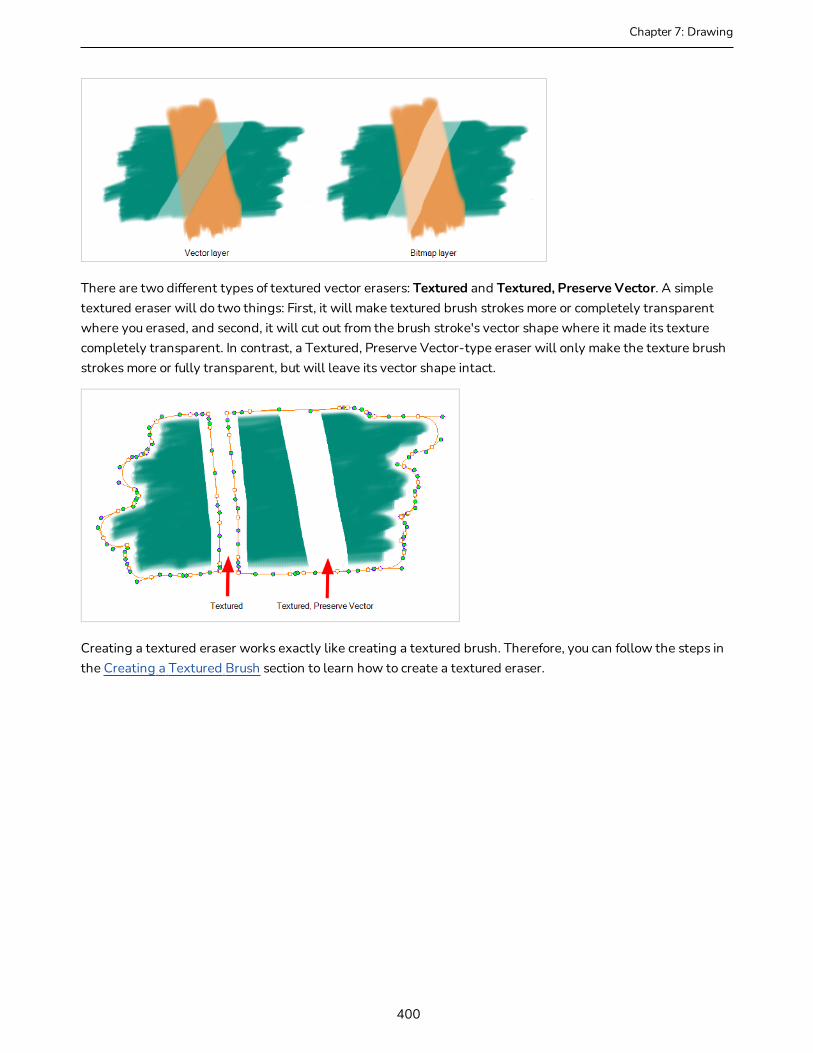
Chapter 7: Drawing
There are two different types of textured vector erasers: Textured and Textured, Preserve Vector. A simple textured eraser will do two things: First, it will make textured brush strokes more or completely transparent where you erased, and second, it will cut out from the brush stroke's vector shape where it made its texture completely transparent. In contrast, a Textured, Preserve Vector-type eraser will only make the texture brush strokes more or fully transparent, but will leave its vector shape intact.
Creating a textured eraser works exactly like creating a textured brush. Therefore, you can follow the steps in the Creating a Textured Brush section to learn how to create a textured eraser.
400

About Eraser Presets
Once you have found the correct settings for your eraser, you might want to reuse it throughout your project for consistency. You can do that by creating and using eraser presets.
Storyboard Pro comes preloaded with a few eraser presets which you can select from the Tool Properties view. It is also possible to create your own eraser presets by configuring your eraser then saving it as a preset.
Like eraser tips and paper textures, eraser presets are saved in your preferences. You can also export your eraser presets into an .xml file, and import them on a different workstation, allowing you to share your eraser presets between the different people collaborating on your project.
NOTES
l Eraser presets are not to be confused with eraser tips and paper textures. Eraser tips and paper textures are one of the many properties of an eraser, whereas an eraser preset contains all the properties of a brush.
l Eraser presets for vector layers and for bitmap layers are separate. An eraser preset created while working on a vector layer cannot be used when working on a bitmap layer, and vice versa.
401
Storyboard Pro 20 User Guide
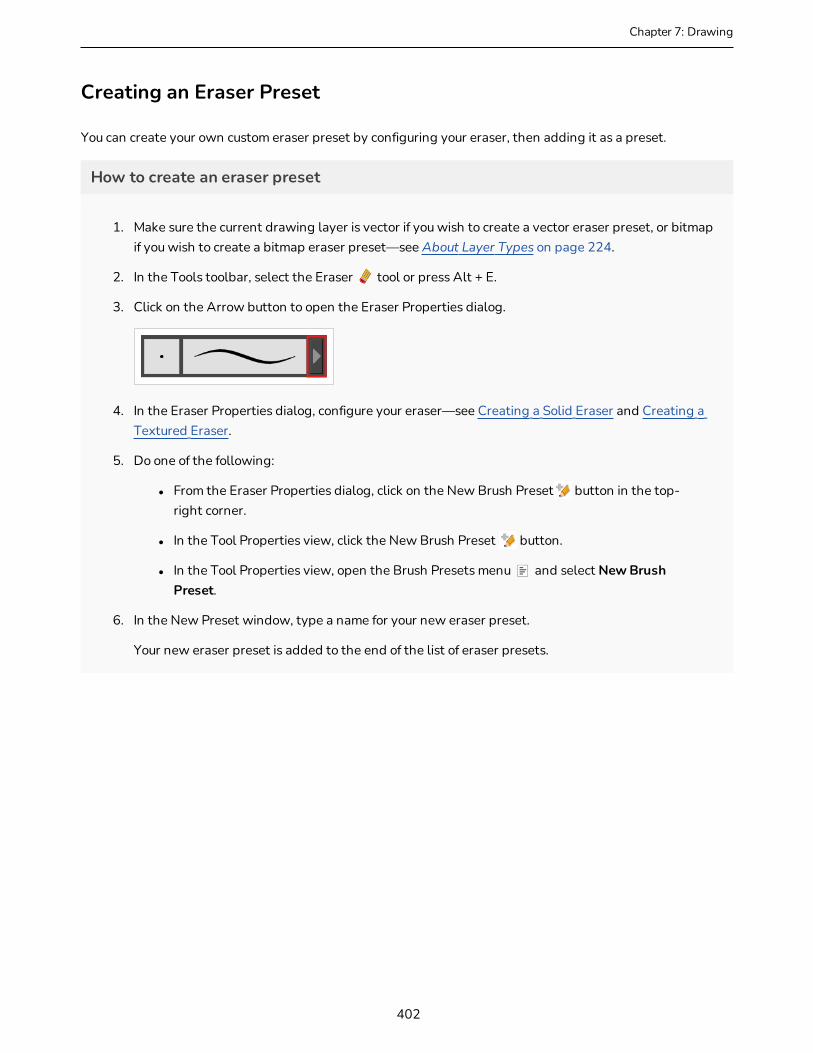
Chapter 7: Drawing
Creating an Eraser Preset
You can create your own custom eraser preset by configuring your eraser, then adding it as a preset.
How to create an eraser preset
1. Make sure the current drawing layer is vector if you wish to create a vector eraser preset, or bitmap if you wish to create a bitmap eraser preset—see About Layer Types on page 224.
2. In the Tools toolbar, select the Eraser tool or press Alt + E.
3. Click on the Arrow button to open the Eraser Properties dialog.
4. In the Eraser Properties dialog, configure your eraser—see Creating a Solid Eraser and Creating a Textured Eraser.
5. Do one of the following:
l From the Eraser Properties dialog, click on the New Brush Preset button in the top-right corner.
l In the Tool Properties view, click the New Brush Preset button.
l In the Tool Properties view, open the Brush Presets menu and select New Brush Preset.
6. In the New Preset window, type a name for your new eraser preset.
Your new eraser preset is added to the end of the list of eraser presets.
402
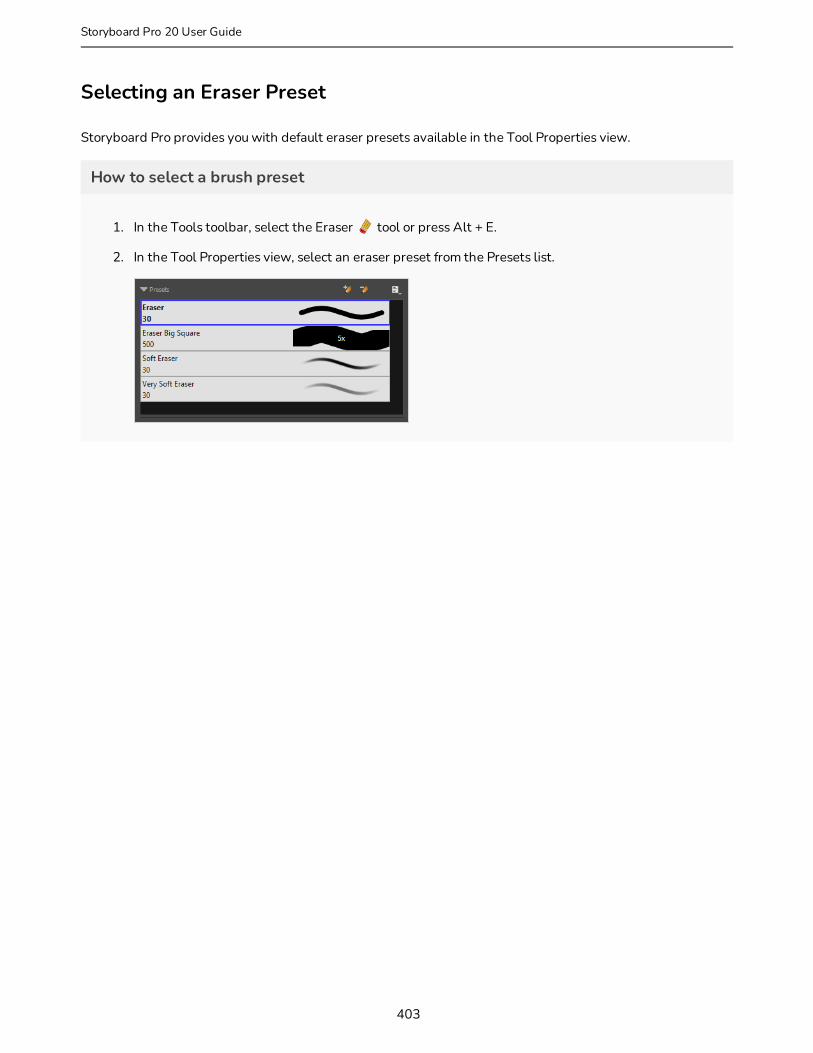
Selecting an Eraser Preset
Storyboard Pro provides you with default eraser presets available in the Tool Properties view.
How to select a brush preset
1. In the Tools toolbar, select the Eraser tool or press Alt + E.
2. In the Tool Properties view, select an eraser preset from the Presets list.
403
Storyboard Pro 20 User Guide

Chapter 7: Drawing
Updating a Brush Preset
If you want to modify the settings of an existing custom preset, you can do so by adjusting the parameters in the Tool Properties view, then updating your preset with your brush current's parameters.
How to update a brush preset
1. In the Tools toolbar, select the Brush tool or press Alt + B.
1. In the Tool Properties view, select the Brush Preset you wish to update.
2. Click on the Arrow button to open the Brush Properties view.
3. Configure your brush to be exactly how you wish to use it in the future—see Creating a Solid Brush or Creating a Textured Brush.
4. Click on the Update Brush Preset button in the upper-right corner of the Brush Properties dialog.
404
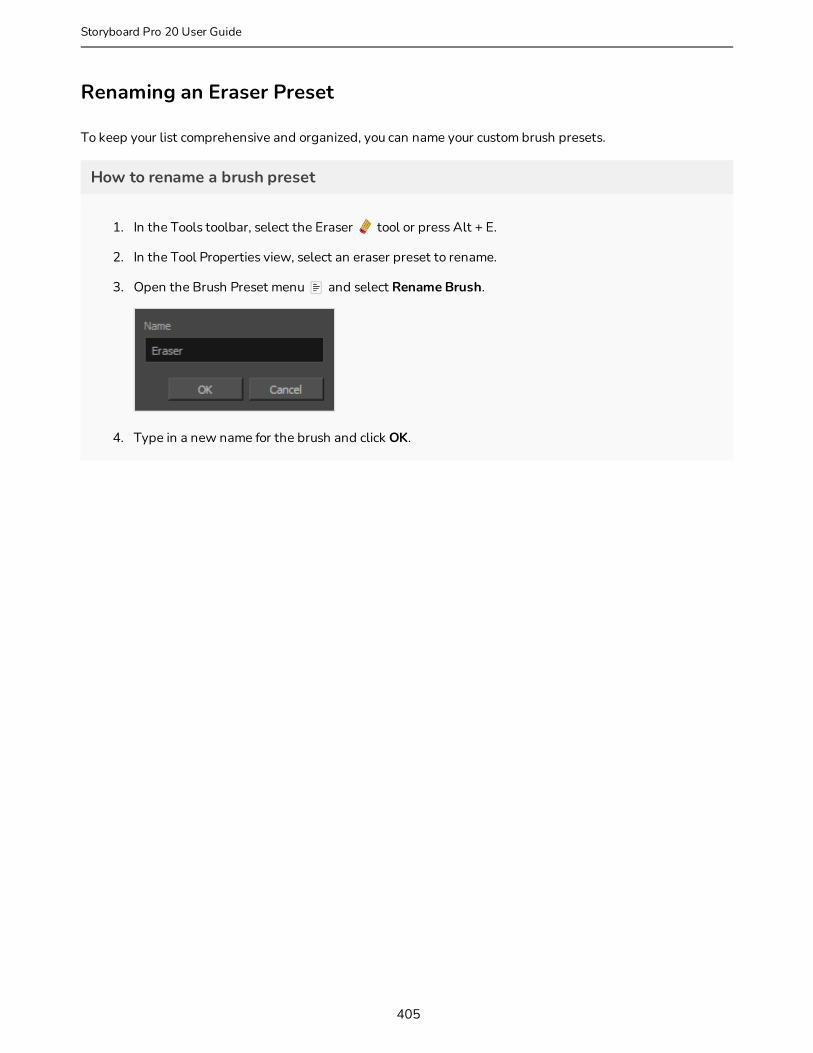
Renaming an Eraser Preset
To keep your list comprehensive and organized, you can name your custom brush presets.
How to rename a brush preset
1. In the Tools toolbar, select the Eraser tool or press Alt + E.
2. In the Tool Properties view, select an eraser preset to rename.
3. Open the Brush Preset menu and select Rename Brush.
4. Type in a new name for the brush and click OK.
405
Storyboard Pro 20 User Guide

Chapter 7: Drawing
Deleting a Brush Preset
You can keep your preset list clean by deleting unwanted custom presets.
How to delete a brush preset
1. In the Tools toolbar, select the Eraser tool or press Alt + E.
2. In the Tool Properties view, select the eraser preset you want to delete.
3. Do one of the following:
l Click the Delete Brush button.
l Open the Brush Preset menu and select Delete Brush.
406

Exporting Eraser Presets
You can export eraser presets into an .xml file which will contain all of your eraser's settings. This can be useful if you wish to back up or share your eraser presets.
How to export pencils, brushes and erasers
1. In the Tools toolbar, select either the Brush , Pencil or Eraser tool.
2. In the Tool Properties view, open the Brush Preset menu and select Export Brushes.
The Export Brushes dialog opens. This dialog allows you to export brush presets for the Brush, Pencil and Eraser tools.
3. By default, the presets for all your tools will be selected for export. If you only wish to export presets for specific tools, uncheck Select/Deselect All and select the tools for which you want to export the presets.
4. Click Export.
5. In the Export Presets dialog that appears, browse to the location where you want to save the .xml file and enter its file name.
6. Click Save.
407
Storyboard Pro 20 User Guide

Chapter 7: Drawing
Importing Eraser Presets
You can import eraser presets that you previously exported from Storyboard Pro.
How to import pencils, brushes and erasers
1. In the Tools toolbar, select either the Brush , Pencil or Eraser tool.
2. In the Tool Properties view, open the Brush Preset menu and select Import Brushes.
3. In the browser window that appears, navigate to and select the .xml file in which you exported your brush presets.
4. Click Open.
The Import Brushes dialog box opens.
5. By default, the presets for any tools included in the file will be selected for import. If you only wish to import presets for specific tools, uncheck Select/Deselect All and select the tools for which you want to export the presets
6. Click Import.
The imported brush, eraser and pencil styles will appear in the Presets list.
408
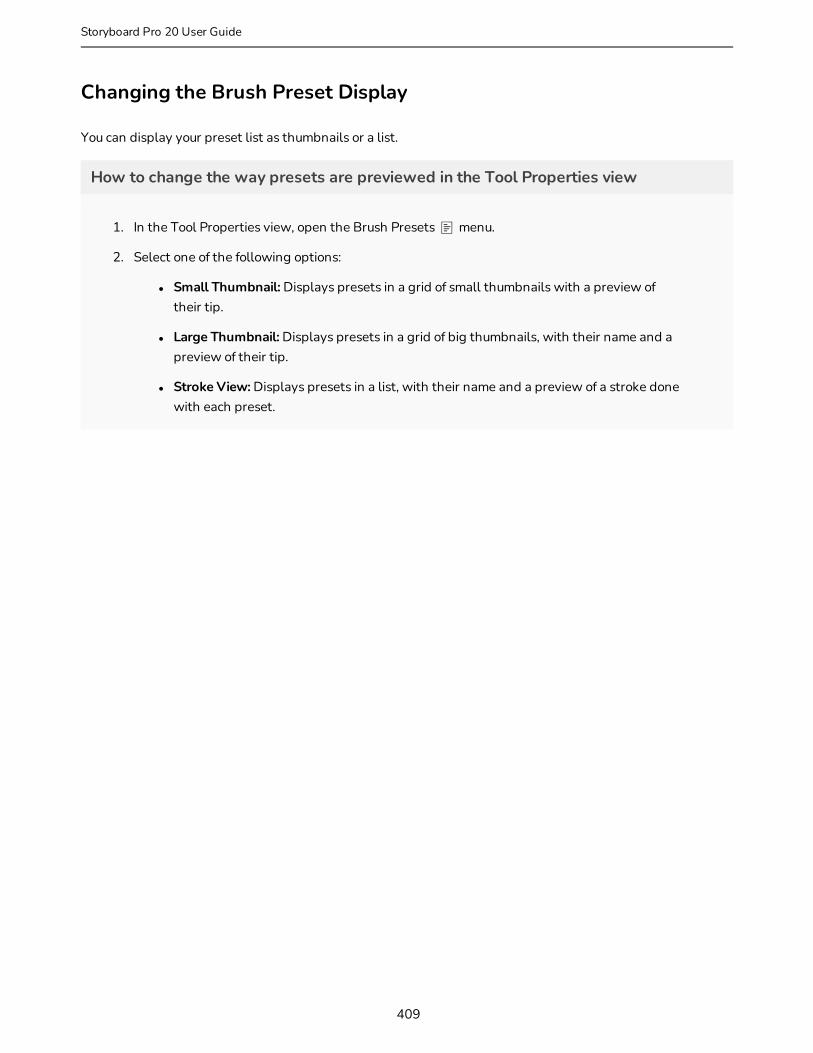
Changing the Brush Preset Display
You can display your preset list as thumbnails or a list.
How to change the way presets are previewed in the Tool Properties view
1. In the Tool Properties view, open the Brush Presets menu.
2. Select one of the following options:
l Small Thumbnail: Displays presets in a grid of small thumbnails with a preview of their tip.
l Large Thumbnail: Displays presets in a grid of big thumbnails, with their name and a preview of their tip.
l Stroke View: Displays presets in a list, with their name and a preview of a stroke done with each preset.
409
Storyboard Pro 20 User Guide
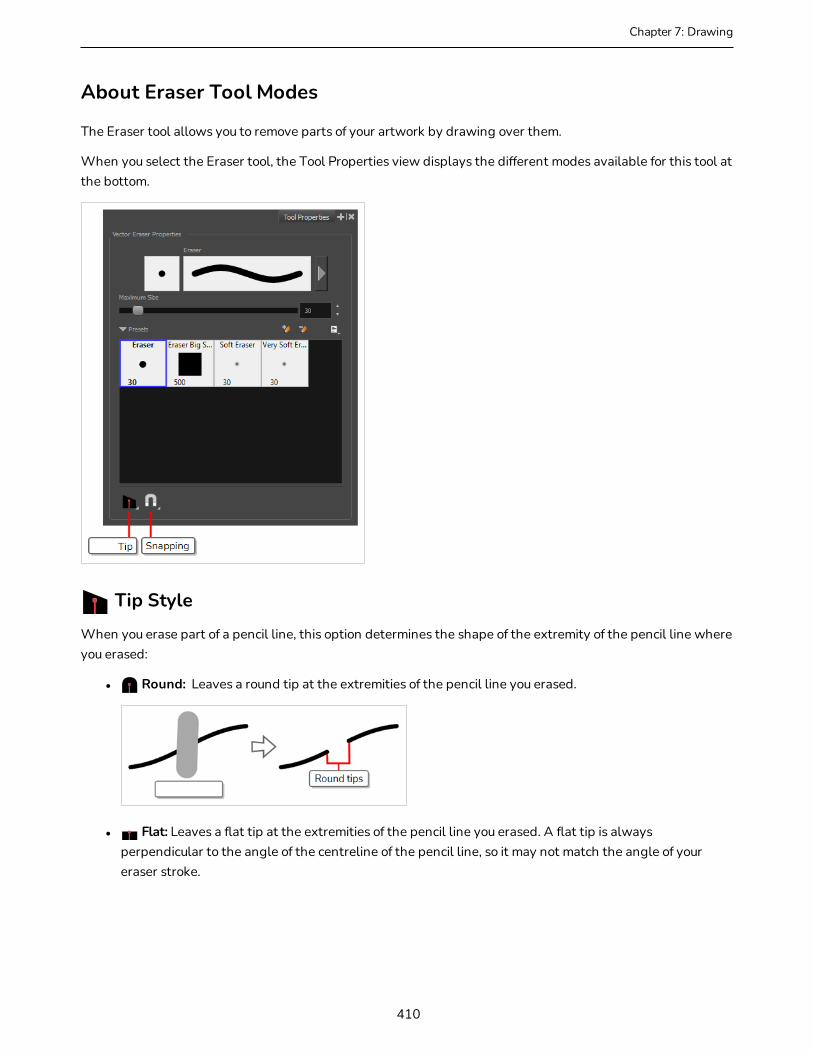
Chapter 7: Drawing
About Eraser Tool Modes
The Eraser tool allows you to remove parts of your artwork by drawing over them.
When you select the Eraser tool, the Tool Properties view displays the different modes available for this tool at the bottom.
Tip Style
When you erase part of a pencil line, this option determines the shape of the extremity of the pencil line where you erased:
l Round: Leaves a round tip at the extremities of the pencil line you erased.
l Flat: Leaves a flat tip at the extremities of the pencil line you erased. A flat tip is always perpendicular to the angle of the centreline of the pencil line, so it may not match the angle of your eraser stroke.
410
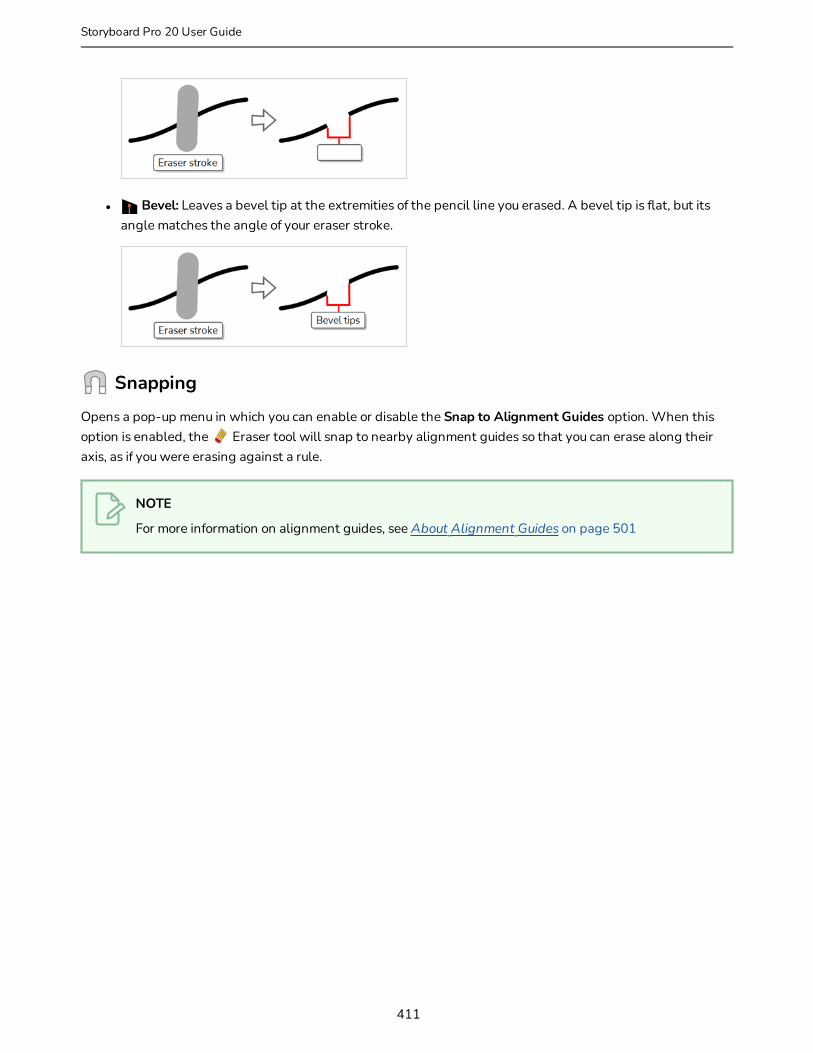
l Bevel: Leaves a bevel tip at the extremities of the pencil line you erased. A bevel tip is flat, but its angle matches the angle of your eraser stroke.
Snapping
Opens a pop-up menu in which you can enable or disable the Snap to Alignment Guides option. When this option is enabled, the Eraser tool will snap to nearby alignment guides so that you can erase along their axis, as if you were erasing against a rule.
NOTE
For more information on alignment guides, see About Alignment Guides on page 501
411
Storyboard Pro 20 User Guide
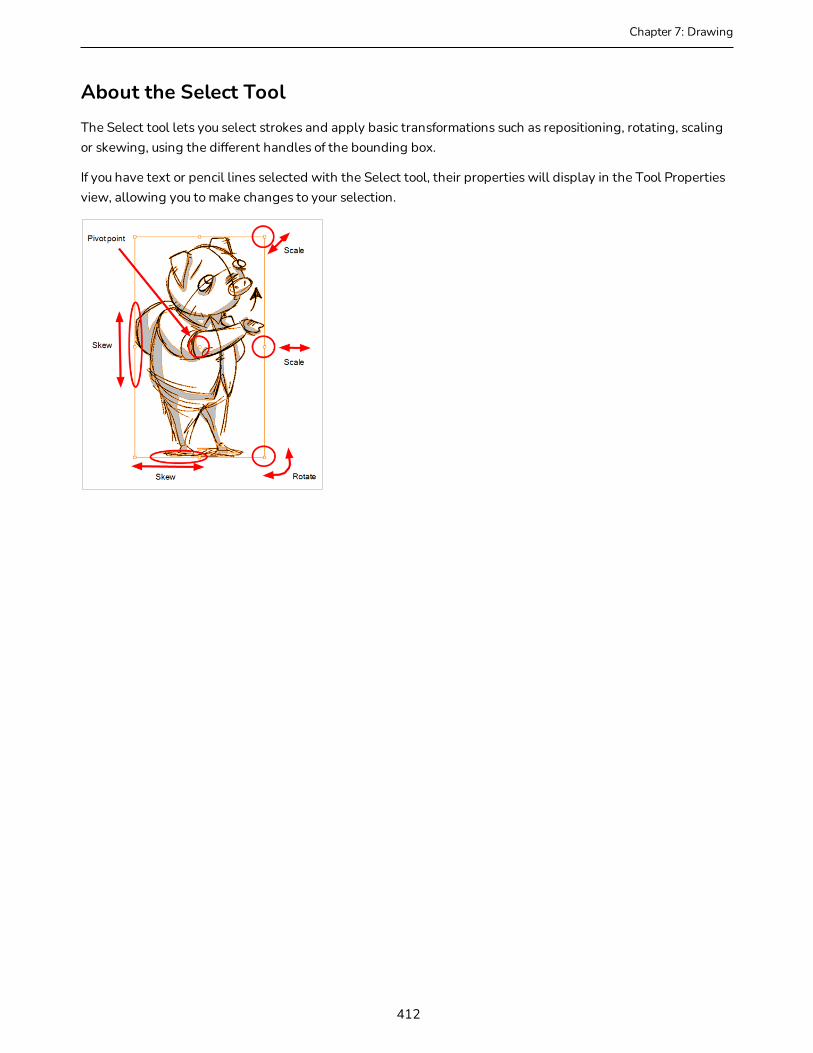
Chapter 7: Drawing
About the Select ToolThe Select tool lets you select strokes and apply basic transformations such as repositioning, rotating, scaling or skewing, using the different handles of the bounding box.
If you have text or pencil lines selected with the Select tool, their properties will display in the Tool Properties view, allowing you to make changes to your selection.
412
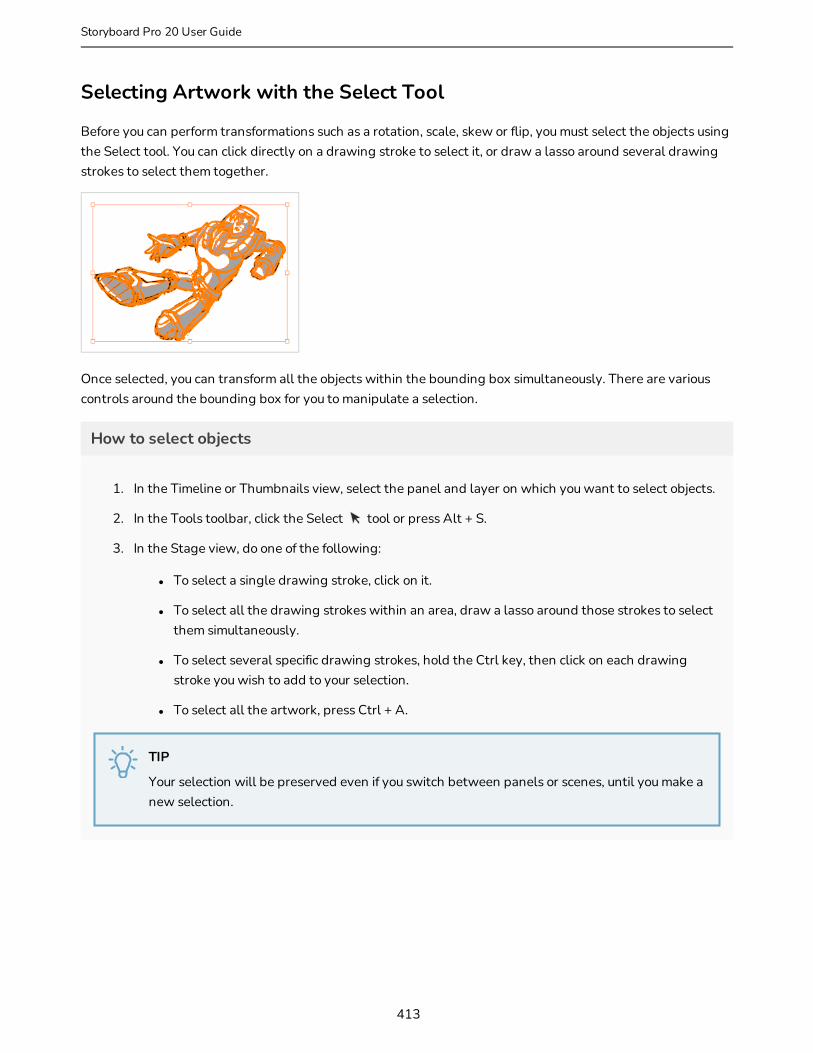
Selecting Artwork with the Select Tool
Before you can perform transformations such as a rotation, scale, skew or flip, you must select the objects using the Select tool. You can click directly on a drawing stroke to select it, or draw a lasso around several drawing strokes to select them together.
Once selected, you can transform all the objects within the bounding box simultaneously. There are various controls around the bounding box for you to manipulate a selection.
How to select objects
1. In the Timeline or Thumbnails view, select the panel and layer on which you want to select objects.
2. In the Tools toolbar, click the Select tool or press Alt + S.
3. In the Stage view, do one of the following:
l To select a single drawing stroke, click on it.
l To select all the drawing strokes within an area, draw a lasso around those strokes to select them simultaneously.
l To select several specific drawing strokes, hold the Ctrl key, then click on each drawing stroke you wish to add to your selection.
l To select all the artwork, press Ctrl + A.
TIP
Your selection will be preserved even if you switch between panels or scenes, until you make a new selection.
413
Storyboard Pro 20 User Guide
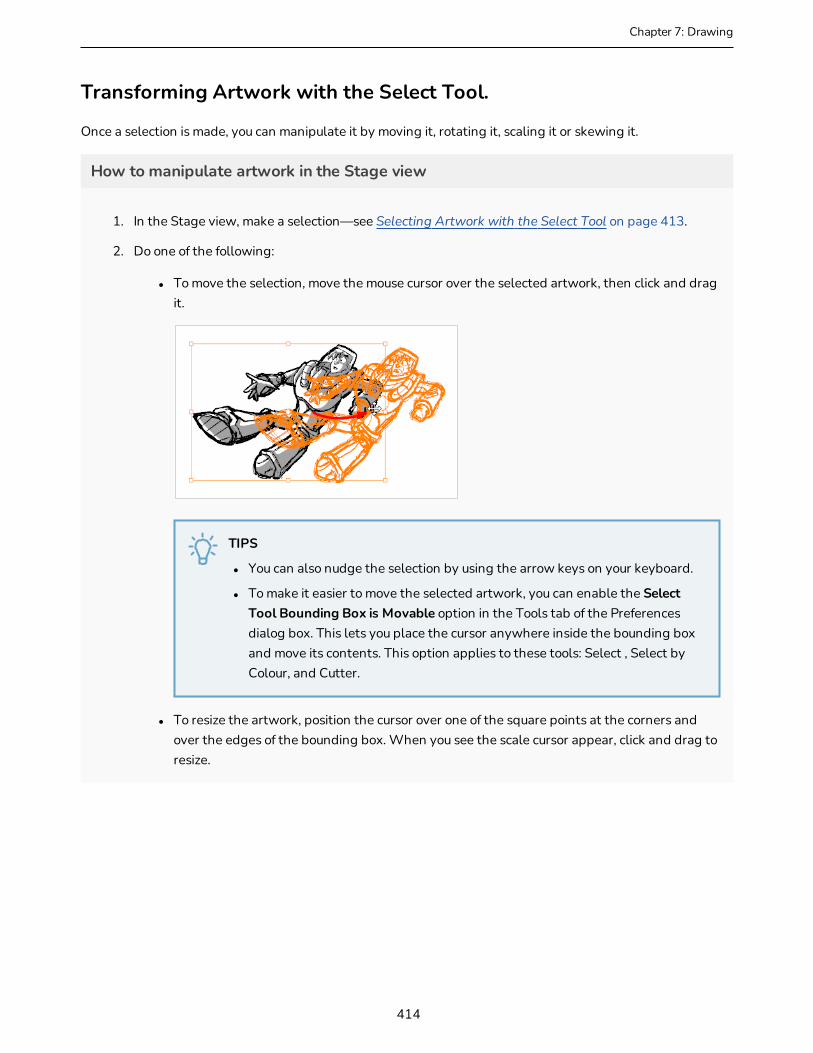
Chapter 7: Drawing
Transforming Artwork with the Select Tool.
Once a selection is made, you can manipulate it by moving it, rotating it, scaling it or skewing it.
How to manipulate artwork in the Stage view
1. In the Stage view, make a selection—see Selecting Artwork with the Select Tool on page 413.
2. Do one of the following:
l To move the selection, move the mouse cursor over the selected artwork, then click and drag it.
TIPS
l You can also nudge the selection by using the arrow keys on your keyboard.
l To make it easier to move the selected artwork, you can enable the Select Tool Bounding Box is Movable option in the Tools tab of the Preferences dialog box. This lets you place the cursor anywhere inside the bounding box and move its contents. This option applies to these tools: Select , Select by Colour, and Cutter.
l To resize the artwork, position the cursor over one of the square points at the corners and over the edges of the bounding box. When you see the scale cursor appear, click and drag to resize.
414
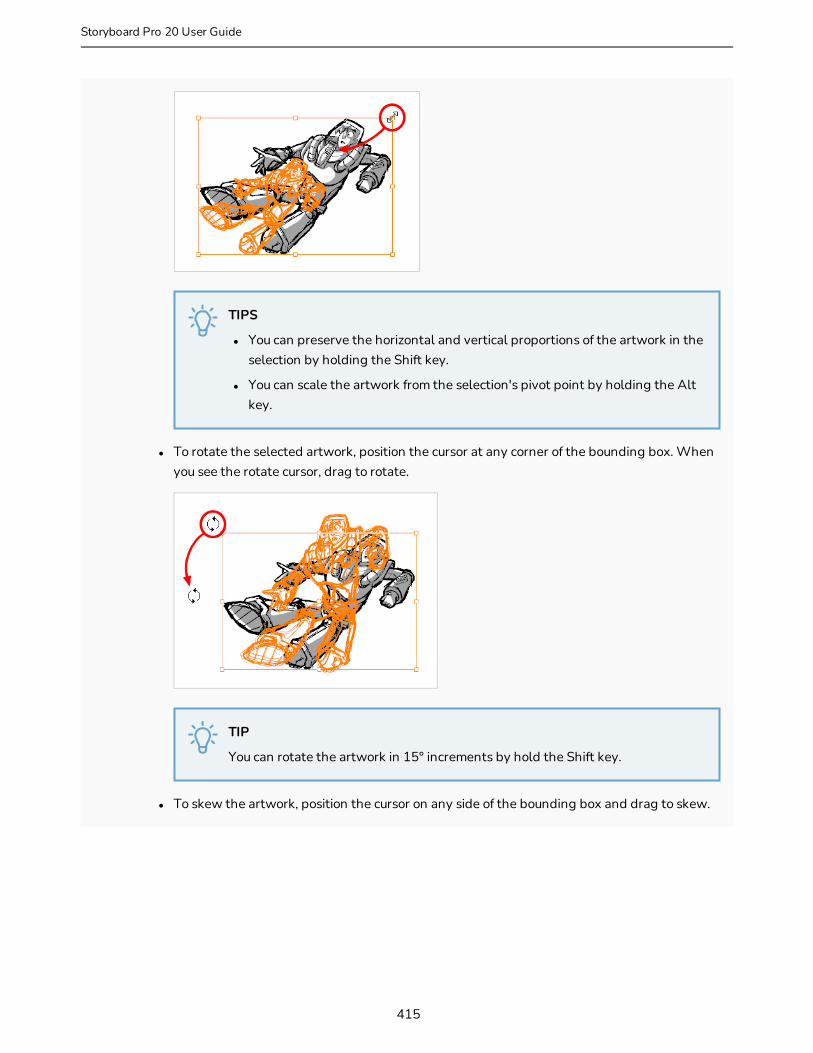
TIPS
l You can preserve the horizontal and vertical proportions of the artwork in the selection by holding the Shift key.
l You can scale the artwork from the selection's pivot point by holding the Alt key.
l To rotate the selected artwork, position the cursor at any corner of the bounding box. When you see the rotate cursor, drag to rotate.
TIP
You can rotate the artwork in 15° increments by hold the Shift key.
l To skew the artwork, position the cursor on any side of the bounding box and drag to skew.
415
Storyboard Pro 20 User Guide
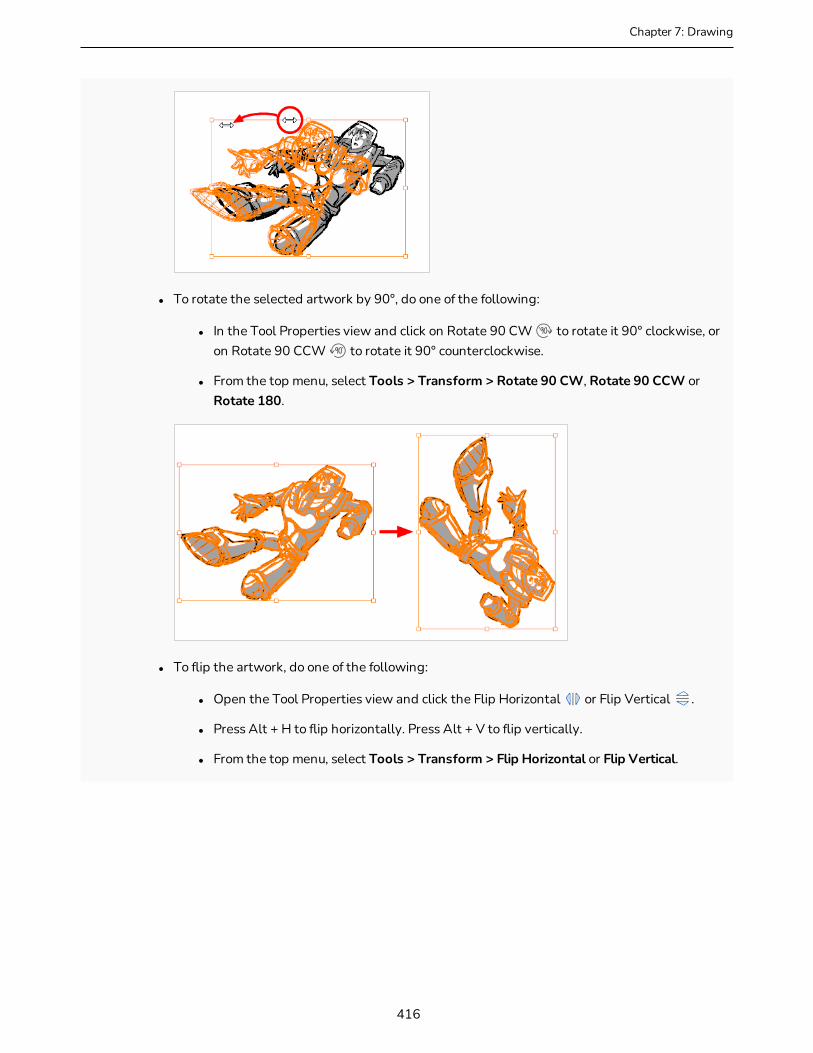
Chapter 7: Drawing
l To rotate the selected artwork by 90°, do one of the following:
l In the Tool Properties view and click on Rotate 90 CW to rotate it 90° clockwise, or on Rotate 90 CCW to rotate it 90° counterclockwise.
l From the top menu, select Tools > Transform > Rotate 90 CW, Rotate 90 CCW or Rotate 180.
l To flip the artwork, do one of the following:
l Open the Tool Properties view and click the Flip Horizontal or Flip Vertical .
l Press Alt + H to flip horizontally. Press Alt + V to flip vertically.
l From the top menu, select Tools > Transform > Flip Horizontal or Flip Vertical.
416
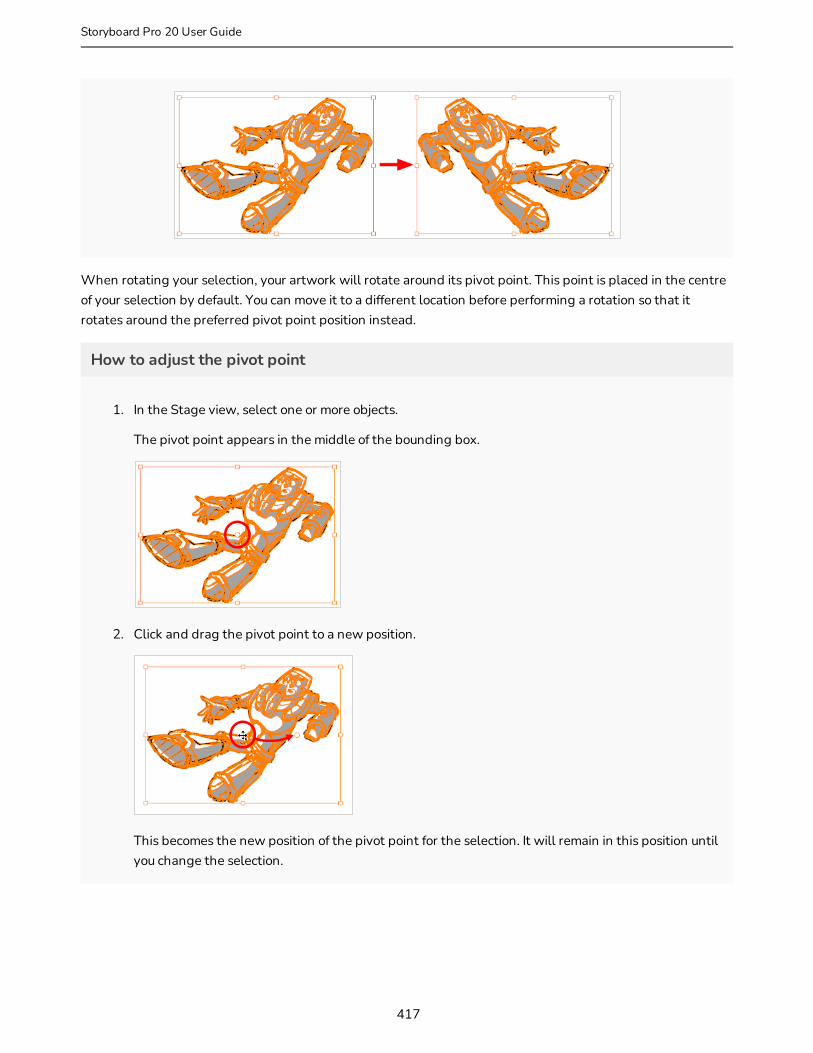
When rotating your selection, your artwork will rotate around its pivot point. This point is placed in the centre of your selection by default. You can move it to a different location before performing a rotation so that it rotates around the preferred pivot point position instead.
How to adjust the pivot point
1. In the Stage view, select one or more objects.
The pivot point appears in the middle of the bounding box.
2. Click and drag the pivot point to a new position.
This becomes the new position of the pivot point for the selection. It will remain in this position until you change the selection.
417
Storyboard Pro 20 User Guide
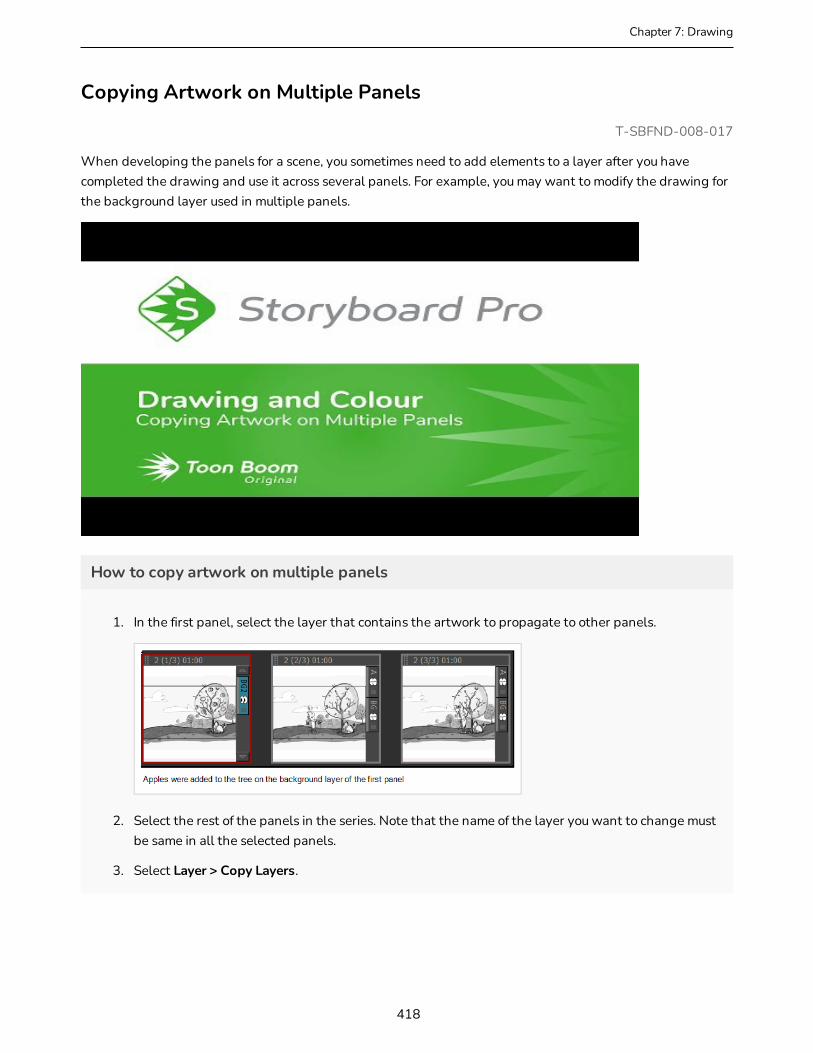
Chapter 7: Drawing
Copying Artwork on Multiple Panels
T-SBFND-008-017
When developing the panels for a scene, you sometimes need to add elements to a layer after you have completed the drawing and use it across several panels. For example, you may want to modify the drawing for the background layer used in multiple panels.
How to copy artwork on multiple panels
1. In the first panel, select the layer that contains the artwork to propagate to other panels.
2. Select the rest of the panels in the series. Note that the name of the layer you want to change must be same in all the selected panels.
3. Select Layer > Copy Layers.
418

NOTE
To quickly select multiple panels, select the first panel and Shift+click the last one in the series. Use the Thumbnails view.
4. Select Layer > Paste Layer Special. This command is only available when multiple panels are selected.
The Paste Layer Special dialog box opens.
5. Select the Once Hold and Overwrite Existing Layers options.
The layer in each of the selected panels is replaced.
The other available options are as follows:
Once: This will paste the layer or drawing on the second panel for once only.
Once Hold: This will paste the layer or drawing on all the selected panels.
Loop: This will run a loop or cycle until one sequence of layers is completed.
Ping-Pong: This is similar to loop and will run a cycle but in a ping pong pattern.
NOTE
If you only need to make a change to two panels, you can simply drag the layer from one panel and drop it in the Layers list of the other panel, and click replace.
419
Storyboard Pro 20 User Guide

Chapter 7: Drawing
Editing Artwork on Multiple Panels
T-SBFND-008-016
Sometimes you need to reposition, resize or in some way modify an element on a layer that appears across multiple panels (like a cloud), and you want the change to be consistent. This is also useful when you want to hide elements or delete drawings across multiple panels.
A quick way to do this is to select the layer on all your panels and then make your change. The layer must have the same name on all the panels.
How to edit artwork on multiple panels
1. In the first panel, select the layer that contains the artwork to modify.
2. Select the rest of the panels in the series. Note that the name of the layer you want to change must be same in all the selected panels.
3. Use the selection tool, to scale and modify the element.
The change you made is applied to all the selected panels.
420
421
Storyboard Pro 20 User Guide
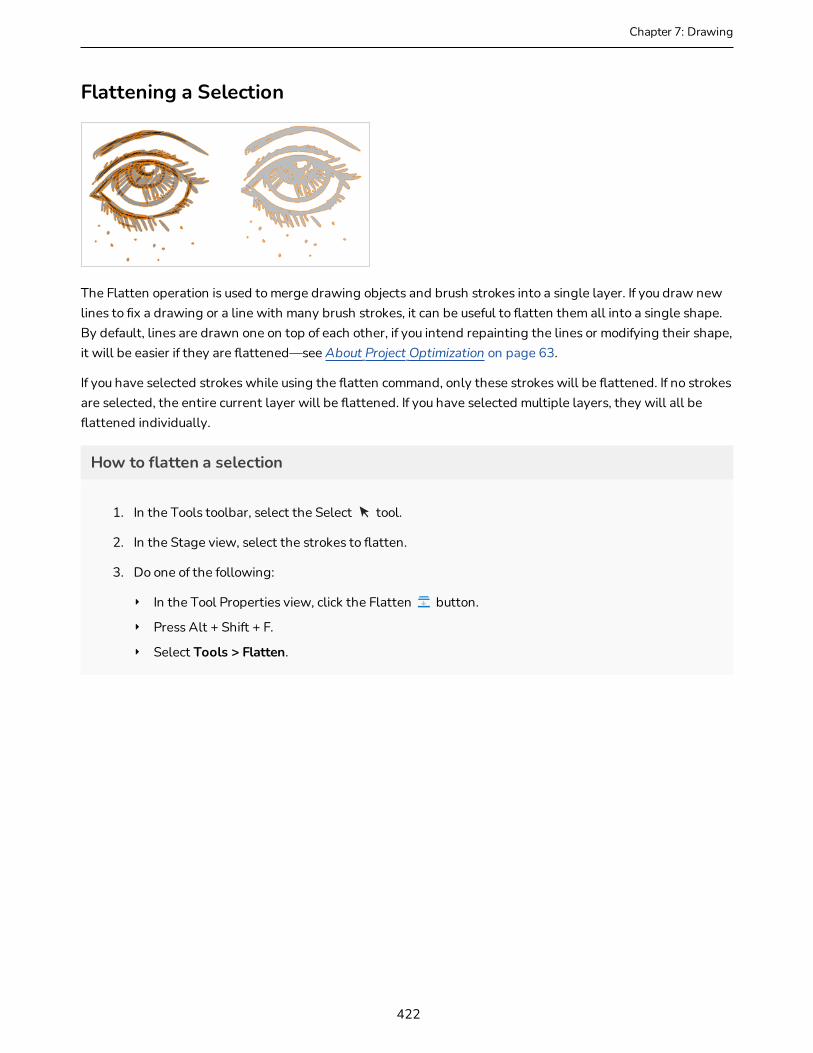
Chapter 7: Drawing
Flattening a Selection
The Flatten operation is used to merge drawing objects and brush strokes into a single layer. If you draw new lines to fix a drawing or a line with many brush strokes, it can be useful to flatten them all into a single shape. By default, lines are drawn one on top of each other, if you intend repainting the lines or modifying their shape, it will be easier if they are flattened—see About Project Optimization on page 63.
If you have selected strokes while using the flatten command, only these strokes will be flattened. If no strokes are selected, the entire current layer will be flattened. If you have selected multiple layers, they will all be flattened individually.
How to flatten a selection
1. In the Tools toolbar, select the Select tool.
2. In the Stage view, select the strokes to flatten.
3. Do one of the following:
‣ In the Tool Properties view, click the Flatten button.
‣ Press Alt + Shift + F.
‣ Select Tools > Flatten.
422
Grouping Objects
By grouping objects together, you can reposition, scale and apply other transformations to multiple objects of a drawing. You can also ungroup a group of objects to fine-tune individual objects.
NOTE
You can only group objects on one vector layer, you cannot group objects from several layers. Also, you cannot group objects on bitmap layers.
How to group or ungroup objects
1. Select drawing strokes in the Stage view.
2. In the top menu, select Edit > Group Drawing Selection or Ungroup Drawings.
423
Storyboard Pro 20 User Guide

Chapter 7: Drawing
Converting Strokes
When drawing on vector layers, you may want to change brush strokes to pencil lines to convert contour strokes into centre line pencil strokes.
NOTE
Any line thickness information is lost upon conversion from brush to pencil
At times, you may want to change pencil lines to brush strokes. This converts a centre line stroke to a contour line stroke. Or you can convert strokes to pencil lines.
How to convert pencil lines to brush
1. Select the strokes you want to convert.
2. Right-click and Convert > Pencil Lines to Brush Strokes.
How to convert brush to pencil lines
1. Select the strokes you want to convert.
2. Right-click and select Convert > Brush Strokes to Pencil Lines.
424
Using the Select by Colour Tool
T-SBADV-005-019
The Select by Colour tool lets you quickly select all artwork painted or drawn with the selected colour. This makes it easy to select artwork from a single layer that contains different colours and shades.
How to select by colour
1. In the Tools toolbar, click the Select by Colour button.
2. In the Stage view, select a layer.
3. Click on a colour.
All artwork painted or drawn with the selected colour is selected.
NOTE
Selecting this tool is simply activates the Select tool with its Select by Colour mode enabled. You can achieve the same result by selecting the Select tool, then enabling the Select by Colour mode in the Tool Properties view.
425
Storyboard Pro 20 User Guide

Chapter 7: Drawing
About the Select Tool Modes
When you use the Select tool, its properties and options appear in the Tool Properties view.
Lasso and Marquee Modes
When selecting artwork, you can use the Lasso mode to make a freehand selection or the Marquee mode to make a rectangular selection.
TIP
You can press and hold the Alt key to temporarily switch from the selected mode to the other.
Easy Drag
When enabled, you can drag the selection by clicking anywhere inside its bounding box. By default, you must click on the artwork in the selection to be able to drag it.
Snapping
Allows you to enable or disable snapping for this tool and all other animation and drawing tools that support snapping, as well as to select which types of snapping are enabled.
If you double-click or long-click on this button, it will open a pop-up menu in which you can toggle different snapping modes. You can also click on this button to toggle it off, which will disable all snapping modes, and click on it again and toggle it on to re-enable the snapping modes which were previously enabled.
This tool supports the following snapping modes:
l Snap to Contour: While moving the selection or one of its control points, it will snap against the nearby points and contours of your artwork, allowing you to snap parts of your artwork together.
l Snap to Alignment Guides: While moving the selection or one of its control points, it will snap against nearby alignment guides—see About Alignment Guides on page 501.
l Snap and Align: While moving the selection, the rectangular bounding box of the selection will align with the rectangular bounding boxes of other strokes and shapes in your artwork. If you move one of your selection's control points, it will also align with the bounding boxes of other strokes and shapes in
426

your artwork.
Select by Colour Mode
When enabled, clicking on a shape or pencil line will select everything in your drawing that is painted with the same colour.
Select All Drawings in Scene
Click on this to select all the drawings in the current scene simultaneously. You can then manipulate them together. The outlines of drawings in other panels will appear in the Stage view.
427
Storyboard Pro 20 User Guide
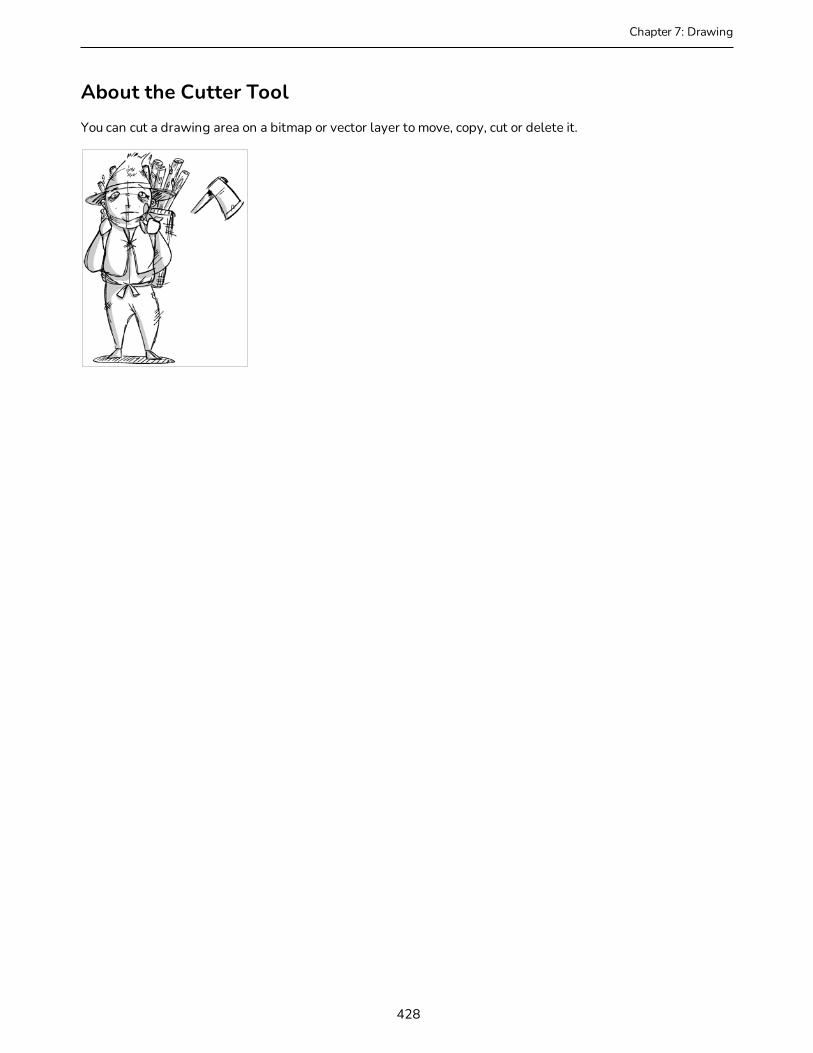
Chapter 7: Drawing
About the Cutter ToolYou can cut a drawing area on a bitmap or vector layer to move, copy, cut or delete it.
428
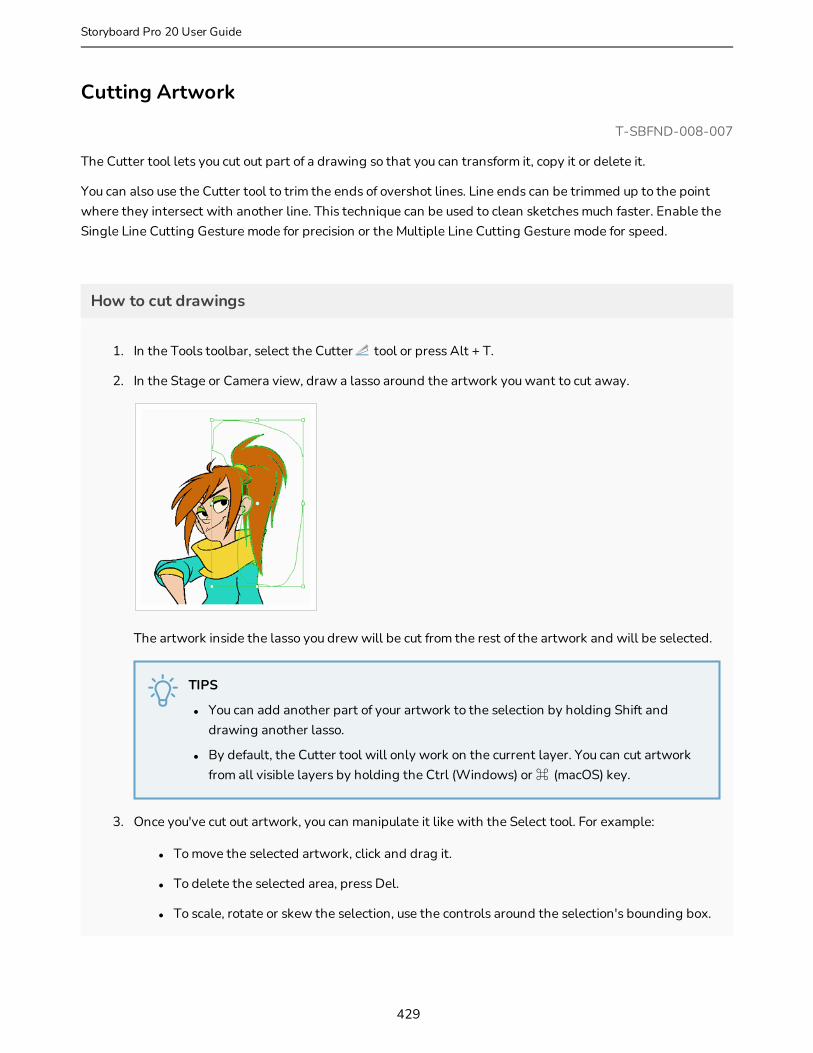
Cutting Artwork
T-SBFND-008-007
The Cutter tool lets you cut out part of a drawing so that you can transform it, copy it or delete it.
You can also use the Cutter tool to trim the ends of overshot lines. Line ends can be trimmed up to the point where they intersect with another line. This technique can be used to clean sketches much faster. Enable the Single Line Cutting Gesture mode for precision or the Multiple Line Cutting Gesture mode for speed.
How to cut drawings
1. In the Tools toolbar, select the Cutter tool or press Alt + T.
2. In the Stage or Camera view, draw a lasso around the artwork you want to cut away.
The artwork inside the lasso you drew will be cut from the rest of the artwork and will be selected.
TIPS
l You can add another part of your artwork to the selection by holding Shift and drawing another lasso.
l By default, the Cutter tool will only work on the current layer. You can cut artwork from all visible layers by holding the Ctrl (Windows) or ⌘ (macOS) key.
3. Once you've cut out artwork, you can manipulate it like with the Select tool. For example:
l To move the selected artwork, click and drag it.
l To delete the selected area, press Del.
l To scale, rotate or skew the selection, use the controls around the selection's bounding box.
429
Storyboard Pro 20 User Guide

Chapter 7: Drawing
NOTE
To transform your selection, see Transforming Artwork with the Select Tool. on page 414.
How to trim a single line
1. In the Tools toolbar, select the Cutter tool or press Alt + T.
2. In the Tool Properties view, under the Cutter Tool Options, select the Lasso .
The Line Cutter Gesture modes are enabled.
3. Select the Single Line Cutting Gesture Mode .
4. In the Stage or Camera view, sweep the Cutter tool across the end of a line you wish to trim.
The line end disappears.
Before
430
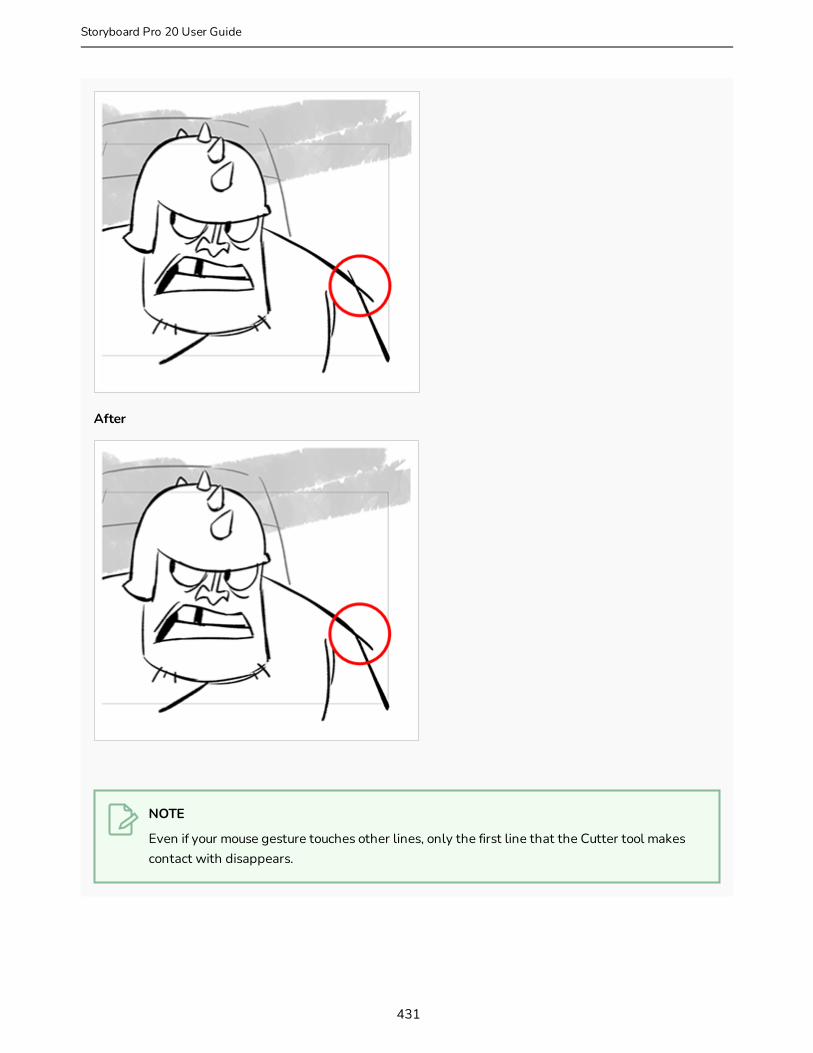
After
NOTE
Even if your mouse gesture touches other lines, only the first line that the Cutter tool makes contact with disappears.
431
Storyboard Pro 20 User Guide

Chapter 7: Drawing
How to trim multiple lines
1. In the Tools toolbar, select the Cutter tool or press Alt + T.
2. In the Tool Properties view, under the Cutter Tool Options, select the Lasso .
The Line Cutter Gesture modes are enabled.
3. In the Tool Properties view, select the Multiple Lines Cutting Gesture Mode .
4. In the Stage or Camera view, sweep the Cutter tool across the end of a lines you wish to trim.
The line ends disappear.
Before
After
432
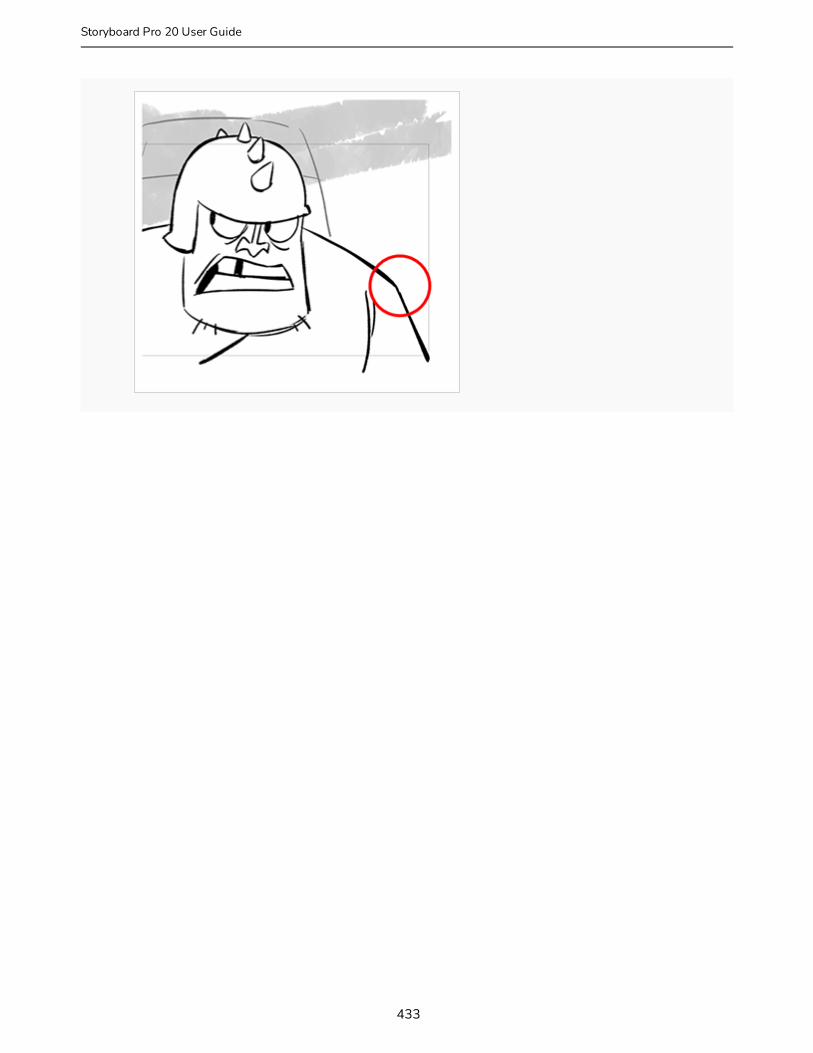
433
Storyboard Pro 20 User Guide

Chapter 7: Drawing
About the Cutter Tool Modes
When you use the Cutter tool, its properties and options appear in the Tool Properties view. The four Cutter modes include: Lasso or Marquee, tip style, mouse gesture, and antialiasing.
Lasso and Marquee Modes
When selecting artwork, you can use the Lasso mode to make a freehand selection or the Marquee mode to make a rectangular selection.
TIP
You can press and hold the Alt key to temporarily switch from the selected mode to the other.
Easy Drag
When enabled, you can drag the selection by clicking anywhere inside its bounding box. By default, you must click on the artwork in the selection to be able to drag it.
Tip Style
When cutting through pencil lines, this option decides what kind of pencil line tips to put at the extremities of the remaining pencil line segments, where they were cut.
By default, this is set to Bevel , which will leave the tip of the pencil line cut at the same angle as your cutter stroke. If you prefer, you can make pencil lines that you split with the Cutter tool have Flat or Round tips instead.
434
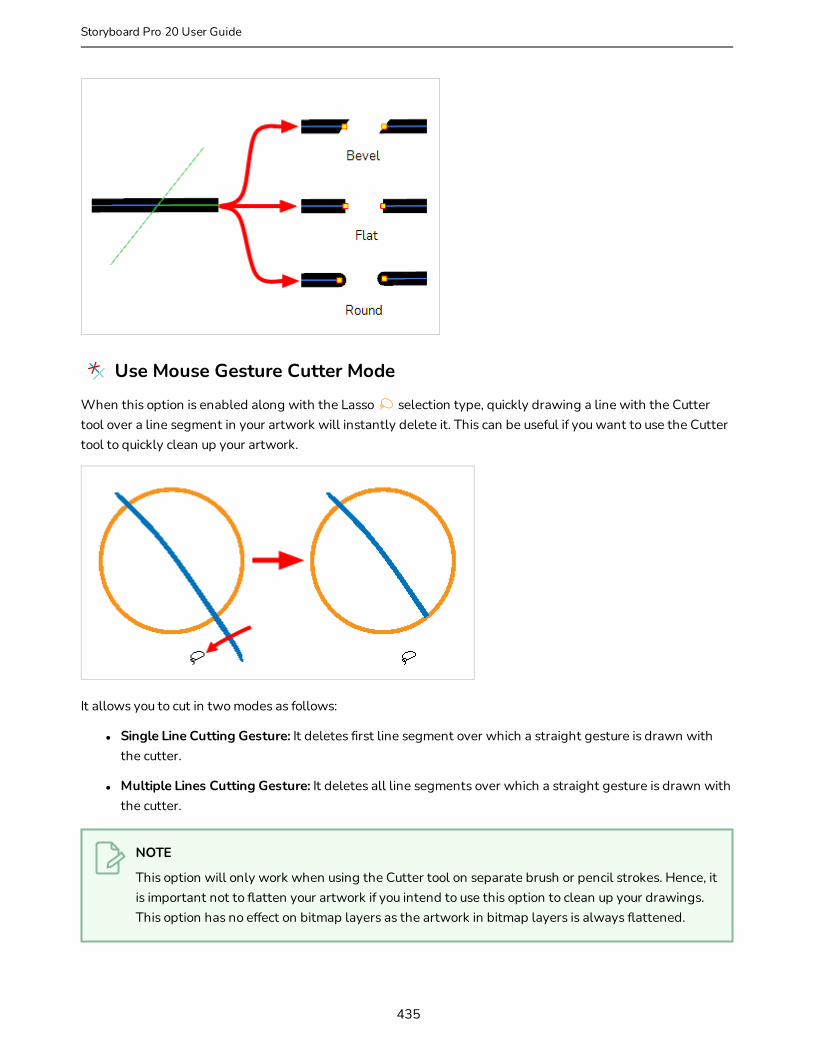
Use Mouse Gesture Cutter Mode
When this option is enabled along with the Lasso selection type, quickly drawing a line with the Cutter tool over a line segment in your artwork will instantly delete it. This can be useful if you want to use the Cutter tool to quickly clean up your artwork.
It allows you to cut in two modes as follows:
l Single Line Cutting Gesture: It deletes first line segment over which a straight gesture is drawn with the cutter.
l Multiple Lines Cutting Gesture: It deletes all line segments over which a straight gesture is drawn with the cutter.
NOTE
This option will only work when using the Cutter tool on separate brush or pencil strokes. Hence, it is important not to flatten your artwork if you intend to use this option to clean up your drawings. This option has no effect on bitmap layers as the artwork in bitmap layers is always flattened.
435
Storyboard Pro 20 User Guide
Chapter 7: Drawing
Antialiasing Mode
When working on bitmap artwork, enabling this will smooth the edges of the artwork you cut out, so that they do not appear pixelated.
NOTE
This option is only available with bitmap layers.
436
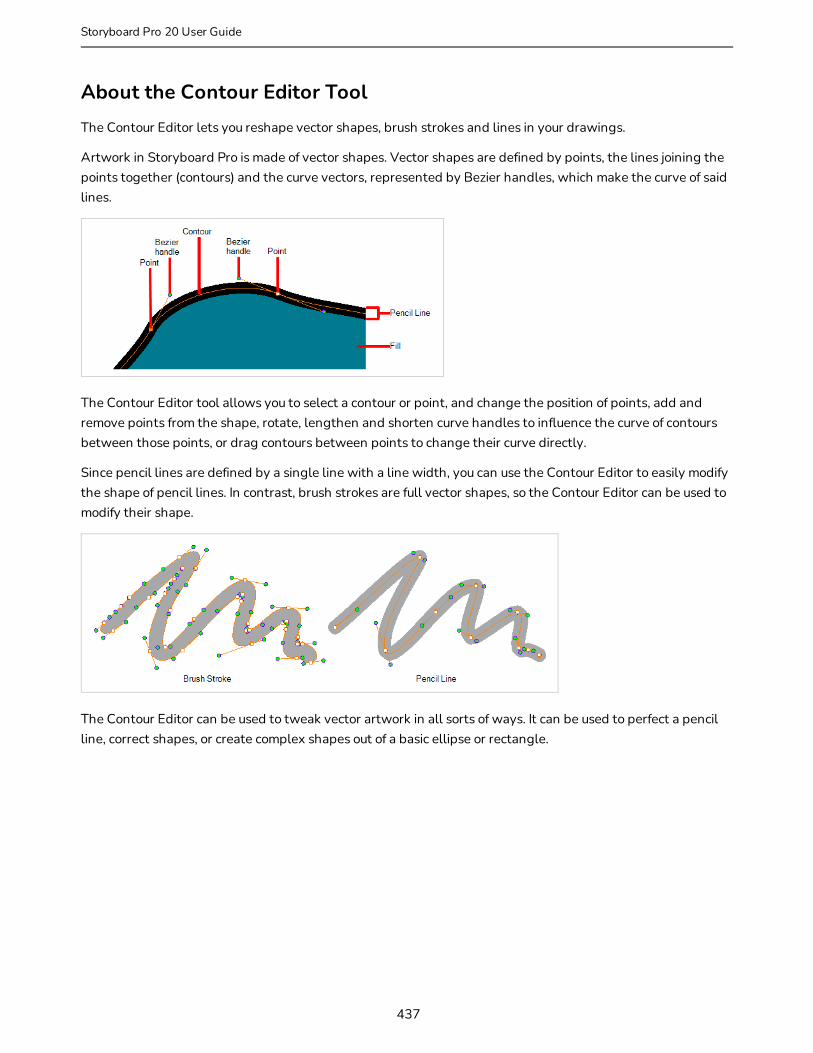
About the Contour Editor ToolThe Contour Editor lets you reshape vector shapes, brush strokes and lines in your drawings.
Artwork in Storyboard Pro is made of vector shapes. Vector shapes are defined by points, the lines joining the points together (contours) and the curve vectors, represented by Bezier handles, which make the curve of said lines.
The Contour Editor tool allows you to select a contour or point, and change the position of points, add and remove points from the shape, rotate, lengthen and shorten curve handles to influence the curve of contours between those points, or drag contours between points to change their curve directly.
Since pencil lines are defined by a single line with a line width, you can use the Contour Editor to easily modify the shape of pencil lines. In contrast, brush strokes are full vector shapes, so the Contour Editor can be used to modify their shape.
The Contour Editor can be used to tweak vector artwork in all sorts of ways. It can be used to perfect a pencil line, correct shapes, or create complex shapes out of a basic ellipse or rectangle.
437
Storyboard Pro 20 User Guide
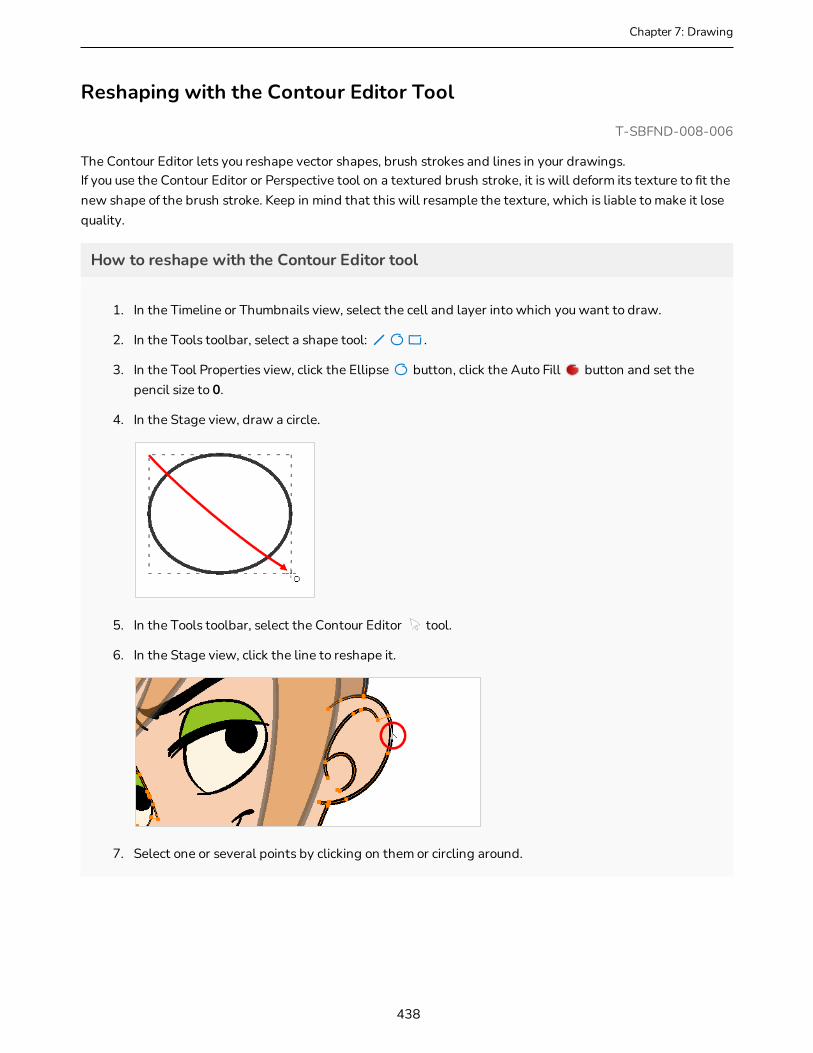
Chapter 7: Drawing
Reshaping with the Contour Editor Tool
T-SBFND-008-006
The Contour Editor lets you reshape vector shapes, brush strokes and lines in your drawings. If you use the Contour Editor or Perspective tool on a textured brush stroke, it is will deform its texture to fit the new shape of the brush stroke. Keep in mind that this will resample the texture, which is liable to make it lose quality.
How to reshape with the Contour Editor tool
1. In the Timeline or Thumbnails view, select the cell and layer into which you want to draw.
2. In the Tools toolbar, select a shape tool: .
3. In the Tool Properties view, click the Ellipse button, click the Auto Fill button and set the pencil size to 0.
4. In the Stage view, draw a circle.
5. In the Tools toolbar, select the Contour Editor tool.
6. In the Stage view, click the line to reshape it.
7. Select one or several points by clicking on them or circling around.
438
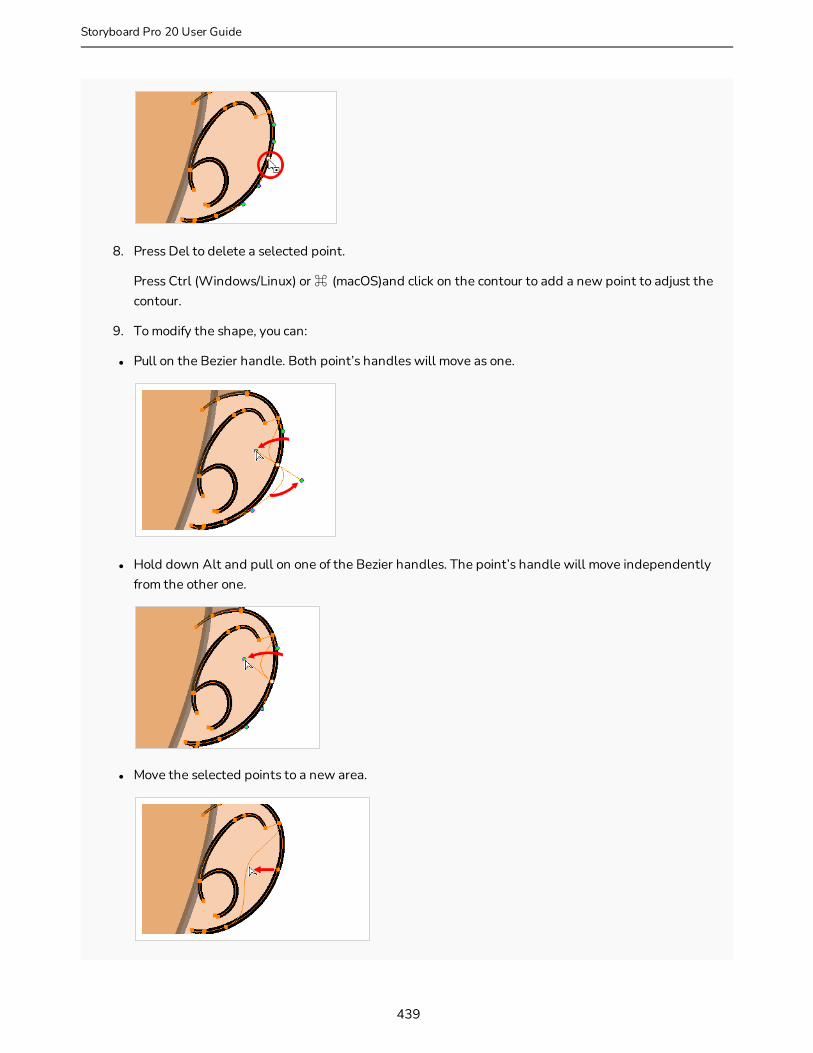
8. Press Del to delete a selected point.
Press Ctrl (Windows/Linux) or ⌘ (macOS)and click on the contour to add a new point to adjust the contour.
9. To modify the shape, you can:
l Pull on the Bezier handle. Both point’s handles will move as one.
l Hold down Alt and pull on one of the Bezier handles. The point’s handle will move independently from the other one.
l Move the selected points to a new area.
439
Storyboard Pro 20 User Guide
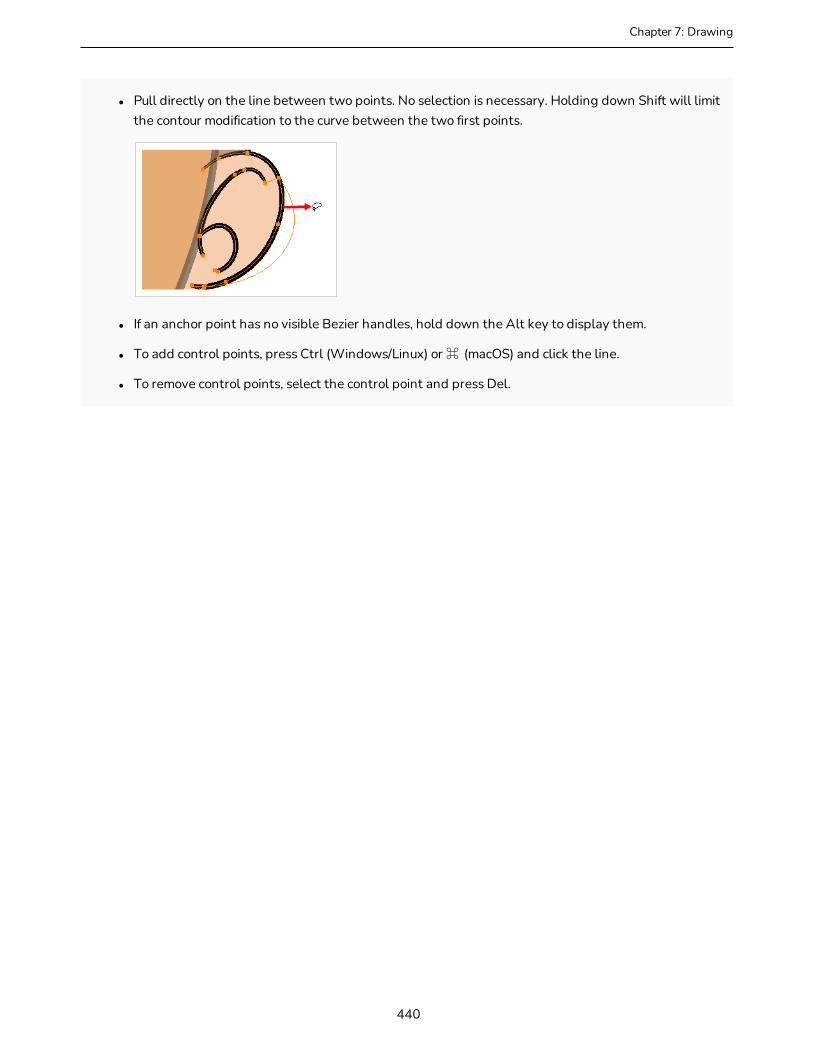
Chapter 7: Drawing
l Pull directly on the line between two points. No selection is necessary. Holding down Shift will limit the contour modification to the curve between the two first points.
l If an anchor point has no visible Bezier handles, hold down the Alt key to display them.
l To add control points, press Ctrl (Windows/Linux) or ⌘ (macOS) and click the line.
l To remove control points, select the control point and press Del.
440
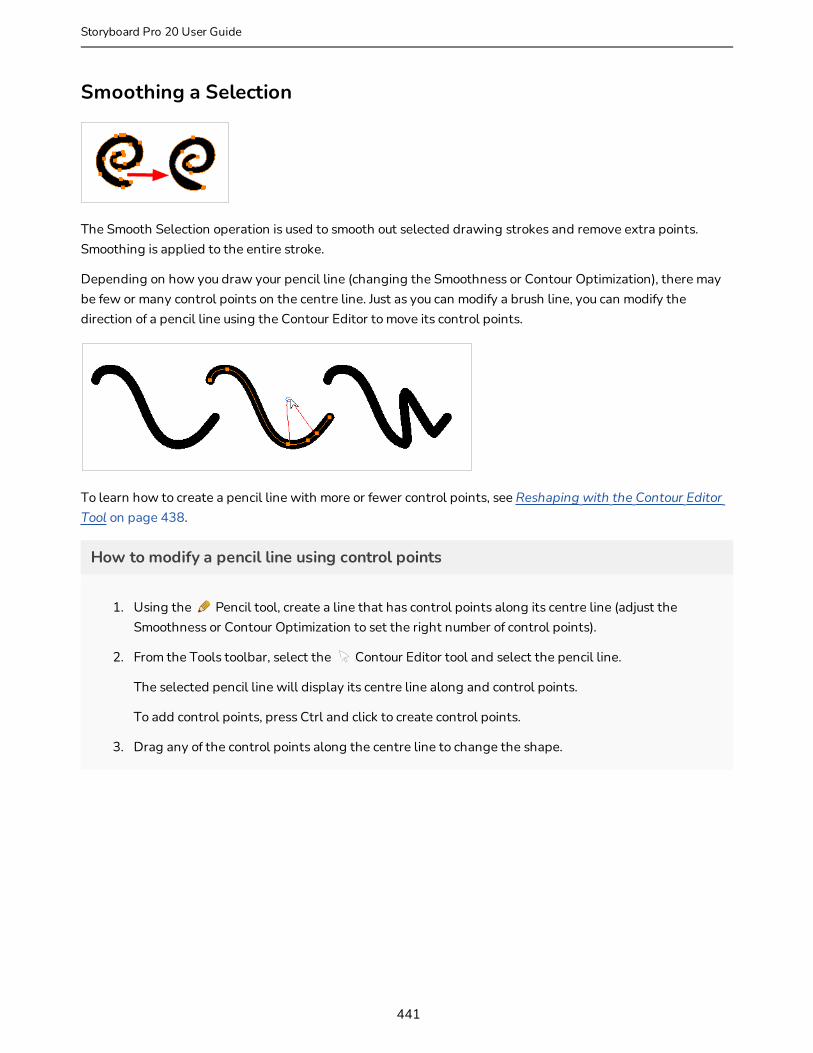
Smoothing a Selection
The Smooth Selection operation is used to smooth out selected drawing strokes and remove extra points. Smoothing is applied to the entire stroke.
Depending on how you draw your pencil line (changing the Smoothness or Contour Optimization), there may be few or many control points on the centre line. Just as you can modify a brush line, you can modify the direction of a pencil line using the Contour Editor to move its control points.
To learn how to create a pencil line with more or fewer control points, see Reshaping with the Contour Editor Tool on page 438.
How to modify a pencil line using control points
1. Using the Pencil tool, create a line that has control points along its centre line (adjust the Smoothness or Contour Optimization to set the right number of control points).
2. From the Tools toolbar, select the Contour Editor tool and select the pencil line.
The selected pencil line will display its centre line along and control points.
To add control points, press Ctrl and click to create control points.
3. Drag any of the control points along the centre line to change the shape.
441
Storyboard Pro 20 User Guide
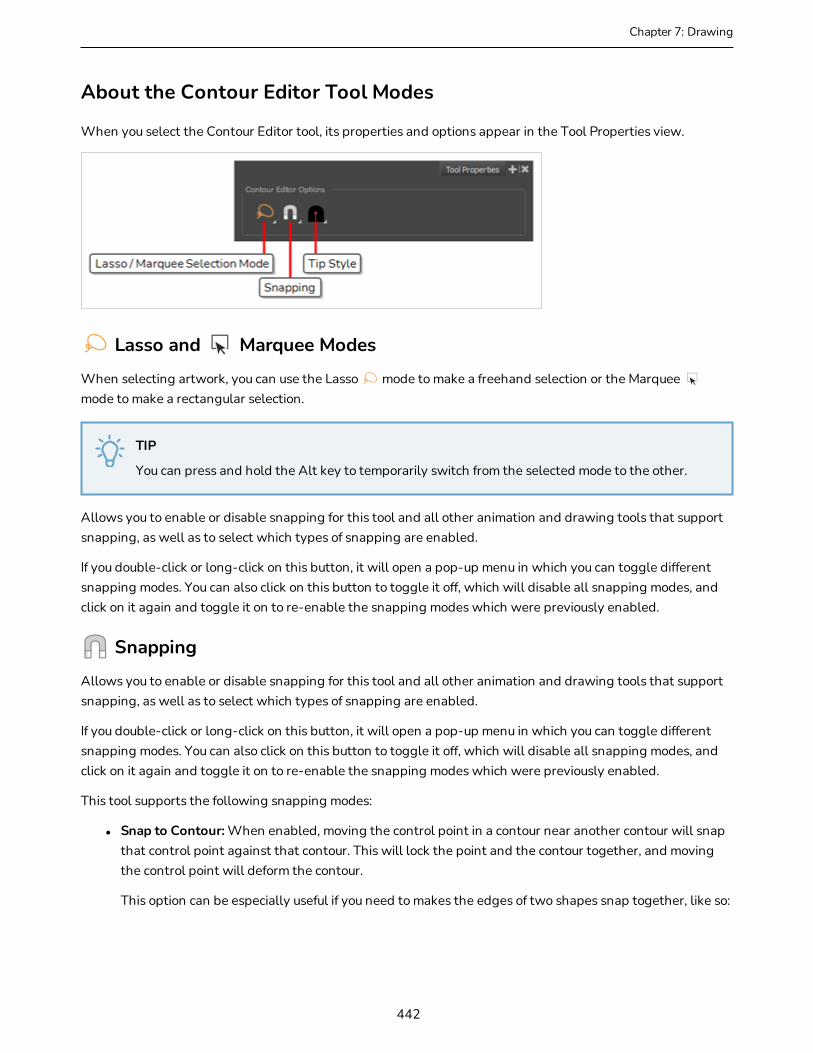
Chapter 7: Drawing
About the Contour Editor Tool Modes
When you select the Contour Editor tool, its properties and options appear in the Tool Properties view.
Lasso and Marquee Modes
When selecting artwork, you can use the Lasso mode to make a freehand selection or the Marquee mode to make a rectangular selection.
TIP
You can press and hold the Alt key to temporarily switch from the selected mode to the other.
Allows you to enable or disable snapping for this tool and all other animation and drawing tools that support snapping, as well as to select which types of snapping are enabled.
If you double-click or long-click on this button, it will open a pop-up menu in which you can toggle different snapping modes. You can also click on this button to toggle it off, which will disable all snapping modes, and click on it again and toggle it on to re-enable the snapping modes which were previously enabled.
Snapping
Allows you to enable or disable snapping for this tool and all other animation and drawing tools that support snapping, as well as to select which types of snapping are enabled.
If you double-click or long-click on this button, it will open a pop-up menu in which you can toggle different snapping modes. You can also click on this button to toggle it off, which will disable all snapping modes, and click on it again and toggle it on to re-enable the snapping modes which were previously enabled.
This tool supports the following snapping modes:
l Snap to Contour: When enabled, moving the control point in a contour near another contour will snap that control point against that contour. This will lock the point and the contour together, and moving the control point will deform the contour.
This option can be especially useful if you need to makes the edges of two shapes snap together, like so:
442
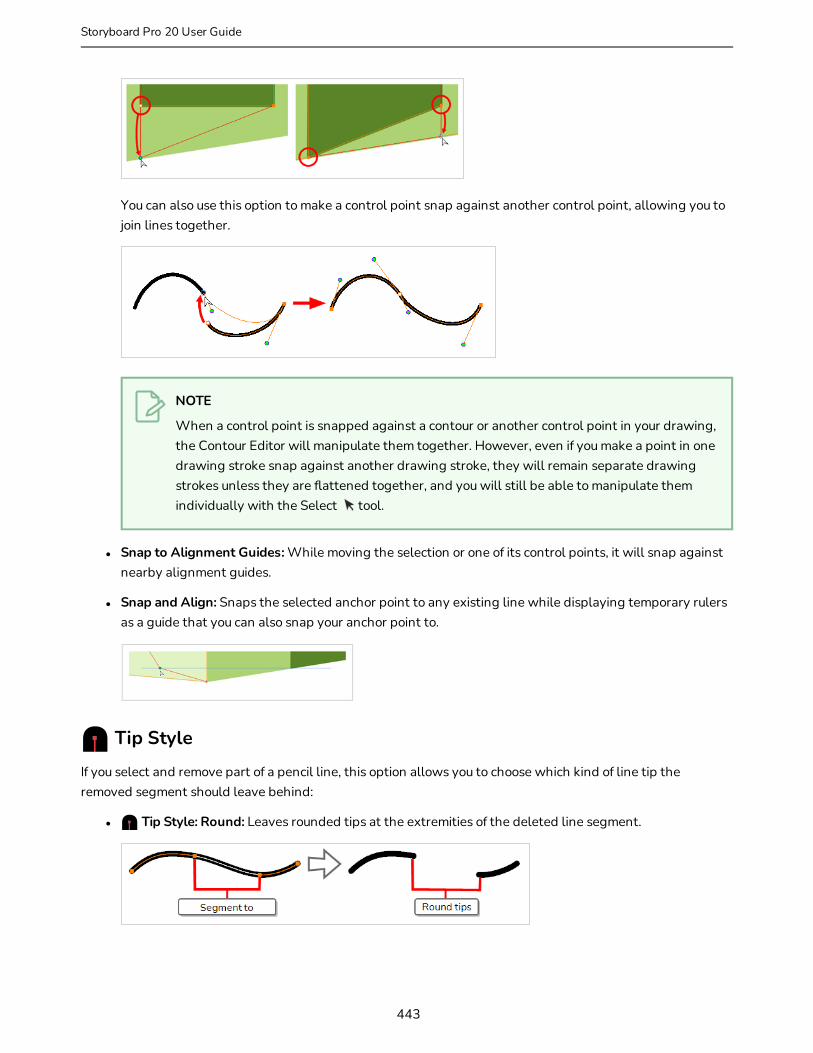
You can also use this option to make a control point snap against another control point, allowing you to join lines together.
NOTE
When a control point is snapped against a contour or another control point in your drawing, the Contour Editor will manipulate them together. However, even if you make a point in one drawing stroke snap against another drawing stroke, they will remain separate drawing strokes unless they are flattened together, and you will still be able to manipulate them individually with the Select tool.
l Snap to Alignment Guides: While moving the selection or one of its control points, it will snap against nearby alignment guides.
l Snap and Align: Snaps the selected anchor point to any existing line while displaying temporary rulers as a guide that you can also snap your anchor point to.
Tip Style
If you select and remove part of a pencil line, this option allows you to choose which kind of line tip the removed segment should leave behind:
l Tip Style: Round: Leaves rounded tips at the extremities of the deleted line segment.
443
Storyboard Pro 20 User Guide
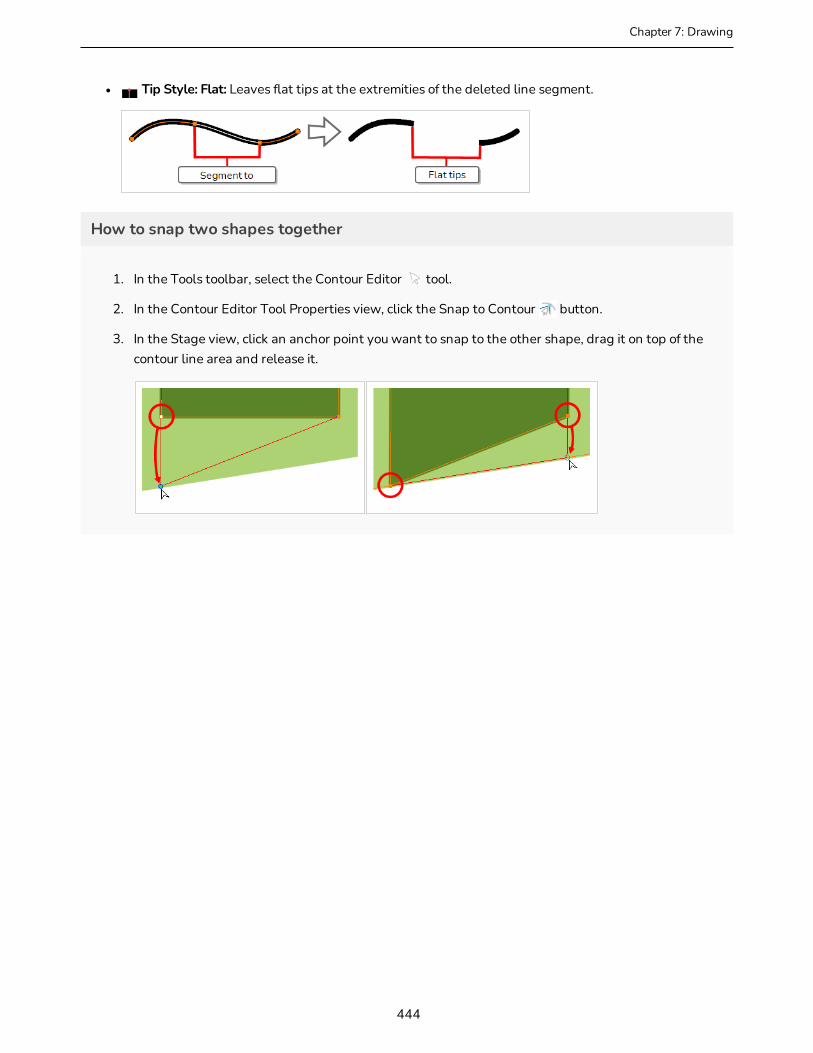
Chapter 7: Drawing
l Tip Style: Flat: Leaves flat tips at the extremities of the deleted line segment.
How to snap two shapes together
1. In the Tools toolbar, select the Contour Editor tool.
2. In the Contour Editor Tool Properties view, click the Snap to Contour button.
3. In the Stage view, click an anchor point you want to snap to the other shape, drag it on top of the contour line area and release it.
444
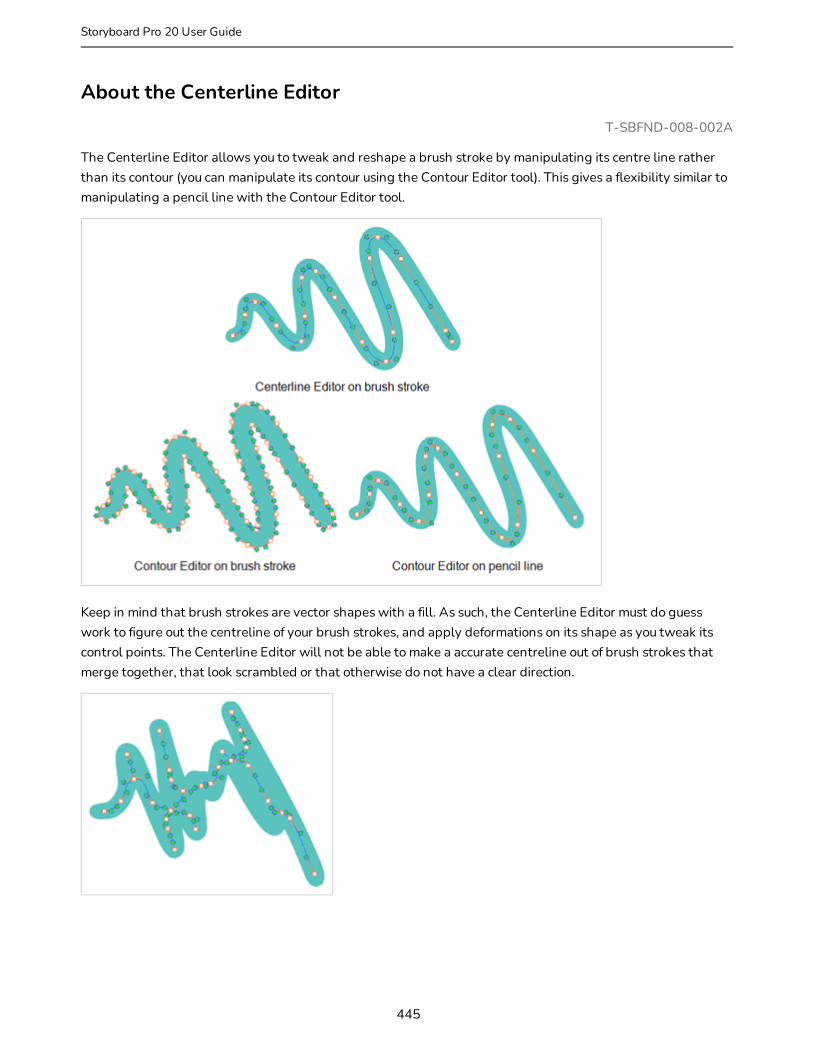
About the Centerline EditorT-SBFND-008-002A
The Centerline Editor allows you to tweak and reshape a brush stroke by manipulating its centre line rather than its contour (you can manipulate its contour using the Contour Editor tool). This gives a flexibility similar to manipulating a pencil line with the Contour Editor tool.
Keep in mind that brush strokes are vector shapes with a fill. As such, the Centerline Editor must do guess work to figure out the centreline of your brush strokes, and apply deformations on its shape as you tweak its control points. The Centerline Editor will not be able to make a accurate centreline out of brush strokes that merge together, that look scrambled or that otherwise do not have a clear direction.
445
Storyboard Pro 20 User Guide
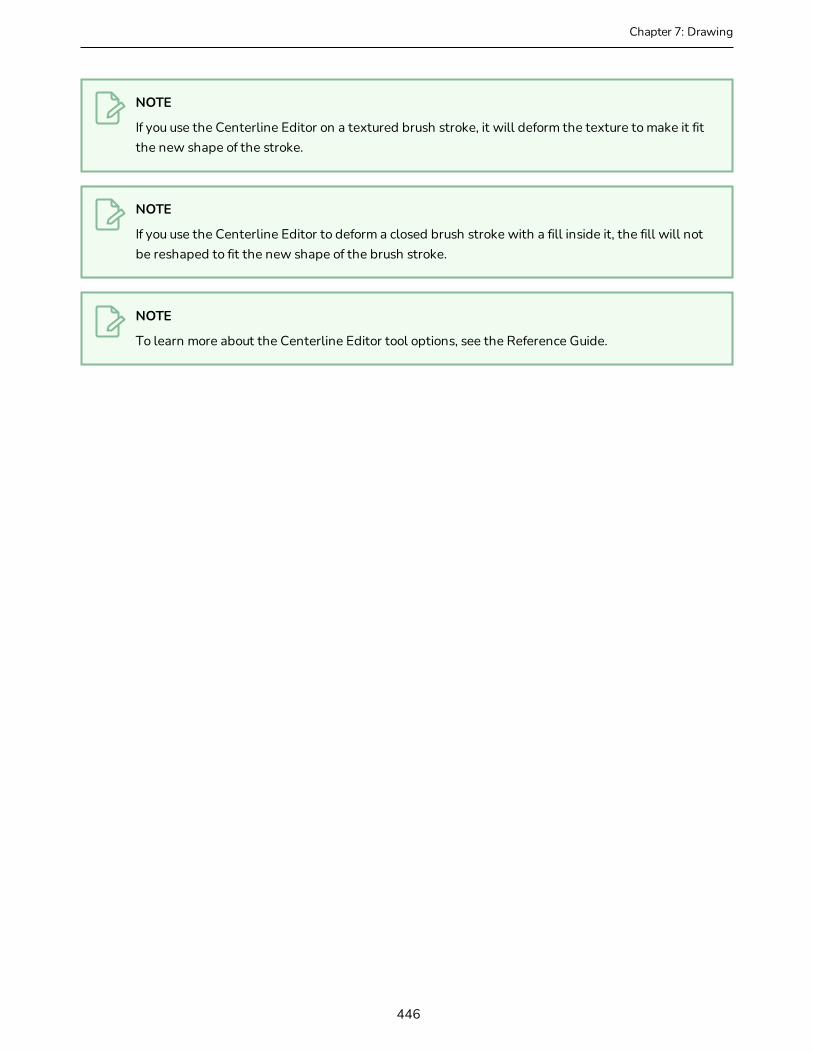
Chapter 7: Drawing
NOTE
If you use the Centerline Editor on a textured brush stroke, it will deform the texture to make it fit the new shape of the stroke.
NOTE
If you use the Centerline Editor to deform a closed brush stroke with a fill inside it, the fill will not be reshaped to fit the new shape of the brush stroke.
NOTE
To learn more about the Centerline Editor tool options, see the Reference Guide.
446
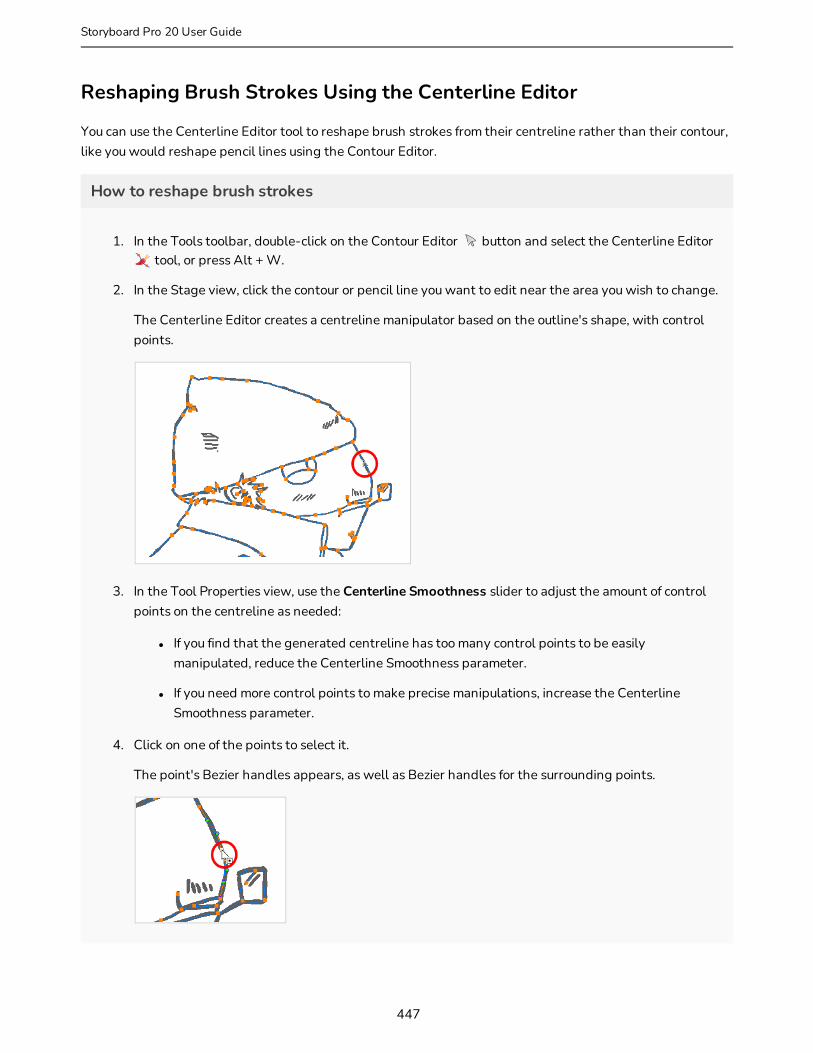
Reshaping Brush Strokes Using the Centerline Editor
You can use the Centerline Editor tool to reshape brush strokes from their centreline rather than their contour, like you would reshape pencil lines using the Contour Editor.
How to reshape brush strokes
1. In the Tools toolbar, double-click on the Contour Editor button and select the Centerline Editor tool, or press Alt + W.
2. In the Stage view, click the contour or pencil line you want to edit near the area you wish to change.
The Centerline Editor creates a centreline manipulator based on the outline's shape, with control points.
3. In the Tool Properties view, use the Centerline Smoothness slider to adjust the amount of control points on the centreline as needed:
l If you find that the generated centreline has too many control points to be easily manipulated, reduce the Centerline Smoothness parameter.
l If you need more control points to make precise manipulations, increase the Centerline Smoothness parameter.
4. Click on one of the points to select it.
The point's Bezier handles appears, as well as Bezier handles for the surrounding points.
447
Storyboard Pro 20 User Guide

Chapter 7: Drawing
5. Do one of the following:
l To move a point or a selection of multiple points, click and drag it.
l To change the curve on both sides of a point, drag one of its Bezier handles.
l To change the curve on only one side of a point, press and hold the Alt key, then drag one of its Bezier handles.
l To deform the contour, drag a part of the contour between two points.
448

l To deform the curve between two points, hold the Shift key and drag the contour between two points.
l To remove a point's Bezier handles and make the lines it is connected to straight, press and hold the Alt key and click on the point.
l Straight lines have no Bezier handles at their points by default. To create Bezier handles for these points and make their lines curved, pres and hold the Alt key, then click and hold the point and drag the mouse cursor away from it. A new Bezier handle will follow your mouse cursor until you release the mouse button.
l To add a control point, press Ctrl (Windows/Linux) or ⌘ (macOS) and click on the contour where you want the new point to be created.
449
Storyboard Pro 20 User Guide
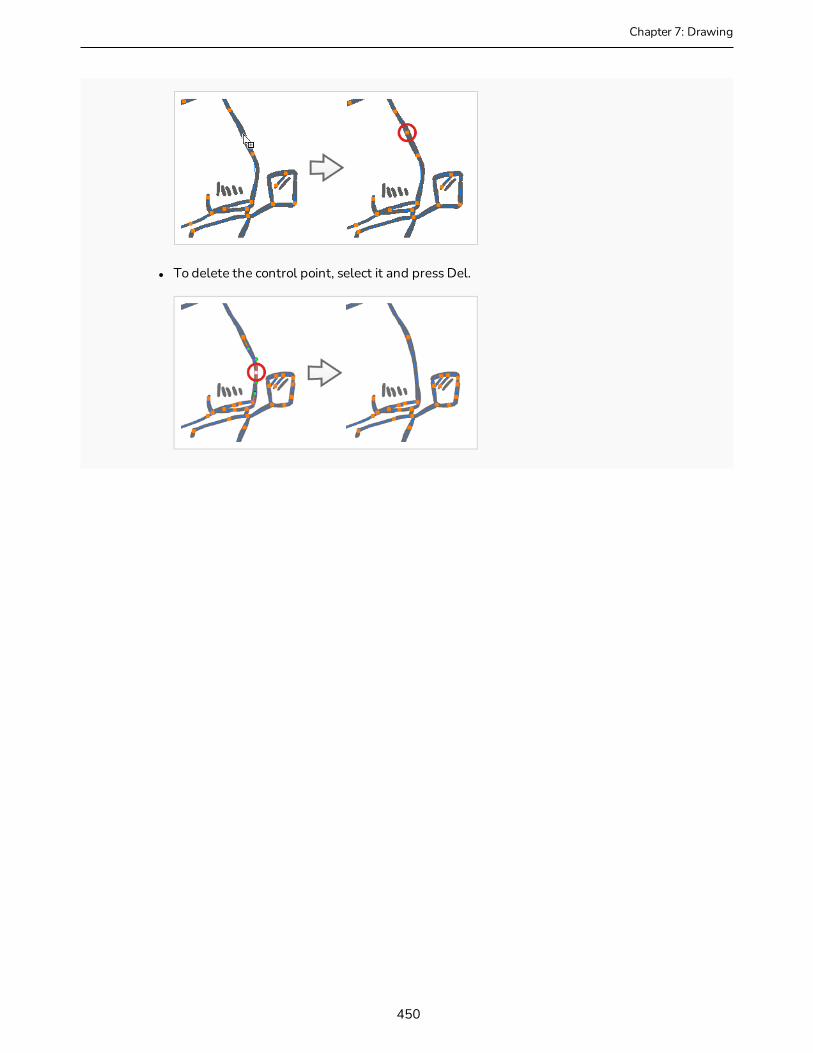
Chapter 7: Drawing
l To delete the control point, select it and press Del.
450
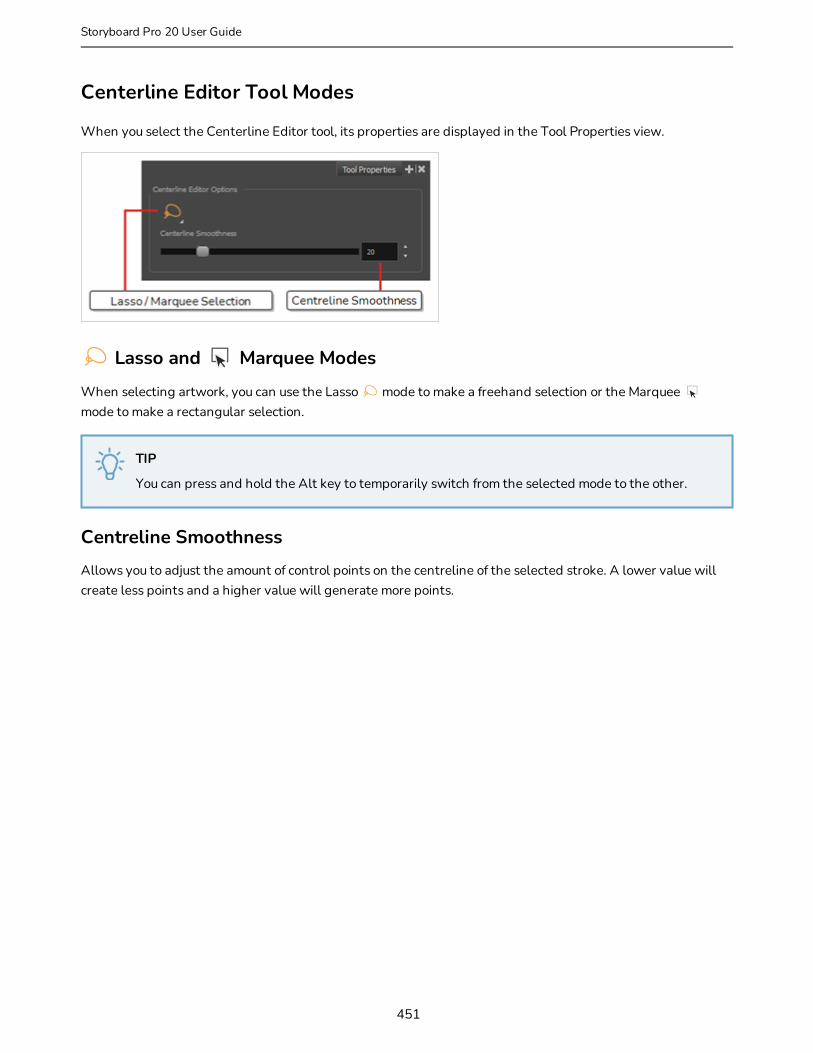
Centerline Editor Tool Modes
When you select the Centerline Editor tool, its properties are displayed in the Tool Properties view.
Lasso and Marquee Modes
When selecting artwork, you can use the Lasso mode to make a freehand selection or the Marquee mode to make a rectangular selection.
TIP
You can press and hold the Alt key to temporarily switch from the selected mode to the other.
Centreline Smoothness
Allows you to adjust the amount of control points on the centreline of the selected stroke. A lower value will create less points and a higher value will generate more points.
451
Storyboard Pro 20 User Guide
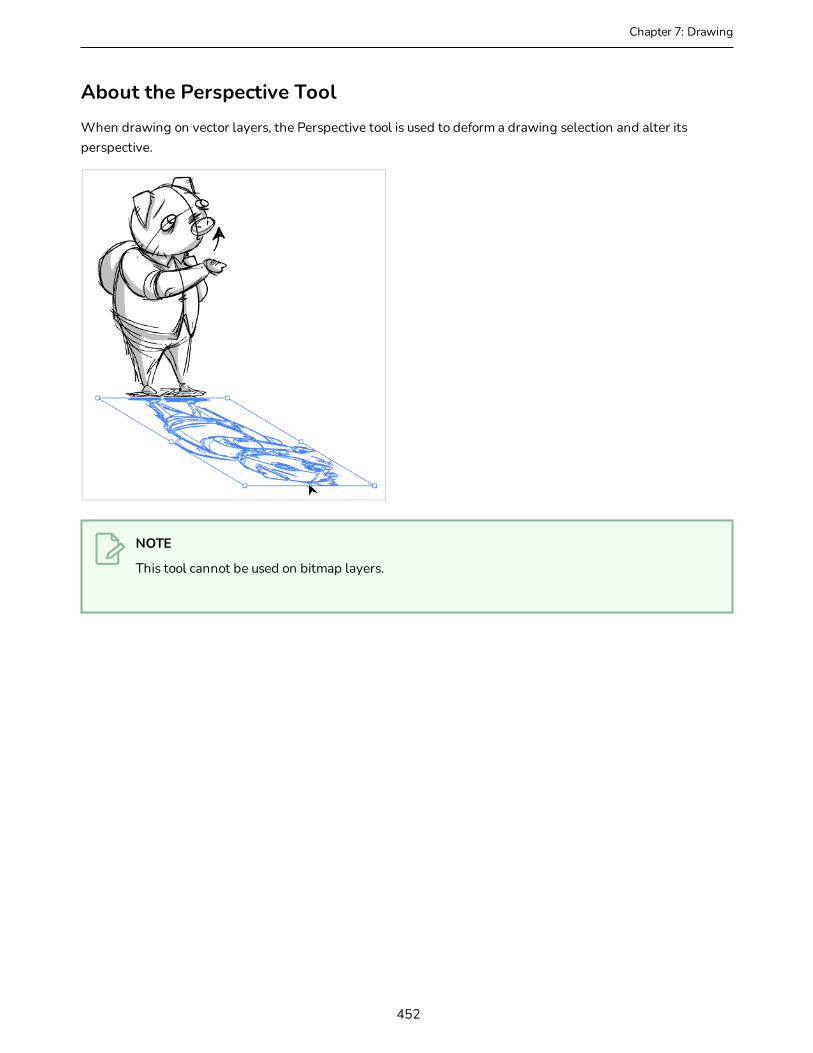
Chapter 7: Drawing
About the Perspective ToolWhen drawing on vector layers, the Perspective tool is used to deform a drawing selection and alter its perspective.
NOTE
This tool cannot be used on bitmap layers.
452
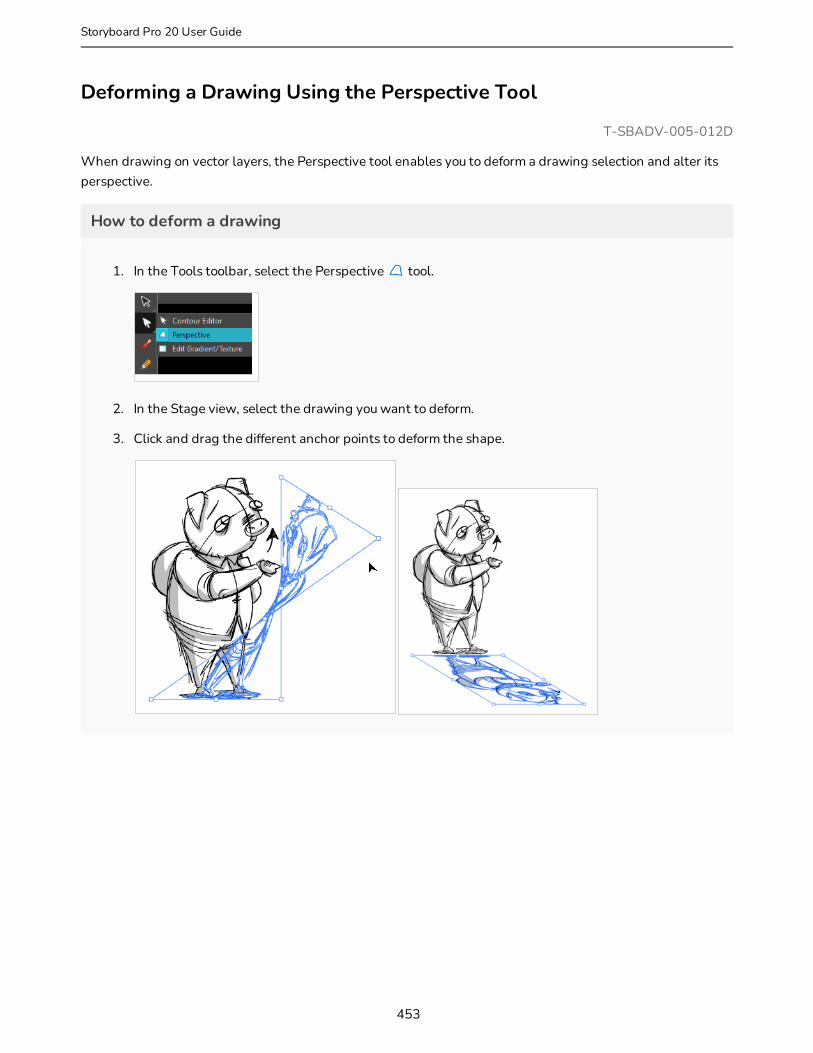
Deforming a Drawing Using the Perspective Tool
T-SBADV-005-012D
When drawing on vector layers, the Perspective tool enables you to deform a drawing selection and alter its perspective.
How to deform a drawing
1. In the Tools toolbar, select the Perspective tool.
2. In the Stage view, select the drawing you want to deform.
3. Click and drag the different anchor points to deform the shape.
453
Storyboard Pro 20 User Guide
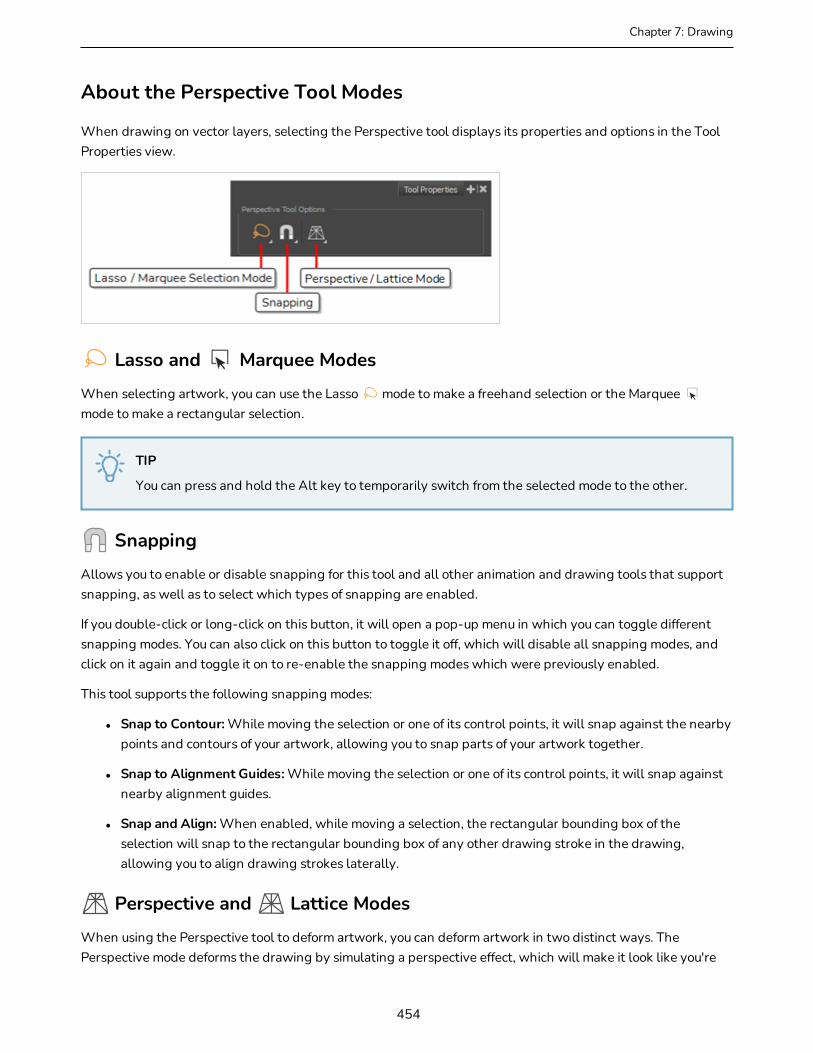
Chapter 7: Drawing
About the Perspective Tool Modes
When drawing on vector layers, selecting the Perspective tool displays its properties and options in the Tool Properties view.
Lasso and Marquee Modes
When selecting artwork, you can use the Lasso mode to make a freehand selection or the Marquee mode to make a rectangular selection.
TIP
You can press and hold the Alt key to temporarily switch from the selected mode to the other.
Snapping
Allows you to enable or disable snapping for this tool and all other animation and drawing tools that support snapping, as well as to select which types of snapping are enabled.
If you double-click or long-click on this button, it will open a pop-up menu in which you can toggle different snapping modes. You can also click on this button to toggle it off, which will disable all snapping modes, and click on it again and toggle it on to re-enable the snapping modes which were previously enabled.
This tool supports the following snapping modes:
l Snap to Contour: While moving the selection or one of its control points, it will snap against the nearby points and contours of your artwork, allowing you to snap parts of your artwork together.
l Snap to Alignment Guides: While moving the selection or one of its control points, it will snap against nearby alignment guides.
l Snap and Align: When enabled, while moving a selection, the rectangular bounding box of the selection will snap to the rectangular bounding box of any other drawing stroke in the drawing, allowing you to align drawing strokes laterally.
Perspective and Lattice Modes
When using the Perspective tool to deform artwork, you can deform artwork in two distinct ways. The Perspective mode deforms the drawing by simulating a perspective effect, which will make it look like you're
454
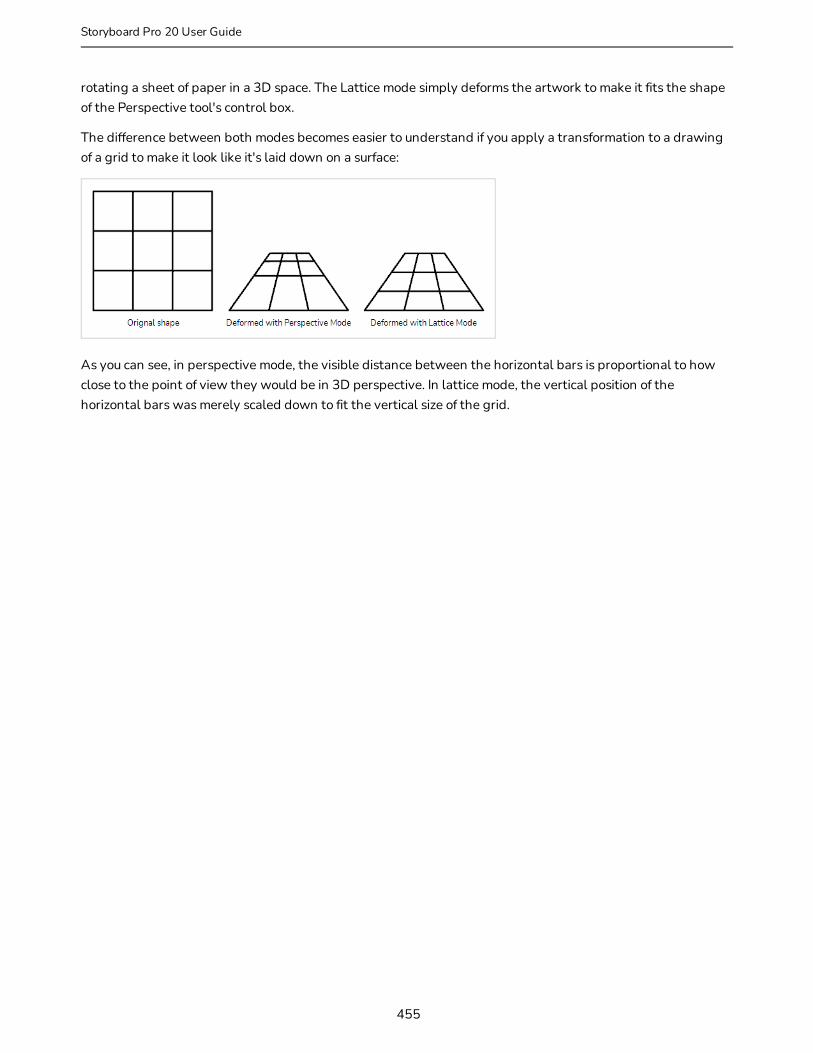
rotating a sheet of paper in a 3D space. The Lattice mode simply deforms the artwork to make it fits the shape of the Perspective tool's control box.
The difference between both modes becomes easier to understand if you apply a transformation to a drawing of a grid to make it look like it's laid down on a surface:
As you can see, in perspective mode, the visible distance between the horizontal bars is proportional to how close to the point of view they would be in 3D perspective. In lattice mode, the vertical position of the horizontal bars was merely scaled down to fit the vertical size of the grid.
455
Storyboard Pro 20 User Guide

Chapter 7: Drawing
About the Text ToolT-SBADV-005-013
With the Text tool, you can type text in your project, using various fonts and text attributes. Text objects are part of a drawing, so you can manipulate them the same way. You can use the Text tools on both vector and bitmap layers.
456
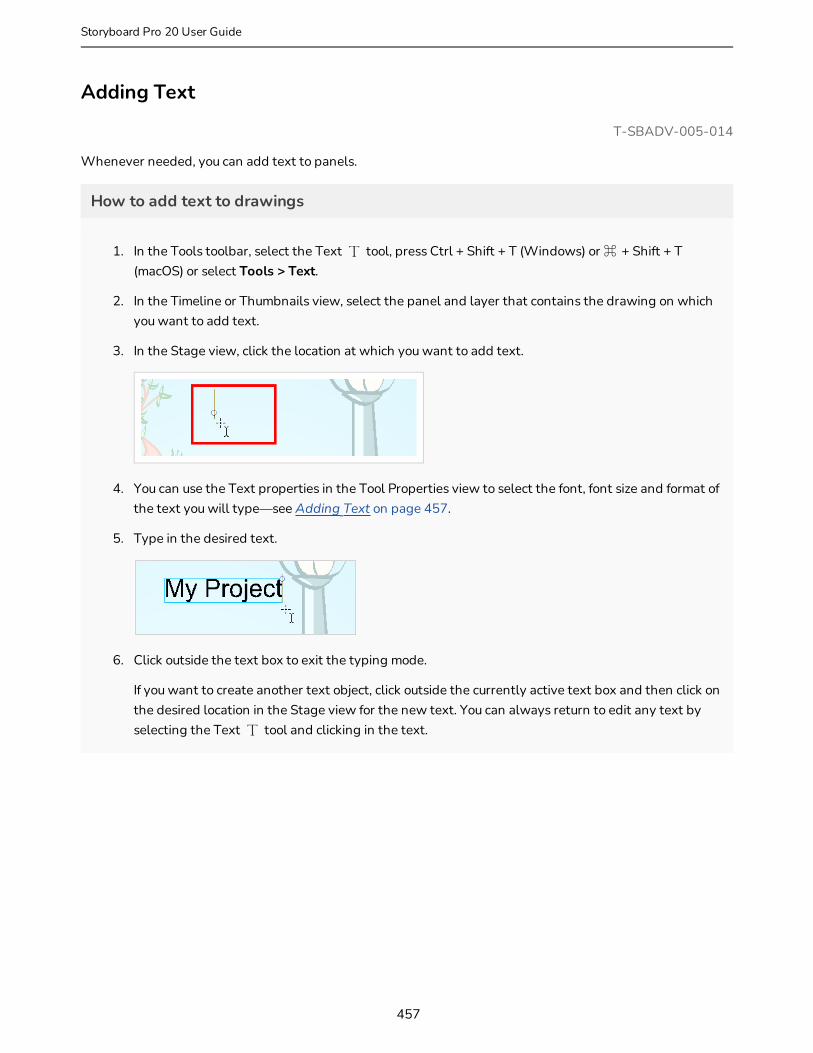
Adding Text
T-SBADV-005-014
Whenever needed, you can add text to panels.
How to add text to drawings
1. In the Tools toolbar, select the Text tool, press Ctrl + Shift + T (Windows) or ⌘ + Shift + T (macOS) or select Tools > Text.
2. In the Timeline or Thumbnails view, select the panel and layer that contains the drawing on which you want to add text.
3. In the Stage view, click the location at which you want to add text.
4. You can use the Text properties in the Tool Properties view to select the font, font size and format of the text you will type—see Adding Text on page 457.
5. Type in the desired text.
6. Click outside the text box to exit the typing mode.
If you want to create another text object, click outside the currently active text box and then click on the desired location in the Stage view for the new text. You can always return to edit any text by selecting the Text tool and clicking in the text.
457
Storyboard Pro 20 User Guide
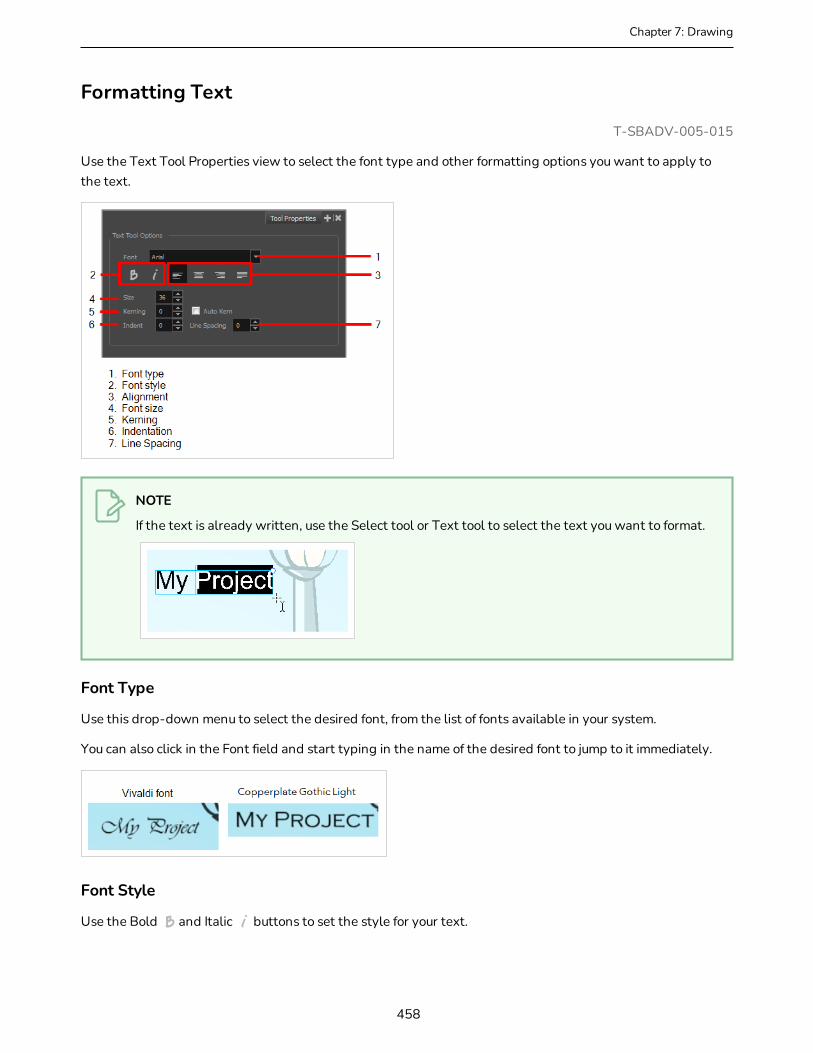
Chapter 7: Drawing
Formatting Text
T-SBADV-005-015
Use the Text Tool Properties view to select the font type and other formatting options you want to apply to the text.
NOTE
If the text is already written, use the Select tool or Text tool to select the text you want to format.
Font Type
Use this drop-down menu to select the desired font, from the list of fonts available in your system.
You can also click in the Font field and start typing in the name of the desired font to jump to it immediately.
Font Style
Use the Bold and Italic buttons to set the style for your text.
458

Alignment
Use these buttons to align the paragraph.
Left Centred
Right Justified
Font Size
Type the desired size for the text in this field. You can also use the up and down arrow buttons to set the desired value.
Kerning
Use the kerning field to modify the spacing between letters and characters. You can select the Auto Kern option to set the kerning automatically, based on the font’s predefined standard. A negative value decreases spacing between each character creating a letter overlap and a positive value increases it.
459
Storyboard Pro 20 User Guide

Chapter 7: Drawing
Indent
Enter a value in the Indent field to increase or decrease the indentation on the first line of your text. A positive value sets the first line of your paragraph farther to the right and a negative value sets it farther to the left.
Line Spacing
Enter a value in the Line Spacing field to decrease or increase the space between each line of text.
460
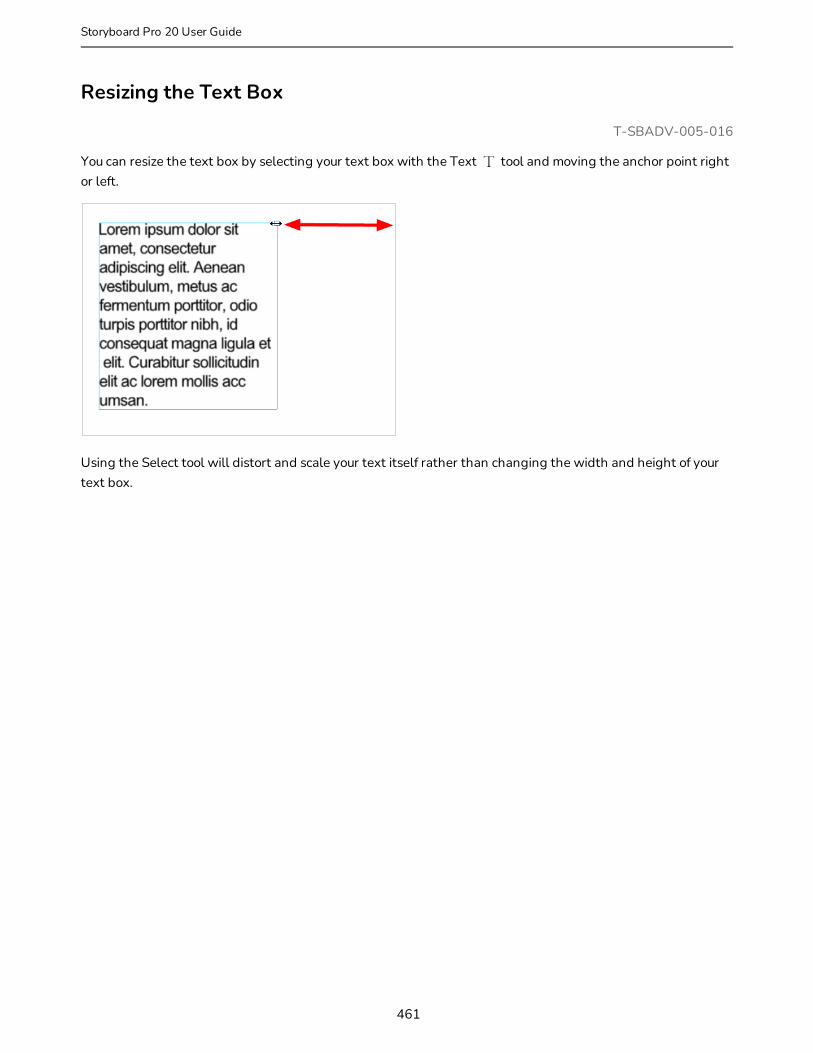
Resizing the Text Box
T-SBADV-005-016
You can resize the text box by selecting your text box with the Text tool and moving the anchor point right or left.
Using the Select tool will distort and scale your text itself rather than changing the width and height of your text box.
461
Storyboard Pro 20 User Guide
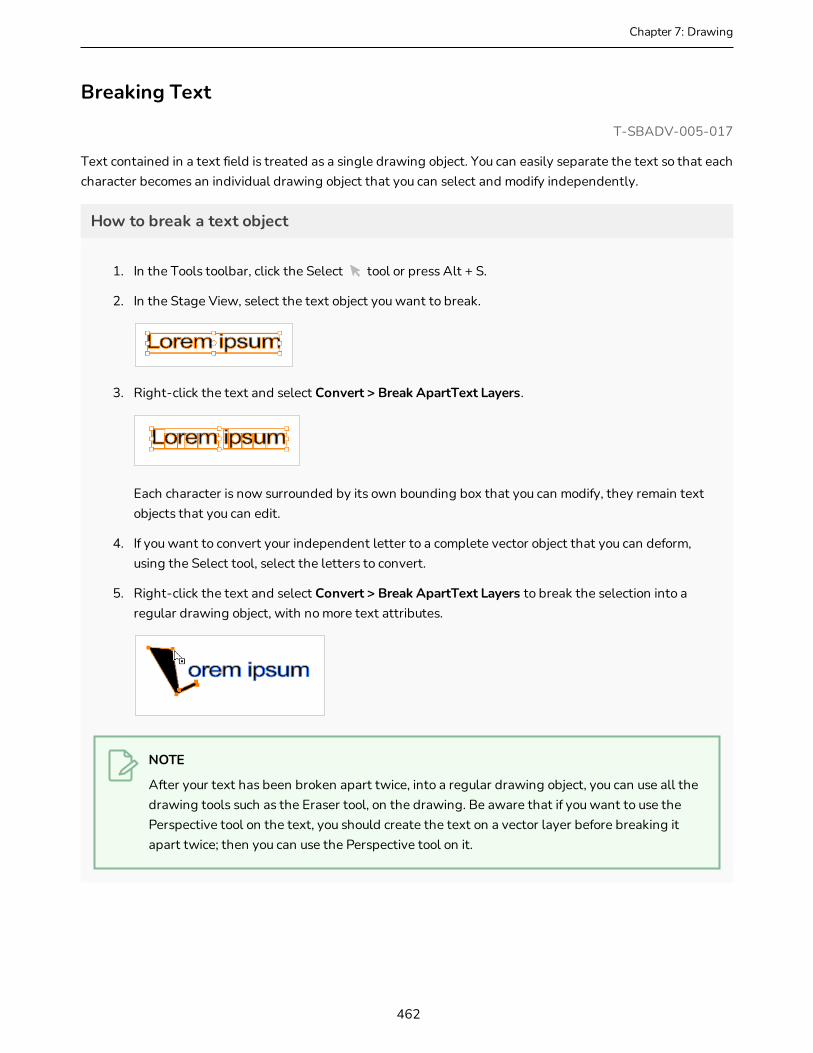
Chapter 7: Drawing
Breaking Text
T-SBADV-005-017
Text contained in a text field is treated as a single drawing object. You can easily separate the text so that each character becomes an individual drawing object that you can select and modify independently.
How to break a text object
1. In the Tools toolbar, click the Select tool or press Alt + S.
2. In the Stage View, select the text object you want to break.
3. Right-click the text and select Convert > Break ApartText Layers.
Each character is now surrounded by its own bounding box that you can modify, they remain text objects that you can edit.
4. If you want to convert your independent letter to a complete vector object that you can deform, using the Select tool, select the letters to convert.
5. Right-click the text and select Convert > Break ApartText Layers to break the selection into a regular drawing object, with no more text attributes.
NOTE
After your text has been broken apart twice, into a regular drawing object, you can use all the drawing tools such as the Eraser tool, on the drawing. Be aware that if you want to use the Perspective tool on the text, you should create the text on a vector layer before breaking it apart twice; then you can use the Perspective tool on it.
462

About Tool PresetsT-SBADV-005-006
Tool presets let you save a variety of settings and are very efficient for accessing the tools you use most often. That way, the tool is already set with the desired properties, such as colour, line thickness, whether to enable Draw Behind or Auto Flatten mode, and so on. You can create presets for these tools and many more: Brush, Pencil, Eraser, Rectangle, Ellipse, and Line.
The difference between a tool preset and a brush preset is that when you save a tool preset, you have the option of saving the colour and assigning a shortcut, which you cannot do with brush presets.
You can assign a keyboard shortcut to tool presets to quickly access them—see Shortcut Preferences in the Preferences Guide.
463
Storyboard Pro 20 User Guide
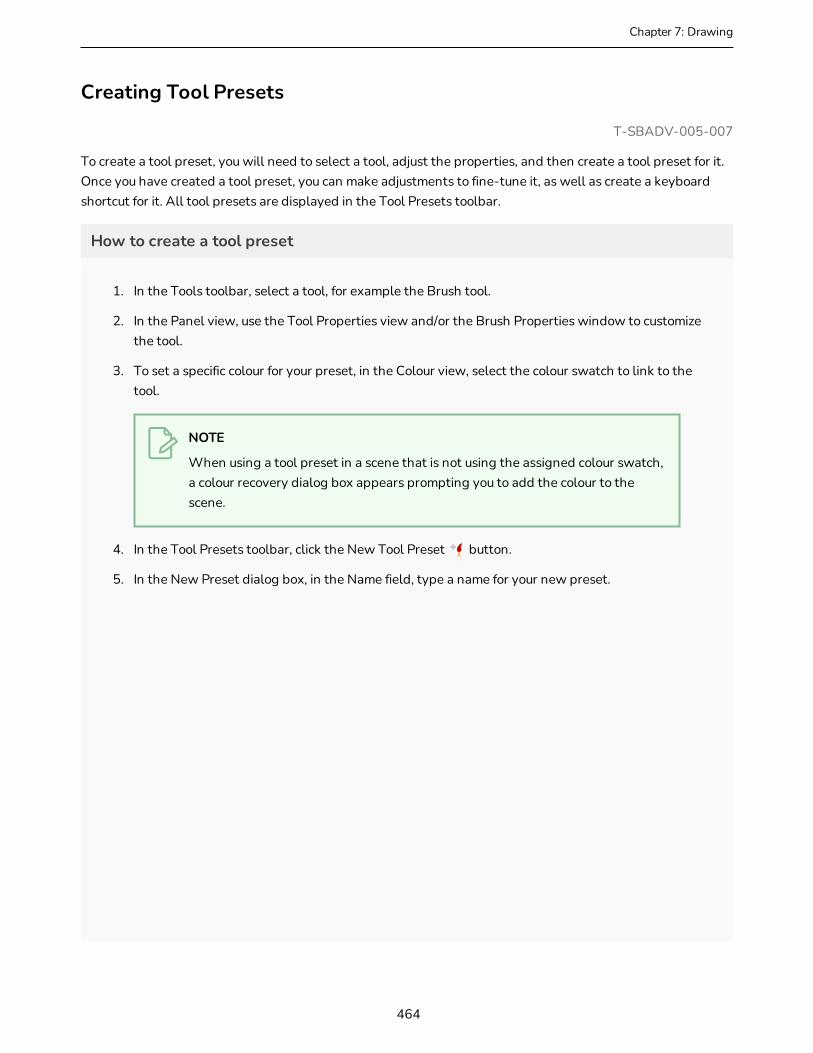
Chapter 7: Drawing
Creating Tool Presets
T-SBADV-005-007
To create a tool preset, you will need to select a tool, adjust the properties, and then create a tool preset for it. Once you have created a tool preset, you can make adjustments to fine-tune it, as well as create a keyboard shortcut for it. All tool presets are displayed in the Tool Presets toolbar.
How to create a tool preset
1. In the Tools toolbar, select a tool, for example the Brush tool.
2. In the Panel view, use the Tool Properties view and/or the Brush Properties window to customize the tool.
3. To set a specific colour for your preset, in the Colour view, select the colour swatch to link to the tool.
NOTE
When using a tool preset in a scene that is not using the assigned colour swatch, a colour recovery dialog box appears prompting you to add the colour to the scene.
4. In the Tool Presets toolbar, click the New Tool Preset button.
5. In the New Preset dialog box, in the Name field, type a name for your new preset.
464

6. From the icon list, select an icon to quickly identify your preset or upload your own by clicking the File button.
7. (Optional) From the Shortcut menu, set a keyboard shortcut to quickly access your preset. By default, the shortcuts are unassigned. To assign a keyboard shortcut, select Edit > Preferences > Shortcuts > Tool Presets (Windows) or Storyboard Pro 20 > Preferences > Shortcuts > Tool Presets (macOS).
8. When you select an option, it will take effect when you use the tool preset. If an option is deselected, then using a tool preset will not override your current settings.
l Colour: Saves the current colour into the tool preset.
l Layer: Lets you select a drawing layer to be used on the current panel when the tool preset is clicked. When selecting the preset, if the assigned layer exists, it will be selected, if not, it will be created. When changing panels, depending on your global navigation setting, it will look for the layer. If it does not exist, the first layer will be
465
Storyboard Pro 20 User Guide

Chapter 7: Drawing
selected. Select the Layer option, assign a layer to the tool preset, and decide whether the layer is vector or bitmap.
l Draw Behind: When this option is selected, saves the specified Draw Behind option to the tool preset. When deselected, the current Draw Behind status is unchanged when the tool preset is clicked—see About the Brush Tool Modes on page 327.
l Auto Flatten: When this option is selected, saves the specified Auto-Flatten state to the tool preset. When deselected, the current Auto-Flatten state is unchanged when the tool preset is clicked—see About the Brush Tool Modes on page 327.
9. Click OK.
466
Updating Tool Presets
T-SBADV-005-008
As you work with a tool preset, you may need to fine-tune and update its parameters until it is exactly what you want.
How to update a tool preset
1. In the Tool Properties view, update the tool settings.
2. In the Tool Presets toolbar, click the Manage Tool Presets button.
3. In the Manage Tool Presets dialog box, select the tool preset from the list.
4. Update the additional parameters such as the icon, Colour, Layer and Draw Behind options.
5. Click Update.
6. Click OK.
467
Storyboard Pro 20 User Guide

Chapter 7: Drawing
Deleting Tool Presets
T-SBADV-005-009
If you no longer need a tool preset, you can delete it.
How to delete a tool preset
1. In the Tool Presets toolbar, click the Manage Tool Presets button.
2. From the list of tool presets on the left, select a preset to delete and click the Trash icon.
468
Importing and Exporting Tool Presets
T-SBADV-005-010
If there are tool presets created by other Storyboard Pro artists you want to use, you can import them to use in your projects. You can also export your tool presets for other artists to use.
How to import a tool preset
1. In the Tool Presets toolbar, click the Manage Tool Presets button.
The Manage Tool Presets dialog box opens.
2. Click Import.
3. In the Import Brush Presets window that opens, locate and select the preset(s) to import and click Open.
How to export a tool preset
1. In the Tool Presets toolbar, click the Manage Tool Presets button.
The Manage Tool Presets dialog box opens.
2. Click Export.
3. In the Export Brush Presets window that opens, select the preset(s) to export and click Export.
4. Give the exported preset(s) a name and click Save.
469
Storyboard Pro 20 User Guide

Chapter 7: Drawing
Locking the Tool Preset Layer Selection
T-SBADV-005-011
It is possible to assign a tool preset to a specific layer. When the preset is selected, it will verify if the layer exists. If so, the layer will be selected and if not, it will be created.
When switching panels, by default Storyboard Prolooks for a layer with the same name as the one currently selected. If it does not exist, the first layer will be selected. To prevent Storyboard Pro from selecting a random layer, you can activate the Enable Brush Preset Layer Selection Lock option. This way, Storyboard Pro prevents you from drawing in the next panel unless you create the missing layer. Click on the preset again to create the missing layer.
How to enable the Enable Brush Preset Layer Selection Lock option
1. Open the Preferences dialog box:
l Windows: Select Edit > Preferences or press Ctrl + U.
l macOS: Select Storyboard Pro 20 > Preferences or press⌘ + ,.
2. Select the General tab.
3. In the Layers section, select the Enable Brush Preset Layer Selection Lock option.
470

About Drawing Space NavigationWhen you are drawing in the Stage view, you can zoom, pan and rotate the view to make it easier to determine where to place objects, determine the scale of objects, and when zooming out, get an overall view of the panel and its contents.
471
Storyboard Pro 20 User Guide
Chapter 7: Drawing
Zooming the Stage ViewZooming in and out of the Stage view lets you see elements close up and far away.
How to zoom the Stage view
l From the Tools toolbar, select the Zoom tool. Click the Stage view to zoom in. Press [Alt] to zoom out.
l Zoom In: Select View > Zoom In or press 2. When the Zoom In mode is selected, hold [Alt] as you click to zoom out.
l Zoom Out: Select View > Zoom Out or press 1.
How to reset zoom
l Select View > Reset Zoom or press Shift + Z.
472
Panning the Stage ViewUsing the Hand tool, you can pan the Stage view.
How to pan the Stage view
1. Do one of the following:
‣ In the Tools toolbar, click the Hand tool.
‣ Hold down the Spacebar.
‣ Select Tools > Hand.
2. In the Stage view, drag the cursor.
How to reset pan
l Select View > Reset Pan or press Shift + N.
473
Storyboard Pro 20 User Guide
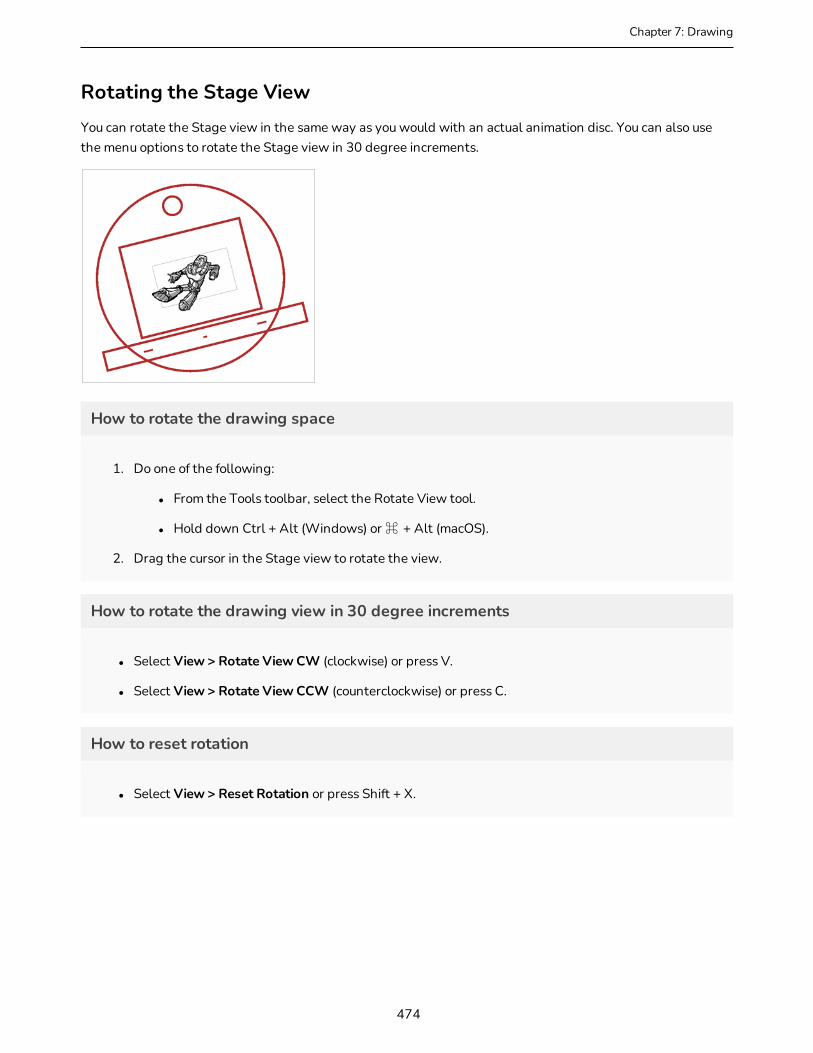
Chapter 7: Drawing
Rotating the Stage ViewYou can rotate the Stage view in the same way as you would with an actual animation disc. You can also use the menu options to rotate the Stage view in 30 degree increments.
How to rotate the drawing space
1. Do one of the following:
l From the Tools toolbar, select the Rotate View tool.
l Hold down Ctrl + Alt (Windows) or ⌘ + Alt (macOS).
2. Drag the cursor in the Stage view to rotate the view.
How to rotate the drawing view in 30 degree increments
l Select View > Rotate View CW (clockwise) or press V.
l Select View > Rotate View CCW (counterclockwise) or press C.
How to reset rotation
l Select View > Reset Rotation or press Shift + X.
474
About Drawing Space EfficiencyT-SBADV-005-001
Drawing can be time consuming and complicated if you don't take advantage of some of the time-saving features in Storyboard Pro. It starts with turning on the grid to help you determine the size and placement of objects as you draw. For your drawing tool, you can choose from a lasso or marquee type cursor.
With onion skinning, you can see the previous and next drawings, which is handy for referring to for the size, angle and position of the drawing in the current panel.
The light table lets you preview the previous and subsequent active layers in light colours. This is really useful for seeing other layers when designing or cleaning up your storyboard.
You can also quickly swap between two drawing tools by using keyboard shortcuts.
Everything you draw in Storyboard Pro is vector-based. When you draw in the Drawing or Camera view, notice that your lines may appear jagged. This is caused by the fast real-time display called OpenGL. If you prefer to see smooth lines as you draw, you can enable the antialiasing preference.
475
Storyboard Pro 20 User Guide

Chapter 7: Drawing
Displaying the GridT-SBADV-005-002
Using a grid is useful when positioning or drawing objects and characters in a scene. Several different kinds of these grids and their grid options can be displayed in the Stage or Camera views.
A grid can also be useful for creating balanced compositions for all your shots. By default, the Proportion Grid is divided into 3 vertical and 3 horizontal sections to create the classic rule of thirds composition grid. It can be used independently in either the Stage or Camera views and follows the Camera frame. Its divisions can be customized in the Camera tab of the Preferences dialog—see .
How to display the grid
1. Do one of the following:
l Click the Grid button at the bottom of the Stage or Camera view.
l Select View > Grid > Show Grid.
l Press Ctrl + G (Windows) or ⌘ + G (macOS).
2. To choose a grid option, click and hold down the Grid button to display its sub menu or select View > Grid and choose one of the following options:
Tool Name Description
Grid Outline Only Displays only the contour of the grid.
Underlay Displays the grid behind the drawing elements.
476

Tool Name Description
Overlay Displays the grid over the drawing elements.
12 Field GridDisplays a 12x12 field grid. Each cell in the grid has an aspect ratio of 4:3. This makes overall aspect ratio of the grid 4:3.
16 Field GridDisplays a 16x16 field grid. Each cell in the grid has an aspect ratio of 4:3. This makes overall aspect ratio of the grid 4:3.
16x12 Field GridDisplays a 16x12 field grid. Each cell in the grid has an aspect ratio of 4:3. This makes overall aspect ratio of the grid 16:9.
Square Displays a standard square grid.
World GridDisplays a reference grid that remains the same size when you scale objects. This is useful when creating elements in your drawing and you need a reference point.
How to display the Proportion Grid
1. Do one of the following:
l Click the Grid button at the bottom of the Stage or Camera view.
l Select View > Extras > Show Proportion Grid.
477
Storyboard Pro 20 User Guide

Chapter 7: Drawing
Using the Light TableT-SBFND-008-005
The light table is used to preview the previous and subsequent active layers. It is useful to see the other layers when designing or cleaning up your storyboard.
When the light table is activated, all layers apart from the currently selected one are shown in washed-out colours in the Stage and Camera views and when using the layer tools.
How to turn on the light table
1. Select View > Light Table.
The drawings for the other layers are displayed as washed-out colours in the Stage view.
478
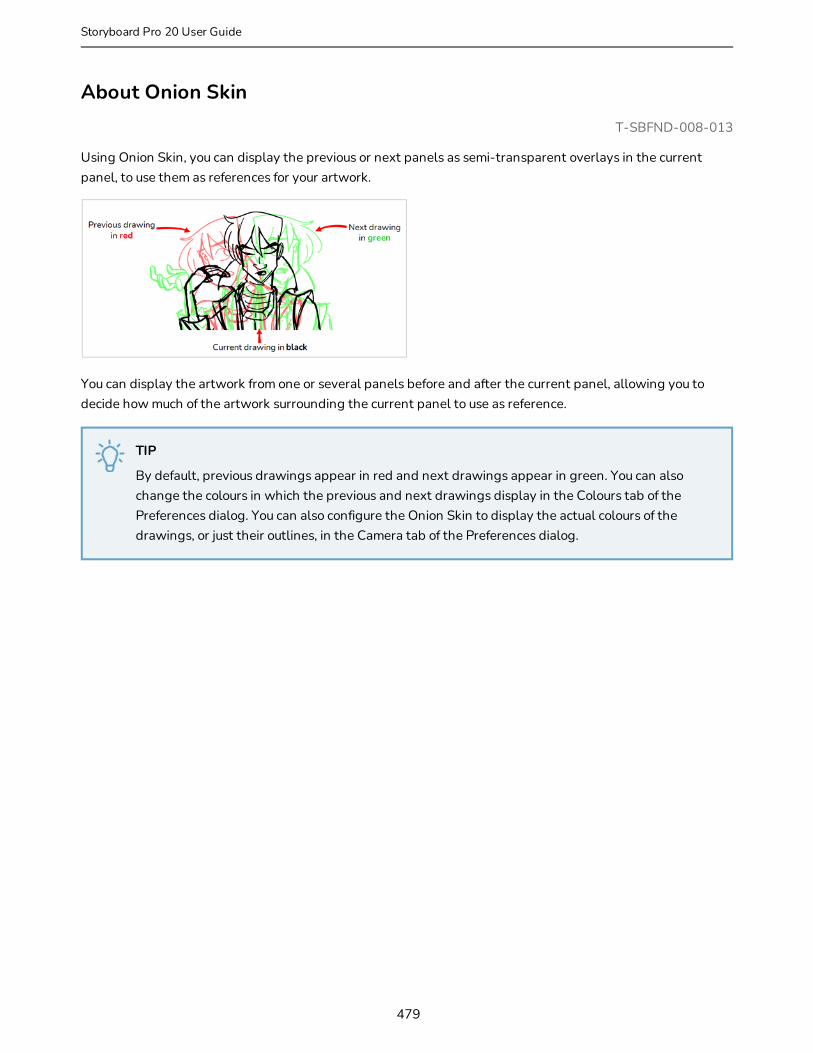
About Onion SkinT-SBFND-008-013
Using Onion Skin, you can display the previous or next panels as semi-transparent overlays in the current panel, to use them as references for your artwork.
You can display the artwork from one or several panels before and after the current panel, allowing you to decide how much of the artwork surrounding the current panel to use as reference.
TIP
By default, previous drawings appear in red and next drawings appear in green. You can also change the colours in which the previous and next drawings display in the Colours tab of the Preferences dialog. You can also configure the Onion Skin to display the actual colours of the drawings, or just their outlines, in the Camera tab of the Preferences dialog.
479
Storyboard Pro 20 User Guide

Chapter 7: Drawing
Enabling the Onion Skin
T-SBFND-008-014
After enabling the Onion Skin, you can set the number of previous and next panels to view. You can set the onion skin to display up to three panels.
How to enable Onion Skin
1. Do one of the following:
l In the Onion Skin toolbar, click the Onion Skin button.
l Press Alt+O (Windows) or ⌘+Alt+O (macOS).
l Select View > Onion Skin > Show Onion Skin.
By default, the Onion Skin for the previous panel will display in the Stage and Camera view in red, and the Onion Skin for the next panel will display in green.
TIP
By default, previous drawings appear in red and next drawings appear in green. You can also change the colours in which the previous and next drawings display in the Colours tab of the Preferences dialog. You can also configure the Onion Skin to display the actual colours of the drawings, or just their outlines, in the Camera tab of the Preferences dialog.
480
Setting the Amount of Neighbouring Panels to Include in Onion Skin
When you enable Onion Skin, by default, only the previous and next panels will be included in the Onion Skin. You can however include up to three previous panels and up to three next panels in the Onion Skin.
The amount of previous panels and next panels to include in the Onion Skin work independently. For example, you can display 1 previous panel and 3 next panels in the Onion Skin simultaneously.
NOTE
You can change the maximum amount of panels to include in the Onion Skin in the Camera Tab of the Preferences dialog.
How to set the number of previous panels to include in the Onion Skin
1. In the Onion Skin toolbar, click the Show Previous button and select one of the following:
l No Previous Panels
l Previous Panel
l Previous Two Panels
l Previous Three Panels
The previous panel(s) appear in the Stage and Camera views, in a washed out red.
NOTE
You can also select View > Onion Skin to access these options.
How to set the number of next panels to include in the Onion Skin
1. In the Onion Skin toolbar, click the Show Next button and select one of the following:
l No Next Panels
l Next Panel
l Next Two Panels
l Next Three Panels
The previous panel(s) appear in the Stage and Camera views, in a washed out green.
481
Storyboard Pro 20 User Guide

Chapter 7: Drawing
NOTE
You can also select View > Onion Skin to access these options.
482
Enabling Onion Skin for the Current Layer Only
If your panels contain several layers, you may want to only see the Onion Skin for a specific layer at a time, and ignore all other layers. In Storyboard Pro, you can set up the onion skin to only include artwork for the currently selected layer.
Since layers are different for each panel, and Onion Skin displays the artwork in surrounding panels, Storyboard Pro identifies which layers match the currently selected layer in the current panel by name. Hence, to be able to use this option, your layers must have consistent names across panels. For example, if you only want to display the Onion Skin for a specific character, the layer on which that character is drawn should have the same name across the panels in your storyboard, so it could be named after the character's name. Or, you could decide that the main action is always drawn on a layer named A in every panel.
NOTE
Background layers are not displayed in the onion skin, even if the currently selected layer is a background layer.
How to enable Onion Skin for the current layer only and exclude other layers
1. In the layer panel of the Stage or Camera view or in the Layers view, select the layer or layers which you want to include in the Onion Skin.
2. Do one of the following:
l In the Onion Skin toolbar, click on the Toggle Selected Layers Only button.
l In the top menu, select View > Onion Skin > Show Only the Selected Layers.
The Onion Skin will now only include artwork from previous and next panels that are in layers that have the same name as the currently selected layer(s).
483
Storyboard Pro 20 User Guide
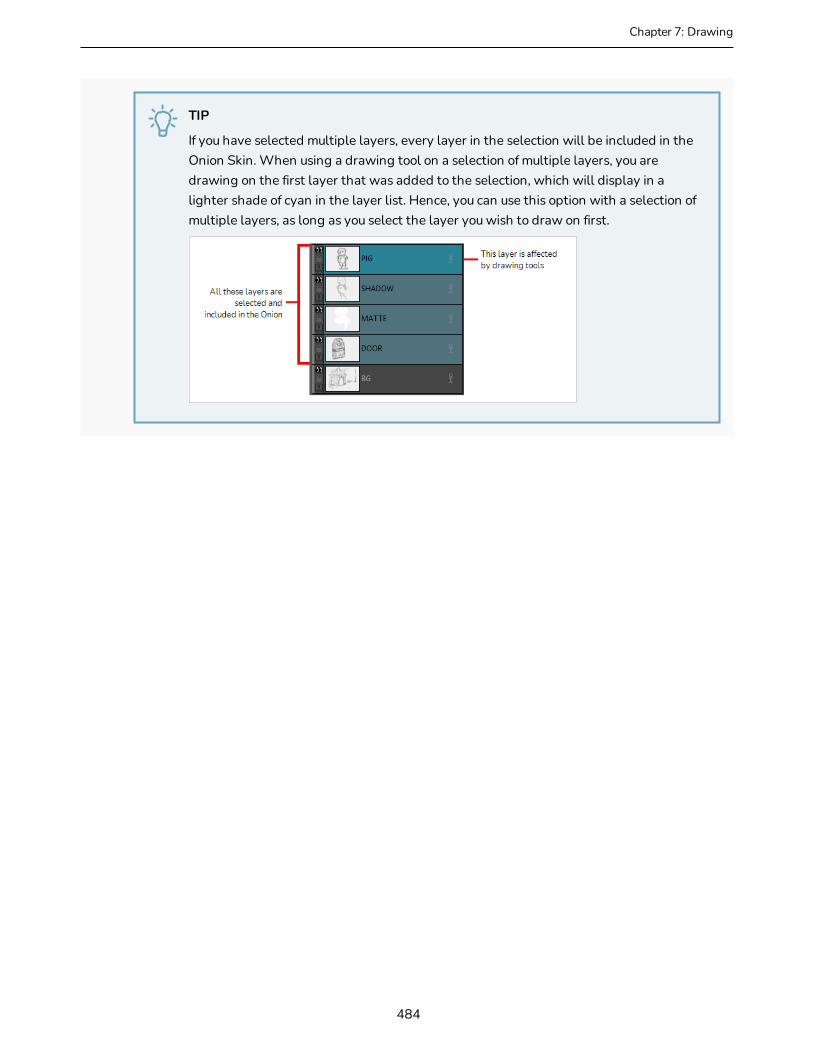
Chapter 7: Drawing
TIP
If you have selected multiple layers, every layer in the selection will be included in the Onion Skin. When using a drawing tool on a selection of multiple layers, you are drawing on the first layer that was added to the selection, which will display in a lighter shade of cyan in the layer list. Hence, you can use this option with a selection of multiple layers, as long as you select the layer you wish to draw on first.
484
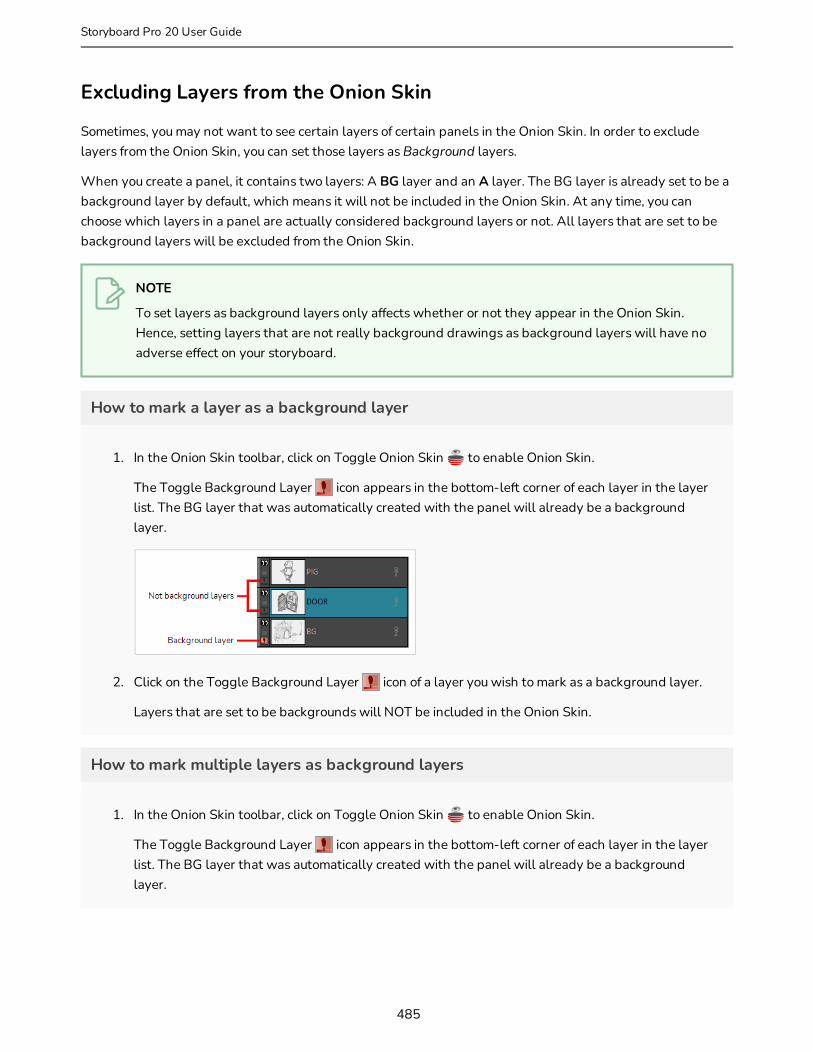
Excluding Layers from the Onion Skin
Sometimes, you may not want to see certain layers of certain panels in the Onion Skin. In order to exclude layers from the Onion Skin, you can set those layers as Background layers.
When you create a panel, it contains two layers: A BG layer and an A layer. The BG layer is already set to be a background layer by default, which means it will not be included in the Onion Skin. At any time, you can choose which layers in a panel are actually considered background layers or not. All layers that are set to be background layers will be excluded from the Onion Skin.
NOTE
To set layers as background layers only affects whether or not they appear in the Onion Skin. Hence, setting layers that are not really background drawings as background layers will have no adverse effect on your storyboard.
How to mark a layer as a background layer
1. In the Onion Skin toolbar, click on Toggle Onion Skin to enable Onion Skin.
The Toggle Background Layer icon appears in the bottom-left corner of each layer in the layer list. The BG layer that was automatically created with the panel will already be a background layer.
2. Click on the Toggle Background Layer icon of a layer you wish to mark as a background layer.
Layers that are set to be backgrounds will NOT be included in the Onion Skin.
How to mark multiple layers as background layers
1. In the Onion Skin toolbar, click on Toggle Onion Skin to enable Onion Skin.
The Toggle Background Layer icon appears in the bottom-left corner of each layer in the layer list. The BG layer that was automatically created with the panel will already be a background layer.
485
Storyboard Pro 20 User Guide

Chapter 7: Drawing
2. Select several noncontinuous layers by pressing Ctrl (Windows) or ⌘ (macOS) and clicking on each layer you want to select. To select a continuous range of layers, click on a layer at the start of the range, then Shift + click the last layer in the range.
3. In the top menu, select Layer > Toggle Background Layers.
Layers that are set to be backgrounds will NOT be included in the Onion Skin.
How to mark all layers except one as background layers
1. In the Onion Skin toolbar, click on Toggle Onion Skin to enable Onion Skin.
The Toggle Background Layer icon appears in the bottom-left corner of each layer in the layer list. The BG layer that was automatically created with the panel will already be a background layer.
2. Alt +click on the Toggle Background Layer icon on the single layer that you wish to keep visible in the Onion Skin.
All other layers are now marked as background layers. To revert all layers back, simply Alt + click again on the only layer visible in the Onion Skin.
486
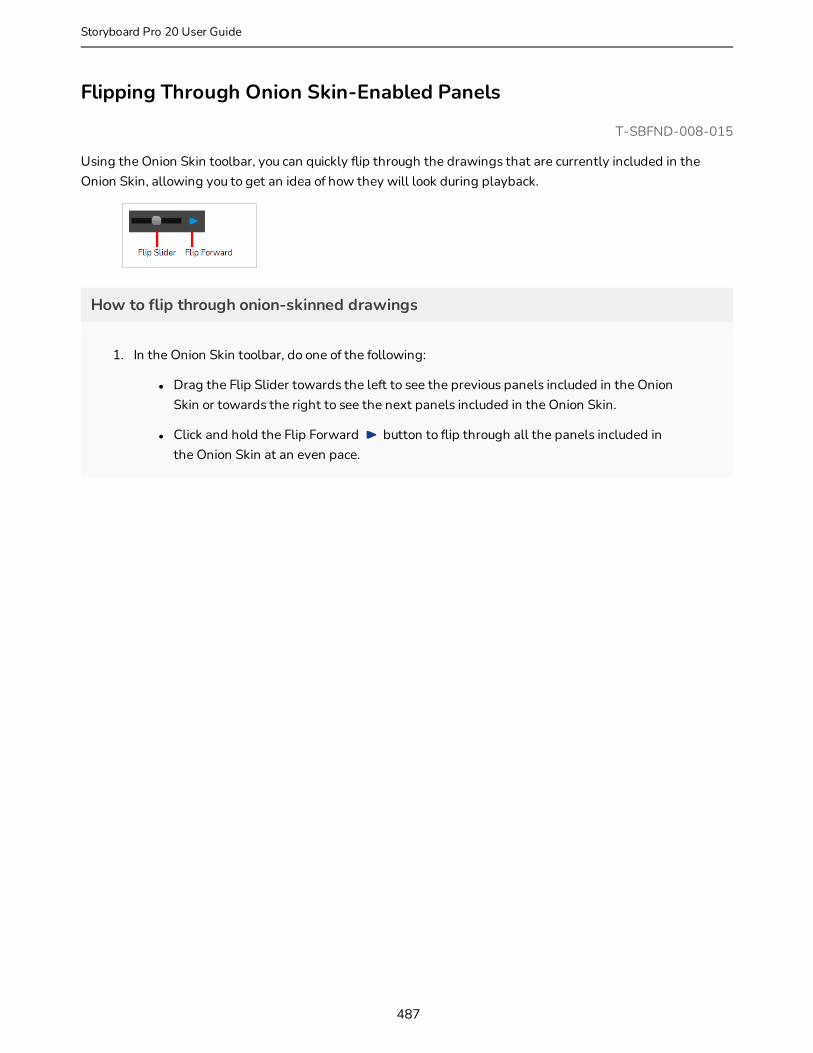
Flipping Through Onion Skin-Enabled Panels
T-SBFND-008-015
Using the Onion Skin toolbar, you can quickly flip through the drawings that are currently included in the Onion Skin, allowing you to get an idea of how they will look during playback.
How to flip through onion-skinned drawings
1. In the Onion Skin toolbar, do one of the following:
l Drag the Flip Slider towards the left to see the previous panels included in the Onion Skin or towards the right to see the next panels included in the Onion Skin.
l Click and hold the Flip Forward button to flip through all the panels included in the Onion Skin at an even pace.
487
Storyboard Pro 20 User Guide

Chapter 7: Drawing
Selecting Specific Panels to Include in Onion Skin
Using the Expand Onion Skin dialog, you can manually select which panels in the range of previous panels and which panels in the range of next panels to include in the Onion Skin. This method is a bit more complicated, but much more flexible, as only the panels you specifically choose to include in the Onion Skin will be included, and not every panel in-between.
How to add more panels or only include specific panels in the Onion Skin
1. In the Onion Skin toolbar, click the Expand Onion Skin button.
The Expand Onion Skin dialog appears.
2. In the Expand Onion Skin dialog, click on the corresponding button for each panel that you want to include in the Onion Skin. For example, if you want to include the first and third previous panels and the second next panels, click on 1 and 3 in the left section and on 2 in the right section.
3. If you want to exclude a panel you already inclued, click on the button again to remove it from the Onion Skin.
4. Without closing the Expand Onion Skin dialog, move it out of the way of your drawing space and resume drawing.
5. Once you are done using the expanded Onion Skin, close the Expand Onion Skin dialog. The Onion Skin will return to its normal settings.
488
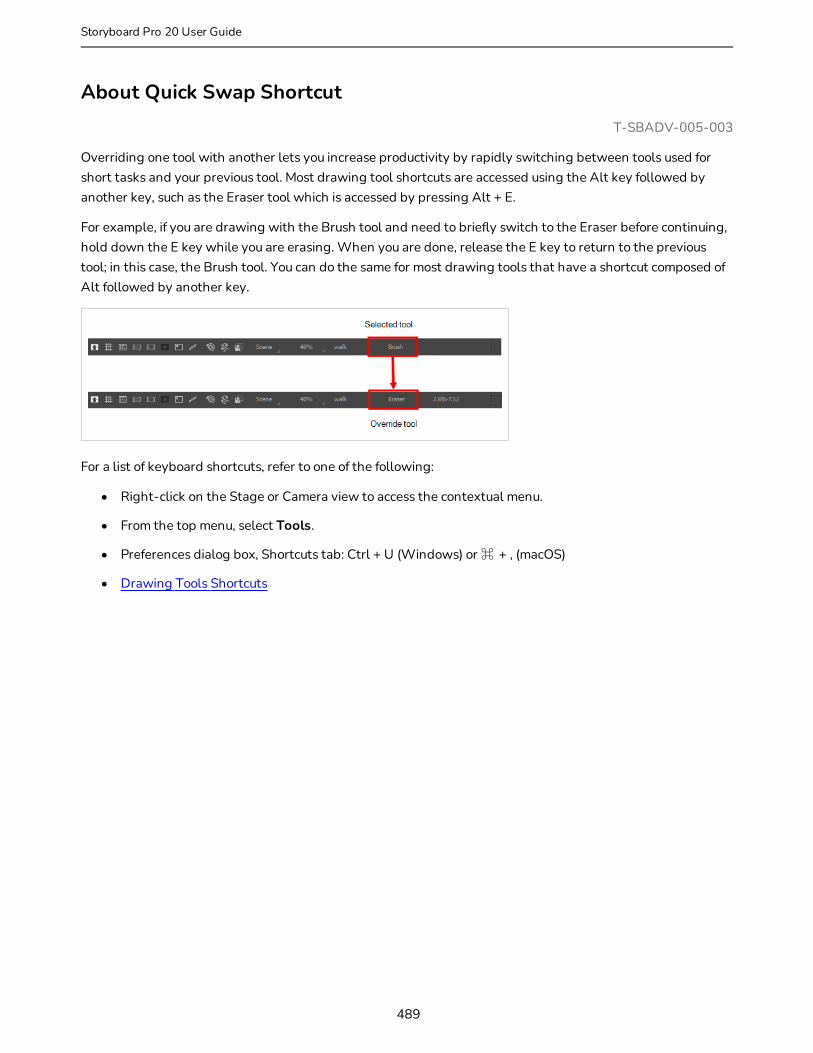
About Quick Swap ShortcutT-SBADV-005-003
Overriding one tool with another lets you increase productivity by rapidly switching between tools used for short tasks and your previous tool. Most drawing tool shortcuts are accessed using the Alt key followed by another key, such as the Eraser tool which is accessed by pressing Alt + E.
For example, if you are drawing with the Brush tool and need to briefly switch to the Eraser before continuing, hold down the E key while you are erasing. When you are done, release the E key to return to the previous tool; in this case, the Brush tool. You can do the same for most drawing tools that have a shortcut composed of Alt followed by another key.
For a list of keyboard shortcuts, refer to one of the following:
• Right-click on the Stage or Camera view to access the contextual menu.
• From the top menu, select Tools.
• Preferences dialog box, Shortcuts tab: Ctrl + U (Windows) or ⌘ + , (macOS)
• Drawing Tools Shortcuts
489
Storyboard Pro 20 User Guide
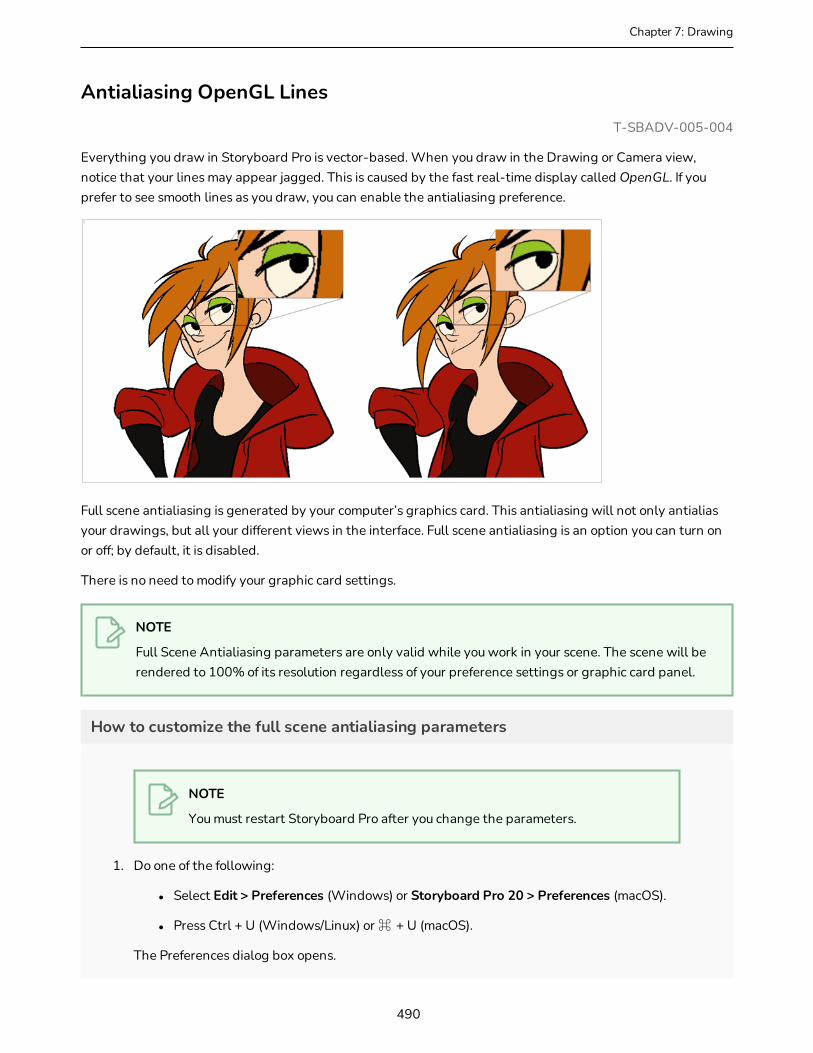
Chapter 7: Drawing
Antialiasing OpenGL LinesT-SBADV-005-004
Everything you draw in Storyboard Pro is vector-based. When you draw in the Drawing or Camera view, notice that your lines may appear jagged. This is caused by the fast real-time display called OpenGL. If you prefer to see smooth lines as you draw, you can enable the antialiasing preference.
Full scene antialiasing is generated by your computer’s graphics card. This antialiasing will not only antialias your drawings, but all your different views in the interface. Full scene antialiasing is an option you can turn on or off; by default, it is disabled.
There is no need to modify your graphic card settings.
NOTE
Full Scene Antialiasing parameters are only valid while you work in your scene. The scene will be rendered to 100% of its resolution regardless of your preference settings or graphic card panel.
How to customize the full scene antialiasing parameters
NOTE
You must restart Storyboard Pro after you change the parameters.
1. Do one of the following:
l Select Edit > Preferences (Windows) or Storyboard Pro 20 > Preferences (macOS).
l Press Ctrl + U (Windows/Linux) or ⌘ + U (macOS).
The Preferences dialog box opens.
490
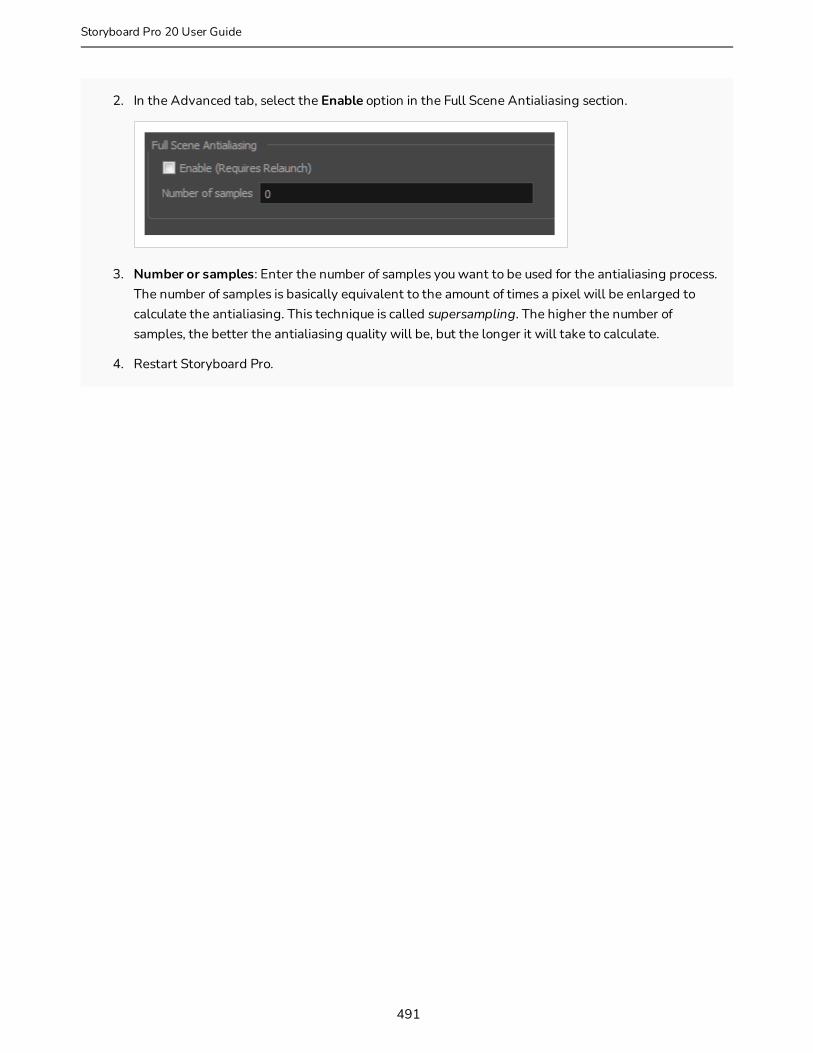
2. In the Advanced tab, select the Enable option in the Full Scene Antialiasing section.
3. Number or samples: Enter the number of samples you want to be used for the antialiasing process. The number of samples is basically equivalent to the amount of times a pixel will be enlarged to calculate the antialiasing. This technique is called supersampling. The higher the number of samples, the better the antialiasing quality will be, but the longer it will take to calculate.
4. Restart Storyboard Pro.
491
Storyboard Pro 20 User Guide
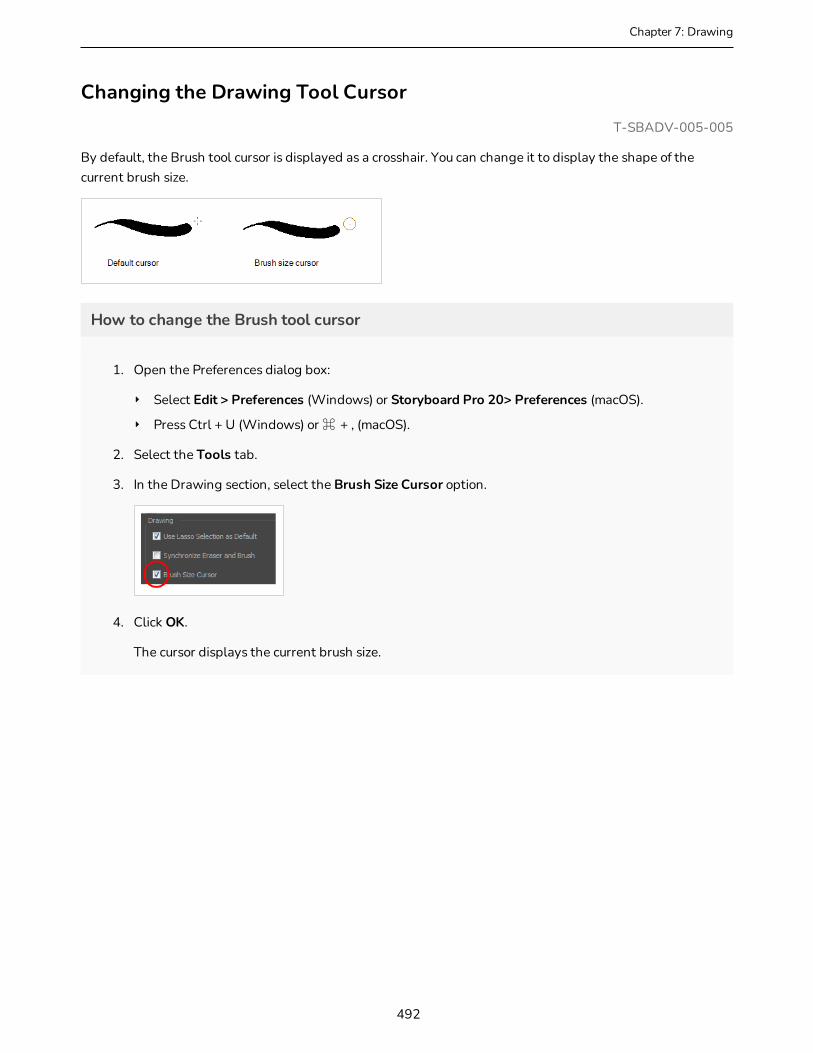
Chapter 7: Drawing
Changing the Drawing Tool CursorT-SBADV-005-005
By default, the Brush tool cursor is displayed as a crosshair. You can change it to display the shape of the current brush size.
How to change the Brush tool cursor
1. Open the Preferences dialog box:
‣ Select Edit > Preferences (Windows) or Storyboard Pro 20> Preferences (macOS).
‣ Press Ctrl + U (Windows) or ⌘ + , (macOS).
2. Select the Tools tab.
3. In the Drawing section, select the Brush Size Cursor option.
4. Click OK.
The cursor displays the current brush size.
492
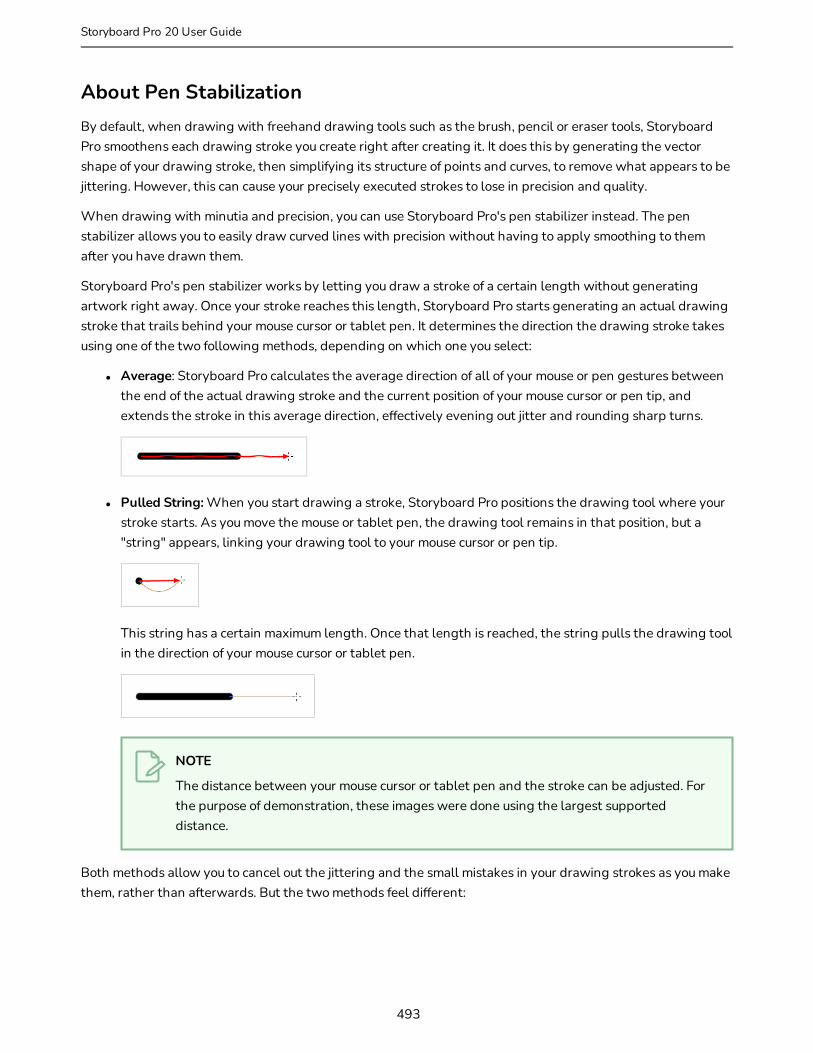
About Pen StabilizationBy default, when drawing with freehand drawing tools such as the brush, pencil or eraser tools, Storyboard Pro smoothens each drawing stroke you create right after creating it. It does this by generating the vector shape of your drawing stroke, then simplifying its structure of points and curves, to remove what appears to be jittering. However, this can cause your precisely executed strokes to lose in precision and quality.
When drawing with minutia and precision, you can use Storyboard Pro's pen stabilizer instead. The pen stabilizer allows you to easily draw curved lines with precision without having to apply smoothing to them after you have drawn them.
Storyboard Pro's pen stabilizer works by letting you draw a stroke of a certain length without generating artwork right away. Once your stroke reaches this length, Storyboard Pro starts generating an actual drawing stroke that trails behind your mouse cursor or tablet pen. It determines the direction the drawing stroke takes using one of the two following methods, depending on which one you select:
l Average: Storyboard Pro calculates the average direction of all of your mouse or pen gestures between the end of the actual drawing stroke and the current position of your mouse cursor or pen tip, and extends the stroke in this average direction, effectively evening out jitter and rounding sharp turns.
l Pulled String: When you start drawing a stroke, Storyboard Pro positions the drawing tool where your stroke starts. As you move the mouse or tablet pen, the drawing tool remains in that position, but a "string" appears, linking your drawing tool to your mouse cursor or pen tip.
This string has a certain maximum length. Once that length is reached, the string pulls the drawing tool in the direction of your mouse cursor or tablet pen.
NOTE
The distance between your mouse cursor or tablet pen and the stroke can be adjusted. For the purpose of demonstration, these images were done using the largest supported distance.
Both methods allow you to cancel out the jittering and the small mistakes in your drawing strokes as you make them, rather than afterwards. But the two methods feel different:
493
Storyboard Pro 20 User Guide
Chapter 7: Drawing
l The Average method takes into account all your drawing gestures. Therefore, if you jitter a lot while drawing, your strokes may jitter a little. It is also tricky to create sharp corners with this method. However, this method tends to create very consistently smooth drawing curves. Also, since it actually follows the gesture of your mouse or tablet pen, you might find that this method feels more natural than the Pulled String method.
l The Pulled String method gives you more precise control, and can be used to make sharp corners with the right technique, but may be harder to learn and to master. Your drawing tool does not follow your drawing strokes, it just gets pulled in the direction of your mouse cursor or tablet pen, which means the way your drawing gestures translate into drawing strokes is different than what you're used to.
You may need to do some trial and error to determine which method fits your drawing style the best. You can also customize the distance by which your drawing stroke trails behind your mouse cursor or tablet pen. A shorter distance will feel more natural, but a longer distance will stabilize your drawing strokes more.
The Pen Stabilizer works with the Brush, Pencil and Stamp tools. Optionally, it can also work with the Eraser tool.
494
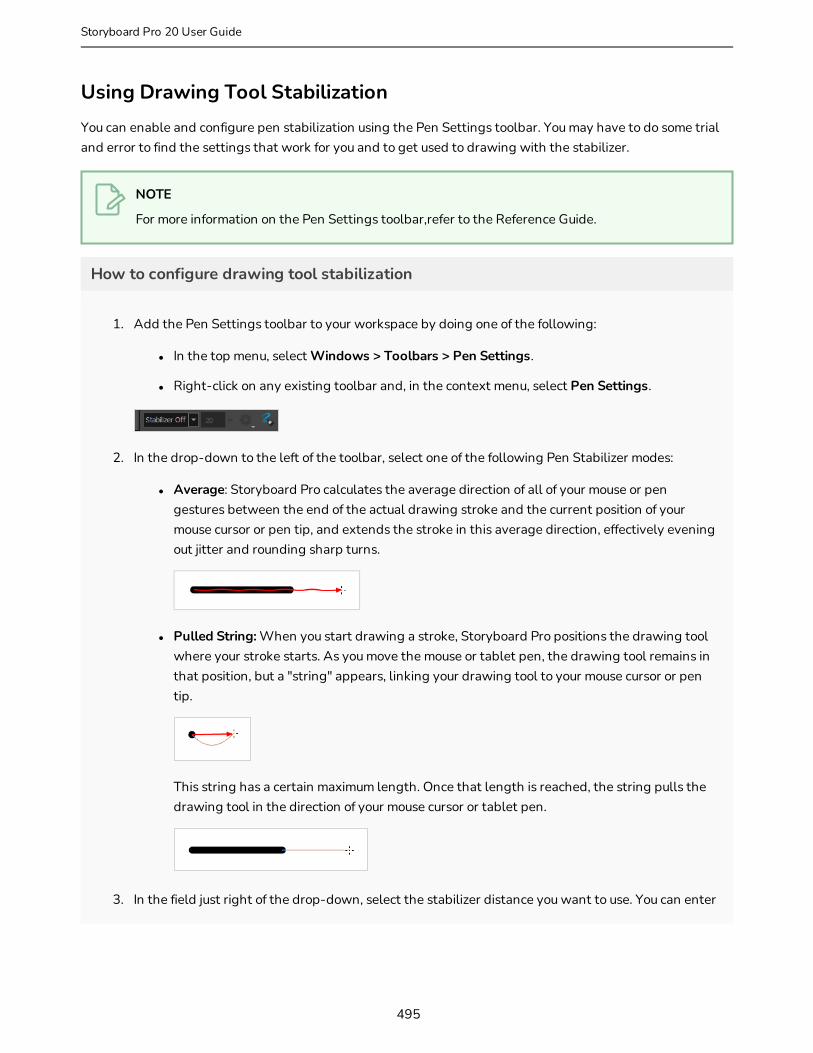
Using Drawing Tool StabilizationYou can enable and configure pen stabilization using the Pen Settings toolbar. You may have to do some trial and error to find the settings that work for you and to get used to drawing with the stabilizer.
NOTE
For more information on the Pen Settings toolbar,refer to the Reference Guide.
How to configure drawing tool stabilization
1. Add the Pen Settings toolbar to your workspace by doing one of the following:
l In the top menu, select Windows > Toolbars > Pen Settings.
l Right-click on any existing toolbar and, in the context menu, select Pen Settings.
2. In the drop-down to the left of the toolbar, select one of the following Pen Stabilizer modes:
l Average: Storyboard Pro calculates the average direction of all of your mouse or pen gestures between the end of the actual drawing stroke and the current position of your mouse cursor or pen tip, and extends the stroke in this average direction, effectively evening out jitter and rounding sharp turns.
l Pulled String: When you start drawing a stroke, Storyboard Pro positions the drawing tool where your stroke starts. As you move the mouse or tablet pen, the drawing tool remains in that position, but a "string" appears, linking your drawing tool to your mouse cursor or pen tip.
This string has a certain maximum length. Once that length is reached, the string pulls the drawing tool in the direction of your mouse cursor or tablet pen.
3. In the field just right of the drop-down, select the stabilizer distance you want to use. You can enter
495
Storyboard Pro 20 User Guide

Chapter 7: Drawing
a number between 0 and 100. You can also click and drag on the left-right button right of the text field to adjust its value.
NOTES
l This sets the distance by which your drawing tool trails behind your mouse cursor or tablet pen. The higher the distance, the more stabilized your drawing motions will be, but the harder it will be to draw sharp corners and precise shapes.
l For casual drawing, it is recommended to try values ranging between 5 and 20 at first. Higher values are more useful for drawing with a lot of minutia.
4. Click on the Stabilizer Settings button and:
l If you selected the Average method and you want your drawing strokes to catch up with your tablet pen when you hold the pen tip against your tablet without moving it, make sure the Catch Up option is checked. Otherwise, uncheck it.
NOTE
Stabilization makes your drawing stroke trail behind as you move your mouse cursor or tablet pen tip. This option makes your stroke catch up to your tablet pen when you hold it against the tablet without moving. This option only works when drawing with a tablet pen.
l If you selected the Pulled String method and you want the virtual string between your mouse cursor or pen tip and your drawing tool to display, make sure the Show String option is checked. Otherwise, uncheck it.
l If you want to use the pen stabilizer with the Eraser tool, make sure the Eraser option is checked. Otherwise, uncheck it.
5. Try to draw in the Stage or Camera view to test how your settings work out, and make adjustments as needed until you have the configuration that works best for you.
6. When you want to disable pen stabilization, open the stabilization drop-down in the Pen Settings toolbar and select Stabilizer Off.
496
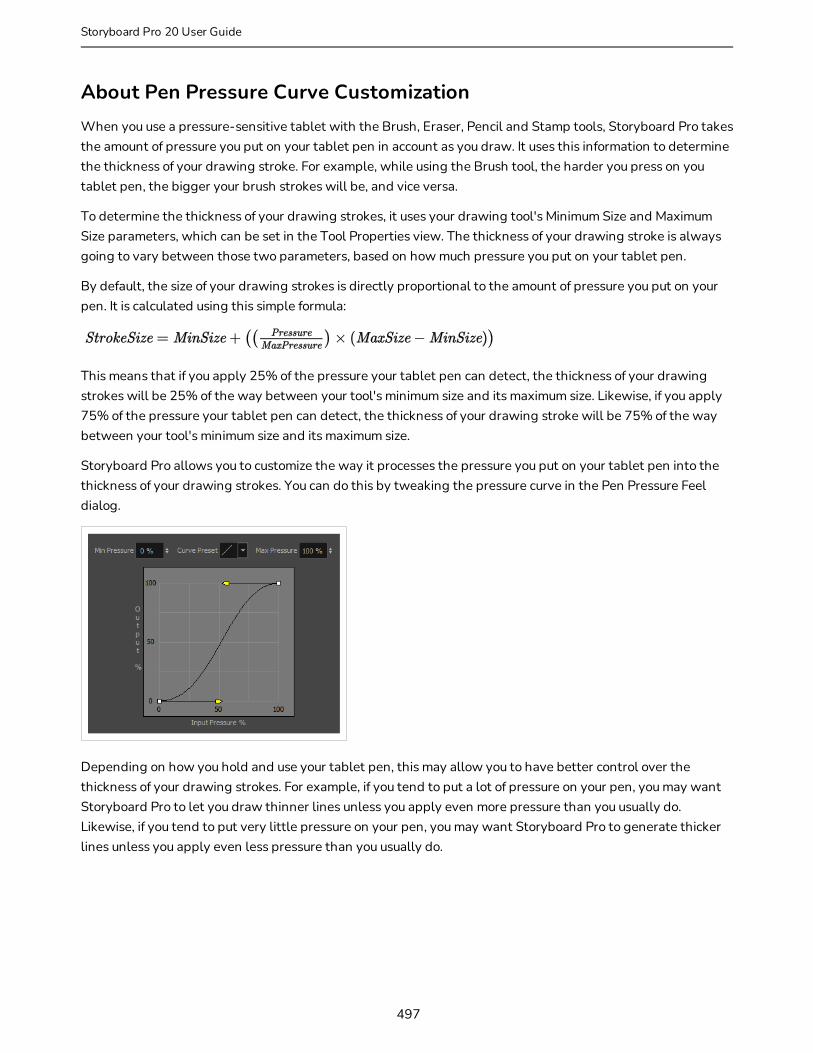
About Pen Pressure Curve CustomizationWhen you use a pressure-sensitive tablet with the Brush, Eraser, Pencil and Stamp tools, Storyboard Pro takes the amount of pressure you put on your tablet pen in account as you draw. It uses this information to determine the thickness of your drawing stroke. For example, while using the Brush tool, the harder you press on you tablet pen, the bigger your brush strokes will be, and vice versa.
To determine the thickness of your drawing strokes, it uses your drawing tool's Minimum Size and Maximum Size parameters, which can be set in the Tool Properties view. The thickness of your drawing stroke is always going to vary between those two parameters, based on how much pressure you put on your tablet pen.
By default, the size of your drawing strokes is directly proportional to the amount of pressure you put on your pen. It is calculated using this simple formula:
This means that if you apply 25% of the pressure your tablet pen can detect, the thickness of your drawing strokes will be 25% of the way between your tool's minimum size and its maximum size. Likewise, if you apply 75% of the pressure your tablet pen can detect, the thickness of your drawing stroke will be 75% of the way between your tool's minimum size and its maximum size.
Storyboard Pro allows you to customize the way it processes the pressure you put on your tablet pen into the thickness of your drawing strokes. You can do this by tweaking the pressure curve in the Pen Pressure Feel dialog.
Depending on how you hold and use your tablet pen, this may allow you to have better control over the thickness of your drawing strokes. For example, if you tend to put a lot of pressure on your pen, you may want Storyboard Pro to let you draw thinner lines unless you apply even more pressure than you usually do. Likewise, if you tend to put very little pressure on your pen, you may want Storyboard Pro to generate thicker lines unless you apply even less pressure than you usually do.
497
Storyboard Pro 20 User Guide

Chapter 7: Drawing
Customizing the Pen Pressure CurveYou can make adjustments to the curve used by Storyboard Pro to process the pressure from your tablet pen via the Pen Pressure Feel dialog, which can be accessed from the Pen Settings toolbar.
NOTE
For more information on the Pen Pressure Feel dialog,refer to the Reference Guide.
How to customize the curve by which tablet pen pressure is applied to the size of your drawing tool
1. Add the Pen Settings toolbar to your workspace by doing one of the following:
l In the top menu, select Windows > Toolbars > Pen Settings.
l Right-click on any existing toolbar and, in the context menu, select Pen Settings.
2. In the Pen Settings toolbar, click on the Pen Pressure Feel button.
The Pen Pressure Feel dialog appears.
3. In the Tools toolbar, select either the Brush or the Pencil tool.
NOTE
The pressure curve affects all tools that supports pressure-sensitivity, such as the Brush tool, the Pencil tool, the Eraser tool and the Stamp tool. However, you should use the Brush or Pencil tool to test out your pressure settings.
4. Make sure that the minimum size of your drawing tool is low enough and that its maximum size is
498

high enough that you can clearly see how the pen pressure affects the thickness of your lines.
TIP
To do this, in the Tool Properties view, click on the Show Extended Properties button to open the Brush or Pencil Properties dialog. Then, adjust the value of the Minimum Size and the Maximum Size sliders.
5. If you want to be able to lightly brush the tip of your tablet pen against your tablet without actually drawing, increase the value in the Min Pressure field.
6. If you don't want to have to press your tablet pen all the way down to draw in your drawing tool's maximum size, decrease the value in the Max Pressure field.
7. To try a curve preset select one in the Curve Preset field. This will instantly change the shape of your pressure curve.
8. To adjust the shape of the curve manually:
l Click and drag on the leftmost Bezier handle to change the shape of the curve from the leftmost point.
l Click and drag on the rightmost Bezier handle to change the shape of the curve from the rightmost point.
The following is a list of examples of how you can adjust the curve, depending on the way you use your tablet pen:
l If you make an ease-in curve like the one below, the size of your drawing strokes will tend to be closer to the minimum size of your drawing tool, unless you apply a lot of pressure on your tablet pen.
l If you make an ease-out curve like the one below, the size of your drawing strokes will tend to be closer to the maximum size of your drawing tool, unless you apply very little pressure on your tablet pen.
499
Storyboard Pro 20 User Guide
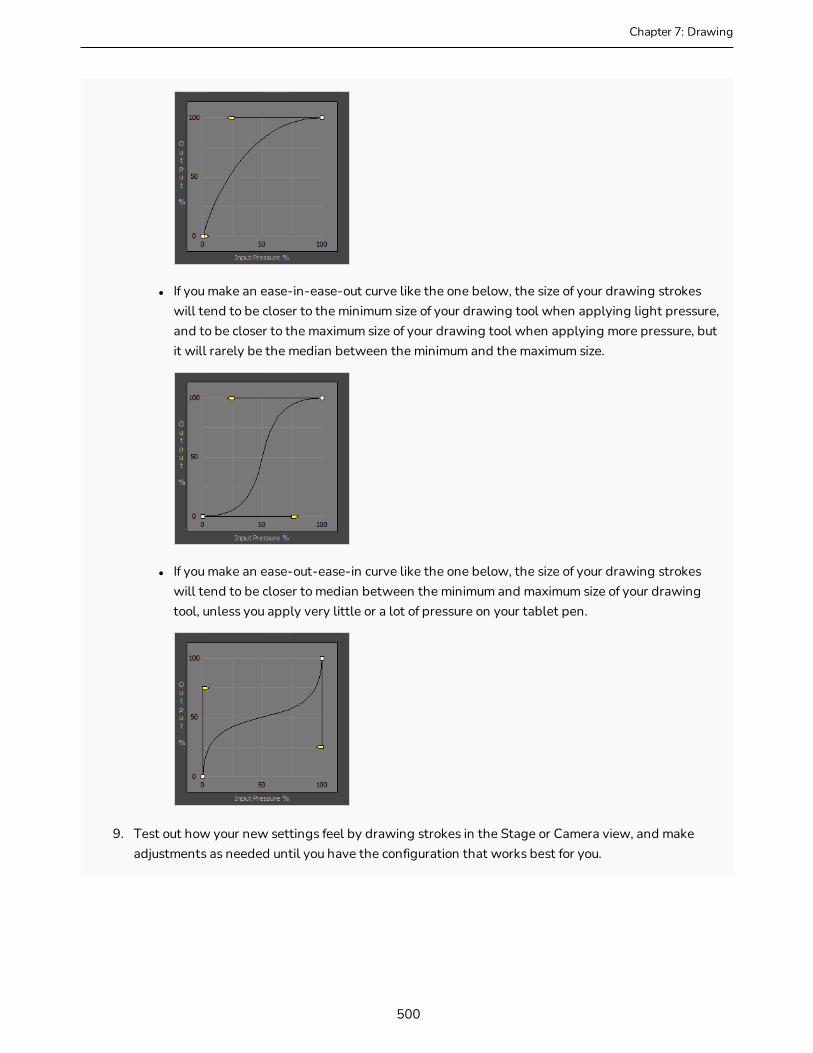
Chapter 7: Drawing
l If you make an ease-in-ease-out curve like the one below, the size of your drawing strokes will tend to be closer to the minimum size of your drawing tool when applying light pressure, and to be closer to the maximum size of your drawing tool when applying more pressure, but it will rarely be the median between the minimum and the maximum size.
l If you make an ease-out-ease-in curve like the one below, the size of your drawing strokes will tend to be closer to median between the minimum and maximum size of your drawing tool, unless you apply very little or a lot of pressure on your tablet pen.
9. Test out how your new settings feel by drawing strokes in the Stage or Camera view, and make adjustments as needed until you have the configuration that works best for you.
500
About Alignment GuidesAlignment guides are horizontal and vertical rulers that you can add to a panel. You can position them anywhere in your stage, and use them to help you align layers and artwork as well as to draw along their axis.
Alignment guides can be used as visual aids, but you can also make your animation and drawing tools snap to them.
The following tools can snap to alignment guides:
l Layer Transform
l Select
l Contour Editor
l Perspective
l Brush
l Pencil
l Stamp
l Eraser
l Rectangle
l Ellipse
l Line
When you manipulate elements with the Layer Transform tool and the Select tool, they will snap to nearby alignment guides. As for drawing tools such as the Brush or the Pencil tool, they will snap to alignment guides if you draw close enough to them, allowing you to draw straight lines along the guides.
NOTE
Alignment guides are added to a panel. Each panel in your project can have its own set of alignment guides. It is not possible to copy alignment guides from one panel to another.
501
Storyboard Pro 20 User Guide

Chapter 7: Drawing
Adding Alignment GuidesYou can add horizontal or vertical alignment guides to your panel.
NOTE
When you add a guide, it is instantly positioned in the centre of your scene. You can move it with the Layer Transform tool or the Select tool.
How to access the Alignment Guides toolbar
1. Do one of the following:
l In the top menu, select Windows > Toolbars > Alignment Guides.
l Right-click on any toolbar in your workspace and select Alignment Guides.
How to add an alignment guide
1. Do one of the following:
l In the Alignment Guides toolbar, click New Horizontal Alignment Guide or New Vertical Alignment Guide.
l In the top menu, select View > Alignment Guides > New Horizontal Alignment Guide or New Vertical Alignment Guide.
The guide is added to the centre of the stage.
502
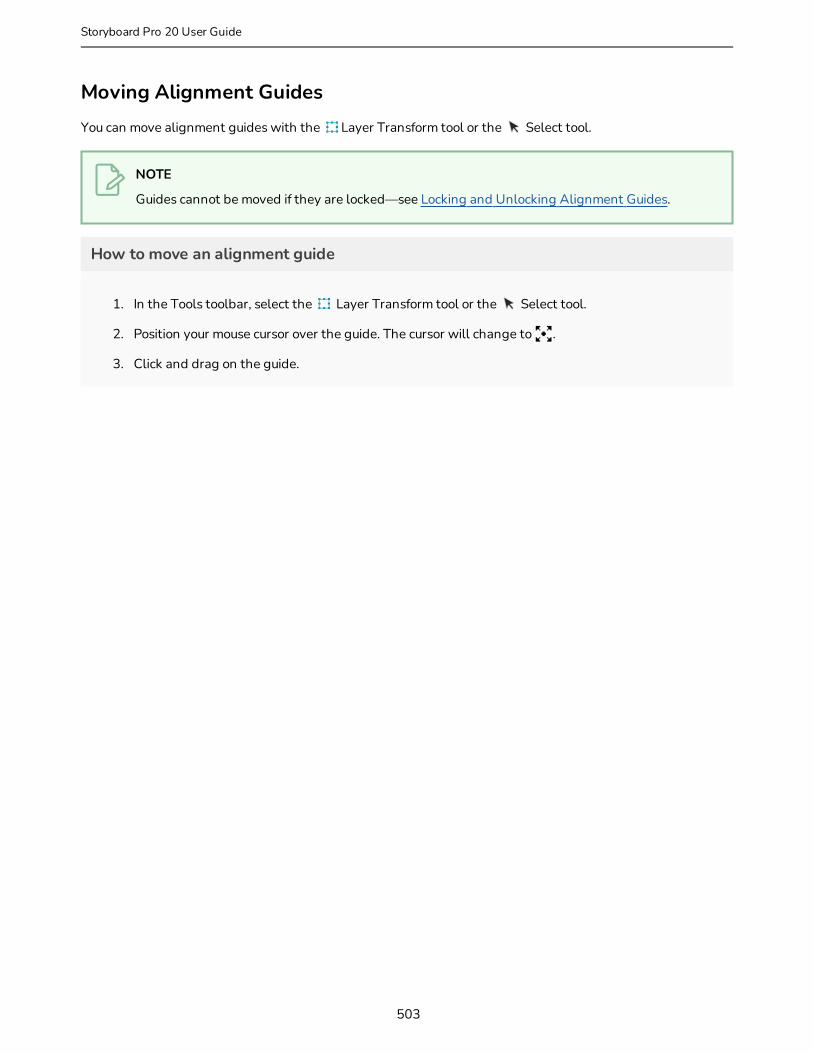
Moving Alignment GuidesYou can move alignment guides with the Layer Transform tool or the Select tool.
NOTE
Guides cannot be moved if they are locked—see Locking and Unlocking Alignment Guides.
How to move an alignment guide
1. In the Tools toolbar, select the Layer Transform tool or the Select tool.
2. Position your mouse cursor over the guide. The cursor will change to .
3. Click and drag on the guide.
503
Storyboard Pro 20 User Guide
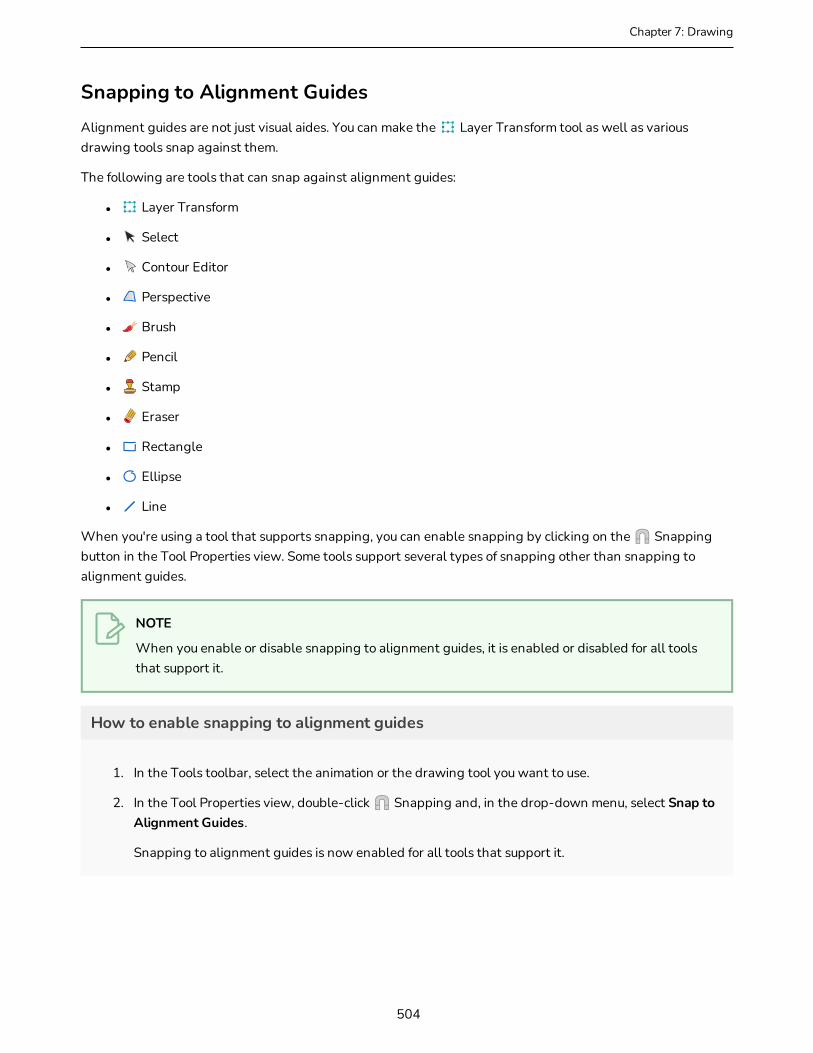
Chapter 7: Drawing
Snapping to Alignment GuidesAlignment guides are not just visual aides. You can make the Layer Transform tool as well as various drawing tools snap against them.
The following are tools that can snap against alignment guides:
l Layer Transform
l Select
l Contour Editor
l Perspective
l Brush
l Pencil
l Stamp
l Eraser
l Rectangle
l Ellipse
l Line
When you're using a tool that supports snapping, you can enable snapping by clicking on the Snapping button in the Tool Properties view. Some tools support several types of snapping other than snapping to alignment guides.
NOTE
When you enable or disable snapping to alignment guides, it is enabled or disabled for all tools that support it.
How to enable snapping to alignment guides
1. In the Tools toolbar, select the animation or the drawing tool you want to use.
2. In the Tool Properties view, double-click Snapping and, in the drop-down menu, select Snap to Alignment Guides.
Snapping to alignment guides is now enabled for all tools that support it.
504
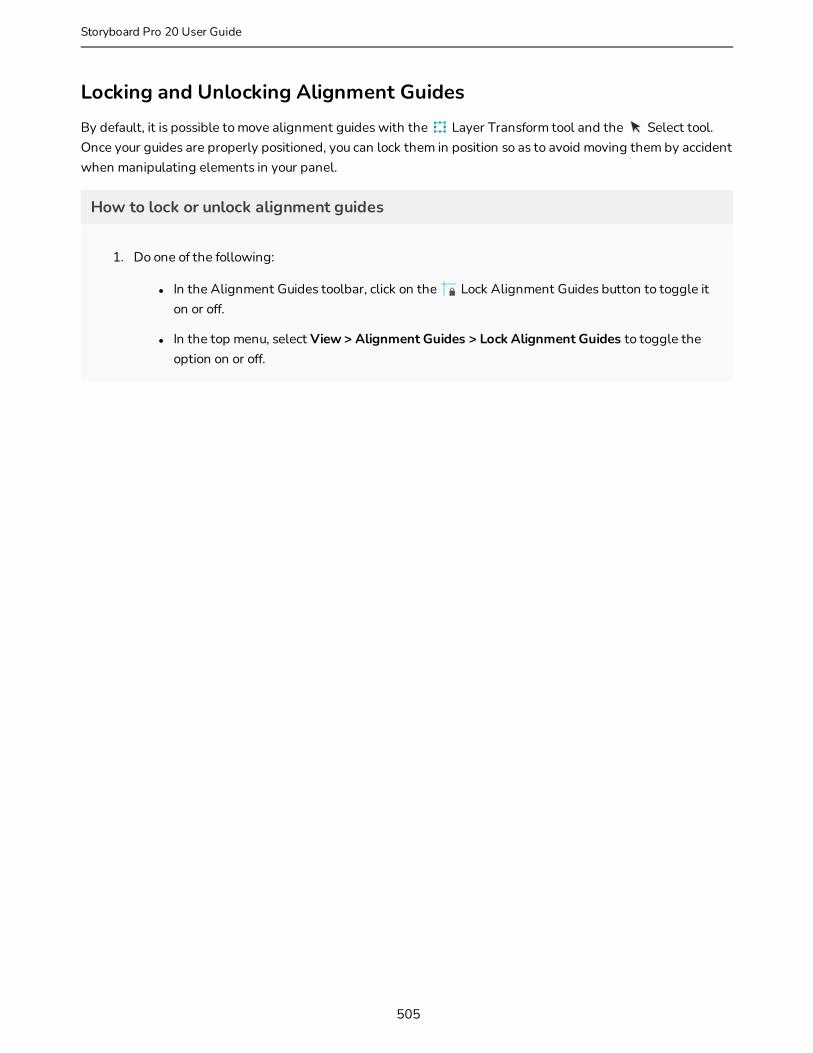
Locking and Unlocking Alignment GuidesBy default, it is possible to move alignment guides with the Layer Transform tool and the Select tool. Once your guides are properly positioned, you can lock them in position so as to avoid moving them by accident when manipulating elements in your panel.
How to lock or unlock alignment guides
1. Do one of the following:
l In the Alignment Guides toolbar, click on the Lock Alignment Guides button to toggle it on or off.
l In the top menu, select View > Alignment Guides > Lock Alignment Guides to toggle the option on or off.
505
Storyboard Pro 20 User Guide

Chapter 7: Drawing
Hiding and Displaying Alignment GuidesIt is possible to temporarily hide alignment guides if you don’t need them.
NOTES
l When alignment guides are hidden, animation and drawing tools do not snap to them.
l Adding an alignment guide automatically makes alignment guides visible.
How to hide or display alignment guides
1. Do one of the following:
l In the Alignment Guides toolbar, click on the Show Alignment Guide button to toggle it on or off.
l In the top menu, select View > Alignment Guides > Show Alignment Guides to toggle the option on or off.
l In the toolbar below the Camera View, click on the Show Alignment Guide button to toggle it on or off.
NOTE
This button is available in the toolbar below the Camera View, but not in the toolbar below the Stage View.
506
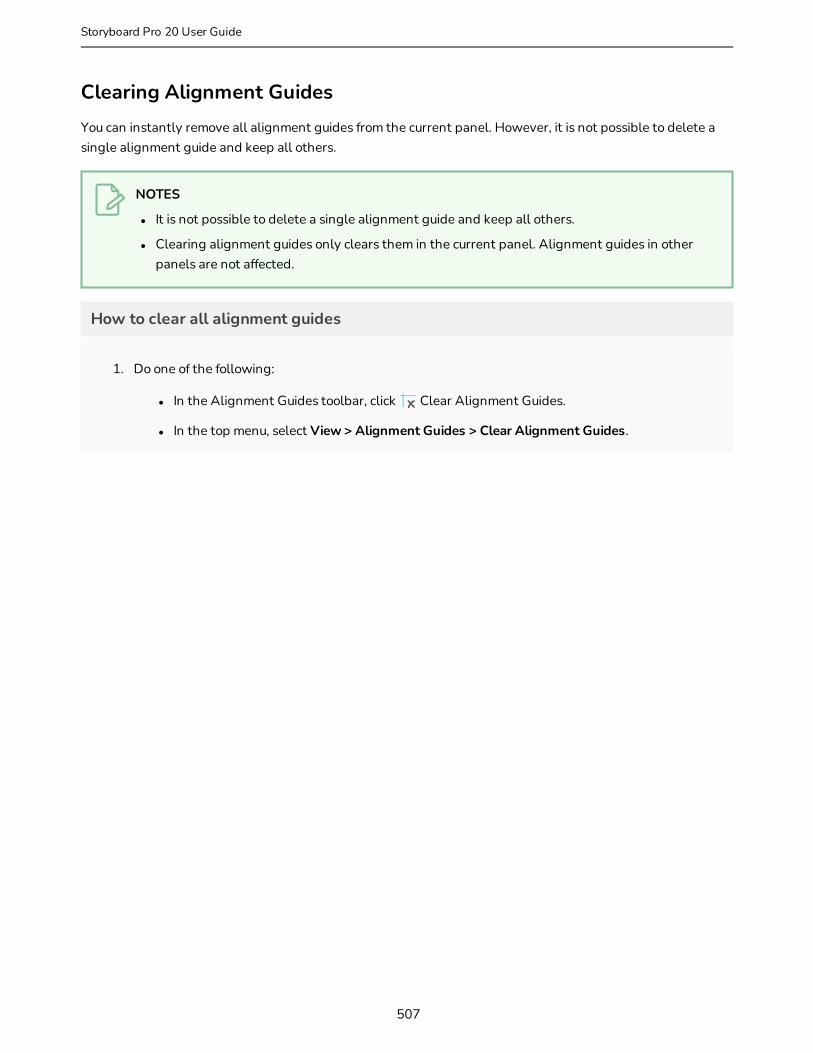
Clearing Alignment GuidesYou can instantly remove all alignment guides from the current panel. However, it is not possible to delete a single alignment guide and keep all others.
NOTES
l It is not possible to delete a single alignment guide and keep all others.
l Clearing alignment guides only clears them in the current panel. Alignment guides in other panels are not affected.
How to clear all alignment guides
1. Do one of the following:
l In the Alignment Guides toolbar, click Clear Alignment Guides.
l In the top menu, select View > Alignment Guides > Clear Alignment Guides.
507
Storyboard Pro 20 User Guide
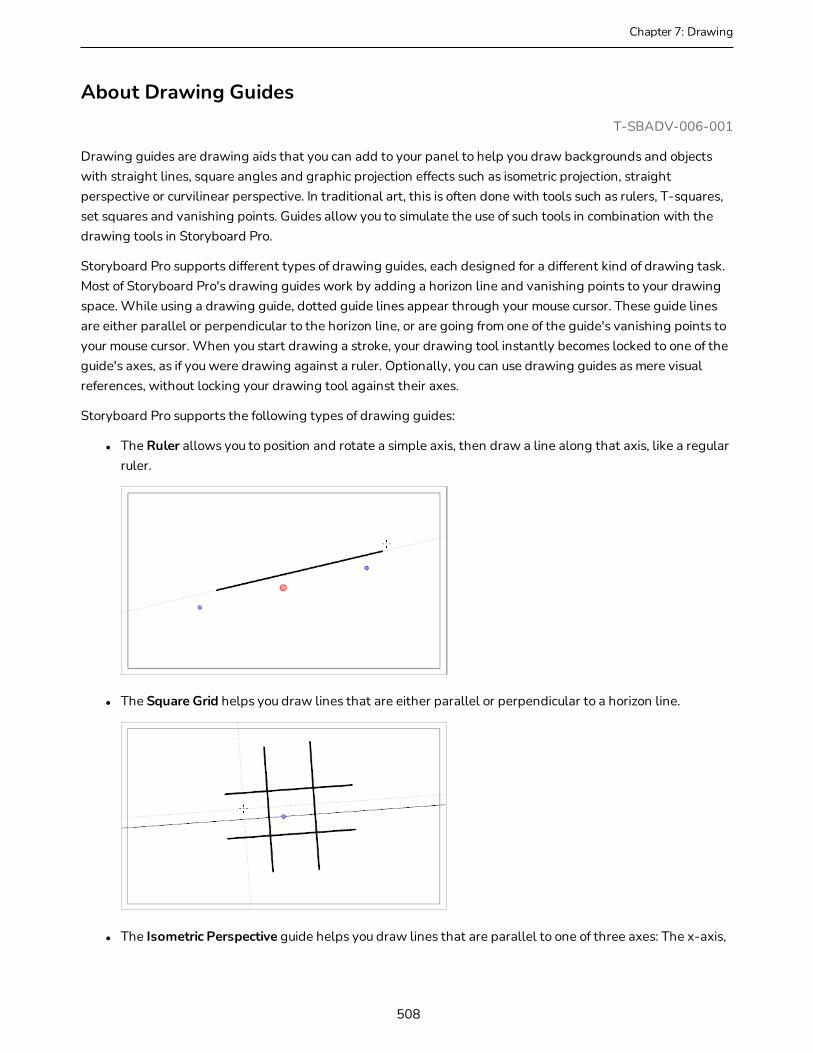
Chapter 7: Drawing
About Drawing GuidesT-SBADV-006-001
Drawing guides are drawing aids that you can add to your panel to help you draw backgrounds and objects with straight lines, square angles and graphic projection effects such as isometric projection, straight perspective or curvilinear perspective. In traditional art, this is often done with tools such as rulers, T-squares, set squares and vanishing points. Guides allow you to simulate the use of such tools in combination with the drawing tools in Storyboard Pro.
Storyboard Pro supports different types of drawing guides, each designed for a different kind of drawing task. Most of Storyboard Pro's drawing guides work by adding a horizon line and vanishing points to your drawing space. While using a drawing guide, dotted guide lines appear through your mouse cursor. These guide lines are either parallel or perpendicular to the horizon line, or are going from one of the guide's vanishing points to your mouse cursor. When you start drawing a stroke, your drawing tool instantly becomes locked to one of the guide's axes, as if you were drawing against a ruler. Optionally, you can use drawing guides as mere visual references, without locking your drawing tool against their axes.
Storyboard Pro supports the following types of drawing guides:
l The Ruler allows you to position and rotate a simple axis, then draw a line along that axis, like a regular ruler.
l The Square Grid helps you draw lines that are either parallel or perpendicular to a horizon line.
l The Isometric Perspective guide helps you draw lines that are parallel to one of three axes: The x-axis,
508

the y-axis and the z-axis. The angle of each axis can be customized as needed.
This type of pseudo-perspective, also referred to as parallel projection, is often used in 2D games, computer graphics and schematics to depict 3D objects and environments without using any actual perspective, foreshortening or 3D rendering. In 2D animation, it is often used to draw long panning backgrounds from a low or high angle.
l The 1-Point Perspective guide helps you draw lines coming from a single vanishing point in the middle of the horizon. It also helps you draw lines that are either parallel or perpendicular to the horizon line.
This is useful for drawing cuboid structures that are facing the camera.
l The 2-Point Perspective guide helps you draw lines coming from one of two vanishing points, which are placed on the horizon line outside the camera field. It also helps you draw lines that are perpendicular to the horizon line.
This is useful for drawing cuboid structures from a specific horizontal angle.
509
Storyboard Pro 20 User Guide
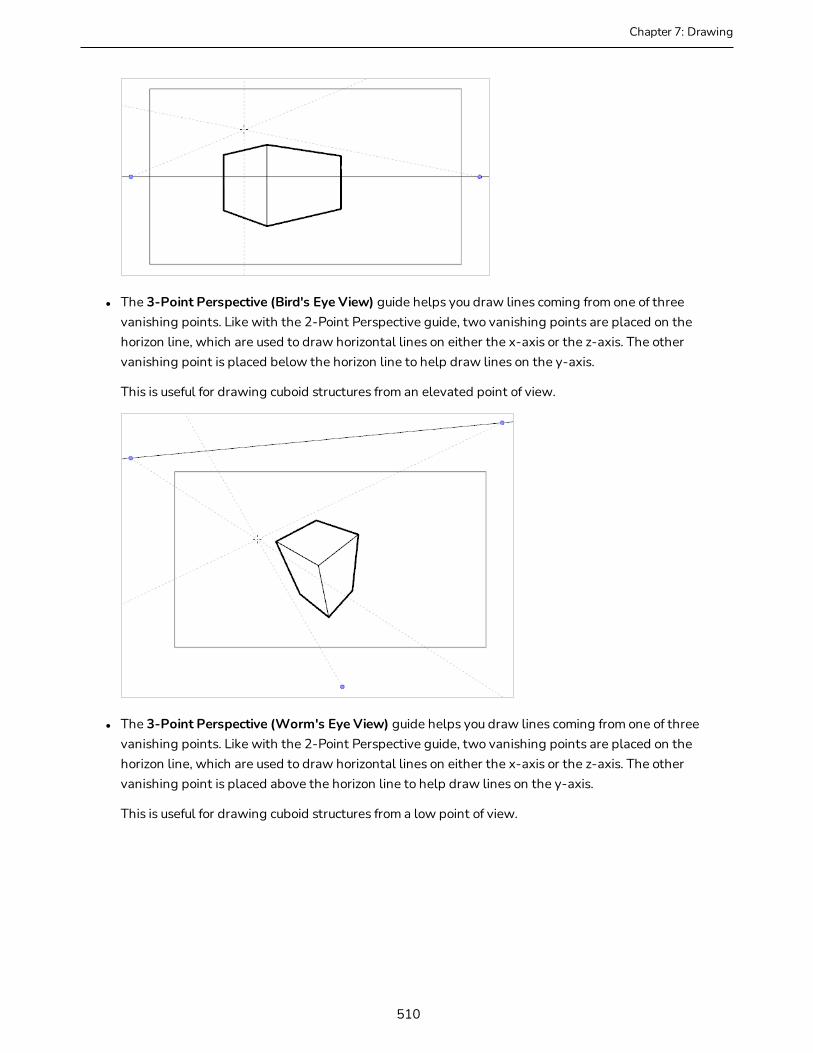
Chapter 7: Drawing
l The 3-Point Perspective (Bird's Eye View) guide helps you draw lines coming from one of three vanishing points. Like with the 2-Point Perspective guide, two vanishing points are placed on the horizon line, which are used to draw horizontal lines on either the x-axis or the z-axis. The other vanishing point is placed below the horizon line to help draw lines on the y-axis.
This is useful for drawing cuboid structures from an elevated point of view.
l The 3-Point Perspective (Worm's Eye View) guide helps you draw lines coming from one of three vanishing points. Like with the 2-Point Perspective guide, two vanishing points are placed on the horizon line, which are used to draw horizontal lines on either the x-axis or the z-axis. The other vanishing point is placed above the horizon line to help draw lines on the y-axis.
This is useful for drawing cuboid structures from a low point of view.
510

l The 3-Point Perspective (Horizontal Pan) guide helps you draw horizontally panoramic backgrounds, with curvilinear horizontal lines. A vanishing point is placed in the middle of the horizon line, to help draw lines on the z-axis, and two vanishing points are placed on the horizon line outside of the camera field, to define the curve of the horizontal lines. Vertical lines are made perpendicular to the horizon line.
This is useful for drawing backgrounds meant to be panned over horizontally. Panning the camera horizontally over a background drawn with a 3-Point Perspective (Horizontal Pan) guide will simulate a rotation of the camera on the y-axis.
l The 3-Point Perspective (Vertical Pan) guide helps you draw vertically panoramic backgrounds, with curvilinear vertical lines. A vanishing point is placed in the middle of the horizon line, to help draw lines on the z-axis, and two vanishing points are placed above and below the horizon line, outside of the camera field, to define the curve of the vertical lines. Horizontal lines are made parallel to the horizon line.
This is useful for drawing background meant to be panned over vertically. Panning the camera vertically over a background drawn with a 3-Point Perspective (Vertical Pan) guide will simulate a vertical rotation of the camera on the x-axis.
511
Storyboard Pro 20 User Guide
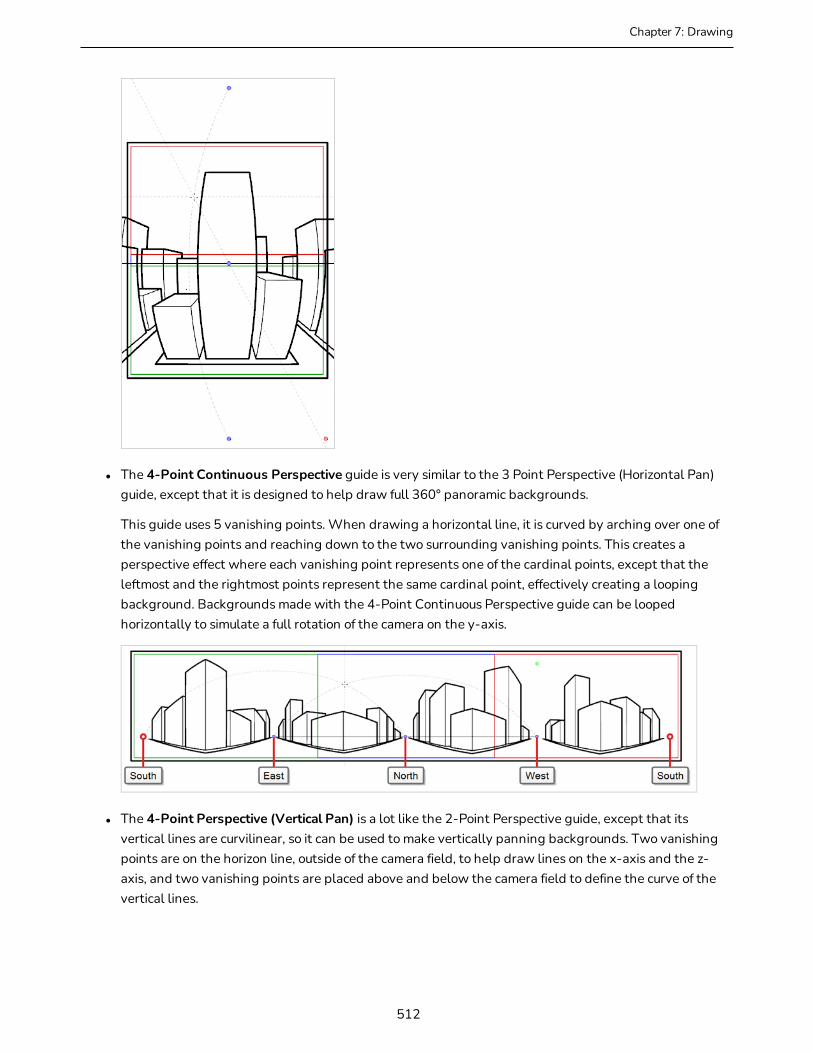
Chapter 7: Drawing
l The 4-Point Continuous Perspective guide is very similar to the 3 Point Perspective (Horizontal Pan) guide, except that it is designed to help draw full 360° panoramic backgrounds.
This guide uses 5 vanishing points. When drawing a horizontal line, it is curved by arching over one of the vanishing points and reaching down to the two surrounding vanishing points. This creates a perspective effect where each vanishing point represents one of the cardinal points, except that the leftmost and the rightmost points represent the same cardinal point, effectively creating a looping background. Backgrounds made with the 4-Point Continuous Perspective guide can be looped horizontally to simulate a full rotation of the camera on the y-axis.
l The 4-Point Perspective (Vertical Pan) is a lot like the 2-Point Perspective guide, except that its vertical lines are curvilinear, so it can be used to make vertically panning backgrounds. Two vanishing points are on the horizon line, outside of the camera field, to help draw lines on the x-axis and the z-axis, and two vanishing points are placed above and below the camera field to define the curve of the vertical lines.
512
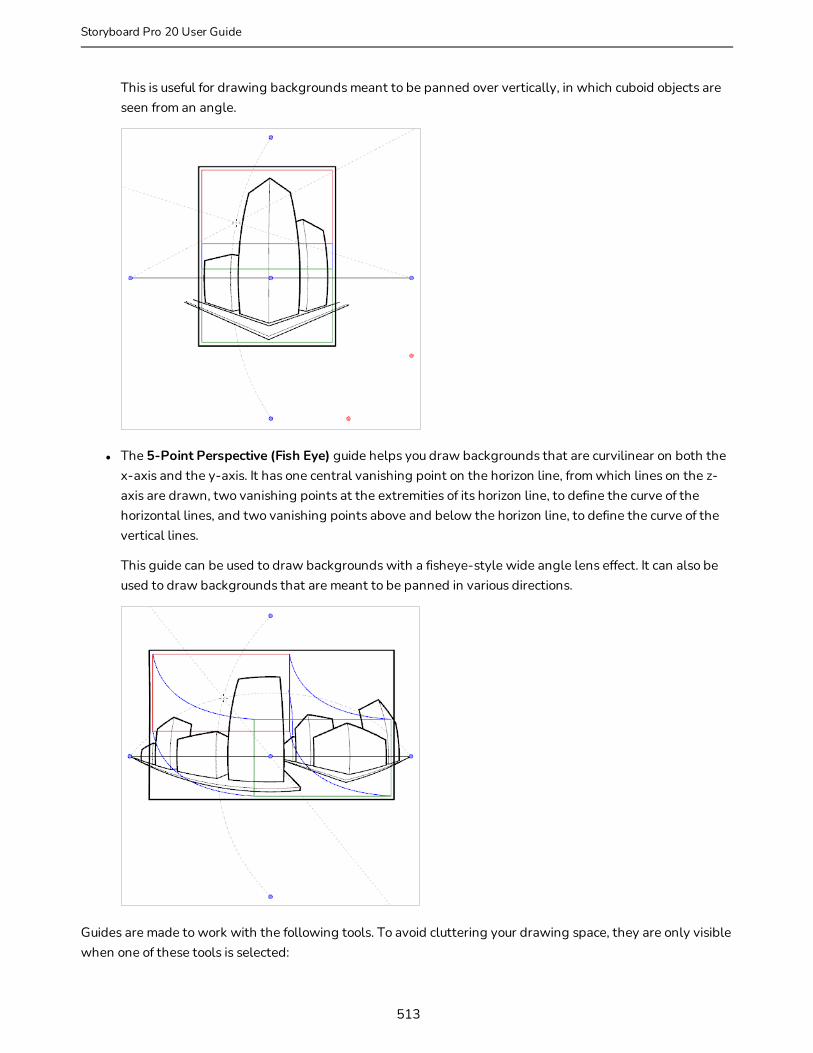
This is useful for drawing backgrounds meant to be panned over vertically, in which cuboid objects are seen from an angle.
l The 5-Point Perspective (Fish Eye) guide helps you draw backgrounds that are curvilinear on both the x-axis and the y-axis. It has one central vanishing point on the horizon line, from which lines on the z-axis are drawn, two vanishing points at the extremities of its horizon line, to define the curve of the horizontal lines, and two vanishing points above and below the horizon line, to define the curve of the vertical lines.
This guide can be used to draw backgrounds with a fisheye-style wide angle lens effect. It can also be used to draw backgrounds that are meant to be panned in various directions.
Guides are made to work with the following tools. To avoid cluttering your drawing space, they are only visible when one of these tools is selected:
513
Storyboard Pro 20 User Guide

Chapter 7: Drawing
l Brush
l Pencil
l Line
To use a guide, you must add the Guides view to your workspace. Then, you can add the guide you wish to use to your panel's guides list. A newly added guide will have its horizon line and vanishing points in preset positions. You can rotate and reposition the horizon line as well as reposition the vanishing points to fit your scene's needs. When using curvilinear perspective guides, you can also adjust the Beziers of the curves to make them narrower or wider.
The Guides view allows you to have as many guides as you want, and each one will preserve the adjustments you make to it. In the Guides view, you can also select which guide you wish to use, rename, delete and reorder guides as needed, as well as cut, copy, paste, export and import guides between different panels, scenes or projects.
NOTES
l Each panel has its own guide list, in which the guides you create and their parameters are saved. Hence, you can create guides for a specific panel, work on another panel, then come back to that panel later and reuse the same guides as you left them.
l When you create a new panel, the guides from the previous panel are copied over to the new panel's guide list. However, when you create a new scene, its guide list is always empty.
l Changes made to a guide or to the guide list can be undone with the Undo command.
514

Adding Drawing GuidesT-SBADV-006-002
The first step in using drawing guides is to add a guide to the current panel's guides list.
How to add a drawing guide to the current panel
1. In the Tools toolbar, select either the Brush, Pencil or Line tool.
NOTE
Drawing guides are only visible in the Stage or Camera view when one of these tools is selected.
2. Add the Guide view to your workspace by doing one of the following:
l In the top-right corner of any view in your workspace, click on the Add View button and select Guides.
l In the top menu, select Windows > Guides.
3. In the Guides view, click on the New Guide button and choose one of the following types of guides:
l Ruler
l Square Grid
l Isometric Perspective
l 1-Point Perspective
l 2-Point Perspective
515
Storyboard Pro 20 User Guide
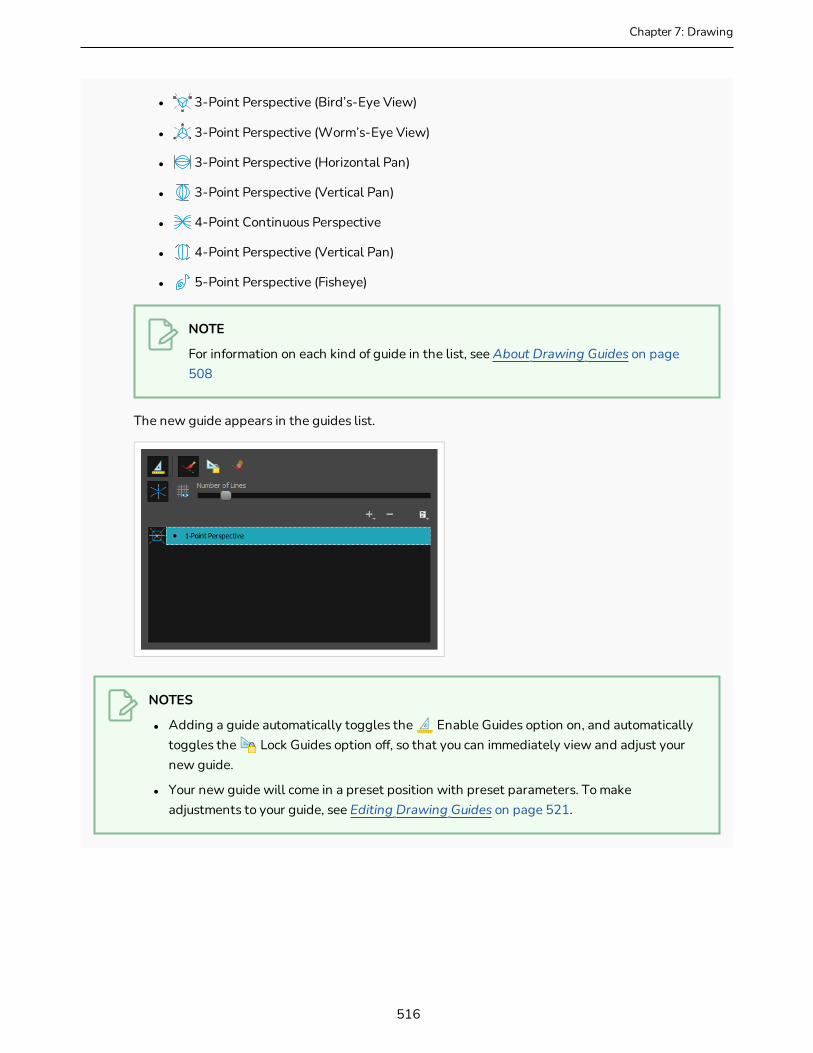
Chapter 7: Drawing
l 3-Point Perspective (Bird’s-Eye View)
l 3-Point Perspective (Worm’s-Eye View)
l 3-Point Perspective (Horizontal Pan)
l 3-Point Perspective (Vertical Pan)
l 4-Point Continuous Perspective
l 4-Point Perspective (Vertical Pan)
l 5-Point Perspective (Fisheye)
NOTE
For information on each kind of guide in the list, see About Drawing Guides on page 508
The new guide appears in the guides list.
NOTES
l Adding a guide automatically toggles the Enable Guides option on, and automatically toggles the Lock Guides option off, so that you can immediately view and adjust your new guide.
l Your new guide will come in a preset position with preset parameters. To make adjustments to your guide, see Editing Drawing Guides on page 521.
516
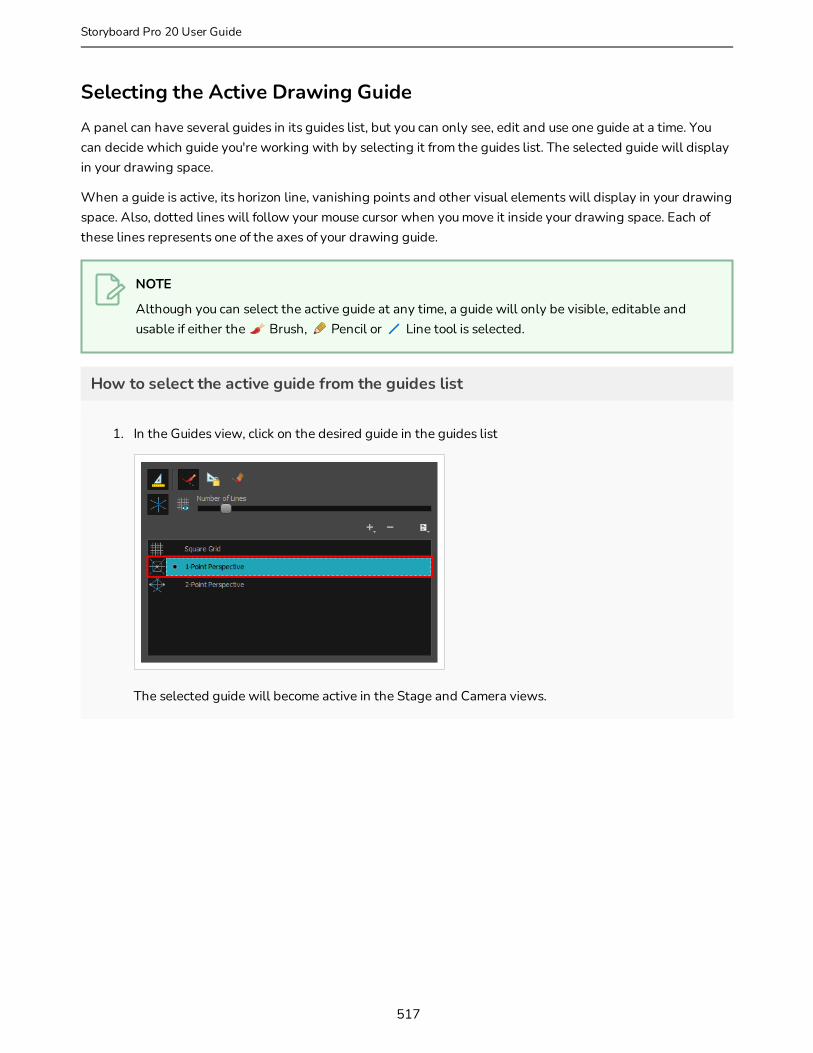
Selecting the Active Drawing GuideA panel can have several guides in its guides list, but you can only see, edit and use one guide at a time. You can decide which guide you're working with by selecting it from the guides list. The selected guide will display in your drawing space.
When a guide is active, its horizon line, vanishing points and other visual elements will display in your drawing space. Also, dotted lines will follow your mouse cursor when you move it inside your drawing space. Each of these lines represents one of the axes of your drawing guide.
NOTE
Although you can select the active guide at any time, a guide will only be visible, editable and usable if either the Brush, Pencil or Line tool is selected.
How to select the active guide from the guides list
1. In the Guides view, click on the desired guide in the guides list
The selected guide will become active in the Stage and Camera views.
517
Storyboard Pro 20 User Guide
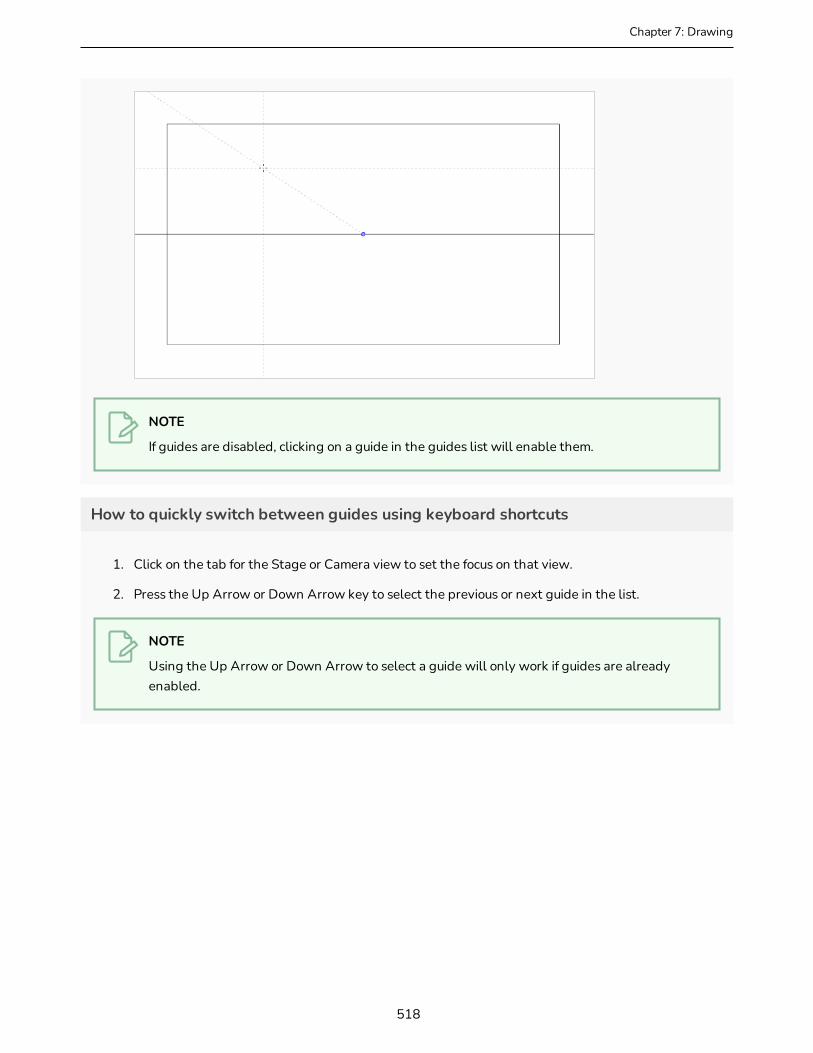
Chapter 7: Drawing
NOTE
If guides are disabled, clicking on a guide in the guides list will enable them.
How to quickly switch between guides using keyboard shortcuts
1. Click on the tab for the Stage or Camera view to set the focus on that view.
2. Press the Up Arrow or Down Arrow key to select the previous or next guide in the list.
NOTE
Using the Up Arrow or Down Arrow to select a guide will only work if guides are already enabled.
518
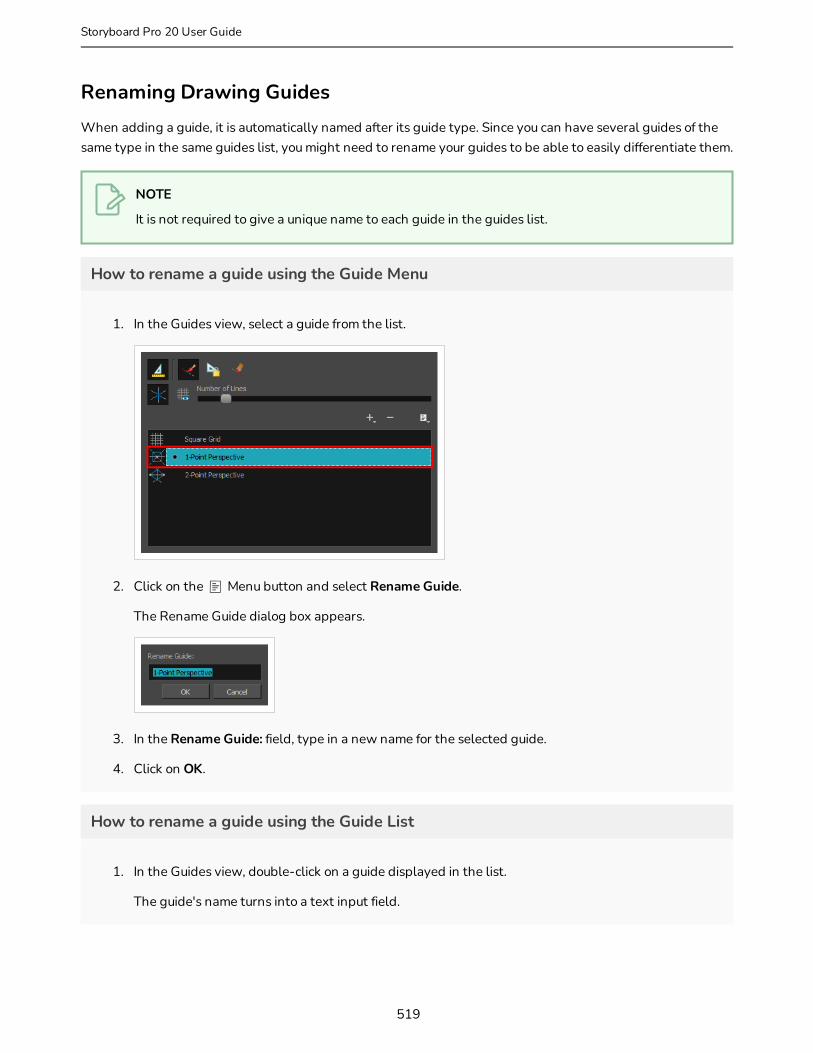
Renaming Drawing GuidesWhen adding a guide, it is automatically named after its guide type. Since you can have several guides of the same type in the same guides list, you might need to rename your guides to be able to easily differentiate them.
NOTE
It is not required to give a unique name to each guide in the guides list.
How to rename a guide using the Guide Menu
1. In the Guides view, select a guide from the list.
2. Click on the Menu button and select Rename Guide.
The Rename Guide dialog box appears.
3. In the Rename Guide: field, type in a new name for the selected guide.
4. Click on OK.
How to rename a guide using the Guide List
1. In the Guides view, double-click on a guide displayed in the list.
The guide's name turns into a text input field.
519
Storyboard Pro 20 User Guide
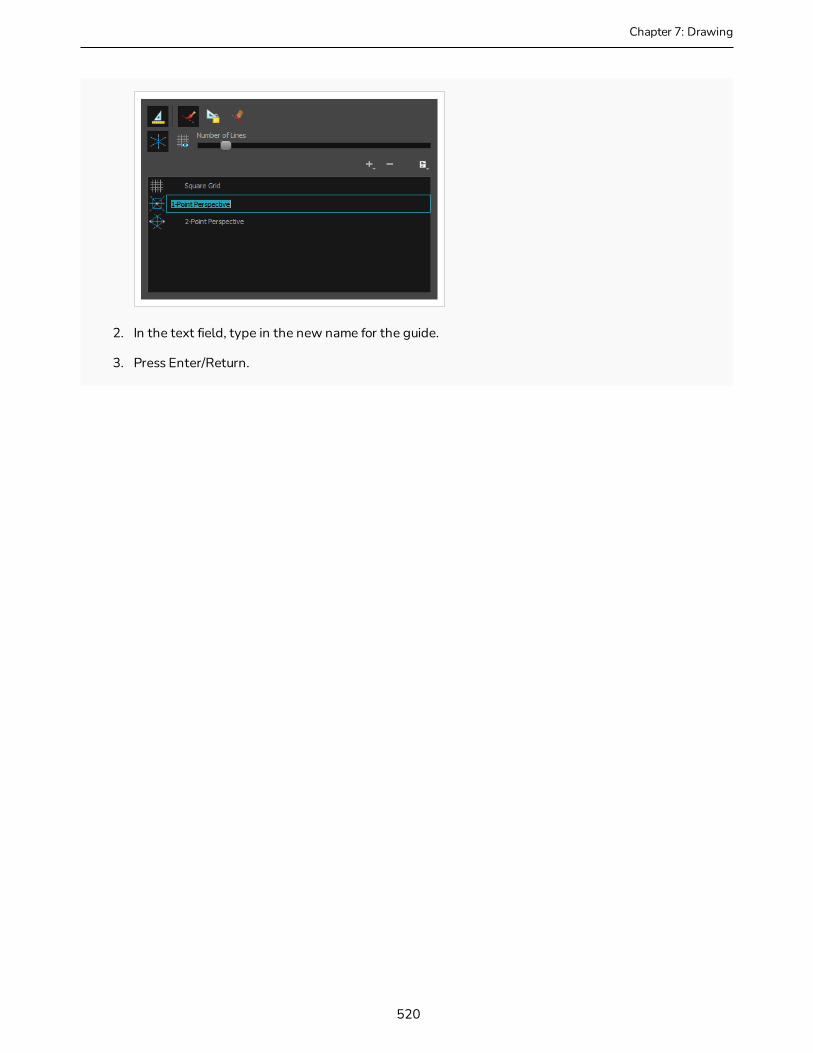
Chapter 7: Drawing
2. In the text field, type in the new name for the guide.
3. Press Enter/Return.
520
Editing Drawing GuidesT-SBADV-006-005
After a guide is added, it is configured with a preset position and angle for its horizon line, a preset position for its vanishing points, a preset size and, if applicable, preset Bezier curves. In many cases, you have to make adjustments to your guide so that you can use it to draw backgrounds and objects from the right point of view.
Different guides can be customized in different ways. This sections provides steps on how to customize each type of guide.
NOTES
l You can view a guide and make changes to it directly in the Stage or Camera view when the Brush, Pencil or Line tool is selected.
l When you make a change to a guide, you can undo that change with the Undo command.
l Changes made to guides are saved to your project.
521
Storyboard Pro 20 User Guide
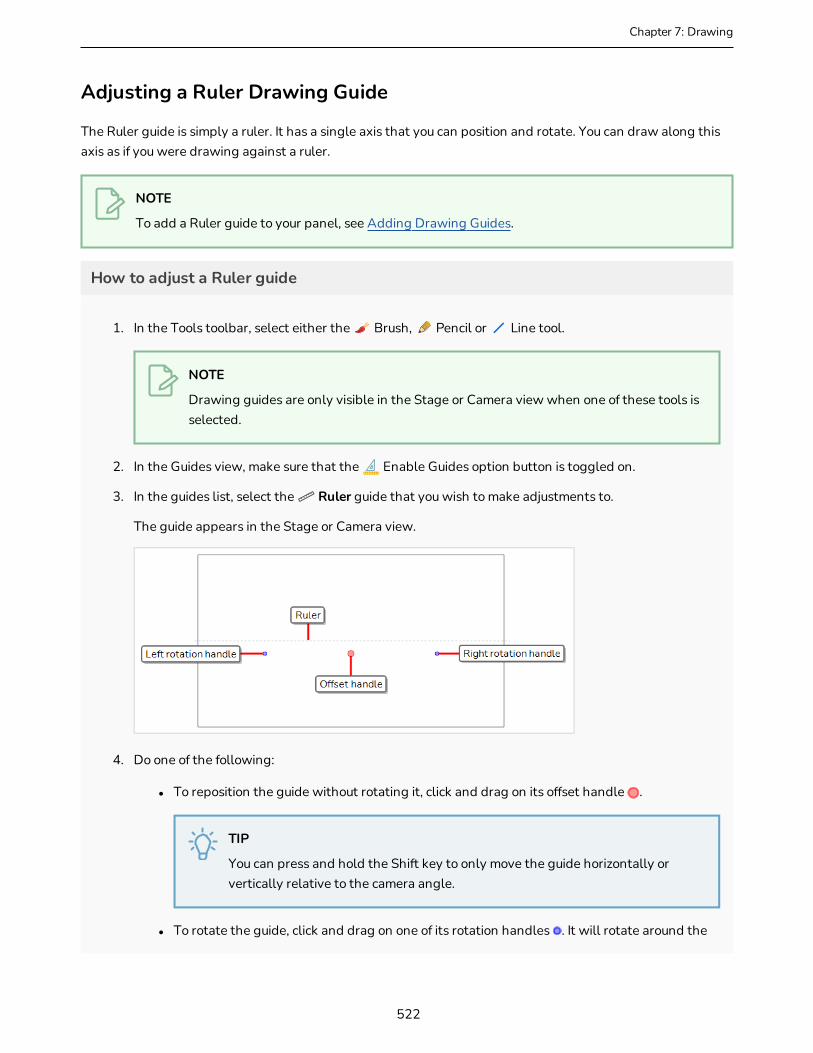
Chapter 7: Drawing
Adjusting a Ruler Drawing Guide
The Ruler guide is simply a ruler. It has a single axis that you can position and rotate. You can draw along this axis as if you were drawing against a ruler.
NOTE
To add a Ruler guide to your panel, see Adding Drawing Guides.
How to adjust a Ruler guide
1. In the Tools toolbar, select either the Brush, Pencil or Line tool.
NOTE
Drawing guides are only visible in the Stage or Camera view when one of these tools is selected.
2. In the Guides view, make sure that the Enable Guides option button is toggled on.
3. In the guides list, select the Ruler guide that you wish to make adjustments to.
The guide appears in the Stage or Camera view.
4. Do one of the following:
l To reposition the guide without rotating it, click and drag on its offset handle .
TIP
You can press and hold the Shift key to only move the guide horizontally or vertically relative to the camera angle.
l To rotate the guide, click and drag on one of its rotation handles . It will rotate around the
522
opposite rotation handle.
TIPS
l You can press and hold the Shift key to make the angle of the ruler snap to the nearest multiple of 15°.
l You can press and hold the Alt key to make the guide rotate around its centre.
l When rotating a guide, its angle displays in the top-left corner of the Stage or Camera view.
5. Once you are done making adjustments to the guide, you can click on the Lock Guides button in the Guides view so as to avoid accidentally modifying your guide while drawing.
523
Storyboard Pro 20 User Guide
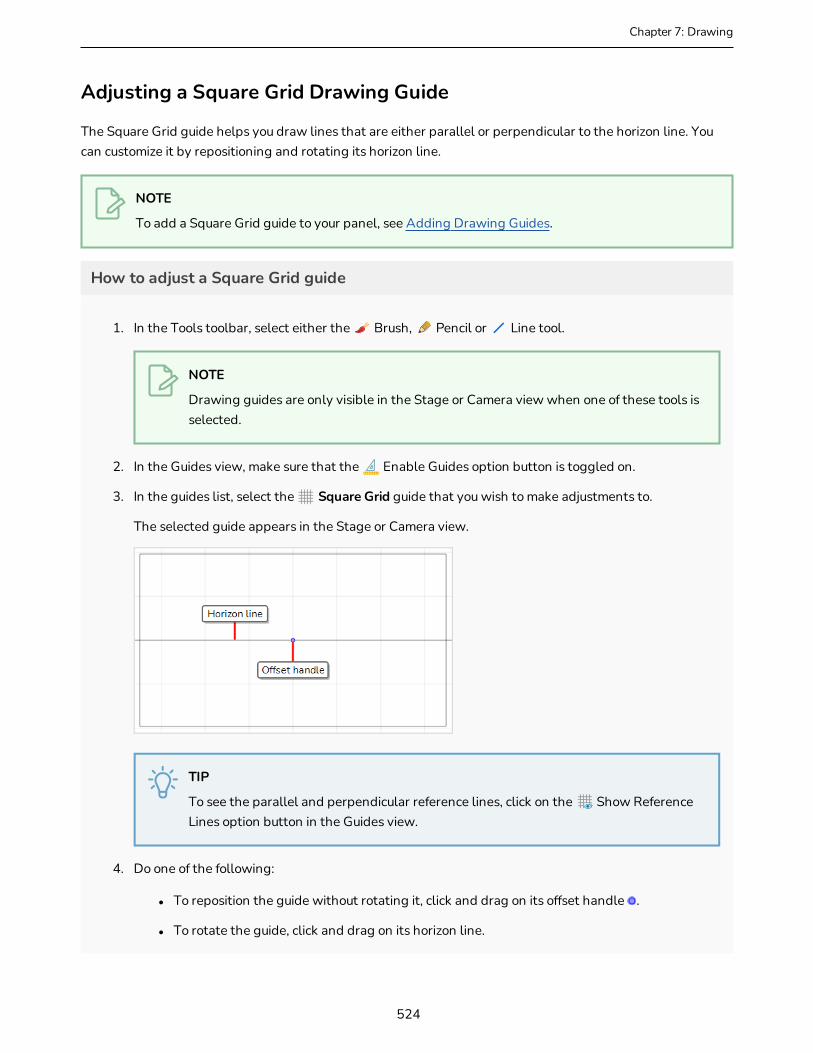
Chapter 7: Drawing
Adjusting a Square Grid Drawing Guide
The Square Grid guide helps you draw lines that are either parallel or perpendicular to the horizon line. You can customize it by repositioning and rotating its horizon line.
NOTE
To add a Square Grid guide to your panel, see Adding Drawing Guides.
How to adjust a Square Grid guide
1. In the Tools toolbar, select either the Brush, Pencil or Line tool.
NOTE
Drawing guides are only visible in the Stage or Camera view when one of these tools is selected.
2. In the Guides view, make sure that the Enable Guides option button is toggled on.
3. In the guides list, select the Square Grid guide that you wish to make adjustments to.
The selected guide appears in the Stage or Camera view.
TIP
To see the parallel and perpendicular reference lines, click on the Show Reference Lines option button in the Guides view.
4. Do one of the following:
l To reposition the guide without rotating it, click and drag on its offset handle .
l To rotate the guide, click and drag on its horizon line.
524

TIPS
l When the mouse is positioned over the horizon line, the mouse cursor will change to to indicate that you are about to rotate the guide.
l When rotating a guide, its angle displays in the top-left corner of the Stage or Camera view.
5. Once you are done making adjustments to the guide, you can click on the Lock Guides button in the Guides view so as to avoid accidentally modifying your guide while drawing.
525
Storyboard Pro 20 User Guide
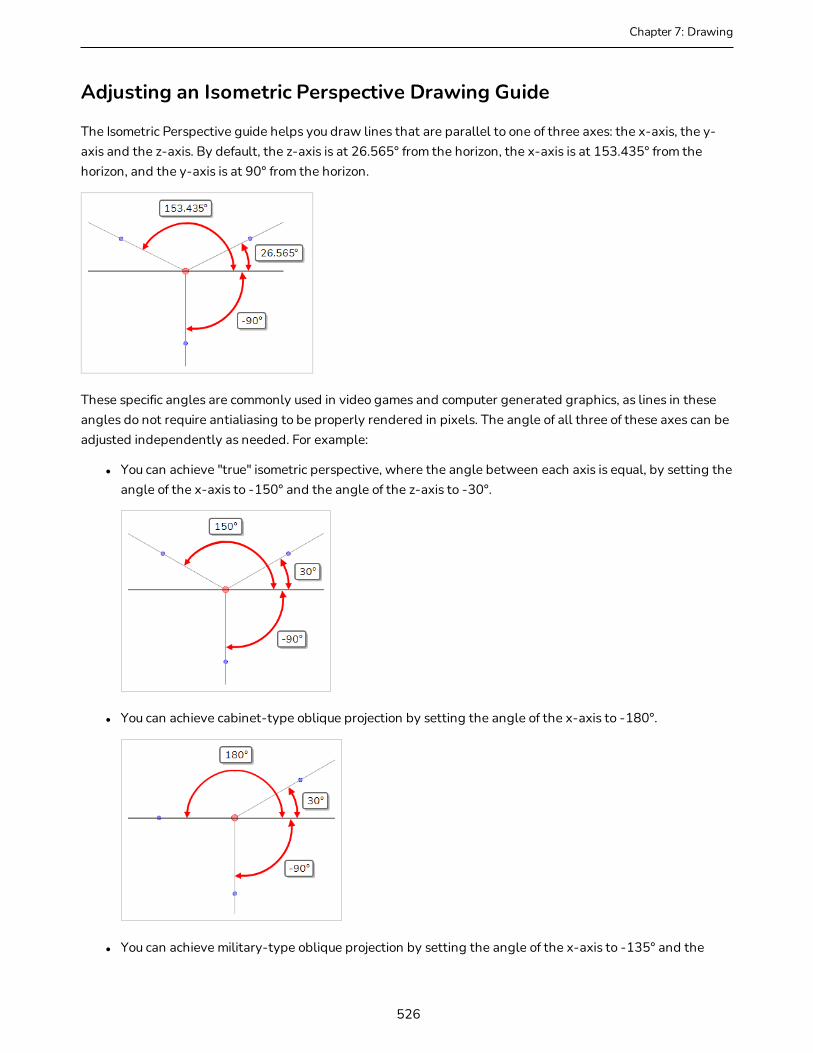
Chapter 7: Drawing
Adjusting an Isometric Perspective Drawing Guide
The Isometric Perspective guide helps you draw lines that are parallel to one of three axes: the x-axis, the y-axis and the z-axis. By default, the z-axis is at 26.565° from the horizon, the x-axis is at 153.435° from the horizon, and the y-axis is at 90° from the horizon.
These specific angles are commonly used in video games and computer generated graphics, as lines in these angles do not require antialiasing to be properly rendered in pixels. The angle of all three of these axes can be adjusted independently as needed. For example:
l You can achieve "true" isometric perspective, where the angle between each axis is equal, by setting the angle of the x-axis to -150° and the angle of the z-axis to -30°.
l You can achieve cabinet-type oblique projection by setting the angle of the x-axis to -180°.
l You can achieve military-type oblique projection by setting the angle of the x-axis to -135° and the
526

angle of the z-axis to -45°.
NOTE
To add a Isometric Perspective guide to your panel, see Adding Drawing Guides.
How to adjust an Isometric Perspective guide
1. In the Tools toolbar, select either the Brush, Pencil or Line tool.
NOTE
Drawing guides are only visible in the Stage or Camera view when one of these tools is selected.
2. In the Guides view, make sure that the Enable Guides option button is toggled on.
3. In the guides list, select the Isometric Perspective guide that you wish to make adjustments to.
The selected guide appears in the Stage or Camera view.
527
Storyboard Pro 20 User Guide

Chapter 7: Drawing
TIP
To display the reference lines for the guide, click on the Show Reference Lines option button on in the Guides view.
4. Do one of the following:
l To reposition the guide, click and drag on the offset handle .
l To adjust the angle of one of the axes, click and drag on the rotation handle for that axis.
TIPS
l The angle of the axis you are adjusting will appear in the top-left corner of the Stage or Camera view as you adjust it.
l You can hold the Shift key while rotating one of the axes to make it snap to the nearest angle that is a multiple of 5°. The x-axis and z-axis will also snap to 26.565° and 153.435°, which are their default angles.
l To adjust the angle of both horizontal axes, press and hold the Alt key, then click and drag on the rotation handle of either the x-axis or the z-axis.
TIP
This will set the angle of both the x-axis and the z-axis to the same value, making your guide symmetrical.
l To rotate the entire guide, press and hold the Alt key, then click and drag on the rotation handle of the y-axis.
528

Adjusting a 1-Point Perspective Drawing Guide
The 1-Point Perspective guide can help you draw backgrounds and objects with front-facing perspective. It provides a horizon line and a single vanishing point. The height and angle of the horizon line as well as the position of the vanishing point on the horizon line can be adjusted as needed.
NOTE
To add a 1-Point Perspective guide to your panel, see Adding Drawing Guides.
How to adjust a 1-Point Perspective guide
1. In the Tools toolbar, select either the Brush, Pencil or Line tool.
NOTE
Drawing guides are only visible in the Stage or Camera view when one of these tools is selected.
2. In the Guides view, make sure that the Enable Guides option button is toggled on.
3. In the guides list, select the 1-Point Perspective guide that you wish to make adjustments to.
The selected guide appears in the Stage or Camera view.
4. Do one of the following:
l To reposition the guide without rotating it, click and drag on its vanishing point .
l To rotate the guide, click and drag on its horizon line.
529
Storyboard Pro 20 User Guide
Chapter 7: Drawing
TIPS
l When the mouse is positioned over the horizon line, the mouse cursor will change to to indicate that you are about to rotate the guide.
l When rotating a guide, its angle displays in the top-left corner of the Stage or Camera view.
5. Once you are done making adjustments to the guide, you can click on the Lock Guides button in the Guides view so as to avoid accidentally modifying your guide while drawing.
530

Adjusting a 2-Points Perspective Drawing Guide
The 2-Points Perspective guide can help you draw backgrounds and objects seen from the ground, but at an angle. It provides a horizon line and two vanishing points, which are located outside of the camera field by default. The height and angle of the horizon line as well as the position of both vanishing points can be adjusted as needed.
NOTE
To add a 2-Points Perspective guide to your panel, see Adding Drawing Guides.
How to adjust a 2-Points Perspective guide
1. In the Tools toolbar, select either the Brush, Pencil or Line tool.
NOTE
Drawing guides are only visible in the Stage or Camera view when one of these tools is selected.
2. In the Guides view, make sure that the Enable Guides option button is toggled on.
3. In the guides list, select the 2-Points Perspective guide that you wish to make adjustments to.
The selected guide appears in the Stage or Camera view.
NOTE
The vanishing points for this guide are far outside of the camera field by default. You may need to zoom out in order to be able to see them.
531
Storyboard Pro 20 User Guide
Chapter 7: Drawing
4. Do one of the following:
l To move the horizon line along with the two vanishing points that are on it, click and drag on the horizon line.
l To rotate the horizon line, click and drag on one of the two vanishing points and move it up or down. This will rotate the horizon line around the opposite vanishing point.
TIPS
l You can press and hold the Shift key to make the angle of the horizon line snap to the nearest multiple of 15°.
l You can press and hold the Alt key to make the guide rotate around the centre of its horizon line.
l When rotating a guide, its angle displays in the top-left corner of the Stage or Camera view.
l To reposition one of the vanishing points on the horizon line, click and drag on that vanishing point and move it left or right.
TIP
You can press and hold the Alt key to make both points move simultaneously, so that they are both at the same distance from the centre of the horizon line.
532
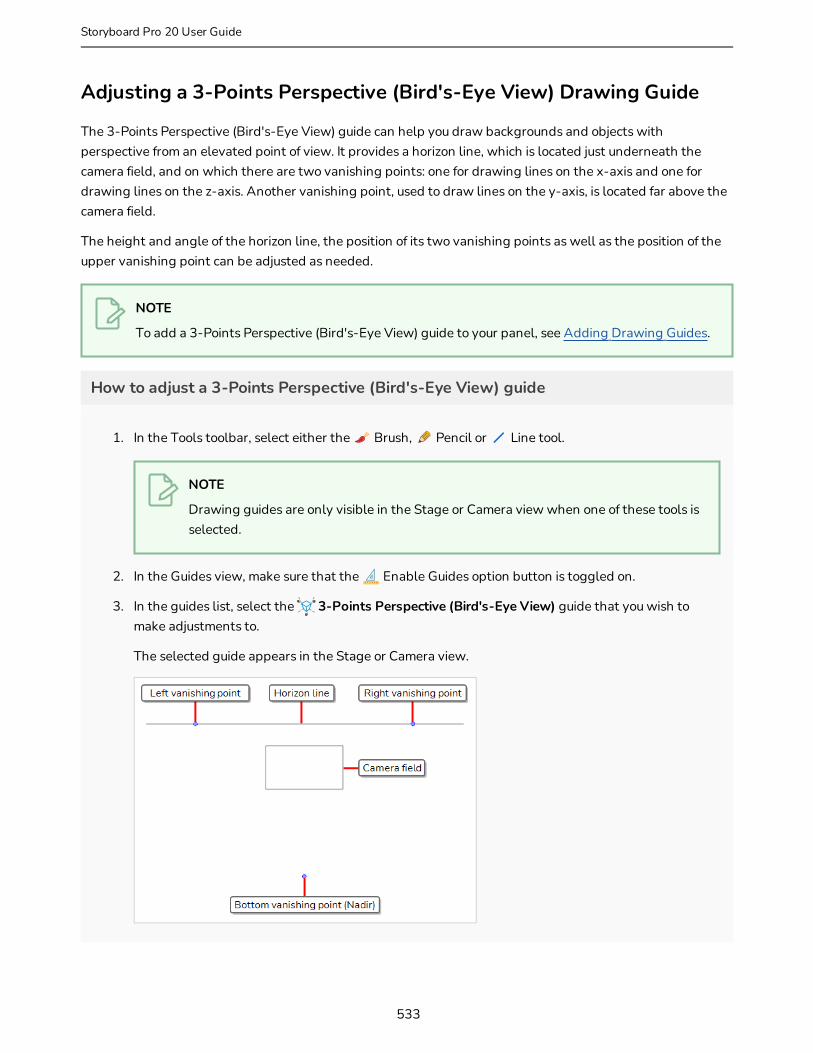
Adjusting a 3-Points Perspective (Bird's-Eye View) Drawing Guide
The 3-Points Perspective (Bird's-Eye View) guide can help you draw backgrounds and objects with perspective from an elevated point of view. It provides a horizon line, which is located just underneath the camera field, and on which there are two vanishing points: one for drawing lines on the x-axis and one for drawing lines on the z-axis. Another vanishing point, used to draw lines on the y-axis, is located far above the camera field.
The height and angle of the horizon line, the position of its two vanishing points as well as the position of the upper vanishing point can be adjusted as needed.
NOTE
To add a 3-Points Perspective (Bird's-Eye View) guide to your panel, see Adding Drawing Guides.
How to adjust a 3-Points Perspective (Bird's-Eye View) guide
1. In the Tools toolbar, select either the Brush, Pencil or Line tool.
NOTE
Drawing guides are only visible in the Stage or Camera view when one of these tools is selected.
2. In the Guides view, make sure that the Enable Guides option button is toggled on.
3. In the guides list, select the 3-Points Perspective (Bird's-Eye View) guide that you wish to make adjustments to.
The selected guide appears in the Stage or Camera view.
533
Storyboard Pro 20 User Guide
Chapter 7: Drawing
NOTE
The horizon line and vanishing points for this guide are far outside of the camera field by default. You may need to zoom out in order to be able to see them.
4. Do one of the following:
l To move the horizon line along with the two vanishing points that are on it, click and drag on the horizon line.
l To rotate the horizon line, click and drag on one of the two vanishing points on the horizon line and move it up or down. This will rotate the horizon line around the opposite vanishing point.
TIPS
l You can press and hold the Shift key to make the angle of the horizon line snap to the nearest multiple of 15°.
l You can press and hold the Alt key to make the guide rotate around the centre of its horizon line.
l When rotating a guide, its angle displays in the top-left corner of the Stage or Camera view.
l To reposition one of the vanishing points on the horizon line, click and drag on that vanishing point and move it left or right.
TIP
You can press and hold the Alt key to make both points move simultaneously, so that they are both at the same distance from the centre of the horizon line.
l To reposition the bottom vanishing point, click and drag on that vanishing point .
TIPS
l You can press and hold the Alt key to position the point on the axis that is perpendicular to the horizon line and in the middle of its two vanishing points.
l You can press and hold the Shift key to make the point only move horizontally or vertically relative to the camera angle.
534
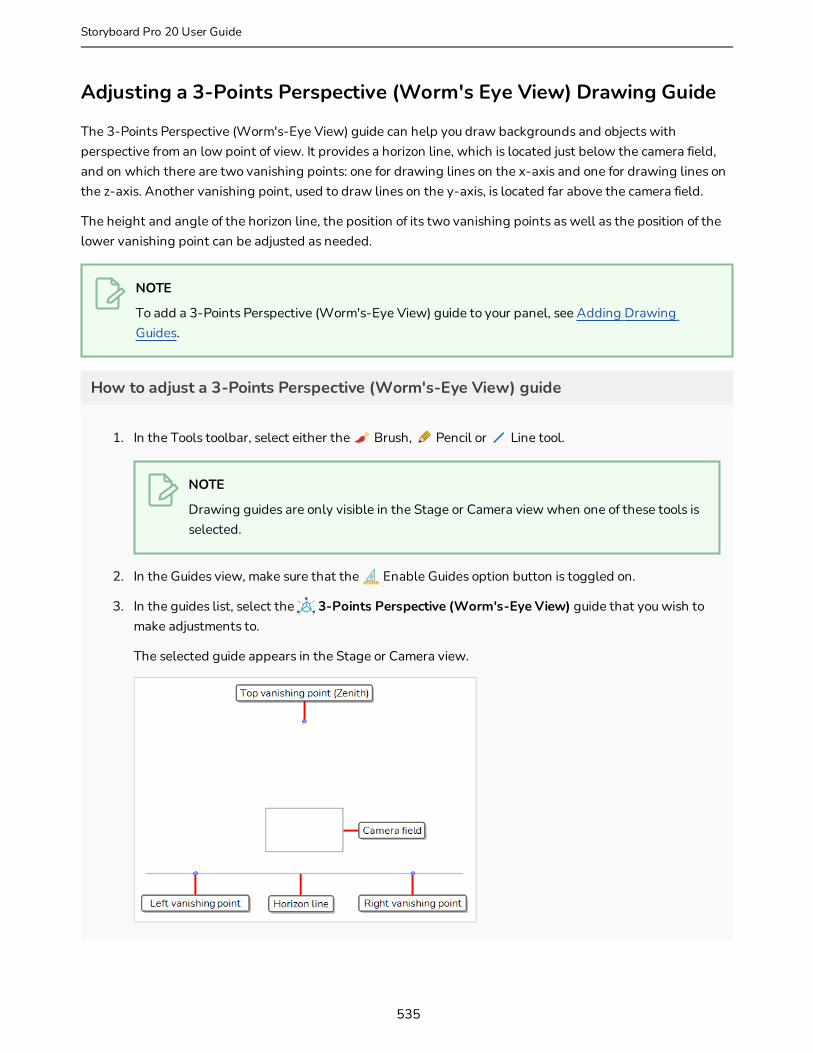
Adjusting a 3-Points Perspective (Worm's Eye View) Drawing Guide
The 3-Points Perspective (Worm's-Eye View) guide can help you draw backgrounds and objects with perspective from an low point of view. It provides a horizon line, which is located just below the camera field, and on which there are two vanishing points: one for drawing lines on the x-axis and one for drawing lines on the z-axis. Another vanishing point, used to draw lines on the y-axis, is located far above the camera field.
The height and angle of the horizon line, the position of its two vanishing points as well as the position of the lower vanishing point can be adjusted as needed.
NOTE
To add a 3-Points Perspective (Worm's-Eye View) guide to your panel, see Adding Drawing Guides.
How to adjust a 3-Points Perspective (Worm's-Eye View) guide
1. In the Tools toolbar, select either the Brush, Pencil or Line tool.
NOTE
Drawing guides are only visible in the Stage or Camera view when one of these tools is selected.
2. In the Guides view, make sure that the Enable Guides option button is toggled on.
3. In the guides list, select the 3-Points Perspective (Worm's-Eye View) guide that you wish to make adjustments to.
The selected guide appears in the Stage or Camera view.
535
Storyboard Pro 20 User Guide

Chapter 7: Drawing
NOTE
The horizon line and vanishing points for this guide are far outside of the camera field by default. You may need to zoom out in order to be able to see them.
4. Do one of the following:
l To move the horizon line along with the two vanishing points that are on it, click and drag on the horizon line.
l To rotate the horizon line, click and drag on one of the two vanishing points on the horizon line and move it up or down. This will rotate the horizon line around the opposite vanishing point.
TIPS
l You can press and hold the Shift key to make the angle of the horizon line snap to the nearest multiple of 15°.
l You can press and hold the Alt key to make the guide rotate around the centre of its horizon line.
l When rotating a guide, its angle displays in the top-left corner of the Stage or Camera view.
l To reposition one of the vanishing points on the horizon line, click and drag on that vanishing point and move it left or right.
TIP
You can press and hold the Alt key to make both points move simultaneously, so that they are both at the same distance from the centre of the horizon line.
l To reposition the top vanishing point, click and drag on that vanishing point .
TIPS
l You can press and hold the Alt key to position the point on the axis that is perpendicular to the horizon line and in the middle of its two vanishing points.
l You can press and hold the Shift key to make the point only move horizontally or vertically relative to the camera angle.
536
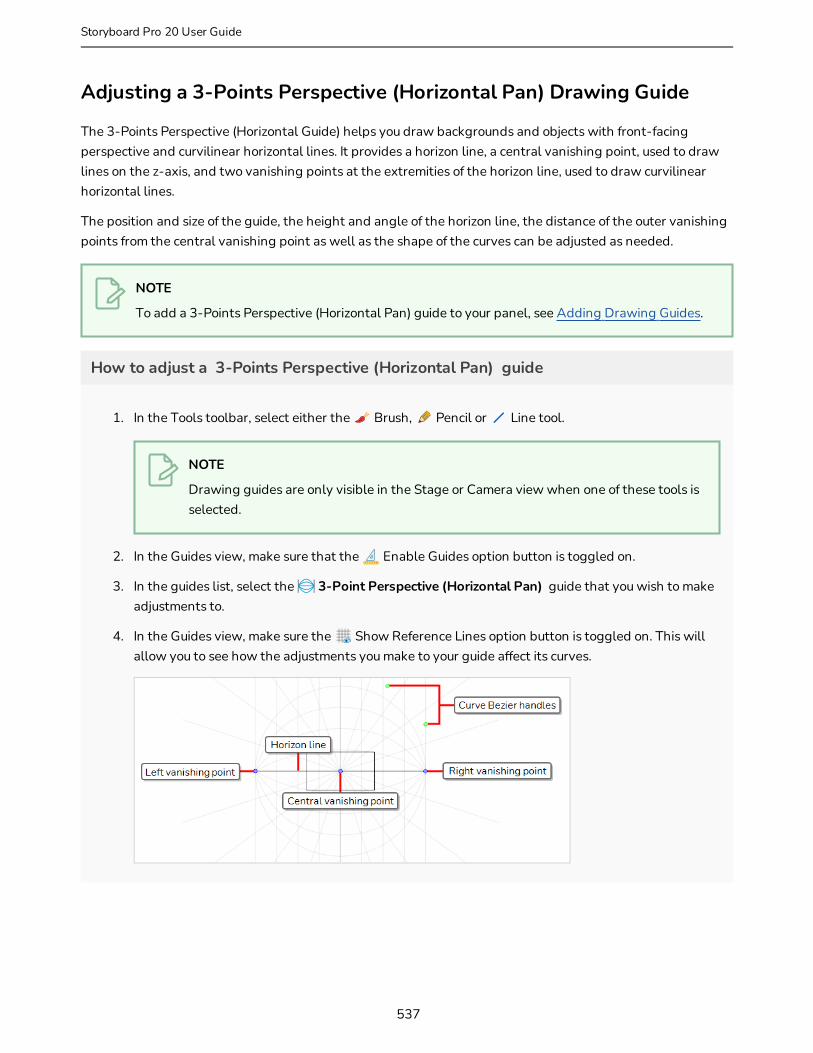
Adjusting a 3-Points Perspective (Horizontal Pan) Drawing Guide
The 3-Points Perspective (Horizontal Guide) helps you draw backgrounds and objects with front-facing perspective and curvilinear horizontal lines. It provides a horizon line, a central vanishing point, used to draw lines on the z-axis, and two vanishing points at the extremities of the horizon line, used to draw curvilinear horizontal lines.
The position and size of the guide, the height and angle of the horizon line, the distance of the outer vanishing points from the central vanishing point as well as the shape of the curves can be adjusted as needed.
NOTE
To add a 3-Points Perspective (Horizontal Pan) guide to your panel, see Adding Drawing Guides.
How to adjust a 3-Points Perspective (Horizontal Pan) guide
1. In the Tools toolbar, select either the Brush, Pencil or Line tool.
NOTE
Drawing guides are only visible in the Stage or Camera view when one of these tools is selected.
2. In the Guides view, make sure that the Enable Guides option button is toggled on.
3. In the guides list, select the 3-Point Perspective (Horizontal Pan) guide that you wish to make adjustments to.
4. In the Guides view, make sure the Show Reference Lines option button is toggled on. This will allow you to see how the adjustments you make to your guide affect its curves.
537
Storyboard Pro 20 User Guide
Chapter 7: Drawing
5. Do one of the following:
l To reposition the guide, click and drag on its central vanishing point .
l To rotate the guide, click and drag on its horizon line.
TIPS
l When the mouse is positioned over the horizon line, the mouse cursor will change to to indicate that you are about to rotate the guide.
l When rotating a guide, its angle displays in the top-left corner of the Stage or Camera view.
l To adjust the distance between the left and right vanishing points, click and drag on either one of these points .
NOTES
l The vanishing point at the other end will also move so as to keep both points at the same distance from the central vanishing point.
l This will stretch or squash the guide horizontally and make its curves wider or narrower.
l To scale up the guide, press and hold Shift, then click and drag on either the left or right vanishing points .
NOTE
If you previously adjusted the position of outer vanishing points relative to the central vanishing point, doing this will reset their position.
l To skew the curves of the guide, click and drag on one of the green dots in the top-right corner of the guide.
NOTE
These dots act as the Bezier handles of the outermost top-right curve, and affect all the curves of the guide.
6. Once you are done making adjustments to the guide, you can click on the Lock Guides button in the Guides view so as to avoid accidentally modifying your guide while drawing.
538
Adjusting the 3-Points Perspective (Vertical Pan) Drawing Guide
The 3-Points Perspective (Vertical Pan) Guide helps you draw backgrounds and objects with front facing perspective and curvilinear vertical lines. It provides a horizon line, a central vanishing point, used to draw lines on the z-axis, and two vanishing points above and below the horizon line, used to draw curvilinear vertical lines.
The position and size of the guide, the height and angle of the horizon line, the distance of the outer vanishing points from the horizon line as well as the shape the curves can be adjusted as needed.
NOTE
To add a 3-Points Perspective (Vertical Pan) guide to your panel, see Adding Drawing Guides.
How to adjust a 3-Points Perspective (Vertical Pan) guide
1. In the Tools toolbar, select either the Brush, Pencil or Line tool.
NOTE
Drawing guides are only visible in the Stage or Camera view when one of these tools is selected.
2. In the Guides view, make sure that the Enable Guides option button is toggled on.
3. In the guides list, select the 3-Point Perspective (Vertical Pan) guide that you wish to make adjustments to.
4. In the Guides view, make sure the Show Reference Lines option button is toggled on. This will allow you to see how the adjustments you make to your guide affect its curves.
539
Storyboard Pro 20 User Guide
Chapter 7: Drawing
5. Do one of the following:
l To reposition the guide, click and drag on its central vanishing point .
l To rotate the guide, click and drag on its horizon line.
TIPS
l When the mouse is positioned over the horizon line, the mouse cursor will change to to indicate that you are about to rotate the guide.
l When rotating a guide, its angle displays in the top-left corner of the Stage or Camera view.
l To adjust the distance between the top and bottom vanishing points, click and drag on either one of these points .
NOTES
l The vanishing point at the other end will also move so as to keep both points at the same distance from the central vanishing point.
l This will stretch or squash the guide vertically and make its curves wider or narrower.
l To scale up the guide, press and hold Shift, then click and drag on either the top or bottom vanishing points .
NOTE
If you previously adjusted the position of outer vanishing points relative to the central vanishing point, doing this will reset their position.
l To skew the curves of the guide, click and drag on one of the red dots in the bottom-right corner of the guide.
NOTE
These dots act as the Bezier handles of the outermost bottom-right curve, and affect all the curves of the guide.
6. Once you are done making adjustments to the guide, you can click on the Lock Guides button in the Guides view so as to avoid accidentally modifying your guide while drawing.
540
Adjusting a 4-Points Continuous Perspective Drawing Guide
The 4-Points Continuous Perspective helps you draw backgrounds with perspective and curvilinear horizontal lines that span over up to four cardinal points, so as to make backgrounds that can be panned in a loop to simulate a 360° camera rotation. It provides a horizon line with five vanishing points spread evenly along it. Each vanishing point represents one cardinal point, except for the two vanishing points at the extremities, which represent the same cardinal point, adding up to four cardinal points.
The size and position of the guide, the height and angle of the horizon line, the distance between the vanishing points as well as the shape of the curves can be adjusted as needed.
NOTE
To add a 4-Points Continuous Perspective guide to your panel, see Adding Drawing Guides.
How to adjust a 4-Points Continuous Perspective guide
1. In the Tools toolbar, select either the Brush, Pencil or Line tool.
NOTE
Drawing guides are only visible in the Stage or Camera view when one of these tools is selected.
2. In the Guides view, make sure that the Enable Guides option button is toggled on.
3. In the guides list, select the 4-Point Continuous Perspective guide that you wish to make adjustments to.
4. In the Guides view, make sure the Show Reference Lines option button is toggled on. This will allow you to see how the adjustments you make to your guide affect its curves.
541
Storyboard Pro 20 User Guide
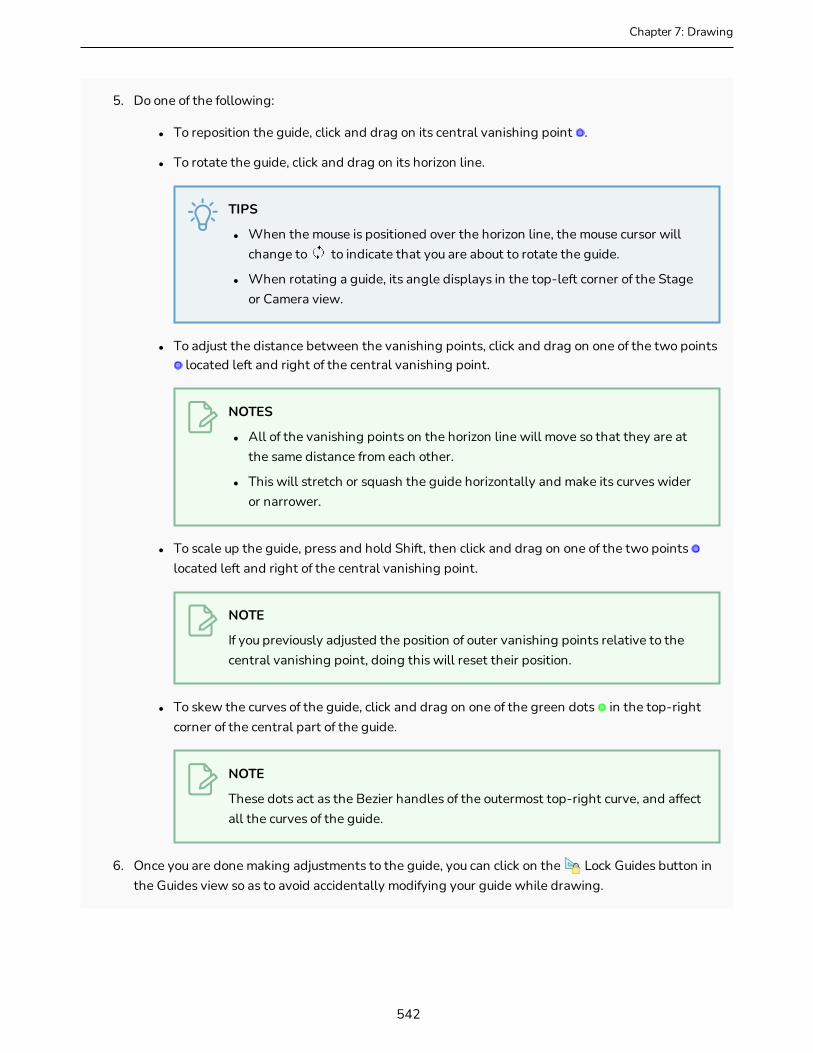
Chapter 7: Drawing
5. Do one of the following:
l To reposition the guide, click and drag on its central vanishing point .
l To rotate the guide, click and drag on its horizon line.
TIPS
l When the mouse is positioned over the horizon line, the mouse cursor will change to to indicate that you are about to rotate the guide.
l When rotating a guide, its angle displays in the top-left corner of the Stage or Camera view.
l To adjust the distance between the vanishing points, click and drag on one of the two points located left and right of the central vanishing point.
NOTES
l All of the vanishing points on the horizon line will move so that they are at the same distance from each other.
l This will stretch or squash the guide horizontally and make its curves wider or narrower.
l To scale up the guide, press and hold Shift, then click and drag on one of the two points located left and right of the central vanishing point.
NOTE
If you previously adjusted the position of outer vanishing points relative to the central vanishing point, doing this will reset their position.
l To skew the curves of the guide, click and drag on one of the green dots in the top-right corner of the central part of the guide.
NOTE
These dots act as the Bezier handles of the outermost top-right curve, and affect all the curves of the guide.
6. Once you are done making adjustments to the guide, you can click on the Lock Guides button in the Guides view so as to avoid accidentally modifying your guide while drawing.
542
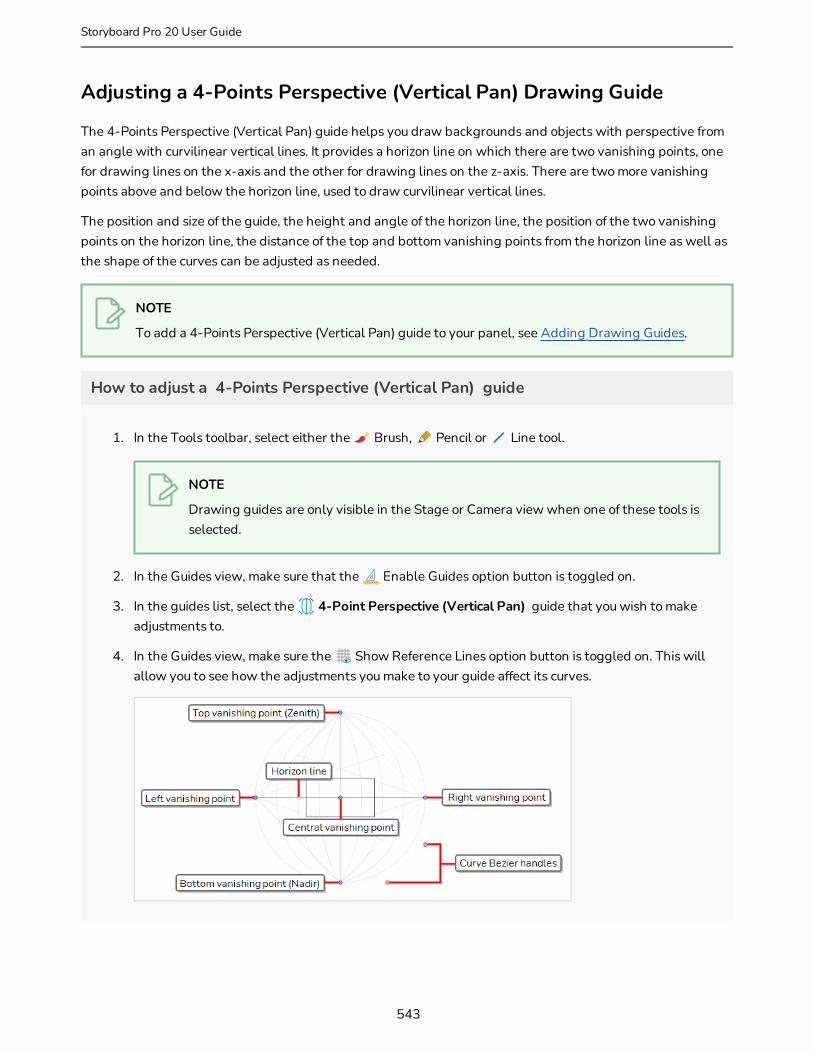
Adjusting a 4-Points Perspective (Vertical Pan) Drawing Guide
The 4-Points Perspective (Vertical Pan) guide helps you draw backgrounds and objects with perspective from an angle with curvilinear vertical lines. It provides a horizon line on which there are two vanishing points, one for drawing lines on the x-axis and the other for drawing lines on the z-axis. There are two more vanishing points above and below the horizon line, used to draw curvilinear vertical lines.
The position and size of the guide, the height and angle of the horizon line, the position of the two vanishing points on the horizon line, the distance of the top and bottom vanishing points from the horizon line as well as the shape of the curves can be adjusted as needed.
NOTE
To add a 4-Points Perspective (Vertical Pan) guide to your panel, see Adding Drawing Guides.
How to adjust a 4-Points Perspective (Vertical Pan) guide
1. In the Tools toolbar, select either the Brush, Pencil or Line tool.
NOTE
Drawing guides are only visible in the Stage or Camera view when one of these tools is selected.
2. In the Guides view, make sure that the Enable Guides option button is toggled on.
3. In the guides list, select the 4-Point Perspective (Vertical Pan) guide that you wish to make adjustments to.
4. In the Guides view, make sure the Show Reference Lines option button is toggled on. This will allow you to see how the adjustments you make to your guide affect its curves.
543
Storyboard Pro 20 User Guide
Chapter 7: Drawing
NOTE
The vanishing points for this guide are far outside of the camera field by default. You may need to zoom out in order to be able to see them.
5. Do one of the following:
l To reposition the guide, click and drag on its central vanishing point .
l To rotate the guide, click and drag on its horizon line.
TIPS
l When the mouse is positioned over the horizon line, the mouse cursor will change to to indicate that you are about to rotate the guide.
l When rotating a guide, its angle displays in the top-left corner of the Stage or Camera view.
l To adjust the distance between either one of the left and right vanishing points and the central vanishing point, click and drag on one of these points .
TIP
You can press and hold the Alt key while dragging one of the outer vanishing points to make both vanishing points move and keep both points at the same distance from the central vanishing point.
l To adjust the distance between the top and bottom vanishing points, click and drag on either one of these points .
NOTES
l The vanishing point at the other end will also move so as to keep both points at the same distance from the central vanishing point.
l This will stretch or squash the guide and make its curves wider or narrower.
l To scale up the guide, press and hold Shift, then click and drag on one of the four outer vanishing points .
544

NOTE
If you previously adjusted the position of outer vanishing points relative to the central vanishing point, doing this will reset their position.
l To skew the curves of the guide, click and drag on one of the red dots in the bottom-right corner of the guide.
NOTE
These dots act as the Bezier handles of the outermost bottom-right curve, and affect all the curves of the guide.
6. Once you are done making adjustments to the guide, you can click on the Lock Guides button in the Guides view so as to avoid accidentally modifying your guide while drawing.
545
Storyboard Pro 20 User Guide

Chapter 7: Drawing
Adjusting a 5-Points Perspective (Fisheye) Drawing Guide
The 5-Points Perspective (Fisheye) guide helps you draw backgrounds and objects with both horizontal and vertical curvilinear perspective. It provides a horizon line, a central vanishing point, used to draw lines on the z-axis, two vanishing points at the horizontal extremities, used to draw curvilinear horizontal lines, and two vanishing points at the vertical extremities, used to draw vertical lines.
The position, angle and size of the guide can be adjusted as needed.
NOTE
To add a 5-Points Perspective (Fisheye) guide to your panel, see Adding Drawing Guides.
How to adjust a 5-Points Perspective (Fisheye) guide
1. In the Tools toolbar, select either the Brush, Pencil or Line tool.
NOTE
Drawing guides are only visible in the Stage or Camera view when one of these tools is selected.
2. In the Guides view, make sure that the Enable Guides option button is toggled on.
3. In the guides list, select the 5-Point Perspective (Fisheye) guide that you wish to make adjustments to.
4. In the Guides view, make sure the Show Reference Lines option button is toggled on. This will allow you to see how the adjustments you make to your guide affect its curves.
5. Do one of the following:
l To reposition the guide, click and drag on its central vanishing point .
l To rotate the guide, click and drag on its horizon line.
546

TIPS
l When the mouse is positioned over the horizon line, the mouse cursor will change to to indicate that you are about to rotate the guide.
l When rotating a guide, its angle displays in the top-left corner of the Stage or Camera view.
l To scale up the guide, click and drag on one of the four outer vanishing points .
6. Once you are done making adjustments to the guide, you can click on the Lock Guides button in the Guides view so as to avoid accidentally modifying your guide while drawing.
547
Storyboard Pro 20 User Guide

Chapter 7: Drawing
Locking Guides to Prevent Editing ThemT-SBADV-006-008
When using a drawing tool with a guide, you are also able to edit the guide's horizon line, vanishing points and other parameters by manipulating them in the Stage or Camera view. Hence, it is possible to make changes to your guide by accident when drawing too close to one of its visual elements. Once you are done making adjustments to a guide, it is recommended to lock guides to be able to draw freely without having to worry about making accidental changes to your guides.
How to prevent editing of Drawing Guides while drawing
1. Do one of the following:
l In the Guides view, click on the Lock Guide button
l Press Shift + L.
NOTES
l The Lock Guide option prevents editing all guides, not just the selected one.
l When adding a new guide, the Lock Guide option is automatically toggled off to allow the new guide to be edited immediately.
548
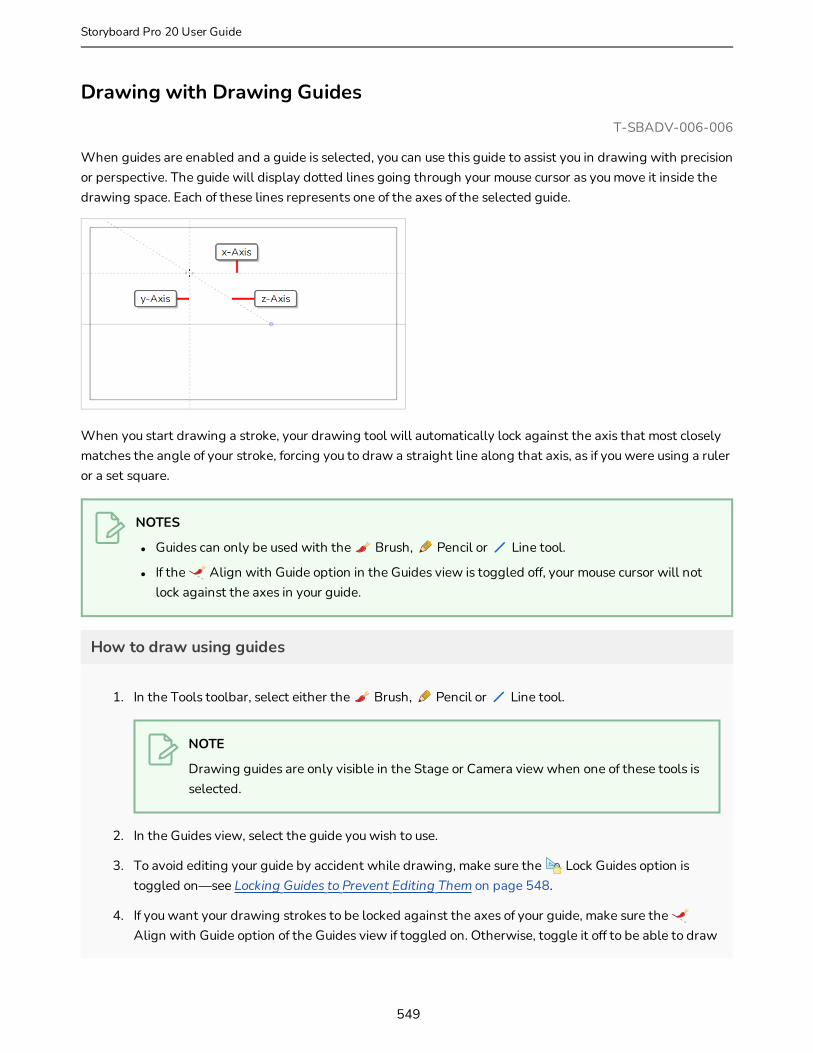
Drawing with Drawing GuidesT-SBADV-006-006
When guides are enabled and a guide is selected, you can use this guide to assist you in drawing with precision or perspective. The guide will display dotted lines going through your mouse cursor as you move it inside the drawing space. Each of these lines represents one of the axes of the selected guide.
When you start drawing a stroke, your drawing tool will automatically lock against the axis that most closely matches the angle of your stroke, forcing you to draw a straight line along that axis, as if you were using a ruler or a set square.
NOTES
l Guides can only be used with the Brush, Pencil or Line tool.
l If the Align with Guide option in the Guides view is toggled off, your mouse cursor will not lock against the axes in your guide.
How to draw using guides
1. In the Tools toolbar, select either the Brush, Pencil or Line tool.
NOTE
Drawing guides are only visible in the Stage or Camera view when one of these tools is selected.
2. In the Guides view, select the guide you wish to use.
3. To avoid editing your guide by accident while drawing, make sure the Lock Guides option is toggled on—see Locking Guides to Prevent Editing Them on page 548.
4. If you want your drawing strokes to be locked against the axes of your guide, make sure the Align with Guide option of the Guides view if toggled on. Otherwise, toggle it off to be able to draw
549
Storyboard Pro 20 User Guide
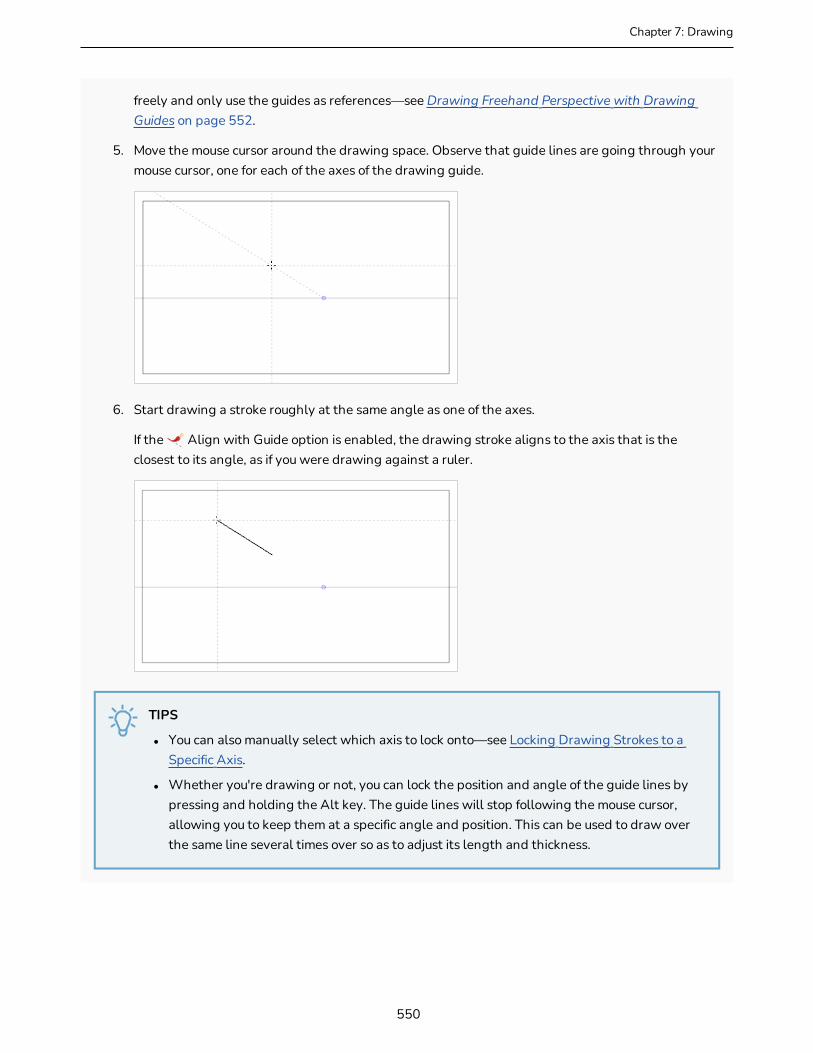
Chapter 7: Drawing
freely and only use the guides as references—see Drawing Freehand Perspective with Drawing Guides on page 552.
5. Move the mouse cursor around the drawing space. Observe that guide lines are going through your mouse cursor, one for each of the axes of the drawing guide.
6. Start drawing a stroke roughly at the same angle as one of the axes.
If the Align with Guide option is enabled, the drawing stroke aligns to the axis that is the closest to its angle, as if you were drawing against a ruler.
TIPS
l You can also manually select which axis to lock onto—see Locking Drawing Strokes to a Specific Axis.
l Whether you're drawing or not, you can lock the position and angle of the guide lines by pressing and holding the Alt key. The guide lines will stop following the mouse cursor, allowing you to keep them at a specific angle and position. This can be used to draw over the same line several times over so as to adjust its length and thickness.
550

Locking Drawing Strokes to a Specific AxisT-SBADV-006-010
When using a drawing guide with the Align with Guide option enabled, your drawing tool will automatically lock against one of the axes of your guide. Which axis it locks onto is the one that is the closest to the angle of your stroke as you start drawing.
If you want, you can manually select which axis to lock your drawing tool against, so as to avoid accidentally locking against the wrong axis.
How to lock your drawing tool to a specific axis
1. Set the focus to the Stage or Camera view, for example, by clicking on the view's tab.
2. Press the Left Arrow or Right Arrow key repeatedly to cycle through your guide's axes. The selected axis will be displayed in bold across your mouse cursor.
All your drawing strokes will lock onto the selected axis.
How to re-enable using all axes
1. Press the Left Arrow or Right Arrow key repeatedly to cycle through your guide's axes, until none of them are displayed in bold across your mouse cursor.
551
Storyboard Pro 20 User Guide
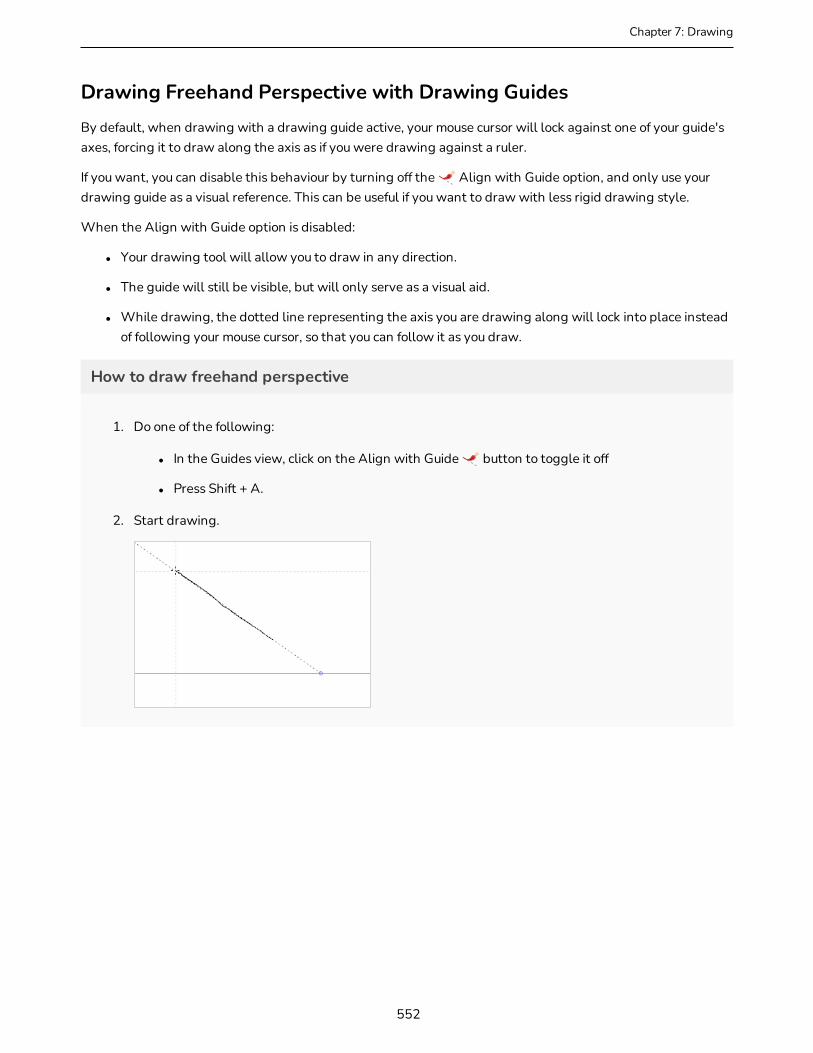
Chapter 7: Drawing
Drawing Freehand Perspective with Drawing GuidesBy default, when drawing with a drawing guide active, your mouse cursor will lock against one of your guide's axes, forcing it to draw along the axis as if you were drawing against a ruler.
If you want, you can disable this behaviour by turning off the Align with Guide option, and only use your drawing guide as a visual reference. This can be useful if you want to draw with less rigid drawing style.
When the Align with Guide option is disabled:
l Your drawing tool will allow you to draw in any direction.
l The guide will still be visible, but will only serve as a visual aid.
l While drawing, the dotted line representing the axis you are drawing along will lock into place instead of following your mouse cursor, so that you can follow it as you draw.
How to draw freehand perspective
1. Do one of the following:
l In the Guides view, click on the Align with Guide button to toggle it off
l Press Shift + A.
2. Start drawing.
552
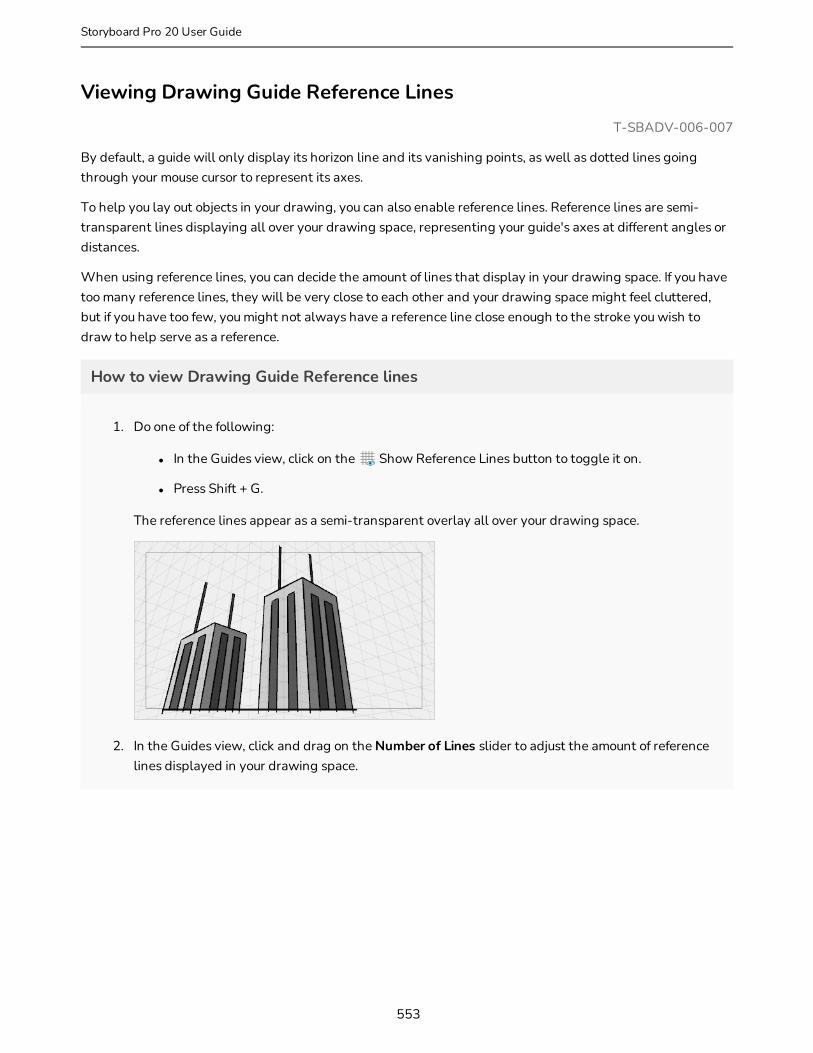
Viewing Drawing Guide Reference LinesT-SBADV-006-007
By default, a guide will only display its horizon line and its vanishing points, as well as dotted lines going through your mouse cursor to represent its axes.
To help you lay out objects in your drawing, you can also enable reference lines. Reference lines are semi-transparent lines displaying all over your drawing space, representing your guide's axes at different angles or distances.
When using reference lines, you can decide the amount of lines that display in your drawing space. If you have too many reference lines, they will be very close to each other and your drawing space might feel cluttered, but if you have too few, you might not always have a reference line close enough to the stroke you wish to draw to help serve as a reference.
How to view Drawing Guide Reference lines
1. Do one of the following:
l In the Guides view, click on the Show Reference Lines button to toggle it on.
l Press Shift + G.
The reference lines appear as a semi-transparent overlay all over your drawing space.
2. In the Guides view, click and drag on the Number of Lines slider to adjust the amount of reference lines displayed in your drawing space.
553
Storyboard Pro 20 User Guide
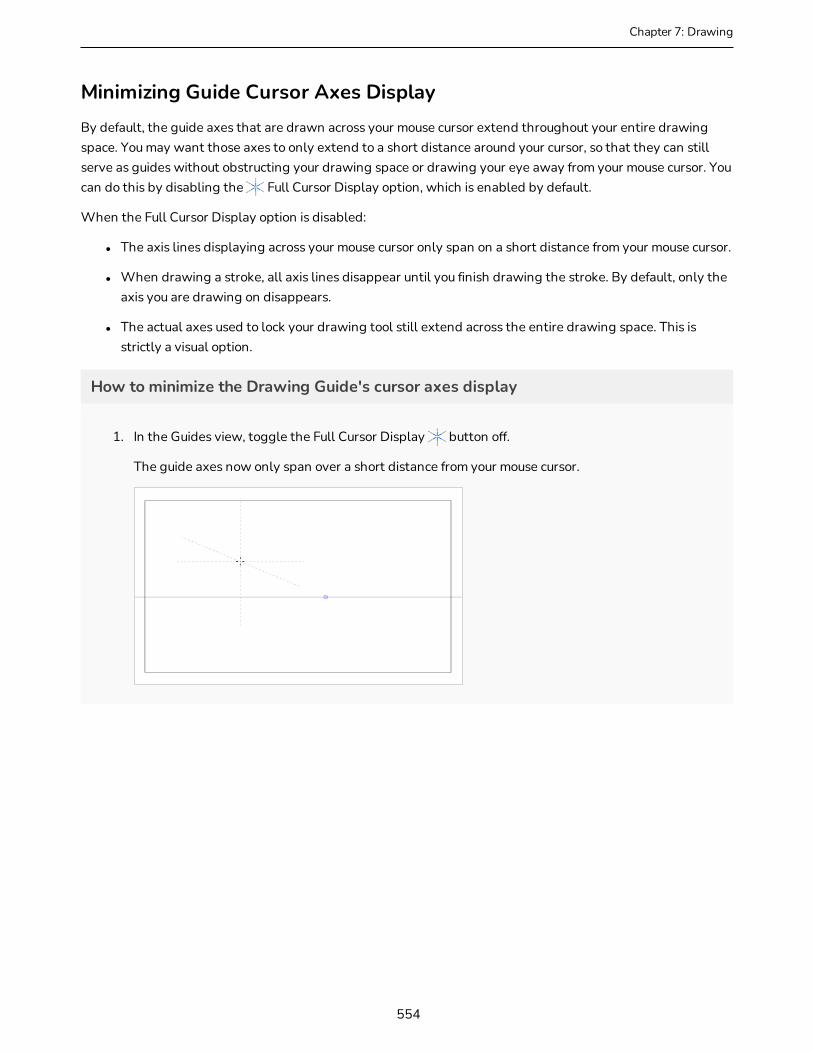
Chapter 7: Drawing
Minimizing Guide Cursor Axes DisplayBy default, the guide axes that are drawn across your mouse cursor extend throughout your entire drawing space. You may want those axes to only extend to a short distance around your cursor, so that they can still serve as guides without obstructing your drawing space or drawing your eye away from your mouse cursor. You can do this by disabling the Full Cursor Display option, which is enabled by default.
When the Full Cursor Display option is disabled:
l The axis lines displaying across your mouse cursor only span on a short distance from your mouse cursor.
l When drawing a stroke, all axis lines disappear until you finish drawing the stroke. By default, only the axis you are drawing on disappears.
l The actual axes used to lock your drawing tool still extend across the entire drawing space. This is strictly a visual option.
How to minimize the Drawing Guide's cursor axes display
1. In the Guides view, toggle the Full Cursor Display button off.
The guide axes now only span over a short distance from your mouse cursor.
554
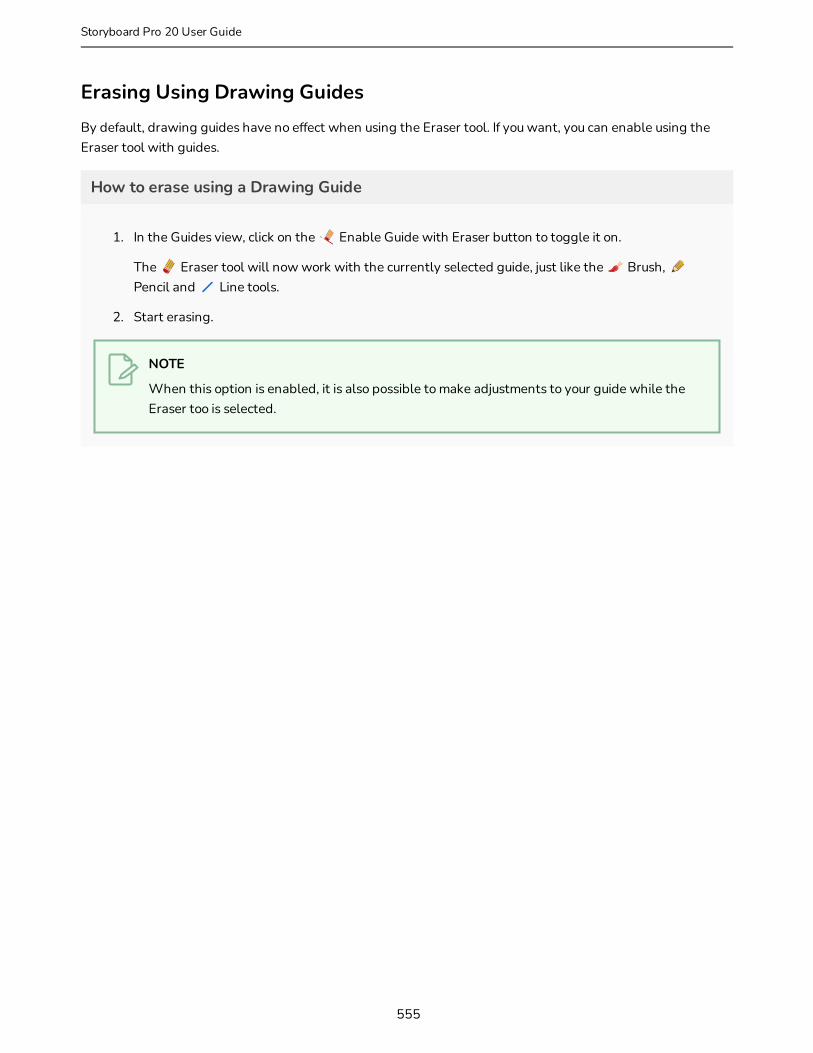
Erasing Using Drawing GuidesBy default, drawing guides have no effect when using the Eraser tool. If you want, you can enable using the Eraser tool with guides.
How to erase using a Drawing Guide
1. In the Guides view, click on the Enable Guide with Eraser button to toggle it on.
The Eraser tool will now work with the currently selected guide, just like the Brush, Pencil and Line tools.
2. Start erasing.
NOTE
When this option is enabled, it is also possible to make adjustments to your guide while the Eraser too is selected.
555
Storyboard Pro 20 User Guide

Chapter 7: Drawing
Enabling and Disabling Drawing GuidesT-SBADV-006-009
Once you are done working with guides, you can disable them. When drawing guides are disabled, they are not displayed in your drawing space and do not affect the behaviour of your drawing tools.
How to enable and disable drawing guides
1. To enable or disable Drawing Guides, do one of the following:
l In the Guides view, click on the Enable Guide button.
l Press G.
NOTES
l Guides are automatically enabled when you add a new guide or when you select a guide in the guides list.
l The guide that was selected in your panel when you disabled guides will be selected again when you re-enable guides.
l Drawing guides only work with the Brush, Pencil and Line tools tools. If any other tool is selected, drawing guides will behave as if they are disabled.
556
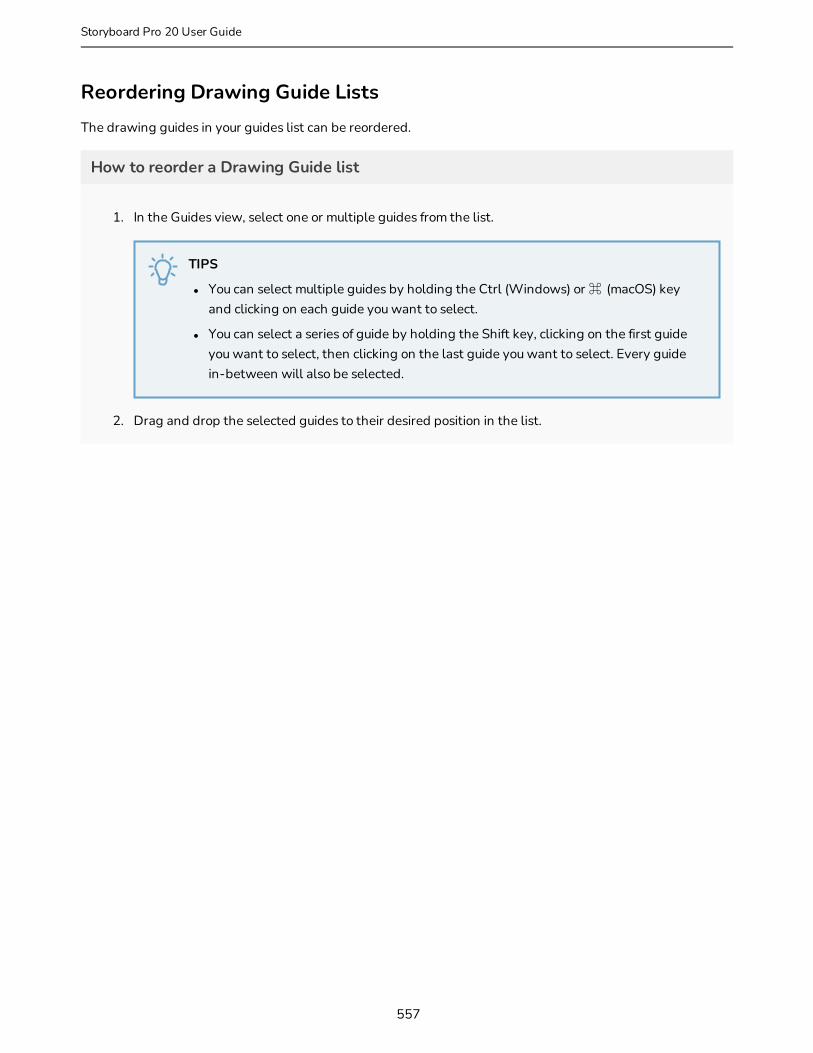
Reordering Drawing Guide ListsThe drawing guides in your guides list can be reordered.
How to reorder a Drawing Guide list
1. In the Guides view, select one or multiple guides from the list.
TIPS
l You can select multiple guides by holding the Ctrl (Windows) or ⌘ (macOS) key and clicking on each guide you want to select.
l You can select a series of guide by holding the Shift key, clicking on the first guide you want to select, then clicking on the last guide you want to select. Every guide in-between will also be selected.
2. Drag and drop the selected guides to their desired position in the list.
557
Storyboard Pro 20 User Guide

Chapter 7: Drawing
Cutting and Pasting Drawing GuidesYou can cut a drawing guide from your guides list and paste it into the guides list of another panel or project.
How to cut and paste drawing guides
1. In the Guides view, select one or multiple guides from the list.
TIPS
l You can select multiple guides by holding the Ctrl (Windows) or ⌘ (macOS) key and clicking on each guide you want to select.
l You can select a series of guide by holding the Shift key, clicking on the first guide you want to select, then clicking on the last guide you want to select. Every guide in-between will also be selected.
2. Do one of the following:
l In the Guides view, click on the Menu button and select Cut.
l Press Ctrl + X (Windows) or ⌘ + X (macOS).
The selected guides are deleted from the list and stored in the clipboard.
3. In the top menu, select File > Open and open a different Storyboard Pro scene.
4. In the Timeline or Thumbnail view, select the destination panel in the same project or in another project.
5. In the Guides view, click on the guides list to set the focus on it. If the guides list already contains guides, select the guide that will act as an insertion point.
6. Do one of the folliowing:
l In the Guides view, click on the Menu button and select Paste.
l Press Ctrl + V (Windows) or ⌘ + V (macOS).
Drawing Guides that were cut from the previous guides list are pasted in the current guides list.
NOTE
If you want to use the Cut, Copy and Paste keyboard shortcuts on guides, make sure the focus is on the Guides view.
558

Copying & Pasting Drawing GuidesT-SBADV-006-004
You can copy drawing guides from your guides list and paste them into the guides list of another panel or project.
How to copy and paste drawing guides
1. In the Guides view, select one or multiple guides from the list.
TIPS
l You can select multiple guides by holding the Ctrl (Windows) or ⌘ (macOS) key and clicking on each guide you want to select.
l You can select a series of guide by holding the Shift key, clicking on the first guide you want to select, then clicking on the last guide you want to select. Every guide in-between will also be selected.
2. Do one of the following:
l In the Guides view, click on the Menu button and select Copy.
l Press Ctrl + C (Windows) or ⌘ + C (macOS).
3. In the Timeline or Thumbnail view, select the destination panel in the same project or in another project.
4. In the Guides view, click on the guides list to set the focus on it. If the guides list already contains guide, select a guide that will act as an insertion point.
5. Do one of the folliowing:
l In the Guides view, click on the Menu button and select Paste.
l Press Ctrl + V (Windows) or ⌘ + V (macOS).
Drawing Guides that were copied from the previous guides list are pasted in the current guides list.
NOTE
If you want to use the Cut, Copy and Paste keyboard shortcuts on guides, make sure the focus is on the Guides view.
559
Storyboard Pro 20 User Guide
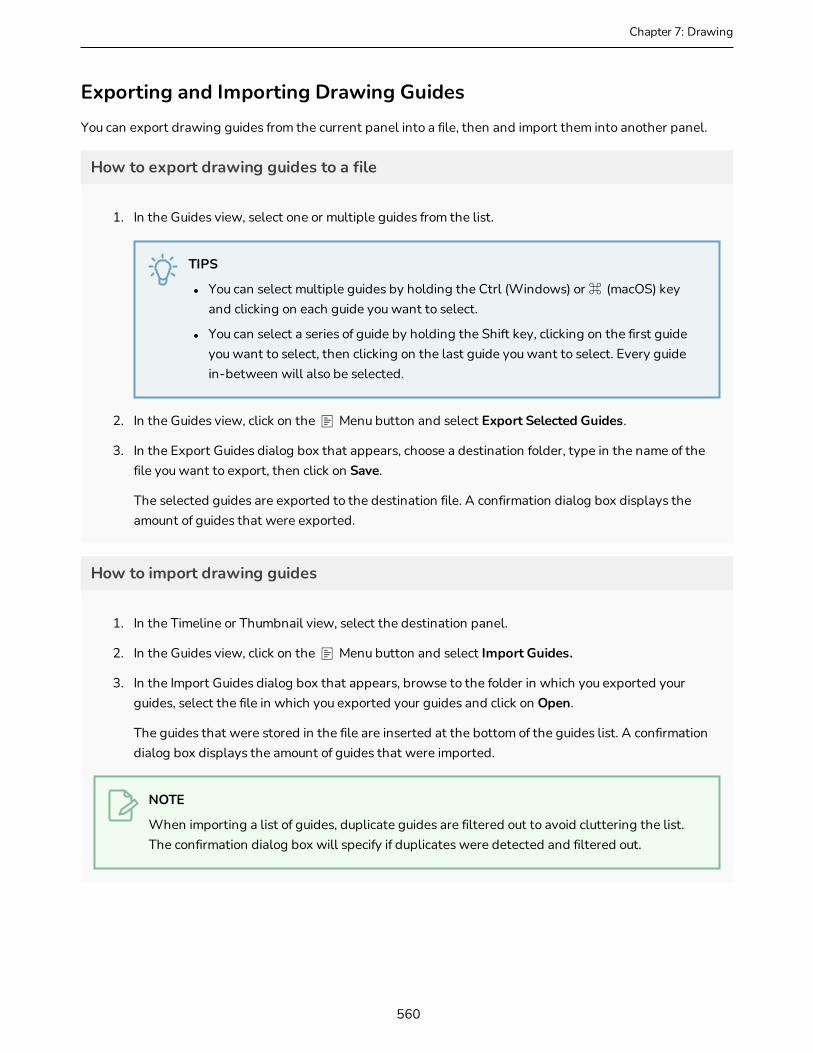
Chapter 7: Drawing
Exporting and Importing Drawing GuidesYou can export drawing guides from the current panel into a file, then and import them into another panel.
How to export drawing guides to a file
1. In the Guides view, select one or multiple guides from the list.
TIPS
l You can select multiple guides by holding the Ctrl (Windows) or ⌘ (macOS) key and clicking on each guide you want to select.
l You can select a series of guide by holding the Shift key, clicking on the first guide you want to select, then clicking on the last guide you want to select. Every guide in-between will also be selected.
2. In the Guides view, click on the Menu button and select Export Selected Guides.
3. In the Export Guides dialog box that appears, choose a destination folder, type in the name of the file you want to export, then click on Save.
The selected guides are exported to the destination file. A confirmation dialog box displays the amount of guides that were exported.
How to import drawing guides
1. In the Timeline or Thumbnail view, select the destination panel.
2. In the Guides view, click on the Menu button and select Import Guides.
3. In the Import Guides dialog box that appears, browse to the folder in which you exported your guides, select the file in which you exported your guides and click on Open.
The guides that were stored in the file are inserted at the bottom of the guides list. A confirmation dialog box displays the amount of guides that were imported.
NOTE
When importing a list of guides, duplicate guides are filtered out to avoid cluttering the list. The confirmation dialog box will specify if duplicates were detected and filtered out.
560

Deleting Drawing GuidesT-SBADV-006-003
You can delete drawing guides from the guides list.
How to delete a Drawing Guide
1. In the Guides view, select one or multiple guides from the list.
TIPS
l You can select multiple guides by holding the Ctrl (Windows) or ⌘ (macOS) key and clicking on each guide you want to select.
l You can select a series of guide by holding the Shift key, clicking on the first guide you want to select, then clicking on the last guide you want to select. Every guide in-between will also be selected.
2. Do one of the following:
l In the Guides view, click on the Delete Guide button
l Press Del (Windows) or (macOS).
The selected guided are deleted from the list.
561
Storyboard Pro 20 User Guide

Chapter 7: Drawing
Automatically Filling Drawings with a MatteT-SBFND-008-019
When sketching scenes in Storyboard Pro, you might find that the background sketch lines interfere with the sketch lines of the characters. To make the panels more legible, you can apply a solid colour behind the character sketches.
The Generate Auto-Matte dialog box allows you to quickly create a colour matte for any sketch isolated on a given layer. The solid matte will obscure from view any background elements directly behind, giving the character more prominence, legibility and a sense of behaving like a solid-real world object. The shape of the matte generated is based on the outlines of your artwork, and will fill your drawing even if there are gaps in the sketch and even if the drawing extends beyond the camera frame.
You can generate a matte on one or several layers in a single panel at a time.
How to fill drawing layers with a matte
1. In the layer panel or the Layers view, select the layers for which you want to generate a matte by doing one of the following:
l To select a single layer, simply click on it.
l To select several non-contiguous layers, press and hold Ctrl (Windows) or ⌘ (macOS) and click on each layer you want to select.
l To select several contiguous layers, press and hold Shift and click on the first layer you want to select, then on the last layer you want to select.
562

2. If you want your matte to be filled with one of the colours in your colour palette, select the desired colour in the Colour view. Otherwise, you can also pick a colour for the matte later.
3. Do one of the following:
l In the top menu, select Layer > Generate Auto-Matte.
l Right-click on the selected layer(s) and select Generate Auto-Matte.
The Generate Auto-Matte dialog appears.
4. If you want a precise matte or a matte for a small drawing, reduce the Radius setting. If you want to generate a very rough or approximate matte, increase the Radius setting.
5. If you want the matte to be filled with the currently selected colour, leave the Matte Colour setting to Current. Otherwise, set it to Custom, then click on the colour swatch to the right to open a colour picker dialog and select a colour for your matte.
6. If you want the matte to be generated in the layer containing your outlines, uncheck the Create Matte on New Layer option. Otherwise, a new layer will be created underneath the layer containing your outlines, and the matte will be generated in that new layer.
NOTE
In both cases, the generated matte will appear behind the outlines in your artwork.
7. If you chose to generate the matte in a new layer, but you want to be able to fill the different
563
Storyboard Pro 20 User Guide

Chapter 7: Drawing
sections of the matte in different colours, check the Copy Strokes to Destination option. This will copy your artwork onto the matte, but as invisible outlines (referred to as strokes). You will be able to fill those outlines with different colours.
8. Click on OK.
A coloured matte is generated for each selected layer, and is placed behind the artwork in each selected layer.
NOTE
If you chose to create the matte in a new layer, and a matte layer already exists for one of the selected layers, you will be prompted to either Replace the existing matte, to Keep Both the old and new mattes or to Cancel.
If this happens for multiple layers, you can check the Apply to All option to either replace the matte, keep both mattes or cancel for all layers.
564
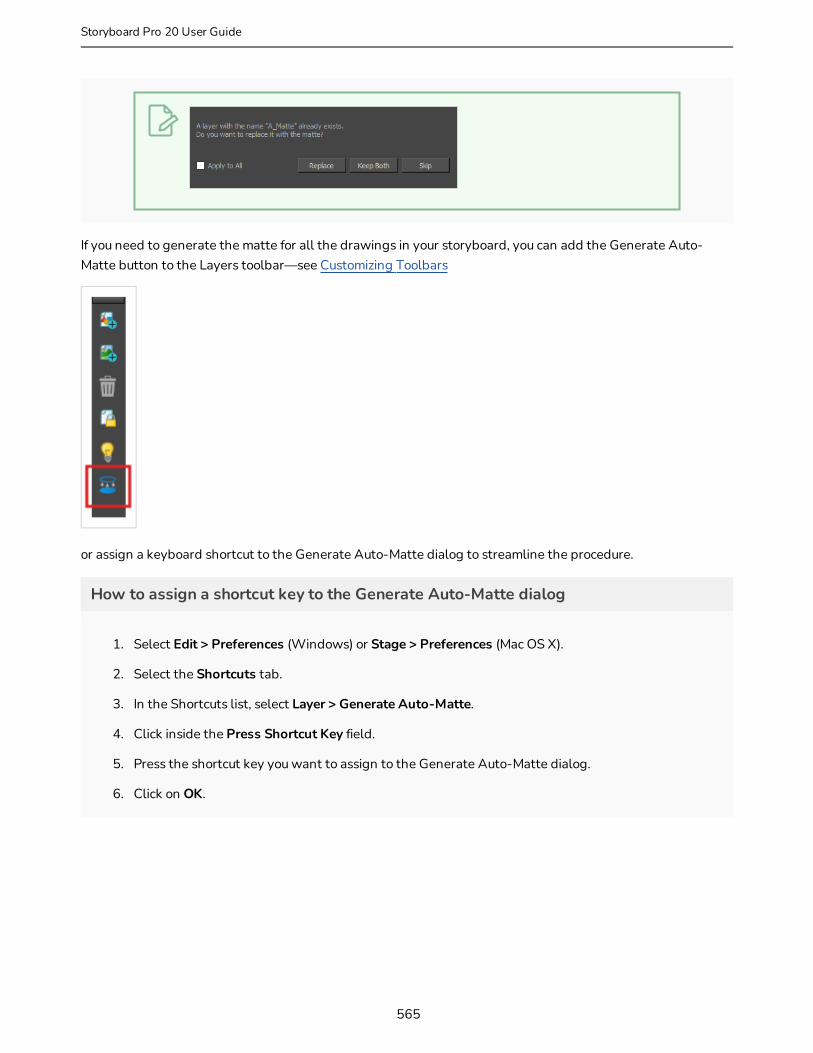
If you need to generate the matte for all the drawings in your storyboard, you can add the Generate Auto-Matte button to the Layers toolbar—see Customizing Toolbars
or assign a keyboard shortcut to the Generate Auto-Matte dialog to streamline the procedure.
How to assign a shortcut key to the Generate Auto-Matte dialog
1. Select Edit > Preferences (Windows) or Stage > Preferences (Mac OS X).
2. Select the Shortcuts tab.
3. In the Shortcuts list, select Layer > Generate Auto-Matte.
4. Click inside the Press Shortcut Key field.
5. Press the shortcut key you want to assign to the Generate Auto-Matte dialog.
6. Click on OK.
565
Storyboard Pro 20 User Guide

Chapter 7: Drawing
Blurring ArtworkT-SBADV-007-001
All the blur effects (Blur, Radial Zoom Blur and Directional Blur) can be applied to both vector and bitmap layers. If you want to apply an effect on a vector layer, it will be converted to a bitmap layer after you confirm the effect.
How to apply a blur effect
1. Select the layer(s) on which you want to apply the effect.
2. Do one of the following:
l Right-click the layer and select Apply Effect.
l From the top menu, select Layer > Apply Effect.
566

3. Choose one of the following options:
l Blur
l Radial Zoom Blur
l Directional Blur
4. In the dialog box, enter the parameters for your blur effect. For more information on the available parameters, refer to the Blur Dialog Box, Radial Zoom Blur Dialog Box and Directional Blur Dialog Box documentation in the Reference Guide.
5. Click OK.
567
Storyboard Pro 20 User Guide

Chapter 7: Drawing
Sharing DrawingsWhen there is a drawing that occurs across multiple panels, you can share (link) the drawing. This way, any changes you make to one of the drawing affects all other instances, making it faster and more efficient when managing and producing your storyboard.
Duplicating a panel that contains a shared drawing preserves the link.
When sharing is not needed, you can easily unlink an instance of a shared drawing from the other instances.
How to share a drawing
1. In the Drawing list, right-click the layer that contains the drawing to share.
2. Right-click and select Share Drawing.
The drawing is now available in the Shared Drawings folder of the Library view. In the Layers list, a star appears beside the name of the drawing to indicate that it is a shared drawing.
3. To use the shared drawing in another panel, drag it from the Share Drawings folder to the Layer list or Stage view.
How to unlink a shared drawing
1. Right-click the layer to unlink and select Unlink from Shared Drawing.
The layer is unlinked from the shared drawing and its instances.
568

569
Storyboard Pro 20 User Guide

Chapter 8: Colour
Chapter 8: Colour
With Storyboard Pro, you can add colour to your projects.
570
About Colour SwatchesT-SBFND-008-008
You can use two different types of colour swatches. You can paint drawings with vector swatches, which are the solid and gradient colours.
You can paint your vector drawings with bitmap texture swatches. You can import textures and add them to your palette. Textures must be *.psd or *.tga files. Transparency is supported. Once you have painted with textures, you can edit the gradient's position—see Using the Edit Gradient - Texture Tool on page 588.
571
Storyboard Pro 20 User Guide
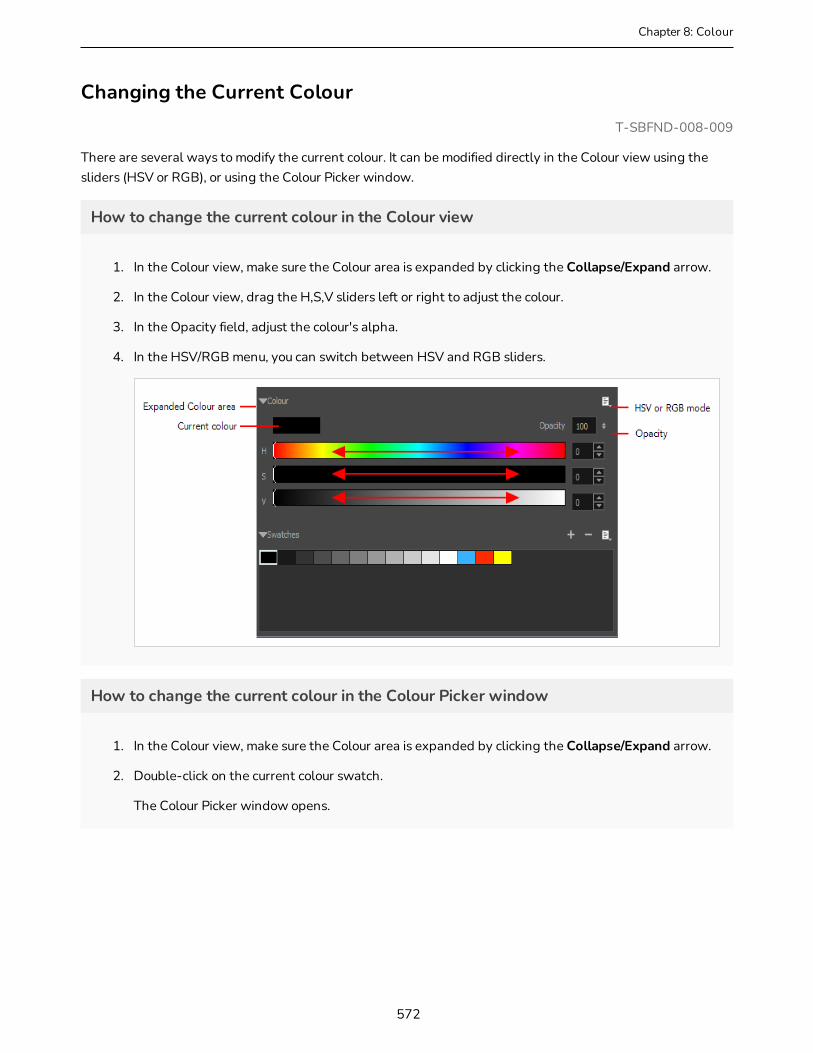
Chapter 8: Colour
Changing the Current ColourT-SBFND-008-009
There are several ways to modify the current colour. It can be modified directly in the Colour view using the sliders (HSV or RGB), or using the Colour Picker window.
How to change the current colour in the Colour view
1. In the Colour view, make sure the Colour area is expanded by clicking the Collapse/Expand arrow.
2. In the Colour view, drag the H,S,V sliders left or right to adjust the colour.
3. In the Opacity field, adjust the colour's alpha.
4. In the HSV/RGB menu, you can switch between HSV and RGB sliders.
How to change the current colour in the Colour Picker window
1. In the Colour view, make sure the Colour area is expanded by clicking the Collapse/Expand arrow.
2. Double-click on the current colour swatch.
The Colour Picker window opens.
572

3. In the Colour Picker window, do one of the following to modify the current colour:
l In the colour picking area, click to select a colour.
l Type in the HSV or RGB values in the corresponding fields. Select the R,G,B or H,S,V options to change the look of the colour picking area.
l Drag the Dropper to select any colour in the Storyboard Pro interface.
NOTE
When using the Dropper tool, the selected colour becomes the current colour, but is not added to the colour swatches.
You can also click the Multi Wheel Mode button to open the Multiwheel Colour dialog box. This displays all the picking area styles and a picking undo list. Click the Single Wheel Mode button return to the regular Colour Picker window.
573
Storyboard Pro 20 User Guide

Chapter 8: Colour
4. Click the Shade Scale swatches to modify the shade of the selected colour.
5. Adjust the level of transparency with the Alpha slider, or type the value directly in the Alpha field.
6. Click the Add button to add the current selected colour to the Colour Storage Library, so you can quickly access it later.
7. You can rename the colour swatch in the Colour Picker window or directly in the colour list by double-clicking its name.
574
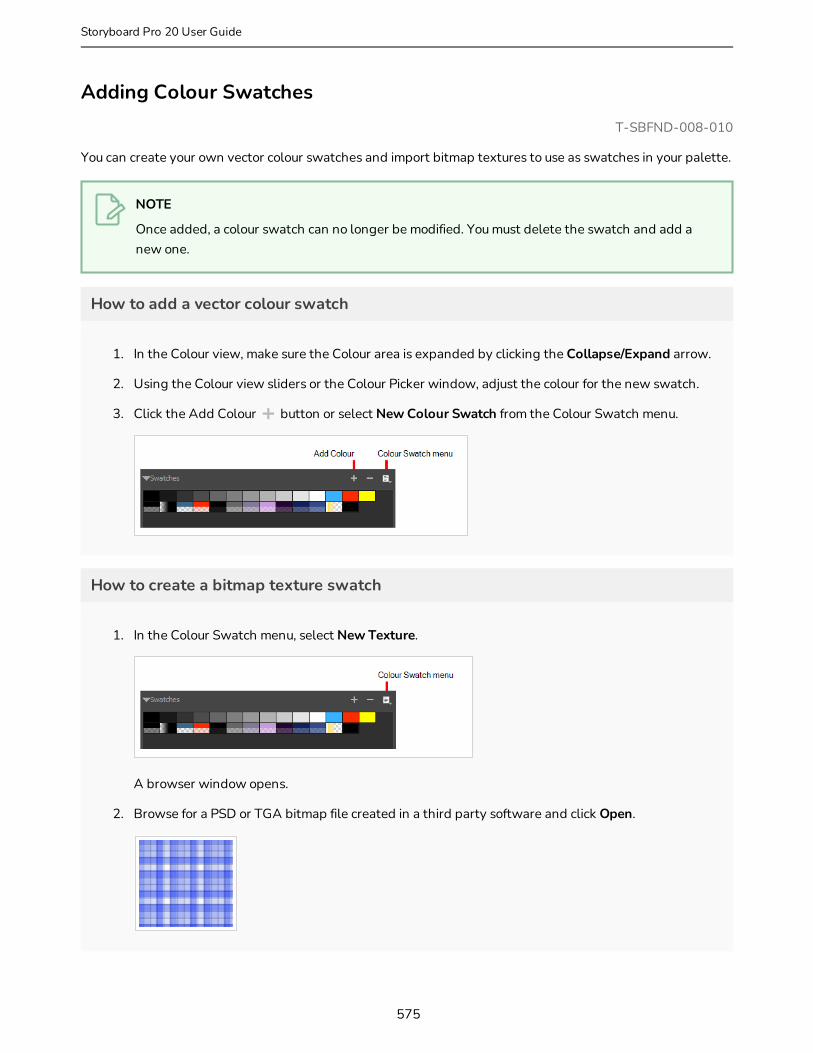
Adding Colour SwatchesT-SBFND-008-010
You can create your own vector colour swatches and import bitmap textures to use as swatches in your palette.
NOTE
Once added, a colour swatch can no longer be modified. You must delete the swatch and add a new one.
How to add a vector colour swatch
1. In the Colour view, make sure the Colour area is expanded by clicking the Collapse/Expand arrow.
2. Using the Colour view sliders or the Colour Picker window, adjust the colour for the new swatch.
3. Click the Add Colour button or select New Colour Swatch from the Colour Swatch menu.
How to create a bitmap texture swatch
1. In the Colour Swatch menu, select New Texture.
A browser window opens.
2. Browse for a PSD or TGA bitmap file created in a third party software and click Open.
575
Storyboard Pro 20 User Guide

Chapter 8: Colour
A textured colour swatch is added to the swatch palette.
576

Renaming Colour SwatchesIf you plan on adding a lot of colour swatches to your palette, it is a good idea to organize them by naming and reordering them.
How to name a colour swatch
1. In the Colour Swatch menu, deselect the Swatch Mode option.
2. In the Colour list, double-click on a swatch name to rename it.
3. Once you are done renaming the swatch, press Enter/Return to validate the entry.
How to order swatches
‣ In the Colour list, in Swatch mode or List mode, drag and drop the swatches to change the order.
577
Storyboard Pro 20 User Guide

Chapter 8: Colour
Deleting Colour SwatchesAt any time, you can delete colour swatches that you are not using or not part of the colour palette you have in mind for a character or scene.
How to delete a colour swatch
1. In the Colour view, select a colour swatch to delete by clicking a swatch. To select multiple swatches, press Ctrl (Windows) or ⌘ (macOS), and click the swatches to delete. To select multiple swatches in a range, press Shift, click the first swatch to delete and then click the last swatch.
2. Do one of the following:
‣ Press Delete.
‣ From the Colour Swatch menu, select Delete Swatch.
‣ Click the Remove Colour button.
578

Creating GradientsVector drawings can be painted using linear and radial gradients. Once painted, you can modify the position of the gradient—see Using the Edit Gradient - Texture Tool on page 588.
How to create a gradient colour
1. In the Colour view, double-click the current colour swatch.
The Colour Picker window opens.
2. Select the Gradient option.
3. Select the Linear or Radial option.
4. In the color picking area, use the gradient arrows to modify the colours.
579
Storyboard Pro 20 User Guide
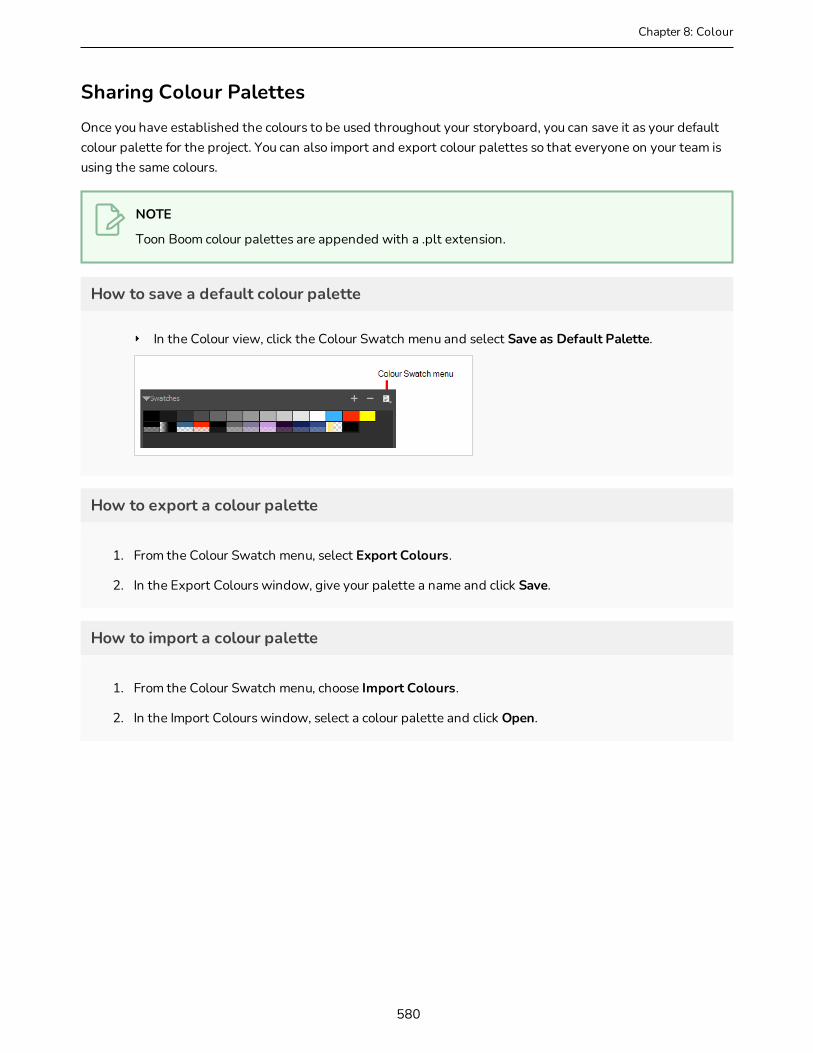
Chapter 8: Colour
Sharing Colour PalettesOnce you have established the colours to be used throughout your storyboard, you can save it as your default colour palette for the project. You can also import and export colour palettes so that everyone on your team is using the same colours.
NOTE
Toon Boom colour palettes are appended with a .plt extension.
How to save a default colour palette
‣ In the Colour view, click the Colour Swatch menu and select Save as Default Palette.
How to export a colour palette
1. From the Colour Swatch menu, select Export Colours.
2. In the Export Colours window, give your palette a name and click Save.
How to import a colour palette
1. From the Colour Swatch menu, choose Import Colours.
2. In the Import Colours window, select a colour palette and click Open.
580
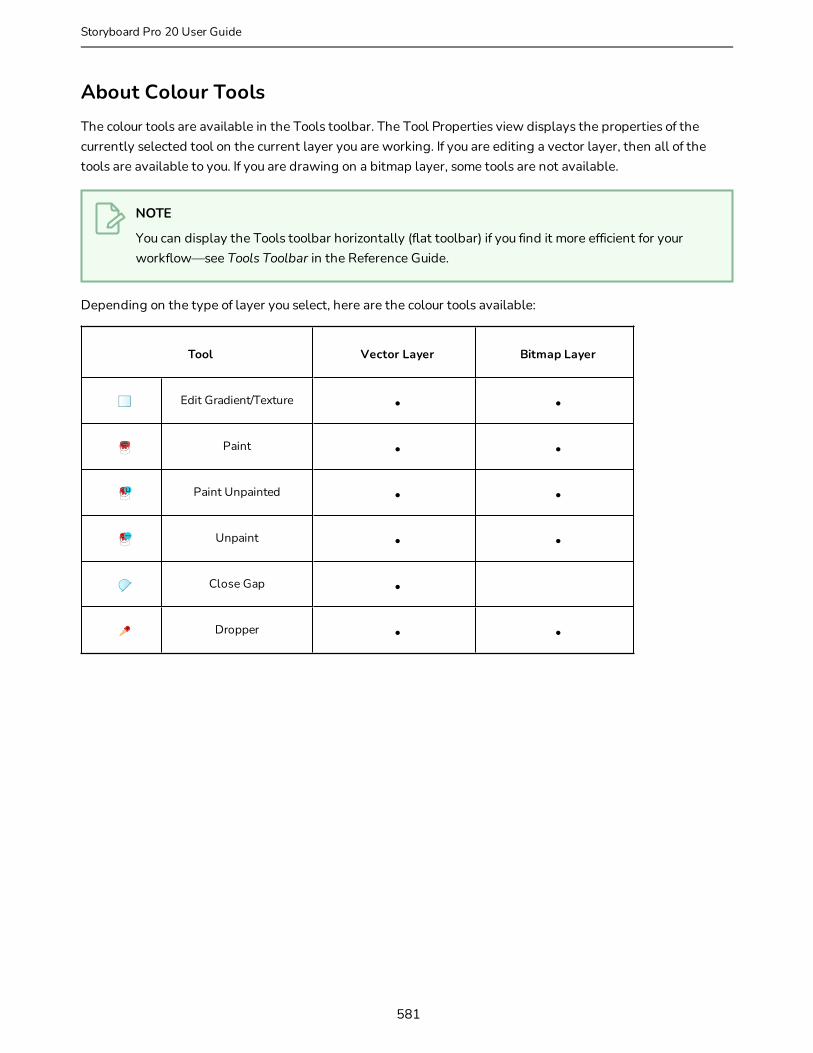
About Colour ToolsThe colour tools are available in the Tools toolbar. The Tool Properties view displays the properties of the currently selected tool on the current layer you are working. If you are editing a vector layer, then all of the tools are available to you. If you are drawing on a bitmap layer, some tools are not available.
NOTE
You can display the Tools toolbar horizontally (flat toolbar) if you find it more efficient for your workflow—see Tools Toolbar in the Reference Guide.
Depending on the type of layer you select, here are the colour tools available:
Tool Vector Layer Bitmap Layer
Edit Gradient/Texture • •
Paint • •
Paint Unpainted • •
Unpaint • •
Close Gap •
Dropper • •
581
Storyboard Pro 20 User Guide
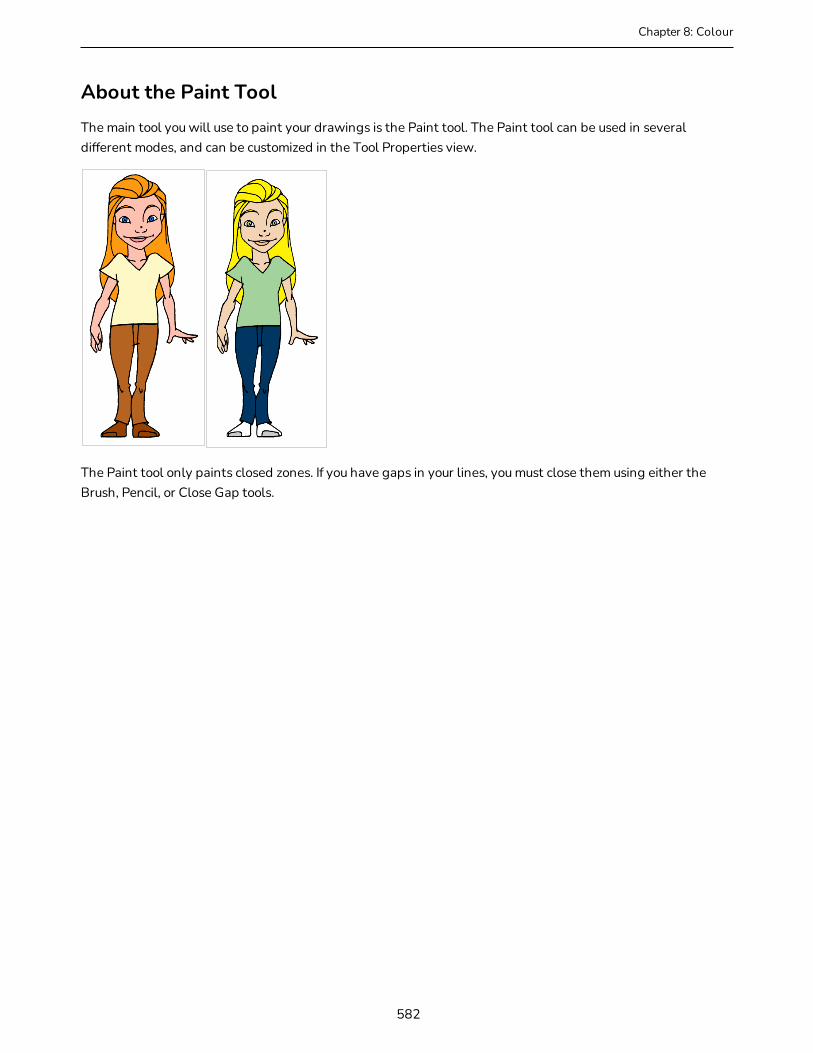
Chapter 8: Colour
About the Paint ToolThe main tool you will use to paint your drawings is the Paint tool. The Paint tool can be used in several different modes, and can be customized in the Tool Properties view.
The Paint tool only paints closed zones. If you have gaps in your lines, you must close them using either the Brush, Pencil, or Close Gap tools.
582
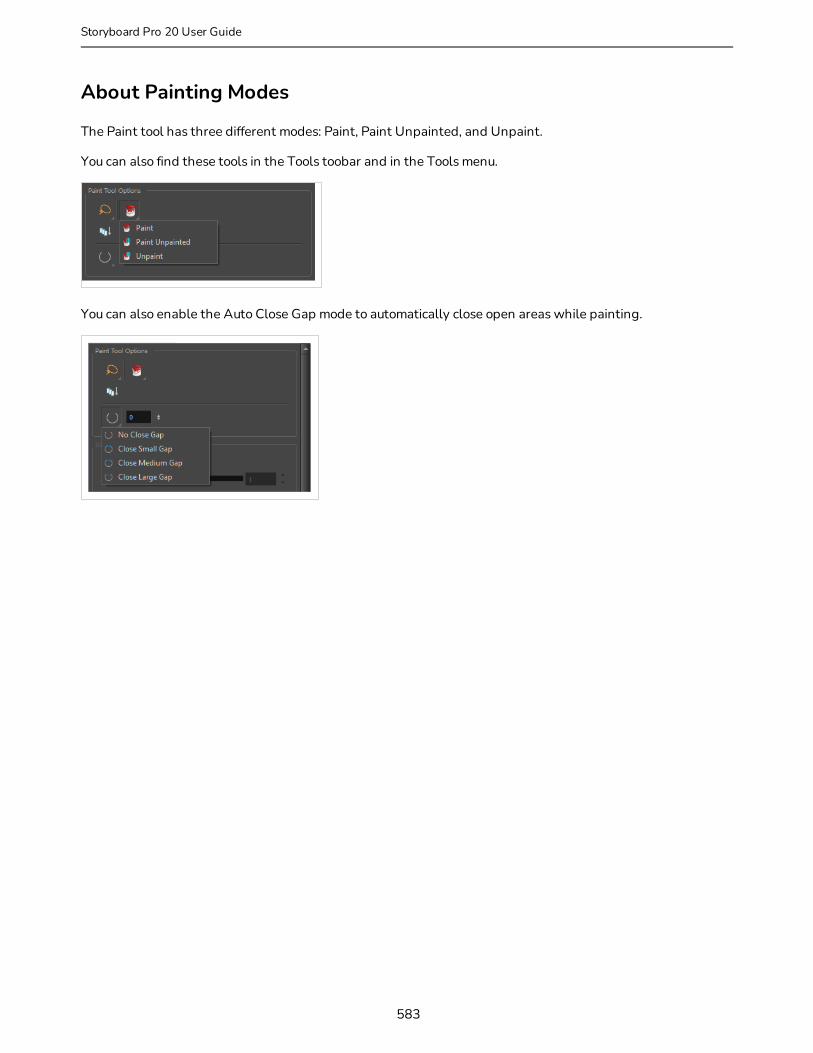
About Painting Modes
The Paint tool has three different modes: Paint, Paint Unpainted, and Unpaint.
You can also find these tools in the Tools toobar and in the Tools menu.
You can also enable the Auto Close Gap mode to automatically close open areas while painting.
583
Storyboard Pro 20 User Guide
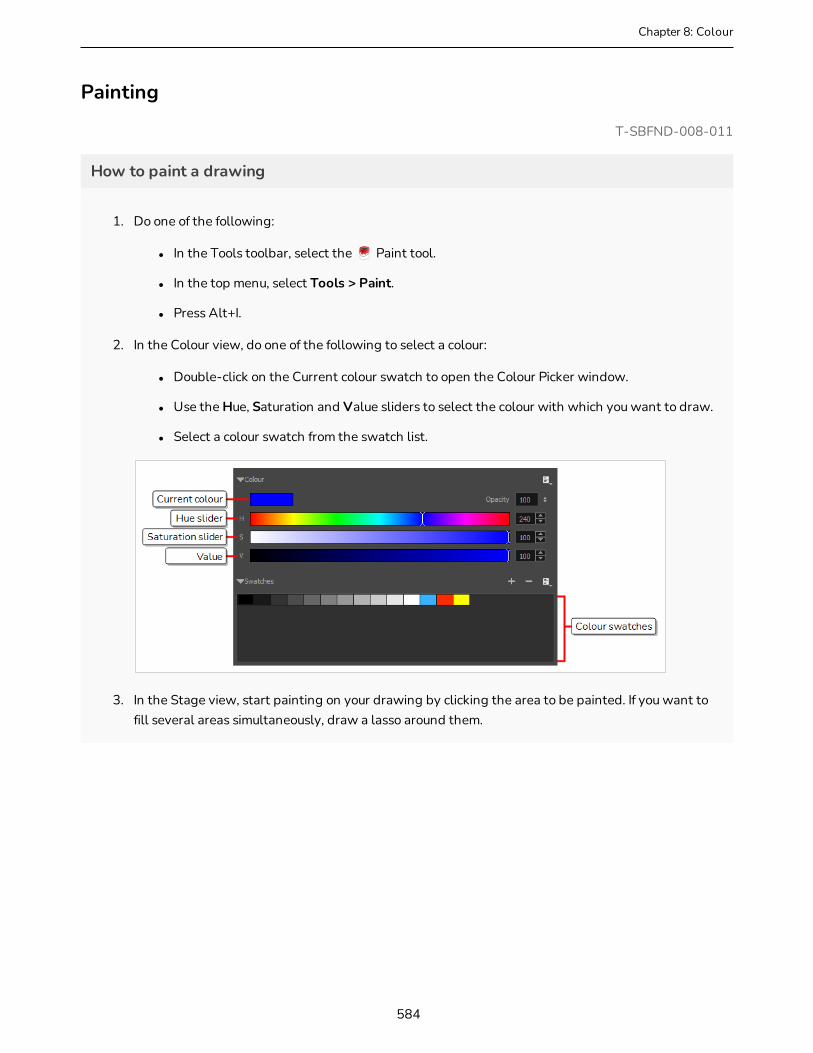
Chapter 8: Colour
Painting
T-SBFND-008-011
How to paint a drawing
1. Do one of the following:
l In the Tools toolbar, select the Paint tool.
l In the top menu, select Tools > Paint.
l Press Alt+I.
2. In the Colour view, do one of the following to select a colour:
l Double-click on the Current colour swatch to open the Colour Picker window.
l Use the Hue, Saturation and Value sliders to select the colour with which you want to draw.
l Select a colour swatch from the swatch list.
3. In the Stage view, start painting on your drawing by clicking the area to be painted. If you want to fill several areas simultaneously, draw a lasso around them.
584

NOTE
If the shape you are trying to paint is not fully closed, it will not fill. You can make the Paint tool automatically close small gaps in the shapes you attempt to fill by increasing the Close Gap setting of the Paint tool in the Tool Properties view. To close big gaps, you can use the Close Gap tool, which is available in the pop-up menu of the Paint tool in the Tools toolbar.
585
Storyboard Pro 20 User Guide
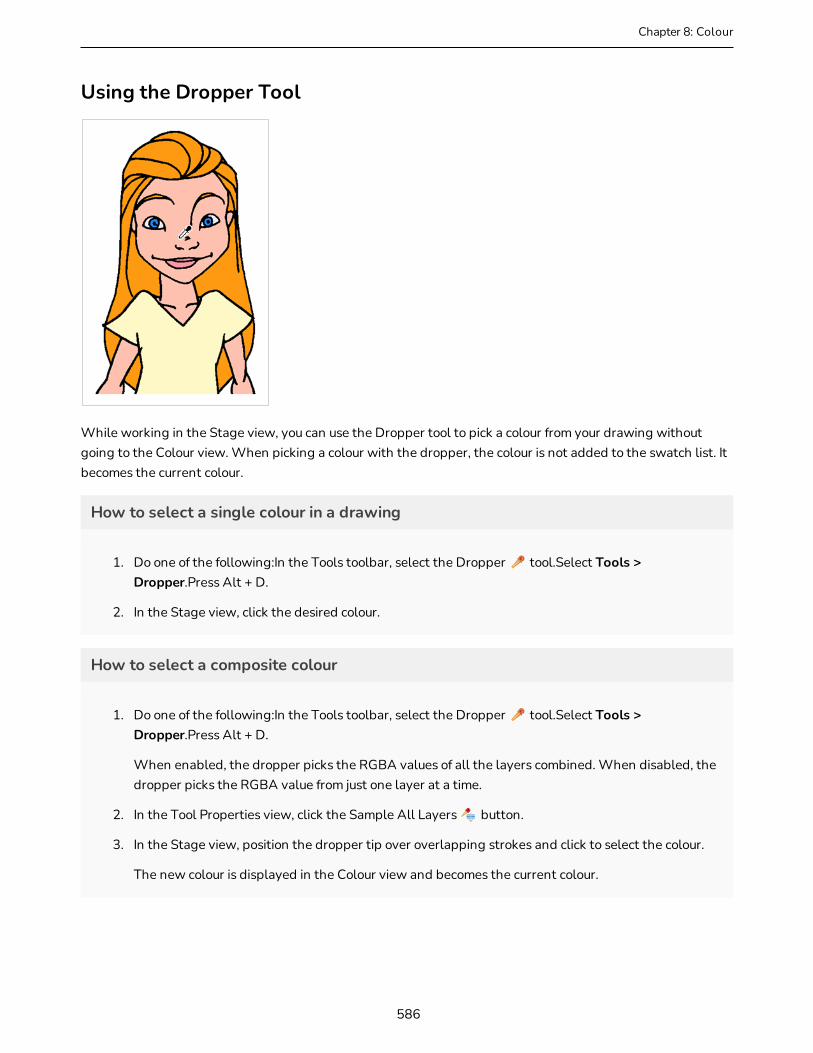
Chapter 8: Colour
Using the Dropper Tool
While working in the Stage view, you can use the Dropper tool to pick a colour from your drawing without going to the Colour view. When picking a colour with the dropper, the colour is not added to the swatch list. It becomes the current colour.
How to select a single colour in a drawing
1. Do one of the following:In the Tools toolbar, select the Dropper tool.Select Tools > Dropper.Press Alt + D.
2. In the Stage view, click the desired colour.
How to select a composite colour
1. Do one of the following:In the Tools toolbar, select the Dropper tool.Select Tools > Dropper.Press Alt + D.
When enabled, the dropper picks the RGBA values of all the layers combined. When disabled, the dropper picks the RGBA value from just one layer at a time.
2. In the Tool Properties view, click the Sample All Layers button.
3. In the Stage view, position the dropper tip over overlapping strokes and click to select the colour.
The new colour is displayed in the Colour view and becomes the current colour.
586
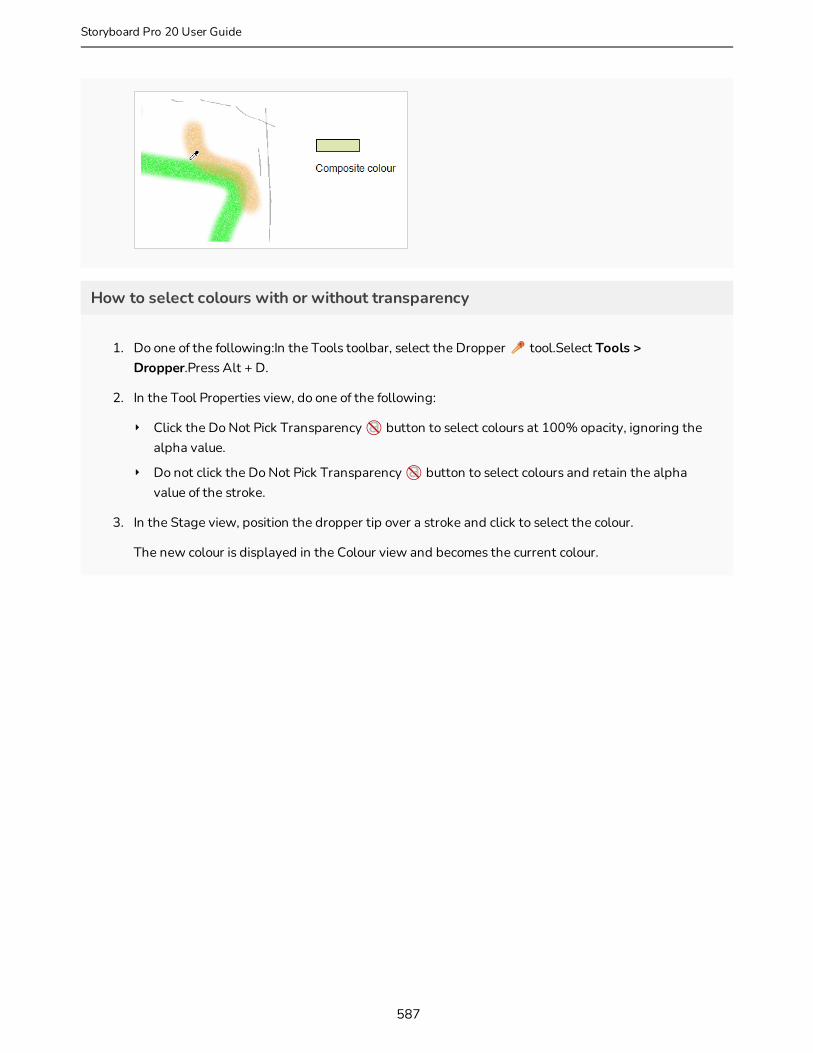
How to select colours with or without transparency
1. Do one of the following:In the Tools toolbar, select the Dropper tool.Select Tools > Dropper.Press Alt + D.
2. In the Tool Properties view, do one of the following:
‣ Click the Do Not Pick Transparency button to select colours at 100% opacity, ignoring the alpha value.
‣ Do not click the Do Not Pick Transparency button to select colours and retain the alpha value of the stroke.
3. In the Stage view, position the dropper tip over a stroke and click to select the colour.
The new colour is displayed in the Colour view and becomes the current colour.
587
Storyboard Pro 20 User Guide
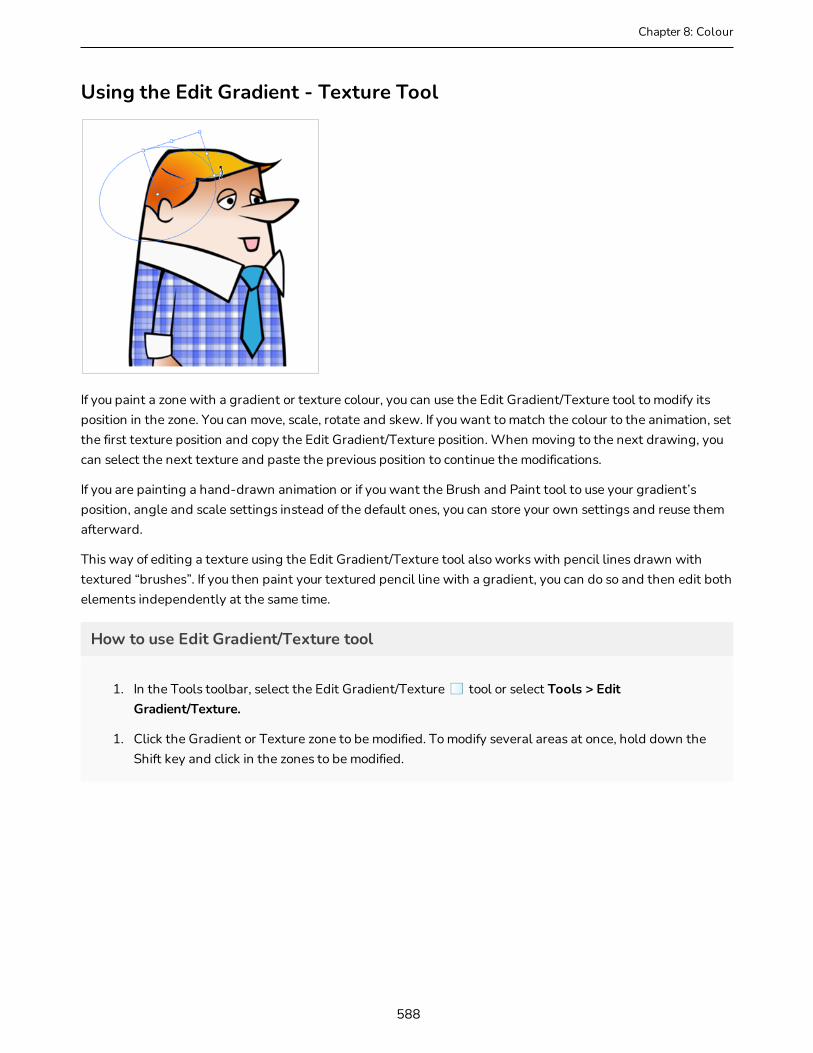
Chapter 8: Colour
Using the Edit Gradient - Texture Tool
If you paint a zone with a gradient or texture colour, you can use the Edit Gradient/Texture tool to modify its position in the zone. You can move, scale, rotate and skew. If you want to match the colour to the animation, set the first texture position and copy the Edit Gradient/Texture position. When moving to the next drawing, you can select the next texture and paste the previous position to continue the modifications.
If you are painting a hand-drawn animation or if you want the Brush and Paint tool to use your gradient’s position, angle and scale settings instead of the default ones, you can store your own settings and reuse them afterward.
This way of editing a texture using the Edit Gradient/Texture tool also works with pencil lines drawn with textured “brushes”. If you then paint your textured pencil line with a gradient, you can do so and then edit both elements independently at the same time.
How to use Edit Gradient/Texture tool
1. In the Tools toolbar, select the Edit Gradient/Texture tool or select Tools > Edit Gradient/Texture.
1. Click the Gradient or Texture zone to be modified. To modify several areas at once, hold down the Shift key and click in the zones to be modified.
588
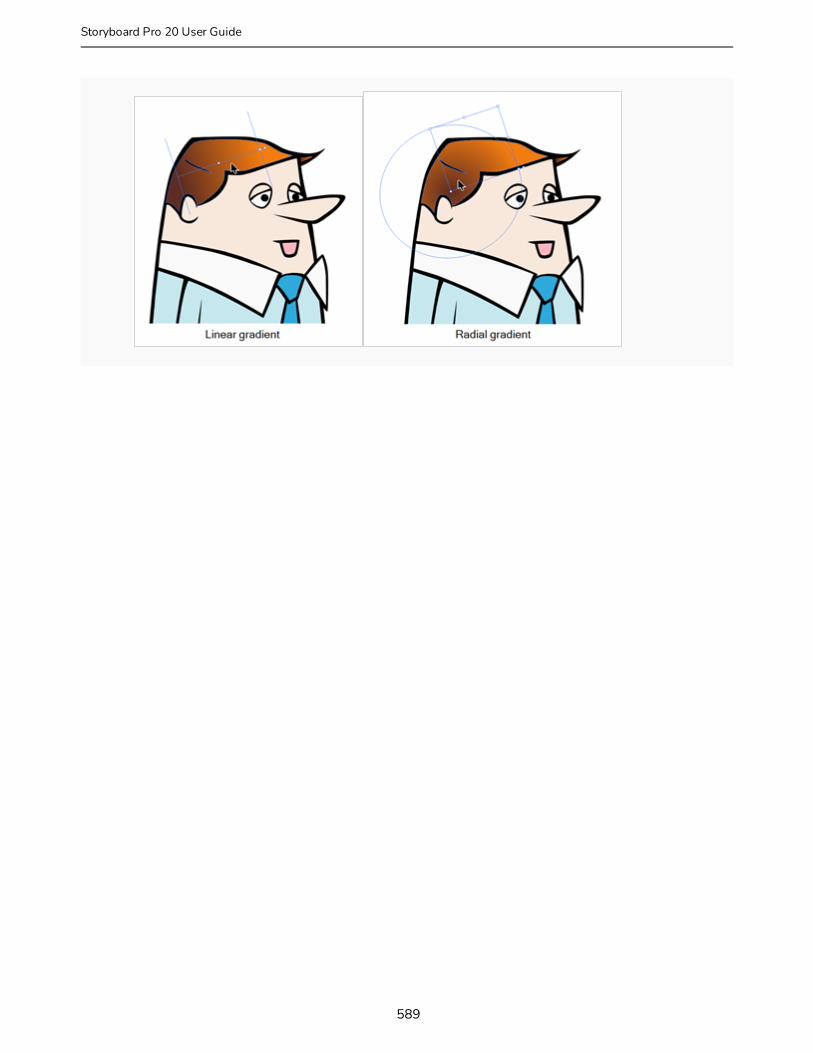
589
Storyboard Pro 20 User Guide
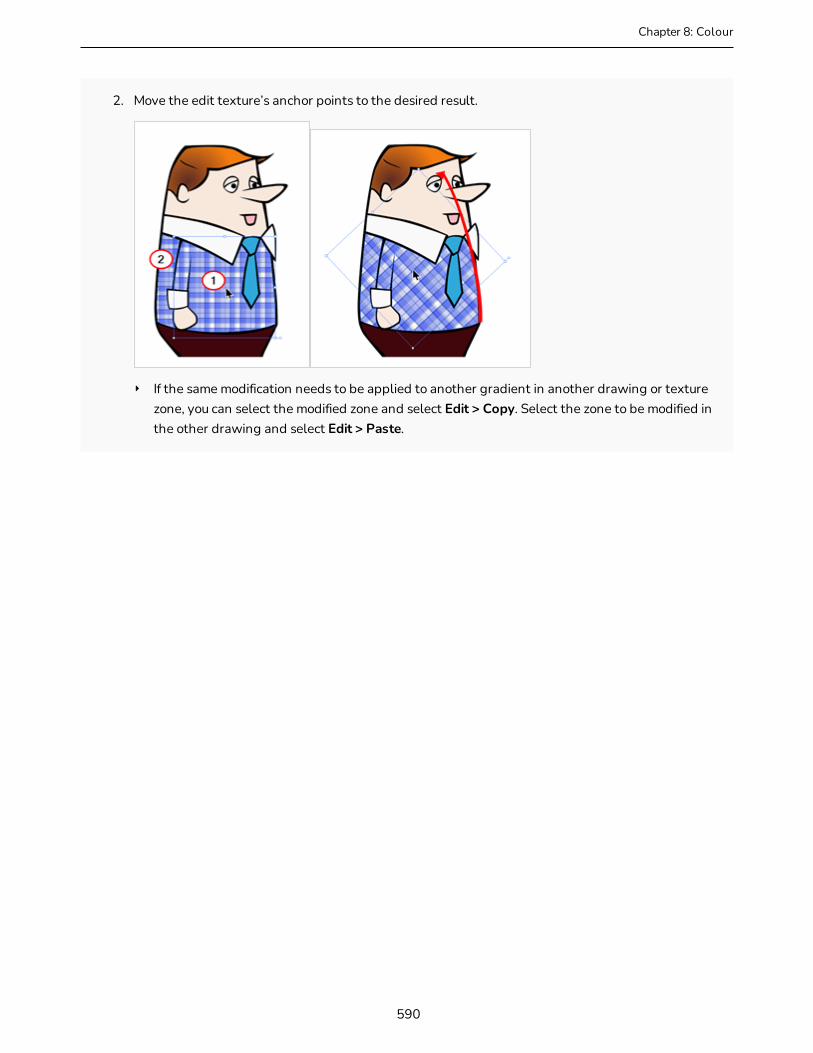
Chapter 8: Colour
2. Move the edit texture’s anchor points to the desired result.
‣ If the same modification needs to be applied to another gradient in another drawing or texture zone, you can select the modified zone and select Edit > Copy. Select the zone to be modified in the other drawing and select Edit > Paste.
590

Using the Close Gap Tool
The paint tool requires the area you attempt to fill to be closed in order to know exactly what area of your artwork must be filled. However, it is common for artists to accidentally leave small gaps in their artwork.
The Close Gap tool allows you to quickly close small gaps in a shape by creating an invisible stroke connecting two extremities of the gap. You can then fill the area using the Paint tool, as this invisible stroke will be taken in account to determine the outline of the shape to fill.
TIP
You do not need to use the Close Gap tool with precision. If you draw a crude stroke near the gap you want to close, the tool will automatically detect the two closest line extremities and will draw an invisible straight line connecting them. closing the gap between them.
How to use the Close Gap tool
1. In the Tools toolbar, select the Close Gap tool or select Tools > Close Gap.
l Click the Auto Flatten button in the Tool Properties view if you want the stroke you will draw to be flattened in your drawing instead of being on top.
l You can display the invisible lines by selecting View > Extras > Show Strokes in the top menu.
l If you do not display the strokes, a warning message dialog box will appear. Enabling the Don’t Show This Message Again option prevents this Message from appearing.
2. In the Stage view, trace an invisible line near to the gap to be closed.
The gap automatically closes.
591
Storyboard Pro 20 User Guide
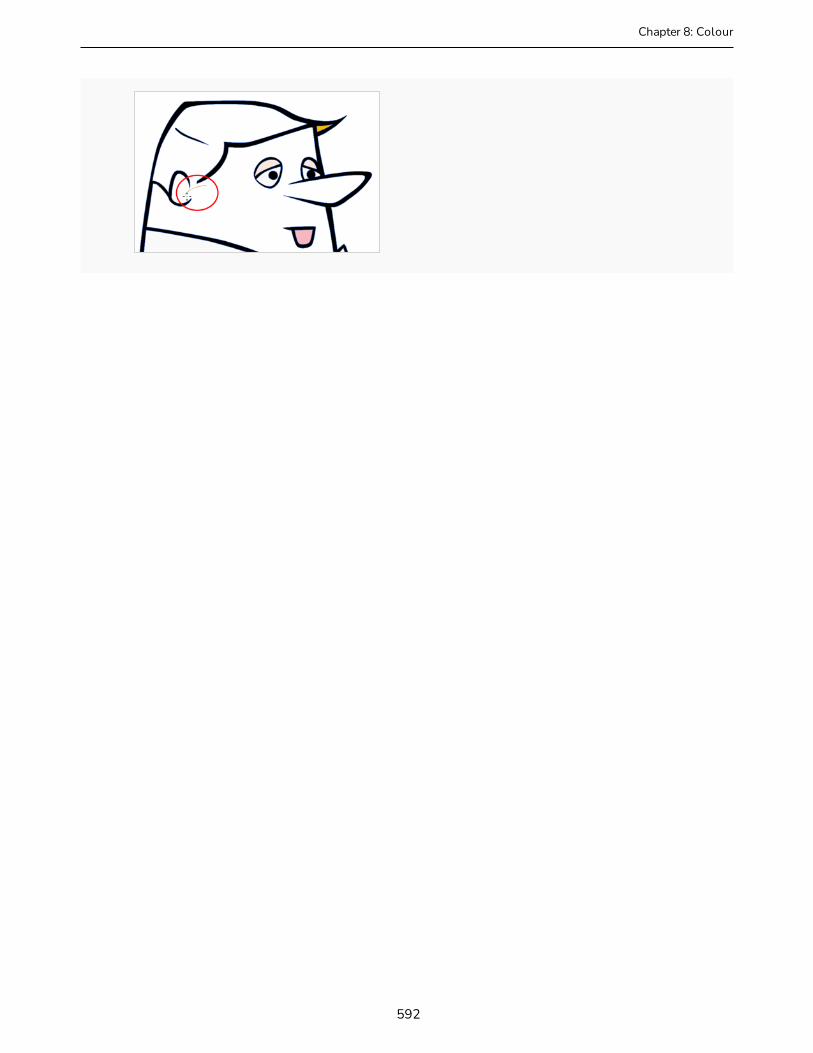
Chapter 8: Colour
592
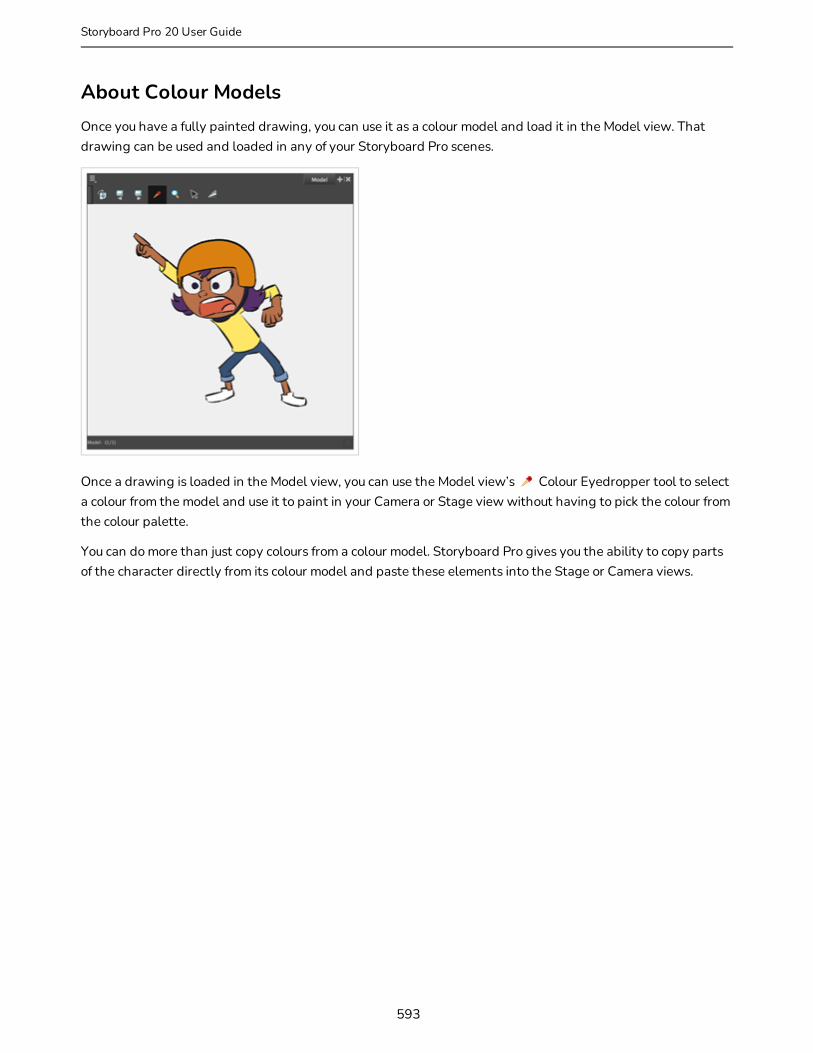
About Colour ModelsOnce you have a fully painted drawing, you can use it as a colour model and load it in the Model view. That drawing can be used and loaded in any of your Storyboard Pro scenes.
Once a drawing is loaded in the Model view, you can use the Model view’s Colour Eyedropper tool to select a colour from the model and use it to paint in your Camera or Stage view without having to pick the colour from the colour palette.
You can do more than just copy colours from a colour model. Storyboard Pro gives you the ability to copy parts of the character directly from its colour model and paste these elements into the Stage or Camera views.
593
Storyboard Pro 20 User Guide
Chapter 8: Colour
Opening the Model ViewIn order to work with colour models, you need to open the Model view first.
How to open the Model view
Do one of the following:
l From the top menu, select Windows > Model.
l From any of the other views, click the Add View button and select Model.
594
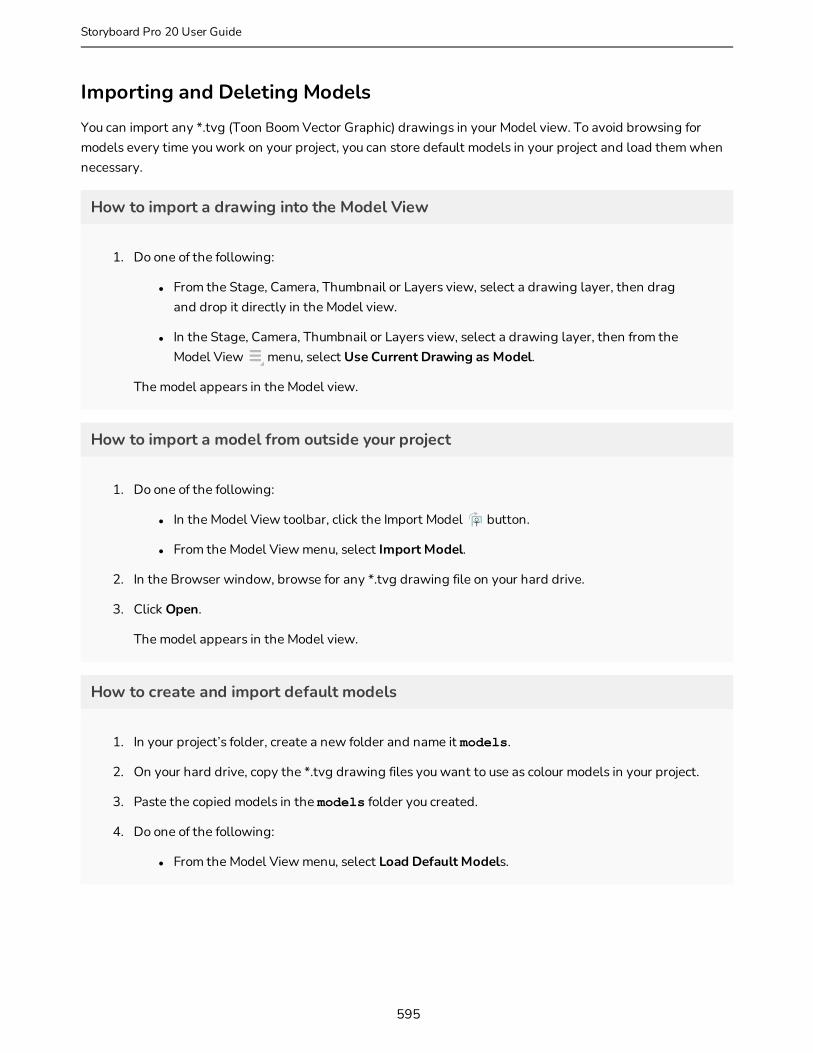
Importing and Deleting ModelsYou can import any *.tvg (Toon Boom Vector Graphic) drawings in your Model view. To avoid browsing for models every time you work on your project, you can store default models in your project and load them when necessary.
How to import a drawing into the Model View
1. Do one of the following:
l From the Stage, Camera, Thumbnail or Layers view, select a drawing layer, then drag and drop it directly in the Model view.
l In the Stage, Camera, Thumbnail or Layers view, select a drawing layer, then from the Model View menu, select Use Current Drawing as Model.
The model appears in the Model view.
How to import a model from outside your project
1. Do one of the following:
l In the Model View toolbar, click the Import Model button.
l From the Model View menu, select Import Model.
2. In the Browser window, browse for any *.tvg drawing file on your hard drive.
3. Click Open.
The model appears in the Model view.
How to create and import default models
1. In your project’s folder, create a new folder and name it models.
2. On your hard drive, copy the *.tvg drawing files you want to use as colour models in your project.
3. Paste the copied models in the models folder you created.
4. Do one of the following:
l From the Model View menu, select Load Default Models.
595
Storyboard Pro 20 User Guide

Chapter 8: Colour
How to import a model from the Library view
1. In the Library view’s left side, select the Template folder and continuing expanding its subfolders until *.tvg files appear on the right side.
2. In the Library view’s right side, select a *.tvg drawing and drag it into the Model view.
How to clear a model
1. In the Model view, navigate to the model you want to remove.
2. Do one of the following:
l In the Model View menu, select Clear Model.
l Right-click in the Model view and select Clear Model.
l Press Del.
596
Navigating the Model ViewUse the navigation features in the Model view to flip through, rotate or zoom in on your models.
All the rotate and reset view commands can be found in the top menu > View, the Model View menu and the menu that appears when you right-click in the Model view.
How to flip between models
1. Do one of the following:
l In the Model View toolbar, click the Next Model or Previous Model buttons.
l From the Model View menu, select Next Model or Previous Model.
The previous or next model appears in the Model view.
How to zoom in and out
Do one of the following:
l From the Model View toolbar, select the Zoom tool, then click in the Model view to zoom in and Alt + click to zoom out.
l From the Model View menu, select either Zoom In or Zoom Out.
l Right-click in the Model view and from the menu select Zoom In or Zoom Out.
l In the Model view, use the keyboard shortcuts 2 (zoom in) and 1 (zoom out).
597
Storyboard Pro 20 User Guide

Chapter 8: Colour
Using ModelsUse models from the Model view to sample colours, copy parts or copy entire character positions.
How to sample a colour
1. In the Model view, navigate to a model whose colours you wish to sample.
2. Select the Dropper tool by doing one of the following:
l In the Model view toolbar, select the Dropper tool.
l In the Model View menu, select Dropper.
l Right-click in the Model view and from the menu select Dropper.
l Use the keyboard shortcut Alt + D.
3. In the Model view, click on an area of colour from the model to select a desired colour.
The colour is now the current selected colour. This means you can save it as a swatch in the Colour view, or use it to paint or draw in the Stage or Camera views.
598
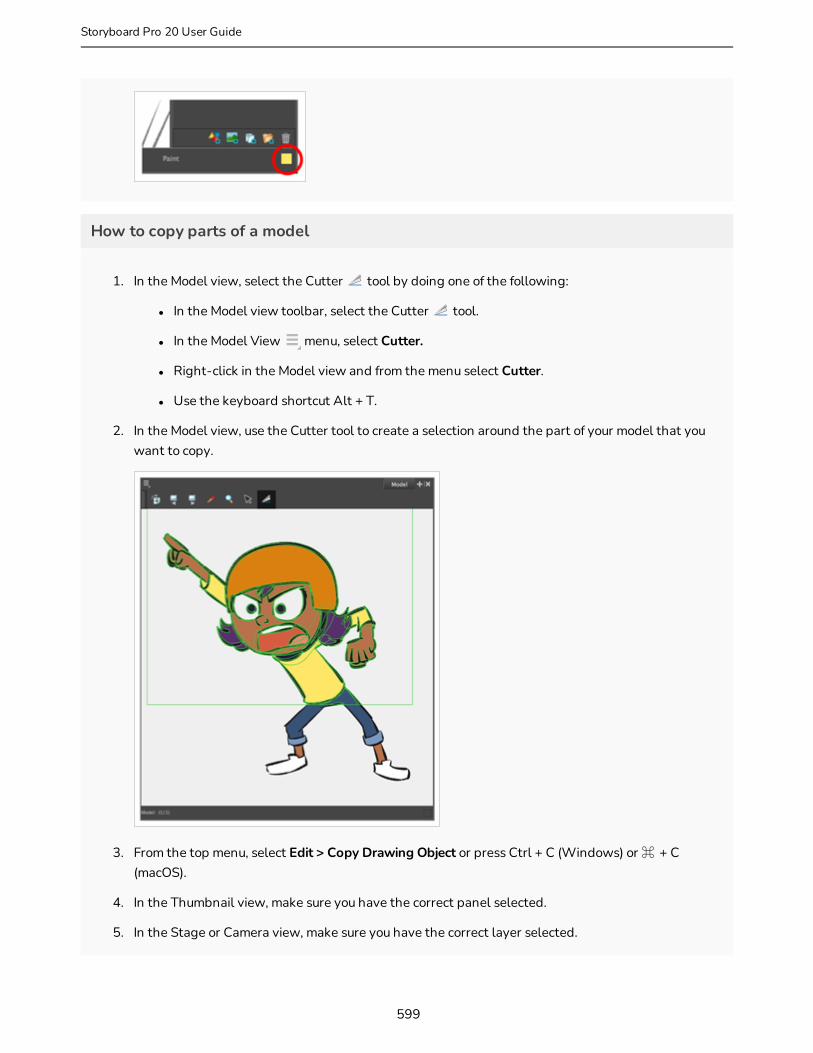
How to copy parts of a model
1. In the Model view, select the Cutter tool by doing one of the following:
l In the Model view toolbar, select the Cutter tool.
l In the Model View menu, select Cutter.
l Right-click in the Model view and from the menu select Cutter.
l Use the keyboard shortcut Alt + T.
2. In the Model view, use the Cutter tool to create a selection around the part of your model that you want to copy.
3. From the top menu, select Edit > Copy Drawing Object or press Ctrl + C (Windows) or ⌘ + C (macOS).
4. In the Thumbnail view, make sure you have the correct panel selected.
5. In the Stage or Camera view, make sure you have the correct layer selected.
599
Storyboard Pro 20 User Guide
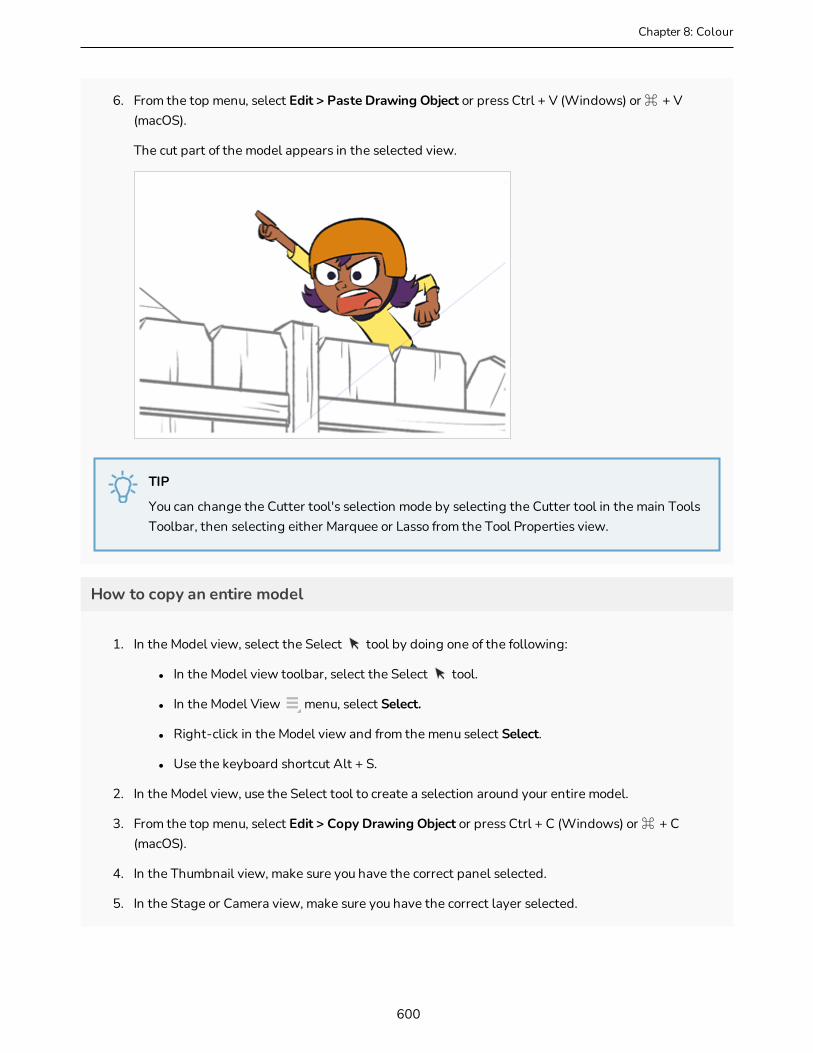
Chapter 8: Colour
6. From the top menu, select Edit > Paste Drawing Object or press Ctrl + V (Windows) or ⌘ + V (macOS).
The cut part of the model appears in the selected view.
TIP
You can change the Cutter tool's selection mode by selecting the Cutter tool in the main Tools Toolbar, then selecting either Marquee or Lasso from the Tool Properties view.
How to copy an entire model
1. In the Model view, select the Select tool by doing one of the following:
l In the Model view toolbar, select the Select tool.
l In the Model View menu, select Select.
l Right-click in the Model view and from the menu select Select.
l Use the keyboard shortcut Alt + S.
2. In the Model view, use the Select tool to create a selection around your entire model.
3. From the top menu, select Edit > Copy Drawing Object or press Ctrl + C (Windows) or ⌘ + C (macOS).
4. In the Thumbnail view, make sure you have the correct panel selected.
5. In the Stage or Camera view, make sure you have the correct layer selected.
600

6. From the top menu, select Edit > Paste Drawing Object or press Ctrl + V (Windows) or ⌘ + V (macOS).
The entire model appears in the selected view.
601
Storyboard Pro 20 User Guide

Chapter 9: Timing
Chapter 9: TimingOnce you have created a storyboard, you can start working on making your storyboard into a full-featured animatic. The first step to making an animatic is to time each panel and scene in your storyboard to match the intended pace of your action and, if applicable, the soundtrack.
By default, each panel you add to your project is timed to last one second during playback. Hence, you already have a barebone animatic just as soon as you finished creating your storyboard. Using the Timeline view, you can adjust the cue time and length of each panel, then play your animatic to test the pace.
In Storyboard Pro, time is expressed in the following format: HH:MM:SS:FF, where HH means hours, MM means minutes, SS means seconds and FF means frames.
TIP
By default, the time at frame 1 of the project is 00:00:00:00. However, in animation, the first frame of a scene is usually identified as frame 1. If you prefer the time at frame 1 of your project to be 00:00:00:01, you can set the time code at the start of your project by changing the Project Start Time setting in the Settings tab of the Project Properties dialog. You can also change the default value of that setting for new projects in the Global UI tab of the Preferences dialog.
602
About the Panel DurationT-SBFND-009-001
When panels are initially created, their default length is 1 second, displayed in timecode format. When it comes to your animatic, you will want to be more accurate. Modifying the duration of a particular panel is key when working out timing. There are a few different ways to accomplish this.
In the Timeline view, it is easy to change the duration of a panel just by dragging to resize it. This way, you can easily see the length of panels in relation to one another.
603
Storyboard Pro 20 User Guide

Chapter 9: Timing
Changing the Panel DurationT-SBFND-009-002
There are two ways to resize a panel, depending on how you want the change to affect subsequent panels. You can resize a panel in the Timeline view and shift all other panels down. This is handy when you are not concerned about modifying the position of all subsequent panels. Or you can resize a panel while only affecting the next panel. This is useful if you need to keep subsequent panels exactly where they are.
An accurate way of setting the duration of a panel is to use the Panel view, which will display, among other things, the exact timecode information for the selected panel. You can also use the Add Frame to Panel and Remove Frame from Panel commands, in the Storyboard Pro 20 menu, to adjust the length of the selected panel frame by frame.
NOTE
When you change the duration of a panel, its camera and layer keyframes are repositioned. However, if you change the length of a panel one frame at a time, the position of keyframes might not follow. This is because keyframes can only be positioned on whole frames, so they cannot be shifted by distances too small.
NOTE
Changing the duration of a panel from its start is no longer possible when Animatic Editing Mode is disabled. Editing the duration of a panel from the start using the mouse is still possible when Animatic Editing Mode is enabled or when holding down the CTRL (command on macOS) modifier to switch from ripple edit (yellow pointer) to non-ripple edit (red pointer) mode.
How to set the duration of a panel duration by frame
1. In the Timeline or Thumbnails view, select a panel.
2. Do one of the following:
604

l In the Panel view, type in the exact length for the panel in the Duration field.
NOTE
The format of the duration is H:MM:SS:FF, where H means hours, M means minutes, S means seconds and F means frames.
l In the Panel view, right of the Duration field, click on the Up arrow to extend the panel by one frame, or on the Down arrow to shorten the panel by one frame.
l Press + to add a frame to the panel, or - to remove a frame from the panel.
l In the top menu, select Storyboard > Add Frame to Panel or Storyboard > Remove Frame from Panel.
How to adjust the length of a panel in the Timeline view and ripple subsequent panels
1. Place the cursor near the right edge of the panel you want to resize.
The resize icon displays. Make sure that it points towards the inside of the panel you want to resize.
2. Click and drag the edge to the right to extend it, or to the left to shorten it.
As you drag, the new length of the panel is indicated, along with the amount of time you are adding or subtracting from it.
605
Storyboard Pro 20 User Guide

Chapter 9: Timing
All subsequent panels will be rippled forward or backward to preserve their length.
TIP
You can also extend or shorten a panel by clicking and dragging on its left edge.
When you do that, dragging towards the left will extend it, and dragging towards the right will shorten it.
How to move the transition between two panels without offsetting later panels
1. While pressing and hold the Alt key, position the mouse cursor over the right edge of the panel you want to resize.
The resize icon displays.
606

2. While holding the Alt key, click and drag the edge of the panel to the right to extend it, or to the left to shorten it.
As you drag, the new length of the panel is indicated, along with the amount of time you are adding or subtracting from it.
The length of the following panel will be adjusted to avoid shifting subsequent panels.
607
Storyboard Pro 20 User Guide
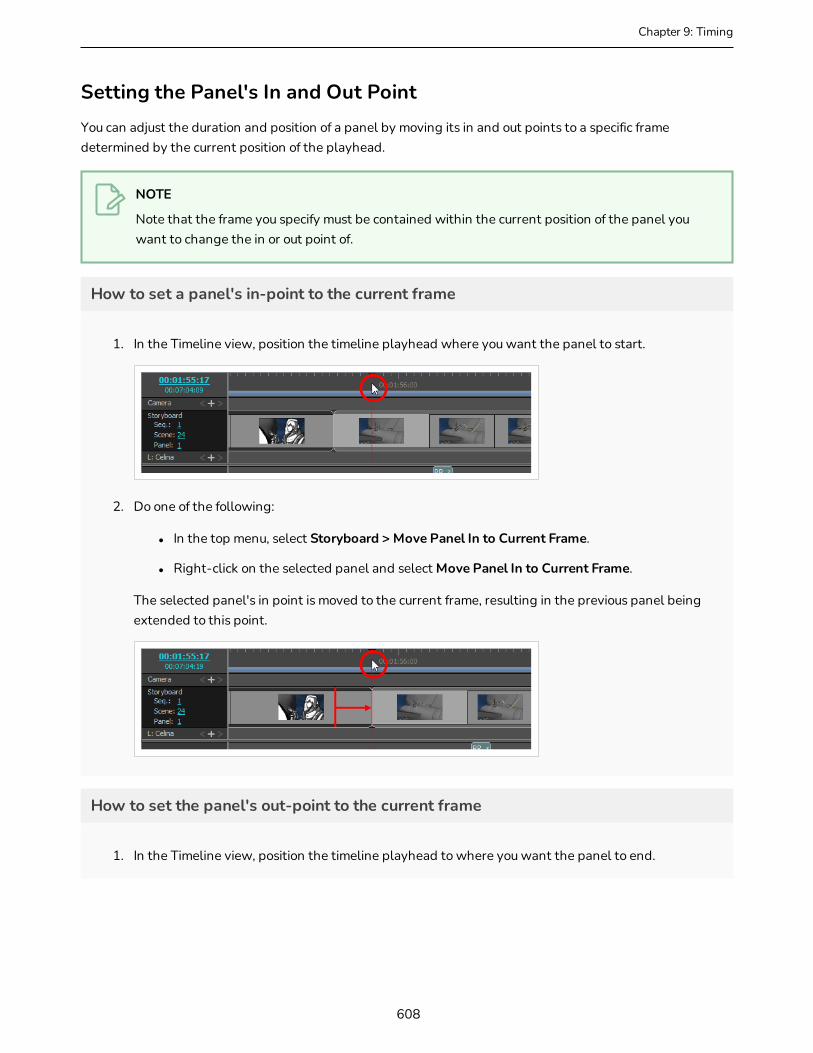
Chapter 9: Timing
Setting the Panel's In and Out Point You can adjust the duration and position of a panel by moving its in and out points to a specific frame determined by the current position of the playhead.
NOTE
Note that the frame you specify must be contained within the current position of the panel you want to change the in or out point of.
How to set a panel's in-point to the current frame
1. In the Timeline view, position the timeline playhead where you want the panel to start.
2. Do one of the following:
l In the top menu, select Storyboard > Move Panel In to Current Frame.
l Right-click on the selected panel and select Move Panel In to Current Frame.
The selected panel's in point is moved to the current frame, resulting in the previous panel being extended to this point.
How to set the panel's out-point to the current frame
1. In the Timeline view, position the timeline playhead to where you want the panel to end.
608
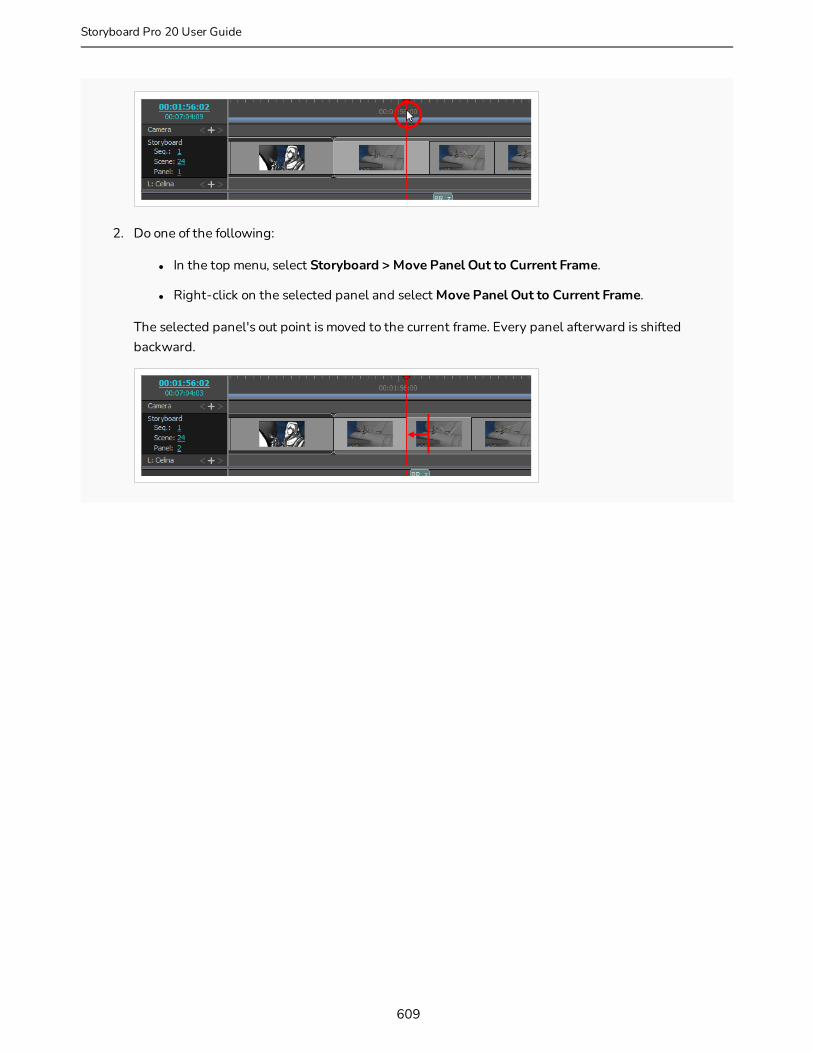
2. Do one of the following:
l In the top menu, select Storyboard > Move Panel Out to Current Frame.
l Right-click on the selected panel and select Move Panel Out to Current Frame.
The selected panel's out point is moved to the current frame. Every panel afterward is shifted backward.
609
Storyboard Pro 20 User Guide
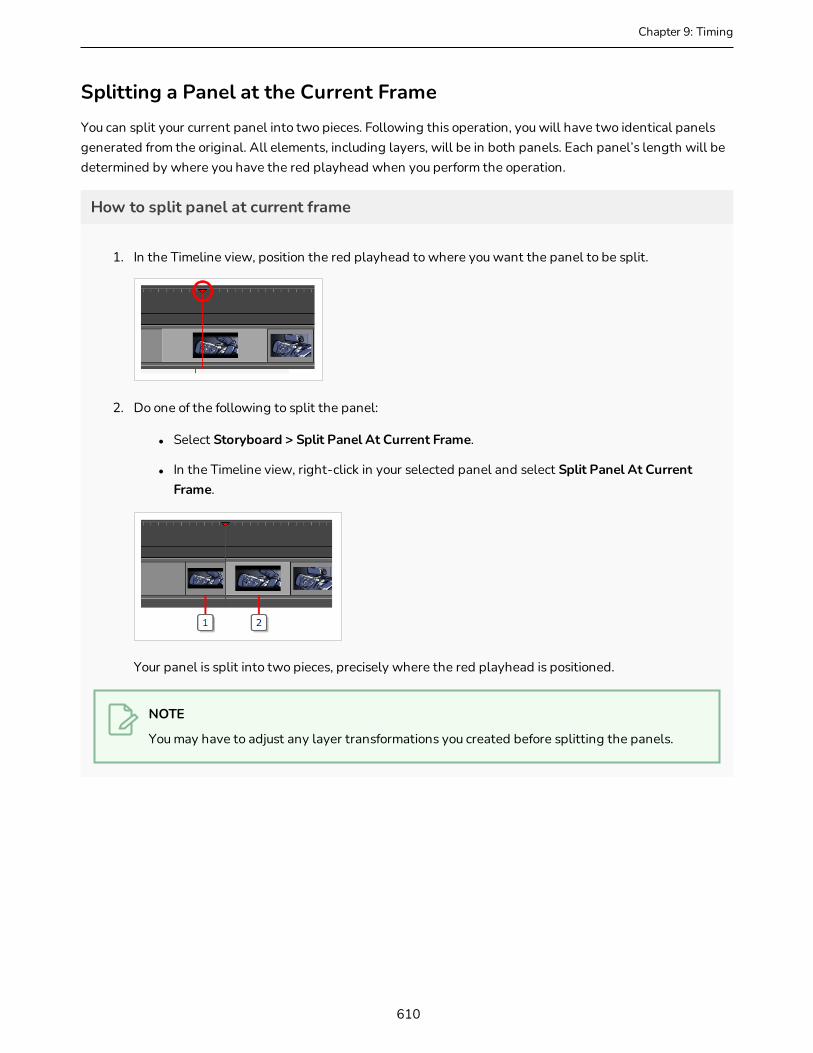
Chapter 9: Timing
Splitting a Panel at the Current FrameYou can split your current panel into two pieces. Following this operation, you will have two identical panels generated from the original. All elements, including layers, will be in both panels. Each panel’s length will be determined by where you have the red playhead when you perform the operation.
How to split panel at current frame
1. In the Timeline view, position the red playhead to where you want the panel to be split.
2. Do one of the following to split the panel:
l Select Storyboard > Split Panel At Current Frame.
l In the Timeline view, right-click in your selected panel and select Split Panel At Current Frame.
Your panel is split into two pieces, precisely where the red playhead is positioned.
NOTE
You may have to adjust any layer transformations you created before splitting the panels.
610
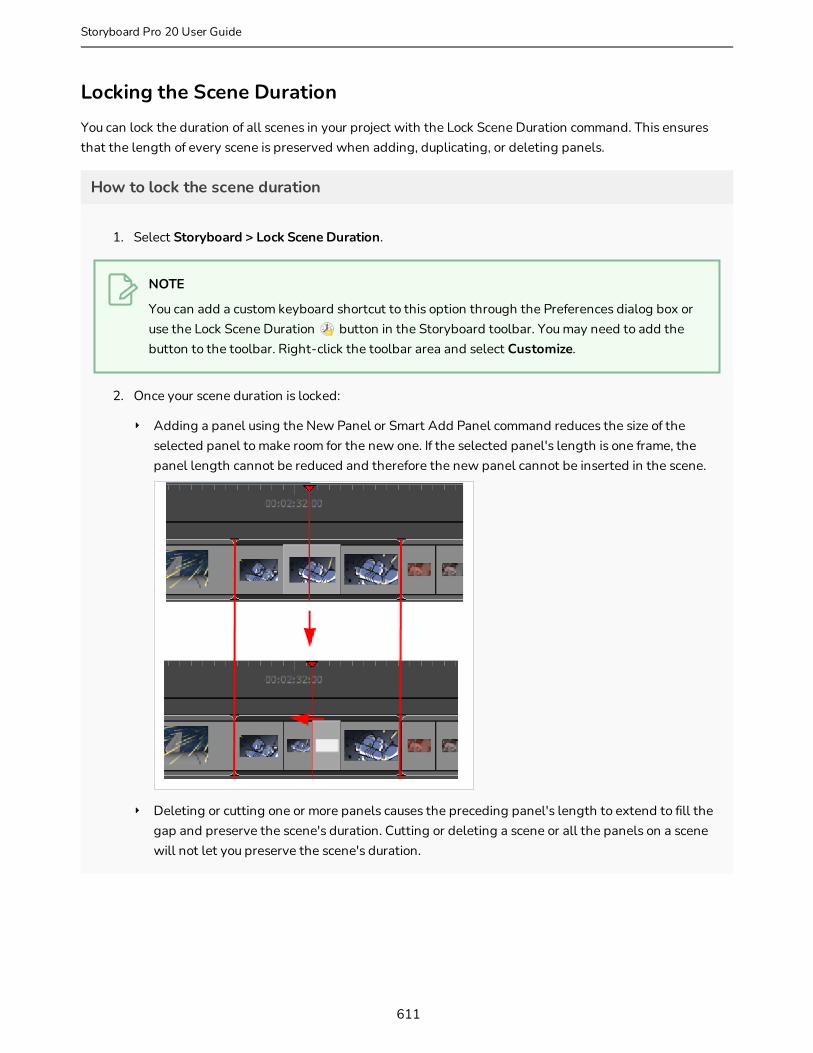
Locking the Scene DurationYou can lock the duration of all scenes in your project with the Lock Scene Duration command. This ensures that the length of every scene is preserved when adding, duplicating, or deleting panels.
How to lock the scene duration
1. Select Storyboard > Lock Scene Duration.
NOTE
You can add a custom keyboard shortcut to this option through the Preferences dialog box or use the Lock Scene Duration button in the Storyboard toolbar. You may need to add the button to the toolbar. Right-click the toolbar area and select Customize.
2. Once your scene duration is locked:
‣ Adding a panel using the New Panel or Smart Add Panel command reduces the size of the selected panel to make room for the new one. If the selected panel's length is one frame, the panel length cannot be reduced and therefore the new panel cannot be inserted in the scene.
‣ Deleting or cutting one or more panels causes the preceding panel's length to extend to fill the gap and preserve the scene's duration. Cutting or deleting a scene or all the panels on a scene will not let you preserve the scene's duration.
611
Storyboard Pro 20 User Guide
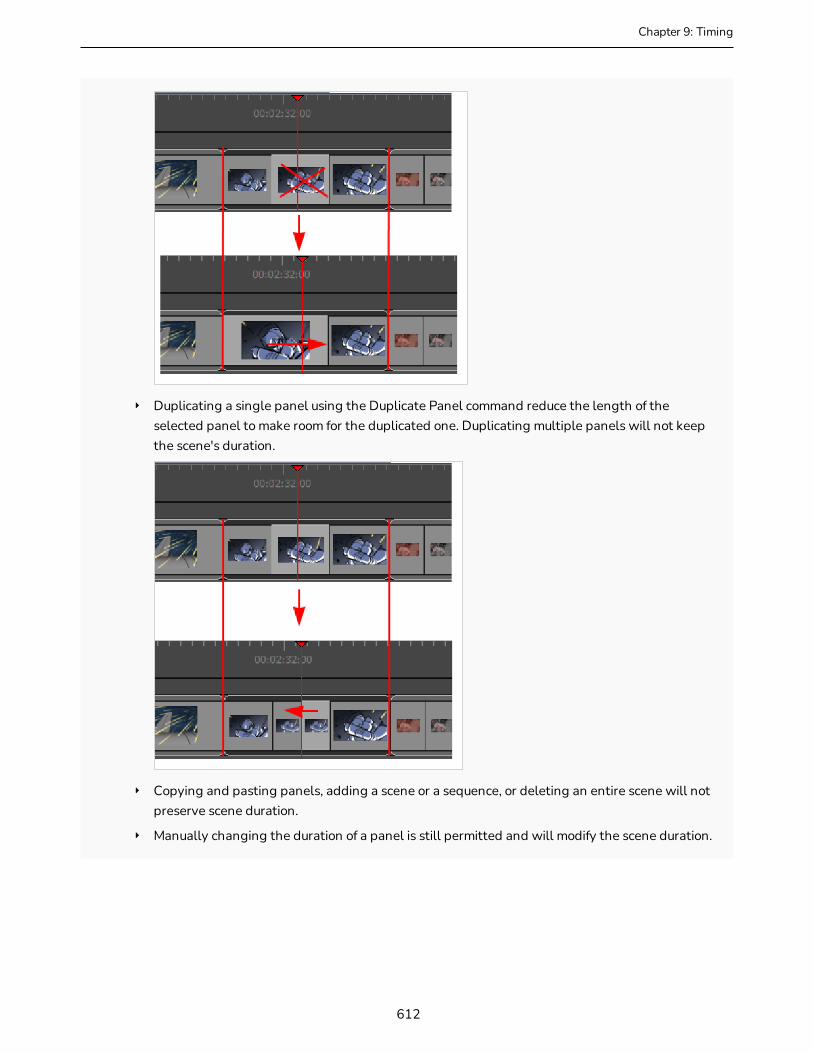
Chapter 9: Timing
‣ Duplicating a single panel using the Duplicate Panel command reduce the length of the selected panel to make room for the duplicated one. Duplicating multiple panels will not keep the scene's duration.
‣ Copying and pasting panels, adding a scene or a sequence, or deleting an entire scene will not preserve scene duration.
‣ Manually changing the duration of a panel is still permitted and will modify the scene duration.
612

Selecting All Panels ForwardBy using a series of keyboard shortcuts, it is possible to select a panel and all the panels following. You can also do this on the audio tracks—see Sound on page 766.
How to select all panels forward
1. In the Timeline view, select a panel.
2. Hold Ctrl + Alt + Shift (Windows) or ⌘ + Alt (macOS) and click the panel again.
The selected panel and all the panels following it, up until the end of the storyboard project, are selected.
‣ If you drag the selection forward, the panel preceding the selection will be extended.
‣ If you drag the selection backward, the panel preceding the selection will be reduced until it reaches the minimum length allowed (one frame). Then the second panel preceding it will be reduced.
How to select all panels and all sound clips forward
1. In the Timeline view, press Ctrl + Alt + Shift (Windows) or ⌘ + Alt (macOS) and click the panel from which you want the selection to start.
The panel and all the panels following it, up until the end of the storyboard project, as well as all the sound clips in all audio tracks starting from the position of the play head are selected and can be moved together.
‣ If you drag the selection forwards, the panel preceding the selection will be extended.
‣ If you drag the selection backwards, the panel preceding the selection will be reduced until it reaches the minimum length allowed (one frame), then the second panel preceding it will be reduced. Overlapping sound clips will be overwritten by the ones that are selected.
613
Storyboard Pro 20 User Guide
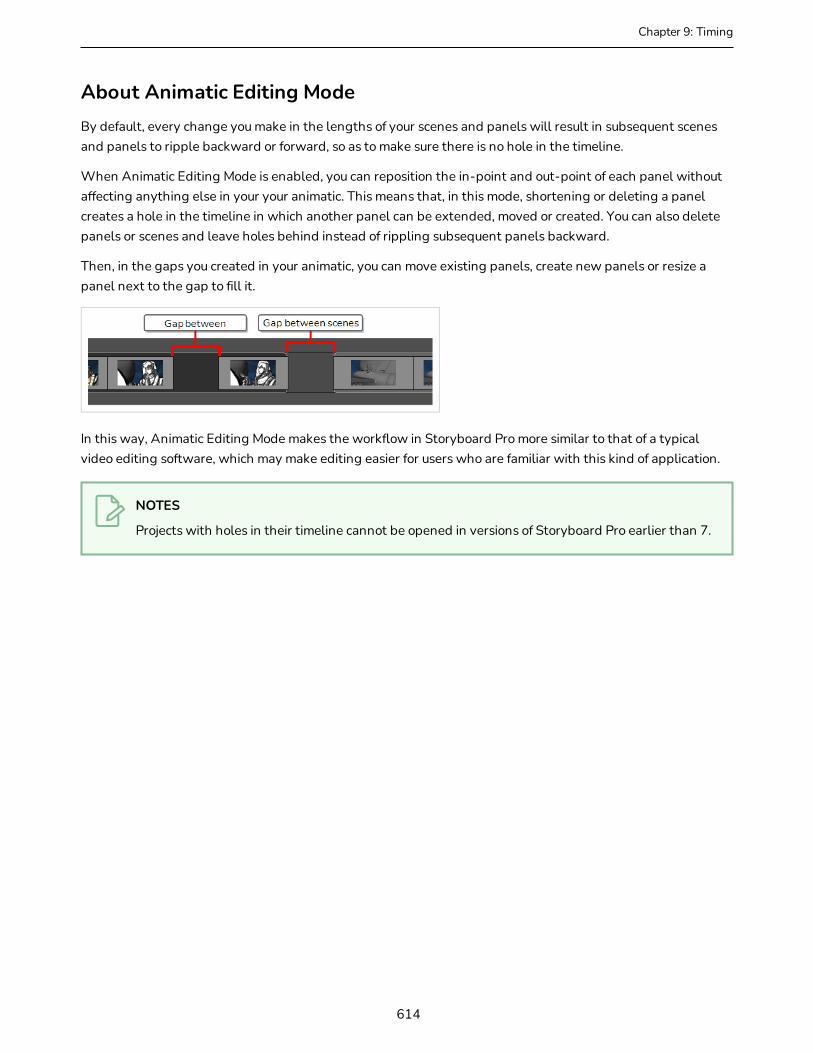
Chapter 9: Timing
About Animatic Editing ModeBy default, every change you make in the lengths of your scenes and panels will result in subsequent scenes and panels to ripple backward or forward, so as to make sure there is no hole in the timeline.
When Animatic Editing Mode is enabled, you can reposition the in-point and out-point of each panel without affecting anything else in your your animatic. This means that, in this mode, shortening or deleting a panel creates a hole in the timeline in which another panel can be extended, moved or created. You can also delete panels or scenes and leave holes behind instead of rippling subsequent panels backward.
Then, in the gaps you created in your animatic, you can move existing panels, create new panels or resize a panel next to the gap to fill it.
In this way, Animatic Editing Mode makes the workflow in Storyboard Pro more similar to that of a typical video editing software, which may make editing easier for users who are familiar with this kind of application.
NOTES
Projects with holes in their timeline cannot be opened in versions of Storyboard Pro earlier than 7.
614
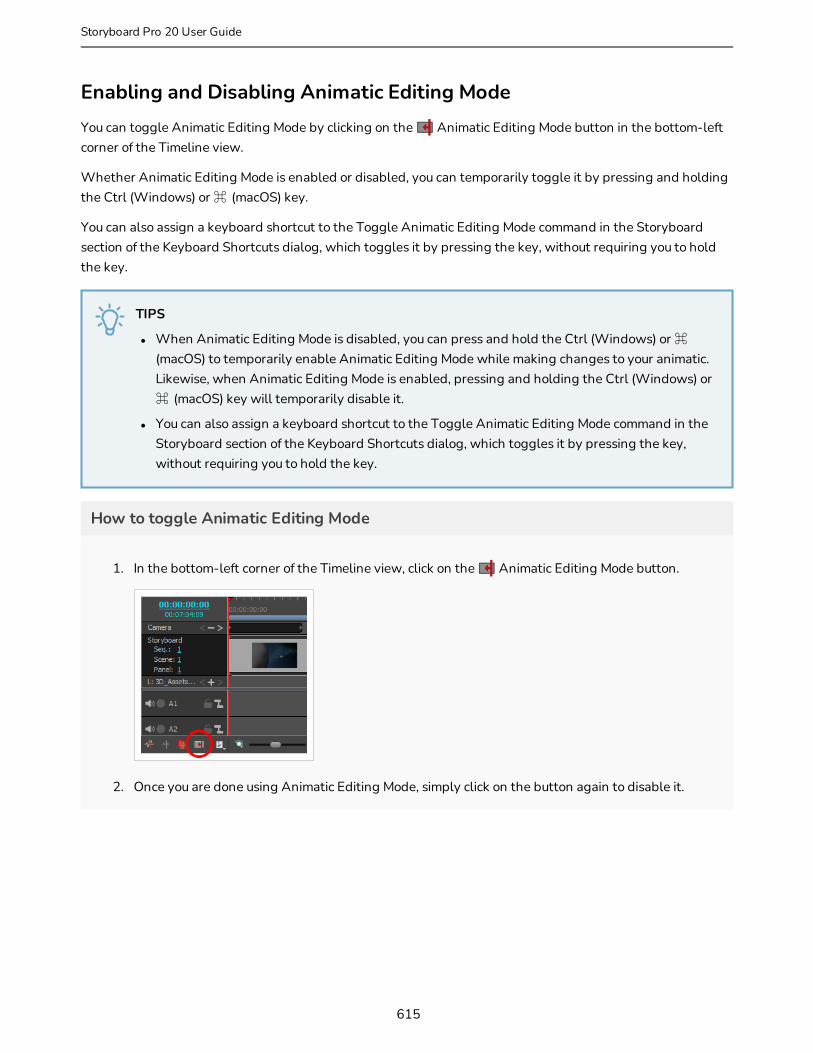
Enabling and Disabling Animatic Editing ModeYou can toggle Animatic Editing Mode by clicking on the Animatic Editing Mode button in the bottom-left corner of the Timeline view.
Whether Animatic Editing Mode is enabled or disabled, you can temporarily toggle it by pressing and holding the Ctrl (Windows) or ⌘ (macOS) key.
You can also assign a keyboard shortcut to the Toggle Animatic Editing Mode command in the Storyboard section of the Keyboard Shortcuts dialog, which toggles it by pressing the key, without requiring you to hold the key.
TIPS
l When Animatic Editing Mode is disabled, you can press and hold the Ctrl (Windows) or ⌘ (macOS) to temporarily enable Animatic Editing Mode while making changes to your animatic. Likewise, when Animatic Editing Mode is enabled, pressing and holding the Ctrl (Windows) or ⌘ (macOS) key will temporarily disable it.
l You can also assign a keyboard shortcut to the Toggle Animatic Editing Mode command in the Storyboard section of the Keyboard Shortcuts dialog, which toggles it by pressing the key, without requiring you to hold the key.
How to toggle Animatic Editing Mode
1. In the bottom-left corner of the Timeline view, click on the Animatic Editing Mode button.
2. Once you are done using Animatic Editing Mode, simply click on the button again to disable it.
615
Storyboard Pro 20 User Guide
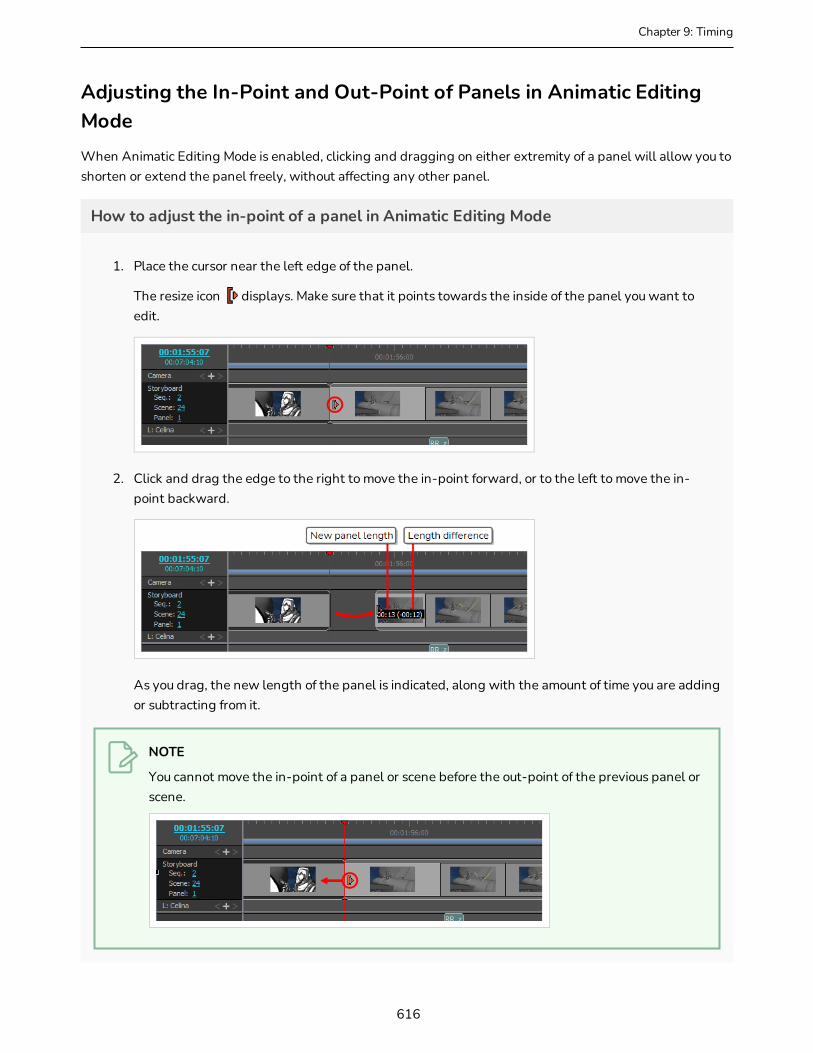
Chapter 9: Timing
Adjusting the In-Point and Out-Point of Panels in Animatic Editing ModeWhen Animatic Editing Mode is enabled, clicking and dragging on either extremity of a panel will allow you to shorten or extend the panel freely, without affecting any other panel.
How to adjust the in-point of a panel in Animatic Editing Mode
1. Place the cursor near the left edge of the panel.
The resize icon displays. Make sure that it points towards the inside of the panel you want to edit.
2. Click and drag the edge to the right to move the in-point forward, or to the left to move the in-point backward.
As you drag, the new length of the panel is indicated, along with the amount of time you are adding or subtracting from it.
NOTE
You cannot move the in-point of a panel or scene before the out-point of the previous panel or scene.
616

How to set a panel's in-point to the current frame in Animatic Editing Mode
1. In the Timeline view, position the timeline playhead where you want the panel to start.
2. Do one of the following:
l In the top menu, select Storyboard > Move Panel In to Current Frame.
l Right-click on the selected panel and select Move Panel In to Current Frame.
The selected panel's in point is moved to the current frame.
How to adjust the out-point of a panel in Animatic Editing Mode
1. Place the cursor near the right edge of the panel.
The resize icon displays. Make sure that it points towards the inside of the panel you want to edit.
2. Click and drag the edge to the left to move the out-point backward, or to the right to move the out-point forward.
617
Storyboard Pro 20 User Guide

Chapter 9: Timing
As you drag, the new length of the panel is indicated, along with the amount of time you are adding or subtracting from it.
NOTE
You cannot move the out-point of a panel or scene past the in-point of the next panel or scene.
How to set the panel's out-point to the current frame in Animatic Editing Mode
1. In the Timeline view, position the timeline playhead to where you want the panel to end.
2. Do one of the following:
l In the top menu, select Storyboard > Move Panel Out to Current Frame.
l Right-click on the selected panel and select Move Panel Out to Current Frame.
The selected panel's out point is moved to the current frame.
618

619
Storyboard Pro 20 User Guide

Chapter 9: Timing
Moving Panels In GapsIn Animatic Editing Mode, you can move panels around within gaps.
620

Rippling Panels in Animatic Editing ModeIn Animatic Editing Mode, panels do not ripple forward or backward, which may be constraining. To get the most out of Animatic Editing Mode, it is useful to know how to ripple panels on the fly.
At any time, you can press and hold the Ctrl (Windows) or ⌘ (macOS) key before editing your animatic to temporarily enable or disable Animatic Editing Mode. This means that, when Animatic Editing Mode is enabled, pressing and holding Ctrl (Windows) or ⌘ (macOS) will temporarily disable it, making any change you make to your animatic while holding this key offset all the panels after the affected panel. When there are gaps in your timeline, those gaps also get rippled forward or backward.
If you need to create a gap, or to adjust the size of a gap, you can do so by selecting all the panels from a specific point until the end of the animatic, then moving the selection.
How to select and ripple all panels from a specific point in the animatic in Animatic Editing Mode
1. Press and hold Ctrl (Windows) or ⌘ (macOS), Alt and Shift.
2. While holding those keys, in the Timeline view, click on the first panel of the sequence of panels you want to offset.
The panel you clicked on as well as every panel after it until the end of the animatic will be selected.
3. Click and drag on the selection to offset it.
621
Storyboard Pro 20 User Guide

Chapter 9: Timing
Clearing and Deleting Panels in Animatic Editing ModeBy default, when you delete a panel, all the subsequent panels ripple backward to make sure there is no gap in the animatic.
In Animatic Editing Mode, when you want to delete panels, you can choose between deleting the panel leaving a gap where it was, or deleting the panel rippling the subsequent panels backwards to close the gap.
Leaving a gap is the default behavior in Animatic Editing Mode. Hence, if you select panels and press Del (Windows) or (macOS), it will leave a hole in the animatic where the panels were.
It is also possible to delete gaps, which instantly ripples all panels after the gap backwards and fills the gap with them.
How to delete panels and leave a hole in the timeline in Animatic Editing Mode
1. Select the panels you want to delete.
TIPS
l You can select multiple panels by holding Ctrl (Windows) or ⌘ (macOS) and clicking on each panel you want to delete.
l You can select a sequence of multiple panels by clicking on the first panel you want to select and, while holding Shift, clicking on the last panel you want to select. Every panel in-between will be selected.
2. Do one of the following:
l Right-click on the selection and select Clear Panels.
l In the top menu, select Edit > Clear Panels.
l Press Del (Windows) or (macOS).
The selected panels will be deleted, leaving a gap where they used to be.
622

How to delete an empty space in the animatic and ripple subsequent panels backwards
1. In the Timeline view, select the gap you want to delete.
2. Do one of the following:
l Right-click on the selection and select Ripple Delete Space.
l In the top menu, select Edit > Ripple Delete Space.
l Press Shift + Del (Windows) or ⇧ + (macOS).
All panels after the selected empty space will be shifted backwards to fill the gap.
How to delete panels and ripple subsequent panels backwards in Animatic Editing Mode
1. Select the panels you want to delete.
623
Storyboard Pro 20 User Guide

Chapter 9: Timing
TIPS
l You can select multiple panels by holding Ctrl (Windows) or ⌘ (macOS) and clicking on each panel you want to delete.
l You can select a sequence of multiple panels by clicking on the first panel you want to select and, while holding Shift, clicking on the last panel you want to select. Every panel in-between will be selected.
2. Do one of the following:
l Right-click on the selection and select Ripple Delete Panels.
l In the top menu, select Edit > Ripple Delete Panels.
l Press Shift + Del (Windows) or ⇧ + (macOS).
The selected panels will be deleted, and subsequent panels will be shifted backwards to fill the gap.
624

About PlaybackThe Playback features can be used all through the animatic process, all the way from Timing to Transitions. You can preview you timing, animation, camera movements and sound in the Stage or Camera views or as a high quality playback in the Playback view.
625
Storyboard Pro 20 User Guide
Chapter 9: Timing
Playing Back the AnimaticYou can preview your project as an animatic in Storyboard Pro at any time during its development process. Using the Playback toolbar, you can preview the visual content, including transformations and transitions, and have it synchronized with sounds.
How to preview an animatic
1. In the Playback toolbar, click the Sound button.
2. If you want to see how the shots will look with dynamic camera movement, click the Camera Preview button.
You will need this option on to preview Camera moves and transitions. When you drag the timeline playhead while Camera Preview is enabled, it will adjust the Stage view to match the point of view of the camera.
3. In the Timeline or Thumbnails view, select the panel where you want the playback to begin.
4. In the Playback toolbar, click the Play Selection or Play buttons or press Shift + Enter.
5. To play your project in a continuous loop, click the Loop button.
6. You may also scroll through the Timeline view by dragging the red playhead.
7. Select Play > Previous Frame or Next Frame to skip and play back one frame at a time. Or press comma (,) and period (.).
626
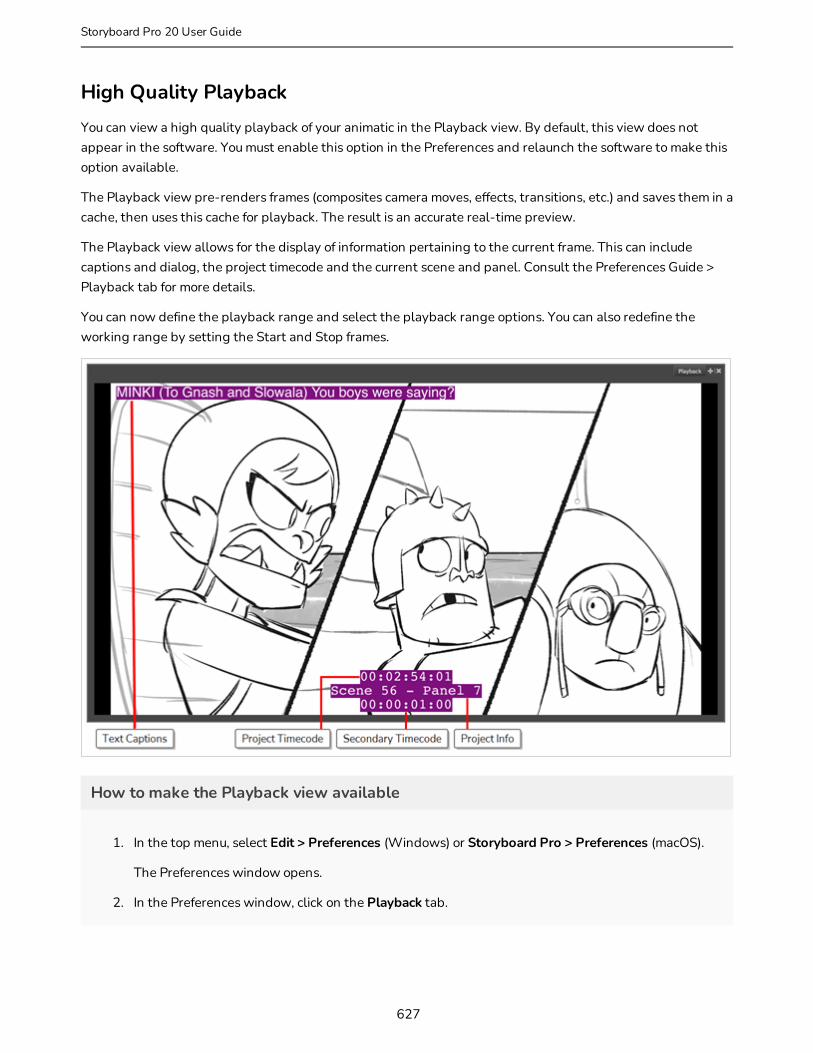
High Quality PlaybackYou can view a high quality playback of your animatic in the Playback view. By default, this view does not appear in the software. You must enable this option in the Preferences and relaunch the software to make this option available.
The Playback view pre-renders frames (composites camera moves, effects, transitions, etc.) and saves them in a cache, then uses this cache for playback. The result is an accurate real-time preview.
The Playback view allows for the display of information pertaining to the current frame. This can include captions and dialog, the project timecode and the current scene and panel. Consult the Preferences Guide > Playback tab for more details.
You can now define the playback range and select the playback range options. You can also redefine the working range by setting the Start and Stop frames.
How to make the Playback view available
1. In the top menu, select Edit > Preferences (Windows) or Storyboard Pro > Preferences (macOS).
The Preferences window opens.
2. In the Preferences window, click on the Playback tab.
627
Storyboard Pro 20 User Guide
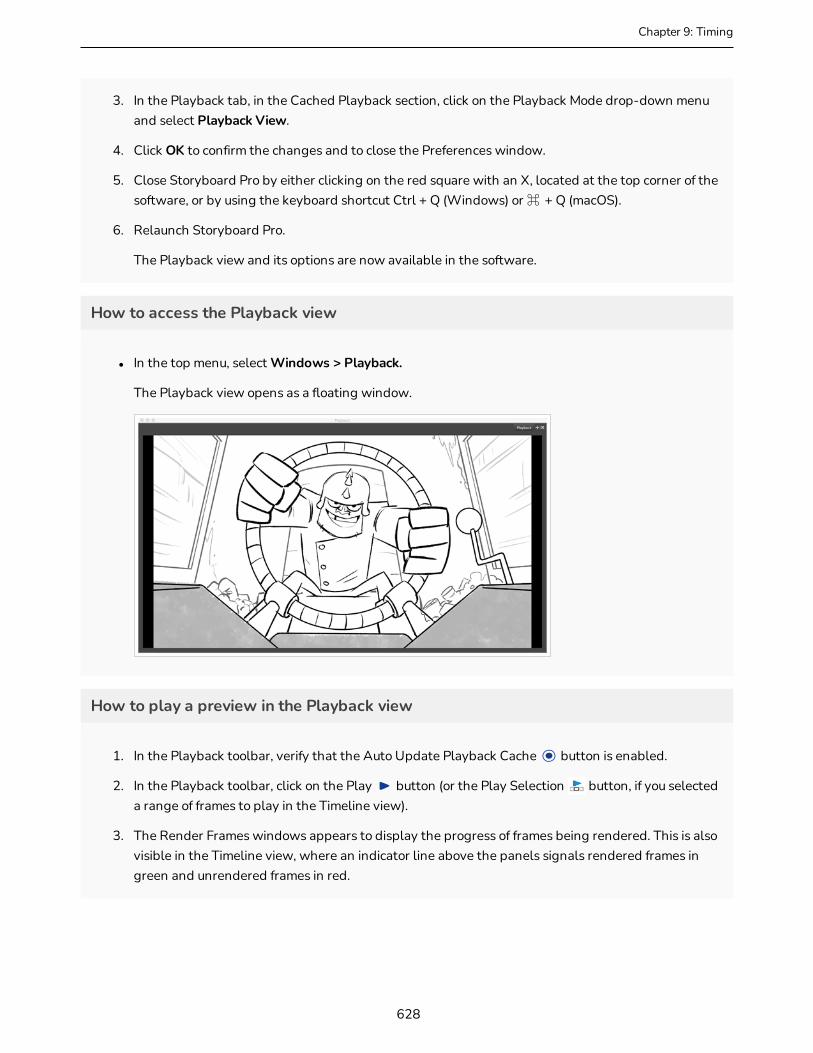
Chapter 9: Timing
3. In the Playback tab, in the Cached Playback section, click on the Playback Mode drop-down menu and select Playback View.
4. Click OK to confirm the changes and to close the Preferences window.
5. Close Storyboard Pro by either clicking on the red square with an X, located at the top corner of the software, or by using the keyboard shortcut Ctrl + Q (Windows) or ⌘ + Q (macOS).
6. Relaunch Storyboard Pro.
The Playback view and its options are now available in the software.
How to access the Playback view
l In the top menu, select Windows > Playback.
The Playback view opens as a floating window.
How to play a preview in the Playback view
1. In the Playback toolbar, verify that the Auto Update Playback Cache button is enabled.
2. In the Playback toolbar, click on the Play button (or the Play Selection button, if you selected a range of frames to play in the Timeline view).
3. The Render Frames windows appears to display the progress of frames being rendered. This is also visible in the Timeline view, where an indicator line above the panels signals rendered frames in green and unrendered frames in red.
628
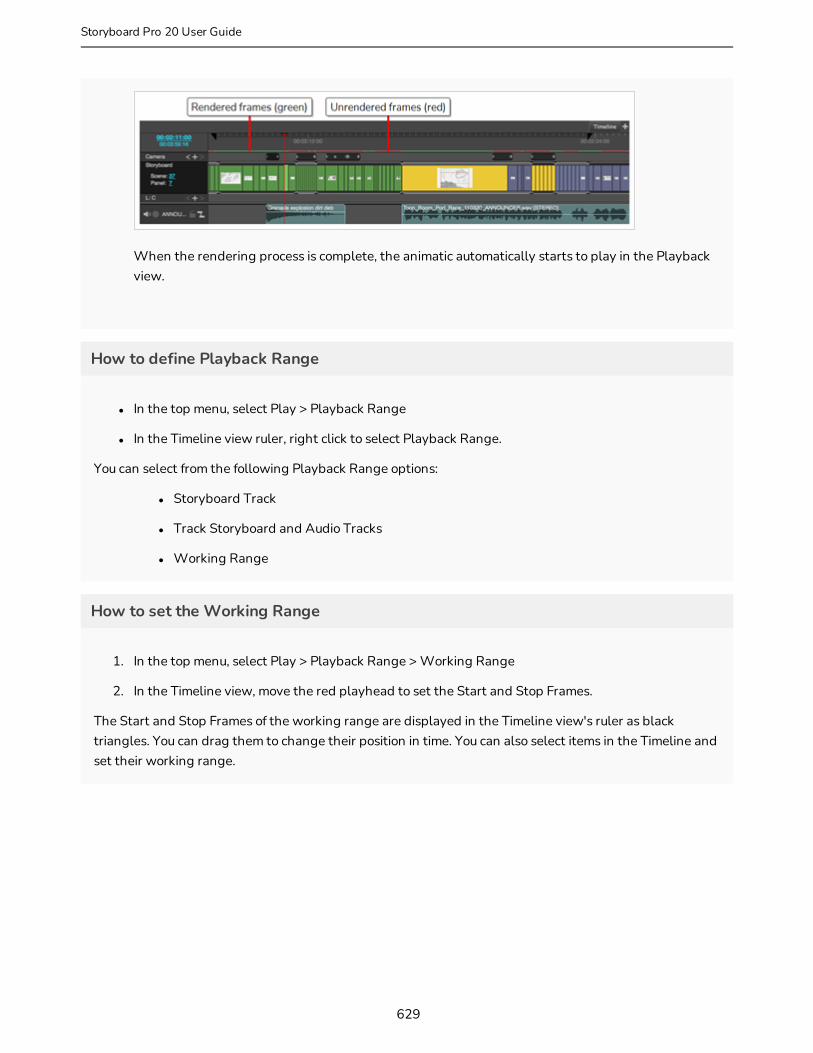
When the rendering process is complete, the animatic automatically starts to play in the Playback view.
How to define Playback Range
l In the top menu, select Play > Playback Range
l In the Timeline view ruler, right click to select Playback Range.
You can select from the following Playback Range options:
l Storyboard Track
l Track Storyboard and Audio Tracks
l Working Range
How to set the Working Range
1. In the top menu, select Play > Playback Range > Working Range
2. In the Timeline view, move the red playhead to set the Start and Stop Frames.
The Start and Stop Frames of the working range are displayed in the Timeline view's ruler as black triangles. You can drag them to change their position in time. You can also select items in the Timeline and set their working range.
629
Storyboard Pro 20 User Guide
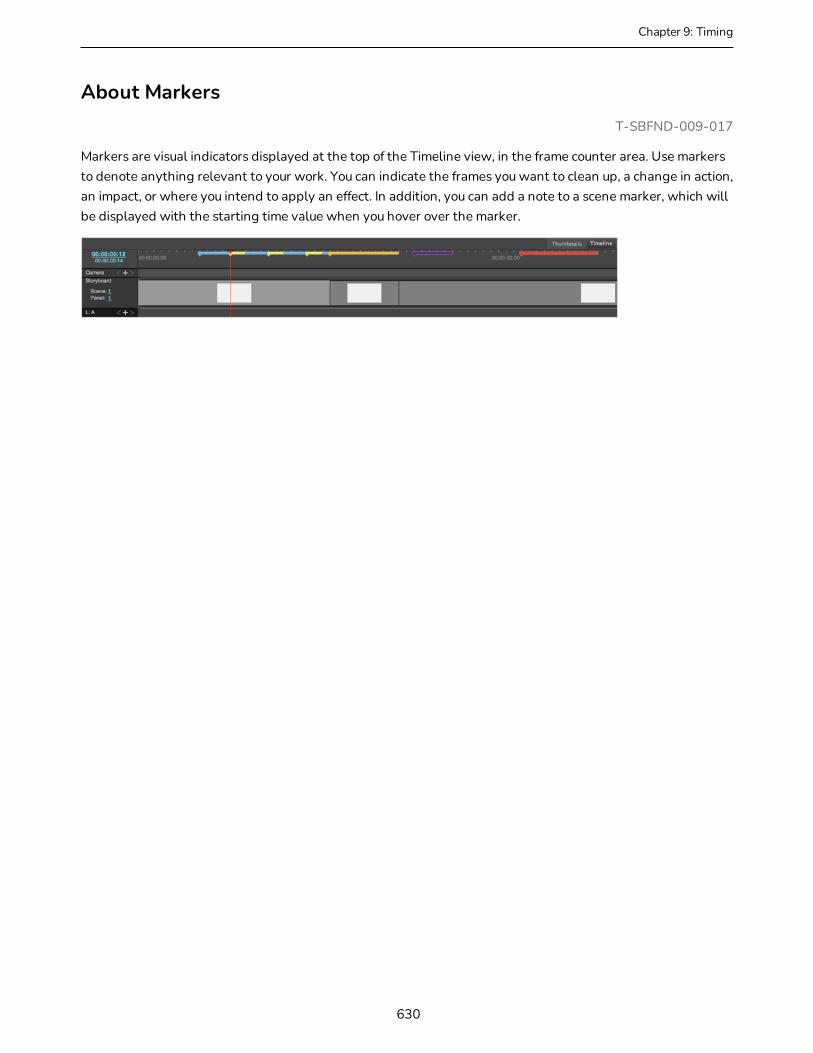
Chapter 9: Timing
About MarkersT-SBFND-009-017
Markers are visual indicators displayed at the top of the Timeline view, in the frame counter area. Use markers to denote anything relevant to your work. You can indicate the frames you want to clean up, a change in action, an impact, or where you intend to apply an effect. In addition, you can add a note to a scene marker, which will be displayed with the starting time value when you hover over the marker.
630

Creating Markers on a Current FrameT-SBFND-009-018
Using Markers, you can identify important moments in your storyboard. You can later easily find these moments by simply scanning the Timeline.
How to mark the current frame
1. In Timeline view, drag the red playhead to the frame on which you want to add a marker.
2. Do one of the following:
l Select Storyboard > Markers > Add Marker.
l Right-click in the frame counter area and select Add Marker.
A marker is added in the Timeline view at the exact position of the red playhead.
NOTE
It is also possible to add a marker during a playback of the storyboard or to a sound by right-clicking in the the frame counter area. The marker will appear at the exact position of the red playhead at the moment of the right-click.
631
Storyboard Pro 20 User Guide

Chapter 9: Timing
Deleting MarkersT-SBFND-009-022
You can delete any marker no longer needed in the project.
How to delete a marker
1. In the Timeline view, select the marker you want to delete.
2. Do one of the following:
l Select Storyboard > Markers > Delete Marker.
l Right-click in the frame counter area and select Delete Marker.
How to delete ripple marker or panels
l In the Timeline view, right click and select Ripple Delete Panels.
Markers placed before or in the time range of the deleted panel will stay at their current time range.
How to delete all markers
1. Do one of the following:
l Select Storyboard > Markers > Delete All Markers.
l Right-click in the frame counter area and select Delete All Markers.
NOTE
When deleting all markers, it is not mandatory to select a marker first.
632
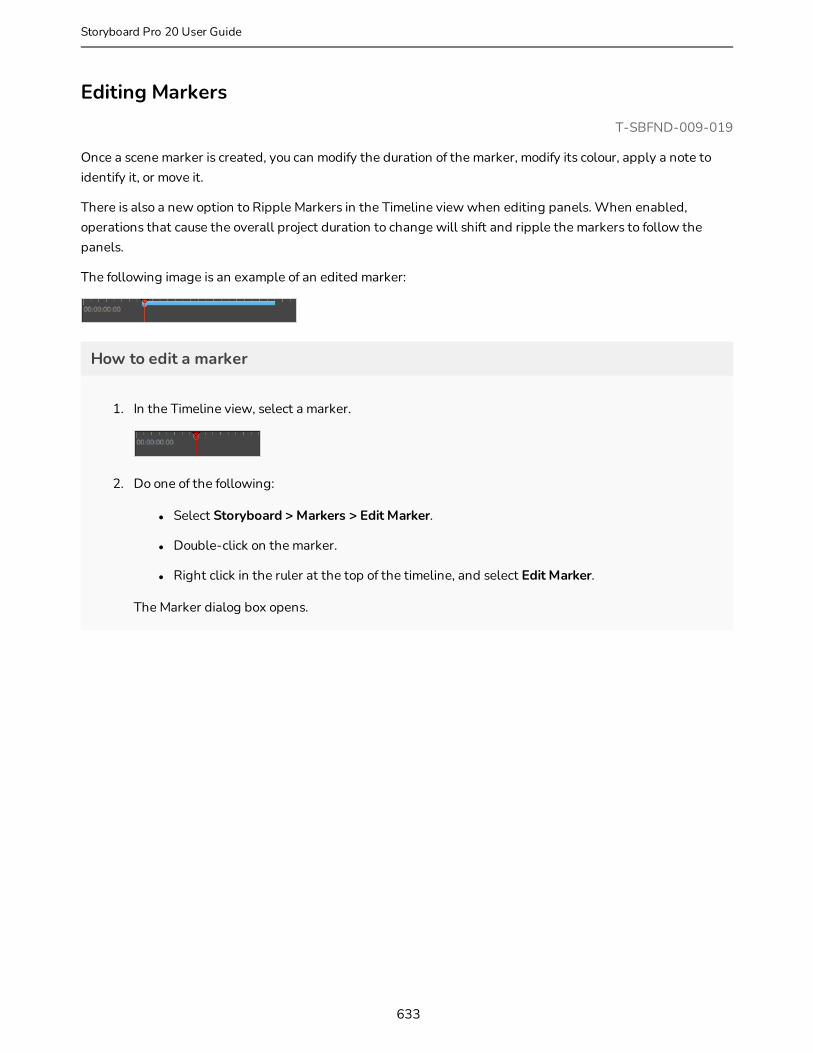
Editing MarkersT-SBFND-009-019
Once a scene marker is created, you can modify the duration of the marker, modify its colour, apply a note to identify it, or move it.
There is also a new option to Ripple Markers in the Timeline view when editing panels. When enabled, operations that cause the overall project duration to change will shift and ripple the markers to follow the panels.
The following image is an example of an edited marker:
How to edit a marker
1. In the Timeline view, select a marker.
2. Do one of the following:
l Select Storyboard > Markers > Edit Marker.
l Double-click on the marker.
l Right click in the ruler at the top of the timeline, and select Edit Marker.
The Marker dialog box opens.
633
Storyboard Pro 20 User Guide
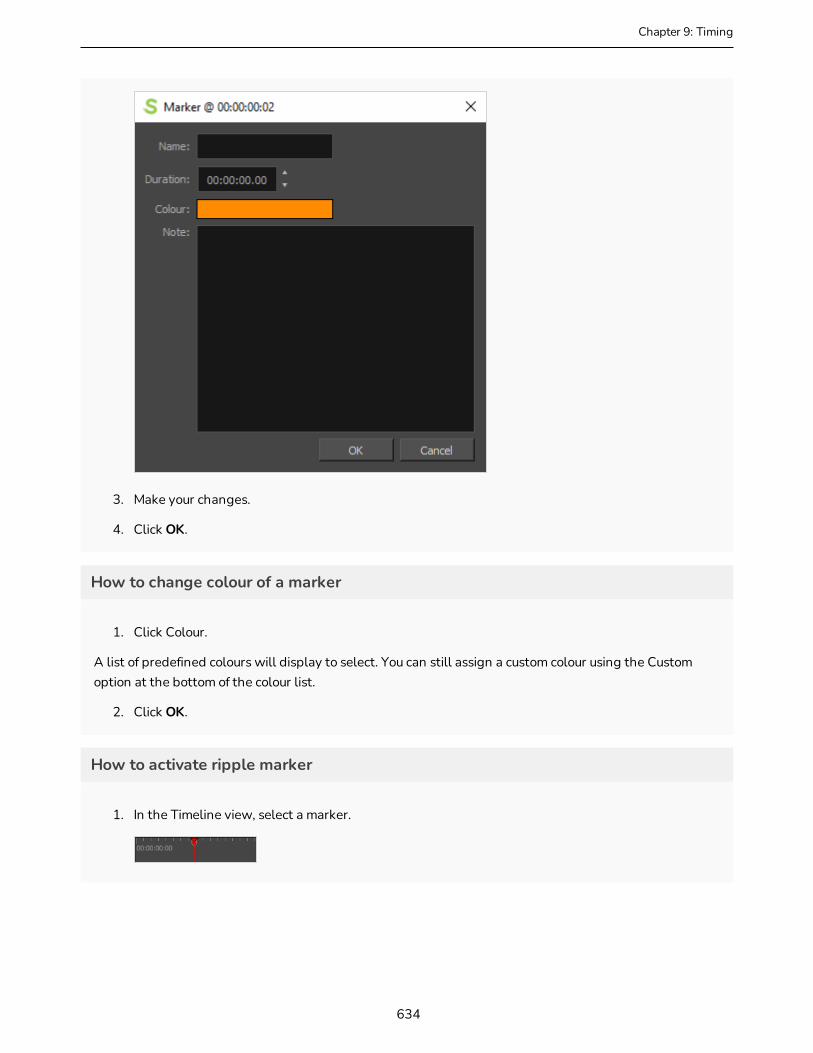
Chapter 9: Timing
3. Make your changes.
4. Click OK.
How to change colour of a marker
1. Click Colour.
A list of predefined colours will display to select. You can still assign a custom colour using the Custom option at the bottom of the colour list.
2. Click OK.
How to activate ripple marker
1. In the Timeline view, select a marker.
634

2. Do one of the following:
l Select Storyboard > Markers > Ripple Markers.
l Right-click in the frame counter area and select Ripple Markers.
635
Storyboard Pro 20 User Guide

Chapter 9: Timing
Displaying Marker TooltipsT-SBFND-009-020
You can display marker tooltips by hovering the pointer over a marker.
How to display a marker’s tooltip
1. In Timeline view, hover over a marker.
NOTE
The marker's tooltip can display time, duration and note.
2. Move the pointer over the next marker to see the next tooltip.
NOTE
As default value, the marker tooltip only shows the information about the time. Depending on the changes made in the Marker dialog box, the tooltip may show additional information, such as duration and note. If a duration other than 00:00:00.00 has been set, duration information will appear in the tooltip. The same logic applies to note information. For details, see Editing Markers on page 633.
You can display the tooltip by hovering over the marker between its starting and ending points. The range varies depending on the duration of the marker.
636

Moving MarkersT-SBFND-009-021
You can move a marker to another location when needed.
How to move a marker
1. In Timeline view, select a marker.
2. Drag and drop the marker to the new location.
NOTE
Only one marker can be selected at a time; therefore, it is not possible to drag and drop multiple markers at the same time.
In the Timeline view, if more than one marker appears at the same time/frame, the last marker created or moved appears on top of the other(s).
How to snap a marker to the beginning of a panel
1. In Timeline view, right-click in the frame counter area and select Snapping.
2. Select the marker.
3. Drag the marker near the beginning of the new panel.
When the marker snaps at the beginning of a new panel, a blue line with arrows will replace the red line of the red playhead.
637
Storyboard Pro 20 User Guide

Chapter 9: Timing
Exporting Markers to Toon Boom HarmonyWhen exporting scenes from Storyboard Pro to Toon Boom Harmony, the markers are exported automatically. All information about the markers (time, duration and note) will be brought over.
For more information, see Exporting Harmony Scenes on page 1007
From Storyboard Pro:
To Toon Boom Harmony:
NOTE
For more information about Scene Markers in Toon Boom Harmony, see About Scene Markers.
NOTE
In Storyboard Pro, any marker having a range that exceeds another scene, will not be exported in the second scene in Harmony.
638

639
Storyboard Pro 20 User Guide
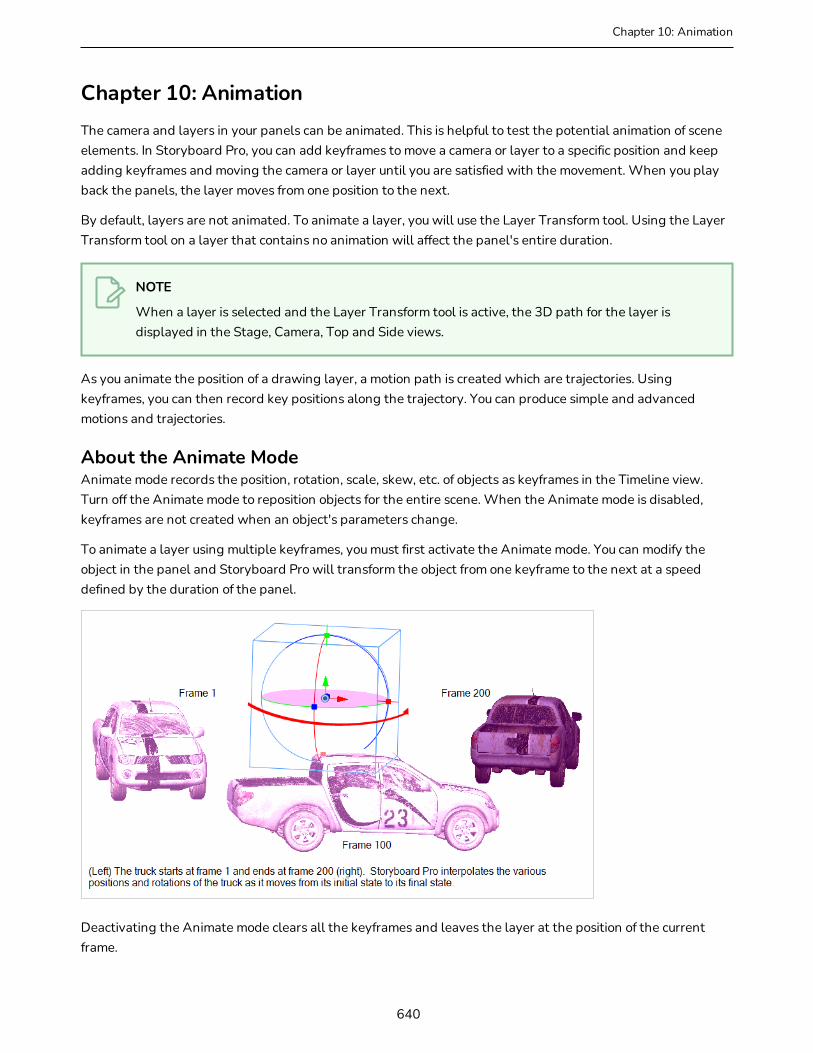
Chapter 10: Animation
Chapter 10: AnimationThe camera and layers in your panels can be animated. This is helpful to test the potential animation of scene elements. In Storyboard Pro, you can add keyframes to move a camera or layer to a specific position and keep adding keyframes and moving the camera or layer until you are satisfied with the movement. When you play back the panels, the layer moves from one position to the next.
By default, layers are not animated. To animate a layer, you will use the Layer Transform tool. Using the Layer Transform tool on a layer that contains no animation will affect the panel's entire duration.
NOTE
When a layer is selected and the Layer Transform tool is active, the 3D path for the layer is displayed in the Stage, Camera, Top and Side views.
As you animate the position of a drawing layer, a motion path is created which are trajectories. Using keyframes, you can then record key positions along the trajectory. You can produce simple and advanced motions and trajectories.
About the Animate ModeAnimate mode records the position, rotation, scale, skew, etc. of objects as keyframes in the Timeline view. Turn off the Animate mode to reposition objects for the entire scene. When the Animate mode is disabled, keyframes are not created when an object's parameters change.
To animate a layer using multiple keyframes, you must first activate the Animate mode. You can modify the object in the panel and Storyboard Pro will transform the object from one keyframe to the next at a speed defined by the duration of the panel.
Deactivating the Animate mode clears all the keyframes and leaves the layer at the position of the current frame.
640

Animating LayersBy default, layers in Storyboard Pro are static, but they can be animated.
A layer is animated by setting it in different positions, angles or sizes at two different frames in the timeline, then letting Storyboard Pro calculate the position, angle and size of the layer for each frame between those two frames. The frames at the beginning and end of an animation are referred to as keyframes.
You can animate a layer or multiple layers by enabling animation on it, which will create a keyframe for it in its current position, at the current frame. From there, you can just go to another frame and change its position, which will automatically create another keyframe at the current frame. At this point, the layer is already animated from its original position to the position you just moved it to.
How to animate a layer
1. In the Timeline view, select the panel with the layer you want to animate.
2. Move the Timeline cursor to the exact time where you want to create the first keyframe for your animation.
3. In the Layer panel of the Stage or Camera view or in the Layers view, click on the Animate button of the 3D object you wish to animate.
The Animate button turns yellow and changes shape.
In the Layer Animation track of the Timeline view, a keyframe is created at the current frame. This keyframe stores the position, angle and size of the layer at the current frame.
641
Storyboard Pro 20 User Guide
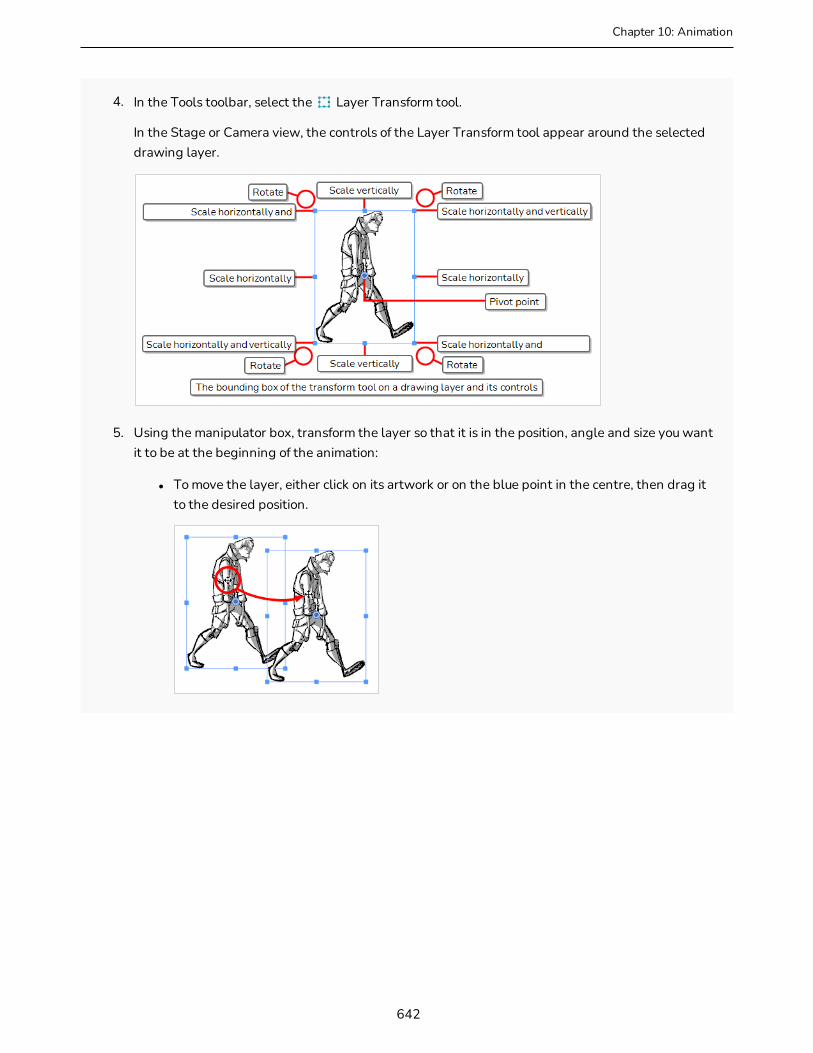
Chapter 10: Animation
4. In the Tools toolbar, select the Layer Transform tool.
In the Stage or Camera view, the controls of the Layer Transform tool appear around the selected drawing layer.
5. Using the manipulator box, transform the layer so that it is in the position, angle and size you want it to be at the beginning of the animation:
l To move the layer, either click on its artwork or on the blue point in the centre, then drag it to the desired position.
642

TIPS
l If you are having trouble dragging the layer by its artwork, you can also click and drag on the blue point in the centre. However, this point may be obstructed by the layer's pivot point . If that is the case, you can click and drag on the pivot point to move it out of the way, then click and drag on the centre point to move the layer.
l You can also nudge the selection by using the arrow keys on your keyboard.
l You can also enter specific coordinates in the Horizontal Offset and Vertical Offset fields in the Tool Properties view.
l To scale the layer, click on one of the squares at the edges or corners of the manipulator box and drag them to stretch or shrink the drawing.
TIPS
l You can preserve the horizontal and vertical proportions of the selection by holding the Shift key.
l You can also enter specific scale percentages in the Horizontal Scale and Vertical Scale fields in the Tool Properties view.
l To rotate the layer, move the cursor just outside of one of the corners of the manipulator box until the mouse cursor becomes . Then, click and drag in either direction to rotate the layer clockwise or counterclockwise.
643
Storyboard Pro 20 User Guide
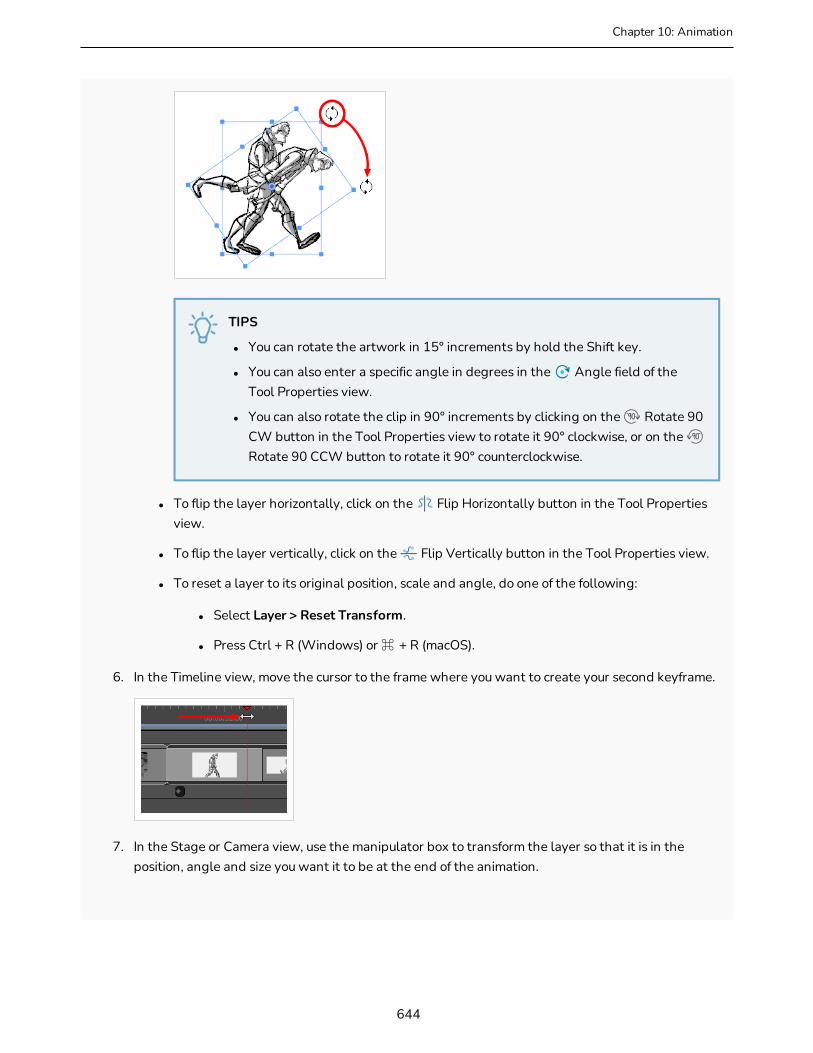
Chapter 10: Animation
TIPS
l You can rotate the artwork in 15° increments by hold the Shift key.
l You can also enter a specific angle in degrees in the Angle field of the Tool Properties view.
l You can also rotate the clip in 90° increments by clicking on the Rotate 90 CW button in the Tool Properties view to rotate it 90° clockwise, or on the Rotate 90 CCW button to rotate it 90° counterclockwise.
l To flip the layer horizontally, click on the Flip Horizontally button in the Tool Properties view.
l To flip the layer vertically, click on the Flip Vertically button in the Tool Properties view.
l To reset a layer to its original position, scale and angle, do one of the following:
l Select Layer > Reset Transform.
l Press Ctrl + R (Windows) or ⌘ + R (macOS).
6. In the Timeline view, move the cursor to the frame where you want to create your second keyframe.
7. In the Stage or Camera view, use the manipulator box to transform the layer so that it is in the position, angle and size you want it to be at the end of the animation.
644
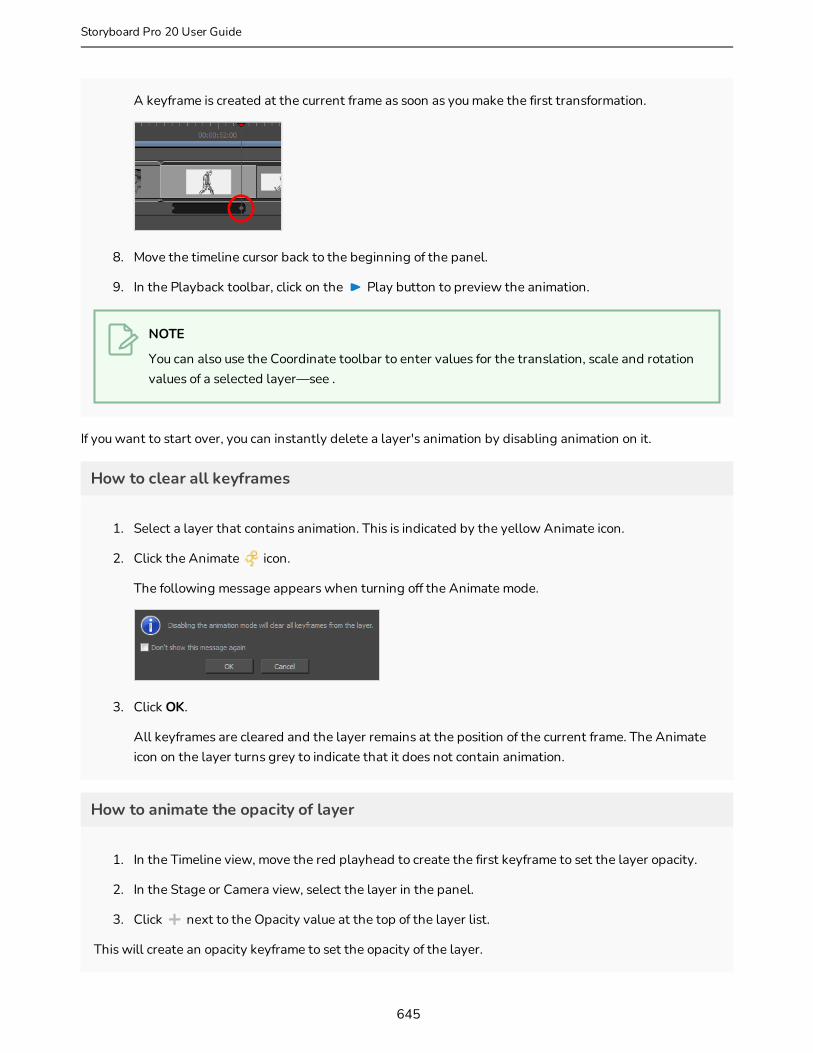
A keyframe is created at the current frame as soon as you make the first transformation.
8. Move the timeline cursor back to the beginning of the panel.
9. In the Playback toolbar, click on the Play button to preview the animation.
NOTE
You can also use the Coordinate toolbar to enter values for the translation, scale and rotation values of a selected layer—see .
If you want to start over, you can instantly delete a layer's animation by disabling animation on it.
How to clear all keyframes
1. Select a layer that contains animation. This is indicated by the yellow Animate icon.
2. Click the Animate icon.
The following message appears when turning off the Animate mode.
3. Click OK.
All keyframes are cleared and the layer remains at the position of the current frame. The Animate icon on the layer turns grey to indicate that it does not contain animation.
How to animate the opacity of layer
1. In the Timeline view, move the red playhead to create the first keyframe to set the layer opacity.
2. In the Stage or Camera view, select the layer in the panel.
3. Click next to the Opacity value at the top of the layer list.
This will create an opacity keyframe to set the opacity of the layer.
645
Storyboard Pro 20 User Guide
Chapter 10: Animation
4. Repeat steps 1,2 & 3 to add another opacity frame.
NOTE
When you playback, the opacity will change over time.
How to delete opacity keyframe
1. Use > < to navigate to the Previous or Next opacity keyframe.
2. Click to delete an opacity keyframe.
646
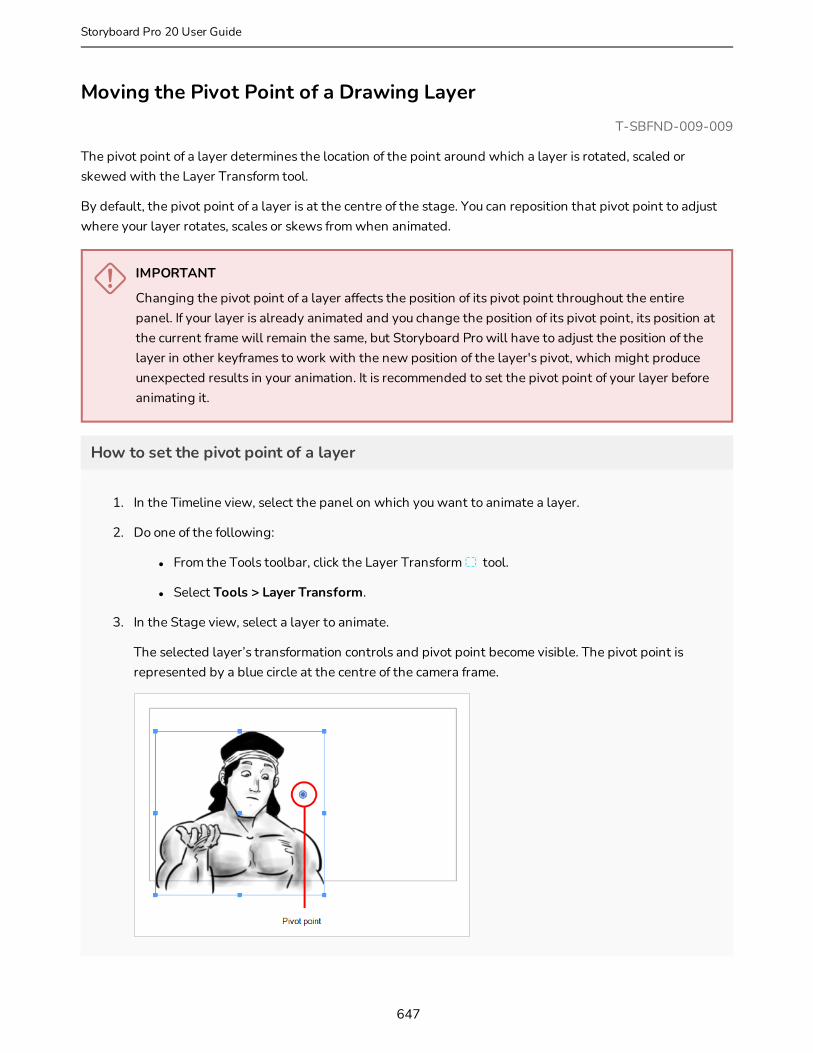
Moving the Pivot Point of a Drawing LayerT-SBFND-009-009
The pivot point of a layer determines the location of the point around which a layer is rotated, scaled or skewed with the Layer Transform tool.
By default, the pivot point of a layer is at the centre of the stage. You can reposition that pivot point to adjust where your layer rotates, scales or skews from when animated.
IMPORTANT
Changing the pivot point of a layer affects the position of its pivot point throughout the entire panel. If your layer is already animated and you change the position of its pivot point, its position at the current frame will remain the same, but Storyboard Pro will have to adjust the position of the layer in other keyframes to work with the new position of the layer's pivot, which might produce unexpected results in your animation. It is recommended to set the pivot point of your layer before animating it.
How to set the pivot point of a layer
1. In the Timeline view, select the panel on which you want to animate a layer.
2. Do one of the following:
l From the Tools toolbar, click the Layer Transform tool.
l Select Tools > Layer Transform.
3. In the Stage view, select a layer to animate.
The selected layer’s transformation controls and pivot point become visible. The pivot point is represented by a blue circle at the centre of the camera frame.
647
Storyboard Pro 20 User Guide
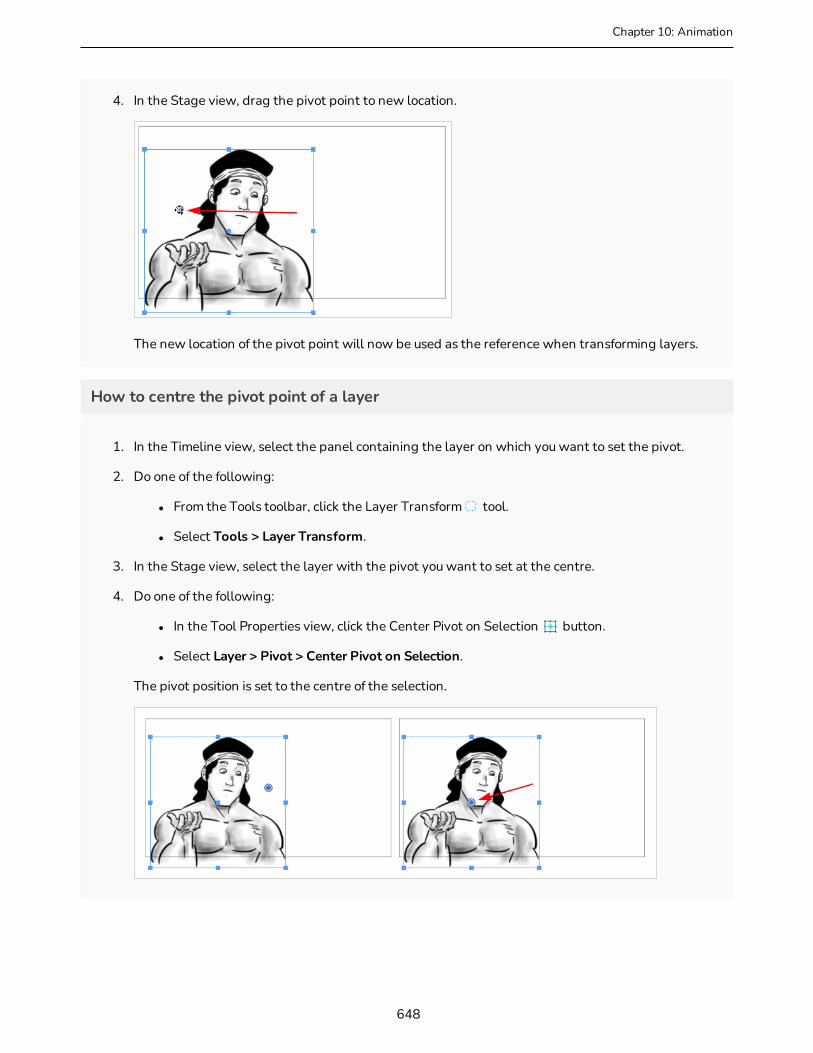
Chapter 10: Animation
4. In the Stage view, drag the pivot point to new location.
The new location of the pivot point will now be used as the reference when transforming layers.
How to centre the pivot point of a layer
1. In the Timeline view, select the panel containing the layer on which you want to set the pivot.
2. Do one of the following:
l From the Tools toolbar, click the Layer Transform tool.
l Select Tools > Layer Transform.
3. In the Stage view, select the layer with the pivot you want to set at the centre.
4. Do one of the following:
l In the Tool Properties view, click the Center Pivot on Selection button.
l Select Layer > Pivot > Center Pivot on Selection.
The pivot position is set to the centre of the selection.
648

How to reset the pivot position
1. In the Timeline view, select the panel containing the layer on which you want to reset the pivot.
2. Do one of the following:
l From the Tools toolbar, click the Layer Transform tool.
l Select Tools > Layer Transform.
3. In the Stage view, select the layer with the pivot to reset.
4. Do one of the following:
l In the Tool Properties view, click the Reset Pivot button.
l Select Layer > Pivot > Reset Pivot.
The pivot position is reset to the centre of the camera frame.
649
Storyboard Pro 20 User Guide
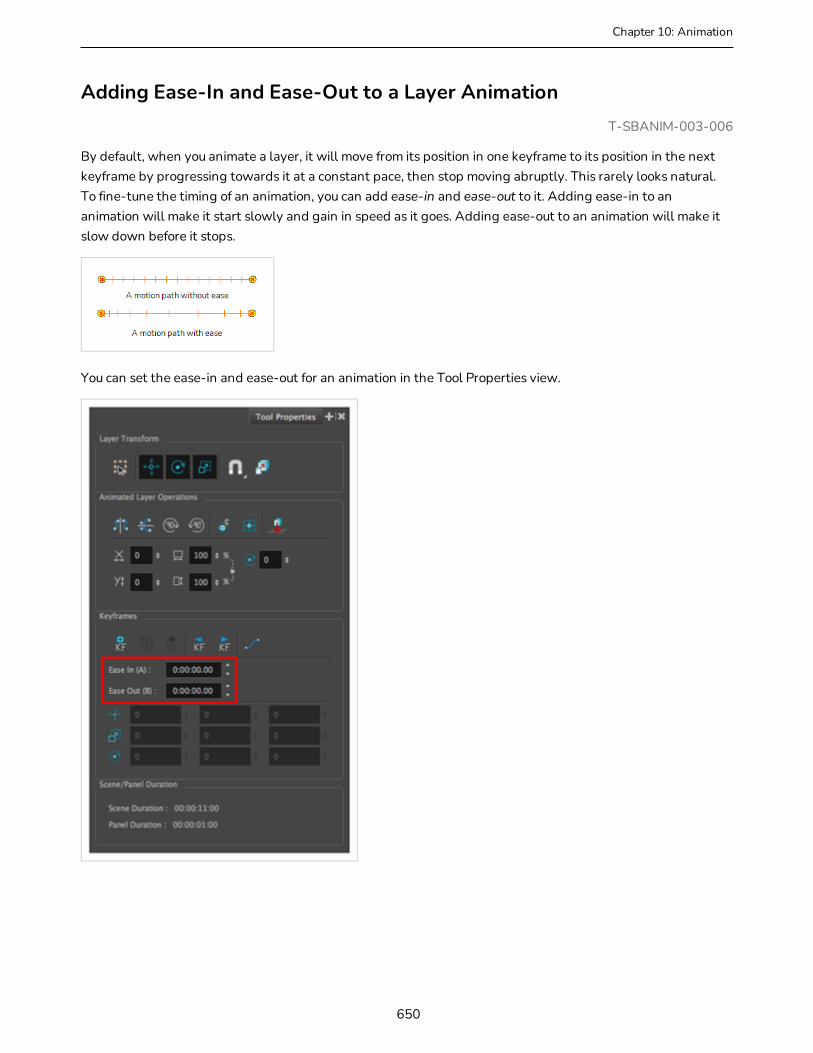
Chapter 10: Animation
Adding Ease-In and Ease-Out to a Layer AnimationT-SBANIM-003-006
By default, when you animate a layer, it will move from its position in one keyframe to its position in the next keyframe by progressing towards it at a constant pace, then stop moving abruptly. This rarely looks natural. To fine-tune the timing of an animation, you can add ease-in and ease-out to it. Adding ease-in to an animation will make it start slowly and gain in speed as it goes. Adding ease-out to an animation will make it slow down before it stops.
You can set the ease-in and ease-out for an animation in the Tool Properties view.
650

How to add ease-in and ease-out to a layer animation
1. In the Tools toolbar, select the Layer Transform tool.
2. In the Layer panel of the Stage or Camera view, or in the Layers view, select the layer for which you want to add ease.
The motion path for the selected layer's animation will appear in the Stage and Camera views.
3. In the Timeline view, move the timeline cursor between the first and last keyframe of the layer animation to which you want to add ease.
4. In the Tool Properties view, enter the desired length of the ease-in in the Ease In field in the H:MM:SS:FF format, where H means hours, MM means minutes, SS means seconds and FF means frames. The longer the length of the ease-in, the smoother it will be.
5. Enter the desired length of the ease-out in the Ease Out field, in the same format. The longer the length of the ease-out, the smoother it will be.
As you make adjustments to the ease-in and ease-out of the animation, the notches in the motion path change place, giving you an idea of how the ease is affecting the timing.
651
Storyboard Pro 20 User Guide
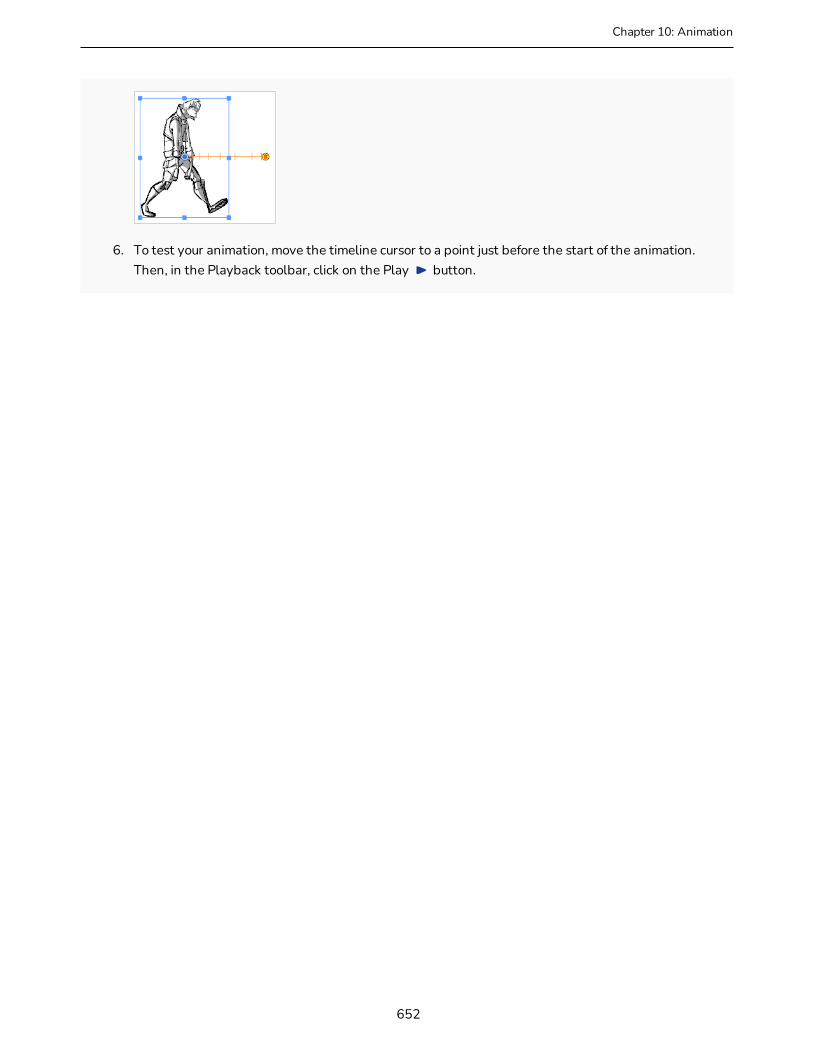
Chapter 10: Animation
6. To test your animation, move the timeline cursor to a point just before the start of the animation. Then, in the Playback toolbar, click on the Play button.
652
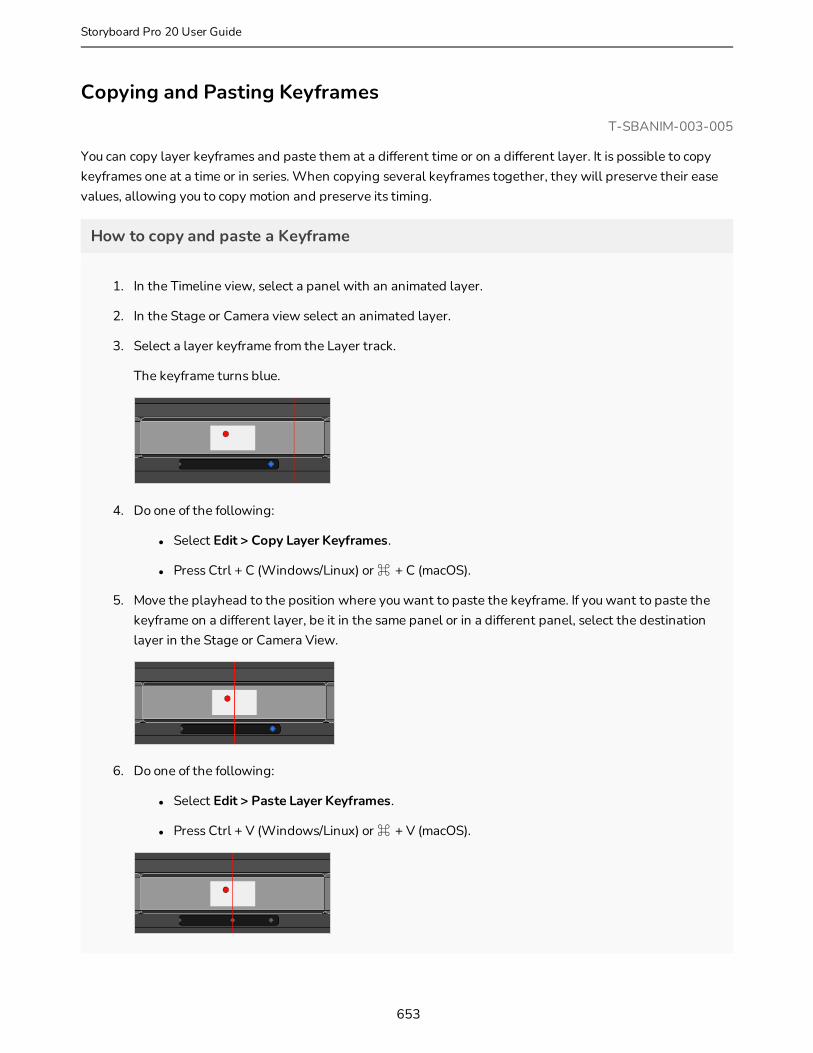
Copying and Pasting KeyframesT-SBANIM-003-005
You can copy layer keyframes and paste them at a different time or on a different layer. It is possible to copy keyframes one at a time or in series. When copying several keyframes together, they will preserve their ease values, allowing you to copy motion and preserve its timing.
How to copy and paste a Keyframe
1. In the Timeline view, select a panel with an animated layer.
2. In the Stage or Camera view select an animated layer.
3. Select a layer keyframe from the Layer track.
The keyframe turns blue.
4. Do one of the following:
l Select Edit > Copy Layer Keyframes.
l Press Ctrl + C (Windows/Linux) or ⌘ + C (macOS).
5. Move the playhead to the position where you want to paste the keyframe. If you want to paste the keyframe on a different layer, be it in the same panel or in a different panel, select the destination layer in the Stage or Camera View.
6. Do one of the following:
l Select Edit > Paste Layer Keyframes.
l Press Ctrl + V (Windows/Linux) or ⌘ + V (macOS).
653
Storyboard Pro 20 User Guide
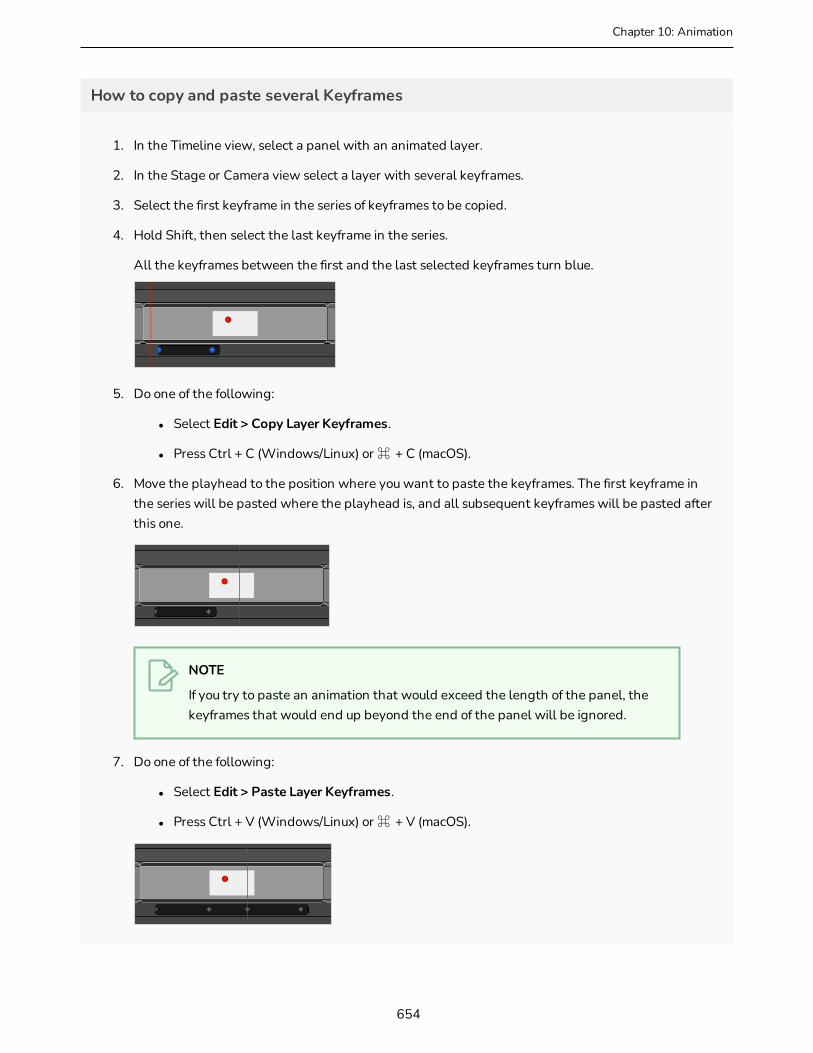
Chapter 10: Animation
How to copy and paste several Keyframes
1. In the Timeline view, select a panel with an animated layer.
2. In the Stage or Camera view select a layer with several keyframes.
3. Select the first keyframe in the series of keyframes to be copied.
4. Hold Shift, then select the last keyframe in the series.
All the keyframes between the first and the last selected keyframes turn blue.
5. Do one of the following:
l Select Edit > Copy Layer Keyframes.
l Press Ctrl + C (Windows/Linux) or ⌘ + C (macOS).
6. Move the playhead to the position where you want to paste the keyframes. The first keyframe in the series will be pasted where the playhead is, and all subsequent keyframes will be pasted after this one.
NOTE
If you try to paste an animation that would exceed the length of the panel, the keyframes that would end up beyond the end of the panel will be ignored.
7. Do one of the following:
l Select Edit > Paste Layer Keyframes.
l Press Ctrl + V (Windows/Linux) or ⌘ + V (macOS).
654
How to copy the end position from the start position
1. In the Timeline view, select the panel that contains the start position to copy.
2. Select Layer > Copy Start Layer Position to End.
How to copy the start position from the end position
1. In the Timeline view, select the panel that contains the end position to copy.
2. Select Layer > Copy End Layer Position to Start.
655
Storyboard Pro 20 User Guide
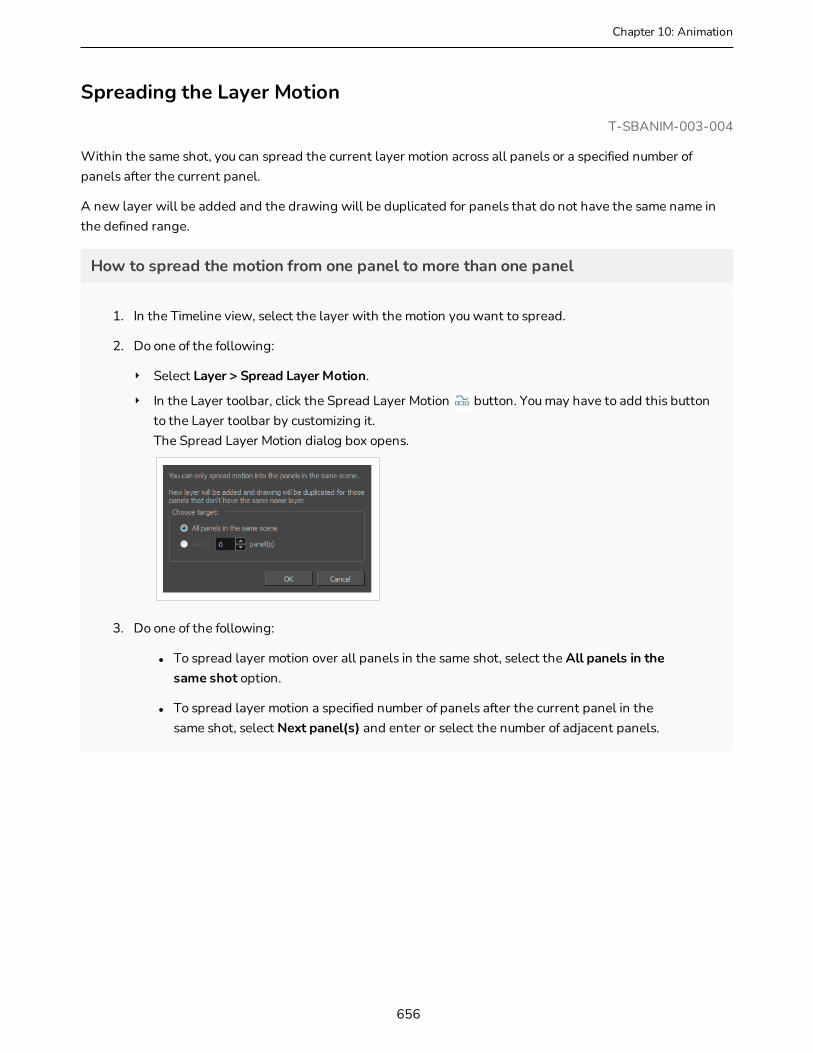
Chapter 10: Animation
Spreading the Layer MotionT-SBANIM-003-004
Within the same shot, you can spread the current layer motion across all panels or a specified number of panels after the current panel.
A new layer will be added and the drawing will be duplicated for panels that do not have the same name in the defined range.
How to spread the motion from one panel to more than one panel
1. In the Timeline view, select the layer with the motion you want to spread.
2. Do one of the following:
‣ Select Layer > Spread Layer Motion.
‣ In the Layer toolbar, click the Spread Layer Motion button. You may have to add this button to the Layer toolbar by customizing it. The Spread Layer Motion dialog box opens.
3. Do one of the following:
l To spread layer motion over all panels in the same shot, select the All panels in the same shot option.
l To spread layer motion a specified number of panels after the current panel in the same shot, select Next panel(s) and enter or select the number of adjacent panels.
656

About Animation FunctionsT-SBANIM-003-006A
Using the Layer Transform tool, the Timeline view as well as the parameters in the Tool Properties view, you can control the position of each point in a layer, the position of each keyframe in time as well as the ease-in and the ease-out of each movement. Layer animations are composed of functions that can be customized in various other ways. If you need to tweak the animation of a layer in specific ways, you may have to use the Function Editor view.
The Function Editor view displays all the functions which, internally, compose the movement of the selected layer or of the scene's camera. A function is simply a geometric (ie: position, size, angle) component of an animation. When you add a keyframe to a layer or to the camera, a keyframe is created for each animation function for that layer or camera, and that keyframe stores the value for that function at the current frame. Then, the value of the function for each frame between any two keyframes is calculated by Storyboard Pro.
Animation Functions
A layer or camera animation is composed of the following functions:
l Path X, Y and Z: The position of the object on the x, y and z axes, relative to the centre of the stage. The default value for these functions is 0.
NOTE
In 2D scenes, the Path Z function should always be 0, as it represents the distance of the layer relative to the camera. Changing the value of this function while in a 2D scene will convert the scene to a 3D scene.
l Path Velo: This function is used to adjust the curve of the Path X, Y and Z functions between their keyframes.
The Path Velo is automatically generated by Storyboard Pro and has one keyframe for each keyframe on the Path X, Y and Z functions. You cannot adjust the value of these keyframes, only the curve between the keyframes. When you do so, the curve between the keyframes of the Path Velo function is applied to the Path X, Y and Z functions. Basically, this allows you to adjust the ease of the object's movement on all three axes simultaneously, using a single function.
In summary, you can edit the Path X, Y and Z function to adjust the position of the object on different keyframes, and the Path Velo function to adjust the pace at which the object moves between keyframes.
NOTE
The value of this function always progresses from 0 to 1.
l Scale X, Y and Z: The size of the object on the x, y and z axes relative to its original size. The default value for these functions is 1.
657
Storyboard Pro 20 User Guide
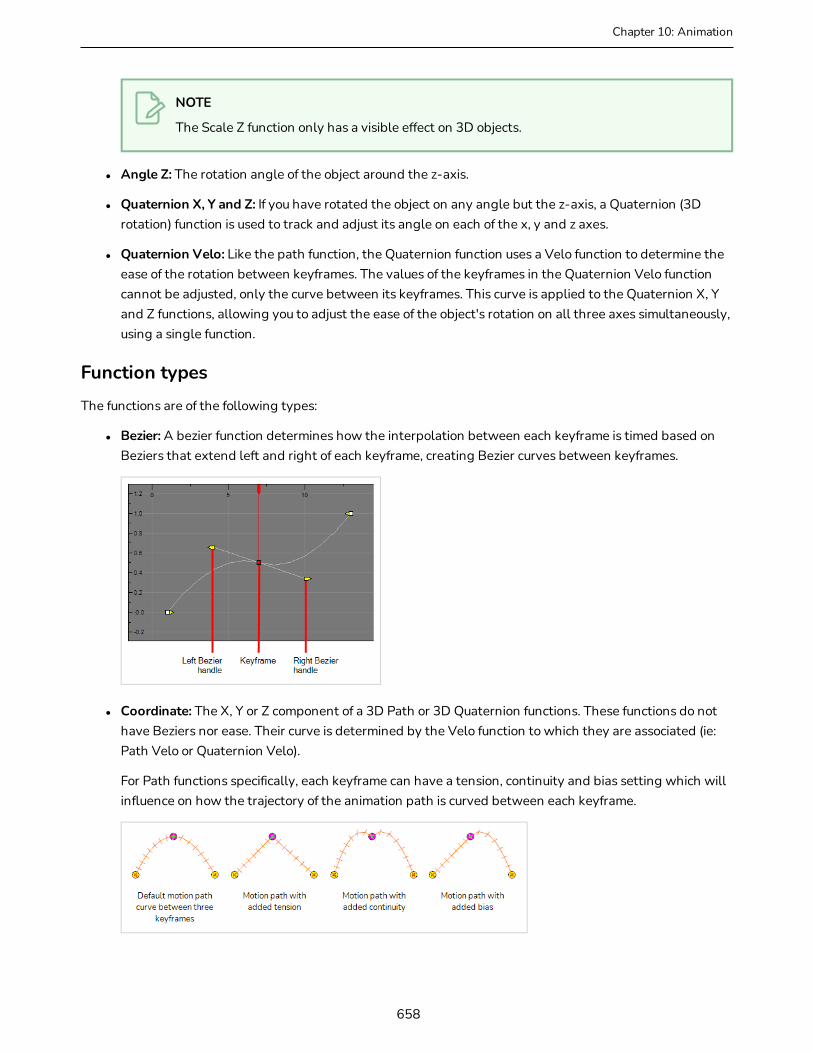
Chapter 10: Animation
NOTE
The Scale Z function only has a visible effect on 3D objects.
l Angle Z: The rotation angle of the object around the z-axis.
l Quaternion X, Y and Z: If you have rotated the object on any angle but the z-axis, a Quaternion (3D rotation) function is used to track and adjust its angle on each of the x, y and z axes.
l Quaternion Velo: Like the path function, the Quaternion function uses a Velo function to determine the ease of the rotation between keyframes. The values of the keyframes in the Quaternion Velo function cannot be adjusted, only the curve between its keyframes. This curve is applied to the Quaternion X, Y and Z functions, allowing you to adjust the ease of the object's rotation on all three axes simultaneously, using a single function.
Function types
The functions are of the following types:
l Bezier: A bezier function determines how the interpolation between each keyframe is timed based on Beziers that extend left and right of each keyframe, creating Bezier curves between keyframes.
l Coordinate: The X, Y or Z component of a 3D Path or 3D Quaternion functions. These functions do not have Beziers nor ease. Their curve is determined by the Velo function to which they are associated (ie: Path Velo or Quaternion Velo).
For Path functions specifically, each keyframe can have a tension, continuity and bias setting which will influence on how the trajectory of the animation path is curved between each keyframe.
658
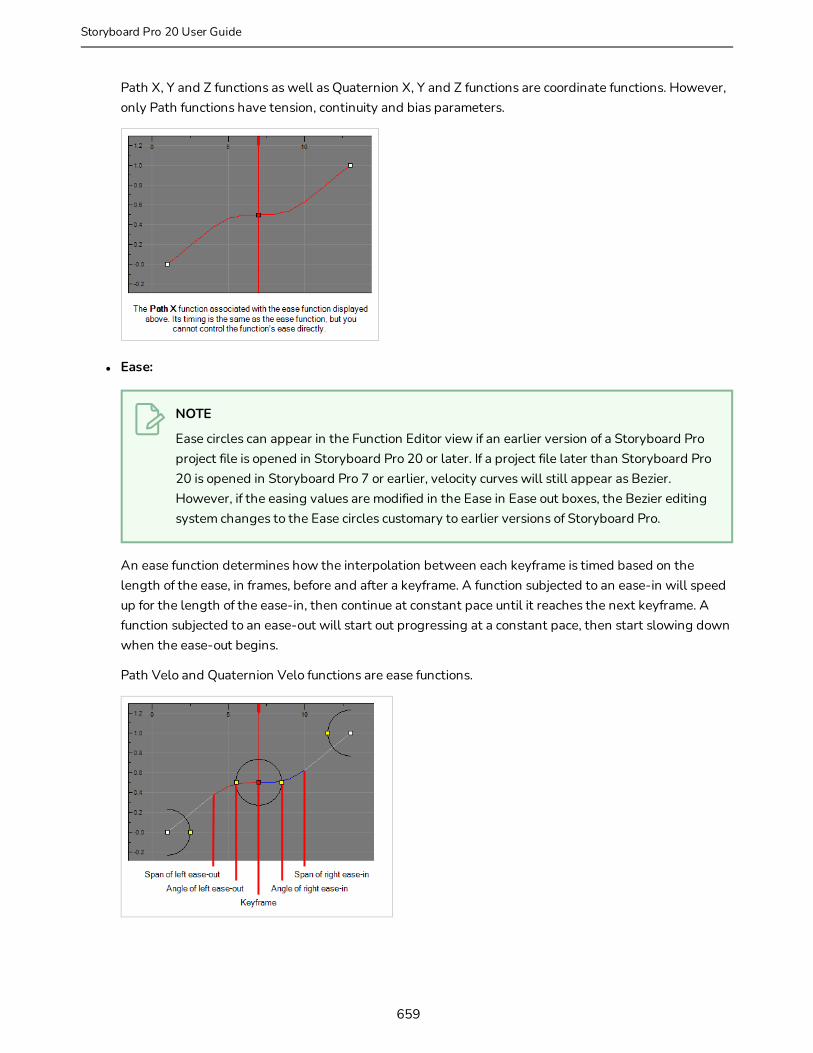
Path X, Y and Z functions as well as Quaternion X, Y and Z functions are coordinate functions. However, only Path functions have tension, continuity and bias parameters.
l Ease:
NOTE
Ease circles can appear in the Function Editor view if an earlier version of a Storyboard Pro project file is opened in Storyboard Pro 20 or later. If a project file later than Storyboard Pro 20 is opened in Storyboard Pro 7 or earlier, velocity curves will still appear as Bezier. However, if the easing values are modified in the Ease in Ease out boxes, the Bezier editing system changes to the Ease circles customary to earlier versions of Storyboard Pro.
An ease function determines how the interpolation between each keyframe is timed based on the length of the ease, in frames, before and after a keyframe. A function subjected to an ease-in will speed up for the length of the ease-in, then continue at constant pace until it reaches the next keyframe. A function subjected to an ease-out will start out progressing at a constant pace, then start slowing down when the ease-out begins.
Path Velo and Quaternion Velo functions are ease functions.
659
Storyboard Pro 20 User Guide

Chapter 10: Animation
Tweaking an Animation PathT-SBANIM-003-007
Using the Function Editor view, you can fine-tune the animation of a layer or camera movement in very specific ways.
How to view a layer or the camera's function curves
1. In the Stage or Camera view, select a layer that contains animation. This is indicated by the yellow Animate icon.
2. From the Tools toolbar, click one of the following:
l Layer Transform button for layer animation.
l Camera button for camera animation.
NOTE
To switch between layer and camera functions, click the Show Camera Functionsbutton at the bottom of the Function Editor view. When the button is selected, camera functions are displayed in the graph, When deselected, layer functions are displayed.
3. In the Tool Properties view, click the Function Editor view button.
The Function Editor view is blank until you select the layer containing the functions you want to display.
4. In the list of functions, check the functions that you wish to edit, and uncheck the ones you want to leave unchanged so that they do not clutter the graph view to the right.
TIP
You can change the colour of the function's representation in the graphic by double-clicking on the coloured square to the right of the function's name. This can help you identify the functions visually.
660
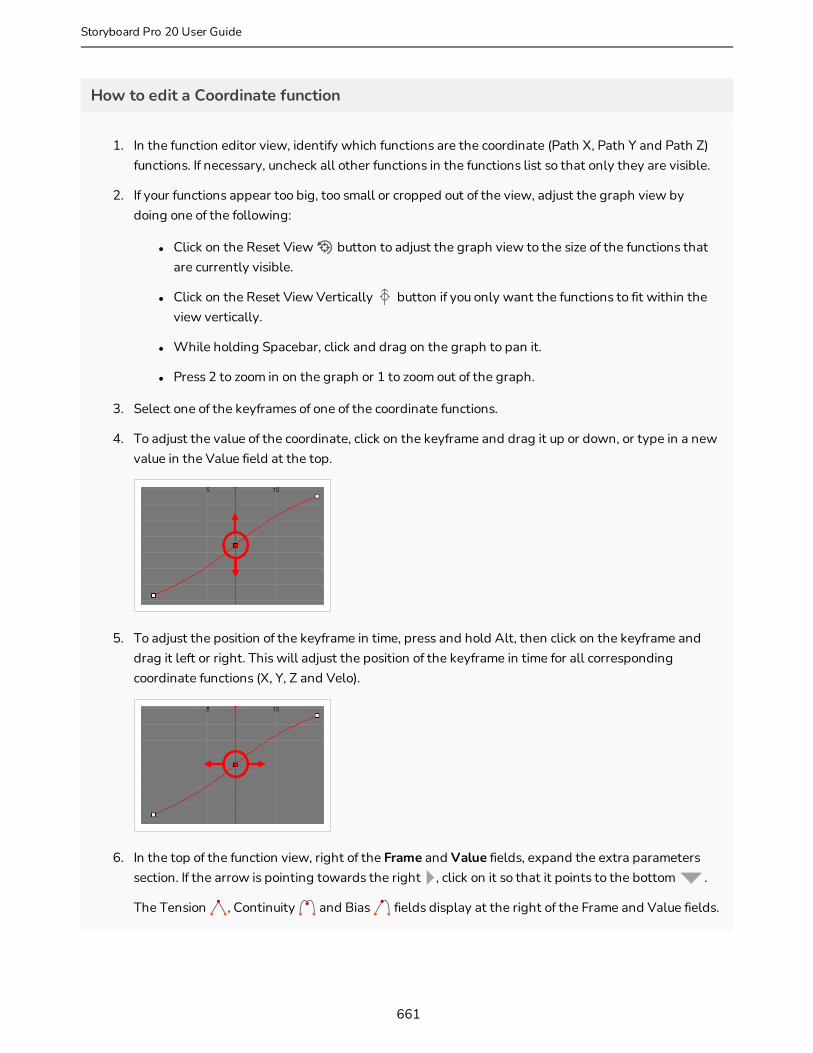
How to edit a Coordinate function
1. In the function editor view, identify which functions are the coordinate (Path X, Path Y and Path Z) functions. If necessary, uncheck all other functions in the functions list so that only they are visible.
2. If your functions appear too big, too small or cropped out of the view, adjust the graph view by doing one of the following:
l Click on the Reset View button to adjust the graph view to the size of the functions that are currently visible.
l Click on the Reset View Vertically button if you only want the functions to fit within the view vertically.
l While holding Spacebar, click and drag on the graph to pan it.
l Press 2 to zoom in on the graph or 1 to zoom out of the graph.
3. Select one of the keyframes of one of the coordinate functions.
4. To adjust the value of the coordinate, click on the keyframe and drag it up or down, or type in a new value in the Value field at the top.
5. To adjust the position of the keyframe in time, press and hold Alt, then click on the keyframe and drag it left or right. This will adjust the position of the keyframe in time for all corresponding coordinate functions (X, Y, Z and Velo).
6. In the top of the function view, right of the Frame and Value fields, expand the extra parameters section. If the arrow is pointing towards the right , click on it so that it points to the bottom .
The Tension , Continuity and Bias fields display at the right of the Frame and Value fields.
661
Storyboard Pro 20 User Guide
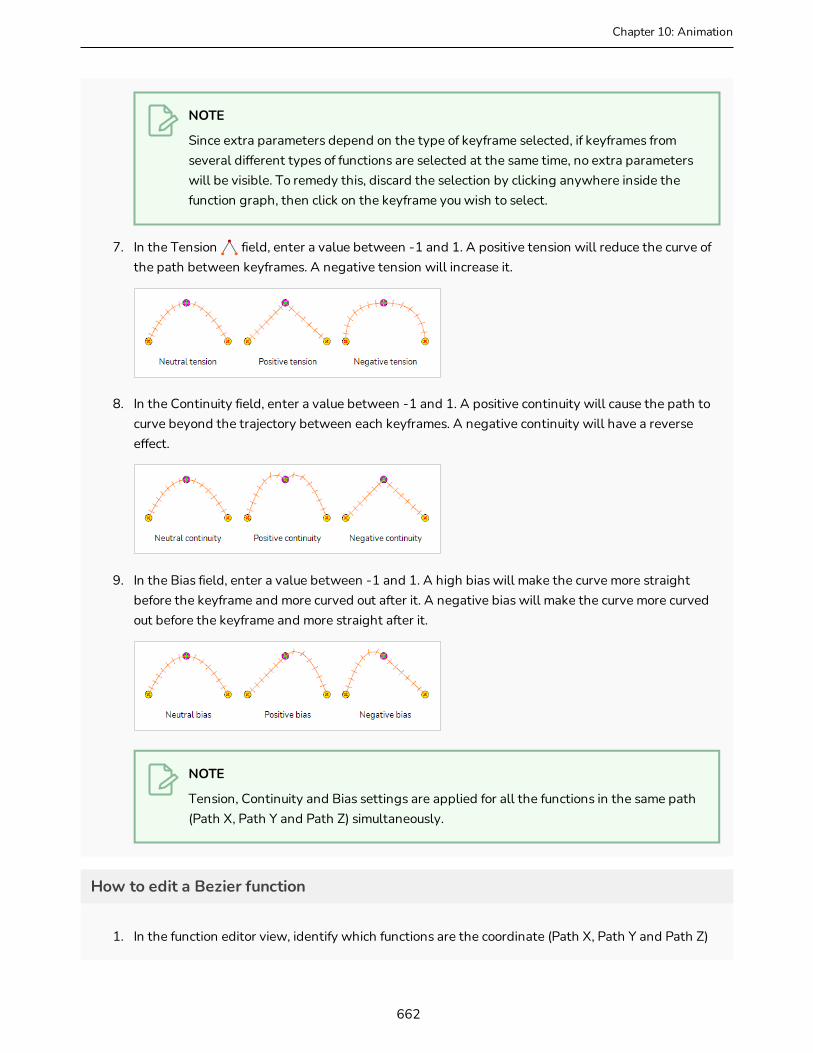
Chapter 10: Animation
NOTE
Since extra parameters depend on the type of keyframe selected, if keyframes from several different types of functions are selected at the same time, no extra parameters will be visible. To remedy this, discard the selection by clicking anywhere inside the function graph, then click on the keyframe you wish to select.
7. In the Tension field, enter a value between -1 and 1. A positive tension will reduce the curve of the path between keyframes. A negative tension will increase it.
8. In the Continuity field, enter a value between -1 and 1. A positive continuity will cause the path to curve beyond the trajectory between each keyframes. A negative continuity will have a reverse effect.
9. In the Bias field, enter a value between -1 and 1. A high bias will make the curve more straight before the keyframe and more curved out after it. A negative bias will make the curve more curved out before the keyframe and more straight after it.
NOTE
Tension, Continuity and Bias settings are applied for all the functions in the same path (Path X, Path Y and Path Z) simultaneously.
How to edit a Bezier function
1. In the function editor view, identify which functions are the coordinate (Path X, Path Y and Path Z)
662

functions. If necessary, uncheck all other functions in the functions list so that only they are visible.
2. If your functions appear too big, too small or cropped out of the view, adjust the graph view by doing one of the following:
l Click on the Reset View button to adjust the graph view to the size of the functions that are currently visible.
l Click on the Reset View Vertically button if you only want the functions to fit within the view vertically.
l While holding Spacebar, click and drag on the graph to pan it.
l Press 2 to zoom in on the graph or 1 to zoom out of the graph.
3. Select one of the keyframes of one of the coordinate functions.
4. To adjust the value of the coordinate, click on the keyframe and drag it up or down, or type in a new value in the Value field at the top.
5. To adjust the position of the keyframe in time, press and hold Alt, then click on the keyframe and drag it left or right. This will adjust the position of the keyframe in time for all corresponding coordinate functions (X, Y, Z and Velo).
6. Do one of the following to adjust the point's Bezier handles:
l Locate the yellow arrows pointing towards the left and towards the right of the keyframe. By default, those arrows will be at the same position as the keyframe. You can click and drag on the left Bezier handle to adjust the curve at the left of the function, or on the right Bezier handle to adjust the curve at the right of the function.
663
Storyboard Pro 20 User Guide

Chapter 10: Animation
l In the top of the function view, right of the Frame and Value fields, expand the extra parameters section. If the arrow is pointing towards the right , click on it so that it points to the bottom . The Left Length , Left Angle , Right Length and Right Angle fields will appear at the right of the Frame and Value fields. You can use these fields to adjust the angle and length of their respective Bezier handles relative to the keyframes.
NOTE
Since extra parameters depend on the type of keyframe selected, if keyframes from several different types of functions are selected at the same time, no extra parameters will be visible. To remedy this, discard the selection by clicking anywhere inside the function graph, then click on the keyframe you wish to select.
664

665
Storyboard Pro 20 User Guide
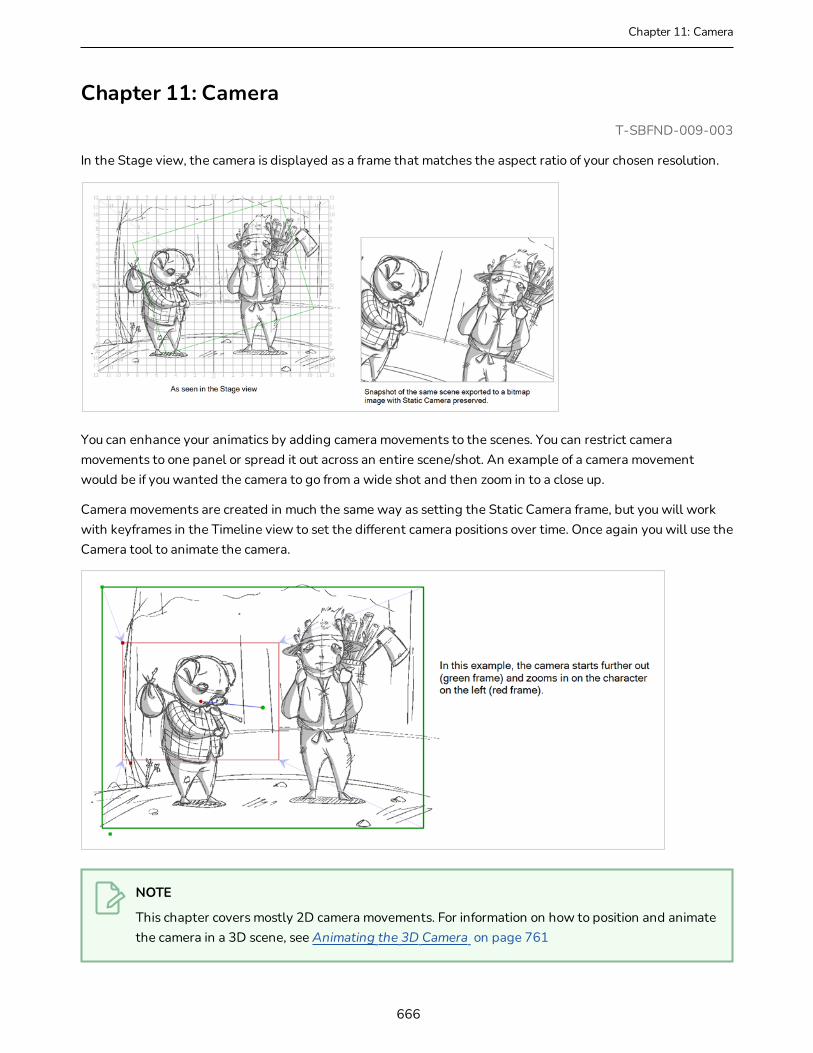
Chapter 11: Camera
Chapter 11: CameraT-SBFND-009-003
In the Stage view, the camera is displayed as a frame that matches the aspect ratio of your chosen resolution.
You can enhance your animatics by adding camera movements to the scenes. You can restrict camera movements to one panel or spread it out across an entire scene/shot. An example of a camera movement would be if you wanted the camera to go from a wide shot and then zoom in to a close up.
Camera movements are created in much the same way as setting the Static Camera frame, but you will work with keyframes in the Timeline view to set the different camera positions over time. Once again you will use the Camera tool to animate the camera.
NOTE
This chapter covers mostly 2D camera movements. For information on how to position and animate the camera in a 3D scene, see Animating the 3D Camera on page 761
666

About the Stage and Camera ViewsT-SBANIM-004-002
In Storyboard Pro, the Stage view is the default view in which to draw and manipulate objects. However, when working in 3D, it has one pitfall: When you pan, rotate, zoom into or zoom out of the stage view, you are changing the point of view from which you are looking at the stage. This means that the apparent position and size of elements may not be representative of what will appear in your storyboard or animatic.
If you want to see a 3D scene exactly as it will look in your storyboard, you must use the Camera view. The Camera view always displays the stage from the point of view of the camera, even if you pan, rotate or zoom it. Therefore, you should always preview your scene from the Camera view if you make changes to the position of the Camera or of 3D objects, to make sure the composition of the scene is as expected.
667
Storyboard Pro 20 User Guide
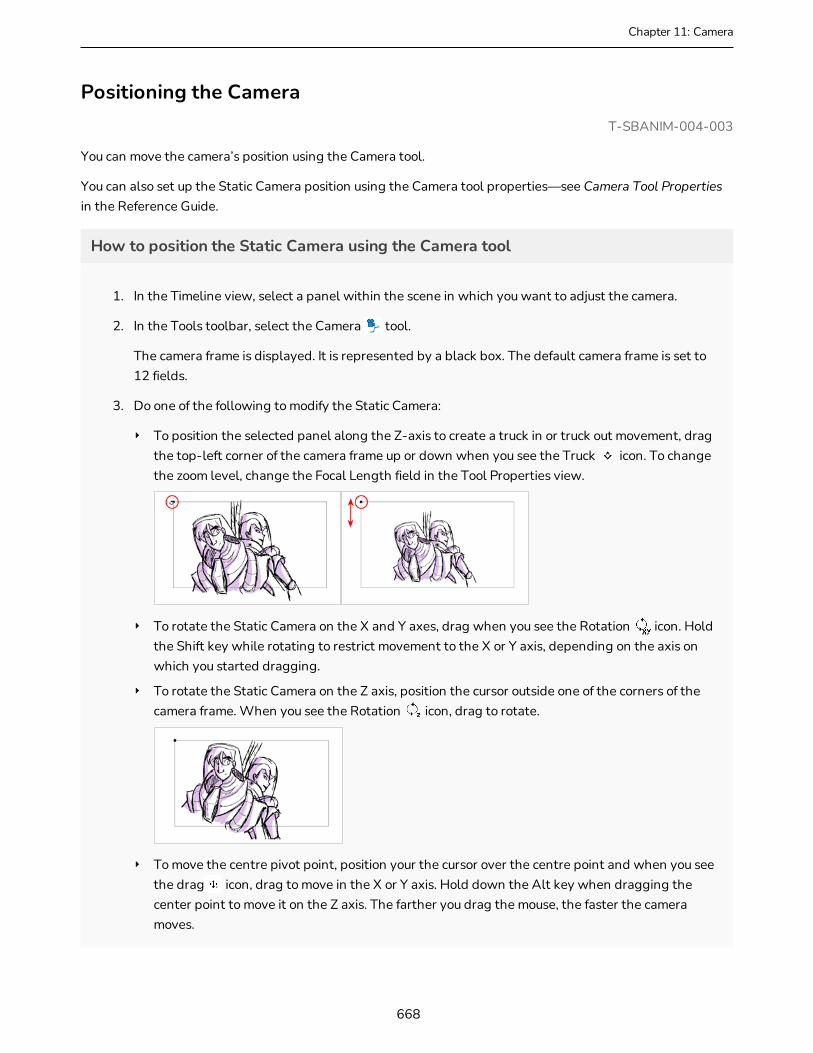
Chapter 11: Camera
Positioning the CameraT-SBANIM-004-003
You can move the camera’s position using the Camera tool.
You can also set up the Static Camera position using the Camera tool properties—see Camera Tool Properties in the Reference Guide.
How to position the Static Camera using the Camera tool
1. In the Timeline view, select a panel within the scene in which you want to adjust the camera.
2. In the Tools toolbar, select the Camera tool.
The camera frame is displayed. It is represented by a black box. The default camera frame is set to 12 fields.
3. Do one of the following to modify the Static Camera:
‣ To position the selected panel along the Z-axis to create a truck in or truck out movement, drag the top-left corner of the camera frame up or down when you see the Truck icon. To change the zoom level, change the Focal Length field in the Tool Properties view.
‣ To rotate the Static Camera on the X and Y axes, drag when you see the Rotation icon. Hold the Shift key while rotating to restrict movement to the X or Y axis, depending on the axis on which you started dragging.
‣ To rotate the Static Camera on the Z axis, position the cursor outside one of the corners of the camera frame. When you see the Rotation icon, drag to rotate.
‣ To move the centre pivot point, position your the cursor over the centre point and when you see the drag icon, drag to move in the X or Y axis. Hold down the Alt key when dragging the center point to move it on the Z axis. The farther you drag the mouse, the faster the camera moves.
668
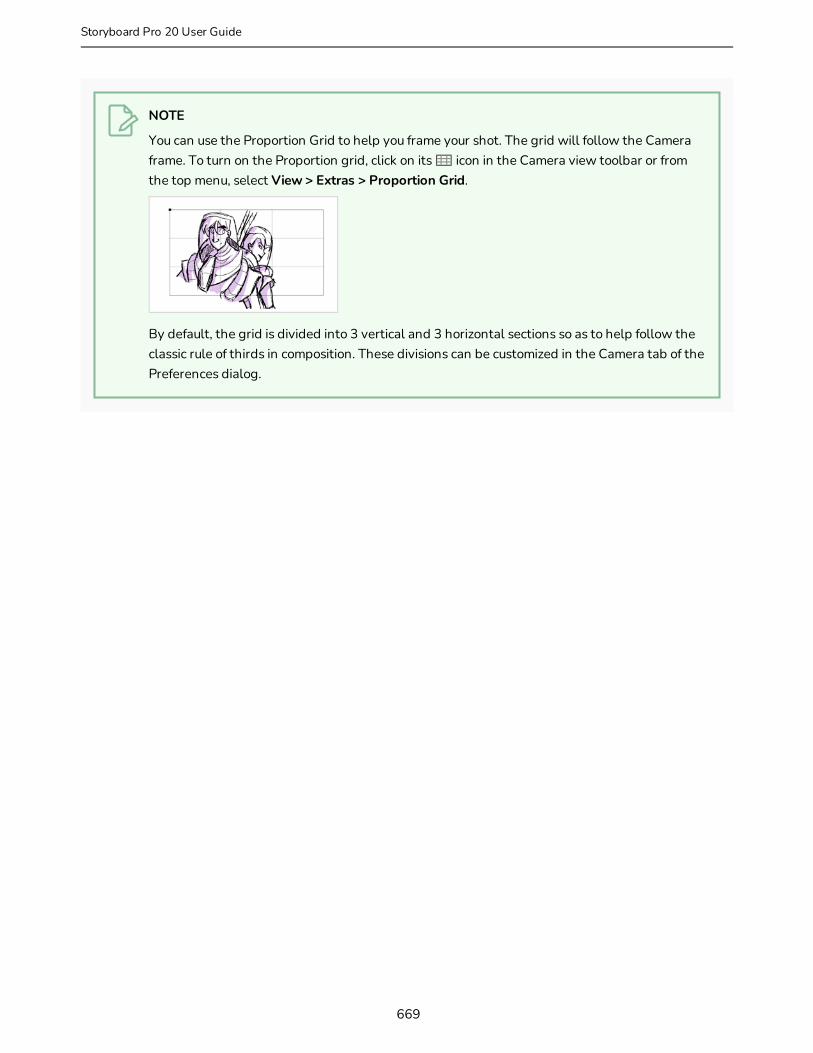
NOTE
You can use the Proportion Grid to help you frame your shot. The grid will follow the Camera frame. To turn on the Proportion grid, click on its icon in the Camera view toolbar or from the top menu, select View > Extras > Proportion Grid.
By default, the grid is divided into 3 vertical and 3 horizontal sections so as to help follow the classic rule of thirds in composition. These divisions can be customized in the Camera tab of the Preferences dialog.
669
Storyboard Pro 20 User Guide
Chapter 11: Camera
Resetting the CameraT-SBANIM-004-004
If necessary, you can remove all the keyframes in your scene, and revert back to the original Static Camera.
How to reset camera animation
1. In the Timeline view, select the scene on which you want to reset the camera animation.
2. Do one of the following:
‣ Select the Camera tool, and in the Tool Properties view, click the Reset Camera button.
‣ Select Camera > Reset Camera.
All camera keyframes for the selected scene are deleted and the scene’s Static Camera is reset.
670

Copying and Pasting the CameraT-SBFND-009-006
If you need to reuse a camera position, you can copy and paste it from one scene to another. It is not necessary to have the Camera tool selected to do this.
How to copy and paste the camera position
1. In the Timeline view, select the scene that contains the Static Camera to copy.
2. Select Camera > Copy Camera from Selected Panels.
3. In the Timeline view, select the scene to which you want to paste the copied camera information.
4. Select Camera > Paste and Fit Camera on Selected Panels.
671
Storyboard Pro 20 User Guide

Chapter 11: Camera
672

673
Storyboard Pro 20 User Guide
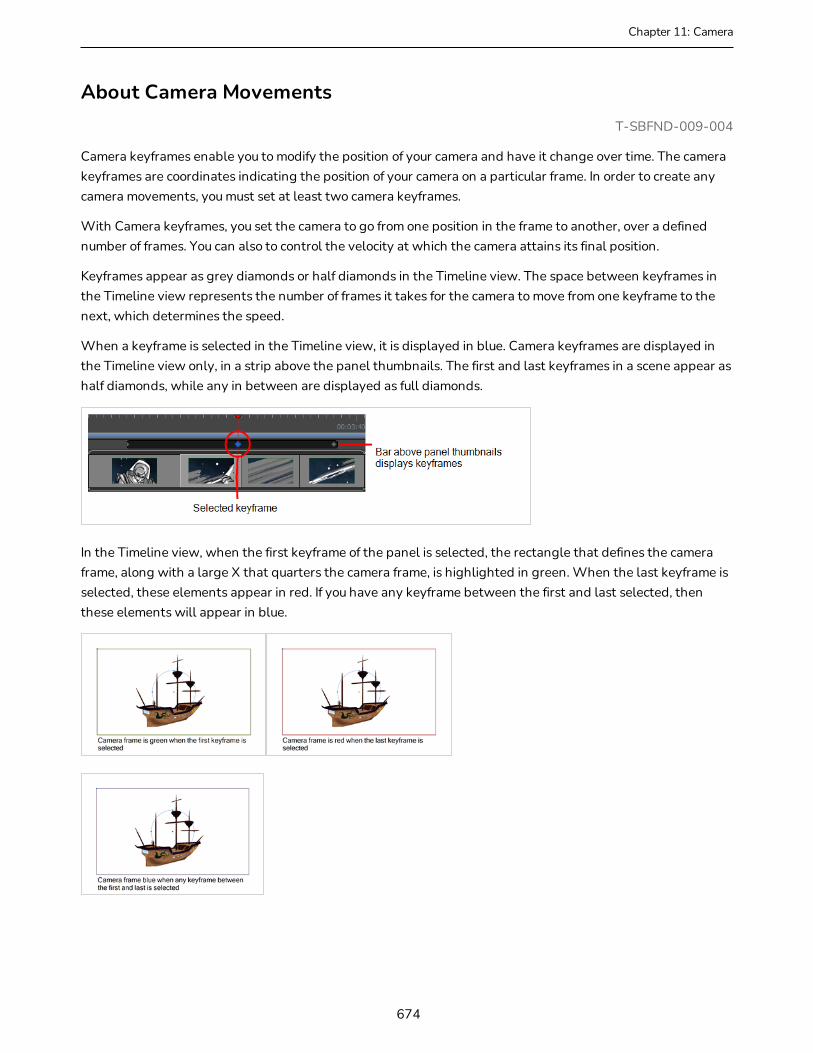
Chapter 11: Camera
About Camera MovementsT-SBFND-009-004
Camera keyframes enable you to modify the position of your camera and have it change over time. The camera keyframes are coordinates indicating the position of your camera on a particular frame. In order to create any camera movements, you must set at least two camera keyframes.
With Camera keyframes, you set the camera to go from one position in the frame to another, over a defined number of frames. You can also to control the velocity at which the camera attains its final position.
Keyframes appear as grey diamonds or half diamonds in the Timeline view. The space between keyframes in the Timeline view represents the number of frames it takes for the camera to move from one keyframe to the next, which determines the speed.
When a keyframe is selected in the Timeline view, it is displayed in blue. Camera keyframes are displayed in the Timeline view only, in a strip above the panel thumbnails. The first and last keyframes in a scene appear as half diamonds, while any in between are displayed as full diamonds.
In the Timeline view, when the first keyframe of the panel is selected, the rectangle that defines the camera frame, along with a large X that quarters the camera frame, is highlighted in green. When the last keyframe is selected, these elements appear in red. If you have any keyframe between the first and last selected, then these elements will appear in blue.
674

These are the default camera keyframe colours. You can use the Preferences dialog box to choose your own camera keyframe colours. When you do, the new colours will used in the Camera and Stage views, as well as in the different export formats of your storyboard.
If you want to create a truck in or truck out (a move along the Z-axis), you can use the manipulators in the Top or Side views, (you can also click on the upper-left corner of the frame in the Camera view). If you select the arrow pointing along the Z-axis and drag the manipulators from that arrow instead of from the centre point of the manipulator circle, your movements will be locked to that axis. This is useful if you do not want to accidentally displace the up and down or left and right position of your camera frame.
Remember that the light-blue arrows in the Camera view do not necessarily indicate backward and forward movements. If your second camera frame appears larger or smaller than the initial camera frame position, then you can be sure that a camera truck in or truck out was made.
675
Storyboard Pro 20 User Guide
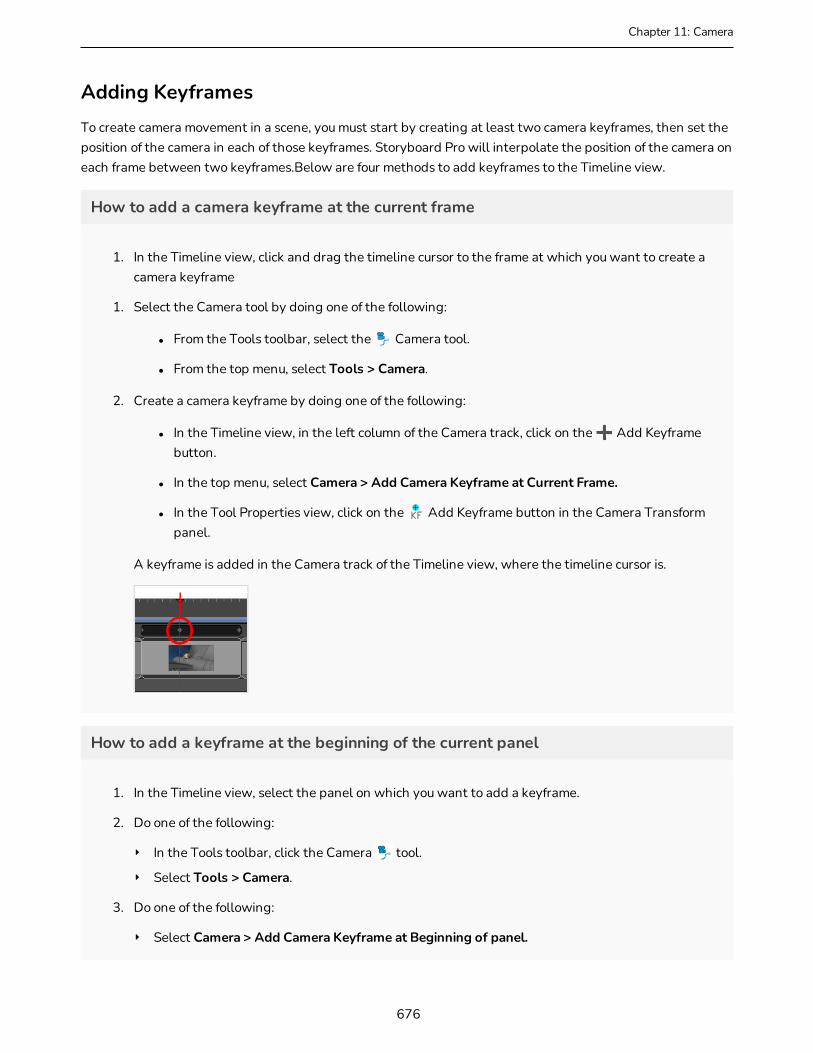
Chapter 11: Camera
Adding KeyframesTo create camera movement in a scene, you must start by creating at least two camera keyframes, then set the position of the camera in each of those keyframes. Storyboard Pro will interpolate the position of the camera on each frame between two keyframes.Below are four methods to add keyframes to the Timeline view.
How to add a camera keyframe at the current frame
1. In the Timeline view, click and drag the timeline cursor to the frame at which you want to create a camera keyframe
1. Select the Camera tool by doing one of the following:
l From the Tools toolbar, select the Camera tool.
l From the top menu, select Tools > Camera.
2. Create a camera keyframe by doing one of the following:
l In the Timeline view, in the left column of the Camera track, click on the Add Keyframe button.
l In the top menu, select Camera > Add Camera Keyframe at Current Frame.
l In the Tool Properties view, click on the Add Keyframe button in the Camera Transform panel.
A keyframe is added in the Camera track of the Timeline view, where the timeline cursor is.
How to add a keyframe at the beginning of the current panel
1. In the Timeline view, select the panel on which you want to add a keyframe.
2. Do one of the following:
‣ In the Tools toolbar, click the Camera tool.
‣ Select Tools > Camera.
3. Do one of the following:
‣ Select Camera > Add Camera Keyframe at Beginning of panel.
676

‣ In the Tool Properties view, click the Add Keyframe at Beginning of Current Panel button.
In the Timeline view, a keyframe is added at the beginning of the selected panel.
How to add a keyframe at the end of the current panel
1. In the Timeline view, select the panel on which you want to add a keyframe.
2. Do one of the following:
‣ In the Tools toolbar, click the Camera tool.
‣ Select Tools > Camera.
1. Do one of the following:
‣ Select Camera > Add Camera Keyframe at End of panel.
‣ In the Tool Properties view, click the Add Keyframe at the End of Current Panel button.
A keyframe is added in the Timeline view, at the end of the current panel.
How to use the Copy and Paste commands to add keyframes
1. In the Timeline view, click to select a camera keyframe.
The keyframe turns blue.
2. In the Stage view, click the camera keyframe.
677
Storyboard Pro 20 User Guide
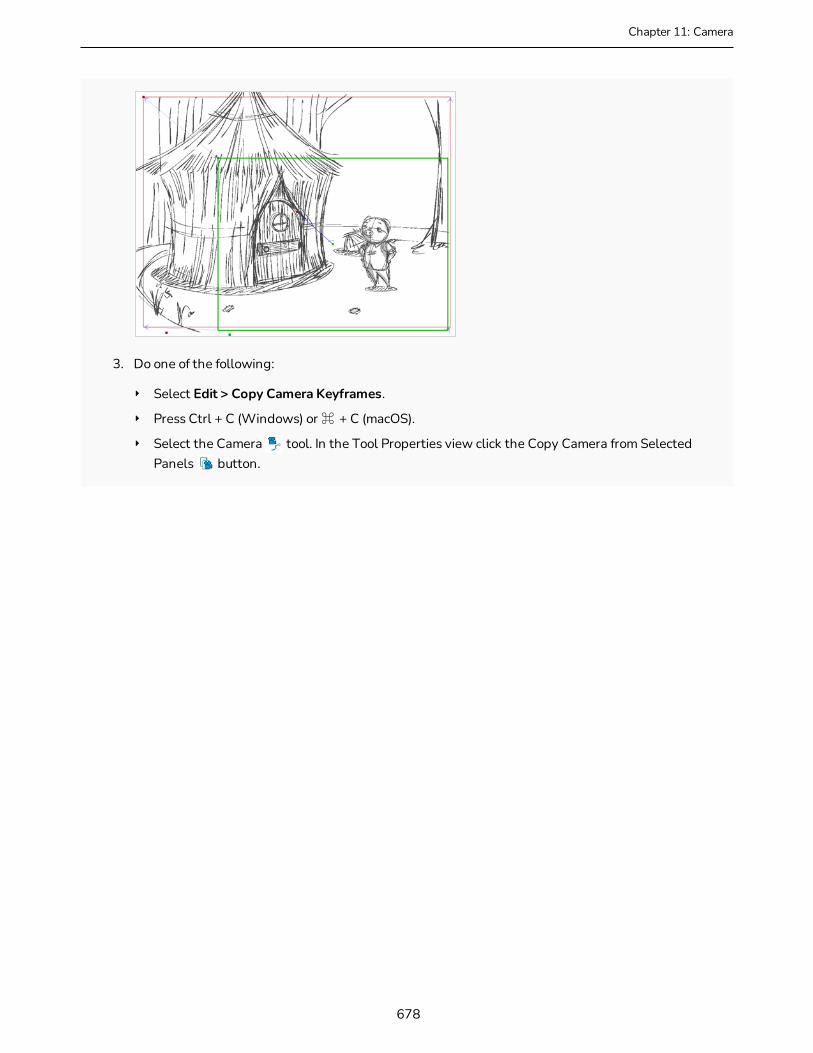
Chapter 11: Camera
3. Do one of the following:
‣ Select Edit > Copy Camera Keyframes.
‣ Press Ctrl + C (Windows) or ⌘ + C (macOS).
‣ Select the Camera tool. In the Tool Properties view click the Copy Camera from Selected Panels button.
678
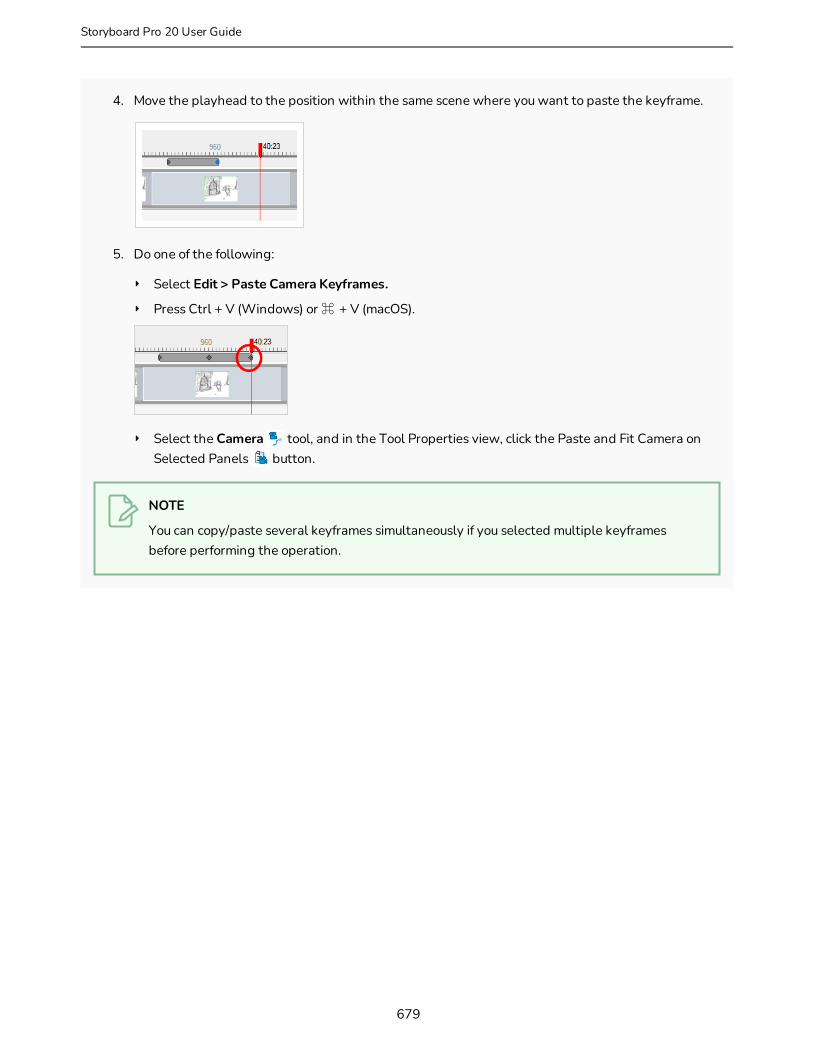
4. Move the playhead to the position within the same scene where you want to paste the keyframe.
5. Do one of the following:
‣ Select Edit > Paste Camera Keyframes.
‣ Press Ctrl + V (Windows) or ⌘ + V (macOS).
‣ Select the Camera tool, and in the Tool Properties view, click the Paste and Fit Camera on Selected Panels button.
NOTE
You can copy/paste several keyframes simultaneously if you selected multiple keyframes before performing the operation.
679
Storyboard Pro 20 User Guide
Chapter 11: Camera
Deleting KeyframesWhen you no longer need keyframes, you can delete them from the Timeline view.
How to delete keyframes from the Timeline view
1. Select the keyframe(s) to delete.
2. Do one of the following:
‣ Select Edit > Delete Selected Camera Keyframes.
‣ Select the Camera tool, and in the Tool Properties view, click the Delete Selected Keyframe button.
‣ Press Delete.
How to delete a keyframe at the current frame
1. In the Timeline view, place the red playhead on the frame that contains the keyframe to delete.
2. Select Camera > Remove Camera Keyframe at Current Frame.
680
Animating KeyframesT-SBFND-009-005
The position of the camera keyframes is set in much the same way as the Static Camera, using the Camera tool in the Stage view. You must do this for every keyframe you created, so the camera moves from one keyframe to the next when played back.
NOTE
This section shows you how to set up a 2D Camera movement. When using the Camera in 3D space, new manipulators become available—see About 3D Objects on page 716 to learn more about 3D camera moves and framing your 3D scene.
NOTE
When manipulating the Camera, you can enable the Camera Label option in the Stage view status bar to display a letter in the corner of each camera frame, indicating their order in the camera movement.
How to position camera keyframes in a 2D scene
1. Select the Camera tool by doing one of the following:
l From the Tools toolbar, select the Camera tool.
l From the top menu, select Tools > Camera.
2. Do one of the following:
l In the Camera track of the Timeline view, select the camera keyframe you want to modify.
l In the Stage or Camera view, zoom out to see all of the camera frames. Then, select the camera frame you want to modify by clicking on its edge or its centre point.
681
Storyboard Pro 20 User Guide

Chapter 11: Camera
TIP
Even if your camera frames are in the same position, you can still select a specific one in the Stage or Camera view. Just below the bottom-left corner of the camera frames, you will find blue square-shaped dots. Each of these dots can be clicked on to select a specific camera frame. If two or more camera keyframes are in the same position, the order of these dots will represent their relative position on the timeline. The leftmost dot can be used to select the first camera keyframe, the second leftmost dot can be used to select the second camera keyframe, etc.
3. Use one of the following methods to modify the camera frame:
l Move: Move the mouse cursor over the edge or the centre point of the camera frame until the mouse cursor becomes , then click and drag the camera frame to move it.
l Truck In or Truck Out: Move the mouse cursor over the point in the top-left corner of the camera frame until the mouse cursor becomes , then click and drag this corner to shrink or stretch the camera frame. Shrinking the camera frame will make it zoom in, and stretching it will make it zoom out.
682
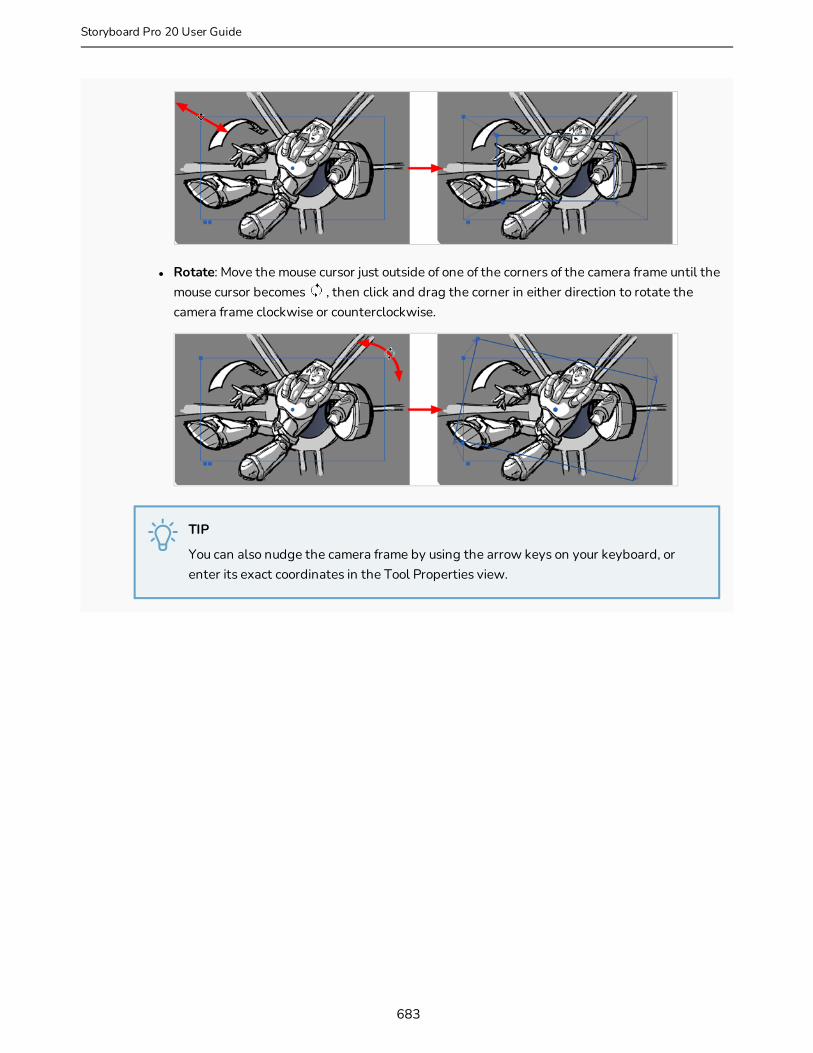
l Rotate: Move the mouse cursor just outside of one of the corners of the camera frame until the mouse cursor becomes , then click and drag the corner in either direction to rotate the camera frame clockwise or counterclockwise.
TIP
You can also nudge the camera frame by using the arrow keys on your keyboard, or enter its exact coordinates in the Tool Properties view.
683
Storyboard Pro 20 User Guide

Chapter 11: Camera
Timing KeyframesT-SBANIM-004-008
If you need to change the frame or timing of a keyframe in the Timeline view, there are a few different ways to do this. Note that camera keyframes can only be moved to a new location within the same scene.
The following two methods are useful when you want to move a keyframe to a new location, or cut and paste a keyframe.
How to drag camera keyframes to a new location in the Timeline view
1. In the Timeline view, select one or more keyframes.
The keyframe turns blue.
2. Drag the selected keyframe left or right to choose a new position in time. You can only drag it to a new location within the current scene.
While you drag the keyframe, its position relative to the scene is displayed in a black box. The number of frames is also displayed from the original position the new keyframe will be located.
How to using the Cut and Paste commands to move keyframes
1. In the Timeline view, select one or more keyframes.
The keyframe turns blue.
2. Select Edit > Cut Camera Keyframes or press Ctrl + X (Windows) or ⌘ + X (macOS).
The keyframe is removed and copied to the Clipboard.
684
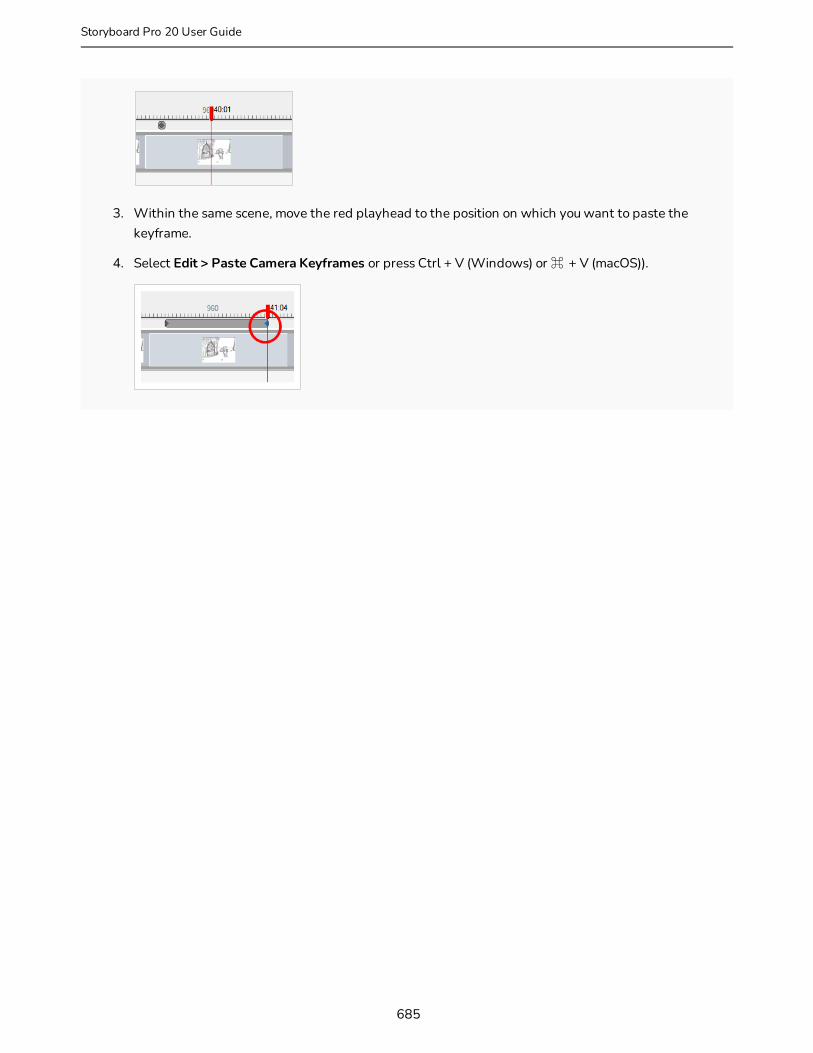
3. Within the same scene, move the red playhead to the position on which you want to paste the keyframe.
4. Select Edit > Paste Camera Keyframes or press Ctrl + V (Windows) or ⌘ + V (macOS)).
685
Storyboard Pro 20 User Guide

Chapter 11: Camera
Spreading Camera Motions Across PanelsT-SBFND-009-007
A camera movement is not restricted to a panel. Keyframes for a particular camera movement can span multiple panels within the same scene.
How to spread a camera movement across multiple panels of a scene
1. In the Timeline view, select the panel that contains the camera movement you want to span over multiple panels.
2. Select the keyframe you want to move to a new panel.
3. Drag the selected keyframe to another panel within the scene.
686

Adding Ease-In and Ease-Out to a Camera AnimationBy default, when you create camera movements, the camera will move from its position in one keyframe to its position in the next keyframe by progressing towards it at a constant pace, then stop moving abruptly. If you want it to gain speed as it start moving or to slow down before it stops, you can do this by adding ease-in and ease-out to its animation. Adding ease-in to an animation will make it start slowly and gain in speed as it goes. Adding ease-out to an animation will make it slow down before it stops.
You can set the ease-in and ease-out for an animation in the Tool Properties view.
How to add ease-in and ease-out to a camera animation
1. In the Tools toolbar, select the Camera tool.
2. In the Timeline view, move the timeline cursor between the first and last keyframe of the camera animation to which you want to add ease.
687
Storyboard Pro 20 User Guide
Chapter 11: Camera
3. In the Tool Properties view, enter the desired length of the ease-in in the Ease In field in the H:MM:SS:FF format, where H means hours, MM means minutes, SS means seconds and FF means frames. The longer the length of the ease-in, the smoother it will be.
4. Enter the desired length of the ease-out in the Ease Out field, in the same format. The longer the length of the ease-out, the smoother it will be.
5. To test your camera animation, move the timeline cursor to a point just before the start of the camera movement. Then, in the Playback toolbar, click on the Play button.
688
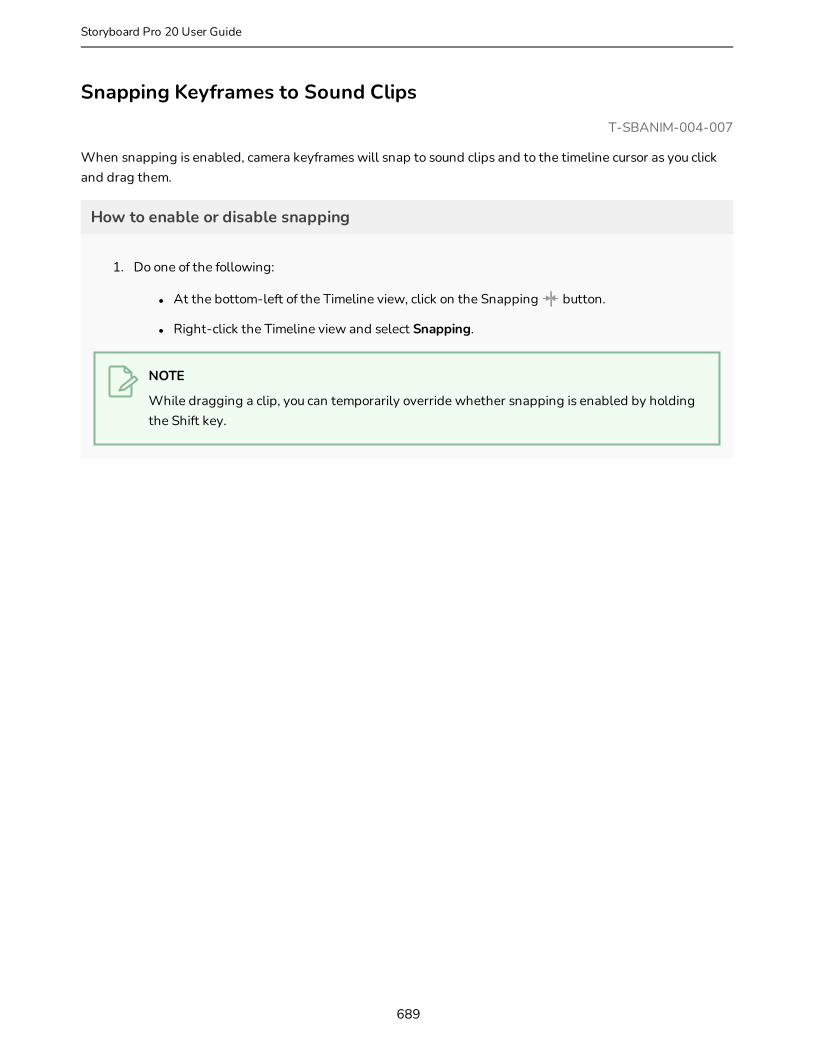
Snapping Keyframes to Sound ClipsT-SBANIM-004-007
When snapping is enabled, camera keyframes will snap to sound clips and to the timeline cursor as you click and drag them.
How to enable or disable snapping
1. Do one of the following:
l At the bottom-left of the Timeline view, click on the Snapping button.
l Right-click the Timeline view and select Snapping.
NOTE
While dragging a clip, you can temporarily override whether snapping is enabled by holding the Shift key.
689
Storyboard Pro 20 User Guide
Chapter 11: Camera
Syncing KeyframesT-SBANIM-004-006
By default, when you change the duration of a panel, the position of camera keyframes within that panel is adjusted to fit the new length of the panel. This behavior can be adjusted depending on your preference.
The Keyframes Sync Mode has three options:
l None: When adjusting the length of a panel or a scene, the camera keyframes remain at their actual frames. This means that if you make a scene shorter than its camera movements, some of its last camera keyframes will get clipped out.
l Relative to Panels: The default option. When adjusting the length of a panel, the position of camera keyframes within this panel will be adjusted to fit the new length of the panel. If camera keyframes are outside of that panel but inside the same scene, their distance relative to each other will not be affected.
l Relative to Scene: When adjusting the length of the panel, the position of all camera keyframes within the scene in which that panel is will be adjusted to fit the new length of the scene. This could cause some camera keyframes to end up in a different panel than the one where they originally were. However, since camera movements occur at the level of the scene, not the panel, this option may give preferable results in some situations.
How to change keyframe syncing settings
1. Do one of the following:
l Select Camera > Keyframe Sync Mode > None, Relative to PanelorRelative to Scene.
l In the Timeline view, right-click on the Camera track and select Keyframes Sync Mode > None, Relative to Panel or Relative to Scene.
690
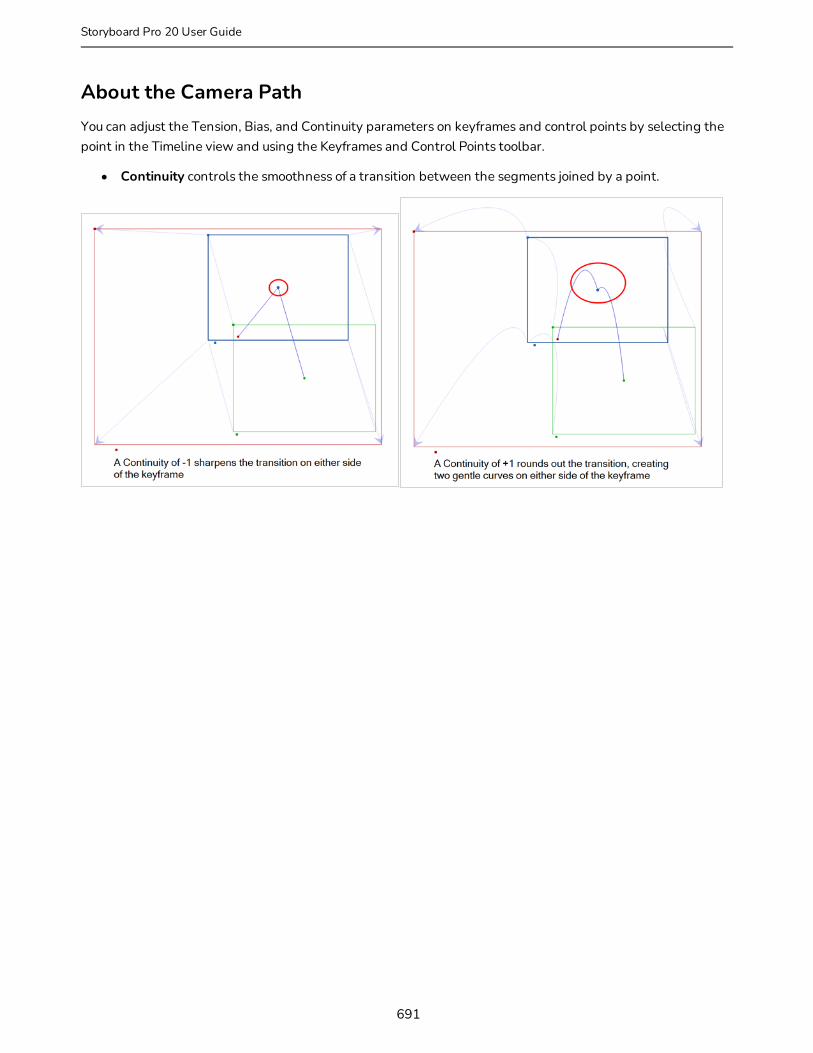
About the Camera PathYou can adjust the Tension, Bias, and Continuity parameters on keyframes and control points by selecting the point in the Timeline view and using the Keyframes and Control Points toolbar.
• Continuity controls the smoothness of a transition between the segments joined by a point.
691
Storyboard Pro 20 User Guide
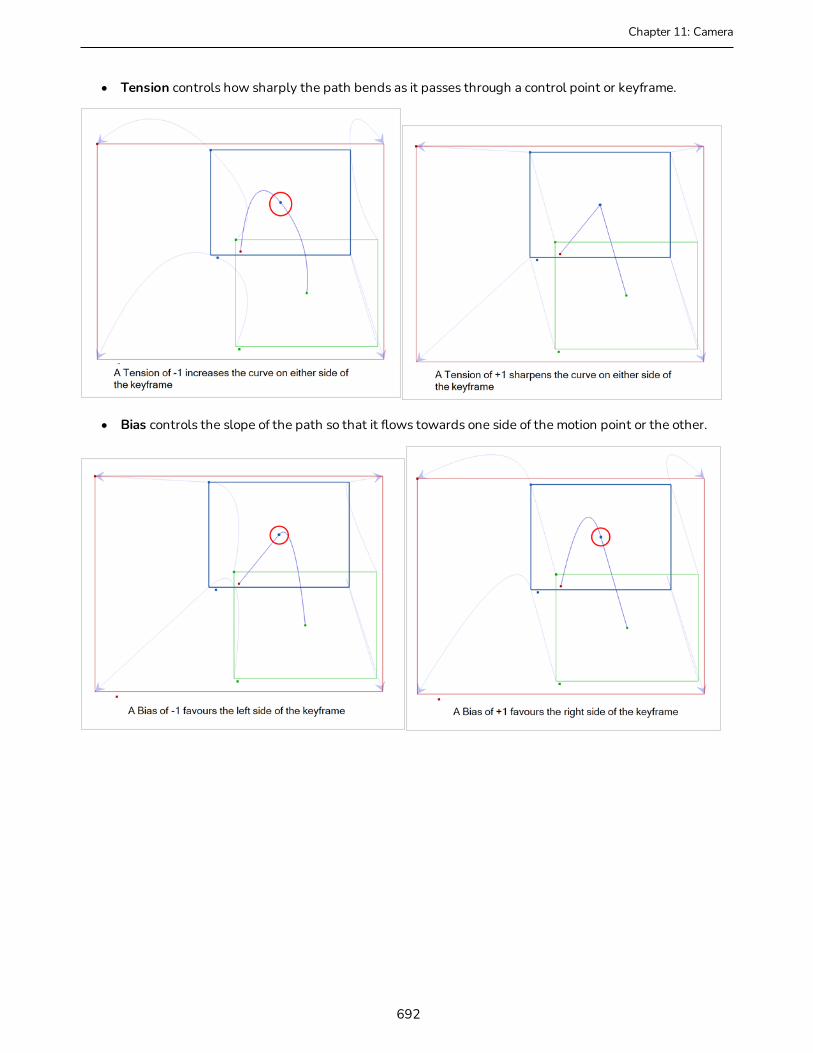
Chapter 11: Camera
• Tension controls how sharply the path bends as it passes through a control point or keyframe.
• Bias controls the slope of the path so that it flows towards one side of the motion point or the other.
692

Adding Control PointsYou can change the camera path from one keyframe to the next by adding control points to the trajectory.
How to add control points to a trajectory
1. In the Timeline view, select the scene on which you want to modify the camera trajectory.
2. From the Tools toolbar or the Tools menu, select the Camera tool.
3. In the Stage view, place the cursor over the trajectory between two keyframes.
4. When you see this icon , click and drag the trajectory to reshape it.
5. A control point is added when you let go of the mouse button.
693
Storyboard Pro 20 User Guide

Chapter 11: Camera
Now, instead of the camera going from A to B in a linear fashion, there is a slight curve to the trajectory.
6. Click the control point to move it and to reshape the trajectory if desired. You can also select the control point in the Stage view, Top view or Side view and click Del. You do not have to go to the Timeline.
694

Deleting Control PointsControl points are visible in the Timeline, but you can only move them in the Stage view. To delete a control point, you must go to the Timeline. A control pointed is represented by a small dot between keyframes.
How to delete a control point
1. In the Timeline view, select the control point which represented by a small dot between keyframes.
The control point turns blue.
2. Press Delete to remove the selected point.
The trajectory reverts to its original shape.
695
Storyboard Pro 20 User Guide

Chapter 11: Camera
Adjusting the Curve of a Camera MovementWhen you animate a camera movement with more than two keyframes, the path of the camera follows a curve that touches every keyframe in its animation. Using the Keyframes and Control Point toolbar, you can adjust how the path curves before and after each keyframe in the camera's trajectory.
When a camera keyframe is selected, the Keyframes and Control Point toolbar gives you access to three settings that can be applied to that keyframe. Each setting can have a value ranging from -1 to 1. When all fields are set to their default value, 0, the curve is constant and even. Here is an example opf how each setting can affect the camera path:
l T (Tension): A positive tension will reduce the curve of the path between keyframes. A negative tension will increase it.
l C (Continuity): A positive continuity will cause the path to curve beyond the trajectory between each keyframes. A negative continuity will have a reverse effect.
l B (Bias): A high bias will make the curve more straight before the keyframe and more curved out after it. A negative bias will make the curve more curved out before the keyframe and more straight after it.
How to adjust the Continuity, Tension and Bias parameters of a keyframe or control point
1. Add the Keyframes and Control Points toolbar to your workspace by doing one of the following:
l In the top menu, select Windows > Toolbars > Keyframes and Control Points.
l Right-click on a toolbar or on the empty space around a toolbar and select Keyframes and Control Points.
696
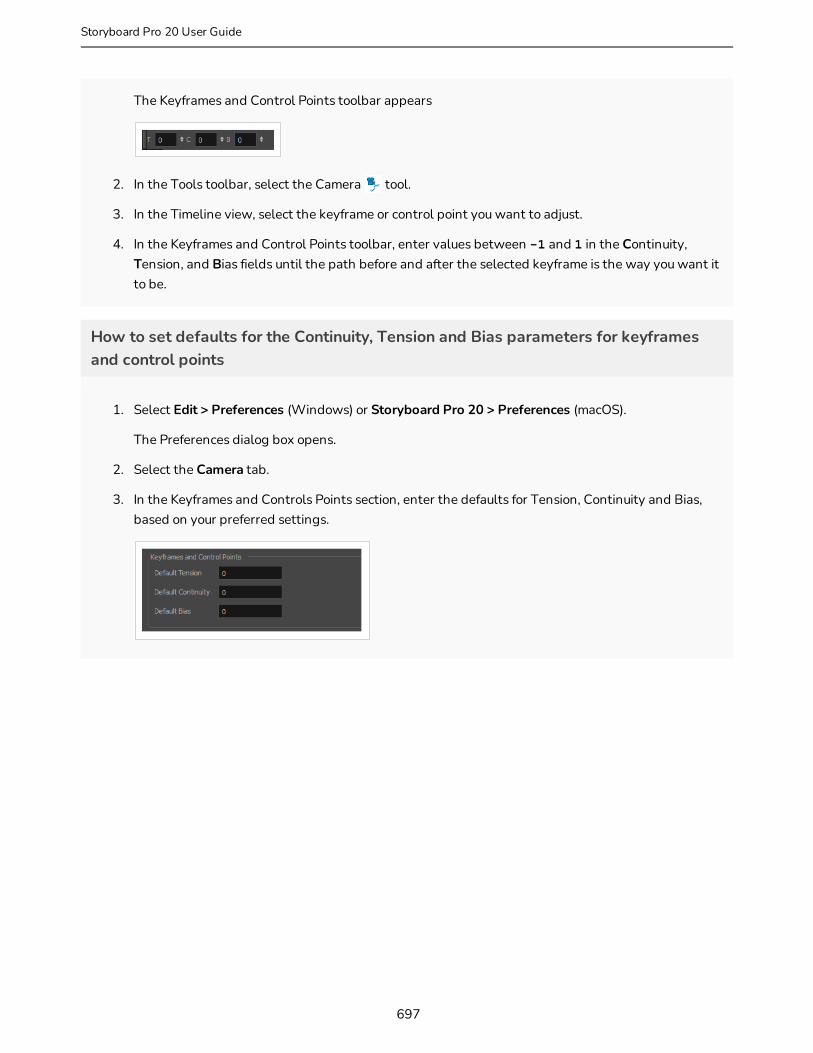
The Keyframes and Control Points toolbar appears
2. In the Tools toolbar, select the Camera tool.
3. In the Timeline view, select the keyframe or control point you want to adjust.
4. In the Keyframes and Control Points toolbar, enter values between -1 and 1 in the Continuity, Tension, and Bias fields until the path before and after the selected keyframe is the way you want it to be.
How to set defaults for the Continuity, Tension and Bias parameters for keyframes and control points
1. Select Edit > Preferences (Windows) or Storyboard Pro 20 > Preferences (macOS).
The Preferences dialog box opens.
2. Select the Camera tab.
3. In the Keyframes and Controls Points section, enter the defaults for Tension, Continuity and Bias, based on your preferred settings.
697
Storyboard Pro 20 User Guide
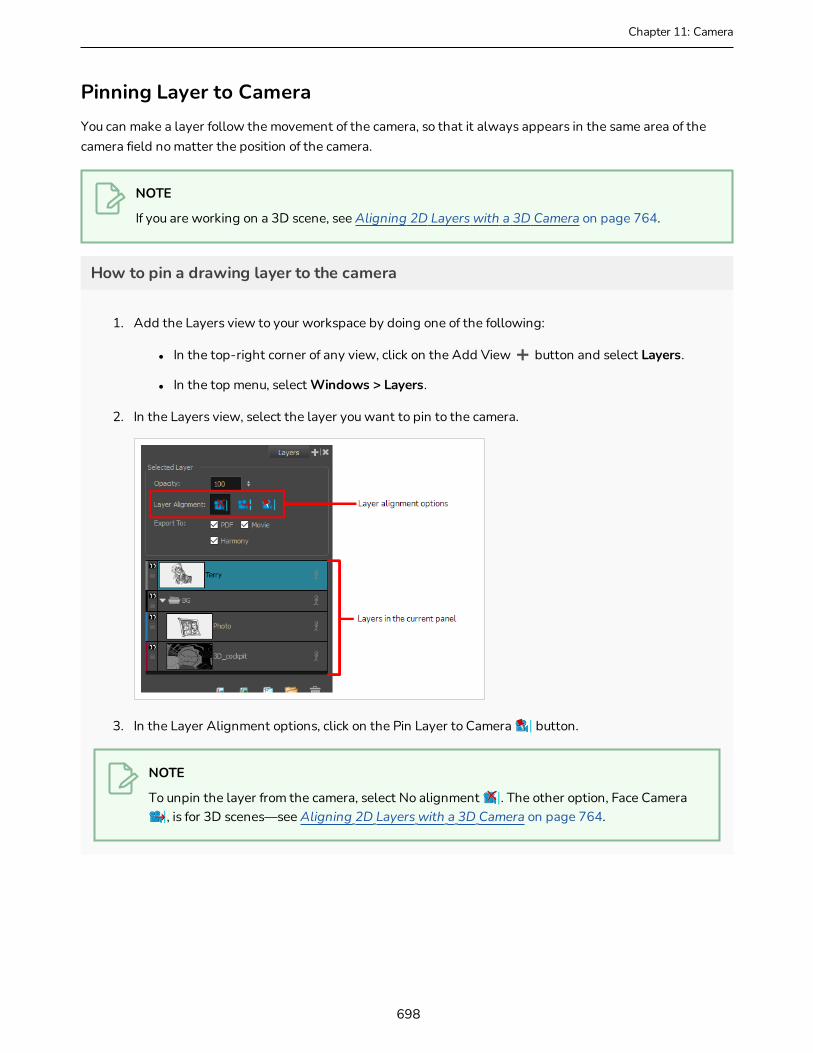
Chapter 11: Camera
Pinning Layer to CameraYou can make a layer follow the movement of the camera, so that it always appears in the same area of the camera field no matter the position of the camera.
NOTE
If you are working on a 3D scene, see Aligning 2D Layers with a 3D Camera on page 764.
How to pin a drawing layer to the camera
1. Add the Layers view to your workspace by doing one of the following:
l In the top-right corner of any view, click on the Add View button and select Layers.
l In the top menu, select Windows > Layers.
2. In the Layers view, select the layer you want to pin to the camera.
3. In the Layer Alignment options, click on the Pin Layer to Camera button.
NOTE
To unpin the layer from the camera, select No alignment . The other option, Face Camera , is for 3D scenes—see Aligning 2D Layers with a 3D Camera on page 764.
698

699
Storyboard Pro 20 User Guide
Chapter 12: 3D
Chapter 12: 3DStoryboard Pro has an extensive set of 3D functionalities:
l You can move drawing layers are different distances from the camera's point of view.
l You can rotate drawing layers on any axis.
l You can import 3D models into your scene and place them into your panels at any position, size and angle.
l You can animate the position, size and angle of 3D models.
l You can adjust the position, size and angle of sub-objects in your 3D model.
l You can separate a sub-object from its 3D model and animate it independently.
Whether 3D functionalities are enabled depends on whether or not the current scene is in 2D mode or 3D mode. By default, scenes created in your project are in 2D Mode. 2D Mode disables 3D functionalities to avoid letting them clutter your workflow, since storyboards are often strictly 2D projects. However, you can enable 3D on a scene instantly and at any time, without it having any negative impact on the scene. 3D functionalities cannot be enabled for a single panel, or for the whole project at a time.
700

About Staging in 3D SpaceStoryboard Pro adds a new dimension to the layout process by allowing you to plan your 2D scenes in a 3D space. The 3D space is described in terms of three planes:
• EW: Maps the horizontal plane in terms of East and West, this is the X coordinate.
• NS: Maps the vertical plane in terms of North and South, this is the Y coordinate.
• FB: Maps the depth of the plane in terms of Front and Back, this is the Z coordinate.
When you add elements to a scene, they appear in layers in the initial position of zero fields NS, zero fields EW, and zero fields FB within the 3D scene space. Before the 3D space feature, you could only change the layer position—see .
But in 3D space, you can use the EW (X), NS (Y), and FB (Z) coordinates to place your elements at different distances in depth from the camera and from each other, adding a three-dimensional effect to your two-dimensional animation.
Once you place the elements in your scene, you can move, rotate, or scale your elements in 3D space. Storyboard Pro automatically applies the changes to all of the contents in the element.
Where previously 2D objects could only be moved, rotated and animated on a 2D plane, now they too can be manipulated in 3D space. This means that flat, 2D objects can move forward or backward along the Z-axis, growing realistically bigger or smaller as they move towards or away from the camera. Features, such as Always Face Camera, mask the paper thin edges of 2D objects for camera rotations around these objects.
701
Storyboard Pro 20 User Guide

Chapter 12: 3D
Converting the Current Scene to 3DWhen you create a scene, it is in 2D mode by default. This means layers are locked at the same position on the z-axis and can only be rotated on the z-axis. This is to avoid incumbering your workflow with 3D functionalities that are not needed.
You can easily convert a 2D scene to 3D, and back and forth. In a 3D scene, you can move layers on the z-axis and rotate them in any direction. You can also rotate the camera in any direction and make it move across the depth of the stage. Likewise, you can rotate the Stage view in any angle and navigate the stage in its depth, allowing you to look at it from various points of view.
NOTE
You can convert a scene to 3D, but not a single panel. When switching to 3D mode, the mode is only applied to the current scene, not the entire project.
How to enable the 3D option
1. In the Thumbnails or Timeline view, select the scene you want to convert to 3D.
2. Do one of the following:
l In the Storyboard toolbar, click the Enable 3D button.
l Select Storyboard > Enable 3D for Current Scene.
702
Resetting the Current Scene to 2DYou can reset a 3D scene back to 2D. When you do this, the following changes are made to your scene:
l Imported 3D models are removed.
l 3D camera movements are converted to 2D camera movements. Camera movements on the z-axis will be converted to 2D camera zoom-ins and zoom-outs, but 3D rotations will be ignored.
l 3D transformations on layers are converted to 2D transformations. Layers that have been moved on the z-axis will be scaled up or down to preserve their apparent proportions, but 3D rotations will be ignored.
How to reset a scene to 2D
1. Do one of the following:
l In the Storyboard toolbar, click the Reset Scene to 2D button.
l Select Storyboard > Reset Scene to 2D.
703
Storyboard Pro 20 User Guide
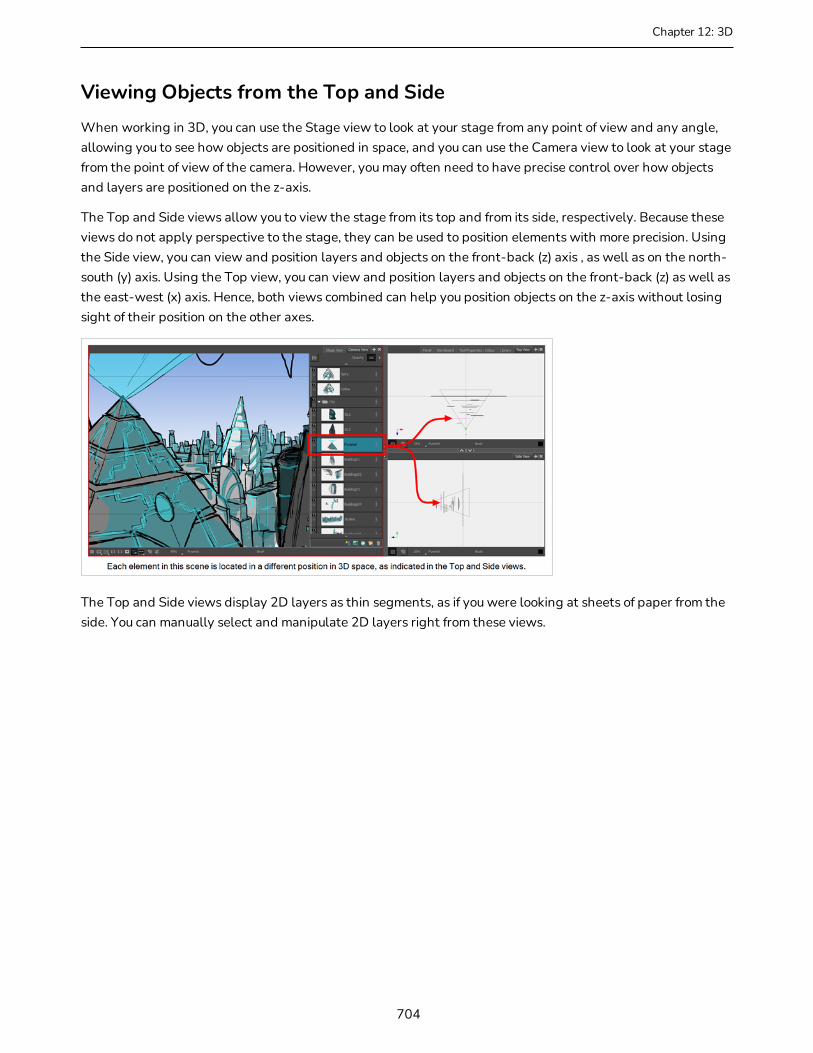
Chapter 12: 3D
Viewing Objects from the Top and SideWhen working in 3D, you can use the Stage view to look at your stage from any point of view and any angle, allowing you to see how objects are positioned in space, and you can use the Camera view to look at your stage from the point of view of the camera. However, you may often need to have precise control over how objects and layers are positioned on the z-axis.
The Top and Side views allow you to view the stage from its top and from its side, respectively. Because these views do not apply perspective to the stage, they can be used to position elements with more precision. Using the Side view, you can view and position layers and objects on the front-back (z) axis , as well as on the north-south (y) axis. Using the Top view, you can view and position layers and objects on the front-back (z) as well as the east-west (x) axis. Hence, both views combined can help you position objects on the z-axis without losing sight of their position on the other axes.
The Top and Side views display 2D layers as thin segments, as if you were looking at sheets of paper from the side. You can manually select and manipulate 2D layers right from these views.
704
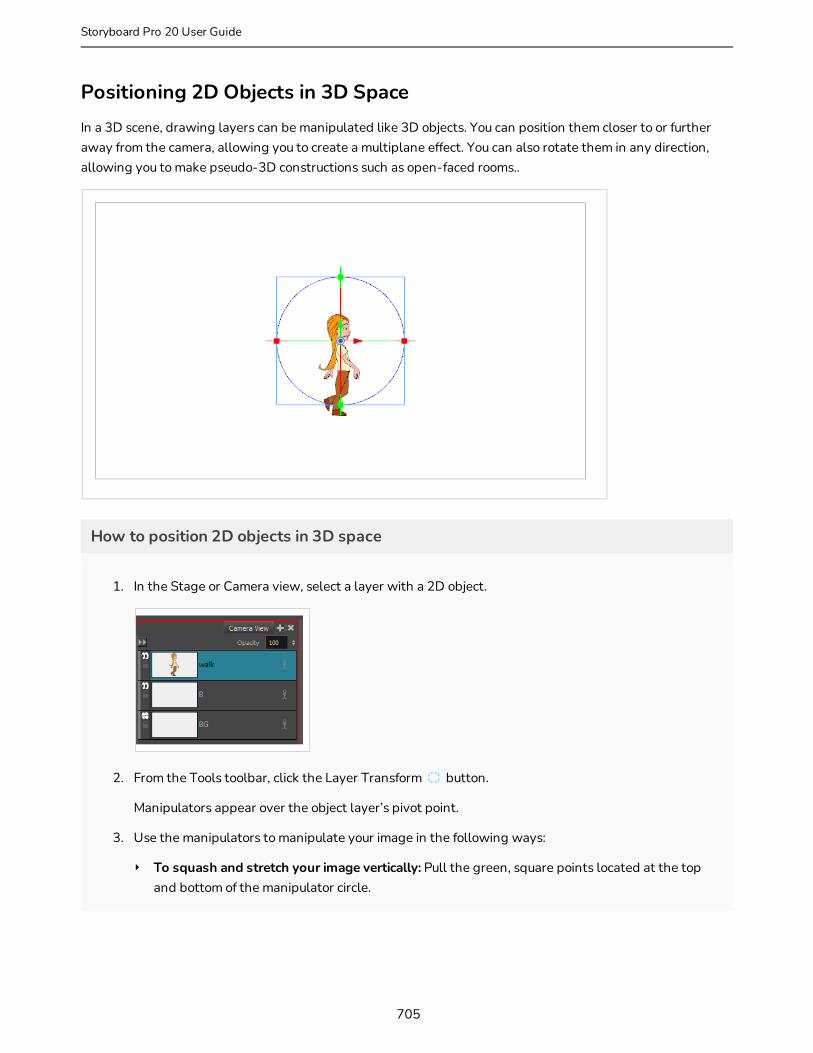
Positioning 2D Objects in 3D SpaceIn a 3D scene, drawing layers can be manipulated like 3D objects. You can position them closer to or further away from the camera, allowing you to create a multiplane effect. You can also rotate them in any direction, allowing you to make pseudo-3D constructions such as open-faced rooms..
How to position 2D objects in 3D space
1. In the Stage or Camera view, select a layer with a 2D object.
2. From the Tools toolbar, click the Layer Transform button.
Manipulators appear over the object layer’s pivot point.
3. Use the manipulators to manipulate your image in the following ways:
‣ To squash and stretch your image vertically: Pull the green, square points located at the top and bottom of the manipulator circle.
705
Storyboard Pro 20 User Guide
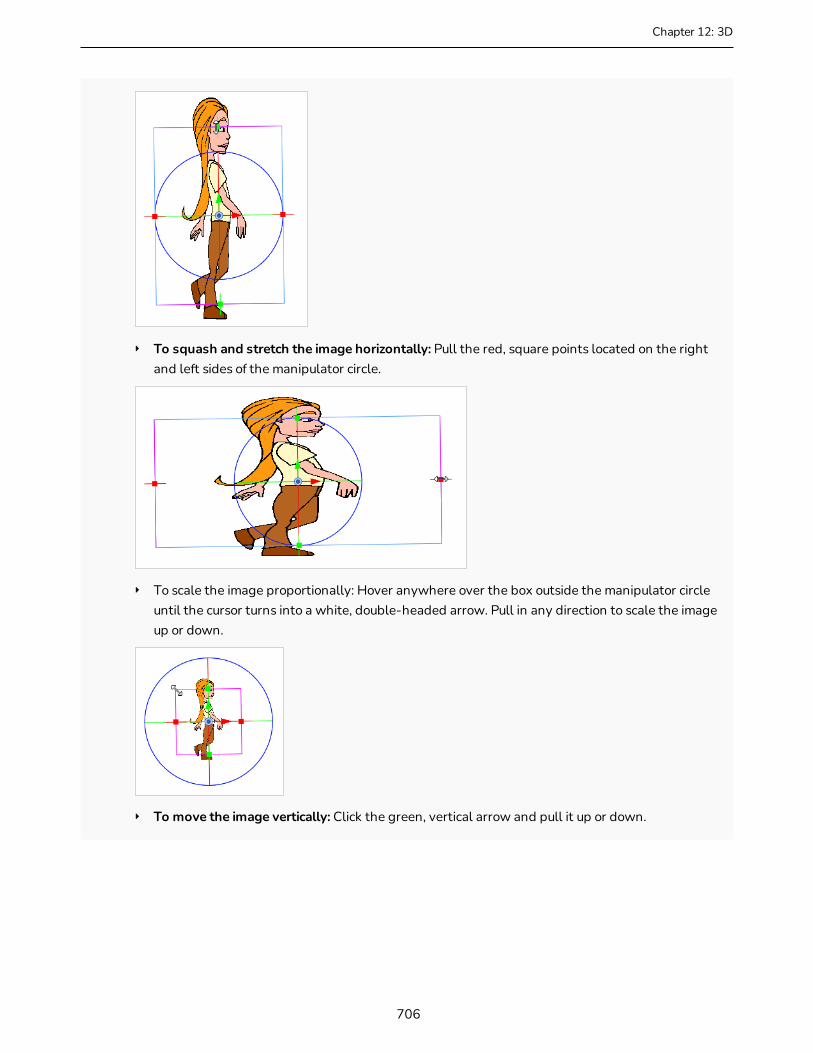
Chapter 12: 3D
‣ To squash and stretch the image horizontally: Pull the red, square points located on the right and left sides of the manipulator circle.
‣ To scale the image proportionally: Hover anywhere over the box outside the manipulator circle until the cursor turns into a white, double-headed arrow. Pull in any direction to scale the image up or down.
‣ To move the image vertically: Click the green, vertical arrow and pull it up or down.
706

‣ To move the image horizontally: Click the red, horizontal arrow and pull it left or right.
‣ To move the image backwards or forwards along the Z-axis: Go to either the Top or Side views and use the blue arrow to pull the layer closer or farther from the static camera cone.
707
Storyboard Pro 20 User Guide
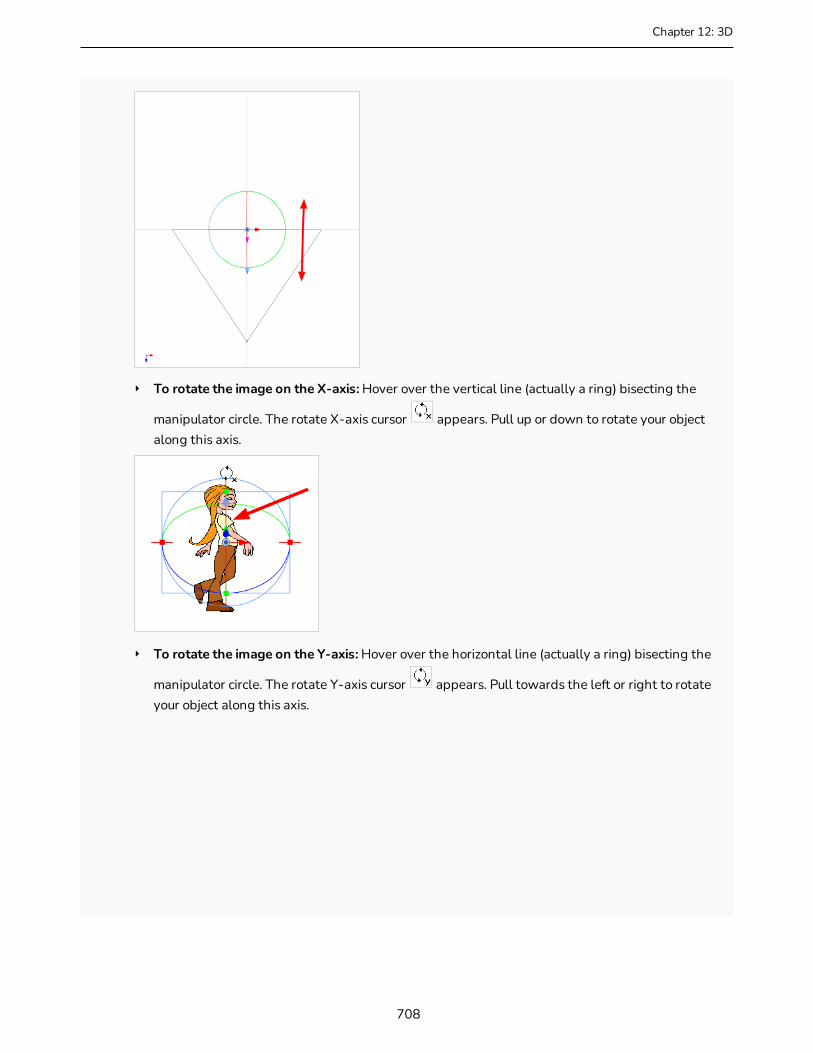
Chapter 12: 3D
‣ To rotate the image on the X-axis: Hover over the vertical line (actually a ring) bisecting the
manipulator circle. The rotate X-axis cursor appears. Pull up or down to rotate your object along this axis.
‣ To rotate the image on the Y-axis: Hover over the horizontal line (actually a ring) bisecting the
manipulator circle. The rotate Y-axis cursor appears. Pull towards the left or right to rotate your object along this axis.
708

‣ To rotate the image on the Z-axis: hover anywhere over the manipulator ring. The rotate Z-axis cursor appears. Pull clockwise or counter clockwise to rotate the object.
You can perform any of these manipulations in combination. For example, after have rotated your 2D object 45 degrees around the Y-axis, you can reposition it along the Z-axis.
709
Storyboard Pro 20 User Guide

Chapter 12: 3D
Moving Layers in the 3D Space and Maintaining their SizeT-SBADV-011-015
When positioning elements, you can retain the visual scale of elements as you move them in the Z-axis in the Side or Top views. As you move drawing layers on the Z-axis, they are scaled to preserve their size in the camera.
How to position an element in the Top and Side views
1. From the Tool toolbar, select the Maintain Size tool.
2. In the Side or Top view, select a layer.
The selected layer is highlighted in pink.
3. Drag the layer to the correct depth position in the camera cone.
Your element aspect remains the same in the Camera view.
4. To scale the element up or down in relation to its distance to the camera, select the Layer Transform tool from the Tools toolbar.
5. In the Tool Properties view, make sure the Peg Selection Mode option is deselected.
The selected layer is highlighted in the camera cone.
710

6. In the Top view, drag the element sideways to position it horizontally. Hold Shift while dragging to make sure it only moves along the X-axis.
7. In the Side view, drag the selected element up or down to position it vertically. Hold Shift while dragging to make sure it only moves along the Y-axis.
711
Storyboard Pro 20 User Guide
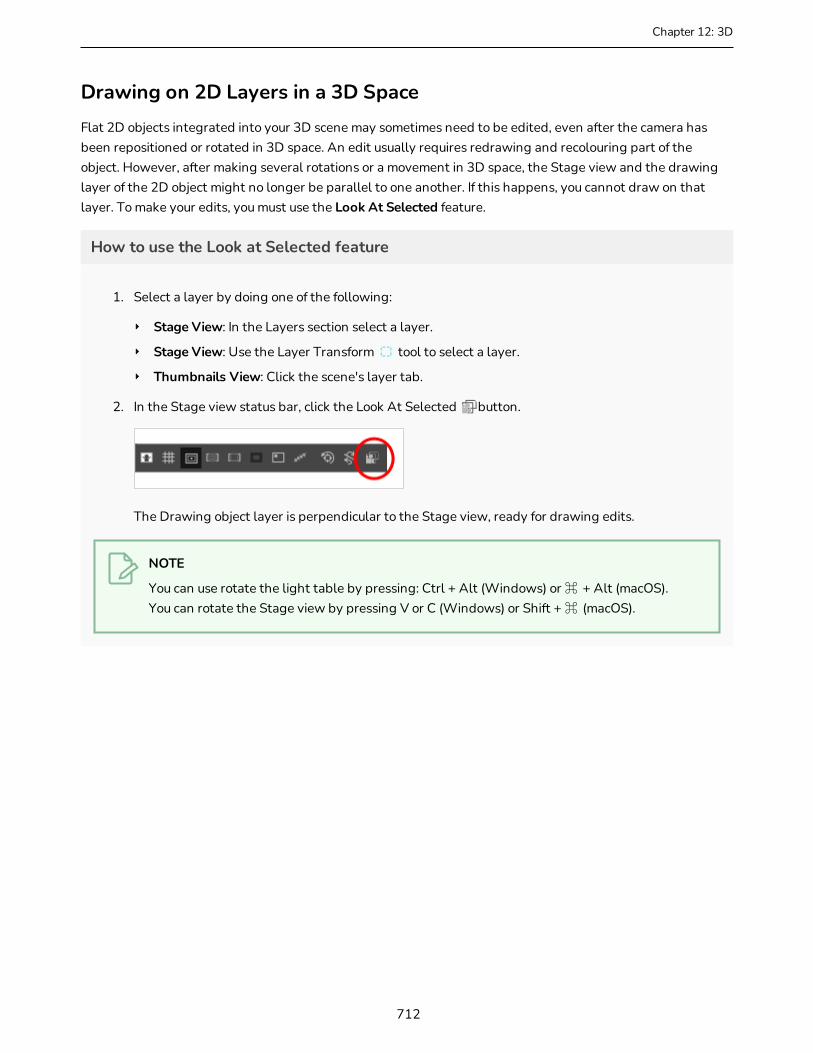
Chapter 12: 3D
Drawing on 2D Layers in a 3D SpaceFlat 2D objects integrated into your 3D scene may sometimes need to be edited, even after the camera has been repositioned or rotated in 3D space. An edit usually requires redrawing and recolouring part of the object. However, after making several rotations or a movement in 3D space, the Stage view and the drawing layer of the 2D object might no longer be parallel to one another. If this happens, you cannot draw on that layer. To make your edits, you must use the Look At Selected feature.
How to use the Look at Selected feature
1. Select a layer by doing one of the following:
‣ Stage View: In the Layers section select a layer.
‣ Stage View: Use the Layer Transform tool to select a layer.
‣ Thumbnails View: Click the scene's layer tab.
2. In the Stage view status bar, click the Look At Selected button.
The Drawing object layer is perpendicular to the Stage view, ready for drawing edits.
NOTE
You can use rotate the light table by pressing: Ctrl + Alt (Windows) or ⌘ + Alt (macOS).You can rotate the Stage view by pressing V or C (Windows) or Shift + ⌘ (macOS).
712

Navigating the 3D SpaceWhen working in the Stage view, you can quickly navigate through a scene using the mouse buttons or 3D navigation tools.
By using your left, middle, and right mouse buttons, you can rotate around in the Stage view, dolly on the Z axis, and pan the X and Y axes. If you only have access to the left mouse button, such as when using a pen and tablet, you can still navigate easily in 3D space.
To increase efficiency while working with the tools in Storyboard Pro, you can temporarily swap one tool for another—see About Quick Swap Shortcut on page 489.
How to navigate 3D space using only the left mouse button
1. In the Stage view, do any of the following:
l Press Shift + Ctrl and left-click to rotate.
l Press Spacebar and left-click to pan.
l Press Spacebar+Alt and left-click to zoom out.
l Press Spacebar+Ctrl and left-click to zoom in.
How to navigate 3D space using the three mouse buttons
1. In the Stage view, hold down Shift + Ctrl and do any of the following:
l Left Mouse Button: Hold down the left mouse button and drag to rotate the view.
l Middle Mouse Button: Hold down the middle mouse button and drag to pan along the X and Y axes.
l Right Mouse Button: Hold down the right mouse button and drag to dolly on the Z-axis.
l Scroll Wheel: Roll the scroll wheel to dolly on the Z-axis.
How to navigate 3D space with the 3D Navigation tool
1. From the Tools toolbar, click the 3D Navigation tool.
2. Do any of the following:
l Hold down the left mouse and drag to rotate the scene.
l Hold down the middle mouse and drag to pan the scene.
713
Storyboard Pro 20 User Guide
Chapter 12: 3D
l Hold down the middle mouse button while pressing Spacebar and drag to dolly in the Z axis.
l Roll the scroll wheel to dolly on the Z-axis.
You can get a first person perspective while navigating with the 3D Flying Navigation tool. By using your mouse buttons, mouse wheel, and arrow keys, you can move through 3D space interactively.
When the 3D Flying Navigation tool is active, the cursor (hand) is not visible. You can now navigate through a scene. When you move the mouse, the view rotates around the current view point (instead of around a fixed pivot).
You can move around in the scene by using the following:
• The mouse wheel controls the Z axis.
• The Up/Down keys control the Z axis.
• The Left/Right keys control the X axis.
• The Pg Up/Pg Dn keys the Y axis.
You can deactivate the tool by clicking anywhere on the interface.
NOTE
When using the 3D Flying Navigation tool with a tablet, the cursor remains visible.
How to navigate with the 3D Flying Navigation tool
1. In the Tools toolbar, select the 3D Flying Navigation tool.
2. To activate the tool, click on the Stage view.
The hand cursor disappears.
l Move mouse to rotate the scene.
l Roll the mouse wheel to move forwards or backwards. The more you roll the mouse wheel, the faster you navigate through the scene.
l Press the arrow keys and PgUp/PgDn keys to move in all six directions. Press repeatedly to increase or decrease speed.
3. To stop all motion, click anywhere on the interface.
The hand cursor reappears.
714

715
Storyboard Pro 20 User Guide
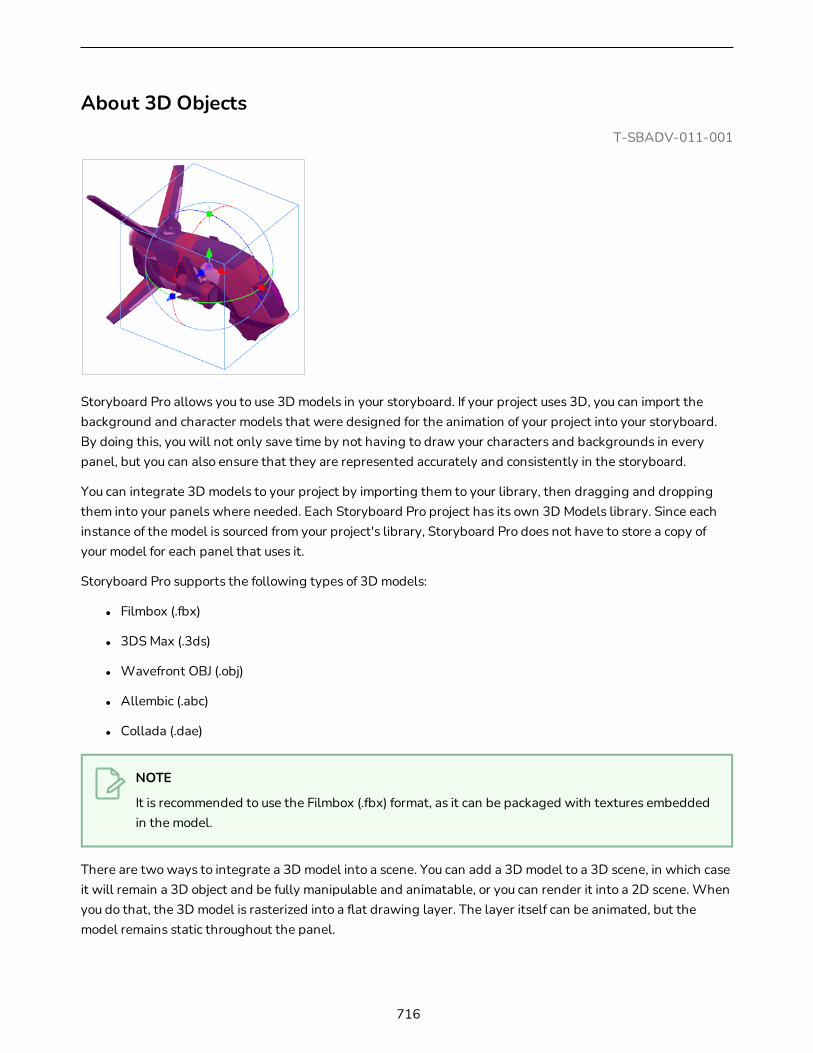
About 3D ObjectsT-SBADV-011-001
Storyboard Pro allows you to use 3D models in your storyboard. If your project uses 3D, you can import the background and character models that were designed for the animation of your project into your storyboard. By doing this, you will not only save time by not having to draw your characters and backgrounds in every panel, but you can also ensure that they are represented accurately and consistently in the storyboard.
You can integrate 3D models to your project by importing them to your library, then dragging and dropping them into your panels where needed. Each Storyboard Pro project has its own 3D Models library. Since each instance of the model is sourced from your project's library, Storyboard Pro does not have to store a copy of your model for each panel that uses it.
Storyboard Pro supports the following types of 3D models:
l Filmbox (.fbx)
l 3DS Max (.3ds)
l Wavefront OBJ (.obj)
l Allembic (.abc)
l Collada (.dae)
NOTE
It is recommended to use the Filmbox (.fbx) format, as it can be packaged with textures embedded in the model.
There are two ways to integrate a 3D model into a scene. You can add a 3D model to a 3D scene, in which case it will remain a 3D object and be fully manipulable and animatable, or you can render it into a 2D scene. When you do that, the 3D model is rasterized into a flat drawing layer. The layer itself can be animated, but the model remains static throughout the panel.
716
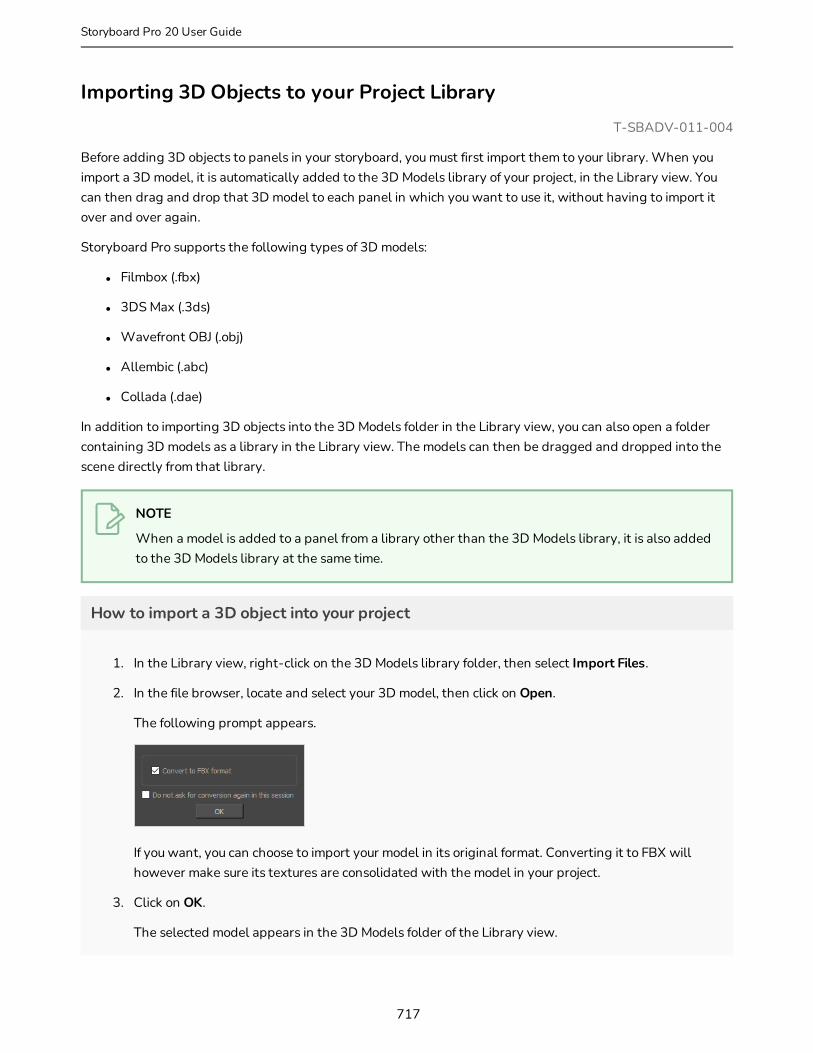
Importing 3D Objects to your Project LibraryT-SBADV-011-004
Before adding 3D objects to panels in your storyboard, you must first import them to your library. When you import a 3D model, it is automatically added to the 3D Models library of your project, in the Library view. You can then drag and drop that 3D model to each panel in which you want to use it, without having to import it over and over again.
Storyboard Pro supports the following types of 3D models:
l Filmbox (.fbx)
l 3DS Max (.3ds)
l Wavefront OBJ (.obj)
l Allembic (.abc)
l Collada (.dae)
In addition to importing 3D objects into the 3D Models folder in the Library view, you can also open a folder containing 3D models as a library in the Library view. The models can then be dragged and dropped into the scene directly from that library.
NOTE
When a model is added to a panel from a library other than the 3D Models library, it is also added to the 3D Models library at the same time.
How to import a 3D object into your project
1. In the Library view, right-click on the 3D Models library folder, then select Import Files.
2. In the file browser, locate and select your 3D model, then click on Open.
The following prompt appears.
If you want, you can choose to import your model in its original format. Converting it to FBX will however make sure its textures are consolidated with the model in your project.
3. Click on OK.
The selected model appears in the 3D Models folder of the Library view.
717
Storyboard Pro 20 User Guide

NOTE
If you delete a 3D model from the library, every instance of that model in the project will be deleted.
How to add a folder containing 3D models as a Library
1. In the Library view, right-click in the list of libraries and select Open Library.
A file browser window opens.
2. In the file browser, browse for the folder that contains the 3D models that you want to use in your project. Those files should be .fbx, .abc, .osb, .3ds, or .obj files.
3. Click on Select Folder.
The selected folder will appear in the list of libraries.
4. Select the folder you just added to the list of libraries.
Any files that can be imported into Storyboard Pro, including 3D models, templates and drawings that are located within this folder are listed in the list of items to the right.
718
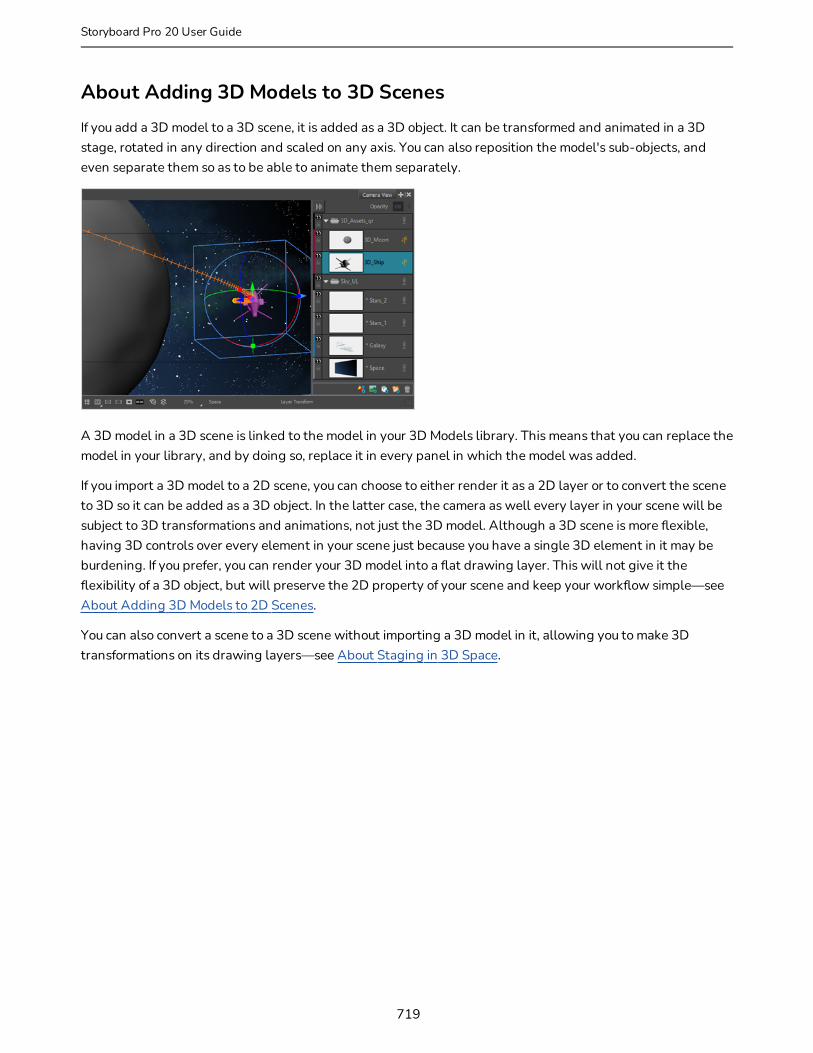
About Adding 3D Models to 3D ScenesIf you add a 3D model to a 3D scene, it is added as a 3D object. It can be transformed and animated in a 3D stage, rotated in any direction and scaled on any axis. You can also reposition the model's sub-objects, and even separate them so as to be able to animate them separately.
A 3D model in a 3D scene is linked to the model in your 3D Models library. This means that you can replace the model in your library, and by doing so, replace it in every panel in which the model was added.
If you import a 3D model to a 2D scene, you can choose to either render it as a 2D layer or to convert the scene to 3D so it can be added as a 3D object. In the latter case, the camera as well every layer in your scene will be subject to 3D transformations and animations, not just the 3D model. Although a 3D scene is more flexible, having 3D controls over every element in your scene just because you have a single 3D element in it may be burdening. If you prefer, you can render your 3D model into a flat drawing layer. This will not give it the flexibility of a 3D object, but will preserve the 2D property of your scene and keep your workflow simple—see About Adding 3D Models to 2D Scenes.
You can also convert a scene to a 3D scene without importing a 3D model in it, allowing you to make 3D transformations on its drawing layers—see About Staging in 3D Space.
719
Storyboard Pro 20 User Guide
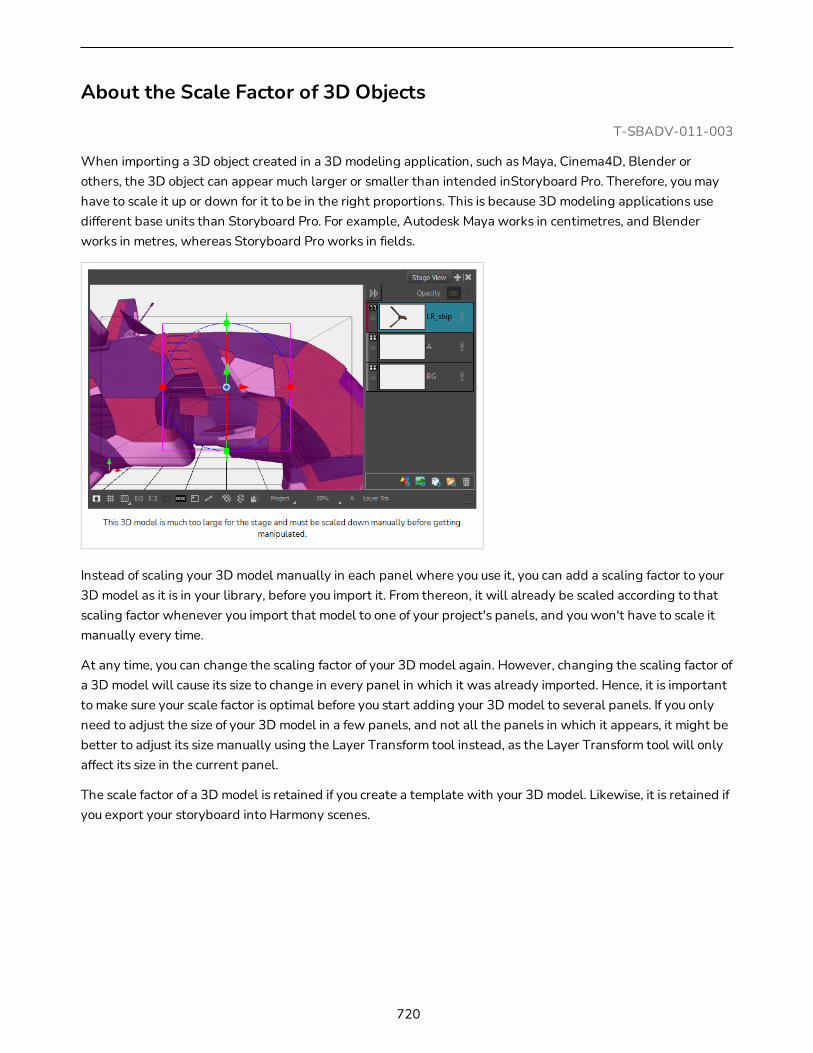
About the Scale Factor of 3D Objects
T-SBADV-011-003
When importing a 3D object created in a 3D modeling application, such as Maya, Cinema4D, Blender or others, the 3D object can appear much larger or smaller than intended inStoryboard Pro. Therefore, you may have to scale it up or down for it to be in the right proportions. This is because 3D modeling applications use different base units than Storyboard Pro. For example, Autodesk Maya works in centimetres, and Blender works in metres, whereas Storyboard Pro works in fields.
Instead of scaling your 3D model manually in each panel where you use it, you can add a scaling factor to your 3D model as it is in your library, before you import it. From thereon, it will already be scaled according to that scaling factor whenever you import that model to one of your project's panels, and you won't have to scale it manually every time.
At any time, you can change the scaling factor of your 3D model again. However, changing the scaling factor of a 3D model will cause its size to change in every panel in which it was already imported. Hence, it is important to make sure your scale factor is optimal before you start adding your 3D model to several panels. If you only need to adjust the size of your 3D model in a few panels, and not all the panels in which it appears, it might be better to adjust its size manually using the Layer Transform tool instead, as the Layer Transform tool will only affect its size in the current panel.
The scale factor of a 3D model is retained if you create a template with your 3D model. Likewise, it is retained if you export your storyboard into Harmony scenes.
720
NOTE
When you apply a scaling factor to your 3D model, it affects its apparent size in your storyboard, but it does not affect the model's scale value in your panels. This means that, when you add a 3D model with a scaling factor to one of your panels, although your model already appears scaled up or down, its scale is actually still 1, which is the default value. This way, you can differentiate the scaling that was manually applied to your model using the Layer Transform tool from the scaling applied to your model because of its scaling factor.
721
Storyboard Pro 20 User Guide
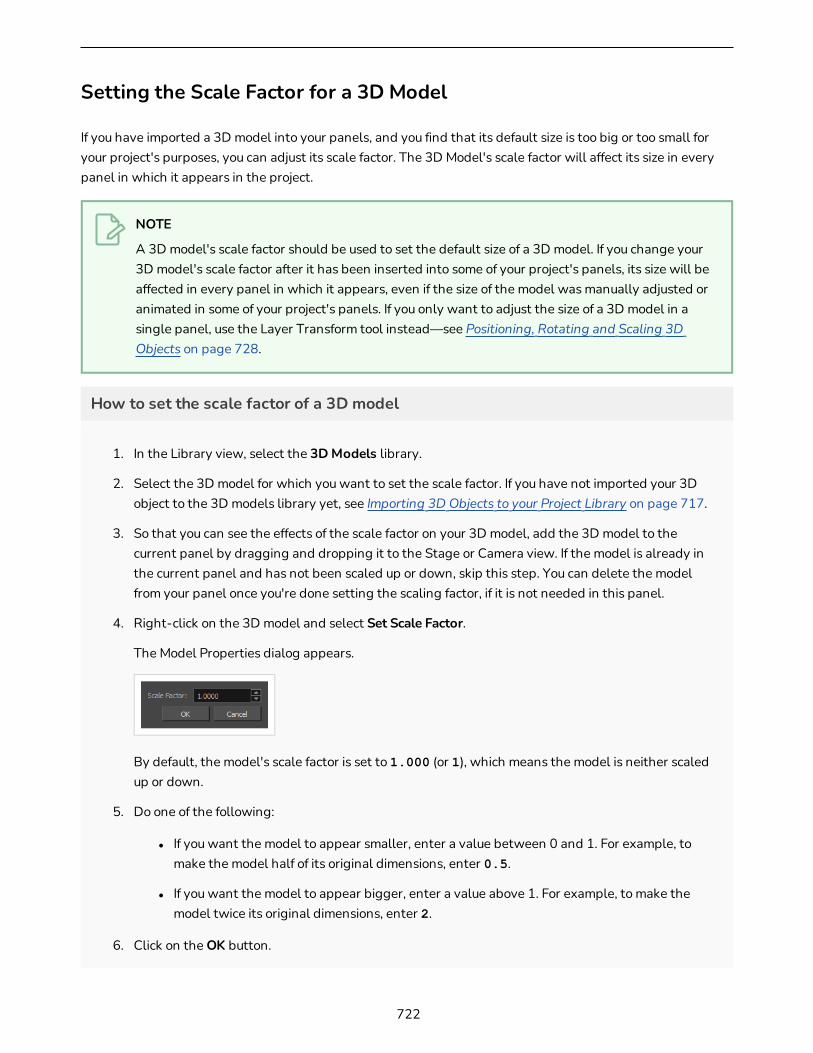
Setting the Scale Factor for a 3D Model
If you have imported a 3D model into your panels, and you find that its default size is too big or too small for your project's purposes, you can adjust its scale factor. The 3D Model's scale factor will affect its size in every panel in which it appears in the project.
NOTE
A 3D model's scale factor should be used to set the default size of a 3D model. If you change your 3D model's scale factor after it has been inserted into some of your project's panels, its size will be affected in every panel in which it appears, even if the size of the model was manually adjusted or animated in some of your project's panels. If you only want to adjust the size of a 3D model in a single panel, use the Layer Transform tool instead—see Positioning, Rotating and Scaling 3D Objects on page 728.
How to set the scale factor of a 3D model
1. In the Library view, select the 3D Models library.
2. Select the 3D model for which you want to set the scale factor. If you have not imported your 3D object to the 3D models library yet, see Importing 3D Objects to your Project Library on page 717.
3. So that you can see the effects of the scale factor on your 3D model, add the 3D model to the current panel by dragging and dropping it to the Stage or Camera view. If the model is already in the current panel and has not been scaled up or down, skip this step. You can delete the model from your panel once you're done setting the scaling factor, if it is not needed in this panel.
4. Right-click on the 3D model and select Set Scale Factor.
The Model Properties dialog appears.
By default, the model's scale factor is set to 1.000 (or 1), which means the model is neither scaled up or down.
5. Do one of the following:
l If you want the model to appear smaller, enter a value between 0 and 1. For example, to make the model half of its original dimensions, enter 0.5.
l If you want the model to appear bigger, enter a value above 1. For example, to make the model twice its original dimensions, enter 2.
6. Click on the OK button.
722

The model's new scale factor is applied to all its instances in the project. If the model is currently visible in the Stage or Camera view, its size will update to match the new scale factor.
723
Storyboard Pro 20 User Guide

Determining the Scale Factor for a 3D model
T-SBADV-011-002
Before importing a 3D object, you must consider the scale factor to use. You can calculate the appropriate scale factor for a 3D model by comparing the measuring units used by Storyboard Pro to the ones used by your 3D modeling software.
This can be done by importing a cube that is 1 unit in size, cubed, in your 3D modeling software, into Storyboard Pro. Then, you can adjust this cube's scale factor until it matches a unit in Storyboard Pro.
To be able to match the size of the cube against a unit in Storyboard Pro, you can enable the World Grid, which is a lot like a standard 12 fields grid, except its fields are square-shaped, whereas units in Storyboard Pro are typically shorter vertically than horizontally, to match the 4:3 aspect ratio of legacy standard displays.
How to determine the right scale factor for your 3D models
1. In your 3D modeling software, create a cube that is 1 cubed unit in size (a cube that is 1 unit in width, 1 unit in height and 1 unit in depth).
2. Export the model from into one of the formats supported by Storyboard Pro:
l Filmbox (.fbx)
l 3DS Max (.3ds)
l Wavefront OBJ (.obj)
l Allembic (.abc)
l Collada (.dae)
3. In the Library view of Storyboard Pro, select the 3D Models library.
4. Right-click in the 3D models list and select Import Files.
5. In the file browser, locate and select the 3D model containing the cube.
6. In the Library view, right-click on the imported model and select Set Scale Factor.
The Model Properties dialog appears.
7. In the Scale Factor field, verify that the model's scaling factor is set to 1.0.
8. Click on OK.
724

9. Drag and drop the model into the Stage view.
The cube appears in the centre of the stage.
10. In the top menu, select View > Grid > Show Grid or press Ctrl + G (Windows) or ⌘ + G (macOS).
The default grid (the 12 Field Grid) displays over the 3D model in the Stage view.
11. In the top menu, select View > Grid > World Grid.
The 12 Field Grid is replaced by the World Grid in the Stage and Camera views.
12. In the Layer panel of the Stage view, or in the Layers view, right-click on the layer for your 3D model and select Wireframe.
13. While holding Ctrl + Shift, click and drag on the Stage view to rotate it, so that you can clearly see how the cube's vertexes align with the grid.
14. In the Library view, using trial and error, adjust the 3D model's scaling factor so that its corners touch the points (-1,1), (1,1), (-1,-1) and (1,-1) of the world grid, which are identified with a hollow 1.
Once you get the cube's size to be 1,1,1 in Storyboard Pro's coordinates system, you can use the scaling factor you applied to this cube onto your other 3D models to make their coordinates systems match Storyboard Pro's coordinates system as well.
725
Storyboard Pro 20 User Guide
Setting the Default Scale Factor for 3D Models
To preserve the proportions between 3D models in Storyboard Pro, you should set all your 3D models to the same scale factor. Once you've determined the ideal scale factor for your project, you can set the default scale factor to apply to 3D models when you import a 3D model into your project.
How to set the default scale factor for 3D models for the current project
1. In the top menu, select Storyboard > Properties.
The Preferences dialog appears.
2. In the Settings tab, in the 3D Models section, in the Default Scale Factor field, type in the default scale factor for your 3D models.
3. Click on OK.
From now on, when you import a 3D model into your project, its scale factor will automatically be set to the scale factor your just entered.
How to set the default scale factor for 3D models for new projects
1. In the top menu, select Edit (Windows) or Storyboard Pro 20 (macOS) > Preferences.
The Preferences dialog appears.
2. Select the Project Settings tab.
3. In the 3D Models section, in the Default Scale Factor field, type in the default scale factor for your 3D models.
4. Click on OK
Projects you create in the future will have their default scale factor set to the scale factor you just entered.
726
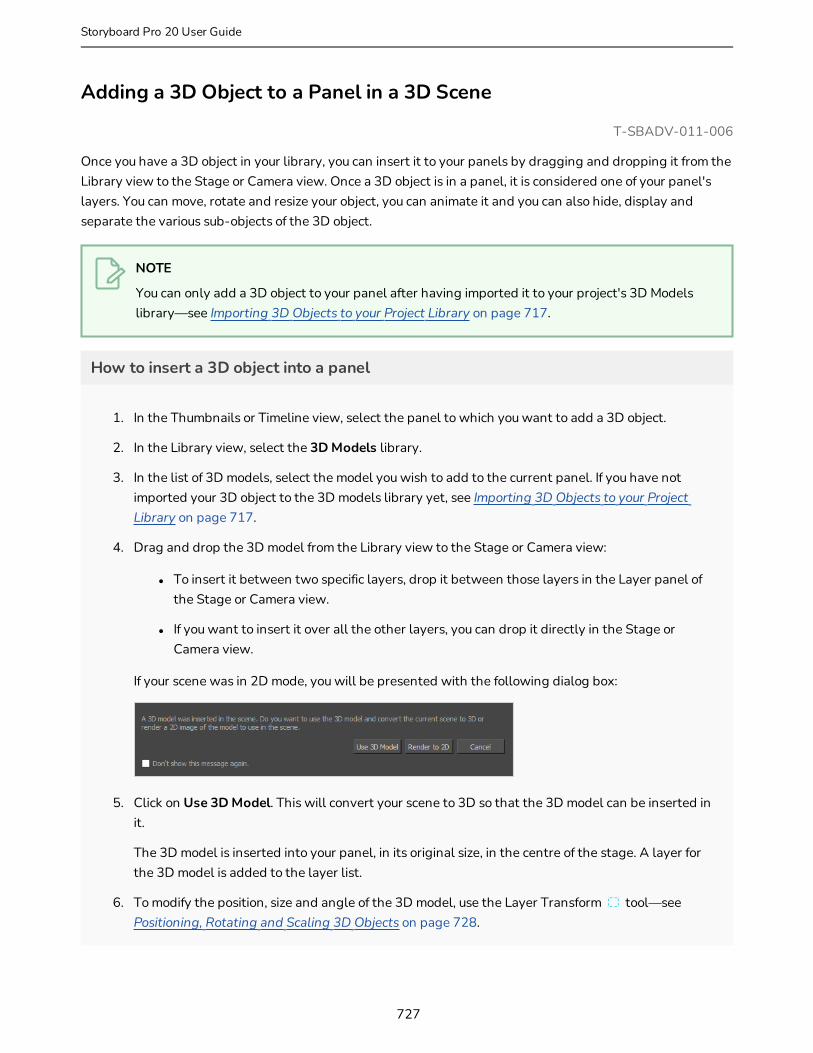
Adding a 3D Object to a Panel in a 3D Scene
T-SBADV-011-006
Once you have a 3D object in your library, you can insert it to your panels by dragging and dropping it from the Library view to the Stage or Camera view. Once a 3D object is in a panel, it is considered one of your panel's layers. You can move, rotate and resize your object, you can animate it and you can also hide, display and separate the various sub-objects of the 3D object.
NOTE
You can only add a 3D object to your panel after having imported it to your project's 3D Models library—see Importing 3D Objects to your Project Library on page 717.
How to insert a 3D object into a panel
1. In the Thumbnails or Timeline view, select the panel to which you want to add a 3D object.
2. In the Library view, select the 3D Models library.
3. In the list of 3D models, select the model you wish to add to the current panel. If you have not imported your 3D object to the 3D models library yet, see Importing 3D Objects to your Project Library on page 717.
4. Drag and drop the 3D model from the Library view to the Stage or Camera view:
l To insert it between two specific layers, drop it between those layers in the Layer panel of the Stage or Camera view.
l If you want to insert it over all the other layers, you can drop it directly in the Stage or Camera view.
If your scene was in 2D mode, you will be presented with the following dialog box:
5. Click on Use 3D Model. This will convert your scene to 3D so that the 3D model can be inserted in it.
The 3D model is inserted into your panel, in its original size, in the centre of the stage. A layer for the 3D model is added to the layer list.
6. To modify the position, size and angle of the 3D model, use the Layer Transform tool—see Positioning, Rotating and Scaling 3D Objects on page 728.
727
Storyboard Pro 20 User Guide
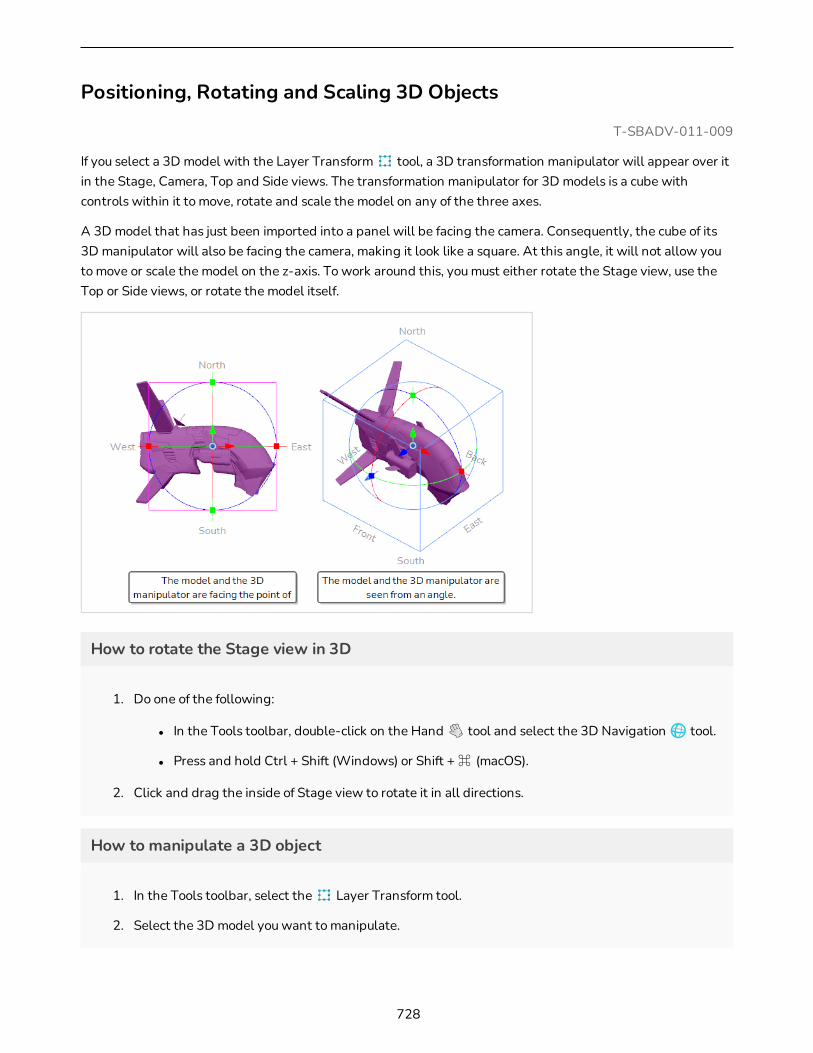
Positioning, Rotating and Scaling 3D Objects
T-SBADV-011-009
If you select a 3D model with the Layer Transform tool, a 3D transformation manipulator will appear over it in the Stage, Camera, Top and Side views. The transformation manipulator for 3D models is a cube with controls within it to move, rotate and scale the model on any of the three axes.
A 3D model that has just been imported into a panel will be facing the camera. Consequently, the cube of its 3D manipulator will also be facing the camera, making it look like a square. At this angle, it will not allow you to move or scale the model on the z-axis. To work around this, you must either rotate the Stage view, use the Top or Side views, or rotate the model itself.
How to rotate the Stage view in 3D
1. Do one of the following:
l In the Tools toolbar, double-click on the Hand tool and select the 3D Navigation tool.
l Press and hold Ctrl + Shift (Windows) or Shift + ⌘ (macOS).
2. Click and drag the inside of Stage view to rotate it in all directions.
How to manipulate a 3D object
1. In the Tools toolbar, select the Layer Transform tool.
2. Select the 3D model you want to manipulate.
728

3. In the Stage view, Camera view, Top view or Side view, do one of the following:
l To translate the model on the x-axis, click ad drag the red arrow.
l To translate the model on the y-axis, click and drag the green arrow.
l To translate the model on the z-axis, click and drag the blue arrow.
l To translate the model laterally relative to your point of view, click and drag on its geometry.
l To rotate the model on the x-axis, click and drag the red circle.
l To rotate the model on the y-axis, click and drag the green circle.
l To rotate the model on the z-axis, click and drag the blue circle.
729
Storyboard Pro 20 User Guide

l To rotate the model in any direction, click and drag on its outer circle.
l To scale the model on the x-axis, click and drag on the red square dot.
l To scale the model on the y-axis, click and drag on the green square dot.
l To scale the model on the z-axis, click and drag on the blue square dot.
l To scale the model on all axes, click and drag on any vertex of the cube.
TIP
If you need to rotate or scale the 3D model from a specific pivot point, you can move the pivot point of the 3D model by clicking and dragging the pivot in the middle of the manipulator. The manipulator and its pivot will move, but not the model.
730

Positioning, Rotating and Scaling 3D Sub-Objects
T-SBADV-011-016
You can select sub-objects in a 3D model and change their position, angle and size.
Transformations done on a 3D model's sub-object are relative to the 3D model itself. This means that the sub-object will follow the 3D model if it moves and will be subjected to the same rotations and size transformations as the 3D model.
Transforming a 3D sub-object works the same way as transforming a 3D object. The key difference is in selecting the sub-object. If you merely click on a 3D Model in the Stage or Camera view, you will select the whole 3D model. Using the 3D Graph view, you can see all the sub-objects in the selected 3D model and select the sub-objects you want to manipulate.
You can also select sub-objects in the Stage or Camera view by holding Ctrl (Windows) or ⌘ (macOS), but it may be difficult to select the right sub-object when they are placed in a hierarchy.
NOTE
While a 3D model can be animated, transformations on 3D sub-objects are static. If you need to animate a 3D sub-object, you must separate it from its model to make it into its own 3D model—Separating 3D Sub-Objects for Animation on page 740.
How to add the 3D Graph view to your workspace
1. Do one of the following:
l In the top-right corner of any existing view in your workspace, click on the Add View button and select 3D Graph.
l In the top menu, select Windows > 3D Graph.
2. To display a 3D model's sub-nodes in the 3D Graph view, select this 3D model in the Stage, Camera or Layers view.
How to select an individual sub-object in the 3D object
1. In the Tools toolbar, select the Layer Transform tool.
2. In the Stage, Camera or Layers view, select the 3D model containing the sub-object you want to transform.
731
Storyboard Pro 20 User Guide

3. Select the sub-object you want to transform by doing one of the following:
l While holding Ctrl (Windows) or ⌘ (macOS), click on the sub-object in the Stage or Camera view.
l Select the sub-object in the 3D Graph view.
TIPS
l Some sub-objects do not have geometry, and are represented with a peg icon in the 3D graph view. Those objects only serve as parents of other sub-objects with geometry, represented with a drawing icon in the 3D Graph view. Since those objects have no visible component, you have to use the 3D Graph view to select them. To help find these objects in the 3D Graph, you can select one of the object's visible children in the Stage or Camera view, then select that sub-object's parent in the 3D Graph view.
l To select multiple sub-objects in the Camera and Stage view, hold Ctrl + Shift (Windows) or Shift + ⌘ (macOS) and click on each sub-object you want to select.
l To select multiple sub-objects in the 3D Graph view, hold Ctrl (Windows) or ⌘ (macOS) and click on each sub-object you want to select, or hold Shift and click on the first sub-object that you want to select.
l To select a series of sub-objects in the 3D Graph view, hold Shift, click on the first sub-object you want to select, then on the last sub-object you want to select. Every sub-object in-between will be selected, inclusively.
The selected sub-object will appear in green, and the 3D manipulator will be centered on the selected sub-object.
TIP
If you need to select a 3D sub-object that does not appear in the 3D Graph view, click
732

the Menu button in the 3D Graph view and select Extended Mode.
4. Using the controls of the 3D transformation manipulator in the Stage or Camera view, set the position, angle and scale of the selected sub-object. For information on how to use the 3D transformation manipulator, see Positioning, Rotating and Scaling 3D Objects on page 728.
733
Storyboard Pro 20 User Guide

Resetting a 3D Object's Position
T-SBADV-011-017
If you make changes to the 3D object, such as its dimensions, position, or rotation, and you want to revert back to the object’s original settings, you do not need to delete the object and start over. You have couple of options:
l You can use the Undo command to undo any of the changes you made to the object or in the panel since the project was last saved.
l You can use the Reset Transform command to revert to the object’s original settings (position and dimensions).
The Reset Transform command will only affect the selected element, reverting it back to its default dimensions, position, and rotation for all the frames in the panel (First Frame and Last Frame).
When you import a 3D element that contains 3D nodes, all these nodes are in their default position and size/proportion. You can make changes to these nodes, but if you want to reset a node to its default position (undoing all the changes you made), you can restore each node to its default settings.
How to reset the position, angle and size of a 3D object
1. In the Stage, Camera or Layers view, select the 3D object you want to reset.
2. Select Layer > Reset Transform.
How to reset the position, angle and size of a 3D sub-object
1. Select the sub-object you want to reset by doing one of the following:
l While holding Ctrl (Windows) or ⌘ (macOS), click on the sub-object in the Stage or Camera view.
l Select the sub-object in the 3D Graph view.
734
TIPS
l Some sub-objects do not have geometry, and are represented with a peg icon in the 3D graph view. Those objects only serve as parents of other sub-objects with geometry, represented with a drawing icon in the 3D Graph view. Since those objects have no visible component, you have to use the 3D Graph view to select them. To help find these objects in the 3D Graph, you can select one of the object's visible children in the Stage or Camera view, then select that sub-object's parent in the 3D Graph view.
l To select multiple sub-objects in the Camera and Stage view, hold Ctrl + Shift (Windows) or Shift + ⌘ (macOS) and click on each sub-object you want to select.
l To select multiple sub-objects in the 3D Graph view, hold Ctrl (Windows) or ⌘ (macOS) and click on each sub-object you want to select, or hold Shift and click on the first sub-object that you want to select.
l To select a series of sub-objects in the 3D Graph view, hold Shift, click on the first sub-object you want to select, then on the last sub-object you want to select. Every sub-object in-between will be selected, inclusively.
The selected sub-object will appear in green, and the 3D manipulator will be centered on the selected sub-object.
2. Select Layer > Reset Selected 3D Sub-Object.
The selected sub-objects return to their default position, angle and size.
735
Storyboard Pro 20 User Guide

Animating 3D Objects
T-SBANIM-003-002
Animating a 3D object is very similar to animating a drawing layer. All you need to do is enable animation on the 3D object, then put it in different positions, angles and sizes at different frames. Transforming an animation-enabled 3D object will create a keyframe at the current frame, storing its transformation parameters in that frame, and its position, angle and size will be interpolated by Storyboard Pro on each frame between the keyframes you create.
How to animate a 3D object
1. In the Timeline view, select the panel with the layer you want to animate.
2. Move the Timeline cursor to the exact time where you want to create the first keyframe for your animation.
3. In the Layer panel of the Stage or Camera view or in the Layers view, click on the Animate button of the layer you wish to animate.
The Animate button turns yellow and changes shape: .
In the Layer Animation track of the Timeline view, a keyframe is created at the current frame. This keyframe stores the position, angle and size of the layer at the current frame.
4. In the Tools toolbar, select the Layer Transform tool.
In the Stage or Camera view, the controls of the Layer Transform tool appear around the selected
736

3D object.
5. Using the 3D manipulator box, transform the 3D model so that it is in the position, angle and size you want it to be at the beginning of the animation:
l To translate the model on the x-axis, click ad drag the red arrow.
l To translate the model on the y-axis, click and drag the green arrow.
l To translate the model on the z-axis, click and drag the blue arrow.
l To translate the model laterally relative to your point of view, click and drag on its geometry.
737
Storyboard Pro 20 User Guide

l To rotate the model on the x-axis, click and drag the red circle.
l To rotate the model on the y-axis, click and drag the green circle.
l To rotate the model on the z-axis, click and drag the blue circle.
l To rotate the model in any direction, click and drag on its outer circle.
l To scale the model on the x-axis, click and drag on the red square dot.
l To scale the model on the y-axis, click and drag on the green square dot.
l To scale the model on the z-axis, click and drag on the blue square dot.
l To scale the model on all axes, click and drag on any vertex of the cube.
738
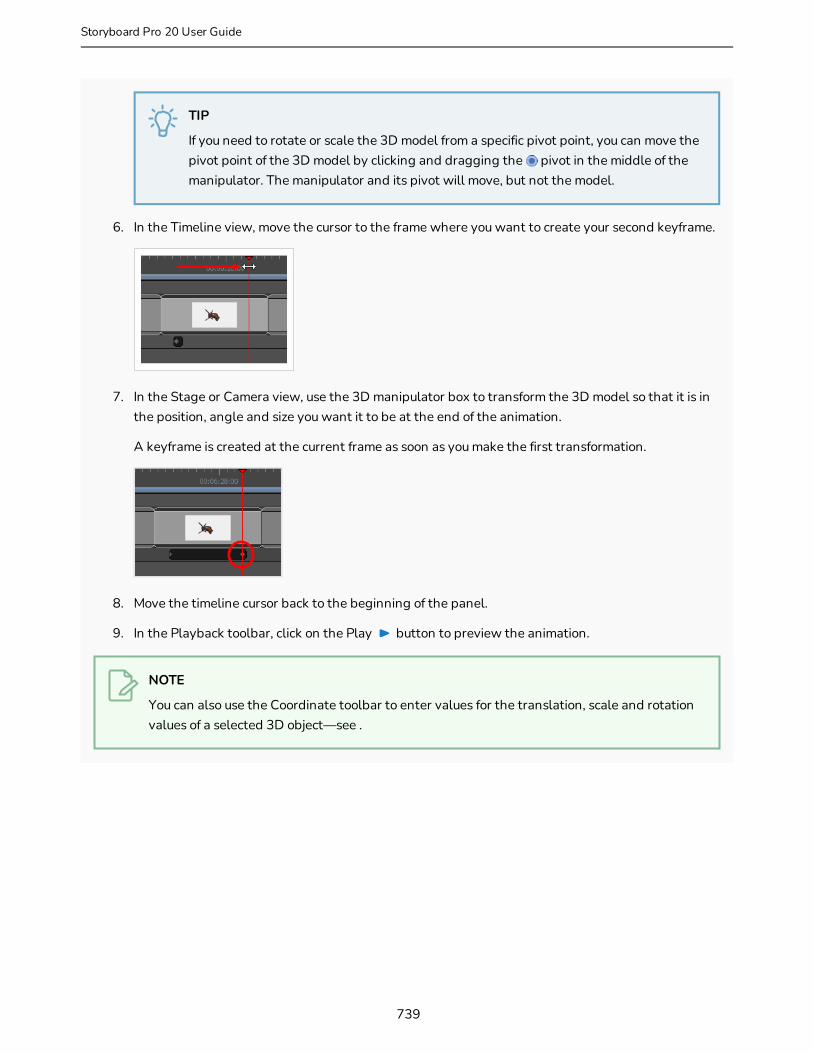
TIP
If you need to rotate or scale the 3D model from a specific pivot point, you can move the pivot point of the 3D model by clicking and dragging the pivot in the middle of the manipulator. The manipulator and its pivot will move, but not the model.
6. In the Timeline view, move the cursor to the frame where you want to create your second keyframe.
7. In the Stage or Camera view, use the 3D manipulator box to transform the 3D model so that it is in the position, angle and size you want it to be at the end of the animation.
A keyframe is created at the current frame as soon as you make the first transformation.
8. Move the timeline cursor back to the beginning of the panel.
9. In the Playback toolbar, click on the Play button to preview the animation.
NOTE
You can also use the Coordinate toolbar to enter values for the translation, scale and rotation values of a selected 3D object—see .
739
Storyboard Pro 20 User Guide
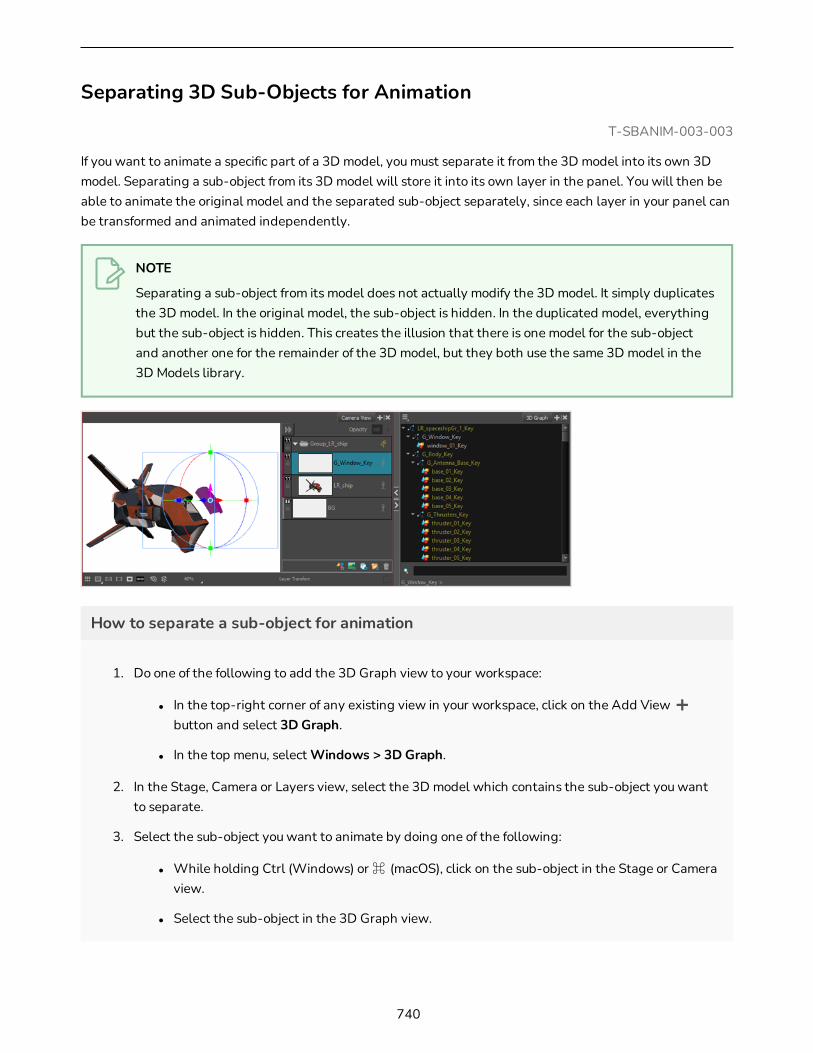
Separating 3D Sub-Objects for Animation
T-SBANIM-003-003
If you want to animate a specific part of a 3D model, you must separate it from the 3D model into its own 3D model. Separating a sub-object from its 3D model will store it into its own layer in the panel. You will then be able to animate the original model and the separated sub-object separately, since each layer in your panel can be transformed and animated independently.
NOTE
Separating a sub-object from its model does not actually modify the 3D model. It simply duplicates the 3D model. In the original model, the sub-object is hidden. In the duplicated model, everything but the sub-object is hidden. This creates the illusion that there is one model for the sub-object and another one for the remainder of the 3D model, but they both use the same 3D model in the 3D Models library.
How to separate a sub-object for animation
1. Do one of the following to add the 3D Graph view to your workspace:
l In the top-right corner of any existing view in your workspace, click on the Add View button and select 3D Graph.
l In the top menu, select Windows > 3D Graph.
2. In the Stage, Camera or Layers view, select the 3D model which contains the sub-object you want to separate.
3. Select the sub-object you want to animate by doing one of the following:
l While holding Ctrl (Windows) or ⌘ (macOS), click on the sub-object in the Stage or Camera view.
l Select the sub-object in the 3D Graph view.
740
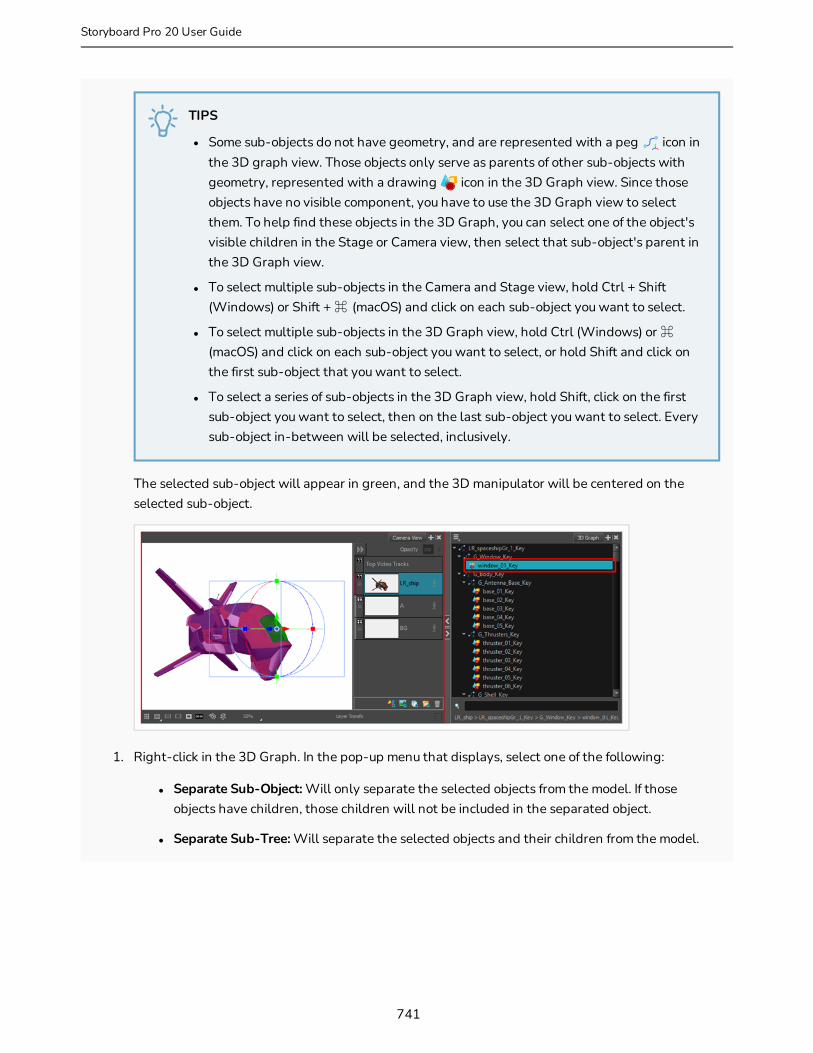
TIPS
l Some sub-objects do not have geometry, and are represented with a peg icon in the 3D graph view. Those objects only serve as parents of other sub-objects with geometry, represented with a drawing icon in the 3D Graph view. Since those objects have no visible component, you have to use the 3D Graph view to select them. To help find these objects in the 3D Graph, you can select one of the object's visible children in the Stage or Camera view, then select that sub-object's parent in the 3D Graph view.
l To select multiple sub-objects in the Camera and Stage view, hold Ctrl + Shift (Windows) or Shift + ⌘ (macOS) and click on each sub-object you want to select.
l To select multiple sub-objects in the 3D Graph view, hold Ctrl (Windows) or ⌘ (macOS) and click on each sub-object you want to select, or hold Shift and click on the first sub-object that you want to select.
l To select a series of sub-objects in the 3D Graph view, hold Shift, click on the first sub-object you want to select, then on the last sub-object you want to select. Every sub-object in-between will be selected, inclusively.
The selected sub-object will appear in green, and the 3D manipulator will be centered on the selected sub-object.
1. Right-click in the 3D Graph. In the pop-up menu that displays, select one of the following:
l Separate Sub-Object: Will only separate the selected objects from the model. If those objects have children, those children will not be included in the separated object.
l Separate Sub-Tree: Will separate the selected objects and their children from the model.
741
Storyboard Pro 20 User Guide

TIP
You should select Separate Sub-Tree if your selection contains a sub-object with no geometry (represented by a peg icon in the 3D Graph view) but you did not select that sub-object's children. Otherwise, only the sub-object with no geometry will be in the separated sub-object, and this sub-object will hence be invisible.
The selected 3D model is separated into two 3D layers: One with only the selected sub-objects visible, and another one with the remainder of the 3D model visible. Both 3D objects are stored in a group.
NOTE
If the original 3D model had any transformations or animation, they will be transferred over to the group containing the separated sub-objects.
2. You can now animate the 3D model and its separated sub-object separately. If you want to animate both of them together, simply select and animate the group in which they were stored. For information on how to animate a 3D model, see Animating 3D Objects on page 736.
742
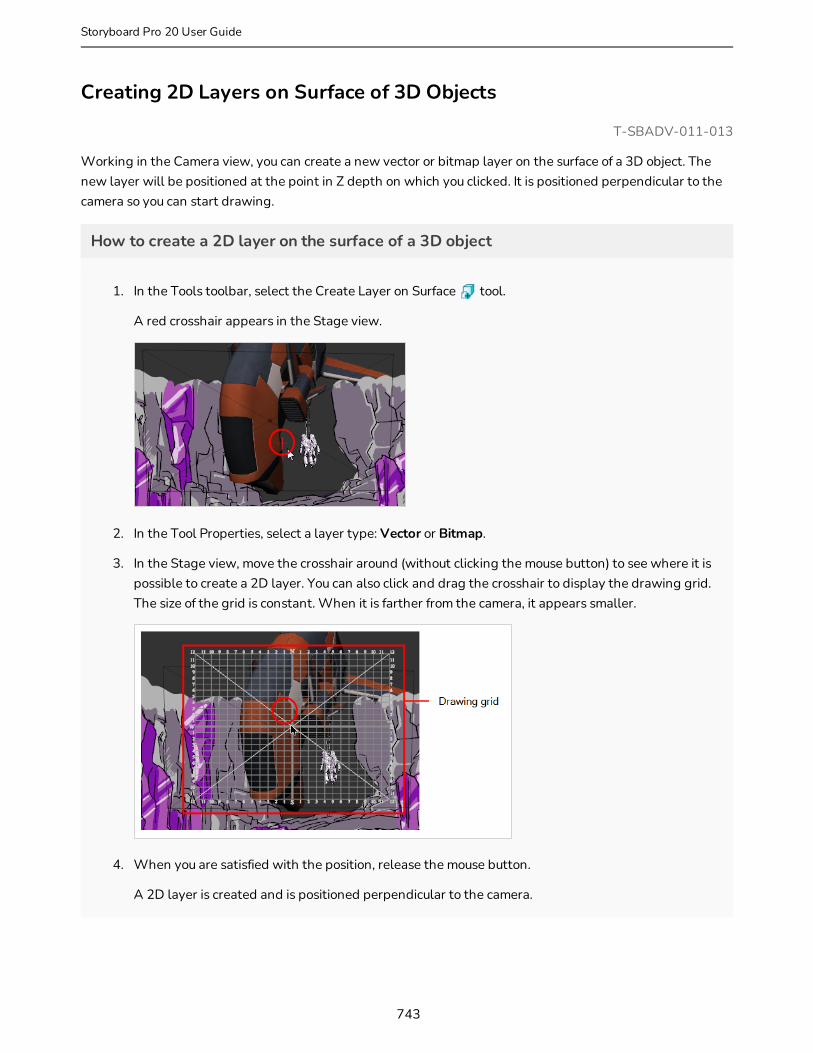
Creating 2D Layers on Surface of 3D Objects
T-SBADV-011-013
Working in the Camera view, you can create a new vector or bitmap layer on the surface of a 3D object. The new layer will be positioned at the point in Z depth on which you clicked. It is positioned perpendicular to the camera so you can start drawing.
How to create a 2D layer on the surface of a 3D object
1. In the Tools toolbar, select the Create Layer on Surface tool.
A red crosshair appears in the Stage view.
2. In the Tool Properties, select a layer type: Vector or Bitmap.
3. In the Stage view, move the crosshair around (without clicking the mouse button) to see where it is possible to create a 2D layer. You can also click and drag the crosshair to display the drawing grid. The size of the grid is constant. When it is farther from the camera, it appears smaller.
4. When you are satisfied with the position, release the mouse button.
A 2D layer is created and is positioned perpendicular to the camera.
743
Storyboard Pro 20 User Guide

Snapping to Surface or Ground
T-SBADV-011-018
When working in Storyboard Pro, you can snap a 2D layer or 3D object to the 3D surface directly below it. Contact between the layer or 3D object is maintained with the surface no matter what changes you make to your selection. This makes it much faster to block out shots and also works with 2D artwork.
When the layer or 3D object comes into contact with the surface, its pivot connects to the 3D surface directly below it if you are moving the mouse. If your selection is a 2D layer, you can move it on the X and Z axes; the Y axis is controlled by Storyboard Pro allowing for quick placement around the ground plane. Also, the layer automatically rotates to be parallel to the surface, which is useful with 2D layers. In the Tool Properties view, you can disable the rotation parameter if you do not want to the rotation to occur.
For both 2D layers and 3D objects, the angle is retained. If needed, you can change the rotation using the rotation controls. When snapping a layer, its lowest point snaps to the 3D surface.
How to snap to a surface
1. Select the layer that contains the object with which you will snap to a surface.
2. In the Tools toolbar, Layer Transform button.
3. In the Tool Properties view, click the Snap to Surface button.
The 3D navigation controls appear in the Camera and Stage views.
744

4. In the Tool Properties view, how you want to use the transform options in Layer Transform controls.
l Translate: Activate this option to move the 3D object. Deactivate to keep the object in place.
l Rotate: Activate this option if you want the 3D object to change its angle to match that of the 3D surface beneath it. Deactivate to keep the angle of the object.
l Scale: Activate this option if you want to change the size of the 3D object. Deactivate to keep the size of the object.
5. Position the cursor close to the centre pivot and when you see the Move Cursor appear, click and drag the 3D object to a new location. As you move, the object will rotate and scale (if you selected these options in the Tool Properties), and adhere to the 3D surface underneath it.
6. Continue moving the object around until you are satisfied with its placement.
7. Deactivate the tool by clicking the Snap to Surface button again.
How to snap to the ground
1. Select the layer that contains the object with which you will snap to the ground.
745
Storyboard Pro 20 User Guide

2. In the Tools toolbar, Layer Transform button.
3. In the Tool Properties view, click the Snap to Surface button.
The 3D object snaps to the 3D surface directly beneath it.
746

Changing the Display Mode of 3D Objects
T-SBADV-011-008
By default, 3D models that you add to your storyboard are displayed fully shaded. This might incumber your stage or overflow the panels with colours and textures that contrast too much with the sketched artwork. To remedy this, Storyboard Pro allows you to display 3D models in one of many display modes.
How to change the display mode of a 3D object
1. In the Thumbnails or Timeline view, select the panel that contains a 3D object.
2. In the Layer panel of the Stage or Camera view, or in the Layers view, select the layer that contains the 3D object.
3. Right-click on the layer and select one of the following:
l Shaded: The 3D object displays its colours and textures, shaded.
l Washed: The 3D object is displayed with a washed-out appearance, so that its details do not overwhelm the stage.
l Flat: The 3D object displays the surface of its geometry in plain white, shaded.
l Wireframe: The 3D object displays the vertexes defining its geometry.
747
Storyboard Pro 20 User Guide
l Wireframe on Shaded: The 3D objects displays its colours and textures with its wireframe on top.
l Wireframe on Flat: The 3D objects displays the surface of its geometry in white with its wireframe on top.
TIP
If you set your model's display mode to Wireframe, and only want to see the wireframe for the polygons facing your point of view and hide the ones for the polygons on the backside, right-click on the layer containing the 3D object again and select Backface Culling.
748
Replacing a 3D Object in your Project
T-SBADV-011-005
Once you have imported a 3D model in the Library, you can easily replace it with a new one using the Replace 3D Model command. This will update all instances of the model used in the project.
How to replace a 3D model
1. In the Library view, click the 3D Models folder to display its contents.
2. From the 3D Models folder, select the model you want to replace.
3. Right-click on the selected model and select Replace 3D Model.
A browser window opens.
4. In the browser, locate the 3D model file you want to replace and click Open.
The Rename Node dialog box opens.
l Click Yes to rename the model you are replacing.
l Click No to keep the existing model name.
l Select the Don't show this message again option to prevent this dialog box from opening again, and use the same behavior as you choose now for future use of the Replace 3D Model command.
The 3D model is updated in the Library view and in your project.
749
Storyboard Pro 20 User Guide
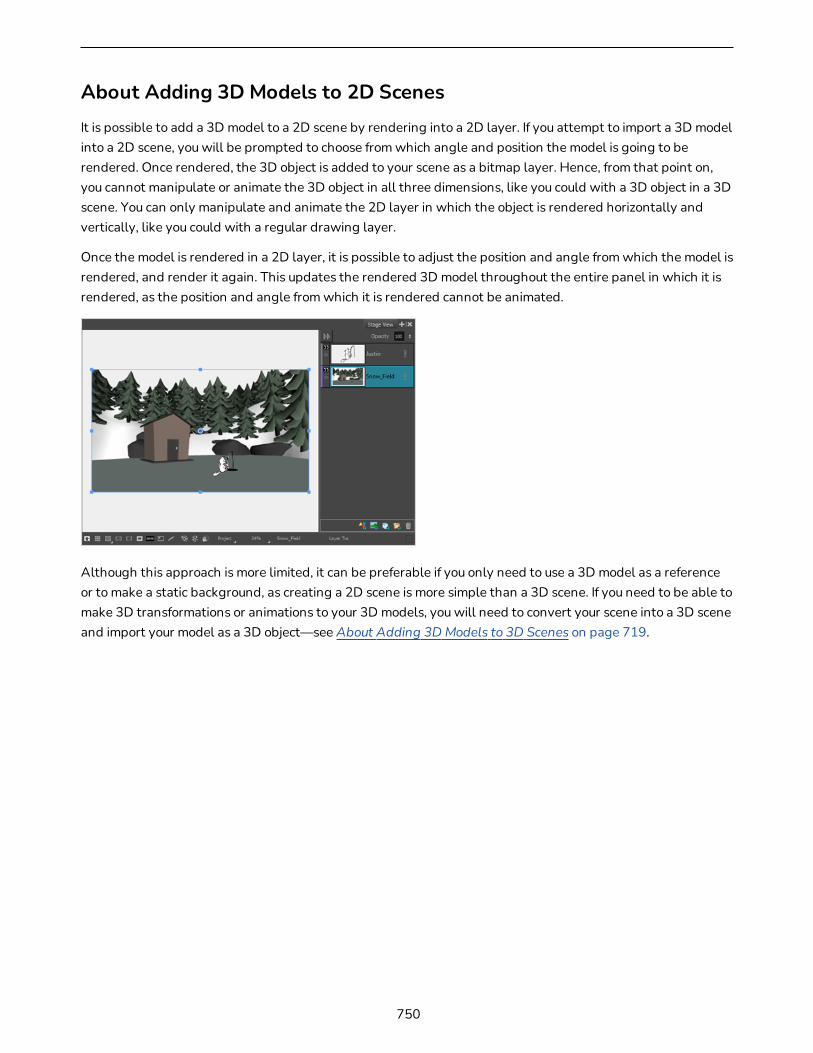
About Adding 3D Models to 2D ScenesIt is possible to add a 3D model to a 2D scene by rendering into a 2D layer. If you attempt to import a 3D model into a 2D scene, you will be prompted to choose from which angle and position the model is going to be rendered. Once rendered, the 3D object is added to your scene as a bitmap layer. Hence, from that point on, you cannot manipulate or animate the 3D object in all three dimensions, like you could with a 3D object in a 3D scene. You can only manipulate and animate the 2D layer in which the object is rendered horizontally and vertically, like you could with a regular drawing layer.
Once the model is rendered in a 2D layer, it is possible to adjust the position and angle from which the model is rendered, and render it again. This updates the rendered 3D model throughout the entire panel in which it is rendered, as the position and angle from which it is rendered cannot be animated.
Although this approach is more limited, it can be preferable if you only need to use a 3D model as a reference or to make a static background, as creating a 2D scene is more simple than a 3D scene. If you need to be able to make 3D transformations or animations to your 3D models, you will need to convert your scene into a 3D scene and import your model as a 3D object—see About Adding 3D Models to 3D Scenes on page 719.
750
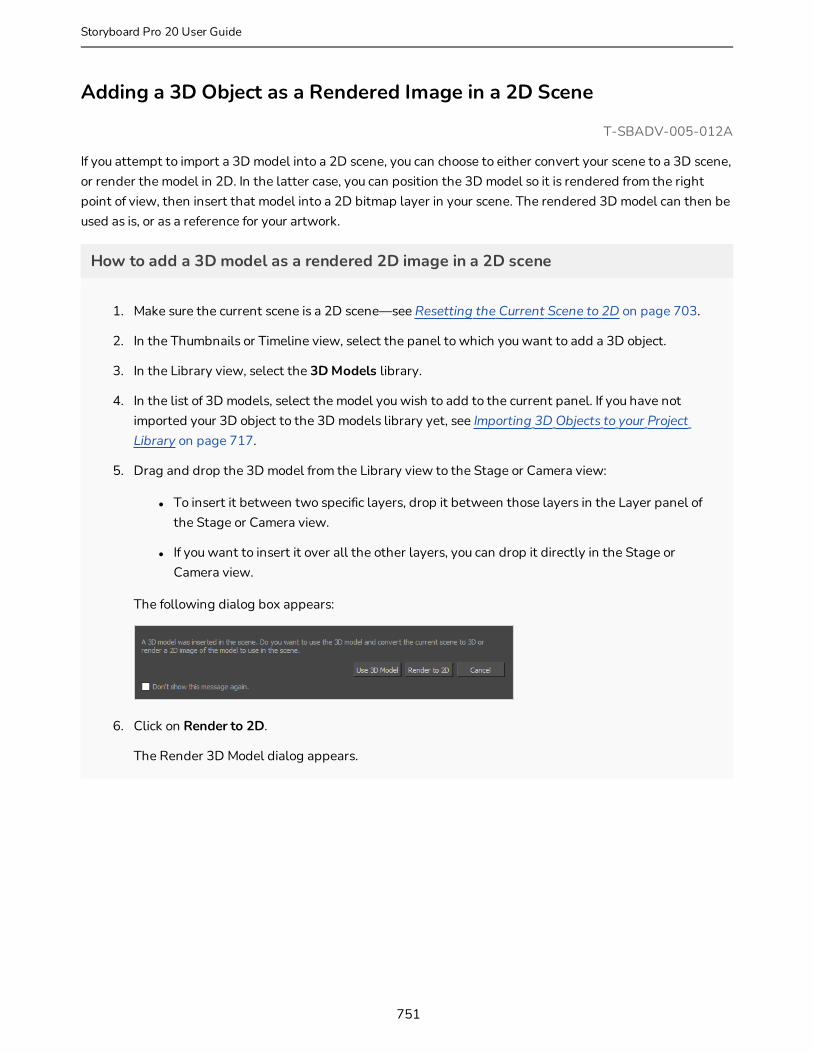
Adding a 3D Object as a Rendered Image in a 2D Scene
T-SBADV-005-012A
If you attempt to import a 3D model into a 2D scene, you can choose to either convert your scene to a 3D scene, or render the model in 2D. In the latter case, you can position the 3D model so it is rendered from the right point of view, then insert that model into a 2D bitmap layer in your scene. The rendered 3D model can then be used as is, or as a reference for your artwork.
How to add a 3D model as a rendered 2D image in a 2D scene
1. Make sure the current scene is a 2D scene—see Resetting the Current Scene to 2D on page 703.
2. In the Thumbnails or Timeline view, select the panel to which you want to add a 3D object.
3. In the Library view, select the 3D Models library.
4. In the list of 3D models, select the model you wish to add to the current panel. If you have not imported your 3D object to the 3D models library yet, see Importing 3D Objects to your Project Library on page 717.
5. Drag and drop the 3D model from the Library view to the Stage or Camera view:
l To insert it between two specific layers, drop it between those layers in the Layer panel of the Stage or Camera view.
l If you want to insert it over all the other layers, you can drop it directly in the Stage or Camera view.
The following dialog box appears:
6. Click on Render to 2D.
The Render 3D Model dialog appears.
751
Storyboard Pro 20 User Guide
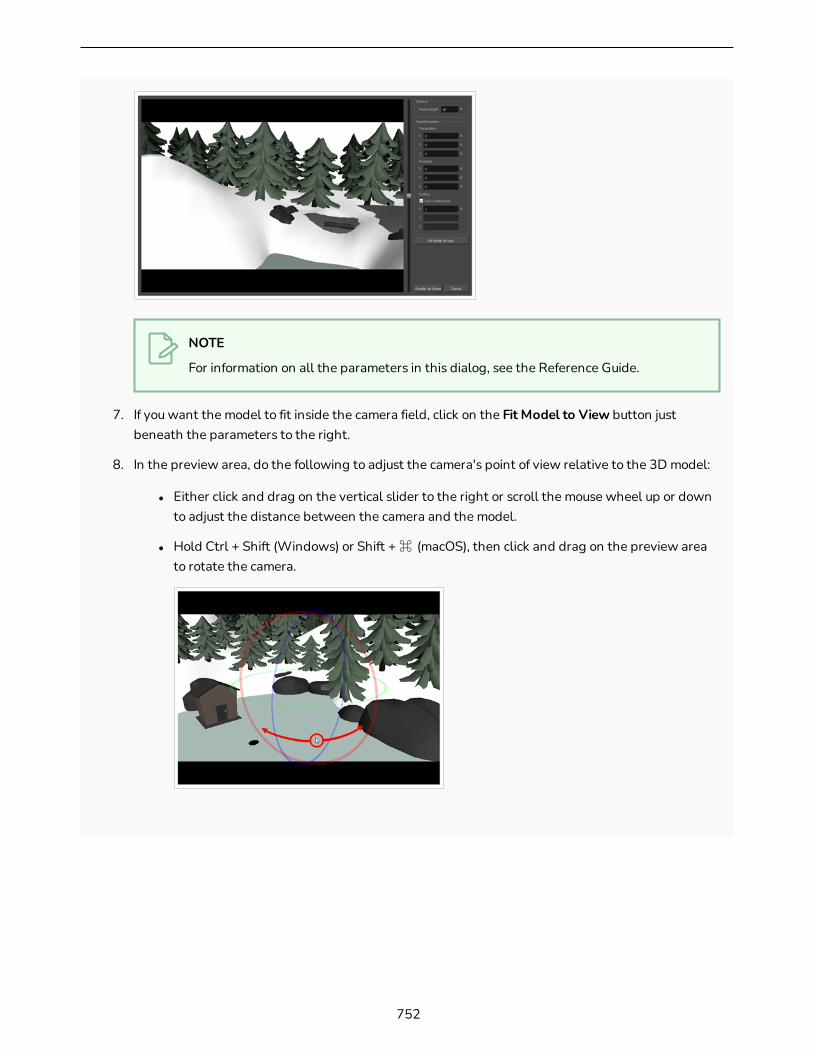
NOTE
For information on all the parameters in this dialog, see the Reference Guide.
7. If you want the model to fit inside the camera field, click on the Fit Model to View button just beneath the parameters to the right.
8. In the preview area, do the following to adjust the camera's point of view relative to the 3D model:
l Either click and drag on the vertical slider to the right or scroll the mouse wheel up or down to adjust the distance between the camera and the model.
l Hold Ctrl + Shift (Windows) or Shift + ⌘ (macOS), then click and drag on the preview area to rotate the camera.
752
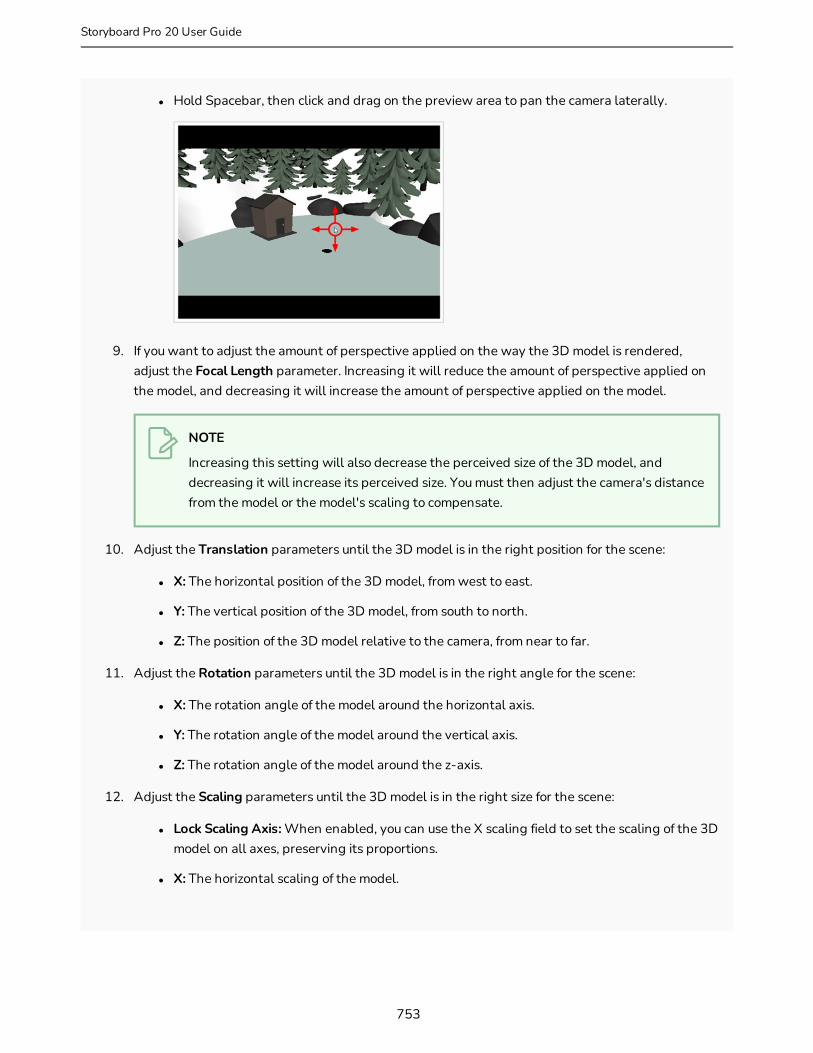
l Hold Spacebar, then click and drag on the preview area to pan the camera laterally.
9. If you want to adjust the amount of perspective applied on the way the 3D model is rendered, adjust the Focal Length parameter. Increasing it will reduce the amount of perspective applied on the model, and decreasing it will increase the amount of perspective applied on the model.
NOTE
Increasing this setting will also decrease the perceived size of the 3D model, and decreasing it will increase its perceived size. You must then adjust the camera's distance from the model or the model's scaling to compensate.
10. Adjust the Translation parameters until the 3D model is in the right position for the scene:
l X: The horizontal position of the 3D model, from west to east.
l Y: The vertical position of the 3D model, from south to north.
l Z: The position of the 3D model relative to the camera, from near to far.
11. Adjust the Rotation parameters until the 3D model is in the right angle for the scene:
l X: The rotation angle of the model around the horizontal axis.
l Y: The rotation angle of the model around the vertical axis.
l Z: The rotation angle of the model around the z-axis.
12. Adjust the Scaling parameters until the 3D model is in the right size for the scene:
l Lock Scaling Axis: When enabled, you can use the X scaling field to set the scaling of the 3D model on all axes, preserving its proportions.
l X: The horizontal scaling of the model.
753
Storyboard Pro 20 User Guide
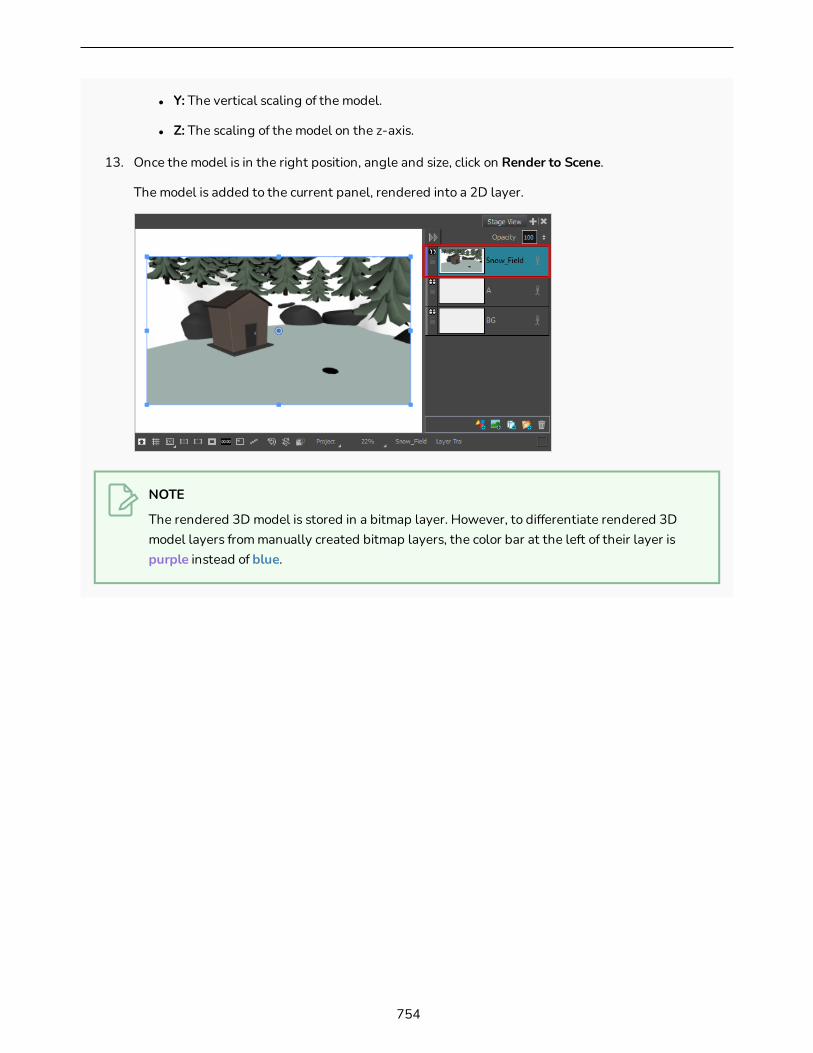
l Y: The vertical scaling of the model.
l Z: The scaling of the model on the z-axis.
13. Once the model is in the right position, angle and size, click on Render to Scene.
The model is added to the current panel, rendered into a 2D layer.
NOTE
The rendered 3D model is stored in a bitmap layer. However, to differentiate rendered 3D model layers from manually created bitmap layers, the color bar at the left of their layer is purple instead of blue.
754
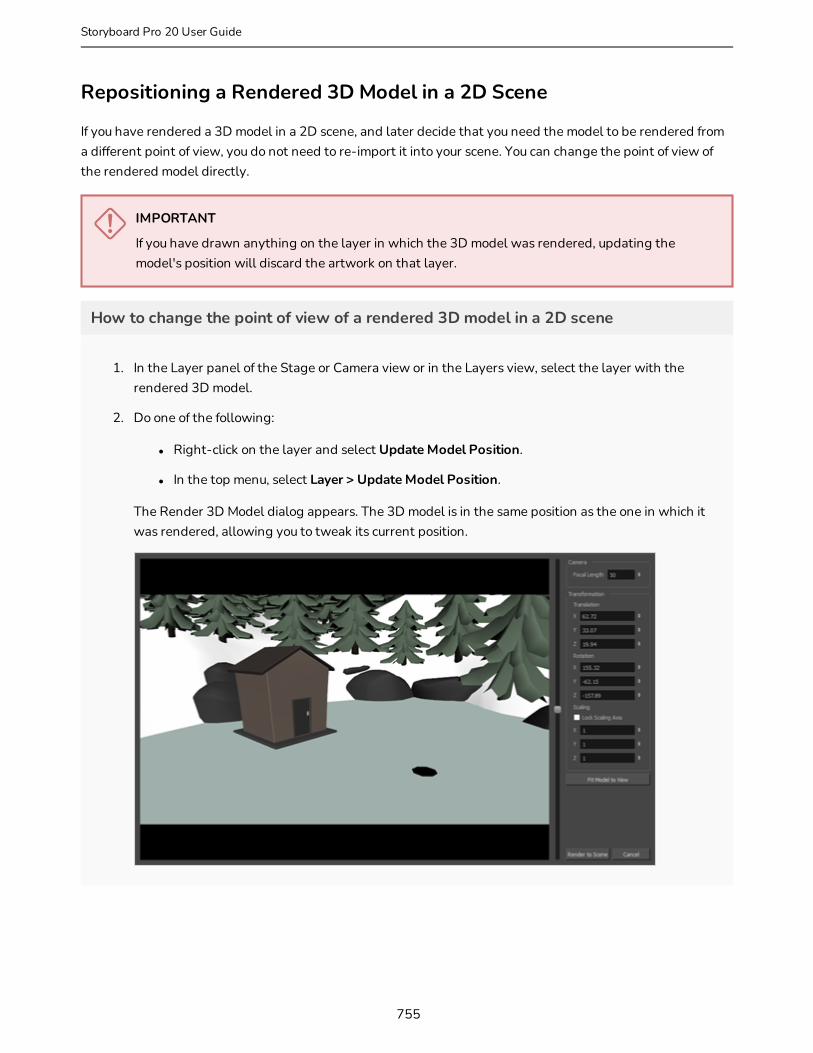
Repositioning a Rendered 3D Model in a 2D Scene
If you have rendered a 3D model in a 2D scene, and later decide that you need the model to be rendered from a different point of view, you do not need to re-import it into your scene. You can change the point of view of the rendered model directly.
IMPORTANT
If you have drawn anything on the layer in which the 3D model was rendered, updating the model's position will discard the artwork on that layer.
How to change the point of view of a rendered 3D model in a 2D scene
1. In the Layer panel of the Stage or Camera view or in the Layers view, select the layer with the rendered 3D model.
2. Do one of the following:
l Right-click on the layer and select Update Model Position.
l In the top menu, select Layer > Update Model Position.
The Render 3D Model dialog appears. The 3D model is in the same position as the one in which it was rendered, allowing you to tweak its current position.
755
Storyboard Pro 20 User Guide
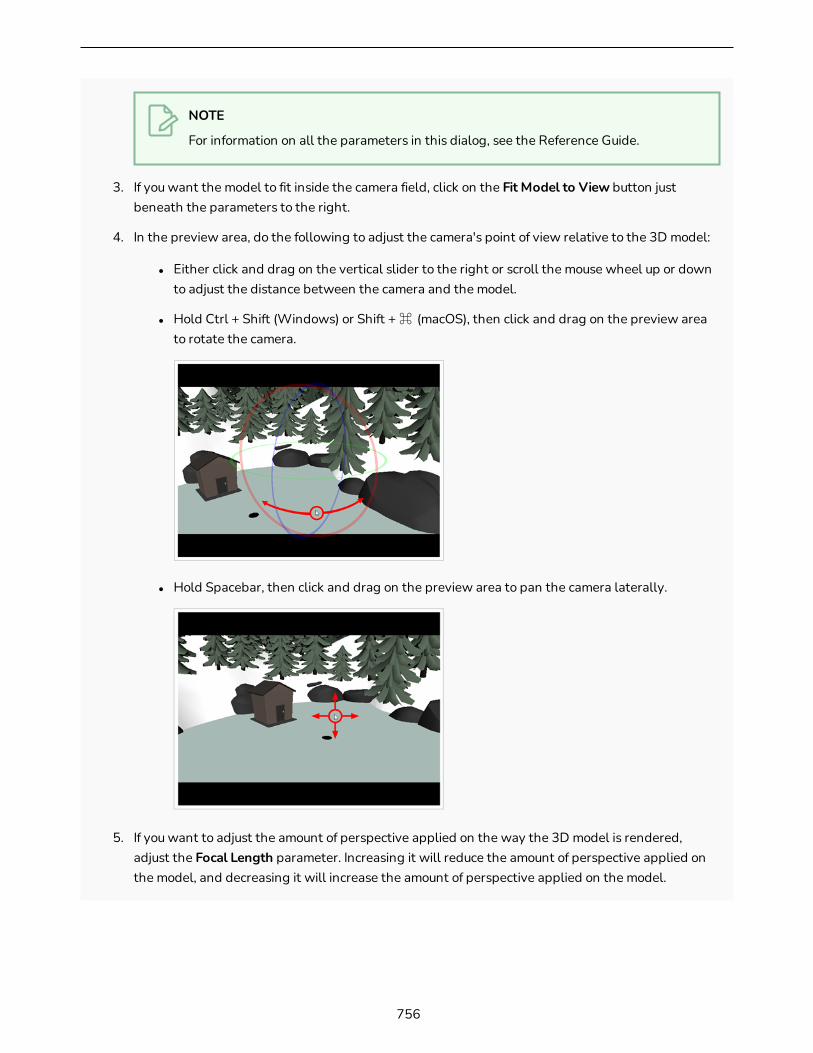
NOTE
For information on all the parameters in this dialog, see the Reference Guide.
3. If you want the model to fit inside the camera field, click on the Fit Model to View button just beneath the parameters to the right.
4. In the preview area, do the following to adjust the camera's point of view relative to the 3D model:
l Either click and drag on the vertical slider to the right or scroll the mouse wheel up or down to adjust the distance between the camera and the model.
l Hold Ctrl + Shift (Windows) or Shift + ⌘ (macOS), then click and drag on the preview area to rotate the camera.
l Hold Spacebar, then click and drag on the preview area to pan the camera laterally.
5. If you want to adjust the amount of perspective applied on the way the 3D model is rendered, adjust the Focal Length parameter. Increasing it will reduce the amount of perspective applied on the model, and decreasing it will increase the amount of perspective applied on the model.
756
NOTE
Increasing this setting will also decrease the perceived size of the 3D model, and decreasing it will increase its perceived size. You must then adjust the camera's distance from the model or the model's scaling to compensate.
6. Adjust the Translation parameters until the 3D model is in the right position for the scene:
l X: The horizontal position of the 3D model, from west to east.
l Y: The vertical position of the 3D model, from south to north.
l Z: The position of the 3D model relative to the camera, from near to far.
7. Adjust the Rotation parameters until the 3D model is in the right angle for the scene:
l X: The rotation angle of the model around the horizontal axis.
l Y: The rotation angle of the model around the vertical axis.
l Z: The rotation angle of the model around the z-axis.
8. Adjust the Scaling parameters until the 3D model is in the right size for the scene:
l Lock Scaling Axis: When enabled, you can use the X scaling field to set the scaling of the 3D model on all axes, preserving its proportions.
l X: The horizontal scaling of the model.
l Y: The vertical scaling of the model.
l Z: The scaling of the model on the z-axis.
9. Click on Render to Scene.
The selected layer is updated with the 3D model as rendered from its new point of view.
757
Storyboard Pro 20 User Guide
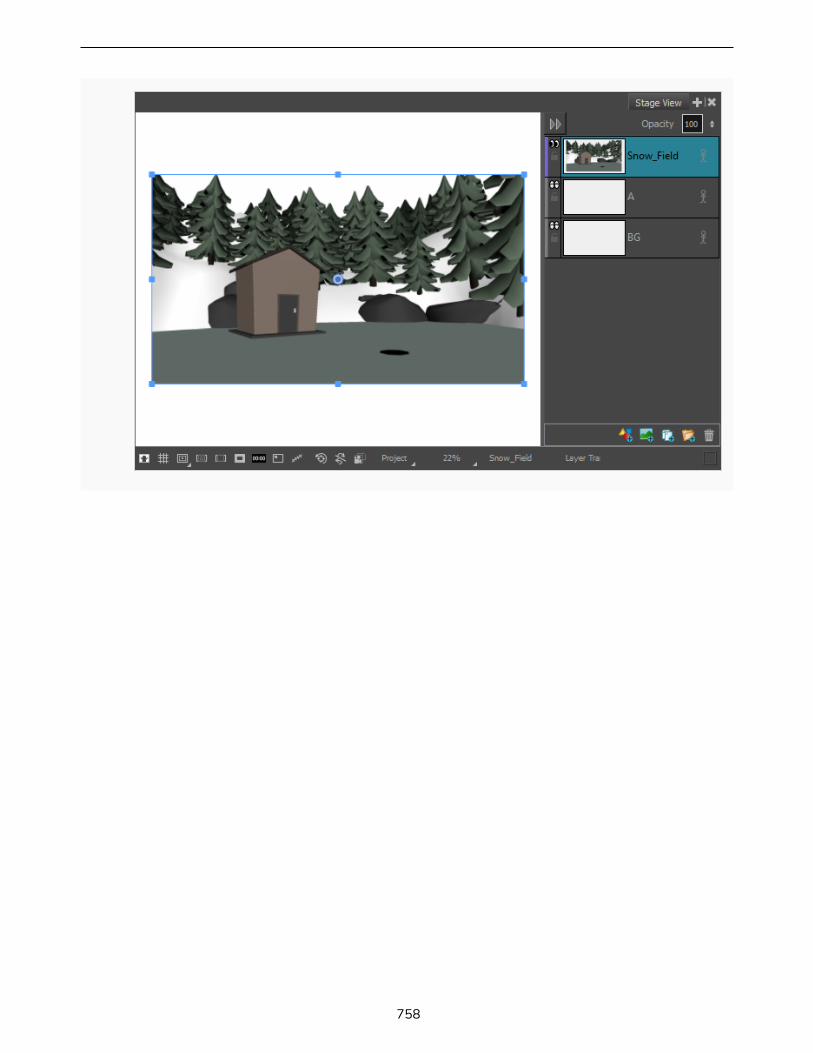
758
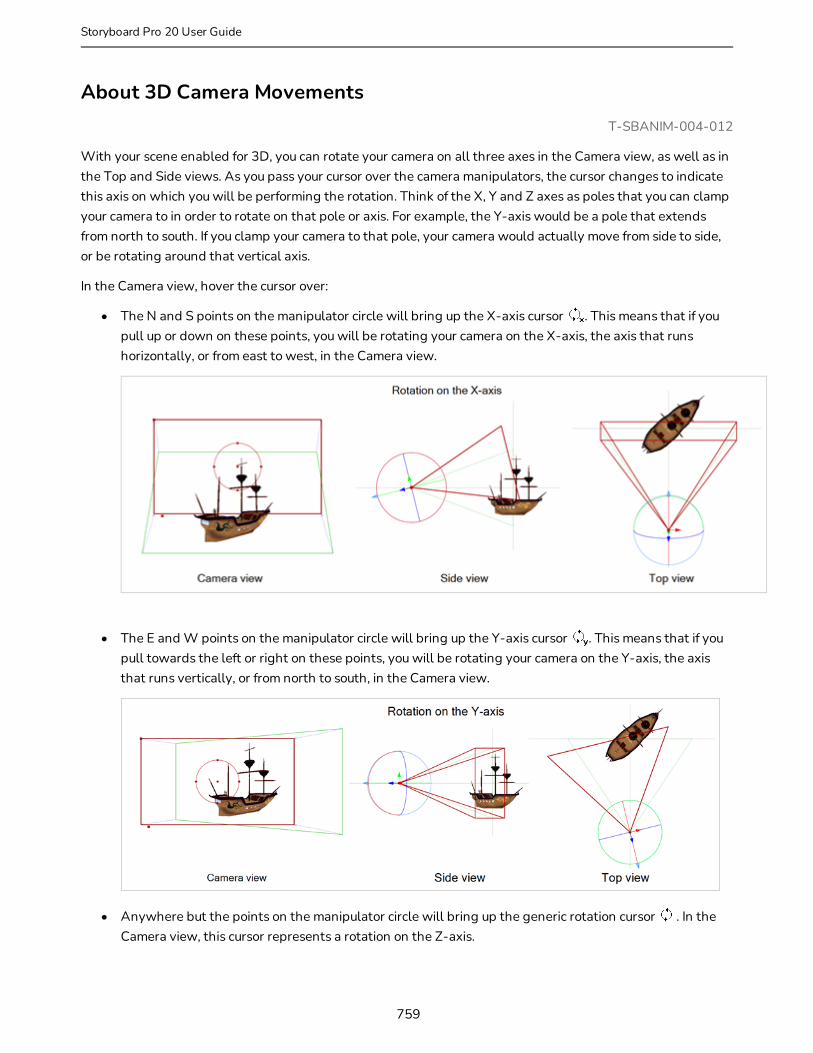
About 3D Camera MovementsT-SBANIM-004-012
With your scene enabled for 3D, you can rotate your camera on all three axes in the Camera view, as well as in the Top and Side views. As you pass your cursor over the camera manipulators, the cursor changes to indicate this axis on which you will be performing the rotation. Think of the X, Y and Z axes as poles that you can clamp your camera to in order to rotate on that pole or axis. For example, the Y-axis would be a pole that extends from north to south. If you clamp your camera to that pole, your camera would actually move from side to side, or be rotating around that vertical axis.
In the Camera view, hover the cursor over:
• The N and S points on the manipulator circle will bring up the X-axis cursor . This means that if you pull up or down on these points, you will be rotating your camera on the X-axis, the axis that runs horizontally, or from east to west, in the Camera view.
• The E and W points on the manipulator circle will bring up the Y-axis cursor . This means that if you pull towards the left or right on these points, you will be rotating your camera on the Y-axis, the axis that runs vertically, or from north to south, in the Camera view.
• Anywhere but the points on the manipulator circle will bring up the generic rotation cursor . In the Camera view, this cursor represents a rotation on the Z-axis.
759
Storyboard Pro 20 User Guide
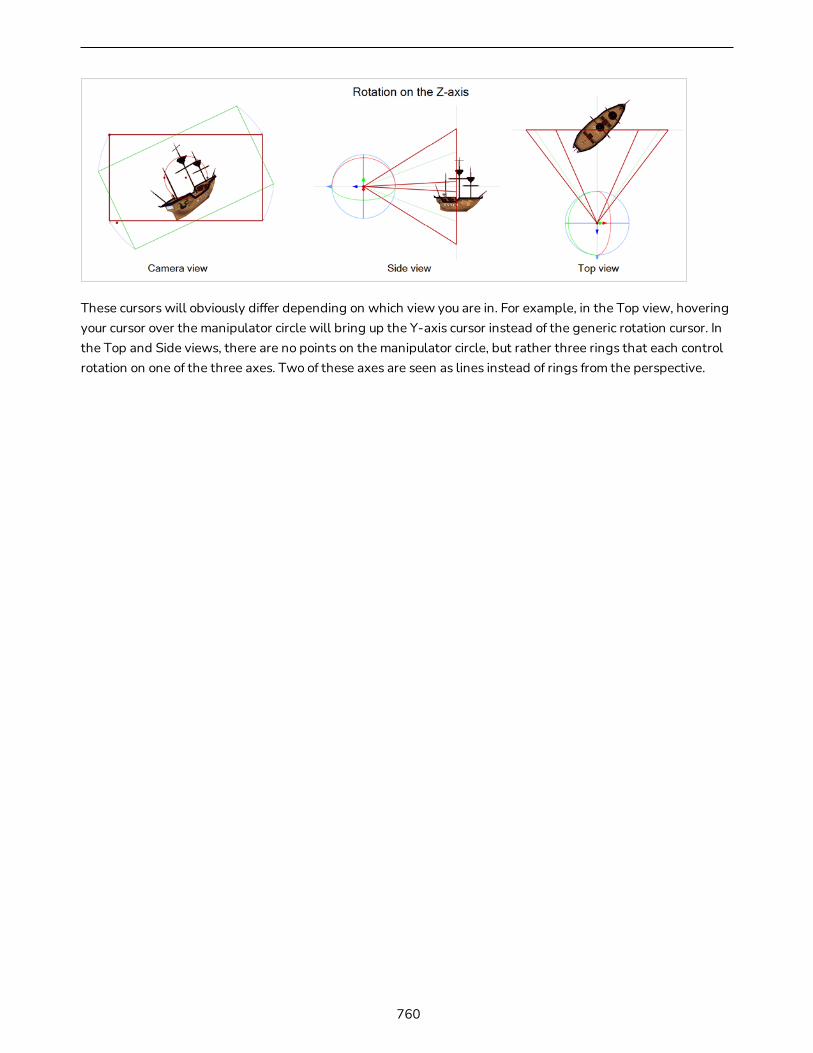
These cursors will obviously differ depending on which view you are in. For example, in the Top view, hovering your cursor over the manipulator circle will bring up the Y-axis cursor instead of the generic rotation cursor. In the Top and Side views, there are no points on the manipulator circle, but rather three rings that each control rotation on one of the three axes. Two of these axes are seen as lines instead of rings from the perspective.
760
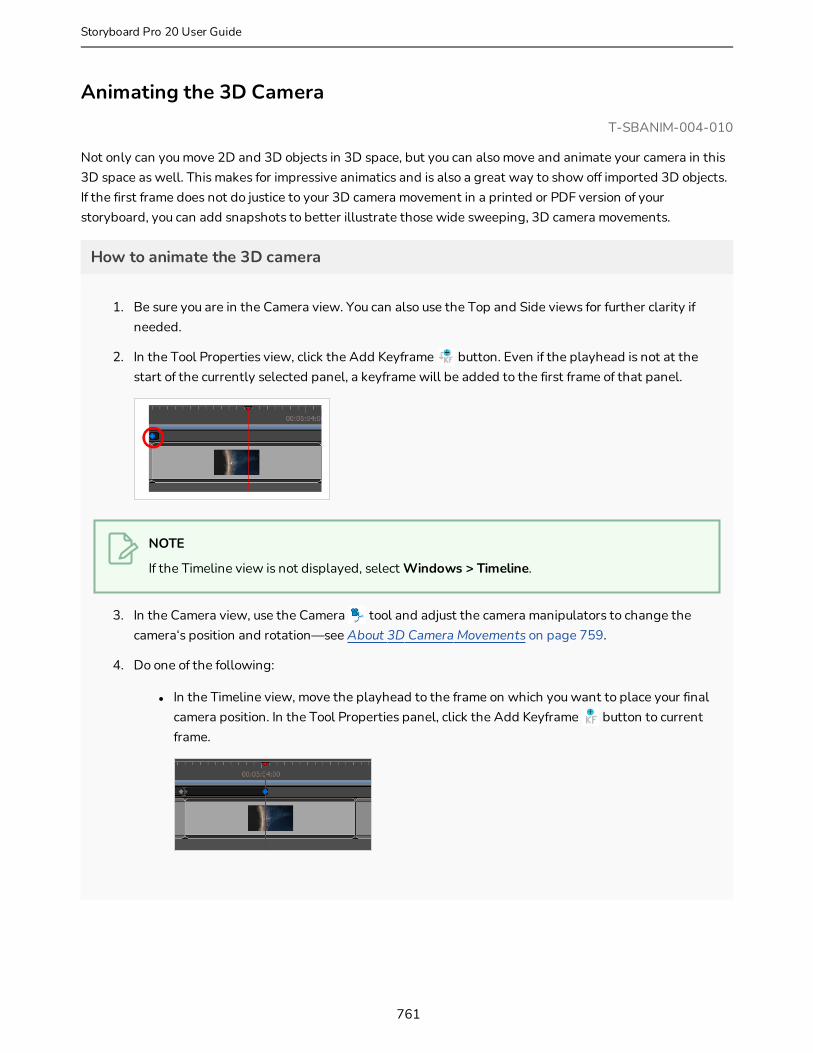
Animating the 3D Camera T-SBANIM-004-010
Not only can you move 2D and 3D objects in 3D space, but you can also move and animate your camera in this 3D space as well. This makes for impressive animatics and is also a great way to show off imported 3D objects. If the first frame does not do justice to your 3D camera movement in a printed or PDF version of your storyboard, you can add snapshots to better illustrate those wide sweeping, 3D camera movements.
How to animate the 3D camera
1. Be sure you are in the Camera view. You can also use the Top and Side views for further clarity if needed.
2. In the Tool Properties view, click the Add Keyframe button. Even if the playhead is not at the start of the currently selected panel, a keyframe will be added to the first frame of that panel.
NOTE
If the Timeline view is not displayed, select Windows > Timeline.
3. In the Camera view, use the Camera tool and adjust the camera manipulators to change the camera‘s position and rotation—see About 3D Camera Movements on page 759.
4. Do one of the following:
l In the Timeline view, move the playhead to the frame on which you want to place your final camera position. In the Tool Properties panel, click the Add Keyframe button to current frame.
761
Storyboard Pro 20 User Guide
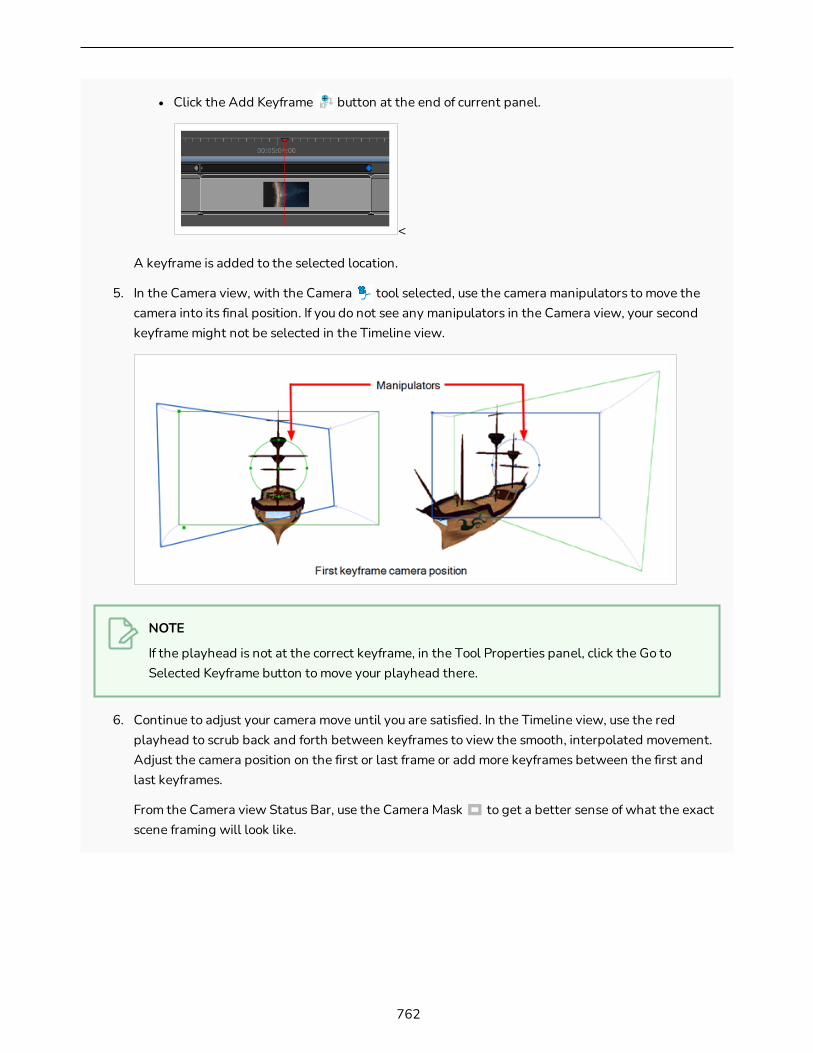
l Click the Add Keyframe button at the end of current panel.
<
A keyframe is added to the selected location.
5. In the Camera view, with the Camera tool selected, use the camera manipulators to move the camera into its final position. If you do not see any manipulators in the Camera view, your second keyframe might not be selected in the Timeline view.
NOTE
If the playhead is not at the correct keyframe, in the Tool Properties panel, click the Go to Selected Keyframe button to move your playhead there.
6. Continue to adjust your camera move until you are satisfied. In the Timeline view, use the red playhead to scrub back and forth between keyframes to view the smooth, interpolated movement. Adjust the camera position on the first or last frame or add more keyframes between the first and last keyframes.
From the Camera view Status Bar, use the Camera Mask to get a better sense of what the exact scene framing will look like.
762
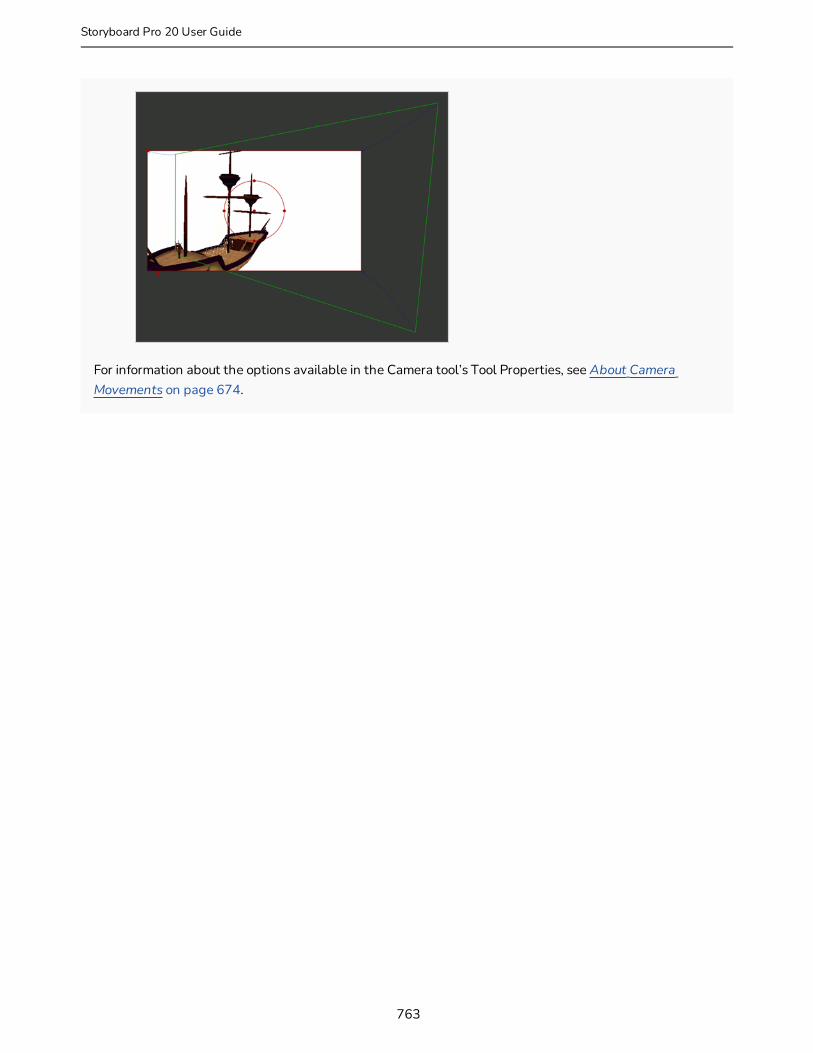
For information about the options available in the Camera tool’s Tool Properties, see About Camera Movements on page 674.
763
Storyboard Pro 20 User Guide

Aligning 2D Layers with a 3D CameraT-SBANIM-004-011
While working with layers, you may want to align specific layers with the camera, so any time you adjust the camera, the layer is always in full view. You can set a different alignment for each layer. The default behaviour is that the camera is not aligned with layers.
How to align a layer with the camera
1. Add the Layers view to your workspace by doing one of the following:
l In the top-right corner of any view, click on the Add View button and select Layers.
l In the top menu, select Windows > Layers.
2. In the Layers view, select a layer to align with the camera.
3. From the Layer Alignment section, select one of the following:
l No Alignment: The layer is independent of the camera.
If the layer is set to No Alignment and you switch to Face Camera, the offset and scale is retained but the rotation is removed.If the layer is set to No Alignment and you switch to Pin to Camera, all layer transformation is reset and animation is removed.
If the layer is set to No Alignment and you switch to Pin to Camera, all layer transformation is reset and animation is removed.
l Face Camera: The layer is oriented to face the camera, so it rotates around its pivot point to always face the camera, but does not move with the camera.
764

If the layer is set to Face Camera and you switch to Pin to Camera, all layer transformation is reset and animation is removed.
If the layer is set to Face Camera and you switch to No Alignment, the offset and scaling are retained. You should change the rotation keyframes so the layer faced the camera at the current frame.
l Pin to Camera: The layer is oriented to the camera's perspective. Essentially the layer always moves with the camera.
If a layer is set to Pin to Camera and you switch to No Alignment or Face Camera, the layer stays at its position at the current frame.
If a layer is set to Pin to Camera and set it back to No Alignment or Face Camera, the layer transformation is combined with the camera. The layer is left in place at the current frame.
765
Storyboard Pro 20 User Guide
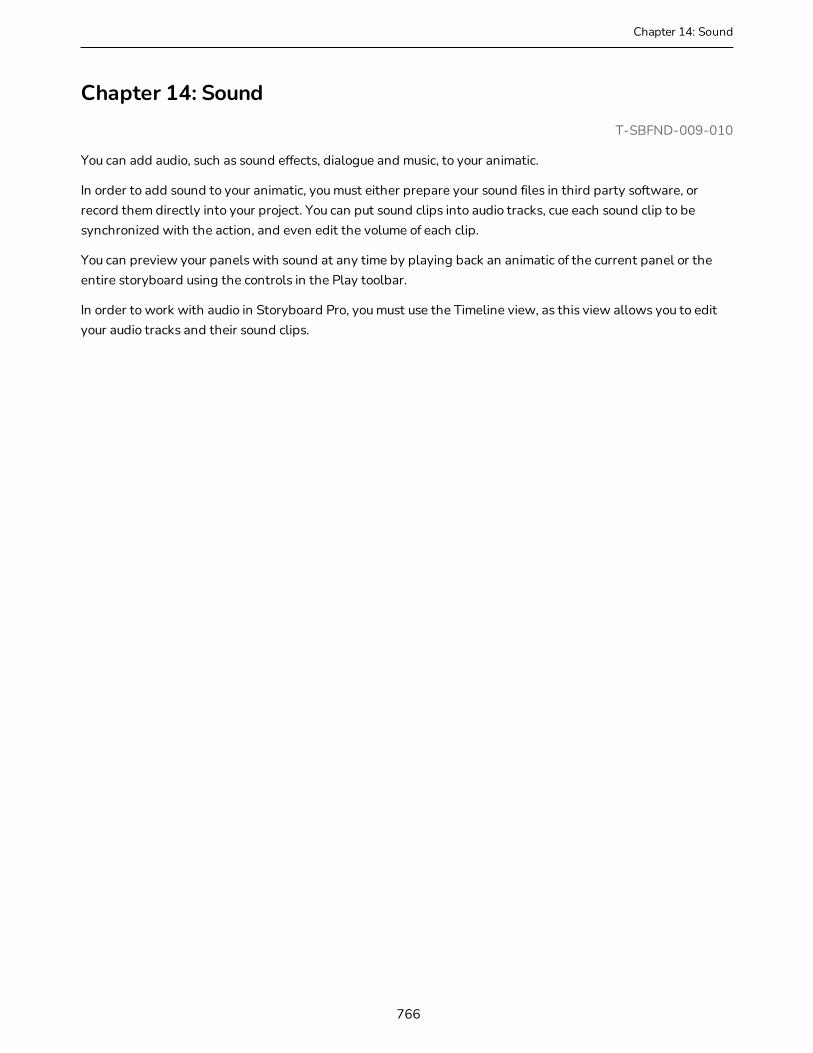
Chapter 14: Sound
Chapter 14: SoundT-SBFND-009-010
You can add audio, such as sound effects, dialogue and music, to your animatic.
In order to add sound to your animatic, you must either prepare your sound files in third party software, or record them directly into your project. You can put sound clips into audio tracks, cue each sound clip to be synchronized with the action, and even edit the volume of each clip.
You can preview your panels with sound at any time by playing back an animatic of the current panel or the entire storyboard using the controls in the Play toolbar.
In order to work with audio in Storyboard Pro, you must use the Timeline view, as this view allows you to edit your audio tracks and their sound clips.
766
About Audio TracksAudio tracks are tracks in which you can add sound clips. Each sound clip in an audio track is cued at a specific time in your animatic, so that it can be synchronized with the action.
Your project can have as many audio tracks as you want. Having several audio tracks is required if you want to play several sound clips at the same time, as a single audio track can have several sound clips cued across the animatic, but can only play one sound clip at any given time. You can also use different audio tracks to organize your sound clips, for example by having a specific track for each character's dialogue, one for music, and one for sound effects. Each audio track can be muted, and you can also enable solo mode on an audio track if you only want to hear that audio track.
NOTE
Audio tracks in Storyboard Pro are not restricted to a specific channel mode. A single audio track can have both mono and stereo sound clips.
767
Storyboard Pro 20 User Guide

Chapter 14: Sound
Adding Audio TracksT-SBANIM-002-002
If you need to have several sound clips playing at the same time, you must add additional audio tracks to your project so that you can cue several sound clips in the same areas of the timeline.
How to add an audio track
1. Do one of the following:
l In the top menu, select Storyboard > New > New Audio Track.
l In the Timeline view, either right-click on an existing audio track or underneath all tracks, then select New Audio Track.
l In the Clips and Tracks toolbar, click the New Audio Track button.
You can now import or move sound clips to the new audio track.
NOTE
When importing or recording a sound clip, you can also choose to add the sound clip into its own new audio track—see Importing Sound Clips on page 781 and Recording Sound Clips on page 785.
768

Importing Audio TracksYou can now import audio tracks using the exchange formats XML or AAF.
How to import an audio track using AAf or XML
1. In the top menu, select File > Import > Audio Tracks.
The Import Audio Tracks dialog box opens:
Choose one of the following options:
l Import to New Audio Tracks: This option will create new audio tracks and import the audio to these tracks.
l Replace all Audio Tracks: This option will remove all audio tracks from the project and replace them with new audio tracks on which the linked audio clips will be imported.
769
Storyboard Pro 20 User Guide
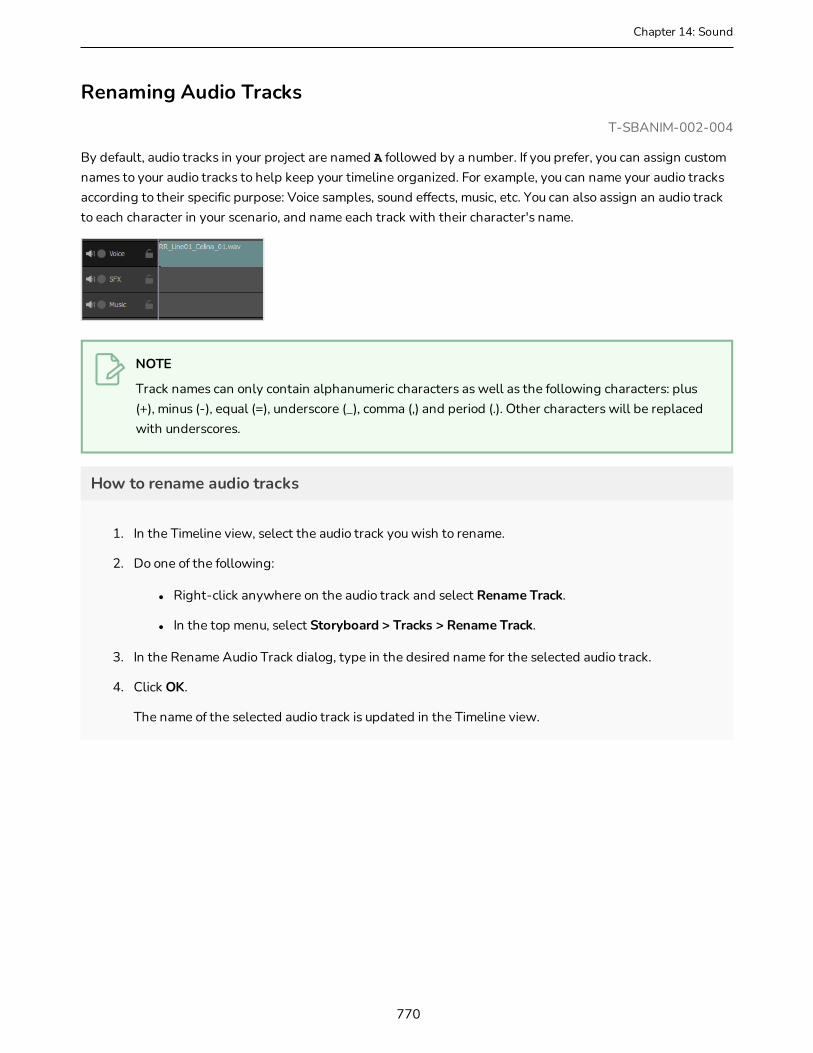
Chapter 14: Sound
Renaming Audio TracksT-SBANIM-002-004
By default, audio tracks in your project are named A followed by a number. If you prefer, you can assign custom names to your audio tracks to help keep your timeline organized. For example, you can name your audio tracks according to their specific purpose: Voice samples, sound effects, music, etc. You can also assign an audio track to each character in your scenario, and name each track with their character's name.
NOTE
Track names can only contain alphanumeric characters as well as the following characters: plus (+), minus (-), equal (=), underscore (_), comma (,) and period (.). Other characters will be replaced with underscores.
How to rename audio tracks
1. In the Timeline view, select the audio track you wish to rename.
2. Do one of the following:
l Right-click anywhere on the audio track and select Rename Track.
l In the top menu, select Storyboard > Tracks > Rename Track.
3. In the Rename Audio Track dialog, type in the desired name for the selected audio track.
4. Click OK.
The name of the selected audio track is updated in the Timeline view.
770
Reordering Audio TracksT-SBANIM-002-005
You can change the order of your audio tracks in the Timeline view. This can be useful to make them organized or to keep the one you're currently editing on top.
How to reorder video tracks
1. In the Timeline view, select the audio track you want to move.
2. Do one of the following:
l Right-click anywhere on the audio track and select Move Track Up or Move Track Down.
l In the Clips and Tracks toolbar, click on the Move Track Up or the Move Track Down button.
The track is moved up or down in the list of audio tracks.
771
Storyboard Pro 20 User Guide
Chapter 14: Sound
Deleting Audio TracksYou can delete an audio track from your project in the Timeline view. When an audio track is deleted, all its sound clips are also deleted from the project.
How to delete an audio track
1. In the Timeline view, select the audio track you want to delete.
2. Do one of the following:
l Right-click anywhere on the audio track and select Delete Current Audio Track.
l In the top menu, select Storyboard > Tracks > Delete Current Track.
The selected audio track is removed from the Timeline view and deleted from your project.
772
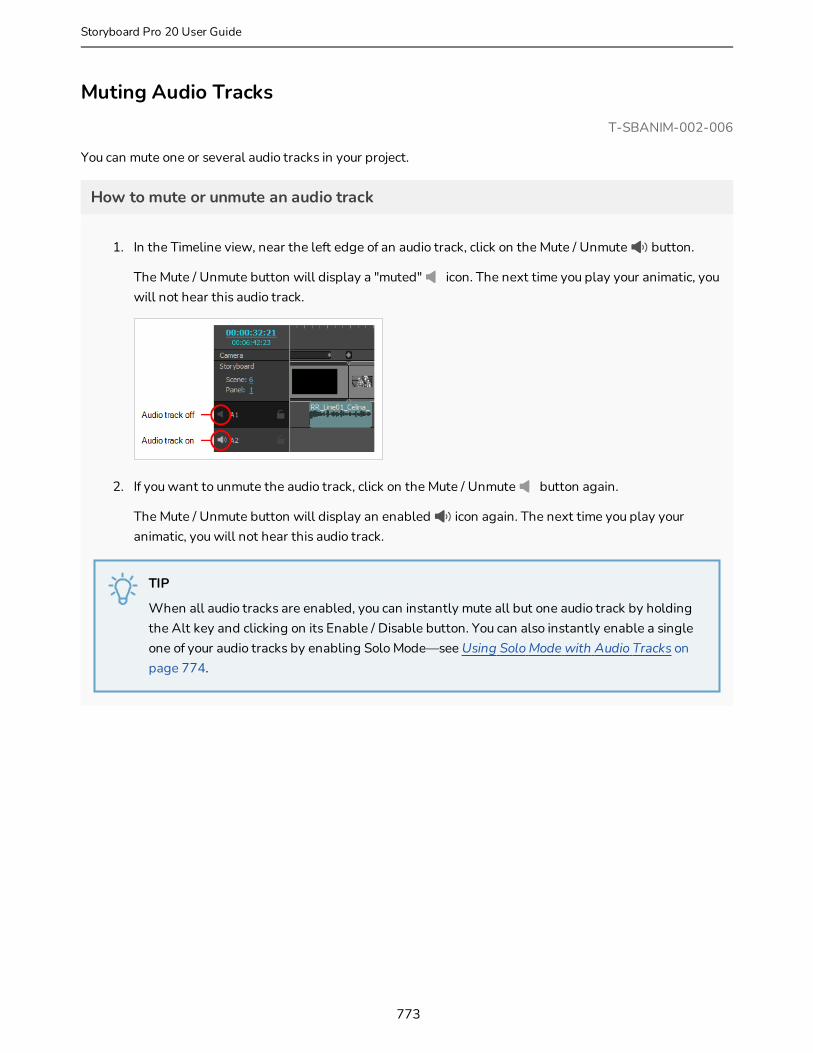
Muting Audio TracksT-SBANIM-002-006
You can mute one or several audio tracks in your project.
How to mute or unmute an audio track
1. In the Timeline view, near the left edge of an audio track, click on the Mute / Unmute button.
The Mute / Unmute button will display a "muted" icon. The next time you play your animatic, you will not hear this audio track.
2. If you want to unmute the audio track, click on the Mute / Unmute button again.
The Mute / Unmute button will display an enabled icon again. The next time you play your animatic, you will not hear this audio track.
TIP
When all audio tracks are enabled, you can instantly mute all but one audio track by holding the Alt key and clicking on its Enable / Disable button. You can also instantly enable a single one of your audio tracks by enabling Solo Mode—see Using Solo Mode with Audio Tracks on page 774.
773
Storyboard Pro 20 User Guide

Chapter 14: Sound
Using Solo Mode with Audio TracksT-SBANIM-002-012
If you have several audio tracks and only want to hear one or two of them, you can enable solo mode on these tracks to temporarily mute all other tracks.
If solo mode is enabled on at least one audio track, only the audio tracks with solo mode enabled will be audible. If solo mode is not enabled on any audio track, then all audio tracks will be audible.
NOTE
Muted audio tracks are never audible, even if solo mode is enabled on them.
How to use Solo Mode with audio tracks
1. In the Timeline view, click the Solo Mode button of an audio track.
The Solo Mode button will become active . From now on, you will only hear this audio track during playback.
2. If you want to hear more than one audio track, you can activate the Solo Mode button on other audio tracks. All audio tracks with Solo Mode enabled will be audible, provided that they are not muted.
3. To remove a track from Solo Mode, click on its Solo Mode button again to disable it for that track.
4. When you want to stop using solo mode and resume hearing all audio tracks, click on the Solo Mode button of all audio tracks on which it is enabled, until Solo Mode is no longer enabled on any audio track.
TIP
You can also enable or disable solo mode for all but a single track by holding the Alt key and clicking on the Solo Mode button of an audio track.
774
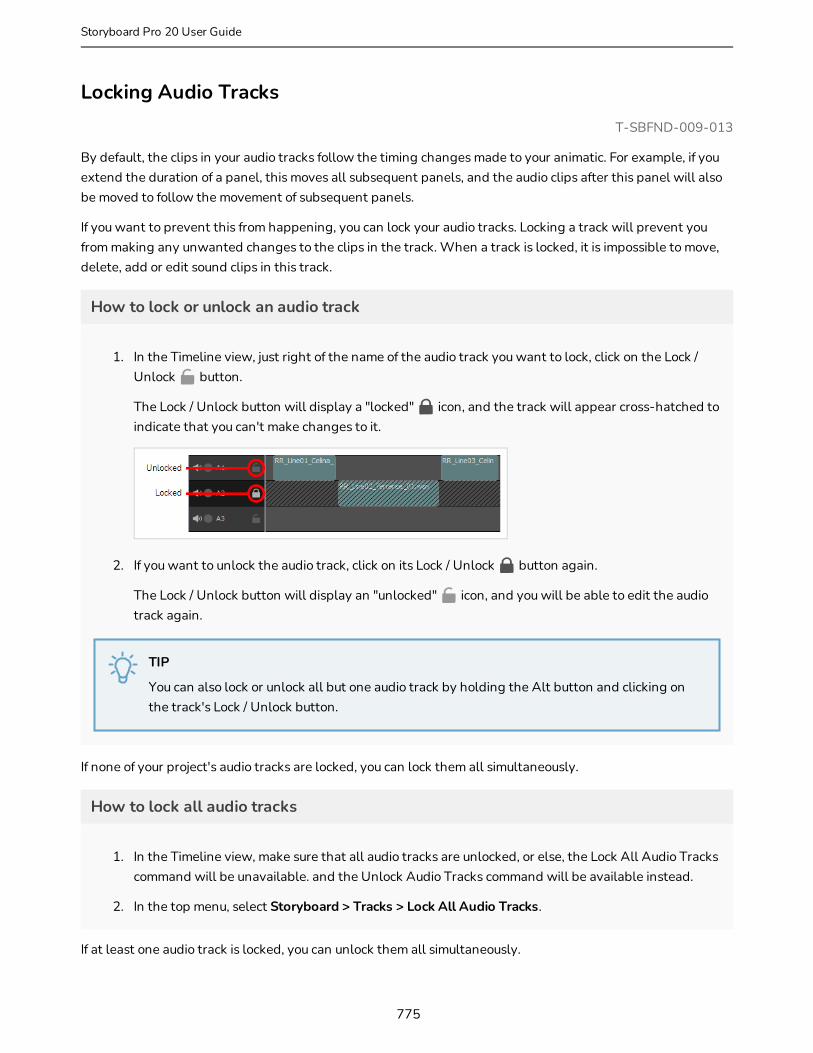
Locking Audio TracksT-SBFND-009-013
By default, the clips in your audio tracks follow the timing changes made to your animatic. For example, if you extend the duration of a panel, this moves all subsequent panels, and the audio clips after this panel will also be moved to follow the movement of subsequent panels.
If you want to prevent this from happening, you can lock your audio tracks. Locking a track will prevent you from making any unwanted changes to the clips in the track. When a track is locked, it is impossible to move, delete, add or edit sound clips in this track.
How to lock or unlock an audio track
1. In the Timeline view, just right of the name of the audio track you want to lock, click on the Lock / Unlock button.
The Lock / Unlock button will display a "locked" icon, and the track will appear cross-hatched to indicate that you can't make changes to it.
2. If you want to unlock the audio track, click on its Lock / Unlock button again.
The Lock / Unlock button will display an "unlocked" icon, and you will be able to edit the audio track again.
TIP
You can also lock or unlock all but one audio track by holding the Alt button and clicking on the track's Lock / Unlock button.
If none of your project's audio tracks are locked, you can lock them all simultaneously.
How to lock all audio tracks
1. In the Timeline view, make sure that all audio tracks are unlocked, or else, the Lock All Audio Tracks command will be unavailable. and the Unlock Audio Tracks command will be available instead.
2. In the top menu, select Storyboard > Tracks > Lock All Audio Tracks.
If at least one audio track is locked, you can unlock them all simultaneously.
775
Storyboard Pro 20 User Guide

Chapter 14: Sound
How to unlock all audio tracks at once
1. In the Timeline view, make sure there is at least one locked audio track. Otherwise, the Unlock All Audio Tracks command will be unavailable.
2. In the top menu, select Storyboard > Tracks > Unlock All Audio Tracks.
776

Enabling and Disabling Audio Track SynchronizationBy default, when you offset or move panels in your animatic, sound clips that are cued during these panels will be offset to remain synchronized with the action. You can disable this synchronization on some or all of your audio tracks, so that sound clips in these audio tracks remain cued at the time you cued them while you make changes to the timing in your animatic.
How to disable or re-enable synchronization on a single audio track
1. In the Timeline view, click on the Synced icon for the audio trackfor which you want to disable synchronization.
The icon will switch to Unsynced, meaning that the audio track is not synchronized with your animatic.
2. If you want the audio track to become synchronized with your animatic again, click on its Unsynced icon.
The icon will switch back to Synced, meaning that the audio track is synchronized with your animatic.
How to disable synchronization on all audio tracks
1. In the top menu, select Storyboard > Tracks > Disable Sync on All Audio Tracks.
How to enable synchronization on all audio tracks
1. Make sure synchronization is disabled for all audio tracks.
2. In the top menu, select Storyboard > Tracks > Enable Sync on All Audio Tracks.
777
Storyboard Pro 20 User Guide
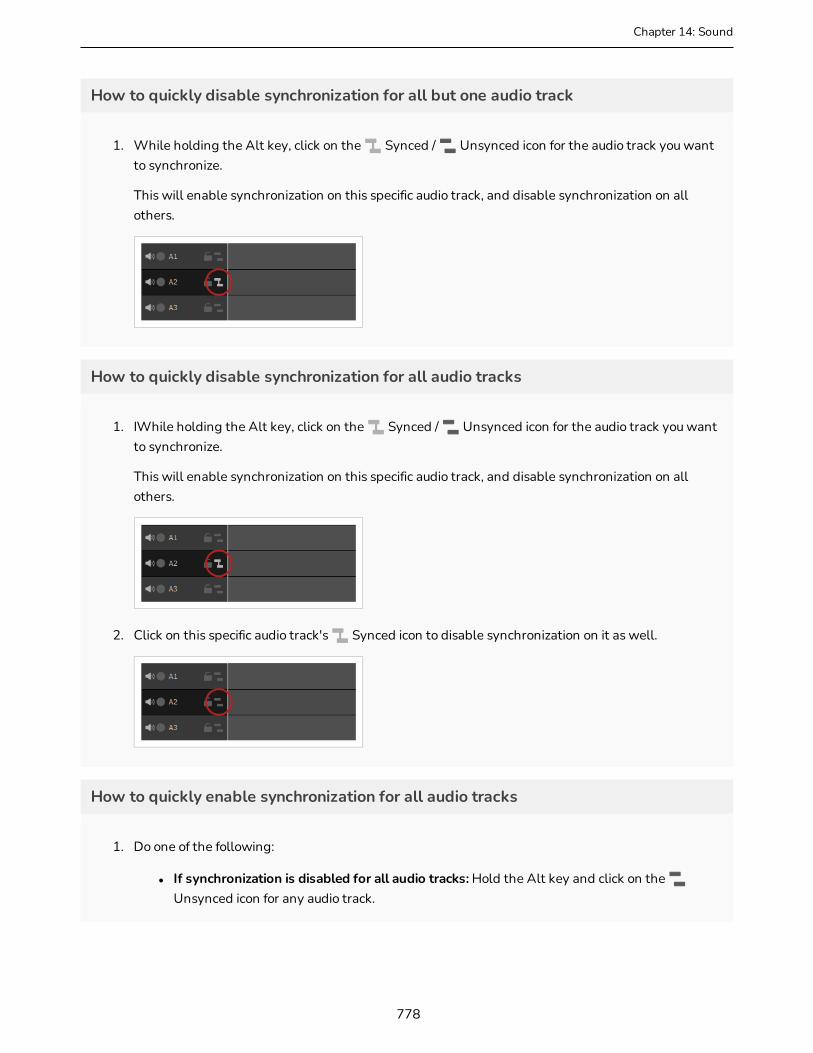
Chapter 14: Sound
How to quickly disable synchronization for all but one audio track
1. While holding the Alt key, click on the Synced / Unsynced icon for the audio track you want to synchronize.
This will enable synchronization on this specific audio track, and disable synchronization on all others.
How to quickly disable synchronization for all audio tracks
1. IWhile holding the Alt key, click on the Synced / Unsynced icon for the audio track you want to synchronize.
This will enable synchronization on this specific audio track, and disable synchronization on all others.
2. Click on this specific audio track's Synced icon to disable synchronization on it as well.
How to quickly enable synchronization for all audio tracks
1. Do one of the following:
l If synchronization is disabled for all audio tracks: Hold the Alt key and click on the Unsynced icon for any audio track.
778
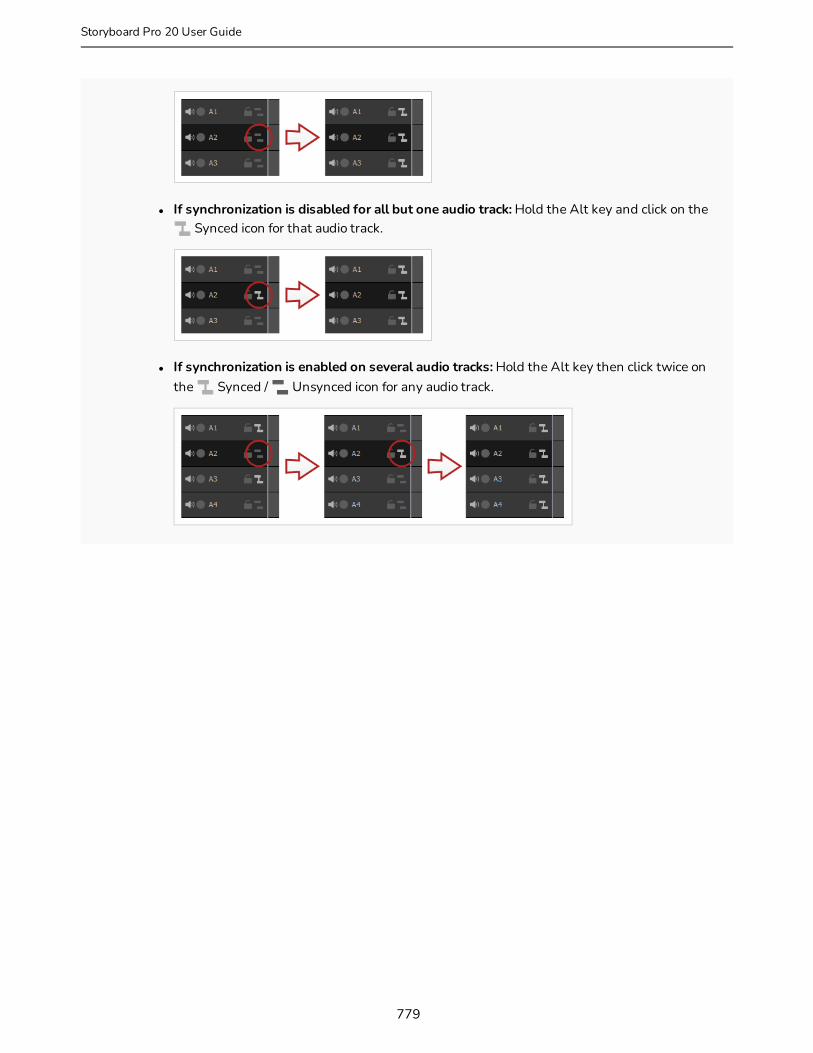
l If synchronization is disabled for all but one audio track: Hold the Alt key and click on the Synced icon for that audio track.
l If synchronization is enabled on several audio tracks: Hold the Alt key then click twice on the Synced / Unsynced icon for any audio track.
779
Storyboard Pro 20 User Guide
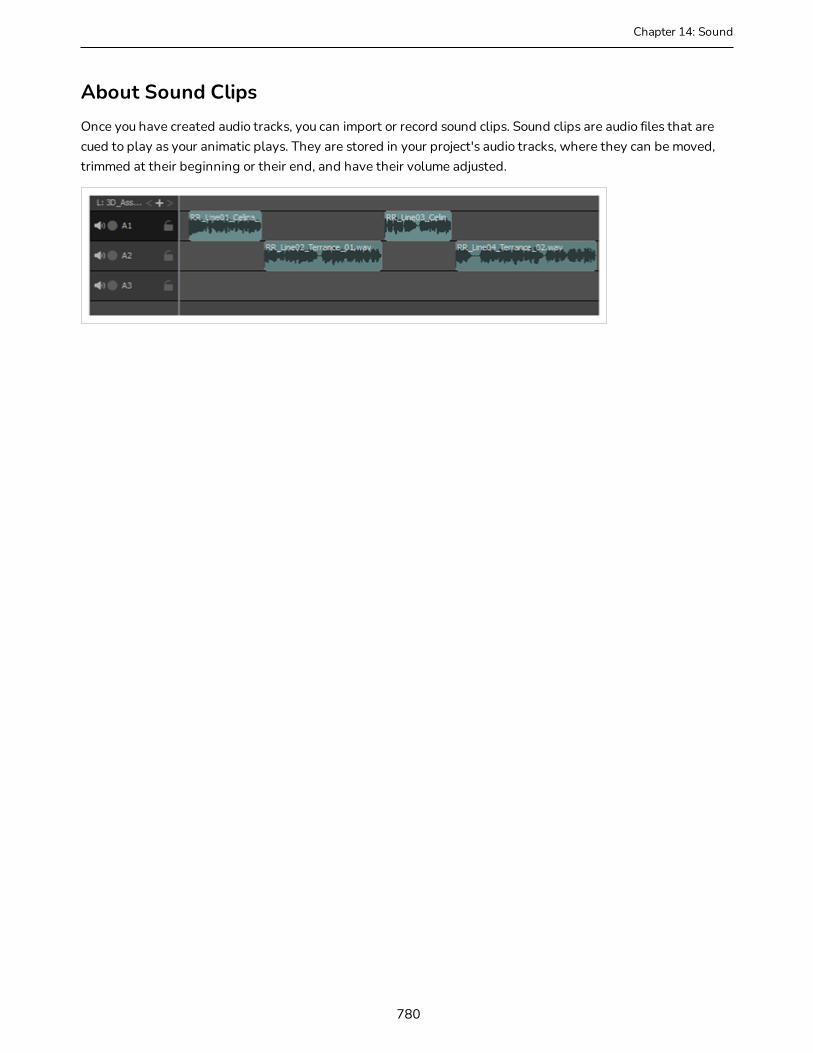
Chapter 14: Sound
About Sound ClipsOnce you have created audio tracks, you can import or record sound clips. Sound clips are audio files that are cued to play as your animatic plays. They are stored in your project's audio tracks, where they can be moved, trimmed at their beginning or their end, and have their volume adjusted.
780

Importing Sound ClipsT-SBFND-009-011
You can import sound clips (.wav, .aif, .aiff, or .mp3) into an audio track at the first frame or at the current frame. If the sound clip does not already exist in your project, Storyboard Pro copies the file from its present location to the audio folder in your storyboard project folder. You must work in the Timeline view.
IMPORTANT
It is not recommended to work .mp3 files as it is a compressed format. Long .mp3 files may not properly sync with the action in your project.
How to import a sound clip
1. In the Timeline view, select the audio track in which you want to import sound clips.
2. Do one of the following:
l In the top menu, select File > Import > Sound Clip.
l Right-click on the audio track in which you want to import sound clips, then select Import Sound Clips.
l Right-click on the empty space below the tracks in the Timeline view, then select Import Sound Clips.
The Import Sound Clips dialog box opens.
3. Click on the Browse button.
4. In the file browser, locate and select the sound file that you want to add to your project, then click on Open.
5. In the Target Audio Track panel, select New Audio Track if you want to create a new audio track and import the sound file in it, or Current Audio Track if you want to import the sound file into the
781
Storyboard Pro 20 User Guide

Chapter 14: Sound
selected audio track.
6. In the Target Frame section, select whether you want the sound clip to be added to the First Frame of the audio track or to the Current Frame, where the timeline cursor is.
7. If you selected the Current Audio Track option, and if other sound clips are present in the target audio track, specify what will happen if the imported sound clip is too long and spans over another existing sound clip by selecting an Import Rule:
l Overwrite Existing Sound Clips: If there are existing sound clips where the imported clips are supposed to be added, the existing clips will be overwritten.
l Fill Next Available Frames: If there are existing sound clips where the new clips are supposed to be added, the clips will be trimmed just before the existing clips.
8. Select the Set as default and don’t show dialogue again option if you want to use the same settings next time you need to import a sound file.
9. Click OK.
The selected sound files will be added to your project as sound clips, in the selected destination audio track, at the selected position.
How to import sound clips using drag & drop
1. Open an Explorer (Windows) or Finder (macOS) window.
2. Browse to the location of the sound files you want to import.
3. Select all the sound files you want to import.
782
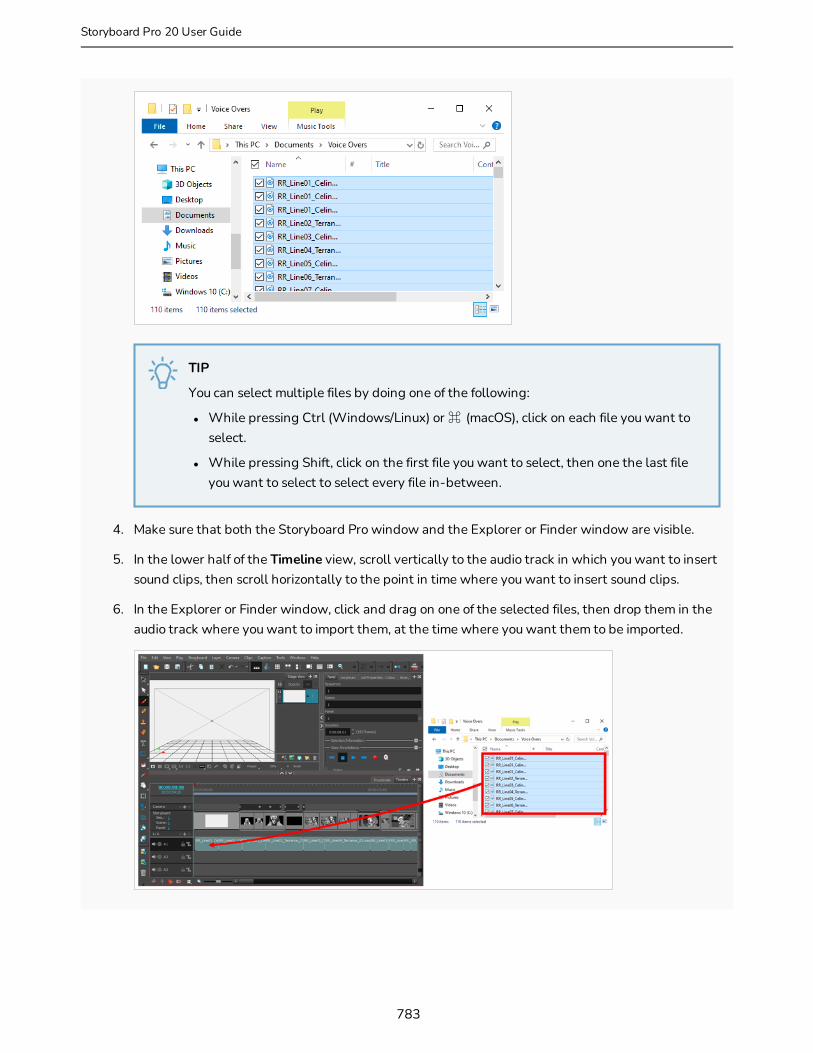
TIP
You can select multiple files by doing one of the following:
l While pressing Ctrl (Windows/Linux) or ⌘ (macOS), click on each file you want to select.
l While pressing Shift, click on the first file you want to select, then one the last file you want to select to select every file in-between.
4. Make sure that both the Storyboard Pro window and the Explorer or Finder window are visible.
5. In the lower half of the Timeline view, scroll vertically to the audio track in which you want to insert sound clips, then scroll horizontally to the point in time where you want to insert sound clips.
6. In the Explorer or Finder window, click and drag on one of the selected files, then drop them in the audio track where you want to import them, at the time where you want them to be imported.
783
Storyboard Pro 20 User Guide

Chapter 14: Sound
The selected sound clips will be added to the target audio track, at the point in the timeline where you dropped them.
784
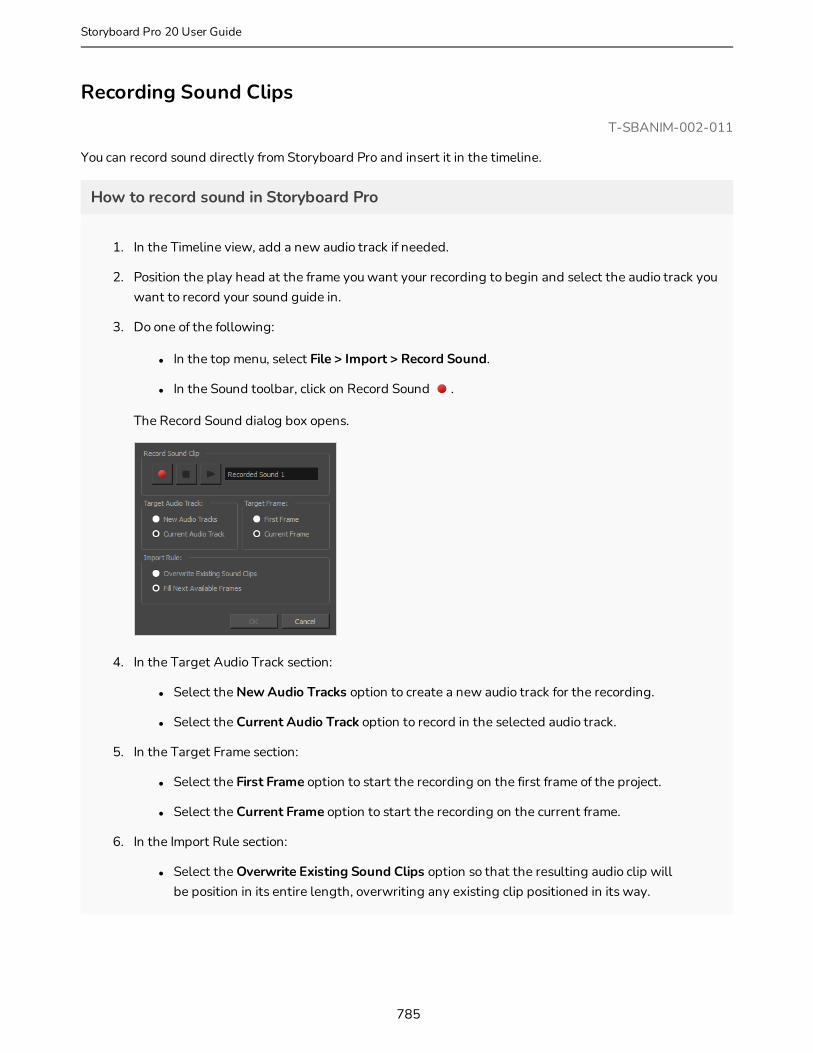
Recording Sound ClipsT-SBANIM-002-011
You can record sound directly from Storyboard Pro and insert it in the timeline.
How to record sound in Storyboard Pro
1. In the Timeline view, add a new audio track if needed.
2. Position the play head at the frame you want your recording to begin and select the audio track you want to record your sound guide in.
3. Do one of the following:
l In the top menu, select File > Import > Record Sound.
l In the Sound toolbar, click on Record Sound .
The Record Sound dialog box opens.
4. In the Target Audio Track section:
l Select the New Audio Tracks option to create a new audio track for the recording.
l Select the Current Audio Track option to record in the selected audio track.
5. In the Target Frame section:
l Select the First Frame option to start the recording on the first frame of the project.
l Select the Current Frame option to start the recording on the current frame.
6. In the Import Rule section:
l Select the Overwrite Existing Sound Clips option so that the resulting audio clip will be position in its entire length, overwriting any existing clip positioned in its way.
785
Storyboard Pro 20 User Guide
Chapter 14: Sound
l Select the Fill Next Available Frames option so that the recording do not overwrite the position of existing audio clips that are on the same audio track.
7. In the Record Sound Clip section:
l Type in the name you want for your audio clip.
l Click the Record button to start the recording.
l Click the Stop button to stop the recording.
l Click the Play button to preview the recording.
8. Click OK.
The recording is imported in the selected audio track of your project.
786
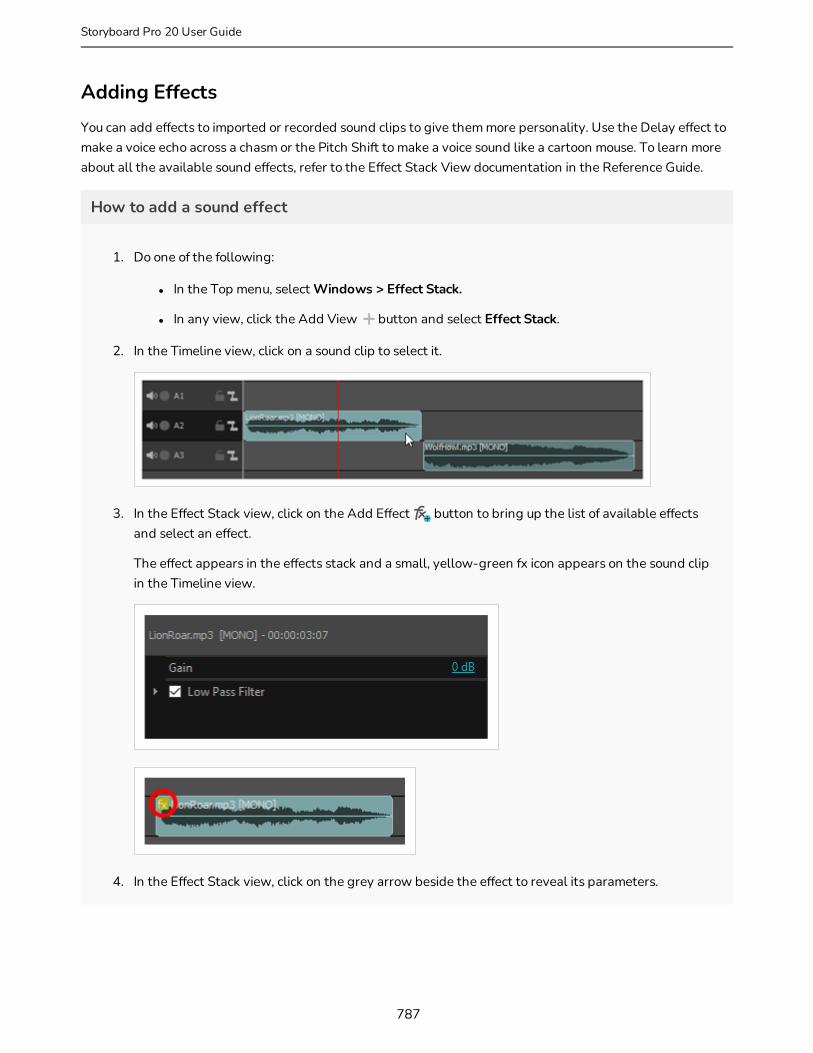
Adding EffectsYou can add effects to imported or recorded sound clips to give them more personality. Use the Delay effect to make a voice echo across a chasm or the Pitch Shift to make a voice sound like a cartoon mouse. To learn more about all the available sound effects, refer to the Effect Stack View documentation in the Reference Guide.
How to add a sound effect
1. Do one of the following:
l In the Top menu, select Windows > Effect Stack.
l In any view, click the Add View button and select Effect Stack.
2. In the Timeline view, click on a sound clip to select it.
3. In the Effect Stack view, click on the Add Effect button to bring up the list of available effects and select an effect.
The effect appears in the effects stack and a small, yellow-green fx icon appears on the sound clip in the Timeline view.
4. In the Effect Stack view, click on the grey arrow beside the effect to reveal its parameters.
787
Storyboard Pro 20 User Guide
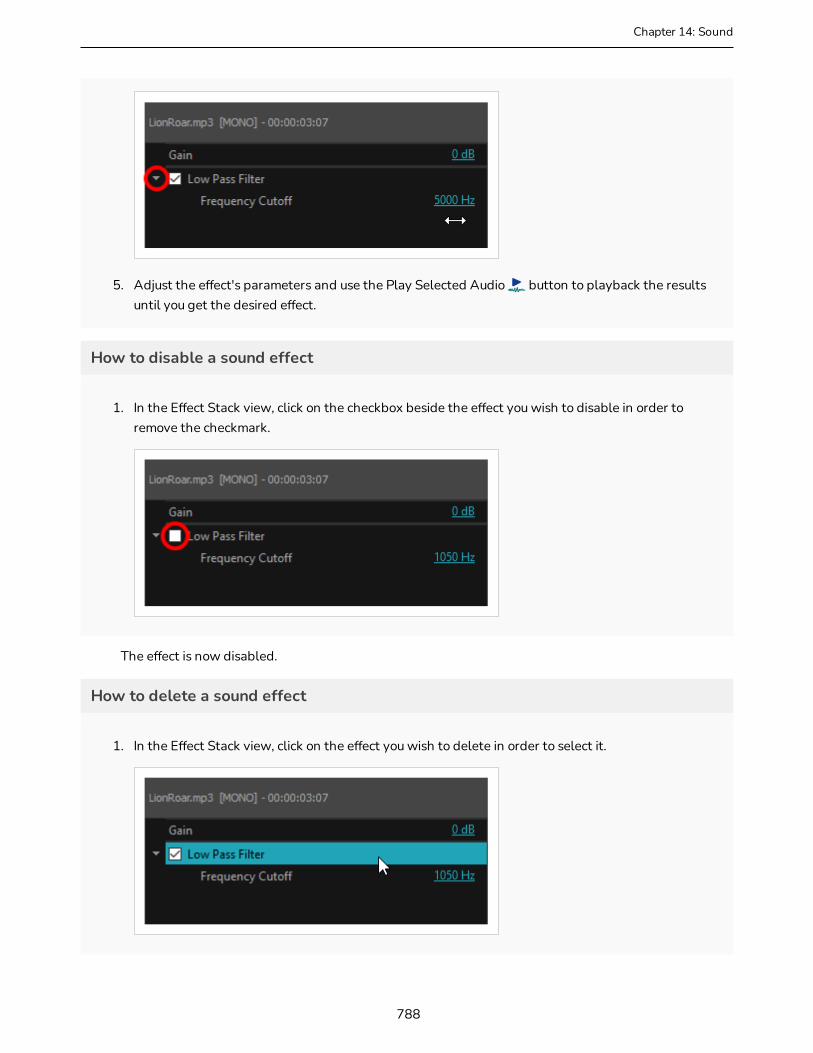
Chapter 14: Sound
5. Adjust the effect's parameters and use the Play Selected Audio button to playback the results until you get the desired effect.
How to disable a sound effect
1. In the Effect Stack view, click on the checkbox beside the effect you wish to disable in order to remove the checkmark.
The effect is now disabled.
How to delete a sound effect
1. In the Effect Stack view, click on the effect you wish to delete in order to select it.
788

2. Click on the Clear Selected Effect button.
The effect is removed from the effect stack.
789
Storyboard Pro 20 User Guide
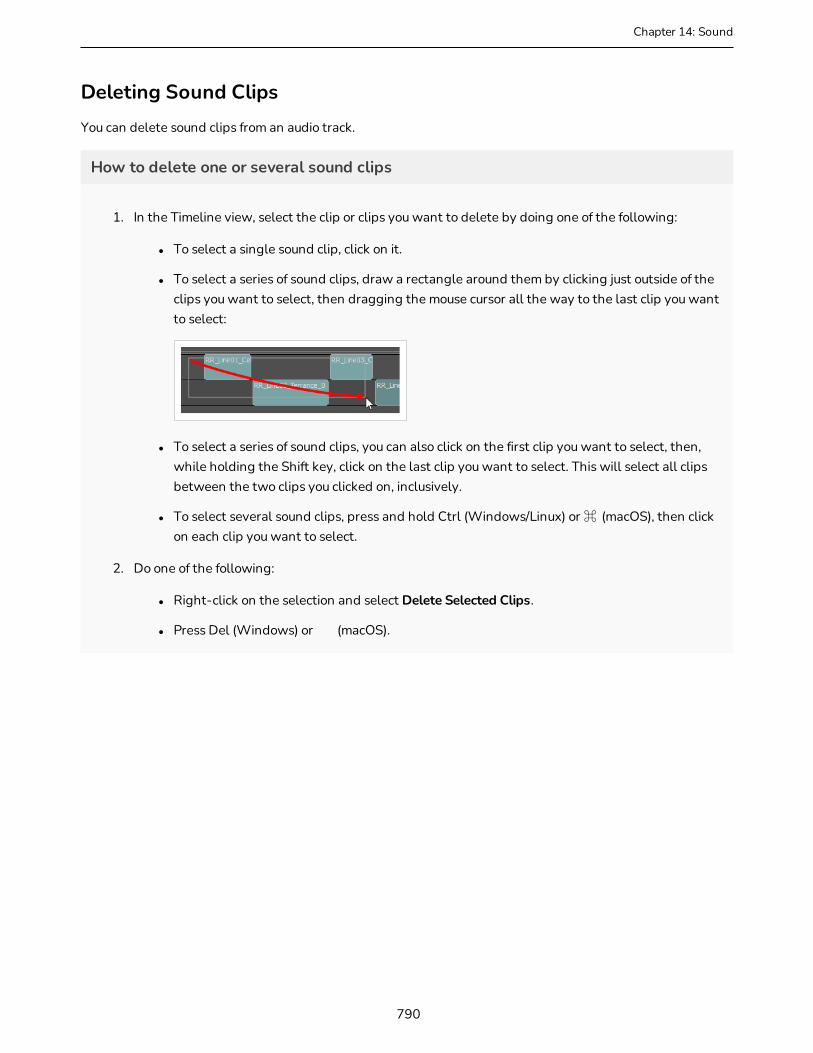
Chapter 14: Sound
Deleting Sound ClipsYou can delete sound clips from an audio track.
How to delete one or several sound clips
1. In the Timeline view, select the clip or clips you want to delete by doing one of the following:
l To select a single sound clip, click on it.
l To select a series of sound clips, draw a rectangle around them by clicking just outside of the clips you want to select, then dragging the mouse cursor all the way to the last clip you want to select:
l To select a series of sound clips, you can also click on the first clip you want to select, then, while holding the Shift key, click on the last clip you want to select. This will select all clips between the two clips you clicked on, inclusively.
l To select several sound clips, press and hold Ctrl (Windows/Linux) or ⌘ (macOS), then click on each clip you want to select.
2. Do one of the following:
l Right-click on the selection and select Delete Selected Clips.
l Press Del (Windows) or (macOS).
790
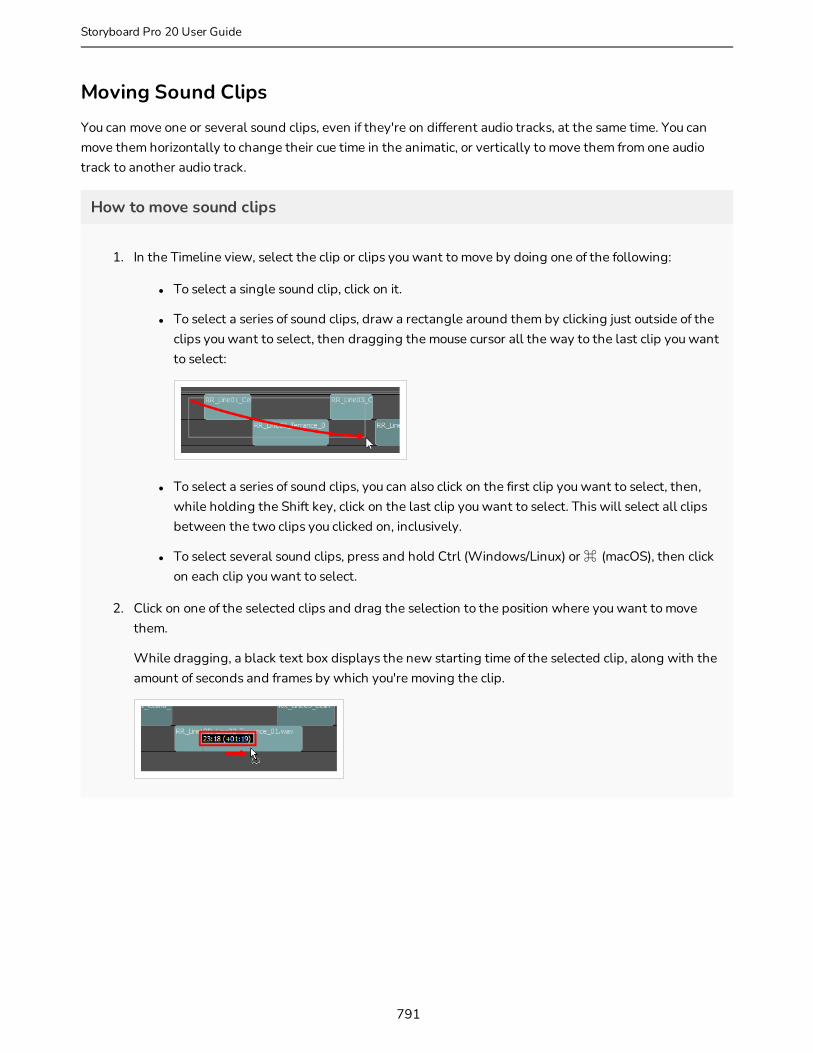
Moving Sound ClipsYou can move one or several sound clips, even if they're on different audio tracks, at the same time. You can move them horizontally to change their cue time in the animatic, or vertically to move them from one audio track to another audio track.
How to move sound clips
1. In the Timeline view, select the clip or clips you want to move by doing one of the following:
l To select a single sound clip, click on it.
l To select a series of sound clips, draw a rectangle around them by clicking just outside of the clips you want to select, then dragging the mouse cursor all the way to the last clip you want to select:
l To select a series of sound clips, you can also click on the first clip you want to select, then, while holding the Shift key, click on the last clip you want to select. This will select all clips between the two clips you clicked on, inclusively.
l To select several sound clips, press and hold Ctrl (Windows/Linux) or ⌘ (macOS), then click on each clip you want to select.
2. Click on one of the selected clips and drag the selection to the position where you want to move them.
While dragging, a black text box displays the new starting time of the selected clip, along with the amount of seconds and frames by which you're moving the clip.
791
Storyboard Pro 20 User Guide
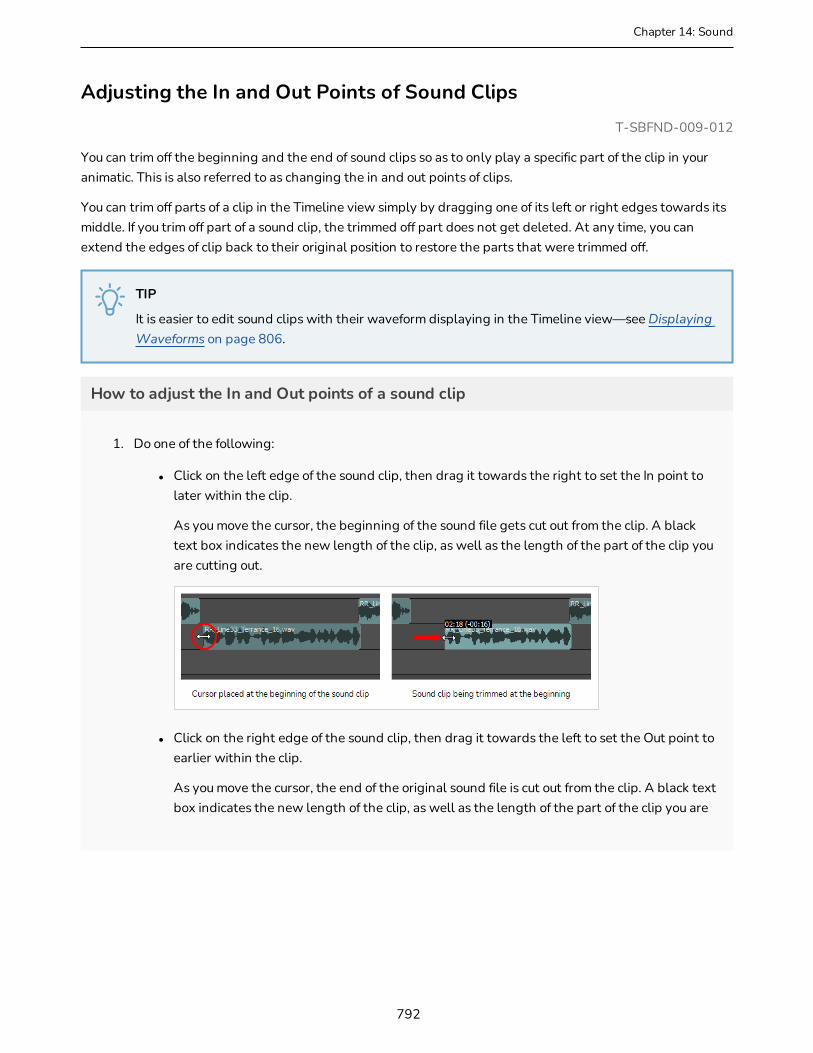
Chapter 14: Sound
Adjusting the In and Out Points of Sound ClipsT-SBFND-009-012
You can trim off the beginning and the end of sound clips so as to only play a specific part of the clip in your animatic. This is also referred to as changing the in and out points of clips.
You can trim off parts of a clip in the Timeline view simply by dragging one of its left or right edges towards its middle. If you trim off part of a sound clip, the trimmed off part does not get deleted. At any time, you can extend the edges of clip back to their original position to restore the parts that were trimmed off.
TIP
It is easier to edit sound clips with their waveform displaying in the Timeline view—see Displaying Waveforms on page 806.
How to adjust the In and Out points of a sound clip
1. Do one of the following:
l Click on the left edge of the sound clip, then drag it towards the right to set the In point to later within the clip.
As you move the cursor, the beginning of the sound file gets cut out from the clip. A black text box indicates the new length of the clip, as well as the length of the part of the clip you are cutting out.
l Click on the right edge of the sound clip, then drag it towards the left to set the Out point to earlier within the clip.
As you move the cursor, the end of the original sound file is cut out from the clip. A black text box indicates the new length of the clip, as well as the length of the part of the clip you are
792

cutting out.
NOTES
l Trimming a sound clip does not delete the part of the audio that is trimmed off. At any time, you can click on the edge of the sound clip and drag it back to its original position to restore the part of the clip that you trimmed off.
l Likewise, trimming a sound clip with volume keyframes does not delete the volume keyframes that get trimmed off. They are hidden, and extending the sound clip back to its original length will restore those keyframes.
793
Storyboard Pro 20 User Guide
Chapter 14: Sound
Snapping Sound ClipsWhen the Snapping option is enabled, when you drag and drop a video clip, the beginning and end of sound clips will snap against the beginning and end of panels as well as against the timeline cursor.
Likewise, when you adjust the in point or the out point of a sound clip while snapping is enabled, it will also snap against the beginning and end of panels and against the timeline cursor.
How to enable or disable snapping
1. Do one of the following:
l At the bottom-left of the Timeline view, click on the Snapping button.
l Right-click the Timeline view and select Snapping.
NOTE
While dragging a clip, you can temporarily override whether snapping is enabled by holding the Shift key.
794

Copying and Pasting Sound ClipsT-SBANIM-002-014
You can copy one or several clips from your project's audio tracks and paste them somewhere else in your project's audio tracks.
How to copy sound clips
1. In Timeline view, select one or multiple sound clips by doing one of the following:
l To select a single sound clip, click on it.
l To select a series of sound clips, draw a rectangle around them by clicking just outside of the clips you want to select, then dragging the mouse cursor all the way to the last clip you want to select:
l To select a series of sound clips, you can also click on the first clip you want to select, then, while holding the Shift key, click on the last clip you want to select. This will select all clips between the two clips you clicked on, inclusively.
l To select several sound clips, press and hold Ctrl (Windows/Linux) or ⌘ (macOS), then click on each clip you want to select.
2. Do one of the following to copy the selected clips:
l In the top menu, select Edit > Copy Clips.
l Press Ctrl + C (Windows) or ⌘ + C (macOS).
3. In the Timeline view, select the audio track in which you want the clips to be pasted.
4. Move the timeline cursor to the position in time where you want the clips to be pasted.
5. Do one of the following to paste the copied clips:
l In the top menu, select Edit > Paste Clips.
l Press Ctrl + V (Windows) or ⌘ + V (macOS).
The copied clips are pasted on the selected track, right after the Timeline cursor.
795
Storyboard Pro 20 User Guide

Chapter 14: Sound
NOTES
l If a sound clip is already present on a destination audio track, the pasted clip will overwrite the sound clip on the destination track.
l If sound clips are copied from multiple tracks, they will be pasted on multiple tracks as well. If needed, Storyboard Pro will create additional audio tracks to preserve the differences in tracks between the copied sound clips.
796
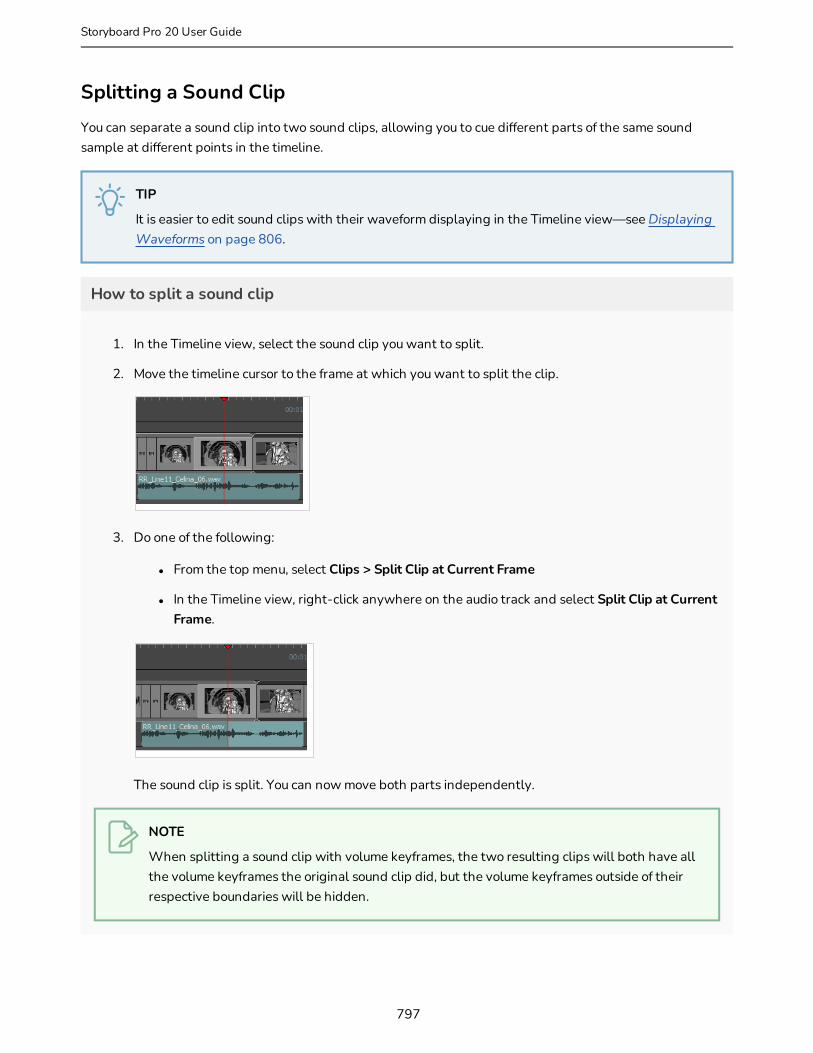
Splitting a Sound ClipYou can separate a sound clip into two sound clips, allowing you to cue different parts of the same sound sample at different points in the timeline.
TIP
It is easier to edit sound clips with their waveform displaying in the Timeline view—see Displaying Waveforms on page 806.
How to split a sound clip
1. In the Timeline view, select the sound clip you want to split.
2. Move the timeline cursor to the frame at which you want to split the clip.
3. Do one of the following:
l From the top menu, select Clips > Split Clip at Current Frame
l In the Timeline view, right-click anywhere on the audio track and select Split Clip at Current Frame.
The sound clip is split. You can now move both parts independently.
NOTE
When splitting a sound clip with volume keyframes, the two resulting clips will both have all the volume keyframes the original sound clip did, but the volume keyframes outside of their respective boundaries will be hidden.
797
Storyboard Pro 20 User Guide
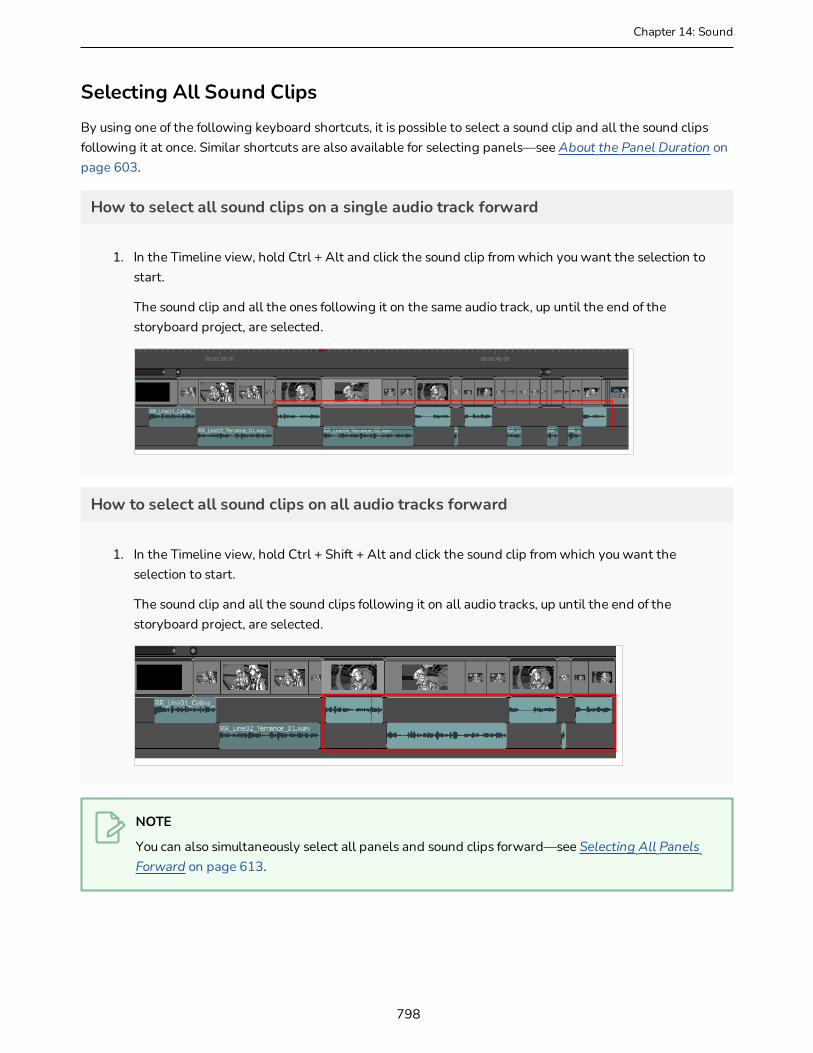
Chapter 14: Sound
Selecting All Sound ClipsBy using one of the following keyboard shortcuts, it is possible to select a sound clip and all the sound clips following it at once. Similar shortcuts are also available for selecting panels—see About the Panel Duration on page 603.
How to select all sound clips on a single audio track forward
1. In the Timeline view, hold Ctrl + Alt and click the sound clip from which you want the selection to start.
The sound clip and all the ones following it on the same audio track, up until the end of the storyboard project, are selected.
How to select all sound clips on all audio tracks forward
1. In the Timeline view, hold Ctrl + Shift + Alt and click the sound clip from which you want the selection to start.
The sound clip and all the sound clips following it on all audio tracks, up until the end of the storyboard project, are selected.
NOTE
You can also simultaneously select all panels and sound clips forward—see Selecting All Panels Forward on page 613.
798

Marking Sound Clips with ColoursMarking sound clips with a custom colour allows you manage them and quickly identify them.
NOTE
You can also mark panels with a colour—see Storyboard Structure on page 112.
How to mark a sound clip with colour
1. In the Timeline view, select one or more sound clips by doing one of the following:
l To select a single sound clip, click on it.
l To select a series of sound clips, draw a rectangle around them by clicking just outside of the clips you want to select, then dragging the mouse cursor all the way to the last clip you want to select:
l To select a series of sound clips, you can also click on the first clip you want to select, then, while holding the Shift key, click on the last clip you want to select. This will select all clips between the two clips you clicked on, inclusively.
l To select several sound clips, press and hold Ctrl (Windows/Linux) or ⌘ (macOS), then click on each clip you want to select.
2. Right-click on the selection, then select one of the following: Set Colour > Red, Orange, Yellow, Green, Blue, Purple or Custom.
The colour of the selected sound clips change to the selected colour.
799
Storyboard Pro 20 User Guide
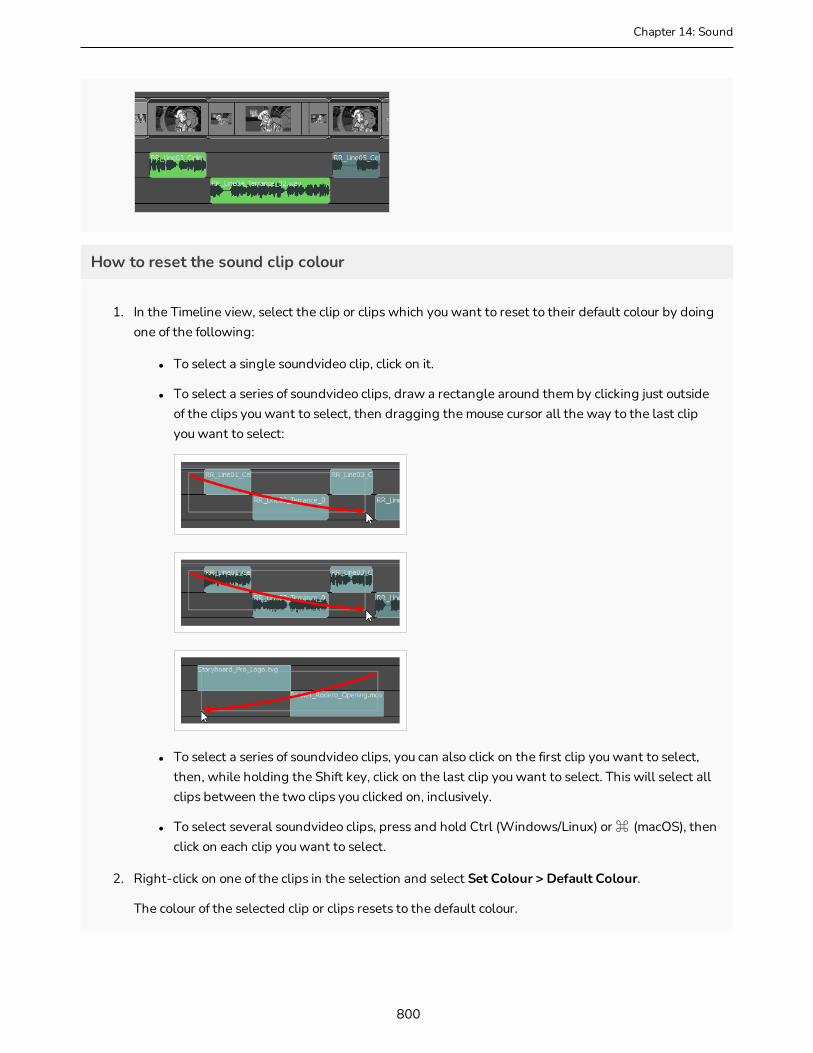
Chapter 14: Sound
How to reset the sound clip colour
1. In the Timeline view, select the clip or clips which you want to reset to their default colour by doing one of the following:
l To select a single soundvideo clip, click on it.
l To select a series of soundvideo clips, draw a rectangle around them by clicking just outside of the clips you want to select, then dragging the mouse cursor all the way to the last clip you want to select:
l To select a series of soundvideo clips, you can also click on the first clip you want to select, then, while holding the Shift key, click on the last clip you want to select. This will select all clips between the two clips you clicked on, inclusively.
l To select several soundvideo clips, press and hold Ctrl (Windows/Linux) or ⌘ (macOS), then click on each clip you want to select.
2. Right-click on one of the clips in the selection and select Set Colour > Default Colour.
The colour of the selected clip or clips resets to the default colour.
800
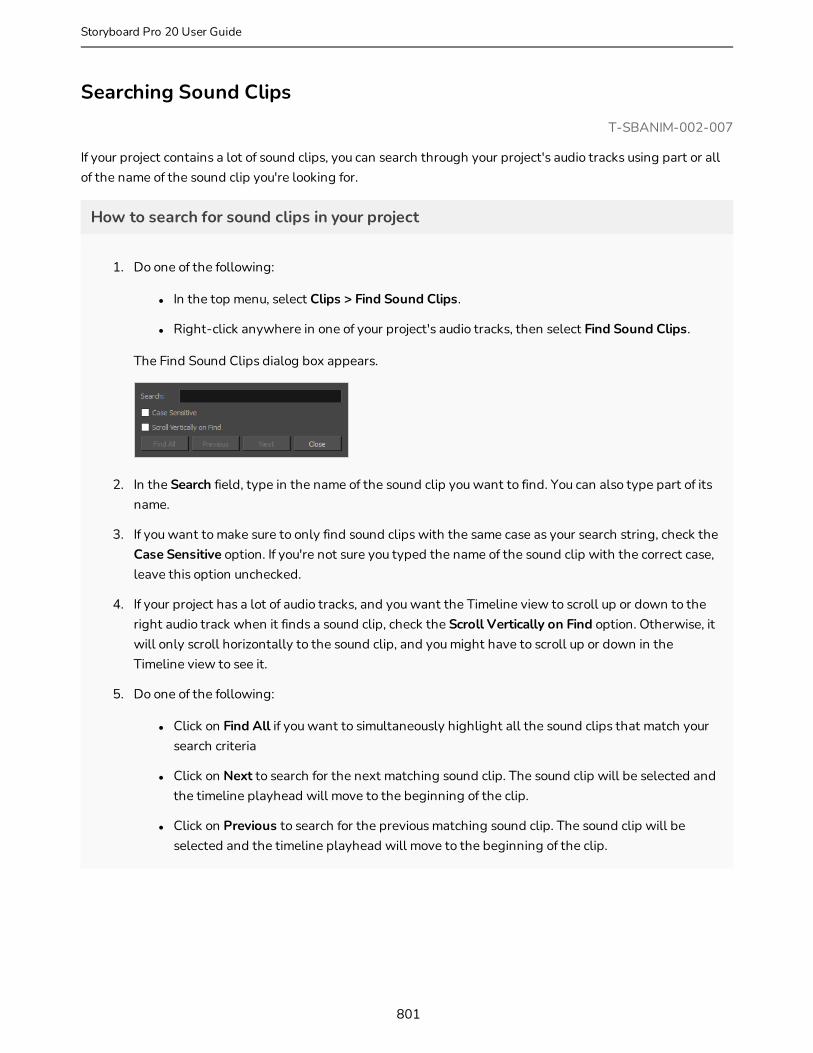
Searching Sound ClipsT-SBANIM-002-007
If your project contains a lot of sound clips, you can search through your project's audio tracks using part or all of the name of the sound clip you're looking for.
How to search for sound clips in your project
1. Do one of the following:
l In the top menu, select Clips > Find Sound Clips.
l Right-click anywhere in one of your project's audio tracks, then select Find Sound Clips.
The Find Sound Clips dialog box appears.
2. In the Search field, type in the name of the sound clip you want to find. You can also type part of its name.
3. If you want to make sure to only find sound clips with the same case as your search string, check the Case Sensitive option. If you're not sure you typed the name of the sound clip with the correct case, leave this option unchecked.
4. If your project has a lot of audio tracks, and you want the Timeline view to scroll up or down to the right audio track when it finds a sound clip, check the Scroll Vertically on Find option. Otherwise, it will only scroll horizontally to the sound clip, and you might have to scroll up or down in the Timeline view to see it.
5. Do one of the following:
l Click on Find All if you want to simultaneously highlight all the sound clips that match your search criteria
l Click on Next to search for the next matching sound clip. The sound clip will be selected and the timeline playhead will move to the beginning of the clip.
l Click on Previous to search for the previous matching sound clip. The sound clip will be selected and the timeline playhead will move to the beginning of the clip.
801
Storyboard Pro 20 User Guide
Chapter 14: Sound
NOTE
When you search with the Previous or Next buttons, the search will start from the position of the timeline playhead if no sound clip is selected, and will start from the position of the selected sound clip if a sound clip is selected. Since finding a sound clip makes it selected, if you want to start the search from a different position, you must first deselect this sound clip by clicking in the empty space in an audio track, then move the timeline cursor to the position where you want the search to start.
802
About Sound Playback and DisplayBy default, the soundtrack of your project is represented by rectangular sound clips spanning from their In point to their Out point, with the name of their audio file displayed in it. However, there are different ways to display and preview the audio in your project, all of which can help you synchronize the action in your animatic with its soundtrack, and vice versa. For example, you can enable audio playback when previewing your animatic, you can enable audio scrubbing, which plays a short part of the soundtrack at the current frame when you move the timeline cursor, or you can even display each sound clip's waveform in the Timeline view, giving you a visual representation of their content.
803
Storyboard Pro 20 User Guide
Chapter 14: Sound
Enabling Audio PlaybackIf you want to hear your soundtrack play as you preview your animatic, you must enable audio playback. You can also disable audio playback afterwards if you prefer.
How to enable or disable audio playback
1. Do one of the following:
l In the Playback toolbar, click the Sound button.
l In the top menu, select Play > Audio Playback.
Next time you play your animatic, you will hear the sound clips in your audio tracks play. To test this, click on the Play button in the Playback toolbar.
804
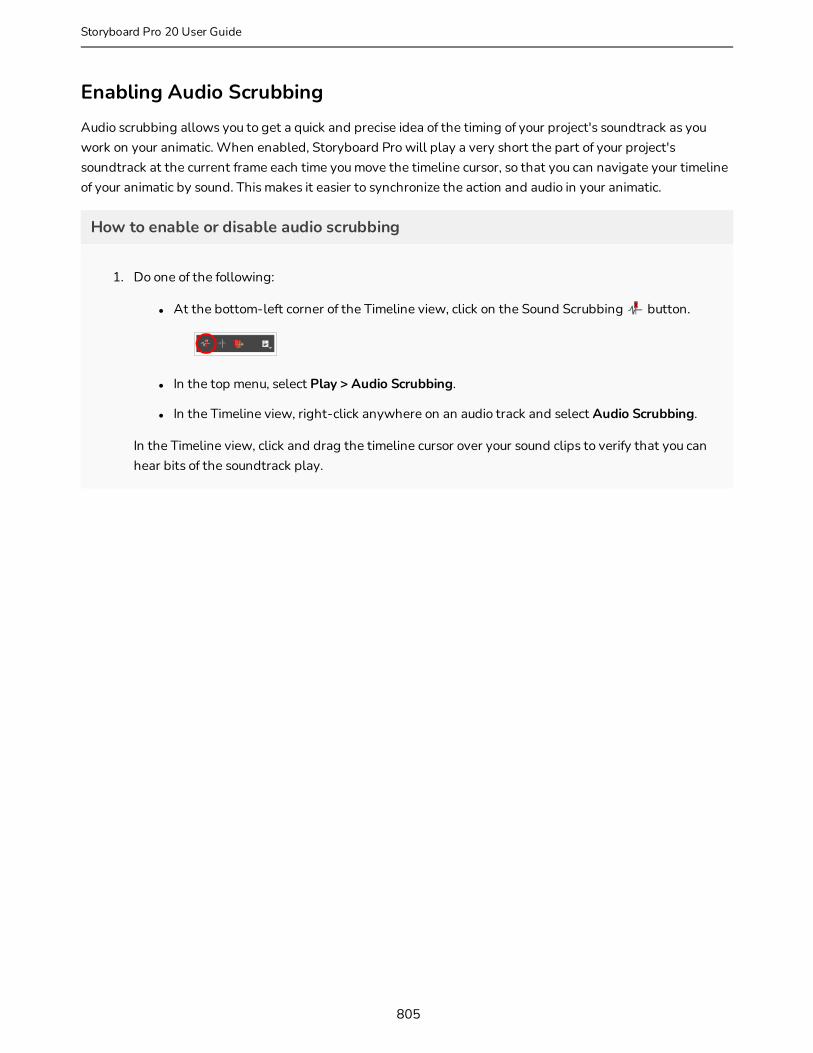
Enabling Audio ScrubbingAudio scrubbing allows you to get a quick and precise idea of the timing of your project's soundtrack as you work on your animatic. When enabled, Storyboard Pro will play a very short the part of your project's soundtrack at the current frame each time you move the timeline cursor, so that you can navigate your timeline of your animatic by sound. This makes it easier to synchronize the action and audio in your animatic.
How to enable or disable audio scrubbing
1. Do one of the following:
l At the bottom-left corner of the Timeline view, click on the Sound Scrubbing button.
l In the top menu, select Play > Audio Scrubbing.
l In the Timeline view, right-click anywhere on an audio track and select Audio Scrubbing.
In the Timeline view, click and drag the timeline cursor over your sound clips to verify that you can hear bits of the soundtrack play.
805
Storyboard Pro 20 User Guide
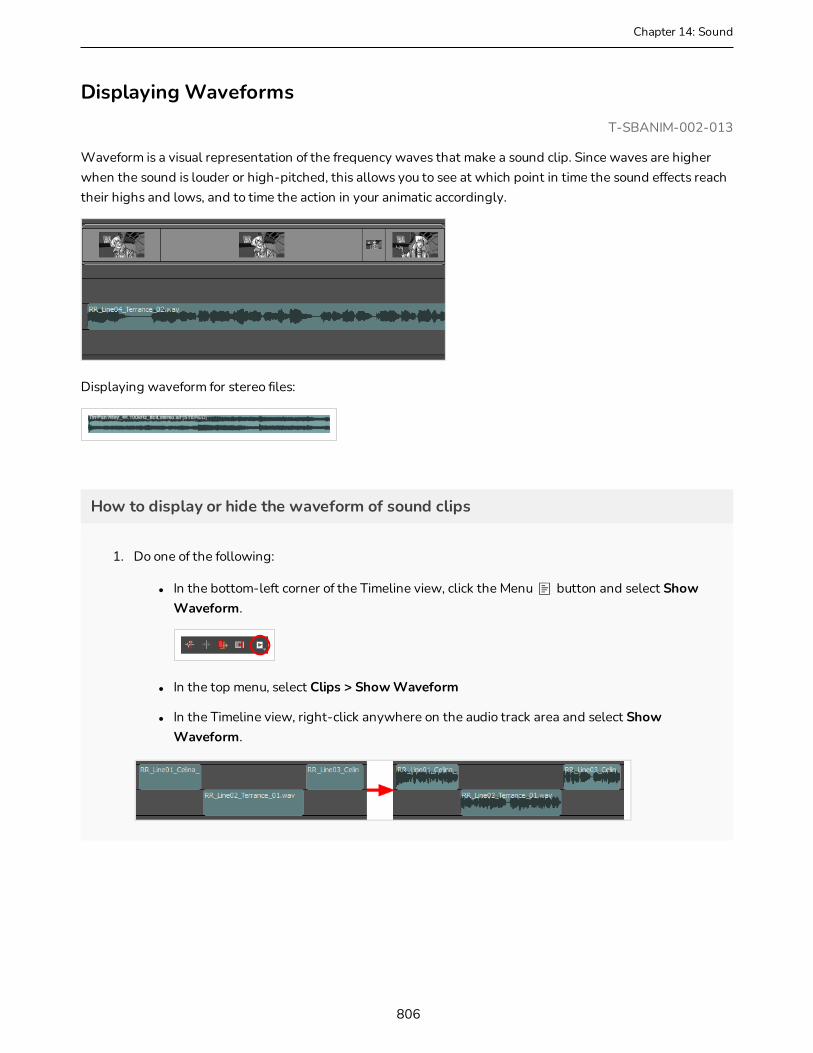
Chapter 14: Sound
Displaying WaveformsT-SBANIM-002-013
Waveform is a visual representation of the frequency waves that make a sound clip. Since waves are higher when the sound is louder or high-pitched, this allows you to see at which point in time the sound effects reach their highs and lows, and to time the action in your animatic accordingly.
Displaying waveform for stereo files:
How to display or hide the waveform of sound clips
1. Do one of the following:
l In the bottom-left corner of the Timeline view, click the Menu button and select Show Waveform.
l In the top menu, select Clips > Show Waveform
l In the Timeline view, right-click anywhere on the audio track area and select Show Waveform.
806

Changing the Audio Track HeightThere are four sizes in which you can display audio tracks: Mini, Small, Medium and Large. The size of an audio track affects how much vertical space the audio track takes in the Timeline view. You can adjust the display size of each track individually. By default, all audio tracks are displayed in small size.
Making audio tracks smaller can be useful if you have many audio tracks and want to see more audio tracks in the Timeline view. Making audio tracks bigger can make it easier to see the differences in waveform and in the volume envelope, and allows you to adjust the volume envelope with more precision—see Displaying Waveforms on page 806, Displaying Volume Envelope on page 810 and Interpolating the Volume of Sound Clips on page 814.
How to set the audio track size
1. In the Timeline view, right-click anywhere on an audio track, then select Track Size > Mini, Small, Medium or Large.
The height of the audio track in the Timeline view is adjusted to the new setting.
807
Storyboard Pro 20 User Guide

Chapter 14: Sound
Showing or Hiding the Sound Clip Name By default, the clip's file names are displayed on the audio blocks. You can enable or disable showing clip names, depending on your preference.
How to show or hide the name of each clip in the audio tracks
1. Do one of the following:
l In the bottom-left corner of the Timeline view, click on the Menu button and select Show Sound Clip Names.
l In the top menu select Clips > Show Sound Clip Names.
l In the Timeline view, right-click anywhere on an audio track and select Show Sound Clip Names.
808

About Volume & GainThere are two ways to adjust the volume at which your sound clips play:
l Audio Gain: Gain is an effect that can be applied to one or several sound clips to compress or amplify its sound waves. It is applied before the volume. Gain affects the amplitude of the sample relative to its maximum, so it can be used to make barely audible audio easy to hear, and it can even saturate the sample, causing it to clip.
l Volume Envelope: The volume envelope allows you to adjust the volume at which the sound is played, downstream. Adjusting the volume of a sound effect cannot saturate it. Volume can only be tweaked on one sound clip at a time and can only amplify audio up to +6dB. It can be adjusted for an entire sound clip, or interpolated between two or several values as the sound clip plays.
809
Storyboard Pro 20 User Guide
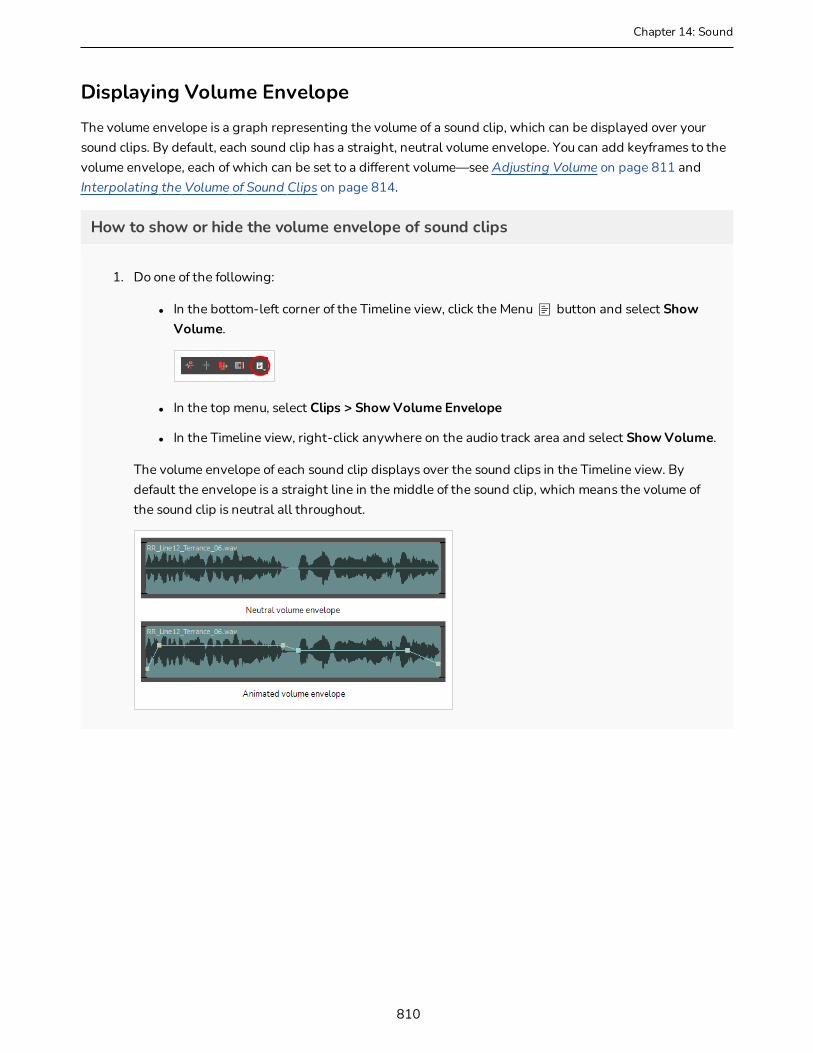
Chapter 14: Sound
Displaying Volume EnvelopeThe volume envelope is a graph representing the volume of a sound clip, which can be displayed over your sound clips. By default, each sound clip has a straight, neutral volume envelope. You can add keyframes to the volume envelope, each of which can be set to a different volume—see Adjusting Volume on page 811 and Interpolating the Volume of Sound Clips on page 814.
How to show or hide the volume envelope of sound clips
1. Do one of the following:
l In the bottom-left corner of the Timeline view, click the Menu button and select Show Volume.
l In the top menu, select Clips > Show Volume Envelope
l In the Timeline view, right-click anywhere on the audio track area and select Show Volume.
The volume envelope of each sound clip displays over the sound clips in the Timeline view. By default the envelope is a straight line in the middle of the sound clip, which means the volume of the sound clip is neutral all throughout.
810

Adjusting VolumeT-SBANIM-002-010
You can change the volume of a sound clip by displaying its volume envelope, then moving the whole envelope up or down.
How to adjust the volume of a sound clip
1. Do one of the following to display each clip's volume envelope in the Timeline view.
l In the bottom-left corner of the Timeline view, click the Menu button and select Show Volume.
l In the top menu, select Clips > Show Volume Envelope
l In the Timeline view, right-click anywhere on the audio track area and select Show Volume.
A blue line, indicating the sound level, is displayed for each sound sequence.
2. Do one of the following to display each clip's waveform. This is not required, but can be useful as it gives you a visual indication of how loud your sound clip is.
l In the bottom-left corner of the Timeline view, click the Menu button and select Show Waveform.
l In the top menu, select Clips > Show Waveform
l In the Timeline view, right-click anywhere on the audio track area and select Show Waveform.
3. If needed, increase the vertical size of the audio track so that you have enough space to properly adjust the volume keyframes. To do this, right-click on the audio track and select Track Size > Medium or Large.
811
Storyboard Pro 20 User Guide
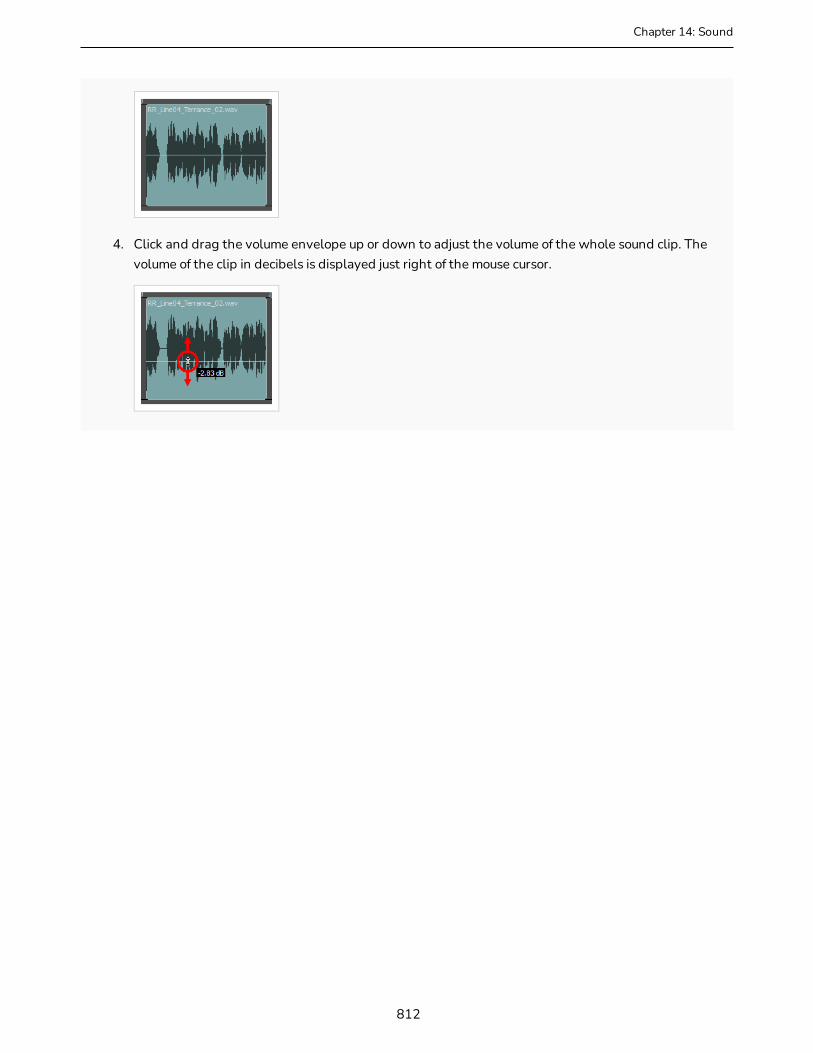
Chapter 14: Sound
4. Click and drag the volume envelope up or down to adjust the volume of the whole sound clip. The volume of the clip in decibels is displayed just right of the mouse cursor.
812
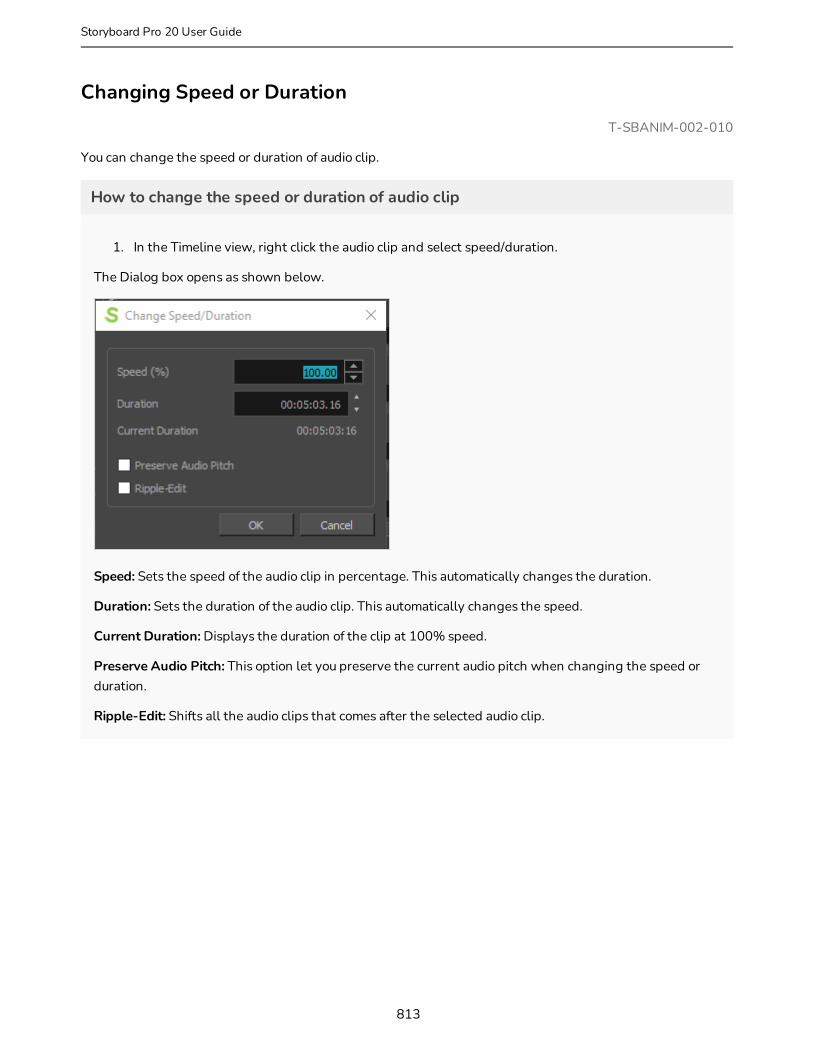
Changing Speed or DurationT-SBANIM-002-010
You can change the speed or duration of audio clip.
How to change the speed or duration of audio clip
1. In the Timeline view, right click the audio clip and select speed/duration.
The Dialog box opens as shown below.
Speed: Sets the speed of the audio clip in percentage. This automatically changes the duration.
Duration: Sets the duration of the audio clip. This automatically changes the speed.
Current Duration: Displays the duration of the clip at 100% speed.
Preserve Audio Pitch: This option let you preserve the current audio pitch when changing the speed or duration.
Ripple-Edit: Shifts all the audio clips that comes after the selected audio clip.
813
Storyboard Pro 20 User Guide
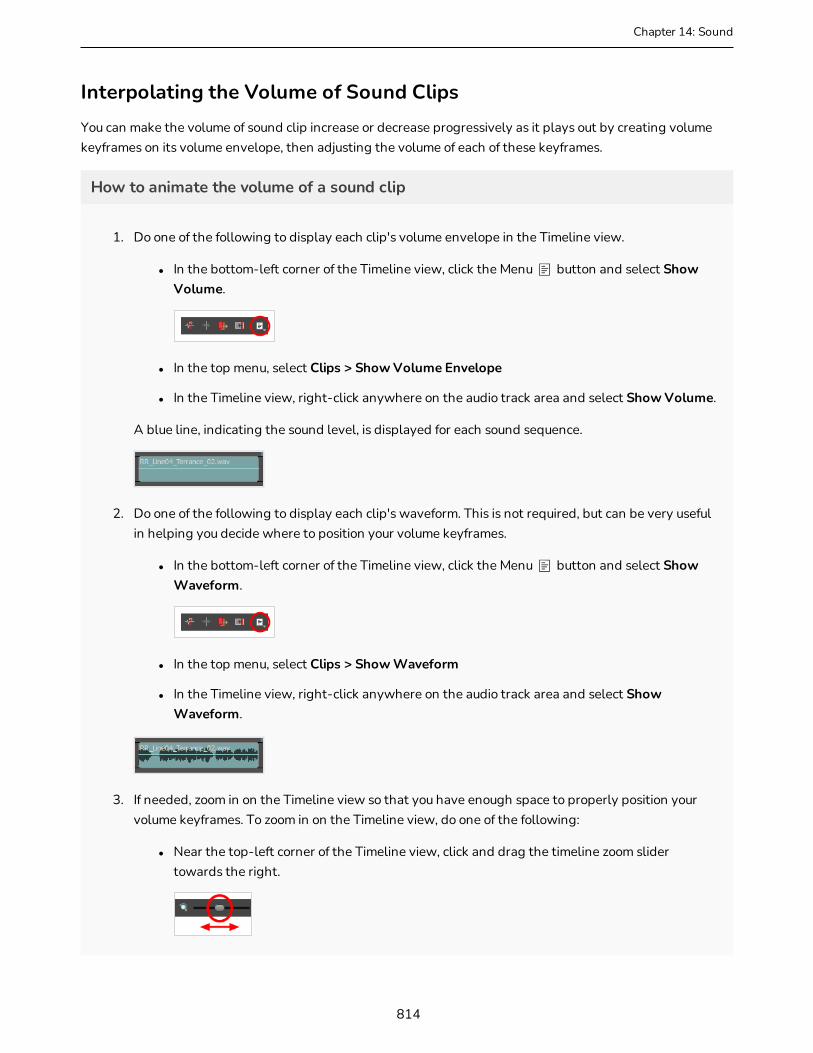
Chapter 14: Sound
Interpolating the Volume of Sound ClipsYou can make the volume of sound clip increase or decrease progressively as it plays out by creating volume keyframes on its volume envelope, then adjusting the volume of each of these keyframes.
How to animate the volume of a sound clip
1. Do one of the following to display each clip's volume envelope in the Timeline view.
l In the bottom-left corner of the Timeline view, click the Menu button and select Show Volume.
l In the top menu, select Clips > Show Volume Envelope
l In the Timeline view, right-click anywhere on the audio track area and select Show Volume.
A blue line, indicating the sound level, is displayed for each sound sequence.
2. Do one of the following to display each clip's waveform. This is not required, but can be very useful in helping you decide where to position your volume keyframes.
l In the bottom-left corner of the Timeline view, click the Menu button and select Show Waveform.
l In the top menu, select Clips > Show Waveform
l In the Timeline view, right-click anywhere on the audio track area and select Show Waveform.
3. If needed, zoom in on the Timeline view so that you have enough space to properly position your volume keyframes. To zoom in on the Timeline view, do one of the following:
l Near the top-left corner of the Timeline view, click and drag the timeline zoom slider towards the right.
814
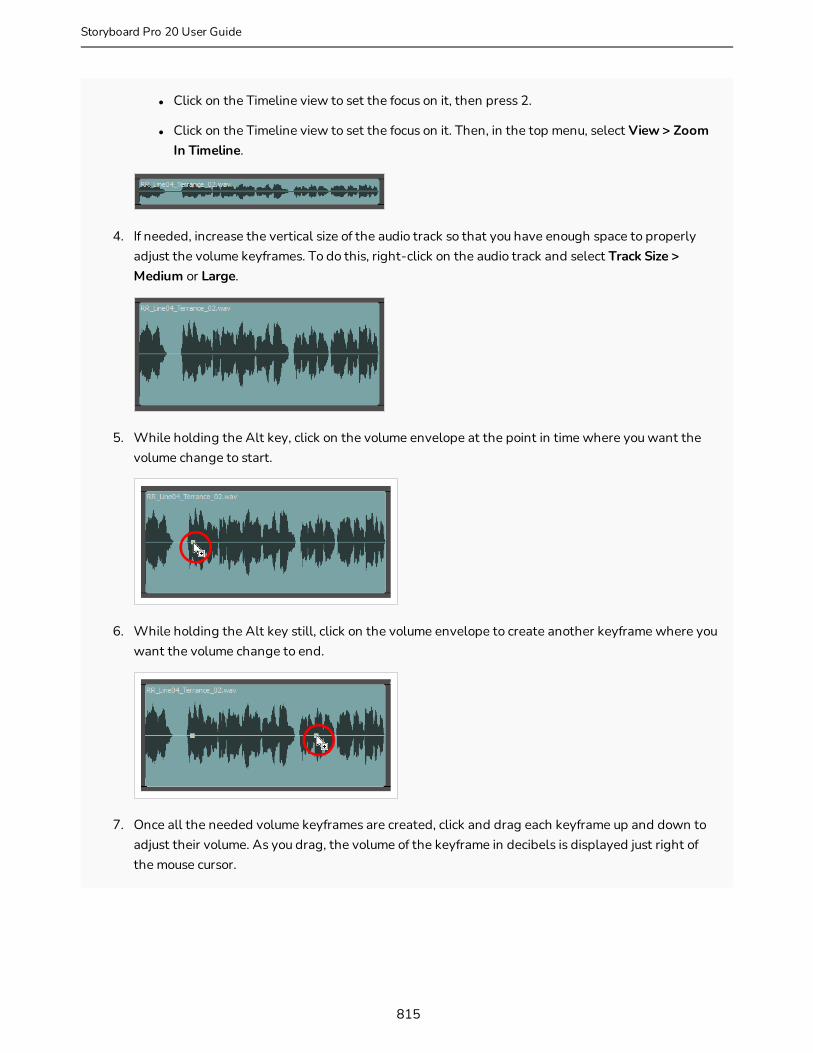
l Click on the Timeline view to set the focus on it, then press 2.
l Click on the Timeline view to set the focus on it. Then, in the top menu, select View > Zoom In Timeline.
4. If needed, increase the vertical size of the audio track so that you have enough space to properly adjust the volume keyframes. To do this, right-click on the audio track and select Track Size > Medium or Large.
5. While holding the Alt key, click on the volume envelope at the point in time where you want the volume change to start.
6. While holding the Alt key still, click on the volume envelope to create another keyframe where you want the volume change to end.
7. Once all the needed volume keyframes are created, click and drag each keyframe up and down to adjust their volume. As you drag, the volume of the keyframe in decibels is displayed just right of the mouse cursor.
815
Storyboard Pro 20 User Guide
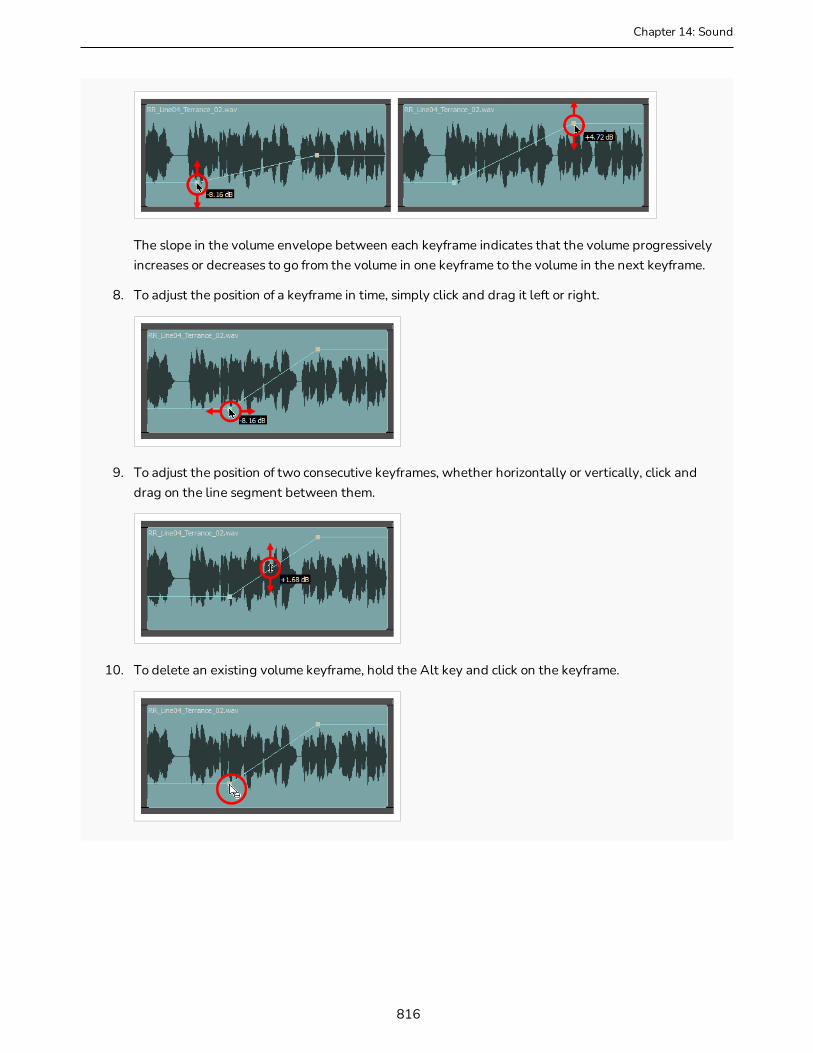
Chapter 14: Sound
The slope in the volume envelope between each keyframe indicates that the volume progressively increases or decreases to go from the volume in one keyframe to the volume in the next keyframe.
8. To adjust the position of a keyframe in time, simply click and drag it left or right.
9. To adjust the position of two consecutive keyframes, whether horizontally or vertically, click and drag on the line segment between them.
10. To delete an existing volume keyframe, hold the Alt key and click on the keyframe.
816
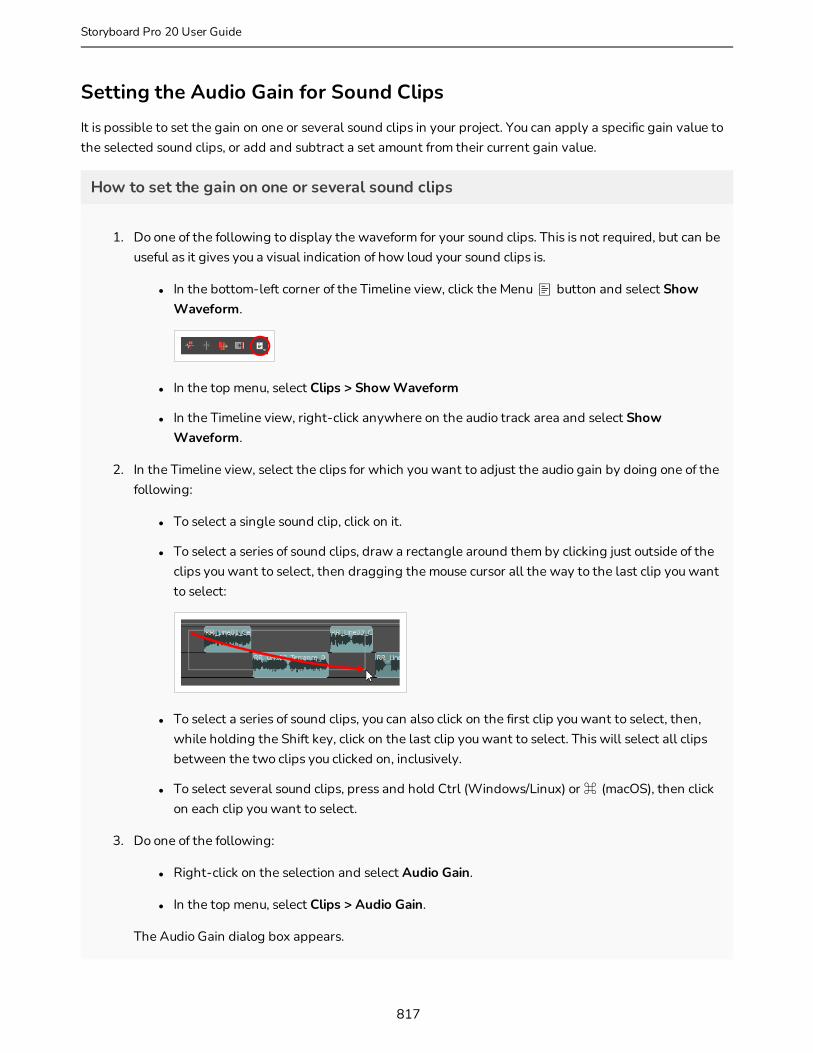
Setting the Audio Gain for Sound ClipsIt is possible to set the gain on one or several sound clips in your project. You can apply a specific gain value to the selected sound clips, or add and subtract a set amount from their current gain value.
How to set the gain on one or several sound clips
1. Do one of the following to display the waveform for your sound clips. This is not required, but can be useful as it gives you a visual indication of how loud your sound clips is.
l In the bottom-left corner of the Timeline view, click the Menu button and select Show Waveform.
l In the top menu, select Clips > Show Waveform
l In the Timeline view, right-click anywhere on the audio track area and select Show Waveform.
2. In the Timeline view, select the clips for which you want to adjust the audio gain by doing one of the following:
l To select a single sound clip, click on it.
l To select a series of sound clips, draw a rectangle around them by clicking just outside of the clips you want to select, then dragging the mouse cursor all the way to the last clip you want to select:
l To select a series of sound clips, you can also click on the first clip you want to select, then, while holding the Shift key, click on the last clip you want to select. This will select all clips between the two clips you clicked on, inclusively.
l To select several sound clips, press and hold Ctrl (Windows/Linux) or ⌘ (macOS), then click on each clip you want to select.
3. Do one of the following:
l Right-click on the selection and select Audio Gain.
l In the top menu, select Clips > Audio Gain.
The Audio Gain dialog box appears.
817
Storyboard Pro 20 User Guide
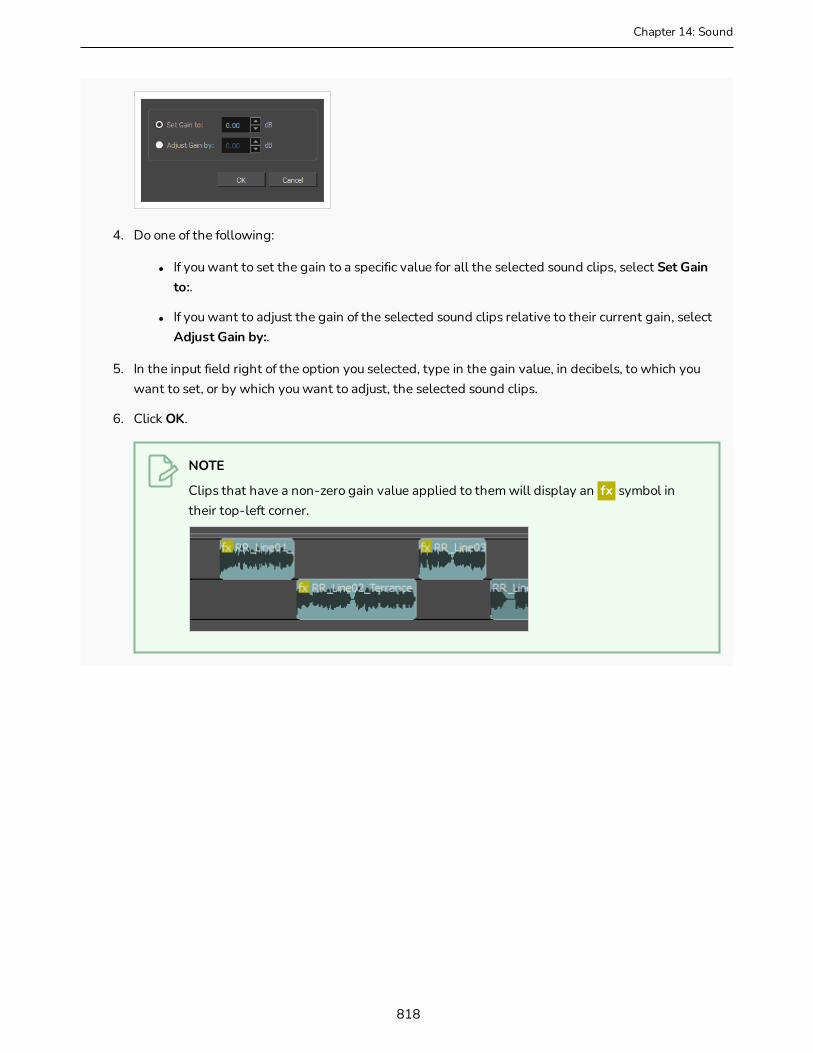
Chapter 14: Sound
4. Do one of the following:
l If you want to set the gain to a specific value for all the selected sound clips, select Set Gain to:.
l If you want to adjust the gain of the selected sound clips relative to their current gain, select Adjust Gain by:.
5. In the input field right of the option you selected, type in the gain value, in decibels, to which you want to set, or by which you want to adjust, the selected sound clips.
6. Click OK.
NOTE
Clips that have a non-zero gain value applied to them will display an fx symbol in their top-left corner.
818

819
Storyboard Pro 20 User Guide
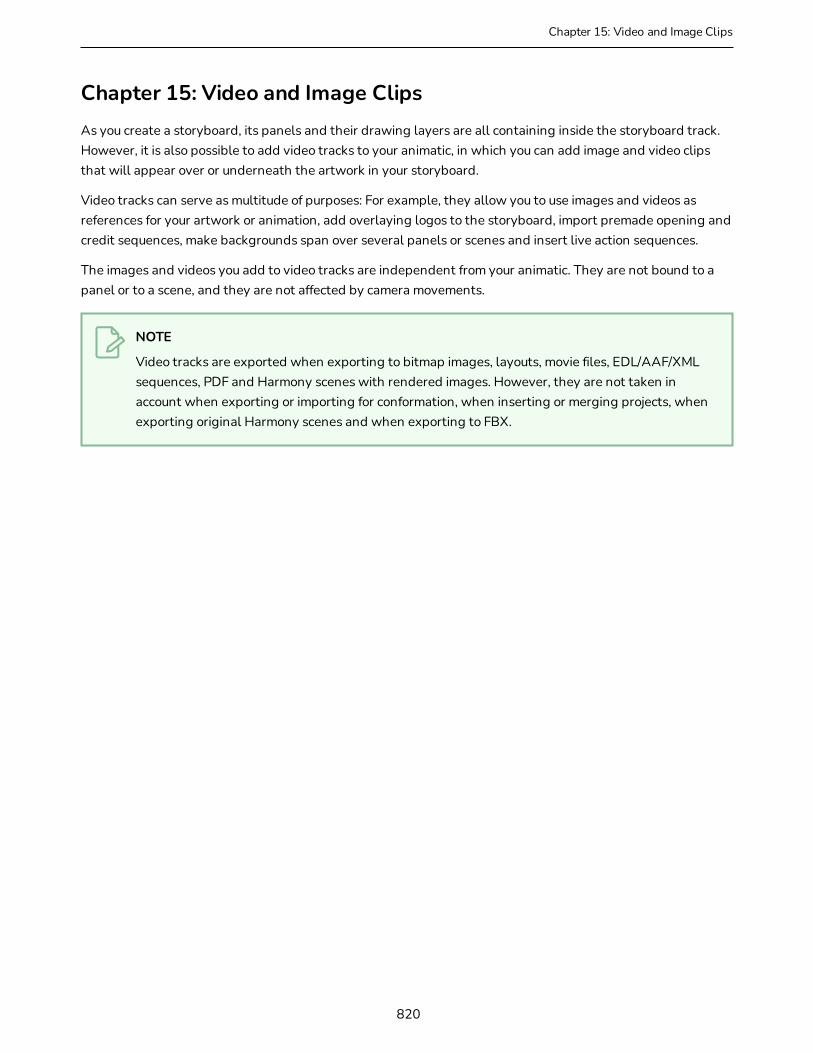
Chapter 15: Video and Image Clips
Chapter 15: Video and Image ClipsAs you create a storyboard, its panels and their drawing layers are all containing inside the storyboard track. However, it is also possible to add video tracks to your animatic, in which you can add image and video clips that will appear over or underneath the artwork in your storyboard.
Video tracks can serve as multitude of purposes: For example, they allow you to use images and videos as references for your artwork or animation, add overlaying logos to the storyboard, import premade opening and credit sequences, make backgrounds span over several panels or scenes and insert live action sequences.
The images and videos you add to video tracks are independent from your animatic. They are not bound to a panel or to a scene, and they are not affected by camera movements.
NOTE
Video tracks are exported when exporting to bitmap images, layouts, movie files, EDL/AAF/XML sequences, PDF and Harmony scenes with rendered images. However, they are not taken in account when exporting or importing for conformation, when inserting or merging projects, when exporting original Harmony scenes and when exporting to FBX.
820

About Video Clip FormatWhen it comes to importing images as video clips, you can import images of any type supported by Storyboard Pro into your video tracks. However, if you want to import video files, some considerations must be taken in regards to the format of the video.
Storyboard Pro is able to import movie files in QuickTime Movie (.mov), MPEG-4 (.mp4, .m4a) and WebM (.webm) format on both Windows and macOS. It is also able to import movie files in Windows Media Video (.wmv) format, but on Windows only. However, while the WebM and Windows Media Video formats use very specific codecs, the QuickTime and MPEG-4 formats are versatile movie containers that support a wide variety of video and audio codecs. While Storyboard Pro is able to decode some of the most commonly used codecs, it is not able to decode all of them.
To decode QuickTime Movie (.mov), MPEG-4 (.mp4, .m4a) and Windows Media Video (.wmv) files, Storyboard Pro uses the media foundation of your machine's operating system, which means it is only able to decode movies using codecs that are supported by your operating system.
When you import a movie file with audio, you can also, optionally, import its audio track into your project. However, this audio track will also be decoded using your operating system's media foundation, meaning it also needs to be encoded using a codec that is supported by your operating system.
For reference, here is a list of video and audio codecs that are known to work in Storyboard Pro, depending on your operating system:
Operating System
Container Supported Video Codecs Supported Audio Codecs
Windows
QuickTime Movie (.mov)
l AVC (H.264)
l Motion JPEG
l HECV (H.265)
l MPEG-4
l AAC
l PCM (up to 32 bits)
l MP3
l ALAC
l ADPCM IMA WAV
l ADPCM Microsoft
l AMR Narrow Band
MPEG-4 (.mp4, .m4a)
l AVC (H.264)
l MPEG-4
l HECV (H.265)
l Motion JPEG
l AAC
l AAC+ Version 1
l AAC+ Version 2
l E-AC-3
l FLAC
l MP3
821
Storyboard Pro 20 User Guide

Chapter 15: Video and Image Clips
Operating System
Container Supported Video Codecs Supported Audio Codecs
l PCM (up to 32 bits)
WebM (.webm) l VP8
l VP9 l Opus
Windows Media Video (.wmv)
l Windows Media Video (WMV)
l Windows Media Audio (WMA)
macOS
QuickTime Movie (.mov)
l AVC (H.264)
l Motion JPEG
l Apple ProRes
l Uncompressed RGB
l H.263
l DV Video
l AAC
l PCM (up to 32 bits)
l MP3
l ALAC
l ADPCM IMA QuickTime
l MP2
l E-AC-3
MPEG-4 (.mp4, .m4v) l AVC (H.264)
l MPEG-4
l AAC
l AAC+ Version 1
l AAC+ Version 2
l E-AC-3
WebM (.webm) l VP8
l VP9 l None
NOTE
l The containers and codecs in bold are supported on both operating systems. Exporting your videos in these settings will ensure intercompatibility.
l Video codecs that are underlined support the alpha channel. It is recommended to use them if you want to import videos with transparency.
l You may also be able to import video clips in other formats if you have additional codecs installed on your operating system.
822
Since each platform supports different codec, a video that plays properly when the project is open on one platform may not be playable if the project is opened on a different computer that uses a different platform. To avoid this, it is recommended to create your video clips in formats that are supported by both operating systems, such as:
l QuickTime Movie (.mov) or MPEG-4 (.mp4, .m4v) with a video stream in AVC (H.264) and, if the video has sound, an audio stream in AAC.
l WebM (.webm) with a video stream in VP8 or VP9 and no audio.
If the video stream of your movie file uses an unsupported format, you may be able to easily transcode it using Apple QuickTime:
l On Windows: If Apple QuickTime is installed on your computer, Storyboard Pro will prompt you to transcode the video in WebM (VP9) format so that it can import it.
l On macOS: If you open a video with an unsupported video codec in QuickTime Player, it will prompt you to convert it to Apple ProRes. Then, in QuickTime Player, you can select File > Save from the top menu to save the converted video as a new file. You can import this file into your Storyboard Pro project.
If you try to import the movie file's audio stream into your project, but that audio stream uses an unsupported codec, only the video stream will be imported and the audio stream will be ignored. To remedy this, you can do either of the following:
l Export your video using a supported audio codec.
l Export the sound track of your video into an audio file in Waveform (.wav) or in Audio Interchange File Format (.aiff) and import it into your project's audio track separately.
823
Storyboard Pro 20 User Guide
Chapter 15: Video and Image Clips
About Video TracksT-SBANIM-001-002
Video tracks are tracks in which you can insert still images or videos, which are referred to as video clips, and which will appear over your animatic. The clips in video tracks can be cued and clipped at any time in your animatic, and they are independent from the scenes, panels and layers in your storyboard.
By default, a Storyboard Pro project does not have any video track. Video tracks can be added and managed using the Timeline view.
Your project can have several video tracks. If more than one video track plays a clip at the same time, the order of the video tracks in the Timeline view will determine the order in which they appear in the stage. Just like layers in a panel, video tracks at the top are rendered over video tracks underneath them. Video tracks in your project can be reordered as needed.
When adding a video track to your project, it is added over the storyboard track, which contains your animatic. However, it is also possible to move a video track underneath the storyboard track. This means all its clips will appear behind the artwork and objects in your panels. This can be useful, for example, if you want to use the same background throughout several panels or scenes. Note however that video clips are not affected by camera movements in your scenes.
824
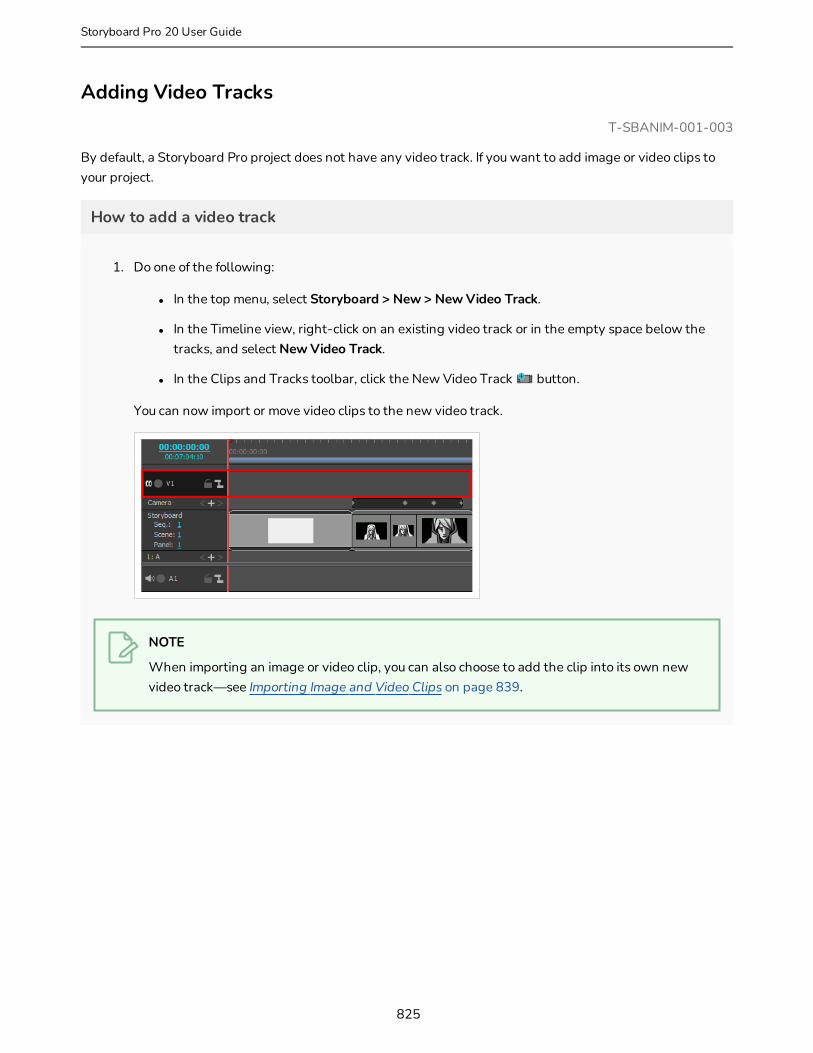
Adding Video TracksT-SBANIM-001-003
By default, a Storyboard Pro project does not have any video track. If you want to add image or video clips to your project.
How to add a video track
1. Do one of the following:
l In the top menu, select Storyboard > New > New Video Track.
l In the Timeline view, right-click on an existing video track or in the empty space below the tracks, and select New Video Track.
l In the Clips and Tracks toolbar, click the New Video Track button.
You can now import or move video clips to the new video track.
NOTE
When importing an image or video clip, you can also choose to add the clip into its own new video track—see Importing Image and Video Clips on page 839.
825
Storyboard Pro 20 User Guide
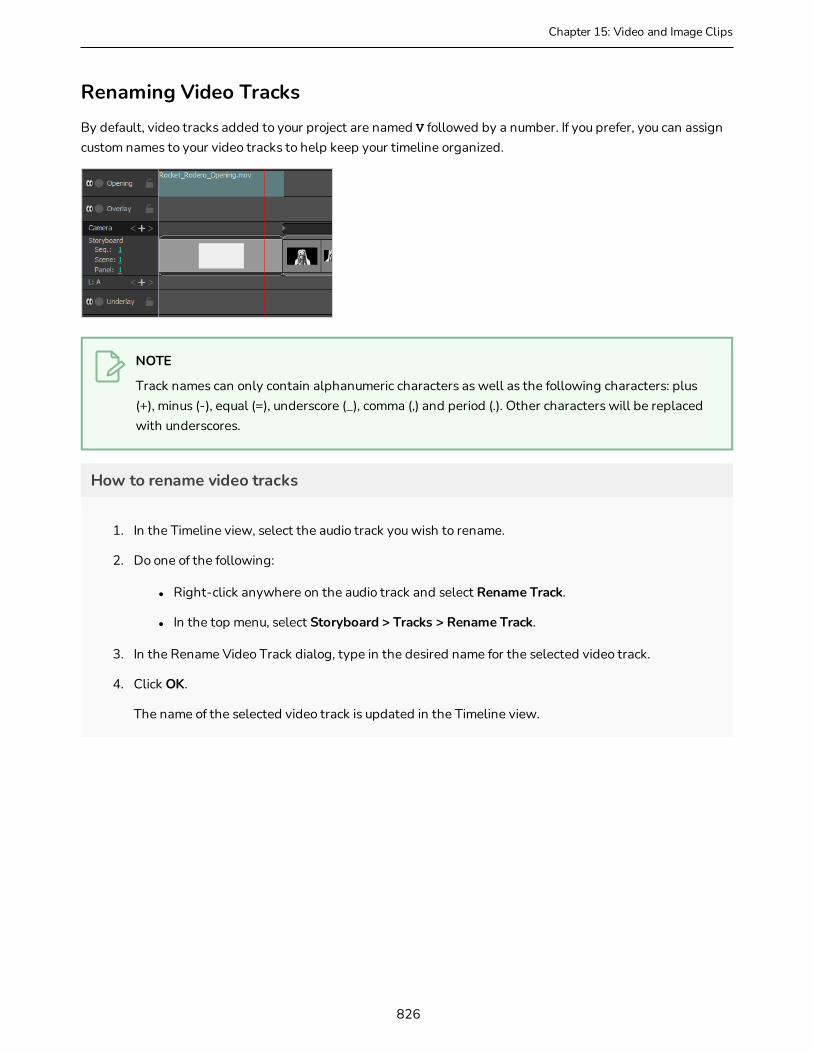
Chapter 15: Video and Image Clips
Renaming Video TracksBy default, video tracks added to your project are named V followed by a number. If you prefer, you can assign custom names to your video tracks to help keep your timeline organized.
NOTE
Track names can only contain alphanumeric characters as well as the following characters: plus (+), minus (-), equal (=), underscore (_), comma (,) and period (.). Other characters will be replaced with underscores.
How to rename video tracks
1. In the Timeline view, select the audio track you wish to rename.
2. Do one of the following:
l Right-click anywhere on the audio track and select Rename Track.
l In the top menu, select Storyboard > Tracks > Rename Track.
3. In the Rename Video Track dialog, type in the desired name for the selected video track.
4. Click OK.
The name of the selected video track is updated in the Timeline view.
826
Reordering Video TracksJust like layers in a panel, each video track renders over the video track below it in the Timeline view. You can change the order of video tracks relative to each other.
NOTE
You can also move video tracks below the storyboard track, to make them appear behind the artwork in your storyboard.
How to reorder video tracks
1. In the Timeline view, select the video track you want to move.
2. Do one of the following:
l Right-click anywhere on the video track and select Move Track Up or Move Track Down.
l In the Clips and Tracks toolbar, click on the Move Track Up or the Move Track Down button.
The track is moved up or down in the list of video tracks.
827
Storyboard Pro 20 User Guide
Chapter 15: Video and Image Clips
Deleting Video TracksYou can delete a video track from your project in the Timeline view. When a video track is deleted, all its clips are also deleted from the project.
How to delete a video track
1. In the Timeline view, select the video track you want to delete.
2. Do one of the following:
l Right-click anywhere on the video track and select Delete Current Video Track.
l In the top menu, select Storyboard > Tracks > Delete Current Track.
The selected video track is removed from the Timeline view and deleted from your project.
828
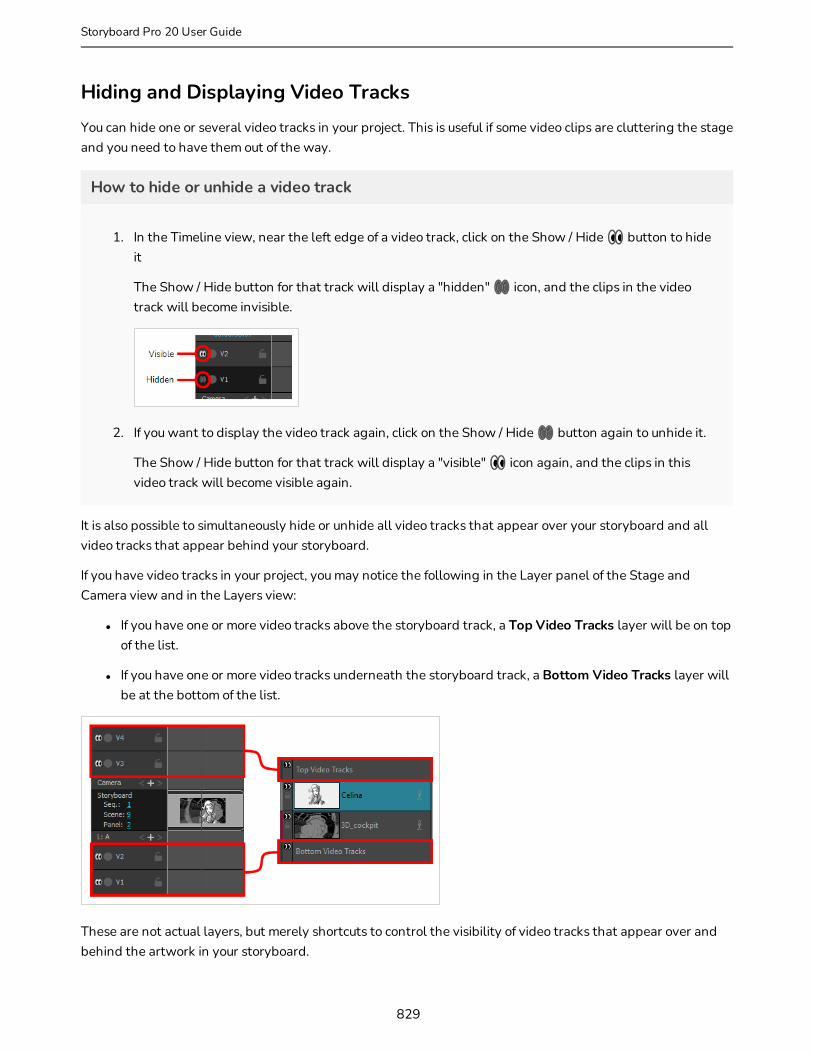
Hiding and Displaying Video TracksYou can hide one or several video tracks in your project. This is useful if some video clips are cluttering the stage and you need to have them out of the way.
How to hide or unhide a video track
1. In the Timeline view, near the left edge of a video track, click on the Show / Hide button to hide it
The Show / Hide button for that track will display a "hidden" icon, and the clips in the video track will become invisible.
2. If you want to display the video track again, click on the Show / Hide button again to unhide it.
The Show / Hide button for that track will display a "visible" icon again, and the clips in this video track will become visible again.
It is also possible to simultaneously hide or unhide all video tracks that appear over your storyboard and all video tracks that appear behind your storyboard.
If you have video tracks in your project, you may notice the following in the Layer panel of the Stage and Camera view and in the Layers view:
l If you have one or more video tracks above the storyboard track, a Top Video Tracks layer will be on top of the list.
l If you have one or more video tracks underneath the storyboard track, a Bottom Video Tracks layer will be at the bottom of the list.
These are not actual layers, but merely shortcuts to control the visibility of video tracks that appear over and behind the artwork in your storyboard.
829
Storyboard Pro 20 User Guide
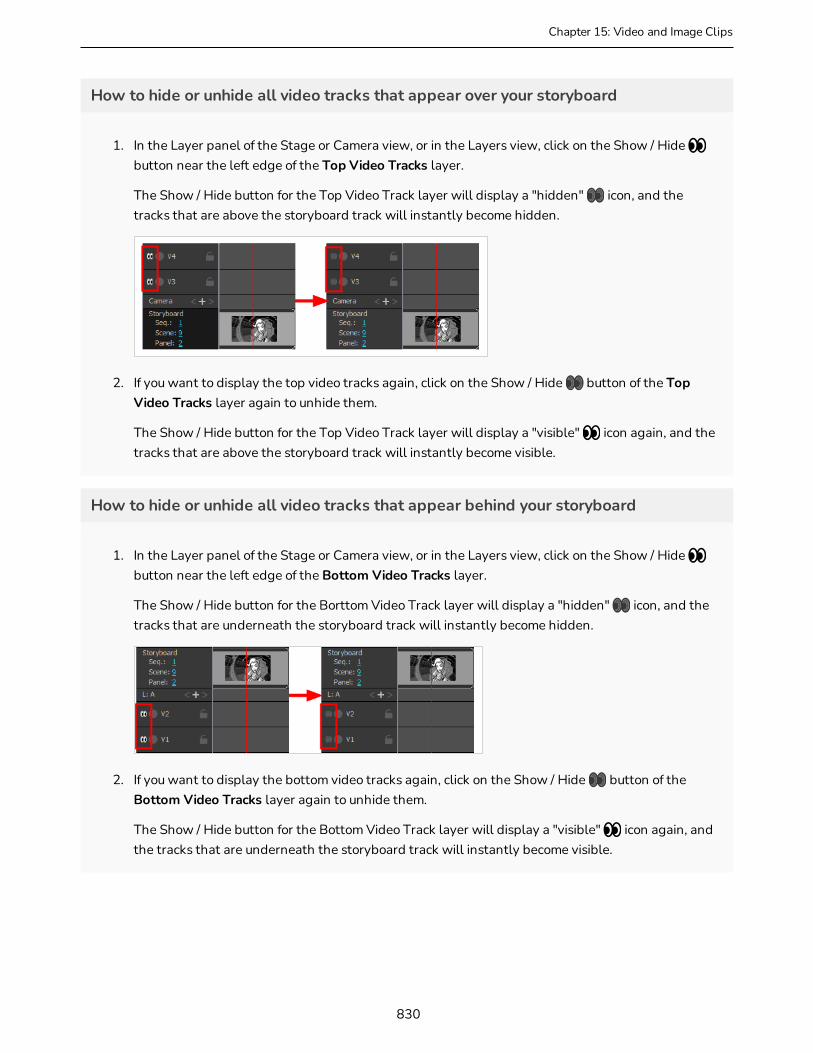
Chapter 15: Video and Image Clips
How to hide or unhide all video tracks that appear over your storyboard
1. In the Layer panel of the Stage or Camera view, or in the Layers view, click on the Show / Hide button near the left edge of the Top Video Tracks layer.
The Show / Hide button for the Top Video Track layer will display a "hidden" icon, and the tracks that are above the storyboard track will instantly become hidden.
2. If you want to display the top video tracks again, click on the Show / Hide button of the Top Video Tracks layer again to unhide them.
The Show / Hide button for the Top Video Track layer will display a "visible" icon again, and the tracks that are above the storyboard track will instantly become visible.
How to hide or unhide all video tracks that appear behind your storyboard
1. In the Layer panel of the Stage or Camera view, or in the Layers view, click on the Show / Hide button near the left edge of the Bottom Video Tracks layer.
The Show / Hide button for the Borttom Video Track layer will display a "hidden" icon, and the tracks that are underneath the storyboard track will instantly become hidden.
2. If you want to display the bottom video tracks again, click on the Show / Hide button of the Bottom Video Tracks layer again to unhide them.
The Show / Hide button for the Bottom Video Track layer will display a "visible" icon again, and the tracks that are underneath the storyboard track will instantly become visible.
830
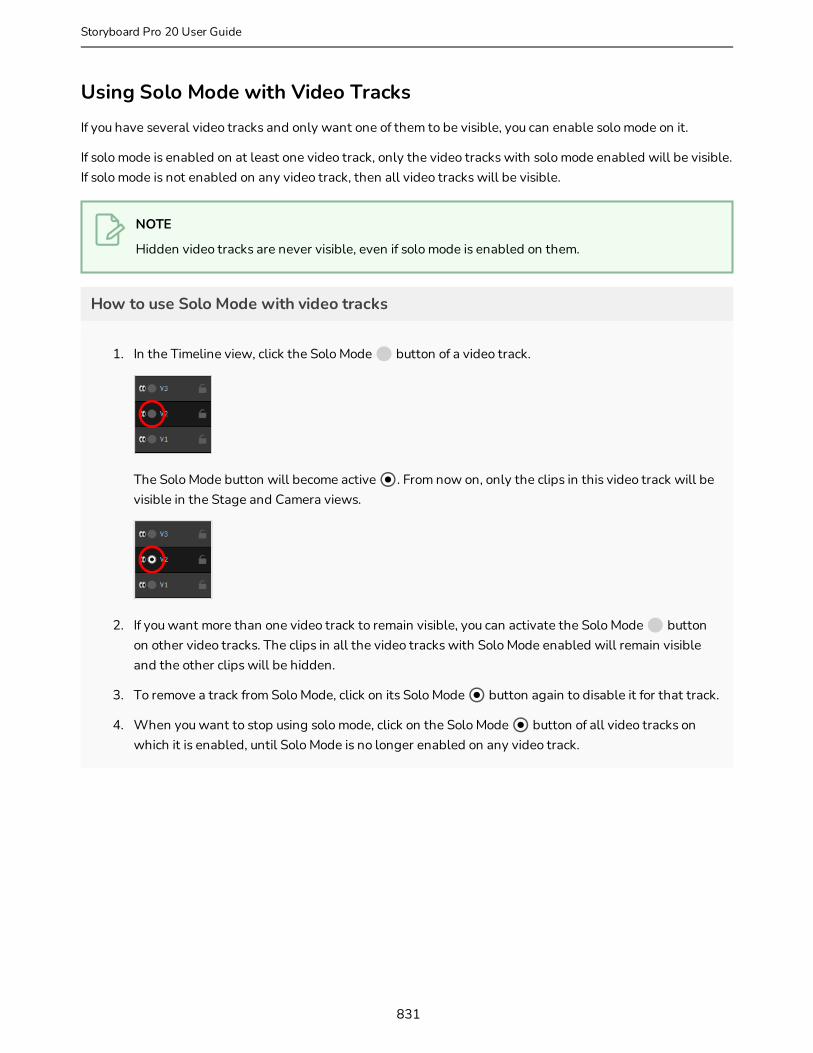
Using Solo Mode with Video TracksIf you have several video tracks and only want one of them to be visible, you can enable solo mode on it.
If solo mode is enabled on at least one video track, only the video tracks with solo mode enabled will be visible. If solo mode is not enabled on any video track, then all video tracks will be visible.
NOTE
Hidden video tracks are never visible, even if solo mode is enabled on them.
How to use Solo Mode with video tracks
1. In the Timeline view, click the Solo Mode button of a video track.
The Solo Mode button will become active . From now on, only the clips in this video track will be visible in the Stage and Camera views.
2. If you want more than one video track to remain visible, you can activate the Solo Mode button on other video tracks. The clips in all the video tracks with Solo Mode enabled will remain visible and the other clips will be hidden.
3. To remove a track from Solo Mode, click on its Solo Mode button again to disable it for that track.
4. When you want to stop using solo mode, click on the Solo Mode button of all video tracks on which it is enabled, until Solo Mode is no longer enabled on any video track.
831
Storyboard Pro 20 User Guide

Chapter 15: Video and Image Clips
Locking Video TracksBy default, the clips in your video tracks follow the timing changes made to your animatic. For example, if you extend the duration of a panel, this moves all subsequent panels, and the video clips after this panel will also be moved to follow the movement of subsequent panels.
If you want to prevent this from happening, you can lock your video tracks. Locking a track will also prevent you from making any unwanted changes to the clips in the tracks. When a track is locked, it is impossible to move, delete, add or edit video clips in this track.
How to lock or unlock a video track
1. In the Timeline view, just right of the name of the video track you want to lock, click on the Lock / Unlock button.
The Lock / Unlock button will display a "locked" icon, and the track will appear cross-hatched to indicate that you can't make changes to it.
2. If you want to unlock the video track, click on its Lock / Unlock button again.
The Lock / Unlock button will display an "unlocked" icon, and you will be able to edit the video track again.
If none of your project's video tracks are locked, you can lock them all simultaneously.
How to lock all audio tracks
1. In the Timeline view, make sure that all video tracks are unlocked, or else, the Lock All Video Tracks command will be unavailable.
2. In the top menu, select Storyboard > Tracks > Lock All Video Tracks.
If at least one video track is locked, you can unlock them all simultaneously.
How to unlock all audio tracks at once
1. In the Timeline view, make sure there is at least one locked video track. Otherwise, the Unlock All
832

Video Tracks command will be unavailable.
2. In the top menu, select Storyboard > Tracks > Unlock All Video Tracks.
833
Storyboard Pro 20 User Guide
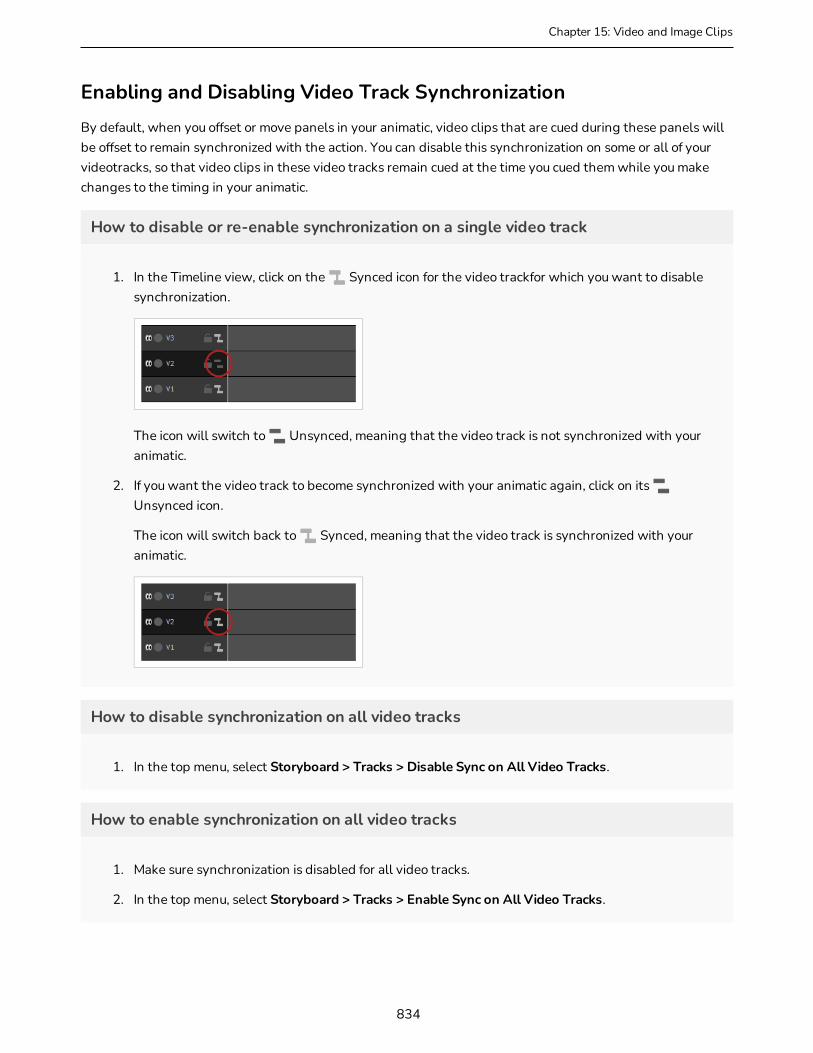
Chapter 15: Video and Image Clips
Enabling and Disabling Video Track SynchronizationBy default, when you offset or move panels in your animatic, video clips that are cued during these panels will be offset to remain synchronized with the action. You can disable this synchronization on some or all of your videotracks, so that video clips in these video tracks remain cued at the time you cued them while you make changes to the timing in your animatic.
How to disable or re-enable synchronization on a single video track
1. In the Timeline view, click on the Synced icon for the video trackfor which you want to disable synchronization.
The icon will switch to Unsynced, meaning that the video track is not synchronized with your animatic.
2. If you want the video track to become synchronized with your animatic again, click on its Unsynced icon.
The icon will switch back to Synced, meaning that the video track is synchronized with your animatic.
How to disable synchronization on all video tracks
1. In the top menu, select Storyboard > Tracks > Disable Sync on All Video Tracks.
How to enable synchronization on all video tracks
1. Make sure synchronization is disabled for all video tracks.
2. In the top menu, select Storyboard > Tracks > Enable Sync on All Video Tracks.
834
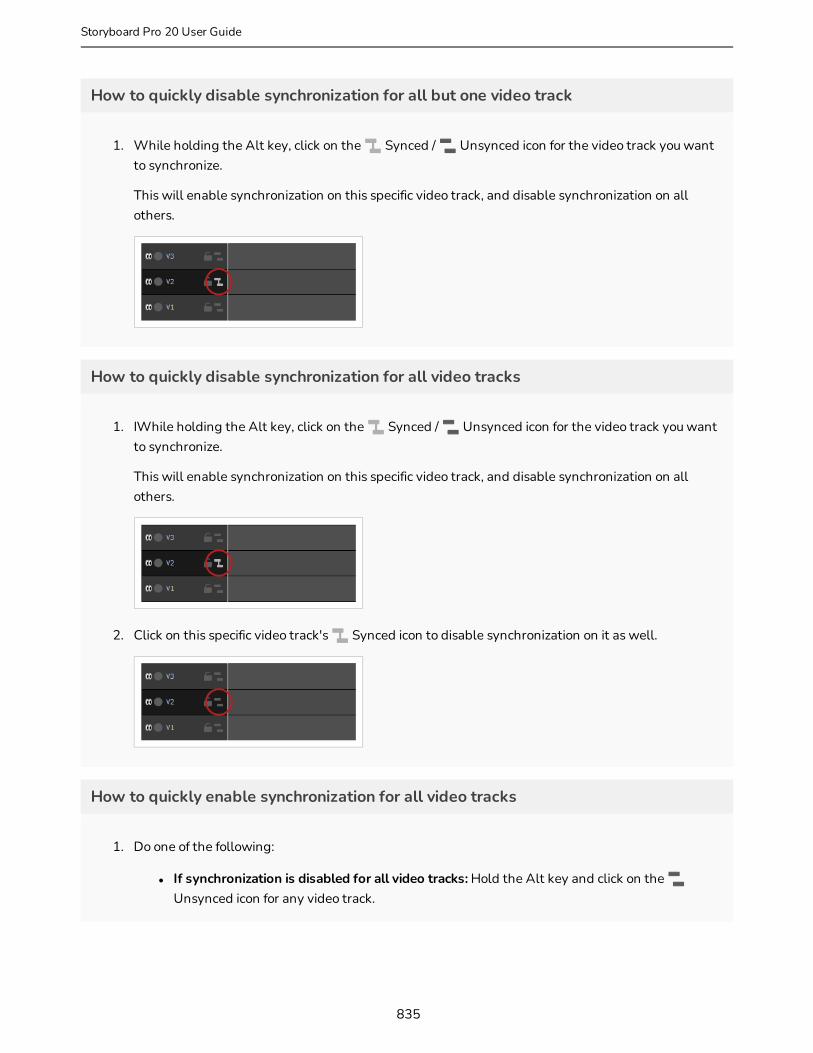
How to quickly disable synchronization for all but one video track
1. While holding the Alt key, click on the Synced / Unsynced icon for the video track you want to synchronize.
This will enable synchronization on this specific video track, and disable synchronization on all others.
How to quickly disable synchronization for all video tracks
1. IWhile holding the Alt key, click on the Synced / Unsynced icon for the video track you want to synchronize.
This will enable synchronization on this specific video track, and disable synchronization on all others.
2. Click on this specific video track's Synced icon to disable synchronization on it as well.
How to quickly enable synchronization for all video tracks
1. Do one of the following:
l If synchronization is disabled for all video tracks: Hold the Alt key and click on the Unsynced icon for any video track.
835
Storyboard Pro 20 User Guide
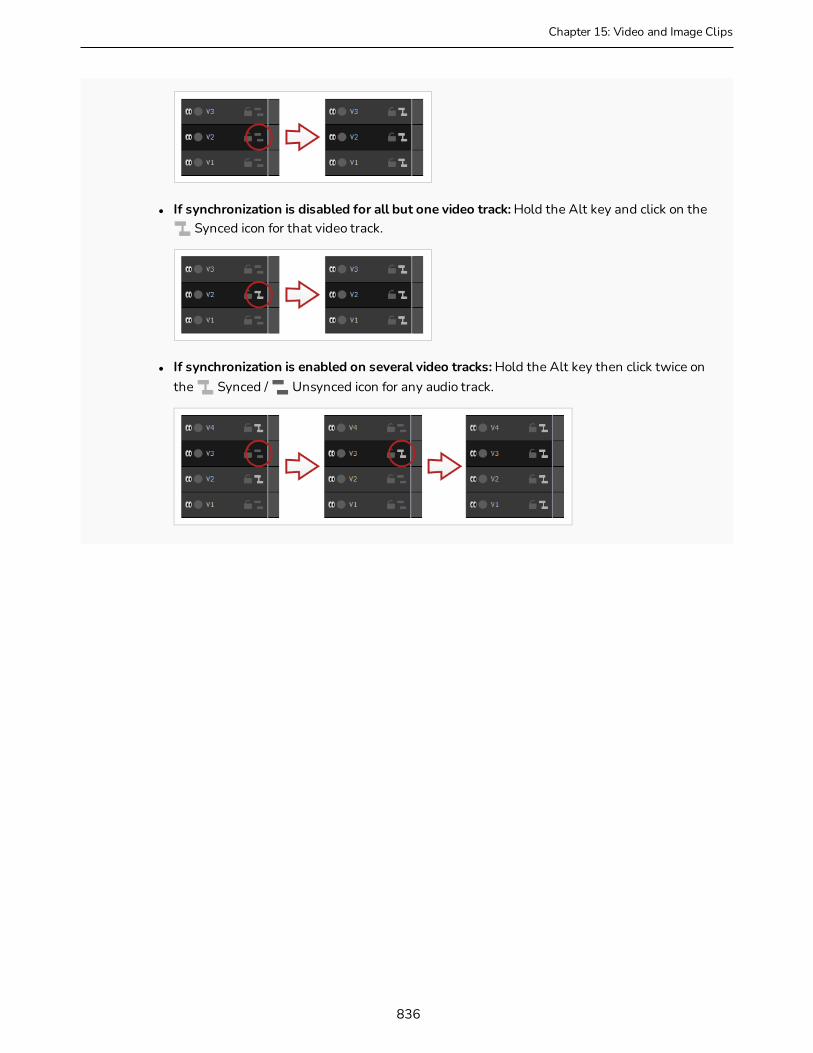
Chapter 15: Video and Image Clips
l If synchronization is disabled for all but one video track: Hold the Alt key and click on the Synced icon for that video track.
l If synchronization is enabled on several video tracks: Hold the Alt key then click twice on the Synced / Unsynced icon for any audio track.
836
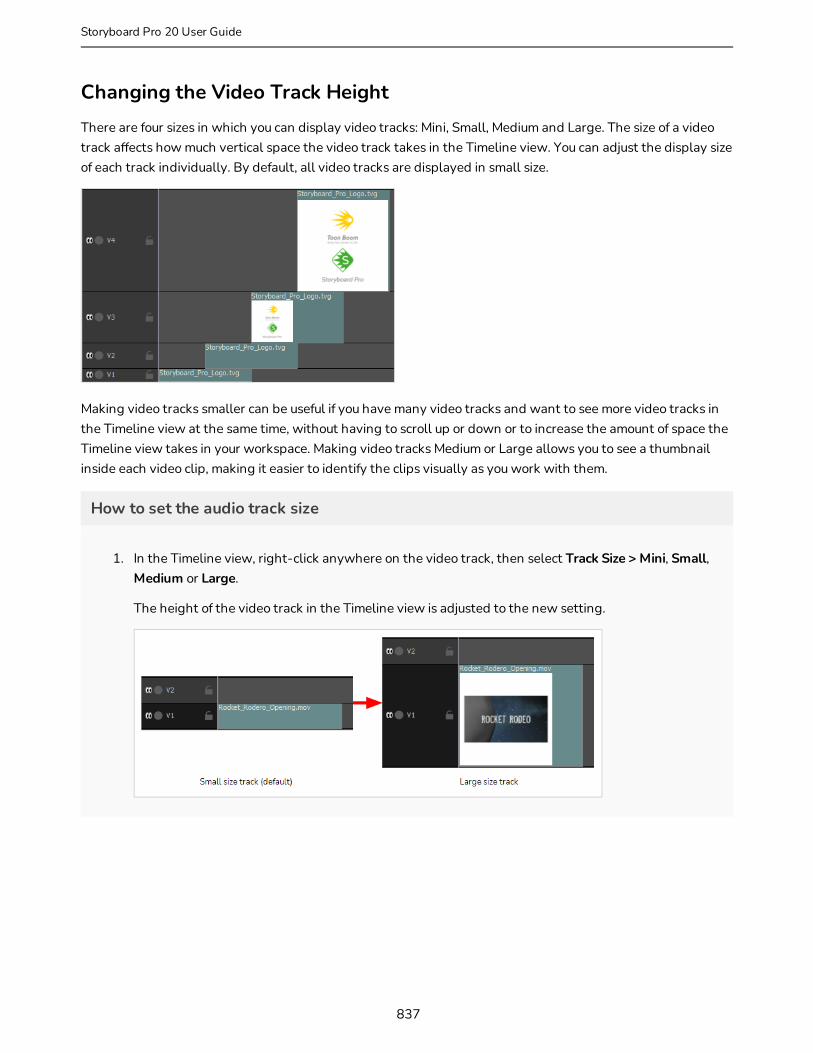
Changing the Video Track HeightThere are four sizes in which you can display video tracks: Mini, Small, Medium and Large. The size of a video track affects how much vertical space the video track takes in the Timeline view. You can adjust the display size of each track individually. By default, all video tracks are displayed in small size.
Making video tracks smaller can be useful if you have many video tracks and want to see more video tracks in the Timeline view at the same time, without having to scroll up or down or to increase the amount of space the Timeline view takes in your workspace. Making video tracks Medium or Large allows you to see a thumbnail inside each video clip, making it easier to identify the clips visually as you work with them.
How to set the audio track size
1. In the Timeline view, right-click anywhere on the video track, then select Track Size > Mini, Small, Medium or Large.
The height of the video track in the Timeline view is adjusted to the new setting.
837
Storyboard Pro 20 User Guide

Chapter 15: Video and Image Clips
About Video ClipsVideo clips are image and movie files that you can add to the video tracks of your project, to display them in your animatic.
If you import an image file as a video clip, it will create a clip that displays the still image for a set amount of time. If you import a movie file as a video clip, it will import the video and play it as is, over your animatic. However, if the movie file contains an audio track, it will be ignored by Storyboard Pro.
Just like sound clips must be stored in audio tracks, video clips must be stored in video tracks. They can be cued at any time in your animatic, and their beginning and ending can be trimmed off if needed.
Just like layers in a panel, video clips can be moved, resized and rotated, can have their opacity adjusted and can even be animated. However, contrary to layers in a panel, video clips are not affected by camera movements.
Video clips are completely independent from the structure of your animatic: They can span over several panels, scenes or even over your entire animatic, and they can start and end in the middle of a panel.
Video clips are not subject to 3D transformations. Hence, they cannot be moved back and forth across the depth of the stage. However, a video track can be put above or underneath the storyboard track. Clips in video tracks that are above the storyboard track will always appear over the artwork and objects in the storyboard, and clips in video tracks that are underneath the storyboard track will always appear behind them.
NOTE
Video clips are subject to certain limitations regarding their format. For more information, see About Video Clip Format on page 821.
838

Importing Image and Video ClipsT-SBANIM-001-004
To add video or image clips to your animatic, you must import image or video files into a video track. You can do this using the Impot Video/Images dialog or using drag and drop.
NOTE
For information on supported video formats, see About Video Clip Format on page 821.
How to import a video clip or an image clip using the Import Videos/Images dialog
1. If you want to import clips into an existing video track, select the video track in which you want to import clips in the Timeline view.
2. Do one of the following:
l In the top menu, select File > Import > Videos/Images as Clips.
l Right-click on the video track in which you want to import clips, then select Import Videos/Images as Clips.
l Right-click on the empty space below or above the tracks in the Timeline view, then select Import Videos/Images as Clips.
The Import Video Clips dialog box opens.
839
Storyboard Pro 20 User Guide
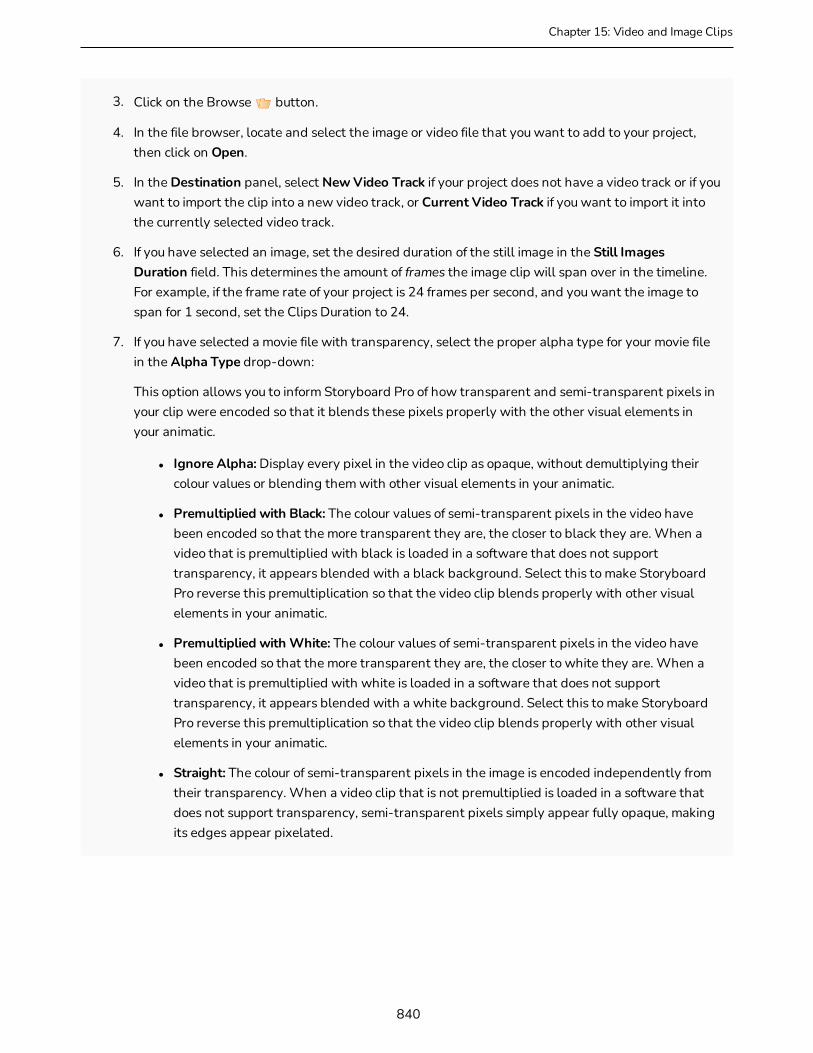
Chapter 15: Video and Image Clips
3. Click on the Browse button.
4. In the file browser, locate and select the image or video file that you want to add to your project, then click on Open.
5. In the Destination panel, select New Video Track if your project does not have a video track or if you want to import the clip into a new video track, or Current Video Track if you want to import it into the currently selected video track.
6. If you have selected an image, set the desired duration of the still image in the Still Images Duration field. This determines the amount of frames the image clip will span over in the timeline. For example, if the frame rate of your project is 24 frames per second, and you want the image to span for 1 second, set the Clips Duration to 24.
7. If you have selected a movie file with transparency, select the proper alpha type for your movie file in the Alpha Type drop-down:
This option allows you to inform Storyboard Pro of how transparent and semi-transparent pixels in your clip were encoded so that it blends these pixels properly with the other visual elements in your animatic.
l Ignore Alpha: Display every pixel in the video clip as opaque, without demultiplying their colour values or blending them with other visual elements in your animatic.
l Premultiplied with Black: The colour values of semi-transparent pixels in the video have been encoded so that the more transparent they are, the closer to black they are. When a video that is premultiplied with black is loaded in a software that does not support transparency, it appears blended with a black background. Select this to make Storyboard Pro reverse this premultiplication so that the video clip blends properly with other visual elements in your animatic.
l Premultiplied with White: The colour values of semi-transparent pixels in the video have been encoded so that the more transparent they are, the closer to white they are. When a video that is premultiplied with white is loaded in a software that does not support transparency, it appears blended with a white background. Select this to make Storyboard Pro reverse this premultiplication so that the video clip blends properly with other visual elements in your animatic.
l Straight: The colour of semi-transparent pixels in the image is encoded independently from their transparency. When a video clip that is not premultiplied is loaded in a software that does not support transparency, semi-transparent pixels simply appear fully opaque, making its edges appear pixelated.
840
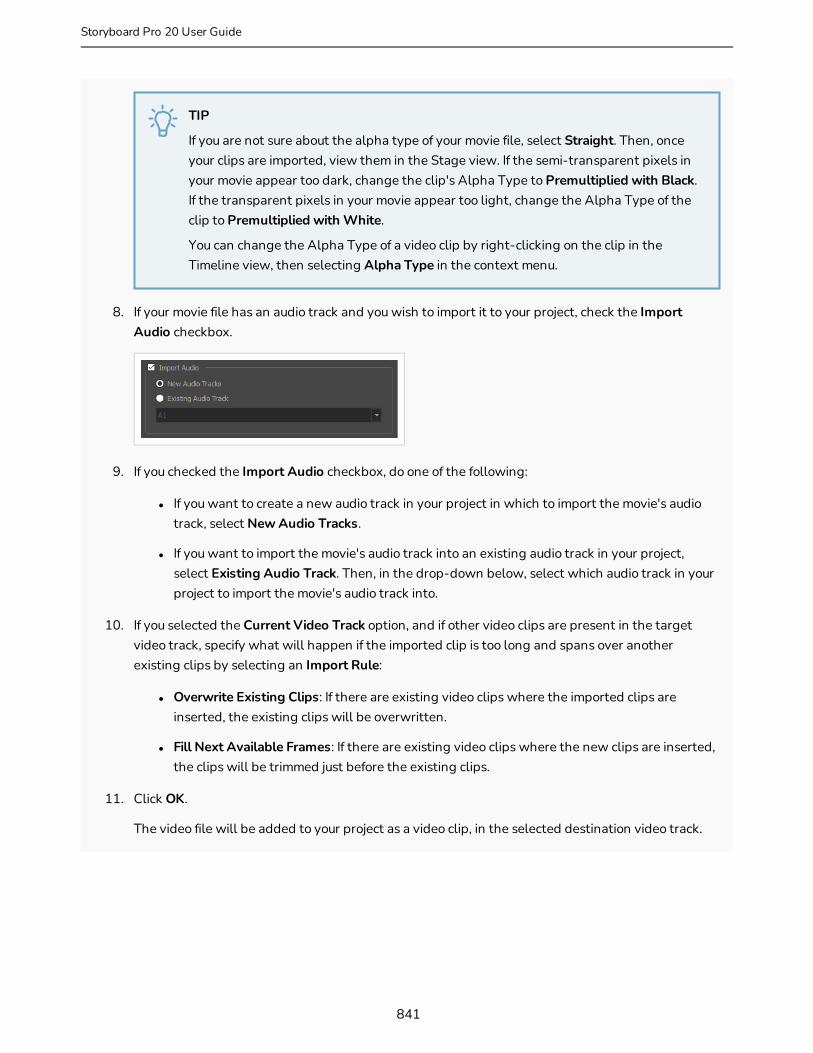
TIP
If you are not sure about the alpha type of your movie file, select Straight. Then, once your clips are imported, view them in the Stage view. If the semi-transparent pixels in your movie appear too dark, change the clip's Alpha Type to Premultiplied with Black. If the transparent pixels in your movie appear too light, change the Alpha Type of the clip to Premultiplied with White.
You can change the Alpha Type of a video clip by right-clicking on the clip in the Timeline view, then selecting Alpha Type in the context menu.
8. If your movie file has an audio track and you wish to import it to your project, check the Import Audio checkbox.
9. If you checked the Import Audio checkbox, do one of the following:
l If you want to create a new audio track in your project in which to import the movie's audio track, select New Audio Tracks.
l If you want to import the movie's audio track into an existing audio track in your project, select Existing Audio Track. Then, in the drop-down below, select which audio track in your project to import the movie's audio track into.
10. If you selected the Current Video Track option, and if other video clips are present in the target video track, specify what will happen if the imported clip is too long and spans over another existing clips by selecting an Import Rule:
l Overwrite Existing Clips: If there are existing video clips where the imported clips are inserted, the existing clips will be overwritten.
l Fill Next Available Frames: If there are existing video clips where the new clips are inserted, the clips will be trimmed just before the existing clips.
11. Click OK.
The video file will be added to your project as a video clip, in the selected destination video track.
841
Storyboard Pro 20 User Guide
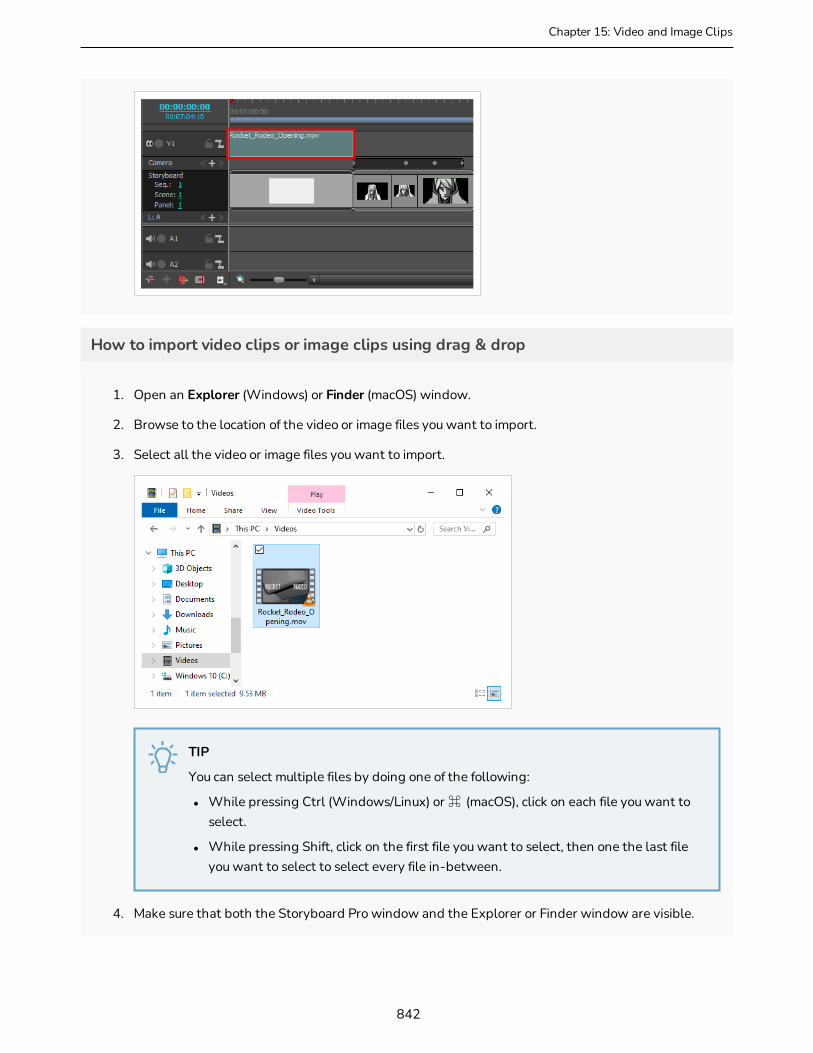
Chapter 15: Video and Image Clips
How to import video clips or image clips using drag & drop
1. Open an Explorer (Windows) or Finder (macOS) window.
2. Browse to the location of the video or image files you want to import.
3. Select all the video or image files you want to import.
TIP
You can select multiple files by doing one of the following:
l While pressing Ctrl (Windows/Linux) or ⌘ (macOS), click on each file you want to select.
l While pressing Shift, click on the first file you want to select, then one the last file you want to select to select every file in-between.
4. Make sure that both the Storyboard Pro window and the Explorer or Finder window are visible.
842
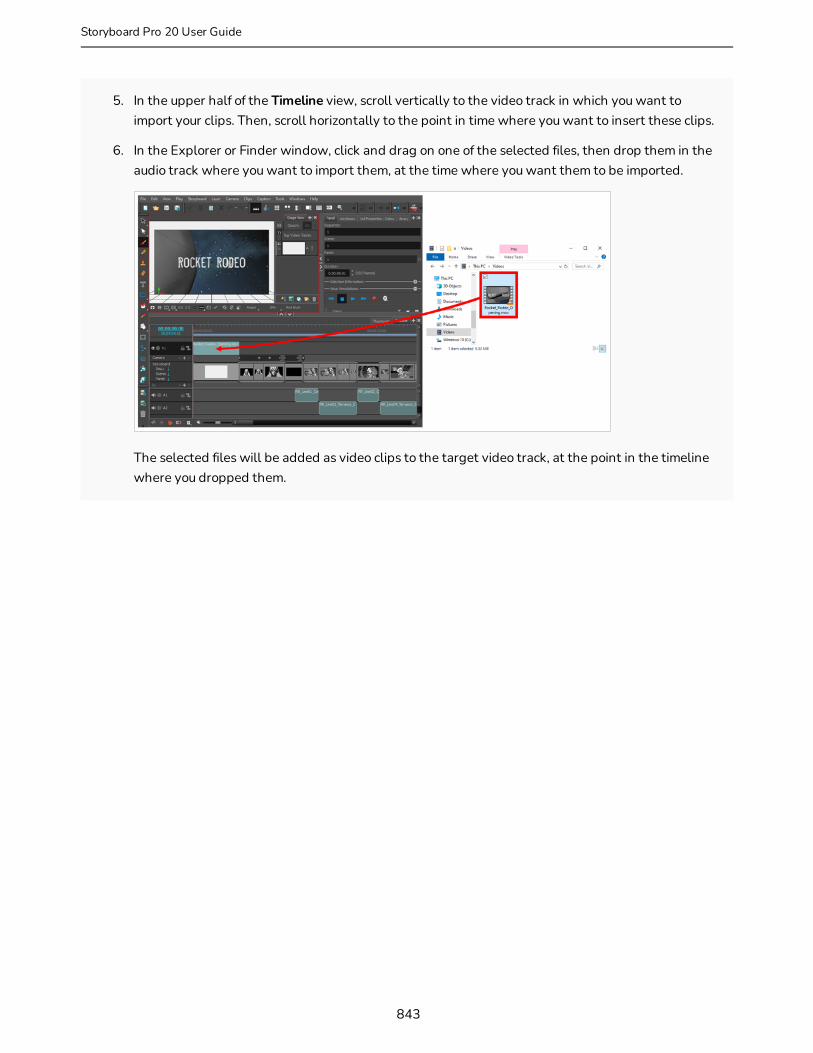
5. In the upper half of the Timeline view, scroll vertically to the video track in which you want to import your clips. Then, scroll horizontally to the point in time where you want to insert these clips.
6. In the Explorer or Finder window, click and drag on one of the selected files, then drop them in the audio track where you want to import them, at the time where you want them to be imported.
The selected files will be added as video clips to the target video track, at the point in the timeline where you dropped them.
843
Storyboard Pro 20 User Guide
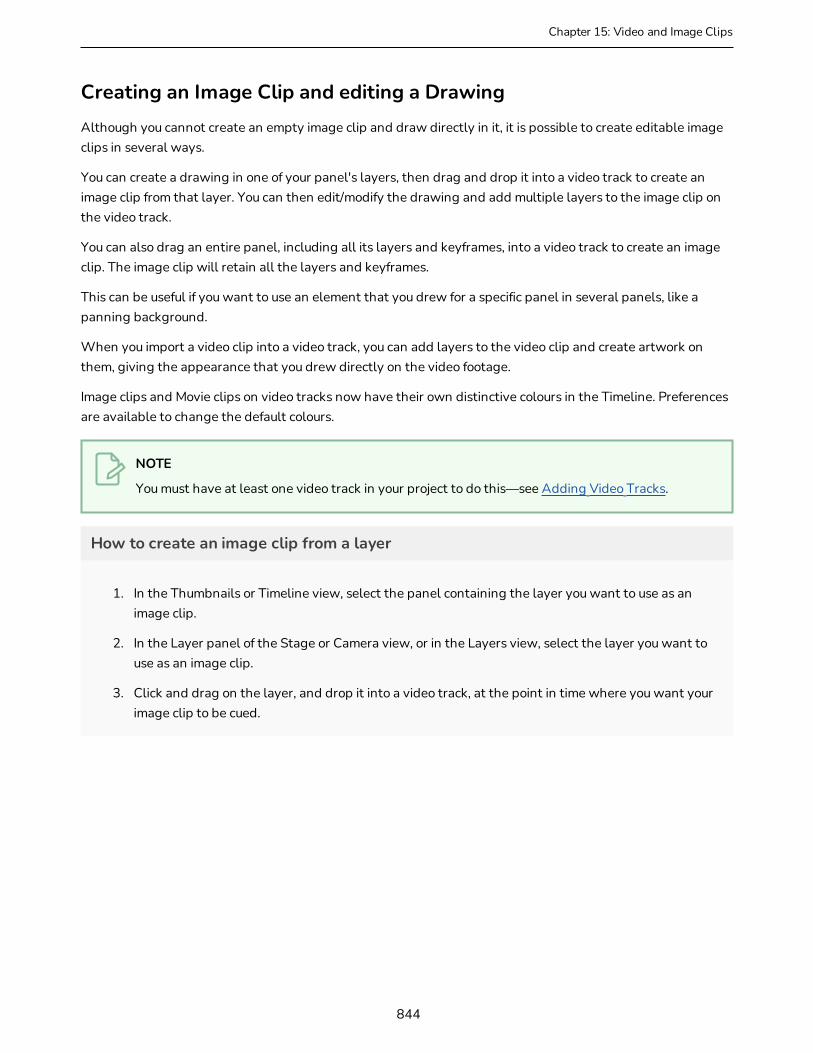
Chapter 15: Video and Image Clips
Creating an Image Clip and editing a DrawingAlthough you cannot create an empty image clip and draw directly in it, it is possible to create editable image clips in several ways.
You can create a drawing in one of your panel's layers, then drag and drop it into a video track to create an image clip from that layer. You can then edit/modify the drawing and add multiple layers to the image clip on the video track.
You can also drag an entire panel, including all its layers and keyframes, into a video track to create an image clip. The image clip will retain all the layers and keyframes.
This can be useful if you want to use an element that you drew for a specific panel in several panels, like a panning background.
When you import a video clip into a video track, you can add layers to the video clip and create artwork on them, giving the appearance that you drew directly on the video footage.
Image clips and Movie clips on video tracks now have their own distinctive colours in the Timeline. Preferences are available to change the default colours.
NOTE
You must have at least one video track in your project to do this—see Adding Video Tracks.
How to create an image clip from a layer
1. In the Thumbnails or Timeline view, select the panel containing the layer you want to use as an image clip.
2. In the Layer panel of the Stage or Camera view, or in the Layers view, select the layer you want to use as an image clip.
3. Click and drag on the layer, and drop it into a video track, at the point in time where you want your image clip to be cued.
844
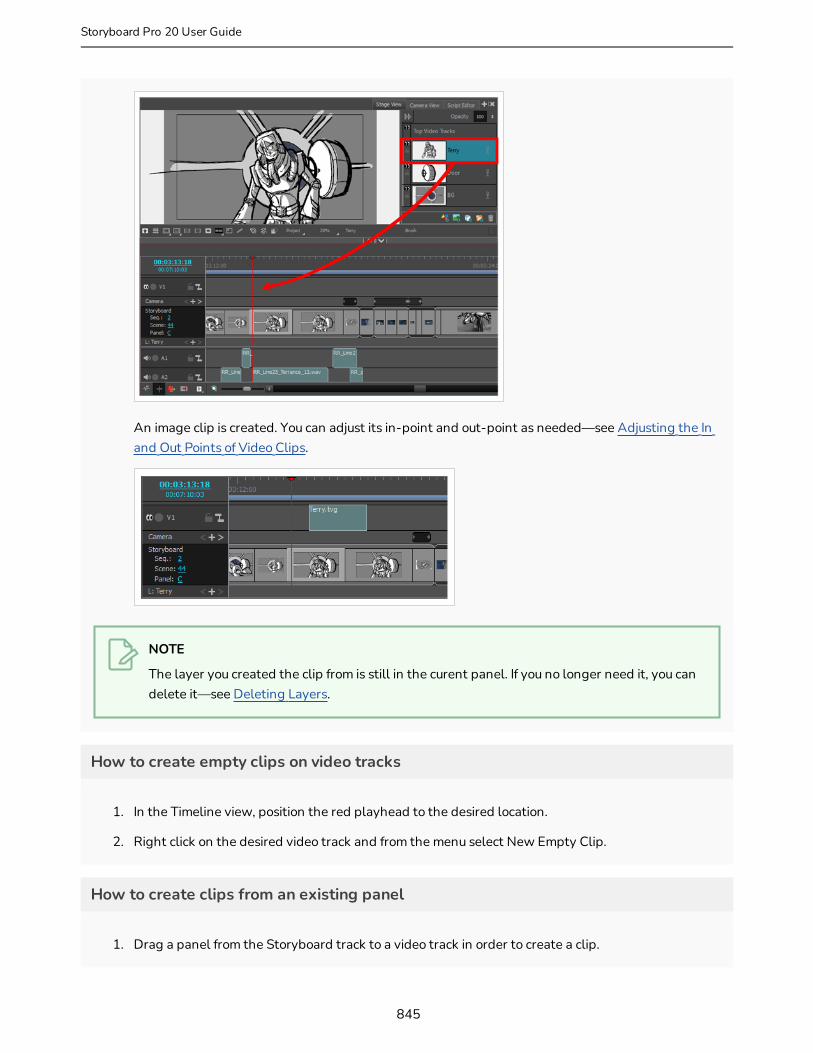
An image clip is created. You can adjust its in-point and out-point as needed—see Adjusting the In and Out Points of Video Clips.
NOTE
The layer you created the clip from is still in the curent panel. If you no longer need it, you can delete it—see Deleting Layers.
How to create empty clips on video tracks
1. In the Timeline view, position the red playhead to the desired location.
2. Right click on the desired video track and from the menu select New Empty Clip.
How to create clips from an existing panel
1. Drag a panel from the Storyboard track to a video track in order to create a clip.
845
Storyboard Pro 20 User Guide
Chapter 15: Video and Image Clips
This creates an independent copy of all the layers that are in the panel.
2. In reverse, a clip can be dragged from a video track to the Storyboard track to create a panel.
How to draw and add layers to clips
1. Select the clip on the video track and drag the red playhead on the clip where you want to draw/edit.
You can add multiple layers and draw or create artwork on those additional layers.
846

Linking ClipsYou can link audio and video clips to a specific panel. Multiple clips can be linked to a single panel.
How to link clip to a panel
1. In the Timeline view, select a panel to which you want to link a clip.
2. Select clip and press CTRL on Windows or CMD on macOS.
3. Right click on the selected clip and then select Link Clips to Panel.
Once linked, a clip will follow its linked panel, instead of the one that is located at the clip's first frame.
847
Storyboard Pro 20 User Guide

Chapter 15: Video and Image Clips
Deleting Video ClipsYou can delete video clips from a video track.
How to delete one or several video clips
1. In the Timeline view, select the clip or clips you want to delete by doing one of the following:
l To select a single video clip, click on it.
l To select a series of video clips, draw a rectangle around them by clicking just outside of the clips you want to select, then dragging the mouse cursor all the way to the last clip you want to select:
l To select a series of video clips, you can also click on the first clip you want to select, then, while holding the Shift key, click on the last clip you want to select. This will select all clips between the two clips you clicked on, inclusively.
l To select several video clips, press and hold Ctrl (Windows/Linux) or ⌘ (macOS), then click on each clip you want to select.
2. Do one of the following:
l Right-click on the selection and select Delete Selected Clips.
l Press Del (Windows) or (macOS).
848

Moving Video ClipsYou can move one or several video clips, even if they're on different video tracks, at the same time. You can move them horizontally to change their cue time in the animatic, or vertically to move them from one video track to another video track.
How to move video clips
1. In the Timeline view, select the clip or clips you want to move by doing one of the following:
l To select a single video clip, click on it.
l To select a series of video clips, draw a rectangle around them by clicking just outside of the clips you want to select, then dragging the mouse cursor all the way to the last clip you want to select:
l To select a series of video clips, you can also click on the first clip you want to select, then, while holding the Shift key, click on the last clip you want to select. This will select all clips between the two clips you clicked on, inclusively.
l To select several video clips, press and hold Ctrl (Windows/Linux) or ⌘ (macOS), then click on each clip you want to select.
2. Click on one of the selected clips and drag the selection to the position where you want to move them.
While dragging, a black text box displays the new starting time of the selected clip, along with the amount of seconds and frames by which you're moving the clip.
849
Storyboard Pro 20 User Guide
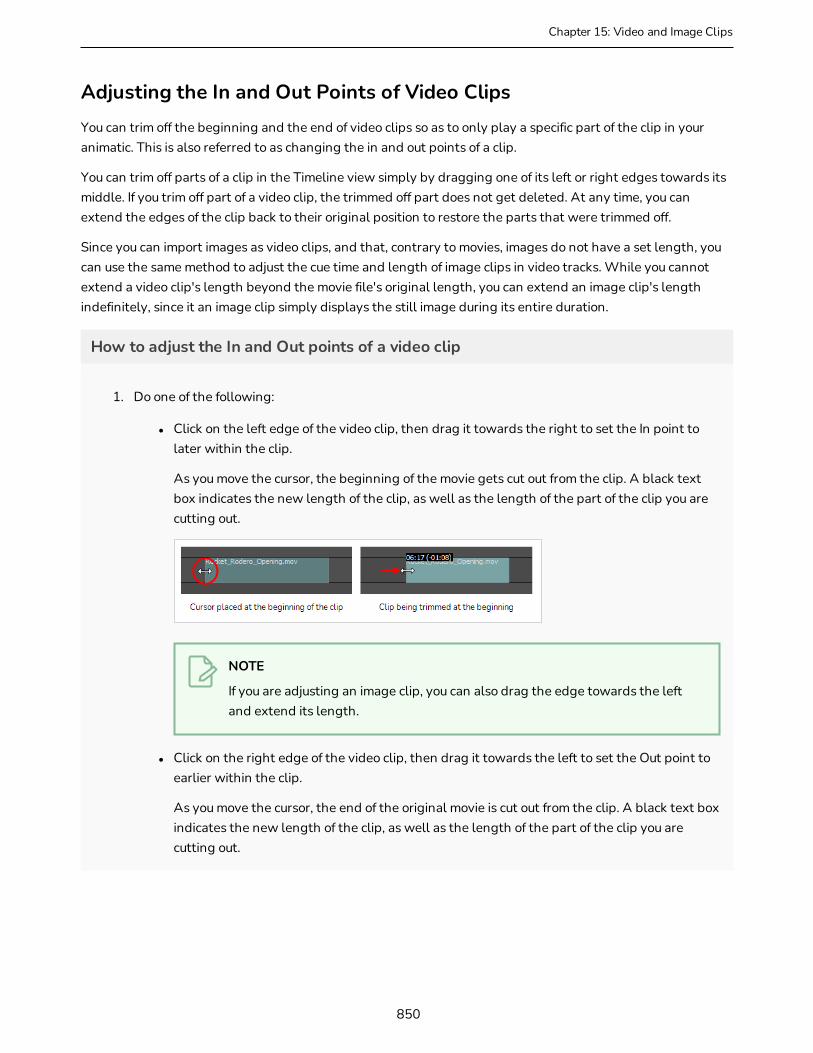
Chapter 15: Video and Image Clips
Adjusting the In and Out Points of Video ClipsYou can trim off the beginning and the end of video clips so as to only play a specific part of the clip in your animatic. This is also referred to as changing the in and out points of a clip.
You can trim off parts of a clip in the Timeline view simply by dragging one of its left or right edges towards its middle. If you trim off part of a video clip, the trimmed off part does not get deleted. At any time, you can extend the edges of the clip back to their original position to restore the parts that were trimmed off.
Since you can import images as video clips, and that, contrary to movies, images do not have a set length, you can use the same method to adjust the cue time and length of image clips in video tracks. While you cannot extend a video clip's length beyond the movie file's original length, you can extend an image clip's length indefinitely, since it an image clip simply displays the still image during its entire duration.
How to adjust the In and Out points of a video clip
1. Do one of the following:
l Click on the left edge of the video clip, then drag it towards the right to set the In point to later within the clip.
As you move the cursor, the beginning of the movie gets cut out from the clip. A black text box indicates the new length of the clip, as well as the length of the part of the clip you are cutting out.
NOTE
If you are adjusting an image clip, you can also drag the edge towards the left and extend its length.
l Click on the right edge of the video clip, then drag it towards the left to set the Out point to earlier within the clip.
As you move the cursor, the end of the original movie is cut out from the clip. A black text box indicates the new length of the clip, as well as the length of the part of the clip you are cutting out.
850
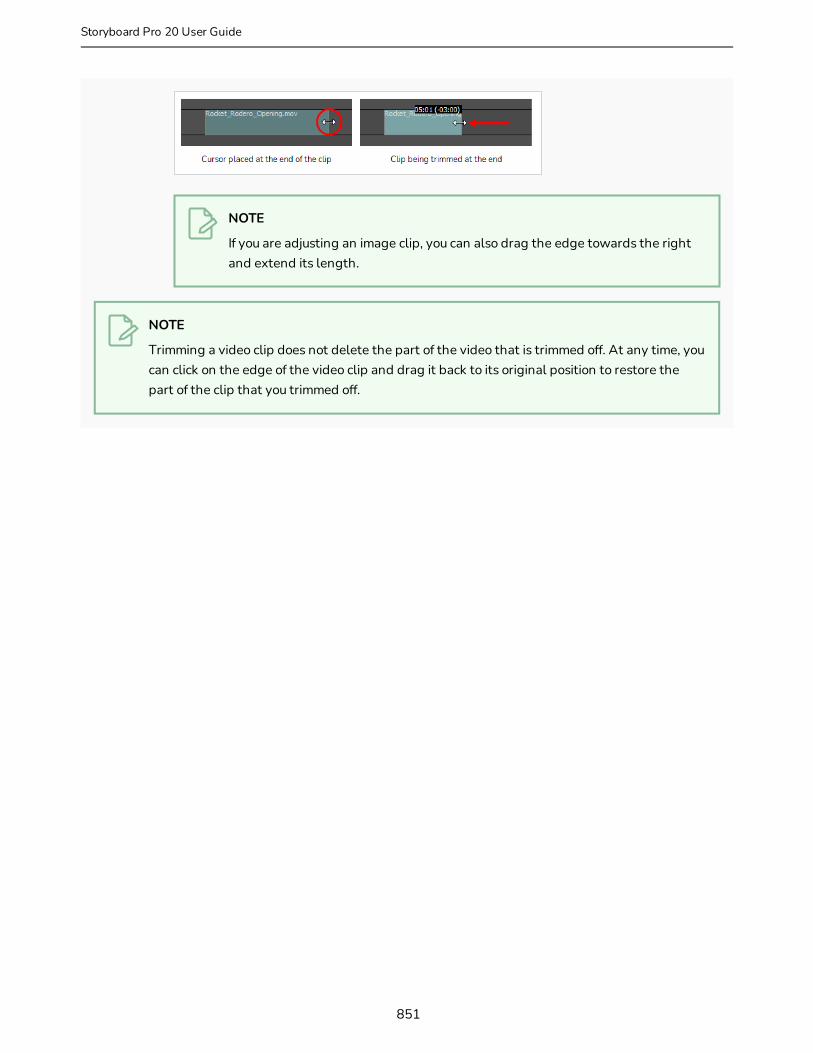
NOTE
If you are adjusting an image clip, you can also drag the edge towards the right and extend its length.
NOTE
Trimming a video clip does not delete the part of the video that is trimmed off. At any time, you can click on the edge of the video clip and drag it back to its original position to restore the part of the clip that you trimmed off.
851
Storyboard Pro 20 User Guide
Chapter 15: Video and Image Clips
Snapping Video ClipsWhen the Snapping option is enabled, when you drag and drop a video clip, the beginning and end of the clip will snap against the beginning and end of panels as well as against the timeline cursor.
Likewise, when you adjust the in point or the out point of a video clip while snapping is enabled, it will also snap against the beginning and end of panels and against the timeline cursor.
How to enable or disable snapping
1. Do one of the following:
l At the bottom-left of the Timeline view, click on the Snapping button.
l Right-click the Timeline view and select Snapping.
NOTE
While dragging a clip, you can temporarily override whether snapping is enabled by holding the Shift key.
852
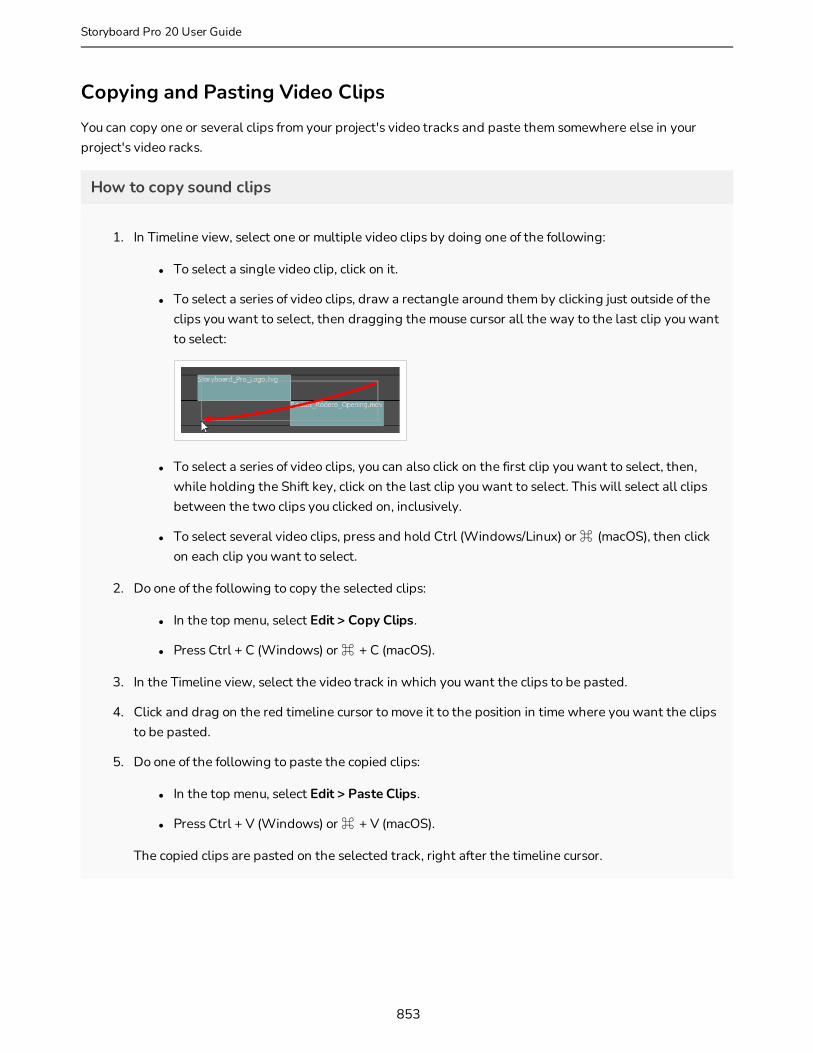
Copying and Pasting Video ClipsYou can copy one or several clips from your project's video tracks and paste them somewhere else in your project's video racks.
How to copy sound clips
1. In Timeline view, select one or multiple video clips by doing one of the following:
l To select a single video clip, click on it.
l To select a series of video clips, draw a rectangle around them by clicking just outside of the clips you want to select, then dragging the mouse cursor all the way to the last clip you want to select:
l To select a series of video clips, you can also click on the first clip you want to select, then, while holding the Shift key, click on the last clip you want to select. This will select all clips between the two clips you clicked on, inclusively.
l To select several video clips, press and hold Ctrl (Windows/Linux) or ⌘ (macOS), then click on each clip you want to select.
2. Do one of the following to copy the selected clips:
l In the top menu, select Edit > Copy Clips.
l Press Ctrl + C (Windows) or ⌘ + C (macOS).
3. In the Timeline view, select the video track in which you want the clips to be pasted.
4. Click and drag on the red timeline cursor to move it to the position in time where you want the clips to be pasted.
5. Do one of the following to paste the copied clips:
l In the top menu, select Edit > Paste Clips.
l Press Ctrl + V (Windows) or ⌘ + V (macOS).
The copied clips are pasted on the selected track, right after the timeline cursor.
853
Storyboard Pro 20 User Guide

Chapter 15: Video and Image Clips
NOTES
l If a video clip is already present on a destination video track, the pasted clip will overwrite the video clip on the destination track.
l If video clips are copied from multiple tracks, they will be pasted on multiple tracks as well. If needed, Storyboard Pro will create additional video tracks to preserve the differences in tracks between the copied video clips.
854

Splitting a Video ClipYou can separate a video clip into two video clips, allowing you to cue different parts of the video at different points in the timeline.
How to split a video clip
1. In the Timeline view, select the video clip you want to split.
2. Move the timeline cursor to the frame at which you want to split the clip.
3. Do one of the following:
l From the top menu, select Clips > Split Clip at Current Frame
l In the Timeline view, right-click anywhere on the video track and select Split Clip at Current Frame.
The video clip is split. You can now move both parts independently.
NOTE
When splitting a video clip with animation keyframes, the animation keyframes will be split between the two resulting clips so that both parts preserve their respective part of the animation.
855
Storyboard Pro 20 User Guide

Chapter 15: Video and Image Clips
Displaying ThumbnailsYou can display the thumbnails of your video clips by increasing the display size of their video track to Medium or Large.
How to set the audio track size
1. In the Timeline view, right-click anywhere on the video track for which you want to display the clip's thumbnails, then select Track Size > Medium or Large.
Each clip in the selected video track will display a thumbnail near its left edge.
856
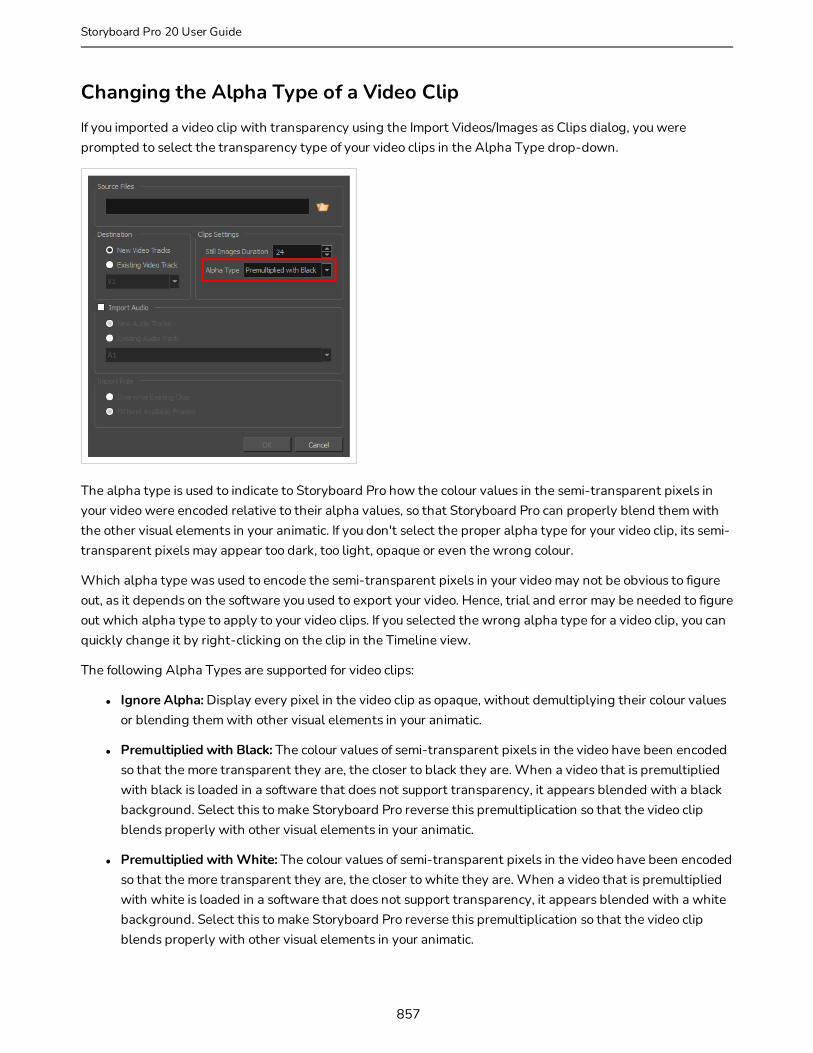
Changing the Alpha Type of a Video ClipIf you imported a video clip with transparency using the Import Videos/Images as Clips dialog, you were prompted to select the transparency type of your video clips in the Alpha Type drop-down.
The alpha type is used to indicate to Storyboard Pro how the colour values in the semi-transparent pixels in your video were encoded relative to their alpha values, so that Storyboard Pro can properly blend them with the other visual elements in your animatic. If you don't select the proper alpha type for your video clip, its semi-transparent pixels may appear too dark, too light, opaque or even the wrong colour.
Which alpha type was used to encode the semi-transparent pixels in your video may not be obvious to figure out, as it depends on the software you used to export your video. Hence, trial and error may be needed to figure out which alpha type to apply to your video clips. If you selected the wrong alpha type for a video clip, you can quickly change it by right-clicking on the clip in the Timeline view.
The following Alpha Types are supported for video clips:
l Ignore Alpha: Display every pixel in the video clip as opaque, without demultiplying their colour values or blending them with other visual elements in your animatic.
l Premultiplied with Black: The colour values of semi-transparent pixels in the video have been encoded so that the more transparent they are, the closer to black they are. When a video that is premultiplied with black is loaded in a software that does not support transparency, it appears blended with a black background. Select this to make Storyboard Pro reverse this premultiplication so that the video clip blends properly with other visual elements in your animatic.
l Premultiplied with White: The colour values of semi-transparent pixels in the video have been encoded so that the more transparent they are, the closer to white they are. When a video that is premultiplied with white is loaded in a software that does not support transparency, it appears blended with a white background. Select this to make Storyboard Pro reverse this premultiplication so that the video clip blends properly with other visual elements in your animatic.
857
Storyboard Pro 20 User Guide

Chapter 15: Video and Image Clips
l Straight: The colour of semi-transparent pixels in the image is encoded independently from their transparency. When a video clip that is not premultiplied is loaded in a software that does not support transparency, semi-transparent pixels simply appear fully opaque, making its edges appear pixelated.
NOTE
The Alpha Type for a video clip only affects movie files. If you imported an image with transparency as a video clip, its alpha type is presumed to be straight.
How to change the Alpha Type for a video clip
1. In the Timeline view, right-click on the video clip.
2. In the contextual menu, select Alpha Type and, in the sub-menu, select the proper alpha type for your clip.
How to figure out the proper alpha type for a video clip.
1. In the Timeline view, right-click on the video-clip.
2. In the contextual menu, select Alpha Type > Straight.
3. Move the timeline playhead over the video so that it is visible in the Stage or Camera view.
4. Look at the semi-transparent pixels in the video for inaccuracies, and do one of the following:
l If the semi-transparent pixels in the video appear properly, leave it as is.
l If the semi-transparent pixels in the video appear too dark, right-click on the video clip again and select Alpha Type > Premultiplied with Black.
l If the semi-transparent pixels in the video appear too light, right-click on the video clip again and select Alpha Type > Premultiplied with White.
858
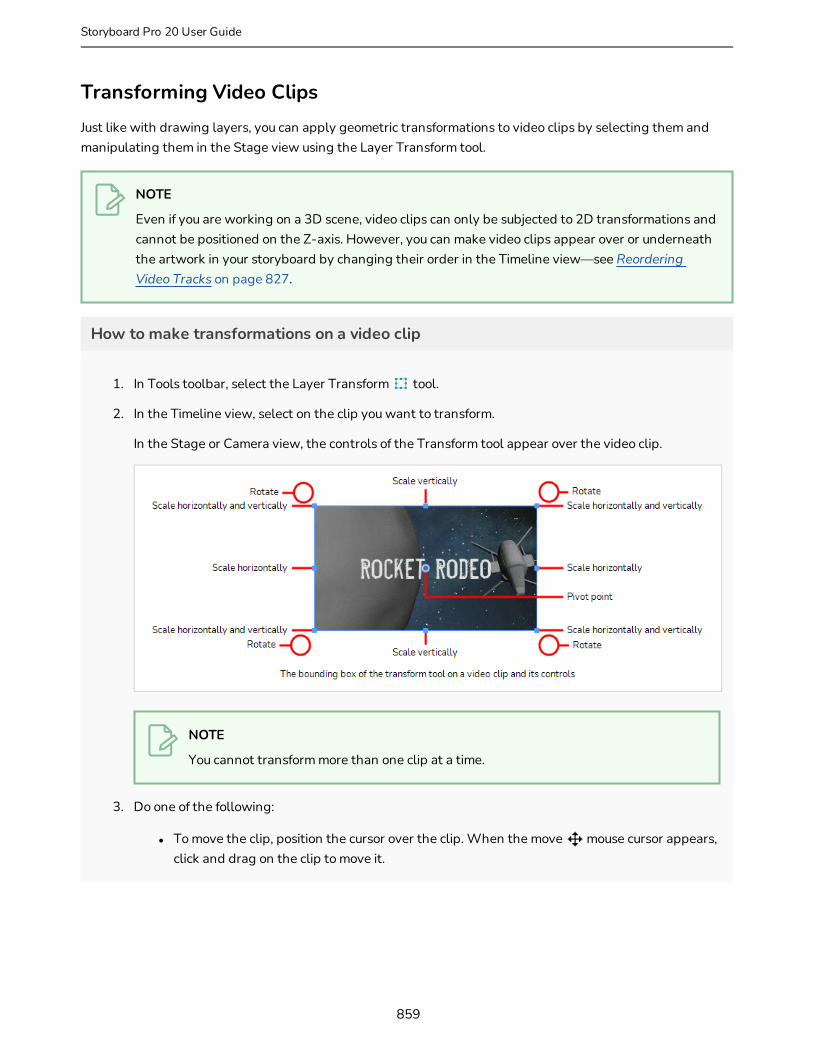
Transforming Video ClipsJust like with drawing layers, you can apply geometric transformations to video clips by selecting them and manipulating them in the Stage view using the Layer Transform tool.
NOTE
Even if you are working on a 3D scene, video clips can only be subjected to 2D transformations and cannot be positioned on the Z-axis. However, you can make video clips appear over or underneath the artwork in your storyboard by changing their order in the Timeline view—see Reordering Video Tracks on page 827.
How to make transformations on a video clip
1. In Tools toolbar, select the Layer Transform tool.
2. In the Timeline view, select on the clip you want to transform.
In the Stage or Camera view, the controls of the Transform tool appear over the video clip.
NOTE
You cannot transform more than one clip at a time.
3. Do one of the following:
l To move the clip, position the cursor over the clip. When the move mouse cursor appears, click and drag on the clip to move it.
859
Storyboard Pro 20 User Guide

Chapter 15: Video and Image Clips
TIPS
l You can also nudge the selection by using the arrow keys on your keyboard.
l You can also enter specific coordinates in the Horizontal Offset and Vertical Offset fields in the Tool Properties view.
l To resize the clip, position the cursor over one of the square points at the corners or in the middle of the edges of the bounding box. When you see the scale cursor appear, click and drag to resize the clip.
860
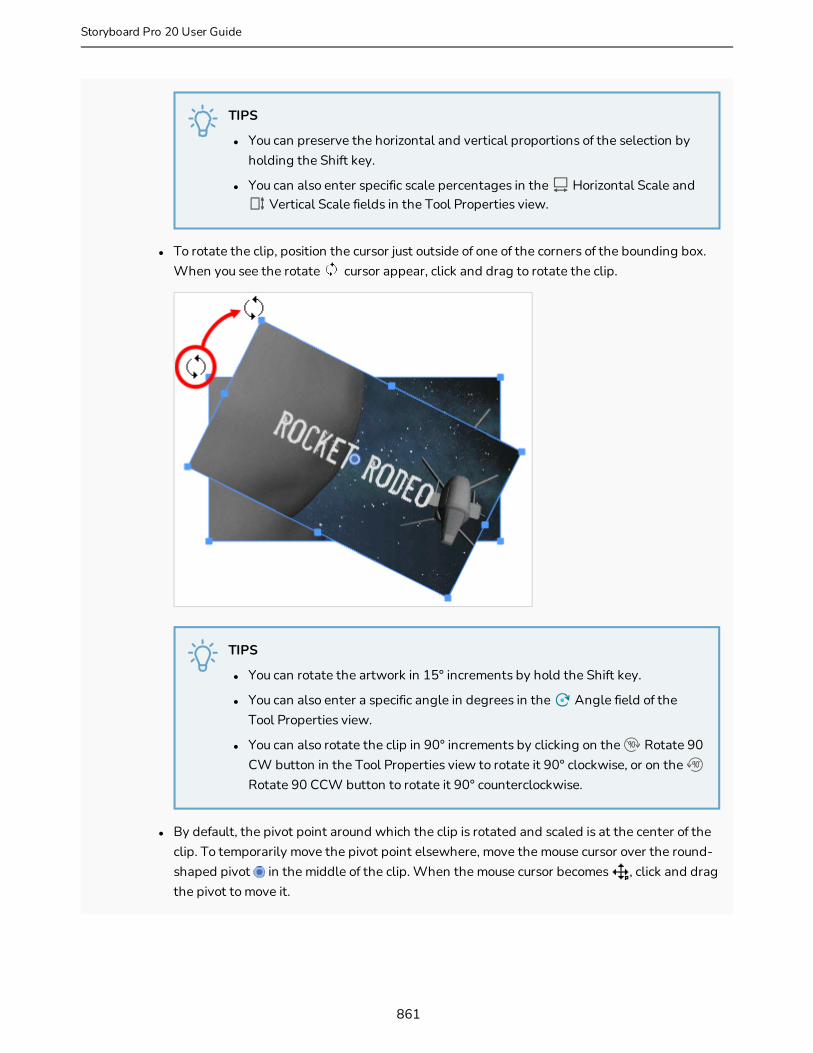
TIPS
l You can preserve the horizontal and vertical proportions of the selection by holding the Shift key.
l You can also enter specific scale percentages in the Horizontal Scale and Vertical Scale fields in the Tool Properties view.
l To rotate the clip, position the cursor just outside of one of the corners of the bounding box. When you see the rotate cursor appear, click and drag to rotate the clip.
TIPS
l You can rotate the artwork in 15° increments by hold the Shift key.
l You can also enter a specific angle in degrees in the Angle field of the Tool Properties view.
l You can also rotate the clip in 90° increments by clicking on the Rotate 90 CW button in the Tool Properties view to rotate it 90° clockwise, or on the Rotate 90 CCW button to rotate it 90° counterclockwise.
l By default, the pivot point around which the clip is rotated and scaled is at the center of the clip. To temporarily move the pivot point elsewhere, move the mouse cursor over the round-shaped pivot in the middle of the clip. When the mouse cursor becomes , click and drag the pivot to move it.
861
Storyboard Pro 20 User Guide
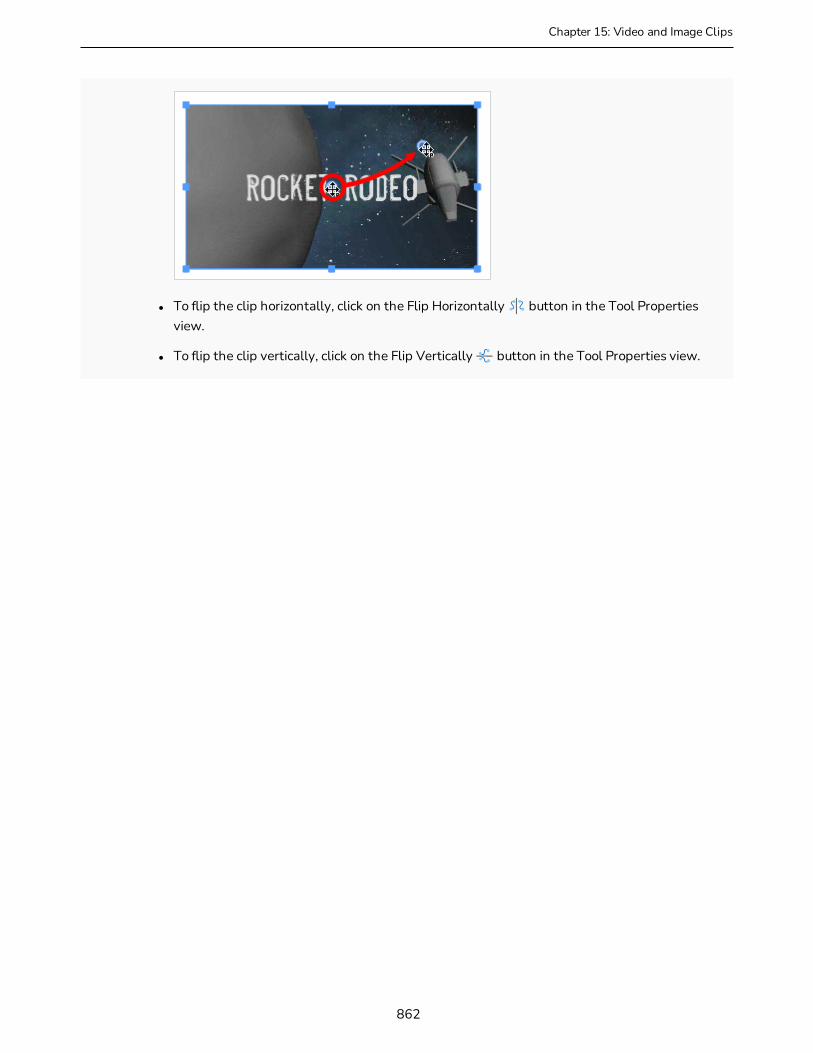
Chapter 15: Video and Image Clips
l To flip the clip horizontally, click on the Flip Horizontally button in the Tool Properties view.
l To flip the clip vertically, click on the Flip Vertically button in the Tool Properties view.
862
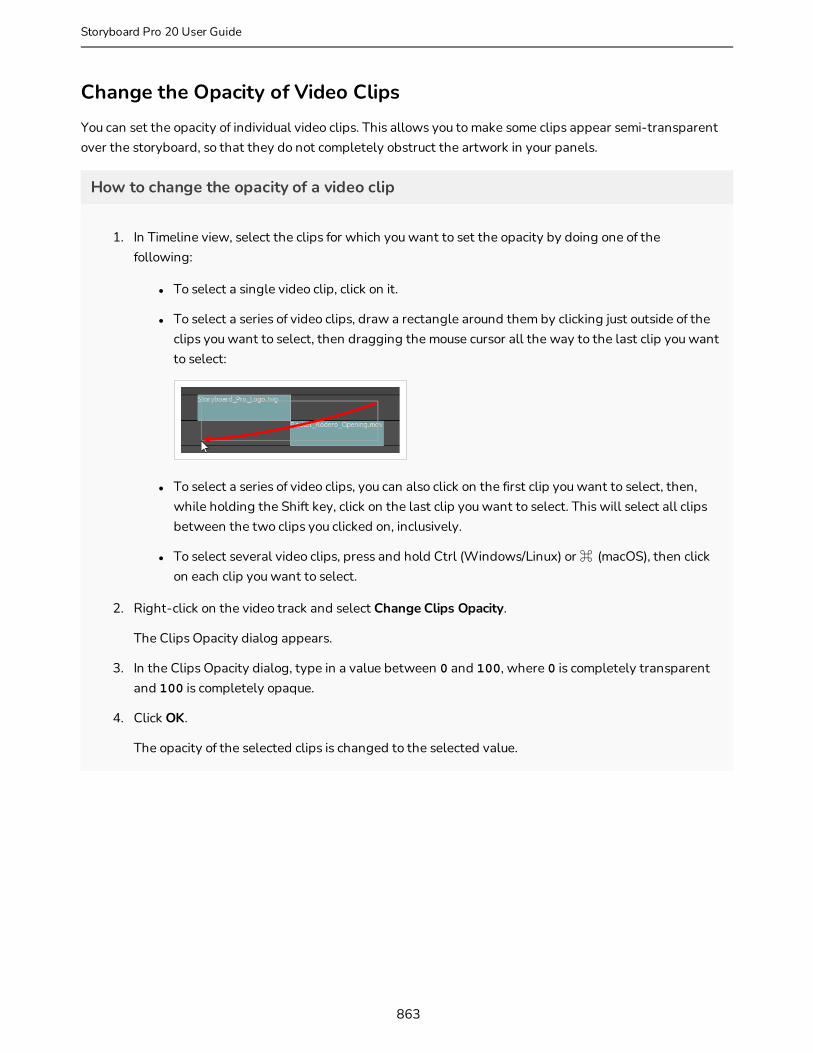
Change the Opacity of Video ClipsYou can set the opacity of individual video clips. This allows you to make some clips appear semi-transparent over the storyboard, so that they do not completely obstruct the artwork in your panels.
How to change the opacity of a video clip
1. In Timeline view, select the clips for which you want to set the opacity by doing one of the following:
l To select a single video clip, click on it.
l To select a series of video clips, draw a rectangle around them by clicking just outside of the clips you want to select, then dragging the mouse cursor all the way to the last clip you want to select:
l To select a series of video clips, you can also click on the first clip you want to select, then, while holding the Shift key, click on the last clip you want to select. This will select all clips between the two clips you clicked on, inclusively.
l To select several video clips, press and hold Ctrl (Windows/Linux) or ⌘ (macOS), then click on each clip you want to select.
2. Right-click on the video track and select Change Clips Opacity.
The Clips Opacity dialog appears.
3. In the Clips Opacity dialog, type in a value between 0 and 100, where 0 is completely transparent and 100 is completely opaque.
4. Click OK.
The opacity of the selected clips is changed to the selected value.
863
Storyboard Pro 20 User Guide
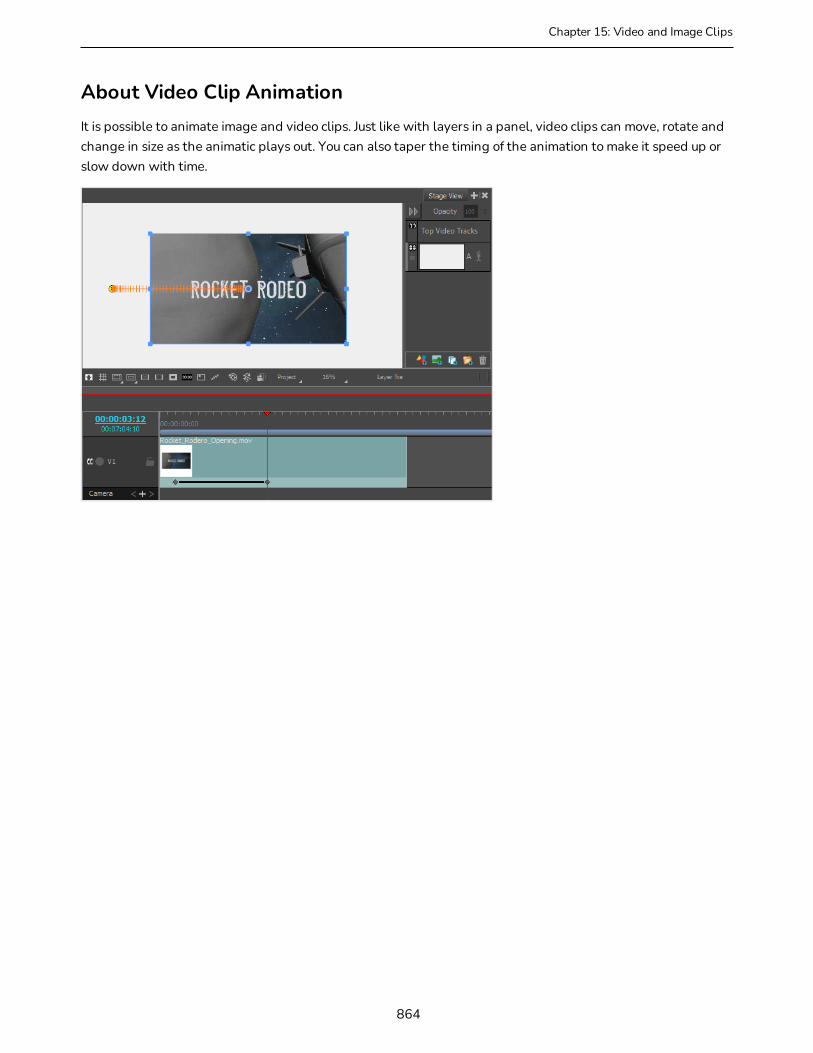
Chapter 15: Video and Image Clips
About Video Clip AnimationIt is possible to animate image and video clips. Just like with layers in a panel, video clips can move, rotate and change in size as the animatic plays out. You can also taper the timing of the animation to make it speed up or slow down with time.
864
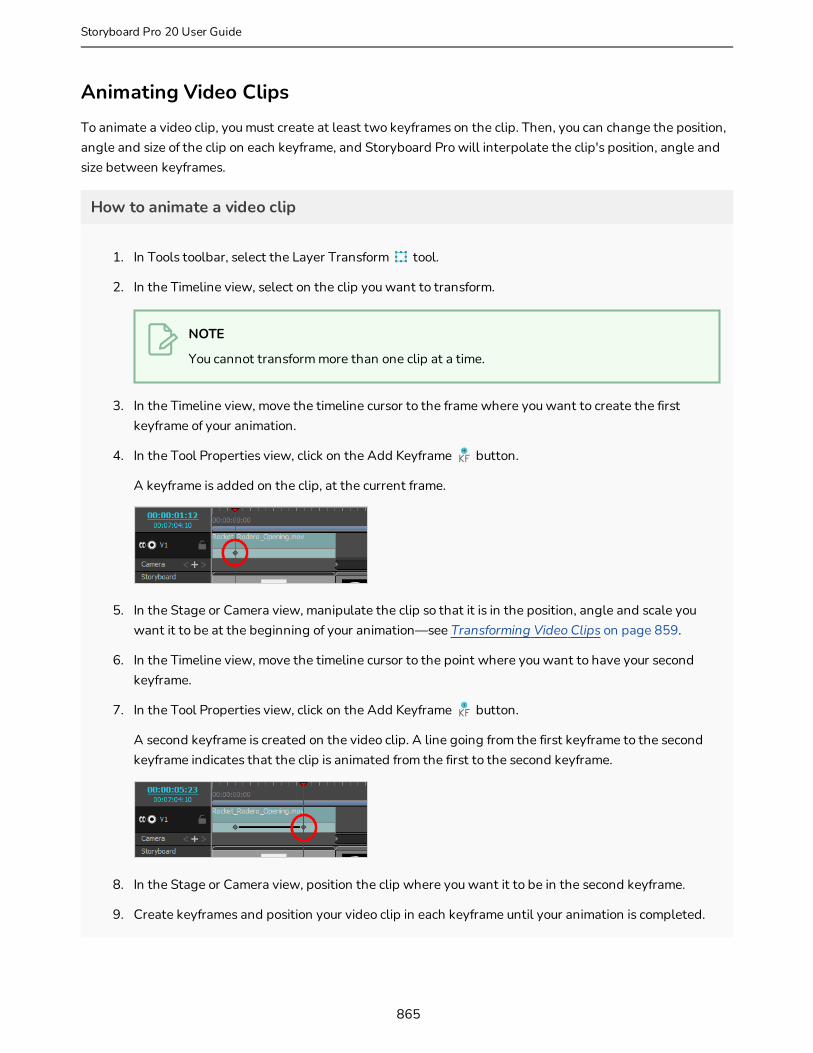
Animating Video ClipsTo animate a video clip, you must create at least two keyframes on the clip. Then, you can change the position, angle and size of the clip on each keyframe, and Storyboard Pro will interpolate the clip's position, angle and size between keyframes.
How to animate a video clip
1. In Tools toolbar, select the Layer Transform tool.
2. In the Timeline view, select on the clip you want to transform.
NOTE
You cannot transform more than one clip at a time.
3. In the Timeline view, move the timeline cursor to the frame where you want to create the first keyframe of your animation.
4. In the Tool Properties view, click on the Add Keyframe button.
A keyframe is added on the clip, at the current frame.
5. In the Stage or Camera view, manipulate the clip so that it is in the position, angle and scale you want it to be at the beginning of your animation—see Transforming Video Clips on page 859.
6. In the Timeline view, move the timeline cursor to the point where you want to have your second keyframe.
7. In the Tool Properties view, click on the Add Keyframe button.
A second keyframe is created on the video clip. A line going from the first keyframe to the second keyframe indicates that the clip is animated from the first to the second keyframe.
8. In the Stage or Camera view, position the clip where you want it to be in the second keyframe.
9. Create keyframes and position your video clip in each keyframe until your animation is completed.
865
Storyboard Pro 20 User Guide
Chapter 15: Video and Image Clips
10. If you need to move a keyframe to another position in time, simply click and drag it to the desired position.
11. To add ease-in and ease-out to the timing of the animation, see Adding Ease-In and Ease-Out to a Video Clip Animation on page 867.
12. If you want to delete a keyframe, move the Timeline cursor to the exact position of the keyframe. Then, in the Tool Properties view, click on Delete Keyframe .
13. If you want to reset the clip to its original position on a keyframe, move the timeline cursor to the position of the keyframe. Then, in the Tool Properties view, click on Reset Keyframe .
14. To test your animation, move the timeline cursor at the beginning of the clip. Then, in the Playback toolbar, click on the Play button.
866
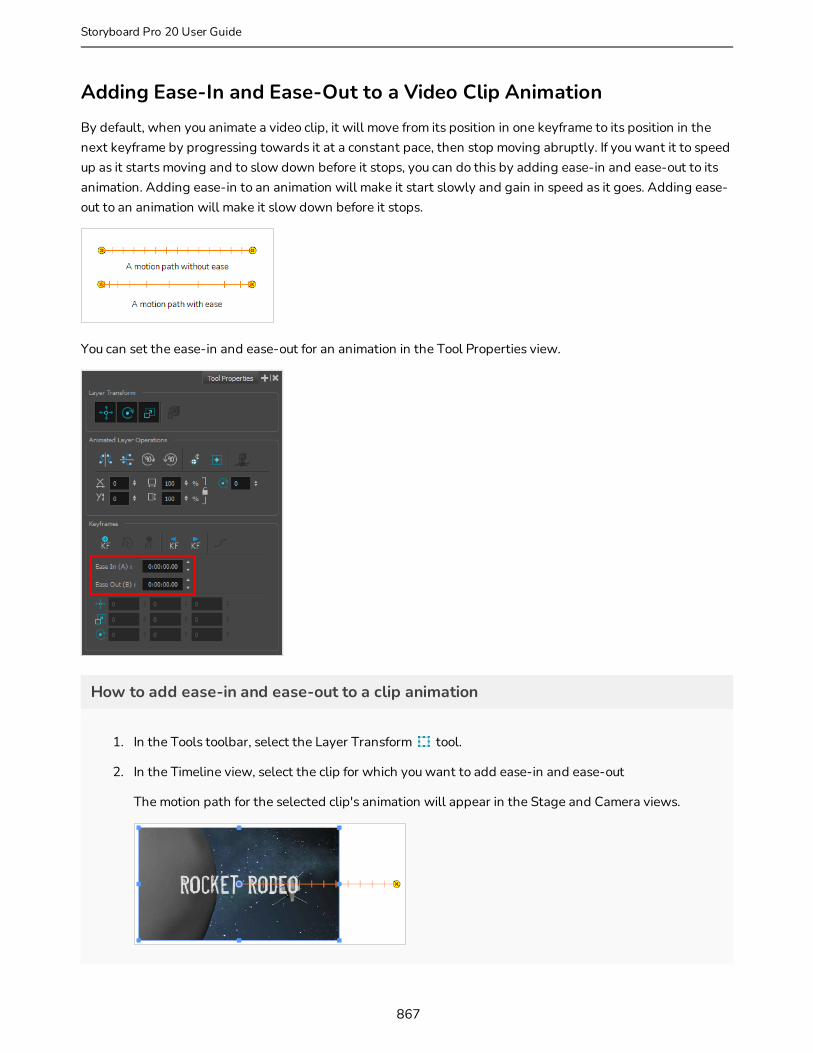
Adding Ease-In and Ease-Out to a Video Clip AnimationBy default, when you animate a video clip, it will move from its position in one keyframe to its position in the next keyframe by progressing towards it at a constant pace, then stop moving abruptly. If you want it to speed up as it starts moving and to slow down before it stops, you can do this by adding ease-in and ease-out to its animation. Adding ease-in to an animation will make it start slowly and gain in speed as it goes. Adding ease-out to an animation will make it slow down before it stops.
You can set the ease-in and ease-out for an animation in the Tool Properties view.
How to add ease-in and ease-out to a clip animation
1. In the Tools toolbar, select the Layer Transform tool.
2. In the Timeline view, select the clip for which you want to add ease-in and ease-out
The motion path for the selected clip's animation will appear in the Stage and Camera views.
867
Storyboard Pro 20 User Guide
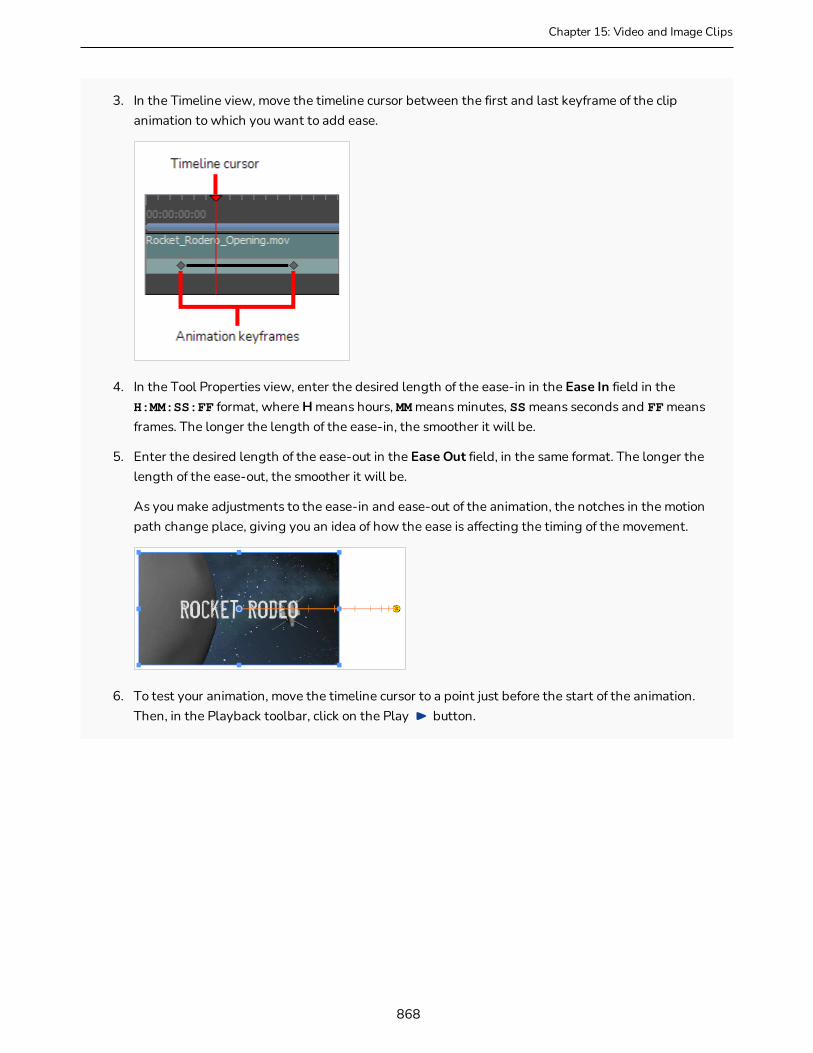
Chapter 15: Video and Image Clips
3. In the Timeline view, move the timeline cursor between the first and last keyframe of the clip animation to which you want to add ease.
4. In the Tool Properties view, enter the desired length of the ease-in in the Ease In field in the H:MM:SS:FF format, where H means hours, MM means minutes, SS means seconds and FF means frames. The longer the length of the ease-in, the smoother it will be.
5. Enter the desired length of the ease-out in the Ease Out field, in the same format. The longer the length of the ease-out, the smoother it will be.
As you make adjustments to the ease-in and ease-out of the animation, the notches in the motion path change place, giving you an idea of how the ease is affecting the timing of the movement.
6. To test your animation, move the timeline cursor to a point just before the start of the animation. Then, in the Playback toolbar, click on the Play button.
868

Moving Video Clip KeyframesAfter you have created keyframes in a video clip, you can change their position in time so as to adjust the starting time, length and pace of the clip animation.
How to move video clip keyframes
1. In the Timeline view, select one or multiple keyframes in a clip by doing one of the following:
l To select a single keyframe, click on it.
l To select a sequence of several keyframes from the same clip, click on the first keyframe in the sequence you want to select. Then, while holding the Shift key, click on the last keyframe in the sequence you want to select. Both keyframes you clicked on as well as every keyframe between them will be selected.
l To select all keyframes in the clip, double click on the clip's animation keyframes track.
Each selected keyframe will be highlighted in blue.
2. Click and drag the selected keyframes towards the left to move the animation earlier in the clip, or towards the right to move the animation later in the clip.
869
Storyboard Pro 20 User Guide
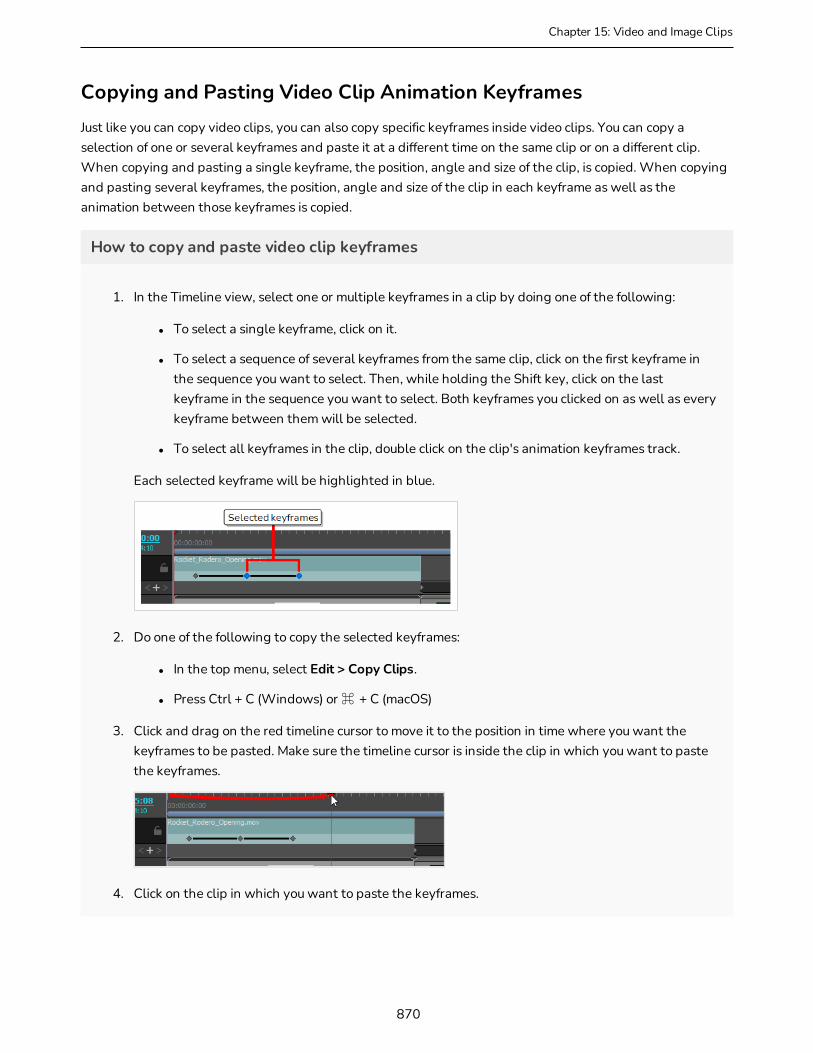
Chapter 15: Video and Image Clips
Copying and Pasting Video Clip Animation KeyframesJust like you can copy video clips, you can also copy specific keyframes inside video clips. You can copy a selection of one or several keyframes and paste it at a different time on the same clip or on a different clip. When copying and pasting a single keyframe, the position, angle and size of the clip, is copied. When copying and pasting several keyframes, the position, angle and size of the clip in each keyframe as well as the animation between those keyframes is copied.
How to copy and paste video clip keyframes
1. In the Timeline view, select one or multiple keyframes in a clip by doing one of the following:
l To select a single keyframe, click on it.
l To select a sequence of several keyframes from the same clip, click on the first keyframe in the sequence you want to select. Then, while holding the Shift key, click on the last keyframe in the sequence you want to select. Both keyframes you clicked on as well as every keyframe between them will be selected.
l To select all keyframes in the clip, double click on the clip's animation keyframes track.
Each selected keyframe will be highlighted in blue.
2. Do one of the following to copy the selected keyframes:
l In the top menu, select Edit > Copy Clips.
l Press Ctrl + C (Windows) or ⌘ + C (macOS)
3. Click and drag on the red timeline cursor to move it to the position in time where you want the keyframes to be pasted. Make sure the timeline cursor is inside the clip in which you want to paste the keyframes.
4. Click on the clip in which you want to paste the keyframes.
870

5. Do one of the following to paste the copied keyframes:
l In the top menu, select Edit > Paste Clips.
l Press Ctrl + V.
The keyframes are pasted in the selected clip, at the position where the timeline cursor is.
871
Storyboard Pro 20 User Guide
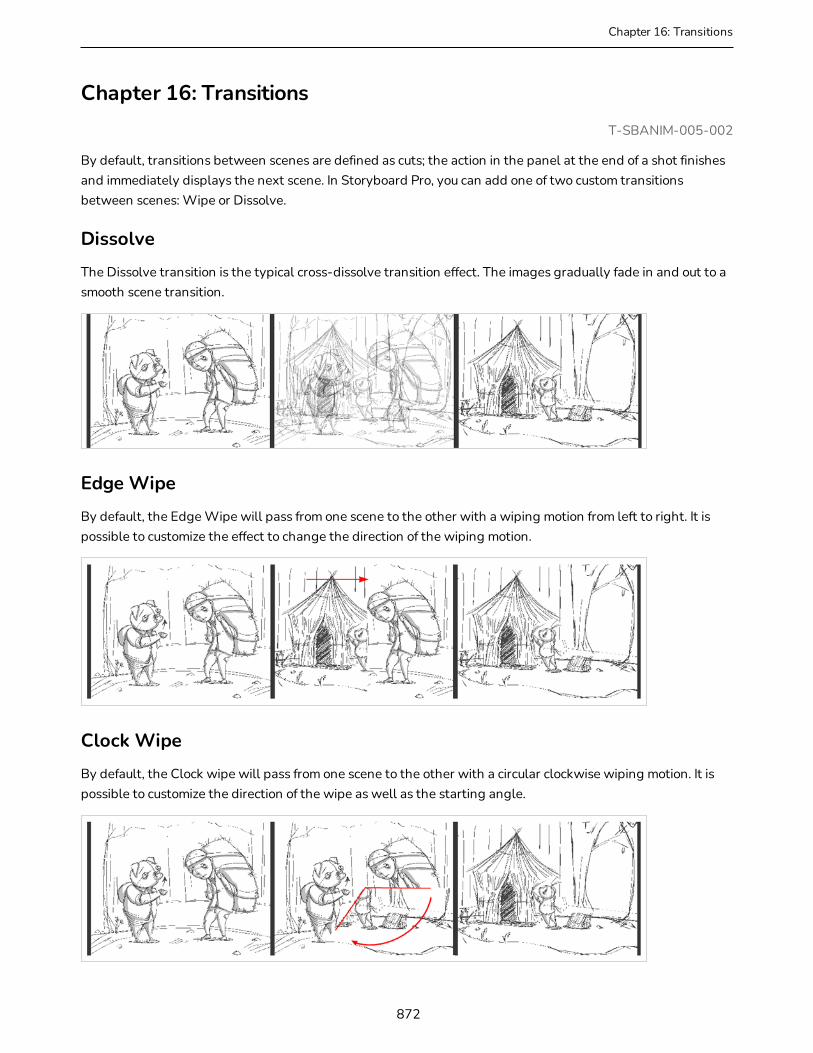
Chapter 16: Transitions
Chapter 16: TransitionsT-SBANIM-005-002
By default, transitions between scenes are defined as cuts; the action in the panel at the end of a shot finishes and immediately displays the next scene. In Storyboard Pro, you can add one of two custom transitions between scenes: Wipe or Dissolve.
Dissolve
The Dissolve transition is the typical cross-dissolve transition effect. The images gradually fade in and out to a smooth scene transition.
Edge Wipe
By default, the Edge Wipe will pass from one scene to the other with a wiping motion from left to right. It is possible to customize the effect to change the direction of the wiping motion.
Clock Wipe
By default, the Clock wipe will pass from one scene to the other with a circular clockwise wiping motion. It is possible to customize the direction of the wipe as well as the starting angle.
872
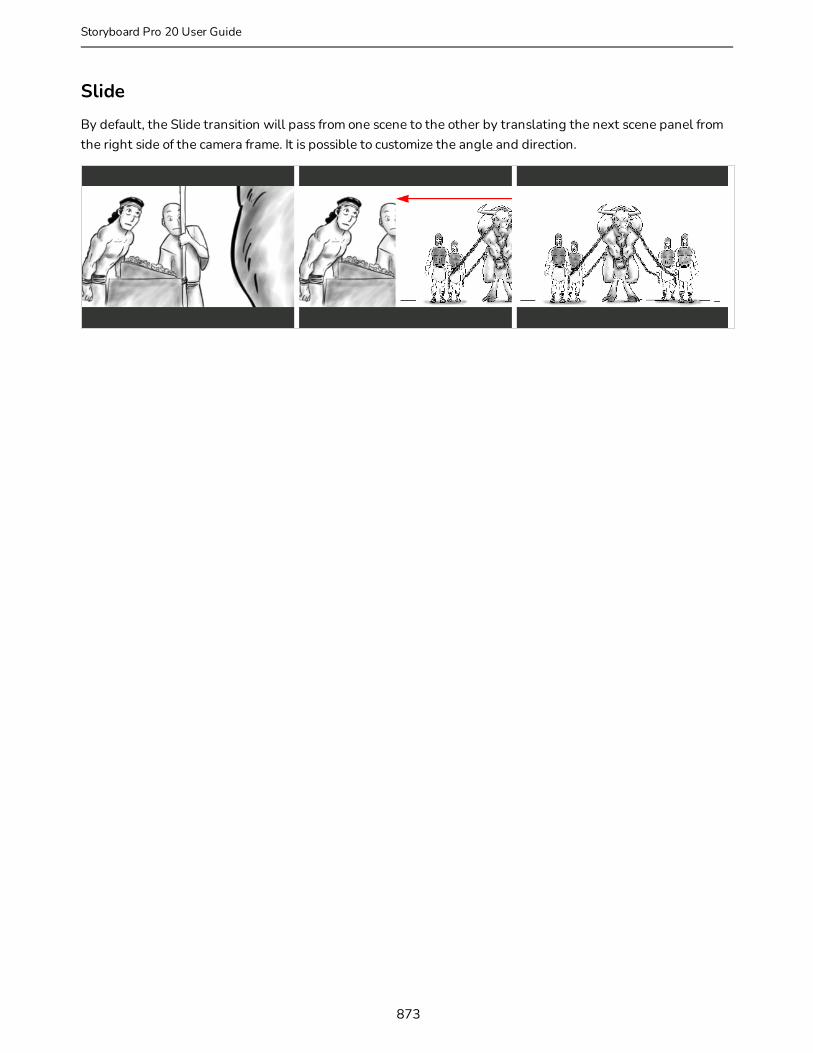
Slide
By default, the Slide transition will pass from one scene to the other by translating the next scene panel from the right side of the camera frame. It is possible to customize the angle and direction.
873
Storyboard Pro 20 User Guide

Chapter 16: Transitions
Adding TransitionsT-SBANIM-005-003
A transition is inserted between scenes (shots).
How to add a transition
1. In the Thumbnails or Timeline view, select the first of the two scenes between which you want to add a transition. For example, if you want to add a transition between scenes 2 and 3, select any panel from scene 2.
2. Do one of the following:
l From the Storyboard toolbar, click the New Transition button.
l Select Storyboard > Add Transition.
l Right-click the scene thumbnails and select Add Transition.
3. Click on the transition to select it.
4. Open the Panel view. When a transition is selected, the Panel view displays its properties and allows you to change them.
5. In the Type drop-down, select which type of transition you want to use:
l Dissolve: Fades the first scene out to black, then fades the second scene in from black.
l Edge Wipe: Wipes the first scene out with the second scene, with a straight line going all the way across the screen. The angle of the line can be customized.
874

l Clock Wipe: Wipes the first scene out with the second scene, with a line going from the centre of the screen to its edge, which rotates 360 degrees to cover the whole screen. The initial angle and direction of the line can be customized.
l Slide: When set to Slide In, this makes the second scene slide from the edge of the screen over the first scene. When set to Slide Out, this makes the first scene slide towards the edge of the screen, leaving the second scene on the screen as if it had always been behind it. The angle at which the scene slides in or out can be customized.
6. Determine the length of the transition by doing one of the following:
l In the Timeline view, click and drag the right edge of the transition towards the right to extend it, or towards the left to shorten it.
l In the Panel view, right of the duration field, click on the Up arrow to extend the transition by 1 frame, or on the Down arrow to shorten the transition by one frame.
l In the duration field of the Panel view, type in the duration of the transition.
NOTE
The format of the duration is H:MM:SS:FF, where H means hours, M means minutes, S means seconds and F means frames.
NOTE
When you extend a transition, the ensuing scenes are rippled backwards, and when you shorten a transition, the ensuing scenes are rippled forward. This is because the scenes before and after the transition overlap during the transition. This means that the scene after the transition starts while the scene before the transition has not ended yet, which shortens the length of the project.
875
Storyboard Pro 20 User Guide
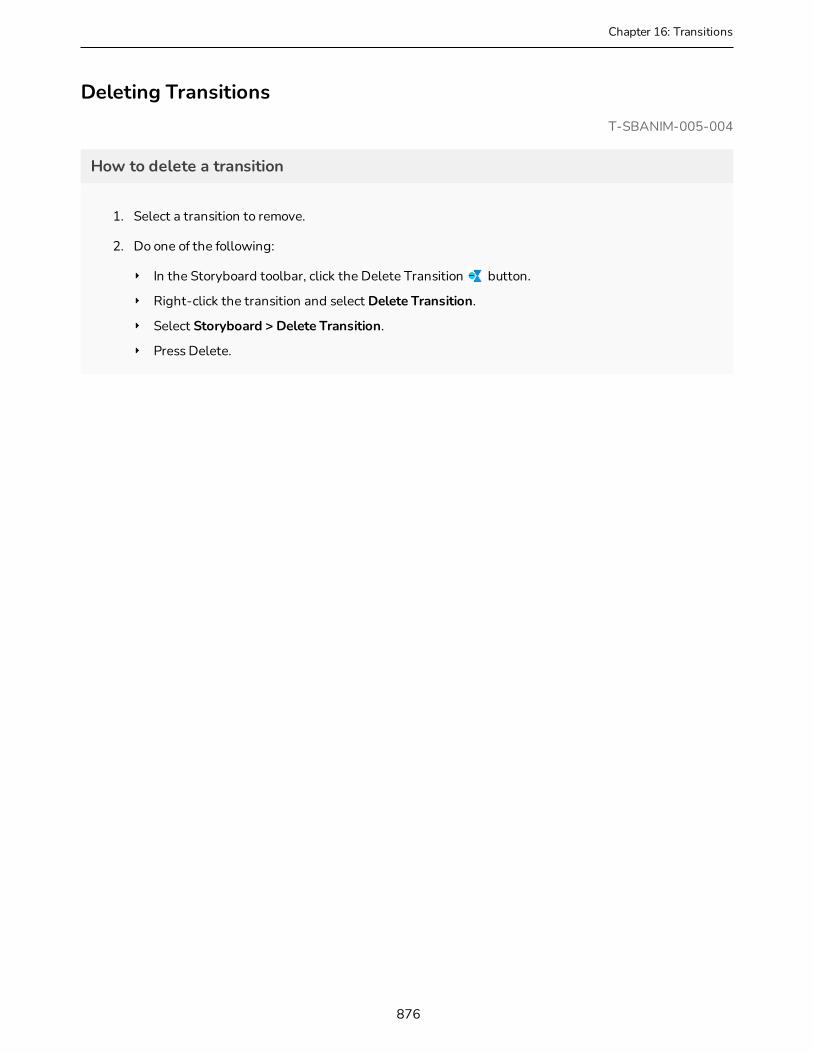
Chapter 16: Transitions
Deleting TransitionsT-SBANIM-005-004
How to delete a transition
1. Select a transition to remove.
2. Do one of the following:
‣ In the Storyboard toolbar, click the Delete Transition button.
‣ Right-click the transition and select Delete Transition.
‣ Select Storyboard > Delete Transition.
‣ Press Delete.
876
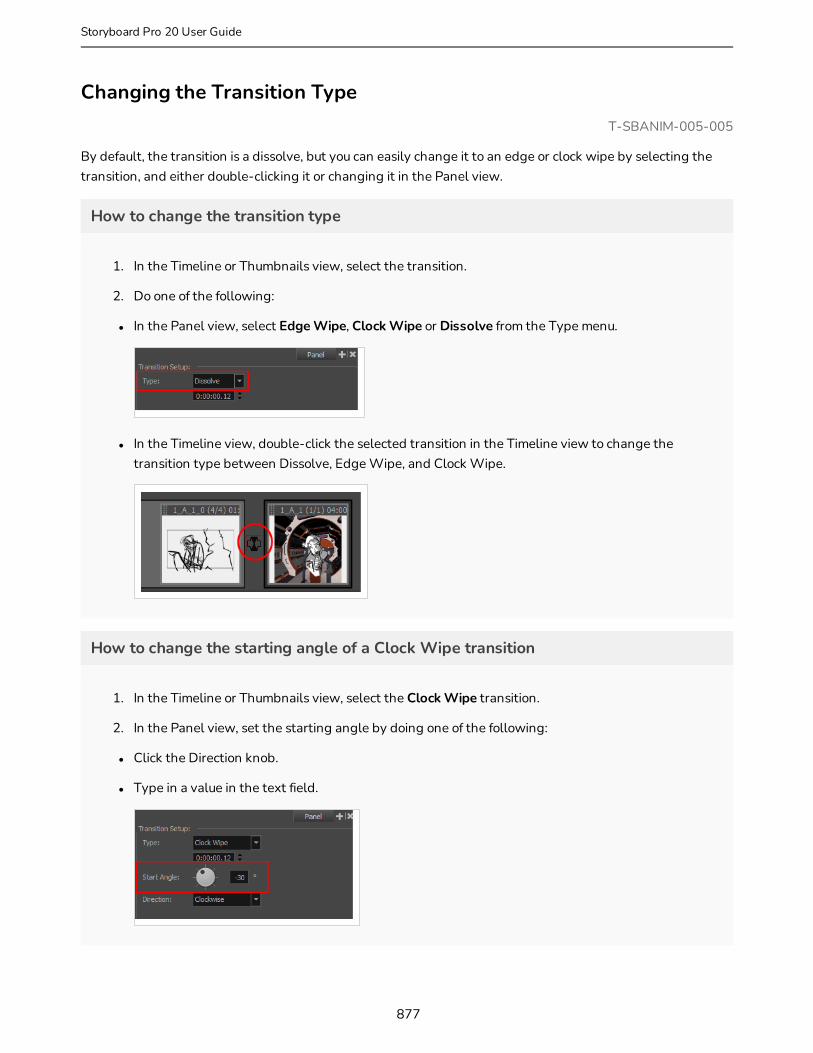
Changing the Transition TypeT-SBANIM-005-005
By default, the transition is a dissolve, but you can easily change it to an edge or clock wipe by selecting the transition, and either double-clicking it or changing it in the Panel view.
How to change the transition type
1. In the Timeline or Thumbnails view, select the transition.
2. Do one of the following:
l In the Panel view, select Edge Wipe, Clock Wipe or Dissolve from the Type menu.
l In the Timeline view, double-click the selected transition in the Timeline view to change the transition type between Dissolve, Edge Wipe, and Clock Wipe.
How to change the starting angle of a Clock Wipe transition
1. In the Timeline or Thumbnails view, select the Clock Wipe transition.
2. In the Panel view, set the starting angle by doing one of the following:
l Click the Direction knob.
l Type in a value in the text field.
877
Storyboard Pro 20 User Guide

Chapter 16: Transitions
3. In the Direction menu, select the wipe direction: Clockwise or Counterclockwise.
878
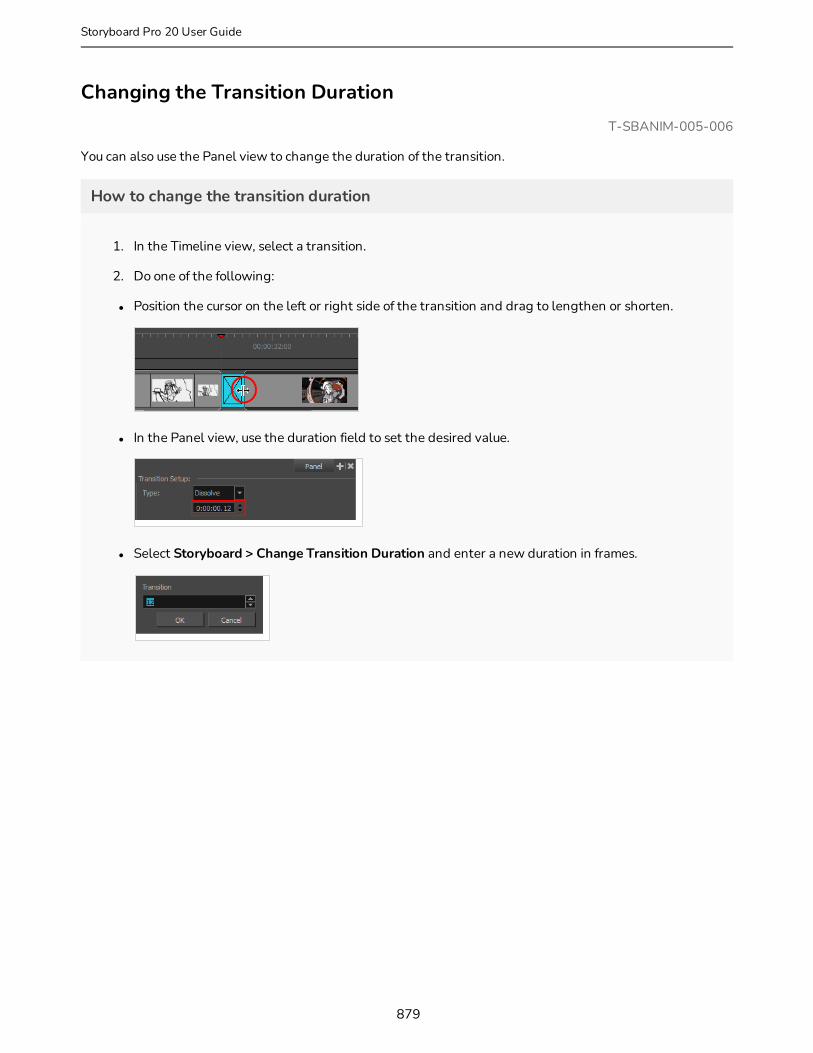
Changing the Transition DurationT-SBANIM-005-006
You can also use the Panel view to change the duration of the transition.
How to change the transition duration
1. In the Timeline view, select a transition.
2. Do one of the following:
l Position the cursor on the left or right side of the transition and drag to lengthen or shorten.
l In the Panel view, use the duration field to set the desired value.
l Select Storyboard > Change Transition Duration and enter a new duration in frames.
879
Storyboard Pro 20 User Guide

Chapter 17: Libraries
Chapter 17: LibrariesT-SBADV-010-001
Using libraries, you can share and reuse any elements you create in Storyboard Pro. With the library view, you can store several different elements such as characters, sets, props, layers, panels, audio files, video files, 3D models, animations and camera movements.
Libraries are stored on your hard drive and the same library can be used in several projects. Hence, you can use libraries to share assets between your projects.
You can create templates simply by selecting assets in your project, such as layers, panels and clips, then dragging them into a library in the Library view. Likewise, you can import a template's content by dragging it from a library into its intended destination in your project.
880

About Library FoldersT-SBADV-010-002
By default, there are four libraries available in the Library view:
l 3D Models: The library in which all 3D models used by your projects are stored. This library is exclusive to the current project—see About 3D Objects on page 716.
l Shared: The library in which all shared drawings in your project are stored. This library is exclusive to the current project—see Sharing Drawings on page 568.
l Global: The default library to use for sharing assets between projects. This library is stored in the Toon Boom Storyboard Pro Library sub-folder of your Documents folder.
l Templates: A library of sample drawings bundled with Storyboard Pro.
Hence, the go-to library for creating templates is the Global library. However, as you will probably create a large number of templates, you might eventually need to organize the assets into different libraries. For example, you may want to create libraries for characters, props, backgrounds, panels, sound clips, and any other type of asset your project needs to re-use. You can add as many libraries as you wish to the Library view, each of which can store different types of templates.
Each library in the Library view corresponds to a folder in your workstation's file system. Since those folders can contain sub-folders, and the Library view allows you to browse sub-folders in a library, you can also organize the templates inside your libraries by storing them in different sub-folders.
881
Storyboard Pro 20 User Guide
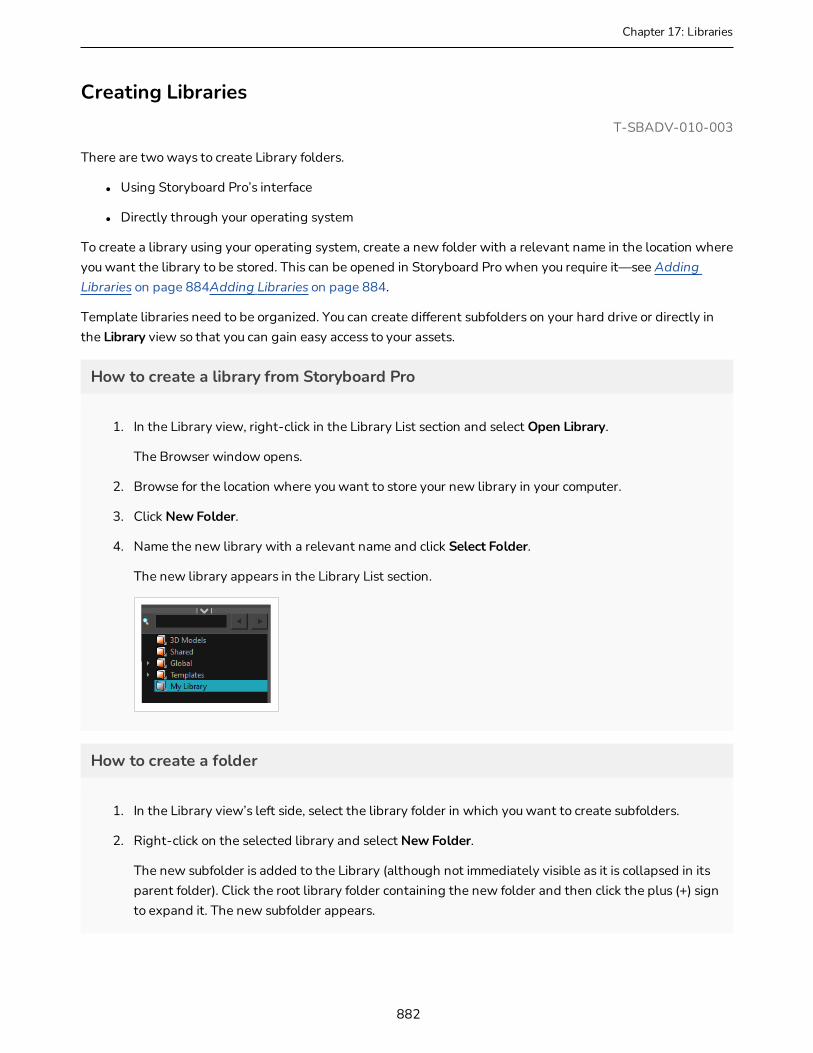
Chapter 17: Libraries
Creating LibrariesT-SBADV-010-003
There are two ways to create Library folders.
l Using Storyboard Pro’s interface
l Directly through your operating system
To create a library using your operating system, create a new folder with a relevant name in the location where you want the library to be stored. This can be opened in Storyboard Pro when you require it—see Adding Libraries on page 884Adding Libraries on page 884.
Template libraries need to be organized. You can create different subfolders on your hard drive or directly in the Library view so that you can gain easy access to your assets.
How to create a library from Storyboard Pro
1. In the Library view, right-click in the Library List section and select Open Library.
The Browser window opens.
2. Browse for the location where you want to store your new library in your computer.
3. Click New Folder.
4. Name the new library with a relevant name and click Select Folder.
The new library appears in the Library List section.
How to create a folder
1. In the Library view’s left side, select the library folder in which you want to create subfolders.
2. Right-click on the selected library and select New Folder.
The new subfolder is added to the Library (although not immediately visible as it is collapsed in its parent folder). Click the root library folder containing the new folder and then click the plus (+) sign to expand it. The new subfolder appears.
882

883
Storyboard Pro 20 User Guide

Chapter 17: Libraries
Adding LibrariesT-SBADV-010-004
You can open any folder on your hard drive or network as a library. Opening a library means linking the folder to your Library view. You only need to open the library once. The library folder is available every time you open the application until you decide to close the library and unlink it.
TIP
You can add a folder that contains images, sound files or video files to your libraries. This will allow you to quickly import those assets into your project. You can drag and drop images directly into the Stage or Camera view, and you can drag and drop sound files and video files into audio or video tracks in the Timeline view.
How to open a library
1. In the Library view, right-click in the Library List section and select Open Library.
The Browser window opens.
2. Browse to the location of the library folder.
3. Select the folder and click OK.
The new library appears in the Library List section.
884
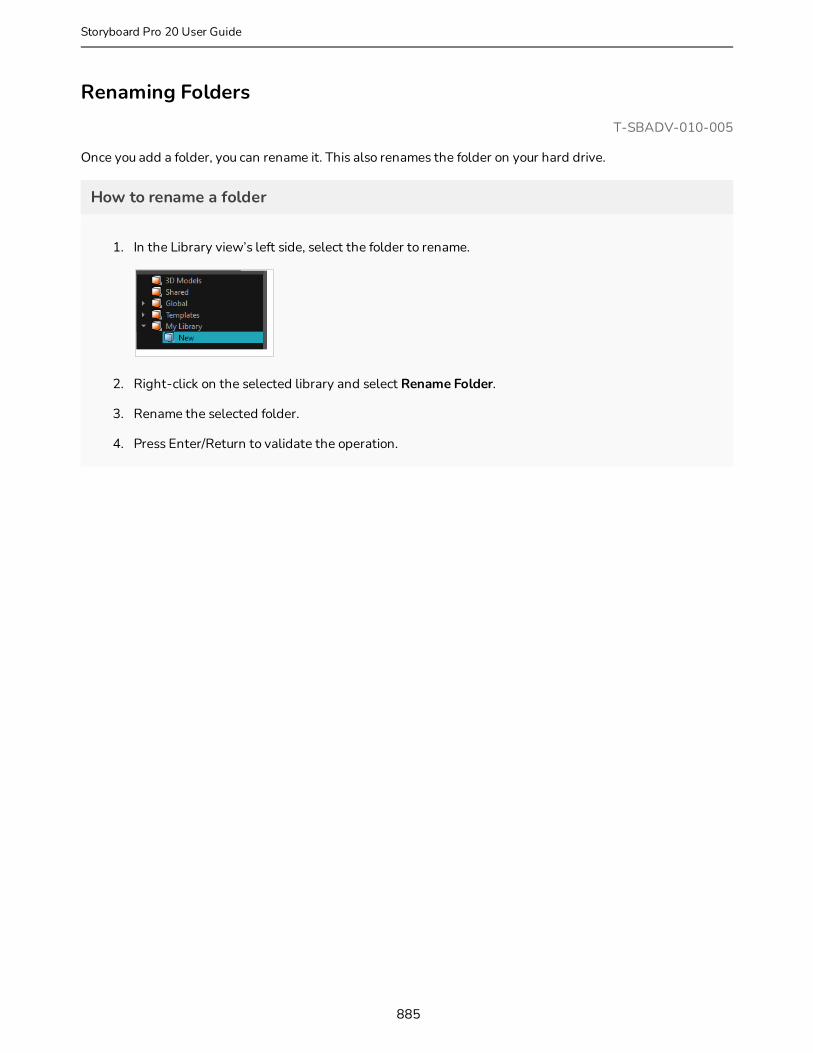
Renaming FoldersT-SBADV-010-005
Once you add a folder, you can rename it. This also renames the folder on your hard drive.
How to rename a folder
1. In the Library view’s left side, select the folder to rename.
2. Right-click on the selected library and select Rename Folder.
3. Rename the selected folder.
4. Press Enter/Return to validate the operation.
885
Storyboard Pro 20 User Guide
Chapter 17: Libraries
Closing Libraries and Deleting FoldersT-SBADV-010-006
If you want to remove a folder from your libraries, you must first understand the difference between a library and a sub-folder in a library. A library is a folder added at the root of your libraries list, and it is indicated by a
icon. A sub-folder is inside one of the libraries in the libraries list, and it is indicated by a icon.
You can close a library , which will remove it from the Library view, but not from your hard drive. However, you cannot close a sub-folder . All the sub-folders in a library are always available in the Library view. However, you can delete sub-folder . This however will delete it from your hard drive permanently.
Hence, in summary:
l You can close a library , which will remove it from the Library view but not from your hard drive, but you cannot outright delete a library from Storyboard Pro.
l You can delete a library sub-folder , which will permanently remove it from your hard drive, but you cannot simply close a library sub-folder.
Hence, if you find that some sub-folders are incumbering your library, but you don't want to lose their content, it would be best to open this library in a file browser, and move those folders somewhere else where you can retrieve them later.
NOTE
You cannot close the following default libraries: 3D Models, Shared and Global.
IMPORTANT
You can undo deleting a library sub-folder up until you close the project or exit the application. After that, the deleted files will be gone permanently and you will not be able to retrieve them.
How to close a library
1. In the left pane of the Library view, select the library folder that you want to remove.
2. Right-click on the library and select Close.
How to delete a library sub-folder
1. In the left pane of the Library view, browse to and select the library sub-folder that you want to delete.
886

2. Do one of the following:
l Right-click the selected library and select Delete Folder.
l Press Del.
A confirmation prompt will appear.
If you are sure you want to permanently delete all the content of the selected folder from your hard drive, click Yes. Otherwise, click No.
887
Storyboard Pro 20 User Guide
Chapter 17: Libraries
Refreshing LibrariesT-SBADV-010-007
If you update the content of your libraries through your operating system, you must refresh the library folders in the Library view.
How to refresh a library
1. In the Library view’s left pane, right-click and select Refresh or press F5.
888

About TemplatesT-SBADV-010-009
If you want to reuse artwork, layers, panels or camera motions from your project in the same or other projects, you can create a template out of it. A template is a package containing a copy of the assets you stored in it, and which can easily be copied into any project as many times as needed.
Storyboard Pro templates can be made with the following types of assets:
Template Type
Content
Layer The artwork, 3D models, layer animation, opacity of the layer or layers.
PanelThe length of the panel, its camera movements, all of its layers and 3D models, their layer animation and their opacity
Video clip The video file, its In and Out points, its animation and its opacity
Sound clip The sound file, its In and Out points and its volume envelope
Camera movement
Camera animation keyframes
Layer animation
The layer's artwork and its animation keyframes
NOTE
When you create a template, it is not linked to the original project. A copy of the assets are created for the template, and you can modify the original project without affecting your template. Likewise, when you import a template into your project, it is copied into your project. Making changes to the template will not affect its imported copies, and you can make changes to the imported assets without affecting the template.
889
Storyboard Pro 20 User Guide

Chapter 17: Libraries
Creating TemplatesT-SBADV-010-010
You can create a template out of many assets in your project. You can create a template out of one or several panels, one or several layers in a panel, a sound clip, a video clip and even animation keyframes.
Creating a template is as simple as selecting the assets you want to store in the template, then dragging and dropping them into a library in the Library view.
How to create a template from one or several layers using the Stage or Camera view
1. In the Library view, select a folder in which you want to store your template.
2. In the Layer panel of the Stage or Camera view, select one or several layers. To select several layers, do one of the following:
l While holding Shift, click on the first layer you want to add to your selection, then on the last layer you want to add to your selection. All layers in-between will be part of the selection, inclusively.
l While holding Ctrl (Windows) or ⌘ (macOS), click on each layer you want to add to your selection.
3. Drag and drop the selection into the right pane of the Library view.
4. In the Rename dialog box, enter the name for your new template.
NOTE
You can also rename a template after it is created by right-clicking on it and selecting Rename.
How to create a template of one or several panels using the Thumbnails view
1. In the Library view, select a folder in which you want to store your template.
890
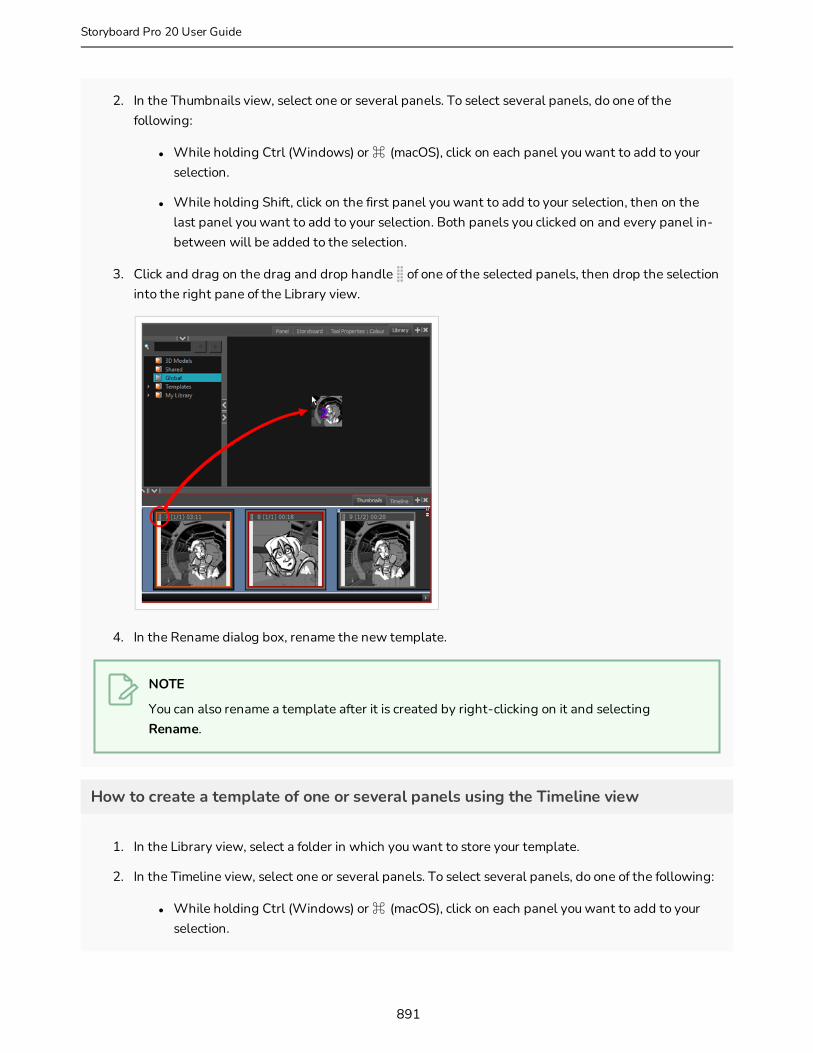
2. In the Thumbnails view, select one or several panels. To select several panels, do one of the following:
l While holding Ctrl (Windows) or ⌘ (macOS), click on each panel you want to add to your selection.
l While holding Shift, click on the first panel you want to add to your selection, then on the last panel you want to add to your selection. Both panels you clicked on and every panel in-between will be added to the selection.
3. Click and drag on the drag and drop handle of one of the selected panels, then drop the selection into the right pane of the Library view.
4. In the Rename dialog box, rename the new template.
NOTE
You can also rename a template after it is created by right-clicking on it and selecting Rename.
How to create a template of one or several panels using the Timeline view
1. In the Library view, select a folder in which you want to store your template.
2. In the Timeline view, select one or several panels. To select several panels, do one of the following:
l While holding Ctrl (Windows) or ⌘ (macOS), click on each panel you want to add to your selection.
891
Storyboard Pro 20 User Guide
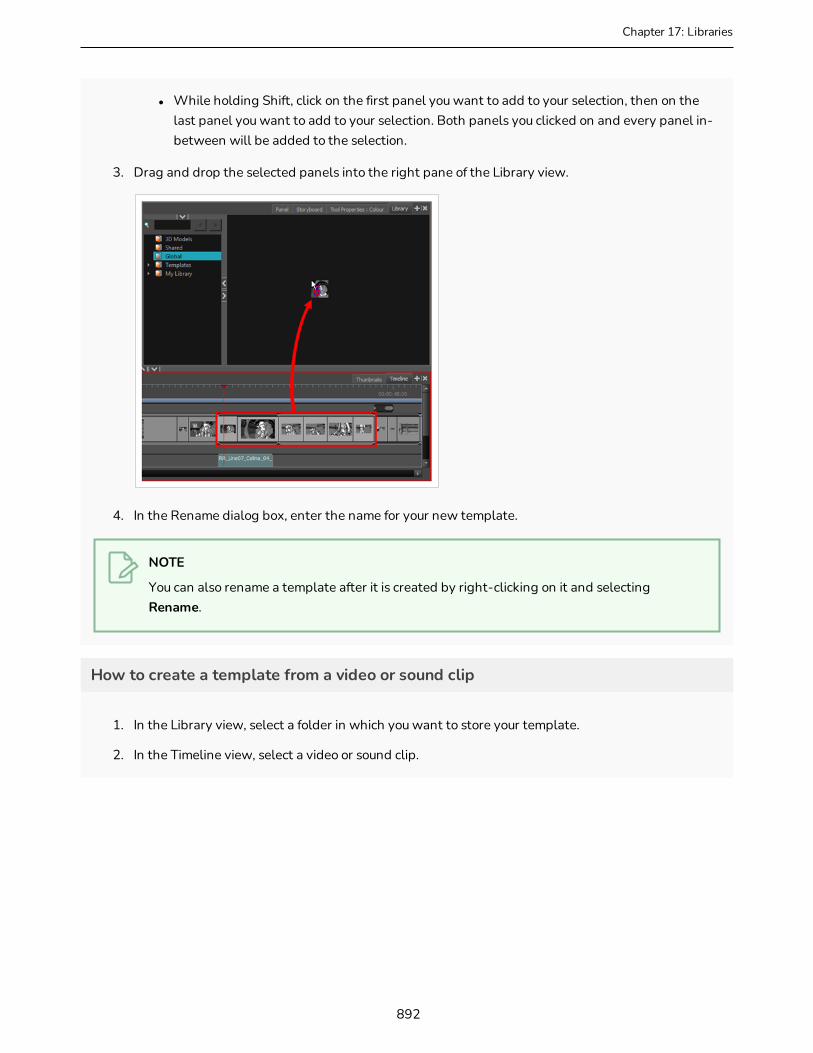
Chapter 17: Libraries
l While holding Shift, click on the first panel you want to add to your selection, then on the last panel you want to add to your selection. Both panels you clicked on and every panel in-between will be added to the selection.
3. Drag and drop the selected panels into the right pane of the Library view.
4. In the Rename dialog box, enter the name for your new template.
NOTE
You can also rename a template after it is created by right-clicking on it and selecting Rename.
How to create a template from a video or sound clip
1. In the Library view, select a folder in which you want to store your template.
2. In the Timeline view, select a video or sound clip.
892
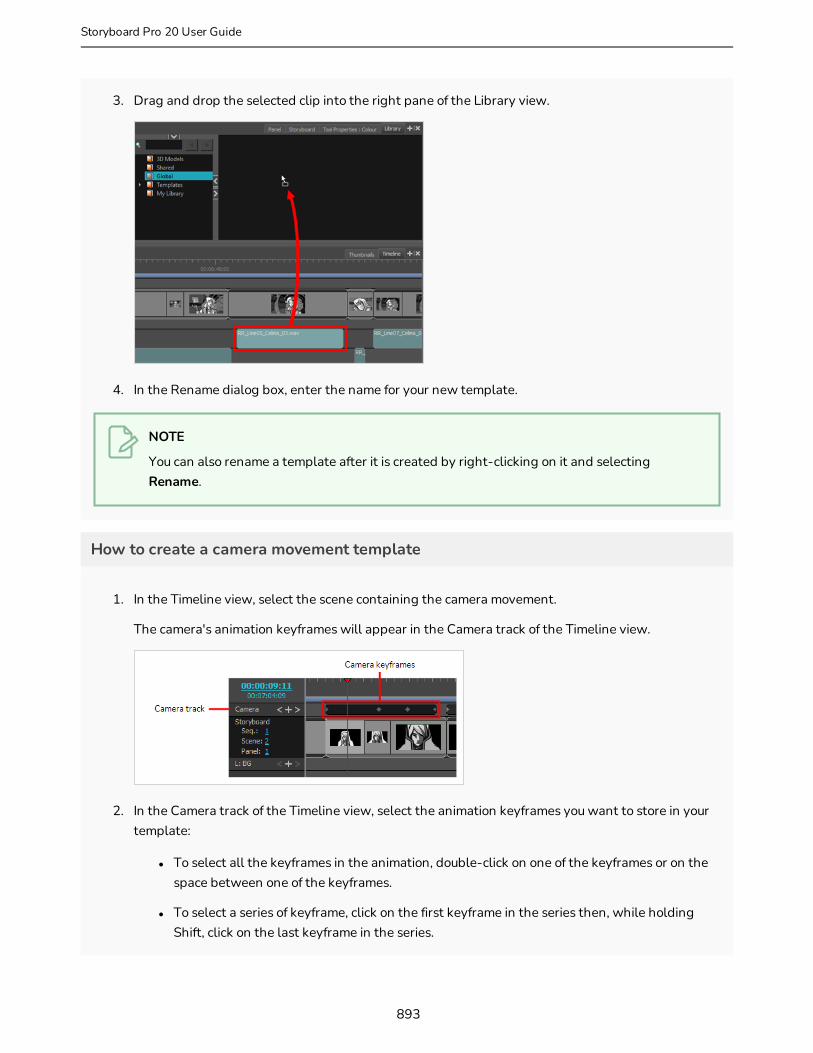
3. Drag and drop the selected clip into the right pane of the Library view.
4. In the Rename dialog box, enter the name for your new template.
NOTE
You can also rename a template after it is created by right-clicking on it and selecting Rename.
How to create a camera movement template
1. In the Timeline view, select the scene containing the camera movement.
The camera's animation keyframes will appear in the Camera track of the Timeline view.
2. In the Camera track of the Timeline view, select the animation keyframes you want to store in your template:
l To select all the keyframes in the animation, double-click on one of the keyframes or on the space between one of the keyframes.
l To select a series of keyframe, click on the first keyframe in the series then, while holding Shift, click on the last keyframe in the series.
893
Storyboard Pro 20 User Guide
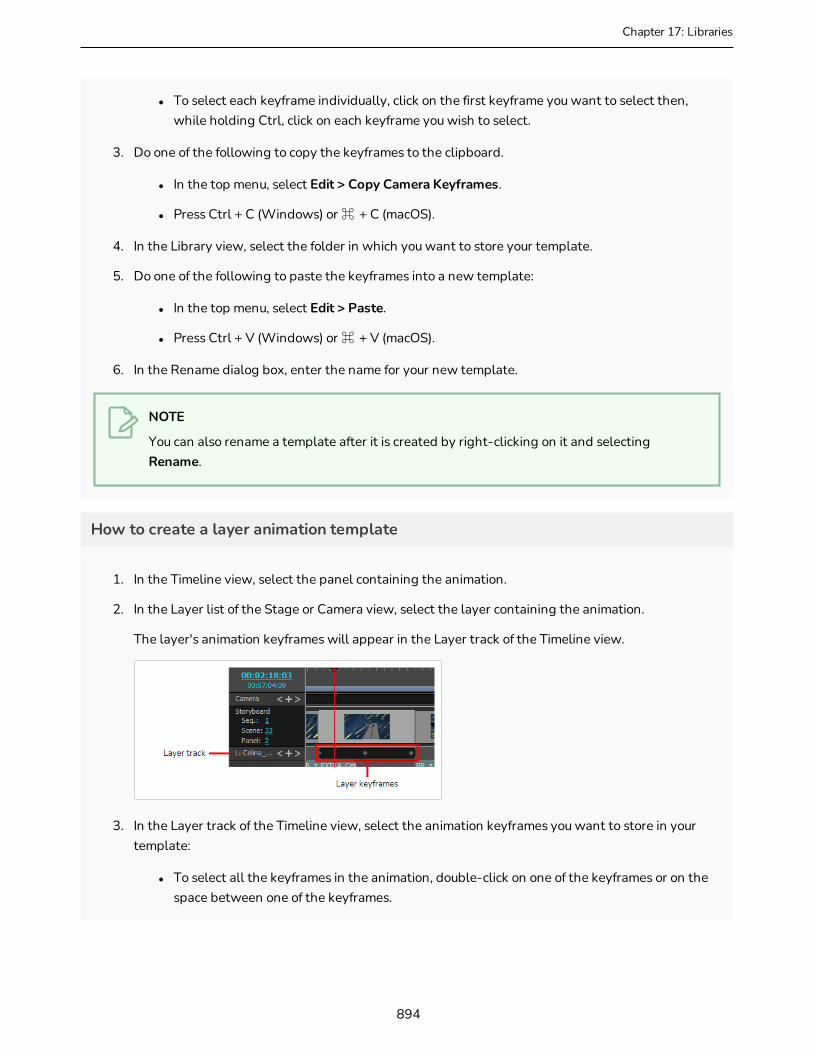
Chapter 17: Libraries
l To select each keyframe individually, click on the first keyframe you want to select then, while holding Ctrl, click on each keyframe you wish to select.
3. Do one of the following to copy the keyframes to the clipboard.
l In the top menu, select Edit > Copy Camera Keyframes.
l Press Ctrl + C (Windows) or ⌘ + C (macOS).
4. In the Library view, select the folder in which you want to store your template.
5. Do one of the following to paste the keyframes into a new template:
l In the top menu, select Edit > Paste.
l Press Ctrl + V (Windows) or ⌘ + V (macOS).
6. In the Rename dialog box, enter the name for your new template.
NOTE
You can also rename a template after it is created by right-clicking on it and selecting Rename.
How to create a layer animation template
1. In the Timeline view, select the panel containing the animation.
2. In the Layer list of the Stage or Camera view, select the layer containing the animation.
The layer's animation keyframes will appear in the Layer track of the Timeline view.
3. In the Layer track of the Timeline view, select the animation keyframes you want to store in your template:
l To select all the keyframes in the animation, double-click on one of the keyframes or on the space between one of the keyframes.
894

l To select a series of keyframe, click on the first keyframe in the series then, while holding Shift, click on the last keyframe in the series.
l To select each keyframe individually, click on the first keyframe you want to select then, while holding Ctrl, click on each keyframe you wish to select.
4. Do one of the following to copy the keyframes to the clipboard.
l In the top menu, select Edit > Copy Layer Keyframes.
l Press Ctrl + C (Windows) or ⌘ + C (macOS).
5. In the Library view, select the folder in which you want to store your template.
6. Do one of the following to paste the keyframes into a new template:
l In the top menu, select Edit > Paste.
l Press Ctrl + V (Windows) or ⌘ + V (macOS).
7. In the Rename dialog box, enter the name for your new template.
NOTE
You can also rename a template after it is created by right-clicking on it and selecting Rename.
895
Storyboard Pro 20 User Guide

Chapter 17: Libraries
Importing TemplatesT-SBADV-010-012
There are several ways you can import templates in your project. You can insert a panel template between two existing panels in the Thumbnails and Timeline view. You can import a template's layers into a panel by dragging it into the Stage or Camera view or over a panel's thumbnail in the Thumbnails or Timeline view.
How to import a template's layers into a panel
1. In the Thumbnails or Timeline view, select the panel in which you want to insert the template.
2. In the Library view, select the template you want to import.
3. Drag and drop the template into the Stage or Camera view:
l To insert it between two specific layers, drop it between those layers in the Layer panel of the Stage or Camera view.
l If you want to insert it over all the other layers, you can drop it directly into the Stage or Camera view.
NOTES
l You can also drag and drop a template over the thumbnail of any panel in the Thumbnails or Timeline view. When you do this, the template's layers are added to that panel.
l You can also import a template made of a single panel into the Stage or Camera view. When you do this, all of the template's layers are added to the current panel. However, you cannot import a template made of multiple panels into the Stage or Camera view.
How to insert a panel template between two panels in the Thumbnails view
1. In the Library view, select the template you want to import.
2. Drag and drop the selected template into the Thumbnails view, between the two panels where you want it to be inserted.
896
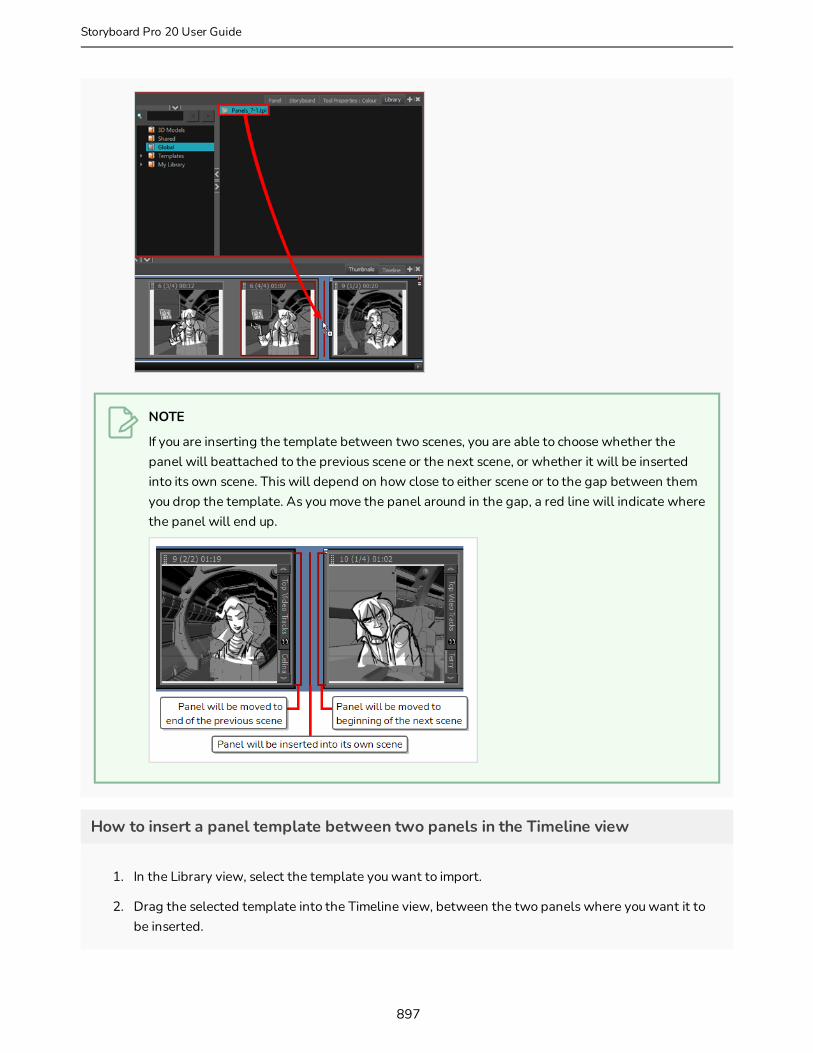
NOTE
If you are inserting the template between two scenes, you are able to choose whether the panel will beattached to the previous scene or the next scene, or whether it will be inserted into its own scene. This will depend on how close to either scene or to the gap between them you drop the template. As you move the panel around in the gap, a red line will indicate where the panel will end up.
How to insert a panel template between two panels in the Timeline view
1. In the Library view, select the template you want to import.
2. Drag the selected template into the Timeline view, between the two panels where you want it to be inserted.
897
Storyboard Pro 20 User Guide
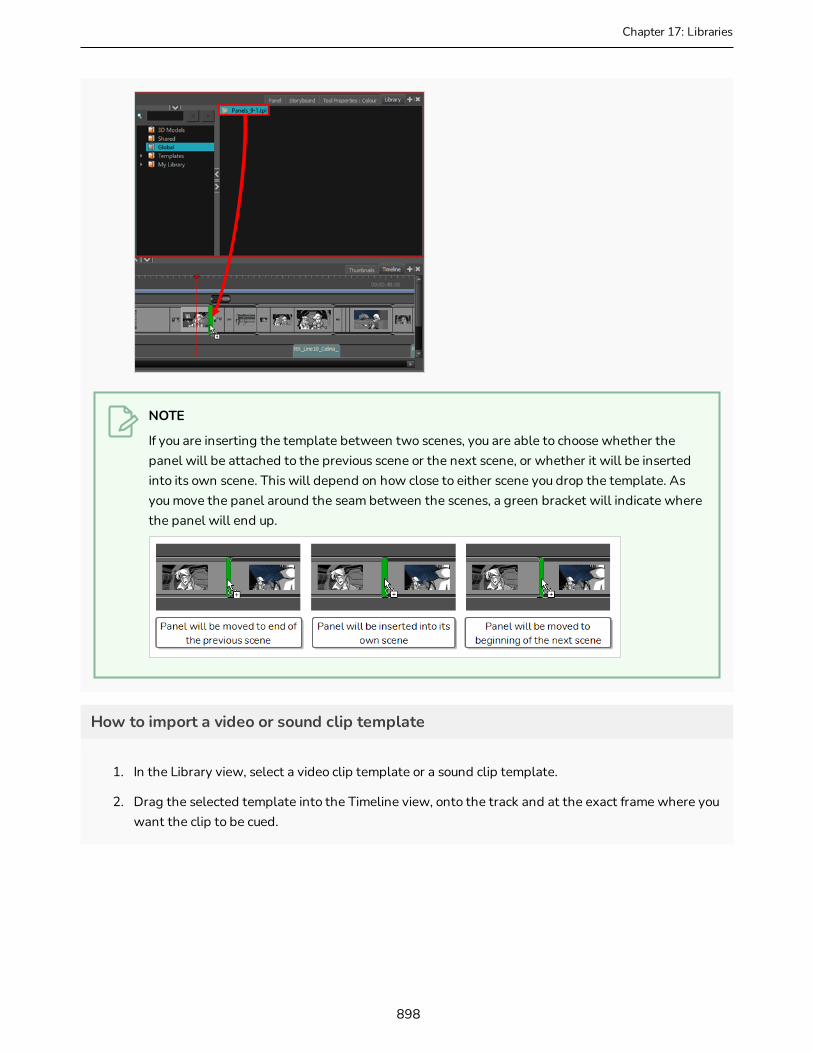
Chapter 17: Libraries
NOTE
If you are inserting the template between two scenes, you are able to choose whether the panel will be attached to the previous scene or the next scene, or whether it will be inserted into its own scene. This will depend on how close to either scene you drop the template. As you move the panel around the seam between the scenes, a green bracket will indicate where the panel will end up.
How to import a video or sound clip template
1. In the Library view, select a video clip template or a sound clip template.
2. Drag the selected template into the Timeline view, onto the track and at the exact frame where you want the clip to be cued.
898

How to import a camera movement template
1. In the Library view, select a camera movement template.
2. Do one of the following:
l Right-click on the template and select Copy.
l In the top menu, select Edit > Copy.
l Press Ctrl + C (Windows) or ⌘ + C (macOS).
3. In the Timeline view, select the scene where you want to import the camera movement.
4. Click on the Camera track.
5. Move the timeline playhead where you want the camera movement to begin.
6. Do one of the following:
l In the top menu, select Edit > Paste Camera Keyframes.
l Press Ctrl + V (Windows) or ⌘ + V (macOS).
The camera keyframes are pasted at the position of the timeline playhead onto the Camera track.
899
Storyboard Pro 20 User Guide

Chapter 17: Libraries
How to import a layer animation template
1. In the Library view, select a layer animation template.
2. Do one of the following:
l Right-click on the template and select Copy.
l In the top menu, select Edit > Copy.
l Press Ctrl + C (Windows) or ⌘ + C (macOS).
3. In the Timeline view, select the panel containing the layer on which you want to import animation.
4. In the Layer panel of the Stage or Camera view, select the layer on which you want to import animation.
5. In the Timeline view, click on the Layer track.
6. Move the timeline playhead where you want the camera movement to begin.
7. Do one of the following:
l In the top menu, select Edit > Paste Layer Keyframes.
l Press Ctrl + V (Windows) or ⌘ + V (macOS).
The animation keyframes are pasted at the position of the timeline playhead, onto the layer's animation track.
900
Deleting TemplatesT-SBADV-010-011
You can delete a template directly from the Library view.
NOTE
It is possible to undo deleting a template up until the point where you close your project or exit the application.
IMPORTANT
If you delete a template via your operating system's file browser, you might not be able to undo it unless the template is moved to your workstation's recycle bin / trash bin and you do not empty it.
How to delete a template
1. In the Library view, select the template to delete.
2. Do one of the following:
l Right-click and select Delete
l Press Del.
901
Storyboard Pro 20 User Guide

Chapter 17: Libraries
Browsing a Template's ContentA template created in Storyboard Pro is a folder with a file structure, in which you can find its assets. If you want to import a specific asset from a template, such as a drawing or a 3D model, you can browse the template's file structure in the library view by opening it as a folder instead of as a template.
How to open a template as a folder
1. In the Library view, select the template to open.
2. Right-click the selection and select Open As Folder.
The template will appear as a subfolder in the current library, with the subfolder icon.
3. Click on the Expand button of the subfolder to explore it. If you are familiar with Harmony, you will find that the template has a file structure similar to a Harmony scene, which contains the following folders:
l audio: The audio clips that were included with the template, if any.
l elements: Contains the folders in which the drawings and 3D models used by the template are stored.
l environment: If the template was created in Harmony Server, this directory will contain the assets used by this template that were sourced from its environment. Otherwise, it will be empty.
l frames: A directory typically used for the rendered frames of a Harmony scene. Usually empty for templates.
902

l jobs: If the template was created in Harmony Server, this directory will contain the assets used by this template that were sourced from its job. Otherwise, it will be empty.
l palette-library: The palettes used by the template.
As you browse the template's folders, if you select a folder that contains assets that can be imported in Storyboard Pro, they will appear in the assets list to the right.
NOTE
Even if the template is opened as a folder, it is still also available as a template in your library. You can undo opening the template as a folder by right-clicking on the template and selecting Open As Folder again.
903
Storyboard Pro 20 User Guide
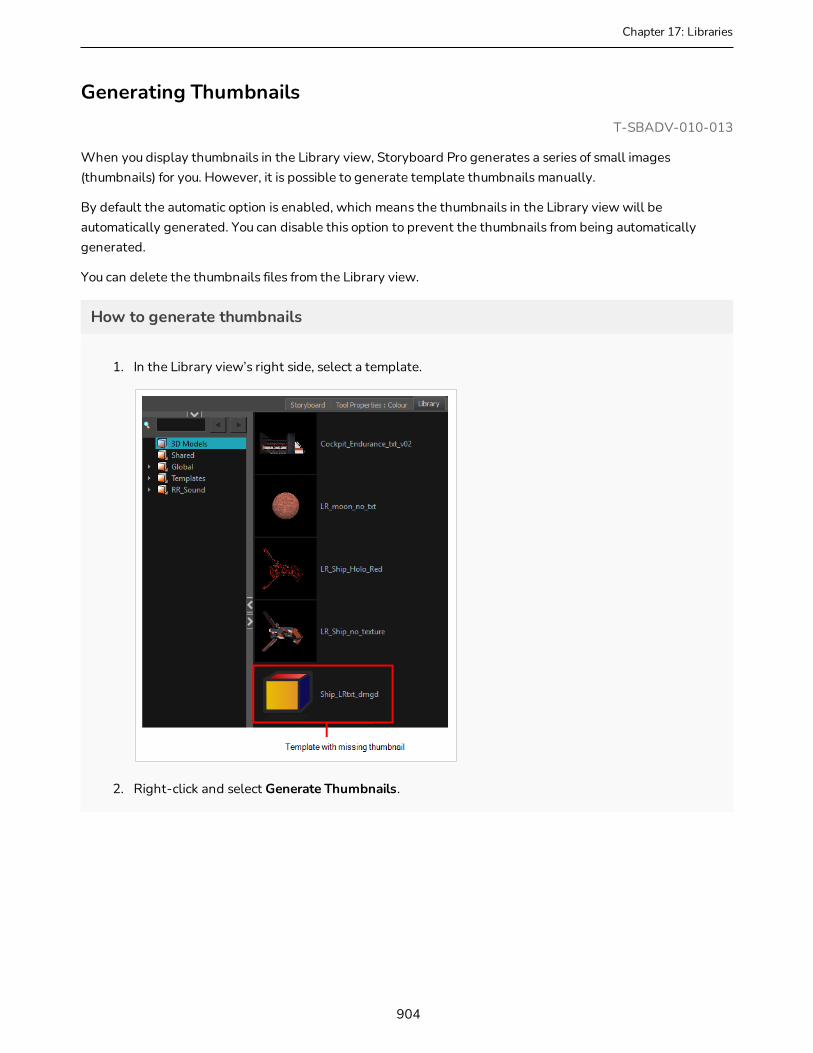
Chapter 17: Libraries
Generating ThumbnailsT-SBADV-010-013
When you display thumbnails in the Library view, Storyboard Pro generates a series of small images (thumbnails) for you. However, it is possible to generate template thumbnails manually.
By default the automatic option is enabled, which means the thumbnails in the Library view will be automatically generated. You can disable this option to prevent the thumbnails from being automatically generated.
You can delete the thumbnails files from the Library view.
How to generate thumbnails
1. In the Library view’s right side, select a template.
2. Right-click and select Generate Thumbnails.
904

How to disable the automatically Generate Thumbnails preference
1. Do one of the following to open the Preferences dialog:
l Windows:
l In the top menu, select Edit > Preferences.
l Press Ctrl + U.
l macOS:
l In the top menu, select Storyboard Pro 20 > Preferences.
l Press ⌘ + U.
2. Select the General tab.
3. In the General section, select the Automatically Generate Thumbnails in Library option.
NOTE
When you deselect the Automatically Generate Thumbnails in Library option, you can manually generate them.
905
Storyboard Pro 20 User Guide

Chapter 17: Libraries
How to delete thumbnails
l In the Library view, right-click in the left section and select Delete Thumbnails.
906
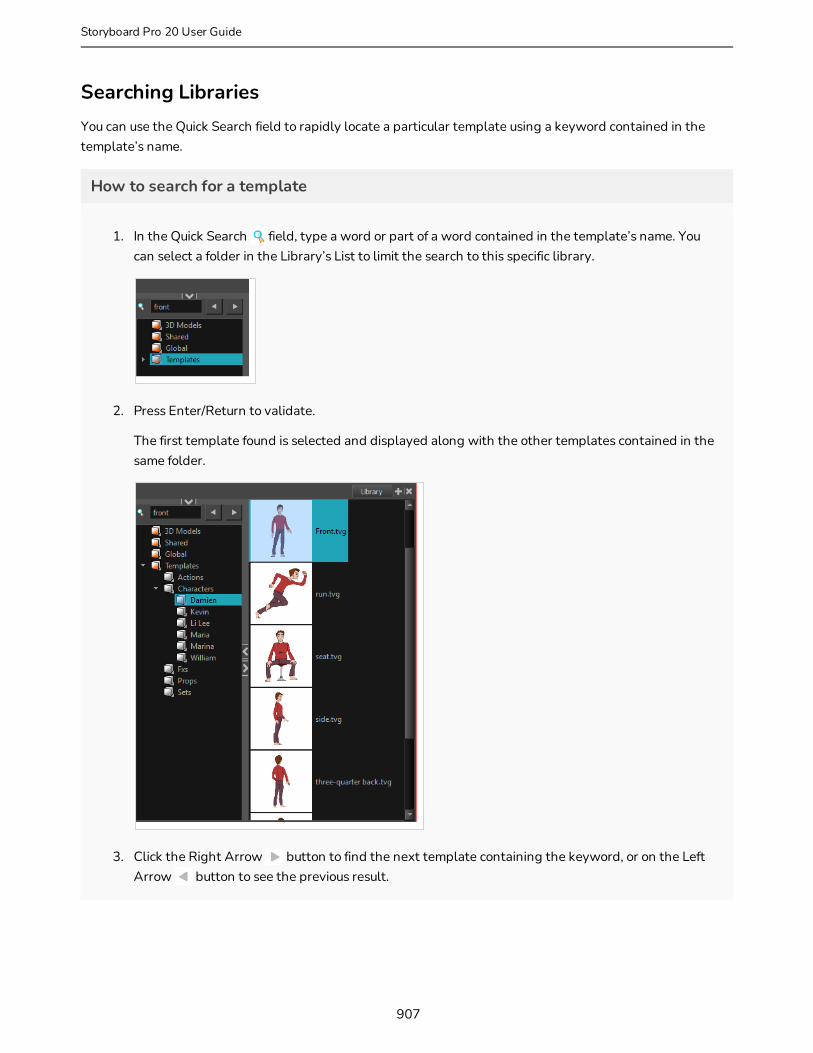
Searching LibrariesYou can use the Quick Search field to rapidly locate a particular template using a keyword contained in the template’s name.
How to search for a template
1. In the Quick Search field, type a word or part of a word contained in the template’s name. You can select a folder in the Library’s List to limit the search to this specific library.
2. Press Enter/Return to validate.
The first template found is selected and displayed along with the other templates contained in the same folder.
3. Click the Right Arrow button to find the next template containing the keyword, or on the Left Arrow button to see the previous result.
907
Storyboard Pro 20 User Guide

Chapter 17: Libraries
908

About Importing FilesUsing the Library view, you can import several types of files and store them in a library folder as a template. Once you have these new templates, you can use them throughout your storyboard projects just like the regular ones.
You can import all sorts of files using the Library view. You can import bitmaps as well as vector-based images, audio files, Adobe Flash movie file (.swf), and templates (.tpl) files made in Harmony 9.2 or highe. This can be useful for importing backgrounds created in Harmony directly into your storyboard.
You can alsoimport four types of 3D files. When you import a 3D model, it is automatically added to the Library in the 3D Models folder according to its format.
909
Storyboard Pro 20 User Guide

Chapter 17: Libraries
Importing ImagesT-SBFND-008-012
You can import all sorts of image files and reuse them throughout your project as templates. You can import bitmap as well as vector-based images, which can be really handy. The supported image formats include: .ai, .pdf, .tvg, .pal, .scan, .sgi, . tga, .yuv, .omf, .psd, .png, .jpg, .jpeg, .bmp and .tif.
How to import an image file
1. In the Library view, right-click a library folder and select Import Files.
The browser window opens.
2. Find and select an image file and click Open.
The selected file appears in the Library view as a .tpl file inside the selected library folder.
910
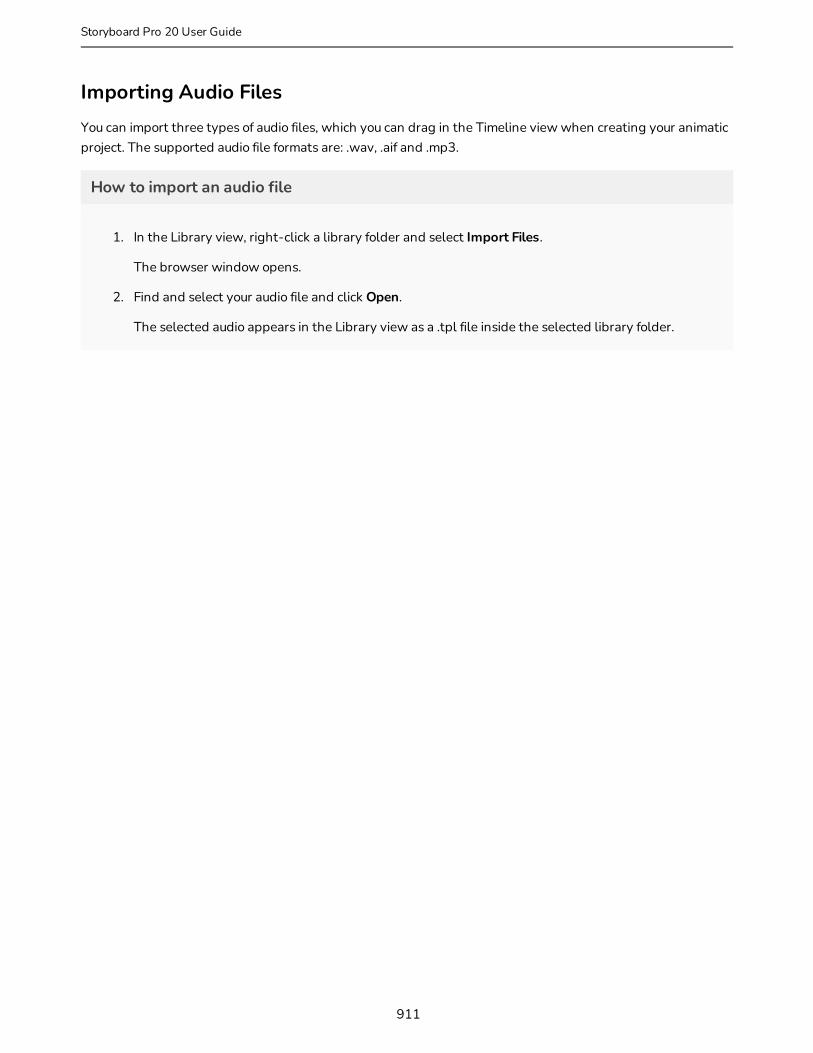
Importing Audio FilesYou can import three types of audio files, which you can drag in the Timeline view when creating your animatic project. The supported audio file formats are: .wav, .aif and .mp3.
How to import an audio file
1. In the Library view, right-click a library folder and select Import Files.
The browser window opens.
2. Find and select your audio file and click Open.
The selected audio appears in the Library view as a .tpl file inside the selected library folder.
911
Storyboard Pro 20 User Guide
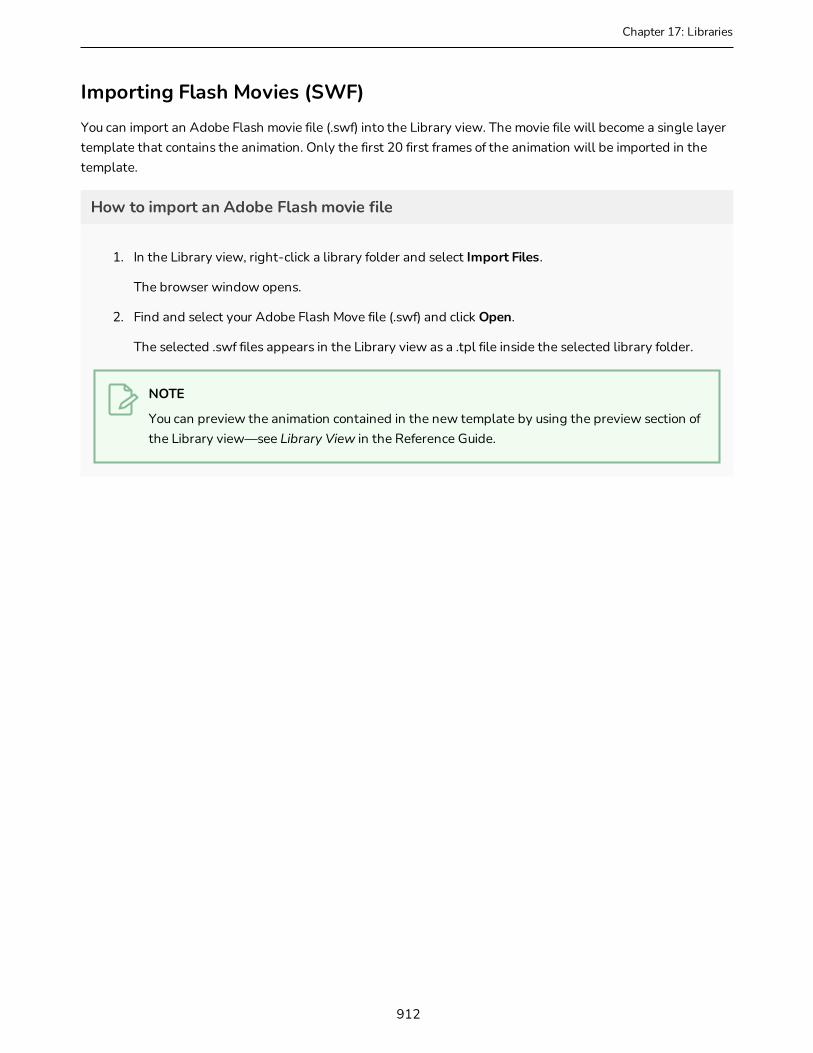
Chapter 17: Libraries
Importing Flash Movies (SWF)You can import an Adobe Flash movie file (.swf) into the Library view. The movie file will become a single layer template that contains the animation. Only the first 20 first frames of the animation will be imported in the template.
How to import an Adobe Flash movie file
1. In the Library view, right-click a library folder and select Import Files.
The browser window opens.
2. Find and select your Adobe Flash Move file (.swf) and click Open.
The selected .swf files appears in the Library view as a .tpl file inside the selected library folder.
NOTE
You can preview the animation contained in the new template by using the preview section of the Library view—see Library View in the Reference Guide.
912
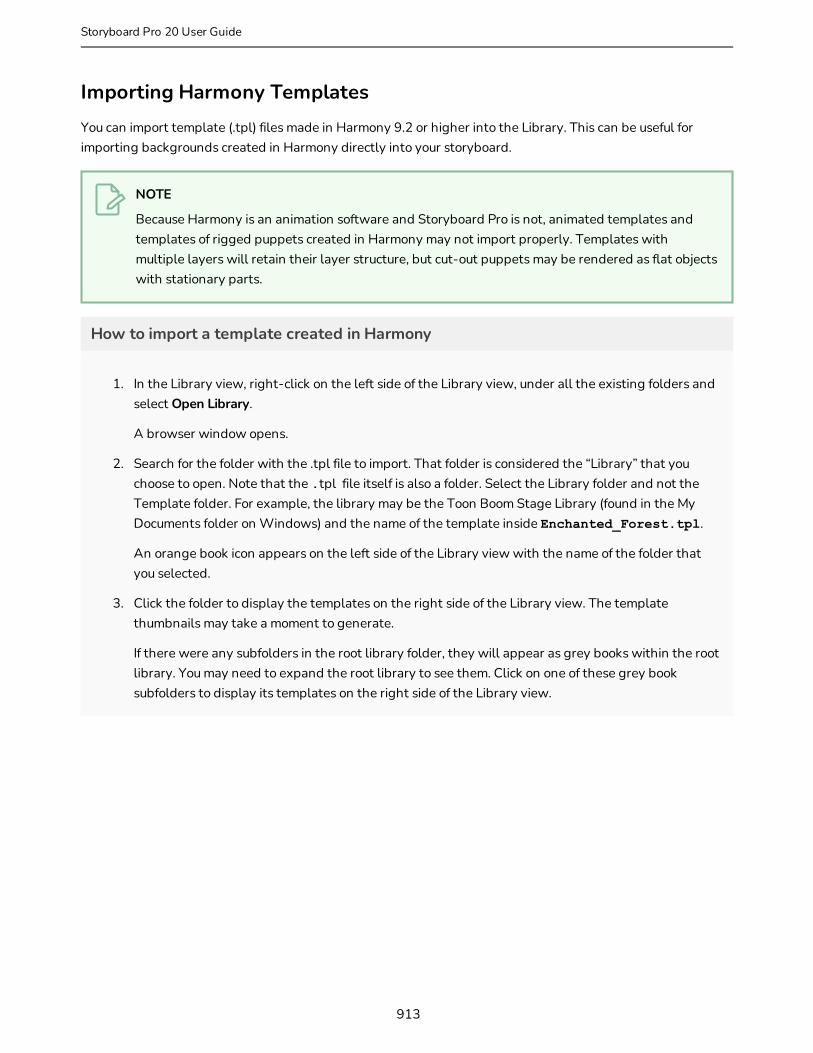
Importing Harmony TemplatesYou can import template (.tpl) files made in Harmony 9.2 or higher into the Library. This can be useful for importing backgrounds created in Harmony directly into your storyboard.
NOTE
Because Harmony is an animation software and Storyboard Pro is not, animated templates and templates of rigged puppets created in Harmony may not import properly. Templates with multiple layers will retain their layer structure, but cut-out puppets may be rendered as flat objects with stationary parts.
How to import a template created in Harmony
1. In the Library view, right-click on the left side of the Library view, under all the existing folders and select Open Library.
A browser window opens.
2. Search for the folder with the .tpl file to import. That folder is considered the “Library” that you choose to open. Note that the .tpl file itself is also a folder. Select the Library folder and not the Template folder. For example, the library may be the Toon Boom Stage Library (found in the My Documents folder on Windows) and the name of the template inside Enchanted_Forest.tpl.
An orange book icon appears on the left side of the Library view with the name of the folder that you selected.
3. Click the folder to display the templates on the right side of the Library view. The template thumbnails may take a moment to generate.
If there were any subfolders in the root library folder, they will appear as grey books within the root library. You may need to expand the root library to see them. Click on one of these grey book subfolders to display its templates on the right side of the Library view.
913
Storyboard Pro 20 User Guide

Chapter 17: Libraries
914

Importing 3D ObjectsBefore adding 3D objects to panels in your storyboard, you must first import them to your library. When you import a 3D model, it is automatically added to the 3D Models library of your project, in the Library view. You can then drag and drop that 3D model to each panel in which you want to use it, without having to import it over and over again.
Storyboard Pro supports the following types of 3D models:
l Filmbox (.fbx)
l 3DS Max (.3ds)
l Wavefront OBJ (.obj)
l Allembic (.abc)
l Collada (.dae)
In addition to importing 3D objects into the 3D Models folder in the Library view, you can also open a folder containing 3D models as a library in the Library view. The models can then be dragged and dropped into the scene directly from that library.
NOTE
When a model is added to a panel from a library other than the 3D Models library, it is also added to the 3D Models library at the same time.
How to import a 3D object into your project
1. In the Library view, right-click on the 3D Models library folder, then select Import Files.
2. In the file browser, locate and select your 3D model, then click on Open.
The following prompt appears.
If you want, you can choose to import your model in its original format. Converting it to FBX will however make sure its textures are consolidated with the model in your project.
3. Click on OK.
The selected model appears in the 3D Models folder of the Library view.
915
Storyboard Pro 20 User Guide
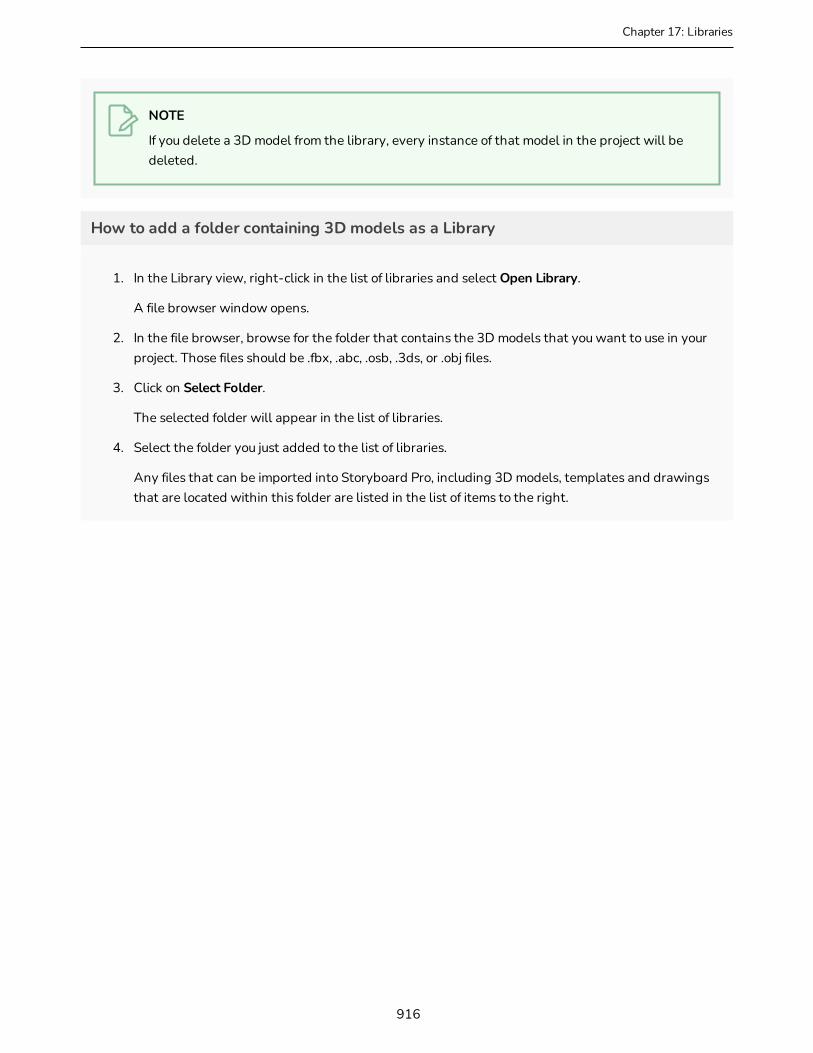
Chapter 17: Libraries
NOTE
If you delete a 3D model from the library, every instance of that model in the project will be deleted.
How to add a folder containing 3D models as a Library
1. In the Library view, right-click in the list of libraries and select Open Library.
A file browser window opens.
2. In the file browser, browse for the folder that contains the 3D models that you want to use in your project. Those files should be .fbx, .abc, .osb, .3ds, or .obj files.
3. Click on Select Folder.
The selected folder will appear in the list of libraries.
4. Select the folder you just added to the list of libraries.
Any files that can be imported into Storyboard Pro, including 3D models, templates and drawings that are located within this folder are listed in the list of items to the right.
916

917
Storyboard Pro 20 User Guide

Chapter 18: Pitching the Storyboard
Chapter 18: Pitching the StoryboardStoryboard Pro has a Pitch Mode workspace that was is created specifically for pitching a storyboard or concept to a group of people.
You can use the Pitch Mode workspace to add comments based on the given feedback. A special Comments layer can automatically be added to your drawing for making notes and corrections.
NOTE
The Camera view displays your drawings, camera moves and transitions. You do not have access to your layer list in this mode. All layers that are enabled are shown.
918
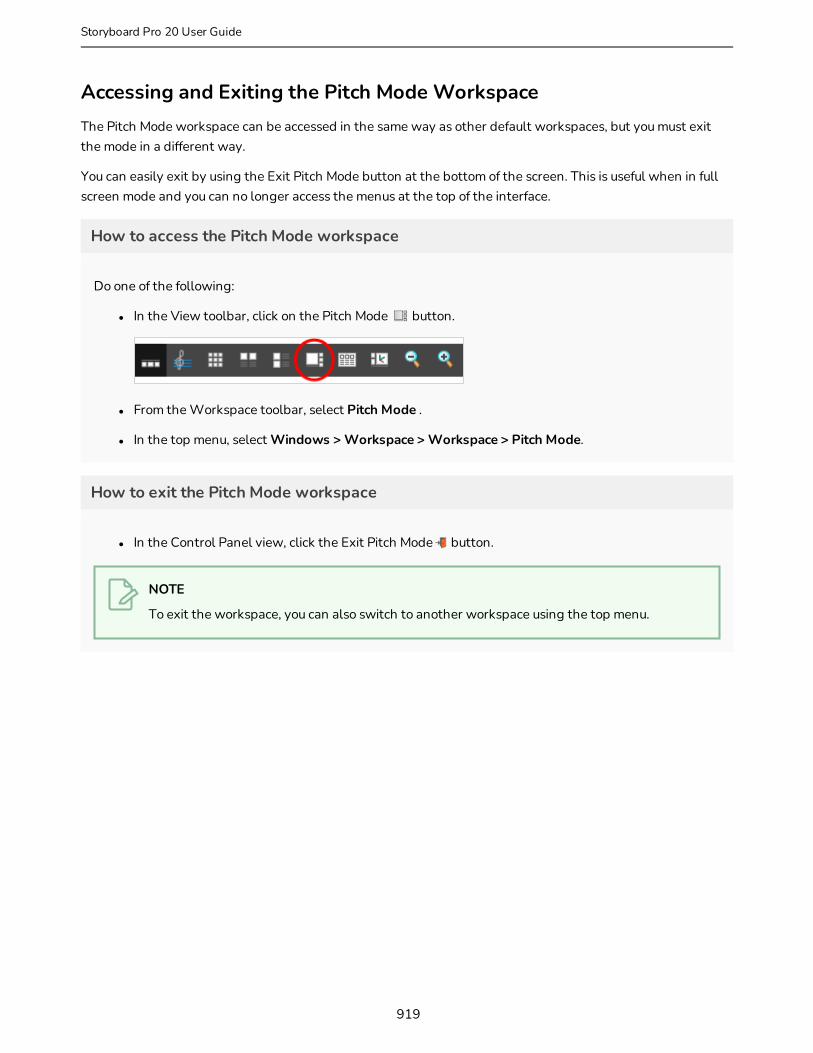
Accessing and Exiting the Pitch Mode WorkspaceThe Pitch Mode workspace can be accessed in the same way as other default workspaces, but you must exit the mode in a different way.
You can easily exit by using the Exit Pitch Mode button at the bottom of the screen. This is useful when in full screen mode and you can no longer access the menus at the top of the interface.
How to access the Pitch Mode workspace
Do one of the following:
l In the View toolbar, click on the Pitch Mode button.
l From the Workspace toolbar, select Pitch Mode .
l In the top menu, select Windows > Workspace > Workspace > Pitch Mode.
How to exit the Pitch Mode workspace
l In the Control Panel view, click the Exit Pitch Mode button.
NOTE
To exit the workspace, you can also switch to another workspace using the top menu.
919
Storyboard Pro 20 User Guide

Chapter 18: Pitching the Storyboard
Displaying CaptionsAs you play back your storyboard, your audience may want to see the dialogue or action notes as subtitles. For that reason, the Pitch Mode workspace lets you select one of the caption fields available in your storyboard and display it at the bottom of the Camera view. By default, the Dialogue caption is selected.
In the Control Panel view, you will find a drop-down menu that will allow you to select the captions in your storyboard. Note that you cannot select a sketch caption. Only text captions can be selected.
If you want to make the selected caption field larger, you can hide the Caption tools area.
How to select a caption
‣ From the Caption menu, select a caption to display below the Camera view.
How to hide the Caption Tools area
‣ In the Caption Tools area, click the Arrow button to hide the settings.
How to show the Caption Tools area
‣ Hover the cursor at the edge of the caption, when you see a splitter cursor, drag left to reveal the Caption Tools area.
920
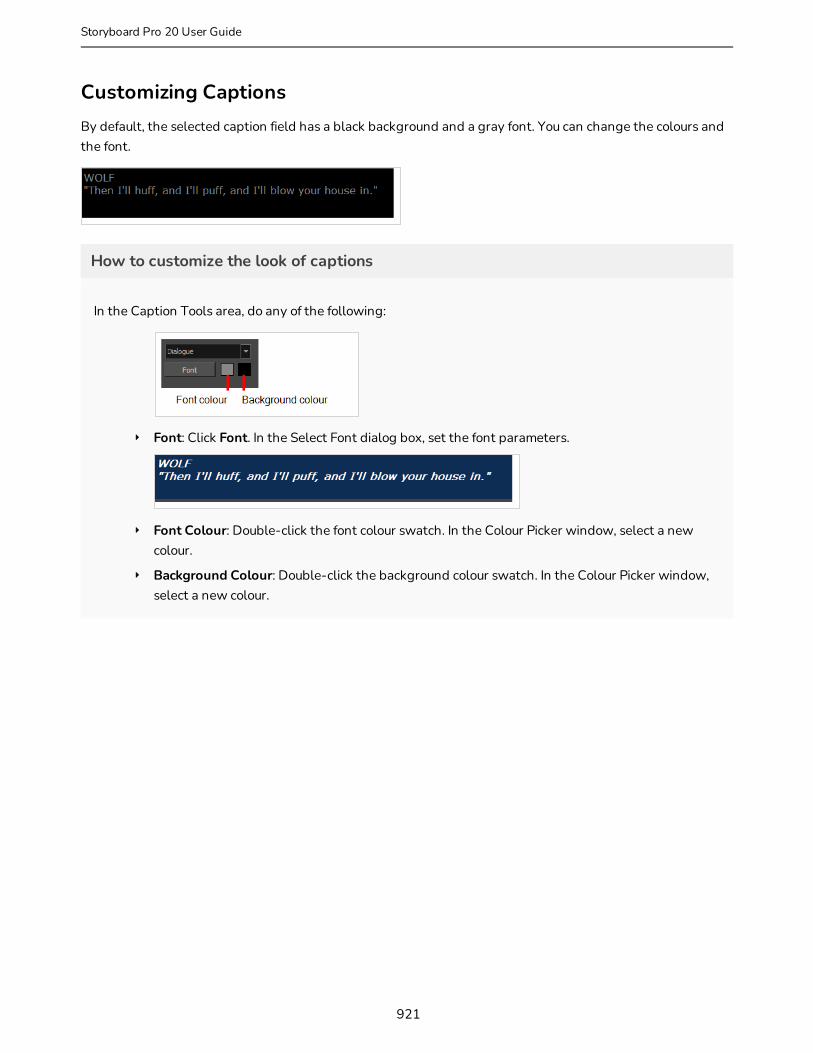
Customizing CaptionsBy default, the selected caption field has a black background and a gray font. You can change the colours and the font.
How to customize the look of captions
In the Caption Tools area, do any of the following:
‣ Font: Click Font. In the Select Font dialog box, set the font parameters.
‣ Font Colour: Double-click the font colour swatch. In the Colour Picker window, select a new colour.
‣ Background Colour: Double-click the background colour swatch. In the Colour Picker window, select a new colour.
921
Storyboard Pro 20 User Guide

Chapter 18: Pitching the Storyboard
Navigating the StoryboardNavigating through your storyboard lets you see how your project is progressing. You can scrub through a scene, view a specific point in the scene, see it in slow motion, or check a particular section.
The slider lets you scrub through all the panels in a scene. You will see the camera motions and the transitions at the speed you want by sliding left or right. Sliding left brings you to the beginning of the scene and sliding right brings you to the end. Transitions, camera moves, and all panels will be displayed.
As you select or scrub through panels and scenes, the name and number of the current scene and panel are displayed.
As you navigate through the panels of your storyboard by either using shortcuts, clicking on panels or using the navigation buttons, you can automatically play the camera moves.
NOTE
When you select a panel that contains a camera move, it will automatically play. If you do not want to see the transitions or camera motions, deselect the Camera Mode button in the Control Panel view.
How to navigate through your storyboard
Do one of the following:
l Press A and F
l Select panels in the Thumbnails view
l Use the Previous Panel and Next Panel buttons
How to automatically play camera moves
‣ In the Control Panel, select the Auto-play Camera Moves option.
922
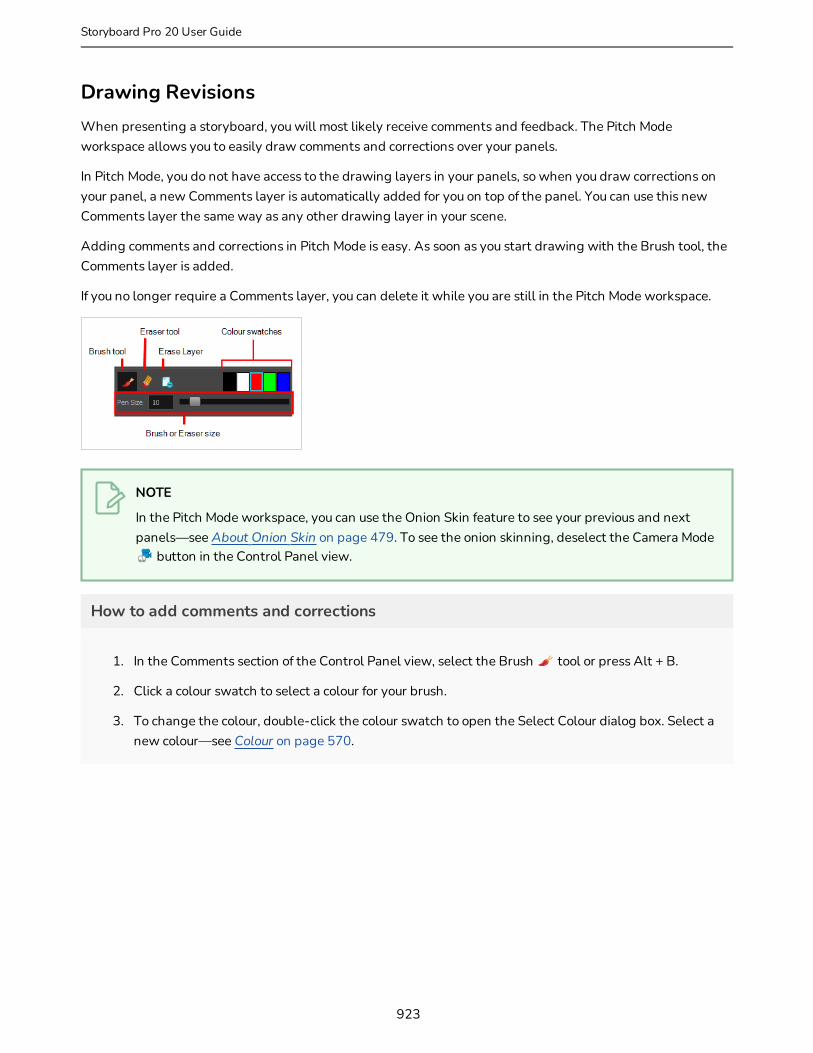
Drawing RevisionsWhen presenting a storyboard, you will most likely receive comments and feedback. The Pitch Mode workspace allows you to easily draw comments and corrections over your panels.
In Pitch Mode, you do not have access to the drawing layers in your panels, so when you draw corrections on your panel, a new Comments layer is automatically added for you on top of the panel. You can use this new Comments layer the same way as any other drawing layer in your scene.
Adding comments and corrections in Pitch Mode is easy. As soon as you start drawing with the Brush tool, the Comments layer is added.
If you no longer require a Comments layer, you can delete it while you are still in the Pitch Mode workspace.
NOTE
In the Pitch Mode workspace, you can use the Onion Skin feature to see your previous and next panels—see About Onion Skin on page 479. To see the onion skinning, deselect the Camera Mode
button in the Control Panel view.
How to add comments and corrections
1. In the Comments section of the Control Panel view, select the Brush tool or press Alt + B.
2. Click a colour swatch to select a colour for your brush.
3. To change the colour, double-click the colour swatch to open the Select Colour dialog box. Select a new colour—see Colour on page 570.
923
Storyboard Pro 20 User Guide

Chapter 18: Pitching the Storyboard
4. Set the brush size and click OK.
5. In the Stage view, add your comments and corrections.
6. In the Camera view, draw your correction.
A Comments layer is added on top of your layers.
7. To access the Comments layer, click the Exit Pitch Mode button.
The Pitch Mode workspace is closed.
How to erase a correction
‣ In the Comments section of the Control Panel, click Eraser tool or press Alt + E.
924

How to delete a comment
‣ In the Comments section of the Control Panel, click the Erase Layer button.
The Comments layer is deleted. You cannot delete any other layers.
925
Storyboard Pro 20 User Guide
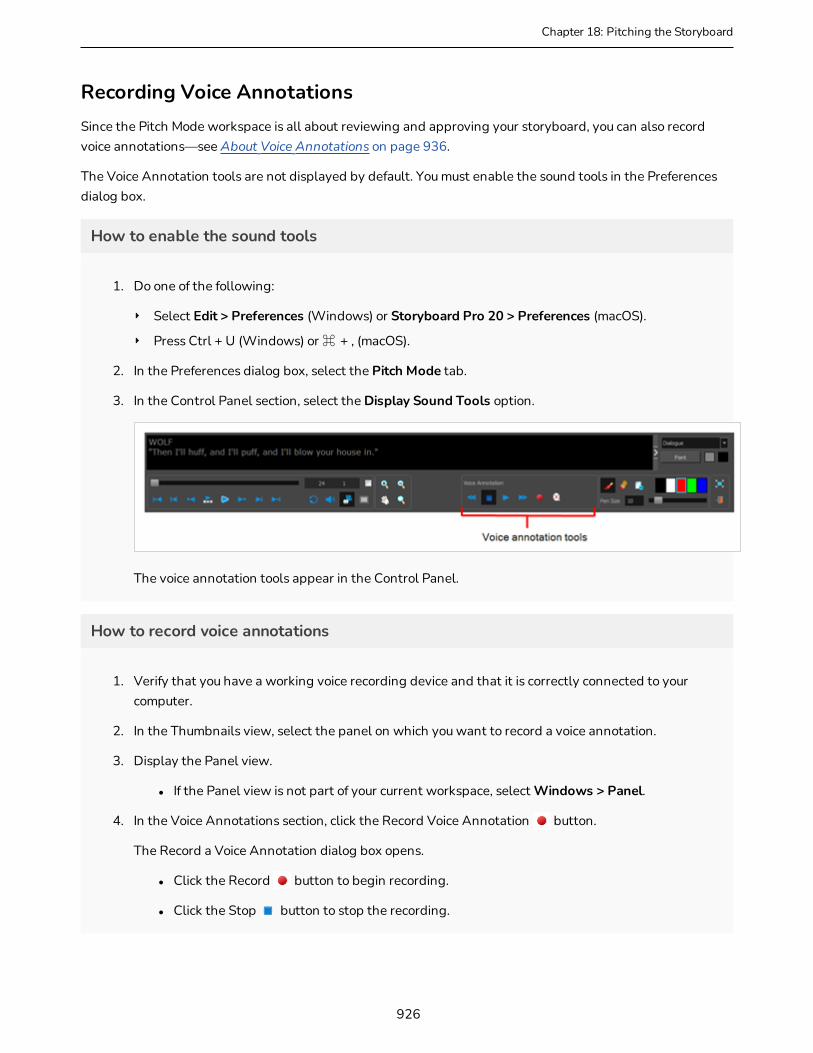
Chapter 18: Pitching the Storyboard
Recording Voice AnnotationsSince the Pitch Mode workspace is all about reviewing and approving your storyboard, you can also record voice annotations—see About Voice Annotations on page 936.
The Voice Annotation tools are not displayed by default. You must enable the sound tools in the Preferences dialog box.
How to enable the sound tools
1. Do one of the following:
‣ Select Edit > Preferences (Windows) or Storyboard Pro 20 > Preferences (macOS).
‣ Press Ctrl + U (Windows) or ⌘ + , (macOS).
2. In the Preferences dialog box, select the Pitch Mode tab.
3. In the Control Panel section, select the Display Sound Tools option.
The voice annotation tools appear in the Control Panel.
How to record voice annotations
1. Verify that you have a working voice recording device and that it is correctly connected to your computer.
2. In the Thumbnails view, select the panel on which you want to record a voice annotation.
3. Display the Panel view.
l If the Panel view is not part of your current workspace, select Windows > Panel.
4. In the Voice Annotations section, click the Record Voice Annotation button.
The Record a Voice Annotation dialog box opens.
l Click the Record button to begin recording.
l Click the Stop button to stop the recording.
926

l Click the Play button to preview your recording.
NOTE
If you try to record your voice and the voice recording device is improperly connected or malfunctioning, a warning message will appear. If this happens, check the voice recording device.
927
Storyboard Pro 20 User Guide

Chapter 18: Pitching the Storyboard
Navigating the StoryboardNavigating through your storyboard lets you see how your project is progressing. You can scrub through a scene, view a specific point in the scene, see it in slow motion, or check a particular section.
The slider lets you scrub through all the panels in a scene. You will see the camera motions and the transitions at the speed you want by sliding left or right. Sliding left brings you to the beginning of the scene and sliding right brings you to the end. Transitions, camera moves, and all panels will be displayed.
As you select or scrub through panels and scenes, the name and number of the current scene and panel are displayed.
As you navigate through the panels of your storyboard by either using shortcuts, clicking on panels or using the navigation buttons, you can automatically play the camera moves.
NOTE
When you select a panel that contains a camera move, it will automatically play. If you do not want to see the transitions or camera motions, deselect the Camera Mode button in the Control Panel view.
How to navigate through your storyboard
Do one of the following:
l Press A and F
l Select panels in the Thumbnails view
l Use the Previous Panel and Next Panel buttons
How to automatically play camera moves
‣ In the Control Panel, select the Auto-play Camera Moves option.
928

929
Storyboard Pro 20 User Guide

Chapter 19: Storyboard Supervision
Chapter 19: Storyboard SupervisionStoryboard Pro goes beyond the storyboard and animatic creation tasks by providing powerful tools for the supervision of a storyboarding project.
Project managers, storyboard supervisors and artistic directors now have an efficient supervision tool to help them track the changes and communicate their feedback, corrections and such to the storyboard artists.
930

About Track ChangesT-SBADV-008-001
In Storyboard Pro, you can track changes in the storyboard’s panels. This allows the storyboard artist to integrate any comments the supervisor has made, and the supervisor can easily track any changes and validate or comment on them.
Modified panels are outlined in yellow. You also have the possibility to write revision notes about the changes. This visual indicator allows the supervisor to rapidly locate any panels which have changed. A new temporary caption field is added to the tracked panel's Panel view.
931
Storyboard Pro 20 User Guide

Chapter 19: Storyboard Supervision
Tracking ChangesT-SBADV-008-002
Storyboard Pro lets you automatically detect any changes in your project, and adds a visual indication in the Thumbnails and Timeline views.
You can also track changes by date. If a storyboard becomes very large, it may be easier to track changes made on a specific date.
You can add notes to the Revision Notes caption. The caption only appears once the panel is marked as changed. Note that the text you type here will also be displayed in the Track Changes dialog box during the validation process—see Tracking Changes on page 932.
How to enable auto tracking
1. Select Storyboard > Track Changes > Auto Tracking Mode.
Once the Auto Tracking Mode is enabled and you edit a panel, a yellow rectangle appears around the panel in the Thumbnails and Timeline views.
2. Edit your panels either by drawing or modifying caption text. If applicable, add comments in the Revision Notes caption.
How to track changes by date
1. Select Storyboard > Track Changes > Track Changes by Date.
The Search by Date dialog box opens.
932
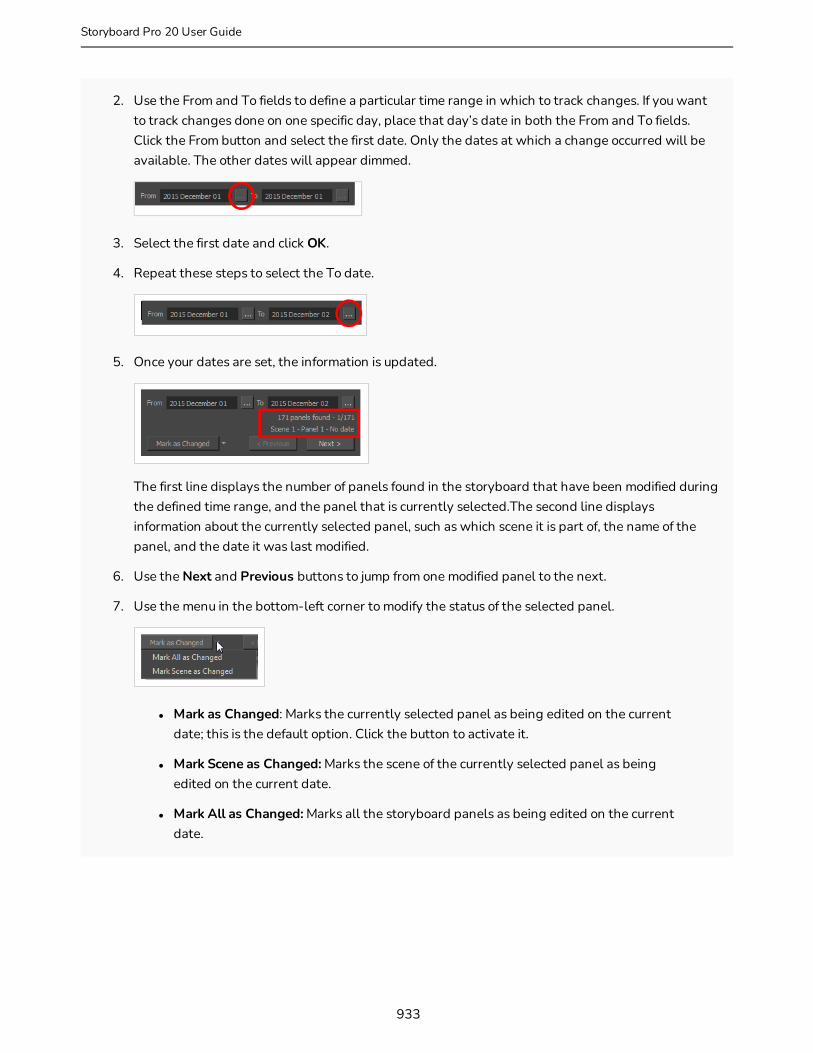
2. Use the From and To fields to define a particular time range in which to track changes. If you want to track changes done on one specific day, place that day’s date in both the From and To fields. Click the From button and select the first date. Only the dates at which a change occurred will be available. The other dates will appear dimmed.
3. Select the first date and click OK.
4. Repeat these steps to select the To date.
5. Once your dates are set, the information is updated.
The first line displays the number of panels found in the storyboard that have been modified during the defined time range, and the panel that is currently selected.The second line displays information about the currently selected panel, such as which scene it is part of, the name of the panel, and the date it was last modified.
6. Use the Next and Previous buttons to jump from one modified panel to the next.
7. Use the menu in the bottom-left corner to modify the status of the selected panel.
l Mark as Changed: Marks the currently selected panel as being edited on the current date; this is the default option. Click the button to activate it.
l Mark Scene as Changed: Marks the scene of the currently selected panel as being edited on the current date.
l Mark All as Changed: Marks all the storyboard panels as being edited on the current date.
933
Storyboard Pro 20 User Guide

Chapter 19: Storyboard Supervision
Validating ChangesT-SBADV-008-003
When you use the Auto Tracking Mode feature, you can use the Validate Changes option to follow up on these changes.
How to validate changes
1. Select Storyboard > Track Changes > Validate Changes.
The Track Changes dialog box opens.
‣ Useful information is displayed on the top part of the dialog box:
‣ The first line displays the number of panels found in the storyboard that were modified while the Auto Tracking Mode was enabled, as well as which of the panels that fits the description is currently selected.
‣ The second line displays information about the currently selected panel, such as which scene it is part of, the name of the panel, and the date it was modified.
2. Use the Notes field to enter text about the selected panel. This information will be available in the tracked panel Panel view in the Revision caption. If notes were added in the Revision Notes caption field, they will be displayed in the Revision Notes field of the Track Changes dialog box.
NOTE
This caption is temporary; it will be removed when the change is validated.
934
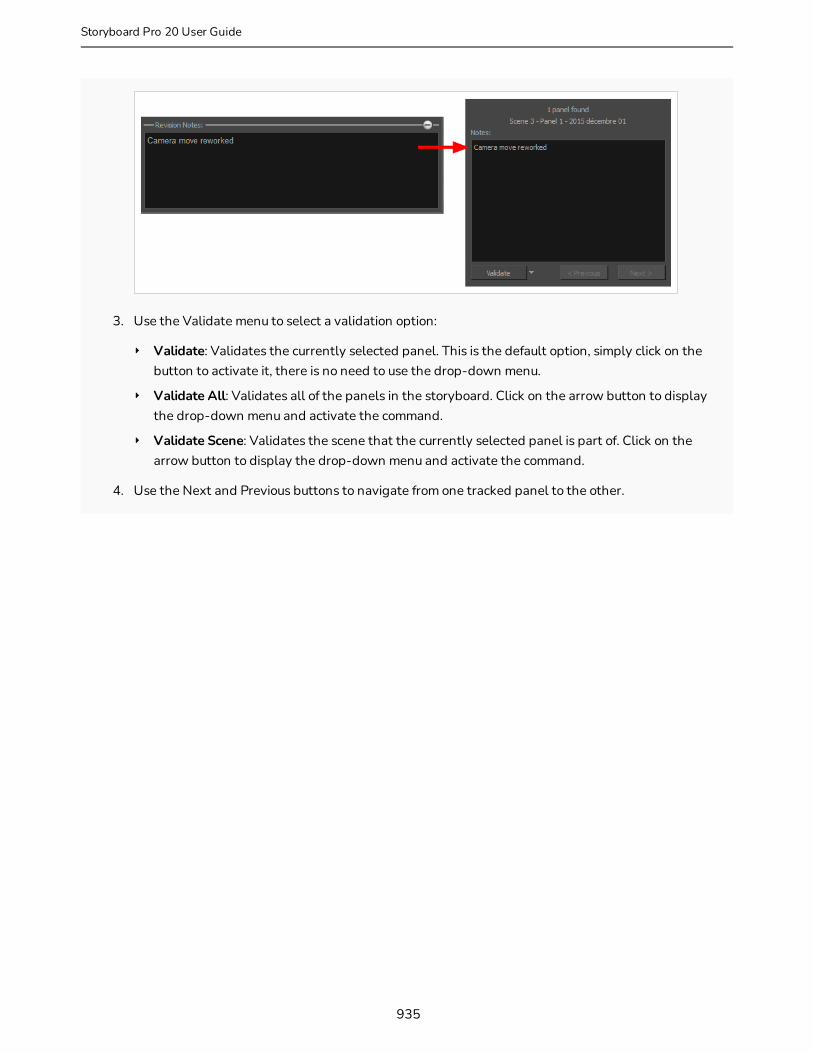
3. Use the Validate menu to select a validation option:
‣ Validate: Validates the currently selected panel. This is the default option, simply click on the button to activate it, there is no need to use the drop-down menu.
‣ Validate All: Validates all of the panels in the storyboard. Click on the arrow button to display the drop-down menu and activate the command.
‣ Validate Scene: Validates the scene that the currently selected panel is part of. Click on the arrow button to display the drop-down menu and activate the command.
4. Use the Next and Previous buttons to navigate from one tracked panel to the other.
935
Storyboard Pro 20 User Guide

Chapter 19: Storyboard Supervision
About Voice AnnotationsT-SBADV-008-004
In Storyboard Pro, you can provide the storyboard artists with voice annotations as well as written notes.
After the voice annotation has been recorded, the Voice Annotations section indicates the total number of annotations, displaying the order of the current voice annotation in the sequence and the total number of voice annotations associated with the panel. As you record voice annotations, they accumulate in sequence without being overwritten. You can select and play back any of the annotations.
936
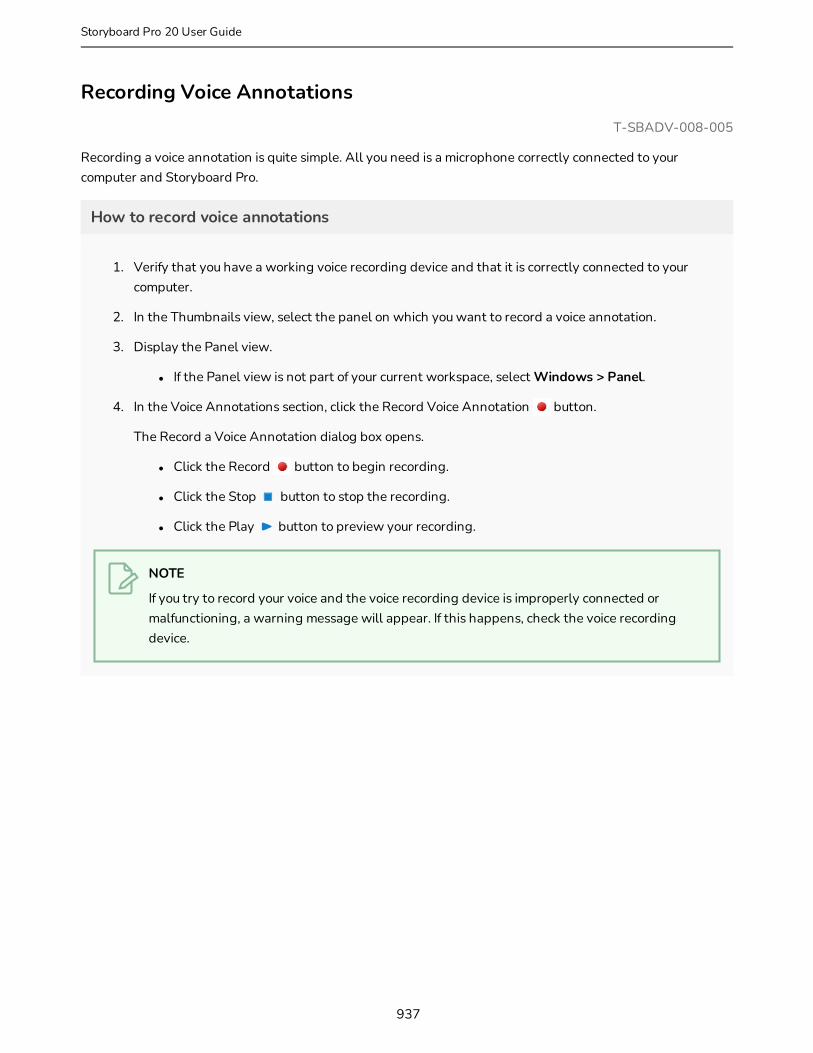
Recording Voice AnnotationsT-SBADV-008-005
Recording a voice annotation is quite simple. All you need is a microphone correctly connected to your computer and Storyboard Pro.
How to record voice annotations
1. Verify that you have a working voice recording device and that it is correctly connected to your computer.
2. In the Thumbnails view, select the panel on which you want to record a voice annotation.
3. Display the Panel view.
l If the Panel view is not part of your current workspace, select Windows > Panel.
4. In the Voice Annotations section, click the Record Voice Annotation button.
The Record a Voice Annotation dialog box opens.
l Click the Record button to begin recording.
l Click the Stop button to stop the recording.
l Click the Play button to preview your recording.
NOTE
If you try to record your voice and the voice recording device is improperly connected or malfunctioning, a warning message will appear. If this happens, check the voice recording device.
937
Storyboard Pro 20 User Guide
Chapter 19: Storyboard Supervision
Playing Voice AnnotationsT-SBADV-008-006
Once a voice annotation has been added to a panel, you can play it back using the playback controls.
How to listen to voice annotations
1. In the Thumbnails view, select the panel with the voice annotation which you want to listen to.
2. In the Panel view, do any of the following in the Voice Annotations section:
l Click the Next Voice Annotation and Previous Voice Annotation buttons to select the annotation you want to listen to. Use the order display in the Voice Annotation section to see which annotation is selected.
l Click the Play Voice Annotation button to play back the selected voice annotation.
l Click the Stop Voice Annotation button to stop playback.
938
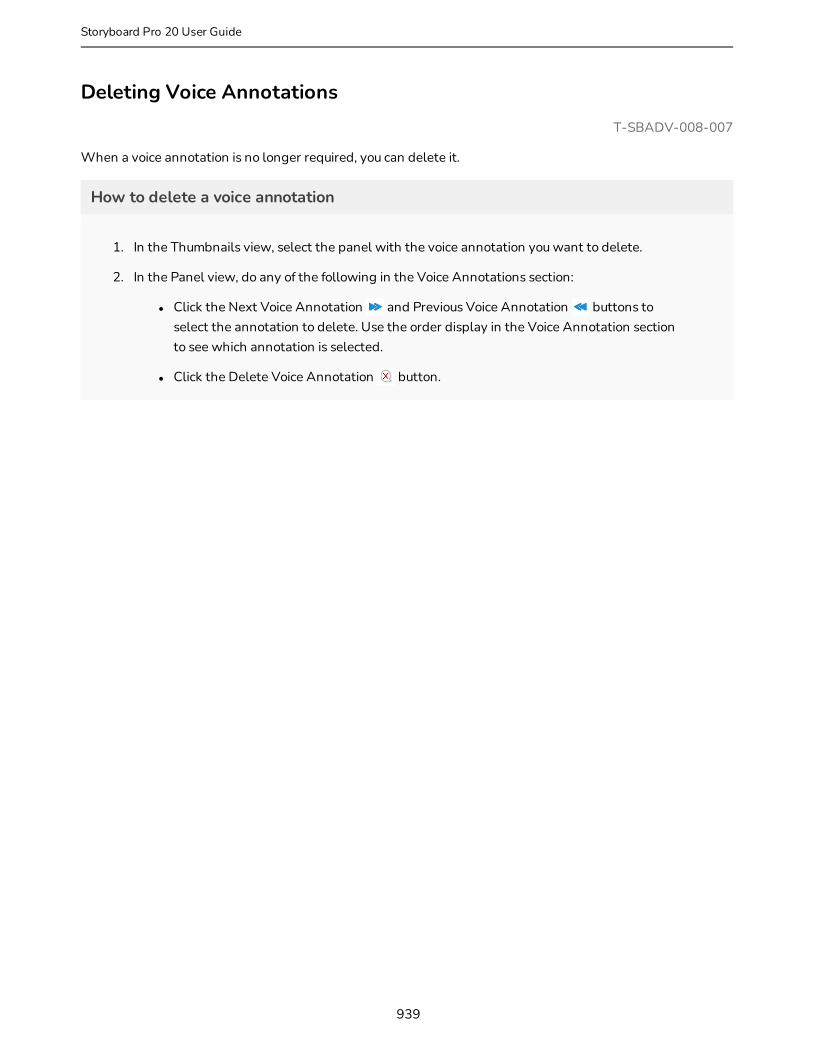
Deleting Voice AnnotationsT-SBADV-008-007
When a voice annotation is no longer required, you can delete it.
How to delete a voice annotation
1. In the Thumbnails view, select the panel with the voice annotation you want to delete.
2. In the Panel view, do any of the following in the Voice Annotations section:
l Click the Next Voice Annotation and Previous Voice Annotation buttons to select the annotation to delete. Use the order display in the Voice Annotation section to see which annotation is selected.
l Click the Delete Voice Annotation button.
939
Storyboard Pro 20 User Guide
Chapter 19: Storyboard Supervision
About Project ManagementT-SBADV-002-001
The project management functionalities of Storyboard Pro allow you to split your storyboard into several small projects so that several contributors can work on parts of the project simultaneously. You can then merge the separated projects back into a single project.
There are two approaches to separating your storyboard into smaller projects:
l Splitting: Separates the current project into two projects. You can create two new projects, each of which make half of the current project, and keep the current project as the master project, or you can take out half of the scenes of the current project into another project, making the current project the other half.
l Extracting: Exports selected parts of the current project into one or several smaller projects. This allows you to split your project into more than two smaller projects. Like with splitting, you can choose to extract the whole storyboard into smaller projects and keep the current project as the master project, or you can remove the extracted chunks from the current project, making the current project one of the chunks that are part of the whole project.
There are three approaches to merging parts of a storyboard into a single project:
l Inserting: Simply adds a single project's scenes into the current project.
l Merging: Allows you to add the scenes from one or several projects to the current project. You can decide in which order each project is added to the current project, and whether they are added before or after the current project's scenes.
l Merging and Replacing: Allows you to replace the scenes in the current project with scenes from extracted projects. This is the method to use if you want to import changes made in extracted projects into the master project, as it will replace the master project's original scenes with the updated scenes. This method allows you to select which scenes to import from the smaller projects. If some scenes in the projects being imported cannot be matched with a scene in the current project, they will be added at the end of the current project.
940

Splitting your Project into Two Projects T-SBADV-002-002
Using the Split Storyboard dialog, you can divide your storyboard into two separate projects so that two project collaborators can work on their half of the project simultaneously. Later, you can assemble both halves of the project back into a single project.
There are two approaches to splitting your project:
l You can choose to export one half of the project into a different project and keep the other half in the current project. If you do this, you can assemble the project back into a single project by inserting the second half at the end of the first half, or by merging both projects together—see Inserting a Project's Scenes into the Current Project on page 958 and Merging Storyboard Projects on page 955.
l You can choose to split the current project into two new projects and keep the current project as a master project. Later, you can assemble the split projects back into the master project using the Merge and Replace dialog—see Merging Projects and Replacing Scenes in the Current Project on page 959.
IMPORTANT
If you intend to split your project into two new projects, then import the changes made in the two new projects into the original project using the Merge and Replace dialog, it is highly recommended to lock you project's scene and panel numbers before splitting your project. To do this, in the top menu, select Storyboard > Lock Scene and Panel Names.
How to split a storyboard project into two projects
1. In the Timeline, move the timeline playhead to the panel where you want to split your project.
NOTE
You can choose in which one of the two projects the current panel will go in the Split Storyboard dialog.
2. Do one of the following:
l In the top menu, select File > Project Management > Split.
l In the Project Management view, click on Menu and select Split.
The Split Storyboard dialog box appears.
941
Storyboard Pro 20 User Guide

Chapter 19: Storyboard Supervision
3. If you want to extract every panel before the current panel into a project, do the following:
a. Check the Export before selected panel checkbox.
b. Click on the Browse button for this half of the project.
c. In the Save dialog that appears, browse to the location where you want to save this half of the project.
d. Type in a name for this half of the project and click on Save.
e. If you want the current panel to be go in this project, check the Include selected panel checkbox.
4. If you want to extract every panel after the current panel into a project, do the following:
a. Check the Export after selected panel checkbox.
b. Click on the Browse button for this half of the project.
c. In the Save dialog that appears, browse to the location where you want to save this half of the project.
d. Type in a name for this half of the project and click on Save.
e. If you want the current panel to go in this project, check the Include selected panel checkbox.
NOTE
If you are extracting both halves of the project and neither Include selected panel checkbox is checked, the current panel will not be extracted to either project.
5. If you chose to only extract one half of the project into a new project, and only want to keep the remaining half in the current project, check the Remove exported panels from current project option. If you prefer to keep a copy of the scenes being extracted in the current project, make sure
942
this option is unchecked.
NOTE
This option will be greyed out if you are extracting every panel in your project including the selected panel, as that would leave the project empty.
6. If you want to add the extracted projects to the list of linked projects in the Project Management view, check the Link extracted project checkbox—see About Linked Projects on page 947.
7. Click on OK.
Project folders containing the split projects will be created in their selected destinations, with their chosen project names.
943
Storyboard Pro 20 User Guide
Chapter 19: Storyboard Supervision
Extracting Parts of your Project into Other ProjectsT-SBADV-002-003
Using the Extract Storyboard dialog, you can extract parts of your storyboard into their ownprojects. This allows you separate your project into smaller projects, each one representing a chunk of the original storyboard. You can then share these extracted projects with project collaborators so that several artists can work on their assigned part of the project simultaneously.
There are two approaches to separating your projects into smaller projects:
l You can extract all but one part of the project into smaller projects, and keep the remaining part in the current project. Later, you can assemble the extracted projects back with the current project using the Merge dialog—see Merging Storyboard Projects on page 955.
l You can every part of your project into smaller projects and keep the current project as a master project. Later, you can assemble the extracted projects back into the master project using the Merge and Replace dialog—see Merging Projects and Replacing Scenes in the Current Project on page 959.
IMPORTANT
If you want to keep the extracted scenes in the original project, and later import the changes made to the extracted projects back into the original project using the Merge and Replace dialog, it is highly recommended to lock you project's scene and panel numbers before splitting your project. To do this, in the top menu, select Storyboard > Lock Scene and Panel Names.
How to extract scenes in your storyboard into different projects
1. Do one of the following:
l In the top menu, select File > Project Management > Extract.
l In the Project Management view, click on Menu and select Extract.
944
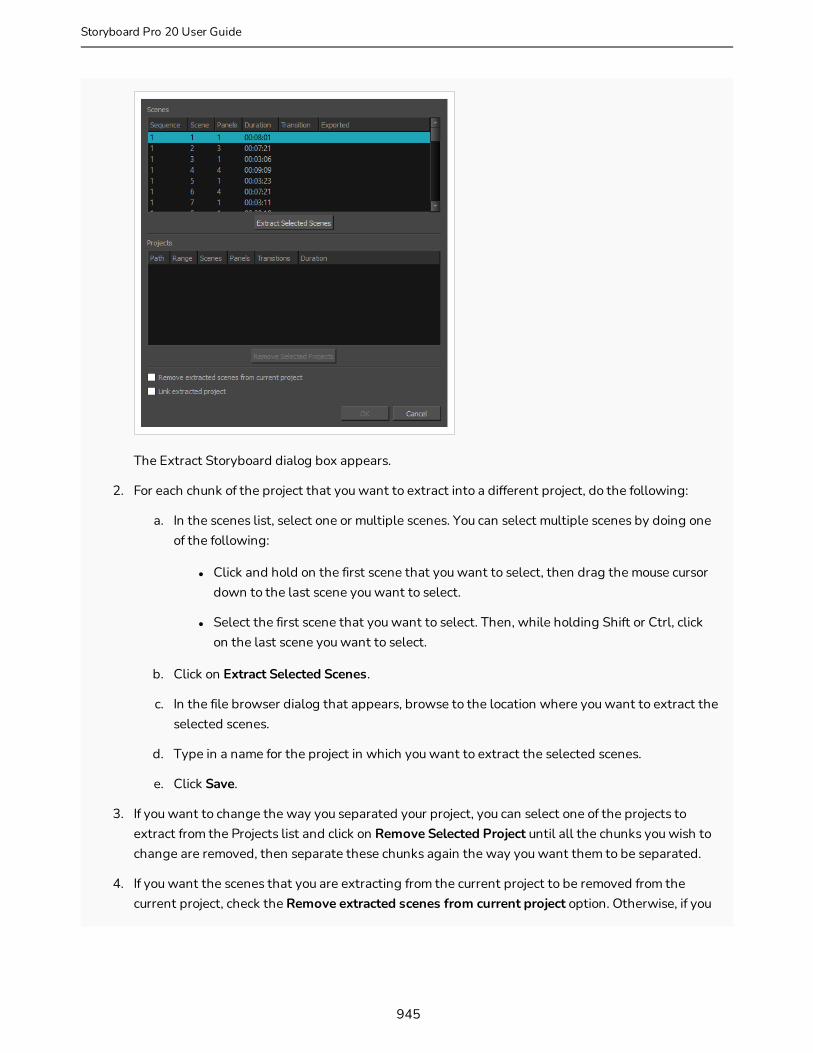
The Extract Storyboard dialog box appears.
2. For each chunk of the project that you want to extract into a different project, do the following:
a. In the scenes list, select one or multiple scenes. You can select multiple scenes by doing one of the following:
l Click and hold on the first scene that you want to select, then drag the mouse cursor down to the last scene you want to select.
l Select the first scene that you want to select. Then, while holding Shift or Ctrl, click on the last scene you want to select.
b. Click on Extract Selected Scenes.
c. In the file browser dialog that appears, browse to the location where you want to extract the selected scenes.
d. Type in a name for the project in which you want to extract the selected scenes.
e. Click Save.
3. If you want to change the way you separated your project, you can select one of the projects to extract from the Projects list and click on Remove Selected Project until all the chunks you wish to change are removed, then separate these chunks again the way you want them to be separated.
4. If you want the scenes that you are extracting from the current project to be removed from the current project, check the Remove extracted scenes from current project option. Otherwise, if you
945
Storyboard Pro 20 User Guide

Chapter 19: Storyboard Supervision
want to keep the current project intact so that it is a master project, leave this option unchecked.
NOTE
This option will be greyed out if you are extracting every scene in your project, as that would leave the project empty.
5. If you want to add the extracted projects to the list of linked projects in the Project Management view, check the Link extracted project checkbox—see About Linked Projects on page 947.
6. Click on OK.
Project folders containing the extracted projects will be created in their selected destinations, with their chosen project names.
946
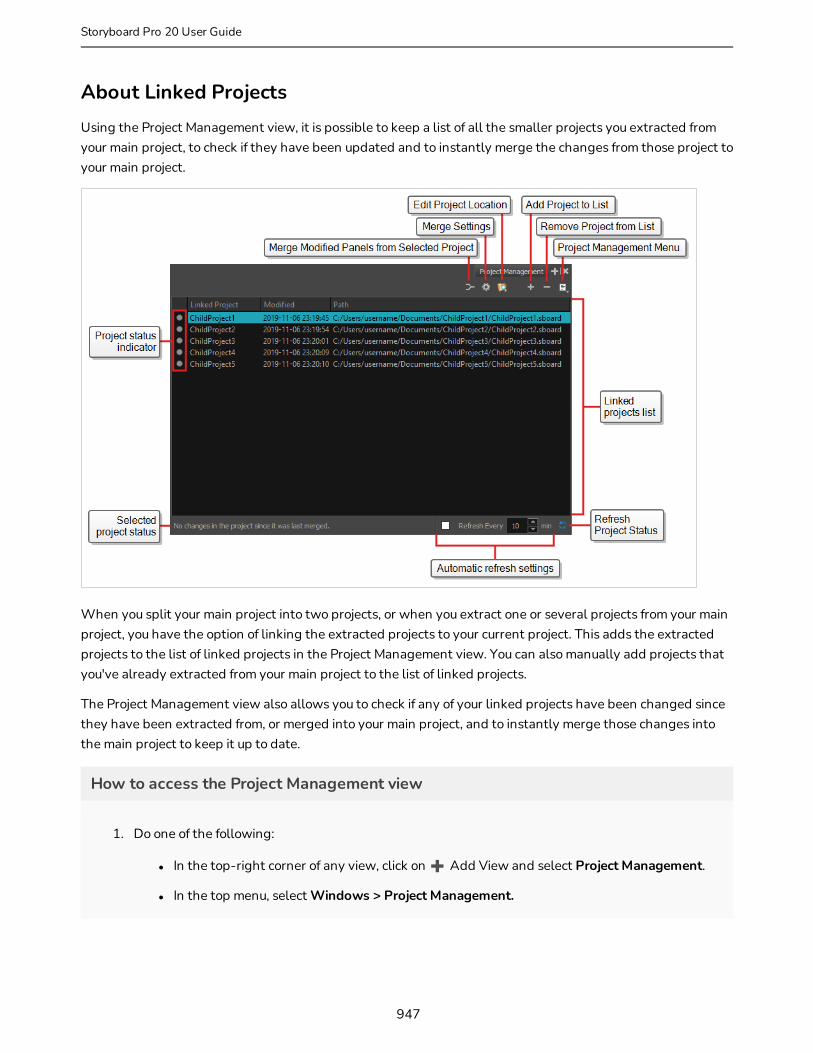
About Linked ProjectsUsing the Project Management view, it is possible to keep a list of all the smaller projects you extracted from your main project, to check if they have been updated and to instantly merge the changes from those project to your main project.
When you split your main project into two projects, or when you extract one or several projects from your main project, you have the option of linking the extracted projects to your current project. This adds the extracted projects to the list of linked projects in the Project Management view. You can also manually add projects that you've already extracted from your main project to the list of linked projects.
The Project Management view also allows you to check if any of your linked projects have been changed since they have been extracted from, or merged into your main project, and to instantly merge those changes into the main project to keep it up to date.
How to access the Project Management view
1. Do one of the following:
l In the top-right corner of any view, click on Add View and select Project Management.
l In the top menu, select Windows > Project Management.
947
Storyboard Pro 20 User Guide

Chapter 19: Storyboard Supervision
NOTE
For more information on the Project Management view, refer to the Reference guide.
948
Adding a Linked Project
When you split a project into smaller projects or when you extract smaller projects from your main project, you have the option to add the extracted projects to your main project's list of linked projects. To do this, simply check the Link extracted project checkbox at the bottom of the Split Storyboard or Extract Storyboard dialog, and every project that is extracted from your main project will be automatically added to the list in the Project Management view.
If you need to add an already existing project to your list of linked projects, you can do so in the Project Management view.
How to add an existing project to the list of linked projects
1. Do one of the following to add the Project Management view to your workspace:
l In the top-right corner of any view, click on Add View and select Project Management.
l In the top menu, select Windows > Project Management.
2. In the Project Management view, click on the Add Project to List button.
The Open Storyboard Project dialog appears.
3. Browse to the location of the extracted project and select it.
4. Click Open.
The selected project is added to the Project Management view.
949
Storyboard Pro 20 User Guide
Chapter 19: Storyboard Supervision
Checking and Updating the Status of Linked Projects
The Project Management view allows you to check on the status of each linked project. This status is displayed in the list of linked project using a colour-coded bullet in the left-most column. The possible colours of this bullet and their meaning are as follow:
l Gray: The project does not have any modifications to merge.
l Orange: The project has modifications to merge.
l Red: The project cannot be found in the location indicated in the Path column.
The status of each linked project is updated when you open your project. However, by default, it does not automatically check for changes to the status of your linked projects. You can manually refresh to status of all your linked project, or you can configure the Project Management view to automatically refresh at a specific interval.
NOTES
l If you select a project in the list, its status will be described textually at the bottom of the Project Management view.
l Selecting a linked project in the Project Management view will not update its status. Hence, if its status colour is not up to date, neither will its textual status at the bottom of the Project Management view.
How to manually refresh the status of linked projects in the Project Management view
1. In the bottom-right corner of the Project Management view, click on the Refresh Project Status button.
The status of every linked project in the list will be updated.
How to automatically refresh the status of linked projects in the Project Management view
1. In the bottom-right corner of the Project Management view, check the Refresh Every checkbox.
2. In the number input field just right of the checkbox, type in the interval at which you want the Project Management view to automatically refresh, in minutes.
950

Merging Changes from a Linked Project
Using the Project Management view, you can instantly merge the changes made to a project that was extracted from your master project into your master project. All you need to do is to select the project in the list of linked projects, then click on the Merge Modified Panels from Selected Project button.
However, before you can merge your linked projects, you must select your merge settings in the Merge Settings dialog. You only need to select your merge settings once, and then those settings will be used every time you merge your linked projects. You can also change those settings at any time thereafter.
NOTE
When merging modified panels from a project into the current project, the following changes are not merged:
l Deleted panels
l Changes to camera position and camera movements
If you need to merge such changes, you need to use the Advanced Merge Storyboard dialog box instead—see Merging Projects and Replacing Scenes in the Current Project.
How to configure your merge settings
1. In the Project Management view, click on the Merge Settings button.
The Merge Settings dialog box appears.
TIP
If you have never selected your merge settings before, clicking on the Merge Modified Panels from Selected Project button will also open the Merge Settings dialog, and will then merge the changes from the selected project.
2. In the drop-down at the top of the dialog box, select the way panels to merge into the current project should be selected:
l Merge Most Recent: Merges every panel in the selected project that has been modified later than its corresponding panel in the current project.
To do this, it checks the date and time of the last modification made on each panel in the selected project. If this date and time is later than that of the last modification date on the corresponding panel in the current project, the panel will be merged.
l Merge Tracked Panels: If you have tracked your changes in the selected project, you can select this option to merge every panel in the selected project that is marked as changed.
951
Storyboard Pro 20 User Guide
Chapter 19: Storyboard Supervision
3. If you only want to merge changes to scenes that are present in the current project, check the Merge Existing Scenes Only option. Otherwise, scenes that are present in the selected project, but not in the current project will be imported into the current project.
4. If any changes were made to the timing of the panels in the selected project, sound clips that are cued during those panels will be offset to remain synchronized with the action. By default, this happens even for sound clips that are inside locked audio tracks. If you don't want sound clips in locked audio tracks to be offset, check the Respect Locked Audio Tracks checkbox.
5. If you don't want changes made to the captions in the selected project to be imported into the current project, check the Preserve Captions in Current Project checkbox.
6. If you don't want changes to the length and order of the panels to be imported, check the Replace Artwork Only checkbox.
7. If you don't want changes to the position, size, angle and animation of layers in the panels to be imported, check the Preserver Layer Transformations in Current Project checkbox.
8. Click OK.
From this point on, if you click on the Merge Modified Panels from Selected Project button, the settings you just selected will be used when merging modifications from the selected project.
How to merge modifications from a linked project
1. In the Project Management view, select the project you want to merge changes from.
2. Just above the list of linked projects, click on the Merge Modified Panels from Selected Project button.
952

Relinking a Missing Linked Project
If a project in the Project Management view appears to be missing because it was moved to a different location, or if you need to change the location of a linked project because an updated version is in a different location, you can edit its location in the Project Management view.
How to edit the location of a linked project
1. In the Project Management view, select the project for which you need to update the location.
2. Click on the Edit Project Location button above the list of linked projects.
The Open Storyboard Project dialog appears.
3. Browse to the new location of your project and select it.
4. Click Open.
The project's location will be updated in the Project Management view, and its status will reflect whether or not it's up to date or if it has changes to merge.
953
Storyboard Pro 20 User Guide
Chapter 19: Storyboard Supervision
Removing a Linked Project
If you accidentally added the wrong project to the list of linked projects, or if you no longer need a specific project to be linked to your master project, you can remove it from the list of linked projects.
How to remove a linked project from the Project Management view
1. In the Project Management view, select the linked project you wish to remove.
2. Click on the Remove Project from List button just above the list of linked projects.
The selected project is removed from the list of linked projects.
954

Merging Storyboard ProjectsT-SBADV-002-004
Using the Merge Storyboard dialog, you can merge several small projects and make a big project. This is useful if you have split or extracted your project into several projects in the past, and now you want to assemble those small projects back together.
How to merge different projects into a single project
1. Do one of the following:
l In the top menu, select File > Project Management > Merge.
l In the Project Management view, click on Menu and select Merge.
The Merge Storyboard window opens.
2. For each project that you want to insert to your current project:
a. Click on Import Project.
b. In the file browser dialog that appears, browse for and select the project file that you want to add to the current project, then click on Open.
The project is added to the list of projects at the top.
c. If you want to change the order of the project relative to the other projects being assembled together, select it and click on Move Up or Move Down. In the end, the scenes of each
955
Storyboard Pro 20 User Guide

Chapter 19: Storyboard Supervision
project being merged together will be assembled in the order in which they appear in the list.
NOTE
You can move projects above the current project. Their scenes will be inserted before the scenes in the current project.
3. In the Captions list, you can see your current project's caption fields alongside the caption fields of each project that you are merging. Do the following to ensure each project's caption fields are properly merged:
a. If the caption fields of any project being imported are not horizontally aligned with their corresponding caption field for the current project, select these fields and use the Move Up and Move Down button until they are aligned.
b. If there are new caption fields in the projects being imported that you want to add to the current project, move them down to the bottom of the list, below the current project's caption fields. This will make it so these captions get added as new fields instead of their content getting inserted in existing fields.
c. If you want any caption field of one of the projects being imported to be left out, so that they are not added to the current project, move them down to the bottom of the list, below the current project's caption fields, then click on Remove Caption.
Refer to the following example:
4. By default, the scene numbers in the projects being merged will be have a suffix letter added to them if any other scene in the current project or in other projects being merged have the same scene number. If would prefer that all scenes in the project are numbered in series regardless of what their previous scene number was:
a. Enable the Force scenes numbering option. This will make it so every scene in the project will be numbered in a series after all the projects have been merged together.
956

b. In the Start scene base name field, type in the number that you want the first scene in the resulting project to have.
5. If you are not re-numbering the scenes, you can add the name of each project getting merged into the current project to the name of their scenes, so that you can easily identify which scene came from which project. To do this, check the Use project name as scene's prefix option.
6. If you want to have the audio tracks from each merged project to be imported into separate audio tracks in the resulting project, check the Create new audio tracks option . Otherwise, the audio clips from the merged projects will be inserted in the existing audio tracks of the current project, when possible, and new audio tracks will only be created if needed.
7. Click on OK.
957
Storyboard Pro 20 User Guide
Chapter 19: Storyboard Supervision
Inserting a Project's Scenes into the Current ProjectT-SBADV-002-005
You can quickly and easily insert a project in your current project. The inserted project's scenes will be added right after the current scene.
NOTE
If you need to insert a project before every scene in the current project, you must use the Merge Projects dialog—see Merging Storyboard Projects on page 955.
How to insert the scenes from a different project into your current project
1. In your current project, in the Timeline view, move the timeline playhead over the scene after which you want the project to be inserted.
2. From the top menu, select File > Project Management > Insert.
The Open Storyboard Project window appears.
3. Browse to and select the *.sboard or *.sbpz file of the project you want to select and click on Open.
1. You will be prompted with a dialog stating whether the inserted project's caption fields match with the current project's caption fields and what it intends to do with the inserted project's caption fields. If you agree with what it intends to do, click on OK. Otherwise, click on Customize. Then, in the Customize Captions dialog, do the following:
a. If the caption fields of any project being imported are not horizontally aligned with their corresponding caption field for the current project, select these fields and use the Move Up and Move Down button until they are aligned.
b. If there are new caption fields in the projects being imported that you want to add to the current project, move them down to the bottom of the list, below the current project's caption fields. This will make it so these captions get added as new fields instead of their content getting inserted in existing fields.
c. If you want any caption field of one of the projects being imported to be left out, so that they are not added to the current project, move them down to the bottom of the list, below the current project's caption fields, then click on Remove Caption.
d. Click OK.
All scenes from the selected project are inserted after the current scene in your current project.
958

Merging Projects and Replacing Scenes in the Current ProjectT-SBADV-002-006
If you have extracted one or several smaller projects from your master project so that several project collaborators can work on different parts of your animatic simultaneously, you can replace the scenes in your master prroject with the updated scenes in the modified projects using the Advanced Merge Storyboard dialog box.
NOTE
When merging projects, the video and sound clips in the master project will remain synchronized with the cue time of their respective panels. Clips that extend beyond the boundaries of a panel will be synchronized with the panel in which they are cued, not the panel in which they end.
How to replace scenes in your project with the updated scenes in projects that were extracted from it
1. Open your master project.
2. Do one of the following:
l In the top menu, select File > Project Management > Merge and Replace.
l In the Project Management view, click on Menu and select Merge and Replace.
The Advanced Merge Storyboard dialog box appears.
959
Storyboard Pro 20 User Guide

Chapter 19: Storyboard Supervision
3. For each project that you want to merge into the current project:
a. Click Import Project.
b. Browse to and locate the .sboard or .sbpz file of the project you want to merge into the current project.
4. For each project that you added to the list of imported projects, do one of the following:
l If you want to merge every scene from the project you are importing, check the checkbox left of the project in the project list at the top. This will select every scene in that project for import.
NOTE
You can also select the scene, then click on the Select All button right of the scenes list.
l If you want to merge only some scenes from the project into the current project, select that project in the list of projects at the top. Then, in the list of scenes at the bottom, check every scene that you want to merge.
960
NOTE
If the project contains sequences, the list of scenes will contain sequences, and scenes will be listed under their respective sequence. You can check the checkbox next to a sequence to select every scene in that sequence.
l If you need to reorder one of the projects you imported, select it, then click on Move Up or Move Down to change its order in the list.
NOTE
If you are merging projects that were originally extracted from the current project, their order in the list does not matter as these projects' scenes will replace the original scenes in the current project.
5. If you want to preserve a copy of the original scenes along with their updated version, check the Keep and move original scenes to the end option. A backup of each scene that gets replaced will be added at the end of the storyboard.
6. If you want audio tracks that you previously locked to remain exactly as they are, check the Respect locked audio tracks option. Otherwise, clips in locked audio tracks will be moved to remain synchronized with the panels in which they are cued.
7. If you want changes made to the audio in the projects getting merged to be imported into the current project, check the Import audio changes from source project option.
8. If you only want to import panels that have been marked as tracked for changes in the imported projects, check the Only Merge Modified Panels (Track Changes) option.
9. If you don't want the adjustments to the length of panels and scenes made in the imported projects to be merged into the current project, check the Replace Artwork Only option.
10. If you don't want the adjustments to the layer transformations and animations in the imported projects to be merged into the current project, check the Preserver Layer Transformations in Master Project option.
11. Click on Merge.
961
Storyboard Pro 20 User Guide

Chapter 19: Storyboard Supervision
Merging Modified Panels from an Extracted ProjectIf you have extracted one or several smaller projects from your master project so that several project collaborators can work on different parts of your animatic simultaneously, you can replace the panels in your master prroject with the updated panels in one of the modified projects using the Merge Modified Panels dialog box.
This method is different from the Merge and Replace command in the following ways:
l You can only merge one sub-project at a time.
l It will automatically detect panels that need to merged into your master project based on their modification date, or whether or not they are tracked.
l It replaces individual panels instead of entire scenes.
NOTE
When merging modified panels from a project into the current project, the following changes are not merged:
l Deleted panels
l Changes to camera position and camera movements
If you need to merge such changes, you need to use the Advanced Merge Storyboard dialog box instead—see Merging Projects and Replacing Scenes in the Current Project.
How to merge the modified panels from an extracted project
1. Do one of the following:
l In the top menu, select File > Project Management > Merge Modified Panels.
l In the Project Management view, click on Menu and select Merge Modified Panels.
The Merge Modified Panels dialog box appears.
962
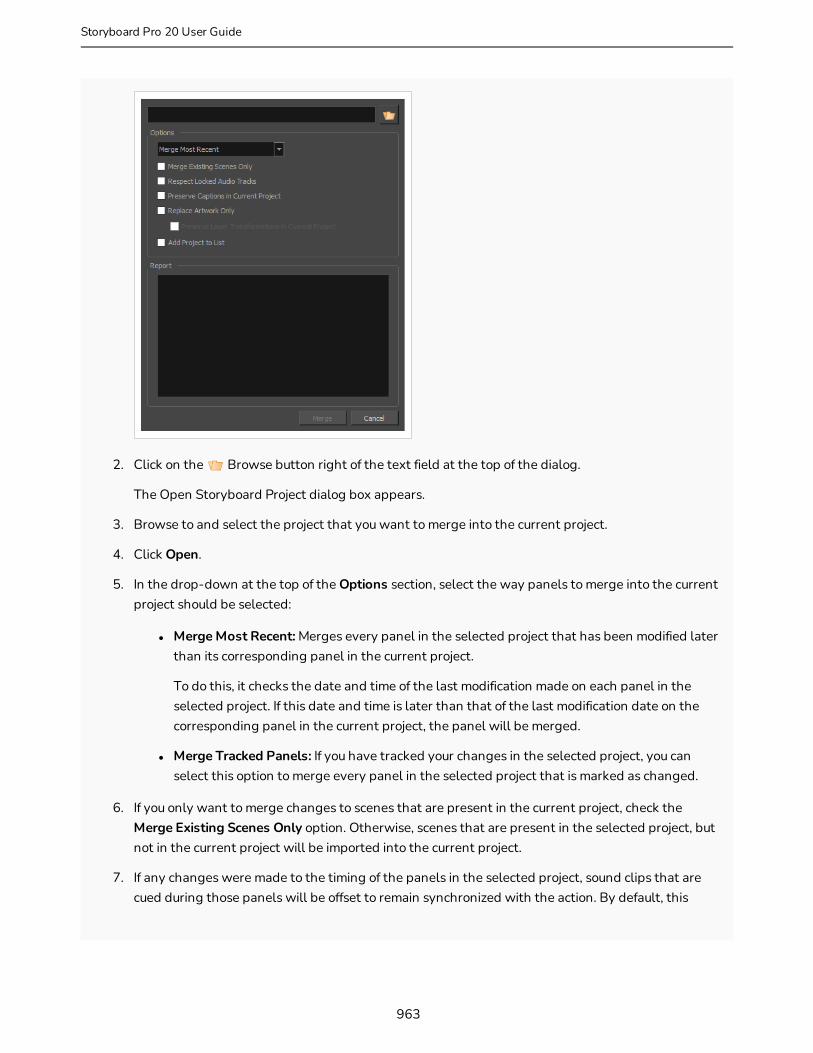
2. Click on the Browse button right of the text field at the top of the dialog.
The Open Storyboard Project dialog box appears.
3. Browse to and select the project that you want to merge into the current project.
4. Click Open.
5. In the drop-down at the top of the Options section, select the way panels to merge into the current project should be selected:
l Merge Most Recent: Merges every panel in the selected project that has been modified later than its corresponding panel in the current project.
To do this, it checks the date and time of the last modification made on each panel in the selected project. If this date and time is later than that of the last modification date on the corresponding panel in the current project, the panel will be merged.
l Merge Tracked Panels: If you have tracked your changes in the selected project, you can select this option to merge every panel in the selected project that is marked as changed.
6. If you only want to merge changes to scenes that are present in the current project, check the Merge Existing Scenes Only option. Otherwise, scenes that are present in the selected project, but not in the current project will be imported into the current project.
7. If any changes were made to the timing of the panels in the selected project, sound clips that are cued during those panels will be offset to remain synchronized with the action. By default, this
963
Storyboard Pro 20 User Guide

Chapter 19: Storyboard Supervision
happens even for sound clips that are inside locked audio tracks. If you don't want sound clips in locked audio tracks to be offset, check the Respect Locked Audio Tracks checkbox.
8. If you don't want changes made to the captions in the selected project to be imported into the current project, check the Preserve Captions in Current Project checkbox.
9. If you don't want changes to the length and order of the panels to be imported, check the Replace Artwork Only checkbox.
10. If you don't want changes to the position, size, angle and animation of layers in the panels to be imported, check the Preserver Layer Transformations in Current Project checkbox.
11. If the selected project is not in the list of linked projects in the Project Management view, and you want to add it to that list, check the Add Project to List checkbox.
12. Click Merge.
The changes in the selected project will be imported into the current project. Each modification will be listed in the Report section.
964

965
Storyboard Pro 20 User Guide

Chapter 20: Exporting
Chapter 20: ExportingNow that you have finished your storyboard or animatic, it is time to export it as images, PDF, or a movie file. Depending on whether or not you plan to edit your movie in a third party software or export snapshots, Storyboard Pro supports several export formats.
966

About Exporting to Portable Document Format (.pdf)You can export your storyboard project as a PDF file which you can print or share digitally. This is where you can set up your visuals to represent a classic storyboard on paper, or any other format you desire.
967
Storyboard Pro 20 User Guide

Chapter 20: Exporting
Setting Up the PDF ExportT-SBFND-010-002
You can set up the PDF export settings for a selected panel. This panel will be exported with all the others, but will follow its own rules.
How to specify independent PDF options for selected panels
1. Display the Panel PDF Options view by doing one of the following:
l In the Workspace toolbar, click the PDF View button to switch to the PDF View workspace.
l Select Windows > Panel PDF Options to display the view in your current workspace.
2. In the Thumbnails view, select one or more panels.
3. In the Panel PDF Options, set the export options to apply to the selected panels:
Parameter Description
Options
Export to PDFExports the selected panel. This option is enabled by default. Deselect this option if you do not want to export this particular panel.
Force New Page Starts panel on a new page.
Full Page Prints panel on a full page.
968
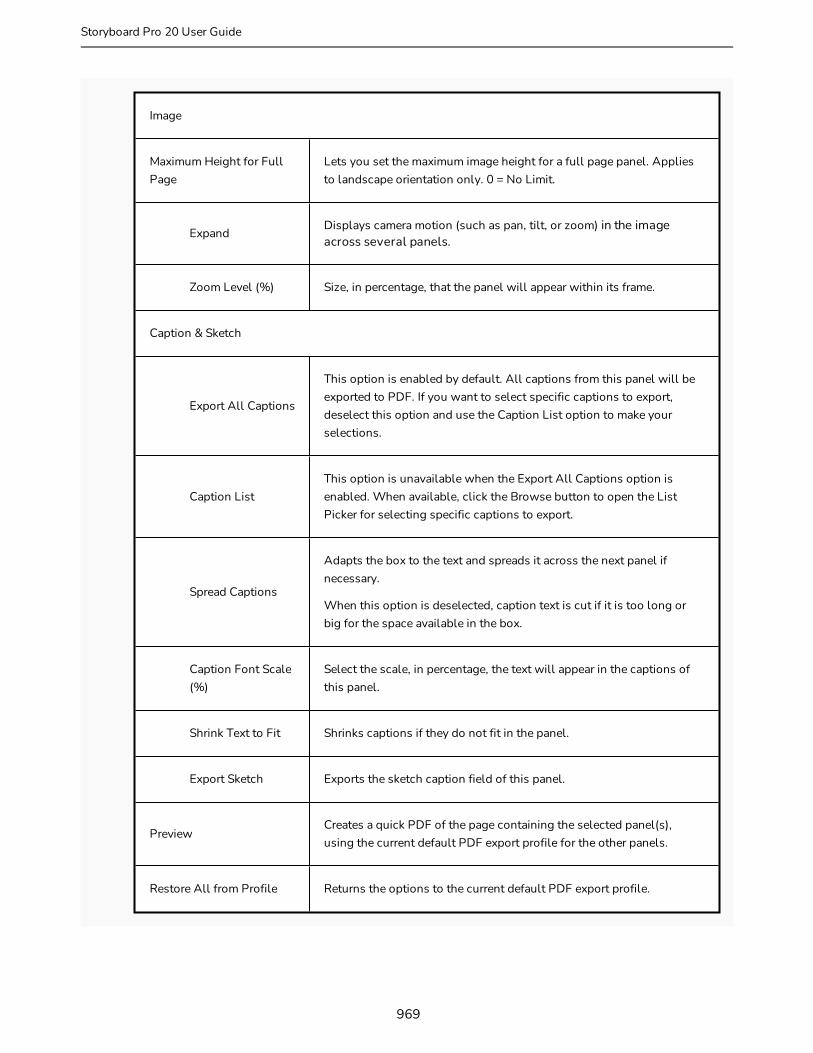
Image
Maximum Height for Full Page
Lets you set the maximum image height for a full page panel. Applies to landscape orientation only. 0 = No Limit.
ExpandDisplays camera motion (such as pan, tilt, or zoom) in the image across several panels.
Zoom Level (%) Size, in percentage, that the panel will appear within its frame.
Caption & Sketch
Export All Captions
This option is enabled by default. All captions from this panel will be exported to PDF. If you want to select specific captions to export, deselect this option and use the Caption List option to make your selections.
Caption ListThis option is unavailable when the Export All Captions option is enabled. When available, click the Browse button to open the List Picker for selecting specific captions to export.
Spread Captions
Adapts the box to the text and spreads it across the next panel if necessary.
When this option is deselected, caption text is cut if it is too long or big for the space available in the box.
Caption Font Scale (%)
Select the scale, in percentage, the text will appear in the captions of this panel.
Shrink Text to Fit Shrinks captions if they do not fit in the panel.
Export Sketch Exports the sketch caption field of this panel.
PreviewCreates a quick PDF of the page containing the selected panel(s), using the current default PDF export profile for the other panels.
Restore All from Profile Returns the options to the current default PDF export profile.
969
Storyboard Pro 20 User Guide

Chapter 20: Exporting
4. Click Preview to create a quick pdf preview of the page containing the selected panel(s), using the current default pdf export profile for the other panels.
5. Click Restore All from Profile to reset the options to the current default pdf export profile.
970
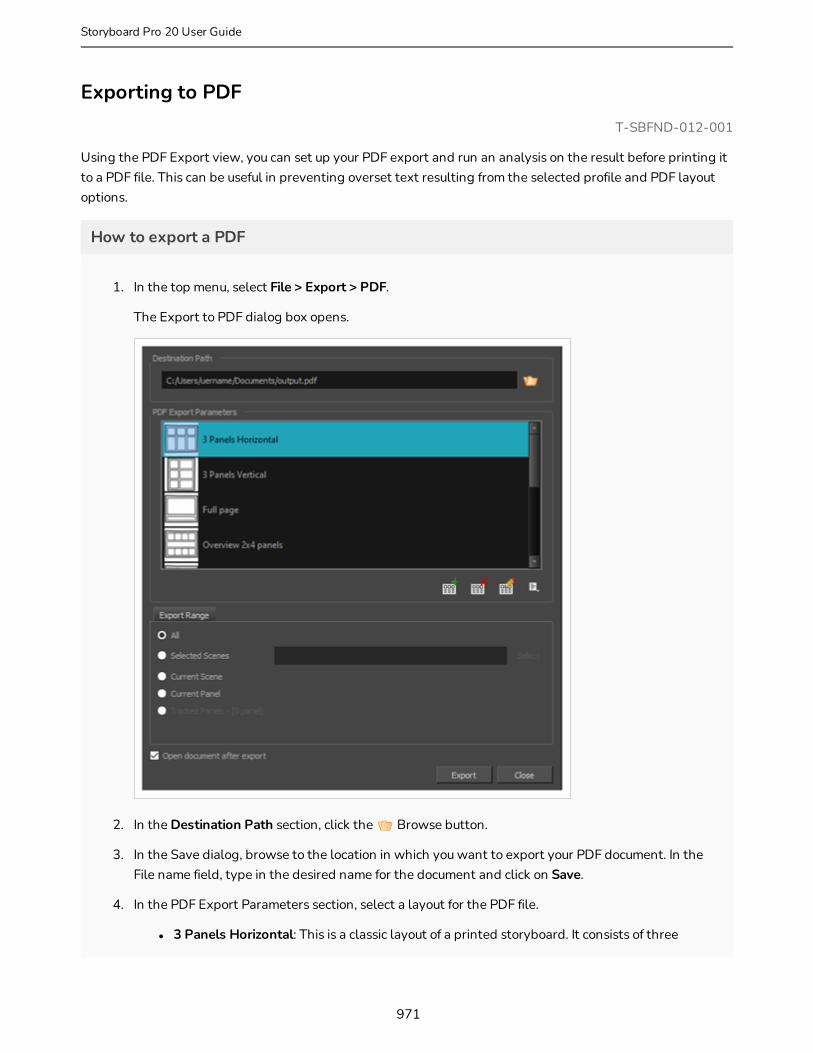
Exporting to PDFT-SBFND-012-001
Using the PDF Export view, you can set up your PDF export and run an analysis on the result before printing it to a PDF file. This can be useful in preventing overset text resulting from the selected profile and PDF layout options.
How to export a PDF
1. In the top menu, select File > Export > PDF.
The Export to PDF dialog box opens.
2. In the Destination Path section, click the Browse button.
3. In the Save dialog, browse to the location in which you want to export your PDF document. In the File name field, type in the desired name for the document and click on Save.
4. In the PDF Export Parameters section, select a layout for the PDF file.
l 3 Panels Horizontal: This is a classic layout of a printed storyboard. It consists of three
971
Storyboard Pro 20 User Guide
Chapter 20: Exporting
panels per page, including captions, in an horizontal arrangement.
l 3 Panels Vertical: This is a classic layout of a printed storyboard. It consists of three panels per page, including captions, in a vertical arrangement.
l Full Page: This layout consists of one large panel per page, including captions.
l Overview 2x4 Panels: This layout consists of a total of eight panels per page, organized on two rows of four, with captions in the middle.
l Overview 4x3: This layout consists of a total of 12 panels per page, organized in three rows of four. No caption is included.
l Overview 8x10: This layout consists of a total of 80 panels per page, organized in ten rows of four. No caption is included.
l Typical Japanese Format: This layout consists of a total of five panels by page, aligned on the left side of the page. Captions and duration are aligned in two consecutive rows on the right side. Note that your PDF reader and system may require an additional font package in order to display the PDF file properly.
l Alternate Vertical Layout: This layout consists of a total of 5 panels per page, aligned on the left side of the page. Captions are organized on the right size of each panel. This export also includes a cut and a duration column, and displays the duration of each scene at the beginning of every new one.
l Alternate Japanese Layout: This layout consists of a total of 5 panels per page, aligned on the left side of the page. This export includes vertical columns for the dialog, action, sluggin, notes, and time (duration) column which is displayed near the end of each scene (optionally). The scene name appears near the top of the first panel of a scene. The caption titles appear at the top and do not repeat at each panel. The total duration appears at the bottom of the page.
5. In the Export Range section, select whether you want to export the entire project, or only specific parts of it:
l All: Exports the entire storyboard.
l Selected Scenes: Select this option to export a specific selection of scenes. Then, click on the Select button to open the Scenes Picker dialog box, in which you can:
l Type the number of a sequence or of a scene in the Sequence or Scene fields in the Filter section, to only show matching sequences or matching scenes in the list.
l Click and drag to select a range of scenes.
l Hold the Ctrl key and click on each scene you want to add to your selection.
972

l Hold the Shift key, then click on the first scene and the last scene you want to add to your selection, to select every scene between those two scenes inclusively.
l If your project has sequences, click on a sequence to select every scene in that sequence.
l Current Scene: Exports only the currently selected scene.
l Current Panel: Exports only the currently selected panel.
l Tracked Panels:Exports panels on which tracking changes is enabled.
6. If you want to view the storyboard after it is exported, check the Open document after export option.
7. Click on Export button.
How to analyse and export with the PDF Export view
1. Done of the following:
l In the Workspace toolbar, click the PDF View button.
l Select Windows > PDF Export.
2. In the PDF Export view or window, do the following:
973
Storyboard Pro 20 User Guide
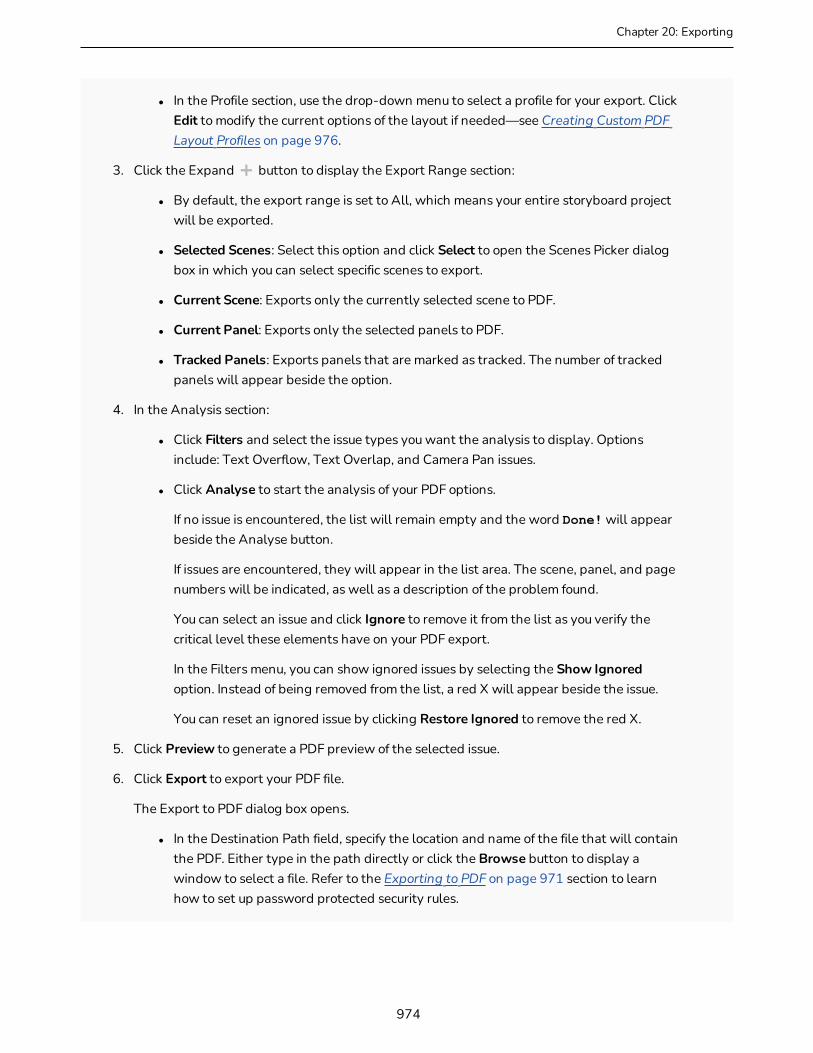
Chapter 20: Exporting
l In the Profile section, use the drop-down menu to select a profile for your export. Click Edit to modify the current options of the layout if needed—see Creating Custom PDF Layout Profiles on page 976.
3. Click the Expand button to display the Export Range section:
l By default, the export range is set to All, which means your entire storyboard project will be exported.
l Selected Scenes: Select this option and click Select to open the Scenes Picker dialog box in which you can select specific scenes to export.
l Current Scene: Exports only the currently selected scene to PDF.
l Current Panel: Exports only the selected panels to PDF.
l Tracked Panels: Exports panels that are marked as tracked. The number of tracked panels will appear beside the option.
4. In the Analysis section:
l Click Filters and select the issue types you want the analysis to display. Options include: Text Overflow, Text Overlap, and Camera Pan issues.
l Click Analyse to start the analysis of your PDF options.
If no issue is encountered, the list will remain empty and the word Done! will appear beside the Analyse button.
If issues are encountered, they will appear in the list area. The scene, panel, and page numbers will be indicated, as well as a description of the problem found.
You can select an issue and click Ignore to remove it from the list as you verify the critical level these elements have on your PDF export.
In the Filters menu, you can show ignored issues by selecting the Show Ignored option. Instead of being removed from the list, a red X will appear beside the issue.
You can reset an ignored issue by clicking Restore Ignored to remove the red X.
5. Click Preview to generate a PDF preview of the selected issue.
6. Click Export to export your PDF file.
The Export to PDF dialog box opens.
l In the Destination Path field, specify the location and name of the file that will contain the PDF. Either type in the path directly or click the Browse button to display a window to select a file. Refer to the Exporting to PDF on page 971 section to learn how to set up password protected security rules.
974

l Select the Open document after export option to automatically open your PDF file when it is ready.
975
Storyboard Pro 20 User Guide

Chapter 20: Exporting
Creating Custom PDF Layout ProfilesT-SBFND-010-003B
When exporting your storyboard project to a PDF file, various page layouts are available depending on your document standards. You can also define some preferences and create a personalized layout.
You can create your own custom PDF profiles. The information is stored in an XML file, pdfoptions.xml, that can be found here:
l Windows: C:\Users\[user_name]\AppData\Roaming\Toon Boom Animation\Toon Boom Storyboard Pro \full-20100-pref\pdfoptions.xml
l macOS: /Users/[user_name]/Library/Preferences/Toon Boom Animation/Toon Boom Storyboard Pro Premium/full-20100-pref/pdfoptions.xml
NOTE
On macOS, the Library folder is a hidden folder. To display the display the folder, hold down the Alt key when displaying Finder's Go menu.
How to create a custom PDF Profile
1. Select File > Export > PDF.
The Export to PDF dialog box opens.
2. In the PDF Export Parameters section, click one of the following buttons:
l New Profile: Creates a completely new layout.
l Duplicate Profile: Makes a copy of the selected layout from the list.
l Edit Profile: Lets you edit the selected layout from the list.
l Delete Profile: Deletes the selected layout from the list.
3. In the PDF Profile dialog box, adjust the parameters for your PDF profile. For information on how to set the parameters for a custom profile, see the PDF Profile Dialog Box topic in the Reference Guide.
976
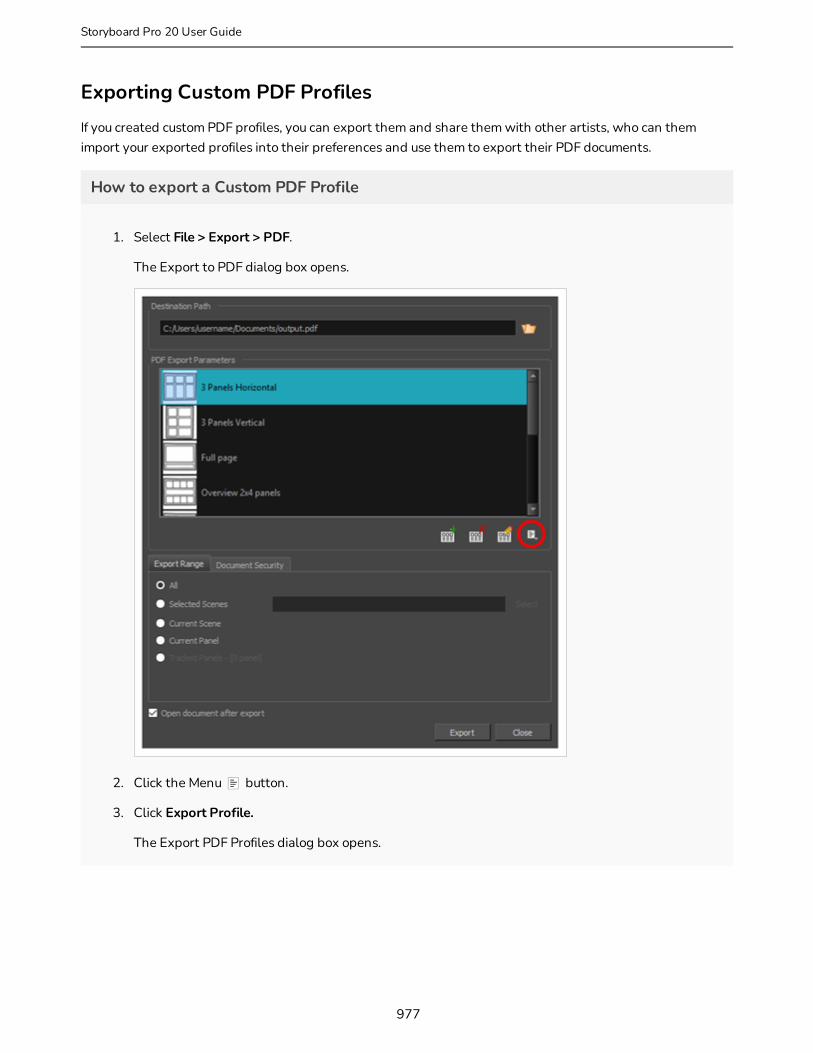
Exporting Custom PDF ProfilesIf you created custom PDF profiles, you can export them and share them with other artists, who can them import your exported profiles into their preferences and use them to export their PDF documents.
How to export a Custom PDF Profile
1. Select File > Export > PDF.
The Export to PDF dialog box opens.
2. Click the Menu button.
3. Click Export Profile.
The Export PDF Profiles dialog box opens.
977
Storyboard Pro 20 User Guide
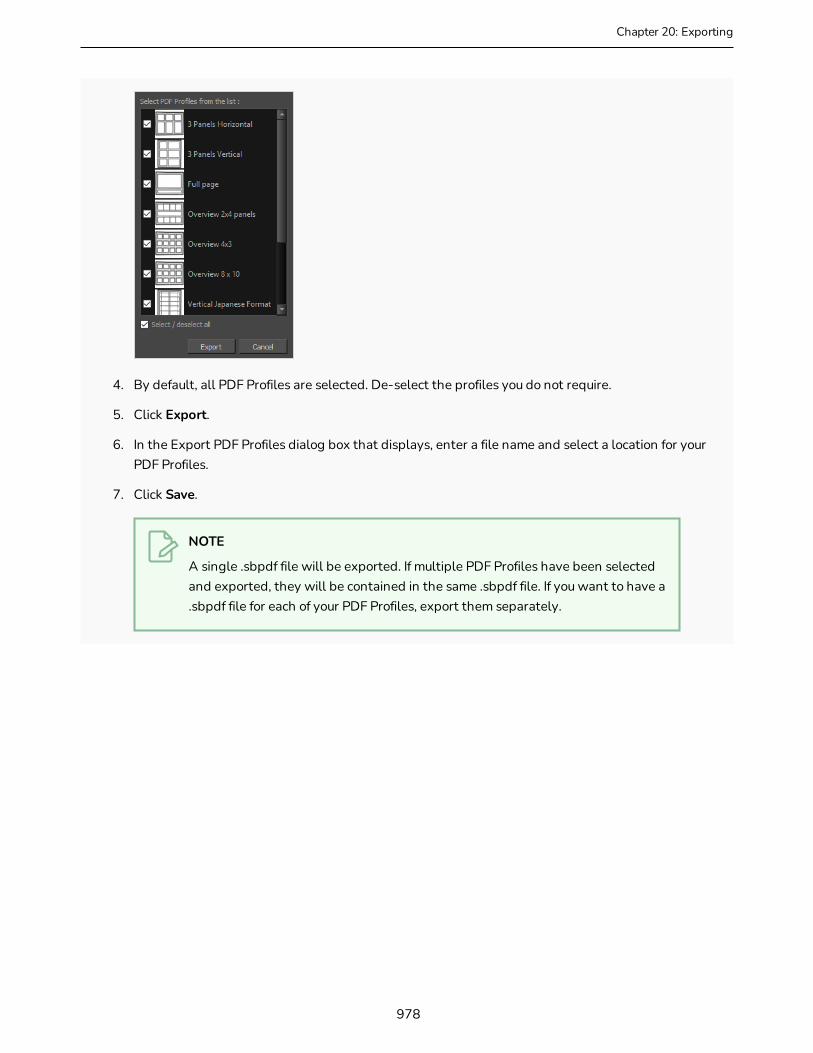
Chapter 20: Exporting
4. By default, all PDF Profiles are selected. De-select the profiles you do not require.
5. Click Export.
6. In the Export PDF Profiles dialog box that displays, enter a file name and select a location for your PDF Profiles.
7. Click Save.
NOTE
A single .sbpdf file will be exported. If multiple PDF Profiles have been selected and exported, they will be contained in the same .sbpdf file. If you want to have a .sbpdf file for each of your PDF Profiles, export them separately.
978
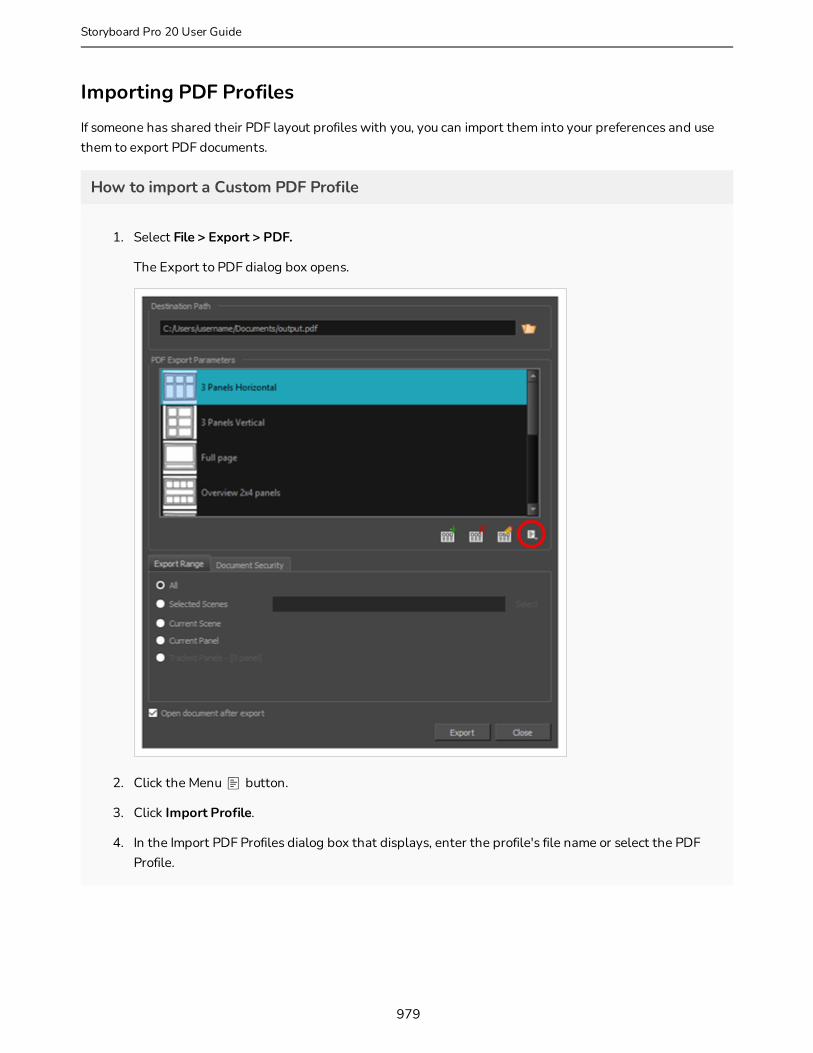
Importing PDF ProfilesIf someone has shared their PDF layout profiles with you, you can import them into your preferences and use them to export PDF documents.
How to import a Custom PDF Profile
1. Select File > Export > PDF.
The Export to PDF dialog box opens.
2. Click the Menu button.
3. Click Import Profile.
4. In the Import PDF Profiles dialog box that displays, enter the profile's file name or select the PDF Profile.
979
Storyboard Pro 20 User Guide

Chapter 20: Exporting
NOTE
PDF Profiles have a file extension .sbpdf
5. Click Open.
980
About Exporting Movie FilesOnce you have created your storyboard and animatic, you can export it as a movie file to share it with project collaborators or import it in third party software. You can export a single file for your whole animatic, or one movie file for each scene or each sequence.
You can export movies in the following formats:
l QuickTime Movie (.mov)
l Windows Media Video (.wmv) (Windows only)
l Flash Movie (.swf)
l Image sequence in Jpeg (.jpg), Portable Network Graphics (.png) or Targa (.tga) format.
981
Storyboard Pro 20 User Guide
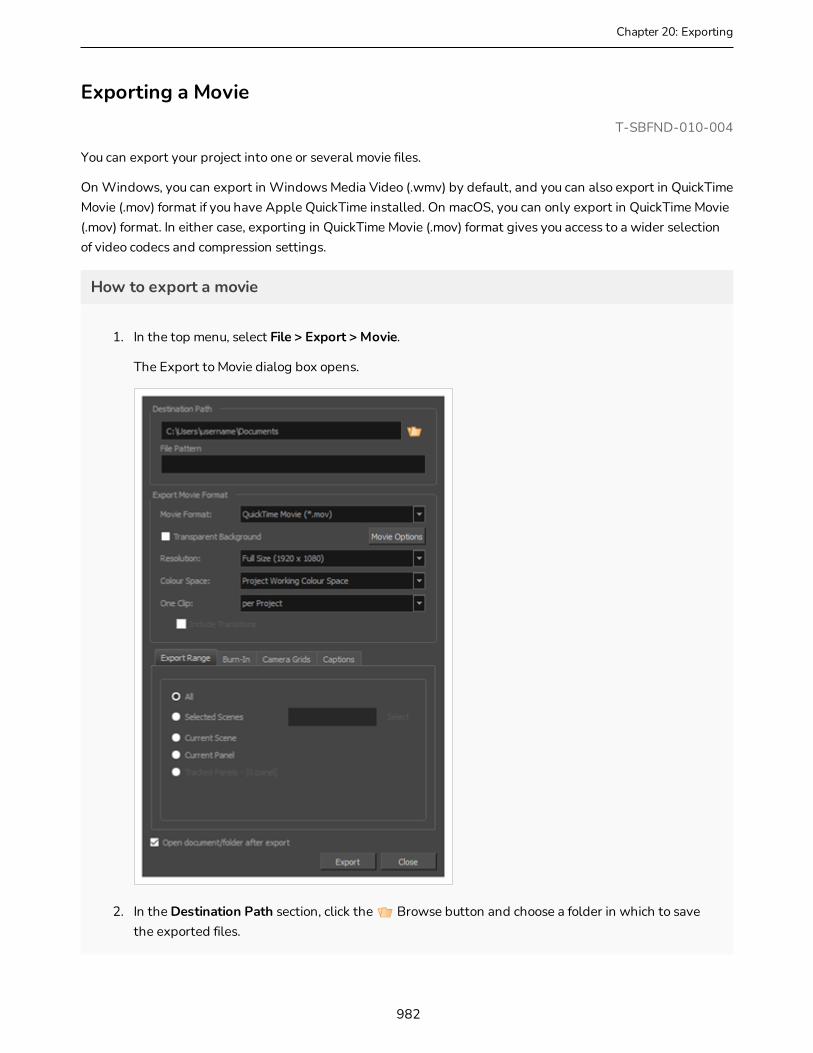
Chapter 20: Exporting
Exporting a MovieT-SBFND-010-004
You can export your project into one or several movie files.
On Windows, you can export in Windows Media Video (.wmv) by default, and you can also export in QuickTime Movie (.mov) format if you have Apple QuickTime installed. On macOS, you can only export in QuickTime Movie (.mov) format. In either case, exporting in QuickTime Movie (.mov) format gives you access to a wider selection of video codecs and compression settings.
How to export a movie
1. In the top menu, select File > Export > Movie.
The Export to Movie dialog box opens.
2. In the Destination Path section, click the Browse button and choose a folder in which to save the exported files.
982
3. In the File Pattern field, type in a prefix or a file naming pattern for the exported files if you plan to export an image sequence—see About File Naming Patterns on page 1056.
4. In the Export Movie Format section, configure the following options:
a. In the Movie Format drop-down, select an export format:
l QuickTime Movie (*.mov): The Apple QuickTime format. This is the default export format and is recommended for its portability, and also because it allows you to choose among several video codecs.
NOTES
l On Windows, Apple QuickTime must be installed to allow Storyboard Pro to export QuickTime movies. You can configure the export of QuickTime movies to use any codec that is compatible with QuickTime, including H.264, MPEG-4 and Animation.
l On macOS, Storyboard Pro uses Apple AVFoundation to export QuickTime movies, which allows you to export using codecs such as H.264, Apple ProRes 422 and Apple ProRes 4444, among others.
l If you are looking to export a QuickTime movie with transparency, be sure to choose a codec that supports encoding with an alpha channel.
l H.264/MPEG-4 (*.mov) : A simple movie format that uses the H.264 codec, which is supported by most web browsers.
NOTES
l Using this format does not require additional software. However, if this is the first time you export a movie in H.264/MPEG-4 format, you will be prompted to download the OpenH264 library from Cisco. Simply click Yes when prompted, and Storyboard Pro will automatically download the library, then export the movie.
l There are no encoding options for this format.
l This format supports resolutions of up to 4096×2304. Each dimension must be a multiple of 16 pixels.
l Audio exported in this format is encoded in PCM 16-bit stereo, 22.05 kHz.
l Windows Media Video (*.wmv): The native format for Windows Media Player.
983
Storyboard Pro 20 User Guide
Chapter 20: Exporting
NOTES
l Windows Media Video (.wmv) files can only be exported on Windows.
l Video players and editors on non-Windows systems can generally not open Windows Media Video (.wmv) files.
l Flash (.swf)
l Image sequence in Jpeg (.jpg), Targa (.tga) or Portable Network Graphics (.png) format.
b. The Transparent Background option is only available for QuickTime Movie (.mov), Targa (.tga) and Portable Network Graphic (.png) formats. Check this box if you want to export your movie or image sequence with a transparent background.
c. Click on Movie Options if you want to customize the video and audio encoding settings for your movie file:
NOTES
l If you are exporting in QuickTime Movie (.mov) format on Windows, see Configuring Movie Settings for QuickTime Movies on Windows on page 989.
l If you are exporting in QuickTime Movie (.mov) format on macOS, see Configuring Movie Settings for QuickTime Movies on macOS on page 993.
l If you are exporting in Windows Media Video (.wmv) format, see Configuring Movie Settings for Windows Media Video on page 995.
l If you are exporting in H.264/MPEG-4 (.mov) format, there are no encoding options available. Movies exported in this format used standard AVC compression for the video stream and uncompressed PCM for the audio stream.
d. In the Resolution drop-down, select whether you want the exported movie to be in Full Size, Half Size or Quarter Size, relative to the resolution of your project. It is recommended to export your animatic in full size unless you want to quickly export a test video.
e. In the Colour Space drop-down menu, select a colour space to use, or stay with the default Project Working Colour Space.
If you plan to create an export for use in a different software, you may want to match colour spaces to keep all your colours consistent. The default setting is the current Storyboard Pro project colour space, which was selected on creation of the project.
f. In the One Clip drop-down, select how you want your video clips to be separated:
984
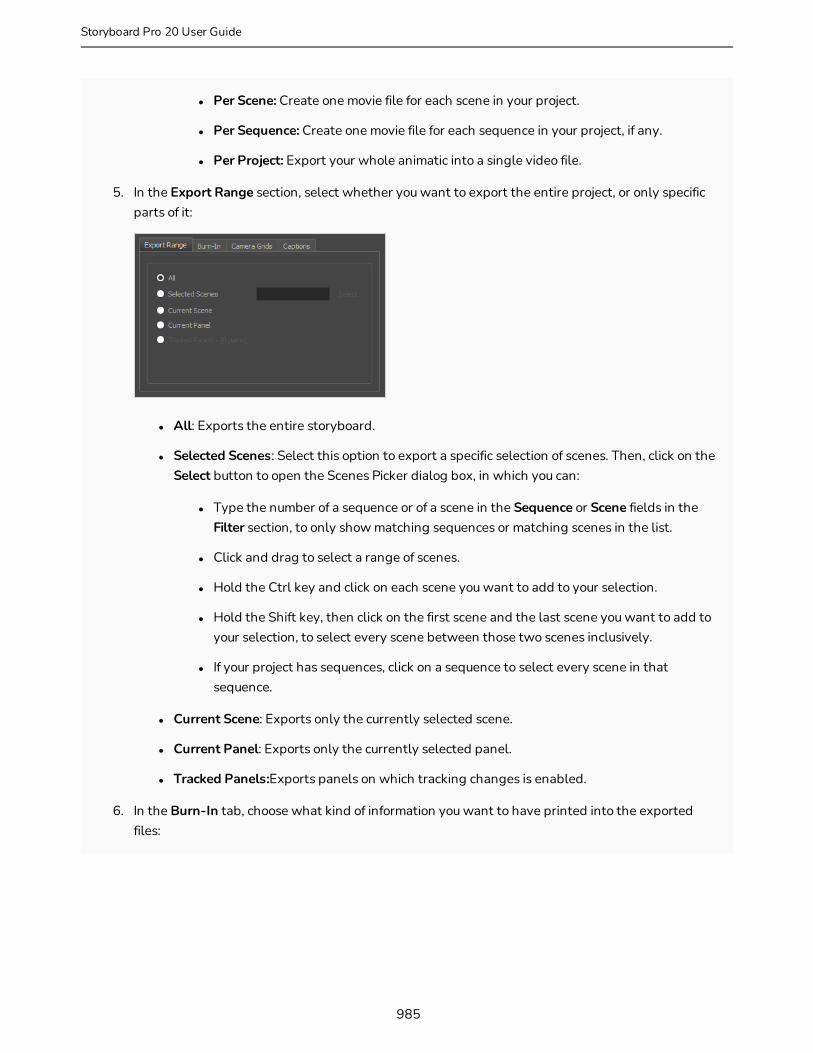
l Per Scene: Create one movie file for each scene in your project.
l Per Sequence: Create one movie file for each sequence in your project, if any.
l Per Project: Export your whole animatic into a single video file.
5. In the Export Range section, select whether you want to export the entire project, or only specific parts of it:
l All: Exports the entire storyboard.
l Selected Scenes: Select this option to export a specific selection of scenes. Then, click on the Select button to open the Scenes Picker dialog box, in which you can:
l Type the number of a sequence or of a scene in the Sequence or Scene fields in the Filter section, to only show matching sequences or matching scenes in the list.
l Click and drag to select a range of scenes.
l Hold the Ctrl key and click on each scene you want to add to your selection.
l Hold the Shift key, then click on the first scene and the last scene you want to add to your selection, to select every scene between those two scenes inclusively.
l If your project has sequences, click on a sequence to select every scene in that sequence.
l Current Scene: Exports only the currently selected scene.
l Current Panel: Exports only the currently selected panel.
l Tracked Panels:Exports panels on which tracking changes is enabled.
6. In the Burn-In tab, choose what kind of information you want to have printed into the exported files:
985
Storyboard Pro 20 User Guide
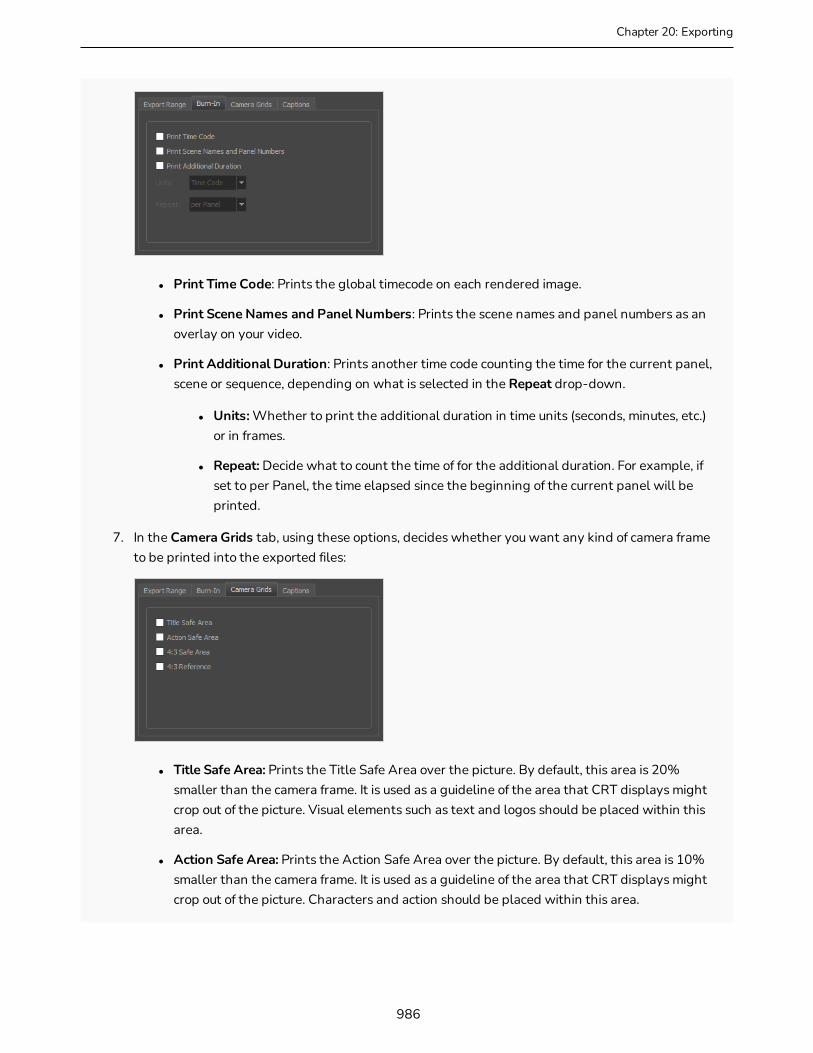
Chapter 20: Exporting
l Print Time Code: Prints the global timecode on each rendered image.
l Print Scene Names and Panel Numbers: Prints the scene names and panel numbers as an overlay on your video.
l Print Additional Duration: Prints another time code counting the time for the current panel, scene or sequence, depending on what is selected in the Repeat drop-down.
l Units: Whether to print the additional duration in time units (seconds, minutes, etc.) or in frames.
l Repeat: Decide what to count the time of for the additional duration. For example, if set to per Panel, the time elapsed since the beginning of the current panel will be printed.
7. In the Camera Grids tab, using these options, decides whether you want any kind of camera frame to be printed into the exported files:
l Title Safe Area: Prints the Title Safe Area over the picture. By default, this area is 20% smaller than the camera frame. It is used as a guideline of the area that CRT displays might crop out of the picture. Visual elements such as text and logos should be placed within this area.
l Action Safe Area: Prints the Action Safe Area over the picture. By default, this area is 10% smaller than the camera frame. It is used as a guideline of the area that CRT displays might crop out of the picture. Characters and action should be placed within this area.
986

l 4:3 Safety: Prints the title safe area and the action safe area for the 4:3 camera frame over the exported image. They can be used to position elements in projects that are meant to be displayed in both widescreen and 4:3 proportions.
l 4:3 Reference: Prints the 4:3 camera frame over the exported image. This frame corresponds to the camera frame if the aspect ratio of the picture was 4:3. It can be used to position elements in projects that are meant to be displayed in both widescreen and 4:3 proportions.
8. In the Captions tab, you can choose to print any of your storyboard’s captions into the exported movies using the following options—see Script and Captions on page 170.
l Print Captions: Choose whether to not print captions (None) or select one of your project’s captions to print into the exported movies. By default, a Storyboard Pro project has Action Notes, Dialog, Slugging and Notes captions, but you can also choose to print custom captions if your project has any.
l Font: Select which font the captions will be printed in. By default, they will be printed in Arial.
l Height %: Sets the size of caption lines relative to the height of the exported movies. For example, if exporting a movie at 1080p with 3% Height captions, each caption line will be 32 pixels in height.
l Position: Prints the captions at either the Top Left, Top Centre, Top Right, Bottom Left, Bottom Centre or Bottom Right of the movie. By default, captions are printed to the Bottom Centre.
l Max Lines: Sets the maximum amount of caption lines to print on each panel. If a caption being printed requires more than the maximum amount of lines, it will be cut off with an ellipsis (...) at the end. Note that even if captions are printed at the bottom, they will be aligned to the top of the space reserved for them, which is calculated by the amount of Max Lines x the Height %. Therefore, if this setting is too high and captions are printed at the bottom, they may appear closer to the middle of the picture than to the bottom.
l Text Colour: Select the font colour in which to print the captions.
987
Storyboard Pro 20 User Guide

Chapter 20: Exporting
l Bg Colour: Select the background colour on which to print the captions. If the checkbox is unchecked, the captions will be printed directly into the rendered picture. Otherwise, they will be printed in rectangular boxes of the chosen colour.
9. If you want to automatically play the video or view the exported files once the export is done, check the Open document/folder after export option.
10. Click on the Export button.
988

Configuring Movie Settings for QuickTime Movies on Windows
On Windows, it is possible to export QuickTime Movie (.mov) files using the libraries provided with Apple QuickTime.
Storyboard Pro allows you to customize the video and audio compression settings for your QuickTime movies via QuickTime's own configuration interface. This makes it possible to export movies using any codec that is compatible with the QuickTime framework.
NOTE
To export QuickTime Movies on Windows, Apple QuickTime must be installed on your machine.
How to configure video and sound settings for QuickTime movies on Windows
1. Proceed to the Movie Settings dialog—see Exporting a Movie on page 982.
2. In the Movie Settings dialog:
l Make sure the Video checkbox is checked.
l If you want your movie file to have an audio stream, make sure Sound is checked.
3. In the Video section, click Settings.
The Standard Video Compression Settings dialog box opens.
989
Storyboard Pro 20 User Guide

Chapter 20: Exporting
4. In the Compression Type drop-down, select a video compression codec. It is recommended to use one of the following codecs, depending on your usage scenario:
l H.264: A very effective lossy compression algorithm that is commonly supported by web browsers and most media players.
l MPEG-4 Video: A very effective lossy compression algorithm that is commonly supported by media players, but less so by web browsers.
l Animation: A high quality compression algorithm that is commonly used for media interchange and video editing.
NOTE
The availability of certain of the compression settings described below will depend on the selected compression type.
5. In the Motion section, make sure the Frame Rate drop-down is set to Current. This will ensure that the video's frame rate matches the frame rate of your Storyboard Pro project.
6. If you set the Compression Type to H.264, make sure the Key Frames option is set to All.
7. In the Quality section, if you set the Compression Type to Animation, select the desired colour depth for your video in the Depth drop-down.
8. In the Quality section, use the slider to choose a quality setting.
990
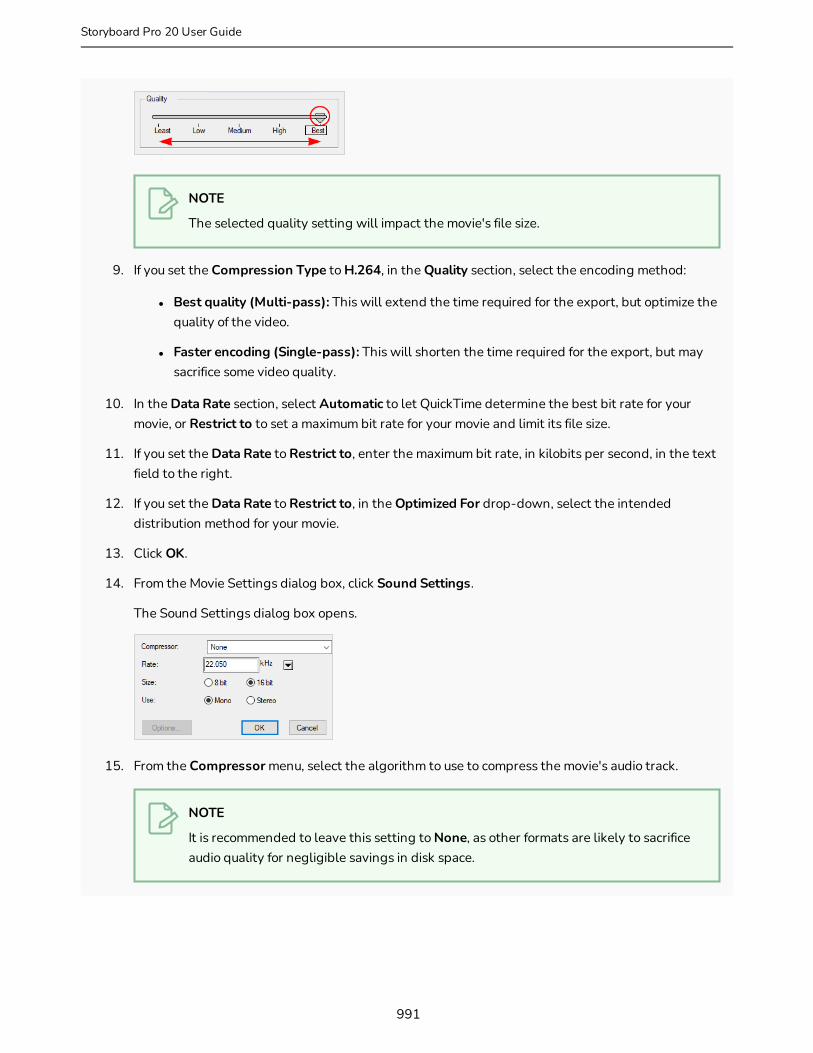
NOTE
The selected quality setting will impact the movie's file size.
9. If you set the Compression Type to H.264, in the Quality section, select the encoding method:
l Best quality (Multi-pass): This will extend the time required for the export, but optimize the quality of the video.
l Faster encoding (Single-pass): This will shorten the time required for the export, but may sacrifice some video quality.
10. In the Data Rate section, select Automatic to let QuickTime determine the best bit rate for your movie, or Restrict to to set a maximum bit rate for your movie and limit its file size.
11. If you set the Data Rate to Restrict to, enter the maximum bit rate, in kilobits per second, in the text field to the right.
12. If you set the Data Rate to Restrict to, in the Optimized For drop-down, select the intended distribution method for your movie.
13. Click OK.
14. From the Movie Settings dialog box, click Sound Settings.
The Sound Settings dialog box opens.
15. From the Compressor menu, select the algorithm to use to compress the movie's audio track.
NOTE
It is recommended to leave this setting to None, as other formats are likely to sacrifice audio quality for negligible savings in disk space.
991
Storyboard Pro 20 User Guide

Chapter 20: Exporting
16. In the Rate field, select the desired sample rate for the movie's audio track
NOTE
Storyboard Pro cannot export audio at a higher sample rate than 22.050 kHz. If you select a higher sample rate, your project's audio will be upsampled, which means it will take more disc space without increasing in quality.
17. Right of Size, select the desired bit depth for the audio track. This determines the amount of precision used to record each wavelength in the audio track.
NOTE
The standard bit depth is 16-bit. If you choose 8-bit, the amount of disk space the audio track of your movie file requires will be halved, but the audio quality will be significantly lower.
18. Right of Use, select whether you want to export audio in the Mono or Stereo channel mode.
NOTE
Stereo sound has a separate track for the left and right speakers, whereas mono sound only has a single audio track for all speakers.
19. Click OK.
20. In the Movie Settings dialog, click OK.
992
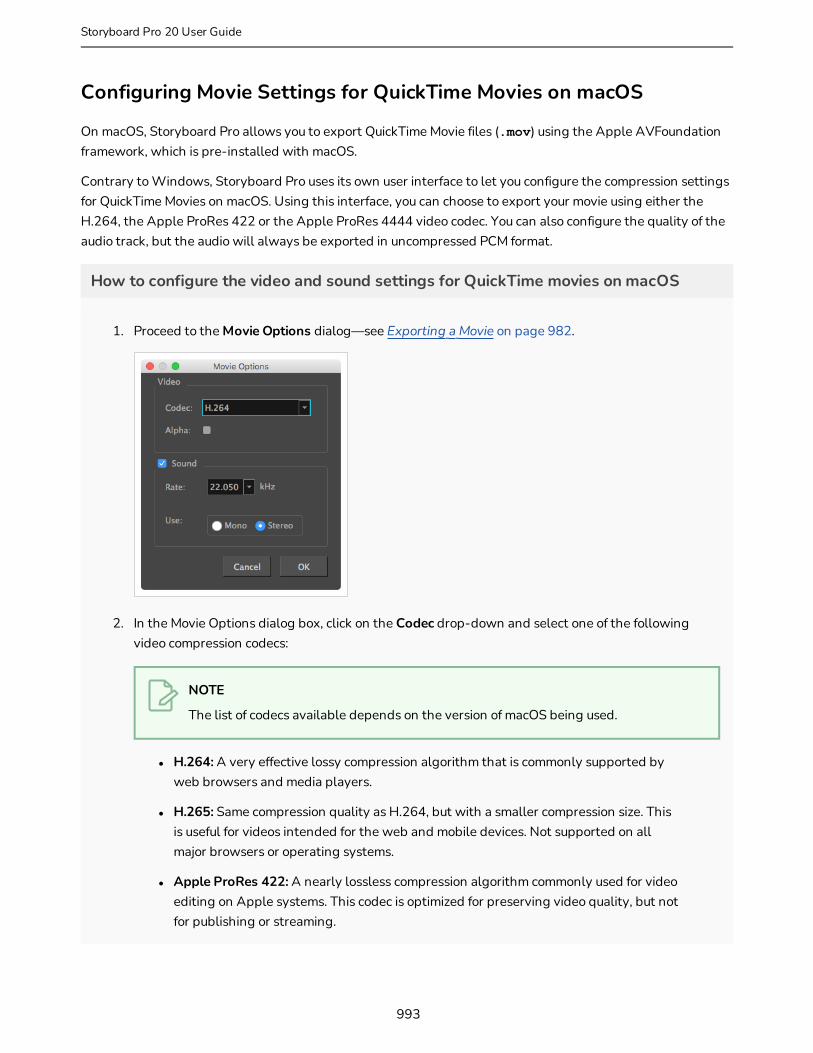
Configuring Movie Settings for QuickTime Movies on macOS
On macOS, Storyboard Pro allows you to export QuickTime Movie files (.mov) using the Apple AVFoundation framework, which is pre-installed with macOS.
Contrary to Windows, Storyboard Pro uses its own user interface to let you configure the compression settings for QuickTime Movies on macOS. Using this interface, you can choose to export your movie using either the H.264, the Apple ProRes 422 or the Apple ProRes 4444 video codec. You can also configure the quality of the audio track, but the audio will always be exported in uncompressed PCM format.
How to configure the video and sound settings for QuickTime movies on macOS
1. Proceed to the Movie Options dialog—see Exporting a Movie on page 982.
2. In the Movie Options dialog box, click on the Codec drop-down and select one of the following video compression codecs:
NOTE
The list of codecs available depends on the version of macOS being used.
l H.264: A very effective lossy compression algorithm that is commonly supported by web browsers and media players.
l H.265: Same compression quality as H.264, but with a smaller compression size. This is useful for videos intended for the web and mobile devices. Not supported on all major browsers or operating systems.
l Apple ProRes 422: A nearly lossless compression algorithm commonly used for video editing on Apple systems. This codec is optimized for preserving video quality, but not for publishing or streaming.
993
Storyboard Pro 20 User Guide

Chapter 20: Exporting
l Apple ProRes 422 HQ: Preserves visual quality at the same high level as Apple ProRes 4444 but for 4:2:2 image sources (cleaner footage for things like green screening). Heavier than Apple ProRes 422 for real-time editing performance.
l Apple ProRes 422 LT: A more highly compressed codec than Apple ProRes 422, with roughly 70 percent of the data rate and 30 percent smaller file sizes. This codec is perfect for environments with limited storage capacity and data rates.
l Apple ProRes 422 Proxy: An even more highly compressed codec than Apple ProRes 422 LT, intended for use in offline workflows that require low data rates but full-resolution video.
l Apple ProRes 4444: A nearly lossless compression algorithm commonly used for video editing on Apple systems. Compared to Apple ProRes 422, this codec preserves more colour detail and supports transparency. However, it results in heavier file sizes.
3. If you want to export a video with transparency, check the Alpha option.
NOTE
This option is only available when exporting with the Apple ProRes 4444 codec. Other codecs do not support transparency.
4. If you want your movie file to have an audio track, make sure the Sound checkbox is checked.
5. In the Rate drop-down, select the desired sample rate for the movie's audio track. The higher the sample rate, the better the quality.
NOTE
Storyboard Pro cannot export audio at a higher sample rate than 22.050 kHz. If you select a higher sample rate, your project's audio will be upsampled, which means it will take more disc space without increasing in quality.
6. Right of Use, select whether you want to export audio using the Mono or Stereo channel mode.
NOTE
Stereo sound has a separate track for the left and right speakers, whereas mono sound only has a single audio track for all speakers.
7. Click OK.
994
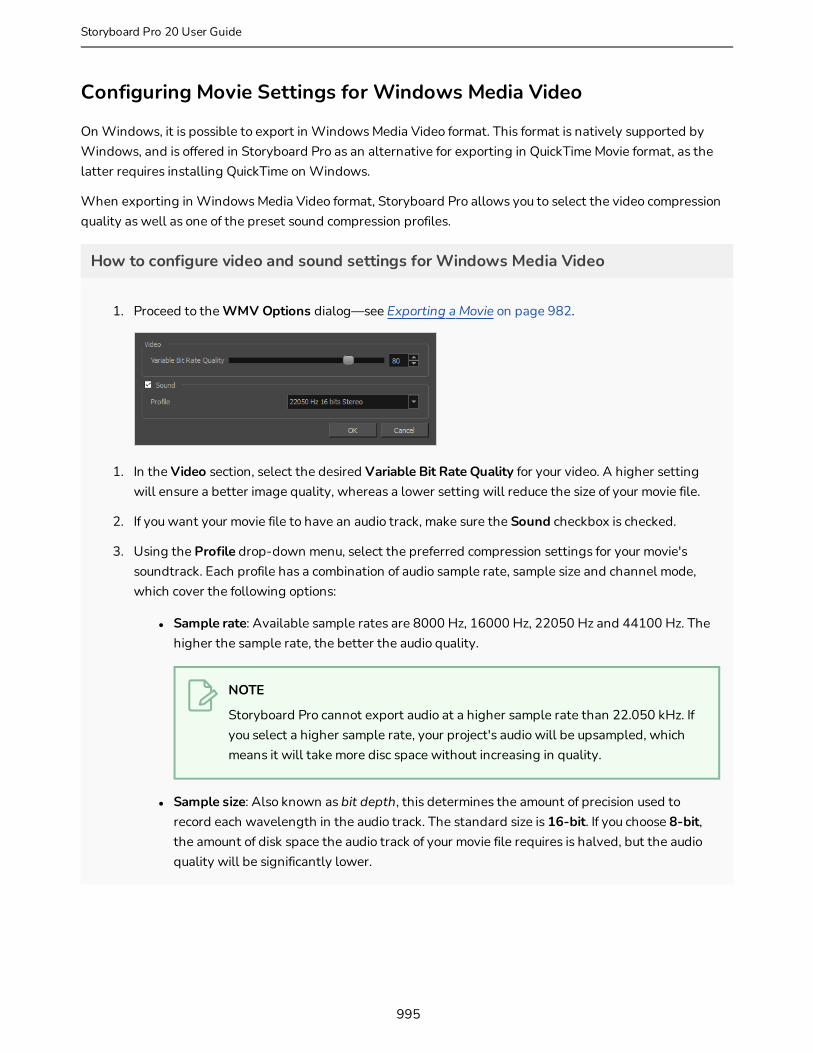
Configuring Movie Settings for Windows Media Video
On Windows, it is possible to export in Windows Media Video format. This format is natively supported by Windows, and is offered in Storyboard Pro as an alternative for exporting in QuickTime Movie format, as the latter requires installing QuickTime on Windows.
When exporting in Windows Media Video format, Storyboard Pro allows you to select the video compression quality as well as one of the preset sound compression profiles.
How to configure video and sound settings for Windows Media Video
1. Proceed to the WMV Options dialog—see Exporting a Movie on page 982.
1. In the Video section, select the desired Variable Bit Rate Quality for your video. A higher setting will ensure a better image quality, whereas a lower setting will reduce the size of your movie file.
2. If you want your movie file to have an audio track, make sure the Sound checkbox is checked.
3. Using the Profile drop-down menu, select the preferred compression settings for your movie's soundtrack. Each profile has a combination of audio sample rate, sample size and channel mode, which cover the following options:
l Sample rate: Available sample rates are 8000 Hz, 16000 Hz, 22050 Hz and 44100 Hz. The higher the sample rate, the better the audio quality.
NOTE
Storyboard Pro cannot export audio at a higher sample rate than 22.050 kHz. If you select a higher sample rate, your project's audio will be upsampled, which means it will take more disc space without increasing in quality.
l Sample size: Also known as bit depth, this determines the amount of precision used to record each wavelength in the audio track. The standard size is 16-bit. If you choose 8-bit, the amount of disk space the audio track of your movie file requires is halved, but the audio quality will be significantly lower.
995
Storyboard Pro 20 User Guide
Chapter 20: Exporting
NOTE
Exporting in 8-bit audio requires Apple QuickTime to be installed.
l Channel mode: Available channel modes are Stereo and Mono. Stereo sound has a separate audio track for the left and the right speakers, whereas mono sound uses a single track for all speakers.
4. Click OK.
996

Exporting an Image SequenceThe Export Movie dialog also allows you to export your project in sequences of images, each one representing a single frame in your animatic.
How to export an image sequence
1. Select File > Export > Movie.
The Export To Movie dialog box opens.
2. In the Destination Path section, click the Browse button and choose a folder in which to save the exported files.
3. In the File Pattern field, type in a prefix or a file naming pattern for the exported files if you plan to export an image sequence—see About File Naming Patterns on page 1056.
4. In the Export Movie Format section:
997
Storyboard Pro 20 User Guide
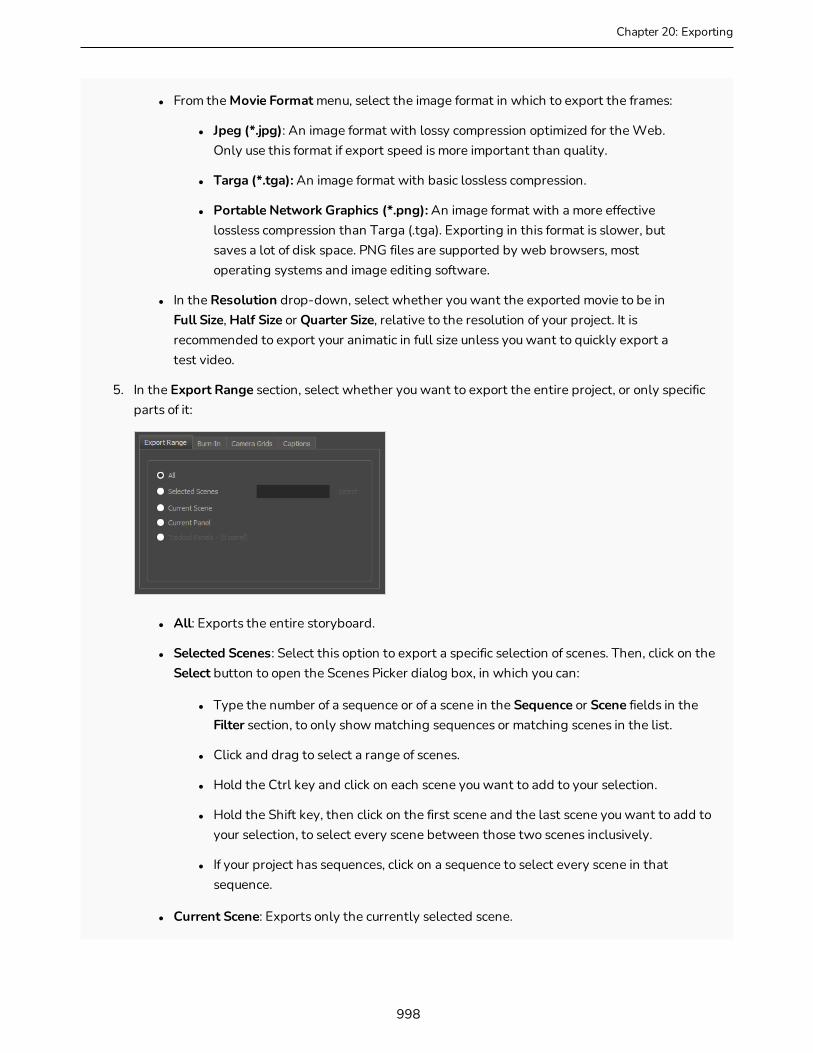
Chapter 20: Exporting
l From the Movie Format menu, select the image format in which to export the frames:
l Jpeg (*.jpg): An image format with lossy compression optimized for the Web. Only use this format if export speed is more important than quality.
l Targa (*.tga): An image format with basic lossless compression.
l Portable Network Graphics (*.png): An image format with a more effective lossless compression than Targa (.tga). Exporting in this format is slower, but saves a lot of disk space. PNG files are supported by web browsers, most operating systems and image editing software.
l In the Resolution drop-down, select whether you want the exported movie to be in Full Size, Half Size or Quarter Size, relative to the resolution of your project. It is recommended to export your animatic in full size unless you want to quickly export a test video.
5. In the Export Range section, select whether you want to export the entire project, or only specific parts of it:
l All: Exports the entire storyboard.
l Selected Scenes: Select this option to export a specific selection of scenes. Then, click on the Select button to open the Scenes Picker dialog box, in which you can:
l Type the number of a sequence or of a scene in the Sequence or Scene fields in the Filter section, to only show matching sequences or matching scenes in the list.
l Click and drag to select a range of scenes.
l Hold the Ctrl key and click on each scene you want to add to your selection.
l Hold the Shift key, then click on the first scene and the last scene you want to add to your selection, to select every scene between those two scenes inclusively.
l If your project has sequences, click on a sequence to select every scene in that sequence.
l Current Scene: Exports only the currently selected scene.
998
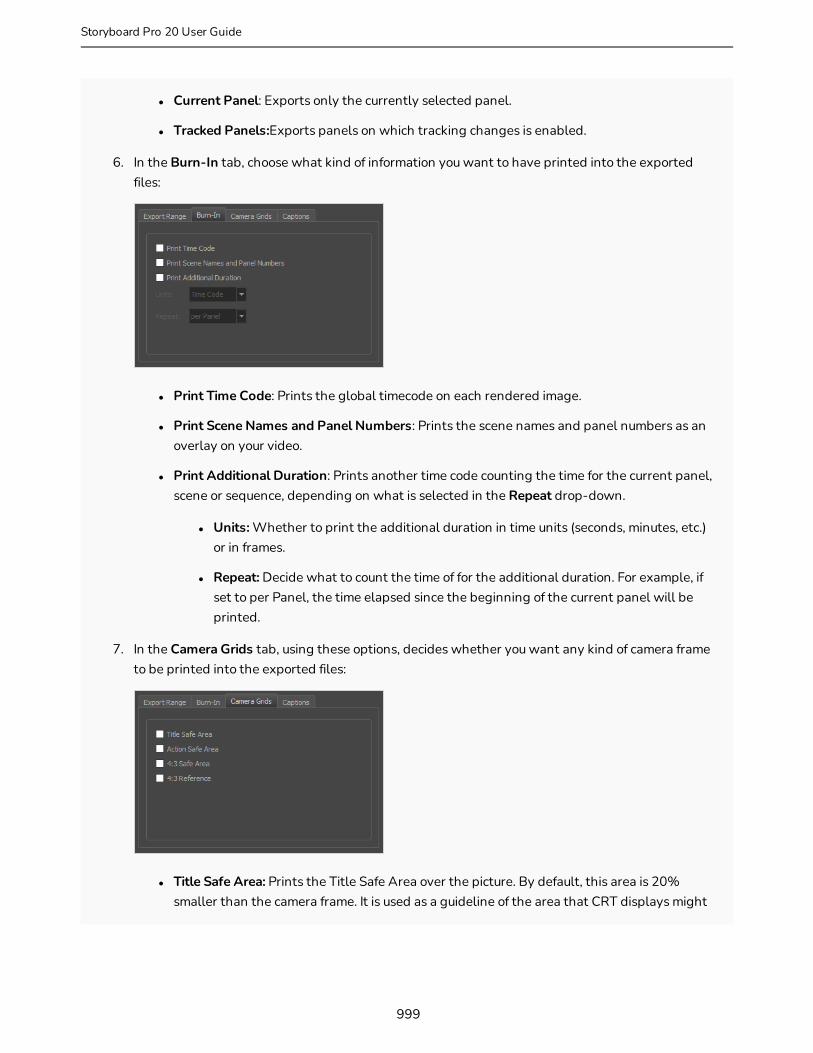
l Current Panel: Exports only the currently selected panel.
l Tracked Panels:Exports panels on which tracking changes is enabled.
6. In the Burn-In tab, choose what kind of information you want to have printed into the exported files:
l Print Time Code: Prints the global timecode on each rendered image.
l Print Scene Names and Panel Numbers: Prints the scene names and panel numbers as an overlay on your video.
l Print Additional Duration: Prints another time code counting the time for the current panel, scene or sequence, depending on what is selected in the Repeat drop-down.
l Units: Whether to print the additional duration in time units (seconds, minutes, etc.) or in frames.
l Repeat: Decide what to count the time of for the additional duration. For example, if set to per Panel, the time elapsed since the beginning of the current panel will be printed.
7. In the Camera Grids tab, using these options, decides whether you want any kind of camera frame to be printed into the exported files:
l Title Safe Area: Prints the Title Safe Area over the picture. By default, this area is 20% smaller than the camera frame. It is used as a guideline of the area that CRT displays might
999
Storyboard Pro 20 User Guide

Chapter 20: Exporting
crop out of the picture. Visual elements such as text and logos should be placed within this area.
l Action Safe Area: Prints the Action Safe Area over the picture. By default, this area is 10% smaller than the camera frame. It is used as a guideline of the area that CRT displays might crop out of the picture. Characters and action should be placed within this area.
l 4:3 Safety: Prints the title safe area and the action safe area for the 4:3 camera frame over the exported image. They can be used to position elements in projects that are meant to be displayed in both widescreen and 4:3 proportions.
l 4:3 Reference: Prints the 4:3 camera frame over the exported image. This frame corresponds to the camera frame if the aspect ratio of the picture was 4:3. It can be used to position elements in projects that are meant to be displayed in both widescreen and 4:3 proportions.
8. In the Captions tab, you can choose to print any of your storyboard’s captions into the exported movies using the following options—see Script and Captions on page 170.
l Print Captions: Choose whether to not print captions (None) or select one of your project’s captions to print into the exported movies. By default, a Storyboard Pro project has Action Notes, Dialog, Slugging and Notes captions, but you can also choose to print custom captions if your project has any.
l Font: Select which font the captions will be printed in. By default, they will be printed in Arial.
l Height %: Sets the size of caption lines relative to the height of the exported movies. For example, if exporting a movie at 1080p with 3% Height captions, each caption line will be 32 pixels in height.
l Position: Prints the captions at either the Top Left, Top Centre, Top Right, Bottom Left, Bottom Centre or Bottom Right of the movie. By default, captions are printed to the Bottom Centre.
l Max Lines: Sets the maximum amount of caption lines to print on each panel. If a caption being printed requires more than the maximum amount of lines, it will be cut off with an ellipsis (...) at the end. Note that even if captions are printed at the bottom, they will be
1000
aligned to the top of the space reserved for them, which is calculated by the amount of Max Lines x the Height %. Therefore, if this setting is too high and captions are printed at the bottom, they may appear closer to the middle of the picture than to the bottom.
l Text Colour: Select the font colour in which to print the captions.
l Bg Colour: Select the background colour on which to print the captions. If the checkbox is unchecked, the captions will be printed directly into the rendered picture. Otherwise, they will be printed in rectangular boxes of the chosen colour.
9. If you want to automatically play the video or view the exported files once the export is done, check the Open document/folder after export option.
10. Click on the Export button.
1001
Storyboard Pro 20 User Guide
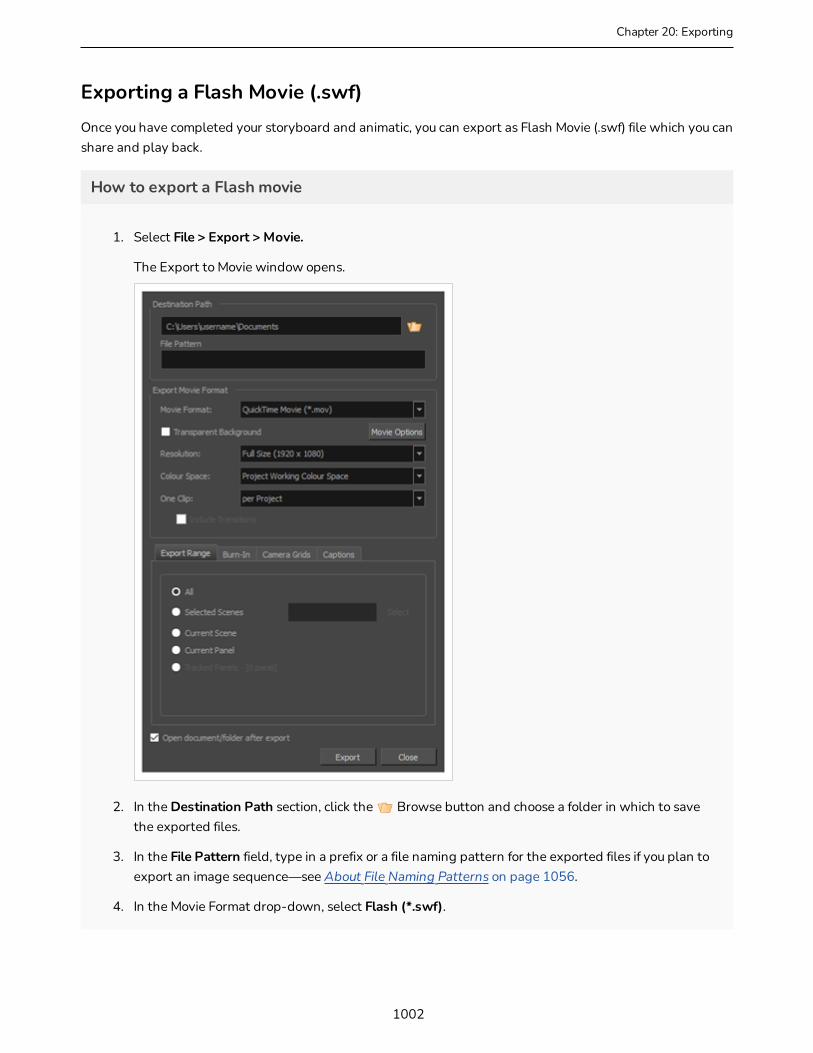
Chapter 20: Exporting
Exporting a Flash Movie (.swf)Once you have completed your storyboard and animatic, you can export as Flash Movie (.swf) file which you can share and play back.
How to export a Flash movie
1. Select File > Export > Movie.
The Export to Movie window opens.
2. In the Destination Path section, click the Browse button and choose a folder in which to save the exported files.
3. In the File Pattern field, type in a prefix or a file naming pattern for the exported files if you plan to export an image sequence—see About File Naming Patterns on page 1056.
4. In the Movie Format drop-down, select Flash (*.swf).
1002
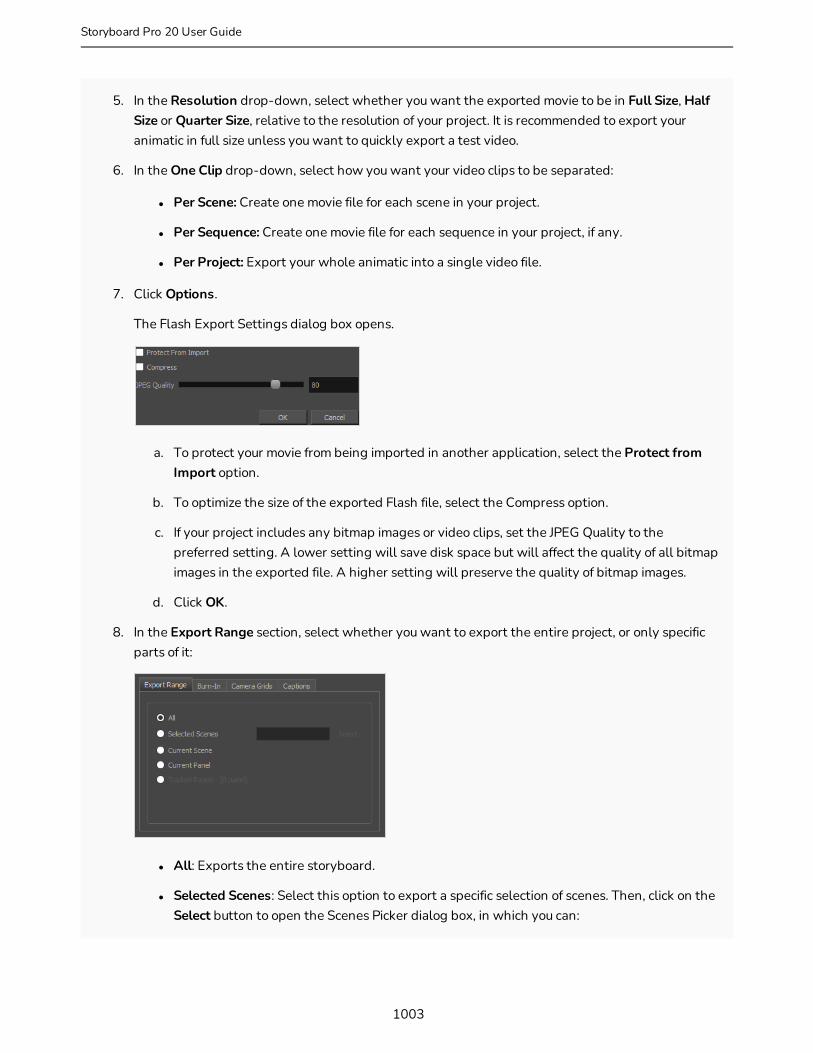
5. In the Resolution drop-down, select whether you want the exported movie to be in Full Size, Half Size or Quarter Size, relative to the resolution of your project. It is recommended to export your animatic in full size unless you want to quickly export a test video.
6. In the One Clip drop-down, select how you want your video clips to be separated:
l Per Scene: Create one movie file for each scene in your project.
l Per Sequence: Create one movie file for each sequence in your project, if any.
l Per Project: Export your whole animatic into a single video file.
7. Click Options.
The Flash Export Settings dialog box opens.
a. To protect your movie from being imported in another application, select the Protect from Import option.
b. To optimize the size of the exported Flash file, select the Compress option.
c. If your project includes any bitmap images or video clips, set the JPEG Quality to the preferred setting. A lower setting will save disk space but will affect the quality of all bitmap images in the exported file. A higher setting will preserve the quality of bitmap images.
d. Click OK.
8. In the Export Range section, select whether you want to export the entire project, or only specific parts of it:
l All: Exports the entire storyboard.
l Selected Scenes: Select this option to export a specific selection of scenes. Then, click on the Select button to open the Scenes Picker dialog box, in which you can:
1003
Storyboard Pro 20 User Guide

Chapter 20: Exporting
l Type the number of a sequence or of a scene in the Sequence or Scene fields in the Filter section, to only show matching sequences or matching scenes in the list.
l Click and drag to select a range of scenes.
l Hold the Ctrl key and click on each scene you want to add to your selection.
l Hold the Shift key, then click on the first scene and the last scene you want to add to your selection, to select every scene between those two scenes inclusively.
l If your project has sequences, click on a sequence to select every scene in that sequence.
l Current Scene: Exports only the currently selected scene.
l Current Panel: Exports only the currently selected panel.
l Tracked Panels:Exports panels on which tracking changes is enabled.
9. In the Burn-In tab, choose what kind of information you want to have printed into the exported files:
l Print Time Code: Prints the global timecode on each rendered image.
l Print Scene Names and Panel Numbers: Prints the scene names and panel numbers as an overlay on your video.
l Print Additional Duration: Prints another time code counting the time for the current panel, scene or sequence, depending on what is selected in the Repeat drop-down.
l Units: Whether to print the additional duration in time units (seconds, minutes, etc.) or in frames.
l Repeat: Decide what to count the time of for the additional duration. For example, if set to per Panel, the time elapsed since the beginning of the current panel will be printed.
10. In the Camera Grids tab, using these options, decides whether you want any kind of camera frame to be printed into the exported files:
1004
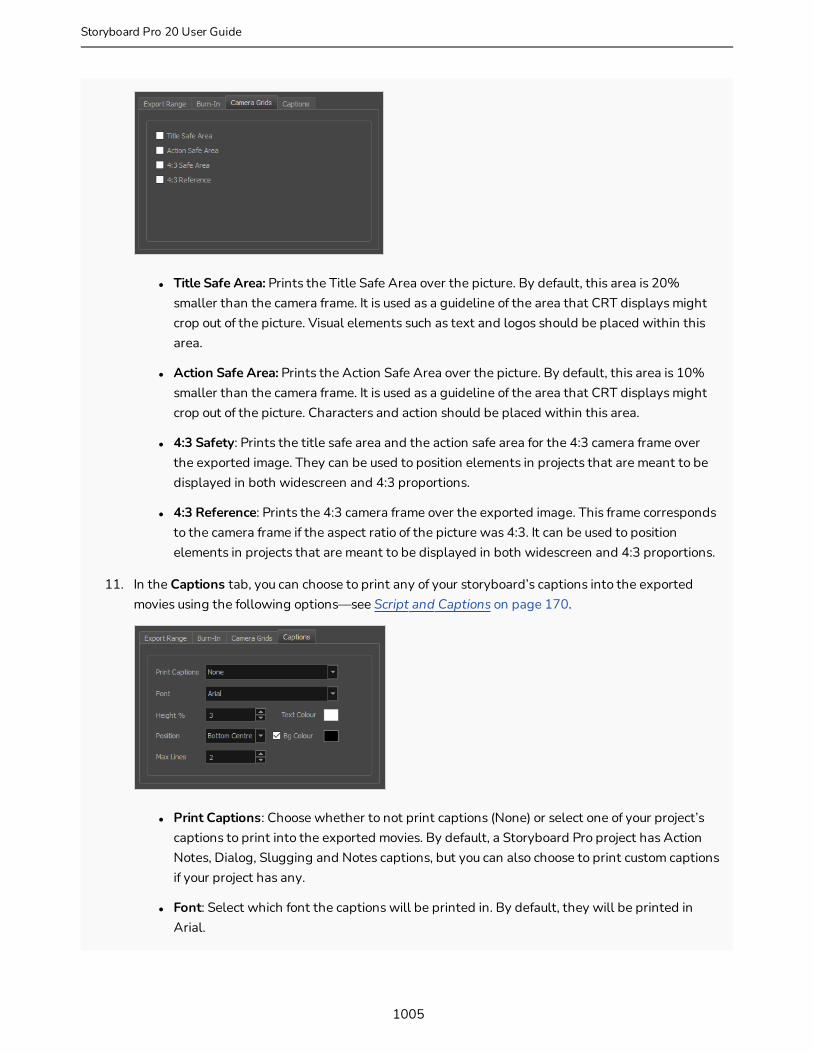
l Title Safe Area: Prints the Title Safe Area over the picture. By default, this area is 20% smaller than the camera frame. It is used as a guideline of the area that CRT displays might crop out of the picture. Visual elements such as text and logos should be placed within this area.
l Action Safe Area: Prints the Action Safe Area over the picture. By default, this area is 10% smaller than the camera frame. It is used as a guideline of the area that CRT displays might crop out of the picture. Characters and action should be placed within this area.
l 4:3 Safety: Prints the title safe area and the action safe area for the 4:3 camera frame over the exported image. They can be used to position elements in projects that are meant to be displayed in both widescreen and 4:3 proportions.
l 4:3 Reference: Prints the 4:3 camera frame over the exported image. This frame corresponds to the camera frame if the aspect ratio of the picture was 4:3. It can be used to position elements in projects that are meant to be displayed in both widescreen and 4:3 proportions.
11. In the Captions tab, you can choose to print any of your storyboard’s captions into the exported movies using the following options—see Script and Captions on page 170.
l Print Captions: Choose whether to not print captions (None) or select one of your project’s captions to print into the exported movies. By default, a Storyboard Pro project has Action Notes, Dialog, Slugging and Notes captions, but you can also choose to print custom captions if your project has any.
l Font: Select which font the captions will be printed in. By default, they will be printed in Arial.
1005
Storyboard Pro 20 User Guide
Chapter 20: Exporting
l Height %: Sets the size of caption lines relative to the height of the exported movies. For example, if exporting a movie at 1080p with 3% Height captions, each caption line will be 32 pixels in height.
l Position: Prints the captions at either the Top Left, Top Centre, Top Right, Bottom Left, Bottom Centre or Bottom Right of the movie. By default, captions are printed to the Bottom Centre.
l Max Lines: Sets the maximum amount of caption lines to print on each panel. If a caption being printed requires more than the maximum amount of lines, it will be cut off with an ellipsis (...) at the end. Note that even if captions are printed at the bottom, they will be aligned to the top of the space reserved for them, which is calculated by the amount of Max Lines x the Height %. Therefore, if this setting is too high and captions are printed at the bottom, they may appear closer to the middle of the picture than to the bottom.
l Text Colour: Select the font colour in which to print the captions.
l Bg Colour: Select the background colour on which to print the captions. If the checkbox is unchecked, the captions will be printed directly into the rendered picture. Otherwise, they will be printed in rectangular boxes of the chosen colour.
12. If you want to automatically play the video or view the exported files once the export is done, check the Open document/folder after export option.
13. Click on the Export button.
1006
Exporting Harmony ScenesT-SBANIM-008-002
Storyboard Pro can automatically export each scene in your project into a scene that can be opened in Harmony, where you can use the animatic to create and time your animation. The resulting Harmony scenes will be the same length as the scenes in your Storyboard Pro project, they will contain each of their panels so that you may animate over them, and they will contain their respective part of the animatic's soundtrack.
You can choose to export your animatic in rendered frames, which will not be editable in Harmony and can only be used as reference, or to export the drawings, 3D objects, images, videos and camera movements of each scene in your project directly into the Harmony scenes, allowing you to reuse its elements in Harmony. If you are rendering your animatic, you can choose whether you want to export one scene for the whole project, for each sequence or for each act, whereas if you want to export original scenes, you can only export one Harmony scene for each scene in your animatic.
NOTES
l Transitions in your project are not exported to Harmony.
How to export Harmony scenes
1. In the top menu, select File > Export > Export to Harmony.
1007
Storyboard Pro 20 User Guide
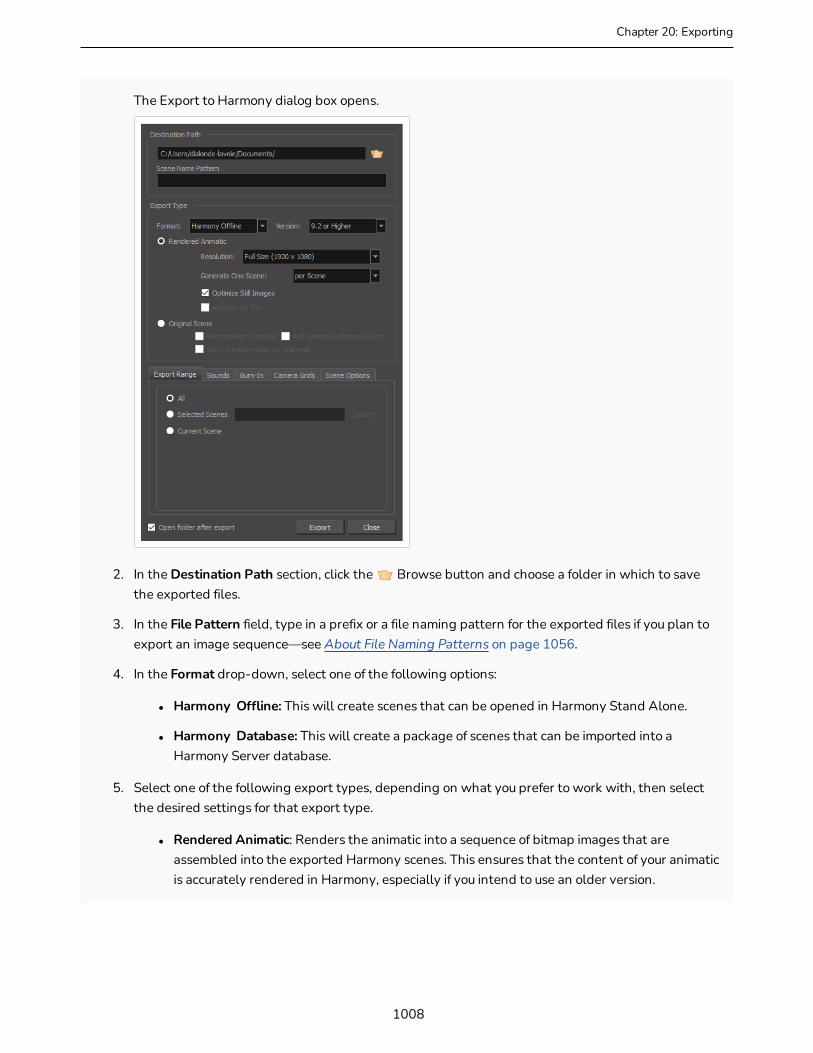
Chapter 20: Exporting
The Export to Harmony dialog box opens.
2. In the Destination Path section, click the Browse button and choose a folder in which to save the exported files.
3. In the File Pattern field, type in a prefix or a file naming pattern for the exported files if you plan to export an image sequence—see About File Naming Patterns on page 1056.
4. In the Format drop-down, select one of the following options:
l Harmony Offline: This will create scenes that can be opened in Harmony Stand Alone.
l Harmony Database: This will create a package of scenes that can be imported into a Harmony Server database.
5. Select one of the following export types, depending on what you prefer to work with, then select the desired settings for that export type.
l Rendered Animatic: Renders the animatic into a sequence of bitmap images that are assembled into the exported Harmony scenes. This ensures that the content of your animatic is accurately rendered in Harmony, especially if you intend to use an older version.
1008
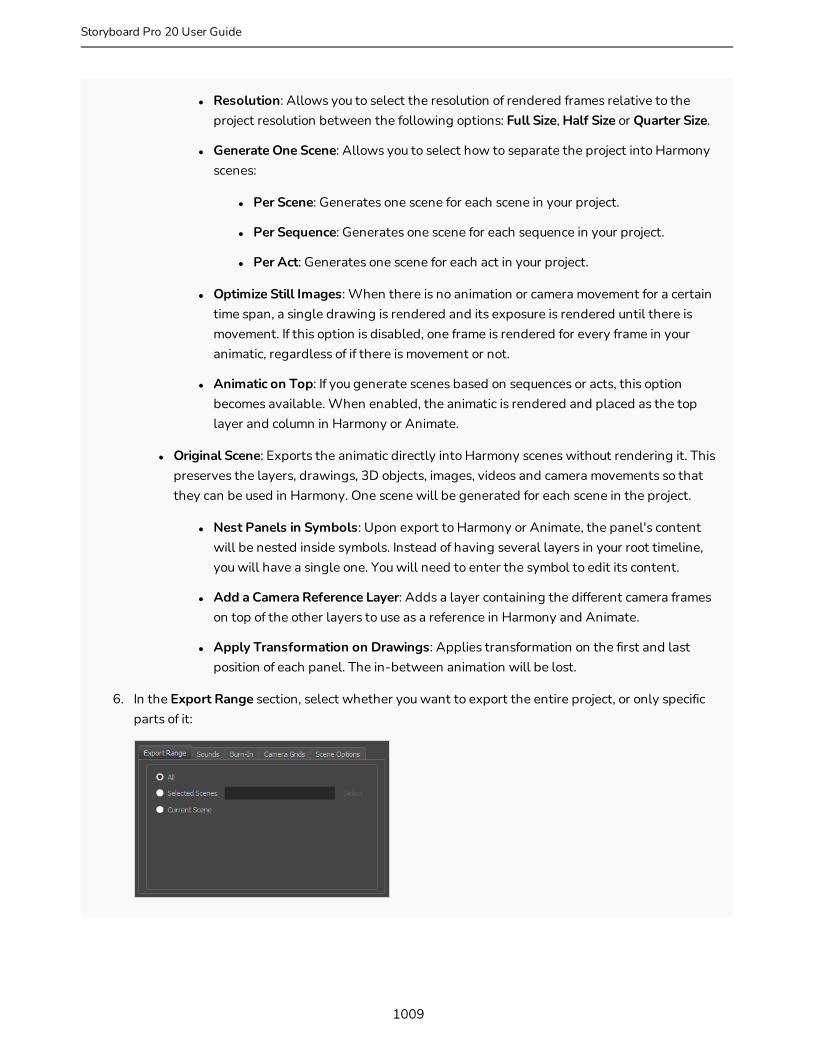
l Resolution: Allows you to select the resolution of rendered frames relative to the project resolution between the following options: Full Size, Half Size or Quarter Size.
l Generate One Scene: Allows you to select how to separate the project into Harmony scenes:
l Per Scene: Generates one scene for each scene in your project.
l Per Sequence: Generates one scene for each sequence in your project.
l Per Act: Generates one scene for each act in your project.
l Optimize Still Images: When there is no animation or camera movement for a certain time span, a single drawing is rendered and its exposure is rendered until there is movement. If this option is disabled, one frame is rendered for every frame in your animatic, regardless of if there is movement or not.
l Animatic on Top: If you generate scenes based on sequences or acts, this option becomes available. When enabled, the animatic is rendered and placed as the top layer and column in Harmony or Animate.
l Original Scene: Exports the animatic directly into Harmony scenes without rendering it. This preserves the layers, drawings, 3D objects, images, videos and camera movements so that they can be used in Harmony. One scene will be generated for each scene in the project.
l Nest Panels in Symbols: Upon export to Harmony or Animate, the panel's content will be nested inside symbols. Instead of having several layers in your root timeline, you will have a single one. You will need to enter the symbol to edit its content.
l Add a Camera Reference Layer: Adds a layer containing the different camera frames on top of the other layers to use as a reference in Harmony and Animate.
l Apply Transformation on Drawings: Applies transformation on the first and last position of each panel. The in-between animation will be lost.
6. In the Export Range section, select whether you want to export the entire project, or only specific parts of it:
1009
Storyboard Pro 20 User Guide

Chapter 20: Exporting
l All: Exports the entire storyboard.
l Selected Scenes: Select this option to export a specific selection of scenes. Then, click on the Select button to open the Scenes Picker dialog box, in which you can:
l Type the number of a sequence or of a scene in the Sequence or Scene fields in the Filter section, to only show matching sequences or matching scenes in the list.
l Click and drag to select a range of scenes.
l Hold the Ctrl key and click on each scene you want to add to your selection.
l Hold the Shift key, then click on the first scene and the last scene you want to add to your selection, to select every scene between those two scenes inclusively.
l If your project has sequences, click on a sequence to select every scene in that sequence.
l Current Scene: Exports only the currently selected scene.
7. In the Sounds tab, decide how you want the audio in the storyboard project to be exported into the scenes.
l Keep Original Files: Copies the sound clips from your project into the exported scenes, without mixing them.
l Process Audio Tracks Individually: Creates a mixed sound file for each audio track and stores each sound file into its own sound layer in the exported scene.
l Merge All Audio Tracks: Creates a single sound file with all the audio tracks merged and stores it into a single sound layer in the exported scene.
l Process Audio Tracks Individually and Merged: Creates a single sound file for each audio track and stores each sound file into its own sound layer, then adds an extra sound layer with all the audio tracks merged together. .
l File Pattern: Allows you to type a prefix or a pattern for the names of the exported audio files—see About File Naming Patterns on page 1056.
1010

l Sample Rate: Sets the frequency rate of the exported audio files. It is recommended to export sound files at the rate at which they were originally created. For reference, the standard sample rate is 48.0 kHz for broadcasting and DVD.
l Bit Depth: Sets the precision level of each wavelength in the sound file. The standard bit depth is 16 bit. Setting this to 8 bit will cut the size of audio files in half, but will significantly impact sound quality.
NOTE
On Windows, audio can only be exported in 16 bit unless QuickTime Player is installed.
l Channels: Allows you to select whether to export sound in Mono or Stereo. Stereo sound uses a separate track for the left and right speakers, which allows to simulate a realistic sound environment. Mono uses a single track for both speakers, which saves disk space.
8. In the Burn-In tab, when exporting rendered animatics, you can choose to print information about the panels and their position in the Timeline, into the exported scenes.
l Print Time Code: Prints the global timecode on each rendered image.
l Print Scene Names and Panel Numbers: Prints the scene names and panel numbers as an overlay on your video.
l Print Additional Duration: Prints another time code counting the time for the current panel, scene or sequence, depending on what is selected in the Repeat drop-down.
l Units: Whether to print the additional duration in time units (seconds, minutes, etc.) or in frames.
l Repeat: Decide what to count the time of for the additional duration. For example, if set to per Panel, the time elapsed since the beginning of the current panel will be printed.
1011
Storyboard Pro 20 User Guide
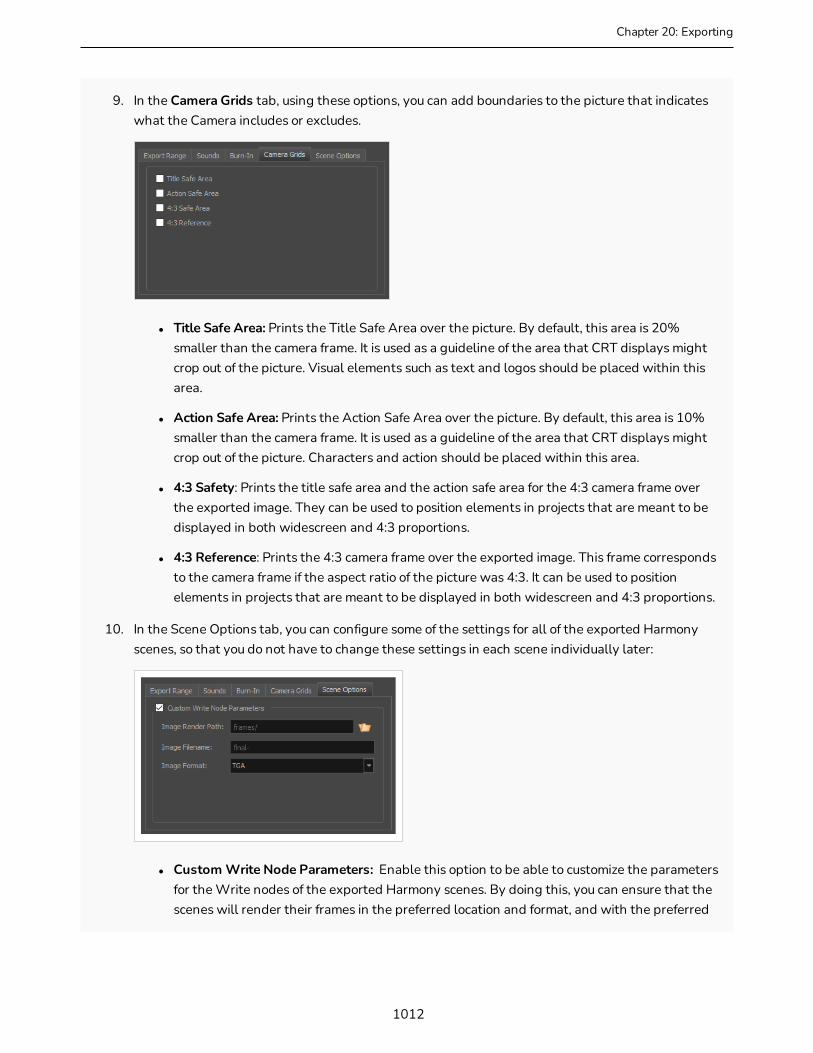
Chapter 20: Exporting
9. In the Camera Grids tab, using these options, you can add boundaries to the picture that indicates what the Camera includes or excludes.
l Title Safe Area: Prints the Title Safe Area over the picture. By default, this area is 20% smaller than the camera frame. It is used as a guideline of the area that CRT displays might crop out of the picture. Visual elements such as text and logos should be placed within this area.
l Action Safe Area: Prints the Action Safe Area over the picture. By default, this area is 10% smaller than the camera frame. It is used as a guideline of the area that CRT displays might crop out of the picture. Characters and action should be placed within this area.
l 4:3 Safety: Prints the title safe area and the action safe area for the 4:3 camera frame over the exported image. They can be used to position elements in projects that are meant to be displayed in both widescreen and 4:3 proportions.
l 4:3 Reference: Prints the 4:3 camera frame over the exported image. This frame corresponds to the camera frame if the aspect ratio of the picture was 4:3. It can be used to position elements in projects that are meant to be displayed in both widescreen and 4:3 proportions.
10. In the Scene Options tab, you can configure some of the settings for all of the exported Harmony scenes, so that you do not have to change these settings in each scene individually later:
l Custom Write Node Parameters: Enable this option to be able to customize the parameters for the Write nodes of the exported Harmony scenes. By doing this, you can ensure that the scenes will render their frames in the preferred location and format, and with the preferred
1012
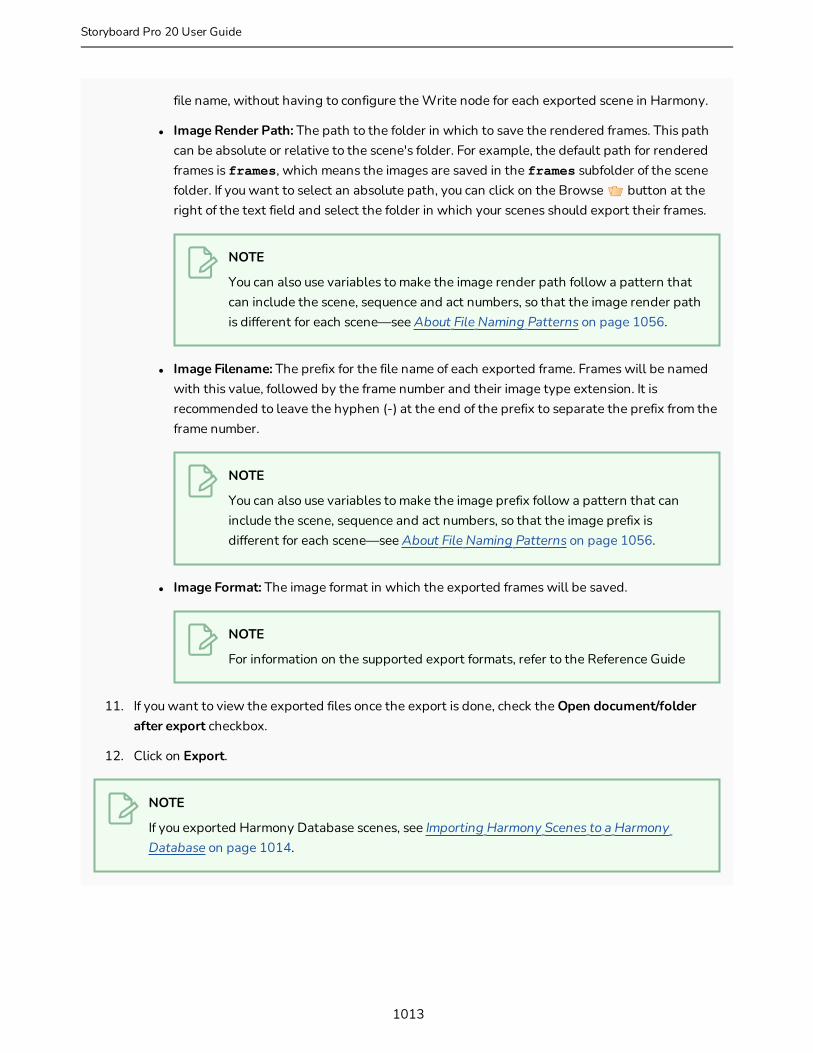
file name, without having to configure the Write node for each exported scene in Harmony.
l Image Render Path: The path to the folder in which to save the rendered frames. This path can be absolute or relative to the scene's folder. For example, the default path for rendered frames is frames, which means the images are saved in the frames subfolder of the scene folder. If you want to select an absolute path, you can click on the Browse button at the right of the text field and select the folder in which your scenes should export their frames.
NOTE
You can also use variables to make the image render path follow a pattern that can include the scene, sequence and act numbers, so that the image render path is different for each scene—see About File Naming Patterns on page 1056.
l Image Filename: The prefix for the file name of each exported frame. Frames will be named with this value, followed by the frame number and their image type extension. It is recommended to leave the hyphen (-) at the end of the prefix to separate the prefix from the frame number.
NOTE
You can also use variables to make the image prefix follow a pattern that can include the scene, sequence and act numbers, so that the image prefix is different for each scene—see About File Naming Patterns on page 1056.
l Image Format: The image format in which the exported frames will be saved.
NOTE
For information on the supported export formats, refer to the Reference Guide
11. If you want to view the exported files once the export is done, check the Open document/folder after export checkbox.
12. Click on Export.
NOTE
If you exported Harmony Database scenes, see Importing Harmony Scenes to a Harmony Database on page 1014.
1013
Storyboard Pro 20 User Guide
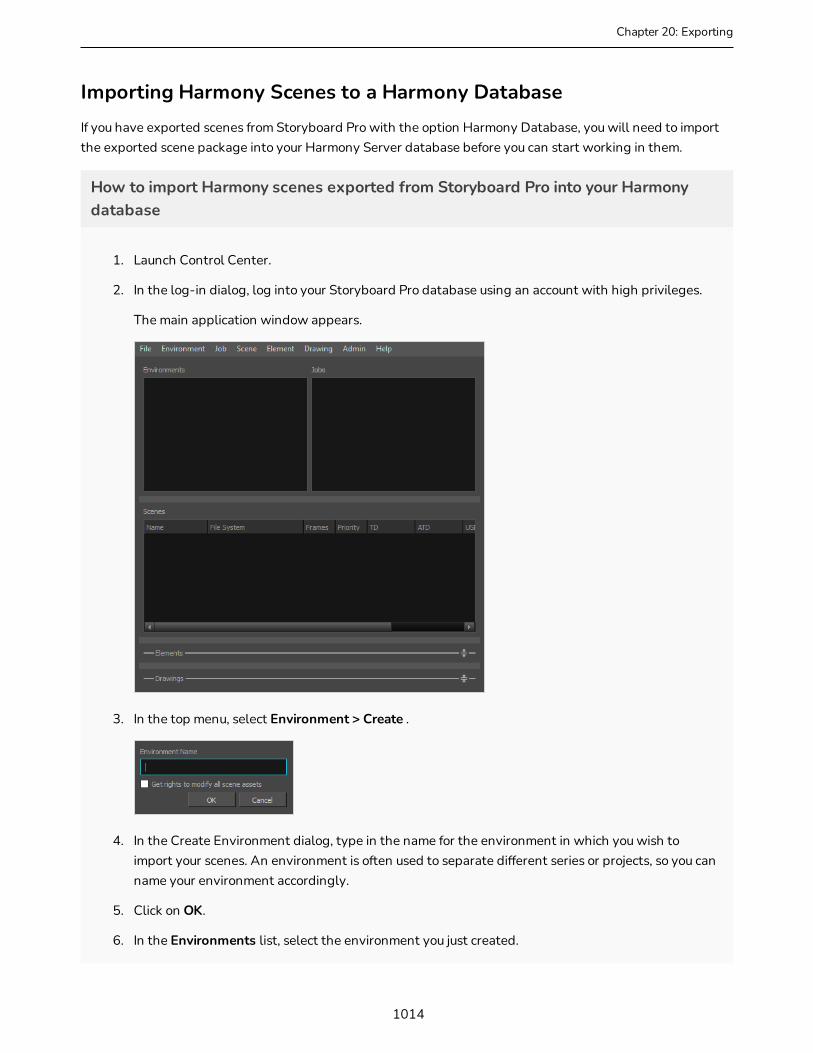
Chapter 20: Exporting
Importing Harmony Scenes to a Harmony DatabaseIf you have exported scenes from Storyboard Pro with the option Harmony Database, you will need to import the exported scene package into your Harmony Server database before you can start working in them.
How to import Harmony scenes exported from Storyboard Pro into your Harmony database
1. Launch Control Center.
2. In the log-in dialog, log into your Storyboard Pro database using an account with high privileges.
The main application window appears.
3. In the top menu, select Environment > Create .
4. In the Create Environment dialog, type in the name for the environment in which you wish to import your scenes. An environment is often used to separate different series or projects, so you can name your environment accordingly.
5. Click on OK.
6. In the Environments list, select the environment you just created.
1014

7. In the top menu, select Jobs > Create.
8. In the Create Job dialog:
a. In the Job Name field, type in the name for the job in which you want to import your scenes. Jobs are often used to separate episodes in a series, so you can name your job accordingly.
b. In the TD drop-down, select the user who should supervise the animation pipeline.
c. In the ATD drop-down, select the user who should assist in supervising the animation pipeline.
d. In the Approvals field, select whether you want the approvals to be automatic or manual.
e. Click OK.
Your new job is added to the Jobs list, as part of the jobs in your new environment.
9. In the top menu, select Admin > Import.
The Import Scene(s) dialog appears.
1015
Storyboard Pro 20 User Guide
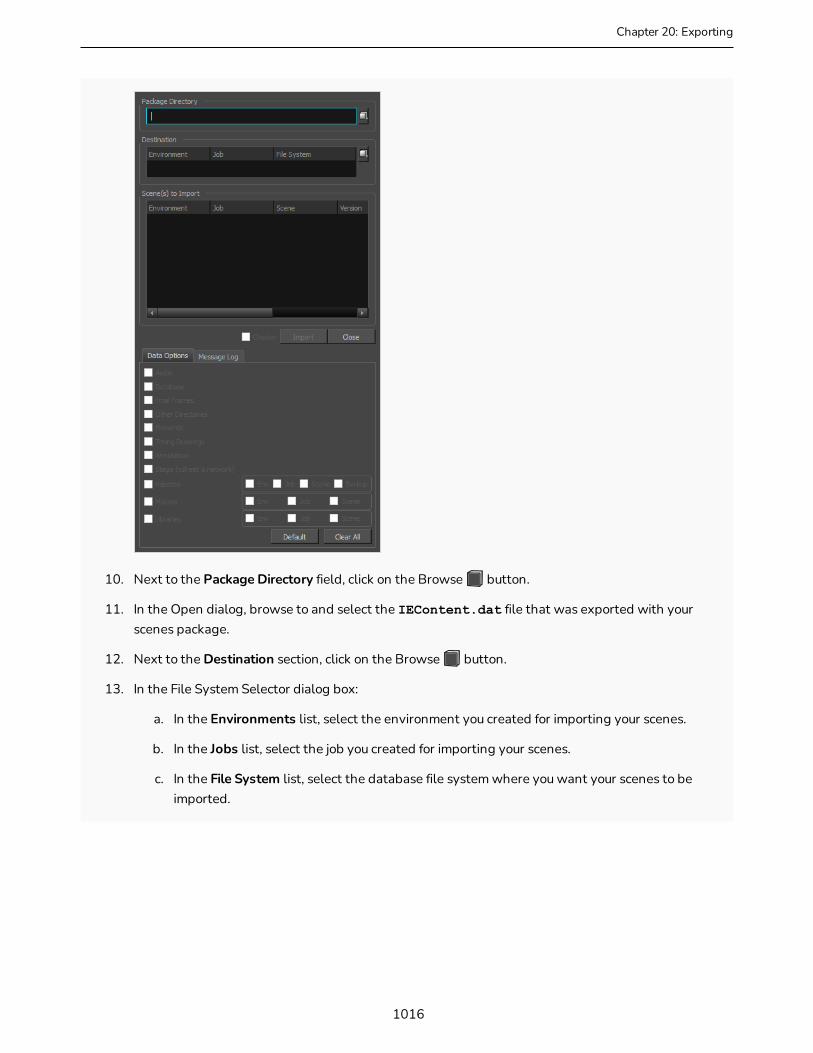
Chapter 20: Exporting
10. Next to the Package Directory field, click on the Browse button.
11. In the Open dialog, browse to and select the IEContent.dat file that was exported with your scenes package.
12. Next to the Destination section, click on the Browse button.
13. In the File System Selector dialog box:
a. In the Environments list, select the environment you created for importing your scenes.
b. In the Jobs list, select the job you created for importing your scenes.
c. In the File System list, select the database file system where you want your scenes to be imported.
1016
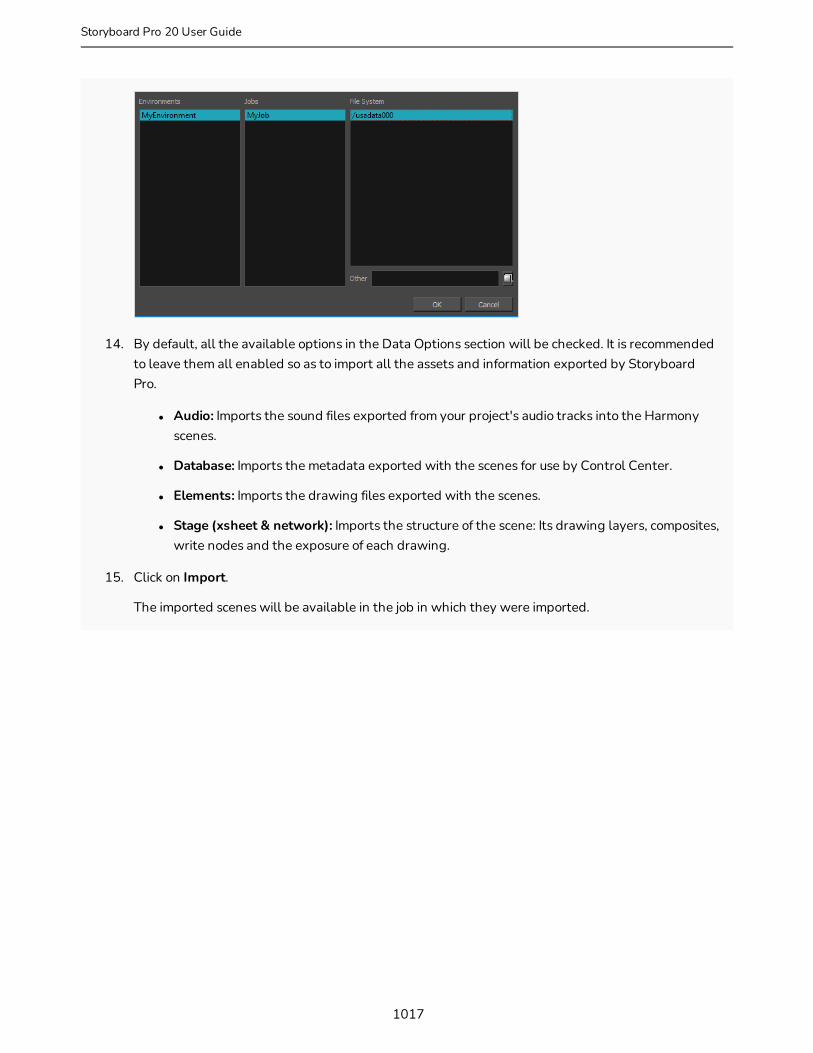
14. By default, all the available options in the Data Options section will be checked. It is recommended to leave them all enabled so as to import all the assets and information exported by Storyboard Pro.
l Audio: Imports the sound files exported from your project's audio tracks into the Harmony scenes.
l Database: Imports the metadata exported with the scenes for use by Control Center.
l Elements: Imports the drawing files exported with the scenes.
l Stage (xsheet & network): Imports the structure of the scene: Its drawing layers, composites, write nodes and the exposure of each drawing.
15. Click on Import.
The imported scenes will be available in the job in which they were imported.
1017
Storyboard Pro 20 User Guide

Chapter 20: Exporting
Exporting Layout ImagesT-SBADV-012-003
The Export Layout window lets you export some or all of the scenes in your project to layout images. This can be used to properly position scene elements when working on different aspects of the scene throughout production. For example, a layout can be imported in Harmony to accelerate its set up and properly position the elements and camera keyframes of the scene. Also, a layout exported to .psd format can serve as the base to create the background art for the scene so that it is properly adapted to the scene’s layout, action and camera movements.
Layout images can be rendered with all layers combined or with one image per layer, and can optionally include camera keyframes and movements. Layouts can be exported in .psd (with separate layers), .tga, .jpg or .png format.
How to export a Layout
1. Select File > Export > Layout.
The Export Layout dialog box opens.
1018
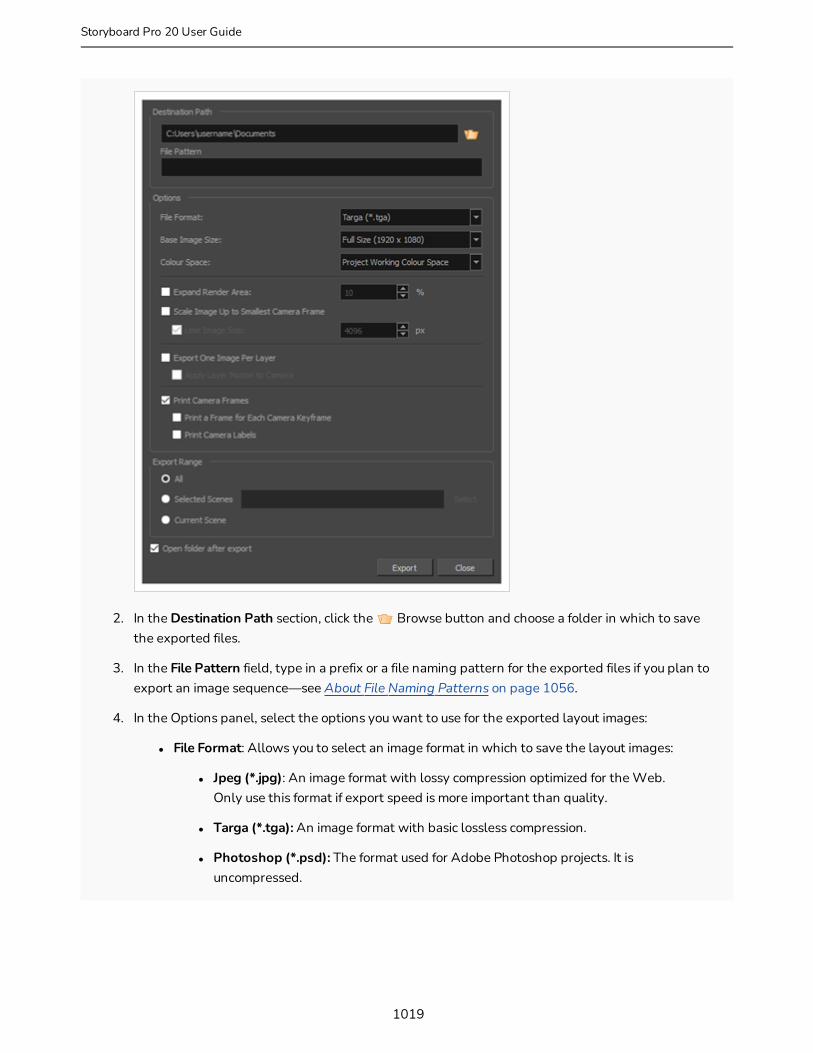
2. In the Destination Path section, click the Browse button and choose a folder in which to save the exported files.
3. In the File Pattern field, type in a prefix or a file naming pattern for the exported files if you plan to export an image sequence—see About File Naming Patterns on page 1056.
4. In the Options panel, select the options you want to use for the exported layout images:
l File Format: Allows you to select an image format in which to save the layout images:
l Jpeg (*.jpg): An image format with lossy compression optimized for the Web. Only use this format if export speed is more important than quality.
l Targa (*.tga): An image format with basic lossless compression.
l Photoshop (*.psd): The format used for Adobe Photoshop projects. It is uncompressed.
1019
Storyboard Pro 20 User Guide
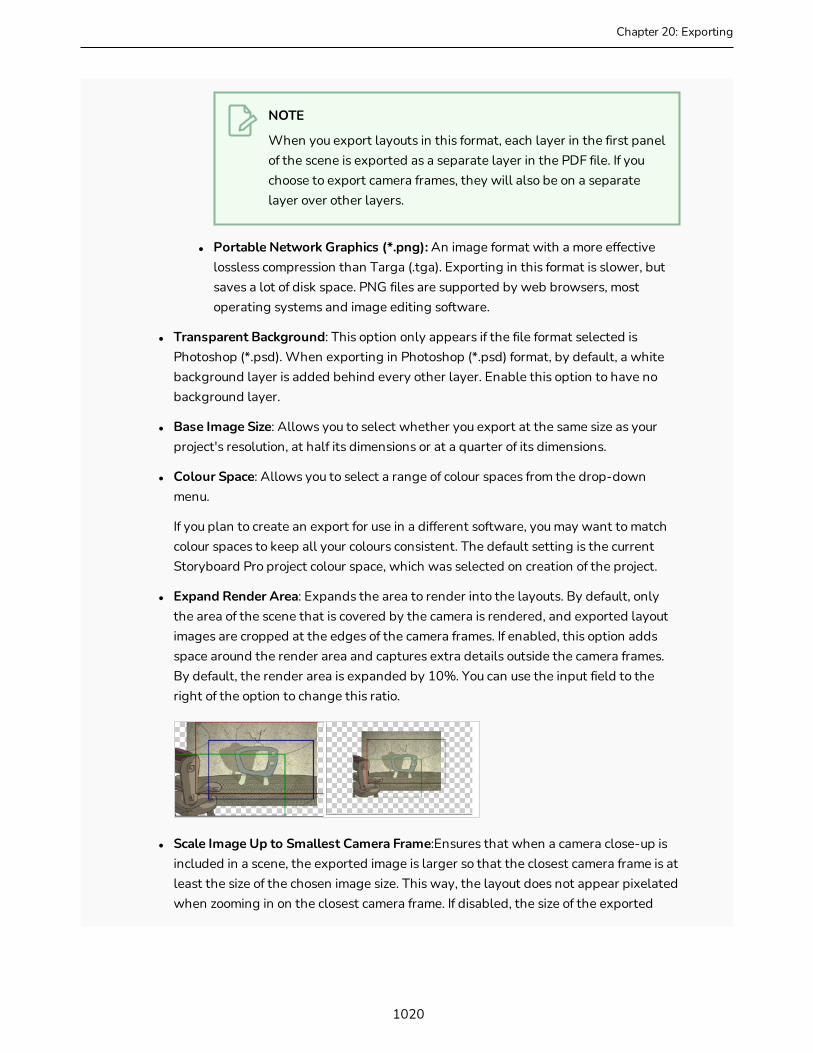
Chapter 20: Exporting
NOTE
When you export layouts in this format, each layer in the first panel of the scene is exported as a separate layer in the PDF file. If you choose to export camera frames, they will also be on a separate layer over other layers.
l Portable Network Graphics (*.png): An image format with a more effective lossless compression than Targa (.tga). Exporting in this format is slower, but saves a lot of disk space. PNG files are supported by web browsers, most operating systems and image editing software.
l Transparent Background: This option only appears if the file format selected is Photoshop (*.psd). When exporting in Photoshop (*.psd) format, by default, a white background layer is added behind every other layer. Enable this option to have no background layer.
l Base Image Size: Allows you to select whether you export at the same size as your project's resolution, at half its dimensions or at a quarter of its dimensions.
l Colour Space: Allows you to select a range of colour spaces from the drop-down menu.
If you plan to create an export for use in a different software, you may want to match colour spaces to keep all your colours consistent. The default setting is the current Storyboard Pro project colour space, which was selected on creation of the project.
l Expand Render Area: Expands the area to render into the layouts. By default, only the area of the scene that is covered by the camera is rendered, and exported layout images are cropped at the edges of the camera frames. If enabled, this option adds space around the render area and captures extra details outside the camera frames. By default, the render area is expanded by 10%. You can use the input field to the right of the option to change this ratio.
l Scale Image Up to Smallest Camera Frame:Ensures that when a camera close-up is included in a scene, the exported image is larger so that the closest camera frame is at least the size of the chosen image size. This way, the layout does not appear pixelated when zooming in on the closest camera frame. If disabled, the size of the exported
1020

images will be based off the chosen Base Image Size and Expand Render Area options.
l Limit Image Size: If the Scale Image Up to Smallest Camera Frame option is enabled, this ensures images do not get scaled up too much. If enabled, images will be limited to 4096 pixels in width and height by default.
l Export One Image Per Layer: Exports each layer as a separate image file. If Print Camera Frames option is enabled, the camera frames and camera movements will be printed on each layer.
l Apply Layer Motion to Camera: When exporting one image per layer and with camera frames, if your layers are animated, this option allows you to combine the layer's animation with the camera movement that is printed on it. By following the resulting camera movement, the layer will appear to be animated just like it is in your animatic.
For example, in a scene where a drawing layer moves towards the right, and the camera moves up, the camera movement that will be printed on the layer's layout image will be combined with that layer's animation, and the resulting camera movement will go up and towards the left, so that the layer itself appears to move towards the right.
l Print Camera Frames: Prints the first and last camera frame of each scene into the exported layout images. If exporting in .psd format, the camera frames will be printed on a separate layer.
l Print a Frame for Each Camera Keyframe: If a scene contains a camera movement with more than two keyframes, this prints each camera keyframe into the layout.
1021
Storyboard Pro 20 User Guide

Chapter 20: Exporting
l Print Camera Labels: Adds the camera position label in the top-left corner of each camera frame. Camera frames are labeled with a letter of the alphabet indicating their respective order.
5. In the Export Range section, select whether you want to export the entire project, or only specific parts of it:
l All: Exports the entire storyboard.
l Selected Scenes: Select this option to export a specific selection of scenes. Then, click on the Select button to open the Scenes Picker dialog box, in which you can:
l Type the number of a sequence or of a scene in the Sequence or Scene fields in the Filter section, to only show matching sequences or matching scenes in the list.
l Click and drag to select a range of scenes.
l Hold the Ctrl key and click on each scene you want to add to your selection.
l Hold the Shift key, then click on the first scene and the last scene you want to add to your selection, to select every scene between those two scenes inclusively.
l If your project has sequences, click on a sequence to select every scene in that sequence.
l Current Scene: Exports only the currently selected scene.
6. To view the location and contents of the exported folder when it is ready, select the Open folder after export option.
7. Click on the Export button.
1022

Exporting Bitmap ImagesT-SBFND-010-007
The Export Bitmap window lets you export a storyboard project to bitmap files in .jpg, .tga, .psd or .png format. The exported data includes a separate bitmap file for each panel in the storyboard.
NOTE
For .psd files, the transform and transition animations are not exported. However, camera moves are rendered into an independent layer.
How to export a storyboard to a bitmap file
1. Select File > Export > Bitmap.
The Export to Bitmap dialog box opens.
1023
Storyboard Pro 20 User Guide
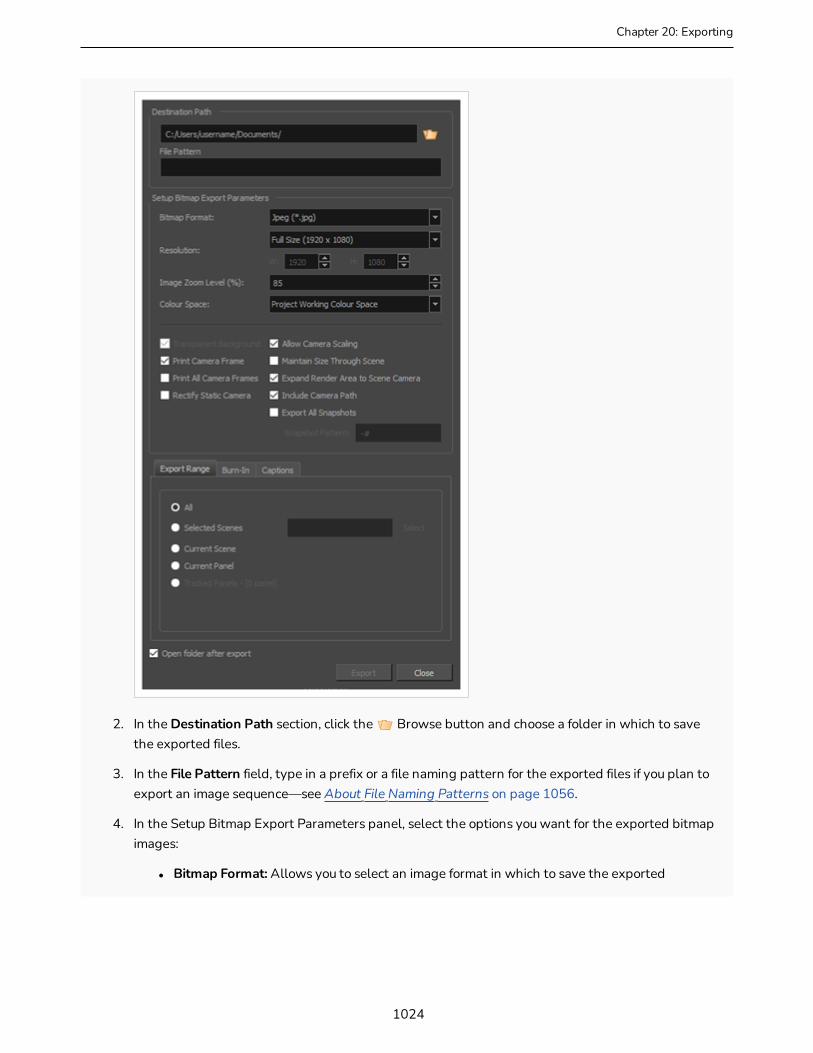
Chapter 20: Exporting
2. In the Destination Path section, click the Browse button and choose a folder in which to save the exported files.
3. In the File Pattern field, type in a prefix or a file naming pattern for the exported files if you plan to export an image sequence—see About File Naming Patterns on page 1056.
4. In the Setup Bitmap Export Parameters panel, select the options you want for the exported bitmap images:
l Bitmap Format: Allows you to select an image format in which to save the exported
1024

bitmaps:
l Jpeg (*.jpg): An image format with lossy compression optimized for the Web. Only use this format if export speed is more important than quality.
l Targa (*.tga): An image format with basic lossless compression.
l Photoshop (*.psd): The format used for Adobe Photoshop projects. It is uncompressed.
l Portable Network Graphics (*.png): An image format with a more effective lossless compression than Targa (.tga). Exporting in this format is slower, but saves a lot of disk space. PNG files are supported by web browsers, most operating systems and image editing software.
l Resolution: Sets the resolution to be a quarter size, half size, full size or double size of the current storyboard resolution. A custom size option also exists. Selecting the Custom option enables the Width and Height fields below. These fields are proportionally linked.
l Image Zoom Level: Sets the magnification of the image. Enter a value between 0 and 400. The default value is 85%.
l In the Colour Space drop-down menu, select a colour space to use, or stay with the default Project Working Colour Space.
If you plan to create an export for use in a different software, you may want to match colour spaces to keep all your colours consistent. The default setting is the current Storyboard Pro project colour space, which was selected on creation of the project.
l Transparent Background: This option is only available when Targa (.tga), Photoshop (.psd) or Portable Network Graphic (.png) file formats are selected. By default, this option is enabled and will export files with a transparent background instead of an opaque white background.
l Print Camera Frame: Prints the camera frame onto the exported images. If a panel has a camera movement, a camera frame will be printed for the position of the camera at the beginning of the panel as well as for the position of the camera at the end of the panel.
l Print All Camera Frames: Prints a camera frame for each camera keyframe in the panel.
l Rectify Static Camera: If the camera is at an angle in a panel, and there is no camera movement in that panel, enabling this option will render the panel as if the camera was at a straight angle.
1025
Storyboard Pro 20 User Guide

Chapter 20: Exporting
l Allow Camera Scaling: This option is enabled by default. This ensures that when a camera close-up is included in a scene, the exported image is larger so that the closest camera frame is at least the size of the chosen resolution. This way, the image will not appear pixelated when zooming in on the closest camera frame. If disabled, the exported images will be the size of the chosen resolution.
In the following example, the camera zooms out, but the image is exported big enough that the closest (smallest) camera frame is exactly the size of the export resolution. That way, if the image is zoomed in to the closest camera frame, it does not look scaled:
l Maintain Size Through Scene: Ensures that the elements from the exported panels retain their size across the different panels of the same scene. For example, when exporting a scene where the camera zooms in on a character through two different panels, this option will make it so the character is the same size in both exported images. In the same situation with this option unchecked, both bitmaps will be just big enough so that their closest camera frame is as big as the chosen export resolution.
In the following example, the camera zooms out on the scene throughout two panels. In the exported images, the scene elements are the same size, but the image canvas increases in size as the camera zooms out:
1026
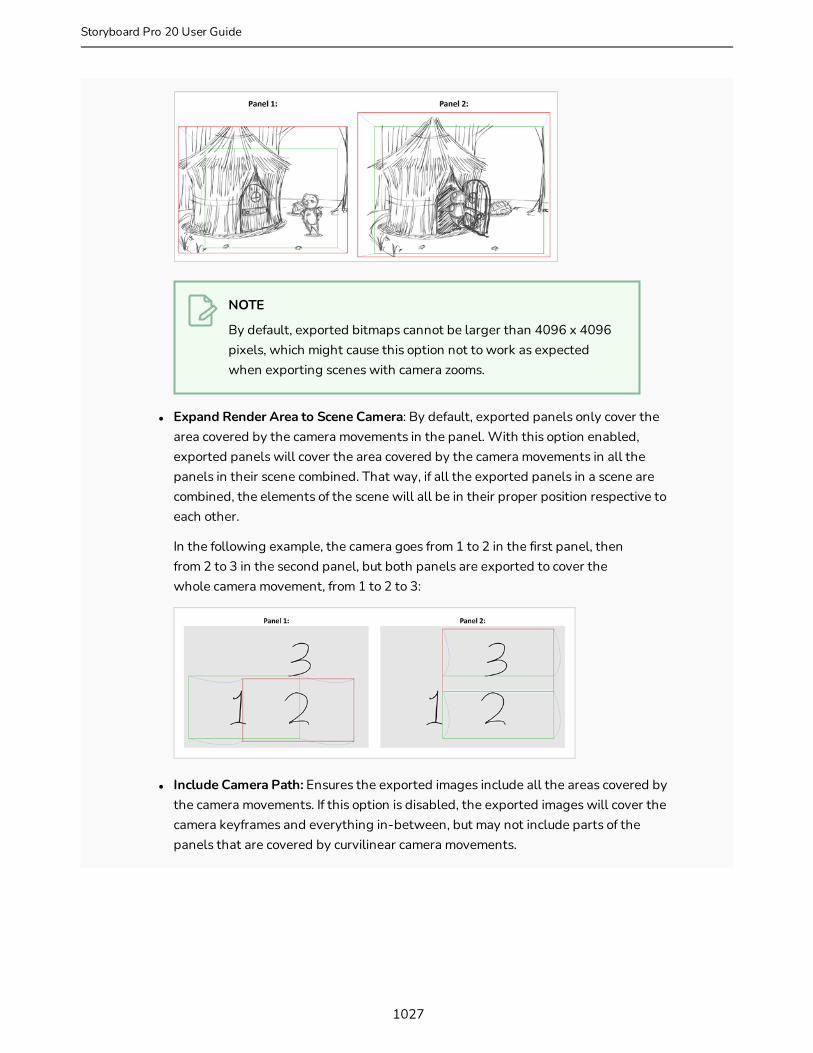
NOTE
By default, exported bitmaps cannot be larger than 4096 x 4096 pixels, which might cause this option not to work as expected when exporting scenes with camera zooms.
l Expand Render Area to Scene Camera: By default, exported panels only cover the area covered by the camera movements in the panel. With this option enabled, exported panels will cover the area covered by the camera movements in all the panels in their scene combined. That way, if all the exported panels in a scene are combined, the elements of the scene will all be in their proper position respective to each other.
In the following example, the camera goes from 1 to 2 in the first panel, then from 2 to 3 in the second panel, but both panels are exported to cover the whole camera movement, from 1 to 2 to 3:
l Include Camera Path: Ensures the exported images include all the areas covered by the camera movements. If this option is disabled, the exported images will cover the camera keyframes and everything in-between, but may not include parts of the panels that are covered by curvilinear camera movements.
1027
Storyboard Pro 20 User Guide
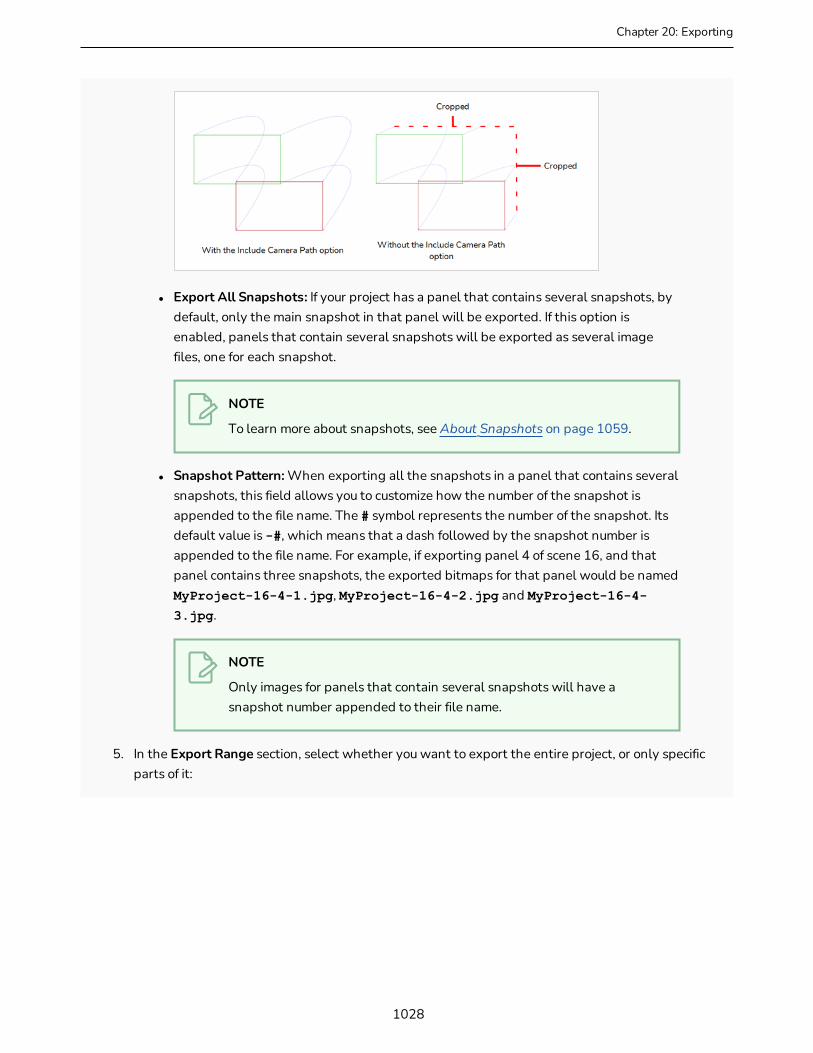
Chapter 20: Exporting
l Export All Snapshots: If your project has a panel that contains several snapshots, by default, only the main snapshot in that panel will be exported. If this option is enabled, panels that contain several snapshots will be exported as several image files, one for each snapshot.
NOTE
To learn more about snapshots, see About Snapshots on page 1059.
l Snapshot Pattern: When exporting all the snapshots in a panel that contains several snapshots, this field allows you to customize how the number of the snapshot is appended to the file name. The # symbol represents the number of the snapshot. Its default value is -#, which means that a dash followed by the snapshot number is appended to the file name. For example, if exporting panel 4 of scene 16, and that panel contains three snapshots, the exported bitmaps for that panel would be named MyProject-16-4-1.jpg, MyProject-16-4-2.jpg and MyProject-16-4-3.jpg.
NOTE
Only images for panels that contain several snapshots will have a snapshot number appended to their file name.
5. In the Export Range section, select whether you want to export the entire project, or only specific parts of it:
1028
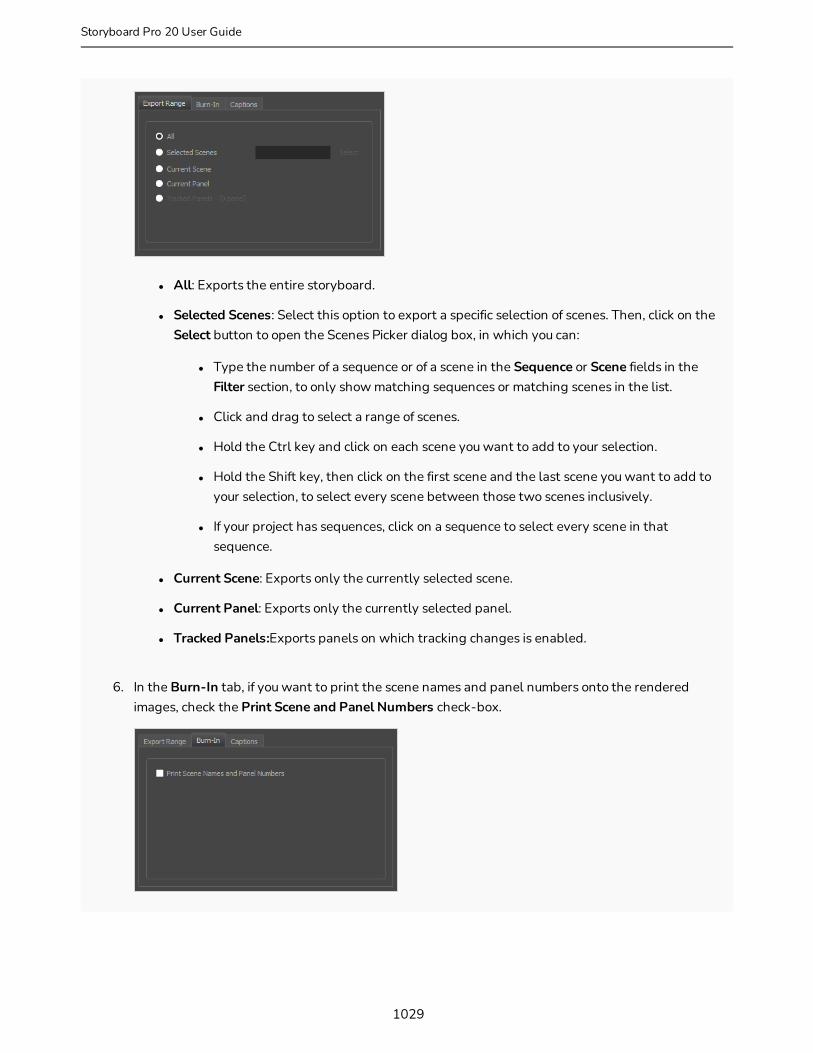
l All: Exports the entire storyboard.
l Selected Scenes: Select this option to export a specific selection of scenes. Then, click on the Select button to open the Scenes Picker dialog box, in which you can:
l Type the number of a sequence or of a scene in the Sequence or Scene fields in the Filter section, to only show matching sequences or matching scenes in the list.
l Click and drag to select a range of scenes.
l Hold the Ctrl key and click on each scene you want to add to your selection.
l Hold the Shift key, then click on the first scene and the last scene you want to add to your selection, to select every scene between those two scenes inclusively.
l If your project has sequences, click on a sequence to select every scene in that sequence.
l Current Scene: Exports only the currently selected scene.
l Current Panel: Exports only the currently selected panel.
l Tracked Panels:Exports panels on which tracking changes is enabled.
6. In the Burn-In tab, if you want to print the scene names and panel numbers onto the rendered images, check the Print Scene and Panel Numbers check-box.
1029
Storyboard Pro 20 User Guide
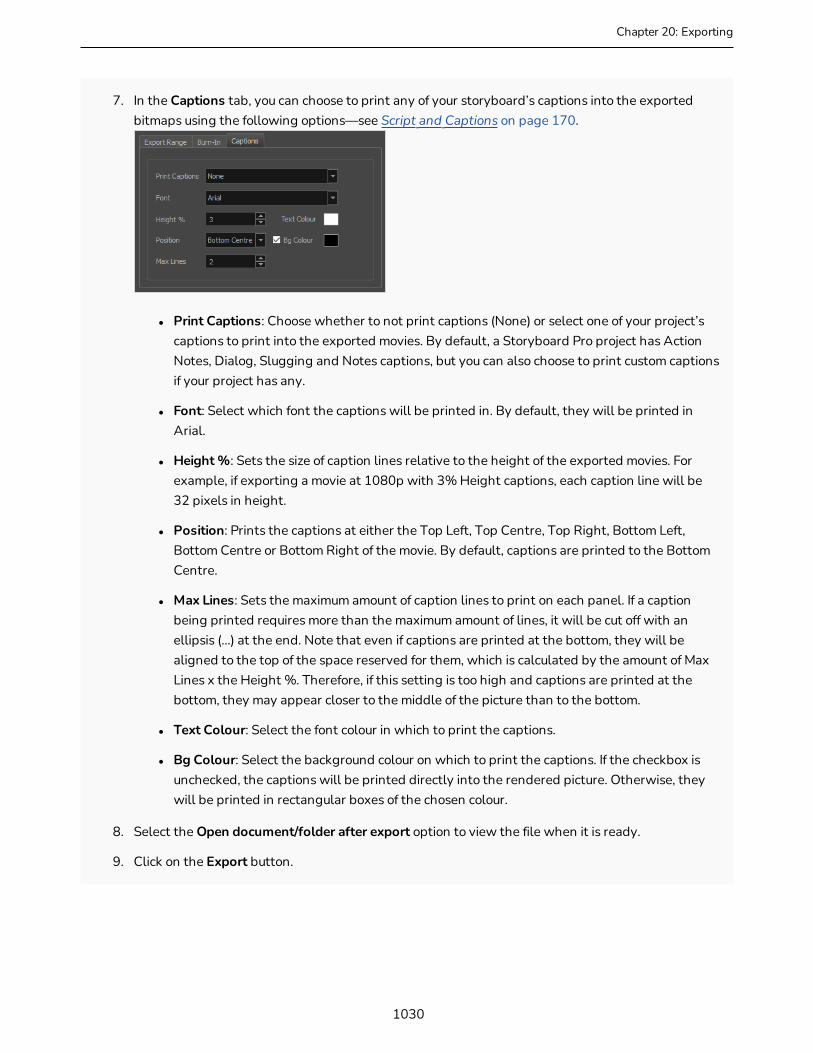
Chapter 20: Exporting
7. In the Captions tab, you can choose to print any of your storyboard’s captions into the exported bitmaps using the following options—see Script and Captions on page 170.
l Print Captions: Choose whether to not print captions (None) or select one of your project’s captions to print into the exported movies. By default, a Storyboard Pro project has Action Notes, Dialog, Slugging and Notes captions, but you can also choose to print custom captions if your project has any.
l Font: Select which font the captions will be printed in. By default, they will be printed in Arial.
l Height %: Sets the size of caption lines relative to the height of the exported movies. For example, if exporting a movie at 1080p with 3% Height captions, each caption line will be 32 pixels in height.
l Position: Prints the captions at either the Top Left, Top Centre, Top Right, Bottom Left, Bottom Centre or Bottom Right of the movie. By default, captions are printed to the Bottom Centre.
l Max Lines: Sets the maximum amount of caption lines to print on each panel. If a caption being printed requires more than the maximum amount of lines, it will be cut off with an ellipsis (...) at the end. Note that even if captions are printed at the bottom, they will be aligned to the top of the space reserved for them, which is calculated by the amount of Max Lines x the Height %. Therefore, if this setting is too high and captions are printed at the bottom, they may appear closer to the middle of the picture than to the bottom.
l Text Colour: Select the font colour in which to print the captions.
l Bg Colour: Select the background colour on which to print the captions. If the checkbox is unchecked, the captions will be printed directly into the rendered picture. Otherwise, they will be printed in rectangular boxes of the chosen colour.
8. Select the Open document/folder after export option to view the file when it is ready.
9. Click on the Export button.
1030

Exporting the Current Frame as a Bitmap ImageT-SBFND-010-009
You can export the current visible frame to a Targa (.tga), Jpeg (.jpg), Photoshop Document (.psd) or Portable Network Graphic (.png) image. If you choose to export in Photoshop Document (.psd) format, the layers in your panel will be exported on separate layers in the exported image.
NOTE
No caption or camera frame will be exported in the image file.
How to export the current frame to .tga, .jpg, .psd or .png image
1. In the Thumbnails view, select the panel containing the image to export as a bitmap image file.
2. Select File > Export > Export Current Image.
The Export Current Image window opens.
3. Select the destination folder for the image.
4. Type a name for the image.
5. Select the desired type from the Save as type menu.
6. Click Save to begin the export.
The image inside the frame is exported as a bitmap image file.
1031
Storyboard Pro 20 User Guide

Chapter 20: Exporting
Exporting an EDL, AAF or XML SequenceT-SBANIM-007-002
You can export your project into sequences that can be imported in non-linear editing (NLE) systems. This can be useful if you just created your storyboard and prefer making it into an animatic using video editing software, of if you're ready to edit the finished shots together and want to use the animatic as a template for the final cut.
You can export your project in the following formats:
l Editing Decision List (.edl): A legacy video editing format that can be imported in most editing software, but which has limited capabilities. Can be imported in Final Cut Pro 7, Avid Media Composer and Adobe Premiere.
l Advanced Authoring Format (.aaf): A binary video editing format with advanced capabilities that can be imported in Avid Media Composer, Adobe Premiere, Avid Xpress and Sony Vegas. It has some incompatibilities with the transitions supported by Storyboard Pro.
l Final Cut Pro XML Interchange Format (.xml): An XML video editing format that can be imported in Apple Final Cut Pro and Adobe Premiere. It is fully compatible with the capabilities of Storyboard Pro.
When exporting your project into an editing sequence, Storyboard Pro creates a video render of all the scenes in your project, copies each sound file in your project, and creates a sequence file that links to these assets, with the same timing for each video and sound clip as in your project.
WARNING
The following steps are for exporting a sequence for editing in third party software, but will not allow you to apply the changes made to your animatic in the editing software back into your Storyboard Pro project. If you want to make changes to your animatic in a third party software, then apply these changes to your Storyboard Pro project, see Conformation on page 1066.
How to export a storyboard to EDL or AAF or XML
1. Select File > Export > EDL/AAF/XML.
The Export to EDL/AAF/XML window opens.
1032

2. In the Destination Path section, click the Browse button and choose a folder in which to save the exported files.
3. In the File Pattern field, type in a prefix or a file naming pattern for the exported files if you plan to export an image sequence—see About File Naming Patterns on page 1056.
4. In the File Pattern field, you can set your own pattern which will be used to name the files created from the export. Leave this field blank to use the default pattern. The following variables can be used to define the file name pattern:
l %t = Project title
l %a = Act name (when acts are enabled)
1033
Storyboard Pro 20 User Guide

Chapter 20: Exporting
l %q = Sequence name (when project contains sequences)
l %s = Scene name
l %p = Panel name
l %l = Layer name (when exporting one image per layer)
You can add a number between the % sign and the letter of the variable to define a minimum number of characters to use.
5. In Export Type, select all the formats in which to store the editing information (ie: file names and timecodes for video and audio clips). One file will be created for each selected format:
l Generate EDL file: Can be imported in Final Cut Pro, Avid Media Composer and Adobe Premiere.
NOTE
Due to limitations with the EDL format, only the first four audio tracks in your project can be exported, and sound clips that are used multiple times in the project will only appear one time in the exported sequence.
l Generate AAF file: Can be imported in Avid Media Composer, Avid Xpress, Sony Vegas and Adobe Premiere.
NOTE
Due to limitation with the AAF format, Slide-in and Slide-out transitions will be converted to Dissolve transitions, Clock Wipe transitions will always be exported as 12 o’clock (0 degree) clockwise transitions, and Edge Wipe transitions will be exported as either Horizontal, Vertical or Corner Wipe transitions.
l Generate XML file: Can be imported in Final Cut Pro and Adobe Premiere.
NOTE
If your editing system is not mentioned above, check its specifications to verify which format can be imported.
1034

6. In the Movie Format drop-down, select the movie format in which you want to export your clips:
l QuickTime Movie (*.mov): The Apple QuickTime format. This is the default export format and is recommended for its portability, and also because it allows you to choose among several video codecs.
NOTES
l On Windows, Apple QuickTime must be installed to allow Storyboard Pro to export QuickTime movies. You can configure the export of QuickTime movies to use any codec that is compatible with QuickTime, including H.264, MPEG-4 and Animation.
l On macOS, Storyboard Pro uses Apple AVFoundation to export QuickTime movies, which allows you to export using codecs such as H.264, Apple ProRes 422 and Apple ProRes 4444, among others.
l If you are looking to export a QuickTime movie with transparency, be sure to choose a codec that supports encoding with an alpha channel.
l H.264/MPEG-4 (*.mov) : A simple movie format that uses the H.264 codec, which is supported by most web browsers.
NOTES
l Using this format does not require additional software. However, if this is the first time you export a movie in H.264/MPEG-4 format, you will be prompted to download the OpenH264 library from Cisco. Simply click Yes when prompted, and Storyboard Pro will automatically download the library, then export the movie.
l There are no encoding options for this format.
l This format supports resolutions of up to 4096×2304. Each dimension must be a multiple of 16 pixels.
l Audio exported in this format is encoded in PCM 16-bit stereo, 22.05 kHz.
l Windows Media Video (*.wmv): The native format for Windows Media Player.
1035
Storyboard Pro 20 User Guide
Chapter 20: Exporting
NOTES
l Windows Media Video (.wmv) files can only be exported on Windows.
l Video players and editors on non-Windows systems can generally not open Windows Media Video (.wmv) files.
l Flash (.swf)
l Image sequence in Jpeg (.jpg), Targa (.tga) or Portable Network Graphics (.png) format.
7. If you want to customize the compression settings for your movie clips, click on Video Config.
NOTES
l If you are exporting in QuickTime Movie (.mov) format on Windows, see Configuring Movie Settings for QuickTime Movies on Windows for EDL/AAF/XML Sequences on page 1041.
l If you are exporting in QuickTime Movie (.mov) format on macOS, see Configuring Movie Settings for QuickTime Movies on macOS for EDL/XML/AAF Sequences on page 1043.
l If you are exporting in Windows Media Video (.wmv) format, see Configuring Movie Settings for Windows Media Video for EDL/XML/AAF Sequences on page 1045.
l If you are exporting in H.264/MPEG-4 (.mov) format, there are no encoding options available. Movies exported in this format used standard AVC compression.
8. The Transparent Background option is only available for QuickTime Movie (.mov), Targa (.tga) and Portable Network Graphic (.png) formats. Check this box if you want to export your movie or image sequence with a transparent background.
9. In the resolution drop-down right of the Video Config button select whether you want to export your movie clips in Full Size, Half Size or Quarter Size. The available sizes are relative to your project's resolution. Exporting in a smaller size than Full Size will make the export faster and take less disk space, but will reduce the visual legibility of your video sequence.
10. In the Colour Space drop-down menu, select a colour space to use, or stay with the default Project Working Colour Space.
If you plan to create an export for use in a different software, you may want to match colour spaces to keep all your colours consistent. The default setting is the current Storyboard Pro project colour space, which was selected on creation of the project.
11. If you want to export one movie file for each panel instead of one video file for each scene, check the One Movie Clip Per Panel checkbox.
1036

12. If you do not want to export your project's sound files, uncheck the Copy Audio Files checkbox. By default, when exporting, the project’s sound files are copied to the same directory as the EDL/XML/AAF file and the video files.
NOTE
When this option is unchecked, the project’s audio tracks and their editing data will still be exported into the EDL/XML/AAF sequence. Only the actual sound files will be missing.
13. If you do not want to export video files for your project's scenes or panels, uncheck the Generate Video Files checkbox. This will generate an EDL, XML or AAF file that will link to movie files, but those movie files will not be created.
14. In the Export Range section, select whether you want to export the entire project, or only specific parts of it:
l All: Exports the entire storyboard.
l Selected Scenes: Select this option to export a specific selection of scenes. Then, click on the Select button to open the Scenes Picker dialog box, in which you can:
l Type the number of a sequence or of a scene in the Sequence or Scene fields in the Filter section, to only show matching sequences or matching scenes in the list.
l Click and drag to select a range of scenes.
l Hold the Ctrl key and click on each scene you want to add to your selection.
l Hold the Shift key, then click on the first scene and the last scene you want to add to your selection, to select every scene between those two scenes inclusively.
l If your project has sequences, click on a sequence to select every scene in that sequence.
l Current Scene: Exports only the currently selected scene.
1037
Storyboard Pro 20 User Guide
Chapter 20: Exporting
l Current Panel: Exports only the currently selected panel.
l Tracked Panels:Exports panels on which tracking changes is enabled.
15. In the Burn-In tab, choose what kind of information you want to have printed into the exported files:
l Print Time Code: Prints the global timecode on each rendered image.
l Print Scene Names and Panel Numbers: Prints the scene names and panel numbers as an overlay on your video.
l Print Additional Duration: Prints another time code counting the time for the current panel, scene or sequence, depending on what is selected in the Repeat drop-down.
l Units: Whether to print the additional duration in time units (seconds, minutes, etc.) or in frames.
l Repeat: Decide what to count the time of for the additional duration. For example, if set to per Panel, the time elapsed since the beginning of the current panel will be printed.
16. In the Camera Grids tab, using these options, decides whether you want any kind of camera frame to be printed into the exported files:
l Title Safe Area: Prints the Title Safe Area over the picture. By default, this area is 20% smaller than the camera frame. It is used as a guideline of the area that CRT displays might
1038
crop out of the picture. Visual elements such as text and logos should be placed within this area.
l Action Safe Area: Prints the Action Safe Area over the picture. By default, this area is 10% smaller than the camera frame. It is used as a guideline of the area that CRT displays might crop out of the picture. Characters and action should be placed within this area.
l 4:3 Safety: Prints the title safe area and the action safe area for the 4:3 camera frame over the exported image. They can be used to position elements in projects that are meant to be displayed in both widescreen and 4:3 proportions.
l 4:3 Reference: Prints the 4:3 camera frame over the exported image. This frame corresponds to the camera frame if the aspect ratio of the picture was 4:3. It can be used to position elements in projects that are meant to be displayed in both widescreen and 4:3 proportions.
17. In the Captions tab, you can choose to print any of your storyboard’s captions into the exported movies using the following options—see Script and Captions on page 170.
l Print Captions: Choose whether to not print captions (None) or select one of your project’s captions to print into the exported movies. By default, a Storyboard Pro project has Action Notes, Dialog, Slugging and Notes captions, but you can also choose to print custom captions if your project has any.
l Font: Select which font the captions will be printed in. By default, they will be printed in Arial.
l Height %: Sets the size of caption lines relative to the height of the exported movies. For example, if exporting a movie at 1080p with 3% Height captions, each caption line will be 32 pixels in height.
l Position: Prints the captions at either the Top Left, Top Centre, Top Right, Bottom Left, Bottom Centre or Bottom Right of the movie. By default, captions are printed to the Bottom Centre.
l Max Lines: Sets the maximum amount of caption lines to print on each panel. If a caption being printed requires more than the maximum amount of lines, it will be cut off with an ellipsis (...) at the end. Note that even if captions are printed at the bottom, they will be
1039
Storyboard Pro 20 User Guide
Chapter 20: Exporting
aligned to the top of the space reserved for them, which is calculated by the amount of Max Lines x the Height %. Therefore, if this setting is too high and captions are printed at the bottom, they may appear closer to the middle of the picture than to the bottom.
l Text Colour: Select the font colour in which to print the captions.
l Bg Colour: Select the background colour on which to print the captions. If the checkbox is unchecked, the captions will be printed directly into the rendered picture. Otherwise, they will be printed in rectangular boxes of the chosen colour.
18. If you want to automatically play the video or view the exported files once the export is done, check the Open document/folder after export option.
19. Click on the Export button.
You can now import the sequence into a third party editing software. Refer to the documentation of your editing software for information on importing the sequence into a project and editing it.
1040
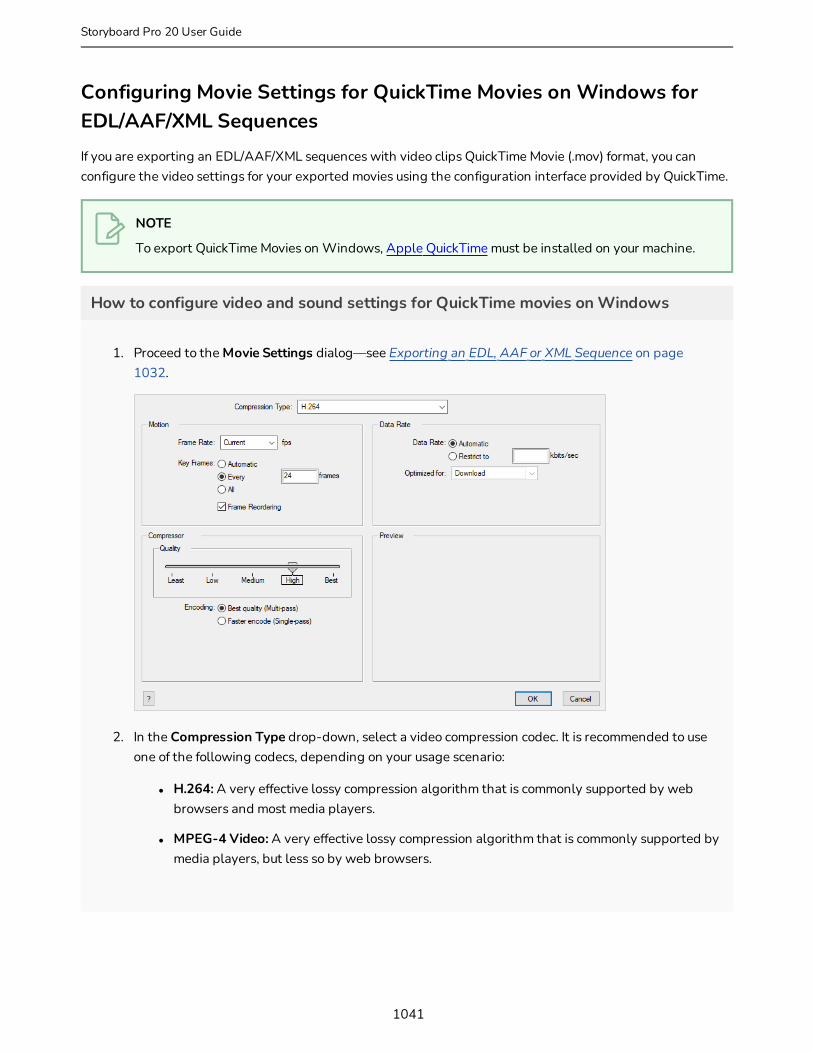
Configuring Movie Settings for QuickTime Movies on Windows for EDL/AAF/XML SequencesIf you are exporting an EDL/AAF/XML sequences with video clips QuickTime Movie (.mov) format, you can configure the video settings for your exported movies using the configuration interface provided by QuickTime.
NOTE
To export QuickTime Movies on Windows, Apple QuickTime must be installed on your machine.
How to configure video and sound settings for QuickTime movies on Windows
1. Proceed to the Movie Settings dialog—see Exporting an EDL, AAF or XML Sequence on page 1032.
2. In the Compression Type drop-down, select a video compression codec. It is recommended to use one of the following codecs, depending on your usage scenario:
l H.264: A very effective lossy compression algorithm that is commonly supported by web browsers and most media players.
l MPEG-4 Video: A very effective lossy compression algorithm that is commonly supported by media players, but less so by web browsers.
1041
Storyboard Pro 20 User Guide
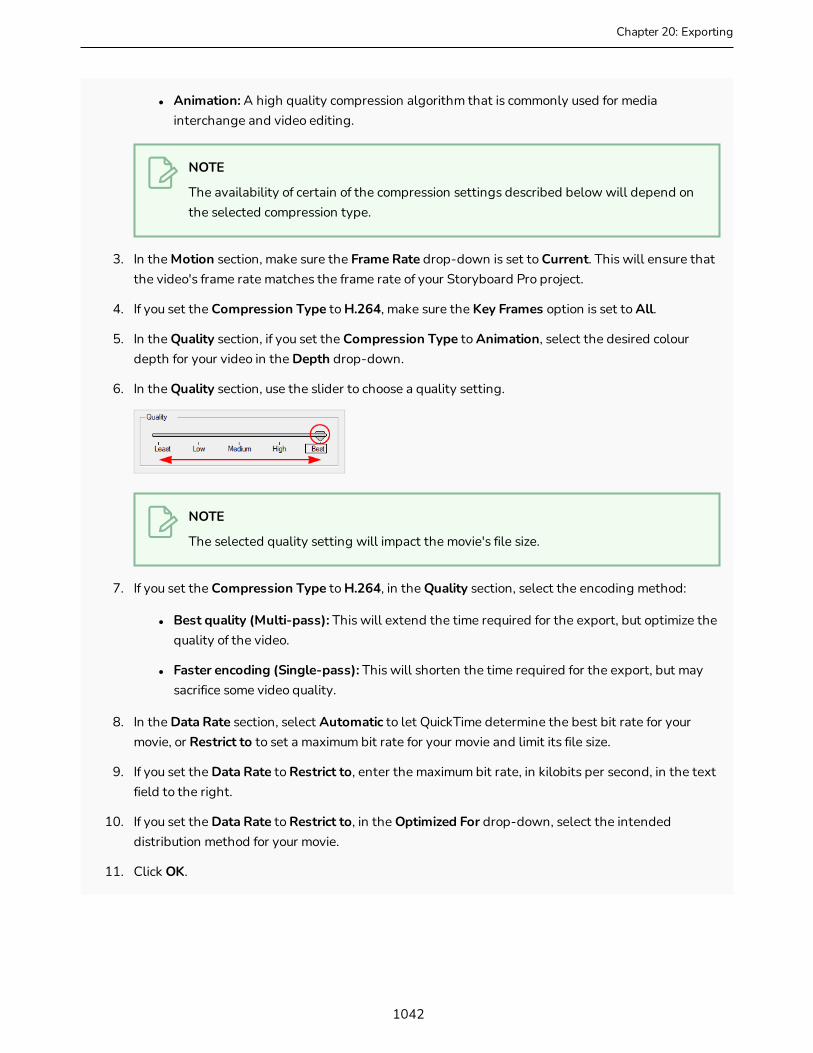
Chapter 20: Exporting
l Animation: A high quality compression algorithm that is commonly used for media interchange and video editing.
NOTE
The availability of certain of the compression settings described below will depend on the selected compression type.
3. In the Motion section, make sure the Frame Rate drop-down is set to Current. This will ensure that the video's frame rate matches the frame rate of your Storyboard Pro project.
4. If you set the Compression Type to H.264, make sure the Key Frames option is set to All.
5. In the Quality section, if you set the Compression Type to Animation, select the desired colour depth for your video in the Depth drop-down.
6. In the Quality section, use the slider to choose a quality setting.
NOTE
The selected quality setting will impact the movie's file size.
7. If you set the Compression Type to H.264, in the Quality section, select the encoding method:
l Best quality (Multi-pass): This will extend the time required for the export, but optimize the quality of the video.
l Faster encoding (Single-pass): This will shorten the time required for the export, but may sacrifice some video quality.
8. In the Data Rate section, select Automatic to let QuickTime determine the best bit rate for your movie, or Restrict to to set a maximum bit rate for your movie and limit its file size.
9. If you set the Data Rate to Restrict to, enter the maximum bit rate, in kilobits per second, in the text field to the right.
10. If you set the Data Rate to Restrict to, in the Optimized For drop-down, select the intended distribution method for your movie.
11. Click OK.
1042

Configuring Movie Settings for QuickTime Movies on macOS for EDL/XML/AAF SequencesOn macOS, Storyboard Pro allows you to export QuickTime Movie files (.mov) using the Apple AVFoundation framework, which is pre-installed with macOS.
Contrary to Windows, Storyboard Pro uses its own user interface to let you configure the compression settings for QuickTime Movies on macOS. Using this interface, you can choose to export your movie using either the H.264, the Apple ProRes 422 or the Apple ProRes 4444 video codec.
How to configure the video and sound settings for QuickTime movies on macOS
1. Proceed to the Movie Options dialog—see Exporting an EDL, AAF or XML Sequence on page 1032.
2. In the Movie Options dialog box, click on the Codec drop-down and select one of the following video compression codecs:
NOTE
The list of codecs available depends on the version of macOS being used.
l H.264: A very effective lossy compression algorithm that is commonly supported by web browsers and media players.
l H.265: Same compression quality as H.264, but with a smaller compression size. This is useful for videos intended for the web and mobile devices. Not supported on all major browsers or operating systems.
l Apple ProRes 422: A nearly lossless compression algorithm commonly used for video editing on Apple systems. This codec is optimized for preserving video quality, but not for publishing or streaming.
l Apple ProRes 422 HQ: Preserves visual quality at the same high level as Apple ProRes 4444 but for 4:2:2 image sources (cleaner footage for things like green screening). Heavier than Apple ProRes 422 for real-time editing performance.
1043
Storyboard Pro 20 User Guide

Chapter 20: Exporting
l Apple ProRes 422 LT: A more highly compressed codec than Apple ProRes 422, with roughly 70 percent of the data rate and 30 percent smaller file sizes. This codec is perfect for environments with limited storage capacity and data rates.
l Apple ProRes 422 Proxy: An even more highly compressed codec than Apple ProRes 422 LT, intended for use in offline workflows that require low data rates but full-resolution video.
l Apple ProRes 4444: A nearly lossless compression algorithm commonly used for video editing on Apple systems. Compared to Apple ProRes 422, this codec preserves more colour detail and supports transparency. However, it results in heavier file sizes.
3. If you want to export a video with transparency, check the Alpha option.
NOTE
This option is only available when exporting with the Apple ProRes 4444 codec. Other codecs do not support transparency.
4. Click OK.
1044

Configuring Movie Settings for Windows Media Video for EDL/XML/AAF SequencesOn Windows, it is possible to export in Windows Media Video format. This format is natively supported by Windows, and is offered in Storyboard Pro as an alternative for exporting in QuickTime Movie format, as the latter requires installing QuickTime on Windows.
When exporting in Windows Media Video format, Storyboard Pro allows you to select the video compression quality.
How to configure video and sound settings for Windows Media Video
1. Proceed to the WMV Options dialog—see Exporting an EDL, AAF or XML Sequence on page 1032.
1. In the Video section, select the desired Variable Bit Rate Quality for your video. A higher setting will ensure a better image quality, whereas a lower setting will reduce the size of your movie file.
2. Click OK.
1045
Storyboard Pro 20 User Guide
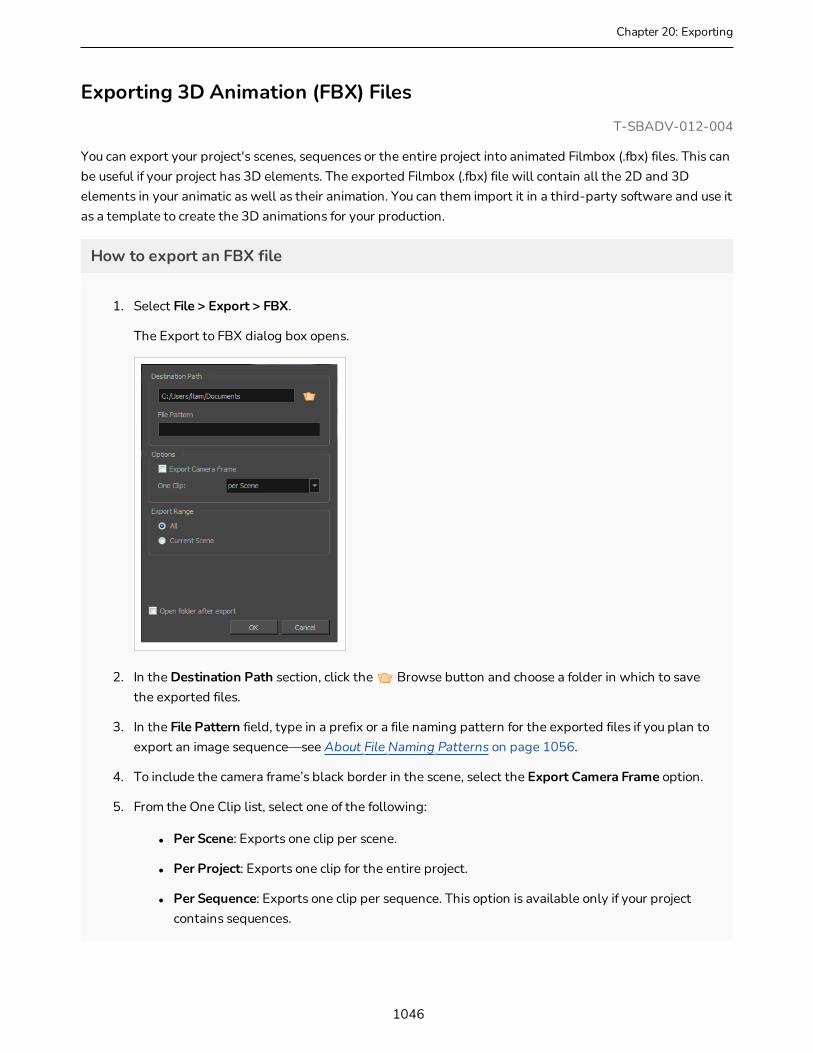
Chapter 20: Exporting
Exporting 3D Animation (FBX) FilesT-SBADV-012-004
You can export your project's scenes, sequences or the entire project into animated Filmbox (.fbx) files. This can be useful if your project has 3D elements. The exported Filmbox (.fbx) file will contain all the 2D and 3D elements in your animatic as well as their animation. You can them import it in a third-party software and use it as a template to create the 3D animations for your production.
How to export an FBX file
1. Select File > Export > FBX.
The Export to FBX dialog box opens.
2. In the Destination Path section, click the Browse button and choose a folder in which to save the exported files.
3. In the File Pattern field, type in a prefix or a file naming pattern for the exported files if you plan to export an image sequence—see About File Naming Patterns on page 1056.
4. To include the camera frame’s black border in the scene, select the Export Camera Frame option.
5. From the One Clip list, select one of the following:
l Per Scene: Exports one clip per scene.
l Per Project: Exports one clip for the entire project.
l Per Sequence: Exports one clip per sequence. This option is available only if your project contains sequences.
1046
6. In the Export Range section, select whether you want to export the entire project, or only specific parts of it:
l All: Includes all the scenes in your project.
l Current Scene: Includes only the scene you selected when you opened this dialog box.
l Current Sequence: Includes only the scenes from the sequence you selected when you opened this dialog box. This option will only be visible if your project contains sequences.
7. Click the OK button.
1047
Storyboard Pro 20 User Guide
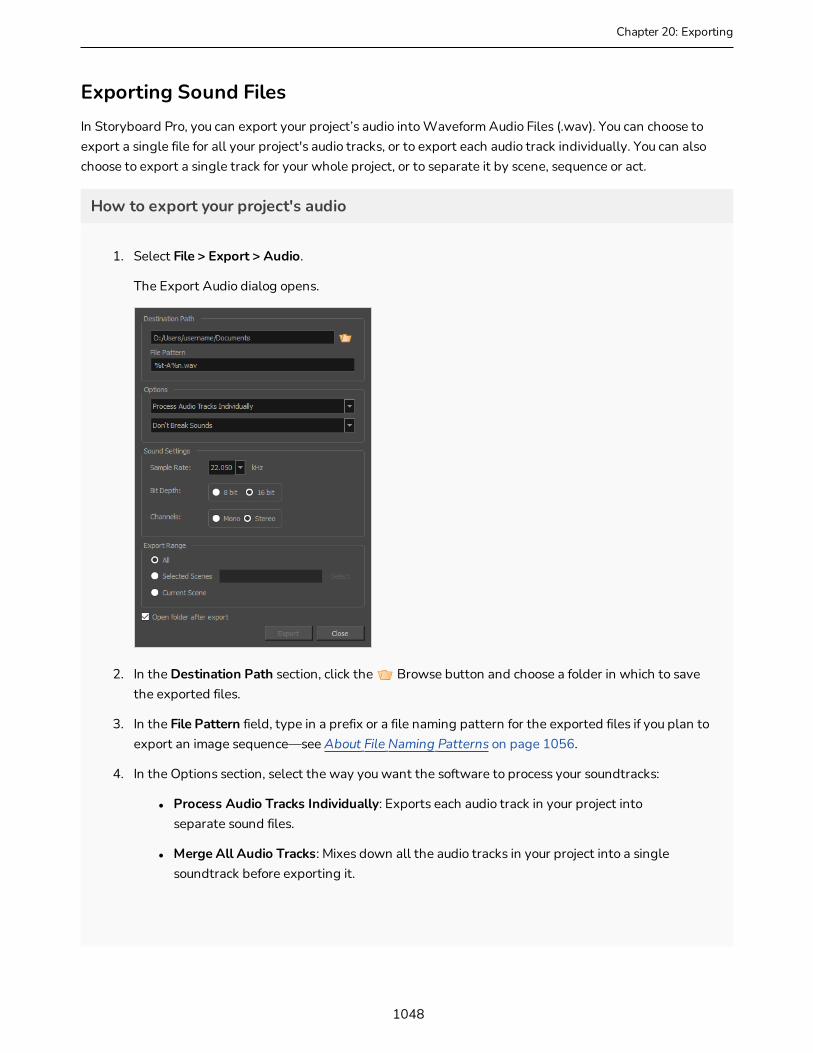
Chapter 20: Exporting
Exporting Sound FilesIn Storyboard Pro, you can export your project’s audio into Waveform Audio Files (.wav). You can choose to export a single file for all your project's audio tracks, or to export each audio track individually. You can also choose to export a single track for your whole project, or to separate it by scene, sequence or act.
How to export your project's audio
1. Select File > Export > Audio.
The Export Audio dialog opens.
2. In the Destination Path section, click the Browse button and choose a folder in which to save the exported files.
3. In the File Pattern field, type in a prefix or a file naming pattern for the exported files if you plan to export an image sequence—see About File Naming Patterns on page 1056.
4. In the Options section, select the way you want the software to process your soundtracks:
l Process Audio Tracks Individually: Exports each audio track in your project into separate sound files.
l Merge All Audio Tracks: Mixes down all the audio tracks in your project into a single soundtrack before exporting it.
1048
l Process Audio Tracks Individually and Merged: Exports each audio track into separate sound files, then exports another file with all the audio tracks mixed together.
l Don't Break Sound: Exports audio tracks spanning for the entire length of your project. If you chose to merge audio tracks, you will have one sound file for the entire project. If you chose to export audio tracks separately, you will have one sound file for each audio track in your project.
l Break Sound Per Scene: Breaks down each exported audio track into scenes. If you chose to merge the audio tracks, you will have one sound file for each scene in your project. If you chose to export audio tracks separately, you will have one sound file per scene per audio track.
l Break Sound Per Sequence: Breaks down each exported audio track into sequences. If you chose to merge the audio tracks, you will have one sound file for each sequence in your project. If you chose to export audio tracks separately, you will have one sound file per sequence per audio track. This option is only available if your project contains sequences.
l Break Sound Per Act: Breaks down each exported audio track into acts. If you chose to merge the audio tracks, you will have one sound file for each act in your project. If you chose to export audio tracks separately, you will have one sound file per actper audio track. This option is only available if your project contains acts.
5. In the Sound Settings section:
l Sample Rate: Sets the frequency rate of the exported audio files. It is recommended to export sound files at the rate at which they were originally created. For reference, the standard sample rate is 48.0 kHz for broadcasting and DVD.
l Bit Depth: Sets the precision level of each wavelength in the sound file. The standard bit depth is 16 bit. Setting this to 8 bit will cut the size of audio files in half, but will significantly impact sound quality.
NOTE
On Windows, audio can only be exported in 16 bit unless QuickTime Player is installed.
l Channels: Allows you to select whether to export sound in Mono or Stereo. Stereo sound uses a separate track for the left and right speakers, which allows to simulate a realistic sound environment. Mono uses a single track for both speakers, which saves disk space.
1049
Storyboard Pro 20 User Guide
Chapter 20: Exporting
6. In the Export Range section, select whether you want to export the entire project, or only specific parts of it:
l All: Exports the entire storyboard.
l Selected Scenes: Select this option to export a specific selection of scenes. Then, click on the Select button to open the Scenes Picker dialog box, in which you can:
l Type the number of a sequence or of a scene in the Sequence or Scene fields in the Filter section, to only show matching sequences or matching scenes in the list.
l Click and drag to select a range of scenes.
l Hold the Ctrl key and click on each scene you want to add to your selection.
l Hold the Shift key, then click on the first scene and the last scene you want to add to your selection, to select every scene between those two scenes inclusively.
l If your project has sequences, click on a sequence to select every scene in that sequence.
l Current Scene: Exports only the currently selected scene.
7. Select the Open folder after export option to have the system automatically open the folder containing your exported audio files.
8. Click on the Export button.
1050

Exporting Project Metadata in CSV FormatT-SBADV-012-005
Using the Export CSV dialog, you can export your project's metadata, such as its scene and panel names, its transitions, the captions for each of your project's panels, the names of each layers in your panels, and other such information into a Comma Separated Value (.csv) spreadsheet.
CSV is a text-based spreadsheet format that is commonly supported by spreadsheet editors, and which is easy to process in scripts and other software as it is merely a text file containing the value of each cell, typically separated by a comma. However, it does not support advanced spreadsheet features such as text formatting and formulas.
Exporting a CSV file can be useful if you wish to view the metadata for your project in a spreadsheet editor, such as Microsoft Excel, LibreOffice Calc or Google Sheets, for analysis, or if you wish to make a script that will use the metadata for your project in any specific way.
You can also use this dialog to export your project's captions into a spreadsheet, edit them in a spreadsheet editor, then import the edited spreadsheet back into your project to update its captions. For more information on this procedure, see About Editing a Project's Captions in a Spreadsheet Editor on page 197.
IMPORTANT
If your captions contain non-latin character (ie: Japanese, Chinese, Korean, etc.), you should avoid editing a CSV containing your project's captions in Microsoft Excel, as it will display those non-latin characters, but it will not save them in your CSV file. LibreOffice Calc and Google Sheets support saving CSV files with non-latin characters.
How to export a storyboard to a CSV file
1. Select File > Export > CSV.
The Export to CSV dialog box opens.
1051
Storyboard Pro 20 User Guide
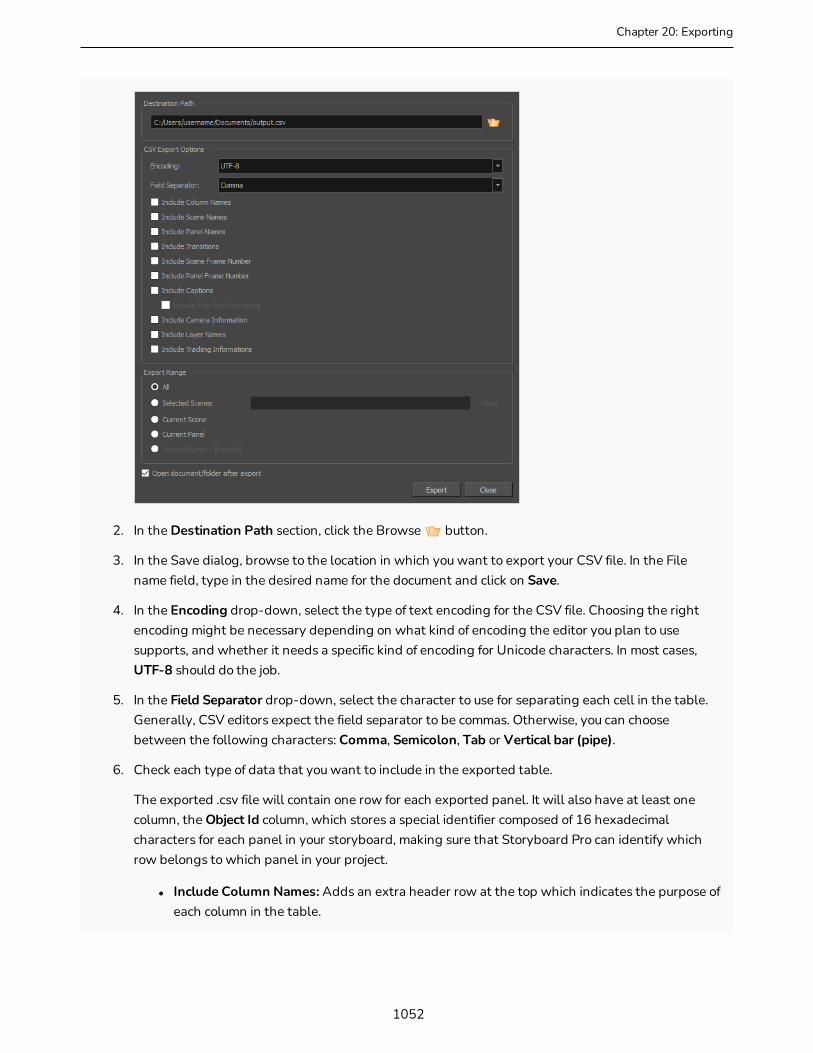
Chapter 20: Exporting
2. In the Destination Path section, click the Browse button.
3. In the Save dialog, browse to the location in which you want to export your CSV file. In the File name field, type in the desired name for the document and click on Save.
4. In the Encoding drop-down, select the type of text encoding for the CSV file. Choosing the right encoding might be necessary depending on what kind of encoding the editor you plan to use supports, and whether it needs a specific kind of encoding for Unicode characters. In most cases, UTF-8 should do the job.
5. In the Field Separator drop-down, select the character to use for separating each cell in the table. Generally, CSV editors expect the field separator to be commas. Otherwise, you can choose between the following characters: Comma, Semicolon, Tab or Vertical bar (pipe).
6. Check each type of data that you want to include in the exported table.
The exported .csv file will contain one row for each exported panel. It will also have at least one column, the Object Id column, which stores a special identifier composed of 16 hexadecimal characters for each panel in your storyboard, making sure that Storyboard Pro can identify which row belongs to which panel in your project.
l Include Column Names: Adds an extra header row at the top which indicates the purpose of each column in the table.
1052
l Include Sequence Names: Adds a Sequence column which indicates the number of the sequence for each panel.
l Include Scene Names: Adds a Scene column which indicates the number or name of each scene for each panel.
l Include Panel Names: Adds a Panel column which indicates the number or name of each panel.
l Include Transitions: Adds a column for each transition in the project, between the rows corresponding to the two panels that are joined by the transition.
l Include Scene Frame Number: Adds a column that indicates the length of the scene in frames.
l Include Panel Frame Number: Adds a column that indicates the length of the panel in frames.
l Include Captions: Adds a column for each caption type in your project, and which will indicate the content of each caption type for each panel.
l Include Rich Text Formatting: If your captions have any formatting, check this option to export the content of your captions in HTML, which will preserve the formatting of your captions. If this option is unchecked, your captions will be exported in plain text. They will be easier to read and edit, but if you re-import the .csv file into your project, the formatting of the captions will be lost.
l Include Camera Information: Indicates whether the camera is static or dynamic (animated) for each panel.
l Include Layer Names: This will add as many columns as the amount of layers in the panel that has the most layers. For each panel, the name of each layer in the panel will be indicated. Layers at the bottom are listed in the leftmost layer column, and layers at the top are listed in the rightmost layer column.
l Include Tracking Information:Indicates whether or not the panel is tracked, the date at which the panel started getting tracked, and the tracking notes added to that panel, if any.
7. In the Export Range section, select whether you want to export the entire project, or only specific parts of it:
l All: Exports the entire storyboard.
l Selected Scenes: Select this option to export a specific selection of scenes. Then, click on the Select button to open the Scenes Picker dialog box, in which you can:
l Type the number of a sequence or of a scene in the Sequence or Scene fields in the Filter section, to only show matching sequences or matching scenes in the list.
1053
Storyboard Pro 20 User Guide
Chapter 20: Exporting
l Click and drag to select a range of scenes.
l Hold the Ctrl key and click on each scene you want to add to your selection.
l Hold the Shift key, then click on the first scene and the last scene you want to add to your selection, to select every scene between those two scenes inclusively.
l If your project has sequences, click on a sequence to select every scene in that sequence.
l Current Scene: Exports only the currently selected scene.
l Current Panel: Exports only the currently selected panel.
l Tracked Panels:Exports panels on which tracking changes is enabled.
8. To view the exported file in your machine's spreadsheet editor after the export, enable the Open document/folder after export option.
9. Click on the Export button.
1054

About Advanced Export TechniquesStoryboard Pro features some advanced exporting techniques, namely: Excluding certain layers from certain types of exports, using variables in file naming patterns and using snapshots to export specific frames of certain panels. The following section explains how to use these advanced features.
1055
Storyboard Pro 20 User Guide

Chapter 20: Exporting
About File Naming PatternsT-SBADV-012-002
Several export dialogs in Storyboard Pro allow you to export several files at a time. By default, these dialogs will name each file they export with the necessary information to identify them: Scene number, panel number if the export is broken down into panels, and frame number when exporting an image sequence. However, these dialogs all have a File Pattern field. If you prefer, you can fill this field with a file pattern to determine how your exported files will be identified.
Variables
A file naming pattern are composed of variables. The following variables can be used, depending on the type of export, and on how the export is broken down:
Variable Definition Availability
%t Project title Always available.
%a Act numberWhen exporting one file per act, sequence, scene, panel or frame, and the project is separated in acts.
%qSequence number
When exporting one file per sequence, scene, panel or frame, and the project is separated in sequences.
%s Scene number When exporting one file per scene, panel or frame.
%p Panel number When exporting one file per panel or frame.
%fFrame number
When exporting one file per frame (i.e.: an image sequence).
%nSound track number
When exporting sound files separated by sound track.
For example, when exporting an image sequence in Jpeg (.jpg) with a file pattern such as MyProject - scene %s - panel %p - frame %f, frame 44 in panel 3 of scene 2 would be exported as MyProject - scene 2 - panel 3 - frame 44.jpg.
If you put a variable in the file naming pattern that is not relevent for your export, for example the %p panel number variable when exporting one file per scene, the variable name will appear in the file name.
1056
Padding
Storyboard Pro will automatically pad the numbers with zeros as needed. For example, if you're exporting a sequence of 10 scenes, the scenes will be numbered 01, 02, ... until 10. This way, all the scenes have the same amount of digits, making it easier to sort them in alphanumeric order.
If you prefer, you can decide the minimum amount of padding you want for each variable. To do this, simply add the amount of digits you want a variable to have between the % sign and the variable letter. For example, instead of %s, put %4s, and scene numbers in the file name will all have four digits. Scene numbers that would require less than four digits will be padded with zeros at their left. For example, scene 1 will be indicated with the number 0001.
Fallback
If you prefer a more simple approach, you can always type a name in plain text in the File Pattern field. This name will be used as a prefix: Your exported files will contain the name you typed, followed by the required information (i.e.: scene number, panel number, etc.) separated by dashes.
Likewise, if you type in a pattern that does not contain all the required variables, your exported files will have the missing variables added at the end, separated by dashes. For example, if you're exporting one image per panel, but type in a file naming pattern that only uses the %s scene number variable, the panel number will be added at the end of each file's name. This avoids exporting several files with the same name.
At any time, you can just delete the content of the File Pattern field to let Storyboard Pro use its default file naming pattern, which will contain all the necessary information.
1057
Storyboard Pro 20 User Guide
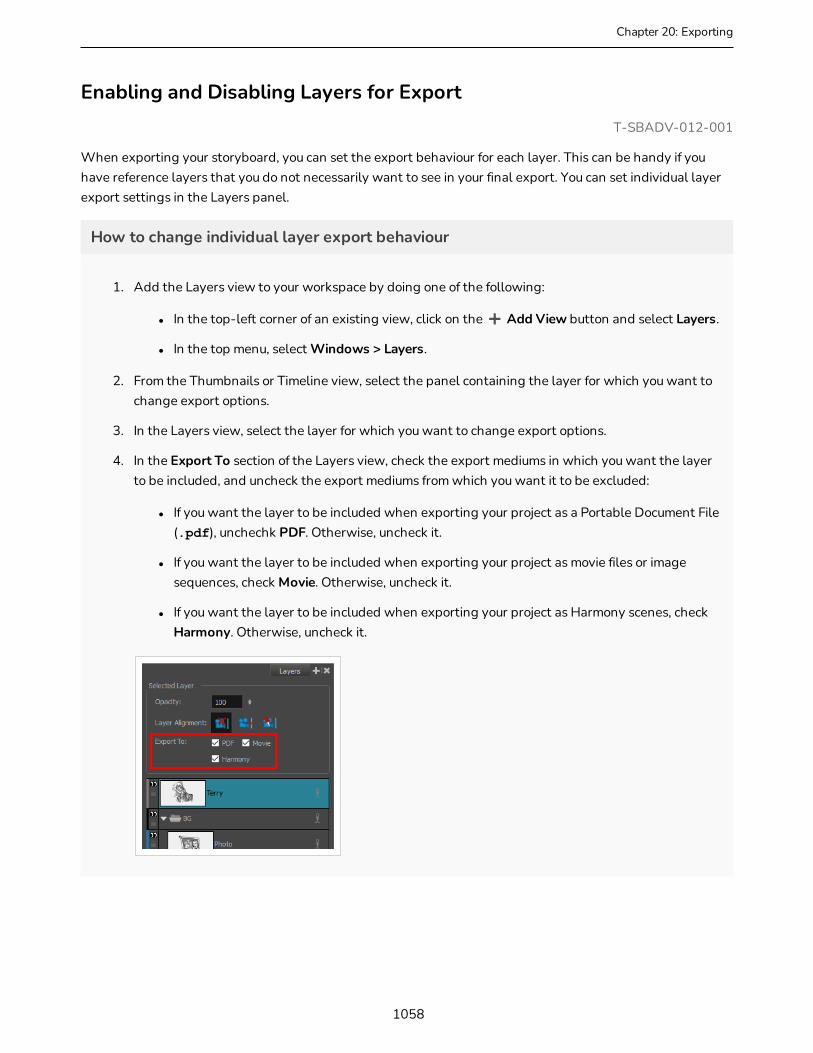
Chapter 20: Exporting
Enabling and Disabling Layers for ExportT-SBADV-012-001
When exporting your storyboard, you can set the export behaviour for each layer. This can be handy if you have reference layers that you do not necessarily want to see in your final export. You can set individual layer export settings in the Layers panel.
How to change individual layer export behaviour
1. Add the Layers view to your workspace by doing one of the following:
l In the top-left corner of an existing view, click on the Add View button and select Layers.
l In the top menu, select Windows > Layers.
2. From the Thumbnails or Timeline view, select the panel containing the layer for which you want to change export options.
3. In the Layers view, select the layer for which you want to change export options.
4. In the Export To section of the Layers view, check the export mediums in which you want the layer to be included, and uncheck the export mediums from which you want it to be excluded:
l If you want the layer to be included when exporting your project as a Portable Document File (.pdf), unchechk PDF. Otherwise, uncheck it.
l If you want the layer to be included when exporting your project as movie files or image sequences, check Movie. Otherwise, uncheck it.
l If you want the layer to be included when exporting your project as Harmony scenes, check Harmony. Otherwise, uncheck it.
1058

About SnapshotsWhen you export your storyboard as a PDF document, by default, only the first frame of each panel is exported into the document. Likewise, if you export your storyboard as bitmap images, each exported image will contain the first frame of its respective panel.
However, there might be situations where a panel is better represented by a specific frame in the middle of the panel rather than its first frame. For example, if the panel has a lot of layer animation, one of the in-between frames of that animation could be a lot more descriptive than the panel's first frame.
Using Snapshots, you can indicate to Storyboard Pro which frame in a panel is the best frame to represent that panel when exporting it as a still image. A snapshot is simply a marker positioned on one of your panel's frames. When you export your storyboard as a PDF document or as bitmap images, if one of the exported panels contains a snapshot in one of its frames, this frame will be used to represent the panel in the exported image, instead of the first frame of the panel.
You can add several snapshots to a panel. When you export your storyboard as a PDF document, each frame that is marked with a snapshot will be included in the storyboard, allowing you to export more than one frame for a single panel if necessary. When exporting your project as bitmap images, you can choose whether only the main snapshot of a panel that has several snapshots should be exported, or all of its snapshots.
1059
Storyboard Pro 20 User Guide

Chapter 20: Exporting
When a 3D scene which contains a camera movement is exported in a PDF document, the panel is usually represented by two thumbnails: the first frame of the camera movement, and the last frame of the camera movement. Adding a snapshot to such a panel adds an extra thumbnail in the PDF.
Using snapshots is completely optional and flexible. If you add a snapshot to a panel, Storyboard Pro will use the snapshot when exporting the panel as a PDF or as a bitmap image. If you don't add snapshots or if you delete snapshots from a panel, Storyboard Pro will use the first frame of the panel. When you add a snapshot, it is always added at the current frame, so you know what the panel will look like when you add a snapshot by looking at the Stage or Camera view. A marker for each snapshot is added to the Timeline view to help you keep track of them.
NOTE
Snapshots do not affect the exported images when exporting layouts.
1060
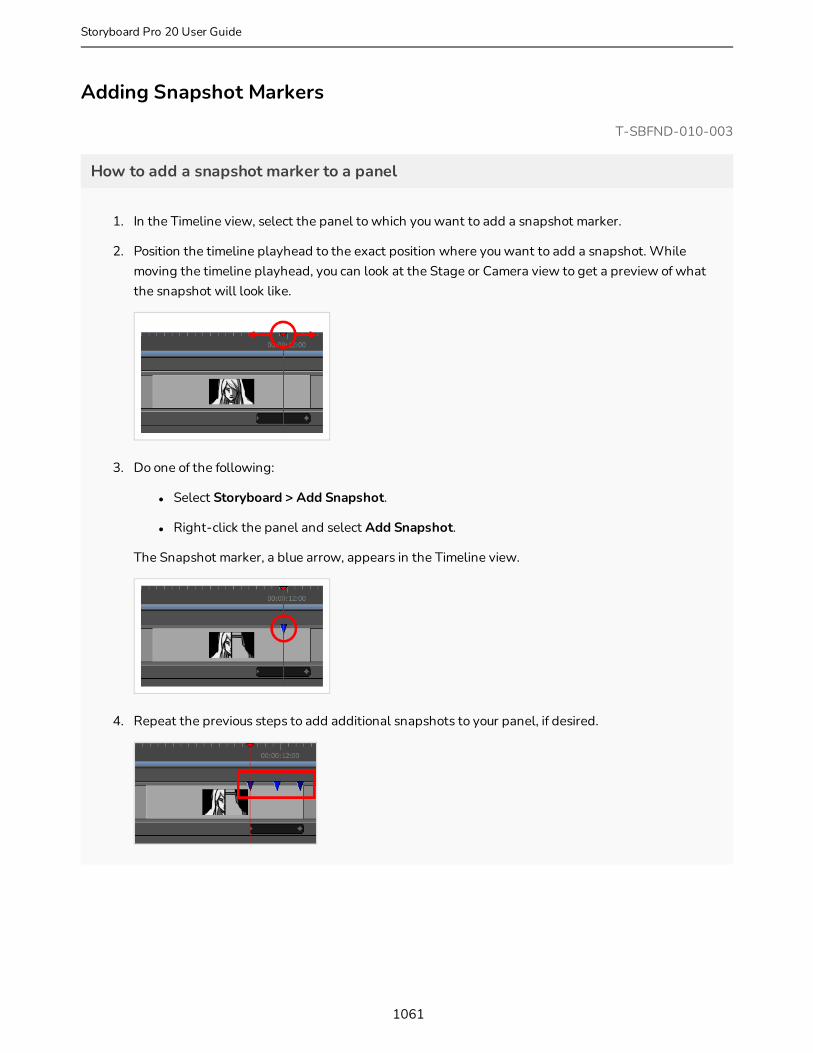
Adding Snapshot Markers
T-SBFND-010-003
How to add a snapshot marker to a panel
1. In the Timeline view, select the panel to which you want to add a snapshot marker.
2. Position the timeline playhead to the exact position where you want to add a snapshot. While moving the timeline playhead, you can look at the Stage or Camera view to get a preview of what the snapshot will look like.
3. Do one of the following:
l Select Storyboard > Add Snapshot.
l Right-click the panel and select Add Snapshot.
The Snapshot marker, a blue arrow, appears in the Timeline view.
4. Repeat the previous steps to add additional snapshots to your panel, if desired.
1061
Storyboard Pro 20 User Guide
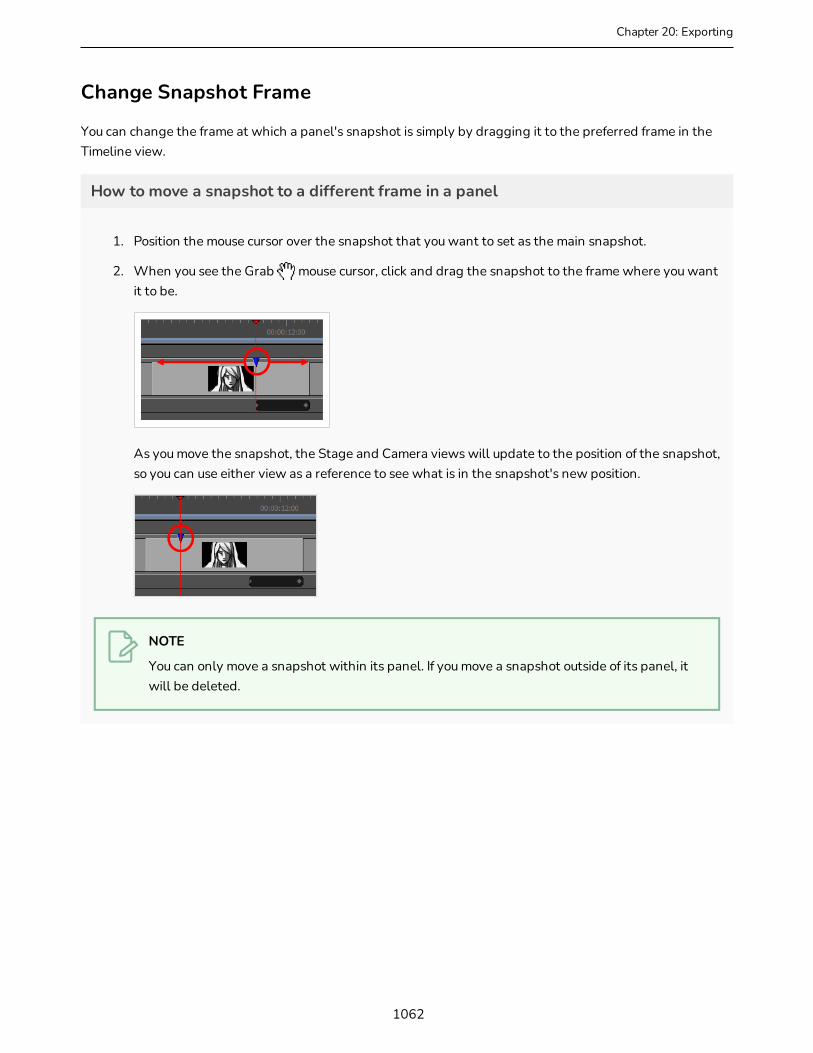
Chapter 20: Exporting
Change Snapshot Frame
You can change the frame at which a panel's snapshot is simply by dragging it to the preferred frame in the Timeline view.
How to move a snapshot to a different frame in a panel
1. Position the mouse cursor over the snapshot that you want to set as the main snapshot.
2. When you see the Grab mouse cursor, click and drag the snapshot to the frame where you want it to be.
As you move the snapshot, the Stage and Camera views will update to the position of the snapshot, so you can use either view as a reference to see what is in the snapshot's new position.
NOTE
You can only move a snapshot within its panel. If you move a snapshot outside of its panel, it will be deleted.
1062

Setting the Main Snapshot in a Panel
Because exporting your storyboard as bitmap images exports only one image per panel, if a panel has several snapshots, Storyboard Pro can only export one of the snapshots for the panel. In order to decide which snapshot to use, it will use the panel's main snapshot.
The main snapshot in a panel is indicated by its colour. In the Timeline view, a panel's main snapshot will appear in plain blue , whereas the other snapshots will appear in a darker shade of blue .
When you add more than one snapshot to a panel, the first snapshot you add is set as the main snapshot. At any time, you can change which snapshot in a panel is the panel's main snapshot.
How to set the main snapshot for a panel
1. Position the mouse cursor over the snapshot that you want to set as the main snapshot.
2. When you see the Grab mouse cursor, double-click on the snapshot.
The snapshot you double-clicked on will become a lighter shade of blue , and the snapshot that used to be the main snapshot will turn a darker shade of blue .
1063
Storyboard Pro 20 User Guide
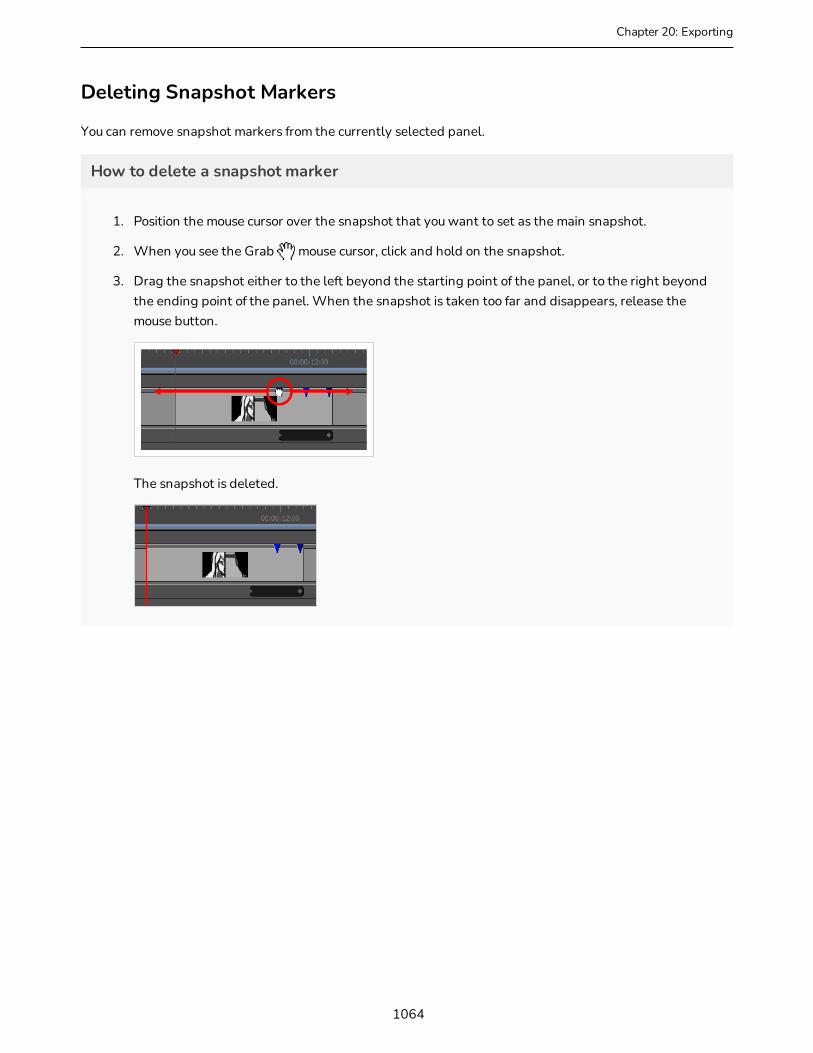
Chapter 20: Exporting
Deleting Snapshot Markers
You can remove snapshot markers from the currently selected panel.
How to delete a snapshot marker
1. Position the mouse cursor over the snapshot that you want to set as the main snapshot.
2. When you see the Grab mouse cursor, click and hold on the snapshot.
3. Drag the snapshot either to the left beyond the starting point of the panel, or to the right beyond the ending point of the panel. When the snapshot is taken too far and disappears, release the mouse button.
The snapshot is deleted.
1064

1065
Storyboard Pro 20 User Guide
Chapter 21: Conformation
Chapter 21: ConformationT-SBANIM-006-002
In Storyboard Pro, you can export your Storyboard Pro project to Final Cut Pro, an Apple third party editing software, or Media Composer, an Avid third party editing software. You can then make your edits and import the changes back into your Storyboard Pro project using the Conformation feature. The conformation export will produce an XML or an AAF file containing the entire animatic project structure, as well as images of your panels. You can then import the XML into Final Cut Pro and the AAF into Media Composer and it will recreate the animatic.
You can also track the changes in your panels and export tracked panels only.
What is exported:
l Panels exported as clips in the top composition. Rendering of the first frame of the panel is used as source image.
l (XML only) Layers can be exported individually in nested clip. Layer motion keyframe is also exported.
l Transitions type and duration.
l Sounds clips (start/end frame), volume keyframes and gain values.
l Camera motion is exported as clip animation.
l Optionally, all scenes' first frame can be exported as markers.
l Optionally, panel captions can be exported as clip metadata.
l Optionally, a scene reference track can be exported. Each clip on this track represents a scene in Storyboard Pro.
l Other metadata are exported in order to allow the conformation; panel ID, transformation data, project resolution.
What is conformed back:
l Panels ordering and duration.
l Duplication of panels; the original panels will be duplicated.
l Deletion of panels; the original panels will be deleted.
l New clips are conformed as new panels, source image is imported.
l (XML only) New layers in the nested sequence are conformed as new layer, source image is imported.
l Change of transition duration.
l Change of transition type is conformed if supported by Storyboard Pro.
l Unknown transitions are imported as dissolves.
1066
l Adjustments to clip animation are conformed as camera motion. When conformed back, camera motion is optimized and redundant keyframes are removed.
l (XML only) Adjustments to clip animation in nested clip are conformed as layer motion.
l Changes to sound clip start time and duration.
l Add/copy/move/delete sound clips.
l Delete or add sound tracks.
l Add/remove/update volume keyframes and gain effects.
NOTE
If your project contains video tracks, they will not be exported for conformation and they will not be affected when importing the edited sequence.
1067
Storyboard Pro 20 User Guide

Chapter 21: Conformation
About XML ConformationT-SBANIM-006-003
In Storyboard Pro, you can export your Storyboard Pro project to Final Cut Pro, an Apple third-party editing software. Storyboard Pro is compatible with the XML format compatible with Final Cut Pro 7.
XML conformation is the most advanced way to conform with Storyboard Pro, since animation layers are supported on export and conform back. You can also create a new layer inside a nested clip in Final Cut Pro, to create a new layer when importing the XML.
Guidelines:
Final Cut Pro (or other third party software compatible with FCP XML) have a wide variety of features or effects not compatible with Storyboard Pro. For the conformation to be successful, the XML project must respect some rules and guidelines.
l The XML sequence imported in Storyboard Pro should have been originally created in Storyboard Pro.
l The structure of the composition (number of video tracks and order) in Final Cut Pro needs to respect the structure of the XML originally exported from Storyboard Pro.
l All clips representing a panel need to be on the same video track. Other tracks will be ignored on import.
l Metadata associated with original clips exported from Storyboard Pro must not be altered.
l New clips and new layers should use image formats compatible with Storyboard Pro. See Importing Images as Layers on page 257 for details about supported formats.
l New sound clips should use sound files compatible with Storyboard Pro. See Importing Sound Clips on page 781 for details on supported formats.
l On import, transitions not supported by Storyboard Pro will be imported as Dissolve transitions, timing will be preserved.
1068

About AAF ConformationT-SBANIM-006-004
In Storyboard Pro, you can export your Storyboard project to Media Composer, an Avid third party editing software.
Media Composer has its own compatibility with the AAF. It does not follow the AAF Edit Protocol. Since Storyboard Pro specifically targets Media Composer for conformation, the AAF exported by Storyboard Pro will not necessarily produce good results in other software used to import AAF.
Guidelines
Media Composer has a wide variety of features or effects not compatible with Storyboard Pro. For a successful conformation, the AAF project must respect some rules and guidelines.
l The AAF sequence imported in Storyboard Pro should have been originally created in Storyboard Pro.
l The structure of the composition (number of video tracks and order) in Media Composer needs to respect the structure of the AAF originally exported from Storyboard Pro.
l All clips representing a panel need to be on the same video track. Other tracks will be ignored on import.
l Storyboard Pro exports the camera motion using a 3D Warp effect on the clip. You should use the same pattern if you want to have camera motion on the new clip when conforming back the AAF.
l Metadata associated to original clips exported from Storyboard Pro must not be altered.
l In Media Composer, images should be imported using the Import Media options (not Link to Media). In the import settings of Media Composer, Resize image to fit format raster should be used for the Image Size Adjustment option.
l New clips and new layers should use image formats compatible with Storyboard Pro. See Importing Images as Layers on page 257 for details about supported formats.
l New sound clips should use sound files compatible with Storyboard Pro. See Importing Sound Clips on page 781 for details about supported formats.
l If you want to add new sound files in Media Composer, stereo sound files should be added to stereo tracks and mono sound files to mono tracks.
Transition Compatibility
Not all Storyboard Pro transition types are supported by Media Composer. When a transition is not supported, it will be converted at export time and a warning message will be displayed. Here are transitions not supported by Media Composer:
l Slide-in and Slide-out transition are converted to dissolve.
l Only 12 o’clock (0 degrees) clockwise is supported by Media Composer, therefore, all clock wipes are exported as 12 o’clock clockwise.
1069
Storyboard Pro 20 User Guide

Chapter 21: Conformation
l Media Composer only supports horizontal wipe, vertical wipe, or corners wipe (45, -45, 135 and -135). All edge wipes with custom angles will be converted to the nearest wipe supported by Media Composer.
1070

Exporting for ConformationT-SBANIM-006-007
When you are ready to export, decide if you need to export the entire project, only the tracked panels or specific panels. If you are exporting to Flix, you can automate the process by using scripts.
NOTE
When only selected or tracked panels are exported, the timeline in the third party software will have holes. This selective export is not recommended if you plan to conform the project back, since the panels excluded from the XML/AFF will be deleted.
How to export for Conformation
1. Do one of the following:
l To export the entire project, select File > Conformation > Export Project in the top menu.
l To export a selection of panels, select all the panels you want to export in the Thumbnails or Timeline view. Then, select File > Conformation > Export Selected Panels in the top menu.
l To export only tracked panels, select File > Conformation > Export Tracked Panels in the top menu.
1071
Storyboard Pro 20 User Guide
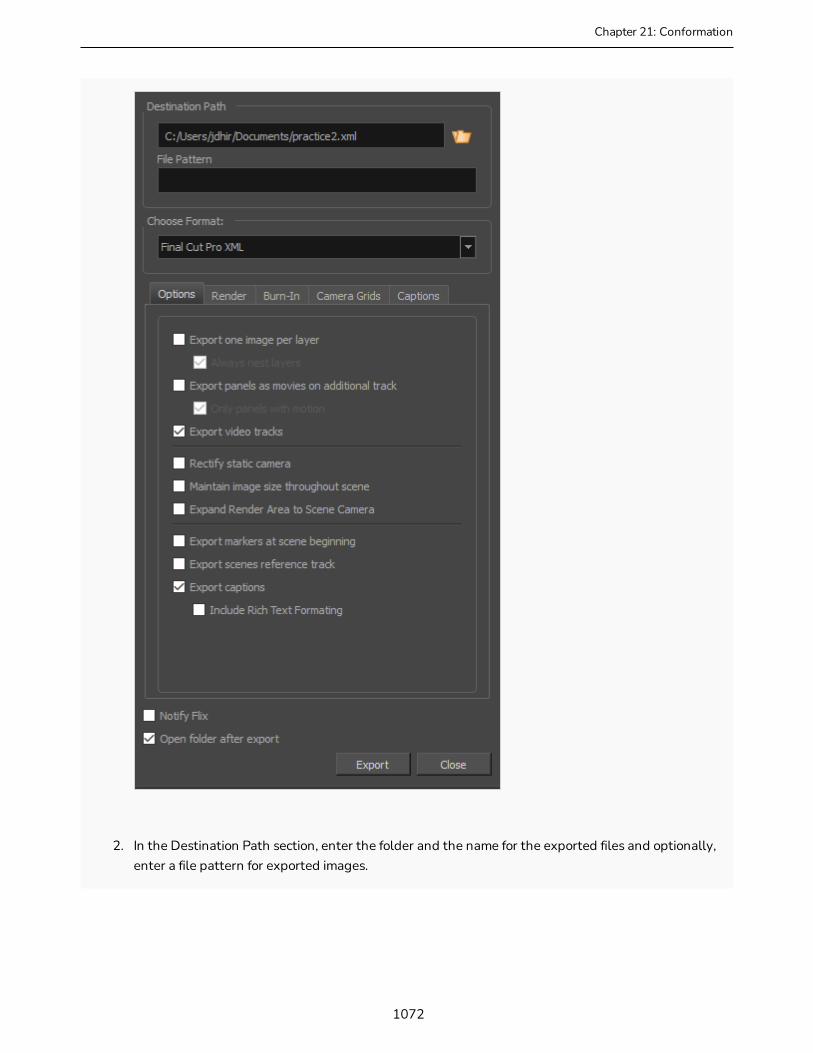
Chapter 21: Conformation
2. In the Destination Path section, enter the folder and the name for the exported files and optionally, enter a file pattern for exported images.
1072
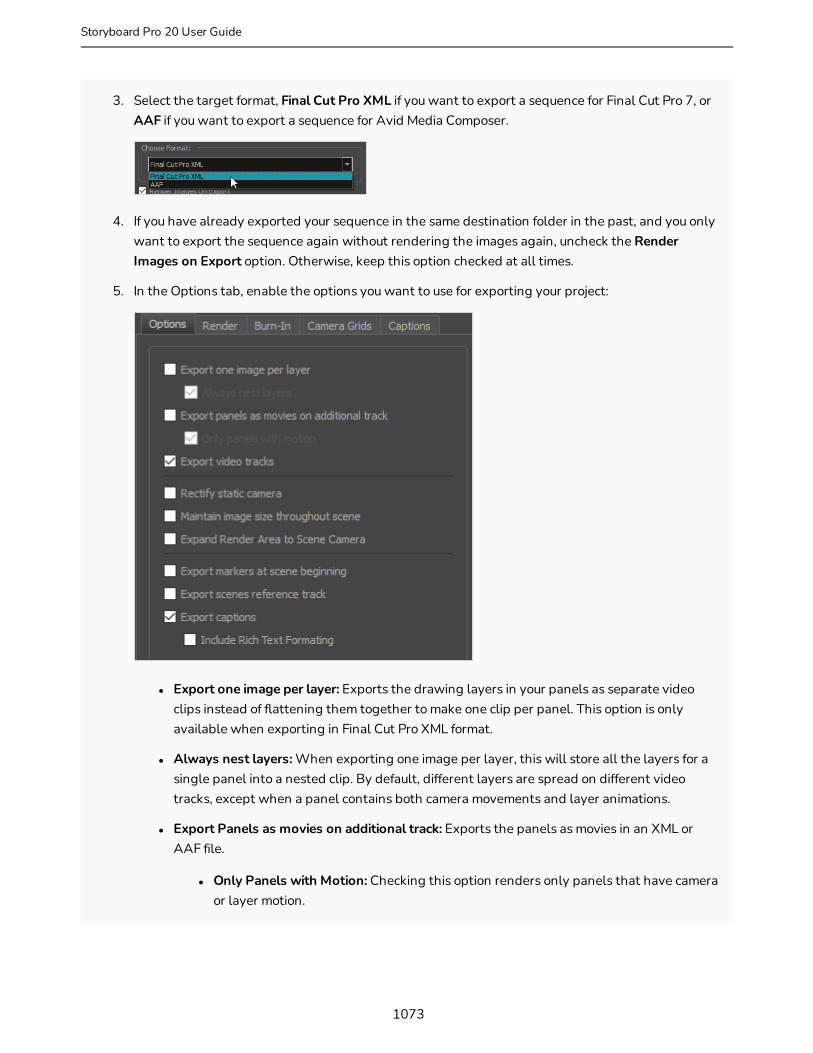
3. Select the target format, Final Cut Pro XML if you want to export a sequence for Final Cut Pro 7, or AAF if you want to export a sequence for Avid Media Composer.
4. If you have already exported your sequence in the same destination folder in the past, and you only want to export the sequence again without rendering the images again, uncheck the Render Images on Export option. Otherwise, keep this option checked at all times.
5. In the Options tab, enable the options you want to use for exporting your project:
l Export one image per layer: Exports the drawing layers in your panels as separate video clips instead of flattening them together to make one clip per panel. This option is only available when exporting in Final Cut Pro XML format.
l Always nest layers: When exporting one image per layer, this will store all the layers for a single panel into a nested clip. By default, different layers are spread on different video tracks, except when a panel contains both camera movements and layer animations.
l Export Panels as movies on additional track: Exports the panels as movies in an XML or AAF file.
l Only Panels with Motion: Checking this option renders only panels that have camera or layer motion.
1073
Storyboard Pro 20 User Guide
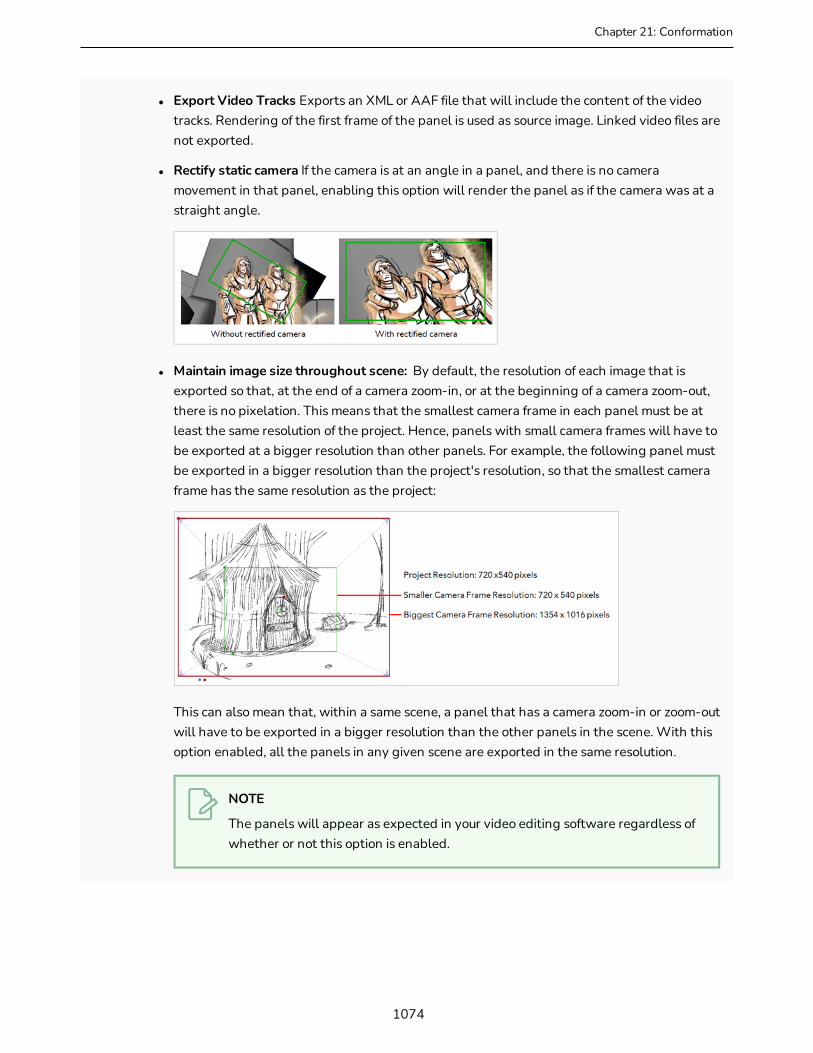
Chapter 21: Conformation
l Export Video Tracks Exports an XML or AAF file that will include the content of the video tracks. Rendering of the first frame of the panel is used as source image. Linked video files are not exported.
l Rectify static camera If the camera is at an angle in a panel, and there is no camera movement in that panel, enabling this option will render the panel as if the camera was at a straight angle.
l Maintain image size throughout scene: By default, the resolution of each image that is exported so that, at the end of a camera zoom-in, or at the beginning of a camera zoom-out, there is no pixelation. This means that the smallest camera frame in each panel must be at least the same resolution of the project. Hence, panels with small camera frames will have to be exported at a bigger resolution than other panels. For example, the following panel must be exported in a bigger resolution than the project's resolution, so that the smallest camera frame has the same resolution as the project:
This can also mean that, within a same scene, a panel that has a camera zoom-in or zoom-out will have to be exported in a bigger resolution than the other panels in the scene. With this option enabled, all the panels in any given scene are exported in the same resolution.
NOTE
The panels will appear as expected in your video editing software regardless of whether or not this option is enabled.
1074
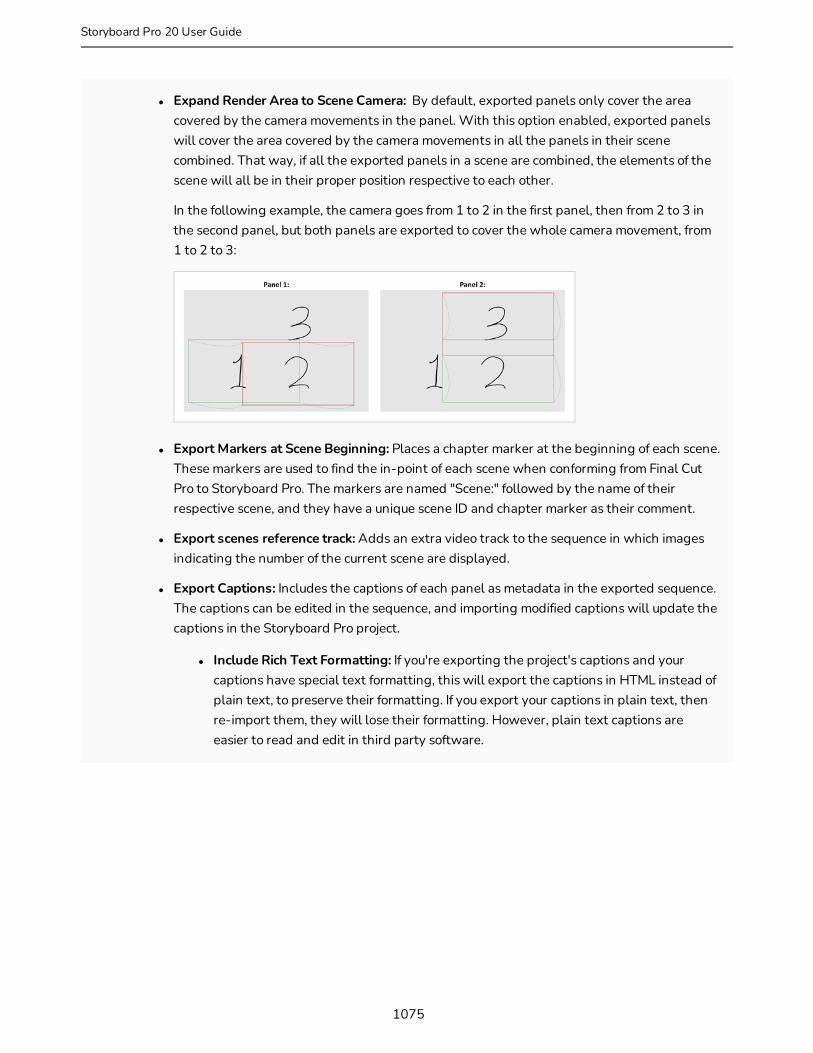
l Expand Render Area to Scene Camera: By default, exported panels only cover the area covered by the camera movements in the panel. With this option enabled, exported panels will cover the area covered by the camera movements in all the panels in their scene combined. That way, if all the exported panels in a scene are combined, the elements of the scene will all be in their proper position respective to each other.
In the following example, the camera goes from 1 to 2 in the first panel, then from 2 to 3 in the second panel, but both panels are exported to cover the whole camera movement, from 1 to 2 to 3:
l Export Markers at Scene Beginning: Places a chapter marker at the beginning of each scene. These markers are used to find the in-point of each scene when conforming from Final Cut Pro to Storyboard Pro. The markers are named "Scene:" followed by the name of their respective scene, and they have a unique scene ID and chapter marker as their comment.
l Export scenes reference track: Adds an extra video track to the sequence in which images indicating the number of the current scene are displayed.
l Export Captions: Includes the captions of each panel as metadata in the exported sequence. The captions can be edited in the sequence, and importing modified captions will update the captions in the Storyboard Pro project.
l Include Rich Text Formatting: If you're exporting the project's captions and your captions have special text formatting, this will export the captions in HTML instead of plain text, to preserve their formatting. If you export your captions in plain text, then re-import them, they will lose their formatting. However, plain text captions are easier to read and edit in third party software.
1075
Storyboard Pro 20 User Guide
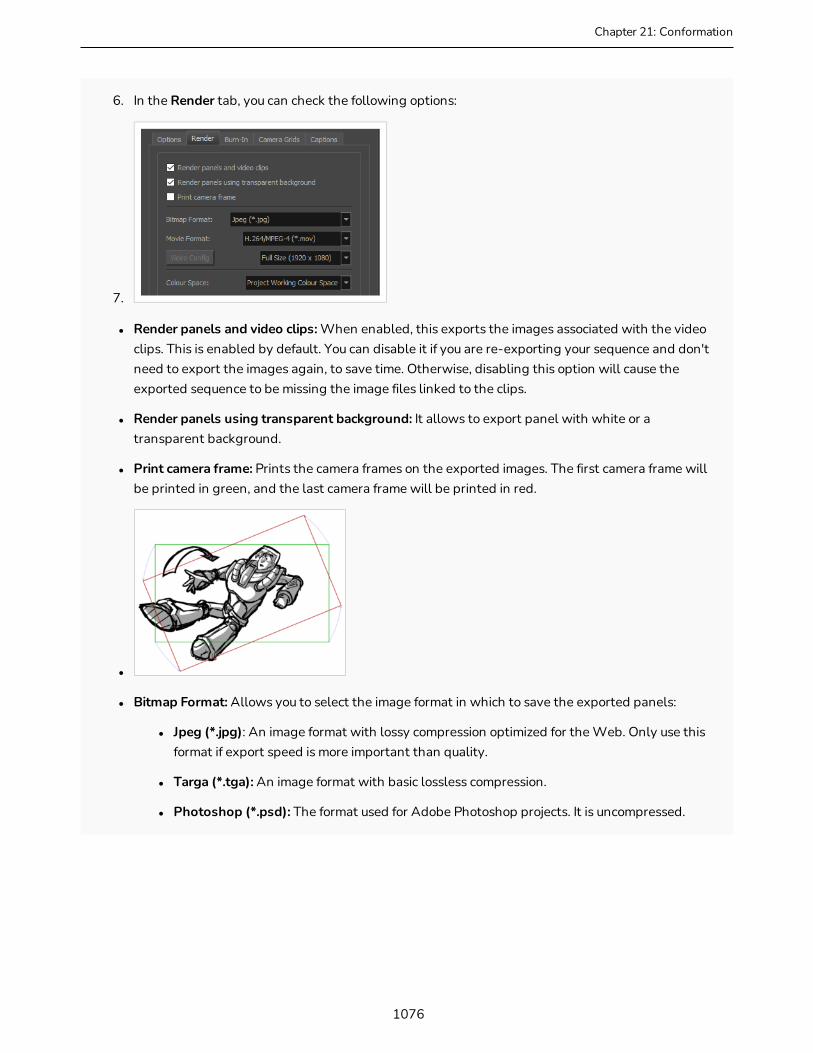
Chapter 21: Conformation
6. In the Render tab, you can check the following options:
7.
l Render panels and video clips: When enabled, this exports the images associated with the video clips. This is enabled by default. You can disable it if you are re-exporting your sequence and don't need to export the images again, to save time. Otherwise, disabling this option will cause the exported sequence to be missing the image files linked to the clips.
l Render panels using transparent background: It allows to export panel with white or a transparent background.
l Print camera frame: Prints the camera frames on the exported images. The first camera frame will be printed in green, and the last camera frame will be printed in red.
l
l Bitmap Format: Allows you to select the image format in which to save the exported panels:
l Jpeg (*.jpg): An image format with lossy compression optimized for the Web. Only use this format if export speed is more important than quality.
l Targa (*.tga): An image format with basic lossless compression.
l Photoshop (*.psd): The format used for Adobe Photoshop projects. It is uncompressed.
1076
NOTE
When you export layouts in this format, each layer in the first panel of the scene is exported as a separate layer in the PDF file. If you choose to export camera frames, they will also be on a separate layer over other layers.
l Portable Network Graphics (*.png): An image format with a more effective lossless compression than Targa (.tga). Exporting in this format is slower, but saves a lot of disk space. PNG files are supported by web browsers, most operating systems and image editing software.
l Movie Format: Allows you to select the movie format in which to save the exported panels.
l l In the Movie Format drop-down, select an export format:
l l H.264/MPEG-4 (*.mov) : A simple movie format that uses the H.264 codec, which is supported by most web browsers.
NOTES
l Using this format does not require additional software. However, if this is the first time you export a movie in H.264/MPEG-4 format, you will be prompted to download the OpenH264 library from Cisco. Simply click Yes when prompted, and Storyboard Pro will automatically download the library, then export the movie.
l There are no encoding options for this format.
l This format supports resolutions of up to 4096×2304. Each dimension must be a multiple of 16 pixels.
l Audio exported in this format is encoded in PCM 16-bit stereo, 22.05 kHz.
l Windows Media Video (*.wmv): The native format for Windows Media Player.
1077
Storyboard Pro 20 User Guide
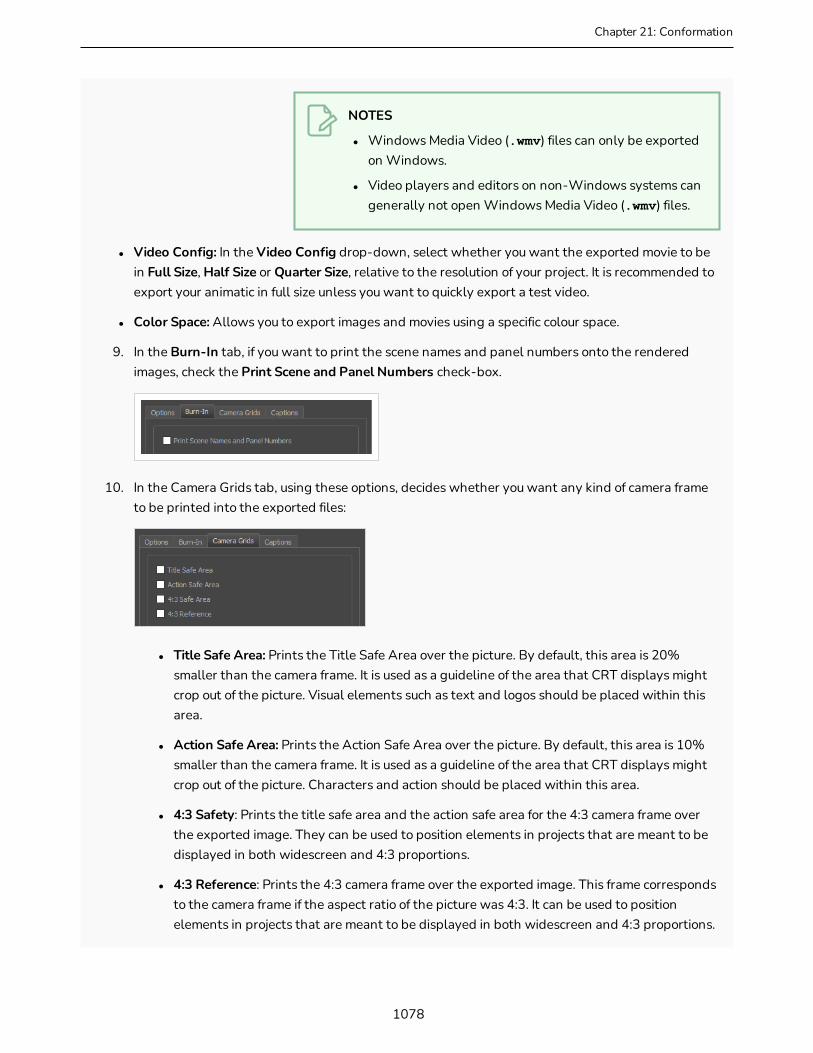
Chapter 21: Conformation
NOTES
l Windows Media Video (.wmv) files can only be exported on Windows.
l Video players and editors on non-Windows systems can generally not open Windows Media Video (.wmv) files.
l Video Config: In the Video Config drop-down, select whether you want the exported movie to be in Full Size, Half Size or Quarter Size, relative to the resolution of your project. It is recommended to export your animatic in full size unless you want to quickly export a test video.
l Color Space: Allows you to export images and movies using a specific colour space.
9. In the Burn-In tab, if you want to print the scene names and panel numbers onto the rendered images, check the Print Scene and Panel Numbers check-box.
10. In the Camera Grids tab, using these options, decides whether you want any kind of camera frame to be printed into the exported files:
l Title Safe Area: Prints the Title Safe Area over the picture. By default, this area is 20% smaller than the camera frame. It is used as a guideline of the area that CRT displays might crop out of the picture. Visual elements such as text and logos should be placed within this area.
l Action Safe Area: Prints the Action Safe Area over the picture. By default, this area is 10% smaller than the camera frame. It is used as a guideline of the area that CRT displays might crop out of the picture. Characters and action should be placed within this area.
l 4:3 Safety: Prints the title safe area and the action safe area for the 4:3 camera frame over the exported image. They can be used to position elements in projects that are meant to be displayed in both widescreen and 4:3 proportions.
l 4:3 Reference: Prints the 4:3 camera frame over the exported image. This frame corresponds to the camera frame if the aspect ratio of the picture was 4:3. It can be used to position elements in projects that are meant to be displayed in both widescreen and 4:3 proportions.
1078
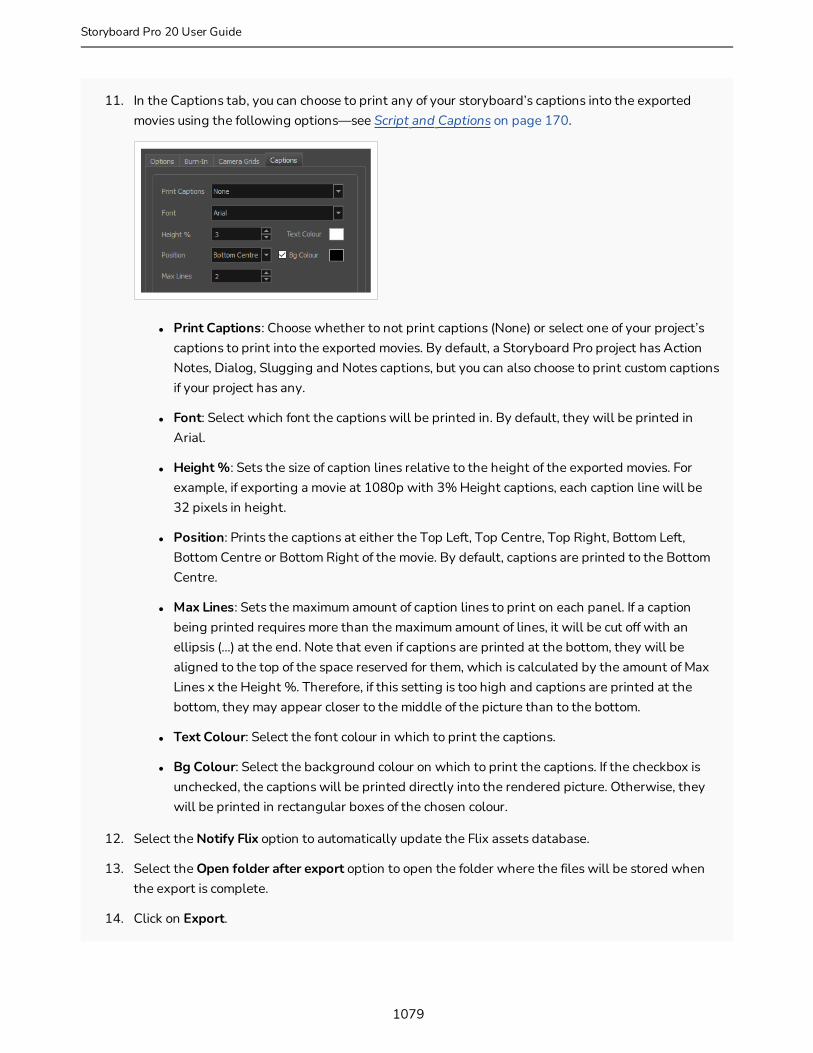
11. In the Captions tab, you can choose to print any of your storyboard’s captions into the exported movies using the following options—see Script and Captions on page 170.
l Print Captions: Choose whether to not print captions (None) or select one of your project’s captions to print into the exported movies. By default, a Storyboard Pro project has Action Notes, Dialog, Slugging and Notes captions, but you can also choose to print custom captions if your project has any.
l Font: Select which font the captions will be printed in. By default, they will be printed in Arial.
l Height %: Sets the size of caption lines relative to the height of the exported movies. For example, if exporting a movie at 1080p with 3% Height captions, each caption line will be 32 pixels in height.
l Position: Prints the captions at either the Top Left, Top Centre, Top Right, Bottom Left, Bottom Centre or Bottom Right of the movie. By default, captions are printed to the Bottom Centre.
l Max Lines: Sets the maximum amount of caption lines to print on each panel. If a caption being printed requires more than the maximum amount of lines, it will be cut off with an ellipsis (...) at the end. Note that even if captions are printed at the bottom, they will be aligned to the top of the space reserved for them, which is calculated by the amount of Max Lines x the Height %. Therefore, if this setting is too high and captions are printed at the bottom, they may appear closer to the middle of the picture than to the bottom.
l Text Colour: Select the font colour in which to print the captions.
l Bg Colour: Select the background colour on which to print the captions. If the checkbox is unchecked, the captions will be printed directly into the rendered picture. Otherwise, they will be printed in rectangular boxes of the chosen colour.
12. Select the Notify Flix option to automatically update the Flix assets database.
13. Select the Open folder after export option to open the folder where the files will be stored when the export is complete.
14. Click on Export.
1079
Storyboard Pro 20 User Guide
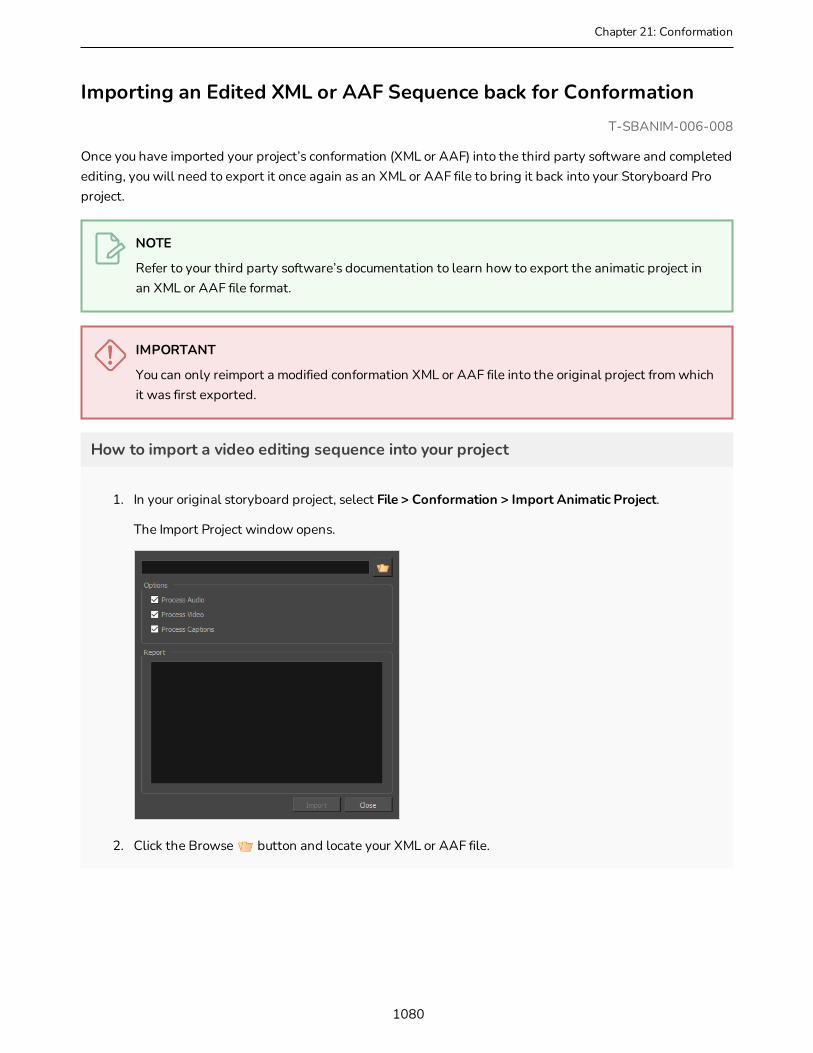
Chapter 21: Conformation
Importing an Edited XML or AAF Sequence back for ConformationT-SBANIM-006-008
Once you have imported your project’s conformation (XML or AAF) into the third party software and completed editing, you will need to export it once again as an XML or AAF file to bring it back into your Storyboard Pro project.
NOTE
Refer to your third party software’s documentation to learn how to export the animatic project in an XML or AAF file format.
IMPORTANT
You can only reimport a modified conformation XML or AAF file into the original project from which it was first exported.
How to import a video editing sequence into your project
1. In your original storyboard project, select File > Conformation > Import Animatic Project.
The Import Project window opens.
2. Click the Browse button and locate your XML or AAF file.
1080

3. In the Options section, all of the options are enabled by default:
l Process Audio: Uncheck this if you don't want the changes done to the audio tracks or sound clips in the sequence you're importing to be applied to your Storyboard Pro project. Your project's audio tracks will be left untouched.
l Process Video: Uncheck this option if you don't want the changes done to the panels, scenes or transitons in the sequence you're importing to be applied to your Storyboard Pro project. This can be useful if you only wish to conform edits to the project's audio tracks.
TIP
You can import audio tracks composed from scratch in a video editing software by exporting them into an XML or AAF sequence, then importing the sequence via this dialog, with the Process Video option unchecked.
l Process Captions: Uncheck this option if you don't want changes to captions done in the sequence you're importing to be applied to your Storyboard Pro project.
NOTE
If you exported your captions without Rich Text Formatting, and made changes to them, they will lose their formatting when the changed captions are imported into your project.
4. Click OK to return to the Import Project window.
The Report section displays information relative to the conformation process. If an error happened during the conformation process, this is also where the details relative to this error would appear.
1081
Storyboard Pro 20 User Guide

Chapter 22: Scripting Guide
Chapter 22: Scripting GuideStoryboard Pro provides you with several scripting interfaces to allow you to automate and streamline certain tasks as well as to add customs functionalities to the application. Those scripting interfaces use Qt Script, a scripting language based on the ECMAScript standard which is very similar to JavaScript.
Storyboard Pro Scripting Reference
This section of the documentation explains how to use the Storyboard Pro Script Editor, but does not teaches how to write scripts nor does it contain in-depth information about the classes and modules that are available in the Storyboard Pro scripting interface. The reference guide for the Storyboard Pro scripting interface is located on a different documentation website. This reference guide documents all the modules and classes that are available in the Storyboard Pro scripting interface, as well as their methods and properties.
To access the scripting reference, in the top-left corner of the Script Editor view, open the View menu and select Help > Scripting Interface Documentation.
About Qt Script
Qt Script is an object-oriented scripting language based on the ECMAScript standard, like JavaScript and JScript. However, there are some differences that distinguish Qt Script from these other scripting languages, which are familiar to web programmers.
The Qt Script environment provides several standard classes and modules that are not documented in the Storyboard Pro scripting documentation. For a reference of the QT development environment, refer to the Qt Documentation website, which can be accessed at the following address:
http://doc.qt.io/qt-4.8/index.html
For a tutorial on writing JavaScript, refer to to the JavaScript Tutorial section of W3Schools, which can be accessed at the following address:
https://www.w3schools.com/js
Creating Scripts 1084
Editing a Script Packaged with Storyboard Pro 1087
Checking Script Syntax 1089
Testing a Script 1090
Debugging Scripts 1092
Using the Scripting Sandbox 1094
Importing Scripts 1095
Deleting Scripts 1097
Restoring a Storyboard Pro Script 1098
Using an External Script Editor 1099
1082

Storing Scripts in a Custom Directory 1101
Adding Scripts as Toolbar Buttons 1104
1083
Storyboard Pro 20 User Guide

Chapter 22: Scripting Guide
Creating ScriptsYou can create scripts for Storyboard Pro by using the Script Editor view.
NOTE
User scripts are stored in the following location:
l Windows: C:\Users\[username]\AppData\Roaming\Toon Boom Animation\Toon Boom Storyboard Pro\20100-scripts
l macOS: /Users/[username]/Library/Preferences/Toon Boom Animation/Toon Boom Storyboard Pro/20100-scripts
How to create a script
1. In the top-right corner of the Stage or Camera view, click on the Add View button and select Script Editor.
The Script Editor view is added to your workspace. It lists all the scripts packaged with Storyboard Pro as well as any script you previously created.
2. Do one of the following:
l In the Script Editor toolbar, click the New Script button.
l In the top-left corner of the Script Editor view, click on the Menu button and select select File > New Script.
1084
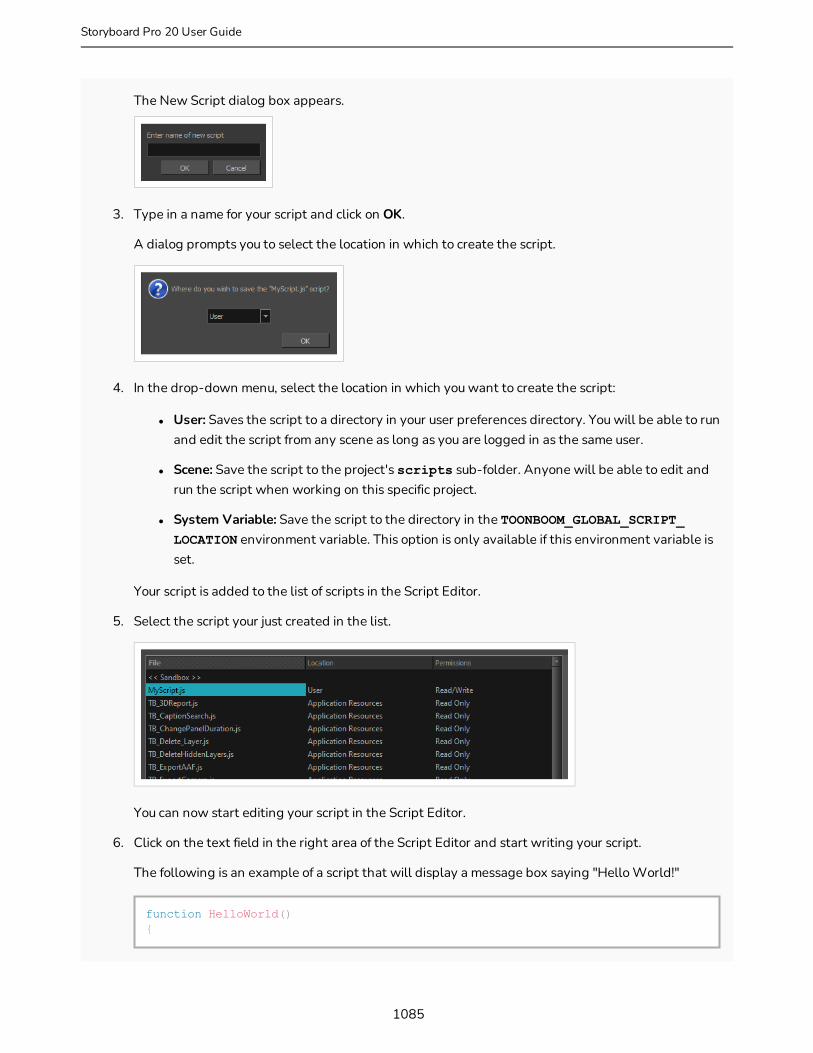
The New Script dialog box appears.
3. Type in a name for your script and click on OK.
A dialog prompts you to select the location in which to create the script.
4. In the drop-down menu, select the location in which you want to create the script:
l User: Saves the script to a directory in your user preferences directory. You will be able to run and edit the script from any scene as long as you are logged in as the same user.
l Scene: Save the script to the project's scripts sub-folder. Anyone will be able to edit and run the script when working on this specific project.
l System Variable: Save the script to the directory in the TOONBOOM_GLOBAL_SCRIPT_LOCATION environment variable. This option is only available if this environment variable is set.
Your script is added to the list of scripts in the Script Editor.
5. Select the script your just created in the list.
You can now start editing your script in the Script Editor.
6. Click on the text field in the right area of the Script Editor and start writing your script.
The following is an example of a script that will display a message box saying "Hello World!"
function HelloWorld(){
1085
Storyboard Pro 20 User Guide

Chapter 22: Scripting Guide
MessageBox.information("Hello World!");}
NOTE
For information on how to use the Qt scripting language in Storyboard Pro, see Scripting Guide on page 1082. You can also open the scripting reference guide directly from the Script Editor by clicking on the Menu button in the top-left corner and selecting Help > Scripting Interface Documentation.
1086
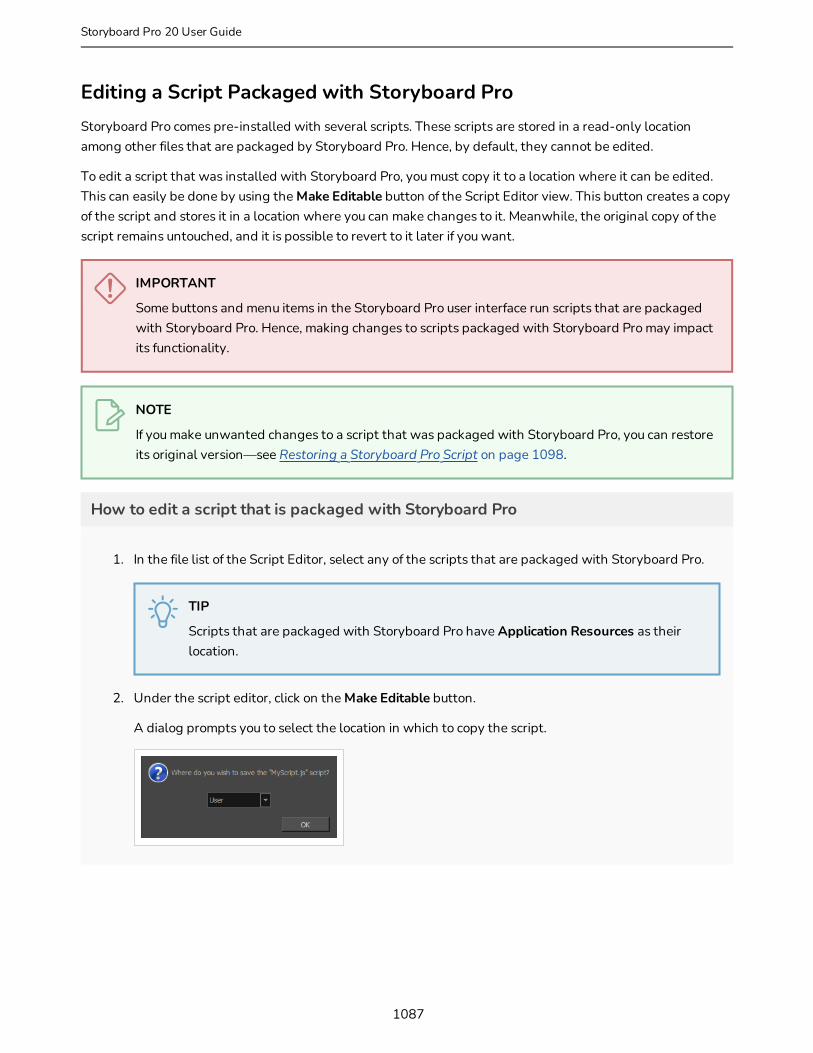
Editing a Script Packaged with Storyboard ProStoryboard Pro comes pre-installed with several scripts. These scripts are stored in a read-only location among other files that are packaged by Storyboard Pro. Hence, by default, they cannot be edited.
To edit a script that was installed with Storyboard Pro, you must copy it to a location where it can be edited. This can easily be done by using the Make Editable button of the Script Editor view. This button creates a copy of the script and stores it in a location where you can make changes to it. Meanwhile, the original copy of the script remains untouched, and it is possible to revert to it later if you want.
IMPORTANT
Some buttons and menu items in the Storyboard Pro user interface run scripts that are packaged with Storyboard Pro. Hence, making changes to scripts packaged with Storyboard Pro may impact its functionality.
NOTE
If you make unwanted changes to a script that was packaged with Storyboard Pro, you can restore its original version—see Restoring a Storyboard Pro Script on page 1098.
How to edit a script that is packaged with Storyboard Pro
1. In the file list of the Script Editor, select any of the scripts that are packaged with Storyboard Pro.
TIP
Scripts that are packaged with Storyboard Pro have Application Resources as their location.
2. Under the script editor, click on the Make Editable button.
A dialog prompts you to select the location in which to copy the script.
1087
Storyboard Pro 20 User Guide
Chapter 22: Scripting Guide
3. In the drop-down menu, select the location in which you want to copy the script:
l User: Saves the script to a directory in your user preferences directory. You will be able to run and edit the script from any scene as long as you are logged in as the same user.
l Scene: Save the script to the project's scripts sub-folder. Anyone will be able to edit and run the script when working on this specific project.
l System Variable: Save the script to the directory in the TOONBOOM_GLOBAL_SCRIPT_LOCATION environment variable. This option is only available if this environment variable is set.
4. Click on OK.
In the file list, the location of the selected script is updated to the one you selected.
Under the script editor, the Make Editable button is replaced with the Save button. This means that you can make changes to the script and save those changes.
1088

Checking Script SyntaxYou can verify the syntax of your script before you attempt to run it.
How to verify the syntax of a script
1. In the File list of the Script Editor, select the script you want to check.
2. Under the editor, click on the Verify button.
A dialog appears and displays whether or not it found a syntax error in the script, and if it did, the location and type of error.
1089
Storyboard Pro 20 User Guide
Chapter 22: Scripting Guide
Testing a ScriptYou can test a script using the Run command, which is available in the Script Editor toolbar and menu. The run command can execute a specific function in one of your scripts, or an entire script. What the Run command is set to run is called the target.
To select which function in which script the Run command should execute, you must use the Set Target command, which will prompt you to select a script and a function. Once you've done this, every time you use the Run command, it will execute the function you set as your target. If you need to test a different function or script later, you will have to use the Set Target command again to change the target script and function. This allows you to work on and repeatedly test one script or one function at a time when working on a script.
NOTES
l If you use the Run command without setting a target first, you will be prompted to set a target. The selected target will persist until you use the Set Target command to change it.
l The target script and function is also used by the Debug command.
l To run a script from the global scope rather than running a specific function, you can select <Nothing> as the target function.
l Although you can run a script at the global scope, you cannot create a toolbar button that runs a script at the global scope. Toolbar buttons can only run specific functions within a script. Hence, running a script at the global scope should be done for testing purposes only.
How to test a script
1. If you are currently editing the script you want to test, save it by clicking on the Save button underneath the editor.
2. Do one of the following:
l In the Script Editor toolbar, click on the Set Target button.
l In the top-left corner of the Script Editor, click on the Menu button and select Play/Debug > SetTarget.
1090

A dialog appears listing all the scripts as well as all the functions in the current script.
3. In the Files list of the dialog, select the script you want to test.
4. In the Functions list of the dialog, select the function you want to test.
NOTE
If you want to test the whole script from the global scope, select the <Nothing> function.
5. Click on OK.
6. Do one of the following to execute the target function:
l In the Script Editor toolbar, click on the Run button.
l In the top-left corner of the Script Editor, click on the Menu button and select Play/Debug > Run.
1091
Storyboard Pro 20 User Guide

Chapter 22: Scripting Guide
Debugging ScriptsIf you are having issues with a script you're working on, you can debug your script using the Debug command. With the Debug command, you can run a specific function in your script, or an entire script, through a debugging interface.
To select which function in which script the Debug command should debug, you must use the Set Target command, which will prompt you to select a script and a function. Once you've done this, every time you use the Debug command, it will debug the function you set as your target. If you need to debug a different function or script later, you will have to use the Set Target command again to change the target script and function. This allows you to work on and repeatedly debug one function at a time when working on a script.
NOTES
l If you use the Debug command without setting a target first, you will be prompted to set a target. The selected target will persist until you use the Set Target command to change it.
l The target script and function is also used by the Run command.
l To debug a script from the global scope rather than debugging a specific function, you can select <Nothing> as the target function.
l Although you can run a script at the global scope, you cannot create a toolbar button that runs a script at the global scope. Toolbar buttons can only run specific functions within a script. Hence, debugging a script at the global scope should be done for testing purposes only.
How to debug a script
1. If you are currently editing the script you want to debug, save it by clicking on the Save button underneath the editor.
2. Do one of the following:
l In the Script Editor toolbar, click on the Set Target button.
l In the top-left corner of the Script Editor, click on the Menu button and select Play/Debug > SetTarget.
1092
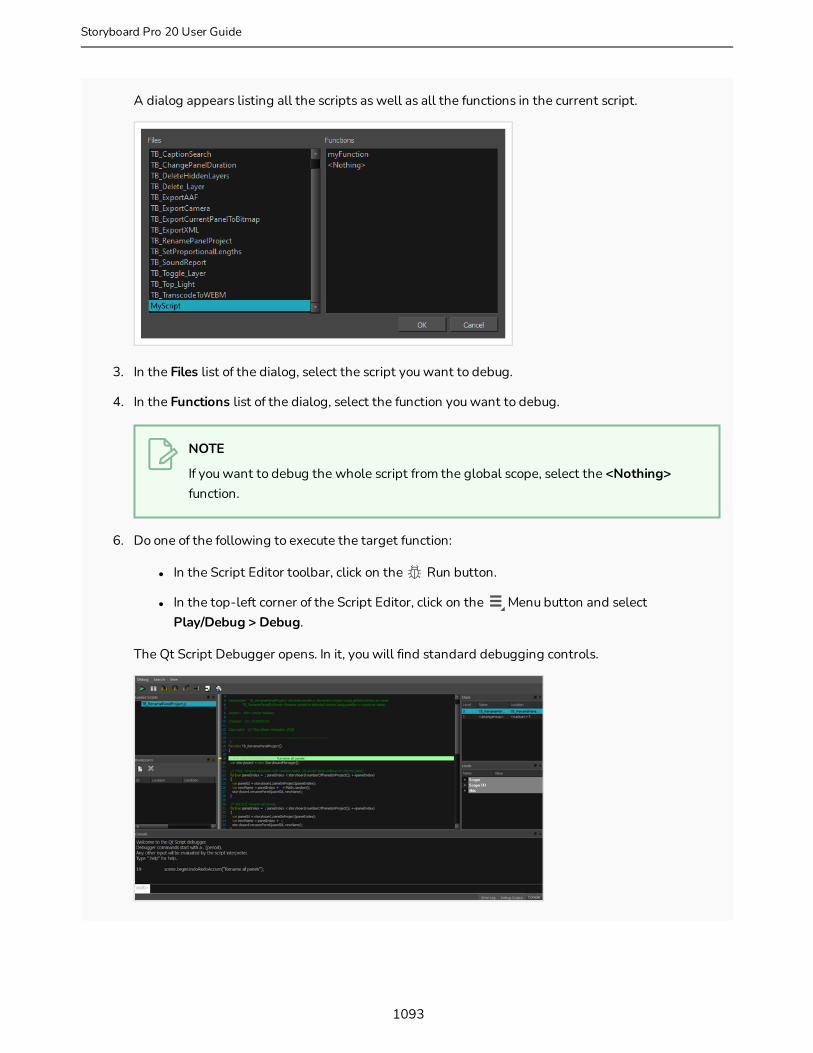
A dialog appears listing all the scripts as well as all the functions in the current script.
3. In the Files list of the dialog, select the script you want to debug.
4. In the Functions list of the dialog, select the function you want to debug.
5. NOTE
If you want to debug the whole script from the global scope, select the <Nothing> function.
6. Do one of the following to execute the target function:
l In the Script Editor toolbar, click on the Run button.
l In the top-left corner of the Script Editor, click on the Menu button and select Play/Debug > Debug.
The Qt Script Debugger opens. In it, you will find standard debugging controls.
1093
Storyboard Pro 20 User Guide
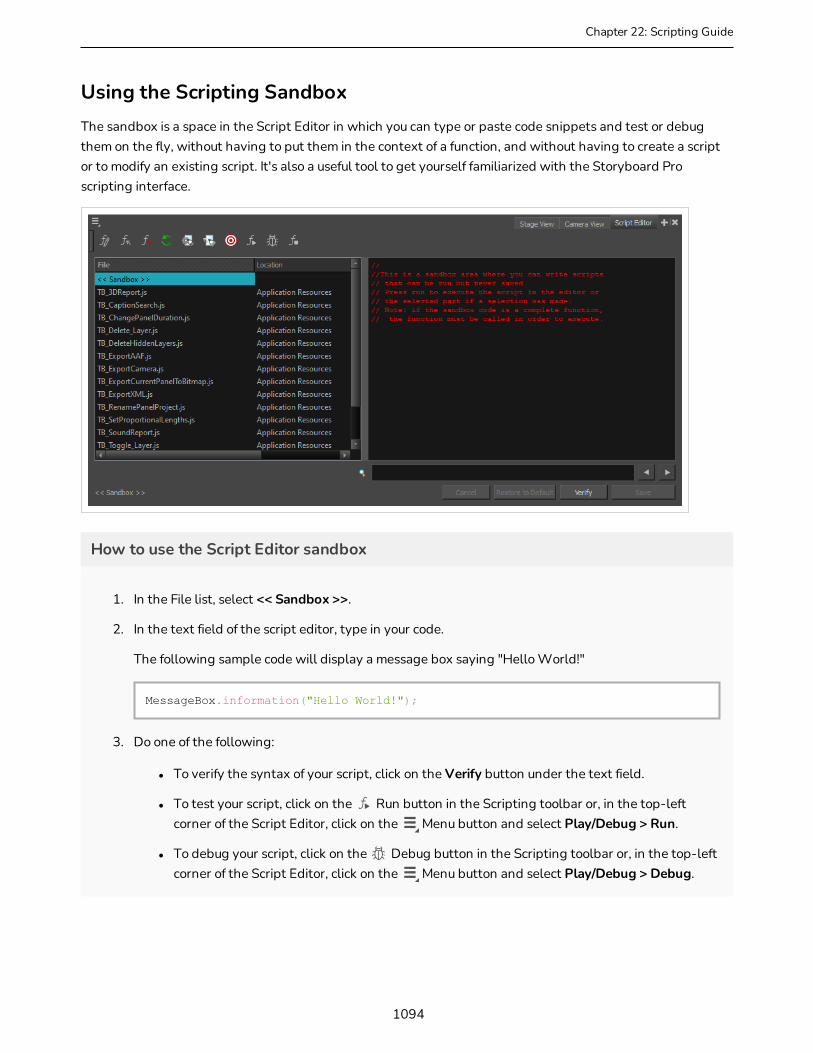
Chapter 22: Scripting Guide
Using the Scripting SandboxThe sandbox is a space in the Script Editor in which you can type or paste code snippets and test or debug them on the fly, without having to put them in the context of a function, and without having to create a script or to modify an existing script. It's also a useful tool to get yourself familiarized with the Storyboard Pro scripting interface.
How to use the Script Editor sandbox
1. In the File list, select << Sandbox >>.
2. In the text field of the script editor, type in your code.
The following sample code will display a message box saying "Hello World!"
MessageBox.information("Hello World!");
3. Do one of the following:
l To verify the syntax of your script, click on the Verify button under the text field.
l To test your script, click on the Run button in the Scripting toolbar or, in the top-left corner of the Script Editor, click on the Menu button and select Play/Debug > Run.
l To debug your script, click on the Debug button in the Scripting toolbar or, in the top-left corner of the Script Editor, click on the Menu button and select Play/Debug > Debug.
1094

Importing ScriptsIf you want to use scripts written by other users, you can transfer the .js files from their computer to yours, then use the Script Editor to import the .js files from where they are stored on your computer.
NOTES
l When you import a script, any user interface (.ui) or icon (.png) file that is in the same directory and has the same filename as the script will also be imported.
l User scripts are stored in the following location:
l Windows: C:\Users\[username]\AppData\Roaming\Toon Boom Animation\Toon Boom Storyboard Pro\20100-scripts
l macOS: /Users/[username]/Library/Preferences/Toon Boom Animation/Toon Boom Storyboard Pro/20100-scripts
How to import scripts
1. Do one of the following:
l In the Script Editor toolbar, click on Import Script.
l In the top-left corner of the Script Editor view, click on the Menu button and select File > Import Script.
An Open dialog appears.
2. In the Open dialog, browse to the location of the script you want to import. Select it, then click on Open.
A dialog prompts you to select the location in which to import the script.
3. In the drop-down menu, select the location in which you want to import the script:
l User: Saves the script to a directory in your user preferences directory. You will be able to run and edit the script from any scene as long as you are logged in as the same user.
l Scene: Save the script to the project's scripts sub-folder. Anyone will be able to edit and run the script when working on this specific project.
1095
Storyboard Pro 20 User Guide
Chapter 22: Scripting Guide
l System Variable: Save the script to the directory in the TOONBOOM_GLOBAL_SCRIPT_LOCATION environment variable. This option is only available if this environment variable is set.
4. Click on OK.
The script is copied to the chosen location and can now be edited and executed in the Script Editor view. It can also be added as a button to the Scripting toolbar—see Adding Scripts as Toolbar Buttons on page 1104.
1096
Deleting ScriptsYou can delete custom scripts from the Script Editor.
IMPORTANT
When you delete a script in the Script Editor, the file containing this script is permanently deleted from your file system.
NOTES
l You cannot delete a script that is in the Application Resources folder. Those scripts were installed with Storyboard Pro and are read only.
l If you made a script that was packaged with Storyboard Pro editable by copying it to another location, you can delete your version of the script. This will restore the original version of the script to the File list.
How to delete a script
1. In the Script Editor, in the File list, select the script you want to delete.
2. Do one of the following:
l From the Script Editor toolbar, click the Delete Script button.
l In the top-left corner of the Script Editor view, click on the Menu button and select File > Delete Script.
1097
Storyboard Pro 20 User Guide
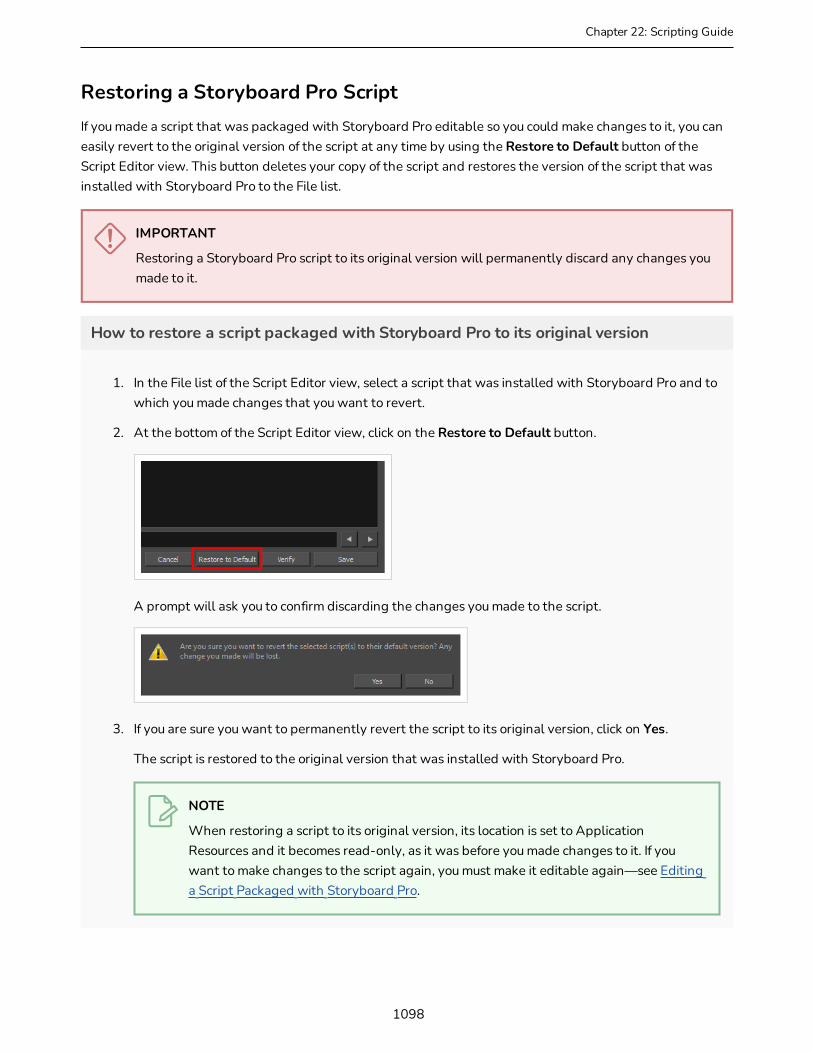
Chapter 22: Scripting Guide
Restoring a Storyboard Pro ScriptIf you made a script that was packaged with Storyboard Pro editable so you could make changes to it, you can easily revert to the original version of the script at any time by using the Restore to Default button of the Script Editor view. This button deletes your copy of the script and restores the version of the script that was installed with Storyboard Pro to the File list.
IMPORTANT
Restoring a Storyboard Pro script to its original version will permanently discard any changes you made to it.
How to restore a script packaged with Storyboard Pro to its original version
1. In the File list of the Script Editor view, select a script that was installed with Storyboard Pro and to which you made changes that you want to revert.
2. At the bottom of the Script Editor view, click on the Restore to Default button.
A prompt will ask you to confirm discarding the changes you made to the script.
3. If you are sure you want to permanently revert the script to its original version, click on Yes.
The script is restored to the original version that was installed with Storyboard Pro.
NOTE
When restoring a script to its original version, its location is set to Application Resources and it becomes read-only, as it was before you made changes to it. If you want to make changes to the script again, you must make it editable again—see Editing a Script Packaged with Storyboard Pro.
1098
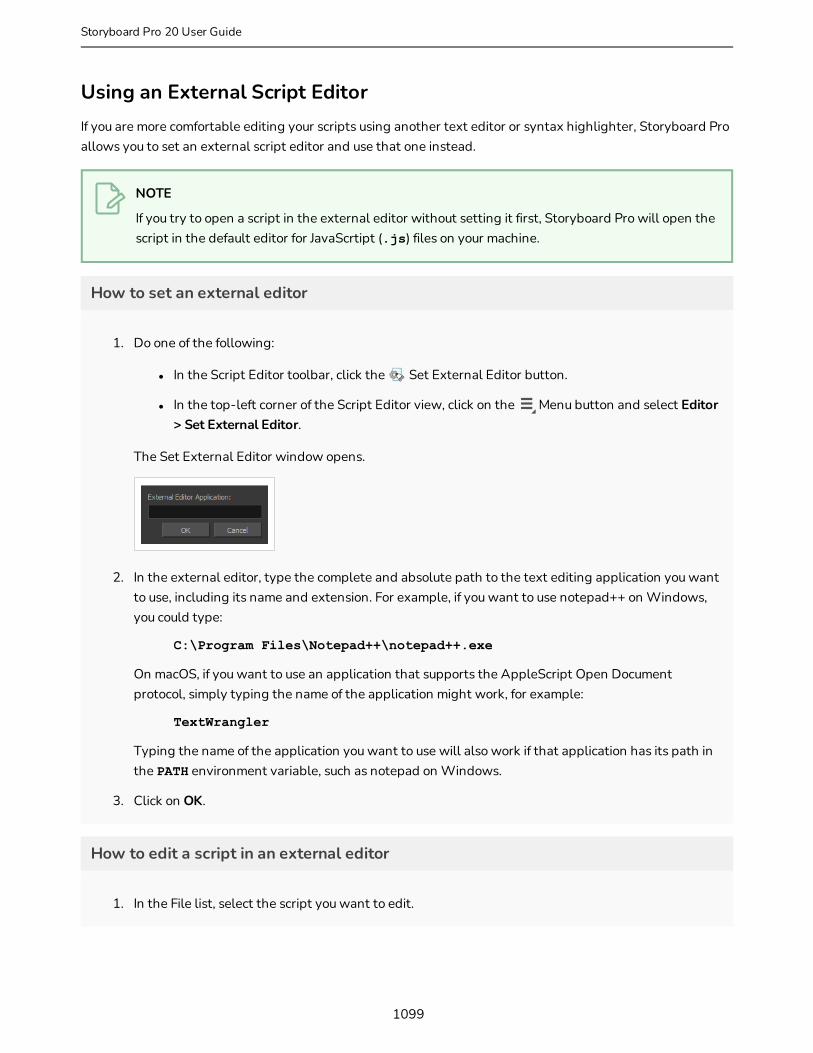
Using an External Script EditorIf you are more comfortable editing your scripts using another text editor or syntax highlighter, Storyboard Pro allows you to set an external script editor and use that one instead.
NOTE
If you try to open a script in the external editor without setting it first, Storyboard Pro will open the script in the default editor for JavaScrtipt (.js) files on your machine.
How to set an external editor
1. Do one of the following:
l In the Script Editor toolbar, click the Set External Editor button.
l In the top-left corner of the Script Editor view, click on the Menu button and select Editor > Set External Editor.
The Set External Editor window opens.
2. In the external editor, type the complete and absolute path to the text editing application you want to use, including its name and extension. For example, if you want to use notepad++ on Windows, you could type:
C:\Program Files\Notepad++\notepad++.exe
On macOS, if you want to use an application that supports the AppleScript Open Document protocol, simply typing the name of the application might work, for example:
TextWrangler
Typing the name of the application you want to use will also work if that application has its path in the PATH environment variable, such as notepad on Windows.
3. Click on OK.
How to edit a script in an external editor
1. In the File list, select the script you want to edit.
1099
Storyboard Pro 20 User Guide
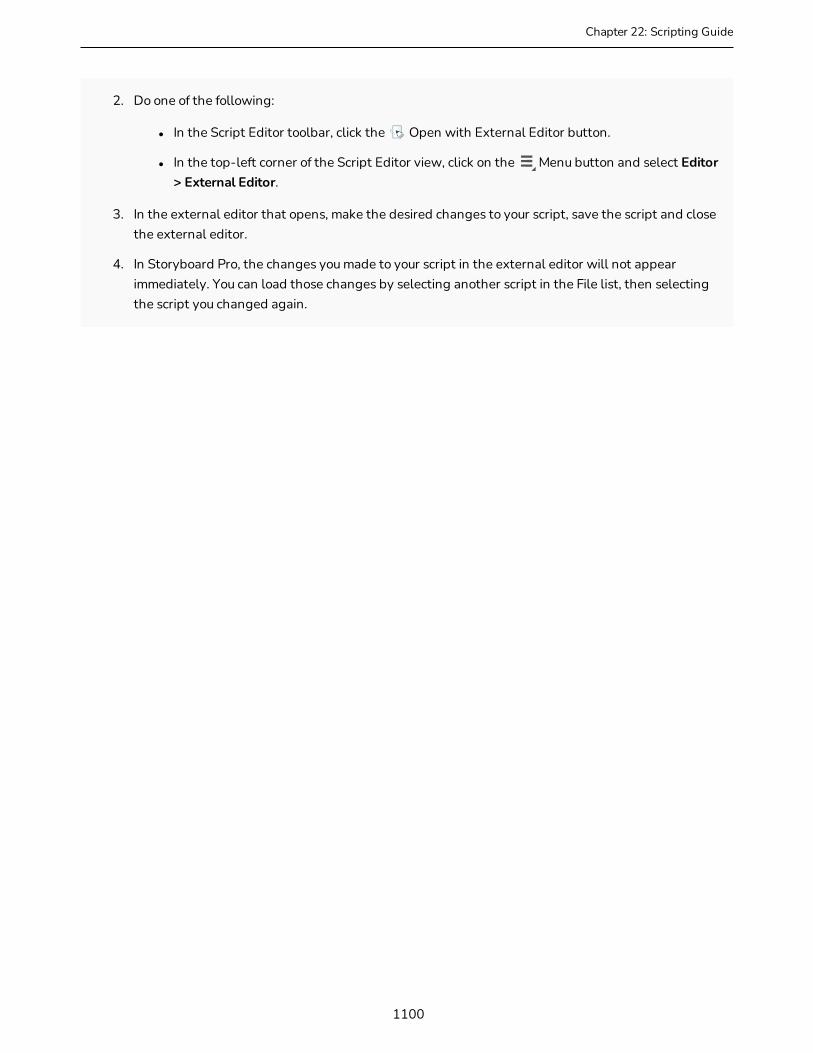
Chapter 22: Scripting Guide
2. Do one of the following:
l In the Script Editor toolbar, click the Open with External Editor button.
l In the top-left corner of the Script Editor view, click on the Menu button and select Editor > External Editor.
3. In the external editor that opens, make the desired changes to your script, save the script and close the external editor.
4. In Storyboard Pro, the changes you made to your script in the external editor will not appear immediately. You can load those changes by selecting another script in the File list, then selecting the script you changed again.
1100
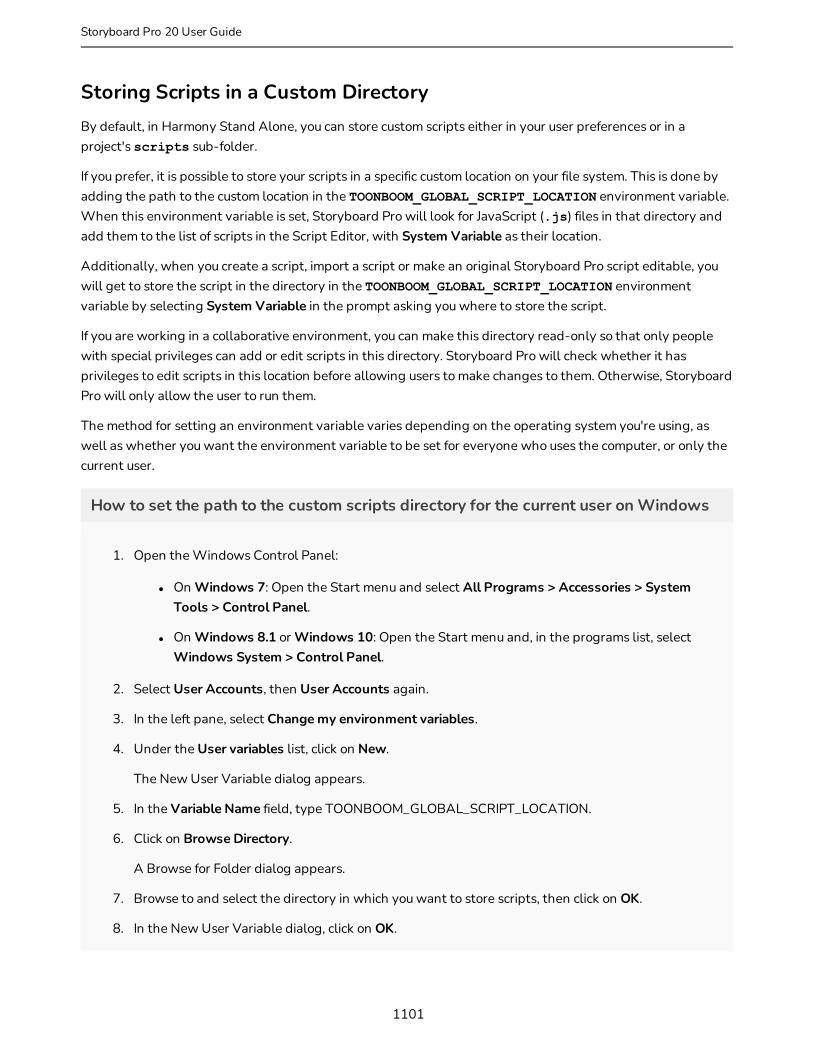
Storing Scripts in a Custom DirectoryBy default, in Harmony Stand Alone, you can store custom scripts either in your user preferences or in a project's scripts sub-folder.
If you prefer, it is possible to store your scripts in a specific custom location on your file system. This is done by adding the path to the custom location in the TOONBOOM_GLOBAL_SCRIPT_LOCATION environment variable. When this environment variable is set, Storyboard Pro will look for JavaScript (.js) files in that directory and add them to the list of scripts in the Script Editor, with System Variable as their location.
Additionally, when you create a script, import a script or make an original Storyboard Pro script editable, you will get to store the script in the directory in the TOONBOOM_GLOBAL_SCRIPT_LOCATION environment variable by selecting System Variable in the prompt asking you where to store the script.
If you are working in a collaborative environment, you can make this directory read-only so that only people with special privileges can add or edit scripts in this directory. Storyboard Pro will check whether it has privileges to edit scripts in this location before allowing users to make changes to them. Otherwise, Storyboard Pro will only allow the user to run them.
The method for setting an environment variable varies depending on the operating system you're using, as well as whether you want the environment variable to be set for everyone who uses the computer, or only the current user.
How to set the path to the custom scripts directory for the current user on Windows
1. Open the Windows Control Panel:
l On Windows 7: Open the Start menu and select All Programs > Accessories > System Tools > Control Panel.
l On Windows 8.1 or Windows 10: Open the Start menu and, in the programs list, select Windows System > Control Panel.
2. Select User Accounts, then User Accounts again.
3. In the left pane, select Change my environment variables.
4. Under the User variables list, click on New.
The New User Variable dialog appears.
5. In the Variable Name field, type TOONBOOM_GLOBAL_SCRIPT_LOCATION.
6. Click on Browse Directory.
A Browse for Folder dialog appears.
7. Browse to and select the directory in which you want to store scripts, then click on OK.
8. In the New User Variable dialog, click on OK.
1101
Storyboard Pro 20 User Guide
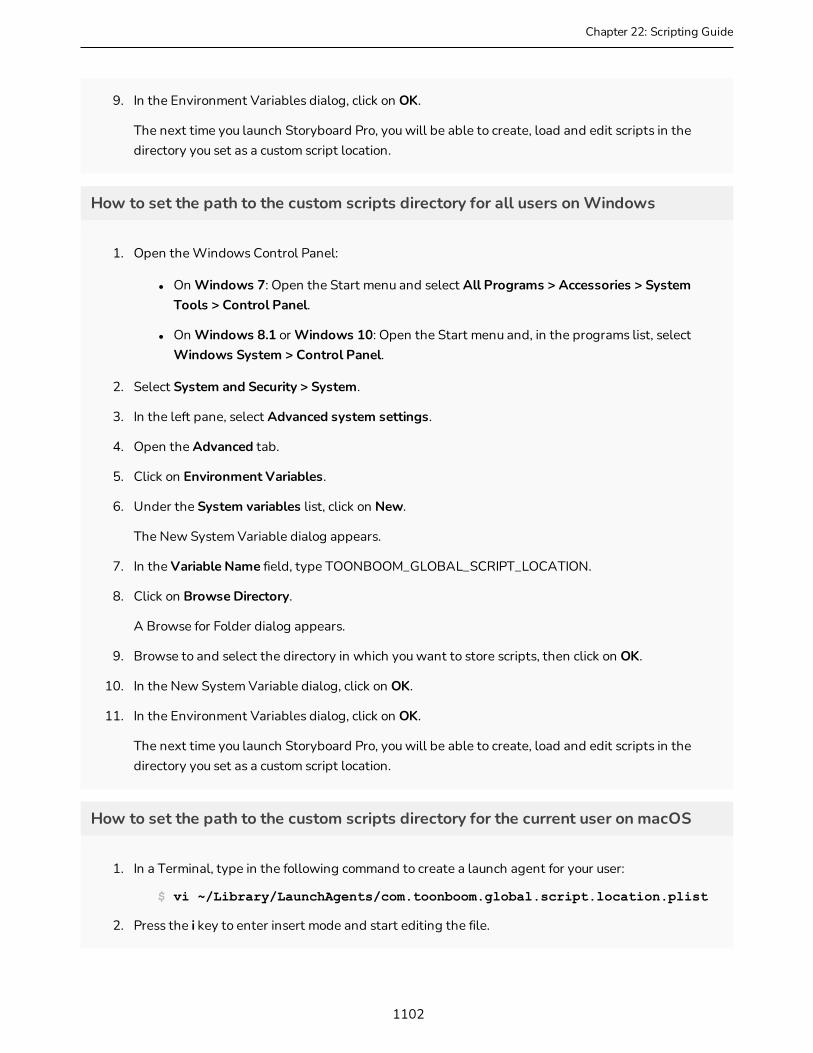
Chapter 22: Scripting Guide
9. In the Environment Variables dialog, click on OK.
The next time you launch Storyboard Pro, you will be able to create, load and edit scripts in the directory you set as a custom script location.
How to set the path to the custom scripts directory for all users on Windows
1. Open the Windows Control Panel:
l On Windows 7: Open the Start menu and select All Programs > Accessories > System Tools > Control Panel.
l On Windows 8.1 or Windows 10: Open the Start menu and, in the programs list, select Windows System > Control Panel.
2. Select System and Security > System.
3. In the left pane, select Advanced system settings.
4. Open the Advanced tab.
5. Click on Environment Variables.
6. Under the System variables list, click on New.
The New System Variable dialog appears.
7. In the Variable Name field, type TOONBOOM_GLOBAL_SCRIPT_LOCATION.
8. Click on Browse Directory.
A Browse for Folder dialog appears.
9. Browse to and select the directory in which you want to store scripts, then click on OK.
10. In the New System Variable dialog, click on OK.
11. In the Environment Variables dialog, click on OK.
The next time you launch Storyboard Pro, you will be able to create, load and edit scripts in the directory you set as a custom script location.
How to set the path to the custom scripts directory for the current user on macOS
1. In a Terminal, type in the following command to create a launch agent for your user:
$ vi ~/Library/LaunchAgents/com.toonboom.global.script.location.plist
2. Press the i key to enter insert mode and start editing the file.
1102
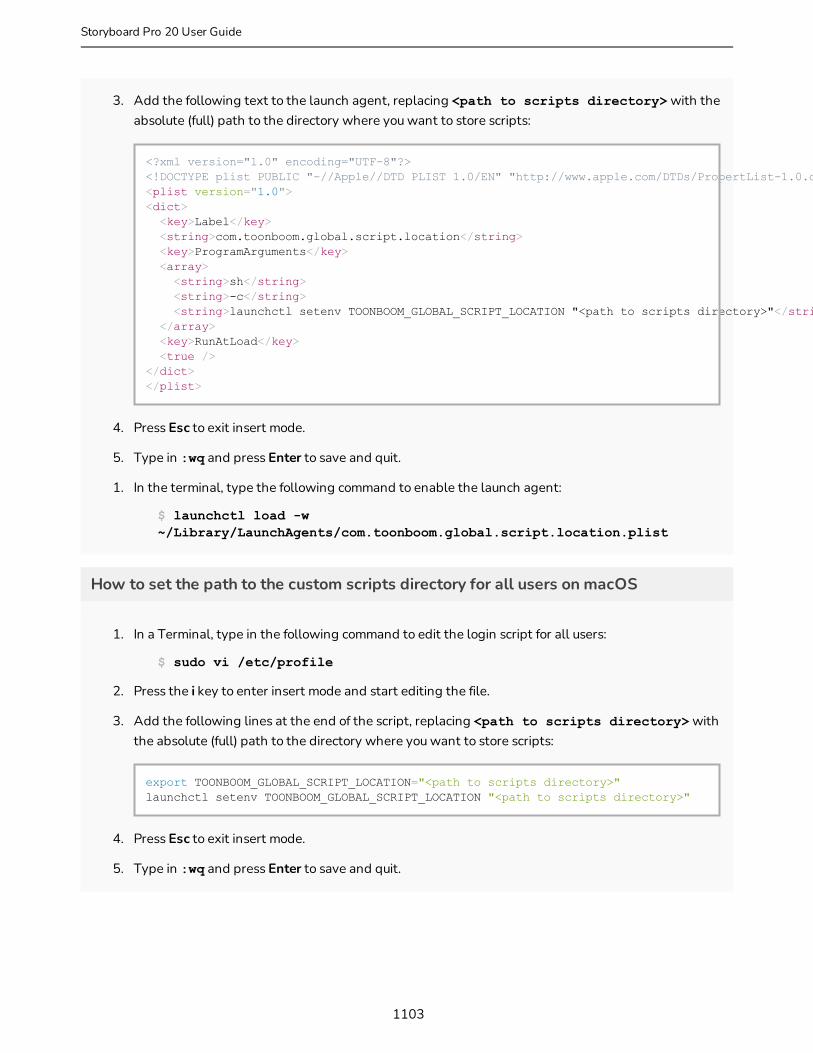
3. Add the following text to the launch agent, replacing <path to scripts directory> with the absolute (full) path to the directory where you want to store scripts:
<?xml version="1.0" encoding="UTF-8"?><!DOCTYPE plist PUBLIC "-//Apple//DTD PLIST 1.0/EN" "http://www.apple.com/DTDs/PropertList-1.0.dtd"><plist version="1.0"><dict> <key>Label</key> <string>com.toonboom.global.script.location</string> <key>ProgramArguments</key> <array> <string>sh</string> <string>-c</string> <string>launchctl setenv TOONBOOM_GLOBAL_SCRIPT_LOCATION "<path to scripts directory>"</string> </array> <key>RunAtLoad</key> <true /></dict></plist>
4. Press Esc to exit insert mode.
5. Type in :wq and press Enter to save and quit.
1. In the terminal, type the following command to enable the launch agent:
$ launchctl load -w ~/Library/LaunchAgents/com.toonboom.global.script.location.plist
How to set the path to the custom scripts directory for all users on macOS
1. In a Terminal, type in the following command to edit the login script for all users:
$ sudo vi /etc/profile
2. Press the i key to enter insert mode and start editing the file.
3. Add the following lines at the end of the script, replacing <path to scripts directory> with the absolute (full) path to the directory where you want to store scripts:
export TOONBOOM_GLOBAL_SCRIPT_LOCATION="<path to scripts directory>" launchctl setenv TOONBOOM_GLOBAL_SCRIPT_LOCATION "<path to scripts directory>"
4. Press Esc to exit insert mode.
5. Type in :wq and press Enter to save and quit.
1103
Storyboard Pro 20 User Guide

Chapter 22: Scripting Guide
Adding Scripts as Toolbar ButtonsTo use scripts in your regular workflow, you can add them as buttons to the Scripting toolbar. You can add buttons to the Scripting toolbar that are configured to run ax specific function in a script and, if you want, give these button a specific icon and tool tip.
NOTE
For more information on the Scripting toolbar and the Scripts Manager dialog, see the Reference Guide.
How to link a script to a toolbar button
1. Add the Scripting toolbar to your workspace by doing one of the following:
l From the top menu, select Windows > Toolbars > Scripting.
l Right-click on any toolbar and select Scripting.
The Scripting toolbar is added to your workspace.
1. In the Scripting toolbar, click the Manage Scripts button.
The Scripts Manager dialog box opens and displays the available scripts.
2. In the Files list, select the script file containing the function you want to add to the toolbar.
The functions in the selected script appear in the Functions list.
3. In the Functions list, select the function that you want to add to the toolbar.
1104
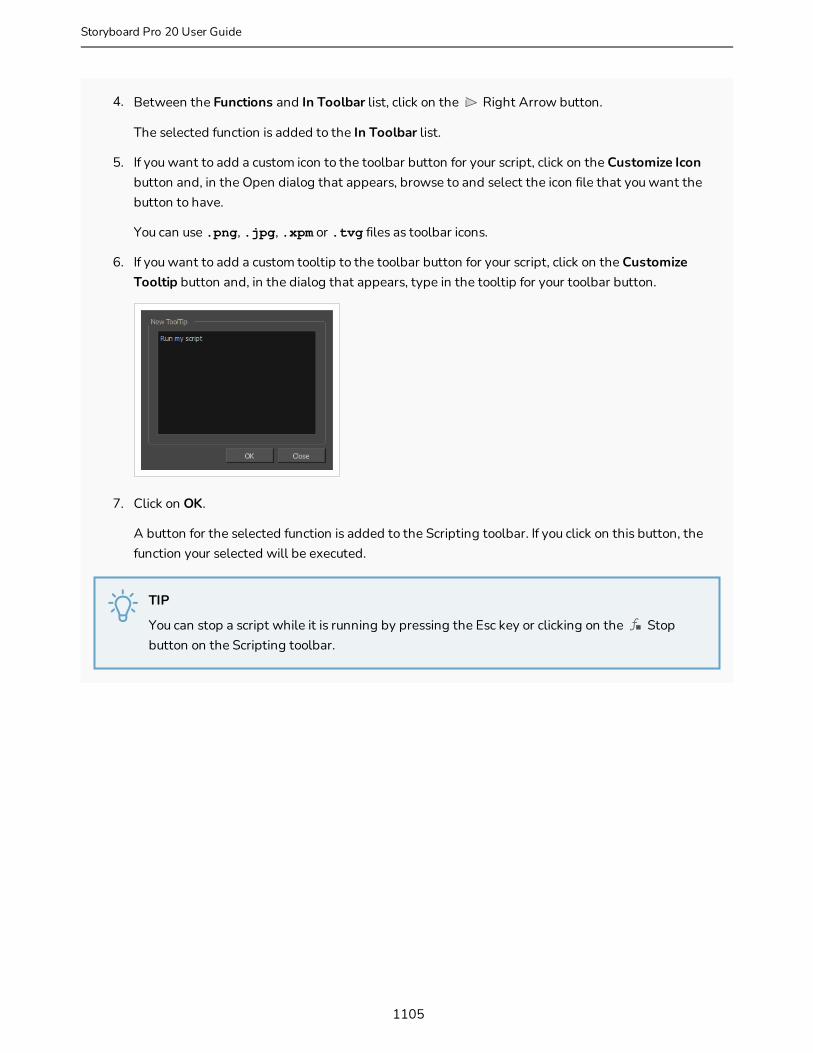
4. Between the Functions and In Toolbar list, click on the Right Arrow button.
The selected function is added to the In Toolbar list.
5. If you want to add a custom icon to the toolbar button for your script, click on the Customize Icon button and, in the Open dialog that appears, browse to and select the icon file that you want the button to have.
You can use .png, .jpg, .xpm or .tvg files as toolbar icons.
6. If you want to add a custom tooltip to the toolbar button for your script, click on the Customize Tooltip button and, in the dialog that appears, type in the tooltip for your toolbar button.
7. Click on OK.
A button for the selected function is added to the Scripting toolbar. If you click on this button, the function your selected will be executed.
TIP
You can stop a script while it is running by pressing the Esc key or clicking on the Stop button on the Scripting toolbar.
1105
Storyboard Pro 20 User Guide