Configuring the Cisco IOS DHCP Server Finding Feature Information
Upload
khangminh22Category
view
1download
0
The Integrated File System Configuration Guide, Cisco IOS Release15S
Americas HeadquartersCisco Systems, Inc.170 West Tasman DriveSan Jose, CA 95134-1706USAhttp://www.cisco.comTel: 408 526-4000 800 553-NETS (6387)Fax: 408 527-0883

© 2013 Cisco Systems, Inc. All rights reserved.
C O N T E N T S
C H A P T E R 1 Using the Cisco IOS Integrated File System 1
Finding Feature Information 1
Prerequisites for Cisco IOS Integrated File System 1
Restrictions for Cisco IOS Integrated File System 2
Information About Cisco IOS Integrated File System 2
Overview of the IFS 2
Display and Classify Files 2
Platform-Independent Commands 2
Minimal Prompting for Commands 2
Create and Navigate Directories 3
URL Specification for Locating Files 3
Files on a Network Server 3
Local Files 3
URL Prefixes 4
URL Prefix for Partitioned Devices 5
URL Component Lengths 5
URLs in Commands 6
File Systems Supporting a Command 6
Default File System 6
Tab Completion 7
List of Files in a File System 7
Remote File System Management 7
NVRAM File System Management 7
System File System Management 8
Flash Memory File System Types 8
Class A Flash File Systems 8
Class B Flash File Systems 9
Class C Flash File Systems 9
The Integrated File System Configuration Guide, Cisco IOS Release 15S iii

How to Manage Cisco IOS Integrated File Systems 9
Listing Available File Systems 9
Setting the Default File System 10
Displaying the Current Default File System 10
Displaying Information About Files on a File System 11
Displaying a File 12
Troubleshooting Tips 12
Displaying a File 13
Managing Files on a Class A Flash File Systems 13
Deleting Files on a Flash Memory Device 13
Recovering Deleted Files on a Flash Memory Device 14
Troubleshooting Tips 14
Recovering Deleted Files on a Flash Memory Device 14
Troubleshooting Tips 15
Permanently Deleting Files on a Flash Memory Device 16
Troubleshooting Tips 16
Permanently Deleting Files on a Cisco 2600 or 3600 Router 16
Troubleshooting Tips 18
Managing Files on Class B Flash File Systems 18
Deleting Files on a Flash Memory Device 18
Recovering Deleted Files on a Flash Memory Device 19
Troubleshooting Tips 20
Erasing Flash Memory 20
Troubleshooting Tips 21
Managing Files on Class C Flash File Systems 21
Deleting Files on a Flash Memory Device 21
Troubleshooting Tips 22
Formatting Flash 22
Troubleshooting Tips 22
Configuration Examples for Cisco IOS Integrated File System 23
Example startup and NVRAM configuration 23
Example System File System 23
C H A P T E R 2 File System Check and Repair for PCMCIA ATA Disks 25
Finding Feature Information 25
The Integrated File System Configuration Guide, Cisco IOS Release 15Siv
Contents

Information About File System Check and Repair for PCMCIA ATA Disks 26
File System Check and Repair for PCMCIA ATA Disks Overview 26
How to Use the File System Check and Repair for PCMCIA ATA Disks 26
Additional References 26
Feature Information for File System Check and Repair for PCMCIA ATA Disks 27
C H A P T E R 3 Storing Data In USB 29
Finding Feature Information 29
Prerequisites for Storing Data In USB 29
Restrictions for Storing Data In USB 30
Information About Storing Data In USB 30
Roles of the USB eToken and the USB Flash 30
How a USB eToken Works 30
How a USB Flash Works 31
Functionality Differences Between an eToken and a USB Flash 31
USB Storage Filesystem Support 32
Benefits of Storing Data In USB 32
Login Methods for the eToken 33
AutomaticLogin 33
Manual Login 33
How to Set Up and Use USB Modules on Cisco Routers 33
Storing the Configuration on an External USB Flash Drive or eToken 33
Accessing and Setting Up the eToken 34
Logging Into the eToken 34
What to Do Next 35
Setting Administrative Functions on the eToken 36
Troubleshooting USB Flash Drives and eTokens 37
TheshowfilesystemsCommand 38
The show usb device Command 39
The show usb controllers Command 40
The dir Command 42
Configuration Examples for Secure Token Support 43
Example Logging Into and Saving RSA Keys to eToken 43
Additional References 44
Feature Information for Storing Data In USB 46
The Integrated File System Configuration Guide, Cisco IOS Release 15S v
Contents

C H A P T E R 4 Configuring Basic File Transfer Services 49
Finding Feature Information 49
Prerequisites for Basic File Transfer Services 49
Restrictions for Basic File Transfer Services 49
Information About Basic File Transfer Services 50
Use of a Router as a TFTP or RARP Server 50
Use of a Router as a TFTP Server 50
Use of a Router as a RARP Server 50
Use of a Router for rsh and rcp 51
Source Interface for Outgoing RCMD Communications 51
About DNS Reverse Lookup for rcmd 51
Implementation of rsh 51
Maintaining rsh Security 51
Implementation of rcp 52
Configure the Remote Client to Send rcp Requests 52
Use of a Router for FTP Connections 53
How to Configure Basic File Transfer Services 53
Configuring the Router for Use as a TFTP Server 53
Troubleshooting 56
Configuring the Client Router 56
What to Do Next 59
Configuring the Router as a RARP Server 59
Configuring System BOOTP Parameters 62
Configuring a Router to Use rsh and rcp 63
Specifying the Source Interface for Outgoing RCMD Communications 63
Disabling DNS Reverse Lookup for rcmd 64
Configuring the Router to Allow Remote Users to Execute Commands Using rsh 64
Executing Commands Remotely Using rsh 66
Configuring the Router to Accept rcp Requests from Remote Users 67
Configuring the Remote to Send rcp Requests 68
Configuring a Router to Use FTP Connections 68
C H A P T E R 5 Transferring Files Using HTTP or HTTPS 71
Finding Feature Information 71
The Integrated File System Configuration Guide, Cisco IOS Release 15Svi
Contents

Prerequisites for Transferring Files Using HTTP or HTTPs 71
Restrictions for Transferring Files Using HTTP or HTTPs 72
Information About File Transfers Using HTTP or HTTPs 72
How to Transfer Files Using HTTP or HTTPs 72
Configuring HTTP Connection Characteristics for File Transfers 72
Downloading a File from a Remote Server Using HTTP or HTTPs 74
Troubleshooting Tips 76
Uploading a File to a Remote Server Using HTTP or HTTPS 76
Troubleshooting Tips 78
Maintaining and Monitoring File Transfers Using HTTP 78
Configuration Examples for the File Transfer Using HTTP or HTTPs 79
Configuring HTTP Connection Characteristics for File Transfers Example 79
Downloading a File from a Remote Server Using HTTP or HTTPs Example 79
Uploading a File from Flash to the Remote HTTP Server Example 79
Downloading a File from the Remote HTTP Server to Flash Memory Example 80
Uploading a File to a Remote Server Using HTTP or HTTPs 80
Additional References 80
Feature Information for Transferring Files Using HTTP or HTTPS 82
The Integrated File System Configuration Guide, Cisco IOS Release 15S vii
Contents

The Integrated File System Configuration Guide, Cisco IOS Release 15Sviii
Contents

C H A P T E R 1Using the Cisco IOS Integrated File System
The Cisco IOS File System (IFS) feature provides a single interface to all the file systems available on yourrouting device, including the following:
• Flash memory file systems
• Network file systems (TFTP, rcp, and FTP)
• Any other endpoint for reading or writing data (such as NVRAM, the running configuration, ROM,raw system memory, system bundled microcode, Xmodem, Flash load helper log, modems, and BRImultiplexing device [mux] interfaces)
• Finding Feature Information, page 1
• Prerequisites for Cisco IOS Integrated File System, page 1
• Restrictions for Cisco IOS Integrated File System, page 2
• Information About Cisco IOS Integrated File System, page 2
• How to Manage Cisco IOS Integrated File Systems, page 9
• Configuration Examples for Cisco IOS Integrated File System, page 23
Finding Feature InformationYour software release may not support all the features documented in this module. For the latest featureinformation and caveats, see the release notes for your platform and software release. To find informationabout the features documented in this module, and to see a list of the releases in which each feature is supported,see the Feature Information Table at the end of this document.
Use Cisco Feature Navigator to find information about platform support and Cisco software image support.To access Cisco Feature Navigator, go to www.cisco.com/go/cfn. An account on Cisco.com is not required.
Prerequisites for Cisco IOS Integrated File System• You should have at least a basic familiarity with the Cisco IOS environment and the command-lineinterface.
The Integrated File System Configuration Guide, Cisco IOS Release 15S 1

• You should have at least a minimal configuration running on your system.
Restrictions for Cisco IOS Integrated File System• You must have your network up and running, with Cisco IOS Release 12.2 or a later release installed.
• Some of the Cisco IOS configuration commands are only available on certain router platforms, and thecommand syntax may vary on different platforms.
Information About Cisco IOS Integrated File System
Overview of the IFS
Display and Classify FilesWith IFS, all files can be viewed and classified (image, text file, and so on), including files on remote servers.For example, you may want to determine the size and type of an image on a remote server before you copyit to ensure that it is a valid image. You can also display a configuration file on a remote server to verify thatit is the correct configuration file before you load the file on the router.
Platform-Independent CommandsWith IFS, the file system user interface is no longer platform-specific. Commands have the same syntax,regardless of which platform is used. Thus, you can use the same commands for all of your routers.
However, not all commands are supported on all platforms and file systems. Because different types of filesystems support different operations, certain commands are not available for all file systems. Platforms willsupport commands for the file systems they use.
Minimal Prompting for CommandsIFS minimizes the required prompting for many commands, such as the copy EXEC command. You can enterall of the required information in the command line, rather than needing to provide information when thesystem prompts you for it. For example, if you want to copy a file to an FTP server, on a single line you canspecify the specific location on the router of the source file, the specific location of the destination file on theFTP server, and the username and password to use when connecting to the FTP server. However, to have therouter prompt you for the needed information, you can still enter the minimal form of the command.
Depending on the current configuration of the fileprompt global configuration command and the type ofcommand you entered, the router may prompt you for confirmation, even if you have provided all theinformation in the command. In these cases, the default value will be the value entered in the command. PressReturn to confirm the values.
The Integrated File System Configuration Guide, Cisco IOS Release 15S2
Using the Cisco IOS Integrated File SystemRestrictions for Cisco IOS Integrated File System
Create and Navigate DirectoriesWith IFS, you can navigate to different directories and list the files in a directory. On newer platforms, youcan create subdirectories in Flash memory or on a disk.
URL Specification for Locating FilesThe new file system interface uses Uniform Resource Locators ( URLs) to specify the location of a file. URLsare commonly used to specify files or locations on the World Wide Web. However, on Cisco routers, theycan now be used to specify the location of files on the router or remote file servers.
On Cisco routers, use URLs in commands to specify the location of the file or directory. For example, if youwant to copy a file from one location to another, use the copysource-urldestination-url EXEC command.
The format of URLs used by the routers can vary from the format you may be used to using. There are alsoa variety of formats that can be used, based on the location of the file.
Files on a Network ServerTo specify a file on a network server, use one of the following forms:
• ftp: [[ // [username[ :password@location] /directory] /filename
• rcp: [[ // [username@location] /directory] /filename
• tftp: [[ //location] /directory] /filename
The location can be an IP address or a host name. The username variable, if specified, overrides the usernamespecified by the iprcmdremote-username or ipftpusername global configuration command. The passwordoverrides the password specified by the ipftppassword global configuration command.
The file path (directory and filename) is specified relative to the directory used for file transfers. For example,on UNIX file servers, TFTP pathnames start in the /tftpboot directory, and rcp and FTP paths start in the homedirectory associated with the username.
The following example specifies the file named c7200-j-mz.112-current on the TFTP server namedmyserver.cisco.com. The file is located in the directory named /tftpboot/master.
tftp://myserver.cisco.com/master/c7200-j-mz.112-currentThe following example specifies the file named mill-config on the server named enterprise.cisco.com. Therouter uses the username liberty and the password secret to access this server via FTP.
ftp://liberty:[email protected]/mill-config
Local FilesUse the prefix:directory/filenamesyntax to specify a file located on the router. You can use this form to specifya file in Flash memory or NVRAM.
For example, nvram:startup-config specifies the startup configuration in NVRAM, andflash:configs/backup-config specifies the file named backup-config in the configs directory of Flash memory.
The Integrated File System Configuration Guide, Cisco IOS Release 15S 3
Using the Cisco IOS Integrated File SystemURL Specification for Locating Files

When referring to a file system instead of a file, use the prefix:form. This form specifies the file system itself,rather than a file in the file system. Use this form to issue commands on file systems themselves, such ascommands to list the files in a file system or to format the file system.
For example, slot0: can indicate the first Personal Computer Memory Card Industry Association (PCMCIA)Flash memory card in slot 0.
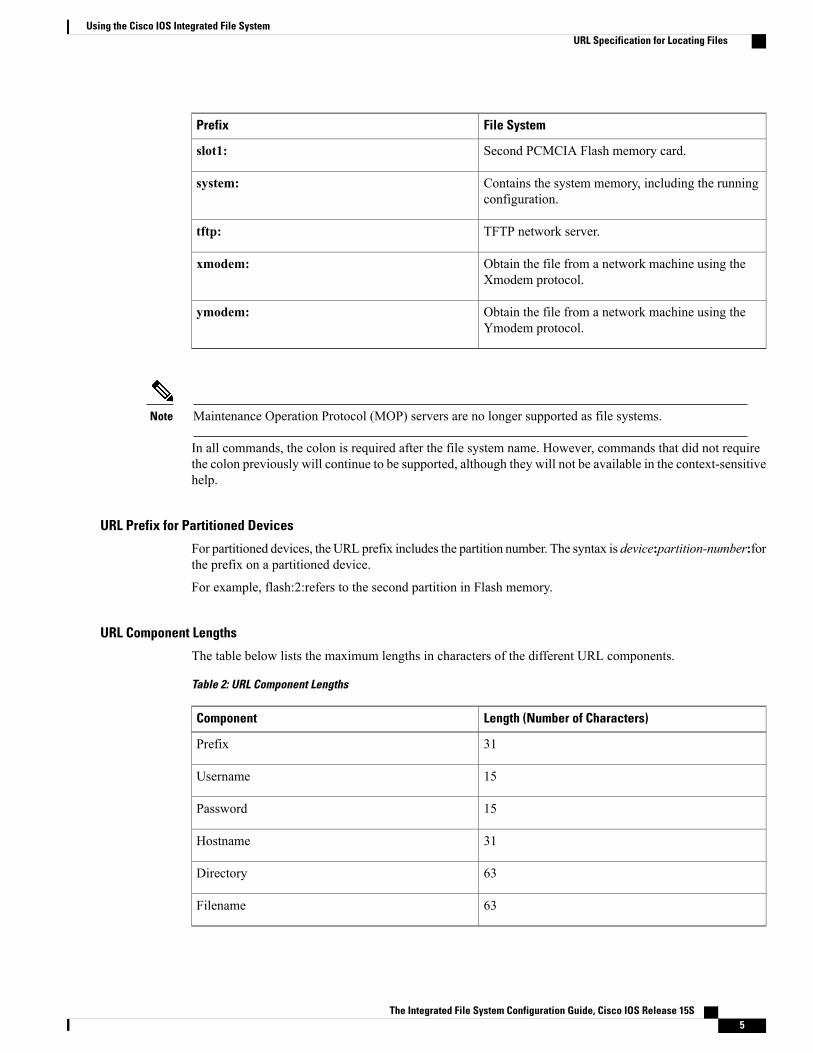
URL PrefixesThe URL prefix specifies the file system. The list of available file systems differs by platform and operation.Refer to your product documentation or use the showfilesystems EXEC command to determine which prefixesare available on your platform. File system prefixes are listed in the table below.
Table 1: File System Prefixes
File SystemPrefix
Boot Flash memory.bootflash:
Rotating media.disk0:
Flash memory. This prefix is available on allplatforms. For platforms that do not have a devicenamed flash:, the prefix flash: is aliased to slot0:.Therefore, you can use the prefix flash: to refer to themain Flash memory storage area on all platforms.
flash:
Flash load helper log files.flh:
FTP network server.ftp:
Null destination for copies. You can copy a remotefile to null to determine its size.
null:
NVRAM.nvram:
Remote copy protocol network server.rcp:
Internal Flashmemory on a slave RSP card of a routerconfigured for high system availability (HSA).
slavebootflash:
NVRAM on a slave Route/Switch Processor (RSP)card of a router configured for HSA.
slavenvram:
First PCMCIA card on a slave RSP card of a routerconfigured for HSA.
slaveslot0:
Second PCMCIA card on a slave RSP card of a routerconfigured for HSA.
slaveslot1:
First PCMCIA Flash memory card.slot0:
The Integrated File System Configuration Guide, Cisco IOS Release 15S4
Using the Cisco IOS Integrated File SystemURL Specification for Locating Files
File SystemPrefix
Second PCMCIA Flash memory card.slot1:
Contains the system memory, including the runningconfiguration.
system:
TFTP network server.tftp:
Obtain the file from a network machine using theXmodem protocol.
xmodem:
Obtain the file from a network machine using theYmodem protocol.
ymodem:
Maintenance Operation Protocol (MOP) servers are no longer supported as file systems.Note
In all commands, the colon is required after the file system name. However, commands that did not requirethe colon previously will continue to be supported, although they will not be available in the context-sensitivehelp.
URL Prefix for Partitioned Devices
For partitioned devices, the URL prefix includes the partition number. The syntax is device:partition-number:forthe prefix on a partitioned device.
For example, flash:2:refers to the second partition in Flash memory.
URL Component Lengths
The table below lists the maximum lengths in characters of the different URL components.
Table 2: URL Component Lengths
Length (Number of Characters)Component
31Prefix
15Username
15Password
31Hostname
63Directory
63Filename
The Integrated File System Configuration Guide, Cisco IOS Release 15S 5
Using the Cisco IOS Integrated File SystemURL Specification for Locating Files

URLs in CommandsDepending on which command you are using, different file systems are available . Some file systems canonly serve as a source for files, not a destination. For example, you cannot copy to another machine usingXmodem. Other operations, such as format and erase, are only supported by certain file systems on certainplatforms.
The following sections describe the use of for using URLs in commands:
File Systems Supporting a CommandUse the context-sensitive help to determine which file systems can be used for a particular command. In thefollowing example, the context-sensitive help displays which file systems can be used as sources for the copyEXEC command. The output will vary based on the platform.
Router# copy ?/erase Erase destination file system.bootflash: Copy from bootflash: file systemflash: Copy from flash: file systemftp: Copy from ftp: file systemnull: Copy from null: file systemnvram: Copy from nvram: file systemrcp: Copy from rcp: file systemsystem: Copy from system: file systemtftp: Copy from tftp: file system
Default File SystemFor most commands, if no file system is specified, the file is assumed to be in the default directory, as specifiedby the cd command.
Router# pwdslot0:Router# dirDirectory of slot0:/
1 -rw- 4720148 Aug 29 1997 17:49:36 hampton/nitro/c7200-j-mz2 -rw- 4767328 Oct 01 1997 18:42:53 c7200-js-mz5 -rw- 639 Oct 02 1997 12:09:32 foo7 -rw- 639 Oct 02 1997 12:37:13 the_time
20578304 bytes total (3104544 bytes free)Router# cd nvram:Router# dirDirectory of nvram:/
1 -rw- 2725 <no date> startup-config2 ---- 0 <no date> private-config3 -rw- 2725 <no date> underlying-config
129016 bytes total (126291 bytes free)
The Integrated File System Configuration Guide, Cisco IOS Release 15S6
Using the Cisco IOS Integrated File SystemURLs in Commands

Tab CompletionYou can use tab completion to reduce the number of characters you need to type for a command. Type thefirst few characters of the filename, and press the Tab key. If the characters are unique to a filename, the routerwill complete the filename for you. Continue entering the command as normal and press Return to executethe command.
In the following example, the router completes the filename startup-config because it is the only file in thenvram: file system that starts with “s”:
Router# show file info nvram:s<tab>Router# show file info nvram:startup-config<Enter>If you use tab completion without specifying any characters, the router uses the first file in the file system.
Router# show file info nvram:<tab>Router# show file info nvram:private-config<Enter>
List of Files in a File SystemFor many commands, you can get a listing of the files in a file system on the router by using the context-sensitivehelp. In the following example, the router lists the files in NVRAM:
Router# show file info nvram:?nvram:private-config nvram:startup-config nvram:underlying-config
Remote File System ManagementOn remote file systems (file systems on FTP, rcp, or TFTP servers) you can perform the following tasks:
• View the contents of a file with themore EXEC command.
• Copy files to or from the router using the copy EXEC command.
• Display information about a file using the showfileinformation EXEC command.
You cannot delete files on remote systems.Note
NVRAM File System ManagementOn most platforms, NVRAM contains the startup configuration. On Class A Flash file system platforms, theCONFIG_FILE environment variable specifies the location of the startup configuration. However, the fileURL nvram:startup-config always specifies the startup configuration, regardless of the CONFIG_FILEenvironment variable.
You can display the startup-config (with themorenvram:startup-configEXEC command), replace the startupconfig with a new configuration file (with the copysource-urlnvram:startup-config EXEC command), savethe startup configuration to another location (with the copynvram:startup-configdestination-url EXEC
The Integrated File System Configuration Guide, Cisco IOS Release 15S 7
Using the Cisco IOS Integrated File SystemRemote File System Management
command), and erase the contents of NVRAM (with the erasenvram:EXECcommand). The erasenvram:command also deletes the startup configuration if another location is specified by the CONFIG_FILE variable.
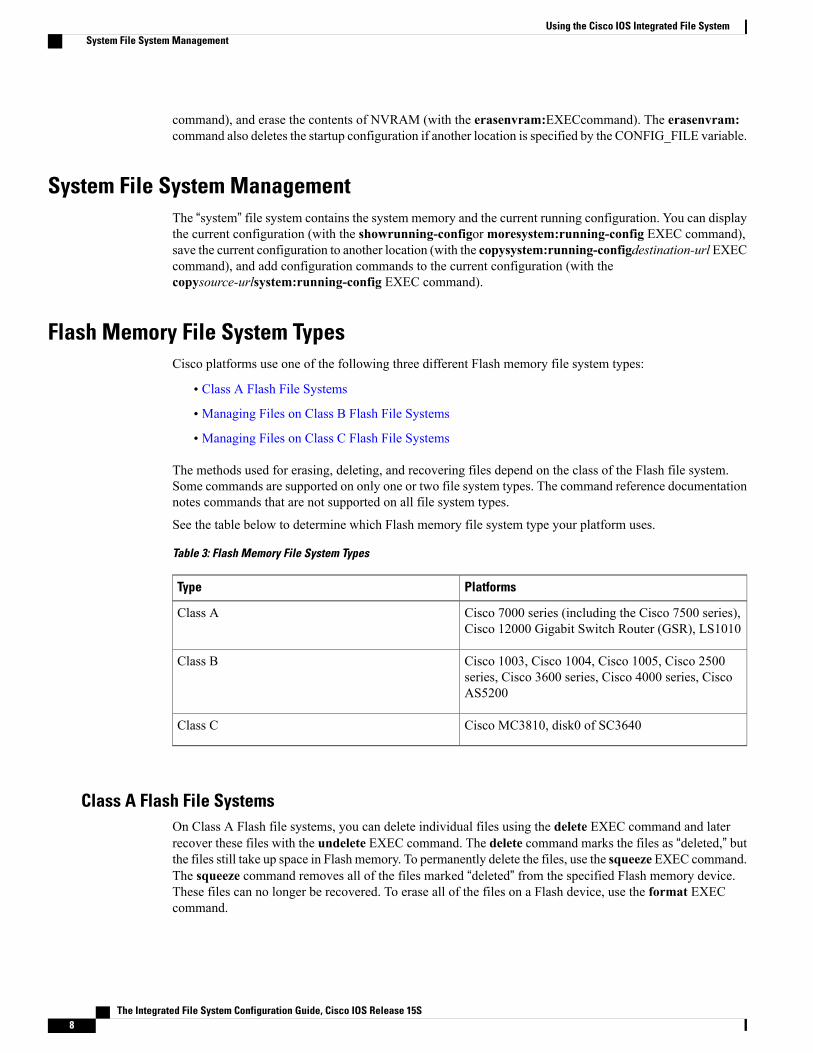
System File System ManagementThe “system” file system contains the system memory and the current running configuration. You can displaythe current configuration (with the showrunning-configor moresystem:running-config EXEC command),save the current configuration to another location (with the copysystem:running-configdestination-url EXECcommand), and add configuration commands to the current configuration (with thecopysource-urlsystem:running-config EXEC command).
Flash Memory File System TypesCisco platforms use one of the following three different Flash memory file system types:
• Class A Flash File Systems
• Managing Files on Class B Flash File Systems
• Managing Files on Class C Flash File Systems
The methods used for erasing, deleting, and recovering files depend on the class of the Flash file system.Some commands are supported on only one or two file system types. The command reference documentationnotes commands that are not supported on all file system types.
See the table below to determine which Flash memory file system type your platform uses.
Table 3: Flash Memory File System Types
PlatformsType
Cisco 7000 series (including the Cisco 7500 series),Cisco 12000 Gigabit Switch Router (GSR), LS1010
Class A
Cisco 1003, Cisco 1004, Cisco 1005, Cisco 2500series, Cisco 3600 series, Cisco 4000 series, CiscoAS5200
Class B
Cisco MC3810, disk0 of SC3640Class C
Class A Flash File SystemsOn Class A Flash file systems, you can delete individual files using the delete EXEC command and laterrecover these files with the undelete EXEC command. The delete command marks the files as “deleted,” butthe files still take up space in Flash memory. To permanently delete the files, use the squeeze EXEC command.The squeeze command removes all of the files marked “deleted” from the specified Flash memory device.These files can no longer be recovered. To erase all of the files on a Flash device, use the format EXECcommand.
The Integrated File System Configuration Guide, Cisco IOS Release 15S8
Using the Cisco IOS Integrated File SystemSystem File System Management
Class B Flash File SystemsOn Class B Flash file systems, you can delete individual files with the delete EXEC command. The deletecommand marks the file as “deleted.” The file is still present in Flash memory and takes up space. To recoverthe file, use the undelete EXEC command. To reclaim any space in Flash memory, you must erase the entireFlash file system with the erase EXEC command.
Class C Flash File SystemsOn Class C Flash memory file systems, you can delete individual files with the delete EXEC command. Filescannot be reclaimed once they have been deleted. Instead, the Flash file system space is reclaimed dynamically.To erase all of the files in Flash, use the format EXEC command.
How to Manage Cisco IOS Integrated File Systems
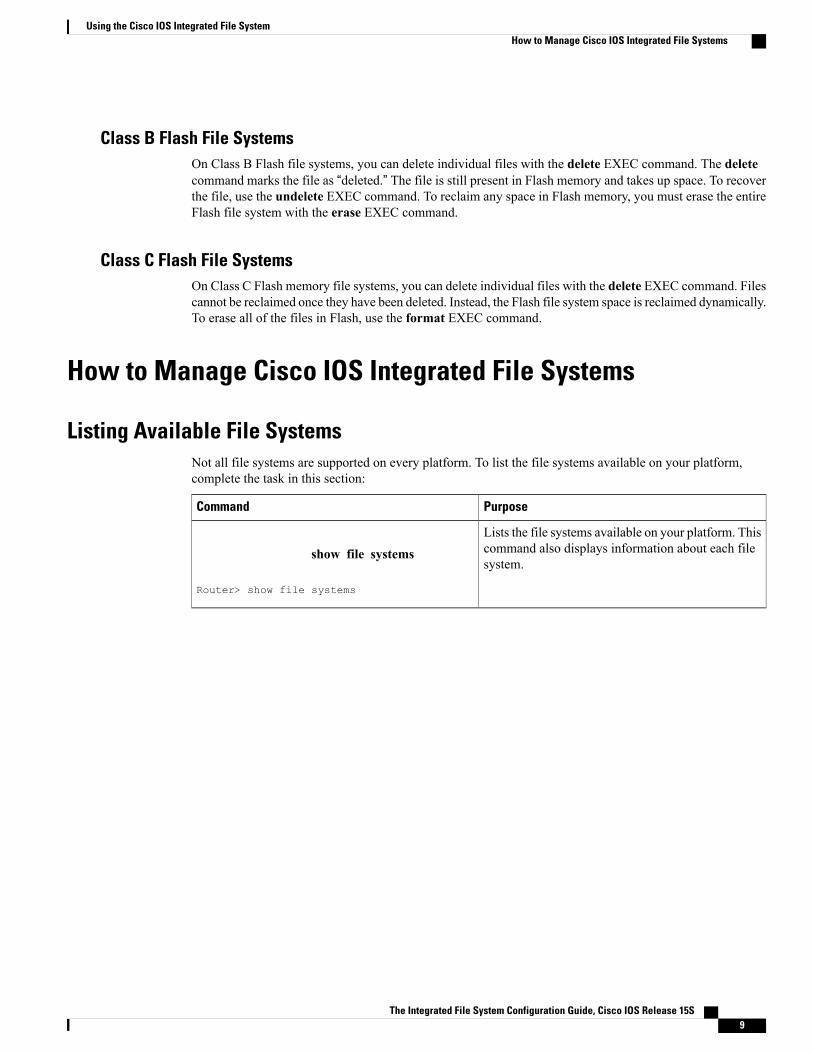
Listing Available File SystemsNot all file systems are supported on every platform. To list the file systems available on your platform,complete the task in this section:
PurposeCommand
Lists the file systems available on your platform. Thiscommand also displays information about each filesystem.
show file systems
Router> show file systems
The Integrated File System Configuration Guide, Cisco IOS Release 15S 9
Using the Cisco IOS Integrated File SystemHow to Manage Cisco IOS Integrated File Systems
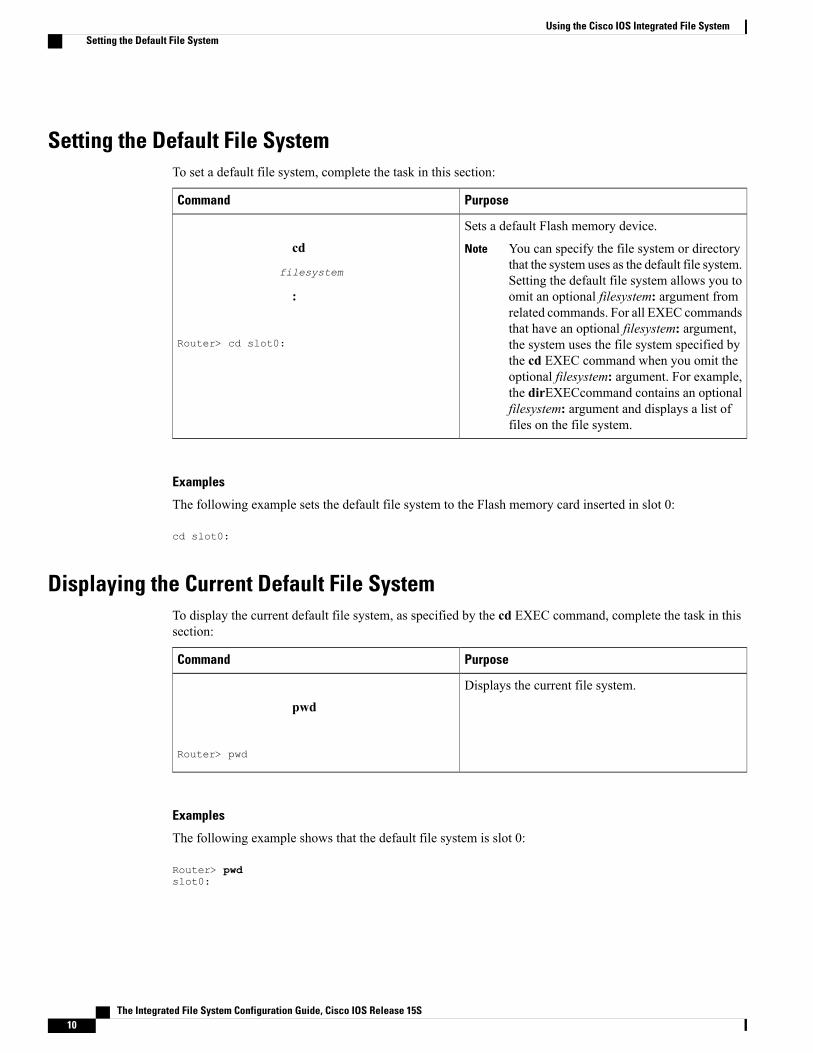
Setting the Default File SystemTo set a default file system, complete the task in this section:
PurposeCommand
Sets a default Flash memory device.
You can specify the file system or directorythat the system uses as the default file system.Setting the default file system allows you toomit an optional filesystem: argument fromrelated commands. For all EXEC commandsthat have an optional filesystem: argument,the system uses the file system specified bythe cd EXEC command when you omit theoptional filesystem: argument. For example,the dirEXECcommand contains an optionalfilesystem: argument and displays a list offiles on the file system.
Notecd
filesystem
:
Router> cd slot0:
Examples
The following example sets the default file system to the Flash memory card inserted in slot 0:
cd slot0:
Displaying the Current Default File SystemTo display the current default file system, as specified by the cd EXEC command, complete the task in thissection:
PurposeCommand
Displays the current file system.pwd
Router> pwd
Examples
The following example shows that the default file system is slot 0:
Router> pwdslot0:
The Integrated File System Configuration Guide, Cisco IOS Release 15S10
Using the Cisco IOS Integrated File SystemSetting the Default File System

The following example uses the cd command to change the default file system to system and then uses thepwd command to verify that the default file system was changed:
Router> cd system:
Router> pwdsystem:
Displaying Information About Files on a File SystemTo display information about files on a file system, complete the tasks in this section:
SUMMARY STEPS
1. enable2. dir [/all] [filesystem:][filename3. show file systems4. show file information file-url5. show file descriptors
DETAILED STEPS
PurposeCommand or Action
Enables privileged EXEC mode.enableStep 1
Example:
Router> enable
• Enter your password if prompted.
Displays a list of files on a file system.dir [/all] [filesystem:][filename
Example:
Router# dir /all
Step 2
Displays detailed information about each of the files ona file system.
show file systems
Example:
Router# show file system
Step 3
Displays information about a specific file.show file information file-url
Example:
Router# show file system 10.1.1.1
Step 4
The Integrated File System Configuration Guide, Cisco IOS Release 15S 11
Using the Cisco IOS Integrated File SystemDisplaying Information About Files on a File System
PurposeCommand or Action
Displays a list of open file descriptors.show file descriptors
Example:
Router# show file descriptors
Step 5
Displaying a File
Examples
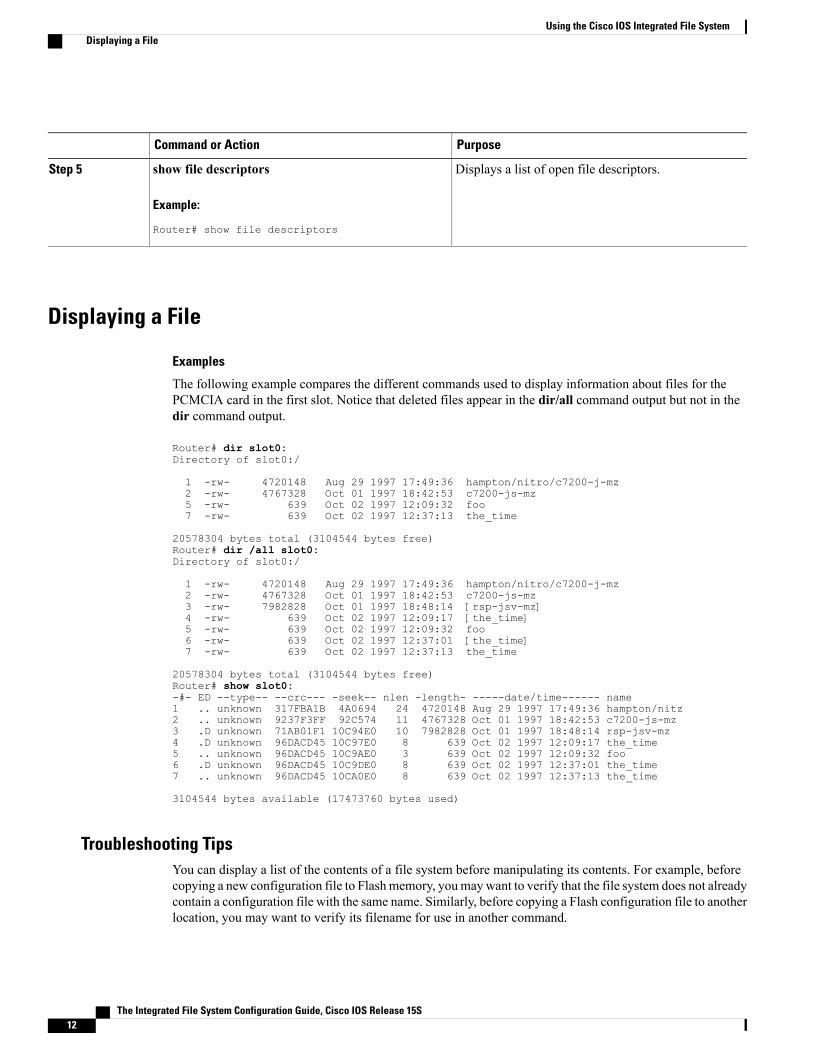
The following example compares the different commands used to display information about files for thePCMCIA card in the first slot. Notice that deleted files appear in the dir/all command output but not in thedir command output.
Router# dir slot0:Directory of slot0:/
1 -rw- 4720148 Aug 29 1997 17:49:36 hampton/nitro/c7200-j-mz2 -rw- 4767328 Oct 01 1997 18:42:53 c7200-js-mz5 -rw- 639 Oct 02 1997 12:09:32 foo7 -rw- 639 Oct 02 1997 12:37:13 the_time
20578304 bytes total (3104544 bytes free)Router# dir /all slot0:Directory of slot0:/
1 -rw- 4720148 Aug 29 1997 17:49:36 hampton/nitro/c7200-j-mz2 -rw- 4767328 Oct 01 1997 18:42:53 c7200-js-mz3 -rw- 7982828 Oct 01 1997 18:48:14 [rsp-jsv-mz]4 -rw- 639 Oct 02 1997 12:09:17 [the_time]5 -rw- 639 Oct 02 1997 12:09:32 foo6 -rw- 639 Oct 02 1997 12:37:01 [the_time]7 -rw- 639 Oct 02 1997 12:37:13 the_time
20578304 bytes total (3104544 bytes free)Router# show slot0:-#- ED --type-- --crc--- -seek-- nlen -length- -----date/time------ name1 .. unknown 317FBA1B 4A0694 24 4720148 Aug 29 1997 17:49:36 hampton/nitz2 .. unknown 9237F3FF 92C574 11 4767328 Oct 01 1997 18:42:53 c7200-js-mz3 .D unknown 71AB01F1 10C94E0 10 7982828 Oct 01 1997 18:48:14 rsp-jsv-mz4 .D unknown 96DACD45 10C97E0 8 639 Oct 02 1997 12:09:17 the_time5 .. unknown 96DACD45 10C9AE0 3 639 Oct 02 1997 12:09:32 foo6 .D unknown 96DACD45 10C9DE0 8 639 Oct 02 1997 12:37:01 the_time7 .. unknown 96DACD45 10CA0E0 8 639 Oct 02 1997 12:37:13 the_time
3104544 bytes available (17473760 bytes used)
Troubleshooting TipsYou can display a list of the contents of a file system before manipulating its contents. For example, beforecopying a new configuration file to Flashmemory, youmaywant to verify that the file system does not alreadycontain a configuration file with the same name. Similarly, before copying a Flash configuration file to anotherlocation, you may want to verify its filename for use in another command.
The Integrated File System Configuration Guide, Cisco IOS Release 15S12
Using the Cisco IOS Integrated File SystemDisplaying a File
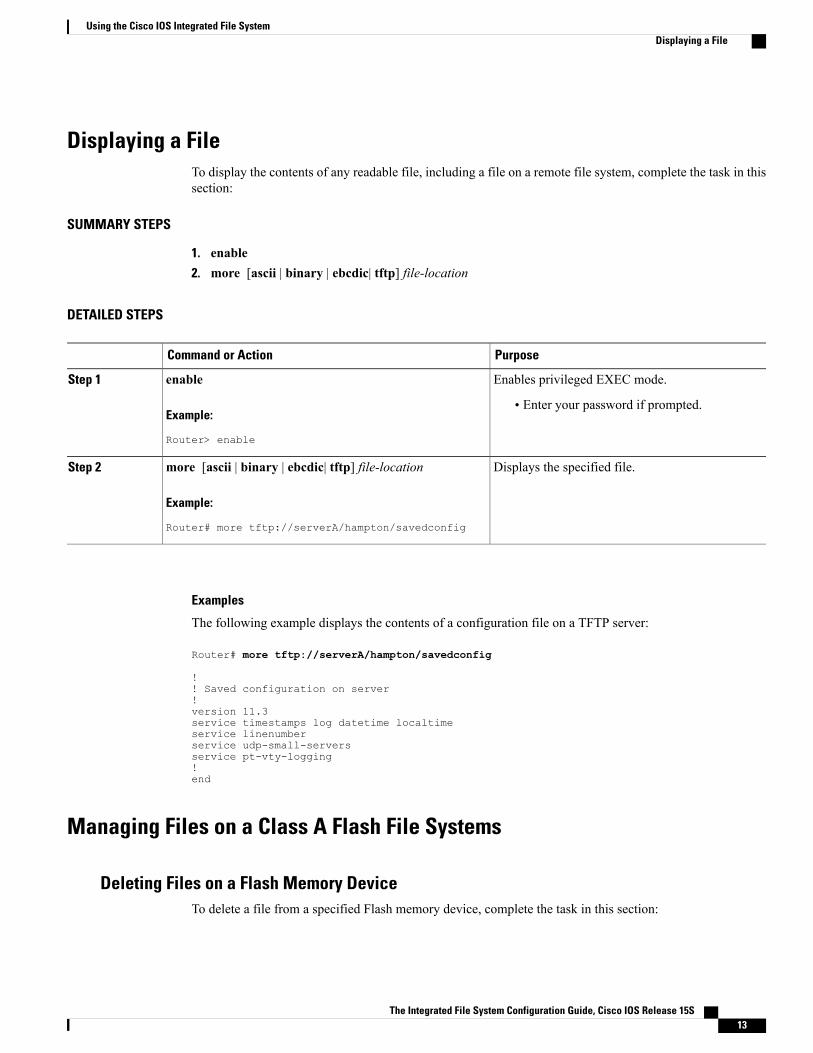
Displaying a FileTo display the contents of any readable file, including a file on a remote file system, complete the task in thissection:
SUMMARY STEPS
1. enable2. more [ascii | binary | ebcdic| tftp] file-location
DETAILED STEPS
PurposeCommand or Action
Enables privileged EXEC mode.enableStep 1
Example:
Router> enable
• Enter your password if prompted.
Displays the specified file.more [ascii | binary | ebcdic| tftp] file-location
Example:
Router# more tftp://serverA/hampton/savedconfig
Step 2
Examples
The following example displays the contents of a configuration file on a TFTP server:
Router# more tftp://serverA/hampton/savedconfig
!! Saved configuration on server!version 11.3service timestamps log datetime localtimeservice linenumberservice udp-small-serversservice pt-vty-logging!end
Managing Files on a Class A Flash File Systems
Deleting Files on a Flash Memory DeviceTo delete a file from a specified Flash memory device, complete the task in this section:
The Integrated File System Configuration Guide, Cisco IOS Release 15S 13
Using the Cisco IOS Integrated File SystemDisplaying a File
SUMMARY STEPS
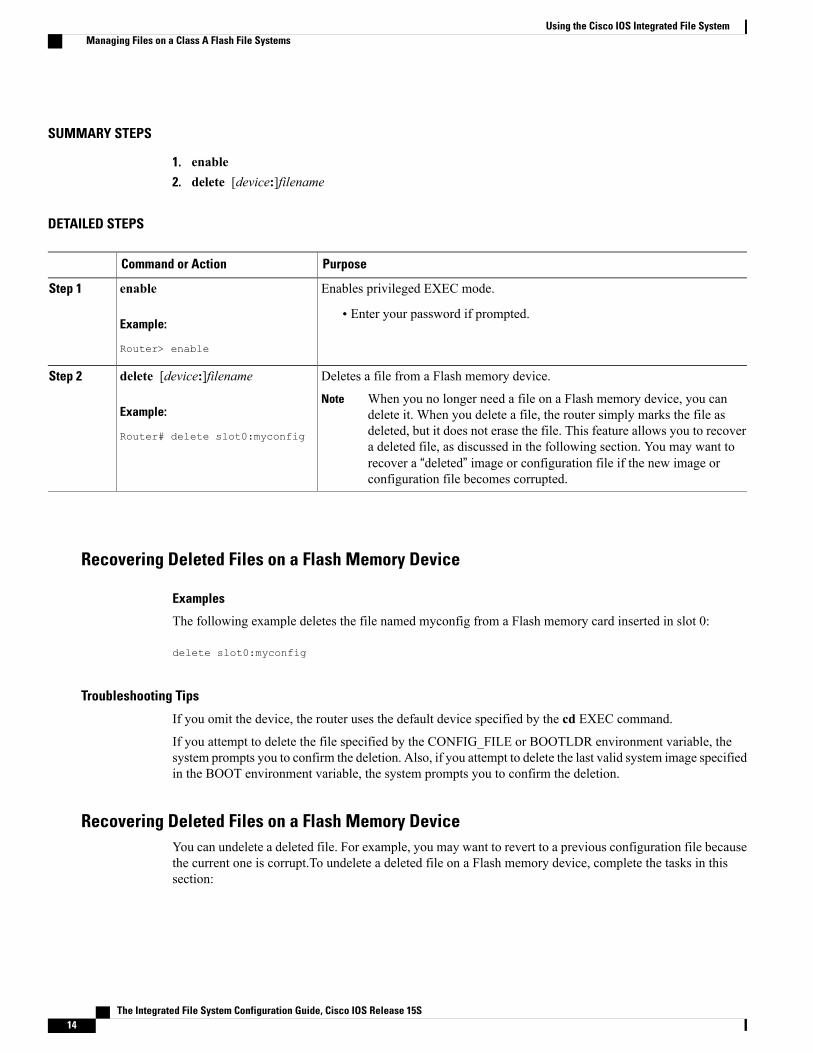
1. enable2. delete [device:]filename
DETAILED STEPS
PurposeCommand or Action
Enables privileged EXEC mode.enableStep 1
Example:
Router> enable
• Enter your password if prompted.
Deletes a file from a Flash memory device.delete [device:]filenameStep 2
Example:
Router# delete slot0:myconfig
When you no longer need a file on a Flash memory device, you candelete it. When you delete a file, the router simply marks the file asdeleted, but it does not erase the file. This feature allows you to recovera deleted file, as discussed in the following section. You may want torecover a “deleted” image or configuration file if the new image orconfiguration file becomes corrupted.
Note
Recovering Deleted Files on a Flash Memory Device
Examples
The following example deletes the file named myconfig from a Flash memory card inserted in slot 0:
delete slot0:myconfig
Troubleshooting Tips
If you omit the device, the router uses the default device specified by the cd EXEC command.
If you attempt to delete the file specified by the CONFIG_FILE or BOOTLDR environment variable, thesystem prompts you to confirm the deletion. Also, if you attempt to delete the last valid system image specifiedin the BOOT environment variable, the system prompts you to confirm the deletion.
Recovering Deleted Files on a Flash Memory DeviceYou can undelete a deleted file. For example, you may want to revert to a previous configuration file becausethe current one is corrupt.To undelete a deleted file on a Flash memory device, complete the tasks in thissection:
The Integrated File System Configuration Guide, Cisco IOS Release 15S14
Using the Cisco IOS Integrated File SystemManaging Files on a Class A Flash File Systems
SUMMARY STEPS
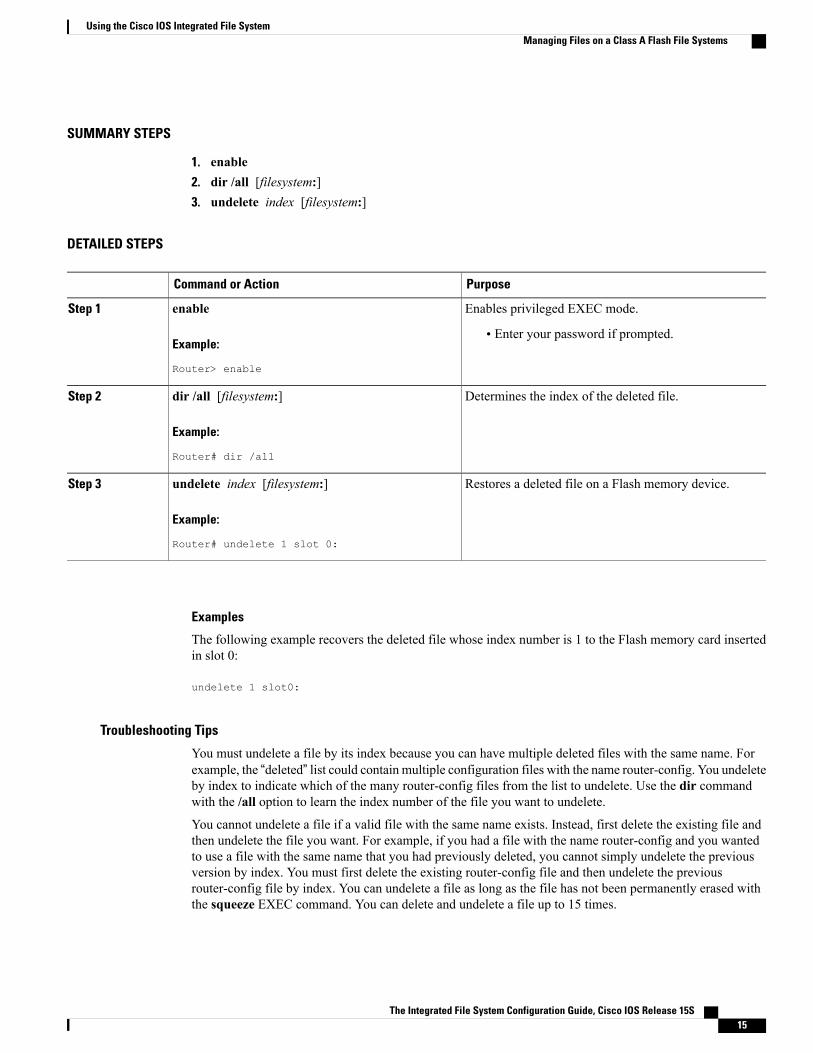
1. enable2. dir /all [filesystem:]3. undelete index [filesystem:]
DETAILED STEPS
PurposeCommand or Action
Enables privileged EXEC mode.enableStep 1
Example:
Router> enable
• Enter your password if prompted.
Determines the index of the deleted file.dir /all [filesystem:]
Example:
Router# dir /all
Step 2
Restores a deleted file on a Flash memory device.undelete index [filesystem:]
Example:
Router# undelete 1 slot 0:
Step 3
Examples
The following example recovers the deleted file whose index number is 1 to the Flash memory card insertedin slot 0:
undelete 1 slot0:
Troubleshooting Tips
You must undelete a file by its index because you can have multiple deleted files with the same name. Forexample, the “deleted” list could contain multiple configuration files with the name router-config. You undeleteby index to indicate which of the many router-config files from the list to undelete. Use the dir commandwith the /all option to learn the index number of the file you want to undelete.
You cannot undelete a file if a valid file with the same name exists. Instead, first delete the existing file andthen undelete the file you want. For example, if you had a file with the name router-config and you wantedto use a file with the same name that you had previously deleted, you cannot simply undelete the previousversion by index. You must first delete the existing router-config file and then undelete the previousrouter-config file by index. You can undelete a file as long as the file has not been permanently erased withthe squeeze EXEC command. You can delete and undelete a file up to 15 times.
The Integrated File System Configuration Guide, Cisco IOS Release 15S 15
Using the Cisco IOS Integrated File SystemManaging Files on a Class A Flash File Systems
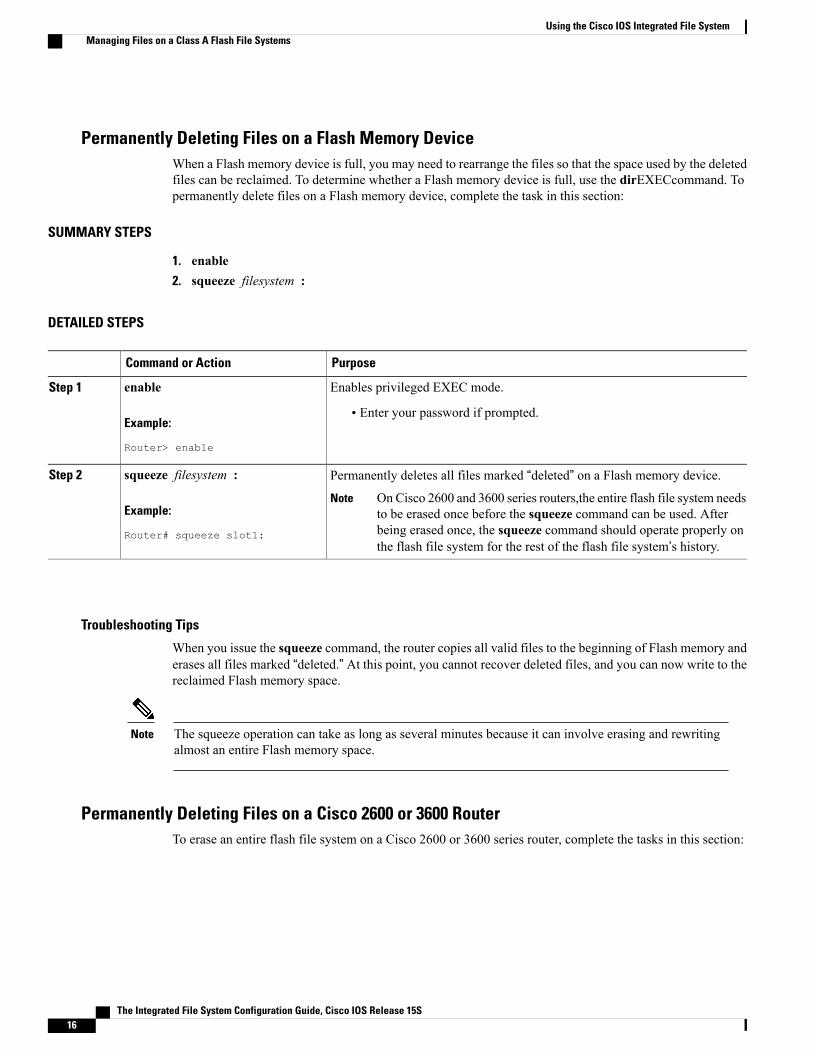
Permanently Deleting Files on a Flash Memory DeviceWhen a Flash memory device is full, you may need to rearrange the files so that the space used by the deletedfiles can be reclaimed. To determine whether a Flash memory device is full, use the dirEXECcommand. Topermanently delete files on a Flash memory device, complete the task in this section:
SUMMARY STEPS
1. enable2. squeeze filesystem :
DETAILED STEPS
PurposeCommand or Action
Enables privileged EXEC mode.enableStep 1
Example:
Router> enable
• Enter your password if prompted.
Permanently deletes all files marked “deleted” on a Flash memory device.squeeze filesystem :
Example:
Router# squeeze slot1:
Step 2
OnCisco 2600 and 3600 series routers,the entire flash file system needsto be erased once before the squeeze command can be used. Afterbeing erased once, the squeeze command should operate properly onthe flash file system for the rest of the flash file system’s history.
Note
Troubleshooting Tips
When you issue the squeeze command, the router copies all valid files to the beginning of Flash memory anderases all files marked “deleted.” At this point, you cannot recover deleted files, and you can now write to thereclaimed Flash memory space.
The squeeze operation can take as long as several minutes because it can involve erasing and rewritingalmost an entire Flash memory space.
Note
Permanently Deleting Files on a Cisco 2600 or 3600 RouterTo erase an entire flash file system on a Cisco 2600 or 3600 series router, complete the tasks in this section:
The Integrated File System Configuration Guide, Cisco IOS Release 15S16
Using the Cisco IOS Integrated File SystemManaging Files on a Class A Flash File Systems

SUMMARY STEPS
1. enable2. no partition flash-filesystem:3. erase filesystem :
DETAILED STEPS
PurposeCommand or Action
Enables privileged EXEC mode.enableStep 1
Example:
Router> enable
• Enter your password if prompted.
Removes all partitions on the specified flash file system.no partition flash-filesystem:Step 2
Example:
Router# no partition flash-filesystem:
The reason for removing partitions is to ensure that the entireflash file system is erased. The squeeze command can be usedin a flash file systemwith partitions after the flash file systemis erased once.
Note
Erases all of the file on the specified flash file system.erase filesystem :
Example:
Router# erase slot1:
Step 3
Examples
In the following example, the image named c7200-js-mz is deleted and undeleted. Note that the deleted filedoes not appear in the output for the first dir EXEC command, but it appears in the output for the dir/allEXEC command.
Router# delete slot1:Delete filename []? c7200-js-mzDelete slot1:c7200-js-mz? [confirm]Router# dir slot1:Directory of slot1:/
No such file
20578304 bytes total (15754684 bytes free)Router# dir /all slot1:Directory of slot1:/
1 -rw- 4823492 Dec 17 1997 13:21:53 [c7200-js-mz]
20578304 bytes total (15754684 bytes free)Router# undelete 1 slot1:Router# dir slot1:Directory of slot1:/
1 -rw- 4823492 Dec 17 1997 13:21:53 c7200-js-mz
The Integrated File System Configuration Guide, Cisco IOS Release 15S 17
Using the Cisco IOS Integrated File SystemManaging Files on a Class A Flash File Systems
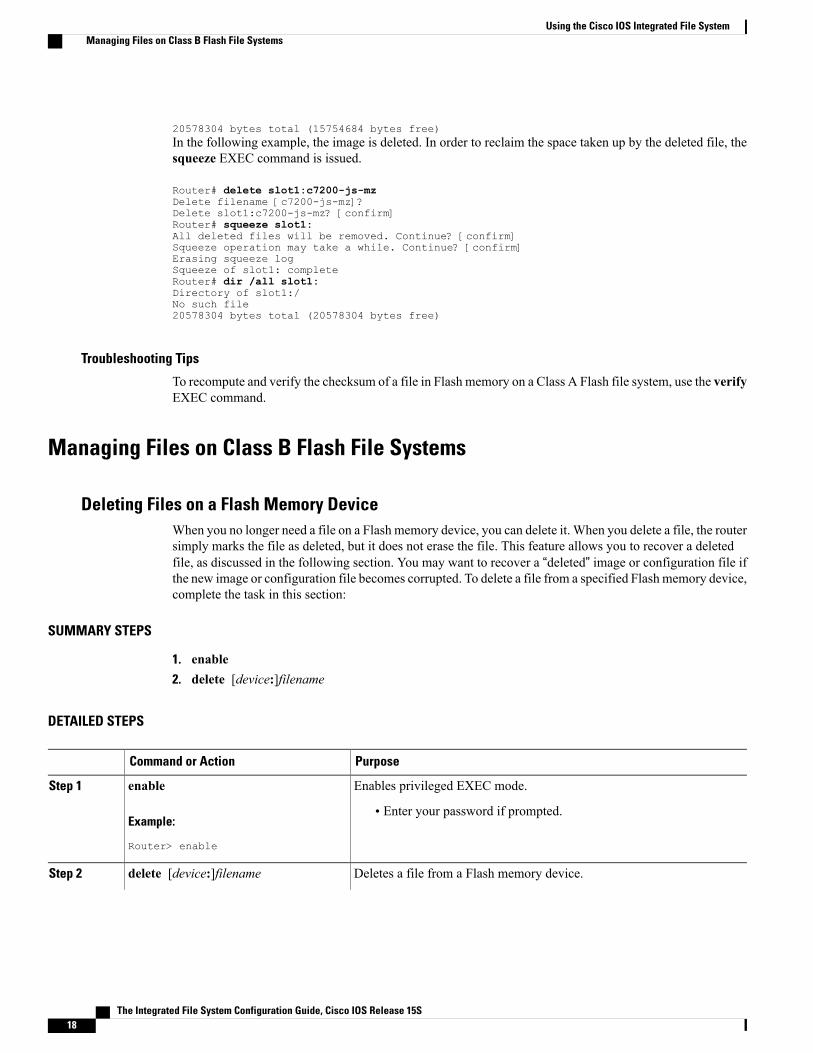
20578304 bytes total (15754684 bytes free)In the following example, the image is deleted. In order to reclaim the space taken up by the deleted file, thesqueeze EXEC command is issued.
Router# delete slot1:c7200-js-mzDelete filename [c7200-js-mz]?Delete slot1:c7200-js-mz? [confirm]Router# squeeze slot1:All deleted files will be removed. Continue? [confirm]Squeeze operation may take a while. Continue? [confirm]Erasing squeeze logSqueeze of slot1: completeRouter# dir /all slot1:Directory of slot1:/No such file20578304 bytes total (20578304 bytes free)
Troubleshooting Tips
To recompute and verify the checksum of a file in Flash memory on a Class A Flash file system, use the verifyEXEC command.
Managing Files on Class B Flash File Systems
Deleting Files on a Flash Memory DeviceWhen you no longer need a file on a Flash memory device, you can delete it. When you delete a file, the routersimply marks the file as deleted, but it does not erase the file. This feature allows you to recover a deletedfile, as discussed in the following section. You may want to recover a “deleted” image or configuration file ifthe new image or configuration file becomes corrupted. To delete a file from a specified Flash memory device,complete the task in this section:
SUMMARY STEPS
1. enable2. delete [device:]filename
DETAILED STEPS
PurposeCommand or Action
Enables privileged EXEC mode.enableStep 1
Example:
Router> enable
• Enter your password if prompted.
Deletes a file from a Flash memory device.delete [device:]filenameStep 2
The Integrated File System Configuration Guide, Cisco IOS Release 15S18
Using the Cisco IOS Integrated File SystemManaging Files on Class B Flash File Systems
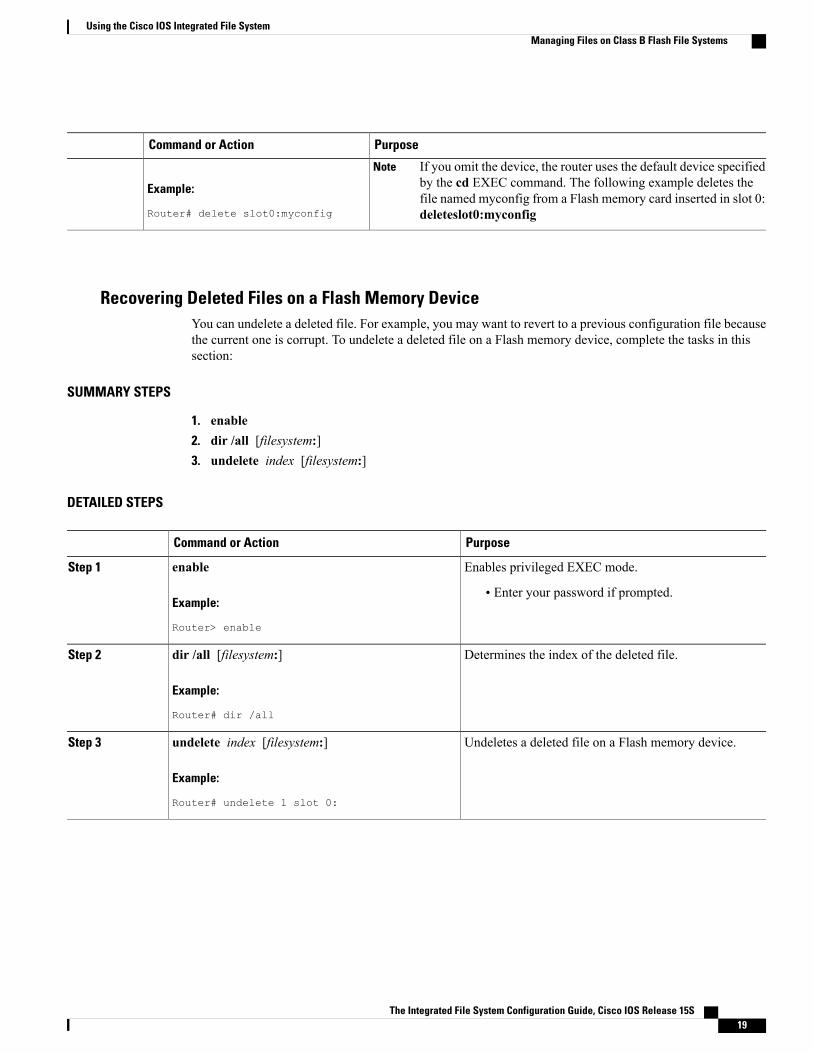
PurposeCommand or Action
Example:
Router# delete slot0:myconfig
If you omit the device, the router uses the default device specifiedby the cd EXEC command. The following example deletes thefile named myconfig from a Flash memory card inserted in slot 0:deleteslot0:myconfig
Note
Recovering Deleted Files on a Flash Memory DeviceYou can undelete a deleted file. For example, you may want to revert to a previous configuration file becausethe current one is corrupt. To undelete a deleted file on a Flash memory device, complete the tasks in thissection:
SUMMARY STEPS
1. enable2. dir /all [filesystem:]3. undelete index [filesystem:]
DETAILED STEPS
PurposeCommand or Action
Enables privileged EXEC mode.enableStep 1
Example:
Router> enable
• Enter your password if prompted.
Determines the index of the deleted file.dir /all [filesystem:]
Example:
Router# dir /all
Step 2
Undeletes a deleted file on a Flash memory device.undelete index [filesystem:]
Example:
Router# undelete 1 slot 0:
Step 3
The Integrated File System Configuration Guide, Cisco IOS Release 15S 19
Using the Cisco IOS Integrated File SystemManaging Files on Class B Flash File Systems
Examples
The following example recovers the deleted file whose index number is 1 to the Flash memory card insertedin slot 0:
undelete 1 slot0:
Troubleshooting Tips
You must undelete a file by its index because you can have multiple deleted files with the same name. Forexample, the “deleted” list could contain multiple configuration files with the name router-config. You undeleteby index to indicate which of the many router-config files from the list to undelete. Use the dir commandwith the /all option to learn the index number of the file you want to undelete.
You cannot undelete a file if a valid (undeleted) one with the same name exists. Instead, first delete the existingfile and then undelete the file you want. For example, if you had an undeleted version of the router-configfile and you wanted to use a previous, deleted version instead, you cannot simply undelete the previous versionby index. You must first delete the existing router-config file and then undelete the previous router-configfile by index. You can undelete a file as long as the file system has not been permanently erased with theerase EXEC command. You can delete and undelete a file up to 15 times.
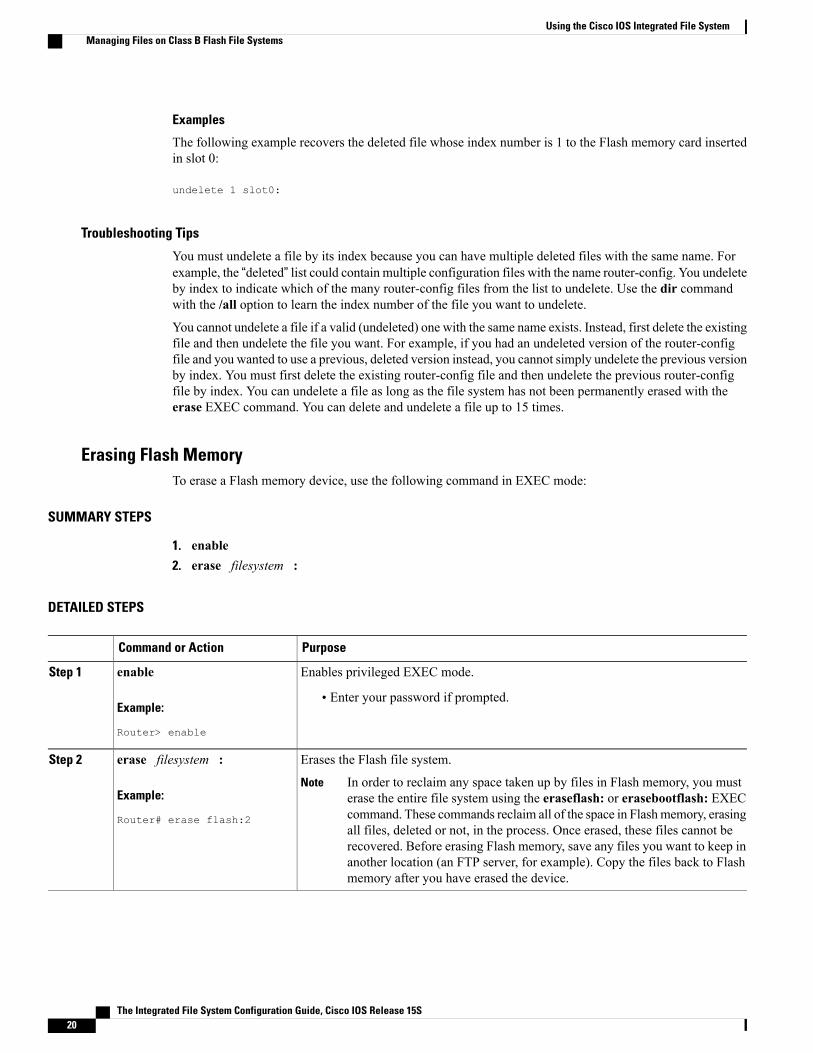
Erasing Flash MemoryTo erase a Flash memory device, use the following command in EXEC mode:
SUMMARY STEPS
1. enable2. erase filesystem :
DETAILED STEPS
PurposeCommand or Action
Enables privileged EXEC mode.enableStep 1
Example:
Router> enable
• Enter your password if prompted.
Erases the Flash file system.erase filesystem :Step 2
Example:
Router# erase flash:2
In order to reclaim any space taken up by files in Flash memory, you musterase the entire file system using the eraseflash: or erasebootflash: EXECcommand. These commands reclaim all of the space in Flashmemory, erasingall files, deleted or not, in the process. Once erased, these files cannot berecovered. Before erasing Flash memory, save any files you want to keep inanother location (an FTP server, for example). Copy the files back to Flashmemory after you have erased the device.
Note
The Integrated File System Configuration Guide, Cisco IOS Release 15S20
Using the Cisco IOS Integrated File SystemManaging Files on Class B Flash File Systems

Examples
The following example erases all files in the second partition in Flash memory:
Router# erase flash:2System flash directory, partition 2:File Length Name/status1 1711088 dirt/gate/c1600-i-mz
[1711152 bytes used, 15066064 available, 16777216 total]Erase flash device, partition 2? [confirm]Are you sure? [yes/no]: yesErasing device... eeeeeeeeeeeeeeeeeeeeeeeeeeeeeeeeeeeeeeeeeeeeeeeeeeeeeee ...erased
Troubleshooting Tips
To recompute and verify the checksum of a file in Flash memory on a Class B Flash file system, use the verifyEXEC command.
Managing Files on Class C Flash File Systems
Deleting Files on a Flash Memory DeviceTo delete a file from a specified Flash device, complete the task in this section:
SUMMARY STEPS
1. enable2. delete [device:]filename
DETAILED STEPS
PurposeCommand or Action
Enables privileged EXEC mode.enableStep 1
Example:
Router> enable
• Enter your password if prompted.
Deletes a file from a Flash memory device.delete [device:]filenameStep 2
Example:
Router# delete slot0:myconfig
When you no longer need a file on a Flash memory device, youcan delete it. When you delete a file on a Class C file system, thefile is deleted permanently. The router reclaims the spacedynamically.
Note
The Integrated File System Configuration Guide, Cisco IOS Release 15S 21
Using the Cisco IOS Integrated File SystemManaging Files on Class C Flash File Systems
Examples
The following example permanently deletes the file named myconfig from a Flash memory card inserted inslot 0:
delete slot0:myconfig
Troubleshooting Tips
If you omit the device, the router uses the default device specified by the cd EXEC command.
If you attempt to delete the file specified by the CONFIG_FILE or BOOTLDR environment variable, thesystem prompts you to confirm the deletion. Also, if you attempt to delete the last valid system image specifiedin the BOOT environment variable, the system prompts you to confirm the deletion.
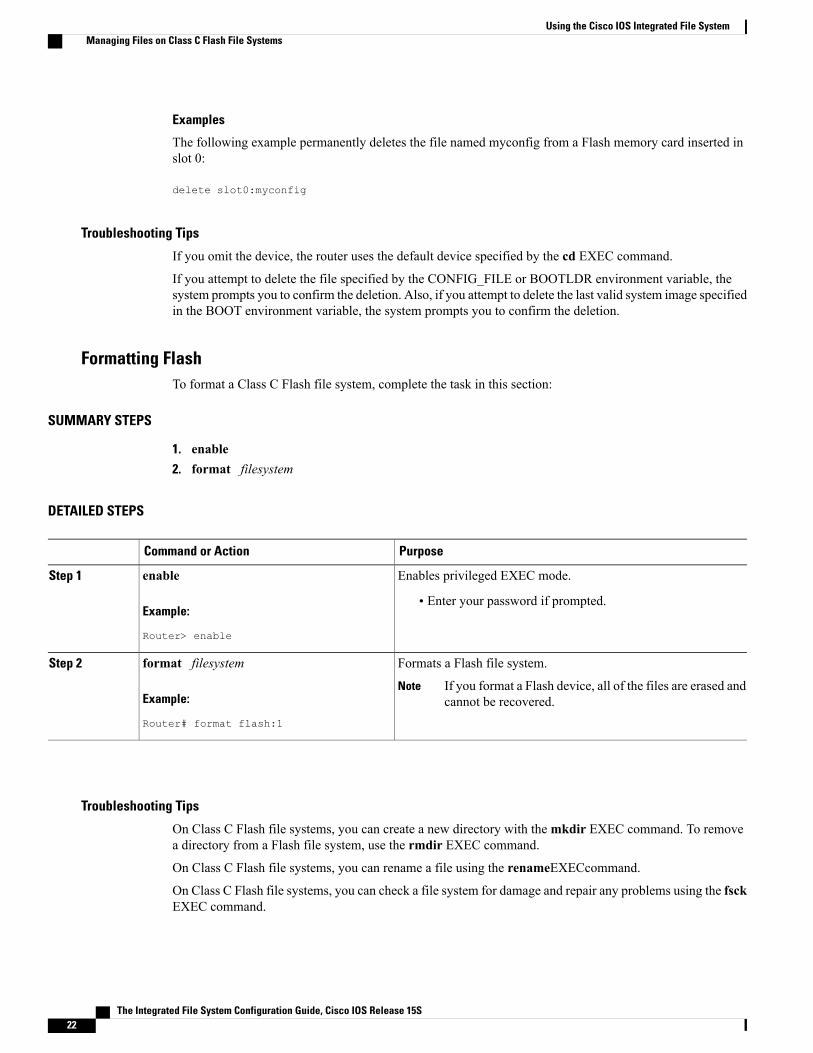
Formatting FlashTo format a Class C Flash file system, complete the task in this section:
SUMMARY STEPS
1. enable2. format filesystem
DETAILED STEPS
PurposeCommand or Action
Enables privileged EXEC mode.enableStep 1
Example:
Router> enable
• Enter your password if prompted.
Formats a Flash file system.format filesystemStep 2
Example:
Router# format flash:1
If you format a Flash device, all of the files are erased andcannot be recovered.
Note
Troubleshooting Tips
On Class C Flash file systems, you can create a new directory with themkdir EXEC command. To removea directory from a Flash file system, use the rmdir EXEC command.
On Class C Flash file systems, you can rename a file using the renameEXECcommand.
On Class C Flash file systems, you can check a file system for damage and repair any problems using the fsckEXEC command.
The Integrated File System Configuration Guide, Cisco IOS Release 15S22
Using the Cisco IOS Integrated File SystemManaging Files on Class C Flash File Systems

Configuration Examples for Cisco IOS Integrated File System
Example startup and NVRAM configurationThe following example displays the startup configuration:
nnm3640-2# more nvram:startup-configUsing 2279 out of 129016 bytes!! Last configuration change at 10:57:25 PST Wed Apr 22 1998! NVRAM config last updated at 10:57:27 PST Wed Apr 22 1998!version 11.3service timestamps log datetime localtimeservice linenumberservice udp-small-serversservice pt-vty-logging...endThe following example displays the contents of the NVRAM file system on a Class A Flash file systemplatform. The file named startup-config is the current startup configuration file, in physical NVRAM or inFlash memory. If the file is located in a Flash memory file system, this entry is a symbolic link to the actualfile. The file named underlying-config is always the NVRAM version of the configuration.
Router# dir nvram:Directory of nvram:/
1 -rw- 2703 <no date> startup-config2 ---- 5 <no date> private-config3 -rw- 2703 <no date> underlying-config
129016 bytes total (126313 bytes free)
Example System File SystemThe following example changes to the “system” file system, displays the contents of the file system, anddisplays the running configuration:
Router# cd ?bootflash: Directory nameflash: Directory namelex: Directory namemodem: Directory namenull: Directory namenvram: Directory namesystem: Directory namevfc: Directory name<cr>
Router# cd system:?system:memory system:running-config system:ucode system:vfilesRouter# cd system:Router# dirDirectory of system:/
6 dr-x 0 <no date> memory1 -rw- 7786 Apr 22 2001 03:41:39 running-config
No space information availablennm3640-2# more system:running-config!! No configuration change since last restart
The Integrated File System Configuration Guide, Cisco IOS Release 15S 23
Using the Cisco IOS Integrated File SystemConfiguration Examples for Cisco IOS Integrated File System
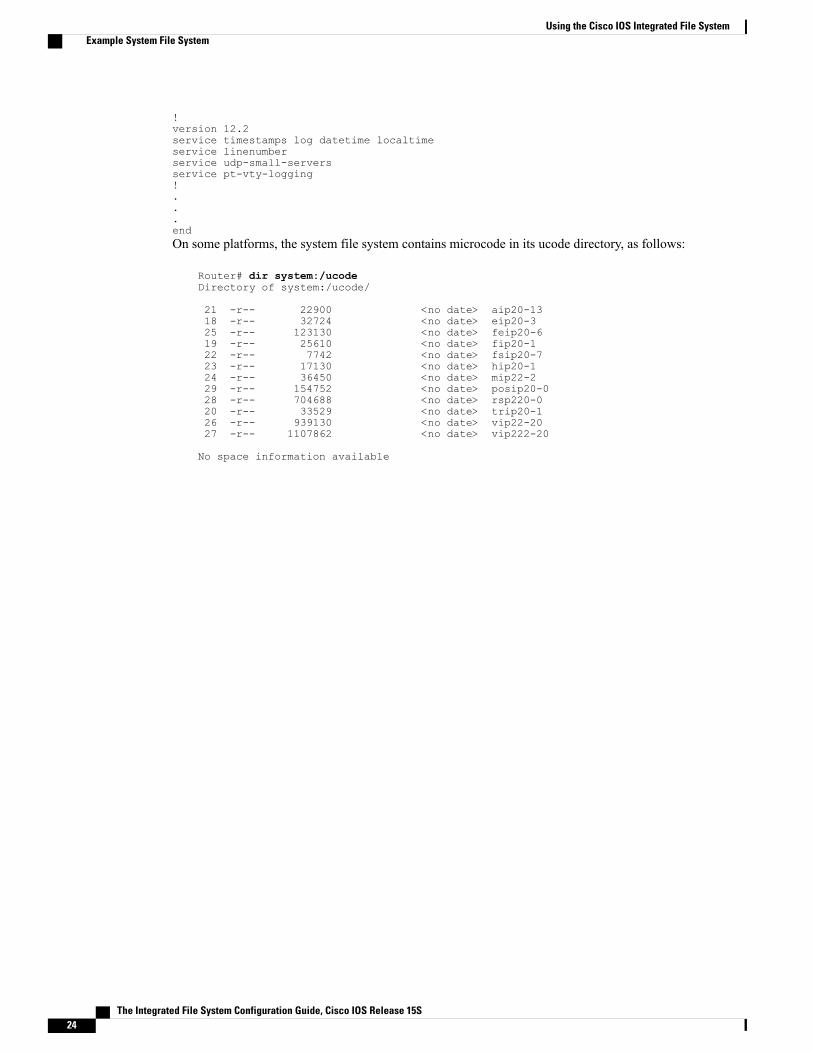
!version 12.2service timestamps log datetime localtimeservice linenumberservice udp-small-serversservice pt-vty-logging!...endOn some platforms, the system file system contains microcode in its ucode directory, as follows:
Router# dir system:/ucodeDirectory of system:/ucode/
21 -r-- 22900 <no date> aip20-1318 -r-- 32724 <no date> eip20-325 -r-- 123130 <no date> feip20-619 -r-- 25610 <no date> fip20-122 -r-- 7742 <no date> fsip20-723 -r-- 17130 <no date> hip20-124 -r-- 36450 <no date> mip22-229 -r-- 154752 <no date> posip20-028 -r-- 704688 <no date> rsp220-020 -r-- 33529 <no date> trip20-126 -r-- 939130 <no date> vip22-2027 -r-- 1107862 <no date> vip222-20
No space information available
The Integrated File System Configuration Guide, Cisco IOS Release 15S24
Using the Cisco IOS Integrated File SystemExample System File System

C H A P T E R 2File System Check and Repair for PCMCIA ATADisks
The File System Check and Repair for PCMCIA ATA Disks feature introduces a File-System-Check (fsck)utility in Cisco IOS software for File Allocation Table (FAT) filesystems on (Personal Computer MemoryCard International Association) PCMCIA disks. The utility performs functions such as checking the bootsector and partition table, checking the file and directory structure, reclaiming unused disk space, and updatingthe FAT file structure.
• Finding Feature Information, page 25
• Information About File System Check and Repair for PCMCIA ATA Disks, page 26
• How to Use the File System Check and Repair for PCMCIA ATA Disks, page 26
• Additional References, page 26
• Feature Information for File System Check and Repair for PCMCIA ATA Disks, page 27
Finding Feature InformationYour software release may not support all the features documented in this module. For the latest featureinformation and caveats, see the release notes for your platform and software release. To find informationabout the features documented in this module, and to see a list of the releases in which each feature is supported,see the Feature Information Table at the end of this document.
Use Cisco Feature Navigator to find information about platform support and Cisco software image support.To access Cisco Feature Navigator, go to www.cisco.com/go/cfn. An account on Cisco.com is not required.
The Integrated File System Configuration Guide, Cisco IOS Release 15S 25
Information About File System Check and Repair for PCMCIAATA Disks
File System Check and Repair for PCMCIA ATA Disks OverviewPrior to the introduction of the file system check (fsck) utility in Cisco IOS Release 12.2(13)T, corrupt filescould not be removed fromAdvanced Technology Attachment (ATA) disks using the Cisco IOS command-lineinterface (CLI).
Files (or file metadata) in an ATA disk can be corrupted by a variety of events, from power failures or systemcrashes to simple TFTP copy failures. Prior to the introduction of the file system check (fsck) utility, corruptedfiles could not be deleted from a usable ATA disk without removing, reformatting, and reinstalling the disk.
Thefsck privileged EXEC command allows you to conveniently recover wasted disk space directly from theCLI.
A FAT16 formatted disk can have only 512 root directory entries. This limits the maximum number offiles stored under the root directory. The number of root directory entries stored by a file is in proportionto the filename length. A FAT32 formatted disk does not have this root directory entry limitation. Asubdirectory of a FAT16 or FAT32 formatted disk also does not have any limitation on the maximumnumber of files stored in it.
Note
How to Use the File System Check and Repair for PCMCIA ATADisks
The fsck utility is enabled by default. No configuration is necessary. For more information, see the fsckcommand page.
Additional ReferencesThe following sections provide references related to the File System Check and Repair for PCMCIA ATADisks feature.
Related Documents
Document TitleRelated Topic
Cisco IOS Master Commands List, All ReleasesCisco IOS commands
Cisco IOS Configuration Fundamentals CommandReference
Configuration fundamental commands
The Integrated File System Configuration Guide, Cisco IOS Release 15S26
File System Check and Repair for PCMCIA ATA DisksInformation About File System Check and Repair for PCMCIA ATA Disks
Technical Assistance
LinkDescription
http://www.cisco.com/cisco/web/support/index.htmlThe Cisco Support website provides extensive onlineresources, including documentation and tools fortroubleshooting and resolving technical issues withCisco products and technologies.
To receive security and technical information aboutyour products, you can subscribe to various services,such as the Product Alert Tool (accessed from FieldNotices), the Cisco Technical Services Newsletter,and Really Simple Syndication (RSS) Feeds.
Access to most tools on the Cisco Support websiterequires a Cisco.com user ID and password.
Feature Information for File System Check and Repair forPCMCIA ATA Disks
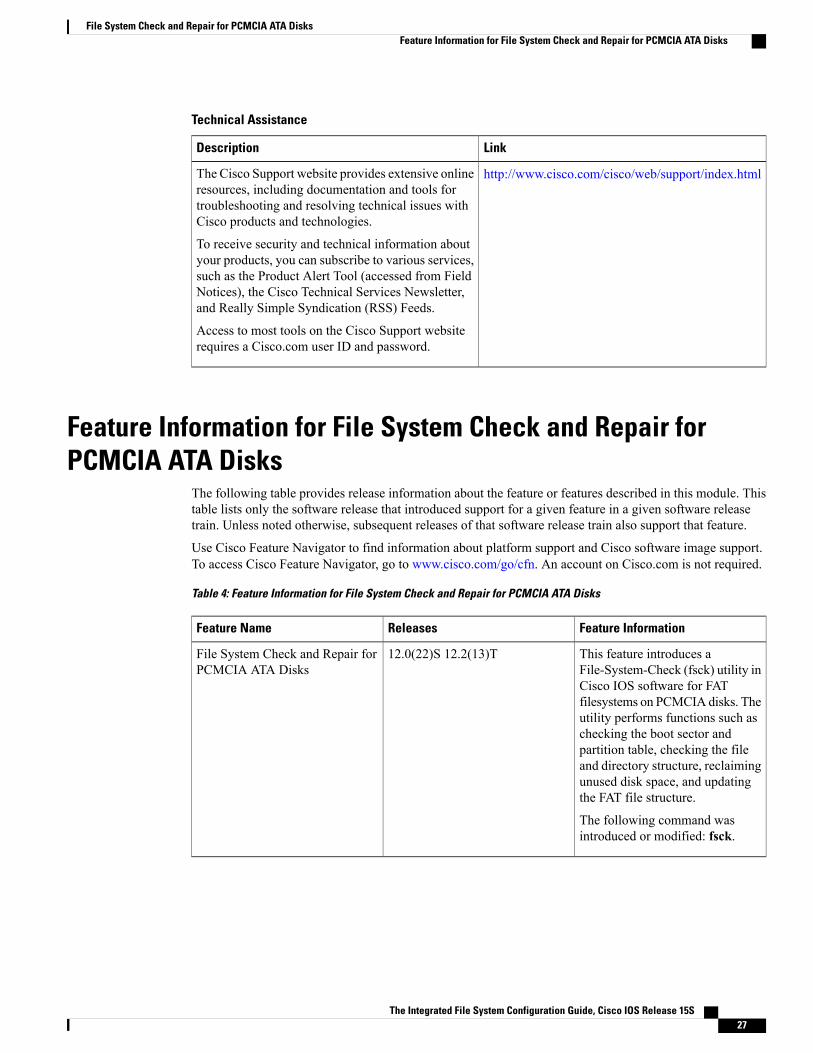
The following table provides release information about the feature or features described in this module. Thistable lists only the software release that introduced support for a given feature in a given software releasetrain. Unless noted otherwise, subsequent releases of that software release train also support that feature.
Use Cisco Feature Navigator to find information about platform support and Cisco software image support.To access Cisco Feature Navigator, go to www.cisco.com/go/cfn. An account on Cisco.com is not required.
Table 4: Feature Information for File System Check and Repair for PCMCIA ATA Disks
Feature InformationReleasesFeature Name
This feature introduces aFile-System-Check (fsck) utility inCisco IOS software for FATfilesystems on PCMCIA disks. Theutility performs functions such aschecking the boot sector andpartition table, checking the fileand directory structure, reclaimingunused disk space, and updatingthe FAT file structure.
The following command wasintroduced or modified: fsck.
12.0(22)S 12.2(13)TFile System Check and Repair forPCMCIA ATA Disks
The Integrated File System Configuration Guide, Cisco IOS Release 15S 27
File System Check and Repair for PCMCIA ATA DisksFeature Information for File System Check and Repair for PCMCIA ATA Disks

The Integrated File System Configuration Guide, Cisco IOS Release 15S28
File System Check and Repair for PCMCIA ATA DisksFeature Information for File System Check and Repair for PCMCIA ATA Disks
C H A P T E R 3Storing Data In USB
The Universal Serial Bus (USB) Storage feature enables certain models of Cisco routers to support USBflash modules and with SmartCard technology (which is owned by Aladdin Knowledge Systems) in a USBkey form factor (also referred to as a USB eToken) to provide secure access to a router.
USB eTokens provides secure configuration distribution and allows users to store Virtual Private Network(VPN) credentials for deployment. USB flash drives allow users to store images and configurations externalto the router.
• Finding Feature Information, page 29
• Prerequisites for Storing Data In USB, page 29
• Restrictions for Storing Data In USB, page 30
• Information About Storing Data In USB, page 30
• How to Set Up and Use USB Modules on Cisco Routers, page 33
• Configuration Examples for Secure Token Support, page 43
• Additional References, page 44
• Feature Information for Storing Data In USB, page 46
Finding Feature InformationYour software release may not support all the features documented in this module. For the latest featureinformation and caveats, see the release notes for your platform and software release. To find informationabout the features documented in this module, and to see a list of the releases in which each feature is supported,see the Feature Information Table at the end of this document.
Use Cisco Feature Navigator to find information about platform support and Cisco software image support.To access Cisco Feature Navigator, go to www.cisco.com/go/cfn. An account on Cisco.com is not required.
Prerequisites for Storing Data In USBBefore you can use a USB Flash module or an eToken, you should have the following system requirements:
The Integrated File System Configuration Guide, Cisco IOS Release 15S 29

• A Cisco 871 router, Cisco 1800 series, Cisco 2800 series, or a Cisco 3800 series router.
• At least a Cisco IOS Release 12.3(14)T image running on any of the supported platforms.
• A Cisco supported USB flash or USB eToken.
• A k9 image is required for USB eToken support. (However, USB flash support is available in all images.)
Restrictions for Storing Data In USB• USB eToken support requires a 3DES (k9) Cisco IOS software image, which provides secure file storage.
• USB hubs are currently not supported. Thus, the number of supported devices is limited to the numberof available USB ports on the router chassis.
• You cannot boot an image from an eToken or a USB flash. (However, you can boot a configurationfrom both an eToken and flash.)
Information About Storing Data In USBTo use a USB flashmodule and a secure eToken on your router, you should understand the following concepts:
Roles of the USB eToken and the USB FlashBoth USB eTokens and USB flash modules can be used to store files (such as router configurations). Thefollowing sections discuss how each device functions and describe the differences between each device:
How a USB eToken WorksA SmartCard is a small plastic card, containing a microprocessor and memory that allows you to store andprocess data. A SmartCard eToken is a SmartCard with a USB interface. The eToken can securely store anytype of file within its available storage space (32KB). Configuration files that are stored on the eToken canbe encrypted and accessed only via a user PIN. The router will not load the configuration file unless the properPIN has been configured for secure deployment of router configuration files.
After you plug the eToken into the router, you must log into the eToken; thereafter, you can change defaultsettings, such as the user PIN (default: 1234567890) and the allowed number of failed login attempts beforefuture logins are refused (default: 15 attempts). For more information on accessing and configuring the eToken,see the section “Accessing and Setting Up the eToken.”After you have successfully logged into the eToken, you can copy files from the router on to the eToken viathe copy command. By default, after the eToken is removed from the router, all associated RSA keys areremoved; IPSec tunnels are not torn down until the next Internet Key Exchange (IKE) negotiation period. (Tochange the default behavior and configure a specified length of time before the IPSec tunnels are torn down,issue the cryptopkitokenremovaltimeout command.)
The Integrated File System Configuration Guide, Cisco IOS Release 15S30
Storing Data In USBRestrictions for Storing Data In USB
How a USB Flash WorksA Cisco USB flash module allows you to store and deploy router configurations and Cisco IOS softwareimages. Cisco USB flash modules are available in 64MB, 128 MB, and 256MB versions.
The USB flash is not a replacement for the router compact flash, which must be present for the router toboot.
Note
After you plug the USB flash module into the router, the router will automatically begin to boot theconfiguration file if the start-up configuration contains the bootconfig command to specify the newconfiguration located on the USB flash device; for example bootconfigusbflash0:new-config
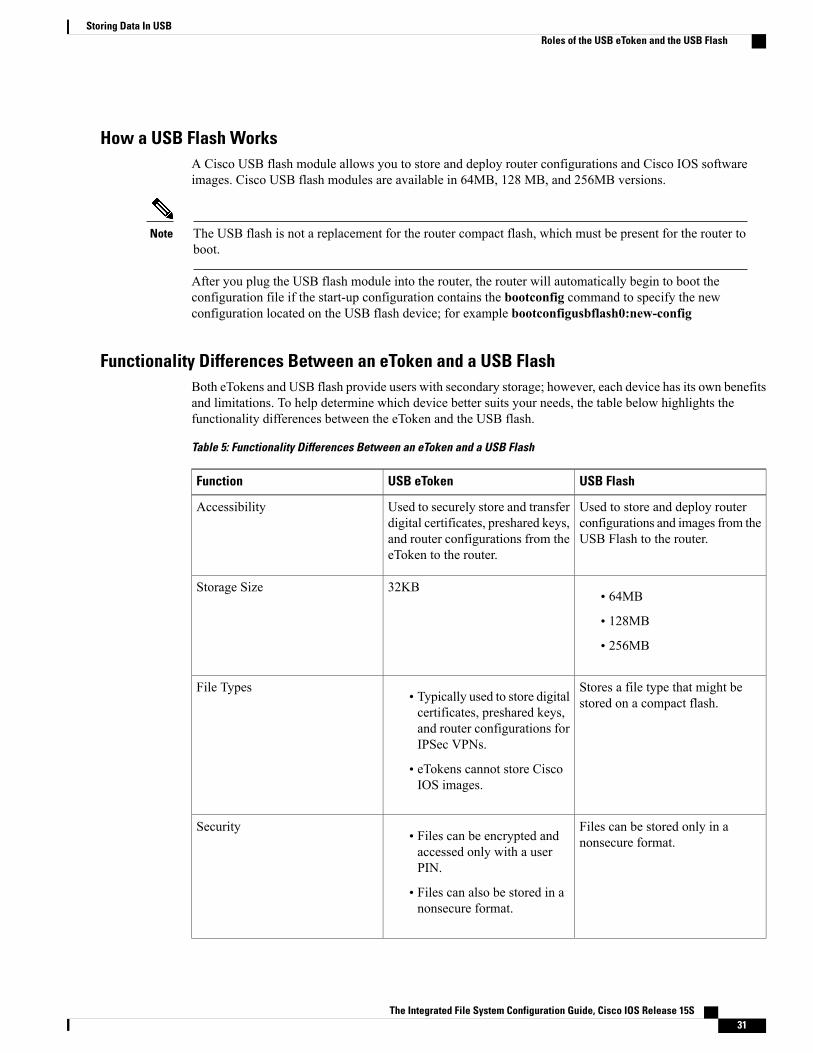
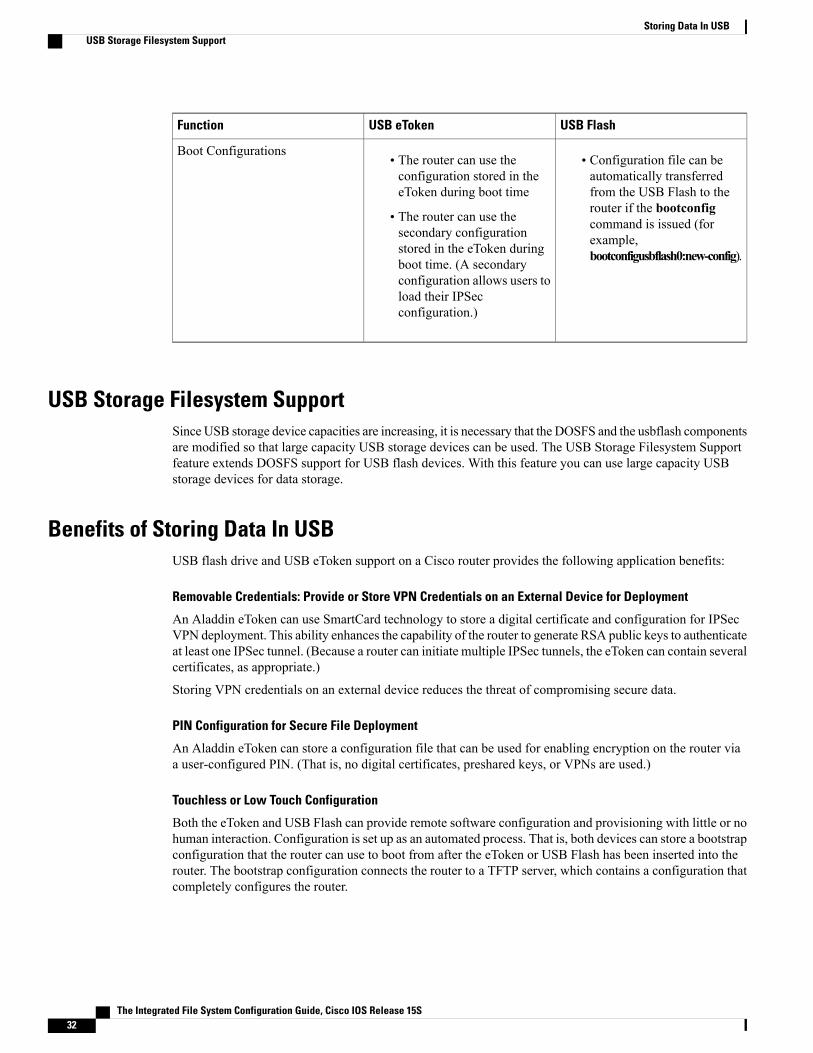
Functionality Differences Between an eToken and a USB FlashBoth eTokens and USB flash provide users with secondary storage; however, each device has its own benefitsand limitations. To help determine which device better suits your needs, the table below highlights thefunctionality differences between the eToken and the USB flash.
Table 5: Functionality Differences Between an eToken and a USB Flash
USB FlashUSB eTokenFunction
Used to store and deploy routerconfigurations and images from theUSB Flash to the router.
Used to securely store and transferdigital certificates, preshared keys,and router configurations from theeToken to the router.
Accessibility
• 64MB
• 128MB
• 256MB
32KBStorage Size
Stores a file type that might bestored on a compact flash.• Typically used to store digital
certificates, preshared keys,and router configurations forIPSec VPNs.
• eTokens cannot store CiscoIOS images.
File Types
Files can be stored only in anonsecure format.• Files can be encrypted and
accessed only with a userPIN.
• Files can also be stored in anonsecure format.
Security
The Integrated File System Configuration Guide, Cisco IOS Release 15S 31
Storing Data In USBRoles of the USB eToken and the USB Flash
USB FlashUSB eTokenFunction
• Configuration file can beautomatically transferredfrom the USB Flash to therouter if the bootconfigcommand is issued (forexample,bootconfigusbflash0:new-config).
• The router can use theconfiguration stored in theeToken during boot time
• The router can use thesecondary configurationstored in the eToken duringboot time. (A secondaryconfiguration allows users toload their IPSecconfiguration.)
Boot Configurations
USB Storage Filesystem SupportSince USB storage device capacities are increasing, it is necessary that the DOSFS and the usbflash componentsare modified so that large capacity USB storage devices can be used. The USB Storage Filesystem Supportfeature extends DOSFS support for USB flash devices. With this feature you can use large capacity USBstorage devices for data storage.
Benefits of Storing Data In USBUSB flash drive and USB eToken support on a Cisco router provides the following application benefits:
Removable Credentials: Provide or Store VPN Credentials on an External Device for Deployment
An Aladdin eToken can use SmartCard technology to store a digital certificate and configuration for IPSecVPN deployment. This ability enhances the capability of the router to generate RSA public keys to authenticateat least one IPSec tunnel. (Because a router can initiate multiple IPSec tunnels, the eToken can contain severalcertificates, as appropriate.)
Storing VPN credentials on an external device reduces the threat of compromising secure data.
PIN Configuration for Secure File Deployment
An Aladdin eToken can store a configuration file that can be used for enabling encryption on the router viaa user-configured PIN. (That is, no digital certificates, preshared keys, or VPNs are used.)
Touchless or Low Touch Configuration
Both the eToken and USB Flash can provide remote software configuration and provisioning with little or nohuman interaction. Configuration is set up as an automated process. That is, both devices can store a bootstrapconfiguration that the router can use to boot from after the eToken or USB Flash has been inserted into therouter. The bootstrap configuration connects the router to a TFTP server, which contains a configuration thatcompletely configures the router.
The Integrated File System Configuration Guide, Cisco IOS Release 15S32
Storing Data In USBUSB Storage Filesystem Support
Login Methods for the eToken
AutomaticLoginAutomatic login allows the router to completely come back up without any user or operator intervention. ThePIN is stored in the private configuration, so it is not visible in the startup or running configuration.
A hand-generated startup configuration can contain the automatic login command for deployment purposes,but the copysystem:running-confignvram:startup-config command must be issued to put thehand-generated configuration in the private configuration.
Note
Manual LoginManual login can be used when storing a PIN on the router is not desirable. Manual login can be executedwith or without privileges, and it will make files and RSA keys on the eToken available to the Cisco IOSsoftware. If a secondary configuration file is configured, it will only be executed with the privileges of theuser who is performing the login. Thus, if you want to use manual login and set up the secondary configurationon the eToken to perform anything useful, you need to enable privileges.
Manual login can also be used in recovery scenarios for which the router configuration has been lost. If thescenario contains a remote site that normally connects to the core network with a VPN, the loss of theconfiguration and RSA keys requires out-of-band services that the eToken can provide. The eToken cancontain a boot configuration, a secondary configuration, or both, and RSA keys to authenticate the connection.
Manual login may also be suitable for some initial deployment or hardware replacement scenarios for whichthe router is obtained from the local supplier or drop-shipped to the remote site.
Unlike automatic login, manual login requires the user to know the actual token PIN. The Aladdin’sWindows-based utilities can be used to copy the RSA keys and secondary config files from the eToken if theuser has physical access to the eToken.
How to Set Up and Use USB Modules on Cisco RoutersThis section contains the following procedures that allow you to configure a router to support USB modules:
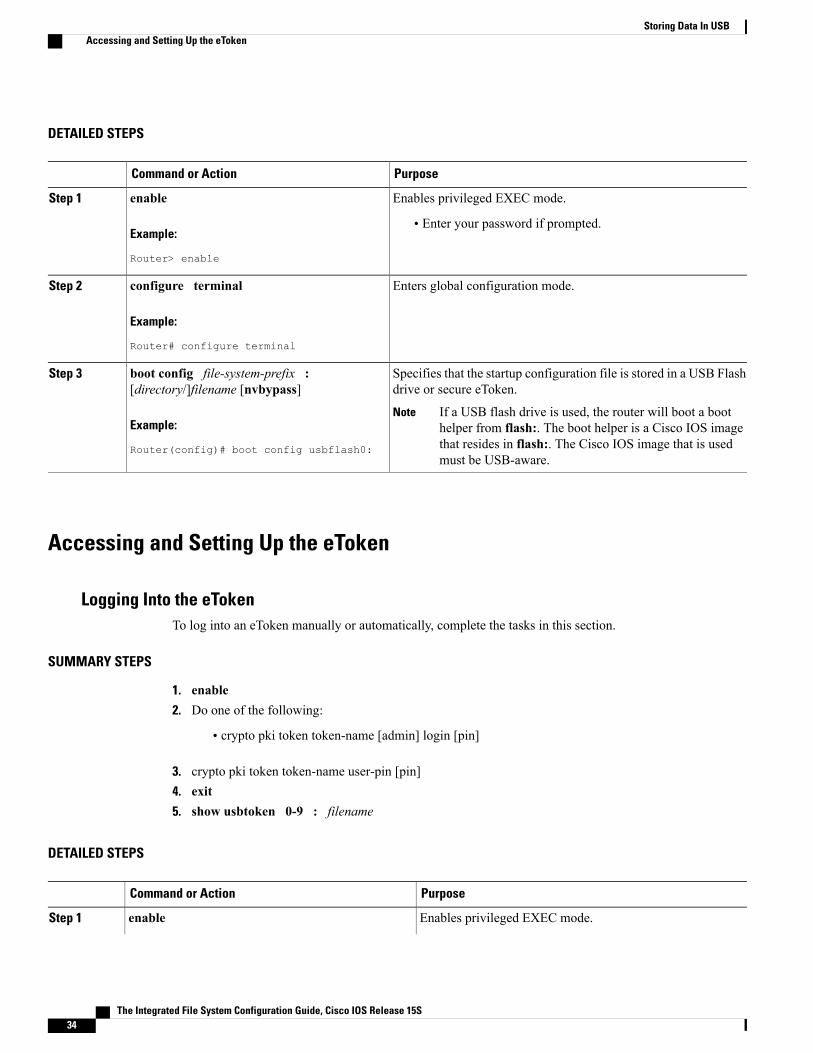
Storing the Configuration on an External USB Flash Drive or eTokenTo store the configuration file in the USB flash drive module or in an eToken, complete the tasks in thissection:
SUMMARY STEPS
1. enable2. configure terminal3. boot config file-system-prefix : [directory/]filename [nvbypass]
The Integrated File System Configuration Guide, Cisco IOS Release 15S 33
Storing Data In USBLogin Methods for the eToken
DETAILED STEPS
PurposeCommand or Action
Enables privileged EXEC mode.enableStep 1
Example:
Router> enable
• Enter your password if prompted.
Enters global configuration mode.configure terminal
Example:
Router# configure terminal
Step 2
Specifies that the startup configuration file is stored in a USB Flashdrive or secure eToken.
boot config file-system-prefix :[directory/]filename [nvbypass]
Step 3
Example:
Router(config)# boot config usbflash0:
If a USB flash drive is used, the router will boot a boothelper from flash:. The boot helper is a Cisco IOS imagethat resides in flash:. The Cisco IOS image that is usedmust be USB-aware.
Note
Accessing and Setting Up the eToken
Logging Into the eTokenTo log into an eToken manually or automatically, complete the tasks in this section.
SUMMARY STEPS
1. enable2. Do one of the following:
• crypto pki token token-name [admin] login [pin]
3. crypto pki token token-name user-pin [pin]4. exit5. show usbtoken 0-9 : filename
DETAILED STEPS
PurposeCommand or Action
Enables privileged EXEC mode.enableStep 1
The Integrated File System Configuration Guide, Cisco IOS Release 15S34
Storing Data In USBAccessing and Setting Up the eToken

PurposeCommand or Action
Example:
Router> enable
• Enter your password if prompted.
Manually logs into the eToken.Do one of the following:Step 2
You must specify the admin keyword if later you want tochange the user PIN.
• crypto pki token token-name [admin] login [pin]
Example:
Router# crypto pki token usbtoken0 admin login5678
or
Puts the router in global configuration mode, which allows youto configure automatic eToken login.
Example:
configure terminal
Example:
Router# configure terminal
(Optional) Creates a PIN that automatically allows the routerto log into the USB eToken at router startup.
crypto pki token token-name user-pin [pin]
Example:
Router(config)# crypto pki token usbtoken0user-pin 1234
Step 3
Do not issue this command if you have already set upmanual login.
Note
Exits global configuration mode.exit
Example:
Router(config)# exit
Step 4
(Optional) Verifies whether the USB eToken has been loggedonto the router.
show usbtoken 0-9 : filename
Example:
Router#
Step 5
What to Do Next
• RSA keys are loaded after the eToken is successfully logged into the router.
• By default, newly generated RSA keys are stored on the most recently inserted eToken. Regeneratedkeys should be stored in the same location that the original RSA key was generated.
The Integrated File System Configuration Guide, Cisco IOS Release 15S 35
Storing Data In USBAccessing and Setting Up the eToken
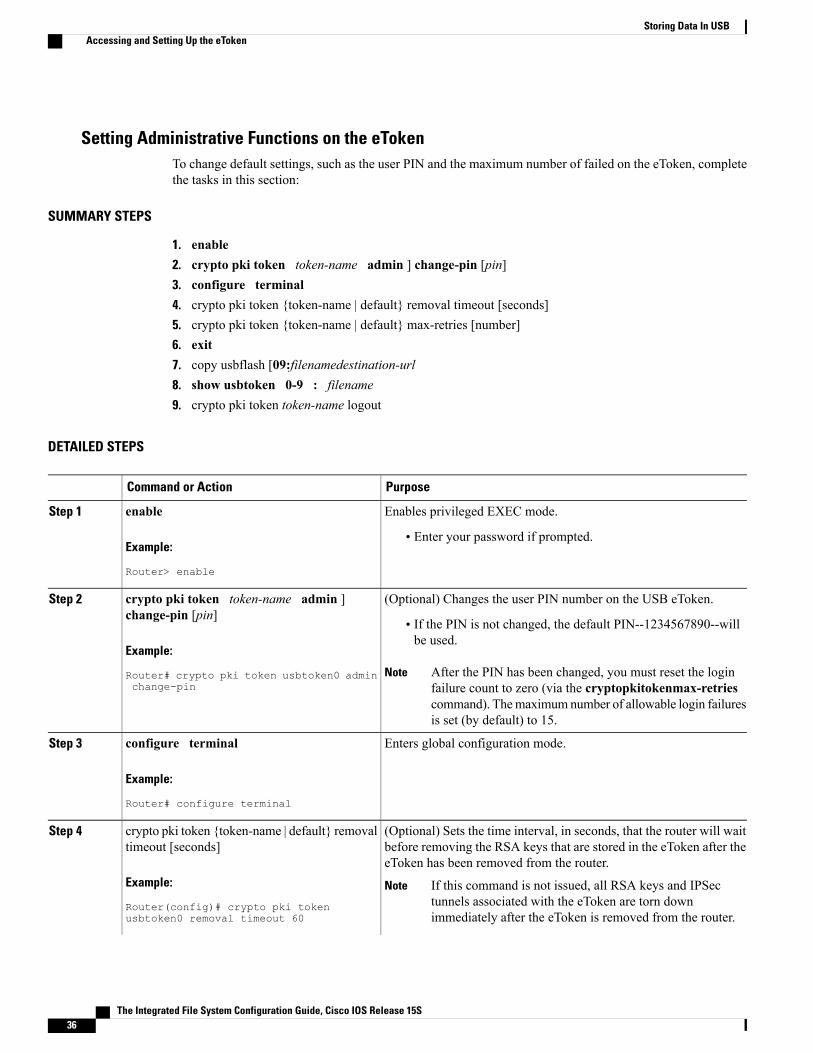
Setting Administrative Functions on the eTokenTo change default settings, such as the user PIN and the maximum number of failed on the eToken, completethe tasks in this section:
SUMMARY STEPS
1. enable2. crypto pki token token-name admin ] change-pin [pin]3. configure terminal4. crypto pki token {token-name | default} removal timeout [seconds]5. crypto pki token {token-name | default} max-retries [number]6. exit7. copy usbflash [09:filenamedestination-url8. show usbtoken 0-9 : filename9. crypto pki token token-name logout
DETAILED STEPS
PurposeCommand or Action
Enables privileged EXEC mode.enableStep 1
Example:
Router> enable
• Enter your password if prompted.
(Optional) Changes the user PIN number on the USB eToken.crypto pki token token-name admin ]change-pin [pin]
Step 2
• If the PIN is not changed, the default PIN--1234567890--willbe used.
Example:
Router# crypto pki token usbtoken0 adminchange-pin
After the PIN has been changed, you must reset the loginfailure count to zero (via the cryptopkitokenmax-retriescommand). Themaximumnumber of allowable login failuresis set (by default) to 15.
Note
Enters global configuration mode.configure terminal
Example:
Router# configure terminal
Step 3
(Optional) Sets the time interval, in seconds, that the router will waitbefore removing the RSA keys that are stored in the eToken after theeToken has been removed from the router.
crypto pki token {token-name | default} removaltimeout [seconds]
Example:
Router(config)# crypto pki tokenusbtoken0 removal timeout 60
Step 4
If this command is not issued, all RSA keys and IPSectunnels associated with the eToken are torn downimmediately after the eToken is removed from the router.
Note
The Integrated File System Configuration Guide, Cisco IOS Release 15S36
Storing Data In USBAccessing and Setting Up the eToken
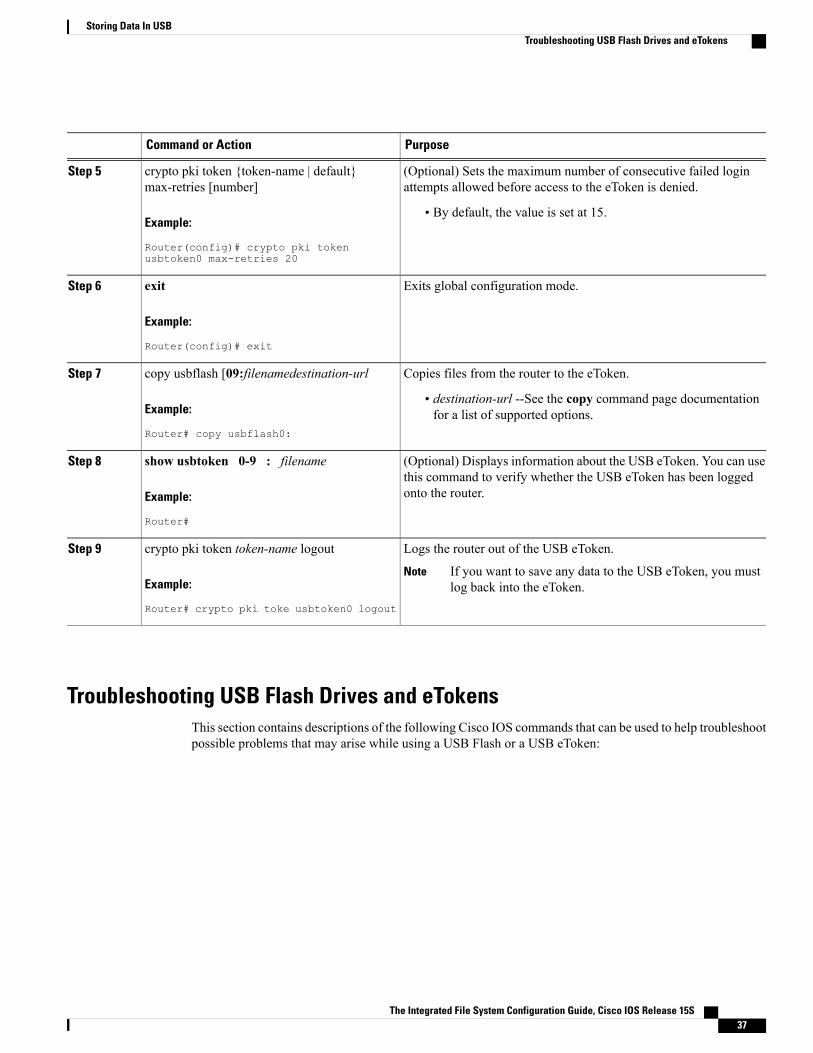
PurposeCommand or Action
(Optional) Sets the maximum number of consecutive failed loginattempts allowed before access to the eToken is denied.
crypto pki token {token-name | default}max-retries [number]
Step 5
Example:
Router(config)# crypto pki tokenusbtoken0 max-retries 20
• By default, the value is set at 15.
Exits global configuration mode.exit
Example:
Router(config)# exit
Step 6
Copies files from the router to the eToken.copy usbflash [09:filenamedestination-urlStep 7
Example:
Router# copy usbflash0:
• destination-url --See the copy command page documentationfor a list of supported options.
(Optional) Displays information about the USB eToken. You can usethis command to verify whether the USB eToken has been loggedonto the router.
show usbtoken 0-9 : filename
Example:
Router#
Step 8
Logs the router out of the USB eToken.crypto pki token token-name logoutStep 9
Example:
Router# crypto pki toke usbtoken0 logout
If you want to save any data to the USB eToken, you mustlog back into the eToken.
Note
Troubleshooting USB Flash Drives and eTokensThis section contains descriptions of the following Cisco IOS commands that can be used to help troubleshootpossible problems that may arise while using a USB Flash or a USB eToken:
The Integrated File System Configuration Guide, Cisco IOS Release 15S 37
Storing Data In USBTroubleshooting USB Flash Drives and eTokens

TheshowfilesystemsCommand
SUMMARY STEPS
1. Use theshowfilesystemscommand to determine whether the router recognizes that there is a USB moduleplugged into a USB port. The USB module should appear on the list of file systems. If the module doesnot appear on the list, it can indicate any of the following problems:
2. Use the showfilesystems command to determine if a USB Flash module is formatted properly. To becompatible with a Cisco router, a USB Flash module must be formatted in a FAT16 format. If that is notthe case, the showfilesystems command will display an error indicating an incompatible file system.
DETAILED STEPS
Step 1 Use theshowfilesystemscommand to determine whether the router recognizes that there is a USB module plugged intoa USB port. The USB module should appear on the list of file systems. If the module does not appear on the list, it canindicate any of the following problems:
• A connection problem with the USB module
• The Cisco IOS image running on the router does not support a USB module
• A hardware problem with the USB module itself
Step 2 Use the showfilesystems command to determine if a USB Flash module is formatted properly. To be compatible witha Cisco router, a USB Flash module must be formatted in a FAT16 format. If that is not the case, the showfilesystemscommand will display an error indicating an incompatible file system.Sample output from the showfilesystems command showing a USB Flash module and a USB eToken appear below.The USB module listing appears in the last line of the examples.
Example:
Router# show file systemsFile Systems:
Size(b) Free(b) Type Flags Prefixes- - opaque rw archive:- - opaque rw system:- - opaque rw null:- - network rw tftp:
* 129880064 69414912 disk rw flash:#491512 486395 nvram rw nvram:
- - opaque wo syslog:- - opaque rw xmodem:- - opaque rw ymodem:- - network rw rcp:- - network rw pram:- - network rw ftp:- - network rw http:- - network rw scp:- - network rw https:- - opaque ro cns:
63158272 33037312 usbflash rw usbflash0:32768 858 usbtoken rw usbtoken1:
The Integrated File System Configuration Guide, Cisco IOS Release 15S38
Storing Data In USBTroubleshooting USB Flash Drives and eTokens

The show usb device Command
SUMMARY STEPS
1. Use the showusbdevice command to determine if a USBmodule is supported by Cisco. The sample outputfor both the USB Flash and the USB eToken that indicates whether or not the module is supported arehighlighted in the sample outputs below.
DETAILED STEPS
Use the showusbdevice command to determine if a USB module is supported by Cisco. The sample output for both theUSB Flash and the USB eToken that indicates whether or not the module is supported are highlighted in the sampleoutputs below.The following sample output is for a USB Flash module:
Example:
Router# show usb deviceHost Controller:1Address:0x1Device Configured:YESDevice Supported:YESDescription:DiskOnKeyManufacturer:M-SysVersion:2.0Serial Number:0750D84030316868Device Handle:0x1000000USB Version Compliance:2.0Class Code:0x0Subclass Code:0x0Protocol:0x0Vendor ID:0x8ECProduct ID:0x15Max. Packet Size of Endpoint Zero:64Number of Configurations:1Speed:FullSelected Configuration:1Selected Interface:0Configuration:
Number:1Number of Interfaces:1Description:Attributes:NoneMax Power:140 mAInterface:
Number:0Description:Class Code:8Subclass:6Protocol:80Number of Endpoints:2Endpoint:
Number:1Transfer Type:BULKTransfer Direction:Device to HostMax Packet:64Interval:0
Endpoint:Number:2Transfer Type:BULKTransfer Direction:Host to Device
The Integrated File System Configuration Guide, Cisco IOS Release 15S 39
Storing Data In USBTroubleshooting USB Flash Drives and eTokens

Max Packet:64Interval:0
The following sample output is for a supported USB eToken:
Example:
Router# show usb deviceHost Controller:1Address:0x11Device Configured:YESDevice Supported:YESDescription:eToken Pro 4254Manufacturer:AKSVersion:1.0Serial Number:Device Handle:0x1010000USB Version Compliance:1.0Class Code:0xFFSubclass Code:0x0Protocol:0x0Vendor ID:0x529Product ID:0x514Max. Packet Size of Endpoint Zero:8Number of Configurations:1Speed:LowSelected Configuration:1Selected Interface:0Configuration:
Number:1Number of Interfaces:1Description:Attributes:NoneMax Power:60 mAInterface:
Number:0Description:Class Code:255Subclass:0Protocol:0Number of Endpoints:0
The show usb controllers Command
SUMMARY STEPS
1. Use the showusbcontrollers command to determine if there is a hardware problem with a USB Flashmodule. If the showusbcontrollers command displays an error, it indicates a hardware problem in theUSB module.
DETAILED STEPS
Use the showusbcontrollers command to determine if there is a hardware problem with a USB Flash module. If theshowusbcontrollers command displays an error, it indicates a hardware problem in the USB module.
The Integrated File System Configuration Guide, Cisco IOS Release 15S40
Storing Data In USBTroubleshooting USB Flash Drives and eTokens

You can also use the showusbcontrollers command to verify that copy operations onto a USB Flash module are occurringsuccessfully. Issuing the showusbcontrollers command after performing a file copy should display successful datatransfers.
Sample output for theshowusbcontrollers command for a working USB Flash module appears below:
Example:
Router# show usb controllersName:1362HCDController ID:1Controller Specific Information:
Revision:0x11Control:0x80Command Status:0x0Hardware Interrupt Status:0x24Hardware Interrupt Enable:0x80000040Hardware Interrupt Disable:0x80000040Frame Interval:0x27782EDFFrame Remaining:0x13C1Frame Number:0xDA4CLSThreshold:0x628RhDescriptorA:0x19000202RhDescriptorB:0x0RhStatus:0x0RhPort1Status:0x100103RhPort2Status:0x100303Hardware Configuration:0x3029DMA Configuration:0x0Transfer Counter:0x1Interrupt:0x9Interrupt Enable:0x196Chip ID:0x3630Buffer Status:0x0Direct Address Length:0x80A00ATL Buffer Size:0x600ATL Buffer Port:0x0ATL Block Size:0x100ATL PTD Skip Map:0xFFFFFFFFATL PTD Last:0x20ATL Current Active PTD:0x0ATL Threshold Count:0x1ATL Threshold Timeout:0xFF
Int Level:1Transfer Completion Codes:
Success :920 CRC :0Bit Stuff :0 Stall :0No Response :0 Overrun :0Underrun :0 Other :0Buffer Overrun :0 Buffer Underrun :0
Transfer Errors:Canceled Transfers :2 Control Timeout :0
Transfer Failures:Interrupt Transfer :0 Bulk Transfer :0Isochronous Transfer :0 Control Transfer:0
Transfer Successes:Interrupt Transfer :0 Bulk Transfer :26Isochronous Transfer :0 Control Transfer:894
USBD Failures:Enumeration Failures :0 No Class Driver Found:0Power Budget Exceeded:0
USB MSCD SCSI Class Driver Counters:Good Status Failures :3 Command Fail :0Good Status Timed out:0 Device not Found:0Device Never Opened :0 Drive Init Fail :0Illegal App Handle :0 Bad API Command :0Invalid Unit Number :0 Invalid Argument:0Application Overflow :0 Device in use :0
The Integrated File System Configuration Guide, Cisco IOS Release 15S 41
Storing Data In USBTroubleshooting USB Flash Drives and eTokens

Control Pipe Stall :0 Malloc Error :0Device Stalled :0 Bad Command Code:0Device Detached :0 Unknown Error :0Invalid Logic Unit Num:0
USB Aladdin Token Driver Counters:Token Inserted :1 Token Removed :0Send Insert Msg Fail :0 Response Txns :434Dev Entry Add Fail :0 Request Txns :434Dev Entry Remove Fail:0 Request Txn Fail:0Response Txn Fail :0 Command Txn Fail:0Txn Invalid Dev Handle:0
USB Flash File System Counters:Flash Disconnected :0 Flash Connected :1Flash Device Fail :0 Flash Ok :1Flash startstop Fail :0 Flash FS Fail :0
USB Secure Token File System Counters:Token Inserted :1 Token Detached :0Token FS success :1 Token FS Fail :0Token Max Inserted :0 Create Talker Failures:0Token Event :0 Destroy Talker Failures:0Watched Boolean Create Failures:0
The dir Command
SUMMARY STEPS
1. Use the dir command with the usbflash09: or the usbtoken09: keyword to display all files, directories,and their permission strings on the USB Flash or USB eToken.
DETAILED STEPS
Use the dir command with the usbflash09: or the usbtoken09: keyword to display all files, directories, and theirpermission strings on the USB Flash or USB eToken.The following sample output displays directory information for the USB Flash:
Example:
Router# dir usbflash0:Directory of usbflash0:/
1 -rw- 30125020 Dec 22 2032 05:31:32 +00:00 c3825-entservicesk9-mz.123-14.T63158272 bytes total (33033216 bytes free)
The following sample output displays directory information for the USB eToken:
Example:
Router# dir usbtoken1:Directory of usbtoken1:/
2 d--- 64 Dec 22 2032 05:23:40 +00:00 10005 d--- 4096 Dec 22 2032 05:23:40 +00:00 10018 d--- 0 Dec 22 2032 05:23:40 +00:00 100210 d--- 512 Dec 22 2032 05:23:42 +00:00 100312 d--- 0 Dec 22 2032 05:23:42 +00:00 500013 d--- 0 Dec 22 2032 05:23:42 +00:00 6000
The Integrated File System Configuration Guide, Cisco IOS Release 15S42
Storing Data In USBTroubleshooting USB Flash Drives and eTokens
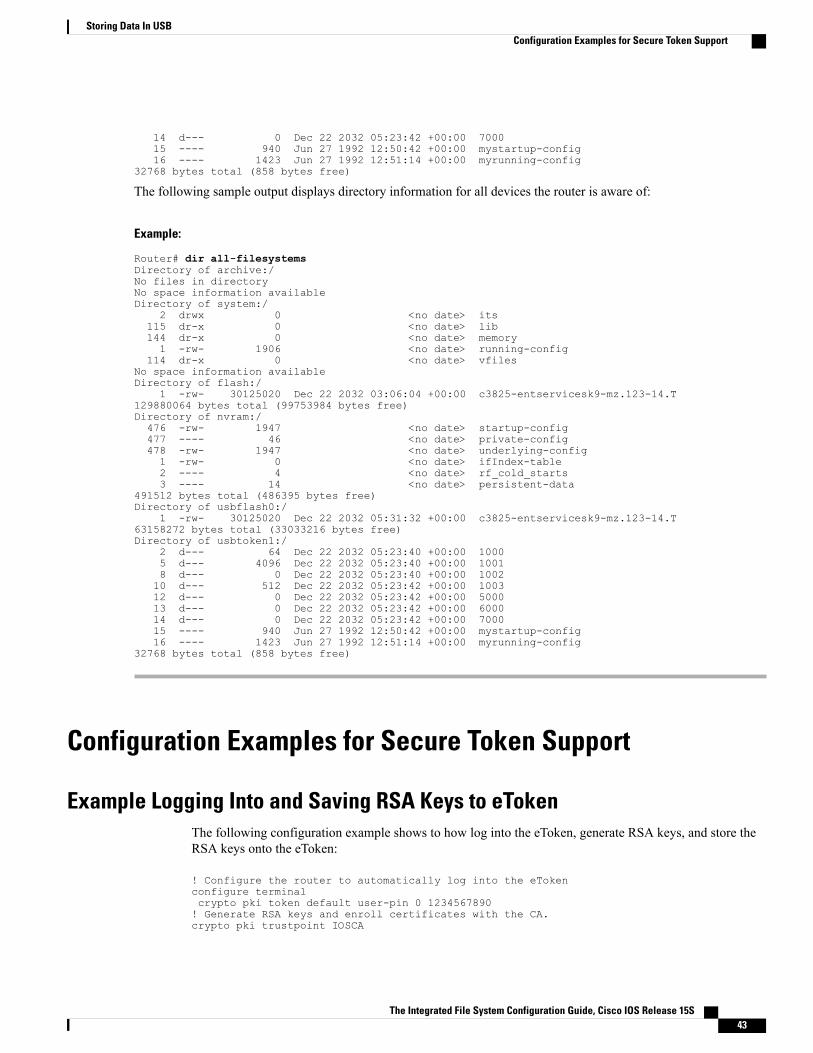
14 d--- 0 Dec 22 2032 05:23:42 +00:00 700015 ---- 940 Jun 27 1992 12:50:42 +00:00 mystartup-config16 ---- 1423 Jun 27 1992 12:51:14 +00:00 myrunning-config
32768 bytes total (858 bytes free)
The following sample output displays directory information for all devices the router is aware of:
Example:
Router# dir all-filesystemsDirectory of archive:/No files in directoryNo space information availableDirectory of system:/
2 drwx 0 <no date> its115 dr-x 0 <no date> lib144 dr-x 0 <no date> memory1 -rw- 1906 <no date> running-config
114 dr-x 0 <no date> vfilesNo space information availableDirectory of flash:/
1 -rw- 30125020 Dec 22 2032 03:06:04 +00:00 c3825-entservicesk9-mz.123-14.T129880064 bytes total (99753984 bytes free)Directory of nvram:/476 -rw- 1947 <no date> startup-config477 ---- 46 <no date> private-config478 -rw- 1947 <no date> underlying-config1 -rw- 0 <no date> ifIndex-table2 ---- 4 <no date> rf_cold_starts3 ---- 14 <no date> persistent-data
491512 bytes total (486395 bytes free)Directory of usbflash0:/
1 -rw- 30125020 Dec 22 2032 05:31:32 +00:00 c3825-entservicesk9-mz.123-14.T63158272 bytes total (33033216 bytes free)Directory of usbtoken1:/
2 d--- 64 Dec 22 2032 05:23:40 +00:00 10005 d--- 4096 Dec 22 2032 05:23:40 +00:00 10018 d--- 0 Dec 22 2032 05:23:40 +00:00 100210 d--- 512 Dec 22 2032 05:23:42 +00:00 100312 d--- 0 Dec 22 2032 05:23:42 +00:00 500013 d--- 0 Dec 22 2032 05:23:42 +00:00 600014 d--- 0 Dec 22 2032 05:23:42 +00:00 700015 ---- 940 Jun 27 1992 12:50:42 +00:00 mystartup-config16 ---- 1423 Jun 27 1992 12:51:14 +00:00 myrunning-config
32768 bytes total (858 bytes free)
Configuration Examples for Secure Token Support
Example Logging Into and Saving RSA Keys to eTokenThe following configuration example shows to how log into the eToken, generate RSA keys, and store theRSA keys onto the eToken:
! Configure the router to automatically log into the eTokenconfigure terminalcrypto pki token default user-pin 0 1234567890! Generate RSA keys and enroll certificates with the CA.crypto pki trustpoint IOSCA
The Integrated File System Configuration Guide, Cisco IOS Release 15S 43
Storing Data In USBConfiguration Examples for Secure Token Support

enrollment url http://10.23.2.2exitcrypto ca authenticate IOSCACertificate has the following attributes:
Fingerprint MD5:23272BD4 37E3D9A4 236F7E1A F534444EFingerprint SHA1:D1B4D9F8 D603249A 793B3CAF 8342E1FE 3934EB7A
% Do you accept this certificate? [yes/no]:yesTrustpoint CA certificate accepted.crypto pki enrollcrypto pki enroll IOSCA%% Start certificate enrollment ..% Create a challenge password. You will need to verbally provide this
password to the CA Administrator in order to revoke your certificate.For security reasons your password will not be saved in the configuration.Please make a note of it.
Password:Re-enter password:% The subject name in the certificate will include:c2851-27.cisco.com% Include the router serial number in the subject name? [yes/no]:no% Include an IP address in the subject name? [no]:noRequest certificate from CA? [yes/no]:yes% Certificate request sent to Certificate Authority% The 'show crypto ca certificate IOSCA verbose' command will show the fingerprint.*Jan 13 06:47:19.413:CRYPTO_PKI: Certificate Request Fingerprint MD5:E6DDAB1B0E30EFE6 54529D8A DA787DBA*Jan 13 06:47:19.413:CRYPTO_PKI: Certificate Request Fingerprint SHA1:3B0F33B7 57C02A10 3935042B C4B6CD3D 61039251*Jan 13 06:47:21.021:%PKI-6-CERTRET:Certificate received from Certificate Authority! Issue the write memory command, which will automatically save the RSA keys to the eToken! instead of private NVRAM.Router# write memoryBuilding configuration...[OK]*Jan 13 06:47:29.481:%CRYPTO-6-TOKENSTOREKEY:Key c2851-27.cisco.com stored onCryptographic Token eToken SuccessfullyThe following sample output from the showcryptokeymypubkeyrsa command displays stored credentialsafter they are successfully load from the eToken. Credentials that are stored on the eToken are in the protectedarea. When storing the credentials on the eToken, the files are stored in a directory called /keystore. However,the key files are hidden from the CLI.
Router#show crypto key mypubkey rsa% Key pair was generated at:06:37:26 UTC Jan 13 2005Key name:c2851-27.cisco.comUsage:General Purpose KeyKey is not exportable.Key Data:305C300D 06092A86 4886F70D 01010105 00034B00 30480241 00E3C644 43AA7DDD732E0F4E 3CA0CDAB 387ABF05 EB8F22F2 2431F1AE 5D51FEE3 FCDEA934 7FBD36037C977854 B8E999BF 7FC93021 7F46ABF8 A4BA2ED6 172D3D09 B5020301 0001
% Key pair was generated at:06:37:27 UTC Jan 13 2005Key name:c2851-27.cisco.com.serverUsage:Encryption KeyKey is not exportable.Key Data:307C300D 06092A86 4886F70D 01010105 00036B00 30680261 00DD96AE 4BF912EB2C261922 4784EF98 2E70E837 774B3778 7F7AEB2D 87F5669B BF5DDFBC F0D521A556AB8FDC 9911968E DE347FB0 A514A856 B30EAFF4 D1F453E1 003CFE65 0CCC6DC721FBE3AC 2F8DEA16 126754BC 1433DEF9 53266D33 E7338C95 BB020301 0001
Additional ReferencesThe following sections provide references related to the Storing data using USB feature.
The Integrated File System Configuration Guide, Cisco IOS Release 15S44
Storing Data In USBAdditional References
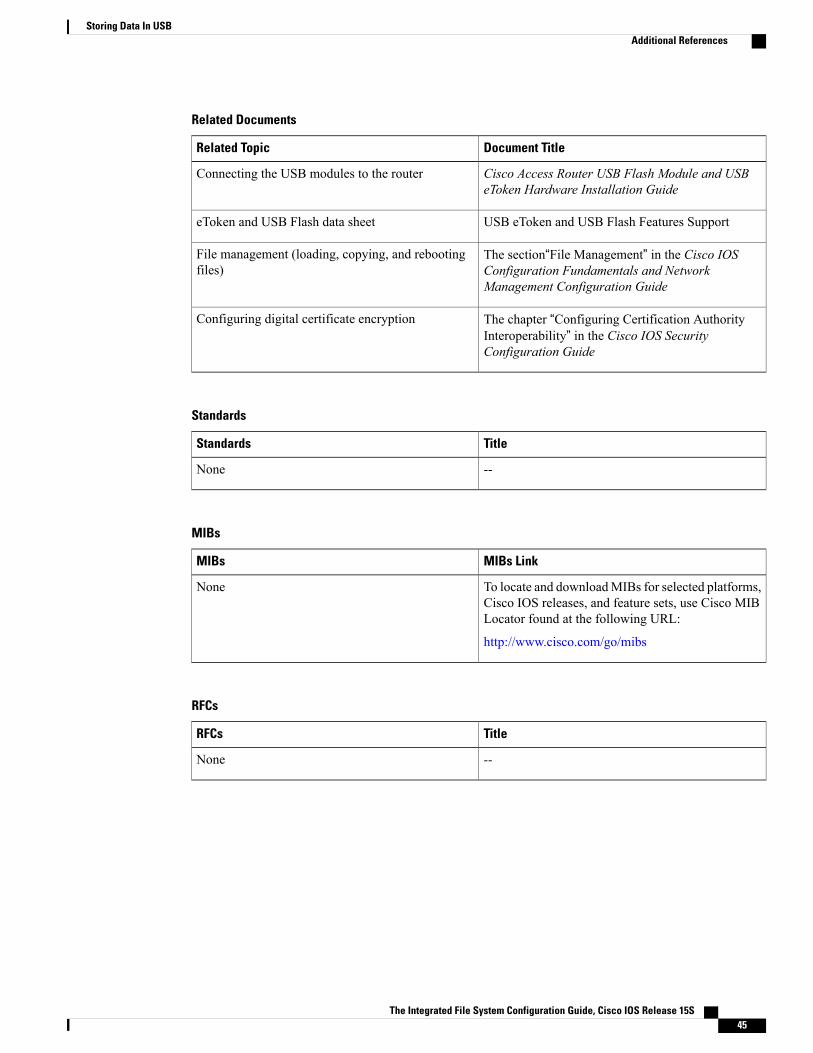
Related Documents
Document TitleRelated Topic
Cisco Access Router USB Flash Module and USBeToken Hardware Installation Guide
Connecting the USB modules to the router
USB eToken and USB Flash Features SupporteToken and USB Flash data sheet
The section“File Management” in the Cisco IOSConfiguration Fundamentals and NetworkManagement Configuration Guide
File management (loading, copying, and rebootingfiles)
The chapter “Configuring Certification AuthorityInteroperability” in the Cisco IOS SecurityConfiguration Guide
Configuring digital certificate encryption
Standards
TitleStandards
--None
MIBs
MIBs LinkMIBs
To locate and downloadMIBs for selected platforms,Cisco IOS releases, and feature sets, use Cisco MIBLocator found at the following URL:
http://www.cisco.com/go/mibs
None
RFCs
TitleRFCs
--None
The Integrated File System Configuration Guide, Cisco IOS Release 15S 45
Storing Data In USBAdditional References
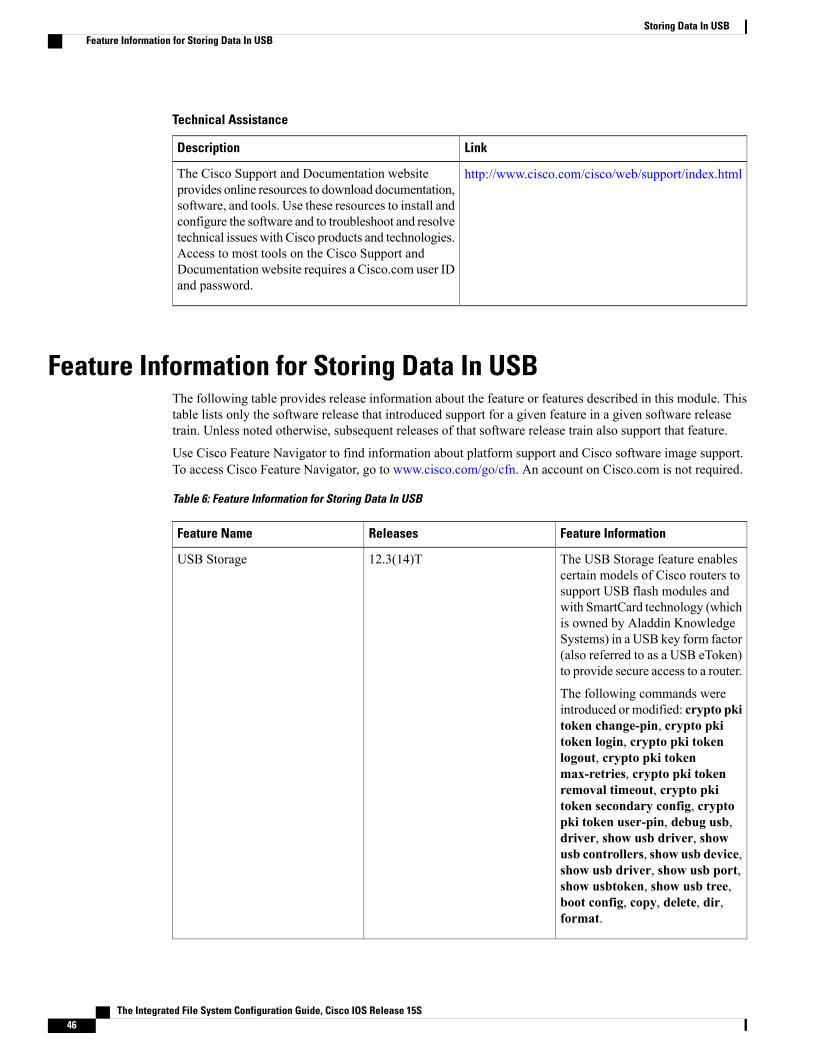
Technical Assistance
LinkDescription
http://www.cisco.com/cisco/web/support/index.htmlThe Cisco Support and Documentation websiteprovides online resources to download documentation,software, and tools. Use these resources to install andconfigure the software and to troubleshoot and resolvetechnical issues with Cisco products and technologies.Access to most tools on the Cisco Support andDocumentation website requires a Cisco.com user IDand password.
Feature Information for Storing Data In USBThe following table provides release information about the feature or features described in this module. Thistable lists only the software release that introduced support for a given feature in a given software releasetrain. Unless noted otherwise, subsequent releases of that software release train also support that feature.
Use Cisco Feature Navigator to find information about platform support and Cisco software image support.To access Cisco Feature Navigator, go to www.cisco.com/go/cfn. An account on Cisco.com is not required.
Table 6: Feature Information for Storing Data In USB
Feature InformationReleasesFeature Name
The USB Storage feature enablescertain models of Cisco routers tosupport USB flash modules andwith SmartCard technology (whichis owned by Aladdin KnowledgeSystems) in a USB key form factor(also referred to as a USB eToken)to provide secure access to a router.
The following commands wereintroduced or modified: crypto pkitoken change-pin, crypto pkitoken login, crypto pki tokenlogout, crypto pki tokenmax-retries, crypto pki tokenremoval timeout, crypto pkitoken secondary config, cryptopki token user-pin, debug usb,driver, show usb driver, showusb controllers, show usb device,show usb driver, show usb port,show usbtoken, show usb tree,boot config, copy, delete, dir,format.
12.3(14)TUSB Storage
The Integrated File System Configuration Guide, Cisco IOS Release 15S46
Storing Data In USBFeature Information for Storing Data In USB

Feature InformationReleasesFeature Name
The USB Storage FilesystemSupport feature extends DOSFSsupport for USB flash devices.With this feature you can use largecapacity USB storage devices fordata storage.
In 12.2(33)SRE, this feature wasintroduced on the Cisco7200-NPE-G2.
The following commands wereintroduced or modified: cd, verify,mkdir, fsck.
12.2(33)SREUSB Storage Filesystem Support
The Integrated File System Configuration Guide, Cisco IOS Release 15S 47
Storing Data In USBFeature Information for Storing Data In USB

The Integrated File System Configuration Guide, Cisco IOS Release 15S48
Storing Data In USBFeature Information for Storing Data In USB
C H A P T E R 4Configuring Basic File Transfer Services
Using basic file transfer services, you can configure a router as a Trivial File Transfer Protocol (TFTP) orReverse Address Resolution Protocol (RARP) server, configure the router to forward extended BOOTPrequests over asynchronous interfaces, and configure rcp, rsh, and FTP.
• Finding Feature Information, page 49
• Prerequisites for Basic File Transfer Services, page 49
• Restrictions for Basic File Transfer Services, page 49
• Information About Basic File Transfer Services , page 50
• How to Configure Basic File Transfer Services, page 53
Finding Feature InformationYour software release may not support all the features documented in this module. For the latest featureinformation and caveats, see the release notes for your platform and software release. To find informationabout the features documented in this module, and to see a list of the releases in which each feature is supported,see the Feature Information Table at the end of this document.
Use Cisco Feature Navigator to find information about platform support and Cisco software image support.To access Cisco Feature Navigator, go to www.cisco.com/go/cfn. An account on Cisco.com is not required.
Prerequisites for Basic File Transfer Services• You should have at least a basic familiarity with the Cisco IOS environment and the command-lineinterface.
• You should have at least a minimal configuration running on your system.
Restrictions for Basic File Transfer Services• You must have your network up and running, with Cisco IOS Release 12.2 or a later release installed.
The Integrated File System Configuration Guide, Cisco IOS Release 15S 49
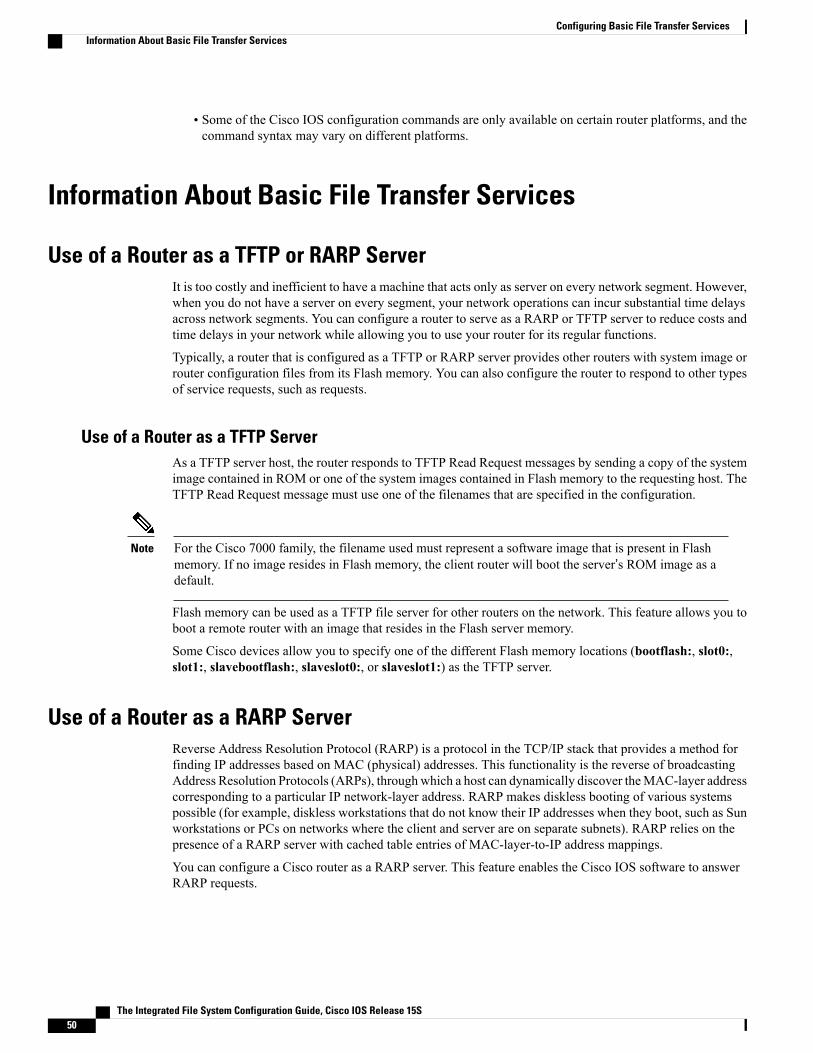
• Some of the Cisco IOS configuration commands are only available on certain router platforms, and thecommand syntax may vary on different platforms.
Information About Basic File Transfer Services
Use of a Router as a TFTP or RARP ServerIt is too costly and inefficient to have a machine that acts only as server on every network segment. However,when you do not have a server on every segment, your network operations can incur substantial time delaysacross network segments. You can configure a router to serve as a RARP or TFTP server to reduce costs andtime delays in your network while allowing you to use your router for its regular functions.
Typically, a router that is configured as a TFTP or RARP server provides other routers with system image orrouter configuration files from its Flash memory. You can also configure the router to respond to other typesof service requests, such as requests.
Use of a Router as a TFTP ServerAs a TFTP server host, the router responds to TFTP Read Request messages by sending a copy of the systemimage contained in ROM or one of the system images contained in Flash memory to the requesting host. TheTFTP Read Request message must use one of the filenames that are specified in the configuration.
For the Cisco 7000 family, the filename used must represent a software image that is present in Flashmemory. If no image resides in Flash memory, the client router will boot the server’s ROM image as adefault.
Note
Flash memory can be used as a TFTP file server for other routers on the network. This feature allows you toboot a remote router with an image that resides in the Flash server memory.
Some Cisco devices allow you to specify one of the different Flash memory locations (bootflash:, slot0:,slot1:, slavebootflash:, slaveslot0:, or slaveslot1:) as the TFTP server.
Use of a Router as a RARP ServerReverse Address Resolution Protocol (RARP) is a protocol in the TCP/IP stack that provides a method forfinding IP addresses based on MAC (physical) addresses. This functionality is the reverse of broadcastingAddress Resolution Protocols (ARPs), through which a host can dynamically discover theMAC-layer addresscorresponding to a particular IP network-layer address. RARP makes diskless booting of various systemspossible (for example, diskless workstations that do not know their IP addresses when they boot, such as Sunworkstations or PCs on networks where the client and server are on separate subnets). RARP relies on thepresence of a RARP server with cached table entries of MAC-layer-to-IP address mappings.
You can configure a Cisco router as a RARP server. This feature enables the Cisco IOS software to answerRARP requests.
The Integrated File System Configuration Guide, Cisco IOS Release 15S50
Configuring Basic File Transfer ServicesInformation About Basic File Transfer Services

Use of a Router for rsh and rcpRemote shell (rsh) gives users the ability to execute commands remotely. Remote copy (rcp) allows users tocopy files to and from a file system residing on a remote host or server on the network. Cisco’s implementationof rsh and rcp interoperates with the industry standard implementations. Cisco uses the abbreviation RCMD(Remote Command) to indicate both rsh and rcp.
Source Interface for Outgoing RCMD CommunicationsYou can specify the source interface for RCMD (rsh and rcp) communications. For example, the router canbe configured so that RCMD connections use the loopback interface as the source address of all packetsleaving the router. Specifying the source-interface is most commonly used to specify a loopback interface.This allows you to associate a permanent IP address with RCMD communications. Having a permanent IPaddress is useful for session identification (remote device can consistently idendify the origin of packets forthe session). A “well-known” IP address can also be used for security purposes, as you can then create accesslists on remote devices which include the address.
About DNS Reverse Lookup for rcmdAs a basic security check, the Cisco IOS software does a reverse lookup of the client IP address using DNSfor the remote command (rcmd) applications (rsh and rcp). This check is performed using a host authenticationprocess.
When enabled, the system records the address of the requesting client. That address is mapped to a host nameusing DNS. Then a DNS request is made for the IP address for that host name. The IP address received isthen checked against the original requesting address. If the address does not match with any of the addressesreceived from DNS, the rcmd request will not be serviced.
This reverse lookup is intended to help protect against “spoofing.” However, please note that the process onlyconfirms that the IP address is a valid routable address; it is still possible for a hacker to spoof the valid IPaddress of a known host.
Implementation of rshYou can use rsh (remote shell) to execute commands on remote systems to which you have access. When youissue the rsh command, a shell is started on the remote system. The shell allows you to execute commandson the remote system without having to log in to the target host.
You do not need to connect to the system, router, or access server and then disconnect after you execute acommand if you use rsh. For example, you can use rsh to remotely look at the status of other devices withoutconnecting to the target device, executing the command, and then disconnecting. This capability is useful forlooking at statistics on many different routers. Configuration commands for enabling rsh use the acronym“rcmd”, which is short for “remote command”.
Maintaining rsh Security
To gain access to a remote system running rsh, such as a UNIX host, an entry must exist in the system’s .rhostsfile or its equivalent identifying you as a user who is authorized to execute commands remotely on the system.On UNIX systems, the .rhosts file identifies users who can remotely execute commands on the system.
The Integrated File System Configuration Guide, Cisco IOS Release 15S 51
Configuring Basic File Transfer ServicesUse of a Router for rsh and rcp
You can enable rsh support on a router to allow users on remote systems to execute commands. However,our implementation of rsh does not support an .rhosts file. Instead, you must configure a local authenticationdatabase to control access to the router by users attempting to execute commands remotely using rsh. A localauthentication database is similar to a UNIX .rhosts file. Each entry that you configure in the authenticationdatabase identifies the local user, the remote host, and the remote user.
Implementation of rcpThe remote copy (rcp) commands rely on the rsh server (or daemon) on the remote system. To copy filesusing rcp, you do not need to create a server for file distribution, as you do with TFTP. You need only to haveaccess to a server that supports the remote shell (rsh). (Most UNIX systems support rsh.) Because you arecopying a file from one place to another, you must have read permission on the source file and write permissionin the destination directory. If the destination file does not exist, rcp creates it for you.
Although Cisco’s rcp implementation emulates the functions of the UNIX rcp implementation--copying filesamong systems on the network--Cisco’s command syntax differs from the UNIX rcp command syntax. TheCisco IOS software offers a set of copy commands that use rcp as the transport mechanism. These rcp copycommands are similar in style to the Cisco IOS TFTP copy commands, but they offer an alternative thatprovides faster performance and reliable delivery of data. These improvements are possible because the rcptransport mechanism is built on and uses the Transmission Control Protocol/Internet Protocol (TCP/IP) stack,which is connection-oriented. You can use rcp commands to copy system images and configuration files fromthe router to a network server and vice versa.
You can also enable rcp support to allow users on remote systems to copy files to and from the router.
If you do not specify the/user keyword and argument, the Cisco IOS software sends a default remote username.As the default value of the remote username, the software sends the remote username associated with thecurrent tty process, if that name is valid. If the tty remote username is invalid, the software uses the routerhost name as the both the remote and local usernames.
Configure the Remote Client to Send rcp Requests
The rcp protocol requires a client to send a remote username on each rcp request to a server. When you copya configuration file from a server to the router using rcp, the Cisco IOS software sends the first valid usernamein the following list:
1 The username set by the iprcmdremote-username command, if the command is configured.
2 The remote username associated with the current tty (terminal) process. For example, if the user is connectedto the router through Telnet and was authenticated through the username command, the router softwaresends the Telnet username as the remote username.
In Cisco products, ttys are commonly used in access servers. The concept of tty originated with UNIX.For UNIX systems, each physical device is represented in the file system. Terminals are called tty devices, which stands for teletype , the original UNIX terminal.
Note
1 The router host name.
For bootcommands using rcp, the software sends the router host name; you cannot explicitly configure theremote username.
The Integrated File System Configuration Guide, Cisco IOS Release 15S52
Configuring Basic File Transfer ServicesUse of a Router for rsh and rcp
For the rcp copy request to execute successfully, an account must be defined on the network server for theremote username.
If you are writing to the server, the rcp server must be properly configured to accept the rcp write requestfrom the user on the router. For UNIX systems, you must add an entry to the .rhosts file for the remote useron the rcp server. For example, if the router contains the following configuration lines.
hostname Rtr1ip rcmd remote-username User0and the router’s IP address translates to Router1.company.com, then the .rhosts file for User0 on the rcp servershould contain the following line:
Router1.company.com Rtr1Refer to the documentation for your rcp server for more details.
If the server has a directory structure, the configuration file or image is written or copied relative to the directoryassociated with the remote username on the server. Use the iprcmdremote-username command to specifywhich directory on the server to use. For example, if the system image resides in the home directory of a useron the server, you can specify that user’s name as the remote username.
If you copy the configuration file to a personalcomputer used as a file server, the computer must support rsh.
Use of a Router for FTP ConnectionsYou can configure a router to transfer files between systems on the network using the File Transfer Protocol(FTP). With the Cisco IOS implementation of FTP, you can set the following FTP characteristics:
• Passive-mode FTP
• User name
• Password
• IP address
How to Configure Basic File Transfer Services
Configuring the Router for Use as a TFTP ServerTo configure your router for use as a TFTP server, complete the tasks in this section.
Before You Begin
The server and client router must be able to reach each other before the TFTP function can be implemented.Verify this connection by testing the connection between the server and client router (in either direction) usingthe pinga.b.c.d command (where a.b.c.d is the address of the client device). After th eping command isissued, connectivity is indicated by a series of exclamation points (!), while a series of periods (.) plus [timedout] or [failed] indicates that the connection attempt failed. If the connection fails, reconfigure the interface,check the physical connection between the Flash server and client router, andping again.
The Integrated File System Configuration Guide, Cisco IOS Release 15S 53
Configuring Basic File Transfer ServicesUse of a Router for FTP Connections
After you verify the connection, ensure that a TFTP-bootable image is present on the server. This is the systemsoftware image the client router will boot. Note the name of this software image so you can verify it after thefirst client boot.
For full functionality, the software image sent to the client must be the same type as the ROM softwareinstalled on the client router. For example, if the server has X.25 software, and the client does not haveX.25 software in ROM, the client will not have X.25 capabilities after booting from the server’s image inFlash memory.
Caution
SUMMARY STEPS
1. enable2. configure terminal3. Do one of the following:
• tftp-server flash [partition-number:]filename1 [aliasfilename2 ] [access-list-number ]
••• tftp-server flash device : filename (Cisco 7000 family only)
••• tftp-server flash [device:][partition-number:]filename (Cisco 1600 series and Cisco 3600 seriesonly)
••• tftp-server rom alias filename1 [access-list-number ]
4. end5. copy running-config startup-config
DETAILED STEPS
PurposeCommand or Action
Enables privileged EXEC mode.enableStep 1
Example:
Router> enable
• Enter your password if prompted.
Enters global configuration mode.configure terminal
Example:
Router# configure terminal
Step 2
The Integrated File System Configuration Guide, Cisco IOS Release 15S54
Configuring Basic File Transfer ServicesConfiguring the Router for Use as a TFTP Server

PurposeCommand or Action
Specifies the system image to send in response toRead Requests. You can enter multiple lines tospecify multiple images.
Do one of the following:Step 3
• tftp-server flash [partition-number:]filename1[aliasfilename2 ] [access-list-number ]
••• tftp-server flash device : filename (Cisco 7000 familyonly)
••• tftp-server flash [device:][partition-number:]filename(Cisco 1600 series and Cisco 3600 series only)
••• tftp-server rom alias filename1 [access-list-number ]
Example:
Router(config)# tftp-server flash version-10.3 22
Ends the configuration session and returns you toprivileged EXEC mode.
end
Example:
Router(config)# end
Step 4
Saves the running configuration to the startupconfiguration file.
copy running-config startup-config
Example:
Router# copy running-config startup-config
Step 5
Examples
In the following example, the system can use TFTP to send copies of the Flash memory file version-10.3 inresponse to a TFTP Read Request for that file. The requesting host is checked against access list 22.
tftp-server flash version-10.3 22In the following example, the system can use TFTP to send a copy of the ROM image gs3-k.101in responseto a TFTP Read Request for the gs3-k.101 file:
tftp-server rom alias gs3-k.101
The Integrated File System Configuration Guide, Cisco IOS Release 15S 55
Configuring Basic File Transfer ServicesConfiguring the Router for Use as a TFTP Server
In the following example, a router sends a copy of the file gs7-k.9.17 in Flash memory in response to a TFTPRead Request. The client router must reside on a network specified by access list 1. Thus, in the example, theany clients on network 172.16.101.0 are permitted access to the file.
Server# configure terminal
Enter configuration commands, one per line. End with CTRL/ZServer(config)# tftp-server flash gs7-k.9.17 1
Server(config)# access-list 1 permit 172.16.101.0 0.0.0.255
Server(config)# end
Server# copy running-config startup-config
[ok]Server#
TroubleshootingThe TFTP session can sometimes fail. TFTP generates the following special characters to help you determinewhy a TFTP session fails:
• An “E” character indicates that the TFTP server received an erroneous packet.
• An “O” character indicates that the TFTP server received an out-of-sequence packet.
• A period (.) indicates a timeout.
For diagnosing any undue delay in the transfer, the output is useful. For troubleshooting procedures, refer tothe Internetwork Troubleshooting Guide publication.
Configuring the Client RouterTo configure the client router to first load a system image from the server, and as a backup, to configure theclient router to load its own ROM image if the load from a server fails, complete the tasks in this section:
SUMMARY STEPS
1. enable2. configure terminal3. no boot system4. boot system [tftp] filename [ip-address ]5. boot system rom6. config-register value7. end8. copy running-config startup-config9. reload
The Integrated File System Configuration Guide, Cisco IOS Release 15S56
Configuring Basic File Transfer ServicesConfiguring the Client Router
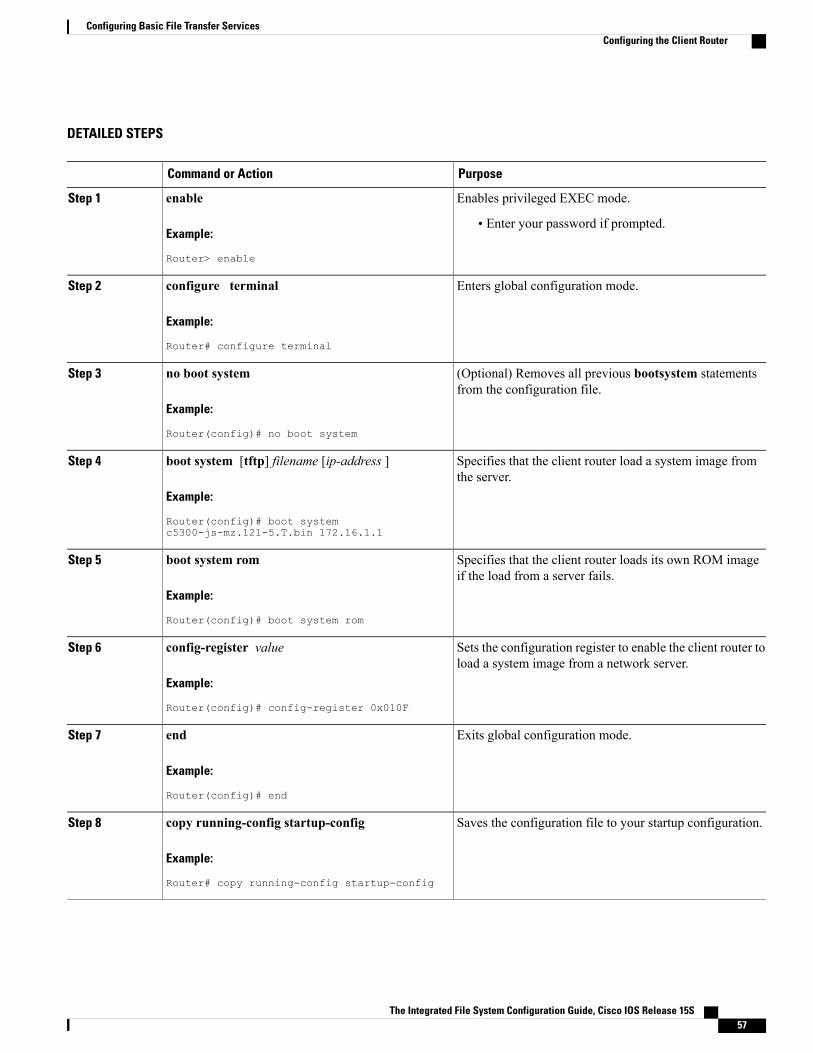
DETAILED STEPS
PurposeCommand or Action
Enables privileged EXEC mode.enableStep 1
Example:
Router> enable
• Enter your password if prompted.
Enters global configuration mode.configure terminal
Example:
Router# configure terminal
Step 2
(Optional) Removes all previous bootsystem statementsfrom the configuration file.
no boot system
Example:
Router(config)# no boot system
Step 3
Specifies that the client router load a system image fromthe server.
boot system [tftp] filename [ip-address ]
Example:
Router(config)# boot systemc5300-js-mz.121-5.T.bin 172.16.1.1
Step 4
Specifies that the client router loads its own ROM imageif the load from a server fails.
boot system rom
Example:
Router(config)# boot system rom
Step 5
Sets the configuration register to enable the client router toload a system image from a network server.
config-register value
Example:
Router(config)# config-register 0x010F
Step 6
Exits global configuration mode.end
Example:
Router(config)# end
Step 7
Saves the configuration file to your startup configuration.copy running-config startup-config
Example:
Router# copy running-config startup-config
Step 8
The Integrated File System Configuration Guide, Cisco IOS Release 15S 57
Configuring Basic File Transfer ServicesConfiguring the Client Router

PurposeCommand or Action
(Optional) Reloads the router to make your changes takeeffect.
reload
Example:
Router# reload
Step 9
Examples
In the following example, the router is configured to boot from a specified TFTP server:
Client# configure terminal
Enter configuration commands, one per line. End with CTRL/ZClient(config)# no boot system
Client(config)# boot system c5300-js-mz.121-5.T.bin 172.16.1.1
Client(config)# boot system rom
Client(config)# config-register 0x010F
Client(config)# end
Client# copy running-config startup-config
[ok]Client# reloadIn this example, the nobootsystem command invalidates all otherbootsystem commands currently in theconfiguration memory, and any bootsystem commands entered after this command will be executed first.The second command, bootsystemfilename address , tells the client router to look for the filec5300-js-mz.121-5.T.bin on the TFTP server with an IP address of 172.16.111.111. Failing this, the clientrouter will boot from its system ROM in response to the bootsystemrom command, which is included as abackup in case of a network problem. The copyrunning-configstartup-config command copies theconfiguration to the startup configuration, and thereloadcommand boots the system.
The system software to be booted from the server must reside in Flash memory on the server. If it is notin Flash memory, the client router will boot the server’s system ROM.
Note
The following example shows sample output of the showversion command after the router has rebooted:
Router> show versionCisco Internetwork Operating System SoftwareCisco IOS (tm) 5300 Software (C5300-JS-M), Version 12.1(5)T, RELEASE SOFTWARE (fc1)Copyright (c) 1986-2000 by Cisco Systems, Inc.Compiled Sat 11-Nov-00 03:03 by joeImage text-base: 0x60008958, data-base: 0x611C6000ROM: System Bootstrap, Version 11.2(9)XA, RELEASE SOFTWARE (fc2)BOOTFLASH: 5300 Software (C5300-BOOT-M), Version 12.0(7)T, RELEASE SOFTWARE (f)Router uptime is 8 weeks, 4 days, 22 hours, 36 minutesSystem returned to ROM by power-onSystem restarted at 00:37:38 UTC Thu Feb 22 2001System image file is "flash:c5300-js-mz.121-5.T.bin"..
The Integrated File System Configuration Guide, Cisco IOS Release 15S58
Configuring Basic File Transfer ServicesConfiguring the Client Router

.Configuration register is 0x010FThe important information in this example is contained in the first line “Cisco IOS (tm)..” and in the line thatbegins “System image file....” The “Cisco IOS (tm)...” line shows the version of the operating system inNVRAM. The “System image file....” line show the filename of the system image loaded from the TFTPserver.
What to Do NextAfter the system reloads, you should use the showversion EXEC mode command to verify that the systembooted the desired image.
Using the nobootsystem command, as in the following example, will invalidate all other boot systemcommands currently in the client router system configuration. Before proceeding, determine whether thesystem configuration stored in the client router should first be saved (uploaded) to a TFTP file server soyou have a backup copy.
Caution
Configuring the Router as a RARP ServerTo configure the router as a RARP server, complete the tasks in this section:
SUMMARY STEPS
1. enable2. configure terminal3. interface type [slot/]port4. ip rarp-server ip-address
DETAILED STEPS
PurposeCommand or Action
Enables privileged EXEC mode.enableStep 1
Example:
Router> enable
• Enter your password if prompted.
Enters global configuration mode.configure terminal
Example:
Router# configure terminal
Step 2
The Integrated File System Configuration Guide, Cisco IOS Release 15S 59
Configuring Basic File Transfer ServicesConfiguring the Router as a RARP Server

PurposeCommand or Action
Specifies the interface that you will be configuring theRARP service on and enters interface configuration modefor the specified interface.
interface type [slot/]port
Example:
Router(config)# interface ethernet 0
Step 3
Enables the RARP service on the router.ip rarp-server ip-address
Example:
Router(config-if)# ip rarp-server 172.30.3.100
Step 4
The Integrated File System Configuration Guide, Cisco IOS Release 15S60
Configuring Basic File Transfer ServicesConfiguring the Router as a RARP Server

Examples
The figure below illustrates a network configuration in which a router is configured to act as a RARP serverfor a diskless workstation. In this example, the Sun workstation attempts to resolve its MAC (hardware)address to an IP address by sending a SLARP request, which is forwarded by the router to the Sun server.
Figure 1: Configuring a Router As a RARP Server
Router A has the following configuration:
! Allow the router to forward broadcast portmapper requestsip forward-protocol udp 111! Provide the router with the IP address of the diskless sunarp 172.30.2.5 0800.2002.ff5b arpainterface ethernet 0! Configure the router to act as a RARP server, using the Sun Server's IP! address in the RARP response packet.ip rarp-server 172.30.3.100! Portmapper broadcasts from this interface are sent to the Sun Server.ip helper-address 172.30.3.100The Sun client and server’s IP addresses must use the same major network number because of a limitationwith the current SunOS rpc.bootparamd daemon.
The Integrated File System Configuration Guide, Cisco IOS Release 15S 61
Configuring Basic File Transfer ServicesConfiguring the Router as a RARP Server

In the following example, an access server is configured to act as a RARP server.
! Allow the access server to forward broadcast portmapper requestsip forward-protocol udp 111! Provide the access server with the IP address of the diskless sunarp 172.30.2.5 0800.2002.ff5b arpainterface ethernet 0! Configure the access server to act as a RARP server, using the Sun Server's! IP address in the RARP response packet.ip rarp-server 172.30.3.100! Portmapper broadcasts from this interface are sent to the Sun Server.ip helper-address 172.30.3.100
Configuring System BOOTP ParametersTo configure extended BOOTP parameters for asynchronous interfaces, complete the task in this section:
SUMMARY STEPS
1. enable2. configure terminal3. async-bootp tag [:hostname ] data4. show async bootp
DETAILED STEPS
PurposeCommand or Action
Enables privileged EXEC mode.enableStep 1
Example:
Router> enable
• Enter your password if prompted.
Enters global configuration mode.configure terminal
Example:
Router# configure terminal
Step 2
Configures extended BOOTP requests for asynchronous interfaces.async-bootp tag [:hostname ] dataStep 3
Example:
Router# async-bootp bootfile :172.30.1.1"pcboot"
The Boot Protocol (BOOTP) server for asynchronousinterfaces supports extended BOOTP requests (defined inRFC 1084). This command is useful in conjunction withusing the auxiliary port as an asynchronous interface.
Note
Displays the extended data that will be sent in BOOTP responses forBOOTP responses.
show async bootp
Example:
Router# show async bootp
Step 4
The Integrated File System Configuration Guide, Cisco IOS Release 15S62
Configuring Basic File Transfer ServicesConfiguring System BOOTP Parameters

Examples
For example, if the DNS server address is specified as extended data for BOOTP responses, you will seeoutput similar to the following:
Router# show async bootp
The following extended data will be sent in BOOTP responses:dns-server 172.22.53.210
Configuring a Router to Use rsh and rcp
Specifying the Source Interface for Outgoing RCMD CommunicationsTo configure the router so that RCMD connections use the loopback interface as the source address of allpackets leaving the router, specify the interface associated with RCMD communications by completing thetask in this section:
SUMMARY STEPS
1. enable2. configure terminal3. ip rcmd source-interface interface-id
DETAILED STEPS
PurposeCommand or Action
Enables privileged EXEC mode.enableStep 1
Example:
Router> enable
• Enter your password if prompted.
Enters global configuration mode.configure terminal
Example:
Router# configure terminal
Step 2
Specifies the interface address that will be used to labelall outgoing rsh and rcp traffic.
ip rcmd source-interface interface-id
Example:
Router(config)# ip rcmd source-interface
Step 3
The Integrated File System Configuration Guide, Cisco IOS Release 15S 63
Configuring Basic File Transfer ServicesConfiguring a Router to Use rsh and rcp
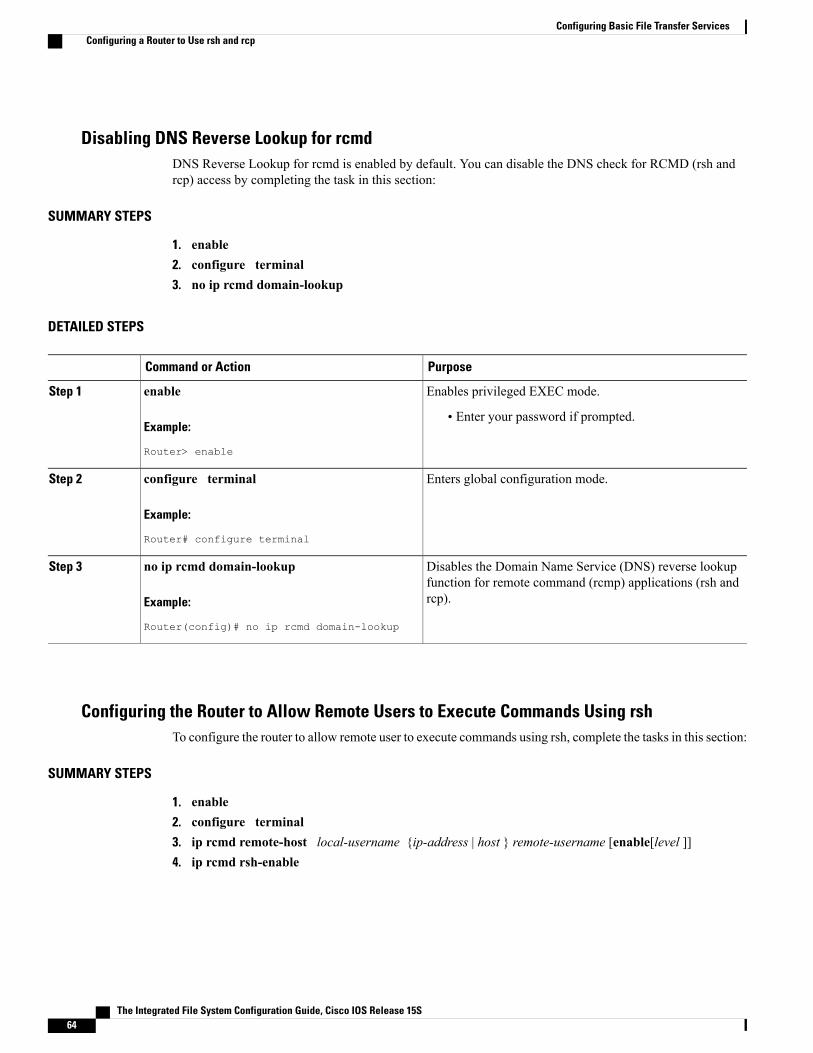
Disabling DNS Reverse Lookup for rcmdDNS Reverse Lookup for rcmd is enabled by default. You can disable the DNS check for RCMD (rsh andrcp) access by completing the task in this section:
SUMMARY STEPS
1. enable2. configure terminal3. no ip rcmd domain-lookup
DETAILED STEPS
PurposeCommand or Action
Enables privileged EXEC mode.enableStep 1
Example:
Router> enable
• Enter your password if prompted.
Enters global configuration mode.configure terminal
Example:
Router# configure terminal
Step 2
Disables the Domain Name Service (DNS) reverse lookupfunction for remote command (rcmp) applications (rsh andrcp).
no ip rcmd domain-lookup
Example:
Router(config)# no ip rcmd domain-lookup
Step 3
Configuring the Router to Allow Remote Users to Execute Commands Using rshTo configure the router to allow remote user to execute commands using rsh, complete the tasks in this section:
SUMMARY STEPS
1. enable2. configure terminal3. ip rcmd remote-host local-username {ip-address | host } remote-username [enable[level ]]4. ip rcmd rsh-enable
The Integrated File System Configuration Guide, Cisco IOS Release 15S64
Configuring Basic File Transfer ServicesConfiguring a Router to Use rsh and rcp
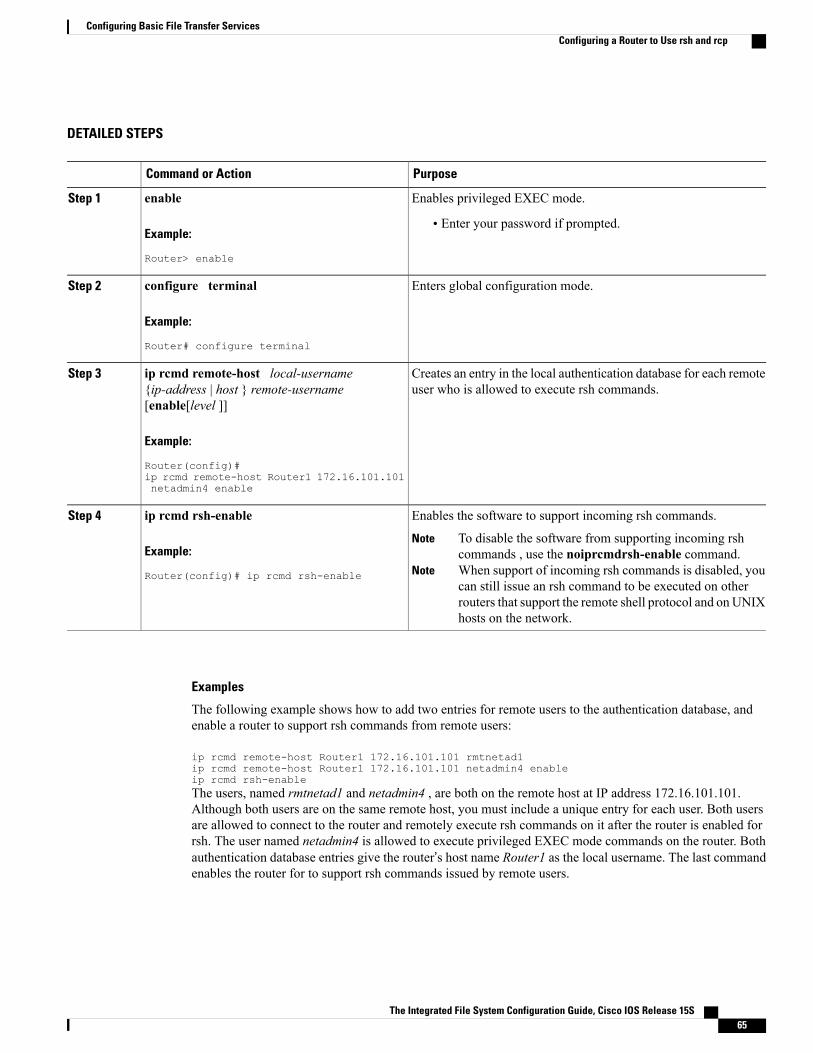
DETAILED STEPS
PurposeCommand or Action
Enables privileged EXEC mode.enableStep 1
Example:
Router> enable
• Enter your password if prompted.
Enters global configuration mode.configure terminal
Example:
Router# configure terminal
Step 2
Creates an entry in the local authentication database for each remoteuser who is allowed to execute rsh commands.
ip rcmd remote-host local-username{ip-address | host } remote-username[enable[level ]]
Step 3
Example:
Router(config)#ip rcmd remote-host Router1 172.16.101.101netadmin4 enable
Enables the software to support incoming rsh commands.ip rcmd rsh-enableStep 4
Example:
Router(config)# ip rcmd rsh-enable
To disable the software from supporting incoming rshcommands , use the noiprcmdrsh-enable command.
Note
When support of incoming rsh commands is disabled, youcan still issue an rsh command to be executed on otherrouters that support the remote shell protocol and on UNIXhosts on the network.
Note
Examples
The following example shows how to add two entries for remote users to the authentication database, andenable a router to support rsh commands from remote users:
ip rcmd remote-host Router1 172.16.101.101 rmtnetad1ip rcmd remote-host Router1 172.16.101.101 netadmin4 enableip rcmd rsh-enableThe users, named rmtnetad1 and netadmin4 , are both on the remote host at IP address 172.16.101.101.Although both users are on the same remote host, you must include a unique entry for each user. Both usersare allowed to connect to the router and remotely execute rsh commands on it after the router is enabled forrsh. The user named netadmin4 is allowed to execute privileged EXEC mode commands on the router. Bothauthentication database entries give the router’s host name Router1 as the local username. The last commandenables the router for to support rsh commands issued by remote users.
The Integrated File System Configuration Guide, Cisco IOS Release 15S 65
Configuring Basic File Transfer ServicesConfiguring a Router to Use rsh and rcp
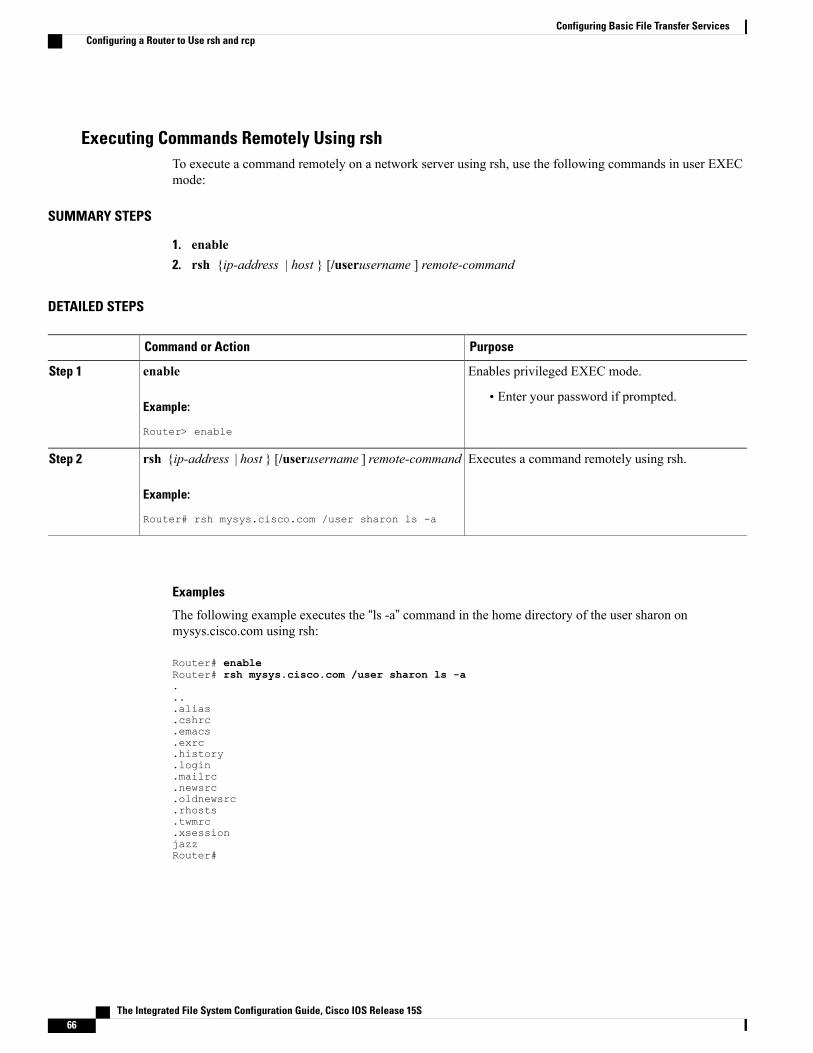
Executing Commands Remotely Using rshTo execute a command remotely on a network server using rsh, use the following commands in user EXECmode:
SUMMARY STEPS
1. enable2. rsh {ip-address | host } [/userusername ] remote-command
DETAILED STEPS
PurposeCommand or Action
Enables privileged EXEC mode.enableStep 1
Example:
Router> enable
• Enter your password if prompted.
Executes a command remotely using rsh.rsh {ip-address | host } [/userusername ] remote-command
Example:
Router# rsh mysys.cisco.com /user sharon ls -a
Step 2
Examples
The following example executes the “ls -a” command in the home directory of the user sharon onmysys.cisco.com using rsh:
Router# enableRouter# rsh mysys.cisco.com /user sharon ls -a....alias.cshrc.emacs.exrc.history.login.mailrc.newsrc.oldnewsrc.rhosts.twmrc.xsessionjazzRouter#
The Integrated File System Configuration Guide, Cisco IOS Release 15S66
Configuring Basic File Transfer ServicesConfiguring a Router to Use rsh and rcp
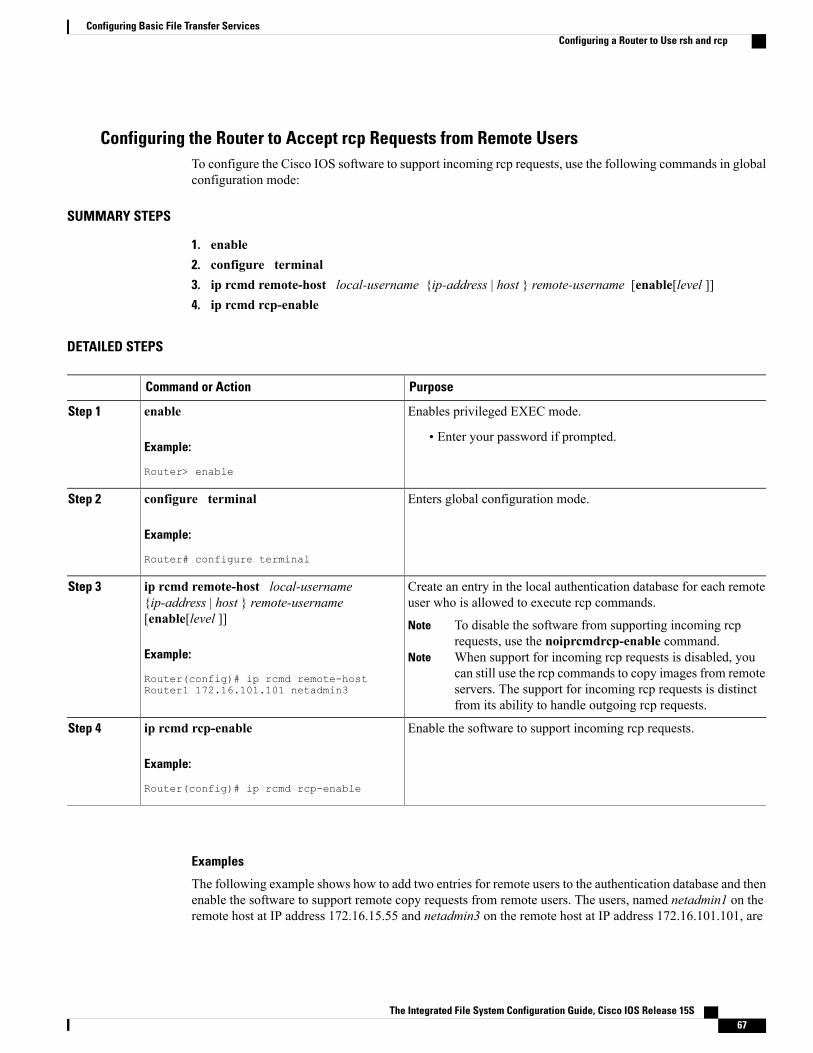
Configuring the Router to Accept rcp Requests from Remote UsersTo configure the Cisco IOS software to support incoming rcp requests, use the following commands in globalconfiguration mode:
SUMMARY STEPS
1. enable2. configure terminal3. ip rcmd remote-host local-username {ip-address | host } remote-username [enable[level ]]4. ip rcmd rcp-enable
DETAILED STEPS
PurposeCommand or Action
Enables privileged EXEC mode.enableStep 1
Example:
Router> enable
• Enter your password if prompted.
Enters global configuration mode.configure terminal
Example:
Router# configure terminal
Step 2
Create an entry in the local authentication database for each remoteuser who is allowed to execute rcp commands.
ip rcmd remote-host local-username{ip-address | host } remote-username[enable[level ]]
Step 3
To disable the software from supporting incoming rcprequests, use the noiprcmdrcp-enable command.
Note
When support for incoming rcp requests is disabled, youcan still use the rcp commands to copy images from remoteservers. The support for incoming rcp requests is distinctfrom its ability to handle outgoing rcp requests.
NoteExample:
Router(config)# ip rcmd remote-hostRouter1 172.16.101.101 netadmin3
Enable the software to support incoming rcp requests.ip rcmd rcp-enable
Example:
Router(config)# ip rcmd rcp-enable
Step 4
Examples
The following example shows how to add two entries for remote users to the authentication database and thenenable the software to support remote copy requests from remote users. The users, named netadmin1 on theremote host at IP address 172.16.15.55 and netadmin3 on the remote host at IP address 172.16.101.101, are
The Integrated File System Configuration Guide, Cisco IOS Release 15S 67
Configuring Basic File Transfer ServicesConfiguring a Router to Use rsh and rcp
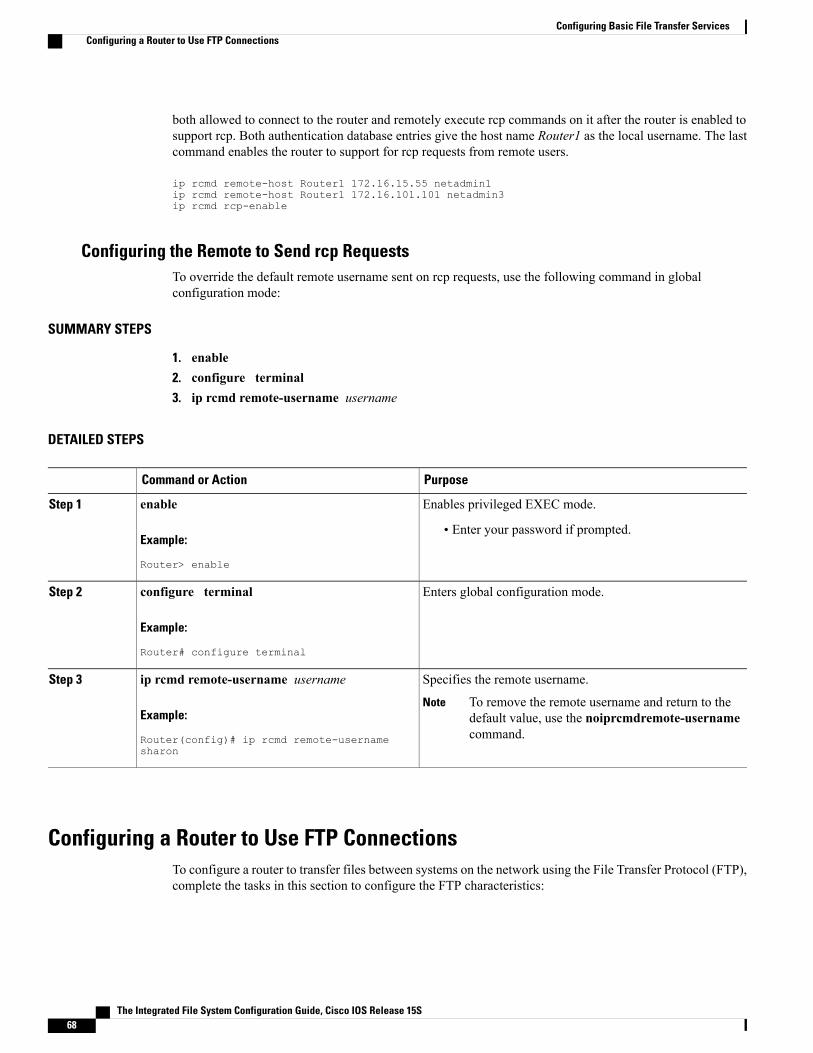
both allowed to connect to the router and remotely execute rcp commands on it after the router is enabled tosupport rcp. Both authentication database entries give the host name Router1 as the local username. The lastcommand enables the router to support for rcp requests from remote users.
ip rcmd remote-host Router1 172.16.15.55 netadmin1ip rcmd remote-host Router1 172.16.101.101 netadmin3ip rcmd rcp-enable
Configuring the Remote to Send rcp RequestsTo override the default remote username sent on rcp requests, use the following command in globalconfiguration mode:
SUMMARY STEPS
1. enable2. configure terminal3. ip rcmd remote-username username
DETAILED STEPS
PurposeCommand or Action
Enables privileged EXEC mode.enableStep 1
Example:
Router> enable
• Enter your password if prompted.
Enters global configuration mode.configure terminal
Example:
Router# configure terminal
Step 2
Specifies the remote username.ip rcmd remote-username usernameStep 3
Example:
Router(config)# ip rcmd remote-usernamesharon
To remove the remote username and return to thedefault value, use the noiprcmdremote-usernamecommand.
Note
Configuring a Router to Use FTP ConnectionsTo configure a router to transfer files between systems on the network using the File Transfer Protocol (FTP),complete the tasks in this section to configure the FTP characteristics:
The Integrated File System Configuration Guide, Cisco IOS Release 15S68
Configuring Basic File Transfer ServicesConfiguring a Router to Use FTP Connections

SUMMARY STEPS
1. enable2. configure terminal3. ip ftp username string4. ip ftp password [type ] password5. Do one of the following:
• ip ftp passive
••• no ip ftp passive
6. ip ftp source-interface interface
DETAILED STEPS
PurposeCommand or Action
Enables privileged EXEC mode.enableStep 1
Example:
Router> enable
• Enter your password if prompted.
Enters global configuration mode.configure terminal
Example:
Router# configure terminal
Step 2
Specifies the user name to be used for the FTP connection.ip ftp username string
Example:
Router# ip ftp username zorro
Step 3
Specifies the password to be used for the FTP connection.ip ftp password [type ] password
Example:
Router# ip ftp password sword
Step 4
Configures the router to only use passive-mode FTPconnections.
Do one of the following:Step 5
• ip ftp passiveor
•Allows all types of FTP connections (default).•
• no ip ftp passive
The Integrated File System Configuration Guide, Cisco IOS Release 15S 69
Configuring Basic File Transfer ServicesConfiguring a Router to Use FTP Connections
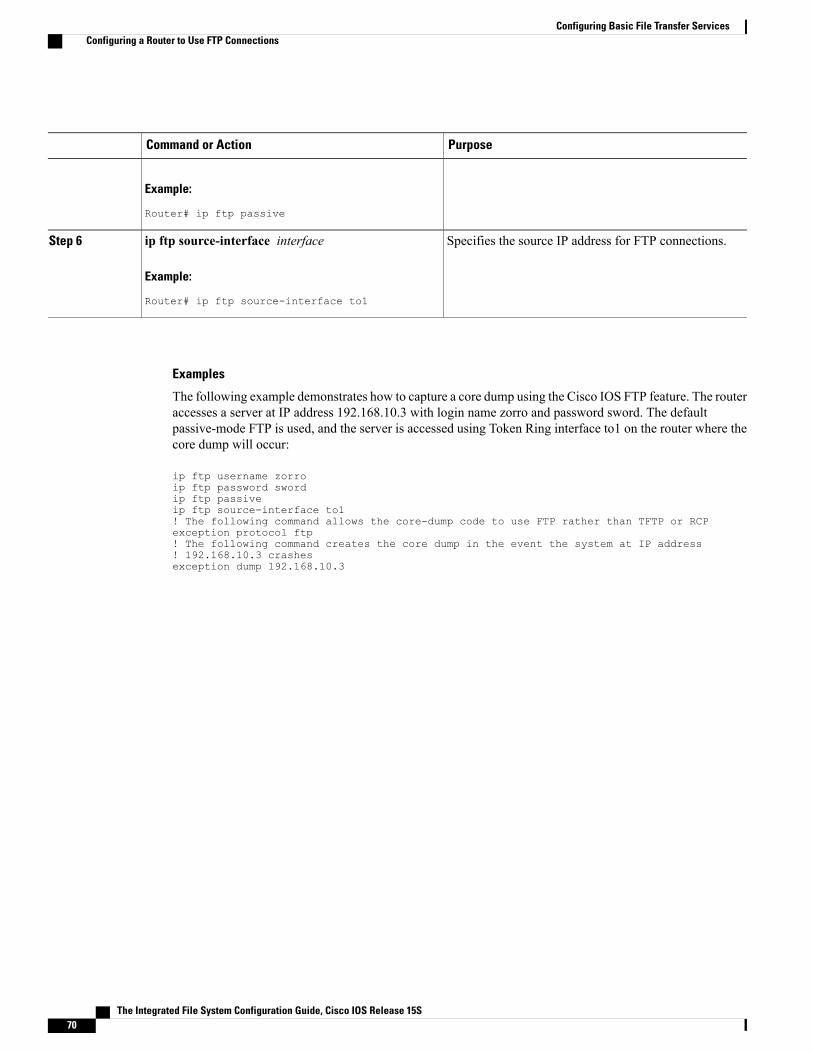
PurposeCommand or Action
Example:
Router# ip ftp passive
Specifies the source IP address for FTP connections.ip ftp source-interface interface
Example:
Router# ip ftp source-interface to1
Step 6
Examples
The following example demonstrates how to capture a core dump using the Cisco IOS FTP feature. The routeraccesses a server at IP address 192.168.10.3 with login name zorro and password sword. The defaultpassive-mode FTP is used, and the server is accessed using Token Ring interface to1 on the router where thecore dump will occur:
ip ftp username zorroip ftp password swordip ftp passiveip ftp source-interface to1! The following command allows the core-dump code to use FTP rather than TFTP or RCPexception protocol ftp! The following command creates the core dump in the event the system at IP address! 192.168.10.3 crashesexception dump 192.168.10.3
The Integrated File System Configuration Guide, Cisco IOS Release 15S70
Configuring Basic File Transfer ServicesConfiguring a Router to Use FTP Connections

C H A P T E R 5Transferring Files Using HTTP or HTTPS
Cisco IOS Release 12.4 provides the ability to transfer files between your Cisco IOS software-based deviceand a remote HTTP server using the HTTP or HTTP Secure (HTTPS) protocol. HTTP and HTTPS can nowbe specified as the targets and source locations in Cisco IOS command-line interface (CLI) commands thatuse file system prefixes such as the copy command.
• Finding Feature Information, page 71
• Prerequisites for Transferring Files Using HTTP or HTTPs, page 71
• Restrictions for Transferring Files Using HTTP or HTTPs, page 72
• Information About File Transfers Using HTTP or HTTPs, page 72
• How to Transfer Files Using HTTP or HTTPs, page 72
• Configuration Examples for the File Transfer Using HTTP or HTTPs, page 79
• Additional References, page 80
• Feature Information for Transferring Files Using HTTP or HTTPS, page 82
Finding Feature InformationYour software release may not support all the features documented in this module. For the latest featureinformation and caveats, see the release notes for your platform and software release. To find informationabout the features documented in this module, and to see a list of the releases in which each feature is supported,see the Feature Information Table at the end of this document.
Use Cisco Feature Navigator to find information about platform support and Cisco software image support.To access Cisco Feature Navigator, go to www.cisco.com/go/cfn. An account on Cisco.com is not required.
Prerequisites for Transferring Files Using HTTP or HTTPsTo copy files to or from a remote HTTP server, your system must support the HTTP client feature, which isintegrated in most Cisco IOS software images. The HTTP client is enabled by default. To determine if theHTTP client is supported on your system, issue the show ip http client allcommand. If you are able to executethe command, the HTTP client is supported.
The Integrated File System Configuration Guide, Cisco IOS Release 15S 71

Commands exist for the optional configuration of the embedded HTTP client and for the HTTPS client, butthe default configuration is sufficient for using the File Transfer Using HTTP or HTTPS feature. For informationon configuring optional HTTP or HTTPS client characteristics, see the “Related Documents” section.
Restrictions for Transferring Files Using HTTP or HTTPsExisting limitations to the copy command, such as no network-to-network copies, are in effect for the FileTransfer Using HTTP or HTTPS feature.
The copy command in Cisco IOS Release 12.4T does not work in conjunction with older versions of theApache server software. The Apache server software must be upgraded to version 2.0.49 or later in orderto use the copy command.
Note
Information About File Transfers Using HTTP or HTTPsTo transfer files using HTTP or HTTPS, you should understand the following concept:
The File Transfer Using HTTP or HTTPs feature provides the capability to copy files, such as Cisco IOSimage files, core files, configuration files, log files, scripts, and so on, to and from a remote server and yourlocal routing device using the Cisco IOS copy command and command-line interface. The HTTP copyoperation works in the same way as copying from other remote file systems, such as FTP or TFTP.
The HTTP copy operation can use the embedded HTTPS client for HTTP Secure transfers, providing secureand authenticated file transfers within the context of a public key infrastructure (PKI).
How to Transfer Files Using HTTP or HTTPsThis section contains the following procedures:
To use the File Transfer Using HTTP feature, you may need to specify a username and password for theHTTP connections for those servers that require a username and password to connect. Commands are alsoavailable to specify custom connection characteristics, although default settings can be used. The featurealso offers commands to monitor and maintain connections and files.
Note
Configuring HTTP Connection Characteristics for File TransfersDefault values are provided for HTTP File transfers. The following task is used to customize the connectioncharacteristics for your network to specify a username and password, connection preferences, a remote proxyserver, and the source interface to be used.
The Integrated File System Configuration Guide, Cisco IOS Release 15S72
Transferring Files Using HTTP or HTTPSRestrictions for Transferring Files Using HTTP or HTTPs
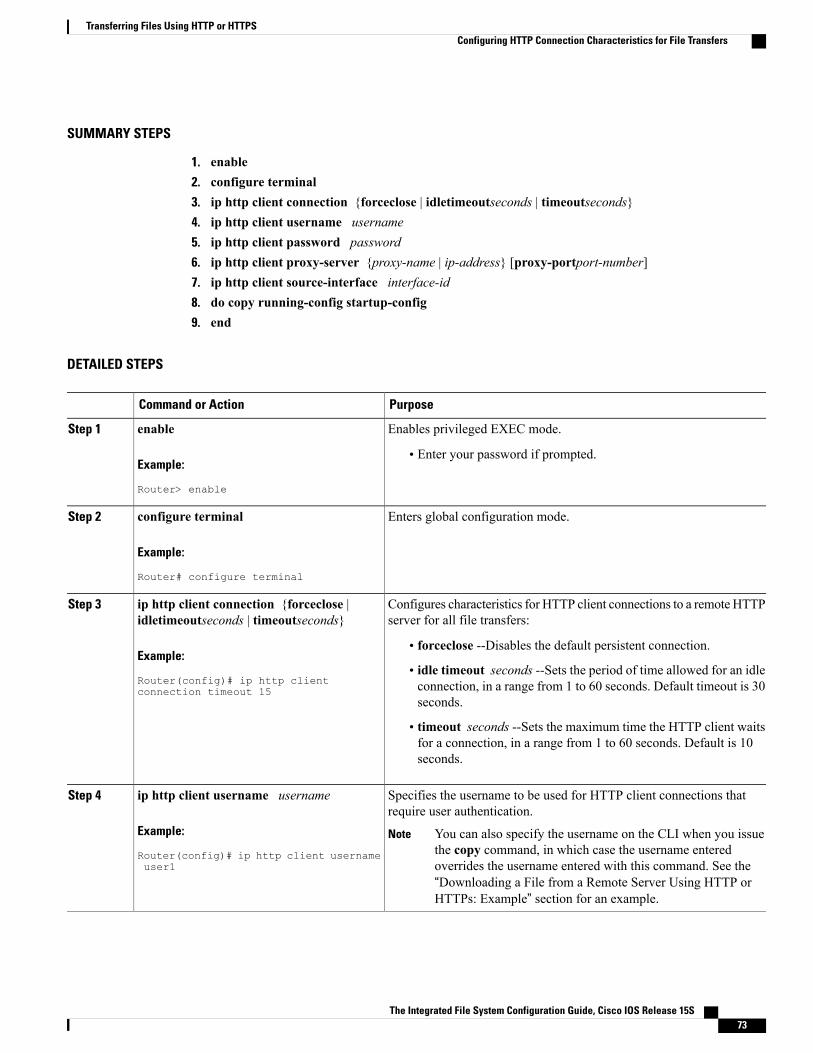
SUMMARY STEPS
1. enable2. configure terminal3. ip http client connection {forceclose | idletimeoutseconds | timeoutseconds}4. ip http client username username5. ip http client password password6. ip http client proxy-server {proxy-name | ip-address} [proxy-portport-number]7. ip http client source-interface interface-id8. do copy running-config startup-config9. end
DETAILED STEPS
PurposeCommand or Action
Enables privileged EXEC mode.enableStep 1
Example:
Router> enable
• Enter your password if prompted.
Enters global configuration mode.configure terminal
Example:
Router# configure terminal
Step 2
Configures characteristics for HTTP client connections to a remote HTTPserver for all file transfers:
ip http client connection {forceclose |idletimeoutseconds | timeoutseconds}
Step 3
Example:
Router(config)# ip http clientconnection timeout 15
• forceclose --Disables the default persistent connection.
• idle timeout seconds --Sets the period of time allowed for an idleconnection, in a range from 1 to 60 seconds. Default timeout is 30seconds.
• timeout seconds --Sets the maximum time the HTTP client waitsfor a connection, in a range from 1 to 60 seconds. Default is 10seconds.
Specifies the username to be used for HTTP client connections thatrequire user authentication.
ip http client username username
Example:
Router(config)# ip http client usernameuser1
Step 4
You can also specify the username on the CLI when you issuethe copy command, in which case the username enteredoverrides the username entered with this command. See the“Downloading a File from a Remote Server Using HTTP orHTTPs: Example” section for an example.
Note
The Integrated File System Configuration Guide, Cisco IOS Release 15S 73
Transferring Files Using HTTP or HTTPSConfiguring HTTP Connection Characteristics for File Transfers
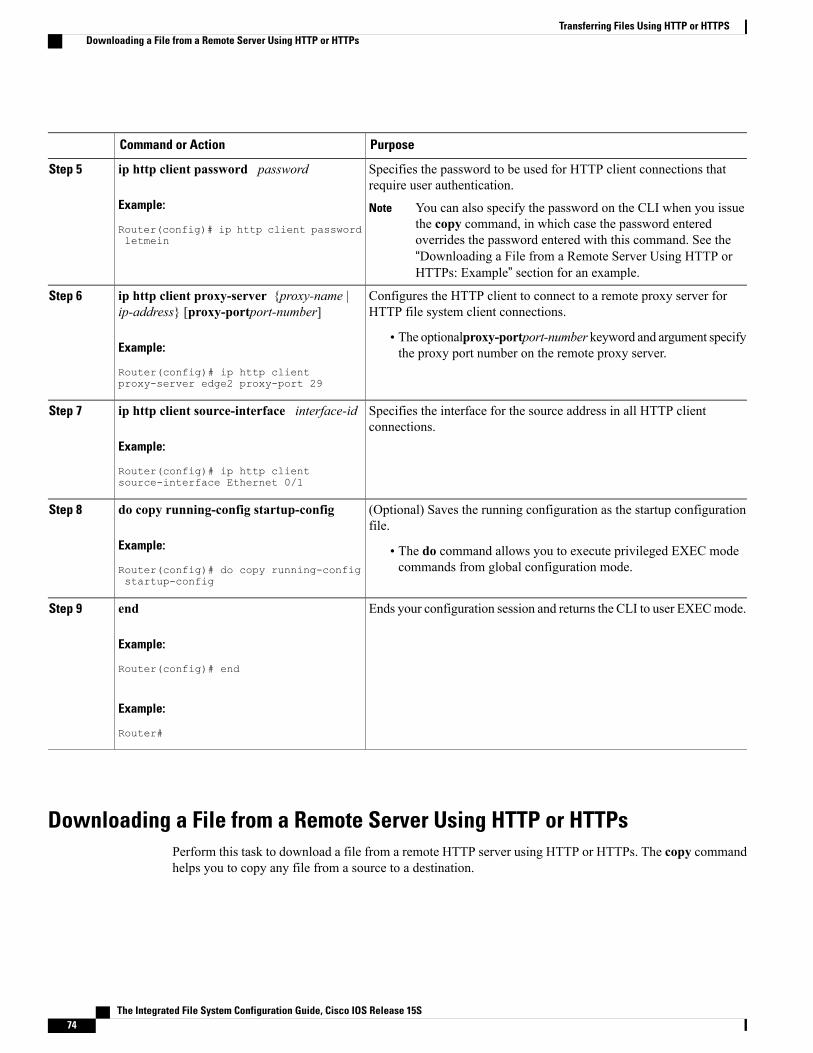
PurposeCommand or Action
Specifies the password to be used for HTTP client connections thatrequire user authentication.
ip http client password password
Example:
Router(config)# ip http client passwordletmein
Step 5
You can also specify the password on the CLI when you issuethe copy command, in which case the password enteredoverrides the password entered with this command. See the“Downloading a File from a Remote Server Using HTTP orHTTPs: Example” section for an example.
Note
Configures the HTTP client to connect to a remote proxy server forHTTP file system client connections.
ip http client proxy-server {proxy-name |ip-address} [proxy-portport-number]
Step 6
Example:
Router(config)# ip http clientproxy-server edge2 proxy-port 29
• The optionalproxy-portport-number keyword and argument specifythe proxy port number on the remote proxy server.
Specifies the interface for the source address in all HTTP clientconnections.
ip http client source-interface interface-id
Example:
Router(config)# ip http clientsource-interface Ethernet 0/1
Step 7
(Optional) Saves the running configuration as the startup configurationfile.
do copy running-config startup-config
Example:
Router(config)# do copy running-configstartup-config
Step 8
• The do command allows you to execute privileged EXEC modecommands from global configuration mode.
Ends your configuration session and returns the CLI to user EXECmode.end
Example:
Router(config)# end
Step 9
Example:
Router#
Downloading a File from a Remote Server Using HTTP or HTTPsPerform this task to download a file from a remote HTTP server using HTTP or HTTPs. The copy commandhelps you to copy any file from a source to a destination.
The Integrated File System Configuration Guide, Cisco IOS Release 15S74
Transferring Files Using HTTP or HTTPSDownloading a File from a Remote Server Using HTTP or HTTPs

SUMMARY STEPS
1. enable2. Do one of the following:
• copy [/erase] [/noverify] http://remote-source-urllocal-destination-url
• copy https:// remote-source-url local-destination-url
DETAILED STEPS
PurposeCommand or Action
Enables privileged EXEC mode.enableStep 1
Example:
Router> enable
• Enter your password if prompted.
Example:
Copies a file from a remote web server toa local file system using HTTP or HTTPS.
Do one of the following:Step 2
• copy [/erase] [/noverify] http://remote-source-urllocal-destination-url• /erase --Erases the local destinationfile system before copying. This• copy https:// remote-source-url local-destination-url
option is provided on Class B file
Example:
Router# copy
system platforms with limitedmemory to allow an easy way to clearlocal flash memory space.
http://user1:[email protected]:8080/image_files/c7200-i-mxflash:c7200-i-mx • /noverify --If the file being copied is
an image file, this keyword disables
Example:
Router# copy
the automatic image verification thatoccurs after an image is copied.
• The remote-source-url argument isthe location URL (or alias) from
Example:
copy
which to get the file to be copied, instandard Cisco IOS file systemHTTPsyntax as follows:https://user1:[email protected]:8080/image_files/c7200-i-mx
flash:c7200-i-mx
http:// [[username:password]@]{hostname | host-ip}[/filepath]/filename
The Integrated File System Configuration Guide, Cisco IOS Release 15S 75
Transferring Files Using HTTP or HTTPSDownloading a File from a Remote Server Using HTTP or HTTPs
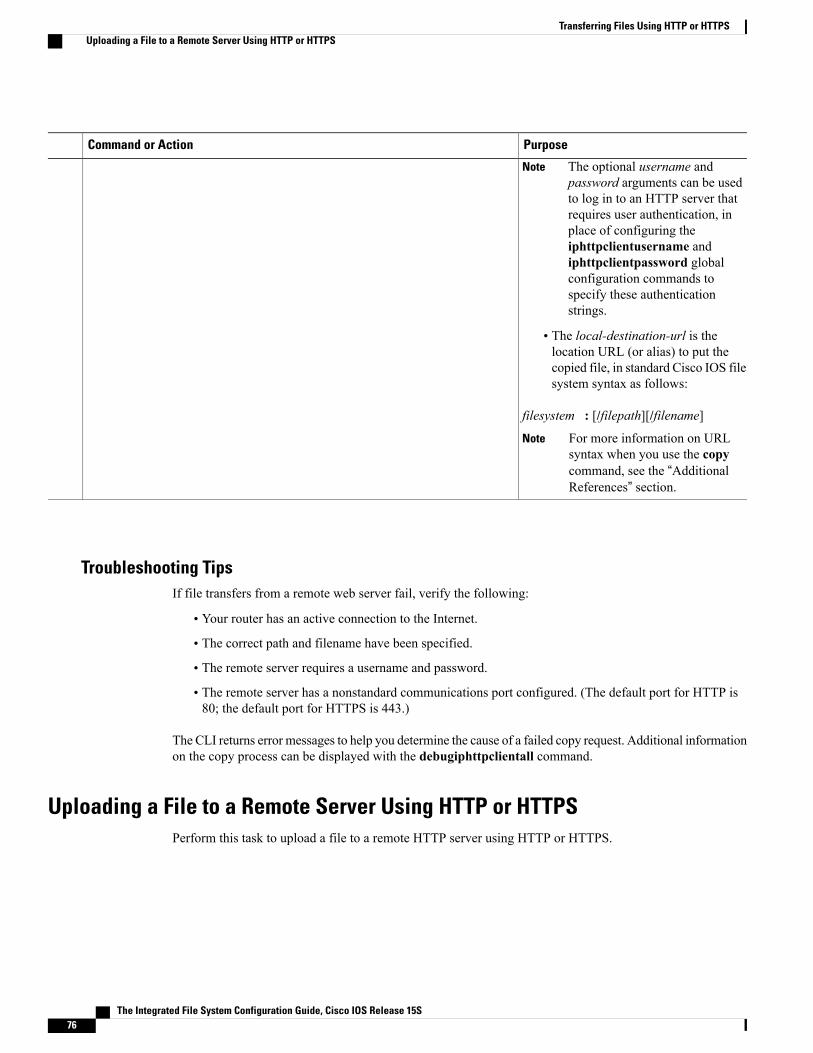
PurposeCommand or Action
The optional username andpassword arguments can be usedto log in to an HTTP server thatrequires user authentication, inplace of configuring theiphttpclientusername andiphttpclientpassword globalconfiguration commands tospecify these authenticationstrings.
Note
• The local-destination-url is thelocation URL (or alias) to put thecopied file, in standard Cisco IOS filesystem syntax as follows:
filesystem : [/filepath][/filename]
For more information on URLsyntax when you use the copycommand, see the “AdditionalReferences” section.
Note
Troubleshooting TipsIf file transfers from a remote web server fail, verify the following:
• Your router has an active connection to the Internet.
• The correct path and filename have been specified.
• The remote server requires a username and password.
• The remote server has a nonstandard communications port configured. (The default port for HTTP is80; the default port for HTTPS is 443.)
The CLI returns error messages to help you determine the cause of a failed copy request. Additional informationon the copy process can be displayed with the debugiphttpclientall command.
Uploading a File to a Remote Server Using HTTP or HTTPSPerform this task to upload a file to a remote HTTP server using HTTP or HTTPS.
The Integrated File System Configuration Guide, Cisco IOS Release 15S76
Transferring Files Using HTTP or HTTPSUploading a File to a Remote Server Using HTTP or HTTPS

SUMMARY STEPS
1. enable2. Do one of the following:
• copy [/erase] [/noverify] local-source-urlhttp://remote-destination-url
• copy local-source-url https:// remote-destination-url
DETAILED STEPS
PurposeCommand or Action
Enables privileged EXEC mode.enableStep 1
Example:
Router> enable
• Enter your password if prompted.
Copies a file from a local file system to a remote web server using HTTPor HTTPS.
Do one of the following:Step 2
• copy [/erase] [/noverify]local-source-urlhttp://remote-destination-url • /erase --Erases the local destination file system before copying. This
option is provided on Class B file system platforms with limitedmemory to allow an easy way to clear local flash memory space.• copy local-source-url https://
remote-destination-url• /noverify --If the file being copied is an image file, this keyworddisables the automatic image verification that occurs after an imageis copied.Example:
Router# http://user1:[email protected]:8080/image_files/c7200-i-mx_backup
• The local-source-url argument is the location URL (or alias) fromwhich to get the file to be copied, in standard Cisco IOS file systemsyntax as follows:
Example:
Router# copy flash:c7200-i-mxhttp:// [[username:password]@] {hostname | host-ip}[/filepath]/filename
The optional username and password arguments can be used tolog in to an HTTP server that requires user authentication, inplace of configuring the iphttpclientusername andiphttpclientpassword global configuration commands to specifythese authentication strings.
Notehttp://user1:[email protected]:8080/image_files/c7200-i-mx_backup
Example:
• The remote-destination-url is the URL (or alias) to put the copiedfile, in standard Cisco IOS file system syntax, as follows:
filesystem : [/filepath ][/filename ]
For more information on URL syntax when you use the copycommand, see the “Additional References” section.
Note
The Integrated File System Configuration Guide, Cisco IOS Release 15S 77
Transferring Files Using HTTP or HTTPSUploading a File to a Remote Server Using HTTP or HTTPS
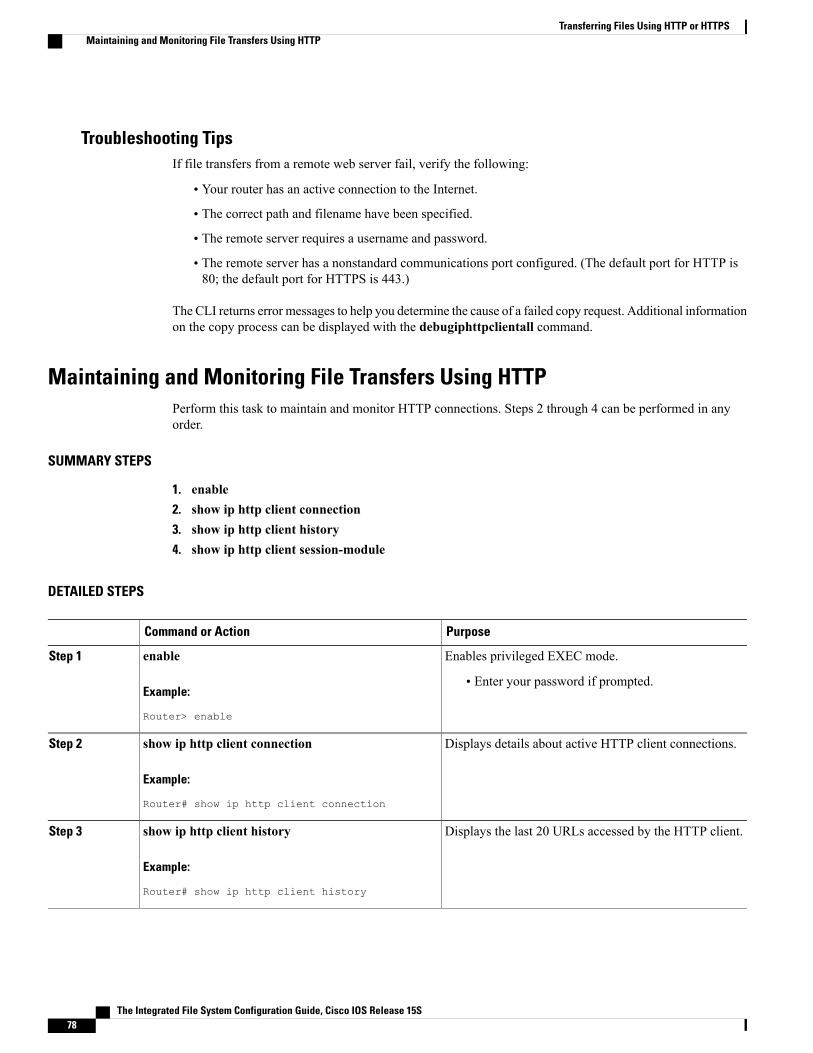
Troubleshooting TipsIf file transfers from a remote web server fail, verify the following:
• Your router has an active connection to the Internet.
• The correct path and filename have been specified.
• The remote server requires a username and password.
• The remote server has a nonstandard communications port configured. (The default port for HTTP is80; the default port for HTTPS is 443.)
The CLI returns error messages to help you determine the cause of a failed copy request. Additional informationon the copy process can be displayed with the debugiphttpclientall command.
Maintaining and Monitoring File Transfers Using HTTPPerform this task to maintain and monitor HTTP connections. Steps 2 through 4 can be performed in anyorder.
SUMMARY STEPS
1. enable2. show ip http client connection3. show ip http client history4. show ip http client session-module
DETAILED STEPS
PurposeCommand or Action
Enables privileged EXEC mode.enableStep 1
Example:
Router> enable
• Enter your password if prompted.
Displays details about active HTTP client connections.show ip http client connection
Example:
Router# show ip http client connection
Step 2
Displays the last 20 URLs accessed by the HTTP client.show ip http client history
Example:
Router# show ip http client history
Step 3
The Integrated File System Configuration Guide, Cisco IOS Release 15S78
Transferring Files Using HTTP or HTTPSMaintaining and Monitoring File Transfers Using HTTP
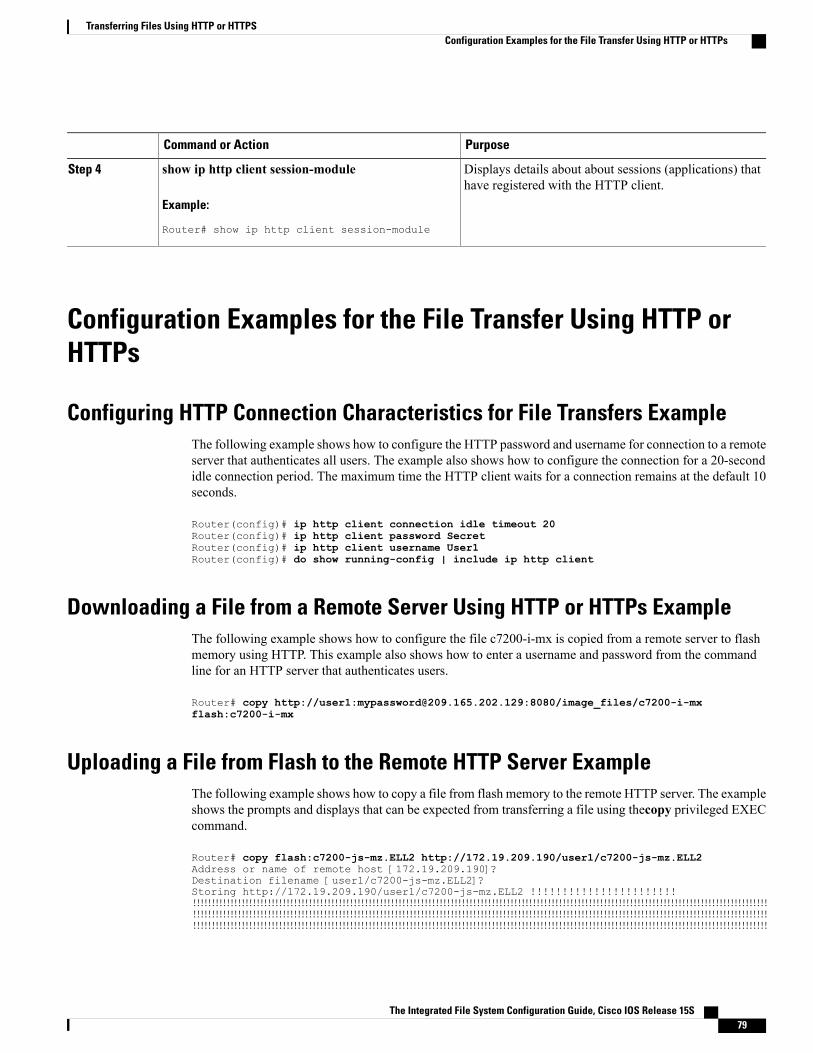
PurposeCommand or Action
Displays details about about sessions (applications) thathave registered with the HTTP client.
show ip http client session-module
Example:
Router# show ip http client session-module
Step 4
Configuration Examples for the File Transfer Using HTTP orHTTPs
Configuring HTTP Connection Characteristics for File Transfers ExampleThe following example shows how to configure the HTTP password and username for connection to a remoteserver that authenticates all users. The example also shows how to configure the connection for a 20-secondidle connection period. The maximum time the HTTP client waits for a connection remains at the default 10seconds.
Router(config)# ip http client connection idle timeout 20Router(config)# ip http client password SecretRouter(config)# ip http client username User1Router(config)# do show running-config | include ip http client
Downloading a File from a Remote Server Using HTTP or HTTPs ExampleThe following example shows how to configure the file c7200-i-mx is copied from a remote server to flashmemory using HTTP. This example also shows how to enter a username and password from the commandline for an HTTP server that authenticates users.
Router# copy http://user1:[email protected]:8080/image_files/c7200-i-mxflash:c7200-i-mx
Uploading a File from Flash to the Remote HTTP Server ExampleThe following example shows how to copy a file from flash memory to the remote HTTP server. The exampleshows the prompts and displays that can be expected from transferring a file using thecopy privileged EXECcommand.
Router# copy flash:c7200-js-mz.ELL2 http://172.19.209.190/user1/c7200-js-mz.ELL2Address or name of remote host [172.19.209.190]?Destination filename [user1/c7200-js-mz.ELL2]?Storing http://172.19.209.190/user1/c7200-js-mz.ELL2 !!!!!!!!!!!!!!!!!!!!!!!!!!!!!!!!!!!!!!!!!!!!!!!!!!!!!!!!!!!!!!!!!!!!!!!!!!!!!!!!!!!!!!!!!!!!!!!!!!!!!!!!!!!!!!!!!!!!!!!!!!!!!!!!!!!!!!!!!!!!!!!!!!!!!!!!!!!!!!!!!!!!!!!!!!!!!!!!!!!!!!!!!!!!!!!!!!!!!!!!!!!!!!!!!!!!!!!!!!!!!!!!!!!!!!!!!!!!!!!!!!!!!!!!!!!!!!!!!!!!!!!!!!!!!!!!!!!!!!!!!!!!!!!!!!!!!!!!!!!!!!!!!!!!!!!!!!!!!!!!!!!!!!!!!!!!!!!!!!!!!!!!!!!!!!!!!!!!!!!!!!!!!!!!!!!!!!!!!!!!!!!!!!!!!!!!!!!!!!!!!!!!!!!!!!!!!!!!!!!!!!!!!!!!!!!!!!!!!!!!!!!!!!!!!!!!!!!!!!!!!!!!!!!!!!!!!!!!!!!!!!!!!
The Integrated File System Configuration Guide, Cisco IOS Release 15S 79
Transferring Files Using HTTP or HTTPSConfiguration Examples for the File Transfer Using HTTP or HTTPs

!!!!!!!!!!!!!!!!!!!!!!!!!!!!!!!!!!!!!!!!!!!!!!!!!!!!!!!!!!!!!!!!!!!!!!!!!!!!!!!!!!!!!!!!!!!!!!!!!!!!!!!!!!!!!!!!!!!!!!!!!!!!!!!!!!!!!!!!!!!!!!!!!!!!!!!!!!!!!!!!!!!!!!!!!!!!!!!!!!!!!!!!!!!!!!!!!!!!!!!!!!!!!!!!!!!!!!!!!!!!!!!!!!!!!!!!!!!!!!!!!!!!!!!!!!!!!!!!!!!!!!!!!!!!!!!!!!!!!!!!!!!!!!!!!!!!!!!!!!!!!!!!!!!!17571956 bytes copied in 57.144 secs (307503 bytes/sec)
Downloading a File from the Remote HTTP Server to Flash Memory ExampleThe following example shows how to copy a file from the remote HTTP server to the flash memory. Theexample shows the prompts and displays that can be expected from transferring a file using the copy privilegedEXEC command.
Router# copy http://172.19.209.190/user1/c7200-i-mz.test flash:c7200-i-mz.testDestination filename [c7200-i-mz.test]?Loading http://172.19.209.190/user1/c7200-i-mz.test!!!!!!!!!!!!!!!!!!!!!!!!!!!!!!!!!!!!!!!!!!!!!!!!!!!!!!!!!!!!!!!!!!!!!!!!!!!!!!!!!!!!!!!!!!!!!!!!!!!!!!!!!!!!!!!!!!!!!!!!!!!!!!!!!!!!!!!!!!!!!!!!!!!!!!!!!!!!!!!!!!!!!!!!!!!!!!!!!!!!!!!!!!!!!!!!!!!!!!!!!!!!!!!!!!!!!!!!!!!!!!!!!!!!!!!!!!!!!!!!!!!!!!!!!!!!!!!!!!!!!!!!!!!!!!!!!!!!!!!!!!!!!!!!!!!!!!!!!!!!!!!!!!!!!!!!!!!!!!!!!!!!!!!!!!!!!!!!!!!!!!!!!!!!!!!!!!!!!!!!!!!!!!!!!!!!!!!!!!!!!!!!!!!!!!!!!!!!!!!!!!!!!!!!!!!!!!!!!!!!!!!!!!!!!!!!!!!!!!!!!!!!!!!!!!!!!!!!!!!!!!!!!!!!!!!!!!!!!!!!!!!!!!!!!!!!!!!!!!!!!!!!!!!!!!!!!!!!!!!!!!!!!!!!!!!!!!!!!!!!!!!!!!!!!!!!!!!!!!!!!!!!!!!!!!!!!!!!!!!!!!!!!!!!!!!!!!!!!!!!!!!!!!!!!!!!!!!!!!!!!!!!!!!!!!!!!!!!!!!!!!!!!!!!!!!!!!!!!!!!!!!!!!!!!!!!!!!!!!!!!!!!!!!!!!!!!!!!!!!!!!!!!!!!!!!!!!!!!!!!!!!!!!!!!!!!!!!!!!!!!!!!!!!!!!!!!!!!!!!!!!!!!!!!!!!!!!!!!!!!!!!!!!!!!!!!!!!!!!!!!!!!!!!!!!!!!!!!!!!!!!!!!!!!!!!!!!!!!!!!!!!!!!!!!!!!!!!!!!!!!!!!!!!!!!!!!!!!!!!!!!!!!!!!!!!!!!!!!!!!!!!!!!!!!!!!!!!!!!!!!!!!!!!!!!!!!!!!!!!!!!!!!!!!!!!!!!!!!!!!!!!!!!!!!!!!!!!!!!!!!!!!!!!!!!!!!!!...11272788 bytes copied in 527.104 secs (21386 bytes/sec)
Uploading a File to a Remote Server Using HTTP or HTTPsThe following example shows how to copy a file to the remote server using HTTP or HTTPs.
router#copy flash: http:Source filename []? running-configAddress or name of remote host []? 10.1.102.1 Destination filename [pilot-confg]?file1 ...
Additional ReferencesThe following sections provide information related to transferring files using HTTP or HTTPS.
Related Documents
Document TitleRelated Topic
HTTPS --HTTP Server and Client with SSL 3.0Secure HTTP communications
HTTP 1.1 Web Server and ClientCisco IOS embedded web server
HTTP 1.1 ClientCisco IOS embedded web client
Cisco IOSNetworkManagement CommandReferenceNetwork Management Commands: completecommand syntax, commandmode, command history,defaults, usage guidelines, and examples
Cisco IOS Configuration Fundamentals CommandReference
Configuration Fundamentals Commands: completecommand syntax, commandmode, command history,defaults, usage guidelines, and examples
The Integrated File System Configuration Guide, Cisco IOS Release 15S80
Transferring Files Using HTTP or HTTPSDownloading a File from the Remote HTTP Server to Flash Memory Example
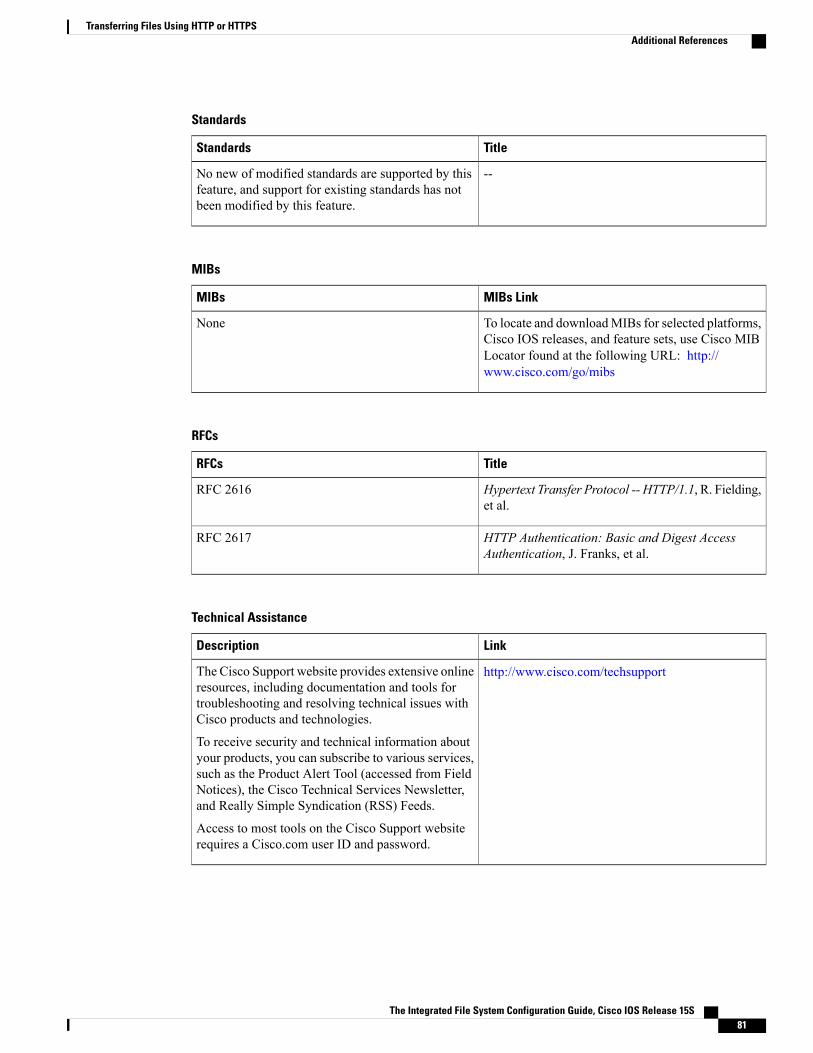
Standards
TitleStandards
--No new of modified standards are supported by thisfeature, and support for existing standards has notbeen modified by this feature.
MIBs
MIBs LinkMIBs
To locate and downloadMIBs for selected platforms,Cisco IOS releases, and feature sets, use Cisco MIBLocator found at the following URL: http://www.cisco.com/go/mibs
None
RFCs
TitleRFCs
Hypertext Transfer Protocol -- HTTP/1.1, R. Fielding,et al.
RFC 2616
HTTP Authentication: Basic and Digest AccessAuthentication, J. Franks, et al.
RFC 2617
Technical Assistance
LinkDescription
http://www.cisco.com/techsupportThe Cisco Support website provides extensive onlineresources, including documentation and tools fortroubleshooting and resolving technical issues withCisco products and technologies.
To receive security and technical information aboutyour products, you can subscribe to various services,such as the Product Alert Tool (accessed from FieldNotices), the Cisco Technical Services Newsletter,and Really Simple Syndication (RSS) Feeds.
Access to most tools on the Cisco Support websiterequires a Cisco.com user ID and password.
The Integrated File System Configuration Guide, Cisco IOS Release 15S 81
Transferring Files Using HTTP or HTTPSAdditional References

Feature Information for Transferring Files Using HTTP or HTTPSThe following table provides release information about the feature or features described in this module. Thistable lists only the software release that introduced support for a given feature in a given software releasetrain. Unless noted otherwise, subsequent releases of that software release train also support that feature.
Use Cisco Feature Navigator to find information about platform support and Cisco software image support.To access Cisco Feature Navigator, go to www.cisco.com/go/cfn. An account on Cisco.com is not required.
Table 7: Feature Information for Transferring Files Using HTTP or HTTPS
Feature InformationReleasesFeature Name
The File Download Using HTTPfeature allows you to copy filesfrom an HTTP server to a CiscoIOS software-based platform.
12.3(2)TFile Download Using HTTP
12.3(7)TFile Upload Using HTTP
The File Transfer Using HTTPfeature provides the capability tocopy files, such as Cisco IOSimage files, core files,configuration files, log files, andscripts to and from a remote serverand your local routing device usingthe Cisco IOS copy command andcommand-line interface. TheHTTPcopy operation works in the sameway as copying from other remotefile systems, such as FTP or TFTP.
This feature provides support forcopying files from a Cisco IOSsoftware-based platform to anHTTP server, using either HTTPor HTTPs.
12.3(7)TFile Transfer Using HTTP
The Integrated File System Configuration Guide, Cisco IOS Release 15S82
Transferring Files Using HTTP or HTTPSFeature Information for Transferring Files Using HTTP or HTTPS
Copyright © 2022 FDOKUMEN