Configuring the Cisco IOS DHCP Server Finding Feature Information
47
Configuring the Cisco IOS DHCP Server Last Updated: December 3, 2012 Cisco devices running Cisco software include Dynamic Host Configuration Protocol (DHCP) server and the relay agent software. The Cisco IOS DHCP server is a full DHCP server implementation that assigns and manages IP addresses from specified address pools within the device to DHCP clients. The DHCP server can be configured to assign additional parameters such as the IP address of the Domain Name System (DNS) server and the default device. This module describes the concepts and the tasks needed to configure the Cisco IOS DHCP server. • Finding Feature Information, page 1 • Prerequisites for Configuring the DHCP Server, page 1 • Information About the Cisco IOS DHCP Server, page 2 • How to Configure the Cisco IOS DHCP Server, page 3 • Configuration Examples for the Cisco IOS DHCP Server, page 36 • Additional References for Cisco IOS DHCP Server, page 43 • Feature Information for the Cisco IOS DHCP Server, page 45 Finding Feature Information Your software release may not support all the features documented in this module. For the latest caveats and feature information, see Bug Search Tool and the release notes for your platform and software release. To find information about the features documented in this module, and to see a list of the releases in which each feature is supported, see the feature information table at the end of this module. Use Cisco Feature Navigator to find information about platform support and Cisco software image support. To access Cisco Feature Navigator, go to www.cisco.com/go/cfn. An account on Cisco.com is not required. Prerequisites for Configuring the DHCP Server Before you configure a Cisco DHCP server, you must understand the concepts documented in the Overview of the DHCP Server, page 2 section. The Cisco DHCP server and the relay agent are enabled by default. Use the no service dhcp command to disable the Cisco DHCP server and the relay agent and the service dhcp command to reenable the functionality. Americas Headquarters: Cisco Systems, Inc., 170 West Tasman Drive, San Jose, CA 95134-1706 USA
-
Upload
independent -
Category
Documents
-
view
4 -
download
0
Transcript of Configuring the Cisco IOS DHCP Server Finding Feature Information

Configuring the Cisco IOS DHCP Server
Last Updated: December 3, 2012
Cisco devices running Cisco software include Dynamic Host Configuration Protocol (DHCP) server andthe relay agent software. The Cisco IOS DHCP server is a full DHCP server implementation that assignsand manages IP addresses from specified address pools within the device to DHCP clients. The DHCPserver can be configured to assign additional parameters such as the IP address of the Domain NameSystem (DNS) server and the default device.
This module describes the concepts and the tasks needed to configure the Cisco IOS DHCP server.
• Finding Feature Information, page 1• Prerequisites for Configuring the DHCP Server, page 1• Information About the Cisco IOS DHCP Server, page 2• How to Configure the Cisco IOS DHCP Server, page 3• Configuration Examples for the Cisco IOS DHCP Server, page 36• Additional References for Cisco IOS DHCP Server, page 43• Feature Information for the Cisco IOS DHCP Server, page 45
Finding Feature InformationYour software release may not support all the features documented in this module. For the latest caveatsand feature information, see Bug Search Tool and the release notes for your platform and software release.To find information about the features documented in this module, and to see a list of the releases in whicheach feature is supported, see the feature information table at the end of this module.
Use Cisco Feature Navigator to find information about platform support and Cisco software image support.To access Cisco Feature Navigator, go to www.cisco.com/go/cfn. An account on Cisco.com is not required.
Prerequisites for Configuring the DHCP ServerBefore you configure a Cisco DHCP server, you must understand the concepts documented in the Overview of the DHCP Server, page 2 section.
The Cisco DHCP server and the relay agent are enabled by default. Use the no service dhcp command todisable the Cisco DHCP server and the relay agent and the service dhcp command to reenable thefunctionality.
Americas Headquarters:Cisco Systems, Inc., 170 West Tasman Drive, San Jose, CA 95134-1706 USA

Port 67 (the DHCP server port) is closed in the Cisco DHCP/BOOTP default configuration. There are twological parts to the service dhcp command: service enabled and service running. The DHCP service isenabled by default, but port 67 does not open until the DHCP service is running. If the DHCP service isrunning, the show ip sockets details or the show sockets detail command displays port 67 as open.
The Cisco DHCP relay agent is enabled on an interface only when you configure the ip helper-addresscommand. This command enables a DHCP broadcast to be forwarded to the configured DHCP server.
Information About the Cisco IOS DHCP Server• Overview of the DHCP Server, page 2• DHCP Attribute Inheritance, page 2• DHCP Server Address Allocation Using Option 82, page 2
Overview of the DHCP ServerThe Cisco DHCP server accepts address assignment requests and renewals from the client and assigns theaddresses from predefined groups of addresses within DHCP address pools. These address pools can alsobe configured to supply additional information to the requesting client such as the IP address of the DomainName System (DNS) server, the default device, and other configuration parameters. The Cisco DHCPserver can accept broadcasts from locally attached LAN segments or from DHCP requests that have beenforwarded by other DHCP relay agents within the network.
DHCP Attribute InheritanceThe DHCP server database is organized as a tree. The root of the tree is the address pool for naturalnetworks, branches are subnetwork address pools, and leaves are manual bindings to clients. Subnetworksinherit network parameters and clients inherit subnetwork parameters. Therefore, common parameters (forexample, the domain name) should be configured at the highest (network or subnetwork) level of the tree.
Inherited parameters can be overridden. For example, if a parameter is defined in both the natural networkand a subnetwork, the definition of the subnetwork is used.
Address leases are not inherited. If a lease is not specified for an IP address, by default, the DHCP serverassigns a one-day lease for the address.
DHCP Server Address Allocation Using Option 82The Cisco IOS DHCP server can allocate dynamic IP addresses based on the relay information option(option 82) sent by the relay agent.
DHCP provides a framework for passing configuration information to hosts on a TCP/IP network.Configuration parameters and other control information are carried in tagged data items that are stored inthe options field of the DHCP message. The data items are also called options. Option 82 is organized as asingle DHCP option that contains information known by the relay agent.
Automatic DHCP address allocation is based on an IP address. This IP address can either be the gatewayaddress (giaddr field of the DHCP packet) or the IP address of an incoming interface. In some networks, itis necessary to use additional information to further determine which IP addresses to allocate. By usingoption 82, the Cisco IOS DHCP relay agent can include additional information about itself whenforwarding client-originated DHCP packets to a DHCP server. The Cisco IOS DHCP server can also useoption 82 to provide additional information to properly allocate IP addresses to DHCP clients. The
Overview of the DHCP Server Information About the Cisco IOS DHCP Server
2

information sent via option 82 is used to identify the port where the DHCP request arrives. AutomaticDHCP address allocation does not parse out the individual suboptions contained in option 82. Rather, theaddress allocation is done by matching a configured pattern byte by byte.
This feature introduces a new DHCP class capability, which is a method to group DHCP clients based onsome shared characteristics other than the subnet in which the clients reside.
For example, DHCP clients are connected to two ports of a single switch. Each port can be configured to bea part of two VLANs: VLAN1 and VLAN2. DHCP clients belong to either VLAN1 or VLAN2 and theswitch can differentiate the VLAN that a particular DHCP Discover message belongs to (possibly throughLayer 2 encapsulation). Each VLAN has its own subnet and all DHCP messages from the same VLAN(same switch) have the giaddr field set to the same value indicating the subnet of the VLAN.
Problems can occur while allocating IP addresses to DHCP clients that are connected to different ports ofthe same VLAN. These IP addresses must be part of the same subnet but the range of IP addresses must bedifferent. In the preceding example, when a DHCP client that is connected to a port of VLAN1 must beallocated an IP address from a range of IP addresses within the VLAN’s subnet, whereas a DHCP clientconnecting to port 2 of VLAN1 must be allocated an IP address from another range of IP addresses. Thetwo range of IP addresses are part of the same subnet (and have the same subnet mask). Generally, duringDHCP address allocation, the DHCP server refers only to the giaddr field and is unable to differentiatebetween the two ranges.
To solve this problem, a relay agent residing at the switch inserts the relay information option (option 82),which carries information specific to the port, and the DHCP server inspects both the giaddr field and theinserted option 82 during the address selection process.
The Cisco software refers to a pool of IP addresses (giaddr or incoming interface IP address) and matchesthe request to a class or classes configured in the pool in the order the classes are specified in the DHCPpool configuration.
When a DHCP address pool is configured with one or more DHCP classes, the pool becomes a restrictedaccess pool, which means that no addresses are allocated from the pool unless one or more classes in thepool matches. This design allows DHCP classes to be used either for access control (no default class isconfigured on the pool) or to provide further address range partitions within the subnet of the pool.
Multiple pools can be configured with the same class, eliminating the need to configure the same pattern inmultiple pools.
The following capabilities are supported for DHCP class-based address allocation:
• Specifying the full relay agent information option value as a raw hexadecimal string by using therelay-information hex command in new relay agent information configuration mode.
• Support for bit-masking the raw relay information hexadecimal value.• Support for a wildcard at the end of a hexadecimal string specified by the relay-information hex
command.
If the relay agent inserts option 82 but does not set the giaddr field in the DHCP packet, the DHCP serverinterface must be configured as a trusted interface by using the ip dhcp relay information trustedcommand. This configuration prevents the server from dropping the DHCP message.
How to Configure the Cisco IOS DHCP Server• Configuring a DHCP Database Agent or Disabling Conflict Logging, page 4• Excluding IP Addresses, page 5• Configuring DHCP Address Pools, page 6
DHCP Server Address Allocation Using Option 82How to Configure the Cisco IOS DHCP Server
3

• Configuring Manual Bindings, page 18• Configuring DHCP Static Mapping, page 21• Customizing DHCP Server Operation, page 25• Configuring a Remote Device to Import DHCP Server Options from a Central DHCP Server,
page 26• Configuring DHCP Address Allocation Using Option 82, page 29• Configuring a Static Route with the Next-Hop Dynamically Obtained Through DHCP, page 34• Clearing DHCP Server Variables, page 35
Configuring a DHCP Database Agent or Disabling Conflict LoggingA DHCP database agent is any host (for example, an FTP, a TFTP, or a remote copy protocol [RCP]server) or storage media on a DHCP server (for example, disk0) that stores the DHCP bindings database.You can configure multiple DHCP database agents, and the interval between database updates and transfersfor each agent.
Automatic bindings are IP addresses that are automatically mapped to the MAC addresses of hosts that arefound in the DHCP database. Automatic binding information (such as lease expiration date and time,interface index, and VPN routing and forwarding [VRF] name) is stored in a database agent. The bindingsare saved as text records for easy maintenance.
An address conflict occurs when two hosts use the same IP address. During address assignment, DHCPchecks for conflicts by using ping and gratuitous Address Resolution Protocol (ARP). If a conflict isdetected, the address is removed from the pool. The address is not assigned until the administrator resolvesthe conflict.
Note We strongly recommend using database agents. However, the Cisco DHCP server can run without databaseagents. If you choose not to configure a DHCP database agent, disable the recording of DHCP addressconflicts on the DHCP server by using the no ip dhcp conflict logging command in global configurationmode. If there is a conflict logging but no database agent is configured, bindings are lost when a devicereboots. Possible false conflicts can occur causing the address to be removed from the address pool.
SUMMARY STEPS
1. enable
2. configure terminal
3. Do one of the following:
• ip dhcp database url [timeout seconds | write-delay seconds]• no ip dhcp conflict logging
4. end
Configuring a DHCP Database Agent or Disabling Conflict Logging How to Configure the Cisco IOS DHCP Server
4

DETAILED STEPS
Command or Action Purpose
Step 1 enable
Example:
Device> enable
Enables privileged EXEC mode.
• Enter your password if prompted.
Step 2 configure terminal
Example:
Device# configure terminal
Enters global configuration mode.
Step 3 Do one of the following:
• ip dhcp database url [timeout seconds | write-delay seconds]• no ip dhcp conflict logging
Example:
Device(config)# ip dhcp database ftp://user:[email protected]/router-dhcp timeout 80
Example:
Device(config)# no ip dhcp conflict logging
Configures a DHCP server to save automaticbindings on a remote host called a databaseagent.
or
Disables DHCP address conflict logging.
Step 4 end
Example:
Device(config)# end
Returns to privileged EXEC mode.
Excluding IP AddressesThe IP address configured on a device interface is automatically excluded from the DHCP address pool.The DHCP server assumes that all other IP addresses in a DHCP address pool subnet are available forassigning to DHCP clients.
You must exclude addresses from the pool if the DHCP server does not allocate those IP addresses toDHCP clients. Consider a scenario where two DHCP servers are set up for the same network segment(subnet) for redundancy. If DHCP servers do not coordinate their services with each other using a protocolsuch as DHCP failover, each DHCP server must be configured to allocate addresses from a nonoverlappingset of addresses in the shared subnet. See the Example: Configuring Manual Bindings, page 39 sectionfor a configuration example.
Excluding IP AddressesHow to Configure the Cisco IOS DHCP Server
5

SUMMARY STEPS
1. enable2. configure terminal3. ip dhcp excluded-address low-address [high-address]
4. end
DETAILED STEPS
Command or Action Purpose
Step 1 enable
Example:
Device> enable
Enables privileged EXEC mode.
• Enter your password if prompted.
Step 2 configure terminal
Example:
Device# configure terminal
Enters global configuration mode.
Step 3 ip dhcp excluded-address low-address [high-address]
Example:
Device(config)# ip dhcp excluded-address 172.16.1.100 172.16.1.103
Specifies IP addresses that the DHCP server shouldnot assign to DHCP clients.
Step 4 end
Example:
Device(config)# end
Returns to privileged EXEC mode.
Configuring DHCP Address Pools
• Configuring a DHCP Address Pool, page 6• Configuring a DHCP Address Pool with Secondary Subnets, page 11• Troubleshooting Tips, page 16• Verifying the DHCP Address Pool Configuration, page 16
Configuring a DHCP Address PoolOn a per-address pool basis, specify DHCP options for the client as necessary.
You can configure a DHCP address pool with a name that is a string (such as “engineering”) or an integer(such as 0). Configuring a DHCP address pool also puts the device into DHCP pool configuration mode—
Configuring DHCP Address Pools Configuring a DHCP Address Pool
6

identified by the (dhcp-config)# prompt—from which you can configure pool parameters (for example, theIP subnet number and default device list).
DHCP defines a process by which the DHCP server knows the IP subnet in which the DHCP client resides,and it can assign an IP address from a pool of valid IP addresses in that subnet. The process by which theDHCP server identifies the DHCP address pool to use for a client request is described in the ConfiguringManual Bindings, page 18 section.
The DHCP server identifies and uses DHCP address pools for a client request, in the following manner:
• If the client is not directly connected to the DHCP server (the giaddr field of the DHCPDISCOVERbroadcast message is nonzero), the server matches the DHCPDISCOVER with the DHCP pool thathas the subnet that contains the IP address in the giaddr field.
• If the client is directly connected to the DHCP server (the giaddr field is zero), the DHCP servermatches the DHCPDISCOVER with DHCP pools that contain the subnets configured on the receivinginterface. If the interface has secondary IP addresses, subnets associated with the secondary IPaddresses are examined for possible allocation only after the subnet associated with the primary IPaddress (on the interface) is exhausted.
Cisco DHCP server software supports advanced capabilities for IP address allocation. See the ConfiguringDHCP Address Allocation Using Option 82, page 29 section for more information.
Before you configure the DHCP address pool, you must:
• Identify DHCP options for devices where necessary, including the following:
◦ Default boot image name◦ Default devices◦ Domain Name System (DNS) servers◦ Network Basic Input/Output System (NetBIOS) name server◦ Primary subnet◦ Secondary subnets and subnet-specific default device lists (see Configuring a DHCP Address
Pool with Secondary Subnets, page 11 for information on secondary subnets).• Decide on a NetBIOS node type (b, p, m, or h).• Decide on a DNS domain name.
Note You cannot configure manual bindings within the same pool that is configured with the network DHCPpool configuration command. To configure manual bindings, see the Configuring Manual Bindings, page18 section.
Configuring DHCP Address PoolsConfiguring a DHCP Address Pool
7

SUMMARY STEPS
1. enable
2. configure terminal
3. ip dhcp pool name
4. utilization mark high percentage-number [log]
5. utilization mark low percentage-number [log]
6. network network-number [mask | /prefix-length] [secondary]
7. domain-name domain
8. dns-server address [address2 ... address8]
9. bootfile filename
10. next-server address [address2 ... address8]
11. netbios-name-server address [address2 ... address8]
12. netbios-node-type type
13. default-router address [address2 ... address8]
14. option code [instance number] {ascii string | hex string | ip-address}
15. lease {days [hours [minutes]] | infinite}
16. end
DETAILED STEPS
Command or Action Purpose
Step 1 enable
Example:
Device> enable
Enables privileged EXEC mode.
• Enter your password if prompted.
Step 2 configure terminal
Example:
Device# configure terminal
Enters global configuration mode.
Step 3 ip dhcp pool name
Example:
Device(config)# ip dhcp pool 1
Creates a name for the DHCP server address pool and enters DHCP poolconfiguration mode.
Configuring DHCP Address Pools Configuring a DHCP Address Pool
8

Command or Action Purpose
Step 4 utilization mark high percentage-number[log]
Example:
Device(dhcp-config)# utilization mark high 80 log
(Optional) Configures the high utilization mark of the current address poolsize.
• The log keyword enables the logging of a system message. A systemmessage will be generated for a DHCP pool when the pool utilizationexceeds the configured high utilization threshold.
Step 5 utilization mark low percentage-number[log]
Example:
Device(dhcp-config)# utilization mark low 70 log
(Optional) Configures the low utilization mark of the current address poolsize.
• The log keyword enables the logging of a system message. A systemmessage will be generated for a DHCP pool when the pool utilizationfalls below the configured low utilization threshold.
Step 6 network network-number [mask | /prefix-length] [secondary]
Example:
Device(dhcp-config)# network 172.16.0.0 /16
Specifies the subnet network number and mask of the DHCP address pool.
Step 7 domain-name domain
Example:
Device(dhcp-config)# domain-name cisco.com
Specifies the domain name for the client.
Step 8 dns-server address [address2 ... address8]
Example:
Device(dhcp-config)# dns server 172.16.1.103 172.16.2.103
Specifies the IP address of a DNS server that is available to a DHCP client.
• One IP address is required; however, you can specify up to eight IPaddresses in one command.
• Servers should be listed in order of preference.
Step 9 bootfile filename
Example:
Device(dhcp-config)# bootfile xllboot
(Optional) Specifies the name of the default boot image for a DHCP client.
• The boot file is used to store the boot image for the client. The bootimage is generally the operating system that the client uses to load.
Configuring DHCP Address PoolsConfiguring a DHCP Address Pool
9

Command or Action Purpose
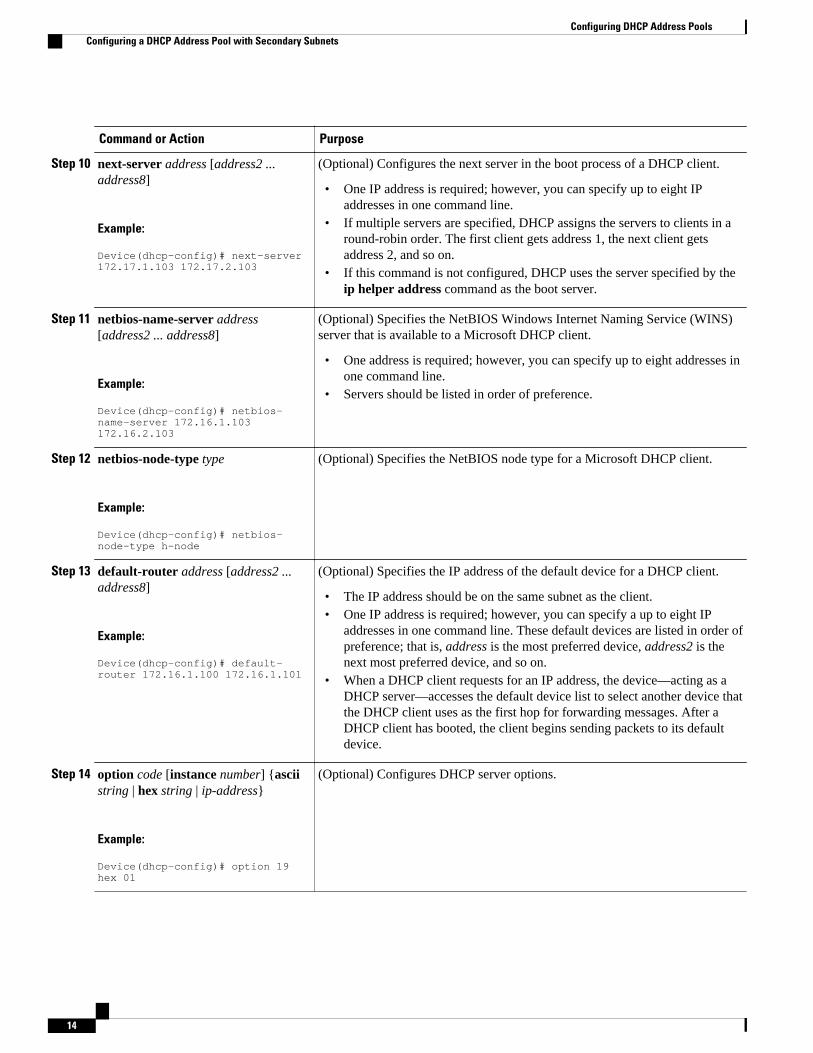
Step 10 next-server address [address2 ...address8]
Example:
Device(dhcp-config)# next-server 172.17.1.103 172.17.2.103
(Optional) Configures the next server in the boot process of a DHCP client.
• One address is required; however, you can specify up to eightaddresses in one command line.
• If multiple servers are specified, DHCP assigns them to clients in around-robin order. The first client gets address 1, the next client getsaddress 2, and so on.
• If this command is not configured, DHCP uses the server specified bythe ip helper address command as the boot server.
Step 11 netbios-name-server address [address2 ...address8]
Example:
Device(dhcp-config)# netbios-name-server 172.16.1.103 172.16.2.103
(Optional) Specifies the NetBIOS WINS server that is available to aMicrosoft DHCP client.
• One address is required; however, you can specify up to eightaddresses in one command line.
• Servers should be listed in order of preference.
Step 12 netbios-node-type type
Example:
Device(dhcp-config)# netbios-node-type h-node
(Optional) Specifies the NetBIOS node type for a Microsoft DHCP client.
Step 13 default-router address [address2 ...address8]
Example:
Device(dhcp-config)# default-router 172.16.1.100 172.16.1.101
(Optional) Specifies the IP address of the default device for a DHCP client.
• The IP address should be on the same subnet as the client.• One IP address is required; however, you can specify up to eight IP
addresses in one command line. These default devices are listed inorder of preference; that is, address is the most preferred device,address2 is the next most preferred device, and so on.
• When a DHCP client requests an IP address, the device—acting as aDHCP server—accesses the default device list to select another devicethat the DHCP client will use as the first hop for forwarding messages.After a DHCP client has booted, the client begins sending packets to itsdefault device.
Step 14 option code [instance number] {asciistring | hex string | ip-address}
Example:
Device(dhcp-config)# option 19 hex 01
(Optional) Configures DHCP server options.
Configuring DHCP Address Pools Configuring a DHCP Address Pool
10

Command or Action Purpose
Step 15 lease {days [hours [minutes]] | infinite}
Example:
Device(dhcp-config)# lease 30
(Optional) Specifies the duration of the lease.
• The default is a one-day lease.• The infinite keyword specifies that the duration of the lease is
unlimited.
Step 16 end
Example:
Device(dhcp-config)# end
Returns to privileged EXEC mode.
Configuring a DHCP Address Pool with Secondary SubnetsFor any DHCP pool, you can configure a primary subnet and any number of secondary subnets. Eachsubnet is a range of IP addresses that the device uses to allocate an IP address to a DHCP client. The DHCPserver multiple subnet functionality enables a Cisco DHCP server address pool to manage additional IPaddresses by adding the addresses to a secondary subnet of an existing DHCP address pool (instead ofusing a separate address pool).
Configuring a secondary DHCP subnetwork places the device in DHCP pool secondary subnetconfiguration mode—identified by the (config-dhcp-subnet-secondary)# prompt—where you can configurea default address list that is specific to the secondary subnet. You can also specify the utilization rate of thesecondary subnet, which allows pools of IP addresses to dynamically increase or reduce in size dependingon the address utilization level. This setting overrides the global utilization rate.
If the DHCP server selects an address pool that contains multiple subnets, the DHCP server allocates an IPaddress from the subnets as follows:
• When the DHCP server receives an address assignment request, it looks for an available IP address inthe primary subnet.
• When the primary subnet is exhausted, the DHCP server automatically looks for an available IPaddress in any of the secondary subnets maintained by the DHCP server (even though the giaddr doesnot necessarily match the secondary subnet). The server inspects the subnets for address availability inthe order of subnets that were added to the pool.
• If the giaddr matches a secondary subnet in the pool, the DHCP server allocates an IP address fromthat particular secondary subnet (even if IP addresses are available in the primary subnet andirrespective of the order of secondary subnets that were added).
Configuring DHCP Address PoolsConfiguring a DHCP Address Pool with Secondary Subnets
11

SUMMARY STEPS
1. enable
2. configure terminal
3. ip dhcp pool name
4. utilization mark high percentage-number [log]
5. utilization mark low percentage-number [log]
6. network network-number [mask | /prefix-length]
7. domain-name domain
8. dns-server address [address2 ... address8]
9. bootfile filename
10. next-server address [address2 ... address8]
11. netbios-name-server address [address2 ... address8]
12. netbios-node-type type
13. default-router address [address2 ... address8]
14. option code [instance number] {ascii string | hex string | ip-address}
15. lease {days [hours] [minutes] | infinite}
16. network network-number [mask | /prefix-length] [secondary]
17. override default-router address [address2 ... address8]
18. override utilization high percentage-number
19. override utilization low percentage-number
20. end
DETAILED STEPS
Command or Action Purpose
Step 1 enable
Example:
Device> enable
Enables privileged EXEC mode.
• Enter your password if prompted.
Step 2 configure terminal
Example:
Device# configure terminal
Enters global configuration mode.
Step 3 ip dhcp pool name
Example:
Device(config)# ip dhcp pool 1
Creates a name for the DHCP server address pool and enters DHCP poolconfiguration mode.
Configuring DHCP Address Pools Configuring a DHCP Address Pool with Secondary Subnets
12

Command or Action Purpose
Step 4 utilization mark high percentage-number [log]
Example:
Device(dhcp-config)# utilization mark high 80 log
(Optional) Configures the high utilization mark of the current address pool size.
• The log keyword enables logging of a system message. A system messageis generated for a DHCP pool when the pool utilization exceeds theconfigured high utilization threshold.
Step 5 utilization mark low percentage-number [log]
Example:
Device(dhcp-config)# utilization mark low 70 log
(Optional) Configures the low utilization mark of the current address pool size.
• The log keyword enables logging of a system message. A system messageis generated for a DHCP pool when the pool utilization falls below theconfigured low utilization threshold.
Step 6 network network-number [mask | /prefix-length]
Example:
Device(dhcp-config)# network 172.16.0.0 /16
Specifies the subnet network number and mask of the primary DHCP addresspool.
Step 7 domain-name domain
Example:
Device(dhcp-config)# domain-name cisco.com
Specifies the domain name for the client.
Step 8 dns-server address [address2 ...address8]
Example:
Device(dhcp-config)# dns server 172.16.1.103 172.16.2.103
Specifies the IP address of a DNS server that is available to a DHCP client.
• One IP address is required; however, you can specify up to eight IPaddresses in one command.
• Servers should be listed in the order of preference.
Step 9 bootfile filename
Example:
Device(dhcp-config)# bootfile xllboot
(Optional) Specifies the name of the default boot image for a DHCP client.
• The boot file is used to store the boot image for the client. The boot imageis generally the operating system image that the client loads.
Configuring DHCP Address PoolsConfiguring a DHCP Address Pool with Secondary Subnets
13
Command or Action Purpose
Step 10 next-server address [address2 ...address8]
Example:
Device(dhcp-config)# next-server 172.17.1.103 172.17.2.103
(Optional) Configures the next server in the boot process of a DHCP client.
• One IP address is required; however, you can specify up to eight IPaddresses in one command line.
• If multiple servers are specified, DHCP assigns the servers to clients in around-robin order. The first client gets address 1, the next client getsaddress 2, and so on.
• If this command is not configured, DHCP uses the server specified by theip helper address command as the boot server.
Step 11 netbios-name-server address[address2 ... address8]
Example:
Device(dhcp-config)# netbios-name-server 172.16.1.103 172.16.2.103
(Optional) Specifies the NetBIOS Windows Internet Naming Service (WINS)server that is available to a Microsoft DHCP client.
• One address is required; however, you can specify up to eight addresses inone command line.
• Servers should be listed in order of preference.
Step 12 netbios-node-type type
Example:
Device(dhcp-config)# netbios-node-type h-node
(Optional) Specifies the NetBIOS node type for a Microsoft DHCP client.
Step 13 default-router address [address2 ...address8]
Example:
Device(dhcp-config)# default-router 172.16.1.100 172.16.1.101
(Optional) Specifies the IP address of the default device for a DHCP client.
• The IP address should be on the same subnet as the client.• One IP address is required; however, you can specify a up to eight IP
addresses in one command line. These default devices are listed in order ofpreference; that is, address is the most preferred device, address2 is thenext most preferred device, and so on.
• When a DHCP client requests for an IP address, the device—acting as aDHCP server—accesses the default device list to select another device thatthe DHCP client uses as the first hop for forwarding messages. After aDHCP client has booted, the client begins sending packets to its defaultdevice.
Step 14 option code [instance number] {asciistring | hex string | ip-address}
Example:
Device(dhcp-config)# option 19 hex 01
(Optional) Configures DHCP server options.
Configuring DHCP Address Pools Configuring a DHCP Address Pool with Secondary Subnets
14

Command or Action Purpose
Step 15 lease {days [hours] [minutes] |infinite}
Example:
Device(dhcp-config)# lease 30
(Optional) Specifies the duration of the lease.
• The default is a one-day lease.• The infinite keyword specifies that the duration of the lease is unlimited.
Step 16 network network-number [mask | /prefix-length] [secondary]
Example:
Device(dhcp-config)# network 10.10.0.0 255.255.0.0 secondary
(Optional) Specifies the network number and mask of a secondary DHCPserver address pool.
• Any number of secondary subnets can be added to a DHCP server addresspool.
• During execution of this command, the configuration mode changes toDHCP pool secondary subnet configuration mode, which is identified by(config-dhcp-subnet-secondary)# prompt. In this mode, the administratorcan configure a default device list that is specific to the subnet.
• See Troubleshooting Tips, page 16 section if you are using secondary IPaddresses under a loopback interface with DHCP secondary subnets.
Step 17 override default-router address[address2 ... address8]
Example:
Device(config-dhcp-subnet-secondary)# override default-router 10.10.0.100 10.10.0.101
(Optional) Specifies the default device list that is used when an IP address isassigned to a DHCP client from a particular secondary subnet.
• If the subnet-specific override value is configured, this override value isused when assigning an IP address from the subnet; the network-widedefault device list is used only to set the gateway device for the primarysubnet.
• If this subnet-specific override value is not configured, the network-widedefault device list is used when assigning an IP address from the subnet.
• See Example: Configuring a DHCP Address Pool with Multiple DisjointSubnets, page 38 section for a sample configuration.
Step 18 override utilization high percentage-number
Example:
Device(config-dhcp-subnet-secondary)# override utilization high 60
(Optional) Sets the high utilization mark of the subnet size.
• This command overrides the global default setting specified by theutilization mark high command.
Step 19 override utilization low percentage-number
Example:
Device(config-dhcp-subnet-secondary)# override utilization low 40
(Optional) Sets the low utilization mark of the subnet size.
• This command overrides the global default setting specified by theutilization mark low command.
Configuring DHCP Address PoolsConfiguring a DHCP Address Pool with Secondary Subnets
15
Command or Action Purpose
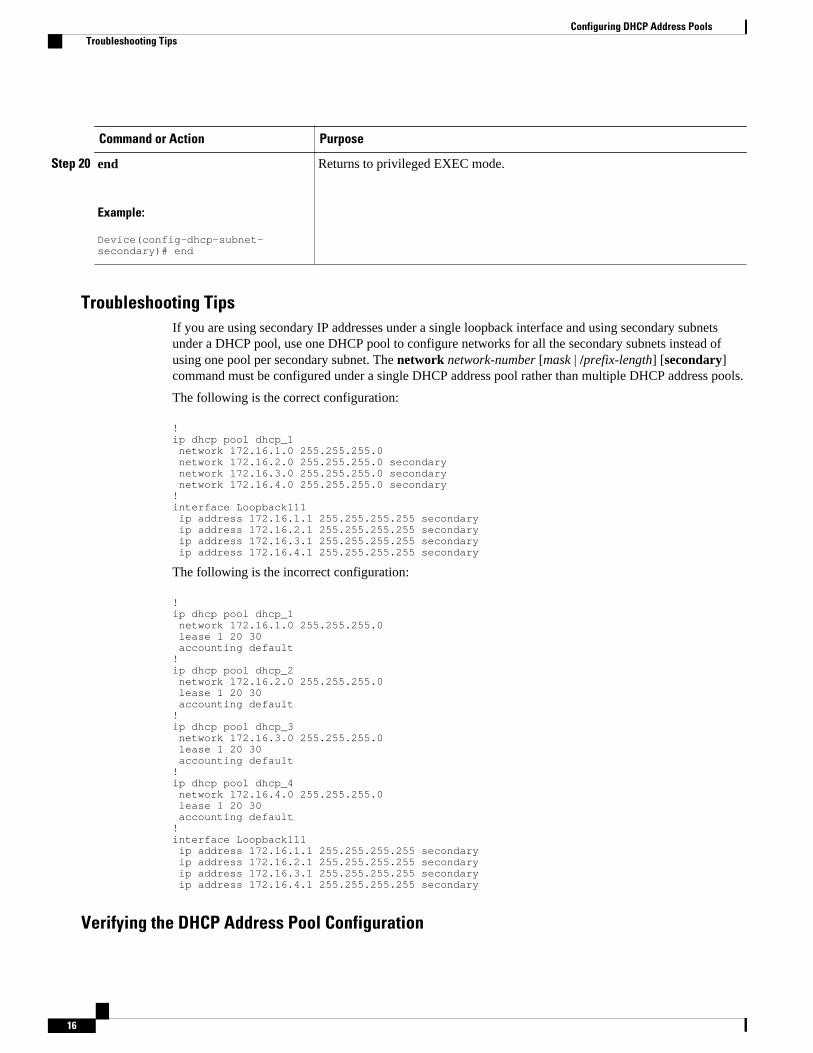
Step 20 end
Example:
Device(config-dhcp-subnet-secondary)# end
Returns to privileged EXEC mode.
Troubleshooting TipsIf you are using secondary IP addresses under a single loopback interface and using secondary subnetsunder a DHCP pool, use one DHCP pool to configure networks for all the secondary subnets instead ofusing one pool per secondary subnet. The network network-number [mask | /prefix-length] [secondary]command must be configured under a single DHCP address pool rather than multiple DHCP address pools.
The following is the correct configuration:
!ip dhcp pool dhcp_1 network 172.16.1.0 255.255.255.0 network 172.16.2.0 255.255.255.0 secondary network 172.16.3.0 255.255.255.0 secondary network 172.16.4.0 255.255.255.0 secondary!interface Loopback111 ip address 172.16.1.1 255.255.255.255 secondary ip address 172.16.2.1 255.255.255.255 secondary ip address 172.16.3.1 255.255.255.255 secondary ip address 172.16.4.1 255.255.255.255 secondary
The following is the incorrect configuration:
! ip dhcp pool dhcp_1 network 172.16.1.0 255.255.255.0 lease 1 20 30 accounting default!ip dhcp pool dhcp_2 network 172.16.2.0 255.255.255.0 lease 1 20 30 accounting default!ip dhcp pool dhcp_3 network 172.16.3.0 255.255.255.0 lease 1 20 30 accounting default!ip dhcp pool dhcp_4 network 172.16.4.0 255.255.255.0 lease 1 20 30 accounting default!interface Loopback111 ip address 172.16.1.1 255.255.255.255 secondary ip address 172.16.2.1 255.255.255.255 secondary ip address 172.16.3.1 255.255.255.255 secondary ip address 172.16.4.1 255.255.255.255 secondary
Verifying the DHCP Address Pool Configuration
Configuring DHCP Address Pools Troubleshooting Tips
16

The following configuration commands are optional. You can enter the show commands in any order.
SUMMARY STEPS
1. enable
2. show ip dhcp pool [name]
3. show ip dhcp binding [address]
4. show ip dhcp conflict [address]
5. show ip dhcp database [url]
6. show ip dhcp server statistics [type-number]
DETAILED STEPS
Command or Action Purpose
Step 1 enable
Example:
Device> enable
Enables privileged EXEC mode.
• Enter your password if prompted.
Step 2 show ip dhcp pool [name]
Example:
Device# show ip dhcp pool
(Optional) Displays information about DHCP address pools.
Step 3 show ip dhcp binding [address]
Example:
Device# show ip dhcp binding
(Optional) Displays a list of all bindings created on a specific DHCPserver.
• Use the show ip dhcp binding command to display the IP addressesthat have already been assigned. Verify that the address pool is notexhausted. If necessary, recreate the pool to create a larger pool ofaddresses.
• Use the show ip dhcp binding command to display the leaseexpiration date and time of the IP address of the host.
Step 4 show ip dhcp conflict [address]
Example:
Device# show ip dhcp conflict
(Optional) Displays a list of all IP address conflicts.
Step 5 show ip dhcp database [url]
Example:
Device# show ip dhcp database
(Optional) Displays recent activity on the DHCP database.
Configuring DHCP Address PoolsVerifying the DHCP Address Pool Configuration
17

Command or Action Purpose
Step 6 show ip dhcp server statistics [type-number]
Example:
Device# show ip dhcp server statistics
(Optional) Displays count information about server statistics and messagessent and received.
Configuring Manual BindingsAn address binding is a mapping between the IP address and MAC address of a client. The IP address of aclient can be assigned manually by an administrator or assigned automatically from a pool by a DHCPserver.
Manual bindings are IP addresses that are manually mapped to MAC addresses of hosts that are found inthe DHCP database. Manual bindings are stored in the NVRAM of the DHCP server. Manual bindings arejust special address pools. There is no limit to the number of manual bindings, but you can configure onlyone manual binding per host pool.
Automatic bindings are IP addresses that have been automatically mapped to MAC addresses of hosts thatare found in the DHCP database. Because the bindings are stored in the volatile memory of the DHCPserver, binding information is lost in the event of power failures or on device reloads. To prevent the loss ofautomatic binding information, a copy of the automatic binding information is stored on a remote hostcalled the DHCP database agent. The bindings are periodically written to the database agent. When thedevice reloads, the bindings are read from the database agent to the DHCP database in the DHCP server.
Note We strongly recommend that you use database agents. However, Cisco DHCP server can function evenwithout database agents.
Some DHCP clients send a client identifier (DHCP option 61) in the DHCP packet. To configure manualbindings for such clients, you must enter the client-identifier command with the hexadecimal values thatidentify the DHCP client. To configure manual bindings for clients that do not send a client identifieroption, you must enter the hardware-address DHCP pool configuration command with the hexadecimalhardware address of the client.
Depending on your release, the DHCP server sends infinite lease time to the clients for which manualbindings are configured.
Depending on your release, the DHCP server sends lease time that is configured using the lease commandto clients for which manual bindings are configured.
Note You cannot configure manual bindings within the same pool that is configured with the network commandin DHCP pool configuration mode. See the Configuring DHCP Address Pools, page 6 section forinformation about DHCP address pools and the network command.
Configuring Manual Bindings Verifying the DHCP Address Pool Configuration
18

SUMMARY STEPS
1. enable
2. configure terminal
3. ip dhcp pool pool-name
4. host address [mask | /prefix-length]
5. client-identifier unique-identifier
6. hardware-address hardware-address [protocol-type | hardware-number]
7. client-name name
8. end
DETAILED STEPS
Command or Action Purpose
Step 1 enable
Example:
Device> enable
Enables privileged EXEC mode.
• Enter your password if prompted.
Step 2 configure terminal
Example:
Device# configure terminal
Enters global configuration mode.
Step 3 ip dhcp pool pool-name
Example:
Device(config)# ip dhcp pool pool1
Creates a name for the DHCP server address pool and enters DHCP poolconfiguration mode.
Step 4 host address [mask | /prefix-length]
Example:
Device(dhcp-config)# host 172.16.0.1
Specifies the IP address and subnet mask of the client.
• There is no limit to the number of manual bindings you can configure.However, you can configure only one manual binding per host pool.
Configuring Manual BindingsVerifying the DHCP Address Pool Configuration
19

Command or Action Purpose
Step 5 client-identifier unique-identifier
Example:
Device(dhcp-config)# client-identifier 01b7.0813.8811.66
Specifies the unique identifier for DHCP clients.
• This command is used for DHCP requests.• DHCP clients require client identifiers. You can specify the unique identifier
for the client in either of the following ways:
◦ A 7-byte dotted hexadecimal notation. For example, 01b7.0813.8811.66,where 01 represents the Ethernet media type and the remaining bytesrepresent the MAC address of the DHCP client.
◦ A 27-byte dotted hexadecimal notation. For example,7665.6e64.6f72.2d30.3032.342e.3937.6230.2e33.3734.312d.4661.302f.31.The equivalent ASCII string for this hexadecimal value isvendor-0024.97b0.3741-fa0/1, where vendor represents the vendor,0024.97b0.3741 represents the MAC address of the source interface, andfa0/1 represents the source interface of the DHCP client.
• See the Troubleshooting Tips, page 20 section for information about how todetermine the client identifier of the DHCP client.
Note The identifier specified here is considered for a DHCP client that sends aclient identifier in the packet.
Step 6 hardware-address hardware-address [protocol-type | hardware-number]
Example:
Device(dhcp-config)# hardware-address b708.1388.f166 ethernet
Specifies a hardware address for the client.
• This command is used for BOOTP requests.
Note The hardware address specified here is considered for a DHCP client thatdoes not send a client identifier in the packet.
Step 7 client-name name
Example:
Device(dhcp-config)# client-name client1
(Optional) Specifies the name of the client using any standard ASCII character.
• The client name should not include the domain name. For example, the nameclient1 should not be specified as client1.cisco.com.
Step 8 end
Example:
Device(dhcp-config)# end
Returns to privileged EXEC mode.
• Troubleshooting Tips, page 20
Troubleshooting Tips
Configuring Manual Bindings Troubleshooting Tips
20

You can determine the client identifier by using the debug ip dhcp server packet command. In thefollowing sample output, the client is identified by the value 0b07.1134.a029:
Device# debug ip dhcp server packet DHCPD:DHCPDISCOVER received from client 0b07.1134.a029 through relay 10.1.0.253.DHCPD:assigned IP address 10.1.0.3 to client 0b07.1134.a029....
Configuring DHCP Static MappingThe DHCP Static Mapping feature enables the assignment of static IP addresses (without creatingnumerous host pools with manual bindings) by using a customer-created text file that the DHCP serverreads. The benefit of this feature is that it eliminates the need for a long configuration file and reduces thespace required in NVRAM to maintain address pools.
A DHCP database contains the mappings between a client IP address and the hardware address, which isreferred to as a binding. There are two types of bindings: manual bindings that map a single hardwareaddress to a single IP address, and automatic bindings that dynamically map a hardware address to an IPaddress from a pool of IP addresses. Manual (also known as static) bindings can be configured individuallydirectly on the device or by using the DHCP Static Mapping feature. These static bindings can be read froma separate static mapping text file. The static mapping text files are read when a device reloads or theDHCP service restarts. These files are read-only.
The read static bindings are treated just like the manual bindings, in that they are:
• Retained across DHCPRELEASEs from the clients.• Not timed out.• Deleted only upon deletion of the pool.• Provided appropriate exclusions for the contained addresses, which are created at the time of the read.
Just like automatic bindings, manual (or static) bindings from the static mapping text file are also displayedby using the show ip dhcp binding command.
Perform this task to create the static mapping text file. You will input your addresses in the text file, whichis stored in the DHCP database for the DHCP server to read. There is no limit to the number of addressesthat can be stored in the file. The file format has the following elements:
• Database version number• End-of-file designator• Hardware type• Hardware address• IP address• Lease expiration• Time the file was created
See the following table for more details about the format of the text file.
The following is a sample static mapping text file:
*time* Jan 21 2005 03:52 PM*version* 2!IP address Type Hardware address Lease expiration10.0.0.4 /24 1 0090.bff6.081e Infinite10.0.0.5 /28 id 00b7.0813.88f1.66 Infinite
Configuring DHCP Static MappingTroubleshooting Tips
21

10.0.0.2 /21 1 0090.bff6.081d Infinite*end*
Table 1 Static Mapping Text File Field Descriptions
Field Description
*time* Specifies the time the file was created. This field allows DHCP to differentiatebetween the new and old database versions when multiple agents are configured.The valid format of the time is mm dd yyyy hh:mm AM/PM.
*version* 2 Specifies the database version number.
IP address Specifies the static IP address. If the subnet mask is not specified, a mask isautomatically assigned depending on the IP address. The IP address and the maskis separated by a space.
Type Specifies the hardware type. For example, type “1” indicates Ethernet. The type“id” indicates that the field is a DHCP client identifier. Legal values can be foundonline at http://www.iana.org/assignments/arp-parameters in the “NumberHardware Type” list.
Hardware address Specifies the hardware address.
When the type is numeric, the type refers to the hardware media. Legal values canbe found online at http://www.iana.org/assignments/arp-parameters in the“Number Hardware Type” list.
When the type is “id,” the type refers to a match on the client identifier.
For more information about the client identifier, see RFC 2132, DHCP Optionsand BOOTP Vendor Extensions, section 9.14, located at http://www.ietf.org/rfc/rfc2132.txt, or the client-identifier command.
If you are unsure about the client identifier to match with the hardware type, usethe debug dhcp detail command to display the client identifier being sent to theDHCP server from the client.
Lease expiration Specifies the expiration of the lease. “Infinite” specifies that the duration of thelease is unlimited.
*end* End of file. DHCP uses the *end* designator to detect file truncation.
• Configuring the DHCP Server to Read a Static Mapping Text File, page 22
Configuring the DHCP Server to Read a Static Mapping Text FileThe administrator must create the static mapping text file in the correct format and configure the addresspools before performing this task.
Before editing the file, you must disable the DHCP server using the no service dhcp command.
Configuring DHCP Static Mapping Configuring the DHCP Server to Read a Static Mapping Text File
22

Note The static bindings must not be deleted when a DHCPRELEASE is received or must not be timed out bythe DHCP timer. The static bindings should be created by using the ip dhcp pool command.
SUMMARY STEPS
1. enable
2. configure terminal
3. ip dhcp pool name
4. origin file url
5. end
6. show ip dhcp binding [address]
DETAILED STEPS
Command or Action Purpose
Step 1 enable
Example:
Device> enable
Enables privileged EXEC mode.
• Enter your password if prompted.
Step 2 configure terminal
Example:
Device# configure terminal
Enters global configuration mode.
Step 3 ip dhcp pool name
Example:
Device(config)# ip dhcp pool pool1
Assigns a name to a DHCP pool and enters DHCP configurationmode.
Note If you have already configured the IP DHCP pool nameusing the ip dhcp pool command and the static file URLusing the origin file command, you must perform a freshread using the no service dhcp command and the servicedhcp command.
Step 4 origin file url
Example:
Device(dhcp-config)# origin file tftp://10.1.0.1/static-bindings
Specifies the URL that the DHCP server can access to locate thetext file.
Configuring DHCP Static MappingConfiguring the DHCP Server to Read a Static Mapping Text File
23

Command or Action Purpose
Step 5 end
Example:
Device(dhcp-config)# end
Returns to privileged EXEC mode.
Step 6 show ip dhcp binding [address]
Example:
Device# show ip dhcp binding
(Optional) Displays a list of all bindings created on a specificDHCP server.
Examples
The following sample output from the show ip dhcp binding command displays address bindings that areconfigured:
Device# show ip dhcp binding
00:05:14:%SYS-5-CONFIG_I: Configured from console by consoleBindings from all pools not associated with VRF:IP address Client-ID/ Ls expir Type Hw address User name10.9.9.4/8 0063.7363.2d30.3036. Infinite Static 302e.3762.2e39.3634. 632d.4574.8892.10.9.9.1/24 0063.6973.636f.2d30. Infinite Static 3036.302e.3437.3165. 2e64.6462.342d.
The following sample output displays each entry in the static mapping text file:
*time* Jan 21 2005 22:52 PM!IP address Type Hardware address Lease expiration10.19.9.1 /24 id 0063.6973.636f.2d30.3036.302e.343710.9.9.4 id 0063.7363.2d30.3036.302e.3762.2e39.3634.632d Infinite*end*
The following sample debug output shows the reading of the static mapping text file from the TFTP server:
Device# debug ip dhcp server
Loading abc/static_pool from 10.19.192.33 (via Ethernet0):[OK - 333 bytes]*May 26 23:14:21.259: DHCPD: contacting agent tftp://10.19.192.33/abc/static_pool (attempt 0)*May 26 23:14:21.467: DHCPD: agent tftp://10.19.192.33/abc/static_pool is responding.*May 26 23:14:21.467: DHCPD: IFS is ready.*May 26 23:14:21.467: DHCPD: reading bindings from tftp://10.19.192.33/abc/static_pool.*May 26 23:14:21.707: DHCPD: read 333 / 1024 bytes.*May 26 23:14:21.707: DHCPD: parsing text line *time* Apr 22 2002 11:31 AM*May 26 23:14:21.707: DHCPD: parsing text line ““*May 26 23:14:21.707: DHCPD: parsing text line!IP address Type Hardware address Lease expiration*May 26 23:14:21.707: DHCPD: parsing text line“10.9.9.1 /24 id 0063.6973.636f.2d30.3036.302e.3437”*May 26 23:14:21.707: DHCPD: creating binding for 10.9.9.1*May 26 23:14:21.707: DHCPD: Adding binding to radix tree (10.9.9.1)*May 26 23:14:21.707: DHCPD: Adding binding to hash tree*May 26 23:14:21.707: DHCPD: parsing text line“10.9.9.4 id 0063.7363.2d30.3036.302e.3762.2e39.3634.632d”*May 26 23:14:21.711: DHCPD: creating binding for 10.9.9.4*May 26 23:14:21.711: DHCPD: Adding binding to radix tree (10.9.9.4)*May 26 23:14:21.711: DHCPD: Adding binding to hash tree*May 26 23:14:21.711: DHCPD: parsing text line “Infinite”
Configuring DHCP Static Mapping Configuring the DHCP Server to Read a Static Mapping Text File
24

*May 26 23:14:21.711: DHCPD: parsing text line “”*May 26 23:14:21.711: DHCPD: parsing text line!IP address Interface-index Lease expiration VRF*May 26 23:14:21.711: DHCPD: parsing text line “*end*”*May 26 23:14:21.711: DHCPD: read static bindings from tftp://10.19.192.33/abcemp/static_pool.
Customizing DHCP Server OperationBy default, the DHCP server pings a pool address twice before assigning a particular address to arequesting client. If the ping is unanswered, the DHCP server assumes (with a high probability) that theaddress is not in use and assigns the address to the requesting client.
By default, the DHCP server waits for 2 seconds before timing out a ping packet.
You can configure the DHCP server to ignore and not reply to any BOOTP requests that the serverreceives. This functionality is beneficial when there is a mix of BOOTP and DHCP clients in a networksegment and there is a BOOTP server and a Cisco DHCP server servicing the network segment. TheBOOTP server is configured with static bindings for the BOOTP clients and the BOOTP clients mustobtain their addresses from the BOOTP server. However, DHCP servers can also respond to BOOTPrequests and the DHCP server may offer an address that causes the BOOTP clients to boot with the addressfrom the DHCP server, instead of the address from the BOOTP server. Configuring the DHCP server toignore BOOTP requests ensures that the BOOTP clients will receive address information from the BOOTPserver and will not accept an address from a DHCP server.
Cisco software can forward these ignored BOOTP request packets to another DHCP server if the ip helper-address command is configured on the incoming interface.
SUMMARY STEPS
1. enable
2. configure terminal
3. ip dhcp ping packets number
4. ip dhcp ping timeout milliseconds
5. ip dhcp bootp ignore
6. end
DETAILED STEPS
Command or Action Purpose
Step 1 enable
Example:
Device> enable
Enables privileged EXEC mode.
• Enter your password if prompted.
Step 2 configure terminal
Example:
Device# configure terminal
Enters global configuration mode.
Customizing DHCP Server OperationConfiguring the DHCP Server to Read a Static Mapping Text File
25
Command or Action Purpose
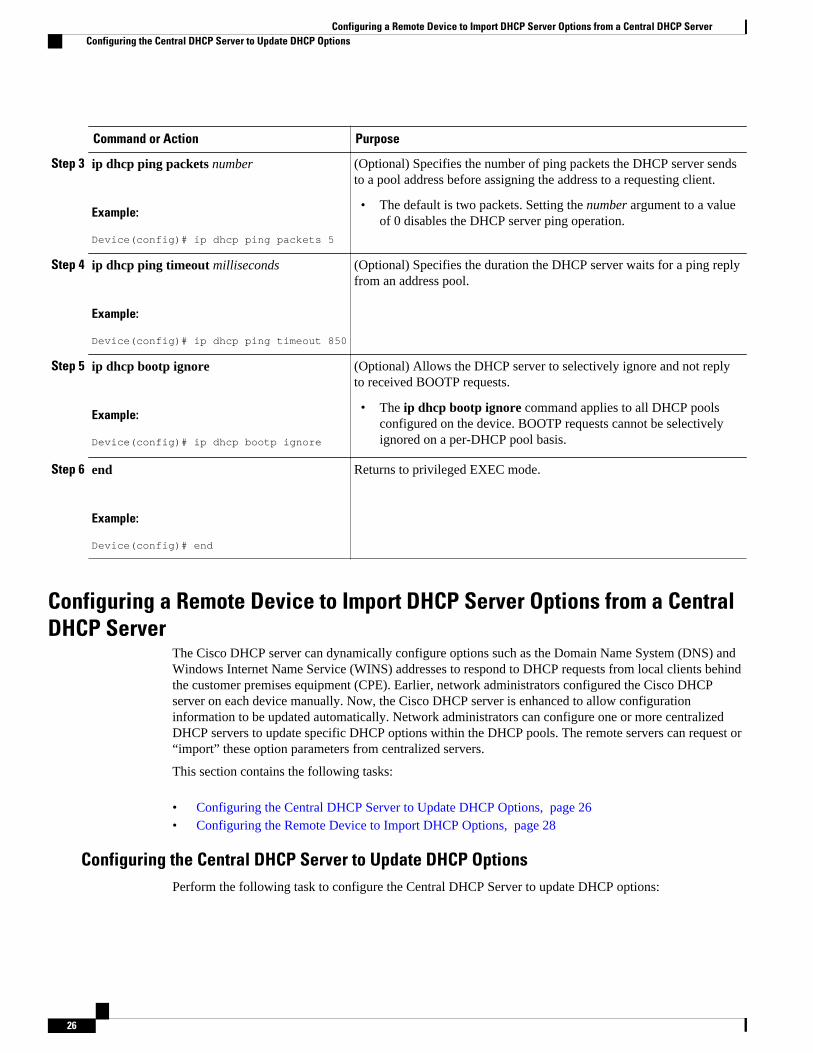
Step 3 ip dhcp ping packets number
Example:
Device(config)# ip dhcp ping packets 5
(Optional) Specifies the number of ping packets the DHCP server sendsto a pool address before assigning the address to a requesting client.
• The default is two packets. Setting the number argument to a valueof 0 disables the DHCP server ping operation.
Step 4 ip dhcp ping timeout milliseconds
Example:
Device(config)# ip dhcp ping timeout 850
(Optional) Specifies the duration the DHCP server waits for a ping replyfrom an address pool.
Step 5 ip dhcp bootp ignore
Example:
Device(config)# ip dhcp bootp ignore
(Optional) Allows the DHCP server to selectively ignore and not replyto received BOOTP requests.
• The ip dhcp bootp ignore command applies to all DHCP poolsconfigured on the device. BOOTP requests cannot be selectivelyignored on a per-DHCP pool basis.
Step 6 end
Example:
Device(config)# end
Returns to privileged EXEC mode.
Configuring a Remote Device to Import DHCP Server Options from a CentralDHCP Server
The Cisco DHCP server can dynamically configure options such as the Domain Name System (DNS) andWindows Internet Name Service (WINS) addresses to respond to DHCP requests from local clients behindthe customer premises equipment (CPE). Earlier, network administrators configured the Cisco DHCPserver on each device manually. Now, the Cisco DHCP server is enhanced to allow configurationinformation to be updated automatically. Network administrators can configure one or more centralizedDHCP servers to update specific DHCP options within the DHCP pools. The remote servers can request or“import” these option parameters from centralized servers.
This section contains the following tasks:
• Configuring the Central DHCP Server to Update DHCP Options, page 26• Configuring the Remote Device to Import DHCP Options, page 28
Configuring the Central DHCP Server to Update DHCP OptionsPerform the following task to configure the Central DHCP Server to update DHCP options:
Configuring a Remote Device to Import DHCP Server Options from a Central DHCP Server Configuring the Central DHCP Server to Update DHCP Options
26

SUMMARY STEPS
1. enable
2. configure terminal
3. ip dhcp pool name
4. network network-number [mask | /prefix-length]
5. dns-server address [address2 ... address8]
6. end
DETAILED STEPS
Command or Action Purpose
Step 1 enable
Example:
Device> enable
Enables privileged EXEC mode.
• Enter your password if prompted.
Step 2 configure terminal
Example:
Device# configure terminal
Enters global configuration mode.
Step 3 ip dhcp pool name
Example:
Device(config)# ip dhcp pool 1
Creates a name for the DHCP server address pool and entersDHCP pool configuration mode.
Step 4 network network-number [mask | /prefix-length]
Example:
Device(dhcp-config)# network 172.16.0.0 /16
Specifies the subnet number and mask of the DHCP address pool.
Step 5 dns-server address [address2 ... address8]
Example:
Device(dhcp-config)# dns server 172.16.1.103 172.16.2.103
(Optional) Specifies the IP address of a DNS server that isavailable to a DHCP client.
• One IP address is required; however, you can specify up toeight IP addresses in one command line.
• Servers should be listed in the order of preference.
Configuring a Remote Device to Import DHCP Server Options from a Central DHCP ServerConfiguring the Central DHCP Server to Update DHCP Options
27

Command or Action Purpose
Step 6 end
Example:
Device(dhcp-config)# end
Returns to privileged EXEC mode.
Configuring the Remote Device to Import DHCP OptionsPerform the following task to configure the remote device to import DHCP options:
SUMMARY STEPS
1. enable
2. configure terminal
3. ip dhcp pool pool-name
4. network network-number [mask | /prefix-length]
5. import all
6. exit
7. interface type number
8. ip address dhcp
9. end
10. show ip dhcp import
DETAILED STEPS
Command or Action Purpose
Step 1 enable
Example:
Device> enable
Enables privileged EXEC mode.
• Enter your password if prompted.
Step 2 configure terminal
Example:
Device# configure terminal
Enters global configuration mode.
Step 3 ip dhcp pool pool-name
Example:
Device(config)# ip dhcp pool pool1
Creates a name for the DHCP server address pool and enters DHCPpool configuration mode.
Configuring a Remote Device to Import DHCP Server Options from a Central DHCP Server Configuring the Remote Device to Import DHCP Options
28

Command or Action Purpose
Step 4 network network-number [mask | /prefix-length]
Example:
Device(dhcp-config)# network 172.30.0.0 /16
Specifies the subnet network number and mask of the DHCPaddress pool.
Step 5 import all
Example:
Device(dhcp-config)# import all
Imports DHCP option parameters into the DHCP server database.
Step 6 exit
Example:
Device(dhcp-config)# exit
Exits DHCP pool configuration mode and enters globalconfiguration mode.
Step 7 interface type number
Example:
Device(config)# interface FastEthernet 0/0
Configures an interface and enters interface configuration mode.
Step 8 ip address dhcp
Example:
Device(config-if)# ip address dhcp
Specifies that the interface acquires an IP address through DHCP.
Step 9 end
Example:
Device(config-if)# end
Returns to privileged EXEC mode.
Step 10 show ip dhcp import
Example:
Device# show ip dhcp import
Displays the options that are imported from the central DHCPserver.
Configuring DHCP Address Allocation Using Option 82
• Enabling Option 82 for DHCP Address Allocation, page 30
Configuring DHCP Address Allocation Using Option 82Configuring the Remote Device to Import DHCP Options
29

• Troubleshooting Tips, page 30• Defining the DHCP Class and Relay Agent Information Patterns, page 31• Troubleshooting Tips, page 32• Defining the DHCP Address Pool, page 32
Enabling Option 82 for DHCP Address AllocationBy default, the Cisco DHCP server uses information provided by option 82 to allocate IP addresses. If theDHCP address allocation is disabled, perform the task described in this section to reenable this capability.
SUMMARY STEPS
1. enable
2. configure terminal
3. ip dhcp use class
4. end
DETAILED STEPS
Command or Action Purpose
Step 1 enable
Example:
Device> enable
Enables privileged EXEC mode.
• Enter your password if prompted.
Step 2 configure terminal
Example:
Device# configure terminal
Enters global configuration mode.
Step 3 ip dhcp use class
Example:
Device(config)# ip dhcp use class
Controls DHCP classes that are used for address allocation.
• This functionality is enabled by default.• Use the no form of this command to disable this functionality without
deleting the DHCP class configuration.
Step 4 end
Example:
Device(config)# end
Returns to privileged EXEC mode.
Troubleshooting TipsIf DHCP classes are configured in the pool, but the DHCP server does not use the classes, verify if the noip dhcp use class command was configured.
Configuring DHCP Address Allocation Using Option 82 Enabling Option 82 for DHCP Address Allocation
30

Defining the DHCP Class and Relay Agent Information PatternsYou must know the hexadecimal value of each byte location in option 82 to configure the relay-information hex command. The option 82 format may vary from product to product. Contact the relayagent vendor for this information.
Perform this task to define the DHCP class and relay agent information patterns:
SUMMARY STEPS
1. enable
2. configure terminal
3. ip dhcp class class-name
4. relay agent information
5. relay-information hex pattern [*] [bitmask mask]
6. Repeat Steps 3 through 5 for each DHCP class you need to configure.
7. end
DETAILED STEPS
Command or Action Purpose
Step 1 enable
Example:
Device> enable
Enables privileged EXEC mode.
• Enter your password if prompted.
Step 2 configure terminal
Example:
Device# configure terminal
Enters global configuration mode.
Step 3 ip dhcp class class-name
Example:
Device(config)# ip dhcp class CLASS1
Defines a DHCP class and enters DHCP class configurationmode.
Step 4 relay agent information
Example:
Device(dhcp-class)# relay agent information
Enters relay agent information option configuration mode.
• If you omit this step, the DHCP class matches any relayagent information option, whether the relay agentinformation option value is available or not.
Configuring DHCP Address Allocation Using Option 82Defining the DHCP Class and Relay Agent Information Patterns
31

Command or Action Purpose
Step 5 relay-information hex pattern [*] [bitmask mask]
Example:
Device(dhcp-class-relayinfo)# relay-information hex 01030a0b0c02050000000123
(Optional) Specifies a hexadecimal value for full relayinformation option.
• The pattern argument creates a pattern that is used to matchthe DHCP class.
• If you omit this step, no pattern is configured and it isconsidered a match to any relay agent information optionvalue, but the relay information option must be available inthe DHCP packet.
• You can configure multiple relay-information hexcommands in a DHCP class.
Step 6 Repeat Steps 3 through 5 for each DHCP class you needto configure.
Step 7 end
Example:
Device(dhcp-class-relayinfo)# end
Returns to privileged EXEC mode.
Troubleshooting TipsUse the debug ip dhcp server class command to display the class matching results.
Defining the DHCP Address PoolPerform this task to define the DHCP address pool:
SUMMARY STEPS
1. enable
2. configure terminal
3. ip dhcp pool name
4. network network-number [mask | /prefix-length]
5. class class-name
6. address range start-ip end-ip
7. Repeat Steps 5 and 6 for each DHCP class you need to associate with the DHCP pool.
8. end
Configuring DHCP Address Allocation Using Option 82 Troubleshooting Tips
32

DETAILED STEPS
Command or Action Purpose
Step 1 enable
Example:
Device> enable
Enables privileged EXEC mode.
• Enter your password if prompted.
Step 2 configure terminal
Example:
Device# configure terminal
Enters global configuration mode.
Step 3 ip dhcp pool name
Example:
Device# ip dhcp pool ABC
Configures a DHCP address pool on a Cisco IOS DHCP server andenters DHCP pool configuration mode.
• Multiple pools can be configured with the same class, eliminatingthe need to configure the same pattern in multiple pools.
Step 4 network network-number [mask | /prefix-length]
Example:
Device(dhcp-config)# network 10.0.20.0
Configures the subnet and mask for a DHCP address pool on a CiscoIOS DHCP server.
Step 5 class class-name
Example:
Device(dhcp-config)# class CLASS1
Associates a class with a pool and enters DHCP pool classconfiguration mode.
• This command also creates a DHCP class if the DHCP class is notyet defined.
Step 6 address range start-ip end-ip
Example:
Device(dhcp-pool-class)# address range 10.0.20.1 10.0.20.100
(Optional) Sets an address range for the DHCP class in a DHCP serveraddress pool.
• If this command is not configured for a class, the default value isthe entire subnet of the pool. Each class in the DHCP pool isexamined for a match in the order configured.
Step 7 Repeat Steps 5 and 6 for each DHCP class youneed to associate with the DHCP pool.
Step 8 end
Example:
Device(dhcp-pool-class)# end
Returns to privileged EXEC mode.
Configuring DHCP Address Allocation Using Option 82Defining the DHCP Address Pool
33

Configuring a Static Route with the Next-Hop Dynamically ObtainedThrough DHCP
This task enables static routes to be assigned using a DHCP default gateway as the next-hop device. Thisbehavior was not possible before the introduction of this feature because the gateway IP address is notknown until after the DHCP address assignment. You cannot configure a static route with the CLI withoutknowing that DHCP-supplied address.
The static routes are updated in the routing table when the default gateway is assigned by the DHCP server.The routes remain in the routing table until the DHCP lease expires and then the routes are removed.
When a DHCP client releases an address, the corresponding static route (the route configured using the iproute command) is automatically removed from the routing table. If the DHCP router option (option 3 ofthe DHCP packet) changes during the client renewal, the DHCP default gateway changes to the new IPaddress supplied after the renewal.
This feature is particularly useful for VPN deployments such as Dynamic Multipoint VPNs (DMVPNs).This feature is useful when a nonphysical interface, such as a multipoint generic routing encapsulation(mGRE) tunnel, is configured on a device and certain traffic must be excluded from entering the tunnelinterface.
Verify all DHCP client and server configuration steps. Ensure that the DHCP client and server are properlydefined to supply a DHCP device option 3 of the DHCP packet.
Note• If the DHCP client is not able to obtain an IP address or the default device IP address, the static route
is not installed in the routing table.• If the lease has expired and the DHCP client cannot renew the address, the DHCP IP address assigned
to the client is released and any associated static routes are removed from the routing table.
SUMMARY STEPS
1. enable
2. configure terminal
3. ip route prefix mask {ip-address | interface-type interface-number [ip-address]} dhcp [distance]
4. end
5. show ip route
DETAILED STEPS
Command or Action Purpose
Step 1 enable
Example:
Device> enable
Enables privileged EXEC mode.
• Enter your password if prompted.
Configuring a Static Route with the Next-Hop Dynamically Obtained Through DHCP Defining the DHCP Address Pool
34

Command or Action Purpose
Step 2 configure terminal
Example:
Device# configure terminal
Enters global configuration mode.
Step 3 ip route prefix mask {ip-address | interface-typeinterface-number [ip-address]} dhcp [distance]
Example:
Device(config)# ip route 192.168.1.1 255.255.255.255 192.168.2.2 dhcp
Assigns a static route for the default next-hop device when the DHCPserver is accessed for an IP address.
• If more than one interface is configured to obtain an IP addressfrom a DHCP server, use the ip route prefix mask interface-typeinterface-number dhcp command for each interface. If theinterface is not specified, the route is added to the routing table assoon as any of the interfaces obtain an IP address and a defaultdevice.
Step 4 end
Example:
Device(config)# end
Returns to privileged EXEC mode.
Step 5 show ip route
Example:
Device# show ip route
(Optional) Displays the current state of the routing table.
Clearing DHCP Server VariablesPerform this task to clear DHCP server variables:
SUMMARY STEPS
1. enable
2. clear ip dhcp binding {address | *}
3. clear ip dhcp conflict {address | *}
4. clear ip dhcp server statistics
Clearing DHCP Server VariablesDefining the DHCP Address Pool
35

DETAILED STEPS
Command or Action Purpose
Step 1 enable
Example:
Device> enable
Enables privileged EXEC mode.
• Enter your password if prompted.
Step 2 clear ip dhcp binding {address | *}
Example:
Device# clear ip dhcp binding *
Deletes an automatic address binding from the DHCP database.
• Specifying the address argument clears the automatic binding fora specific (client) IP address, whereas specifying an asterisk (*)clears all automatic bindings.
Step 3 clear ip dhcp conflict {address | *}
Example:
Device# clear ip dhcp conflict 172.16.1.103
Clears an address conflict from the DHCP database.
• Specifying the address argument clears the conflict for a specificIP address, whereas specifying an asterisk (*) clears conflicts forall addresses.
Step 4 clear ip dhcp server statistics
Example:
Device# clear ip dhcp server statistics
Resets all DHCP server counters to 0.
Configuration Examples for the Cisco IOS DHCP Server• Example: Configuring the DHCP Database Agent, page 37• Example: Excluding IP Addresses, page 37• Example: Configuring DHCP Address Pools, page 37• Example: Configuring a DHCP Address Pool with Multiple Disjoint Subnets, page 38• Example: Configuring Manual Bindings, page 39• Example: Configuring Static Mapping, page 40• Example: Configuring the Option to Ignore all BOOTP Requests, page 40• Example: Importing DHCP Options, page 41• Example: Configuring DHCP Address Allocation Using Option 82, page 42• Example: Configuring a Static Route with the Next-Hop Dynamically Obtained Through DHCP,
page 43
Clearing DHCP Server Variables Configuration Examples for the Cisco IOS DHCP Server
36

Example: Configuring the DHCP Database AgentThe following example shows how to store bindings on host 172.16.4.253. The file transfer protocol isFTP. The server waits for 2 minutes (120 seconds) before performing database changes.
ip dhcp database ftp://user:[email protected]/router-dhcp write-delay 120
Example: Excluding IP AddressesIn the following example, server A and server B service the subnet 10.0.20.0/24. If the subnet is splitequally between the two servers, server A is configured to allocate IP addresses 10.0.20.1 to 10.0.20.125and server B is configured to allocate IP addresses 10.0.20.126 to 10.0.20.254.
Server A
ip dhcp excluded-address 10.0.20.126 10.0.20.255!ip dhcp pool A network 10.0.20.0 255.255.255.0
Server B
ip dhcp excluded-address 10.0.20.0 10.0.20.125!ip dhcp pool B network 10.0.20.0 255.255.255.0
Example: Configuring DHCP Address PoolsIn the following example, three DHCP address pools are created: one in network 172.16.0.0, one insubnetwork 172.16.1.0, and one in subnetwork 172.16.2.0. Attributes from network 172.16.0.0—such asthe domain name, Domain Name System (DNS) server, (Network Basic Input/Output System) NetBIOSname server, and NetBIOS node type—are inherited in subnetworks 172.16.1.0 and 172.16.2.0. In eachpool, clients are granted 30-day leases and all addresses in each subnetwork, except the excluded addresses,are available to the DHCP server for assigning to clients. The table below lists the IP addresses for thedevices in three DHCP address pools.
Table 2 DHCP Address Pool Configuration
Pool 0 (Network172.16.0.0)
Pool 1 (Subnetwork172.16.1.0)
Pool 2 (Subnetwork172.16.2.0)
Device IP Address Device IP Address Device IP Address
Default devices — Default devices 172.16.1.100
172.16.1.101
Default devices 172.16.2.100
172.16.2.101
DNS server 172.16.1.102
172.16.2.102
— — — —
Example: Configuring the DHCP Database AgentConfiguration Examples for the Cisco IOS DHCP Server
37
Pool 0 (Network172.16.0.0)
Pool 1 (Subnetwork172.16.1.0)
Pool 2 (Subnetwork172.16.2.0)
NetBIOS nameserver
172.16.1.103
172.16.2.103
— — — —
NetBIOS node type h-node — — — —
ip dhcp database ftp://user:[email protected]/router-dhcp write-delay 120ip dhcp excluded-address 172.16.1.100 172.16.1.103 ip dhcp excluded-address 172.16.2.100 172.16.2.103!ip dhcp pool 0 network 172.16.0.0 /16 domain-name cisco.com dns-server 172.16.1.102 172.16.2.102 netbios-name-server 172.16.1.103 172.16.2.103 netbios-node-type h-node!ip dhcp pool 1 network 172.16.1.0 /24 default-router 172.16.1.100 172.16.1.101 lease 30 !ip dhcp pool 2 network 172.16.2.0 /24 default-router 172.16.2.100 172.16.2.101 lease 30
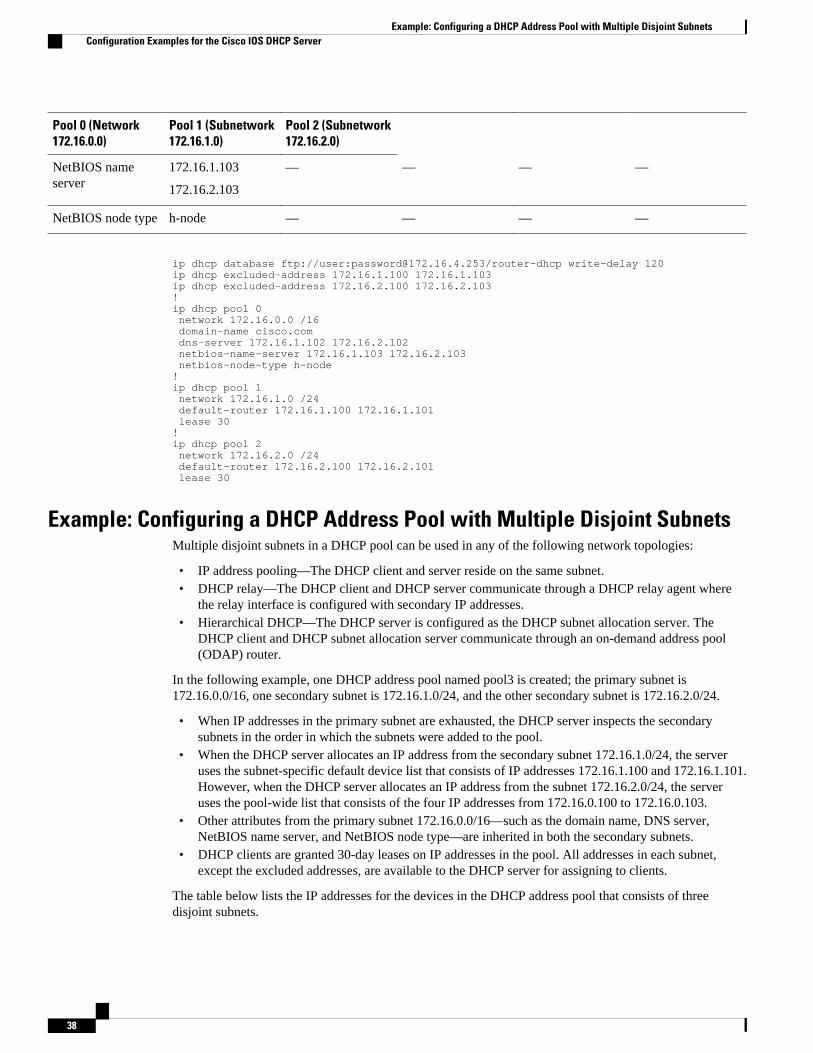
Example: Configuring a DHCP Address Pool with Multiple Disjoint SubnetsMultiple disjoint subnets in a DHCP pool can be used in any of the following network topologies:
• IP address pooling—The DHCP client and server reside on the same subnet.• DHCP relay—The DHCP client and DHCP server communicate through a DHCP relay agent where
the relay interface is configured with secondary IP addresses.• Hierarchical DHCP—The DHCP server is configured as the DHCP subnet allocation server. The
DHCP client and DHCP subnet allocation server communicate through an on-demand address pool(ODAP) router.
In the following example, one DHCP address pool named pool3 is created; the primary subnet is172.16.0.0/16, one secondary subnet is 172.16.1.0/24, and the other secondary subnet is 172.16.2.0/24.
• When IP addresses in the primary subnet are exhausted, the DHCP server inspects the secondarysubnets in the order in which the subnets were added to the pool.
• When the DHCP server allocates an IP address from the secondary subnet 172.16.1.0/24, the serveruses the subnet-specific default device list that consists of IP addresses 172.16.1.100 and 172.16.1.101.However, when the DHCP server allocates an IP address from the subnet 172.16.2.0/24, the serveruses the pool-wide list that consists of the four IP addresses from 172.16.0.100 to 172.16.0.103.
• Other attributes from the primary subnet 172.16.0.0/16—such as the domain name, DNS server,NetBIOS name server, and NetBIOS node type—are inherited in both the secondary subnets.
• DHCP clients are granted 30-day leases on IP addresses in the pool. All addresses in each subnet,except the excluded addresses, are available to the DHCP server for assigning to clients.
The table below lists the IP addresses for the devices in the DHCP address pool that consists of threedisjoint subnets.
Example: Configuring a DHCP Address Pool with Multiple Disjoint Subnets Configuration Examples for the Cisco IOS DHCP Server
38

Table 3 DHCP Address Pool Configuration with Multiple Disjoint Subnets
Primary Subnet(172.16.0.0/16)
First SecondarySubnet(172.16.1.0/24)
Second SecondarySubnet(172.16.2.0/24)
Device IP Address Device IP Address Device IP Address
Default devices 172.16.0.100
172.16.0.101
172.16.0.102
172.16.0.103
Default devices 172.16.1.100
172.16.1.101
Default devices 172.16.0.100
172.16.0.101
172.16.0.102
172.16.0.103
DNS server 172.16.1.102
172.16.2.102
— — — —
NetBIOS nameserver
172.16.1.103
172.16.2.103
— — — —
NetBIOS node type h-node — — — —
ip dhcp database ftp://user:[email protected]/router-dhcp write-delay 120ip dhcp excluded-address 172.16.0.100 172.16.1.103 ip dhcp excluded-address 172.16.1.100 172.16.1.101 !ip dhcp pool pool3 network 172.16.0.0 /16 default-router 172.16.0.100 172.16.2.101 172.16.0.102 172.16.0.103 domain-name cisco.com dns-server 172.16.1.102 172.16.2.102 netbios-name-server 172.16.1.103 172.16.2.103 netbios-node-type h-node lease 30 ! network 172.16.1.0 /24 secondary override default-router 172.16.1.100 172.16.1.101 end ! network 172.16.2.0 /24 secondary
Example: Configuring Manual BindingsThe following example shows how to create a manual binding for a client named example1.abc.com thatsends a client identifier in the DHCP packet. The MAC address of the client is 02c7.f800.0422 and the IPaddress of the client is 172.16.2.254.
ip dhcp pool pool1 host 172.16.2.254 client-identifier 01b7.0813.8811.66 client-name example1
The following example shows how to create a manual binding for a client named example2.abc.com thatdoes not send a client identifier in the DHCP packet. The MAC address of the client is 02c7.f800.0422 andthe IP address of the client is 172.16.2.253.
ip dhcp pool pool2 host 172.16.2.253
Example: Configuring Manual BindingsConfiguration Examples for the Cisco IOS DHCP Server
39

hardware-address 02c7.f800.0422 ethernet client-name example1
Because attributes are inherited, the two preceding configurations are equivalent to the following:
ip dhcp pool pool1 host 172.16.2.254 255.255.255.0 hardware-address 02c7.f800.0422 ieee802 client-name client1 default-router 172.16.2.100 172.16.2.101 domain-name abc.com dns-server 172.16.1.102 172.16.2.102 netbios-name-server 172.16.1.103 172.16.2.103 netbios-node-type h-node
Example: Configuring Static MappingThe following example shows how to restart the DHCP server, configure the pool, and specify the URLwhere the static mapping text file is stored:
no service dhcpservice dhcpip dhcp pool abcpoolorigin file tftp://10.1.0.1/staticfilename
Note The static mapping text file can be copied to flash memory on the device and served by the TFTP processof the device. In this case, the IP address in the original file line must be an address owned by the deviceand one additional line of configuration is required on the device:tftp-server flash static-filename.
Example: Configuring the Option to Ignore all BOOTP RequestsThe following example shows two DHCP pools that are configured on the device and that the device’sDHCP server is configured to ignore all received BOOTP requests. If a BOOTP request is received fromsubnet 10.0.18.0/24, the request will be dropped by the device (because the ip helper-address command isnot configured). If there is a BOOTP request from subnet 192.168.1.0/24, the request will be forwarded to172.16.1.1 via the ip helper-address command.
version 12.2service timestamps debug uptimeservice timestamps log uptimeno service password-encryption!hostname Router !ip subnet-zero!ip dhcp bootp ignore!ip dhcp pool ABC network 192.168.1.0 255.255.255.0 default-router 192.168.1.3 lease 2!ip dhcp pool DEF network 10.0.18.0 255.255.255.0!ip cef!interface FastEthernet0/0 no ip address shutdown
Example: Configuring Static Mapping Configuration Examples for the Cisco IOS DHCP Server
40

duplex half!interface Ethernet1/0 ip address 10.0.18.68 255.255.255.0 duplex half!interface Ethernet1/1 ip address 192.168.1.1 255.255.255.0 ip helper-address 172.16.1.1 duplex half!interface Ethernet1/2 shutdown duplex half!interface Ethernet1/3 no ip address shutdown duplex half!interface FastEthernet2/0 no ip address shutdown duplex half!ip route 172.16.1.1 255.255.255.255 e1/0 no ip http serverno ip pim bidir-enable!call rsvp-sync!mgcp profile default!dial-peer cor custom!gatekeeper shutdown!line con 0line aux 0line vty 0 4!end
Example: Importing DHCP OptionsThe following example shows how to configure a remote and central server to support the importing ofDHCP options. The central server is configured to automatically update DHCP options, such as DNS andWINS addresses, within the DHCP pools. In response to a DHCP request from a local client behind CPE
Example: Importing DHCP OptionsConfiguration Examples for the Cisco IOS DHCP Server
41

equipment, the remote server can request or “import” these option parameters from the centralized server.See the figure below for a diagram of the network topology.
Figure 1 DHCP Example Network Topology
Local DNS
serverCentral
routerRemote
router
PC/client
10.0.0.2 10.0.0.1
FE0/0 FE0/0
127131
Central Device
!do not assign this range to DHCP clientsip dhcp-excluded address 10.0.0.1 10.0.0.5!ip dhcp pool central! Specifies network number and mask for DHCP clients network 10.0.0.0 255.255.255.0! Specifies the domain name for the client domain-name central! Specifies DNS server that will respond to DHCP clients when they need to correlate host ! name to ip address dns-server 10.0.0.2!Specifies the NETBIOS WINS server netbios-name-server 10.0.0.2 !interface FastEthernet0/0 ip address 10.0.0.1 255.255.255.0 duplex auto speed auto
Remote Device
ip dhcp pool client! Imports DHCP option parameters into DHCP server database import all network 172.16.2.254 255.255.255.0!interface FastEthernet0/0 ip address dhcp duplex auto speed auto
Example: Configuring DHCP Address Allocation Using Option 82This example shows how to configure two DHCP classes. CLASS1 defines the group of DHCP clientswhose address requests contain the relay agent information option with the specified hexadecimal values.CLASS2 defines the group of DHCP clients whose address requests contain the configured relay agent
Example: Configuring DHCP Address Allocation Using Option 82 Configuration Examples for the Cisco IOS DHCP Server
42

information suboptions. CLASS3 has no pattern configured and is treated as a “match to any” class. Thistype of class is useful for specifying a “default” class.
The subnet of pool ABC has been divided into three ranges without further subnetting the 10.0.20.0/24subnet. If there is a DHCP Discover message from the 10.0.20.0/24 subnet with option 82 matching that ofclass CLASS1, an available address in the range from 10.0.20.1 to 10.0.20.100 will be allocated. If there isno free address in CLASS1’s address range, the DHCP Discover message will be matched againstCLASS2, and so on.
Therefore, each class in the DHCP pool will be examined for a match in the order configured by the user.In pool ABC, the order of matching is CLASS1, CLASS2, and finally CLASS3. In pool DEF, classCLASS2 does not have any address range configured. By default, the address range for a particular class isthe pool’s entire subnets. Therefore, clients matching CLASS2 may be allocated addresses from 10.0.20.1to 10.0.20.254.
Multiple pools can be configured with the same class, eliminating the need to configure the same patternsin multiple pools. For example, there may be a need to specify that one or more pools must be used only toservice a particular class of devices (for example, cable modems and IP phones).
! Defines the DHCP classes and relay information patternsip dhcp class CLASS1 relay agent information relay-information hex 01030a0b0c02050000000123 relay-information hex 01030a0b0c02* relay-information hex 01030a0b0c02050000000000 bitmask 0000000000000000000000FF ip dhcp class CLASS2 relay agent information relay-information hex 01040102030402020102 relay-information hex 01040101030402020102 ip dhcp class CLASS3 relay agent information ! Associates the DHCP pool with DHCP classes ip dhcp pool ABC network 10.0.20.0 255.255.255.0 class CLASS1 address range 10.0.20.1 10.0.20.100 class CLASS2 address range 10.0.20.101 10.0.20.200 class CLASS3 address range 10.0.20.201 10.0.20.254 ip dhcp pool DEF network 172.64.2.2 255.255.255.0 class CLASS1 address range 172.64.2.3 172.64.2.10 class CLASS2
Example: Configuring a Static Route with the Next-Hop DynamicallyObtained Through DHCP
The following example shows how to configure two Ethernet interfaces to obtain the next-hop device IPaddress from the DHCP server:
ip route 10.10.10.0 255.255.255.0 dhcp 200 ip route 10.10.20.1 255.255.255.255 ethernet 1 dhcp
Additional References for Cisco IOS DHCP Server
Example: Configuring a Static Route with the Next-Hop Dynamically Obtained Through DHCPAdditional References for Cisco IOS DHCP Server
43

Related Documents
Related Topic Document Title
Cisco IOS commands Cisco IOS Master Command List, All Releases
DHCP commands: complete command syntax,command mode, command history, defaults, usageguidelines, and examples
Cisco IOS IP Addressing Services CommandReference
DHCP conceptual information “DHCP Overview” module
DHCP relay agent configuration “Configuring the Cisco IOS DHCP Relay Agent”module
DHCP server on-demand address pools “Configuring the DHCP Server On-DemandAddress Pool Manager” module
DHCP client configuration “Configuring the Cisco IOS DHCP Client” module
DHCP advanced features “Configuring DHCP Services for Accounting andSecurity” module
DHCP enhancements for edge-session management “Configuring DHCP Enhancements for Edge-Session Management” module
DHCP options “DHCP Options” appendix in the NetworkRegistrar User’s Guide, Release 6.1.1
RFCs
RFCs Title
RFC 951 Bootstrap Protocol (BOOTP)
RFC 1542 Clarifications and Extensions for the BootstrapProtocol
RFC 2131 Dynamic Host Configuration Protocol
RFC 2132 DHCP Options and BOOTP Vendor Extensions
Example: Configuring a Static Route with the Next-Hop Dynamically Obtained Through DHCP Additional References for Cisco IOS DHCP Server
44

Technical Assistance
Description Link
The Cisco Support and Documentation websiteprovides online resources to downloaddocumentation, software, and tools. Use theseresources to install and configure the software andto troubleshoot and resolve technical issues withCisco products and technologies. Access to mosttools on the Cisco Support and Documentationwebsite requires a Cisco.com user ID andpassword.
http://www.cisco.com/cisco/web/support/index.html
Feature Information for the Cisco IOS DHCP ServerThe following table provides release information about the feature or features described in this module.This table lists only the software release that introduced support for a given feature in a given softwarerelease train. Unless noted otherwise, subsequent releases of that software release train also support thatfeature.
Use Cisco Feature Navigator to find information about platform support and Cisco software image support.To access Cisco Feature Navigator, go to www.cisco.com/go/cfn. An account on Cisco.com is not required.
Table 4 Feature Information for the Cisco IOS DHCP Server
Feature Name Releases Feature Configuration Information
DHCP Address Allocation UsingOption 82
12.3(4)T
12.2(28)SB
12.2(33)SRB
15.3(1)S
The Cisco IOS DHCP server canallocate dynamic IP addressesbased on the relay informationoption (option 82) informationsent by the relay agent.
The following commands wereintroduced or modified: addressrange, class, ip dhcp class, ipdhcp use class, relay agentinformation, relay-informationhex.
Example: Configuring a Static Route with the Next-Hop Dynamically Obtained Through DHCPFeature Information for the Cisco IOS DHCP Server
45

Feature Name Releases Feature Configuration Information
DHCP Server Import AllEnhancement
12.2(15)T
12.2(33)SRC
15.3(1)S
The DHCP Server Import AllEnhancement feature is anenhancement to the import allcommand. Prior to this feature,the options imported through theimport all command wereoverwritten by those imported byanother subsystem. Through thisfeature, options imported bymultiple subsystems can coexistin the DHCP address pool. Whenthe session is terminated or thelease is released, the importedoptions are cleared.
DHCP Server Multiple Subnet 12.4(15)T
12.2(33)SRB
15.3(1)S
The DHCP Server MultipleSubnet feature enables multiplesubnets to be configured underthe same DHCP address pool.
The following commands wereintroduced or modified:network(DHCP), overridedefault-router.
DHCP Server Option to Ignore allBOOTP Requests
12.2(8)T
12.2(28)SB
15.3(1)S
The DHCP Server Option toIgnore all BOOTP Requestsfeature allows the Cisco IOSDHCP server to selectivelyignore and not reply to receivedBootstrap Protocol (BOOTP)request packets.
The following command wasintroduced or modified: ip dhcpbootp ignore.
DHCP Static Mapping 12.3(11)T
12.2(28)SB
12.2(33)SRC
15.3(1)S
Configuring static mapping poolsenables the DHCP server to readthe static bindings from a separatetext file (similar in format to theDHCP database file) that is storedin special pools.
The following command wasintroduced or modified: origin.
Example: Configuring a Static Route with the Next-Hop Dynamically Obtained Through DHCP Feature Information for the Cisco IOS DHCP Server
46

Feature Name Releases Feature Configuration Information
DHCP Statically ConfiguredRoutes Using a DHCP Gateway
12.3(8)T
12.2(28)S
12.2(33)SRC
15.3(1)S
The DHCP Statically ConfiguredRoutes Using a DHCP Gatewayfeature enables the configurationof static routes that point to anassigned DHCP next-hop device.
The following commands wereintroduced or modified: ip route,show ip route.
Cisco and the Cisco logo are trademarks or registered trademarks of Cisco and/or its affiliates in the U.S.and other countries. To view a list of Cisco trademarks, go to this URL: www.cisco.com/go/trademarks.Third-party trademarks mentioned are the property of their respective owners. The use of the word partnerdoes not imply a partnership relationship between Cisco and any other company. (1110R)
Any Internet Protocol (IP) addresses and phone numbers used in this document are not intended to beactual addresses and phone numbers. Any examples, command display output, network topology diagrams,and other figures included in the document are shown for illustrative purposes only. Any use of actual IPaddresses or phone numbers in illustrative content is unintentional and coincidental.
© 2012 Cisco Systems, Inc. All rights reserved.
Example: Configuring a Static Route with the Next-Hop Dynamically Obtained Through DHCP
47