AXXESS CARE MOBILE iOS MANUAL
73
1 AXXESS CARE MOBILE iOS MANUAL November 2021
-
Upload
khangminh22 -
Category
Documents
-
view
0 -
download
0
Transcript of AXXESS CARE MOBILE iOS MANUAL
1
AXXESS CARE MOBILE iOS MANUAL
November 2021

2
Table of Contents DOWNLOADING APP .......................................................................................... 4
New Account/Sign Up ........................................................................................ 9
MAIN MENU ....................................................................................................... 13
Home ............................................................................................................... 13
Schedule .......................................................................................................... 14
Visits ................................................................................................................ 14
SIDE MENU ........................................................................................................ 17
Home ............................................................................................................... 17
Profile .............................................................................................................. 17
Credentials................................................................................................... 20
Skills Assessment ........................................................................................ 21
Preferences ................................................................................................. 23
Vaccinations ................................................................................................ 23
Uploads ....................................................................................................... 25
Infectious Disease Screening ...................................................................... 26
Messages ........................................................................................................ 27
Schedule .......................................................................................................... 29
Applied Visits ................................................................................................... 29
All Visits ........................................................................................................... 30
Earnings .......................................................................................................... 30
Payment Account ............................................................................................ 31
Tax Documents ............................................................................................... 32
Help ................................................................................................................. 33
Log Out ............................................................................................................ 34
VISITS ................................................................................................................ 34
Applying for Visit .............................................................................................. 34
Patient Profile .................................................................................................. 39
Orders .......................................................................................................... 40
Immunizations .............................................................................................. 42
Pharmacies .................................................................................................. 44
3
Performing Visit ............................................................................................... 46
Medications.................................................................................................. 47
Templates .................................................................................................... 50
COVID-19 Screenings ................................................................................. 51
Logs ............................................................................................................. 53
Aide Care Plan ............................................................................................. 55
OASIS .......................................................................................................... 56
Completing Visit ........................................................................................... 62
Patient Voice Recording .............................................................................. 66
QA Returned .................................................................................................... 68
Paid ................................................................................................................. 71
4
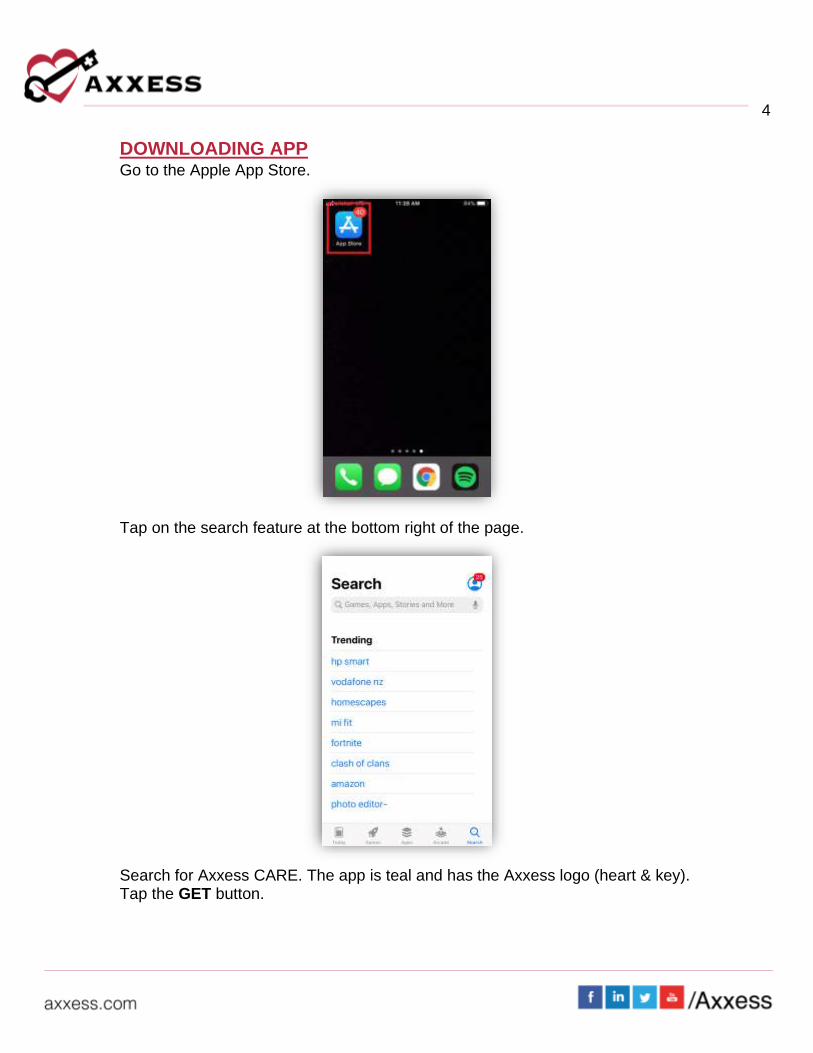
DOWNLOADING APP Go to the Apple App Store.
Tap on the search feature at the bottom right of the page.
Search for Axxess CARE. The app is teal and has the Axxess logo (heart & key). Tap the GET button.
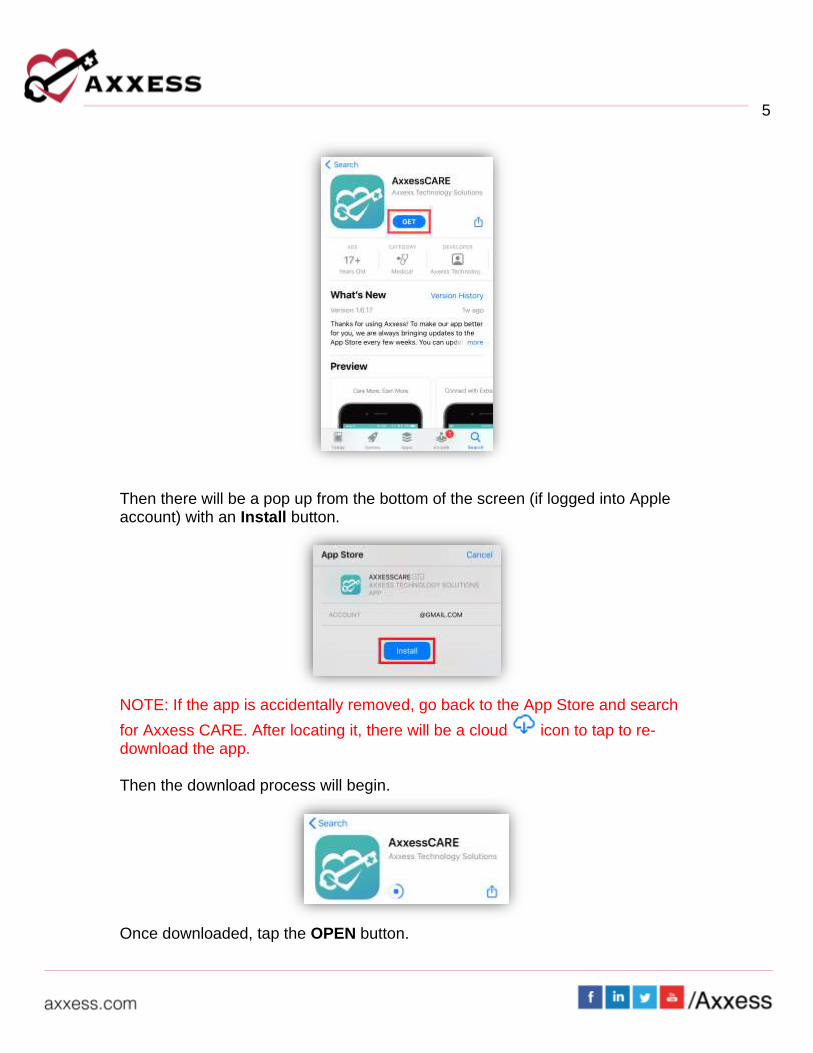
5
Then there will be a pop up from the bottom of the screen (if logged into Apple account) with an Install button.
NOTE: If the app is accidentally removed, go back to the App Store and search
for Axxess CARE. After locating it, there will be a cloud icon to tap to re-download the app. Then the download process will begin.
Once downloaded, tap the OPEN button.
6
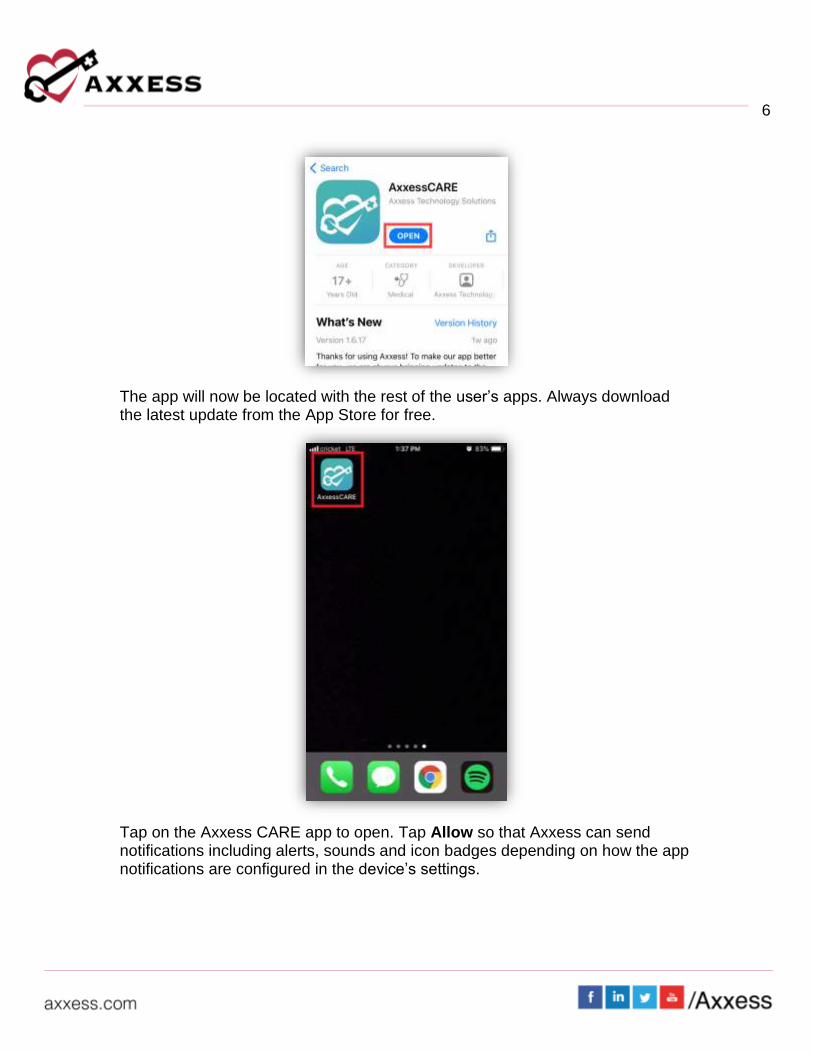
The app will now be located with the rest of the user’s apps. Always download the latest update from the App Store for free.
Tap on the Axxess CARE app to open. Tap Allow so that Axxess can send notifications including alerts, sounds and icon badges depending on how the app notifications are configured in the device’s settings.
7
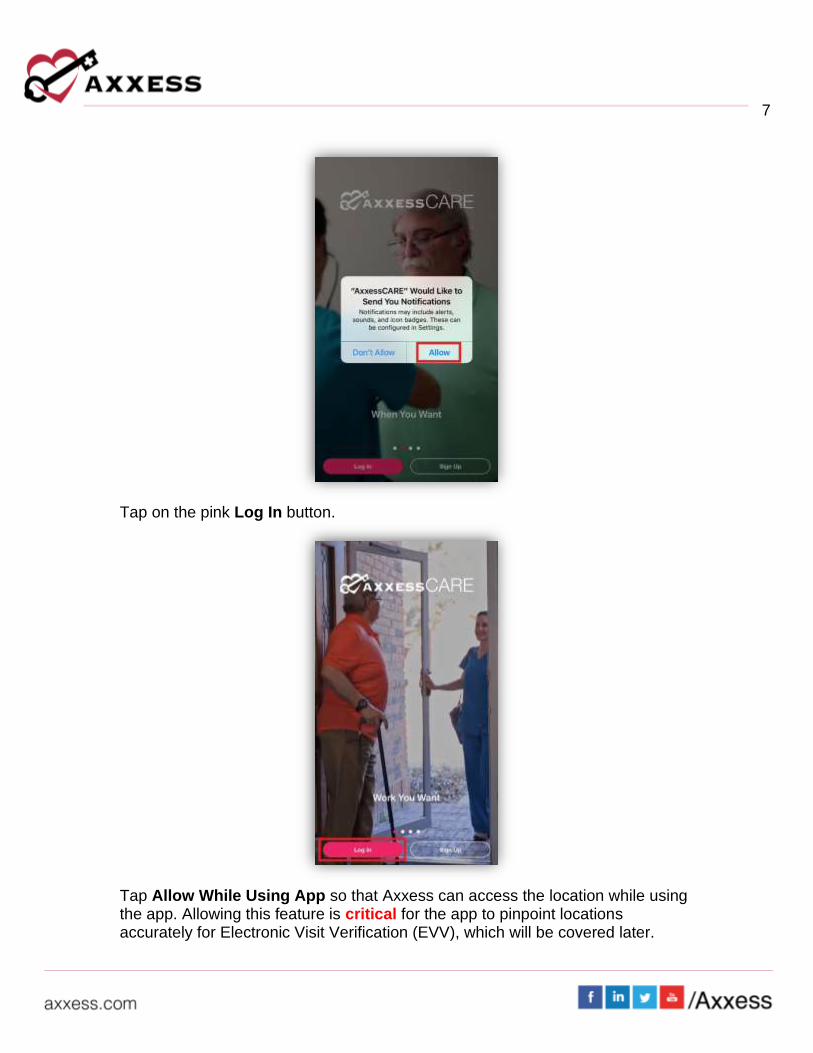
Tap on the pink Log In button.
Tap Allow While Using App so that Axxess can access the location while using the app. Allowing this feature is critical for the app to pinpoint locations accurately for Electronic Visit Verification (EVV), which will be covered later.
8
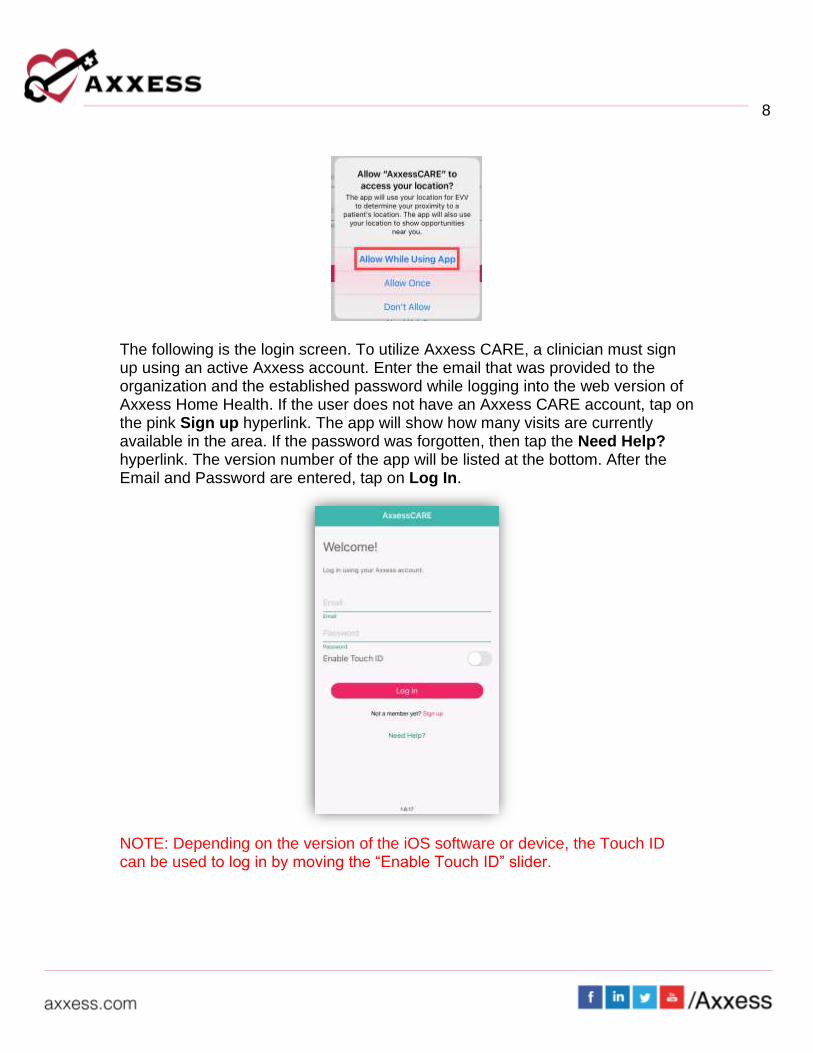
The following is the login screen. To utilize Axxess CARE, a clinician must sign up using an active Axxess account. Enter the email that was provided to the organization and the established password while logging into the web version of Axxess Home Health. If the user does not have an Axxess CARE account, tap on the pink Sign up hyperlink. The app will show how many visits are currently available in the area. If the password was forgotten, then tap the Need Help? hyperlink. The version number of the app will be listed at the bottom. After the Email and Password are entered, tap on Log In.
NOTE: Depending on the version of the iOS software or device, the Touch ID can be used to log in by moving the “Enable Touch ID” slider.
9
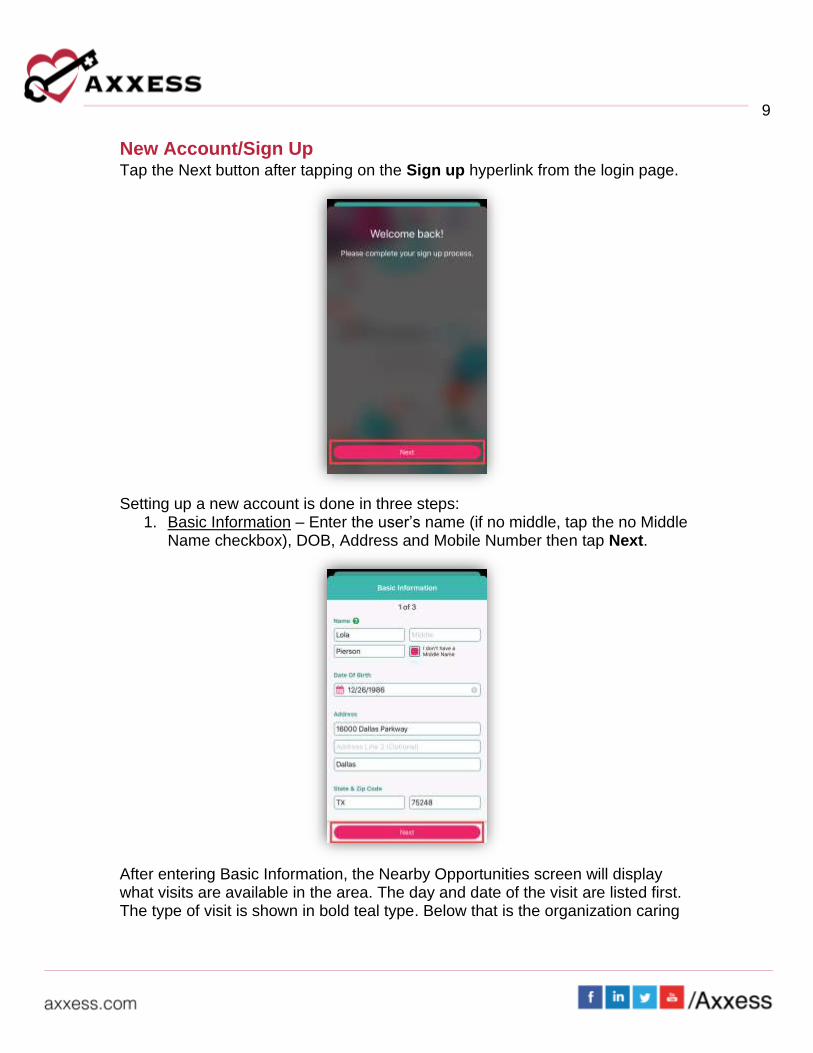
New Account/Sign Up Tap the Next button after tapping on the Sign up hyperlink from the login page.
Setting up a new account is done in three steps:
1. Basic Information – Enter the user’s name (if no middle, tap the no Middle Name checkbox), DOB, Address and Mobile Number then tap Next.
After entering Basic Information, the Nearby Opportunities screen will display what visits are available in the area. The day and date of the visit are listed first. The type of visit is shown in bold teal type. Below that is the organization caring
10
for the patient. Below is the Pay Rate and how far away the visit is based on the device’s GPS. Tap Continue to finish the sign-up process.
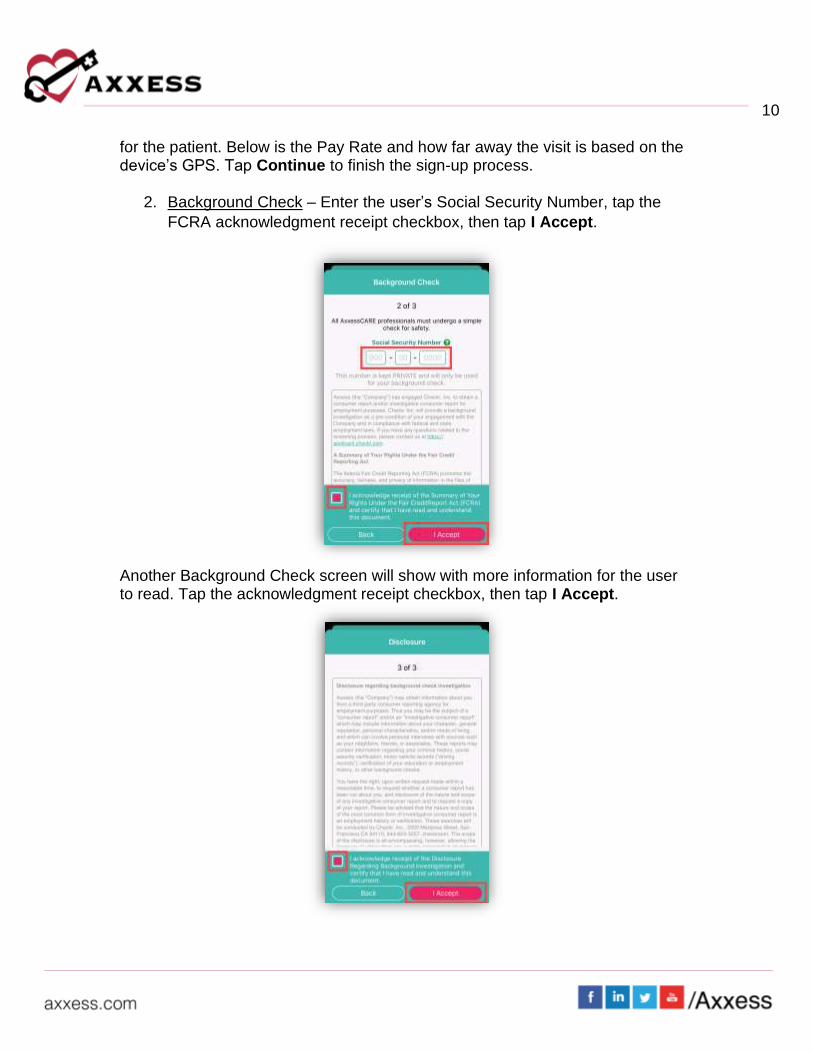
2. Background Check – Enter the user’s Social Security Number, tap the
FCRA acknowledgment receipt checkbox, then tap I Accept.
Another Background Check screen will show with more information for the user to read. Tap the acknowledgment receipt checkbox, then tap I Accept.

11
3. Disclosure - Read the Authorization Regarding Background Investigation.
Tap the acknowledgment receipt checkbox. Then the user will enter their
First name and Last name, which serves as their Electronic Signature.
Then tap the I Accept button.
NOTE: The Electronic Signature must match the first and last name entered during step 1 of the sign-up process.
After completing the previous three New Accounts steps, the following prompt will ask the user to enter a 4-digit passcode:
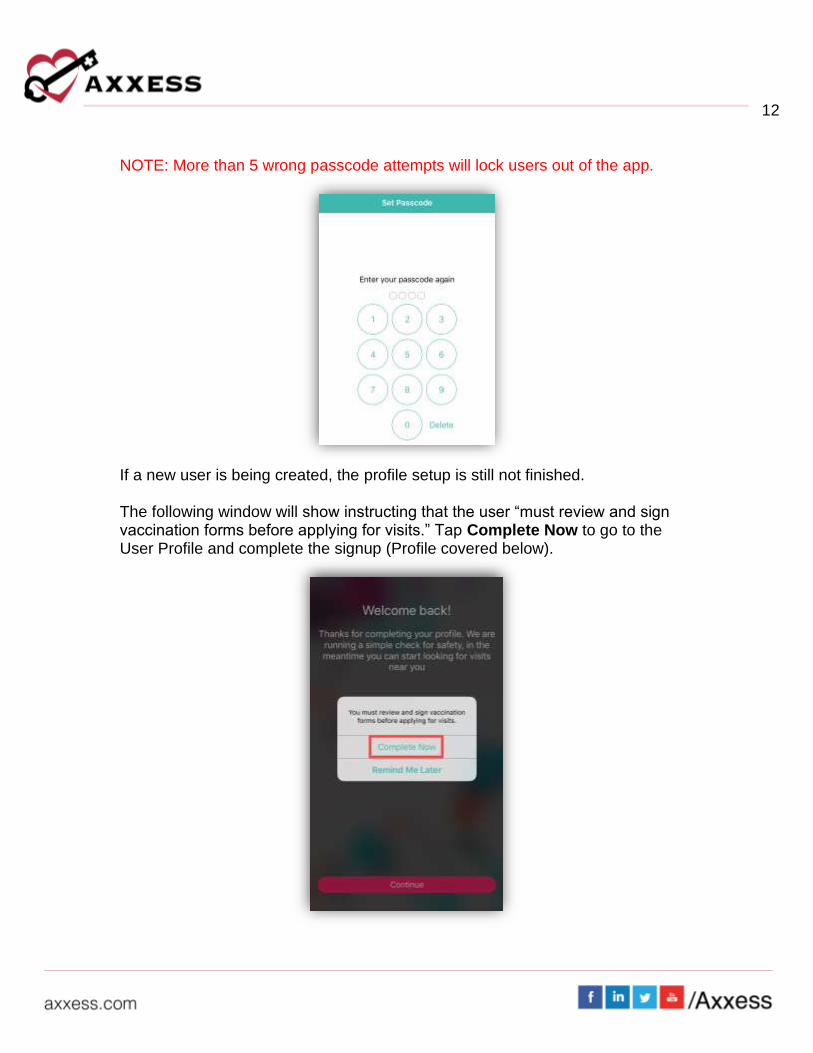
Once a 4-digit passcode has been entered, confirm the passcode by entering it one more time. The passcode must be reentered any time a user leaves the app and comes back or the app times out due to inactivity.
12
NOTE: More than 5 wrong passcode attempts will lock users out of the app.
If a new user is being created, the profile setup is still not finished. The following window will show instructing that the user “must review and sign vaccination forms before applying for visits.” Tap Complete Now to go to the User Profile and complete the signup (Profile covered below).
13
Trying to view visits will display the following orange warning until the background check is complete.
MAIN MENU
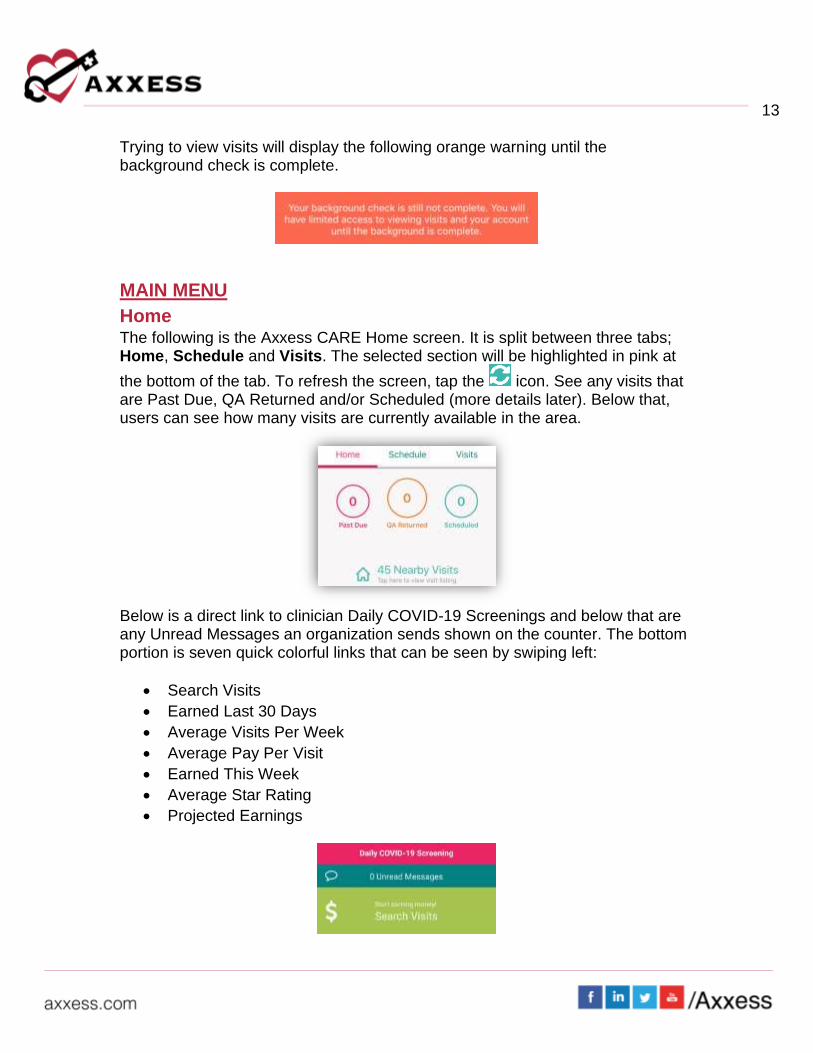
Home The following is the Axxess CARE Home screen. It is split between three tabs; Home, Schedule and Visits. The selected section will be highlighted in pink at
the bottom of the tab. To refresh the screen, tap the icon. See any visits that are Past Due, QA Returned and/or Scheduled (more details later). Below that, users can see how many visits are currently available in the area.
Below is a direct link to clinician Daily COVID-19 Screenings and below that are any Unread Messages an organization sends shown on the counter. The bottom portion is seven quick colorful links that can be seen by swiping left:
• Search Visits
• Earned Last 30 Days
• Average Visits Per Week
• Average Pay Per Visit
• Earned This Week
• Average Star Rating
• Projected Earnings
14
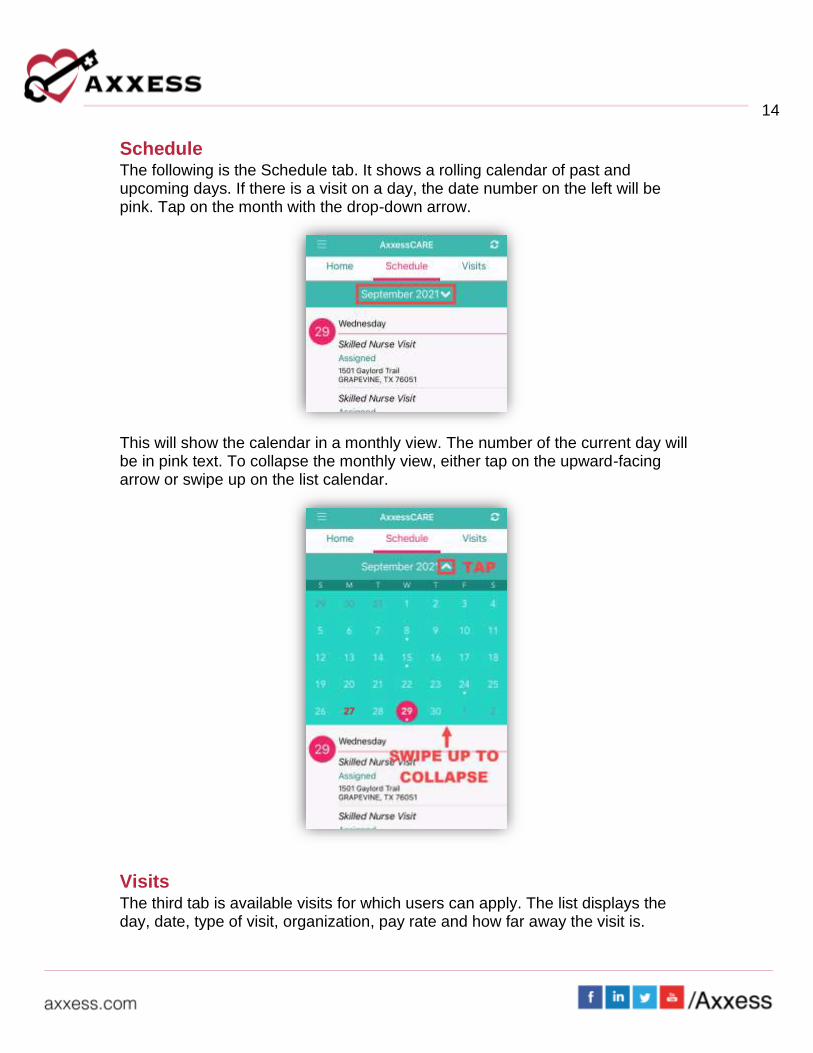
Schedule The following is the Schedule tab. It shows a rolling calendar of past and upcoming days. If there is a visit on a day, the date number on the left will be pink. Tap on the month with the drop-down arrow.
This will show the calendar in a monthly view. The number of the current day will be in pink text. To collapse the monthly view, either tap on the upward-facing arrow or swipe up on the list calendar.
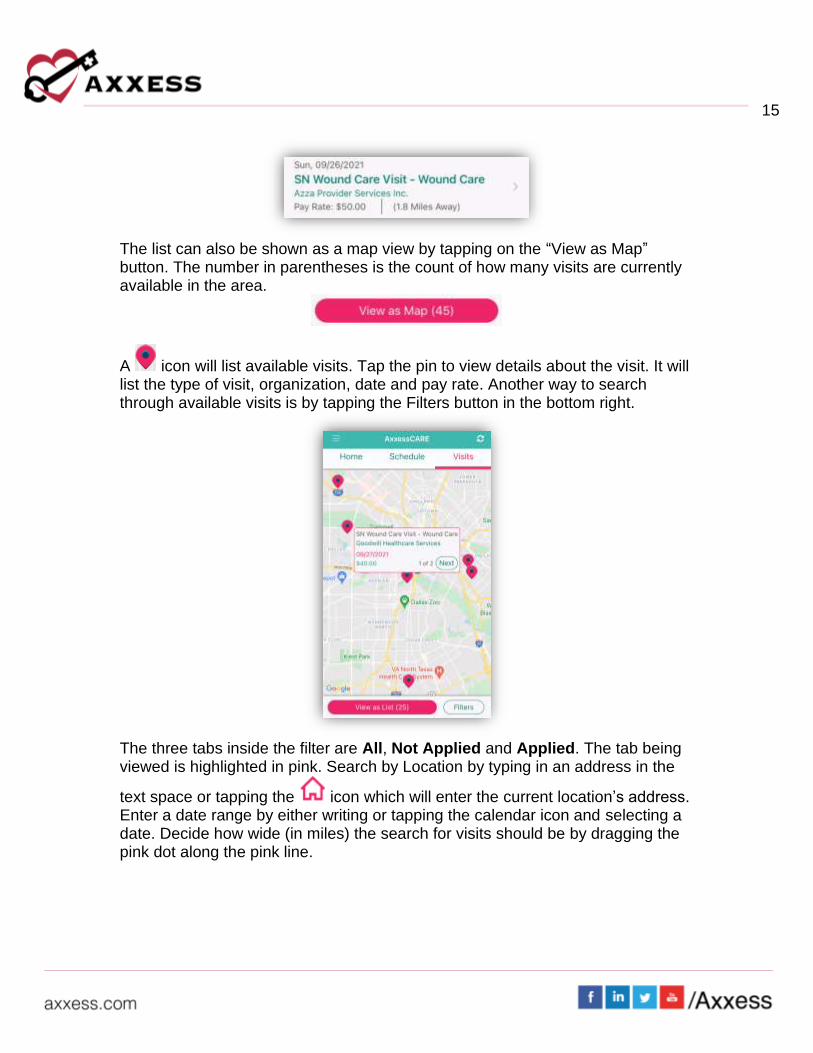
Visits The third tab is available visits for which users can apply. The list displays the day, date, type of visit, organization, pay rate and how far away the visit is.
15
The list can also be shown as a map view by tapping on the “View as Map” button. The number in parentheses is the count of how many visits are currently available in the area.
A icon will list available visits. Tap the pin to view details about the visit. It will list the type of visit, organization, date and pay rate. Another way to search through available visits is by tapping the Filters button in the bottom right.
The three tabs inside the filter are All, Not Applied and Applied. The tab being viewed is highlighted in pink. Search by Location by typing in an address in the
text space or tapping the icon which will enter the current location’s address. Enter a date range by either writing or tapping the calendar icon and selecting a date. Decide how wide (in miles) the search for visits should be by dragging the pink dot along the pink line.

16
In the bottom half of the page, use the same type of line to determine the minimum pay range. Decide to view visits that are External or Internal by moving the sliders. Internal visits are visits from the user’s parent company/organization. Tap the Skills Competencies button to select all applicable competencies, i.e. IV, CHF or COPD Management etc. Then either tap Done in the top right or the Filter Visits back arrow in the top left to return. After selecting the filters, tap on the Apply Filters button or tap Reset Filters to set back to the default parameters.
The Visits list will indicate if any visits are posted from the user’s primary organization and are only available to the staff members of that organization with the following purple icon:

17
SIDE MENU
Tap the menu button in the top left to see the Side Menu. It has the following 10 options:
Home Tap Home to collapse the side menu or tap anywhere outside of the side menu to collapse.
Profile Tapping Profile goes to the personal clinician profile. The Profile will show the
user’s picture. To upload a picture, tap the icon. Choose to Take a Photo or Choose from Library and select OK to give access to camera.
18
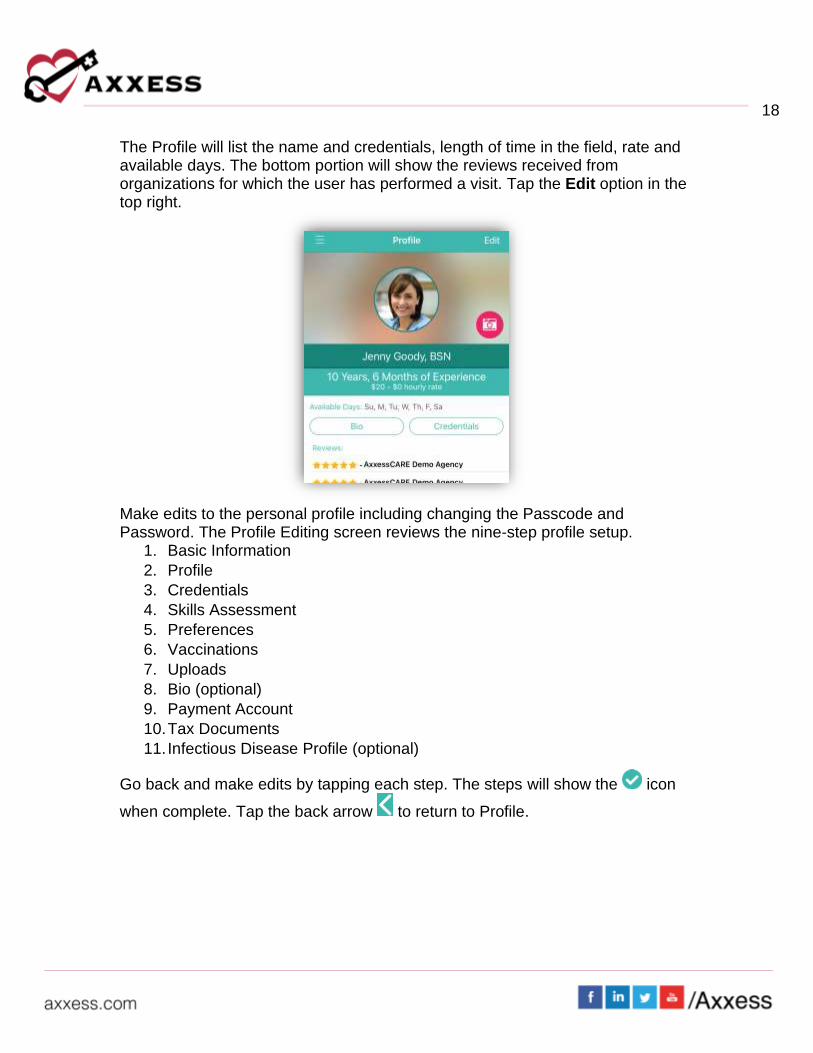
The Profile will list the name and credentials, length of time in the field, rate and available days. The bottom portion will show the reviews received from organizations for which the user has performed a visit. Tap the Edit option in the top right.
Make edits to the personal profile including changing the Passcode and Password. The Profile Editing screen reviews the nine-step profile setup.
1. Basic Information
2. Profile
3. Credentials
4. Skills Assessment
5. Preferences
6. Vaccinations
7. Uploads
8. Bio (optional)
9. Payment Account
10. Tax Documents
11. Infectious Disease Profile (optional)
Go back and make edits by tapping each step. The steps will show the icon
when complete. Tap the back arrow to return to Profile.
19
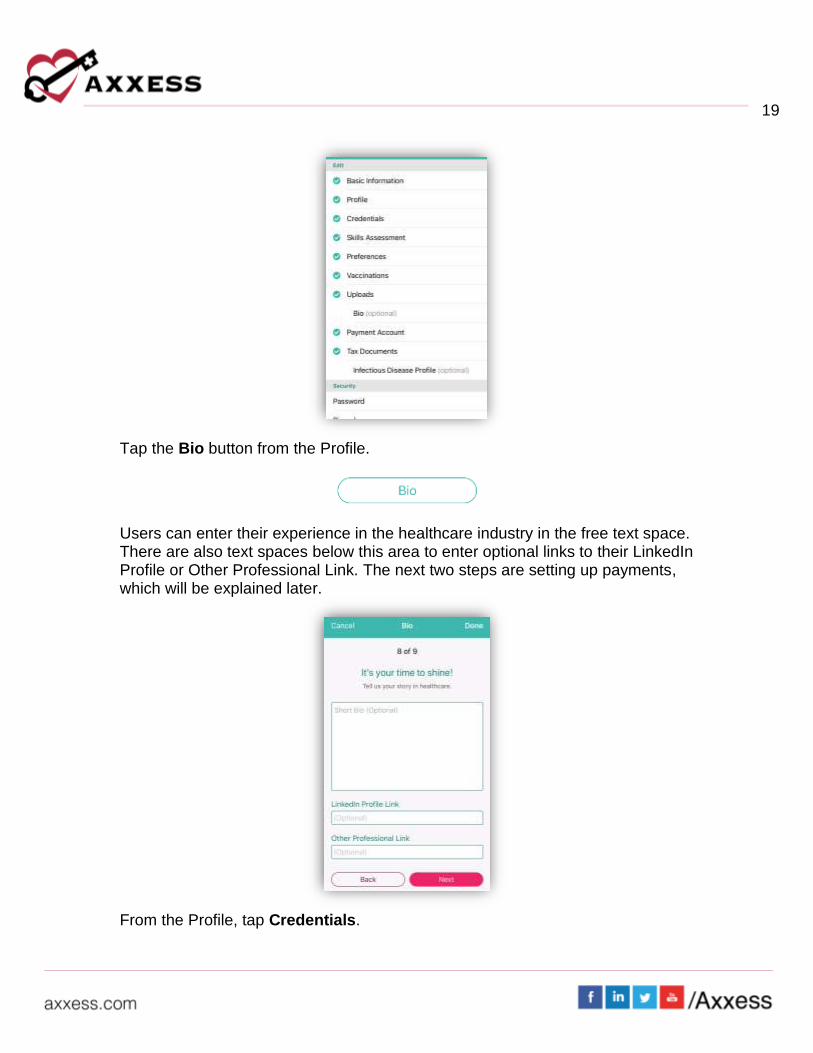
Tap the Bio button from the Profile.
Users can enter their experience in the healthcare industry in the free text space. There are also text spaces below this area to enter optional links to their LinkedIn Profile or Other Professional Link. The next two steps are setting up payments, which will be explained later.
From the Profile, tap Credentials.
20
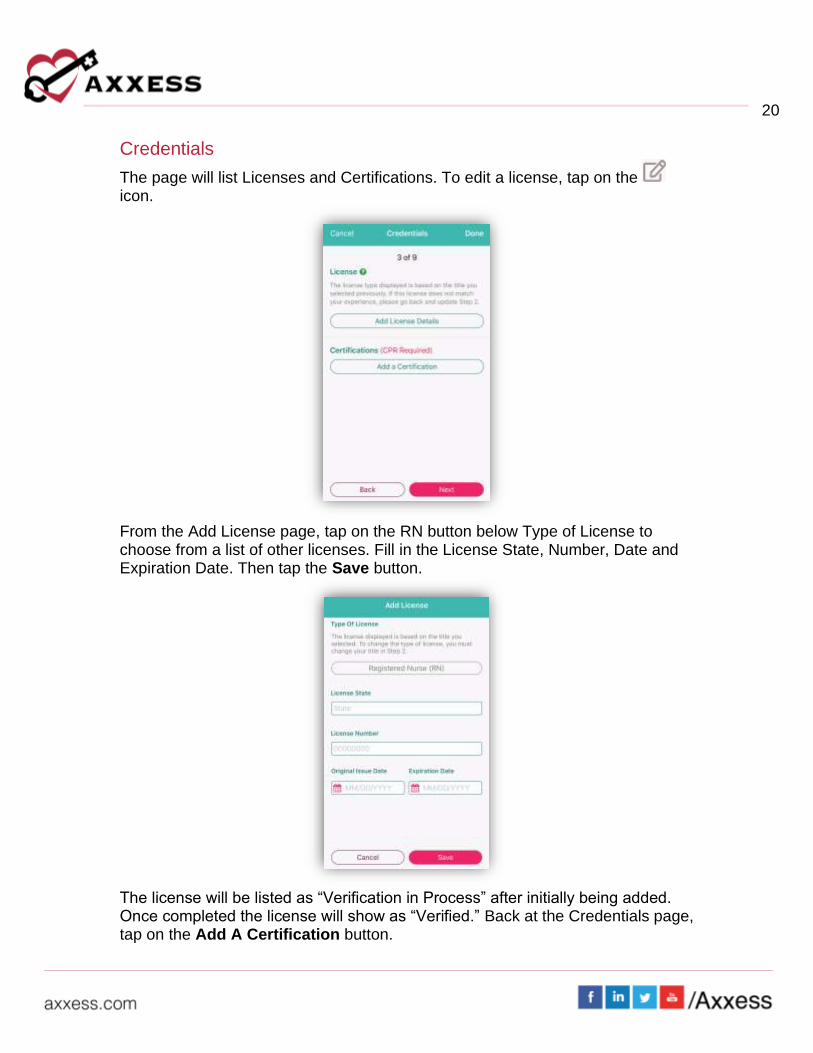
Credentials
The page will list Licenses and Certifications. To edit a license, tap on the icon.
From the Add License page, tap on the RN button below Type of License to choose from a list of other licenses. Fill in the License State, Number, Date and Expiration Date. Then tap the Save button.
The license will be listed as “Verification in Process” after initially being added. Once completed the license will show as “Verified.” Back at the Credentials page, tap on the Add A Certification button.

21
Tap the Tap to Choose button below Type of Certification to find a certification. Enter an Expiration Date. Then tap the Tap to Add button to add a photo of the certification for the front and the back (both required). Then tap the Save button.
NOTE: Adding the CPR Certification and driver’s license are required.
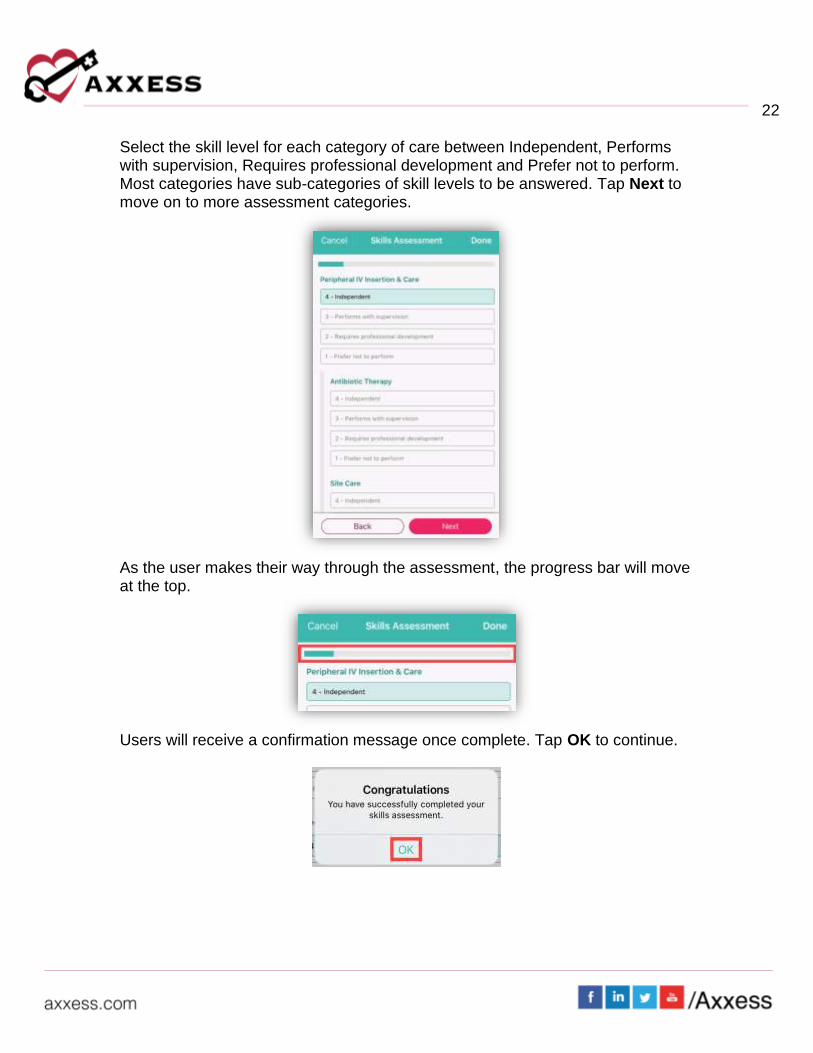
Skills Assessment Clinicians must document their skills in the Skills Assessment. Tap on Get Started.
22
Select the skill level for each category of care between Independent, Performs with supervision, Requires professional development and Prefer not to perform. Most categories have sub-categories of skill levels to be answered. Tap Next to move on to more assessment categories.
As the user makes their way through the assessment, the progress bar will move at the top.
Users will receive a confirmation message once complete. Tap OK to continue.
23
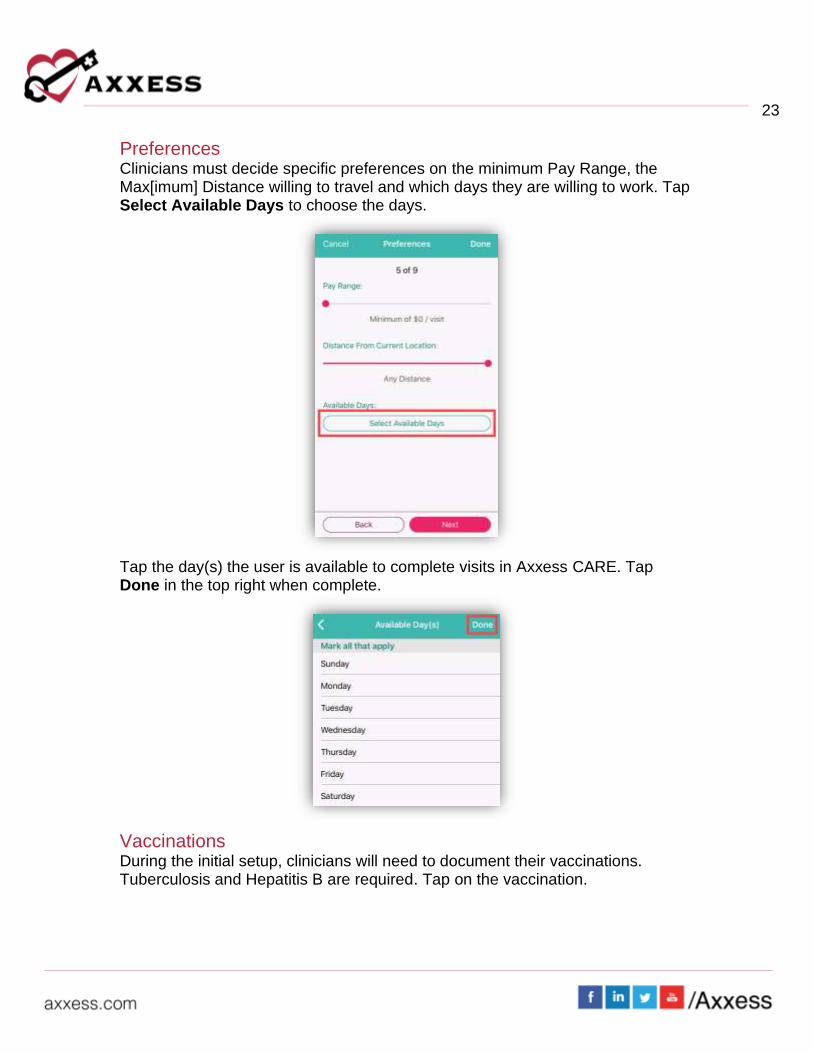
Preferences Clinicians must decide specific preferences on the minimum Pay Range, the Max[imum] Distance willing to travel and which days they are willing to work. Tap Select Available Days to choose the days.
Tap the day(s) the user is available to complete visits in Axxess CARE. Tap Done in the top right when complete.
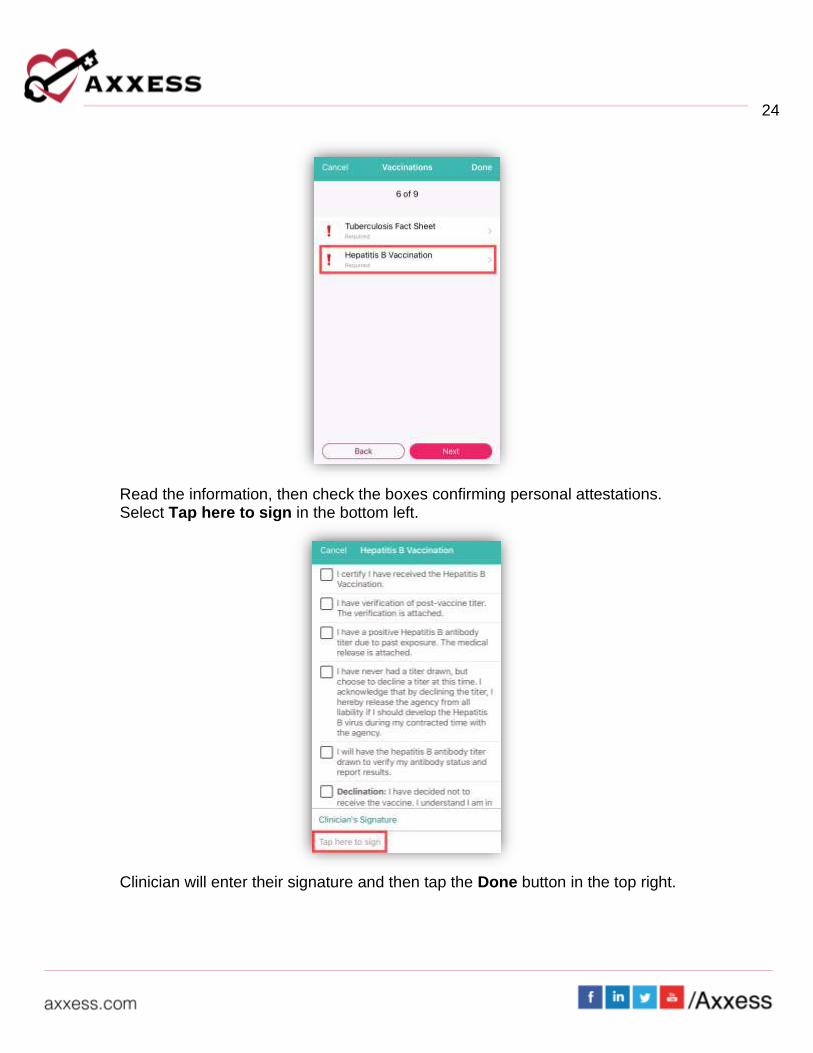
Vaccinations During the initial setup, clinicians will need to document their vaccinations. Tuberculosis and Hepatitis B are required. Tap on the vaccination.
24
Read the information, then check the boxes confirming personal attestations. Select Tap here to sign in the bottom left.
Clinician will enter their signature and then tap the Done button in the top right.
25
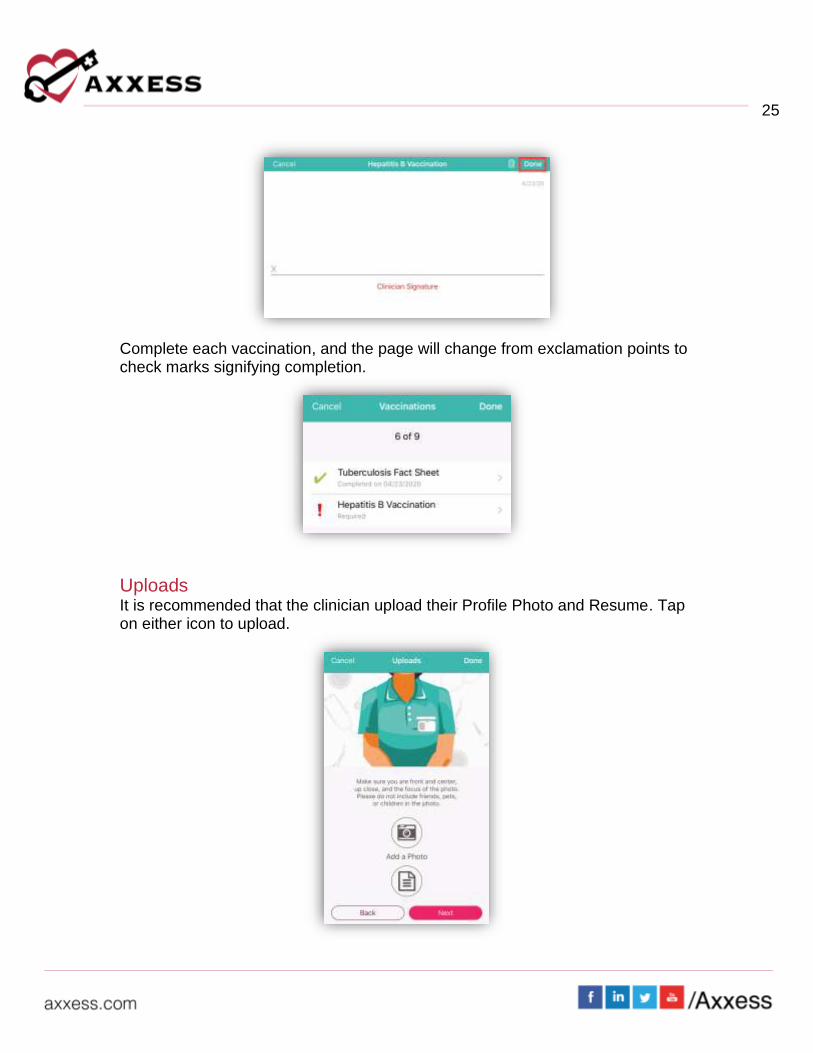
Complete each vaccination, and the page will change from exclamation points to check marks signifying completion.
Uploads It is recommended that the clinician upload their Profile Photo and Resume. Tap on either icon to upload.

26
Then decide to Take a Photo or Choose from Library to find a photo from the device to upload.
Infectious Disease Screening View user completed screenings or add a new screening. Before completing a clinician COVID-19 screening on Axxess CARE, users must provide consent by selecting ACCEPT in the Consent Required pop-up box.
Select a completed screening to view the screening questions and answers. The screening questions and answers appear in gray. NOTE: Completed screenings cannot be edited.
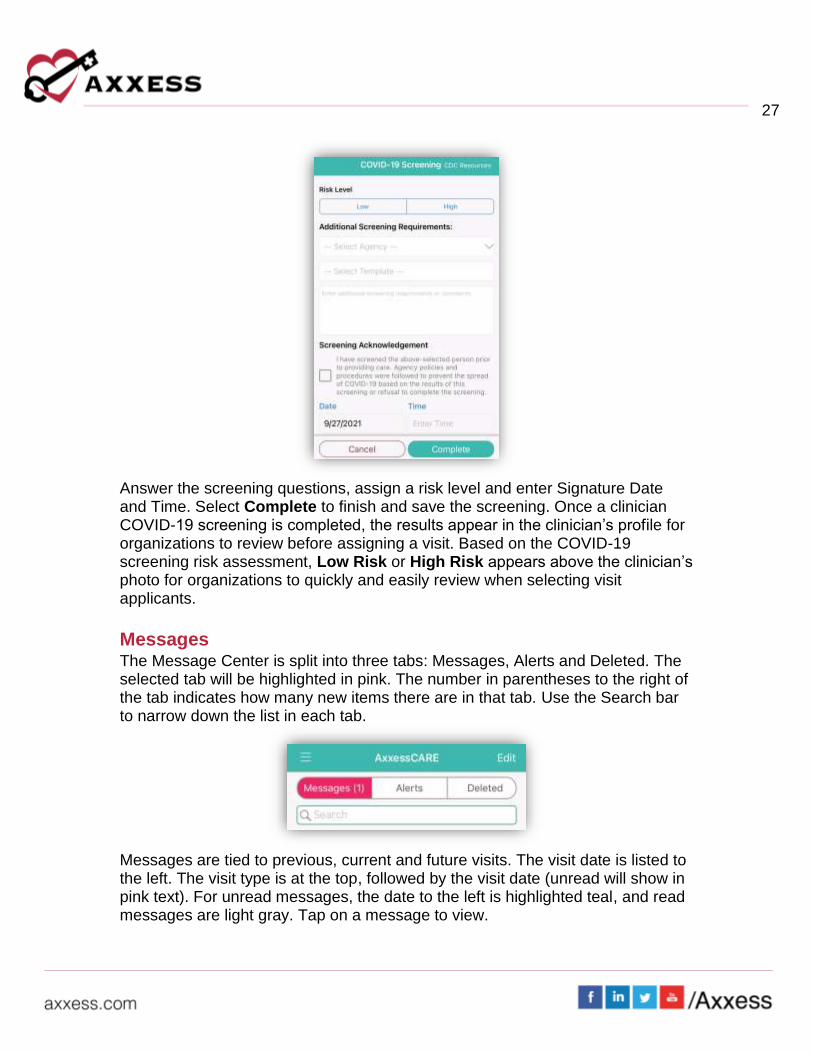
Select Add COVID-19 Screening to add a new screening.
27
Answer the screening questions, assign a risk level and enter Signature Date and Time. Select Complete to finish and save the screening. Once a clinician COVID-19 screening is completed, the results appear in the clinician’s profile for organizations to review before assigning a visit. Based on the COVID-19 screening risk assessment, Low Risk or High Risk appears above the clinician’s photo for organizations to quickly and easily review when selecting visit applicants.
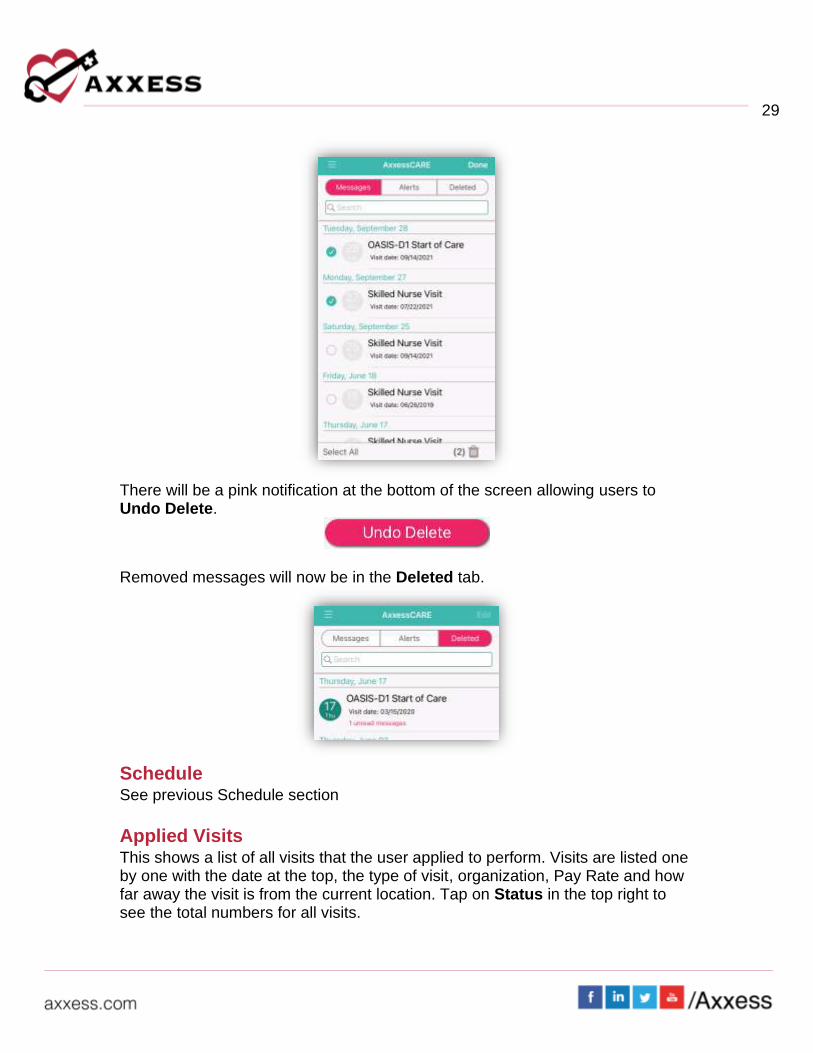
Messages The Message Center is split into three tabs: Messages, Alerts and Deleted. The selected tab will be highlighted in pink. The number in parentheses to the right of the tab indicates how many new items there are in that tab. Use the Search bar to narrow down the list in each tab.
Messages are tied to previous, current and future visits. The visit date is listed to the left. The visit type is at the top, followed by the visit date (unread will show in pink text). For unread messages, the date to the left is highlighted teal, and read messages are light gray. Tap on a message to view.

28
The visit information will be listed at the top with a button to view the Visit Details. Below the messaging exchange is shown. Messages from the organization appear on the left side of the page, citing the date and time they were sent. QA returned notes will be listed in orange (more on QA process later). Messages sent by the user will be on the right side. To write a message, type in the free text space at the bottom of the page, then tap the Send button. Tap the back arrow in the top left when done messaging to get back to the Message center.
Tap on the Edit option in the top right to remove one or more messages. Bullets will appear to the left of the messages where one or more may be selected. Tap the Select All option in the bottom left to automatically check all messages. The number of selected messages will be in parentheses in the bottom right next to the trash icon. Tap the trash icon when ready to delete it. Tap on Done in the top right when finished deleting visits.
29
There will be a pink notification at the bottom of the screen allowing users to Undo Delete.
Removed messages will now be in the Deleted tab.
Schedule See previous Schedule section
Applied Visits This shows a list of all visits that the user applied to perform. Visits are listed one by one with the date at the top, the type of visit, organization, Pay Rate and how far away the visit is from the current location. Tap on Status in the top right to see the total numbers for all visits.

30
A table will expand from the bottom of the page to show the number of Applied, Unassigned and Withdrawn/Returned visits. Tapping outside the table will collapse it.
All Visits Shows all visits in every status. It will list the type of visit; the status will appear in the line below. The patient’s name will be on the left and to the right users will see the date of the visit. Tap on the visit to view more details. This page can be sorted by Status and Date by choosing either in the top right.
Earnings This page will show the total amount earned in the last 30 days. Below this number, users will see the Received amount, which is the amount deposited from the organization into the bank that is set up in the Payment Account. The Pending Release amount shows the total of payments currently being processed by the organization. The Anticipated amount reflects any visits that have been started and finished pending a QA review with the organization.

31
In the Received Earnings section, select the icon in the top right corner of the screen to download and/or print payment details. Use the buttons across the top of the screen to filter payment information by month, year or a selected date range. Use the Sort By button to sort payment details by date, organization name or patient name.
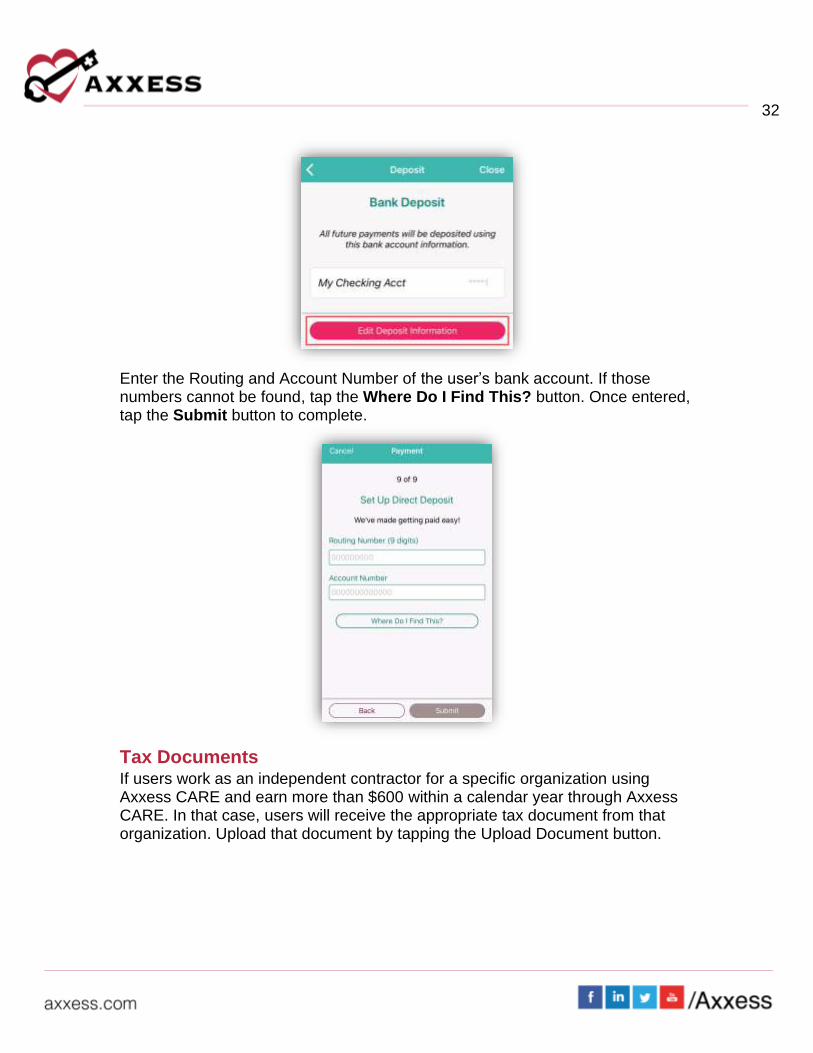
Payment Account All payments from organizations will be deposited into the bank account information listed by the summary here. To update the bank account, tap the Edit Deposit Information button.
32
Enter the Routing and Account Number of the user’s bank account. If those numbers cannot be found, tap the Where Do I Find This? button. Once entered, tap the Submit button to complete.
Tax Documents If users work as an independent contractor for a specific organization using Axxess CARE and earn more than $600 within a calendar year through Axxess CARE. In that case, users will receive the appropriate tax document from that organization. Upload that document by tapping the Upload Document button.

33
Help If the password is forgotten, enter the email address associated with the account and tap Reset Password. To call Axxess Support, who are available Monday – Friday from 7:00 am – 7:00 pm CST. The phone number is (214) 575-7711.

34
The top section (Frequently Asked Questions) FAQ button will send users to a Axxess Help Center site to ask any questions related to Axxess CARE.
Log Out To leave the app, tap on Log Out. To get back into the app, tap the Log In button, re-enter the email address and password, then tap Log In button again.
VISITS
Applying for Visit Tap on a visit from Main Menu/Visits. It will list the visit type, date, Pay Rate, how far away and the organization. Tap on the Apply button.
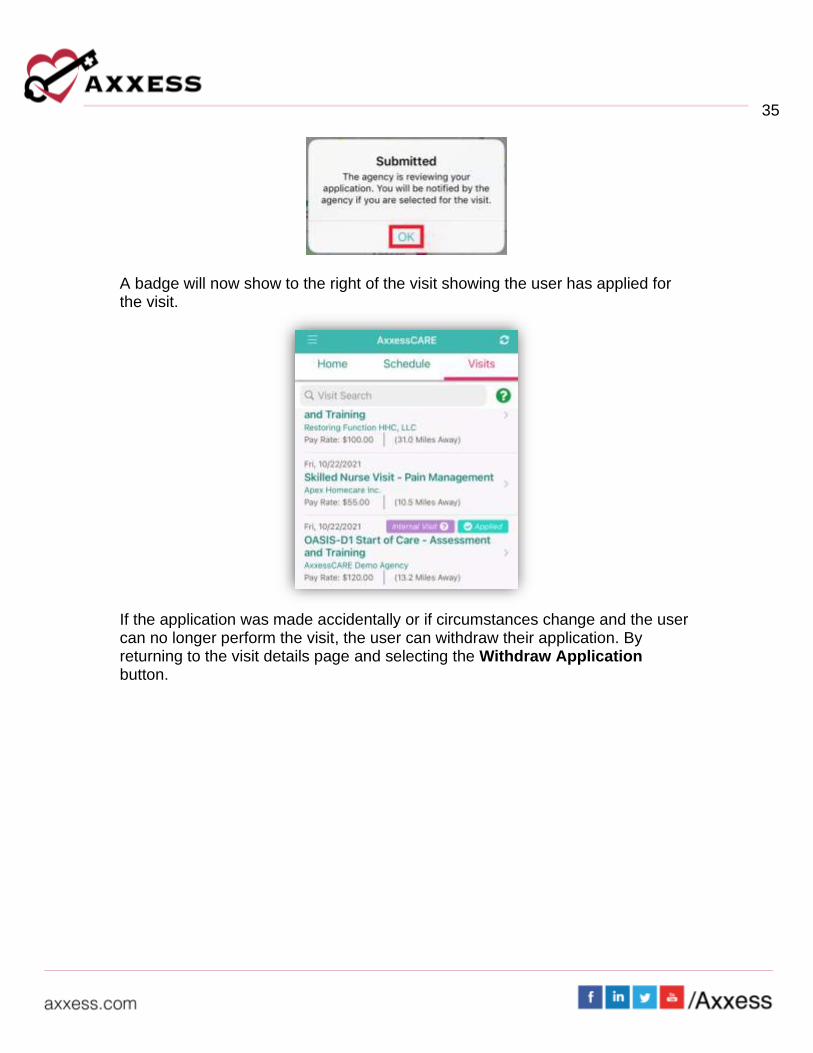
After applying for a visit, a confirmation window will appear. Tap OK. The visit will now be on the list of Applied Visits. The organization will now have to determine whose application they will accept (if there’s more than one) in the Axxess CARE web application.
35
A badge will now show to the right of the visit showing the user has applied for the visit.
If the application was made accidentally or if circumstances change and the user can no longer perform the visit, the user can withdraw their application. By returning to the visit details page and selecting the Withdraw Application button.
36
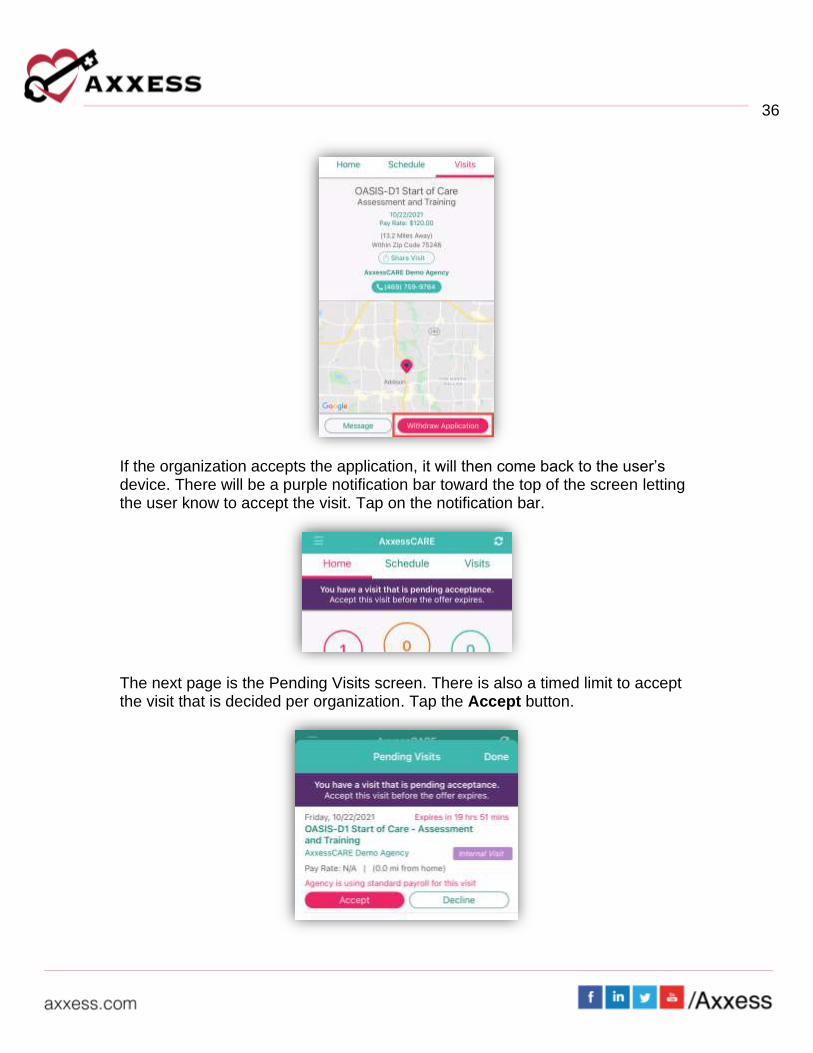
If the organization accepts the application, it will then come back to the user’s device. There will be a purple notification bar toward the top of the screen letting the user know to accept the visit. Tap on the notification bar.
The next page is the Pending Visits screen. There is also a timed limit to accept the visit that is decided per organization. Tap the Accept button.

37
There will be a confirmation that the visit has been accepted. Tap on OK.
The visit will now show on the Schedule as Assigned. Tap on the visit to go to the specifics, including the Patient Profile and the ability to start the visit.
There is an option to call the organization if there are any questions. Also, if the visit cannot be performed, tap the Return Visit button. Tap on the Patient Profile button to be able to look at the patient chart before starting the visit.
38
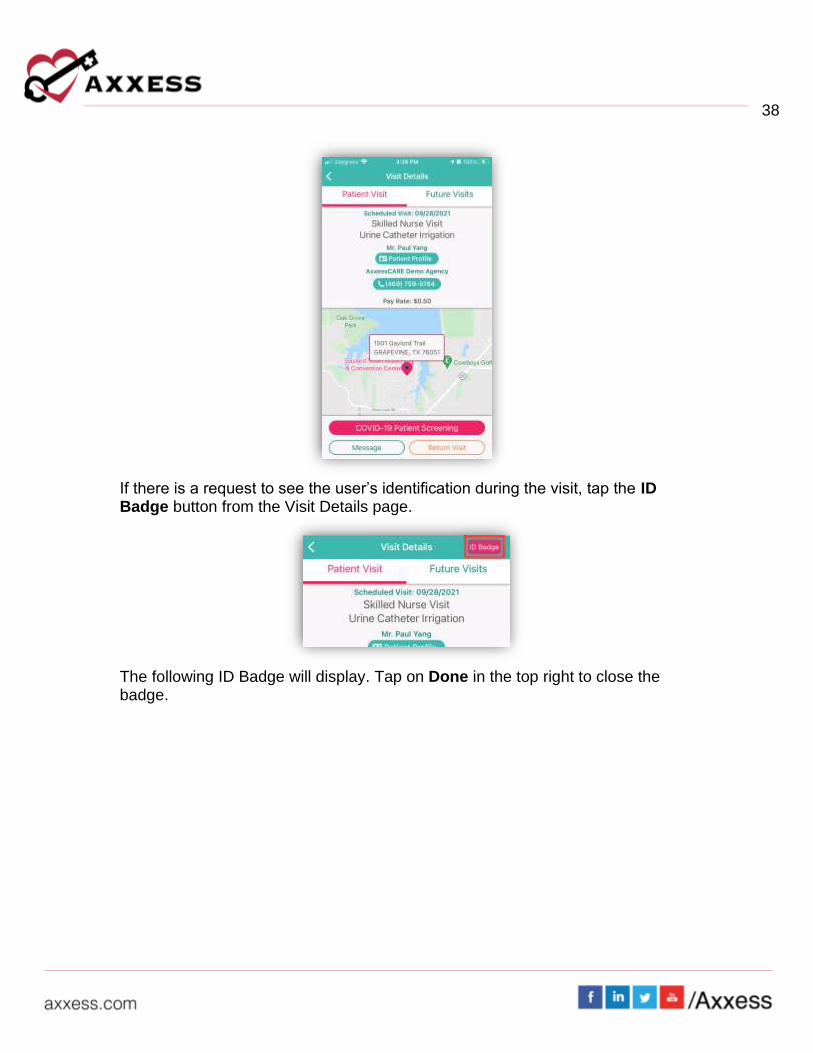
If there is a request to see the user’s identification during the visit, tap the ID Badge button from the Visit Details page.
The following ID Badge will display. Tap on Done in the top right to close the badge.

39
Patient Profile The following is the Patient Profile. All information shown has been entered through the Axxess Home Health web application. It shows the patient’s DOB, MRN #, Gender, Payor. Tap Call to auto-dial the patient’s phone number. Tap Map to see the patient’s location in the map/directions apps available.
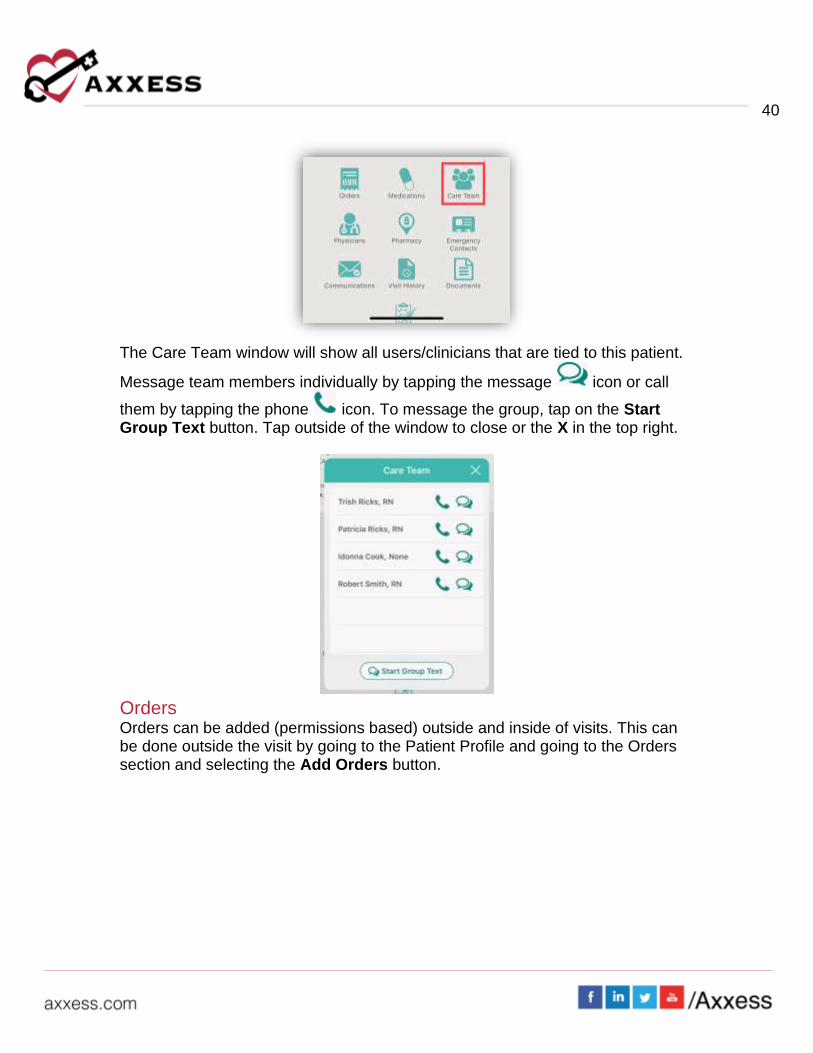
The Patient Profile will also show the patient’s Allergies, Primary Diagnosis and links to view, edit and/or add to their Orders, Medications, Care Team, Physicians, Pharmacy, Emergency Contacts, Communications, Visit History, Documents and Immunizations. Tap the Care Team button.
40
The Care Team window will show all users/clinicians that are tied to this patient.
Message team members individually by tapping the message icon or call
them by tapping the phone icon. To message the group, tap on the Start Group Text button. Tap outside of the window to close or the X in the top right.
Orders Orders can be added (permissions based) outside and inside of visits. This can be done outside the visit by going to the Patient Profile and going to the Orders section and selecting the Add Orders button.
41
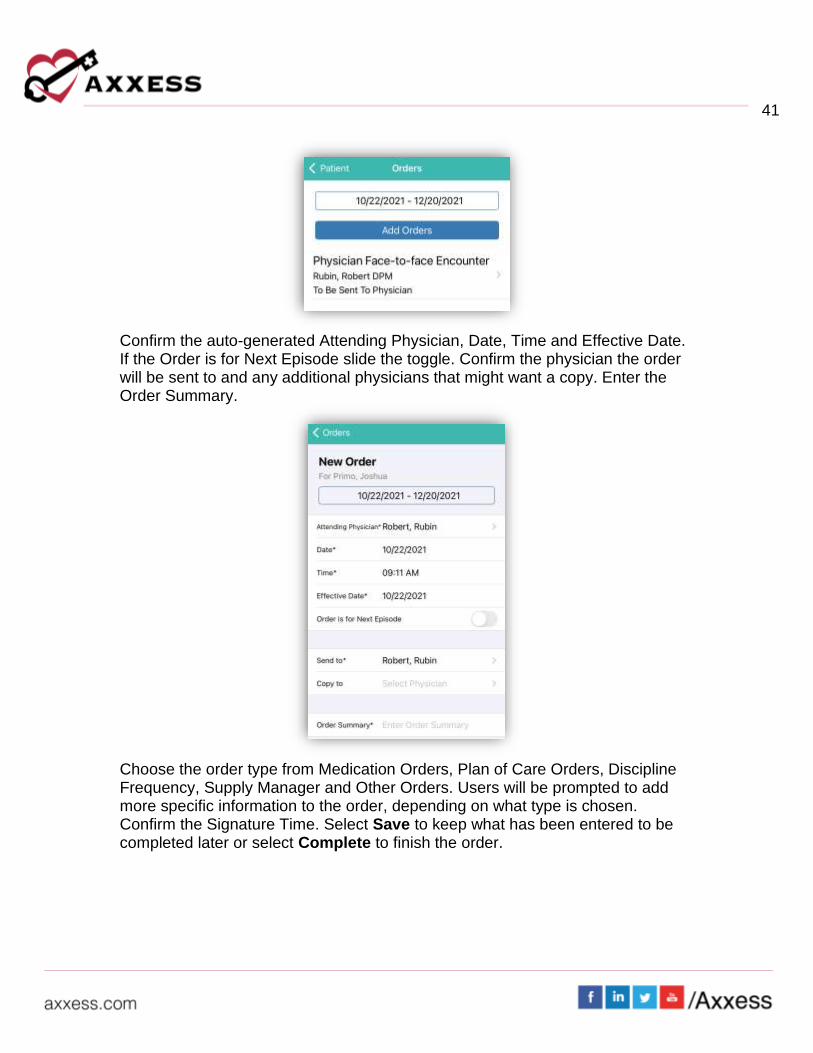
Confirm the auto-generated Attending Physician, Date, Time and Effective Date. If the Order is for Next Episode slide the toggle. Confirm the physician the order will be sent to and any additional physicians that might want a copy. Enter the Order Summary.
Choose the order type from Medication Orders, Plan of Care Orders, Discipline Frequency, Supply Manager and Other Orders. Users will be prompted to add more specific information to the order, depending on what type is chosen. Confirm the Signature Time. Select Save to keep what has been entered to be completed later or select Complete to finish the order.
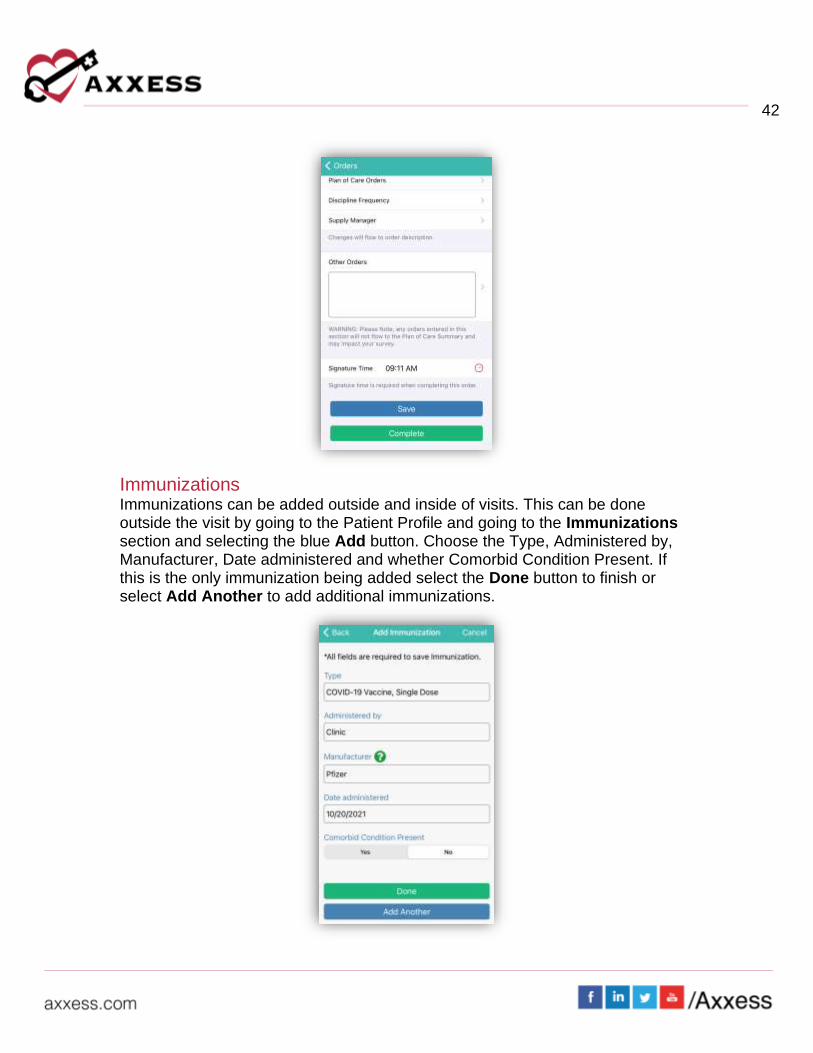
42
Immunizations Immunizations can be added outside and inside of visits. This can be done outside the visit by going to the Patient Profile and going to the Immunizations section and selecting the blue Add button. Choose the Type, Administered by, Manufacturer, Date administered and whether Comorbid Condition Present. If this is the only immunization being added select the Done button to finish or select Add Another to add additional immunizations.

43
To add declined records from the immunizations page, tap the red Decline/Contraindication button. Enter the Type, Date documented, whether Declined or Contraindication and the Reason. If this is the only immunization being declined select the Done button to finish or select Add Another to add additional declined immunizations.
To inactivate active immunizations listed, swipe the item to the left and there is an option to Inactivate or Delete.

44
Confirm the inactivation or deletion and then inactive immunizations will be listed under the Inactive group.
Pharmacies To see the patient pharmacy list, navigate to the Pharmacy section in the patient’s profile. If no pharmacies were added previously or by the organization through the Home Health web application, users can add them to the profile or add new pharmacies altogether (permissions based).
Tap the Add Pharmacy button and search through the Existing Pharmacies list or to add a new pharmacy to the database, tap the Add New Pharmacy button.
45
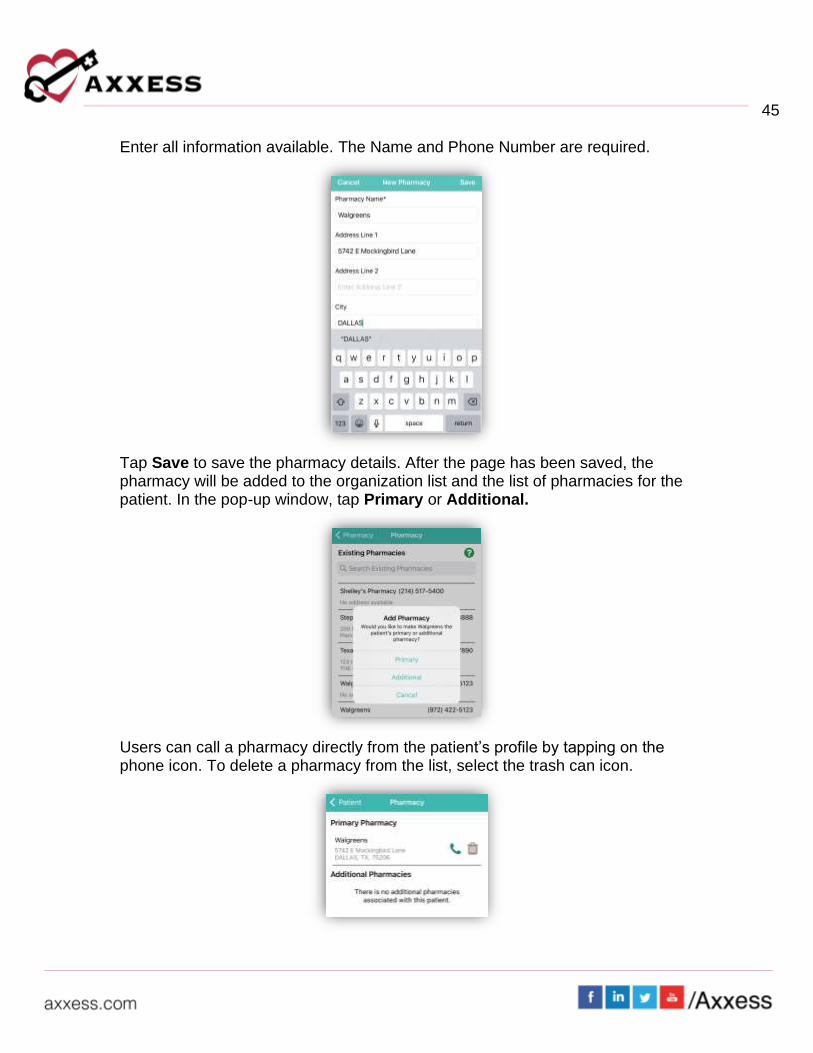
Enter all information available. The Name and Phone Number are required.
Tap Save to save the pharmacy details. After the page has been saved, the pharmacy will be added to the organization list and the list of pharmacies for the patient. In the pop-up window, tap Primary or Additional.
Users can call a pharmacy directly from the patient’s profile by tapping on the phone icon. To delete a pharmacy from the list, select the trash can icon.
46
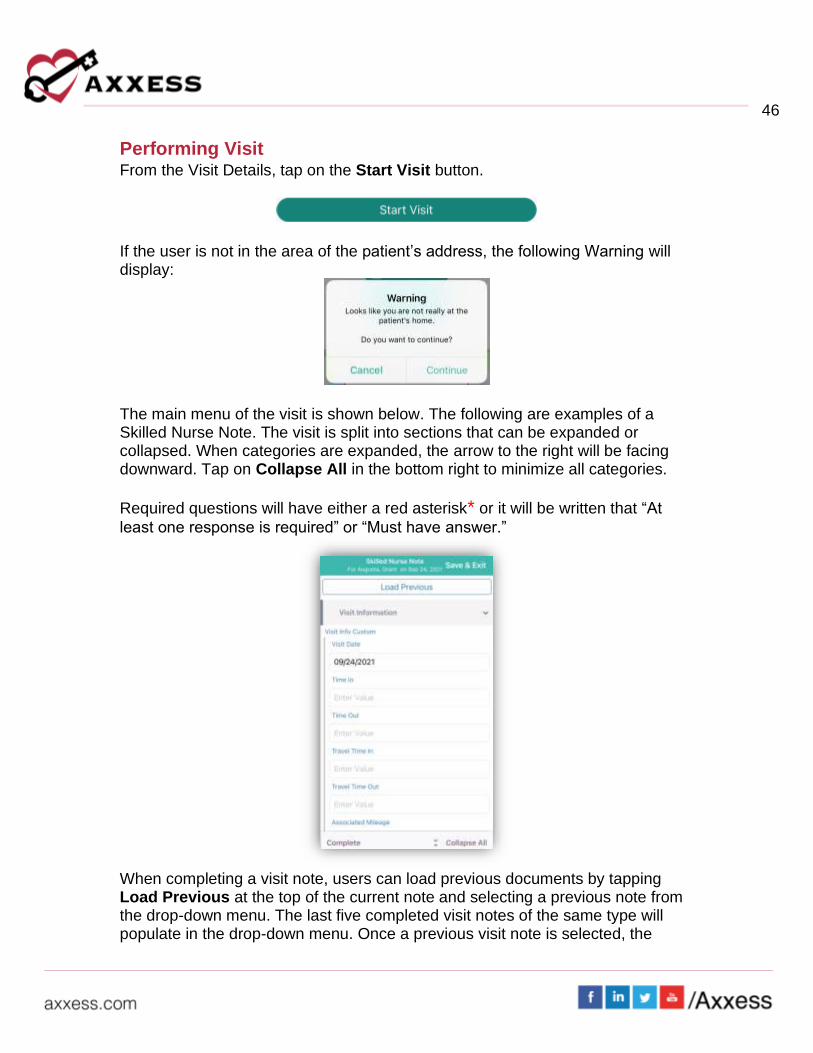
Performing Visit From the Visit Details, tap on the Start Visit button.
If the user is not in the area of the patient’s address, the following Warning will display:
The main menu of the visit is shown below. The following are examples of a Skilled Nurse Note. The visit is split into sections that can be expanded or collapsed. When categories are expanded, the arrow to the right will be facing downward. Tap on Collapse All in the bottom right to minimize all categories.
Required questions will have either a red asterisk* or it will be written that “At
least one response is required” or “Must have answer.”
When completing a visit note, users can load previous documents by tapping Load Previous at the top of the current note and selecting a previous note from the drop-down menu. The last five completed visit notes of the same type will populate in the drop-down menu. Once a previous visit note is selected, the
47
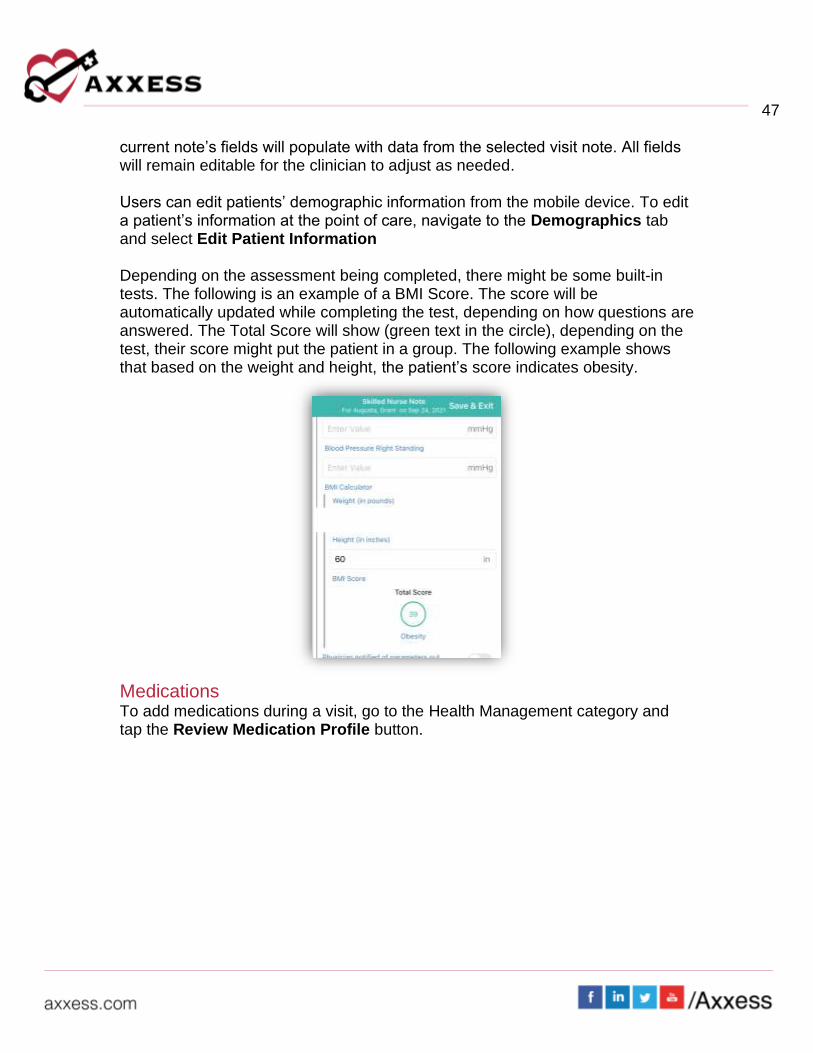
current note’s fields will populate with data from the selected visit note. All fields will remain editable for the clinician to adjust as needed. Users can edit patients’ demographic information from the mobile device. To edit a patient’s information at the point of care, navigate to the Demographics tab and select Edit Patient Information Depending on the assessment being completed, there might be some built-in tests. The following is an example of a BMI Score. The score will be automatically updated while completing the test, depending on how questions are answered. The Total Score will show (green text in the circle), depending on the test, their score might put the patient in a group. The following example shows that based on the weight and height, the patient’s score indicates obesity.
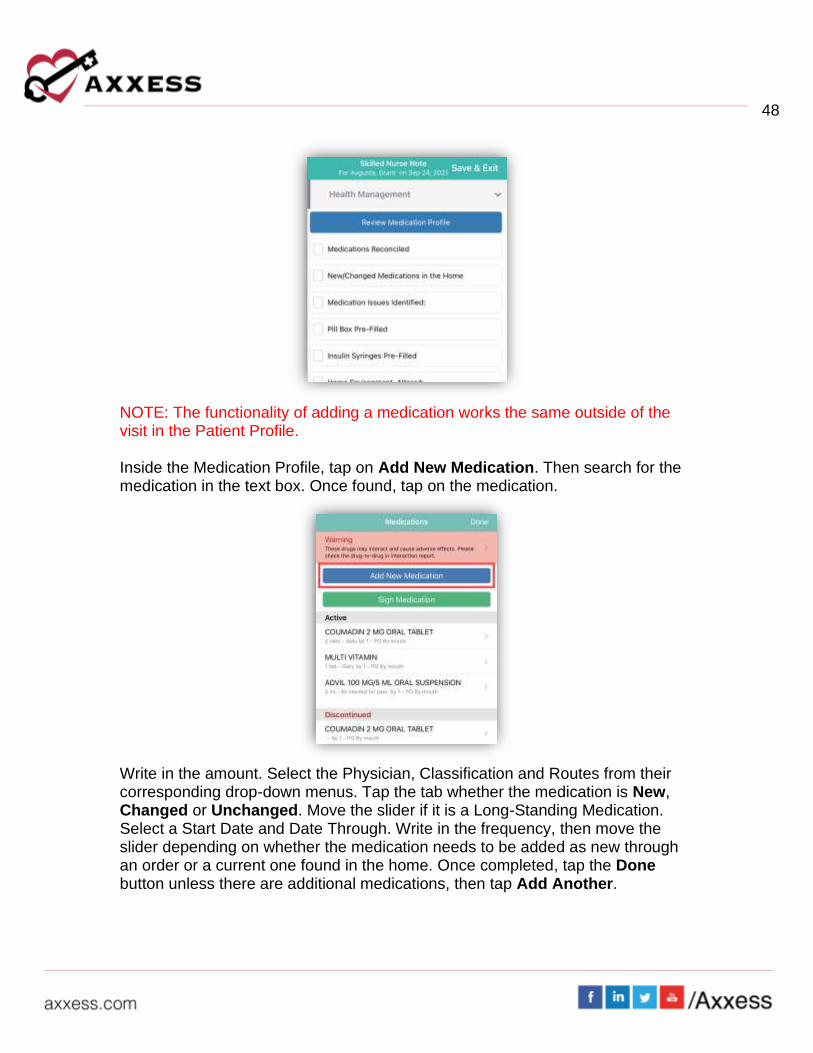
Medications To add medications during a visit, go to the Health Management category and tap the Review Medication Profile button.
48
NOTE: The functionality of adding a medication works the same outside of the visit in the Patient Profile. Inside the Medication Profile, tap on Add New Medication. Then search for the medication in the text box. Once found, tap on the medication.
Write in the amount. Select the Physician, Classification and Routes from their corresponding drop-down menus. Tap the tab whether the medication is New, Changed or Unchanged. Move the slider if it is a Long-Standing Medication. Select a Start Date and Date Through. Write in the frequency, then move the slider depending on whether the medication needs to be added as new through an order or a current one found in the home. Once completed, tap the Done button unless there are additional medications, then tap Add Another.

49
If more than one medication is added, the system will automatically run them for potential interactions. If the system finds any interactions, they will be listed as a Warning highlighted in the color of severity at the top of the page. Tap the Warning. Then tap the combination of medications that are conflicting to read more. Tap Medications in the top left to go back to the Medication Profile.
NOTE: Interactions are only run for medications currently listed in the Axxess Axxess Home Health database.
Once a medication has been entered, edit by tapping on the name of the medication. Scroll to the bottom of the page to Delete (added in error) or Discontinue (patient is no longer taking this medication). After tapping Discontinue, confirm by tapping Discontinue again. It will then be listed in the Discontinued section of the medication profile.

50
Once finished with the medication reconciliation, tap the Sign Medication button to verify medications have been clinically reviewed. Sign with a finger or stylus above the line after the X. When completed, tap Done in the top right.
The medication profile button will change from blue to green showing reviewed.
Templates When completing documentation, users can select a template from the Templates menu to populate the template’s text in the associated text field for patient teaching and seamless point-of-care documentation.

51
COVID-19 Screenings COVID-19 screenings can be documented through skilled nurse visits, OASIS assessments, therapy assessments and therapy visit notes. Select the Infectious Disease Profile button to navigate to the patient’s Infectious Disease Profile.

52
To add a COVID-19 screening, tap the Add COVID-19 Screening button.
Choose the person screened and enter their name and relationship. Answer the screening questions and assign a risk level. Users can select a template from the drop-down menu to load it into the screening. Under the Templates menu, users can enter additional screening requirements or comments in the Additional

53
Screening Requirements section. When all the screening fields are complete, tap the Screening Acknowledgment slider. The Electronic Signature will auto-generate based on the time the form was opened.
Logs Incident logs can be accessed and documented from a SN Note, PT Visit, OT Visit or ST Visit on the mobile app. To create an incident log from a Skilled Nurse Note, navigate to the Care Coordination category and tap the Add Incident Log.

54
Once documentation is entered in the Follow-Up section, the incident log can be signed and completed. A PDF version of the incident log can be accessed from the patient’s chart. When submitted with a signature, the log will go to QA.
Infection logs can be accessed and documented from an OASIS, SN Visit, PT Visit, OT Visit or ST Visit on the mobile app. To create an infection log from a Skilled Nurse or PT/OT/ST Visit, navigate to the Infection Control category and tap Infection Log.

55
Complete the sections listed.
Once documentation is entered in the Follow-Up section, the infection log can be signed and completed. The saved log will appear in a report for infections that require a follow-up. Completed reports will appear in a report for infections.
Aide Care Plan When documenting an OASIS or Skilled Nurse Visit on the mobile app, clinicians can add and document an Aide Care Plan. To document an Aide Care Plan from an OASIS visit, navigate to the Aide Care Plan section and tap Add/Edit Aide Care Plan.
The following tabs appear on the Aide Care Plan.
56
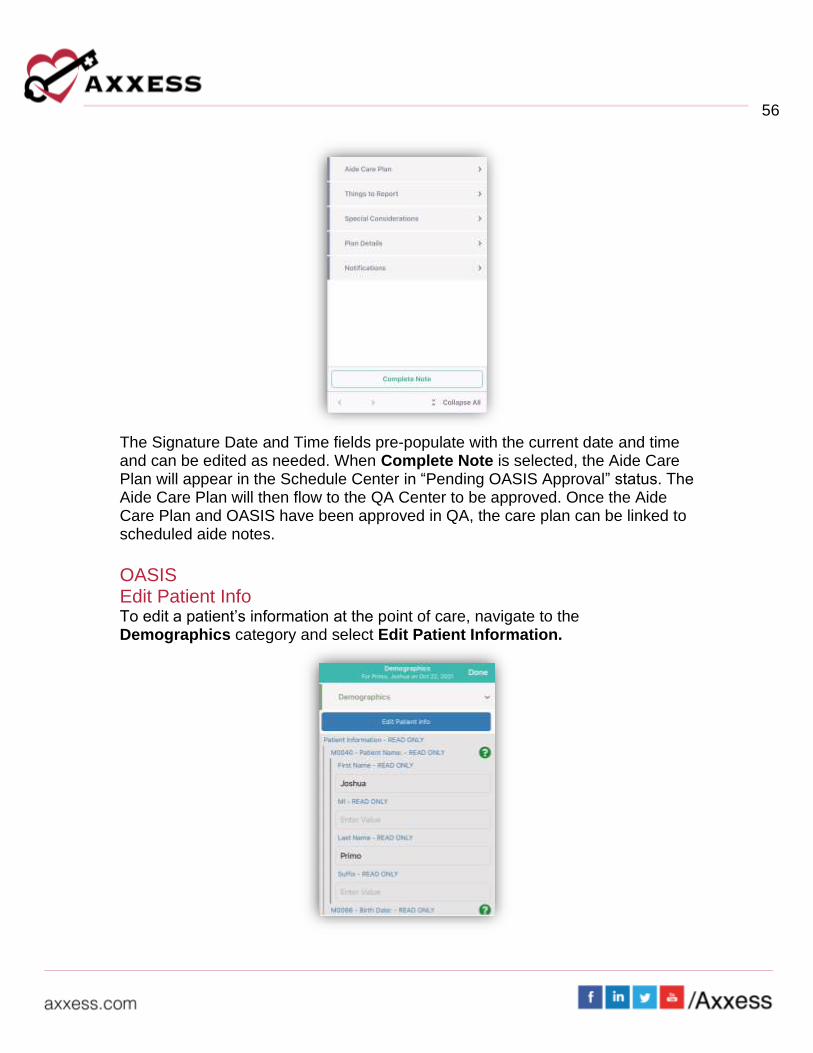
The Signature Date and Time fields pre-populate with the current date and time and can be edited as needed. When Complete Note is selected, the Aide Care Plan will appear in the Schedule Center in “Pending OASIS Approval” status. The Aide Care Plan will then flow to the QA Center to be approved. Once the Aide Care Plan and OASIS have been approved in QA, the care plan can be linked to scheduled aide notes.
OASIS Edit Patient Info To edit a patient’s information at the point of care, navigate to the Demographics category and select Edit Patient Information.
57
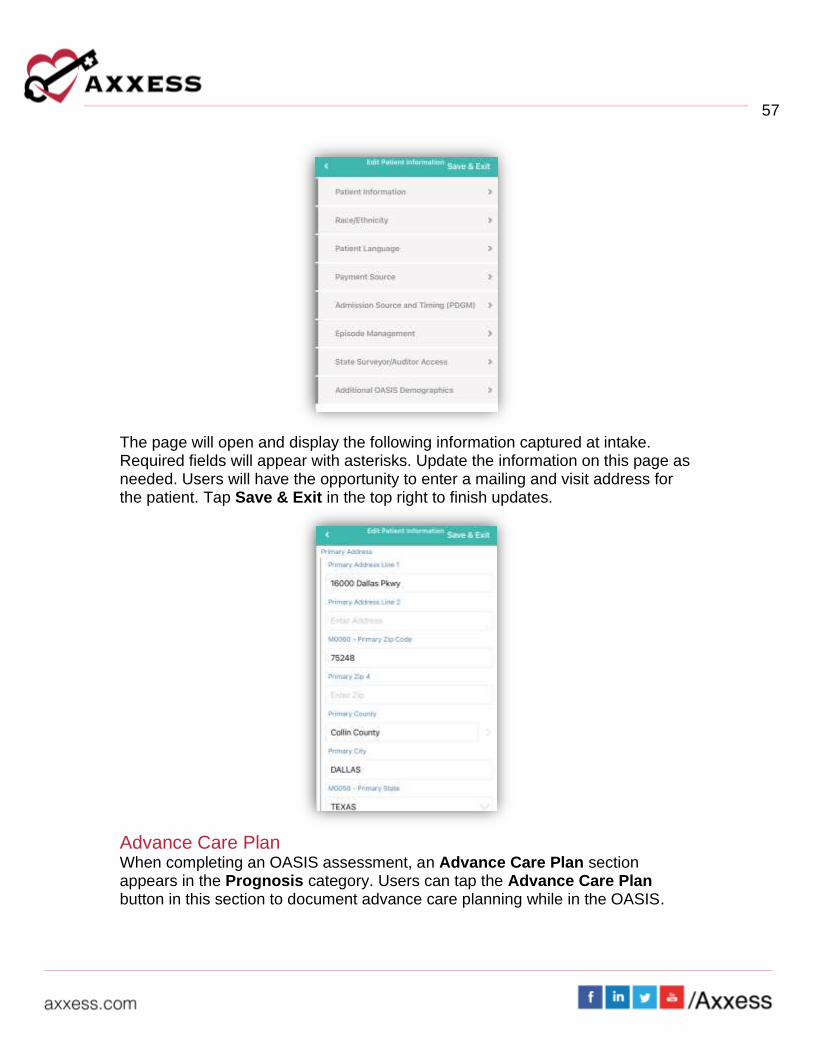
The page will open and display the following information captured at intake. Required fields will appear with asterisks. Update the information on this page as needed. Users will have the opportunity to enter a mailing and visit address for the patient. Tap Save & Exit in the top right to finish updates.
Advance Care Plan When completing an OASIS assessment, an Advance Care Plan section appears in the Prognosis category. Users can tap the Advance Care Plan button in this section to document advance care planning while in the OASIS.

58
Once Advance Care Plan is selected, seven options for advance care planning will appear:
• Advance Care Plan
• Living Will
• DNR, Out of Hospital
• Durable Power of Attorney for Health (A text box for Name and
Relationship opens)
• Physician Orders for Life-Sustaining Treatment
• Medical Orders for Life-Sustaining Treatment
• Other Legal Documents Valid Under State Law
Users can also document four options for treatment preferences. At the bottom of the screen, a Comments text box is available for users to enter any additional information.
59
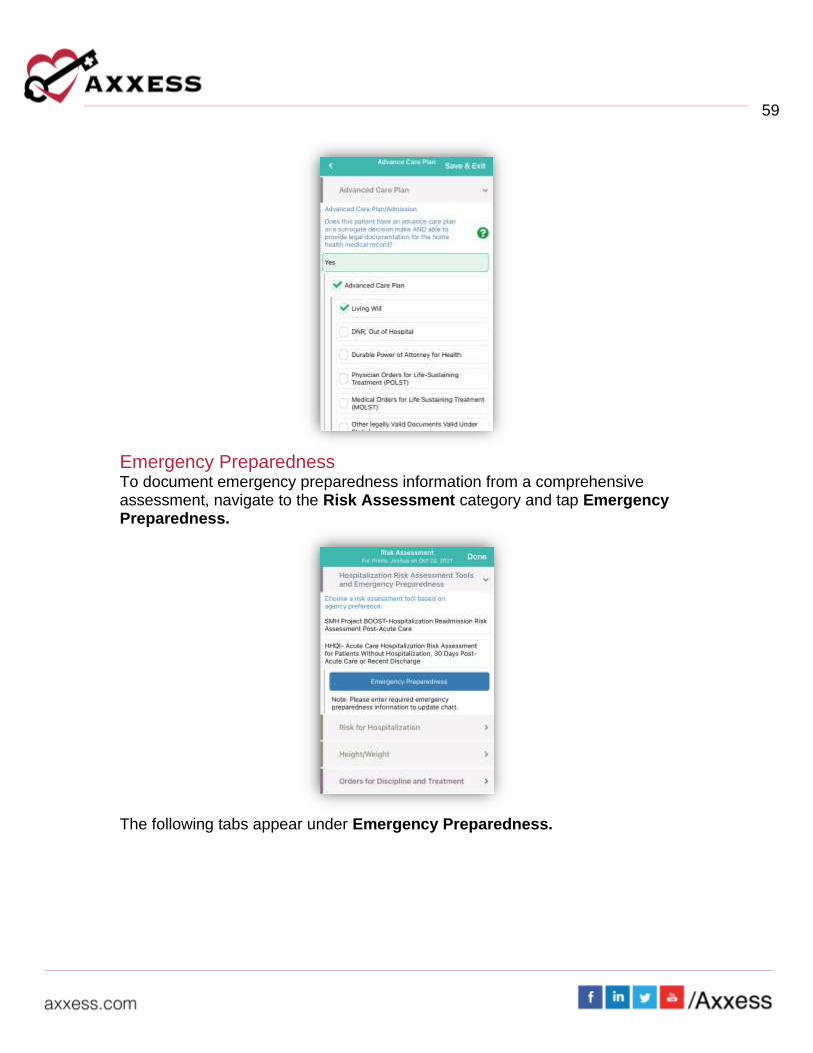
Emergency Preparedness To document emergency preparedness information from a comprehensive assessment, navigate to the Risk Assessment category and tap Emergency Preparedness.
The following tabs appear under Emergency Preparedness.

60
Tap Save and Exit to return to the assessment when you are finished documenting emergency preparedness details. The Emergency Preparedness will change to green with a check mark to confirm completion.
Scrubber The OASIS scrubber can be used to audit OASIS assessments for clinical inconsistencies, coding inconsistencies, fatal audits and CMS warnings, so clinicians can correct any errors and maintain accurate OASIS documentation. Once an OASIS is completed on the app, tap the Check for Errors button to run an OASIS audit. Once the audit is completed, the OASIS Scrubber button will appear at the bottom of the assessment.
Tap the OASIS Scrubber button to open and review a PDF of the findings. Tap the <Back option in the top left to get back to the errors/warnings.

61
Audit and Signature The app enables users to audit, sign, complete and submit OASIS assessments at from the device. Auditing an OASIS assessment ensures that all OASIS questions have been answered and enables users to correct any errors that are identified. To run an OASIS audit, complete the OASIS documentation and tap Save & Exit or Check for Errors. When the audit is complete, a list of errors and warnings will appear for correction.
Select an error or warning from the list to view the OASIS question. A description of the error will appear at the top of the screen, followed by the OASIS question

62
and response items. Select a response to resolve the error and click the arrow icon in the bottom-right corner to advance to the next error.
Once all errors have been corrected, the HHRG and case-mix calculations will appear. The expected payment amount will also appear for users with the appropriate permissions. The signature page will be available once the users taps Save & Sign. The page will include all options available on the web signature page. Tap Save & Exit once all steps have been completed. OASIS assessments cannot be submitted until an audit is completed.
Completing Visit To leave the visit and save progress, tap on the Save & Exit button in the top right of the visit menu.
To return to the visit, tap on Documentation button. To leave the patient’s residence before documenting is finished, tap on the Patient Signature button.
63
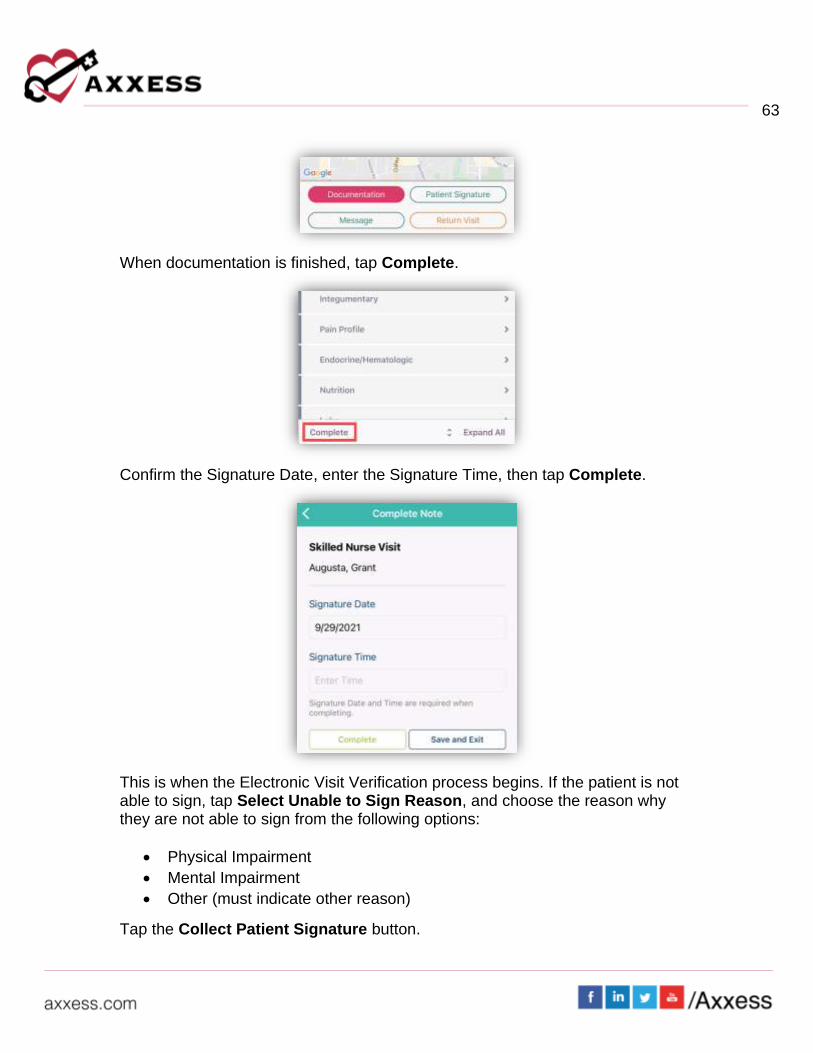
When documentation is finished, tap Complete.
Confirm the Signature Date, enter the Signature Time, then tap Complete.
This is when the Electronic Visit Verification process begins. If the patient is not able to sign, tap Select Unable to Sign Reason, and choose the reason why they are not able to sign from the following options:
• Physical Impairment
• Mental Impairment
• Other (must indicate other reason)
Tap the Collect Patient Signature button.
64
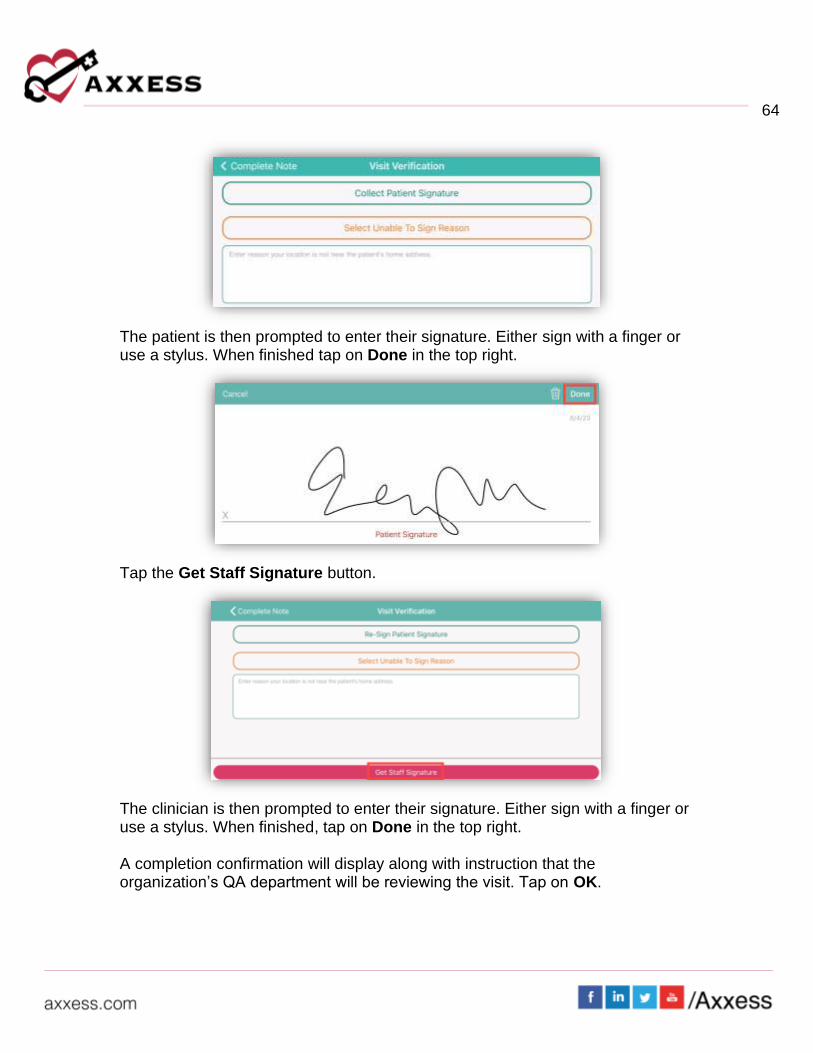
The patient is then prompted to enter their signature. Either sign with a finger or use a stylus. When finished tap on Done in the top right.
Tap the Get Staff Signature button.
The clinician is then prompted to enter their signature. Either sign with a finger or use a stylus. When finished, tap on Done in the top right.
A completion confirmation will display along with instruction that the organization’s QA department will be reviewing the visit. Tap on OK.

65
On the Visit Details page, to see the Electronic Visit Verification, tap on Visit Log. The Visit Verification page shows the Verified Time In & Out and the Signature along with the:
– Patient Address
– Visit Started Location
– Visit Ended Location Tap on Back in the top left to get back to the schedule. From Visit Details, tap on View Documents. This will show the PDF printed version of the completed visit. Tap on Visit Details to go back.
66
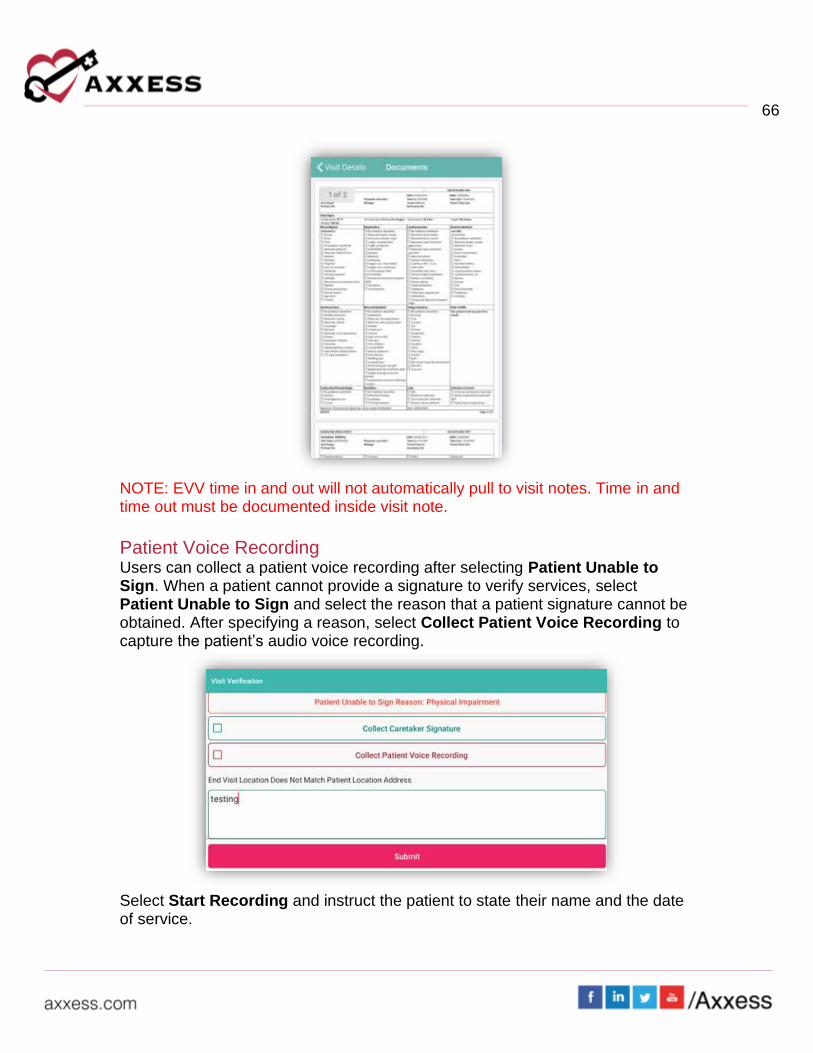
NOTE: EVV time in and out will not automatically pull to visit notes. Time in and time out must be documented inside visit note.
Patient Voice Recording Users can collect a patient voice recording after selecting Patient Unable to Sign. When a patient cannot provide a signature to verify services, select Patient Unable to Sign and select the reason that a patient signature cannot be obtained. After specifying a reason, select Collect Patient Voice Recording to capture the patient’s audio voice recording.
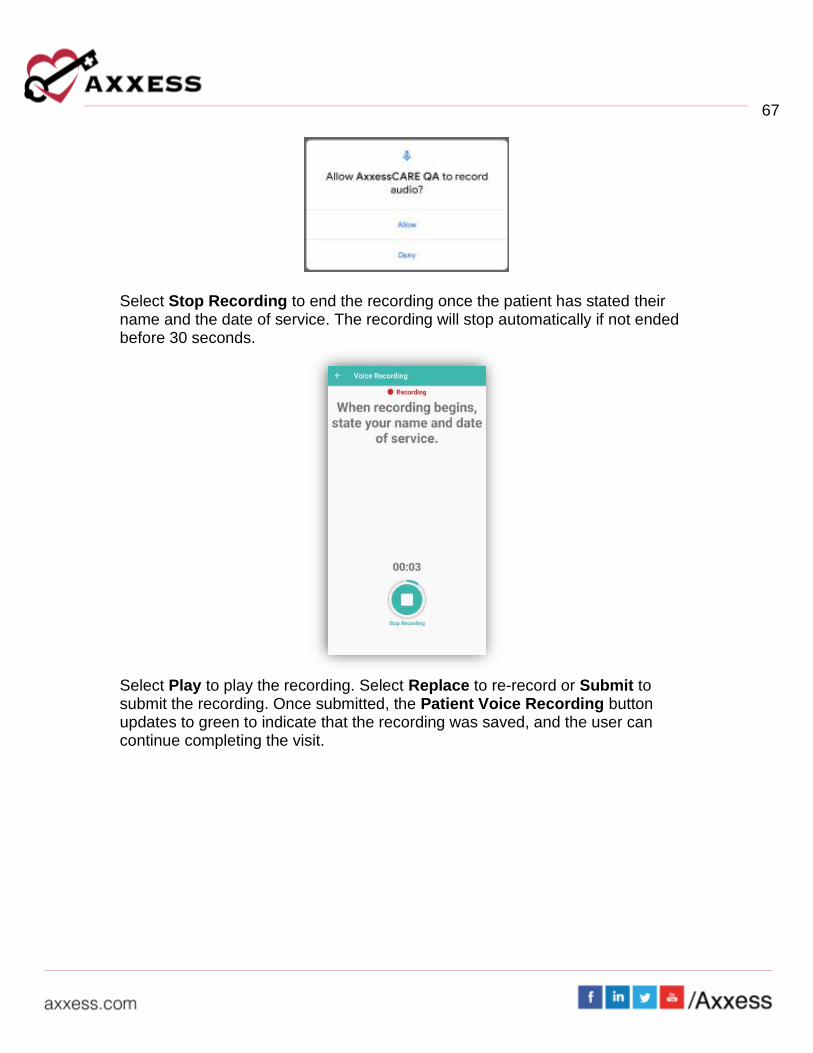
Select Start Recording and instruct the patient to state their name and the date of service.
67
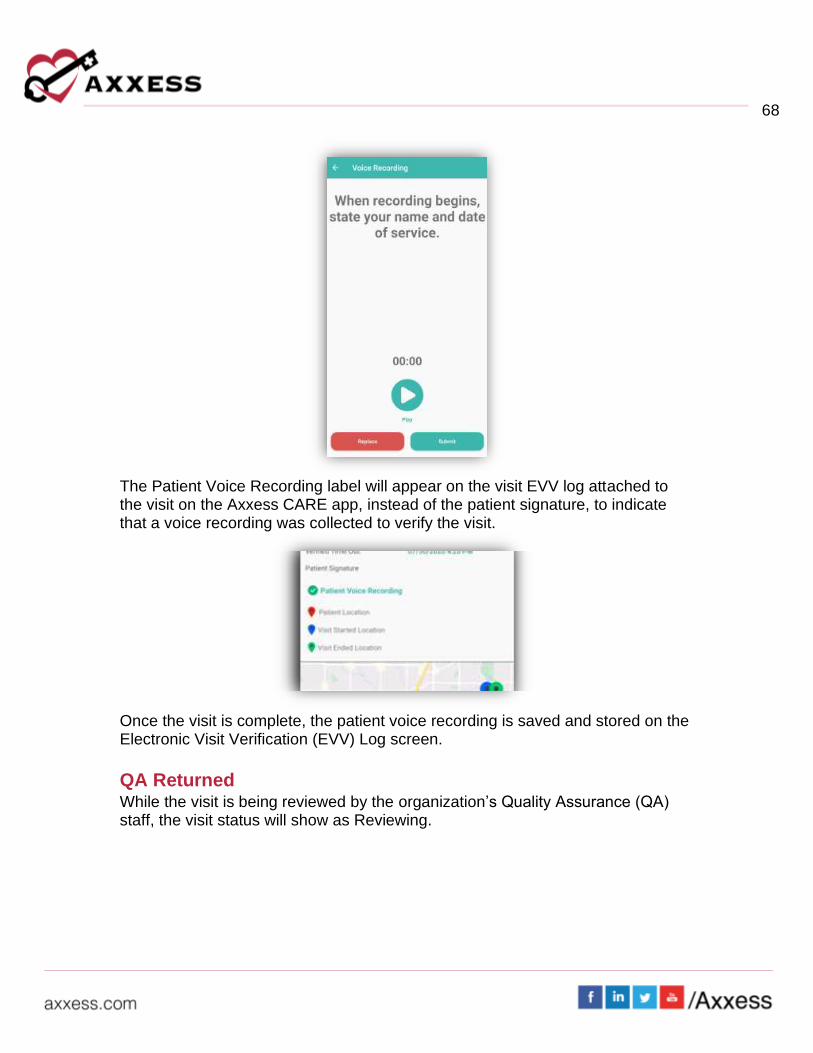
Select Stop Recording to end the recording once the patient has stated their name and the date of service. The recording will stop automatically if not ended before 30 seconds.
Select Play to play the recording. Select Replace to re-record or Submit to submit the recording. Once submitted, the Patient Voice Recording button updates to green to indicate that the recording was saved, and the user can continue completing the visit.
68
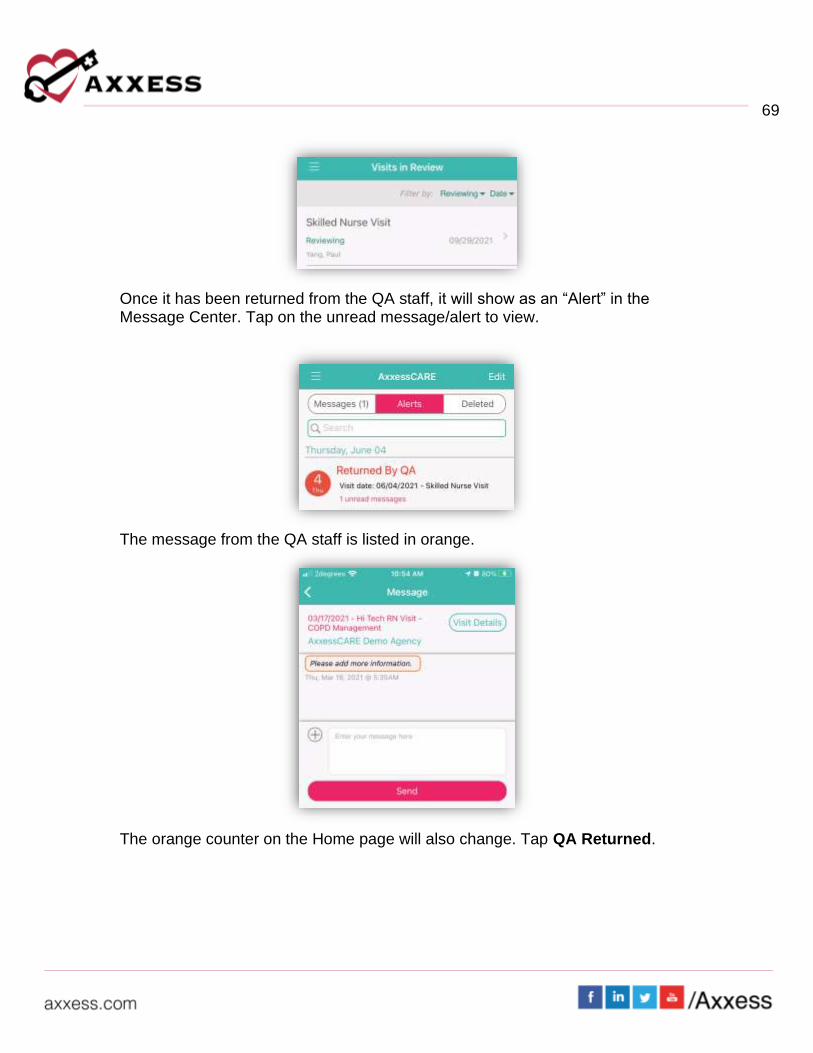
The Patient Voice Recording label will appear on the visit EVV log attached to the visit on the Axxess CARE app, instead of the patient signature, to indicate that a voice recording was collected to verify the visit.
Once the visit is complete, the patient voice recording is saved and stored on the Electronic Visit Verification (EVV) Log screen.
QA Returned While the visit is being reviewed by the organization’s Quality Assurance (QA) staff, the visit status will show as Reviewing.
69
Once it has been returned from the QA staff, it will show as an “Alert” in the Message Center. Tap on the unread message/alert to view.
The message from the QA staff is listed in orange.
The orange counter on the Home page will also change. Tap QA Returned.
70
All visits that have been reviewed will be listed on the Returned by QA page. Tap on the visit to review the notes.
The reason why the document was returned will be listed at the bottom of the page in the Return Comments. Tap on Edit Documents to make the requested changes, which will return to the visit. Make requested updates inside the visit, Complete again and re-sign.
71
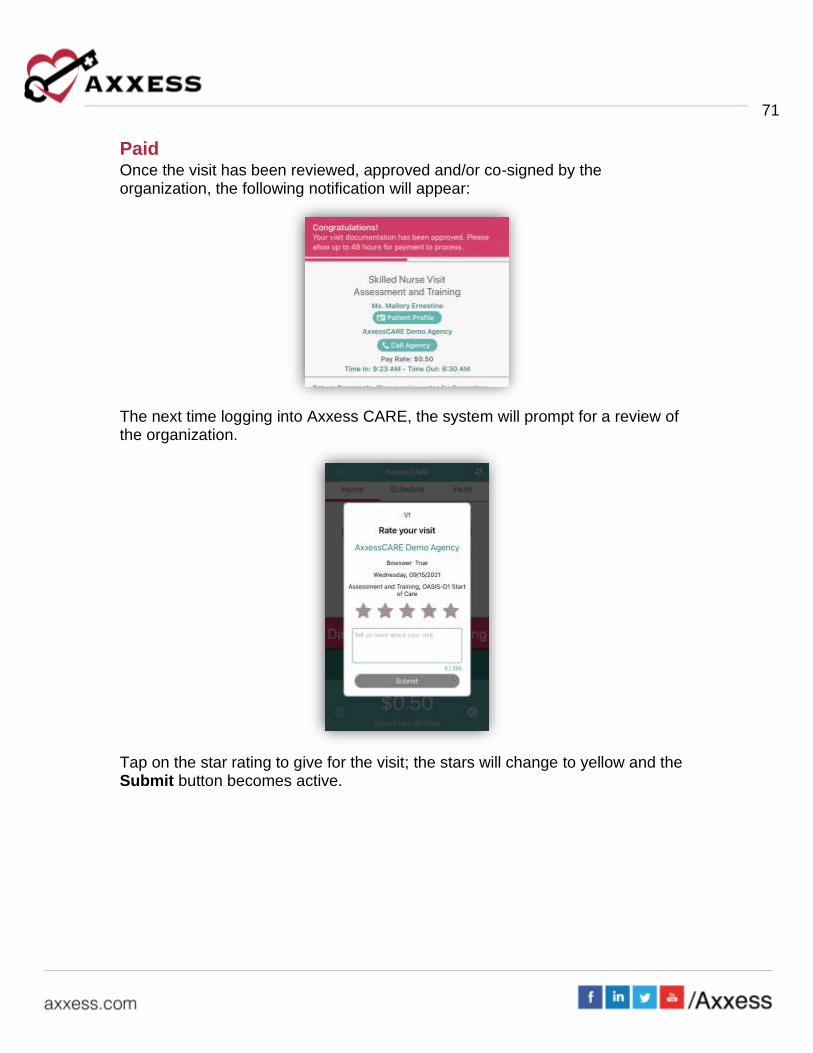
Paid Once the visit has been reviewed, approved and/or co-signed by the organization, the following notification will appear:
The next time logging into Axxess CARE, the system will prompt for a review of the organization.
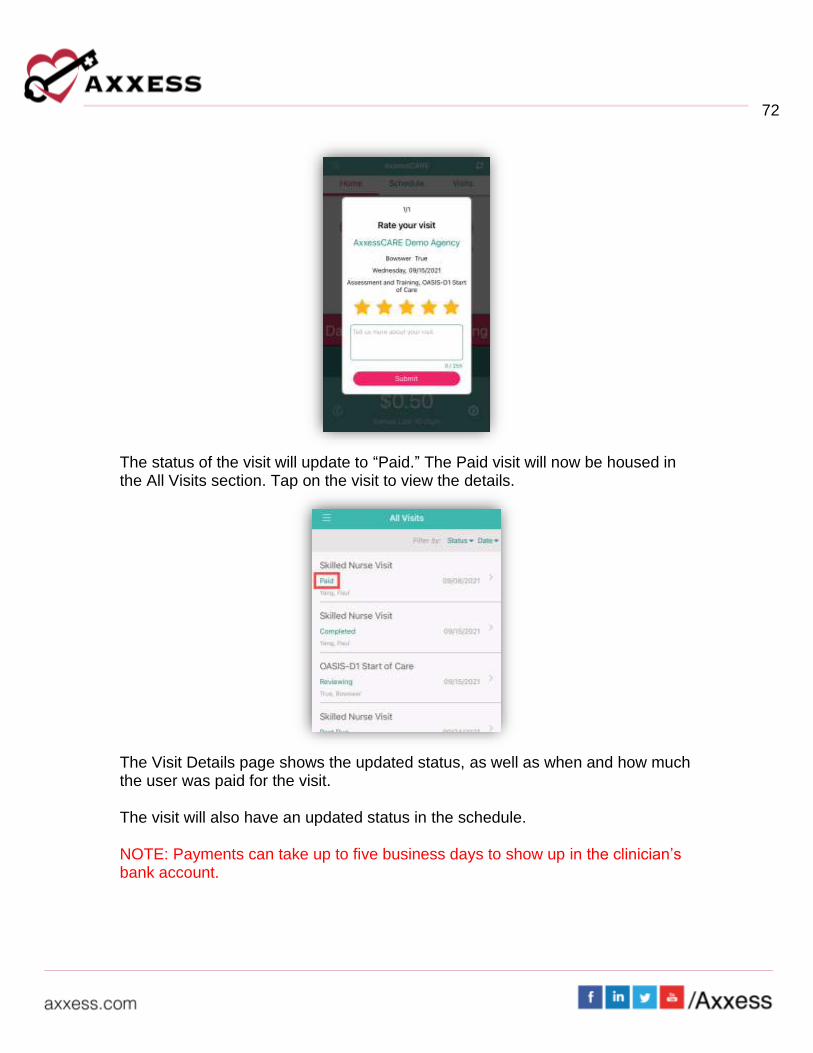
Tap on the star rating to give for the visit; the stars will change to yellow and the Submit button becomes active.
72
The status of the visit will update to “Paid.” The Paid visit will now be housed in the All Visits section. Tap on the visit to view the details.
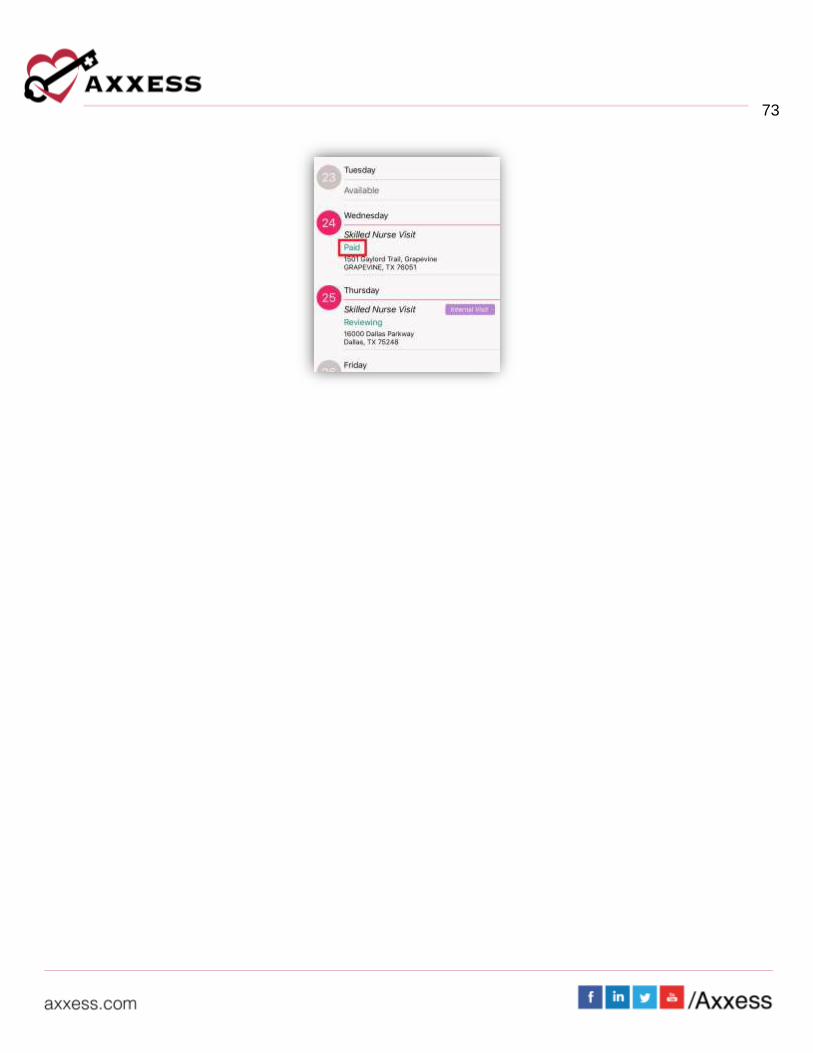
The Visit Details page shows the updated status, as well as when and how much the user was paid for the visit. The visit will also have an updated status in the schedule. NOTE: Payments can take up to five business days to show up in the clinician’s bank account.
73