Start Developing iOS Apps Today - Everything Computer ...
131
Start Developing iOS Apps Today
-
Upload
khangminh22 -
Category
Documents
-
view
0 -
download
0
Transcript of Start Developing iOS Apps Today - Everything Computer ...

Start Developing iOS Apps Today

Contents
Introduction 5
Setup 6Get the Tools 7
Tutorial: Basics 8Create a New Project 9Get Familiar with Xcode 11Run iOS Simulator 12Review the Source Code 14Create a Storyboard 17Add a Scene to Your Storyboard 19Test Your Changes 23Build the Basic Interface 23Recap 28
Structuring an App 29
App Development Process 30Defining the Concept 30Designing a User Interface 31Defining the Interaction 31Implementing the Behavior 32
Objects Are Building Blocks for Apps 32Classes Are Blueprints for Objects 32Objects Communicate Through Messages 33Protocols Define Messaging Contracts 34
Incorporating the Data 34Use the Right Resources 34Incorporate Real Data 35
Designing a User Interface 36The View Hierarchy 36Building an Interface Using Views 37
2013-10-22 | Copyright © 2013 Apple Inc. All Rights Reserved.
2

Use Storyboards to Lay Out Views 38Use Inspectors to Configure Views 40Use Auto Layout to Position Views 41
Defining the Interaction 42View Controllers 42Actions 43Outlets 44Controls 44Navigation Controllers 45Use Storyboards to Define Navigation 45
Tutorial: Storyboards 47Adopt Auto Layout 48Creating a Second Scene 50Display Static Content in a Table View 53Add a Segue to Navigate Forward 55Create Custom View Controllers 63Unwind a Segue to Navigate Back 66Recap 68
Implementing an App 69
Incorporating the Data 70Designing Your Model 70Implementing Your Model 71
Using Design Patterns 72MVC 72Target-Action 73Delegation 73
Working with Foundation 75Value Objects 75
Strings 76Numbers 77
Collection Objects 78Arrays 78Sets 82Dictionaries 83
2013-10-22 | Copyright © 2013 Apple Inc. All Rights Reserved.
3
Contents

Represent nil with NSNull 84
Writing a Custom Class 86Declaring and Implementing a Class 87
Interface 87Implementation 87
Properties Store an Object’s Data 88Methods Define an Object’s Behavior 89
Method Parameters 90Implementing Methods 91
Tutorial: Add Data 93Create a Data Class 94Load the Data 95Display the Data 98Mark Items as Completed 102Add New Items 105Recap 111
Next Steps 112
iOS Technologies 113User Interface 113Games 114Data 115Media 115
Finding Information 116Use Contextual Help Articles for Xcode Guidance 116Use Guides for General and Conceptual Overviews 118Use API Reference for Class Information 119Use Quick Help for Contextual Source Code Information 124Use Sample Code to See Real-World Usage 126
Where to Go from Here 128Taking the ToDoList App to the Next Level 129
Document Revision History 130
2013-10-22 | Copyright © 2013 Apple Inc. All Rights Reserved.
4
Contents

● “Setup” (page 6)
● “Tutorial: Basics” (page 8)
2013-10-22 | Copyright © 2013 Apple Inc. All Rights Reserved.
5
Introduction

Start Developing iOS Apps Today provides the perfect starting point for iOS development. On your Mac, youcan create iOS apps that run on iPad, iPhone, and iPod touch. View this guide’s four short modules as a gentleintroduction to building your first app—including the tools you need and the major concepts and best practicesthat will ease your path.
The first three modules each end with a tutorial, where you’ll implement what you’ve learned. At the end ofthe last tutorial, you’ll have created a simple to-do list app.
After you’ve built your first app in this guide and are considering your next endeavor, read the fourth module.It explores the technologies and frameworks you might consider adopting in your next app. You’ll be on yourway to keeping your customers engaged and looking forward to the next great thing.
Even though this guide takes you through every step of building a simple app, to benefit most it helps to beacquainted with computer programming in general and with object-oriented programming in particular.
2013-10-22 | Copyright © 2013 Apple Inc. All Rights Reserved.
6
Setup

Get the ToolsBefore you can start developing great apps, set up a development environment to work in and make sure youhave the right tools.
App Store Xcode Download
To develop iOS apps, you need:
● A Mac computer running OS X 10.7 (Lion) or later
● Xcode
● iOS SDK
Xcode is Apple’s integrated development environment (IDE). Xcode includes a source editor, a graphical userinterface editor, and many other features. The iOS SDK extends the Xcode toolset to include the tools, compilers,and frameworks you need specifically for iOS development.
You can download the latest version of Xcode for free from the App Store on your Mac. (The App Store app isinstalled with OS X version 10.7 and later. If you have an earlier version of OS X, you need to upgrade.) The iOSSDK is included with Xcode.
To download the latest version of Xcode
1. Open the App Store app on your Mac (by default it’s in the Dock).
2. In the search field in the top-right corner, type Xcode and press the Return key.
3. Click Free .
Xcode is downloaded into your /Applications directory.
SetupGet the Tools
2013-10-22 | Copyright © 2013 Apple Inc. All Rights Reserved.
7

This tutorial takes you through the basics of what an app is, to the process of creating a simple user interface,and on to adding the custom behavior that transforms the interface into a working app.
Follow this tutorial to learn the basics of iOS app development, including:
● How to use Xcode to create and manage a project
● How to identify the key pieces of an Xcode project
● How to add standard user interface elements to your app
● How to build and run your app
After you finish the tutorial, you’ll have an app that looks something like this:
To keep things simple, the tutorial project has only an iPhone interface, but you use the exact same tools andtechniques to develop an iPad app. This tutorial uses Xcode 5.0 and iOS SDK 7.0.
2013-10-22 | Copyright © 2013 Apple Inc. All Rights Reserved.
8
Tutorial: Basics
Create a New ProjectTo get started developing your app, create a new Xcode project.
Xcode includes several built-in app templates that you can use to develop common styles of iOS apps, suchas games, apps with tab-based navigation, and table-view-based apps. Most of these templates havepreconfigured interface and source code files for you to start working with. For this tutorial, you’ll start withthe most basic template: Empty Application.
Working with the Empty Application template will help you understand the basic structure of an iOS app andhow content gets onscreen. After you’ve learned how everything works, you can use one of the other templatesfor your own app to save yourself some configuration time.
To create a new empty project
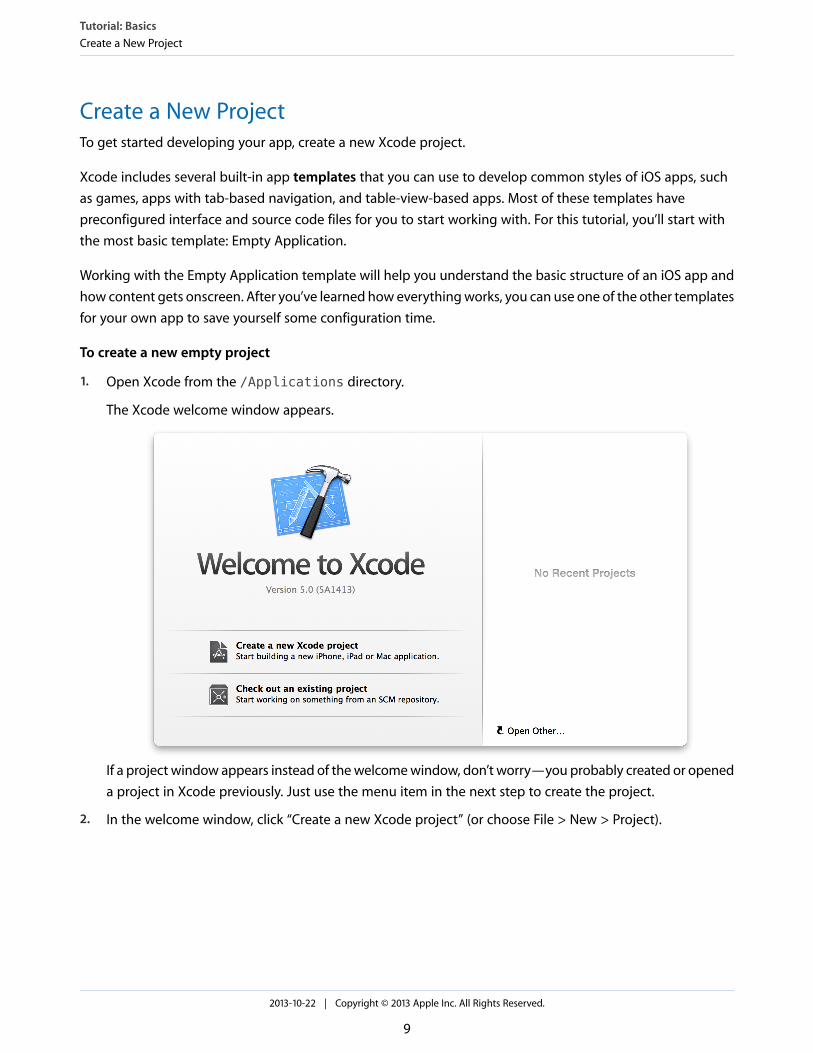
1. Open Xcode from the /Applications directory.
The Xcode welcome window appears.
If a project window appears instead of the welcome window, don’t worry—you probably created or openeda project in Xcode previously. Just use the menu item in the next step to create the project.
2. In the welcome window, click “Create a new Xcode project” (or choose File > New > Project).
Tutorial: BasicsCreate a New Project
2013-10-22 | Copyright © 2013 Apple Inc. All Rights Reserved.
9

Xcode opens a new window and displays a dialog in which you can choose a template.
3. In the iOS section at the left of the dialog, select Application.
4. In the main area of the dialog, click Empty Application and then click Next.
5. In the dialog that appears, name your app and choose additional options for your project.
Use the following values:
● Product Name: ToDoList
Tutorial: BasicsCreate a New Project
2013-10-22 | Copyright © 2013 Apple Inc. All Rights Reserved.
10

Xcode uses the product name you entered to name your project and the app.
● Company Identifier: Your company identifier, if you have one. If you don’t, use com.example.
● Class Prefix: XYZ
Xcode uses the class prefix name to name the classes it creates for you. Objective-C classes must benamed uniquely within your code and across any frameworks or bundles you might be using. To keepclass names unique, the convention is to use prefixes for all classes. Two-letter prefixes are reservedby Apple for use in framework classes, so use something that’s three letters or longer.
6. Choose iPhone from the Devices pop-up menu.
As already mentioned, creating an app with an iPhone interface is the simplest way to start. The techniquesused are the same for an iPad or universal app.
7. Click Next.
8. In the dialog that appears, choose a location for your project and click Create.
Xcode opens your new project in a window (called the workspace window), which should look similar tothis:
Get Familiar with XcodeXcode includes everything you need to create an app. It not only organizes the files that go into creating anapp, it provides editors for code and interface elements, allows you to build and run your app, and includes apowerful integrated debugger.
Tutorial: BasicsGet Familiar with Xcode
2013-10-22 | Copyright © 2013 Apple Inc. All Rights Reserved.
11
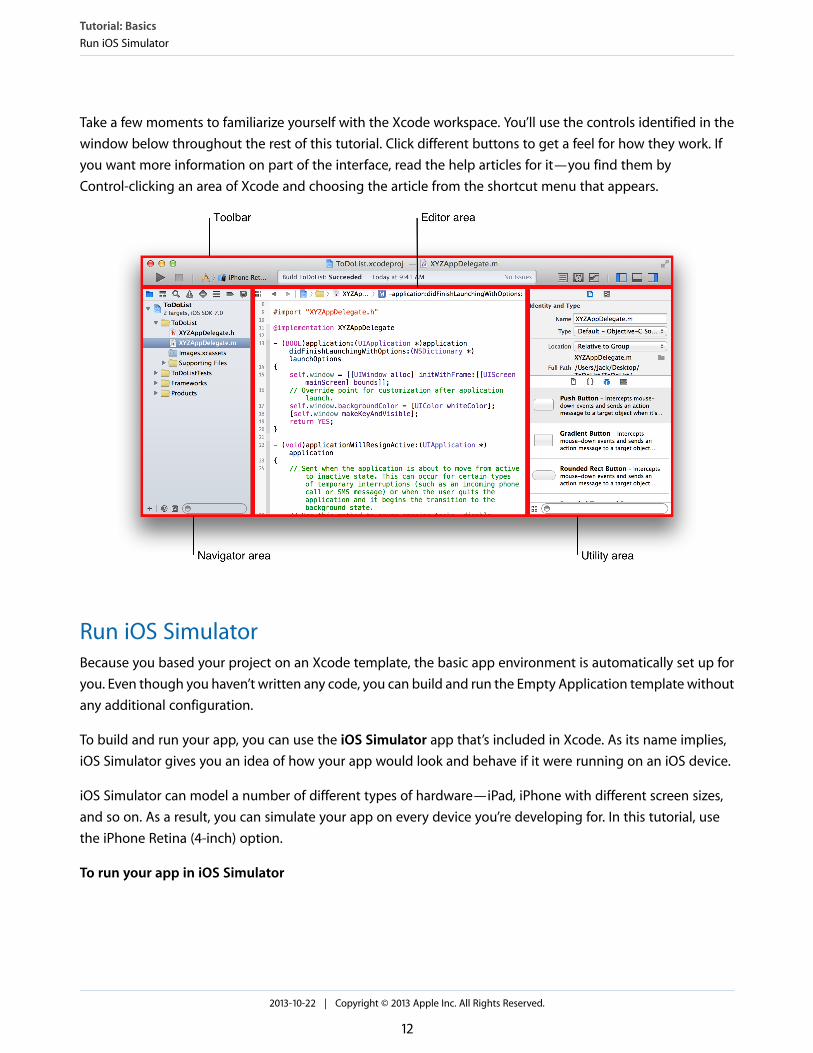
Take a few moments to familiarize yourself with the Xcode workspace. You’ll use the controls identified in thewindow below throughout the rest of this tutorial. Click different buttons to get a feel for how they work. Ifyou want more information on part of the interface, read the help articles for it—you find them byControl-clicking an area of Xcode and choosing the article from the shortcut menu that appears.
Run iOS SimulatorBecause you based your project on an Xcode template, the basic app environment is automatically set up foryou. Even though you haven’t written any code, you can build and run the Empty Application template withoutany additional configuration.
To build and run your app, you can use the iOS Simulator app that’s included in Xcode. As its name implies,iOS Simulator gives you an idea of how your app would look and behave if it were running on an iOS device.
iOS Simulator can model a number of different types of hardware—iPad, iPhone with different screen sizes,and so on. As a result, you can simulate your app on every device you’re developing for. In this tutorial, usethe iPhone Retina (4-inch) option.
To run your app in iOS Simulator
Tutorial: BasicsRun iOS Simulator
2013-10-22 | Copyright © 2013 Apple Inc. All Rights Reserved.
12

1. Choose iPhone Retina (4-inch) from the Scheme pop-up menu in the Xcode toolbar.
Go ahead and look through the menu to see what other hardware options are available in iOS Simulator.
2. Click the Run button, located in the top-left corner of the Xcode toolbar.
Alternatively, you can choose Product > Run (or press Command-R).
If this is the first time you’re running an app, Xcode asks whether you’d like to enable developer mode onyour Mac. Developer mode allows Xcode access to certain debugging features without requiring you toenter your password each time. Decide whether you’d like to enable developer mode and follow theprompts. If you choose not to enable it, you may be asked for your password later on. The tutorials assumedeveloper mode is enabled.
3. Watch the Xcode toolbar as the build process completes.
Xcode displays messages about the build process in the activity viewer, which is in the middle of thetoolbar.
After Xcode finishes building your project, iOS Simulator starts automatically. It may take a few moments tostart up the first time.
Tutorial: BasicsRun iOS Simulator
2013-10-22 | Copyright © 2013 Apple Inc. All Rights Reserved.
13

iOS Simulator opens in iPhone mode, just as you specified. On the simulated iPhone screen, iOS Simulatoropens your app.
As the name Empty Application implies, the template doesn’t do much—it just displays a white screen. Othertemplates have more complex behavior. It’s important to understand a template’s uses before you extend itto make your own app. Running the template with no modifications is a good way to start developing thatunderstanding.
After you’ve explored the app, quit iOS Simulator by choosing iOS Simulator > Quit iOS Simulator (or pressingCommand-Q).
Review the Source CodeThe Empty Application template comes with a few existing source code files that set up the app environment.Most of the work is done by the UIApplicationMain function, which is automatically called in your project’smain.m source file. The UIApplicationMain function creates an application object that sets up theinfrastructure for your app to work with the iOS system. This includes creating a run loop that delivers inputevents to your app.
You won’t be dealing with the main.m source file directly, but it’s interesting to understand how it works.
To look at the main.m source file
1. Make sure the project navigator is open in the navigator area.
Tutorial: BasicsReview the Source Code
2013-10-22 | Copyright © 2013 Apple Inc. All Rights Reserved.
14

The project navigator displays all the files in your project. If the project navigator isn’t open, click theleftmost button in the navigator selector bar.
2. Open the Supporting Files folder in the project navigator by clicking the disclosure triangle next to it.
3. Select main.m.
Xcode opens the source file in the main editor area of the window, which looks similar to this:
If you double-clicked the file, you’ll notice that it opened in a separate window. You can choose to havea file open in the main project window by clicking it once, or you can open it in a separate window bydouble-clicking it.
The main function in main.m calls the UIApplicationMain function within an autorelease pool.
Tutorial: BasicsReview the Source Code
2013-10-22 | Copyright © 2013 Apple Inc. All Rights Reserved.
15

@autoreleasepool {
return UIApplicationMain(argc, argv, nil, NSStringFromClass([XYZAppDelegateclass]));
}
The@autoreleasepool statement is there to support memory management for your app. Automatic ReferenceCounting (ARC) makes memory management straightforward by getting the compiler to do the work of keepingtrack of who owns an object; @autoreleasepool is part of the memory management infrastructure.
The call to UIApplicationMain creates two important initial components of your app:
● An instance of the UIApplication class, called the application object.
The application object manages the app event loop and coordinates other high-level app behaviors. Thisclass, defined in the UIKit framework, doesn’t require you to write any additional code to get it to do itsjob.
● An instance of the XYZAppDelegate class, called the app delegate.
Xcode created this class for you as part of setting up the Empty Application template. The app delegatecreates the window where your app’s content is drawn and provides a place to respond to state transitionswithin the app. This window is where you write your custom app-level code. Like all classes, theXYZAppDelegate class is defined in two source code files in your app: in the interface file,XYZAppDelegate.h, and in the implementation file, XYZAppDelegate.m.
Here’s how the application object and app delegate interact. As your app starts up, the application object callsdefined methods on the app delegate to give your custom code a chance to do its job—that’s where theinteresting behavior for an app is executed. To understand the role of the app delegate in more depth, viewyour app delegate source files, starting with the interface file. To view the app delegate interface file, selectXYZAppDelegate.h in the project navigator. The app delegate interface contains a single property: window.With this property the app delegate keeps track of the window in which all of your app content is drawn.
Next, view the app delegate implementation file. To do this, select XYZAppDelegate.m in the project navigator.The app delegate implementation contains “skeletons” of important methods. These predefined methodsallow the application object to talk to the app delegate. During a significant runtime event—for example, applaunch, low-memory warnings, and app termination—the application object calls the corresponding methodin the app delegate, giving it an opportunity to respond appropriately. You don’t need to do anything specialto make sure these methods get called at the correct time—the application object handles that part of thejob for you.
Tutorial: BasicsReview the Source Code
2013-10-22 | Copyright © 2013 Apple Inc. All Rights Reserved.
16
Each of these automatically implemented methods has a default behavior. If you leave the skeletonimplementation empty or delete it from your XYZAppDelegate.m file, you get the default behavior wheneverthat method is called. Use these skeletons to put additional custom code that you want to be executed whenthe methods are called. For example, the first method in the XYZAppDelegate.m file contains some lines ofcode that set up the app window and give it the white background color you saw when you ran your app forthe first time. In this tutorial, you won’t be using any custom app delegate code, so go ahead and remove thecode that sets the window to have a plain white background.
To configure the app delegate implementation file
1. Find the application:didFinishLaunchingWithOptions: method in XYZAppDelegate.m.
It is the first method in the file.
2. Delete the first three lines of code from that method so it looks just like this:
- (BOOL)application:(UIApplication *)applicationdidFinishLaunchingWithOptions:(NSDictionary *)launchOptions
{
return YES;
}
Xcode automatically saves the changes. Xcode continuously tracks and saves all of your work. (You can undoyour changes by choosing Edit > Undo Typing.)
Create a StoryboardAt this point, you’re ready to create a storyboard for your app. A storyboard is a visual representation of theapp’s user interface, showing screens of content and the transitions between them. You use storyboards tolay out the flow—or story—that drives your app.
To see how a storyboard fits into an app, in this tutorial you create one manually and add it to your app. Unlikethe Empty Application template you started with, other Xcode templates include preconfigured storyboardsproviding views, view controllers, and associated source code files that set up the basic architecture for an appof that type. After you’ve configured a storyboard manually, you’ll see how the pieces fit together. Then you’llbe able to start with a project template that comes with a preconfigured storyboard, which will save you someoverhead.
To create a new storyboard
1. Choose File > New > File (or press Command-N).
Tutorial: BasicsCreate a Storyboard
2013-10-22 | Copyright © 2013 Apple Inc. All Rights Reserved.
17

A dialog appears that prompts you to choose a template for your new file.
2. On the left, select User Interface under iOS.
3. Click Storyboard, and click Next.
4. For the Devices option, select iPhone.
5. Click Next.
A dialog appears that prompts you to choose a location and name for your new storyboard.
6. In the Save As field, name the file Main.
7. Make sure the file is saved in the same directory as your project.
8. For the Group option, select ToDoList.
9. For Targets, select the checkbox next to ToDoList.
This option tells Xcode to include the new storyboard when it builds your app.
10. Click Create.
A new storyboard file is created and added to your project. You’ll work in this file to lay out the content of yourapp.
Now you need to tell Xcode that you want to use this storyboard as the interface to your app. When it startsup, the application object checks whether the app has a main interface configured. If it does, the applicationobject loads the defined storyboard when the app launches.
To set the storyboard as the app’s main interface
1. In the project navigator, select your project.
In the editor area of the workspace window, Xcode displays the project editor, which allows you to viewand edit details about how your app is built.
Tutorial: BasicsCreate a Storyboard
2013-10-22 | Copyright © 2013 Apple Inc. All Rights Reserved.
18

2. Under Targets, select ToDoList.
If the Project and Targets lists don’t appear in the project editor, click the disclosure triangle in the top-leftcorner of the editor pane to reveal the lists.
3. Select the General tab.
4. Under Deployment Info, find the Main Interface option.
5. Select your storyboard, Main.storyboard.
Add a Scene to Your StoryboardNow that you have a storyboard, it’s time to start adding app content. Xcode provides a library of objects thatyou can add to a storyboard file. Some of these are user interface elements that belong in a view, such asbuttons and text fields. Others define the behavior of your app but don’t themselves appear onscreen, suchas view controllers and gesture recognizers.
Tutorial: BasicsAdd a Scene to Your Storyboard
2013-10-22 | Copyright © 2013 Apple Inc. All Rights Reserved.
19

To start, you’ll add a view controller to your storyboard. A view controller manages a corresponding view andits subviews. You’ll learn more about the roles of views and view controllers in the next chapter, “AppDevelopment Process” (page 30).
To add a view controller to your storyboard
1. In the project navigator, select Main.storyboard.
Xcode opens the storyboard in Interface Builder—its visual interface editor—in the editor area. Becausethe storyboard is empty, what you see is a blank canvas. You use the canvas to add and arrange userinterface elements.
2. Open the Object library.
The Object library appears at the bottom of the utility area. If you don’t see the Object library, you canclick its button, which is the third button from the left in the library selector bar. (If you don’t see the utilityarea, you can display it by choosing View > Utilities > Show Utilities.)
A list appears showing each object’s name, description, and visual representation.
3. Drag a View Controller object from the list to the canvas.
If you can’t find the object titled View Controller in the Object library, filter the list of objects by typing inthe text field below the list. Type View Controller, and you see only view controller objects in thefiltered list.
At this point, the storyboard in your app contains one scene. The arrow that points to the left side of the sceneon the canvas is the initial scene indicator, which means that this scene is loaded first when the app starts.Right now, the scene that you see on the canvas contains a single view that’s managed by a view controller.If you run your app in iOS Simulator, this view is what you see on the device screen. It’s useful to run your appin iOS Simulator to verify that everything is configured correctly. Before doing that, add something to the scenethat you’ll be able to see when you run the app.
Tutorial: BasicsAdd a Scene to Your Storyboard
2013-10-22 | Copyright © 2013 Apple Inc. All Rights Reserved.
20

To add a label to your scene
1. In the Object library, find the Label object.
If you entered text in the filter text field, you may need to clear its contents before you can see the Labelobject. You can also type Label in the filter field to find the Label object quickly.
2. Drag a Label object from the list to your scene.
3. Drag the label to the center of the scene until horizontal and vertical guides appear.
Tutorial: BasicsAdd a Scene to Your Storyboard
2013-10-22 | Copyright © 2013 Apple Inc. All Rights Reserved.
21

Stop dragging the label when you see something like this:
The guides mean that the label is now centered horizontally and vertically. (The guides are visible onlywhen you’re dragging or resizing objects next to them, so they will disappear when you let go of the label.)
4. Double-click the text of the label to select it for editing.
5. Type Hello, World! and press Return.
If necessary, recenter the label.
Tutorial: BasicsAdd a Scene to Your Storyboard
2013-10-22 | Copyright © 2013 Apple Inc. All Rights Reserved.
22

Test Your ChangesRunning your app in iOS Simulator is a great way to periodically check that everything is working the way youexpect. At this point your app should launch and load the scene you created in your main storyboard. Clickthe Run button in Xcode. You should see something like this:
If you don’t see the label you added, make sure the storyboard you created is configured as the main interfacefor your app and make sure you’ve removed the code that creates the empty white window in the app delegate.If necessary, go back and repeat the steps for those sections.
This is also a good time to experiment with what you can add to an interface. Explore Interface Builder bychanging:
● The text of the label
● The font size of the label
● The color of the text
Build the Basic InterfaceNow that you can put content in a scene, it’s time to build the basic interface for the scene that lets you adda new item to the to-do list.
Tutorial: BasicsTest Your Changes
2013-10-22 | Copyright © 2013 Apple Inc. All Rights Reserved.
23

To add an item to the to-do list, you need a single piece of information: the item name. You get this informationfrom a text field. A text field is the interface element that lets a user input a single line of text using a keyboard.But first, you need to remove the label you added earlier.
To remove the label from your scene
1. Click the label to select it.
2. Press the Delete key.
The label is removed from the scene. If this wasn’t what you wanted, you can choose Edit > Undo DeleteLabel. (Every editor has an Edit > Undo command to undo the last action.)
Now that you again have a blank canvas, create the scene for adding a to-do item.
To add a text field to your scene
1. If necessary, open the Object library.
2. Drag a Text Field object from the list to your scene.
Tutorial: BasicsBuild the Basic Interface
2013-10-22 | Copyright © 2013 Apple Inc. All Rights Reserved.
24

3. Drag the text field so that it’s positioned about two-thirds from the bottom of the screen.
4. If necessary, click the text field to reveal the resize handles.
You resize a UI element by dragging its resize handles, which are small white squares that appear on theelement’s borders. You reveal an element’s resize handles by selecting it. In this case, the text field shouldalready be selected because you just stopped dragging it. If your text field looks like the one below, you’reready to resize it; if it doesn’t, select it on the canvas.
5. Resize the left and right edges of the text field until you see vertical guides appear.
Tutorial: BasicsBuild the Basic Interface
2013-10-22 | Copyright © 2013 Apple Inc. All Rights Reserved.
25

Stop resizing the text field when you see something like this:
Although you have the text field in your scene, there’s no instruction to the user about what to enter in thefield. Use the text field’s placeholder text to prompt the user to enter the name of a new to-do item.
To configure the text field’s placeholder text
1. With the text field selected, open the Attributes inspector in the utility area.
Tutorial: BasicsBuild the Basic Interface
2013-10-22 | Copyright © 2013 Apple Inc. All Rights Reserved.
26

TheAttributes inspector appears when you select the fourth button from the left in the inspector selectorbar. It lets you edit the properties of an object in your storyboard.
2. In the Attributes inspector, find the field labeled Placeholder and type New to-do item.
To display the new placeholder text in the text field, press Return.
Checkpoint: Run your app in iOS Simulator to make sure that the scene you created looks the way you expectit to. You should be able to click inside the text field and enter a string using the keyboard.
Tutorial: BasicsBuild the Basic Interface
2013-10-22 | Copyright © 2013 Apple Inc. All Rights Reserved.
27

RecapYou’re now well on your way to being able to create a basic interface using storyboards. In the remainingtutorials, you’ll learn more about adding interaction to your interface and writing code to create custombehavior. The chapters between the tutorials guide you through the concepts that you’ll put into practicewhile working on your app.
Tutorial: BasicsRecap
2013-10-22 | Copyright © 2013 Apple Inc. All Rights Reserved.
28

● “App Development Process” (page 30)
● “Designing a User Interface” (page 36)
● “Defining the Interaction” (page 42)
● “Tutorial: Storyboards” (page 47)
2013-10-22 | Copyright © 2013 Apple Inc. All Rights Reserved.
29
Structuring an App

Although the task of developing an app may seem daunting, the process can be distilled into several digestiblesteps. The steps that follow will help you get started and guide you in the right direction as you develop yourfirst app.
Defining the ConceptEvery great app starts with a concept.
The best way to arrive at that concept is to consider the problem you want your app to solve. Great apps solvea single, well-defined problem. For example, the Settings app allows users to adjust all of the settings on theirdevice. It provides a single interface for users to accomplish a related set of tasks.
Here are some key questions to consider when arriving at a concept:
Who is your audience? Your app content and experience will differ depending on whether you’re writing achildren’s game, a to-do list app, or even a test app for your own learning.
2013-10-22 | Copyright © 2013 Apple Inc. All Rights Reserved.
30
App Development Process

What is the purpose of your app? It’s important for an app to have a clearly defined purpose. Part of definingthe purpose is understanding what one thing will motivate users to use your app.
What problem is your app trying to solve? An app should solve a single problem well instead of trying tooffer solutions to multiple distinct problems. If you find that your app is trying to solve unrelated problems,you might consider writing multiple apps.
What content will your app incorporate? Consider what type of content your app will present to users andhow they’ll interact with it. Design the user interface to complement the type of content that’s presented inthe app.
An app concept doesn’t have to be completely polished or finished when you start developing your app. Still,it helps to have an idea of where you’re going and what you need to do to get there.
Designing a User InterfaceAfter you have a concept for your app, designing a good user interface is the next step to creating a successfulapp. A user needs to be able to interact with the app interface in the simplest way possible. Design the interfacewith the user in mind, and make it efficient, clear, and straightforward.
Perhaps the most challenging thing about building a user interface is translating your concept into a designand then implementing that design. To help simplify this process, use storyboards. Storyboards let you designand implement your interface in a single step using a graphical environment. You can see exactly what you’rebuilding while you’re building it, get immediate feedback about what’s working and what’s not, and makeinstantly visible changes to your interface.
When you build an interface in a storyboard, you’re working with views. Views display content to the user. In“Tutorial: Basics” (page 8), you began to define a user interface for the ToDoList app using a single view in astoryboard scene. As you develop more complex apps, you’ll create interfaces with more scenes and moreviews.
In “Tutorial: Storyboards” (page 47), you’ll finish building the user interface for your ToDoList app using severaldifferent views to display different types of content. You’ll learn more about working with views and storyboardsto design and create a user interface in “Designing a User Interface” (page 36).
Defining the InteractionA user interface doesn’t do much without any logic backing it. After you’ve created an interface, you definehow users can interact with what they see by writing code to respond to user actions in your interface.
App Development ProcessDesigning a User Interface
2013-10-22 | Copyright © 2013 Apple Inc. All Rights Reserved.
31

Before you start thinking about adding the behaviors for your interface, it’s important to understand that iOSapps are based on event-driven programming. In event-drivenprogramming, the flow of the app is determinedby events: system events or user actions. The user performs actions on the interface, which trigger events inthe app. These events result in the execution of the app’s logic and manipulation of its data. The app’s responseto user action is then reflected back in the interface.
As you define how a user can interact with your interface, keep event-driven programming in mind. Becausethe user, rather than the developer, is in control of when certain pieces of the app code get executed, youwant to identify exactly which actions a user can perform and what happens in response to those actions.
You define much of your event-handling logic in view controllers. You’ll learn more about working with viewcontrollers in “Defining the Interaction” (page 42). Afterward, you’ll apply these concepts to add functionalityand interactivity to your ToDoList app in “Tutorial: Storyboards” (page 47).
Implementing the BehaviorAfter you’ve defined the actions a user can perform in your app, you implement the behavior by writing code.
When you write code for iOS apps, most of your time is spent working with the Objective-C programminglanguage. You’ll learn more about Objective-C in the third module, but for now, it helps to have some basicfamiliarity with the vocabulary of the language.
Objective-C is built on top of the C programming language and provides object-oriented capabilities and adynamic runtime. You get all of the familiar elements, such as primitive types (int, float, and so on), structures,functions, pointers, and control flow constructs (while, if...else, and for statements). You also have accessto the standard C library routines, such as those declared in stdlib.h and stdio.h.
Objects Are Building Blocks for AppsWhen you build an iOS app, most of your time is spent working with objects.
Objects package data with related behavior. You can think of an app as a large ecosystem of interconnectedobjects that communicate with each other to solve specific problems, such as displaying a visual interface,responding to user input, or storing information. You use many different types of objects to build your app,ranging from interface elements, such as buttons and labels, to data objects, such as strings and arrays.
Classes Are Blueprints for ObjectsA class describes the behavior and properties common to any particular type of object.
App Development ProcessImplementing the Behavior
2013-10-22 | Copyright © 2013 Apple Inc. All Rights Reserved.
32

In the same way that multiple buildings constructed from the same blueprint are identical in structure, everyinstance of a class shares the same properties and behavior as all other instances of that class. You can writeyour own classes or use framework classes that have been defined for you.
You make an object by creating an instance of a particular class. You do this by allocating it and initializing itwith acceptable default values. When you allocate an object, you set aside enough memory for the object andset all instance variables to zero. Initialization sets an object’s initial state—that is, its instance variables andproperties—to reasonable values and then returns the object. The purpose of initialization is to return a usableobject. You need to both allocate and initialize an object to be able to use it.
One of the fundamental concepts in Objective-C programming is class inheritance, the idea that a class inheritsbehaviors from a parent class. When one class inherits from another, the child—or subclass—inherits all thebehavior and properties defined by the parent. The subclass can define its own additional behavior andproperties or override the behavior of the parent. This gives you the ability to extend the behaviors of a classwithout duplicating its existing behavior.
Objects Communicate Through MessagesObjects interact by sending each other messages at runtime. In Objective-C terms, one object sends amessageto another object by calling a method on that object.
Although there are several ways to send messages between objects in Objective-C, by far the most commonis the basic syntax that uses square brackets. If you have an object somePerson of class Person, you can sendit the sayHello message like this:
[somePerson sayHello];
The reference on the left, somePerson, is the receiver of the message. The message on the right, sayHello,is the name of the method to call on that receiver. In other words, when the above line of code is executed,somePerson will be sent the sayHello message.
App Development ProcessImplementing the Behavior
2013-10-22 | Copyright © 2013 Apple Inc. All Rights Reserved.
33

Protocols Define Messaging ContractsA protocol defines a set of behavior that’s expected of an object in a given situation. A protocol comes in theform of a programmatic interface, one that any class may choose to implement. Using protocols, two classesdistantly related by inheritance can communicate with each other to accomplish a certain goal, such as parsingXML code or copying an object.
Any class that can provide behavior that’s useful to other classes can declare a programmatic interface forvending that behavior anonymously. Any other class can choose to adopt the protocol and implement one ormore of its methods, making use of the behavior.
Incorporating the DataAfter you implement your app’s behavior, you create a data model to support your app’s interface. An app’sdata model defines the way you maintain data in your app. Data models can range from a basic dictionary ofobjects to complex databases.
Your app’s data model should reflect the app’s content and purpose. There should be a clear correlationbetween the interface and the data, even though the user doesn’t interact with the data directly.
A good data model is essential to creating a solid foundation for your app. It makes it easier to build a scalableapp, improve functionality, and make changes to your features. You’ll learn more about defining your owndata model in “Incorporating the Data” (page 70).
Use the Right ResourcesDesign patterns are best practices for solving common problems in apps. Use design patterns to help youdefine the structure of your data model and its interaction with the rest of your app. When you understandand use the right design patterns, you can more easily create an app that’s simple and efficient. You’ll learnmore about design patterns in “Using Design Patterns” (page 72).
App Development ProcessIncorporating the Data
2013-10-22 | Copyright © 2013 Apple Inc. All Rights Reserved.
34

As you start implementing your model, remember that you don’t have to implement everything from scratch.There are a number of frameworks that provide existing functionality for you to build upon. For instance, theFoundation framework includes classes representing basic data types—such as strings and numbers—as wellas collection classes for storing other objects. It’s recommended that, where possible, you use existing frameworkclasses—or subclass them to add your own app’s features—instead of trying to reimplement their functionality.In this way, you can create an efficient, functional, sophisticated app. You’ll learn more about the capabilitiesof the Foundation framework in “Working with Foundation” (page 75).
Often, you’ll write your own custom classes as part of your data model. Writing a custom class gives you controlover how you organize the internal structure of your app. You’ll learn about creating custom classes in “Writinga Custom Class” (page 86).
Incorporate Real DataWhen you first test your data model, you may want to use static or fake data. This way, you don’t have to worryabout supplying real data until you know the model is assembled and connected properly. After you’ve defineda data model that’s working properly, you can pull real data into your app.
The remainder of this guide takes you through these steps in more detail. As you make your way through theapp development process, you’ll learn the necessary conceptual material and then put it to use in the tutorials.
App Development ProcessIncorporating the Data
2013-10-22 | Copyright © 2013 Apple Inc. All Rights Reserved.
35

Views are the building blocks for constructing your user interface. It’s important to understand how to useviews to present your content in a clear, elegant, and useful way. Creating a great user interface that effectivelyshowcases your app’s content is essential to building a successful app. In this chapter, you’ll learn about creatingand managing views in a storyboard to define your interface.
The View HierarchyViews not only display themselves onscreen and react to user input, they also serve as containers for otherviews. As a result, views in an app are arranged in a hierarchical structure called the view hierarchy. The viewhierarchy defines the layout of views relative to other views. Within that hierarchy, view instances enclosedwithin a view are called subviews, and the parent view that encloses a view is referred to as its superview.Even though a view instance can have multiple subviews, it can have only one superview.
At the top of the view hierarchy is the window object. Represented by an instance of the UIWindow class, awindow serves as the basic container into which you can add your view objects for display onscreen. By itself,a window doesn’t display any content. To display content, you add a content view (with its hierarchy ofsubviews) to the window.
For a content view and its subviews to be visible to the user, the content view must be inserted into a window’sview hierarchy. When you use a storyboard, this placement is configured automatically for you. The applicationobject loads the storyboard, creates instances of the relevant view controller classes, unarchives the contentview hierarchies for each view controller, and then adds the content view of the initial view controller into thewindow. You’ll learn more about managing view controllers in the next chapter; for now, you’ll focus on creatinga hierarchy within a single view controller in your storyboard.
2013-10-22 | Copyright © 2013 Apple Inc. All Rights Reserved.
36
Designing a User Interface

Building an Interface Using ViewsWhen you design your app, it’s important to know what kind of view to use for what purpose. For example,the kind of view you use to gather input text from a user, such as a text field, is different from what you mightuse to display static text, such as a label. Apps that use UIKit views for drawing are easy to create because youcan assemble a basic interface quickly. A UIKit view object is an instance of the UIView class or one of itssubclasses. The UIKit framework provides many types of views to help present and organize data.
Although each view has its own specific function, UIKit views can be grouped into seven general categories:
ExamplesPurposeCategory
Image view, labelDisplay a particular type of content, such as animage or text.
Content
Collection view, table viewDisplay collections or groups of views.
Collections
Button, slider, switchPerform actions or display information.
Controls
Toolbar, navigation bar, tab barNavigate, or perform actions.
Bars
Search bar, text viewReceive user input text.
Input
View, scroll viewServe as containers for other views.
Containers
Action sheet, alert viewInterrupt the regular flow of the app to allow auser perform some kind of action.
Modal
Designing a User InterfaceBuilding an Interface Using Views
2013-10-22 | Copyright © 2013 Apple Inc. All Rights Reserved.
37

You can assemble views graphically using Interface Builder. Interface Builder provides a library of the standardviews, controls, and other objects that you need to build your interface. After dragging these objects from thelibrary, you drop them onto the canvas and arrange them in any way you want. Next, use inspectors to configurethose objects before saving them in a storyboard. You see the results immediately, without the need to writecode, build, and run your app.
The UIKit framework provides standard views for presenting many types of content, but you can also defineyour own custom views by subclassing UIView (or its descendants). A custom view is a subclass of UIView inwhich you handle all of the drawing and event-handling tasks yourself. You won’t be using custom views inthese tutorials, but you can learn more about implementing a custom view in “Defining a Custom View” inView Programming Guide for iOS .
Use Storyboards to Lay Out ViewsYou use a storyboard to lay out your hierarchy of views in a graphical environment. Storyboards provide adirect, visual way to work with views and build your interface.
As you saw in the first tutorial, storyboards are composed of scenes, and each scene has an associated viewhierarchy. You drag a view out of the object library and place it in a storyboard scene to add it automaticallyto that scene’s view hierarchy. The view’s location within that hierarchy is determined by where you place it.After you add a view to your scene, you can resize, manipulate, configure, and move it on the canvas.
Designing a User InterfaceUse Storyboards to Lay Out Views
2013-10-22 | Copyright © 2013 Apple Inc. All Rights Reserved.
38

The canvas also shows an outline view of the objects in your interface. The outline view—which appears onthe left side of the canvas—lets you see a hierarchical representation of the objects in your storyboard.
The view hierarchy that you create graphically in a storyboard scene is effectively a “shrinkwrapped” set ofObjective-C objects. At runtime, these shrinkwrapped objects are unarchived. The result is a hierarchy ofinstances of the relevant classes configured with the properties you’ve set visually using the various inspectorsin the utility area.
Designing a User InterfaceUse Storyboards to Lay Out Views
2013-10-22 | Copyright © 2013 Apple Inc. All Rights Reserved.
39

Use Inspectors to Configure ViewsWhen working with views in a storyboard, the inspector pane is an essential tool. The inspector pane appearsin the utility area above the Object library.
Each of the inspectors provides important configuration options for elements in your interface. When youselect an object, such as a view, in your storyboard, you can use each of the inspectors to customize differentproperties of that object.
● File. Lets you specify general information about the storyboard.
● Quick Help. Provides useful documentation about an object.
● Identity. Lets you specify a custom class for your object and define its accessibility attributes.
● Attributes. Lets you customize visual attributes of an object.
● Size. Lets you specify an object’s size and Auto Layout attributes.
● Connections. Lets you create connections between your interface and source code.
You began working with the Attributes inspector in the first tutorial. You’ll continue using these inspectorsthroughout the rest of the tutorials to configure views and other objects in your storyboard. In particular, you’lluse the Attributes inspector to configure your views, the Identity inspector to configure your view controllers,and the Connections inspector to create connections between your views and view controllers.
Designing a User InterfaceUse Inspectors to Configure Views
2013-10-22 | Copyright © 2013 Apple Inc. All Rights Reserved.
40

Use Auto Layout to Position ViewsWhen you start positioning views in your storyboard, you need to consider a variety of situations. iOS appsrun on a number of different devices, with various screen sizes, orientations, and languages. Instead of designinga static interface, you want it to be dynamic and to seamlessly respond to changes in screen size, deviceorientation, localization, and metrics.
To help you use views to create a versatile interface, Xcode offers a tool called Auto Layout. Auto Layout is asystem for expressing relationships between views in your app’s user interface. Auto Layout lets you definethese relationships in terms of constraints on individual views or between sets of views.
The Auto Layout menu, which resides in the bottom-right area of your canvas, has four segments. You use thismenu to add various types of constraints to views on your canvas, resolve layout issues, and determine constraintresizing behavior.
You’ll work briefly with Auto Layout in the second tutorial to add support for landscape mode to your ToDoListapp.
Designing a User InterfaceUse Auto Layout to Position Views
2013-10-22 | Copyright © 2013 Apple Inc. All Rights Reserved.
41

After you lay out your user interface, you need to let users interact with it. This is where controllers come in.Controllers support your views by responding to user actions and populating the views with content. Controllerobjects are a conduit through which views learn about changes in the data model, and vice versa. Views arenotified of changes in model data through the app’s controllers, and controllers communicate user-initiatedchanges—for example, text entered in a text field—to model objects. Whether they’re responding to useractions or defining navigation, controllers implement your app’s behavior.
View ControllersAfter you’ve built a basic view hierarchy, your next step is to control the visual elements and respond to userinput. In an iOS app, you use a view controller (UIViewController) to manage a content view with itshierarchy of subviews.
2013-10-22 | Copyright © 2013 Apple Inc. All Rights Reserved.
42
Defining the Interaction

A view controller isn’t part of the view hierarchy and it’s not an element in your interface. Instead, it managesthe view objects in the hierarchy and provides them with behavior. Each content view hierarchy that you buildin your storyboard needs a corresponding view controller, responsible for managing the interface elementsand performing tasks in response to user interaction. This usually means writing a custom UIViewControllersubclass for each content view hierarchy. If your app has multiple content views, you use a different customview controller class for each content view.
View controllers play many roles. They coordinate the flow of information between the app’s data model andthe views that display that data, manage the life cycle of their content views, and handle orientation changeswhen the device is rotated. But perhaps their most obvious role is to respond to user input.
You also use view controllers to implement transitions from one type of content to another. Because iOS appshave a limited amount of space in which to display content, view controllers provide the infrastructure neededto remove the views from one view controller and replace them with the views of another.
To define interaction in your app, make your view controller files communicate with the views in your storyboard.You do this by defining connections between the storyboard and source code files through actions and outlets.
ActionsAn action is a piece of code that’s linked to some kind of event that can occur in your app. When that eventtakes place, the code gets executed. You can define an action to accomplish anything from manipulating apiece of data to updating the user interface. You use actions to drive the flow of your app in response to useror system events.
You define an action by creating and implementing a method with an IBAction return type and a senderparameter.
- (IBAction)restoreDefaults:(id)sender;
The sender parameter points to the object that was responsible for triggering the action. The IBActionreturn type is a special keyword; it’s like the void keyword, but it indicates that the method is an action thatyou can connect to from your storyboard in Interface Builder (which is why the keyword has the IB prefix).You’ll learn more about how to link an IBAction action to an element in your storyboard in “Tutorial:Storyboards” (page 47).
Defining the InteractionActions
2013-10-22 | Copyright © 2013 Apple Inc. All Rights Reserved.
43
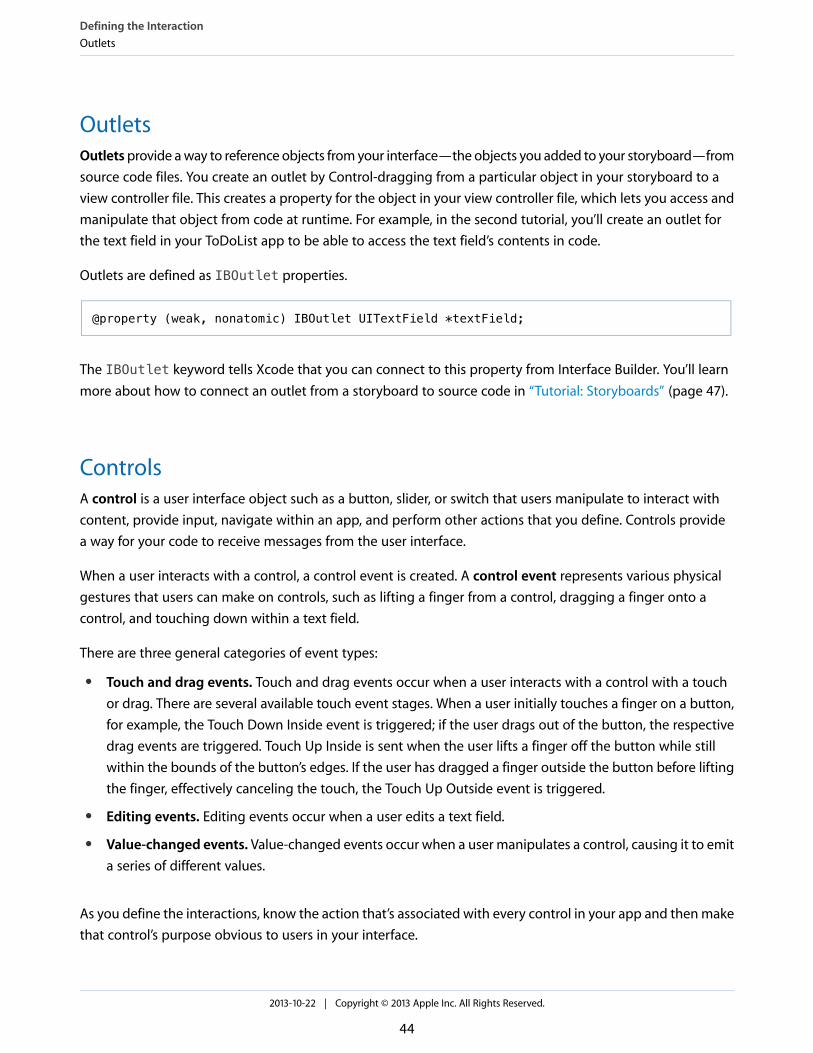
OutletsOutletsprovide a way to reference objects from your interface—the objects you added to your storyboard—fromsource code files. You create an outlet by Control-dragging from a particular object in your storyboard to aview controller file. This creates a property for the object in your view controller file, which lets you access andmanipulate that object from code at runtime. For example, in the second tutorial, you’ll create an outlet forthe text field in your ToDoList app to be able to access the text field’s contents in code.
Outlets are defined as IBOutlet properties.
@property (weak, nonatomic) IBOutlet UITextField *textField;
The IBOutlet keyword tells Xcode that you can connect to this property from Interface Builder. You’ll learnmore about how to connect an outlet from a storyboard to source code in “Tutorial: Storyboards” (page 47).
ControlsA control is a user interface object such as a button, slider, or switch that users manipulate to interact withcontent, provide input, navigate within an app, and perform other actions that you define. Controls providea way for your code to receive messages from the user interface.
When a user interacts with a control, a control event is created. A control event represents various physicalgestures that users can make on controls, such as lifting a finger from a control, dragging a finger onto acontrol, and touching down within a text field.
There are three general categories of event types:
● Touch and drag events. Touch and drag events occur when a user interacts with a control with a touchor drag. There are several available touch event stages. When a user initially touches a finger on a button,for example, the Touch Down Inside event is triggered; if the user drags out of the button, the respectivedrag events are triggered. Touch Up Inside is sent when the user lifts a finger off the button while stillwithin the bounds of the button’s edges. If the user has dragged a finger outside the button before liftingthe finger, effectively canceling the touch, the Touch Up Outside event is triggered.
● Editing events. Editing events occur when a user edits a text field.
● Value-changed events. Value-changed events occur when a user manipulates a control, causing it to emita series of different values.
As you define the interactions, know the action that’s associated with every control in your app and then makethat control’s purpose obvious to users in your interface.
Defining the InteractionOutlets
2013-10-22 | Copyright © 2013 Apple Inc. All Rights Reserved.
44

Navigation ControllersIf your app has more than one content view hierarchy, you need to be able to transition between them. Forthis, you’ll use a specialized type of view controller: a navigation controller (UINavigationController). Anavigation controller manages transitions backward and forward through a series of view controllers, suchas when a user navigates through email accounts, inbox messages, and individual emails in the iOS Mail app.
The set of view controllers managed by a particular navigation controller is called its navigation stack. Thenavigation stack is a last-in, first-out collection of custom view controller objects. The first item added to thestack becomes the root view controller and is never popped off the stack. Other view controllers can bepushed on or popped off the navigation stack.
Although a navigation controller’s primary job is to manage the presentation of your content view controllers,it’s also responsible for presenting custom views of its own. Specifically, it presents a navigation bar—the viewat the top of the screen that provides context about the user’s place in the navigation hierarchy—whichcontains a back button and other buttons you can customize. Every view controller that’s added to the navigationstack presents this navigation bar. You are responsible for configuring the navigation bar.
You generally don’t have to do any work to pop a view controller off of the navigation stack; the back buttonprovided by the navigation controller handles this for you. However, you do have to manually push a viewcontroller onto the stack. You can do this using storyboards.
Use Storyboards to Define NavigationSo far, you’ve learned about using storyboards to create a single screen of content in your app. Now, you’lllearn about using them to define the flow between multiple scenes in your app.
In the first tutorial, the storyboard you worked with had one scene. In most apps, a storyboard is composedof a sequence of scenes, each of which represents a view controller and its view hierarchy. Scenes are connectedby segues, which represent a transition between two view controllers: the source and the destination.
Defining the InteractionNavigation Controllers
2013-10-22 | Copyright © 2013 Apple Inc. All Rights Reserved.
45
There are several types of segues you can create:
● Push. A push segue adds the destination view controller to the navigation stack. Push segues may onlybe used when the source view controller is connected to a navigation controller.
● Modal. A modal segue is simply one view controller presenting another controller modally, requiring auser to perform some operation on the presented controller before returning to the main flow of the app.A modal view controller isn’t added to a navigation stack; instead, it’s generally considered to be a childof the presenting view controller. The presenting view controller is responsible for dismissing the modalview controller it created and presented.
● Custom. You can define your own custom transition by subclassing UIStoryboardSegue.
● Unwind. An unwind segue moves backward through one or more segues to return the user to an existinginstance of a view controller. You use unwind segues to implement reverse navigation.
Instead of segues, scenes may also be connected by a relationship. For example, there’s a relationship betweenthe navigation controller and its root view controller. In this case, the relationship represents the containmentof the root view controller by the navigation controller.
When you use a storyboard to plan the user interface for your app, it’s important to make sure that one of theview controllers is marked as being the initial view controller. At runtime, this is the view controller whosecontent view will be displayed the first time the app is launched and from which you can transition to otherview controllers’ content views as necessary.
Now that you’ve learned the basics of working with views and view controllers in storyboards, it’s time toincorporate this knowledge into your ToDoList app in the next tutorial.
Defining the InteractionUse Storyboards to Define Navigation
2013-10-22 | Copyright © 2013 Apple Inc. All Rights Reserved.
46

This tutorial builds on the project you created in the first tutorial (“Tutorial: Basics” (page 8)). You’ll put touse what you learned about views, view controllers, actions, and navigation. Following the interface-first designprocess, you’ll also create some of the key user interface flows for your ToDoList app and add behavior to thescene you’ve already created.
This tutorial teaches you how to:
● Adopt Auto Layout to add flexibility to your user interface
● Use storyboards to define app content and flow
● Manage multiple view controllers
● Add actions to elements in your user interface
After you complete all the steps in this tutorial, you’ll have an app that looks something like this:
2013-10-22 | Copyright © 2013 Apple Inc. All Rights Reserved.
47
Tutorial: Storyboards

Adopt Auto LayoutThe add-to-do-item scene is configured to work in portrait mode because that’s how you created it. So whathappens if a user rotates the device? Try it out by running your app in Simulator.
To rotate in iOS Simulator
1. Launch your app in iOS Simulator.
2. Choose Hardware > Rotate Left (or press Command–Left Arrow).
As you see, the text field doesn’t look quite right. It stops about halfway across the screen. The text field shouldstretch all the way across the screen, as it does in portrait mode. Fortunately, Xcode has a powerful built-inlayout engine called Auto Layout. With Auto Layout you describe your intent for the positioning of elementsin a scene and then let the layout engine determine how best to implement that intent. You describe yourintent using constraints—rules that explain where one element should be located relative to another, or whatsize it should be, or which of two elements should shrink first when something reduces the space available foreach of them. For the add-to-do-item scene, two sets of constraints are needed—one to position the text fieldand the other to set its size.
Setting these constraints can easily be accomplished in Interface Builder.
To position the text field using Auto Layout
1. In the project navigator, select Main.storyboard.
2. In your storyboard, select the text field.
3. On the canvas, Control-drag from the text field toward the top of the scene, ending in the empty spacearound the text field. This space is the text field’s superview.
Tutorial: StoryboardsAdopt Auto Layout
2013-10-22 | Copyright © 2013 Apple Inc. All Rights Reserved.
48

A shortcut menu appears in the location where you release the drag.
4. Choose “Top Space to Top Layout Guide” from the shortcut menu.
A spacing constraint is created between the top of the text field and the navigation bar.
If a different shortcut menu appears, perhaps with a menu item such as “Leading Space to Container,” thisis because instead of dragging vertically to the top of the screen, you dragged in a different direction.Xcode uses the direction you drag in as a way to understand what kind of constraints you’re trying tomake, and it uses the start and end points of the drag to understand which objects are being related bythe constraints. Go ahead and experiment with different dragging directions to see what constraints areavailable.
5. When you’re done experimenting, Control-drag from the text field to the right, ending in the superview,to create a “Trailing Space to Container” constraint.
6. Control-drag from the text field to the left, ending in its superview, to create a “Leading Space to Container”constraint.
These constraints specify that the distance between the edges of the text field and its superview shouldn’tchange. This means that if the device orientation changes, the text field will automatically grow to satisfy theseconstraints.
Checkpoint: Run your app. If you rotate the device, the text field grows or shrinks to the appropriate sizedepending on the device’s orientation.
Tutorial: StoryboardsAdopt Auto Layout
2013-10-22 | Copyright © 2013 Apple Inc. All Rights Reserved.
49

If you don’t get the behavior you expect, use the Xcode Auto Layout debugging features to help you. Withthe text field selected, choose Editor > Resolve Auto Layout Issues > “Reset to Suggested Constraints” to haveXcode set up the constraints described by the steps above. Or choose Editor > Resolve Auto Layout Issues >Clear Constraints to remove all constraints on the text view, and then try following the steps above again.
Although your add item scene doesn’t do much yet, the basic user interface is there and functional. Consideringlayout from the start ensures that you have a solid foundation to build upon.
Creating a Second SceneSo far, you’ve been working with a single scene managed by a view controller that represents a page whereyou can add an item to your to-do list. Now it’s time to create the scene that shows the entire to-do list.Fortunately, iOS comes with a powerful built-in class called a table view designed specifically to display ascrolling list of items.
To add a scene with a table view to your storyboard
1. In the project navigator, select Main.storyboard.
2. Open the Object library in the utility area. (To open the library with a menu command, choose View >Utilities > Show Object Library.)
3. Drag a Table View Controller object from the list and drop it on the canvas to the left of the add-to-do-itemscene. If you need to, you can use the Zoom Out button in the lower right of the canvas to get enoughspace to drag it to.
If you see a table view with content and nothing happens when you try to drag it to the canvas, you’reprobably dragging a table view rather than a table view controller. A table view is one of the thingsmanaged by a table view controller, but you want the whole package, so find the table view controllerand drag it to the canvas.
Tutorial: StoryboardsCreating a Second Scene
2013-10-22 | Copyright © 2013 Apple Inc. All Rights Reserved.
50

You now have two scenes, one for displaying the list of to-do items and one for adding to-do items.
It makes sense to have the list be the first thing users see when they launch your app, so tell Xcode that’s yourintent by setting the table view controller as the first scene.
To set the table view controller as the initial scene
1. If necessary, open the outline view using the button in the lower left of the canvas.
2. In the outline view, select the newly added table view controller.
3. With the table view controller selected, open the Attributes inspector in the utility area.
Tutorial: StoryboardsCreating a Second Scene
2013-10-22 | Copyright © 2013 Apple Inc. All Rights Reserved.
51

4. In the Attributes inspector, select the checkbox next to the Is Initial View Controller option.
Alternatively, you can drag the initial scene indicator from the XYZAddToDoItemViewController tothe table view controller directly on the canvas.
The table view controller is set as the initial view controller in your storyboard, making it the first scenethat loads on app launch.
Tutorial: StoryboardsCreating a Second Scene
2013-10-22 | Copyright © 2013 Apple Inc. All Rights Reserved.
52

Checkpoint: Run your app. Instead of the add-to-do-item scene with its text field, you should now see an emptytable view—a screen with a number of horizontal dividers to separate it into rows, but with no content in eachrow.
Display Static Content in a Table ViewBecause you haven’t learned about storing data yet, it’s too early to create and store to-do items and displaythem in the table view. But you don’t need real data to prototype your user interface. Xcode allows you tocreate static content in a table view in Interface Builder. This makes it a lot easier to see how your user interfacewill behave, and it’s a valuable way to try out different ideas.
To create a static cell in your table view
1. In the outline view for your interface, select Table View under Table View Controller.
2. With the table view selected, open the Attributes inspector in the utility area.
3. In the Attributes inspector, choose Static Cells from the pop-up menu next to the Content option.
Three empty table view cells appear in your table view.
4. In the outline view or on the canvas, select the top cell.
5. In the Attributes inspector, choose Basic from the pop-up menu next to the Style option.
Tutorial: StoryboardsDisplay Static Content in a Table View
2013-10-22 | Copyright © 2013 Apple Inc. All Rights Reserved.
53

The Basic style includes a label, so Xcode creates a label with the text “Title” in the table cell.
6. In the outline view or on the canvas, select the label.
7. In the Attributes inspector, change the text of the label from “Title” to “Mow the Lawn.” For the changeto take effect, press Enter or click outside the utility area.
Alternatively, you can edit a label by double-clicking it and editing the text directly.
8. Repeat steps 4–7 for the other cells, giving them text for other likely to-do items.
9. Create enough cells so that the items more than fill the screen. You can create new cells by copying andpasting them or by holding down the Option key when dragging a cell.
Checkpoint: Run your app. You should now see a table view with the preconfigured cells you added in InterfaceBuilder. See how the new table view feels when you scroll it. Try rotating the simulated device—notice howthe table view is already configured to lay out its contents properly. You get a lot of behavior for free by usinga table view.
When you’re done, it’s time to provide a way to navigate from this table view, with its list of to-do items, tothe first scene you created, where a user can create a new to-do item.
Tutorial: StoryboardsDisplay Static Content in a Table View
2013-10-22 | Copyright © 2013 Apple Inc. All Rights Reserved.
54

Add a Segue to Navigate ForwardYou have two view controllers configured in the storyboard, but there’s no connection between them. Transitionsbetween scenes are called segues.
Before creating a segue, you need to configure your scenes. First, you’ll wrap yourXYZToDoListViewController in a navigation controller. Recall from “Defining the Interaction” (page 42)that navigation controllers provide a navigation bar and keep track of the navigation stack. You’ll add a buttonto this navigation bar to transition to the XYZAddToDoItemViewController scene.
To add a navigation controller to your table view controller
1. In the outline view, select Table View Controller.
2. With the view controller selected, choose Editor > Embed In > Navigation Controller.
Xcode adds a new navigation controller to your storyboard, sets the initial scene to it, and creates a relationshipbetween the new navigation controller and your existing table view controller. On the canvas, if you select theicon connecting the two scenes, you’ll see that it’s the root view controller relationship. This means that theview for the content displayed below the navigation bar will be your table view. The initial scene is set to thenavigation controller because the navigation controller holds all of the content that you’ll display in yourapp—it’s the container for both the to-do list and the add-to-do-item scenes.
Tutorial: StoryboardsAdd a Segue to Navigate Forward
2013-10-22 | Copyright © 2013 Apple Inc. All Rights Reserved.
55

Checkpoint: Run your app. Above your table view you should now see extra space. This is the navigation barprovided by the navigation controller.
Now, you’ll add a title (to the to-do list) and a button (to add additional to-do items) to the navigation bar.
To configure the navigation bar
1. In the outline view or on the canvas, select Navigation Item under Table View Controller.
Navigation bars get their title from the view controller that the navigation controller currently displays—theydon’t themselves have a title. You set the title using the navigation item of your to-do list (the table viewcontroller) rather than setting it directly on the navigation bar.
2. In the Attributes inspector, type My To-Do List in the Title field.
3. If necessary, open the Object library.
4. Drag a bar button item from the list to the far right of the navigation bar in the table view controller.
A button containing the text “Item” appears where you dragged the bar button item.
5. In the outline view or on the canvas, select the bar button item.
6. In the Attributes inspector, find the Identifier option in the Bar Button Item section. Choose Add from theIdentifier pop-up menu.
The button changes to an Add button (+).
Tutorial: StoryboardsAdd a Segue to Navigate Forward
2013-10-22 | Copyright © 2013 Apple Inc. All Rights Reserved.
56

Checkpoint: Run your app. The navigation bar should now have a title and display an Add button. The buttondoesn’t do anything yet. You’ll fix that next.
You want the Add button to bring up the add-to-do-item scene. The scene is already configured—it was thefirst scene you created—but it’s not connected to the other scenes. Xcode makes it easy to configure the Addbutton to bring up another scene when tapped.
To configure the Add button
1. On the canvas, select the Add button.
Tutorial: StoryboardsAdd a Segue to Navigate Forward
2013-10-22 | Copyright © 2013 Apple Inc. All Rights Reserved.
57

2. Control-drag from the button to the add-to-do-item view controller.
Tutorial: StoryboardsAdd a Segue to Navigate Forward
2013-10-22 | Copyright © 2013 Apple Inc. All Rights Reserved.
58
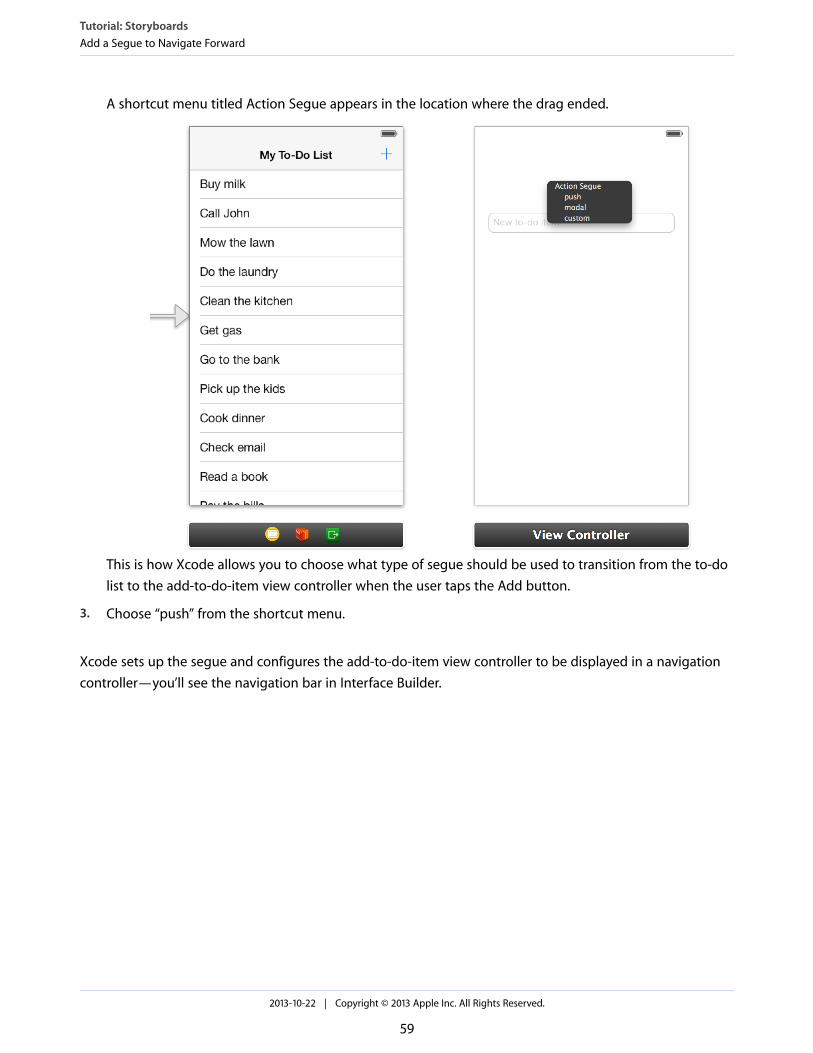
A shortcut menu titled Action Segue appears in the location where the drag ended.
This is how Xcode allows you to choose what type of segue should be used to transition from the to-dolist to the add-to-do-item view controller when the user taps the Add button.
3. Choose “push” from the shortcut menu.
Xcode sets up the segue and configures the add-to-do-item view controller to be displayed in a navigationcontroller—you’ll see the navigation bar in Interface Builder.
Tutorial: StoryboardsAdd a Segue to Navigate Forward
2013-10-22 | Copyright © 2013 Apple Inc. All Rights Reserved.
59

At this point, you might notice a couple of warnings in your project. Go ahead and open the Issue navigatorto see what’s wrong.
Because you added the add-to-do-item scene to the navigation stack, it now displays a navigation bar. Thisbar caused the frame of your text field to move down, which means that the Auto Layout constraints youspecified earlier are no longer satisfied. Fortunately, this is easy to fix.
To update the Auto Layout constraints
1. In the outline view or on the canvas, select the text field.
2. On the canvas, open the Resolve Auto Layout Issues pop-up menu , and choose Update Constraints.
Alternatively, you can choose Editor > Resolve Auto Layout Issues > Update Constraints.
The constraints are updated and the Xcode warnings disappear.
Tutorial: StoryboardsAdd a Segue to Navigate Forward
2013-10-22 | Copyright © 2013 Apple Inc. All Rights Reserved.
60

Checkpoint: Run your app. You can click the Add button and navigate to the add-to-do-item view controllerfrom the table view. Because you’re using a navigation controller with a push segue, the backward navigationis handled for you. This means you can click the back button to get back to the table view.
The push navigation is working just as it’s supposed to—but it’s not quite what you want when adding items.Push navigation is designed for a drill-down interface, where you’re providing more information about whateverthe user selected. Adding an item, on the other hand, is a modal operation—the user performs some actionthat’s complete and self-contained, and then returns from that scene to the main navigation. The appropriatemethod of presentation for this type of scene is a modal segue.
To change the segue style
1. In the outline view or on the canvas, select the segue from the table view controller to the add-to-do-itemview controller.
2. In the Attributes inspector, choose Modal from the pop-up menu next to the Style option.
Because a modal view controller doesn’t get added to the navigation stack, it doesn’t get a navigation barfrom the table view controller’s navigation controller. However, you want to keep the navigation bar to providethe user with visual continuity. To give the add-to-do-item view controller a navigation bar when presentedmodally, embed it in its own navigation controller.
To add a navigation controller to the add-to-do-item view controller
Tutorial: StoryboardsAdd a Segue to Navigate Forward
2013-10-22 | Copyright © 2013 Apple Inc. All Rights Reserved.
61

1. In the outline view, select View Controller.
2. With the view controller selected, choose Editor > Embed In > Navigation Controller.
As before, Xcode adds a navigation controller and shows the navigation bar at the top of the view controller.Next, configure this bar to add a title to this scene as well as two buttons, Cancel and Done. Later, you’ll linkthese buttons to actions.
To configure the navigation bar in the add-to-do-item view controller
1. In the outline view or on the canvas, select Navigation Item under View Controller. If necessary, open theAttributes inspector .
2. In the Attributes inspector, type Add To-Do Item in the Title field.
Xcode changes the description of the view controller from “View Controller” to “View Controller – AddTo-Do Item” to make it easier for you to identify the scene. The description appears in the outline view.
3. Drag a bar button item from the Object library to the far right of the navigation bar in the add-to-do-itemview controller.
4. In the Attributes inspector, choose Done from the pop-up menu next to the Identifier option.
The button text changes to “Done.”
5. Drag another bar button item from the Object library to the far left of the navigation bar in theadd-to-do-item view controller.
6. In the Attributes inspector, choose Cancel from the pop-up menu next to the Identifier option.
The button text changes to “Cancel.”
Tutorial: StoryboardsAdd a Segue to Navigate Forward
2013-10-22 | Copyright © 2013 Apple Inc. All Rights Reserved.
62

Checkpoint: Run your app. Click the Add button. You still see the add item scene, but there’s no longer a buttonto navigate back to the to-do list—instead, you see the two buttons you added, Done and Cancel. Thosebuttons aren’t linked to any actions yet, so you can click them, but they don’t do anything. Configuring thebuttons to complete or cancel editing of the new to-do item—and bring the user back to the to-do list—isthe next task.
Create Custom View ControllersYou’ve accomplished all of this configuration without needing to write any code. Configuring the completionof the add-to-do-item view controller requires some code, though, and you need a place to put it. Right nowXcode has configured both the add-to-do-item view controller and the table view controller as generic viewcontrollers. To have a place for your custom code, you need to create subclasses for each of these view controllersand then configure the interface to use those subclasses.
First, you’ll address the add-to-do-item view controller scene. The custom view controller class will be calledXYZAddToDoItemViewController, because this view controller will control the scene that adds a new itemto your to-do list.
To create a subclass of UIViewController
1. Choose File > New > File (or press Command-N).
Tutorial: StoryboardsCreate Custom View Controllers
2013-10-22 | Copyright © 2013 Apple Inc. All Rights Reserved.
63

2. On the left of the dialog that appears, select the Cocoa Touch template under iOS.
3. Select Objective-C Class, and click Next.
4. In the Class field, type AddToDoItem after the XYZ prefix.
5. Choose UIViewController in the “Subclass of” pop-up menu.
The class title changes to “XYZAddToDoItemViewController.” Xcode helps you by making it clear from thenaming that you’re creating a custom view controller. That’s great, so leave the new name as is.
6. Make sure the “Targeted for iPad” and “With XIB for user interface” options are unselected.
7. Click Next.
8. The save location will default to your project directory. Leave that as is.
9. The Group option will default to your app name, ToDoList. Leave that as is.
10. The Targets section will default to having your app selected and the tests for your app unselected. That’sperfect, so leave that as is.
11. Click Create.
Now that you’ve created a custom view controller subclass, you need to tell your storyboard to use your customclass instead of the generic view controller. The storyboard file is a configuration of objects that’s used atruntime by your app. The app machinery is smart enough to substitute your custom view controller for thegeneric view controller the storyboard starts with, but you need to tell the storyboard that that’s what youwant.
To identify your class as the view controller for a scene
1. In the project navigator, select Main.storyboard.
2. If necessary, open the outline view .
3. In the outline view, select the “View Controller – Add To-Do Item” view controller.
Click the disclosure triangle next to the “View Controller – Add To-Do Item” scene to show the objects inyour scene. The first one should be the view controller. Click it to select it. Notice that the scene row hasa different icon from the view controller row.
4. With the view controller selected, open the Identity inspector in the utility area.
Tutorial: StoryboardsCreate Custom View Controllers
2013-10-22 | Copyright © 2013 Apple Inc. All Rights Reserved.
64
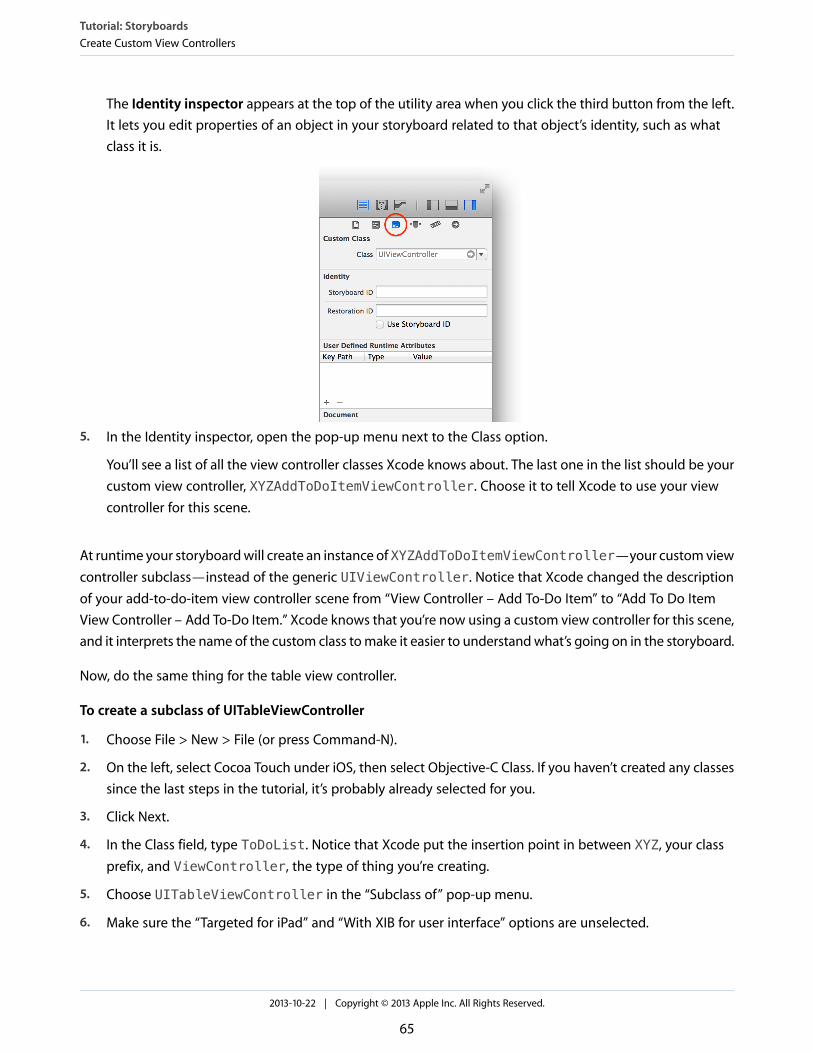
The Identity inspector appears at the top of the utility area when you click the third button from the left.It lets you edit properties of an object in your storyboard related to that object’s identity, such as whatclass it is.
5. In the Identity inspector, open the pop-up menu next to the Class option.
You’ll see a list of all the view controller classes Xcode knows about. The last one in the list should be yourcustom view controller, XYZAddToDoItemViewController. Choose it to tell Xcode to use your viewcontroller for this scene.
At runtime your storyboard will create an instance of XYZAddToDoItemViewController—your custom viewcontroller subclass—instead of the generic UIViewController. Notice that Xcode changed the descriptionof your add-to-do-item view controller scene from “View Controller – Add To-Do Item” to “Add To Do ItemView Controller – Add To-Do Item.” Xcode knows that you’re now using a custom view controller for this scene,and it interprets the name of the custom class to make it easier to understand what’s going on in the storyboard.
Now, do the same thing for the table view controller.
To create a subclass of UITableViewController
1. Choose File > New > File (or press Command-N).
2. On the left, select Cocoa Touch under iOS, then select Objective-C Class. If you haven’t created any classessince the last steps in the tutorial, it’s probably already selected for you.
3. Click Next.
4. In the Class field, type ToDoList. Notice that Xcode put the insertion point in between XYZ, your classprefix, and ViewController, the type of thing you’re creating.
5. Choose UITableViewController in the “Subclass of” pop-up menu.
6. Make sure the “Targeted for iPad” and “With XIB for user interface” options are unselected.
Tutorial: StoryboardsCreate Custom View Controllers
2013-10-22 | Copyright © 2013 Apple Inc. All Rights Reserved.
65

7. Click Next.
The save location will default to your project directory. Leave that as is.
8. The Group option will default to your app name, ToDoList. Leave that as is.
9. The Targets section will default to having your app selected and the tests for your app unselected. That’sperfect, so leave that as is.
10. Click Create.
Once again, you need to make sure to configure your custom table view controller,XYZToDoListViewController, in your storyboard.
To configure your storyboard
1. In the project navigator, select Main.storyboard.
2. If necessary, open the outline view.
3. In the outline view, select the table view controller and open the Identity inspector in the utility area.
4. In the Identity inspector, choose XYZToDoListViewController from the pop-up menu next to theClass option.
Now, you’re ready to add custom code to your view controllers.
Unwind a Segue to Navigate BackIn addition to push and modal segues, Xcode provides an unwind segue. This segue allows users to go froma given scene back to a previous scene, and it provides a place for you to add your own code that gets executedwhen users navigate between those scenes. You can use an unwind segue to navigate back fromXYZAddToDoItemViewController to XYZToDoListViewController.
An unwind segue is created by adding an action method to the destination view controller (the view controlleryou want to unwind to). A method that can be unwound to must return an action (IBAction) and take in astoryboard segue (UIStoryboardSegue) as a parameter. Because you want to unwind back toXYZToDoListViewController, you need to add an action method with this format to theXYZToDoListViewController implementation.
To unwind back to XYZToDoListViewController
1. In the project navigator, open XYZToDoListViewController.m.
2. Add the following code below the @implementation line:
Tutorial: StoryboardsUnwind a Segue to Navigate Back
2013-10-22 | Copyright © 2013 Apple Inc. All Rights Reserved.
66

- (IBAction)unwindToList:(UIStoryboardSegue *)segue
{
}
You can name the unwind action anything you want. Calling it unwindToList: makes it clear where theunwind will take you. For future projects, adopt a similar naming convention, one where the name of the actionmakes it clear where the unwind will go.
For now, leave this method implementation empty. Later, you’ll use this method to retrieve data from theXYZAddToDoItemViewController to add an item to your to-do list.
To create the unwind segue, link the Cancel and Done buttons to the unwindToList: action through theExit icon in the dock of the source view controller, XYZAddToDoItemViewController.
To link buttons to the unwindToList: action
1. In the project navigator, select Main.storyboard.
2. On the canvas, Control-drag from the Cancel button to the Exit item in the add-to-do-item scene dock.
Tutorial: StoryboardsUnwind a Segue to Navigate Back
2013-10-22 | Copyright © 2013 Apple Inc. All Rights Reserved.
67

If you don’t see the Exit item in the scene dock but instead see the description of the scene, click the ZoomIn button on the canvas until you see it.
A menu appears in the location where the drag ended.
3. Choose unwindToList: from the shortcut menu.
This is the action you just added to the XYZToDoListViewController.m file. This means that whenthe Cancel button is tapped, the segue will unwind and this method will be called.
4. On the canvas, Control-drag from the Done button to the Exit item in theXYZAddToDoItemViewController scene dock.
5. Choose unwindToList: from the shortcut menu.
Notice that you used the same action for both the Cancel and the Done buttons. In the next tutorial, you’lldistinguish between the two different cases when you write the code to handle the unwind segue.
Checkpoint: Now, run your app. At launch, you see a table view—but there’s no data in it. You can click theAdd button and navigate to XYZAddToDoItemViewController from XYZToDoListViewController. Youcan click the Cancel and Done buttons to navigate back to the table view.
So why doesn’t your data show up? Table views have two ways of getting data—statically or dynamically.When a table view’s controller implements the required UITableViewDataSource methods, the table viewasks its view controller for data to display, regardless of whether static data has been configured in InterfaceBuilder. If you look at XYZToDoListViewController.m, you’ll notice that it implements threemethods—numberOfSectionsInTableView:, tableView:numberOfRowsInSection:, andtableView:cellForRowAtIndexPath:. You can get your static data to display again by commenting outthe implementations of these methods. Go ahead and try that out if you like.
RecapAt this point, you’ve finished developing the interface for your app. You have two scenes—one for addingitems to your to-do list and one for viewing the list—and you can navigate between them. Next, you’ll implementthe ability to have users add a new to-do item and have it appear in the list. The next module covers workingwith data to implement this behavior.
Tutorial: StoryboardsRecap
2013-10-22 | Copyright © 2013 Apple Inc. All Rights Reserved.
68

● “Incorporating the Data” (page 70)
● “Using Design Patterns” (page 72)
● “Working with Foundation” (page 75)
● “Writing a Custom Class” (page 86)
● “Tutorial: Add Data” (page 93)
2013-10-22 | Copyright © 2013 Apple Inc. All Rights Reserved.
69
Implementing an App

Your app’s data model is composed of your data structures and (optionally) custom business logic needed tokeep that data in a consistent state. You never want to design your data model in total isolation from yourapp’s user interface. You do, however, want to implement your data model objects separately, without relyingon the presence of specific views or view controllers. When you keep your data separate from your user interface,you’ll find it easier to implement a universal app—one that can run on both iPad and iPhone—and easier toreuse portions of your code later.
Designing Your ModelIf you simply need to store a small amount of data, Foundation framework classes may be your best option.Research existing Foundation classes to see what behaviors are available for you to use instead of attemptingto implement the same thing on your own. For example, if your app only needs to keep track of a list of strings,you can rely on NSArray and NSString to do the job for you. You’ll learn more about these and otherFoundation classes in “Working with Foundation” (page 75).
If your data model requires custom business logic in addition to just storing data, you can write a custom class.Consider how you can incorporate existing framework classes into the implementation of your own classes.It’s beneficial to use existing framework classes within your custom classes instead of trying to reinvent them.For example, a custom class might use NSMutableArray to store information—but define its own featuresfor working with that information.
When you design your data model, here are some questions to keep in mind:
What types of data do you need to store? Whether you’re storing text, documents, large images, or anothertype of information, design your data model to handle that particular type of content appropriately.
2013-10-22 | Copyright © 2013 Apple Inc. All Rights Reserved.
70
Incorporating the Data

What data structures can you use? Determine where you can use framework classes and where you need todefine classes with custom functionality.
How will you supply data to the user interface? Your model shouldn’t communicate directly with yourinterface. To handle the interaction between the model and the interface, you’ll need to add logic to yourcontrollers.
Implementing Your ModelTo write good, efficient code, you need to learn more about Objective-C and its capabilities. Although thisguide teaches you how to build a simple app, you’ll want to become familiar with the language before writingyour own fully functional app.
There are several good approaches to learning Objective-C. Some people learn the concepts by readingProgramming with Objective-C and then writing a number of small test apps to solidify their understandingof the language and to practice writing good code.
Others jump right into programming and look for more information when they don’t know how to accomplishsomething. If you prefer this approach, keep Programming with Objective-C as a reference and make it anexercise to learn concepts and apply them to your app as you develop it.
The most important goal in developing your first data model is to get something that works. Think carefullyabout the structure of your data model, but don’t worry about making it perfect. Don’t be afraid to iterate andrefine your model after you begin implementing it.
Incorporating the DataImplementing Your Model
2013-10-22 | Copyright © 2013 Apple Inc. All Rights Reserved.
71

A design pattern solves a common software engineering problem. Patterns are abstract designs, not code.When you adopt a design, you adapt its general pattern to your specific needs. No matter what type of appyou’re creating, it’s good to know the fundamental design patterns used in the frameworks. Understandingdesign patterns helps you use frameworks more effectively and allows you to write apps that are more reusable,more extensible, and easier to change.
MVCModel-View-Controller (MVC) is central to a good design for any iOS app. MVC assigns the objects in an appto one of three roles: model, view, or controller. In this pattern, models keep track of your app’s data, viewsdisplay your user interface and make up the content of an app, and controllers manage your views. By respondingto user actions and populating the views with content, controllers serve as a gateway for communicationbetween models and views.
2013-10-22 | Copyright © 2013 Apple Inc. All Rights Reserved.
72
Using Design Patterns

As you’ve been building your ToDoList app, you’ve followed an MVC-centric design. The interface you built instoryboards makes up the view layer.XYZAddToDoItemViewController andXYZToDoListViewControllerare the controllers that manage your views. In “Tutorial: Add Data” (page 93), you’ll be incorporating a datamodel to work with the views and controllers in your app. When you begin designing your own app, it’simportant to keep MVC at the center of your design.
Target-ActionTarget-action is a conceptually simple design in which one object sends a message to another object whena specific event occurs. The action message is a selector defined in source code, and the target—the objectthat receives the message—is an object capable of performing the action, typically a view controller. The objectthat sends the action message is usually a control—such as a button, slider, or switch—that can trigger anevent in response to user interaction such as tap, drag, or value change.
For example, imagine that you want to restore default settings in your app whenever a user taps the RestoreDefaults button (which you create in your user interface). First, you implement an action, restoreDefaults:,to perform the logic to restore default settings. Next, you register the button’s Touch Up Inside event to sendthe restoreDefaults: action method to the view controller that implements that method.
You’ve already used target-action in your ToDoList app. When a user taps the Done button in theXYZAddToDoItemViewController, it triggers the unwindToList: action. In this case, the Done button isthe object sending the message, the target object is the XYZToDoListViewController, the action messageis unwindToList:, and the event that triggers the action message to be sent is a user tapping the Donebutton. Target-action is a powerful mechanism for defining interaction and sending information betweendifferent parts of your app.
DelegationDelegation is a simple and powerful pattern in which one object in an app acts on behalf of, or in coordinationwith, another object. The delegating object keeps a reference to the other object—the delegate—and at theappropriate time sends a message to it. The message informs the delegate of an event that the delegating
Using Design PatternsTarget-Action
2013-10-22 | Copyright © 2013 Apple Inc. All Rights Reserved.
73

object is about to handle or has just handled. The delegate may respond to the message by updating theappearance (or state) of itself or of other objects in the app, and in some cases it will return a value that affectshow an impending event is handled.
delegation.epsStreamline Your App with Design PatternsApple, Inc.window.tif reduced to 25%
The delegate pattern is prevalent in existing framework classes, but you can also implement delegation betweentwo custom objects in an app. A common design uses delegation as a means for allowing a child view controllerto communicate some value (typically a user-entered value) to its parent view controller.
You haven’t worked with delegation yet, but in “Tutorial: Add Data” (page 93), you’ll see an example of it whenyou add additional behavior to your XYZToDoListViewController class.
These are a few of the most common design patterns that you’ll encounter during iOS development, but thereare many more. As you learn more about Objective-C, you’ll spot other design patterns that you can apply inyour app.
Using Design PatternsDelegation
2013-10-22 | Copyright © 2013 Apple Inc. All Rights Reserved.
74

As you begin writing code for your app, you’ll find that there are many Objective-C frameworks that you cantake advantage of. Of particular importance is the Foundation framework, which provides basic services forall apps. The Foundation framework includes value classes representing basic data types such as strings andnumbers, as well as collection classes for storing other objects. You’ll be relying on value and collection classesto write much of the code for your ToDoList app.
Value ObjectsThe Foundation framework provides you with classes that generate value objects for strings, binary data, datesand times, numbers, and other values.
A value object is an object that encapsulates a primitive value (of a C data type) and provides services relatedto that value. You frequently encounter value objects as the parameters and return values of methods andfunctions that your app calls. Different parts of a framework—or even different frameworks—can exchangedata by passing value objects.
Some examples of value objects in the Foundation framework are:
NSString and NSMutableString
NSData and NSMutableData
2013-10-22 | Copyright © 2013 Apple Inc. All Rights Reserved.
75
Working with Foundation

NSDate
NSNumber
NSValue
Because value objects represent scalar values, you can use them in collections and wherever else objects arerequired. Value objects have an advantage over the primitive types they encapsulate: They let you performcertain operations on the encapsulated value simply and efficiently. The NSString class, for example, hasmethods for searching for and replacing substrings, for writing strings to files or (preferably) URLs, and forconstructing file-system paths.
You create a value object from data of the primitive type (and then perhaps pass it in a method parameter).In your code, you later access the encapsulated data from the object. The NSNumber class provides the clearestexample of this approach.
int n = 5; // Value assigned to primitive type
NSNumber *numberObject = [NSNumber numberWithInt:n]; // Value object created fromprimitive type
int y = [numberObject intValue]; // Encapsulated value obtained from value object(y == n)
Most value classes create their instances by declaring both initializers and class factory methods. Class factorymethods—implemented by a class as a convenience for clients—combine allocation and initialization in onestep and return the created object. For example, the NSString class declares a string class method thatallocates and initializes a new instance of the class and returns it to your code.
NSString *string = [NSString string];
In addition to creating value objects and letting you access their encapsulated values, most value classesprovide methods for simple operations such as object comparison.
StringsObjective-C supports the same conventions for specifying strings as does C: Single characters are enclosed bysingle quotes, and strings of characters are surrounded by double quotes. But Objective-C frameworks typicallydon’t use C strings. Instead, they use NSString objects.
Working with FoundationValue Objects
2013-10-22 | Copyright © 2013 Apple Inc. All Rights Reserved.
76

The NSString class provides an object wrapper for strings, offering advantages such as built-in memorymanagement for storing arbitrary-length strings, support for different character encodings (particularly Unicode),and utilities for string formatting. Because you commonly use such strings, Objective-C provides a shorthandnotation for creating NSString objects from constant values. To use this NSString literal, just precede adouble-quoted string with the at sign (@), as shown in the following examples:
// Create the string "My String" plus carriage return.
NSString *myString = @"My String\n";
// Create the formatted string "1 String".
NSString *anotherString = [NSString stringWithFormat:@"%d %@", 1, @"String"];
// Create an Objective-C string from a C string.
NSString *fromCString = [NSString stringWithCString:"A C string"encoding:NSUTF8StringEncoding];
NumbersObjective-C offers a shorthand notation for creating NSNumber objects, removing the need to call initializersor class factory methods to create such objects. Simply precede the numeric value with the at sign (@) andoptionally follow it with a value type indicator. For example, to create NSNumber objects encapsulating aninteger value and a double value, you could write the following:
NSNumber *myIntValue = @32;
NSNumber *myDoubleValue = @3.22346432;
You can even use NSNumber literals to create encapsulated Boolean and character values.
NSNumber *myBoolValue = @YES;
NSNumber *myCharValue = @'V';
You can create NSNumber objects representing unsigned integers, long integers, long long integers, and floatvalues by appending the letters U, L, LL, and F, respectively, to the notated value. For example, to create anNSNumber object encapsulating a float value, you can write the following:
NSNumber *myFloatValue = @3.2F
Working with FoundationValue Objects
2013-10-22 | Copyright © 2013 Apple Inc. All Rights Reserved.
77

Collection ObjectsMost collection objects in Objective-C code are instances of one of the basic collection classes—NSArray,NSSet, and NSDictionary. These classes are used to manage groups of objects, so any item you want toadd to a collection must be an instance of an Objective-C class. If you need to add a scalar value, you mustfirst create a suitable NSNumber or NSValue instance to represent it.
Any object you add to a collection will be kept alive at least as long as the collection is kept alive. That’s becausecollection classes use strong references to keep track of their contents. In addition to keeping track of theircontents, each of the collection classes makes it easy to perform certain tasks, such as enumeration, accessingspecific items, or finding out whether a particular object is part of the collection.
The contents of the NSArray, NSSet, and NSDictionary classes are set at creation. Because they can’t bechanged over time, they’re called immutable. Each one also has a subclass that’s mutable to allow you to addor remove objects at will. Different types of collections organize their contained objects in distinctive ways:
● NSArray and NSMutableArray—An array is an ordered collection of objects. You access an object byspecifying its position (that is, its index) in the array. The first element in an array is at index 0 (zero).
● NSSet and NSMutableSet—A set stores an unordered collection of objects, with each object occurringonly once. You generally access objects in the set by applying tests or filters to objects in the set.
● NSDictionary and NSMutableDictionary—A dictionary stores its entries as key-value pairs; the keyis a unique identifier, usually a string, and the value is the object you want to store. You access this objectby specifying the key.
ArraysAn array (NSArray) is used to represent an ordered list of objects. The only requirement is that each item bean Objective-C object—there’s no requirement for each object to be an instance of the same class.
To maintain order in the array, each element is stored at a zero-based index.
...NSObject
@"Hello, World!"NSString
@42NSNumber
...NSValue
0
1
2
3
Working with FoundationCollection Objects
2013-10-22 | Copyright © 2013 Apple Inc. All Rights Reserved.
78

Creating ArraysAs with the value classes described earlier in this chapter, you can create an array through allocation andinitialization, class factory methods, or array literals.
There are a variety of different initialization and factory methods available, depending on the number of objects.
+ (id)arrayWithObject:(id)anObject;
+ (id)arrayWithObjects:(id)firstObject, ...;
- (id)initWithObjects:(id)firstObject, ...;
Because the arrayWithObjects: and initWithObjects: methods both take a nil-terminated, variablenumber of arguments, you must include nil as the last value.
NSArray *someArray =
[NSArray arrayWithObjects:someObject, someString, someNumber, someValue, nil];
This example creates an array like the one shown earlier. The first object, someObject, will have an array indexof 0; the last object, someValue, will have an index of 3.
It’s possible to truncate the list of items unintentionally if one of the provided values is nil.
id firstObject = @"someString";
id secondObject = nil;
id thirdObject = @"anotherString";
NSArray *someArray =
[NSArray arrayWithObjects:firstObject, secondObject, thirdObject, nil];
In this case, someArray contains only firstObject, because secondObject, which is nil, is interpretedas the end of the list of items.
It’s possible to create an array literal using a compact syntax.
NSArray *someArray = @[firstObject, secondObject, thirdObject];
When using this syntax, don’t terminate the list of objects with nil—in fact, nil is an invalid value. For example,you’ll get an exception at runtime if you try to execute the following code:
id firstObject = @"someString";
Working with FoundationCollection Objects
2013-10-22 | Copyright © 2013 Apple Inc. All Rights Reserved.
79

id secondObject = nil;
NSArray *someArray = @[firstObject, secondObject];
// exception: "attempt to insert nil object"
Querying Array ObjectsAfter you’ve created an array, you can query it for information—such as how many objects it has or whetherit contains a given item.
NSUInteger numberOfItems = [someArray count];
if ([someArray containsObject:someString]) {
...
}
You can also query the array for an item at a given index. If you attempt to request an invalid index, you’ll getan out-of-bounds exception at runtime. To avoid getting an exception, always check the number of items first.
if ([someArray count] > 0) {
NSLog(@"First item is: %@", [someArray objectAtIndex:0]);
}
This example checks to see whether the number of items is greater than zero. If it is, the Foundation functionNSLog logs a description of the first item, which has an index of 0.
As an alternative to using objectAtIndex:, you can also query the array using a subscript syntax, which isjust like accessing a value in a standard C array. The previous example can be rewritten like this:
if ([someArray count] > 0) {
NSLog(@"First item is: %@", someArray[0]);
}
Sorting Array ObjectsThe NSArray class offers a variety of methods to sort its collected objects. Because NSArray is immutable,each of these methods returns a new array containing the items in the sorted order.
For example, you can sort an array of strings by calling compare: on each string.
Working with FoundationCollection Objects
2013-10-22 | Copyright © 2013 Apple Inc. All Rights Reserved.
80

NSArray *unsortedStrings = @[@"gammaString", @"alphaString", @"betaString"];
NSArray *sortedStrings =
[unsortedStrings sortedArrayUsingSelector:@selector(compare:)];
MutabilityAlthough the NSArray class itself is immutable, it can nevertheless contain mutable objects. For example, ifyou add a mutable string to an immutable array, like this:
NSMutableString *mutableString = [NSMutableString stringWithString:@"Hello"];
NSArray *immutableArray = @[mutableString];
there’s nothing to stop you from mutating the string.
if ([immutableArray count] > 0) {
id string = immutableArray[0];
if ([string isKindOfClass:[NSMutableString class]]) {
[string appendString:@" World!"];
}
}
If you want to add or remove objects from an array after initial creation, use NSMutableArray, which adds avariety of methods to add, remove, or replace one or more objects.
NSMutableArray *mutableArray = [NSMutableArray array];
[mutableArray addObject:@"gamma"];
[mutableArray addObject:@"alpha"];
[mutableArray addObject:@"beta"];
[mutableArray replaceObjectAtIndex:0 withObject:@"epsilon"];
This example creates an array made up of the objects @"epsilon", @"alpha", and @"beta".
It’s also possible to sort a mutable array in place, without creating a secondary array.
[mutableArray sortUsingSelector:@selector(caseInsensitiveCompare:)];
Working with FoundationCollection Objects
2013-10-22 | Copyright © 2013 Apple Inc. All Rights Reserved.
81

In this case, the contained items are sorted into the ascending, case-insensitive order @"alpha", @"beta",and @"epsilon".
SetsA set (NSSet) object is similar to an array, but it maintains an unordered group of distinct objects.
...NSObject
@"Hello, World!"NSString
@42NSNumber
...NSValue
Because sets don’t maintain order, they offer faster performance than arrays do when it comes to testing formembership.
Because the basic NSSet class is immutable, its contents must be specified at creation, using either allocationand initialization or a class factory method.
NSSet *simpleSet =
[NSSet setWithObjects:@"Hello, World!", @42, aValue, anObject, nil];
As with NSArray, the initWithObjects: and setWithObjects: methods both take a nil-terminated,variable number of arguments. The name of the mutable NSSet subclass is NSMutableSet.
Sets store only one reference to an individual object, even if you try adding an object more than once.
NSNumber *number = @42;
NSSet *numberSet =
[NSSet setWithObjects:number, number, number, number, nil];
// numberSet only contains one object
Working with FoundationCollection Objects
2013-10-22 | Copyright © 2013 Apple Inc. All Rights Reserved.
82

DictionariesRather than simply maintaining an ordered or unordered collection of objects, a dictionary (NSDictionary)stores objects associated with given keys, which can then be used for retrieval.
The best practice is to use string objects as dictionary keys.
Keys
Values...
@"anObject"
NSObject
@"Hello, World!"
@"helloString"
NSString
@42
@"magicNumber"
NSNumber
...
@"aValue"
NSValue
Although you can use other objects as keys, keep in mind that each key is copied for use by a dictionary andso must support NSCopying. If you want to use key-value coding, however, you must use string keys fordictionary objects (to learn more, see Key-Value Coding Programming Guide ).
Creating DictionariesYou can create dictionaries using either allocation and initialization, or class factory methods, like this:
NSDictionary *dictionary = [NSDictionary dictionaryWithObjectsAndKeys:
someObject, @"anObject",
@"Hello, World!", @"helloString",
@42, @"magicNumber",
someValue, @"aValue",
nil];
For the dictionaryWithObjectsAndKeys: and initWithObjectsAndKeys: methods, each object isspecified before its key, and the list of objects and keys must be nil terminated.
Objective-C offers a concise syntax for dictionary literal creation.
NSDictionary *dictionary = @{
@"anObject" : someObject,
@"helloString" : @"Hello, World!",
@"magicNumber" : @42,
@"aValue" : someValue
Working with FoundationCollection Objects
2013-10-22 | Copyright © 2013 Apple Inc. All Rights Reserved.
83

};
For dictionary literals, the key is specified before its object, and the list of objects and keys is not nil terminated.
Querying DictionariesAfter you’ve created a dictionary, you can ask it for the object stored against a given key.
NSNumber *storedNumber = [dictionary objectForKey:@"magicNumber"];
If the object isn’t found, the objectForKey: method returns nil.
There’s also a subscript syntax alternative to using objectForKey:.
NSNumber *storedNumber = dictionary[@"magicNumber"];
MutabilityIf you need to add or remove objects from a dictionary after creation, use the NSMutableDictionary subclass.
[dictionary setObject:@"another string" forKey:@"secondString"];
[dictionary removeObjectForKey:@"anObject"];
Represent nil with NSNullIt’s not possible to add nil to the collection classes described in this section because nil in Objective-C means“no object.” If you need to represent “no object” in a collection, use the NSNull class.
NSArray *array = @[ @"string", @42, [NSNull null] ];
With NSNull, the null method always returns the same instance. Classes that behave in this way are calledsingleton classes. You can check to see whether an object in an array is equal to the shared NSNull instancelike this:
for (id object in array) {
if (object == [NSNull null]) {
NSLog(@"Found a null object");
}
Working with FoundationCollection Objects
2013-10-22 | Copyright © 2013 Apple Inc. All Rights Reserved.
84

}
Although the Foundation framework contains many more capabilities than are described here, you don’t needto know every single detail right away. If you do want to learn more about Foundation, take a look at FoundationFramework Reference . For now, you have enough information to continue implementing your ToDoList app,which you’ll do by writing a custom data class.
Working with FoundationCollection Objects
2013-10-22 | Copyright © 2013 Apple Inc. All Rights Reserved.
85

As you develop iOS apps, you’ll find many occasions when you need to write your own custom classes. Customclasses are useful when you need to package custom behavior together with data. In a custom class, you candefine your own behaviors for storing, manipulating, and displaying your data.
For example, consider the World Clock tab in the iOS Clock app. The cells in this table view need to displaymore content than a standard table view cell. This is a good opportunity to implement a subclass that extendsthe behavior of UITableViewCell to let you display additional custom data for a given table view cell. If youwere designing this custom class, you might add outlets for a label to display the hours ahead informationand an image view to display the custom clock on the right of the cell.
This chapter teaches you what you need to know about Objective-C syntax and class structure to finishimplementing the behavior of your ToDoList app. It discusses the design of XYZToDoItem, the custom classthat will represent a single item on your to-do list. In the third tutorial, you’ll actually implement this class andadd it to your app.
2013-10-22 | Copyright © 2013 Apple Inc. All Rights Reserved.
86
Writing a Custom Class

Declaring and Implementing a ClassThe specification of a class in Objective-C requires two distinct pieces: the interface and the implementation.The interface specifies exactly how a given type of object is intended to be used by other objects. In otherwords, it defines the public interface between instances of the class and the outside world. The implementationincludes the executable code for each method declared in the interface.
An object should be designed to hide the details of its internal implementation. In Objective-C, the interfaceand implementation are usually placed in separate files so that you need to make only the interface public. Aswith C code, you define header files and source files to separate public declarations from the implementationdetails of your code. Interface files have a .h extension, and implementation files have a .m extension. (You’llactually create these files for the XYZToDoItem class in “Tutorial: Add Data” (page 93)—for now, just followalong as all of the pieces are introduced.)
InterfaceThe Objective-C syntax used to declare a class interface looks like this:
@interface XYZToDoItem : NSObject
@end
This example declares a class named XYZToDoItem, which inherits from NSObject.
The public properties and behavior are defined inside the @interface declaration. In this example, nothingis specified beyond the superclass, so the only behavior expected to be available on instances of XYZToDoItemis the behavior inherited from NSObject. All objects are expected to have a minimum behavior, so by default,they must inherit from NSObject (or one of its subclasses).
ImplementationThe Objective-C syntax used to declare a class implementation looks like this:
#import "XYZToDoItem.h"
@implementation XYZToDoItem
@end
If you declare any methods in the class interface, you’ll need to implement them inside this file.
Writing a Custom ClassDeclaring and Implementing a Class
2013-10-22 | Copyright © 2013 Apple Inc. All Rights Reserved.
87

Properties Store an Object’s DataConsider what information the to-do item needs to hold. You probably need to know its name, when it wascreated, and whether it’s been completed. In your custom XYZToDoItem class, you’ll store this information inproperties.
Declarations for these properties reside inside the interface file (XYZToDoItem.h). Here’s what they look like:
@interface XYZToDoItem : NSObject
@property NSString *itemName;
@property BOOL completed;
@property NSDate *creationDate;
@end
In this example, the XYZToDoItem class declares three public properties. These properties are available forfull public access. With public access, other objects can both read and change the values of the properties.
You may decide to declare that a property shouldn’t be changed (that is, that it should be read-only). To indicatewhether a property is intended to be read-only—among other things—Objective-C property declarationsinclude property attributes. For example, if you don’t want the creation date of an XYZToDoItem to bechangeable, you might update the XYZToDoItem class interface to look like this:
@interface XYZToDoItem : NSObject
@property NSString *itemName;
@property BOOL completed;
@property (readonly) NSDate *creationDate;
@end
Properties can be private or public. Sometimes it makes sense to make a property private so that other classescan’t see or access it. For example, if you want to keep track of a property that represents the date an item wasmarked as completed without giving other classes access to this information, make the property private byputting it in a class extension at the top of your implementation file (XYZToDoItem.m).
#import "XYZToDoItem.h"
Writing a Custom ClassProperties Store an Object’s Data
2013-10-22 | Copyright © 2013 Apple Inc. All Rights Reserved.
88
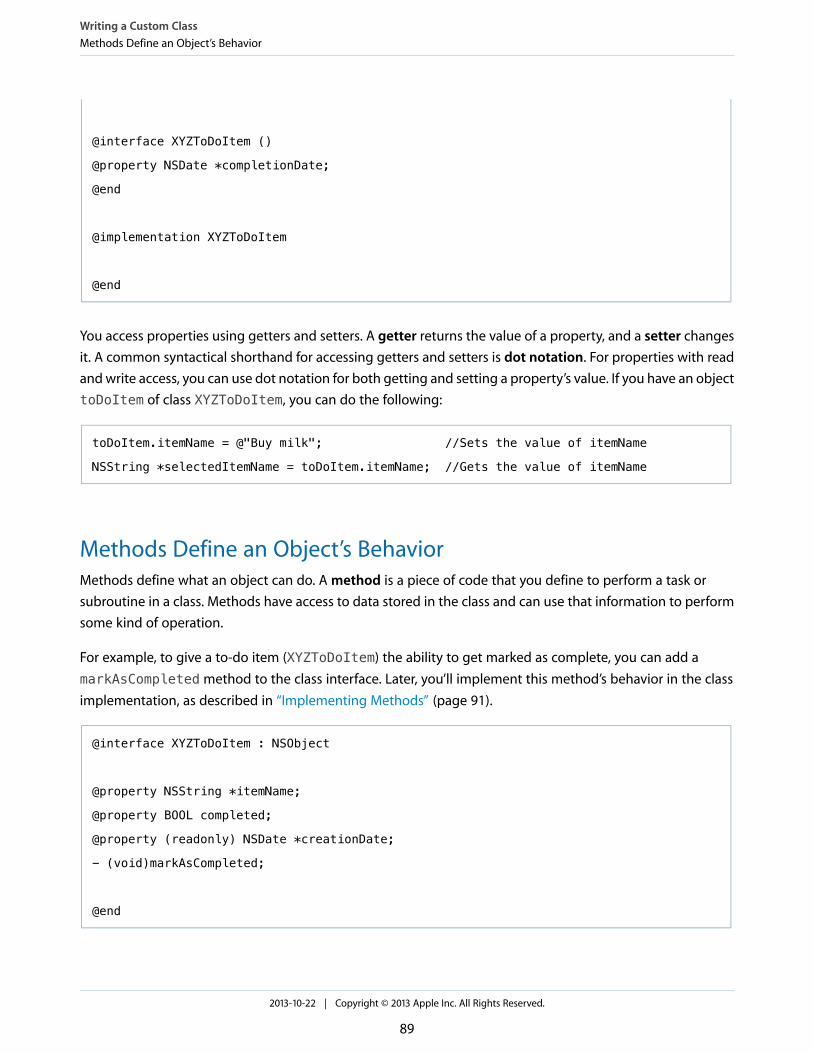
@interface XYZToDoItem ()
@property NSDate *completionDate;
@end
@implementation XYZToDoItem
@end
You access properties using getters and setters. A getter returns the value of a property, and a setter changesit. A common syntactical shorthand for accessing getters and setters is dot notation. For properties with readand write access, you can use dot notation for both getting and setting a property’s value. If you have an objecttoDoItem of class XYZToDoItem, you can do the following:
toDoItem.itemName = @"Buy milk"; //Sets the value of itemName
NSString *selectedItemName = toDoItem.itemName; //Gets the value of itemName
Methods Define an Object’s BehaviorMethods define what an object can do. A method is a piece of code that you define to perform a task orsubroutine in a class. Methods have access to data stored in the class and can use that information to performsome kind of operation.
For example, to give a to-do item (XYZToDoItem) the ability to get marked as complete, you can add amarkAsCompleted method to the class interface. Later, you’ll implement this method’s behavior in the classimplementation, as described in “Implementing Methods” (page 91).
@interface XYZToDoItem : NSObject
@property NSString *itemName;
@property BOOL completed;
@property (readonly) NSDate *creationDate;
- (void)markAsCompleted;
@end
Writing a Custom ClassMethods Define an Object’s Behavior
2013-10-22 | Copyright © 2013 Apple Inc. All Rights Reserved.
89

The minus sign (-) at the front of the method name indicates that it is an instance method, which can becalled on an object of that class. This minus sign differentiates it from class methods, which are denoted witha plus sign (+). Class methods can be called on the class itself. A common example of class methods are classfactory methods, which you learned about in “Working with Foundation” (page 75). You can also use classmethods to access some piece of shared information associated with the class.
The void keyword is used inside parentheses at the beginning of the declaration to indicate that the methoddoesn’t return a value. In this case, the markAsCompleted method takes in no parameters. Parameters arediscussed in more detail in “Method Parameters” (page 90).
Method ParametersYou declare methods with parameters to pass along some piece of information when you call a method.
For example, you can revise the markAsCompletedmethod from the previous code snippet to take in a singleparameter that will determine whether the item gets marked as completed or uncompleted. This way, you cantoggle the completion state of the item instead of setting it only as completed.
@interface XYZToDoItem : NSObject
@property NSString *itemName;
@property BOOL completed;
@property (readonly) NSDate *creationDate;
- (void)markAsCompleted:(BOOL)isComplete;
@end
Now, your method takes in one parameter, isComplete, which is of type BOOL.
When you refer to a method with a parameter by name, you include the colon as part of the method name,so the name of the updated method is now markAsCompleted:. If a method has multiple parameters, themethod name is broken up and interspersed with the parameter names. If you wanted to add another parameterto this method, its declaration would look like this:
- (void)markAsCompleted:(BOOL)isComplete onDate:(NSDate *)date;
Here, the method’s name is written as markAsCompleted:onDate:. The names isComplete and date areused in the implementation to access the values supplied when the method is called, as if these names werevariables.
Writing a Custom ClassMethods Define an Object’s Behavior
2013-10-22 | Copyright © 2013 Apple Inc. All Rights Reserved.
90

Implementing MethodsMethod implementations use braces to contain the relevant code. The name of the method must be identicalto its counterpart in the interface file, and the parameter and return types must match exactly.
Here is a simple implementation of the markAsCompleted: method you added to your XYZToDoItem classinterface:
@implementation XYZToDoItem
- (void)markAsCompleted:(BOOL)isComplete {
self.completed = isComplete;
}
@end
Like properties, methods can be private or public. Public methods are declared in the public interface and socan be seen and called by other objects. Their corresponding implementation resides in the implementationfile and can’t be seen by other objects. Private methods have only an implementation and are internal to theclass, meaning they’re only available to call inside the class implementation. This is a powerful mechanism foradding internal behavior to a class without allowing other objects access to it.
For example, say you want to keep a to-do item’s completionDate updated. If the to-do item gets markedas completed, set completionDate to the current date. If it gets marked as uncompleted, set completionDateto nil, because it hasn’t been completed yet. Because updating the to-do item’s completionDate is aself-contained task, the best practice is to write its own method for it. However, it’s important to make surethat other objects can’t call this method—otherwise, another object could set the to-do item’s completionDateto anything at any time. For this reason, you make this method private.
Now, update the implementation of XYZToDoItem to include the private method setCompletionDate thatgets called inside markAsCompleted: to update the to-do item’s completionDatewhenever it gets markedas completed or uncompleted. Notice that you’re not adding anything to the interface file, because you don’twant other objects to see this method.
@implementation XYZToDoItem
- (void)markAsCompleted:(BOOL)isComplete {
self.completed = isComplete;
[self setCompletionDate];
}
- (void)setCompletionDate {
if (self.completed) {
self.completionDate = [NSDate date];
Writing a Custom ClassMethods Define an Object’s Behavior
2013-10-22 | Copyright © 2013 Apple Inc. All Rights Reserved.
91

} else {
self.completionDate = nil;
}
}
@end
At this point, you’ve defined a basic representation of a to-do list item using the XYZToDoItem class.XYZToDoItem stores information about itself—name, creation date, completion state—in the form of properties,and it defines what it can do—get marked as completed or uncompleted—using a method. This is the extentof the features you need to finish implementing your ToDoList app in the next tutorial. However, you canalways experiment by adding your own properties and methods to the class to integrate new behavior intoyour app.
Writing a Custom ClassMethods Define an Object’s Behavior
2013-10-22 | Copyright © 2013 Apple Inc. All Rights Reserved.
92

This tutorial builds on the project you created in the second tutorial (“Tutorial: Storyboards” (page 47)). You’lluse what you learned about using design patterns, working with Foundation, and writing a custom class toadd support for dynamic data to your ToDoList app.
This tutorial teaches you how to:
● Work with common Foundation classes
● Create custom data classes
● Implement a delegate and data source protocol
● Pass data between view controllers
After you complete all the steps in this tutorial, you’ll have an app that looks something like this:
2013-10-22 | Copyright © 2013 Apple Inc. All Rights Reserved.
93
Tutorial: Add Data

Create a Data ClassTo get started, open your existing project in Xcode.
At this point, you have an interface and a navigation scheme for your ToDoList app using storyboards. Now,it’s time to add data storage and behavior with model objects.
The goal of your app is to create a list of to-do items, so first you’ll create a custom class, XYZToDoItem, torepresent an individual to-do item. As you recall, the XYZToDoItem class was discussed in “Writing a CustomClass” (page 86).
To create the XYZToDoItem class
1. Choose File > New > File (or press Command-N).
A dialog appears that prompts you to choose a template for your new file.
2. On the left, select Cocoa Touch under iOS.
3. Select Objective-C Class, and click Next.
4. In the Class field, type ToDoItem after the XYZ prefix.
5. Choose NSObject from the “Subclass of” pop-up menu.
If you’ve been following along with the tutorials exactly, the Class title probably saidXYZToDoItemViewController prior to this step. When you choose NSObject as the “Subclass of,” Xcodeknows you’re making a normal custom class and removes the ViewController text that it was addingpreviously.
6. Click Next.
7. The save location defaults to your project directory. Leave that as is.
8. The Group option defaults to your app name, ToDoList. Leave that as is.
9. The Targets section defaults to having your app selected and the tests for your app unselected. That’sperfect, so leave that as is.
10. Click Create.
The XYZToDoItem class is straightforward to implement. It has properties for its name, creation date, andwhether the item has been completed. Go ahead and add these properties to the XYZToDoItem class interface.
To configure the XYZToDoItem class
1. In the project navigator, select XYZToDoItem.h.
2. Add the following properties to the interface so that the declaration looks like this:
Tutorial: Add DataCreate a Data Class
2013-10-22 | Copyright © 2013 Apple Inc. All Rights Reserved.
94

@interface XYZToDoItem : NSObject
@property NSString *itemName;
@property BOOL completed;
@property (readonly) NSDate *creationDate;
@end
Checkpoint: Build your project by choosing Product > Build (or pressing Command-B). You’re not using yournew class for anything yet, but building it gives the compiler a chance to verify that you haven’t made anytyping mistakes. If you have, fix them by reading through the warnings or errors that the compiler provides,and then look back over the instructions in this tutorial to make sure everything looks the way it’s describedhere.
Load the DataYou now have a class from which you can create and store the data for individual list items. You also need tokeep a list of those items. The natural place to track this is in the XYZToDoListViewController class—viewcontrollers are responsible for coordinating between the model and the view, so they need a reference to themodel.
The Foundation framework includes a class, NSMutableArray, that works well for tracking lists of items. It’simportant to use a mutable array so that the user can add items to the array. The immutable version, NSArray,doesn’t allow you to add items to it after it’s initialized.
To use an array you need to both declare it and create it. You do this by allocating and initializing the array.
To allocate and initialize the array
1. In the project navigator, select XYZToDoListViewController.m.
Because the array of items is an implementation detail of your table view controller, you declare it in the.m file instead of the .h file. This makes it private to your custom class.
2. Add the following property to the interface category Xcode created in your custom table view controllerclass. The declaration should look like this:
@interface XYZToDoListViewController ()
Tutorial: Add DataLoad the Data
2013-10-22 | Copyright © 2013 Apple Inc. All Rights Reserved.
95
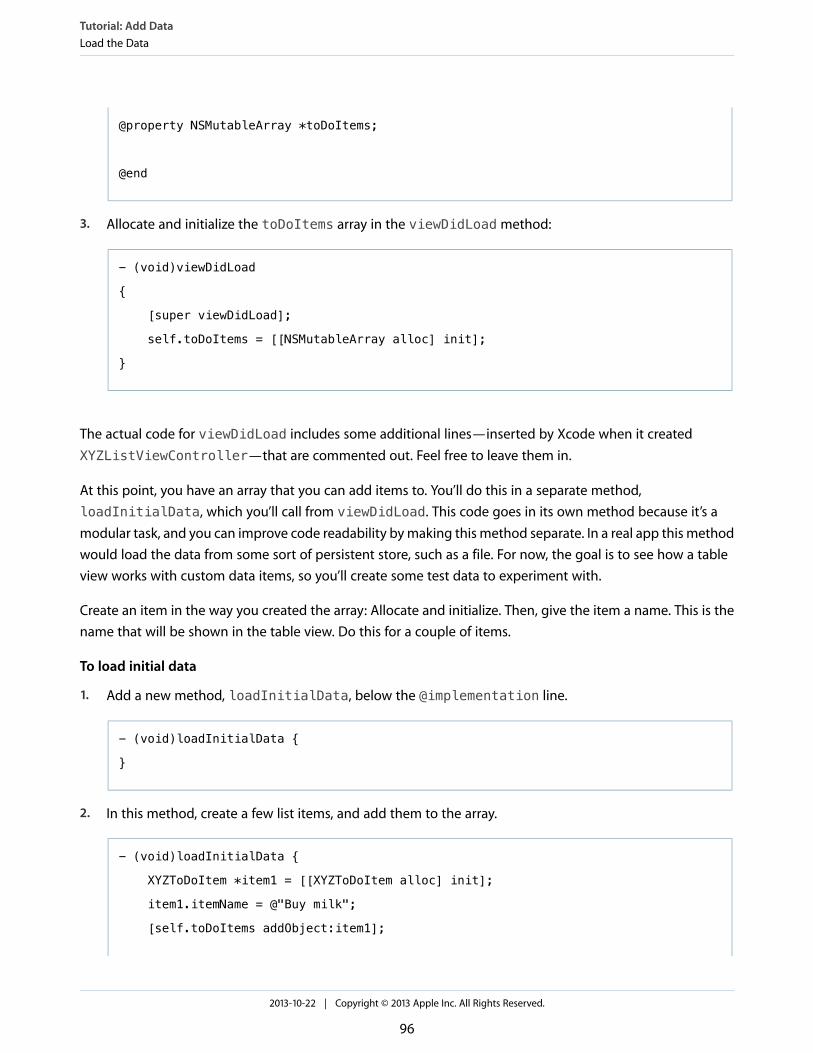
@property NSMutableArray *toDoItems;
@end
3. Allocate and initialize the toDoItems array in the viewDidLoad method:
- (void)viewDidLoad
{
[super viewDidLoad];
self.toDoItems = [[NSMutableArray alloc] init];
}
The actual code for viewDidLoad includes some additional lines—inserted by Xcode when it createdXYZListViewController—that are commented out. Feel free to leave them in.
At this point, you have an array that you can add items to. You’ll do this in a separate method,loadInitialData, which you’ll call from viewDidLoad. This code goes in its own method because it’s amodular task, and you can improve code readability by making this method separate. In a real app this methodwould load the data from some sort of persistent store, such as a file. For now, the goal is to see how a tableview works with custom data items, so you’ll create some test data to experiment with.
Create an item in the way you created the array: Allocate and initialize. Then, give the item a name. This is thename that will be shown in the table view. Do this for a couple of items.
To load initial data
1. Add a new method, loadInitialData, below the @implementation line.
- (void)loadInitialData {
}
2. In this method, create a few list items, and add them to the array.
- (void)loadInitialData {
XYZToDoItem *item1 = [[XYZToDoItem alloc] init];
item1.itemName = @"Buy milk";
[self.toDoItems addObject:item1];
Tutorial: Add DataLoad the Data
2013-10-22 | Copyright © 2013 Apple Inc. All Rights Reserved.
96

XYZToDoItem *item2 = [[XYZToDoItem alloc] init];
item2.itemName = @"Buy eggs";
[self.toDoItems addObject:item2];
XYZToDoItem *item3 = [[XYZToDoItem alloc] init];
item3.itemName = @"Read a book";
[self.toDoItems addObject:item3];
}
3. Call the loadInitialData in the viewDidLoad method.
- (void)viewDidLoad
{
[super viewDidLoad];
self.toDoItems = [[NSMutableArray alloc] init];
[self loadInitialData];
}
Checkpoint: Build your project by choosing Product > Build. You should see numerous errors for the lines ofyour loadInitialData method. The key to what’s gone wrong is the first line, which should say “Use ofundeclared identifier XYZToDoItem.” This means that the compiler doesn’t know about your XYZToDoItemwhen it’s compiling XYZToDoListViewController. Compilers are very particular and need to be toldexplicitly what to pay attention to.
To tell the compiler to pay attention to your custom list item class
1. Find the #import "XYZToDoListViewController.h" line near the top of theXYZToDoListViewController.m file.
2. Add the following line immediately below it:
#import "XYZToDoItem.h"
Checkpoint: Build your project by choosing Product > Build. It should build without errors.
Tutorial: Add DataLoad the Data
2013-10-22 | Copyright © 2013 Apple Inc. All Rights Reserved.
97
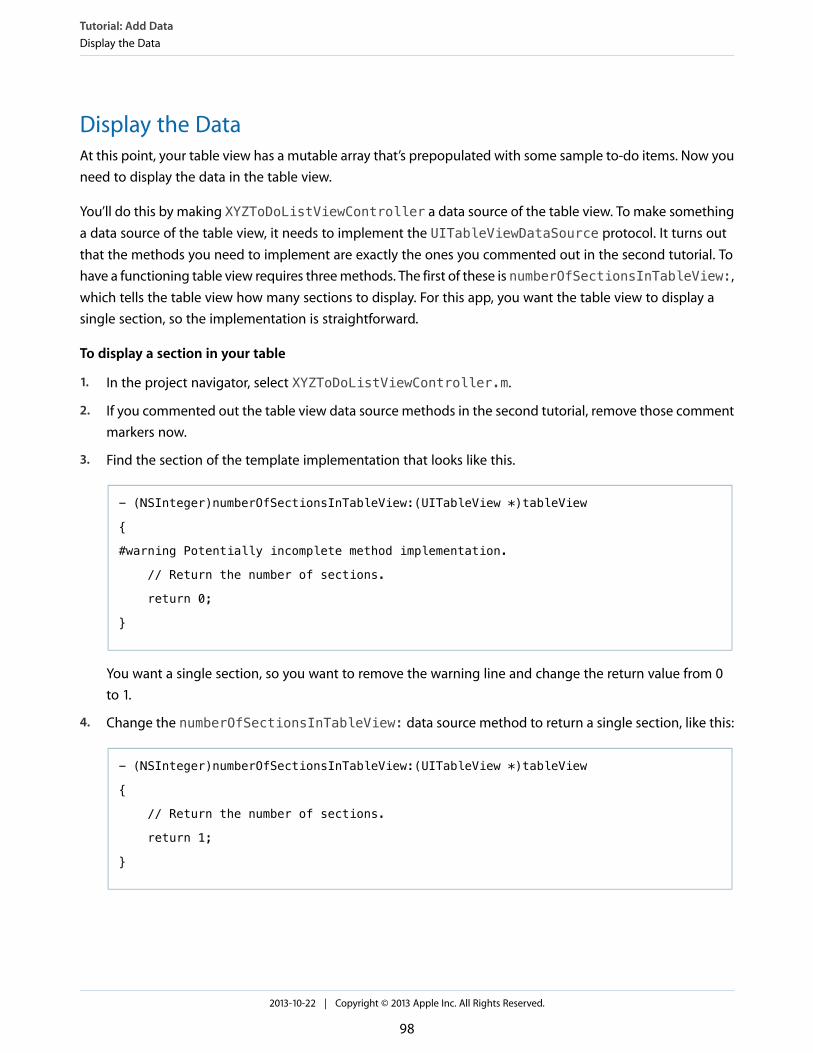
Display the DataAt this point, your table view has a mutable array that’s prepopulated with some sample to-do items. Now youneed to display the data in the table view.
You’ll do this by making XYZToDoListViewController a data source of the table view. To make somethinga data source of the table view, it needs to implement the UITableViewDataSource protocol. It turns outthat the methods you need to implement are exactly the ones you commented out in the second tutorial. Tohave a functioning table view requires three methods. The first of these is numberOfSectionsInTableView:,which tells the table view how many sections to display. For this app, you want the table view to display asingle section, so the implementation is straightforward.
To display a section in your table
1. In the project navigator, select XYZToDoListViewController.m.
2. If you commented out the table view data source methods in the second tutorial, remove those commentmarkers now.
3. Find the section of the template implementation that looks like this.
- (NSInteger)numberOfSectionsInTableView:(UITableView *)tableView
{
#warning Potentially incomplete method implementation.
// Return the number of sections.
return 0;
}
You want a single section, so you want to remove the warning line and change the return value from 0to 1.
4. Change the numberOfSectionsInTableView: data source method to return a single section, like this:
- (NSInteger)numberOfSectionsInTableView:(UITableView *)tableView
{
// Return the number of sections.
return 1;
}
Tutorial: Add DataDisplay the Data
2013-10-22 | Copyright © 2013 Apple Inc. All Rights Reserved.
98

The next method, tableView:numberOfRowsInSection:, tells the table view how many rows to displayin a given section. You have a single section in your table, and each to-do item should have its own row in thetable view. That means that the number of rows should be the number of XYZToDoItem objects in yourtoDoItems array.
To return the number of rows in your table
1. In the project navigator, select XYZToDoListViewController.m.
2. Find the section of the template implementation that looks like this:
- (NSInteger)tableView:(UITableView *)tableViewnumberOfRowsInSection:(NSInteger)section
{
#warning Incomplete method implementation.
// Return the number of rows in the section.
return 0;
}
You want to return the number of list items you have. Fortunately, NSArray has a handy method calledcount that returns the number of items in the array, so the number of rows is [self.toDoItems count].
3. Change the tableView:numberOfRowsInSection: data source method to return the appropriatenumber of rows.
- (NSInteger)tableView:(UITableView *)tableViewnumberOfRowsInSection:(NSInteger)section
{
// Return the number of rows in the section.
return [self.toDoItems count];
}
The last method, tableView:cellForRowAtIndexPath:, asks for a cell to display for a given row. Up untilnow, you’ve been working with code only, but the cell to display for a row is very much part of your interface.Fortunately, Xcode makes it easy to design custom cells in Interface Builder. The first task is to design your celland to tell the table view that instead of using static content, it’s going to be using prototype cells with dynamiccontent.
To configure your table view
1. Open your storyboard.
Tutorial: Add DataDisplay the Data
2013-10-22 | Copyright © 2013 Apple Inc. All Rights Reserved.
99

2. Select the table view in the outline.
3. With the table view selected, open the Attributes inspector in the utility area.
4. In the Attributes inspector, change the table view’s Content attribute from Static Cells to DynamicPrototypes.
Interface Builder takes the static cells you configured and converts them all into prototypes. Prototype cells,as the name implies, are cells that are configured with text styles, colors, images, or other attributes as youwant them to be displayed but that get their data from the data source at runtime. The data source loads aprototype cell for each row and then configures that cell to display the data for the row.
To load the correct cell, the data source needs to know what it’s called, and that name must also be configuredin the storyboard.
While you’re setting the prototype cell name, you’ll also configure another property—the cell selection style,which determines a cell’s appearance when a user taps it. Set the cell selection style to None so that the cellwon’t be highlighted when a user taps it. This is the behavior you want your cells to have when a user taps anitem in the to-do list to mark it as completed or uncompleted—a feature you’ll implement later in this tutorial.
To configure the prototype cell
1. Select the first table view cell in your table.
2. In the Attributes inspector, locate the Identifier field and type ListPrototypeCell.
3. In the Attributes inspector, locate the Selection field and choose None.
You could also change the font or other attributes of the prototype cell. The basic configuration is easy to workwith, so you’ll keep that.
The next step is to teach your data source how to configure the cell for a given row by implementingtableView:cellForRowAtIndexPath:. This data source method is called by the table view when it wantsto display a given row. For table views with a small number of rows, all rows may be onscreen at once, so thismethod gets called for each row in your table. But table views with a large number of rows display only a smallfraction of their total items at a given time. It’s most efficient for table views to only ask for the cell for rowsthat are being displayed, and that’s what tableView:cellForRowAtIndexPath: allows the table view todo.
For any given row in the table, fetch the corresponding entry in the toDoItems array and then set the cell’stext label to the item’s name.
To display cells in your table
1. In the project navigator, select XYZToDoListViewController.m.
Tutorial: Add DataDisplay the Data
2013-10-22 | Copyright © 2013 Apple Inc. All Rights Reserved.
100
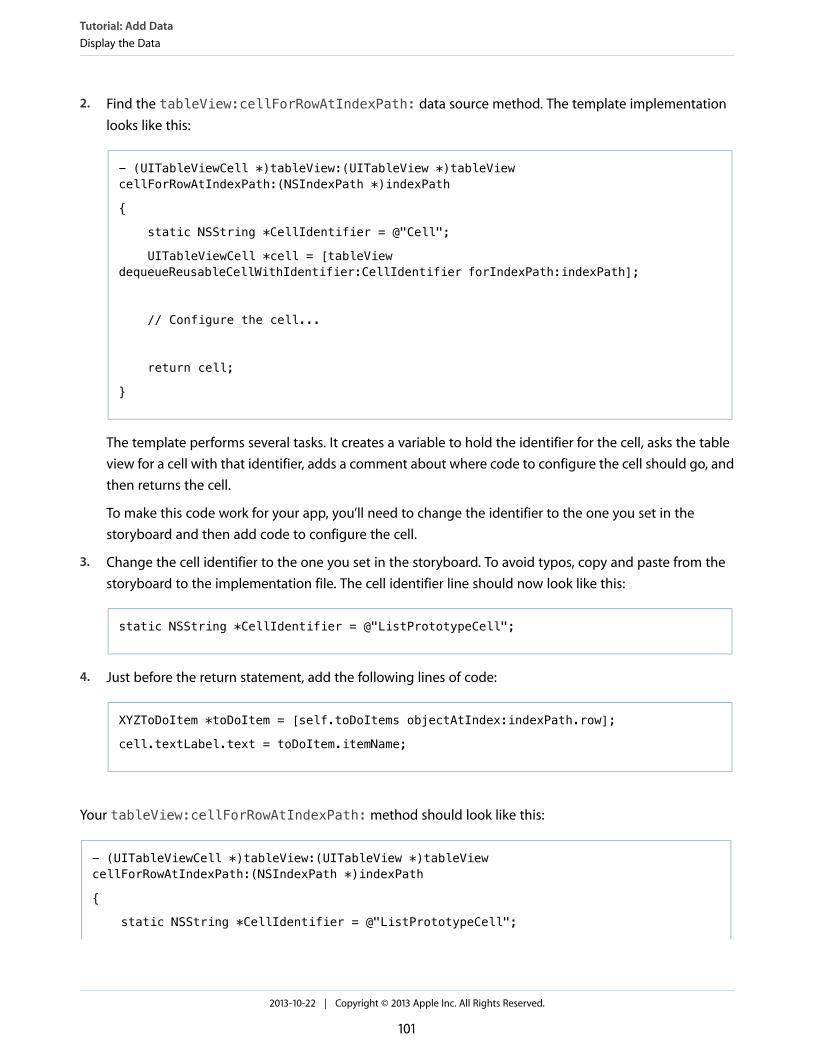
2. Find the tableView:cellForRowAtIndexPath: data source method. The template implementationlooks like this:
- (UITableViewCell *)tableView:(UITableView *)tableViewcellForRowAtIndexPath:(NSIndexPath *)indexPath
{
static NSString *CellIdentifier = @"Cell";
UITableViewCell *cell = [tableViewdequeueReusableCellWithIdentifier:CellIdentifier forIndexPath:indexPath];
// Configure the cell...
return cell;
}
The template performs several tasks. It creates a variable to hold the identifier for the cell, asks the tableview for a cell with that identifier, adds a comment about where code to configure the cell should go, andthen returns the cell.
To make this code work for your app, you’ll need to change the identifier to the one you set in thestoryboard and then add code to configure the cell.
3. Change the cell identifier to the one you set in the storyboard. To avoid typos, copy and paste from thestoryboard to the implementation file. The cell identifier line should now look like this:
static NSString *CellIdentifier = @"ListPrototypeCell";
4. Just before the return statement, add the following lines of code:
XYZToDoItem *toDoItem = [self.toDoItems objectAtIndex:indexPath.row];
cell.textLabel.text = toDoItem.itemName;
Your tableView:cellForRowAtIndexPath: method should look like this:
- (UITableViewCell *)tableView:(UITableView *)tableViewcellForRowAtIndexPath:(NSIndexPath *)indexPath
{
static NSString *CellIdentifier = @"ListPrototypeCell";
Tutorial: Add DataDisplay the Data
2013-10-22 | Copyright © 2013 Apple Inc. All Rights Reserved.
101

UITableViewCell *cell = [tableViewdequeueReusableCellWithIdentifier:CellIdentifier forIndexPath:indexPath];
XYZToDoItem *toDoItem = [self.toDoItems objectAtIndex:indexPath.row];
cell.textLabel.text = toDoItem.itemName;
return cell;
}
Checkpoint: Run your app. The list of items you added in loadInitialData should show up as cells in yourtable view.
Mark Items as CompletedA to-do list isn’t much good if you can never mark items as completed. Now, you’ll add support for that. Asimple interface would be to have the completion state toggle when the user taps the cell and to displaycompleted items with a checkmark next to them. Fortunately, table views come with some built-in behaviorthat you can take advantage of to implement this simple interface—specifically, table views notify their delegatewhen the user taps a cell. So the task is to write the code that will respond to the user tapping a to-do item inthe table.
Xcode already made XYZToDoListViewController the delegate of the table view when you configured itin the storyboard. All you have to do is implement the tableView:didSelectRowAtIndexPath: delegatemethod to respond to user taps and update your to-do list items appropriately.
When a cell gets selected, the table view calls the tableView:didSelectRowAtIndexPath: delegatemethod to see how it should handle the selection. In this method, you’ll write code to update the to-do item’scompletion state.
To mark an item as completed or uncompleted
1. In the project navigator, select XYZToDoListViewController.m.
2. Add the following lines to the end of the file, just above the @end line:
#pragma mark - Table view delegate
- (void)tableView:(UITableView *)tableViewdidSelectRowAtIndexPath:(NSIndexPath *)indexPath
{
Tutorial: Add DataMark Items as Completed
2013-10-22 | Copyright © 2013 Apple Inc. All Rights Reserved.
102
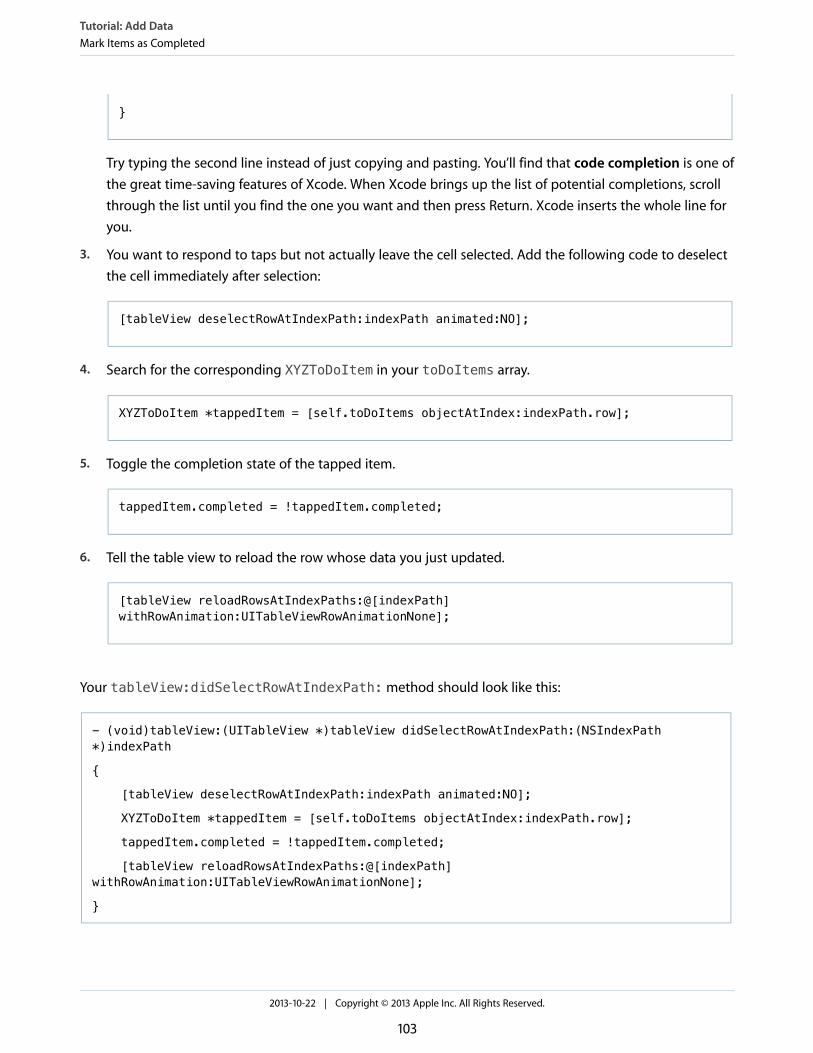
}
Try typing the second line instead of just copying and pasting. You’ll find that code completion is one ofthe great time-saving features of Xcode. When Xcode brings up the list of potential completions, scrollthrough the list until you find the one you want and then press Return. Xcode inserts the whole line foryou.
3. You want to respond to taps but not actually leave the cell selected. Add the following code to deselectthe cell immediately after selection:
[tableView deselectRowAtIndexPath:indexPath animated:NO];
4. Search for the corresponding XYZToDoItem in your toDoItems array.
XYZToDoItem *tappedItem = [self.toDoItems objectAtIndex:indexPath.row];
5. Toggle the completion state of the tapped item.
tappedItem.completed = !tappedItem.completed;
6. Tell the table view to reload the row whose data you just updated.
[tableView reloadRowsAtIndexPaths:@[indexPath]withRowAnimation:UITableViewRowAnimationNone];
Your tableView:didSelectRowAtIndexPath: method should look like this:
- (void)tableView:(UITableView *)tableView didSelectRowAtIndexPath:(NSIndexPath*)indexPath
{
[tableView deselectRowAtIndexPath:indexPath animated:NO];
XYZToDoItem *tappedItem = [self.toDoItems objectAtIndex:indexPath.row];
tappedItem.completed = !tappedItem.completed;
[tableView reloadRowsAtIndexPaths:@[indexPath]withRowAnimation:UITableViewRowAnimationNone];
}
Tutorial: Add DataMark Items as Completed
2013-10-22 | Copyright © 2013 Apple Inc. All Rights Reserved.
103

Checkpoint: Run your app. The list of items you added in loadInitialData is visible as cells in your tableview. But when you tap items, nothing seems to happen. Why not?
The reason is that you haven’t configured the table view cell to display the completion state of an item. To doso, you need to go back to the tableView:cellForRowAtIndexPath: method and configure the cell todisplay an indicator when an item is completed.
One way to indicate that an item is completed is to put a checkmark next to it. Luckily, table view cells canhave a cell accessory on the right side. By default, there’s no accessory; however, you can change the cell todisplay a different accessory, one of which is a checkmark. All you have to do is set the cell accessory basedon the completion state of the to-do item.
To display an item’s completion state
1. Go to the tableView:cellForRowAtIndexPath: method.
2. Add the following code just below the line that sets the text label of the cell:
if (toDoItem.completed) {
cell.accessoryType = UITableViewCellAccessoryCheckmark;
} else {
cell.accessoryType = UITableViewCellAccessoryNone;
}
Your tableView:cellForRowAtIndexPath: method should now look like this:
- (UITableViewCell *)tableView:(UITableView *)tableViewcellForRowAtIndexPath:(NSIndexPath *)indexPath
{
static NSString *CellIdentifier = @"ListPrototypeCell";
UITableViewCell *cell = [tableViewdequeueReusableCellWithIdentifier:CellIdentifier forIndexPath:indexPath];
XYZToDoItem *toDoItem = [self.toDoItems objectAtIndex:indexPath.row];
cell.textLabel.text = toDoItem.itemName;
if (toDoItem.completed) {
cell.accessoryType = UITableViewCellAccessoryCheckmark;
} else {
cell.accessoryType = UITableViewCellAccessoryNone;
}
Tutorial: Add DataMark Items as Completed
2013-10-22 | Copyright © 2013 Apple Inc. All Rights Reserved.
104

return cell;
}
Checkpoint: Run your app. The list of items you added in loadInitialData is visible as cells in your tableview. When you tap an item, a checkmark should appear next to it. If you tap the same item again, the checkmarkdisappears.
Add New ItemsThe final step in creating the to-do list app’s functionality is implementing the ability to add an item. When auser enters an item name in the text field on the XYZAddToDoItemViewController scene and taps theDone button, you want the view controller to create a new list item and pass it back to theXYZToDoListViewController to display in the to-do list.
First, you need to have a list item to configure. Just as with the table view, the view controller is the logicalplace to connect the interface to the model. Give the XYZAddToDoItemViewController a property to holdthe new to-do item.
To add an XYZToDoItem to the XYZAddToDoItemViewController class
1. In the project navigator, select XYZAddToDoItemViewController.h.
Because you’ll need to access the list item from your table view controller later on, it’s important to makethis a public property. That’s why you declare it in the interface file, XYZAddToDoItemViewController.h,instead of in the implementation file, XYZAddToDoItemViewController.m.
2. Add an import declaration to the XYZToDoItem class above the @interface line.
#import "XYZToDoItem.h"
3. Add a toDoItem property to the interface.
@interface XYZAddToDoItemViewController : UIViewController
@property XYZToDoItem *toDoItem;
@end
Tutorial: Add DataAdd New Items
2013-10-22 | Copyright © 2013 Apple Inc. All Rights Reserved.
105

To get the name of the new item, the view controller needs access to the contents of the text field where theuser enters the name. To do this, create a connection from the XYZAddToDoItemViewController class thatconnects to the text field in your storyboard.
To connect the text field to your view controller
1. In the outline view, select the XYZAddToDoItemViewController object.
2. Click the Assistant button in the upper right of the window’s toolbar to open the assistant editor.
The editor on the right should appear with XYZAddToDoItemViewController.m displayed. If it isn’tdisplayed, click the filename in the editor on the right and choose XYZAddToDoItemViewController.m.
The assistant editor allows you to have two files open at once, making it possible to perform operationsbetween them—for example, tying a property in your source file with an object in your interface.
3. Select the text field in your storyboard.
Tutorial: Add DataAdd New Items
2013-10-22 | Copyright © 2013 Apple Inc. All Rights Reserved.
106

4. Control-drag from the text field on your canvas to the code display in the editor on the right, stoppingthe drag at the line just below the @interface line in XYZAddToDoItemViewController.m.
5. In the dialog that appears, for Name, type textField.
Leave the rest of the options as they are. Your dialog should look like this:
6. Click Connect.
Xcode adds the necessary code to XYZAddToDoItemViewController.m to store a pointer to the textfield and configures the storyboard to set up that connection.
Tutorial: Add DataAdd New Items
2013-10-22 | Copyright © 2013 Apple Inc. All Rights Reserved.
107

Additionally, you need to know when to create the item. You want to create the item only if the Done buttonwas tapped. To do this, add the Done button as an outlet.
To connect the Done button to your view controller
1. In your storyboard, open the assistant editor, and set the rightmost window toXYZAddToDoItemViewController.m.
2. Select the Done button in your storyboard.
3. Control-drag from the Done button on your canvas to the code display in the editor on the right, stoppingthe drag at the line just below your textField property in XYZAddToDoItemViewController.m.
4. In the dialog that appears, for Name, type doneButton.
Leave the rest of the options as they are. Your dialog should look like this:
5. Click Connect.
You now have a way to identify the Done button. Because you want to create an item when the Done buttonis tapped, you need to know when that happens.
When the user taps the Done button, it kicks off an unwind segue back to the to-do list—that’s the interfaceyou configured in the second tutorial. Before a segue executes, the system gives the view controller involveda chance to prepare by calling prepareForSegue:. This is exactly the point at which you want to check tosee whether the user tapped the Done button, and if so, create a new to-do item. You can check which oneof the buttons got tapped, and if it was the Done button, create the item.
To create an item after tapping the Done button
1. Select XYZAddToDoItemViewController.m in the project navigator.
2. Add the prepareForSegue: method below the @implementation line:
- (void) prepareForSegue:(UIStoryboardSegue *)segue sender:(id)sender
{
}
Tutorial: Add DataAdd New Items
2013-10-22 | Copyright © 2013 Apple Inc. All Rights Reserved.
108

3. In the method, see whether the Done button was tapped.
If it wasn’t, instead of saving the item, you want the method to return without doing anything else.
if (sender != self.doneButton) return;
4. See whether there’s text in the text field.
if (self.textField.text.length > 0) {
}
5. If there’s text, create a new item and give it the name of the text in the text field. Also, ensure that thecompleted state is set to NO.
self.toDoItem = [[XYZToDoItem alloc] init];
self.toDoItem.itemName = self.textField.text;
self.toDoItem.completed = NO;
If there isn’t text, you don’t want to save the item, so you won’t do anything else.
Your prepareForSegue: method should look like this:
- (void) prepareForSegue:(UIStoryboardSegue *)segue sender:(id)sender
{
if (sender != self.doneButton) return;
if (self.textField.text.length > 0) {
self.toDoItem = [[XYZToDoItem alloc] init];
self.toDoItem.itemName = self.textField.text;
self.toDoItem.completed = NO;
}
}
Now that you’ve created a new item, you need to pass the item back to XYZToDoListViewController sothat it can add the item to the to-do list. To accomplish this, you need to revisit the unwindToList: methodthat you wrote in the second tutorial. This method gets called when the XYZAddToDoItemViewControllerscene closes, which happens when the user taps either the Cancel or the Done button.
Tutorial: Add DataAdd New Items
2013-10-22 | Copyright © 2013 Apple Inc. All Rights Reserved.
109

The unwindToList: method takes a segue as a parameter, like all methods that are used as targets for anunwind segue. The segue parameter is the segue that unwinds from XYZAddToDoItemViewControllerback to XYZToDoListViewController. Because a segue is a transition between two view controllers, it isaware of its source view controller—XYZAddToDoItemViewController. By asking the segue object for itssource view controller, you can access any data stored in the source view controller in the unwindToList:method. In this case, you want to access toDoItem. If it’s nil, the item was never created—either the textfield had no text or the user tapped the Cancel button. If there’s a value for toDoItem, you retrieve the item,add it to your toDoItems array, and display it in the to-do list by reloading the data in the table view.
To store and display the new item
1. In the project navigator, select XYZToDoListViewController.m.
2. Add an import declaration to the XYZAddToDoItemViewController class above the @interface line.
#import "XYZAddToDoItemViewController.h"
3. Find the unwindToList: method you added in the second tutorial.
4. In this method, retrieve the source view controller—the controller you’re unwinding from,XYZAddToDoItemViewController.
XYZAddToDoItemViewController *source = [segue sourceViewController];
5. Retrieve the controller’s to-do item.
XYZToDoItem *item = source.toDoItem;
This is the item that was created when the Done button was tapped.
6. See whether the item exists.
if (item != nil) {
}
If it’s nil, either the Cancel button closed the screen or the text field had no text, so you don’t want tosave the item.
If it does exist, add the item to your toDoItems array.
Tutorial: Add DataAdd New Items
2013-10-22 | Copyright © 2013 Apple Inc. All Rights Reserved.
110

[self.toDoItems addObject:item];
7. Reload the data in your table.
Because the table view doesn’t keep track of its data, it’s the responsibility of the data source—in thiscase, your table view controller—to notify the table view when there’s new data for it to display.
[self.tableView reloadData];
Your unwindToList: method should look like this:
- (IBAction)unwindToList:(UIStoryboardSegue *)segue
{
XYZAddToDoItemViewController *source = [segue sourceViewController];
XYZToDoItem *item = source.toDoItem;
if (item != nil) {
[self.toDoItems addObject:item];
[self.tableView reloadData];
}
}
Checkpoint: Run your app. Now when you click the Add button (+) and create a new item, you should see itin your to-do list. Congratulations! You’ve created an app that takes input from the user, stores it in an object,and passes that object between two view controllers. This is the foundation of moving data between scenesin a storyboard-based app.
RecapYou’re almost done with this introductory tour of developing apps for iOS. The final section gives you moreinformation about how to find your way around the documentation, and it suggests some next steps youmight take as you learn how to create more advanced apps.
Tutorial: Add DataRecap
2013-10-22 | Copyright © 2013 Apple Inc. All Rights Reserved.
111

● “iOS Technologies” (page 113)
● “Finding Information” (page 116)
● “Where to Go from Here” (page 128)
2013-10-22 | Copyright © 2013 Apple Inc. All Rights Reserved.
112
Next Steps

You’ve just learned how to write an app with a simple user interface and basic behavior. At this point, you maybe thinking about implementing additional behavior that will turn your project into a full-featured app.
As you consider which features you want to add, remember that you don’t have to implement everything fromscratch. iOS provides frameworks that define particular sets of functionality—from gaming and media tosecurity and data management—which you can integrate into your app. You’ve already used the UIKit frameworkto design your app’s user interface, and the Foundation framework to incorporate common data structuresand behavior into your code. These are two of the most common frameworks used in iOS app development,but there are many more available to you.
This chapter is a high-level overview of technologies and frameworks that you might consider adopting inyour app. Use this chapter as a starting point for possible technologies to explore. For a full overview of thetechnologies available in iOS, see iOS Technology Overview .
User InterfaceiOS has many frameworks and technologies for creating and enhancing your app’s user interface.
UIKit. The UIKit framework provides classes to create a touch-based user interface. Because all iOS apps arebased on UIKit, you can’t ship an app without this framework. UIKit provides the infrastructure for drawing tothe screen, handling events, and creating common user interface elements. UIKit also organizes a complexapp by managing the content that’s displayed onscreen. For more information, see UIKit Framework Reference .
Core Graphics. Core Graphics—a low-level, C-based framework—is the workhorse for handling high-qualityvector graphics, path-based drawing, transformations, images, data management, and more. Of course, thesimplest and most efficient way to create graphics in iOS is to use prerendered images with the standard viewsand controls of the UIKit framework, letting iOS do the drawing. Because UIKit, a higher-level framework, also
2013-10-22 | Copyright © 2013 Apple Inc. All Rights Reserved.
113
iOS Technologies

provides classes for custom drawing—including paths, colors, patterns, gradients, images, text, andtransformations—use it instead of Core Graphics whenever possible. For more information, see Core GraphicsFramework Reference .
Core Animation. Core Animation is a technology that allows you to make advanced animations and visualeffects. UIKit provides animations that are built on top of the Core Animation technology. If you need advancedanimations beyond the capabilities of UIKit, you can use Core Animation directly. The Core Animation interfacesare contained in the Quartz Core framework. Using Core Animation, you create a hierarchy of layer objectsthat you manipulate, rotate, scale, transform, and so forth. By using Core Animation’s familiar view-likeabstraction, you can create dynamic user interfaces without having to use low-level graphics APIs such asOpenGL ES. For more information, see Core Animation Programming Guide .
GamesYou have a number of different technologies to explore when developing games for iOS.
Game Kit. The Game Kit framework provides leaderboards, achievements, and other features to add to youriOS game. For more information, see Game Kit Framework Reference .
Sprite Kit. The Sprite Kit framework provides graphics support for animating arbitrary textured images, orsprites . In addition to being a graphics engine, it also includes physics support to bring objects to life. SpriteKit is a good choice for games and other apps that require complex animation chains. (For other kinds of userinterface animation, use Core Animation instead.) For more information, see Sprite Kit Programming Guide .
OpenGL ES. OpenGL ES is a low-level framework that provides tools to support hardware-accelerated 2D and3D drawing. Apple’s implementation of the OpenGL ES standard works closely with the device hardware toprovide high frame rates for full-screen, game-style apps. Because OpenGL ES is a low-level, hardware-focusedAPI, it has a steep learning curve and a significant effect on the overall design of your app. (For apps thatrequire high-performance graphics for more specialized uses, consider using Sprite Kit or Core Animation.) Formore information, see OpenGL ES Programming Guide for iOS .
Game Controller. The Game Controller framework makes it easy to find controllers connected to a Mac or iOSdevice. When a controller is discovered on your device, your game reads control inputs as part of its normalgameplay. These controllers provide new ways for players to control your game. Apple has designedspecifications for hardware controllers to ensure that all of the controllers have consistent sets of controlelements that both players and game designers can rely on. For more information, see Game ControllerFramework Reference .
iOS TechnologiesGames
2013-10-22 | Copyright © 2013 Apple Inc. All Rights Reserved.
114

DataWhen working with your app’s data, consider what capabilities are available to you in existing frameworks.
Core Data. The Core Data framework manages an app’s data model. With Core Data, you create model objects,known as managed objects. You manage relationships between those objects and make changes to the datathrough the framework. Core Data takes advantage of the built-in SQLite technology to store and managedata efficiently. For more information, see Core Data Framework Reference .
Foundation. You worked with Foundation earlier in this guide. The Foundation framework defines a base layerof Objective-C classes. In addition to providing a set of useful primitive object classes, this framework introducesseveral paradigms that define behaviors not covered by the Objective-C language. Among other things, thisframework includes classes representing basic data types, such as strings and numbers, and collection classesfor storing other objects. For more information, see Foundation Framework Reference .
MediaMedia frameworks provide a number of capabilities for working with audio and video in your app.
AV Foundation. AV Foundation is one of several frameworks that you can use to play and create time-basedaudiovisual media. For example, you can use AV Foundation to examine, create, edit, or reencode media files.You can also use it to get input streams from devices and manipulate video during real-time capture andplayback. For more information, see AV Foundation Framework Reference .
iOS TechnologiesData
2013-10-22 | Copyright © 2013 Apple Inc. All Rights Reserved.
115

As you develop your app, you’ll want the information you’ve learned—and more—at your fingertips. You canget all the information you need without leaving Xcode.
Xcode comes with a large documentation suite containing a number of different types of documents, includinggeneral and conceptual guides, framework and class references, and focused help articles. You can access thisdocumentation in a number of ways, such as right-clicking on areas of Xcode to learn how to use them, openingthe Quick Help pane in the main project window for context-aware code help, or searching in the DocumentationWindow to find guides and full API reference.
Use Contextual Help Articles for Xcode GuidanceTo get help when using Xcode itself, take a look at help articles.Help articles show how to accomplish commontasks, such as creating a new class, setting a custom class in Interface Builder, and resolving issues with AutoLayout.
2013-10-22 | Copyright © 2013 Apple Inc. All Rights Reserved.
116
Finding Information
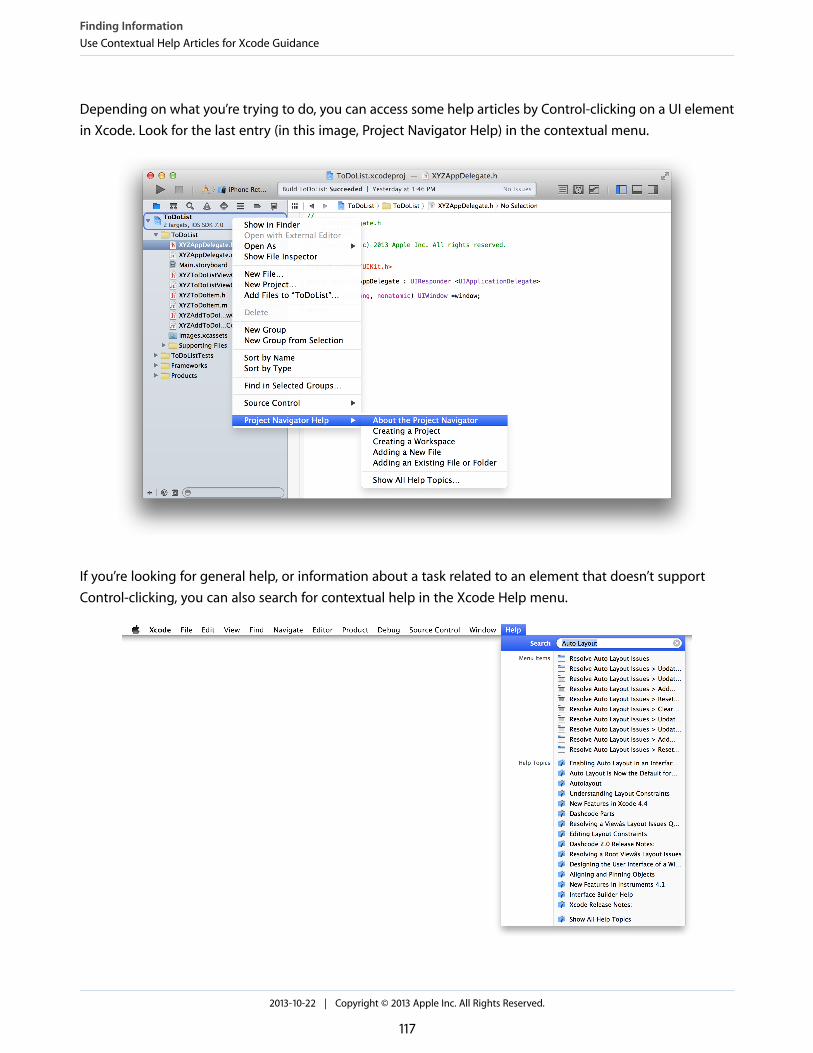
Depending on what you’re trying to do, you can access some help articles by Control-clicking on a UI elementin Xcode. Look for the last entry (in this image, Project Navigator Help) in the contextual menu.
If you’re looking for general help, or information about a task related to an element that doesn’t supportControl-clicking, you can also search for contextual help in the Xcode Help menu.
Finding InformationUse Contextual Help Articles for Xcode Guidance
2013-10-22 | Copyright © 2013 Apple Inc. All Rights Reserved.
117

Use Guides for General and Conceptual OverviewsTo learn about a new technology or to gain a deeper understanding of how the different classes in a frameworkwork together, look at one of the conceptual guides. Most Cocoa frameworks and technologies haveprogrammingguidesassociatedwiththem,suchasSpriteKitProgrammingGuide ,ProgrammingwithObjective-C ,and Location and Maps Programming Guide .
To view these documents in Xcode, use thedocumentation viewerwindow, which you can access by choosingHelp > “Documentation and API Reference” (Option–Command–Question Mark). Simply type the name of atechnology, such as Sprite Kit.
The results are ordered to be most helpful when you are writing code. This means that you’ll see API referenceentries listed first, and then SDK and Tools guides.
Finding InformationUse Guides for General and Conceptual Overviews
2013-10-22 | Copyright © 2013 Apple Inc. All Rights Reserved.
118

If a suitable result doesn’t appear in the pop-up list, choose Show All Results to display a complete set of resultsthat you can filter.
Use API Reference for Class InformationWhen you’ve read a guide to learn about the different parts of a technology and you start writing code thatuses the technology, you’ll probably find that you need to know more about what an individual class can do,or that you need to learn the correct way to call a particular method. This information is provided by APIreference documents.
Finding InformationUse API Reference for Class Information
2013-10-22 | Copyright © 2013 Apple Inc. All Rights Reserved.
119

For example, for more information on the NSString class that you used in the earlier tutorials, just type thename of the class in the documentation viewer window’s search field.
Finding InformationUse API Reference for Class Information
2013-10-22 | Copyright © 2013 Apple Inc. All Rights Reserved.
120

The top hit is usually the one you want; press Return to select it, and you see the API reference for that class.
Finding InformationUse API Reference for Class Information
2013-10-22 | Copyright © 2013 Apple Inc. All Rights Reserved.
121

API reference documentation is designed to give you quick access to information about individual classes,including the list of methods the class provides, and information such as the parent class and adopted protocols.Click “More related items” to see to see general information about the class.
The Related Items popover also shows a list of related guides. For NSString, for example, you might want amore conceptual overview rather than delving into reference material, so you should read String ProgrammingGuide .
Finding InformationUse API Reference for Class Information
2013-10-22 | Copyright © 2013 Apple Inc. All Rights Reserved.
122

In addition to describing a specific method or property, API reference documents also provide an overview ofall the tasks that a class can perform.
Finding InformationUse API Reference for Class Information
2013-10-22 | Copyright © 2013 Apple Inc. All Rights Reserved.
123

Use Quick Help for Contextual Source Code InformationWhen you’re writing code in the source editor, you have easy access to API reference documentation in theQuick Help pane (choose View > Utilities > Show Quick Help Inspector). The Quick Help pane updates as youwrite code, showing information about the symbol you’re currently typing.
Finding InformationUse Quick Help for Contextual Source Code Information
2013-10-22 | Copyright © 2013 Apple Inc. All Rights Reserved.
124

Alternatively, you can Option-Click a symbol in the source editor to display a pop-up window with the QuickHelp information.
From the Quick Help pane or pop-up window, you can open the API Reference in the separate documentationviewer window, or you can view the original header file containing the declaration for the symbol you clicked.
Finding InformationUse Quick Help for Contextual Source Code Information
2013-10-22 | Copyright © 2013 Apple Inc. All Rights Reserved.
125

Use Sample Code to See Real-World UsageIn addition to written documentation, you also have access to a library of sample code. Whenever you lookat quick help, or guides and reference in the documentation viewer window, you’ll see entries showing relevantsample code projects for the given technology or class.
Click one of the sample code entries to download and open a project in Xcode so that you can examine thecode.
Finding InformationUse Sample Code to See Real-World Usage
2013-10-22 | Copyright © 2013 Apple Inc. All Rights Reserved.
126

In addition to having code comments throughout the project, some of the larger code samples also haveaccompanying documents. For example, the Sprite Kit Adventure project is accompanied by code:ExplainedAdventure .
Finding InformationUse Sample Code to See Real-World Usage
2013-10-22 | Copyright © 2013 Apple Inc. All Rights Reserved.
127

In Start Developing iOS Apps Today , you learned the basics of iOS app development. At this point, you’re readyto start developing your first full-featured app. Although taking an app from a simple concept to the App Storeisn’t a small task, the process and practices you’ve learned in this document will guide you in the right direction.
Here are a few more pointers on where to go from here:
● Register as a developer.
“Managing Accounts” in App Distribution Guide walks you through the process of registering as an Appledeveloper.
● Learn to design beautiful app interfaces.
iOS Human Interface Guidelines teaches you how to make your app consistent with the user interfaceconventions for iOS.
● Learn the language.
Programming with Objective-C describes how to define classes, send messages, encapsulate data, andaccomplish a variety of other tasks with the Objective-C programming language.
● Learn to develop great apps.
iOS App Programming Guide explains the essential things you must know and do when developing aniOS app.
● Learn about the technologies available to you.
2013-10-22 | Copyright © 2013 Apple Inc. All Rights Reserved.
128
Where to Go from Here

iOS Technology Overview describes the frameworks and other technologies that are available to your appin iOS.
● Access the documentation.
“Finding Information” (page 116) shows you how to make the most of the documentation available to you.
● Debug and test your app.
“Debug Your App” in Xcode Overview teaches you how to thoroughly debug and test your app in Xcode.
● Ship your app.
App Distribution Guide walks you through the process of provisioning devices for testing and submittingapps to the App Store.
Taking the ToDoList App to the Next LevelThe to-do list app you just created benefits from numerous built-in behaviors. You can continue to experimentwith this app to enhance your understanding, or you can start something new. If you do continue with theto-do list app, here are some areas to investigate:
● Your to-do list disappears when you quit and relaunch the app. You might want to explore ways to makethe list persist over time.
● You’re using the default appearance for all of the controls in your app. UIKit includes features for customizingthe appearance of many controls. Explore different user interface options using this technology.
● You’ve given the user a way to add items to the list and mark them as completed, but there’s no facilityfor deleting items. Table views have built-in behavior for supporting editing, including deletion andreordering of rows, which you might consider incorporating into your app.
As you continue developing iOS apps, you’ll find that there are a vast number of concepts and technologiesleft to explore, including localization, accessibility, and appearance customization. Start by defining a directionthat interests you. Remember to put concepts into practice as you learn them. When you encounter aninteresting new technology, framework, or design pattern, don’t be afraid to write a small app to test it out.
Although the breadth of what you can do may seem intimidating, by adopting the divide-and-conquer approachshown in this document, you’ll find that you ship your first app quickly. After you have an app in the App Store,you can continue to incorporate additional features incrementally. There are always new ways to keep yourcustomers engaged and looking forward to the next great thing.
Where to Go from HereTaking the ToDoList App to the Next Level
2013-10-22 | Copyright © 2013 Apple Inc. All Rights Reserved.
129

This table describes the changes to Start Developing iOS Apps Today .
NotesDate
Rewritten as a multipart tutorial to provide the fundamental skills neededto create an iOS app.
2013-10-22
2013-10-22 | Copyright © 2013 Apple Inc. All Rights Reserved.
130
Document Revision History

Apple Inc.Copyright © 2013 Apple Inc.All rights reserved.
No part of this publication may be reproduced,stored in a retrieval system, or transmitted, in anyform or by any means, mechanical, electronic,photocopying, recording, or otherwise, withoutprior written permission of Apple Inc., with thefollowing exceptions: Any person is herebyauthorized to store documentation on a singlecomputer for personal use only and to printcopies of documentation for personal useprovided that the documentation containsApple’s copyright notice.
No licenses, express or implied, are granted withrespect to any of the technology described in thisdocument. Apple retains all intellectual propertyrights associated with the technology describedin this document. This document is intended toassist application developers to developapplications only for Apple-labeled computers.
Apple Inc.1 Infinite LoopCupertino, CA 95014408-996-1010
Apple, the Apple logo, Cocoa, Cocoa Touch, iPad,iPhone, iPod, iPod touch, Mac, Numbers,Objective-C, OS X, Quartz, and Xcode aretrademarks of Apple Inc., registered in the U.S.and other countries.
Retina is a trademark of Apple Inc.
App Store is a service mark of Apple Inc.
OpenGL is a registered trademark of SiliconGraphics, Inc.
iOS is a trademark or registered trademark ofCisco in the U.S. and other countries and is usedunder license.
Even though Apple has reviewed this document,APPLE MAKES NO WARRANTY OR REPRESENTATION,EITHER EXPRESS OR IMPLIED, WITH RESPECT TO THISDOCUMENT, ITS QUALITY, ACCURACY,MERCHANTABILITY, OR FITNESS FOR A PARTICULARPURPOSE.ASARESULT, THISDOCUMENT ISPROVIDED“AS IS,” AND YOU, THE READER, ARE ASSUMING THEENTIRE RISK AS TO ITS QUALITY AND ACCURACY.
IN NO EVENT WILL APPLE BE LIABLE FOR DIRECT,INDIRECT, SPECIAL, INCIDENTAL, ORCONSEQUENTIALDAMAGES RESULTING FROM ANY DEFECT ORINACCURACY IN THIS DOCUMENT, even if advised ofthe possibility of such damages.
THE WARRANTY AND REMEDIES SET FORTH ABOVEARE EXCLUSIVE AND IN LIEU OF ALL OTHERS, ORALOR WRITTEN, EXPRESS OR IMPLIED. No Apple dealer,agent, or employee is authorized to make anymodification, extension, or addition to this warranty.
Some states do not allow the exclusion or limitationof implied warranties or liability for incidental orconsequential damages, so the above limitation orexclusion may not apply to you. This warranty givesyou specific legal rights, and youmay also have otherrights which vary from state to state.