THE ARCHAEOLOGICAL SURVEY OF SUDANESE NUBIA ...
41
SUDAN ARCHAEOLOGICAL RESEARCH SOCIETY PUBLICATION NUMBER 23 THE ARCHAEOLOGICAL SURVEY OF SUDANESE NUBIA 1963–69 The Pharaonic sites edited by David N. Edwards by David N. Edwards and Anthony J. Mills with contributions by Lauriane Mielle Vivian Davies
-
Upload
khangminh22 -
Category
Documents
-
view
2 -
download
0
Transcript of THE ARCHAEOLOGICAL SURVEY OF SUDANESE NUBIA ...

SUDAN ARCHAEOLOGICAL RESEARCH SOCIETYPUBLICATION NUMBER 23
THE ARCHAEOLOGICAL SURVEY OF SUDANESE NUBIA 1963–69
The Pharaonic sites
edited by
David N. Edwards
by
David N. Edwards and Anthony J. Mills
with contributions by
Lauriane Mielle
Vivian Davies
Archaeopress Publishing LtdSummertown Pavilion18-24 Middle WaySummertownOxford OX2 7LGwww.archaeopress.com
ISBN 978-1-78969-649-3ISBN 978-1-78969-650-9 (e-Pdf)
© David N. Edwards and Archaeopress 2020
Front Cover: A view towards Kulb from Akasha West, 2013. (photo courtesy of Derek Welsby)Back Cover (top): A view upriver towards Shelfak from near Diffinarti, October 1966 (photo ASSN F/333:1)Back Cover (bottom): Inscription of Thutmose I, Akasha West, 2013. (photo courtesy of Derek Welsby)
All rights reserved. No part of this book may be reproduced, or transmitted, in any form or by any means, electronic, mechanical, photocopying or otherwise, without the prior written permission of the copyright owners.
This book is available direct from Archaeopress or from our website www.archaeopress.com
In memory of W.B. Emery, who introduced me to Nubia, of Nigm ed-Din Mohammed Sharif, who welcomed me to his homeland,
and of William Y. Adams, who offered me the Batn el-Hagar as a place to work
A.J. Mills


v
Contents
List of Figures ix
List of Tables xxvii
1. Introduction 1 The Archaeological Survey of Sudanese Nubia (ASSN) 1 The ASSN Archive 4 From Archive to Publication 7 Site registration and the Archaeological Map of Sudan (AMS) 8 Nubian toponyms 11 Acknowledgements 12
2. Gemai – Murshid 14 11-D-5 Gemai East (Affu) (= FNE 15) 18 11-D-36 Gemai West (Gintil) 20 11-D-37 Gemai West 23 11-I-59* Murshid West 25 11-I-5 Murshid East (Kermala) (= FNE 32) 26 11-I-7 Murshid East (Sigaga) (= FNE 39) 27 11-I-32 Murshid East (Sigaga) (= FNE 41) 29 11-I-34 Murshid East (Sigaga) (= FNE 44) 30 11-H-11 Murshid East (Sigaga) (= FNE 46) 31
3. Saras 32 11-H-7 Saras West 40 11-H-4 Saras West 44 11-H-3 Saras West 46 11-M-11 Saras West (Kieko) 47 11-M-12 Saras West (Kieko) 48 11-M-13 Saras West (Kieko) 49 11-M-6 Saras West 52 11-L-1 Saras – Askut 52 11-L-6 Saras – Askut 58 11-L-7 Saras – Kajnarti 58 11-L-24 Saras West 59 11-L-22 Saras West 60 11-L-18 Saras West 67 11-L-26 Saras – Kajnarti 78 11-L-30 Saras East 101 11-Q-9 Saras East (Kagifarai) 103 11-Q-3 Saras East (Oshiargi) 105 11-Q-10 Saras East (Oshiargi) 108 11-Q-65 Saras East 109
00 ASSN Pharaonic Sites_i-xxviii.indd 500 ASSN Pharaonic Sites_i-xxviii.indd 5 10/02/2020 11:4010/02/2020 11:40

Contents
vi
11-Q-61 Saras East 115 11-Q-59 Saras East 125 11-Q-62 Saras East 135 11-Q-63 Saras East 152 11-Q-60 Saras East 157 11-U-1 Shelfak (Saras West) 163 11-U-11* Shelfak (Saras West) 164 11-U-12* Shelfak (Saras West) 164 11-U-13* Shelfak (Saras West) 165 10-Y-24* Saras West 165
Uronarti 166 10-Y-1 Uronarti 168 10-Y-22* Uronarti 169 10-Y-2 Uronarti 169 10-Y-23* Uronarti 170 10-Y-23 Uronarti 171 10-Y-20* 171 11-Q-57 Saras East 172
4. Semna 183 10-Y-12 Semna West 187 16-E-28 Semna West 193 16-E-21 Semna East 197 16-E-30 Semna East 212 16-E-31 Semna East 214 16-E-32 Semna East 215 Other Semna Sites 217 16-E -57* Semna West (= 16-E-1) 217 16-E-58* Kumma (= 16-E-2) 217 16-E-59* Semna East (Suratab) (= 16-E-8) 218 16-E-51* Semna West (Saidnambi-Saadig) (= 16-E-9) 218 16-E-56* Semna West (Saidnambi) (= 16-E-9) 218 16-E-61* Semna West (= S500) 220 16-E-62* Semna West (= S700) 220 16-E-63* Semna West (= S800) 220 16-E-15 Semna West (= S1000) 220 16-E-64* Semna West Cemetery 221 16-E-65* Semna East (Kumma) (= H200) 221
5. Duweishat – Tangur 222 16-O-12 Attiri-Sorki 227 16-O-27* Duweishat West 235 16-O-24 Duweishat West 236 16-O-25 Duweishat West 239 16-O-2 Duweishat (Jedagur) 243 16-O-15 Duweishat East 251 16-N-18 Duweishat West 254 16-O-1 Duweishat East (= 16-N-1) 256 16-N-11 Duweishat East 257 16-N-13 Duweishat East 260 16-N-14 Duweishat East 266
00 ASSN Pharaonic Sites_i-xxviii.indd 600 ASSN Pharaonic Sites_i-xxviii.indd 6 10/02/2020 11:4010/02/2020 11:40

Contents
vii
16-N-24 Duweishat West 268 16-S-7 Duweishat East 271 16-S-8 Duweishat East 273 16-S-2 Duweishat East 279 16-S-9 Duweishat East 280 16-V-22 Melik en Nasr West 287 The Egyptian Rock Inscription (16-V-22/1) by W.V. Davies 288 16-U-46 Melik en Nasr West 289 16-U-60* Melik en Nasr East (Sahaba) (= 16-U-3) 296 16-U-61* Melik en Nasr East (Sahaba) (= 16-U-4) 296
Tangur – Sonki Inscriptions 297 21-E-11* ‘Tanjur’ – Sonki East (= 21-E-1) 297 21-E-12* ‘Tanjur’ – Sonki East (= 21-E-2) 297 21-E-13* ‘Tanjur’ – Sonki East (= 21-E-3) 297 21-E-14* Sonki East (= 21-E-4) 298 21-E-16* Sonki East (= 21-E-6) 299 21-D-31* ‘Tanjur’ – Sonki West (= 21-D-1) 299 21-D-33* Sonki East (= 21-D-3) 299
6. Ukma – Akasha – Dal 300 21-I-19 Sonki West 304 21-H-16 Ukma West 309 21-H-11 Ukma West (Milamu) 328 21-H-10 Ukma West (Milamu) 336 21-I-34* Ukma West (= 21-H-21) 352 The Egyptian Rock-Inscription [21-I-34*/E17] by W. V. Davies 354 21-S-29 Akasha West 355 The Egyptian Rock-Inscriptions (21-S-29) by W. V. Davies 358 21-S-13 Akasha East 364 21-S-32 Kulb West (Kolatod) 366 21-X-12* Kulb East (Shiragoshe) (= 21-X-1) 370 21-X-13* Kulb East (Dakke) (= 21-X-2) 370 21-V-26 Dal West 371 21-V-20 Dal (Tina) 372 3-B-2 Debba 375 3-B-16 Asruniya Island 375 The Egyptian Rock-Inscriptions [21-V-20], Tina Island – Dal Cataract,
by W. V. Davies 375
7. The Pharaonic Presence in the Batn al-Hajar 378 Gemai – Murshid 379 Saras 380 Semna 386 Duweishat 388 Ukma-Akasha-Dal 390 Chronological perspectives 392 Middle Kingdom 393 New Kingdom 394 Napatan/Dynasty 25 396 Mortuary landscapes and burial communities 396 Larger-scale perspectives 397 Gold mining and processing 398
00 ASSN Pharaonic Sites_i-xxviii.indd 700 ASSN Pharaonic Sites_i-xxviii.indd 7 10/02/2020 11:4010/02/2020 11:40

Contents
viii
Material repertoires 408 Inscriptional evidence 412 Landscape transformations 413
Appendices 415 A. The ASSN Archive 416 B. Site Registration Concordance 422 C. Registered Finds in Sudan National Museum 424
ASSN Archive abbreviations 428Bibliography 428
Arabic Summary 429
00 ASSN Pharaonic Sites_i-xxviii.indd 800 ASSN Pharaonic Sites_i-xxviii.indd 8 10/02/2020 11:4010/02/2020 11:40

ix
Figure 1.01 Northern end of ASSN Survey area, with sites identified during 1964-64 reconnaissance survey, between Gemai and Ambikol (based on Mills 1965, fig.1). 2
Figure 1.02 Southern end of ASSN Survey area, with sites identified during 1964-64 reconnaissance survey, between Semna and Dal (based on Mills 1965, fig.1). 3
Figure 1.03 Survey area between Gemai and Dal. The 180m contour corresponded with the expected high water levels (based on Mills 1965, fig.1). 5
Figure 1.04 Detail of aerial photograph (AP328230) of area of Turmukki island (Melik en Nasr), with site locations marked. 9
Figure 1.05 Detail of ASSN record map for Turmukki island area. 10Figure 1.06 ASSN staff of 1963-64 (reconnaissance survey) at Wadi Halfa. (left to right)
Abdel Ghani Ali, Abdel Hadi Mohammed, ?, Mohammed Hamid, Said Beshir, Reis Ibrahim Mubarek, ’Satur’. 11
Figure 1.07 Reis Ibrahim Mubarek, Lesley Mills, Abdu Ferriq, Arbab Hassan Hafiz, Yusuf Mohammed Yussuf, ?, Mohammed Hamid. 12
Figure 2.01 Northern end of ASSN Survey area at Gemai (Jemey). Detail from air photograph with site locations plotted. 15
Figure 2.02 Composite aerial photograph of Gemai-Murshid area. 16Figure 2.03 Location of [11-D-5] north of the hamlet of Affu, Gemai East. 18Figure 2.04 Examples of pottery recovered by FNE excavations in 1965 (based on Donner
1998, pl.166) (scale c.1:5). 19Figure 2.05 Location of [11-D-36] and [11-D-37] and adjoining sites in Gemai West. 20Figure 2.06 Bowl (11-D-36/1). 20Figure 2.07 Pottery samples from [11-D-36] (scale c.1:4). 21Figure 2.08 Grindstone (11-D-36/2). 21Figure 2.09 Location of [11-D-37] south of Gemai West village. 23Figure 2.10 New Kingdom bowls from [11-D-37]. 23Figure 2.11 ‘Furnace’ structure before excavation. Large jar rim visible at right side. 24Figure 2.12 Excavated ‘furnace’ structure. Date uncertain. 24Figure 2.13 Location of New Kingdom inscription [11-I-59*] at rock drawing station on
west bank, Murshid West. 25Figure 2.14 Location of [11-I-5] near the end of Khor Sila at the Murshid bend; with an
early medieval (’Early Christian’) settlement site [11-I-6] c.200m to NW. 27Figure 2.15 Pottery from ‘Kerma’ burials [11-I-5] (based on Donner 1998, pls 174-175). 28Figure 2.16 Pottery from [11-I-7] identified as potentially of New Kingdom or
‘pre-Meroitic’ date (redrawn from Donner 1998, pls 176, 179). 28Figure 2.17 Location of [11-I-7 = FNE 39], [11-I-32 = FNE 41] and [11-I-34 = FNE 44]
and nearby sites in Sigaga plain, west of Murshid. 28Figure 2.18 View south across river (from site [11-I-21]) to Sigaga area. 30Figure 2.19 Location of rock drawings [11-H-11 = FNE 46] west of Sigaga village,
Murshid East. 31Figure 2.20 Rock drawings [11-H-11 = FNE 46] (after Donner 1998, pl.216,1). No scale. 31
List of Figures
00 ASSN Pharaonic Sites_i-xxviii.indd 900 ASSN Pharaonic Sites_i-xxviii.indd 9 10/02/2020 11:4010/02/2020 11:40

List of Figures
x
Figure 3.01 Aerial photograph composite of northern Saras area. 33Figure 3.02 Aerial photograph composite of south-central areas of Saras and Shelfak.
Location of west bank hilltop above [11-Q-15] indicated, from which both Askut and Shelfak could be seen. 34
Figure 3.03 View towards ridge at river bend at north end of Saras West (site [11-H-5] in foreground). 35
Figure 3.04 View south from northern end of Saras West with houses of Kieko/Kiyyeeko visible, and hills of east bank beyond. 35
Figure 3.05 View north from Diffinarti [11-P-1] showing sand accumulations along west bank of Saras West. 36
Figure 3.06 View towards Shelfak [11-U-1] and west bank from upstream of Diffinarti [11-P-1]. 36
Figure. 3.07 View downriver from near Shelfak [11-U-1] towards Diffinarti [11-P-1] when river levels quite low; with main river channel passing west of Diffinarti. 37
Figure 3.08 Aerial photograph composite of area upstream of Saras between Shelfak and Uronarti. 37
Figure 3.09 Enclosure [11-L-34*], of unknown date in northern part of Saras, facing Mugufil. 38
Figure 3.10 Enclosure [10-Y-24], of unknown date, opposite Uronarti. 39Figure 3.1.1 Location of [11-H-7] on ridge overlooking river bend close to boundary
between Saras and Murshid. 40Figure 3.1.2 Plan of stone huts [11-H-7]. 41Figure 3.1.3 View upstream (south) from [11-H-7]. 41Figure 3.1.4 View downstream (east) from [11-H-7]. Note young dom palms close to river. 41Figure 3.1.5 View north across desert from [11-H-7]. 42Figure 3.1.6 View across Room 1 towards Room 2, [11-H-7]. 42Figure 3.1.7 Room 1 with bowl (1) in centre of room, [11-H-7]. 42Figure 3.1.8 Coarse handmade bowl (11-H-7/1). 42Figure 3.1.9 Coarse handmade bowl (11-H-7/2). 42Figure 3.1.10 Pottery from (11-H-7) (scale 1:4). 43Figure 3.1.11 Location of [11-H-4] on west bank at the north end of Saras, opposite Anksi
(Angsi) village. 44Figure 3.1.12 Pottery sample from [11-H-4] (scale 1:4). 45Figure 3.1.13 Pottery ‘weights’ (11-H-4/1). 45Figure 3.1.14 Location of tomb [11-H-3] in north section of Saras West. 46Figure 3.1.15 Plan and section of tomb [11-H-3]. 46Figure 3.1.16 Location of [11-M-11] and nearby sites on west bank south of Kieku
(Kiyyeeko). 47Figure 3.1.17 Wheelmade cup (11-M-12/1). 48Figure 3.1.18 Grindstones from [11-M-12] ; (4) –top; (3) –bottom. 48Figure 3.1.19 Wheelmade cup and bowl from cache (scale 1:4). 48Figure 3.1.20 Location of [11-M-13] and nearby sites, south of Kieko (Kiyyeeko). 49Figure 3.1.21 Plan of [11-M-13]. 50Figure 3.1.22 View across [11-M-13] to northeast. Hilltop location of [11-H-7] in distance. 50Figure 3.1.23 View across [11-M-13] to southwest. 51Figure 3.1.24 View north across [11-M-13]. 51Figure 3.1.25 Jar (1) outside Room 4 [11-M-13]. 51Figure 3.1.26 View east across Room 3 [11-M-13] with pits in floor. 51Figure 3.1.27 Steatite net-sinker/weight (11-M-13/2). (SNM.19753). 52Figure 3.1.28 Examples of mud weights (?) (11-M-13/2). (SNM.20472). 52Figure 3.1.29 Pottery from [11-M-13] (scale 1:4). 52Figure 3.1.30 Tall necked jar (11-M-13/1). (SNM.16506). 53Figure 3.1.31 Grave 1, [11-M-6]. 54
00 ASSN Pharaonic Sites_i-xxviii.indd 1000 ASSN Pharaonic Sites_i-xxviii.indd 10 10/02/2020 11:4010/02/2020 11:40

List of Figures
xi
Figure 3.1.32 Bowl (1) and jar neck (A) from grave 1 [11-M-6] (scale 1:4). 54Figure.3.1.33 Carinated bowl, (11-M-6/1/1). 54Figure 3.1.34 Grave 2, [11-M-6]. Original burials cleared to south end of grave during
reuse. 55Figure 3.1.35 Pottery from Grave 2, [11-M-6] (1:4). 55Figure 3.1.36 Bowl (11-M-6/2/1) with red slipped upper interior surface. Surface suggests
much organic temper in fabric. 56Figure 3.1.37 Bowl (11-M-6/2/1) with red burnished exterior. 56Figure 3.1.38 Handled bowl (11-M-6/2/2). 56Figure 3.2.1 Sites on Askut-Kajnarti and west bank. 57Figure 3.2.2 Pottery from [11-L-24] (scale 1:4). 59Figure 3.2.3 Plan of cemetery [11-L-22]. 60Figure 3.2.4 Plan and sections Grave 1, [11-L-22]. 61Figure 3.2.5 Grave 1, [11-L-22]. 61Figure 3.2.6 Jar (11-L-22/1/1) (scale 1:4). 61Figure 3.2.7 Plan and sections Grave 2, [11-L-22]. 62Figure 3.2.8 Grave 2, [11-L-22]. 62Figure 3.2.9 Plan and sections Grave 3, [11-L-22]. 62Figure 3.2.10 Grave 3, [11-L-22]. 62Figure 3.2.11 Plan and sections Grave 4, [11-L-22]. 62Figure 3.2.12 Grave 4, [11-L-22]. 63Figure 3.2.13 Grave 4, [11-L-22]. Detail, with scarab (11-L-22/4/1) below neck. 63Figure 3.2.14 Scarab (11-L-22/4/1) (scale 1:1). 63Figure 3.2.15 Scarab (11-L-22/4/1). 63Figure 3.2.16 Plan and sections Grave 5, [11-L-22]. 63Figure 3.2.17 Grave 5, [11-L-22]. 63Figure 3.2.18. Plan and sections Grave 6, [11-L-22]. 64Figure 3.2.19 Grave 6, [11-L-22]. 64Figure 3.2.21 Bowl, pot-stand (scale 1:4) and copper alloy tweezers (scale 1:1) from Grave 6,
[11-L-22]. 64Figure 3.2.22 Bowl (11-L-22/6/1). 64Figure 3.2.23 Copper alloy tweezers (11-L-22/6/2). 64Figure 3.2.24 Plan and section Grave 7, [11-L-22]. 65Figure 3.2.25 Plan and sections Grave 8, [11-L-22]. 65Figure 3.2.26 Grave 8, [11-L-22]. 65Figure 3.2.27 Plan of Grave 9, [11-L-22]. 66Figure 3.2.28 Location of graves [11-L-22] and adjoining sites on west bank opposite Askut
and Kajnarti. 67Figure 3.2.29 Sketch location plan of two groups of tombs [11-L-18]. 68Figure 3.2.30 Plan and section of Grave 1, [11-L-18]. 68Figure 3.2.31 Incomplete bowls from (11-L-18/2) (scale 1:4). 69Figure 3.2.32 Plan and section of Grave 2, [11-L-18]. 69Figure 3.2.33 Plan and section of Grave 3, [11-L-18]. 70Figure 3.2.34 Bowls and jar from (11-L-18/3) (scale 1:4). 70Figure 3.2.35 Bowl (11-L-18/3/1). 71Figure 3.2.36 Jar (11-L-18/3/A). 71Figure 3.2.37 Plan and section of Grave 4, [11-L-18]. 71Figure 3.2.38 Bowl (11-L-18/4/A) (scale 1:4). 72Figure 3.2.39 Plan and section of Grave 5, [11-L-18]. 72Figure 3.2.40 Bowl and bottle from (11-L-18/5) (scale 1:4). 73Figure 3.2.41 Plan and section of Grave 6, [11-L-18]. 73Figure 3.2.42 Plan and section of Grave 7, [11-L-18]. 74Figure 3.2.43 Bowls from Grave 7, [11-L-18] (scale 1:4). 74
00 ASSN Pharaonic Sites_i-xxviii.indd 1100 ASSN Pharaonic Sites_i-xxviii.indd 11 10/02/2020 11:4010/02/2020 11:40

List of Figures
xii
Figure 3.2.44 Bowl (11-L-18/7/1). 74Figure 3.2.45 Plan and section of Grave 8, [11-L-18]. 75Figure 3.2.46 Pottery (scale 1:4) and carnelian ring (11-L-18/8/1) (scale 1:1). 76Figure 3.2.47 Carnelian ring (11-L-18/8/1). 76Figure 3.2.48 Bowl (11-L-18/8/2). 76Figure 3.2.49 Fragments of ‘glass’ (?) (11-L-18/8/8). 76Figure 3.2.50 Sherds of (A-Group?) vessels (scale 1:4) recovered from large pit near Grave
8, [11-L-18]. 77Figure 3.2.51 Kajnarti island. General view towards main area of burials [11-L-26] on
rocky outcrop to north of recently abandoned village. 78Figure 3.2.52 Kajnarti island. View across narrow seasonal channel to Askut island. 78Figure 3.2.53 Excavated area [11-L-26], view across site to east. Note east bank hills
overlooking island. 79Figure 3.2.54 Excavated area [11-L-26], view across site to south (upriver). Grave 10
marked in centre of image. 79Figure 3.2.55 Excavated area [11-L-26], view towards west side of site. 79Figure 3.2.56 Plan of sampled area on south side of hilltop on Kajnarti [11-L-26]. Main
rock outcrops shaded. 80Figure 3.2.57 Scarab – surface find in sample excavation area (11-L-26/0/1). 80Figure 3.2.58 Grave 1, [11-L-26], from west. 80Figure 3.2.59 Grave 1. Plan and section. Bowl (11-L-26/1/1) (scale 1:4). 81Figure 3.2.60 Bowl (11-L-26/1/1). 81Figure 3.2.61 Grave 2, [11-L-26], from north. 81Figure 3.2.62 Grave 2, [11-L-26] plan and section. Bowl (1:4) and carnelian ring (scale 1:1). 82Figure 3.2.63 Carnelian ring (11-L-26/2/2). 82Figure 3.2.64 Grave 3, [11-L-26] plan and section. 83Figure 3.2.65 Grave finds (11-L-26/3): Copper alloy ‘cup’ (11-L-26/3/1), beads (11-L-
26/3/2) and ring (11-L-26/3/3) (scale 1:1). 83Figure 3.2.66 Copper alloy ‘cup’ (11-L-26/3/1). 84Figure 3.2.67 Faience and glass beads (11-L-26/3/2). 84Figure 3.2.68 Ivory ring (11-L-26/3/3). 84Figure 3.2.69 Grave 4, [11-L-26]. 84Figure 3.2.69 Grave 4, [11-L-26]. 84Figure 3.2.70 Grave 4, [11-L-26]. 84Figure 3.2.71 Grave 4, [11-L-26] plan and section, intact upper burial and remains of
earlier burial at chamber base. 85Figure 3.2.72 Pottery from Grave 4 (scale 1:4). 86Figure 3.2.73 Amphora (11-L-26/4/1). Handle broken. 86Figure 3.2.74 Bowl (11-L-26/4/2). 86Figure 3.2.75 Bowl (11-L-26/4/A), part restored. 86Figure 3.2.76 Grave 5, [11-L-26], plan and section. 86Figure 3.2.77 Grave 6, [11-L-26] plan and section. 87Figure 3.2.78 Vessel fragments from Grave 6, [11-L-26] (scale 1:4). 87Figure 3.2.79 Grave 7, [11-L-26]. Intact lower burial and bowl (11-L-26/7/1) from upper
burial over head. 88Figure 3.2.80 Grave 7, [11-L-26] plan and section. 88Figure 3.2.81 Bowl (scale 1:4) and earring and bead (scale 1:1) from Grave 7. 89Figure 3.2.82 Bowl (11-L-26/7/1). 89Figure 3.2.83 Blue faience disc bead bracelet (11-L-26/7/3), restrung. 89Figure 3.2.84 Carnelian ring (11-L-26/7/2). 89Figure 3.2.85 Grave 8, [11-L-26] plan and section. 89Figure 3.2.86 Grave 9, [11-L-26] plan and section. Painted plaster fragments from
cartonnage. 90
00 ASSN Pharaonic Sites_i-xxviii.indd 1200 ASSN Pharaonic Sites_i-xxviii.indd 12 10/02/2020 11:4010/02/2020 11:40

List of Figures
xiii
Figure 3.2.87 Handmade bowl (11-L-26/9/A), incomplete (intrusive). 91Figure 3.2.88 Grave 10, [11-L-26] plan and section. Pot fragments from fill (scale 1:4). 91Figure 3.2.89 Grave 11, [11-L-26] plan and section. 92Figure 3.2.90 Grave 12, [11-L-26] plan and section. Carnelian ring (11-L-26/12/1) (scale
1:1) and reconstructed bowl (11-L-26/12/A) (scale 1:4). 92Figure 3.2.91 Bowl (11-L-26/12/A). 93Figure 3.2.92 Carnelian rings (11-L-26/12/1). 93Figure 3.2.93 Grave 13, [11-L-26] plan and section; Bowl (11-L-2/13/1) (scale 1:4). 93Figure 3.2.94 Bowl (11-L-2/13/1). 93Figure 3.2.95 Grave 14, [11-L-26]. 94Figure 3.2.96 Grave 14, [11-L-26] plan and section. 94Figure 3.2.97 Grave 15, [11-L-26] plan and section. 95Figure 3.2.98 Grave 16, [11-L-26] plan and section. 95Figure 3.2.99 Grave 17, [11-L-26] plan and section. 95Figure 3.2.100 Grave 19, [11-L-26], plan and section. 96Figure 3.2.101 Grave 20 [11-L-26], plan and section. 96Figure 3.2.102 Grave 21, [11-L-26] plan and section, and pottery. 97Figure 3.2.103 Grave 22, [11-L-26] plan and section; scarab (11-L-26/22/1) from fill
(scale 1:1). 97Figure 3.2.104 Scarab (11-L-26/22/1). 97Figure 3.2.105 Grave 23, [11-L-26] plan and section. Pottery finds. 98Figure 3.2.106 Heavy bowl (intrusive?) (11-L-26/23/1). 98Figure 3.2.107 Grave 24, [11-L-26] plan and section; carnelian ring and scarab. 99Figure 3.2.108 Pair of carnelian rings (11-L-26/24/2). 99Figure 3.2.109 Scarab (11-L-26/24/3). 99Figure 3.2.110 Air photograph of linear excavations [11-L-30] in hills overlooking Kajnarti. 101Figure 3.2.111 Bowls from [11-L-30] (scale 1:4). 101Figure 3.3.1 Location of stone enclosure [11-Q-9] and nearby C-Group/Kerma sites,
Saras East. 103Figure 3.3.2 Bowl (11-Q-9/1) (scale 1:4). 103Figure 3.3.3 Bowl (11-Q-9/1). 104Figure 3.3.4 Location of possible New Kingdom cemetery [11-Q-3] and nearby C-Group
and Kerma sites in central Saras plain. 105Figure 3.3.5 Plan of cemetery [11-Q-3]. 106Figure 3.3.6 Plan and section Grave 1, [11-Q-3]. 106Figure 3.3.7 Plan and section Grave 2, [11-Q-3]. 106Figure 3.3.8 Intact stone blocking within Grave 2, [11-Q-3]. 107Figure 3.3.9 Decayed wooden coffin of child burial within Grave 2, [11-Q-3]. 107Figure 3.3.10 Plan and section Grave 3, [11-Q-3]. 107Figure 3.3.11 Location of graves [11-Q-65] on higher ground to east of workshop sites,
Saras East. 109Figure 3.3.12 Plan of Grave 1, [11-Q-65]. 110Figure 3.3.13 Sections through Grave 1, [11-Q-65]. 111Figure 3.3.14 Shaft blocking of (11-Q-65/1). Rubble and stone chippings around grave
visible behind. 111Figure 3.3.15 Shaft blocking of (11-Q-65/1). 111Figure 3.3.16 Burial chamber of Grave 1, [11-Q-65], looking towards west end with
disturbed burials in foreground and undisturbed burials behind. 112Figure 3.3.17 Bowls from Grave 1, [11-Q-65] (scale 1:4). 112Figure 3.3.18 Scarabs (3,4) and beads from (11-Q-65/1): shell (a), faience (b,c) and carnelian
(d) (scale 1:1). 112Figure 3.3.19 Bowl (11-Q-65/1/1). 113Figure 3.3.20 Bowl (11-Q-65/1/5). 113
00 ASSN Pharaonic Sites_i-xxviii.indd 1300 ASSN Pharaonic Sites_i-xxviii.indd 13 10/02/2020 11:4010/02/2020 11:40
List of Figures
xiv
Figure 3.3.21 Bowl (11-Q-65/1/6). 113Figure 3.3.22 Faience scarabs from Grave 1, [11-Q-65]. 113Figure 3.3.23 Beads (11-Q-65/1) from fill; restrung. 113Figure 3.3.24 Plan and section of Grave 2, [11-Q-65]. Reconstructed profile of large dish/
bowl (11-Q-65/2/A) (scale 1:4). 114Figure 3.3.25 Initial test excavation at south end of site [11-Q-61], with undisturbed surface
beyond. 115Figure 3.3.26 Finds (unregistered) from test excavations of [11-Q-61]: faience bowl
fragments (a), stone vessel (b), beads (c) and earrings (d). 115Figure 3.3.27 Plan of two building complexes [11-Q-61]. 115Figure 3.3.28 Plan of southern part of complex [11-Q-61] (plan A. J. Mills). 116Figure 3.3.29 Room 2, stone foundations of two bins. 117Figure 3.3.30 Room 4, stone stands for grinding slab. 117Figure 3.3.31 Stone-lined bin in Room 5. 117Figure 3.3.32 Room 10, stone stands forming support for grinding slab. 118Figure 3.3.33 View south across east side of [11-Q-61], Room 26 on left. 118Figure 3.3.34 View southwest from south end of [11-Q-61] towards [11-Q-59] and [11-Q-
62] in distance, under excavation. This makes clear the close proximity of these three sites. The upstanding building remains to right of cleared pathway seem likely to date to the 19th century. 119
Figure 3.3.35 View north across [11-Q-61]. 119Figure 3.3.36 View looking west across north end of [11-Q-61]. 120Figure 3.3.37 Plan of north part of complex [11-Q-61] (plan A. J. Mills). 120Figure 3.3.38 Quartz chippings outside Room 21; with grindstone just inside entrance
(looking west). 121Figure 3.3.39 Room 22, stone-lined bin (unexcavated) and outline of the mud floor of
another bin (?) feature to north (right). 121Figure 3.3.40 Room 22, excavated stone lined tank/bin. 121Figure 3.3.41 Room 23, grindstone set in floor. 122Figure 3.3.42 Finds from [11-Q-61]. 122Figure 3.3.43 Copper alloy awl (11-Q-61/1). 123Figure 3.3.44 Blue faience and calcite beads(11-Q-61/4) from Room 22. 123Figure 3.3.45 Sample pottery from test trenches [11-Q-61] (scale 1:4). 123Figure 3.3.46 View west across south end of [11-Q-61]. 124Figure 3.3.47 Initial test excavations of [11-Q-59], from north. 125Figure 3.3.48 Test excavations of [11-Q-59], from west. Examples of large grindstones on
surface in foreground. 126Figure 3.3.49 Plan of [11-Q-59] workshop with large spread of tailings on south side
(shaded). 127Figure 3.3.50 Mortar embedded in floor of Room 3. 126Figure 3.3.51 Hearth in corner of Room 4 with ash deposit beside it. 126Figure 3.3.52 Stone-lined bin in Room 7, from east. 128Figure 3.3.53 Detail of plastered lining of bin in Room 7. 128Figure 3.3.54 Stone ‘bins’ in Room 8 area, from west. 128Figure 3.3.55 Deposit of large pebbles in Room 8 area. 128Figure 3.3.56 Stone bin on north side of Room 12, from east. 129Figure 3.3.57 Stone bin on north side of Room 12, from north. 129Figure 3.3.58 Excavated rooms at west side of [11-Q-59], from north. 130Figure 3.3.59 Excavated site [11-Q-59] towards northwest. Note large rock outcrop, one of
many in this area, between site and river beyond (marked by trees); west bank hills in distance. 130
Figure 3.3.60 Excavated site [11-Q-59] looking east. 131Figure 3.3.61 Excavated site [11-Q-59] looking south. 131
00 ASSN Pharaonic Sites_i-xxviii.indd 1400 ASSN Pharaonic Sites_i-xxviii.indd 14 10/02/2020 11:4010/02/2020 11:40

List of Figures
xv
Figure 3.3.62 Small finds from [11-Q-59]. 132Figure 3.3.63 Copper alloy finds (11-Q-59/1-4,6). 133Figure 3.3.64 Calcite bow-drill holder (11-Q-59/5). 133Figure 3.3.65 Carnelian ring, fragment (11-Q-59/7). 134Figure 3.3.66 Examples of grinding tool types from surface of [11-Q-59]. 134Figure 3.3.67 Panoramic view across site [11-Q-62], before excavation, looking towards
southeast. Note large grindstones on surface in lower right part of image. 135Figure 3.3.68 Sketch section of walls and floor levels. 135Figure 3.3.69 General plan of [11-Q-62] with second (upper) phase of rooms in central area
(mainly Rooms 19-24). 136Figure 3.3.70 View east across central area of excavation [11-Q-62]. 137Figure 3.3.71 Room 1 features, from west. 137Figure 3.3.72 Room 1 Grinding emplacement, from north. 137Figure 3.3.73 Feature within Room 1, from north. 138Figure 3.3.74 Room 1. Two grindstone stands one with grinder in place, in northwest of
room. 138Figure 3.3.75 Two tank/bins on east side of site in ‘Room 5’ area; from north. 138Figure 3.3.76 View looking north across east side of site [11-Q-62]. Saras fort on hill (top
left). 139Figure 3.3.77 Rooms 9 and 15, with series of stone bins. 139Figure 3.3.78 Room 11 with mud bases of two bins in corners of room; looking west.
Grinders/mortars in centre of room. 140Figure 3.3.79 Room 15, from west. 140Figure 3.3.80 Detail of stone pounders in northwest corner of Room 15. 140Figure 3.3.81 Bin in southwest corner of Room 15. 140Figure 3.3.82 Stone lined tank/bin inside Room 24 with mortar beside it. 141Figure 3.3.83 Room 22, from north. 141Figure 3.3.84 Stone lined tank/bin in outside area Room 21; looking west towards
Room 22. 141Figure 3.3.85 View south across site. Grindstone stand in foreground in poorly preserved
Room 27 at north end of site. 141Figure 3.3.86 Plan of earlier phase structure, identified mainly as Rooms 29-31 (shaded).
Potters turntable was apparently found near bin in the northeast part of Room 29. 142
Figure 3.3.87 Example of large granite grindstone (11-Q-62/1). 143Figure 3.3.88 Drawing of grindstone used on two sides from [11-Q-62]. 144Figure 3.3.89 Example of mortar-type grindstone block (11-Q-62/2). 144Figure 3.3.90 Copper alloy tools and artefacts from [11-Q-62]. 145Figure 3.3.91 Potters turntable (11-Q-62/10 a,b). 145Figure 3.3.92 Potters turntable (11-Q-62/10 a,b). 145Figure 3.3.93 Copper alloy blade/knife (11-Q-62/5). 145Figure 3.3.94 Granite hammer stone (11-Q-62/11), left; and grinder/rubbing stone (11-Q-
62/12), right (scale 1:3). 146Figure 3.3.95 Finds from [11-Q-62]. 147Figure 3.3.96 Potters turntable (11-Q-62/10 a,b). 148Figure 3.3.97 Pottery sample from test excavation [11-Q-62]. 148Figure 3.3.98 Pottery sample from [11-Q-62], with a range of plate and bowl forms. 149Figure 3.3.99 Pottery sample from [11-Q-62], with a range of jars and other containers;
and handmade ‘Kerma’ pottery (41-44). 150Figure 3.3.100 Three mud sealings (a-c) from [11-Q-62]. 151Figure 3.3.101 View south across [11-Q-63]. Note large boulders used in wall of Room 2, in
foreground. 152Figure 3.3.102 Plan of small workshop [11-Q-63]. 153
00 ASSN Pharaonic Sites_i-xxviii.indd 1500 ASSN Pharaonic Sites_i-xxviii.indd 15 10/02/2020 11:4010/02/2020 11:40

List of Figures
xvi
Figure 3.3.103 View west across [11-Q-63], with small rock outcrops beyond. 153Figure 3.3.104 View across [11-Q-63], from southwest. 153Figure 3.3.105 Room 1 looking east across feature (bin?) with quartz dust, and water-laid
material on left (north) side. 154Figure 3.3.106 Room 1 brick lined ‘furnace’, from north. 154Figure 3.3.107 Room 6 grindstone and mortar with fragment of surviving mud floor surface
below, from north. 154Figure 3.3.108 Detail of Room 6 grindstone and mortar with fragment of surviving mud
floor surface below, from north. Note small grinding stone, bottom centre. 155Figure 3.3.109 Large bowl (11-Q-63/1) by wall of Room 7. 155Figure 3.3.110 Wheelmade pottery from test excavation [11-Q-63] (scale 1:4). 155Figure 3.3.111 Bowl (11-Q-63/1). 155Figure 3.3.112 Bowl (11-Q-63/1). 155Figure 3.3.113 Handmade vessels from test excavations [11-Q-63] (1:4). 156Figure 3.3.114 Mining areas [11-Q-60] along Khor Ahmed Sherif and hills to north, and
workshops and nearby graves to northwest. Kerma cemeteries [11-Q-36] and [11-Q-73] are also indicated. 157
Figure 3.3.115 View across Khor Ahmed Sherif from [11-Q-60/B] towards [11-Q-60/A], (below arrow). 158
Figure 3.3.116 Open mining [11-Q-60/A] on south side of Khor Ahmed Sherif. 158Figure 3.3.117 Entrance to mine shaft [11-Q-60/B] on north side of Khor Ahmed Sherif. 159Figure 3.3.118 Narrow interior of mine [11-Q-60/B] on north side of Khor Ahmed Sherif. 159Figure 3.3.119 Hut cluster (11-Q-60/C) and nearby linear excavations relating to quartz extraction. 159Figure 3.3.120 Structures at [11-Q-60/C], from west. 160Figure 3.3.121 Rooms 1-2 at [11-Q-60/C], looking towards northeast. 160Figure 3.3.122 Sketch plan of stone structures beside linear excavation/mining pit [11-Q-
60/C]. 160Figure 3.3.123 Bowl with red-slipped rim (1:4) and profile of excavated pit. 161Figure 3.3.124 Linear mining pit at [11-Q-60/C], before testing; looking towards east. 161Figure 3.3.125 Linear mining pit at [11-Q-60/C], after testing; looking towards east. 161Figure 3.3.126 View towards river from [11-Q-60/C]. 162Figure 3.3.127 Shelfak fort [11-U-1] from east bank, looking upriver. 163Figure 3.3.128 Shelfak fort [11-U-1] overlooking major bend in river, and approximate
locations of associated cemeteries [11-U-12*] and [11-U-13*], excavated in 1931. 164Figure 3.3.129 Stone enclosure [10-Y-24*] of unknown date on west bank opposite Uronarti.
Photograph also suggests rectilinear features c.200m to the east of the enclosure close to river bank. 165
Figure 3.3.130 Uronarti, from west bank, to northeast of island. 166Figure 3.3.131 View upriver with Kajinjera island in central distance, from south end of
Uronarti. Hill in foreground was location of some medieval structures [10-Y-5], and inscription [10-Y-3] was near river to left of photograph (1966). 166
Figure 3.3.132 Uronarti fort; photographed when river levels were quite high. River stairs and later stone quay to northeast of fort. 168
Figure 3.3.133 Location of ‘Palace’ [10-Y-2] on Uronarti. Location of Inscription of Turo [10-Y-3] at southern tip of island and nearby area of (unexcavated) burials [10-Y-23*] indicated. 169
Figure 3.3.134 Plan of ‘Palace’ building [10-Y-2] to southwest of Uronarti fort (after Dunham 1967, Map VI). 170
Figure 3.3.135 Plan of cemetery [11-Q-57]. 172Figure 3.3.136 Sketch plan and section of Grave 1 [11-Q-57]. 172Figure 3.3.137 Grave 1 [11-Q-57], from west. 173Figure 3.3.138 Bowl (11-Q-57/1/A) (scale 1:4). 173Figure 3.3.139 Sketch plan and section of Grave 2 [11-Q-57]. 173
00 ASSN Pharaonic Sites_i-xxviii.indd 1600 ASSN Pharaonic Sites_i-xxviii.indd 16 10/02/2020 11:4010/02/2020 11:40

List of Figures
xvii
Figure 3.3.140 Grave 2 [11-Q-57], from west. 173Figure 3.3.141 Jar (11-Q-57/2/1) and bowl (11-Q-57/2/A) (scale 1:4). 174Figure 3.3.142 Sketch plan and section of Grave 3 [11-Q-57]. 174Figure 3.3.143 Grave 3 [11-Q-57] from west. 174Figure 3.3.144 Jar (11-Q-57/3/1) (scale 1:4). 174Figure 3.3.145 Sketch plan of Grave 4 [11-Q-57]. 175Figure 3.3.146 Grave 4 [11-Q-57], from east with jar (11-Q-57/4/1) by head of
semi-contracted burial. 175Figure 3.3.147 Jar (11-Q-57/4/1) and bowl (11-Q-57/4/A) (scale 1:4). 175Figure 3.3.148 Sketch plan of Grave 5 [11-Q-57]. 176Figure 3.3.149 Sketch plan of Grave 6 [11-Q-57]. 176Figure 3.3.150 Grave 6 [11-Q-57], from east. 176Figure 3.3.151 Bowl (11-Q-57/6/A) (scale 1:4). 176Figure 3.3.152 Sketch plan of eroded Grave 7 [11-Q-57]. 176Figure 3.3.153 Sketch plan of eroded Grave 8 [11-Q-57]. 177Figure 3.3.154 Jar (11-Q-57/8/1) (scale 1:4). 177Figure 3.3.155 Sketch plan of Grave 9 [11-Q-57]. 177Figure 3.3.156 Grave 9 [11-Q-57], from west. 177Figure 3.3.157 Sketch plan of Grave 10 [11-Q-57]. 178Figure 3.3.158 Grave 10 [11-Q-57], from west. 178Figure 3.3.159 Jar and bowls (scale 1:4) and bone awl (3) and glazed steatite scarab (4),
(scale 1:1) from Grave 10 [11-Q-57]. 178Figure 3.3.160 Sketch plan of Grave 11 [11-Q-57]. 179Figure 3.3.161 Grave 11 [11-Q-57], from south. 179Figure 3.3.162 Sketch plan of Grave 12 [11-Q-57]. 179Figure 3.3.163 Grave 12 [11-Q-57], from east. 179Figure 3.3.164 Sketch plan of Grave 13 [11-Q-57]. 180Figure 3.3.165 Infant burial in Grave 13 [11-Q-57], from west. 180Figure 3.3.166 Sketch plan of Grave 14 [11-Q-57]. 180Figure 3.3.167 Grave 14 [11-Q-57], from west. 180Figure 3.3.168 Sketch plan of Grave 15 [11-Q-57]. 181Figure 3.3.169 Grave 15 [11-Q-57], from west. 181Figure 3.3.170 Grave 15 [11-Q-57], detail of loin-cloth. 181
Figure 4.01 Northern part of Semna, with projected line of (Middle Kingdom) wall [10-Y-12] extending from near Uronarti to area of Semna South [16-E-3]. The area immediately south of Semna allocated to the University of Chicago Oriental Institute Expedition is indicated. 183
Figure 4.02 Rapids on eastern channel at south end of Kajinjera island, looking southwest (1964). 184
Figure 4.03 View towards Semna-Kumma from c.1km downriver (1964). 185Figure 4.04 View of Semna-Kumma from west bank c.500m northeast of Semna West. 185Figure 4.05 The southern part of Semna, extending to area of Tila island, near Attiri. 186Figure 4.06 Reconstructed line of wall [10-Y-12] based on field tests and aerial
photographs. 187Figure 4.07 Wall [10-Y-12]. West side of peak tower A, with three courses of bricks,
looking towards southwest. 188Figure 4.08 Wall [10-Y-12]. West side of peak tower A, looking towards southwest. 188Figure 4.09 Wall [10-Y-12]. View down slope to southwest of tower A into area of deep
sand. 188Figure 4.10 Wall [10-Y-12]. Northern section of wall, west of Kajinjera island with areas
of test excavations and tower A. 189Figure 4.11 Wall [10-Y-12] running down towards river near south end of Kajinjera island. 190
00 ASSN Pharaonic Sites_i-xxviii.indd 1700 ASSN Pharaonic Sites_i-xxviii.indd 17 10/02/2020 11:4010/02/2020 11:40

List of Figures
xviii
Figure 4.12 Wall [10-Y-12] running down towards river near south end of Kajinjera island. Several long stone linear features visible beyond the wall are of unknown date and significance. 190
Figure 4.13 Wall [10-Y-12] in section examined to west of Semna West fort. 191Figure 4.14 Wall [10-Y-12] with small areas of stonework c.1.2km north-northeast of
Semna fort. 192Figure 4.15 Sherds (A-C) found near wall [10-Y-12], probably from northern section
opposite Kajinjera island. 192Figure 4.16 Semna West – location of graves [16-E-28] cut into wall [10-Y-12], to
southwest of Semna Fort [16-E-1] and other known cemeteries S500, S700 and S800. 193
Figure 4.17 Plan of graves of [16-E-28] cut into and around wall [10-Y-12]. 194Figure 4.18 Grave 1, [16-E-28] from west. 194Figure 4.19 Plan and section of Grave 1, [16-E-28]. Bowl (scale 1:4), scarab and beads
(scale 1:1). 194Figure 4.20 Bowl (16-E-28/1/1). 194Figure 4.21 Scarab (16-E-28/1/2). 195Figure 4.22 Plan and section of Grave 2, [16-E-28]. Bowl (scale 1:4), beads (scale 1:1). 195Figure 4.23 Faience bead necklace with carnelian pendant (16-E-28/2/1) 195Figure 4.24 Plan and section Grave 3, [16-E-28]. 195Figure 4.25 Grave 3, [16-E-28] from above, with stone grave covering in situ. 196Figure 4.26 Grave 3, [16-E-28] from east, with stone grave covering in situ. 196Figure 4.27 Location of site [16-E-21] in areas of wall systems. Two groups of
unregistered features (circled) visible to the north and part of long wall feature [16-E-40] running along raised ground to east. 197
Figure 4.28 View across [16-E-21] towards west-southwest, with approximate location of Kumma fort beyond ridge. 198
Figure 4.29 Looking west over [16-E-21]. 198Figure 4.30 View to northwest over [16-E-21]. 198Figure 4.31 Plan of building [16-E-21] and location sketch. Inset shows distribution of
disturbed skeleton within Room 5. 199Figure 4.32 Stone Feature A in Room 1 with mud surface partly preserved. 200Figure 4.33 Stone Feature A in Room 1 with orthostats (B) beyond. 200Figure 4.34 Room 1 from east wall, Looking west. 200Figure 4.35 Room 2 looking north; doorway on right. 200Figure 4.36 View across Room 2, looking northeast. 201Figure 4.37 Pottery and other finds on floor of Room 2. 201Figure 4.38 Room 5 from south, with skeletal remains on left and cluster of pots in
northeast corner (top right). 202Figure 4.39 Skeletal remains in foreground and pots beyond beside ‘Room 4’ stone
feature. Further animal (?) bones behind scale along east side of room. 202Figure 4.40 Pottery and crucibles from Room 1. (scale 1:4, except (3B)) 203Figure 4.41 Finds from Room 1. 204Figure 4.42 Pottery from Room 2 (scale 1:4). 205Figure 4.43 Stone grinders, bone needle and haematite fragments from Room 2
(scale 1:2). 205Figure 4.44 Stone and bone objects (scale 1:2). 206Figure 4.45 Small finds, Room 3. Scales as indicated. 207Figure 4.46 Pottery and grinder from Room 5 (scale 1:4). 208Figure 4.47 Pottery vessels and crucibles from Room 1. 208Figure 4.48 Interior of incense burner (16-E-21/3) with incised potmark. 209Figure 4.49 Pottery vessels from Room 2. 209Figure 4.50 Pottery vessels from Room 5. 209
00 ASSN Pharaonic Sites_i-xxviii.indd 1800 ASSN Pharaonic Sites_i-xxviii.indd 18 10/02/2020 11:4010/02/2020 11:40

List of Figures
xix
Figure 4.51 Bone tools from (16-E-21). 210Figure 4.52 Stone tool (polisher?) (16-E-21/31). 210Figure 4.53 Grindstone (16-E-21/23). 210Figure 4.54 Bone beads (16-E-21/14). 210Figure 4.55 Ivory bracelet fragments from Room 1 (16-E-21/11a-c). 210Figure 4.56 Stone chopper from Room 2 (16-E-21/24). 210Figure 4.57 Location of [16-E-30] and nearby sites on hills above Semna East/Kumma. 212Figure 4.58 Structure [16-E-30]. 212Figure 4.59 Design on south face of structure [16-E-30]. 212Figure 4.60 View of boulder strewn hillside at [16-E-31]. 214Figure 4.61 View of hillside at [16-E-31]. 214Figure 4.62 Detail of broken stones and surface [16-E-31]. 214Figure 4.63 Detail of broken stones and possible pounders/hammer-stones [16-E-31]. 214Figure 4.64 General view of cairns on plateau [16-E-32], looking east. 215Figure 4.65 Well-preserved cairn with niche in south face [16-E-32] 215Figure 4.66 Cairn with niche in south face [16-E-32]. Note upright stone on more distant
cairn. 215Figure 4.67 Cairns [16-E-32]. 216Figure 4.68 General view over cairns [16-E-32]. 216Figure 4.69 Semna-Kumma area and site locations. 219Figure 4.70 Location of cemetery ‘H200’ [16-E-65*] to east of Kumma fort. 221
Figure 5.01 Area of Attiri and north end of Duweishat. 223Figure 5.02 Duweishat East. The main area of New Kingdom gold mining and processing
was along the east bank and in the hills beyond. 224Figure 5.03 Area of Ambikol. In modern times this was very thinly populated, with
encroaching blown sand a particular problem on the west bank. 225Figure 5.04 Area of Melik en Nasr with large islands of Turmukki and Tangur. 226Figure 5.05 Location of [16-O-12] in area of village of Sorki. A series of buildings relating
to the modern mining operations were located on higher ground to the east. 227Figure 5.06 Panoramic view over area of test excavation 1 of [16-O-12], looking north,
with village to northeast. 228Figure 5.07 View over area of test excavation 1 of [16-O-12] looking east. 228Figure 5.08 View over area of test excavation 1 of [16-O-12] looking west. 228Figure 5.09 Parts of stone-lined bin in southwest corner of Room 5 [16-O-12]. 229Figure 5.10 Two large grindstones in east wall of Room 5 [16-O-12]. 229Figure 5.11 Partially preserved stone-lined bin in Room 6, (from southeast) [16-O-12]. 229Figure 5.12 Partially preserved stone-lined bin in Room 6, (from northeast) [16-O-12]. 229Figure 5.13 Plan of test excavation (Area 1) [16-O-12]. 230Figure 5.14 Plan of test excavation (Area 2) [16-O-12]. 230Figure 5.15 Pottery sample from test excavation (Area 1) [16-O-12]. 232Figure 5.16 Pottery sample from test excavation (Area 1) [16-O-12]. 233Figure 5.17 Pottery sample from test excavation (Area 2) [16-O-12]. 234Figure 5.18 Location of rock drawing site [16-O-27] with Middle Kingdom (?) graffito. 235Figure 5.19 Location of cemetery [16-O-24] on east side of dispersed ‘settlement’ [16-O-
25] to north of Askur hamlet. 236Figure 5.20 Grave 1[16-O-24]. 237Figure 5.21 Scarab (16-O-24/1/4). 237Figure 5.22 Pottery (scale 1:4) and scarab and bead (scale 1:1) from Grave 1 [16-O-24]. 237Figure 5.23 Grave 2 [16-O-24]. 238Figure 5.24 Bowl (16-O-24/2/1) (scale 1:4). 238Figure 5.25 Registered pottery from graves 1 and 2 [16-O-24]. 238Figure 5.26 Sketch plan of denuded stone structure 1, [16-O-25]. 239
00 ASSN Pharaonic Sites_i-xxviii.indd 1900 ASSN Pharaonic Sites_i-xxviii.indd 19 10/02/2020 11:4010/02/2020 11:40

List of Figures
xx
Figure 5.27 Surface clearance around Structure 1, [16-O-25]. 240Figure 5.28 View across denuded structure, towards east [16-O-25]. 240Figure 5.29 Sketch plan of Structure 2, [16-O-25]. 240Figure 5.30 Structure 2; view to north with blown sand on south side of hills. 241Figure 5.31 Structure 2; view south towards river. 241Figure 5.32 Entrance at south end of Structure 2. 241Figure 5.33 Steatite seal/amulet (16-O-25/1). 241Figure 5.34 Granite grinding stone (16-O-25/2). 242Figure 5.35 Air photograph of northern end of Duweishat in area of Jedagur, Diffi
(named after the postmedieval ‘Turkish Fort’ [16-N-28*]) and Askur on the west bank. 243
Figure 5.36 Location of three settlement areas of [16-O-2]. 244Figure 5.37 Plan of upper levels of workshop on ‘Kom C’ [16-O-2]. 245Figure 5.38 Room 1, looking west. 246Figure 5.39 Detail of stone-lined bin in corner Room 1. 246Figure 5.40 Room 2, looking west. 246Figure 5.41 Rooms 1 and 2, looking south. 246Figure 5.42 Room 6/L2, looking south. Note grindstone stands and mortars. 247Figure 5.43 Large grindstones in Room 7, with doorway into Room 12. 247Figure 5.44 Pit in area of Room 11. 247Figure 5.45 Pit in area of Room 11, looking east. 247Figure 5.46 General view across [16-O-2], looking towards Nile. 248Figure 5.47 Plan of lower (original?) structure [16-O-2]. 248Figure 5.48 Lower (original?) structure [16-O-2], from east. 249Figure 5.49 Stone-lined bin/tank and eroded walls on north side of structure in area L3. 249Figure 5.50 Detail of stratigraphy within kom with surface deposits over alluvium, [16-O-2]. 249Figure 5.51 Pilgrim flask (16-O-2/1). 250Figure 5.52 Bowls from lower structure (16-O-2/2-3). 250Figure 5.53 Pilgrim flask and bowls from lower levels of [16-O-2]. 250Figure 5.54 Location plan of clusters of stone structures on hill-slopes above [16-O-2/C]. 251Figure 5.55 Sketch plans of stone structures [16-O-15] in northern Duweishat East. 251Figure 5.56 Stone structure [16-O-15/1] after test excavation, from north. Larger stones
slabs used to frame doorways. 252Figure 5.57 Stone structure [16-O-15/1] after test excavation, from east. 252Figure 5.58 Stone structure [16-O-15/4] after test excavation. 252Figure 5.59 Stone structure [16-O-15/4] after test excavation. 252Figure 5.60 Sketch plans of stone structures [16-O-15] in northern Duweishat East. 253Figure 5.61 Stone structure [16-O-15] after test excavation, looking west. 253Figure 5.62 Location of [16-N-18] and nearby sites: of which [16-N-15], [16-N-16] and
[16-N-20] included ‘A-Group’ and/or ‘C-Group’ elements. [16-N-5] was a small medieval cemetery and [16-N-19] a cluster of burials of uncertain date. 254
Figure 5.63 Sketch plan of stone structure foundations [16-N-18]. 254Figure 5.64 View across [16-N-18], Rooms 3 and 4, looking towards northwest. 255Figure 5.65 View across [16-N-18], looking along wadi, towards southwest. 255Figure 5.66 Location of small cemetery [16-N-11] above modern hamlet of Duweisha. 257Figure 5.67 Plan of graves within cemetery [16-N-11]. 257Figure 5.68 Plan and section of Grave 1 [16-N-11]. 258Figure 5.69 Bowl (16-N-11/1/1). 258Figure 5.70 Faience seal (16-N-11/1/2). 258Figure 5.71 Pottery (scale 1:4) and faience seal (scale 1:1) from Grave 1 [16-N-11]. 258Figure 5.72 Grave 2 [16-N-11], plan and section. 258Figure 5.73 Grave 2 [16-N-11], from east. Excavated pit with stone slabs at base covering
burial. 259
00 ASSN Pharaonic Sites_i-xxviii.indd 2000 ASSN Pharaonic Sites_i-xxviii.indd 20 10/02/2020 11:4010/02/2020 11:40

List of Figures
xxi
Figure 5.74 Grave 3 [16-N-11], plan and section. 259Figure 5.75 Grave 4 [16-N-11]. Unexcavated; robbed to expose grave chamber. 259Figure 5.76 Grave 4 [16-N-11]. Unexcavated with drystone wall sealing grave. 259Figure 5.77 Location of workshop sites [16-N-13] and [16-N-14] and nearby features. 260Figure 5.78 Plan of test excavation [16-N-13], Rooms 1-14. 261Figure 5.79 View to southwest across excavated part of site from northeast side of Room
14. Several grindstones/mortars visible. 261Figure 5.80 Stone-lined bin in southeast corner of Room 5. 261Figure 5.81 Stone-lined bin between Rooms 5-6. Pot in floor; large grindstones behind. 262Figure 5.82 Central part of excavation with best preserved rooms (9-10). 262Figure 5.83 Room 10 with large grindstone/mortar at west end. 262Figure 5.84 Detail of grindstone/mortar in Room10, from north. 262Figure 5.85 Pit beside east wall of Room12; with Room 11 at higher level beyond. 262Figure 5.86 Pit in Room. 12. Grindstone in wall behind. 263Figure 5.87 Limestone ‘mace head’ fragment (16-N-13/1). 263Figure 5.88 View north across site with modern stone buildings behind. 263Figure 5.89 Pottery sample from [16-N-13] (scale 1:4). 264Figure 5.90 Plan of medieval structures (A,B) and remnants of workshop site (C) [16-N-
14]. 266Figure 5.91 Medieval pots (16-N-14/1-2) from Structure A. 266Figure 5.92 Medieval bowl with stamped centrepiece and incised designs from Structure
A (16-N-14/3). 267Figure 5.93 Bowl (16-N-14/5), from Structure C. 267Figure.4.94 Pottery from area of (16-N-14) Structure C (scale 1:4). 267Figure 5.95 Location of stone structures [16-N-24] and nearby sites, including several
‘game-drive’ walls. 268Figure 5.96 View to southwest over structure (‘House 1’) of [16-N-24] under excavation.
Long wall running westwards visible on lower slope. 268Figure 5.97 ‘House 1’ under excavation. 269Figure 5.98 Test excavation within [16-N-24] looking to northwest. 269Figure 5.99 Test excavation within [16-N-24]. 269Figure 5.100 Test excavation within[16-N-24]. 269Figure 5.101 Plan of excavated area within [16-S-7]. 271Figure 5.102 Pottery from [16-S-7]. 272Figure 5.103 Clay cylinders (16-S-7/1). 272Figure 5.104 Beads (16-S-7/2). 272Figure 5.105 Location of [16-S-8] on hilltop at south end of Duweishat. Several further
(unregistered) clusters of structures are visible further east. 273Figure 5.106 Unexcavated surface within area of [16-S-8] with stone alignments and
quantities of quartz debris visible on surface (view towards west). 274Figure 5.107 Plan of area of test excavation within [16-S-8]. 274Figure 5.108 Room 1 in [16-S-8] looking north across room towards work space and pit
against north wall and entrance to subfloor bin on left. 274Figure 5.109 Work place with pierced orthostat and other features in Room 1
(looking west). 275Figure 5.110 Entrance to subfloor stone-lined bin in Room 1 [16-S-8]. 275Figure 5.111 Stone features in floor of Room 2, [16-S-8] (looking towards south wall). 275Figure 5.112 Plastered stone-lined bin with raised surround in southeast corner of Room 2,
[16-S-8]. 276Figure 5.113 Mud plastered feature, probably a quern emplacement, Room 2, [16-S-8]. 276Figure 5.114 View east along Room 3 [16-S-8] to hilltop beyond. 276Figure 5.115 Bin area with some surviving plastered floor at north end of Room 6
[16-S-8]. 276
00 ASSN Pharaonic Sites_i-xxviii.indd 2100 ASSN Pharaonic Sites_i-xxviii.indd 21 10/02/2020 11:4010/02/2020 11:40

List of Figures
xxii
Figure 5.116 Chert blade (16-S-8/1). 276Figure 5.117 Pottery sample from test excavation of (16-S-8) (scale 1:4). 277Figure 5.118 Location of [16-S-2] with further workshop sites [16-S-9] on high ground
to east. 279Figure 5.119 Location of [16-S-9] and nearby sites. 280Figure 5.120 Detail of main components of [16-S-9], with test excavation (1) and other
structures (2-8). Air photograph taken when Nile levels falling. 281Figure 5.121 View along north wall of Room 6 with stone bins and pit (centre). 281Figure 5.122 Southwest corner of Room 6 with bin, and grindstones; looking west with
river, islands and west bank beyond. 281Figure 5.123 Plan of [16-S-9] building complex (House 1). 282Figure 5.124 Stone-lined bin in Room11 (entrance to Room 4); looking south. 283Figure 5.125 Stone features (bins?) along north wall of Room 7. 283Figure 5.126 Stone features (bins?) along east wall of Room 8. 283Figure 5.127 Stone features (bins?) on east side of Room 8. 283Figure 5.128 View east into corridor Room 9. 284Figure 5.129 Room 14 with Room 8 beyond. 284Figure 5.130 Grinder setting in Room 10 on east side of complex. 284Figure 5.131 Stone-lined bin, with stone base, in Room 15, at southwest side of site. 284Figure 5.132 Bone beads (16-S-9/1), restrung. 284Figure 5.133 Pottery sample from [16-S-9]. 285Figure 5.134 View east across north of [16-S-9] test excavation, with locations of other
structures indicated on higher ground. 286Figure 5.135 Location of inscription amongst rock drawings (16-V-22). 287Figure 5.136 Inscription (16-V-22/1). 288Figure 5.137 Location of [16-U-46] on west bank opposite Sahaba village. 289Figure 5.138 Plan of [16-U-46]. 290Figure 5.139 North end of site, looking upslope to north over bins in area 4. 291Figure 5.140 Medieval (?) stone and mud bins in area 4. 291Figure 5.141 Grindstone emplacement at north end of Room 5. 291Figure 5.142 Buried jars in floor of Room 6. 291Figure 5.143 Room 9 and Room 7 beyond. 292Figure 5.144 View across [16-U-46] to south (east) bank and Sahaba village. 292Figure 5.145 Sandstone bowl (16-U-46/1). 293Figure 5.146 Stone axe (16-U-46/2). 293Figure 5.147 Copper alloy scale or sheathing (?) (16-U-46/4). 293Figure 5.149 Mud object (16-U-46/6) with impressed decoration. 293Figure 5.150 Pottery from [16-U-46]. 293Figure 5.151 Registered small finds from [16-U-46], all (scale 1:2) except stone bowl (16-U-
46/1) (scale 1:3). 294Figure 5.152 Pottery (date uncertain) from [16-U-46] (scale 1:6). 295Figure 5.153 Melk en Nasr area between Tangur and Turmukki islands and approximate
location of inscriptions [16-U-60*] and [16-U-61*] near Sahaba village. 296Figure 5.154 Locations (approximate) of four groups of New Kingdom inscriptions and
graffiti in Tangur-Sonki area [21-E-11* to 21-E-14*] on east bank and [21-D-31*] on west bank, above the Tangur cataract. Other sites in [21-D] and [21-E] registered by ASSN also indicated. 298
Figure 6.01 District of Sonki and northern end of Ukma and Akasha. 300Figure 6.02 Districts of Ukma and Akasha. 301Figure 6.03 The area between Akasha and Kulub/Kulubnarti. 302Figure 6.04 The southern end of the ASSN survey area, between Kulubnarti and Dal. 303Figure 6.05 Location of [21-I-19] and nearby sites at Sonki West. 304
00 ASSN Pharaonic Sites_i-xxviii.indd 2200 ASSN Pharaonic Sites_i-xxviii.indd 22 10/02/2020 11:4010/02/2020 11:40

List of Figures
xxiii
Figure 6.06 Site Plan [21-I-19]. 305Figure 6.07 Grave 1 [21-I-19] from northwest end. Cup and jar in corner of grave. 305Figure 6.08 Plan and section of grave 1 [21-I-19]. 305Figure 6.09 Cup and bottle from Grave 1 [21-I-19] (scale 1:4). 306Figure 6.10 Cup and bottle from Grave 1 [21-I-19]. 306Figure 6.11 Grave 2 [21-I-19] from east end. Further subrectangular pits around grave. 306Figure 6.12 Plan and section of grave 2 [21-I-19]. 307Figure 6.13 Cup and bottle from Grave 2 [21-I-19] (scale 1:4). 307Figure 6.14 Cup and bottle from grave 2 [21-I-19]. 307Figure 6.15 Plan and section of eroded grave 3 [21-I-19] and faience vessel from fill. 308Figure 6.16 Faience vessel from fill of grave 3 [21-I-19] (SNM.19513). 308Figure 6.17 Child burial grave 4 [21-I-19]. 308Figure 6.18 Pottery from grave 4 fill [21-I-19]. 308Figure 6.19 Location of [21-H-16], with cemetery [21-H-4] to north. 309Figure 6.20 Plan of cemetery [21-H-16]. 310Figure 6.21 Plan of grave 1 [21-H-16] with upper burials (top) and lower adult (bottom)
burial, and finds’ locations. 311Figure 6.22 Lower adult female burial in grave 1 [21-H-16]. 311Figure 6.23 Pottery from grave 1 [21-H-16] (scale 1:4). 312Figure 6.24 Ovoid jar with incised potmark (21-H-16/1/7). 312Figure 6.25 Jars and beer bottle (21-H-16/1/4-6). 312Figure 6.26 Travertine (?) and carnelian earrings (21-H-16/1/1). 312Figure 6.27 Earring (21-H-16/1/2). 312Figure 6.28 Necklace (21-H-16/1/8) with carnelian amulets and faience beads. 313Figure 6.29 Carnelian and calcite earrings (21-H-16/1/3). 313Figure 6.30 Necklace (21-H-16/1/9) of 4 bead strands – restrung. 313Figure 6.31 Bracelet (21-H-16/1/10) of faience beads. 313Figure 6.32 Green steatite scarab (21-H-16/1/11). 314Figure 6.33 Earrings , beads, amulets and scarabs from grave 1 [21-H-16] (scale 1:1). 315Figure 6.34 Grave 2 [21-H-16], plans of superimposed burials (A-F) and section. 316Figure 6.35 Burials B and C. 316Figure 6.36 Burials C and sarcophagus of D, from west. 316Figure 6.37 Details of sarcophagus plaster fragments from burial D. 316Figure 6.38 Burials D,E,F and pottery, from east. 317Figure 6.39 Burials D,E,F and pottery, from west. 317Figure 6.40 Sketch of wooden coffin with painted plaster lid holding burial D, (for colours
of decoration, see above). 317Figure 6.41 Jars and bowls from grave 2 [21-H-16]. 318Figure 6.42 Jars and Bowls (1-4) from grave 2 [21-H-16] (scale 1:4). 318Figure 6.43 Plan of grave 3 [21-H-16] blocking and section, with successive burials. 318Figure 6.44 Dom palm coffin of Burial A, jar (1) and Bowl (2). 319Figure 6.45 Burial A uncovered; Burial B below. 319Figure 6.46 Burial C and associated pottery (4,6) by head; (5) in mouth of jar (7). 319Figure 6.47 Burial D with child burial beside it. 319Figure 6.48 Burial G and lowest levels of pottery becoming visible. 320Figure 6.49 Jar, bowl and scarab with (21-H-16/3) Burial A. 320Figure 6.50 Jars and bowl, with (21-H-16/3) Burial C. 320Figure 6.51 Bottle (21-H-16/3/7) and black painted decoration. With Burial D or E? 320Figure 6.52 Jar (21-H-16/3/8); possibly with Burials D/E? 321Figure 6.53 Plans of grave 3 [21-H-16] successive burials and associated artefacts. 321Figure 6.54 Restrung bead necklace (21-H-16/3/10) with scarabs. 322Figure 6.55 Glazed steatite scarab (a) from necklace (21-H-16/3/10). 322Figure 6.56 Glazed steatite scarab (b) from necklace (21-H-16/3/10). 322

List of Figures
xxiv
Figure 6.57 Earring (21-H-16/3/21). 322Figure 6.58 Restrung bead necklace (21-H-16/3/11). 322Figure 6.59 Earring (21-H-16/3/26). 322Figure 6.60 Wooden kohl stick (21-H-16/3/9). 322Figure 6.61 Jars and bowl with grave 3 [21-H-16], Burials G/H/I. 323Figure 6.62 Carnelian earring (21-H-16/3/19). 323Figure 6.63 Jars and bowls with grave 3 [21-H-16], Burials J/K/L/M. 323Figure 6.64 Shell earrings (21-H-16/3/17), Burial J. 324Figure 6.65 Shell earrings (21-H-16/3/16), Burial M. 324Figure 6.66 Beads, scarabs, earrings and kohl stick from grave 3 [21-H-16] (scale 1:1). 324Figure 6.67 Pottery from grave 3 [21-H-16] (1:4). 325Figure 6.68 Grave 3 [21-H-16] before excavation. 326Figure 6.69 Plan and section grave 4 [21-H-16]. 326Figure 6.70 Carnelian arrow head (21-H-16/1/0); surface find. 327Figure 6.71 Location of [21-H-11] and [21-H-10]. 328Figure 6.72 Location plan of three graves in [21-H-11]. 329Figure 6.73 Grave 1 [22-H-11], from north. 329Figure 6.74 Plan of superstructure and shaft grave 1 [21-H-11]. 329Figure 6.75 Shaft and uncompleted chamber of grave 1 [21-H-11], from east. 329Figure 6.76 Sections across shaft and superstructure (21-H-11/1). 330Figure 6.77 Reconstructed bowls from (21-H-11/1) (1:4). 331Figure 6.78 Shaft and collapsed chamber entrance of Grave 2 [21-H-11], from east. 331Figure 6.79 Plan and section of Grave 2 [21-H-11]; with location of qadus jar. 332Figure 6.80 Qadus jar (21-H-11/2/A) (scale 1:6). 333Figure 6.81 Qadus jar (21-H-11/2/A). 333Figure 6.82 Grave 3 [21-H-11], from southeast. 333Figure 6.83 View to southeast over area of grave 3 [21-H-11] towards river and hamlet of
Milamla. 333Figure 6.84 Plan and section of grave 3 [21-H-11]. 334Figure 6.85 Pilgrim flask (Marl B), reconstructed (21-H-11/3/1). 334Figure 6.86 Reconstructed amphora (21-H-11/3/2) (1:6) and Pilgrim Flask (21-H-11/3/1)
(scale 1:4). 335Figure 6.87 Plan of cemetery [21-H-10]. 337Figure 6.88 Plan and section of grave 1 [21-H-10]. 338Figure 6.89 Grave 1 [21-H-10] looking west, with rubble mound beyond. 339Figure 6.90 View into shaft of grave 1 [21-H-10] covering slab in place. 339Figure 6.91 Entrance and chambers of grave 1 [21-H-10]. 339Figure 6.92 Pottery sample from grave 1 [21-H-10] (scale 1:4). 340Figure 6.93 Fragmentary bowl (21-H-10/1/1). 340Figure 6.94 Grave 2 [21-H-10]. 341Figure 6.95 Beads (21-H-10/2/1). 341Figure 6.96 Grave 3 [21-H-10] under excavation with bowl in upper fill. 341Figure 6.97 Grave 3 [21-H-10]. 342Figure 6.98 Grave 3 [21-H-10], detail of head. 342Figure 6.99 Grave 3 [21-H-10]. 342Figure 6.100 Handmade bowl (21-H-10/3/1). 342Figure 6.101 Grave 4 [21-H-10]. 342Figure 6.102 Grave 4 [21-H-10]. 343Figure 6.103 Grave 5 [21-H-10], from east. 343Figure 6.104 Grave 5 [21-H-10]. 343Figure 6.105 Grave 6 [21-H-10]. 343Figure 6.106 Beads (21-H-10/6/1). 343Figure 6.107 Grave 7 [21-H-10]. 344
00 ASSN Pharaonic Sites_i-xxviii.indd 2400 ASSN Pharaonic Sites_i-xxviii.indd 24 10/02/2020 11:4010/02/2020 11:40

List of Figures
xxv
Figure 6.108 Grave 7 [21-H-10]. 344Figure 6.109 Grave 8 [21-H-10]. 344Figure 6.110 Grave 8 [21-H-10]. 344Figure 6.111 Beads (21-H-10/8/2). 345Figure 6.112 Glass beads (21-H-10/8/1 and 3). 345Figure 6.113 Grave 10 [21-H-10]. 345Figure 6.114 Grave 10 [21-H-10]. 345Figure 6.115 Grave 11 [21-H-10]. 346Figure 6.116 Grave 11 [21-H-10]. 346Figure 6.117 Grave 13 [21-H-10]. 346Figure 6.118 Bowl (21-H-10/13/1). 346Figure 6.119 Bowl and jar (21-H-10/13/1-2) (scale 1:4). 347Figure 6.120 Grave 14 [21-H-10], from east. 347Figure 6.121 Grave 14 [21-H-10]. 347Figure 6.122 Faience ring (21-H-10/14/1). 348Figure 6.123 Carnelian pendant (21-H-10/14/2). 348Figure 6.124 Beads (21-H-10/14/3). 348Figure 6.125 Grave 15 [21-H-10]. 348Figure 6.126 Grave 15 [21-H-10]. 348Figure 6.127 Superstructure over Grave 16 [21-H-10]. 349Figure 6.127 Grave 16 [21-H-10]. 349Figure 6.128 Grave 16 [21-H-10]. 349Figure 6.129 Grave 17 [21-H-10]. 349Figure 6.130 Grave 17 [21-H-10]. 349Figure 6.131 Grave 18 [21-H-10]. 350Figure 6.132 Grave 18 [21-H-10]. 350Figure 6.133 Ring, beads and pendant from Grave 14 (21-H-10/14/1-3) and calcite vessel
fragment (21-H-10/x) (scale 1:1). 350Figure 6.134 Calcite vessel fragment, (21-H-10/x); surface find. 351Figure 6.135 Pit 9 and jar, [21-H-10]. 351Figure 6.136 Pit 12 and jar with stone covering its mouth, [21-H-10]. 351Figure 6.137 Pits 9 and 12 [21-H-10]. 351Figure 6.138 View over lower wadi and location of rock drawings on rock outcrop [22-I-
34*/E], originally registered as [21-H-21/E]. 352Figure 6.139 Southwest face of rock outcrop with drawing groups [21-I-34*/E17-18]. 353Figure 6.140 Detail of drawings and inscription on [21-I-34*/E17]. 353Figure 6.141 View east over location of [21-I-34*/E] below wadi, now masked by recent
alluvium. (photo W.V. Davies 2015) 353Figure 6.142 Location of inscriptions [21-S-29] and nearby sites. 355Figure 6.143 View up hillside towards inscriptions A-C [21-S-29]. 355Figure 6.144 Inscription A, of Ahmose recording presence of Amenmose, Year 2 of
Thutmose I. Additional inscriptions to right. 356Figure 6.145 Inscription ‘face B’, [21-S-29]. 356Figure 6.146 Inscription ‘face C’, [21-S-29]. 356Figure 6.147 Inscription ‘face D’, [21-S-29]. 356Figure 6.148 Inscription ‘face E’, [21-S-29]. 357Figure 6.149 Inscription ‘face F’, [21-S-29]. 357Figure 6.150 Inscription ‘face G’, [21-S-29]. 357Figure 6.151 Northern end of main hill at Akasha West, viewed from near the river
(2015). 358Figure 6.152 Inscriptions of Thutmose I and others (Faces A-C). 359Figure 6.153 Copy of inscription of Thutmose I (Face A). 360Figure 6.154 Inscription of Nehy (Face A). 360
00 ASSN Pharaonic Sites_i-xxviii.indd 2500 ASSN Pharaonic Sites_i-xxviii.indd 25 10/02/2020 11:4010/02/2020 11:40

List of Figures
xxvi
Figure 6.155 Inscriptions of Ahmose-Pennekhbet (left) and Minmose and Menkheper (right) (Face B). 360
Figure 6.156 Inscription of Amenhotep (Face B). 360Figure 6.157 Inscription of Minmose (left) and a scribe (right) (Face C). 361Figure 6.158 Inscription (upper) of King’s son Uadjmose; (lower) remnant of inscription
(Face D). 361Figure 6.159 Inscription of Sutekh (Face D). 361Figure 6.160 Inscription of Great king’s wife (Face E). (Photo Bert Verrept). 361Figure 6.161 Inscription of Siamun and (left) unclear inscription (Face F). 361Figure 6.162 Rock with inscriptions and indigenous drawings (Face G). 362Figure 6.163 Inscription of Hatia… (Face G). 362Figure 6.164 Inscription of scribe, name unclear (Face G). 362Figure 6.165 Inscription of scribe, name uncertain (Face G). 363Figure 6.166 Location of [21-S-13] on west side of wadi leading south from Akasha. 364Figure 6.167 Grave 1 [21-S-13]. 364Figure 6.168 Excavated cleft/crevice Grave 1 [21-S-13], looking west. 365Figure 6.169 Detail of upper part of burial in Grave 1 [21-S-13]. 365Figure 6.170 Bowl (21-S-13/1). 365Figure 6.171 Bowl (21-S-13/1) (scale 1:4). 365Figure 6.172 Location of [21-S-32] and medieval/Meroitic cemetery [21-S-31] to west of
Kulubnarti island 366Figure 6.173 Location plan of two graves [21-S-32]. 367Figure 6.174 View west across area of [16-S-32] with burials; Grave 2 near centre. 367Figure 6.175 Beads (21-S/-32/1/1). 367Figure 6.176 Saucer (21-S-32/1/2) (scale 1:4). 367Figure 6.177 Saucer (21-S-32/1/2). 367Figure 6.178 Grave 1 [21-S-32], from east. 368Figure 6.179 Plan and section of Grave 1 [21-S-32]. 368Figure 6.180 Plan and section of Grave 2 [21-S-32] One stone slab, possibly from original
covering at east end. 369Figure 6.181 Grave 2 [21-S-32], from east. 369Figure 6.182 Location of inscriptions [21-X-12*] and [21-X-13*] and other sites in Kulb East. 370Figure 6.183 Location of site [21-V-26] and nearby sites on west bank at Dal. 371Figure 6.184 Location of [21-V-20] and nearby inscriptions on the east bank [3-B-2] and
on Asruniya island [3-B-16]. The southern boundary of the ASSN survey crossed Tina island. 372
Figure 6.185 Two inscriptions (21-V-20/A-B) on boulder face, from north. 373Figure 6.186 Detail of (21-V-20/A) (photo A. J. Mills, April 1968). 374Figure 6.187 Detail of (21-V-20/B) (photo A. J. Mills, April 1968). 374Figure 6.188 View of Tina island from east bank. Inscriptions are at north (right) end of
island (photo W.V. Davies, 2014). 375Figure 6.189 Boulder with two inscriptions, from river (photo W. V. Davies, 2014). 376Figure 6.190 Tina Island, two Nile-level inscriptions of Senwosret III, (photo W.V. Davies,
2014). 377
Figure 7.01 Sites in Gemai-Murshid area (180m contour approximates to flood level). 380Figure 7.02 Sites in northern Saras (180m contour approximates to flood level). 381Figure 7.03 Sites in area of Askut (180m contour approximates to flood level). 381Figure 7.04 Askut, Kajnarti and nearby sites. 382Figure 7.05 Sites in southern Saras area (180m contour approximates to flood level). 383Figure 7.06 Workshop sites [11-Q-59], [11-Q-61], [11-Q-62] and [11-Q-63] and
nearby cemeteries/burials [11-Q-36], [11-Q-57] and [11-Q-65] with ‘late C-Group’/‘Kerma’ and/or New Kingdom burials. 384
00 ASSN Pharaonic Sites_i-xxviii.indd 2600 ASSN Pharaonic Sites_i-xxviii.indd 26 10/02/2020 11:4010/02/2020 11:40

List of Figures
xxvii
Figure 7.07 Site distribution within Saras region (180m contour approximates to flood level). 385
Figure 7.08 Site distribution within Semna region (180m contour approximates to flood level). 387
Figure 7.09 Site distribution within Duweishat region (180m contour approximates to flood level). Some sites survive above flood levels to southwest of Shuwerta and in (unsurveyed) areas away from river. Location of ‘Kerma’ workshop site [16-S-16] also indicated. 389
Figure 7.10 Site distribution within Melk en Nasr – Tangur – Sonki region (180m contour approximates to flood level). 390
Figure 7.11 Site distribution Ukma –Akasha to Dal (180m contour approximates to flood level). Two sites with inscriptions ([3-B-16] and [3-B-3]) recorded by Vila lay just to the south of the ASSN survey concession. 391
Figure 7.12 Buildings of modern mines at Duweishat Manjam, from north (1964). 399Figure 7.13 Aerial photograph detail of Duweishat area including some mining areas
(Duweishat 2 and 7) of the interior (cf. Klemm and Klemm 2013, fig.6.209). 399Figure 7.14 Area of quartz mining, before (left) and after (right) test excavation;
[11-Q-60] in Saras East (1965). 400Figure 7.15 Mine adit in Duweishat interior, probably in area of mining areas 1 or 2
(1964). 400Figure 7.16 Grindstones and rubbers/grinders, Duweishat site [16-O-2]. Several mortars/
anvils in walls behind. 401Figure 7.17 Varied grindstone forms, Duweishat site [16-O-2]. 401Figure 7.18 Large grindstone with prominent (here horizontal) striations and ‘leather-like’
residues on the surface. This example is also identified as [11-Q-62/1) in photographic records. 402
Figure 7.19 Large grinder on one of two adjoining stone stands, Saras site [11-Q-62]. 402Figure 7.20 Stone stand for larger grindstone, Saras site [11-Q-61]. 402Figure 7.21 Stone stand for larger grindstone, Duweishat site [16-S-9]. 403Figure 7.22 Rounded mortar (?) also used for grinding set in floor level, Saras [11-Q-61]. 403Figure 7.23 Detail of grinding emplacement, Saras [11-Q-62]. 403Figure 7.24 Mortar/anvil amongst quartz chippings, Saras [11-Q-62]. 403Figure 7.25 Example of mortar/anvil set in floor levels with some surviving laid mud
surface beside it and a larger (associated ?) grindstone, Saras [11-Q-63], room 11. 404Figure 7.26 Mortars/anvils in wall fabric of Saras site, [11-Q-62]. 404Figure 7.27 Mortars/anvils set beside wall fragment in uncertain context, Saras site
[11-Q-62]. These examples could relate to an earlier phase of the workshop’s use. 404
Figure 7.28 A cluster of pounders/grinders and partially preserved floor surface, Saras site [11-Q-62]. 404
Figure 7.29 Stone-lined tank/bin. 405Figure 7.30 Stone-lined tank/bin. 405Figure 7.31 Work-station and storage pit at Duweishat site [16-S-8]. 405Figure 7.32 ‘Kerma/C-Group’ workshop site [16-S-16] under excavation, 1967. 406Figure 7.33 Scarabs and seals. 409Figure 7.34 Faience beads and carnelian Bes amulets (21-H-16/1/8). 410Figure 7.35 Copper alloy tools and other artefacts from the Saras workshops. 410Figure 7.36 Abandoned pottery within Semna East workshop [16-E-21]. 411
00 ASSN Pharaonic Sites_i-xxviii.indd 2700 ASSN Pharaonic Sites_i-xxviii.indd 27 10/02/2020 11:4010/02/2020 11:40

List of Figures
xxviii
AppendicesFigure 8.01 Example of field notebook record for site [11-Q-59], from November 1965
(notebook AJM VII, for 1965-1966). 416Figure 8.02 Details of annotated site plan (scale 1:50) of initial test excavation at site
[11-Q-59]. Stone construction was represented schematically. 417Figure 8.03 Example of object finds card: dish (11-Q-63/1), registered as SNM.18319. 418Figure 8.04 Record sheet for Grave 3, site [21-H-6] showing arrangement of multiple
burials. 419Figure 8.05 Detail of record sheet for Grave 3, site [21-H-6]. 420Figure 8.06 Record sheet of finds from Grave 1, site [21-H-6]. 421
List of TablesTable B.1 Concordance of Site registration numbers. 422Table C.1 Register of finds and Sudan National Museum (SNM) numbers. 424
00 ASSN Pharaonic Sites_i-xxviii.indd 2800 ASSN Pharaonic Sites_i-xxviii.indd 28 10/02/2020 11:4010/02/2020 11:40

1
The Archaeological Survey of Sudanese Nubia (ASSN)
Of the Nubian Archaeological Campaigns (see Adams 1992) responding to the construction of the Aswan High Dam, the survey and excavations carried out within Sudanese Nubia represent the most substantial achievement of the larger enter-prise. Many components of the larger project of the UNESCO – Sudan Antiquities Service Survey have been published, in addition to the reports of a number of other major projects assigned separate concessions within the region. However, the results of one major element, the Archaeological Survey of Sudanese Nubia (ASSN) between the Second Cataract and the Dal Cataract remain largely unpublished. This volume is the first of a series which aims to bring to publication the records of the ASSN. These records represent a major body of data relating to a region largely now lost to flooding. This is also a region of very consid-erable importance for understanding the archae-ology and history of Nubia more generally, not least in relation to the still often poorly understood relationships between Lower Nubia to the north and the surviving areas of Middle and Upper Nubia, to the south.
The ASSN project fieldwork was undertaken over six years between 1963 and 1969, investigat-ing c.130km of the river valley between Gemai, at the south end of the Second Cataract, and Dal. A first reconnaissance survey traversed the whole region in 1963–64, passing through the admin-istrative villages of Gemai, Saras, Semna, Attiri, Duweishat, Ambikol, Melik en Nasr, Songi, Ukma, Akasha, Kulb, Dakki and Dal (figs 0.1–2). During that initial reconnaissance, the first archaeological investigation of any kind in many of those areas, c.240 sites were located and registered (Mills 1965). That work started on the 22nd December 1963 and reached the end of the concession at Dal on 14th April 1964.
Beginning 4th November 1964, the ASSN survey team began to survey and excavate areas and sites not otherwise assigned to other missions, starting at Gemai, the most imminently threatened area. During that season it completed the survey of areas south of Gemai as far as Saras, investigating 69 sites between November 1964 and April 1965. A preliminary report on that work was published soon afterwards (Mills and Nordström 1966; see also Robinson and Hewes 1966).
The third field season (October 1965-March 1966) covered the region between Saras and Semna, recording a further 101 sites; a report relat-ing to this was published in the next volume (for 1967–68) of Kush, albeit delayed for some years (Mills 1973). Reports on the subsequent seasons were not however forthcoming following the lapse of the journal Kush (not revived until 1993), so even preliminary published reports have been lacking for the three later seasons. Of those the 1966–67 season focused mainly on excavations in the Semna-Attiri area, while the final seasons, in between November 1967 – April 1968 and October 1968 – April 1969 took the survey southwards to Dal.
The final stages of fieldwork were largely completed in April 1969 with the excavation of the large Kerma cemetery [21-H-4] at Ukma West, under the direction of André Vila (Vila 1987). The consolidation and removal of a painted altar from a medieval (monastic?) site [21-N-11] at Akasha West represented the final site-based work, completed in mid-May, after which the field team returned to Wadi Halfa, leaving for Khartoum on the 21st May 1969.
The fieldwork carried out between Gemai and Dal by the ASSN teams was complemented by the work of a number of other projects. An early and important contribution was made by the German Epigraphic Mission led by Professor Fritz Hintze (Hintze 1963, 1964, 1965; Hintze and Reineke 1989). They explored the whole area due to be flooded both north and south of the
1. Introduction
01 ASSN Pharaonic Sites_001-013.indd 101 ASSN Pharaonic Sites_001-013.indd 1 10/02/2020 11:4110/02/2020 11:41

1 Introduction
2
Second Cataract, with a brief to record the rock art and inscriptions (see below).1 Parts of the east bank between Gemai and Firka were also investigated by a team from Columbia University2 with a partic-ular interest in the earlier prehistory and geology, in the field over the winter of 1961–62 (Solecki 1963). Further survey and site investigations of
1 Nubien-Expedition der Akademie der Wissenschaften, Berlin, DDR2 In some records this is also identified as the New Mexico-Columbia Expedition (=NMC)
a range of prehistoric sites of the west bank was later undertaken by a team from the University of Colorado Nubian Expedition over two fieldwork seasons in 1964–1965 and 1965–66 (Hewes 1966; Carlson and Sigstad 1973).
A number of more localized concessions were also allocated to other projects. Following the
Figure 1.01 Northern end of ASSN Survey area, with sites identified during 1963–64 reconnaissance survey, between Gemai and Ambikol (based on Mills 1965, fig.1).
1. 2. 01 ASSN Pharaonic Sites_001-013.indd 201 ASSN Pharaonic Sites_001-013.indd 2 10/02/2020 11:4110/02/2020 11:41

The Archaeological Survey of Sudanese Nubia (ASSN)
3
initial reconnaissance survey of 1963–1964, 15km of the east bank from Gemai to Murshid was allocated for further investigation by the Finnish Nubian Expedition (FNE). The Finnish expedition conducted fieldwork between 21st December 1964 and 1st May 1965, their work including more extensive excavations on several sites identified by the ASSN reconnaissance. Its preliminary results were reported in the journal Kush (Donner 1973), and more fully in 1998 in a two-volume report (Donner 1998; see also Strouhal 1995). For the
sake of completeness, a summary of the results of the later work relevant to this volume is included here. The northernmost of the sites reported here (11-D-5 = FNE 15) lay c.1km south of the small groups of islands around Meili island, at the upstream end of the Second Cataract.
In the Saras area, the one major Middle Kingdom site which had not been investigated by Reisner’s expedition, at Askut, was excavated over two seasons in 1962–1964 by a team from the University of California at Los Angeles (Badawy
Figure 1.02 Southern end of ASSN Survey area, with sites identified during 1963–64 reconnaissance survey, between Semna and Dal (based on Mills 1965, fig.1).
01 ASSN Pharaonic Sites_001-013.indd 301 ASSN Pharaonic Sites_001-013.indd 3 10/02/2020 11:4110/02/2020 11:41

1 Introduction
4
1964, 1966; S.T. Smith 1995). At a similar time, further epigraphic and architectural studies were also made of the New Kingdom temples at Semna West and East (Kumma) by a joint expedition of the Egypt Exploration Society and Brown University (Caminos 1964, 1965, 1998a, 1998b). During 1966 an additional concession was allocated to the Oriental Institute Expedition to Sudanese Nubia (OINE) at Semna, in the central area of the region. This was focused on the Middle Kingdom fortified outpost at Semna South and an adjacent cemetery, and undertook two seasons of fieldwork in 1966–67 and 1967–68 (Žabkar and Žabkar 1982).
Further concessions were also allocated in the southern Batn al-Hajar, removing further areas from further ASSN investigations. On the west bank in the Songi (Sonki) area, an area of c.4km of the west bank was allocated to a team from the University of Rome (Donadoni 1970; Fanfoni 1979). A little upstream, a larger concession extending from Sonki East to Akasha (c.16km) on the east bank became the responsibility of a Swiss mission (Maystre 1970, 1975, 1980, 1996a, 1996b). In addition a group of medieval sites in the Melik en Nasr area (Sunnarti, Tangur and Turmukki) and at Kulb West were investigated by a German Archaeological Institute/University of Heidelberg team in 1967 and 1968 (Dinkler 1970, 1985; Rodziewicz 1972). As the ASSN Survey was drawing to a close, W. Y. Adams began new field-work on Kulubnarti in 1969, continued in1970 and again in 1979, mainly concerned with investi-gating the post-medieval (Islamic’) archaeology of the island but later also excavating two medieval cemeteries (Adams 1994, 4–9).
What was soon apparent from the fieldwork undertaken in this region was the great density of sites identified and recorded. By the mid-1960s the results of early fieldwork within Egyptian Nubia have been drawn together and assessed in Bruce Trigger’s still important synthetic study: History and Settlement in Lower Nubia (Trigger 1965). Mainly sites recorded by the First and Second Archaeological Surveys of Nubia, these included c.151 sites recorded during 1907–11, a further 76 sites during 1929–34 (see Adams 1977, 72–76), and c.70 sites recorded by the Sondage Survey of the Egypt Exploration Society during early 1961 (Smith 1962, 3). Trigger’s analysis also identified a range of factors likely to have contributed to both the uneven recovery as well as uneven preserva-tion of sites of various types and periods within this
region (1965, 43–54). The increasing intensity of fieldwork by the
1960s was soon reflected in its results. Within Sudanese Nubia in the area between the Egyptian-Sudanese frontier and the Second Cataract zone, the West Bank Survey subsequently recorded c.262 sites (Adams 2004, 1). The Scandinavian Joint Expedition (SJE) recorded c.490 sites over the corresponding area along c.60km of the east bank (Säve-Söderbergh 1992, 39), a total also including numerous rock drawing sites. As the SAS/UNESCO team had recognized during the later phases of their work (1961–62) within the Second Cataract zone, notwithstanding the rugged and inhospitable terrain south of Wadi Halfa this was not reflected in the number of sites encoun-tered. As they recognized “the very barrenness … has undoubtedly been responsible for the survival of minor remains which long since have disap-peared had they been situated in more populous areas” (Adams and Nordström 1963, 11).
The subsequent work of the ASSN south of Gemai was to further demonstrate the often remarkable conditions of archaeological preserva-tion at a more extensive regional scale. In this respect attention may also be drawn to experi-ences both of the Sudan Antiquities Service survey over c.64km of the Nile between Dal and Nilwatti which recorded more than 460 registered ‘sites’ (Vila 1979, 7–8) and the more than 700 sites identi-fied in the often rugged Third Cataract region (Osman and Edwards 2012). More recently large numbers (still unquantified) of sites were identi-fied in another sparsely inhabited cataract region during salvage work in advance of the Merowe Dam (Welsby 2003; Paner and Jakobielski 2005; Näser and Lange 2007; Wotzka 2012).
The ASSN Archive
The paper record produced by the project was extensive and built on the experience and practices of the earlier survey work downstream of Gemai and north of the Second Cataract (Adams 2004, 16–19). This included a handwritten field diary compiled by A. J. Mills, latterly archived as a typed document. Primary site records were compiled within a series of field notebooks, with details of individual sites recorded in one or more of these. These included 14 volumes compiled by A. J. Mills spanning the six field seasons from 1963 to 1969 (AJM II-XV), three by Bengt Schönbäck
01 ASSN Pharaonic Sites_001-013.indd 401 ASSN Pharaonic Sites_001-013.indd 4 10/02/2020 11:4110/02/2020 11:41

The ASSN Archive
5
(BS I-III) for the 1967–6 season, four by J. E. Knudstad (JEK I-IV) and a further five for Lars Gezelius (Gez I-V) relating to sites examined during the seasons of 1967–68 and 1968–69. Some additional records were also made in one notebook of Nordström’s (Nordström VII) as well as a volume prepared by W. Y. Adams (WYA
XII). While the notebooks commonly included sketch plans and object drawings as well as written descriptions for sites, these were supplemented where necessary by additional paper site plans, of various sizes, but most commonly on c.A3 size squared sheets. In earlier seasons these made use of proforma record sheets originally devised for the
Figure 1.03 Survey area between Gemai and Dal. The 180m contour corresponded with the expected high water levels (based on Mills 1965, fig.1).
01 ASSN Pharaonic Sites_001-013.indd 501 ASSN Pharaonic Sites_001-013.indd 5 10/02/2020 11:4110/02/2020 11:41

1 Introduction
6
West Bank (Faras-Gemai) Survey. For excavated cemeteries these were commonly recorded as grave sheets for one or more burials with increas-ingly standardised formats. The quite standard-ized character and formatting of these records was developed to facilitate publication, and a quite similar format was later followed in the publica-tions of the Dal-Nilwatti Survey. Examples of field notebook records and additional record sheets are illustrated in Appendix A.
The photographic archive relating to the ASSN Gemai-Dal Survey survey and excavations is substantial comprising more than 9000 images, as photographic negatives. These may be added to the c.3000 images in the archive of the West Bank Survey. Facilities for and practical experience in photographic work has already begun to be estab-lished in 1960 when the first fieldwork began in Sudanese Nubia and an associated documentation centre was established in Wadi Halfa. The devel-opment of the first phase of survey and excavation has been described elsewhere in the reports of the West Bank Survey (Adams 2004, 2005; Nordström 2014) and need not be repeated here. However, this early work was important in seeing the estab-lishment of a photographic darkroom in Wadi Halfa as well as the acquisition of a series of field cameras, supplied by UNESCO, essential to the successful completion of the project. The museum assistant and photographer Arbab Hassan Hafiz also provided much valuable support for such work.
As described by Nordström, then as now, practi-cal challenges of successful photographic work in the harsh Nubian environment were not incon-siderable. It is also evident from the archive how practical experience and expertise was accumu-lated over several years of fieldwork, producing an archive within which the generally high quality of the photographs is very evident. The very small number of poor quality images makes clear the care and attention taken in creating these records, care and attention perhaps less familiar in the age of almost limitless digital photography. The reasonably satisfactory condition of most of the photographic negatives some 50 years later may also be noted, although some physical deteriora-tion is occasionally evident. Bearing this in mind, one early priority of this publication project has
3 The scanning of the photographic negative archive was assisted by a grant from the Sudan Archaeological Research Society in 2014, for which we are very grateful.
4 These include films F/197, 199, 200, 230–233, 260, 265; partly within the sequence used by the West Bank Survey.
been to ensure the creation of digital copies of the whole photographic archive.3
The care and skill evident in the photographic archive has ensured that a large proportion of images are significant and suitable for publication, and it is assumed that the majority were prepared with that in mind. That the continuous pressure of work did not always allow the best conditions to be established for photographic recording is sometimes apparent, seen for example in rather ad hoc attempts of providing shade for photograph in a desert environment of bright sunlight and often deep shadows. While the field photographic record remains generally closely focused on site recording, some more general content may also be found amongst this archive. On occasions interest-ing and valuable landscape views were recorded, all too rare perhaps for a landscape which has since disappeared or been radically transformed. On some other occasions fleeting glimpses of Nubian communities just prior to their removal may also be seen. Such records are also all too rare with the limited ethnographic record made of this region prior to its inundation, although we may be grateful to the more informal photo-graphic record made by Herman Bell during his work in the region 1962–1964 (Bell 2009).
This part of the archive forms a continuation of the photographic records relating to the initial UNESCO-Sudan Antiquities Service West Bank Survey project (Nordström 2014, 3). Following on from that, there was one series of ‘field’ photo-graphs (prefixed with an F/), and a second consec-utive series of films used for objects/’collections’ (prefixed with a C/). The majority of the former were medium-format (120) films, while the object photographs were largely 35mm. The sequence of site films for the ASSN Gemai-Dal Survey comprise eight 35mm films,4 and c.330 films of medium format (sequence F/293-F/618). The object/finds films comprise films C/049-C/180, continuing the sequence of films (C/001-C/048) of the West Bank Survey (Nordström 2014, 3). In total these represent a total of c.4,300 site photographs and c.4,700 object photographs, although to these may be added some photographs within the West Bank Survey archive relating to the first season’s work when both projects were underway.
01 ASSN Pharaonic Sites_001-013.indd 601 ASSN Pharaonic Sites_001-013.indd 6 10/02/2020 11:4110/02/2020 11:41

From Archive to Publication
7
A card index photographic record for Gemai-Dal Survey, begun for the West Bank Survey, is currently incomplete, but is being reconstructed as the publication programme develops, while also better integrating the paper and digital archives of both projects. A series of notebooks record on-site photography from 1964–1969. In addition the archive holds prints of c.850 aerial photographs (scale 1:15,000), most taken during late 1959, but with some earlier coverage (initiated by Jean Vercoutter) apparently dating to 1955–57 (Adams and Allen 1961).
Finds from sites were generally recorded in the field and those selected for retention were latterly photographed and registered into the Sudan National Museum (SNM) collections. These were recorded on standardized finds cards with descriptive information, generally including sketch drawings, record information and Sudan National Museum (SNM.xxx) registration number, as well as attached identification photograph. Identification numbers of small finds were allocated based on (AMS) site registration codes. An example finds card is also illustrated in Appendix A.
From Archive to Publication
Some further comments may here be offered concerning this publication programme and its objectives, and how it relates to the original field-work and its records. In the first instance it must be made clear that the primary objective remains to bring to publication, as far as possible, the existing archive in the form that it was originally created. Additional discussion and commentary is also added, in this volume mainly in section 7, but a priority remains to present the original data in a concise and accessible form. This follows a similar approach to the publications of the earlier West Bank Survey (Adams 2004 2005; Nordström 2014). In so doing, the publication has attempted to make the fullest use of the various elements of the original archive, using the original fieldnotes, drawings and site and object photographs. One more innovative feature of this work has however been to make better use of the extensive aerial photography archive to better visualise the archae-ological sites within their landscape setting. This may be a first stage in rediscovering the landscapes of the Batn al-Hajar before their inundation. In so doing it has been felt desirable to make a full use of the aerial photographs the 1950s, in so doing
often being able to provide useful views of now lost landscapes.
In respecting the structure of the original site records, it has also been necessary to maintain the basic chronological scheme around which it was organized, in this case dealing only with sites identi-fied as ‘Pharaonic’. That there are many potential problems with the original chronological scheme is recognized, not least with the division made between ‘Egyptian’ Pharaonic and potentially contemporary ‘Nubian’ sites (identified as C-Group and/or Kerma). As scholarship of more recent decades has made clear, both in Nubia and more widely, such distinctions may often be very problematic, not least where such boundaries may often have become very blurred in the long history of Egyptian/Nubian encounters, colonial or otherwise. Addressing such problems and the more general interpretative issues raised in exploring the encounters between Egyptians and Nubians must however await the completion of the basic publication of the data. Where the records relating to the C-Group/Kerma sites recorded by the ASSN are much more substantial than those relating to the ‘Pharaonic’ sites presented here, it was not felt possible to further delay the publication of this first element of the larger archive. That the complete study of the full archive is likely to throw new light on a number of sites presented here also seems very likely.
On occasions, where some sites are already identified as likely to be relevant to these ‘Pharaonic’ sites, they have however been noted in the text. This has been the case for example with what may be termed a ‘Late C-Group’ cemetery at Saras East [11-Q-57] which may be dated to early Dynasty 18, in exactly the period when Egyptian/Nubian identities are becoming blurred. The presence of what appears to be a ‘Kerma’ workshop site close to the area of New Kingdom gold-working at Duweishat is also noted. It should also be noted here that a number of sites initially registered as ‘Pharaonic’ (and on occasions identified as such in early publications), but which now may be inter-preted otherwise, have also been included here, to avoid as far as possible the creation of further uncertainties in published accounts. One excep-tion has been a number of rock drawing sites, mainly around Kulubnarti which while identified as possibly ‘Pharaonic’ (Adams 1994, Table 1.1, 288), cannot be easily dated. These sites have not been included here as this attribution requires further investigation. These are however recorded in the site listing in Appendix B.
01 ASSN Pharaonic Sites_001-013.indd 701 ASSN Pharaonic Sites_001-013.indd 7 10/02/2020 11:4110/02/2020 11:41

1 Introduction
8
It should also be noted that individual site records were generally compiled in a format looking forward to publication rather than a subse-quent separate phase of post-excavation analysis and interpretation. As such there is limited scope for further re-interpretation of the site records, and as far as possible the degree of editing of the records has been kept to a minimum, so as to maintain as far as possible its original form. The one most common amendment to the original texts has been to change site descriptions phrased in the present tense to the past, reflecting their subsequent loss. That a number of sites (or at least their location), mainly in the southern Batn al-Hajar, have however survived above the Nile waters has been noted on a number of occasions, where known. Similarly, as much as possible of the original records are presented here, both in terms of site drawings and photographs. At this stage the original record photographs of objects are presented. That many researchers would wish to have new (and colour) photographs of objects is understood, but the major undertaking of relocat-ing and re-recording objects in the Sudan National Museum collections is beyond the scope of this publication project, however desirable. The basic format for presenting the general site records as well as specific site components (e.g. grave descrip-tions) also closely follows the format devised by the ASSN team and used quite systematically within their field records.
As is often evident with some of the uncertain-ties concerning the date of some sites reported here, understandings of Pharaonic pottery at the time of the ASSN survey were often inadequate. That this material was recorded prior to the very important study by Holthoer (1977) of the pottery from the Scandinavian Joint Expedition conces-sion to the north must be borne in mind. The general recording of pottery followed practices then current, such as the EES project at Buhen where A. J. Mills had been working (during the 1960–61, 1961–62 and 1962–63 seasons) prior to the ASSN Survey, which itself looked back to typological studies established much earlier in Nubian archaeology (Emery et al. 1979, 160). As such, particularly where dealing with fragmentary sherd material, much of the archaeological poten-tial of the material recovered was never adequately exploited. Observations on the production technology of pottery sought only to distinguish ‘handmade’ and ‘wheelmade’ pottery, while obser-vations of fabrics and wares remained at a rather
generalised level. Also following common practice of the time, record drawings of pottery were limited to more general formal records, mainly at a scale of 1:3. On occasions their scaled measurements also lack precision, although measurements were provided for most registered vessels on the finds registration cards. Where changes in width/height proportions of some Egyptian vessel forms have been recognized as chronologically significant (e.g. S. T. Smith 1995, 28–32) this ‘vessel index’ (VI) has been noted in the pottery records.
This lack of more detailed and nuanced record-ing can be especially frustrating where much progress has been made in the intervening years in developing more sophisticated understandings of Egyptian ceramic technology and its products. In view of this, the dating of pottery groups must often remain tentative, generally relying on the presence of more chronologically distinctive vessel forms. Where possible, likely dates for these have been noted, and we are very grateful for Lauriane Mielle [LM] for her work on reviewing this material. Pottery collections may be divided into two main bodies of material, those selected as individually registered finds and more general sherd collections, from within excavations and more general surface collections. Of the latter, the written records make clear that on occasions, some were examined by colleagues with more special-ist expertise, notably W. Y. Adams in the case of Meroitic and a more recent pottery (‘Christian’ and ‘Islamic’), and H-Å. Nordström for prehistoric pottery. Their comments, with annotations relat-ing to wares and fabrics are on occasions added to the field notebooks.
Site registration and the Archaeological Map of Sudan (AMS)
The ASSN continued the site registration system initiated north of the Second Cataract, a system later pursued by F. Hinkel with the Sudan Antiquities Service with the aim to develop a definitive Archaeological Map of Sudan (Hinkel 1977). All sites were assigned registration numbers within this system as the work progressed, and consider-able progress was made in establishing a primary database, both at the time and in subsequent discus-sions between A. J. Mills and F. Hinkel (especially in 1990) and with D. N. Edwards. However, while Hinkel was able to make some progress is publishing a number of regional volumes of the
01 ASSN Pharaonic Sites_001-013.indd 801 ASSN Pharaonic Sites_001-013.indd 8 10/02/2020 11:4110/02/2020 11:41

Site registration and the Archaeological Map of Sudan (AMS)
9
Archaeological Map of Sudan, a definitive listing of sites in this region has yet to be completed. While it may be hoped that one outcome of the ASSN publication programme will be to complete that task (if no longer envisaged in the same form), this remains an ongoing project. The current work has for example identified a number of instances where sites have been mis-located and conse-quently assigned incorrect registration numbers.
A more substantial task remains the integration of site registers of other projects working in the region, most importantly those of the Epigraphic Expedition of the German Academy of Sciences (Nubien-Expedition 1961–1963 der Akademie der Wissenschaften, Berlin, DDR). As was recognized at the time there was some duplication of site regis-tration numbers in the early stages of the ASSN. As reported in preliminary reports, it was initially
5 The organising principles for site registration laid out by W.Y. Adams (1961) and later developed more fully by F. Hinkel (1977) in relation to the Archaeological Map of Sudan (A.M.S) clearly require a single unique reference for all sites
6 Note that Otto and Buschendorf-Otto indicate that 794 field files were created (1993, 13).
sought to avoid renumbering of sites where there has been duplication of ‘epigraphic’ site numbers and those assigned to archaeological sites (Mills 1965, 2; Hintze and Reineke 1989, 10–11; Otto and Buschendorf-Otto 1993, 13). However it was later recognized that this would be necessary and this process was begun, although not fully complet-ed.5 At least one card index concordance was prepared by A. J. Mills, referring to 11 volumes of records prepared by the Rock Drawing survey registering 757 field files (Feldakte).6 Many of these had been assigned registration numbers which duplicated those of the main ASSN site register.
Integration of the large body of information collected by this team with the ASSN records was not completed at the time and presents a number of challenges. While the survey of rock drawings was published with an extended series of 46 maps,
Figure 1.04 Detail of aerial photograph (AP328230) of area of Turmukki island (Melik en Nasr), with site locations marked.
01 ASSN Pharaonic Sites_001-013.indd 901 ASSN Pharaonic Sites_001-013.indd 9 10/02/2020 11:4110/02/2020 11:41
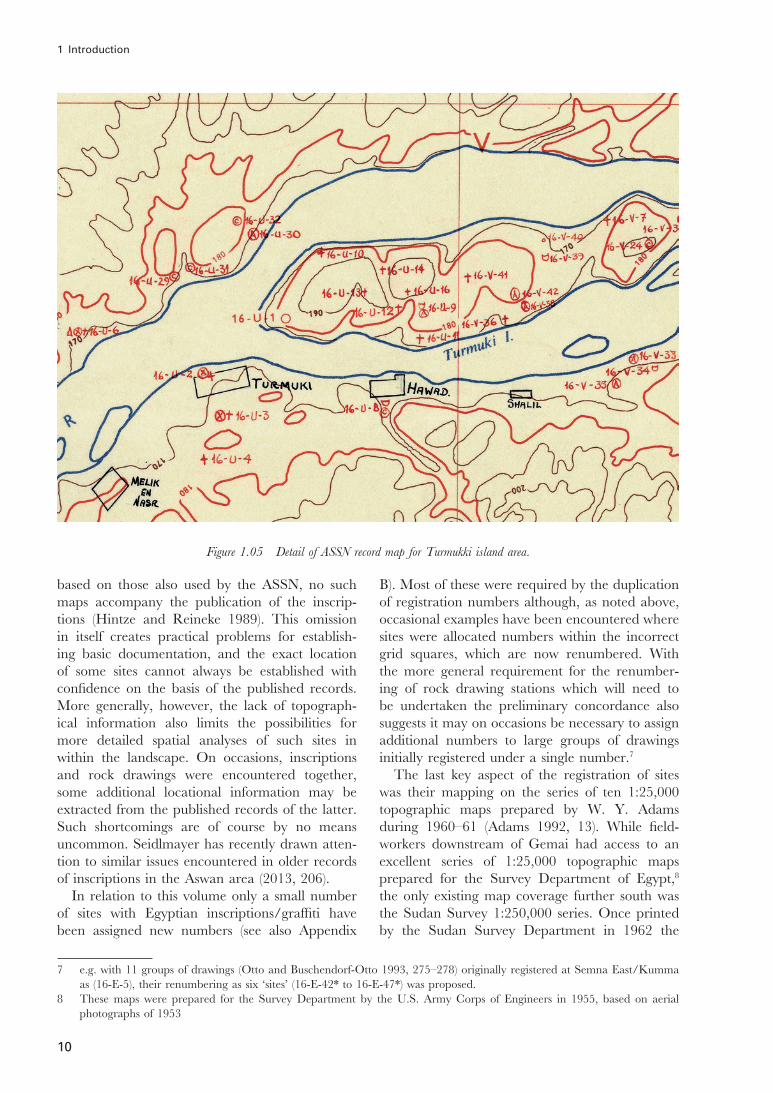
1 Introduction
10
based on those also used by the ASSN, no such maps accompany the publication of the inscrip-tions (Hintze and Reineke 1989). This omission in itself creates practical problems for establish-ing basic documentation, and the exact location of some sites cannot always be established with confidence on the basis of the published records. More generally, however, the lack of topograph-ical information also limits the possibilities for more detailed spatial analyses of such sites in within the landscape. On occasions, inscriptions and rock drawings were encountered together, some additional locational information may be extracted from the published records of the latter. Such shortcomings are of course by no means uncommon. Seidlmayer has recently drawn atten-tion to similar issues encountered in older records of inscriptions in the Aswan area (2013, 206).
In relation to this volume only a small number of sites with Egyptian inscriptions/graffiti have been assigned new numbers (see also Appendix
7 e.g. with 11 groups of drawings (Otto and Buschendorf-Otto 1993, 275–278) originally registered at Semna East/Kumma as (16-E-5), their renumbering as six ‘sites’ (16-E-42* to 16-E-47*) was proposed.
8 These maps were prepared for the Survey Department by the U.S. Army Corps of Engineers in 1955, based on aerial photographs of 1953
B). Most of these were required by the duplication of registration numbers although, as noted above, occasional examples have been encountered where sites were allocated numbers within the incorrect grid squares, which are now renumbered. With the more general requirement for the renumber-ing of rock drawing stations which will need to be undertaken the preliminary concordance also suggests it may on occasions be necessary to assign additional numbers to large groups of drawings initially registered under a single number.7
The last key aspect of the registration of sites was their mapping on the series of ten 1:25,000 topographic maps prepared by W. Y. Adams during 1960–61 (Adams 1992, 13). While field-workers downstream of Gemai had access to an excellent series of 1:25,000 topographic maps prepared for the Survey Department of Egypt,8
the only existing map coverage further south was the Sudan Survey 1:250,000 series. Once printed by the Sudan Survey Department in 1962 the
Figure 1.05 Detail of ASSN record map for Turmukki island area.
01 ASSN Pharaonic Sites_001-013.indd 1001 ASSN Pharaonic Sites_001-013.indd 10 10/02/2020 11:4110/02/2020 11:41

Nubian toponyms
11
new 1:25,000 maps provided functional base maps for plotting sites. These were also used as the base maps for the publication of the German Epigraphic Expedition. While useful for the compi-lation of general mapping, the primary locational data remained based on the aerial photography, on which sites could be located with some preci-sion (Adams and Allen 1961, 14). In addition to the marking of individual sites on the standard imagery, a series of 35 larger prints at a scale of c. 1:8,333 were made on which sites were marked directly. An example (fig.1.04), may be compared with the more schematic registration map (fig.1.05).
Nubian toponyms
It may also be appropriate here to provide some background to the toponyms by which sites are recorded here, and how these may relate to our wider understanding of placenames within this part of Middle Nubia. At this time, Herman Bell’s fundamental study of the placenames of the region (Bell 1970), based on fieldwork carried out
between 1962 and 1964 represents the most defin-itive record of the region’s placenames, informed by his extensive knowledge of the Nubian (Nobiin) language. At the southern end of the survey around Dal some additional recording was undertaken by the SFDRA-Sudan Antiquities Service survey which continued the general survey upstream of the Dal cataract (Vila 1979, 63–64, fig.21). During the twentieth century various forms of toponyms are encountered in the archaeological records. In relation to the ASSN, the most common forms are those reproduced on the Sudan Survey 1:250,000 map series, which are supplemented by those which appear on the ASSN map coverage, elements of which are used in this report. As made clear by Bell in a number of studies (e.g. Bell 1970, 2018; Bell and Hashim 2002) a number of problems are commonly encountered in the way such toponyms have been represented. Here, while the most familiar forms of toponyms will continue to be used, additional information will also be provided on variants, including the more linguistically ‘correct’ forms. As an example, such well-known toponyms such as that of Gammai/Gemai may
Figure 1.06 ASSN staff of 1963–64 (reconnaissance survey) at Wadi Halfa. (left to right) Abdel Ghani Ali, Abdel Hadi Mohammed, ?, Mohammed Hamid, Said Beshir, Reis Ibrahim Mubarek, ’Satur’.
01 ASSN Pharaonic Sites_001-013.indd 1101 ASSN Pharaonic Sites_001-013.indd 11 10/02/2020 11:4110/02/2020 11:41

1 Introduction
12
be compared with a more correct form of Jemey (Bell 1970, 47). While such modern placenames are only indirectly relevant to the ancient sites and landscapes described here, these may prove of greater relevance in subsequent volumes dealing with the medieval and more recent archaeology of the region.
Acknowledgements
A first and fundamental acknowledgment is due to all those who undertook the fieldwork, both the expatriate staff, especially H-Å. Nordström, B. Schönbeck, L. Gezelius, A. Vila and J. Knudstad and their Sudanese and Egyptian staff. As recorded elsewhere (Adams 2004, 2–3) the Sudanese staff of the Antiquities Service provided essential practical
9 It may be noted that Reis Ibrahim Mubarek worked with a number of other foreign archaeological teams during this period, for example accompanying the Swiss team working at Tabo (Argo) in the northern Dongola Reach, and the Italian team at Sonki.
10 The ASSN field diary records that the survey work began at 6.00a.m. on 22nd December 1963, with two Quftis, Abdel Ghani and Abdel Hadi
support throughout, notably Thabit Hassan Thabit and Negm el-Din Mohammed Sherif then Inspector of Antiquities resident in Wadi Halfa, as well as Gamal Ahmed Hassan and Arbab Hassan Hafiz. Following current practice and drawing on links with the Egyptian Exploration Society, field staff included both Egyptian workers, recruited from Quft, as well as locally recruited Sudanese staff. These were led in the early years of the Survey between Faras and Gemai by Reis Hufni, Reis Beshir and Reis Ibrahim Mubarek and latterly Yussuf Mohammed Yussuf el-Khou-li.9 While a comprehensive record of all the field staff does not survive in the ASSN archive the names of some may be recorded here: (1963–64) Abdel Ghani Ali Maharib Dungul (Quft), Abdel Hadi Mohammed Osman (Quft),10 Khalifa Hamed Abdullah (El Kab), Mohammed Juma
Figure 1.07 Reis Ibrahim Mubarek, Lesley Mills, Abdu Ferriq, Arbab Hassan Hafiz, Yusuf Mohammed Yussuf, ?, Mohammed Hamid.
01 ASSN Pharaonic Sites_001-013.indd 1201 ASSN Pharaonic Sites_001-013.indd 12 10/02/2020 11:4110/02/2020 11:41

Acknowledgements
13
and Hamuda Ali (Ambikol), Mohammed Hamid Mohammed Hamid (Soleb), Abdel Salam Ibrahim Salem (Kosha), logistic support of drivers, cooks, water supplies and boats, Mohammed Osman Mohammed Daud Aga Derwish Ramadan (Abri), Said Beshir Mohammed Saleh Abdel Karim (Halfa), Abdel Moneim Mohammed Fadl (Kumma), Abdel Rashid Abdu Ali (Saras), Abdel Aziz and Suleiman Salih Beshari (Semna), Ali Mohammed Musa (Attiri), Idris Mohammed Fareg, Saleh Hussein Berkieh, Salih Ghassim; (1964–65) Hamid Shegah Ahmed, Ibrahim Idris Ibrahim, Ali Mohammed Ali, Saleh Berkieh; (1965–1966) Ibrahim Mubarek, Yussuf Mohammed Yussuf el-Khouli, Abdel Hadi Mohammed Osman, Mutawalli Hassan Ali; (1966–1967) Ibrahim Mubarek, Yussuf Mohammed Yussuf el-Khouli, Abdel Hadi Mohammed Osman, Ali Mustafa Shahat [Abdel Ati], Hassan Mohammed Musa; (1967–68) Ibrahim Mubarek, Yussuf Mohammed Yussuf el-Khouli, Abdel Hadi Mohammed Osman, Kamal Faris, Tewfik Ali Shahat, Abdel Majid Hussein, Mubarek Mubarek, Mahmoud Mohammed Ali el Far, Ramadan Mohammed Osman, Hussein Ibrahim, Hamid Mohammed Aboud; (1968–69) Abdel Hadi Mohammed Osman, Ibrahim Mubarek, Mubarek Mubarek, Tewfik Ali Shahat, Ali Mustafa Shahat, Abdel Majid Hussein, Yussuf Mohammed Yussuf el-Khouli, Abdallah el-Kurdi.
Thanks are also due to the Sudan Archaeological Research Society for financial support for
beginning the digitizing the photographic archive. Further early support for the publication of the ASSN provided to A. J. Mills by the Fondation Michela Schiff Giorgini and the Haycock Trust should also be acknowledged. The editor (DNE) is also grateful for a period of academic study leave in 2018 provided by the University of Leicester which assisted in the completion of this volume. Additional special thanks are due to W. V. Davies for sharing information and insights concerning the Egyptian inscriptions, a number of which he has relocated in recent years as part of his more general research (see Davies 2014, 2016, 2017a, 2017b, 2018).
An acknowledgement is also due to Iain McLean for a number of interesting insights concerning the Saras gold workshops which emerged as part of a BA Dissertation project at the University of Leicester. Amongst many others who have contri-bution to the completion of this volume, Martin Sterry provided much valuable assistance with aerial photographs and their integration with modern satellite imagery, Margaret Finch and Mike Hawkes with preparation of drawings as well as Chantal Bielmann, Michaela Senkova and Julia Nikolaus. Thanks are also due to Laurel Bestock, Julien Cooper, Vivian Davies, Maria Gatto, Christian Knoblauch, Claudia Näser, Pamela Rose, Stuart Tyson Smith and Derek Welsby for advice and information on various elements of this material. All errors of course remain our own. All photographs are from the ASSN archive.
01 ASSN Pharaonic Sites_001-013.indd 1301 ASSN Pharaonic Sites_001-013.indd 13 10/02/2020 11:4110/02/2020 11:41