Tele Video User's Guide - bitsavers.org
166
Tele Video 9065 User's Guide
-
Upload
khangminh22 -
Category
Documents
-
view
0 -
download
0
Transcript of Tele Video User's Guide - bitsavers.org

Tele Video 9065
User's Guide

Tele Video 9065 Video Display Terminal
USER'S GUIDE
Publication No. 143304-00 Rev B April 1992

Copyright Copyright© 1992 by Tele Video Systems, Inc. All rights reserved. No part of this publication may be reproduced, transmitted, transcribed, stored in a retrieval system, or translated into any language or computer language, in any form or by any means, electronic, mechanical, magnetic, optical, chemical, manual, or otherwise, without the prior written permission of Tele Video Systems, Inc.; 550 E. Brokaw Road, P.O. Box 49048, San Jose, CA 95161-9048.
Disclaimer Tele Video Systems, Inc. makes no representations or warranties with respect to this manual. Further, TeleVideo Systems, Inc. reserves the right to make changes in the specifications of the product described within this manual at any time without notice and without obligation of Tele Video Systems, Inc. to notify any person of such revision or changes.
Canadian Department of Communications This digital apparatus does not exceed the class (NB, whichever is applicable) limits for radio noise emission from digital apparatus as set out in the radio interference regulations of the Canadian Department of Communications. Le present appareil numerique n' emet pas de bruits radioelectriques depassant les limites applicables aux appareils numeriques de classe (NB) (selon de cas) prescrites dans le reglement sur le brouillage radioelectrique edicre par le ministere des communications du Canada.
FCC Class A Warning This device is classified as a Class A computing device. Class A devices may only be used in commercial, business, or industrial environments. This equipment generates, uses, and can radiate radio frequency energy. If not installed and used in accordance with the instruction manual, it may cause interference with radio emissions. This equipment has been tested and found to comply with the limits for a Class A computing device, pursuant to Subpart J of Part 15 of FCC Rules, which are designed to provide reasonable protection against radio frequency interference (RFI) when operated in a commercial environment. Operation of this equipment in a residential area is likely to cause interference, in which case the user at his own risk and expense will be required to correct the interference. The use of nonshielded 1/0 cables may not guarantee compliance with FCC RFI limits.
Trademarks The following trademarks appear in this publication:
• TeleVideo, 905, 910, 910+, 912, 920, 925, 950, 955, 965, 9065, and VideoDesk-TeleVideo Systems, Inc.
• WordStar-MicroPro International Corp., Inc. • ADDS A2 and VP60-Applied Digital Data Systems, Inc. • ADM 3A/5/31-Lear Siegler, Inc. • Hazeltine 1500-Hazeltine Corp. • DG200-Data General Corp. • WY-60, WY-50, WY-50+, WY-120, WY-150, WY-160-Wyse Technology, Inc. • VT52, VT100-Digital Equipment Corporation • IBM 3101and3161-lntemational Business Machines, Inc.
Tele Video Systems, Inc., 550 East Brokaw Road, P. 0. Box 49048, San Jose, CA 95161-9048 Phone: 408-954-8333 FAX: 408-954-0623
ii 9065 USER'S GUIDE

Table of Contents
Introduction . . . . . . . . . . . . About This Manual . . . . . . . .
Local Keys ......... . Escape Key Sequences . . . Command Code Variables . Special Notices . . . . . . .
Chapter 1 INSTALLATION Preparation . . . . . . . . . . .
Choosing a Site . . . . . . . . Interface Types and Cables . .
Installation . . . . . . . . . . . Unpacking the Terminal . . . Attaching the Keyboard . . . . Connecting a Parallel Printer Connecting a Serial Printer . . Host Connections . . . . . . .
Port Pin Assignments . . . . . . Serial Ports . . . . COM! Serial Port ... COM2 Serial Port . . . Serial Port Verification PARALLEL Port . . . Plugging In the Terminal Turning On the Power . Self-Test .....
Chapter 2 SET UP Parameter Menus . . . . . . . .
Entering Set Up . . . Help Lines ..... . The Command Menu The General Menu . . The Display Menu . . The Keyboard Menu . The COM! Menu . The COM2 Menu .. The Attribute Menu .
PROGRAM MENUS .... Function Key Logical Sets . The Editing Key Submenu . Numeric Pad Submenu . . . The Answerback Submenu The Delimiter Submenu . . .
9065 USER'S GUIDE iii
.......... ix
.......... x x x x x
. . . . . . . . . 1-1 ...... ',.· . 1-1
1-1 1-1 l-1 1-1 1-1 1-2 1-2 1-2 1-2 1-3 1-3 1-4 1-4 1-4 1-4 1-5
. . . . . . . . . 2-1 . . 2-1 . . 2-1 .. 2-2
2-3 . 2-4
.. 2-5
. . 2-6
. . 2-7
. . 2-8 . ....... 2-9
. 2-9 2-10 2-12 2-13 2-14

Chapter 3 OPERATION Starting Up ........................................ 3-1
Adjusting Screen and Keyboard . . . . . . . . . . . . . . . . . . . . . . . . . . . . . . 3-2 Display Features . . . . . . . . . . . . . . . . . . . . . . . . . . . . . . . . . . . . . . 3-2 Information Lines ..................................... 3-2
Status line . . . . . . . . . . . . . . . . . . . . . .. . . . . . . . . . . . . . . . . . . . . 3-2 User messages. . . . . . . . . . . . . . . . . . . . . . . . . . . . . . . . . . . . . . . . 3-3 Function key labels . . . . . . . . . . . . . . . . . . . . . . . . . . . . . . . . . . . . . 3-3
Data Lines ......................................... 3-3 Splitting the Screen . . . . . . . . . . . . . . . . . . . . . . . . . . . . . . . . . . . . . 3-4 Number of Columns . . . . . . . . . . . . . . . . . . . . . . . . . . . . . . . . . . . . 3-4 Screen-Saver . . . . . . . . . . . . . . . . . . . . . . . . . . . . . . . . . . . . . . . . 3-4
Resetting the Terminal . . . . . . . . . . . . . . . . . . . . . . . . . . . . . . . . . . . 3-4 Funct/ Alt/Compose Key . . . . . . . . . . . . . . . . . . . . . . . . . . . . . . . . . . 3-4
The FUNCT Selection . . . . . . . . . . . . . . . . . . . . . . . . . . . . . . . . . . . 3-4 The MET A Selection . . . . . . . . . . . . . . . . . . . . . . . . . . . . . . . . . . . . 3-4 The 3rd LEGEND Selection . . . . . . . . . . . . . . . . . . . . . . . . . . . . . . . . 3-5 The COMPOSE Selection . . . . . . . . . . . . . . . . . . . . . . . . . . . . . . . . . 3-5
The ASCII Keyboard . . . . . . . . . . . . . . . . . . . . . . . . . . . . . . . . . . . 3-6 Types of Keys . . . . . . . . . . . . . . . . . . . . . . . . . . . . . . . . . . . . . . . . 3-6
PC Enhanced Keyboard . . . . . . . . . . . . . . . . . . . . . . . . . . . . . . . . . . 3-8 Types of Keys . . . . . . . . . . . . . . . . . . . . . . . . . . . . . . . . . . . . . . . . 3-8
ANSI Keyboard ..................................... 3-10 Types of Keys . . . . . . . . . . . . . . . . . . . . . . . . . . . . . . . . . . . . . . . 3-10
Host Communication . . . . . . . . . . . . . . . . . . . . . . . . . . . . . . . . . . 3-12 Dual-Session Operation. . . . . . . . . . . . . . . . . . . . . . . . . . . . . . . . . . 3-12 Dual Session Configuration . . . . . . . . . . . . . . . . . . . . . . . . . . . . . . . 3-12 Single Session Operation . . . . . . . . . . . . . . . . . . . . . . . . . . . . . . . . . 3-12 Serial Communication Modes . . . . . . . . . . . . . . . . . . . . . . . . . . . . . . 3-13 Sending Blocks of Data . . . . . . . . . . . . . . . . . . . . . . . . . . . . . . . . . . 3-13 Editing Key Modes . . . . . . . . . . . . . . . . . . . . . . . . . . . . . . . . . . . . 3-13
Serial Printer Control . . . . . . . . . . . . . . . . . . . . . . . . . . . . . . . . . . 3-14 Serial Printer Modes . . . . . . . . . . . . . . . . . . . . . . . . . . . . . . . . . . . 3-14 Page Print . . . . . . . . . . . . . . . . . . . . . . . . . . . . . . . . . . . . . . . . . 3-14
Parallel Printer Control ................................. 3-15 Parallel Printer Modes . . . . . . . . . . . . . . . . . . . . . . . . . . . . . . . . . . 3-15 Page Print . . . . . . . . . . . . . . . . . . . . . . . . . . . . . . . . . . . . . . . . . 3-15
Chapter 4 VIDEO DESK General Information . . . . . . . . . . . . . . . . . . . . . . . . . . . . . . . . . . . . 4-1
Entering and Leaving VideoDesk . . . . . . . . . . . . . . . . . . . . . . . . . . . . . 4-1 Going From One Menu to Another . . . . . . . . . . . . . . . . . . . . . . . . . . . . . 4-1 Moving the Window . . . . . . . . . . . . . . . . . . . . . . . . . . . . . . . . . . . . 4-1
The Clock . . . . . . . . . . . . . . . . . . . . . . . . . . . . . . . . . . . . . . . . . 4-1 Setting the Clock/Calendar . . . . . . . . . . . . . . . . . . . . . . . . . . . . . . . . . 4-1 Displaying the Date and Time ............................... 4-2 Setting the Alarm Clock and Bell . . . . . . . . . . . . . . . . . . . . . . . . . . . . . 4-2 The Notepad . . . . . . . . . . . . . . . . . . . . . . . . . . . . . . . . . . . . . . . . 4-2
The Calendar . . . . . . . . . . . . . . . . . . . . . . . . . . . . . . . . . . . . . . . . 4-2 The Calculator . . . . . . . . . . . . . . . . . . . . . . . . . . . . . . . . . . . . . . . 4-2
Key Functions . . . . . . . . . . . . . . . . . . . . . . . . . . . . . . . . . . . . . . . . 4-3
iv 9065 USER'S GUIDE

Examples . . . . . . . . . . . . . . . . . . . . . . . . . . . . . . . . . . . . . . . . . . 4-3 The ASCII Chart . . . . . . . . . . . . . . . . . . . . . . . . . . . . . . . . . . . . . 4-4
Chapter 5 TROUBLESHOOTING If A Problem Occurs . . . . . . . . . . . . . . . . . . . . . . . . . . . . . . . . . . . 5-1
Troubleshooting Checklist . . . . . . . . . . . . . . . . . . . . . . . . . . . . . .. . . . 5-1 Running Self Test . . . . . . . . . . . . . . . . . . . . . . . . . . . . . . . . . . . . . . 5-2 Monitor Mode ........................................ 5-3 Stand-Alone Test ...................................... 5-3
If You Need Assistance . . . . . . . . . . . . . . . . . . . . . . . . . . . . . . . . . . 5-4
Chapter 6 PROGRAMMING Entering Commands . . . . . . . . . . . . . . . . . . . . . . . . . . . . . . . . . . . 6-1
Commands From the Host. . . . . . . . . . . . . . . . . . . . . . . . . . . . . . . . . . 6-1 Commands From the Keyboard . . . . . . . . . . . . . . . . . . . . . . . . .. . . . . . . 6-1 Command Format . . . . . . . . . . . . . . . . . . . . . . . . . . . . . . . . . . . . .. . 6-2
Personality Modes . . . . . . . . . . . . . . . . . . . . . . . . . . . . . . . . . . . . 6-2 Saving/resetting Values ................................... 6-4
Chapter 7 KEYBOARD AND SCREEN Keyboard Functions. . . . . . . . . . . . . . . . . . . . . . . . . . . . . . . . . . . . 7-1
Lock/Unlock the Keyboard . . . . . . . ....................... 7-1 Auto Repeat Mode ...................................... 7-1 Key click ............................................. 7-1 NumLock .......................................... 7-1 Disabling Specific Keys ................................... 7-1 BREAK Signal Time-out .................................. 7-1 CAPS LOCK Mode ..................................... 7-1 Caps Reverse Mode ..................................... 7-2 The Beeper . . . . . . . . . . . . . . . . . . . . . . . . .................. 7-2 Selecting the Bell Column . . . . . . . . . . . . . . . . .................. 7-2 Margin Bell Mode . . . . . . . . . . . . . . . . . . . . . . . . . . . . . .. . . . . . . . . 7-2
Screen Display . . . . . . . . . . . . . . . . . . . . . . . . . . . . . . . . . . . . . . 7-2 Visibility . . . . . . . . . . . . ............................... 7-2 Background ......................................... 7-2 Screen Saver ......................................... 7-2 Cursor Appearance ..................................... 7-2
Visual Attributes . . . . . . . . . . . . . . . . . . . . . . . . . . . . . . . . . . . . . 7-2 Visual Attribute Types ................................... 7-2 Selecting Attribute Type .................................. 7-3 Selecting the Attribute Base ................................ 7-3 Defining Visual Attributes ................................. 7-4 Normal Intensity Mode ................................... 7-4 Filling a Rectangle with Attributes .............................. 7-4 Information Area Attributes .................................. 7-4 Status Line Attributes .................................... 7-5 Write-Protected Characters ................................. 7-5
Line Appearance ..................................... 7-5 Selecting the Number of Columns ............................. 7-5 80/132 Change Clear Feature .... ·. . . . . . . . . . .................. 7-5 Line Attributes . . . . . . . . . . . . . . . . . . ...................... 7-5
Test Displays . . . . . . . . . . . . . . . . . . . . . . . . . . . . . . . . . . . . . . . 7-6 Self Test ........................................... 7-6
9065 USER'S GUIDE v

Monitor Mode ........................................ 7-6
Chapter 8 DISPLAY & PAGES Configuring Lines and Pages . . . . . . . . . . . . . . . . . . . . . . . . . . . . . . . 8-1
Selecting Number of Lines . . . . . . . . . . . . . . . . . . . . . . . . . . . . . . . . . 8-1 Selecting Lines per Page . . . . . . . . . . . . . . . . . . . . . . . . . . . . . . . . . . 8-2
The Split Screen . . . . . . . . . . . . . . . . . . . . . . . . . . . . . . . . . . . . . . 8-2 Split Screen w/o Clearing Pages . . . . . . . . . . . . . . . . . . . . . . . . . . . . . . 8-2 Split Screen and Clear Pages . . . . . . . . . . . . . . . . . . . . . . . . . . . . . . . . 8-2 Sizing the Windows. . . . . . . . . . . . . . . . . . . . . . . . . . . . . . . . . . . . . 8-2 Closing the Windows . . . . . . . . . . . . . . . . . . . . . . . . . . . . . . . . . . . . 8-3 Moving to Another Page/Window . . . . . . . . . . . . . . . . . . . . . . . . . . . . . 8-3
Page Movement Modes . . . . . . . . . . . . . . . . . . . . . . . . . . . . . . . . . . 8-3 Autopage Flip Mode . . . . . . . . . . . . . . . . . . . . . . . . . . . . . . . . . . . . 8-3 Autoscroll Mode . . . . . . . . . . . . . . . . . . . . . . . . . . . . . . . . . . . . . . 8-4
Scrolling . . . . . . . . . . . . . . . . . . . . . . . . . . . . . . . . . . . . . . . . . . 8-4 Setting the Scrolling Rate . . . . . . . . . . . . . . . . . . . . . . . . . . . . . . . . . . 8-4 Defining the Scrolling Region . . . . . . . . . . . . . . . . . . . . . . . . . . . . . . . 8-5 Locking One Line . . . . . . . . . . . . . . . . . . . . . . . . . . . . . . . . . . . . . . 8-5
Chapter 9 EDITING & CURSOR MOVEMENT Protected Modes . . . . . . . . . . . . . . . . . . . . . . . . . . . . . . . . . . . . . . 9-1
Write-Protect & Protect Modes . . . . . . . . . . . . . . . . . . . . . . . . . . . . . . 9-1 Creating a Protected Form . . . . . . . . . . . . . . . . . . . . . . . . . . . . . . . . . 9-1
Editing Keys . . . . . . . . . . . . . . . . . . . . . . . . . . . . . . . . . . . . . . . . 9-2 Down Arrow Key Mode . . . . . . . . . . . . . . . . . . . . . . . . . . . . . . . . . . 9-2 Autowrap Mode . . . . . . . . . . . . . . . . . . . . . . . . . . . . . . . . . . . . . . . 9-2 New Line Mode . . . . . . . . . . . . . . . . . . . . . . . . . . . . . . . . . . . . . . . 9-3 Editing Modes . . . . . . . . . . . . . . . . . . . . . . . . . . . . . . . . . . . . . . . 9-3 Insert/Replace Modes . . . . . . . . . . . . . . . . . . . . . . . . . . . . . . . . . . . . 9-3 The Replacement Character . . . . . . . . . . . . . . . . . . . . . . . . . . . . . . . . 9-3
Editing Text . . . . . . . . . . . . . . . . . . . . . . . . . . . . . . . . . . . . . . . . 9-3 Inserting Characters . . . . . . . . . . . . . . . . . . . . . . . . . . . . . . . . . . . . . 9-3 Inserting Nulls . . . . . . . . . . . . . . . . . . . . . . . . . . . . . . . . . . . . . . . 9-3 Repeating a Character . . . . . . . . . . . . . . . . . . . . . . . . . . . . . . . . . . . 9-4 Deleting Text . . . . . . . . . . . . . . . . . . . . . . . . . . . . . . . . . . . . . . . . 9-4 Clearing a Field . . . . . . . . . . . . . . . . . . . . . . . . . . . . . . . . . . . . . . . 9-4 Erasing a Column . . . . . . . . . . . . . . . . . . . . . . . . . . . . . . . . . . . . . . 9-4 Erasing Unprotected Text . . . . . . . . . . . . . . . . . . . . . . . . . . . . . . . . . . 9-5 Erasing Unprotected Text . . . . . . . . . . . . . . . . . . . . . . . . . . . . . . . . . . 9-5 and Attributes . . . . . . . . . . . . . . . . . . . . . . . . . . . . . . . . . . . . . . . . 9-5 Erasing a Rectangle . . . . . . . . . . . . . . . . . . . . . . . . . . . . . . . . . . . . . 9-5
Cursor Control . . . . . . . . . . . . . . . . . . . . . . . . . . . . . . . . . . . . . . . 9-5 Cursor Movement . . . . . . . . . . . . . . . . . . . . . . . . . . . . . . . . . . . . . 9-6 Line Feed and Reverse Line Feed . . . . . . . . . . . . . . . . . . . . . . . . . . . . . 9-6 Addressing the Cursor . . . . . . . . . . . . . . . . . . . . . . . . . . . . . . . . . . . 9-6 Reading the Cursor . . . . . . . . . . . . . . . . . . . . . . . . . . . . . . . . . . . . . 9-7 Cursor Address (Decimal Units) . . . . . . . . . . . . . . . . . . . . . . . . . . . . . . 9-7 Reading Cursorin Decimal Units . . . . . . . . . . . . . . . . . . . . . . . . . . . . . 9-7
Tabulation . . . . . . . . . . . . . . . . . . . . . . . . . . . . . . . . . . . . . . . . . 9-7 Setting Tab Stops . . . . . . . . . . . . . . . . . . . . . . . . . . . . . . . . . . . . . . 9-7 Clearing Tab Stops . . . . . . . . . . . . . . . . . . . . . . . . . . . . . . . . . . . . . 9-8 Moving the Cursor to a Tab Stop . . . . . . . . . . . . . . . . . . . . . . . . . . . 9-8
vi 9065 USER'S GUIDE

Chapter 10 CHARACTER SETS Selecting A Character Set . . . .
Loading the Font Banks . . . Automatic Font Loading . . Special Graphics Characters . Designating Primary and Secondary Character Sets . . Displaying a Character Set . Displaying One Character from the Secondary Set . . . . . . . . . . . . . . . . . . . . Selecting a Keyboard Layout
.......... 10-1 10-3 10-3 10-3
10-3 10-4
.............. 10-4 ......... 10-4
Custom Characters . . . . . . . . . . . . . . . . . . . . . . . . . . ......... 10-4 Anatomy of a Character Cell Creating a Soft Character . . . Example ........... .
Block Graphics . . . . . . . . . Creating a Measured Block . Creating a Positioned Block .. Moving a Block . . . . . . . .
Chapter 11 DATA TRANSMISSION Programming The Ports . . . .
Dual Session . . . . . . . Selecting the Host Port(s) ... Selecting the Printer Port . . . Programming the Serial Ports . Host Null Characters Data Word Mode ...... . Transmit Delay Rate . . . . . .
Handshaking Protocols . . . . . . . . . . . . . . . . . . . . . . . . Sending X-On/X-Off Characters . . . . . . . . ...... . Transmission Control Mode . . Receive Buffer Fill Limit . . . . . . . . . . . . . . . . . . . Data Acknowledge Mode . . . . . . . . . . . . . . . . ...
10-4 . ....... 10-5 ........ 10-6 . ....... 10-7
10-7 10-7 10-7
........ 11-1 11-1 11-1 11-1 11-1 11-1 11-2 11-2
........ 11-2 . ..... 11-2
11-2 . ..... 11-2 . ..... 11-3
Data Transmission Modes . . . . . . . . . . . . . . . . . . . . . . ......... 11-3 Host Mode ..... . Parallel Printer Mode . . . . . Serial Printer Mode . . . . . .
Sending Text . . . . . . . . . . Block Start Mode Block End Mode . . . . . . . . Delimiters . . . . . . . . . . . Programming Delimiters . . . Text Blocks for Transmission . Page Send Commands . . . . . Page Print .......... .
Page Print Commands . . . . . Page Print Flip Mode . . . . . Page Print Termination Signal
9065 USER'S GUIDE vii
11-3 . . . . . . . . 11-3 ........ 11-3 ........ 11-4
11-4 ...... 11-4 . ..... 11-4
11-4 . . . . . . . . . . 11-4 . . . . . . . . . . 11-4
. . . . . . . . . 11-6
. ........ 11-6 11-6
......... 11-6

Chapter 12 REPROGRAMMING Key Configuration Modes . . . . . . . . . . . . . . . . . . . . . . . . . . . . . . . . 12-1
Application Key Mode . . . . . . . . . . . . . . . . . . . . . . . . . . . . . . . . . . 12-1 WordStarMode . . . . . . . . . . . . . . . . . . . . . . . . . . . . . . . . . . . . . . 12-1
Editing And Numeric Keys ............................... 12-1 Reprogramming One Key . . . . . . . . . . . . . . . . . . . . . . . . . . . . . . . . 12-1 Reprogramming a Set of Keys . . . . . . . . . . . . . . . . . . . . . . . . . . . . . . 12-2
The Function Keys .................................... 12-2 Selecting the Function Key Set . . . . . . . . . . . . . . . . . . . . . . . . . . . . . . 12-2 Loading Function Keys . . . . . . . . . . . . . . . . . . . . . . . . . . . . . . . . . . 12-2
Reprogramming Function Keys . . . . . . . . . . . . . . . . . . . . . . . . . . . . . 12-3 Sending Function Key Contents . . . . . . . . . . . . . . . . . . . . . . . . . . . . . 12-4 Loading Function Key Labels . . . . . . . . . . . . . . . . . . . . . . . . . . . . . . 12-4 Shifted Label Mode . . . . . . . . . . . . . . . . . . . . . . . . . . . . . . . . . . . . 12-4 Funct/ Alt/Compose Key . . . . . . . . . . . . . . . . . . . . . . . . . . . . . . . . . 12-5
Information Lines . . . . . . . . . . . . . . . . . . . . . . . . . . . . . . . . . . . . 12-5 Info Line Contents . . . . . . . . . . . . . . . . . . . . . . . . . . . . . . . . . . . . 12-5 Loading User Messages . . . . . . . . . . . . . . . . . . . . . . . . . . . . . . . . . 12-5 Sending User Messages . . . . . . . . . . . . . . . . . . . . . . . . . . . . . . . . . . 12-6 Loading the Time of Day . . . . . . . . . . . . . . . . . . . . . . . . . . . . . . . . . 12-6
Terminal Identity Messages . . . . . . . . . . . . . . . . . . . . . . . . . . . . . . . 12-6 The Answerback Message . . . . . . . . . . . . . . . . . . . . . . . . . . . . . . . . 12-6 Sending Terminal Identification . . . . . . . . . . . . . . . . . . . . . . . . . . . . . 12-6
Appendix A Appendix B Appendix C Appendix D Appendix E Appendix F Appendix G Appendix H
SPECIFICATIONS CODE AND CHARACTER SETS TELEVIDEO COMMAND SUMMARIES OTHER COMMAND SUMMARIES KEY CODES KEYBOARD LAYOUTS CURSOR COORDINATES STATUS LINE MESSAGES
viii 9065 USER'S GUIDE

Introduction
The Tele Video 9065 is a high-performance terminal, designed to operate in the ASCII, PC terminal, and ANSI environments, providing considerable flexibility. It has also been designed to be user friendly. You'll find that the terminal is very easy to use, with many features that simplify your work. Keep this manual near the terminal for future reference. This terminal will provide you with many years of trouble-free service.
9065 USER'S GUIDE ix

About This Manual
This manual is organized in three parts:
• Operation Installation, setup, daily operation, and problem-solving. Read this portion of the manual. It's written to help you take best advantage of all the time-saving and work-saving features of the terminal. Chapters 1-5.
• Programming 9065-mode commands and some technical details about terminal operation. Chapters 6-12.
• Reference Specifications, code tables, and operational references. Appendices A-H.
Local Keys
Within prOcedural steps, you will be directed to press certain keys. The keys to be pressed will be shown with a box around the keycap legend. For example, the procedure may tell you to press
lctrII [g This means to hold down the Ctrl key until you press the C key.
Similarly, the Shirt and Funct keys are simultaneously pressed with other keys.
Escape Key Sequences
The terminal responds to escape sequences from the host or from the keyboard. To enter an escape sequence from the keyboard, momentarily press the Esc key, then sequentially press the keys for the string of characters shown in the escape sequence.
Command Code Variables
Command codes listed in Appendices C and D (and described in Chapters 6 -12) may have variable values as part of the code to be entered. Variables are shown in italics. For example, if you are directed to enter a date, it will be shown as mm dd )Y.
Special Notices
This manual has three types of notices that require special attention
NOTE Information of special interest or importance about a feature.
I CAUTION I This procedure might destroy data or damage equipment. Make sure you read and understand thoroughly what you are doing before proceeding.
~ WARNING II
This procedure might cause you physical harm. Stop what you're doing and read instructions carefully before proceeding. Call a service technician, if necessary.
x 9065 USER'S GUIDE

This chapter contains instructions for installing the terminal. Following this is a section on connecting the COMl (or COM2) serial port to a host computer, the COM2 (or COMl) serial port to a second host or serial printer, and the parallel port to a parallel printer.
Preparation Before you start the installation process, plan your system layout:
• Prepare the site • Decide on a computer interface type and
obtain all cables
Choosing a Site • Choose a location with indirect lighting,
away from windows or other sources of bright, direct light.
• Allow 4 inches (10.2 cm) of clearance for ventilation on all sides.
• Place the keyboard lower than the terminal screen.
• Select furniture conducive to good work-ing posture.
You can sit as close to the screen as you wish, without fear of radiation. Tests performed on Tele Video terminals by Underwriters Laboratories indicate they emit virtually no radiation and pose no health hazard.
Interface Types and Cables The type of interface you select depends on the distance between the host and the terminal.
If the distance between the terminal and your computer or modem is less than 50 feet, connect them with an RS-232C interface cable.
The terminal offers several interface options for distances greater than 50 feet, available through your dealer: RS-422, current loop, and internal modem. Ask your dealer or distributor for help in selecting the appropriate interface.
Cables for connecting the terminal to a computer, modem, or printer are not included with the terminal. The service technician in your or-
9065 USER'S GUIDE 1-1
Chapter 1 INSTALLATION
ganization should be able to obtain the cables, or you can contact a computer supply dealer.
Installation Review the entire installation procedure before you start. Make sure you have the necessary cables and have prepared a suitable location, as instructed in the previous sections.
II WARNING
Never open the terminal case. You can receive a serious electrical shock, even when the terminal is off and unplugged. Always call a technician to seNice the interior of the terminal.
Unpacking the Terminal Inspect all parts for damage. If anything is missing or damaged, contact your distributor or dealer. Save the shipping material in case you move or ship the terminal again.
Attaching the Keyboard
I CAUTION I Never disconnect or connect the keyboard when the power is on. Doing so can seriously damage the terminal.
Plug the end of the coiled keyboard cable into the left side of the terminal (Figure 1-1).
Connecting a Parallel Printer Make sure your printer is a Centronics compatible printer. Connect its cable between the (default) PARALLEL port on the terminal (Figure 1-2) and the parallel port on the printer. See the pin assignment tables at the end of this chapter to verify the type of cable required.
INSTALLATION

Connecting a Serial Printer If you use a serial printer, connect its cable to the COM2(orCOMl) serialport(Figure 1-2) on the terminal. See the pin assignment tables at the end of this chapter to help you determine the type of cable for your printer. Since a serial printer is not the default configuration you need to run Set Up before printing.
Host Connections Make sure you have the appropriate interface, as discussed at the beginning of this chapter. For an RS-232C interface, connect the cable between the COMl (or COM2) port and the RS-232C port on the host or modem. If you have to rewire the RS-232C connector for proper communication with the computer, see "RS-232C Pin Assignments" later in this chapter.
This completes the installation steps. See Chapter 3 for adjustment and operating instructions.
INSTALLATION 1-2
Port Pin Assignments The terminal has two serial communication ports and a parallel printer port.
Serial Ports Determine the signals that each unit requires. Typically, the terminal requires only Transmit Data, Receive Data, and Ground (pins 2, 3, and 7) for serial communication. Some computers, however, may require additional signals. Find out if the serial port for each interface is a data communication equipment (DCE) or data terminal equipment (DTE) type. Check the computer and printer manuals for data on port type, required signals, and signal direction.
NOTE: Before buying any cables, check pin assignments in Table 1-1 and for the connector on the host computer. Make sure the connectors at each end mate (male to female) properly.
Figure 1-1. Front View
9065 USER'S GUIDE

COM1 Serial Port The COMl port has a male 25-pin D-connector; your computer or printer may not have a 25-pin connector (some units have a 9-pin connector) or the DCE/DTE interfaces may not match up. In such cases, consult a technician or your dealer for assistance. When connecting the COMl port to a host computer, refer to its manual and Table 1-1. Active-high TTL signals in the table are followed by+, active-low signals by-.
Table 1-1. COM1 Port_iDTEl S!s nals .Pm Mrfollfollfo :Fllllctioh > nfr~afoll
1 Frame _ground 2 TXD- Transmit data Ou.!P_ut 3 RXD- Receive data ln_EUt 4 RTS+ R~uest to send Ou_!I>_ut 5 CTS+ Clear to send ln_.£._ut
6 DSR+ Data set rea~ ln_.£._ut 7 GND S!.g_nal _g_round n/a
8 DCD+ Data carrier detect Input 20 DTR+ Data terminal ready Output
COM2 Serial Port The COM2 port has a female 9-pin D-connector; please note that its pin connections are not the same as on the COMl port.
Since the terminal has the capability to toggle (Session 1 or Session 2) between two host computers, use the COM2 port to connect to the second host
NOTE: Before buying any cables, check pin assignments for COM1/COM2 (Tables 1-1 /1-2) and for the connector on the device. Make sure the connectors at each end mate (male to female) properly.
Check the port connector on the second host. Make sure the cable you use has connectors (9-pin or 25-pin) that mate with connectors on the terminal and host computer.
If you connect the COM2 port to a serial printer, use a cable with a male 9-pin D-connector; the other end must mate with the printer connector.
When connecting the COM2 port to a computer or other serial device, refer to Table 1-2, and to
COM2 serial port
PARALLEL port
Figure 1-2. Rear View
9065 USER'S GUIDE 1-3 INSTALLATION

the manual supplied with the computer or device. Active-high TTL signals in the table are followed by+, active-low signals by-.
Table 1-2. COM2 Port S_!g_nals
1 DCD + Data carrier detect IDI>_Ut
2 RXD - Receive data fuput
3 TXD- Transmit data Ou_!P_ut 4 DTR+ Data terminal Output
rea~ 5 GND S~nal ground n/a 6 DSR+ Data set rea~ 7 RTS+ Request to send Ou_!E_ut
8 CTS+ Clear to send fu...r_ut
9 Not connected n/a
Serial Port Verification Verify correct cabling to each computer or serial device. Run Set Up; verify that parameters in the COMl and COM2 menus agree with the manufacturer's parameters for each device. If the terminal then fails to communicate properly with the computers (or serial printer), ask a service technician or your dealer for assistance.
PARALLEL Port The parallel port has a 25-pin D-connector, with Centronic-compatible signal levels. At a print command, the STROBE- signal gates the first byte of data out on data lines DO-D7 to the printer. The printer responds with acknowledge signal ACK-, and the process repeats until the last byte is sent to the printer. The presence of any other input signal from the printer (BUSY+, PE+, or ERR-) will inhibit all data lines to the printer. Pin assignments are shown in Table 1-3.
NOTE: Mnemonics for active-high signals are followed by a + sign (e.g. BUSY+); active-low signals are followed by a - sign (e.g. STB-).
INSTALLATION 1-4
Table 1-3. PARALLEL Port Signals Pin Mri~lifoi:liti s!&_na1 1'/ilfue nil'eetiOfr
1 STB- Data strobe Ou__!p_ut
2 PDO+ Data bitO Ou__!p_ut
3 PDl+ Data bit 1 Ou~t
4 PD2+ Data bit 2 Ou_!P_ut
5 PD3+ Data bit 3 Qu_!:J>Ut 6 PD4+ Data bit4 Output
7 PDS+ Data bit 5 Output
8 PD6+ Data bit 6 Ou_tg_ut
9 PD7+ Data bit 7 Ou_tg_ut
10 ACK- Acknowledge ID_l)Ut
11 BUSY+ Printer is busy ID_IJ_Ut 12 PE+ Paper empty fuput
13 No connection n/a 14 No connection n/a 15 ERR- Printer error state fuput
16 No connection n/a
17-25 GND Signal ground n/a
Plugging In the Terminal Do not push in the power switch before plugging in the terminal. Plug the power cable into the terminal first, then plug the cable into a grounded wall outlet.
NOTE: In the United States, use a threeprong electrical outlet with a National Electrical Manufacturers Association (NEMA) Standard 5-15R rating. If you use a twoprong adapter, make sure it is properly grounded.
Turning On the Power Press the power switch (Figure 1-1) to turn on power; make sure the green power indicator is on. After a moment, the beeper sounds; after 10 to 15 seconds, the self-test display appears.
9065 USER'S GUIDE

Self-Test The tenninal self-test program automatically checks the display memory, the system memory, and the keyboard circuit. After successful completion of this test, the screen should display messages similar to those shown in Figure 1-3.
The "PRESS ANY KEY TO CONTINUE" message should be blinking. If you forgot to connect the keyboard, you should see the following message:
Keyboard ==> Disconnected/Failed
Any memory failures will also be displayed.
Turn power off and correct the indicated problem.
Turn power on; verify a successful self-test as indicated in Figure 1-3.
To continue to the next procedure, press any key. This places the tenninal in the communication mode.
After the self-test display is no longer displayed, you should see the cursor in the upper left comer. You may also see a status line above the cursor.
* Display Memory ==> OK
* System Memory ==> OK
* Keyboard ==> OK
TVS 9065 REV B.0
PRESS ANY KEY TO CONTINUE
Figure 1-3. Self Test message
9065 USER'S GUIDE 1-5 INSTALLATION

NOTES
INSTALLATION 1-6 9065 USER'S GUIDE

The terminal is ready to operate when you tum it on, but you need to check that its parameters agree with your host, your printer and other peripherals, and your application programs.
In general, there are three types of set up parameters:
• Communication values that must match those of other system components. (For example, terminal and computer must communicate at the same baud rate.}
• Operating values that must agree with your application program. (Does your spread sheet require 80 or 132 characters per line? What terminal emulation mode does your program require?}
• Personal preference values. (silent or clicking keys? dark or light screen background?}
When in doubt about a particular parameter, don't change it. Default (factory set) values are those commonly employed in system communication and data entry/processing.
Application programs often reset terminal parameters for you automatically. Refer to your computer and application program manuals first, or consult your system manager, for specific information about your system.
Parameter Menus This chapter presents the set up menus; the set up menu names and the parameters each menu controls are as follows:
COMMAND Exit, save parameters, default parameters, recall parameters, clear screen, clear communications, reset terminal, and default key codes.
GENERAL Terminal modes: personality, communication, monitor, autowrap, edit, font choice, send acknowledge, received carriage return, port configuration, and dual session choices.
DISPLAY Number of lines and columns per page, page length, status line attribute, top and bottom line content, cursor attributes, screen saver, screen background, and scrolling speed.
9065 USER'S GUIDE 2-1
Chapter 2 SETUP
KEYBOARD Key click, key repeat, caps lock; margin bell, editing key functions, international character mode, WordStar mode.
COMl Serial port communication values.
COM2 Serial port communication values.
ATTRIBUTE Visual attribute characteristics, write-protect attributes.
PROGRAM Function, editing, and numeric keypad key codes; plus answerback message and block send delimiters.
Entering Set Up
I CAUTION I Before changing the personality or display configuration (number of lines, columns, or pages of memory}, save any data on the screen before entering set up. Changing parameters clears the screen.
To enter set up mode, press
I Shift I I Set Up!No Scroll I Use the cursor keys to move through eight screen menus, and the space bar to toggle values. From these menus you can either choose a new value or toggle an action.
The first seven menus present parameters from which you can choose a value or toggle an action. The Program menu branches to a group of submenusto reprogram keys and messages.
To save your choices, select the COMMAND menu, and select SA VE PARAMETERS. To exit from set up mode, either press
I Shift I I Set Up/No Scroll I or select the COMMAND menu, then EXIT.
Help Lines At the bottom of each menu are two lines that show you how to move the cursor and choose options. Also shown are the commands Ctrl P to print the screen, Ctrl S to save and exit, and Esc to exit without saving any changes.
SETUP

The Command Menu Each field in the Command menu brings about a terminal action, shown in Figure 2-1 and explained in the paragraphs that follow.
EXIT Leaves set up and returns to the previous screen display and operating modes. Does not save set up values.
SA VE PARAMETERS Saves current set up values in permanent memory. (Chapter 6)
I CAUTION I The following action destroys all reprogrammed operating values!
DEFAULT PARAMETERS Resets set up parameters to factory default values if you are in single session mode. If you are in dual-session mode, it resets set up parameters (except language) to factory default values for current session. (Chapter 6)
RECALL PARAMETERS Resets current set up values to those last saved in nonvolatile (permanent) memory. If you accidentally change to incorrect values, this action recalls the last saved values.
CLEAR SCREEN Clears screen display.
CLEAR COMMUNICATIONS Unlocks the keyboard; clears COMl and COM2 buffers; disables any print mode enabled. (Chapter 7)
RESET TERMINAL Returns all operating values to those last saved in nonvolatile memory; leaves set up. (Chapter 6)
I CAUTION I This action destroys all reprogramming in the function and editing keys!
DEFAULT KEY CODES Returns editing and function keys to default codes of the current personality.
COMMAND GENERAL DISPLAY KEYBOARD COMl COM2 A TIRIBUTE PROGRAM
PARAMETERS EXIT SA VE PARAMETERS DEFAULT PARAMETERS RECALL PARAMETERS CLEAR SCREEN CLEAR COMMUNICATIONS RESET TERMINAL DEFAULT KEY CODES
OPTIONS EXIT FROM SET-UP
f- ~:MENU i J-:PARAMETERS SPACE/BKSPACE:OPTIONS CTRL/P:PRINT SCREEN CTRL/S:SA VE AND EXIT ESC:EXIT WITHOUT SA VE
Figure 2-1. COMMAND Menu
SETUP 2-2 9065 USER'S GUIDE

The General Menu The General menu (Figure 2-2) controls a number of operating modes, as described in the following paragraphs.
PERSONALITY = 9065 and other terminal emulations, (Chapter 6, Appendix C).
I CAUTION I Avoid loss of data! Selecting a new personality clears the screen and resets many terminal parameters.
ENHANCE MODE= OFF or ON. Command sets of non-native personalities include additional native commands. (Chap. 6, Appendix C)
COMM MODE = Communication modes: HALF DUPLEX, FULL DUPLEX, BLOCK, HALF BLOCK, LOCAL. (Chapter 11)
MONITOR MODE = ON or OFF: Terminal displays control characters (ON) instead of interpreting them as commands (OFF). (Ch. 3, 7)
AUTOWRAP = ON or OFF: When cursor reaches end of the line during data entry, it wraps to the beginning of the next line (ON) or stays at the end ofline (OFF). (Autowrap Mode, Ch. 9)
EDIT MODE = Editing commands affect data to end of LINE or end of PAGE. (Chapter 9)
FONT CHOICE = When personality or screen configuration changes, character set automatically changes to match PERSONALITY, LAST USED, or PC. (Chapter 10)
SEND ACKNOWLEDGE= OFF or ON. ON means the terminal sends the ASCII ACK character (06h) after operations that require the host to temporarily suspend transmission. (Ch. 11)
RECEIVE CR = The terminal responds to a carriage return code (CTRL-M) with CR or CR/LF. (New Line Mode, Chapter 9)
HOST PORT= CO Ml or COM2 sends data to the host out the selected port (Chapter 11 for commands and Chapter 1 for port pin-outs)
DUAL SESSION= OFF or On. (See Chapter 3 for description of dual session vs. single session)
PRINTER= PARALLEL, COM2, or COMl. Serial ports available only in single session.
PRINT MODE = NONE, COPY, TRANSPARENT, or BIDIRECT(IONAL).
PRINT PAGE FLIP= ON or OFF
AUTO PAGE FLIP= ON or OFF.
COMMAND GENERAL DISPLAY KEYBOARD COMl COM2 A TIRIBUTE PROGRAM
PARAMETERS PERSONALITY = 9065 ENHANCE MODE= OFF COMM MODE= FULL DUPLEX MONITOR MODE= OFF AUTOWRAP =ON EDIT MODE= LINE FONT CHOICE= PERSONALITY SEND ACKNOWLEOCE =OFF RECEIVE CR= CR HOST PORT= COMl DUAL SESSION =OFF PRINTER= PARALLEL PRINT MODE= NONE PRINT PAGE FLIP= ON AUTO PAGE FLIP= OFF
OPTIONS 9065 912/920 925/910+ 955 WY-120/150 WY-50/50+ ADDS-A2 HZ-1500 ADM-31 IBM3101-2X Vf-100/52
965 910 950 WY-160 WY-60 PC-TERM ADDS-VP60 OC-200 IBM3101-1X IBM3161V
~-+:MENU i !:PARAMETERS SPACE/BKSPACE:OPTIONS CTRL/P:PRINT SCREEN CTRL/S:SA VE AND EXIT ESC:EXIT WITHOUT SA VE
Figure 2-2. The GENERAL Menu
9065 USER'S GUIDE 2-3 SETUP

The Display Menu The menu parameters affect the configuration and appearance of the screen, as shown in Figure 2-3 and described in the paragraphs that follow.
COLUMNS =Number of columns per page of memory: 80, 132 80 DSPLY (132 with only 80 displayed), 132. (Chapters 3 & 7)
CLS @ COLUMN CHANGE= ON or OFF. Clears the screen when you change the number of columns.
I CAUTION I Save screen data before changing the number of data lines. Doing so clears all existing screen data.
LINES =Number of data lines on the screen (24, 25, 42, 43, 48, 49). (Chapter 8)
PAGE LENGTH= Number of lines per page of memory (1 X LINES, 2 X LINES, 4 X LINES, 1 + MEM). (Chapter 8)
NUMBEROFPAGES = 1 to7memorypages.
STATUS LINE= Appearance (attribute) of the status line: NORMAL, REVERSE, UNDERLINE. (Chapter 7)
TOP LINE = Contents of the top information line: NONE, STATUS, USER 1, USER 2, FKEY LABEL. (Chapter 12)
BOTTOM LINE = Contents of the bottom information line: NONE, STATUS, USER l, USER 2, F-KEY LABEL. (Chapter 12)
CURSOR TYPE = Appearance (attributes) of the cursor: BLK BLINK, BLK STEADY, UNDL BLINK, UNDL STEADY, NONE .. (Chapter 7)
SCREEN SA VER = Screen goes blank after 10, 20, or 30 minutes of inactivity, or remains displayed if NONE is selected. (Chapter 7)
SCROLL RATE= Data scrolls onto the screen at the rate of reception (JUMP), smoothly at a relative rate (SMOOTH 8, 4, 2, or 1). (Chapter 7) NO SCROLL means that the cursor wraps from the bottom of the page to the top, so data cannot scroll off the page and be lost. (Chapt. 8)
OVRSCAN BORDER = Overscan Options are: BKGROUND, DARKEST, 2, 3, 4, and LIGHTEST.
CHAR CELL = Character cell options are 10x16, 10xl4, or 10x12 with 24/25 lines, or 10x8 with 42/43/48/49 lines.
BACKGROUND = Screen background: DARK or LIGHT. (Chapter 7)
COMMAND GENERAL DISPLAY KEYBOARD CO Ml COM2 ATTRIBUTE PROGRAM
PARAMETERS OPTIONS COLUMNS = 80 80
CLS@ COLUMN CHANGE= OFF 132 80 DSPLY LINES = 24 132 PAGE LENGTH= 1 X LINES NUMBER OF PAGES= 7 STATUS LINE= REVERSE TOP LINE= STATUS BOTTOM LINE = NONE CURSOR TYPE = BLK BLINK SCREEN SA VER= 10 MIN SCROLL RA TE= JUMP OVRSCAN BORDER= BKGROUND CHAR CELL= 10 X 16 BACKGROUND= DARK
f- ~:MENU t J.:PARAMETERS SPACE/BKSPACE:OPTIONS CTRL/P:PRINT SCREEN CTRL/S:SA VE AND EXIT ESC:EXIT WITHOUT SA VE
Figure 2-3. The DISPLAY Menu
SETUP 2-4 9065 USER'S GUIDE
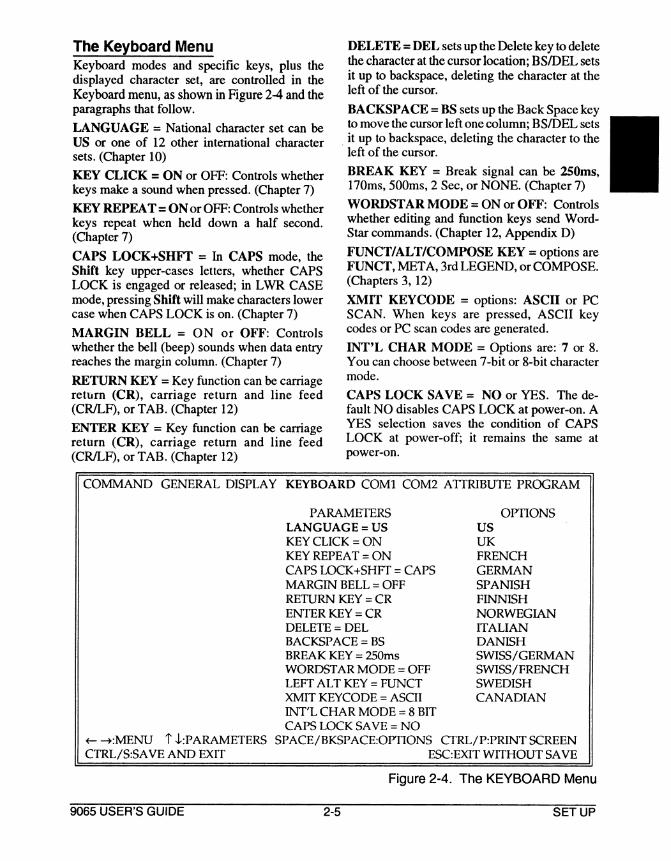
The Keyboard Menu Keyboard modes and specific keys, plus the displayed character set, are controlled in the Keyboard menu, as shown in Figure 2-4 and the paragraphs that follow.
LANGUAGE = National character set can be US or one of 12 other international character sets. (Chapter 10)
KEY CLICK = ON or OFF: Controls whether keys make a sound when pressed. (Chapter 7)
KEY REPEAT= ON or OFF: Controls whether keys repeat when held down a half second. (Chapter7)
CAPS LOCK+SHFf =In CAPS mode, the Shift key upper-cases letters, whether CAPS LOCK is engaged or released; in LWR CASE mode, pressing Shift will make characters lower case when CAPS LOCK is on. (Chapter 7)
MARGIN BELL = ON or OFF: Controls whether the bell (beep) sounds when data entry reaches the margin column. (Chapter 7)
RETURN KEY = Key function can be carriage return (CR), carriage return and line feed (CR/LF), or TAB. (Chapter 12)
ENTER KEY = Key function can be carriage return (CR), carriage return and line feed (CR/LF), or TAB. (Chapter 12)
DELETE= DEL sets up the Delete key to delete the character at the cursor location; BS/DEL sets it up to backspace, deleting the character at the left of the cursor.
BACKSPACE= BS sets up the Back Space key to move the cursor left one column; BS/DEL sets
. it up to backspace, deleting the character to the left of the cursor.
BREAK KEY = Break signal can be 250ms, l 70ms, 500ms, 2 Sec, or NONE. (Chapter 7)
WORDSTAR MODE= ON or OFF: Controls whether editing and function keys send WordStar commands. (Chapter 12, Appendix D)
FUNCT/ALT/COMPOSE KEY= options are FUN CT, META, 3rd LEGEND, or COMPOSE. (Chapters 3, 12)
XMIT KEYCODE =options: ASCII or PC SCAN. When keys are pressed, ASCII key codes or PC scan codes are generated.
INT'L CHAR MODE = Options are: 7 or 8. You can choose between 7-bit or 8-bit character mode.
CAPS LOCK SA VE = NO or YES. The default NO disables CAPS LOCK at power-on. A YES selection saves the condition of CAPS LOCK at power-off; it remains the same at power-on.
COMMAND GENERAL DISPLAY KEYBOARD COMl COM2 A TIR1BU1E PROGRAM
PARAMETERS LANGUAGE= US KEY CLICK =ON KEY REPEAT= ON CAPS LOCK+SHFT =CAPS MARGIN BELL= OFF RETURN KEY= CR ENTER KEY= CR DELETE=DEL BACKSPACE= BS BREAK KEY= 250ms WORDSTAR MODE= OFF LEFT ALT KEY= FUNCT XMIT KEYCODE =ASCII INTL CHAR MODE= 8 BIT CAPS LOCK SA VE= NO
OPTIONS us UK FRENCH GERMAN SPANISH FINNISH NORWEGIAN ITALIAN DANISH SWISS/GERMAN SWISS/FRENCH SWEDISH CANADIAN
+-~:MENU i ..!.:PARAMETERS SPACE/BKSPACE:OPTIONS CTRL/P:PRlNTSCREEN CTRL/S:SA VE AND EXIT ESC:EXIT WITHOUT SA VE
Figure 2-4. The KEYBOARD Menu
9065 USER'S GUIDE 2-5 SETUP

The COM1 Menu Set communication parameters for the COMl port in this menu. Chapters 1 and 11 explain communication between the terminal and the host or peripheral devices.
BAUD RATE= Select from 50 to 38.4K; default9600.
DATA BITS= 8 or 7.
STOP BIT= 1 or 2.
PARITY= NONE, ODD, EVEN, MARK, SPACE.
REC HANDSHAKE = Handshaking signal sent by the terminal when receiving data can be XON/XOFF, DTR, NONE, or BOTH.
XMT HANDSHAKE= Handshaking signal accepted by the terminal when transmitting can be XON/XOFF, DCD/DSR, or NONE.
BUFFER THRESHOLD = The number of bytes from the top of the modem port buffer at which the terminal begins handshaking can be 16, 32, 64, or 128.
XMT WAIT STATES =Selects number of character delays per character transmitted (NONE, 1-7). Does not change the baud rate.
PARITY CHECK =Port parity checking function may be ON or OFF.
EIGHTH DATA BIT= IGNORE or PROCESS.
COMMAND GENERAL DISPLAY KEYBOARD COMl COM2 ATTRIBUTE PROGRAM
OPTIONS 38.4K 50 75 110 135 150 300 600 1200 2400 3600 4800 7200 9600 19.2k
PARAMETERS BAUD RATE= 9600 DATA BITS=8 STOP BIT= 1 PARITY= NONE REC HANDSHAKE= XON/XOFF XMT HANDSHAKE= NONE BUFFER THRESHOLD= 16 XMIT WAIT STA TES= NONE PARITY CHECK= OFF EIGHTH DATA BIT= IGNORE
~~:MENU i .J,:PARAMETERS SPACE/BKSPACE:OPTIONS CTRL/P:PRINTSCREEN CTRL/S:SA VE AND EXIT ESC:EXIT WITHOUT SA VE
Figure 2-5. The COM1 Menu
SETUP 2-6 9065 USER'S GUIDE

The COM2 Menu Set communication parameters for the COM2 port in this menu. Chapters 1 and 11 explain communication between the terminal and the host or peripheral devices.
BAUD RATE= Select from 50 to 38.4K; default 9600.
DATA BITS= 8 or 7.
STOP BIT = 1 or 2.
PARITY = NONE, ODD, EVEN, MARK, SPACE.
REC HANDSHAKE = Handshaking signal sent by the terminal when receiving data can be XON/XOFF, DCD/DSR, NONE, or BOTH. (In dual session, default is XON/OFF.)
XMT HANDSHAKE= Handshaking signal accepted by the terminal when transmitting data can be XON/XOFF, DTR, NONE, or BOTH. (In dual session, default is NONE.)
BUFFER THRESHOLD = The number of bytes from the top of the modem port buffer at which the terminal begins handshaking can be 16, 32, 64, or 128.
XMIT WAIT ST A TES = Selects number of character delays per character transmitted (NONE, 1-7). Does not change the baud rate.
PARITY CHECK = Port parity checking function may be ON or OFF.
EIGHTH DATA BIT= IGNORE, or PROCESS
COMMAND GENERAL DISPLAY KEYBOARD CO Ml COM2 ATTRIBUTE PROGRAM
OPTIONS 38.4K 50 75 110 135 150 300 600 1200 2400 3600 4800 7200 9600 19.2K
PARAMETERS BAUD RATE= 9600 DATA BITS=B STOP BIT= 1 PARITY= NONE REC HANDSHAKE= OCD /DSR XMT HANDSHAKE= BOTH BUFFER THRESHOLD= 16 XMIT WAIT STA TES= NONE PARITY CHECK= OFF EIGHTH DATA BIT= IGNORE
f- ~:MENU i J..:PARAMETERS SPACE/BKSPACE:OPTIONS CTRL/P:PRINTSCREEN CTRL/S:SA VE AND EXIT ESC:EXIT WITHOUT SA VE
Figure 2-6. The COM2 Menu
9065 USER'S GUIDE 2-7 SETUP

The Attribute Menu The Attribute menu parameters affect the nature and extent of visual attributes and specify the attributes of write-protected characters. See Chapter 7 for a detailed explanation of visual attributes.
ATTRIBUTE = Visual attributes may be by CHARacter, LINE, or PAGE. See comment at the end of the descriptions below.
I CAUTION I Changing between character and line or page attributes clears the screen!
955 ATTRIBUTE= Line- or page-based attributes may occupy NO SPACE on screen or a SPACE.
WRITE PROTECT ATTRIBUTES: INTENSITY = Write-protected characters will be displayed in NORMAL or DIM intensity.
REVERSE = Write-protected characters may also be displayed with the reverse attribute OFF or ON.
UNDERLINE = Write-protected characters may also be displayed with the underline attribute OFF or ON.
BLINK = Write-protected characters may also be displayed with the blink attribute OFF or ON.
BLANK = Write-protected characters may also be displayed with the blank attribute OFF or ON.
Character-based attributes are available in 9065, 965, WY-60, WY-120/150, WY-160, VP A2, VP 60, PC Term, IBM 3101 and 3161, VTlOO, and 00200 modes. Field-based attributes are available in 9065, 965, 955, 910/910+, 912/920, 925/905, 950, WY-60, WY-50150+, Hazeltine 1500, and ADM 31 modes.
COMMAND GENERAL DISPLAY KEYBOARD COMl COM2 ATTRIBUTE PROGRAM
OPTIONS CHAR LINE PAGE
PARAMETERS ATTRIBUTE= CHAR 955 ATfRIBUTE =NO SPACE WRITE PROTECT A TTRIBUfES
INTENSilY =DIM + REVERSE= OFF +UNDERLINE= OFF + BLINK=OFF +BLANK=OFF
+-- ~:MENU i !:PARAMETERS SPACE/BKSPACE:OPTIONS CTRL/P:PRINT SCREEN CTRL/S:SA VE AND EXIT ESC:EXIT WITHOUT SA VE
Figure 2-7. The ATTRIBUTE Menu
SETUP 2-8 9065 USER'S GUIDE

PROGRAM MENUS The Program menus consist of five subordinate menus (F-Key, Edit Key, Key-pad, Answerback, and Delimiter), named in the OPTIONS window when you enter each submenu. The remaining display in the PARAMETERS window contains fields of the current submenu.
To display other submenus, highlight the Program= field in the PARAMETERS window and press the space bar. To select fields in each submenu, press the up/down arrows.
Reprogramming is also explained in Chapter 12.
If you select a programmable function, the following message appears on the menu:
,, PRESS <ENTER> TO BEGIN PROGRAMMING 11
Function Key Logical Sets The terminal has four logical sets of function keys. The 16 function keys (Fl through Fl6) in each set can send 32 separate messages, since pressing a key alone sends one message, and pressing the same key with Shift sends another. So a total of 128 function keys are available.
Each function key set holds up to 256 characters (bytes), apportioned among the 32 keys as you wish. You can load any message or command into a function key, such as your logon sequence, an access code, or frequently typed words and phrases. You can reprogram the function keys here in setup, or your program may do it for you.
Follow these steps to reprogram function keys:
1. Highlight the SET field.
2. Press the space bar until the number of the desired function key set (1, 2, 3, or 4) is highlighted.
3. Now move to the F-KEY field.
4. Press any unshifted or shifted function key to select it for reprogramming. The key number appears in the PARAMETERS window, with the current message in the OPTIONS window. If you press a shifted key, an s appears in front of the key number.
5. To start reprogramming the message, press
I Enter I NOTE: The current function key set-the one most recently programmed-ts active (but not saved) when you leave set up. You must save the set as you would any individual value. If you don't save the set, it will remain in effect only until you reset the terminal.
After pressing Enter on the numeric pad, you should see the following messages on the menu.
<ESC> TO ABORT PROGRAM <ENTER> TO EXIT PROGRAM
COMMAND GENERAL DISPLAY KEYBOARD CO Ml COM2 A TTRlBUTE PROGRAM
F-KEY ANSWERBACK
PARAMETERS OPTIONS PROGRAM= F-KEY
EDIT KEY NUMERIC PAD SET= 1 DELIMITER F-KEY = Fl
F-KEY LABEL= XMIT DIRECTION= HOST SA VE F-KEY LABEL= OFF
TOTAL CHAR LEFT: 159 CHAR USED THIS KEY: 003
~~:MENU t .!.:PARAMETERS SPACE/BKSPACE:OPTIONS CTRL/P:PRINT SCREEN CTRL/S:SA VE AND EXIT ESC:EXIT WITHOUT SA VE
Figure 2-8. Program Menu: F-KEY
9065 USER'S GUIDE 2-9 SETUP

6. Use keys listed at the bottom of the screen to edit your message and move the cursor: ~ i J,~: Move the cursor around in the message.
BKSPACE: Clears the current message. You can restore the message by pressing Esc immediately.
DEL: Deletes characters to the right of the cursor one at a time.
INSERT: Toggles between character insert and character replace modes.
7. Enter the new message. It can be any combination of alphanumeric and control characters. Press control keys (Ctr)+ key) to enter commands in the message. For example, to enter the carriage return character, press
lctr1I CM] 8. To enter the ESC character in an escape
sequence, type
I Ctrl I [i] If you make a mistake, move the cursor with the arrow keys back to the position of the error and correct the mistake.
9. Each function key set has a total memory capacity of 255 bytes in single session (127 bytes in dual session), which can be distributed any way among the keys. Two fields at the bottom the PARAMETERS window show the number of characters remaining in the function key set memory and the number of characters programmed into the current key. As you program, the figures update. When memory is full, the terminal beeps.
10. To end the loading process and save the message, press I Enter I
11. Move to the LABEL field, press Enter; then type up to nine characters (80 columns) or seven characters (132 columns) as a label for the key. Use the keys described in Step 6 to edit the label. (Labels for keys F8 and F16 take only eight characters.)
NOTE: Enable display of the function key labels on screen 1n the Display set up menu.
SETUP 2-10
The DIRECTION field lets you determine where the message goes when you press a function key:
• HOST To the host computer • LOCAL To the terminal (screen) • BOTH To host and terminal • PRINTER To the printer
The message destination, like the function key message, is automatically saved in nonvolatile memory.
The Editing Key Submenu Editing keys send ASCII characters (codes) that control editing operations, data transmission, and cursor movement. This submenu (Figure 2-9) lets you change the codes sent by the editing keys listed in the PARAMETERS window and specify their destination (i.e., editing key mode). Your program can also change the key codes and destination mode.
NOTE: Only the main keyboard Tab key is reprogrammable in this submenu. Reprogram the numeric keypad Tab key in the KEYPAD submenu.
The steps below tell how to reprogram the editing keys and set the editing key mode. Procedures similar to reprogramming the function keys are not repeated in full here; refer to Chapter 12 for a complete explanation.
1. Enter the Program set up menu and press the space bar to display the EDIT KEY submenu.
2. Move the cursor down to the EDIT KEY= or SHIFT/EDIT KEY= (for shifted keys) field. A list of editing keys appears in the OPTIONS window, and the current code of the highlighted key appears in the CONTENT: field at the bottom of the window. An asterisk (*) in front of the code indicates the code display is the default code.
3. Press the space bar to highlight the desired key.
NOTE: When you select a programmable function, the following message appears on the menu:
11 PRESS <ENTER> TO BEGIN PROGRAMMING 11
9065 USER'S GUIDE

4. Press
I Enter I to start reprogramming the key. You can use the keys listed at the bottom of the screen to edit your message and move the cursor. See the explanation of key operations in the function key reprogramming section for more information. Once you enable the programming function, the following messages appear on the menu.
<ESC> TO ABORT PROGRAM <ENTER> TO EXIT PROGRAM
5. Enter up to five bytes as the new key code. The new codes display in the CONTENT: field as you enter them.
6. Press I Enter I
to end the loading process. This automatically saves the new key contents in nonvolatile memory.
The XMIT DIRECTION field lets you determine where the key code goes when you press . an editing key:
• HOST To the host • · LOCAL To the terminal (screen) • NORMAL Determined by the communi
cation mode The message destination, like the key code, is automatically saved in nonvolatile memory.
COMMAND GENERAL DISPLAY KEYBOARD CO Ml COM2 A TIRIBUTE PROGRAM
OPTIONS F-KEY EDIT KEY
PARAMETERS PROGRAM= EDIT KEY
NUMERIC PAD EDIT KEY= HOME ANSWERBACK DELIMITER XMIT DIRECTION= NORMAL
SHF /EDIT KEY= HOME XMIT DIRECTION= NORMAL
f- ~:MENU i !:PARAMETERS SPACE/BKSPACE:OPTIONS CTRL/P:PRINT SCREEN CTRL/S:SA VE AND EXIT ESC:EXIT WITHOUT SA VE
Figure 2-9. Program Menu: EDIT KEY
9065 USER'S GUIDE 2-11 SETUP

Numeric Pad Submenu The numeric pad submenu is very similar to the editing key submenu. It lets you change the characters sent by the keys in the numeric keypad. You can reprogram all the unshifted keys, plus the shifted Tab, CE, and Enter keys. The DIRECTION field lets you specify the destination of the shifted keys. Your program can also do this reprogramming, but cannot specify the direction of the keys.
NOTE: Only the numeric keypad Tab key is reprogrammable in this submenu. Reprogram the main keyboard Tab key in the EDIT KEY submenu.
The following steps tell how to reprogram the numeric keypad keys. Procedures similar to reprogramming the function keys are not repeated in full here; refer to the instructions for reprogramming function keys for a complete explanation.
1. Enter the Program set up menu and press the space bar to display the NUMERIC PAD submenu.
2. Move the cursor down to the KEY = or SHIFf/KEY =(for the shifted keys) field. A list of keys appears in the OPTIONS window, and the current code of the highlighted key appears in the CONTENT: field at the bottom of the window.
3. Press the space bar to highlight the desired key.
4. Press
I Enter I to start reprogramming the key. Once you enable the programming function, the following messages appear on the menu.
<ESC> TO ABORT PROGRAM <ENTER> TO EXIT PROGRAM
5. Use the keys listed at the bottom of the screen to edit your message and move the cursor. See the explanation of key operations in the function key reprogramming section for more information.
6. Enter up to five bytes as the new key code. ·Tue new codes display in the CONTENT: field as you enter them.
7. Press
I Enter I to end the loading process. This automatically saves the new key contents in nonvolatile memory.
The XMIT DIRECTION field lets you determine where the key code goes when you press one of the selected (shifted or unshifted) keys:
• HOST To the host computer • LOCAL To the terminal (screen) • NORMAL Determined by the communi
cation mode The message destination, like the key code, is automatically saved in nonvolatile memory.
COMMAND GENERAL DISPLAY KEYBOARD CO Ml COM2 ATTRIBUTE PROGRAM
OPTIONS F-KEY EDIT KEY
PARAMETERS PROGRAM= NUMERIC PAD
NUMERIC PAD KEY= 7 ANSWERBACK DELIMITER XMIT DIRECTION= NORMAL
SHF/KEY =TAB XMIT DIRECTION= NORMAL
~-+:MENU i i:PARAMETERS SPACE/BKSPACE:OPTIONS CTRL/P:PRINT SCREEN CTRL/S: SA VE AND EXIT ESC: EXIT WITHOUT SA VE
Figure 2-10. Program Menu: NUMERIC PAD
SETUP 2-12 9065 USER'S GUIDE

The Answerback Submenu The terminal sends an answerback message to the host in response to a received command. The default answerback message is blank.
You can load an answerback message of up to 31 characters in this submenu. You can then elect to display or conceal the message.
I CAUTION I Once you conceal the answerback message, you cannot display It again.
The steps below tell how to load an answerback message.
1. Enter the Program set up menu and press the space bar to display the ANSWERBACK submenu.
2. Move the cursor down to the ANSWERBACK field.
3. To start reprogramming the key, press
I Enter I Once you enable the programming function, the following messages appear on the menu.
<ESC> TO ABORT PROGRAM <ENTER> TO EXIT PROGRAM
4. Use the keys listed at the bottom of the screen to edit your message and move the cursor. See the section on reprogramming the function keys.
5. Enter up to 31 bytes as the new message. 6. To end the entry, press
I Enter I 7. To conceal the message, move the cursor
down to the CONCEALED field and press the space bar to highlight the ON value.
I CAUTION I Once you select CONCEALED= ON, you cannot redisplay or alter the answerback message without erasing it. Pressing the space bar again to select OFF erases the message.
8. To reprogram a concealed message, select CONCEALED= OFF. This destroys the existing message. Then return to the ANS WERBACK = field and load a new message.
COMMAND GENERAL DISPLAY KEYBOARD COMl COM2 A TIRIBUTE PROGRAM
OPTIONS F-KEY EDIT KEY NUMERIC PAD
PARAMETERS PROGRAM= ANSWERBACK ANSWERBACK CONCEALED= OFF
ANSWERBACK DELIMITER
~~:MENU i J-:PARAMETERS SPACE/BKSPACE:OPTIONS CTRL/P:PRINTSCREEN CTRL/S:SA VE AND EXIT ESC:EXIT WITHOUT SA VE
Figure 2-11. Program Menu: ANSWERBACK Message
9065 USER'S GUIDE 2-13 SETUP

The Delimiter Submenu The terminal automatically inserts field, line, and message delimiters when it transmits text to the host. Chapter 11 describes the function of delimiters in transmissions to the host You can reprogram the transmission delimiters in this submenu.
The following steps tell how to reprogram the delimiters.
1. Enter the Program set up menu; repeatedly press the space bar until the word DELIMITER is highlighted on the OPTIONS window.
2. On the PARAMETERS window, move the cursor down to highlight DELIMITER = FIELD SEP.
3. Press the space bar to select the delimiter you want to reprogram.
4. To start reprogramming the delimiter, press
I Enter I Once you enable the programming function, the following messages appear on the menu.
<ESC> TO ABORT PROGRAM <ENTER> TO EXIT PROGRAM
5. Use the keys listed at the bottom of the screen to edit the code and move the cursor. See the explanation of key operations in the function key reprogramming section for more information.
6. Enter two bytes as the new delimiter. To end the code, press
I Enter I
COMMAND GENERAL DISPLAY KEYBOARD COMl COM2 ATIRIBUTE PROGRAM
OPTIONS
PARAMETERS PROGRAM= DELIMITER DELIMITER = FIELD SEP
F-KEY EDIT KEY NUMERIC PAD ANSWERBACK DELIMITER
~~:MENU i .l-:PARAMETERS SPACE/BKSPACE:OPTIONS CTRL/P:PRINT SCREEN CTRL/S:SA VE AND EXIT ESC:EXIT WITHOUT SA VE
Figure 2-12. Program Menu: DELIMITER
SETUP 2-14 9065 USER'S GUIDE

This chapter describes how to operate the tenninal. It tells how to adjust the screen and keyboard for your comfort, followed by details on display features, the keyboard, communicating with a computer, and printing. The terminal's desktop accessory program, VideoDesk,™ is explained in Chapter 4. Trouble-shooting procedures are covered in Chapter 5. You will encounter frequent references to choosing operating values in set up mode. Chapter 2 explains how you can control the terminal's operations in set up mode.
The descriptions in this chapter apply to local keyboard functions, and to communications with your host computer(s). Many of the functions described in this chapter can be changed by your operating system or an application program. If a feature described here does not operate as expected, contact your system manager or consult the manuals for your computer and application program. If you suspect the terminal is not working properly, first look at the troubleshooting suggestions
9065 USER'S GUIDE 3-1
Chapter 3 OPERATION
in Chapter 5. Then if you need help, call your system administrator, dealer, or distributor.
Starting Up This section assumes that the tenninal is already installed. If the tenninal is not yet installed, see Chapter 1, "Installation," for instructions. Tum on the terminal. After a few seconds, the terminal beeps; the self-test display should indicate that memory and keyboard are OK. Press any key to clear the screen. Presently the cursor appears in the upper left comer of the screen; a status line may appear above the cursor. You may also receive boot and login messages from your operating system.
The cursor can be steady or blinking, block or underline, or invisible. You can select its appearance in set up.
The cursor position is sometimes called the active position. It is where the next character is entered or program function takes place.
Figure 3-1. Turning On the Terminal
OPERATION

Adjusting Screen and Keyboard You can adjust the screen and keyboard to your own preference. Adjust the contrast control for best screen clarity, and the brightness control for best level for your lighting conditions. See Figure 3-2. Tilt the case vertically (and horizontally) to adjust for your seated position.
Adjust the two 2-position supports underneath the keyboard for the most comfortable typing angle.
Display Features The screen has three display areas:
• A top information line • Data lines (24 to 49} • A bottom information line
This section describes the screen areas and other display features (such as the number of columns on the screen). Chapter 2 tells how to control display features in the set up menus. Your program may also change them. See the section titled "Local Key Functions," later in this chapter, for a summary of keys that control many display features.
Information Lines The top and bottom information lines may contain a variety of information:
• The status line • User messages • Function key labels
You can choose the contents of the information lines in set up (in the Display menu). As you read the descriptions in this section, you may find it helpful to enter set up and look at the Display and Program menus.
Your program can also control the contents and display of the information lines, overriding your set up choices.
NOTE: When 25, 43, or 49 data lines are displayed, the last data line always overwrites the bottom information line.
Status line The status line normally appears on the top information line. It has fields for the cursor position, a number of terminal operating states, and the time/date display. See Appendix H.
To toggle the status line on and off, press
lctrll EJ Your application program may also tum it off or move it to the bottom information line.
Contrast Brightness
Figure 3-2. Adjusting the Terminal
OPERATION 3-2 9065 USER'S GUIDE

The cursor position (page, row, and column) and communication mode are always displayed in the status line. Other codes appear only when the terminal enters special modes (see Appendix H).
The time of day appears in the status line if you elect in VideoDesk to display it by selecting TIME, DATE, or DATEffIME in the clock Display field. If your program writes a message over the time/date display, you can re-enable it in VideoDesk. See Chapter 4 for instructions.
User messages Your program can display a "user message" in a full-width (80- or 132-column) message line at the top or bottom of the screen, or in place of time and date in the status line.
You can choose where to display user messages, but you cannot write them in set up.
NOTE If you want to write your own user messaµes, first read "Entering Commands' in Chapter 6, then "Loading User Messages" in Chapter 12.
Function key labels In the Program set up menu, you can write small labels identifying the contents of your function keys. Use the Display menu to select F-labels for an information line.
Labels for all function keys (Fl-Fl6, shifted and unshifted) appear on a single line. However, only one set of labels (shifted or unshifted) can occupy the line at a time.
9065 USER'S GUIDE 3-3
With 80-column displays, you can display only eight labels at a time. The one that appears at any given moment is the one that was most recently defined. For example, referring to the diagram below, if Fll is defined after F3, then the label for Fll will occupy the third label space.
Fl F2 F3 F4 F5 F6 F7 F8 F9 FlO Fl 1 F12 F13 F14 F15 F16
Pressing
I Shift I (by itself) temporarily displays labels for the shifted function keys. Unshifted key labels return when you release the key.
Data Lines The screen can display 24 to 49 data lines. You may select the number of lines in set up, or your program can automatically change the number of lines.
I CAUTION I Changing the number of displayed lines clears data from the screen. Save and exit files before changing the number of lines.
When you change the number of lines, your character set may also change size.
Figure 3-3. Information Lines
OPERATION

Splitting the Screen The screen can be split into windows that show two different pages of terminal display memory. Many programs employ this split-screen feature. Refer to the local key menu for your keyboard for the keystrokes that let you move to the next window or the previous window.
Number of Columns You may choose either 80 or 132 columns on the screen. Many programs make that choice for you. The 132-column display is convenient for spreadsheets or horizontal-format documents.
Choosing 132 80 DSPL Y mode in set up lets the screen display 80 columns, but lines are actually 132 columns wide. The active position (cursor/data entry location) can be beyond the display margins. Pressing
I Ctrl I I Shift I I ~ I or
I Ctrl I I Shift I I~ I scrolls the display along the 132-column line, so you can find the cursor again.
In 132 80 DSPL Y mode, the cursor moves to the right edge of the display, no matter what column that is, then wraps to the next line. You must scroll the display so column 132 is at the right margin if you want to enter data continuously from column 1 to column 132.
Screen-Saver The screen-saver feature makes the screen go blank after 10, 20, or 30 minutes of inactivity. You can change this time-out in set up. To tum the screen saver on or off, refer to the local key menu for your keyboard. Local key menus are in the sections following this page.
Blanking out the display conserves the phosphor coating inside the face of the screen. Any new data from the keyboard or host makes the display reappear.
Resetting the Terminal The terminal offers several ways to reset:
Partial reset Enter set up and select CLEAR COMMUNICATION. This disables any currently enabled print mode, clears the main and auxiliary port buffers, and unlocks the keyboard.
OPERATION 3-4
Non volatile reset Turn the terminal off and on again, or enter set up and select RESET TERMINAL. This severs all communication with other system units (computer, printer, etc.),so data not saved in permanent memory may be lost. Operating parameters revert to the last values saved in permanent memory.
I CAUTION I A default reset destroys all reprogramming, including function key messages!
Default reset Make sure you are have selected single-session operation. Enter set up; in the GENERAL menu, select DEFAULT PARAMETERS. This returns all operating parameters to factory-set values.
Your dealer, system administrator, or programmer may have set up your terminal specifically for your data processing system. Do not use this reset once you have begun using the terminal on a day-to-day basis.
Funct/Alt/Compose Key With this terminal, you have a choice of three keyboards: ASCII, PC enhanced (AT), or ANSI. One of the keys (located left of the space bar) has a different name on each keyboard. On the ASCII keyboard, it is labeled Funct; on the PC keyboard, it is the left Alt key; on the ANSI keyboard, it is labeled Compose Character.
The KEYBOARD menu (or a command code described in Chapter 12) allows you to select one of the key's four functions: FUN CT, MET A, 3rd LEGEND, or COMPOSE.
The FUNCT Selection Once defining the key, pressing it and another key sends the ASCII code for that key, bracketed by the start-of-header (SOH) and carriage return (CR) control characters. It works only with alphanumeric keys, not with the editing keys.
The META Selection The Funct/ Alt/Compose key, pressed simultaneously with an alphanumeric key, sends the alphanumeric key's code, with the high bit set.
9065 USER'S GUIDE

The 3rd LEGEND Selection This function is for the PC Enhanced keyboard; international keycap sets for this keyboard have three legends on some keys. The unshifted key sends a code that corresponds with the first legend; the shifted key sends a code that corresponds to the second legend. When you press the key while holding down the left Alt key, you send a code that corresponds to the third legend engraved on the key.
The COMPOSE Selection You may have the need to enter a nonstandard character, but can't find it on your keyboard.
The Funct/ Alt/Compose key is used in sequence with a pair of other keys to compose any of the characters listed in Table 3-1. These sequences are similar to Esc command codes in that you do not hold down any of the keys, but press them in sequence.
For example, to compose the character re from a PC Enhanced keyboard, press and release
I Alt I then press and release
[!] and finally, press and release
~ To compose the same re character from an ASCII keyboard, pres~ and release
IFunctl
then press and release
[!] and finally, press and release
~ To compose the same re character from an ANSI keyboard, press and release
I Compose Character I then press and release
[!] and finally, press and release
~
9065 USER'S GUIDE 3-5
Table 3-1. Com_Q_osin_g_ Nonstandard Characters
11~111ar'~~~tmll~11 ~7.a~ L = or I = or L - or I - £
/" I _i( [
)J ] 0" 0
! ! l ??
SS or SS Jt
a' a' a" a II
A" A a* A* A ae AE .IE
c' e' E' e' e" i ' i ' i I\ i
N-n- ii
o' 0 I\
o" O" u'
u'
of 0
01 0 u I\ ii u" ii
U" 0
OPERATION

The ASCII Keyboard This section describes the ASCII keyboard. If you have a PC Enhanced (AT) keyboard or and ANSI keyboard, refer to the appropriate section on the following pages.
Types of Keys • Keyboard areas called keypads a re
shown in Figure 3-4. • Alphanumeric or special keys.
Alphanumeric keys proauce a printable letter, number, or symbol, just hke typewriter keys. Special keys control computer operations.
• Remote or local. This distinction is most important to a terminal operator:
Remote keys Remote keys send signals (printable characters or operating messages) to the computer when the terminal is on line. When signals from the remote keys go to the computer, your program then controls their effect. For example, the Backspace key may erase the character to the left of the cursor in some programs, and move the cursor in other programs. Most keys
Function Key Keypad
j
(even alphanumeric keys!) are remote keys. This means that when the computer controls the terminal, this manual cannot predict what happens when you press a remote key. Consult your software manual.
When the terminal is not on line to the computer, it receives signals from the remote keys and responds to their commands.
Appendices C and D list the command codes sent by the remote keys.
Local keys Local keys send codes only to the terminal itself. They cause the same terminal operations regardless of communication or terminal personality mode. To access the local key menu (Figure 3-5), press
l!!!ritl] I Shift I .-I S-e-t U-p-.I
NOTE: The Enter key, numerals, and punctuation marks referenced in the local key menu are located on the numeric keypad.
Editing Keypad
j luuuLJLJuuuuuuuuuuul §J~~~EJ ~~~~~~~~~~~0~00~~~~~~ 1234567890- =' , .....
EJEJEJ[]U[][J[JD~Ll[]CT[J§J ouur:=JO EJ~r.Ju~[]~rJtJtJOOD ..... EJ [][][JO EJEJ[][Jt:JtJ[JtJEJDO[]EJ[]EJ EJuuu D EJEJ[ JEJEJOJEJ ~DO
r Alphanumeric Keypad
J Numeric Keypad
Figure 3-4. US ASCII Keyboard Layout
OPERATION 3-6 9065 USER'S GUIDE

LOCAL KEY MENU
FUNCT Fl VideoDesk - clock FUNCT F2 VideoDesk - calendar FUNCT F3 VideoDesk - calculator FUNCT F4 Video Desk - ASCII chart SHIFT SETUP Enter/exit setup FUNCT SHIFT PAGE Session change NO SCROLL Screen activity on/ off CIRL..... Toggle WordStar on/ off .cmL..: Raise split line CTRlu. Lower split line CTRL O - 6 Display page 0 - 6 CTRL PAGE Next page/window CTRL --t Status line on/ off CTRL f..J, Scroll up I down CTRL CHAR INS Insert mode on/ off CTRL ENTER Key click on/ off CTRL CLEAR SP ACE Screen saver on
CTRL BREAK Send a 250 ms break CTRL SHIFT CLEAR SPACE Clear screen CTRL SHIFT 1 Monitor mode on/ off CTRL SHIFT SET UP Partial Reset CTRL SHIFT ENTER Block/Duplex Mode CTRL SHIFT BREAK Toggle Ports CTRL SHIFT PRINT Copy Mode On/Off CTRL SHIFT PAGE Previous Page/window CTRL SHIFT t= --t Horizontal scroll in 132 80 DSPL Y mode CTRL SHIFT t .J, Increase/ decrease scrolling rate
To exit, press ESC or Funct-Shift-Set Up key
Figure 3-5. ASCII Keyboard Local Key Menu
9065 USER'S GUIDE 3-7 OPERATION

PC Enhanced Keyboard This section describes the PC Enhanced (AT) keyboard. If you have an ASCII keyboard , refer to the section on the preceding pages. If you have an ANSI keyboard, refer to the section on the following pages.
Types of Keys • Keyboard areas called keypads are
shown in Figure 3-6. • Alphanumeric or special keys.
Alphanumeric keys proauce a J?rintable letter, number, or symbol, just hke typewriter keys. Special keys control computer operations.
• Remote or local. This distinction is most important to a terminal operator:
Remote keys Remote keys send signals (printable characters or operating messages) to the computer when the terminal is on line. When signals from the remote keys go to the computer, your program then controls their effect. For example, the Backspace key may erase the character to the left of the cursor in some programs, and move the cursor in other programs. Most keys
Function Key Keypad
1
(even alphanumeric keys!) are remote keys. This means that when the computer controls the terminal, this manual cannot predict what happens when you press a remote key. Consult your software manual.
When the terminal is not on line to the computer, it receives signals from the remote keys and responds to their commands.
Appendices C and D list the command codes sent by the remote keys.
Local keys Local keys send codes only to the terminal itself. They cause the same terminal operations regardless of communication or terminal personality mode. To access the local key menu (Figure 3-7), press
I Alt I I Shift I .-~-el-ec.....,t
NOTE: The Enter key, numerals, and punctuation marks referenced in the local key menu are located on the numeric keypad.
Editing Keypad
8 EJEJEJEl EJEJEJEJ ElBEJEJ lSJ~8 <::! <::! i::iB LJ [] (] (] (] r:J (] (] [] [] [[] D [J 1.--1 ~ EJ EJ [][] []t::J~[] EJ [][] [] D ~ [] [] E::J l:J EJ EJ ~~El DD~ ~ EJ [] ~ tJ ~ EJ EJ D D !ZJ 1~- I
EJ ~L _I~ EJ
Alphanumeric Keypad
EJEl~ ~EJDD EJEJ~ ~[]~o
(][](] [!] ~[]~a
B0B ~[:] -·
Numeric Keypad
Figure 3-6. PC Enhanced (AT) Keyboard Layout
OPERATION 3-8 9065 USER'S GUIDE
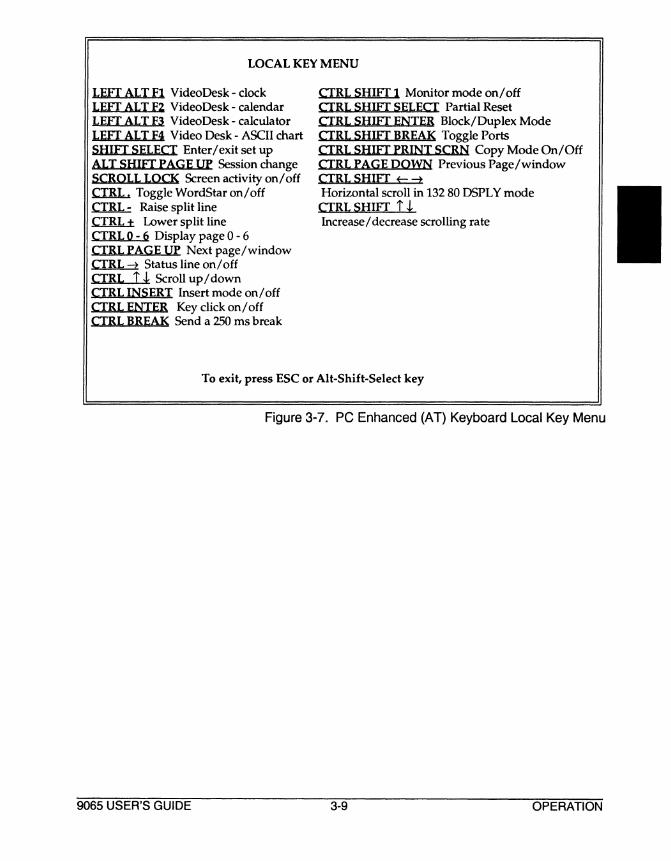
LOCAL KEY MENU
LEFI ALT Fl VideoDesk - clock CTRL SHIFI 1 Monitor mode on/ off LEFI ALT F2 VideoDesk - calendar CTRL SHiff SELECT Partial Reset LEFT ALT F3 Video Desk - calculator CTRL SHiff ENTER Block/Duplex Mode LEFI ALT F4 Video Desk - ASCII chart CTRL SHiff BREAK Toggle Ports SHIFI SELECT Enter I exit set up CTRL SHiff £RINI SCRN Copy Mode On/Off ALI SHifI £AGE UP Session change CTRL PAGE DOWN Previous Page/window SCROLL LOCK Screen activity on/ off CTRL SHIFI t- --t CTRL..... Toggle WordStar on/off Horizontal scroll in 132 80 DSPL Y mode CIRL..: Raise split line CTRL SHIFI t J, CTRL± Lower split line Increase/decrease scrolling rate CTRL o -6 Display page o -6 CIRL PAGE UP Next page/window CTRL--t Status line on/off CIRL 1 J, Scroll up/down CTRL INSERT Insert mode on/ off CTRLENTER Key click on/ off CTRL BREAK Send a 250 ms break
To exit, press ESC or Alt-Shift-Select key
Figure 3-7. PC Enhanced (AT) Keyboard Local Key Menu
9065 USER'S GUIDE 3-9 OPERATION

ANSI Keyboard This section describes the ANSI keyboard. If you have an ASCII keyboard or a PC Enhanced (AT) keyboard, refer to the sections on the preceding pages.
Types of Keys • Keyboard areas called keypads are
shown in Figure 3-8. • Alphanumeric or special keys.
Alphanumeric keys proauce a printable letter, number, or symbol, just hke typewriter keys. Special keys control computer operations.
• Remote or local. This distinction is most important to a terminal operator:
Remote keys Remote keys send signals (printable characters or operating messages) to the computer when the terminal is on line. When signals from the remote keys go to the computer, your program then controls their effect. For ex -ample, the Backspace key may erase the character to the left of the cursor in some programs, and move the cursor in other programs. Most keys
Function Keys
Alphanumeric Keypad
(even alphanumeric keys!) are remote keys. This means that when the computer controls the terminal, this manual cannot predict what happens when you press a remote key. Consult your software manual.
When the terminal is not on line to the computer, it receives signals from the remote keys and responds to their commands.
Appendices C and D list the command codes sent by the remote keys .
Local keys Local keys send codes only to the terminal itself. They cause the same terminal operations regardless of communication or terminal personality mode. To access the local key menu (Figure 3-9), press
I Compose I I F3 I NOTE: The Enter key, numerals, and punctuation marks referenced in the local key menu are located on the numeric keypad.
Editing Keypad Numeric Keypad
Figure 3-8. ANSI Keyboard Layout
OPERATION 3-10 9065 USER'S GUIDE

LOCAL KEY MENU
COMPOSE F6 VideoDesk - clock COMPOSE FZ VideoDesk - calendar COMPOSE F8 VideoDesk - calculator COMPOSE F9 Video Desk - ASCII chart fl. Enter I exit set up COMPOSE SHFT PREV-SCRN Session chg El Screen activity on/ off .CTJ.U.... Toggle WordStar on/ off crR.L..:: Raise split line CIRL... Lower split line CTRL 0 - 6 Display page 0 - 6 CTRL NEXI-SCREEN Next page/window CTRL =t Status line on/ off CIRL t .J, Scroll up I down CTRL INSERT Insert mode on/ off CTRL ENIER Key click on/ off CTRL REMOVE Screen saver on
CTRL FS Send a 250 ms break CTRL SHIFT REMOVE Clear screen CTRL SHIFT 1 Monitor mode on/ off CJRL F3 Partial Reset CTRL SHIFT ENJER Block/Duplex Mode CTRL SHIFT F5 Toggle Ports CTRL SHIFT F2 Copy Mode On/Off CTRL PREY-SCREEN Previous Page/window CTRL SHlff t- =t Horizontal scroll in 132 80 DSPL Y mode
CTRL SHIFT t J. Increase/ decrease scrolling rate
To exit, press ESC or Compose F3
Figure 3-9. ANSI Keyboard Local Key Menu
9065 USER'S GUIDE 3-11 OPERATION
Host Communication This section describes the host port communication modes and related terminal operations.
The terminal communicates with a computer (sends and receives data) through a serial port. If you have a single-host environment, use single-session operation; for a two-host environment, use dual-session operation.
Dual-Session Operation Factory default setting is with the dual-session option turned off. To tum it on, perform the following steps:
1. Enter Set Up (Chapter 2). 2. Move to the GENERAL menu. 3. Move down to the DUAL-SESSION item,
and select the ON option. 4. To save and exit from set up, press
I Ctrl I 00 5. Verify that "SI" appears in the status line. 6. Enter Set Up. Verify that the following mes
sage is blinking at the lower part of the screen.
*** SET UP FOR SESSION 1 *** II
7. To exit from set up, press
IEscl
Dual Session Configuration Configuration of each session, including the associated COM port configuration, is accomplished independent of the other session. The configuration information is stored in C-MOS memory in its entirety.
When selecting the dual session option, specify the COM port, just as you would for a single-session terminal. At the completion of session I configuration, press
I Ctrl I 00 to save and exit set up. Use the appropriate keyboard sequence to toggle the active session and; enter set up again and verify the following message blinking at the lower part of the screen (all menus).
II *** SET UP FOR SESSION 2 *** II
OPERATION 3-12
Configure the terminal with the appropriate parameters; save these and exit.
Please note that when selecting the dual session mode, the printer is automatically set to P ARALLEL and the default for session 1 port is COMI. If you select COM 2 for session 1, then the default for session 2 will be COMl.
NOTE: A session using alternate communication methods (internal modem, current loop option, or FtS422 option) must be assigned to COM1.
During operation, the keyboard switches sessions with with the appropriate COM port and display screen. The inactive session will update its host generated data only until the receive buffer is full (about 128 characters). It will then generate the appropriate flow control signal to stop the host transmission until such time that the session is reactivated from the keyboard.
Switching between Sessions You must be in the dual-session mode. On the ASCII keyboard, switch sessions by pressing
I Funct I I Shift I ~ On the PC Enhanced keyboard, press
I Alt I I Shift I I Page Up I On the ANSI keyboard, switch by pressing
I Compose I I Shift I I Prev Screen I If you plan to continue using the dual-session feature, remember to SA VE PARAMETERS in the COMMAND menu, or save and exit by pressing
lctrII 00 Single Session Operation Single session operation is accomplished by selecting the OFF option for the DUAL-SESSION item in the GENERAL menu (factory default).
Once this is done, you need to specify the serial port connected to the host, and the serial port connected to a serial printer or other serial device. Most users connect the host to the first serial port; if they have only a serial printer, they connect it to to the second serial port. To do this, perform the following steps:
1. In Set Up, go to the GENERAL menu. 2. Move down to the HOST PORT item and
make sure that the COMl option is selected.
9065 USER'S GUIDE

3. Move down to the PRINTER item and select the COM2 option.
NOTE: If you don't use a serial J:>rinter, leave the PRINTER item at the PARALLEL option (default).
4. If your host is connected to the COM2 port, select COMl for your serial printer.
Serial Communication Modes In either single session or dual session, the serial port communication mode determines where data goes when you press a key --to the screen, the computer, or both. Following is a brief explanation of each communication mode.
Full duplex Most "interactive" application programs (those where you enter commands or data and the computer responds) work best with the terminal in full duplex communication mode. Your terminal is set for full duplex mode when it comes from the factory.
In full duplex mode, the terminal sends key codes only to the host and not to the screen. However, hosts often "echo" key codes back to the terminal, so the printable characters you type appear on your screen.
Half duplex If your host does not echo key codes back to the terminal, you can set it for half duplex. Then the terminal sends key codes both to the host and to the screen.
NOTE: You can switch between the current conversational mode (full or half dup I ex) and block mode by pressing CTRL-BREAK
Block Data you enter goes only to the screen until you send it to the host by pressing the SEND key. However, the terminal can still receive any data the host sends. ·
Half block May be used for modem communication. Similar to block mode, but the Request To Send (RTS) line is used to control transmission and receipt of data.
Local The terminal turns off all communication with the computer. Data entered at the keyboard goes to the screen, and the terminal does not receive any data from the computer. All keys act as local keys.
9065 USER'S GUIDE 3-13
NOTE: Once the terminal is in local mode, it cannot receive any commands from the computer to change to another mode!To restore communicalion, you must reset the terminal or enter set up and change the mode.
Sending Blocks of Data The Send key sends screen data to the host when the terminal is in block mode.
For a page send, press
I send I All data from the top of the screen through the
cursor position goes to the host.
For a line send, press
I Shift I I Send l Data on the cursor line through the cursor goes to the host.
To interrupt transmission from the terminal to the host, press
I Ctrl I I Shift I I Set Up I Editing Key Modes Editing key modes affect most editing keys (keys that control cursor movement, editing, and data transmission). Your application program usually determines the editing key mode, but you can also change it in set up (in the Program menu).
NOTE: If your editing keys do not operate as expected, check the communication and editing key modes.
The terminal has three editing key modes:
Local Editing key commands go only to the screen, in all communication modes. In effect, the editing keys become local keys. So you can always use the editing keys to move the cursor, change data on the screen, and send data to the computer and printer.
Host Editing key commands go only to the computer, in all communication modes except local. How the computer handles them depends entirely on its programming.
Normal Editing key commands are handled the same as other characters you type--they go to the computer and/or the screen, depending on the communication mode.
OPERATION

Serial Printer Control This section describes how to send data to a serial printer from a serial port. Make sure you have selected the COMl or COM2 option for the PRINTER item in the general set up menu.
The terminal offers two methods of communicating with a serial device, such as a printer, connected to a serial port:
• Enabling a printer port mode, which passes Clata through the terminal between the computer or keyboard and a device (e.g., a printer) connected to a serial port. Depending on the print mode, the qata may or may not appear on the terminal screen.
• Executing a page print, which sends onscreen data to the printer (much like the Prt Sc key function of a personal computer)
Unlike the host communication modes, the terminal comes from the factory with all serial printer port modes disabled. You (or your program) must enable a serial printer mode to pass data between the host and the serial printer. If you have a problem with printing, see the troubleshooting suggestions in Chapter 5.
Serial Printer Modes Four serial printer modes can be enabled by your program or in set up. Pressing
I Ctrl I I Shift I I Print I has two effects on print modes: It first changes the current print mode to copy mode, and then toggles copy mode on and off.
Copy Sometimes called "typewriter" or "typethrough" mode. Characters from the keyboard or host are simultaneously displayed on the screen and sent to the printer.
Transparent Characters from the host or keyboard are sent to the serial printer port without affecting the display. The display freezes during transmission.
Bi-directional Data from the host or keyboard goes to both the screen and peripheral, just like copy mode. In addition, the device (printer or other peripheral) connected to the serial port can send data through the terminal to the computer. When data flows from the peripheral to the computer, it is not displayed on the screen.
Secondary receive The terminal passes data to the host from the device connected to the parallel port; data from the host or keyboard goes only to the screen.
Page Print A page print sends data on the current page (from the home position to the cursor position) to the serial printer port. The terminal flips the next page of display memory onto the screen, unless page print flip mode has been disabled.
For a formatted page print, press
lPrintl
Each line sent to the printer ends with a carriage return and line feed, so the printed copy resembles the screen.
For an unformatted page print, press
I Shift I I Print I Without formatting, the appearance of the printed output varies, depending on the amount of space characters the data contains.
Pressing
I Ctrl I I Shift I I Set Up I interrupts transmission from the terminal to the serial printer port.
OPERATION 3-14 9065 USER'S GUIDE
Parallel Printer Control The parallel port is is a one-way port. Data goes only from the terminal to the device, not from the device to the terminal. This section describes how to send data from the terminal to a parallel printer connected to the parallel port. Make sure you have selected the PARALLEL option for the PRINTER item in the general set up menu.
The terminal offers two methods of communicating with a printer connected to the parallel port:
• Enabling a parallel printer mode, which passes data through the tenninal from the computer or keyboard to a device (e.g., a printer) connected to the parallel port. Depending on the print mode, the data may or may not appear on the terminal screen.
• Executing a page print, which sends onscreen data to the printer (much like the Prt Sc key function of a personal computer)
The terminal comes from the factory with the parallel printer port enabled. If you have a problem with printing, see the troubleshooting suggestions in Chapter 5.
Parallel Printer Modes Two parallel printer modes can be enabled by your program or in set up. Pressing
I Ctrl I I Shift I I Print I has two effects on print modes: It first changes the current print mode to copy mode, and then toggles copy mode on and off.
9065 USER'S GUIDE 3-15
Copy Sometimes called "typewriter" or "typethrough" mode. Characters from the keyboard or host are simultaneously displayed on the screen and sent to the printer.
Transparent Characters from the host or keyboard are sent to the serial printer port without affecting the display. The display freezes during transmission.
Page Print A page print command sends data on the current page (up to the cursor position) to the parallel port. The terminal does not automatically flip the next page of display memory onto the screen. To send another page, use the
I Next/Prev Page I key to call up a different page, then press
I Ctrl I I Shift I I Print I For a formatted page print, press
I Print I Each line sent to the printer ends with a carriage return and line feed, so the printed copy resembles the screen.
For an unformatted page print, press
I Shift I I Print I Without formatting, the appearance of the printed output varies, depending on the amount of space characters the data contains.
Pressing
I Ctrl I I Shift I I Set Up I interrupts transmission from the terminal to the serial printer port.
OPERATION

NOTES
OPERATION 3-16 9065 USER'S GUIDE

The terminal's VideoDesk program comprises four pop-up accessory windows:
• A clock that can display the time and date in the status line as you work in a program. It also has an alarm function.
• A calendar for the years 1901 to 2099. • A calculator that can transfer calculations
from VideoDesk to the display and can give you a "tape" print-out of your calcurations (or send them to a printer).
• An ASCII chart that shows decimal, octal, hexadecimal, and binary values for the currently loaded character set.
The windows overlay your current display, but do not destroy any data. You can move the windows around to see any portion of the screen.
General Information This section presents the operating details common to all four VideoDesk accessories. Following are separate sections that describe in detail the operation of each accessory.
Entering and Leaving VideoDesk To enter an accessory window, refer to the Local Key Menu for your keyboard (Chapter 3).
To exit from VideoDesk, press:
IEscl Going From One Menu to Another Once you have selected one of the VideoDesk accessories, you can move from one accessory to another by simply pressing one of the four function keys alone.
Refer to the Local Key Menu that applies to your keyboard, for access to the VideoDesk accessories. See Chapter 3.
Moving the Window You can move a Video Desk window left, right, up, or down on the screen by pressing an arrow key together with the Shift key.
9065 USER'S GUIDE 4-1
The Clock
Chapter 4 VIDEODESK
The first thing you may want to do in VideoDesk is set the time and date. To display the clock window (Figure 4-1) on your screen, refer to the Local Key Menu for your keyboard (Chapter 3).
The right and left arrow keys move the highlight bar from field to field. The up and down arrows step through values in the highlighted field.
DATE Time Alarm Display 12-24 Hr Bell
Note:
January 1 8 04 AM 8 01 AM
Dote/Time 12 Hour Alarm/Hourly
Stoff Meeting
1992 I-
Figure 4-1. Clock Window
Setting the Clock/Calendar When the clock appears, the highlight bar is in the month area of the Date field. Press the up or down arrow until the correct month appears.
Now press
B to move to the day and year areas. In each area, set the correct values with the up and down arrows. Do the same in the hour, minute, and AM/PM areas of the Time field.
If you reset the terminal, it remembers the VideoDesk time, date, and other values. But the clock does not run while the terminal is turned off. For example, if you tum the terminal off at 5 p.m. and back on at 8 a.m. the next morning, the clock/calendar resumes from 5 p.m. of the previous day!
VIDEODESK

Displaying the Date and Time The terminal can display the date and time in the status line. You select the date/time in two areas:
• Select None, Time, Date, Or Date!rime in the VideoDesk clock Display field.
• Select the status line display values in the TOR..INE and BOTTOM..INE parameters in the Display set up menu.
12· or 24-hour mode lets you select either a 12-hour clock that displays a.m./p.m. with the time, or a 24-hour (military) clock. (When you select 24-hour mode, the terminal automatically converts the 12-hour time from the VideoDesk Time field to 24-hour time in the status line.)
Setting the Alarm Clock and Bell To set and turn on the alarm, first set the alarm time as you would the clock time. Then set the Bell field to either Alarm or Alarm/Hourly. When the alarm goes off, the bell sounds and the clock pops up on your screen. To disable the alarm, set the Bell field for None. To remove the clock from the screen, press
IEscl The Notepad At the bottom of the clock is a 20-character notepad, handy for inserting a reminder when you set the alarm. To write a message, first move the highlight bar to the Note field. Press
I Back Space I to erase the current message, and enter your message.
NOTE: Move the cursor with the space bar and Back Space key, not the cursor keys.
The Calendar
January 1992 I-
Sun Mon Tue Wed Thu Fri Sat
1 2 3 4 5 6 7 8 9 10 11 12 13 14 15 16 17 18 19 20 21 22 23 24 25 26 27 28 29 30 31
l Todqy_ is Januq_ry L 1992
Figure 4-2. Calendar Window
VIDEODESK 4-2
To display the calendar window on your screen, press the key(s) specified in the Local Key Menu for your keyboard (Chapter 3).
The calendar (Figure 4-2) automatically displays the month you set in the Date field of the clock. To display other months of the current year, press the right and left arrows; to display other years, press the up and down arrows.
You need not return the calendar to the current date; it resets automatically when you return to the clock or reset the terminal.
The Calculator To display the calculator, press the key(s) specified in the Local Key Menu for your keyboard (Chapter 3).
The calculator (Figure 4-3) uses the accountingstyle numeric keypad and the editing keys above it. To avoid confusion, disre ard the le ends on
Figure 4-3. Calculator Window
9065 USER'S GUIDE

the actual keyboard, and keep your eyes on the on-screen calculator pad as you calculate. The active key (the key last pressed) is displayed in reverse video.
The full-intensity area above the calculator pad on screen is the "tape" area. Every calculator entry can be output to tape or printer (or both). The line at the bottom of the calculator indicates whether tape and printer outputs are on or off.
Key Functions Here's a summary of what the (on-screen) calculator keys do:
0-9 Numbers displayed in current entry area.
• Decimal point.
+, -, *,I,= Operands (add, subtract, multiply, divide, equals).
M+ Adds current entry to the number in memory.
M- Subtracts current entry from the number in memory.
Fix Enables fixed decimal point, zero to four places, depending on number of times pressed (default two).
Flo Enables floating decimal point.
+/- Toggles the sign of the current entry.
1/x Comt>utes the inverse of the current entry.
Ce Clears the current entry; clears the operation and starts a new calculation when pressed twice.
Xmt Transmits the current entry to the active position in your program; also exits Video Desk.
Tap Toggles tape display on/off.
Prt Toggles printer output on/off.
Rel Recalls the number stored in memory.
Sto Stores the current entry in memory.
2nd Selects the second function of a key (displayed above the calculator key). Press and release this key, then press the desired key to invoke its second function.
Examples The best way to learn how to use the calculator is just to start in using it. Display the calculator, position your right hand over the keyboard numeric keypad (keep your eyes on the screen), and begin:
9065 USER'S GUIDE 4-3
Simple arithmetic; clearing an error Enter 64+ 128=. On the ASCII or ANSI keyboards, use the comma (,) as a plus ( +) sign. On all keyboards, use Enter instead of the equal (=) sign. If you make a mistake, press Ce to clear the current entry line, and start the current entry again. Each time you press an operand, the current entry goes to the tape.
Selecting the second function; storing a number in memory The result of the above calculation is 192 (64 + 128 = 192). It should be displayed in the current entry line. Press 2nd, then press Rel. This invokes the Sto key and stores 192 in memory.
More simple arithmetic Now enter 16*32=. This multiplies 16 times 32. The result, 512, appears in the current entry line.
Adding to the number in memory Press 2nd, then press*. This invokes the M+ key, adding the current entry, 512, to the number in memory (192). The result, 704, appears as the current entry.
Toggling the sign Press+/-. The number in the current entry line, 704, changes to -704.
Transferring a number to the screen Press 2nd, then CE. This transfers the current entry (-704) to the cursor position in your program and leaves VideoDesk.
Display the calculator again by pressing the key(s) specified in the Local Key Menu for your keyboard (Chapter 3) and start another set of examples:
Turning the printer output on Press 2nd; then press Tap. This toggles the printer display on. The display selection area at the bottom of the calculator changes from Tape = On Print = Off to Tape = On Print = On. Now you will both see your calculations in the tape area and have a record of them from your printer.
Changing to fixed decimal point format Before starting any calculations, press Fix to change the decimal point format from floating to fixed. Continue to press Fix until the desired number of decimal places (zero to four) appears. (In this case, choose two places.) Note that the fixed decimal format always returns to the number of places previously set.
VIDEODESK

NOTE: Fixed decimal format truncates a value, rather than rounding it off. It displays 2.229, for example, as 2.22, rather than 2.23.
Simple arithmetic Enter 347-18=. The answer, 329, appears in the current entry area. Press /6= to divide this figure by six. The result, 54.8333, is truncated at two decimal places.
Storing a number in memory Press 2nd, then press Rel. This invokes the Sto key and stores 54.8333 in memory.
Finding the inverse Enter .47. Press 2nd, then +/- to invoke the Vx key and find the inverse amount. The answer, 2.1276, is truncated to 2.12.
Subtracting the number in memory Press 2nd, then /. This invokes the M- key and subtracts the current entry, 2.1276, from the number you previously stored in memory, 54.8333. The result, truncated to 52.70, appears in the current entry area and is also stored in memory.
Recalling a number from memory Now press 695.99/Rcl. In turn, this displays and sends to the printer 695.99/, then 52.70, then the result (13.20).
THE ASCII Chart Figure 4-4 shows the default ASCII chart that appears when you press the key(s) specified in the Local Key Menu for your keyboard (Chapter 3).
The ASCII chart can display up to 256 characters and give the decimal, hexadecimal, octal, and binary values of the active position shown in reverse video. But the characters that appear in the chart depend entirely on which character set is loaded in the terminal's character generator.
Press the four arrow keys to move the active position around in the chart. Note that the ASCII chart displayed here does not match the ASCII tables shown in Appendix B in all emulations. Under the emulations listed below, hex codes 10-lF of the seven-bit ASCII set are converted to hex codes 80-8F of the Multinational set.
VIDEODESK 4-4
This takes place under the following emulations:
• TeleVideo 912/920 • TeleVideo 91 o • TeleVideo 925/910+ • TeleVideo 950 • Lear-Siegler ADM 31 • Hazeltine 1500
Unfortunately, memory limitations make these conversions necessary for the emulations listed.
Finally, under VTlOO emulation, hex codes EOFF display a variety of symbols from different character sets.
Apart from these exceptions, the VideoDesk ASCII chart displays the characters shown in Appendix B. Tele Video regrets any inconvenience to its customers that may be caused by these internal corrections.
I F 0 i I t--
, 'l 0 ii • o, 1 b sx Cii 2 6 E 03 3 x 6 ~ 04 4 0 E
Q 'k 5 0 A s b K y 03 \ ~ 7 Id 8s c.i 8 u H \ 9 T u l
F \ A a y
~ B T i.i FF FS c y li \ D
t \ E ~ SI 't F
Dec 001 Hex 01 Oct 001 Bin 0000 0001
Figure 4-4. ASCII Chart Window
9065 USER'S GUIDE

If A Problem Occurs Once you have properly installed your terminal and matched its operating values with those of your computer and printer, it should give you years of trouble-free service. However, if it does not operate properly, check the following list before calling your dealer or distributor.
Troubleshooting Checklist If the terminal doesn't operate at all, check these items:
• Are all cables firmly plugged in at both ends? (You'd be surprised how often this is the problem!)
• Are all system units turned on? • Is your terminal locked up? Turn it off and
back on. • Do you need to replace the line fuse?
See the instructions in the next section. If the terminal doesn't communicate with the host or modem:
• Are you in the proper operating mode? The correct communication mode? Check the status line.
• Is your computer operating system booted up?
• Do the terminal and computer communication formats match? Check the set up menu of the port selected as the host port for the terminal communication format.
• Is the interface between the terminal and the ccmputer or modem correctly wired? Check the computer port pin signals (see Chapter 1 ). Make sure that pins 1, 2, 3, 7, and 20 are connected as specified.
9065 USER'S GUIDE 5-1
Chapter 5 TROUBLESHOOTING
• Is your modem operating correctly? Check its instructions; if necessary, contact the manufacturer for assistance.
If the terminal doesn't communicate with the printer or other peripheral:
• Is the interface cable firmly plugged in at both ends?
• Is your application program correctly configured for your peripheral?
• Are the communication, editing key, print key operation and print modes set so the terminal receives the print key codes and printing commands?
• Does the serial port communication format match that of your serial peripheral?
• Is the interface between the terminal and the peripheral correctly wired? Check serial and parallel port pin signals (see Chapter 1).
If the screen display is faint or the cursor does not appear correctly:
• Have you adjusted the screen brightness?
• What cursor style is specified in set up?
I CAUTION I Do not plug or unplug the keyboard cable while the terminal is turned on. A power surge may result, which could severely damage the terminal.
• Is the keyboard locked? Reset the terminal or press
I Ctrl l l Shift l I Set Up l
TROUBLESHOOTING

Running Self Test You can verify proper operation of the terminal video display circuitry by running the self test. The test shows all displayable characters and visual attributes.
NOTE: Running self test erases any data on the screen.
1. Be sure the terminal is in 9065 mode. Enter set up by pressing
IShiftl lsetUpl 2. After the set up menu appears, press
[]
TROUBLESHOOTING 5-2
3. Verify that the test screen appears (Figure 5-1).
4. Check the screen for the following items:
• Four lines should blink. • All 256 characters (ASCII control and dis
play; graphics) should be displayed.
• Each character should be formed properly, with no extra or missing dots.
• The screen should show all the visual attributes in both full and half intensity.
• The firmware revision level should appear in the lower left corner.
5. To clear the test from the screen, press I Ctrl I I Shift I I Clear Space I
Figure 5-1 . The Test Screen
9065 USER'S GUIDE

Monitor Mode A terminal usually displays printable (alphanumeric) characters such as letters, numbers, and punctuation symbols on the screen. But it also receives many other characters (called codes) that are commands. They do not appear on the screen; instead, the terminal interprets and responds to them. (For example, whe~ the terminal receives the command Ctrl Z, 1t clears the screen.) When monitor mode is enabled, the terminal no longer responds to commands from the computer or keyboard. It displays all data (printable characters and command codes) on the screen. Programmers use monitor mode to display the contents of a program on the screen, or to find out what code an editing key sends. To toggle monitor mode on and off, press
I Shift I I Ctrl I IIJ (numeric keypad one).
Stand-Alone Test This test checks the transmit and receive capabilities of the COM 1 serial communication port; it also checks terminal functions in the communication mode.
With all communication cables disonnected, connect a jumper from pin 2 to pin 3 of the COMl port.
9065 USER'S GUIDE 5-3
NOTE: A wire paper clip can be easily bent so its ends will fit into the COM1 connector. As viewed from the rear of the terminal, pins 2 and 3 are the second and third from the right , on the top row.
Make sure the power cord is properly connected to the terminal and plugged into a live wall receptacle. Power up the terminal by pressing the POWER switch (Figure 1-1); listen for a beep sound.
NOTE: Lack of a beep sound may indicate a power supply failure, and require service.
After the beep sounds, self-test results should be displayed (provided the contrast and brightness controls are not turned down). The screen will indicate any memory or keyboard failures; these should be logged and noted for any unit returned for repair. Pressing any key will clear the screen and place the terminal in the communication mode. For those users not displaying a status line, check the COMM MODE in the GENERAL set up menu. The option selected should be FULL DUPLEX, HALF DUPLEX, or BLOCK. Enter several keystrokes and observe the screen.
In full duplex mode, each character should be displayed as typed.
In half duplex mode, each character you ty~ will be repeated on the screen. For example, tf you type an "a," the screen will display "aa."
In the block mode, each character is repeated when the Send key is pressed.
TROUBLESHOOTING

If You Need Assistance Your Tele Video dealer can help you solve problems and obtain service. Before calling your dealer, review the troubleshooting checklist in this chapter and check the operating parameters (tum to Chapter 2 to review them). Try to place the terminal by the phone. Have the terminal serial number, found on the rear of the case, and this manual at hand.
The terminal is covered by a limited warranty, which should be packed with the terminal (see your dealer if by chance it was omitted from your package). No warranty registration is required. If you need service during the warranty period, call your dealer.
TROUBLESHOOTING 5-4
Should you need to ship the terminal to TeleVideo for repair, ask your dealer to first contact Tele Video and secure a Return Material Authorization (RMA) number. Tele Video does not accept items for repair without an RMA number. Then carefully pack the terminal, using either the original Tele Video shipping container or other suitable materials.
I CAUTION I If returning the terminal for a communication failure, have your system ports and cables checked. A miswired or short circuited system could damage a newly repaired terminal.
Keep this manual; do not return it with the unit.
9065 USER'S GUIDE

This chapter introduces the basics of programming the terminal. It then presents the commands for changing the terminal personality, saving reprogrammed set up values, and resetting the terminal.
NOTE: Command code descriptions in this chapter are for the TeleVideo 9065. Codes for TeleVideo emulations are listed in Appendix C; codes for all other emulations are listed in Appendix D.
I CAUTION I Avoid loss of data! When you select a new terminal personality, the screen clears and many values reset. Read the information in this chapter about selecting a personality and saving reprogrammed set up values.
The 9065 command set is a superset of TeleVideo 955 and 965 terminal commands. Most 9065 mode commands follow the format of industry-standard Tele Video 950/955 command sets. But some terminal functions are also controlled by duplicate commands structured in the style of Wyse 60 commands. These duplications are ·intended to adapt this terminal to a broad range of programming environments.
PROGRAMMERS: If you are not experienced in sending commands directly (locally) from the keyboard, read 11 Commands From the Keyboard, 11 starting in the next column.
Entering Commands The terminal responds to commands either sent from the host or entered at the keyboard.
Commands From the Host How you incorporate commands into your programs depends on your programming language. The terminal responds to control codes and escape sequences from the host regardless of your programming language format and syntax.
The multitude of languages and syntaxes makes it impossible to show you in this manual how to incorporate commands in each program. If you
9065 USER'S GUIDE 6-1
Chapter 6 PROGRAMMING
need help with the proper syntax, refer to the documentation for your programming language.
Appendix B contains an ASCII chart that shows the ASCII characters and corresponding numeric values in various systems.
Commands From the Keyboard Sending programming commands from the keyboard lets an operator control many aspects of terminal operation not available in set up.
Two factors affect the response of the terminal to commands from the keyboard:
• Communication mode • Correct key sequence
Communication mode To ensure that commands from the keyboard go to the terminal, enable block or local communication mode. If you enter commands at the keyboard during full or half duplex communication mode, the results are unpredictable. The computer receives the commands, and its response depends on the operating system and application program.
However, you can send escape sequences to the terminal during full or half duplex mode by entering the commands with the Loe Esc key (Shift-Esc) instead of Esc. This sends commands to the terminal only.
Correct key sequence Always press the Ctrl key first and hold it down while you press the other key (as you would the Shift key). Always press and release the Esc key before pressing the next key.
Enter characters exactly as shown. Notice whether the command requires an upper- or lower-case character, a number one or a lowercase L, a zero or an uppercase 0. Make sure the Caps Lock key is not locked.
Commands are printed in this manual with a space between the characters. Do not type this space as part of the sequence; it is included only for clarity. For example, the command Esc c means press the Esc key, then a lower-case c.
PROGRAMMING

Command Format This manual presents programming commands in a format that shows the section title, values selectable in set up, default values, command function, ASCII command characters, and variable values. For the cursor style selection command, see Table 6-1 for choice of attributes.
Cursor Style
Cursor style selection Esc . Ps
Table 6-1. Cursor S_.Me Selection
mtJ.:: ·; :: ,'¢ii-~t.~ijiiijl': < 0 Not dis__Q_la_y_ed 1 Blinkin_g__ block J_defaul!}_ 2 Stead_y_ block 3 BlinkiJ!g_ underline 4 Steac!Y_ underline 5 Blinking block
Cursor Style is the title of the section, which contains one or more commands
Cursor Style Selection defines the function of the command.
Esc • Ps is the command in ASCII characters. Appendix B contains ASCII charts with binary, decimal, octal, or hexadecimal values.
Variables are usually shown in italics as Ps, to represent a selected value. The effects of variables are dEscribed in the text following each command.
Personality Modes Selecting a Terminal Personality
I CAUTION I The following command can cause loss of data! Save all data before sending this command.
Select a personality Esc [ 10; Psv
PROGRAMMING 6-2
T bl 6 2 S I a e - . e ectin_g_a p r ersona 1!Y_ crsn~JJ ~ ~-0 Tele Video 955
1 Tele Video 950 2 W_y_~ 50/5o+ 3 TeleVideo 9121920 4 Tele Video 910 5 TeleVideo 925/905/91o+ 6 Tele Video 965
7 Wy~60
8 PC Tenn 9 ADDSA2 IO ADDSVP60 11 Hazeltine 1500 12 00200 13 ADM31 14 IBM3101-1X 15 IBM3101-2X 16 IBM 3161 17 VTl00/52 18 W~e 150 19 W~e 160 20 TeleVideo 9065
When you select the personality mode, the screen clears and many operating modes reset to a state compatible with the new personality. See Table 6-2 for each personality's Ps value. Table 6-3 shows the states to which the terminal resets when it enters various personalities.
Reprogrammed function and editing keys retain their reprogramming when you select a new terminal personality unless you elect in set up to return them to the default codes of the new personality.
Appendices C and D contain summaries of code sets for the terminal personalities.
NOTE Set up values not listed in Table 6-3 remain the same when the personality mode changes. This means you can enable a terminal feature in 9065 mode that is not normally available in some other personality, then select a new P.ersonality mode and retain the feature. (Any mode harmful to a new personality is automatically inhibited.)
9065 USER'S GUIDE

Table 6-3. Terminal States after Personality Mode Reset m ~;;~-::;- .) r~~rifili!t._(Jiiv~m~>
DISPLAY MODES
EDITING MODES
KEYBOARD
CHARACTER SETS
HOST/PRINTER COMMUNICATIONS
Visual attribute setting_ Nonnal All
Visual attribute base Character 7, 8, 9, 12, 17
Write~tectattribute
Line attribute
Disj>_la_y_ (on/off)
Cursor di~lay_ ( on/~ff)_
Column width
Number of lines per page
Number of lines per screen
Line lock
Scrollin.£_ re_g!ons
SJ!_lit screen
Monitor mode
Auto scroll mode
Auto~mode
Auto wrap mode
Receive CR mode (CR,CRLF)
Tab stops
Edit mode ~e, line
Protect mode
lnsert/re~ace mode
Wordstar mode
AJ>I>).ication mode
F-key, edit key reprogramming
Gra_.P_hics mode
R~acement character
font bank assig_nments 1st/2nd character set
definitions
ACK mode
Print modes
P~e_E..rint
Page fliP._ mode
Answerback message
Page 0, 1, 2, 3, 6, 10, 11, 20 Line 4,5, 13
Half intensity All
Sin~le hig_h/wide All On, cleared All
On All
80 All
24 All but8
25 8 24 All but8
25 8 All lines unlocked All
Clear All
Clear All Off All
On All Off All
On(wra_.£2._ All but 17
Off (no wra-2) 17
CR All
Clear All All but4, 17
Set 8 column st~s 4,17 Line All Off All
All No reset All
No reset All No reset All
unless selected in set l!E_
Off All All
Reset to default All Reset to default All
On 0, 1,3,4,5,6, 7,20 Off All others
Off All
On 1,5 Off All others
No reset All
9065 USER'S GUIDE 6-3 PROGRAMMING

Enhanced Personality Mode CAUTION Enable enhanced mode Esc [ = 20 h
Disable enhanced mode Esc[=201 Enhanced mode provides additional commands in some terminal personalities. Appendix C indicates enhanced mode commands by setting them in bold type.
NOTE Enable enhanced mode during 9065 mode. Some set up values are retained when you switch to another personality.
Return to 9065 mode Esc ! 9 (from VT100, DG 200, and PC TERM} Return to 9065 mode Esc - 9 (from all other modes} Returns the terminal to 9065 mode from any other mode. By entering 9065 mode, then returning to another mode (Esc [ 10 ; Ps v), it is possible to retain some 9065 features in another mode. However, any 9065 command that is either destructive or in conflict with another mode will be erased when you enter that mode.
I CAUTION I This command can cause loss of data. Save all data before using this command.
Saving/resetting Values Saving Set Up Values
Save current set up values in nonvolatile memory
Esc[0;1}
Most reprogrammed operating values are not saved in nonvolatile memory. (Exceptions, such as key contents, answerback message, send delimiters, and page print termination character, are noted in their descriptions.) This command saves reprogrammed values that can also be changed in set up and that are not automatically saved in nonv<?latile memory. The section earlier in this chapter called "Command Format" tells how to identify set up values.
PROGRAMMING 6-4
The following command erases any reprogramming you may have loaded into non volatile memory.
Resetting the Terminal Be careful when you reset the terminal. These commands void any values previously changed by commands from the keyboard or host that have not been saved.
Reset operating values to factory default values
Esc-0
Resets software; returns nonvolatile memory to factory default values; clears the screen.
Reset operating values Esc - 1 to nonvolatile memory values Returns the terminal to nonvolatile memory values (including latest set up menu values and reprogrammed function keys), unlocks the keyboard, and clears the screen. Same as turning the power off and on again.
Reset function keys to Esc - 2 factory default values Restores codes sent by function keys to factory default values; does not clear the screen.
Reset editing and numeric keypad keys to factory default values
Esc-3
Restores codes sent by editing and numeric keypad keys to factory default values; does not clear the screen.
Load the date Esc x 9 mmddyyyy This command loads the date for the VideoDesk calendar, using these values:
mm=
dd=
YYYY=
two-digit month code
two-digit day code
four-digit year code
9065 USER'S GUIDE

Chapter 7 KEYBOARD AND SCREEN
This chapter covers the following.
• Keyboard and beeper functions • Screen appearance • Character, line, and cursor attributes • Attributes of the information lines
(Chapter 12 covers messages on the lines.)
NOTE: Command code descriptions in this chapter are for the TeleVideo 9065. Codes for TeleVideo emulations are listed in Appendix C; codes for all other emulations are listed in Appendix D.
Keyboard Functions Lock/Unlock the Keyboard Lock (disable) the keyboard Unlock (enable) the keyboard (default)
Esc# Esc"
With the keyboard locked, only the Shift, Ctr), and Set Up keys operate. To unlock the keyboard, enter set up and execute CLEAR COMMUNICATIONS, or reset the terminal. See "Resetting the Terminal" (Chapt. 6) for the effects of resetting.
Auto Repeat Mode Auto repeat on (default) Esc [ = 8 h
Keys (except Clear Space, Home, Send, Page, Ce, Enter, Return, Esc, Loe Esc, Print, Line Erase, Page Erase, and the function keys) repeat when pressed for more than a half second.
Auto repeat off
Key click Key click on (default) Key click off
Esc[=BI
Esc > Esc <
This command temporarily overrides the set up menu value.
Num Lock Num Lock on
Num Lock off
Esc[=33h
Esc[=331
With Num Lock on, the numeric pad number keys are active; with it off, they are inoperative.
9065 USER'S GUIDE 7-1
Disabling Specific Keys Enable specified key(s) Esc [ = Ps h (default) Disables
12 13 14
Clear S ace
Break Disabling these keys prevents operator interference.
0 Disabled 170ms
2 250 ms (default) 3 500ms 4 2seconds
The Break key holds the communication line (pin 2 of the main port RS-232C connector) in the 0 (low) state for a specified time. How your computer responds depends entirely on its program. A break signal may disconnect a modem.
CAPS LOCK Mode Enable CAPS LOCK mode Esc[=26h
Enabling CAPS LOCK mode has the same effect during reverse mode as pressing
leaps Lock!
CAPS LOCK affects only the letter keys. All other number and symbol keys must be pressed with Shift to generate the upper key symbol.
Disable CAPS LOCK mode (default)
Esc [ = 261
During CAPS LOCK mode, letter keys generate uppercase letters, as if the CAPS LOCK key were engaged.
KEYBOARD & SCREEN

Caps Reverse Mode Enable caps reverse mode
Disable caps reverse mode (default)
Esc[=25h
Esc [ = 251
When caps reverse mode is also enabled, press. ing a letter key with Shift generates a lower-case letter, as shown in the following table.
Alone lower-case lower-case Shifted UPPERCASE UPPERCASE
CAPSLOCK UPPERCASE UPPERCASE CAPS LOCK, UPPERCASE lower-case
Shifted
The Beeper Sound the beeper Ctrl G You can insert this command whenever you want the terminal beeper to sound.
Selecting the Bell Column Load the margin bell column CtrlW This command sets the margin bell column at the current cursor location. The bell sounds when the cursor reaches the column during keyboard data entry. The defaults are 72 (80 columns) and 124 (132 columns).
Margin Bell Mode Enable the margin bell Esc[=4h
The margin bell sounds when the cursor reaches the bell column, determined by the command Ctrl W (above).
Disable the margin bell (default)
Screen Display Visibility Screen display on (default)
Screen display off
Esc [ = 41
Esc n or Esc. 9
Esco or Esc. 8
Turning the display off does not clear data from the screen; it merely hides it.
KEYBOARD & SCREEN 7-2
Background Dark background (default) Esc d Light background Esc b The screen background is either light with dark characters or dark with light characters.
Screen Saver Select screen saver time Esc[B;Psv
0 None (default) 10 minutes
2 20minutes 3 30minutes
If there is no keyboard or host activity for the time period indicated, the screen goes blank to conserve the phosphor. Any new activity restores the display.
To enable the screen saver immediately, press
I Ctrl I I Clear Space I Cursor Appearance
0 Invisible Blinkin block (default)
2 Steady block
3 Blinking underline 4 Steady underline
5 Blinking block
Visual Attributes Visual attributes determine the appearance of characters on the screen. The terminal has a wide range of visual attribute choices. If you are unfamiliar with the characteristics of visual attributes, read the following pages.
Visual Attribute Types The 9065 mode gives you a choice of field- or character-based visual attributes. The field attributes can be line- or page-based. The following paragraphs discuss each.
9065 USER'S GUIDE

CAUTION
Changing between field and character attributes clears the display, causing loss of all unsaved text.
Character-based Attributes are a function of time. Characters entered anywhere on the screen are displayed in the currently defined attribute. When you redefine the attribute, characters displayed in previously defined attributes do not change. Only subsequently entered characters display the new attribute.
For example, suppose you enable the blinking underline attribute and enter a character, a space, and a character. Then you change to reverse attribute and enter a character in the space between the two blinking underlined characters. You end up with a blinking underlined character, a reversed character, and another blinking underlined character.
Field-based Attributes are a function of location. Any time you enter a character within an attribute field, it has the attribute of that field. The display may contain any numberof different attributes in various locations. An attribute field extends to the end of the line or page, or until it encounters another attribute.
For example, you could define a field of reverse attributes. No matter when you type in the field, the entry appears in reverse-attribute characters. If the field is followed by a field of underline attributes, positioning the cursor anywhere in the reverse-attribute field and entering a normal attribute creates a field of normal attributes from the cursor to the beginning of the underline attribute field. Field-based attributes are write protected. They may (or may not) occupy a space, and the fields may be line-based or pagebased:
• Space Visual attributes occupy a character space. Entering a character in that space destroys the attribute (unless protect mode is enabled, since attributes are write-protected).
• No Space Visual attributes do not occupy character spaces. The first character you enter never destroys the attribute. But after you enter the first character, entering a character where the attribute starts cfestroys the attribute.
9065 USER'S GUIDE 7-3
Since attributes can be write protected, you can avoid destroying them by turning on protect mode when you want to re-enter a character where an attribute starts.
• Line-based The attribute field, unless previously disabled, automatically terminates at the end of the current line.
• Page-based The attribute field, unless previously disabled, extends to the end of the page.
Selecting Attribute Type
0
2
Esc F Ps
Space (default) NoS ace Character
I CAUTION I This command can destroy data! Changing between field and character attributes clears the display.
If the terminal is already in field attribute mode, changing between embedded and non embedded attributes does not clear the display.
This command controls the attribute type for both the text and information areas. See the previous discussion of attributes for an explanation of each attribute type.
Selecting the Attribute Base The following commands allow you to base your field attributes on pages or lines.
Select page-based (default)
Select line-based
I CAUTION I
Esc[=2h
Esc[=21
These commands can destroy data! Changing from character to field attributes clears the display.
If the terminal is already in field attribute mode, changing between page- and line-based attributes does not clear the display.
KEYBOARD & SCREEN

Defining Visual Attributes Define visual attribute(s} Esc G Ps
~,,.~11111:: ..•• t 0 _I)_ Normal (default) 1 _g_ 2 r
3 s 4
5 u
6 v 7 w 8 x
9
z
=
> ? Del
Invisible nonnal video Blink
Invisible blink Reverse video
Invisible reverse Reverse & blink
Invisible reverse & blink Underline
Invisible underline
Underline & blink Invisible underline & blink
Reverse & underline
Invisible reverse & underline
Reverse, underline & blink Invisible reverse,
underline, & blink
The Esc G Ps command defines visual attributes for unprotected text--not for write-protected characters or the information lines.
Normal Intensity Mode Normal attribute is half intensity
Esc[=5h
This command resets the normal visual attribute to half-intensity. It does not reset the half-intensity attribute to full intensity.
Normal attribute is Esc ( = 5 I full intensity (default}
KEYBOARD & SCREEN 7-4
Filling a Rectangle with Attributes Define character-based attributes in a rectangle
Escx I rcPs
r = An ASCII character from Appendix G for the row (line) at which the sides of the block, extending from the cursor row, terminate.
c = An ASCII character from Appendix G for the column at which the top and bottom of the block, extending from the cursor column, terminate.
Ps = Any value of Ps on the previous page
This command removes the write-protect attribute, as well as any other attribute, from the characters in the specified rectangle and assigns the designated attribute to the characters. The variables r and c define the row and column framing two sides of the block. The cursor anchors the opposite comer.
The terminal accepts this command only during character-based attribute mode. It does not accept this command with protect mode enabled.
You cannot specify a value of r or c beyond line or column 96.
Information Area Attributes Select area attribute Esc PaPs
.Pit > . trittiriri~tiort Afti~ > 4 Status line 5 Status line message field 6 User message one 7 User message two
Ps = A variable from "Defining Visual At-tributes" table.
The information areas and text areas have the same attribute type (selected with the command Esc F Pn or in set up). Note that the first position in l\D area contains an attribute character. The following table shows the default attributes of the various information areas:
Status line Reverse Status line mess~e field Normal
User mess~e one Normal User message two Normal
9065 USER'S GUIDE

Status Line Attributes Select status line attribute Esc[3;Psv
0 Normal 1 Reverse (default) 2 Underline
Write-Protected Characters Select the attribute(s) of write- rotected characters
6 Reverse
Esc. Ps
7 Half intensi (default) A Normal B Blinking c Blank (invisible) E Underline F Reverse G Half intensity
Define attributes of write-protected characters separately from those of normal text characters.
Line Appearance The commands in this section let you display from 80 to 132 characters on a line.
Selecting the Number of Columns Select 80 columns per line (default)
Select 132 columns per line
Esc[=31 or Esc.:
Esc[=3h or Esc.;
These commands affect both the information lines and the data display lines. If the 80/132 Change Clear feature is off, they do not clear the screen, but you should clear the message and function key label lines before changing the number of columns per line, then display the lines programmed for the new column width.
If the 80/132 Change Clear feature is off and you change from 132 to 80 column mode, data in columns 81-132 remains in display memory. The cursor also remains in its current position, even if it is beyond the right margin of the display, and you can enter data in the columns that are not displayed. But once you move the cursor into the display, you cannot go back into the undisplayed columns.
9065 USER'S GUIDE 7-5
To retain an 80-column display, but be able to access the entire 132 columns, select 132 80 DSPL Yin set-up, and scroll the display horizontally with Ctrl-Shift-arrow keys. See Chapter 1 for more information about terminal behavior during this mode.
80/132 Change Clear Feature 80/132 Change Clear ON
80/132 Change Clear OFF
Esc [ = 61 h
Esc [ = 61 I With this feature on, each time you change the number of columns, the screen is cleared and all data in display memory is lost.
Line Attributes Define the line attribute(s) Esc G Ps
Ps @ Single high, wide (default) A Single high, double wide B To half double high, single wide c D E Bottom half, double high, wide
I CAUTION I Changing from single width to double width destroys all characters on the right half of the line.
Line attributes affect all characters on the cursor line and any entered on that line after you change attributes. Line attributes affect only the cursor line. The screen can contain lines with different attributes.
Lines of double-width characters can contain only half as many characters as a single-width line can. When you enable the double-wide attribute, the cursor moves to the screen's right margin if it is in a column that moves beyond the right margin.
Specify double-height lines in pairs (top line first) and send the same data to both. (The display may look strange until both lines are on the screen.)
KEYBOARD & SCREEN

Most printers print one character for each character position. For example, printing a page of double-high/wide characters could result in four printed characters for each display character.
Test Displays Self Test Run the self test EscV This command starts the self test described in Chapter 5. After you run the test, press
I Ctrl I I Shift I I Clear Space I or send a clear command to clear the screen.
Monitor Mode Monitor mode on Monitor mode off (default}
KEYBOARD & SCREEN
EscU EscX
or Esc u
7-6
Mnitor mode on The terminal displays commands (control and Escape sequence characters) on the screen, instead of acting on them.
Monitor mode off Terminal processes commands normally.
Seeing command characters on the screen can help you debug a program. Appendix B shows how control characters appear on the screen in monitor mode.
If you want to display a control character without putting the terminal in monitor mode, send an Escape character (or press LOC Esc) just before the control character.
To toggle monitor mode from the keyboard, press
I Ctrl I I Shift I [!] using the number on the numeric pad.
9065 USER'S GUIDE

This chapter presents commands that control the following features:
• Lines per display and per page • Split screen • Scrolling
NOTE: Command code descriptions in this chapter are for the TeleVideo 9065. Codes for TeleVideo emulations are listed in Appendix C; codes for all other emula· tions are listed in Appendix D.
Configuring Lines and Pages The concepts in this section are fairly complex; you may need to study the tables carefully and then look over the line and page configuration commands that follow.
The terminal automatically divides display memory into pages. The number of pages selected depends on these factors:
• Number of lines per page • Current personality mode • Columns per line mode
In addition, the number of lines per page is affected by the number of display lines selected, since you cannot configure the display for more lines than the page has.
Table 8-2. Maximum Pa es Available
25 6 42 4 43 4 48 4 49 4pages 1 page
9065 USER'S GUIDE 8-1
Chapters DISPLAY & PAGES
Table 8-1. Personal_!!y_ Mode Sets 8¢~: 1>~(i$ . :J#i~~~•m~:':: :: :
3 9065, 965, 955, WY-60, WY-120/150, WY-160,
VPA2 60, 00200,VTlOO, PC TERM, Hazeltine 1500
2 7 91CY9lo+, 9121')20, 925/905, 950, WY-50/5o+, ADM 31
For the 1500 and the 910, enhanced mode must be on. All other personalities are capable of single-page support only.
Table 8-2 lists the maximum number of pages available for the 9065 personality. Changing to other personalities may limit the number of pages available.
Selecting Number of Lines Select the number of display lines Ps Lines 0 24 (default) 1 25 2 42
Esc[14;Psv
Ps Lines 3 43 4 48 5 49
CAUTION
This command clears the screen and may cause loss of data!
If you select 25, 43, or 49 lines, the bottom line overwrites the bottom information line.
n/a n/a n/a n/a n/a n/a 2pages
DISPLAY & PAGES

Selecting Lines per Page Define page length Esc \ Ps Ps Page Length 1 1 x number of display lines 2 2 x number of display lines 3 4 x number of display lines 7 1 + Memory: Page 1 same as number
of display lines, page 2 contains all lines remaining in display memory
I CAUTION I The Esc \ Ps command can cause loss of data!
When you execute the Esc \ Ps command, the terminal performs the following functions:
• Clears all pages of memory to space characters
• Displays page one with the cursor at home position
• Defines the display as one full screen • Redefines the scrolling region as the en-
tire display You cannot define page length as less than the number of display lines.
The term page (i.e., document) refers to an amount of memory. Do not confuse page length with the number of lines on the display-the amount of data that can be viewed on the screen atone time.
Figure 8-1 shows the terminal's memory divided into pages, with part of one page displayed.
The Split Screen You may split the screen into two horizontal windows. The top window shows the current (active) page; the page that appears in the bottom window depends on the total number of pages of memory. You can then move the cursor between windows (change the active page) and change the size of the windows.
While the screen is split, commands to display another page of memory are still valid.
NOTE Splitting the screen disables protect mode, and you cannot enable protect mode while the screen is split.
DISPLAY & PAGES 8-2
Split Screen w/o Clearing Pages Split without clearing Esc\APn (two pages of memory only)
Split without clearing Esc \ C Pn (one or more than two pages of memory)
Pn = a line number code from Appendix G that indicates where the lower window starts (default = 8)
One page of memory The top line of the upper window is line 1 of the page. The top line of the lower window is line Pn of the page.
Multiple pages of memory The top line of the upper window is line one of the current page. The top line of the lower window is line one of the next sequential page. If the upper window contains the last configured page, the lower window contains page zero. When you split the screen, the cursor moves to home position.
Split Screen and Clear Pages Split, and clear both pages (two pages of memory only)
Esc\DPn
Split, and clear both pages Esc \ E Pn (one or more than two pages of memory)
Pn = a line number code from Appendix G that indicates where the lower window starts (default= 8)
This command has the same effects as the previous command to split the screen without clearing the pages, except that both affected pages are cleared to replacement characters.
Sizing the Windows Lower the horizontal split
Raise the horizontal split
Esc\P
Esc\ R Each time you send one of these commands to the terminal, the windows increase/decrease by one line. Data that scrolls off the screen remains in memory.
This command is ignored if the screen is not in a split screen mode.
9065 USER'S GUIDE

Closing the Windows Return the active window to full display size
Esc\@
Return the active window Esc \ O to full display size and clear the pages Pages not cleared The current page is displayed on the full screen. The page in the inactive window is saved in display memory.
Pages cleared Pages in both windows are cleared to replacement characters. The active page is displayed on the full screen, with the cursor in home position.
Moving to Another Page/Window Activate the upper window Esc \ H
Activate the lower window Esc \ I
Display the previous page Esc J or activate the other window
Display the next page Esc K or activate the other window
Display page Pn Esc [ 1 ; Pn }
Pn = A decimal value from 0 through 6 (default= 0)
Lines Displayed
~~',\'~I t~,=.n~to top window shoWs the current
~~=~~It~~ depends on the total number of pages of memory. You con then move the c~ between
NOTE The terminal can have up to seven pages, which are numbered o through 6. See Table 8-1.
These commands let you move the cursor between windows (or pages). The command to display page Pn lets you move to any page in memory regardless of the page currently displayed. The status of autopage mode is irrelevant.
If you have already displayed the next or previous page, or when you are working with a split screen, the cursor returns to its last location there after a next or previous page command. Otherwise, the cursor goes to the first unprotected (home) position.
Page Movement Modes Autopage Flip Mode Autopage Flip on Esc v
Autopage Flip off Esc w Autopage Flip on A new page in the terminal's memory moves onto the screen when the terminal receives a command to move the cursor beyond the current page.
One 96-Llne Page or Two 48-Llne Pages or Four 24-Llne Pages
Figure 8-1 Display memory
9065 USER'S GUIDE 8-3 DISPLAY & PAGES

A line feed or reverse line feed command moves the cursor to the first or last line of an adjoining page (while remaining in the same column position.)
A cursor right, cursor left, or cursor addressing command displays the adjoining page when the cursor reaches the beginning or end of a page. When the cursor reaches the end of the last page, it returns to the beginning of the first page.
Text on a page that moves off the screen is not cleared. When you return to that page, your text reappears.
Autopage Flip off When autopage mode is disabled, autoscroll mode, described in the next section, determines the effects of cursor movement on page and data display.
Autoscroll Mode Autoscroll mode on
Autoscroll mode off
Esc [ = 19 h
Esc[=191 Autoscroll on If autopage and protect modes are turned off, data scrolls up (or down) one line when the cursor moves past the last (or first) line of the page. The line that scrolls off the screen is lost and a new line of replacement characters appears at the other end of the display.
I CAUTION I This mode can cause loss of text!
Table 8-4 lists the keys and commands that can cause loss of text. To prevent loss of text, enable protect or autopage mode.
Table 8-4. Data Loss Due to Scrolling
Line Feed Shift-down Shift-Up
Ri_g_ht Alphanumeric
Ctrl J
Esci Ctrl L
<Function---'--. Line feed
Reverse line feed Cursor rig_ht
Text entry from host or keyboard
Autoscroll off The cursor does not move beyond the top or bottom of the page.
DISPLAY & PAGES 8-4
Scrolling Scrolling is the movement of text on the screen. There are two types of scrolling:
• The flow of text received from the host onto the screen
• The movement of displayed text lines as you move the cursor or enter text from the keyboard
If page size is greater than the num her of display lines, text entry or cursor movement can cause lines of text to scroll up or down into other areas of the page.
Setting the Scrolling Rate Select normal smooth scroll (4 lines per second)
Select jump scroll
Set the scrolling rate
< = Smooth scroll at 2 lines
> Smooth scroll a 4 lines ? Smooth scrill at 8 lines @ Jump scrill
Esc 8
Esc 9
Esc. Ps
Set the scrolling rate Esc [ 6; Psv Ps lG s ' Scroll Rate L2 0 Jull_!E_ scrol 1 Normal ( 4 lines per second) 2 Slow (2 lines ..£.er second)
3 Fast (8 lines _p_er second) 4 Very slow (1 line per second)
NOTE: Jump scrolling displays data at the rate it is received.
9065 USER'S GUIDE

Defining the Scrolling Region Define the scrolling region Esc [Pt; Pb r
Pt= The decimal number of the top line in the scrolling region
Pb= The decimal number of the bottom line in the scrolling region
This command fixes certain lines on the screen, while permitting the display to scroll through a section of the screen.You can design pages, such as a business form, with a defined head and foot, and a center area through which data can scroll.
Count Pt and Pb from the screen's top line (line 1), in single-height lines, even when you have configured the display for double-height lines. Values range from 1 to 24.
The area outside the defined scrolling region is called the memory-locked area (see Figure 8-2). You cannot move the cursor into that area or scroll its text.
1 111 2 3 222 4
~ 333~ 7 444 ----8 9 555 10 11 666 12 13 777 14 15 888 16 17 999 18 19 101010 20 21 111111 22 23 121212 24
Defining a scrolling region moves the cursor to the first character position of the top line of the scrolling region.
Figure 8-2 shows a screen containing all doubleheight lines, with the defined scrolling region starting at line five and ending at line 18 (Pt= 5, Pb= 18).,
Locking One Line Enable line lock
Disable line lock
Esc ! 1 Esc. H
Esc ! 2 Esc. I
You can lock selected lines on the screen with this command, so they remain fixed regardless of the scrolling of the rest of the display. To lock a line, place the cursor on the desired line and send the command. You may lock all but one of the displayed lines. The command to disable line lock unlocks all locked lines.
DEFINED SCROLLING
REGION
---------~----------------~
Figure 8-2. Scrolling Region
9065 USER'S GUIDE 8-5 DISPLAY & PAGES

NOTES
DISPLAY & PAGES 8-6 9065 USER'S GUIDE

Chapter 9 EDITING & CURSOR MOVEMENT
Editing modes affect the action of many editing commands, some of which can cause loss of data. If you are unsure about the setting of a mode or the effect of a command, experiment on data you don't mind losing.
NOTE: Command code descriptions in this chapter are for the TeleVideo 9065. Codes for TeleVideo emulations are listed in Appendix C; codes for all other emulations are listed in Appendix D.
Protected Modes Write-Protect & Protect Modes Enable write-protect mode Disable write-protect mode
Enable protect mode Disable protect mode
Esc) Esc (
Esc& Esc'
While write-protect mode is enabled, any data then entered is write-protected. When you later enable protect mode, only certain commands can edit and transmit write-protected characters.
Protect mode guards all write-protected characters on the screen. Cursor position is irrelevant when you enable protect mode.
NOTE: You cannot enable protect mode when the screen is split.
The effects of protect mode are described below. Steps for entering write-protected text and enabling protect mode follow.
Data entry The cursor skips over protected fields during data entry.
Cursor Cursor movement commands cannot cause protected movement or unprotected data to scroll off the screen.
The cursor skips over protected fields in response to cursor movement commands.
Tabulation The first unprotected position after a protected field becomes a field tab stop. Sending a tab command moves the cursor to the first field tab stop following a protected field.
9065 USER'S GUIDE 9-1
Editing Most editing commands affect only unprotected data. Only some clear commands (see the section titled "Clearing Data") can affect protected data.
Data transmission Only specific commands transmit protected characters.
Creating a Protected Form Using write-protect and protect modes, you can create forms with permanent (protected) headings and blank areas for an operator to fill in later. Protecting the headings keeps them from being accidentally deleted or changed.
Figure 9-1 shows a typical form with protected areas.
Creating protected data, such as a form, takes two steps:
• Turn on write protect mode and enter the data you want to protect.
• Turn on protect mode to guard the writeprotected data.
Follow these steps to enter protected data:
1. Position the cursor where you want to enter the first protected character.
2. To enable write-protect mode, enter
IEscl W 3. Enter the information you want to protect.
NOTE: Bracketing existing data with the commands to enable and disable writeprotect mode does not write-protect the field. To write-protect existing data, you must enable write-protect moae, then retype the desired characters.
4. To disable write-protect mode, enter
IEscl m 5. After entering all data you want to protect
and disabling write-protect mode, turn on protect mode. All write-protected areas are now protected.
EDITING & CURSOR MOVEMENT

Editing Keys Enable local editing key mode Esc k Even in a conversational communication mode, codes from the following keys act locally (go to the screen only):
Home Return J, Print i Send +-- CE ~ Page Line Insert Char Insert Line Delete Char Delete Line Erase Page Erase Line Feed Clear Space Tab (both)
NOTE: The effects of this command do not completely correspond to the effects of redirecting editing key codes in Set Up.
EDITING & CURSOR MOVEMENT 9-2
Figure 9-1 . A Typical Protected Form
Enable duplex editing key mode Esc I (default) The communication mode determines the destination of all key codes.
Down Arrow Key Mode Down arrow sends Ctrl V (default)
Down arrow sends Ctrl J
Esc[=91
Esc[=9h See the section about the line feed command for information about the effects of Ctr! J.
Autowrap Mode Autowrap mode on (default) Esc[=7h The cursor wraps from the end of one line to the start of the next line during data entry. Autowrap mode does not change the effect of the cursor movement commands.
Autowrap mode off Esc[=71 Each character entered after the cursor reaches the line's last unprotected position overwrites the previous one.
9065 USER'S GUIDE

New Line Mode New line mode on Esc[=6h A carriage return code {Ctr! M), from the host or the keyboard, moves the cursor down one line and then to the start of the new line (LF/CR), just as a new line code (Ctr! _) does.
New line mode off (default) Esc [ = 61 Carriage return code causes only a carriage return (CR).
NOTE: When protect mode is on, LF/CR is different from CR/LF. A line feed can move the cursor into a protected field; a carriage return cannot.
Editing Modes Enable page edit mode EscN Existing data wraps around from line to line. Data moves to the end of the page before it is lost. When protect mode is on, the terminal ignores the command to enable page edit mode.
Enable line edit mode (default) Esco When you insert or delete characters, existing data moves forward or backward only on the current line. Data pushed beyond the end of the line is lost. The terminal automatically enables line edit mode when you turn on protect mode.
Insert/Replace Modes Enable insert mode Esc q Existing data is pushed aside (to the right) by new data. Data pushed to the end of the line or page (depending on edit mode, below) is lost.
Enable replace mode (default) Esc r New data replaces (writes over) existing data.
The Replacement Character Load a replacement character Esc e Ps
Ps = Any ASCII character (default= space)
Some editing commands replace data with a predefined replacement character. You can reprogram this character as any ASCII character. This terminal capability lets you replace data with characters such as an underline or asterisk.
9065 USER'S GUIDE 9-3
Editing Text This section explains the commands to insert, delete, erase, and clear characters.
Inserting Characters Insert a replacement character Esc Q at the cursor position
Insert Pn replacement Esc [ Pn .@
characters, starting at the cursor position When protect mode is off, either of these commands enters replacement character(s) at the cursor and moves existing characters right. Data pushed past the end of the line or page is lost.
When protect mode is on, only unprotected characters in the current field move. Characters reaching the first protected position or the end of the line (whichever comes first) are lost.
Insert a line of replacement characters on the current line
Insert Pn lines of replacement characters, starting at the current line
Esc E
Esc[Pnl
When protect mode is off, either of these commands inserts line(s) of replacement characters starting at the current line; moves all following lines down. Cursor moves to column one of the new line. Lines pushed off the screen are lost.
When protect mode is on, there is no action.
Pn = A decimal value
Inserting Nulls Insert a column of nulls at the cursor position
EscxM
This command inserts a column of null characters from top to bottom of the page. Characters to the right of the column on every line are Shifted one position to the right.
I CAUTION I This command can cause loss of data! The last character on each line or before a protected field is pushed "off the edge" and lost.
EDITING & CURSOR MOVEMENT

Repeating a Character Repeat the next character Pntimes
Pn = A decimal character
Esc[Pnb
This command writes the character received immediately after the command for a specified number of times (Pn ). When a protected field is encountered, the cursor skips over it and continues writing. Characters are pushed ahead of the cursor or overwritten, depending on the status of insert/replace mode.
Deleting Text Deleting removes unprotected text only, starting at the cursor position, and pulls the remaining characters back to the left. Replacement characters appear at the end of the line or page.
Delete a character Esc W
Delete Pn characters Esc[PnP
When protect mode is off, either command deletes character(s) starting at the cursor and pulls the following characters left.
When protect mode is on, only unprotected characters are deleted.
Delete the cursor column
Delete the current line
Delete Pn lines
Pn = A decimal value
EscxJ
EscR
Esc[PnM
When protect mode is off, either command deletes line(s) starting at the cursor line, moves remaining lines up, and moves the cursor back to the first position.
When protect mode is on, nothing happens.
Clearing a Field Clear the current tab field; Ctrl X replace with new characters.
Protect mode off Ctrl X clears all characters in the cursor tab field (or the line, if no tab stops are set) to replacement characters. The cursor moves to the beginning of the field (or line).
Protect mode on Ctrl X clears the unprotected characters in the cursor field to replacement characters. The cursor moves to the beginning of that field.
EDITING & CURSOR MOVEMENT 9-4
Clear unprotected in page and replace with write-protected spaces (disable protect mode)
Clear unprotected in page and replace with new characters.
Clear attributes and unprotected text in page: replace text with new.
Clear unprotected in page; replace with null characters
Clear attributes and unprotected text in page; replace with nulls.
Clear all in page; replace with new characters (disable protect and write-protect modes)
Esc,
Esc; Ctrl Z
EscxV
Esc:
EscxU
Esc+
Clear all in page; replace Esc * with nulls (disable protect and write-protect modes)
Clear unprotected in page; Esc <SP> Ps replace with specified character
Ps = Any ASCII character
Clearing replaces data with space, replacement, or null characters. Unlike erasing and deleting, clear commands (except Ctrl x) do not relate to the cursor position; what you clear depends only on the command you give.
All clear commands except Ctrl x move the cursor to home or the first unprotected position.
Erasing a Column Erase unprotected column Esc x O at cursor position and replace with new write-protected characters.
Erase unprotected column Esc x K at cursor position and replace with nulls
Erase unprotected column at cursor position and replace with specified characters.
Ps = Any ASCII character
EscxN Ps
The erased column extends from top to bottom of the display.
9065 USER'S GUIDE

Erasing Unprotected Text These commands replace only unprotected characters (text) with replacement or null characters. The cursor and protected text do not move.
Erase from cursor to end of line; Esc T replace with new characters.
Erase from cursor to protected Esc t field or end of line; replace with new characters
Erase from cursor to end of line; replace with nulls
Escx L
Erase from cursor to end of page; Esc Y replace with new characters.
Erase from cursor to end of Esc y screen; replace with nulls
Erase specific characters Esc [ Ps K in current line; replace with new characters
Erase specific characters in Esc [ Ps J page; replace with new characters.
Ps Amount Erased
0 From cursor to end of line/field or page
1 Start of line/field or home position to cursor
2 Entire line/field or page
NOTE: Write-protected text is not protected until you enable protect mode. To avoid losing write-protected text, enable protect mode before erasing.
Erasing Unprotected Text and Attributes These commands erase unprotected text and attributes in specific areas; text is replaced as noted. Cursor and protected text do not move.
Clear attributes and erase text from cursor to end of line; replace text with new.
Clear attributes and erase text from cursor to protected field or end of line; replace text with new.
Clear attributes and erase text from cursor to end of line; replace text with nulls.
9065 USER'S GUIDE
Escx R
EscxS
EscxT
9-5
Clear attributes and erase text Esc x P from cursor to end of page; replace text with new.
Clear attributes and erase text Esc x a from cursor to end of screen; replace text with nulls.
Erasing a Rectangle Erase unprot. chars. in a Esc x F r c Ps rectangle; replace with Ps
Erase all chars. in a rectangle; replace with Ps
Escx H rcPs
r=
C=
An ASCII character from Appendix G for the row (line) at which the sides of the block, extending from the cursor row, terminate.
An ASCII character from Appendix G for the column at which the top and bottom of the block, extending from the cursor column, terminate.
Ps = Any ASCII character.
Variables r and c define the row and column framing two sides of the block. The cursor anchors the opposite comer.
I CAUTION I Erasing all characters can cause loss of data! The command erases even protected characters.
The area erased with these commands may extend above or below the cursor, and to the right or left. It may extend on a page or a defined scrolling region beyond the edge of the display. You cannot specify a value of r or c beyond line or column 96.
Chapter 8 contains commands to draw a rectangle on the screen.
Cursor Control Many cursor movements are affected by protect and autoscroll modes. The paragraphs that follow each set of commands explain how they are affected.
EDITING & CURSOR MOVEMENT

Cursor Movement Move the cursor up Ctrl K
Esc [ PnA
Move the cursor down Ctrl V Esc[PnB
Move the cursor right Ctrl L Esc [ PnC
Move the cursor left Ctrl H (back space) Esc[PnD
Move the cursor to home Ctrl A
Carriage return Ctrl M
Pn = A decimal value
When the cursor reaches the top or bottom of the page, it does not move any further.
The home command moves the cursor to the first unprotected screen position unless already there (usually row 1 and column 1).
During protect mode, right and left commands skip the cursor over a protected field, but up and down commands move the cursor into the field.
When autowrap mode is disabled, the cursor right and left commands do not wrap the cursor from its current line to the next or previous line.
The cursor right command can cause text to scroll off the screen under certain circumstances, as described below:
• Autowrap and autoscroll modes on, protect mode off. If cursor is on the last column of the last line, data scrolls up one line. The first line is lost, and a new bottom line of replacement characters appears.
• Autowrap and protect modes on. If cursor is on the last unprotected position, it wraps around to the first unprotected position.
• Autowrap mode off. If cursor is on the last unprotected position, it stops. Beyond that point, all characters entered will appear in the 80th column.
Line Feed and Reverse Line Feed Line feed
Reverse line feed
New line (LF/CR)
Move cursor down Pn lines
Ctrl J
Esc j
Ctrl
Esc [ PnS or Esc [ PnB
EDITING & CURSOR MOVEMENT 9-6
Move cursor up Pn lines Esc [ PnT or Esc [ PnA
Pn = A decimal figure for the desired number of lines
I CAUTION I These commands can destroy data!
These commands move the cursor up or down on the page. When the cursor reaches the top or bottom of the page or defined scrolling region, the lines scroll if protect mode is off. The lines that scroll off the screen are lost, and lines of new characters appear at the other end of the screen.
The following paragraphs summarize how autoscroll and protect modes affect cursor movement after a line feed command:
• Autoscroll and protect modes on. If the cursor is at the bottom of the page, it wraps around to the top line.
• Autoscroll mode on, protect mode off. If the cursor is at the bottom of the page, the display scrolls up one line. The top line is lost, and a new bottom line of replacement characters appears.
• Autoscroll mode off. When the cursor reaches the last line, it wraps around to the first line.
Addressing the Cursor Address (send) cursor to row and columns 1-80
Address (send) cursor to row and columns 81-132
Address (send) cursor to page, row, and columns 1-80
Esc =re
Esc = r- c
Esc-prc
Address (send) cursor to Esc - pr- c page, row, and columns 81-132
r= An ASCII character for the row (line) from the cursor coordinate table in Appendix G.
C= An ASCII character for the column (from Appendix G).
9065 USER'S GUIDE

To calculate the value of c for columns 81-132, subtract 80 from the column number and find the corresponding ASCII character.
p Page 0 1 1 2 2 3 3 4 4 5 5 6 6 7
This command lets you move the cursor to a specified screen location. If your computer inserts nulls between characters, the terminal response to this command is unpredictable.
For example, Esc = ( Q sends the cursor to row 9, column 50; and Esc = ( - Q sends the cursor to row 9, column 130.
Reading the Cursor Read cursor row and column position
Read cursor page, row, column position
Esc?
Esc/
The terminal responds to these commands with row/column characters from the cursor coordinate table in Appendix G, as shown in the cursor addressing examples above. A carriage return character terminates the report.
If you send Esc /, the terminal sends a zero for page 0, a one for page l, and so forth.
Cursor Address (Decimal Units) Address the cursor to line and column of the current page in decimal units
Esc [Pl; PcH Esc [Pl; Pct
Pl = A decimal value for the line
Pc= A decimal value for the column
If you address the cursor to a nonexistent area, it moves as far as logical to the right and down.
If you enter no variables, the cursor moves to home position.
9065 USER'S GUIDE 9-7
Reading Cursor in Decimal Units Read cursor row and column in decimal units
Read cursor page, row, and, column in decimal units The terminal responds in the format
Esc [Pl; Pc R. or Esc [ Pp ; Pl ; Pc R
with Pp and Pl in decimal units.
Tabulation
Esc[6n
Esc[?6n
The terminal has two types of tab stops:
• Typewriter (recognized only when protect mode is off)
• Field (recognized only when protect mode is on)
Setting Tab Stops Set field (protect mode on) or Esc 1 typewriter (protect mode off) tabs
I CAUTION I This command can destroy data during protect mode.
Field tab stops can be set in two ways:
• Enabling protect mode automatically sets field tab stops at the first unprotected position after each protected field.
• Sending Esc 1 while protect mode is enabled creates a column of protected space characters at the cursor position, destroying the characters that occupy that column.
The column extends down from the cursor line until it encounters a protected character. The first unprotected position after the protected replacement character in each line becomes a field tab stop. The cursor moves from its previous position, now a protected replacement character, . to the new field tab stop.
After protect mode is disabled, the protected column remains as a column of write-protected replacement characters.
When protect mode is off, sending Esc 1 creates a tab stop in every line at the current column position.
Be sure you enter a number one in the command. A lower-case I turns on duplex edit mode.
EDITING & CURSOR MOVEMENT

Clearing Tab Stops Clear typewriter tab stop at cursor location
Clear all typewriter tab stops
Esc2
Esc3 The cursor position is irrelevant when you clear all typewriter tab stops.
Turning protect mode off automatically clears field tab stops. Turning it on again automatically resets them.
Moving the Cursor to a Tab Stop To tab forward, press
I Tab I To tab backward, press
I Ctrl I I Tab I To set a tab stop, press
I Shift I I Tab I Move cursor forward to Ctrl I next typewriter or field tab stop If protect mode is off, Ctrl I moves the cursor to the next typewriter tab stop. If no more tab stops exist, the cursor does not move.
EDITING & CURSOR MOVEMENT 9-8
If protect mode is on, Ctrl I moves the cursor to the first position in the next unprotected field (next field tab stop). If the screen has no more unprotected fields, the cursor returns to the first unprotected position.
Move cursor forward to Esc i next field tab stop If protect mode is on or off, Esc i moves the cursor to the next unprotected field (next field tab stop).
Move cursor backward to Esc I previous typewriter or field tab stop If protect mode is off, Esc I moves the cursor back to the previous typewriter tab. If the cursor is already on the first tab position on the line, or if no other tabs exist, the cursor moves to the first column of the line.
If protect mode is on, Esc I moves the cursor back to the first position in the current or previous unprotected field. If the screen has no previous unprotected positions, the cursor does not move.
9065 USER'S GUIDE

The terminal can display an extensive range of alphanumeric, special symbol, and graphics characters. You may also design and download custom characters.
NOTE: Command code descriptions in this chapter are for the TeleVideo 9065. Codes for TeleVideo emulations are listed in Appendix C; codes for all other emulations are listed in Appendix D.
Selecting A Character Set There are seven character sets available: 9065 Mode ASCII (default), 9065 Line Graphics, 9065 Multinational, IBM 7-Bit, IBM 8-Bit, Wyse 60 7-Bit, and Wyse 60 Line Graphics.
Changing sets from the default group is complex. Here is a summary of the steps for selecting non-default values all the way. In most cases, you'd go with the default values at some point, and the process wouldn't be so long.
1. Decide which set(s) you want to load in place of the default set(s).
1JPAPHl(S r l J 1 f
~61~I I ~ B , H I_ M
I= ~PL u I 1 I ~ •) ; "
H'~I= l I ! '
= TC·L J ~ '
.:.,:- " ' L
,-TC, ,j l j f ' ' f f
"- " Ci e I i ; >
T
N
µ
~
"
~
0
.,
ii
Chapter 10 CHARACTER SETS
2. Change the 9065 mode character set from U.S. ASCII to one of the other national character sets before loading the font banks.
3. Load the desired character set(s) into the font bank(s) (character generator).
4. If desired, load custom (soft) characters into one of the font bank sets.
5. Select a primary and a secondary character set from the sets in the font banks.
6. Display primary or secondary character set. Figures 10-1 through 10-4 show the character sets as displayed on screen. Note that 9065 mode control characters (OOh to lFh) are replaced by 32 special graphics characters. Appendix B shows control and display characters with their code equivalents. The following sections present the commands to select, load, and display character sets. The command to create and load a soft character is presented in a separate section.
• I I I • I • ~ r ' ,, I
I] p - T u ,, [
' )
J c; •J 0
" " iJ IJ 'J L' u ' - r
•J 0 ~ J u •j ,,
n 0 t u w 0 ~fl
Figure 10-1. 9065 ASCII, Graphics, and Multinational
9065 USER'S GUIDE 10-1 CHARACTER SETS

NOTE When you change terminal personality mode or the number of display lines, the character set changes to match the new configuration, unless you disable auto font load.
NOTE Figure 10-4 shows each graphics character aligned with the key you press to produce it.
8-hit ~ u e a a a a ~ e e e i' 1 1 ii II i: 11' A o ii o u u y o u c £ • ft s
7-h It g e ' • ~ t . a 0 = G ~ f fl 0 ~ ~ i !! q1 § • l f ! • • L ~ ' '
8-hit a i o u n ii ~ 2 i .- , ~ ~ • {( " 11 I I ~ i ~ n ~ ll 11 11 !I ii J i
7-hit ! " 11 $ :.< & • < > • • , - . / e t z 3 4 c; & 1 8 9 : : < = > ?
8-hit L 1 T ~ - + ~ H l! Ii !! u It = U ! 11 f 11 11 b f rr ll ~ J r I • I I •
7-hit Cl A B c D E F G H I J )( L " " 0 p Q R s T u u II x y z [ ' I A
8-hlt a II r n r rJ v T 0 8 ll 6 "' ¢ { n = ! ~ ~ r J 7 ~ 0 • J n z I
7-hlt ' a b c d e f 9 h i j k I II! n o p q r s t u u w x ':I z { : } -
Figure 10-2. IBM 7- and 8-Bit Character Sets
Figure 10-3. Wyse 60 Native Mode Characters
Figure 10-4. Wyse 60 Graphics Characters
CHARACTER SETS 10-2 9065 USER'S GUIDE

NOTE: When you change the terminal personality, the character set changes to the set appropriate for the new personality, unless you have disabled auto font load.
Loading the Font Ban~s Load a character set into a font bank
Escx@ PbPs
Clear a font bank Esc x ? Pb Pb = A decimal number from 0 to 3 that
selects the corresponding font bank (default= 0)
@ 9065 mode (default)
A 9065 multinational
B Wyse 60 native mode
c W se 16-character ra hies
D IBM 7-bit
E IBM 8-bit
F Reserved
G Reserved
H Soft characters
Small 9065
a Small 9065 multinational
b Small Wyse 60 native mode
c Small IBM 7-bit
d Small IBM 8-bit
NOTE: If you clear the font bank containing the currently displa~ed character set, the screen goes blank. Data reappears in the re-designated character set when you re-load the font bank.
To create soft characters, first load the soft character set (Pb = H) into a font bank, and then load the soft characters into the set. The terminal sends ACK after executing these commands.
The "small" character sets are intended for display when the screen is configured for 42 to 49 lines. See "Anatomy of a Character Cell" for a description of standard and small characters.
Default font bank loading is as follows:
0 @ 9065 mode
A 9065 multinational
2 Small 9065
3 a Small 9065 multinational
9065 USER'S GUIDE 10-3
Automatic Font Loading Enable auto font loading (default) Disable auto font loading
Esc [ = 29 h
Esc [ = 291 When you enable auto font mode, the terminal automatically loads and displays the co.rrect character set for the selected terminal personality mode and number of display lines.
NOTE Switching between personalities does not reset aulo font loading mode.
Special Graphics Characters Enable special graphics mode Esc $ The terminal converts 7-bit alphanumeric characters to 32 write-protected special graphics characters. The first 16 are compatible with the 950 terminal graphics characters. Figure 10-1 shows the 32 graphics characters and the keys you press to produce them. (The last character is a space, which occupies a position but is not visible.)
Graphics characters are automatically write protected. Protect mode and visual attribute commands affect them as they would any other write-protected character.
Disable special graphics mode (default)
Enter a graphics character
Esc%
EscxY Ps Select the graphics character you want from the top row in Figure 10-1. Ps = the ASCII character just below it. You do not need the graphics mode on to enter a graphics character with this command.
Designating Primary and Secondary Character Sets Define the primary character set
EscxBPb
Define the secondary Esc x C Pb character set Pb = The number (0 to 3) of the font bank
containing the character set designated as primary or secondary (default: 0 for primary, 1 for secondary)
This command defines two of the four character sets loaded into the font banks as primary and secondary character sets. The terminal displays
CHARACTER SETS

the primary character set unless the secondary set is chosen with the command below.
Displaying a Character Set Display the primary character set (default)
Display the secondary character set
Escx D
Esc x E
This command determines the character set actually displayed when you enter data.
Displaying One Character from the Secondary Set Display one character from Ctrl U Ps the secondary character set
Ps = Any character from! (21h) to - (7Eh)
Once you have loaded and designated the primary and secondary sets, you can display characters from the secondary set one at a time. When you send Ctrl U, followed by a character from the primary set, the screen displays the character from the secondary set that occupies the corresponding position in the font bank.
The multinational character sets are at positions Alh to FEh in the character generator. When you enable 8-bit mode, you can send these characters from the host in that range. (The characters at AOh and FFh are reserved for firmware control.)
Selecting a Keyboard Layout Select an international Esc [ 9 ; Ps v k~board IC!Y_out
<~ Y > ktt66ifat~6li1 <~•far~~wf set)••• 0 U.S. ASCII (default)
U.K. 2 French 3 German 4 ~anish
5 Fmnish 6 7 Italian 8 Danish 9 Swiss/German 10 Swiss/French 11 Swedish 12 Canadian
This command redefines the native mode character set, supplementing it with any international
CHARACTER SETS 10-4
characters required for a given keyboard. Before selecting an international keyboard layout, first send this command; then load the font banks, and designate and select the character sets.
You can order keycaps for the keyboard layout that you are using. Some of the keyboard layouts are shown in Appendix F; consult your Tele Video dealer about the availability of international keycap sets.
Custom Characters You can create "soft" (custom) characters, one at a time, and load them into a font bank.
NOTE Read the following explanations, including the example, before attempting to program a soft character.
Anatomy of a Character Cell The figures on the following pages illustrate the explanations below. Each character cell is a matrix of pixels whose dimensions vary according to the number of data lines on the screen:
10x8 (1-pixel dEscender)
NOTE The number of columns per line (80 or 132) does not affect the dimensions measured in pixels of the character cell and alphanumeric character. The characters are smaller because the pixels are closer together.
The vertical columns of the character cell are numbered from bit 7 (most significant bit) to bit 0 (least significant bit), plus A and B. (A and B are not included in the programming command bit count.)
Note that the alphanumeric character matrix (indicated by e's and d's in the figures) is confined to columns 7 through 1. Only graphics characters extend into columns 0, A, and B.
The bit value of pixels in column 0 (one or zero) is automatically duplicated in columns A and B. This permits graphics characters to extend completely across the character cell, so that adjacent characters can touch to form a larger figure. (Graphics figures may also extend from scan line 1 through line 16, for the same reason.)
9065 USER'S GUIDE

Table 10-1. 24/25-Line Cell
llSclili~ll;I Q!t}Sli&t ]fug;:1 IMr ~ .... ;jj .••• m;; L1lll 1 x x x x x x x x x x 2 c c c c c c c x x x 3 c c c c c c c x x x 4 c c c c c c c x x x 5 c c c c c c c x x x 6 c c c c c c c x x x 7 c c c c c c c x x x 8 c c c c c c c x x x 9 c c c c c c c x x x 10 cccccccxxx 11 CCCCCCCXXX
12 c c c c c c c x x x
13 :t.. :t.. :t.. :t.. .:t.. .:t.. :t.. x x x 14 :t.. .:L .:L .:L .:t.. y .:L x x x 15 .:L .:L .:L .:L .:t.. .:t.. :t.. x x x 16 x x x x x x x x x x
10x16 Cell, 7xl 1 Matrix, 3-line DEscenders
Table 10-2. 42- to 49-Line Cell
x x a a a a a x x x 2 x x a a a a a x x x 3 x x c c c c c x x x 4 x x c c c c c x x x 5 x x c c c c c x x x 6 x x c c c c c x x x 7 x x c c c c c x x x 8 x x d d d d d x x x
10x8 Cell, 5x7 Matrix, I-line DEscenders
Each pixel in the matrix is assigned zero if it is background (not in the character) or one if it is foreground (in the character). For example, Table 10-3 shows a pixel matrix of the uppercase Greek character sigma (I.) in a 10 x 16 character cell.
9065 USER'S GUIDE 10-5
Table 10-3. Gr<!Q_hics Character Cell
~~···1··:rnill.lli±J.±·•i1•1rn.· .. •···~~~~·~ ~ 11111111000 2 0100000000 3 0010000000 4 0001000000 5 0000100000 6 0000010000 7 0000001000 8 0000010000 9 0000100000 10 0 0 0 l 0 0 0 0 0 0 11 0 0 1 0 0 0 0 0 0 0 12 0 1 0 0 0 0 0 0 0 0 13 1 1 1 1 1 1 1 0 0 0 14 0 0 0 0 0 0 0 0 0 0 15 0 0 0 0 0 0 0 0 0 0 16 0 0 0 0 0 0 0 0 0 0
Creating a Soft Character Create & load a soft character:
Esc xA PbPpB1 ... Bn Ctrl Y
Pb = A decimal number from 0 to 3 indicating the font bank that contains the target character set (default= 0)
Pp = A hex value between OOh and 7Fh defining the position of the character in the font bank (default= 0)
The characters created in this command are intended to load into the soft character set (selected with variable Ps = H in the command to load a character set into a font bank). You may also load a soft character into an existing character set, overwriting the character in the selected position.
NOTE Do not confuse the hex values for the 128 positions with the hex values of the actual characters themselves. Each font · bank has 128 character positions, even
· when the characters themselves are in the range 80h-FFh.
81 = 32 or 20 hexadecimal digits (Oh-Fh) derived from the binary values of scan lines 1 through 16 (large cell) or 1 through 10 (small cell).
CHARACTER SETS
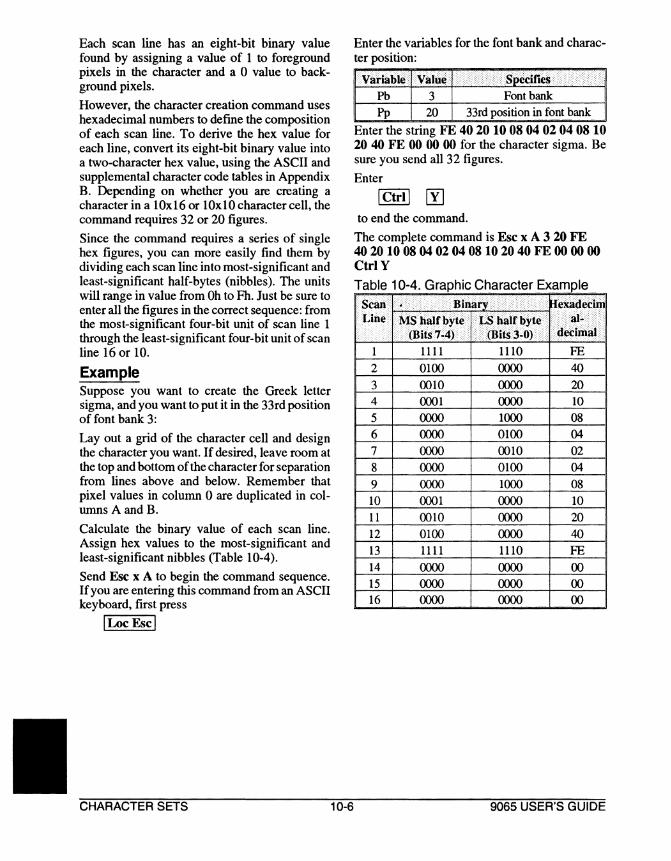
Each scan line has an eight-bit binary value found by assigning a value of 1 to foreground pixels in the character and a 0 value to background pixels.
However, the character creation command uses hexadecimal numbers to define the composition of each scan line. To derive the hex value for each line, convert its eight-bit binary value into a two-character hex value, using the ASCII and supplemental character code tables in Appendix B. Depending on whether you are creating a character in a 1Ox16 or 1Ox10 character cell, the command requires 32 or 20 figures.
Since the command requires a series of single hex figures, you can more easily find them by dividing each scan line into most-significant and least-significant half-bytes (nibbles). The units will range in value from Oh to Fh. Just be sure to enter all the figures in the correct sequence: from the most-significant four-bit unit of scan line 1 through the least-significant four-bit unit of scan line 16 or 10.
Example Suppose you want to create the Greek letter sigma, and you want to put it in the 33rd position of font bank 3:
Lay out a grid of the character cell and design the character you want. If desired, leave room at the top and bottom of the character for separation from lines above and below. Remember that pixel values in column 0 are duplicated in columns A and B.
Calculate the binary value of each scan line. Assign hex values to the most-significant and least-significant nibbles (Table 10-4).
Send Esc x A to begin the command sequence. If you are entering this command from an ASCII keyboard, first press
!Loe Escl
CHARACTER SETS 10-6
Enter the variables for the font bank and character position:
Pb 3 Font bank Pp 20 33rd position in font bank
Enter the string FE 40 20 10 08 04 02 04 08 10 20 40 FE 00 00 00 for the character sigma. Be sure you send all 32 figures.
Enter
lctrII [!] to end the command.
The complete command is Esc x A 3 20 FE 402010 08 04 02 04 0810 20 40 FE 00 00 00 CtrlY Table 10-4. Graphic Character Example
~liifi1i~~lll~tlf! 1111 1110 FE
2 0100 0000 40 3 0010 0000 20 4 0001 0000 10 5 0000 1000 08 6 0000 0100 04 7 0000 0010 02 8 0000 0100 04
9 0000 1000 08 10 0001 0000 10 11 0010 0000 20 12 0100 0000 40 13 1111 1110 FE
14 0000 0000 00 15 0000 0000 00 16 0000 0000 00
9065 USER'S GUIDE

Block Graphics You can draw two types of blocks. This chapter contains commands to clear a rectangle and to fill it with specified characters.
Creating a Measured Block Define a measured block Esc H wh
w = An ASCII character from the cursor coordinate table in Appendix G whose row/column number equals the width of the block, measured in columns. The top and bottom lines start at the cursor position and extend to the right.
h = An ASCII character from the cursor coordinate table in Appendix G whose row/column number equals the height of the block, measured in rows. The sides start at the cursor position and extend down.
A block created with this command may extend on a page or a defined scrolling region beyond the edge of the display. But a block defined to extend beyond the page or scrolling region ends at the right or bottom margin.
Figure 10-5 shows how the screen might appear with three overlapping blocks created with this command.
Creating a Positioned Block Define a positioned block EscxGrc
r = An ASCII character from Appendix G for the row (line) at which the sides of the block, extending from the cursor row, terminate.
c = An ASCII character from Appendix G for the column at which the top and bottom of the block, extending from the cursor column, terminate.
The variables rand c define the row and column that are two sides of the box. The cursor anchors the comer opposite the junction of rand c. The lines drawn with this command may extend above or below the cursor, and to the right or left.
A block created with this command may extend on a page or a defined scrolling region beyond the edge of the display. But a block defined to extend beyond the page or scrolling region ends at the right or bottom margin.
Moving a Block Move a Block EscxZ PaSpP SsrR
SscC SerR SecC DpP DsrR DscC
With this command you can swap a block at a source location with a block at a destination location, copy a block to a new destination (leaving the original block intact), or move a source block to a new destination.
1 Copy (re licate) source block at destination 2 Move source block to new destination
Sp = Source page number
. Ssr = Source starting row
Ssc = Source starting column
Ser= Source ending row
Sec= Source ending column
Op = Destination page number
Figure 10-5. 3 Blocks on the Screen Dsr= Destination starting row
Dsc = Destination starting column
9065 USER'S GUIDE 10-7 CHARACTER SETS

NOTES
CHARACTER SETS 10-8 9065 USER'S GUIDE
This chapter presents the commands that control data communication and transmission.
NOTE: Command code descriptions in this chapter are for the TeleVideo 9065. Codes for TeleVideo emulations are listed in Appendix C; codes for all other emulations are listed in Appendix D.
Programming The Ports Although the set up program (Chapter 2) configures the communication ports, you can also reconfigure them from the keyboard.
When you select one serial port for host communications, the other serial port may be connected to another computer (dual-session mode) or to a serial printer (single-session mode). The port selected for host communications assumes the current host communication mode (full or half duplex, block, local).
However, the physical ports, CO Ml and COM2, retain their previous communication format baud rate, stop bits, parity, data bits, transmit and receive handshaking protocol, and port pin-outs.
For example, when you select the COM2 port for host communication, the terminal sends data to the host through it. But the port's default communication format remains the same (i.e., 9600 baud), and it is still a DCE port.
Dual Session Dual Session off (default)
Dual Session on
Session Change
Selecting the Host Port(s)
Esc[=601
Esc(=60h
Esc\S
Select COM1 as host (default) Esc [ = 221
Select COM2 as host port Esc [ = 22 h
Selecting the Printer Port Select PARALLEL Esc \ 0 1 as printer port (default)
Select COM1 as printer port
Select COM2 as printer port
9065 USER'S GUIDE
Esc\02
Esc\03
11-1
Chapter 11 DATA TRANSMISSION
Programming the Serial Ports Program COM 1 port Esc{p1 p2p3p4
1 50 9 1800
2 75 2400
3 110 3f>OO 4 135 < 4800
5 150 = 7200
6 300 > 9f>OO 7 ? 19200
8 1200 @ 38400
jjii st6~ l>i~ ~ .• :P~Ht~ Yi# •b~tibit$ 0 1 0 None 0 8
2 1 Odd 7 3 Even 5 Mark
7 ~ace
This command assigns communication values to the COMl or COM2 port, regardless of whether you have selected the port for host or printer communication. The changes are temporary; unless you save the new values in nonvolatile memory, they are lost after a reset.
For example, if you enter Esc } < 0 31 the COM2 port values become:
Baud rate = 4800 Stop bits= 1 Parity = Even Word length= 7 bits
Host Null Characters Accept
Ignore
Esc[=34h
Esc[=341 Determines whether the terminal will accept or ignore null characters received from the host.
DATA TRANSMISSION

Data Word Mode Although the character generator has special graphics characters at positions 80h through 9Fh, generating them by sending the codes from the host may cause software incompatibilities.
Read COM1 7-bit words Esc [ = 1 I
Read COM2 7-bit words Esc [ = 62 I The terminal ignores (masks) the eighth bit in each data word from the host, even if "process" is selected in set up.
Read COM1 8-bit words
Read COM2 8-bit words
Esc[=1 h
Esc[=62h The terminal reads all eight bits of received data words. If "process" is selected in set up, this permits the terminal to interpret and generate characters in the code range Alh to FEh without any special commands. (Characters at AOh and FFh are reserved for firmware control.)
Transmit Delay·Rate Select the character Esc [ O ; Pn v transmit delay rate
Pn = 0 ... 7 delays per character transmitted
This command causes the terminal to insert from zero to seven character delays per character transmitted. It does not change the baud rate.
Handshaking Protocols
Disable COM1 port X-On/X-Off; Ctrl N enable DTR line
Enable COM1 port X-On/X-Off; Ctrl 0 disable DTR line (default}
0 None 1 Xon/Xoff 2 DTR (COMl receive, COM2 transmit)
DCD/DSR (COMI transmit) DSR COM2 receive
3 Both (except COMl transmit)
Ctrl N and Ctrl 0 are compatible with the 955 command set. They apply only to the COMl port receive protocol. These commands set the protocol mode; the commands that follow are the actual X-On/X-Off signals.
Sending X-On/X-Off Characters Enable transmission (X-On} Ctrl Q
Disable transmission (X-Off) Ctrl S If the handshaking protocol between the host and the COMl port is X-On/X-Off, the host can command the terminal to stop sending characters with the X-Off (DC3) command. Sending X-On (DCl) signals the terminal to resume sending characters.
Transmission Control Mode Transmission control on Esc [ = O h When X-On/X-Off is selected as the CO Ml port receive protocol, the terminal accepts signals from the computer.
Transmission control off Esc [ = o I (default} The terminal ignores X-On/X-Off signals from the computer.
Receive Buffer Fill Limit
Select the COM1 port receive protocol (default: X-On/X-Off)
Esc [ 1 ; Ps v Select the receive buffer fill limit
Esc[2; Psv
Select the COM1 port transmit protocol (default none)
Select the COM2 port receive protocol (default DCD/DCD/DSR)
Select the COM2 port transmit protocol (default both)
DATA TRANSMISSION
Esc[11; Psv
Esc [ 12; Psv
Esc [ 13; Psv
11-2
3 128 When the COMl receive buffer fills to its limit, the terminal tells the host to stop sending data.
9065 USER'S GUIDE

Data Acknowledge Mode Enable data acknowledge mode
Esc [ = 28 h
The terminal sends the ASCII ACK character (06h) to the computer, to indicate it is ready to receive data, after the following operations:
• Changing the COM1 or COM2 port operating values
• A page print • Loading or clearing a font
Disable data acknowledge Esc [ = 28 I mode
Data Transmission Modes
Host Mode These commands let you move between communication modes during a program. Of course, once you enable local mode, the operator must change the mode to reestablish communication with the computer. Keep in mind that your choice of communication mode always applies the port designated for host communication.
Enable local mode Esc c No communication with the computer.
Enable block mode Esc B Keyboard data and editing key codes go only to the screen, as in local mode. When the terminal receives a send command (see next section), it transmits screen data to the computer. It can also receive data from the host during block mode.
Enable full duplex mode Esc D F The terminal sends keyboard entries only to the computer. (The computer may echo keystrokes back to the terminal.) The terminal can transmit and receive simultaneously.
Enable half duplex mode Esc DH The terminal sends keyboard entries to the screen and to the computer at the same time.
Return to last conversational Esc C mode from block or local mode
9065 USER'S GUIDE 11-3
Parallel Printer Mode You can send data to the PARALLEL port with a page print command during any printer port mode. Chapter 1 contains an illustration of the flow of data in print modes.
Enable copy print Esc @
Disable copy print Esc A Data from the host or keyboard goes both to the screen and printer.
Enable transparent print Disable transparent print
Esc' Esc a
Data from the host or keyboard goes to the printer only. The screen display freezes.
Serial Printer Mode The serial printer port communication mode determines how data is transmitted through the terminal to or from a device connected to the port configured as the serial printer port. Default: all modes disabled. All printer port modes are buffered. This permits COM 1 and COM2 port baud rates to differ. You can send data to the printer port with a page print command during any printer port mode. Chapter 1 contains an illustration of the flow of data in print modes.
Enable copy print Esc @
Disable copy print Esc A Data from the host or keyboard goes both to the screen and printer.
Enable transparent print Esc ' Disable transparent print Esc a Data from the host or keyboard goes to the printer only. The screen display freezes.
Enable bidirectional mode Disable bidirectional mode
Ctrl R CtrlT
Data from the host or keyboard goes to both the screen and peripheral device. Data sent from the peripheral goes to the host only.
Enable secondary receive Esc [ = 27 h mode Disable secondary receive mode
Esc [ = 271
Data from the host or keyboard goes only to the screen. Data from the device connected to the COM2 port goes to the host only.
DATA TRANSMISSION

Sending Text This section tells how to send screen data to the host port in a page send or to the COM2 port in a page print.
Block Start Mode Start at top of page (default) Esc[=171
Start at top of display Esc [ = 17 h This command applies to data sent with a block send command, the Send key, a page print command, or the Print key.
Block End Mode End at cursor position (default) Esc [ = 181
End at end of the display Esc [ = 18 h This command defines the end of the block.
Delimiters The terminal automatically inserts field, line, and message delimiters in a page send.
Control characters listed in the table below are the default delimiters. If you don't want these characters in your transmissions, reprogram them with the commands in the next section.
Table 11-1. Default Delimiters
Field separator FS NUL 1 ax> Start protected field Esc ) 1B29 End_J>_rotected field Esc J_ 1B28
Endofline US NUL lFOO End of message CR NUL ODOO
NOTE: The terminal does not transmit nulls in the delimiter codes to the host.
p1=
p2=
1 End of line 2 3 4 End of message
Any ASCII characters
Any ASCII characters
This command changes the delimiters included when the terminal sends screen data. If you don't
DATA TRANSMISSION
want any delimiters, program pl andp2 as nulls. The terminal does not send null characters to the host in a delimiter. The reprogrammed delimiter characters are saved in nonvolatile memory.
Text Blocks for Transmission The ASCII start-of-text (STX) and end-of-text (ETX) control characters (hex 02 and 03) define the portion of text transmitted by the page send commands Esc S and Esc s (presented on the next page). Insert these characters where you want the block to begin and where you want it to end. Normally the terminal does not display ASCII control characters on the screen. But you can display a control character, as if it were an alphanumeric character, in two ways: Position the cursor where you want the STX or ETX character (the character occupies a space in the display); next, either press Loe Esc (keyboard) or enable monitor mode (program); then transmit either Ctrl B or Ctrl C.
Page Send Commands During full or half-duplex modes, data entered at the keyboard goes to the computer immediately, but during block mode, sending it to the computer is a separate step. You can either press the Send key or enter one of these commands to send a text block. These commands define the data sent to the computer in a page send. If the data contains more than one set of STX and ETX characters, the STX above and nearest the cursor and the following ETX define what goes to the computer. You cannot send data to the computer in local mode.
Tum back to Table 11-1 for default delimiter values.
Send unprotected characters in Esc 4 cursor line up to and including cursor Esc 4 sends all unprotected data on the line between column one and the cursor.
11-4
Delimiters Esc 4 sends a field separator in place of each protected field and a termination character after the transmission.
Send unprotected page up to Esc 5 and including cursor Esc 5 sends unprotected data between the first unprotected position and the cursor.
9065 USER'S GUIDE

Delimiters Esc 5 sends a field separator for each protected field, line delimiter after each line, and a tennination character after the transmission.
Send entire line of data up to Esc 6 and including cursor Esc 6 sends all data between the first and the cursor positions.
Delimiters Esc 6 sends a tennination character after the transmission. Brackets protected fields with start and end protected field delimiters. When protect mode is on, each field of graphics characters is bracketed by Esc $ and Esc % , and the terminal sends Esc G Ps for visual attributes.
Send entire page up to Esc 7 and including cursor Esc 7 sends all data between the first and the cursor positions.
Delimiters Esc 7 sends line delimiter after each line and a termination character after the transmission. Brackets protected fields with start and end protected field delimiters. When protect mode is on, each field of graphics characters is bracketed by Esc $ and Esc % , and the terminal sends Esc G Ps for visual attributes.
Send unprotected data Esc S between STX and ETX characters Esc S sends all unprotected data between either STX (if the cursor follows STX) or first unprotected position (if the cursor is before STX) and ETX. Cursor moves to ETX.
If the page has no ETX, Esc S sends all unprotected data between either STX (if cursor follows STX) or the first unprotected position (if the cursor is before STX) and the end of the
9065 USER'S GUIDE 11-5
page; moves the cursor to the first unprotected position. If the page has no STX or ETX, Esc S sends all unprotected data.
If there is no STX, starting position is defined by block start mode. If there is no ETX, ending position is defined by block end mode.
Delimiters Esc S sends a field separator in place of each protected field, line delimiter after each line, and a termination character after the transmission.
Send all data between STX and ETX characters
Esc s
Esc s sends all data between STX (if the cursor follows STX) or home (if the page lacks STX or the cursor is before the STX) and ETX; moves the cursor to ETX.
If page has no ETX, the terminal sends all data between either STX (if the cursor follows STX) or home (if the cursor precedes STX) and the end of the page; moves the cursor to the home or first unprotected position.
If there is no STX, starting position is defined by block start mode. If there is no ETX, ending position is defined by block end mode. If page has no STX or ETX, Esc s sends everything; moves the cursor to home or the first unprotected position.
Delimiters Esc s sends a line delimiter after each line and a termination character after the transmission. Each protected field is bracketed by start and end protected field delimiters. When protect mode is on, each field of graphics characters is bracketed by Esc $ and Esc % , and the 965 sends Esc G Ps for visual attributes.
DATA TRANSMISSION

Page Print When the terminal receives a page print command, it sends a block of text to the printer or other device connected to the COM2 port. The extent of the text block is determined by the setting of block st1lrt and block end modes.
A page print can be formatted or wiformaned. A formatted page print sends a carriage return and a line feed after each line and space characters for all protected characters. An unformatted page print sends all characters, without any formatting controls, so the appearance of the printed copy is unpredictable.
Use a formatted page print for output to a printer. An unformatted page print command is appropriate for data transmissions to another type of data communication device, where control characters in the data file would be unwanted.
During a page print, the terminal flips the next page of display memory onto the screen, unless page print flip mode has been disabled. The terminal responds to the selected handshaking signals from the receiving peripheral during transmission.
After the transmission, the terminal sends ACK (hex 06) to the host as a signal to resume screen updating. If your computer does not need this signal, or may respond to it in an inappropriate way, you can reprogram the page print termination signal (last of the page-print commands).
NOTE: The terminal responds to a page print command during any print moae {page print is an action command, not a mode.)
DATA TRANSMISSION 11-6
Page Print Commands
Print unprotected formatted page
Print all unformatted page
Esc P
Esc L
Page print Esc[O;Psi ) AritrifrntPrinted···•
0 Formatted all
Formatted ull!>._rotected
4 Unformatted all
5 Unformatted unprotected
Page Print Flip Mode Page print flip on (default) Esc [ = 15 h During page print, the display flips to the next page of screen memory and the screen continues to accept data from the host or keyboard.
Page print flip off Esc [ = 15 I The current page of memory remains displayed, and screen updating halts during transmission.
Page Print Termination Signal Define the page print Esc p Ps termination signal
Ps = Any ASCII character (default: ACK)
This command reprograms the ASCII character sent to the computer after each page print, to signal the end of the transmission. The reprogrammed value is saved in nonvolatile memory.
9065 USER'S GUIDE

This chapter covers key codes, information line messages, and the terminal answerback and ID.
NOTE: Command code descriptions in this chapter are primarily for the Tele Video 9065, although code descriptions for other emulations may be included. Codes for TeleVideo emulations are listed in Appendix C; codes for all other emulations are listed in Appendix D.
Key Configuration Modes Application Key Mode Enable application key mode
Disable application key mode (default)
Esc [ = 23 h
Esc [ = 231
Application key mode changes the codes sent by nearly all keys (except the main keypad alphanumeric keys) to eight-bit codes. Table E-2 in Appendix E shows the reconfigured key codes. The terminal must be in 8-bit data word mode when this mode is enabled.
NOTE: This mode overrides all other key reprogramming, including WordStar mode and function key, editing l<ey, and numeric key reprogramming.
WordStar Mode Enable WordStar mode
Disable WordStar mode (default)
Esc [ = 21 h
Esc [ = 21 I
In WordStar mode, the editing and function keys send commands used by the WordStar application program. Table E-3 in Appendix E shows the WordStar key codes.
When this mode is enabled, a w shows in the status line.
NOTE: This mode overrides all other key reprogramming except application key mode.
9065 USER'S GUIDE 12-1
Chapter 12 REPROGRAMMING
Editing And Numeric Keys This section tells how to reprogram editing and numeric keypad keys. The reprogrammed codes are saved in nonvolatile memory.
Reprogramming One Key Reprogram one key Esco Ps p1 ... p5
Table 12-1. Pr~ rammi'!9._ Editing K~s
·····• >.·•Ea1ti~K~····· u&hifili<l• #s <s1tirtcil ei/ Home @
J, A a i B b
f- c c ~ D d
Tab( main) E e
Back~ce F f Clear~ce G g
Print H h Char Insert I Char Delete J l Line Insert K k Line Delete L 1 Line Erase M m
P~eErase N n
P~eJ_Next/Prev) 0 0
Send p p
Tab (numeric pad) Q q CE R r
Enter s s Return T
Line Feed u u Esc v v Del w w
REPROGRAMMING

0 0 1 2 2 3 3 4 4
5 5 6 6 7 7 8 8 9 9
< ()() =
You can load up to five bytes <pl ••• pS) into any one editing or numeric keypad key with this command.
1 2 unshifted numeric ke
pl ... pn = One of five ASCII characters for each key in the set
Use this command to reprogram most or all keys in a set, since you must enter, in order, five bytes each for all the keys in the set specified by Ps. Each set of keys, in the order it loads, is listed in the previous command to reprogram one key.
After receiving a value for Ps, the terminal assigns the next 120 bytes (for an editing key set), or 70 bytes (for the numeric keys) that it receives. Then the command automatically terminates. Enter null characters to fill up the required five bytes per key.
The following example starts you out reprogramming the unshifted editing keys. Remember to press Loe Esc if you are reprogramming from an ASCII keyboard.
1. Enter Esc ] 1 to start the command and specify the Shifted editing keys.
REPROGRAMMING
2. Enter, in a string without spaces, the follow-ing codes for the first three keys:
RS NUL NUL NUL NUL LF NUL NUL NUL NUL Esc j NUL NUL NUL
This string leaves the Home key unchanged, then reverses the functions of the J. and t keys.
3. Now continue entering five bytes of code apiece for the remaining editing keys.
The Function Keys The 9065 has four sets of function key memory, each with 256 bytes. Table E-1 shows the default codes for sets one and two. (Sets three and four have no default codes.) For more information about the keys, read the section in Chapter 3 about reprogramming the function keys.
This section presents the following operations:
• Selecting a function key set • Saving reprogrammed codes • Reprogramming the keys • Sending key codes from a program • Loading the function key labels
Selecting the Function Key Set Select the function key set Esc[7; Psv
0 One default Two
2 1bree
3 Four
The terminal does not save the new value in non volatile memory. When you reset the terminal, set one is again the active set, unless you send the command presented in Chapter 4 to save set up values (or enter set up and save the new value).
Loading Function Keys Load function keys in non volatile memory
Load function keys in temporary memory
Esc[=10h
Esc[=101
If you elect to load key reprogramming in temporary memory, the keys return to default codes when you reset the terminal.
12-2 9065 USER'S GUIDE

Reprogramming Function Keys Reprogram a function key
Esc I p1 p2 msg Ctrl Y
Fl 1 A F2 2 B
F3 3 c F4 4 D
F5 5 E F6 6 F Fl 7 G F8 8 H
F9 9 FlO J Fll K F12 < L
F13 M F14 > N F15 I 0 F16 @ p
e Destination .•.· · • Host
2 Local( screen)
3 Both 4 Printer
Select a value of pl to reprogram any individual key, clear all the keys, or load all the keys in sequence.
When pl:: 0, separate each key's message with a Ctrl \. Your command would look like this:
Esc I 0 p2 msg Fl Ctrl \ p2 msg F2 Ctrl \ p2 msg F3 Ctrl \
p2 msgFn Ctrl Y
9065 USER'S GUIDE 12-3
CAUTION
Count your bytes! You can program 256 bytes into each function key set, distributed among its keys as you wish. If the message you are entering exceeds the remaining number of unused bytes in the function key set, the 965 continues to load the message and destroys the existing messages in other keys.
If pl = a space character, you can omit the remaining command sequence (p2 msg Ctrl Y). You need only enter Esc I space.
Think about where you want the message to go before you enter p2. If you send it only to the terminal (p2 = 2), the computer cannot act on it. And if you send it only to the computer (p2 = 1), the message may not appear on the screen. (Unless the computer echoes it back to the terminal.)
Each message can contain any combination of display and control characters. If you want to enter Ctrl P or Ctrl Y as part of the message, preface either character with Ctrl P. Otherwise, the terminal interprets Ctrl P and Ctrl Y as part of the command.
For example, let's program shifted key Fl to tell the terminal to move the cursor to the end of the screen, display user message one (which reminds the operator to tum on the printer) on the bottom information line, and print the page. We'll send these messages to the terminal as Escape sequences.
1. Press Loe Esc or send Esc I to start the programming sequence. (Use Loe Esc if you are entering the command from an ASCII keyboard.)
2. Send (or press) A to specify the Shifted Fl key.
3. Send (or press) 2 to send the message to the terminal.
NOTE: Everything you enter after this and before Ctrl Y (Steps 4, 5, and 6) is part of the message that goes to the terminal when you press F1.
REPROGRAMMING

4. Send (or press) Esc = 7 o to address the cursor to the end of the screen. This defines the amount printed with the page print command in the next step. 7 and o are values from Appendix G that indicate the row (line) and column position.
5. Send (or press) Esc g to display user message one on the bottom line.
6. Send (or press) Esc P to command the termi-nal to print an unprotected, formatted page.
7. Send (or press) Ctrl Y to end the command. To calculate the bytes in this example, let's look at the entire command. The message portion appears in italic type.
Esc I A 2 Esc = 7 o Esc g Esc P Ctrl Y Now let's tally the bytes. Remember, you count only the bytes in the message.
Esc=7 oEsc Esc p
1 1 1 1 1 The message contains 8 bytes.
Now whenever the shifted Fl key is pressed, the terminal moves the cursor to the end of the screen, displays user message one, and prints the contents of the screen.
Sending Function Key Contents Send the contents of a function key
Pn 1-16 17-32
Esc[Pnl
Key unshifted 1-16 Shifted 1-16
This command sends the contents of the specified function key to its programmed destination, just as if you pressed the key.
This command loads labels or a full-line message (similar to a user message) into the function key label line.
In 80-column mode, only eight key labels can be displayed at a time. Also, the labels for keys FS and F16 (unshifted and shifted) contain only eight characters, making a total of 79 characters on the label line. The locations of the labels for 80-colurnn ~ode are as follows:
Fl F2 F3 F4 F5 F6 F7 F8 F9 FIO Fl 1 F12 F13 F14 F15 F16
REPROGRAMMING 12-4
loading Function Key labels Load function key labels
Esc _ Ps label Ctrl M
lml'''•·:·······:······ -Fl @ p
F2 A Q F3 B R F4 c s F5 D T F6 E u F7 F v F8 G w F9 H x FlO I y
Fll J z F12 K [
F13 L \ F14 M ] F15 N /\
F16 0 -Entire line ( )
label = 1-9 characters in 80-line mode 1-7 characters in 132-line mode
Only the label most recently defined will appear. For example, if you define F12 after you define F4, then the label for F12 will appear in the fourth space in place of the label for F4.
To display the labels for the shifted function keys, press the Shift key. As soon as you release the Shift key, the labels for the unshifted function keys will reappear.
Shifted Label Mode Enable shifted label mode (default)
Disable Shifted label mode
Esc_ *
Esc_+ Normally, the operator can display labels of the Shifted function keys by pressing the Shift key (alone). Disabling shifted label mode disables this function.
The rules for displaying labels are the same as for the unshifted key labels (described above).
9065 USER'S GUIDE

Fun ct/ Alt/Compose Key With this terminal, you have a choice of three keyboards: ASCII, PC enhanced, or ANSI. One key has a different name on each keyboard. On the ASCII keyboard, it is the Funct key; on the PC keyboard, it is the left Alt key; on the ANSI keyboard, it is labeled Compose Character.
You can designate the use of this key in the set up KEYBOARD menu, or with the following commands
FuncVAIVCompose = Funct Esc\ T 1 Once defining the key with this command, pressing it and another key sends the ASCII code of the that key, bracketed by the start-of-header (SOH) and carriage return (CR) control characters. It works only with alphanumeric keys, not with the editing keys.
FuncVAIVCompose = META Esc \ T 2
The key, pressed with an alphanumeric key, sends the key's code with the high bit set.
FuncVAIVCompose = 3rd legend Esc \ T 3
The key, pressed with an alphanumeric key, sends a third legend code.
_ NOTE: The third legend refers to markings on certain international keycap sets
FuncVAIVCompose =Compose Esc\ T 4 The key, in sequence with certain other keys, composes nonstandard characters. (Chapter 3)
Information Lines The top and bottom information areas can display the following reprogrammable data:
• Time of day (status line) • Status line message • Two user messages • Function key labels
This section lets you select the contents of the top and bottom information lines, load the messages, and send them to the computer. It contains several commands that are redundant or overlapping, for the sake of programming compatibility.
See Chapter l for details on information lines, and Appendix H for status line messages.
NOTE: If screen is configured for 25, 43, or 49 data display lines, fhe last data line overwrites the bottom information line.
9065 USER'S GUIDE 12-5
Info Line Contents (default: Ps = 1/0)
Display user message 1 on bottom line
Turn on bottom status or message line
Display the status line on the top line
Turn off the top line display
Select the contents of the top line
O Blank Status line
Escg
Esch
Esc. b
Esc .c
Esc[4;Psv
Esc[5;Psv
2 User messa e 1 (F LABEL line 1) 3 User message 2 (F LABEL line 2)
Note that these commands do not include the function key label lines. The previous section about the function keys tells how to load function key labels; the user must elect in set up to display them (user messages one and two).
Loading User Messages Load text into user message 1
Load text into a
Esc f text Ctrl M
Esc Pl Ps text Ctrl M
0 Message field in status line (7 characters, 955-com atible)
2 User messa e 2 3 Message field in status line (30 characters)
NOTE: These messages are not saved in nonvolatile memory.
You can enter 79 or 131 display characters and commands in the user messages. Like the screen's other display lines, the information
REPROGRAMMING

lines contain 80 or 132 character positions. However, the first character of a message line is always the current visual attribute (default is reverse video). You can change this visual attribute, but you cannot write over it with a display character.
The status line message field contains either 7 characters (955 mode) or 30 characters (9065 mode).
Until you enter text in a message line, it is blank (except for the visual attribute in the first character position).
The following example shows how to enter text into user message one on the bottom information line. If you are entering these commands from an ASCII keyboard, press Loe Esc .
1. Enter Esc g or Esc [ S ; 2 v to display user message 1 on the bottom information line (if you want to see the message as you enter it).
2. Enter Esc for Esc _ 1 0 to clear the previous text and start loading new text into user message one.
3. Change the visual attribute in the first character position if desired. The default attribute is reverse video.
4. Enter up to 79 or 131 characters of text. If you displayed the message line before entering text, you can see the message as you enter it.
S. You can also include visual attributes any place in the message with the command Esc G Ps. Remember to include any commands in the character count.
6. Enter Ctrl M to end the message.
Sending User Messages EscZ Ps
0 1 Messa e field in status line 2 User message 2
The Esc Z Ps command sends the desired message to the host computer. It does not display the message in an information line.
REPROGRAMMING
Loading the Time of Day Load the time of day Esc x 8 hh mm
hh = two-digit number for the hour
mm = two digit number for the minute
This command loads the time in the VideoDesk clock. You can select there to display the time and/or date in the status line.
Enter military (24-hour) time. For example, enter Esc x 8 1500 to load three o'clock in the afternoon.
Terminal Identity Messages The Answerback Message Program the answerback message
Esc " message Ctrl Y
Send the answerback message Ctrl E
The default answerback message is blank. You can program up to 16 control or display characters in the answerback message. To include Ctrl Y or Ctrl P as a character in the message, precede them with Ctrl P (which is not counted as a character in the message). Otherwise, the terminal interprets these codes as part of the command.
The terminal stores the reprogrammed message in nonvolatile memory.
The terminal sends the answerback message to the host when it receives Ctrl E.
Sending Terminal Identification Send terminal identification EscM
When the terminal receives this command, it returns the identification message TVS9065 R.O Ctrl M to the host.
R ,;, Firmware revision level 0 = Firmware revision sub level
12-6 9065 USER'S GUIDE

Terminal Part number
Case
Screen
Configuration
Display format
Data lines
Information lines
Columns
Display memory
Character formation
24/25 lines
42/43/48/49 lines
Character sets
9065 USER'S GUIDE
Appendix A SPECIFICATIONS
143301-10: Green screen, VOE 143301-11: Green screen, standard 143301-20: Amber screen, VOE 143301-22: Amber screen, standard 143301-30: White screen, VDE 143301-33: White screen, standard
Touch tilt (-5 to +26°); swivel (300°); front-mounted power switch and brightness adjustment; side-mounted keyboard connector
14 inches measured diagonally; P31 green, amber H24, or H47 white nonglare phosphor; screen saver; selectable on/off and background color
12 set up menus
24,25,42,43,48,49
Top and bottom; status, user message, function key labels
80, 132, or 132 with 80 displayed
Up to seven pages
7xl 1 matrix in a 10x14 or 10x16 cell (10x12 cell @ 72-Hz refresh rate)
5x7 matrix in a 10x8 cell
US ASCII standard (96 upper- and lower-case display with descenders, 32 control) and 955 multinational (8-bit); IBM ASCII and 8-bit multinational; Wyse 60; Wyse 60 graphics; 955 graphics; block graphics
A-1 SPECIFICATIONS

Visual attributes
Line attributes
Cursor attributes
Cursor control
Editing
Code compatibility
Programmable messages
Communication modes
Print capabilities
Communication interfaces
Word structure
Parity
Baud rates
Communication protocols
Keyboard
SPECIFICATIONS
Character or page/line, space/no space field; combinative full/half intensity blink, blank, underline, reverse
Combinative single/double high/wide
Block (blinking or steady), underline (blinking or steady), none
Home, up, down, right, left; carriage return, line feed, reverse line feed, new line; typewriter and field tabs (forward and backward); address, read
Character/line/column insert/delete; line/page/field erase; field/page/column/block clear; jump/smooth scroll, definable scrolling region, line lock; protect mode; insert/replace and pagenine edit modes; programmable replacement character
TeleVideo 9065 Native Mode; 965, 910/910+, 912/920, 905/925, 950, 955; WY-60, WY-50150+, WY-120/150, WY-160; ADM-3A/5/31, ADDS VP-A2, VP-60; DG200, Hazeltine 1500; IBM 3101-IX, 3101-2X, 3161; VTl00/52; PC TERM.
Answerback, status line field, user line, function key labels
Conversational (full or half duplex), block, half-block, local, secondary receive, local or duplex edit, monitor
Formatted/unformatted page print; buffered copy, transparent, bidirectional, and secondary print modes
RS-232C 256-character, buffered transmit/receive COMI and COM2 ports, configurable for host and serial device communication, selectable character transmit delay rate, reprogrammable parameters
7 or 8 data bits, 1 or 2 stop bits, 10- or 11-bit word, 7- or 8-bit multinational characters
Odd, even, mark, space, or none
16 main, 15 auxiliary (50 to 38,400/19,200 KB)
X-On/X-Off, DTR, DCD/DSR, none, Reprogrammable send and print delimiters
Detached, slim-line, typewriter-style with sculptured keycaps, sealed key switches, N-key roll-over with ghost key lockout, accounting-style numeric keypad with TAB and ENTER keys, on/off repeat and key click, reprogrammable remote special keys. Choice of PC Enhanced keyboard, ASCII keyboard, or VT220 (ANSI) keyboard.
A-2 9065 USER'S GUIDE

Dimensions
Cabinet
Keyboard
PC Enhanced
ASCII
ANSI
Footprint
Net weight
Terminal
Keyboard
Shipping weight
Terminal
Ke board
Environmental requirements
Ventilation
Temperature
Operating
Storage
Relative humidity
Operating
Non operating
Power requirements
Power dissipation (max.)
Option board
Available power
(beyond normal load)
Options available
9065 USER'S GUIDE
Height in. (cm)
13.6 (34.5)
1.5 (3.8)
1.5 (3.8)
1.5 (3.8)
8.6 x 8.0 in.
17 .5 lb. (8.0 kg)
3 lb. (1.4 kg)
23.5 lb. (10.7 kg)
3.5 lb. (1.6 kg)
Width Depth in. (cm) in. (cm)
12.9 (32.7) 13.9 (35.4)
19.5 (49.6) 7.1 (18.0)
17.7 (45.2) 7.2 (18.4)
19.5 (49.6) 7.1 ( 18.0)
4 inches (10 cm) minimum on all sides
32° F (0° C) to 113° F (45° C)
-40° F (-40° C) to 149° F (65° C)
10%-85% noncondensing.
10%-85% noncondensing.
90 to 250 Vac, 60150 Hz (Power supply automatically senses the source voltage and adjusts to it.)
25 watts
400 mA @+5 Vdc
100 mA @ +12 Vdc
100 mA @-12 Vdc
20-mA current loop RS-422 interface International keycap sets 2400 baud internal modem (V.42 MNP5)
A-3 SPECIFICATIONS

NOTES
SPECIFICATIONS A-4 9065 USER'S GUIDE

B I T s
Appendix B CODE AND CHARACTER SETS
Table B-1. Seven-Bit ASCII Character Set
7 6 5
4 3 2 1 Column +Row ~
0 0 0 0 0
0 0 0 1 1
0 0 1 0 2
0 0 1 1 3
0 1 0 0 4
0 1 0 1 5
0 1 1 0 6
0 1 1 1 7
1 0 0 0 8
1 0 0 1 9
1 0 1 0 A(10)
1 0 1 1 8(11)
1 1 0 0 C(12)
1 1 0 1 0(13)
1 1 1 0 E(14) -
1 1 1 1 F(15)
KEY
9065 USER'S GUIDE
0 0 0
0 0 1
0 1
NUL 0 OLE 0 0
SOH 1 DC1 1 (XON) 1
STX 2 DC2 2 2
ETX 3 DC3 3 3 (XOFF)
EOT 4 DC4 4 4
ENQ 5 NAK 5 5
ACK ~SYN+ 6
BEL 7 ETB 7 7
BS• 10 CAN 8 8
HT 11 EM 9 9
LF 12 SUB 10 A
VT+ 13 ESC 11 B
FF~ 14 FS 12 c
CR 1S GS 13 0
so 16 RS 14 E
SI 17 us 1S F
~-~
ESC 33 OCTAL 27 DECIMAL 16 HEX
~-~
20 16 10 21 17 11 22 18 12 23 19 13 24 20 14 25 21 15 26 22 16 27 23 17 30 24 18 31 25 19 32 26 1A 33 27 1B 34 28 1C 3S 29 10 36 30 1E 37 31 1F
0 1
2
SP
!
II
#
$
%
&
I
(
)
. +
'
-
I
B-1
0 1 1 1 1 1 0 0 0 1 1 0 1
0 1 1
3 4 5 6 7 40
0 60 100 p 120
\ 140 160
32 48 (u 64 80 96 p 112 20 30 40 50 60 70 41
1 61 A 101 a 121 141 161
33 49 65 81 a 97 q 113 21 31 41 51 61 71 42 2 62 B 102 R 122
b 142 162
34 50 66 82 98 r 114 22 32 42 52 62 72 43 3 63 c 103 s 123 143 163 35 51 67 83 c 99 s 115 23 33 43 53 63 73 44 • 4 64
D 104 T 124
d 144 164
36 52 68 84 100 t 116 24 34 44 54 64 74 45
5 65 E 105 u 125 145 165
37 53 69 85 e 101 u 117 25 35 45 55 65 75 46
6 66 F 106 v 126
f 146 166
38 54 70 86 102 v 118 26 36 46 56 66 76 47
7 67 G 107 w 127 147 167
39 55 71 87 g 103 w 119 27 37 47 57 67 77 50
8 70 H 110 x 130
h 150 g~ 40 56 72 88 104 x
28 38 48 58 68 78 51
9 71 111 y 131
i 151 171
41 57 I 73 89 105 y 121 29 39 49 59 69 79 52 72
J 112 z 132
i 152 172
42 58 74 90 106 z 122 2A 3A 4A 5A 6A 7A 53 73 K
113 [
133 k
153 {
173 43 S9 7S 91 107 123 2B 36 46 SB 66 76 S4 74 L 114 134
I 1S4
I 174
44 < 60 76 \ 92 108 124 2C 3C 4C SC 6C 7C SS 7S M 11S
I 13S 1SS
} 17S
4S = 61 77 93 m 109 12S 20 30 40 so 60 70 S6 76 N
116 A
136 1S6 176 46 > 62 ~
94 n 110 "' 126 2E 3E SE 6E 7E S7
? 77
0 117 137 1S7 DEL 177
47 63 79 9S 0 111 127 2F 3F 4F - SF 6F 7F
CHARACTER SETS
Table B-2. Eight-Bit Multinational Character Set
B 7 6 I 5 T 4 3 s
0 0
2
0 0
Column
i Row -+
0
8 9 A (10)
~~~~m ~~~ BO 90 AO
f----+---+--+---!------+~\j-*2~01+-- 221 241 0 0 0 1 1 129 145 i 161
Blt------1 91 Al
2 202~222 242 ,..-1130 146 c 162
_[_J B2 92 A2 0 0 0
l 0 3 203 ~223 £ 243 0 1 1 ~ 131 147 163 L_l B3 93 A3
I,__-+--+--+--+------+~ 1--1o2~04+--~____,"'j22'°"4--, - 244 !, 0 1 0 0 4 ./ 132 4B 164
B4 94 A4
I o 0 5 ~ 205 225 ¥ 245 L_ 133 149 165
B5 95 A5
B (11)
260 176
BO 261 177 Bl
262 17B B2
263 179 BJ
264 lBO B4
265 1B1 B5
C (12) D (13)
A 302 194 C2
303 195 C3
304 196 C4
305 197 C5
0
0
0
322 210 02
323 211 03
324 212 04
325 213 05
1 1 1 0 1 1
E (14) F (15)
340 360 224 ---, 240
EO FO
~~~ n m El Fl
~~~ 0 ~~~ E2 F2
a m 6 E3
363 243
F3 364 244
F4 365 245
F5 ,__o---+--1----1-1-+--o-+---6---+--,-_~~~~~ 226 246
150 '8, 166 ~~~ A: ~~~ Q m CE ~~~ 366 246
F6
0
0 0 0
0 0
0 0
0
I 1 0 0
0
0
CHARACTER SETS
7
8
9
A (10)
B (11)
c (12)
D (13)
E (14)
F (15)
_l__ B6
B 207 135
B7 210 136
BB 211
f--1--137 B9
212 13B
BA 213
t---139 BB
214 140
BC 215
t---1141 BO
216 t::d142 BE
111217 f----L----1143
BF
KEY
ESC 33 OCTAL 27 DECIMAL lB HEX
~-~~
96 A6 B6 C6 06 E6
m § m 97 A7
230 n 250 152 v 16B
9B AB 231 153 99
232 154 9A
233 155 9B
II
251 169 A9
252 170 AA
253 171 AB
Q
m c B7
270 1B4 BB
271 1B5 B9
272 1B6 BA
273 1B7 BB
234 156 9C
254 274 1T 172 :s lBB
m ~ 9F
B-2
AC BC 255 173 ¥-AO
256 174 2'
AE 257
1~~ l
275 1B9 BO
276 190
BE 277 191
BF
~~~ CE m C7 07
~~~ 0 CB
31·4 204 cc
315 205 co
316 206
CE
0
330 216
OB 331 217 09
332 21B
DA 333 219 OB
334 220 DC
335 221 00
336 222
OE 317 207
CF
337 (3 223
OF
e
!!
,__.. __ ,__.. 347 231
E7 350 232
EB 351 233
E9 352 234
EA 353 235
EB 354 236
EC 355 237
ED 356 23B
EE
367 re 241
F7 370
0 24B FB
0
0
371 249
F9 372 250
FA 373 251
FB 374 252
FC 375 253
FD 376 254
FE 377 255
FF
9065 USER'S GUIDE

Table B-3. Seven-Bit IBM Character Set
B 7 6 I 5 T 4 3 2 1 Column
s +Row -.
0 0 0 0 0
0 0 0 1 1
0 0 1 0 2
0 0 1 1 3
0 1 0 0 4
0 1 0 1 5
0 1 1 0 6
0 1 1 1 7
1 0 0 0 8
1 0 0 1 9
1 0 1 0 A(10)
1 0 1 1 B (11)
1 1 0 0 c (12)
1 1 0 1 D (13)
1 1 1 0 E (14)
1 1 1 1 F (15)
KEY
9065 USER'S GUIDE
0 0
0
NUL
ID ~ • • • • •
II 0
II 0
9
J>
~
* ESC
0 0 0
1
0 ... 0 0 1 ~ 1
1 2 i 2 2 3
!! 3 3 4 .: 4 4 5
!P 5 5 6 6 -6 7 i 7 7 -
10
t 8 8
11
+ 9 9
12 10 -A 13 11 -B 14 12 L__ c 15 13 -0 16 14 • E 17 15 • f
33 OCTAL 27 DECIMAL 18 HEX
~-~~
0 1
1
2
20 SP 16
10 21
! 17 11 22
II 18 12 23 19 # 13 24
$ 20 14 25
% 21 15 26
& 22 16 27 , 23 17 30
( 24 18 31
) 41 19 32 26 . 1A
33 27 + 16 34 28
' 1C 35 29 -1D 36 30 1E 37 31 I 1F
B-3
0 1 1 1 1 1 0 0 0 1 1
0 1 1 0 1
3 4 5 6 7
40 0
60 100 p 120 '
140 160 32 48 (a 64 80 96 p 112 20 30 40 50 60 70 41
1 61
A 101 a 121 141 161
33 49 65 81 a 97 q 113 21 31 41 51 61 71 42
2 62
B 102
R 122
b 142 162
34 50 66 82 98 r 114 22 32 42 52 62 72 43
3 63 c 103 s 123 143 163
35 51 67 83 c 99 s 115 23 33 . 43 53 63 73 44
4 64
D 104
T 124
d 144 164
36 52 68 84 100 t 116 24 34 44 54 64 74 45
5 65
E 105 u 125 145 165
37 53 69 85 e 101 u 117 25 35 45 55 65 75 46
6 66
F 106 v 126
I 146 166
38 54 70 86 102 v 118 26 36 46 56 66 76 47
7 67
G 107 w 127 147 167
39 55 71 87 g 103 w 119 27 37 47 57 67 77 50
8 70
H 110 x 110
h 150 170
40 56 72 88 104 x 120 28 38 48 58 68 78 51
9 71 111 y 131
i 151 171
41 57 I 73 89 105 y 121 29 39 49 59 69 79 52 72
J 112 z 132
j 152 172
42 : 58 74 90 106 z 122 2A 3A 4A 5A 6A 7A
53 73 K
113 [
133 k
153 {
173 43 ; 59 75 91 107 123 28 38 48 58 68 78 54 74 L
114 134 I
154 I
174 44 < 60 76 \ 92 108 I 124 2C 3C 4C 5C 6C 7C 55 75
M 115
I 135 155
} 175
45 = 61 77 93 m 109 125 20 30 40 50 60 70 56 76 N
116 "
136 156 176 46 > 62 78 94 n 110 ~ 126 2E 3E 4E 5E 6E 7E 57
? 77
0 117 137 157 111
47 63 79 95 0 111 /\ 127 2F 3F 4F - 5F 6F IF
·-- L-. ...J
CHARACTER SETS

Table B-4. Eight-Bit IBM Character Set
B 87.-~~~~~~ I &5~~~~~~-----
T 4 3 2 1 Column -+ 8 9 A (10) B (11) C (12) D (13) E (14) F (15) s ! Row
0 0 0 0
0 0 0 1
0 0 1 0
0 0 1 1
0 1 0 0
0 1 0 1
0 1 1 0
0 1 1 1
1 0 0 0
1 0 0 1
1 0 1 0
0
2
3
4
5
6
7
8
9
E m 90
c rn~ BO
340 oc 224
EO
360 - 240
FO
0
a
201 221 129 iE 145
81 91
204 132
84
224 148 94
n
241 ~ 261LlJ301 321 341 361 161 ;::::: m 193! I 209 /3 225 ± 241 Al :::::E 81 C1 01 E1 F1
242 I 262 302 322 1. 342 362 162 17Bt--r--i1941T1210 226 ~ 242 ~ ~ c~m u ~
243 263 303 u_ 323 I I 343 363 163 179 t--1195 211 227 :$ 243 u ~ ~ 00 0 ~
244 164t-
A4
264 304 b 324 ,. 1B0t----i196 212 84 C4 04
344 22B
E4
364 244
F4
m o 225 245 ,~~ N ,~~t==:
265 305 325 345 365 245
E5 B5 206 134
B6 207 135
B7
Q
210 136 y
BB
226 150
96 227
a
151 0 97 -
230 152 l
9B
246 1661--1 ~
1B1t------t----197 r:=213 IT 229 85 C5 J__ 05 E5
266 306 326 346 1B2 t== 19B ,-- 214 µ 230 86 C6 06 E6
247 267 16701 1B3
A7 87
307 327 t---199t--- f--'215
Cl 07
347 T 231
E7
366 246
F6 367 = 247
F7 250 270 310 330 16~Fl 1B4 ...'.:::::=200~216 <l> ~~~ '-' m
AB 8B CB DB EB FB 2511 I 271 311 331 351 e 371
r- 1A6991~ 1B5 rr==201t---- 217 . (-) 233 249 M ~~ ~ ~ ~
m o m B9 • 99
m o m BA 9A
252 212p~ 312 332 352 • 372 A(10) ~ --, 11!2 1B6r--=:202 21B !! 234 250
~ M ~ M ~ ~ l---+--+--+---t------+---t2~1-=+3 --b23=3!-----lc2=53+-~-+2=7-=+3 --b-o313 333 353 - 373
1 0 1 1 8(11) "i 139 ¢ 19585 112 1A181tn} 1B71--L203 219 fi 235 \ 251 oo oo ~ oo rn rn l---+--+--+---t------+---t--t---l--f--+-+-++--+---+---++--+-
214 234 '541 11 214 11 314 334 354 374 1 1 0 0 C(12) j· 140 £ 156 1/4 17~~ 1BB I ~204 220 00 236 11. 252
oc oc ~ oc ~c oc ~ ~ l---+--l---+---f-----+---f=-'21=t5 --t-23~51---+:2=55:1-;1---,, I l--f2="7=t5 ____i_.1.._'="'-=315 335 355 2 375
1 1 0 1 0(13) 1 141 Y. 157 i 173~ 1B9 205 221 0 237 253 oo w ~ oo w oo ro ro
l---+--+--+---t------+---t--t---+-+--+-+-~-+---+-~-+-
E(14) A.. 2,4162 236 2561 I 2761 11 316 336 356 I 376 1 1 1 0
1 1 1 1
CHARACTER SETS
~ 15B « 11~p 190LJ11--'1 ~206 222 E 23B 254 ~ ~ Af fil ~cr ~ ff ff
A 217 237 257 277~ 317 b.33c=l7--b~~o-=l~l-8-LA_N_Kb ~2~~~ F(15) 1i~ f 1i~ )) 1~~.tJ 1~}i-----2g~ 25~ n EF FF FF
KEY --~
ESC 33 OCTAL 27 DECIMAL 18 HEX
~-~
B-4 9065 USER'S GUIDE
Table B-5. Monitor Mode ASCII Control Characters
CTRL@ NUL 00 NL
CTRL A SOH OI 5H
CTRLB STX 02 CTRLC ETX 03 CTRLD EOT 04 CTRLE EN_Q_ 05 CTRLF ACK 06 CTRLG BEL 07 CTRLH BS 08 CTRLI HT 09 CTRLJ LF OA CTRLK VT OB CTRLL FF oc CTRLM CR OD CTRLN so OE CTRLO SI OF CTRLP DLE 10
CTRL_Q DCI Ii CTRLR DC2 I2 CTRLS DC3 13 CTRLT DC4 I4 CTRLU NAK I5 CTRLV SYN I6 CTRLW ETB I7 CTRLX CAN I8 [C:N
CTRLY EM I9 CTRLZ SUB IA fSB CTRLl ESC 1B
CTRL\ FS IC CTRL] GS 1D
CTRL" RS 1E
CTRL us 1F DEL DEL 7F
9065 USER'S GUIDE 8-5 CHARACTER SETS

Table B-6. ASCII Control Character Abbreviations - mu~······~ >£• LI ' \. ·······~·············~ NUL Null
SOH Start of headin~_
STX Start of text
ETX End of text
EOT End of transmission ENQ Enqui!Y_
ACK Acknowle~
BEL Bell
BS Back~ace
HT Horizontal tabulation
LF Linefeed
VT Vertical tabulation FF Form feed CR Carria~ return
so Shift out SI Shift in
DLE Data link esc~e
DCl. Device control 1 DC2 Device control 2
DC3 Device control 3 DC4 Device control 4
NAK N~ative acknowle~
SYN ~chronous idle ETB End of transmission block CAN Cancel
EM End of medium SUB Substitute
ESC EscllJ:l(:_ FS File sep_arator GS Group_ separator RS Record s~arator us Unit s~rator SP ~Ce
DEL Delete
CHARACTER SETS B-6 9065 USER'S GUIDE

Appendix C TELEVIDEO COMMAND SUMMARIES
This terminal offers 27 different terminal emulations. The commands for these terminals are summarized in Appendices C and D in the tables shown below. Within the command codes in the tables, variable values are shown in italics.
Appendix C Table Terminals Table Terminals
C-1 Tele Video 9065 C-2 Tele Video 925/905 Tele Video 965 Tele Video 910/910+ Tele Video 955 Tele Video 912/920 Tele Video 950
Appendix D Table Terminals Table Terminals
D-1 Wyse WY-60 D-2 ADDSVPA2 Wyse WY-50/50+ ADDS VP60 Wyse WY-120/150 LSI ADM 3A/5/31 WyseWY-160 Hazeltine 1500
D-3 Data General DG200 D-4 PC TERM DEC VTI00/52 IBM 3161-V
IBM 3101-lX IBM 3101-2X
NOTE The terminal recognizes boldfaced commands only during enhanced compatibility mode (enabled in the General set l:IP menu).
9065 USER'S GUIDE C-1 TELEVIDEO COMMAND SUMMARIES

Table C-1. TeleVideo 9065, 965, 955, and 950 Commands
1Ef22 coMfu~riCI <·····•·• ··· · .. . ···.:.·<·.<::·:>::::. 0065 }· .. ·~··· . 965········~· 9ss·i> ,i ..... 951) LLG Run self test EscV EscV EscV EscV
Monitor mode on EscU EscU EscU EscU 0 Monitor mode off EscX EscX EscX EscX p E orEsc u orEsc u orEsc u orEsc u R Reset terminal Esc-Pn Esc -Pn Esc-Pn Esc-Pn A
EsclO;Il Esc [_O;IJ Esc_l_O;lj Esc_l_O;lj T Save set-'!£_ values I
Enhanced mode on Escl=20h Esc_l_=20h 0 N Enhanced mode off Escl=201 Escl=201 s
Dual session on EscJ=60h Dual session off Esc_l_=601 Session chfil!&_e Esc\S
Enable k~board Esc" Esc" Esc" Esc"
Disable k!?Y_board Esc# Esc# Esc# Esc#
PC scan codes ~nerated Escl_=65h ASCII k~codes ~nerated Esc_l_=651 Key_click on Esc> Esc> Esc> Esc>
K K~lickoff Esc< Esc< Esc< Esc< E
y Keyrep_eat on Esc_l_=8h Escl=8h Esc_l_=8h Esc_l_ = 8 h B 0 K~r~eatoff Escl=81 Escl=81 Escl_=81 EscJ= 81 A R Set U.1>_ enabled Esc_l_= 11 h Esc_l_=llh Esc [ = 11 h Esc [ = 11 h D Set Uj>_ disabled Escl_=lll Esc[=lll Esc[=lll Escl_= 11 l & Esc enabled Escl_ = 12 h Escl_= 12h Escl_ = 12h Escl_= 12h B Esc disabled Esc_l_ = 121 Escl_ = 121 Esc[=12l Escl_ = 121 E
Clear ~ace enabled Escl=13h Escl=13h Escl=l3h Escl=13h L L Clear Space disabled Escl_=l31 Esc L= 131 Esc_l_ = 131 Esc_l_ = 131
Break enabled Escl_=l4h Esc [ = 14 h Escl_=14h Esc[= 14h
Break disabled Escl_=141 Escl_ = 141 Esc[=141 Esc[ = 141 Set break sig_nal Escl_15; Ps v Esc115; Ps v
~Lockon Escl_=26h Escl_=26h
~sLockoff EscJ =261 Escl_ = 261 Normal Caj>_s Lock Escl_=251 Escl =251 Reverse Ca__I>S Lock Esc[=25 h Esc [_ = 25 h NumLockon Escl_ =33 h NumLockoff Escl_ =33 l Mar_gin bell on Escl_=4h Escl_=4 h Escl_=4h
~nbelloff Escl_=41 Escl_=41 Esc_l_ =41 Set bell column CtrlW Ctrl W CtrlW
Sound the bee~ Ctr!G Ctr!G Ctrl G Ctrl G Set number of data lines Esc_l_14; Ps v Esc_l_l4; Ps v
P~e lef!g_th Esc \Ps Esc \Ps Esc \Ps
TELEVIDEO COMMAND SUMMARIES C-2 9065 USER'S GUIDE

Select screen saver time Esc 18 ; Ps v Esc 18 ; Ps v Escl8 ;Psv
Screen on Screen off
Dark background Overscan same as background
S Overscan dark .Q2_ to li_g_hti_.51 C Attribute base: character R E Attribute base: ~ace ~ Attribute base: no SJJ_ace
D Attribute base: line I Attribute base:~e s p Set cursor attribute L A y
Set line attribute 80-column mode
132-column mode
Changing columns total l.@0/13i_lclears the screen 801132 chan_g_e clear off 80-col econom_y_ mode on 80-col econom_y_ mode off Set visual attribute Attribute in a box Set write:P._rotect attribute Half intens!!Y_ Full intensi!r_ Information area attribute Status line attribute WordStar mode on WordStar mode off
A~ication key mode on A_JJI>_lication key mode off
Line lock on
Line lock off
9065 USER'S GUIDE
EscnorEsc.9 EscnorEsc.9 EscoorEsc.8 EscoorEsc.8
Esch Esch Escd Esc d
Esc\00 Esc\O 1...5
EscF2 EscFO EscF 1
Escl=21 Escl=2h Esc. Ps EscGPs Esc[=31 orEsc.: Esc[=3h orEsc.; Esc [ = 61 h
Escl=6ll
EscGPs Esc x I re Pa Esc. Ps
Escl_=5h Esc_l=5l Esc PaPs Escj_3; Ps v
Escl =21 h Escj_ = 211
EscJ_ =23 h
Escl=23l Esc ! 1 orEsc. H
Esc ! 2 orEsc.I
EscF2 EscFO Esc F 1
Escl= 2 l Escj_ =2h Esc. Ps EscGPs Esc[=3l orEsc.: Esc[=3h orEsc.;
Esc [ = 24 h Escl = 241 EscGPs Escxl re Pa Esc. Ps
EscJ_=5h Esc_l = 5 l Esc PaPs
Esc_l3; Ps v
Escl= 21 h EscJ_=21 l
Escl = 23 h EscJ_= 231
Esc ! 1 orEsc.H
Esc !2 or Esc. I
Escn Esco
Esch Escd
EscFO EscF 1
Escl=2l Esc_l =2h Esc. Ps EscGPs Esc[=3l
Esc[=3h
EscG Ps
Esc ! 1
Esc ! 2
Escn Esco
Esch Escd
Esc .Ps EscGPs Esc[=3l
Esc[=3h
EscGPs
Esc ! 1
Esc !2
C-3 TELEVIDEO COMMAND SUMMARIES

1~···-~>.·~~~ Select character set Esc [ 9; Ps v Esc 1_9; Ps v Esc l_ 9; Ps v Load font banks Esc x@ Pb Ps Esc x@ Pb Ps
C Oear font banks H A R A c T E R
s E T s
Auto font load on Auto font load off Set _p_rim~ character set Set second character set
Di~l!Y_ secoI1Cl:!Jy set Di~l!Y_ char. from 2nd set Create a soft character
Set character cell at 10xl6 Set character cell at 10xl4 Set character cell at 1Ox12 Auto wra_p_ on
E D Auto wrap off I T I N G
New line mode on New line mode off DOWN=CtrlJ
M DOWN= Ctrl V g Protect mode on E Protect mode off s
Write_p_rotect on Write_p_rotect off S_p!it the screen
M Sj>lit and clear ~ S_l)_lit 2 paj!;es E S_l)_lit 2 and clear
S Activate upper window c R E E N
Activate lower window
Raise ~lit line Lower ~lit line
M Di~l!Y_ next~e
~ Di~l!Y__Q_revious~ ~ Di~~g_ePn y Close the window
Close and clear Auto_p11ge fl.!£_ mode on Auto~e fl.!£_ mode off
Escx? Pb Esc_l =29h Escl=29l Esc x B Pb
EscxCPb EscxD EscxE Ctrl U Ps Escx APbfp Bl .. BnCtrl Y
Esc\L Esc\M Esc\N
Escl=7h EscJ_ =7 l Esc[=6h Escl_=6l
Escl=9h Escl_=91 Esc& Esc' Esc_l Esc_{_ Esc\CPs
Esc\EPs Esc\APs Esc\DPs
Esc\H Esc\I Esc\R Esc\P EscK EscJ Esc[_l;Pn} Esc\@
Esc\O Escv Escw
TELEVIDEO COMMAND SUMMARIES C-4
Esc x? Pb
Escl_= 29h Escl =291 EscxB Pb
EscxCPb
EscxD EscxE Ctrl U Ps Esc xAPbPp Bl .. Bn Ctrl Y
Escl = 7 h Esc[=7l
Escl=6h Escl=6l Escl=9h Escl=9l Esc& Esc' Esc_l
EscJ. Esc\CPs
Esc\EPs Esc\A Ps Esc\D Ps
Esc\H Esc \I Esc\R Esc\P EscK EscJ Escl_l; Pnl Esc\@
Esc\O Escv Escw
Ctrl U Ps
Esc_l=7h Esc[=7l Esc[=6h Esc_l=6l Esc[=9h Esc_[=9l Esc& Esc' Esc_l Esc_{_
EscK EscJ Esc[ 1; Pnl
Escv Escw
Esc& Esc' Esc_l Esc_{_
EscK EscJ
Escv Escw
9065 USER'S GUIDE

Gra__Qhics mode on
G Gra_rltics mode off
~ Enter a _g_ra__Qhics character
~ Drawabox I c s Swap, copy, or move a box
from source page, row, and column to destination page, row, and column Auto scroll mode on
~ Autoscroll mode off ~ Jum__Q_ scroll L Smooth scroll L I N G
Set scroll rate
Define scrolling region
Tab T Field tab
~ Backtab S Set tab st~
Clear cursor tab Clear all tabs Address cursor row, column Address cursor row col 132 Address cursor row, column
.i.decima!l Address cursor~ge, row, col
Esc $ Esc $ Esc $ Esc%
Escx Y Ps EscHwh orEscxGrc
EscxZPaSpP Ssr R Ssc C Ser RSecCDp P Dsr RDscC Esc_I_ = 19 h Escl_ = 19 l Esc9 Esc 8 Esc [ 6; Ps v or Esc. Ps
Esc [Pt; Pb r
Ctr! I Esc i Esc I Esc 1 Esc2 Esc 3 Esc=rc Esc=r-c
Esc[J_·cH orEsc r;cf Esc -_p_rc
Esc%
EscHwh or Esc x G re
Esc_I_ = 19 h Esc_I_ = 191 Esc9 Esc 8 Esc [ 6; Ps v or Esc. Ps
Esc%
EscHwh
Esc9 Esc8 Esc [ 6; Ps v
Esc [ Pt ; Pb r Esc [ Pt ; Pb r
Ctr! I Ctr! I Esc i Esc i Esc I Esc I Esc 1 Esc 1 Esc 2 Esc 2 Esc 3 Esc 3 Esc=rc Esc=rc Esc=r-c Esc=r-c
Esc[rl.·cH Esc[r_(_·cH orEsc r;cf orEsc r;cf Esc -p_r c Esc -_p_r c
Esc$
Esc%
Esc9 Esc 8
Ctrl I Esci Escl Esc 1 Esc2 Esc3 Esc=rc
Esc -_p_r c Read cursor row_,_ column Esc ? Esc ? Esc ? Esc?
Read cursor row, co!J5lecimajl Esc l_ 6 n Esc L 6 n Esc l_ 6 n c Read cursor~e. row, column Esc I Esc I Esc I Esc/
U Read cursor page, row, Esc ? [ 6 n Esc ? [ 6 n Esc ? [ 6 n ~ coluwP~(d_ec_-_1m_al~)-----~·~-----;-------1-------+-------<i O Curso1 home R
New line
B Carri~e return N Line feed T R 0 L
Cursorl!£. Cursor up Pn times
Cursor down Cursor down Pn times
Cursorri~t
Cursor ri_g_ht Pn times Cursor left Cursor left Pn times Reverse line feed
9065 USER'S GUIDE
Cir!" Ctr!
CtrlM Ctr! J Ctr! KA Esc [ PlnA orEsc Pn T Ctr! V Esc [Pp B orEsc_1Pn S Ctr! L Esc [Pn C Ctr! H Esc[_Pn D
Esci
C-5
Ctr! " Ctr!_
Ctr!M Ctr! J Ctr! K Esc [Pn A orEscl_Pn T Ctr!V Esc [Pn B or Esc [ Pn S Ctr! L Esc [Pn C Ctr! H Escl_Pn D Escj
Ctr!"
CtrL Ctr!M Ctr! J Ctr! K Esc[PnA orEscl_Pn T Ctr!V Esc [ Pn B orEsc [ Pn S
Ctrl_" ___ _,I
Ctr!~
CtrlM Ctrl J Ctr! K
Ctr! V
Ctr! L Ctr! L Esc[PnC Ctr! H Ctr! H Escl_Pn D Escj Esci
TELEVIDEO COMMAND SUMMARIES

Pllg_e edit mode EscN
Line edit mode Esco Insert mode Esc_q
R~acemode Escr Insert character Esc_Q_ Insert Pn characters EscJ_Pn@ Insert column of nulls EscxM Insert line
T E Insert Pn lines
EscE Escl_Pn L EscW Escl_PnP Esc xJ
~ Delete character E Delete Pn characters D I T I N G
Delete cursor column Delete current line Delete Pn lines Erase line (or protected field) to character Erase text & attr. to end of line Erase text to _Q_rotected field Erase text & attr. to ~t. field Erase line, unI>_rot. to nulls Erase text & attribute to end of line, re~ace with nulls
Erase text to end of~e Erase text & attr. to end of pg.
Erase ~ecified field to char. Erase text to end of screen Erase text & attributes to end of screen Clear unprotected text on ~e, r~lace with new
EscR Escl_PnM EscT orEsclPs K EscxR Esct EscxS EscxL EscxT
EscY EscxP EsclPsJ Esc_y_ EscxQ
Esc · orCtrl Z
Clear attributes & unprotected Esc x V text on ~e. re~ace with new Clear~. all to character Esc + Clear _p_age, UI.!l!Ot. to nulls Esc : Clear attibutes and unprot. Esc x U text on ~e, re~ace with nulls Clear~. all to nulls Esc * Cl~ page, unprotected to Esc , wnte:Q_rotected ~ces Clear page, unprotected to character
Clear~ field
Esc sp Ps
Ctrl X
EscN Esco Esc_q Escr Esc_Q_ Escl_Pn@ EscxM EscE Escl_Pn L EscW Escl_Pn P
EscxJ EscR Esc [PnM EscT orEsc_[PsK
Esct
EscxL
EscY
Escl_Ps J Esc_y_
Esc · orCtrl Z
Esc+ Esc:
Esc * Esc,
Esc sp Ps
CtrlX Clear column to w _,£, ~aces Esc x 0 Esc x 0 Clear u~rotected col. to nulls Esc x K Esc x K Clear m~rot. col. to character Esc x N Ps Esc x N Ps Clear bo:ic UI.!I!Otected to char. Esc x Fr c Ps Esc x Fr c Ps Clear box all to character Esc x H r c Ps Esc x H r c Ps
TELEVIDEO COMMAND SUMMARIES C-6
Esco Esc_q Escr Esc_Q_ Escl_Pn@
EscE EsclPnL EscW Escl_Pn P
EscR Escl_PnM EscT or Esc _[_Ps K
Esct
EscxL
EscY
Escl_Ps J Esc_y_
Esc · orCtrl Z
Esc+ Esc:
Esc * Esc,
Ctrl X
Esco Esc_q Escr Esc_Q_
EscE
EscW
EscR
EscT
Esct
EscxL
EscY
Esc_y_
Esc · or Ctrl Z
Esc+ Esc:
Esc * Esc,
Ctrl X
9065 USER'S GUIDE

--cT ~ ~ ~37T?JTS ~ ~ I> L::
Confil!;llre COMl_I>2rt Esc J_p_J. .£_4 Esc J_p_l .. J!j_ EscJ_pJ .. .Q! Esc J_pJ .. £4 Configure COM2 port Esc J._p_J .. £_4 Esc ]J!J. .:J!...4 Esc-1£.1...Q! Esc J._pJ .. J!j_ Block mode EscB EscB EscB EscB
Half-block mode EscDB
Conversational mode EscC EscC EscC EscC
Full dUQlex ~mode EscDF EscDF EscDF EscDF c Half dUQlexJ!iDl.Q_ mode EscDH EscDH EscDH EscDH 0 M Local mode Esc c Escc Escc Escc M
Local edit on Esck Esck Esck Esck u N Local edit off Escl Escl Esc l Esc l I c Set PARALLEL as __p_rinter Esc \_Q_l A T Set COMl as_p_rinter Esc \_Q_2 I
Set COM2 as _p_rinter Esc \_Q_3 0 N Set COMl as host Esc_I_ = 22 l Esc_I_ = 22 l s
Set COM2 as host Escl_=22h Esc_I_ = 22h Ace~ host null characters Esc_[_ = 34 h !gpore host null chatacters Escl_=341
COMl receive handshakin__g_ Escl_l; Ps v Escl_l; Ps v
COMl transmit handshakin__g_ Escl_ll; Ps v Esc_I_ll; Ps v
COM2 receive handshakin__g_ Escl_l2 · Ps v EscJ12·Psv
COM2 transmit handshakin__g_ Esc_[_l3; Ps v Esc [ 13; Ps v
X-on/X-off_p_rotocol on Ctr! 0 Ctrl 0 Ctrl 0 Ctrl 0
X-on/X-off _£!"Otocol off CtrlN Ctrl N Ctrl N CtrlN Hold host transmission Ctrl S Ctrl S Ctrl S Ctrl S Resume host transmission Ctrl_Q Ctrl_Q_ Ctrl_Q_ Ctrl_Q_
Transmission control mode on Esc[=Oh Escl_=Oh Escl_=Oh Transmission control mode off Escl_=Ol Escl_=Ol Esc_I_=OI
Set character mode at 7 bits Esc1_=64l
Set character mode at 8 bits Esc_l=64h Read COMl 7-bit words Escl_=ll Escl_=ll Escl_=ll
Read COMl 8-bit words Esc[=lh Escl_= 1 h Esc[=lh
Read COM2 7-bit words Esc_I_=621
Read COM2 8-bit words Esc [ =62 h
Set buffer threshold Esc[ 2; Ps v Esc [2; Ps v Esc[2 ;Ps v
Set transmit wait state Esc_I_O; Ps v Esc [0; Ps v Esc [ 0; Ps v
ACK mode on Escl =28 h Escl= 28 h ACK mode off Esc[=28l Escl =28 l Send/print block boundaries from screen t~
Esc[=l7h Esc[=l7h
Send/print block boundaries from~et~
Esc[=l7l Esc[=l7l
Send/Frint block boundaries to end o di~l!Y_
Esc [ = 18 h Esc[=l8h
Send/print block boundaries to end at cursor
Esc [ = 181 Esc[=l8l
9065 USER'S GUIDE C-7 TELEVIDEO COMMAND SUMMARIES

Send ul!P!"otected line s E Send ul!P!"otected ~ ~ Send entire line S Send entire paJ?e C Send ul!P!"otected messa~ R E Send entire messag_e ~ Send messag_e line 1 D Send mess~e line 2 A Send status line I Send terminal ID
Send answerback
Show user 1 on bottom line L Turn off bottom line ~ Di~ay_ status on t<:>J:>_line D Turn off to__p_ line & Set top line s Set bottom line E N D
Load user message l
M Load user message E s s A G E s
Load/display F-key labels
Load time of day
Load the date
C~ntmodeon
C~rint mode off Transparent_Qrint mode on Tran~arent_Qrint mode off
P Bidirectional __p_rint mode on R I Bidirectional __12_rint mode off ~ Secondary receive mode on I Secondary receive mode off N G Print formatted~ to cursor
Print all formatted __Q_ag_es Print formatted unprotected
I a t-~'
Esc4 Esc5 Esc6 Esc7 EscS Esc s EscZO EscZ2 EscZl EscM Ctrl E
Esc_g Esch Esc. b Esc. c Escl 4; Ps v Esc [ 5; Ps v Esc fmsg CtrlM Esc_pl p~ ms_g_Ctrl M Esc Ps ms_g_ -Ctr! M Escx8 hhmm
Escx 9 mmddyy
Esc@ EscA Esc • Esca Ctr! R Ctrl T Escj_ = 27 h Escj_ =271 EscP Escj_O·Oi Esc[O;li
Esc4 Esc 5 Esc6 Esc7 EscS Esc s EscZO EscZ2 EscZ 1 EscM Ctr! E
Escg_ Esch Esc. b Esc. c Escl4; Psv
Escj_5; Ps v Esc fmsg CtrlM Esc_pl p~ m~Ctr!M
Esc Ps m~-Ctr!M
Escx8 hhmm Escx9 mmddyy
Esc@ EscA Esc • Esc a Ctrl R Ctr! T Escl = 27h Escl = 271 EscP EsclO;Oi Esc[O;li
Esc 5 Esc 6 Esc7 EscS Escs EscZO EscZ2 EscZ l EscM Ctr! E
Esc_g_ Esch
Escl 4; Psv
Escl5; Ps v Esc f msg Ctr!M Esc_pl p2 ms_g_Ctrl M
Esc@ EscA Esc' Esc a Ctrl R Ctr! T
EscP Esc [ O;O i Esc[O;li
Esc4 Esc5 Esc6 Esc7 EscS Esc s EscZO
EscZ 1 EscM Ctrl E
Esc_g_ Esch
Esc fmsg Ctr!M
Esc@ EscA Esc • Esc a Ctrl R Ctr! T
EscP
----------+------+-------+-------+----__,, Print 1.mformatted page to cursor
EscL EscL
1-"-Prin-"''--t"-'al=l"-'u-"n=fo-'-'rma=tt.;..:.ed..;_~-""=~=e.;;_s -+Es~c l_,_;;,0_,_; ..,;.4..::.i ----+=Es=c l 0 ; 4 i Print unformatted unprotected Esc [ 0 ; 5 i Esr, [ 0 ; 5 i
lpasi;es 1-P~ag.,_1e;...o'_P1'"'""n_· n_t fl=i"---po""n ____ +Es:;;;.:;...;.c l_._=....:lc.::.5..;;.:h"----+:Es=c l = 15 h Page print flip off Esc [ = 15 I Esc [ = 15 l
TELEVIDEO COMMAND SUMMARIES C-8
EscL
Esc[0;4i Esc[0;5i
Esc_L= 15 h Esc[=l'il
EscL
9065 USER'S GUIDE

·~ e•lllia > :{:.::::::~:::::::~::!~::!:[!:~:: :;;;:;;;;;;;{ ~ 'Cit.lb 32···· ~lti:JJl;.:.:::./. I"..,.;; > \({.I I >:::::tt.:>:••:?:•J
Select function k~ set Escl1;Psv Escl_7 ;Psv Escl7 ;Psv Reprogram function key Esc~J Pf text trl Esc~J Pf
text trl Esc~J Pf text trl Esc~J Pf text trl
F Function k~ save on Escl=lOh Escl_= lOh Escl_=lOh u Function k~ save off Escl=lOI Escl= 101 Escl_=lOI N c Send function k~ messl!,g_e Escl_Pnl Escl_Pn I Escl_Pn I T I Load editing key EscOPs EscOPs EscOPs EscOPs 0 [2_l •.• _!!} [2_l ... _!!} IJ!l ... J!? Jp_l ••• J!? N Load all editing keys Esc] Ps Esc] Ps Esc] Ps Esc] Ps K Le! ... _pn Le! ···J!!l !2J ... p_n 12_1 •.• p_n E Load re~ace character EscePs EscePs EscePs EscePs y s Program answerback Esc A text Esc" text Esc" text Esc" text
messa~ Ctrl Y Ctrl Y Ctrl Y Ctrl y Reprogram send delimiters Escx Escx Escx Escx
Ps Pl P2 PsPJ P2 PsPJ P2 PsPJ P2 R~.R:_am _£..rint terminator Esc_E..Ps Esc_p_Ps Esc_p_Ps Esc_p_Ps
9065 USER'S GUIDE C-9 TELEVIDEO COMMAND SUMMARIES

Table C-2. TeleVideo 925/905/910+, 912/920, and 910 Commands ~~; ,, ~:U~os/91.0f.. ~'.w12~
0 Self test Esc V Esc V p E R Monitor mode on A
T Monitor mode off 0 ~ Reset
K Enable ~board E y Disable k~board B K~lickon 0 A K~lickoff R D Sound the beeper
Screen on Screen off L~ht backizround
s Dark bac~und c R Set attribute E
Blinkin_g_ on E N Blank on D Blinkin_g&Jank off I s Reverse on p
Reverse off L A Underline on y
Underline off &
Set cursor attribute M Toggle cursor on/off E M Set line attribute 0 R Auto~e mode on y
Auto~e mode off Display next~e Display previous page
G Di~la_y_controlcharacter R
Graphics mode on A p H Graphics mode off I c s Draw a box
E Write ~rotect on D
Write _I!.rotect off I T Protect mode on I N Protect mode on G
TELEVIDEO COMMAND SUMMARIES
EscU
EscX orEscu Esc-Pn
Esc" Esc# Esc> Esc< CtrlG
Escn Esco Esch Escd EscGn
Esc.n
EscGn Escv Escw EscK EscJ
Esc$
Esc%
EscHwh
Esc_l EscJ_ Esc& Esc'
C-10
EscU
EscX orEscu Esc-Pn
Esc" Esc#
Ctrl G
Esco Esco Esch Escd EscGn Esc"
Esc__q_ Escj Esck Escl Escm Esc.n
Escv Escw EscK EscJ
Esc $
Esc%
Esc_l EscJ_ Esc& Esc.
EscU
EscX orEscu Esc-Pn
Esc" Esc# Esc> Esc< CtrlG
Esc. EscGn Escv Escw EscK EscJ
EscFPc Esc$
Esc%
Esc_l EscJ_ Esc& Esc.
9065 USER'S GUIDE

l~lcAA iLi·•···· ±8221{ 220 LrrSIT±filTTo'>c;/9051!iiiff2liliiJ 9121920 ····./•· < ·~ SCR- Scroll mode on/off OLL-ING Jump scroll
T A B
s T 0 p s
c u R s 0 R
c 0 N T R 0 L
E D I T I N G
T E x T
Smooth scroll Tab Field tab
Back tab
Set tab sto~
Clear cursor tab Clear all tabs
Cursor home
Cursoru~
Cursor down Cursor ri__g_ht Cursor left
Carriage return
Line feed
Reverse line feed
New line Address cursor row, column
Address cursor row
Address cursor column
Address cursor_page, row, column
Read cursor row column Read cursor~. row, column
Pl!&.e edit mode
Line edit mode
Insert mode
R~acemode
Insert character Delete character
Insert line Delete line
Erase line to si:>_aces
Erase line to nulls Erase page to ~aces
Erase paJ?;e to nulls Clear ulll>fotected
Clear Ulll>fOtected cursor to ~aces
Clear all Ulll>fOtected to ~aces Clear u~otected cursor to nulls
Clear all u~otected to nulls
Clear u~otected tow . ...£: ~aces Clear field
9065 USER'S GUIDE
Esc9 Esc8 Ctrl I Esc i
Esc I Esc 1 Esc2 Esc 3
Ctrl I\
Ctrl K Ctrl V Ctrl L
Ctrl H
CtrlM
Ctrl J
Ctrl Esc =re
Esc -_.E.r c Esc? Esc/
EscN Esco Esc_q
Esc r
EscQ EscW
EscE
EscR
EscT
Esct
EscY
Esc_y_ Ctrl Z Esc;
Esc+
Esc:
Esc * Esc,
Ctrl X
C-11
Esc9
Esc8 Ctrl I Esc i
Escl
Esc 1
Esc2 Esc3
Ctrl I\
Ctrl K Ctrl V Ctrl L CtrlH
CtrlM
Ctrl J
Ctrl Esc=rc
Esc-_prc
Esc?
Esc/ EscN
Esco
EscQ EscW
EscE
EscR
EscT
Esc t
EscY
Esc_y_ Ctrl Z Esc;
Esc+
Esc:
Esc *
Ctrl X
EscH
Esc9
Esc8
Ctrl I Esci
Escl
Esc 1 Esc2 Esc3
Ctrl K Ctrl V CtrlL CtrlH
CtrlM
CtrlJ
Ctrl
Esc=rc Esc_Lr
Esc?
EscN
Esco
Esc_g_
Escr
Esc_Q_
EscW
EscE
EscR
EscT
Esc t EscY
Esc_y_ Ctrl Z Esc;
Esc+
Esc:
Esc *
CtrlX
TELEVIDEO COMMAND SUMMARIES

~ 1AllLJ~~> · ... <.·<1 i9i: ,,,,,,.;.; >. . /. ~:.;~ ,.:;,; .. ,,.. . . ·. .. .. '.__] ~ ...___. l9tn••.••.• ... •.··•<•·•~
c X-On/X-Off handshaki'!&_ on Ctr!O CtrlO Ctr! 0 0
X-On/X-Off handshakin_g_ off Ctr! N Ctr! N Ctr!N M M ~d main transmission CtrlS Ctr! S Ctr! S u N Resume main transmission Ctrl_Q_ Ctrl_Q_ Ctrl_Q_ I c Block communication mode EscB EscB EscB A
Coversational mode EscC EscC EscC T I Full d'!P!ex communication mode EscDF 0 N Half dl!Qiex communication mode EscDH s
Local edit on Esck
Local edit off Escl s Send u'!Q._rotected line Esc4 Esc4 Esc4 E N Send u111>_rotected _p11g_e Esc5 Esc5 Esc5 D Send entire line Esc6 Esc6 Esc6 s Send entire Plige Esc7 Esc7 Esc7 c R Send one character EscM E
Reprogram send delimiters Escx E N PsJ!...ll!J
T Send u111>_rotected messllg_e EscS EscS EscS E Send entire messa~ Esc s Esc s Escs x T Send terminal ID EscM EscM I Send answerback Ctrl E Ctr! E Ctr! E M E Di~l!Y_ messllg_e line Esc_g_ s s Di~~ status line Esch A G Load 25th line Esc f m.s_x_ Ctr! Y E Program answerback message Esc " m.sg Ctr! Y s
C~rint mode on Esc@ Esc@ Esc@
CoJJY.Pfeit mode off Esc A or Ctr! T p
Tran~arent_Q_rintmodeon Esc' Esc' Esc ' or Ctr! R R I Tran~arent_print mode off Esc a Esc a Esc a or Ctr! T N T Bidirectional__Q_rinton Ctr! R Ctr! R I Bidirectional_print off Ctr! T Ctr! T N G Prinit formatted~ EscP EscP EscP
Print unformatted ~e EscL EscL EscL R~roj!l"affi terminator Esc_Q_Ps
F- Load function key Esc 1~1 p2 m.sg Esc 1{1 p2 msg Esc 1{1 p2 msg KEY Ctr! Ctrl Ctrl
TELEVIDEO COMMAND SUMMARIES C-12 9065 USER'S GUIDE

Appendix D OTHER COMMAND SUMMARIES
The 9065 offers 27 different terminal emulations. The commands for these terminals are summarized in Appendices C and Din the tables shown below. Within the command codes in the tables, variable values are shown in italics.
Appendix C Table Terminals Table Terminals
C-1 Tele Video 9065 C-2 Tele Video 925/905 Tele Video 965 Tele Video 910/910+ Tele Video 955 Tele Video 912/920 Tele Video 950
Appendix D Table Terminals Table Terminals
D-1 WyseWY-60 D-2 ADDSVPA2 Wyse WY-50/50+ ADDSVP60 Wyse WY-120/150 LSI ADM 3A/5/31 Wyse WY-160 Hazeltine 1500
D-3 Data General DG200 D-4 PC TERM DEC VTl00/52 IBM3161-V
IBM 3101-lX IBM 3101-2X
NOTE The terminal recognizes boldfaced commands only during enhanced compatibility mode (enabled in the General set up menu).
9065 USER'S GUIDE D-1 OTHER KEY CODES

T bl 01 W E If C d a e~ mu a ion omman s rr ' ' ill ' I j@'t~H !UH wv.:soiso+) ••·' wiW.fao/iso wvJi60 u
Monitor mode on EscU EscU EscU EscU Monitor mode off Esc XorEscu Esc XorEsc u EscXorEscu EscXorEscu
T Reset terminal Esc ! Pn EsccX E Save set UI>._ values Esc ! 2 EsccV R M Save set 1:!P._ values and tabs EsccW I
Enable k~board Esc 11 or Ctrl N Esc 11 or Ctrl N Esc 11 or Ctrl N Esc 11 or Ctrl N N A Disable key_board Esc # or Ctrl 0 Esc # or Ctrl 0 Esc #or Ctrl 0 Esc # or Ctrl 0 L
& K~clickon Esce% Esce% Esce% Esce% K~clickoff Esce$ Esce$ Esce$ Esce$
K K~repeaton Esce- Esce- Esce- Esce-E
y K~ repeat off Esce, Esce, Esce, Esce, B 0 CAPS LOCK on Esce& Esce& Esce& Esce& A
CAPS LOCK off Esce' Esce' Esce' Esce' R D Normal CAPS LOCK EsceT EsceT EsceT EsceT
Reverse CAPS LOCK EsceU EsceU EsceU EsceU NumLockon Escd -NumLockoff Escd,
Select ASCII key_ code mode EsceH Select PC scan code mode Escel Sound the bee~ CtrlG CtrlG CtrlG CtrlG Screen saver on Esce_Q_ Esc e_Q_ Esc e_Q_ Esc e_Q_ Screen saver off EsceP EsceP EsceP EsceP Screen on Esc '9 Esc '9 Esc '9 Esc '9 Screen off Esc. 8 Esc' 8 Esc. 8 Esc '8 Set attribute EscGn EscGn EscGn EscGn
s Write~rotect mode on Escj_ Escj_ Esc_l Escj_ c
R Write:P._rotect mode off EscJ. EscJ. Escl_ Escl_ E E Set write:I>IOtect attribute Esc 'Pn Esc 'Pn Esc 'Pn Esc 'Pn N
Set information line attribute EscAPnPs EscAPnPs EscAPnPs EscAPnPs D Attribute base: character mode on EsceO EsceO EsceO EsceO I s Attribute base: character mode off Esce 1 Esce 1 Esce 1 Esce 1 p L Attribute base: _l)llg_e Esce2 Esce2 Esce2 Esce2 A
Attribute base: line Esce3 Esce 3 Esce3 Esce3 y
Set cursor attribute Esc 'n Esc 'n Esc 'n Esc 'n Set line attribute EscGPs EscGPs EscGPs EscGPs Set number of data lines EscePs EscePs EscePs EscePs 80-column mode Esc.: Esc': Esc.: Esc': 132-column mode Esc'; Esc'; Esc •. Esc'; 80-col. econom_y_ mode on EsceG EsceG EsceG 80-col. econom_y_ mode off EsceF EsceG EsceG.
OTHER KEY CODES D-2 9065 USER'S GUIDE

u "'~~··>·>'··""'""'' ~ wvs60 + HHH • wvusoiso+< •• WY~iioiiso jVylj6i) .. . } Tab Ctrll or Esc i Ctrll or Esc i Ctrl I or Esc i Ctrl I or Esc i
T Back tab Escl Escl Escl Escl A
B Set tab st~ Esc I Esc 1 Esc I Esc I s Clear tab stQI>_ Esc2 Esc2 Esc2 Esc2 Clear all tabs Esco Esco Esco Esco Gra_J>_hics mode on EscHCtrlB EscHCtrl B EscHCtrl B EscHCtrlB Gra_J>_hics mode off EscHCtrlC EscHCtrl C EscHCtrlC EscHCtrlC
G DifilllllY a irraphics character EscHPs EscHPs EscHPs EscHPs R A Draw a box EsccGrc EsccGrc EsccGrc EsccGrc p H Sw~/copy/move a box (action = Esc c " action I Oil , sp = source page, ssr = ~PssrRssc c source start row, ssc =source start serRsecC s column, ser = source end row </! P dsr R dsc
sec = source end column, dp = destination page, dsr = destmation start row, dSc = dest. start columri_l Auto font load on EsceO EsceO EsceO EsceO Auto font load off EsceN EsceN EsceN EsceN Linewrapon Escd/ Escd/ Escd/ Escd/
E Line wra_J>_ off Escd. Escd. Escd. Escd. D
I New line mode on Esce5 Esce5 Esce5 Esce5 T I New line mode off Esce4 Esce4 Esce4 Esce4 N G WordStar mode on Esc-/ Esc-/
M WordStar mode off Esc-. Esc-. 0 Application mode on Esc-3 Esc-3 D E Application mode off Esc ! 2 Esc ! 2 s
Protect mode on Esc& Esc& Esc& Esc& Protect mode off Esc' Esc' Esc' Esc'
Set number of lines per page EscePs EscePs EscePs EscePs
S_J>_lit the screen Esc x C Pl EscxCPl EscxC Pl EscxCPl A S_J>_lit and clear Escx3Pl Escx 3Pl Escx 3 Pl Esc x 3 Pl D D S_J>_lit two ~es EscxAPn EscxAPn EscxAPn EscxAPn I T Si>_lit two pages and clear Escx I Pl Esc x 1 Pl Esc x I Pl Escx I Pl I Activate upper window Escl Esc_l Esc] Esc l 0 N Activate lower window Esc} Esc} Esc} Esc} A L Raise ~t line EscxR EscxR EscxR EscxR
s Lower ~lit line EscxP EscxP EscxP EscxP c Display next page EscK EscwC EscwC EscwC 1 R orEsc K1 orEscK1 E orEscK E Display previous page EscJ EscwB EscwB EscwB 1 N orEscJ1 orEsc J1 orEscJ M Difill}ll}'Qage Pn EscwPn EscwPn EscwPn EscwPn E M Define screen as one window Escx@ Escx@ Escx@ Escx@ 0
Define screen as one window and EscxO EscxO EscxO EscxO R y clear~es
Auto page mode on Escd+ Escd+ Escd+ Escd+ Auto page mode off Escd * Escd* Escd* Escd*
1 Screen must not be split
9065 USER'S GUIDE D-3 OTHER KEY CODES

~········~wv>.60< / W¥;;51)1so+ /. W\1'~1:foii56 wvH60 < Autoscroll mode on Esco Esco Esco Esco
s Autoscroll node off EscN EscN EscN EscN c
R Jump scroll Esc'@ Esc.@ Esc '@ Esc '@ 0 L Smooth scroll Esc'= L
Esc 'Ps Esc 'Ps I Set scroll rate Esc 'Ps Esc 'Ps N Line lock on Esc'H Esc'H Esc'H Esc 'H G
Line lock off Esc 'I Esc 'I Esc 'I Esc 'I
Cursor home Ctrl " or Esc l Ctrl " or Esc l Ctrl " or Esc J_ Ctrl " or Esc J_ Set cursor at specific line EscJ_line Cursor up CtrlK Ctrl K Ctrl K Ctrl K
c Cursor ri_g_ht CtrlL CtrlL Ctrl L Ctrl L u Cursor left CtrlH Ctrl H Ctrl H Ctrl H R Cursor down Ctrl V Ctrl V Ctrl V Ctrl V s 0 Newline Ctrl Ctrl Ctrl Ctrl R
c Carril!&_e return CtrlM CtrlM CtrlM CtrlM
0 Linefeed CtrlJ CtrlJ Ctrl J CtrlJ N Reverse line feed Escj Escj Esci Esci T R Address cursor row, column J_8Ql Esc=rc Esc= re Esc= re Esc=rc 0 L Address cursor row, column _(13~ EscarRcC EscarRcC EscarRcC EscarRcC
Address cursor ~e row column Esc W @J!JC Escw@_2_rc Esc w@p_rc Escw@pJc Read cursor row, column Esc? Esc? Esc? Esc? Read cursor row, column Jdecimall Esch Esch Esch Esch Read cursor~e. row, column Esc/ Esc/ Esc/ Esc/ Read cursor_}>llge, row col.J_dec_l Escw' Escw' Escw' Escw' Pl!&_e edit mode Esce# Esce# Esce# Esce#
E Line edit mode Esce" Esce" Esce" Esce" D Insert mode Esc_q Esc_q Esc_g_ Esc_q I T R~acemode Escr Escr Escr Escr I N Insert character Esc_Q_ Esc_Q Esc_Q Esc_Q_ G Insert column of nulls EsccM EsccM EsccM EsccM
Insert line EscE EscE EscE EscE Delete character EscW EscW EscW EscW Delete cursor column EsccJ EsccJ EsccJ EsccJ Delete line EscR EscR EscR EscR
OTHER KEY CODES D-4 9065 USER'S GUIDE
1c;rz ~~Gt~=- == ~ \tfills&s~+ rn w-v2u6/1sij c wv~•~ ;t Clear all redefineable EsccU k~ definitions
c Clear u~rotected line to ~ace EscT EscT EscT EscT L Clear u~rotected line to nulls Esct Esct Esct Esct E A Erase ~e to ~aces EscY EscY EscY EscY R I Erase ~e to nulls Esc_y Esc_y Esc_y_ Esc_y N I Clear unprotected to end of line EsccO EsccO N with~aces G Clear unprotected page foreground EsccP EsccP D to~ces A Clear unprotected page foreground EsccQ EsccQ T A to nulls
Oear unprotected line foreground EsccR EsccR to~aces · Cleat unprote;:ted line foreground E.c;c cs EsccS to nulls Clear u~rotected ~e to ~aces Esc ; or Ctrl Z Esc ; or Ctrl Z Esc ; or Ctrl Z Esc ; or Ctrl Z Oear ~e all to ~aces Esc+ Esc+ Esc+ Esc+ Clear u~rotected page to nulls Esc: Esc: Esc: Esc: Clear ~e all to nulls Esc* Esc* Esc* Esc* Clear U1!£_rotected ~e to ~ace Esc, Esc, Esc' Esc, Clear ul!£_rotected ~e to character Esc. Ps Esc. Ps Esc. Ps Esc .Ps Clear col. to write-~rotected ~ace EscV EscV EscV EscV Clear column to nulls EsccK EsccK EsccK EsccK Clear column to character Escc I Pc Esc c I Pc Esc c I Pc EsccIPc Clear u~rotected box to character EsccF re Pc Esc c F re Pc Esc c F re Pc EsccFrc Pc Clear box all to character Escc H re Pc EsccH re Pc Esc c H re Pr: Esc c H re Pc
9065 USER'S GUIDE D-5 OTHER KEY CODES

Ll .......... ,, ...... ~ WV~66 WY~SO/SO+ W\'Lt:fo/iso· wv~foo
Config\lre COMl port EsccOn EsccOn EsccOn EsccOn Configure COM2 port Esccln Esc c 1 n Esccln Esccln Set COMl _l>_Ort as host Esce 8 Esce8 Esc e 8 Esce8
Set COM2 p9rt as host Esce9 Esce9 Esc e9 Esc e9 Set COMl receive handshaki11[ Escc2n Escc2n Escc2n Escc2n Set COM2 receive handshakiJ!g_ Escc3n Escc3n Escc3n Escc3n
H Set COMl transmit handshaking_ Escc4n Escc4n Escc4n Escc4n 0 Set COM2 transmit handshakin__g_ Escc5n Escc5n Escc5n Escc5n s
Block mode EscB EscB EscB EscB T
c Conversational mode EscC EscC EscC EscC 0 Full d~ex i!'mQ_ EscDF EscDF EscDF EscDF M M Half d~ex (HDlQ_ EscDH EscDH EscDH EscDH u N Local edit on Esck Esck Esck Esck I Local edit off Esc l Esc l Esc l Esc l c A !g_nore null chatacters from host EsceR T I Ace~ null characters from host EsceS 0 Hold host transmission Ctrl S Ctrl S Ctrl S Ctrl S N s Resume host transmission Ctrl_Q_ Ctrl_Q_ Ctrl_Q_ Ctrl_Q_
Set maximum data transmit rate Escc6n Escc6n Escc6n Escc6n Acknowled__g_e J..ACKl. mode on Esce 7 Esce7 Esce7 Esc e 7 ACK mode off Esce6 Esc e 6 Esce6 Esce6 Send block boundaries Escd' Esc d' Escd' from to_Q_ of~e
Send block boundaries Escd& Escd& Escd& Escd& from to..£. of screen Send end of Plle:elline boundaries EsceE Send boundary to end at cursor EsceD Send Ul!l?!"Otected line Esc4 Esc4 Esc4 Esc4 Send u'!P!"otected ~e Esc5 Esc5 Esc 5 Esc 5 Send entire line Esc 6 Esc 6 Esc6 Esc6 Send entire ~e Esc7 Esc 7 Esc7 Esc 7 Send u'!P!"otected mess~ Esc S EscS Esc s Esc S Send entire mess~e Esc s Esc s Esc s Esc s Send one character EscM EscM EscM EscM Send terminal ID Esc<~ Esc~ Esc~ Esc<~
Send answerback CtrlE Ctrl E Ctrl E Ctr! E Set status line Esc 'Ps Esc 'Ps Esc 'Ps Esc 'Ps
M Load user message EscFmsg Esc Fmsg EscFmsg Esc Fmsg E
s Ctr!M Ctr!M Ctr!M Ctrl M s Load time of day Escc 8 Escc8 Esc c 8 Esc c 8 A G hhmm hhmm hhmm hhmm E Enhanced mode on Esc- ! Esc- ! Esc- ! Esc- ! s
Enhanced mode off Esc - sp_ Esc - SQ_ Esc- SQ_ Esc -sp_
OTHER KEY CODES D-6 9065 USER'S GUIDE

-fh222•..::::..:·~
C~rint mode on C~rint mode off Transparent print mode on
p R Tran~arent_.12_rint mode off I N Bidirectional_.12_rint mode on T I Bidirectional _.12_rint mode off N COM2 receive _p_rint mode on G
COM2 receive _p_rint mode off Print formatted~ Print Ul!l!"Otected ~e Print unformatted page
R ~eprofiam function key E see ta les belowl p R Load/display Funct key labels 0 G R Load editing key A M
0 Normal Remote
2 Local
Reprogram Wyse function key direction and definition:
Esc Z pl p2 msg Del
9065 USER'S GUIDE
~~ WY~SO/SO.f ? wv~tio/1so ·••wvti6o < CtrlR CtrlR Ctrl R Ctrl R Ctrl T Ctrl T Ctrl T Ctrl T Escd# Escd# Escd# Escd#
Ctrl X Ctrl X Ctrl T Ctrl T Ctrl T Ctrl T Escd% Escd% Escd% Escd% Escd$ Escd$ Escd$ Escd$ Escd ! Escd! Escd ! Escd ! Escd <S_p_> Escd<S_p_> Esc d<S_p_> Escd<~
EscP EscP EscP EscP Esc@ Esc@ Esc@ Esc@ EscL EscL EscL EscL or Esc_p_ or Esc_p_ or Esc_.12_ or Esc_.12_ EscZpl p2 ms_g_Del
EscZpl p2 ms_g_Del
Esc Zpl p2 ms_g_Del
Esc Zpl p2 m~Del
EscZPs EscZPs EscZPs EscZPs ms_g_ Ctrl M ms_g_Ctrl M ms....s_Ctrl M m~CtrlM
EscZpl p2 msg Del
EscZpl p2 msg Del
EscZpl p2 msg Del
Esc Zpl p2 msg Del
I · < Ki>vbo~rds ~ ASCII AT/ ANSI >_Qfi~hi#Mlj >
Fl Fl @ ' F2 F2 A a F3 F3 B b F4 F4 c c F5 F5 D d F6 F6 F6 E e
F f F8 F8 F8 G [g F9 F9 F9 H h FlO FlO FlO I Fll Fll Fll J Li Fl2 Fl2 Fl2 K k Fl3 F13 L Fl4 Fl4 M m FIS He~ N n Fl6 Do 0 0
D-7 OTHER KEY CODES

Table D-2. VP A2., VP 60, ADM, and HZ 1500 Emulation Commands m:mw!~iiili!:Hi!iMiM~MM@HWM:mt:lf:!WiJJnMM::r::) 'ii!!iifffMtrn:m !~6.miS.iiMt ~:iii'.,,, .. _····
K Enable keyboard Esc 6 Esc 6 Esc " -Ctrl F E m~B m~N
~ Disable keyboard Esc # -Ctrl U o m~O
~ Sound the bell Ctrl G Ctrl G D
Screen on ? Screenoff s p L A y
&
Set attribute Tjlg_ bit set T_!!_ bit reset Set attribute
M Set video attribute E Store conttol M O Di~la_ynext~e
~ Di~la_y]!_revious~e Auto pae:e mode on
Auto pae:e mode off Forms mode ModJ!Y. mode Gra_Qhics mode on Gra__p_hics mode off
T Tab ~ Tabenable S Tab disable
Field tab Back tab Cursor home Cursor'!Q_ Cursor down
C Cursor ri_g_ht u Cursor left R s 0 R
c 0 N T R 0 L
Newline ~ag_eretum
Line feed Address cursor row, column Address cursor column row Address cursor row col 132 Address cursor row Address cursor column Address cursor pg, row, col Read cursor row column Read cursor pg, row, column
OTHER KEY CODES
Escl Esc2 Ctrl I
Esco CtrlA CtrlZ
CtrlF CtrlH orCtrl U
CtrlM CtrlJ Esc Y re
Ctrl Kr Ctrl Pc
EscGn -CtrlGn
EscK EscJ Escv Escw
EscR EscC Esc I Esc2 Ctrl I Ctr II Ctr II EscH Esch
Esc i Ctrl I Esco Esc I -Ctrl I Ctrl A Ctrl I\ -CtrlR
Ctrl Z Ctrl K -CtrlL CtrlJ Ctrl F Ctrl L Ctrl P Ctrl H Ctrl H Ctrl H orCtrl U ·-------
Ctrl CtrlM CtrlM CtrlM
CtrlJ CtrlJ Esc Y re Esc =re Ctrl Pc r
Esc =r-c VTr DLEc
Esc -.E_rc
Esc? -Ctrl E Esc/
D-8 9065 USER'S GUIDE

a:~a '=fr:: .. \.:: :·:::::::, ::::}::::rv~~:::::t:m: ::: Mi~u::::::=:::::: ::: ~J>.~1Ws.tJ.t:: :'tt~i$ijij::: =:::::::.::::.,. Write-protect mode on Ctr! N Esc) - Ctr! Y
Write-protect mode off Ctr! 0 Esc { - Ctr! Cursor on Cursor off Insert mode ~ace mode Insert a character Insert a character ~ill
E Insert a line D I T I N G
Insert Pn lines Delete a character Delete a character~ Delete a line
~ Erase line to S].)_ace X Erase line to nulls T
Erase ~e to S].)_ace Erase_l)llge to nulls Erase variable data Clear PJ?; UllQfOtected to S].)_ace Clear ~e all to S].)_aces Clear ~ge unprotected to nulls Clear ~e all to nulls
Clear ~e ul!Q_rot. to w .:£: S].)_ace Block mode c o Conversational mode
~ Full d~ex mode ~ Half d11plex mode I P~mode c A Mess~e mode T Transmit 0 Read status N S Hold host transmission
Resume host transmission
Rt!J>rQg!_am send delimiters s E Send UllQfOtected line ~ Send UllQfOtected ~ I Send entire line N G Send entire page T Send UllQfOtected mess~e ~ Send entire mess~e T Send one character
Send terminal ID answerback Di~l!}'._ mess~e line Display status line
9065 USER'S GUIDE
CtrlX CtrlW
EscF Esc f EscM EsclPn L EscE Esce Esc I EscK
Esck
Ctr! L
Esc t EscT
Ctr! S Ctr! Q
Esc s
EscB Esch
D-9
EscF
EscM
EscE
Esc I EscK
Esck
EscG Ctr! Z Ctr! L Esc:
Esc *
Esct EscT
EscU Escu Esc DCl EscEN_Q_
EscB Esch
Esc_g_ Escr Esc_Q_
EscE
EscW
EscR EscT Esc t EscY Esc_y_
Esc+
Esc, EscB EscC EscDF EscDH
Esc.nm
Esc4 Esc 5 Esc6 Esc7 EscS
Ctr! E
Escl Esc}
-Ctr! z
-Ctr! s - Ctr! 0
- Ctr! X
- Ctr!] - Ctr!\
-Ctr! T
-CtrlN - Ctrl P
OTHER KEY CODES

··:·· .. ,,.,.,,,rma:J:::::::::::::::::::::}:•:::::::::::::••:::f:J:r:::::f::::•:•• :~1:~•••::::1••::::1::::•••:••:·•~··ijijJ::J:·•·••m••••:•:•:••J• ~hmAl~iJi:••:•:••••• ~·•itwJ::• ·'!•••· •••• ,.
p R
Copy print mode on Ctrl R Ctrl R Ctrl R Ctrl R orEscA2
I Copy print mode off N T I Tran~aren~rint mode on ~ Tran~arent_g_rint mode off
Print formatted ~e Print Ulll'l:_Otected _p~ Print unformatted page
F- Load function key KEY
RE- Load replace character PGM
OTHER KEY CODES
Ctrl T
Esc3 Esc4
EscX
Escx Esc lply_2 msg_CtrfY
D-10
Ctrl T
Esc3 Esc4
EscX
Escx
Ctrl T orEsc A 0 EscA 1 Ctrl T
EscP Esc@ EscL
Esc I ms_g_Ctrl Y Esc.8m
Ctrl T
Esc * Esc/
9065 USER'S GUIDE

Table D-3. DEC Emulation Commands
~ lhiii/i:ti~ ~) 11 ~ vrioo ii:/rn:!nii::~!:iii ••wst::: t M Alt ~board mode on Esc= Esc= 0 D Alt kl?Y_board mode off Esc Esc> E Enter ANSI mode Esc<
New line Escl20h Linefeed Esc_[_201 Application kl?Y_s Escl?lh
0 Cursor keys Escl?ll T H ANSI Escl?2h E
VT52 EscJ_?21 R
M 132columns Escj?3h 0 SO columns Esc_l?31 D E Smooth scroll Escj?4h s Jum_l)_ scroll Esc_L?41
Reverse video RSD Escl? 5 h Normal video RSE Escl?51 Relative ori__g_in Escl?6h Absolute otjg_in Escl?61 Wra~around on Escl?7h Wra~around off Escl?71 Auto repeat on Esc[?Sh Auto repeat off Escl?Sl Sound the bee~ CtrlG
c Cursor U)_)_ CtrlW EscJ_PnA EscA u Cursor down Ctrl Z EscJ_PnB EscB R
s Cursor ri__g_ht Ctrl X EscJ_PnC EscC 0 R Cursor left Ctrl Y EscJPn D EscD c Cursor home CtrlH 0
New line Ctrl J EscE N T Carriage return CtrlM R 0 Index EscD L
Reverse index EscM EscI Address row, column EsclPl;PcH Esc Y re Address column, row CtrlPcr Select char attribute Esc l Ps; ... ;Ps m Save cursor & attribute Esc7 Restore cursor & attribute Esc8
LS Double-he!g_ht to__p_ Esc#3 I I NZ Double-heig_ht bottom Esc#4 EE Sin_g!e-width & he!g_ht Esc#5
Double-width, si~e-height Esc#6
9065 USER'S GUIDE D-11 OTHER KEY CODES

c L E A R I E R A s E
c H
s E T
s c R E E N
D I s p L A y
T A B s
p R I N T I N G
R E p 0 R T
Clear~ to all ~aces Erase line to ~ces Erase ~e to ~aces Erase line ri_g!tt of cursor Erase line left of cursor Erase entire cursor line Erase from cursor to end of screen Erase from beginning of screen to cursor Erase entire screen Select character set United Kil!&.dom U.S. ASCII Special Graphics
Blinkin_g_ on Blinkin_g_ off Underline on Underline off Write::P_rotect mode on Write::P_rotect mode off Define scrollil!&. re_g!on Autoscroll mode on Autoscroll mode off
Set a siggle tab Clear a sin_gle tab Clear all tabs Co...l:?YJ!int mode on C~rint mode off Tran~arent_£..rint mode on Transparent_£..rint mode off Print all from cursor line Print unprotected from cursor line Cursor position Terminal status Terminal ID
OTHER KEY CODES
Ctrl L CtrlK RSF
EsclOK EscK Escl_l K Escl2K Esc[OJ EscJ
Esc[lJ
Escl2J GO Set G1 Set Esc_(A Esc_(B EscG Esc(O Esc )0 EscF
CtrlN Ctrl 0 Ctrl T Ctrl u Ctrl\ CtrlJ
EsclPt ;Pbr Ctrl R Ctrl S
EscH EsclOK Esc [ 3_g_
RSETX RS STX RSSOH RS STX Ctrl..Q. Ctrl A
Escl6n Escl5n
RSC Esc[Oc EscZ
D-12 9065 USER'S GUIDE

Table D-4. PC TERM & IBM Emulation Commands I~ ~~ ebntiiiVi t8Ni:ii6J.t :\?:~ • mN13i01Hxu • lbii 31.Cd;ixt
Monitor mode on EscU Esc~: M 0 Monitor mode off EscX Esc<sp>; N orEscu I Select GO character set Esc<Pa T 0 Select G 1 character set Esc>Pa R
Reset_{_RISJ_ Esc <~1»S Cancel Esc5 EscS Unlock k~board Esc" Esc. Esc· Esc·
T Unlock k~bd, reset MDT Esc ! s E Lock k~board Esc# Esc: Esc: Esc: R M K~clickon Esc> I N K~clickoff Esc< A Sound bee_per CtrlG L
Set mar_g!n bell Esco Clear mar_g_in bell Escn
F- Program function key Escl~/f.2 Esc ! =Fn K msg tr Y FJFpEsc E y Set default function k~ EsctFn s
Set all default function k~ Esc<~t Screen di~!!Y_ on EscN Screen displ!!Y_ off Esco
s Di~l!Y. test~ttem EscF c Dark text, li_g_ht background Esch R E qg_ht text, dark back~und Escd E Load text into message line Esc f text N
CtrlM Di~!!Y_ mess~e line Esc_g_ Di~l!Y. send mark EscE EscE Di~~vious~e EscJ Di~l!Y. next~e EscK Set field attribute Esc3
A Pal ... Pa4 T
Set character attribute T Esc4Pal R Define visual attribute EscGPs
Set cursor attribute Esc. Ps p Write:Q_rotect mode on Esc_l R
Write:Q_rotect mode off EscJ_ 0 T Protect mode on Esc& E c Protect mode off Esc' T
Gra_I>_hics mode on Esc$ Gra__p_hics mode off Esc%
9065 USER'S GUIDE D-13 OTHER KEY CODES

-- '::':'"''''''~ ~i.iltM ? mM'.3i~if r mM: 3101Gttx > JBM ~H6ii~x : P Create viewport Esc r Vt A Vid Vdh Vdl R Vwh Vwl ... T I Select host partition Esc<sp>q T Pid I
Select active _p_artition Esc !.9._Pid 0 N Jump partition Esc" A
Cursor home Ctrl I\ EscH EscH EscH New line _&ICRi Ctrl Carri~e return CtrlM CtrlM
c Linefeed CtrlJ u Reverse line feed Escj R
Wra~around on Esc-s 0 Wra..E:around off Esco R
c Autoline mode on Esc8 0 Autoline mode off Esc9 N
Cursor~ CtrlK EscA EscA EscA T R Cursor down Ctrl V EscB EscB EscB 0 L Cursor ri__g_ht CtrlL EscC EscC EscC
Cursor left CtrlH EscD EscD EscD Address cursor row, column Esc= re Esc Y PrJJS Esc Y re Esc Y re
Address cursor location EscZ Address cursor_page, row_,_ column Esc-J!J e Set buffer address EscX Insert cursor EscZ EscX Read row, column Esc?
B Set buffer address EscXPrPe u Reset buffer address mode EscZ F
Set tab st~ Esc 1 Esco Esco Esco Clear tab stop Esc2 Esc 1 Esc 1 Esc 1 Clear all tab sto_l>! Esc3 Esc<~l Tabulate cursor Ctr II
E Field tab Esci D Back tab Escl Esc2 Esc2 I T Start field Esc3x I N Insert mode on EscZ G
R~ace mode on Escr Insert ~ace Esc_Q
· Insert a line of ~ces EscE EscN EscN EscN Delete line EscR Esco Esco Esco Insert a character EscP Pa EscP EscP Delete a character EscW Esc_Q_ Esc_Q_ Esc_Q_ Erase to end of line Escl Esc I Escl Erase il!l!_ut EscK EscK EscK Erase to end of page EscJ EscJ EscJ
OTHER KEY CODES D-14 9065 USER'S GUIDE

~ 1•;;:;.;22.:;.;1;:.-~CTERM> llJ!'1:W~t ::::>:<:: m!'13fol.Gix/ m!'13fois~x t Clear all to nulls Esc!L
Clear~ to nulls Esc * EscL EscL EscL c Cl~pageto Esc, L E wnte~otected ~ces A Clear unprotected page to spaces Esc. R orESc+ I orCtrl Z N G Clear unQ_rotected]Jl!,g_e to nulls Esc: D Clear unprotected page from EscY A cursor to ~aces T A Clear unprotected page from Escy
cursor to nulls Clear unprotected line from cursor EscT to~aces
Clear unprot. line from cursor to Esct nulls
s Send entire line Esc6 Esc ! 8 E
Send Ul!l!Otected line Esc4 N D Send entire page Esc7 Esc#8 D send ul!)2_rotected ~e Esc 5 Esc 8 Esc 8 Esc8 A T Send entire block Esc s A Send unprotected characters in EscS
block Send messl!&_e Esc<~8
R Rgmrt terminal status Escl Esc6 Esc 6 sO sl Esc 6s0sl E p R~ort terminal model Esc ! 6 Esc Y re EscYrc 0 R~ort cursor address Esc5 R T ~ort attr. under cursor EscD s
R~ortset'!P_ Esc 7 cOcl Esc7 cOcl Program answerback message Esc l msg
Ctr M Send answerback message Ctr! E
9065 USER'S GUIDE D-15 OTHER KEY CODES

LL ¢6fufuifu<l > </ · ....... · :::·:.·:::::.::::;.:::: PC TERM____;_ IBM316l IBM3101~1X• IBM 3101·2X .. Set control Esc9x Esc9x
s Set control 1 Esc<~9Pa E Read control 1 Esc<~7 T
& Set control 2 Esc ! 9
Pal .. Pa3 R Read control 2 Esc ! 7 E
Set control 3 Esc" 9 A D Pal .. Pa2
c Read control 3 Esc "7 0 Set control 4 Esc #9 Pa N T Read control 4 Esc#7 R
Set control 5 Esc$9 0 L Pal .. Pa4
Read control 5 Esc$7 Set control 6 Esc%9
Pal .. Pa4
Read control 6 Esc%7 Set control 7 Esc&9
Pal .. Pa3
Read control 7 Esc& 7 c Full duplex mode Esc} 0 M
Half duplex mode M Esc { u N
Block mode EscB I c A Conversational mode EscC T I 0 EnableDTR Ctrl N N
Enable X-on/X-off Ctrl 0
SetJ?_rint terminator EscJ?_Ps
Define delimiters Escx Ps Pl .. P2
Print all UI!P.fOtetected EscL p Print un_protected formatted~e EscP R I Buffered c~rint mode on Esc@ N T Bufferedc~rintmodeoff EscA I Transp_arent_Q_rint mode on Esc' N G Tran~arent£._rint mode off Esca
Bidirectional J?_rint mode on Ctrl R Bidirectional_P!int mode off Ctrl T Print line EscU Print message EscV Print page EscW
OTHER KEY CODES D-16 9065 USER'S GUIDE

Key Legend Line Delete Page Erase
Key Legend Print Fun ct Char. Insert Char. Delete Line Delete
VTlOO Function PFI PF2
PC TERM Function Print Screen Alt Insert Delete NumLock
9065 USER'S GUIDE
Key Legend Prev/Next Page Clear Space
Appendix E KEY CODES VTlOO Function PF3 PF4
Figure E-1. ASCII Keyboard in VT100 Mode
Key Legend Page Erase Prev/Next Page , (keypad) Break F16
PC TERM Function I
* + Pause Scroll Lock
+
Figure E-2. ASCII Keyboard in PC TERM Mode
E-1 KEY CODES

Key Legend Print Screen Scroll Lock Pause Insert
D
ASCII Function Print No Scroll Break Char Insert
Key Legend Print Screen Scroll Lock Pause NumLock I
*
Key Legend ASCII Function Delete Char Delete Page Up PrevPage Page Down Next Page Alt (left) Fun ct
PRINT sc:LL BREAK D CHAR PREY
INSERT PAGE
CHAR NEXT DEl.ETE PAGE
Figure E-3. Enhanced PC Keyboard in ASCII Mode
VTlOO Function Print No Scroll Break PFI PF2 PF3 PF4
D '---'-----''----'----'! .___I ...___....__.______.! l'----'--'_,___,I I •~NT lsc:qsAEAKI D ffij PF1 PF2 PF3 PF4
dlJ ,________._____ Figure E-4. Enhanced PC Keyboard on VT100 Mode
KEY CODES E-2 9065 USER'S GUIDE

Key Legend ASCII Function Key Legend ASCII Function F2 Print Insert Char Insert F5 Break Remove Char Delete F3 Shift/Set Up Prev Screen PrevPage F20 Send Next Screen Next Page Compose Fun ct
CHAR CHAR INSERT DELETE
REV NEXT PAGE PAGE
Figure E-5. ANSI Keyboard in ASCII Mode
Key Legend PC TERM Function Key Legend PC TERM Function Fl? Print Screen Find Insert FIS Pause Select Delete F19 Set Up/No Scroll PFI NumLock Compose Alt PF2 I Insert Home PF3 * Remove Pg Up PF4 Prev Screen End , (keypad) + Next Screen PgDn
INSERT HOME PAGE
UP NUM
/ * -LOCK
DELETE END PAGE DOWN
+
Figure E-6. ANSI Keyboard in PC TERM Mode
9065 USER'S GUIDE E-3 KEY CODES

T bl E1 L I K bo rd F f a e . oca e~ a unc ions
- s ~~ ~ 'T]~i! ~ iH ~l~c11 t? ~ ==ss i
Ent.er/exit set '!I!. . Shift Select Shift Set U..Q. F3
~ession change hl Alt Shift Funct Shift Page Compose Shift dual-session onl P!!.[e U.£. PreVIous Screen
Partial reset Ctrl Shift Select Ctrl Shift Set U..Q. Ctrl F3 Screen activ!!Y_ on/off Scroll Lock No Scroll Fl Block/d~ex Ctrl Shift Enter _(note 1l Ctrl Shift Ent.er Ctrl Shift Enter Tonie oort ~it:!&!e-session only) Ctrl Shift Break Ctrl Shift Break Ctrl Shift F5 Co__py_J>rint on/off Ctrl Shift Print Scrn Ctrl Shift Print Ctrl Shift F2 Word Star mode on/off Ctrl . Ctrl . Ctrl . Monitor mode on/off Ctrl Shift 1 Ctrl Shift 1 Ctrl Shift 1 Insert/re_1>lace mode Ctrl Insert Ctrl Char Insert Ctrl Insert K~click on/off Ctrl Ent.er _(not.e 1l Ctrl Ent.er Ctrl Ent.er Screen saver on/off Ctrl Clear ~ce Ctrl Remove aearscreen Ctrl Shift Clear Space Ctrl Shift Remove VideoDesk clock Left Alt Fl FunctFl CompcseF6 VideoDesk calendar Left Alt F2 FunctF2 Compose Fl VideoDesk calculator Left Alt F3 FunctF3 CompcseF8 VideoDesk ASCII chart Left AltF4 FunctF4 CompcseF9 Dis..Q.la~e 0 Ctrl 0 Ctrl 0 Ctrl 0 Dis_Q_la_ypa2e 1 Ctrl 1 Ctrl 1 Ctrl 1 Dis.J?!l!Y. pa2e 2 Ctrl 2 Ctrl 2 Ctrl 2 Di~aypl!&_e 3 Ctrl 3 Ctrl 3 Ctrl 3 Di~la~e4 Ctrl 4 Ctrl 4 Ctrl 4 Dis_l>lay pl!&_e 5 Ctrl 5 Ctrl 5 Ctrl 5 Dis__p!~e6 Ctrl 6 Ctrl 6 Ctrl 6 Status line on/off Ctrl-+ Ctrl-+ Ctrl-+ Horiz. scroll left _(132 80 DSPI..TI_ CtrlShift~ Ctrl Shift~ Ctrl Shift~ Horiz. scroll r!g_ht_(.132 80 DSPL_TI_ CtrlShift-+ Ctrl Shift-+ Ctrl Shift-+ Raise ~lit line Ctrl - Ctrl - Ctrl -Lower ~lit line Ctrl + J!tum ~adj_ Ctrl , Ctrl ' Nextj>llg_e/window Ctrl Pl!&_e U.£. Ctrl Pl!&_e Ctrl Next Screen Previous~ window Ctrl Page Down Ctrl Shift Page Ctrl Prev Screen Scroll up_ Ctrl i Ctrl i Ctrl i Scroll down Ctrl ..I. Ctrl ..I. Ctrl ..I. Increase scrollin_g_ rate Ctrl Shift i Ctrl Shift i CtrlShift i Decrease scrolli11g_ rate Ctrl Shift J. Ctrl Shift J. Ctrl Shift ..I. Note I: The Enter key, numerals, and punctuation marks are located on the numeric keypad. Note 2: In PC TERM mode, Set U_E_ is the on!Y_ local k<?Y_board function.
KEY CODES E-4 9065 USER'S GUIDE
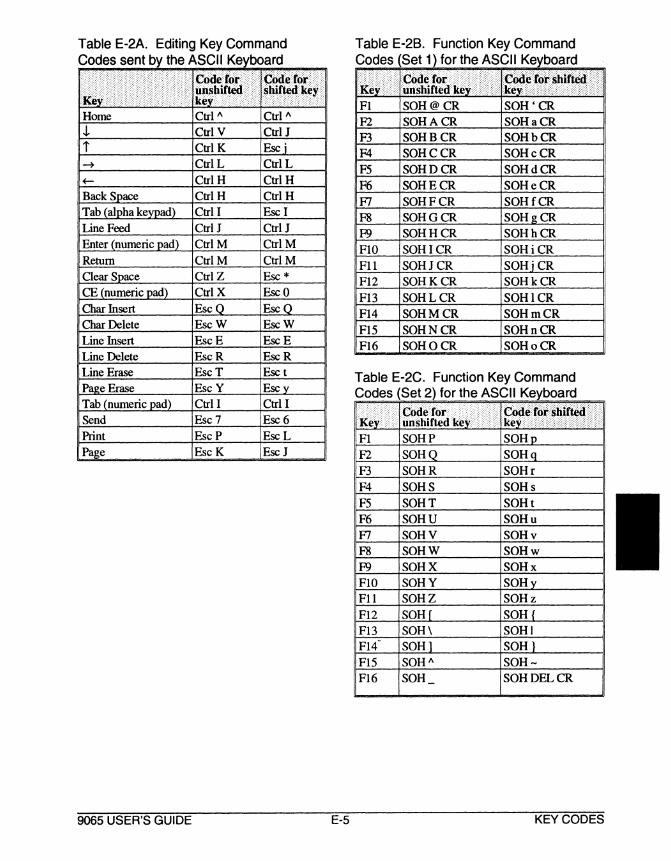
Table E-2A. Editing Key Command h ASCII K b d Codes sent by t e ~oar
\~~ ········ Code f()f ( c6ae•ttit>··· unsbifted .. •• ~ltif~~ey. ll~l' ~£~ kfr'._..c, - .·.
Home Ctrl" Ctrl" J, Ctrl V Ctrl J i Ctrl K Escj ~ CtrlL Ctrl L
~ Ctrl H Ctrl H Back~ace Ctrl H Ctrl H Tab _ial_g_ha k~ad) Ctrl I Esc I Line Feed Ctrl J Ctrl J Enter .i numeric _g_a<!2_ CtrlM CtrlM
Return CtrlM CtrlM
Clear~ace Ctrl Z Esc * CE Jnumeric _g_ad) Ctrl X Esco Char Insert Esc_Q Esc_Q Char Delete EscW EscW Line Insert EscE EscE Line Delete EscR EscR Line Erase EscT Esc t
P~eErase EscY Esc_y_ Tab Jnumeric_g_a<!}_ Ctrl I Ctrl I Send Esc7 Esc6 Print EscP EscL
P~e EscK EscJ
9065 USER'S GUIDE E-5
Table E-28. Function Key Command Codes (Set 1) for the ASCII Keyboard
~·· Code ror le~~ ( unshifted ••• f~~ ~~f ~~~~~~ i
Fl SOH@CR SOH'CR F2 SOHACR SOHaCR F3 SOHBCR SOHbCR F4 SOHCCR SOHcCR F5 SOHDCR SOHdCR F6 SOHECR SOHeCR
F7 SOHFCR SOHfCR F8 SOHGCR SOH_g_CR F9 SOHHCR SOHhCR FlO SOHICR SOHiCR Fil SOHJCR SOHjCR Fl2 SOHKCR SOHkCR
F13 SOHL CR SOHICR F14 SOHM CR SOHmCR F15 SOHN CR SOHnCR Fl6 SOHO CR SOHoCR
Table E-2C. Function Key Command Codes Set ~for the ASCII Ke_yboard
. · .... Codefor .··. •· 2 c&Ie fof shirted. >·•·•
K~_c unshifted k!1 k~ <>···<·. Fl SOHP SOH_j)_ F2 SOH__Q_ SOH_q
F3 SOHR SOHr
F4 SOHS SOHs F5 SOHT SOHt F6 SOHU SOHu F7 SOHV SOHv F8 SOHW SOHw
F9 SOHX SOHx FlO SOHY SOH_y_ Fil SOHZ SOHz
Fl2 SOH_l SOH_[ F13 SOH\ SOHi
-Fl4 SOHJ SOH_l Fl5 SOH" SOH-Fl6 SOH SOHDELCR -
KEY CODES

Table E-3A. Editing Key Hexadecimal C d h ASCII K b d 0 es sent by t e ~oar ... ~2!f J1!~ tlJi ¢()tt~t<>r y
z $lilfted•.kcili < f- 88 80 Tab l{ajp!ia k~ad~
89 81
.J, 8A 82 i 8B 83 ~ 8C 84 Return 8D 8S Home 8E 86 Back Space 8F 87 Line Feed 90 AO Print 92 A2
Clear~ace 93 A3 Char Insert 94 A4 Char Delete 9S A5 Line Insert 96 A6 Line Delete 97 A7 Line Erase 98 A8 Page Erase 99 A9 Pl!,g_e 9A AA Esc FO Fl Send F2 F3 Enter F4 FS Tab
l{numeric__Qa<!2_ F6 F7
CE F8 F9 Break FB FC No Scroll FD4 n/a
KEY CODES E-6
Table E-38. Function Key Hexadecimal Codes sent ~the ASCII K~board
F2 D1 El F3 D2 E2 F4 D3 E3 FS D4 E4 F6 DS ES F7 D6 E6 F8 D7 E7 F9 D8 E8
FIO D9 E9 Fil DA EA Fl2 DB EB Fl3 DC EC Fl4 DD ED FlS DE EE Fl6 DF EF
Table E-3C. Numeric Key Hexadecimal Codes sent by the ASCII Keyboard
0 BO BO Bl Bl
2 B2 B2 3 B3 B3 4 B4 B4 s BS BS 6 B6 B6 7 B7 B7 8 B8 B8 9 B9 B9
BC BC
BD BD
BE BE
00 FA FA
9065 USER'S GUIDE

Table E-4. WordStar Mode Key Codes (ASCII Keboardl
I Home tQ_E Tog_ of screen tQ_R B~innin_g_ of file
"X Down line "Z U..Q.line i "E U..Q. line "W Down line
"S Left character "A Left word "D Ri_g!tt character "F Ri_g_ht word
Tab _ial_Qha k~<!L "I Tab ri_gJtt L"QB Tab J!iumeric ..£..adl "I Tab ri_g!lt b2._K Block end p~ "C U..Q. screenful "R Down screenful Clear ~ Bottom of screen ~C End of file Char Insert "V Insert t~e on/off ~p Previous position Char Delete "G Delete character "T Delete word right Line Insert Carril!&_e return Hide/di~!!Y_ block Line Delete "Y Delete line "KV Move block Line Erase Delete to ri._g_ht ~DEL Delete to left P~eErase "KY Delete block "KC CQQY_block CE _(numeric _Q_ad}_ Interru~ Delete file Print "PB Boldface begin/end "PS Underscore begin/end Send "KW Write block to file Read file into text Fl "OL Left mqin set "OR Ri__g_ht marg_in set F2 "01 Tab set "ON Tab clear F3 Reformp_aral!fllph "OC Center the line F4 "OS Line ~ace settiJ!g_ "OG Para~htab
F5 Mark block b~g_inniJ!g_ "KK Mark block end F6 Find string_ L"Q_A Find and replace F7 Find & re_£).ace l!&_ain ~v Start of last find/r~).ace F8 "JH Set he.!£. level Repeat next command F9 ~z Continuous ~~scroll bl._w Continuous down screen FlO .HE Headin_g_ .FO Footin_g_ Fll .PA "PD Double strike be_g!.n/end F12 "PV Subscri~ b~in/end Sl,!P_erscri__Q! be__g_in/end F13 "OJ Justification on/off "OW Word wra_Q_ on/off F14 Block menu I Quick menu F15 Save, done edit Save, exit to ~tern F16 "KS Save and resume Abandon exit
9065 USER'S GUIDE E-7 KEY CODES

NOTES
KEY CODES E-8 9065 USER'S GUIDE

Appendix F KEYBOARD LAYOUTS
~~~~~~D~D~~~~~~~~~~~B ~D~~~~~~~Li~DLlD~~~~~~~ 1234567890- =' , ......
EJEJEJ[']EJ[]t::JEJOEJEJ[l]~~ EJ~tJ[]rJ[JEJrJ[J[][]DD..... EJ
0[]['][']0 [][][]0
[!]EJ[][J[]tJ~tJEJOtJ[JEJITJEJ EJ[']['][']D EJEJ[ ~EJEJ[]JEJ EJl 0 ID
Figure F-1. U.S. ASCII Keyboard Layout
8 EJEJEJEJ EJEJEJEJ EJBEJB ~~8 o o o El
DD~~~~~~~~~orn~-1 BB~ ~EJEJ[J[J~tJ~[]EJrJ[][]D EJEJ~ Li[] EJ [] [] [] EJ ~~[][JD~ ~ [] [] ~ tJ ~ EJ EJ D D IIJ I"'"" I 0 EJ EJ El EJ BGJG
Figure F-2. U. S. Enhanced PC Keyboard Layout
Figure F-3. U. S. ANSI Keyboard Layout
9065 USER'S GUIDE F-1 KEYBOARD LAYOUTS

Figure F-4. U. K. Keyboard Layout
Figure F-5. French Keyboard Layout
Figure F-6. German Keyboard Layout
KEYBOARD LAYOUTS F-2 9065 USER'S GUIDE

Figure F-7. Swiss (French) Keyboard Layout
Figure F-8. Swiss (German) Keyboard Layout
Figure F-9. Danish Keyboard Layout
9065 USER'S GUIDE F-3 KEYBOARD LAYOUTS

Figure F-10. Norweigian Keyboard Layout
Figure F-11. Swedish/Finnish Keyboard Layout
KEYBOARD LAYOUTS F-4 9065 USER'S GUIDE

Appendix G CURSOR COORDINATES
•.•.•.·.• •. • ..• •.·.••.•".·.·.··."'·.•.·•.;...·.·.•.· .. : •. ·.~.·.·:• .. ·.·o·.··.•.·.·.·um·.·.·.·.••.·.·.··.··.··n·.··.•.· .. • •·•· ··•<A·•··•·s··cn· ·· ··c· ·;;.:~··········•• ••· n<<'•Jc·· ....... · ............ ·•·• ············A·•·····s···c····u· ·····c·····•·•·d··•·········•·•· •·•· R·.·.·o·.··.· .. ·.·.;.,.· .. ,·.r..•.··."•.·.··.1·.·u•·.•·•.;;;..··."·.··.•· ···•· ·•··•<:•rs·····c· ··u··· ···c·····j•J·······•·•·••· AU .. I'> 'l Trinsmi~? < ~0~1
. 0 · 11111" Trihsriu8e3 ) •.•• .. ..... .. ... ••••• trarisiliima
1 S_Q_ace 33 @ 65 2 ! 34 A 66 a 3 35 B 67 b 4 # 36 c 68 c 5 37 D 69 d 6 % 38 E 70 e 7 & 39 F 71 f 8 40 G 72 _g_ 9 i 41 H 73 h 10 l 42 74 11 * 43 J 75 l 12 + 44 K 76 k 13 45 L 77 I 14 46 M 78 m 15 47 N 79 n 16 I 48 0 80 0
17 0 49 p 81 _Q_ 18 1 50 a 82 _g_ 19 2 51 R 83 r 20 3 52 s 84 s 21 4 53 T 85 t 22 5 54 u 86 u 23 6 55 v 87 v 24 7 56 w 88 w 25 8 57 x 89 x 26 9 58 y 90 .'i_
27 59 z 91 z 28 60 l 92 _L 29 < 61 \ 93 I 30 = 62 J 94 J_ 31 > 63 /\ 95 32 ? 64 96 DEL
9065 USER'S GUIDE G-1 CURSOR COORDINATES

NOTES
CURSOR COORDINATES G-2 9065 USER'S GUIDE

Appendix H STATUS LINE MESSAGES
Field Values Description
1 p rrrccc p = Page of memory (0-6) r =Row (1-168) c =Column (1-132)
2 Sl Dual-session mode, Session 1 S2 Dual-session mode, Session 2
3 * Monitor mode on/off (blank) w WordStar mode on/off (blank) mode Communication mode:
FDX = full duplex HDX = half duplex BLK=block LOC =local
4 W.P. Write protect mode on/off (blank)
5 PROT Protect mode on/off (blank)
6 N Num Lock (Enhanced PC keyboard only) s Scroll Lock key engaged/released (blank) c CAPS LOCK key engaged/released (blank)
7 GRAF Graphics mode on/off (blank)
8 mode COPY= Copy print mode TRSP = Transparent print mode BDIR =Bidirectional print mode
9 mode UFPG = Unformatted page print FMPG = Fom1atted page print KLOK = Keyboard locked
SEND Block send in progress TBSY Terminal has sent X-Off to host or dropped DTR.
10 COMP Compose function selected for the Funct/ Alt/Compose key
9065 USER'S GUIDE H-1 STATUS LINE MESSAGES

STATUS LINE MESSAGES H-2 9065 USER'S GUIDE

ACK An ASCII character (hex 06) meaning acknowledgment. Usually sent by the terminal to the computer to indicate page print or some local function is finished.
address Noun: A number identifying a unique location in the computer's memory where information is stored. Similar to a post office box number. Verb: To send something to a particular location. The computer can address the cursor to a specific line and column position on the screen.
alphanumeric characters Alphabetic, numeric, and special data symbols. The standard ASCII character set includes 96 alphanumeric characters. See character, display characters.
ANSI Acronym: American National Standards Institute. A private organization that sets voluntary data processing standards. Sponsor of the ASCII communication standard and the ANSI X3.64 command standard. See ASCil.
answerback A programmable response sent to the computer upon request. Can identify a particular terminal when several terminals are connected to a computer, since each terminal's answerback can be unique. If 25 9065terminals are connected to the computer, the fifth 9065 terminal could be programmed to reply, "9065-5." Answerback codes are also used with modems.
applications program A program to accomplish a specific task, such as word processing, financial analysis, or retrieval of corporate data. See program, software.
ASCil Acronym: American Standard Code for Information Interchange, pronounced ask-key. A standard set of characters used in most data transmission applications in the United States. An ASCII character is expressed as a group of7 bits. The 128 ASCII characters (found in Appendix C) are divided into 96 alphanumeric (display) and 32 control characters. See alphanumeric characters, control characters.
autowrap A mode that automatically moves the cursor to the beginning of the next line after it reaches the end of the current line during data entry.
9065 USER'S GUIDE GL-1
Glossary baud rate The number of binary hits transmitted per second.
bi-directional print A communication mode that enables two-way communication between devices attached to the computer and printer ports. Both devices must have the same baud rate, parity, word structure, and stop bits.
bit Acronym: binary digit. The simplest unit of data; always a one or a zero (meaning yes/no, on/oft). A group of bits (usually seven or eight) that represents a character is called a byte. See byte, character.
block mode A communication mode that sends text entered from the keyboard only to the screen until you signal the terminal to send it as a block to the computer.
break signal A signal sent by the Break key that holds the communication line (pin 2 of the main RS-232C connector) in the 0 state (low) for 250 milliseconds. It does not affect the terminal's operation and no character appears on the screen. How your computer responds to the signal depends entirely on its programming. A break signal can cause a modem to disconnect.
buffer A temporary data storage location in the terminal's memory. Can be used to compensate for differences in transmission rates or temporarily store characters until the computer or printer can accept them. Buffers let data flow from the computer to the tenninal at a different baud rate than from the terminal to the printer. See handshaking protocol, DTR, X-On/X-Off.
buffered print A print mode (either transparent or copy) that stores data in the terminal's buffer(s) when the computer sends data faster than the printer can receive it. See transparent print, copy print, buffer.
byte A group of bits (usually eight) representing a character. See bit.
character A unique, transmittable data symbol. See display character, control character.
character keys The keys that send display (alphanumeric) characters to the terminal and/or computer.
connector The device (plug or jack) at the end of the cable and the electrical interface (port) of the computer, terminal, printer, etc. RS-232
GLOSSARY

connectors are commonly D-shaped and contain pins (male connector) or holes (female connector). The number of pins varies between equipment manufacturers. Tele Video terminals have 25-pin female connectors.
control characters Characters that send a command to the terminal, rather than being displayed on the screen. The standard ASCII control characters are in the range of hex 00 to IF. See the ASCII Control Chart in Appendix C.
controls display mode A mode in which the screen displays all ASCII characters (control and alphanumeric) and does not act on command characters.
conversational mode A communication mode that lets data flow interactively from one communication device to another. See full duplex, half duplex.
copy print A print mode that sends data from the computer to the printer and the screen at the same time. Sometimes called extension print. See transparent print, page print.
CRT Acronym: cathode ray tube. An electronic vacuum tube, like a TV picture tube, that displays images. See screen.
cursor A marker showing where the next character should appear on the screen. Can be blinking or steady, a block or an underline, or invisible.
current loop A method of sending data as 20-milliampere current pulses over a serial line {up to 700 meters). Although usually slower than RS-232, it permits accurate communication over longer distances. Either the computer or the terminal may supply the current. The configuration chosen (active or passive) depends on whether the terminal or computer is supplying the power. If the terminal supplies the current, configure the terminal's current loop for active; if the computer supplies the current, configure the terminal for passive.
To determine correct configuration, think of a person holding a garden hose with a nozzle on the end. If the house supplies the water pressure to the hose and the person merely opens the nozzle, the house is the active device and the person is passive device. However, if opening and closing the nozzle causes water to flow from (i.e., suctioned out of) a holding tank within the
house, the person is the active device and the house is the passive device.
CTS Acronym: Clear to Send. A signal on a dedicated RS-232 line indicating that the computer is ready to receive more data from the terminal.
data Information that can be coded into bits, to be stored in a computer or terminal's memory and transmitted between devices.
DCD Acronym: Data Carrier Detected. A signal on a dedicated RS-232 line that indicates whether or not the data carrier in the phone system is active and the device at the other end of the phone line is available.
DCE Acronym: Data Communications Equipment. Usually the computer or the equipment connected to it.
default A value or instruction in effect until otherwise defined.
delete To eliminate (destroy) data stored in certain memory locations. See erase.
delimiter A code transmitted at the end of a predefined area (field) of data. Could be a field, end of line, or end of text delimiter.
descender That part of a lower-case character that hangs below the main body of the character. The tail of the lower-case y is a descender. A terminal with true descenders (such as TeleVideo's) displays the tail below the main line of text.
DIP Switches Acronym: Dual In-Line Package. A panel of very small switches.
display The amount of data that can be viewed on the terminal screen at one time. See page, screen.
display characters Characters that appear on the terminal's screen, including alphanumeric and graphic symbols. See characters, alphanumeric characters, graphics characters.
download To copy (read) data from the computer into the terminal's memory.
DSR Acronym: Data Set Ready. A signal on a dedicated RS-232 line indicating when the data coming from the computer is meant for your terminal (or another terminal on a network).
DTE Acronym: Data Terminal Equipment. Equipment that supports data transmission from a terminal.
GLOSSARY GL-2 9065 USER'S GUIDE

DTR Acronym: Data Terminal Ready. A handshaking protocol that controls the flow of data between the terminal and the computer or printer by lowering and raising the voltage on pin 20 (the DTR line) in the RS-232C connector. See handshaking protocol, X-On/X-OtT, bufT· er.
duplex Bi-directional communication. See conversational mode, half duplex, full duplex.
echo To send back received data. For example, in full duplex communication mode, the computer must echo back data it receives from the terminal before that data can be displayed on the screen.
EM Acronym: End of Message. An ASCII control character (hex 19) sometimes marking the end of a block transmission.
EPROM Acronym: Erasable, Programmable ROM. A read-only memory chip that can be erased and reprogrammed.
erase To replace data in certain memory locations with replacement characters. See delete, replacement character.
escape sequence A command introduced by an ASCII escape character (hex IB) that controls terminal operations.
ETX Acronym: End of Text. An ASCII character (hex 03) that marks the end of a block transmission message.
extension print See copy print.
field A group of characters affected in the same way by commands (e.g., a tab field).
firmware A program embedded on a chip, usually called an EPROM, inside the terminal that tells the terminal how to operate. See program.
formatted Screen data that includes the delimiters that signal the line ends (e.g., CR, LF, and null) and end of the transmission. See delim· iter, page print.
full duplex A communication mode that lets the terminal and computer transmit and receive simultaneously. Data from the computer is not displayed on the screen unless the computer echoes it back. See echo.
function keys Keys that send preset escape sequences whose application is user definable. Many TeleVideo terminals have reprogrammable function keys.
graphics characters Special non-ASCII characters used to draw lines, figures, and graphs.
half duplex An interactive communication mode that lets the terminal transmit and receive data in separate, consecutive operations. Key codes go to both the computer and the screen.
handshaking protocol Prearranged signals the computer and the peripherals send when they are ready to send or receive data. They prevent data loss when the other device is not able to accept or handle more data at that time. They can be ASCII control characters (X-On/X-Oft) in the data stream or they can be raised or lowered voltage on RS-232C lines dedicated to that purpose (DTR). See DTR, X-On/X-OtT, DCD, DSR.
hardware The physical components of a system, such as computer, terminals, cables, printers, modems.
hertz A unit of frequency (of electrical waves) equal to one cycle per second. If the frequency rate of the terminal does not match the frequency rate of the incoming alternating current, the display may waver. Abbreviated Hz.
hexadecimal A numbering system with a base of 16 (digits 0-9 and A-F). Commonly used by programmers to indicate locations and contents of a computer's memory. Abbreviated hex. See the ASCII Code Chart in Appendix C.
home The first character position on the page (line 1, column I). Pressing HOME moves the cursor to this position.
host The computer controlling the terminal.
insert To add data within existing data, which is usually moved to the right at the point of insertion to make room for the new data.
interface An interaction or connection between devices in a computer system (i.e., the computer and peripherals). See current loop, RS-232C, RS-422.
interface cable A cable with connectors that can be plugged into the port connectors of the components in a system, thus linking the various devices. See connector, RS-232C, interface.
keyboard An arrangement of keys, similar to a typewriter's, on which an operator can enter data, send commands, and operate the terminal.
load To program information into memory.
9065 USER'S GUIDE GL-3 GLOSSARY

local mode A mode that disconnects the tenninal and computer. Keyboard entries go only to the screen. See block mode, conversational mode.
menu A displayed list of operating values from which the operator can make selections.
millisecond 1/1000 of a second.
mode An operating state that controls how the terminal operates or reacts to commands. For instance, in controls display mode, the terminal displays all characters (including control codes and escape sequences), not just alphanumeric characters. The tenninal can be iri several modes at the same time, e.g., autowrap and duplex edit modes.
modem Acronym: modulator/demodulator. An electronic device that changes digital signals (bits) to analog signals (tones), or vice versa. A modem translates digital signals from a computer to analog signals, which can be sent across telephone wires. The modem at the other end translates the analog signals back to digital signals and passes them on to the other computer.
monitor Hardware: A video screen on which you can see computer output and input.
N-key roll-over A keyboard feature that lets you type faster than the keyboard can transmit without locking up or missing a character. You can strike a series of keys virtually simultaneously, and the characters will be transmitted in the order in which the keys are pressed.
non volatile memory A permanent memory storage area not affected by loss of power. This memory is backed up by a lithium battery.
null An ASCII character (hex 00) that occupies no space and is not transmitted.
operating parameter A value (constant or selectable) that determines terminal operating characteristics, such as the speed of data transmission, the status of an operating mode, and operating appearance (dark or light screen background). See mode.
page The amount of available screen memory. Can range from 24 to 96 lines, depending on your terminal,' s configuration. Since the screen displays 24 lines at a time, you may not see the entire page. See display, screen.
page print A print command that sends data on the terminal's screen to the printer. See formatted, unformatted.
parameter See operating parameter.
parity A method of checking received data bits to ensure they are complete and accurate. If two devices are connected, the parity setting for both devices must be the same. See start bit, stop bit.
peripheral External equipment connected to a computer. The most common peripherals are terminals, disk drives, printers, modems, and cassette-tape recorders.
permanent memory See non volatile memory.
port The location at which data goes in and out of the device, usually the physical connector into which interface cables are plugged. See connector, RS-232C, interface.
program A set of commands that control a computer or terminal. There are three kinds of programs: firmware, which is burned into the EPROMs that control the system; applications, which accomplish specific tasks; and the operating system, which controls the overall operation of the system, directing the firmware and applications programs. See firmware, applications program, software.
RAM Acronym: Random-Access Memory. The changeable part of the computer or terminal's memory that can be read and written into during normal operation. It is erased (lost) when power to the RAM chip is turned off. RAM is used in all computers to store the instructions of programs being run. See ROM.
read the cursor Report the cursor's position and content to the computer.
refresh To change or update the screen with new data.
replacement character The character that occupies the position previously occupied by an erased character. Usually a space character. See delete, erase, space character.
resolution The sharpness of the characters on the display. When a character contains a lot of small dots (pixels), it is much sharper than a character containing only a few large dots.
GLOSSARY GL-4 9065 USER'S GUIDE

reverse video A terminal feature that produces the opposite combination of characters and background from the one usually employed (i.e., light characters on a dark background if normally characters are dark on a light background).
ROM Acronym: Read-Only Memory. A memory chip that, after manufacture, can be read but not written or altered. Used to store permanent instructions.
RS-232C A standard technical specification written by the Electronic Industry Association for data sent as voltage pulses over a serial cable at distances up to 50 feet (although shielded wires allow greater length). See interface, current loop, RS-422.
RS-422 A technical specification for highspeed communication between the computer and a peripheral. When used, sends data faster than RS-232C while allowing the peripheral to be located up to 4,000 feet from the computer. See interface, current loop, RS-232C.
RTS Acronym: Request to Send. A line whose voltage changes to control data flow between computer, terminal, and printer. See handshaking protocol.
screen The terminal viewing area that shows 24 lines of data and a 25th status line. See display, page.
screen saver A feature that causes the screen to go blank when no data entry or editing. occurs for a fixed time span (e.g., 10, 20, or 30 minutes), thus preventing the display pattern f~om being burned into the phosphor. To re display the screen, press any key. No data is lost
screen updating Data changing on the terminal's screen as new data is received from the computer.
scroll The action that moves the display (screen area) up or down in the page so you can see more than 24 lines on that page of memory. The direction, rate, and evenness of the scrolling can be controlled. See page, display, screen.
scrolling region The area in a page of memory through which the display can scroll: Mov~ment of the cursor is limited to the scrolhng regmn.
self-test A procedure that causes the terminal (or a program or peripheral) to check its own operation.
serial transmission A method of sending one bit of data at a time in a stream. See RS-232C.
set up A terminal mode that lets the operator change the terminal's operating values from the keyboard.
set up menu Lines displayed on the screen during set up mode. Set up menus list all terminal operating values that can be changed from the keyboard.
software Various programs, including the operating system and the applications programs, that can be loaded into the terminal. See firmware, program, system.
SOH Acronym: Start of Header. An ASCII character (hex 01) that frames the start of block of data to be transmitted. See EM.
space character An ASCII alphanumeric character (hex 20) that occupies a character position on the screen and in the terminal's memory. Not the same as a null, which looks like a space but contains nothing (i.e., is a void) and does not occupy memory space. The terminal transmits space characters, while it does not transmit null characters. See null.
special keys Keys that do not send displa7 characters or editing commands, used for a vanety of purposes in controlling the terminal.
status line A line appearing on the bottom (25th) line that describes the terminal's current operating conditions.
start bit The bit that signals the beginning of data transmission. It is always a one (1). See parity, stop bit.
stop bit The bit that signals the end of dat:a transmission. It is always a one (1). The termInal can use either one or two stop bits, depending on the computer's requirements. See parity, start bit.
STX Acronym: Start of Text. An ASCII character (hex 02) signaling that text transmission follows.
system The computer, the peripheral devices (such as terminals, printers, and modems), and the programs that work together to accomplish various tasks.
tab stop A preset position to which the cursor goes when the TAB key is pressed or the termi-
9065 USER'S GUIDE GL-5 GLOSSARY

nal receives the tab command. Tab stops can be changed or deleted on command.
transmit To send data between one system component (such as the computer) and another (such as the terminal).
transparent print A print mode that sends all data received by the terminal to the printer without displaying it on the screen. See copy print, bi-directional print, page print.
unformatted Screen data that contains no delimiters marking line ends. See delimiter.
VUT Acronym: video display terminal. A terminal containing a cathode ray tube on which infomtation received from the computer or keyboard can be displayed. Different than a terminal that uses a printer to display data. Video display terminals include a keyboard, while printer terminals may not.
visual attributes The aspects of a character's appearance on the screen. The character can be steady or blinking, full or half intensity, visible or blank (invisible), normal or reverse video, and underlined.
word structure The arrangement of bits in each piece of transmitted data. Consists of a start bit, the data bits, a parity bit (optional) and one or two stop bits.
X3.64 A uniform set of programming commands developed under the American National Standards Institute. See ANSI, ASCII. X-On/X-OtT A handshaking protocol in which the terminal and computer or printer recognize the ASCII control characters X-On (hex 11) and X-Off (hex 13) as signals to regulate data flow. See handshaking protocol, DTR.
GLOSSARY GL-6 9065 USER'S GUIDE

Index A c screen 3-2 cables 1-1 answerback message character
programming from a menu 2-13 repeating with a command 9-4 programming the 12-7 character set sending the 12-7 selecting from a menu 2-5
application key mode character sets enabling and disabling 12-1 defining primary and secondary 10-3
attributes displaying characters from 10-4 character-based 7-3 displaying with commands 10-4 defined for status line 7-5 loading 10-3 efined for write-protected text 7-5 selecting 10-1 defined in a rectangular area 7-4 characters defined in an information area 7-4 deleting with a command 9-4 defining 7-2, 7-4 port buffers 2-2 field-based 7-3 columns selecting from a menu 2-8 erasing with commands 9-4
status line columns per line selecting from a menu 2-4 choosing 80 or 132 3-4
auto font mode selecting 80 or 132 with a command 7-5 enabling with a command 10-3 commands
auto repeat mode effect of communication modes on 6-1 turning on with a command 7-1 entering from the keyboard 6-1
font loading 10-3 format used in this manual for 6-2 autopage mode sending from the host 6-1
turning on with a command 8-3 communication modes autoscroll mode description of 3-12
turning on with a command 8-4 selecting from a menu 2-3 autowrap mode communication ports 1-2
enabling with a command 9-2 selecting from a menu 2-3 B printer 1-1
baud rate host 1-2
selecting from a menu 2-6, 2-7 top line
bidirectional print mode selecting from a menu 2-4
description of 3-14 copy print mode
enabling/disabling with commands 11-3 description of 3-14, 3-15
block end mode 11-3 enabling/disabling w/commands 11-3, 11-6
block graphics 10-7 CR or CR/LF for Enter key
block mode selecting from a menu 2-5
description of 3-13 CR or CR/LF for Return key
enabling with commands 11-3 selecting from a menu 2-5 CRorLF/CR block start mode 11-3 choosing from a menu 2-3 break signal current line selecting from a menu 2-5
deleting with a command 9-4 buffer threshold (COM2 port) selecting from a menu 2-7 cursor
buffer threshold (COMl port) addressing the 9-6
selecting from a menu 2-6 moving the 9-5 reading the 9-6
9065 USER'S GUIDE X-1 INDEX

cursor column attribute 7-4 deleting with a command 9-4 Functkey 12-5
cursor control 9-5 function key labels cursor type description of 3-3
selecting from a menu 2-4 function keys custom characters loading 12-2
creating 10-5 loading labels for 12-5 designing 10-4 to 10-6 programming 12-3, 12-4
D programming from a menu 2-9, 2-10
data acknowledge returning to default 2-2
enabling and disabling 11-2 selecting 12-2
data words sending the contents of 12-4
programming 11-1 H date half duplex mode
loading with a command 6-4 description of 3-13 delimiters enabling with commands 11-3
programming from a menu 2-14 attribute 7-4 delimiters for page send 11-3 handshaking (COM2 port) down arrow key mode selecting from a menu 2-7
enabling with a command 9-2 handshaking (COMl port) dual sessions 3-12 selecting from a menu 2-6 duplex editing key mode handshaking protocols
enabling with a command 9-2 selecting 11-2
E selecting with commands 11-2
editmode host mode
turning on from a menu 2-3 description of 3-13
editing key modes setting with commands 11-3
description of 3-13 I editing keys information lines 12-6
programming 1 2-2 insert mode programming from a menu 2-10 ,2-11 enabling with a command 9-3 returning to default 2-2 K
CAPS LOCK mode 7-1, 7-2 key lock screen saver 7-2 enhanced mode
selecting from a menu 2-5
selecting from a menu 2-3 key repeat
selecting from a menu 2-5 enhanced personality mode keyboard selecting with a command 6-4 description of 3-6 F keyboard layout fields selecting a 10-4
clearing with commands 9-4 keyclick font banks 10-3 selecting from a menu 2-5 font load turning on with a command 7-1
selecting from a menu 2-3 keypad keys form programming from a menu 2-12
creating with protected areas 9-1 L form with protected areas line attributes 7-5
example of a 9-1 line edit mode full duplex mode enabling with a command 9-3 description of 3-13 line feed commands 9-6 enabling with commands 11-3
INDEX X-2 9065 USER'S GUIDE
line lock pages enabling with a command 8-5 configuring 8-1
line wrap parity (COM2 port) turning on from a menu 2-3 selecting from a menu 2-7
attributes parity (COMl port) selecting 7-3 selecting from a menu 2-6
lines parity check (COM2 port) configuring 8-1 seltcting from a menu 2-7 deleting with a command 9-4 parity checking selecting number of display 8-1 selecting from a menu 2-6
lines per page personality selecting from a menu 2-4 selecting from a menu 2-3 selecting with a command 8-2 personality mode
local editing key mode 9-2 electing with a command 6-2 local key functions 3-6, 3-8, 3-10 plugging in the 965 1-4 local mode ports
description of 3-13 programming the 11-1 enabling with commands 11-3 positioned block
locking lines 8-5 creating 10-7 locking the keyboard 7-1 printer port controls 3-14, 3-15
M printer port mode
margin bell setting with commands 11-6
turning on from a menu 2-5 programming the 965 introduction to 6-1 measured block
protect mode creating a 10-7 monitor mode enabling with a command 9-1
initiating with a command 7-6 protected form
turning on from a menu 2-3 creating 9-1
moving the cursor R commands for 9-5 set-up parameters 2-2
N receive buffer
new line mode fill limit for 11-2
enabling with a command 9-3 rectangle
normal mode erasing with commands 9-5
description of 3-13 replace mode
nulls enabling with a command 9-3
inserting with a command 9-3 replacement character
columns displayed inserting with a command 9-3
selecting from a menu 2-4, 2-6, 2-7 loading with a command 9-3 resetting the 965
p performing with a command 6-4 page resetting the terminal 2-2, 3-5
moving to another 8-3 performing with a command 6-4 page edit mode factory default parameters 2-2
enabling with a command 9-3 native mode page print selecting with a command 6-4
description of 3-14, 3-15 RS-232 signals 1-2 page print commands 11-5 s page send commands 11-4, 11-5
set-up paramaters 2-2 attributes selecting 7-3 screen
splitting the -4
9065 USER'S GUIDE X-3 INDEX

screen background selecting from a menu
screen display clearing splitting into windows turning on or off
screen saver
2-4
2-2 8-2 7-2
description of 3-5 selecting from a menu 2-4
scrolling loss of text because of 8-4
scrolling rate selecting from a menu 2-4 selecting with a command 8-4
secondary receive mode enabling and disabling with commands 11-3
cursor type 7-2, 7-3 BREAK key signal 7-1to7-3 self-test 5-2
initiating with a command 7-6 Send acknowledge (ACK)
selecting from a menu 2-3 set-up menus
Attribute menu 2-8 Command menu 2-2 exiting from 2-2 General menu 2-3 Keyboard menu 2-5 Program menus 2-9 saving values from 2-1
set-up mode entering 2-1
set-up parameters saving with a command 6-4
shifted label mode 12-5 soft character
creating a beeper special graphics mode
enabling with a command status line
description of toggling on and off
set-up menus T tab stops
clearing moving to setting
terminal identification sending the
INDEX
10-5 7-2
10-3
3-2 3-3 2-1
9-8 9-8 9-7
12-7
X-4
text blocks for transmission defining with commands 11-4
time of day loading the 12-7
transmission control turning on and off 11-2
transmit delay (COM2 port) selecting from a menu 2-7
transmit delay (COMl port) selecting from a menu 2-6
transmit delay rate selecting the 11-2
transparent print mode description of 3-14, 3-15 enabling/disabling w/commands 11-3, 11-6
trouble-shooting checklist 5-1
u unlocking the keyboard 7-1 unpacking instructions 1-1 unprotected text
erasing with commands 9-4 '9-5 user messages
loading the 12-6 sending 12-7
v VideoDesk program
alarm clock and bell 4-2 ASCII chart 4-4 calculator function 4-2,4-3 calendar function 4-2 lock function 4-1 clock/calendar 4-1 entering and leaving 4-1 introduction to 4-1 notepad 4-2
w windows
closing 8-2 moving between 8-3 sizing 8-2 splitting the screen display into 8-2
WordStar mode enabling and disabling 12-1 turning on from a menu 2-5
write-protect attributes selecting from a menu 2-8
write-protect mode enabling with a command 9-1
x X-On/X-Off characters
sending to the host 11-2
9065 USER'S GUIDE


PI N 1-H HJ-l·OO Telt>Vidt•o l / 'Jl Printed in Tainan X ~ 1A~O 1·678