Technology Platform for Springs User Manual - | India Water ...
12
Technology Platform for Springs User Manual
-
Upload
khangminh22 -
Category
Documents
-
view
0 -
download
0
Transcript of Technology Platform for Springs User Manual - | India Water ...

Technology Platform for Springs
User Manual

Installing the ODK Collect App Go to google play and search for “ODK Collect “. Download and install ODK Collect.
1. General Settings As the App is launched, click on the settings option and select General Settings on the top right
navigation bar.
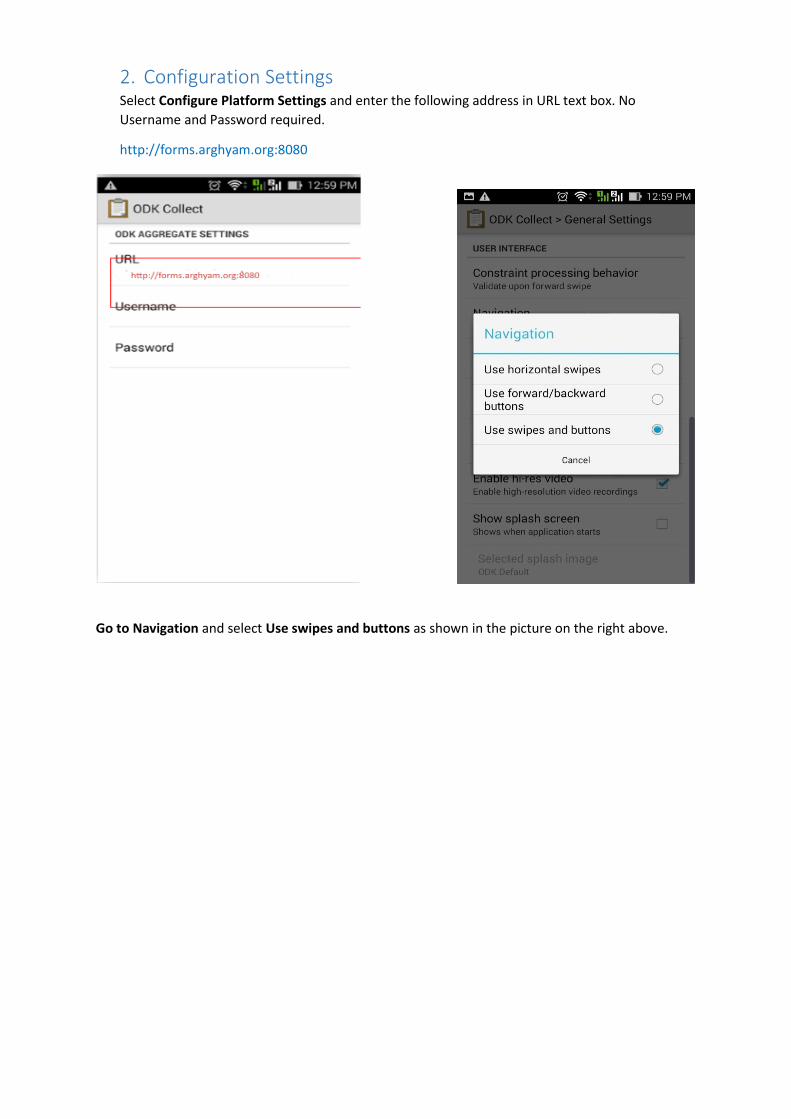
2. Configuration Settings Select Configure Platform Settings and enter the following address in URL text box. No
Username and Password required.
http://forms.arghyam.org:8080
Go to Navigation and select Use swipes and buttons as shown in the picture on the right above.

3. Downloading Springs Forms
Select Get Blank Form option and select the forms.
Click Get Selected option from the bottom right corner. You will get a notification for successful
download.

4. Filling Blank Form
On the Main Menu, select Fill Blank Form option and start filling the forms.

5. Sending Forms Send the finalized forms from “Send Finalized Form” option on main page.

Web Application Login
URL: http:// springs.arghyam.org
User names and Password can be created by logging with the admin credentials. Contact
Administrator for any issues.
User Name: *****
Password: ******
Figure 1: Login Page
6. Data Portal
Figure 2: Data Grid View
Back
Upload Export Log out View on Map
Data Grid

As one enters the login credentials of PGWM, it takes the user to web platform. The following
options are available on the web page:
1. Back: Takes the user to the previous visited link
2. Upload: One can upload data in the specified format (excel sample file) refer pic.
3. Export : Export data in KML and Excel formats
4. Visualize (view on map): Visualise the data on google map background.
5. Log out : Ends the session
6. Data grid: View the data submitted by the mobile users or uploaded from sample excel sheet.
7. Export Features As user clicks on the export option, he can select the attributes to export. The exported file must be
saved on the local disk by selecting Save as Excel worksheet.
Figure 3 : Choose fields to export

The following screenshot shows the sample excel file. The columns in MS excel are order sensitive. It
is also requested to delete the old data and then paste the new.
Figure 4: Download Sample excel file
Clicking on the visualize option, generates the map in the new tab. One can click on the placemarks
and see the attribute information on the right panel.
Figure 5: Upload Data format

Figure 6: Map View screenshot
8. Admin Panel
To enter the admin panel, enter administrator credentials:
Admin: XXXXXXX
Password: XXXXXX
Figure 7: Admin login

As one enters the admin panel , the following options are displayed on the web page.
Springs Atlas link : It opens the Springs data platform
Spring Monitoring : It directs to the Springs Monitoring Data Platform
New User , Edit User and Remove User : The admin can create new user , edit user and remove
user.
Figure 8: Admin Panel Screenshot
User Types:
There are two kind of users.
Figure 9: Admin Panel screenshot

Figure 101: Spring Monitor Data Portal Screenshot
Authentication Matrix:
User Type Access to Application Edit and Remove Entry
Admin Admin Platform Yes
Both Spring Data Platform No
Once the user enters the following credentials, it takes to the Springs data platform. The normal user
without admin rights logs in the web application then he will see the spring atlas data platform with
a link which points to spring monitoring data platform.
Figure 110: Spring Atlas Data Portal Screenshot