Teaching Practicum at Doherty Memorial High School Appendix
231
A1 Project Number JAG-7002 Teaching Practicum at Doherty Memorial High School A Student Teaching Practcum Portfolio Appendix Mark E. Kuhlwein 14 October 2010
-
Upload
khangminh22 -
Category
Documents
-
view
1 -
download
0
Transcript of Teaching Practicum at Doherty Memorial High School Appendix
A1
Project Number JAG-7002
Teaching Practicum at Doherty Memorial High School A Student Teaching Practcum Portfolio
Appendix
Mark E. Kuhlwein
14 October 2010

A2
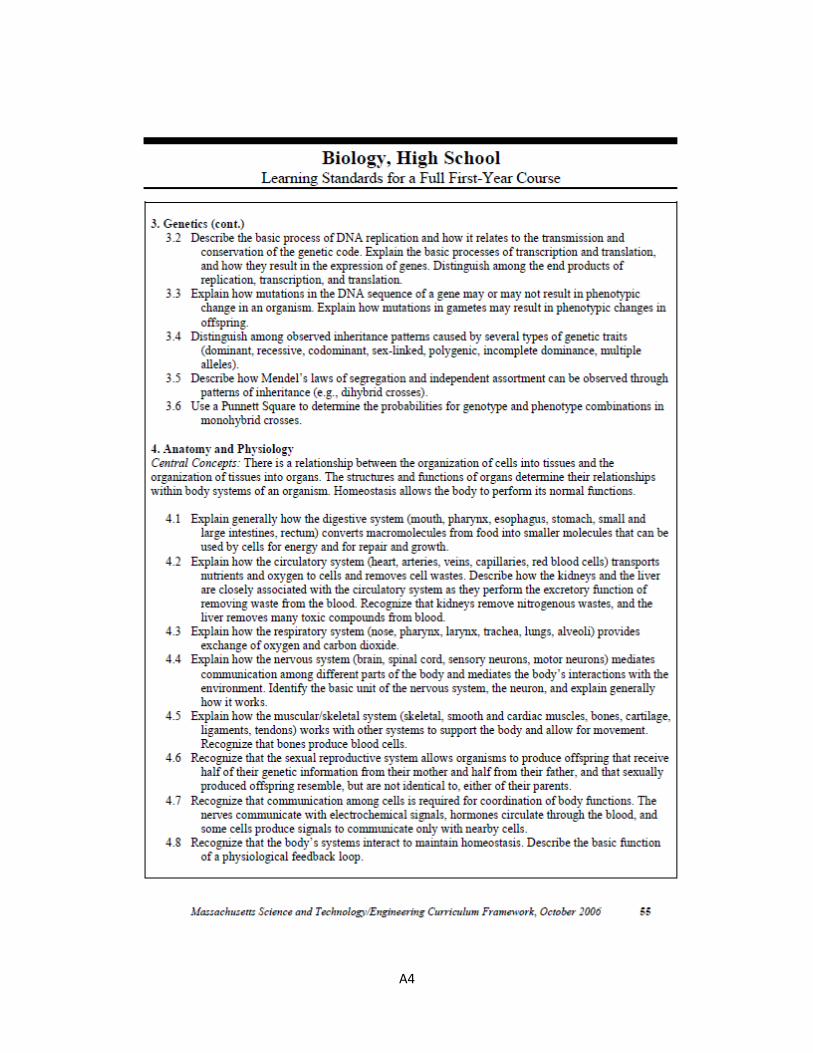
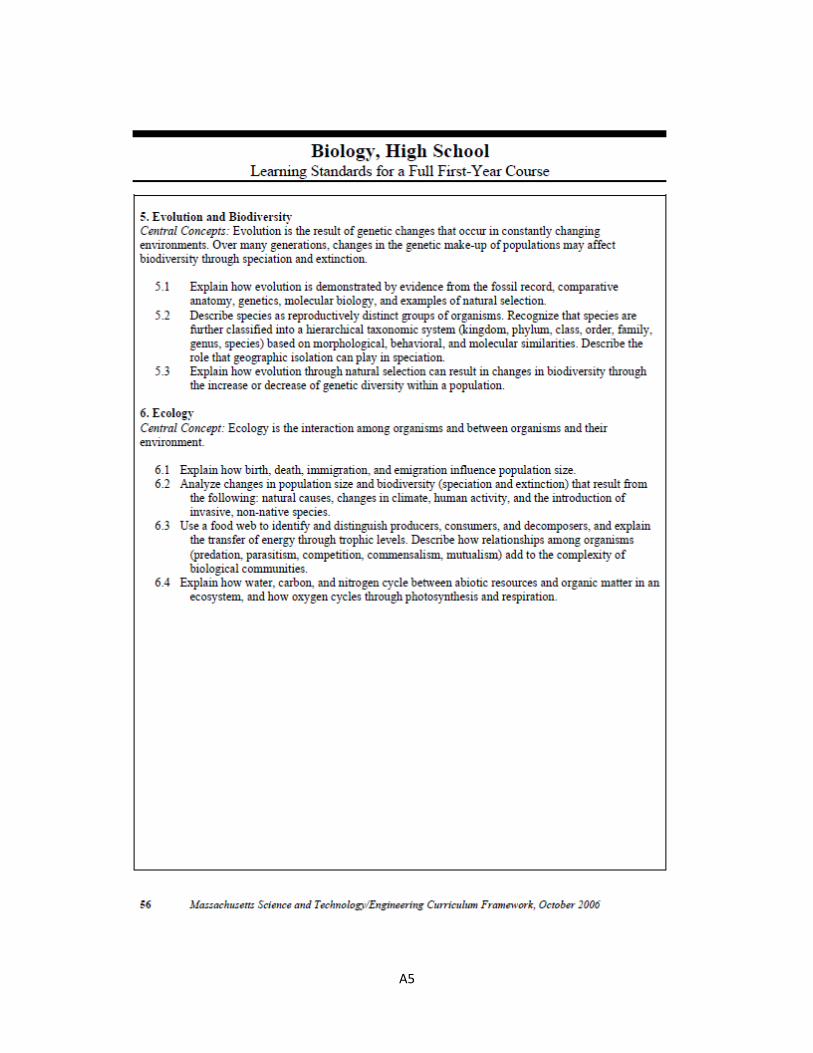
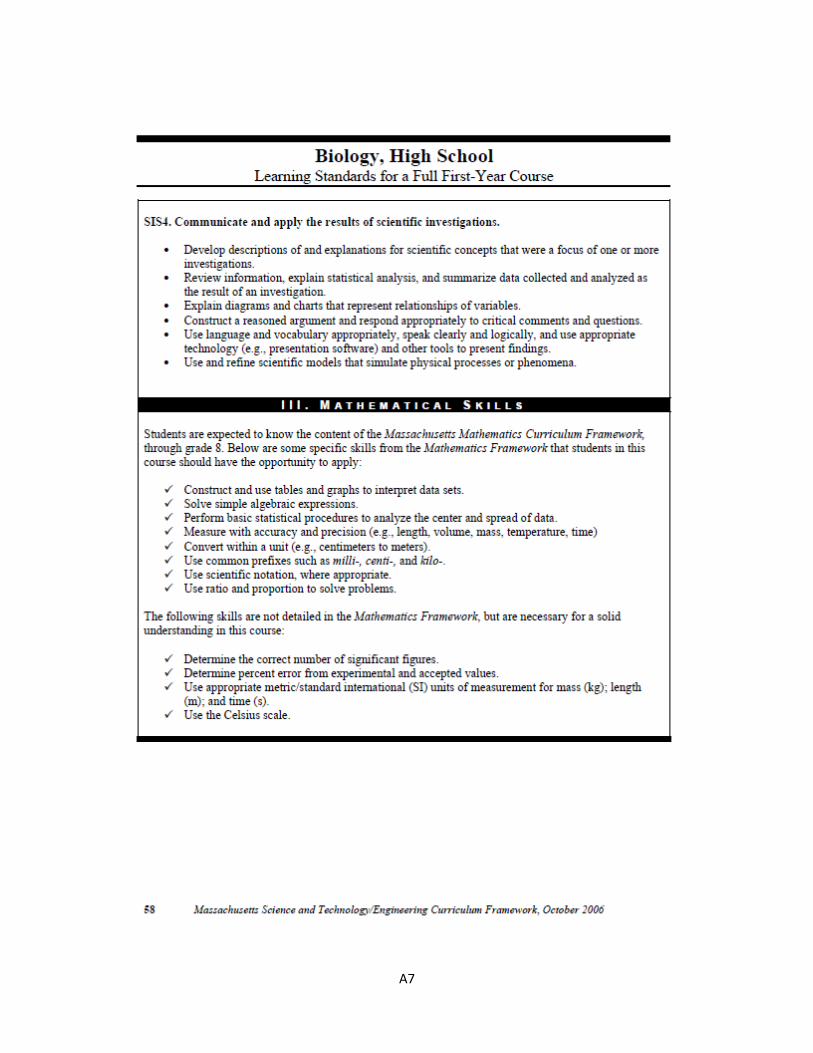
Appendix I: Massachusetts Curriculum Frameworks: Biology, High School
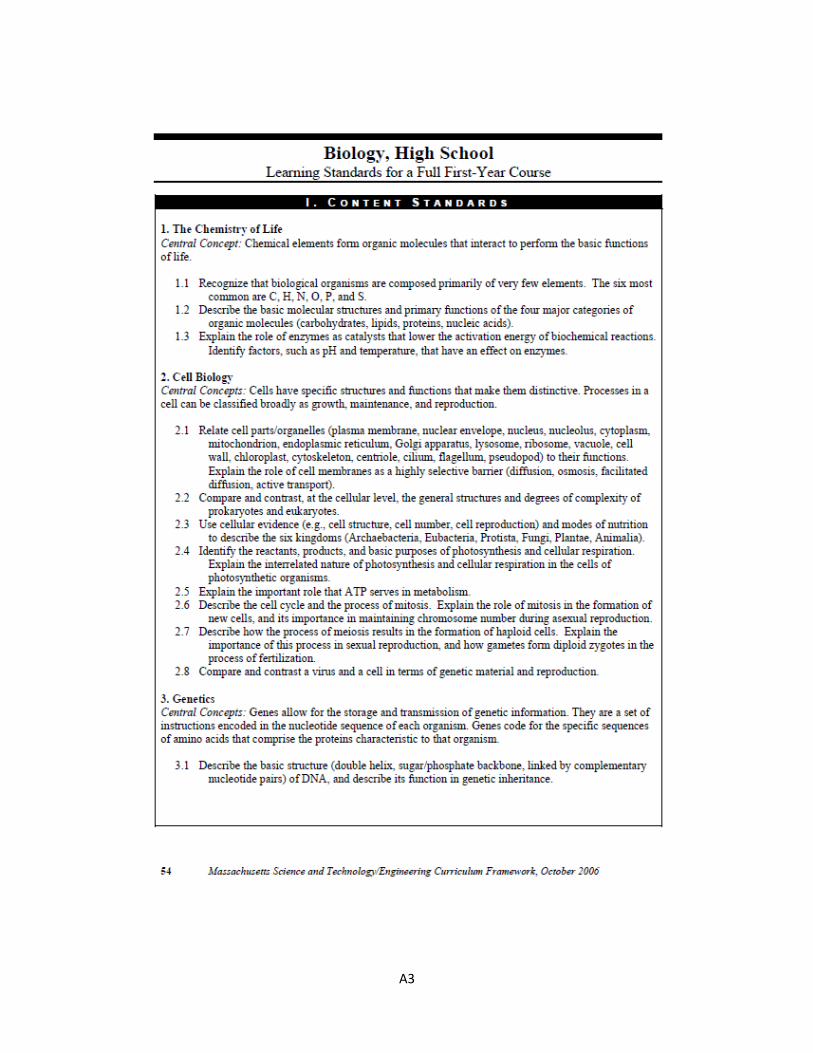
A3
A4
A5

A6
A7
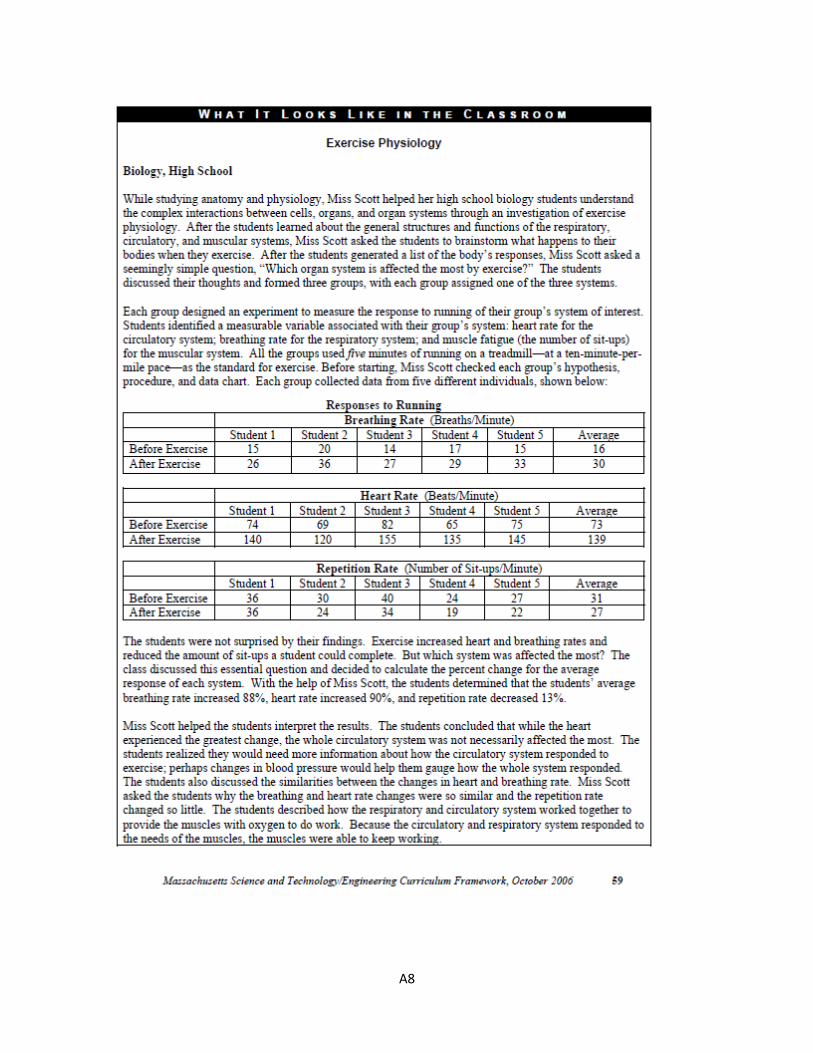
A8
A9

A10
Appendix II: Worcester Public Schools
Science and Technology/Engineering
Curriculum Materials: Biology

A11
A12
A13
A14
A15
A16
A17
Appendix III: Doherty Memorial High School
Daily Bell Schedule
A18
A19
Appendix IV: Lesson Plans

A20
Mark Kuhlwein Cardiovascular System
Last Edit (3/1/2010) & Blood Lesson Plan
Run Time: 3 Weeks (12 lesson days + 2 assessment days)
MA Curriculum Frameworks 4.2:
Explain how the Circulatory System (heart, arteries, veins, capillaries, red blood cells) transports
nutrients and oxygen to cells and removes cell wastes. Describe how the kidneys and liver are closely
associated with the circulatory system as they perform the excretory function of removing waste from
the blood. Recognize that kidneys remove nitrogenous wastes, and the liver removes many toxic
compounds from blood.
Overview:
This lesson will start by reviewing the importance of the heart, veins, and blood in the body.
Topics such as transport of nutrients, wastes, and bodily defense cells will be discussed briefly such that
the students will have a general understanding of what we will be going over during the next 3 weeks in
this unit. The class will then begin by focusing on the gross anatomy of the heart. Students will be
responsible for knowing the following anatomical features of the heart; Left/Right Ventricles/Atria,
Superior/Inferior Vena Cava, Aorta, Pulmonary Artery/Vein, Atrioventricular Valves, the Semilunar
Valves, Pericardium, Anterior Interventricular Artery, and the Chordae Tendineae. These anatomical
features will be located and their function will be discussed. A review will be given on this information in
the form of a worksheet to be completed in class. This will make it so the students will be able see and
work with the diagrams first-hand which will aid in the retention of the material.
The lesson will then change its focus to the anatomy of blood vessels. There are 3 types of blood
vessels in the body; arteries, veins, and capillaries. These blood vessels are quite different in anatomy
and their differences are what aid in their function. Features that will be covered include arteries, veins,
capillaries, the capillary bed, valves, tunica intima/media/ and externa. These features will be gone over
and their function in the blood vessels will be discussed. A review of the lesson, to this point, will be
given in the form of a worksheet as well a review of all the anatomy in preparation for the midpoint
assessment.
Cardiovascular Physiology will then be started. The lesson will move to focus on the physiology
of the Heart. Topics covered include the direction that blood moves through the heart, the importance
of the valves to prevent backflow, how the heart actually contracts, the importance and purpose of the

A21
pericardium of the heart and what it does during heart contractions, how cardiac muscle has the ability
to contract independently even though there are nerves present from the nervous system, and that
there is a basic rhythm that beats in. The lesson will discuss each topic and show how everything works
in unison to oxygenate blood and pump it back to the rest of the body.
To continue, the lesson will move to focus on where blood travels after it leaves the heart. As
blood leaves the heart, it moves through the body via blood vessels called arteries, veins, and capillaries.
The lesson will explore what drives the blood through the vessels and how the structural features of
each vessel make it suitable for its function in transport.
The students, at this point, should have a good grasp of how the blood is moving through the
body, and the lesson will move to focus on what exactly is in blood. The blood is, in essence, the
highway of the body. This system is responsible for transporting many different materials through the
body. These materials can be good things, such as RBC, Platelets, WBC, and parts of what makes up the
plasma. These materials can also be bad things, such as CO2 and metabolic wastes. The blood is the key
component that is responsible for bringing these good things to the tissue cells and, at the same time,
bringing the bad things to other systems so that they can be released from the body.
The lesson will now continue to go more in depth on the components of blood. The class will
start to talk about the Red Blood Cells, Platelets, and Blood Plasma. These different components will be
gone over in more in depth and their purpose for being in the blood will be reviewed and expanded
upon. The lesson will also work on discussing what will happen to the body if these components were to
be mutated or completely absent.
To continue going deeper into the blood and its components, the lesson will now focus on the
blood plasma. The blood plasma has previously been touched upon and now it will be explored further.
Blood plasma is an important aspect of the blood in its role as the “highway” of the body. As touched on
previously, the blood plasma contains things such as electrolytes and proteins, which are needed for
energy production in cells, as well as wastes like urea and carbon dioxide, that are excreted from the
cells and need to exit the body. The lesson will go more in depth in exploring how those components
make their way into the blood stream as well as their journey and how they leave the blood. The
interaction between the blood and digestive system will be discussed, as well as the blood’s interaction
with the liver and kidneys. Through the lesson students will learn what makes up the plasma, the
importance of those components, and how those components are maintained.
The lesson will move to work on teaching about the White Blood Cells and their role in the
blood. The WBCs are a key aspect for bodily defense. These cells are responsible for recognizing and
A22
eliminating any threats that may be present in the blood. There are many different types of WBCs and
they all have their own specific function. The lesson will focus on what these cells are, what they look
like, and why they are important to have.
The Cardiovascular System, and the Blood which it transports, are vital to Human survival. This
lesson aims to teach the different aspects of the Cardiovascular System and Blood, as well as their
function in the system, by first going the terminology. After this hurdle has been passed, the students
will be taught how everything works together. It is crucial for things to be taught in this order, in order
to curve confusions that may arise.
Purpose:
- To spark interest in the Cardiovascular System and Blood
- To learn the basic anatomical features of the Cardiovascular System
- To review these features and work with their names so that they become instilled in the
students’ mind and can be easily recalled
- To assess the class on what has been taught and check the learning progress of the students
- To discuss how the heart works to pump blood through the body
- To further learning in the anatomical features of the heart and their role in the pumping of
blood
- To gradually start to tie together the significance and role of the cardiovascular system in the
body
- To further knowledge on how the blood moves through the body by focusing on the blood
vessels
- To show how the differences in structure dictate the function of the different blood vessels
- To give a description of what makes up blood
- To spark interest in the blood in the minds of the students
- To build upon prior knowledge of the blood and go more in depth on what the purpose of
certain components of the blood is.
- To discuss, in greater depth, the blood plasma and what it consists of
- Using the new knowledge of what is in the blood plasma to discuss its purpose in the body
- To further instill the importance of homeostasis and relate this concept to the blood plasma and
how it aids in the process
A23
Objectives:
At the conclusion of this lesson, the students will…
- Have knowledge of what is happening in the Cardiovascular System as well as in the Blood.
- Will be able to locate the mentioned anatomical features of the heart and will have knowledge of their
function.
- Will be able to recognize the differences between arteries, veins, and capillaries and differentiate
between the vessels when an image is shown.
- Will have an understanding of the direction that blood moves through the heart, the importance of the
valves to prevent backflow, how the heart actually contracts, the importance of the pericardium of the
heart and what the myocardium does during heart contractions, how cardiac muscle has the ability to
contract independently even though there are nerves present from the nervous system, and the basic
rhythm that beats in.
- Will understand the terms, such as systole and diastole, related to the cardiac cycle.
- Will understand the functional difference between arteries, veins, and capillaries.
- Will have the knowledge of what is pushing the blood through the body, both out to the limbs and
back to the heart.
- Will understand that blockages in the blood vessels can be a very bad thing to have.
- Will have a general knowledge of what can be found in the blood.
- Will, along with knowing what can be found in the blood, have an understanding of why those things
can be found in the blood and where their ultimate endpoint will be.
- Will have an understanding of the purpose red blood cells, platelets, and plasma and the role they play
in the body.
- Will be able to use their knowledge to explore how the components help the blood plasma in its role in
the body.
- Will have an understanding of how the components of the blood plasma make their way in and out of
the blood stream and how the blood plasma it maintained.
- Will have knowledge and understanding of how the WBCs work to protect the body from invaders.
- Will be aware that all of the WBCs have a specific function and that some of them work together to
eradicate possible threats.
A24
Materials:
- Whiteboard
- Overhead Transparencies
- Worksheets for students to complete to aid in retention of material
Day 1/Day 2:
Procedure:
1) The “hook” for this class will be “In celebration of Valentine’s Day, we will now start our unit on
the heart.” Have them come to the board and write what they know, think they know, and want
to know about the heart, circulatory system, and blood.
2) An overview of the circulatory system and its importance in the body will be provided in a class
discussion type format. Topics to be mentioned will include….
- What the blood does in the body / the importance (ex: transporting nutrients and wastes in and
out of the body, transporting WBC for bodily defense, and maintaining body heat)
- Where blood is located in the body (in veins and arteries)
- How the blood moves through the body and back to the heart
3) Change the direction of the class discussion to locate and discuss key anatomical features of the
Heart. Make sure to touch on……
- Left/Right Ventricles/Atria (the 4 chambers of the heart)
- Superior/Inferior Vena Cava (bring blood into the heart)
- Aorta (brings blood out of the heart and to the body)
- Pulmonary Artery/Vein (bring blood to the lungs and back to the heart after)
- Atrioventricular Valves (valves between the Atria and Ventricles)
- the Semilunar Valves (valves between ventricles and exiting vessels)
- Pericardium (protective covering around the heart)
- Anterior Interventricular Artery (brings blood to the cells of the heart)
4) Make sure class has an understanding of all of the features and their functions by periodically
asking questions that relate back to the earlier parts of the lesson
5) Announce the HW: pg 358-359 #1-12, 13, 14, 16, 17, 19, 23, 29, 32 and pg 399-401 #1-19, 20,
21, 24, 26, 28, 41, 49, 52 that will be due February 26th (after vacation)
6) Provide a worksheet, to be completed in class, which has the students practice locating and
identifying the key anatomical features of the heart.

A25
7) Announce quiz that will be given at the end of the anatomy portion of the lesson (planned to fall
on the 5th day; a Friday)
Day 3/ Day 4:
Procedure:
1) Start to give a brief review of the previous days in terms of Heart anatomy
2) The “hook” for this class will be “Ok, who can tell me anything about arteries, veins, or
capillaries?” Their answers will be written on the board such that they can be referred back to
and added upon later in the class
3) Begin to discuss blood vessels by first discussing the role of each different type in the body.
Explain how arteries bring blood away from the heart, veins bring blood back to the heart, and
capillaries connect veins and arteries.
4) Start to show the anatomy of each type of blood vessel. Make sure to touch on…
- arteries (bring blood to the body)
- veins (bring blood to the heart)
- capillaries (connect arteries and veins / site of nutrient exchange)
- the capillary bed (vast network of capillaries)
- valve (show how they work by trying to force the blood in the opposite direction)
- tunica intima/media/ externa (protective coverings of the arteries and veins)
- Endothelium (only protective layer shared by all 3 types of vessels)
5) On Day 4, provide a review worksheet to aid in the retention of the taught material.
6) Give the students half of the period to work on the worksheet before concluding the class with a
review of all the anatomy that they need to know for the upcoming assessment
Day 5:
Assessment:
This assessment will be in the form of an oral quiz where students will come to the front of the room
one at a time and pick random anatomical parts from a jar and will have to identify them on the figure
that will be in front of them.
Day 6:
Procedure:
1) Start class with a quick recap of the Heart and the structures that we went over in the anatomy
section.
A26
2) The “hook” for this class will be having the class feel where their Heart is and feel for the heart
beat. Pose the question “Does anyone know what is going on here?” to the class and write
responses on the board so that they can be referred back to at a later point.
3) Begin class discussion on how blood moves through the heart (comes in through the vena cava,
empties into the right atrium, passes into the right ventricle, gets pumped through the lungs via
the pulmonary arteries, re-enters the heart via the pulmonary veins, empties into the left
atrium, passes into the left ventricle, and then leaves to go to the body through the aorta).
Make sure to touch on…
- The cycle noted above
- The “lub-dub” sounds caused by the AV valves closing and the Semilunar valves closing
4) Continue discussion by moving onto the valves and their purpose in the heart (i.e. preventing
backflow etc.)
5) Move on to point out that the heart muscle (cardiac muscle) is contracting, and that is what is
causing the blood to flow through and out of the heart. They have already learned about Cardiac
Muscle, so should not be a need to go over that again. Make sure to touch on…
- Nerves are present in the heart to help with regulation of contractions, though Cardiac Muscle is
able to beat on its own. “Why are there nerves in the heart if cardiac muscle can beat by itself?”
Nerves are present to regulate heart beat when more blood is needed in the body (during
exercise etc)
- How the Pericardium is present to protect the heart. Mention how all organs have a protective
membrane. Move on to the Myocardium and how this is the actual Cardiac Muscle. Have the
notice that the Myocardium in the left ventricle is thicker than that of the right ventricle. This is
due to the left side needing more power to push the blood through the body.
6) Review what was just went over, in terms of heart contractions. Bring into play the terms systole
and diastole and discuss their definition. Systole=contraction ; Diastole=relaxation
7) Make sure everyone has been paying attention by asking some random questions about what
has just been gone over. Possibly give points out to people who answer correctly.
Day 7:
Procedure:
1) Recap the past lesson on heart physiology and how the heart’s chambers work together to
pump the blood to the body
A27
2) The “hook” for this lesson will be “have you ever just let your arms dangle by your sides and
they start to get numb and such? Well part of today’s lesson will tell you exactly why that is
happening”
3) After they are excited to learn, recap the differences between the arteries, veins, and capillaries.
This recap should be structural.
4) Relate that recap to what the purpose of them all is. Be sure to touch on…….
- How structure is related to function (arteries are rigid, veins are a bit floppy, capillaries are very
thin, etc)
- Arteries are very thick, to support the pressure of the blood coming from the heart
- Veins are a bit floppy and are between/next to muscles. They also have their valve to prevent
backflow
- Capillaries are what you are most likely to cut/scrape and are basically a big blanket within the
body.
5) Tie all of this together with going over the path that blood takes through the blood vessels of
the body while on its way from the heart to the body and from the body to the heart.
6) Any Questions?
Day 8:
Procedure:
1) Review from the previous class’ lesson
2) The “Hook” will be me posing the question “From what we have talked about already and what
you may already know, what do you all think is found in blood?” These responses will be written
on the board and will be referred back to as the lesson progresses.
3) Move to discussing what exactly is in the blood. Make sure to touch on
- Red Blood Cells and their purpose (carry oxygen)
- White Blood Cells and their purpose (fight off intruders)
- Platelets and their purpose (clotting of blood)
- Plasma and what it contains
- The relative amounts of blood cells to plasma (55% plasma to 45% formed elements)
4) Review what was covered from this class.
- Make sure the class understands how the circulatory system is basically a highway in the way
that it transports many things to and from tissue cells

A28
- Bring up again how only about half of the blood is actually blood cells.
Day 9:
Procedure:
1) Recap what was discussed in the previous class’ lesson
2) Let the class know that, now that they have a general knowledge of what is in the blood as well
as the purpose of blood, we will start to go a bit more in depth on certain aspects of the blood.
3) Start class discussion on Red Blood Cells. Make sure touch on…
- The actual name of RBC (Erythrocytes)
- Their purpose in the blood (to carry oxygen)
- How they get their color (hemoglobin + oxygen=red, hemoglobin – oxygen=blue)
- The fact that they do not have a nucleus (in fact, they mostly act as a bag of hemoglobin)
- RBCs are shaped like donuts (this makes it more efficient at binding to oxygen)
- They are formed in Bone Marrow
4) What would happen if the RBC was to be deformed (sickle cell anemia=decrease in the oxygen
carrying capacity and the deformed RBC may block blood vessels) (let them know that we will
have a lesson on blood disorders at a later date)
5) Continue class discussion by moving to Platelets. Make sure to touch on…
- How they are not actually cells (actually pieces of cells)
- They are responsible for clotting the blood when a rupture has occurred
- Relate their purpose to what would happen if they were not present.
6) Move onto the Blood Plasma, what it is composed of, and its role in the blood. Make sure to
touch on…
- How it is 90% water
- Yellowish color
- How it contains lots of electrolytes (electrolytes are important to cells)
- Also contains a lot of proteins (also needed by cells)
- Waste products such as urea and uric acid (make up Urine)
- How the blood plasma’s purpose in the body is to carry substances (it is a good solvent),
maintain the pH and osmotic balance, and maintain body heat (water is good at this)
7) Recap of today’s lesson
8) Give remaining time to work on the homework.
A29
Day 10:
Procedure:
1) Recap the previous class’ lesson
2) Explain that we will now be going more in depth into the blood plasma
3) Recap the blood plasma material that was mentioned in the previous class
4) Start going more in depth on what is in the blood plasma and what its purpose in the body is. Be
sure to touch on…
- Water (absorbs heat and is a great solvent for carrying substances)
- Electrolytes (pretty much salts such as sodium, potassium, calcium, magnesium, chloride, and
bicarbonate) (they work to maintain osmotic balance, pH, and regulate membrane
permeability)
- Proteins (Albumin, Fibrinogen, and Globulins) (they work to maintain osmotic balance, pH, the
clotting of blood, as well as being antibodies)
- Other nutrients (glucose, fatty acid, amino acids, and vitamins) (needed for cells)
5) Continue onto waste products that are carried in the blood plasma. Be sure to touch on….
- Urea and Uric Acid (waste products of metabolism)
6) Move now onto a review of the respiratory gasses that are present in the blood (O2 and CO2)
7) Finish with the components with the presence of hormones. Hormones are secreted into the
blood by the endocrine system and work to tell certain organs/tissues what to do and when.
8) Start to discuss the interaction that happens between the blood and the digestive system. Be
sure to touch on….
- How the digestive system is responsible for breaking down food and delivering nutrients into
the blood. (there is an excess amount of nutrients put into the blood)
9) Move onto the purpose of the liver. Be sure to touch on…
- How the liver processes the blood (maintains glucose/fat/protein levels)
- The liver takes out all of the excess nutrients from the blood and stores them for later use
- The blood goes through the liver right after it picks up the nutrients are acquired
10) End this lesson with a discussion on the kidneys and their function in the body. Be sure to touch
on….
- How the kidneys maintain blood volume and pressure (by regulating how much water is
conserved) (also secrete the chemical renin)
A30
- Site of water and waste uptake (the kidneys filter the blood and distribute the wastes and
excess water into the urinary system)
11) If time permits, tie everything together and give an overview of everything that we have just
gone over.
Day 11:
Procedure:
1) Review what has already been gone over in terms of what is present in the blood
2) Pose the question “what component of the blood have we not gone over yet?” Explain to the
students that the WBCs are one of the most important aspects of the blood due to their role in
defense and that being in the blood helps them to travel through the body and get where they
need to be.
3) Proceed by identifying all of the different types of WBCs and discussing their function. Be sure to
touch on…
- The granulocytes
- Neutrophils (phagocyte that engulfs threats and digests them)
- Eosinophils (releases chemicals to digest parasites…also known to be a phagocyte)
- Basophils (release histamine (a vasodilator) at inflammation sites as well as heparin (an
anticoagulant)
- The Agranulocytes
- Lymphocytes (B=antibody producing and T=direct cell attack)
- Monocytes (phagocytes that turn into macrophages….the cleanup crew)
4) Recap the day’s lesson and allow the rest of class to work on the homework
Day 12:
Procedure:
1) Explain the purpose of the review sheet and how it will be collected and graded as a quiz at the
conclusion of the class.
2) Distribute the review sheets and ask that students work individually

A31
Day 13:
This class will consist solely of review of all of the material that has been discussed in relation to the
circulatory system and blood. A game will be played to get the students active and participating.
Day 14:
Assessment:
This is the assessment day of the lesson. The students will be given a written exam.
A32
Mark Kuhlwein Digestive System Lesson Plan
Last Edit: 5/7/10
Run Time: 10 lesson days / 2 assessment days
MA Curriculum Frameworks: 4.1: Explain generally how the Digestive System (mouth, pharynx,
esophagus, stomach, small and large intestines, rectum) converts macromolecules from food into
smaller molecules that can be used by cells for energy and for repair and growth.
Overview:
The Digestive System, being vital for survival, is responsible for the conversion of food into its
basic components. In addition, the Digestive System deposits these nutrients into the blood stream
where they can be used by the various cells of the body. The lesson will begin with giving an overview of
the digestive system and what it entails. Specific topics to be covered in this overview lesson include the
3 aspects of digestion, being mechanical, chemical, and absorption, the difference between digestion
and metabolism, and what exactly defecation is. It is crucial that the students are able to understand
these topics and differentiate between them. These processes are the fundamental aspects of the
Digestive System. To continue, the students will then become familiar with the anatomical features of
the digestive system and their names. This, coupled with the topics previously mentioned, will work to
build a foundation on which the rest of the lesson can build.
The lesson will continue by going more in depth into the topic of digestion. Students will begin
to gain an understanding in the first aspect of digestion, ingestion, by learning about the mechanical
aspect of digestion and how it plays a major role in overall digestion. To summarize, this aspect of
digestion works to physically break the food ingested into smaller pieces and therefore increase the
surface area. To continue, the lesson will move to what is happening in the stomach, pertaining to the
digestion of food. The topic of chemical digestion will be brought up once more and will be discussed in
more depth. To summarize, chemical digestion pertains to the breaking down of food by the use of
chemicals and enzymes. Finally, what is happening in the intestines and how nutrients make their way
out of the digestive system and into the rest of the body will be discussed. This act is referred to as
absorption. Once the process of digestion has been covered, the lesson will discuss the act of defecation
and clearing the body of excess and indigestible aspects of food.
A33
In addition to classroom discussion, and to further discuss and review the digestive system and
how it works, a laboratory experiment that focuses on the digestive system and how it works will be
completed to show how digestion provides the body with nutrients.
A short assessment, in the form of a quiz, will be provided at the conclusion of the class’s
discussion on digestion. This will work to assess the students’ knowledge of digestion before discussing
nutrition.
Acting as a basic introduction to the topic, the lesson will move to give an overview of nutrition
in terms of what exactly a nutrient is and why proper nutrition is important for the body. Continuing
from this, carbohydrates, lipids, proteins, vitamins, and minerals will be discussed. In terms of the
digestive system, it is crucial that the students understand that the body needs certain aspects of food,
as well as understand that various aspects are more important to have than others. The lesson will move
to focus on cellular metabolism and the production of ATP. Through the lesson, the students have
explored how the body digests certain food as well as what each food contains and what that in turn
does for the body. At this point the student work with how the body uses some of those nutrients to
make chemical energy in the form of ATP. The lesson will conclude with a review of the material
followed by a written examination to check knowledge on the topic.
Purpose:
- To give students an overview of what the digestive system is, what it does, and why it is
important
- To further the students understanding of the Digestive System
- To explain the difference between digestion and metabolism
- To explain the act of defecation
- To make students aware of the anatomical features of the digestive system and their names
- To go into greater depth on mechanical digestion, chemical digestion, and absorption
- To provide a knowledge of how nutrients, after being broken down by the stomach, make their
way to the rest of the body
- To discuss the act of defecation, what it is doing, and what fecal matter is composed of
- To use an interactive laboratory experiment to further students’ understanding of the Digestive
System
- To introduce the topic of nutrition
- To give the students knowledge as to what the body needs from the food that is consumed
A34
- To discuss how the body uses some of the nutrients brought into the body to make energy
- To review the material from the digestive system and nutrition for the benefit of the students
Objectives:
At the conclusion of this lesson…
- Students will have an understanding of the digestive system and how it works to provide the
cells of the body with nutrients
- Students will understand the 3 aspects of the digestive system and where they can be observed
- Students will know the difference between digestion and metabolism
- Students will understand defecation and what it entails
- Students will know the anatomical features of the digestive system
- Students will understand what is happening in defecation and what fecal matter is composed of
- Students will understand nutrition, what it is, and why it is important
- Students will understand why proper food intake is important to have
- Students will know about the different nutrients and what each one entails
- Students will have an understanding of Glycolysis and its purpose in cellular respiration
- Students will have an understanding of The Krebs Cycle
- Students will have an understanding of the electron transport chain and how it works to
produce energy
Materials:
- Whiteboard
- Overhead projector
- Proper/relevant transparencies
- Materials for Laboratory Experiment
Day 1:
Procedure:
1) Explain how this lesson is to act as a brief overview of the Digestive System and that this
material will be gone over in more detail in later lessons
2) Answer the question “What is digestion?”
- The process of breaking down foods into their raw materials
3) Describe to the students the 3 steps of digestion and where each step can be observed.
A35
- Mechanical: the use of the body to break food into smaller pieces (teeth / chewing)
- Chemical: the use of acids and enzymes to further break down food into their raw materials (in
stomach and intestines)
- Absorption: when the raw materials pass into the blood stream to be used by the rest of the
body (done in intestines, both large and small)
4) Contrast the act of digestion with the act of metabolism
- Metabolism is the use of raw materials by the body to make energy
- Need the products of digestion in order to have metabolism
5) End this lesson by discussing defecation
- The last step for the ingested food
- This is the elimination of the contents of the bowels
- What comes out is everything that the body does not need or cannot digest
6) Give the remaining time for the students to work on the homework, which is…..
HW: pages 514-515 #1-30 DUE: 5/6/10
Day 2:
Procedure:
1) Review the previous day’s lesson
2) Begin discussion on the anatomical features of the digestive system. Be sure to touch on…
- Salivary Glands (found in mouth and produce saliva to start chemically digesting food)
- Teeth (located in mouth and are used to mechanically break down food into smaller pieces)
- Esophagus (located behind the trachea and is the pipe that brings food from the mouth to the
stomach)
- Stomach (Located to the left of the liver and food deposited here for chemical digestion)
- Small Intestine (right after the stomach and is home to the final digestion of food as well as
initial place for the absorption of nutrients)
- Large Intestine (follows the small intestine and is responsible for absorbing water from the
digested food)
- Anus (used to expel everything that the body could not use of digest)
- Pancreas (located behind stomach and responsible for secreting digestive enzymes into the
small intestine)
A36
- Gallbladder (located under the liver and responsible for storing leftover bile present in the small
intestine)
- Liver (located to the right of the stomach and is responsible for releasing bile into the small
intestine)
3) Discuss the term peristalsis and its importance in relation to digestion
- Peristalsis=waves of contractions noticed in tube-like organs that propels substances along a
tract.
4) Provide the students with a worksheet to complete on their own time that will further
emphasize this new knowledge
Day 3:
Procedure:
1) Review the previous day’s lesson
2) Start the new topic of Ingestion and what it entails. Be sure to touch on…
- It is the act of placing food into the mouth, chewing, and swallowing
- This starts the mechanical aspect of digestion
- Saliva works to start chemically breaking down the food in the mouth
3) Touch on the act of mechanical digestion.
- Primarily in the mouth, using the teeth, but can also be observed in the esophagus and stomach
- This act entails any point at which the food is chewed, moved, or churned (basically anything
that breaks the food into smaller pieces)
4) End this discussion by explaining the importance to mechanical digestion
- Breaks the food into smaller pieces, thus increasing the surface area
- The increased surface area makes it possible for more areas to be chemically digested in current
and later steps of digestion
5) Review all of the material from today’s lesson and explain how the rest of this week will be
focusing on digestion, with a lab on Thursday and quiz on Friday.
6) Give the students the rest of class to work on homework.
A37
Day 4:
Procedure:
1) Review from the previous day’s lesson.
2) Start the class by showing the students how we are following food on its journey through the
digestive system. Today’s lesson will focus on what is happening inside the stomach.
3) Start to go a bit in depth as the workings of the stomach. Be sure to touch on…
- The sight, smell, and taste of food triggers the stomach to start secreting gastric juices
- Even more gastric juices are secreted when food enters the stomach (it raises the pH so the
body wants to fix itself)
- Gastric Juices are made up of protein-digesting enzymes, mucus, and hydrochloric acid
- The enzymes and hydrochloric acid work to break down the food into its raw elements (the acid
also works to activate some of the enzymes)
4) Why does the stomach secrete mucus?
- The enzymes and acids have the ability to harm the inside of the stomach
- Mucus keeps the cells of the stomach safe from the rising acidity of the contents of the stomach
5) With the secretion of the enzymes and acids, the stomach will start to contract
- The contraction (peristalsis) of the stomach works to further break down the food into its raw
materials
6) All-in-all, the stomach acts to merely start chemical digestion and further mechanically digest
the food.
- Chemically, the stomach digests only proteins and carbohydrates
7) Once the food is done in the stomach, it will pass to the intestines, where it will be further
chemically digested and absorption of the nutrients will occur.
Day 5:
Procedure:
1) Review from the previous day’s lesson
2) Start the class by first discussing what happens when the food is leaving the stomach. Be sure to
touch on…
- The stomach is working to further break down the food into its raw materials
- At the end of the stomach, there is a feature called the Pyloric Sphincter which acts to only let
liquids and VERY SMALL pieces of food through
A38
- The food that is able to pass through is then deposited into the Small Intestine
3) Continue by discussing the Small Intestine in general. Be sure to touch on…
- It has 3 parts (Duodenum, Jejunum, and Ileum) and they are known to be around (26cm, 2.5m,
and 3.5m) respectively.
- This is the point, in the digestive system, at which fats are digested
- Absorption of nutrients is also noticed in the small intestine
4) Provide a little more depth on how the small intestine is further working to digest food. Be sure
to touch on…
- At this point, the food is only partially digested and needs more time before it is fully ready to
be used by the body
- The Small Intestine secretes enzymes to further digest the fat aspect of food
- Peristalsis and the winding nature if the Small Intestine further work to mechanically break job
food into smaller pieces (remember: Larger Surface Area = More places for enzymes to attack)
5) Provide a little more depth on how the Small Intestines work to provide the body with the
nutrients that become present. Be sure to touch on…
- The Small Intestines are full of these little finger-like extensions called “microvilli”
- These extensions are filled with capillaries (more capillaries!)
- The raw materials are able to pass through the thin wall of the microvilli as well as the thin wall
of the capillary
- The raw materials, now being in the circulatory system, are able to be moved through the body
to the places that need them
6) After the food has spent some time in the Small Intestine (3-6 hours), it then passes into the
Large Intestine. Be sure to touch on…
- No digestive enzymes are produced in the Large Intestine, rather there are bacteria present
which work to further breakdown some nutrients that were left behind
- The Large Intestine has 3 parts (the Ascending, Transverse, and Descending Colon)
- The Large Intestine works to absorb all of the water (and vitamins produced by the resident
bacteria) out of the now virtually nutrient-less material that is passing through it
7) Defecation is the release of fecal matter from the body. In discussing this topic, be sure to touch
on…
A39
- Feces is material that is unable to be digested by the body as well as mucus (from the stomach),
bacteria (both digested as well as some from the large intestine), and water (enough to make it
exit easily)
- Defecation is a reflex that is triggered when fecal matter is forced into the rectum by the
descending colon. This reflex causes a mass contraction of the rectum and forces the feces out
8) Recap from this lesson and ask for questions
Day 6: LAB DAY
Materials:
- Copy of the Experiment Protocol (provided by http://www.phreneticus.com/leftbrain/leach)
- 1 bag of baby carrots
- 1 box of plastic knives
- 1 large bottle of Alcohol
- Small beakers
- Large Beakers
- Hot Plates
- Water (from sink)
- 1 package of coffee filters
Procedure:
1) Review from the previous day’s lesson
2) Brief the Students about the laboratory that they will be performing and what it is supposed to
simulate
3) Write questions on the board that are to be answered and turned in as a Quiz Grade at the end
of the class period
4) Provide the Students with the necessary materials to complete the laboratory
5) Let the students complete the experiment and provide helpful insight to those students who
may be having trouble grasping the concepts
6) Have students clean their materials as they finish their experiment
7) Collect the observations and answers to the provided questions at the conclusion of the class
period
8) Be available for any post-laboratory questions that the students may have
A40
Day 7:
Assessment:
This assessment will be in the form of a quiz that will focus on concepts discussed in the past 6 lessons.
The quiz will include images of digestive system anatomy, as well as specific questions pertaining to the
aspects of digestions and what happens at each anatomical aspect.
Day 8:
Procedure:
1) Begin class discussion by first talking about food and coming to the conclusion that food is important
for life
2) Continue by discussing possible reasons why food is so vital and why it is needed to survive. Be sure
to touch on…
- use the phrase “You are what you eat” to discuss that part of what is eaten is actually used to
physically make up (the cell walls, etc) the cells of the body (skin cells / hair)
- explain how the rest of the nutrients are used to chemically produce energy and that this energy is
measured in kilocalories
3) Move on to discussing what exactly a nutrient is. Be sure to touch on…
- They are substances found in food that is used by the body to promote normal growth, maintenance,
and repair
- Nutrients are broken up into 2 categories, Major (carbs / lipids / proteins) and Minor (Vitamins /
minerals)
4) Start discussing the different types of nutrients. Be sure to touch on…
- Carbohydrates: Sugars and Starches (basically anything that eventually gets broken down into glucose)
: all derived from plants (sugars are from fruits and starches are from grains/legumes/
root vegetables
: work to provide the body with long term energy storage
-Lipids: Natural Fats (work to help with energy storage)
: Saturated – comes from animal products
: Unsaturated- comes from seeds, nuts, vegetable oils
A41
Day 9:
Procedure:
1) Review from the previous day’s lesson
2) Start this day’s lesson by discussing Protein. Be sure to touch on…
- Proteins are made up of various amino acids
- DNA ultimately codes for protein and for this reason it is crucial to have access to excess amino acids
so that they can be made properly
- Protein can be found in meat, eggs, milk, fish, nuts, seeds, beans, peas
- Proteins found in plants do not have a particular essential amino acid and for this reason strict
vegetarians need to monitor what they eat more closely
- Essential amino acids are called such due to the body not being capable of making them itself
- Ultimately, protein is broken down into amino acids which are then used by the body to make different
proteins
3) Continue by discussing Vitamins. Be sure to touch on…
- These are organic nutrients (contain carbon) that the body needs in small amounts
- found in all foods but no food contains all of the essential amino acids. For this reason, it is very
important that a balanced diet is had
- Vitamins work to help enzymes work more efficiently
4) End the class with a discussion on Minerals. Be sure to touch on……
- Similar to vitamins but these are inorganic nutrients, meaning that they do not contain carbon
- Minerals can be found in pretty much all foods, though different ones are found in different foods
- Include calcium, potassium, sulfur, sodium, etc
- Help with bone formation, maintaining blood pressure, enzyme activity, and the transmission of nerve
impulses
Day 10:
Procedure:
1) Review from the previous day’s lesson
2) Begin class discussion by introducing cellular metabolism and what it is.
- Metabolism= is a broad term referring to all chemical reactions that are necessary to maintain life
- Catabolism= the breaking down of larger molecules into smaller molecules
- Anabolism= the building up of larger molecules from smaller molecules
A42
3) Continue by discussing cellular respiration
- When cells use oxygen to make energy
4) Start to go a bit more in depth into the process metabolism and respiration by first discussing
Glycolysis. Be sure to touch on…
- performed in the Cytosol of the cell
- 1 Glucose molecule is broken down into 2 molecules of Pyruvic Acid
- While this is happening, the Glucose is also being stripped of its Hydrogen atoms, which contain high
energy electrons
5) Continue by discussing the Kreb’s Cycle
- This process uses the Pyruvic Acid produced by Glycolysis
-Occurs in the Mitochondria of the cell
- Enzymes found in the Mitochondria work to further break down the Pyruvic Acid and detach more
Hydrogen atoms
- This process, in turn, produces carbon dioxide as a by-product, which is released into the blood stream
6) These two processes work to ultimately strip the glucose molecules of their hydrogen. These
hydrogen atoms are then used in what is called the electron transport chain.
- In this process, the Hydrogen atoms are stripped of their electrons (producing hydrogen ions and
electrons)
- The electrons are gathered and used for energy through the cell
- The Hydrogen ions are combined with oxygen to make water as a by-product which is then released
into the rest of the cell
- This process produces the majority of the energy used by the cell
7) Recap what was discussed in this lesson and how that pertains to the body and how it makes energy
Day 11:
Overview: REVIEW DAY
Day 12:
Overview:
This will be an assessment on the material that has been presented on the Digestive System and
Nutrition. The assessment will be in the form of an Exam and will consist of questions in the form of
Multiple Choice, True/False, Short Answer, Identification, and an Essay.
A43
Mark Kuhlwein Lymphatic and Endocrine Systems
Last Edit (3/4/10)
Run Time: 3 Weeks (13 lesson days and 2 assessment days)
MA Curriculum Frameworks 4.7
Recognize that communication among cells is required for coordination of body functions. The nerves
communicate with electrochemical signals, hormones circulate through the blood, and some cells
produce signals to communicate only with nearby cells.
Overview:
The lesson will start by having the class start thinking about the Lymphatic and Endocrine
Systems and how they work in the body. The first class will be devoted to giving a brief overview of both
systems, how the work, what they do for the body, and their relationship to other bodily systems. After
the class has gotten their brief overview of what will be being taught over the next 3 weeks, the focus of
the class will move to starting to go more in depth on the Lymphatic System and, more specifically, its
relationship with the blood vessels of the Circulatory System.
Once an overview of the Endocrine and Lymphatic Systems has been discussed, and a more in
depth introduction of the Lymphatic System has been done as well, the class will move onto talking
more about the Lymph Vessels and the Lymph Nodes. These structures are key for draining excess fluids
that has been released from the circulatory system and cells. After they have collected this fluid, the
Lymph Vessels lead to Lymph Nodes, which “clean” the fluid and return it back to the circulatory system.
Without these vessels much bodily fluid would be lost and the blood volume would not be what it is
supposed to be.
Continuing from this, the class will go a little further into the structure of the lymph node and
what takes place at the different places within it. It was explained earlier that Macrophages and
Lymphocytes can be found in the Lymph Nodes, but it was not explained where they were while inside.
Clarification of this process will be given at this point.
The lesson will then move onto a discussion on the other Lymphoid Organs. It is important for
the students to know that other organs are also working to keep the body clean and free of harmful
materials. This will be tied together by giving the students a brief description of what else is going on to
achieve this goal.
A44
The lesson progress by working with the Innate Bodily Defenses. It is important for the students
to understand that the body has both non-specific AND specific ways to destroy harmful foreign
materials. The Innate Body Defenses are very non-specific and work to block the majority of the foreign
materials. Examples of this defense system are surface barriers, phagocytes, natural killer cells, and the
inflammatory response. This defense system works together to eliminate the majority of the risk that
may be trying to enter the body.
Continuing from this, the class’s discussion will start to bring up a new subject within the
Lymphatic System. The class will begin to learn about the Immune System and how it works to rid the
body of harmful materials. The Inflammatory Response and Fevers will be the first topics of choice and
mechanisms that trigger these will be discussed. Along with these mechanisms, the purpose of both in
the immune system will also be discussed.
The lesson will then move to discuss the Adaptive Body Defenses. Adaptive Body Defenses
refers to the Immune Response and there are two main types of immune responses. The two types of
immune responses are Humoral and Cellular Immune Responses. A brief overview of why these types of
responses are considered adaptive and how they differ from Innate Body Defenses will first be given.
The lesson will then proceed to build off of the overview presented the previous day. The
Humoral Immune Response will first be discussed, with a focus on antibodies and how they work to
defend the body from harmful foreign materials.
To finish up the class’ discussion on the Lymphatic System and Immune Responses, the lesson
will move to focus on the Cellular Immune Response. This is the second type of the Adaptive Body
Defenses and involves to T Lymphocytes of the body. Focus will be on the way that they cells work to
fight off antigens as well as how they interact with other lymphocytes to speed up the healing process.
At this point, the class will abandon the Lymphatic System and start to delve deeper into the
Endocrine System. The first lesson will act as an introduction to the Endocrine System. Key concepts,
such as what exactly a hormone is, that need to be discussed before moving on will also be brought up
in this lesson.
Over the 2 days, the students will explore the different endocrine glands that are present in the
body. In doing this, the name, appearance, location, and function of each endocrine gland will be
discussed. In regards to function, major hormones released as well as their destination and overall
function will be discussed. The glands that will be gone over are the Pineal Body, Hypothalamus,
Pituitary Gland, Thyroid Gland, Parathyroid Glands, Thymus, Adrenal Glands, Pancreas, and the Gonads
(both male and female).

A45
Finally, hormones that are secreted by non-endocrine organs will be discussed. This topic is
important to discuss due to its relevance in the endocrine system. This system deals with the secretion
of hormones by organs/glands that travel through the body. With this in mind, it is easy to see why
hormones secreted by non-endocrine organs are just as much part of this system as hormones secreted
by Endocrine Glands.
This lesson will work to spark interest in the Lymphatic and Endocrine Systems as well as build
upon knowledge as time progresses. The students will be given basic concepts followed by further in
depth discussion on the topics. This lesson will work to further enhance the student’s knowledge of the
human body and how it works to protect itself as well as communicate with itself.
Purpose:
- To spark interest in the Lymphatic and Endocrine Systems
- To explain to the students what the next subject matter to be discussed will be and the basic
rundown of the lessons so they can prepare
- To further the students’ knowledge in the Lymphatic System and what its purpose in the body is.
- To further knowledge on the lymph nodes
- To get the students to start thinking about other Lymphoid Organs
- To discuss how the body protects itself
- To have the students think about how the body works to keep itself healthy and how these
actions can make the person themselves feel unhealthy
- To give the students an overall description of how antibodies as used to combat harmful foreign
materials and remove them from the body
- To discuss the Adaptive Body Defenses
- To explain concepts that students should know before moving on with future lessons
- To give the students an overview of the different glands of the Endocrine System and their
function within the system.
- To show students that hormones are secreted by organs that are not a part of the Endocrine
System
- To discuss the hormones and their functions

A46
Materials:
- Overhead transparencies
- Whiteboard
Day 1:
Objectives:
At the conclusion of this class, the students will have a basic understanding of what the Endocrine
System and Lymphatic System do in the body. The students will also have a deeper knowledge of the
Lymphatic System and how it interacts with the blood vessels. Lastly, members of the class will be
excited to learn the material over the next 3 weeks.
Procedure:
1) Talk about the Exam that they took to previous Friday in class on the Circulatory System and
Blood and how they feel it went for them. If they happen to be graded, pass the exams back to
the students and go over them.
2) The “Hook” for this class will be writing the topics that will be covered in the upcoming lessons
in attempts to spark interest in the subject material. (Innate and Adaptive Body Defense /
Inflammation / Fevers / Immunity / Hormones)
3) Start to discuss the Lymphatic and Endocrine Systems. Be sure to touch on….
- How the Endocrine System is responsible for secreting hormones (chemicals secreted to
regulate metabolic activity of cells in the body)
- The endocrine system has multiple organs that all secrete different hormones and those
hormones all have a different effect on the body
- Hormones are responsible for things like the release of milk, retention of water, sperm/egg
production, adrenalin being released, maintaining metabolism, and much more
- How the Lymphatic System works on bodily defense
- We will basically be working off what we learned about WBC
- Responsible for watching over the body and eliminating risks
- Responsible for inflammation and fevers
4) Start to go more in depth on the Lymph Vessels. Be sure to touch on…
- How they entangle the Blood Vessels and this helps them to keep an eye on what is currently
being transported through the blood
A47
- This also helps so that the products of the lymphatic system are able to move freely and still
maintain a healthy relationship with the blood vessels
- They basically collect excess tissue fluid, clean it, and then release it back into the blood
- Fluid is constantly being leaked out of the capillaries (due to them being so thin) and this system
just helps to get it back to doing what it needs to
5) HW: pg 337-338 #1-9, 10, 12, 14, 23, 28 DUE: 3/25/10
pg 437-439 #1-13, 14, 15, 16, 19, 20, 39
Day 2:
Objectives:
At the conclusion of this lesson, students will have an understanding of the Lymph Vessels and how they
collect leaked fluids in the body. They will also understand how the lymph vessels transport the leaked
fluid to Lymph Nodes, where it is “cleaned” before being returned to circulation.
Procedure:
1) Recap the previous lesson with questions on the board. Allow students time to try to complete
the questions on their own before going over for the class.
2) Start class discussion on the Lymph Vessels and their role in the body. Be sure to touch on…
- These collect excess fluid that may have been leaked out of the circulatory system
- It is very important for this to get done (explain how a buildup of this fluid can decrease the
amount of gas/nutrients that can be exchanged between the blood and cells…it forms a
blockade)
- These vessels weave between the capillary beds (this is where fluid is going to be leaked if it is)
so they can better collect the leaked fluids
- These vessels are unique compared to the vessels of the circulatory system because they have
little flaps on the outside (this makes it possible for bigger things such as cellular
debris/bacteria/viruses to be able to get in but at the same time not let anything out)
3) Explain how these vessels will, in turn, lead to Lymph Nodes. Move class discussion to Lymph
Nodes and what they do. Be sure to touch on…
- The Lymph Vessels will bring the fluid to many of these on their way back to the blood stream.
A48
- At this point in its journey, the fluid will be cleaned by Macrophages and Lymphocytes
(macrophages are phagocytes whereas Lymphocytes are either B or T and have different
functions depending on what form they take)
- The Lymph Nodes will hold the fluid there until it believes it has done its job fully. When the
fluid is held there for a long period of time, the nodes may become sensitive to the touch (relate
- to the Lymph Nodes in the neck and how when you’re sick they get bigger and hurt)
4) Explain to the class that after the fluid has passed through many of these nodes, it is eventually
released back into the blood so it can circulate and complete its journey either to cells or to the
kidneys to be excreted.
Day 3:
Objectives:
- The students will have a deeper knowledge of the Lymph Nodes, how they work, and the
functions of the different areas inside
- The students will have an understanding of other Lymphoid Organs and their function in the
Lymphatic System
Procedure:
1) Review from the previous day’s lesson
2) Move onto the day’s topic
3) Finish up the lesson on the Lymph Nodes. Be sure to touch on…
- 3 features that they should be familiar with (Cortex/Medulla/Hilum)
- Cortex: around the outer edge/first feature after Lymph Vessels.
- Location of the Lymphocytes
- Medulla: the inner area/second feature that the fluid passes by
- Location of the Macrophages
- Hilum: the last feature that the fluid passes by as it leaves the Lymph Node
- Noticed as an indent on one side
4) Have the students notice that there are far more vessels entering than leaving the lymph node.
This makes the fluid pass by very slowly as well as builds up pressure to push it to its next
destination.
5) Move onto a discussion on other Lymphoid Organs of the body. Be sure to touch on…
A49
- Spleen: filters blood of bacteria, viruses, and other blood debris/behind the stomach/most
important function is to break down worn out RBCs that are not functioning properly
- Thymus Gland: found in the neck (and a little over heart)/ produces hormones to program
lymphocytes
- Tonsils: located in the throat/trap bacteria and viruses in the mucus of the respiratory system
and destroy them/tonsillitis is when they become so congested with materials and need to be
taken out
- Peyer’s Patches: found in the small intestine/destroy bacteria that has not already been
destroyed in the stomach so it can’t enter the blood stream
6) Tie everything together by showing how many different organs are working to keep the body
clean. Being clean is VERY important and that is why there are “check points” everywhere that
foreign materials may be passing by
7) Any questions??
Day 4:
Objectives:
- The students will have an understanding of why the body needs both non-specific and specific
forms of defense.
- The students will have a deeper knowledge of the non-specific defense systems present in the
body
Procedure:
1) Review the previous day’s lesson
2) Start class discussion on Bodily Defense. Explain how the body has both specific and non-specific
ways to keep itself clean and how today we will be talking about the non-specific ways
3) We will be talking about 4 Innate Bodily Defenses (Surface Barriers, Phagocytes, Natural Killer
Cells, and the Inflammatory Response)
4) Continue by talking about Surface Barriers. Be sure to touch on…
- It is the body’s first line of defense
- The skin helps to physically keep the harmful things from entering the body (so long as it goes
unbroken)
A50
- Mucus membranes work to trap the harmful materials that may be trying to enter via the
nose/mouth/ears/etc.
5) Move onto Phagocytes. Be sure to touch on…
- It is the body’s second line of defense
- Phagocytes include neutropils, macrophages, etc
- Work by eating the foreign materials, digesting them, and then depositing the pieces back into
the body (they also don’t really care what it is, and this is why they are considered innate)
6) Natural Killer Cells will be discussed next. Be sure to touch on…
- They are considered the “police” of the blood and lymph
- Work to kill (spontaneously) infected body cells
- They are NOT phagocytes. These cells secrete a chemical that attaches to the surface of the
infected cells causing them to die
7) Remind them about the quiz that will be the next day (this material will not be on the quiz)
Day 5:
Assessment:
A quiz on Lymph Vessels, Lymph Nodes, and Lymphoid Organs will be held this day. This quiz will be a
short, 5 question assessment of the material that has been covered, with the exception of Innate Bodily
Defense.
Day 6:
Objectives:
- The students will have an understanding of the inflammatory response and what it is used for in
terms of protecting the body
- Students will have an understanding of Fevers and their role in protecting the body
Procedure:
1) Review from the previous lesson and go over the quiz.
2) Continue the lesson on Innate Body Defenses by reviewing what has already been gone over.
3) The lesson will continue with a brief description of the Inflammatory Response. Be sure to touch
on…
- This happens whenever a body tissue is damaged (cut yourself, etc)
A51
- Recognized by swelling and intense pain (usually prolonged)
- When the cells are injured, they will release histamine. The histamine will dilate the blood
vessels and cause Basophils to release more histamine.
- The increased blood flow to the area causes pain receptors to be triggered and WBCs to arrive
- Because there is a lot more blood passing through, more is able to be leaked through the walls
of the blood vessels. This increased leaking causes the swelling that is noticed.
4) Explain how the inflammatory response does 3 things
- It prevents the spread of harmful foreign materials (bringing WBCs)
- Disposes of cell debris and harmful materials (kills them and then the blood takes it away)
- Starts the repair process (cells can now start to reproduce with the presence of excess nutrients)
- Basically, make sure that the students understand that, even though it makes you feel lousy, the
body is actually working to become healthy once more.
5) Move onto Fevers and their role in Bodily Defense. Be sure to touch on…
- What is it: an abnormally high body temp / a response to invading microorganisms
- Normally, your temp. should be around 98.6
- When WBCs interact with the invading foreign materials, they release Pyrogens
- These chemicals tell the body to turn up the heat
- Extreme Fevers are bad! (they destroy things that you need and can damage your inner
workings)
- Mild Fevers are good! (they trigger the Liver to retain more nutrients so the invading
microorganisms cannot use them) (make the body cells work more and reproduce more so they
can repair the body)
6) Give them the extra time to work on HW
Day 7:
Objectives:
- The students will have an understanding of what an Adaptive Body Response is
- Students will understand aspects of these responses and what triggers them as well
A52
Procedure:
1) Review from the previous day’s lesson
2) Begin class discussion on Adaptive Body Defenses by posing the question “What do you all think
the Adaptive portion of the name means?” Go over responses and explain to the students that
these responses are going to be responses that are specific to certain foreign substances.
3) Explain how this response is also referred to as the body’s 3rd line of defense, how it recognizes
certain foreign materials and starts a specific response to each, and that it is normally referred
to as an Immune Response.
4) Discuss of the Adaptive Body Defenses are Antigen Specific(able to recognize specific foreign
substances), Systemic (not restricted to the infection site), and has a memory (will recognize a
second infection and mounts an even stronger attack)
5) Go over what exactly an Antigen is. Be sure to touch on…
- How it is any substance that is able to trigger an immune response
- These are substances that are recognized as “foreign” or “non-self”
- These are not always harmful substances, but can also be substances from other people
(transplants, etc)
6) End the class by explaining how there are two types of Immune Responses. These are Humoral
(Antibody Mediated) and Cellular (cell mediated) Immune Responses. Be sure to touch on…
- Humoral Immune Responses deal with the release of antibodies to combat the foreigners
- Cellular Immune Responses deal with cells combating the foreigners directly
7) Give the rest of class to work on the homework
Day 8:
Objectives:
At the end of the lesson, students will have knowledge of…
- What the Humoral Immune Response entails
- What an antibody is
- How an antibody works to combat foreign materials
Procedure:
1) Review from the previous day’s lesson
2) Begin class discussion on the Humoral Immune Response. Be sure to touch on…
A53
- How this is all about the B Lymphocytes
- There are 2 Humoral Immune Responses (Primary and Secondary)
3) Move on to start discussing the Primary Humoral Immune Response. Be sure to touch on…
- How first, an immature B cell comes in contact with an antigen
- This contact activates the B cell to turn on
- When the B cell is turned on, it starts to replicate into both Plasma Cells and Memory B Cells
- Plasma Cells produce antibodies that are perfect compliments to the antigen that bound the
original B cell (and produce a lot of them….around 2,000 a second)
- Memory B Cells stick around and are used in the Secondary Humoral Immune Response
4) Next, redirect the class’ attention to the Secondary Humoral Response. Be sure to touch on…
- How this time the antigens bind to the Memory B Cell
- This Memory B Cell recognizes that it has already dealt with that antigen before and makes
many plasma cells immediately
- Keep in mind that this has to be the same antigen binding to the right Memory B Cell
- This response is a lot faster and more prolonged (this is why we get better faster when we
become sick with the same thing)
5) Lastly, move the class’ attention to antibodies. Be sure to touch on…
- How Antibodies, by definition, are proteins secreted by activated B Plasma Cells in response to
an antigen that are capable of binding to that specific antigen
- How antibodies have 2 regions (a variable region, which is specific to a certain antigen, and a
constant region, which is the same in all antibodies)
- The variable region is specific to a certain antigen (draw a simple picture to explain this)
6) Continue by explaining how antibodies combat foreign materials. Be sure to touch on…
- Complement Fixation: the antibodies will bind to and kill the foreign material (either by cell lysis
or by tagging for phagocytes to find later)
- Neutralization: Bind the antigen in a certain way to make them unable to do anything (hand-
cuffs)
- Agglutination: Binding to cells that exhibit Antigens (wrong blood type getting put in), forming a
clump that is unable to function
- Precipitation: Binding of really small antigenic molecules that are in the blood. Causes them to
become larger and “precipitate” out
A54
7) Explain how the antibodies that work to Neutralize, Agglutinate, and Precipitate make it possible
for Phagocytes to get a hold of and kill the antigens and how antibodies that work as
compliment fixate-ors can either do this or kill the cell themself
8) Review the day’s lesson and see if there are any questions on the Humoral (antibody mediated)
Immune Response
Day 9:
Objectives:
- Students will have an understanding of the different types of T Lymphocytes as well as their
function in The Cellular Immune Response
- Students will now understand the differences between Innate and Adaptive Body Defenses as
well as how they work together to rid the body of harmful/non harmful foreign materials
Procedure:
1) Review the previous day’s lesson
2) Begin class discussion on the Cellular Immune Response. Be sure to touch on…
- How this is different from the Humoral Immune Response (T vs B Cells / no antibodies)
- How this involves the T Lymphocytes
- How T Cells are only able to function if an antigen presenting cell shows them the antigen
(macrophages digest antigens and then present some of them on their surface. The T cells will
then interact with the macrophage and activate)
- How there are 4 different types of T Lymphocytes
3) Move class discussion to the different types of T Lymphocytes and their function
- Cytotoxic (killer) T Cell: Bind to cells that are infected or foreign and inject them with chemicals
to kill them (very similar to NKC)
- Helper T Cell: “managers” of the immune system. Once they are activated, the circulate and
recruit other cells to help fight (makes B Cells divide faster/makes plasma cells make more
antibodies/makes T cells divide faster/attracts other WBCs/makes the macrophages hungrier)
- Regulatory T Cell: tells the immune cells to stop and that the infection is gone
- Memory T Cell: live long after the infection to aid in a faster response at a later date
4) End the Lymphatic System by tying everything together and showing the students the big
picture that is that the lymphatic system is present to keep the body clean.
A55
5) Distribute the Take-Home Quiz and explain how it is due the next day at the start of class. Each
day that it is late will result in a 5pt reduction.
Day 10:
Objectives:
- Students will have a brief knowledge of the Endocrine System, what it does, and how it does it
- Students will understand what a hormone is, what it does, and how it works
Procedure:
1) Review from the previous day’s lesson
2) Move class discussion away from the Lymphatic System and onto the Endocrine System
3) Begin talking about what the purpose of the Endocrine System is and what it does. Be sure to
touch on…
- Definition: it works to release hormones to control prolonged or continuous processes such as
growth, development, reproduction, and metabolism
- Basically, it works to direct the activity of body cells (work more / work less)
- Works very slow, but for a long time(as opposed to the Nervous System that is very fast and
short)
- Does things like control development, reproduction, mobilize body defense, maintaining
nutrient levels in the blood, and cellular metabolism
- Endocrine Organs are very small and unimpressive (not really the coolest things to look at) and
are scattered through the body
4) Move class discussion to hormones. Be sure to touch on…
- Definition: chemical substances released by endocrine cells into extracellular fluids (blood) that
regulate the metabolic activity of other cells in the body. (in latin, it means “to arouse”)
- Different types of hormones (some proteins and steroids)
- They travel through the blood to their Target Organs (these organs have receptors that bind to
these hormones) and influence the cells there to either be more productive, less productive, or
to alter its reproductive activity
- Hormonal Release is controlled by other hormones (endocrine glands activating endocrine
glands), concentration of fluids (triggers to either decrease or increase levels..the body wants to
stay equal), and by the nervous system (electrical impulse tells the glad to start working)
5) Let the students have the rest of class to work on homework

A56
Days 11 & 12:
Objectives:
- Students will know the different Endocrine organs by name and be able to tell them apart from
various others in the body
- Students will have an understanding of the different hormones that are secreted by the various
glands and their function when they come in contact with their target organ
Procedure:
1) Review from the previous day’s lesson
2) Begin discussion on the Endocrine Glands. Be sure to show an image of each and touch on…
- The Pineal Body- produces melatonin which helps to program the internal clock
- The Hypothalamus- works to regulate Pituitary Gland activity
- Posterior Pituitary Gland- produces Antidiuretic Hormone which tells the kidneys to retain water
- Anterior Pituitary Gland- Produces Growth Hormone which stimulates growth and Prolactin
which stimulates milk production
- Thyroid Gland- produces Calcitonin which lowers blood calcium levels
- Parathyroid Glands- produce Parathyroid Hormone which raises blood calcium levels
- Thymus- produces Thymosin which programs T Lymphocytes
- The Adrenal Glands- Medulla produces Epinephrine which raises blood glucose levels
Cortex produces Glucocorticoids which increases blood glucose
- Pancreas- produces Insulin which reduces blood glucose levels
- Testes- produce Androgens which supports sperm growth
- Ovaries- produce estrogen, which stimulates uterine wall growth
3) After going over this material, let students make a chart to summarize the information that was
just provided.
4) Leave the remainder of class time for homework
Day 13:
Objectives:
- Students will understand the purpose
- Students will know some of the hormones secreted and their purpose in the body
A57
Procedure:
1) Review from the previous day’s lesson
2) Begin discussion on hormones secreted by non-endocrine organs. Be sure to touch on…
- Gastrin- produced in the stomach in the presence of food / stimulates gland to make more HCl
- Intestinal Gastrin- produced in small intestine in the presence of food (non-digested) /
stimulates glands to make HCl
- Erythroproietin- produced in kidneys to travel to bone marrow and signal them to make more
RBC
- Leptin- produced in fat tissue and tells your brain that you are not hungry anymore
3) Review from this days lesson and the rest of the Endocrine System and Lymphatic System
Day 14:
This day will act a review day. There will be time for students to ask about topics that will be assessed as
well as a time for students to play a review game to instill material.
Day 15:
This day will be an assessment of the previous 14 days of lessons. The assessment will be in the form of
a written Test that will be administered that the beginning of the class period.

A58
Mark Kuhlwein Nervous System Lesson Plan
Last Edit: 4/14/2010
MA Curriculum Frameworks: 4.4: Explain how the nervous system (brain, spinal cord, sensory neurons,
motor neurons) mediates communication among different parts of the body and mediates the body’s
interactions with the environment. Identify the basic unit of the nervous system, the neuron, and
explain generally how it works.
Run Time: 6 lesson days / 1 assessment day
Day 1:
Overview:
In efforts to ease the students into this new organ system, this lesson will act mainly as an introduction
to the Nervous System. The lesson will start by discussing with students the general organization of the
Nervous System. Topics to be mentioned in the organization of the Nervous System will include Central
vs. Peripheral Nervous Systems, Sensory vs. Motor, Voluntary vs. Involuntary, and Sympathetic vs.
Parasympathetic. All of these terms can easily be organized into a flow chart and this visual aid should
be used during class discussion. The class will next focus their attention on different cells of the Nervous
System. The Neuroglia Cells will be mentioned first and their purpose explored. Of the Neuroglia Cells,
the ones to be discussed are Astrocytes, Microglia, Ependymal, Oligodendrocytes, Schwann Cells, and
Satellite cells. To conclude the lesson, a brief introduction to the different types of nerve cells will be
presented. Nerve Cells to be discussed include Motor vs. Sensory Neurons, Multipolar, Bipolar, and
Unipolar Neurons.
Purpose:
- To provide the students will the necessary background knowledge that they need in order to
build a deeper knowledge in the Nervous System
Objectives:
- Students will understand the organization of the Nervous System and have a general knowledge
of how the different parts of the Nervous System work together
A59
- Students will have a knowledge of the supporting cells of the Nervous System and how they
work to support the Nervous System
- Students will have a general understanding of the different types of neurons and their
appearance
Procedure:
1) Provide students with a brief overview of what the Nervous System is and how it works to signal
the body to move and function
2) Move class discussion to the organization of the Nervous System. Use the chart on pg 230 of the
text to help students to organize what they are being taught. Be sure to touch on…
- Central Nervous System= Brian / Spinal Cord (take in info and process it based on past
experiences)
- Peripheral Nervous System= everything else (everything responsible for bringing info to the
Central Nervous System
- Sensory vs. Motor= 2 subdivisions of the Peripheral Nervous System (sensory=input ;
motor=output)
- Voluntary vs. Involuntary= 2 subdivisions of Motor (voluntary=you have conscious control ;
involuntary=you do NOT have control (heartbeat / smooth muscle))
- Sympathetic vs. Parasympathetic=2 subdivisions of Involuntary Movements (Sympathetic=fight
or flight response (during fear/exercise/rage) ; Parasympathetic=allows us to unwind and
conserve energy (relaxation))
3) Move class discussion onto the supporting cells of the Nervous System. Be sure to touch on…
- All called Neuroglia Cells (nerve glue)
- Astrocytes=star shaped / attach blood vessels to the neurons / act as an anchor
- Microglia=spider web shaped / phagocytes
- Ependymal= line the brain and spinal cord cavities / helps to circulate cerebral spinal fluid
- Oligodendrocytes= wrap around nerve fibers to form a myelin sheath
- Schwann Cell= Oligodendrocytes of the PNS
- Satellite Cell=around nerve cell body and act as a protective barrier
4) End class with a brief description of the different types of Nerve Cells. Be sure to touch on…
- Multipolar Neurons= several processes coming off the cell body (all motor neurons)
A60
- Bipolar Neurons- 2 processes coming off of the cell body (sensory neurons in nose and eye / rare
in adults)
- Unipolar Neurons- single process coming off of cell body (sensory neurons / only one able to
induce a signal in both directions)
5) HW due April 8th : pg 277-279 #1-18, 23, 33, 34
Day 2:
Overview:
In efforts to build off the information presented in the previous lesson, this lesson will focus on the
anatomy of a neuron and the synaptic cleft. The neuron is a rather complicated cell in the body that
needs a bit of discussion. Anatomical features of the neuron to be discussed include the cell body,
nucleus, dendrite, Schwann cells, axon, and axon terminals. These features will be discussed to show
location, look, and purpose in the cell. Between one neuron’s axon and the next neuron there is the
presence of a Synaptic Cleft. The class will next discuss the purpose of this cleft as well as anatomical
features of it.
Purpose:
- To instill a deeper knowledge of the structure of a neuron
- To explain the importance of the synaptic cleft and its function in signal transduction
Objectives
- Students will have a deeper understanding of the anatomy of a neuron
- Students will understand the Synaptic Cleft as well as its function in the body
Procedure:
1) Review from the previous day’s lesson
2) Move class discussion to the neuron and structure of the neuron. Be sure to touch on…
- The Nucleus (and where it is located)
- Dendrite (directs impulses TO the cell body)
- Axon (directs impulses AWAY from the cell body)
- Axon Terminal (very end of the Axon / forms half of the synaptic cleft)
- Schwann Cells (wrap around Axon and form a myelin sheath which helps in signal transduction)
A61
3) Continue onto discussing the Synaptic Cleft. Be sure to touch on…
- It is the junction of the Axon Terminal of one nerve and the next nerve/body cell
- When an impulse makes it this far, it triggers the Axon Terminal to push its vesicles to the
surface and release neurotransmitters. These chemicals attach to receptors on the receiving end
which triggers it to start relaying the message
4) Give them the rest of the time to work on the Homework.
Day 3:
Overview:
To ensure that the students fully understand how a neuron works to relay messages, this day of the
lesson will focus solely on nerve impulses, how they are initiated, how they are maintained, and how
they work to initiate yet another impulse. This lesson will enlighten the students as to the nature of
neurons, in terms of their electrical charge, and how a disruption in this charge initiates an impulse to be
sent. Furthermore, this lesson will show how an impulse ends at the terminal end of the axon and how it
is then transmitted to another neuron or an ending muscle, gland, or organ.
Purpose:
- To show students how neurons actually work to relay messages and relate this to the Endocrine
System to demonstrate their similarities and differences
Objectives:
- Students will understand how an impulse is created
- Students will understand how the impulse is maintained and moved
- Students will understand the importance of the Schwann Cell
- Students will understand what happens at the terminal end of the axon and how the neuron
transmits the message to yet another neuron or a different ending location
Procedure:
1) Recap from the previous day’s lesson
2) Begin class discussion on the neuron and its properties. Be sure to touch on…
- How there is a concentration of sodium outside the walls of the neuron
- How there is a concentration of potassium within the neuron
A62
- The presence of a Na-K pump within the cell membrane
- The presence of Schwann Cells surrounding the axon arm of the neuron
3) Now that the students have had a refresher of what we are dealing with in terms of the neuron,
it is time to discuss the resting state of the neuron. Be sure to touch on…
- How we have a concentration of Na on the outside and K on the inside
- How these concentrations make the inside slightly more negative than the outside (this is
important)
4) Move discussion onto how exactly an impulse is initiated. Be sure to touch on…
- How a stimulus initiates a local depolarization
- This depolarization comes to be due to the stimulus changing the permeability of the Na-K
pumps which causes the inside to now become more positive
5) Continue by discussing how the impulse is moved through the neuron. Be sure to touch on…
- If the stimulus is strong enough it causes a complete change in the polarity, which causes an
Action Potential= long distance signal (nerve impulse)
- How the initial depolarization causes the neighboring channels to do the same, thus moving the
action potent down the length of the neuron
6) Continue on to the act of repolarization of the neuron and why this is important. Be sure to
touch on…
- How the potassium and sodium will naturally diffuse back to their normal places, outside and
inside the neuron thus restoring the natural polarity
- This repolarization happens slow, thus making it so the impulse cannot go backwards
- This Na-K pumps will then work to further restore the natural polarity
7) Move to discuss the Schwann Cells and their importance in the movement of the action
potential. Be sure to touch on…
- They wrap around and form a Myelin Sheath around the axon of the neuron
- This myelin sheath actually makes it so the impulse “jumps” the next uncovered area of the
axon
- These sheaths quicken the action potential
8) End the lesson by discussing what happens at the end of the axon. Be sure to touch on…
- How the impulse triggers the release of neurotransmitters
- These neurotransmitters attach to the Na-K pumps on the receiving neuron
- The attachment of the neurotransmitters initiates another action potential on the next neuron
A63
9) Any questions??
Day 4:
Overview:
Now that the students have a background in how neurons work and how the nervous system works to
relay information, it is possible to show them what part of the brain are working to control the different
aspects of life. This lesson will focus on the lobes of the brain, how they communicate, and how they
work to control the body.
Purpose:
- To show the students how the brain works to communicate with itself and with the body
- To show students that there is reason in the way that the brain is set up and organized
Objectives:
- Students will understand the organization of the brain and how it communicates both with itself
and with the body
- Students will further realize that everything in the body is set up a certain way for a reason and
that reason is why we are able to live the way that we do
Procedure:
1) Recap from the previous day’s lesson
2) Start the discussion by first covering the difference between the white and grey matter in the
brain. Be sure to touch on…
- Grey Matter= the outermost portion of the brain / location of the cell bodies of the neurons
- White Matter= the deeper/inner portion of the brain / location of the axons and dendrites of
the neurons
3) Move onto how the brain is divided and the basic anatomical features. Be sure to touch on…
- 2 cerebral hemispheres that make up the Cerebrum
- The Cerebrum is broken up into multiple lobes
- The Cerebellum is located in the far back of the brain
- The Interbrain is located in the middle of the brain, surrounded by the Cerebrum
- The Midbrain and Brain Stem are between the Brain and the Spinal Cord
A64
4) Start to discuss the different lobes of the Cerebrum and what each part is responsible for. Be
sure to touch on…
- The Frontal Lobe: Deals with comprehension and personality
- The Temporal Lobe: Deals with hearing and smelling / also works with speech
- The Parietal Lobe: Deals with receiving sensory info from the body and telling different body
parts to move
- The Occipital Lobe: Deals with sight and vision
5) Move onto a discussion on the Cerebellum. Be sure to touch on…
- Located right behind the Occipital Lobe of the Cerebrum
- Works to organize and prioritize the messages that are sent to skeletal muscle
6) Continue on to the Interbrain. Be sure to touch on…
- Location of the hypothalamus
- Surrounded by the Cerebrum
- Works to do things such as… distinguishing whether something will be pleasant or not,
regulation of body temp, regulation of metabolism, emotion, and smell interpretation.
7) End class with a discussion on the Midbrain and Brainstem. Be sure to touch on…
- Connects the brain and spinal cord
- Controls breathing, heartbeat, blood pressure, swallowing, vomiting, awake/sleep cycles
8) Explain how there is a lot more going on in the brain and that we are still in the process of
figuring it all out
Day 5:
Overview:
Continuing with the CNS, this lesson will focus on the spinal cord and the protective barriers of the CNS.
The spinal cord is an extremely important aspect of the Nervous System due to its role in connecting the
brain with most of the PNS as well as acting as a relay station for reflexes. Likewise, the protective
covering of the CNS is crucial for sustained life of the CNS and its workings. This lesson will work to instill
functional knowledge of the spinal cord as well as importance of the Meninges as a protective covering.
Purpose:
- To give students a feel for how everything is the body is connected and the nervous system is
the same way
A65
- To instill basic knowledge of what the spinal cord is and what it does for the body
- To discuss the protective covering of the CNS, its parts, and how it works to protect the CNS
Objectives:
- Students will have an understanding of the spinal cord, what is it, what it does, and basic
anatomy
- Students will further understand that everything in the body has a protective covering
- Students will have an understanding of the Meninges and how they work to protect the CNS
Procedure:
1) Recap on the previous day’s lesson
2) Start class discussion on the spinal cord and what it is. Be sure to touch on…
- How it connects the brain with the rest of the body
- It is basically a continuation of the brain stem
- It is the source of reflex impulses
- Nerves from the body make their way to the spinal cord in pairs
- The spinal cord also has white and grey matter, though they are opposite from the brain (white
on the outside and grey on the inside)
3) Move onto a more structural aspect of the spinal cord. Be sure to touch on…
- Again how the nerves come in pairs
- Nerve=containing both sensory and motor neurons
- The spinal cord has both ascending and descending tracts to bring impulses both to the brain
and to the body
4) Continue class discussion and move onto the Meninges and their purpose in the body. Be sure
to touch on…
- How the nervous tissue is very soft and fragile and for this reason a protective covering is
needed.
- The protective covering of the nervous system is known as the Meninges and it has three main
layers to it (Dura Mater, Arachnoid Layer, and Pia Mater)
- These layers work to protect the CNS as well as hold in the cerebral spinal fluid
5) Go a little more in depth on the different layers of the Meninges. Be sure to touch on…

A66
- Dura Mater= outermost layer / stands for Tough Hard Mother / attaches to the skull (helps to
keep everything in place….acts as an anchor)
- Arachnoid Mater= Middle Layer / web-like in structure / acts as a cushion
- Pia Mater= Innermost layer / very thin / attaches to the CNS / stands for Gentle Mother
6) Any questions?
Day 6:
Overview:
This will be the final lesson of the Nervous System before the assessment and will primarily include the
Peripheral Nervous System. More specifically, this lesson will work with the Cranial Nerves, Nerve
Endings, Motor Neurons, and Nerve Plexuses. The relationship between the central nervous system and
the peripheral nervous system will be discussed at every point to further show the students how the
body is constantly talking to itself and working with itself.
Purpose:
- To show students how the peripheral nervous system works with the central nervous system in
gathering sensory information and providing a network to relay motor functions
- Show students the sensory aspect of the PNS through Cranial Nerves and Nerve Endings
- Show students the motor aspect of the PNS through a brief description of Autonomic and
Somatic Neurons
- Explain the way that nerves are organized in relation to thickness and concentration
Objectives:
- Students will understand how the PNS works in a sensory and motor fashion to aid the CNS
- Students will have a knowledge of Cranial Nerves and Nerve Endings as a way for the PNS to
work in a sensory fashion
- Students will have a knowledge in both Autonomic and Somatic Neurons
- Students will understand the organization of the nervous system in relation to concentration
and placement of nerves
Procedure:
1) Review from the previous day’s lesson
A67
2) Introduce the PNS and give a brief overview of its purpose. Be sure to touch on…
- How it uses sensory receptors to receive information and transmit that info to the CNS
- How it uses motor neurons to convey messages from the CNS to the body
3) Move on by going a bit more in depth on the sensory aspect of the PNS. Be sure to touch on…
- Cranial Nerves: 12 of them
Come straight out of the brain
II Optic Nerve: works with sight and bringing sight info to the occipital lobe
X Vagus Nerve: controls digestion and regulates heartbeat (parasympathetic)
- Sensory Receptors: 3 types of them
Naked Nerve Endings (pain + temp receptors without protective
coverings)
Corpuscles (covered nerve endings that receive touch and deep
pressure depending on their location)
Proprioceptors (located on the muscle and receive muscle placement
and stress)
4) Continue by moving onto a brief description of the motor aspect of the PNS. Be sure to touch
on…
- This relays information from the CNS to the rest of the body
- Autonomic: goes to the heart / smooth muscle
- Somatic: goes to skeletal muscle (controllable)
5) End class by showing the students different nerve plexuses and discussing how the nervous
system is very concentrated towards the CNS and becomes less concentrated as it reaches the
outer limits of the body.
6) Remind the students about the quiz the following day.
Day 7:
Overview:
This day will be an assessment, in the form of a quiz, on the nervous system.
Assessment:
This quiz will be constructed to have ten questions, of which the students will only have to completed
five.
A68
Mark Kuhlwein Reproductive System
Last Edit (5/24/10)
MA Curriculum Frameworks 4.6:
Recognize that the sexual reproduction system allows organisms to produce offspring that receive half
of their genetic information from their mother and half from their father, and that sexually produced
offspring resemble, but are not identical to, either of their parents.
Run Time: 10 days (8 Lesson Days + 2 Assessment Days)
Day 1:
Overview:
The Reproductive System is a complex organ system that ultimately works to produce further
generations. This system attains this goal through the production of both male and female gametes as
well as depositing the male gametes into the female reproductive system. To begin the reproductive
system, this lesson will be an overview of the system, with an emphasis placed on anatomical features.
Worksheets will be completed by the students to be collected at the conclusion of the class period. The
reasoning for providing worksheets to teach this topic deals with the fact that seniors are to be taking
their final exam during this period. Worksheets will get the students to think about the material and
start gaining an understanding of the anatomical features of the reproductive system.
Purpose:
- To start the learning of the reproductive system while providing a quite environment for the
seniors to take their final exam in
- To spark interest in the reproductive system
Objectives:
- The students will start to have an understanding of the anatomical features of the reproductive
system
- The seniors will have a quite environment in which to take their final exam
A69
Procedure:
1) Start the seniors on their final examination
2) Distribute worksheets to the rest of the class and explain that they are to be quite for the entirety of
the period and that the sheets will be collected at the end of the period
3) Monitor exam and be available for possible questions
Day 2:
Overview:
To further the students’ knowledge in the anatomical features of the reproductive system, this lesson
will focus on starting the discussion on the male reproductive anatomy. Features to be mentioned and
discussed include the Testes, Seminiferous Tubules, Epididymis, Vas Deferens, Urethra, Seminal Vesicle,
and Prostate.
Purpose:
- To identify key features of the male reproductive system
Objectives:
- The students will begin to understand the male reproductive anatomy in relation to location and
function
Procedure:
1) Go over the packet that was completed the previous day and start to point out some key features.
2) Start to discuss the key anatomical features of the male reproductive system. Use overheads to aid in
the location identification and be sure to touch on…
- Testes: Male gonads
Produce Sperm and Testosterone
- Seminiferous Tubules: tiny coil of tubes at the center of the testicle
Site of sperm productive
- Epididymis: Cup-shaped coil of tubules around the seminiferous tubules
Work to collect sperm that are being produced
- Vas Deferens: A.K.A. Ductus Deferens
Transports sperm from the Epididymis to the ejaculatory duct

A70
- Urethra: Transports sperm from the Vas Deferens to outside the body
It has 3 parts: Prostatic Urethra / Membranous Urethra / Spongy Urethra
- Seminal Vesicles: Located at the base of the bladder
Produces Seminal Fluids (what mixes with sperm to make semen)
- Prostate: Encircles the Prostatic Urethra
Produces Seminal Fluids known as “milky fluids”
3) Review the day’s lesson and ask if there are any questions
Day 3:
Overview:
To continue the learning of the anatomy of the Reproductive System, this day’s lesson will finish the
male anatomy and then move on to the female anatomy. To further reiterate, it is important for the
students to learn the names and functions of each feature prior to going more in depth on any given
aspect.
Purpose:
- To further teach the anatomy of the reproductive system
Objectives:
- The students will have all the knowledge that they need concerning male reproductive anatomy
- The students will have knowledge concerning the anatomy of the external genitalia of the female
Procedure:
1) Review from the previous day’s lesson.
2) Continue, and ultimately finish, the male reproductive anatomy by discussing the external features of
the system. Be sure to touch on…
- Scrotum “pouch”: holds the testicles in place and protects them from the elements
Works to keep the testicles at a constant temperature that is slightly lower than body
temperature by shirking and expanding (sperm need this temperature in order to develop correctly)
- Penis “tail”: designed to transport/deliver semen to the female reproductive tract
There are 2 main parts of the penis: Glans Penis (the tip) & the Shaft (everything else)
Composed of Erectile Tissue (specially designed to be able to fill up with and retain blood)
A71
3) Introduce the female reproductive system and begin discussing the external features. Be sure to
touch on…
- Mons Pubis: fatty, rounded, hair covered area superior to the Labia Majora
- Labia Majora: pair of hair covered, skin folds around the Perineum (the entire vaginal region)
Acts as a pseudo protective covering
- Labia Minora: pair of delicate, hair-free folds underneath the Labia Majora
Acts as a 2nd pseudo protective covering
- Vestibule: covers the urethra orifice and acts as yet another protective covering
- Urethral Orifice: point at which the urethra finally exits the body
Located superior to the vaginal orifice
- Vaginal Orifice: point at which the vagina exits the body
Situated inferior to the urethral orifice and superior to the anus
- Note that females have a second opening for reproductive purposes whereas the male urethra serves
both purposes.
- Greater Vestibular Glands: located around the vaginal orifice
Secretes a liquid that acts as a lubricant during sexual intercourse
4) Recap this day’s lesson and ask if there are any questions.
Day 4:
Overview:
To conclude the class’ work on the anatomy of the reproductive system, this lesson will include the
internal female reproductive anatomy.
Purpose:
- To finish the class’ work on the anatomy of the reproductive system
Objective:
- After this lesson, the students will have a firm grasp of knowledge pertaining to the anatomy of the
female reproductive system
A72
Procedure:
1) Review from the previous day’s lesson.
2) Continue, and ultimately finish, the female reproductive system by introducing the internal
anatomical features. Be sure to touch on…
- Ovaries: 2 there of 2 of them
Similar to the male testicles, these produce sex cells (in this case eggs) and have a second
purpose in the production of estrogen
Note that they are held in place by ligaments
- Fallopian Tubes: work to transport the eggs from the ovaries to the uterus
THIS is the sight of fertilization!
Note that these are not directly attached to the ovaries
- Uterus “womb”: located in the pelvic area of the female body between the bladder and rectum
Works to receive, retain, and nourish the fertilized embryo
Again, this is held in place by ligaments
- Cervix: narrow outlet at the exiting end of the uterus
- Endometrium: The inner wall of the uterus
This is where the fertilized egg attaches to continue development
- Myometrium: The middle layer of the wall of the uterus
This layer of the wall is what contracts during childbirth
- Perimetrium: This is the outermost layer of the uterine wall
This is responsible for protecting the uterus
3) Review all of the anatomical terms that have been mentioned up to this point to be sure the students
understand the contents of the quiz
Day 5:
Assessment:
This day will consist of a quiz reflecting the material that has been presented as to the anatomy of the
reproductive system. This assessment will consist of diagrams of the male and female reproductive
systems with 10 predetermined features to be identified.
A73
Day 6:
Overview:
Now that the students have a background in the anatomy of the reproductive system, the function and
processes of the system can be discussed. This day’s lesson will start the topic of sex cell production by
discussing sperm production.
Purpose:
- To discuss the process of sperm production and prepare the students for learning process of sexual
reproduction
Objectives:
- Students will understand the process of sperm production and will be prepared to discuss sexual
reproduction
Procedure:
1) Review from the previous day’s lesson
2) For review from freshmen year, discuss Meiosis and how it is different from Mitosis. Be sure to touch
on…
- How Meiosis is the production of reproductive cells
- The end product has ½ the amount of genetic information and is called haploid (pose the question why
is it important for the end cells to have only half the genetic information?)
- Note that this process is modified for both sperm and egg reproduction
3) Continue onto Spermatogenesis (sperm production). Be sure to touch on…
- Men make millions of sperm every day (pose the question of why is this important?)
- The sperm are made in the Seminiferous Tubules
- They start off as Spermatogonia: primitive male stem cells that will ultimately become sperm
- Until puberty, these Spermatogonia undergo Mitosis and, in turn, make millions of copies of
themselves
- When puberty hits, a hormone is released that stops this type of mitotic division and, in turn, makes all
other divisions produce 1 Spermatogonia and 1 Type B Daughter Cell
- The Spermatogonia will live on to make more at a later point and the Type B Daughter cell will undergo
Meiosis and produce 4 of its own daughter cells (Spermatids)

A74
4) Now that Spermatogenesis has been discussed, the process of Spermiogenesis can be started. Be sure
to touch on…
- This deals with the development of Spermatids
- In this process, each Spermatid develops a tail (for movement), head (for storing genetic material), and
an acrosome (for storing enzymes that will be used to make a hole in the wall of the female egg)
5) To conclude this day’s lesson, discuss semen and what it is made up of.
- Sperm
- Protective fluids (a basic solution that will help the sperm with the acidic environment in the woman,
and a nutrient solution to provide energy to the sperm
- Antibiotics to help again bacteria, which are everywhere
Day 7:
Overview:
To continue the class discussion on the functional aspects of the reproductive system, this lesson will
focus on what happens within the female body. The main topic to be discussed will be Oogenesis.
Purpose:
- To further discuss the functional aspects of the Reproductive System
Objective:
- At the conclusion of this lesson, the students will understand how females produce and release sex
cells
Procedure:
1) Review from the previous day’s lesson
2) Begin class by relating the name for male sex cell production (Spermogenesis) to that of the name for
female sex cell production (Oogenesis)
3) Discuss the process of Oogenesis. Be sure to touch on…
- The cells start out as Oogonia: female stem cells that will ultimately become eggs
- These cells then develop into Primary Oocytes (females will make about 2 million of these before they
are born)
- The Primary Oocytes are stopped at this stage until hormones triggers their release during puberty
A75
- During puberty these Primary Oocytes are released in a cycle
- In this cycle the Primary Oocytes start going through a Meiotic Division and form a Secondary Oocyte
and a Polar Body (a cell that is basically waste)
- This Secondary Oocyte (now in the Fallopian Tube) will stop its division until it has been fertilized by a
sperm
- Once Fertilization has occurred, a Meiotic Division happens, forming an Ovum and Polar Body
4) Recap this day’s lesson
Day 8:
Overview:
This day’s topic will tie everything that the students have learned in the Reproductive System together
and discuss the process of reproduction. The entirety of this topic will not be covered, due to testing
having to take place. This lesson will go as far as implantation of the zygote onto the uterine wall.
Purpose:
- To begin to show the students the complexity of producing offspring
- To spark interest in further learning about vertebrate anatomy
Objectives:
- The students will understand the primary steps in the production of offspring
Procedure:
1) Review from the previous day’s lesson
2) Begin discussing the act of making offspring. Explain that the first step involves vaginal intercourse
(but of course will new advances in science, a woman’s egg can be fertilized in other ways) and that the
reason for this is the injection of male sperm into the female reproductive system
3) Explain how the sperm will make their way up the woman’s uterus and then down the fallopian tubes
(note that usually only 1 ovary ovulates at a given time, so half of the sperm die after this separation)
4) Move on to then discuss how the sperm make their way into the egg. (note that it is a very difficult
act where the sperm use the enzymes stored in the acrosome to start to “chip away” at the surface of
the egg. In the end only one will make it all the way in but would not be able to if the others hadn’t
helped)
A76
5) Now that the sperm has entered the secondary Oocyte, the egg will no longer allow any sperm to
enter
6) Explain that, in the sense, the term “fertilization” refers to the moment that the male DNA combines
with the female DNA
7) Now that fertilization has occurred, a zygote is formed and starts to undergo cleavage (the rapid
dividing of cells). Once a larger ball of cells has been formed (about 16+ cells), it is said to be in the
Morula stage. This Morula will then form into a Blastocyst containing a fluid-filled sphere (nutrients for
the developing baby) and an inner cell mass (the cells that will eventually become the child)
8) These past stages all happen while the egg is making its way down the rest of the fallopian tube and
into the uterus. The Blastocyst will then implant onto the Endometrium of the Uterine Wall and the child
will further develop there.
9) Review this day’s lesson
Day 9:
Overview:
This day will act as a review of all the material presented regarding the Reproductive System and will
help the students prepare for the Exam that will be given on Day 10.
Day 10:
Assessment:
This assessment will be in the form of an Exam covering all of the material on the Reproductive System.
It will contain 10 short answer / essay questions and the students will have the entire length of the class
to complete it.
A77
Mark Kuhlwein Respiratory System Lesson Plan
Last edit: 1/11/10
Run Time: 2 weeks (8 lesson days + 2 assessment days)
MA Curriculum Frameworks 4.3:
Explain how the respiratory system (nose, pharynx, larynx, trachea, lungs, alveoli) provides exchange of
oxygen and carbon dioxide.
Overview:
This lesson will focus on the Respiratory System and its purpose in the body. It is formatted in
such a way that the students will first learn the anatomical features of the Respiratory System. Ample
time will be given for this purpose so that when the physiology of Respiratory System is discussed, the
students will have a much easier time understanding the process in relation to the features. Two
assessments will be given for this lesson, with the first acting as a halfway marker and checking progress
and the second tying everything together at the conclusion of the lesson.
The lesson will start with the learning of the anatomical features of this system. It will start with
the features located in the skull and neck. Students will be responsible for knowing the location of the
Superior/Middle/Inferior Nasal Conchae, Uvula, Hyoid Bone, Epiglottis, Vocal Fold, Larynx, Pharynx, and
Trachea. Also, a brief explanation of function will be given for reference and to aid in the learning
process. A review of this information will be given in the form of worksheets for those students who
work better by reading and in a hands-on fashion.
The lesson then works to further the knowledge of the anatomical features of the Respiratory
System along with their function by focusing from the neck into the lungs and thoracic cavity. Features
being taught will include Primary/Secondary Bronchi, Bronchioles, Alveoli, Diaphragm, lobes of the
Lungs, and Intercostal Muscles. Just like the first set of anatomical features, they will be located and
their function will be discussed. An exercise / review will be given to be finished in class.
Before continuing onto the physiology of the Respiratory System, a class period will be set aside
to assess the students’ progress at this point.
After the small assessment, Respiratory Physiology will be started. The lesson will move to focus
on inspiration, expiration, and non respiratory air movements. In relation to respiration, the passages
that air passes through will be mentioned and the muscle movements (diaphragm and intercostals) will
A78
be explored. Moving to expiration, the same basic concepts will be referenced, in terms of the passages
that the air passes through once more and the movements of the diaphragm and intercostals. Next, the
change in pressure in the thoracic cavity during respiration will be discussed. The role of surfactant, as a
lubricant, will be referenced in terms of its role in the maintenance of alveolar sacs. Lastly, non
respiratory air movements will be explored. Coughing, sneezing, crying, laughing, hiccupping, and
yawning are to be covered. These movements will be examined in terms of what is happening during the
movement and how that movement effects respiration.
The lesson will move to the topic of gas exchange. Focusing on external respiration and its gas
exchange, the lesson will work to teach what is happening in the lungs and the alveolar sacs when air
enters. There is a path that the oxygen takes as it enters the blood stream and makes its way to the
body cells. The lesson will work with talking about this path and the role of hemoglobin in the red blood
cells.
Continuing with the gas exchange portion of respiration, the lesson will next work with following
the oxygen through the body and show how it interacts with the cells of the body. The examining of
internal respiration will then proceed to follow the CO2 as it travels back through the bloodstream and
to the lungs where it is exhaled.
A day of review will be given before the exam. A review game will be played so students can
practice their knowledge and check to see what they need to brush up on before the exam. This review
game will also act a possible point gainer, with points going to the winning team.
All-in-all, this lesson sets out to teach the structure and function of the body’s Respiratory
System. It does so by first teaching the students the structures of the system, and then exploring what
said structures do and how they work together to supply the body with oxygen.
Purpose:
- To spark interest in the Respiratory System
- Provide an overview of the system so students can relate and connect future lessons
- Initiate the learning of basic anatomical features related to the Respiratory System
- Review these anatomical features until they are instilled in the memory of the students before
moving on to the next set of anatomical features
- To gradually instill a deeper knowledge of the Respiratory System and its function
- To explore the superficial act of inspiration and expiration and teach the students what is
happening in terms of air movement and muscle contractions.

A79
- To discuss the importance of change in pressure in terms of its role in the respiration
- Talk about surfactant and what can happen if the lung cells fail to produce it
- Explore other ways that air can either enter or leave the body in non respiratory air movements
and their relation to respiration as a whole
- To further show the importance of the respiratory system as a way to bring oxygen into the
body
- To show the primary defenses that the body has, in terms of mucus and cilia, against foreign
material that may be harmful
- To explore the act of gas transport and how the structures of the lung and the qualities of red
blood cells aid in the movement of oxygen through the body
- To show the different processes that are taking place during the act of respiration
- To further show the importance of the respiratory system in its role to bring oxygen into the
body and expel carbon dioxide and other foreign agents from it
- To show the importance of the cardiovascular system and blood in the body
Objectives:
At the conclusion of this lesson, the students…
- Will be able to give a brief description of the respiratory system, how it works, and what it is
responsible for doing in the body.
- Will be able to locate key anatomical features of the Respiratory System located in the head and neck
as well as give a brief description of their role in respiration.
- Will have the knowledge on exactly what is happening in the body during respiration.
- Will be able to understand later concepts easier due to this primary knowledge being in place.
- Will understand Inspiration, Expiration, and Non-Respiratory Air Movements
Materials:
- White board
- Overheads that clearly show the anatomical features that will be discussed
- Worksheets for students to complete as an exercise and review of material
A80
Day 1/Day 2:
Procedure:
1) Start with the “hook”, which will be asking the students to come to the board and write down
whatever they know, think they know, and want to know about the Respiratory System.
2) We will then go over this information and relate all of it to the Respiratory System by a brief
description of how it works and what it is responsible for doing. Make sure to touch on…
- The passages that air passes through in the body on its way to the lungs
- How the diaphragm and intercostal muscles create a change in pressure that pulls air into the
body
- Gas transport in the lungs and how it effects the body
3) Anatomical features of the skull and neck that aid in the respiratory system will then be located
and discussed. Make sure to touch on……
- Superior/Middle/Inferior Nasal Conchae (work to warm the air as well as clean it as it enters)
- Uvula (prevents food from entering upper Respiratory Passages)
- Hyoid Bone (acts as an anchor for many muscles related to the neck)
- Epiglottis (prevents food from entering the Trachea)
- Vocal Fold (produces noise)
- Larynx (known as the voice box and contains the vocal fold)
- Pharynx (respiratory area that is superior to the Larynx)
- Trachea (between the larynx and bronchi)
4) Provide an exercise / review for the students in the form of a worksheet that will aid in the
studying process and develop understanding of the material that students will complete in class
5) Give homework assignment due the last day of the lesson (Friday, February 5th). Review
Questions at the end of Chapter 13 (pg 466-467).
6) Announce the quiz that will be happening at the end of the anatomy lesson (planned to fall on a
Friday)
Day 3 / Day 4
Procedure:
1) Recap of what we have learned already in relation to the anatomical features.
2) The “hook” for this lesson will be first having the students take a deep breath and watching /
feeling their chest rise. I will pose the question of “who knows what is happening that is making
A81
your chest do this?” These answers will be put on the board and referred back to as we are
going through the day’s lesson
3) Anatomical features of the neck / chest that relate to the Respiratory System will be located and
their function, in relation to this system, will be discussed. Make sure to touch on….
- Primary Bronchi (as the Bronchi split, they are given the names Primary / Secondary / etc)
- Bronchioles (after the last split of the Bronchi)
- Alveoli (little sacs that cover the Bronchioles
- Diaphragm (muscle that controls the pressure inside the Thoracic Cavity)
- Intercostal Muscles (muscles located between the Costal Bones (ribs))
- Lobes of the Lungs (the Lungs are actually separated into different parts)
4) Provide an exercise / review for the students in the form of a worksheet that will aid in the
studying process and develop understanding of the material that students will complete in class.
5) Check up on students as to the progress of their homework assignment.
6) Remind class that there will be a quiz on all of the week’s material the following day (Friday).
Day 5:
Assessment:
This quiz has been developed in light of what was covered in class over the past 4 days of the lesson. The
quiz acts as a checkpoint for the class before more in depth topics are brought up later.
Day 6:
Procedure:
1) Recap the anatomical features that they were just quizzed on the following Friday as a post
weekend refresher.
2) Use the same “hook” as the past lesson. Have students take a deep breath and feel / watch their
chest rise. Have them also notice that their chest falls when they release that breath. Pose the
question “who thinks that they know what is happening?” Put responses on the board and refer
back to them as we are going through the lesson.
3) Start discussion on inspiration. Touch upon…
- The anatomical features that the air passes as is it brought into the body, through the
nose/mouth and into the lungs
- Ask “What is drawing the air into the lungs?”
A82
- Talk about the contraction on the diaphragm and external intercostals and how that changes the
pressure in the chest, which pulls the air in.
4) Continue with discussing expiration. Touch on…
- Start in the lungs and move to the mouth/nose and then out of the body
- Refer back to muscles and say “muscles only contract. With that in mind, what has to be
happening now?”
- Discuss the relaxation of the diaphragm and the external intercostals (expiration is passive)
- Forced expiration = contraction of the internal intercostals
- Relate back to the discussion on the pressure in the thoracic cavity and pose the question
“knowing what we do about what happens with the pressure when we breathe in, what do you
think is happening in the chest now?”
- Continue to relate to basically the opposite of inspiration in the fact that air is going backwards
through the air passages and out of the body.
5) Discuss the presence and role of surfactant in the lungs. “What do you think would happen if
you did not have this secretion?”
6) Explore with the class other possible ways that air can either move in or out of the body. Discuss
how these movements effect respiration. Make sure to touch on….
- Coughing (the clearing of the lower Respiratory Tract)
- Sneezing (the clearing of the upper Respiratory Tract)
- Crying (an emotional response to pain)
- Laughing (an emotional response to humor)
- Hiccupping (the spasm of the Diaphragm)
- Yawning (the opening of all the Alveolar Sacs)
Day 7:
Procedure:
1) Recap from last lesson the act of respiration in terms of muscle movement and the movement
of air in and out of your lungs.
2) The “hook” for this lesson will be “What do you think is different about the air that you breathe
in and the air that you breathe out?” Write these responses on the board to refer back to as we
progress through the lesson.
3) Start class discussion on what is happening when air comes into the lungs. Be sure to touch on….
A83
- How it travels into the lungs and further into the alveolar sacks
- Discuss how the alveolar sacks are very thin (one cell thick) and how they are embedded in a
mesh of capillaries (a capillary bed)
- Try to have them figure out what this means for the oxygen that is entering the lungs
- Explain the importance on the red blood cells and their ability to transport oxygen through the
body via the blood vessels
- Make sure that they know the reasoning behind why they are able to do this due to the
presence of hemoglobin and how this chemical is what gives the RBC their color.
4) Propose the question “Now what do you think would happen if something harmful (like a virus,
etc) were to get into the lungs and subsequently the body?” Take these answers down and then
start to discuss how the body have a way to protect itself from these harmful agents before they
can even get into the lungs
5) In the process of describing the body’s 2nd line of defense, make sure to touch on……
- How mucus traps some of the foreign material
- The location and purpose of cilia to move the material up the trachea and out of the body (via
constant swallowing, sneezing, snot, etc.)
-
Day 8:
Procedure:
1) Recap what we went over in the last lesson. Bring up the importance of the capillary bed that
surrounds the alveoli and how the hemoglobin in the Red Blood Cells is what carries the oxygen.
2) The “hook” for this lesson is to propose the question “What do you think happens to the oxygen
that is in the blood now?” Write the responses on the board to refer back to as we progress
through the lesson.
3) Pick up where we left off at the last class by starting to talk about the gas exchange that takes
place during internal respiration. Be sure to touch on….
- How gas exchange happens again in capillary beds in the body
- Body cells that are in need of oxygen take it from the RBC. “Why do they need it?”
- The by-product of cellular respiration in CO2 which is deposited into the bloodstream (but not
on the RBC)
- Discuss the progression of chemical reactions (CO2 + H2OH2CO3H+ + HCO3-) (carbon dioxide +
water goes to carbonic acid which looses a hydrogen and becomes a bicarbonate ion)

A84
- Now we will follow this as the blood makes its way back to the lungs where the reaction goes
backwards and the CO2 moves through into the lungs and out of the body
- Final recap on the respiration process from start to finish
- Any questions?
Day 9:
Procedure:
1) Start the review game and play until the conclusion of the class period. The winning team will be
awarded points to be added to their score on the Exam.
Day 10:
Assessment:
This will be a written exam with categories of questions including matching, multiple choice, short
answer, and an essay. I have noticed that these particular students do not do well with essay questions
and for that reason I will try to make it so they can still do well on the exam as a whole if they are able to
answer the other questions correctly.
A85
Mark Kuhlwein Urinary System Lesson Plan
Last Edit: 5/11/10
Run Time: 7 lesson days / 2 assessment days
MA Curriculum Frameworks 4.8: Recognize that the body’s systems interact to maintain homeostasis.
Describe the basic function of the physiological feedback loop.
Day 1:
Overview:
To begin the topic of the Urinary System, this lesson will have the goal of introducing the new system
and starting a very general discussion of it. Topics to be covered include an overview of what the Urinary
System is, why it is needed in the body, and what anatomical features it includes. These topics will be
discussed very loosely and generally such that they can be built on at a later date.
Purpose:
- To provide an overview of the Urinary System
Objectives:
- Students will have a basic knowledge of what the Urinary System is and what it does
- Students will have a basic knowledge of the importance of the urinary system
- Students will have an understanding of what organs are involved and have a role in the Urinary
System
Procedure:
1) Introduce the new organ system by its name and ask the class what they already know, or think they
know, about the topic. Be sure to….
- Comment of each student’s response
- Write the responses on the board
2) Start class discussion on what the Urinary System is and what it does. Be sure to touch on…
- The Urinary System has two main purposes: to monitor the balance of nutrients in the blood
To remove nitrogenous waste from the blood
A86
3) Continue by posing the question “How did all of the nutrients and wastes get into the blood?” Write
down answers and be sure that the following points are mentioned and discussed.
- The Digestive System is responsible for providing the blood with nutrients to be brought through the
body
- Cellular Respiration is responsible for adding the wastes to the blood stream
4) Now that the students have an understanding of how the materials made their way into the blood,
pose the question “Why is it important to rid the body of excess nutrients and wastes?” Write down
answers given and make sure that the topic of Homeostasis is mentioned and discussed. Be sure to
touch on…
- The body wants to remain a certain way and every bodily function and organ system work to maintain
this state
- The Urinary System works to maintain the concentration of nutrients and wastes within the blood and
disposes of the excess
4) Conclude the class discussion with a brief description of the anatomy of the Urinary System. Be sure
to touch on…
- Kidneys: located in the lower back
2 of them (but we only need 1)
Work to filter blood
- Ureters: 1 for each kidney
They are essentially tubes that transport urine produced in the kidneys down to the urinary
Bladder
- Urinary Bladder: Located in the Pelvic Area
Holding area for urine
It is collapsible (how does it know it is full?)
- Urethra: carries urine from the bladder to outside the body
Liquid is moved through via peristalsis and monitored by sphincters
A87
Day 2:
Overview:
In order to learn more about the Urinary System, the anatomy of its key organ must first be discussed.
This lesson will deal with the anatomy of the Kidney and is important to have prior to discussing the
workings said organ. Through this lesson, general anatomy will be discussed, with emphasis on major
features. Furthermore, the nephron, and its anatomy will be reviewed and discussed.
Purpose:
- To act as a transition into the function of the kidney which will be discussed in the next day’s
lesson
Objectives:
- Students will understand the location and function of major anatomical features of the kidney
- Students will understand the location and function of the nephron and its features
- Students, after having this lesson, will be better equipped to learn the function of the kidney
Procedure:
1) Review from the previous day’s lesson
2) Begin discussing the general anatomy of the kidney. Be sure to touch on…
- The Renal Artery and Vein: located on the Ureter end and responsible for bringing blood to and from
the kidney
- Renal Pelvis: Structure in the middle of the kidney toward the side of the Ureter that is responsible for
funneling urine from the collecting ducts into the Ureter
- Renal Cortex: Outer edge of the Kidney
- Renal Medulla- Inner area of the Kidney
- Renal Pyramids- located in the Renal Medulla and contain many nephrons
3) Continue by discussing the Nephron and what it is. Be sure to touch on…
- How it is located within the renal pyramids
- How there are millions of them within a single Kidney
- This is the site where urine is made
4) End the day’s lesson with going over the anatomy of the Nephron. Be sure to touch on…
A88
- The Glomerulus: The bundle of capillaries within the nephron where the majority of the filtrate enters
the renal tubule
- The Bowman’s Capsule: The end of the renal tubule that surrounds the Glomerulus
- The Renal Tubule: Transports filtrate (that will eventually become urine) through the nephron and to
the collecting duct
- The Loop of Henle: Big notable dip in the renal tubule
- Collecting Duct: Located at the exiting end of the Renal Tubule and responsible for transporting urine
from the renal tubule to the renal pelvis
- Cortical artery and vein: Responsible for bringing blood to and from the Nephron so it can be filtered
Day 3:
Overview:
To build off of the previous lesson, now the topic of urine formation will be discussed. There are three
main steps within this process and, by discussing each step and what it entails, the process of urine
formation can be fully discussed. It is important to reference anatomical features, which were previously
learned, while discussing this topic to ensure the students have a sense of placement at every point in
the process. After this topic has been taught fully, the composition of urine can then be discussed.
Purpose:
- To show how urine is formed in the nephron
- To show the students what urine is actually made up of
Objectives:
- Students will understand the act of urine formation and can distinguish between Glomerular
Filtration, Tubular Reabsorption, and Tubular Secretion
- Students will know what can be found in urine
Procedure:
1) Review from the previous day’s lesson
2) Begin discussing the formation of urine. Mention that there are 3 processes involved in the formation
of urine (Glomerular Filtration, Tubular Reabsorption, and Tubular Secretion) but ultimately the process
involves the depositing of the blood plasma into the renal tubule, the reabsorption of wanted materials,
and the secretion of unwanted materials.
A89
3) Continue by going more in depth on the process of Glomerular Filtration. Be sure to touch on…
- This is happening at the Glomerulus / Bowman’s Capsule junction
- It involves the majority of the filtering of materials out of the blood and into the renal tubule. The
structure of the Glomerulus (a bit knot of capillaries) helps it with this function
- This is a very passive and nonselective processes in which the majority of the blood plasma, and its
contents, are deposited into the renal tubule (RBC / WBC / Proteins generally cannot be filtered out of
the capillary bed due to their size)
4) Move onto the process of Tubular Reabsorption. Be sure to touch on…
- This is happening in the Renal Tubule / surrounding capillary bed
- When Glomerular Filtration occurs, a lot of useful things (nutrients) are also deposited into the renal
tubule and this process helps the body to reabsorb some of those nutrients before they are voided and
lost.
- During this process, certain nutrients are able to be reabsorbed back into the blood stream (either by
passive or active processes) so they can still be used by the body
- Generally, waste products are not able to be reabsorbed due to their size and composition
5) Further, discuss the final process in the formation of urine. When talking about Tubular Secretion, be
sure to touch on…
- This is also happening in the Renal Tubule / surrounding capillary bed
- When Glomerular Filtration occurs, some harmful/unneeded materials (ex: drugs/poisons/more waste
products) fail to be deposited into the renal tubule and this process helps the body to further secrete
these unwanted materials into the renal tubule from the blood stream
- Compared to reabsorption, this is an opposite/reverse process
- This is the body’s second chance at eliminating unwanted materials that are still in the blood after
Glomerular Filtration
6) Lastly, urine and what it is composed of will be discussed. Be sure to touch on…
- This is the liquid that eventually comes out of the body
- Urea: formed during the breakdown of protein
- Uric Acid: formed during the metabolizing of nucleic acids
-Creatinine: formed during the metabolizing of muscle tissue
- Excess water can also be found in urine (this is why some people say to drink it in case of emergency)
- Urine is sterile
A90
Day 4:
Overview:
This day’s lesson will consist of an assessment on the Kidneys and Urine Production.
Assessment:
The assessment will be in the form of a short quiz containing 2 figures to be labeled and 5 questions to
be answered. All of the material will be based on knowledge gained through the past 3 days of lessons.
Day 5:
Overview:
Now that the students have a firm background in the kidney’s and how urine is formed, the movement
of urine through the rest of the urinary tract can be discussed. In this day’s lesson the structure and
function of the Ureters and Urinary Bladder will be discussed.
Purpose:
- To begin the discussion of the rest of the Urinary System and how it works
Objectives:
- The students will have an understanding in the structure and function of the Ureters and Urinary
Bladder
Procedure:
1) Review the previous day’s lesson and go over the last assessment
2) Begin discussion on the Ureters. Focus on structure and function and be sure to touch on…
- There are 2 of them (on for each kidney)
- They are about 10-12 inches long and ¼ inch thick
- They are continuous with the Renal Pelvis and Urinary Bladder
- They are responsible for transporting urine from the kidneys to the urinary bladder
- The movement of urine through these tubes is controlled by both gravity and peristalsis
- There are valves located at the Bladder-end of the Ureters that prevent backflow
3) Continue class discussion by presenting information on the Urinary Bladder. Be sure to touch on…
- The bladder is collapsible (this helps it to detect when it is full)
A91
- It is located in the pelvic area
- There are 3 openings in the Bladder (2 for the Ureters and 1 for the Urethra)
- There is an area located in the Bladder named the Trigone that is outlined by the 3 openings (this area
is significant due to its susceptibility to becoming infected)
- The cell wall of the Bladder is made up of Transitional Epithelial Cells (named as such because they are
able to slide past one another) (diagram how these cells work to help the Bladder increase and shrink in
size as urine passes through)
- A full bladder is capable of holding around 1 pint of urine
4) Review this day’s lesson, remind students of the exam and homework that are due at the end of the
week
Day 6:
Overview:
Continuing with the rest of the urinary system, this day’s lesson will focus on the Urethra as well as the
process of urination. The urethra, being the last organ to be discussed in the urinary system, is very
simple and is easily relatable to the rest of the organs that have previously been discussed. The process
of urination, also known as micturition, is a bit more complicated and involves primarily the bladder,
which the students have already had a lesson on.
Purpose:
- To finish the discussion on the organs if the Urinary System
- To introduce the process of urination and how the body physically releases the urine that has
been accumulating
Objectives:
- Students will now have an understanding of all the organs related to the urinary system and the
purpose of each
- Students will now know the process of how the body works to release urine
A92
Procedure:
1) Review from the previous day’s lesson
2) Finish the class discussion of the organs of the urinary system by introducing the Urethra. Be sure to
touch on…
- The walls of the Urethra are very thin (what does this mean for the Urethra in relation to what it is
meant to pass?)
- Urine is passed through by the process of peristalsis
- The Urethra has 2 sphincter muscles in it
Internal Sphincter: Involuntary Movement (you cannot control it)
Works to hold in Urine when the body is not voiding (if the body did not have
this than the bladder would constantly be releasing liquid)
External Sphincter: Voluntary Movement (you can control it)
Makes it possibly to stop in the middle of voiding and gives the body control
so that an individual can choose to hold in the urine for a longer period of time
3) Briefly review all of the organs that have been discussed as well as the path urine takes as it passes
through the system
4) Continue onto the act of voiding (A.K.A. Urination / Micturition). Be sure to touch on…
- This is the act of emptying the bladder and releasing its contents
- The nerve endings found on the bladder are known as “stretch receptors” and start to be triggered
after about 200 mL of urine has accumulated in the bladder
- These receptors, when triggered, send messages to the brain, which eventually induces contractions of
the bladder
- The contractions that eventually start in the bladder are when tell you that you need to go to the
bathroom and urinate
- The contractions, and the feelings they induce, can be suppressed and eventually will subside and go
away
- If one chooses to ignore the feelings until they go away, they will come back once about 50 mL more
urine has entered the bladder
- The body cannot ignore the feelings indefinitely. Eventually the body will have to Urinate and it will,
whether the individual wants to or not
- If one chooses to not urinate for an extended period of time after the initial feeling has been noticed,
the bladder will eventually stretch and lasting effects can be noticed (bladder contractions can become
A93
less effective at pushing urine out of the bladder / a increased amount of urine might be needed to
trigger the stretch receptors / etc)
5) Review what was discussed in this lesson and ask if there are any questions related to the Urinary
System thus far
Day 7:
Overview:
In ending the Urinary System, this lecture will focus on the 2nd function of the system. In the previous
lectures the function of disposing of waste was discussed. This lesson will focus on the other main
function of the Urinary System, being the maintaining of homeostasis in the blood. Topics to be
discussed include water/electrolyte balance and pH balance.
Purpose:
- To discuss the second function of the Urinary System
- To further discuss homeostasis
Objectives:
- Students will understand how the Urinary System works to maintain the balance of certain
aspects of the blood (homeostasis)
Procedure:
1) Review from the previous day’s lesson
2) Begin reviewing the term Homeostasis and how it relates to the Urinary System. Be sure to touch on…
- Constantly there are things being added to the blood as well as taken out of the blood (what is in the
blood depends on diet, cellular metabolism, and urine output)
- There has to be ways to make sure that the blood stays the same basic chemistry (the body works best
when things are a certain way and that includes the blood)
- In the Urinary System, the Kidneys have 4 purposes that help to maintain blood chemistry
- To remove nitrogenous wastes from cellular metabolism (what we have already talked about)
- To maintain water balance in the blood
- To maintain electrolyte balance in the blood
- To maintain blood pH

A94
- All of these aspects of the kidneys help it to maintain bodily homeostasis
3) Continue onto the function of water/electrolyte maintenance. Be sure to touch on…
- Water makes up about ½ of the body weight
- The balance of water and electrolytes in the blood really depends on simply those two things and the
kidneys simply work to either retain/excrete water/electrolytes to keep the balance of the two (recall
osmosis)
- The kidneys are able to do this job with the help of hormones (ADH= prevents excess water loss /
Aldosterone= regulates the amount of sodium retained (an electrolyte))
- The term Hydrated simply means that water in = water out
4) Pose the questions “What would happen if the blood was too dilute?” & “What would happen if the
blood was too concentrated?”
5) Move onto the regulation of blood pH. Be sure to touch on…
- The bodily cells work best at a relatively neutral pH (around 7.35 – 7.45)
- Because there is a need for a certain pH, the body must regulate the amount of acids and bases in the
blood
- Because the blood is made up of a mixture of acids and bases, it is an effective buffer (meaning it is
able to prevent a dramatic change in pH)
- The kidneys work to monitor the pH of the blood, ensuring that the balance of acids to bases is
maintained, by either eliminating acids/bases or retaining such things to keep the blood constant
6) Review the material presented today and ask if there are any questions on the topic
Day 8:
Overview:
Being the day before the exam on the Urinary System, this lesson will be a review of all the material that
has been presented. The basic review game that has been used through the whole year will be played in
efforts to promote studying as well as show the students what they may need to study more.
Purpose:
- To act as a study tool for the next day’s exam
Objectives:
- Students will be more prepared to take the exam
A95
Procedure:
1) Ask if there are any last minute questions before the review game starts
2) Start Review Game
Day 9:
Overview:
This day will end the unit on the Urinary System and assess the knowledge gained by the students.
Assessment:
The assessment for this material will be in the form of an Exam containing short answer and essay
questions.
A96
Appendix V: Handwritten Notes
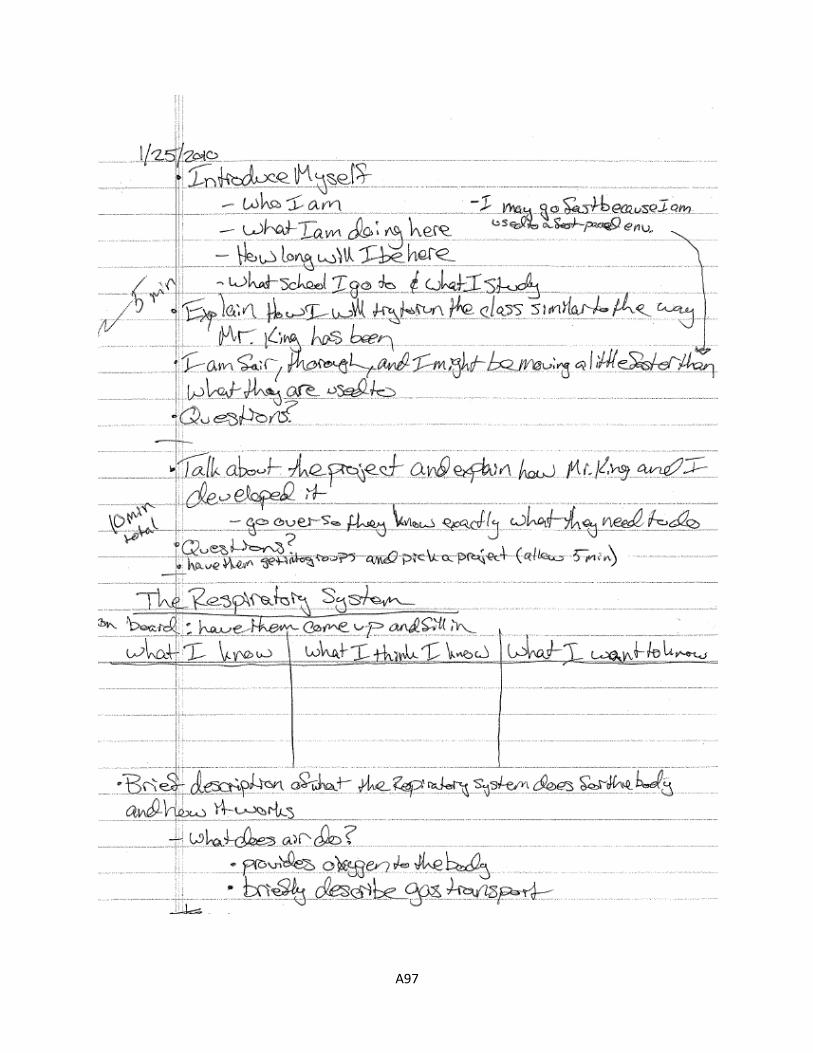
A97
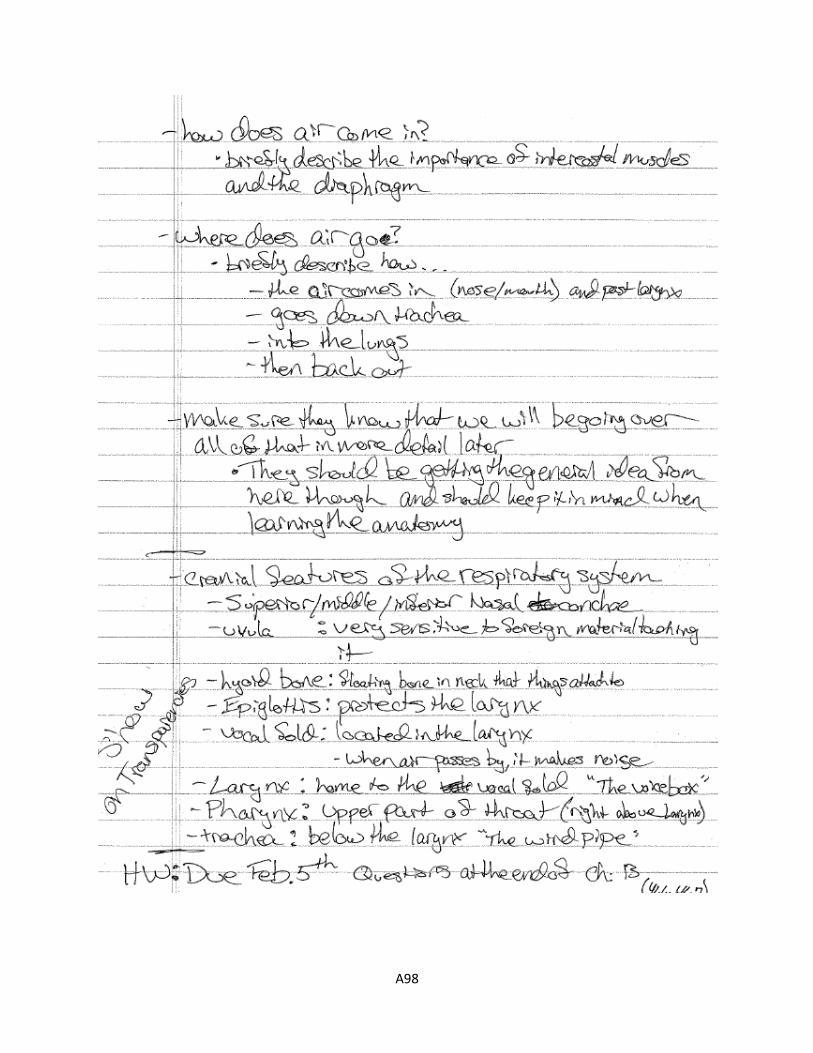
A98
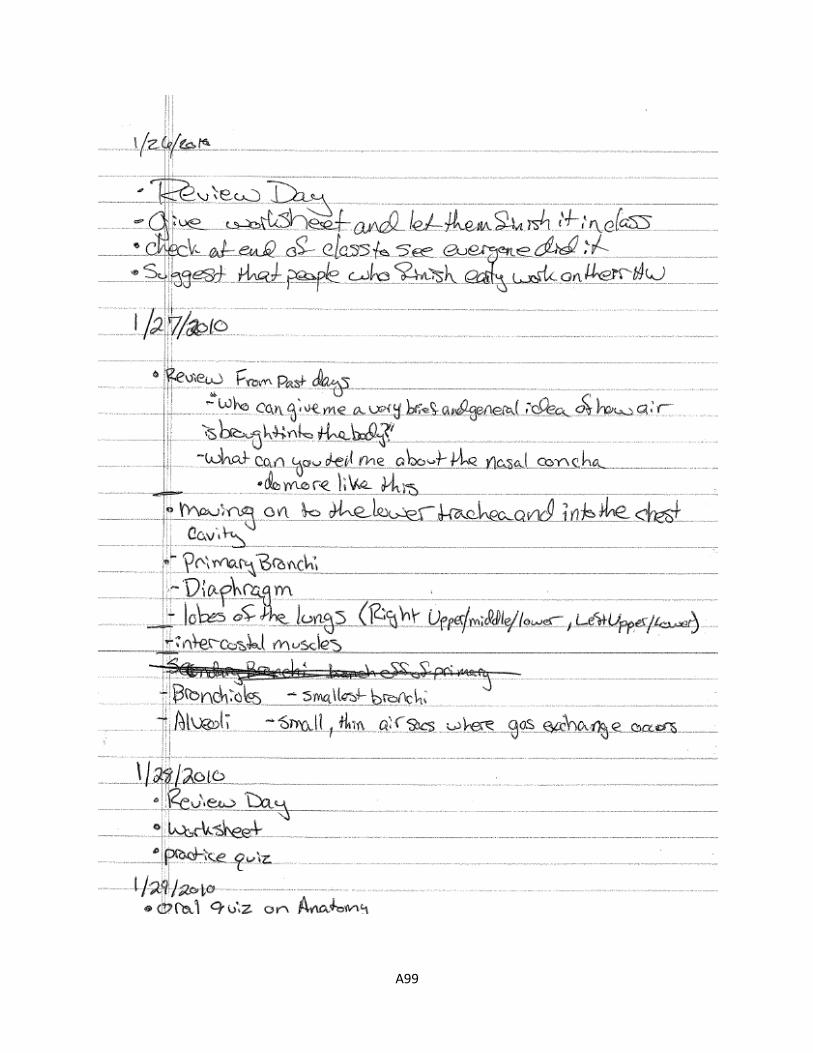
A99
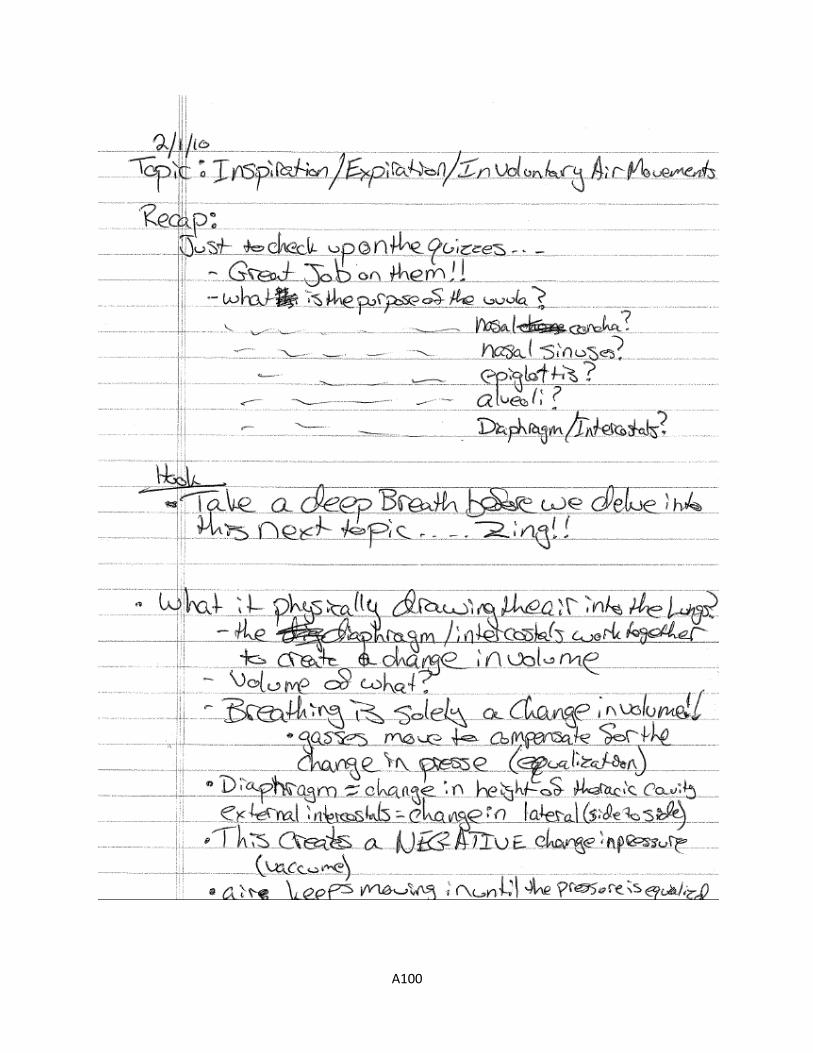
A100
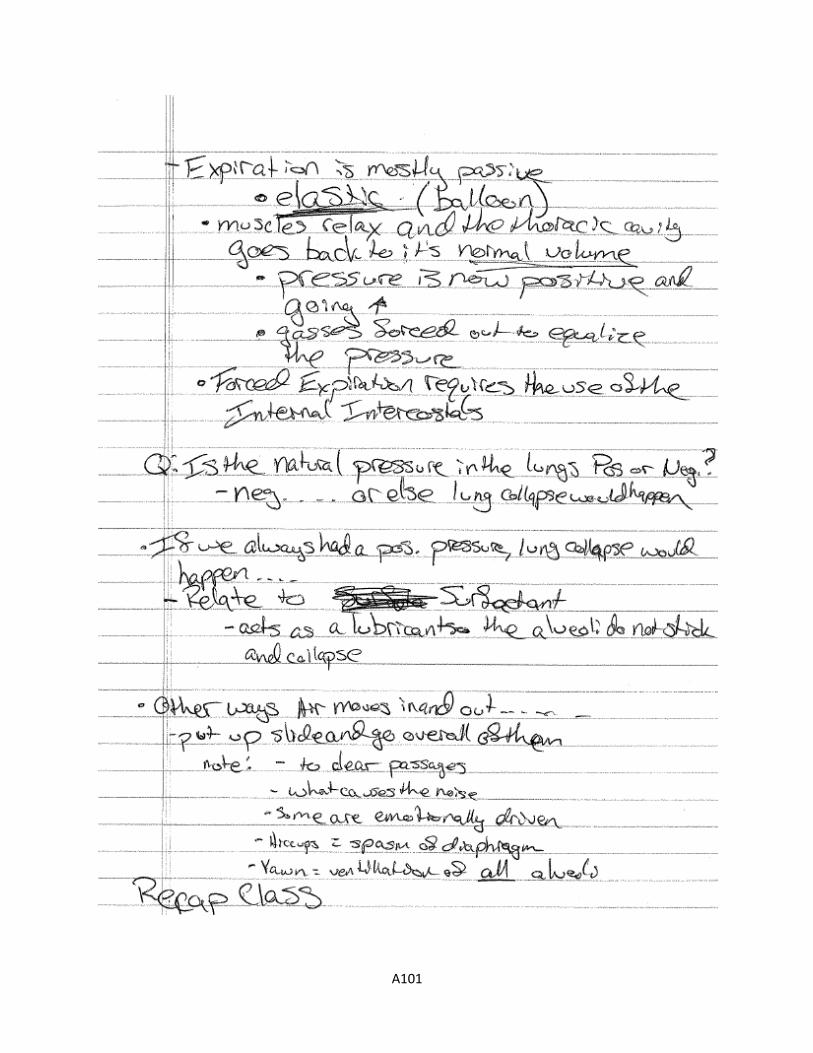
A101
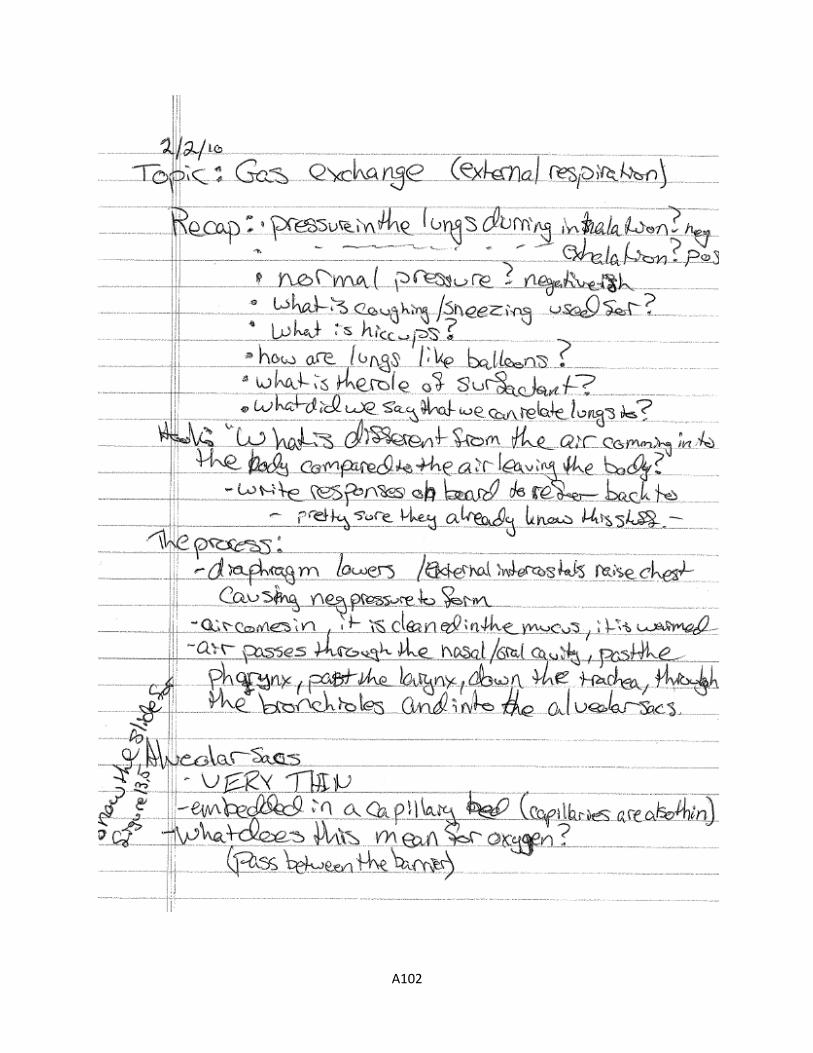
A102
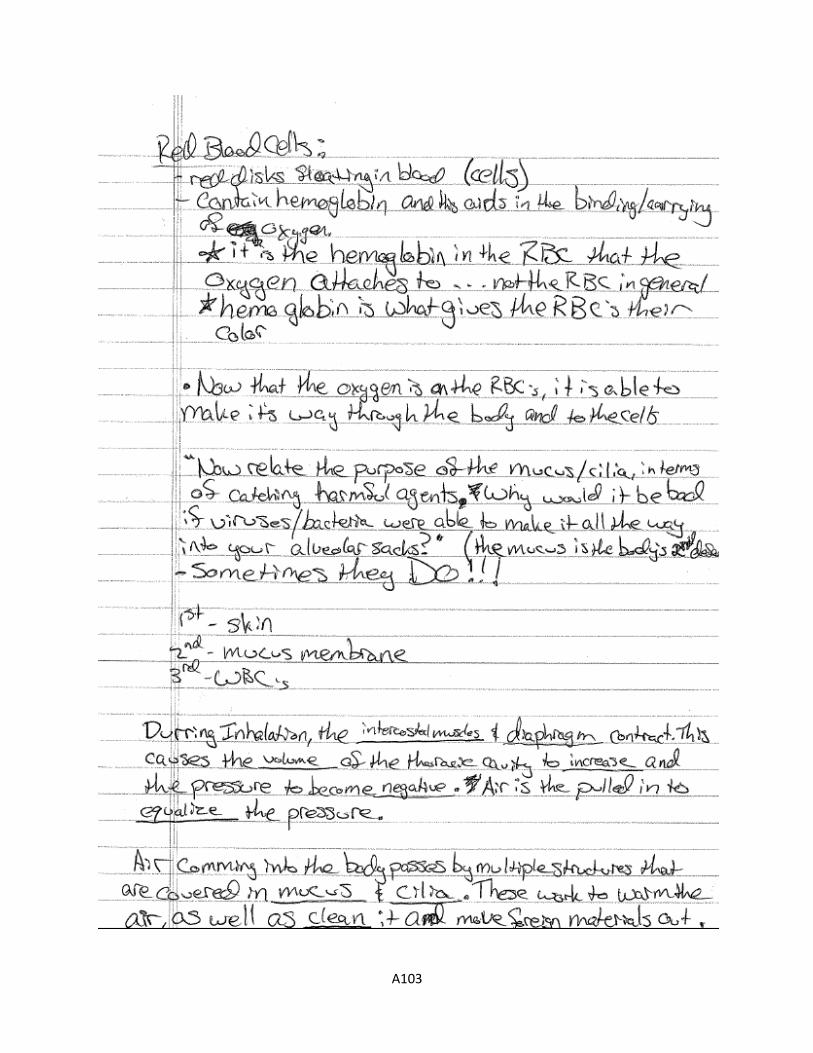
A103
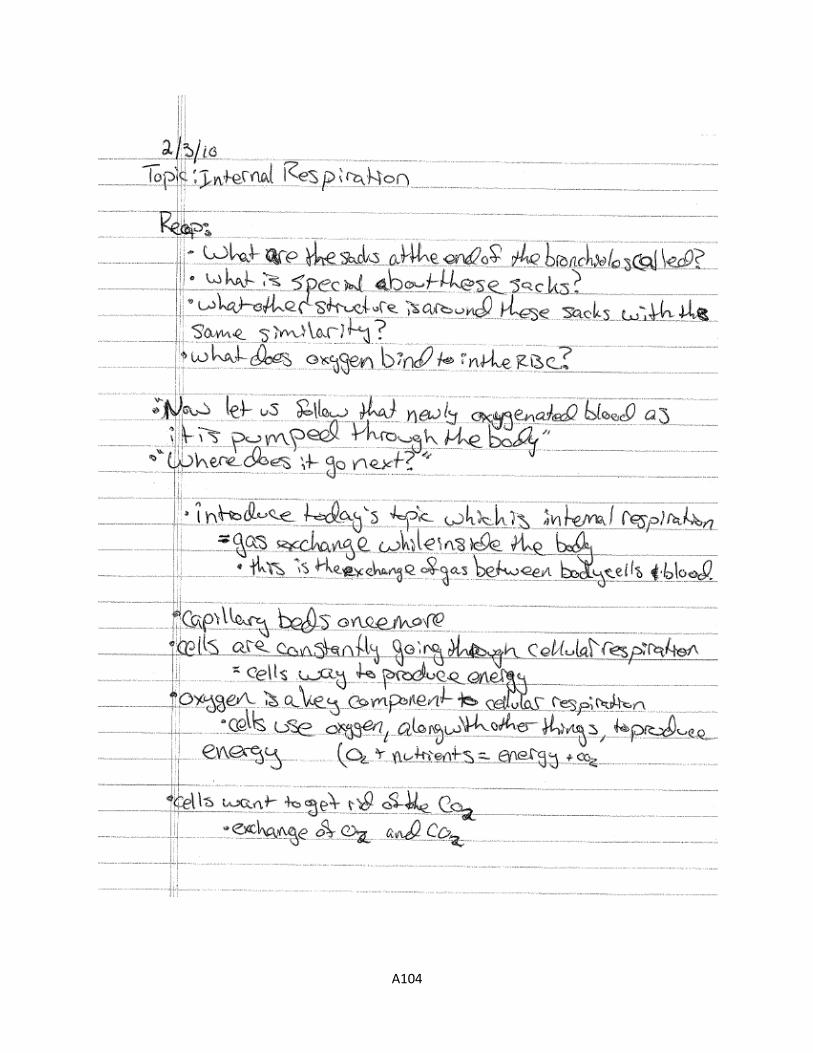
A104
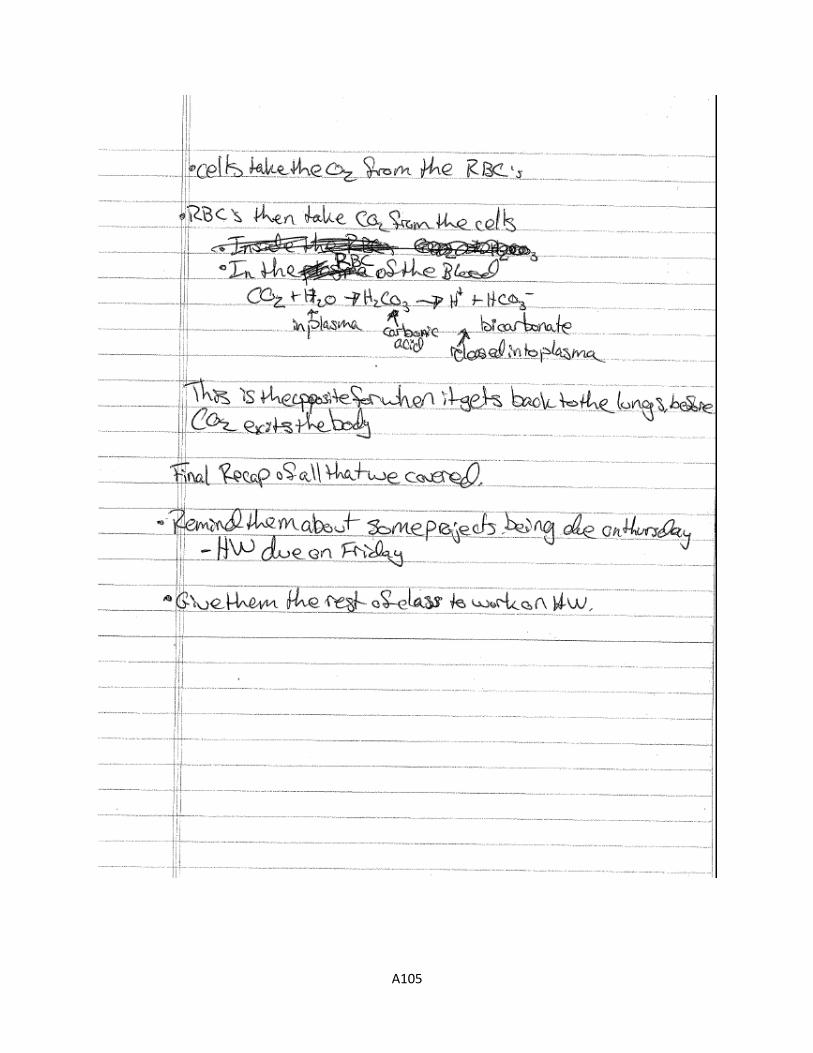
A105

A106
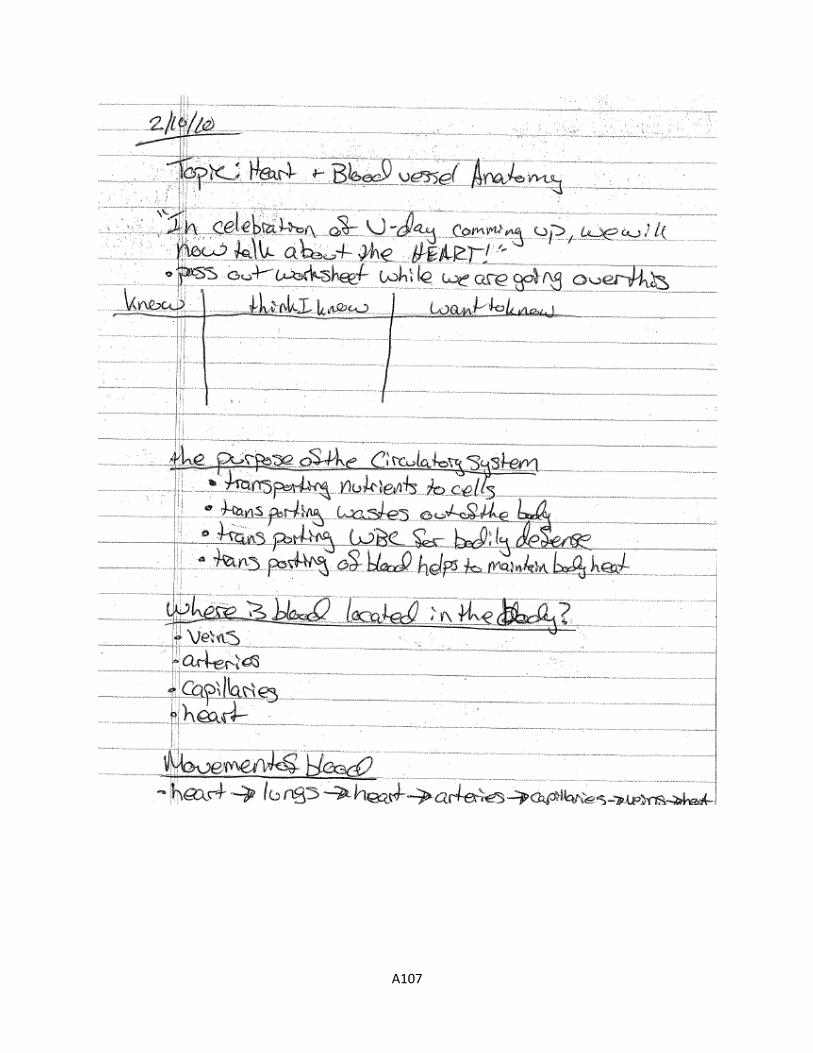
A107
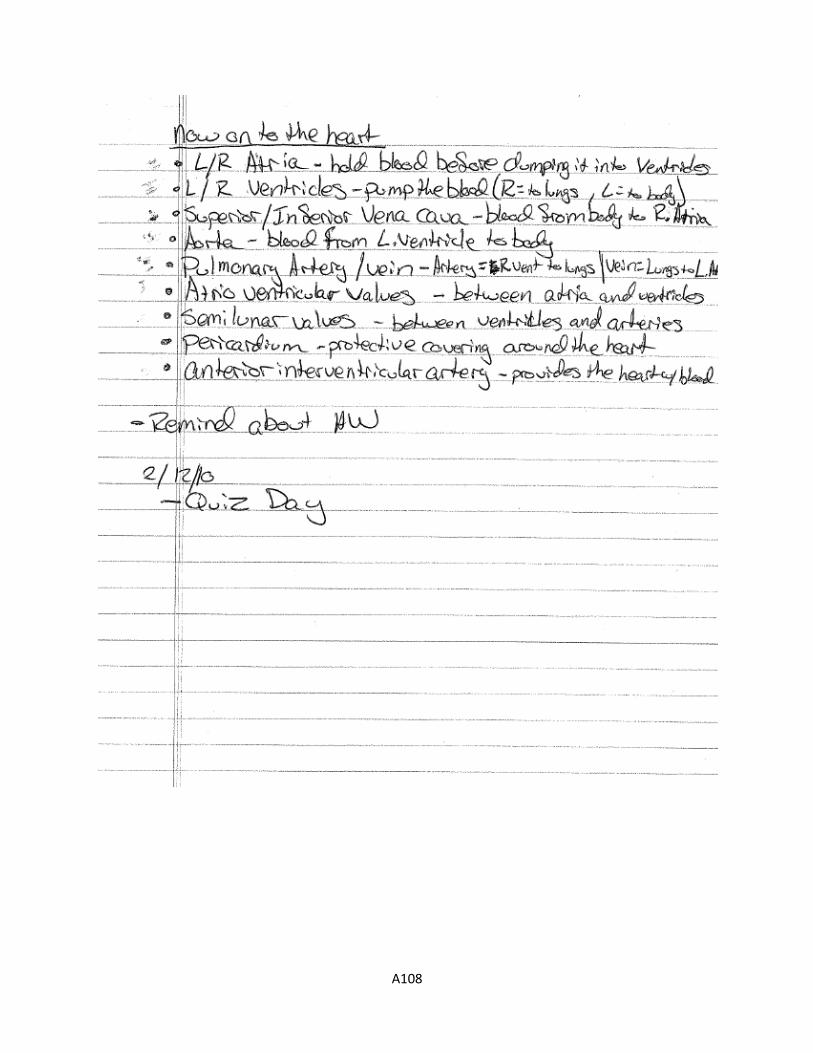
A108
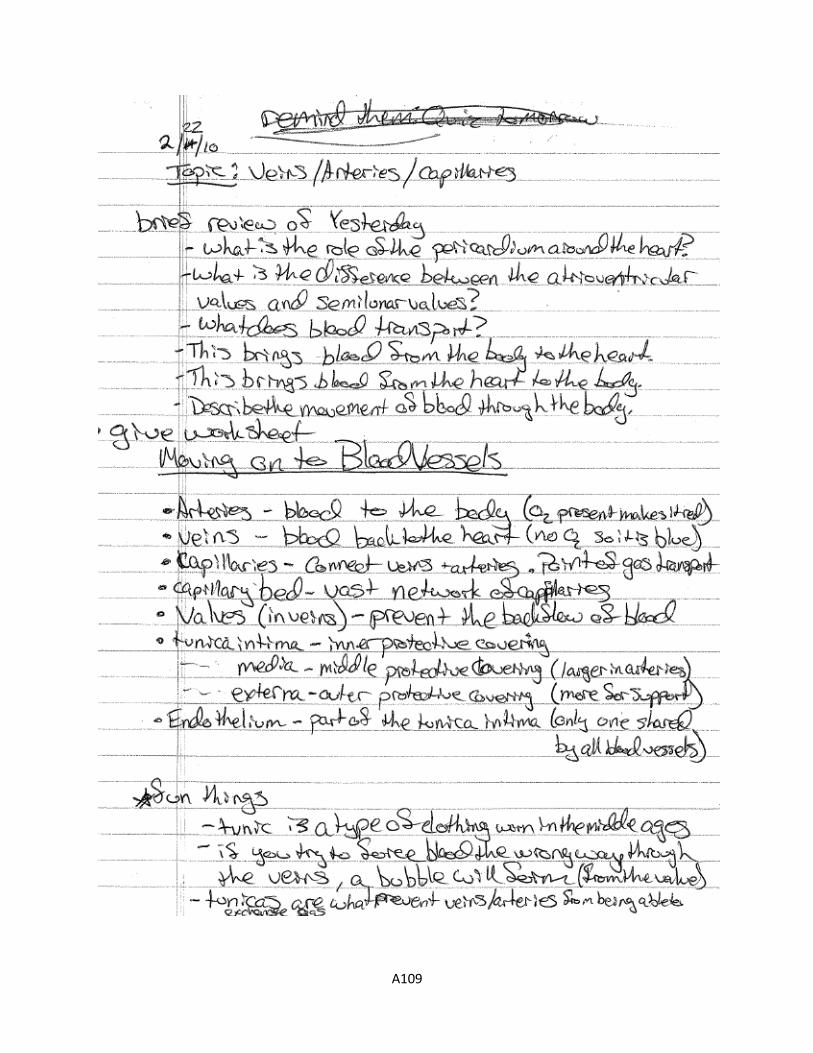
A109
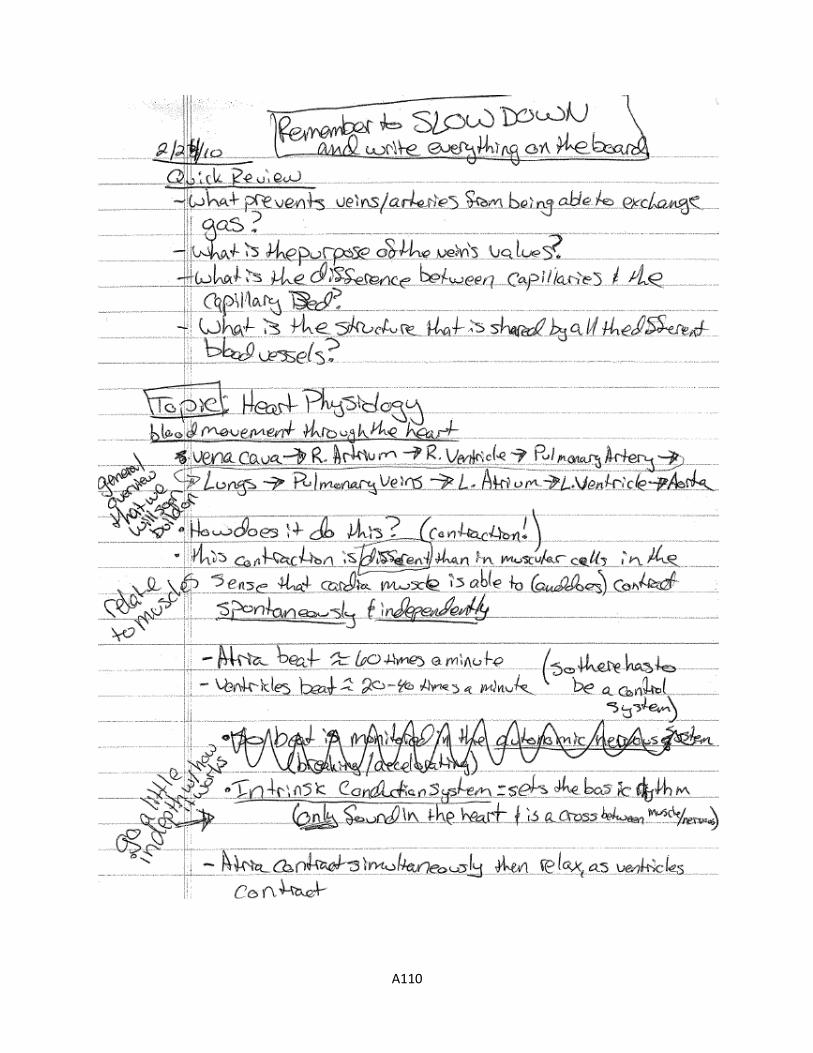
A110
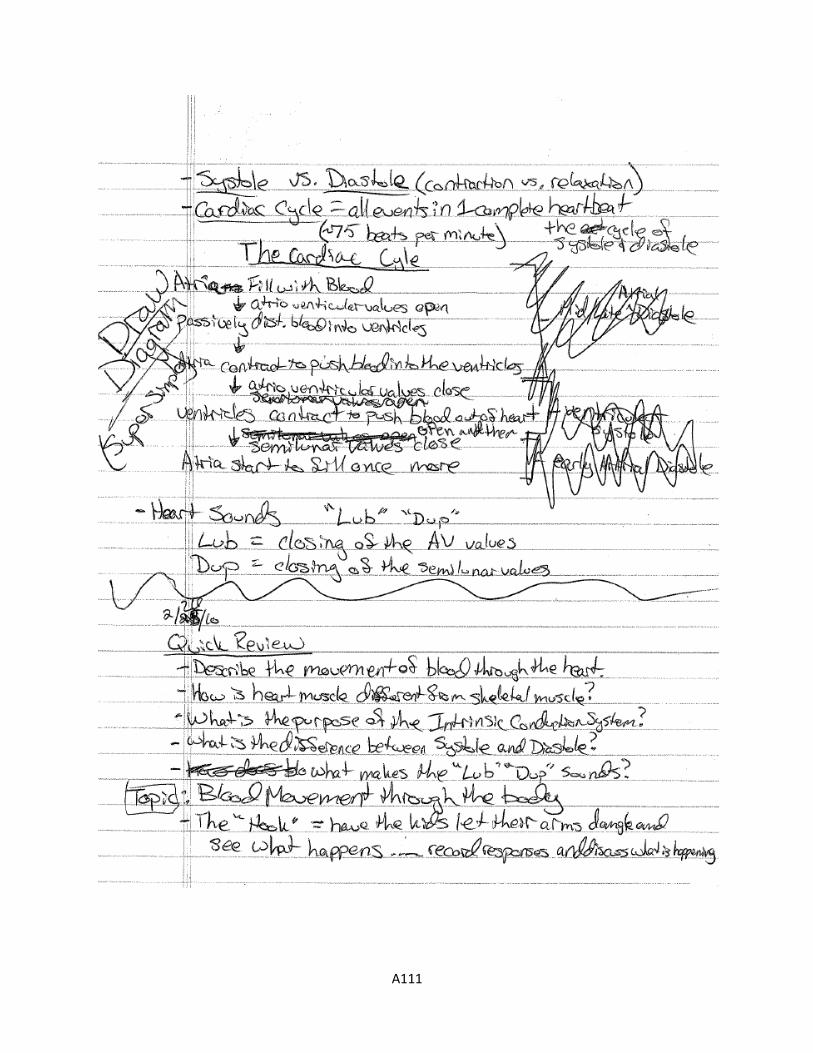
A111

A112

A113

A114
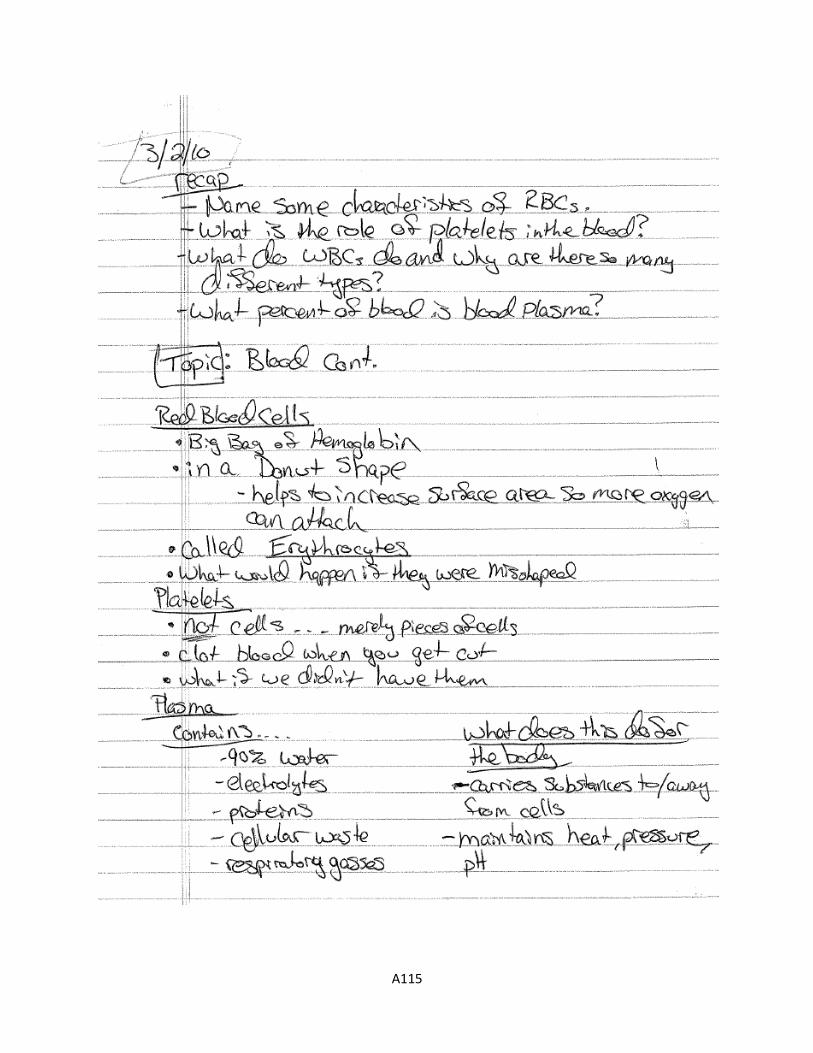
A115
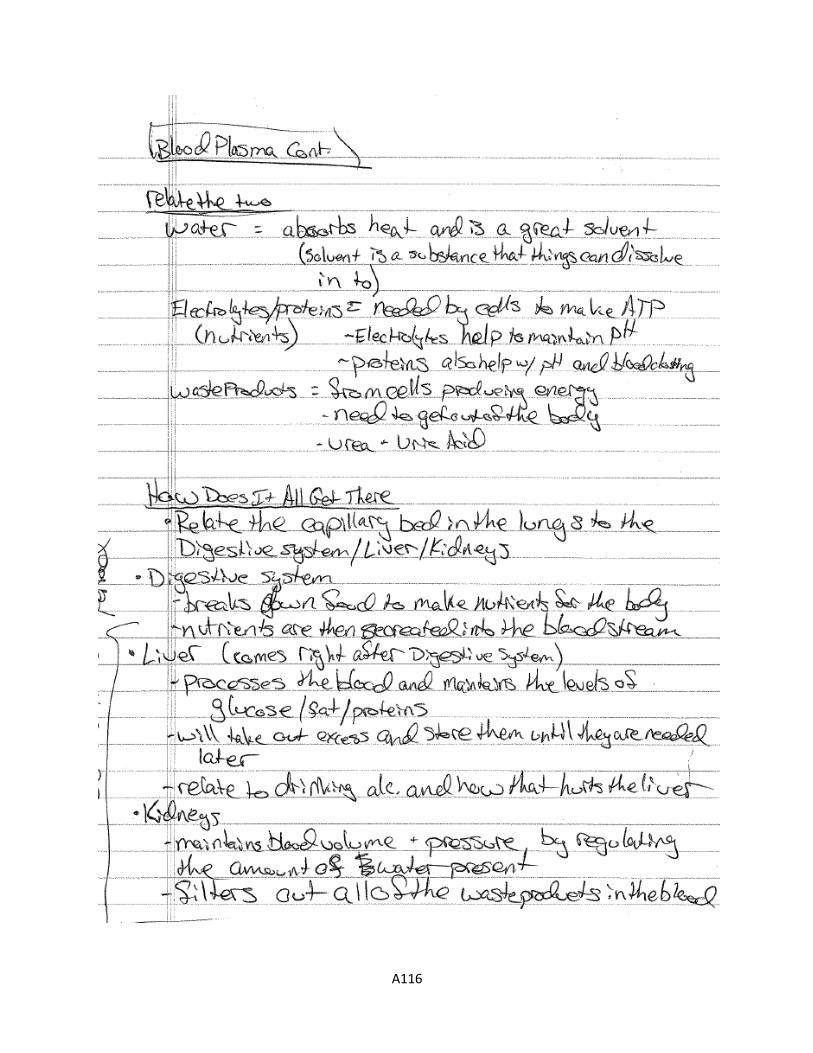
A116
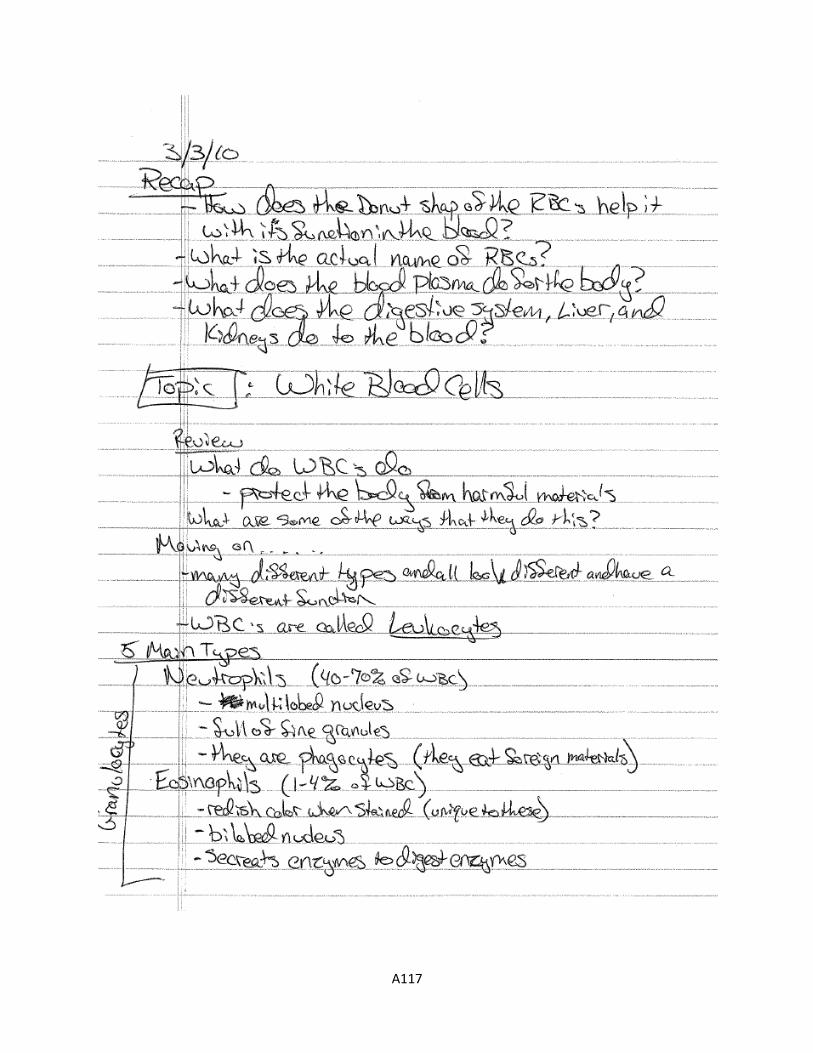
A117

A118
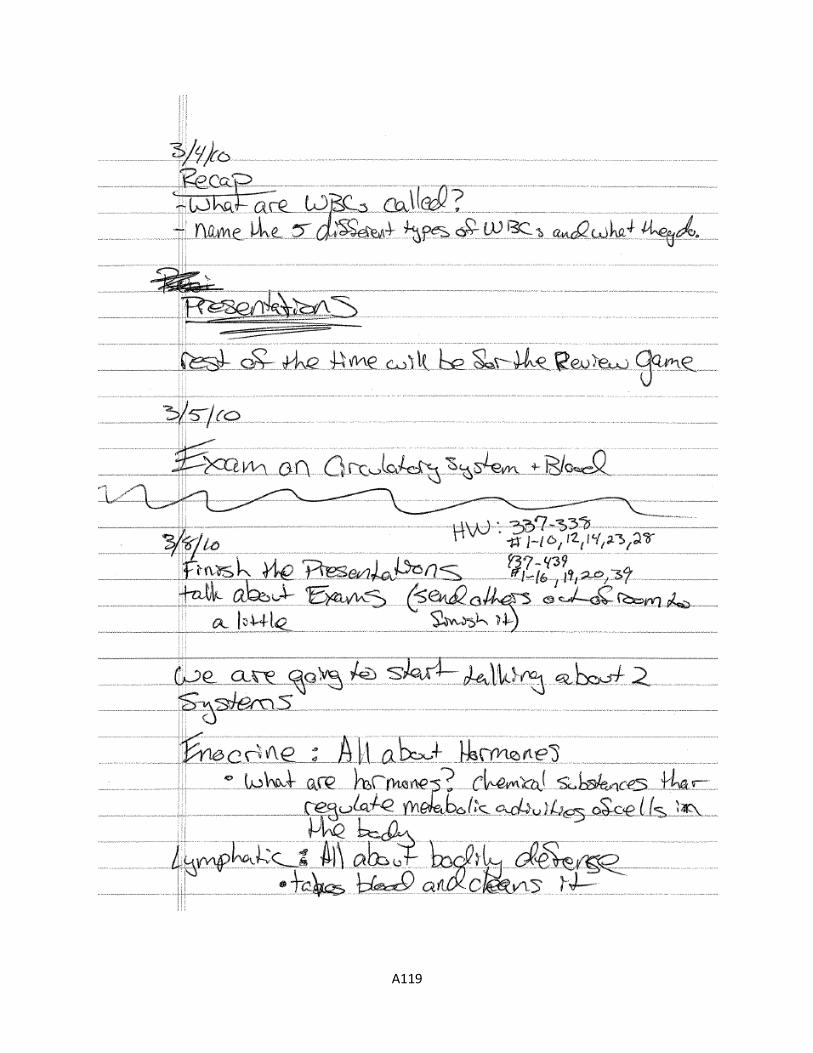
A119
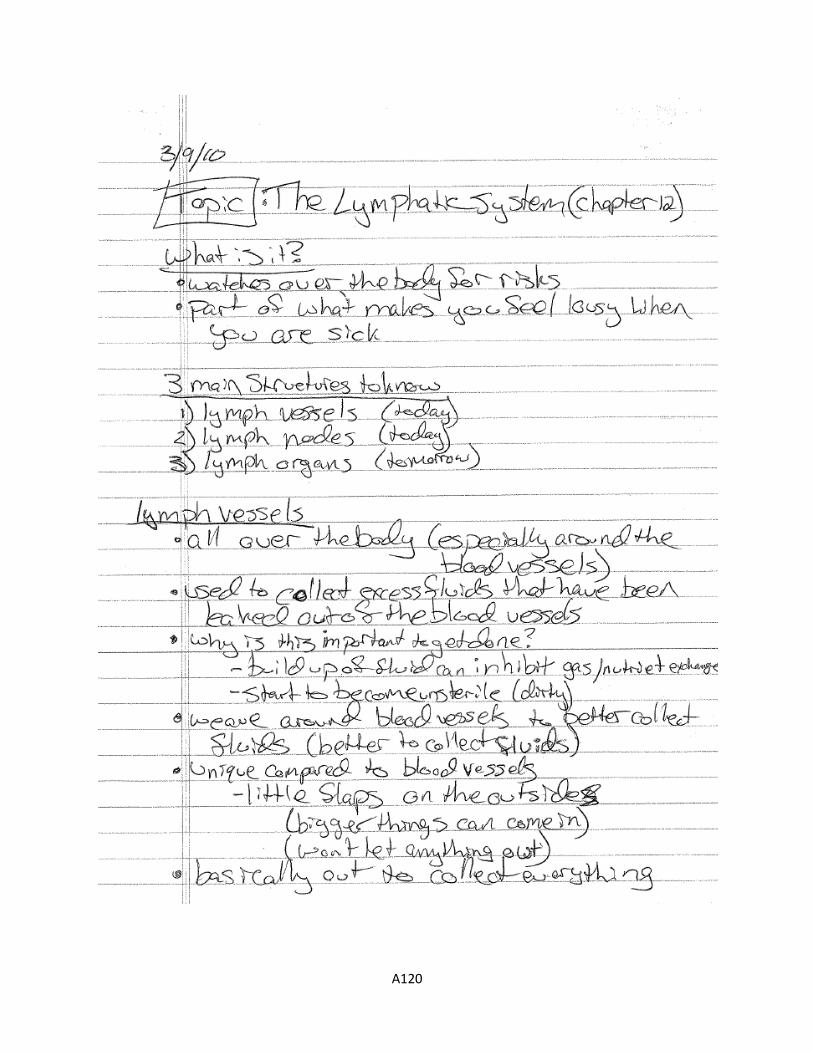
A120
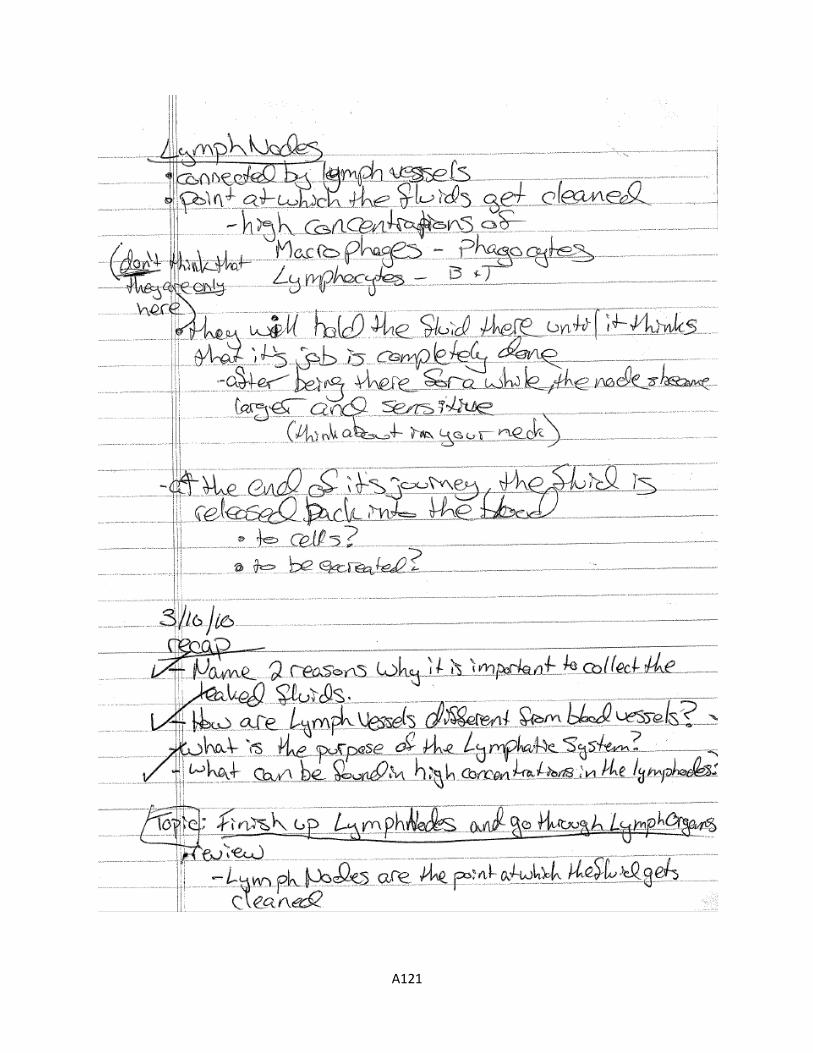
A121
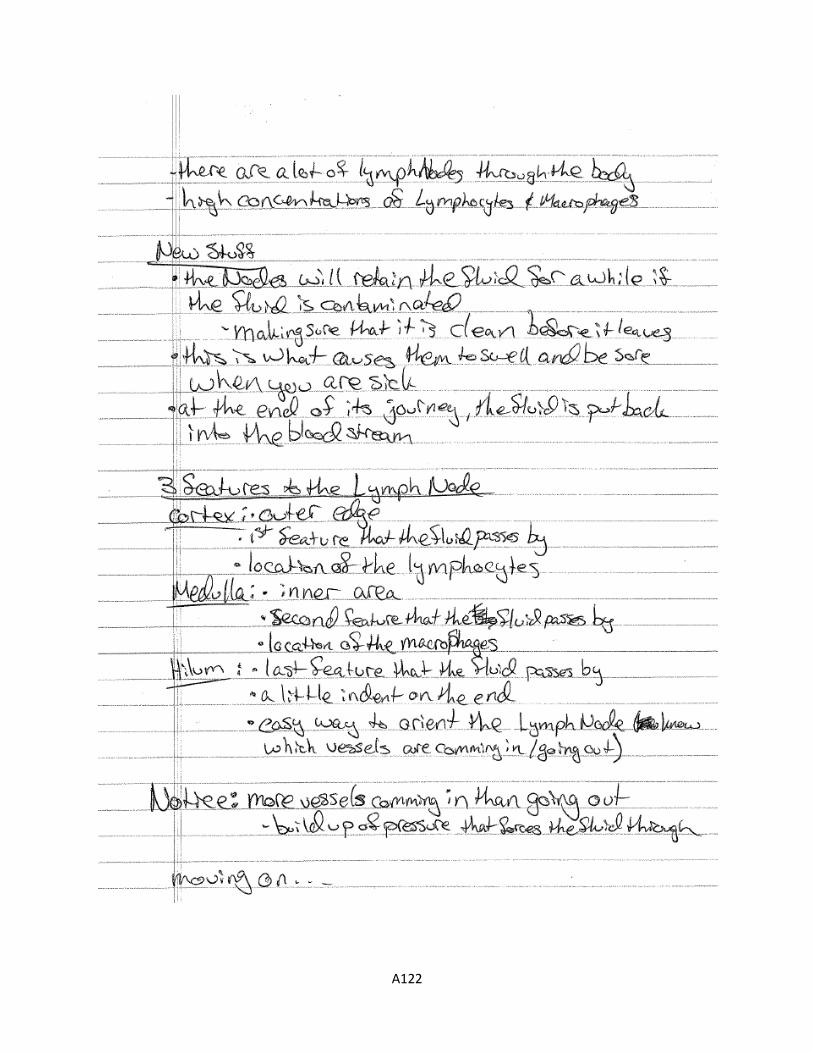
A122
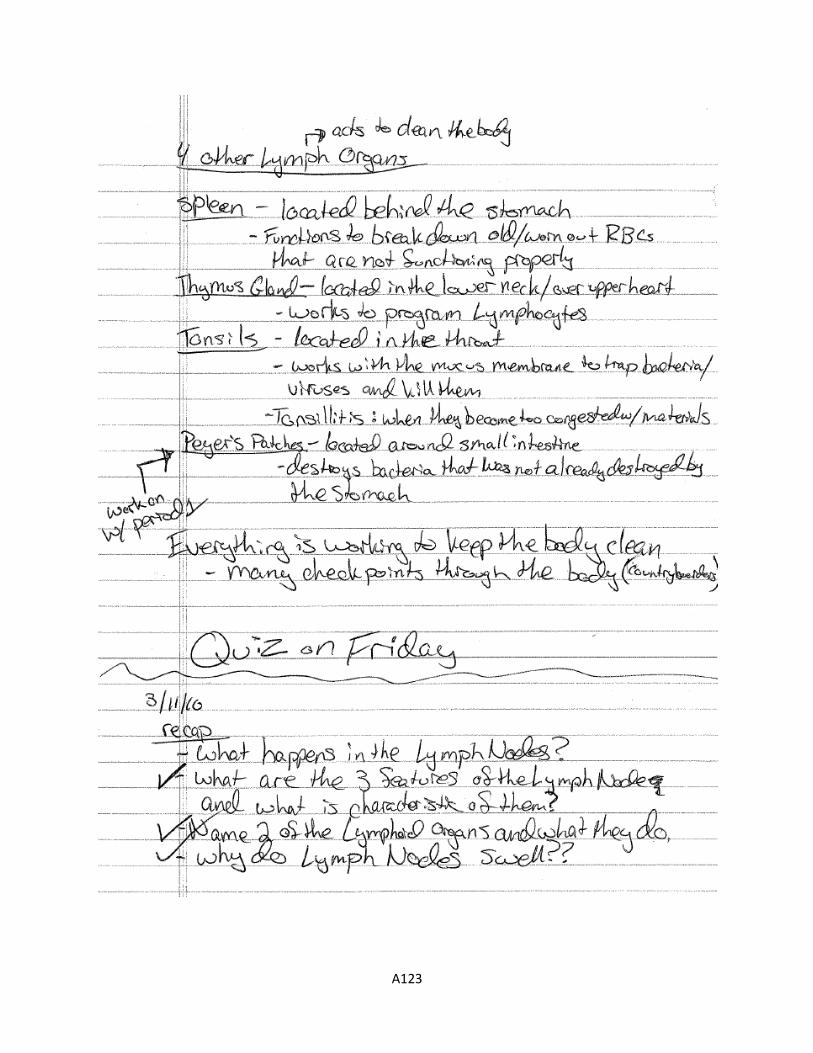
A123
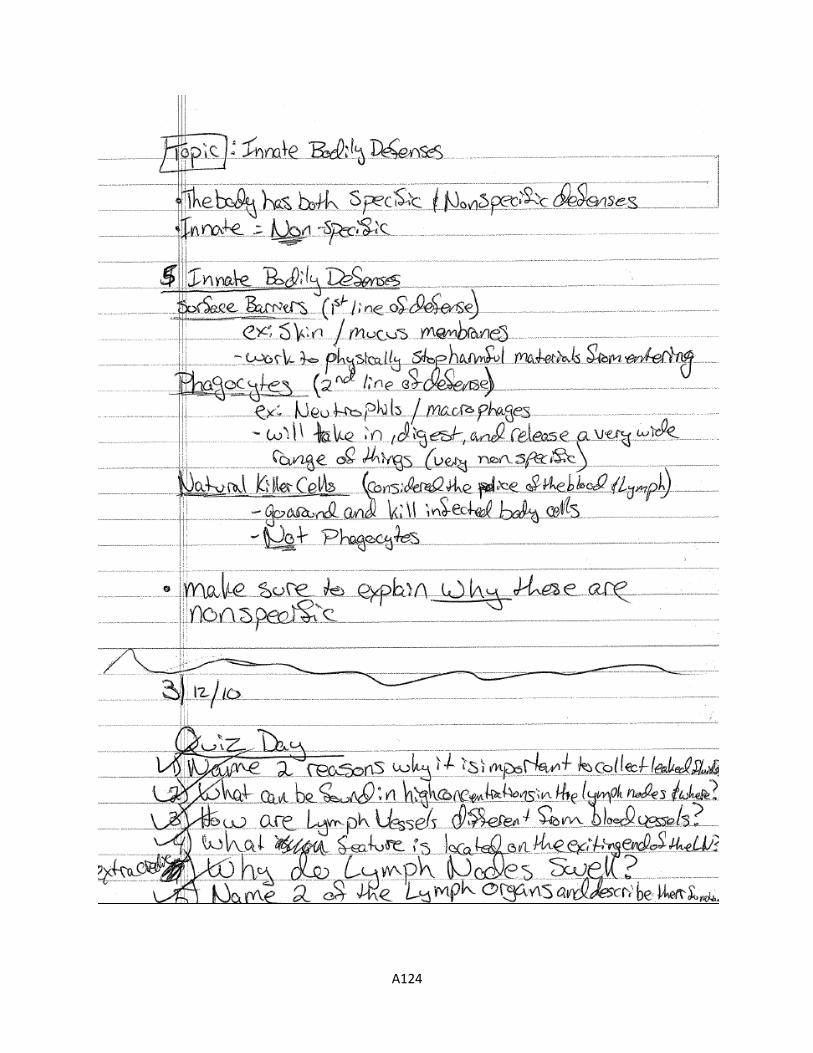
A124
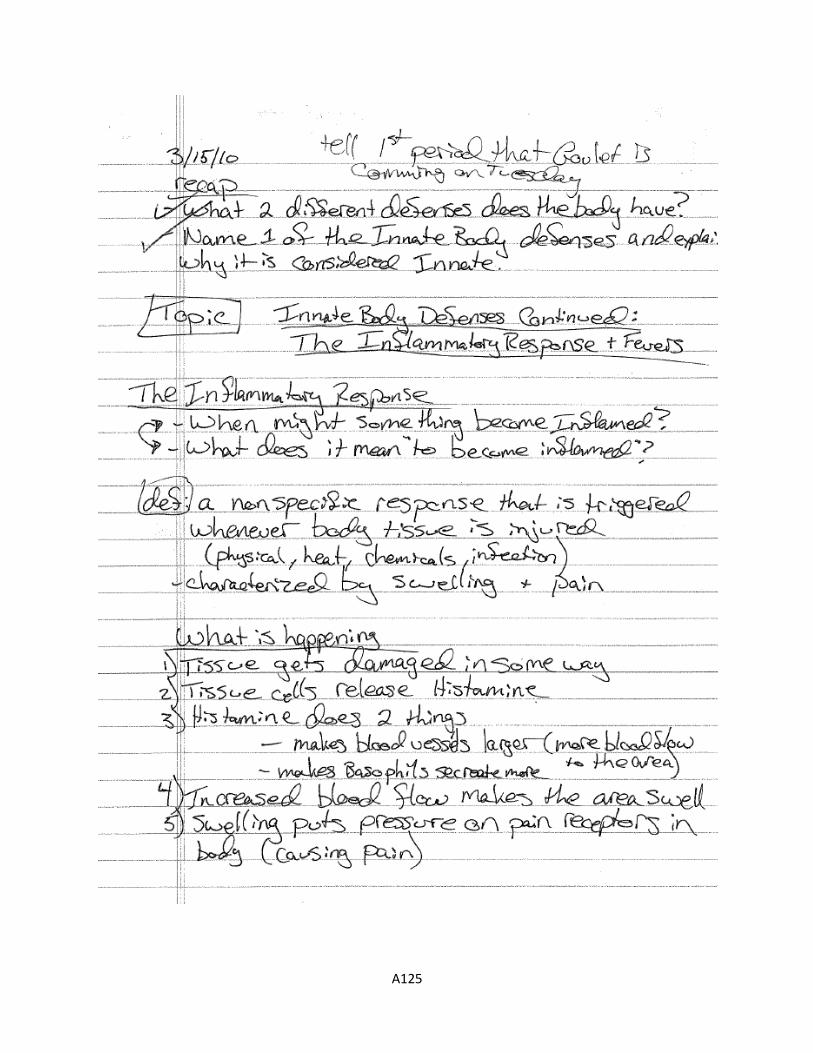
A125
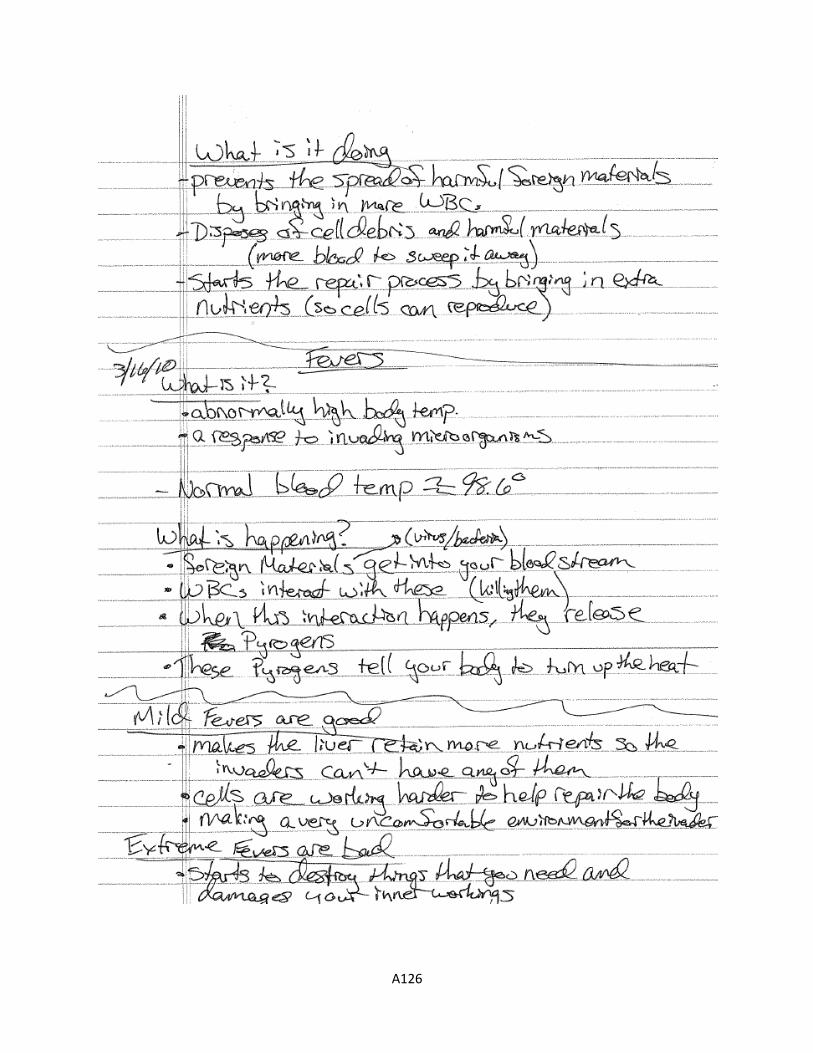
A126
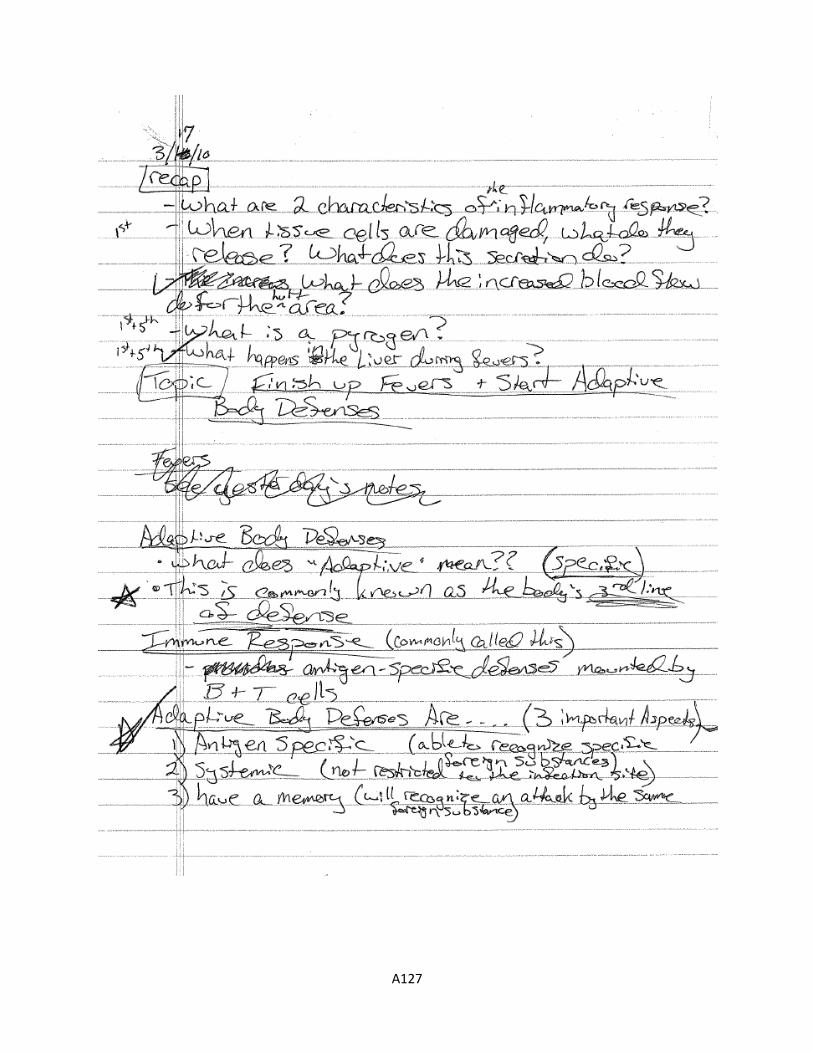
A127
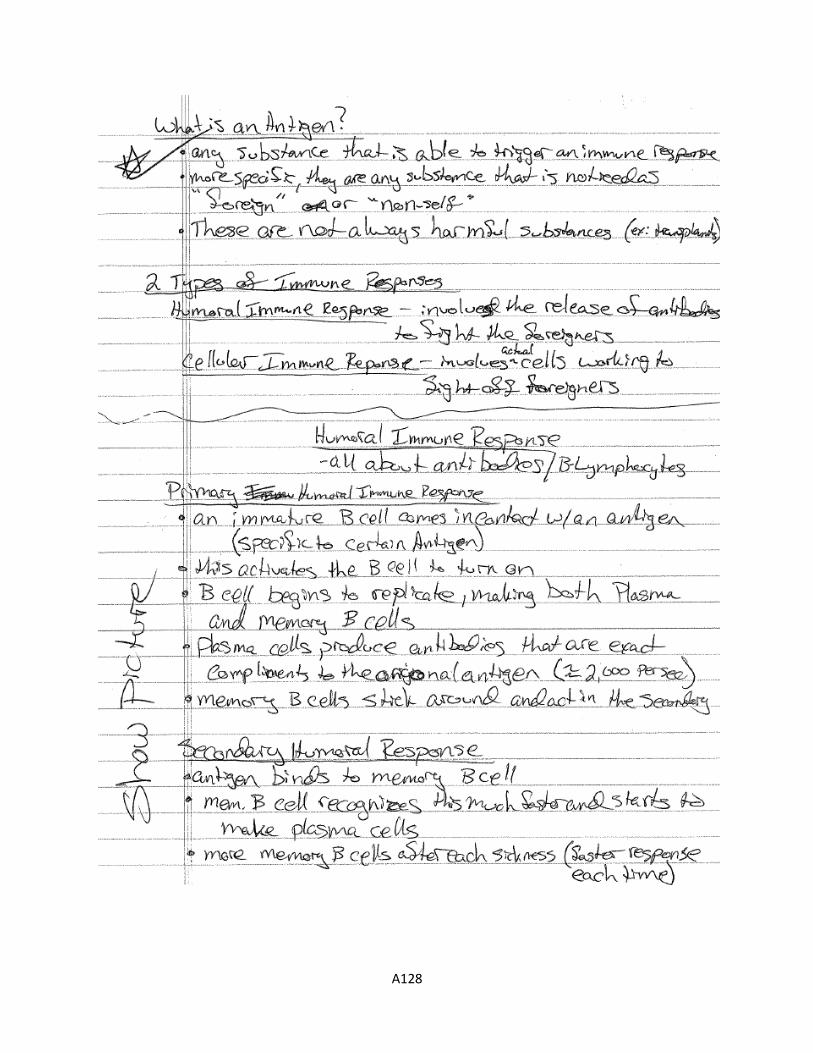
A128
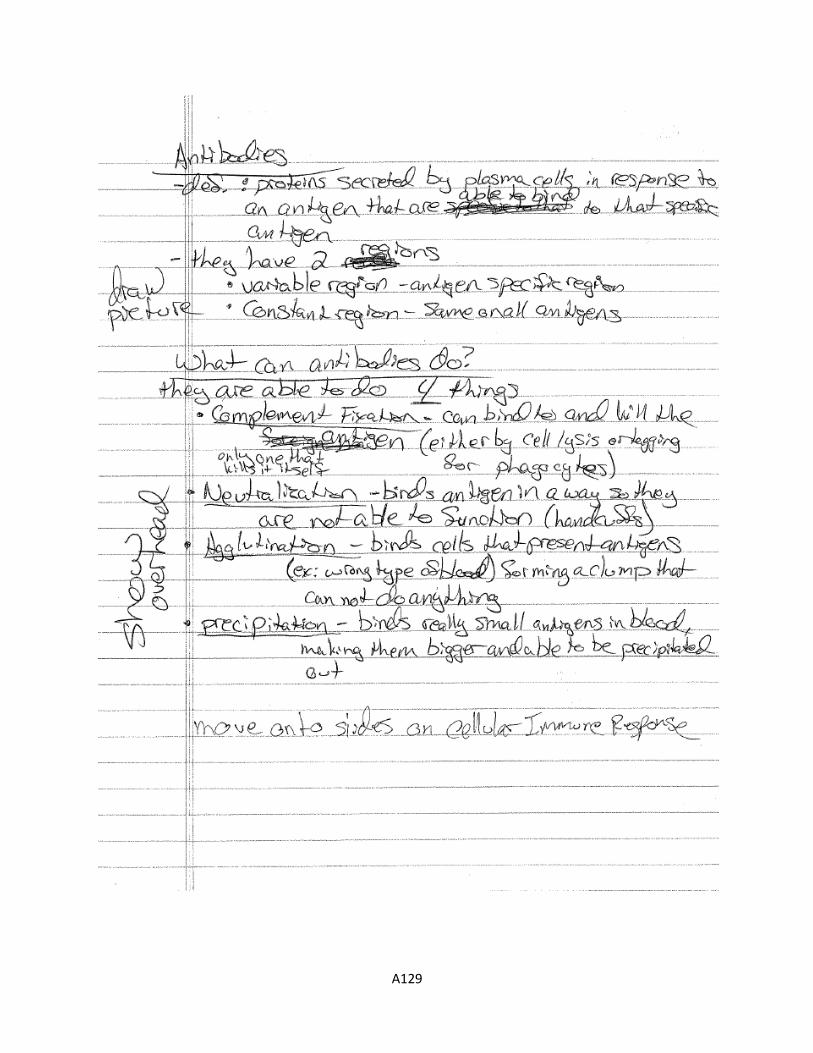
A129
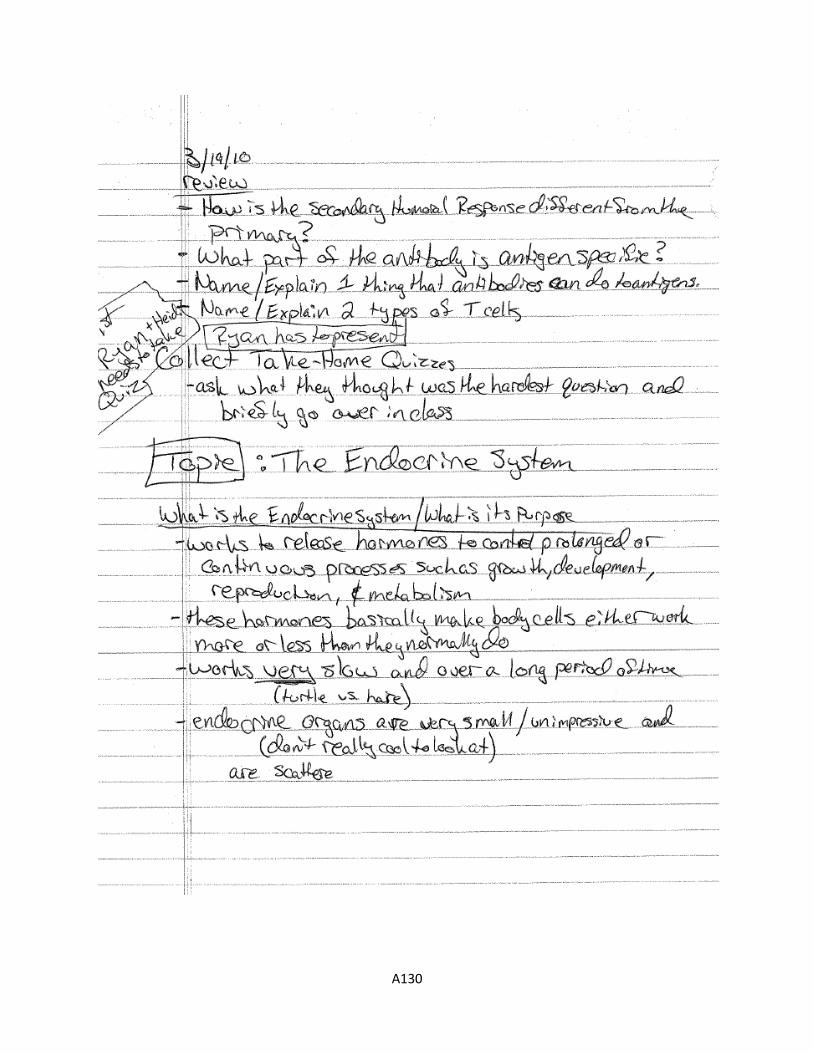
A130
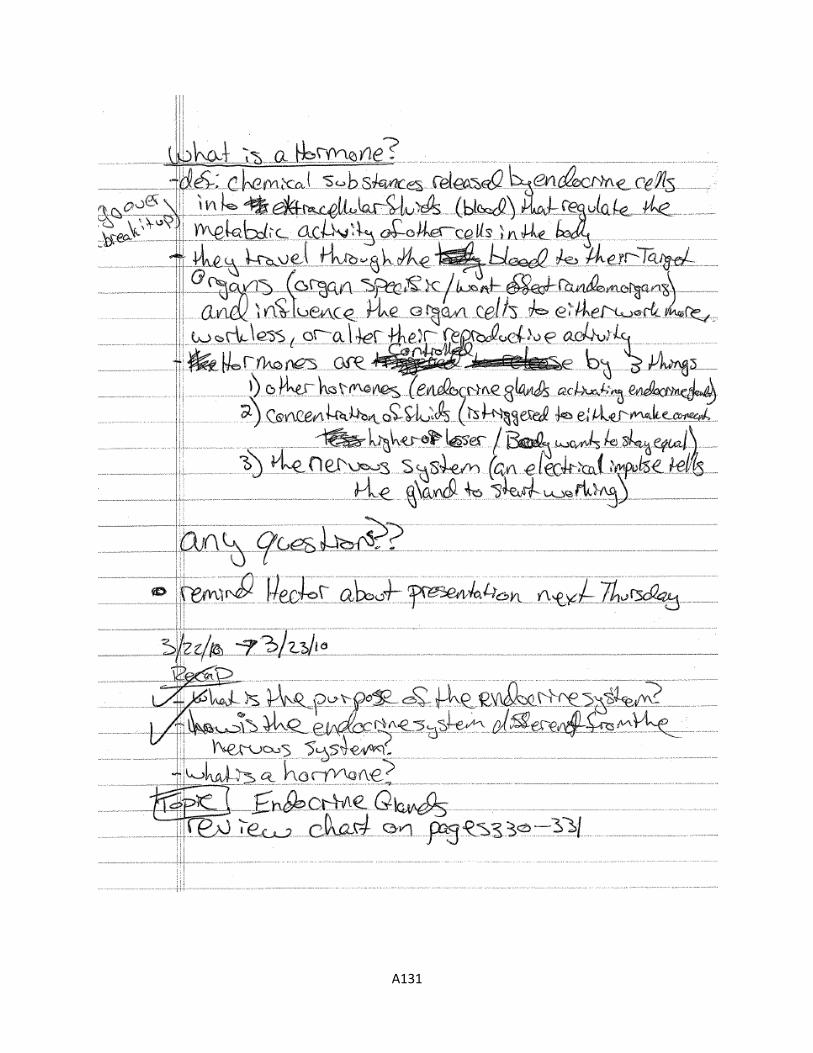
A131
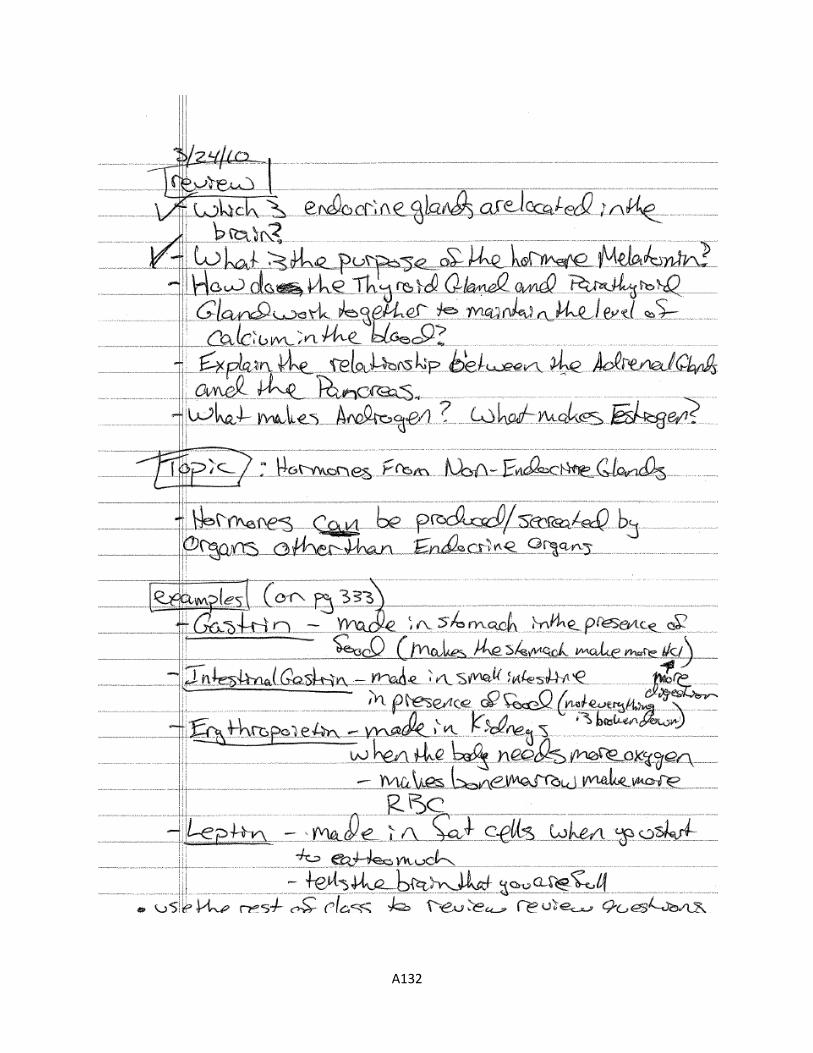
A132

A133

A134

A135
A136

A137
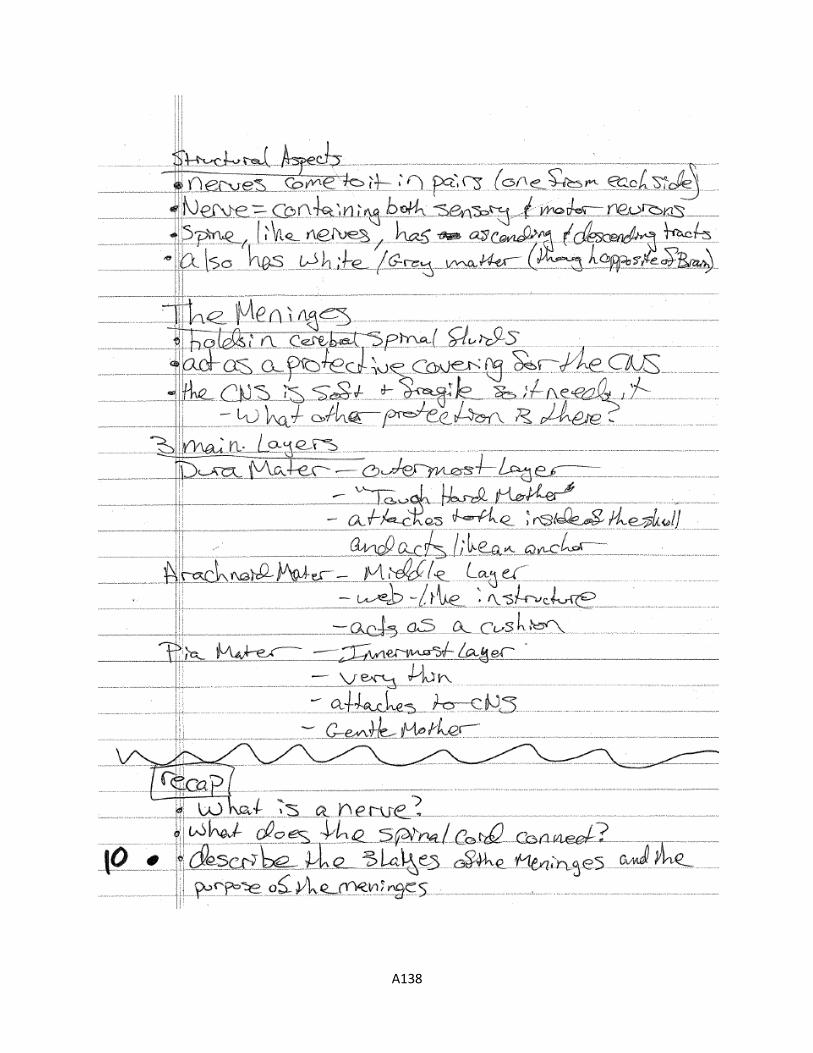
A138
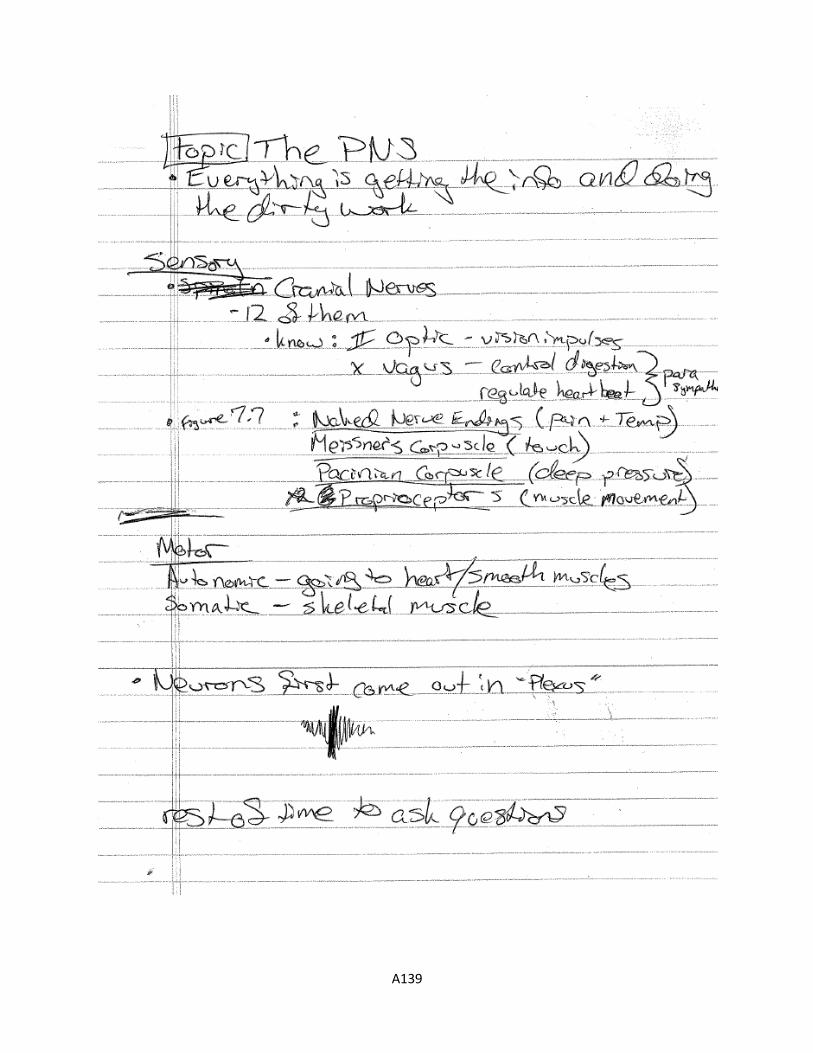
A139
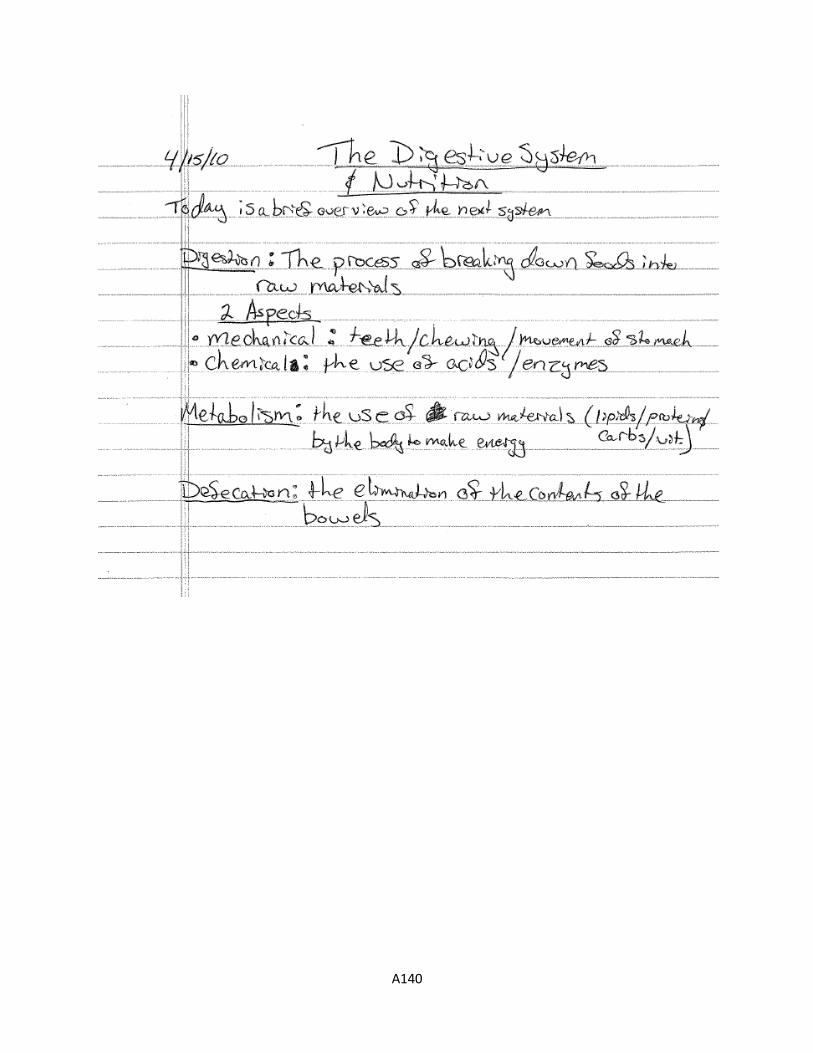
A140
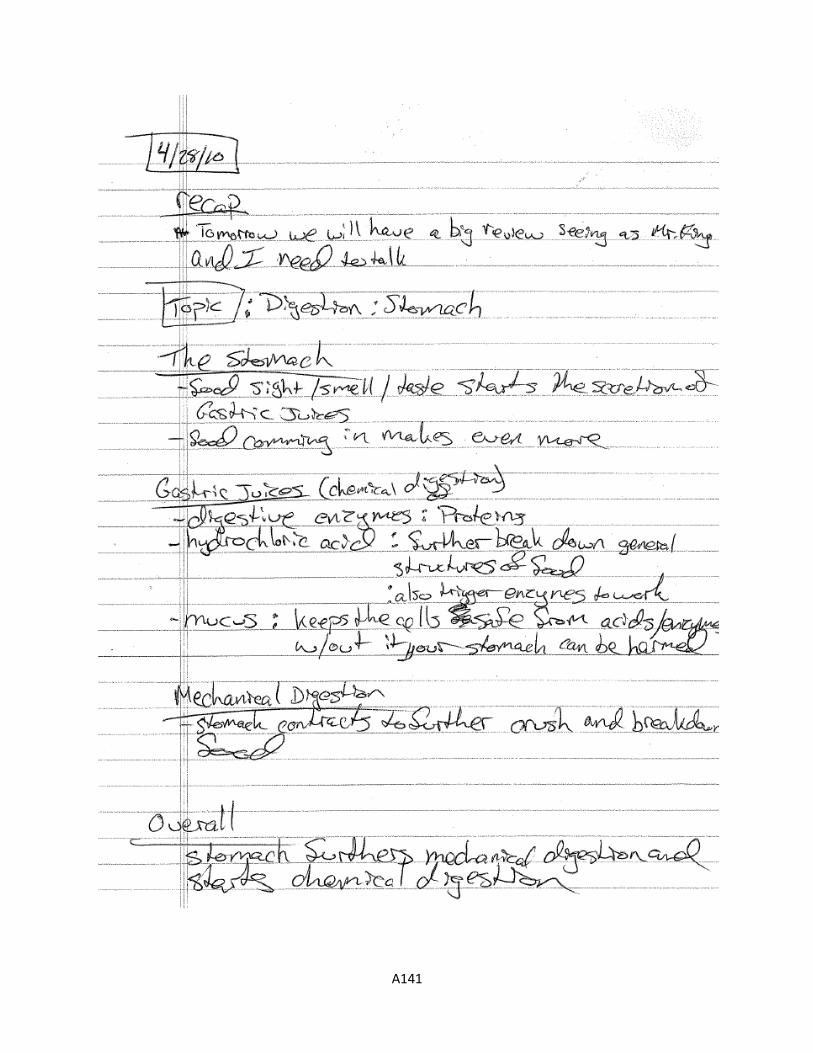
A141
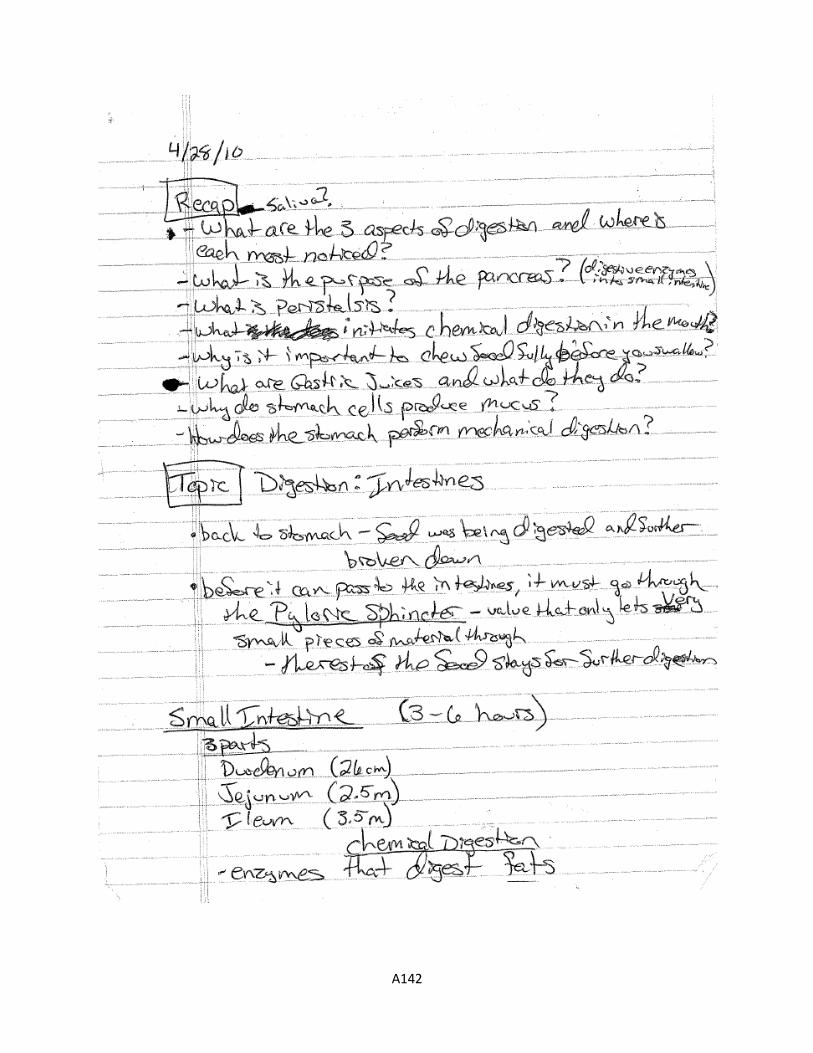
A142
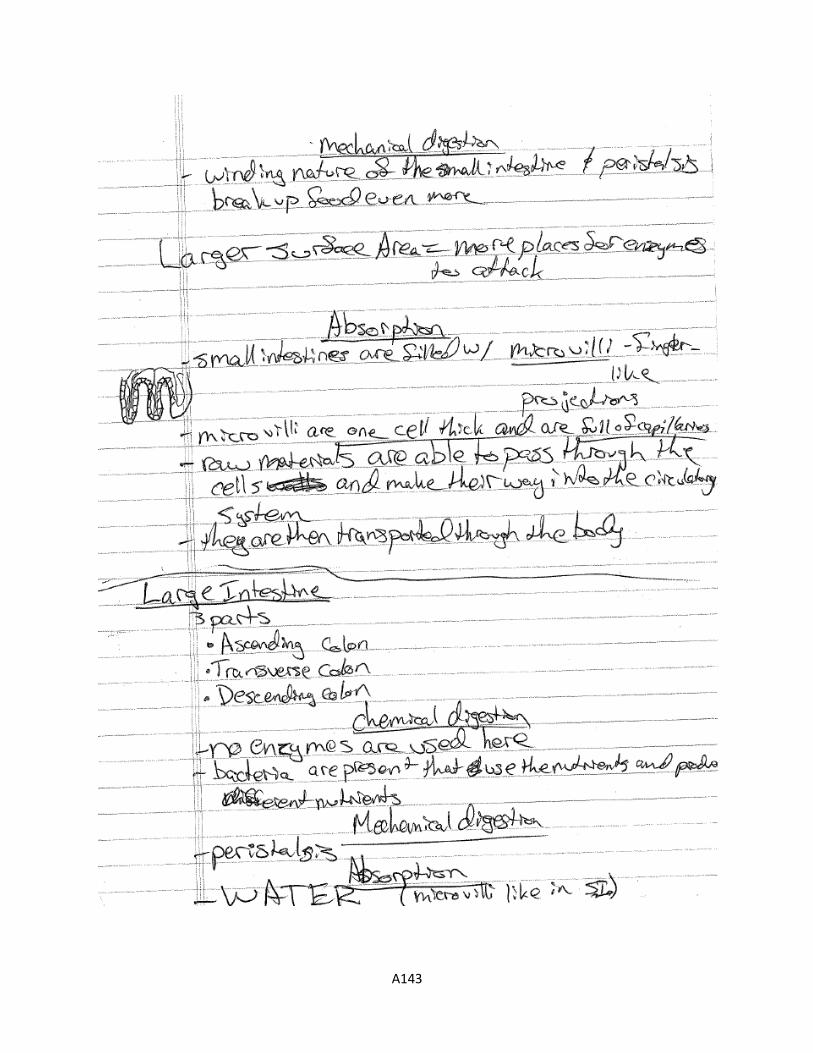
A143
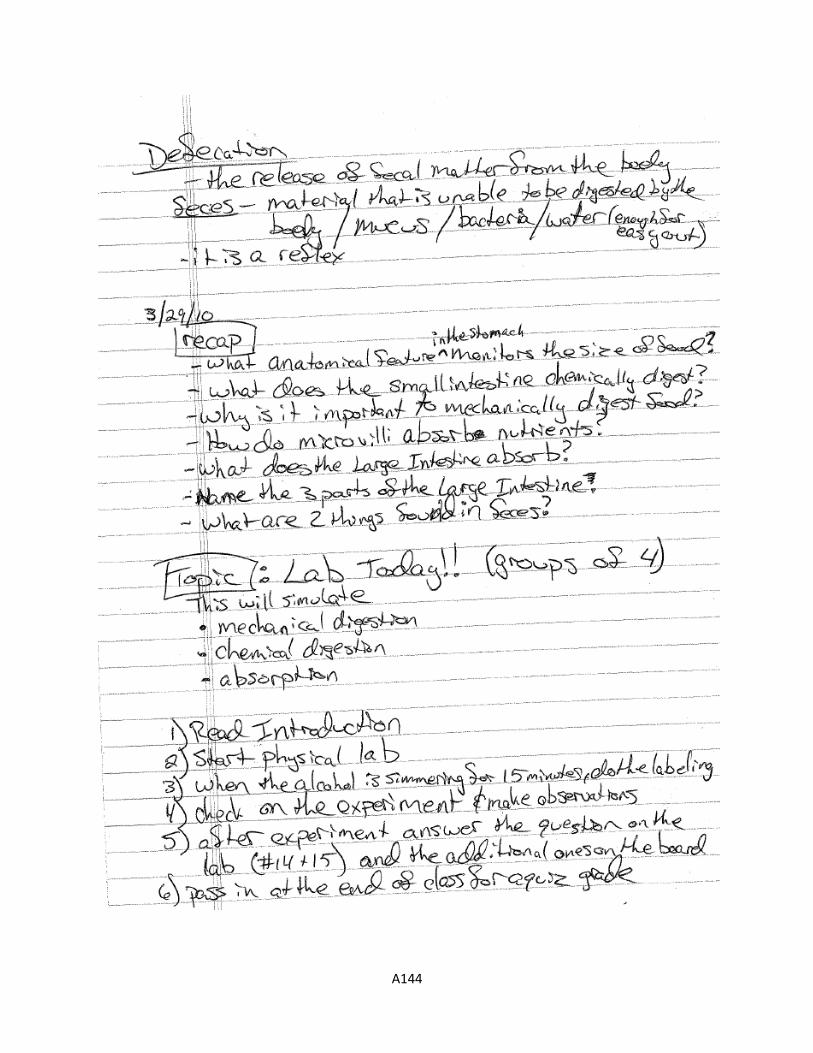
A144
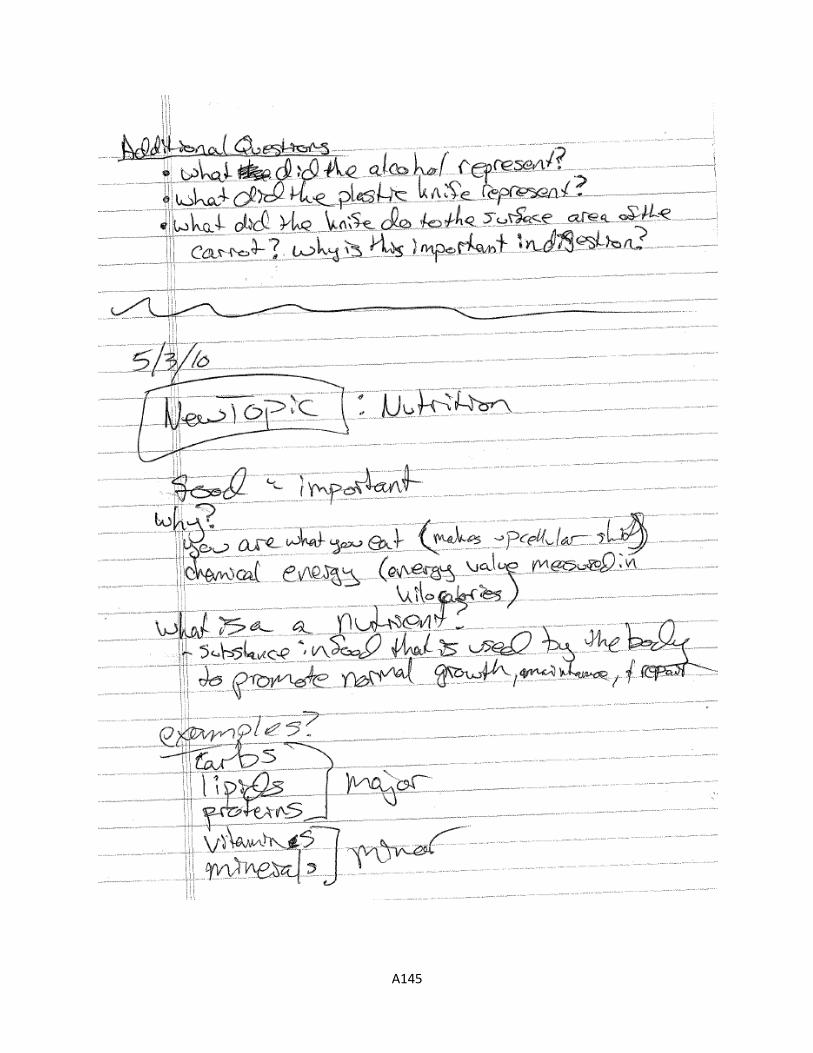
A145
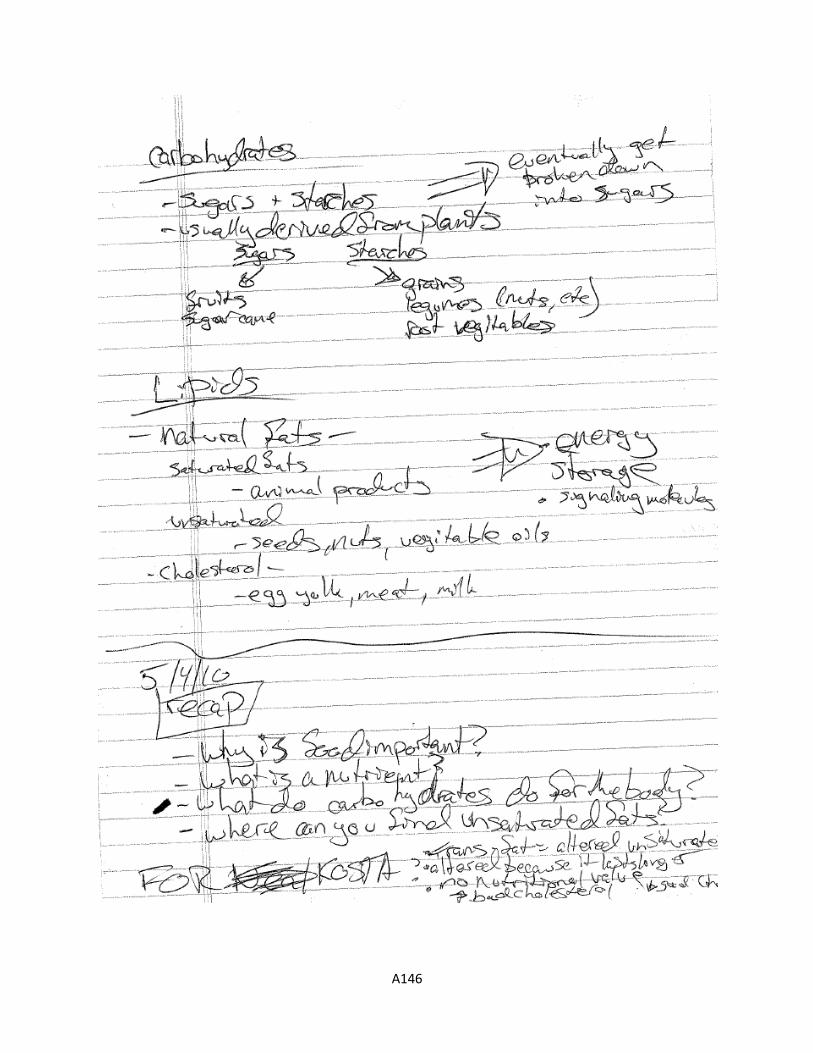
A146
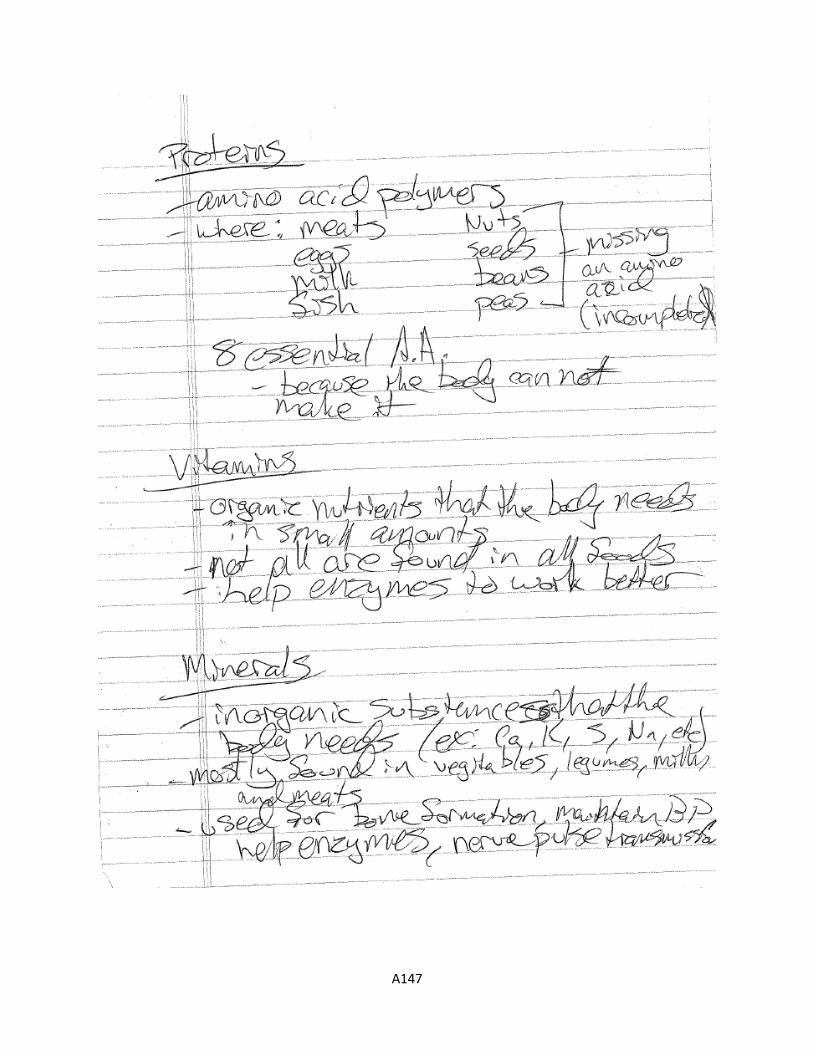
A147

A148
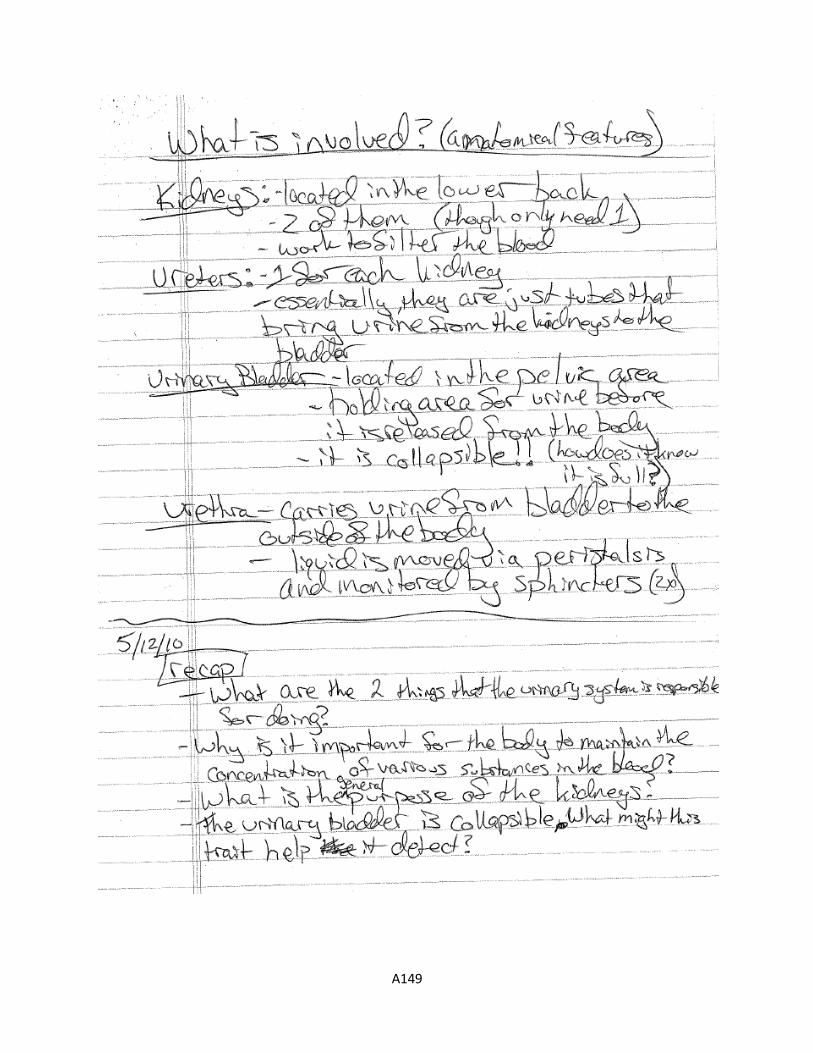
A149
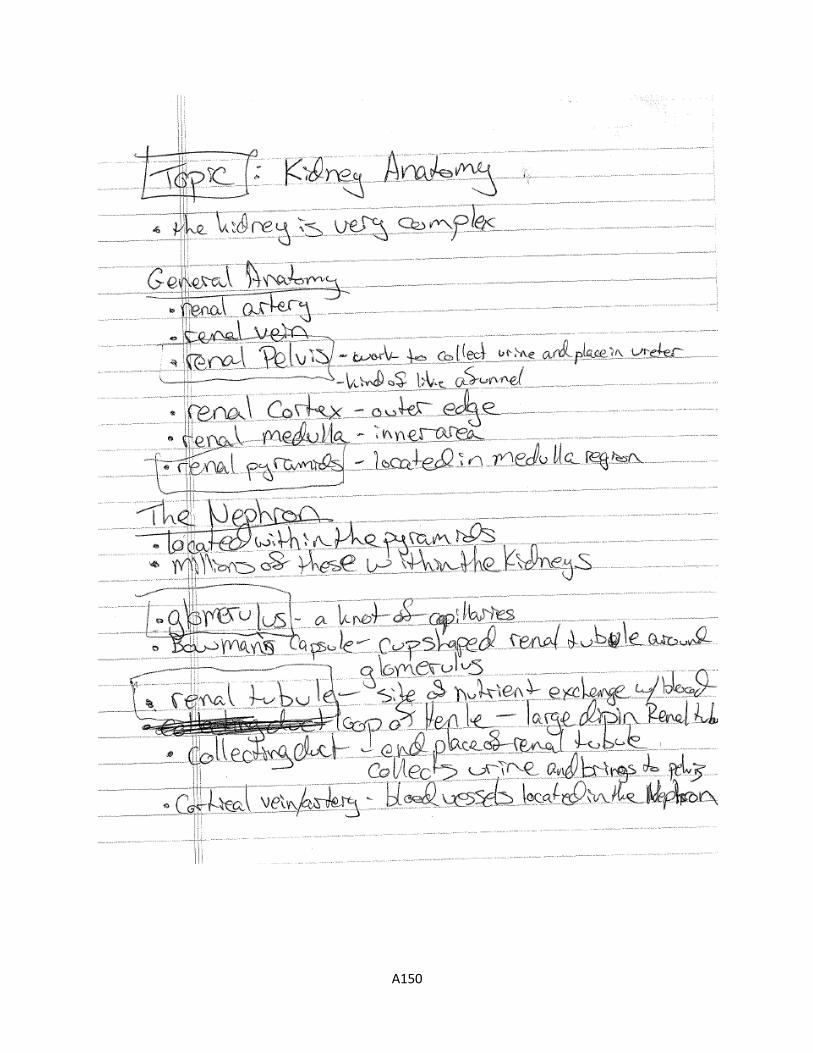
A150
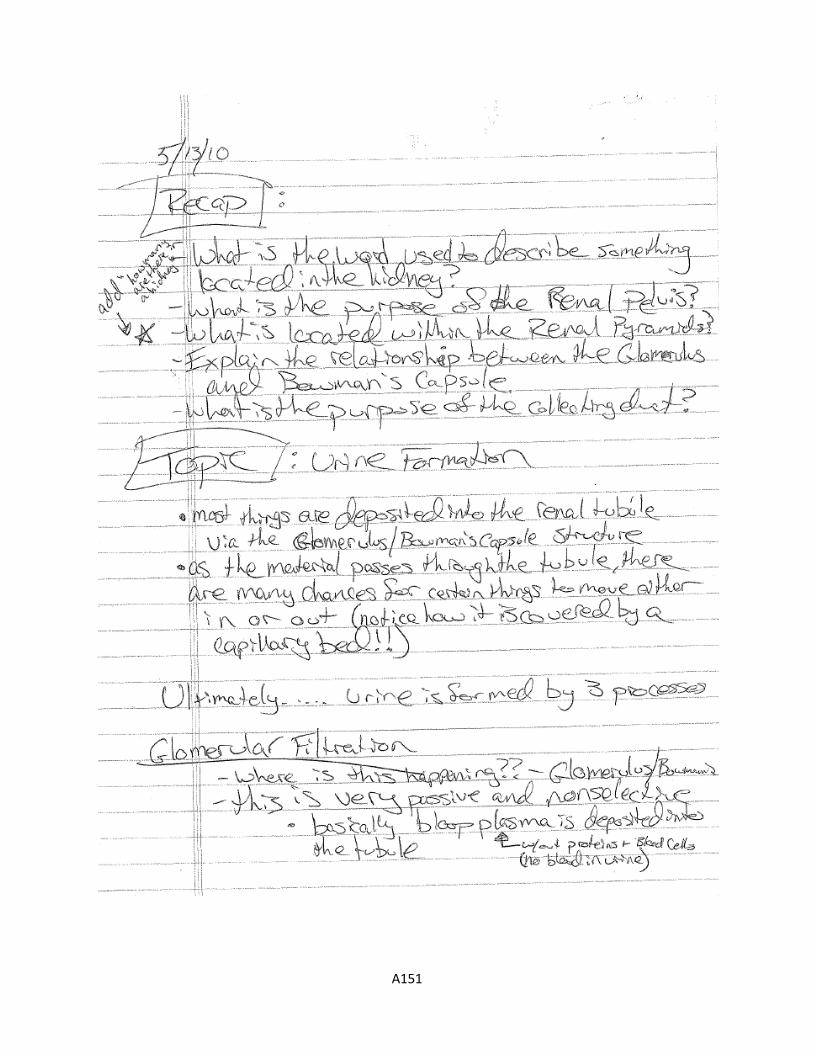
A151

A152
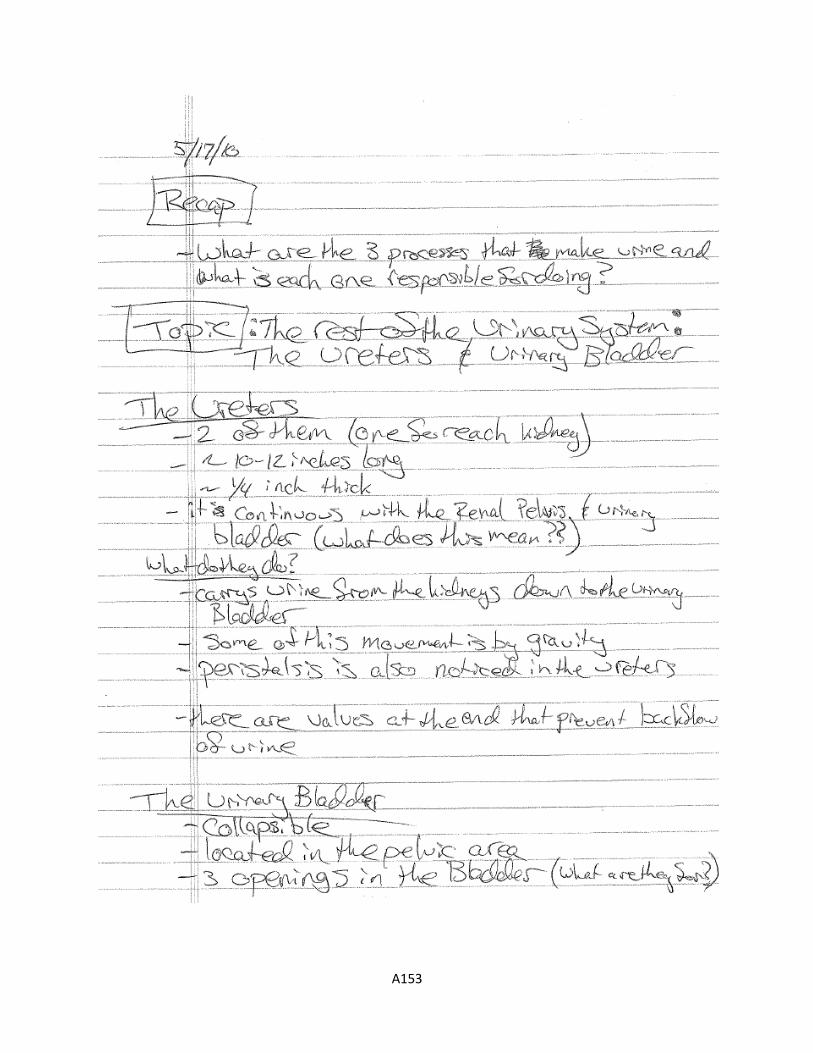
A153

A154
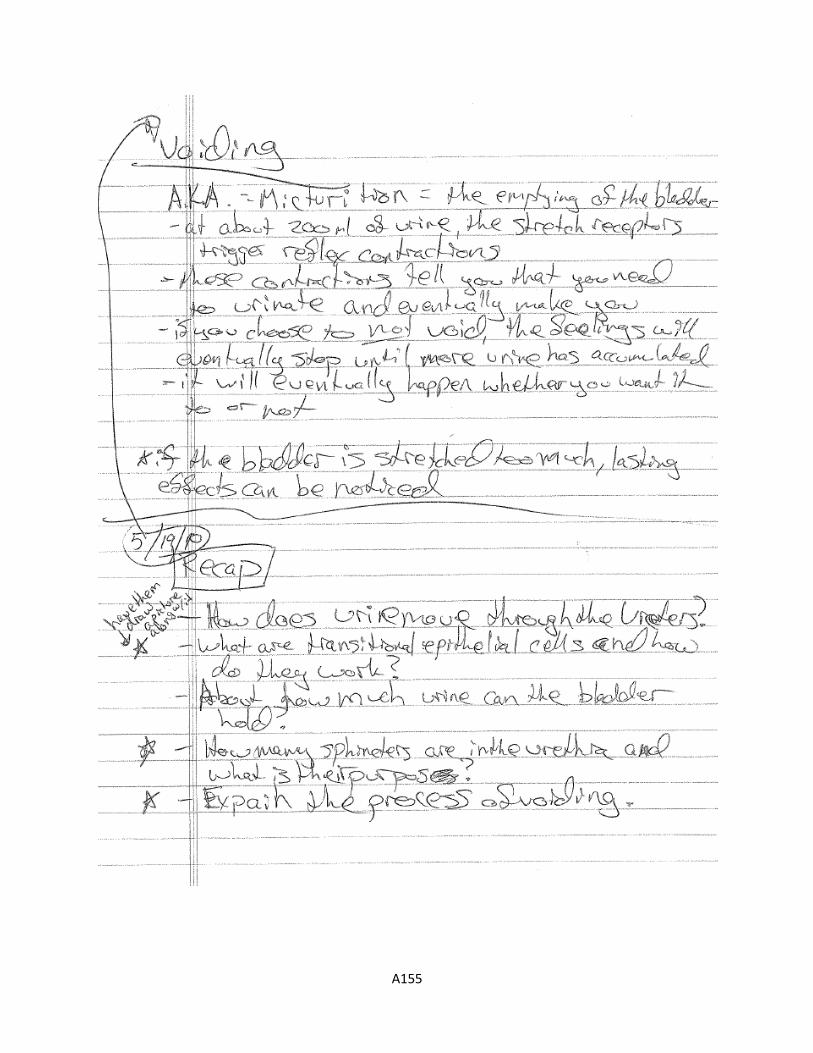
A155
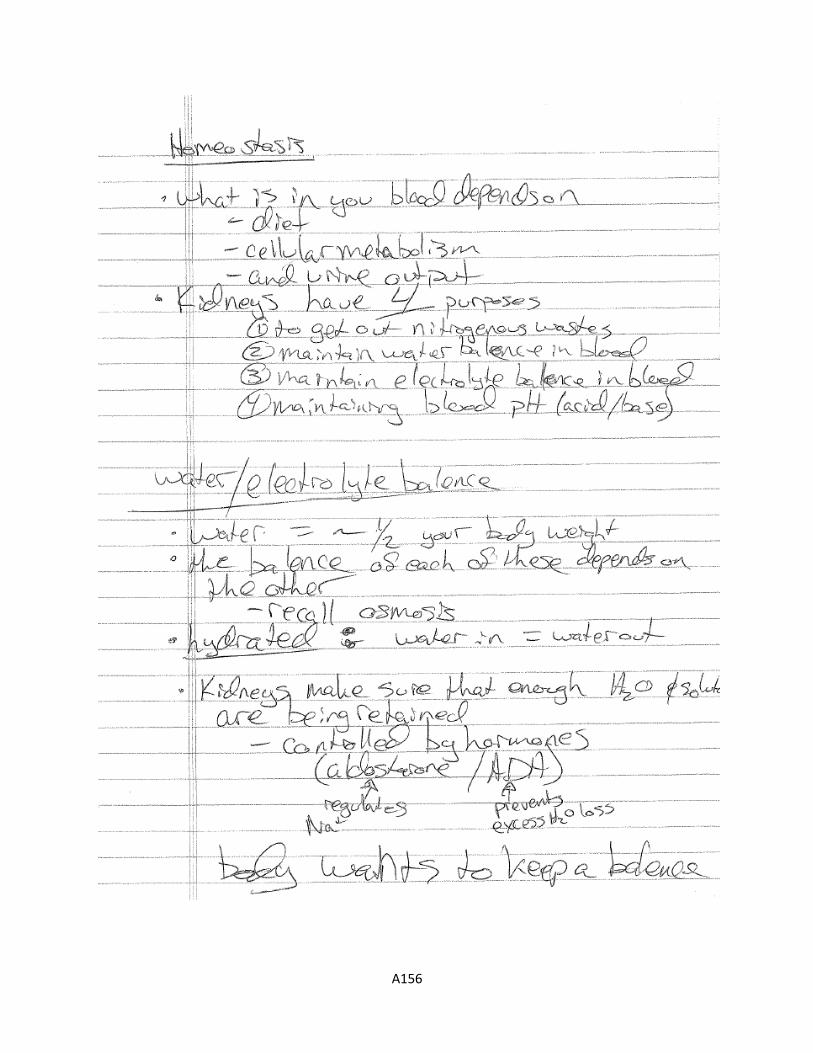
A156
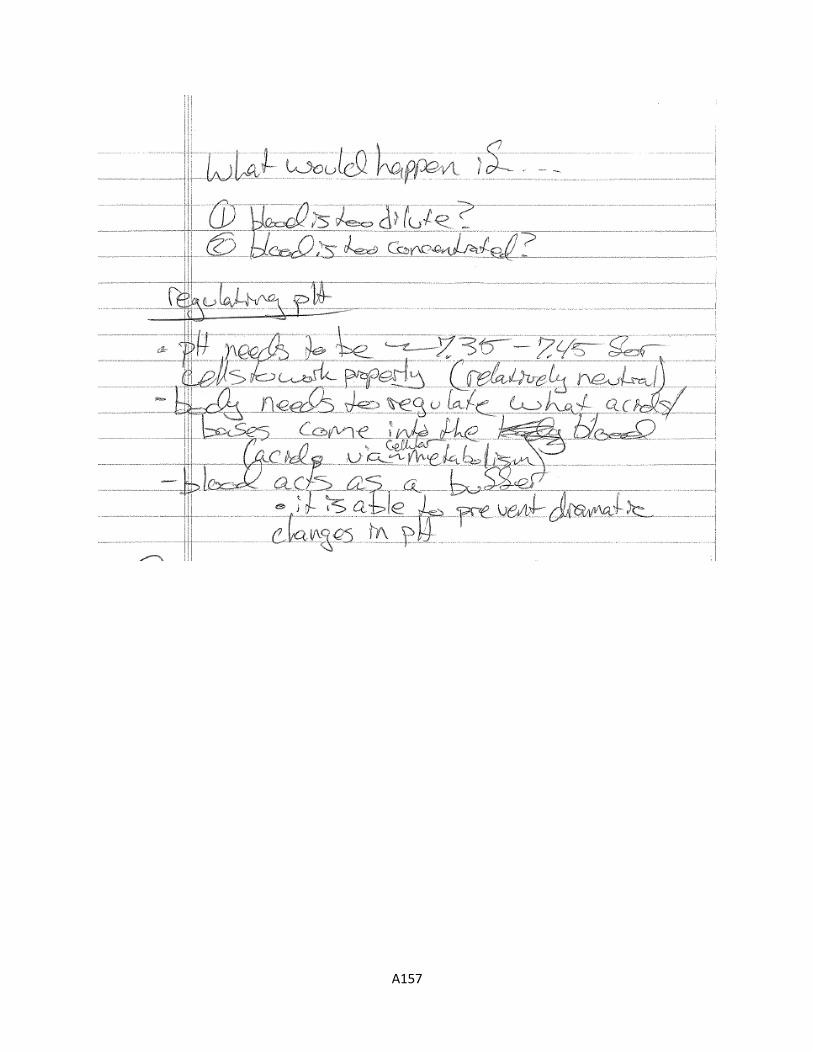
A157

A158
A159
A160
A161

A162

A163
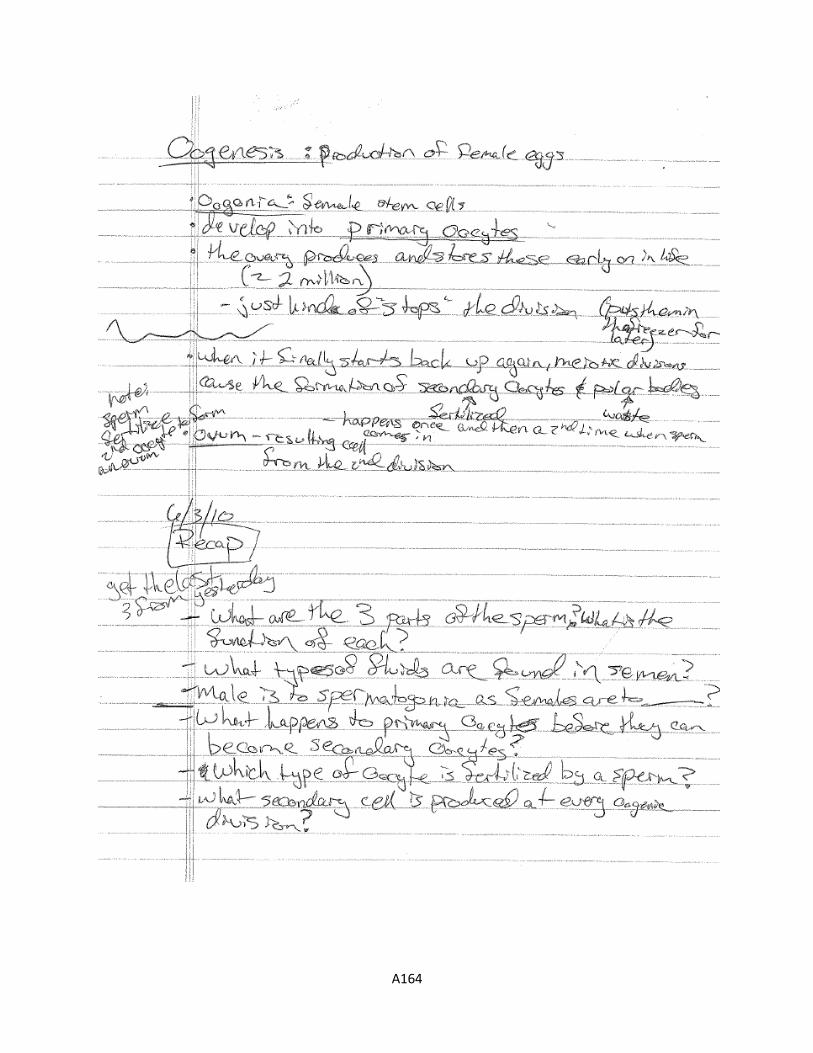
A164

A165
A166
Appendix VI: Worksheets

A167
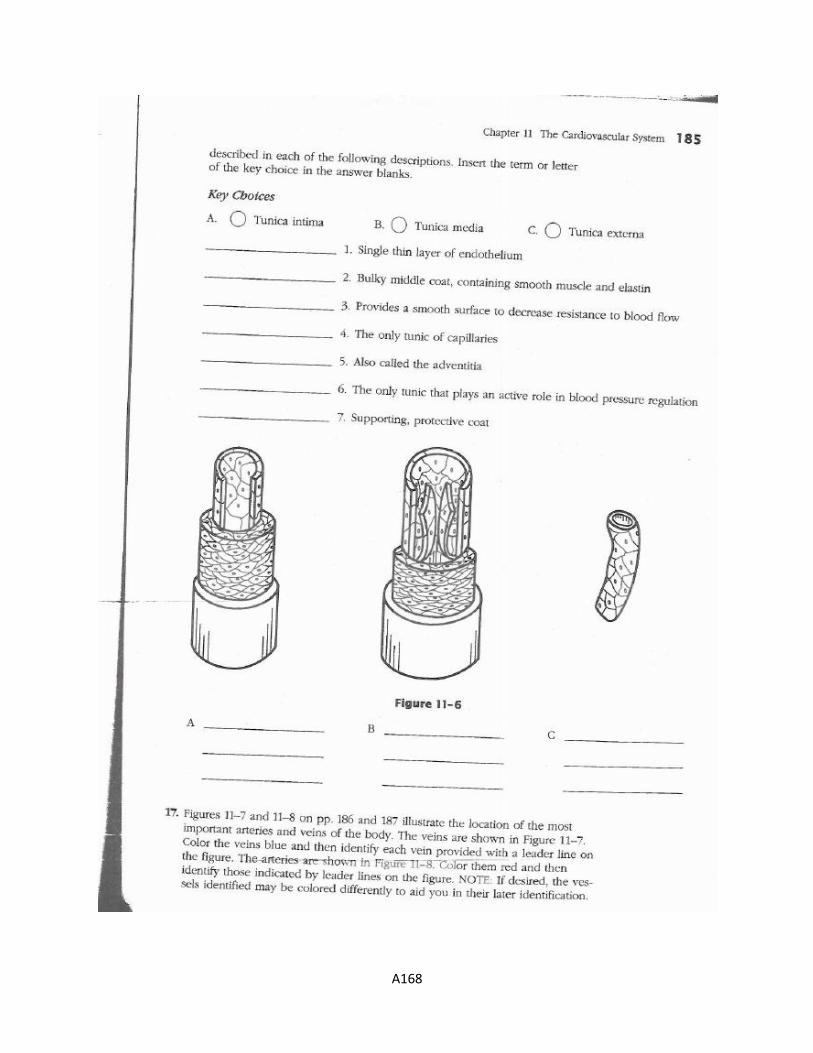
A168

A169
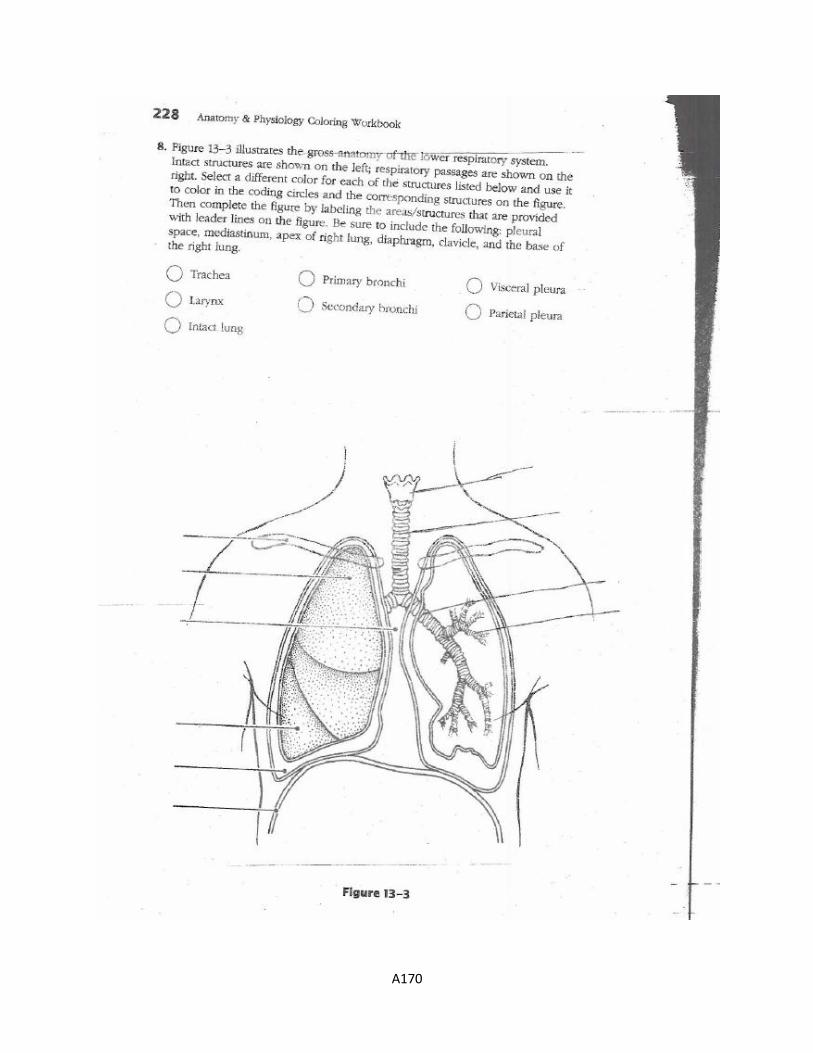
A170
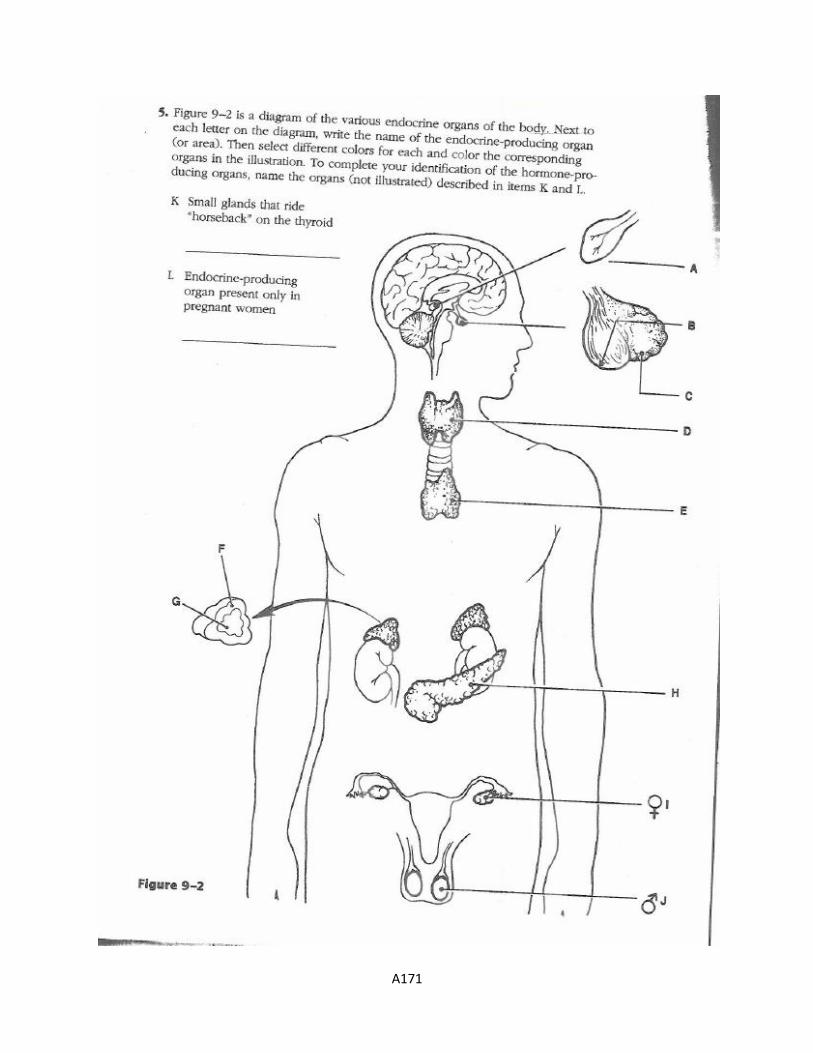
A171

A172

A173

A174

A175
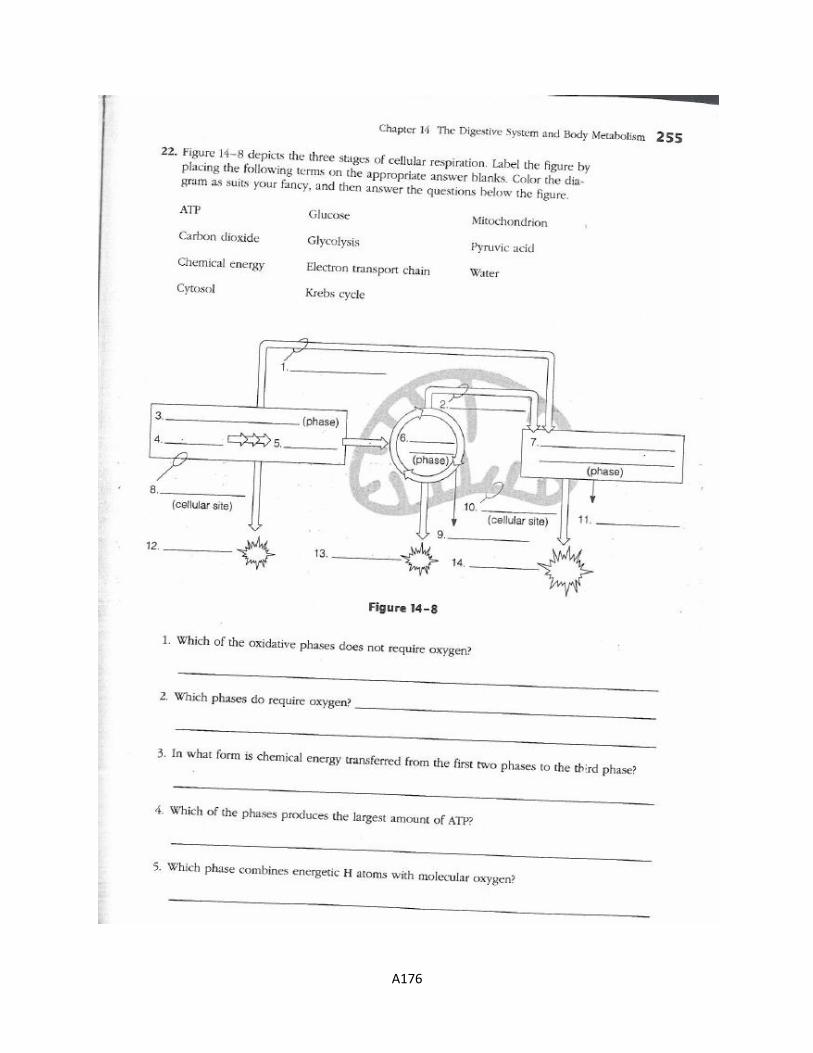
A176
A177
Appendix VII: Assessments
A178

A179
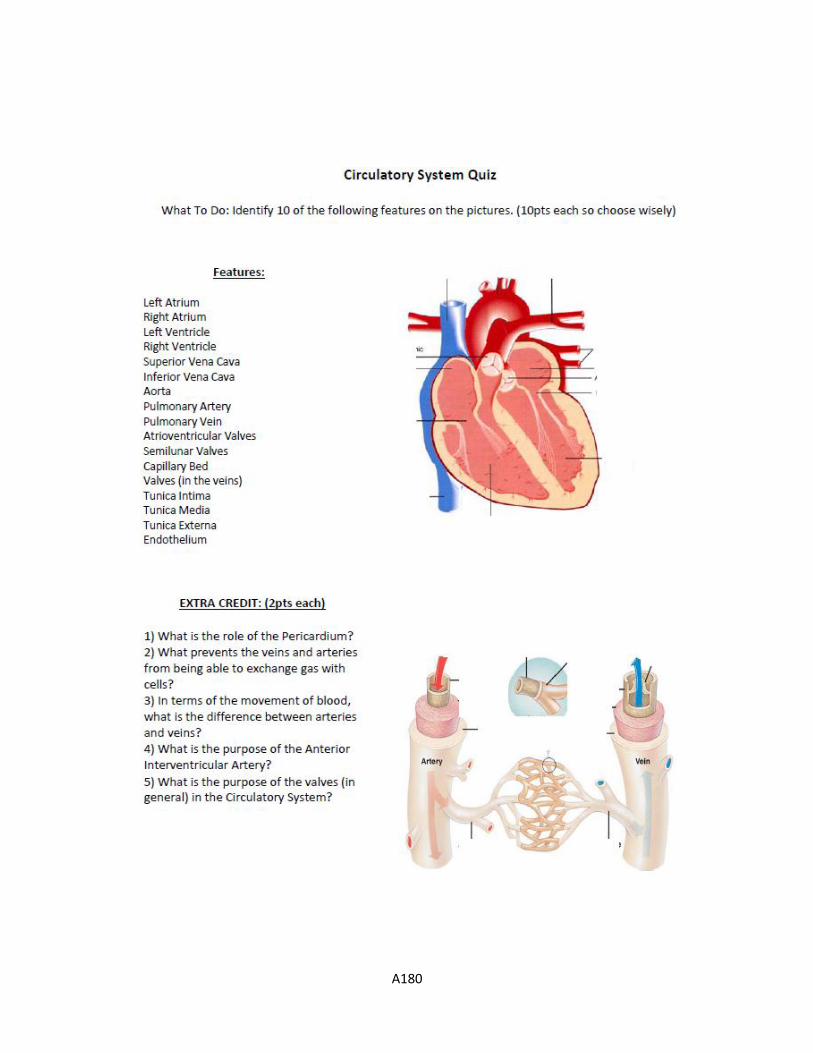
A180
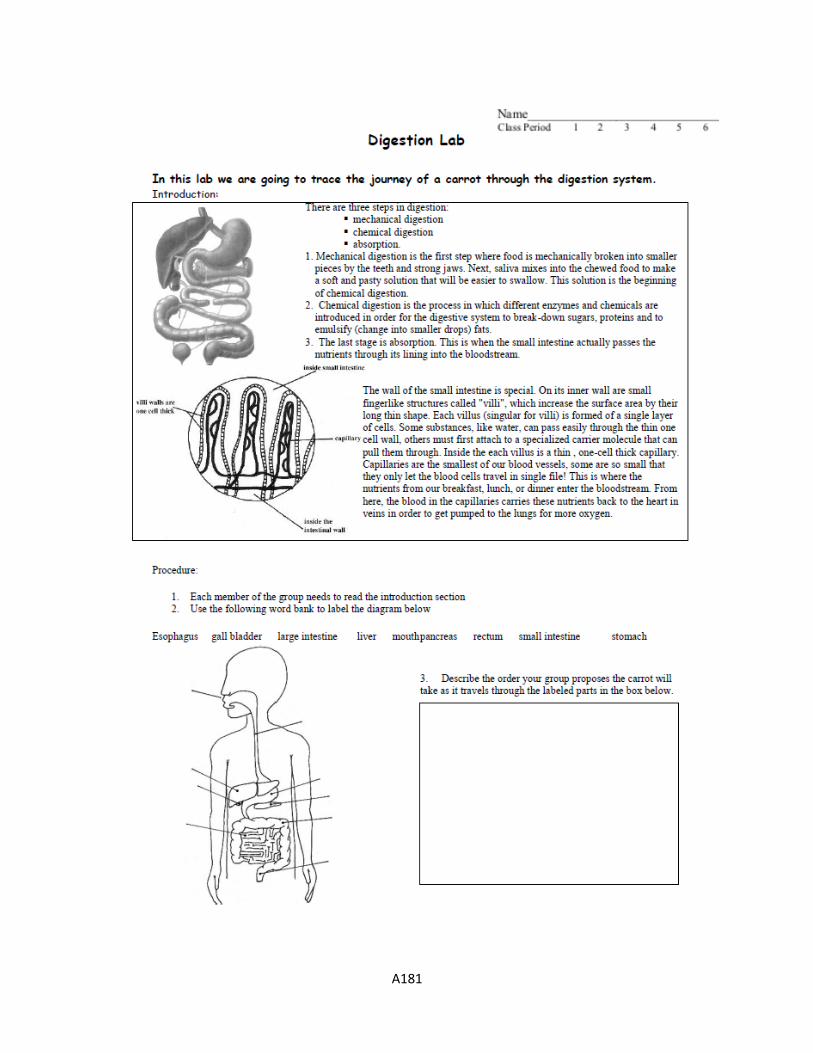
A181
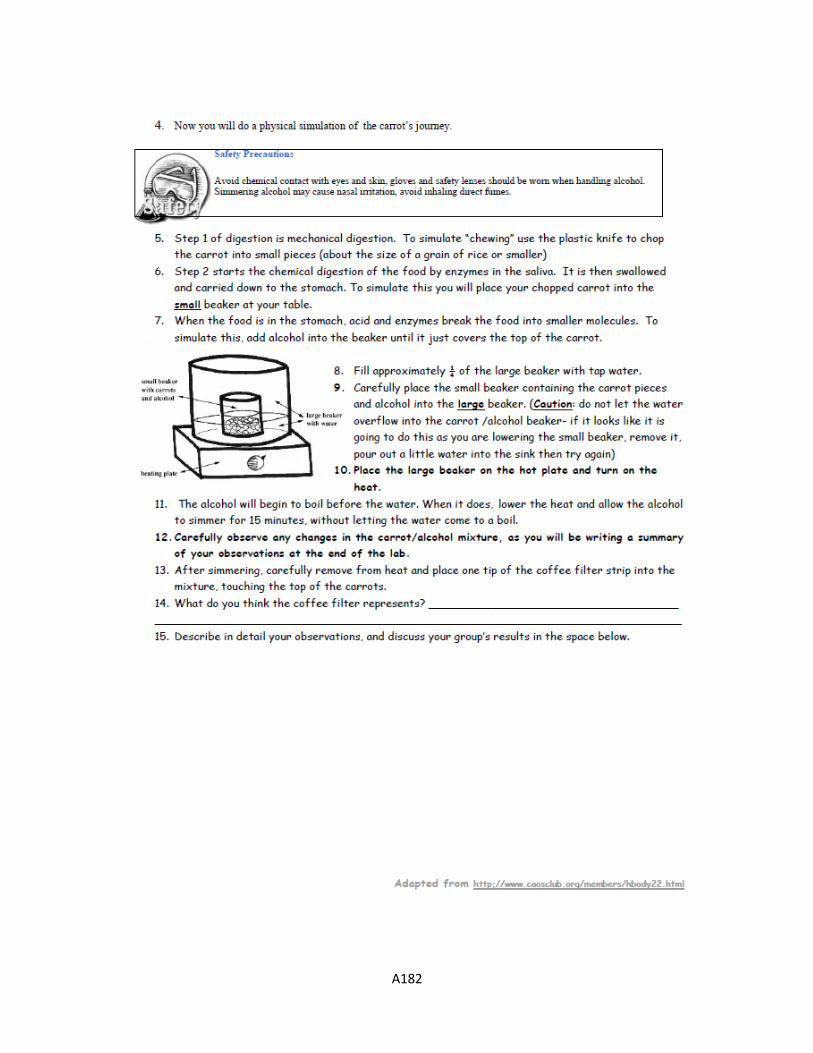
A182

A183
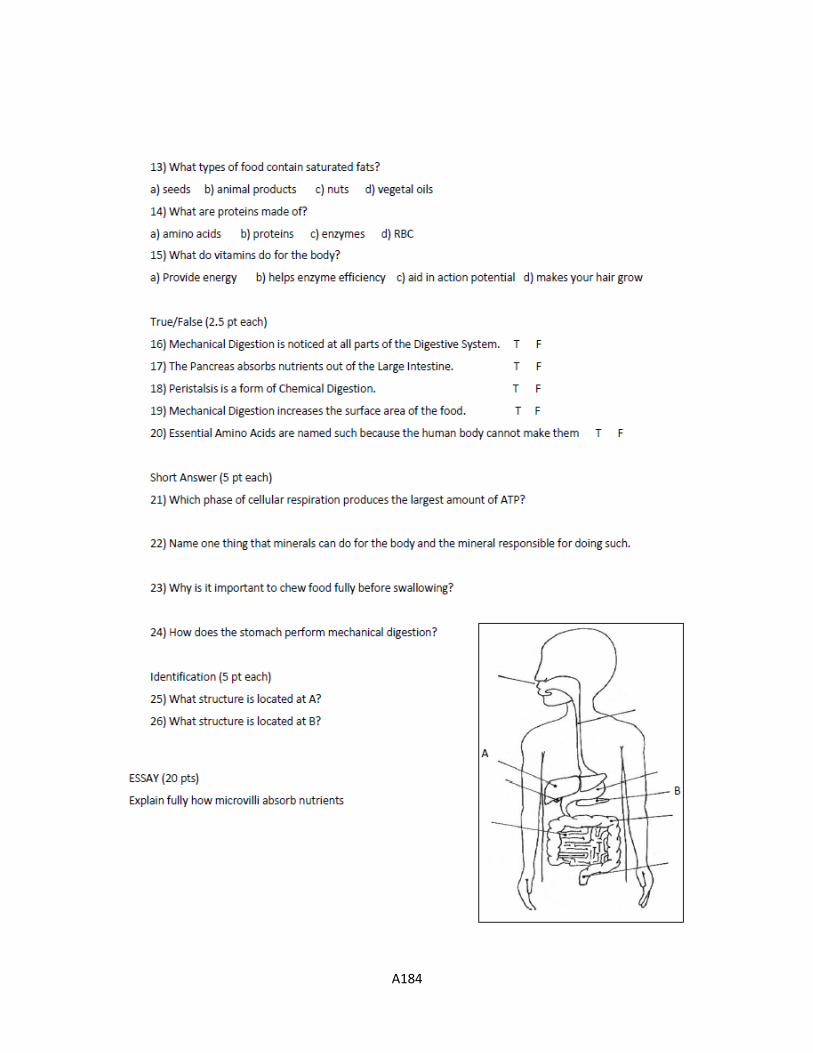
A184
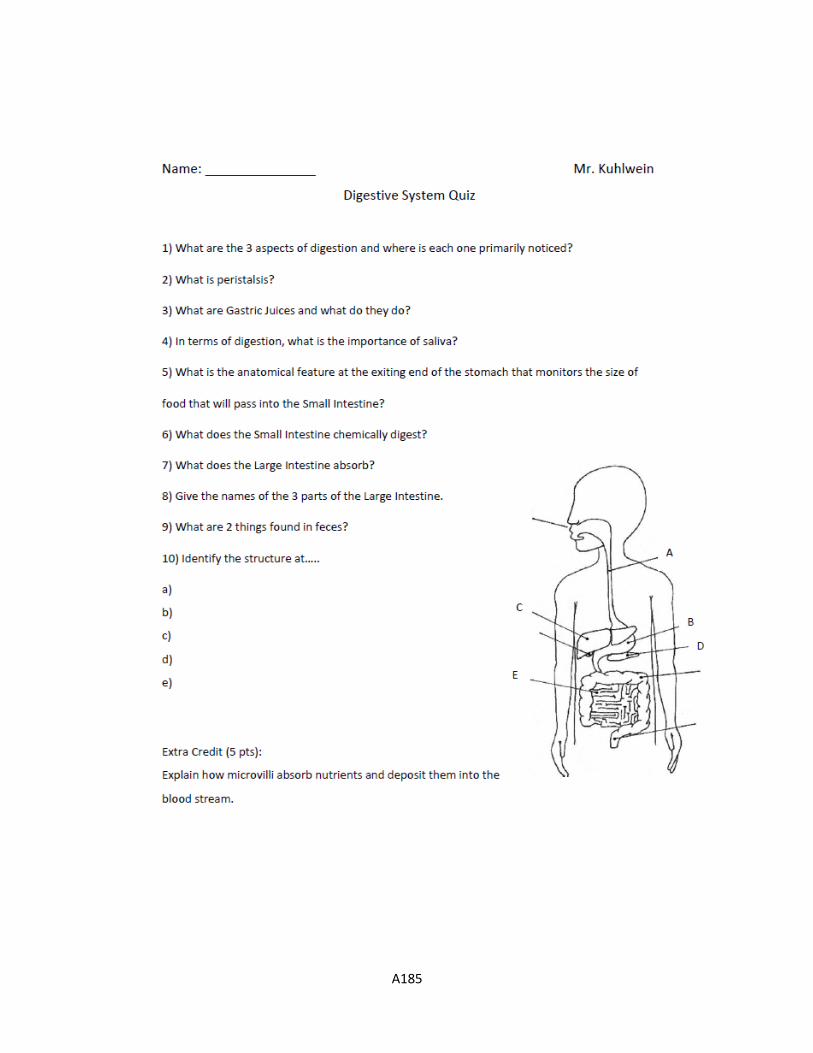
A185

A186

A187
A188

A189
A190
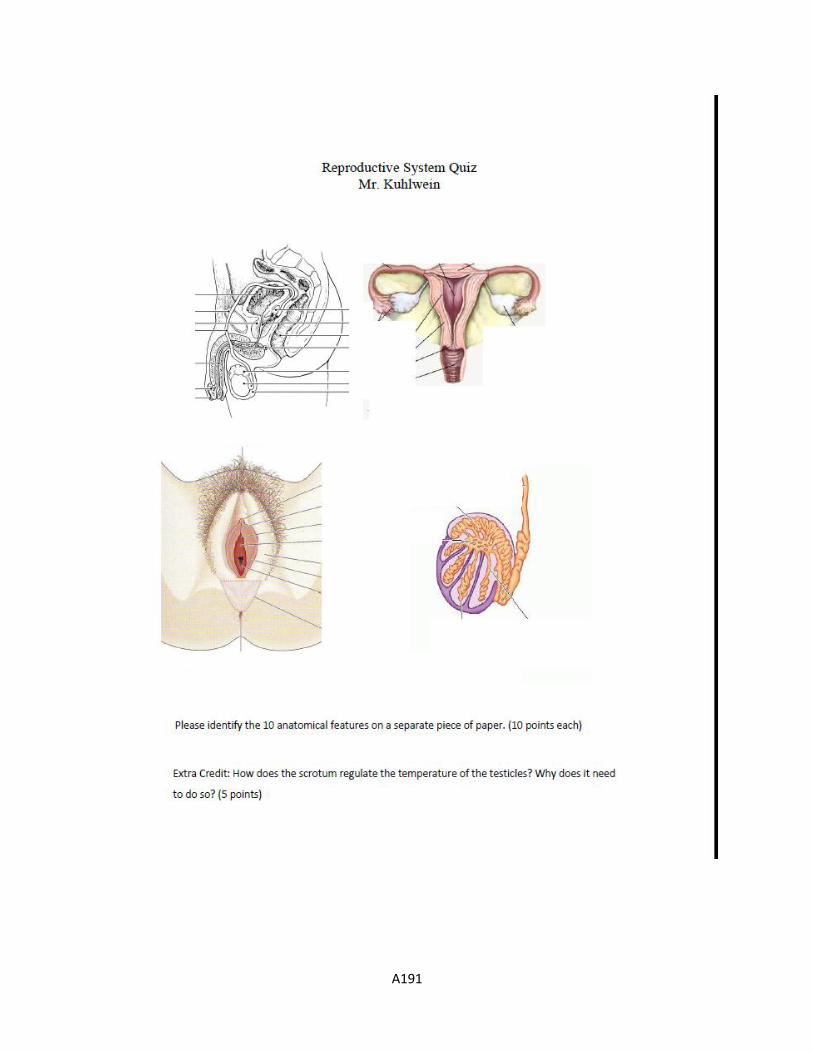
A191
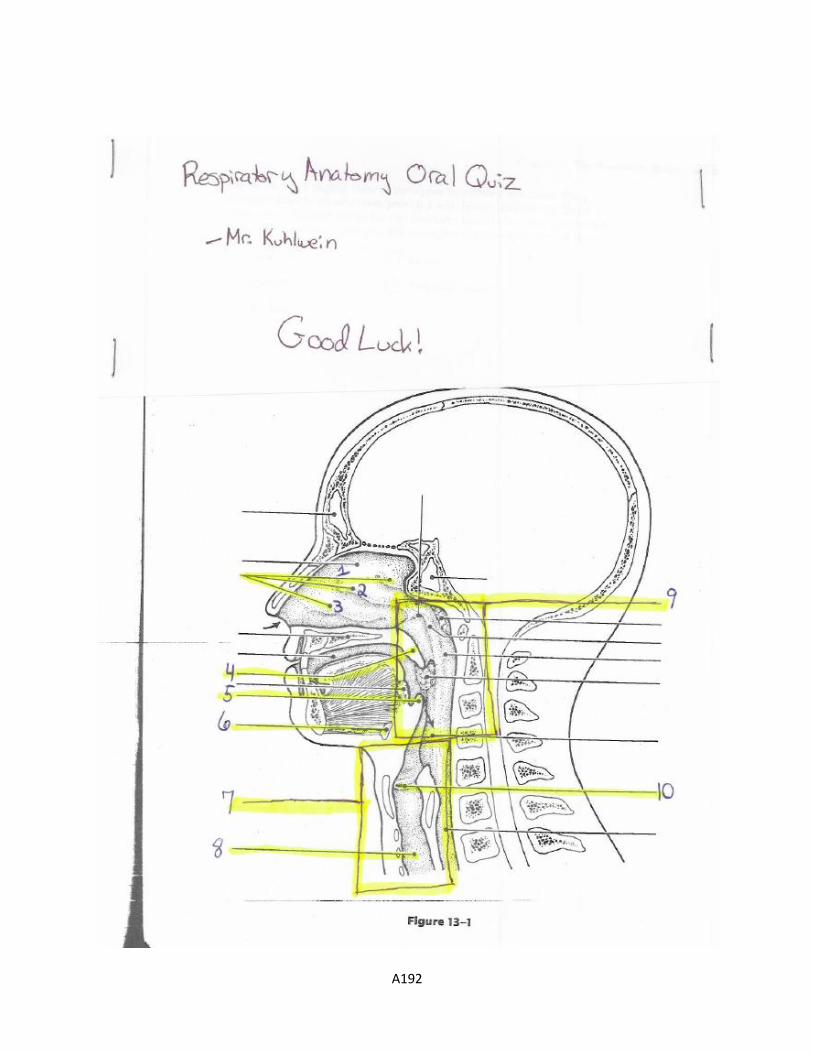
A192
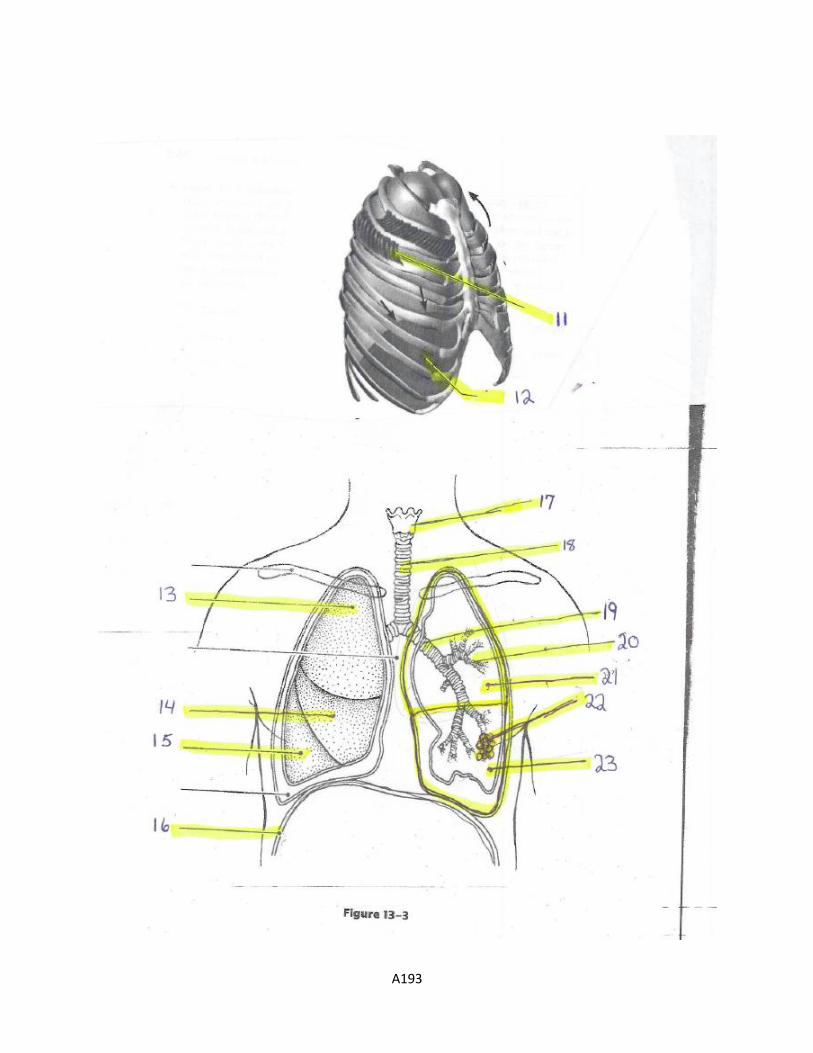
A193
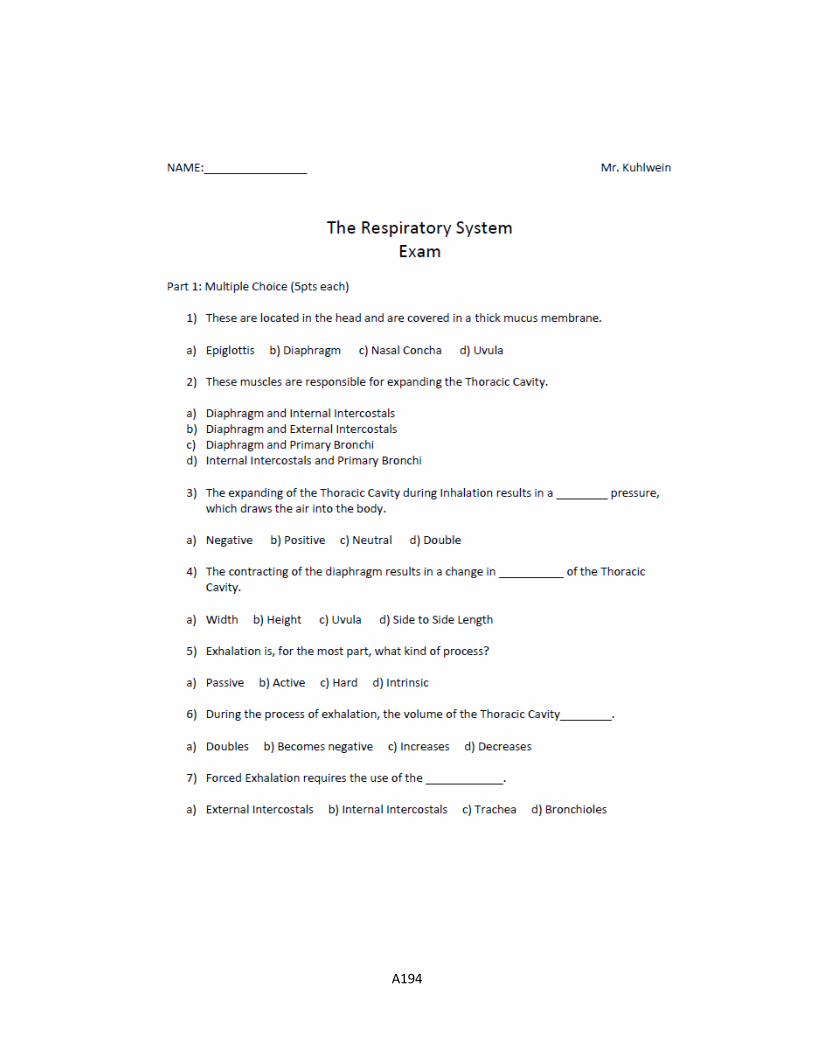
A194
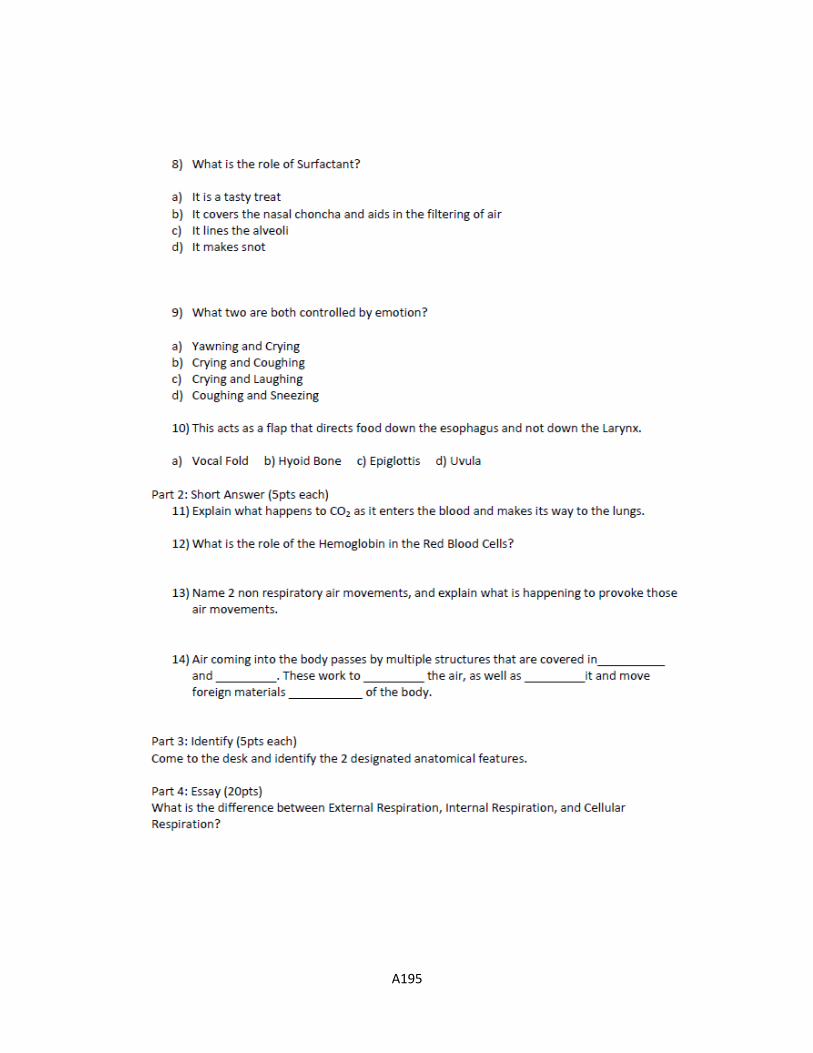
A195

A196
A197

A198
Appendix VIII: Poster Project
A199
A200
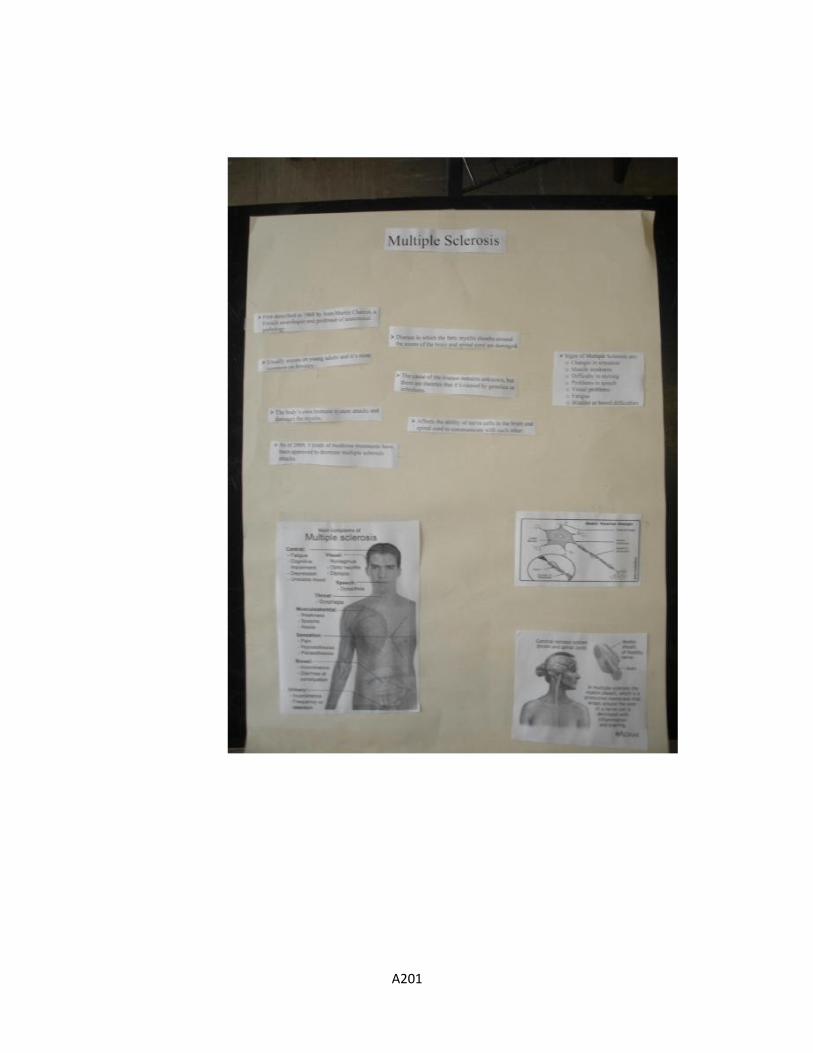
A201
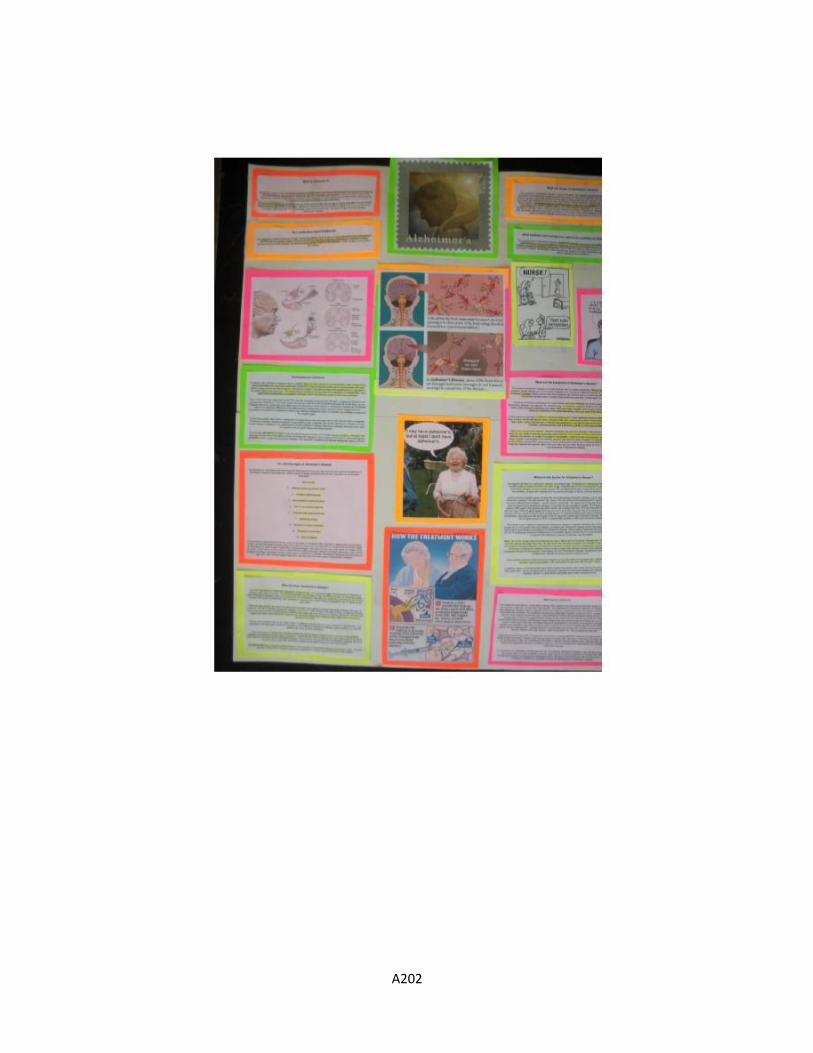
A202
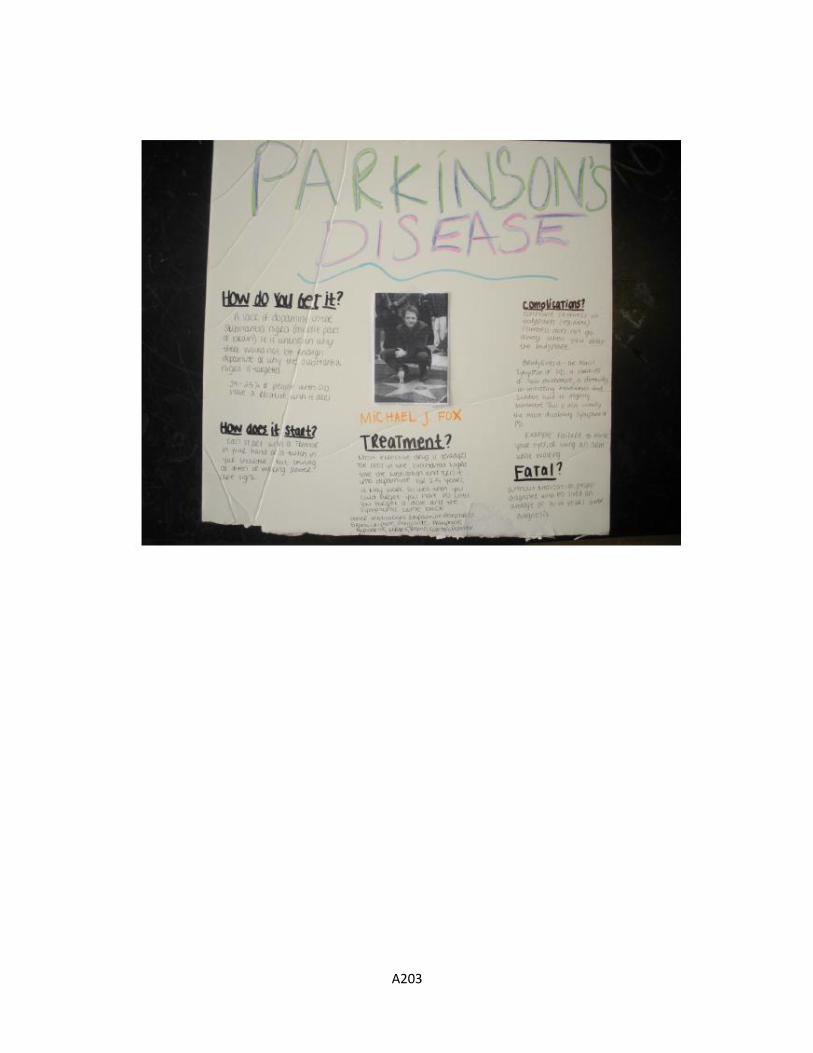
A203
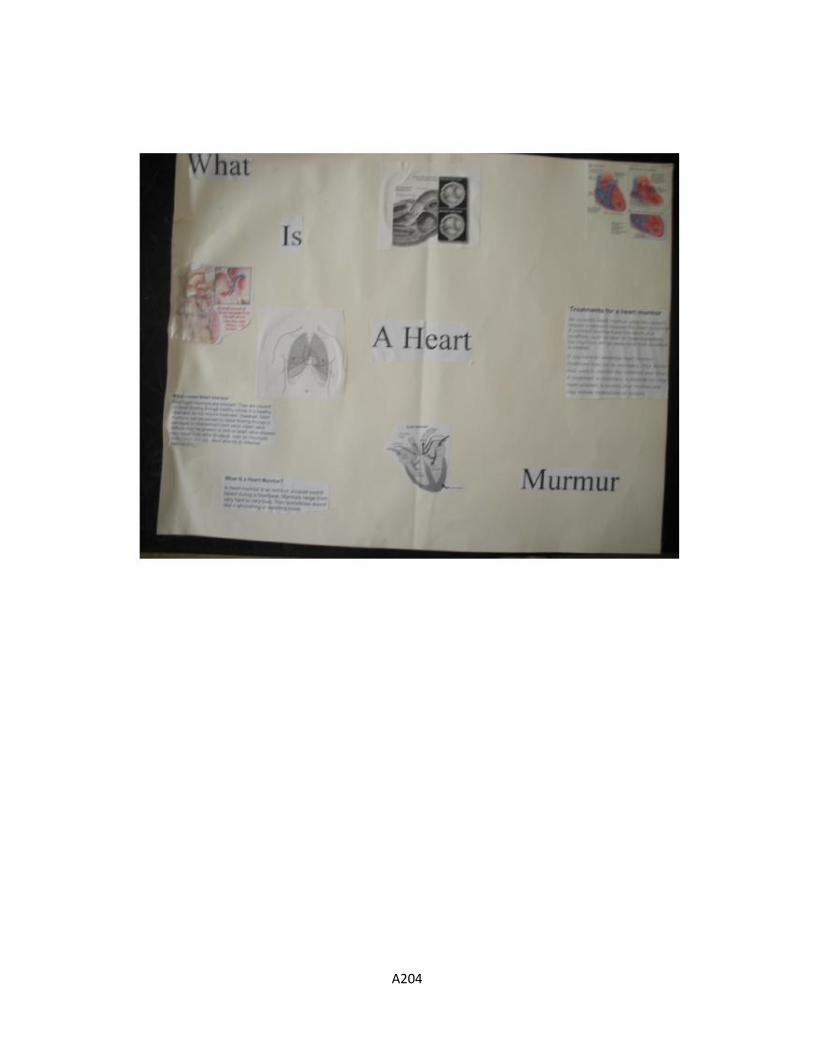
A204
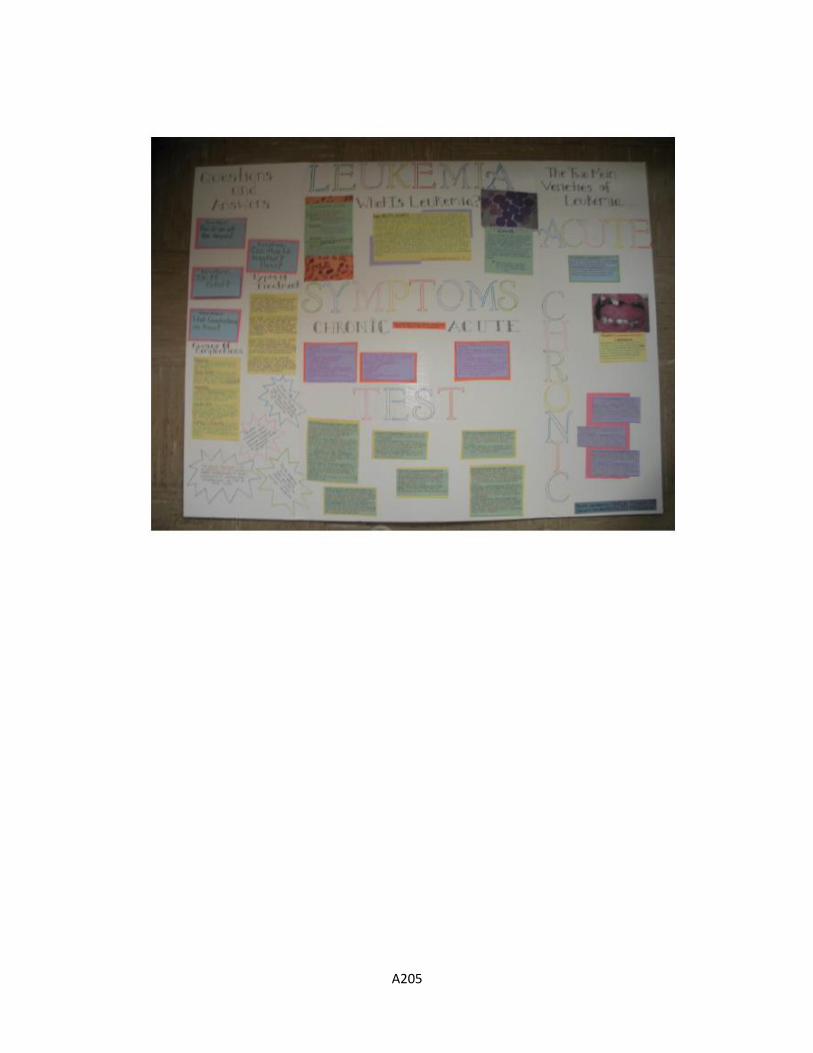
A205
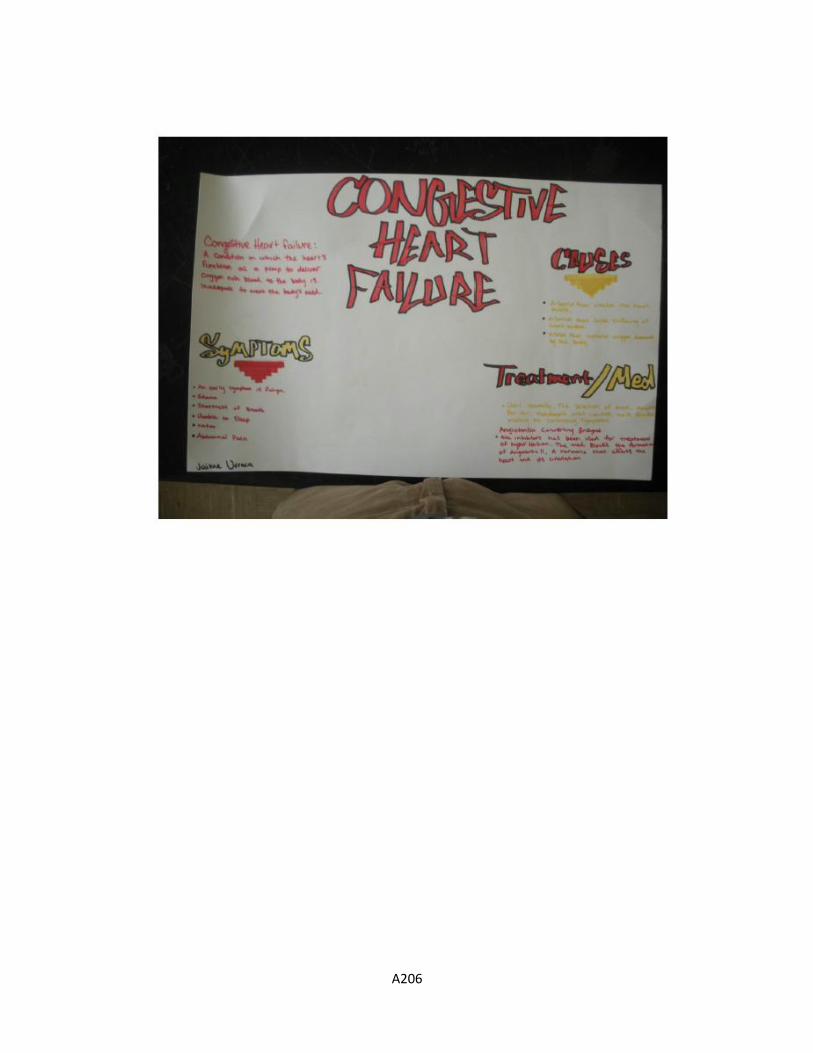
A206
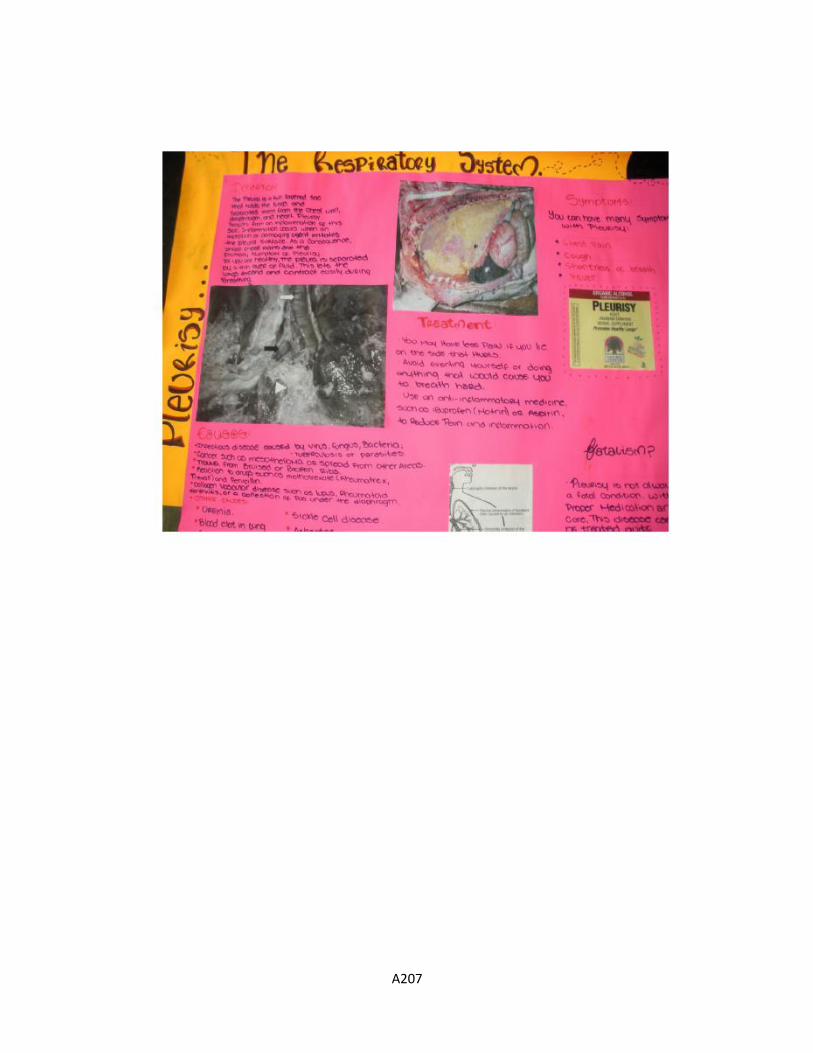
A207

A208
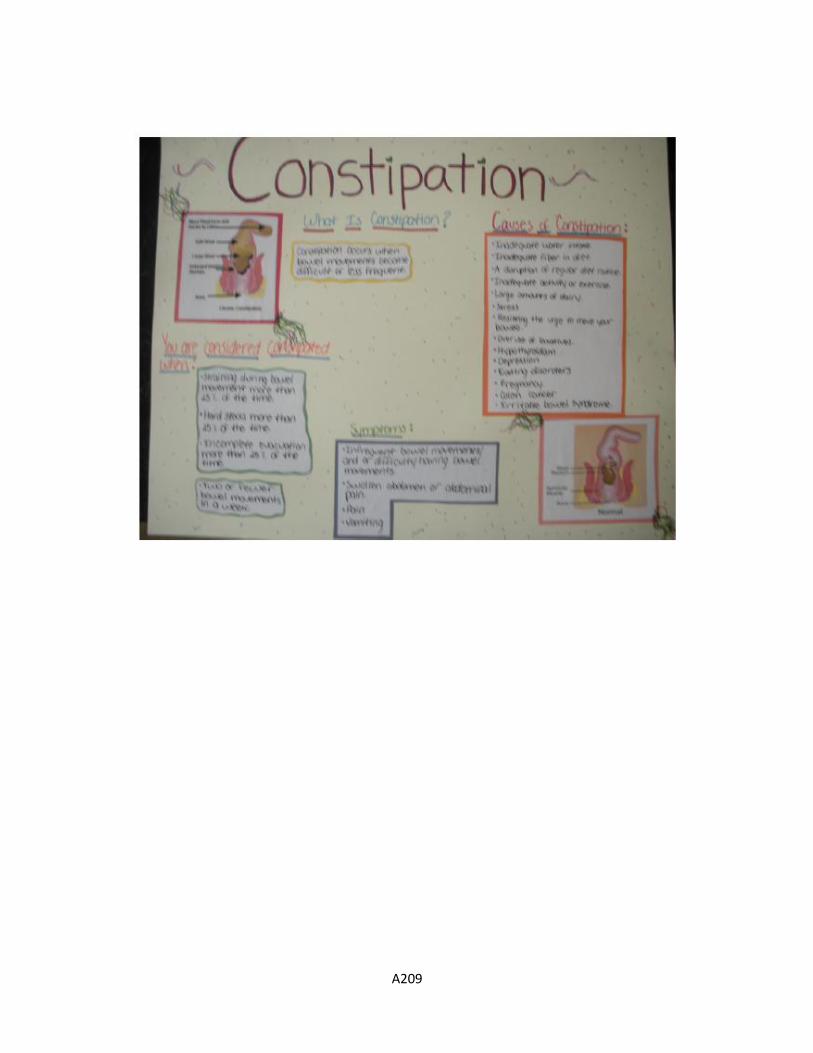
A209

A210
Appendix IX: Time Sheets
A211
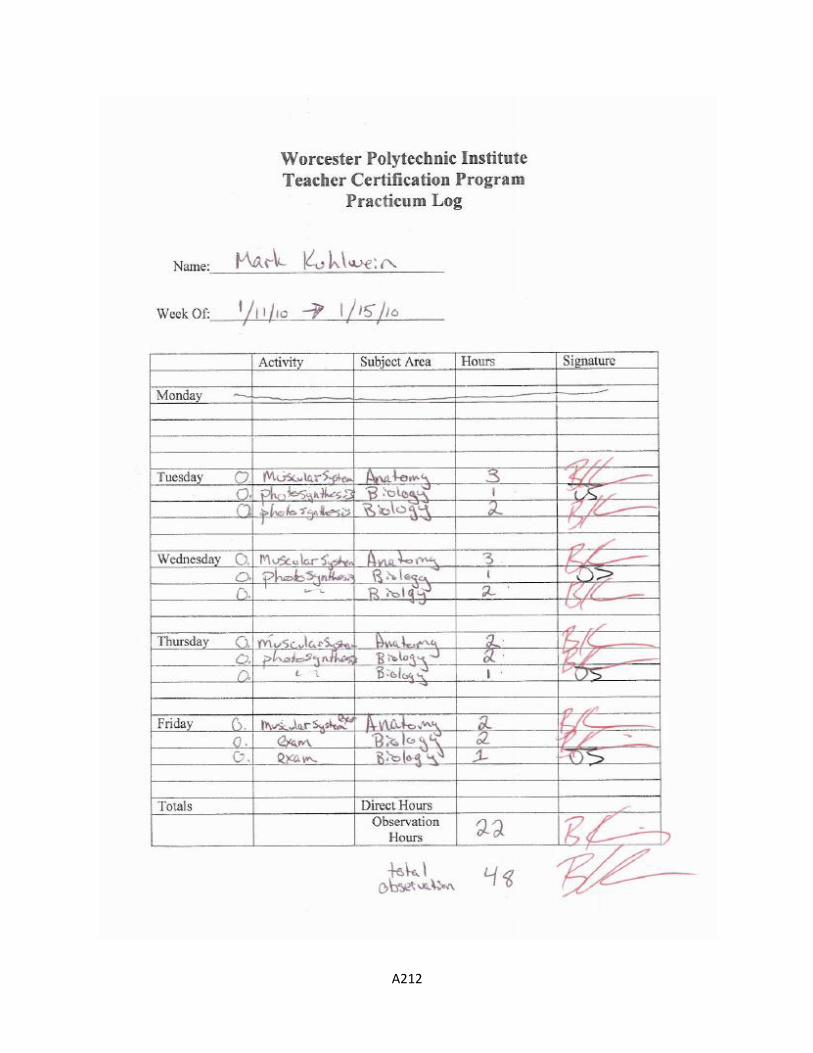
A212
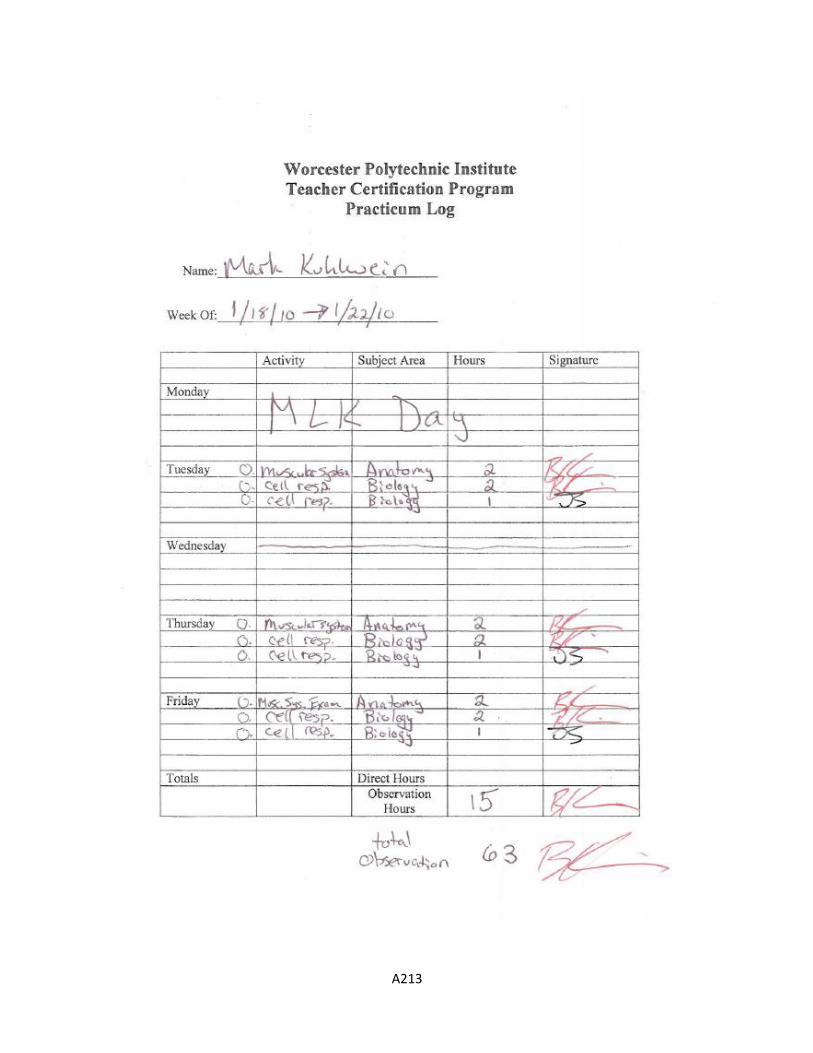
A213
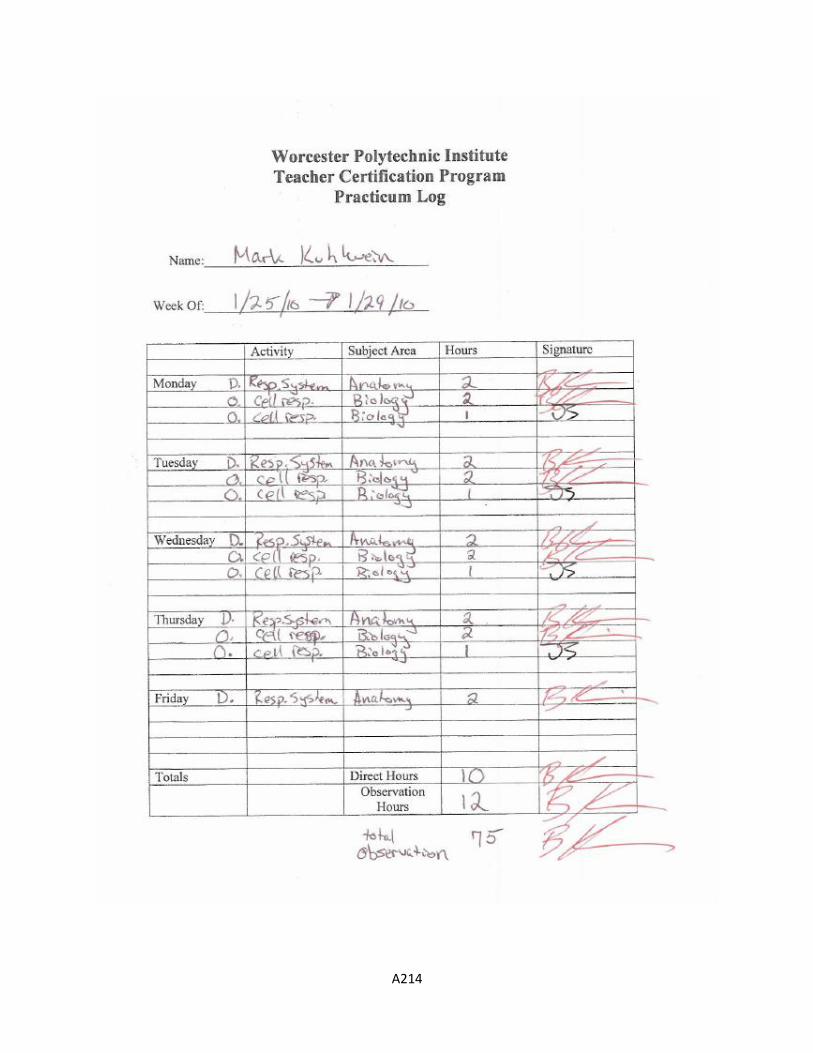
A214
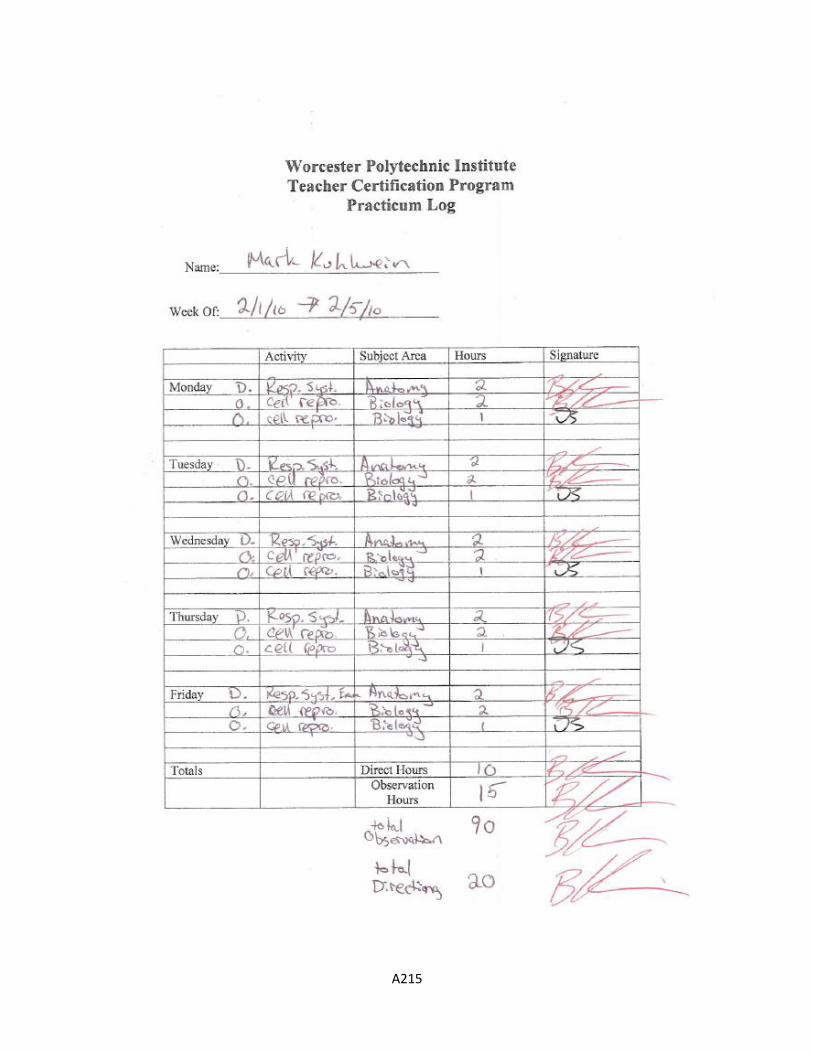
A215

A216
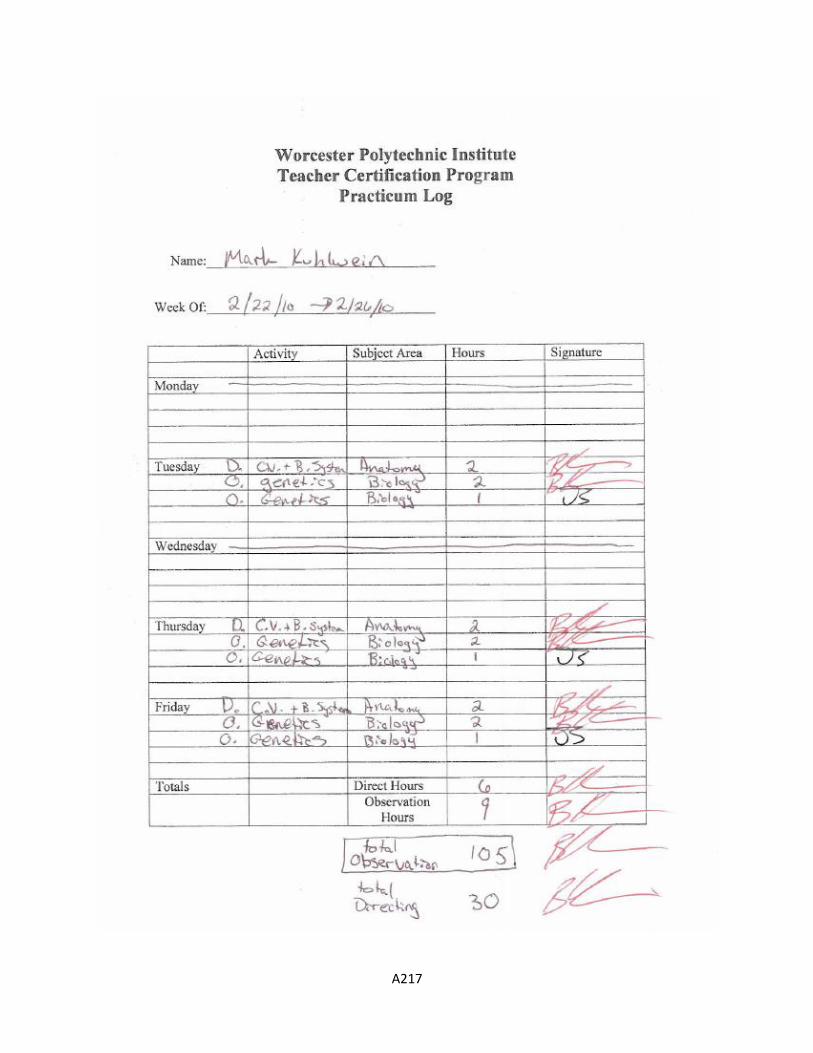
A217

A218
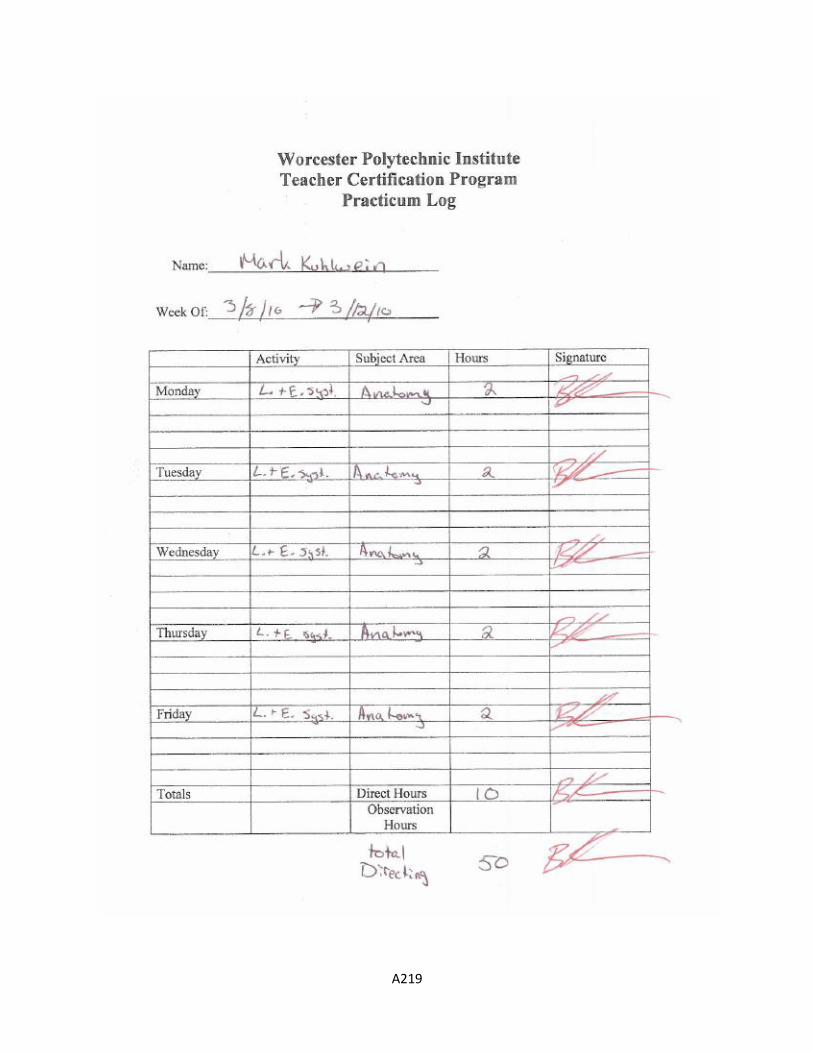
A219
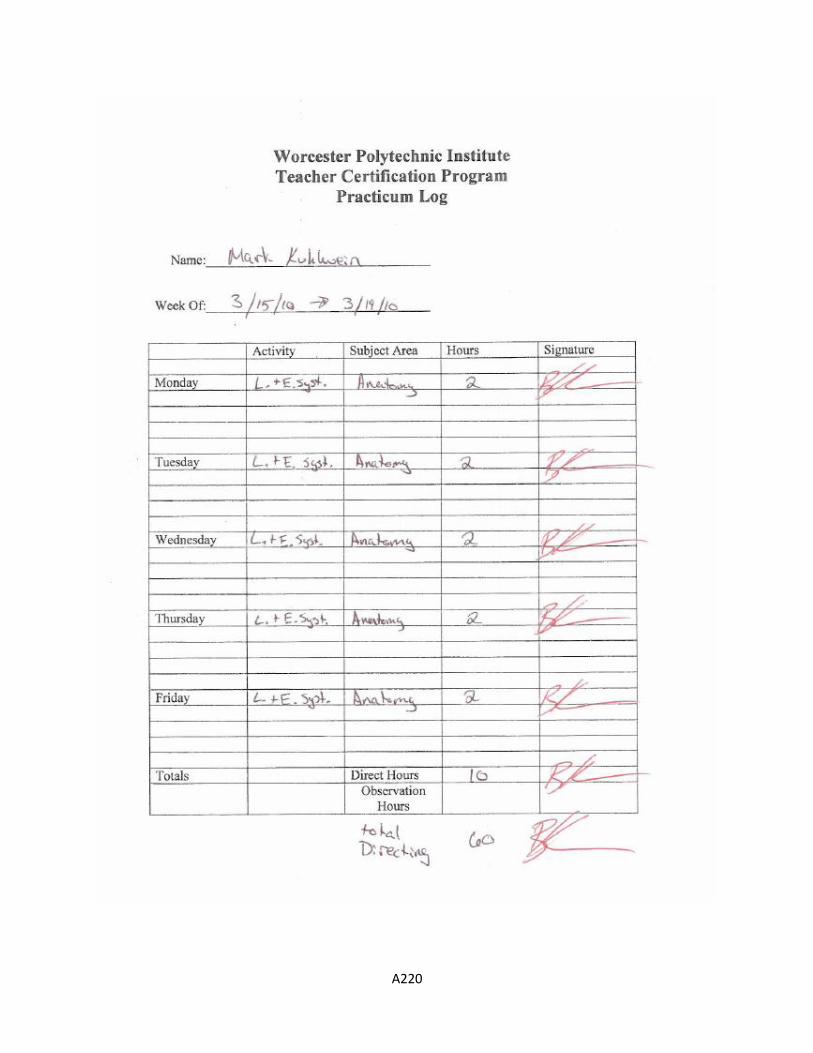
A220
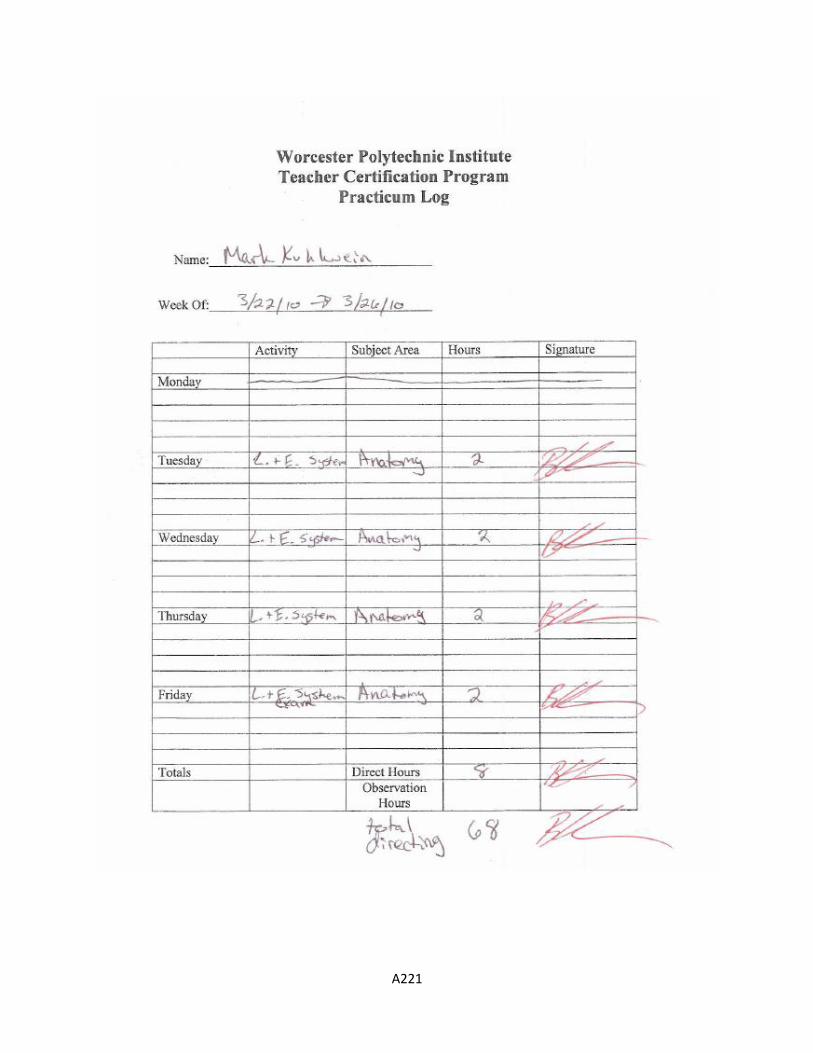
A221
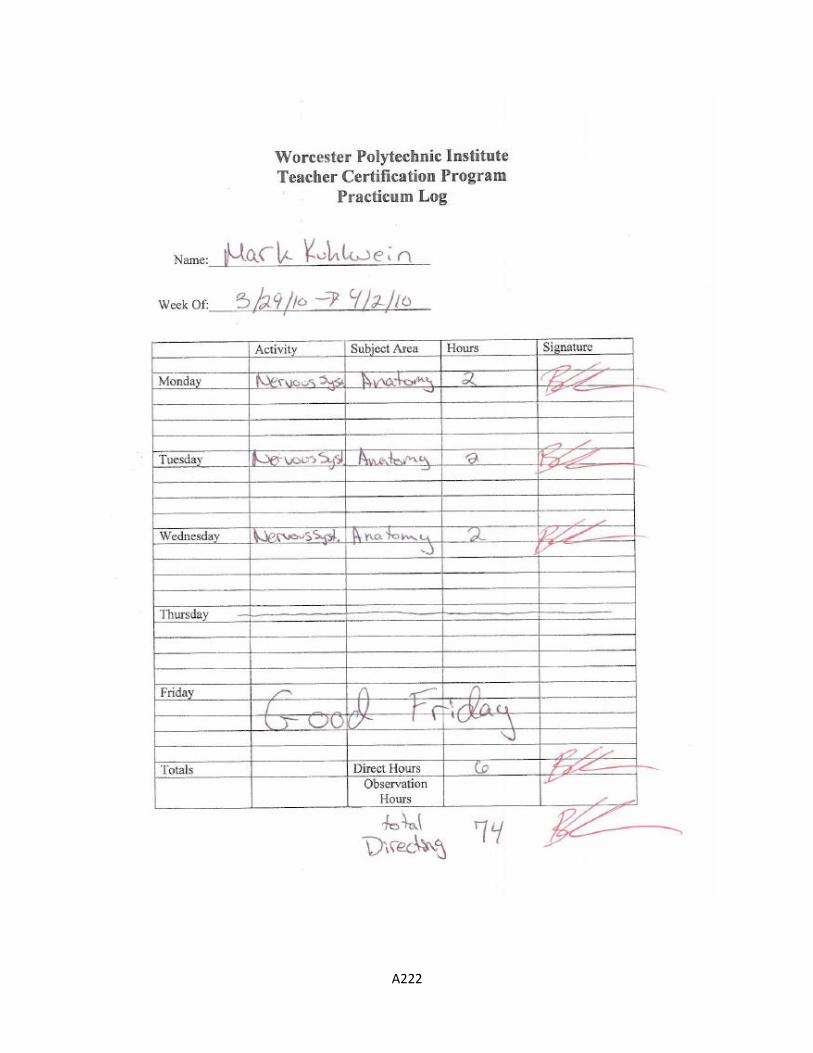
A222

A223

A224
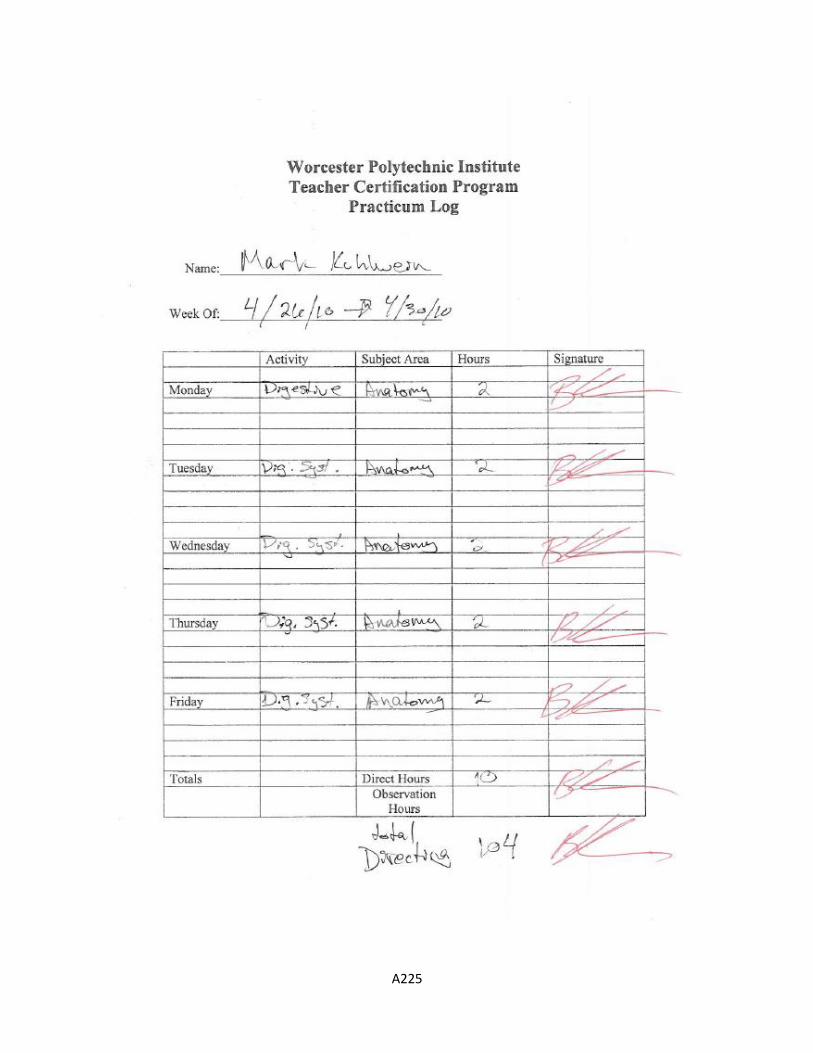
A225
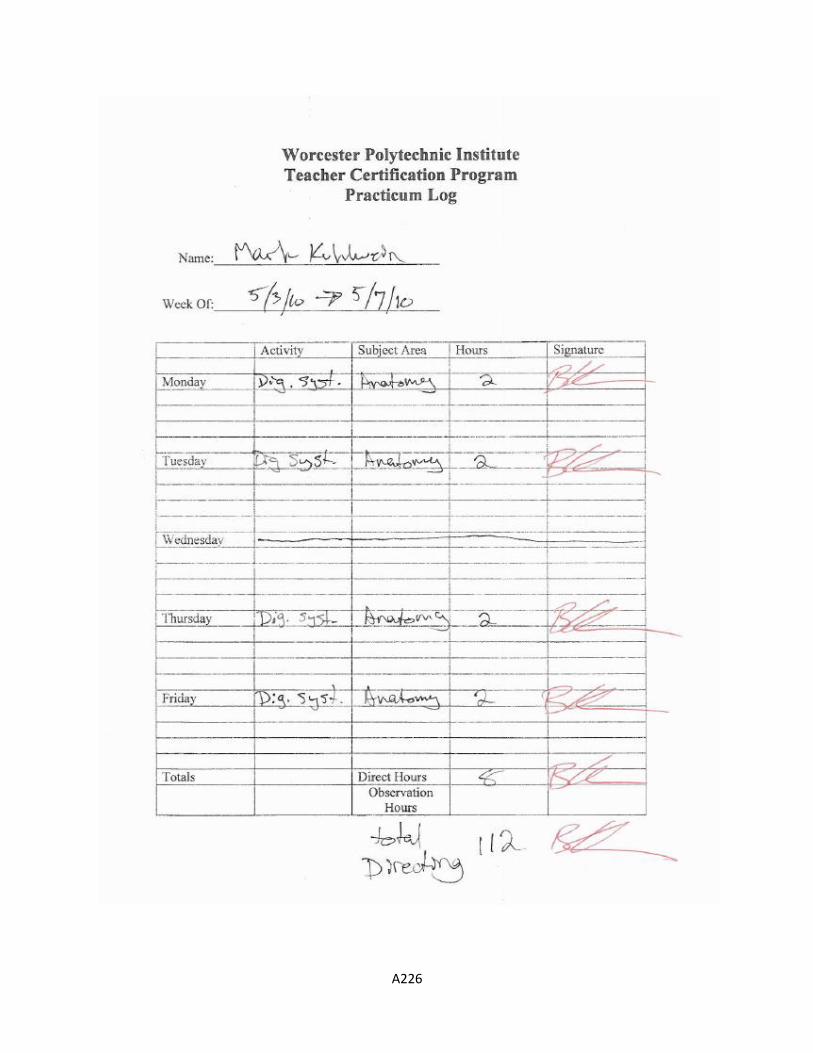
A226
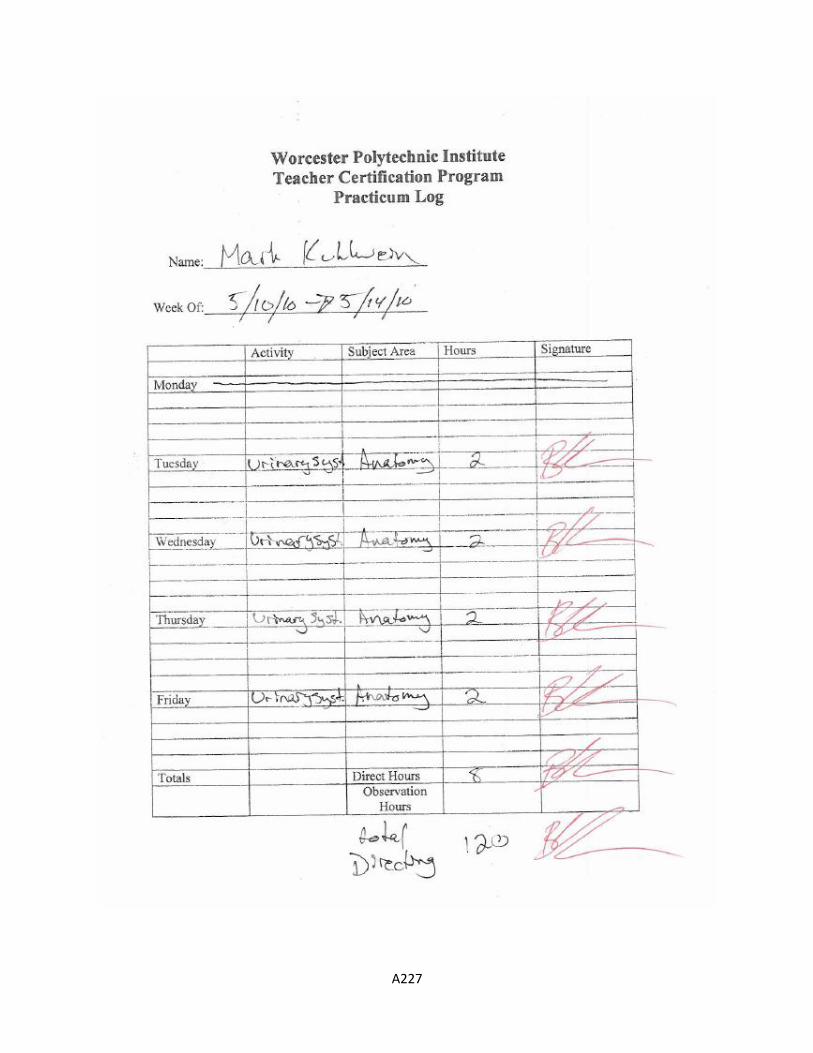
A227
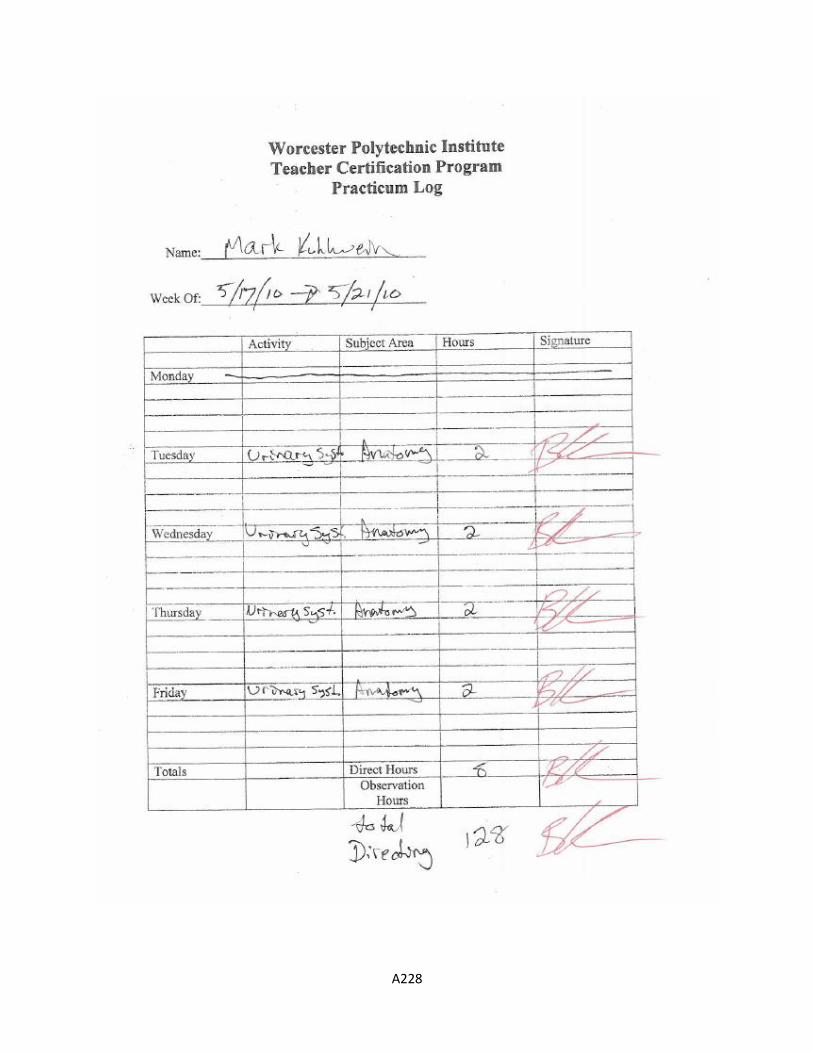
A228
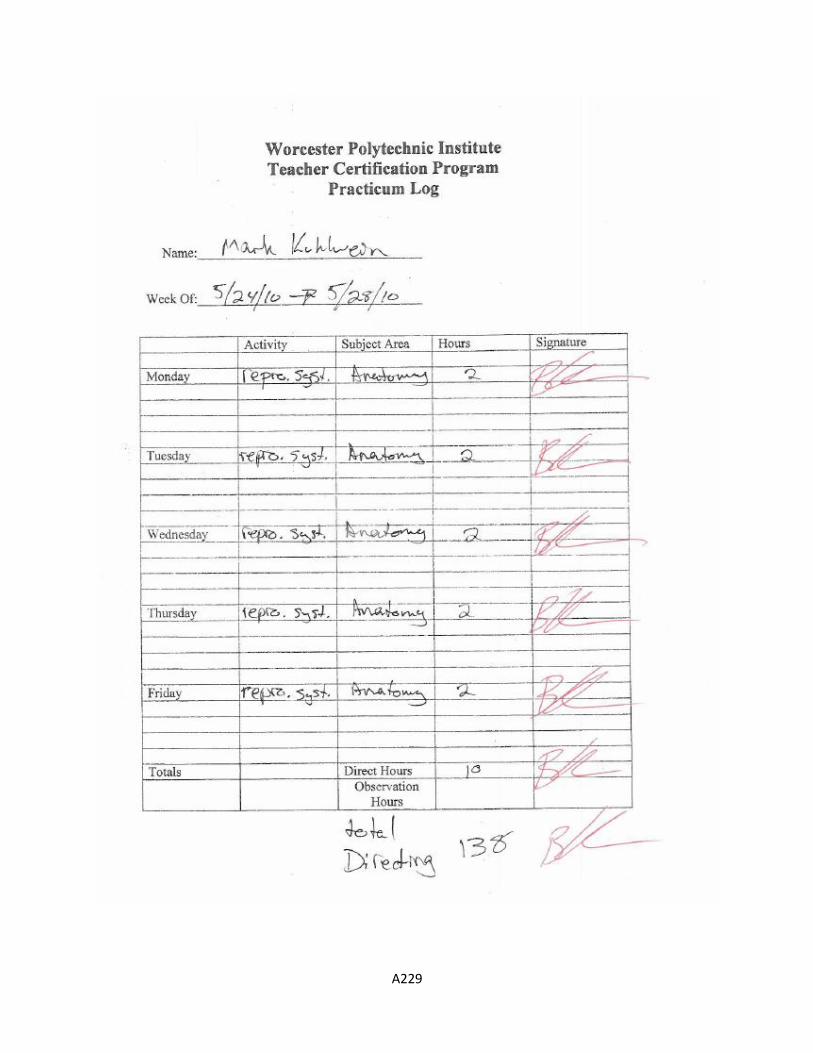
A229
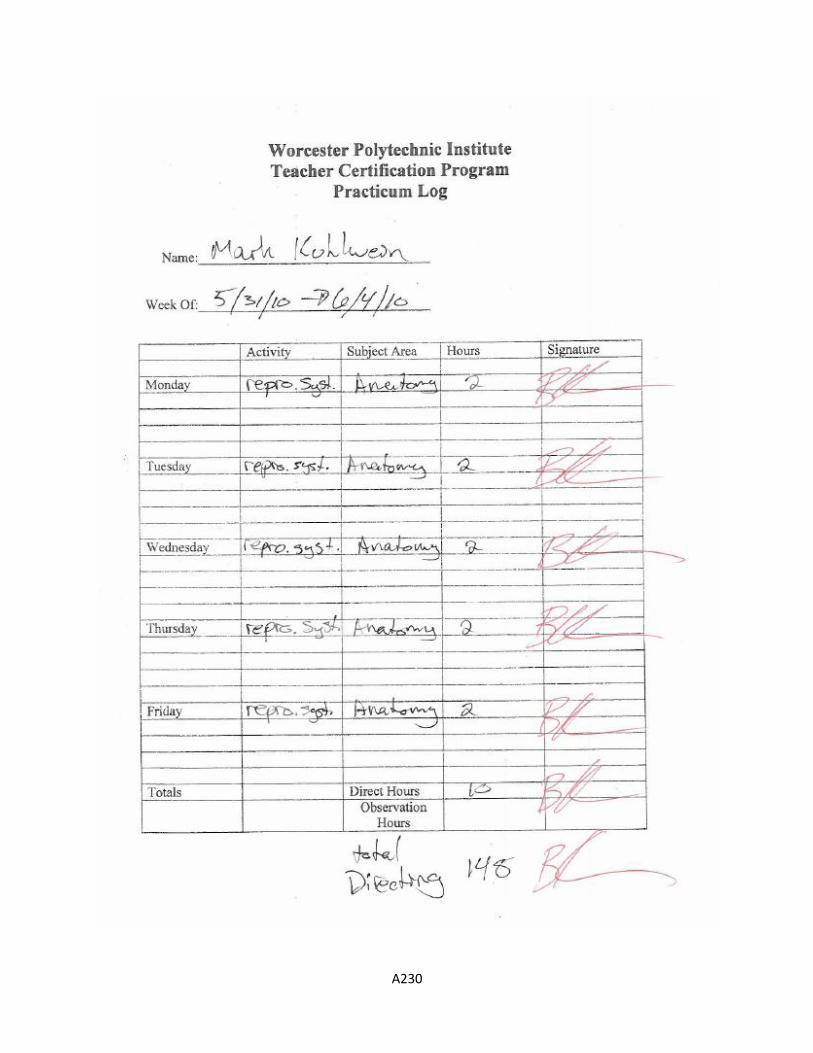
A230
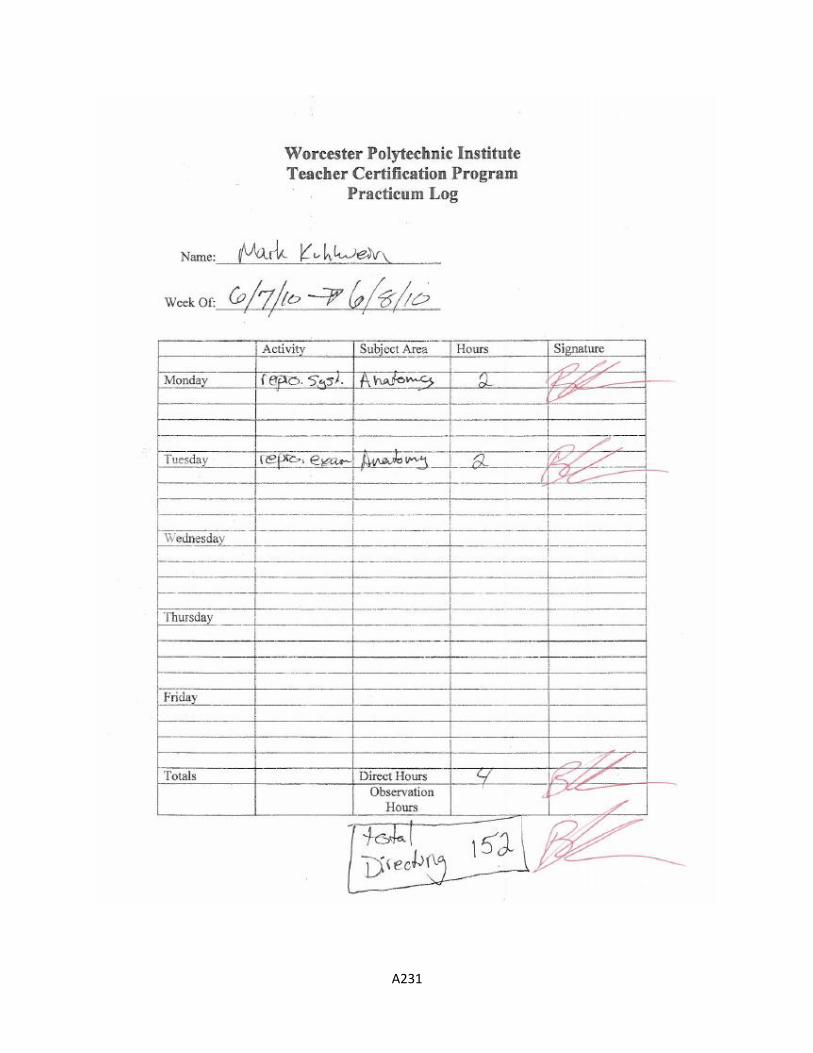
A231