TADM70 SAP System: OS and DB Migration - hservers.org
608
THE BEST-RUN BUSINESSES RUN SAP © SAP AG 2010 TADM70 SAP System: OS and DB Migration SAP WebAS 6.40 (NetWeaver '04), NetWeaver 7.00 (NetWeaver '04S), NetWeaver 7.0x Version 64 Material number 50099265
-
Upload
khangminh22 -
Category
Documents
-
view
1 -
download
0
Transcript of TADM70 SAP System: OS and DB Migration - hservers.org

© SAP AG 2009
TADM70 SAP System: OS and DB Migration
THE BEST-RUN BUSINESSES RUN SAP
© SAP AG 2010
TADM70SAP System: OS and DB Migration
SAP WebAS 6.40 (NetWeaver '04), NetWeaver 7.00 (NetWeaver '04S), NetWeaver 7.0x
Version 64
Material number 50099265

© SAP AG 2010
Copyright 2010 SAP AG. All rights reserved.
No part of this publication may be reproduced or transmitted in any form or for any purpose without the express permission of SAP AG. The information contained herein may be changed without prior notice.
Copyright
Some software products marketed by SAP AG and its distributors contain proprietary software components of other software vendors.
Microsoft, Windows, Excel, Outlook, and PowerPoint are registered trademarks of Microsoft Corporation.
IBM, DB2, DB2 Universal Database, OS/2, Parallel Sysplex, MVS/ESA, AIX, S/390, AS/400, OS/390, OS/400, iSeries, pSeries, xSeries, zSeries, System i, System i5, System p, System p5, System x, System z, System z9, z/OS, AFP, Intelligent Miner, WebSphere, Netfinity, Tivoli, Informix, i5/OS, POWER, POWER5, POWER5+, OpenPower and PowerPC are trademarks or registered trademarks of IBM Corporation.
Adobe, the Adobe logo, Acrobat, PostScript, and Reader are either trademarks or registered trademarks of Adobe Systems Incorporated in the United States and/or other countries.
Oracle is a registered trademark of Oracle Corporation.
UNIX, X/Open, OSF/1, and Motif are registered trademarks of the Open Group.
Citrix, ICA, Program Neighborhood, MetaFrame, WinFrame, VideoFrame, and MultiWin are trademarks or registered trademarks of Citrix Systems, Inc.
HTML, XML, XHTML and W3C are trademarks or registered trademarks of W3C®, World Wide Web Consortium, Massachusetts Institute of Technology.
Java is a registered trademark of Sun Microsystems, Inc.
JavaScript is a registered trademark of Sun Microsystems, Inc., used under license for technology invented and implemented by Netscape.
MaxDB is a trademark of MySQL AB, Sweden.
SAP, R/3, mySAP, mySAP.com, xApps, xApp, SAP NetWeaver, and other SAP products and services mentioned herein as well as their respective logos are trademarks or registered trademarks of SAP AG in Germany and in several other countries all over the world. All other product and service names mentioned are the trademarks of their respective companies. Data contained in this document serves informational purposes only. National product specifications may vary.
The information in this document is proprietary to SAP. No part of this document may be reproduced, copied, or transmitted in any form or for any purpose without the express prior written permission of SAP AG.
This document is a preliminary version and not subject to your license agreement or any other agreement with SAP. This document contains only intended strategies, developments, and functionalities of the SAP® product and is not intended to be binding upon SAP to any particular course of business, product strategy, and/or development. Please note that this document is subject to change and may be changed by SAP at any time without notice.
SAP assumes no responsibility for errors or omissions in this document. SAP does not warrant the accuracy or completeness of the information, text, graphics, links, or other items contained within this material. This document is provided without a warranty of any kind, either express or implied, including but not limited to the implied warranties of merchantability, fitness for a particular purpose, or non-infringement.
SAP shall have no liability for damages of any kind including without limitation direct, special, indirect, or consequential damages that may result from the use of these materials. This limitation shall not apply in cases of intent or gross negligence.
The statutory liability for personal injury and defective products is not affected. SAP has no control over the information that you may access through the use of hot links contained in these materials and does not endorse your use of third-party Web pages nor provide any warranty whatsoever relating to third-party Web pages.

© SAP AG 2010
Organizational consulting for and practical implementation of the migration of an operating system and / or database for SAP Systems which are based on SAP ABAP/JAVA Web AS 6.x / NetWeaver ’04, and NetWeaver 7.00 / 7.0x.Previous releases like R/3 3.x and 4.x are covered as well.
This course provides information about:
Course Goal

© SAP AG 2010
Course Objectives
SAP OS/DB Migration Strategy
SAP OS/DB Migration Check
and be able to:
Implement OS/DB migrations using SAP migration tools
At the conclusion of this course, you will understand the:
© SAP AG 2010
Course Prerequisites - Target Group - Duration
Audience:SAP Technology Consultants
Duration: 3 days

© SAP AG 2010
Course Content
Unit 7 R3LOAD & JLOAD Files
Unit 8 Advanced Migration Techniques
Unit 9 Performing the Migration
Unit 10 Troubleshooting
Unit 11 Special Projects
Preface
Unit 1 Introduction
Unit 2 The Migration Project
Unit 3 System Copy Methods
Unit 4 SAP Migration Tools
Unit 5 R3SETUP/SAPINST
Unit 6 Technical Background Knowledge


© SAP AG TADM70 1-1
© SAP AG 2010
Introduction
1 Introduction 7 R3LOAD & JLOAD Files
2 The Migration Project 8 Advanced Migration Techniques
3 System Copy Methods 9 Performing the Migration
4 SAP Migration Tools 10 Troubleshooting
5 R3SETUP / SAPINST 11 Special Projects
6 Technical Background Knowledge

© SAP AG TADM70 1-2
© SAP AG 2010
ObjectivesAt the end of this unit, you will be able to:
Distinguish between an SAP homogeneous system copy and an SAP OS/DB MigrationEstimate the problems involved with a system copy or migrationUnderstand the functions of the SAP OS/DB Migration Check
SAP homogeneous system copy versus SAP OS/DB Migration
Definitions:
SAP homogeneous system copy
SAP heterogeneous system copy
SAP OS/DB Migration
Functions of the SAP OS/DB Migration Check
Introduction
© SAP AG TADM70 1-3
© SAP AG 2010
Definition of Terms
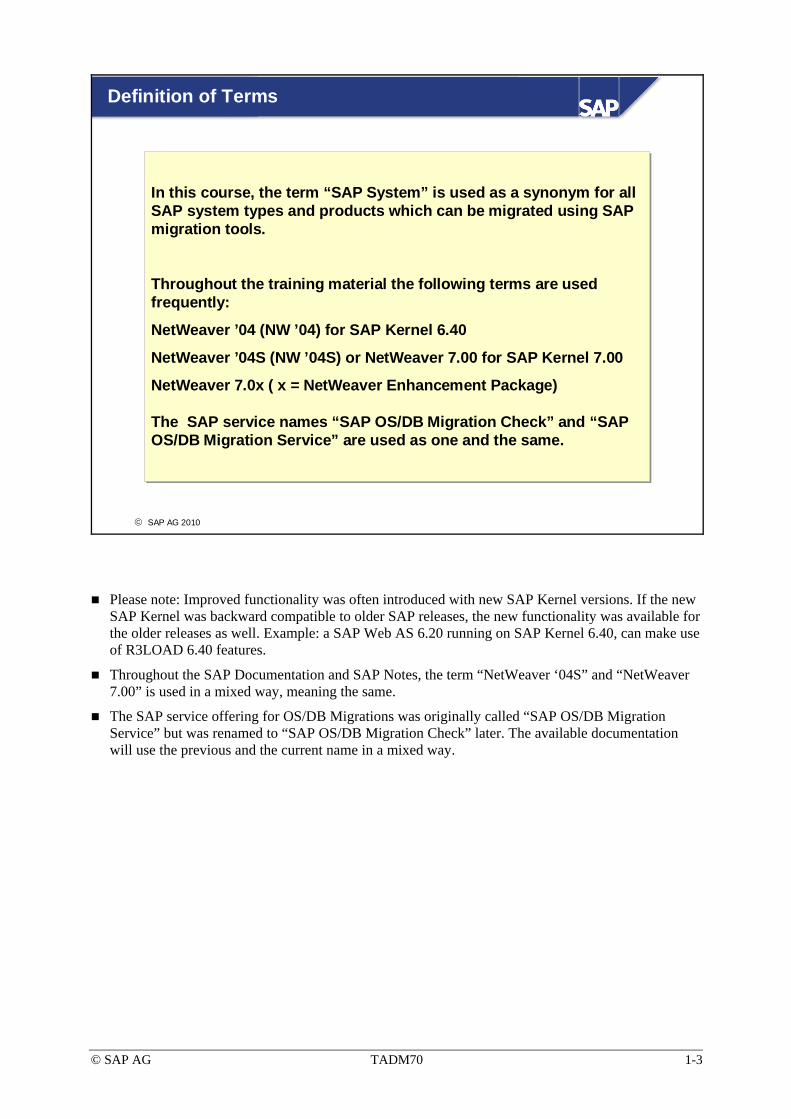
In this course, the term “SAP System” is used as a synonym for all SAP system types and products which can be migrated using SAP migration tools.
Throughout the training material the following terms are used frequently:
NetWeaver ’04 (NW ’04) for SAP Kernel 6.40
NetWeaver ’04S (NW ’04S) or NetWeaver 7.00 for SAP Kernel 7.00
NetWeaver 7.0x ( x = NetWeaver Enhancement Package)
The SAP service names “SAP OS/DB Migration Check” and “SAP OS/DB Migration Service” are used as one and the same.
Please note: Improved functionality was often introduced with new SAP Kernel versions. If the new SAP Kernel was backward compatible to older SAP releases, the new functionality was available for the older releases as well. Example: a SAP Web AS 6.20 running on SAP Kernel 6.40, can make use of R3LOAD 6.40 features.
Throughout the SAP Documentation and SAP Notes, the term “NetWeaver ‘04S” and “NetWeaver 7.00” is used in a mixed way, meaning the same.
The SAP service offering for OS/DB Migrations was originally called “SAP OS/DB Migration Service” but was renamed to “SAP OS/DB Migration Check” later. The available documentation will use the previous and the current name in a mixed way.

© SAP AG TADM70 1-4
© SAP AG 2010
Copying a SAP System
Requirement:To copy an SAP System WITHOUT changing the operating system or the databaseTo copy an SAP System WHILE changing the operating system and/or the database
Potential solutions:Client transport?Backup/restore?3rd party tools for data unload/load?SAP System copy tools!
A client transport is not a true SAP System copy or migration. The copy function cannot transport all of the system settings and data to the target system, nor is it intended to do so. This applies particularly to production systems. Of course client transports have no meaning to JAVA-based SAP Systems. For further reference see SAP Note 96866 “DB copy by client transport not supported”.
Databases can be duplicated by restoring a backup. In most cases, this is the fastest and easiest way to perform a homogeneous system copy. Some databases even allow a database backup to be restored in a different operating system platform (OS migration).
Note: 3rd party database tools and methods suitable for switching the operating system (OS migration) or even the database (DB migration) are not supported by SAP, if not explicitly mentioned in SAP documents or SAP Notes. Nevertheless, the usage of unsupported tools or methods is not forbidden in general (the tool and method support must be provided by the 3rd party organization in such a case). SAP cannot be made responsible for erroneous results. After the system copy, the migrated SAP system is still under maintenance, but efforts to fix problems caused by the unsupported tool or method, can and will be charged to the customer!
SAP System copy tools can be used for system copies or migrations on any SAP supported operating system and database combination as of R/3 Release 3.0D.
Since NetWeaver '04 (6.40) JAVA based systems can also be copied or migrated to any SAP supported operating system and database combination by SAP System copy tools.

© SAP AG TADM70 1-5
© SAP AG 2010
SAP System Copy / Migration Tools (1)
R3SETUP (3.1I – 4.6D) / SAPINST (since 6.10)Installs ABAP and JAVA based SAP Systems, controls the unload/load processes and executes related tasks
R3LDCTLUnloads ABAP Dictionary structures from the database
R3SZCHK (since 4.5A)Computes size of ABAP tables and indexes for the target databaseComputes the ABAP related size for the target database
R3LOADUnloads/loads ABAP table data from/into the database
The SAP System copy tools are used for homogeneous and heterogeneous system copies. SAP System copy tools used for heterogeneous system copies are called SAP Migration Tools. In the remainder of this document, the the term SAP Migration Tools will be used.

© SAP AG TADM70 1-6
© SAP AG 2010
SAP System Copy Tools / Migration Tools (2)
SMIGR_CREATE_DDL (ABAP Report)Generates database specific DDL statements for non-standard database objects of the ABAP Dictionary (mainly BW objects)
RS_BW_POST_MIGRATION (ABAP Report)Post system copy activities for non-standard database objects in the ABAP Dictionary
JLOAD (since 6.40)Unloads/loads JAVA Dictionary structures and table datafrom/into database
JSIZECHECK (since 7.00)Computes the JAVA Web AS related size for the target database
BW functionality is part of the ABAP Web AS 6.40 standard. Since then, every SAP System can contain non-standard objects! Special post- and pre-migration activities are required for them.
The generated DDL statements of SMIGR_CREATE_DDL are used to tell R3LOAD how to create non-standard objects in the target database.
The RS_BW_POST_MIGRATION program adapts the non-standard objects to the requirements of the target system.
The reports SMIGR_CREATE_DDL and RS_BW_POST_MIGRATION are required since BW 3.0, and for all systems based on BW functionality (i.e. SCM/APO). They are also mandatory for NetWeaver '04 (Web AS 6.40) and later.
JLOAD is available since NetWeaver '04 (Web AS 6.40). Earlier versions of the JAVA Web AS (i.e. Web AS 6.20) did not store data in a database.
JSIZECHECK is available since NetWeaver ’04S / 7.00.
JLOAD and JSIZECHECK are JAVA programs which are called by SAPINST.

© SAP AG TADM70 1-7
© SAP AG 2010
Support Tools for ABAP System Copies (1)
PACKAGE SPLITTER (since 4.6B)Splits R3LOAD *.STR and *.EXT files to reduce export and import times
TABLE SPLITTER (since 6.40)Computes WHERE conditions to allow multiple R3LOADs running on a single table during export / import
MIGCHECK (Migration Checker, since 7.00)Checks the existence of R3LOAD import logs and verifies import task files
The PACKAGE SPLITTER is available in a JAVA and in a Perl implementation. R3SETUP is using the Perl PACKAGE SPLITTER. SAPINST provides the Perl and JAVA PACKAGE SPLITTER or the JAVA version only (release dependent).
Two TABLE SPLITTERs exist: One is database independent and is called R3TA, the other is a PL/SQL script implementation and is available for Oracle only.
Table splitting is supported since R3LOAD 6.40 in combination with MIGMON.
MIGCHECK is implemented in JAVA.

© SAP AG TADM70 1-8
© SAP AG 2010
Support Tools for ABAP System Copies (2)
MIGMON (Migration Monitor)Allows advanced control of R3LOAD export/import processesAutomates dump shipping between source and target systemSupports parallel unload/load processing
DISTMON (Distribution Monitor)Used to run multiple Migration Monitors distributed over different application servers
MIGTIME (Time Analyzer)Analyzes export and import run-times from R3LOAD files
MIGMON and MIGTIME are implemented in JAVA. The JAVA based tools are release independent and can be utilized on any SAP platform which supports the required JAVA version.
The Distribution Monitor can be used if the R3LOAD caused CPU load should be distributed over several application servers. This can improve the database server performance significantly. It is often seen in Unicode conversion scenarios. Normally the Distribution Monitor makes sense only, if more than one application server is planned to use. It was developed to support system copies based on Web AS 6.x and later.

© SAP AG TADM70 1-9
© SAP AG 2010
Support Tools for JAVA System Copies (1)
JPKGCTL (JSPLITTER) (since 7.02)Unloads JAVA dictionary information from databaseJLOAD package splittingJLOAD table splitting
JMIGMON (since 7.02)Allows advanced control of JLOAD export/import processesSupports parallel unload/load processing
JMIGTIME (since 7.02)Analyzes export and import run-times from JLOAD log files
JPKGCTL (also called JSPLITTER) was developed to reduce the export/import run-time for large JAVA systems. A single JLOAD process exporting the whole database (like implemented in previous SAPINST versions) was often too slow as soon as the database was exceeding a certain size, so it was necessary to provide package and table splitting for JLOAD as for R3LOAD.
JMIGMON and JMIGTIME do offer a similar functionality like MIGMON and MIGTIME.

© SAP AG TADM70 1-10
© SAP AG 2010
Possible Negative Consequences of a System Copy
Poor performance
User dissatisfaction
Reduced system availability
Increased support requirements for the SAP Hotline and on-site consultants
WORST CASE: Missing or corrupted data
The goal of this training is to prevent problems, such as those mentioned above, by providing in-depth knowledge about each SAP System copy step and the tools which are involved. Following the SAP guidelines ensures a smooth migration project.

© SAP AG TADM70 1-11
© SAP AG 2010
Definition: SAP Homogeneous System Copy
Move/Copy a SAP System to a new environment:Source and target system will use the SAME operating system (OS) and database system (DB)The hardware architecture remains the same, or is a certified successor, where SAP supports homogeneous system copies to
Operating / Database System:SAP-released combinations of OS and DB versions In some cases an OS or DB upgrade might be necessary on the source system before a system copy can be performed
Execution:By customer with or without assistance from an SAP Technology Consultant
For the target system, the same operating system can also mean an SAP certified successor like Windows 2003 / Windows 2008.
Depending on the method used for executing the homogeneous system copy, it might be necessary to upgrade the database or the operating system of the source system first. On older SAP System releases, even an upgrade might be necessary. This can happen if the target platform requires a database or operating system version that was not backward released for the SAP System version that is to be copied, etc.
New hardware on the target system might be supported by the latest operating system and database version only.
With or without assistance from a consultant, customers can execute a homogeneous system copy by themselves. If you plan to use a new hardware type or make major expansions to the hardware (such as changing the disk configuration), we recommend involving the hardware partner as well.
© SAP AG TADM70 1-12
© SAP AG 2010
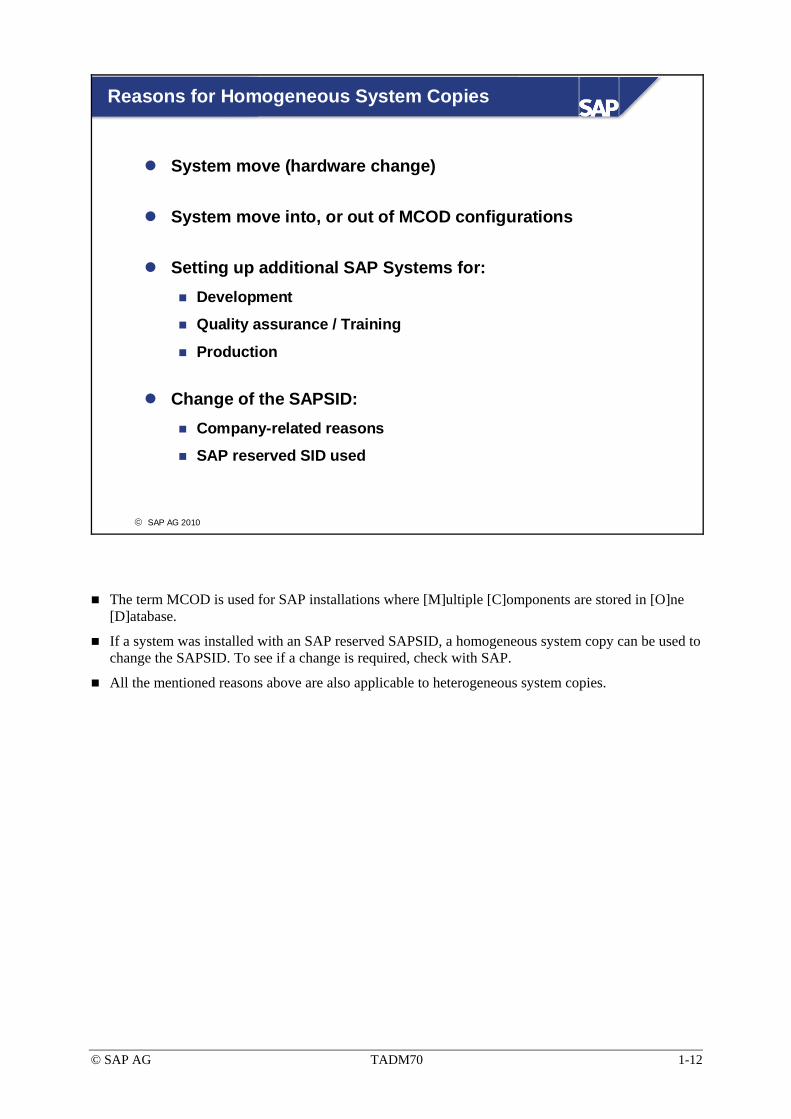
Reasons for Homogeneous System Copies
System move (hardware change)
System move into, or out of MCOD configurations
Setting up additional SAP Systems for:Development
Quality assurance / Training
Production
Change of the SAPSID:Company-related reasons
SAP reserved SID used
The term MCOD is used for SAP installations where [M]ultiple [C]omponents are stored in [O]ne [D]atabase.
If a system was installed with an SAP reserved SAPSID, a homogeneous system copy can be used to change the SAPSID. To see if a change is required, check with SAP.
All the mentioned reasons above are also applicable to heterogeneous system copies.

© SAP AG TADM70 1-13
© SAP AG 2010
Definition: SAP Heterogeneous System Copy
Move/Copy a SAP System to a new environment:Source and target system will use a DIFFERENT operating system (OS) and/or database system (DB)
A change of the hardware architecture will be involved in many cases
Operating / Database System:SAP released combinations of OS and DB versions
In some cases an OS or DB upgrade might be necessary on the source system before a migration can be performed
Execution:By a SAP Technology Consultant with special certification for OS/DB Migrations
The SAP OS/DB Migration Check is required for each productive SAP System involved
An OS/DB migration is a complex process. Consultants are strongly advised to do all they can to minimize the risk with regard to the availability and performance of a production SAP System.
Depending on the method used for executing the heterogeneous system copy, it might be necessary to upgrade the database or the operating system of the source system first. On older SAP System releases, even an upgrade might be necessary. This can happen if the target platform requires a database or operating system version that was not backward released for the SAP System version that is to be migrated, etc.
New hardware on the target system might be supported by the latest operating system and database version only.
The decisive factors for performance in a SAP System are the parameter settings in the database, the operating system, and the SAP System itself (which depends on the operating system and the database system). During an OS/DB migration, the old settings cannot simply be taken unchanged. Determining the new parameter values requires an iterative process, during which the availability of the migrated system is restricted.

© SAP AG TADM70 1-14
© SAP AG 2010
Common Heterogeneous System Copy Reasons
Change of database or operating system:
Hardware enhancements
Performance improvement
Availability of new technologies
Administrative efficiency
Cost reduction
Guarantee against hardware/software obsolescence
Standardization through group-wide platform strategy
The above mentioned points are the primary reasons for changing an operating system or database, but the reasons for homogeneous system copies also apply. The reasons also partially apply to homogeneous system copies.

© SAP AG TADM70 1-15
© SAP AG 2010
Frequently used SAP Terms
SAP DB migration (heterogeneous system copy)
SAP OS/DB migration (heterogeneous system copy)
SAP OS migration (heterogeneous system copy)
SAP System copy(homogeneous or heterogeneous system copy )
SAP term being used (synonym)
Homogeneous system copy
No
Yes
Yes
?
Change of operating
system (OS)
Change of database
system (DB)
?
No
Yes
Yes
No
No
The above table shows which term is being used for SAP System copies. For example, when changing the operating system, this is called an OS migration and is a heterogeneous system copy. Generally, the term heterogeneous system copy implies that it is some kind of OS and/or DB migration.
The term “SAP System copy” is used in a more unspecific way.

© SAP AG TADM70 1-16
© SAP AG 2010
Homogeneous or Heterogeneous System Copy?
Source system*SAP System version X
Target system*SAP System version X
Explanation SAP systemcopy type
Windows 2003Database XHardware manufacturer X
Windows 2008 Database X Hardware manufacturer Y
OS successorSame DB Same architecture
Homogeneous
Operating system XHardware architecture XDatabase X
Operating system XHardware architecture YDatabase X
Same OS typeDifferent architectureSame DB
Homogeneous(see note below)
Operating system X 32 BitDatabase X 32 Bit
Operating system X 64 Bit Database X 64 Bit
Same OSSame DB
Homogeneous
Operating system XVersion nDatabase XVersion n
Operating system XVersion n+xDatabase XVersion n+x
Same OSNew version onlySame DBNew versions only
Homogeneous
Operating system XDatabase X
Operating system YDatabase X
Different OSSame DB
Heterogeneous
Operating system XDatabase X
Operating system YDatabase Y
Different OSDifferent DB
Heterogeneous
* SAP released OS, DB, and hardware combination for the used SAP product version
The table above is only valid when using R3LOAD or JLOAD. Homogeneous system copies using Backup/Restore will require the same database version on source and target system, or must be upgraded after the system copy
Note: If the hardware architecture in a system copy does change, but the operating system type stays the same, it is a homogenous system copy. In other words, if the operating system is called the same on source and target, it is a homogeneous system copy. This does not automatically imply the possibility of a backup/restore to copy the database (i.e. system copy from Solaris SPARC to Solaris Intel). It only points out, SAP treats it like a homogeneous system copy and no “SAP OS/DB Migration Check” is required. SAP assumes the operating system behavior will be the same without regards of the underlying platform. Please check the database documentation for details on available system copy procedures. Further examples are: HP-UX PA-RISC to HP-UX IA64, LINUX X86 to LINUX POWER, etc.

© SAP AG TADM70 1-17
© SAP AG 2010
SAP OS/DB Migration Check (1)
Scope of activities:SAP OS/DB Migration Check - Remote Project Audit
SAP OS/DB Migration Check - Analysis Session
SAP OS/DB Migration Check - Verification Session
Technical support in case of problems with the migration tools (troubleshooting)
Costs:The SAP OS/DB Migration Check is fee-based
Tools for homogeneous and heterogeneous SAP System copies are free of charge
The cost for the SAP OS/DB Migration Check is specific to the customer location and may differ from country to country.
The SAP OS/DB Migration Check will be delivered as a remote service.
In the "Remote Project Audit", SAP checks the OS/DB migration project planning.
The required tools for homogeneous or heterogeneous system copies (installation software) are provided by SAP to customers free of charge. The software can be downloaded from the SAP Service Marketplace.
© SAP AG TADM70 1-18
© SAP AG 2010
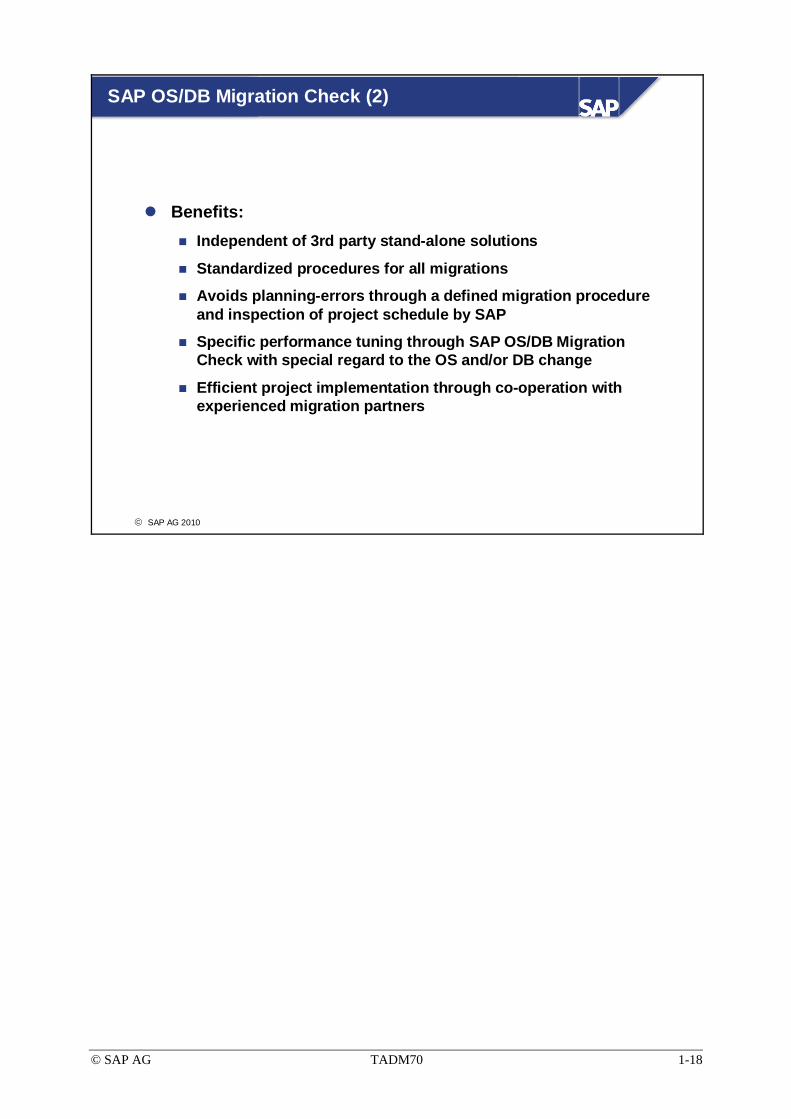
SAP OS/DB Migration Check (2)
Benefits:Independent of 3rd party stand-alone solutions
Standardized procedures for all migrations
Avoids planning-errors through a defined migration procedure and inspection of project schedule by SAP
Specific performance tuning through SAP OS/DB Migration Check with special regard to the OS and/or DB change
Efficient project implementation through co-operation with experienced migration partners

© SAP AG TADM70 1-19
© SAP AG 2009
Information on the SAP OS/DB Migration
SAP Service Marketplace
http://service.sap.com/osdbmigration
Available information:SAP OS/DB Migration Check presentations and FAQs on the SAP OS/DB Migration procedure
SAP Developer Network (SDN)
http://sdn.sap.com/irj/sdn/systemcopy
Available information:
Various technical documents on SAP system copy and migration
SAP Notes Homogeneous and HeterogeneousSystem Copy (ABAP and/or JAVA based)
SAP Notes Homogeneous and HeterogeneousSystem Copy (ABAP and/or JAVA based)
ManualsHomogeneous and Heterogeneous System Copy (ABAP and/or JAVA based)
ManualsHomogeneous and Heterogeneous System Copy (ABAP and/or JAVA based)
Complete information about OS/DB migrations is available in the SAP Service Marketplace and the SAP Developer Network.
FAQs = Frequently Asked Questions
The manuals for homogeneous and heterogeneous system copies can be downloaded from the SAP Service Marketplace.
SAP Notes are available on homogeneous and heterogeneous system copies. Check the homogeneous / heterogeneous system copy manuals for the respective SAP Note numbers.
© SAP AG TADM70 1-20
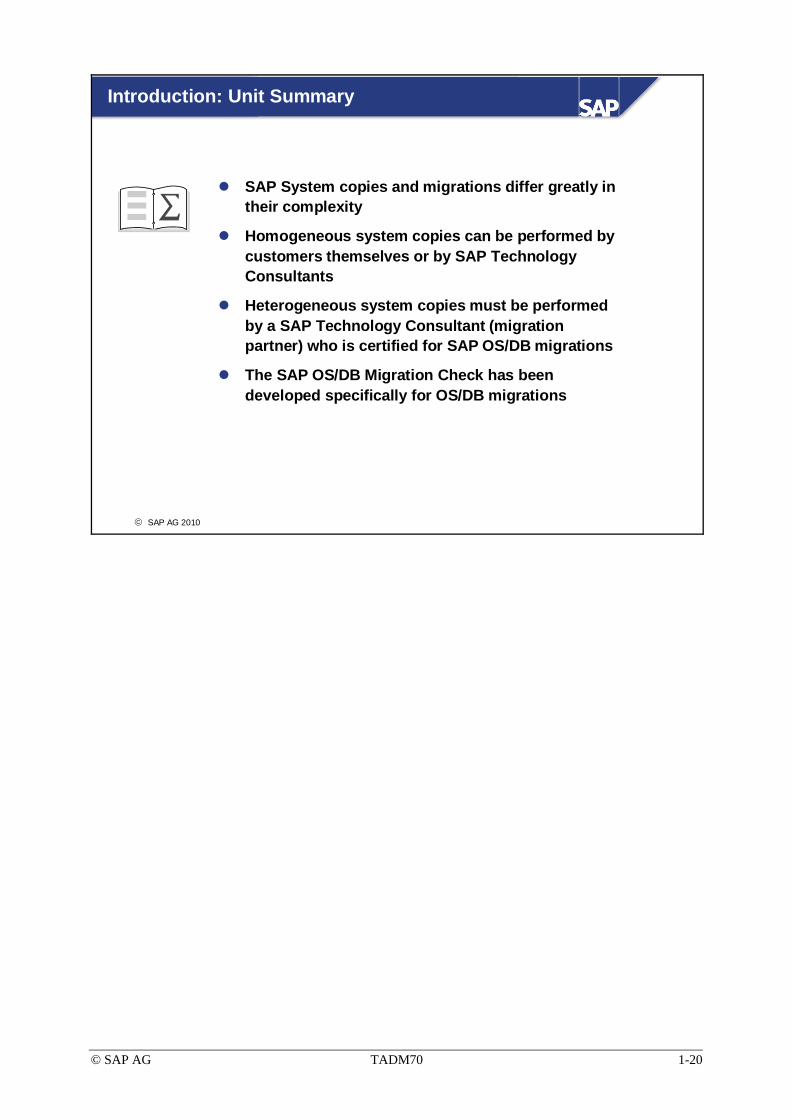
© SAP AG 2010
SAP System copies and migrations differ greatly in their complexity
Homogeneous system copies can be performed by customers themselves or by SAP Technology Consultants
Heterogeneous system copies must be performed by a SAP Technology Consultant (migration partner) who is certified for SAP OS/DB migrations
The SAP OS/DB Migration Check has been developed specifically for OS/DB migrations
Introduction: Unit Summary

© SAP AG TADM70 1-21
Exercises
Unit 1: Introduction
At the conclusion of this exercise, you will be able to:
• Differentiate between homogeneous and heterogeneous system copies and to know the procedural consequences for a migration project.
1-1 A customer plans to invest in a new and more powerful hardware for his ABAP-based SAP production system (no JAVA Web AS installed). As the operating system and database version are not up-to-date, he also wants to change to the latest software versions in a single step while doing the system move.
Current system configuration: Oracle 9.2, AIX 5.3
Planned system configuration: Oracle 10.2, AIX 6.1
1-1-1 Is the planned system move a homogeneous system copy, a DB migration or an OS migration? Describe your solution!
1-1-2 If the SAP System copy tool R3LOAD is used, will it be necessary to perform an operating system or database upgrade after the move? Describe your solution!
1-2 An SAP implementation project must change the database system before going into production, because of strategic customer decisions. The customer system configuration was setup as a standard three-system landscape (development, quality assurance, production). Each system is configured as ABAP Web AS with JAVA Add-In.
1-2-1 Is it necessary to order a SAP OS/DB Migration Check for the planned database change?
1-2-2 According the SAP System copy rules, who must do the system copies?

© SAP AG TADM70 1-22

© SAP AG TADM70 1-23
Solutions
Unit 1: Introduction
1-1
1-1-1 The system move will be a homogeneous system copy. Neither the database nor the operating system will be changed. During a system copy, an upgrade to a new database or operating system software version is not a problem, as long as the operating system and database combinations are supported by the respective SAP System release and SAP kernel version.
1-1-2 Provided the fact that the installation software is able to install on the target operating system version and also supports the installation of target database release directly, no additional OS/DB software upgrade will be necessary after the R3LOAD import. In the case that the new target database is not supported by the installation software, a database upgrade will have to be done after the system copy.
1-2
1-2-1 The system landscape contains a pre-production system only. In this case, no OS/DB migration service is necessary, as its intention is to be used for productive systems only.
1-2-2 The change of a database involves a heterogeneous system copy, which must be done from someone who is certified for OS/DB migrations. The fact that the systems are not productive is regardless.

© SAP AG TADM70 1-24
© SAP AG TADM70 2-1
© SAP AG 2010
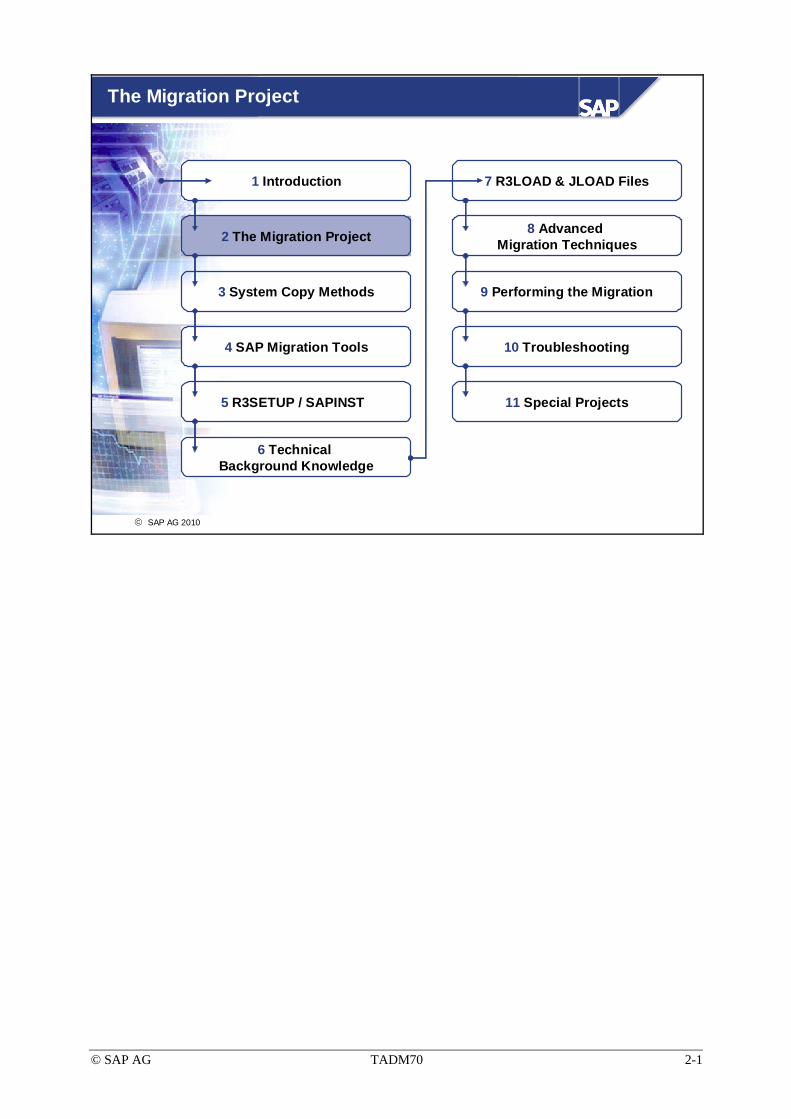
The Migration Project
1 Introduction 7 R3LOAD & JLOAD Files
2 The Migration Project 8 Advanced Migration Techniques
3 System Copy Methods 9 Performing the Migration
4 SAP Migration Tools 10 Troubleshooting
5 R3SETUP / SAPINST 11 Special Projects
6 Technical Background Knowledge

© SAP AG TADM70 2-2
© SAP AG 2010
ContentsProject Schedule of an OS/DB Migration Drawing Up a Project Schedule for the SAP OS/DB Migration Check
ObjectivesAt the end of this unit, you will be able to:
Describe the scope of services performed by the SAP OS/DB Migration CheckEstimate the effort involved in a migrationPlan a migration project
The Migration Project

© SAP AG TADM70 2-3
© SAP AG 2010
Project Schedule of an OS/DB Migration (1)
Customer reports migration request to SAP Customer reports migration request to SAP
Check SAP Service Marketplace for recent updates on the OS/DB migration procedure.
Quick link: osdbmigration
Check SAP Service Marketplace for recent updates on the OS/DB migration procedure.
Quick link: osdbmigration
Contractual arrangements with SAP with regard to operating system and/or database
change, and SAP OS/DB Migration Check
Contractual arrangements with SAP with regard to operating system and/or database
change, and SAP OS/DB Migration Check
Introductory phase or SAP
project involvement?
Arrangements for SAP project involvement in system copy project
Arrangements for SAP project involvement in system copy projectNo
Yes
continued on next slide
Customer registers an Introductory Phase
project at SAP
Customer registers an Introductory Phase
project at SAP
if requiredif required
Migration requests can be directed to the local SAP Support Organization or to the local customer SAP contact (i.e. Customer Interaction Center).
An introductory phase applies to new SAP products only. If mentioned in a system copy SAP Note, customers must register to the introductory phase before starting the OS/DB Migration. In such a case, it was decided that this particular product can only be migrated under SAP's control (providing direct support from SAP development in case of problems). Usually the introductory phase is limited to few months only.
Customer projects with required SAP involvement can be i.e. “Pilot Projects” or a “Minimized Downtime Service” (MDS) for very of large databases.
The standard OS/DB migration procedure applies also to heterogeneous system copies of ABAP Systems in “Introductory Phase Projects” or “Pilot Projects”. The project type specific activities can be seen as something over-and-above a standard migration procedure.
© SAP AG TADM70 2-4
© SAP AG 2010
Project Schedule of an OS/DB Migration (2)
Migration project schedule is drawn up together with the
migration partner and the Project Audit questionnaire is sent to SAP
Migration project schedule is drawn up together with the
migration partner and the Project Audit questionnaire is sent to SAP
SAP checks and approves the migration project schedule
(Remote Project Audit Session)SAP provides the Project Audit Report
to the customer
SAP checks and approves the migration project schedule
(Remote Project Audit Session)SAP provides the Project Audit Report
to the customer
Customer downloads or orders SAP installation software for source and
target system
Customer downloads or orders SAP installation software for source and
target system
Migration test-runsMigration test-runs
SAP OS/DB Migration Check Analysis Session
SAP OS/DB Migration Check Analysis Session
Final migration (production)Final migration (production)
SAP OS/DB Migration Check Verification Session
SAP OS/DB Migration Check Verification Session
Test of the migrated systemTest of the migrated system
Customer chooses migration partnerCustomer chooses migration partner
Continued from previous slide
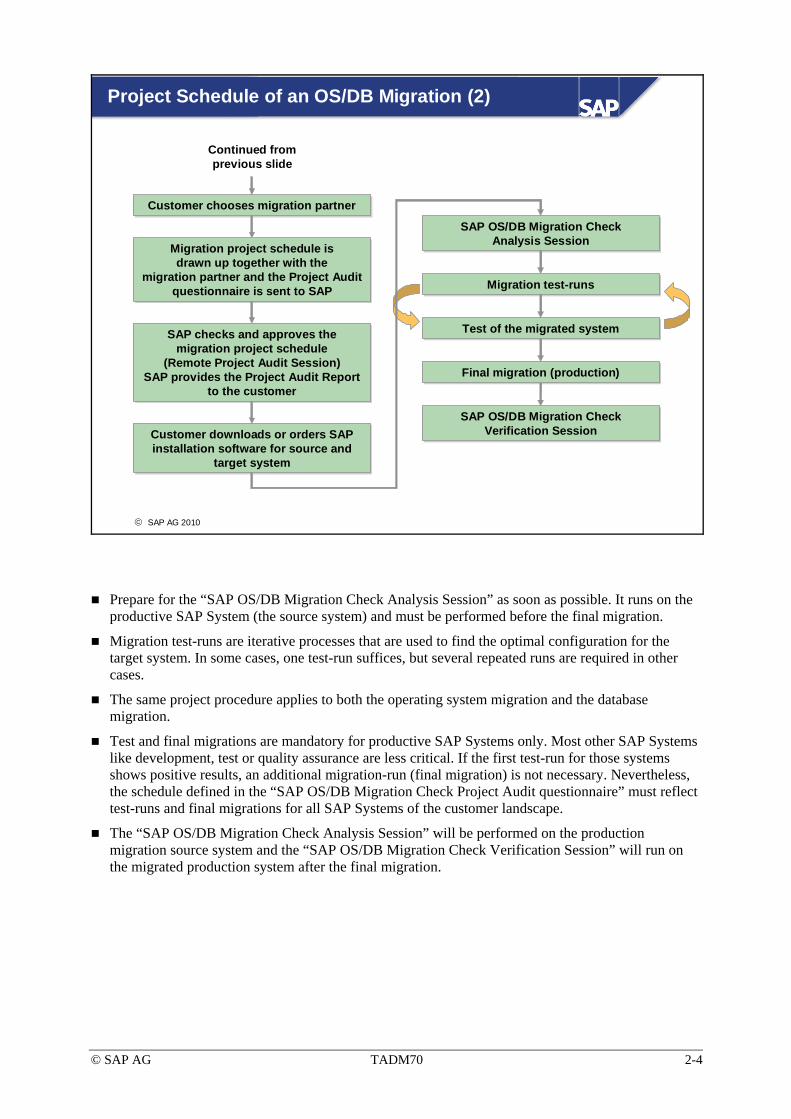
Prepare for the “SAP OS/DB Migration Check Analysis Session” as soon as possible. It runs on the productive SAP System (the source system) and must be performed before the final migration.
Migration test-runs are iterative processes that are used to find the optimal configuration for the target system. In some cases, one test-run suffices, but several repeated runs are required in other cases.
The same project procedure applies to both the operating system migration and the database migration.
Test and final migrations are mandatory for productive SAP Systems only. Most other SAP Systems like development, test or quality assurance are less critical. If the first test-run for those systems shows positive results, an additional migration-run (final migration) is not necessary. Nevertheless, the schedule defined in the “SAP OS/DB Migration Check Project Audit questionnaire” must reflect test-runs and final migrations for all SAP Systems of the customer landscape.
The “SAP OS/DB Migration Check Analysis Session” will be performed on the production migration source system and the “SAP OS/DB Migration Check Verification Session” will run on the migrated production system after the final migration.

© SAP AG TADM70 2-5
© SAP AG 2010
Time Schedule for Productive SAP Systems
SAP OS/DB Migration Check VerificationSAP OS/DB Migration Check Verification
Final migrationFinal migration
SAP OS/DB Migration Check Analysis SAP OS/DB Migration Check Analysis
Test migrationTest migration
Start of migration planningStart of migration planning
Hardware ordering / changing contractsHardware ordering / changing contracts
SAP OS/DB Migration Check Remote Project Audit SessionSAP OS/DB Migration Check Remote Project Audit Session
At least 2 weeks At least 2 weeks Extensive testsExtensive tests
As soon as possibleAs soon as possible
Four weeks after final migration
Four weeks after final migration
As soon as possible As soon as possible
Next SAP release upgradeNext SAP release upgradeRecommendation: not before 6 weeks after final migration!!!
Recommendation: not before 6 weeks after final migration!!!
You should begin planning a migration early. If you procure new hardware, there may be long delivery times.
The time which is necessary to do serious tests varies from system to system. Allow at least two weeks!
SAP recommends to wait with a SAP release upgrade on a migrated productive system for 6 weeks! First get the system stable and then do the upgrade!
SAP will schedule the “SAP OS/DB Migration Check Analysis Session” only if the “Remote Project Audit Session” was completed successfully.

© SAP AG TADM70 2-6
© SAP AG 2010
The customer and the migration partner are responsible for the schedule and the migration. SAP provides back-office supportfor the migration project.
The customer and the migration partner are responsible for the schedule and the migration. SAP provides back-office supportfor the migration project.
Migration Partners
RequirementsCertified SAP Technology Consultant for OS/DB migrations
Experience in the area of heterogeneous system copies (migrations)
SAP ABAP Dictionary knowledge
Advanced knowledge about the source database
Advanced knowledge about the target database and operating system for the migration
The above requirements refer to the technical implementation of the migration.
Application-specific tests require knowledge of the applications.
ABAP Dictionary knowledge is required for System copies based on R3LOAD. Understand consequences of missing objects on database and/or SAP ABAP Dictionary.

© SAP AG TADM70 2-7
© SAP AG 2010
Contractual Arrangements
Changes to the existing contractual agreementwith SAP
Operating system / platform
Database license
Order a SAP OS/DB Migration Check for EACH productive SAP System involved
Database or operating system specific areas in the SAP Service Marketplace may not be visible to the customer unless the contractual agreement regarding the new configuration is finalized with SAP.
The “SAP OS/DB Migration Check” is mandatory for each productive system, but not for development, quality assurance, or test systems.
A productive system can be a stand-alone ABAP system, but it can also be an ABAP Web AS with an JAVA Add-in, or an ABAP Web AS with a JAVA Web AS, each using its own database. The services are checking the parameters for ABAP and JAVA-based systems.
A heterogeneous system copy of a stand-alone JAVA system means that no ABAP system is copied in the migration project.
© SAP AG TADM70 2-8
© SAP AG 2010
Hardware Procurement
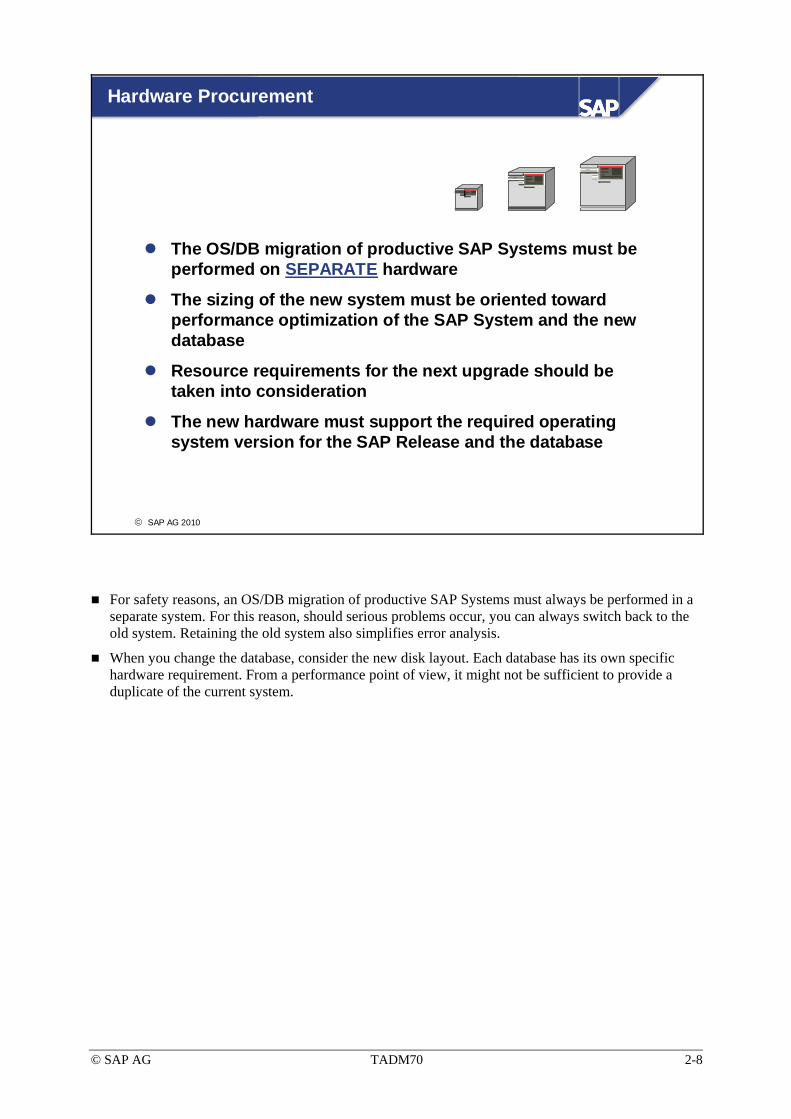
The OS/DB migration of productive SAP Systems must be performed on SEPARATE hardware
The sizing of the new system must be oriented toward performance optimization of the SAP System and the new database
Resource requirements for the next upgrade should be taken into consideration
The new hardware must support the required operating system version for the SAP Release and the database
For safety reasons, an OS/DB migration of productive SAP Systems must always be performed in a separate system. For this reason, should serious problems occur, you can always switch back to the old system. Retaining the old system also simplifies error analysis.
When you change the database, consider the new disk layout. Each database has its own specific hardware requirement. From a performance point of view, it might not be sufficient to provide a duplicate of the current system.
© SAP AG TADM70 2-9
© SAP AG 2010
Migrating a SAP System Landscape
Minimum migration count: 4
Development
1 x1 x
Quality Assurance
1 x1 x
Production
2 x2 x
System type:
1 x1 x 00 2 x2 x
Homogeneous system copy
Minimum migration count: 3
Test & final migration
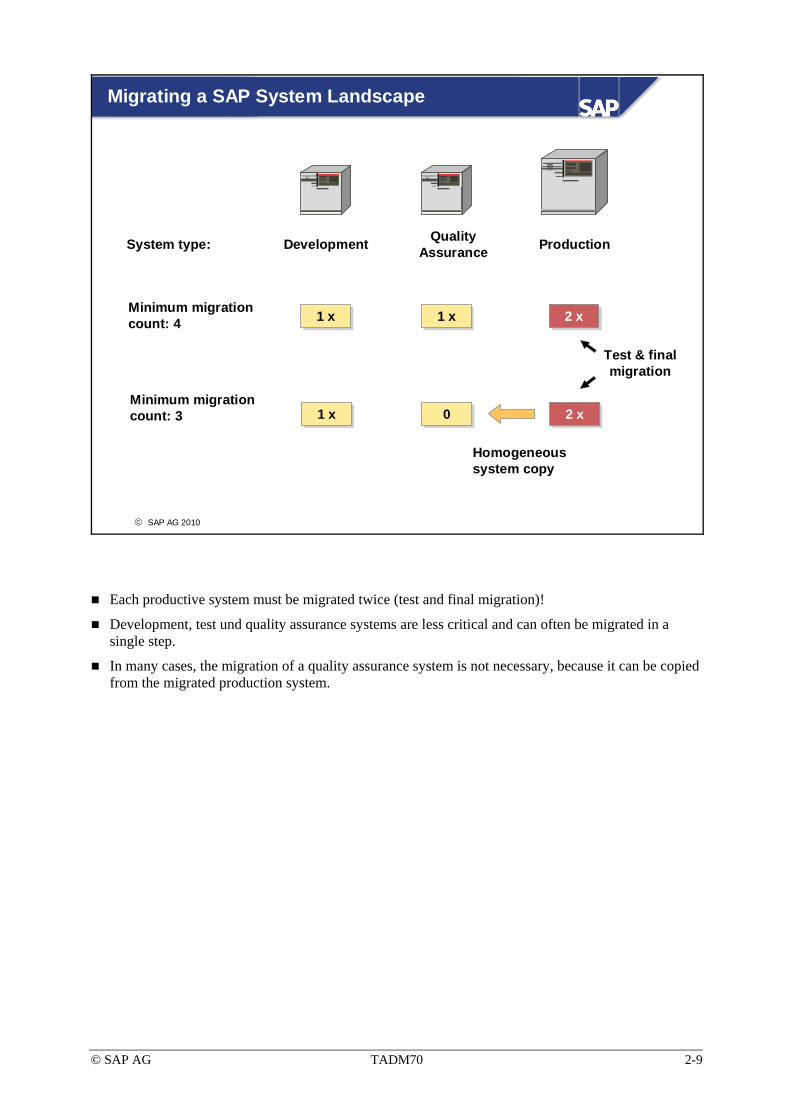
Each productive system must be migrated twice (test and final migration)!
Development, test und quality assurance systems are less critical and can often be migrated in a single step.
In many cases, the migration of a quality assurance system is not necessary, because it can be copied from the migrated production system.

© SAP AG TADM70 2-10
© SAP AG 2010
Important: The migration source of a productive SAP System must not be identical to the target system
Important: The migration source of a productive SAP System must not be identical to the target system
SAP OS/DB Migration Check Project Audit
SAP OS/DB Migration Check Project Audit QuestionnaireName of migration partner
Description of the source system(s)
Description of the target system(s)
Target dates for the test migration and the final migration
Target date for SAP OS/ DB Migration Check Analysis Session
Target date for SAP OS/DB Migration Checck Verification Session
The “SAP OS/DB Migration Check Project Audit Questionnaire” will automatically be sent from SAP to the customer, as soon as the “SAP OS/DB Migration Check” was requested.
The migration project time schedule should be created in consultation with the migration partner.
For safety reasons, SAP cannot approve any migration of a production SAP System in which the source system is deleted after the data export in order to set up the target database.
Make sure to include the dates for test and final migration steps of every SAP System, not only for productive systems.
The migration project schedule must reflect correct estimates of the complexity of the conversion, its time schedule, and planned effort.
SAP checks for the following:
• Is the migration partner technology consultant SAP-certified for migrations?
• Does the migration project schedule meet the migration requirements?
• Technical feasibility. Are hardware, operating system, SAP System, and database versions compatible with the migration tools, and is this combination supported for the target system?
The migration of an SAP System is a complex undertaking that can result in unexpected problems. For this reason, it is essential that SAP has remote access to the migrated system. Remote access is also a prerequisite for the “SAP OS/DB Migration Check”.

© SAP AG TADM70 2-11
© SAP AG 2010
SAP Migration Tools
The tool versions that are necessary to migrate a current SAP System are part of the standard installation software
In some cases specific tool or template updates are provided on the SAP Service Marketplace
Very seldom in the case of outdated system installations or rare OS/DB combinations, it might be necessary to use the Migration CD set (only for SAP Systems of 4.6D and below!)
Check the SAP System Copy Notes to get the latest update
The existing Migration CD set is as-is and will not be updated!The existing Migration CD set is as-is and will not be updated!
The migrations tools must fit to the used SAP release and kernel.
Only for those SAP installations that are running old database or operating systems (which are no longer supported by current installation software 4.6D and below), it may be necessary to order the Migration CD set. Most questions regarding tool versions are answered in the SAP System copy notes and manuals. Also check the “Product Availability Matrix” (PAM) in the SAP Service Marketplace. Please open a call at the SAP Service Marketplace if in doubt about which tools to use in certain software combinations.
In some cases it is advisable to upgrade the operating system, database or SAP release first, before performing the migration. In rare cases if can be even necessary to use intermediate systems.

© SAP AG TADM70 2-12
© SAP AG 2010
SAP OS/DB Migration Check Analysis
When:As soon as possible, after the SAP OS/DB Migration Check has been ordered and the migration project is approved by SAP
Activities:Check the production system with regard to the migration
Check SAP System and database parameters
Analyze performance in the SAP System and the DB
Make recommendations for the migration target system
The “SAP OS/DB Migration Check Analysis Session” is focused on the special aspects involved in the platform or database change. It is performed on the production SAP System with regard to the target migration system environment.
The results of the “SAP OS/DB Migration Check” are recorded in detail and provided to the customer through the SAP Service Marketplace. They also include recommendations for the migration target system.
ABAP and JAVA-based SAP Systems components will be checked.

© SAP AG TADM70 2-13
© SAP AG 2010
Required Source System Information (1)
General information:
SAP products installed (ABAP/JAVA based, others)
Installed versions of products, support packages, kernel, operating systems, databases, ...
Current system landscape (i.e. Cluster?)
How many systems are in a productive state
System migration order and time schedule
Maximum system downtimes for migration purposes
System access in case of hosting environments
It must be carefully checked that all software components can be migrated – in particular JAVA-based components!
The exact version information of each software component is necessary to be able to download/order and use the right installation software. It could be the case, that a certain Support Package Stack must be installed before a OS/DB migration can take place (i.e. certain target database features can be utilized only if the Support Packages are current). Updating Support Packages can be a serious problem in some customer environments, because of modifications, system interdependencies, or fixed update schedules.
The current system landscape must be known to have the big picture. There may be OS/DB related dependencies between certain systems which must be analyzed first.
The number of productive systems indicates the number of test and final migrations
Which systems should be migrated in which order? What is the customer time schedule (deadlines)?
When minimizing the downtime, the amount of tuning efforts that are necessary increases and much more time must be spend on it.
In case of a hosting environment, will the consultant have access to the source system (which limitations will apply)?

© SAP AG TADM70 2-14
© SAP AG 2010
Required Source System Information (2)
Technical information:Current Hardware (RAM, CPUs, disk sub-system)Size of the source databasesFree local disk space for unloading the databaseLargest tables and indexes (special treatment of large tables?)Code pages used Tables in ABAP Dictionary but not in DB or vice versaExternal files and interfacesJAVA/Perl installable for Migration Tools (customer policy)?How to transport the dump files from source to target system
The number of CPUs and information about the I/O sub system can help in determining the best number of export processes.
The sizes of the source databases indicate how long the migration will take. Next to the database size itself, the size of the largest tables will influence the export significantly. For the first test migration 10% - 15% of the source database size should be available as export file system free space.
If large tables are stored in separate locations (i.e. table spaces), should this also be retained in the target database? On some databases it can increase performance or ease database administration.
MDMP or UNICODE system? In case of AS/400 R/3 4.6C and below: is it an EBCDIC or ASCII based system?
Case 1: Table exists in database but not in the ABAP Dictionary - table will not be exported. Case 2: Table exists in ABAP Dictionary but not in database - export errors are to be expected.
How to handle external files (spool files, archives, logs, transport system files, interfaces, …) ? Which files must be copied to the target system?
The migration support tools like MIGMON and the PACKAGE SPLITTER used by SAPINST will need JAVA. The old Perl-based PACKAGE SPLITTER of R3SETUP needs Perl version 5. Because of strict software policies, customers might not allow the installation of additional software on productive systems.
If source and target system are not in the same location – which media will be available to transport the dump files?
© SAP AG TADM70 2-15
© SAP AG 2010
Required Target System Information
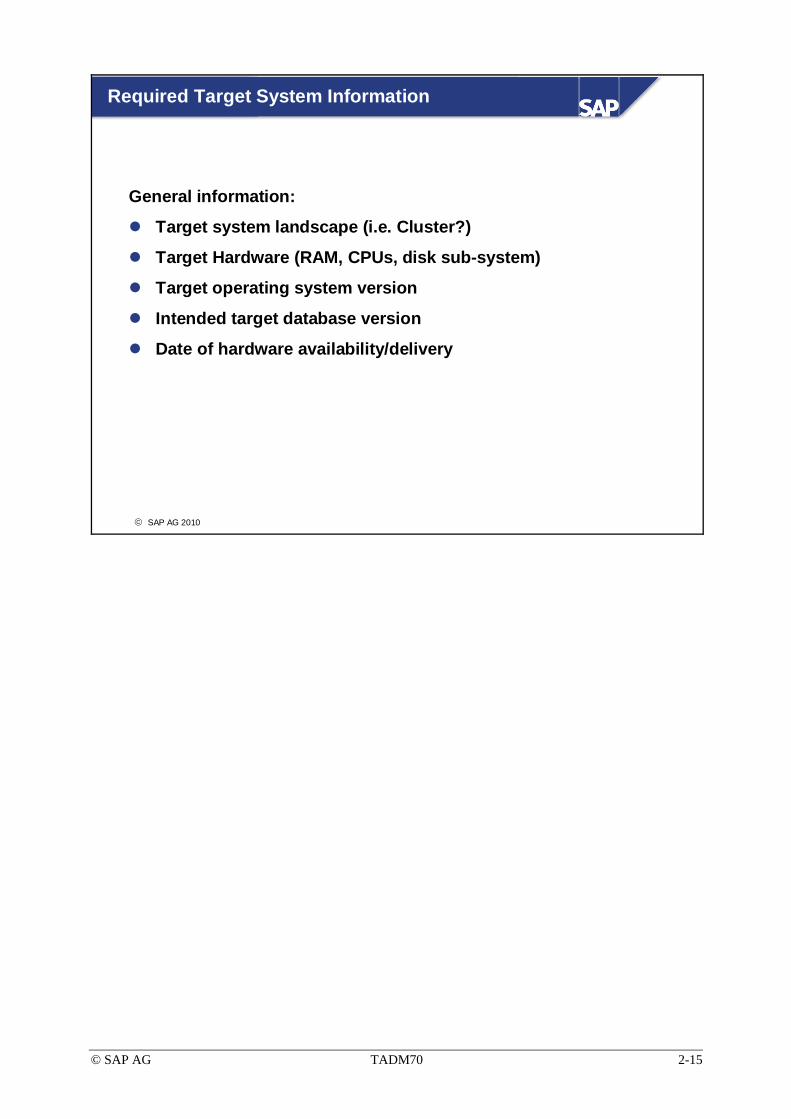
General information:
Target system landscape (i.e. Cluster?)
Target Hardware (RAM, CPUs, disk sub-system)
Target operating system version
Intended target database version
Date of hardware availability/delivery

© SAP AG TADM70 2-16
© SAP AG 2010
Migration Test Run
Procedure:
Install migration tools and prepare source system
Export data from the SAP source system
Install the SAP products on target system
Install the database software in the target system
Transport/share the data export to the target system
Generate the target database
Load the data export into the target database
Perform the follow-up tasks
Configure the test environment
Perform extensive tests on the migrated system
Generating the target database:
• Make a generous sizing of the target database, or set it to an auto extensible mode (if possible), this will prevent load errors caused by insufficient space. An analysis of disk usage cannot be performed until after the data has been loaded.
Configuring the test environment:
• RFC connections
• External interfaces
• Transport environment
• Backup
• Printer
• Archiving
• etc.

© SAP AG TADM70 2-17
© SAP AG 2010
Final Migration
Activities:
Create a cut-over plan
Perform the migration
Perform follow-up tasks
Check the system
Make a complete backup
Start production work
Check List
A cut-over plan should be created, including an activity checklist and a time schedule. Include plenty of reserve time. The migration of a production system is often performed under intense time pressure. Checklists will help you to keep track of what is to be done, and when to do it. Not all the tests and checks which were done during previous test runs must be necessarily done again in the final migration.
In most cases it makes sense to have one cut-over-plan for the technical migration, and a separate one for application related tasks.

© SAP AG TADM70 2-18
© SAP AG 2010
SAP OS/DB Migration Check Verification
When:
Around 4 weeks after the final migration
Activities:
Analyze the SAP System and database system logs
Analyze response times of critical transactions
Analyze performance bottlenecks in the SAP System and DB
Optimize SAP System and database parameters
Important: Keep the “old” production SAP Systemavailable for verification purposes!
Important: Keep the “old” production SAP Systemavailable for verification purposes!
The “SAP OS/DB Migration Check Verification Session” should be scheduled 4 weeks after the final migration of the productive SAP System. This is because several weeks are required to collect enough data for a performance analysis. The “old” production system should still be available.
ABAP and JAVA-based SAP Systems will be checked.
© SAP AG TADM70 2-19
© SAP AG 2010
The Migration Project: Unit Summary
SAP offers the SAP OS/DB Migration Check to all SAP customers who plan to perform an OS/DB migration
The customer migration project plan approved by SAP ensures that the recommended procedure is followed
The SAP OS/DB Migration Check provides the services for verifying the performance of the migrated system

© SAP AG TADM70 2-20
© SAP AG TADM70 2-21
Exercises
Unit 2: The Migration Project
At the conclusion of this exercise, you will be able to:
• Create a migration project plan and a time schedule that is compliant to SAP needs.
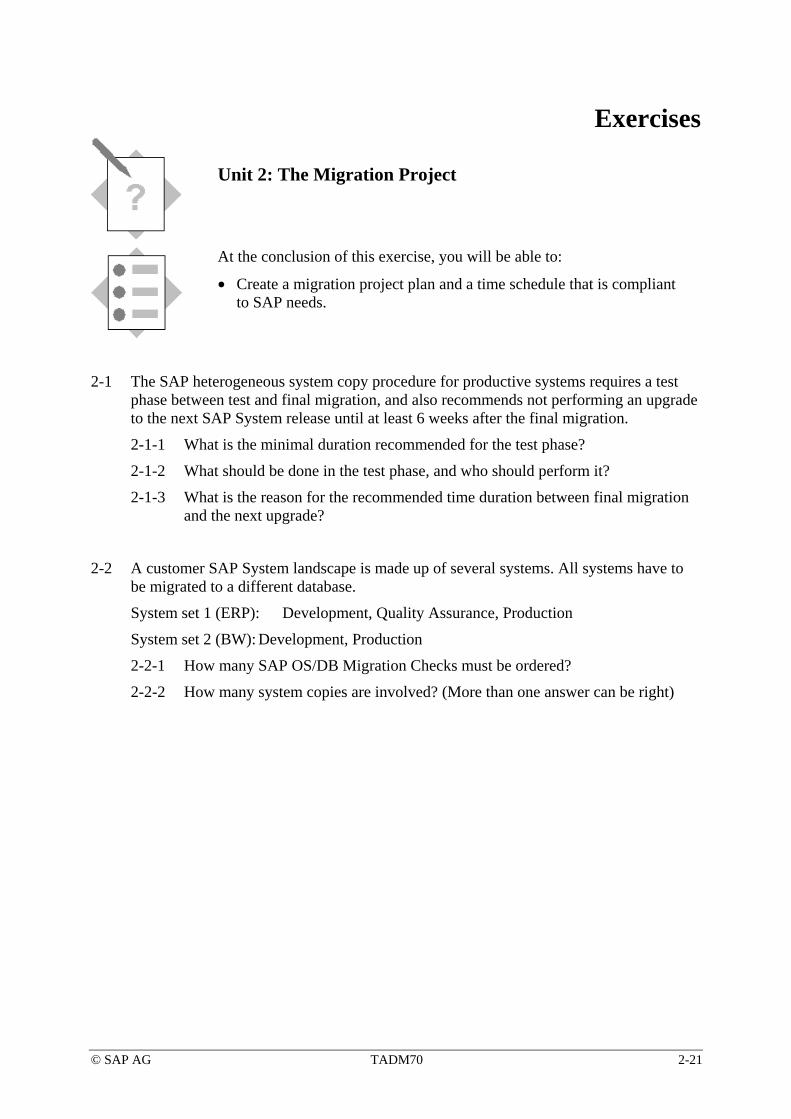
2-1 The SAP heterogeneous system copy procedure for productive systems requires a test phase between test and final migration, and also recommends not performing an upgrade to the next SAP System release until at least 6 weeks after the final migration.
2-1-1 What is the minimal duration recommended for the test phase?
2-1-2 What should be done in the test phase, and who should perform it?
2-1-3 What is the reason for the recommended time duration between final migration and the next upgrade?
2-2 A customer SAP System landscape is made up of several systems. All systems have to be migrated to a different database.
System set 1 (ERP): Development, Quality Assurance, Production
System set 2 (BW): Development, Production
2-2-1 How many SAP OS/DB Migration Checks must be ordered?
2-2-2 How many system copies are involved? (More than one answer can be right)

© SAP AG TADM70 2-22
2-3 The following facts as listed below are known in inspecting the source system of a migration (ABAP Web AS with JAVA Add-In). Please indicate for every item what the impact on the R3LOAD/JLOAD migration will be.
2-3-1 The to total size of the database is 500 GB (used space)
2-3-2 The sizes of the largest ABAP tables are 34 GB, 20 GB, 18 GB
2-3-3 The sum of all tables and index sizes of the JAVA schema does not exceed 2 GB.
2-3-4 Transaction DB02 shows two tables belonging to the ABAP schema user that only exist on the database, but not in the ABAP Dictionary.
2-4 The SAP OS/DB Migration Check sessions have three major topics. Please explain the main tasks of each session type.
2-4-1 Project Audit Session
2-4-2 Analysis Session
2-4-3 Verification Session

© SAP AG TADM70 2-23
Solutions
Unit 2: The Migration Project
2-1
2-1-1 Two weeks is the minimum amount of time to be considered between the test and final migration of a productive system.
2-1-2 The test phase should be utilized to check the migrated system regarding the most important customer tasks and business processes. End users who know their daily business very well should do the major part of the testing. Two weeks might be sufficient even in complex environments.
2-1-3 Every time a system has been copied to a different operating system and/or database, it takes some time to get familiar with it and to establish a smooth-running production environment. In the case that an upgrade immediately follows the migration, the direct cause of the problems may be hard to identify. First get the system stable and then do the upgrade!
2-2
2-2-1 System sets 1 and 2 contain productive systems. Because of this, two separate SAP OS/DB Migration Checks must be ordered.
2-2-2 System set 1: 1 x Development, 1 x Quality Assurance, 2 x Production Alternate: 1 x Development, 2 x Production, homogeneous system copy from Production to Quality Assurance. System set 2: 1 x Development, 2 x Production

© SAP AG TADM70 2-24
2-3
2-3-1 From a database size of 500 GB it can be expected, that the R3LOAD / JLOAD export will need about 10% - 15% (50 GB - 75 GB) of local disk storage.
2-3-2 The largest ABAP tables will significantly influence the amount of time necessary to export or import the database. A single R3LOAD process for each large table will improve the export and import time.
2-3-3 Because the JAVA tables will only need a little bit of time to export, this will not be critical for the overall export time.
2-3-4 R3LDCTL only reads the ABAP Dictionary. Tables that exist on the database, but not in the ABAP Dictionary, are ignored. As a consequence they are not inserted into any *.STR file. The same happens to tables belonging to the JAVA schema, but are not defined in the JAVA Dictionary. They will not be exported.
2-4
2-4-1 Project Audit Session: Checks for technical feasibility, certified migration partner, and time schedule.
2-4-2 Analysis Session: Performance analysis on source system. Returns configuration and parameter recommendations for the target system.
2-4-3 Verification Session: Performance verification on the target system after going live. Returns updated configuration and parameter recommendations.

© SAP AG TADM70 3-1
© SAP AG 2010
System Copy Methods
1 Introduction 7 R3LOAD & JLOAD Files
2 The Migration Project 8 Advanced Migration Techniques
3 System Copy Methods 9 Performing the Migration
4 SAP Migration Tools 10 Troubleshooting
5 R3SETUP / SAPINST 11 Special Projects
6 Technical Background Knowledge

© SAP AG TADM70 3-2
© SAP AG 2010
ContentsDatabase-specific and -unspecific methods for SAP homogeneous or heterogeneous system copies (OS/DB Migrations)
ObjectivesAt the end of this unit, you will be able to:
Evaluate the database-specific and -unspecific options for performing SAP homogeneous or heterogeneous system copies (OS/DB Migrations)
System Copy Methods
© SAP AG TADM70 3-3
© SAP AG 2010
Unless otherwise indicated, the following tables contain an overview about the methods for homogeneous system copies and OS/DB migrations that are approved by SAP and described in SAP Notes.
Unless otherwise indicated, the following tables contain an overview about the methods for homogeneous system copies and OS/DB migrations that are approved by SAP and described in SAP Notes.
Comment
Any Hotline or Remote Consulting effort that results from the use of a copy or migration procedure that has not been officially approved by SAP will be billed.

© SAP AG TADM70 3-4
© SAP AG 2010
R3LOAD Method
Database SAP short cut
Homogeneous system copy
Heterogeneous system copy
DB2 for OS/390 DB2 R3LOAD 1) R3LOAD
DB2 for AS/400 DB4 R3LOAD 1) R3LOAD
DB2 LUW DB6 R3LOAD 1) R3LOAD 2)
Informix INF R3LOAD 1) R3LOAD
MaxDB ADA R3LOAD 1) R3LOAD 2)
MS SQL Server MSS R3LOAD 1) R3LOAD
Oracle ORA R3LOAD 1) R3LOAD 2)
The above table shows that all SAP supported database systems can be copied to each other by using R3LOAD.
DB2 LUW = DB2 for Linux, Unix, Windows
Note:
1. The database specific methods might be faster than the R3LOAD (if released by SAP).
2. The database specific methods might be faster for an OS migration than R3LOAD (if released by SAP).

© SAP AG TADM70 3-5
© SAP AG 2010
R3LOAD Restrictions (1)
An R3LOAD homogeneous or heterogeneous system copy of SAP Systems is NOT supported in the following cases:
The PREPARE phase of an upgrade has been started (SAP release dependent)
The Incremental Table Conversion (ICNV) has been started
On earlier SAP release the PREPARE phase imports and implements ABAP Dictionary changes which cannot be unloaded consistently by R3LOAD. A complete reset of all PREPARE changes is not possible. Restarting the PREPARE phase on the migrated system will not help. If it applies to your SAP release it is mentioned in the system copy guide and/or in a corresponding SAP Note.
The Incremental Table Conversion implements database-specific methods which cannot be unloaded consistently by R3LOAD (danger for loss of data). Before using R3LOAD, finish all table conversions! The transaction ICNV should not show any entry.
© SAP AG TADM70 3-6
© SAP AG 2010
R3LOAD Restrictions (2)
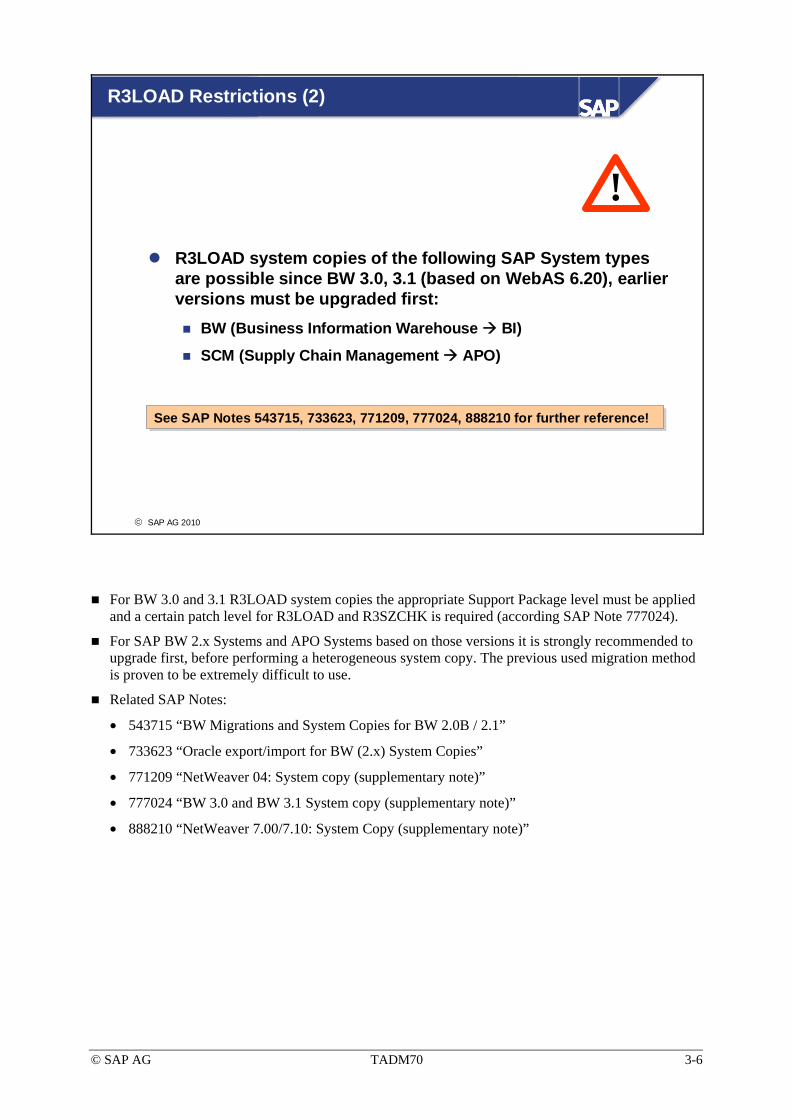
R3LOAD system copies of the following SAP System types are possible since BW 3.0, 3.1 (based on WebAS 6.20), earlier versions must be upgraded first:
BW (Business Information Warehouse BI)
SCM (Supply Chain Management APO)
See SAP Notes 543715, 733623, 771209, 777024, 888210 for further reference!See SAP Notes 543715, 733623, 771209, 777024, 888210 for further reference!
!
For BW 3.0 and 3.1 R3LOAD system copies the appropriate Support Package level must be applied and a certain patch level for R3LOAD and R3SZCHK is required (according SAP Note 777024).
For SAP BW 2.x Systems and APO Systems based on those versions it is strongly recommended to upgrade first, before performing a heterogeneous system copy. The previous used migration method is proven to be extremely difficult to use.
Related SAP Notes:
• 543715 “BW Migrations and System Copies for BW 2.0B / 2.1”
• 733623 “Oracle export/import for BW (2.x) System Copies”
• 771209 “NetWeaver 04: System copy (supplementary note)”
• 777024 “BW 3.0 and BW 3.1 System copy (supplementary note)”
• 888210 “NetWeaver 7.00/7.10: System Copy (supplementary note)”

© SAP AG TADM70 3-7
© SAP AG 2010
Database Specific System Copy Methods (ABAP)
Database SAP short cut
Homogeneous system copy *)
Heterogeneous system copy **)
DB2 for OS/390 DB2 Copy / Dump 1) -- / --
DB2 for AS/400 DB4 Backup / Restore 2) -- / --
DB2 LUW DB6 Backup / Restore 3) Backup / Restore 4)
Informix INF Backup / Restore 5) -- / --
MaxDB ADA Backup / Restore Backup / Restore 6)
MS SQL Server MSS Backup / Restore 7) -- / --
Oracle ORA Backup / Restore 8) Transportable Tablespace 9)
*) Not all methods may be supported with SAPINST. Consult related SAP Notes**) The OS/DB Migration Check is required!
Certain databases can be even migrated to other operating systems by a simple restore. However, heterogeneous system copies by database-specific methods must be approved by SAP. If in doubt contact SAP before executing such kind of OS migration. The SAP OS/DB Migration Check is required anyway!
Notes on database specific methods for ABAP based systems (make sure that the method is also valid for JAVA Add-In installations)
• 1) DB2: Copy - Database copy on the same host, Dump - Database copy to another host.
• 2) DB4: SAVLIB/RSTLIB method, see SAP Note: 585277
• 3) DB6: Database director (redirect restore) or brdb6 tools.
• 4) DB6: Cross platform restore since DB2 UDB version 8. Released for big-endian server only (AIX, HP-UX, Solaris), see SAP Note: 628156
• 5) INF: Informix Level 0 Backup, see SAP Notes: 89698, 173970.
• 6) ADA: Cross platform restore if source and target OS belongs to the same endian type. SAP Note: 962019
• 7) MSS: Detach/Attach database files, see SAP Notes: 151603, 339912
• 8) ORA: The SAPINST Backup/Restore method is released for all products. SAP Notes: 659509, 147243
• 9) ORA: Transportable Tablespace, see SAP Notes: 1035051, 1003028, 1367451
"Big-endian" means that the most significant byte has the lowest address. "Little-endian" means the opposite. Operating system types: Big-endian: AIX, HP-UX, Solaris (SPARC). Little-endian: COMPAQ TRU64, Windows, LINUX (Intel). SAP Note: 552464

© SAP AG TADM70 3-8
© SAP AG 2010
Database Specific System Copy Methods (JAVA)
SAPINST supports database-specific system copy methods since JAVA Web AS NetWeaver '04 SP13 based SAP products.
The database-specific system copy methods do replace the JLOAD part, but still needs SAPINST to adjust the target system, to collect file system application data, and SDM for deployed software components.
For restrictions check appropriate SAP Notes regarding system copies.
SAPINST runs an internal function called “Migration Tool Kit” (“Migration Controller”) to adjust the SAP JAVA target system for the new instance name, instance number, host name, etc.

© SAP AG TADM70 3-9
© SAP AG 2010
System Copy Methods: Unit Summary
Different methods are available for implementing an SAP homogeneous system copy or OS migration, depending on the database used.
In most cases, some type of Backup/Restore method can be used for a homogeneous system copy - this method is often the fastest.
With few exceptions, R3LOAD/JLOAD is used for OS migrations, but for DB migrations R3LOAD/ JLOAD must always be used!!

© SAP AG TADM70 3-10
© SAP AG TADM70 3-11
Exercises
Unit 3: System Copy Methods
At the conclusion of this exercise, you will be able to:
• Know in which cases to prefer homogeneous system copies with R3LOAD/JLOAD against database specific methods.
• Understand how to handle OS migrations with database tools.
3-1 The homogeneous copy of an ABAP system performed with database specific means is in most cases much faster than using the R3LOAD method.
3-1-1 What could be some of the reasons for using the R3LOAD method?
3-1-2 Which specific checks should be done before using R3LOAD to export the source system?
3-2 Some databases allow OS migrations of SAP systems using database specific means.
3-2-1 Is it necessary in this case to order an SAP OS/DB Migration Check for productive systems?
3-2-2 Is a test and final migration required for productive systems?
3-2-3 Must one be certified in order to perform an OS/DB migration?

© SAP AG TADM70 3-12

© SAP AG TADM70 3-13
Solutions
Unit 3: System Copy Methods
3-1
3-1-1
a) The source and target systems use the same operating system and database type but different versions.
b) The target disk layout is completely different from the source system and the database specific copy method does not allow adapting to new disk layouts.
c) If the database storage unit names include the SAP SID, the installation of the target database according the R3LOAD method will allow you to choose new names.
d) Data archiving is done in the source database and the system copy to the target system should also be used to reduce the amount of required disk space.
e) In the case that systems should be moved in or out of a MCOD database.
3-1-2 Make sure the PREPARE for the next SAP upgrade was not started (if this restriction applies to your SAP System release) and verify that the Incremental Table Conversion (ICNV) has completed.
3-2
3-2-1 It doesn’t matter which method is used to perform a heterogeneous system copy of a productive SAP ABAP System. The SAP OS/DB Migration Check is required anyway.
3-2-2 A test and a final system migration is required, when performing an SAP heterogeneous system copy.
3-2-3 Yes, an OS/DB migration certification is required to perform the system copy.

© SAP AG TADM70 3-14

© SAP AG TADM70 4-1
© SAP AG 2010
SAP Migration Tools
1 Introduction 7 R3LOAD & JLOAD Files
2 The Migration Project 8 Advanced Migration Techniques
3 System Copy Methods 9 Performing the Migration
4 SAP Migration Tools 10 Troubleshooting
5 R3SETUP / SAPINST 11 Special Projects
6 Technical Background Knowledge

© SAP AG TADM70 4-2
© SAP AG 2010
ContentsFunctional description of the SAP OS/DB migration toolsTechnical procedure for an OS/DB migration using the SAP migration tools
ObjectivesAt the end of this unit, you will be able to:
Recognize the tools that are required to perform a SAP OS/DB migration and describe their functions
SAP Migration Tools
© SAP AG TADM70 4-3
© SAP AG 2010
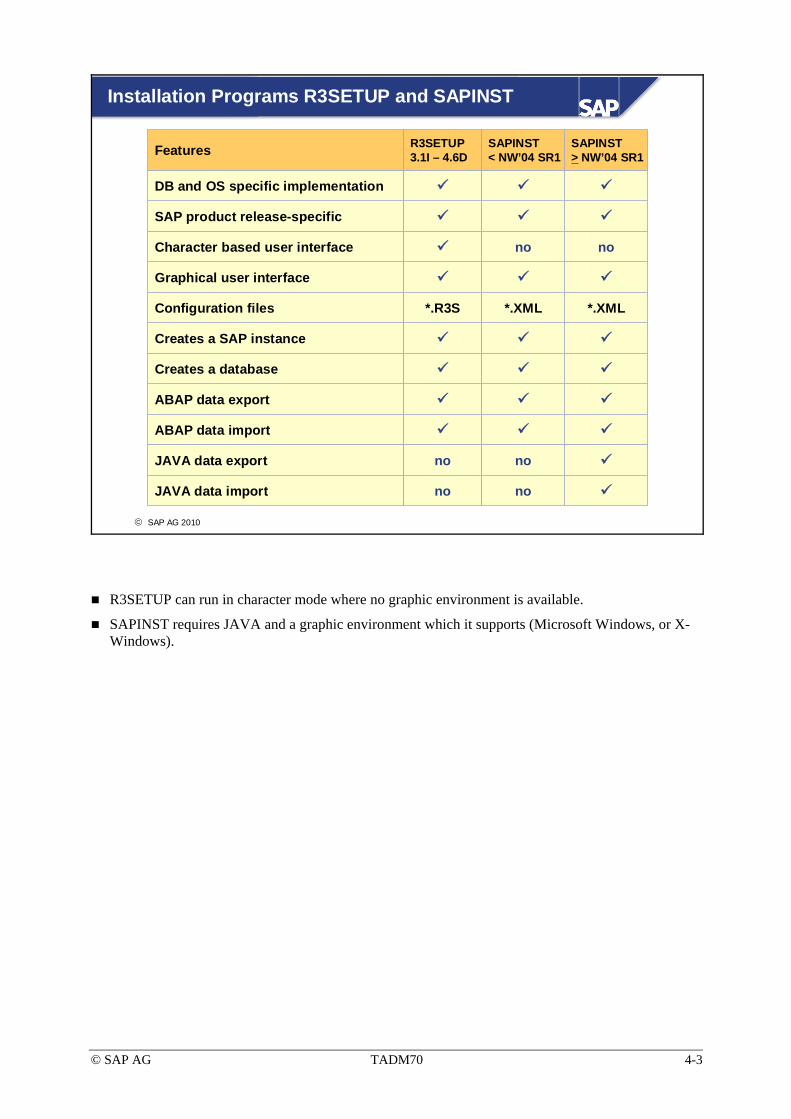
Installation Programs R3SETUP and SAPINST
ABAP data export
Creates a SAP instance
Creates a database
Graphical user interface
*.XML*.R3SConfiguration files
ABAP data import
SAP product release-specific
DB and OS specific implementation
SAPINST < NW’04 SR1
R3SETUP 3.1I – 4.6DFeatures
noCharacter based user interface
*.XML
SAPINST > NW’04 SR1
no
nonoJAVA data export
nonoJAVA data import
R3SETUP can run in character mode where no graphic environment is available.
SAPINST requires JAVA and a graphic environment which it supports (Microsoft Windows, or X-Windows).

© SAP AG TADM70 4-4
© SAP AG 2010
ABAP DDIC Export and DB Object Size Calculation
R3LDCTL (R/3 Load Control)Implementation is database-specific and platform-specificCreates table and index structures files (*.STR)Creates the view structure file (SAPVIEW.STR) Has SAP release-related built-in knowledge about specific tablesCreates database-specific DDL command templates (DDL<DBS>.TPL)
R3SZCHK (R/3 Size Check)Implementation is database-specific and platform-specificAvailable since 4.5A (R3LDCTL is used on 3.1I and 4.0B instead)Computes space requirements for tables/indexes and stores them into extent files (*.EXT).Creates target database size file (DBSIZE.XML, since 6.10)DB object size limits apply
R3LDCTL reads the ABAP Dictionary to extract the database independent table and index structures, and writes them into *.STR files.
Every version of R3LDCTL contains release-specific, built-in knowledge about the table and index structures of specific SAP internal tables, which can not be retrieved from the ABAP dictionary.
R3LDCTL creates the DDL<DBS>.TPL files for every SAP supported database. Since 6.40, additional DDL<DBS>_LRG.TPL files are generated to support system copies of large databases more easy.
As of version 4.5A, the size computation of tables and indexes are removed from R3LDCTL (R/3 Load Control) and implemented in a separate program called R3SZCHK (R/3 Size Check), which also creates the *.EXT files. R3LDCTL is still used for *.EXT file generation on 3.1I and 4.0B.
R3LDCTL/R3SZCHK can only run as a single process (no parallelization is possible). The table DDLOADD is used to store the results of the table/index size calculation.
R3SZCHK generates the target database size file DBSIZE.XML for SAPINST.
The size calculation is limited to a maximum of 1.78 GB for each database object (table or index).

© SAP AG TADM70 4-5
© SAP AG 2010
ABAP Data Export/Import
R3LOADImplementation is database- and platform-specific
Dump format is independent of database and platform
Efficient data compression
Data integrity checked by checksum calculation (> 4.5A)
Syntax check of R3LOAD control files
Parallel call of multiple R3LOAD processes is common
Restart capable for data export and import
Requires migration key for heterogeneous data import (> 4.5A)
Character set conversion (EBCDIC, Unicode)
Table splitting (> 6.40)
The standard R3LOAD implementation contains an EBCDIC/ASCII conversion of LATIN-1 character sets only. Other translations tables are available upon request. Note that 4.6C is the last R/3 version which runs on EBCDIC. Those 4.6C SAP Systems running on AS/400 (iSeries) must be converted to ASCII before an upgrade to a higher release can be possible.
Character set conversions to Unicode are implemented since R3LOAD 6.10. The conversion will be done at export time, as additional information is necessary only available in the source system.
Before the data export/import, R3LOAD performs a syntax check on the *.STR files. This prevents unintended overlaps between field names in tables and R3LOAD key words, as well as other inconsistencies.
If an R3LOAD process terminates with an error, a restart function allows the data export/import to be continued after the last successfully recorded action. Special care must be taken on restarts after OS crashes, power failures, and out of space on export disk (see the troubleshooting section).
As of Release R/3 4.5A, R3LOAD writes information about the source system into the dump file. R3LOAD checks these entries when starting the import. If source and target OS or DB are different, R3LOAD will need a valid migration key to perform the input
The parallel export/import of single tables using multiple R3LOADs processes is supported since R3LOAD 6.40.

© SAP AG TADM70 4-6
© SAP AG 2010
ABAP Migration Tools Compatibility
The SAP ABAP migration tools R3LDCTL, R3SZCHK, and R3LOAD are SAP System release dependent
ABAP kernel versions, which are backward compatible to earlier SAP System releases, also have backward compatible versions of R3LDCTL, R3SZCHK, and R3LOAD
R3SETUP and SAPINST can be updated by SAP independently from R3LDCTL, R3SZCHK, and R3LOAD to support new environments
For SAP migration tool version dependencies, see the relevant SAP Notes.
For special considerations on migration tools for Release 3.x, see the relevant SAP Notes for 3.1I.
From time to time, SAP provides updated installation software to support new operating systems or database versions for the installation of older SAP releases directly. These updates might have new installation programs, but will still use the matching R3LDCTL, R3SZCHK, R3LOAD and kernel versions for the SAP System release in charge.

© SAP AG TADM70 4-7
© SAP AG 2010
DDL Statements for Non-Standard DDIC Objects
SMIGR_CREATE_DDL (runs on the source system)Generates <TABART>.SQL files containing DDL statements for non-standard ABAP database objects (mainly BW objects)
Mandatory for all systems based on NetWeaver ’04 and later
Mandatory for BW > 3.0 and other SAP systems based on BW functionalities (i.e. APO)
RS_BW_POST MIGRATION (runs on the target system)Performs database specific adaptations after import
Mandatory for all systems based on NetWeaver ’04 and later
Mandatory for BW > 3.0 and other SAP systems based onBW functionalities (i.e. APO)
The report SMIGR_CREATE_DDL generates DDL statements for non-standard database objects and writes it into <TABART>.SQL files. The <TABART>.SQL file is used by R3LOAD to create the non-standard DB objects in the target database, bypassing the information in <PACKAGE>.STR files. Non-standard objects are using DB specific features/storage parameters, which are not part of the ABAP dictionary (mainly BW objects). Since NetWeaver '04, BW functionality is an integral part of the standard. Now customers or SAP can decide to implement BW objects on any system. The report must run to make sure that no non-standard DB objects get the wrong storage parameters on the target system.
The report RS_BW_POST_MIGRATION performs necessary adaptations because of DB specific objects in the target system (mainly BW objects). Required adaptations can be the regeneration of database specific coding, maintaining aggregate indexes, ABAP dictionary adaptations, and many others. The program should run independently, regardless of whether a <TABART>.SQL file was used or not.
The reports above are not applicable to BW 2.x versions!

© SAP AG TADM70 4-8
© SAP AG 2010
ABAP Web AS – Source System Tasks < NW ’04
Database update statistics Database update statistics
R3SETUP/SAPINST
Generate table, index and view structure files (*.STR) Generate DDL template files (*.TPL)
Generate table, index and view structure files (*.STR) Generate DDL template files (*.TPL)
R3LDCTL
Compute size of tables and indexesCompute size of tables and indexes R3LDCTL / R3SZCHK
Compute size of target database Compute size of target database R3SETUP / R3SZCHK
Split *.STR files (optional)Split *.STR files (optional) Package Splitter
Export data to dump filesExport data to dump files R3LOAD
MIGMONGenerate R3LOAD command files (*.CMD) for data exportGenerate R3LOAD command files (*.CMD) for data export
MIGMON / R3SETUP / SAPINST
Generate R3LOAD task files (*.TSK) for data export (> 6.10)Generate R3LOAD task files (*.TSK) for data export (> 6.10) R3LOAD
Exit here for MIGMON
Generate DDL statements for non-standard database objects into *.SQL files (mainly BW objects)
Generate DDL statements for non-standard database objects into *.SQL files (mainly BW objects)
SMIGR_CREATE_DDL
The slide applies to: 3.1I - NetWeaver ’04
!
Optional! Can run in client or server mode
FinishFinish
Return from MIGMON
The execution is database dependent
Depending on the database, update statistics is required before the size calculation or not.
R3SETUP/SAPINST calls R3LDCTL and R3SZCHK to generate various control files for R3LOAD and to perform the size calculation for tables and indexes.
R3LDCTL will also do the size calculation for tables and indexes on R/3 releases before 4.5A.
Once the size of each table and index has been calculated, R3SETUP/R3SZCHK computes the required database size. R3SETUP generates a DBSIZE.TPL. R3SZCHK creates a DBSIZE.XML for SAPINST.
Optional MIGMON can be used to reduce the unload and load time significantly. A special exit step was implemented to call MIGMON since SAPINST for NetWeaver '04. Earlier versions of SAP systems can benefit from MIGMON as well. Appropriate break-points must be implemented.
R3SETUP/SAPINST/MIGMON generates R3LOAD command files for every *.STR file.
SAPINST/MIGMON calls R3LOAD to generate task files for every *.STR file.
The splitting of *.STR files improves unload/load times.
For table splitting the usage of MIGMON is mandatory (6.40 and later)!
© SAP AG TADM70 4-9
© SAP AG 2010
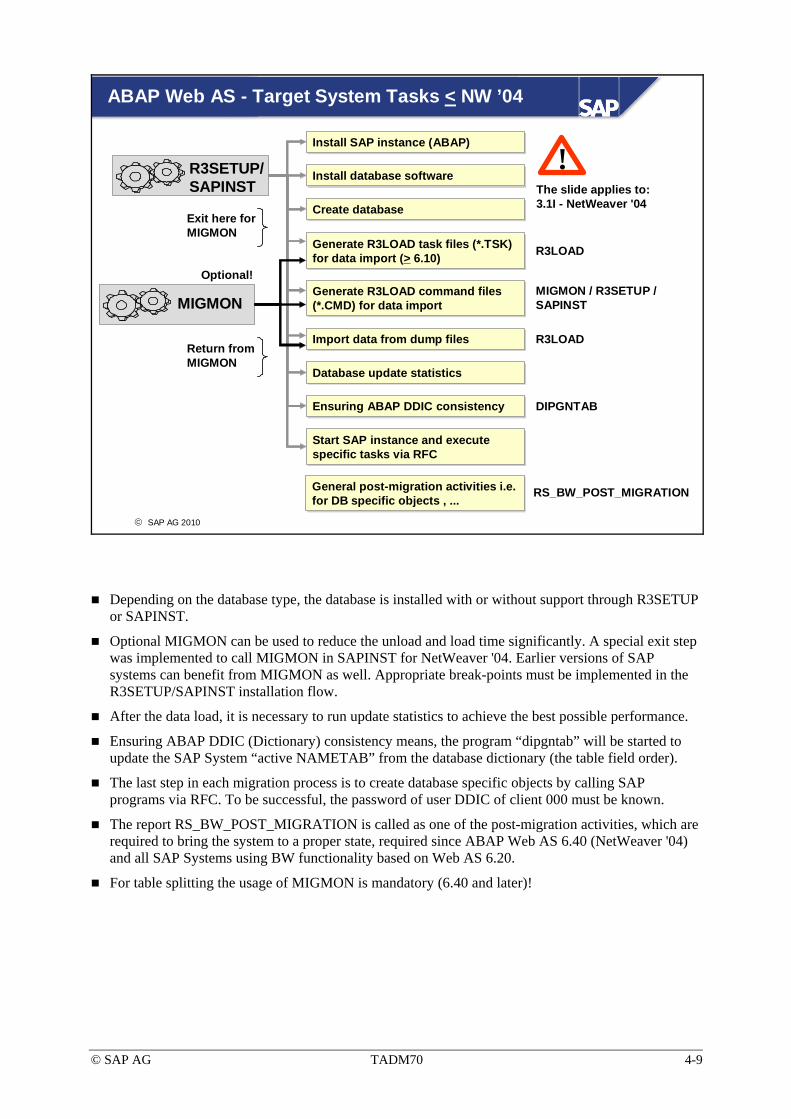
ABAP Web AS - Target System Tasks < NW ’04
Install SAP instance (ABAP)Install SAP instance (ABAP)
Install database software Install database software
Database update statisticsDatabase update statistics
R3SETUP/SAPINST
Start SAP instance and execute specific tasks via RFCStart SAP instance and execute specific tasks via RFC
Create databaseCreate database
Ensuring ABAP DDIC consistencyEnsuring ABAP DDIC consistency DIPGNTAB
MIGMONGenerate R3LOAD command files (*.CMD) for data import Generate R3LOAD command files (*.CMD) for data import
MIGMON / R3SETUP / SAPINST
Import data from dump filesImport data from dump files R3LOAD
Generate R3LOAD task files (*.TSK) for data import (> 6.10)Generate R3LOAD task files (*.TSK) for data import (> 6.10) R3LOAD
Optional!
Exit here for MIGMON
General post-migration activities i.e. for DB specific objects , ... General post-migration activities i.e. for DB specific objects , ... RS_BW_POST_MIGRATION
Return from MIGMON
The slide applies to: 3.1I - NetWeaver '04
!
Depending on the database type, the database is installed with or without support through R3SETUP or SAPINST.
Optional MIGMON can be used to reduce the unload and load time significantly. A special exit step was implemented to call MIGMON in SAPINST for NetWeaver '04. Earlier versions of SAP systems can benefit from MIGMON as well. Appropriate break-points must be implemented in the R3SETUP/SAPINST installation flow.
After the data load, it is necessary to run update statistics to achieve the best possible performance.
Ensuring ABAP DDIC (Dictionary) consistency means, the program “dipgntab” will be started to update the SAP System “active NAMETAB” from the database dictionary (the table field order).
The last step in each migration process is to create database specific objects by calling SAP programs via RFC. To be successful, the password of user DDIC of client 000 must be known.
The report RS_BW_POST_MIGRATION is called as one of the post-migration activities, which are required to bring the system to a proper state, required since ABAP Web AS 6.40 (NetWeaver '04) and all SAP Systems using BW functionality based on Web AS 6.20.
For table splitting the usage of MIGMON is mandatory (6.40 and later)!
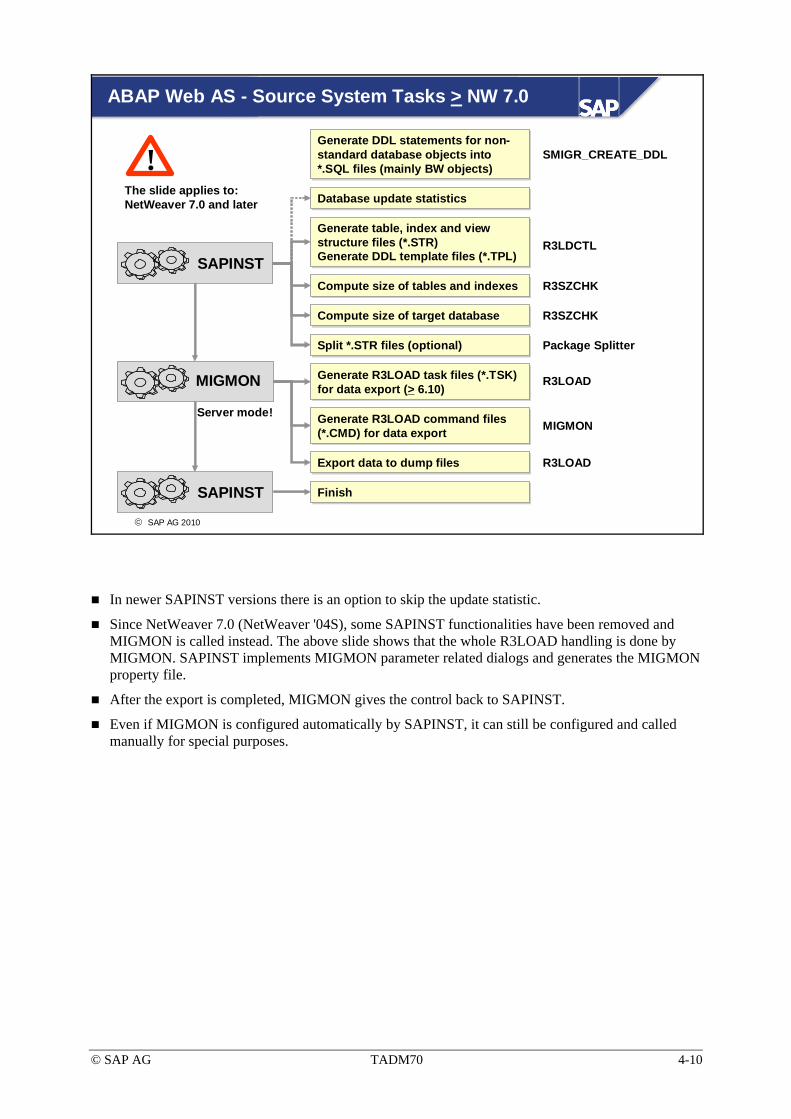
© SAP AG TADM70 4-10
© SAP AG 2010
ABAP Web AS - Source System Tasks > NW 7.0
Generate R3LOAD command files (*.CMD) for data exportGenerate R3LOAD command files (*.CMD) for data export MIGMON
Generate R3LOAD task files (*.TSK) for data export (> 6.10)Generate R3LOAD task files (*.TSK) for data export (> 6.10) R3LOAD
Generate DDL statements for non-standard database objects into *.SQL files (mainly BW objects)
Generate DDL statements for non-standard database objects into *.SQL files (mainly BW objects)
SMIGR_CREATE_DDL
Database update statistics Database update statistics
SAPINST
Generate table, index and view structure files (*.STR) Generate DDL template files (*.TPL)
Generate table, index and view structure files (*.STR) Generate DDL template files (*.TPL)
R3LDCTL
Compute size of tables and indexesCompute size of tables and indexes R3SZCHK
Compute size of target database Compute size of target database R3SZCHK
Split *.STR files (optional)Split *.STR files (optional) Package Splitter
Export data to dump filesExport data to dump files R3LOAD
MIGMON
The slide applies to: NetWeaver 7.0 and later
!
SAPINST FinishFinish
Server mode!
In newer SAPINST versions there is an option to skip the update statistic.
Since NetWeaver 7.0 (NetWeaver '04S), some SAPINST functionalities have been removed and MIGMON is called instead. The above slide shows that the whole R3LOAD handling is done by MIGMON. SAPINST implements MIGMON parameter related dialogs and generates the MIGMON property file.
After the export is completed, MIGMON gives the control back to SAPINST.
Even if MIGMON is configured automatically by SAPINST, it can still be configured and called manually for special purposes.
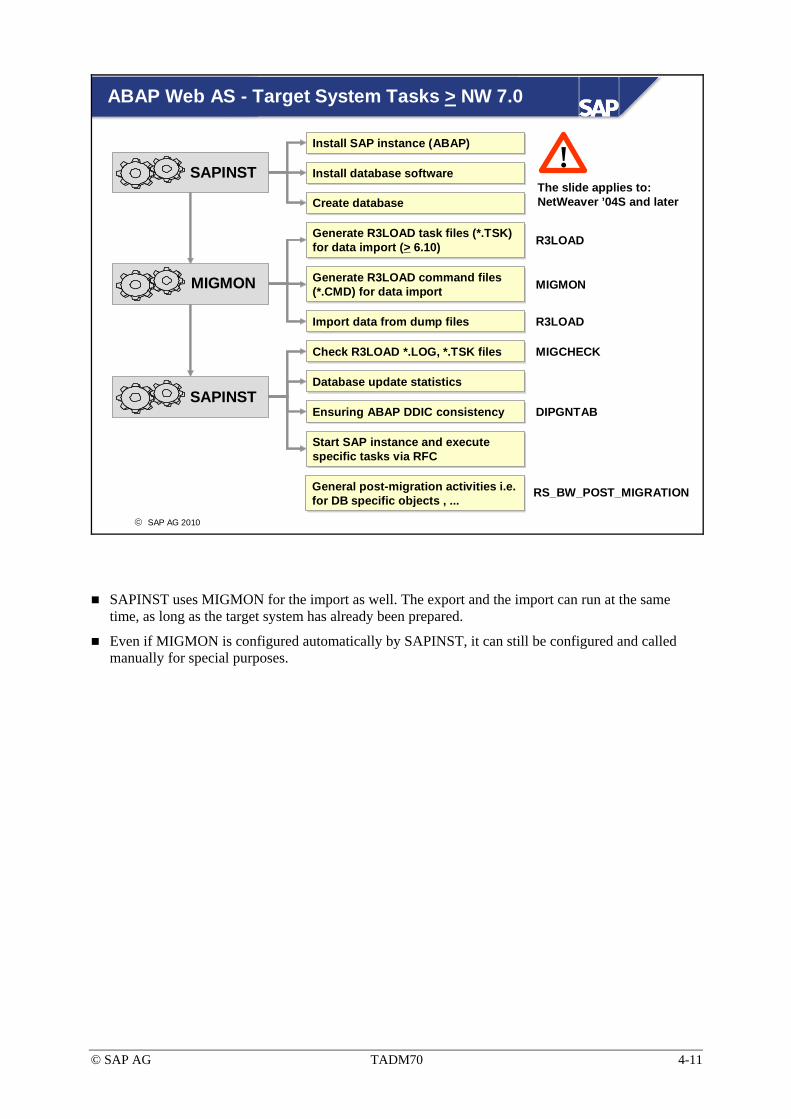
© SAP AG TADM70 4-11
© SAP AG 2010
ABAP Web AS - Target System Tasks > NW 7.0
Install SAP instance (ABAP)Install SAP instance (ABAP)
Install database software Install database software
Database update statisticsDatabase update statistics
SAPINST
Start SAP instance and execute specific tasks via RFCStart SAP instance and execute specific tasks via RFC
Create databaseCreate database
Ensuring ABAP DDIC consistencyEnsuring ABAP DDIC consistency DIPGNTAB
MIGMON Generate R3LOAD command files (*.CMD) for data import Generate R3LOAD command files (*.CMD) for data import MIGMON
Import data from dump filesImport data from dump files R3LOAD
Generate R3LOAD task files (*.TSK) for data import (> 6.10)Generate R3LOAD task files (*.TSK) for data import (> 6.10) R3LOAD
General post-migration activities i.e. for DB specific objects , ... General post-migration activities i.e. for DB specific objects , ... RS_BW_POST_MIGRATION
SAPINST
Check R3LOAD *.LOG, *.TSK filesCheck R3LOAD *.LOG, *.TSK files MIGCHECK
The slide applies to: NetWeaver ’04S and later
!
SAPINST uses MIGMON for the import as well. The export and the import can run at the same time, as long as the target system has already been prepared.
Even if MIGMON is configured automatically by SAPINST, it can still be configured and called manually for special purposes.

© SAP AG TADM70 4-12
© SAP AG 2010
ABAP Web AS - Export Directories and Files
<install directory><install directory>
<PACKAGE>.CMD<PACKAGE>.CMD
<PACKAGE>.TSK<PACKAGE>.TSK
<PACKAGE>.LOG<PACKAGE>.LOG
DATADATADBDB
ADAADA DB2DB2 MSSMSSINFINFDB4DB4 DB6DB6 ORAORA
LABEL.ASCLABEL.ASC
<PACKAGE>.EXT<PACKAGE>.EXT
DDL<DBS>.TPLDDL<DBS>.TPL
<PACKAGE>.TOC<PACKAGE>.TOC
<PACKAGE>.STR<PACKAGE>.STR
<PACKAGE>.<nnn><PACKAGE>.<nnn>
DBSIZE.*DBSIZE.*
<TABART>.SQL<TABART>.SQL Since NetWeaver ’04 or BW-based systems since 6.20
<dump directory> / ABAP<dump directory> / ABAP JAVAJAVA
<dump directory><dump directory>
<TABLE>-#.WHR<TABLE>-#.WHRTable splitting sinceR3LOAD 6.40
Directory
File
R3SETUP and SAPINST automatically creates the shown directory structure on the named dump file system. During the export procedure, the files are then copied to the specified directory structures.
Since NetWeaver 7.0 the dump directory contains an ABAP and/or a JAVA subdirectory to store the exports into one location, but separated by name.
The *.STR, *.TOC and the dump files are stored in the DATA directory. All *.EXT files are stored in the corresponding database subdirectory. Under UNIX, the directory names are case sensitive.
The <TABART>.SQL files exists only, if the report SMIGR_CREATE_DDL created them and they were copied to the database subdirectory (automatically by SAPINST, or manually according the system copy instructions).
Example target database: Oracle *.STR, *.TOC, and *.<nnn> files are stored in <dump directory>/DATA *.EXT files and the target database size file DBSIZE.* are stored in <dump directory>/DB/ORA The DDLORA.TPL file is stored in <dump directory>/DB
At import time, R3SETUP and SAPINST will read the content of file LABEL.ASC to verify the dump directory location.
The *.WHR files do only exist if the optional table splitting was used.

© SAP AG TADM70 4-13
© SAP AG 2010
JAVA Data Export/Import
JLOADNetWeaver version specific
Available since NetWeaver ’04 SR1
Dump format is independent of database and operating system
Exports JAVA meta data (dictionary definitions) and table data
Efficient data compression
Data integrity checked by checksum calculation
Restart capable for data export and import
Multiple JLOAD processes can run simultaneously (since 7.02)
Table splitting (since 7.02)
As of NetWeaver '04, JAVA data is stored in a database, but there are still JAVA applications storing persistent data in the file system. JLOAD deals with database data only. File system data is covered by SAPINST functionality.
JLOAD is not designed to be a stand-alone tool. For migrating a JAVA-based SAP system, SAPINST will need to perform additional steps which are version and installed software components specific.
Unlike R3LOAD which exports only table data, JLOAD can export the dictionary definitions and the table data into dump files.
JLOAD writes its data in a format that is independent of database and platform. This format can be read and processed on all platforms supported by SAP.
If JLOAD terminates with an error, a restart function allows the data export/import to be continued after the last successfully recorded action.
Before NetWeaver 7.02 one single JLOAD process did the whole export or import. Starting with 7.02, multiple JLOAD processes can run simultaneously.
As of SAPINST for NetWeaver 7.02 package and table splitting is available for JLOAD.
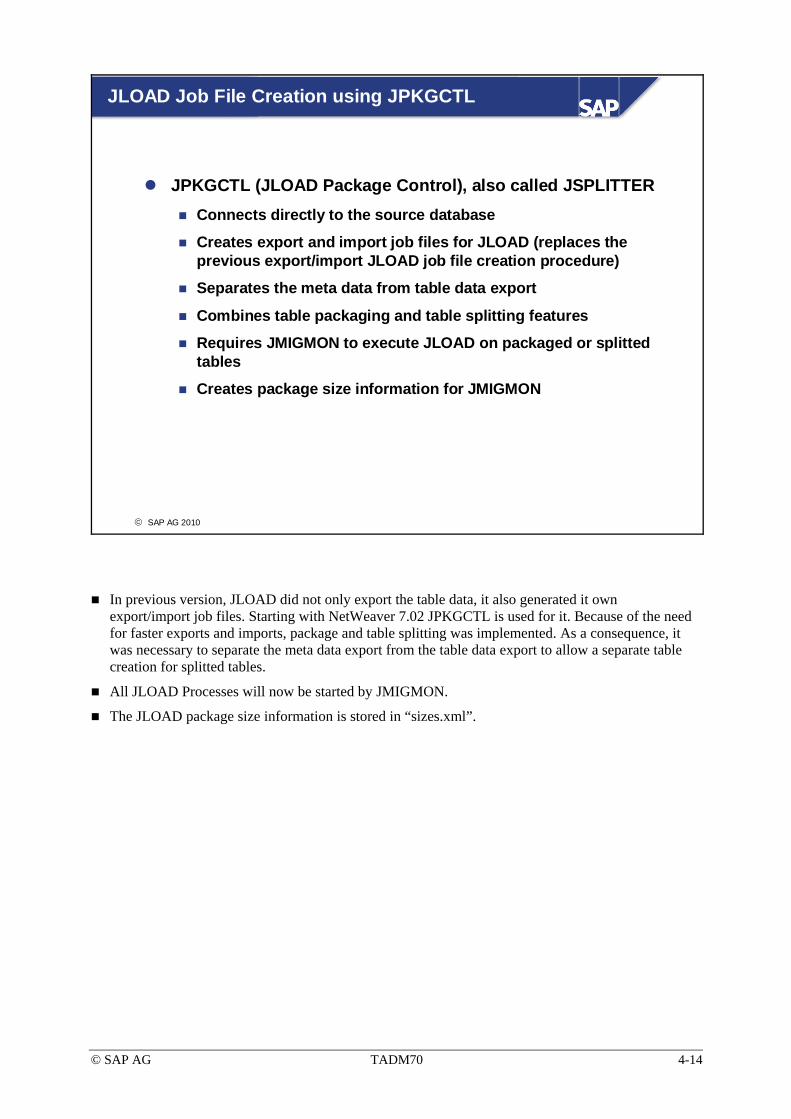
© SAP AG TADM70 4-14
© SAP AG 2010
JLOAD Job File Creation using JPKGCTL
JPKGCTL (JLOAD Package Control), also called JSPLITTERConnects directly to the source database
Creates export and import job files for JLOAD (replaces the previous export/import JLOAD job file creation procedure)
Separates the meta data from table data export
Combines table packaging and table splitting features
Requires JMIGMON to execute JLOAD on packaged or splitted tables
Creates package size information for JMIGMON
In previous version, JLOAD did not only export the table data, it also generated it own export/import job files. Starting with NetWeaver 7.02 JPKGCTL is used for it. Because of the need for faster exports and imports, package and table splitting was implemented. As a consequence, it was necessary to separate the meta data export from the table data export to allow a separate table creation for splitted tables.
All JLOAD Processes will now be started by JMIGMON.
The JLOAD package size information is stored in “sizes.xml”.
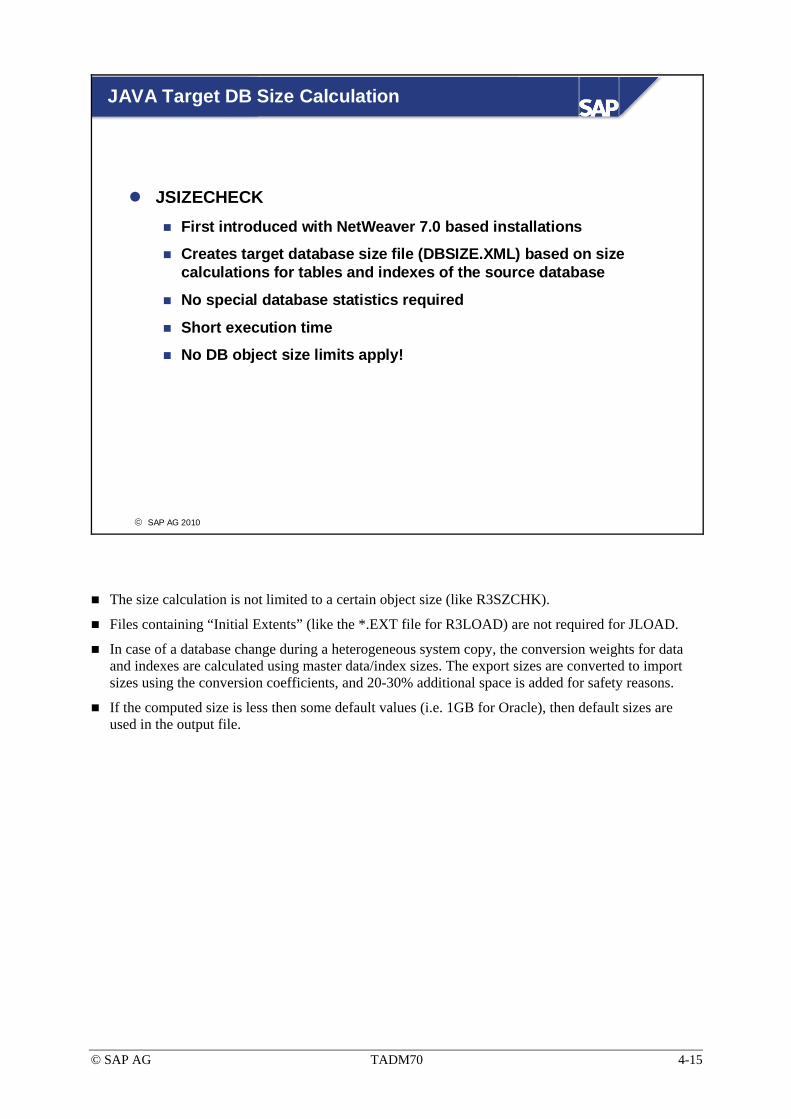
© SAP AG TADM70 4-15
© SAP AG 2010
JAVA Target DB Size Calculation
JSIZECHECKFirst introduced with NetWeaver 7.0 based installations
Creates target database size file (DBSIZE.XML) based on size calculations for tables and indexes of the source database
No special database statistics required
Short execution time
No DB object size limits apply!
The size calculation is not limited to a certain object size (like R3SZCHK).
Files containing “Initial Extents” (like the *.EXT file for R3LOAD) are not required for JLOAD.
In case of a database change during a heterogeneous system copy, the conversion weights for data and indexes are calculated using master data/index sizes. The export sizes are converted to import sizes using the conversion coefficients, and 20-30% additional space is added for safety reasons.
If the computed size is less then some default values (i.e. 1GB for Oracle), then default sizes are used in the output file.

© SAP AG TADM70 4-16
© SAP AG 2010
Flow Diagram JAVA Add-In / JAVA System Copy
JAVA Add-InJAVA System
Export ABAP System
Export JAVA SystemExport JAVA System
Import ABAP System
Central System
Install JAVA System
Distributed System
Install DB schemaon DB instance host
Install JAVA System on CI Host
Import JAVA System
JAVA Add-In
Import JAVA System
Central System
Install JAVA System
Distributed System
Install DB on DB instance host
Install JAVA System on CI Host
Prepare CI host
JAVA System
DB=Database
CI=Central Instance

© SAP AG TADM70 4-17
© SAP AG 2010
JAVA Web AS - Source System Tasks NW ’04 / ’04S
SAPINST
Compute size of tables and indexes and create DBSIZE.XMLCompute size of tables and indexes and create DBSIZE.XML JSIZECHECK > NW ’04S
Collect SDM file system components into SDMKIT.JARCollect SDM file system components into SDMKIT.JAR SDM
Archive application specific data stored in the file system (*.SAR)Archive application specific data stored in the file system (*.SAR) SAPINST (SAPCAR)
Export data to dump filesExport data to dump files JLOAD
Export ABAP instanceExport ABAP instance If JAVA Add-In > NW ’04S
SAPINST Export ABAP instanceExport ABAP instance If JAVA Add-In NW ’04
Note: The above graphic describes general steps which are important for a JAVA Web AS system copy. The steps can vary in their order.
The JSIZECHECK is called to create the DBSIZE.XML files for all target databases where this file is needed. The log files for JSIZECHECK can be found in the installation directory.
For applications storing their persistent data in the file system, SAPINST collects the files into SAPCAR archives.
The software deployment manager (SDM) is called to put its file system components (incl. SDM repository) into the SDMKIT.JAR file.
JLOAD is called to export the JAVA meta and table data.
In NW ’04 SAPINST must be called twice. One time for the ABAP export and the second time for the JAVA part.
Since NW ’04S SAPINST provides a selection for JAVA Add-In which exports the ABAP and the JAVA part in one single step.

© SAP AG TADM70 4-18
© SAP AG 2010
JAVA Web AS - Target System Tasks NW ’04 / ’04S
Install JAVA Web AS(J2EE engine / Central Services)Install JAVA Web AS(J2EE engine / Central Services)
Install database software (if not an Add-In installation)Install database software (if not an Add-In installation)
SAPINST
Create database or extend existing database (Add-In installation)Create database or extend existing database (Add-In installation)
Install SDM and deploy file system software components from SDMKIT.JAR
Install SDM and deploy file system software components from SDMKIT.JAR
SDM
Load JAVA exportLoad JAVA export JLOAD
Restore application from archive files (*.SAR) into file systemRestore application from archive files (*.SAR) into file system SAPINST (SAPCAR)
Install ABAP instanceInstall ABAP instance If JAVA Add-In > NW ’04S
Load ABAP exportLoad ABAP export If JAVA Add-In > NW ’04S
SAPINST Install and load ABAP instanceInstall and load ABAP instance If JAVA Add-In NW ’04
Note: The above graphic describes general steps which are important for a JAVA Web AS system copy. The steps can vary in their order.
The database software installation is only required in cases where a JAVA Web AS is installed using its own database, opposed to an JAVA Add-in installation into an existing ABAP database.
JLOAD is called to load the database.
SDM file system software components are re-installed (re-deployed).
Applications specific data is restored from SAPCAR archives.
Various post-migration tasks must be done, to bring the system to a proper state.
Since NW ’04S SAPINST provides a selection for JAVA Add-In which imports the ABAP and the JAVA part in one single step.

© SAP AG TADM70 4-19
© SAP AG 2010
JAVA Web AS - Source System Tasks - JPKGCTL
SAPINST Compute size of tables and indexes and create DBSIZE.XMLCompute size of tables and indexes and create DBSIZE.XML JSIZECHECK
Collect SDM file system components into SDMKIT.JARCollect SDM file system components into SDMKIT.JAR
SDM (disappears in > 7.10)
Archive application specific data stored in the file system (*.SAR)Archive application specific data stored in the file system (*.SAR)
SAPINST (SAPCAR) (disappears in > 7.10)
Create JLOAD job files and split them into packages. Optional: table splitting
Create JLOAD job files and split them into packages. Optional: table splitting
JPKGCTL (JSPLITTER)
Export data into dump files, run multiple JLOADs in parallelExport data into dump files, run multiple JLOADs in parallel JLOAD
Export ABAP instanceExport ABAP instance If JAVA Add-In
JMIGMON
Final tasksFinal tasks
SAPINST
The slide applies to NetWeaver versions using JPKGCTL (i.e. NW 7.02)
Note: The above graphic describes general steps which are important for a JAVA Web AS system copy. The steps can vary in their order.
The JSIZECHECK is called to create the DBSIZE.XML files for all target databases where this file is needed. The log files for JSIZECHECK can be found in the installation directory.
JPKGCTL distributes the JAVA tables to package files (job files) and can optionally split tables.
JMIGMON calls JLOAD to export the JAVA table data.
For applications storing their persistent data in the file system, SAPINST collects the files into SAPCAR archives. Since 7.10 not required anymore.
The software deployment manager (SDM) is called to put its file system components (incl. SDM repository) into the SDMKIT.JAR file. Since 7.10 not required anymore.
The JPKGCTL/JMIGMON is active only if the environment variable “JAVA_JMIGMON_ENABLED=TRUE” was set before starting SAPINST 7.02. If the environment variable was not set, the export looks like in NW ‘04S. Later versions of SAPINST might user JPKGCTL/JMIGMON by default.

© SAP AG TADM70 4-20
© SAP AG 2010
JAVA Web AS - Target System Tasks - JPKGCTL
Install JAVA Web AS(J2EE engine / Central Services)Install JAVA Web AS(J2EE engine / Central Services)
Install database software Install database software
SAPINSTCreate databaseCreate database
Install SDM and deploy file system software components from SDMKIT.JAR
Install SDM and deploy file system software components from SDMKIT.JAR
SDM(disappears in > 7.10)
Import data, run multiple JLOADs in parallelImport data, run multiple JLOADs in parallel JLOAD
Restore application from archive files (*.SAR) into file systemRestore application from archive files (*.SAR) into file system
SAPINST (SAPCAR) (disappears in > 7.10)
JMIGMON
SAPINST
Install ABAP instanceInstall ABAP instance If JAVA Add-In
Load ABAP export Load ABAP export If JAVA Add-In
The slide applies to NetWeaver versions using JPKGCTL (i.e. NW 7.02)
Note: The above graphic describes general steps which are important for a JAVA Web AS system copy. The steps can vary in their order.
SDM file system software components are re-installed (re-deployed). Since 7.10 not required anymore.
JLOAD is called to load the database.
Applications specific data is restored from SAPCAR archives. Since 7.10 not required anymore.
Various post-migration tasks must be done, to bring the system to a proper state.
The JPKGCTL/JMIGMON is active only if the environment variable “JAVA_JMIGMON_ENABLED=TRUE” was set before starting SAPINST 7.02. If the environment variable was not set, the import looks like in NW ‘04S. Later versions of SAPINST might user JMIGMON by default.

© SAP AG TADM70 4-21
© SAP AG 2010
<dump directory>/JAVA<dump directory>/JAVA
JAVA Web AS - Export Directories and Files
APPSAPPS
EXPORT_<PACKAGE>.XML
EXPORT_<PACKAGE>.XML
JDMPJDMP
LABEL.ASCLABEL.ASC
EXPDMP_<PACKAGE>.<nnn>
EXPDMP_<PACKAGE>.<nnn>
SDMSDM
LABEL.ASCLABEL.ASC
SDMKIT.JARSDMKIT.JAR
SOURCE.PROPERTIESSOURCE.PROPERTIES
LABEL.ASCLABEL.ASC
LABELIDX.ASCLABELIDX.ASC
Directory
File
Optional directory
Optional file
ADSADS PORTALPORTALKMKM ……
*.SAR*.SAR
LABEL.ASCLABEL.ASC
DBDB
ADAADA ORAORA
DBSIZE.XMLDBSIZE.XML
<install directory><install directory>
*.LOG*.LOG
*.STA*.STA
IMPORT_<PACKAGE>.XML
IMPORT_<PACKAGE>.XML
*.STAT.XML*.STAT.XML
sizes.xmlsizes.xml
<dump directory><dump directory>
ABAPABAP
The JLOAD.LOG, *_<PACKAGE>.LOG and *.STAT.XML files will be created in the SAPINST installation directory.
The *_<PACKAGE>.STA files are in the SAPINST installation directory or in /usr/sap/<SAP SID>/<instance>/j2ee/sltools. “
The “SOURCE.PROPERTIES” file contains information that is used to create the central instance on the target system.
Directories: Applications (APPS), DB, JLOAD Dump (JDMP), Software Deployment Manager (SDM)
The DB sub-directories contain the target database size files created by JSIZECHECK (since SAPINST for NetWeaver 7.0)
The APPS directory holds archives from applications storing their persistent data in the file system. The subdirectories and files are only created if the application is installed and known by SAPINST, otherwise application specific directives must be performed, to copy the required files to the target system (see respective SAP Notes). Examples for applications are: ADS (Adobe Document Services), PORTAL (SAP Portal), KM (Content Management and Collaboration)
The APPS and SDM directory may disappear in future releases as no JAVA relevant persistent data is stored in the file system anymore.

© SAP AG TADM70 4-22
© SAP AG 2010
Changes in NetWeaver 7.10 and later
No Software Deployment Manager (SDM) used anymore
No JAVA application data in file system
JLOAD is able to export the persistent data standalone
JLOAD package and table splitting features available i.e. for NetWeaver 7.02, but not necessarily for 7.10
Since NetWeaver 7.10 the Software Deployment Manager (SDM) using a file system based repository, is not used anymore. The repository is now stored in the database and can be exported with JLOAD.
JAVA applications were changed to store no persistent data in the file system. As a result SAPINST does not need to collect application files for system copies anymore.
As NetWeaver 7.10 (released for certain SAP products only) was available before SAPINST 7.02, JLOAD package and table splitting is not available for this version. Releases using SAPINST functionality based on 7.02 and higher may provide these features later on. Please check the system copy guides and SAP Notes for updates.

© SAP AG TADM70 4-23
© SAP AG 2010
SAP Migration Tools: Unit Summary
In the case of an SAP ABAP system copy, the installation programs R3SETUP/SAPINST calls R3LDCTL and R3LOAD to unload the database structures and the data. R3SZCHK is invoked to calculate the size of tables and indexes for the target database. The resulting values are used to compute the ABAP-related size of the target database. In the target system, R3LOAD is used to re-load the database.
In the case of an SAP JAVA system copy, the installation program SAPINST archives application data from the file system (if any) and calls JLOAD to unload the database structures and the data. JSIZECHECK is executed to calculate the JAVA-related size of the target database. In the target system, JLOAD re-loads the database, and the archived data will be extracted (if any).

© SAP AG TADM70 4-24
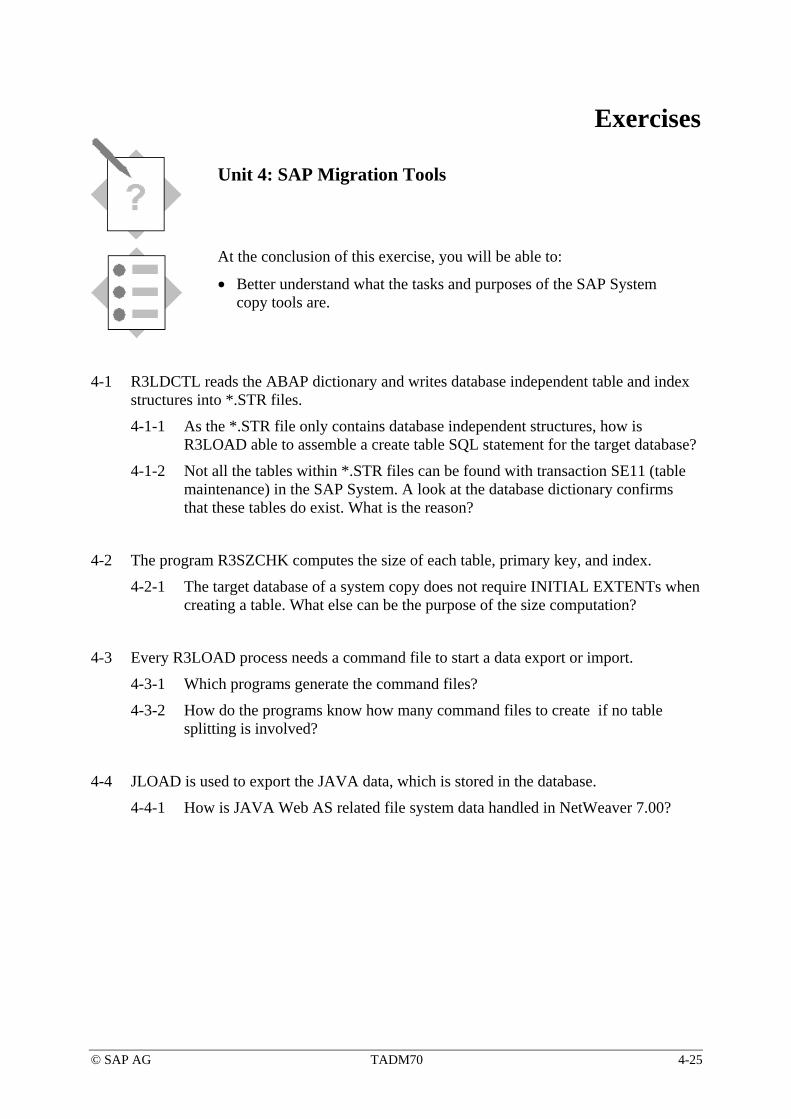
© SAP AG TADM70 4-25
Exercises
Unit 4: SAP Migration Tools
At the conclusion of this exercise, you will be able to:
• Better understand what the tasks and purposes of the SAP System copy tools are.
4-1 R3LDCTL reads the ABAP dictionary and writes database independent table and index structures into *.STR files.
4-1-1 As the *.STR file only contains database independent structures, how is R3LOAD able to assemble a create table SQL statement for the target database?
4-1-2 Not all the tables within *.STR files can be found with transaction SE11 (table maintenance) in the SAP System. A look at the database dictionary confirms that these tables do exist. What is the reason?
4-2 The program R3SZCHK computes the size of each table, primary key, and index.
4-2-1 The target database of a system copy does not require INITIAL EXTENTs when creating a table. What else can be the purpose of the size computation?
4-3 Every R3LOAD process needs a command file to start a data export or import.
4-3-1 Which programs generate the command files?
4-3-2 How do the programs know how many command files to create if no table splitting is involved?
4-4 JLOAD is used to export the JAVA data, which is stored in the database.
4-4-1 How is JAVA Web AS related file system data handled in NetWeaver 7.00?

© SAP AG TADM70 4-26

© SAP AG TADM70 4-27
Solutions
Unit 4: SAP Migration Tools
4-1
4-1-1 R3LDCTL creates DDL<DBS>.TPL template files, which contain all the necessary information to assemble a create table SQL statement for the target database. Information from *.STR and *.EXT files are used to fill the table or index specific part of the statement.
4-1-2 Tables that made up the ABAP dictionary itself, or used by internal kernel functions, can not be viewed with standard dictionary transactions. R3LDCTL contains a built-in knowledge about these tables and can write their structures directly into the *.STR files.
4-2
4-2-1 The sizes of tables and indexes are used to compute the amount of disk space that will be required to create the target database. The Package Splitters rely on size information from the *.EXT files.
4-3
4-3-1 The programs R3SETUP, SAPINST or MIGMON create the command files.
4-3-2 Command files are created for every *.STR file that can be found.
4-4
4-4-1 The installed software components must be recognized by SAPINST 7.00 or by the tools which are called from it. Most of the file system data is collected in SAPCAR files, and the SDM data is stored inside the SDMKIT.JAR file. In addition, SAP System copy notes might give instructions on how to copy some files manually.

© SAP AG TADM70 4-28
© SAP AG TADM70 5-1
© SAP AG 2010
R3SETUP/SAPINST
1 Introduction 7 R3LOAD & JLOAD Files
2 The Migration Project 8 Advanced Migration Techniques
3 System Copy Methods 9 Performing the Migration
4 SAP Migration Tools 10 Troubleshooting
5 R3SETUP / SAPINST 11 Special Projects
6 Technical Background Knowledge

© SAP AG TADM70 5-2
© SAP AG 2010
ContentsThe role of R3SETUP and SAPINST in the homogeneous or heterogeneous system copy process
ObjectivesAt the end of this unit, you will be able to:
Understand how R3SETUP and SAPINST control the export and import processes of homogeneous or heterogeneous system copies and how to influence their behavior Recognize the structure of the R3SETUP *.R3S control files, and be able to adjust their contents if necessary
R3SETUP/SAPINST

© SAP AG TADM70 5-3
© SAP AG 2010
R3SETUP: *.R3S Files
DBEXPORT.R3SDBEXPORT.R3S
DATABASE.R3SDATABASE.R3S
Homogeneous or heterogeneous database export
DBMIG.R3SDBMIG.R3S
DBRELOAD.R3SDBRELOAD.R3S
CENTRAL.R3SCENTRAL.R3S
DBMIGR.R3SDBMIGR.R3S
… load dump files from SAP installation CDs
… load dump files from homogenous or heterogeneous database export
… on raw devices and load dump files from homogenous or heterogeneous database export (Oracle only)
Install central instance
Create database and reload dump files (Oracle only)
Install/create database …
The command file DBEXPORT.R3S controls the database export of a homogeneous or heterogeneous system copy.
CENTRAL.R3S calls other *.R3S files as selected.
DBRELOAD.R3S is only used for re-loading an already finished installation (that is, after the test migration). Available for Oracle only.
Older *.R3S files are: CENTRDB.R3S for a combined installation of central instance and database, and CEDBMIG, used for a combined installation of central instance and database for homogeneous or heterogeneous system copies.
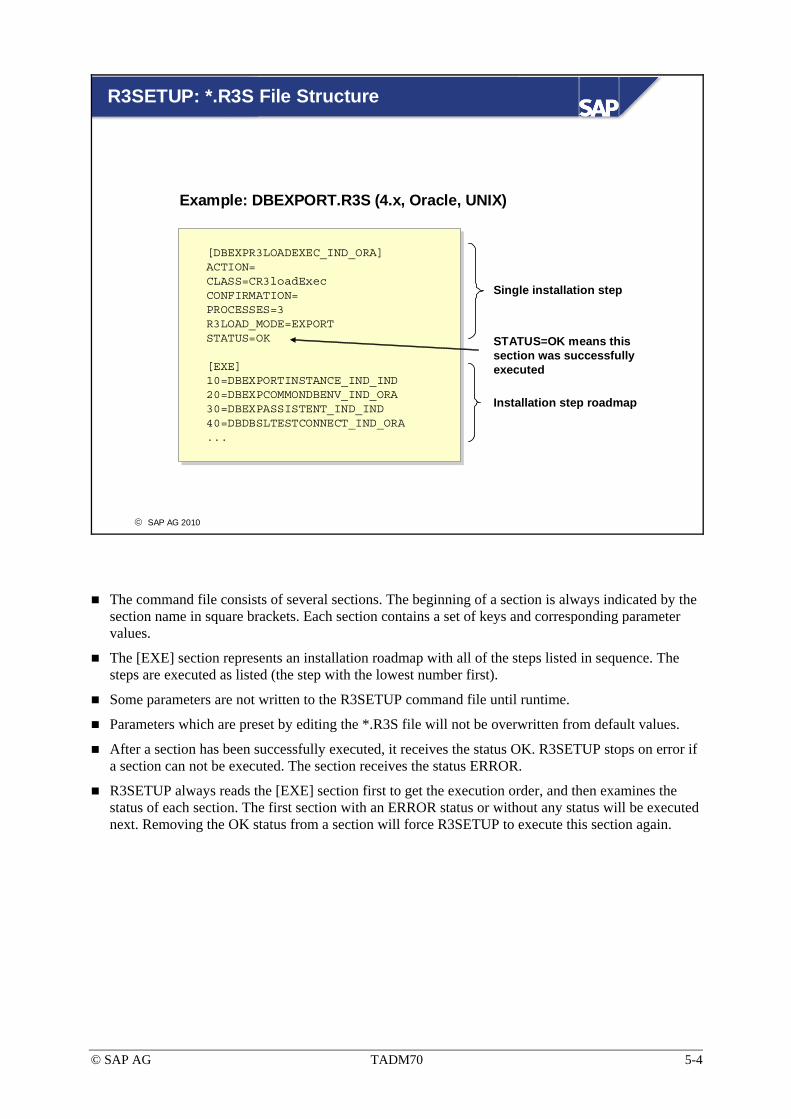
© SAP AG TADM70 5-4
© SAP AG 2010
R3SETUP: *.R3S File Structure
[DBEXPR3LOADEXEC_IND_ORA]ACTION=CLASS=CR3loadExecCONFIRMATION=PROCESSES=3R3LOAD_MODE=EXPORTSTATUS=OK
[EXE]10=DBEXPORTINSTANCE_IND_IND20=DBEXPCOMMONDBENV_IND_ORA30=DBEXPASSISTENT_IND_IND40=DBDBSLTESTCONNECT_IND_ORA...
[DBEXPR3LOADEXEC_IND_ORA]ACTION=CLASS=CR3loadExecCONFIRMATION=PROCESSES=3R3LOAD_MODE=EXPORTSTATUS=OK
[EXE]10=DBEXPORTINSTANCE_IND_IND20=DBEXPCOMMONDBENV_IND_ORA30=DBEXPASSISTENT_IND_IND40=DBDBSLTESTCONNECT_IND_ORA...
Installation step roadmap
Single installation step
Example: DBEXPORT.R3S (4.x, Oracle, UNIX)
STATUS=OK means this section was successfully executed
The command file consists of several sections. The beginning of a section is always indicated by the section name in square brackets. Each section contains a set of keys and corresponding parameter values.
The [EXE] section represents an installation roadmap with all of the steps listed in sequence. The steps are executed as listed (the step with the lowest number first).
Some parameters are not written to the R3SETUP command file until runtime.
Parameters which are preset by editing the *.R3S file will not be overwritten from default values.
After a section has been successfully executed, it receives the status OK. R3SETUP stops on error if a section can not be executed. The section receives the status ERROR.
R3SETUP always reads the [EXE] section first to get the execution order, and then examines the status of each section. The first section with an ERROR status or without any status will be executed next. Removing the OK status from a section will force R3SETUP to execute this section again.

© SAP AG TADM70 5-5
© SAP AG 2010
R3SETUP: User-Defined Break-Points
Example: User defined break point in DBEXPORT.R3S (4.6x, Oracle)
[EXE]...70=DBCOMPUTESTAT4MIG_NT_ORA80=BRCONNECTEXPSTAT_NT_ORA90=R3LDCTL_NT_IND95=STOP_AFTER_R3LDCTL100=R3SZCHK_NT_ORA110=SPLITSTRFILES_NT_IND115=STOP_BEFORE_COMMANDFILE_CREATION120=DBEXPCOPYR3LDCTLFILES_IND_IND130=DBEXPCOPYEXTFILES_NT_ORA140=DBR3LOADEXECDUMMY_IND_IND150=DBEXPR3LOADEXEC_NT_ORA...[STOP_AFTER_R3LDCTL]CLASS=CExitStepEXIT=YES
[STOP_BEFORE_COMMANDFILE_CREATION]CLASS=CExitStepEXIT=YES
User break-point 2
Break-point definition 1
SAP Note 118059
Break-point definition 2
User break-point 1
Between the execution of two command sections in a *.R3S file, you may need to stop and make manual changes to the R3LOAD control files, modify database settings, or even call MIGMON. As shown in the graphic, R3SETUP can be forced to stop, by implementing user-defined break-points.
The R/3 installation kits for Windows operating systems provide R3SEDIT.EXE for modifying *.R3S files in an easy way.
SAP Note: “118059 Storage parameter for system copy with R3load” describes how to implement user break-points.
SAP Note: “784118 System Copy Java Tools” explains how to find the MIGMON software on the SAP Marketplace. The MIGMON*.SAR archive contains a PDF-document which shows how to use MIGMON with R3SETUP.

© SAP AG TADM70 5-6
© SAP AG 2010
R3SETUP: LABEL.ASC
[CDSERVERMIG_IND_ORA]1_LABEL=ORACLE:::KERNEL:1_LOCATION=/sapcd1_NAME=KERNEL2_COPY=2_LABEL=ORACLE:@RDBMS_VERSION@:RDBMS:2_LOCATION=/sapcd2_NAME=RDBMS...6_LABEL=SAP:::EXPORT: 6_LOCATION=/exp_dir6_NAME=EXPORT1CDNUM=6CLASS=CCDSupportCONFIRMATION=1_LOCATION 2_LOCATION 2_COPY ...LABEL=LABEL.ASCMSGID=RI_GIST_CDSERVER_IND_IND
[CDSERVERMIG_IND_ORA]1_LABEL=ORACLE:::KERNEL:1_LOCATION=/sapcd1_NAME=KERNEL2_COPY=2_LABEL=ORACLE:@RDBMS_VERSION@:RDBMS:2_LOCATION=/sapcd2_NAME=RDBMS...6_LABEL=SAP:::EXPORT: 6_LOCATION=/exp_dir6_NAME=EXPORT1CDNUM=6CLASS=CCDSupportCONFIRMATION=1_LOCATION 2_LOCATION 2_COPY ...LABEL=LABEL.ASCMSGID=RI_GIST_CDSERVER_IND_IND
Example: DBMIG.R3S (4.6C, Oracle, UNIX)
Migration import file location
Expected label
File name of label to check for
The content of the LABEL.ASC file in the export directory will be compared against the expected string inside DBMIG.R3S to make sure that the import is read from the right location. The same mechanism is used by SAPINST.

© SAP AG TADM70 5-7
© SAP AG 2010
SAPINST: *.XML Files
keydb.xmlkeydb.xml
message.xmlmessage.xml
SAPINST status
control.xmlcontrol.xml
dialog.xmldialog.xml
package.xmlpackage.xml
SAPINST dialogs
SAPINST messages
SAPINST installation packages
SAPINST execution control
SAPINST records the installation progress in the “keydb.xml” file. SAPINST can continue the installation from a failed step, without having to repeat previous steps.
The package.xml file contains the name of installation media (CDs) and the expected LABEL.ASC content.
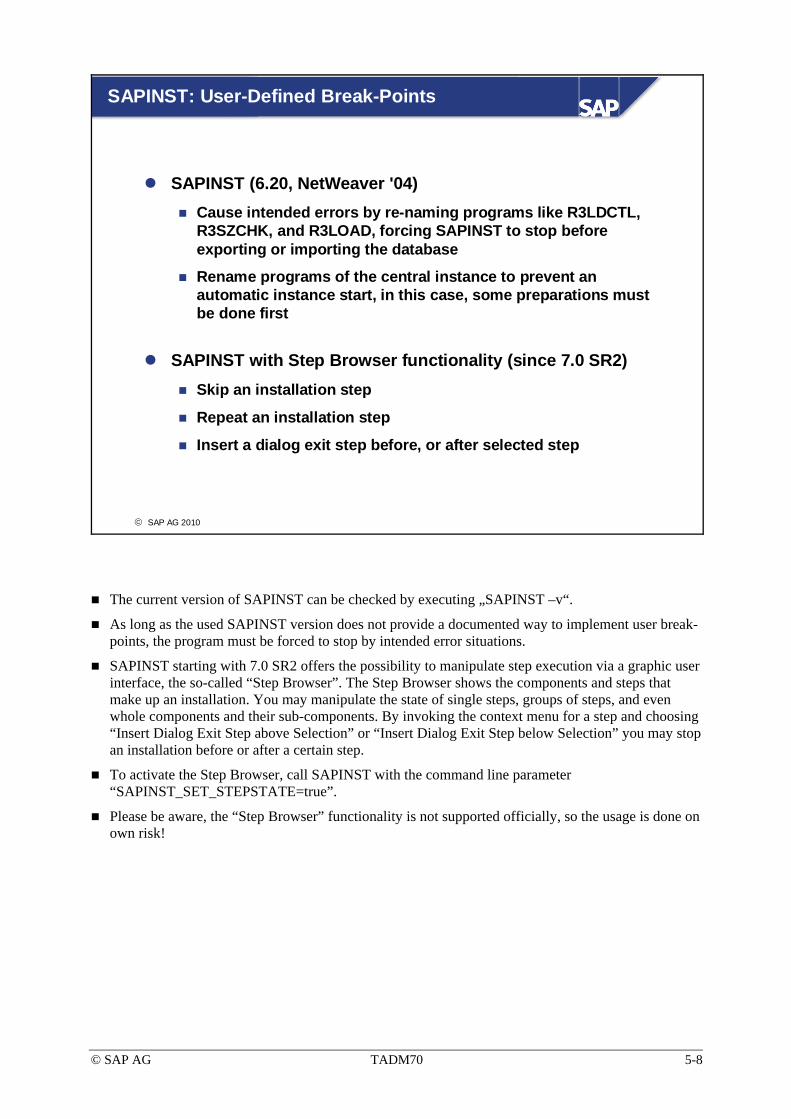
© SAP AG TADM70 5-8
© SAP AG 2010
SAPINST: User-Defined Break-Points
SAPINST (6.20, NetWeaver '04)Cause intended errors by re-naming programs like R3LDCTL, R3SZCHK, and R3LOAD, forcing SAPINST to stop before exporting or importing the database
Rename programs of the central instance to prevent an automatic instance start, in this case, some preparations must be done first
SAPINST with Step Browser functionality (since 7.0 SR2) Skip an installation step
Repeat an installation step
Insert a dialog exit step before, or after selected step
The current version of SAPINST can be checked by executing „SAPINST –v“.
As long as the used SAPINST version does not provide a documented way to implement user break-points, the program must be forced to stop by intended error situations.
SAPINST starting with 7.0 SR2 offers the possibility to manipulate step execution via a graphic user interface, the so-called “Step Browser”. The Step Browser shows the components and steps that make up an installation. You may manipulate the state of single steps, groups of steps, and even whole components and their sub-components. By invoking the context menu for a step and choosing “Insert Dialog Exit Step above Selection” or “Insert Dialog Exit Step below Selection” you may stop an installation before or after a certain step.
To activate the Step Browser, call SAPINST with the command line parameter “SAPINST_SET_STEPSTATE=true”.
Please be aware, the “Step Browser” functionality is not supported officially, so the usage is done on own risk!

© SAP AG TADM70 5-9
© SAP AG 2010
Size of the Target Database
ABAP Database size templatesCreated by R3SETUP: DBSIZE.TPL
Created by R3SZCHK: DBSIZE.XML
JAVA Database size templates (since NetWeaver 7.0)
Created by JSIZECHECK: DBSIZE.XML
Note: All values of the size templates are ESTIMATES!In the case of ABAP size computations additional spacemust be allocated for tables and indexes above 1.78 GB!
The values calculated for ABAP database storage units are estimates, like the values for the initial extents, and primarily serve as guidelines for sizing the target database. You will probably have to increase or decrease individual values during, or after the first test migration.
ABAP Tables and indexes that are larger than 1.78 GB will be normalized to an initial extent of 1.78 GB. The target database size calculation is based on estimations. Adjust the database size manually if required.
The JAVA DBSIZE calculation does not have table or index size limitations, but the result is based on estimations as well.

© SAP AG TADM70 5-10
© SAP AG 2010
R3INST/R3SETUP Control Files: Unit Summary
The R3SETUP/SAPINST programs are adapted to the specific requirements by the control files:
R3SETUP: *.R3S
SAPINST: *.XML
The standard behavior of R3SETUP can be influenced when modifying *.R3S files
The standard behavior of SAPINST can be influenced by causing indented “errors” or using the step browser functionality.

© SAP AG TADM70 5-11
Exercises
Unit 5: R3SETUP/SAPINST
At the conclusion of this exercise, you will be able to:
• Know how R3SETUP and SAPINST can be influenced and adapted to special needs.
5-1 The installation program R3SETUP will be started with a command line containing the name of a “*.R3S” file to read (i.e. “RESETUP –f DBMIG.R3S”). The purpose of “*.R3S” files is not only to define installation steps; it is also used to store parameters and status information. R3SETUP sets the status of completed steps to “OK” and stops on error if a step can not be executed successfully. An erroneous step will get the status “ERROR”. Every time R3SETUP is started, the “*.R3S” file will be copied first, to have a backup of the original content. Next, R3SETUP will begin the execution at the first step that has the status “ERROR”, or no status at all.
For repeated test migrations or for the final migration of a production system, it would be helpful to have a DBMIG.R3S file that rebuilds the database without reinstalling the database software again. For this purpose, we need a “DBMIG.R3S” file which starts with the generation of an empty database.
5-1-1 What can be done to create such a “*.R3S” file? Different methods are possible.
5-1-2 What happens to R3SETUP parameters that were preset by hand?
5-2 SAPINST stores all its installation information in “*.XML” files. As the file structure is neither easy to read nor documented, modifying the files can be risky, as it might cause unexpected side effects.
5-2-1 What can be done to force SAPINST to stop before a certain installation step?
5-2-2 In the case where we need to repeat a system copy import, it would be useful to have a SAPINST that starts at a certain step. How could this be achieved without modifying the files?

© SAP AG TADM70 5-12

© SAP AG TADM70 5-13
Solutions
Unit 5: R3SETUP/SAPINST
5-1
5-1-1
a) Insert a break point in the “*.R3S” file at the place where R3SETUP should stop. Copy the “*.R3S” file using a new name.
b) Remove the “STATUS=OK” lines from completed “*.R3S” files. Begin editing the section where R3SETUP should start later on.
The step order is defined in the [EXE] section. If you reuse an already executed “*.R3S” file, be sure to remove the STATUS=OK lines from all sections following an [EXE] order. Do not skip steps. Use this method only if you want to repeat the installation exactly like it was done before!
5-1-2 R3SETUP does not overwrite preset parameters with default values. A description of each installation step and related parameters can be found in the installation directory (sub-directory “doc”), or on the installation CD.
5-2
5-2-1 Since SAPINST NetWeaver 7.0 SR2 the step browser can be used to insert an exit dialog before or after an installation step. Earlier SAPINST versions can only be stopped by forcing intended errors.
5-2-2 Stop SAPINST before the step where you would like to start later on. Copy the entire installation directory as it is. Restore the saved installation directory to its original location to redo the installation.

© SAP AG TADM70 5-14

© SAP AG TADM70 6-1
© SAP AG 2010
Technical Background Knowledge
1 Introduction 7 R3LOAD & JLOAD Files
2 The Migration Project 8 Advanced Migration Techniques
3 System Copy Methods 9 Performing the Migration
4 SAP Migration Tools 10 Troubleshooting
5 R3SETUP / SAPINST 11 Special Projects
6 Technical Background Knowledge

© SAP AG TADM70 6-2
© SAP AG 2010
ContentsABAP table types and storage parametersABAP data types and data access through the DBSL interfaceJAVA data types and data access through the JDBC interface
ObjectivesAt the end of this unit, you will be able to:
Explain from where the migration tools retrieve the information required to unload a SAP System databaseExplain the use of the ABAP/JAVA Dictionary and the database dictionary for the SAP migration tools
Technical Background Knowledge

© SAP AG TADM70 6-3
© SAP AG 2010
Definition
In this course, a database storage unitstores tables or indexes separately in different
database files, or on different raw devices, depending on table/index characteristics
In this course, a database storage unitstores tables or indexes separately in different
database files, or on different raw devices, depending on table/index characteristics
By this definition, examples of database storage units are:
• Tablespaces (Oracle),
• Dataspaces (Informix),
• Tablespaces/containers (DB2 LUW)

© SAP AG TADM70 6-4
© SAP AG 2010
TABART – Table Types (1)
ABAP Dictionary: Technical characteristics
Tables are generally assigned to a table type
Each table type belongs to a certain database storage unit
Different table types can be saved in the same database storage unit
Table types also exist in databases that do not separate tables into different storage units
The table types are maintained in the ABAP Dictionary, regardless of the database used.
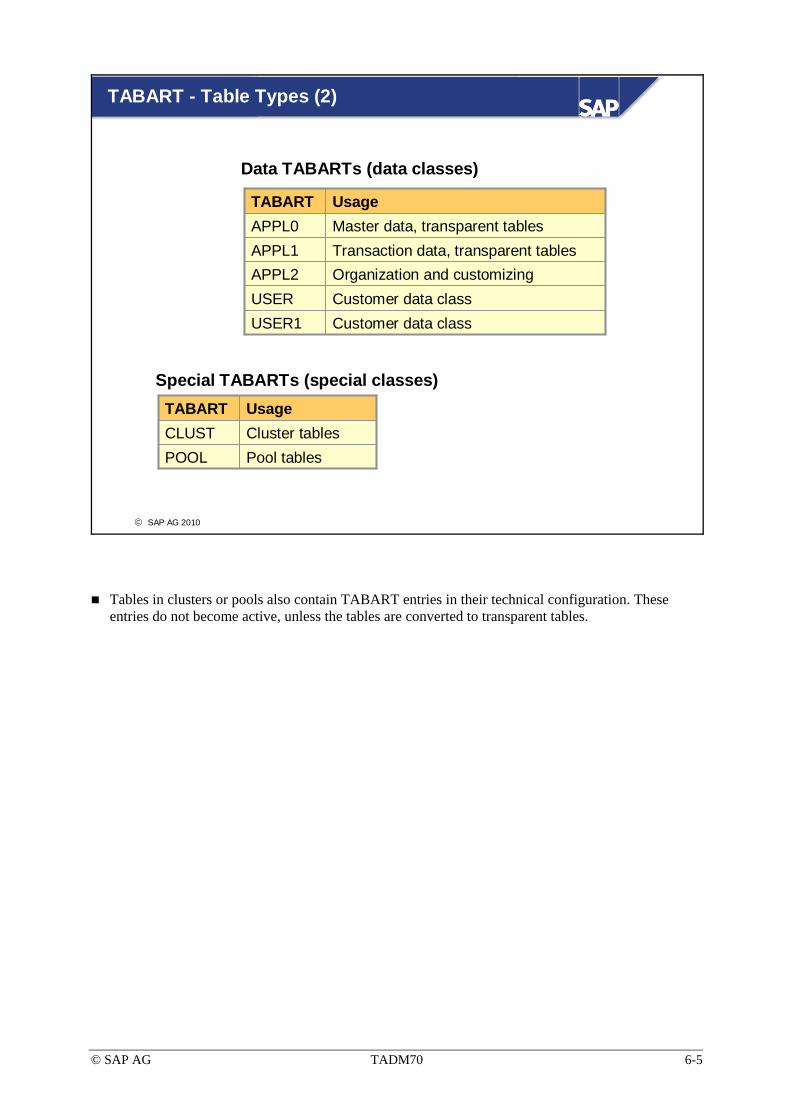
© SAP AG TADM70 6-5
© SAP AG 2010
Data TABARTs (data classes)
Special TABARTs (special classes)
TABART - Table Types (2)
Organization and customizingAPPL2Customer data classUSERCustomer data classUSER1
Transaction data, transparent tablesAPPL1Master data, transparent tablesAPPL0UsageTABART
Pool tablesPOOLCluster tablesCLUSTUsageTABART
Tables in clusters or pools also contain TABART entries in their technical configuration. These entries do not become active, unless the tables are converted to transparent tables.

© SAP AG TADM70 6-6
© SAP AG 2010
TABART - Table Types (3)
Source of screens and reports
Repository switch
Repository switch
Spool and logs
Screen and report loads
Repository switch
Repository switch
Documentation
ABAP Dictionary tables
Exchange tables for upgrades
Usage
SPROT
SAP upgradeSSDEF
SAP upgradeSSEXC
SDIC
SDOCU
SAP upgradeSLDEF
SAP upgradeSLEXC
SSRC
SLOAD
SAUS
CommentTABART
System data TABART (system data classes)

© SAP AG TADM70 6-7
© SAP AG 2010
TABART - Table Types (4)
Specific TABARTs for SAP systems using BW functionality
Fact tablesDFACT
ODS, PSA tablesDODS
Dimension tablesDDIM
UsageTABART
Since NetWeaver '04, the above TABARTs can be found in any SAP System based on Web AS 6.40 and later. Even if no BW info cube was created, some tables do exist belonging to the TABARTs as shown above.
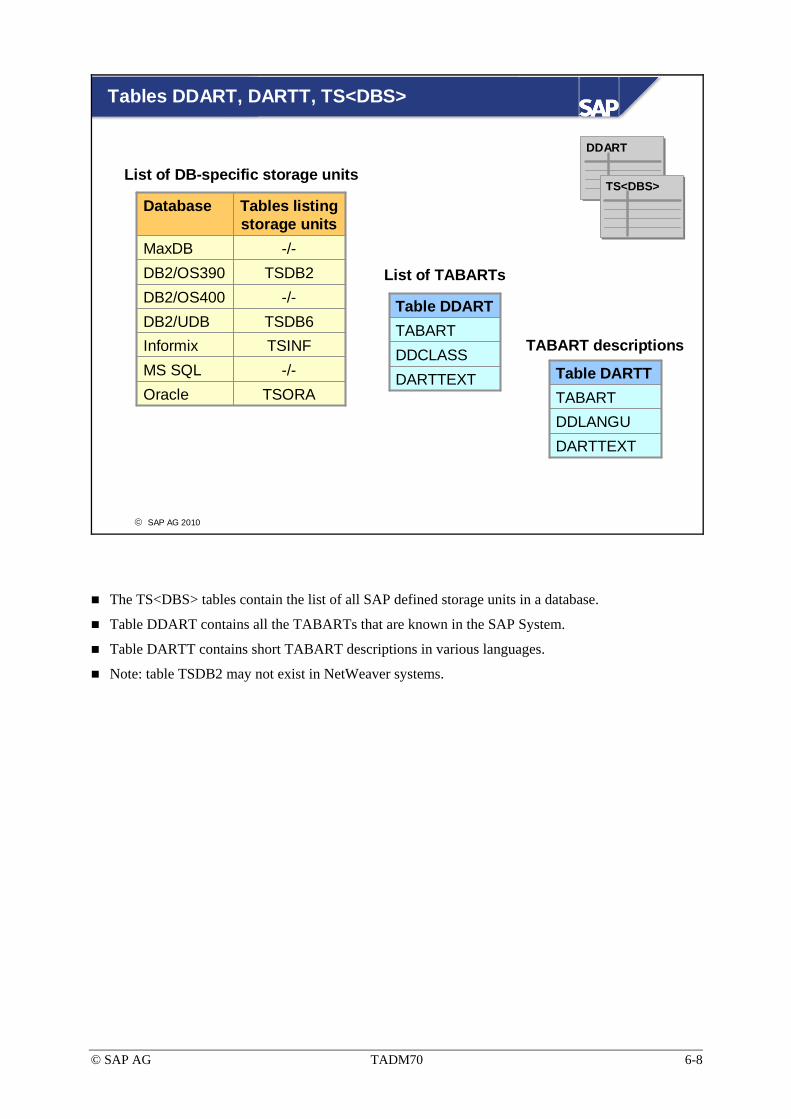
© SAP AG TADM70 6-8
© SAP AG 2010
Tables DDART, DARTT, TS<DBS>
List of DB-specific storage units
DDART
TS<DBS>
-/-MS SQLTSINFInformixTSDB6DB2/UDB
-/-DB2/OS400
TSORAOracle
TSDB2DB2/OS390-/-MaxDB
Tables listingstorage units
Database
List of TABARTs
TABART descriptions
DARTTEXTDDLANGUTABARTTable DARTTDARTTEXT
DDCLASSTABARTTable DDART
The TS<DBS> tables contain the list of all SAP defined storage units in a database.
Table DDART contains all the TABARTs that are known in the SAP System.
Table DARTT contains short TABART descriptions in various languages.
Note: table TSDB2 may not exist in NetWeaver systems.

© SAP AG TADM70 6-9
© SAP AG 2010
Tables TA<DBS> and IA<DBS> receive the assignments of TABARTs / database storage units
IA<DBS>
TA<DBS>
Assignment: TABART - Database Storage Unit
Tables TA<DBS> and IA<DBS>
-/--/-MS SQLIAINFTAINFInformixIADB6TADB6DB2/UDB
-/--/-DB2/OS400
IAORATAORAOracle
IADB2TADB2DB2/OS390-/--/-MaxDB
Index storage unit
Data storage unit
Database
R3LDCTL reads tables TA<DBS> and IA<DBS>, and writes the assignments between TABARTs and database storage units into DDL<DBS>TPL.
Tables TA<DBS> and IA<DBS> only exist for databases with the appropriate architecture.

© SAP AG TADM70 6-10
© SAP AG 2010
...TABARTTABKATTABNAMETable DD09L
Technical Configuration - Table DD09L
DD09L
Table name (DD02L)
Category of table size
TABART (data class) (DDART)
SAP<TABART>.STR SAP<TABART>.STR
Technical table parameters:
DD09L: ABAP Dictionary, technical configuration of tables (TABART and TABKAT)
R3LDCTL extracts the corresponding TABART and size category (TABKAT) for each table, from table DD09L of the ABAP Dictionary. This information is written to the *.STR files.

© SAP AG TADM70 6-11
© SAP AG 2010
Table and Index Storage Parameters
Database table storage parameters
The parameters for indexes are stored in table IG<DBS> The parameters for indexes are stored in table IG<DBS>
-/-MS SQLTGINFInformixTGDB6DB2/UDB
-/-DB2/OS400
TGORAOracle
TGDB2DB2/OS390-/-MaxDB
TableDatabase
NEXT
INIT
MAXEXTENT
MINEXTENT
CATEGORY
TGORA
DB2SECQTY
DB2PRIQTY
DB2BUFPOOL
DB2PCTFREE
CATEGORY
TGDB2NEXTSIZE
FIRSTSIZE
MAXEXTENT
MINEXTENT
TABKAT
TGINF
IG<DBS>
TG<DBS>
TG<DBS>/IG<DBS>: Assignment of size category (TABKAT = table category) to database storage parameters.
Table TG<DBS> gives R3LDCTL the information (i.e. for Oracle) about the size of “Default Initial Extent”, “Next Extent”, “Min Extent”, and “Max Extent”. This information is saved in the files DDL<DBS>.TPL. The assignment of a table to a specific table category is used to determine the “Next Extent Size” in *.STR.
The “Initial Extent Size” actually used, is calculated and saved in *.EXT.
Note: table TGDB2 and IGDB2 may not exist in NetWeaver systems.
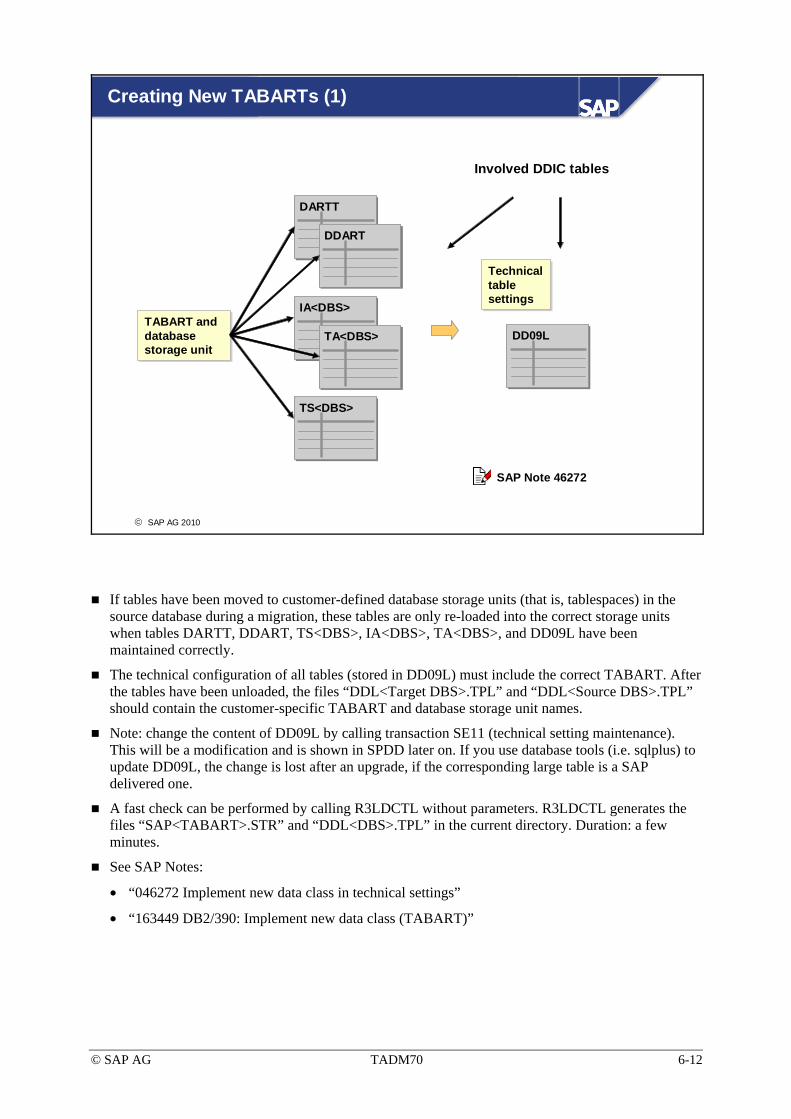
© SAP AG TADM70 6-12
© SAP AG 2010
Creating New TABARTs (1)
SAP Note 46272
IA<DBS>
TA<DBS>
TS<DBS>
DARTT
DDART
Technical table settings
Technical table settings
TABART and database storage unit
TABART and database storage unit
DD09L
Involved DDIC tables
If tables have been moved to customer-defined database storage units (that is, tablespaces) in the source database during a migration, these tables are only re-loaded into the correct storage units when tables DARTT, DDART, TS<DBS>, IA<DBS>, TA<DBS>, and DD09L have been maintained correctly.
The technical configuration of all tables (stored in DD09L) must include the correct TABART. After the tables have been unloaded, the files “DDL<Target DBS>.TPL” and “DDL<Source DBS>.TPL” should contain the customer-specific TABART and database storage unit names.
Note: change the content of DD09L by calling transaction SE11 (technical setting maintenance). This will be a modification and is shown in SPDD later on. If you use database tools (i.e. sqlplus) to update DD09L, the change is lost after an upgrade, if the corresponding large table is a SAP delivered one.
A fast check can be performed by calling R3LDCTL without parameters. R3LDCTL generates the files “SAP<TABART>.STR” and “DDL<DBS>.TPL” in the current directory. Duration: a few minutes.
See SAP Notes:
• “046272 Implement new data class in technical settings”
• “163449 DB2/390: Implement new data class (TABART)”

© SAP AG TADM70 6-13
© SAP AG 2010
Creating New TABARTs (2)
Oracle example: New TABART for table COEP, NW 7.0, Schema-ID:SR3
Table: DDARTAdd new TABART ZCOEP
Table: DDARTAdd new TABART ZCOEP
Table: DARTTAdd new TABART description for
ZCOEP
Table: DARTTAdd new TABART description for
ZCOEP
Table: TAORAAdd mapping TABART data tablespace
and database dependent parametersZCOEP <-> PSAPSR3ZCOEP
Table: TAORAAdd mapping TABART data tablespace
and database dependent parametersZCOEP <-> PSAPSR3ZCOEP
Table: TSORAAdd new Oracle tablespace name
PSAPSR3ZCOEP
Table: TSORAAdd new Oracle tablespace name
PSAPSR3ZCOEP
Table: IAORAAdd mapping TABART index
tablespace and database dependent parameters
ZCOEP <-> PSAPSR3ZCOEP
Table: IAORAAdd mapping TABART index
tablespace and database dependent parameters
ZCOEP <-> PSAPSR3ZCOEP
Table: DD09LChange TABART of table COEP to
ZCOEP
Table: DD09LChange TABART of table COEP to
ZCOEP
Use R3LDCTL to check for proper SAPZCOEP.STR and DDLORA.TPL
generation
Use R3LDCTL to check for proper SAPZCOEP.STR and DDLORA.TPL
generation
SAP Notes: 46272, 490365
For information on how to create a new TABART, see SAP Note 46272.
A customer TABART name must start with “Z” or “Y”, and four additional characters. If SAPDBA or BRSPACE was used to create additional tablespaces, TABART names like U####, USR##, and USER#, can be seen as well. To prevent SAP upgrades from overwriting these definitions, the class for customer created TABARTs must be “USR”.
In the example above, the new tablespace will be used for table COEP data and index storage location.
It is recommended to name new database storage units like the TABART to identify their purpose, but this is not strictly necessary.
See SAP Notes:
• “046272 Implement new data class in technical settings”
• “490365 Tablespace naming conventions”
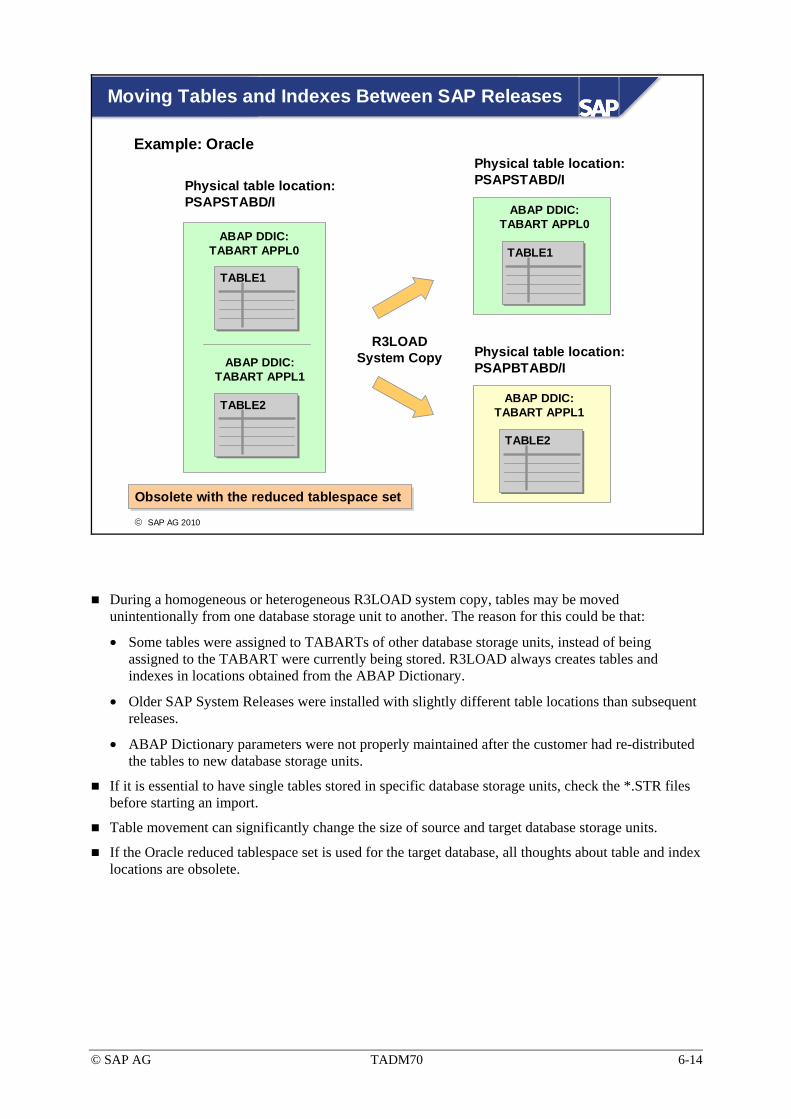
© SAP AG TADM70 6-14
© SAP AG 2010
Moving Tables and Indexes Between SAP Releases
TABLE1
TABLE2
TABLE1
TABLE2
Physical table location: PSAPSTABD/I
Physical table location: PSAPSTABD/I
ABAP DDIC: TABART APPL0
ABAP DDIC:TABART APPL1
R3LOAD System Copy Physical table location:
PSAPBTABD/I
ABAP DDIC:TABART APPL1
ABAP DDIC:TABART APPL0
Example: Oracle
Obsolete with the reduced tablespace setObsolete with the reduced tablespace set
During a homogeneous or heterogeneous R3LOAD system copy, tables may be moved unintentionally from one database storage unit to another. The reason for this could be that:
• Some tables were assigned to TABARTs of other database storage units, instead of being assigned to the TABART were currently being stored. R3LOAD always creates tables and indexes in locations obtained from the ABAP Dictionary.
• Older SAP System Releases were installed with slightly different table locations than subsequent releases.
• ABAP Dictionary parameters were not properly maintained after the customer had re-distributed the tables to new database storage units.
If it is essential to have single tables stored in specific database storage units, check the *.STR files before starting an import.
Table movement can significantly change the size of source and target database storage units.
If the Oracle reduced tablespace set is used for the target database, all thoughts about table and index locations are obsolete.
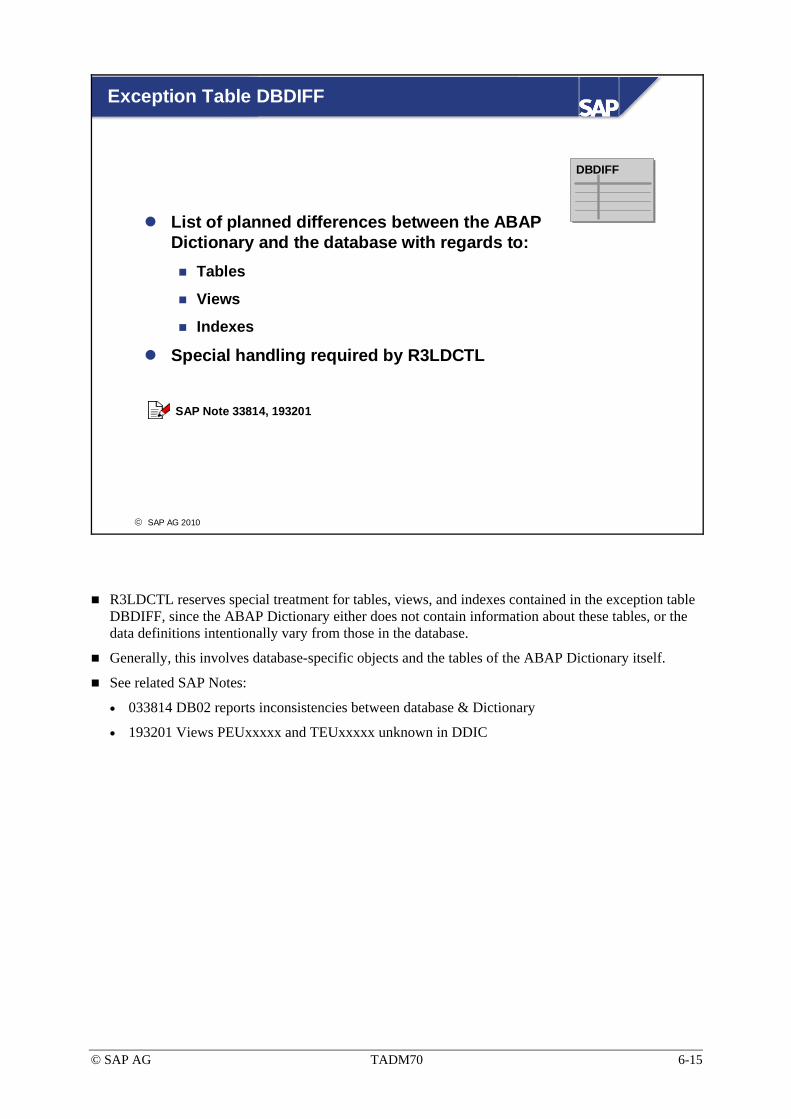
© SAP AG TADM70 6-15
© SAP AG 2010
DBDIFF
SAP Note 33814, 193201
Exception Table DBDIFF
List of planned differences between the ABAP Dictionary and the database with regards to:
Tables
Views
Indexes
Special handling required by R3LDCTL
R3LDCTL reserves special treatment for tables, views, and indexes contained in the exception table DBDIFF, since the ABAP Dictionary either does not contain information about these tables, or the data definitions intentionally vary from those in the database.
Generally, this involves database-specific objects and the tables of the ABAP Dictionary itself.
See related SAP Notes:
• 033814 DB02 reports inconsistencies between database & Dictionary
• 193201 Views PEUxxxxx and TEUxxxxx unknown in DDIC
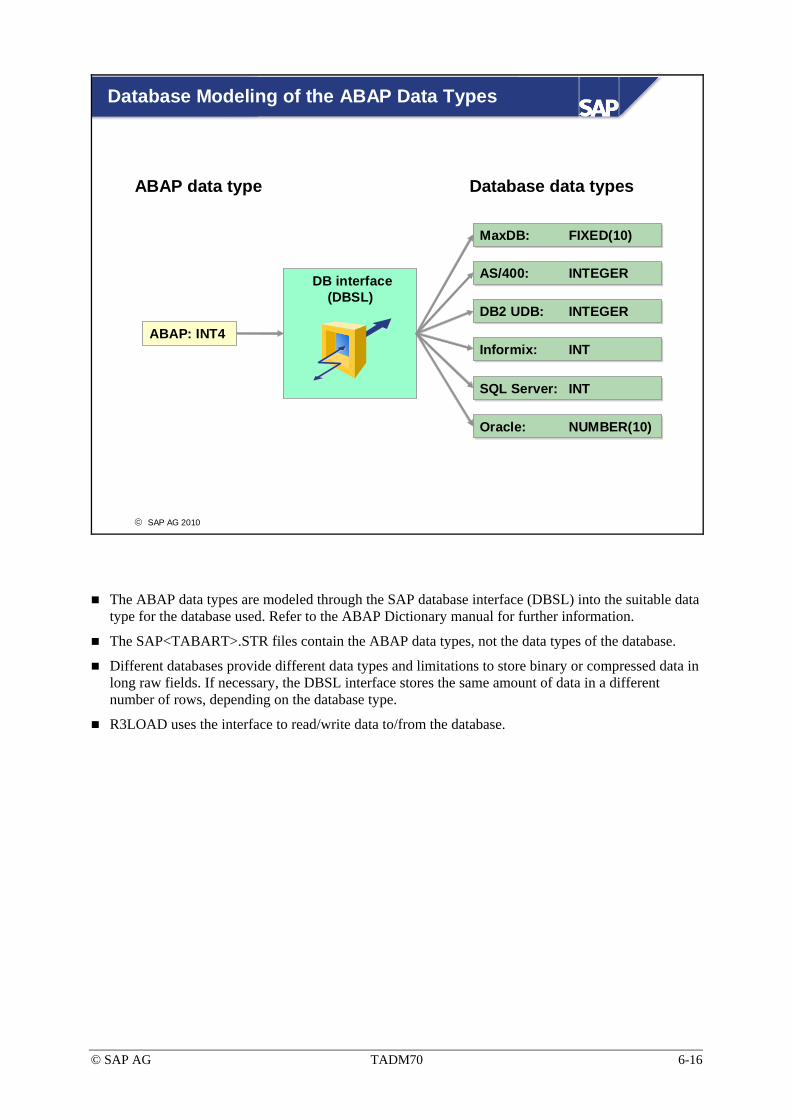
© SAP AG TADM70 6-16
© SAP AG 2010
Database Modeling of the ABAP Data Types
Oracle: NUMBER(10)Oracle: NUMBER(10)
Informix: INTInformix: INT
DB2 UDB: INTEGERDB2 UDB: INTEGERABAP: INT4
SQL Server: INTSQL Server: INT
AS/400: INTEGERAS/400: INTEGER
ABAP data type Database data types
MaxDB: FIXED(10)MaxDB: FIXED(10)
DB interface (DBSL)
The ABAP data types are modeled through the SAP database interface (DBSL) into the suitable data type for the database used. Refer to the ABAP Dictionary manual for further information.
The SAP<TABART>.STR files contain the ABAP data types, not the data types of the database.
Different databases provide different data types and limitations to store binary or compressed data in long raw fields. If necessary, the DBSL interface stores the same amount of data in a different number of rows, depending on the database type.
R3LOAD uses the interface to read/write data to/from the database.

© SAP AG TADM70 6-17
© SAP AG 2010
R3LOAD – ABAP Data Access
R3LOAD unloads/loads data through the DBSL interface, which converts ABAP data types from/to database data types and connects to the database
The storage format of the data in the export dump files is not database or operating system specific
Read
WriteDBS
R3LOAD
Dump file
Read
Write
DBSLRead
Write

© SAP AG TADM70 6-18
© SAP AG 2010
Consistency Check: ABAP DDIC - DB and Runtime
SAP transaction SE11SAP transaction SE11
Select object name: table or viewSelect object name: table or view
Check runtime objectCheck runtime object
Runtime object consistent with DDIC?Runtime object consistent with DDIC?
Check database objectCheck database object
Database object consistent with DDIC?Database object consistent with DDIC?
Database utilityDatabase utility
DBS DDIC ABAP DDIC ABAP DDIC
DDNTT
DDNTF
NAMETAB
Transaction SE11 can be used to check the consistency of individual tables or views. In this process, the system checks whether the tables or view definitions in the ABAP Dictionary (DDIC) agree with the runtime object or database object. The data in the database is accessed via the runtime object of the active NAMETAB. Changes to the ABAP Dictionary are not written (and therefore are not effective) until they are activated in the NAMETAB.
The ABAP Dictionary should be OK in a standard SAP System. If you suspect that any tables are inconsistent, you can check them individually using transaction SE11.
Sometimes tables exist in the active NAMETAB but not in the database. In this case, R3LOAD will stop the export on error. Fix the NAMETAB problem with appropriate methods or mark the table entry as comment in the *.STR file.
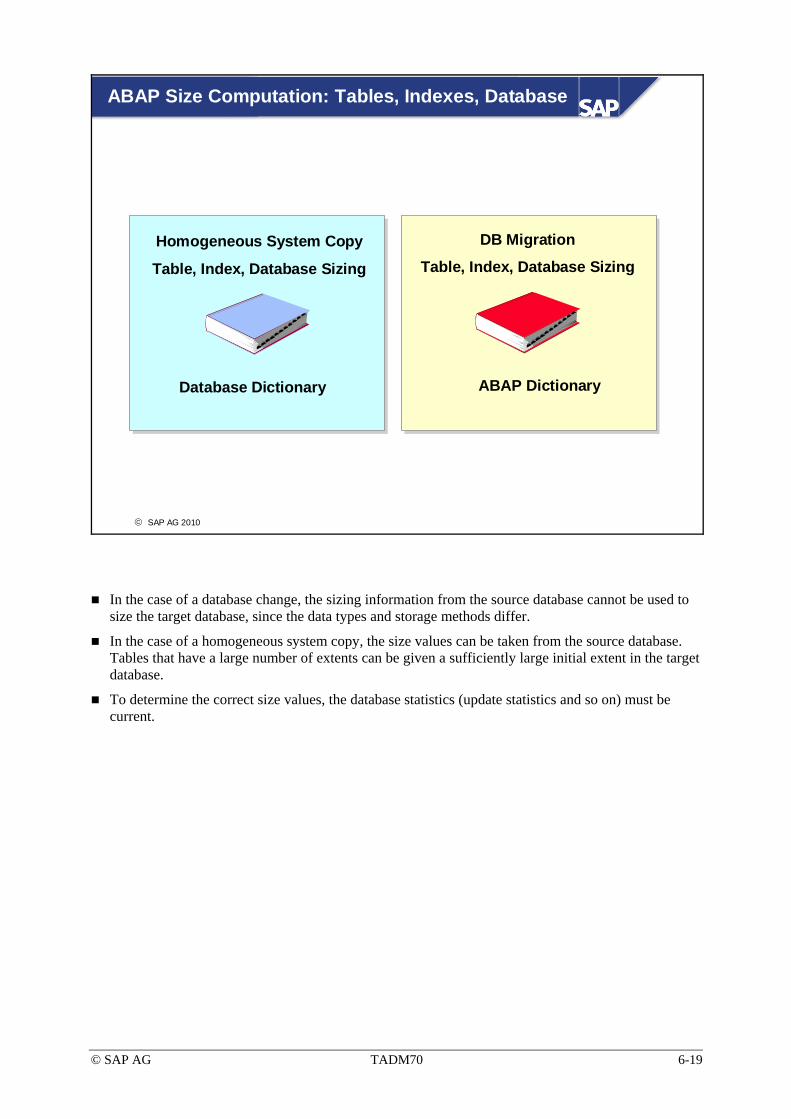
© SAP AG TADM70 6-19
© SAP AG 2010
Homogeneous System Copy
Table, Index, Database Sizing
Database Dictionary
DB Migration
Table, Index, Database Sizing
ABAP Dictionary
ABAP Size Computation: Tables, Indexes, Database
In the case of a database change, the sizing information from the source database cannot be used to size the target database, since the data types and storage methods differ.
In the case of a homogeneous system copy, the size values can be taken from the source database. Tables that have a large number of extents can be given a sufficiently large initial extent in the target database.
To determine the correct size values, the database statistics (update statistics and so on) must be current.

© SAP AG TADM70 6-20
© SAP AG 2010
JAVA Data Dictionary
Meta data stored in XML formatTable
Index
Views (not used yet)
Exclude lists
JAVA Dictionary
Attention: The JAVA Meta data is a subject of change and can bealtered without notice!
Attention: The JAVA Meta data is a subject of change and can bealtered without notice!
The JAVA Web AS table and index definitions are stored as XML documents in the dictionary table.
Exclude lists tell JLOAD and JPKGCTL (JSPLITTER) which objects must not be exported and which objects need special treatment during the export (i.e. removal of trailing blanks)
A catalog reader (JAVA Dictionary browser) will be available with 7.10.
Note: The JAVA Dictionary table will only be filled with the XML-documents, describing the table and indexes, if JLOAD is used! Do not mix a JLOAD import with other methods (i.e. database specific import tools).

© SAP AG TADM70 6-21
© SAP AG 2010
JLOAD - Data Access
JLOAD unloads/loads data through the SAP JDBC interface, which connects to the database. SAP Open SQL is used for reading and writing data.
The data storage format of the export dump files is database and operating system independent.
Read
WriteDBS
JLOAD
Dump file
Read
Write
SAPJDBCOpen SQL
Read
Write
The SAP JDBC interface implements specific extensions to the JDBC standard, which are used by SAP Open SQL (i.e. the SAP JAVA DDIC, SAP transaction logic, SAP OPEN SQL compatibility).
JLOAD uses SAP Open SQL to access database data.

© SAP AG TADM70 6-22
© SAP AG 2010
Technical Background Knowledge: Unit Summary
The ABAP and JAVA Dictionary is used for the data export of the SAP migration tools
Tables that are not contained in the ABAP Dictionary/NAMETAB or in the exception table of R3LDCTL are not unloaded by R3LOAD.
Tables that are not contained in the JAVA Dictionary are not unloaded by JLOAD.

© SAP AG TADM70 6-23
Exercises
Unit 6: Technical Background Knowledge
At the conclusion of this exercise, you will be able to:
• Utilize the concept of TABARTs to create additional *.STR files.
• Understand the function of the ABAP and JAVA database interface
6-1 The OS migration of a large Oracle database was utilized to move the heavily used customer table ZTR1 to a separate table space. For that purpose the necessary tasks were done in the ABAP dictionary: TABART ZZTR1 was created and the tablespace name PSAPSR3ZZTR1 was defined.
6-1-1 Which changes were done to the ABAP dictionary of the source system? Which tables were involved? Note the table entries.
6-2 A customer database was exported using R3LOAD. A look into the export directory shows that no additional *.STR files exist for tables, which were stored in separate Oracle tablespaces. The ABAP dictionary tables, which are used to define additional TABARTs, containing the list of tablespaces, and the mapping between TABART/tablespace, were properly maintained.
6-2-1 What is the reason that no additional *.STR files were created besides the standard ones?
6-2-2 What can be done in advance to check the proper creation of an *.STR file before starting a time consuming export? Which steps are necessary?
6-3 The *.STR files contain database independent data type definitions as used in the ABAP dictionary.
6-3-1 How is R3LOAD able to convert database independent into database specific data types?
6-4 Every database vendor provides a JDBC interface for easy database access.
6-4-1 Why is SAP using its own JDBC interface?

© SAP AG TADM70 6-24

© SAP AG TADM70 6-25
Solutions
Unit 6: Technical Background Knowledge
6-1
6-1-1
a) Define new TABARTs ZZTR1 in tables DDART and DARTT.
b) Add the new tablespace name to TSORA.
c) Map TABART ZZTR1 to tablespace PSAPSR3ZZTR1 in tables TAORA and IAORA.
d) Change the TABART entry for table ZTR1 to ZZTR1 in table DD09L.
Table and index data can also be stored in the same tablespace.
6-2
6-2-1 The technical settings (table DD09L) of the involved objects were not changed. The existence of customer TABARTs does not cause the creation of additional *.STR files, if no tables have been mapped to it.
6-2-2 R3LDCTL can be executed stand-alone as the <sapsid>adm user. If no command line parameters are provided, R3LDCTL will create *.STR and DDL<DBS>.TPL files in the current directory. It will take a few minutes. The created files can then be checked for proper content.
6-3
6-3-1 R3LOAD does not need specific knowledge about the data types of the target database, because it calls the database interface (DBSL), which knows how to handle them.
6-4
6-4-1 Standard JDBC interfaces do not provide features required by SAP applications. Important JDBC extensions are the usage of the SAP JAVA Dictionary and the implementation of the SAP transaction mechanism.

© SAP AG TADM70 6-26

© SAP AG TADM70 7-1
© SAP AG 2010
R3LOAD & JLOAD Files
1 Introduction 7 R3LOAD & JLOAD Files
2 The Migration Project 8 Advanced Migration Techniques
3 System Copy Methods 9 Performing the Migration
4 SAP Migration Tools 10 Troubleshooting
5 R3SETUP & SAPINST 11 Special Projects
6 Technical Background Knowledge
© SAP AG TADM70 7-2
© SAP AG 2010
ContentsPurpose, contents, and structure of the R3LOAD / JLOAD control and data files
ObjectivesAt the end of this unit, you will be able to:
Understand the purpose, contents, and structure of the R3LOAD/JLOAD control, and data files
R3LOAD & JLOAD Files

© SAP AG TADM70 7-3
© SAP AG 2010
Overview: R3LOAD Control and Data Files
Table of content file
<PACKAGE>.EXT<PACKAGE>.EXT
DDL<DBS>.TPLDDL<DBS>.TPL
<PACKAGE>.STA<PACKAGE>.STA
<PACKAGE>/VIEW.STR<PACKAGE>/VIEW.STR
<PACKAGE>.TOC<PACKAGE>.TOC
<PACKAGE>.<nnn><PACKAGE>.<nnn>
<PACKAGE>.LOG<PACKAGE>.LOG
<PACKAGE>.CMD<PACKAGE>.CMD
DDL template file
Initial extent size file
Structure file
Data dump file
Export/import log file
Command file
Load statistic/progress file
R3LDCTL
R3LOAD
R3LOAD
R3LOAD
R3LOAD
R3LDCTL/R3SZCHK
R3LDCTL
R3SETUP/SAPINST/MIGMON
Generated by:
<PACKAGE>.TSK<PACKAGE>.TSKR3LOAD Task file (since 6.10)
Description:
<TABART>.SQL<TABART>.SQLSMIGR_CREATE_DDL SQL file (since 6.20)
R3LOAD writes <PACKAGE>*.XML files during Unicode conversions. They contain the primary key of each row which cannot be properly translated to Unicode. The content is used by transaction SUMG to fix the problems in the target system. These files are not discussed in this course.
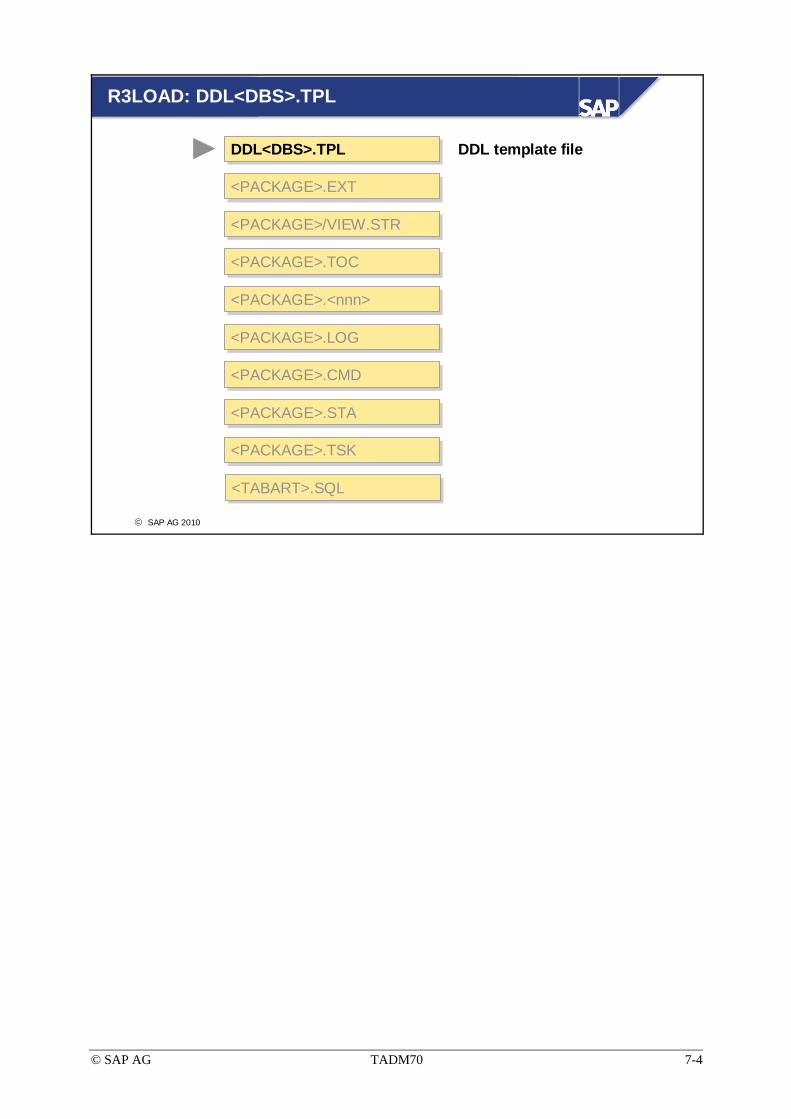
© SAP AG TADM70 7-4
© SAP AG 2010
R3LOAD: DDL<DBS>.TPL
<PACKAGE>.EXT<PACKAGE>.EXT
<PACKAGE>.STA<PACKAGE>.STA
<PACKAGE>/VIEW.STR<PACKAGE>/VIEW.STR
<PACKAGE>.TOC<PACKAGE>.TOC
<PACKAGE>.<nnn><PACKAGE>.<nnn>
<PACKAGE>.LOG<PACKAGE>.LOG
<PACKAGE>.CMD<PACKAGE>.CMD
DDL<DBS>.TPLDDL<DBS>.TPL DDL template file
<PACKAGE>.TSK<PACKAGE>.TSK
<TABART>.SQL<TABART>.SQL

© SAP AG TADM70 7-5
© SAP AG 2010
DDL<DBS>.TPL: Description
Create table/index/view templates and sequence
Sorted or unsorted export
Negative list: table, data, index, view (data since 6.10)
Assignment of TABART to database storage unit
“Next extent size“ for table/index (database specific)
Database specific drop statements (since 6.10)
Database specific delete and truncate data statements (since 6.10)
The “DDL<DBS>.TPL” files contain the database-specific description of the create table/index statements. R3LOAD uses these descriptions to generate the tables and indexes.
Depending on the database used, the primary key or secondary indexes are generated either before, or after the data is loaded.
Normally the R3LOAD based data export is done sorted by primary key. This default behavior can be switched on and off in the DDL<DBS>.TPL file.
A negative list can be used to exclude tables, views, or indexes from the load process. Typical examples include tables LICHECK and MLICHECK.
The assignment of TABART and data/index storage is made here for databases that support the distribution of data among database storage units.
“Next Extent Size” classes are defined separately for tables and indexes, provided this is supported by the target database.
Database specific drop, delete and truncate data SQL statements can be defined for better performance in R3LOAD restart situations.
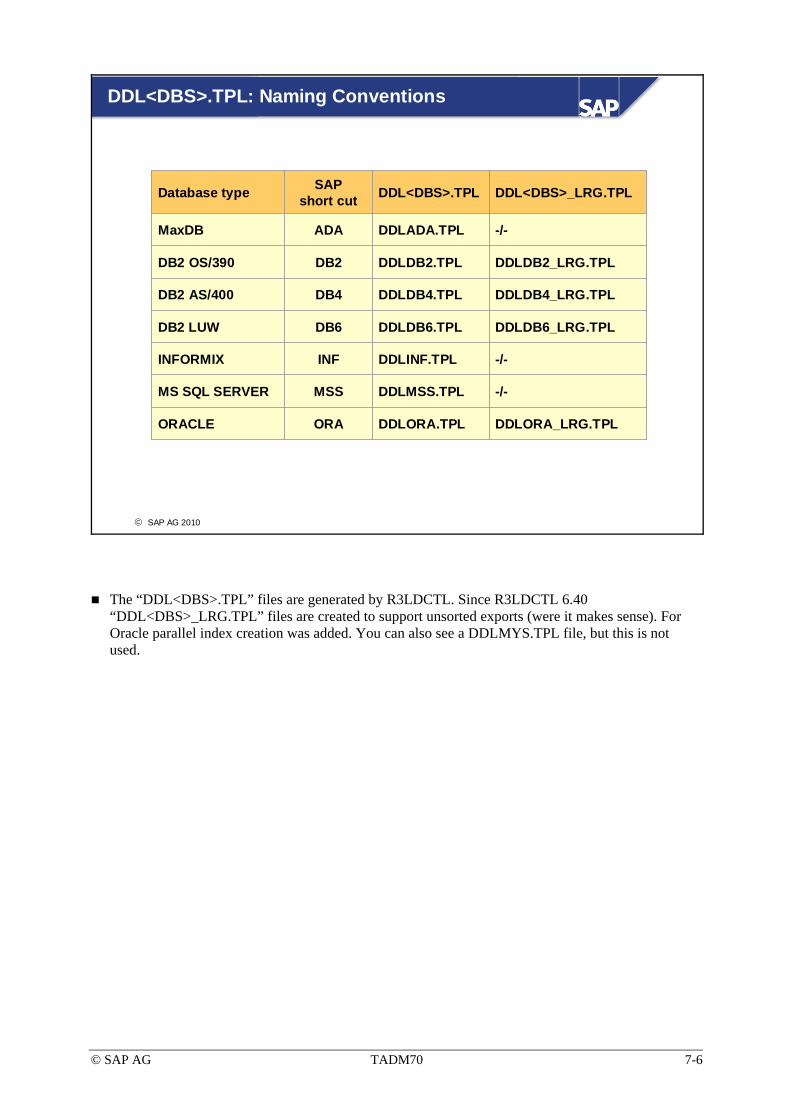
© SAP AG TADM70 7-6
© SAP AG 2010
DDL<DBS>.TPL: Naming Conventions
Database type SAP short cut DDL<DBS>.TPL DDL<DBS>_LRG.TPL
MaxDB ADA DDLADA.TPL -/-
DB2 OS/390 DB2 DDLDB2.TPL DDLDB2_LRG.TPL
DB2 AS/400 DB4 DDLDB4.TPL DDLDB4_LRG.TPL
DB2 LUW DB6 DDLDB6.TPL DDLDB6_LRG.TPL
INFORMIX INF DDLINF.TPL -/-
MS SQL SERVER MSS DDLMSS.TPL -/-
ORACLE ORA DDLORA.TPL DDLORA_LRG.TPL
The “DDL<DBS>.TPL” files are generated by R3LDCTL. Since R3LDCTL 6.40 “DDL<DBS>_LRG.TPL” files are created to support unsorted exports (were it makes sense). For Oracle parallel index creation was added. You can also see a DDLMYS.TPL file, but this is not used.
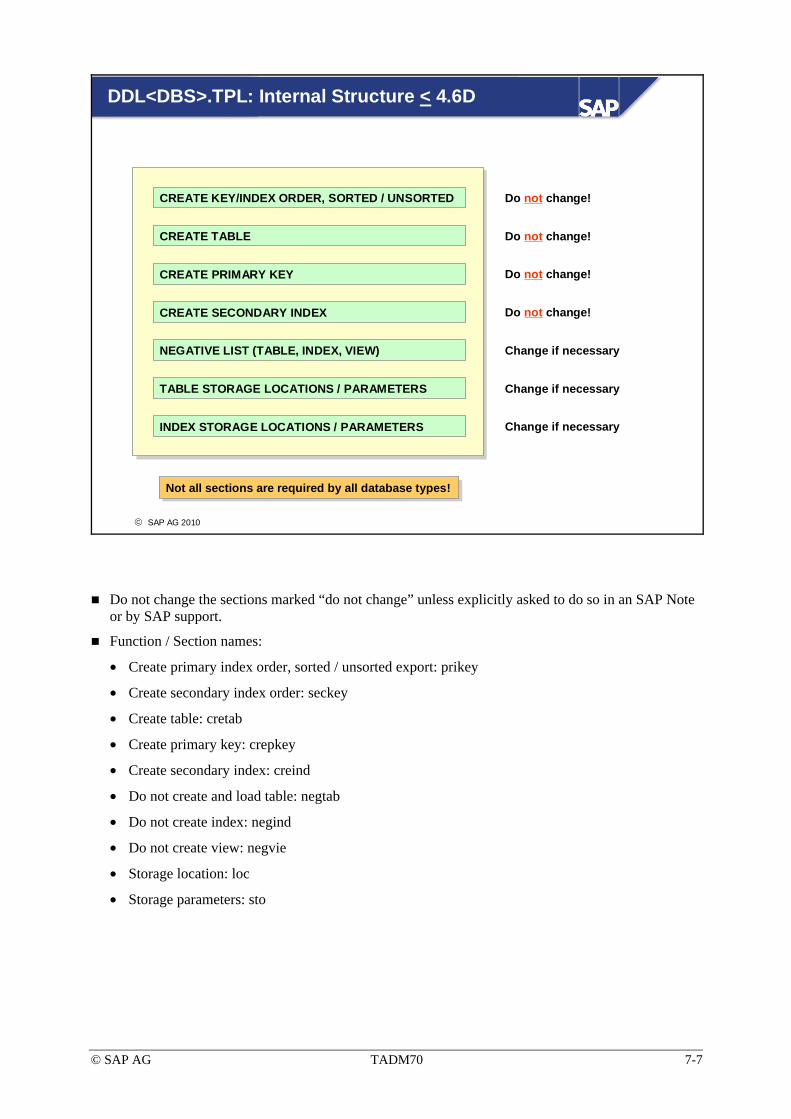
© SAP AG TADM70 7-7
© SAP AG 2010
Not all sections are required by all database types!Not all sections are required by all database types!
CREATE KEY/INDEX ORDER, SORTED / UNSORTED
CREATE TABLE
CREATE PRIMARY KEY
CREATE SECONDARY INDEX
NEGATIVE LIST (TABLE, INDEX, VIEW)
TABLE STORAGE LOCATIONS / PARAMETERS
INDEX STORAGE LOCATIONS / PARAMETERS
Do not change!
Do not change!
Do not change!
Do not change!
Change if necessary
Change if necessary
Change if necessary
DDL<DBS>.TPL: Internal Structure < 4.6D
Do not change the sections marked “do not change” unless explicitly asked to do so in an SAP Note or by SAP support.
Function / Section names:
• Create primary index order, sorted / unsorted export: prikey
• Create secondary index order: seckey
• Create table: cretab
• Create primary key: crepkey
• Create secondary index: creind
• Do not create and load table: negtab
• Do not create index: negind
• Do not create view: negvie
• Storage location: loc
• Storage parameters: sto

© SAP AG TADM70 7-8
© SAP AG 2010
DDL<DBS>.TPL: Structure - Create Table
prikey: AFTER_LOAD ORDER_BY_PKEYseckey: AFTER_LOAD
cretab: CREATE TABLE &tab_name ( /{ &fld_name &fld_desc /-, /} )TABLESPACE &locationSTORAGE (INITIAL &init
NEXT &nextMINEXTENTS &minextMAXEXTENTS &maxextPCTINCREASE &pctinc )
prikey: AFTER_LOAD ORDER_BY_PKEYseckey: AFTER_LOAD
cretab: CREATE TABLE &tab_name ( /{ &fld_name &fld_desc /-, /} )TABLESPACE &locationSTORAGE (INITIAL &init
NEXT &nextMINEXTENTS &minextMAXEXTENTS &maxextPCTINCREASE &pctinc )
Example: DDLORA.TPL (Oracle, 4.6C)
Create Table
Index creation order, sorted export
The DDL files are templates used to generate database specific SQL statements for creating tables, primary keys and secondary indexes by R3load. Variables are indicated by “&” and filled with various values from *.STR, *.EXT files, and from the storage sections of the DDL<DBS>.TPL file itself.

© SAP AG TADM70 7-9
© SAP AG 2010
crepky: CREATE UNIQUE INDEX &pri_keyON &tab_name( &key_fld /-, )TABLESPACE &locationSTORAGE (INITIAL &init
NEXT &nextMINEXTENTS &minext MAXEXTENTS &maxextPCTINCREASE &pctinc )
creind: CREATE &unique INDEX &ind_nameON &tab_name( /{ &fld_name /-, /} )TABLESPACE &locationSTORAGE (INITIAL &init
NEXT &nextMINEXTENTS &minextMAXEXTENTS &maxextPCTINCREASE &pctinc )
Example: DDLORA.TPL (Oracle, 4.6C)
DDL<DBS>.TPL: Structure - Create Index
Create primary key
Create index
Secondary indexes can be unique or ununique. Primary keys are always unique.

© SAP AG TADM70 7-10
© SAP AG 2010
Tables, indexes, and views NOT to be loaded (4.6C):
negtab: LICHECK MLICHECK
negind: LICHECK~0 MLICHECK~0 LICHECK^0 MLICHECK^0
negvie:
negtab: LICHECK MLICHECK
negind: LICHECK~0 MLICHECK~0 LICHECK^0 MLICHECK^0
negvie:
Table
Index
View
DDL<DBS>.TPL: Structure - Negative List
The negative list can be used to prevent tables, indexes, and views from being loaded. The entries are separated by blanks and can be inserted into a single line.

© SAP AG TADM70 7-11
© SAP AG 2010
TABARTOracle data tablespace name PCTINCREASE
# table storage parametersloc: APPL0 PSAPSTABD 0000
APPL1 PSAPBTABD 0000 APPL2 PSAPPOOLD 0000CLUST PSAPCLUD 0000POOL PSAPPOOLD 0000SDIC PSAPDDICD 0000
...
sto: 0 0000000016K 0000000040K 0001 0300 1 0000000016K 0000000160K 0001 03002 0000000016K 0000000640K 0001 03003 0000000016K 0000002560K 0001 03004 0000000016K 0000010240K 0001 03005 0000000016K 0000020480K 0001 0300
...
Example: DDLORA.TPL (Oracle) - Table storage parameters (4.6C)
DDL<DBS>.TPL: Structure - Table Storage
Size Initial extent Next extent Min extent Max extentclass (default)
The default initial extent is only used when no <PACKAGE>.EXT exists or when it does not contain the table.
New TABARTs for additional storage units (i.e. tablespaces for Oracle) can be added to the DDL<DBS>.TPL by changing the table and index storage parameters. If you do this, change the *.STR files, and the corresponding create database templates for R3SETUP (DBSIZE.TPL) or SAPINST (DBSIZE.XML). It is easier to change the ABAP Dictionary before the export, than to change the R3LOAD control files.

© SAP AG TADM70 7-12
© SAP AG 2010
# index storage parametersloc: APPL0 PSAPSTABI 0000
APPL1 PSAPBTABI 0000 APPL2 PSAPPOOLI 0000CLUST PSAPCLUI 0000POOL PSAPPOOLI 0000SDIC PSAPDDICI 0000
...
sto: 0 0000000016K 0000000040K 0001 03001 0000000016K 0000000080K 0001 03002 0000000016K 0000000160K 0001 03003 0000000016K 0000000640K 0001 03004 0000000016K 0000002560K 0001 03005 0000000016K 0000005120K 0001 0300
...
Size Initial extent Next extent Min extent Max extentclass (default)
Example: DDLORA.TPL (Oracle) - Index storage parameters (4.6C)
DDL<DBS>.TPL: Structure - Index Storage
TABARTOracle index tablespace name PCTINCREASE
The default initial extent is only used when no “<PACKAGE>.EXT” exists, or when it does not contain the index.
The same index storage parameters are used for primary and secondary indexes.

© SAP AG TADM70 7-13
© SAP AG 2010
prikey: AFTER_LOAD ORDER_BY_PKEYseckey: AFTER_LOAD
cretab: CREATE TABLE &tab_name( /{ &fld_name &fld_desc /-, /}
, PRIMARY KEY ( &key_fld ) )
crepky: ;
creind: CREATE &unique INDEX &ind_nameON &tab_name( /{ &fld_name /-, /} )
negtab: LICHECK MLICHECK
negind: LICHECK~0 MLICHECK~0 LICHECK^0 MLICHECK^0
negvie:
Example: DDLADA.TPL (MaxDB, 4.6C)
DDL<DBS>.TPL: Structure - Second Example
Create Table and primary key
Index creation order, sorted export
Create Index
Negative list
A less complex example from MaxDB.

© SAP AG TADM70 7-14
© SAP AG 2010
DDL<DBS>.TPL: Internal Structure > 6.10
Not all sections are required by all database types!Not all sections are required by all database types!
CREATE KEY/INDEX ORDER, SORTED / UNSORTED
CREATE / DROP TABLE
CREATE / DROP PRIMARY KEY
CREATE / DROP SECONDARY INDEX
NEGATIVE LIST (TABLE, INDEX, DATA, VIEW)
TABLE STORAGE LOCATIONS / PARAMETERS
INDEX STORAGE LOCATIONS / PARAMETERS
Do not change!
Do not change!
Do not change!
Do not change!
Change if necessary
Change if necessary
Change if necessary
CREATE / DROP VIEW Do not change!
DELETE / TRUNCATE DATA Do not change!
Do not change the sections marked “do not change” unless explicitly asked to do so in an SAP Note or by SAP support.
Function / Section names:
• Create primary key order, sorted / unsorted export: prikey
• Create secondary index order: seckey
• Create table: cretab, drop table: drptab
• Create primary key: crepky, drop primary key: drppky
• Create secondary index: creind, drop secondary index: drpind
• Create view: crevie, drop view: drpvie
• Truncate data: trcdat
• Delete data: deldat
• Do not create table: negtab
• Do not load data: negdat
• Do not create index: negind
• Do not create view: negvie
• Storage location: loc
• Storage parameters: sto

© SAP AG TADM70 7-15
© SAP AG 2010
drptab: DROP TABLE &tab_name&
drppky: DROP INDEX &pri_key&
drpind: DROP INDEX &ind_name&
drpvie: DROP VIEW &view_name&
trcdat: TRUNCATE TABLE &tab_name&
deldat: DELETE FROM &tab_name& &where&
negdat: LICHECK MLICHECK
drptab: DROP TABLE &tab_name&
drppky: DROP INDEX &pri_key&
drpind: DROP INDEX &ind_name&
drpvie: DROP VIEW &view_name&
trcdat: TRUNCATE TABLE &tab_name&
deldat: DELETE FROM &tab_name& &where&
negdat: LICHECK MLICHECK
Example: DDLORA.TPL (Oracle, 7.00)
DDL<DBS>.TPL: Structure – DROP/DELETE Data
Database specific DROP statements
Do not load data into table ...
Database specific DELETE data statements
Above are the templates for dropping objects and deleting/truncating table data. The “&where&” condition is used during restarting an import in case of splitted tables. All other sections are similar to 4.6D and below.
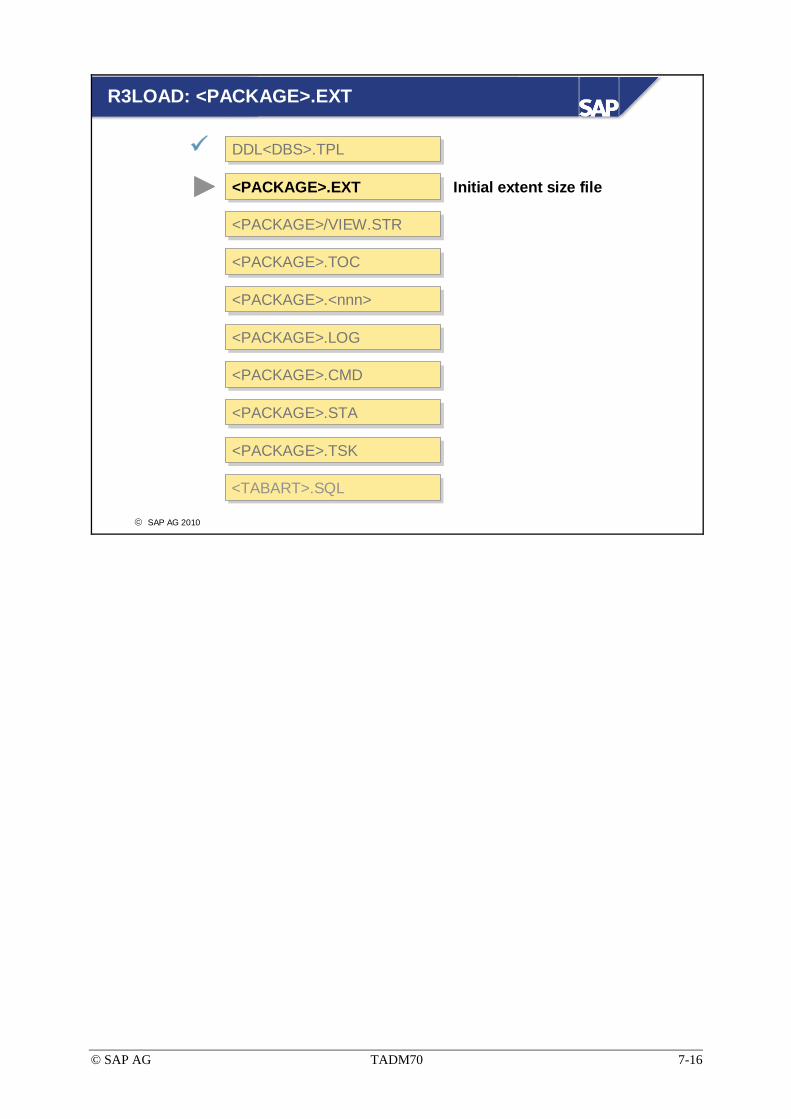
© SAP AG TADM70 7-16
© SAP AG 2010
R3LOAD: <PACKAGE>.EXT
<PACKAGE>.EXT<PACKAGE>.EXT
DDL<DBS>.TPLDDL<DBS>.TPL
<PACKAGE>.STA<PACKAGE>.STA
<PACKAGE>/VIEW.STR<PACKAGE>/VIEW.STR
<PACKAGE>.TOC<PACKAGE>.TOC
<PACKAGE>.<nnn><PACKAGE>.<nnn>
<PACKAGE>.LOG<PACKAGE>.LOG
<PACKAGE>.CMD<PACKAGE>.CMD
Initial extent size file
<PACKAGE>.TSK<PACKAGE>.TSK
<TABART>.SQL<TABART>.SQL

© SAP AG TADM70 7-17
© SAP AG 2010
<PACKAGE>.EXT: Initial Extent (1)
Initial extent sizes are calculated for:TablePrimary index / primary keySecondary index
Calculated by:R3LDCTL (before 4.5A)R3SZCHK (since 4.5A)
The <PACKAGE>.EXT files will created for all database types, because the extent values are used to compute the size of the target database DBSIZE.TPL/DBSIZE.XML and for package splitting.

© SAP AG TADM70 7-18
© SAP AG 2010
<PACKAGE>.EXT: Initial Extent (2)
A065 16384A065~0 16384ACCTCR 94278342ACCTCR~0 71907210ACCTHD 7369284ACCTHD~0 2127216ACCTHD~1 303888ACCTIT 585644277ACCTIT~0 30360822ACCTIT~1 11984535ACTFLI 16384ACTFLI~0 16384
A065 16384A065~0 16384ACCTCR 94278342ACCTCR~0 71907210ACCTHD 7369284ACCTHD~0 2127216ACCTHD~1 303888ACCTIT 585644277ACCTIT~0 30360822ACCTIT~1 11984535ACTFLI 16384ACTFLI~0 16384
Table/index name Initial extent size (in bytes)
Example: SAPAPPL1.EXT
The size of “initial extent” is based on assumptions about the expected space requirements of a table. Factors such as the number and average length of the data records, compression, and the data type used, play an important role.
In case of Oracle dictionary managed tablespaces the values for the “initial extent” can be increased or decreased as required. Observe database-specific limitations for maximum “initial extent” sizes.
R3ZSCHK limits the maximum initial extent to a value of 1.78 GB. This was implemented to prevent data load errors of very large tables because of having not enough consecutive space in a single storage unit, otherwise small tables or indexes could block the storage unit easily. Today's database releases handle the storage more flexibly, making this mechanism obsolete.
Even if the maximum size of a table is limited to 1.78 GB (more precisely 1700 MB), this information is accurate enough for package splitting.
Typical warning in R3SZCHK.log if reaching the size limit: WARNING: REPOLOAD in SLEXC: initial extent reduced to 1782579200 WARNING: /BLUESKY/FECOND in APPL0: initial extent reduced to 1782579200
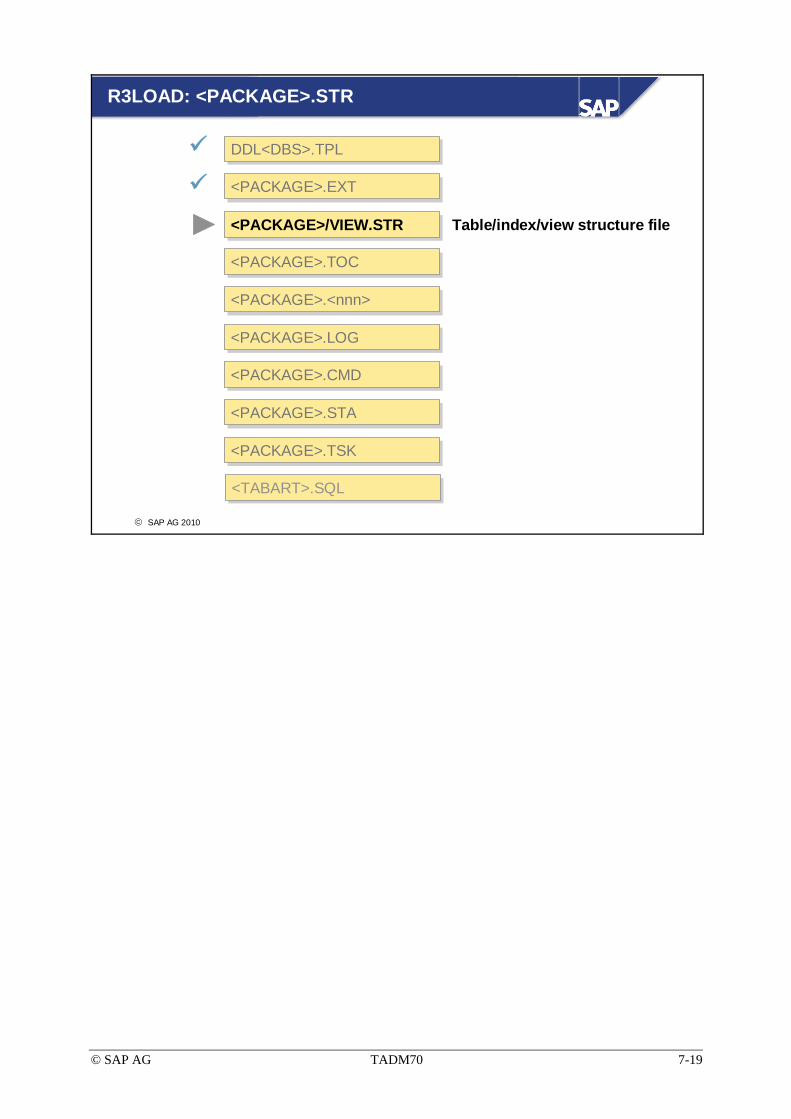
© SAP AG TADM70 7-19
© SAP AG 2010
R3LOAD: <PACKAGE>.STR
<PACKAGE>.EXT<PACKAGE>.EXT
DDL<DBS>.TPLDDL<DBS>.TPL
<PACKAGE>.STA<PACKAGE>.STA
<PACKAGE>/VIEW.STR<PACKAGE>/VIEW.STR
<PACKAGE>.TOC<PACKAGE>.TOC
<PACKAGE>.<nnn><PACKAGE>.<nnn>
<PACKAGE>.LOG<PACKAGE>.LOG
<PACKAGE>.CMD<PACKAGE>.CMD
Table/index/view structure file
<PACKAGE>.TSK<PACKAGE>.TSK
<TABART>.SQL<TABART>.SQL

© SAP AG TADM70 7-20
© SAP AG 2010
<PACKAGE>.STR: Description (1)
General<PACKAGE>.STR
Table/index structures of ABAP Dictionary
SpecialSAP0000.STR
ABAP report load tables
SAPSDIC.STR / SAPNTAB.STRABAP Nametab tables (and others)
SAPVIEW.STRView structures from ABAP Dictionary
The term “package” is used as a synonym for R3LOAD structure files (*.STR).
The data of tables in SAP0000.STR will never be exported. ABAP report loads must be regenerated on the target system.
The ABAP Nametab tables DDNTF / DDNTT (and since 6.x DDNTF_CONV_UC / DDNTT_CONV_UC for Unicode conversions) require a certain import order. The JAVA-based Package Splitter makes sure that the Nametab tables are always put into the same file (SAPNTAB.STR).

© SAP AG TADM70 7-21
© SAP AG 2010
<PACKAGE>.STR: Description (2)
Table, primary index, secondary index name
“Next Extent Size” table/index (class)
Buffer flag (since 4.5A)
Table type (C, D, N, P, Q, R, T, X)
R3LOAD activity (all, data, struct)
Field definitions/data types
The buffer flag is used for OS/390 migrations (as of Release 4.5A). It indicates how to buffer tables in an OS/390 DB2 database.
Table type (conversion type with code page change):
• C = Cluster table
• D = Dynpro (screen) table
• N = Nametab (active ABAP Dictionary)
• P = Pooled table
• Q = Unicode conversion related purpose
• R = Report table
• T = Transparent table
• X = Unicode conversion related purpose
R3LOAD activity:
• all = Create table/index and load data
• data = Load data only (table must be created manually)
• struct = Create table/index, but do not load any data
For tables which are marked with “struct”, R3LOAD will not create a data export or import row inside the task file. This will prevent the export or import of unwanted table data.
Comments are indicated by a “#” character in the first column.

© SAP AG TADM70 7-22
© SAP AG 2010
<PACKAGE>.STR: Object Structure (1)
Size class of next extent (primary index)
Example: SAPSSRC.STR
tab: ICONTatt: SSRC 0 XX T all ICONT~0 SSRC 0fld: LANGU LANG 1 0 0 not_null 1fld: ID CHAR 4 0 0 not_null 2fld: SHORTTEXT CHAR 30 0 0 not_null 0fld: QUICKINFO CHAR 30 0 0 not_null 0
tab: ICONTatt: SSRC 0 XX T all ICONT~0 SSRC 0fld: LANGU LANG 1 0 0 not_null 1fld: ID CHAR 4 0 0 not_null 2fld: SHORTTEXT CHAR 30 0 0 not_null 0fld: QUICKINFO CHAR 30 0 0 not_null 0
Table name
TABART(table)
Table type
Size class ofnext extent (table)
Activity
Primary index nameTABART(index)
Field name ABAP data type Constraint
Field length
Decimal representation
Primary index fields
Buffer flag
The total of field lengths is the offset of the next data record to read in the “<PACKAGE>.<nnn>” file.
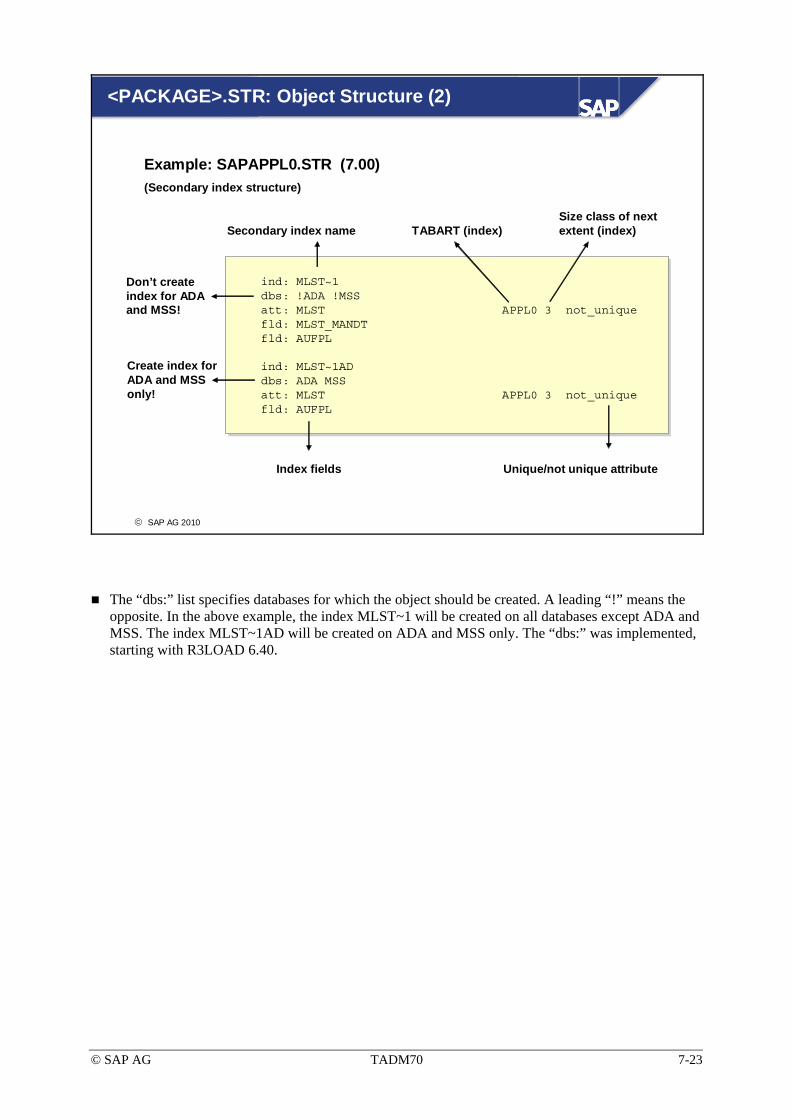
© SAP AG TADM70 7-23
© SAP AG 2010
Example: SAPAPPL0.STR (7.00)(Secondary index structure)
ind: MLST~1dbs: !ADA !MSSatt: MLST APPL0 3 not_uniquefld: MLST_MANDTfld: AUFPL
ind: MLST~1ADdbs: ADA MSSatt: MLST APPL0 3 not_uniquefld: AUFPL
ind: MLST~1dbs: !ADA !MSSatt: MLST APPL0 3 not_uniquefld: MLST_MANDTfld: AUFPL
ind: MLST~1ADdbs: ADA MSSatt: MLST APPL0 3 not_uniquefld: AUFPL
Secondary index name TABART (index)Size class of next extent (index)
Index fields Unique/not unique attribute
<PACKAGE>.STR: Object Structure (2)
Don’t create index for ADA and MSS!
Create index for ADA and MSS only!
The “dbs:” list specifies databases for which the object should be created. A leading “!” means the opposite. In the above example, the index MLST~1 will be created on all databases except ADA and MSS. The index MLST~1AD will be created on ADA and MSS only. The “dbs:” was implemented, starting with R3LOAD 6.40.
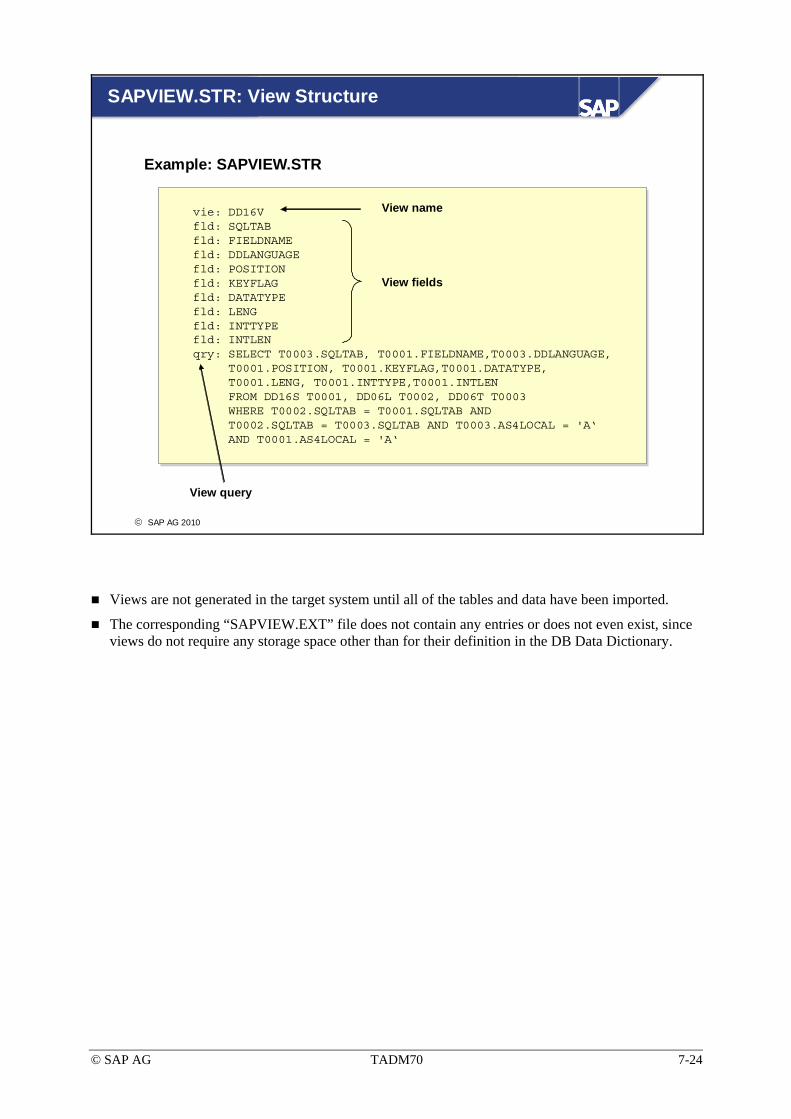
© SAP AG TADM70 7-24
© SAP AG 2010
Example: SAPVIEW.STR
vie: DD16Vfld: SQLTABfld: FIELDNAMEfld: DDLANGUAGEfld: POSITIONfld: KEYFLAGfld: DATATYPEfld: LENGfld: INTTYPEfld: INTLENqry: SELECT T0003.SQLTAB, T0001.FIELDNAME,T0003.DDLANGUAGE,
T0001.POSITION, T0001.KEYFLAG,T0001.DATATYPE,T0001.LENG, T0001.INTTYPE,T0001.INTLENFROM DD16S T0001, DD06L T0002, DD06T T0003 WHERE T0002.SQLTAB = T0001.SQLTAB AND T0002.SQLTAB = T0003.SQLTAB AND T0003.AS4LOCAL = 'A‘AND T0001.AS4LOCAL = 'A‘
View name
View fields
View query
SAPVIEW.STR: View Structure
Views are not generated in the target system until all of the tables and data have been imported.
The corresponding “SAPVIEW.EXT” file does not contain any entries or does not even exist, since views do not require any storage space other than for their definition in the DB Data Dictionary.

© SAP AG TADM70 7-25
© SAP AG 2010
R3LOAD: <PACKAGE>.TOC
<PACKAGE>.EXT<PACKAGE>.EXT
DDL<DBS>.TPLDDL<DBS>.TPL
<PACKAGE>.STA<PACKAGE>.STA
<PACKAGE>/VIEW.STR<PACKAGE>/VIEW.STR
<PACKAGE>.TOC<PACKAGE>.TOC
<PACKAGE>.<nnn><PACKAGE>.<nnn>
<PACKAGE>.LOG<PACKAGE>.LOG
<PACKAGE>.CMD<PACKAGE>.CMD
Table of content file
<PACKAGE>.TSK<PACKAGE>.TSK
<TABART>.SQL<TABART>.SQL

© SAP AG TADM70 7-26
© SAP AG 2010
<PACKAGE>.TOC: Description
Header information (since 6.10)R3LOAD version, ID, code page, checksum information
Name of the dump file used<PACKAGE>.001 - <PACKAGE>.<nnn>
Table name and position of the data within the dump fileFirst data block / last data block
Where conditions in case of table splitting (since 6.40)
Number of table rows unloaded and time stamps
The content of the <PACKAGE>.TOC file is used by R3LOAD version 4.6D and below, to restart an interrupted export. As of R3LOAD 6.10, the <PACKAGE>.TSK file is used for the restart.

© SAP AG TADM70 7-27
© SAP AG 2010
<PACKAGE>.TOC: Internal Structure < 4.6D
tab: RFMHNfil: SAPCLUST.001 1024 #20090404010952514431 519626 #14488 rowseot: #20090404011042tab: RKEPIeot: #20090404011042tab: SFHOAfil: SAPCLUST.001 1024 #20090404011043519627 520525 #393 rowseot: #20090404011047
tab: RFMHNfil: SAPCLUST.001 1024 #20090404010952514431 519626 #14488 rowseot: #20090404011042tab: RKEPIeot: #20090404011042tab: SFHOAfil: SAPCLUST.001 1024 #20090404011043519627 520525 #393 rowseot: #20090404011047
Table name Data file Block size Start of export
End of export
First block of table data
Last block of table data
Unloaded rows
Example: SAPCLUST.TOC (4.6C)
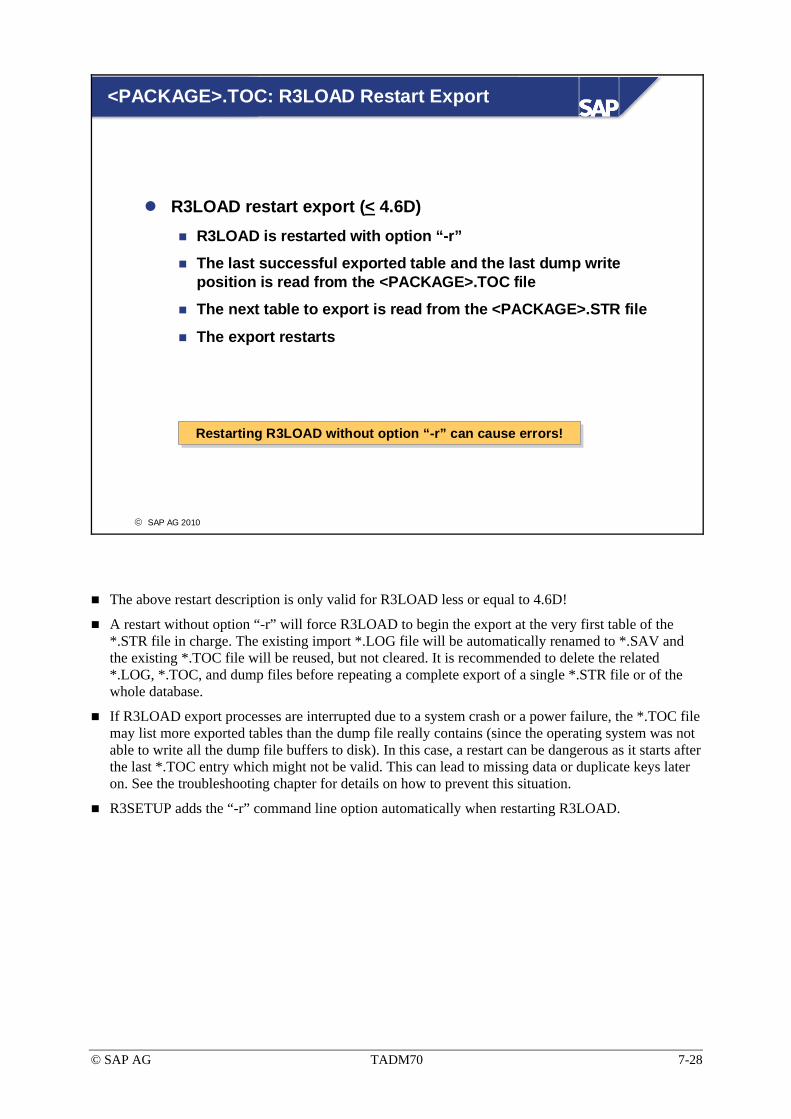
© SAP AG TADM70 7-28
© SAP AG 2010
<PACKAGE>.TOC: R3LOAD Restart Export
R3LOAD restart export (< 4.6D)R3LOAD is restarted with option “-r”
The last successful exported table and the last dump write position is read from the <PACKAGE>.TOC file
The next table to export is read from the <PACKAGE>.STR file
The export restarts
Restarting R3LOAD without option “-r” can cause errors!Restarting R3LOAD without option “-r” can cause errors!
The above restart description is only valid for R3LOAD less or equal to 4.6D!
A restart without option “-r” will force R3LOAD to begin the export at the very first table of the *.STR file in charge. The existing import *.LOG file will be automatically renamed to *.SAV and the existing *.TOC file will be reused, but not cleared. It is recommended to delete the related *.LOG, *.TOC, and dump files before repeating a complete export of a single *.STR file or of the whole database.
If R3LOAD export processes are interrupted due to a system crash or a power failure, the *.TOC file may list more exported tables than the dump file really contains (since the operating system was not able to write all the dump file buffers to disk). In this case, a restart can be dangerous as it starts after the last *.TOC entry which might not be valid. This can lead to missing data or duplicate keys later on. See the troubleshooting chapter for details on how to prevent this situation.
R3SETUP adds the “-r” command line option automatically when restarting R3LOAD.
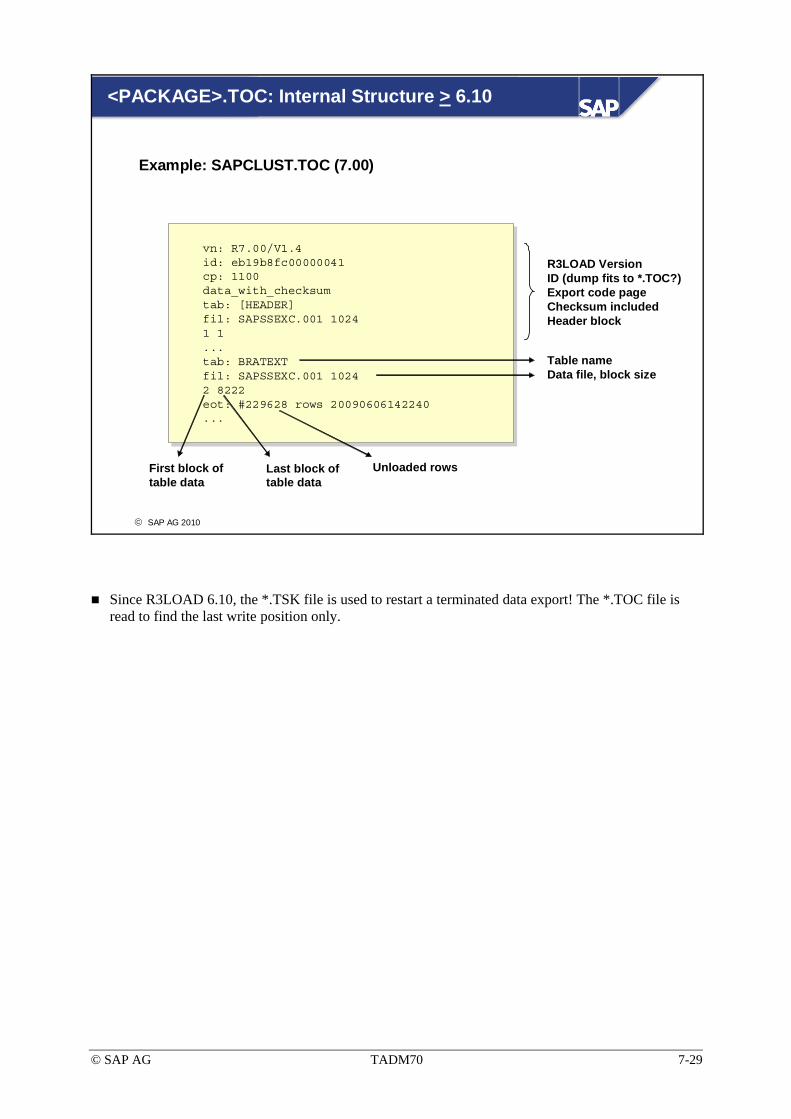
© SAP AG TADM70 7-29
© SAP AG 2010
<PACKAGE>.TOC: Internal Structure > 6.10
vn: R7.00/V1.4id: eb19b8fc00000041cp: 1100data_with_checksumtab: [HEADER]fil: SAPSSEXC.001 10241 1... tab: BRATEXTfil: SAPSSEXC.001 10242 8222eot: #229628 rows 20090606142240...
vn: R7.00/V1.4id: eb19b8fc00000041cp: 1100data_with_checksumtab: [HEADER]fil: SAPSSEXC.001 10241 1... tab: BRATEXTfil: SAPSSEXC.001 10242 8222eot: #229628 rows 20090606142240...
Example: SAPCLUST.TOC (7.00)
R3LOAD VersionID (dump fits to *.TOC?) Export code pageChecksum includedHeader block
First block of table data
Last block of table data
Unloaded rows
Table nameData file, block size
Since R3LOAD 6.10, the *.TSK file is used to restart a terminated data export! The *.TOC file is read to find the last write position only.

© SAP AG TADM70 7-30
© SAP AG 2010
<PACKAGE>.TOC: Internal Structure > 6.40
vn: R7.00/V1.4id: 4b11ad7a0000003ccp: 4102data_with_checksumtab: [HEADER]fil: DFKKOP-1.001 10241 1eot: #0 rows 20100201145648tab: DFKKOPsel: WHERE ("OPBEL" < '010003603700')fil: DFKKOP-1.001 10242 1024000fil: DFKKOP-1.002 10241 550088eot: #16295259 rows 20100201222156
eof: #20100201222156
vn: R7.00/V1.4id: 4b11ad7a0000003ccp: 4102data_with_checksumtab: [HEADER]fil: DFKKOP-1.001 10241 1eot: #0 rows 20100201145648tab: DFKKOPsel: WHERE ("OPBEL" < '010003603700')fil: DFKKOP-1.001 10242 1024000fil: DFKKOP-1.002 10241 550088eot: #16295259 rows 20100201222156
eof: #20100201222156
Example: Splitted table DFKKOP in DFKKOP-1.TOC (7.00)
Name of splitted tableWhere conditionDump file 1
Dump file 2
In case of splitted tables, the WHERE condition used during the export is written into the respective *.TOC file. Before starting the import, R3LOAD compares the WHERE condition in the *.TOC file against the where condition in the *.TSK file. R3LOAD assumes a problem if they do not match and stops on error.
If there is an error during data load and R3LOAD must be restarted, the WHERE condition is used for selective deletion of already imported data.
Unicode code pages: 4102 Big Endian, 4103 Little Endian.
Non-Unicode code pages: 1100, MDMP (for exports of MDMP systems).
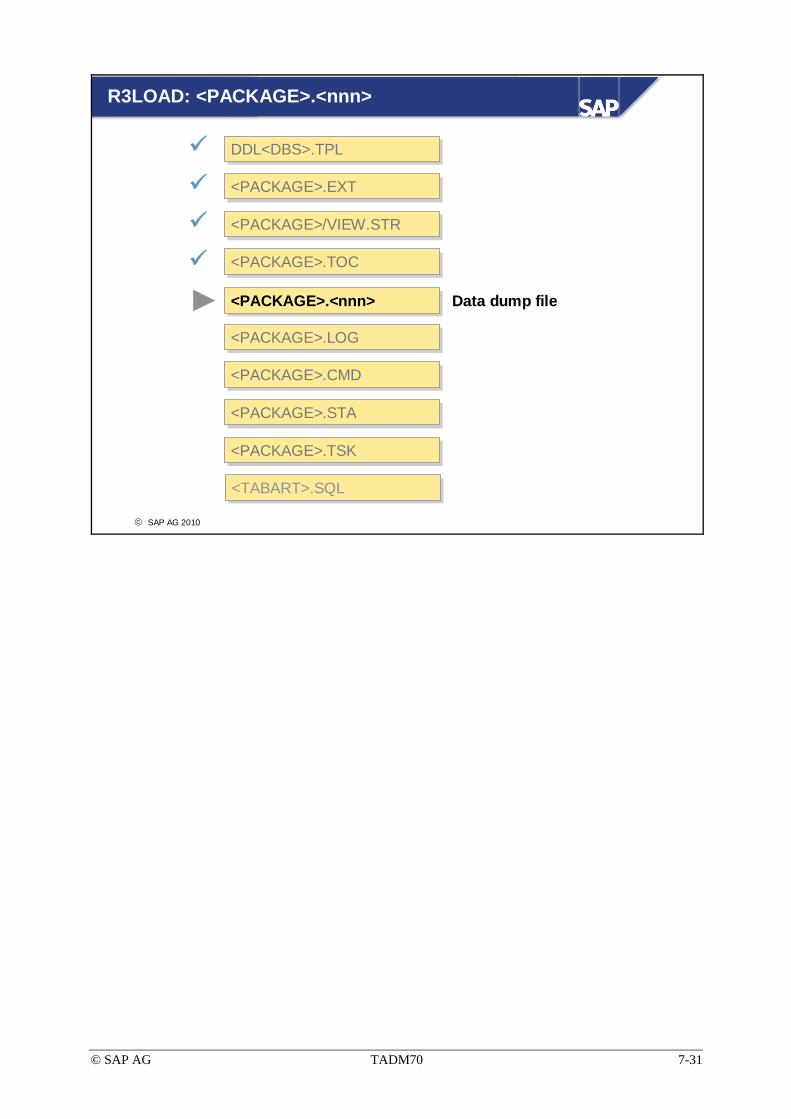
© SAP AG TADM70 7-31
© SAP AG 2010
R3LOAD: <PACKAGE>.<nnn>
<PACKAGE>.EXT<PACKAGE>.EXT
DDL<DBS>.TPLDDL<DBS>.TPL
<PACKAGE>.STA<PACKAGE>.STA
<PACKAGE>/VIEW.STR<PACKAGE>/VIEW.STR
<PACKAGE>.TOC<PACKAGE>.TOC
<PACKAGE>.<nnn><PACKAGE>.<nnn>
<PACKAGE>.LOG<PACKAGE>.LOG
<PACKAGE>.CMD<PACKAGE>.CMD
Data dump file
<PACKAGE>.TSK<PACKAGE>.TSK
<TABART>.SQL<TABART>.SQL

© SAP AG TADM70 7-32
© SAP AG 2010
<PACKAGE>.<nnn>: Description
Contains the exported data
Maximum file size defined in <PACKAGE>.CMD
Non-platform-specific file format
Non-platform-specific data compression
Checksums for data integrity (since 4.5A)
Information about the export system (since 4.5A)
Depending on the source database used for the export, a data compression ratio of between 1:4, and 1:10 or more can be achieved. The compression is performed at block level, so the file cannot be decompressed as a whole.
Some versions of R3SETUP/SAPINST are asking for the maximum dump file size (other versions use different defaults - check the *.CMD file for the used value). Each additional dump file (for the same *.STR file) is assigned to a new number (such as SAPAPPL1.001 or SAPAPPL1.002). The files of a PACKAGE are all generated in the same directory (if not specified differently in the *.CMD file – >=6.10 only!). Make sure that the available disk space is sufficient.
A checksum calculation at block level is implemented as of R3LOAD 4.5A to ensure data integrity.
R3LOAD versions 4.5A and above compare source system information obtained from the dump file against the actual system information. If R3LOAD detects a difference in OS or DB, a migration key is necessary to perform the import (see GSI section in export log file).

© SAP AG TADM70 7-33
© SAP AG 2010
<PACKAGE>.<nnn>: Internal Dump File Structure
Example: SAPAPPL1.001 (> 4.5A)
Block (1)Block (1) Block (2)Block (2) Block (n)Block (n)Block (3)Block (3)
Block (1 … n) Compressed table data
Example: SAPAPPL1.001 (< 4.5A)
Block (1)Block (1) Block (2)Block (2) Block (n)Block (n)Block (3)Block (3)
Block (1)[Header]
Source system information, i.e. database and operating system type
Block (2 ... n) Compressed table data with check sum
R3LOAD reads a certain amount of database data into an internal buffer and does a compression on it. The number of written blocks (group) will depend on the compression result and block size used. This figure is also written into the dump, to tell R3LOAD how many blocks to read later on.
Since 4.5A, a header block is used to identify heterogeneous system copies and to verify the migration key.
Implemented with 4.5A, was that every group of compressed data blocks has its own checksum. Before a checksum can be verified, all blocks of a group must be read by R3LOAD. If a dump file has been corrupted during a file transfer, typical R3LOAD read errors will be: RFF (cannot read from file), RFB (cannot read from buffer), or “cannot allocate buffer of size ...”. For more details, see unit “Troubleshooting”.

© SAP AG TADM70 7-34
© SAP AG 2010
R3LOAD: <PACKAGE>.LOG
<PACKAGE>.EXT<PACKAGE>.EXT
DDL<DBS>.TPLDDL<DBS>.TPL
<PACKAGE>.STA<PACKAGE>.STA
<PACKAGE>/VIEW.STR<PACKAGE>/VIEW.STR
<PACKAGE>.TOC<PACKAGE>.TOC
<PACKAGE>.<nnn><PACKAGE>.<nnn>
<PACKAGE>.LOG<PACKAGE>.LOG
<PACKAGE>.CMD<PACKAGE>.CMD
Export/import log file
<PACKAGE>.TSK<PACKAGE>.TSK
<TABART>.SQL<TABART>.SQL

© SAP AG TADM70 7-35
© SAP AG 2010
<PACKAGE>.LOG: Export Log < 4.6D
Exported tables
...#START: 20090326132320(GSI) INFO: dbname = "I3120090426090439"(GSI) INFO: vname = "ORACLE"(GSI) INFO: hostname = "sapintg"(GSI) INFO: sysname = "AIX"(GSI) INFO: nodename = "sapintg"(GSI) INFO: release = "3"(GSI) INFO: version = "4"(GSI) INFO: machine = "000573774C00"(EXP) TABLE: "A055"(EXP) TABLE: "A056"(EXP) TABLE: "A064"(EXP) TABLE: "A065"(EXP) TABLE: "ACCTCR" ...#STOP: 20090326153327
R3load> Export terminated successfully#END OF LOG: 20090326153327
Start of export
Example: SAPAPPL1.LOG (4.6C)
End of export
Source system information
The header entries (GSI) of the export *.LOG file show important information which can be useful for the migration key generation.

© SAP AG TADM70 7-36
© SAP AG 2010
<PACKAGE>.LOG: Export Log > 6.10
...(GSI) INFO: dbname = "BWH20090807120816"(GSI) INFO: vname = "ORACLE"(GSI) INFO: hostname = "sapbwh"(GSI) INFO: sysname = "SunOS"(GSI) INFO: nodename = "sapbwh"(GSI) INFO: release = "5.8"(GSI) INFO: version = "Generic_108528-15"(GSI) INFO: machine = "sun4u"
Wed Sep 4 02:31:32 2009
(GSI) INFO: instno = "0020333684"...
(EXP) TABLE: "AAACD1"(EXP) TABLE: "AAACD2"(EXP) TABLE: "AAUSORG"(EXP) TABLE: "ADMI_APPLI" ... /sapmnt/BWH/exe/R3load: job completed/sapmnt/BWH/exe/R3load: END OF LOG: 20090904024851
Example: SAPAPPL1.LOG (6.20)
Exported tables
Start of export
End of export
Source system information
Installation number
Since R3LOAD 6.10 the installation number of the exported system was added.
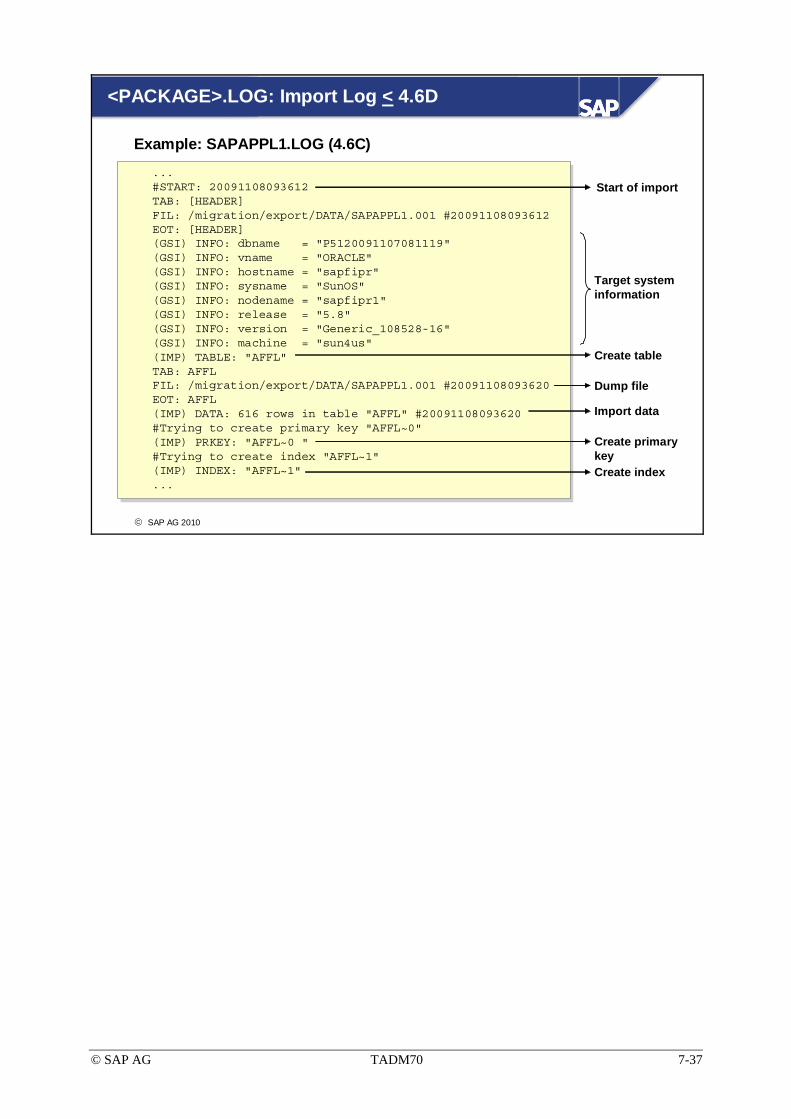
© SAP AG TADM70 7-37
© SAP AG 2010
<PACKAGE>.LOG: Import Log < 4.6D
... #START: 20091108093612TAB: [HEADER]FIL: /migration/export/DATA/SAPAPPL1.001 #20091108093612EOT: [HEADER](GSI) INFO: dbname = "P5120091107081119"(GSI) INFO: vname = "ORACLE"(GSI) INFO: hostname = "sapfipr"(GSI) INFO: sysname = "SunOS"(GSI) INFO: nodename = "sapfipr1"(GSI) INFO: release = "5.8"(GSI) INFO: version = "Generic_108528-16"(GSI) INFO: machine = "sun4us"(IMP) TABLE: "AFFL"TAB: AFFLFIL: /migration/export/DATA/SAPAPPL1.001 #20091108093620EOT: AFFL(IMP) DATA: 616 rows in table "AFFL" #20091108093620#Trying to create primary key "AFFL~0"(IMP) PRKEY: "AFFL~0 "#Trying to create index "AFFL~1"(IMP) INDEX: "AFFL~1"...
... #START: 20091108093612TAB: [HEADER]FIL: /migration/export/DATA/SAPAPPL1.001 #20091108093612EOT: [HEADER](GSI) INFO: dbname = "P5120091107081119"(GSI) INFO: vname = "ORACLE"(GSI) INFO: hostname = "sapfipr"(GSI) INFO: sysname = "SunOS"(GSI) INFO: nodename = "sapfipr1"(GSI) INFO: release = "5.8"(GSI) INFO: version = "Generic_108528-16"(GSI) INFO: machine = "sun4us"(IMP) TABLE: "AFFL"TAB: AFFLFIL: /migration/export/DATA/SAPAPPL1.001 #20091108093620EOT: AFFL(IMP) DATA: 616 rows in table "AFFL" #20091108093620#Trying to create primary key "AFFL~0"(IMP) PRKEY: "AFFL~0 "#Trying to create index "AFFL~1"(IMP) INDEX: "AFFL~1"...
Create index
Create primarykey
Dump file
Import data
Example: SAPAPPL1.LOG (4.6C)
Create table
Target system information
Start of import

© SAP AG TADM70 7-38
© SAP AG 2010
<PACKAGE>.LOG: R3LOAD Restart Import
R3LOAD restart import (< 4.6D)Restart R3LOAD with option “-r”
R3LOAD reads the erroneous task from the import log file
Restart action in case of a load error: Delete table data – load data again
Restart action in case of object creation error: Drop table, primary key or index – create object again
Restarting R3LOAD without option “-r” will cause errorsRestarting R3LOAD without option “-r” will cause errors
Up to R3LOAD 4.6D, the restart point for an interrupted import is read from the <PACKAGE>.log file. The restart performs a delete data (DELETE FROM…) or a drop table/index.
A restart without option “-r” will force R3LOAD to begin at the very first table of the *.STR. The existing import *.LOG file will be automatically renamed to *.SAV. The import process will terminate on error, as the database objects already exist.
R3SETUP adds the “-r” option automatically when restarting R3LOAD.

© SAP AG TADM70 7-39
© SAP AG 2010
<PACKAGE>.LOG: Import Log > 6.10 and < 6.40
... Thu Sep 5 23:15:58 2009 ... (GSI) INFO: dbname = "XBE20090905100926"(GSI) INFO: vname = "ORACLE"(GSI) INFO: hostname = "pnvw013b"(GSI) INFO: sysname = "AIX"(GSI) INFO: nodename = "pnvw013b"(GSI) INFO: release = "3"(GSI) INFO: version = "4"(GSI) INFO: machine = "000871714C00" ...(DB) INFO: ADMI_JOBS created (IMP) INFO: import of ADMI_JOBS completed (12 rows)(DB) INFO: ADMI_JOBS~0 created(DB) INFO: ADMI_JOBS~OBJ created(IMP) INFO: import of ADMI_RJOBS completed (0 rows)(DB) INFO: ADMI_RJOBS~0 created.../sapmnt/XBE/exe/R3load: job completed/sapmnt/XBE/exe/R3load: END OF LOG: 20090906091431
... Thu Sep 5 23:15:58 2009 ... (GSI) INFO: dbname = "XBE20090905100926"(GSI) INFO: vname = "ORACLE"(GSI) INFO: hostname = "pnvw013b"(GSI) INFO: sysname = "AIX"(GSI) INFO: nodename = "pnvw013b"(GSI) INFO: release = "3"(GSI) INFO: version = "4"(GSI) INFO: machine = "000871714C00" ...(DB) INFO: ADMI_JOBS created (IMP) INFO: import of ADMI_JOBS completed (12 rows)(DB) INFO: ADMI_JOBS~0 created(DB) INFO: ADMI_JOBS~OBJ created(IMP) INFO: import of ADMI_RJOBS completed (0 rows)(DB) INFO: ADMI_RJOBS~0 created.../sapmnt/XBE/exe/R3load: job completed/sapmnt/XBE/exe/R3load: END OF LOG: 20090906091431
Create primary key
Example: SAPAPPL1.LOG (6.20)
Import table data
Target system information
Create index
Start of import
End of import
Create table
Since R3LOAD 6.10, only the *.TSK file is used to restart an interrupted import! The restart point for the data load is the first entry in the *.TSK file of status error (err) or execute (xeq).

© SAP AG TADM70 7-40
© SAP AG 2010
<PACKAGE>.LOG: Import Log > 6.40
R3load: version R6.40/V1.4 [UNICODE]Compiled Feb 9 2009 00:28:30...(DB) INFO: connected to DB(DB) INFO: DbSlControl(DBSL_CMD_NLS_CHARACTERSET_GET): UTF8(GSI) INFO: dbname = "DEV20090504020537"(GSI) INFO: vname = "ORACLE"(GSI) INFO: hostname = "TWDF0701"(GSI) INFO: sysname = "Windows NT"(GSI) INFO: nodename = "TWDF0701"(GSI) INFO: release = "5.0"(GSI) INFO: version = "2195 Service Pack 4"(GSI) INFO: machine = "4x Intel 801586 (Mod 2 Step 9)"...(DB) INFO: T000 created #20090517175445(IMP) INFO: import of T000 completed (6 rows) #20090517175445(DB) INFO: T000~0 created #20090517175446...(DB) INFO: disconnected from DB
R3load: job completedR3load: END OF LOG: 20090517183425
Example: SAPAPPL2.LOG (6.40)
Separate time stamps for eachimport task
DB character set used
As of R3LOAD 6.40, separate time stamps for create table, load data, and create index are implemented. This allows a much better load analytics than on previous releases.
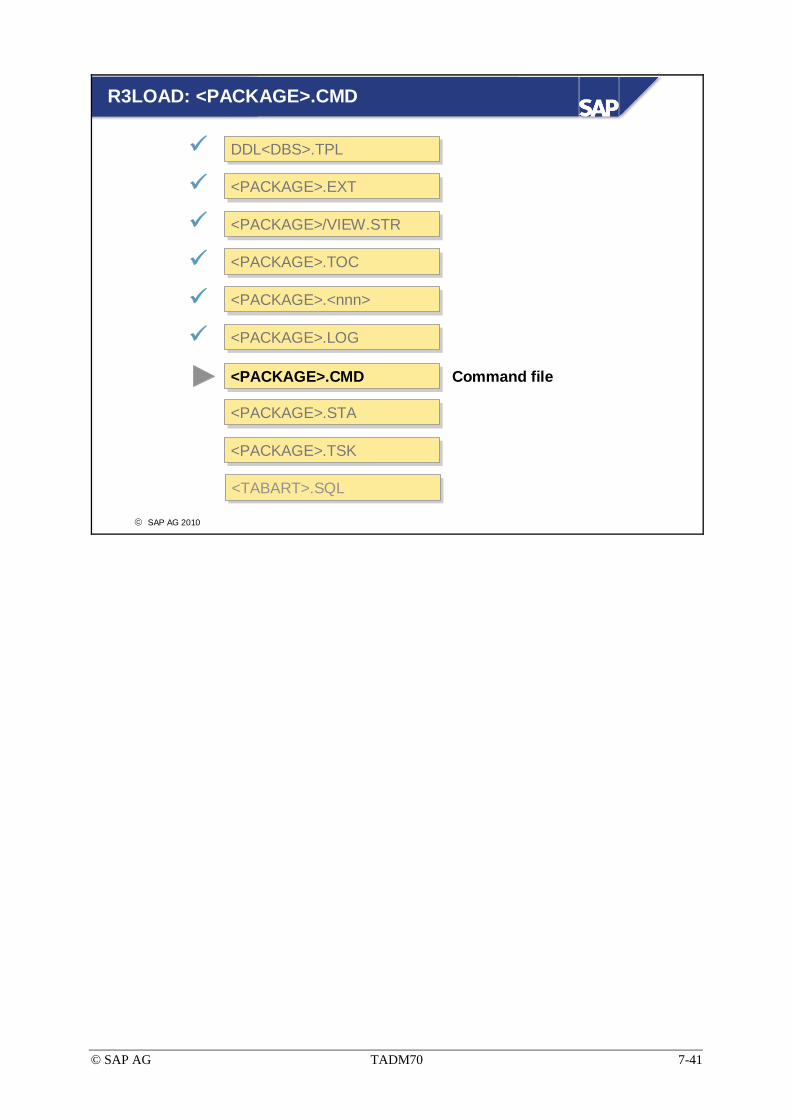
© SAP AG TADM70 7-41
© SAP AG 2010
R3LOAD: <PACKAGE>.CMD
<PACKAGE>.EXT<PACKAGE>.EXT
DDL<DBS>.TPLDDL<DBS>.TPL
<PACKAGE>.STA<PACKAGE>.STA
<PACKAGE>/VIEW.STR<PACKAGE>/VIEW.STR
<PACKAGE>.TOC<PACKAGE>.TOC
<PACKAGE>.<nnn><PACKAGE>.<nnn>
<PACKAGE>.LOG<PACKAGE>.LOG
<PACKAGE>.CMD<PACKAGE>.CMD Command file
<PACKAGE>.TSK<PACKAGE>.TSK
<TABART>.SQL<TABART>.SQL

© SAP AG TADM70 7-42
© SAP AG 2010
<PACKAGE>.CMD: Description
Path and names for R3LOAD files<PACKAGE>.TSK (since 6.10)<PACKAGE>.STRDDL<DBS>.TPLDump directory, block size, file size Up to 16 dump directory locations (since 6.10)Parameter for socket connection (since 6.40)<PACKAGE>.TOC<PACKAGE>.EXT
Command files are automatically generated by SAP installation programs R3SETUP, SAPINST, and MIGMON.
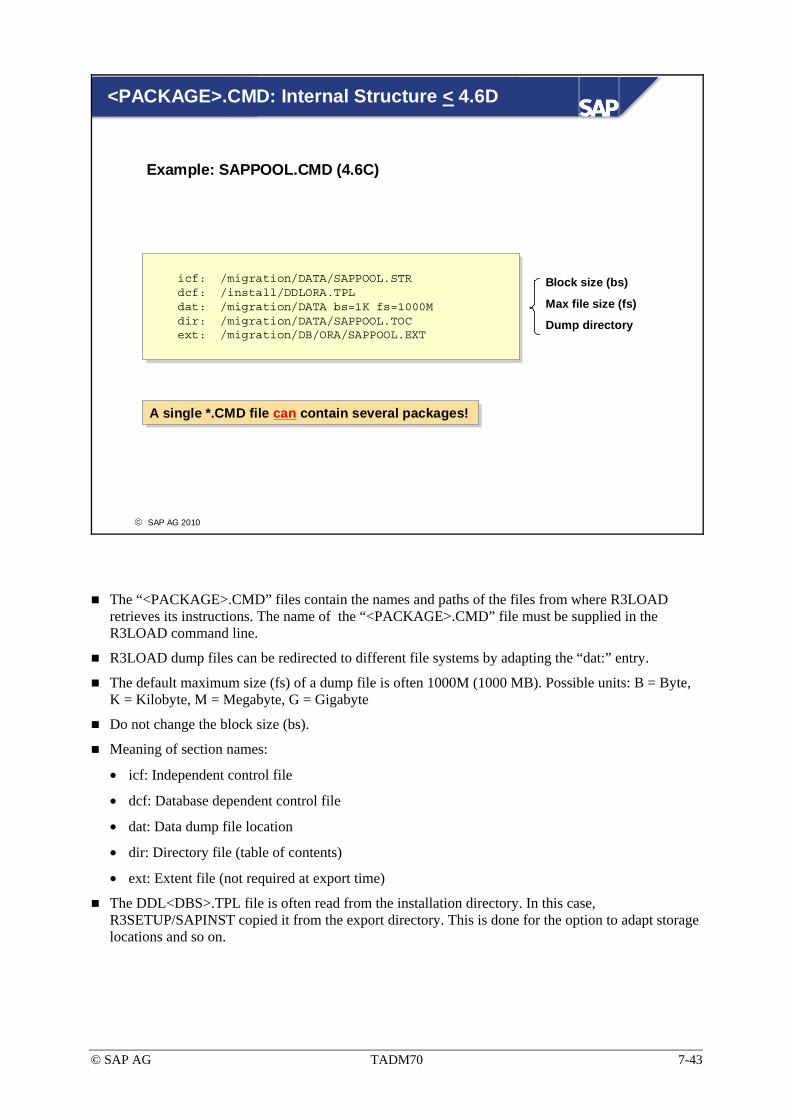
© SAP AG TADM70 7-43
© SAP AG 2010
<PACKAGE>.CMD: Internal Structure < 4.6D
Block size (bs)
Max file size (fs)
Dump directory
Example: SAPPOOL.CMD (4.6C)
icf: /migration/DATA/SAPPOOL.STRdcf: /install/DDLORA.TPLdat: /migration/DATA bs=1K fs=1000Mdir: /migration/DATA/SAPPOOL.TOCext: /migration/DB/ORA/SAPPOOL.EXT
icf: /migration/DATA/SAPPOOL.STRdcf: /install/DDLORA.TPLdat: /migration/DATA bs=1K fs=1000Mdir: /migration/DATA/SAPPOOL.TOCext: /migration/DB/ORA/SAPPOOL.EXT
A single *.CMD file can contain several packages! A single *.CMD file can contain several packages!
The “<PACKAGE>.CMD” files contain the names and paths of the files from where R3LOAD retrieves its instructions. The name of the “<PACKAGE>.CMD” file must be supplied in the R3LOAD command line.
R3LOAD dump files can be redirected to different file systems by adapting the “dat:” entry.
The default maximum size (fs) of a dump file is often 1000M (1000 MB). Possible units: B = Byte, K = Kilobyte, M = Megabyte, G = Gigabyte
Do not change the block size (bs).
Meaning of section names:
• icf: Independent control file
• dcf: Database dependent control file
• dat: Data dump file location
• dir: Directory file (table of contents)
• ext: Extent file (not required at export time)
The DDL<DBS>.TPL file is often read from the installation directory. In this case, R3SETUP/SAPINST copied it from the export directory. This is done for the option to adapt storage locations and so on.

© SAP AG TADM70 7-44
© SAP AG 2010
<PACKAGE>.CMD: Internal Structure > 6.10
Dump directory 1Dump directory 2 Dump directory 3
Example: SAPMYCMD.CMD (6.20)
tsk: /install/SAPPOOL.TSK icf: /migration/DATA/SAPPOOL.STRdcf: /install/DDLORA.TPLdat: /migration/DATA bs=1K fs=1000Mdat: /mig1/DATA bs=1K fs=1000Mdat: /mig2/DATA bs=1K fs=1000Mdir: /migration/DATA/SAPPOOL.TOCext: /migration/DB/ORA/SAPPOOL.EXT
tsk: /install/SAPAPPL1.TSK icf: /migration/DATA/SAPAPPL1.STRdcf: /install/DDLORA.TPLdat: /migration/DATA bs=1K fs=1000Mdir: /migration/DATA/SAPAPPL1.TOC...
Task file
Up to 16 different dump directories for each R3LOAD process possible!Up to 16 different dump directories for each R3LOAD process possible!
Possible but rarely used
Meaning of section names:
• tsk: Task file
• icf: Independent control file
• dcf: Database dependent control file
• dat: Data dump file location (up to 16 different locations)
• dir: Directory file (table of contents)
• ext: Extent file (not required at export time)
In the above example, the first dump file SAPPOOL.001 will be written to /migration/DATA, the second dump file SAPPOOL.002 to /mig1/DATA, and so on. The 4th , 5th, etc., ... dump file will be stored in the last defined dump location.
If more than one PACKAGE is mentioned in a *.CMD file, a single R3LOAD will execute them in sequential order. This might be useful in certain cases.
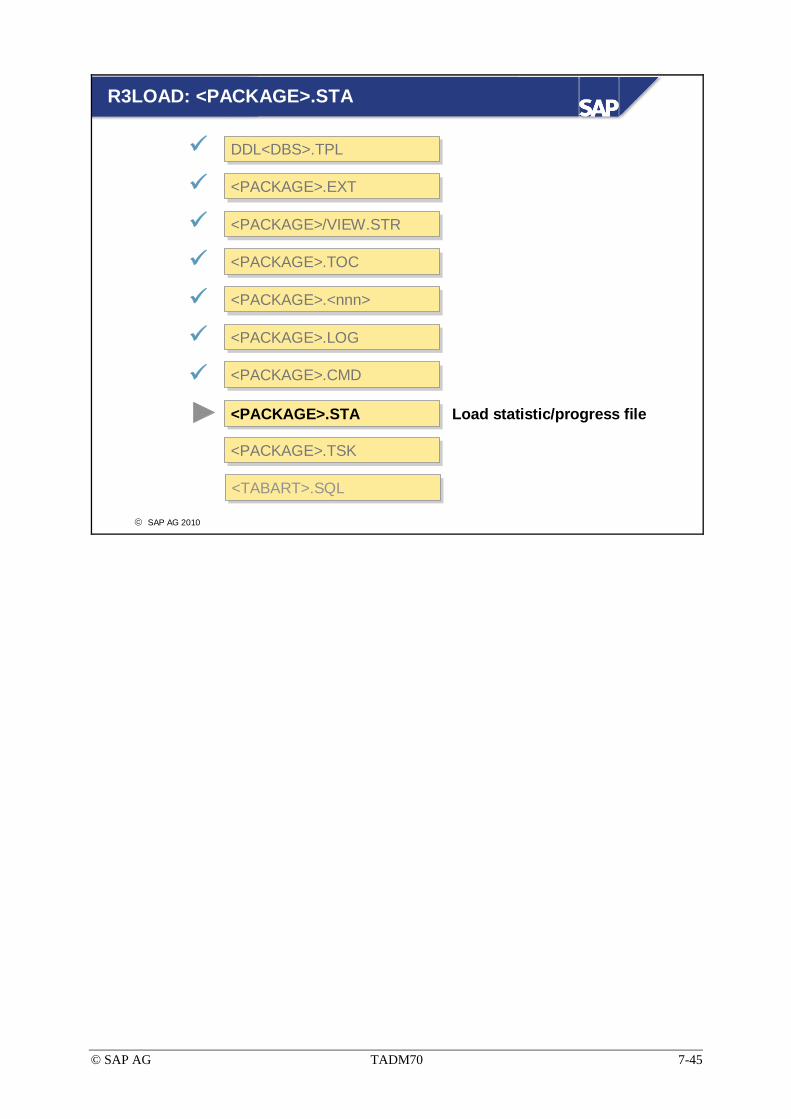
© SAP AG TADM70 7-45
© SAP AG 2010
R3LOAD: <PACKAGE>.STA
<PACKAGE>.EXT<PACKAGE>.EXT
DDL<DBS>.TPLDDL<DBS>.TPL
<PACKAGE>.STA<PACKAGE>.STA
<PACKAGE>/VIEW.STR<PACKAGE>/VIEW.STR
<PACKAGE>.TOC<PACKAGE>.TOC
<PACKAGE>.<nnn><PACKAGE>.<nnn>
<PACKAGE>.LOG<PACKAGE>.LOG
<PACKAGE>.CMD<PACKAGE>.CMD
Load statistic/progress file
<PACKAGE>.TSK<PACKAGE>.TSK
<TABART>.SQL<TABART>.SQL

© SAP AG TADM70 7-46
© SAP AG 2010
<PACKAGE>.STA: Description
Contains the load statistic of a TABARTBytes loaded
Total bytes
Note: all values are estimates!
The values are estimates and serve primarily to display the load progress.
The generation of statistic files is switched off by default. Use R3LOAD option -s <stat file> to make use of the statistic feature.
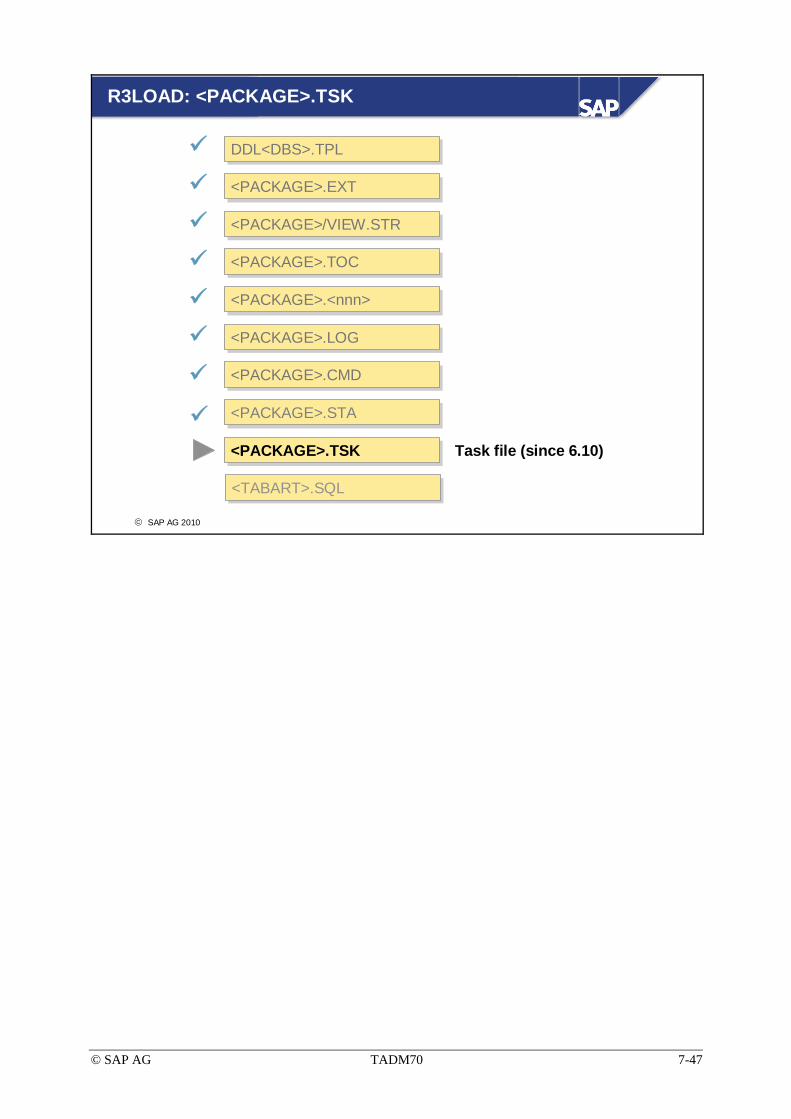
© SAP AG TADM70 7-47
© SAP AG 2010
R3LOAD: <PACKAGE>.TSK
<PACKAGE>.EXT<PACKAGE>.EXT
DDL<DBS>.TPLDDL<DBS>.TPL
<PACKAGE>.STA<PACKAGE>.STA
<PACKAGE>/VIEW.STR<PACKAGE>/VIEW.STR
<PACKAGE>.TOC<PACKAGE>.TOC
<PACKAGE>.<nnn><PACKAGE>.<nnn>
<PACKAGE>.LOG<PACKAGE>.LOG
<PACKAGE>.CMD<PACKAGE>.CMD
<PACKAGE>.TSK<PACKAGE>.TSK Task file (since 6.10)
<TABART>.SQL<TABART>.SQL
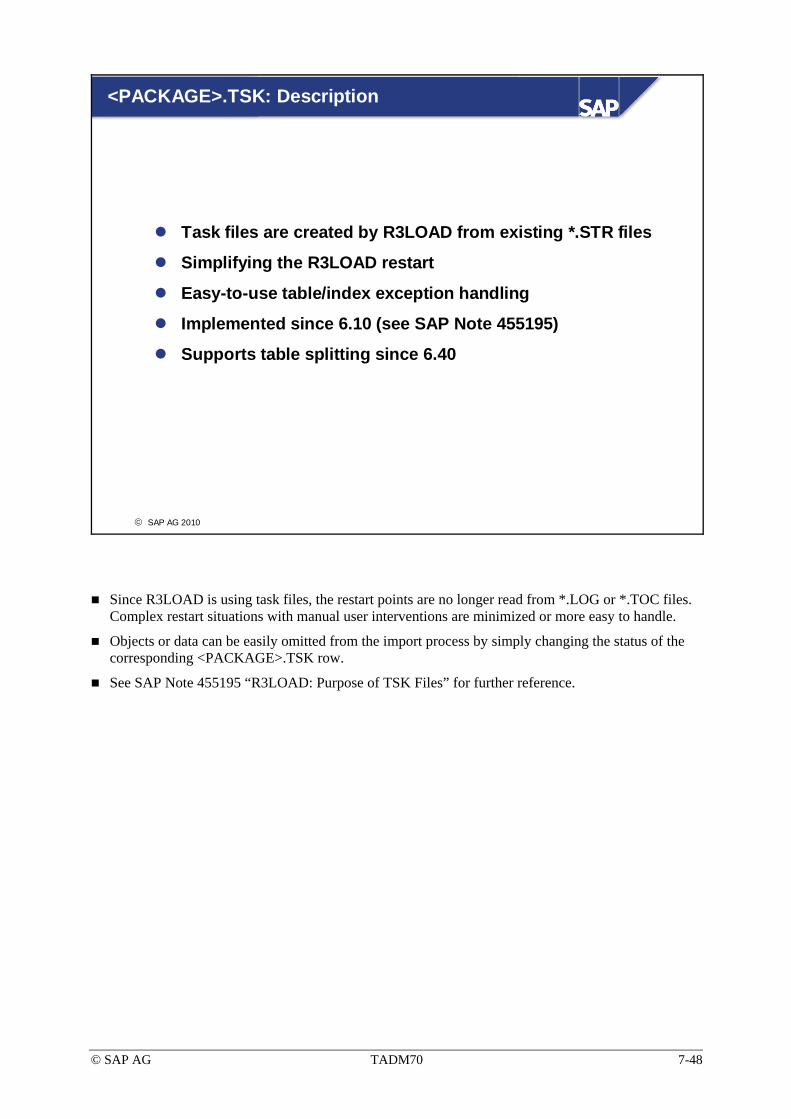
© SAP AG TADM70 7-48
© SAP AG 2010
<PACKAGE>.TSK: Description
Task files are created by R3LOAD from existing *.STR files
Simplifying the R3LOAD restart
Easy-to-use table/index exception handling
Implemented since 6.10 (see SAP Note 455195)
Supports table splitting since 6.40
Since R3LOAD is using task files, the restart points are no longer read from *.LOG or *.TOC files. Complex restart situations with manual user interventions are minimized or more easy to handle.
Objects or data can be easily omitted from the import process by simply changing the status of the corresponding <PACKAGE>.TSK row.
See SAP Note 455195 “R3LOAD: Purpose of TSK Files” for further reference.

© SAP AG TADM70 7-49
© SAP AG 2010
<PACKAGE>.TSK: Internal Structure for Export
Export example: <PACKAGE>.TSK
D /SAPSMOSS/STAT E xeqD /SAPSMOSS/STATT E xeqD /SAPSMOSS/TURL E xeqD A000 E xeqD A002 E xeqD A008 E xeqD A011 E xeqD A013 E xeqD A014 E xeqD A020 E xeq
D /SAPSMOSS/STAT E xeqD /SAPSMOSS/STATT E xeqD /SAPSMOSS/TURL E xeqD A000 E xeqD A002 E xeqD A008 E xeqD A011 E xeqD A013 E xeqD A014 E xeqD A020 E xeq
Type Object
Action Status
Status: xeq (not processed yet)
The slide above shows the initial <PACKAGE>.TSK file content, after it was created by R3LOAD.
Please check unit 8 “Advanced Migration Techniques” for the table split case.

© SAP AG TADM70 7-50
© SAP AG 2010
<PACKAGE>.TSK: Internal Structure for Import
Import example: <PACKAGE>.TSK
T ABDBG_BPS C okD ABDBG_BPS I okP ABDBG_BPS~0 C okT ABDBG_INFO C okD ABDBG_INFO I ok P ABDBG_INFO~0 C okT ACL_ACE C okD ACL_ACE I okP ACL_ACE~0 C okI ACL_ACE~AGR C errI ACL_ACE~GRP C xeqI ACL_ACE~USR C xeq
T ABDBG_BPS C okD ABDBG_BPS I okP ABDBG_BPS~0 C okT ABDBG_INFO C okD ABDBG_INFO I ok P ABDBG_INFO~0 C okT ACL_ACE C okD ACL_ACE I okP ACL_ACE~0 C okI ACL_ACE~AGR C errI ACL_ACE~GRP C xeqI ACL_ACE~USR C xeq
Type Object
Action Status
Status: xeq (not processed yet)Status: err (error occurred)Status: ok (successfully executed)
The above <PACKAGE>.TSK file shows the content after R3LOAD has stopped on error. The corresponding <PACKAGE>.LOG file contains the error description/reason.
Please check unit 8 “Advanced Migration Techniques” for the table split case.

© SAP AG TADM70 7-51
© SAP AG 2010
<PACKAGE>.TSK: Syntax Elements
xeq = executeok = successfully executederr = error occurredign = ignore
C = Create ObjectIndex I (Secondary Index)
xeq = executeok = successfully executederr = error occurredign = ignore
C = Create ObjectPrimary Key P (Primary Key)
xeq = executeok = successfully executederr = error occurredign = ignore
C = Create ObjectView V (View)
xeq = executeok = successfully executederr = error occurredign = ignore
E = Export Data I = Import Data
TableD (Data)
xeq = executeok = successfully executederr = error occurredign = ignore
C = Create ObjectTableT (Table)
StatusActionObject NameType
The “<PACKAGE>.TSK” files are used to define which objects have to be created and which data has to be exported/imported by R3LOAD. It is also used to find the right restart position after a termination.
Status
• xeq = Task not yet processed.
• ok = Task successfully processed.
• err = Failure occurred while processing the task. The next run will drop the object or delete/truncate
• data before re-doing the task.
• ign = Ignore task, do nothing.
The Status “ ign” can be used to omit a task action and to document it as well. Setting a task manually to “ok” will have the same result, but it is not visible for later checks.
There is also an action “D” which can be used to delete objects with R3load, but used in exceptional cases only.
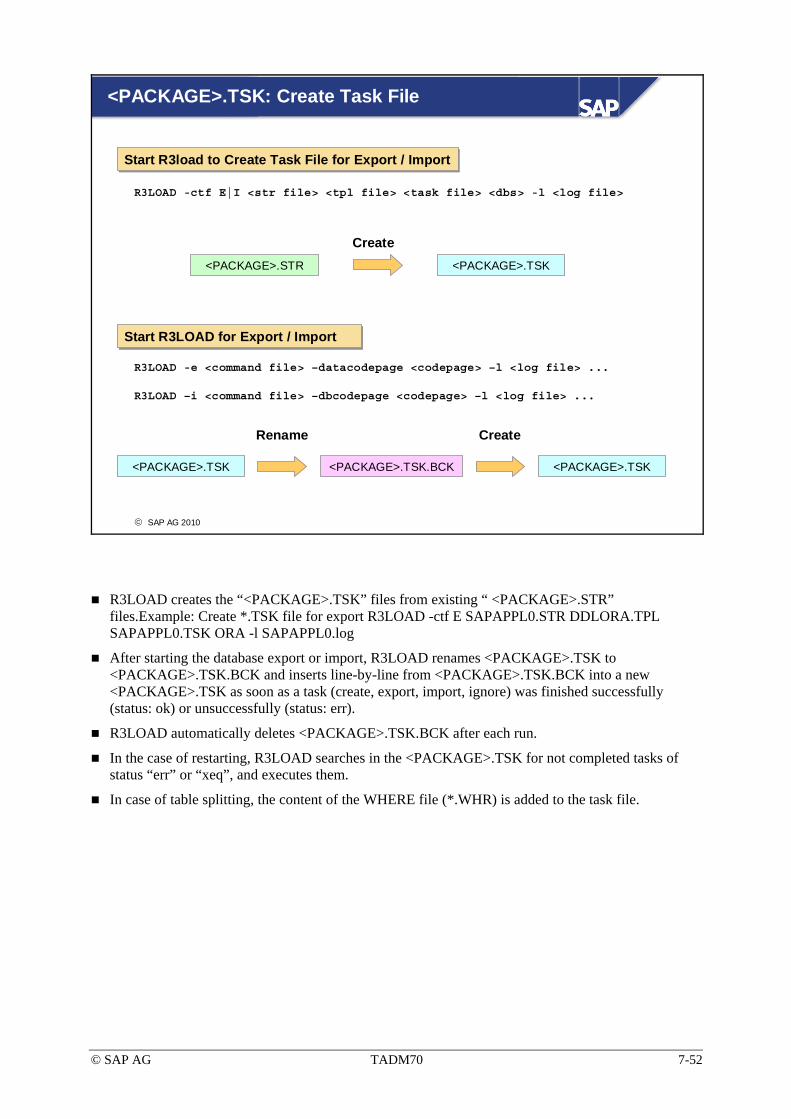
© SAP AG TADM70 7-52
© SAP AG 2010
<PACKAGE>.TSK: Create Task File
R3LOAD -ctf E|I <str file> <tpl file> <task file> <dbs> -l <log file>
Start R3load to Create Task File for Export / Import Start R3load to Create Task File for Export / Import
R3LOAD -e <command file> –datacodepage <codepage> –l <log file> ...
R3LOAD –i <command file> –dbcodepage <codepage> –l <log file> ...
Start R3LOAD for Export / ImportStart R3LOAD for Export / Import
<PACKAGE>.STR
Create<PACKAGE>.TSK
<PACKAGE>.TSK <PACKAGE>.TSK.BCK
Rename
<PACKAGE>.TSK
Create
R3LOAD creates the “<PACKAGE>.TSK” files from existing “ <PACKAGE>.STR” files.Example: Create *.TSK file for export R3LOAD -ctf E SAPAPPL0.STR DDLORA.TPL SAPAPPL0.TSK ORA -l SAPAPPL0.log
After starting the database export or import, R3LOAD renames <PACKAGE>.TSK to <PACKAGE>.TSK.BCK and inserts line-by-line from <PACKAGE>.TSK.BCK into a new <PACKAGE>.TSK as soon as a task (create, export, import, ignore) was finished successfully (status: ok) or unsuccessfully (status: err).
R3LOAD automatically deletes <PACKAGE>.TSK.BCK after each run.
In the case of restarting, R3LOAD searches in the <PACKAGE>.TSK for not completed tasks of status “err” or “xeq”, and executes them.
In case of table splitting, the content of the WHERE file (*.WHR) is added to the task file.

© SAP AG TADM70 7-53
© SAP AG 2010
<PACKAGE>.TSK: Merge Option (1)
R3LOAD –merge_bck –e|i <command file> ...
Merge forExport/Import
Merge task file after hard terminationMerge task file after hard termination
(TSK) ERROR: file /install/SAPAPPL1.TSK.bck already seems to exist.A previous run may not have been finished cleanly
file /install/SAPAPPL1.TSK possibly corrupted
/sapmnt/C11/exe/R3load: job finished with 1 error(s)
(TSK) ERROR: file /install/SAPAPPL1.TSK.bck already seems to exist.A previous run may not have been finished cleanly
file /install/SAPAPPL1.TSK possibly corrupted
/sapmnt/C11/exe/R3load: job finished with 1 error(s)
The <PACKAGE>.log shows a restart problem after hard terminationThe <PACKAGE>.log shows a restart problem after hard termination
<PACKAGE>.TSK<PACKAGE>.TSK
<PACKAGE>.TSK.BCK
In rare cases, it may be necessary to rebuild an already used <PACKAGE>.TSK file after a hard termination, caused by operating system crashes, power failures, etc. This must be done by merging the file <PACKAGE>.TSK.BCK with <PACKAGE>.TSK.
Note: If more than one R3LOAD is executing the same task file by accident, one of the processes will find an existing <PACKAGE>.TSK.BCK file and then stop on error. This should prevent running parallel R3LOAD processes against the same database objects.
The “-merge_bck“ option can only be used in combination with “-e“ or “-i“. The export or import will start immediately after the merge is finished!
The merge option “-merge_only” merges the <PACKAGE>.TSK.BCK into the <PACKAGE>.TSK files, but does not start an export or import.
See unit 10 “Troubleshooting” for possible dangers when using the merge option.

© SAP AG TADM70 7-54
© SAP AG 2010
<PACKAGE>.TSK: Merge Option (2)
T TAB001 C xeqD TAB001 I xeqP TAB001~0 C xeqI TAB001~A C xeq I TAB001~B C xeq T TAB002 C xeqD TAB002 I xeqP TAB002~0 C xeq T TAB003 C xeq D TAB003 I xeqP TAB003~0 C xeq
T TAB001 C xeqD TAB001 I xeqP TAB001~0 C xeqI TAB001~A C xeq I TAB001~B C xeq T TAB002 C xeqD TAB002 I xeqP TAB002~0 C xeq T TAB003 C xeq D TAB003 I xeqP TAB003~0 C xeq
T TAB001 C okD TAB001 I okP TAB001~0 C okI TAB001~A C ok I TAB001~B C ok T TAB002 C ok
T TAB001 C okD TAB001 I okP TAB001~0 C okI TAB001~A C ok I TAB001~B C ok T TAB002 C ok
<PACKAGE>.TSK.BCK <PACKAGE>.TSK
The <PACKAGE>.TSK file contains already executed tasks only! The <PACKAGE>.TSK file contains already executed tasks only!
Technical view before merge
R3LOAD stops on error if a <PACKAGE>.TSK.BCK file is found, as it is not clear how to proceed. For example, a power failure interrupted the import processes and R3LOAD will not be able to cleanup the <PACKAGE>.TSK.BCK and <PACKAGE>.TSK files. The current content of both files are shown above.
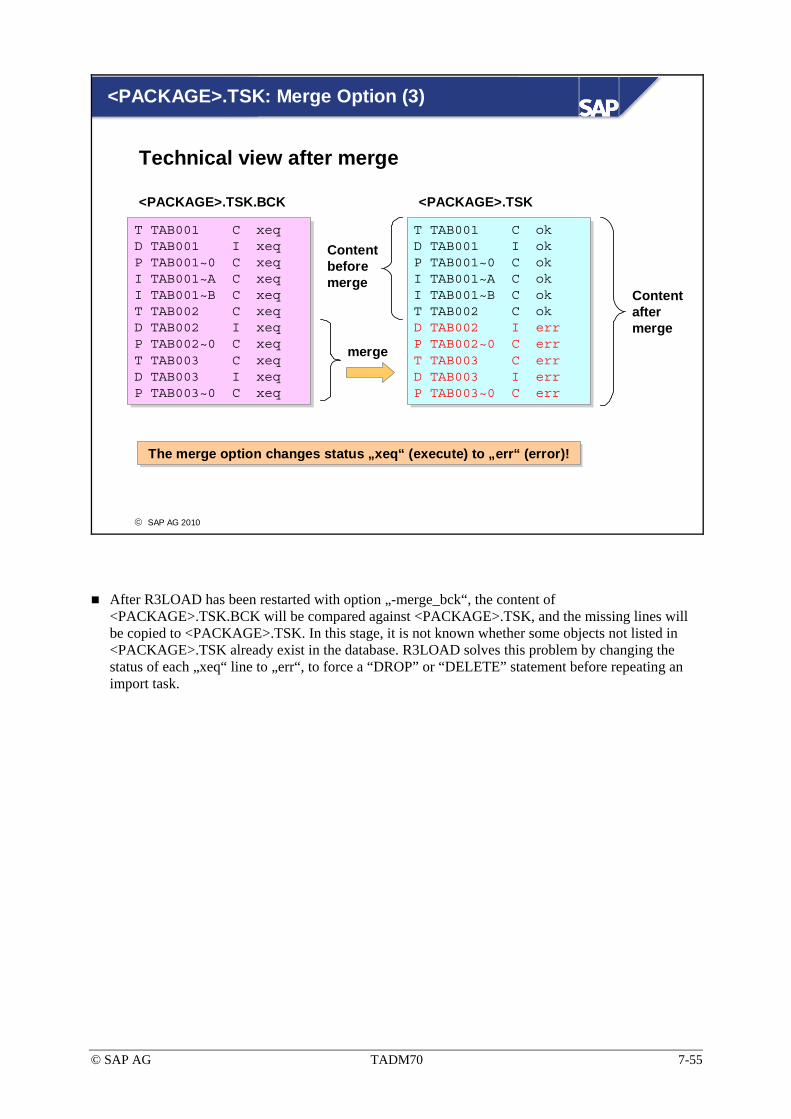
© SAP AG TADM70 7-55
© SAP AG 2010
<PACKAGE>.TSK: Merge Option (3)
T TAB001 C xeqD TAB001 I xeqP TAB001~0 C xeqI TAB001~A C xeq I TAB001~B C xeq T TAB002 C xeqD TAB002 I xeqP TAB002~0 C xeq T TAB003 C xeq D TAB003 I xeqP TAB003~0 C xeq
T TAB001 C xeqD TAB001 I xeqP TAB001~0 C xeqI TAB001~A C xeq I TAB001~B C xeq T TAB002 C xeqD TAB002 I xeqP TAB002~0 C xeq T TAB003 C xeq D TAB003 I xeqP TAB003~0 C xeq
T TAB001 C okD TAB001 I okP TAB001~0 C okI TAB001~A C ok I TAB001~B C ok T TAB002 C okD TAB002 I errP TAB002~0 C err T TAB003 C err D TAB003 I errP TAB003~0 C err
T TAB001 C okD TAB001 I okP TAB001~0 C okI TAB001~A C ok I TAB001~B C ok T TAB002 C ok
<PACKAGE>.TSK.BCK <PACKAGE>.TSK
D TAB002 I errP TAB002~0 C err T TAB003 C err D TAB003 I errP TAB003~0 C err
merge
The merge option changes status „xeq“ (execute) to „err“ (error)! The merge option changes status „xeq“ (execute) to „err“ (error)!
Content before merge
Content after merge
Technical view after merge
After R3LOAD has been restarted with option „-merge_bck“, the content of <PACKAGE>.TSK.BCK will be compared against <PACKAGE>.TSK, and the missing lines will be copied to <PACKAGE>.TSK. In this stage, it is not known whether some objects not listed in <PACKAGE>.TSK already exist in the database. R3LOAD solves this problem by changing the status of each „xeq“ line to „err“, to force a “DROP” or “DELETE” statement before repeating an import task.
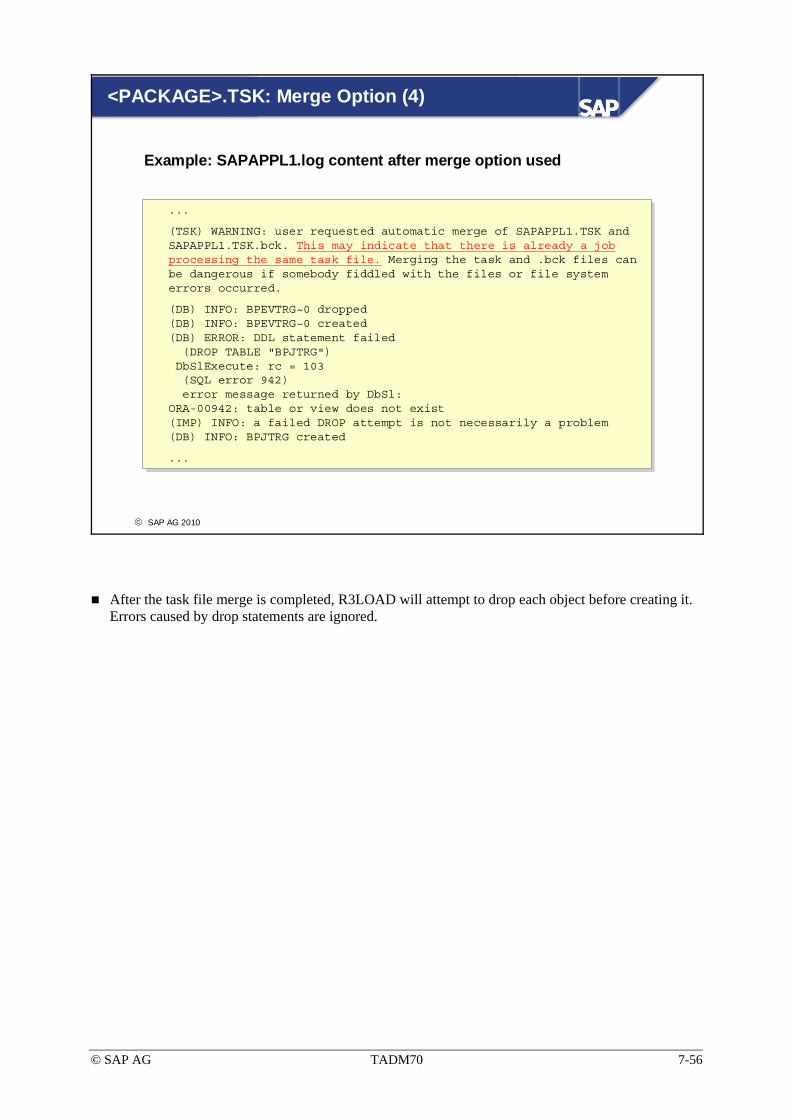
© SAP AG TADM70 7-56
© SAP AG 2010
<PACKAGE>.TSK: Merge Option (4)
...
(TSK) WARNING: user requested automatic merge of SAPAPPL1.TSK and SAPAPPL1.TSK.bck. This may indicate that there is already a jobprocessing the same task file. Merging the task and .bck files can be dangerous if somebody fiddled with the files or file system errors occurred.
(DB) INFO: BPEVTRG~0 dropped(DB) INFO: BPEVTRG~0 created(DB) ERROR: DDL statement failed(DROP TABLE "BPJTRG")DbSlExecute: rc = 103(SQL error 942)error message returned by DbSl:
ORA-00942: table or view does not exist(IMP) INFO: a failed DROP attempt is not necessarily a problem(DB) INFO: BPJTRG created
...
...
(TSK) WARNING: user requested automatic merge of SAPAPPL1.TSK and SAPAPPL1.TSK.bck. This may indicate that there is already a jobprocessing the same task file. Merging the task and .bck files can be dangerous if somebody fiddled with the files or file system errors occurred.
(DB) INFO: BPEVTRG~0 dropped(DB) INFO: BPEVTRG~0 created(DB) ERROR: DDL statement failed(DROP TABLE "BPJTRG")DbSlExecute: rc = 103(SQL error 942)error message returned by DbSl:
ORA-00942: table or view does not exist(IMP) INFO: a failed DROP attempt is not necessarily a problem(DB) INFO: BPJTRG created
...
Example: SAPAPPL1.log content after merge option used
After the task file merge is completed, R3LOAD will attempt to drop each object before creating it. Errors caused by drop statements are ignored.

© SAP AG TADM70 7-57
© SAP AG 2010
<PACKAGE>.TSK: R3LOAD Restart Behavior
R3LOAD restart export (> 6.10)Read next table to export with status “err” or “xeq” from *.TSK
Read next write position in dump file from *.TOC
Export restarts
In rare cases, the merge option may be necessary
R3LOAD restart import (> 6.10)Read next task with status “err” or “xeq” from *.TSK
Delete table content or drop objects of tasks flagged with “err”
Import restarts
In rare cases, the merge option may be necessary
No special R3LOAD restart option is necessary!
Rare cases are hard terminations caused by power failures and operating system crashes.
Export write order: dump data, <PACKAGE>.TOC, <PACKAGE>.TSK

© SAP AG TADM70 7-58
© SAP AG 2010
R3LOAD: <TABART>.SQL
<PACKAGE>.EXT<PACKAGE>.EXT
DDL<DBS>.TPLDDL<DBS>.TPL
<PACKAGE>.STA<PACKAGE>.STA
<PACKAGE>/VIEW.STR<PACKAGE>/VIEW.STR
<PACKAGE>.TOC<PACKAGE>.TOC
<PACKAGE>.<nnn><PACKAGE>.<nnn>
<PACKAGE>.LOG<PACKAGE>.LOG
<PACKAGE>.CMD<PACKAGE>.CMD
<PACKAGE>.TSK<PACKAGE>.TSK
SQL file (since 6.20)<TABART>.SQL<TABART>.SQL
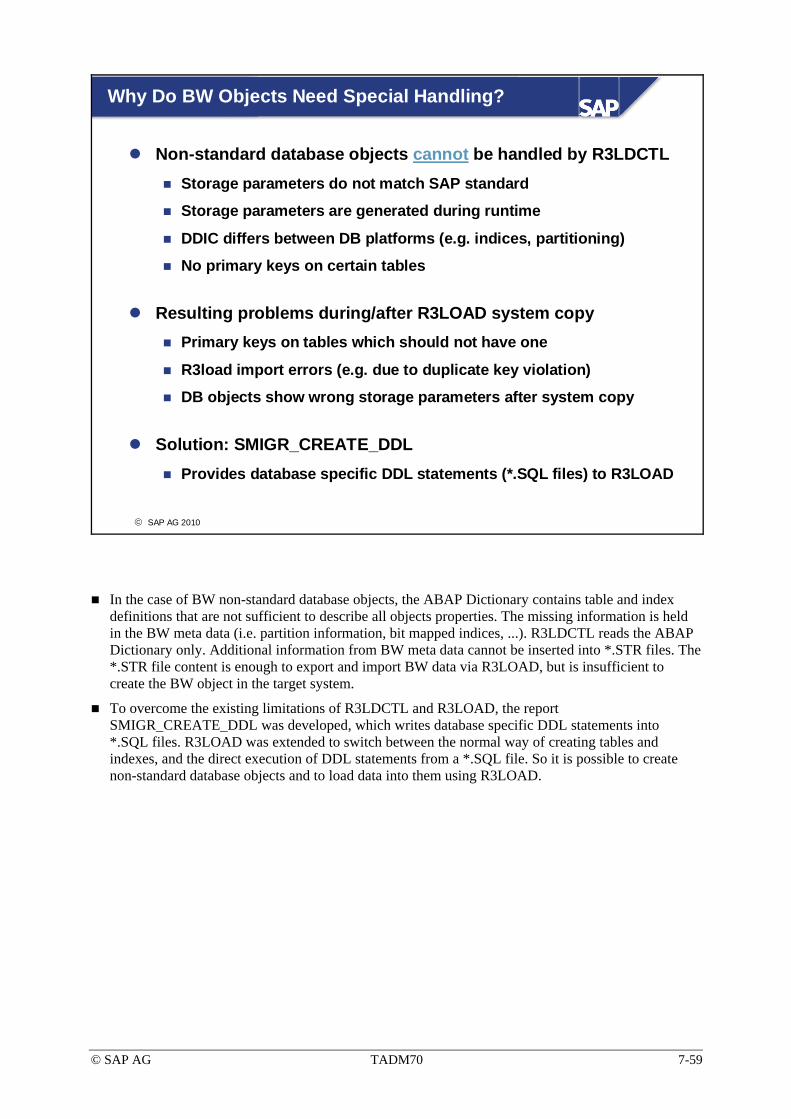
© SAP AG TADM70 7-59
© SAP AG 2010
Why Do BW Objects Need Special Handling?
Non-standard database objects cannot be handled by R3LDCTL Storage parameters do not match SAP standard
Storage parameters are generated during runtime
DDIC differs between DB platforms (e.g. indices, partitioning)
No primary keys on certain tables
Resulting problems during/after R3LOAD system copyPrimary keys on tables which should not have one
R3load import errors (e.g. due to duplicate key violation)
DB objects show wrong storage parameters after system copy
Solution: SMIGR_CREATE_DDLProvides database specific DDL statements (*.SQL files) to R3LOAD
In the case of BW non-standard database objects, the ABAP Dictionary contains table and index definitions that are not sufficient to describe all objects properties. The missing information is held in the BW meta data (i.e. partition information, bit mapped indices, ...). R3LDCTL reads the ABAP Dictionary only. Additional information from BW meta data cannot be inserted into *.STR files. The *.STR file content is enough to export and import BW data via R3LOAD, but is insufficient to create the BW object in the target system.
To overcome the existing limitations of R3LDCTL and R3LOAD, the report SMIGR_CREATE_DDL was developed, which writes database specific DDL statements into *.SQL files. R3LOAD was extended to switch between the normal way of creating tables and indexes, and the direct execution of DDL statements from a *.SQL file. So it is possible to create non-standard database objects and to load data into them using R3LOAD.

© SAP AG TADM70 7-60
© SAP AG 2010
<TABART>.SQL: File Generation
Run report SMIGR_CREATE_DDL on source system and select target
database type
Run report SMIGR_CREATE_DDL on source system and select target
database type
Database system?
Get BW object definitions from the database catalog, for all BW objects
having storage parameters <> SAP standard
Get BW object definitions from the database catalog, for all BW objects
having storage parameters <> SAP standard
Write SQL statements into <TABART>.SQL file
Write SQL statements into <TABART>.SQL file
Get object definitions and storage parameters based on BW meta data for
target database system
Get object definitions and storage parameters based on BW meta data for
target database system
Build SQL statements for creating BW object on target database
Build SQL statements for creating BW object on target database
Source database <> target database
Source database == target database
Mandatory for:
- > NetWeaver '04 (> 6.40)and systems basedon it
- BW 3.0 and 3.1 (6.20)and systems based on it (like APO)
The report SMIGR_CREATE_DDL is mandatory for all systems using non-standard database objects (mainly BW objects).

© SAP AG TADM70 7-61
© SAP AG 2010
<TABART>.SQL: Content Variants
## <DATABASE_TYPE> : NATIVE SQL EXPORT GENERATED AT <DATE><TIME>#
# Example 1tab: /BI0/B0000103000sql: <DATABASE SPECIFIC CREATE TABLE STATEMENT>;
ind: /BI0/B0000103000~0sql: <DATABASE SPECIFIC CREATE UNIQUE INDEX STATEMENT>;
# Example 2tab: /BI0/B0000106000sql: <DATABASE SPECIFIC CREATE TABLE STATEMENT>;
<DATABASE SPECIFIC CREATE UNIQUE INDEX STATEMENT>;
ind: /BI0/B0000106000~0
# Example 3tab: /BI0/B0000108000sql: <DATABASE SPECIFIC CREATE TABLE STATEMENT>;
ind: /BI0/B0000108000~0
Here used as a dummy
Here used as a dummy
Example 1: R3LOAD creates table /BI0/B0000103000, using the supplied CREATE TABLE statement. Depending on the DDL<DBS>.TPL, content data will be loaded before or after the primary key /BI0/B0000103000~0 creation.
Example 2: R3LOAD creates table /BI0/B0000106000 and primary key /BI0/B0000106000~0 in a single step. Afterwards, data will be loaded. As the /BI0/B0000106000~0 SQL section is empty, R3load will not try to create /BI0/B0000106000~0 again. This configuration is used to make sure that table and index will always be created together, independent from DDL<DBS>.TPL entries.
Example 3: R3LOAD creates table /BI0/B0000108000 and will load data into it. As the index /BI0/B0000108000~0 has no SQL section, no further action is required. The table will not have a primary key.
Empty SQL sections are used to prevent R3LOAD from creating objects according to *.STR file content.
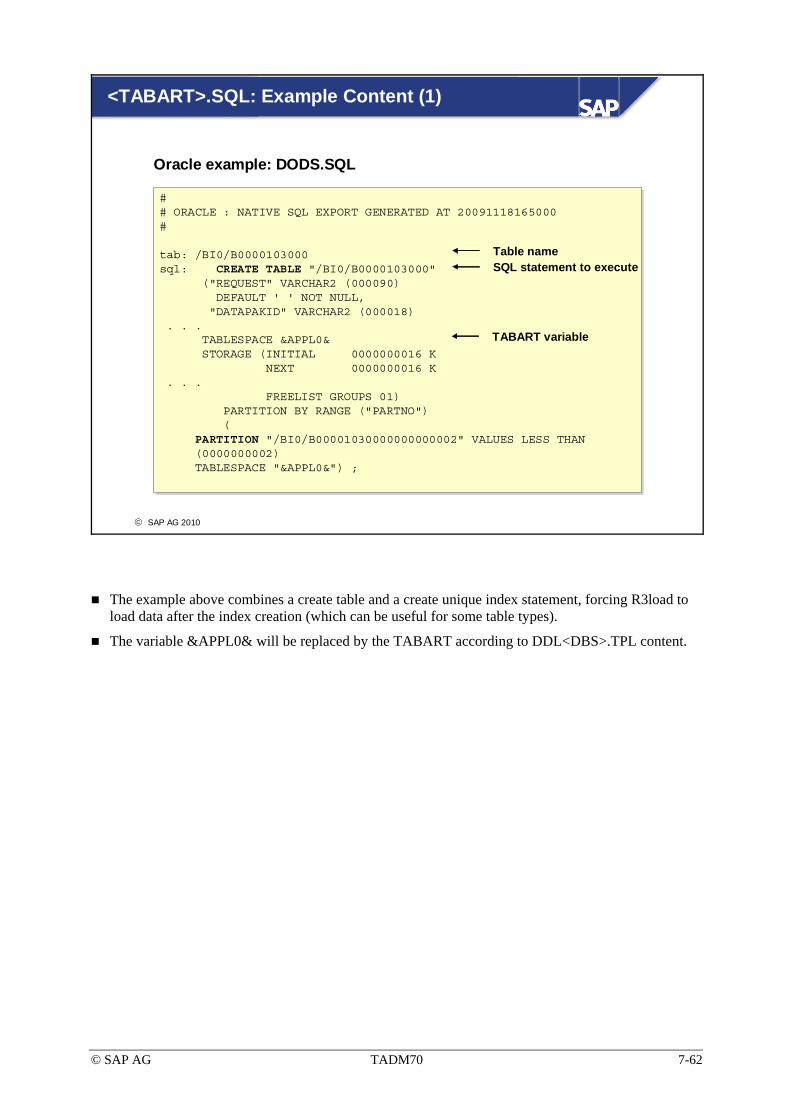
© SAP AG TADM70 7-62
© SAP AG 2010
<TABART>.SQL: Example Content (1)
Oracle example: DODS.SQL
## ORACLE : NATIVE SQL EXPORT GENERATED AT 20091118165000 #
tab: /BI0/B0000103000sql: CREATE TABLE "/BI0/B0000103000"
("REQUEST" VARCHAR2 (000090)DEFAULT ' ' NOT NULL,"DATAPAKID" VARCHAR2 (000018)
. . .TABLESPACE &APPL0&STORAGE (INITIAL 0000000016 K
NEXT 0000000016 K. . .
FREELIST GROUPS 01)PARTITION BY RANGE ("PARTNO")(
PARTITION "/BI0/B00001030000000000002" VALUES LESS THAN(0000000002)TABLESPACE "&APPL0&") ;
Table nameSQL statement to execute
TABART variable
The example above combines a create table and a create unique index statement, forcing R3load to load data after the index creation (which can be useful for some table types).
The variable &APPL0& will be replaced by the TABART according to DDL<DBS>.TPL content.

© SAP AG TADM70 7-63
© SAP AG 2010
<TABART>.SQL: Example Content (2)
Oracle example: DODS.SQL (continued)
. . . CREATE UNIQUE INDEX "/BI0/B0000103000~0" ON "/BI0/B0000103000"
("REQUEST","DATAPAKID","PARTNO","RECORD")
LOCALPCTFREE 10TABLESPACE &APPL0&STORAGE (INITIAL 0000000016 K
NEXT 0000000016 KMINEXTENTS 0000000001MAXEXTENTS UNLIMITEDPCTINCREASE 0000FREELISTS 000) ;
ind: /BI0/B0000103000~0
tab: /BI0/B0000104000sql: CREATE TABLE "/BI0/B0000104000"
("REQUEST" VARCHAR2 (000090)DEFAULT ' ' NOT NULL, . . .
Index name
Table name

© SAP AG TADM70 7-64
© SAP AG 2010
R3LOAD: Execution of External SQL Statements
Prepare to assemble 1st create object statement from *.STR file (get TABART)Prepare to assemble 1st create object
statement from *.STR file (get TABART)
Search for <TABART>.SQL file in current and DB/<DBS> directory
Search for <TABART>.SQL file in current and DB/<DBS> directory
If <TABART>.SQL was found, build list (index) of object names from
<TABART>.SQL file
If <TABART>.SQL was found, build list (index) of object names from
<TABART>.SQL file
Create object according *.STR and DDL<DBS>.TPL content
Create object according *.STR and DDL<DBS>.TPL content
Read next object from *.STR fileRead next object from *.STR file
Object in list?yesno
Load data (as appropriate)Load data (as appropriate)
Create object according <TABART>.SQL content Create object according <TABART>.SQL content
Before R3LOAD assembles the first SQL statement, it searches for a <TABART>.SQL file, which matches the TABART of the first object. The <TABART>.SQL file is searched in the current directory first and then in the DB/<DBS> directory. All object names in the <TABART>.SQL file will be added to an internal list (index). R3load will then scan the internal list for a matching object name prior to assembling a create object statement. If a match has been found, the SQL statement from the <TABART>.SQL file will be used, instead of building a statement according to DDL<DBS>.TPL content.
R3LOAD can only read one <TABART>.SQL file per *.STR file!
The usage of a <TABART>.SQL file may not be mentioned in the R3LOAD import log file.

© SAP AG TADM70 7-65
© SAP AG 2010
Common R3LOAD Command Line Options (1)
R3LOAD Option Description Version< 4.6D > 6.10 > 6.40
-c <commit count> Set number of rows to insert before commit
x x x
-continue_on_error R3load continues with next task on error - x x-ctf I | E ... Create task files for export or import - x x-datacodepage ... Set export code page for data dump file - x x-dbcodepage ... Set database code page for import - x x-e <command file> Export x x x-i <command file> Import x x x-h | or none Print help information x x x-k <key>-K <key>
Provide migration keyTest provided migration key
xx
xx
xx
-l <log file>-p <protocol file>
Use log fileUse log file
-x
xx
xx
Increasing the commit count can improve database performance, if a database monitor shows the cause of the slowing down of the database leading to the number of commits as opposed to loading of the data. Changing the value can also decrease performance. Load tests are recommended. The default commit count is approximately 1 commit for 10.000 rows.
The “-k” or “-K” option is not valid for R3LOAD below 4.5A.
For additional R3LOAD options, see “R3LOAD -h”.
The option “-continue_on_error” is dangerous for the export!
On MDMP systems, R3LOAD 6.x automatically uses a dummy code page called “MDMP”, which indicates “do no conversion”. The MDMP code page entry can be seen in the *.TOC file. For the conversion of MDMP systems to Unicode, see unit 11 “Special Projects”.

© SAP AG TADM70 7-66
© SAP AG 2010
Common R3LOAD Command Line Options (2)
R3LOAD Option Description Version< 4.6D > 6.10 > 6.40
-merge_bck Merge task files, continue export/import - x x-merge_only Merge task file w/o starting export/import - - x-o T|I|V|D|P Omit object creation or data load:
Do not create table (T), index (I), view (V), primary key (P), do not load data (D)
x x x
-r Restart x - --s Write statistic data x x x-stop_on_error R3load stops after error occurrence - x x-testconnect Database test connect - x x-socket Use socket connection - - x-v Show version - x x
-<db specific> Database specific options (i.e. fast load) x x x
The statistic data file is useful to watch the load progress of large data dump files.
Option “-o” can be combined with option “-ctf” (create task file), “-e” (export), and “-i” (import). In the combination with “-ctf”, the corresponding tasks will not be inserted into the *.TSK file. The “-o” options is used in the case of the import of splitted tables. For example:
• R3LOAD -ctf I … resulting task file content:
- T TAB01 C xeq
- D TAB01 I xeq
- P TAB01~0 I xeq
• R3LOAD -o D -ctf I … resulting task file content:
- T TAB01 C xeq
- P TAB01 C xeq
Since R3LOAD 6.40, the “-v” command line option shows the program compile time, to make it easier to identify patch levels.
Database specific load options can be listed by “-h”. The options are used to speed up the R3LOAD import bypassing database mechanisms, which are not required for a system copy load. If in doubt about which options are recommended, check to see what R3SETUP or SAPINST is using.

© SAP AG TADM70 7-67
© SAP AG 2010
R3LOAD Command Line Examples
R3load -dbcodepage 1100 -i SAPAPPL1.cmd \-l SAPAPPL1.log -stop_on_error \-k 1WwgdUM50Tk01eqtd1Yx01A1
Import > 6.10
R3load -datacodepage 1100 -e SAPAPPL1.cmd \-l SAPAPPL1.log -stop_on_error
Export > 6.10
R3load -i SAPAPPL1.cmd -p SAPAPPL1.log \-k 1WwgeeM50Tv015qtdaAt3Qm4
Import < 4.6D
R3load -e SAPAPPL1.cmd -p SAPAPPL1.logExport < 4.6D
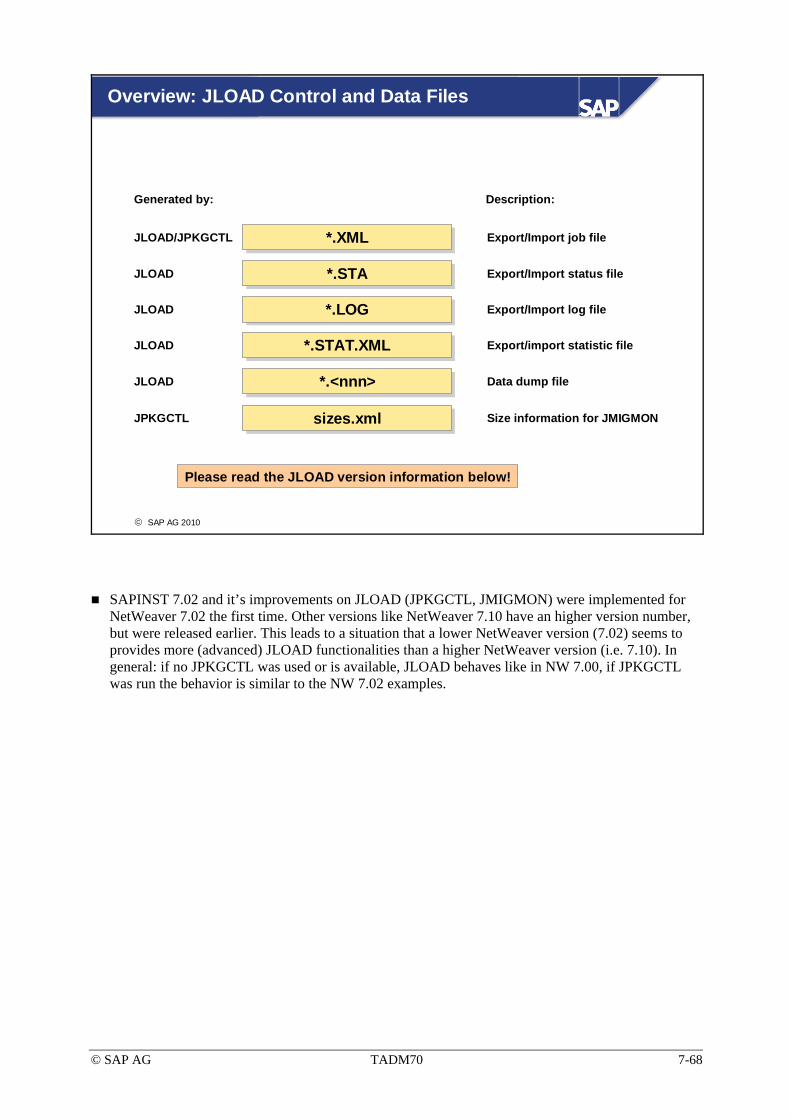
© SAP AG TADM70 7-68
© SAP AG 2010
Overview: JLOAD Control and Data Files
Export/import statistic file
*.STA*.STA
*.XML*.XML
*.LOG*.LOG
*.STAT.XML*.STAT.XML
Export/Import job file
Export/Import status file
Export/Import log file
JLOAD/JPKGCTL
JLOAD
JLOAD
JLOAD
Generated by: Description:
Data dump file*.<nnn>*.<nnn>JLOAD
Size information for JMIGMONsizes.xmlsizes.xmlJPKGCTL
Please read the JLOAD version information below!
SAPINST 7.02 and it’s improvements on JLOAD (JPKGCTL, JMIGMON) were implemented for NetWeaver 7.02 the first time. Other versions like NetWeaver 7.10 have an higher version number, but were released earlier. This leads to a situation that a lower NetWeaver version (7.02) seems to provides more (advanced) JLOAD functionalities than a higher NetWeaver version (i.e. 7.10). In general: if no JPKGCTL was used or is available, JLOAD behaves like in NW 7.00, if JPKGCTL was run the behavior is similar to the NW 7.02 examples.

© SAP AG TADM70 7-69
© SAP AG 2010
JLOAD: Job Files
*.STA*.STA
*.XML*.XML
*.LOG*.LOG
*.STAT.XML*.STAT.XML
Export/Import job file
*.<nnn>*.<nnn>
sizes.xmlsizes.xml

© SAP AG TADM70 7-70
© SAP AG 2010
Export Job File 6.40 / 7.00
<export file="EXPDUMP"><object name="BC_COMPVERS" type="T" action="describe" /> <object name="BC_COMPVERS" action="select" /> <object name="BC_CVERS" type="T" action="describe" /> <object name="BC_CVERS" action="select" />
…</export>
<export file="EXPDUMP"><object name="BC_COMPVERS" type="T" action="describe" /> <object name="BC_COMPVERS" action="select" /> <object name="BC_CVERS" type="T" action="describe" /> <object name="BC_CVERS" action="select" />
…</export>
Example: EXPORT.XML (6.40)
Name of data dump file Object type Action: describe object(export meta data)
Action: select data (export data)
Job files are used to specify JLOAD actions. SAPINST in NetWeaver '04 SR1 and NetWeaver ’04S is starting a single JLOAD process, which exports the whole JAVA schema (meta data and table data). The default data dump file name is “EXPDUMP”. JLOAD can create the EXPORT.XML and IMPORT.XML files by itself.
The job file can also contain a maximum data dump file size. Without such a parameter, the default size is set to 2 GB. For example: <export file=“EXPDUMP" size="100MB">
Future versions may contain additional object types like database views (which are not used yet).

© SAP AG TADM70 7-71
© SAP AG 2010
Export Job Files created by JPKGCTL 7.02
<export file="EXPDMP_METADATA"><object name="J2EE_CONFIGENTRY" type="T" action="describe" /> <object name="BI_MMRL2JCLASS" type="T" action="describe" />
...
<export file="EXPDMP_METADATA"><object name="J2EE_CONFIGENTRY" type="T" action="describe" /> <object name="BI_MMRL2JCLASS" type="T" action="describe" />
...
Example: EXPORT_METADATA.XML (7.02)
Example: EXPORT_POSTPROCESS.XML (7.02)
Example: EXPORT_<PACKAGE>.XML (7.02)
<export file="EXPDMP_METADATA"><object name="J2EE_CONFIGENTRY" type="T" action="describe" /> <object name="BI_MMRL2JCLASS" type="T" action="describe" />
...
<export file="EXPDMP_METADATA"><object name="J2EE_CONFIGENTRY" type="T" action="describe" /> <object name="BI_MMRL2JCLASS" type="T" action="describe" />
...
<export file="EXPDMP_0"><object name="BC_XMLA_EXPURIS" type="T" action="select" /> <object name="BC_MID_DU_IMPORT" type="T" action="select" />
...
<export file="EXPDMP_0"><object name="BC_XMLA_EXPURIS" type="T" action="select" /> <object name="BC_MID_DU_IMPORT" type="T" action="select" />
...
Starting with SAPINST 7.02, JPKGCTL can be used to create the JLOAD job files. The meta data describing a table or index (EXPORT_METADATA.XML) is separated from the data export (EXPORT_<PACKAGE>.XML). This allows multiple JLOAD export and import processes. For table splitting it is necessary to create the table first, then load data, and create indices afterwards (post-processing). For the post-processing purpose the meta data dump is not exported again, but referenced a second time in the post-process job file (EXPORT_POSTPROCESS.XML). There is one meta data dump and multiple package table dumps.

© SAP AG TADM70 7-72
© SAP AG 2010
Export Job Files - JPKGCTL Future Versions
<export file="EXPDMP_0_METADATA" groupKey="METADATA"><object action="describe" name="XI_RWB_EDITOR" type="TABLE" /><object action="describe" name="UME_ACL_PERM_MEM" type="TABLE" />
...
<export file="EXPDMP_0_METADATA" groupKey="METADATA"><object action="describe" name="XI_RWB_EDITOR" type="TABLE" /><object action="describe" name="UME_ACL_PERM_MEM" type="TABLE" />
...
Example: EXPORT_<PACKAGE>_METADATA.XML (future version)
Example: EXPORT_<PACKAGE>.XML (future version)<export file="EXPDMP_5" groupKey="GROUPKEY_5"><object action="select" name="XI_RWB_EDITOR" type="TABLE" /><object action="select" name="UME_ACL_PERM_MEM" type="TABLE" />
...
<export file="EXPDMP_5" groupKey="GROUPKEY_5"><object action="select" name="XI_RWB_EDITOR" type="TABLE" /><object action="select" name="UME_ACL_PERM_MEM" type="TABLE" />
...
In a future version each package will have it’s own export meta data and table data job file. An EXPORT_<PACKAGE>_POSTPROCESS.XML does not need to exist.
The examples above are just an outlook to future enhancements. They might be implemented in a different way.
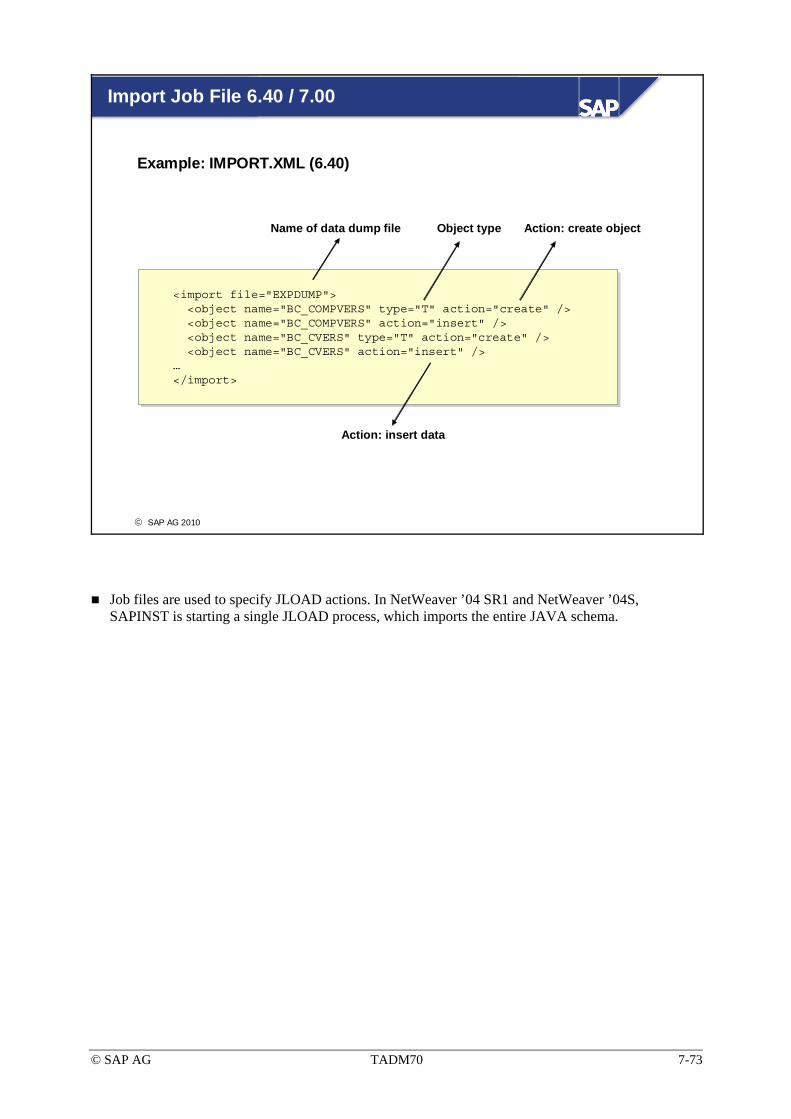
© SAP AG TADM70 7-73
© SAP AG 2010
Import Job File 6.40 / 7.00
<import file="EXPDUMP"><object name="BC_COMPVERS" type="T" action="create" /> <object name="BC_COMPVERS" action="insert" /> <object name="BC_CVERS" type="T" action="create" /> <object name="BC_CVERS" action="insert" />
…</import>
<import file="EXPDUMP"><object name="BC_COMPVERS" type="T" action="create" /> <object name="BC_COMPVERS" action="insert" /> <object name="BC_CVERS" type="T" action="create" /> <object name="BC_CVERS" action="insert" />
…</import>
Example: IMPORT.XML (6.40)
Name of data dump file Object type Action: create object
Action: insert data
Job files are used to specify JLOAD actions. In NetWeaver ’04 SR1 and NetWeaver ’04S, SAPINST is starting a single JLOAD process, which imports the entire JAVA schema.
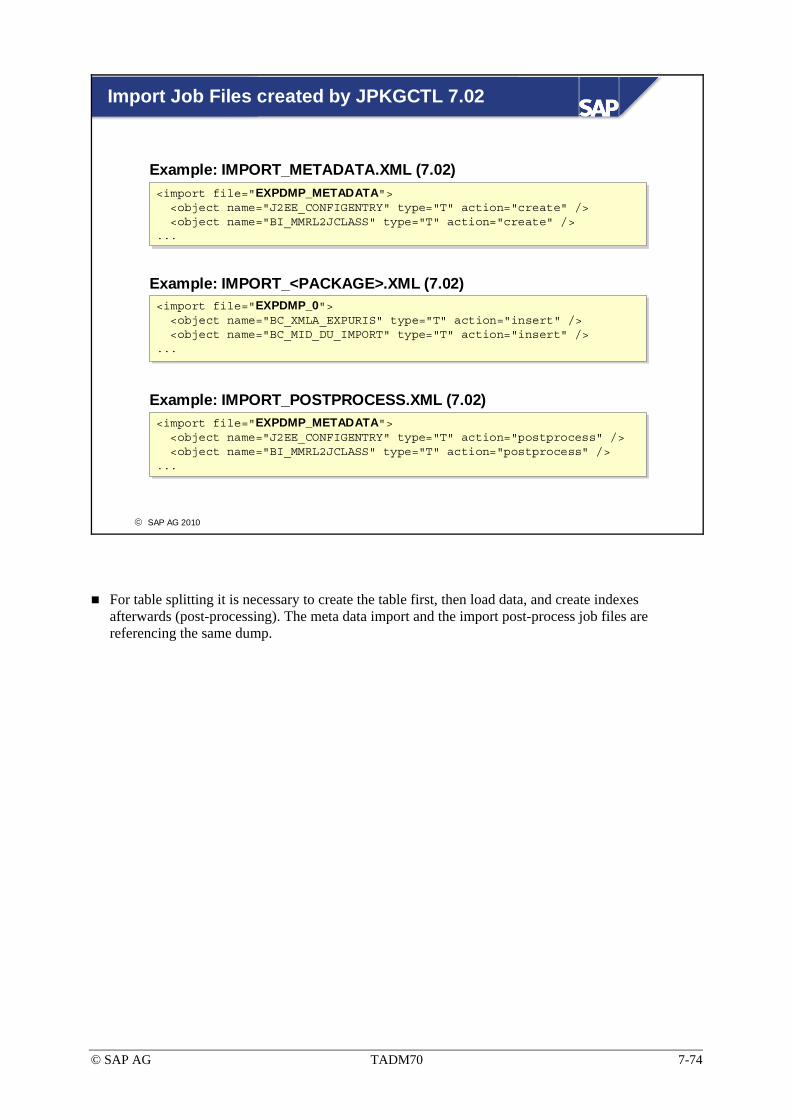
© SAP AG TADM70 7-74
© SAP AG 2010
Import Job Files created by JPKGCTL 7.02
<import file="EXPDMP_METADATA"><object name="J2EE_CONFIGENTRY" type="T" action="create" /> <object name="BI_MMRL2JCLASS" type="T" action="create" />
...
<import file="EXPDMP_METADATA"><object name="J2EE_CONFIGENTRY" type="T" action="create" /> <object name="BI_MMRL2JCLASS" type="T" action="create" />
...
Example: IMPORT_METADATA.XML (7.02)
Example: IMPORT_POSTPROCESS.XML (7.02)
Example: IMPORT_<PACKAGE>.XML (7.02)
<import file="EXPDMP_METADATA"><object name="J2EE_CONFIGENTRY" type="T" action="postprocess" /> <object name="BI_MMRL2JCLASS" type="T" action="postprocess" />
...
<import file="EXPDMP_METADATA"><object name="J2EE_CONFIGENTRY" type="T" action="postprocess" /> <object name="BI_MMRL2JCLASS" type="T" action="postprocess" />
...
<import file="EXPDMP_0"><object name="BC_XMLA_EXPURIS" type="T" action="insert" /> <object name="BC_MID_DU_IMPORT" type="T" action="insert" />
...
<import file="EXPDMP_0"><object name="BC_XMLA_EXPURIS" type="T" action="insert" /> <object name="BC_MID_DU_IMPORT" type="T" action="insert" />
...
For table splitting it is necessary to create the table first, then load data, and create indexes afterwards (post-processing). The meta data import and the import post-process job files are referencing the same dump.

© SAP AG TADM70 7-75
© SAP AG 2010
Import Job Files – JPKCTL Future Versions
<import file="EXPDMP_0_METADATA" groupKey="METADATA"><object action="create" name="XI_RWB_EDITOR" type="TABLE" /> <object action="create" name="UME_ACL_PERM_MEM" type="TABLE" />
...
<import file="EXPDMP_0_METADATA" groupKey="METADATA"><object action="create" name="XI_RWB_EDITOR" type="TABLE" /> <object action="create" name="UME_ACL_PERM_MEM" type="TABLE" />
...
Example: IMPORT_<PACKAGE>_METADATA.XML (future version)
Example: IMPORT_<PACKAGE>.XML (future version)<import file="EXPDMP_5" groupKey="GROUPKEY_5"><object action="insert" name="XI_RWB_EDITOR" type="TABLE" /><object action="insert" name="UME_ACL_PERM_MEM" type="TABLE" />
...
<import file="EXPDMP_5" groupKey="GROUPKEY_5"><object action="insert" name="XI_RWB_EDITOR" type="TABLE" /><object action="insert" name="UME_ACL_PERM_MEM" type="TABLE" />
...
Example: IMPORT_<PACKAGE>_POSTPROCESS.XML (future version)<import file="EXPDMP_0_METADATA" groupKey="METADATA"><object action="postprocess" name="UME_ACL_PERM_MEM" type="TABLE" /><object action="postprocess" name="XI_RWB_EDITOR" type="TABLE" />
...
<import file="EXPDMP_0_METADATA" groupKey="METADATA"><object action="postprocess" name="UME_ACL_PERM_MEM" type="TABLE" /><object action="postprocess" name="XI_RWB_EDITOR" type="TABLE" />
...
In a future version each package will have it’s own import meta data, table data, and post-processing job file.
The examples above are just an outlook to future enhancements. They might be implemented in a different way.

© SAP AG TADM70 7-76
© SAP AG 2010
JLOAD: Status Files
*.STA*.STA
*.XML*.XML
*.LOG*.LOG
*.STAT.XML*.STAT.XML
Export/Import status file
*.<nnn>*.<nnn>
sizes.xmlsizes.xml

© SAP AG TADM70 7-77
© SAP AG 2010
Export Status File 6.40 / 7.00
T:BC_COMPVERS:METADATA DESCRIBE OK 25.04.09 11:02T:BC_COMPVERS:DATA SELECT OK 25.04.09 11:02T:BC_CPT_ACTION:METADATA DESCRIBE OK 25.04.09 11:02T:BC_CPT_ACTION:DATA SELECT OK 25.04.09 11:02T:BC_CPT_ALLOC_ID:METADATA DESCRIBE OK 25.04.09 11:02T:BC_CPT_ALLOC_ID:DATA SELECT OK 25.04.09 11:02T:BC_CPT_CORRELATOR:METADATA DESCRIBE OK 25.04.09 11:02T:BC_CPT_CORRELATOR:DATA SELECT OK 25.04.09 11:02
T:BC_COMPVERS:METADATA DESCRIBE OK 25.04.09 11:02T:BC_COMPVERS:DATA SELECT OK 25.04.09 11:02T:BC_CPT_ACTION:METADATA DESCRIBE OK 25.04.09 11:02T:BC_CPT_ACTION:DATA SELECT OK 25.04.09 11:02T:BC_CPT_ALLOC_ID:METADATA DESCRIBE OK 25.04.09 11:02T:BC_CPT_ALLOC_ID:DATA SELECT OK 25.04.09 11:02T:BC_CPT_CORRELATOR:METADATA DESCRIBE OK 25.04.09 11:02T:BC_CPT_CORRELATOR:DATA SELECT OK 25.04.09 11:02
Example: EXPORT.STA (6.40)
Object description successfully exported (table, index)
Data successfully exported
The above *.STA file contains the export status. As soon as an item is exported, a new line will be added to the *.STA file. The content of the *.STA file is used to identify where to proceed, in case of a restart.
The status can either be “OK” for successful, or “ERR” for failed.
In NetWeaver ’04 SR1, the “EXPORT.STA” file can be found under: “/usr/sap/<SAP SID>/<Instance>/j2ee/sltools” Check the SAPINST log file for the location in other versions.

© SAP AG TADM70 7-78
© SAP AG 2010
Export Status Files 7.02
T:J2EE_CONFIGENTRY:METADATA DESCRIBE OK 07.10.09 14:53:09T:BI_MMRL2JCLASS:METADATA DESCRIBE OK 07.10.09 14:53:09T:TC_WDRR_MRO_FILES:METADATA DESCRIBE OK 07.10.09 14:53:10...
T:J2EE_CONFIGENTRY:METADATA DESCRIBE OK 07.10.09 14:53:09T:BI_MMRL2JCLASS:METADATA DESCRIBE OK 07.10.09 14:53:09T:TC_WDRR_MRO_FILES:METADATA DESCRIBE OK 07.10.09 14:53:10...
Example: EXPORT_METADATA.STA (7.02)
Example: EXPORT_<PACKAGE>.STA (7.02)T:BC_XMLA_EXPURIS:DATA SELECT OK 07.10.09 15:42:01T:BC_MID_DU_IMPORT:DATA SELECT OK 07.10.09 15:42:02T:CAF_RT_TREX_IDX:DATA SELECT OK 07.10.09 15:42:02...
T:BC_XMLA_EXPURIS:DATA SELECT OK 07.10.09 15:42:01T:BC_MID_DU_IMPORT:DATA SELECT OK 07.10.09 15:42:02T:CAF_RT_TREX_IDX:DATA SELECT OK 07.10.09 15:42:02...
Example: EXPORT_POSTPROCESS.STA (7.02)T:J2EE_CONFIGENTRY:METADATA DESCRIBE OK 07.10.09 14:53:09T:BI_MMRL2JCLASS:METADATA DESCRIBE OK 07.10.09 14:53:09T:TC_WDRR_MRO_FILES:METADATA DESCRIBE OK 07.10.09 14:53:10...
T:J2EE_CONFIGENTRY:METADATA DESCRIBE OK 07.10.09 14:53:09T:BI_MMRL2JCLASS:METADATA DESCRIBE OK 07.10.09 14:53:09T:TC_WDRR_MRO_FILES:METADATA DESCRIBE OK 07.10.09 14:53:10...
Because the meta data and the post-process export do reference the same dump file content, the time stamps are the same.
In future versions the meta data export task will implemented for each individual package.
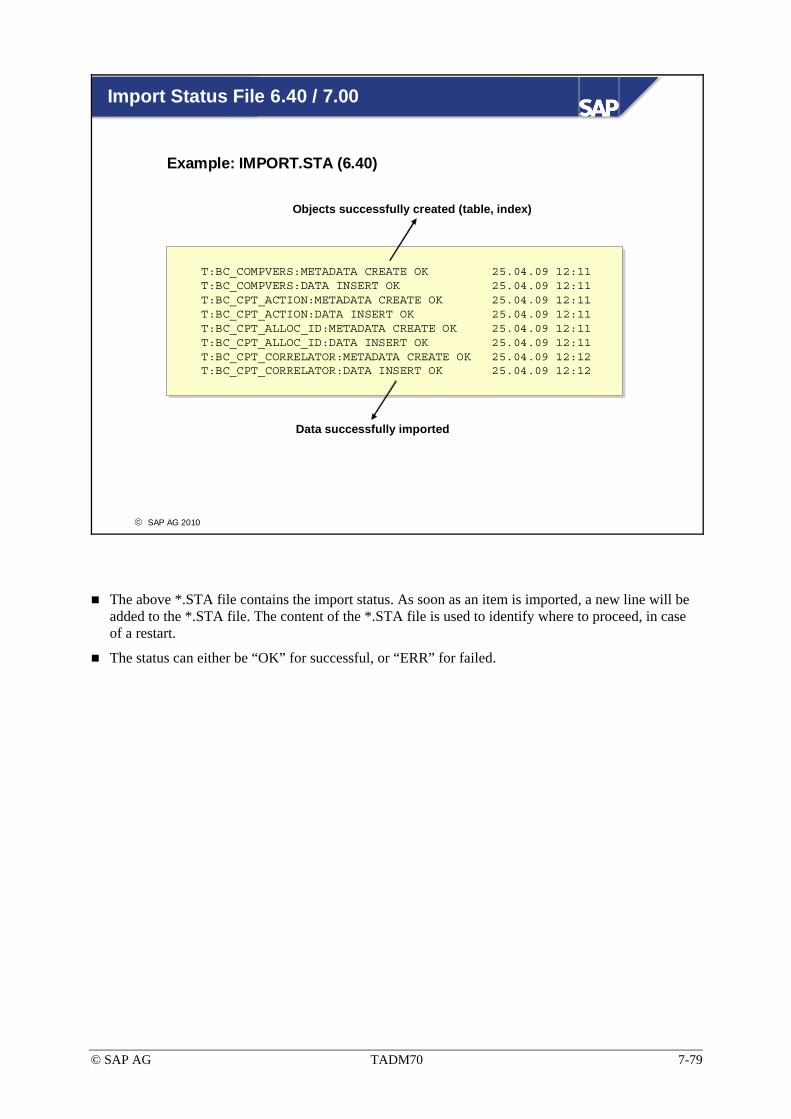
© SAP AG TADM70 7-79
© SAP AG 2010
Import Status File 6.40 / 7.00
T:BC_COMPVERS:METADATA CREATE OK 25.04.09 12:11T:BC_COMPVERS:DATA INSERT OK 25.04.09 12:11 T:BC_CPT_ACTION:METADATA CREATE OK 25.04.09 12:11T:BC_CPT_ACTION:DATA INSERT OK 25.04.09 12:11T:BC_CPT_ALLOC_ID:METADATA CREATE OK 25.04.09 12:11T:BC_CPT_ALLOC_ID:DATA INSERT OK 25.04.09 12:11T:BC_CPT_CORRELATOR:METADATA CREATE OK 25.04.09 12:12T:BC_CPT_CORRELATOR:DATA INSERT OK 25.04.09 12:12
T:BC_COMPVERS:METADATA CREATE OK 25.04.09 12:11T:BC_COMPVERS:DATA INSERT OK 25.04.09 12:11 T:BC_CPT_ACTION:METADATA CREATE OK 25.04.09 12:11T:BC_CPT_ACTION:DATA INSERT OK 25.04.09 12:11T:BC_CPT_ALLOC_ID:METADATA CREATE OK 25.04.09 12:11T:BC_CPT_ALLOC_ID:DATA INSERT OK 25.04.09 12:11T:BC_CPT_CORRELATOR:METADATA CREATE OK 25.04.09 12:12T:BC_CPT_CORRELATOR:DATA INSERT OK 25.04.09 12:12
Example: IMPORT.STA (6.40)
Objects successfully created (table, index)
Data successfully imported
The above *.STA file contains the import status. As soon as an item is imported, a new line will be added to the *.STA file. The content of the *.STA file is used to identify where to proceed, in case of a restart.
The status can either be “OK” for successful, or “ERR” for failed.

© SAP AG TADM70 7-80
© SAP AG 2010
Import Status Files 7.02
T:J2EE_CONFIGENTRY:METADATA CREATE OK 27.11.09 11:38:39T:BI_MMRL2JCLASS:METADATA CREATE OK 27.11.09 11:38:40T:TC_WDRR_MRO_FILES:METADATA CREATE OK 27.11.09 11:38:40...
T:J2EE_CONFIGENTRY:METADATA CREATE OK 27.11.09 11:38:39T:BI_MMRL2JCLASS:METADATA CREATE OK 27.11.09 11:38:40T:TC_WDRR_MRO_FILES:METADATA CREATE OK 27.11.09 11:38:40...
Example: IMPORT_METADATA.STA (7.02)
Example: IMPORT_<PACKAGE>.STA (7.02)T:BC_XMLA_EXPURIS:DATA INSERT OK 27.11.09 11:42:50T:BC_MID_DU_IMPORT:DATA INSERT OK 27.11.09 11:42:50T:CAF_RT_TREX_IDX:DATA INSERT OK 27.11.09 11:42:50...
T:BC_XMLA_EXPURIS:DATA INSERT OK 27.11.09 11:42:50T:BC_MID_DU_IMPORT:DATA INSERT OK 27.11.09 11:42:50T:CAF_RT_TREX_IDX:DATA INSERT OK 27.11.09 11:42:50...
Example: IMPORT_POSTPROCESS.STA (7.02)T:J2EE_CONFIGENTRY:METADATA POSTPROCESS OK 27.11.09 11:44:22T:BI_MMRL2JCLASS:METADATA POSTPROCESS OK 27.11.09 11:44:22T:TC_WDRR_MRO_FILES:METADATA POSTPROCESS OK 27.11.09 11:44:22...
T:J2EE_CONFIGENTRY:METADATA POSTPROCESS OK 27.11.09 11:44:22T:BI_MMRL2JCLASS:METADATA POSTPROCESS OK 27.11.09 11:44:22T:TC_WDRR_MRO_FILES:METADATA POSTPROCESS OK 27.11.09 11:44:22...
First the meta data is applied (create table, primary key), then the data import takes places (insert), and finally the secondary indexes are generated (post-processing).
In future versions the meta data and post-processing import tasks will implemented for each individual package.

© SAP AG TADM70 7-81
© SAP AG 2010
JLOAD: *.LOG Files
*.STA*.STA
*.XML*.XML
*.LOG*.LOG
*.STAT.XML*.STAT.XML
Export/Import log file
*.<nnn>*.<nnn>
sizes.xmlsizes.xml
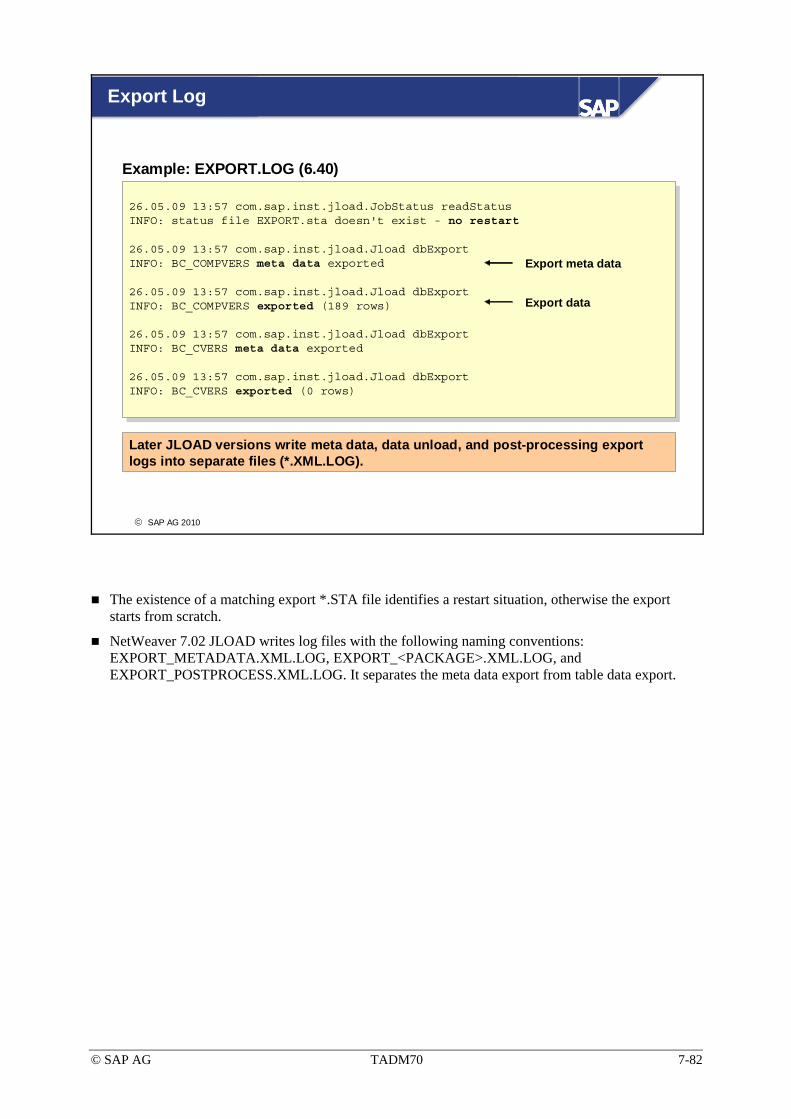
© SAP AG TADM70 7-82
© SAP AG 2010
Export Log
Example: EXPORT.LOG (6.40)
26.05.09 13:57 com.sap.inst.jload.JobStatus readStatusINFO: status file EXPORT.sta doesn't exist - no restart
26.05.09 13:57 com.sap.inst.jload.Jload dbExportINFO: BC_COMPVERS meta data exported
26.05.09 13:57 com.sap.inst.jload.Jload dbExportINFO: BC_COMPVERS exported (189 rows)
26.05.09 13:57 com.sap.inst.jload.Jload dbExportINFO: BC_CVERS meta data exported
26.05.09 13:57 com.sap.inst.jload.Jload dbExportINFO: BC_CVERS exported (0 rows)
Export meta data
Export data
Later JLOAD versions write meta data, data unload, and post-processing export logs into separate files (*.XML.LOG).
The existence of a matching export *.STA file identifies a restart situation, otherwise the export starts from scratch.
NetWeaver 7.02 JLOAD writes log files with the following naming conventions: EXPORT_METADATA.XML.LOG, EXPORT_<PACKAGE>.XML.LOG, and EXPORT_POSTPROCESS.XML.LOG. It separates the meta data export from table data export.

© SAP AG TADM70 7-83
© SAP AG 2010
Import Log
27.05.09 13:52 com.sap.inst.jload.JobStatus readStatusINFO: status file IMPORT.sta doesn't exit - no restart
27.05.09 13:52 com.sap.inst.jload.Jload dbImportINFO: trying to create table BC_COMPVERS
27.05.09 13:52 com.sap.inst.jload.Jload dbImportINFO: table BC_COMPVERS created
27.05.09 13:52 com.sap.inst.jload.Jload dbImportINFO: BC_COMPVERS loaded (211 rows)
27.05.09 13:52 com.sap.inst.jload.Jload dbImportINFO: trying to create table BC_CVERS
Create object
Load data
Example: IMPORT.LOG (6.40, 7.00)
Later JLOAD versions write meta data, data load, and post-processing import logs into separate files (*.XML.LOG).
The existence of a matching import *.STA file identifies a restart situation, otherwise the import starts from the first data dump file entry.
NetWeaver 7.02 JLOAD writes log files with the following naming conventions: IMPORT_METADATA.XML.LOG, IMPORT_<PACKAGE>.XML.LOG, and IMPORT_POSTPROCESS.XML.LOG. It separates the meta data import from table data import and post-processing.

© SAP AG TADM70 7-84
© SAP AG 2010
JLOAD: Export / Import Statistic Files
Export/Import statistic file
*.STA*.STA
*.XML*.XML
*.LOG*.LOG
*.STAT.XML*.STAT.XML
*.<nnn>*.<nnn>
sizes.xmlsizes.xml

© SAP AG TADM70 7-85
© SAP AG 2010
Export / Import Statistic Files 7.02
<?xml version="1.0" encoding="UTF-8" ?> - <package name="EXPORT_0" enddate="2009-10-07 15:49:49">- <table name="BC_XMLA_EXPURIS">
<startdate>2009-10-07 15:41:59</startdate> <enddate>2009-10-07 15:42:01</enddate> <rows>0</rows> <size>8192</size>
</table>…
<?xml version="1.0" encoding="UTF-8" ?> - <package name="EXPORT_0" enddate="2009-10-07 15:49:49">- <table name="BC_XMLA_EXPURIS">
<startdate>2009-10-07 15:41:59</startdate> <enddate>2009-10-07 15:42:01</enddate> <rows>0</rows> <size>8192</size>
</table>…
Start / end export time, number of rows,size
<?xml version="1.0" encoding="UTF-8" ?> - <package name="IMPORT_0" enddate="2009-11-27 11:44:21">- <table name="BC_XMLA_EXPURIS">
<startdate>2009-11-27 11:42:50</startdate> <enddate>2009-11-27 11:42:50</enddate> <rows>0</rows> <size>8192</size>
</table>…
<?xml version="1.0" encoding="UTF-8" ?> - <package name="IMPORT_0" enddate="2009-11-27 11:44:21">- <table name="BC_XMLA_EXPURIS">
<startdate>2009-11-27 11:42:50</startdate> <enddate>2009-11-27 11:42:50</enddate> <rows>0</rows> <size>8192</size>
</table>…
Start / end import time, number of rows,size
Example: EXPORT_0.STAT.XML (7.02)
Example: IMPORT_0.STAT.XML (7.02)
The “*_PACKAGE.STAT.XML” files will be read by JMIGTIME to create the corresponding export/import time lists and HTML graphics.
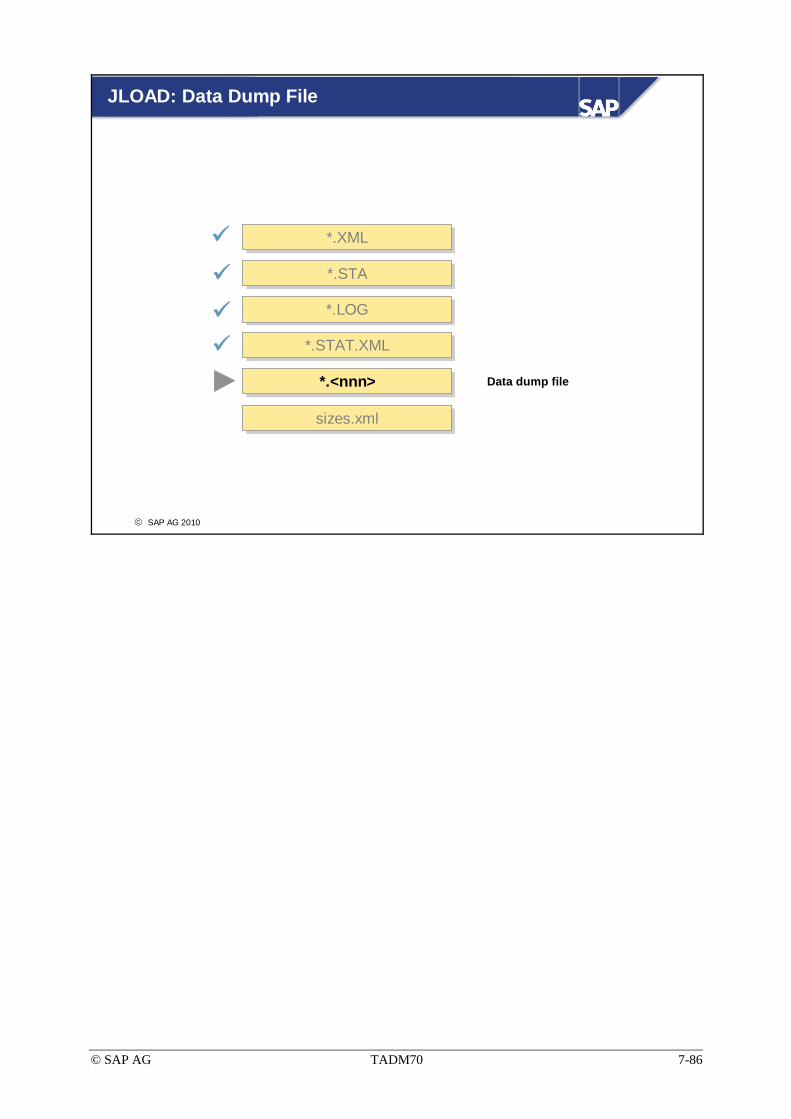
© SAP AG TADM70 7-86
© SAP AG 2010
JLOAD: Data Dump File
*.STA*.STA
*.XML*.XML
*.LOG*.LOG
*.STAT.XML*.STAT.XML
Data dump file*.<nnn>*.<nnn>
sizes.xmlsizes.xml
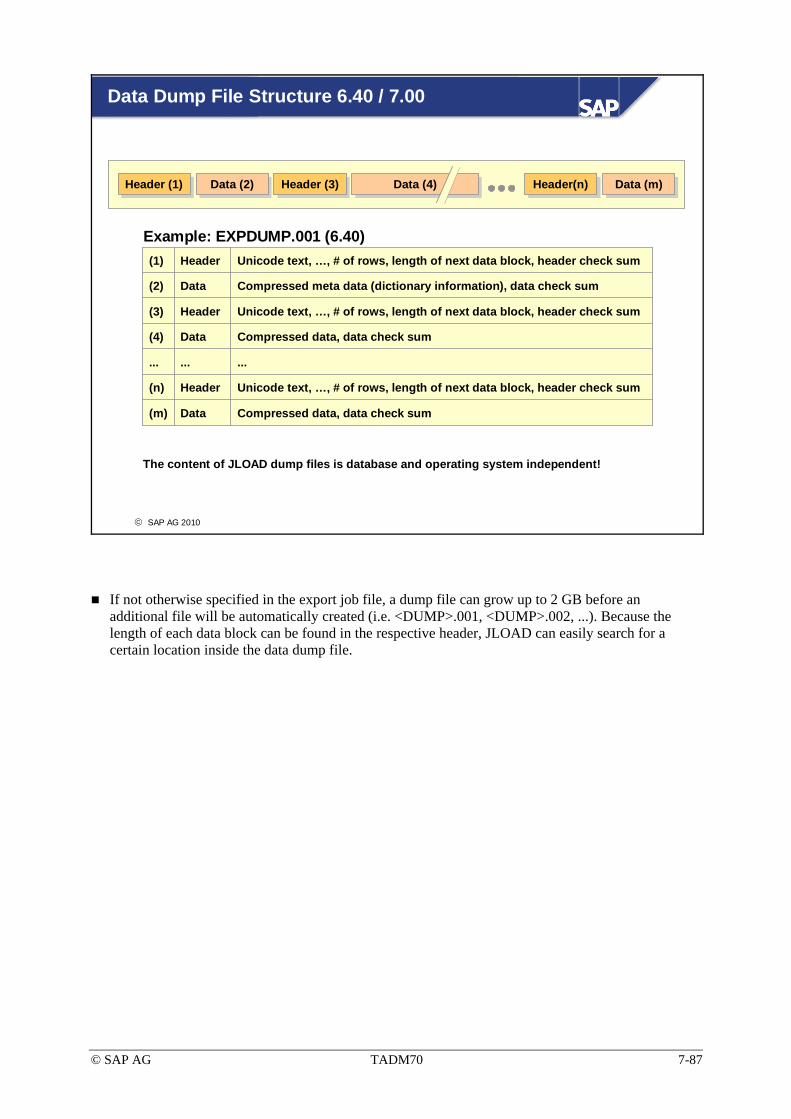
© SAP AG TADM70 7-87
© SAP AG 2010
Data Dump File Structure 6.40 / 7.00
Header (1)Header (1) Data (2)Data (2) Header (3)Header (3) Data (4)Data (4) Header(n)Header(n) Data (m)Data (m)
(1) Header Unicode text, …, # of rows, length of next data block, header check sum
(2) Data Compressed meta data (dictionary information), data check sum
(3) Header Unicode text, …, # of rows, length of next data block, header check sum
(4) Data Compressed data, data check sum
... ... ...
(n) Header Unicode text, …, # of rows, length of next data block, header check sum
(m) Data Compressed data, data check sum
The content of JLOAD dump files is database and operating system independent!
Example: EXPDUMP.001 (6.40)
If not otherwise specified in the export job file, a dump file can grow up to 2 GB before an additional file will be automatically created (i.e. <DUMP>.001, <DUMP>.002, ...). Because the length of each data block can be found in the respective header, JLOAD can easily search for a certain location inside the data dump file.

© SAP AG TADM70 7-88
© SAP AG 2010
Data Dump File Structures for separated Meta Data
(1) Header Unicode text, …, # of rows, length of next data block, header check sum
(2) Data Compressed meta data (dictionary information), check sum
... ... ...
(n) Header Unicode text, …, # of rows, length of next data block, header check sum
(m) Data Compressed meta data (dictionary information), data check sum
Example: EXPDMP_METADATA.001 / EXPDMP_POSTPROCESS.001
(1) Header Unicode text, …, # of rows, length of next data block, header check sum
(2) Data Compressed table data, check sum
... ... ...
(n) Header Unicode text, …, # of rows, length of next data block, header check sum
(m) Data Compressed table data, check sum
Example: EXPDMP_<PACKAGE>.001
If JPKGCTL was used meta data and table data were put into separate dump files.

© SAP AG TADM70 7-89
© SAP AG 2010
JPKGCTL (JSPLITTER): Package Sizes
*.STA*.STA
*.XML*.XML
*.LOG*.LOG
*.STAT.XML*.STAT.XML
*.<nnn>*.<nnn>
Size information for JMIGMONsizes.xmlsizes.xml

© SAP AG TADM70 7-90
© SAP AG 2010
Size Information for JMIGMON
<?xml version="1.0" encoding="UTF-8" standalone="no" ?><sizes>...<package expected="26727219"
exportfile="EXPORT_13_J2EE_CONFIGENTRY.XML" importfile="IMPORT_13_J2EE_CONFIGENTRY.XML" />
<package expected="26727219" exportfile="EXPORT_14_J2EE_CONFIGENTRY.XML" importfile="IMPORT_14_J2EE_CONFIGENTRY.XML" />
<package expected="20963328" exportfile="EXPORT_0.XML" importfile="IMPORT_0.XML" />
<package expected="20963328" exportfile="EXPORT_1.XML" importfile="IMPORT_1.XML" />
<package expected="11567104" exportfile="EXPORT_2.XML" importfile="IMPORT_2.XML" />
<package expected="0" exportfile="EXPORT_POSTPROCESS.XML" importfile="IMPORT_POSTPROCESS.XML" />
...</sizes>
Expected package size
Package with multiple tables
Package with splitted table, part 2
Package with splitted table, part 1
Example: sizes.xml (7.02)
After the package splitting was completed, JPKGCTL writes the "sizes.xml" file containing the expected package sizes. This helps JMIGMON to identify large packages which should be exported first.

© SAP AG TADM70 7-91
© SAP AG 2010
Common JLOAD Command Line Options
Function JLOAD Option Description
DB Connect -sec <SID>,<data source name>,[<SecureStore property file>,<SecureStore key file>][,<SecureStore key phrase>]
Database logon via SecureStore
DB Connect -url <url> -driver <driver> -auth <user, password> Direct database logon
Jobs -job <job file name>[,<job file name, ...] Job file names (*.XML)
Dump Directory
-dataDir <directory name> Specifies the location where to write, or from where to read dump files
Log -log <log file name> Log file name (*.LOG)
JLOAD is not a standalone tool! SAPINST and JLOAD must always fit together!
Parameters:
• url = url for database to connect
• driver = JDBC database driver
• auth = database logon
If no job file is specified, the complete database will be exported by default. In addition, suitable “EXPORT.XML” and “IMPORT.XML” files will be generated.
The default log file name will be “JLOAD.LOG”, unless a job file is specified; in this case, the log file will get the same name as the job file, with *.XML replaced by *.LOG.
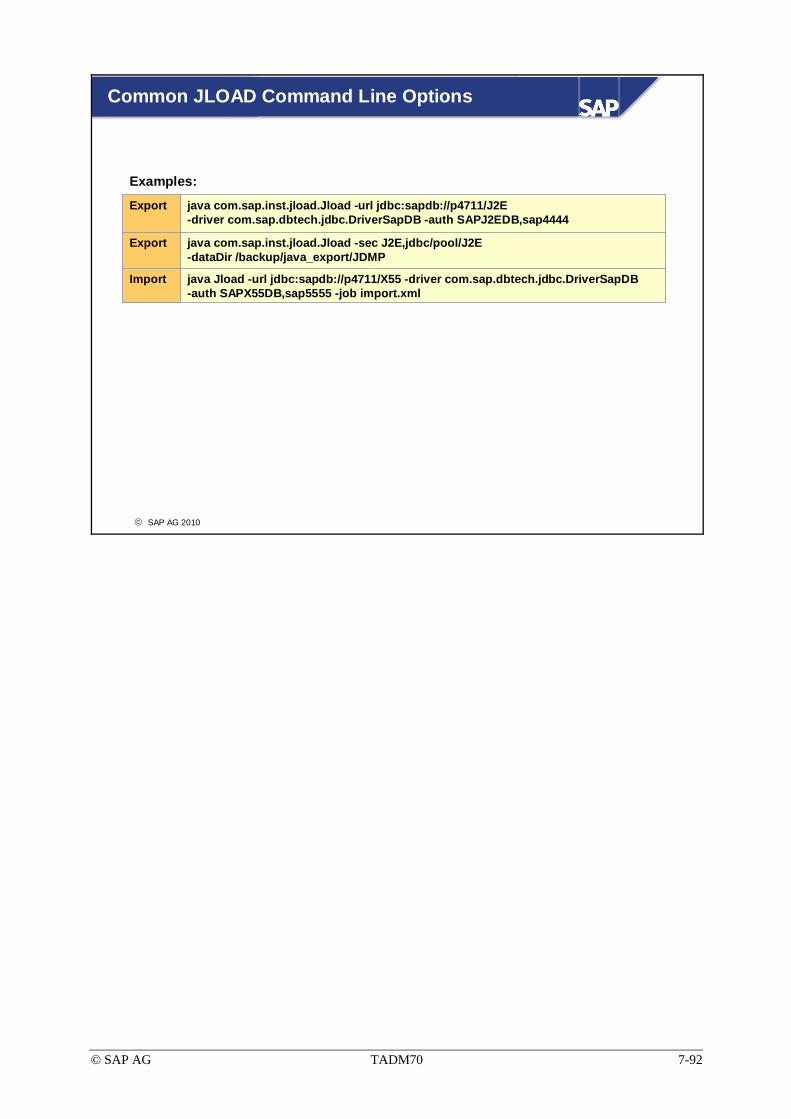
© SAP AG TADM70 7-92
© SAP AG 2010
Common JLOAD Command Line Options
Examples:
Export java com.sap.inst.jload.Jload -url jdbc:sapdb://p4711/J2E -driver com.sap.dbtech.jdbc.DriverSapDB -auth SAPJ2EDB,sap4444
Export java com.sap.inst.jload.Jload -sec J2E,jdbc/pool/J2E -dataDir /backup/java_export/JDMP
Import java Jload -url jdbc:sapdb://p4711/X55 -driver com.sap.dbtech.jdbc.DriverSapDB -auth SAPX55DB,sap5555 -job import.xml

© SAP AG TADM70 7-93
© SAP AG 2010
R3LOAD & JLOAD Files: Unit Summary
In case of problems or migration tuning, detailed knowledge of the R3LOAD/JLOAD control and data files is critical for making corrections
Be sure to distinguish between:
Parameters that can be adjusted
Parameters that should not be changed

© SAP AG TADM70 7-94

© SAP AG TADM70 7-95
Exercises
Unit 7: R3LOAD & JLOAD Files (Part I)
At the conclusion of this exercise, you will be able to:
• Modify R3LOAD files to serve special demands. Often various methods are available to achieve the same result.
7-1 In a DB migration of a large database to Oracle, it was decided to move the heavily-used customer table ZTR1 (TABART APPL1) to a separate table space. No changes were done to the ABAP dictionary in advance. The export was executed the normal way.
7-1-1 What changes should be done to the R3LOAD files for creating table ZTR1 and its indexes in tablespace PSAPSR3ZZTR1 and to load data into it?
Fragment of SAPAPPL1.STR tab: ZTR1
att: APPL1 4 ?? T all ZTR1~0 APPL1 4
fld: MANDT CLNT 3 0 0 not_null 1
fld: MBLNR CHAR 10 0 0 not_null 2
fld: TSTMP FLTP 8 0 16 not_null 0
ind: ZTR1~PSP
att: ZTR1 APPL1 4 not_unique
fld: MANDT
fld: TSTMP
7-1-2 After the import is finished, which dictionary maintenance tasks should be done?
See also Exercise 6-1

© SAP AG TADM70 7-96
7-2 An Informix export of a heterogeneous system copy with R3LOAD 6.x is short on disk space. None of the available file systems is large enough to store the expected amount of dump data.
All TABARTs will fit into the “sapreorg” file system, except TABART CLUST, which has a size of 600 MB.
File system A: /tools/exp_1 ~ 400 MB free
File system B: /oracle/C11/sapreorg/exp ~ 4500 MB free
File system C: /usr/sap/trans/exp_2 ~ 350 MB free
7-2-1 Which SAPCLUST.cmd file content would allow an export without any manual intervention? tsk: "/oracle/C11/sapreorg/install/SAPCLUST.TSK"
icf: "/oracle/C11/sapreorg/exp/DATA/SAPCLUST.STR"
dcf: "/oracle/C11/sapreorg/install/DDLINF.TPL"
dat: "/oracle/C11/sapreorg/exp/DATA/" bs=1k fs=1000M
dir: "/oracle/C11/sapreorg/exp/DATA/SAPCLUST.TOC"
7-2-2 Which other solutions are possible with more or less manual intervention?
7-3 While doing an export, R3LOAD stops on error, because an expected table does not exist. This seems to be an inconsistency between the ABAP Dictionary and the database dictionary. As most of the tables are already exported, it does not make sense to restart the SAP instance to fix the problem and to repeat the export afterwards.
7-3-1 How can R3LOAD 4.x be forced to skip the export of the table?
7-3-2 How can R3LOAD 6.x be forced to skip the export of the table?
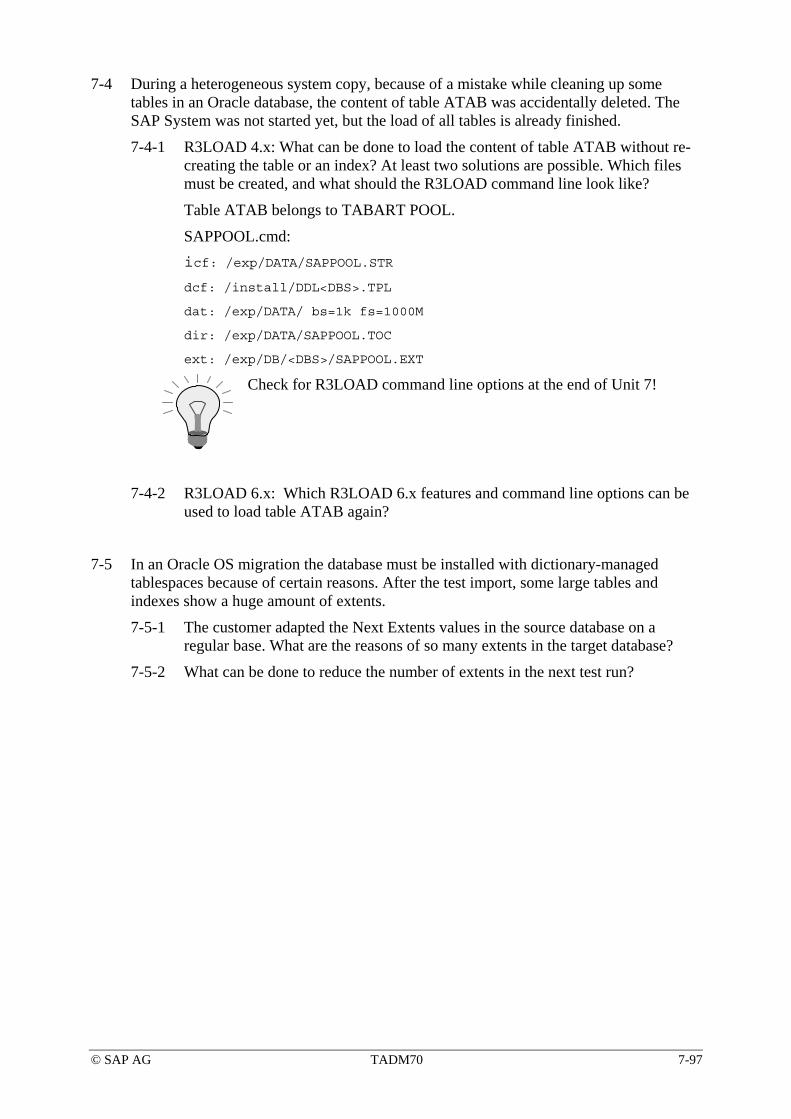
© SAP AG TADM70 7-97
7-4 During a heterogeneous system copy, because of a mistake while cleaning up some tables in an Oracle database, the content of table ATAB was accidentally deleted. The SAP System was not started yet, but the load of all tables is already finished.
7-4-1 R3LOAD 4.x: What can be done to load the content of table ATAB without re-creating the table or an index? At least two solutions are possible. Which files must be created, and what should the R3LOAD command line look like?
Table ATAB belongs to TABART POOL.
SAPPOOL.cmd: icf: /exp/DATA/SAPPOOL.STR
dcf: /install/DDL<DBS>.TPL
dat: /exp/DATA/ bs=1k fs=1000M
dir: /exp/DATA/SAPPOOL.TOC
ext: /exp/DB/<DBS>/SAPPOOL.EXT
Check for R3LOAD command line options at the end of Unit 7!
7-4-2 R3LOAD 6.x: Which R3LOAD 6.x features and command line options can be used to load table ATAB again?
7-5 In an Oracle OS migration the database must be installed with dictionary-managed tablespaces because of certain reasons. After the test import, some large tables and indexes show a huge amount of extents.
7-5-1 The customer adapted the Next Extents values in the source database on a regular base. What are the reasons of so many extents in the target database?
7-5-2 What can be done to reduce the number of extents in the next test run?

© SAP AG TADM70 7-98
Unit 7: R3LOAD & JLOAD Files (Part II) Hands-On Exercise
At the conclusion of this exercise, you will be able to:
• Use R3LOAD standalone.
• To manually create *.TSK and *.CMD files.
7-6 This is a hands-on exercise for which you must logon to the source system of the example migration.
Hostname: ________________ Group-ID ________________
Telnet user: ________________ Password: ________________
Hostname: ________________ Instance #: ________________
SAP user: ________________ Password: ________________
Client #: ________________
If there is a unique group number on your workstation monitor, please use this number as your Group-ID.
Use telnet to logon to system DEV (user, password, and hostname as supplied by the trainer)
You will logon as an administrator! Please do not make any changes to the system, except for those explained in this exercise.
Please open one telnet session only! The training system will not allow more than 20 parallel sessions for all students.

© SAP AG TADM70 7-99
Perform the following preparation steps: - Change to the drive and the directory as supplied by the trainer
- Copy the whole directory “TEMPLATE” to your work directory. Use name “work<group-id> (i.e. “xcopy TEMPLATE work00”)
- Execute “env.bat” in your work directory. It will set required environment variables. Repeat this step after each telnet logon!
- Change to your work<group-id> directory (i.e. work00)
- Use the editor “xvi” to perform the following modifications:
In ZZADDRESS.STR change the table and primary key name
ZZADDRESS to ZZADDRESS<group-id> (i.e. ZZADDRESS00)
ZZADDRESS~0 to ZZADDRESS<group-id>~0 (i.e. ZZADDRESS00~0)
In ZZADDRESS.EXT change the table and primary key name ZZADDRESS to ZZADDRESS<group-id>
ZZADDRESS~0 to ZZADDRESS<group-id>~0
In ZZADDRESS.TOC change the table name
ZZADDRESS to ZZADDRESS<group-id>
Edit Notes The editor “xvi” is a “vi” implementation for Windows systems, which works very well on telnet sessions.
“xvi” survival guide Insert mode: press “i”, end insert mode: press “Escape” Delete character under cursor: press “x” Delete character while in insert mode: press “Backspace” Save file: enter “:wq” (write and quit), if it doesn’t work, press “Escape” and try it again
Tip: Do not use cursor keys while in insert mode; press “Escape” first

© SAP AG TADM70 7-100
7-6-1 Which fields belong to the primary key of table ZZADDRESS<group-id>?
7-6-2 Logon to SAP System DEV and verify the ABAP Dictionary against the DB Dictionary in transaction DB02. Save the shown output to a file.
7-6-3 Use R3LOAD to create the import task file ZZADDRESS.TSK.
7-6-4 Use an editor to create an R3LOAD command file, which can be used to import table ZZADDRESS<group-id>
Since R3LOAD 4.5A, “\” and “/” are accepted as path separator in Windows.
7-6-5 Import table ZZADDRESS<group-id> with R3LOAD and check the content of table ZZADDRESS<group-id> by using the MSS command line utility “osql”. The command line is case sensitive!
osql -E -Q "SELECT * FROM dev.ZZADDRESS<group-id>"
As the dump was created on a little endian Unicode system (see ZZADDRESS.TOC) the import must be done with dbcodepage “4103”
For more information on “osql”, see document “MSS_osql.txt” in your work directory.
Ignore R3LOAD messages starting with “sapparam”: sapparam: sapargv( argc, argv) has not been called. sapparam(1c): No Profile used. sapparam: SAPSYSTEMNAME neither in Profile nor in Commandline
7-6-6 Repeat the verification of the ABAP Dictionary against the DB Dictionary (do a refresh!). Does the output look different than before? Any new entries?

© SAP AG TADM70 7-101
7-6-7 Try to load table ZZADDRESS<group-id> again by changing the ZZADDRESS<group-id> .TSK file: D ZZADDRESS<group-id> I ok D ZZADDRESS<group-id> I xeq
What happened? What is the content of ZZADDRESS.TSK and ZZADDRESS.log?
Try the import again, what happens now?
7-6-8 Create a new sub-directory in your work directory. Name it “export”. Create a task and a command file to export ZZADDRESS<group-id>. Export table ZZADDRESS<group-id> and compare the number of exported rows against the number of table rows in the database.
osql -E -Q “select count(*) from dev.ZZADDRESS<group-id>”
Make sure not to overwrite your existing ZZADDRESS.TOC and ZZADDRESS.001 file!

© SAP AG TADM70 7-102

© SAP AG TADM70 7-103
Solutions
Unit 7: R3LOAD & JLOAD Files (Part I)
7-1
7-1-1 To create additional tablespaces on the target database, the files DBSIZE.TPL or DBSIZE.XML must be adapted. A new TABART / tablespace assignment must be added in the file DDLORA.TPL file: # table storage parameters ZZTR1 PSAPSR3ZZTR1
# index storage parameters ZZTR1 PSAPSR3ZZTR1
… and the original TABART in the SAPAPPL1.STR file has to be changed from: tab: ZTR1
att: APPL1 4 ?? T all ZTR1~0 APPL1 4
fld: MANDT CLNT 3 0 0 not_null 1
fld: MBLNR CHAR 10 0 0 not_null 2
fld: TSTMP FLTP 8 0 16 not_null 0
ind: ZTR1~PSP
att: ZTR1 APPL1 4 not_unique
fld: MANDT
fld: TSTMP
to:
tab: ZTR1
att: ZZTR1 4 ?? T all ZTR1~0 ZZTR1 4
fld: MANDT CLNT 3 0 0 not_null 1
fld: MBLNR CHAR 10 0 0 not_null 2
fld: TSTMP FLTP 8 0 16 not_null 0
ind: ZTR1~PSP
att: ZTR1 ZZTR1 4 not_unique
fld: MANDT
fld: TSTMP
7-1-2 After the import is finished, the ABAP dictionary should be maintained for table ZTR1 (update tables DDART, DARTT, TSORA, TAORA, IAORA and DD09L).

© SAP AG TADM70 7-104
7-2
7-2-1 Original SAPCLUST.cmd tsk: "/oracle/C11/sapreorg/install/SAPCLUST.TSK"
icf: "/oracle/C11/sapreorg/exp/DATA/SAPCLUST.STR"
dcf: "/oracle/C11/sapreorg/install/DDLINF.TPL"
dat: "/oracle/C11/sapreorg/exp/DATA/" bs=1k fs=1000M
dir: "/oracle/C11/sapreorg/exp/DATA/SAPCLUST.TOC"
Modified SAPCLUST.cmd tsk: "/oracle/C11/sapreorg/install/SAPCLUST.TSK"
icf: "/oracle/C11/sapreorg/exp/DATA/SAPCLUST.STR"
dcf: "/oracle/C11/sapreorg/install/DDLINF.TPL"
dat: "/tools/exp_1/DATA/" bs=1k fs=300M
dat: "/usr/sap/trans/exp_2/DATA/" bs=1k fs=300M
dir: "/oracle/C11/sapreorg/exp/DATA/SAPCLUST.TOC"
7-2-2 Move the dump files of small packages out of the export directory, as soon as they are completed. It can also be helpful to reduce the dump file size, to move completed dump files of large packages sooner.
7-3
7-3-1 R3LOAD 4.x: In the *.STR file, the definitions of the non-existing table (and its indexes) can be marked as comments, by placing a “#” at the beginning of each line. Deleting the entries would also work, but afterwards the change will not be visible to others who might be searching for errors. Restart R3LOAD.
7-3-2 R3LOAD 6.x: Change the status of the table entry inside the export *.TSK file to “ign” (ignore). This will help fix the export problem, but for the import, you will still have to a change the *.STR file (see R3LOAD 4.x).
Restart R3LOAD.

© SAP AG TADM70 7-105
7-4
7-4-1 Solution 1:
a) Copy SAPPOOL.STR to ATAB.STR
b) Remove everything from ATAB.STR that doesn’t belong to table ATAB.
c) Inside ATAB.STR, change the action field from “all” to “data”
d) Copy SAPPOOL.cmd to ATAB.cmd
e) Change the content of ATAB.cmd from: icf: /exp/DATA/SAPPOOL.STR
dcf: /install/DDL<DBS>.TPL
dat: /exp/DATA/ bs=1k fs=1000M
dir: /exp/DATA/SAPPOOL.TOC
ext: /exp/DB/<DBS>/SAPPOOL.EXT
to:
icf: /<directory path>/ATAB.STR
dcf: /install/DDL<DBS>.TPL
dat: /exp/DATA/ bs=1k fs=1000M
dir: /exp/DATA/SAPPOOL.TOC
ext: /exp/DB/<DBS>/SAPPOOL.EXT
f) R3load –i ATAB.cmd –p ATAB.log –k <migration key>
Solution 2:
As in solution 1, but skip step c). The R3load command line looks
different: R3load –o TIVP –i ATAB.cmd –p ATAB.log –k <migration key>
7-4-2 Change the status of the table load entry from “ok” to “err” (error) in SAPPOOL.TSK. Start R3LOAD just as SAPINST did earlier. The previously used R3LOAD command line can be found in SAPPOOL.log. R3load –i SAPPOOL.cmd –l SAPPOOL.LOG –k <migration key> ...
7-5
7-5-1 The next extent values used by R3LOAD are obtained from the size categories of the ABAP Dictionary. These size categories are part of the technical settings of tables and will not be updated by any external database administration tool. If R3SZCHK computes the initial extent of tables smaller than needed, the number of next extents increases because the size category values are often too small.
7-5-2 The initial or next extent values of the involved tables should be increased by modifying the *.EXT or *.STR file.
© SAP AG TADM70 7-106
Unit: 7 R3LOAD & JLOAD Files (Part II) Hands-On Exercise
7-6
This solution is using group-id “00”!
ZZADDRESS.STR tab: ZZADDRESS00
att: SSEXC 0 XX T all ZZADDRESS00~0 USER 0
fld: NAME CHAR 30 0 0 not_null 1
fld: CITY CHAR 30 0 0 not_null 0
ZZADDRESS.EXT ZZADDRESS00 16384
ZZADDRESS00~0 16384
ZZADDRESS.TOC vn: R6.40/V1.4
id: adb1c36e00000046
cp: 4103
data_with_checksum
tab: [HEADER]
fil: ZZADDRESS.001 1024 1 1
eot: #0 rows 20050606141758
tab: ZZADDRESS00
fil: ZZADDRESS.001 1024
2 2
eot: #20 rows 20050606141758
eof: #20050606141758
7-6-1 The primary key uses field NAME only.
7-6-2 Check for tables that only exist in the database, but not in the ABAP Dictionary
© SAP AG TADM70 7-107
7-6-3 Generate task file ZZADDRESS.TSK: R3load -ctf I ZZADDRESS.STR DDLMSS.TPL ZZADDRESS.TSK \
MSS -l ZZADDRESS.log
ZZADDRESS.TSK: T ZZADDRESS00 C xeq
P ZZADDRESS00~0 C xeq
D ZZADDRESS00 I xeq
7-6-4 Create command file ZZADDRESS.CMD: tsk: ZZADDRESS.TSK
icf: ZZADDRESS.STR
dcf: DDLMSS.TPL
dat: .\ bs=1K fs=1000M
dir: ZZADDRESS.TOC
ext: ZZADDRESS.EXT
Alternate notation: tsk: ZZADDRESS.TSK
icf: ZZADDRESS.STR
dcf: DDLMSS.TPL
dat: ./ bs=1K fs=1000M
dir: ZZADDRESS.TOC
ext: ZZADDRESS.EXT
7-6-5 Import table ZZADDRESS00: R3load -dbcodepage 4103 -i ZZADDRESS.cmd -l ZZADDRESS.log
ZZADDRESS.log: (IMP) INFO: import of ZZADDRESS00 completed (20 rows)
ZZADDRESS.TSK: T ZZADDRESS00 C ok
P ZZADDRESS00~0 C ok
D ZZADDRESS00 I ok
osql -E -Q "SELECT * FROM dev.ZZADDRESS00"
Wattenberg Muenchen
Werle Offenbach
(20 rows affected)
7-6-6 Transaction DB02 will show your imported table ZZADDRESS00. If not, refresh the display (tables of your student neighbors might be visible as well).

© SAP AG TADM70 7-108
7-6-7 Because of the primary key on field “NAME”, it is impossible to insert two identical names. R3LOAD returns an error (rc=26 error). The ZZADDRESS.TSK file contains: D ZZADDRESS00 I err
ZZADDRESS.log: (IMP) ERROR: DbSlEndModify failed
rc = 26, table "ZZADDRESS00"
The import works the second time as the status “err” in ZZADDRESS.TSK forces R3LOAD to delete the table content before starting the import..
ZZADDRESS.log:
(IMP) INFO: import of ZZADDRESS00 completed (20 rows)
7-6-8 Create directory “export” and copy ZZADDRESS.CMD into it. Change to directory “export”. Edit the copied command file: ZZADDRESS.CMD tsk: ZZADDRESS.TSK
icf: ..\ZZADDRESS.STR
dcf: ..\DDLMSS.TPL
dat: .\ bs=1K fs=1000M
dir: ZZADDRESS.TOC
Alternate notation: tsk: ZZADDRESS.TSK
icf: ../ZZADDRESS.STR
dcf: ../DDLMSS.TPL
dat: ./ bs=1K fs=1000M
dir: ZZADDRESS.TOC
Create the task file ZZADDRESS.TSK containing the following line (you can use R3LOAD or an editor): R3load -ctf E ..\ZZADDRESS.STR ..\DDLMSS.TPL ZZADDRESS.TSK \
MSS -l ZZADDRESS.log
ZZADDRESS.TSK D ZZADDRESS00 E xeq
Start the export: R3load -datacodepage 4103 -e ZZADDRESS.CMD -l ZZADDRESS.log
There should be 20 rows in the database, and the same number should be mentioned in the *.TOC file.

© SAP AG TADM70 8-1
© SAP AG 2010
Advanced Migration Techniques
1 Introduction 7 R3LOAD & JLOAD Files
2 The Migration Project 8 Advanced Migration Techniques
3 System Copy Methods 9 Performing the Migration
4 SAP Migration Tools 10 Troubleshooting
5 R3SETUP / SAPINST 11 Special Projects
6 Technical Background Knowledge

© SAP AG TADM70 8-2
© SAP AG 2010
ContentsTime critical steps in an R3LOAD / JLOAD based system copyMethods/strategies to save time during system copy
ObjectivesAt the end of this unit, you will be able to:
Identify time-critical system copy steps in a customer environmentTake the right steps to shorten long-running phases
Advanced Migration Techniques
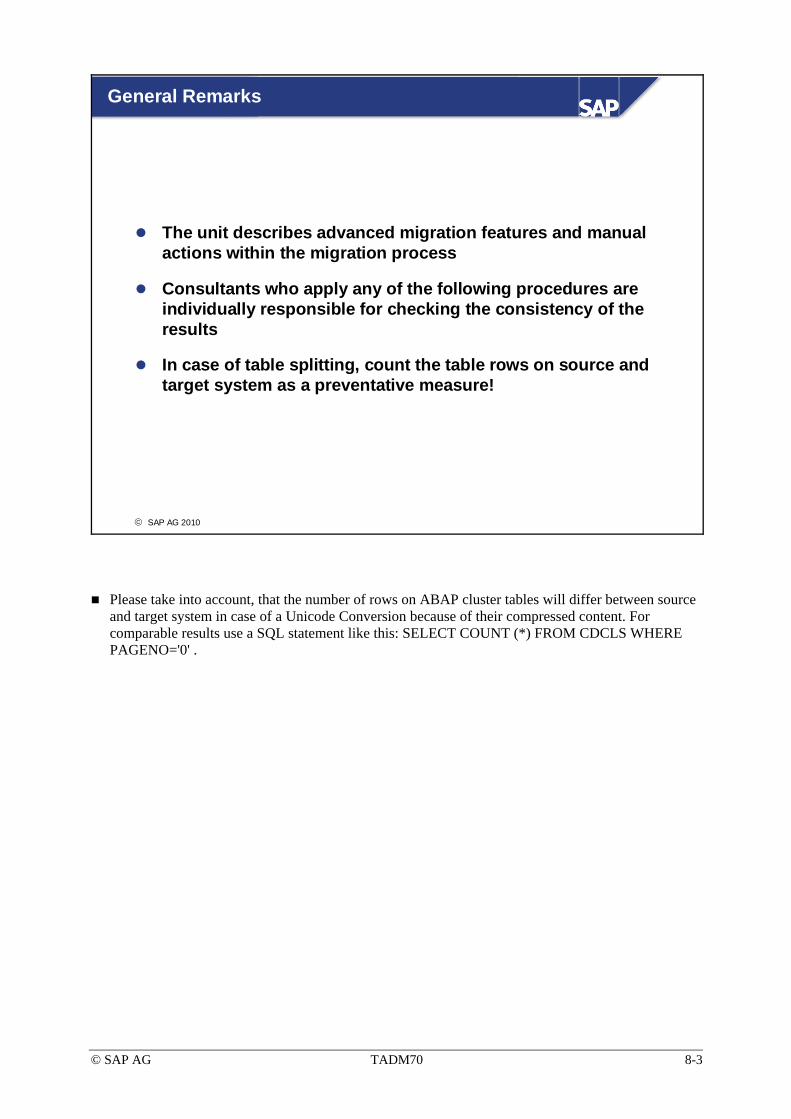
© SAP AG TADM70 8-3
© SAP AG 2010
The unit describes advanced migration features and manual actions within the migration process
Consultants who apply any of the following procedures are individually responsible for checking the consistency of the results
In case of table splitting, count the table rows on source and target system as a preventative measure!
General Remarks
Please take into account, that the number of rows on ABAP cluster tables will differ between source and target system in case of a Unicode Conversion because of their compressed content. For comparable results use a SQL statement like this: SELECT COUNT (*) FROM CDCLS WHERE PAGENO='0' .
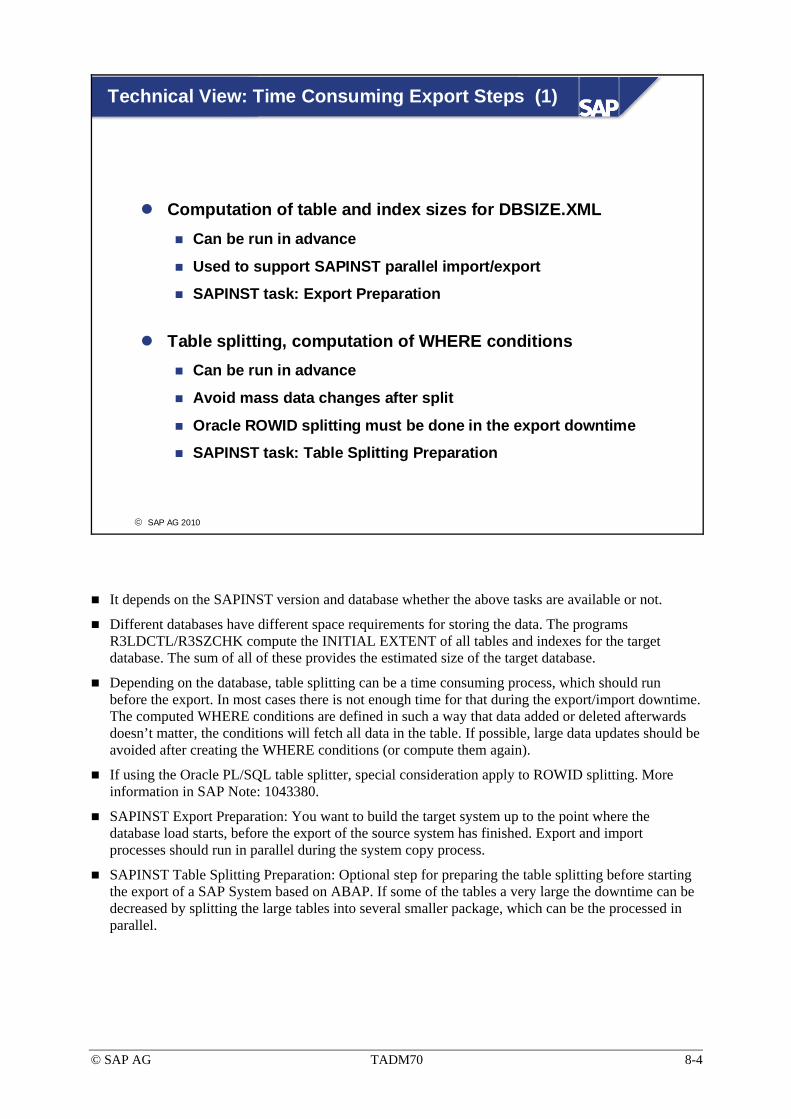
© SAP AG TADM70 8-4
© SAP AG 2010
Technical View: Time Consuming Export Steps (1)
Computation of table and index sizes for DBSIZE.XMLCan be run in advance
Used to support SAPINST parallel import/export
SAPINST task: Export Preparation
Table splitting, computation of WHERE conditionsCan be run in advance
Avoid mass data changes after split
Oracle ROWID splitting must be done in the export downtime
SAPINST task: Table Splitting Preparation
It depends on the SAPINST version and database whether the above tasks are available or not.
Different databases have different space requirements for storing the data. The programs R3LDCTL/R3SZCHK compute the INITIAL EXTENT of all tables and indexes for the target database. The sum of all of these provides the estimated size of the target database.
Depending on the database, table splitting can be a time consuming process, which should run before the export. In most cases there is not enough time for that during the export/import downtime. The computed WHERE conditions are defined in such a way that data added or deleted afterwards doesn’t matter, the conditions will fetch all data in the table. If possible, large data updates should be avoided after creating the WHERE conditions (or compute them again).
If using the Oracle PL/SQL table splitter, special consideration apply to ROWID splitting. More information in SAP Note: 1043380.
SAPINST Export Preparation: You want to build the target system up to the point where the database load starts, before the export of the source system has finished. Export and import processes should run in parallel during the system copy process.
SAPINST Table Splitting Preparation: Optional step for preparing the table splitting before starting the export of a SAP System based on ABAP. If some of the tables a very large the downtime can be decreased by splitting the large tables into several smaller package, which can be the processed in parallel.
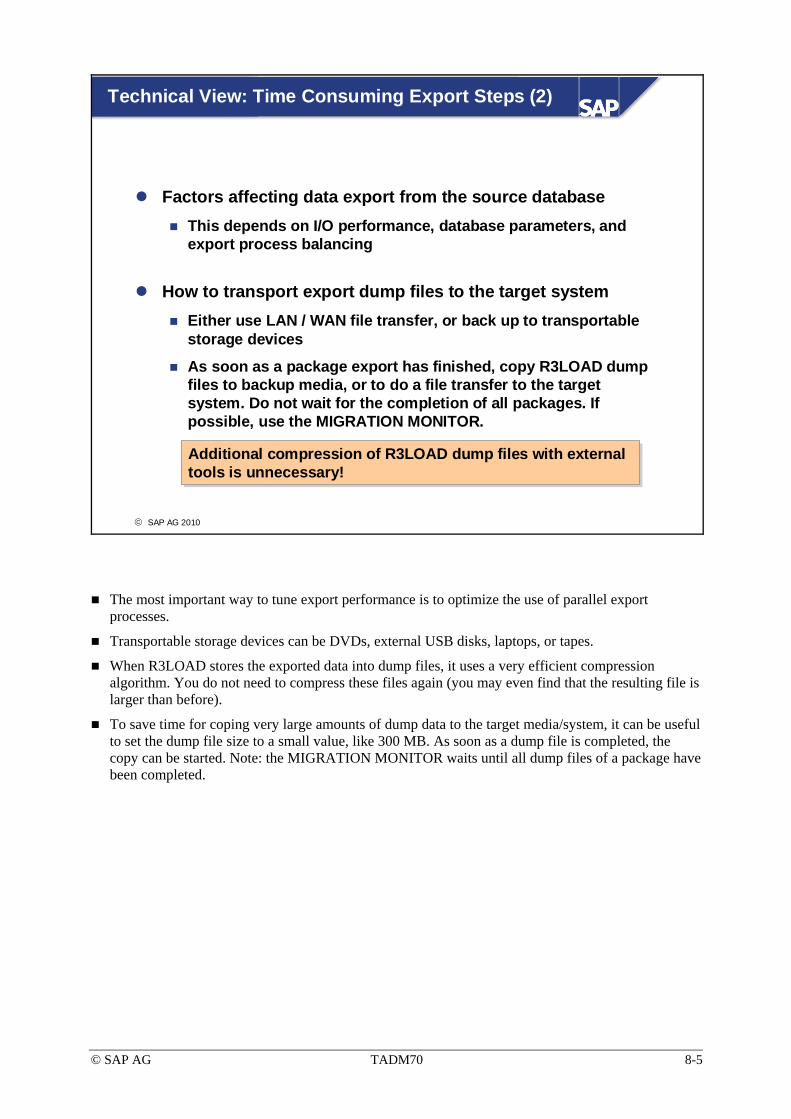
© SAP AG TADM70 8-5
© SAP AG 2010
Technical View: Time Consuming Export Steps (2)
Factors affecting data export from the source databaseThis depends on I/O performance, database parameters, and export process balancing
How to transport export dump files to the target systemEither use LAN / WAN file transfer, or back up to transportable storage devices
As soon as a package export has finished, copy R3LOAD dump files to backup media, or to do a file transfer to the target system. Do not wait for the completion of all packages. If possible, use the MIGRATION MONITOR.
Additional compression of R3LOAD dump files with externaltools is unnecessary!Additional compression of R3LOAD dump files with externaltools is unnecessary!
The most important way to tune export performance is to optimize the use of parallel export processes.
Transportable storage devices can be DVDs, external USB disks, laptops, or tapes.
When R3LOAD stores the exported data into dump files, it uses a very efficient compression algorithm. You do not need to compress these files again (you may even find that the resulting file is larger than before).
To save time for coping very large amounts of dump data to the target media/system, it can be useful to set the dump file size to a small value, like 300 MB. As soon as a dump file is completed, the copy can be started. Note: the MIGRATION MONITOR waits until all dump files of a package have been completed.

© SAP AG TADM70 8-6
© SAP AG 2010
Technical View: Time Consuming Import Steps
Create databaseRun in advance as soon as the target size computation is completed
Import data into the target database This depends on I/O performance, database parameters, and export process balancing
Update statistics after data loadMust be done before going into production
Can be postponed from after import to a later point in time (i.e. after the first DB backup)
If a parallel export / import using R3LOAD is planned the database must be ready to import when the export starts.
Normally the first database update statistic is started directly after the database import. If short on time, the update statistic can be postponed to a later point in time where it can run in parallel with other activities.
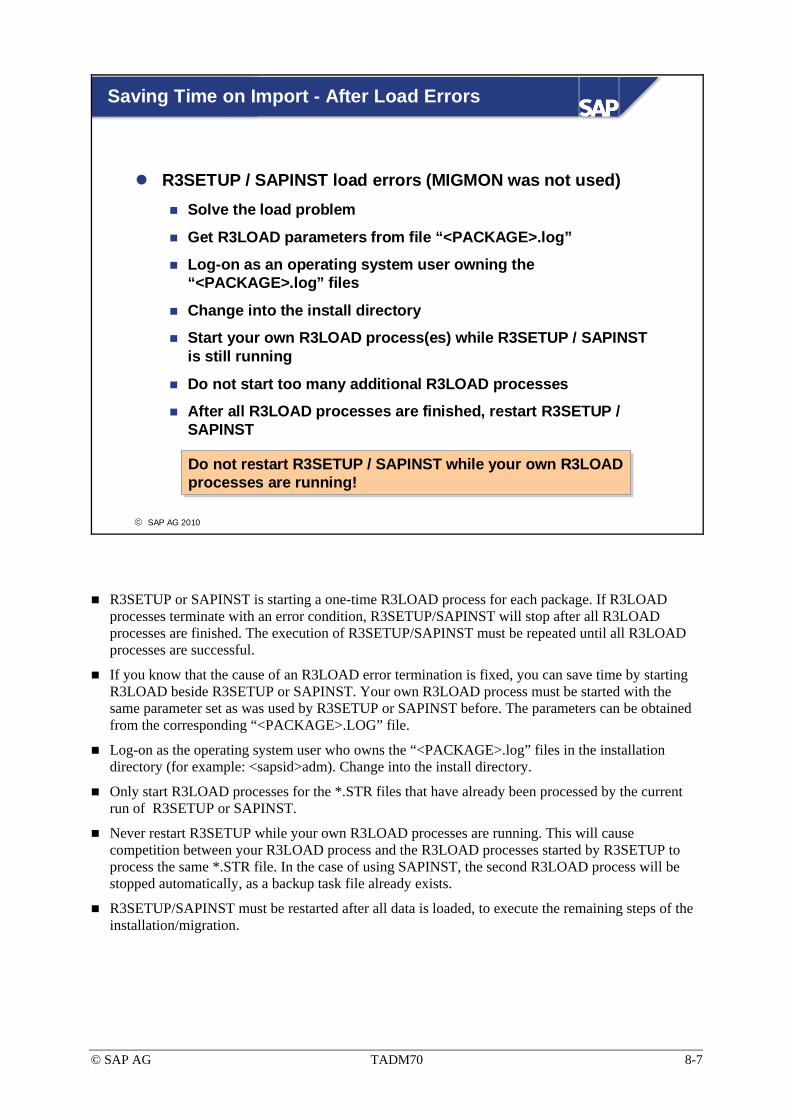
© SAP AG TADM70 8-7
© SAP AG 2010
R3SETUP / SAPINST load errors (MIGMON was not used)Solve the load problem
Get R3LOAD parameters from file “<PACKAGE>.log”
Log-on as an operating system user owning the “<PACKAGE>.log” files
Change into the install directory
Start your own R3LOAD process(es) while R3SETUP / SAPINST is still running
Do not start too many additional R3LOAD processes
After all R3LOAD processes are finished, restart R3SETUP / SAPINST
Saving Time on Import - After Load Errors
Do not restart R3SETUP / SAPINST while your own R3LOAD processes are running! Do not restart R3SETUP / SAPINST while your own R3LOAD processes are running!
R3SETUP or SAPINST is starting a one-time R3LOAD process for each package. If R3LOAD processes terminate with an error condition, R3SETUP/SAPINST will stop after all R3LOAD processes are finished. The execution of R3SETUP/SAPINST must be repeated until all R3LOAD processes are successful.
If you know that the cause of an R3LOAD error termination is fixed, you can save time by starting R3LOAD beside R3SETUP or SAPINST. Your own R3LOAD process must be started with the same parameter set as was used by R3SETUP or SAPINST before. The parameters can be obtained from the corresponding “<PACKAGE>.LOG” file.
Log-on as the operating system user who owns the “<PACKAGE>.log” files in the installation directory (for example: <sapsid>adm). Change into the install directory.
Only start R3LOAD processes for the *.STR files that have already been processed by the current run of R3SETUP or SAPINST.
Never restart R3SETUP while your own R3LOAD processes are running. This will cause competition between your R3LOAD process and the R3LOAD processes started by R3SETUP to process the same *.STR file. In the case of using SAPINST, the second R3LOAD process will be stopped automatically, as a backup task file already exists.
R3SETUP/SAPINST must be restarted after all data is loaded, to execute the remaining steps of the installation/migration.

© SAP AG TADM70 8-8
© SAP AG 2010
R3LOAD Parameters from Import *.LOG File
# R3load version @(#) $Id: //bas/46D/src/ins/R3load/R3load.c#5 $ SAP# R3load -i SAPSDIC.cmd -p SAPSDIC.log -k BV7S00UQSTQ5
Example: Header of SAPSDIC.LOG (4.x) R3LOAD import protocol file
/sapmnt/XBE/exe/R3load: sccsid @(#) $Id:/bas/620/src/R3ld/R3load/R3ldmain.c#5 $ SAP/sapmnt/XBE/exe/R3load: version R6.20/V1.2
/sapmnt/XBE/exe/R3load -dbcodepage 1100 -i /install/SAPSDIC.cmd -l /install/SAPSDIC.log -stop_on_error -k 1WwgdUM50Tk01eqtd1Yx01A1
Example: Header of SAPSDIC.LOG (6.x) R3LOAD import protocol file
Do not forget to add the restart parameter “-r” to the command line of R3LOAD (4.6D and below only).
If you are starting R3LOAD manually, make sure that your current working directory is the installation directory!
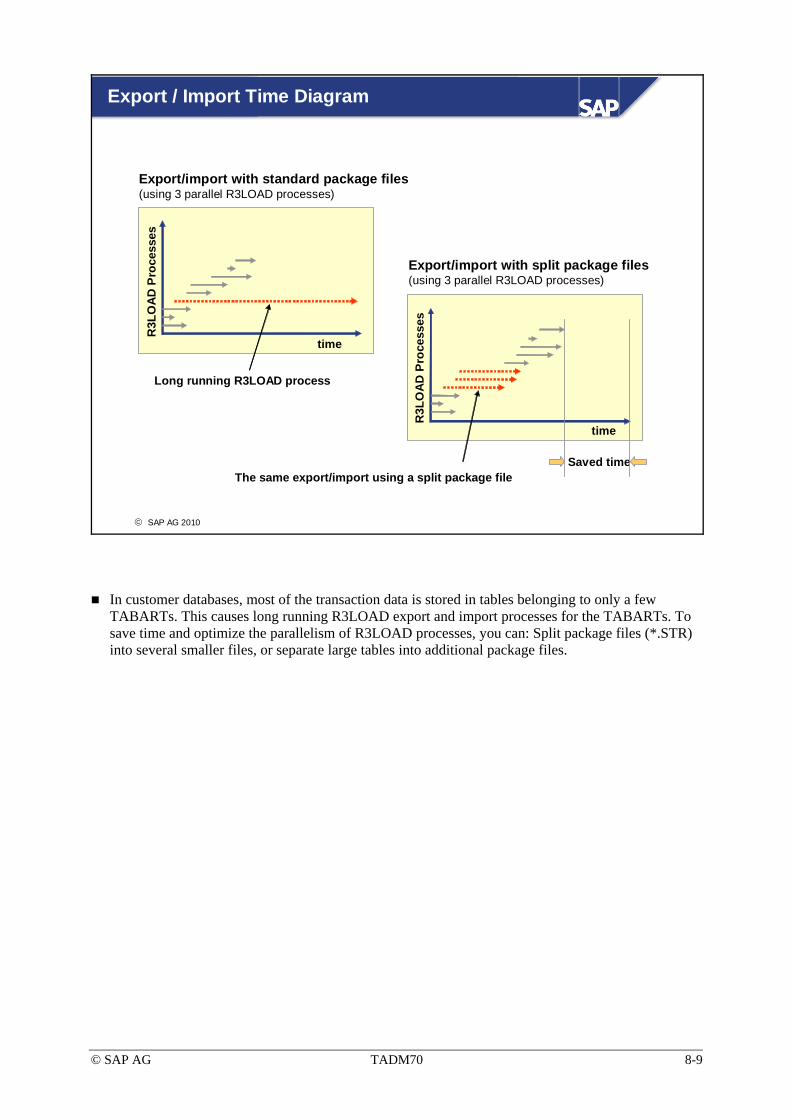
© SAP AG TADM70 8-9
© SAP AG 2010
Export / Import Time Diagram
time
R3L
OAD
Pro
cess
es
Export/import with standard package files(using 3 parallel R3LOAD processes)
Export/import with split package files(using 3 parallel R3LOAD processes)
timeR
3LO
AD P
roce
sses
Saved time
Long running R3LOAD process
The same export/import using a split package file
In customer databases, most of the transaction data is stored in tables belonging to only a few TABARTs. This causes long running R3LOAD export and import processes for the TABARTs. To save time and optimize the parallelism of R3LOAD processes, you can: Split package files (*.STR) into several smaller files, or separate large tables into additional package files.

© SAP AG TADM70 8-10
© SAP AG 2010
Optimizing the Export / Import Process
R3LOAD export / import optimizationSplit existing package files
Create separate package files for large tables
Take special care of large tables export / import order
Export / import very large tables with multiple processes
Adapt database parameters for the best possible performance
Parallelize export / import
Adapt number of parallel running export / import processes
Run export / import from Non-DB servers
R3LOAD socket method
Export and import times are reduced by splitting package files (*.STR) and creating additional package files for large tables.
Always try to export/import large tables first. This ensures the maximum parallelism of R3LOAD processes.
Very large tables should be exported / imported with multiple R3LOAD processes (table splitting).
Optimizing the database parameters speeds up the export or import process and can prevent time-consuming errors because of bottlenecks.
Reduce CPU load on the database server by running R3LOAD on a different system.
In a fast and stable network environment the usage of the R3LOAD socket method can save time.
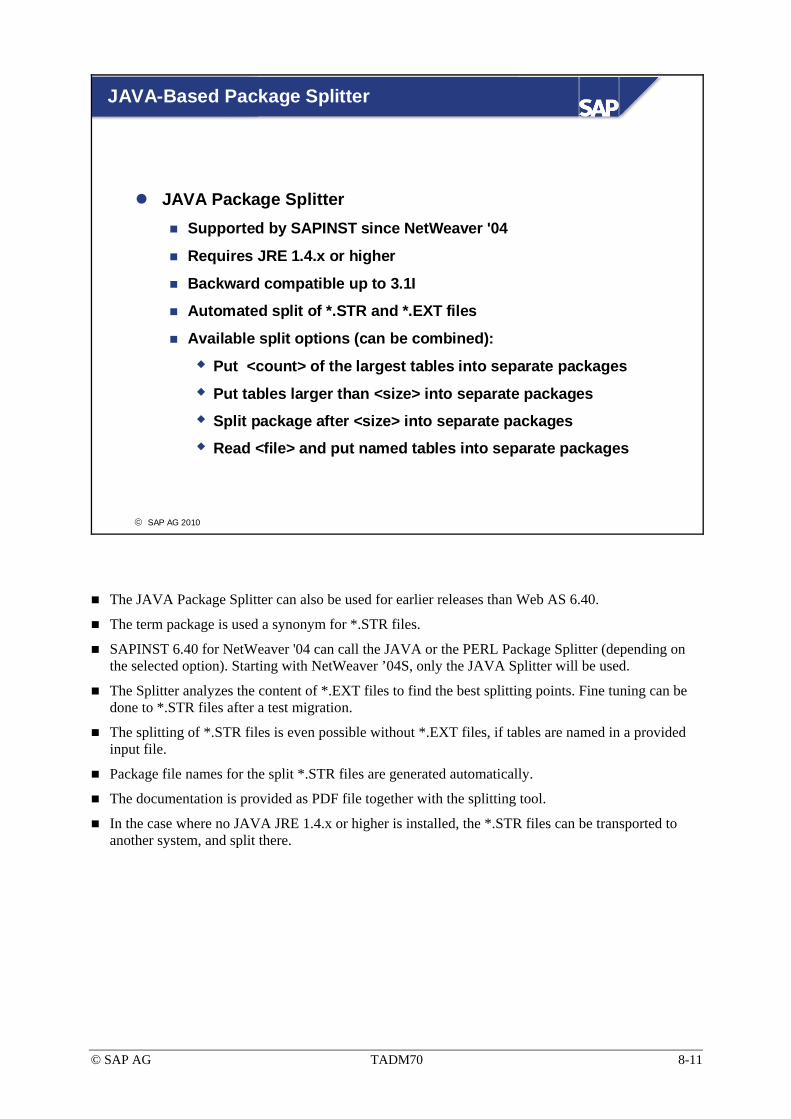
© SAP AG TADM70 8-11
© SAP AG 2010
JAVA-Based Package Splitter
JAVA Package SplitterSupported by SAPINST since NetWeaver '04
Requires JRE 1.4.x or higher
Backward compatible up to 3.1I
Automated split of *.STR and *.EXT files
Available split options (can be combined):
Put <count> of the largest tables into separate packages
Put tables larger than <size> into separate packages
Split package after <size> into separate packages
Read <file> and put named tables into separate packages
The JAVA Package Splitter can also be used for earlier releases than Web AS 6.40.
The term package is used a synonym for *.STR files.
SAPINST 6.40 for NetWeaver '04 can call the JAVA or the PERL Package Splitter (depending on the selected option). Starting with NetWeaver ’04S, only the JAVA Splitter will be used.
The Splitter analyzes the content of *.EXT files to find the best splitting points. Fine tuning can be done to *.STR files after a test migration.
The splitting of *.STR files is even possible without *.EXT files, if tables are named in a provided input file.
Package file names for the split *.STR files are generated automatically.
The documentation is provided as PDF file together with the splitting tool.
In the case where no JAVA JRE 1.4.x or higher is installed, the *.STR files can be transported to another system, and split there.
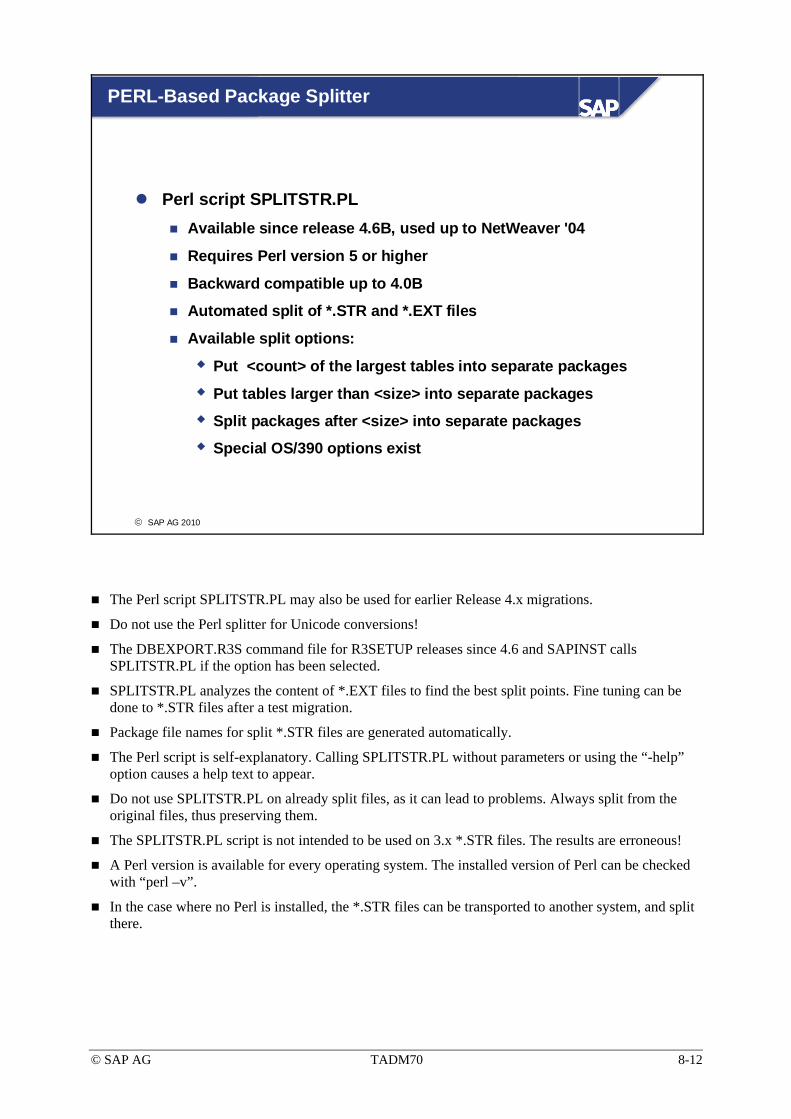
© SAP AG TADM70 8-12
© SAP AG 2010
PERL-Based Package Splitter
Perl script SPLITSTR.PLAvailable since release 4.6B, used up to NetWeaver '04
Requires Perl version 5 or higher
Backward compatible up to 4.0B
Automated split of *.STR and *.EXT files
Available split options:
Put <count> of the largest tables into separate packages
Put tables larger than <size> into separate packages
Split packages after <size> into separate packages
Special OS/390 options exist
The Perl script SPLITSTR.PL may also be used for earlier Release 4.x migrations.
Do not use the Perl splitter for Unicode conversions!
The DBEXPORT.R3S command file for R3SETUP releases since 4.6 and SAPINST calls SPLITSTR.PL if the option has been selected.
SPLITSTR.PL analyzes the content of *.EXT files to find the best split points. Fine tuning can be done to *.STR files after a test migration.
Package file names for split *.STR files are generated automatically.
The Perl script is self-explanatory. Calling SPLITSTR.PL without parameters or using the “-help” option causes a help text to appear.
Do not use SPLITSTR.PL on already split files, as it can lead to problems. Always split from the original files, thus preserving them.
The SPLITSTR.PL script is not intended to be used on 3.x *.STR files. The results are erroneous!
A Perl version is available for every operating system. The installed version of Perl can be checked with “perl –v”.
In the case where no Perl is installed, the *.STR files can be transported to another system, and split there.

© SAP AG TADM70 8-13
© SAP AG 2010
R3LOAD Export/Import Using Sockets
Released since R3LOAD 6.40
Features concurrent export and import
Neither dump nor *.TOC files are written
A stable network connection is a must
Sufficient database resources are required
R3LOAD import processes have to be started first
Fully supported by the Migration Monitor
Socket connections are released for R3LOAD 6.40 and later. (Do not try to use an earlier version, even if R3LOAD provides the socket option).
R3LOAD writes directly to the opened socket and does not need any dump or table of content (*.TOC) file. Error situations will be handled, as with conventional exports and imports. The exporting and importing processes will use their respective task files for restart.
Network interruptions will terminate the export and import process immediately.
Make sure that the export or import process does not fail because of database resource bottlenecks. R3LOAD restarts can make the import more time consuming than expected.
The R3LOAD import process has to be started first, because the export process must connect to an existing socket - otherwise the process fails.
The Migration Monitor does support socket connections in an easy-to-configure way.

© SAP AG TADM70 8-14
© SAP AG 2010
R3LOAD Socket Connections - Technical View
DB DB
Host A Host B
*.CMD, *.EXT, *.LOG, *.STR, *.TPL, *.TSK
*.CMD,*.EXT, *.LOG, *.STR, *.TPL, *.TSK
R3LOAD R3LOAD60004 60004
R3LOAD R3LOAD60003 60003
R3LOAD R3LOAD60002 60002
R3LOAD R3LOAD60001 60001
Network socket
connection
Data flow
R3LOADaccessible
files
Socket port
The same files are used, as in standard R3LOAD scenarios, but no dump or *.TOC files are created. The R3LOAD control files must be accessible as usual, on the source and target system.

© SAP AG TADM70 8-15
© SAP AG 2010
<PACKAGE>.CMD – Socket Connection > 6.40
Socket port number and name or IP address of the importing host
Example: SAPAPPL1.CMD (6.40)
tsk: /install/SAPAPPL1.TSK icf: /migration/DATA/SAPAPPL1.STRdcf: /migration/DB/DDLORA.TPLdat: 12345@hostimp
tsk: /install/SAPAPPL1.TSK icf: /migration/DATA/SAPAPPL1.STRdcf: /migration/DB/DDLORA.TPLdat: 12345@hostimp
tsk: /install/SAPAPPL1.TSK icf: /migration/DATA/SAPAPPL1.STRdcf: /install/DDLORA.TPLdat: 12345@hostimpext: /migration/DB/ORA/SAPAPPL1.EXT
tsk: /install/SAPAPPL1.TSK icf: /migration/DATA/SAPAPPL1.STRdcf: /install/DDLORA.TPLdat: 12345@hostimpext: /migration/DB/ORA/SAPAPPL1.EXT
Source system
Target system
Socket port number and name or IP address of the importing host (localhost)
Each parallel running process pair needs it’s own port number!
Each parallel running process pair needs it’s own port number!
R3LOAD must be started with the “-socket” command line option.
The importing process must be invoked before the export process can be started.
The socket port can be any free number between 1024 and 65535 on the import host.
Meaning of section names:
• tsk: Task file
• icf: Independent control file
• dcf: Database dependent control file
• dat: Socket port number and name or IP address of the import host
• ext: Extent file (not required at export time)
The “dir” section is not required because no <PACKAGE>.TOC file will be created
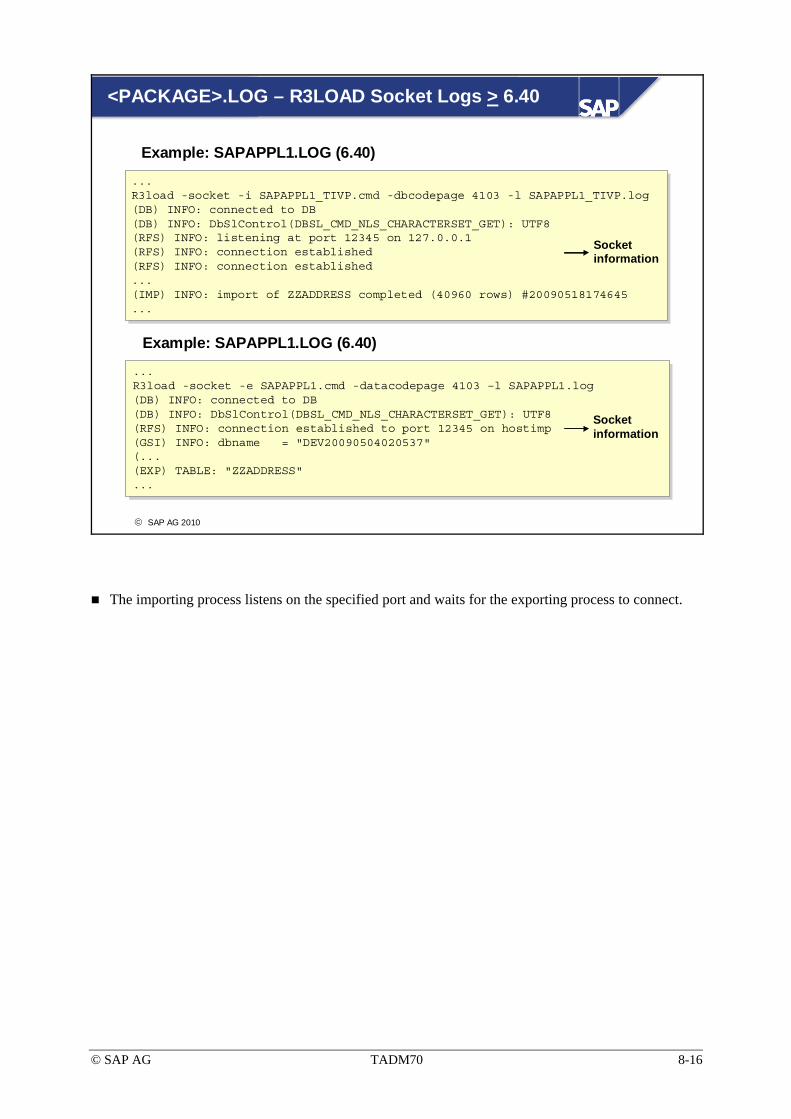
© SAP AG TADM70 8-16
© SAP AG 2010
<PACKAGE>.LOG – R3LOAD Socket Logs > 6.40
...R3load -socket -i SAPAPPL1_TIVP.cmd -dbcodepage 4103 -l SAPAPPL1_TIVP.log (DB) INFO: connected to DB(DB) INFO: DbSlControl(DBSL_CMD_NLS_CHARACTERSET_GET): UTF8(RFS) INFO: listening at port 12345 on 127.0.0.1(RFS) INFO: connection established(RFS) INFO: connection established...(IMP) INFO: import of ZZADDRESS completed (40960 rows) #20090518174645...
...R3load -socket -i SAPAPPL1_TIVP.cmd -dbcodepage 4103 -l SAPAPPL1_TIVP.log (DB) INFO: connected to DB(DB) INFO: DbSlControl(DBSL_CMD_NLS_CHARACTERSET_GET): UTF8(RFS) INFO: listening at port 12345 on 127.0.0.1(RFS) INFO: connection established(RFS) INFO: connection established...(IMP) INFO: import of ZZADDRESS completed (40960 rows) #20090518174645...
Example: SAPAPPL1.LOG (6.40)
Socket information
...R3load -socket -e SAPAPPL1.cmd -datacodepage 4103 –l SAPAPPL1.log (DB) INFO: connected to DB(DB) INFO: DbSlControl(DBSL_CMD_NLS_CHARACTERSET_GET): UTF8(RFS) INFO: connection established to port 12345 on hostimp(GSI) INFO: dbname = "DEV20090504020537"(...(EXP) TABLE: "ZZADDRESS"...
...R3load -socket -e SAPAPPL1.cmd -datacodepage 4103 –l SAPAPPL1.log (DB) INFO: connected to DB(DB) INFO: DbSlControl(DBSL_CMD_NLS_CHARACTERSET_GET): UTF8(RFS) INFO: connection established to port 12345 on hostimp(GSI) INFO: dbname = "DEV20090504020537"(...(EXP) TABLE: "ZZADDRESS"...
Example: SAPAPPL1.LOG (6.40)
Socket information
The importing process listens on the specified port and waits for the exporting process to connect.

© SAP AG TADM70 8-17
© SAP AG 2010
Migration / Table Checker (MIGCHECK) - Features
Migration CheckerChecks the existence of import log files for each package file
Verifies the task file content
Can handle database and table specific exceptions
Used by SAPINST (> NetWeaver ’04S)
Table CheckerVerifies the number of table rows
Long running task!
The JAVA-based “Migration Checker” was developed to check that there is a log file for each package file (option: -checkPackages). This is an indicator that R3LOAD did run for them. The second check is to verify that each action in the task file is completed successfully (option: -checkObjects). Unsuccessful tasks are listed in an output file. The two features are used by SAPINST for NetWeaver ’04S and later, to check the import completeness. Database and table depending exceptions are handled automatically.
The “Table Checker” feature is used to check the number of table rows. It can be used to make sure, that tables are containing the right number of rows after import. As this is a long running task, it can be started manually only.

© SAP AG TADM70 8-18
© SAP AG 2010
Migration Monitor (MIGMON) - Features (1)
Export server mode (default)Creates R3LOAD export command files
Calls R3LOAD to generate export task files, if required
Number of R3LOAD export processes can be changed on the fly
Easy adaption of package export order and DDL*.TPL usage
Transfers packages from source to target system, if required
Signals the import server that a package is ready to import
Informs the person performing the system copy, in case of errors
SAP Note 784118
MIGMON can be used together with R3SETUP up to R/3 3.1I and older SAPINST versions before NetWeaver '04 SR1!
Requires a released JAVA version on the source and target system.
MIGMON can be used together with R3SETUP up to R/3 3.1I and older SAPINST versions before NetWeaver '04 SR1!
Requires a released JAVA version on the source and target system.
SAP Note: 784118 “System Copy JAVA Tools”. The note also describes how to download the software from SAP Marketplace.
The export server mode applies where R3SETUP/SAPINST will be replaced for the export.
Even if MIGMON is not used for the import, the advanced control features of the export processes can help to save time.
Already existing *.TSK or *.CMD files will not be overwritten, but used.

© SAP AG TADM70 8-19
© SAP AG 2010
Migration Monitor (MIGMON) - Features (2)
Export client modeStarts beside R3SETUP/SAPINSTWatches R3LOAD export processing stateTransfers packages from the source to target system, if requiredSignals the import server that a package is ready to be importedInforms the person performing the system copy, in case of errors
Import server modeCreates R3LOAD import command filesCalls R3LOAD to generate import task files, if requiredStarts an R3LOAD processes as soon as a package is available
Number of R3LOAD import processes can be changed on the fly
Easy adaption of package import order and DDL*.TPL usageInforms the person performing the system copy, in case of errors
The export client mode applies, where R3SETUP/SAPINST performs the database export, and MIGMON is used for the import. The client MIGMON is used to transfer the files to the target host and to signal the importing MIGMON, that a package is ready to load.
Even if MIGMON was not used to perform the export, the import can still benefit from the advanced MIGMON R3LOAD control features.
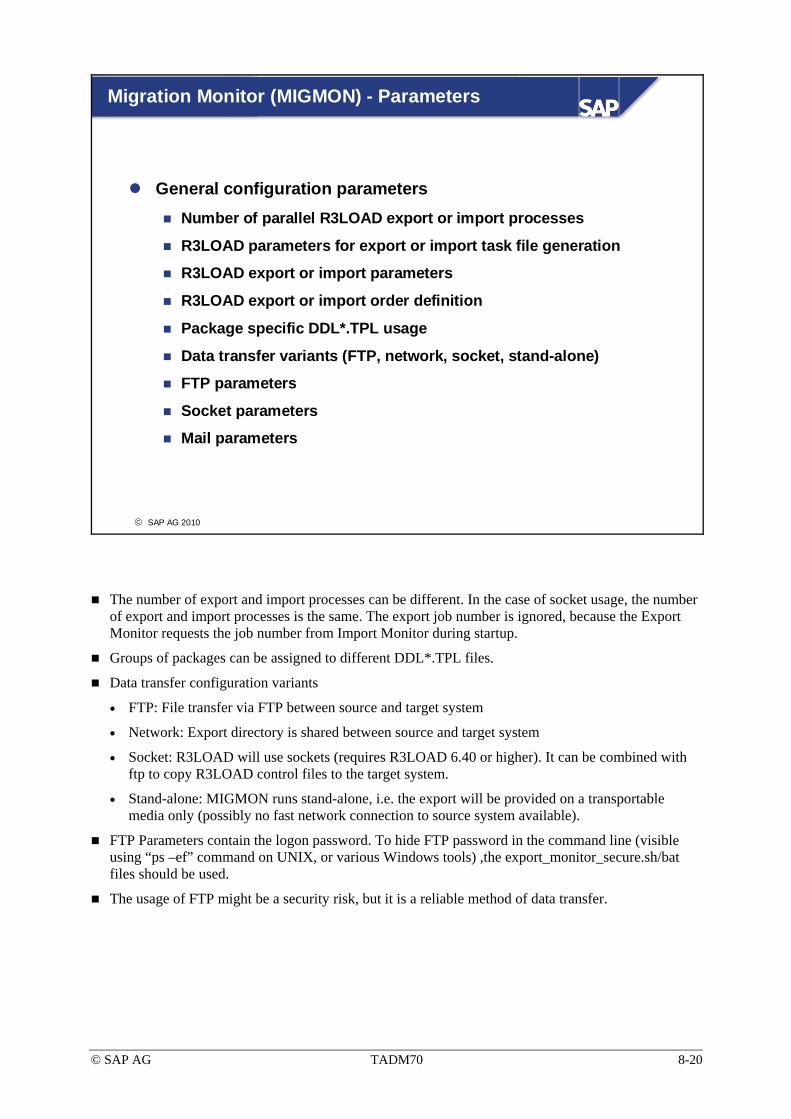
© SAP AG TADM70 8-20
© SAP AG 2010
Migration Monitor (MIGMON) - Parameters
General configuration parametersNumber of parallel R3LOAD export or import processes
R3LOAD parameters for export or import task file generation
R3LOAD export or import parameters
R3LOAD export or import order definition
Package specific DDL*.TPL usage
Data transfer variants (FTP, network, socket, stand-alone)
FTP parameters
Socket parameters
Mail parameters
The number of export and import processes can be different. In the case of socket usage, the number of export and import processes is the same. The export job number is ignored, because the Export Monitor requests the job number from Import Monitor during startup.
Groups of packages can be assigned to different DDL*.TPL files.
Data transfer configuration variants
• FTP: File transfer via FTP between source and target system
• Network: Export directory is shared between source and target system
• Socket: R3LOAD will use sockets (requires R3LOAD 6.40 or higher). It can be combined with ftp to copy R3LOAD control files to the target system.
• Stand-alone: MIGMON runs stand-alone, i.e. the export will be provided on a transportable media only (possibly no fast network connection to source system available).
FTP Parameters contain the logon password. To hide FTP password in the command line (visible using “ps –ef” command on UNIX, or various Windows tools) ,the export_monitor_secure.sh/bat files should be used.
The usage of FTP might be a security risk, but it is a reliable method of data transfer.
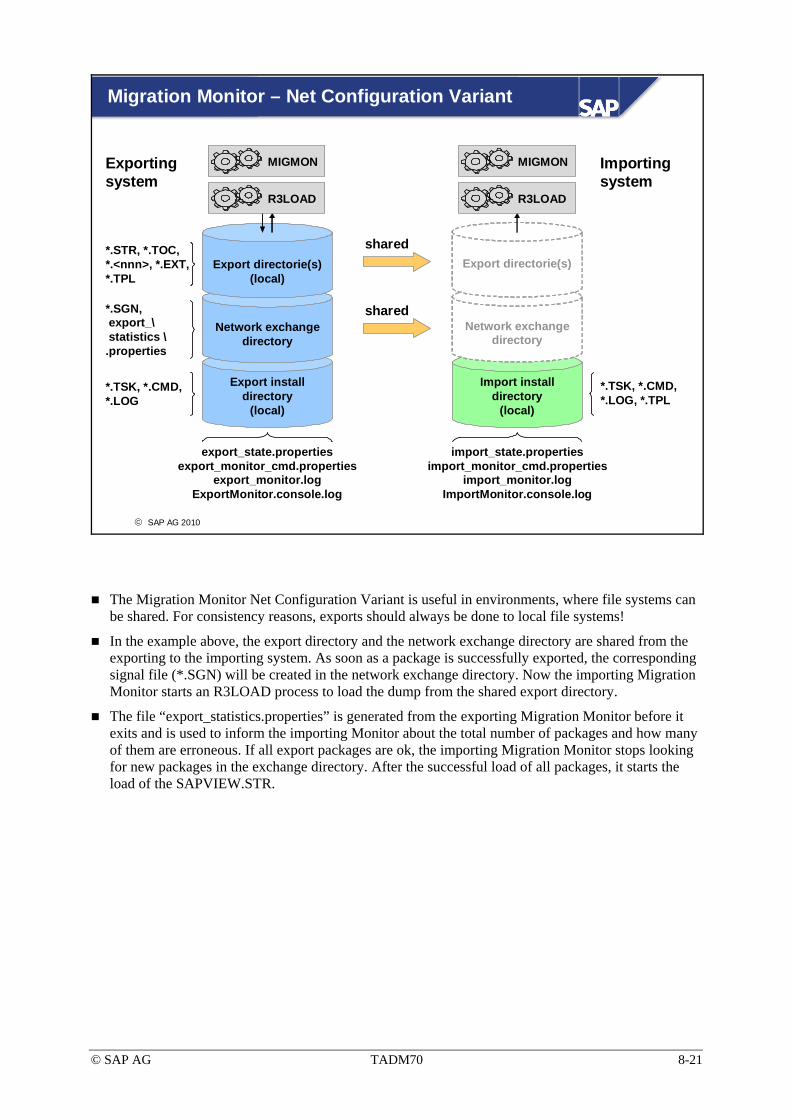
© SAP AG TADM70 8-21
© SAP AG 2010
Migration Monitor – Net Configuration Variant
Export install directory
(local)
Network exchange directory
Export directorie(s) (local)
Import install directory
(local)
*.SGN, export_\statistics \.properties
export_state.propertiesexport_monitor_cmd.properties
export_monitor.logExportMonitor.console.log
import_state.propertiesimport_monitor_cmd.properties
import_monitor.logImportMonitor.console.log
*.TSK, *.CMD, *.LOG, *.TPL
shared
shared
Network exchange directory
Export directorie(s)*.STR, *.TOC, *.<nnn>, *.EXT, *.TPL
*.TSK, *.CMD, *.LOG
MIGMON
R3LOAD
MIGMON
R3LOAD
Exportingsystem
Importingsystem
The Migration Monitor Net Configuration Variant is useful in environments, where file systems can be shared. For consistency reasons, exports should always be done to local file systems!
In the example above, the export directory and the network exchange directory are shared from the exporting to the importing system. As soon as a package is successfully exported, the corresponding signal file (*.SGN) will be created in the network exchange directory. Now the importing Migration Monitor starts an R3LOAD process to load the dump from the shared export directory.
The file “export_statistics.properties” is generated from the exporting Migration Monitor before it exits and is used to inform the importing Monitor about the total number of packages and how many of them are erroneous. If all export packages are ok, the importing Migration Monitor stops looking for new packages in the exchange directory. After the successful load of all packages, it starts the load of the SAPVIEW.STR.
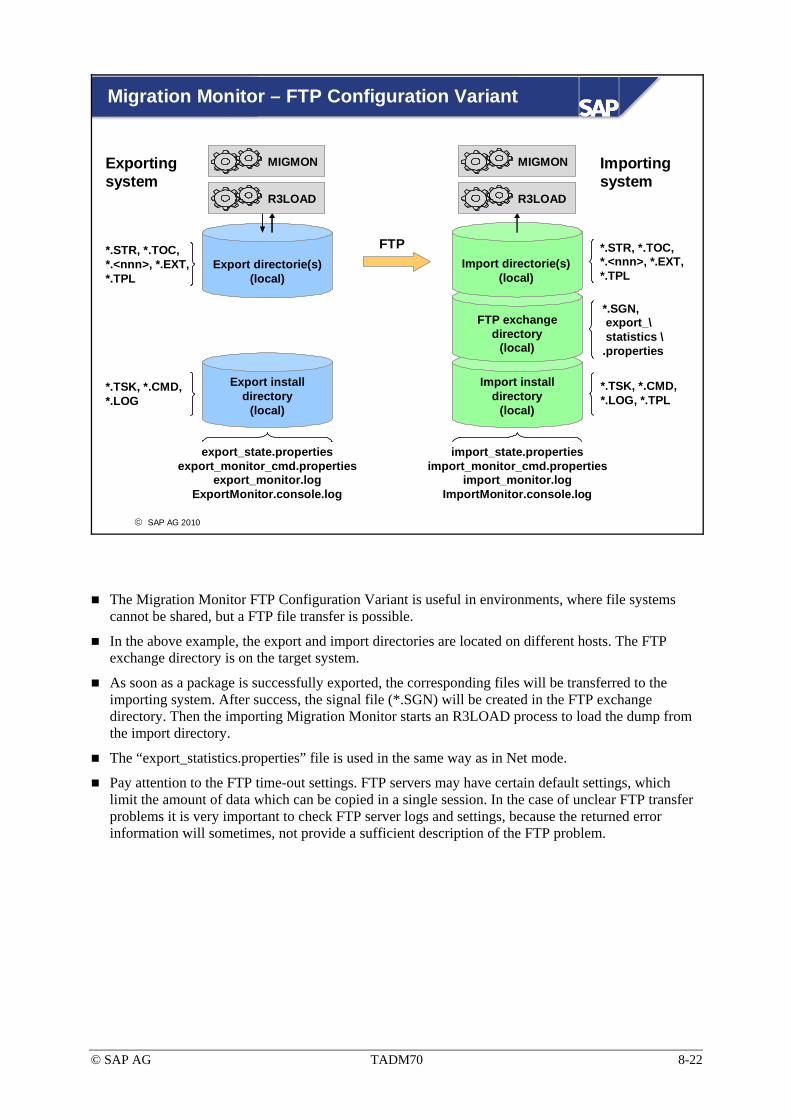
© SAP AG TADM70 8-22
© SAP AG 2010
Migration Monitor – FTP Configuration Variant
Export install directory
(local)
Export directorie(s) (local)
Import install directory
(local)
*.STR, *.TOC, *.<nnn>, *.EXT, *.TPL
*.SGN, export_\statistics \.properties
*.TSK, *.CMD, *.LOG
export_state.propertiesexport_monitor_cmd.properties
export_monitor.logExportMonitor.console.log
import_state.propertiesimport_monitor_cmd.properties
import_monitor.logImportMonitor.console.log
*.TSK, *.CMD, *.LOG, *.TPL
FTP exchange directory
(local)
Import directorie(s)(local)
*.STR, *.TOC, *.<nnn>, *.EXT, *.TPL
FTP
Exportingsystem
Importingsystem
MIGMON MIGMON
R3LOADR3LOAD
The Migration Monitor FTP Configuration Variant is useful in environments, where file systems cannot be shared, but a FTP file transfer is possible.
In the above example, the export and import directories are located on different hosts. The FTP exchange directory is on the target system.
As soon as a package is successfully exported, the corresponding files will be transferred to the importing system. After success, the signal file (*.SGN) will be created in the FTP exchange directory. Then the importing Migration Monitor starts an R3LOAD process to load the dump from the import directory.
The “export_statistics.properties” file is used in the same way as in Net mode.
Pay attention to the FTP time-out settings. FTP servers may have certain default settings, which limit the amount of data which can be copied in a single session. In the case of unclear FTP transfer problems it is very important to check FTP server logs and settings, because the returned error information will sometimes, not provide a sufficient description of the FTP problem.

© SAP AG TADM70 8-23
© SAP AG 2010
Migration Monitor – Socket Configuration Variant
Export install directory
(local)
Export directorie(s) (local)
Import install directory
(local)
export_state.propertiesexport_monitor_cmd.properties
export_monitor.logExportMonitor.console.log
import_state.propertiesimport_monitor_cmd.properties
import_monitor.logImportMonitor.console.log
*.TSK, *.CMD, *.LOG, *.TPL
Import directorie(s)(local)
*.STR, *.EXT, *.TPL
No dump or
*.TOC files!
R3LOAD R3LOAD
Data flow
Shared or FTPof R3LOAD control files
*.STR,*.EXT, *.TPL
*.TSK, *.CMD, *.LOG
No dump or
*.TOC files!
Exportingsystem
Importingsystem
MIGMON MIGMONSocket
communication
60000 60000
60001 60001
The Migration Monitor socket method is in theory, the fastest method ever in export and import of data in that we have to have a stable network and we have to make sure that the exporting and importing databases always have enough resources to serve the R3LOAD processes.
A network share, a manual file copy, or the Migration Monitor FTP file transfer (option –ftpCopy) can be used to copy the R3LOAD control files to the target system.
The importing Migration Monitor must be started first. The exporting Migration Monitor connects to the importing Monitor, using the provided socket port. The socket port numbers are incremented one-by-one, for each R3LOAD process started. The communication between the export and import Monitor ensures, that the right port numbers will be written into the corresponding *.CMD files. No port number is used twice. Unusable port numbers are skipped (may be in use by others).
If a firewall is between the source and target system, make sure that a whole port range (base port + number of R3LOAD packages + safety) is released for the duration of the migration.
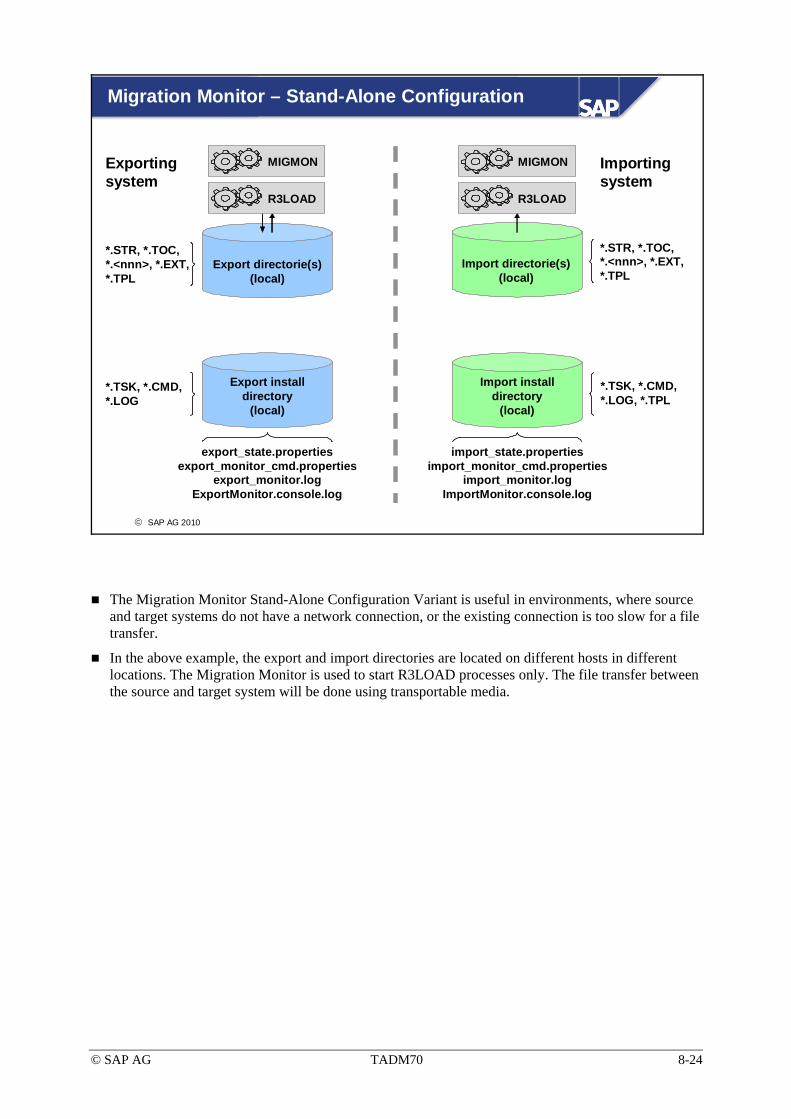
© SAP AG TADM70 8-24
© SAP AG 2010
Migration Monitor – Stand-Alone Configuration
Export install directory
(local)
Export directorie(s) (local)
Import install directory
(local)
*.STR, *.TOC, *.<nnn>, *.EXT, *.TPL
*.TSK, *.CMD, *.LOG
export_state.propertiesexport_monitor_cmd.properties
export_monitor.logExportMonitor.console.log
import_state.propertiesimport_monitor_cmd.properties
import_monitor.logImportMonitor.console.log
*.TSK, *.CMD, *.LOG, *.TPL
Import directorie(s)(local)
*.STR, *.TOC, *.<nnn>, *.EXT, *.TPL
Exportingsystem
Importingsystem
MIGMON MIGMON
R3LOADR3LOAD
The Migration Monitor Stand-Alone Configuration Variant is useful in environments, where source and target systems do not have a network connection, or the existing connection is too slow for a file transfer.
In the above example, the export and import directories are located on different hosts in different locations. The Migration Monitor is used to start R3LOAD processes only. The file transfer between the source and target system will be done using transportable media.

© SAP AG TADM70 8-25
© SAP AG 2010
Migration Monitor – Control Files
export_monitor_cmd.propertiesimport_monitor_cmd.properties
Export/import parameter files.
export_state.propertiesimport_state.properties
Package export/import status
export_monitor.logimport_monitor.log
Export/import log files (various trace levels can be set)
ExportMonitor.console.logImportMonitor.console.log
Export/import console output log
State Description0 Package export/import not yet started? Package export/import in progress- Package export/import finished with errors+ [0] Package export/import finished successfully [; package transfer not yet started][+ ?] [Package export finished successfully; package transfer in progress][+ - ] [Package export finished successfully; package transfer finished with errors][+ +] [Package export finished successfully; package transfer finished successfully]
export/import_state.properties (<package>=<state>)
Note: Values in square brackets apply to exports with file transfer only
Change to reprocess package
The export/import state or the file transfer state can be changed from minus (“-“) to zero (“0”) for restarting R3LOAD or a file transfer.
Sockets only: MIGMON for NetWeaver '04 cannot restart the R3LOAD process by changing the state only (future versions will support this).
In case of a file transfer restart, all dump files of a package are copied again.
Example: import_state.properties
• SAPAPPL1=0 not started yet
• COEP=? Running
• SWW_CONT-1=+ finished (part 1 of splitted table)
• SWW_CONT-2=+ finished (part 2 of splitted table)
• SWW_CONT-3=- error (part 3 of splitted table)
• SWW_CONT-4=0 not started yet (part 4 of splitted table)
• SWW_CONT-5=0 not started yet (part 5 of splitted table)
• SWW_CONT-post=0 not started yet (secondary index creation, post-processing)
• SWW_CONT-pre=+ finished (table and primary key creation, pre-processing)
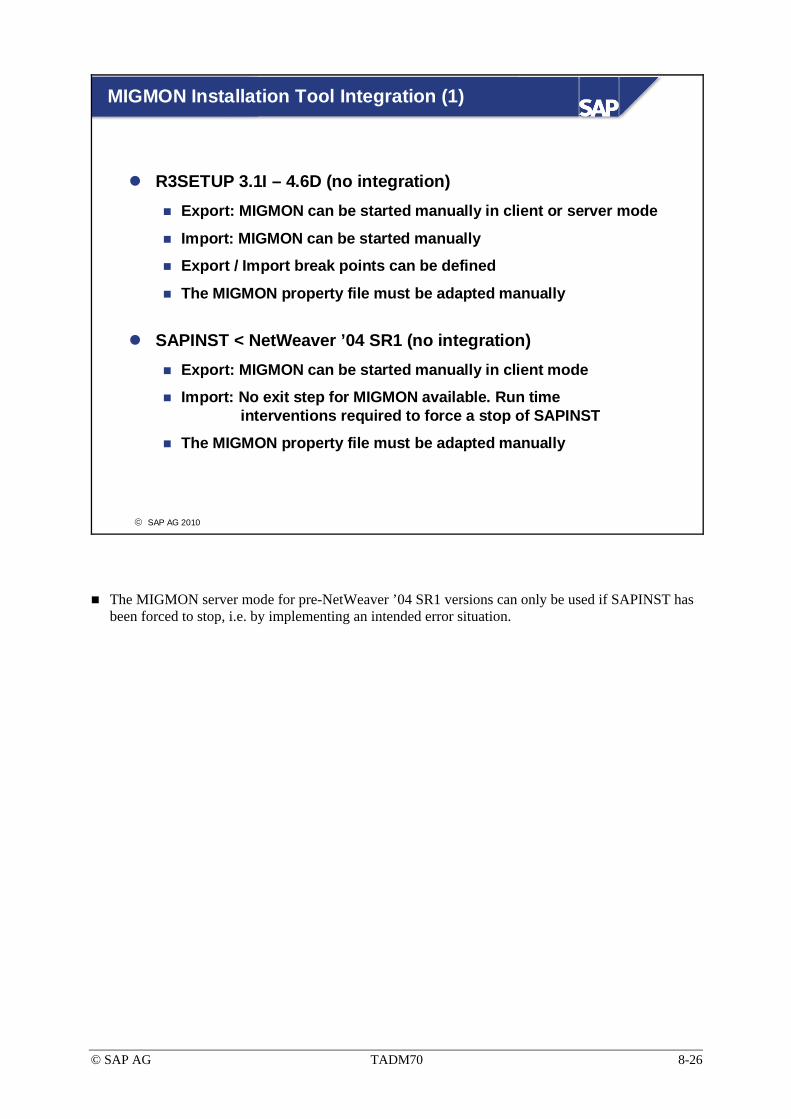
© SAP AG TADM70 8-26
© SAP AG 2010
MIGMON Installation Tool Integration (1)
R3SETUP 3.1I – 4.6D (no integration)Export: MIGMON can be started manually in client or server mode
Import: MIGMON can be started manually
Export / Import break points can be defined
The MIGMON property file must be adapted manually
SAPINST < NetWeaver ’04 SR1 (no integration)Export: MIGMON can be started manually in client mode
Import: No exit step for MIGMON available. Run timeinterventions required to force a stop of SAPINST
The MIGMON property file must be adapted manually
The MIGMON server mode for pre-NetWeaver ’04 SR1 versions can only be used if SAPINST has been forced to stop, i.e. by implementing an intended error situation.
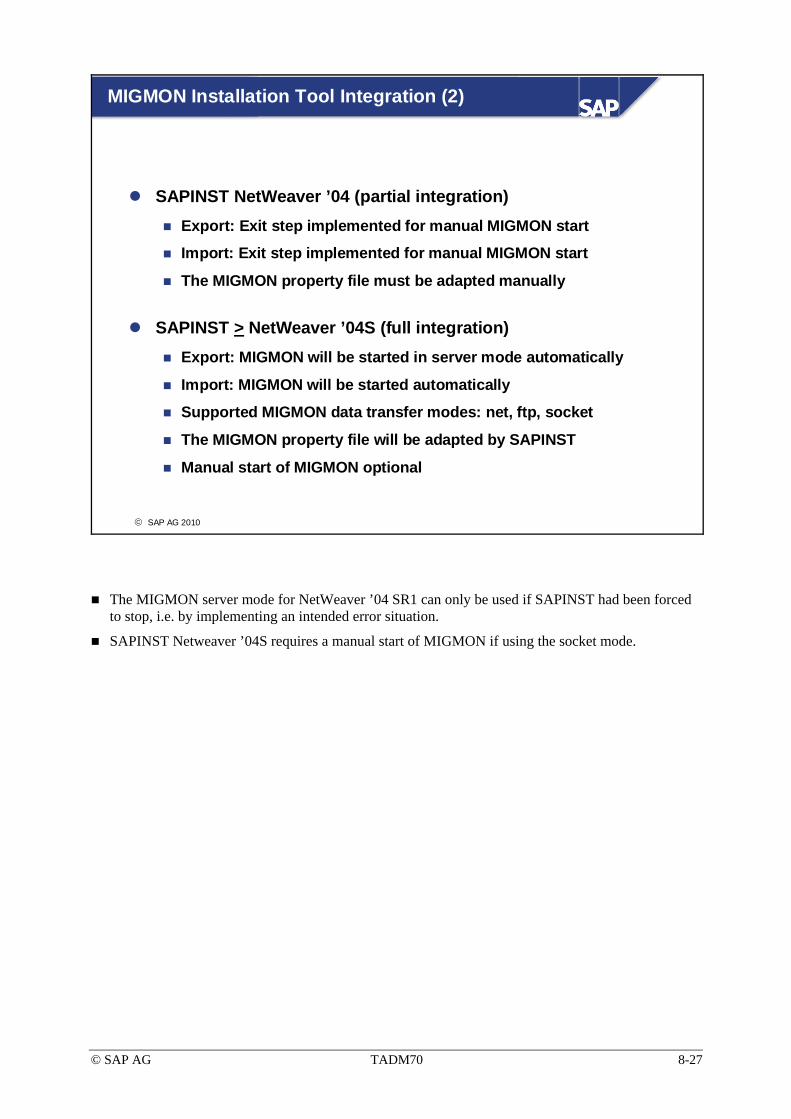
© SAP AG TADM70 8-27
© SAP AG 2010
MIGMON Installation Tool Integration (2)
SAPINST NetWeaver ’04 (partial integration)Export: Exit step implemented for manual MIGMON start
Import: Exit step implemented for manual MIGMON start
The MIGMON property file must be adapted manually
SAPINST > NetWeaver ’04S (full integration)Export: MIGMON will be started in server mode automatically
Import: MIGMON will be started automatically
Supported MIGMON data transfer modes: net, ftp, socket
The MIGMON property file will be adapted by SAPINST
Manual start of MIGMON optional
The MIGMON server mode for NetWeaver ’04 SR1 can only be used if SAPINST had been forced to stop, i.e. by implementing an intended error situation.
SAPINST Netweaver ’04S requires a manual start of MIGMON if using the socket mode.

© SAP AG TADM70 8-28
© SAP AG 2010
Time Analyzer (MIGTIME / JMIGTIME) - Features
Calculates the export/import runtime per package
Output files: plain list, HTML, and XML
Export and import statistics are generated separately
Provides separate lists for data load and index creation (since 6.40)
Joins export and import information
Available for R3LOAD in all releases, available for JLOAD (since 7.02)
SAP Note 784118
SAP Note: 784118 “System Copy JAVA Tools”. The note also describes how to download the software from the SAP Marketplace.
Over time, the content of R3LOAD *.LOG and *.TOC files has been improved by adding more and more information. The Time Analyzer can handle all existing formats.
R3LOAD 6.40 writes separate time stamps for data load and index creation (earlier versions did not!).
MIGTIME obtains the export import time information from *.TOC and *.LOG files. JMIGTIME retrieves the time information from the JLOAD <PACKAGE>.STAT.XML files.

© SAP AG TADM70 8-29
© SAP AG 2010
Time Analyzer – Output Based on Export Files (1)
----------------------------------------------------------------------package time start date end date size MB MB/min----------------------------------------------------------------------SAPREPOS 1:38:29 2009-05-27 22:37 2003-05-28 00:15 457.48 4.65SAPREPOL 0:50:03 2009-05-27 22:36 2009-05-27 23:27 445.98 8.91SAPREPOT 0:49:05 2009-05-27 22:37 2009-05-27 23:26 110.55 2.25SAPSSEXC 0:14:25 2009-05-27 23:35 2009-05-27 23:49 66.13 4.59SAPAPPL0 0:07:26 2009-05-27 22:23 2009-05-27 22:30 35.85 4.82SAPAPPL2 0:05:02 2009-05-27 22:24 2009-05-27 22:29 31.68 6.29...----------------------------------------------------------------------
4:33:45 2009-05-27 22:23 2009-05-28 00:15 1634.01---------------------------------------------------------------------------------------------------table package time-----------------------------REPOSRC SAPREPOS 1:38:27REPOLOAD SAPREPOL 0:50:02REPOTEXT SAPREPOT 0:49:03DYNPSOURCE SAPSSEXC 0:10:56DOKCLU SAPDOKCL 0:03:31-----------------------------
3:31:59-----------------------------
Packages export runtime with 5 of the longest running tables
The list output shows the start/end date and the export duration of each package, and additionally provides run-time information, as seen above in the longest running tables.
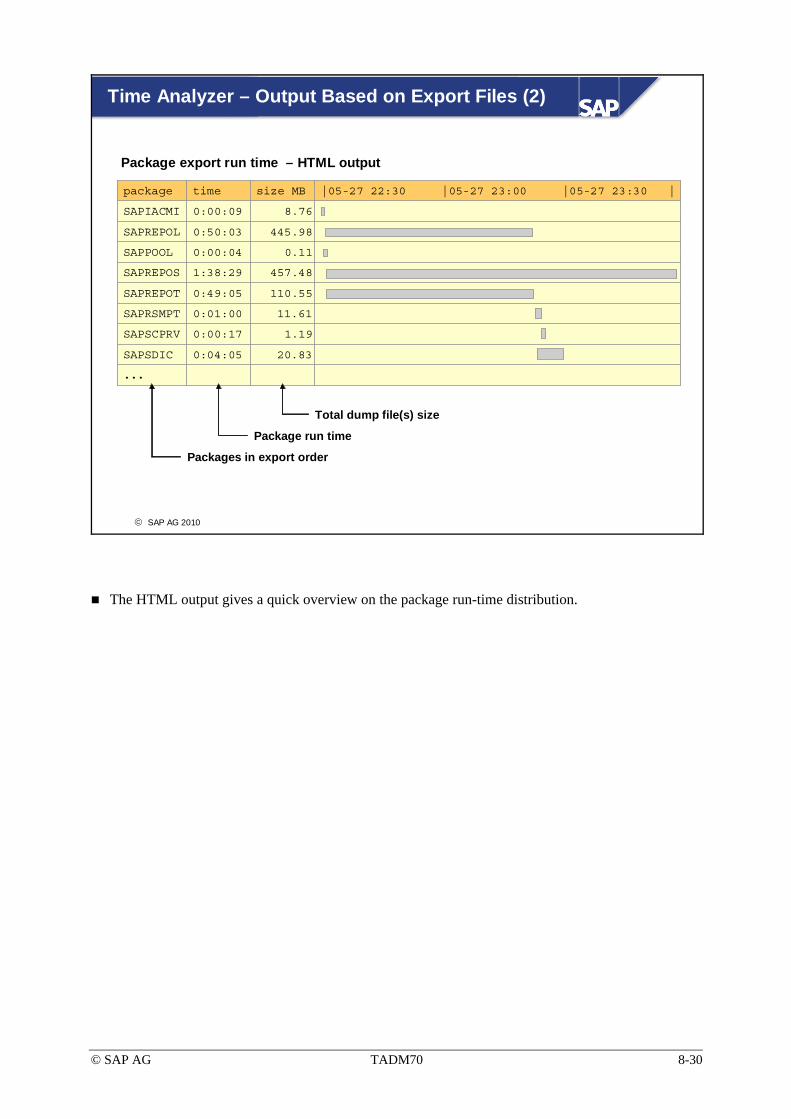
© SAP AG TADM70 8-30
© SAP AG 2010
Time Analyzer – Output Based on Export Files (2)
package time size MB |05-27 22:30 |05-27 23:00 |05-27 23:30 |
SAPIACMI 0:00:09 8.76
SAPREPOL 0:50:03 445.98
SAPPOOL 0:00:04 0.11
SAPREPOS 1:38:29 457.48
SAPREPOT 0:49:05 110.55
SAPRSMPT 0:01:00 11.61
SAPSCPRV 0:00:17 1.19
SAPSDIC 0:04:05 20.83
...
Package export run time – HTML output
Total dump file(s) size
Package run time
Packages in export order
The HTML output gives a quick overview on the package run-time distribution.

© SAP AG TADM70 8-31
© SAP AG 2010
Time Analyzer – Output Based on Import Files (1)
----------------------------------------------------------------------package time start date end date size MB MB/min----------------------------------------------------------------------SAPREPOS 0:25:49 2009-05-28 00:46 2009-05-28 01:12 457.48 17.72SAPAPPL0 0:23:02 2009-05-28 00:19 2009-05-28 00:42 35.85 1.56SAPREPOL 0:17:23 2009-05-28 00:47 2009-05-28 01:05 445.98 25.66SAPAPPL2 0:15:22 2009-05-28 00:21 2009-05-28 00:36 31.68 2.06SAPAPPL1 0:10:04 2009-05-28 00:20 2009-05-28 00:30 24.79 2.46SAPD010T 0:08:57 2009-05-28 00:37 2009-05-28 00:46 15.14 1.69...----------------------------------------------------------------------
3:10:36 2009-05-28 00:00 2009-05-28 01:13 1634.01-------------------------------------------------------------------------------------------------------------------table package time data index---------------------------------------------REPOSRC SAPREPOS 0:25:47 0:20:21 0:05:26REPOLOAD SAPREPOL 0:17:19 0:14:10 0:03:09---------------------------------------------
0:43:06 0:34:31 0:08:35---------------------------------------------
Packages import runtime with 2 of the longest running tables
The list output shows the start/end date and the import duration of each package. If the used R3LOAD version (i.e. 6.40) provides time stamps for each table import and primary key/index creation, the output list can then distinguish between data load and index creation time.
The list of long running tables can be generated for pre-6.40 R3load releases too, but it does not contain data and index columns, only a time column. The log file contains time information for data load ends, therefore the time for tables in the old R3load releases is not 100% correct: table time = table load time + index/pkey creation time for the previous table (if index/pkey is created after data load). From R3LOAD 6.40, table time is correctly determined, because create table/index times are present in the log files.

© SAP AG TADM70 8-32
© SAP AG 2010
Time Analyzer – Output Based on Import Files (2)
package time size MB |05-28 0:20 |05-28 0:40 |05-28 1:00
...
SAPRSMPT 0:01:54 11.61
SAPREPOS 0:25:49 457.48
SAPREPOT 0:07:06 110.55
SAPREPOL 0:17:23 445.98
SAPPOOL 0:00:30 0.11
SAPIWB0C 0:00:35 19.42
SAPIACMI 0:00:22 8.76
...
Package import run time – HTML output
Total dump file(s) size
Package run time
Packages in export order

© SAP AG TADM70 8-33
© SAP AG 2010
Time Analyzer – Time Join
package time size MB |05-28 0:20 |05-28 0:40 |05-28 1:00
...
SAPAPPL0_9 E 0:01:52 27.53
I 0:11:08
SAPAPPL0_3 E 0:02:26 33.54
I 0:04:51
STXL E 0:02:09 363.09
I 0:14:04
SWFREVTLOG E 0:41:36 1227.25
I 0:33:48
...
Joined package export & import run time – HTML output
Total dump file(s) size
Package run time
Packages in export order
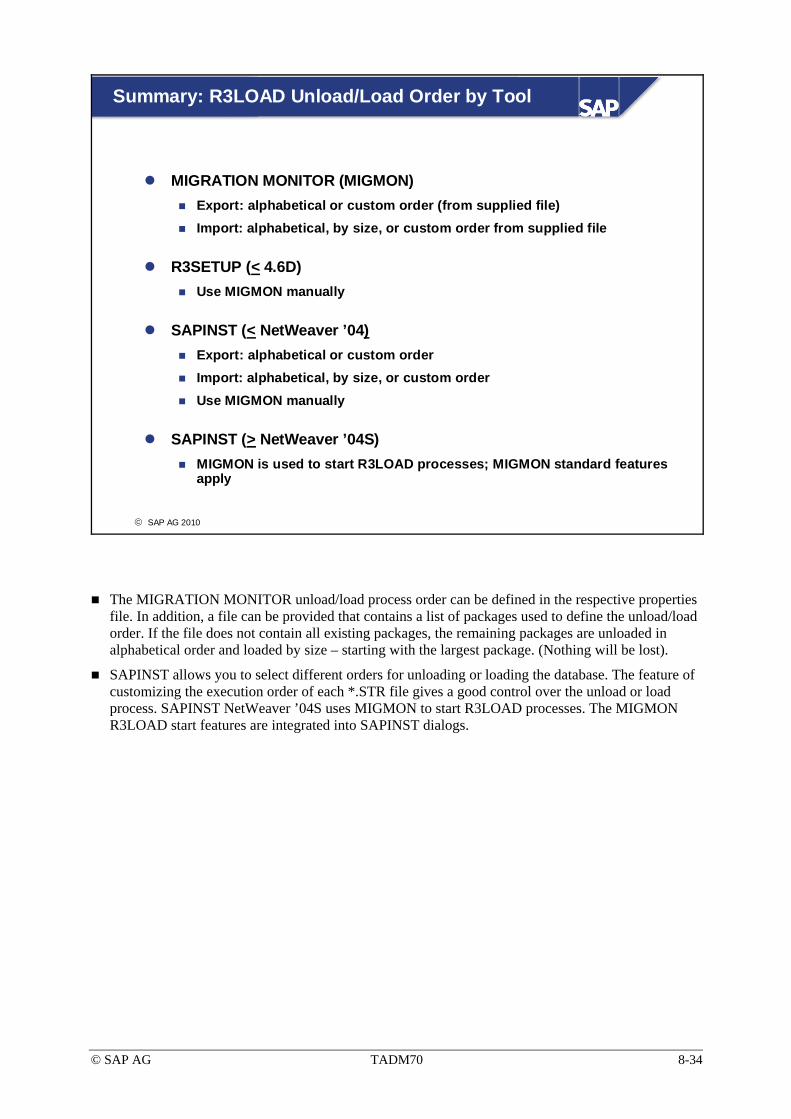
© SAP AG TADM70 8-34
© SAP AG 2010
Summary: R3LOAD Unload/Load Order by Tool
MIGRATION MONITOR (MIGMON)Export: alphabetical or custom order (from supplied file)Import: alphabetical, by size, or custom order from supplied file
R3SETUP (< 4.6D)Use MIGMON manually
SAPINST (< NetWeaver ’04)Export: alphabetical or custom orderImport: alphabetical, by size, or custom orderUse MIGMON manually
SAPINST (> NetWeaver ’04S)MIGMON is used to start R3LOAD processes; MIGMON standard features apply
The MIGRATION MONITOR unload/load process order can be defined in the respective properties file. In addition, a file can be provided that contains a list of packages used to define the unload/load order. If the file does not contain all existing packages, the remaining packages are unloaded in alphabetical order and loaded by size – starting with the largest package. (Nothing will be lost).
SAPINST allows you to select different orders for unloading or loading the database. The feature of customizing the execution order of each *.STR file gives a good control over the unload or load process. SAPINST NetWeaver ’04S uses MIGMON to start R3LOAD processes. The MIGMON R3LOAD start features are integrated into SAPINST dialogs.

© SAP AG TADM70 8-35
© SAP AG 2010
SAPINST: Complete / Modify Package Table (6.40)
/mig/DB/DDLORA.TPL
/mig6.65846e+08SAPAPPL1.STRT12_T120
/mig/DB/DDLORA.TPL
/mig6.65846e+08SAPSTPO.STRT12_T12-100
PKGCMDFILE
/mig
PKGDIR
/mig/DB/DDLORA.TPL
PKGDDLFILE
...
6.65846e+08SAPSDIC.STRT12_T12100
PKGLOADOPTION
PKGFILESIZE
PKGNAMEPKGIDOrder
Export/import order
SpecificR3LOAD options
Add (Row)Add (Row) Remove (Row)Remove (Row) Buttons to add or remove Packages from export or import table
The above screen does only exists in SAPINST < NetWeaver ’04. Later versions are using MIGMON features.The above screen does only exists in SAPINST < NetWeaver ’04. Later versions are using MIGMON features.
SAPINST: allows for custom export/import order definitions and even the change of individual parameters for each single package.
ORDER: defines the sequence in which the packages are to be loaded. The load starts with the lowest values first. Negative values are also allowed.
PKGID: Identifier <SAPSID>_<DBSID>.
PKGNAME: Name of the package (*.STR file).
PKGFILESIZE: Size of the data dump file.
PGKDIR: Path where DATA and DB sub-directories for the package reside.
PKGDDLFILE: The name of the DDL<DBS>.TPL file.
PKGCMDFILE: The name of the command file for this package. (Will be generated automatically, but if you want to use your own, you may enter it’s name).
PKGLOADOPTIONS: Additional DB specific R3LOAD options that will be applied when this package is imported.
As NetWeaver ’04S uses MIGMON to start R3LOAD, the advanced features of the Migration Monitor are used, instead of the mechanism above.

© SAP AG TADM70 8-36
© SAP AG 2010
MIGMON Export / Import Order
...
# Package order: name | file with package namesorderBy=/exp_inst/export_order.txt
...
...
# Package order: name | file with package namesorderBy=/exp_inst/export_order.txt
...
SOFFCONT1 CDCLS
GLPCA MSEG _BIC_B0000100 _BLUESKY_FECPKON VBEP CE41000
SOFFCONT1 CDCLS
GLPCA MSEG _BIC_B0000100 _BLUESKY_FECPKON VBEP CE41000
export_order.txtExport Monitor: export_monitor_cmd.properties
Caution: ABAP tables using name ranges will have special *.STR file names, because „/“ is not allowed in file names!
Table “/BIC/B0000100” is defined in “_BIC_B0000100.STR” after package splitting.
List of packages!
...
# Package order: name | size | file with package namesorderBy=/imp_inst/import_order.txt
...
...
# Package order: name | size | file with package namesorderBy=/imp_inst/import_order.txt
...
Import Monitor: import_monitor_cmd.properties
GLPCAMSEG
GLPCAMSEG
import_order.txt
In the above example, the largest tables should be exported first. For that purpose, the tables were splitted from it’s standard *.STR files into package files containing one table only. The package names were inserted into “export_order.txt”. The Migration Monitor will export the packages in exactly the order as defined in “export_order.txt”. Afterwards it will export the remaining packages in alphabetical order.
On the target system, the packages will be imported as specified in “import_order.txt”. If no package mentioned in “import_order.txt”, is available for import (still exporting) the package with the next largest dump file will be used instead.
Often two different export- and import-order files make sense, i.e. if some tables have a lot of indexes but are small compared to the largest tables. In this case the overall run-time of a smaller table can be much longer then for the larger table, because of the index creation time. In the above example the tables GLPCA and MSEG are big, but not the biggest. For the import it was decided to give them top priority because they have a lot of indexes and so the index creation times will exceed even the import time of the largest table SOFFCONT1.

© SAP AG TADM70 8-37
© SAP AG 2010
Unsorted Export
Unsorted exports can reduce unload times significantly!
General possible in all SAP Releases
Implemented in SAPINST since NetWeaver 7.00
Specific tables cannot be exported unsorted
Restrictions in case of Unicode conversions
Restrictions for Unicode system copies with endian change
Not suitable for all source and target databases
Predefined DDL<DBS>_LRG.TPL for unsorted exports
SAP Notes 954268, 1054852
prikey: AFTER_LOAD ORDER_BY_PKEYDDLORA.TPL
Before starting an unsorted export, please read SAP Note: “954268 Optimization of export: Unsorted unloading”!
By default, the system unloads the data as sorted. This is controlled by the following entry in the DDL<DBS>.TPL file: prikey: .... ORDER_BY_PKEY. Sorting takes time and needs a large temporary storage, if it can be omitted, the export will be faster. Take care about consequences in the target system (performance impact).
If you use MaxDB as target database, you must export all of the tables as sorted. If you use MaxDB as the source database, you can unload sorted data only. Do not override this option when you export MaxDB.
If you use MSSQL as the target database, you should export all of the tables as sorted, so that you can avoid performance problems during the import. If you have to unload the tables as unsorted and if you use MSSQL as the target database, you should refer to Note 1054852.
Certain table types are not allowed to be exported in an unsorted way. SAP Note 954268 explains the considerations release and code page dependent.
R3LDCTL generates DDL<DBS>_LRG.TPL files to simplify unsorted exports since NetWeaver ’04.

© SAP AG TADM70 8-38
© SAP AG 2010
Advanced MIGMON DDL*.TPL File Usage
...# DDL control file, default is # DDL<DB_TYPE>.TPLddlFile=/exp/DB/DDLORA.TPL
# File with mapping between DDL# files and package namesddlMap=/exp_inst/exp_ddlmap.txt...
...# DDL control file, default is # DDL<DB_TYPE>.TPLddlFile=/exp/DB/DDLORA.TPL
# File with mapping between DDL# files and package namesddlMap=/exp_inst/exp_ddlmap.txt...
# DDL mapping file# export File
[ unsorted ]# DDLORA-FILE for unsorted exportddlFile = /exp/DB/DDLORA_LRG.TPL
GLPCADBTABLOGSWW_CONT
# DDL mapping file# export File
[ unsorted ]# DDLORA-FILE for unsorted exportddlFile = /exp/DB/DDLORA_LRG.TPL
GLPCADBTABLOGSWW_CONT
exp_ddlmap.txtExport Monitor: export_monitor_cmd.properties
...# DDL control file, default is DDL<DB_TYPE>.TPLddlFile=/imsp_inst/DDLORA.TPL
# File with mapping between DDL files and package namesddlMap=/imp_inst/imp_ddlmap.txt...
...# DDL control file, default is DDL<DB_TYPE>.TPLddlFile=/imsp_inst/DDLORA.TPL
# File with mapping between DDL files and package namesddlMap=/imp_inst/imp_ddlmap.txt...
[ Parallel2 ]# Parallel 2 index generationddlFile = /imp_inst/DDLORA_par_2.TPL
RFBLGCDCLS
[ Parallel4 ]# Parallel 4 index generation ddlFile = /imp_inst/DDLORA_par_4.TPL
MSEGZGLFUNCA
[ Parallel2 ]# Parallel 2 index generationddlFile = /imp_inst/DDLORA_par_2.TPL
RFBLGCDCLS
[ Parallel4 ]# Parallel 4 index generation ddlFile = /imp_inst/DDLORA_par_4.TPL
MSEGZGLFUNCA
Import Monitor: import_monitor_cmd.properties imp_ddlmap.txt
The Migration Monitor can be used to export or import selected packages with specific DDL<DBS>.TPL files.
The above export example, shows a how to export three packages unsorted (DDLORA_LRG.TPL) and the majority of all tables the standard way (DDLORA.TPL).
The import example, utilizes a special Oracle feature to parallelize the index creation. For that purpose two different DDL<DBS>.TPL files were generated to import two packages with index creation parallel degree 2 (DDLORA_par_2.TPL) and the other two packages with index creation parallel degree 4 (DDLORA_par_4.TPL). The remaining packages are imported as usual (DDLORA.TPL).

© SAP AG TADM70 8-39
© SAP AG 2010
Changing R3LOAD Table Load Sequence in *.STR
Don’t re-order *.STR files after export!
Data container 1 Data container 2 Data container 1 Data container 2
? ?or
tab: A055 ...ind: A055~A ......tab: MSEG ...ind: MSEG~1 ...ind: MSEG~2 ......tab: ZTRIGGN ...ind: ZTRIGGN~A ......
Example: Standard “SAPAPPL1.STR”
tab: MSEG ...ind: MSEG~1 ...ind: MSEG~2 ......tab: A055 ...ind: A055~A ......tab: ZTRIGGN ...ind: ZTRIGGN~A ......
Example: Reordered “SAPAPPL1.STR”
Do not re-order tables in *.STR files after export. If more than one dump file exists for a single *.STR file, R3LOAD will not be able to read table data from i.e. File *.002 and for the next table from file *.001, if the table order in the *.STR file was changed after export.

© SAP AG TADM70 8-40
© SAP AG 2010
Initial Extent Larger than Consecutive DB Storage
?
Data container 1 (1GB) Data container 2 (1GB)
Before change
Change to, for example, 7 (~80 MB)(value from file “DDL<DBS>.TPL”)
...tab: MSEGatt: APPL1 4 T all MSEG~0 APPL1 4fld: MANDT CLNT 3 0 0 not_null 1fld: MBLNR CHAR 10 0 0 not_null 2...
Example: SAPAPPL1.STR
MSEG 1.5 GB
Data container 1 (1GB) Data container 2 (1GB)
After change
Example: SAPAPPL1.EXT
Change to, for example, 900 000 000...MSEG 1 521 225 472MSEG~0 644 245 094MSEG~1 322 122 547...
The situation above can be a problem on Oracle dictionary managed tablespaces, but should not apply to locally managed tablespaces as well.
Customer databases can contain tables and indexes that require a larger “initial extent” than the maximum possible in a single data container. In such cases, reduce the “initial extent” in the *.EXT file and adapt the “next extent” size class in the relevant *.STR file.
The new “initial extent” size should be slightly less than the maximum available space in the data container. This gives the database some space for internal administration data.

© SAP AG TADM70 8-41
© SAP AG 2010
R3TA Table Splitter
Generates database independent WHERE conditions to allow multiple R3LOAD export / import processes for a single table
Supported with R3LOAD 6.40 and later
Implemented in SAPINST since NW ‘04 SR1 Patch Collection
The usage of MIGMON is mandatory
The parallel export of single tables is possible for all databases
The parallel import into a single table might be restricted on some databases
SAP Note 952514
R3LOAD R3LOAD R3LOAD R3LOAD R3LOAD
Single table
R3TA analyzes a given table and returns a set of WHERE conditions that will select approximately the same amount of rows. For each WHERE condition one R3LOAD can be started.
The parallel export does not reduce the export time only, it will also allow an earlier start of the import.
Because of the complex handling of splitted tables, the usage of MIGMON is mandatory.
The resulting “<table>.WHR” file requires further splitting into “<table>-n.WHR” format (WHERE SPLITTER).
If the parallel import into a single table is not possible on a particular database type, a sequential import of splitted tables can be forced by defining MIGMON load groups. Please check the respective system copy manual and related notes for current limitations.
Even if the parallel import into a single table is not supported on your database, the overall time saving because of the parallel export itself is significantly enough.
SAP Note: 952514 Using the table splitting feature
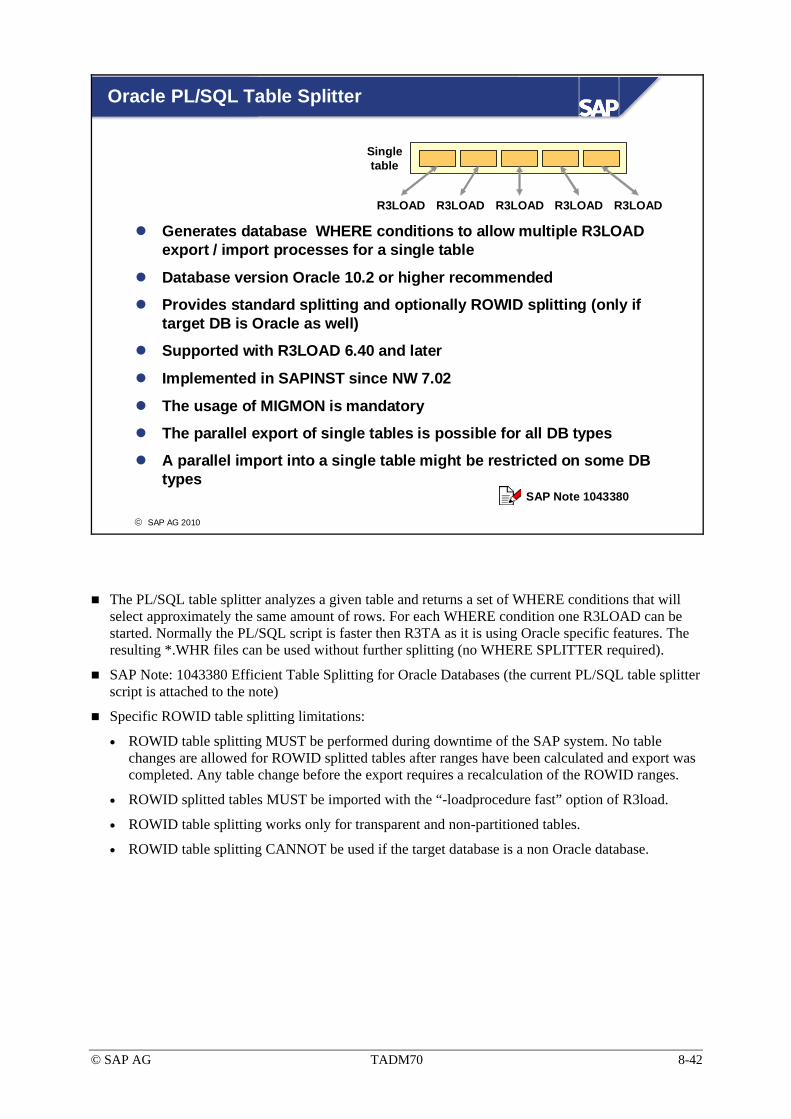
© SAP AG TADM70 8-42
© SAP AG 2010
Oracle PL/SQL Table Splitter
Generates database WHERE conditions to allow multiple R3LOAD export / import processes for a single table
Database version Oracle 10.2 or higher recommended
Provides standard splitting and optionally ROWID splitting (only if target DB is Oracle as well)
Supported with R3LOAD 6.40 and later
Implemented in SAPINST since NW 7.02
The usage of MIGMON is mandatory
The parallel export of single tables is possible for all DB types
A parallel import into a single table might be restricted on some DB types
SAP Note 1043380
R3LOAD R3LOAD R3LOAD R3LOAD R3LOAD
Single table
The PL/SQL table splitter analyzes a given table and returns a set of WHERE conditions that will select approximately the same amount of rows. For each WHERE condition one R3LOAD can be started. Normally the PL/SQL script is faster then R3TA as it is using Oracle specific features. The resulting *.WHR files can be used without further splitting (no WHERE SPLITTER required).
SAP Note: 1043380 Efficient Table Splitting for Oracle Databases (the current PL/SQL table splitter script is attached to the note)
Specific ROWID table splitting limitations:
• ROWID table splitting MUST be performed during downtime of the SAP system. No table changes are allowed for ROWID splitted tables after ranges have been calculated and export was completed. Any table change before the export requires a recalculation of the ROWID ranges.
• ROWID splitted tables MUST be imported with the “-loadprocedure fast” option of R3load.
• ROWID table splitting works only for transparent and non-partitioned tables.
• ROWID table splitting CANNOT be used if the target database is a non Oracle database.

© SAP AG TADM70 8-43
© SAP AG 2010
Table Splitting in SAPINST > NW04
SAP System ID (SAPSID): <SID> Password of <sapsid>adm: <pasword>File with tables to be split: /exp/split_input.txtExport directory: /expNumber of parallel R3TA runs: 3Database type (> 7.02 only): <database type>
SAPINST: Table Splitting Preparation Dialog
CDCLS%5CKIS%10GLPCA%10STXL%3
CDCLS%5CKIS%10GLPCA%10STXL%3
Note: The resulting *.WHR files will be written into the /exp/DATA directory
PL/SQL: split_input.txt (> 7.02 only)
CDCLS-1.WHR … CDCLS-5.WHRCKIS-1.WHR … CKIS-10.WHRGLPCA-1.WHR … GLPCA-10.WHRSTXL-1.WHR … STXL-3.WHRwhr.txt
ACCTCR AWREFACCTIT AWREF…CDCLS CHANGENR…
ACCTCR AWREFACCTIT AWREF…CDCLS CHANGENR…
R3TA:R3ta_hints.txt
Note: SAPINST uses different input formats for the Oracle PL/SQL table splitter and R3TA!
CDCLS%5,CHAGENRCKIS%10,KALNRGLPCA%10,ROWIDSTXL%3,ROWID
CDCLS%5,CHAGENRCKIS%10,KALNRGLPCA%10,ROWIDSTXL%3,ROWID
R3TA: split input.txt
Table splitting is a task which will be done before the export. The “split_input.txt” file must specify the tables to split and how often. Take care about the different input formats in case of R3TA or the Oracle PL/SQL table splitter. Check the corresponding system copy guide.
The “R3ta_hints.txt” contains predefined split fields for the most common large tables. More tables and fields can be inserted with an editor. The file has to be located in the directory in which R3ta will be started. If “R3ta_hints.txt” was found and the table to split is inside, the predefined field will be used, otherwise R3TA analyzes each field of the primary key to find the best matching one. The “R3ta_hints.txt” is part of the R3TA archive which can be downloaded from SAP Marketplace, if not already on the installation media.
CAUTION: When doing a system copy with the change of the code page (non-Unicode to Unicode; 4102 to 4103; 4103 to 4102), make sure not to use a WHERE condition with the PAGENO column included for cluster tables (i.e. CDCLS, RFBLG, …).
The resulting “*.WHR” files will be written into subdirectory DATA of the specified export directory. Table splitting will take place if the specified export directory is the same like for the R3LOAD export later on. The “whr.txt” file contains the name of the splitted tables. It can be used as an input file for the package splitter to make sure that each splitted table has it own *.STR file.
It depends on the SAPINST release whether a database type can be selected or not. SAPINST 7.02 can make use of the Oracle PL/SQL splitter if the database type Oracle was selected. Radio buttons allow to choose between the R3TA and the PL/SQL table splitter.

© SAP AG TADM70 8-44
© SAP AG 2010
Example of an R3TA Based Table Splitting
CKIS.STR
R3TA
Read Read
WriteWrite
R3TA_HINTS.TXT
Duration: several hours(depending on table size and
database type)
CKIS_IDX.TSK
CKIS_IDX.STR
DRP_CKIS_IDX.TSK
CKIS_IDX.CMD DRP_CKIS_IDX.CMD
Create temporary index Drop temporary index
CKIS.WHR
Where conditions
R3ta -f CKIS.STR -check_utf8 -l CKIS.log -o CKIS.WHR -table CKIS%10
The above example shows the R3TA WHERE file creation for an Oracle database.
The CKIS.STR is provided to the command line to tell R3TA which fields belong to the primary key.
R3TA generates a CKIS.WHR file containing the computed R3LOAD WHERE conditions, a set of files to create a temporary index, and a further set of files to drop the temporary index.
It must be decided on an individual base, whether it makes sense to create an additional index or not.

© SAP AG TADM70 8-45
© SAP AG 2010
R3TA Example: Create Temporary Index (Optional)
I CKIS~IMG C xeqI CKIS~IMG C xeq
ind: CKIS~IMGatt: CKIS APPL1 4 not_uniquefld: KALNR
ind: CKIS~IMGatt: CKIS APPL1 4 not_uniquefld: KALNR
R3TA generated structure definition of temporary index CKIS~IMG on field KALNR
R3TA generated task file to create temporary index CKIS~IMIG
CKIS_IDX.STR
CKIS_IDX.TSK
tsk: CKIS_IDX.TSKicf: CKIS_IDX.STRdcf: DDLORA.TPLdat: nulldir: null
tsk: CKIS_IDX.TSKicf: CKIS_IDX.STRdcf: DDLORA.TPLdat: nulldir: null
CKIS_IDX.CMD
R3TA generated command file to create temporary index CKIS~IMIG
R3LOAD -dbcodepage <code page> -i CKIS_IDX.CMD -l CKIS_IDX.LOG
Depending on the database type, database optimizer behavior, table type, table field or table size, a temporary index can improve the R3LOAD data selection considerably. To find out whether a temporary index makes sense or not, a SQL EXPLAIN statement can help to check the database optimizer cost factor on the data to select. Indexes should be checked on a copy of the productive system for example.
The corresponding system copy guide describes how to create or delete R3TA related indexes.

© SAP AG TADM70 8-46
© SAP AG 2010
R3TA Example: Drop Temporary Index
I CKIS~IMG D xeqI CKIS~IMG D xeq
ind: CKIS~IMGatt: CKIS APPL1 4 not_uniquefld: KALNR
ind: CKIS~IMGatt: CKIS APPL1 4 not_uniquefld: KALNR
R3TA generated structure definition of temporary index CKIS~IMG on field KALNR
R3TA generated task file to drop temporary index CKIS~IMIG
CKIS_IDX.STR
DRP_CKIS_IDX.TSK
tsk: DRP_CKIS_IDX.TSKicf: CKIS_IDX.STRdcf: DDLORA.TPLdat: nulldir: null
tsk: DRP_CKIS_IDX.TSKicf: CKIS_IDX.STRdcf: DDLORA.TPLdat: nulldir: null
DRP_CKIS_IDX.CMD
R3TA generated command file to drop temporary index CKIS~IMIG
R3LOAD -dbcodepage <code page> -i DRP_CKIS_IDX.CMD -l DRP_CKIS_IDX.LOG
If the temporary index does not improve the R3LOAD export, it can be dropped using the predefined files or with SQL commands directly.
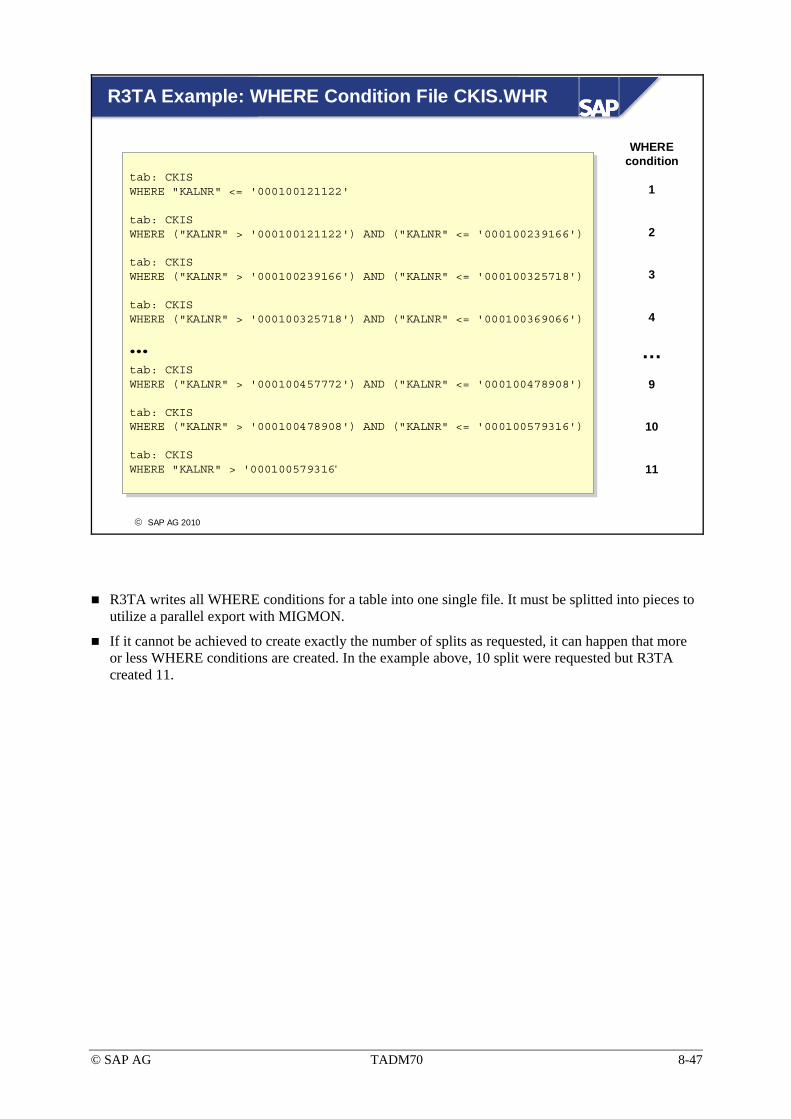
© SAP AG TADM70 8-47
© SAP AG 2010
R3TA Example: WHERE Condition File CKIS.WHR
tab: CKISWHERE "KALNR" <= '000100121122'
tab: CKISWHERE ("KALNR" > '000100121122') AND ("KALNR" <= '000100239166')
tab: CKISWHERE ("KALNR" > '000100239166') AND ("KALNR" <= '000100325718')
tab: CKISWHERE ("KALNR" > '000100325718') AND ("KALNR" <= '000100369066')
…tab: CKISWHERE ("KALNR" > '000100457772') AND ("KALNR" <= '000100478908')
tab: CKISWHERE ("KALNR" > '000100478908') AND ("KALNR" <= '000100579316')
tab: CKISWHERE "KALNR" > '000100579316'
WHERE condition
1
2
3
4
…9
10
11
R3TA writes all WHERE conditions for a table into one single file. It must be splitted into pieces to utilize a parallel export with MIGMON.
If it cannot be achieved to create exactly the number of splits as requested, it can happen that more or less WHERE conditions are created. In the example above, 10 split were requested but R3TA created 11.
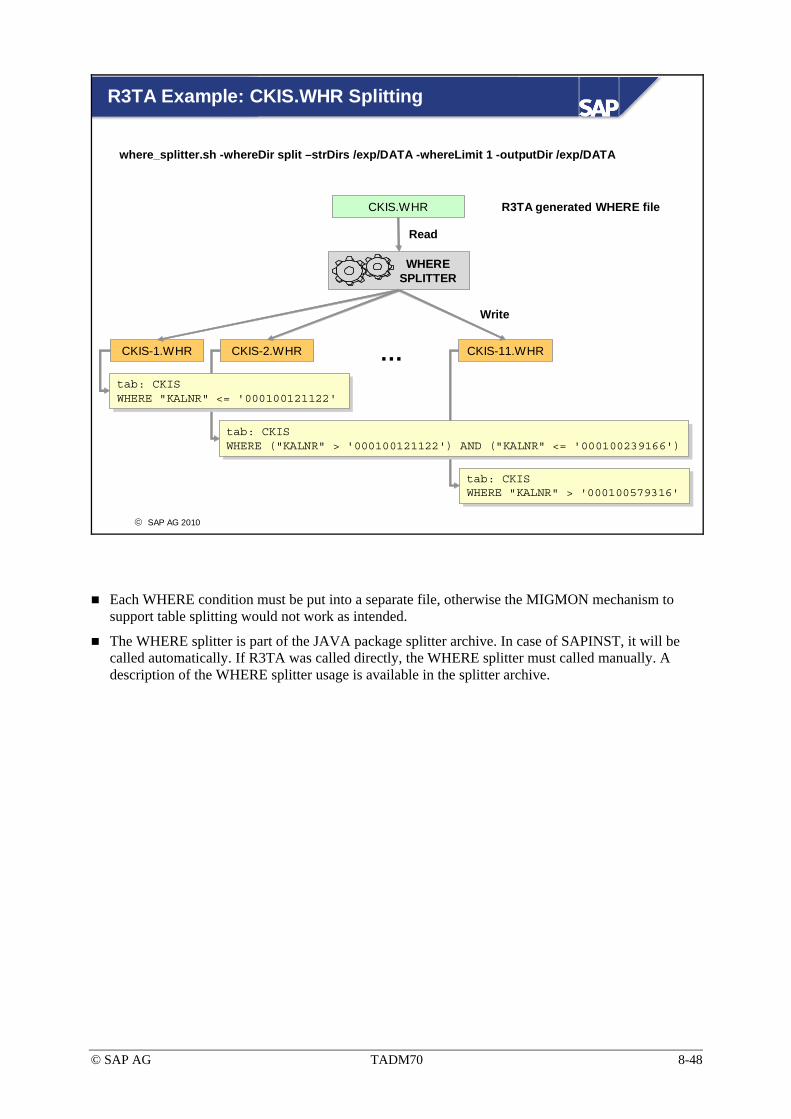
© SAP AG TADM70 8-48
© SAP AG 2010
R3TA Example: CKIS.WHR Splitting
WHERESPLITTER
Read
Write
CKIS.WHR
CKIS-1.WHR CKIS-2.WHR CKIS-11.WHR…
where_splitter.sh -whereDir split –strDirs /exp/DATA -whereLimit 1 -outputDir /exp/DATA
R3TA generated WHERE file
tab: CKISWHERE "KALNR" > '000100579316'
tab: CKISWHERE "KALNR" > '000100579316'
tab: CKISWHERE ("KALNR" > '000100121122') AND ("KALNR" <= '000100239166')
tab: CKISWHERE ("KALNR" > '000100121122') AND ("KALNR" <= '000100239166')
tab: CKISWHERE "KALNR" <= '000100121122'
tab: CKISWHERE "KALNR" <= '000100121122'
Each WHERE condition must be put into a separate file, otherwise the MIGMON mechanism to support table splitting would not work as intended.
The WHERE splitter is part of the JAVA package splitter archive. In case of SAPINST, it will be called automatically. If R3TA was called directly, the WHERE splitter must called manually. A description of the WHERE splitter usage is available in the splitter archive.

© SAP AG TADM70 8-49
© SAP AG 2010
Example of an Oracle PL/SQL Based Table Splitting
PL/SQLSPLITTER
Duration: less than R3TA
sqlplusexec table_splitter.ranges ('COEP', 'ROWID', 5)
sqlplusexec table_splitter.ranges ('COEP', 'ROWID', 5)
Row ID based splitting
sqlplusexec table_splitter.ranges ('CKIS', 'KALNR', 11)
sqlplusexec table_splitter.ranges ('CKIS', 'KALNR', 11)
Field based splitting
tab: CKISWHERE "KALNR" > '000100579316'
tab: CKISWHERE "KALNR" > '000100579316'
tab: CKISWHERE ("KALNR" > '000100121122') AND ("KALNR" <= '000100239166')
tab: CKISWHERE ("KALNR" > '000100121122') AND ("KALNR" <= '000100239166')
CKIS-1.WHR CKIS-2.WHR CKIS-11.WHR…tab: CKISWHERE "KALNR" <= '000100121122'
tab: CKISWHERE "KALNR" <= '000100121122'
The above example shows the PL/SQL script based WHERE file creation for an Oracle database. A split strategy can be chosen between field or ROWID splitting. ROWID splitting can be used if the target database is Oracle (“-loadprocedure fast” must be used for the import).
Opposite to R3TA, the PLS/SQL splitter creates *.WHR files directly usable by MIGMON.

© SAP AG TADM70 8-50
© SAP AG 2010
Example: MIGMON Export Processing (1)
MIGMON
CKIS-1.WHR
CKIS.STR
CKIS-1.TSK
Example CKIS-1.TSK: R3load -ctf E /exp/DATA/CKIS.STR /exp/DB/DDLORA.TPL /exp_inst/CKIS-1.TSKORA -where /exp/DATA/CKIS-1.WHR -l CKIS-1.log
Call R3load <n> times to generate export *.TSK files with WHERE condition
DDLORA.TPL
R3LOAD
CKIS-2.TSK
D CKIS E xeqWHERE ("KALNR" > '000100121122') AND ("KALNR" <= '000100239166')
D CKIS E xeqWHERE ("KALNR" > '000100121122') AND ("KALNR" <= '000100239166')
CKIS-11.TSK
D CKIS E xeqWHERE "KALNR" > '000100579316'
D CKIS E xeqWHERE "KALNR" > '000100579316'
…D CKIS E xeqWHERE "KALNR" <= '000100121122'
D CKIS E xeqWHERE "KALNR" <= '000100121122'
CKIS-11.WHR
…Read
Write
file names
content
As soon as MIGMON finds „*.WHR“ files, it generates the necessary „*.TSK“ and „*.CMD“ files automatically. The „*.TSK“ files will be created with the special option „-where“ to put the WHERE condition into it.
Make sure to have a separate “*.STR” file for each splitted table.

© SAP AG TADM70 8-51
© SAP AG 2010
…
Example: MIGMON Export Processing (2)
MIGMONCKIS-1.TSK
CKIS.STR
CKIS-1.CMD
Generate R3load command files for each *.TSK file
DDLORA.TPL
CKIS-2.CMD CKIS-11.CMD…tsk: "/exp_inst/CKIS-1.TSK"icf: "/exp/DATA/CKIS.STR"dcf: "/exp/DB/DDLORA.TPL"dat: "/exp/DATA/" bs=1k fs=1000Mdir: "/exp/DATA/CKIS-1.TOC"
tsk: "/exp_inst/CKIS-1.TSK"icf: "/exp/DATA/CKIS.STR"dcf: "/exp/DB/DDLORA.TPL"dat: "/exp/DATA/" bs=1k fs=1000Mdir: "/exp/DATA/CKIS-1.TOC"
CKIS-11.TSK
Read file names
Write
tsk: "/exp_inst/CKIS-2.TSK"icf: "/exp/DATA/CKIS.STR"dcf: "/exp/DB/DDLORA.TPL"dat: "/exp/DATA/" bs=1k fs=1000Mdir: "/exp/DATA/CKIS-2.TOC"
tsk: "/exp_inst/CKIS-2.TSK"icf: "/exp/DATA/CKIS.STR"dcf: "/exp/DB/DDLORA.TPL"dat: "/exp/DATA/" bs=1k fs=1000Mdir: "/exp/DATA/CKIS-2.TOC"
tsk: "/exp_inst/CKIS-11.TSK"icf: "/exp/DATA/CKIS.STR"dcf: "/exp/DB/DDLORA.TPL"dat: "/exp/DATA/" bs=1k fs=1000Mdir: "/exp/DATA/CKIS-11.TOC"
tsk: "/exp_inst/CKIS-11.TSK"icf: "/exp/DATA/CKIS.STR"dcf: "/exp/DB/DDLORA.TPL"dat: "/exp/DATA/" bs=1k fs=1000Mdir: "/exp/DATA/CKIS-11.TOC"
For each „*.TSK“ file a corresponding „*.CMD“ file will be created.

© SAP AG TADM70 8-52
© SAP AG 2010
…
Example: MIGMON Export Processing (3)
CKIS-1.CMD
CKIS-1.TOC
Call R3load <n> times to export data of splitted tables
CKIS-2.TOC CKIS-11.TOC …...tab: CKISsel: WHERE "KALNR" <= '000100121122'fil: CKIS-1.001 10242 505974eot: #7769037 rows 20091008053631eof: #20091008053632
...tab: CKISsel: WHERE "KALNR" <= '000100121122'fil: CKIS-1.001 10242 505974eot: #7769037 rows 20091008053631eof: #20091008053632
CKIS-11.CMD
Read
Write
...tab: CKISsel: WHERE ("KALNR„ > '000100121122') AND ("KALNR" <= '000100239166')fil: CKIS-2.001 10242 647210eot: #7767686 rows 20091008060331eof: #20091008060331
...tab: CKISsel: WHERE ("KALNR„ > '000100121122') AND ("KALNR" <= '000100239166')fil: CKIS-2.001 10242 647210eot: #7767686 rows 20091008060331eof: #20091008060331
...tab: CKISsel: WHERE "KALNR" > '000100579316'fil: CKIS-11.001 10242 1463eot: #16356 rows 20091008021631eof: #20091008021631
...tab: CKISsel: WHERE "KALNR" > '000100579316'fil: CKIS-11.001 10242 1463eot: #16356 rows 20091008021631eof: #20091008021631
MIGMON
R3LOAD
R3LOAD inserts the used WHERE condition into the *.TOC file. So it is easy to find out which part of a table is stored in which dump file. Furthermore this information is used for a safety mechanism to make sure the import does run with the same WHERE conditions as the export did (otherwise it could lead to a potential data lost in import restart situations). I the case of a mismatch, R3LOAD stops on error.

© SAP AG TADM70 8-53
© SAP AG 2010
Example: Directory Content after Export
SAPINST export diretory: /exp_instSAPINST export diretory: /exp_inst
CKIS-1.CMD … CKIS-11.CMDCKIS-1.CMD … CKIS-11.CMD
CKIS-1.TSK … CKIS-11.TSK CKIS-1.TSK … CKIS-11.TSK
CKIS-1.LOG … CKIS-11.LOGCKIS-1.LOG … CKIS-11.LOG
DATADATA
DBDB
Export directory: /expExport directory: /exp
LABEL.ASCLABEL.ASC
CKIS-1.TOC … CKIS-11.TOCCKIS-1.TOC … CKIS-11.TOC
CKIS.STRCKIS.STR
CKIS-1.WHR … CKIS-11.WHRCKIS-1.WHR … CKIS-11.WHR
CKIS-1.<nnn> … CKIS-11.<nnn>CKIS-1.<nnn> … CKIS-11.<nnn>
Export control
/exp_inst/split/exp_inst/split
R3TA_HINTS.TXTR3TA_HINTS.TXT
R3TA_CKIS.LOGR3TA_CKIS.LOG R3TA control
CKIS.WHRCKIS.WHR
……
To simplify the graphic above, no deep directory structures are shown (like SAPINST is creating) and the files under “<export_dir>/DB” are not explicitly mentioned. R3LOAD is assumed to run in “/inst” and the export directory is named “/exp”. The “/inst/split” directory is used to run R3TA some days or hours before the database export. The R3TA WHERE file was splitted and the results were copied into “/exp/DATA”. In case of the Oracle PL/SQL splitter, the WHERE files an be put directly into “/exp/DATA”.

© SAP AG TADM70 8-54
© SAP AG 2010
Example: MIGMON Import Processing (1)
MIGMON
CKIS.STR
CKIS__DPI.TSK
Example CKIS-1__DIP.TSK: R3load -ctf I /exp/DATA/CKIS.STR /imp_inst/DB/DDLADA.TPL/imp_inst/CKIS__DPI.TSK ORA -l CKIS__DPI.log –o DPI
Call R3load to generate import *.TSK files to create tableDDLORA.TPL
R3LOAD
T CKIS C okT CKIS C ok
Read
Write
file names
content
MIGMON
CKIS__DPI.CMD
tsk: "/imp_inst/CKIS__DPI.TSK"icf: "/exp/DATA/CKIS.STR"dcf: "/exp/DB/DDLORA.TPL"dat: nulldir: nullext: "/exp/DB/ORA/CKIS.EXT"
tsk: "/imp_inst/CKIS__DPI.TSK"icf: "/exp/DATA/CKIS.STR"dcf: "/exp/DB/DDLORA.TPL"dat: nulldir: nullext: "/exp/DB/ORA/CKIS.EXT"
MIGMON makes automatically sure, that the “*.TSK” and “*.CMD” files for table creation are generated before data import. After successfully creating the table, the data load processes are started. This preparation phase is marked in the MIGMON “import.state.properties” file as “<table>-pre=+”.
For databases with the need of a primary key before import, it will be created together with the table.

© SAP AG TADM70 8-55
© SAP AG 2010
Example: MIGMON Import Processing (2)
MIGMON
CKIS-1.WHR
CKIS.STR
CKIS-1__TPI.TSK
Example CKIS-1.TSK: R3load -ctf I /exp/DATA/CKIS.STR /exp/DB/DDLARA.TPL /imp_inst/CKIS-1.TSKORA -where /exp/DATA/CKIS-1.WHR -l CKIS-1.log -o TPI
Call R3load <n> times to generate export *.TSK files with WHERE condition
DDLORA.TPL
R3LOAD
CKIS-2__TPI.TSK CKIS-11__TPI.TSK
D CKIS I xeqWHERE "KALNR" > '000100579316'
D CKIS I xeqWHERE "KALNR" > '000100579316'
…D CKIS I xeqWHERE "KALNR" <= '000100121122'
D CKIS I xeqWHERE "KALNR" <= '000100121122'
CKIS-11.WHR
…Read
Write
file names
content
D CKIS I xeqWHERE ("KALNR" > '000100121122') AND ("KALNR" <= '000100239166')
D CKIS I xeqWHERE ("KALNR" > '000100121122') AND ("KALNR" <= '000100239166')
After the table was created successfully, multiple „*.TSK“ files are generated for each WHERE condition. The „*.TSK“ files will be created with the special option „-where“ to put the WHERE condition into it.

© SAP AG TADM70 8-56
© SAP AG 2009
…
Example: MIGMON Import Processing (3)
MIGMONCKIS-1.TSK
CKIS.STR
CKIS-1__TPI.CMD
Generate R3load command files for each *.TSK file
DDLORA.TPL
CKIS-2__TPI.CMD CKIS-11__TPI.CMD…tsk: "/imp_inst/CKIS-1__TPI.TSK"icf: "/exp/DATA/CKIS.STR"dcf: "/exp/DB/DDLORA.TPL"dat: "/exp/DATA/" bs=1k fs=1000Mdir: "/exp/DATA/CKIS-1.TOC"
tsk: "/imp_inst/CKIS-1__TPI.TSK"icf: "/exp/DATA/CKIS.STR"dcf: "/exp/DB/DDLORA.TPL"dat: "/exp/DATA/" bs=1k fs=1000Mdir: "/exp/DATA/CKIS-1.TOC"
CKIS-11.TSK
Read file names
Write
tsk: "/imp_inst/CKIS-11__TPI.TSK"icf: "/exp/DATA/CKIS.STR"dcf: "/exp/DB/DDLORA.TPL"dat: "/exp/DATA/" bs=1k fs=1000Mdir: "/exp/DATA/CKIS-11.TOC"
tsk: "/imp_inst/CKIS-11__TPI.TSK"icf: "/exp/DATA/CKIS.STR"dcf: "/exp/DB/DDLORA.TPL"dat: "/exp/DATA/" bs=1k fs=1000Mdir: "/exp/DATA/CKIS-11.TOC"
tsk: "/imp_inst/CKIS-2__TPI.TSK"icf: "/exp/DATA/CKIS.STR"dcf: "/exp/DB/DDLORA.TPL"dat: "/exp/DATA/" bs=1k fs=1000Mdir: "/exp/DATA/CKIS-2.TOC"
tsk: "/imp_inst/CKIS-2__TPI.TSK"icf: "/exp/DATA/CKIS.STR"dcf: "/exp/DB/DDLORA.TPL"dat: "/exp/DATA/" bs=1k fs=1000Mdir: "/exp/DATA/CKIS-2.TOC"
For each „*.TSK“ file, the corresponding „*.CMD“ file is generated.
Before starting the import, R3LOAD compares the WHERE condition between the “*.TOC” and “*.TSK” files. R3LOAD stops on error in case of a mismatch.

© SAP AG TADM70 8-57
© SAP AG 2010
…
Example: MIGMON Import Processing (4)
CKIS-1.CMD
CKIS-1.TOC
Call R3load <n> times to import data of splitted tables
CKIS-2.TOC CKIS-11.TOC …...tab: CKISsel: WHERE "KALNR" <= '000100121122'fil: CKIS-1.001 10242 505974eot: #7769037 rows 20091008053631eof: #20091008053632
...tab: CKISsel: WHERE "KALNR" <= '000100121122'fil: CKIS-1.001 10242 505974eot: #7769037 rows 20091008053631eof: #20091008053632
CKIS-11.CMD
Read
Read
...tab: CKISsel: WHERE ("KALNR„ > '000100121122') AND ("KALNR" <= '000100239166')fil: CKIS-2.001 10242 647210eot: #7767686 rows 20091008060331eof: #20091008060331
...tab: CKISsel: WHERE ("KALNR„ > '000100121122') AND ("KALNR" <= '000100239166')fil: CKIS-2.001 10242 647210eot: #7767686 rows 20091008060331eof: #20091008060331
...tab: CKISsel: WHERE "KALNR" > '000100579316'fil: CKIS-11.001 10242 1463eot: #16356 rows 20091008021631eof: #20091008021631
...tab: CKISsel: WHERE "KALNR" > '000100579316'fil: CKIS-11.001 10242 1463eot: #16356 rows 20091008021631eof: #20091008021631
MIGMON
R3LOAD
After start, R3LOAD compares the WHERE condition between the “*.TOC” and “*.TSK” files and terminates on error in case of a mismatch. A successful import is only possible if the WHERE condition used for the export is identical to the one during import. Otherwise a possible restart would delete more or less data from a table, which can result in a data loss. In case of an Oracle “-loadprocedure fast”, R3LOAD does not commit data until the import is finished successfully.

© SAP AG TADM70 8-58
© SAP AG 2009
Example: MIGMON Import Processing (5)
MIGMON
CKIS.STR
CKIS__DT.TSK
Example CKIS__DT.TSK: R3load -ctf I /exp/DATA/CKIS.STR /exp/DB/DDLORA.TPL/imp_inst/CKIS__DT.TSK ORA -l CKIS__DT.log -o DT
Call R3load to generate import *.TSK files to create the primary key and sindexes (if exist)DDLORA.TPL
R3LOAD
P CKIS~0 C xeqI CKIS~Z1 C xeq
P CKIS~0 C xeqI CKIS~Z1 C xeq
Read
Write
file names
content
MIGMON
CKIS__DT.CMD
tsk: "/imp_inst/CKIS__DT.TSK"icf: "/exp/DATA/CKIS.STR"dcf: "/exp/DB/DDLORA.TPL"dat: nulldir: nullext: "/exp/DB/ORA/CKIS.EXT"
tsk: "/imp_inst/CKIS__DT.TSK"icf: "/exp/DATA/CKIS.STR"dcf: "/exp/DB/DDLORA.TPL"dat: nulldir: nullext: "/exp/DB/ORA/CKIS.EXT"
After all parallel import processes for the splitted table were finished, the remaining tasks can be started: creating the primary key and secondary indexes. This post-import phase is marked in the MIGMON “import.state.properties” file as “<table>-post=+”.
For databases creating the primary index before import, the remaining task is the secondary index generation only.

© SAP AG TADM70 8-59
© SAP AG 2010
Example: Force Sequential Import of CKIS Splits
...# List of import directoriesimportDirs=/exp
# Installation directoryinstallDir=/imp_inst
# Package order: name | size | file with package namesorderBy=import_order.txt...# Number of parallel import jobsjobNum=13
...
...# List of import directoriesimportDirs=/exp
# Installation directoryinstallDir=/imp_inst
# Package order: name | size | file with package namesorderBy=import_order.txt...# Number of parallel import jobsjobNum=13
...
[ CKIS ]jobNum=1
CKIS-1CKIS-2CKIS-3CKIS-4CKIS-5CKIS-6CKIS-7CKIS-8CKIS-9CKIS-10CKIS-11
[ GROUP_X ]jobNum=1…
[ CKIS ]jobNum=1
CKIS-1CKIS-2CKIS-3CKIS-4CKIS-5CKIS-6CKIS-7CKIS-8CKIS-9CKIS-10CKIS-11
[ GROUP_X ]jobNum=1…
import_order.txtImport Monitor: import_monitor_cmd.properties
If the target database does not allow to import with multiple R3LOAD processes into the same table (because of performance or locking issues), MIGMON can be instructed to use a single R3LOAD process for a specified list of packages. In the above example, the file “import_order.txt” is read by MIGMON to set the import order. All packages belonging to group [CKIS], that is CKIS-1 to CKIS-11, will be imported using one single R3LOAD process (jobNum = 1). This does not guarantee, that CKIS-1 is imported before CKIS-2, but it will make sure that no two R3LOAD processes import into CKIS.
A group can have any name, but it makes sense to name it like the table in charge.
Beside the number of R3LOAD processes (jobNum=) the R3LOAD arguments for task file generation (taskArgs=) and import (loadArgs=) can be defined individually for each group.
The total number of running R3LOAD processes is the sum of the specified number of processes in “import_monitor_cmd.properties” and the number of processes defined in “import_order.txt”.

© SAP AG TADM70 8-60
© SAP AG 2010
Example: Directory Content after Import
SAPINST import directory: /imp_instSAPINST import directory: /imp_inst
CKIS__DPI.CMDCKIS__DPI.CMD
CKIS__DPI.TSK CKIS__DPI.TSK
CKIS__DPI.LOGCKIS__DPI.LOG
DATADATA
DBDB
Export directory: /expExport directory: /exp
LABEL.ASCLABEL.ASC
CKIS-1.TOC … CKIS-11.TOCCKIS-1.TOC … CKIS-11.TOC
CKIS.STRCKIS.STR
CKIS-1.WHR … CKIS-11.WHRCKIS-1.WHR … CKIS-11.WHR
CKIS-1.<nnn> … CKIS-11.<nnn>CKIS-1.<nnn> … CKIS-11.<nnn>
CKIS-1__TPI.CMD … CKIS-11 __ TPI.CMDCKIS-1__TPI.CMD … CKIS-11 __ TPI.CMD
CKIS-1__TPI.TSK … CKIS-11__TPI.TSKCKIS-1__TPI.TSK … CKIS-11__TPI.TSK
CKIS-1__TPI.LOG … CKIS-11__TPI.LOGCKIS-1__TPI.LOG … CKIS-11__TPI.LOG
CKIS__DT.CMDCKIS__DT.CMD
CKIS__DT.TSKCKIS__DT.TSK
CKIS__DT.LOGCKIS__DT.LOG
Create table and primary key
Load data but do not create indexes
Create primary key and indexes
……
For Oracle:
• CKIS__DPI.TSK: create table, but do not create primary key, indexes, or load data
• CKIS__TPI.TSK: load data, but do not create table, primary key, or indexes
• CKIS__DT.TSK: create primary key and indexes, but do create table, or load data
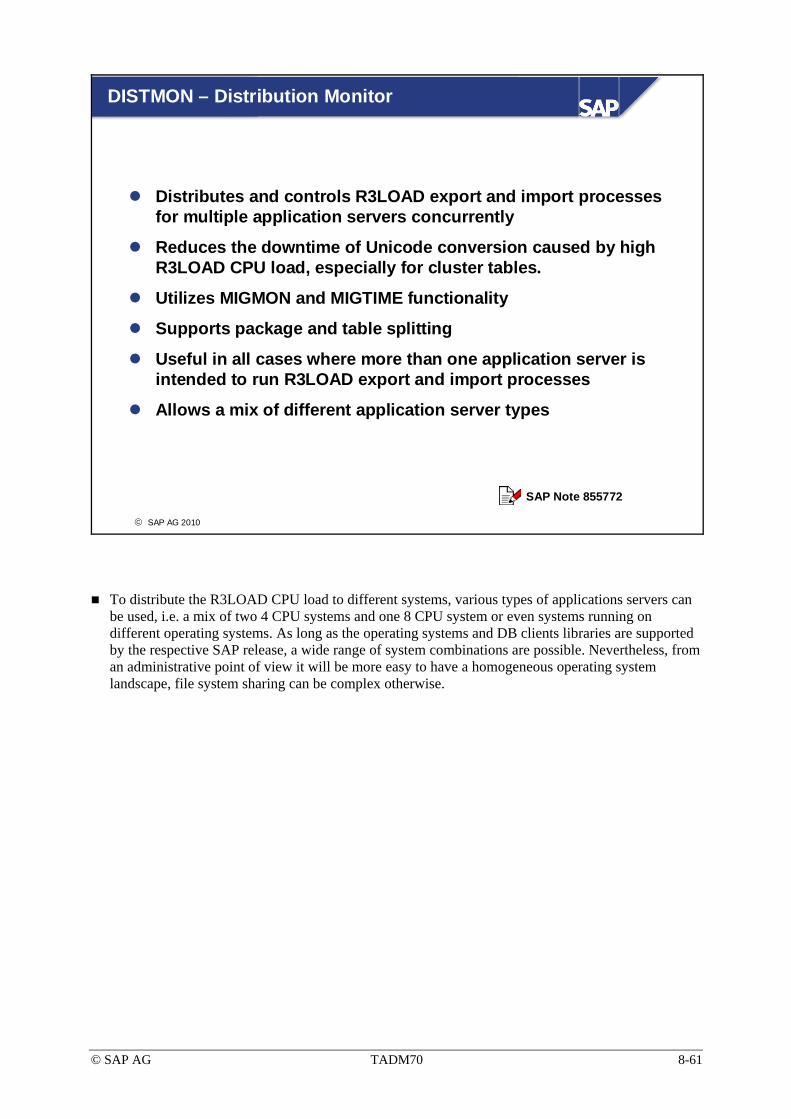
© SAP AG TADM70 8-61
© SAP AG 2010
DISTMON – Distribution Monitor
Distributes and controls R3LOAD export and import processes for multiple application servers concurrently
Reduces the downtime of Unicode conversion caused by high R3LOAD CPU load, especially for cluster tables.
Utilizes MIGMON and MIGTIME functionality
Supports package and table splitting
Useful in all cases where more than one application server is intended to run R3LOAD export and import processes
Allows a mix of different application server types
SAP Note 855772
To distribute the R3LOAD CPU load to different systems, various types of applications servers can be used, i.e. a mix of two 4 CPU systems and one 8 CPU system or even systems running on different operating systems. As long as the operating systems and DB clients libraries are supported by the respective SAP release, a wide range of system combinations are possible. Nevertheless, from an administrative point of view it will be more easy to have a homogeneous operating system landscape, file system sharing can be complex otherwise.

© SAP AG TADM70 8-62
© SAP AG 2010
DISTMON - Restrictions
DISTMON is not supported below SAP Basis 6.20
Only the “NET” mode of MIGMON is implemented (no “FTP” or SOCKET” methods)
For SAP Systems with JAVA Add-In, the ABAP and the JAVA part must be exported / imported separately
!
DISTMON is making use of R3LOAD features not available below 6.40.
DISTMON can only handle the ABAP data export. JAVA stacks must be exported using JLOAD.

© SAP AG TADM70 8-63
© SAP AG 2010
DISTMON Server Layout
Source DB server Target DB server
Application server 1
Application server <n>
commDir
DISTMON
R3load
ExportMIGMON
Local storage
R3load
ImportMIGMON
R3load
ExportMIGMON
Local storage
R3load
ImportMIGMON
The communication directory is used to share configuration and status information among the servers. It is physically mounted on one of the involved systems and shared to the other application servers.
Control files (*.STR, DDL*.TPL, export_monitor_cmd.properties and import_monitor_cmd.properties) are generated here and distributed during the preparation phase.
Because of safety reasons, the export of each application server is written to local mounted disks and not to NFS mounted file systems.
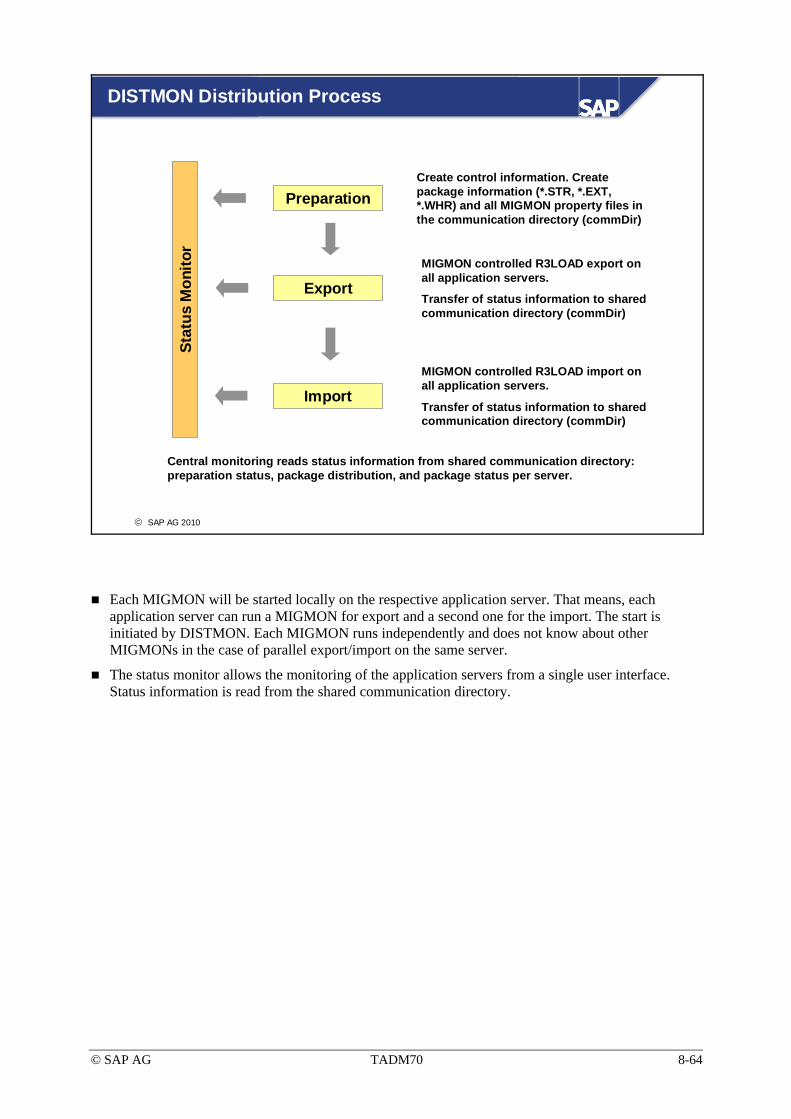
© SAP AG TADM70 8-64
© SAP AG 2010
DISTMON Distribution Process
Stat
us M
onito
rPreparation
Create control information. Create package information (*.STR, *.EXT, *.WHR) and all MIGMON property files in the communication directory (commDir)
Export MIGMON controlled R3LOAD export on all application servers.
Transfer of status information to shared communication directory (commDir)
ImportMIGMON controlled R3LOAD import on all application servers.
Transfer of status information to shared communication directory (commDir)
Central monitoring reads status information from shared communication directory: preparation status, package distribution, and package status per server.
Each MIGMON will be started locally on the respective application server. That means, each application server can run a MIGMON for export and a second one for the import. The start is initiated by DISTMON. Each MIGMON runs independently and does not know about other MIGMONs in the case of parallel export/import on the same server.
The status monitor allows the monitoring of the application servers from a single user interface. Status information is read from the shared communication directory.

© SAP AG TADM70 8-65
© SAP AG 2010
JPKGCTL - Package and Table Splitting
First introduced with SAPINST 7.02
JLOAD package and table splitting is done in a single tool
Packages are created by size
Table splitting based on rule file
...# Size of the splitted package with table(s)split = 20M# File that contains table split rules splitrulesfile = split_rules.txt...
...# Size of the splitted package with table(s)split = 20M# File that contains table split rules splitrulesfile = split_rules.txt...
J2EE_CONFIG:2NTRY:4:CID
PVERS:3:COMPID;HASHNUMBER;COMP
:J2EE_CONFIGEJ2EE_COM
J2EE_J2EE_CONFIGJ2EE_COMP
JPKGCTL JSplitter_cmd.properties
CONFIG:2:ENTRY:4:CID
VERS:3:COMPID;HASHNUMBER;COMP
The "split" parameter defines the size limit for JLOAD packages. JPKGCTL will add as many tables to a package until the size limit is reached. The number of packages is related to the size limit parameter. A small size will result into a large number of package files compared to a large size which will create few packages only. If a table is equal or larger then the given size, the package file will contain this single table only.
The "splitrulesfile" is only required if table splitting is planned. It can contain entries in three different formats. If only the number of splits is specified, all fields of the primary key are checked for highest selectivity. In the case where a single field is explicitly given, only this field is used for splitting. If multiple fields are provided, the most selective field is used.
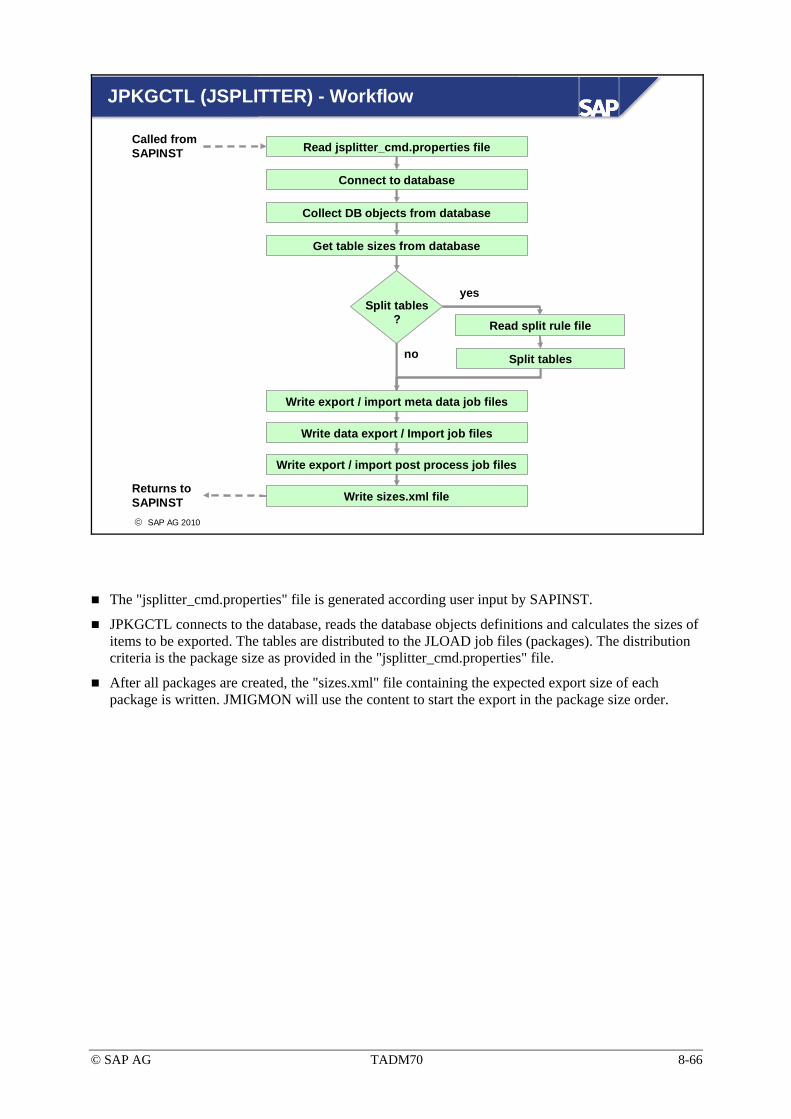
© SAP AG TADM70 8-66
© SAP AG 2010
JPKGCTL (JSPLITTER) - Workflow
Read jsplitter_cmd.properties file
Connect to database
Collect DB objects from database
Get table sizes from database
Split tables
Write data export / Import job files
Write export / import post process job files
Write sizes.xml file
Split tables ? Read split rule file
yes
no
Called from SAPINST
Returns to SAPINST
Write export / import meta data job files
The "jsplitter_cmd.properties" file is generated according user input by SAPINST.
JPKGCTL connects to the database, reads the database objects definitions and calculates the sizes of items to be exported. The tables are distributed to the JLOAD job files (packages). The distribution criteria is the package size as provided in the "jsplitter_cmd.properties" file.
After all packages are created, the "sizes.xml" file containing the expected export size of each package is written. JMIGMON will use the content to start the export in the package size order.

© SAP AG TADM70 8-67
© SAP AG 2010
JPKGCTL (JSPLITTER) - Table Split Strategy
Get key columns for splitting
Calculate the number of unique rows per key
Check if the number of packages is appropriate for splitting the table
Get the number of rows for table
Get the average number of rows per package
Define row ranges per packages
Get the maximum row count for key
Reduce number of packages or reject split
(exit)
Does number of row counts of key fit to requested number of packages?
no
yes
Reject if split makes no sense with given key (i.e. selectiveness too low)
?
Table splitting is an optional task. It makes sense for large tables which do influence the export time significantly. JPKGCTL is able to find a useful split column automatically, but then it will only check the fields of the primary key. If a different field should be used, it must be explicitly mentioned in a split rule file. If the requested number of splits cannot be achieved, the number of splits will be automatically reduced. If even this does not result into useful WHERE conditions, JPKGCTL gives up and no table splitting takes place.

© SAP AG TADM70 8-68
© SAP AG 2010
EXPORT_<PACKAG>.XML of a Splitted Table
<?xml version="1.0" encoding="UTF-8" standalone="no" ?> - <export file="EXPDMP_3_TC_WDRR_MRO_FILES">- <object action="select" name="TC_WDRR_MRO_FILES" type="TABLE">
<where cond= "MRO_GUID <= '189273913187BACE'" /> </object>
</export>
<?xml version="1.0" encoding="UTF-8" standalone="no" ?> - <export file="EXPDMP_3_TC_WDRR_MRO_FILES">- <object action="select" name="TC_WDRR_MRO_FILES" type="TABLE">
<where cond= "MRO_GUID <= '189273913187BACE'" /> </object>
</export>
<?xml version="1.0" encoding="UTF-8" standalone="no" ?> - <export file="EXPDMP_4_TC_WDRR_MRO_FILES">- <object action="select" name="TC_WDRR_MRO_FILES" type="TABLE">
<where cond="(MRO_GUID > '189273913187BACE') AND(MRO_GUID <= '33254DF9B6F6FB22')" />
</object></export>
<?xml version="1.0" encoding="UTF-8" standalone="no" ?> - <export file="EXPDMP_4_TC_WDRR_MRO_FILES">- <object action="select" name="TC_WDRR_MRO_FILES" type="TABLE">
<where cond="(MRO_GUID > '189273913187BACE') AND(MRO_GUID <= '33254DF9B6F6FB22')" />
</object></export>
<?xml version="1.0" encoding="UTF-8" standalone="no" ?> - <export file="EXPDMP_3_TC_WDRR_MRO_FILES">- <object action="select" name="TC_WDRR_MRO_FILES" type="TABLE">
<where cond="MRO_GUID > 'D5E34900AC0DD651'" /> </object>
</export>
<?xml version="1.0" encoding="UTF-8" standalone="no" ?> - <export file="EXPDMP_3_TC_WDRR_MRO_FILES">- <object action="select" name="TC_WDRR_MRO_FILES" type="TABLE">
<where cond="MRO_GUID > 'D5E34900AC0DD651'" /> </object>
</export>
. . .
1
2
n
WHEREcondition
. . .Export (select) data of specified range
The WHERE condition is used to select data of a specified range. For each job file of a splitted table, a separate JLOAD is started.

© SAP AG TADM70 8-69
© SAP AG 2010
JAVA Migration Monitor (JMIGMON) - Features
First introduced with SAPINST 7.02
Requires JPKGCTL (JSPLITTER) and a corresponding JLOAD version
Supports package and table splitting
Parallel export / Import with multiple JLOAD processes
Export / import order by size
Simple restart of failed JLOAD processes
Easy JLOAD parameter settings
The very first implementation came with SAPINST 7.02.
The JLOAD package files must be created with JPKGCTL before starting the export or import.
The parallel export / import makes use of “*.SGN” files like in the MIGMON implemenation.
JPKGCTL creates a “sizes.xml” containing the package sizes to support an ordered export with the largest packages first.
Failed JLOAD processes can be restarted by changing the content of the file “export/import.jmigmon.states“.

© SAP AG TADM70 8-70
© SAP AG 2010
JMIGMON – Net Configuration
Export install directory
(local)
Network exchange directory
Export directorie(s) (local)
Import install directory
(local)
*.SGN
export.jmigmon.statesexport.jmigmon.properties
jload.log, jload.trcjmigmon.console.log
import.jmigmon.statesimport.jmigmon.properties
jload.log, jload.trcjmimgon.console.log
*.STA,*.LOG,*.STAT.XML
shared
shared
Network exchange directory
Export directorie(s)*.XML, sizes.xml*.<nnn>
*.STA, *.LOG,*.STAT.XML
JMIGMON
JLOAD
JMIGMON
JLOAD
Exportingsystem
Importingsystem
The JMIGMON network configuration is useful in environments, where file systems can be shared between source and target system. For consistency reasons, exports should always be done to local file systems / directories!
In the example above, the export directory and the network exchange directory are shared from the exporting to the importing system. As soon as a package is successfully exported, the corresponding signal file (*.SGN) will be created in the network exchange directory. Now the importing JMIGMON starts an JLOAD process to load the dump from the shared export directory.
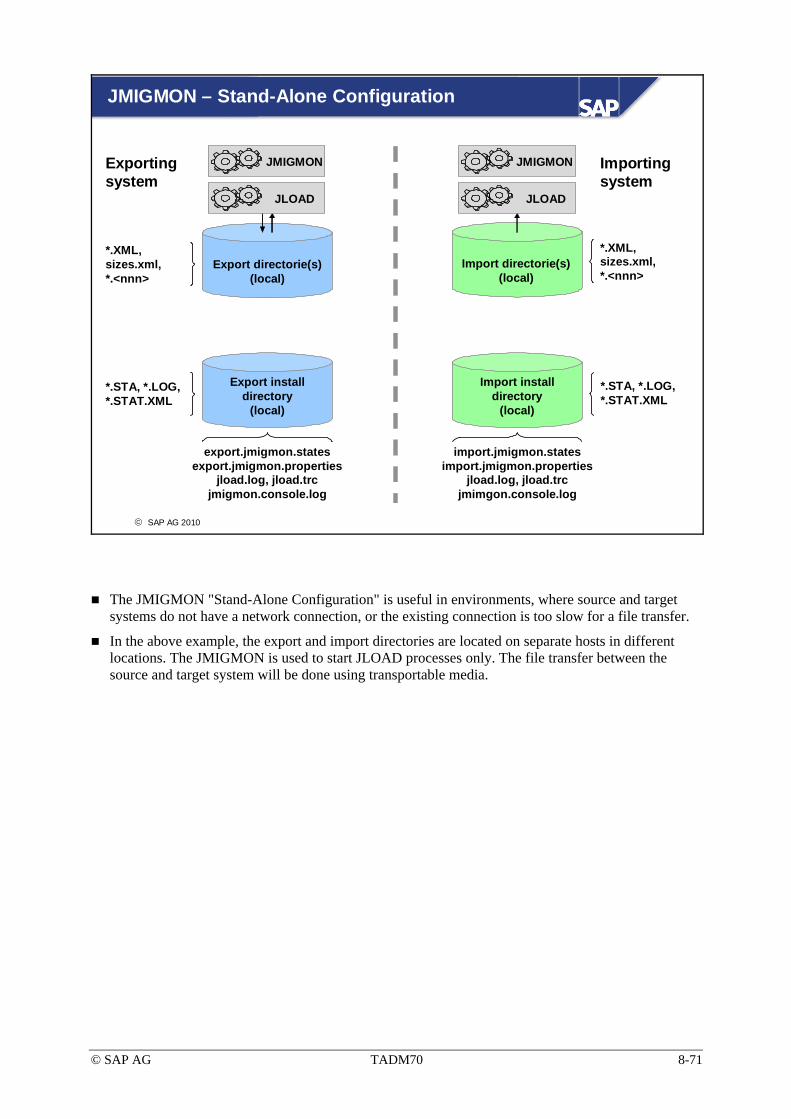
© SAP AG TADM70 8-71
© SAP AG 2010
JMIGMON – Stand-Alone Configuration
Export install directory
(local)
Export directorie(s) (local)
Import install directory
(local)
*.XML, sizes.xml,*.<nnn>
*.STA, *.LOG, *.STAT.XML
export.jmigmon.statesexport.jmigmon.properties
jload.log, jload.trcjmigmon.console.log
import.jmigmon.statesimport.jmigmon.properties
jload.log, jload.trcjmimgon.console.log
*.STA, *.LOG, *.STAT.XML
Import directorie(s)(local)
*.XML, sizes.xml, *.<nnn>
Exportingsystem
Importingsystem
JMIGMON JMIGMON
JLOADJLOAD
The JMIGMON "Stand-Alone Configuration" is useful in environments, where source and target systems do not have a network connection, or the existing connection is too slow for a file transfer.
In the above example, the export and import directories are located on separate hosts in different locations. The JMIGMON is used to start JLOAD processes only. The file transfer between the source and target system will be done using transportable media.

© SAP AG TADM70 8-72
© SAP AG 2010
JMigMon – Control and Output Files
State Description0 Package export/import not yet started? Package export/import in progress- Package export/import finished with errors+ Package export/import finished successfully
export/import.jmigmon.states (<package>=<state>)
Change to reprocess package
export.jmigmon.propertiesimport.jmigmon.properties
Export/import parameter files.
export.jmigmon.statesimport.jmimgon.states
Package export/import status
jmigmon.console.log Export/import console output log
The "jmigmon.console.log" should be inspected in case of export or import errors. More detailed information can be found in the respective job log.
The JMIGMON state files are used to control which packages are already exported, currently in use, or terminated on error. Changing a package state from minus (“-”) to zero (“0”), will force JMIGMON to restart the job.
Example export_jmigmon_states:
• EXPORT_METADATA.XML=+ finished
• EXPORT_13_J2EE_CONFIGENTRY.XML=+ finished (splitted table)
• EXPORT_14_J2EE_CONFIGENTRY.XML=+ finished (splitted table)
• EXPORT_0.XML=+ finished
Example import.jmigmon_states:
• IMPORT_METADATA.XML=+ finished
• IMPORT_13_J2EE_CONFIGENTRY.XML=+ finished (splitted table)
• IMPORT_14_J2EE_CONFIGENTRY.XML=? running (splitted table)
• IMPORT_0.XML=- failed

© SAP AG TADM70 8-73
© SAP AG 2010
Advanced Migration Techniques: Unit Summary
Different methods are available to speed up the OS/DB migration process. You should implement a mixture of different methods to save time on OS/DB migrations
In most cases, several alternatives are available

© SAP AG TADM70 8-74
© SAP AG TADM70 8-75
Exercises
Unit 8: Advanced Migration Techniques
At the conclusion of this exercise, you will be able to:
• Prevent situations where the content of split *.STR files is not satisfactory.
• Handle situations where no Perl of JAVA is available or cannot be installed; but the Package Splitter features should still be utilized.
8-1 A customer database of an ABAP SAP System has 10 very large tables that are between 2 and 20 GB in size and some other large tables ranging from 500 – 2.000 MB. After the JAVA- or Perl-based Package Splitter was executed with option “-top 10” (move the 10 largest tables to separate *.STR files) 10 additional *.STR files exit, but contain other tables than expected.
8-1-1 What can be the reason of this behavior?
What file is read to get the table size? What happens to large tables?
8-2 In a preparation of an R3LOAD heterogeneous system copy, the customer was asked to install Perl 5 or a JAVA JDK on his Windows production system, but he denied, because of restrictive software installation policies.
8-2-1 Nevertheless, what can be done to improve the export time?
8-3 The Migration Monitor has a client and a server export mode.
8-3-1 What are the benefits of using the client mode?

© SAP AG TADM70 8-76
© SAP AG TADM70 8-77
Solutions
Unit 8: Advanced Migration Techniques
8-1
8-1-1 R3SZCHK limits the computed table sizes to a maximum of 1.78 GB. Because of this, the package splitter catches the first 10 largest tables found in the *.EXT files. A 20 GB table will have the same *.EXT entry as a 2000 MB table.
8-2
8-2-1 The *.STR files can be split manually using an editor, or can be transferred to another system where Perl or JAVA is available to perform the split. In order to do this, the export will need to have been stopped after R3SZCHK has started.
If the split is done in advance, be sure that no new changes have been made to the ABAP dictionary since the initial creation of the *.STR files! Otherwise you risk inconsistencies.
8-3
8-3-1
a) No changes to the standard R3SETUP or SAPINST export process is required.
b) Automatic file transfer to the target system is possible
c) The data load can be started automatically as soon as the first package is signaled to be ready.

© SAP AG TADM70 8-78

© SAP AG TADM70 9-1
© SAP AG 2010
Performing the Migration
1 Introduction 7 R3LOAD & JLOAD Files
2 The Migration Project 8 Advanced Migration Techniques
3 System Copy Methods 9 Performing the Migration
4 SAP Migration Tools 10 Troubleshooting
5 R3SETUP / SAPINST 11 Special Projects
6 Technical Background Knowledge

© SAP AG TADM70 9-2
© SAP AG 2010
ContentsScheduling a standard SAP OS/DB migration using the SAP migration tools
ObjectivesAt the end of this unit, you will be able to:
Prepare the migration source systemUnload the data in the source systemTransport the data to the target systemInstall the target system and configure the required file systemsLoad the target systemPerform the migration follow-up tasks
Performing the Migration
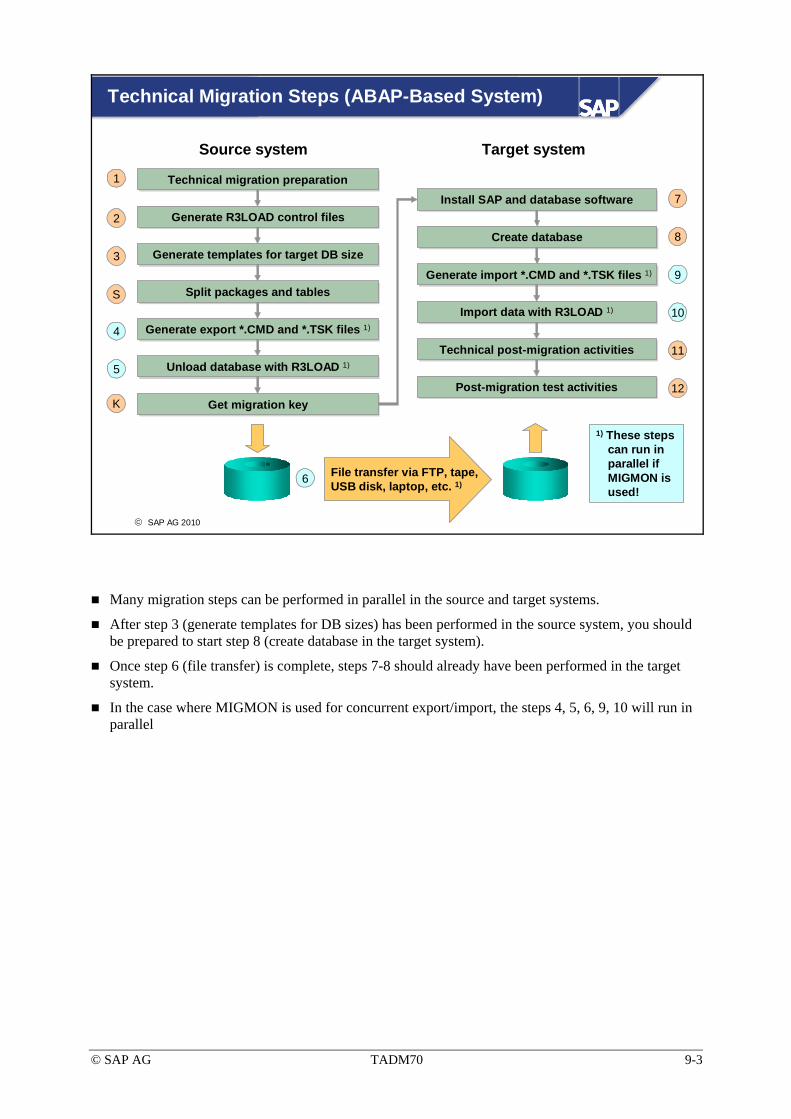
© SAP AG TADM70 9-3
© SAP AG 2010
Technical Migration Steps (ABAP-Based System)
File transfer via FTP, tape, USB disk, laptop, etc. 1)6
Generate R3LOAD control files Generate R3LOAD control files
Generate templates for target DB sizeGenerate templates for target DB size
Generate export *.CMD and *.TSK files 1)Generate export *.CMD and *.TSK files 1)
Unload database with R3LOAD 1)Unload database with R3LOAD 1)
Install SAP and database softwareInstall SAP and database software
Create databaseCreate database
Import data with R3LOAD 1)Import data with R3LOAD 1)
Technical post-migration activitiesTechnical post-migration activities
Source system Target system
2
3
5
4
1
7Technical migration preparation Technical migration preparation
10
8
11
Get migration keyGet migration keyKPost-migration test activitiesPost-migration test activities 12
Generate import *.CMD and *.TSK files 1)Generate import *.CMD and *.TSK files 1) 9Split packages and tablesSplit packages and tablesS
1) These steps can run in parallel if MIGMON is used!
Many migration steps can be performed in parallel in the source and target systems.
After step 3 (generate templates for DB sizes) has been performed in the source system, you should be prepared to start step 8 (create database in the target system).
Once step 6 (file transfer) is complete, steps 7-8 should already have been performed in the target system.
In the case where MIGMON is used for concurrent export/import, the steps 4, 5, 6, 9, 10 will run in parallel

© SAP AG TADM70 9-4
© SAP AG 2010
Technical Migration Preparation (1)
Retrieve latest SAP NotesHomogeneous/heterogeneous system copy
Installation
Operating system levelSet up the migration file systems/directories
Install migration tools
Deschedule all OS/DB data backups
Shut down external interfaces
Make sure that the database is not being accessed while the export is running
1Step
Just before you start the migration, check all the migration-related SAP Notes for updates.

© SAP AG TADM70 9-5
© SAP AG 2010
Technical Migration Preparation (2)
Database levelRun update statistics or other performance-relevant activities
SAP System levelDelete unnecessary data (spool data, test clients, and so on)
De-schedule all SAP jobs and data backups
Release all repairs and corrections if changing SAP SID
DB02: Missing tables/indexes?
Check for database-specific modifications - cancel if necessary
Run report SMIGR_CREATE_DDL (creates <TABART>.SQL files)
Stop the SAP System
1Step
To reduce the time required to unload and load the database, minimize the amount of data in the migration source system.
Before the migration make sure to de-schedule all jobs in the source system. This avoids jobs failing directly after the first start of the migrated SAP System. The reports BTCTRNS1 (set jobs into suspend mode) and BTCTRNS2 (reactivate jobs) can be helpful. Check the corresponding SAP Notes and SAP System upgrade guides for further reference.
If the target system has a new SAP SID, release all the corrections and repairs before starting the export.
If the database contains tables that are not in the ABAP Dictionary, check whether some of these tables also have to be migrated.

© SAP AG TADM70 9-6
© SAP AG 2010
Technical Migration Preparation (3)
Target Database
DB2DB4DB6INFORMIXOracleMSSQLMaxDB
Database Version
Additional Parameters
Unicode MigrationInstallation Directory
Optional Parameters
Table CategoryTable Name
Report SMIGR_CREATE_DDL (creates <TABART>.SQL)
Mandatory for:
- > NetWeaver ’04 (> 6.40)and system based onit
- BW 3.0 and 3.1 (6.20)and systems based on it (like APO)
1Step
SAP Note 771209
The execution of report “SMIGR_CREATE_DDL” is mandatory for all SAP systems using non-standard database objects (BI/BW, SCM/APO, …). For NetWeaver ’04 and later, the execution of “SMIGR_CREATE_DDL” is a must! Make sure not to make any changes to the non-standard objects after “SMIGR_CREATE_DDL” has been called!
If no database specific objects exist, then no <TABART>.SQL files will be generated. As long as the report terminates with status “successfully”, everything is ok.
The “Installation Directory” can be any file system location. Copy <TABART>.SQL files to the SAPINST export install directory or directly into the “<export_dir>/DB/<target_DBS>” directory. Follow the guidelines in the homogeneous/heterogeneous system copy manual.
Depending on the target database additional options might be available, which can be selected in the field “Database Version“.
“Optional Parameters“ allows the creation of a single <TABART>.SQL file for a certain TABART, or for a specific table only. The resulting <TABART>.SQL file will always have the name of the TABART. If the selected TABART or table is not a BW object, no <TABART>.SQL file will be created.
See SAP Notes:
• 771209 “NetWeaver ’04: System copy (supplementary note)”
• 888210 “NetWeaver 7.00/7.10: System Copy (supplementary note)”

© SAP AG TADM70 9-7
© SAP AG 2010
Generate *.EXT and *.STR Files
Duration: several hours
DDL<DBS>.TPL
DBSIZE.XML SAP<TABART>.STR
Read
Write
DB
R3SZCHK
R3LDCTL
SAP<TABART>.EXT
Write
3Step 2 +
R3SETUP/SAPINST calls R3LDCTL and R3SZCHK.
The runtime of R3SZCHK depends on the version, the size of the database and the database type.
DBSIZE.TPL is created by R3SETUP, from the information computed by R3SZCHK and stored in table DDLOADD.
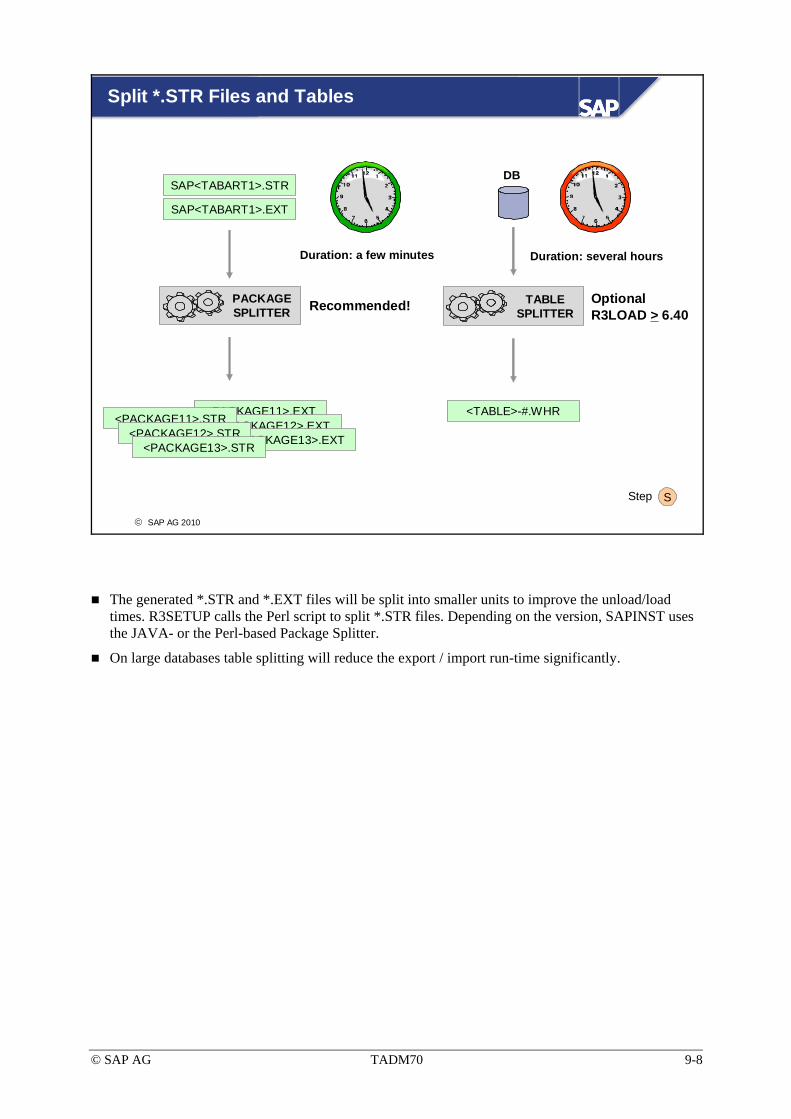
© SAP AG TADM70 9-8
© SAP AG 2010
Split *.STR Files and Tables
SStep
SAP<TABART1>.EXT
SAP<TABART1>.STR
<PACKAGE11>.EXT<PACKAGE12>.EXT
<PACKAGE13>.EXT
<PACKAGE11>.STR<PACKAGE12>.STR
<PACKAGE13>.STR
PACKAGE SPLITTER
TABLE SPLITTER
<TABLE>-#.WHR
Duration: a few minutes Duration: several hours
Optional R3LOAD > 6.40
Recommended!
DB
The generated *.STR and *.EXT files will be split into smaller units to improve the unload/load times. R3SETUP calls the Perl script to split *.STR files. Depending on the version, SAPINST uses the JAVA- or the Perl-based Package Splitter.
On large databases table splitting will reduce the export / import run-time significantly.

© SAP AG TADM70 9-9
© SAP AG 2010
Generate Export *.CMD and *.TSK Files
4Step
Duration: a few minutes
<PACKAGE>.CMD
DDL<DBS>.TPL
<PACKAGE>.STR
<PACKAGE>.TSK
<PACKAGE>.CMD
[tsk: .../<INSTALL>/<PACKAGE>.TSK]icf: .../DATA/<PACKAGE>.STRdcf: .../DB/DDL<DBS>.TPLdat: .../DATA bs=1K fs=1000Mdir: .../DATA/<PACKAGE>.TOC
> 6.10only
<TABLE>-#.WHR
SAPINST/MIGMON call R3LOAD to create task files.
R3SETUP/SAPINST/MIGMON generates command files. If WHERE files exist, the WHERE conditions will be inserted into the *.TSK files.

© SAP AG TADM70 9-10
© SAP AG 2010
Export Database with R3LOAD
5Step 5Step
Duration: several hours(depending on database size)
DB
Write
Read
Write
DDL<DBS>.TPL <PACKAGE>.TSK
<PACKAGE>.LOG
WriteRead Read
> 6.10 only
<PACKAGE>.STR
Do not use NFS!
<PACKAGE>.<nnn> <PACKAGE>.TOC
ReadR3LOAD
R3SETUP/SAPINST/MIGMON start a number of R3LOAD processes. A separate R3LOAD processes is started for each command file. The R3LOAD processes write the dump files to disk.
As soon as an R3LOAD process terminates (whether successfully or due to error), R3SETUP/SAPINST/MIGMON start a new R3LOAD process for the next command file.
Do not use NFS file systems as an export target for the dump files! Dump files can be unnoticeably damaged and cause data corruption!

© SAP AG TADM70 9-11
© SAP AG 2010
6Step
Manual File Transfer (1)
FTPDump files - Binary mode
Control files - as recommended in the system copy guide
Control files - ASCII mode (AS/400 EBCDIC only)
Tape
DVD
USB disk devices
Laptop with high capacity disk drive
Use a safe copy method !!!!
EBCDIC R3LOAD control files created on AS/400 systems must be transferred in ASCII mode, if the target system is to run on an ASCII-based platform.
In cases where dump files must be copied to transportable media, make sure that the files are copied correctly. It’s better to spend additional time on verifying the copied files against the original files than spending several hours or even days to transport them to the target system, only to discover that some files had been corrupted by the copy procedure used. Appropriate checksum tools are available for every operating system.

© SAP AG TADM70 9-12
© SAP AG 2010
Manual File Transfer (2)
Location File(s)Files to transfer into the target system:
<export_dir> LABEL.ASC<export_dir>/DATA <PACKAGE>.<nnn><export_dir>/DATA <PACKAGE>.STR<export_dir>/DATA <PACKAGE>.TOC<export_dir>/DATA <TABLE>-#.WHR (if existing)<export_dir>/DB/<target_DBS> <PACKAGE>.EXT<export_dir>/DB/<target_DBS> DBSIZE.*<export_dir>/DB/<target_DBS> <TABART>.SQL (if existing)<export_dir>/DB DDL<target DBS>.TPL
Files not to transfer:<install_dir> <PACKAGE>.CMD<install_dir> <PACKAGE>.TSK
The entire content of the export directory must be transferred to the target system!
The file “LABEL.ASC” is generated during the export of the source database. R3SETUP/SAPINST uses its content to determine whether the load data is read from the correct directory.
Only if <TABART>.SQL files have been created by SMIG_CREATE_DDL: SAPINST automatically copies the <TABART>.SQL file(s) from the install directory into the <export_dir>/DB/<target_DBS> directory, but only if the <TABART>.SQL file(s) were copied during the SAPINST dialog phase into the install directory before. If this was forgotten, copy the <TABART>.SQL files directly into the <export_dir>/DB/<target_DBS> directory. Otherwise the importing R3LOAD process will not be able to find the <TABART>.SQL file. As a result, the create parameters of the non-standard database objects will be wrong (i.e. missing partitions).
The *.CMD and *.TSK files are generated separately for export and import. Therefore, do not copy them!

© SAP AG TADM70 9-13
© SAP AG 2010
KStep
Get Migration Key (1)
Logon to SAP Service Marketplace using an S-USER valid for the installation number of the
source system.
Logon to SAP Service Marketplace using an S-USER valid for the installation number of the
source system.
Use alias “migrationkey”Use alias “migrationkey”
Select installation number of the source systemSelect installation number of the source system
Accept migration key license agreementAccept migration key license agreement
Provide migration parametersProvide migration parameters
Check migration key as soon as possible!Check migration key as soon as possible!
Case sensitive!
Customer task!
The migration key must be requested from the customer, because he has to accept the shown migration key license agreement.
Check the migration key as soon as possible! All entries are case sensitive. Before opening a problem call, See SAP Note 338372.

© SAP AG TADM70 9-14
© SAP AG 2010
KStep
Get Migration Key (2)
Installation number 01200xxxxx
Source System
System ID TI6R/3 Release Release 4.6DOP System HPUXDB System INFORMIXDB Server Hostname uxasb00(case sensitive)
Target System
System ID CI6OP System SOLARISDB System ORACLEDB Server Hostname hxasb00(case sensitive)
Installation number 01200xxxxx
Source System
System ID TI6R/3 Release Release 4.6DOP System HPUXDB System INFORMIXDB Server Hostname uxasb00(case sensitive)
Target System
System ID CI6OP System SOLARISDB System ORACLEDB Server Hostname hxasb00(case sensitive)
Node name where R3LOAD runs!“(GSI) INFO nodename”
Node name where R3LOAD runs! “(GSI) INFO nodename”
Kernel version (R3LOAD version)!First 3 characters “(GSI) INFO: dbname”
Entries are case sensitive!Entries are case sensitive!
SAP Note 338372
Since 4.6D, the migration key is identical for different SAP Systems of the same installation number.
The migration key must match the R3LOAD version. If asked for the SAP R/3 Release, enter the release version of the used R3LOAD. If in doubt check the log files.
Some systems are using several different hostnames (i.e. in a cluster environment). The node name shown by “uname -a” or “hostname” should be the “DB Server Hostname”.
Starting with 4.5A, always generate the migration key from the node name which is listed in the “(GSI) INFO” section of the R3LOAD export log (source system) and MIGKEY.log (target system). In some installations the System ID can even be in lower-case letters, because it is obtained from the first three characters of “(GSI) INFO: dbname”! The R3LOAD log files of 3.1I and 4.0B do not contain information about the source system, as in versions 4.5A and above.
R3SETUP and SAPINST test the migration key by calling R3LOAD -K (upper-case K). The file “MIGKEY.log” contains the check results.
The migration key in NetWeaver 7.00 Systems with “old” SAP license installed (upgraded system) is different then for the “new” SAP license. Check the corresponding system copy note for details.
See SAP Note 338372 “Migration key does not work” for further reference.

© SAP AG TADM70 9-15
© SAP AG 2010
Install SAP and Database Software
7Step
Install the SAP instanceSame procedure as in a standard SAP installation
Install the latest SAP kernel *)
Install the database softwareSame procedure as in a standard SAP installation
Install latest database patches*)
*) Check the approved SAP product platform/release combinations*) Check the approved SAP product platform/release combinations

© SAP AG TADM70 9-16
© SAP AG 2010
8Step
Duration: several hours(depending on database size)
Create Database
Determine the database configuration:Size the database storage unitsDistribute the database storage unitsConfigure the database logsR3SETUP: Adjust DBSIZE.TPL SAPINST: Adjust DBSIZE.XML
Create database:May be time-consuming when large databases are involvedCan take place before to the unload in the source database
The size values for the target database that are calculated from the source database serve only as starting points. Generally, some values will be too large and others will be too small. Therefore, be generous in your database sizing during the first migration test run. The experience gained through the test migration is better than any advanced estimate you could calculate, and you can always adjust the values in subsequent tests.

© SAP AG TADM70 9-17
© SAP AG 2010
Generate Import *.CMD and *.TSK Files
Duration: a few minutes
9Step
<PACKAGE>.CMD
[tsk: .../<INSTALL>/<PACKAGE>.TSK]icf: .../DATA/<PACKAGE>.STRdcf: .../<INSTALL>/DDL<DBS>.TPLdat: .../DATA bs=1K fs=1000Mdir: .../DATA/<PACKAGE>.TOCext: .../DB/<DBS>/<PACKAGE>.EXT
<PACKAGE>.CMD
DDL<DBS>.TPL
<PACKAGE>.STR
<PACKAGE>.TSK > 6.10only
<TABLE>-#.WHR
SAPINST/MIGMON call R3LOAD to create task files.
R3SETUP/SAPINST/MIGMON generate commands files. If WHERE files exist, the WHERE conditions will be inserted into the *.TSK files.

© SAP AG TADM70 9-18
© SAP AG 2010
Import Data with R3LOAD
10Step
Duration: several hours(depending on database size)
Write
DB
<PACKAGE>.<nnn> <PACKAGE>.TOC
Write
<PACKAGE>.TSK
<PACKAGE>.LOG
Read
> 6.10 only
Read
Write
<PACKAGE>.EXT <PACKAGE>.STR
DDL<DBS>.TPL
Read
R3LOAD
<TABART>.SQL
Read
> 6.20 only
R3SETUP/SAPINST/MIGMON starts the import R3LOAD processes.

© SAP AG TADM70 9-19
© SAP AG 2010
11Step
Technical Post-Migration Activities (1)
Operating system levelVerify log file of ABAP/DB DDIC consistency check
Install the SAP System license
Copy external SAP System files (job logs, archives, external spool files, interface data, etc.)
Set up access to the transport directory
Set up external interfaces
Perform a file system backup
The general follow-up activities are described in the homogeneous and heterogeneous system copy guides and their respective SAP Notes.
Before the copied system is started the first time, the consistency between the ABAP and database dictionary will be checked and updated. R3SETUP/SAPINST will start the program “dipgntab” for that purpose. All updates of the active NAMETAB are logged in the file “dipgntab<SAP SID>.log”. The summary at the end of this file should not report any error!

© SAP AG TADM70 9-20
© SAP AG 2010
11Step
Technical Post-Migration Activities (2)
Database levelMake a database backup
Perform a database restore test
Update statistics or perform other performance-relevant activities
Adjust the database parameters
Analyze the DB fill level
Set up additional indexes if necessary (see relevant SAP Notes)
Delete old SAP System monitor and statistics data
In many cases, the change of a database system will also include a change in the backup mechanism. Make sure to get familiar with the changed/new backup/restore procedures.
After the migration, the SAP System statistics and backup information for the source system can be deleted from the target database. For a list of the tables, see the system copy guide.

© SAP AG TADM70 9-21
© SAP AG 2010
11Step
Technical Post-Migration Activities (3)
SAP System levelCheck the SAP System installation (transaction SICK)
DB02: ABAP Dictionary / database consistency check
Make sure that install RFC reports have been executed successfully
If the SAPSID has been changed, initialize the transport system
Configure the transport management system (TMS)
Regenerate ABAP Loads
Schedule data backups
Adjust all printer definitions
Adjust the RFC destinations, profiles, and operation modes
Reschedule SAP jobs (if necessary, change the batch server)
Report RADDBDIF creates database-specific objects (tables, views, indexes). RADDBDIF is usually called by R3SETUP/SAPINST via RFC (user DDIC, client 000) after the data is loaded.
After ok from customer side, the SAP jobs that have been set to suspend mode via report BTCTRNS1, can now be rescheduled with BTCTRNS2.

© SAP AG TADM70 9-22
© SAP AG 2010
Technical Post-Migration Activities (4)
RS_BW_POST_MIGRATION
Connect all data source systems to the migrated system
Make sure the data source system are accessable while the report is running
Run the report in the background (it can take several hours)
Check spool and job protocols carefully
Starting with Web AS 6.40 Support Package Stack 12, monitoring objects can be created using BW functionality!Starting with Web AS 6.40 Support Package Stack 12, monitoring objects can be created using BW functionality!
11Step
The non-standard database objects (mainly BW objects) which were identified on the source system and are recreated and imported into the target system, will need some adjustments. The report RS_BW_POST_MIGRATION will do this. For further reference check SAP Note 777024 “BW 3.0 and BW 3.1 System copy” and/or read the corresponding chapter “Final Activities” in the homogeneous and heterogeneous system copy 6.40 or higher. The program should run independently, whether or not a *.SQL file was used or not.
The data source system connection can be checked in transaction RSA1. The RFC parameters can be changed in transaction SM59.
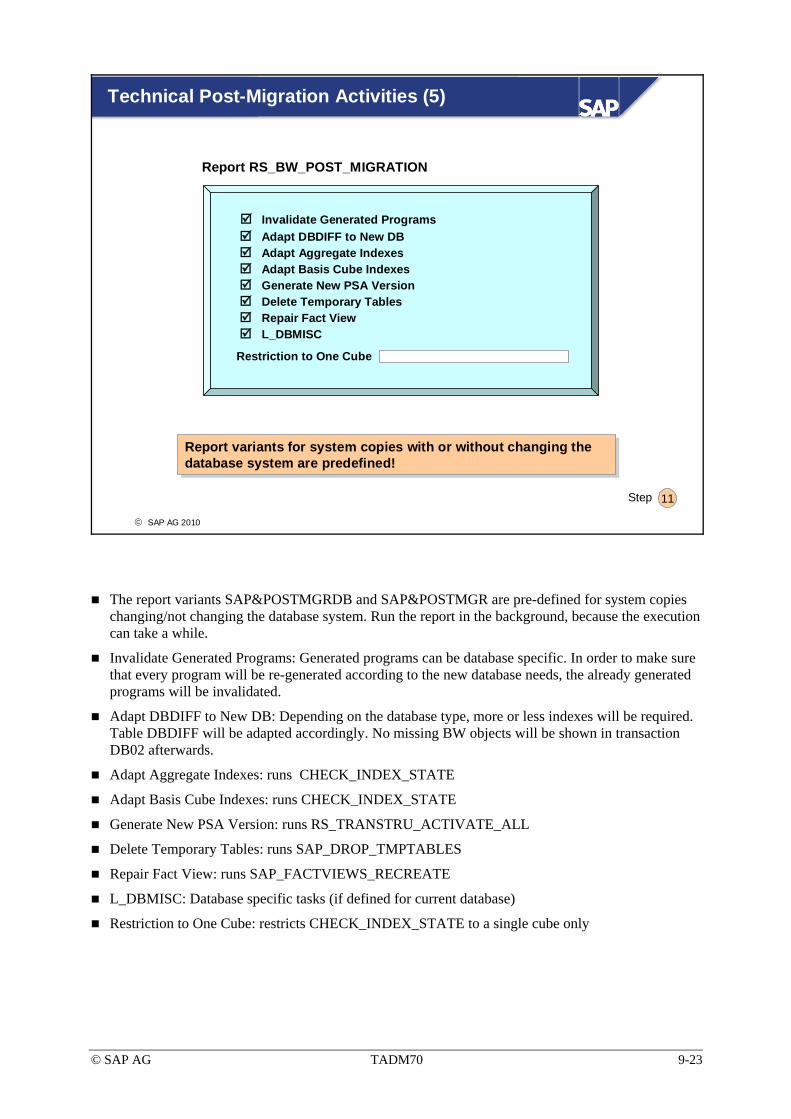
© SAP AG TADM70 9-23
© SAP AG 2010
Technical Post-Migration Activities (5)
Invalidate Generated ProgramsAdapt DBDIFF to New DBAdapt Aggregate IndexesAdapt Basis Cube IndexesGenerate New PSA VersionDelete Temporary TablesRepair Fact ViewL_DBMISC
Restriction to One Cube
Report RS_BW_POST_MIGRATION
11Step
Report variants for system copies with or without changing the database system are predefined!Report variants for system copies with or without changing the database system are predefined!
The report variants SAP&POSTMGRDB and SAP&POSTMGR are pre-defined for system copies changing/not changing the database system. Run the report in the background, because the execution can take a while.
Invalidate Generated Programs: Generated programs can be database specific. In order to make sure that every program will be re-generated according to the new database needs, the already generated programs will be invalidated.
Adapt DBDIFF to New DB: Depending on the database type, more or less indexes will be required. Table DBDIFF will be adapted accordingly. No missing BW objects will be shown in transaction DB02 afterwards.
Adapt Aggregate Indexes: runs CHECK_INDEX_STATE
Adapt Basis Cube Indexes: runs CHECK_INDEX_STATE
Generate New PSA Version: runs RS_TRANSTRU_ACTIVATE_ALL
Delete Temporary Tables: runs SAP_DROP_TMPTABLES
Repair Fact View: runs SAP_FACTVIEWS_RECREATE
L_DBMISC: Database specific tasks (if defined for current database)
Restriction to One Cube: restricts CHECK_INDEX_STATE to a single cube only

© SAP AG TADM70 9-24
© SAP AG 2010
Technical Post-Migration Activities (6)
ABAP Loads are OS dependant. Use the appropriate method to regenerate them on the migration target system
Transaction SGEN (> R/3 4.6B)
Transaction SAMT (R/3 4.5B)
Reports RDDGENLD and RDDLDTC2 (< R/3 4.5B)
11Step
The tables in the SAP0000.STR file contain the generated ABAPs (ABAP loads) of the SAP System. These loads are no longer valid after a hardware migration. For this reason, R3SETUP/SAPINST does not load these tables.
Each ABAP load is generated automatically the next time a program is called. The system will be slow unless all commonly used programs are generated.
Use transaction SGEN (starting with Release 4.6B) to regenerate all ABAPs.
On versions before 4.6B, run transaction SAMT or report RDDGENLD. The report RDDGENLD requires the file REPLIST in the SAP instance work directory. To create the file REPLIST in the source system, call report RDDLDTC2.

© SAP AG TADM70 9-25
© SAP AG 2010
12Step
Involve end users in the test process!Involve end users in the test process!
Post-Migration Test Activities
General testsSet up a test environment
Run reports to compare results to those in the source system
Test typical transactions from day-to-day business
Perform runtime tests of critical reports/transactions
Run performance tests (under heavy load)
Verify communication with external systems (carefully - as a test)
Create a cut over plan for the final migration
Take care when setting up the test environment. To prevent unwanted data communication to external systems, isolate the system. External systems do not distinguish between migration tests and production access.
To develop a cut over plan, an already existing checklist from a previous upgrade/migration can be a valuable source of ideas.
To identify any differences between the original and the migrated system, involve end users as soon as possible.

© SAP AG TADM70 9-26
© SAP AG 2010
Technical Migration Steps (JAVA-Based System)
File transfer via FTP, tape, USB disk, laptop, etc.6
Install SAP and database softwareInstall SAP and database software
Create or extend databaseCreate or extend database
Import database with JLOADImport database with JLOAD
Technical post-migration activitiesTechnical post-migration activities
Source system Target system
7
10
8
12
Post-migration test activitiesPost-migration test activities 13
Deploy SDM file system dataDeploy SDM file system data 9
Restore application data to file systemRestore application data to file system 11
Collect application data from file system Collect application data from file system 3
Generate templates for target DB sizeGenerate templates for target DB size2
Export database with JLOADExport database with JLOAD5
1 Technical migration preparation Technical migration preparation
Collect SDM data Collect SDM data 4
Generate export / import job filesGenerate export / import job filesG
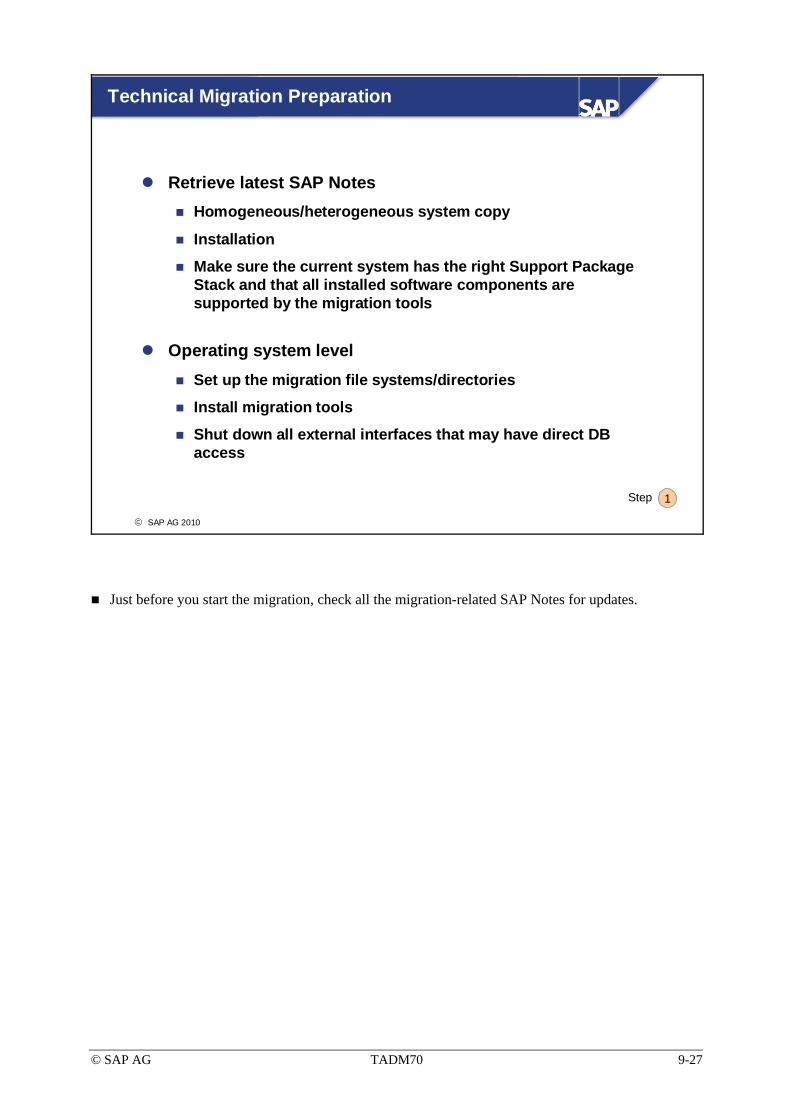
© SAP AG TADM70 9-27
© SAP AG 2010
Technical Migration Preparation
Retrieve latest SAP NotesHomogeneous/heterogeneous system copy
Installation
Make sure the current system has the right Support Package Stack and that all installed software components are supported by the migration tools
Operating system levelSet up the migration file systems/directories
Install migration tools
Shut down all external interfaces that may have direct DB access
1Step
Just before you start the migration, check all the migration-related SAP Notes for updates.

© SAP AG TADM70 9-28
© SAP AG 2010
Generate Template for Target DB Size
2Step
Duration: a few minutes
DBSIZE.XMLDB
Table A size + key A size + index A [1] size ... Table B size + key B size + index B [1] size ...Table C size + key C size + index C [1] size ......
+ Target DB conversion coefficients
JSIZE-CHECK
compute
writeread

© SAP AG TADM70 9-29
© SAP AG 2010
Collect Application Data from File System
SAPINST starts SAPCAR to archive application specific data stored in the file system
As a prerequisite, the application must be known by SAPINST
Various *.SAR files can be created
3Step
Note: in SAP releases based on 7.10 and later not required any more
If SAPINST does not recognize the installed application and its related files, no archives will be created. Make sure to use the right version of the installation CD, as mentioned in the appropriate SAP Notes regarding homogeneous and heterogeneous system copies.
Applications that are not recognized by SAPINST may require operation system specific commands to copy the respective directories and files to the target system. If this is the case, the corresponding SAP Notes will give instructions how to deal with it. The copy of other applications might need the installation of a certain support stack and a matching SAPINST.

© SAP AG TADM70 9-30
© SAP AG 2010
Collect SDM Data
SAPINST calls the Software Deployment Manager (SDM) to collect deployed file system software components
Read SDM Repository (list of deployed components)
Put file system components into the SDMKIT.JAR file
4Step
Note: in SAP releases based on 7.10 and later not required any more
In SAP releases below 7.10, the SDM repository itself is installed in the file system and will be redeployed into the target system from the SDMKIT.JAR file.

© SAP AG TADM70 9-31
© SAP AG 2010
JPKGCTL (JSPLITTER) only
Jsplitter_cmd.properties splitrules.txt
Duration: minutes to several hours(depending on table size and
database type)
export job Files
EXPORT_<PACKAGE>.XML IMPORT_<PACKAGE>.XML
EXPORT_METADATA.XML
EXPORT_POSTPROCESS.XML
IMPORT_METADATA.XML
IMPORT_POSTPROCESS.XML
import job files
JPKGCTL
Read Read
WriteWrite
sizes.xml
GStep
JPKGCTL is optional used since SAPINST 7.02.
Packaged job files containing multiple tables are named "EXPORT_<n>.XML" and job files for a single table only are named "EXPORT_<n>_<TABLE>.XML“. If a table was splitted, the resulting job files are named the same but with a different number.
For every export job file an import job file is generated with the same name but "EXPORT" is replaced with "IMPORT".
The "sizes.xml" file contains the expected export size of each generated packaged job file. It helps JMIGMON to export the packages by size. The largest package will be exported first, then the next smaller packages, and so on.
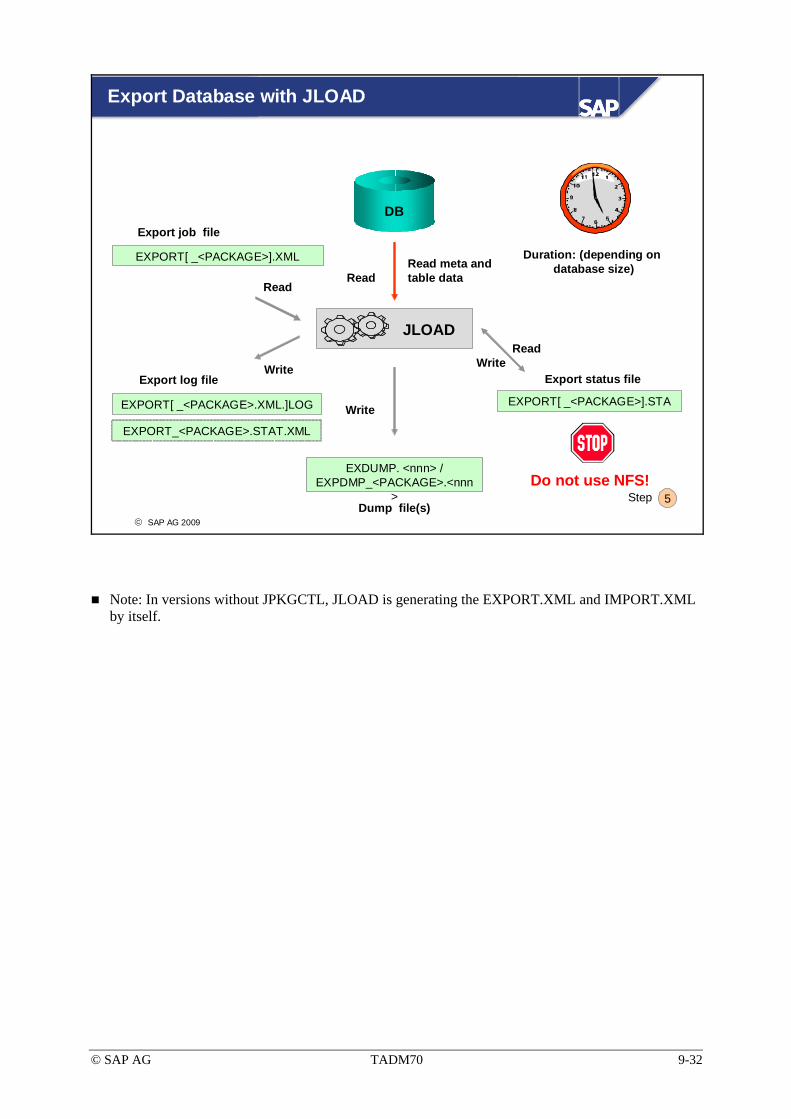
© SAP AG TADM70 9-32
© SAP AG 2009
Export Database with JLOAD
JLOAD
Read meta and table data
EXPORT[ _<PACKAGE>].STA
EXPORT[ _<PACKAGE>].XML
DB
EXPORT[ _<PACKAGE>.XML.]LOG Write
Export job file
Export status fileExport log file
Duration: (depending on database size)
Do not use NFS!
ReadRead
5Step
Write
ReadWrite
EXPORT_<PACKAGE>.STAT.XML
EXDUMP. <nnn> /EXPDMP_<PACKAGE>.<nnn
>Dump file(s)
Note: In versions without JPKGCTL, JLOAD is generating the EXPORT.XML and IMPORT.XML by itself.

© SAP AG TADM70 9-33
© SAP AG 2010
File Transfer
Location Content<export_dir> SOURCE.PROPERTIES<export_dir> LABEL.ASC<export_dir> LABELIDX.ASC<export_dir>/APPS LABEL.ASC<export_dir>/APPS/... Application specific <export_dir>/DB/<target_DBS> DBSIZE.XML<export_dir>/JDMP EXPDUMP.<nnn> /
EXPDMP_<PACKAGE>.<nnn><export_dir>/JDMP sizes.xml (if exists)<export_dir>/JDMP LABEL.ASC<export_dir>/JDMP IMPORT[ _<PACKAGE>].XML<export_dir>/JDMP EXPORT[ _<PACKAGE>].XML<export_dir>/SDM SDMKIT.JAR<export_dir>/SDM LABEL.ASC<export_dir> ... Others
6StepThe entire content of the export directory must be trans-ferred to the target system!
The file “LABELIDX.ASC” and the “LABEL.ASC” files are generated during the export of the source database. SAPINST uses its content to determine whether the load data is read from the correct directory.
The “<export_dir>/APPS” directory might be empty if no applications are installed, i.e. those which are keeping their data in the file system. Another possibility can be that the application is not known by SAPINST.
Future releases may be able to create additional directories/files in the export directory, which are named “Others” in the above slide.

© SAP AG TADM70 9-34
© SAP AG 2010
Install DB/SAP Software and Extend Database
Non-JAVA Add-In installation: install database softwareApply latest database patchesAdapt DBSIZE.XML (if the export SAPINST version called JSIZECHECK)
JAVA Add-In installation: the already existing database must be extended and a new schema is added or is done in a single during the ABAP installation.
Adapt DBSIZE.XML (if the export SAPINST version called JSIZECHECK)
The JAVA Web AS is installed in a single step, together with necessary system copy activities performed by SAPINST
8Step 7 +
In SAPINST versions below NetWeaver ’04S the database size is set using a default value.

© SAP AG TADM70 9-35
© SAP AG 2010
Deploy SDM File System Data
SAPINST calls the Software Deployment Manager (SDM) to reinstall (deploy) its file system components including the SDM Repository from the SDMKIT.JAR
9Step
Note: in SAP releases based on 7.10 and later not required any more
The Software Deployment Manager holds its repository in the file system. For a re-installation, the content of SDMIT.JAR will be used, which contains the necessary file system components as collected in the source system.
This step is not necessary anymore in NetWeaver 7.10 and later.
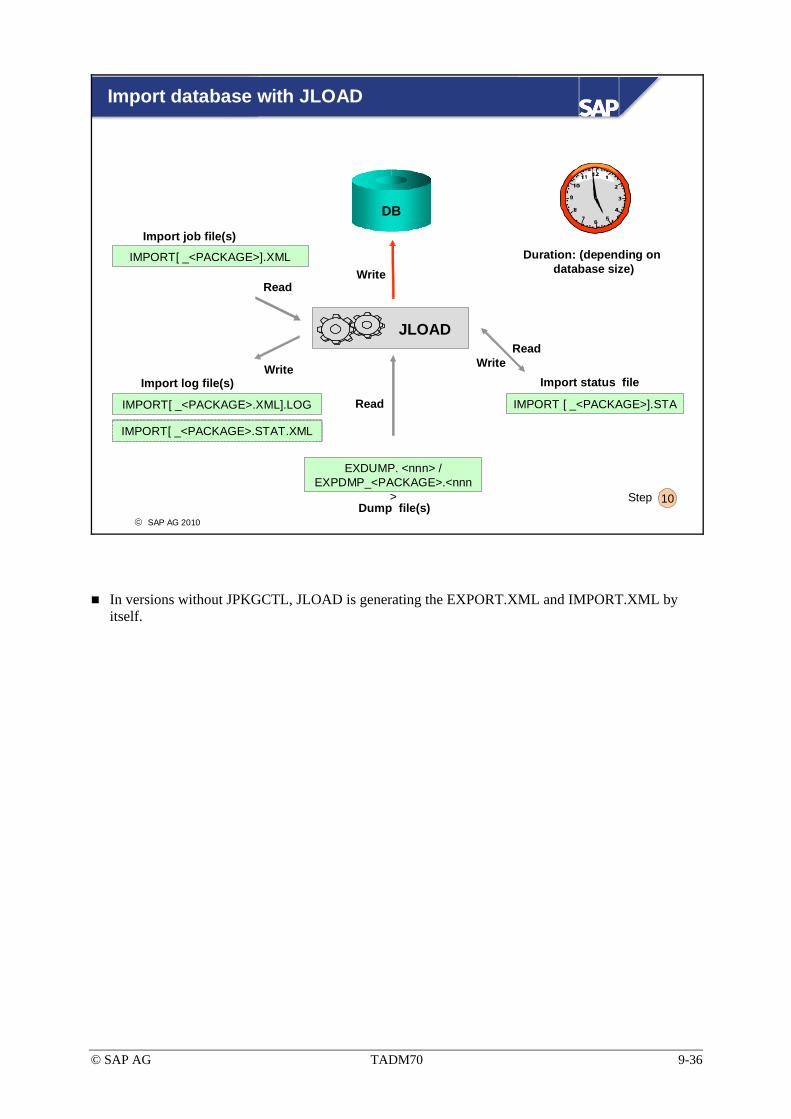
© SAP AG TADM70 9-36
© SAP AG 2010
Import database with JLOAD
JLOAD
Write
ReadWriteWrite
Read
IMPORT [ _<PACKAGE>].STA
IMPORT[ _<PACKAGE>].XML
DB
IMPORT[ _<PACKAGE>.XML].LOG
EXDUMP. <nnn> /EXPDMP_<PACKAGE>.<nnn
>
Read
Import job file(s)
Import status fileImport log file(s)
Duration: (depending on database size)
10StepDump file(s)
IMPORT[ _<PACKAGE>.STAT.XML
In versions without JPKGCTL, JLOAD is generating the EXPORT.XML and IMPORT.XML by itself.

© SAP AG TADM70 9-37
© SAP AG 2010
Restore Application Data to File System
SAPINST automatically extracts the SAPCAR archives into the respective directory structures
Copy SAPCAR archives manually into the respective directory structures, if instructed to do so
Copy application specific data which was not collected by SAPINST according to SAP Notes
11Step
Note: in SAP releases based on 7.10 and later not required any more
More and more JAVA-based software components will be integrated into the SAPINST system copy procedure. In the meantime, SAP Notes will give instructions how to copy or to extract data manually, if required.
Since 7.10 well behaving JAVA programs should not write persistent data into the file system.
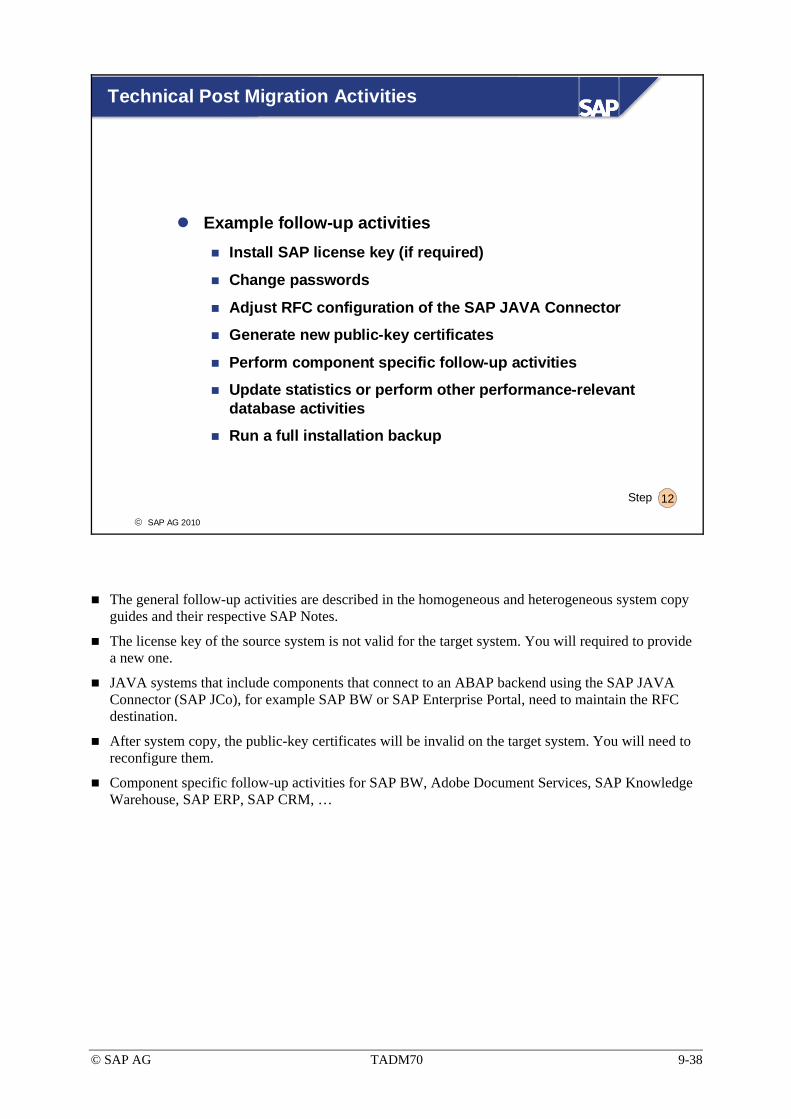
© SAP AG TADM70 9-38
© SAP AG 2010
Technical Post Migration Activities
Example follow-up activities Install SAP license key (if required)
Change passwords
Adjust RFC configuration of the SAP JAVA Connector
Generate new public-key certificates
Perform component specific follow-up activities
Update statistics or perform other performance-relevant database activities
Run a full installation backup
12Step
The general follow-up activities are described in the homogeneous and heterogeneous system copy guides and their respective SAP Notes.
The license key of the source system is not valid for the target system. You will required to provide a new one.
JAVA systems that include components that connect to an ABAP backend using the SAP JAVA Connector (SAP JCo), for example SAP BW or SAP Enterprise Portal, need to maintain the RFC destination.
After system copy, the public-key certificates will be invalid on the target system. You will need to reconfigure them.
Component specific follow-up activities for SAP BW, Adobe Document Services, SAP Knowledge Warehouse, SAP ERP, SAP CRM, …
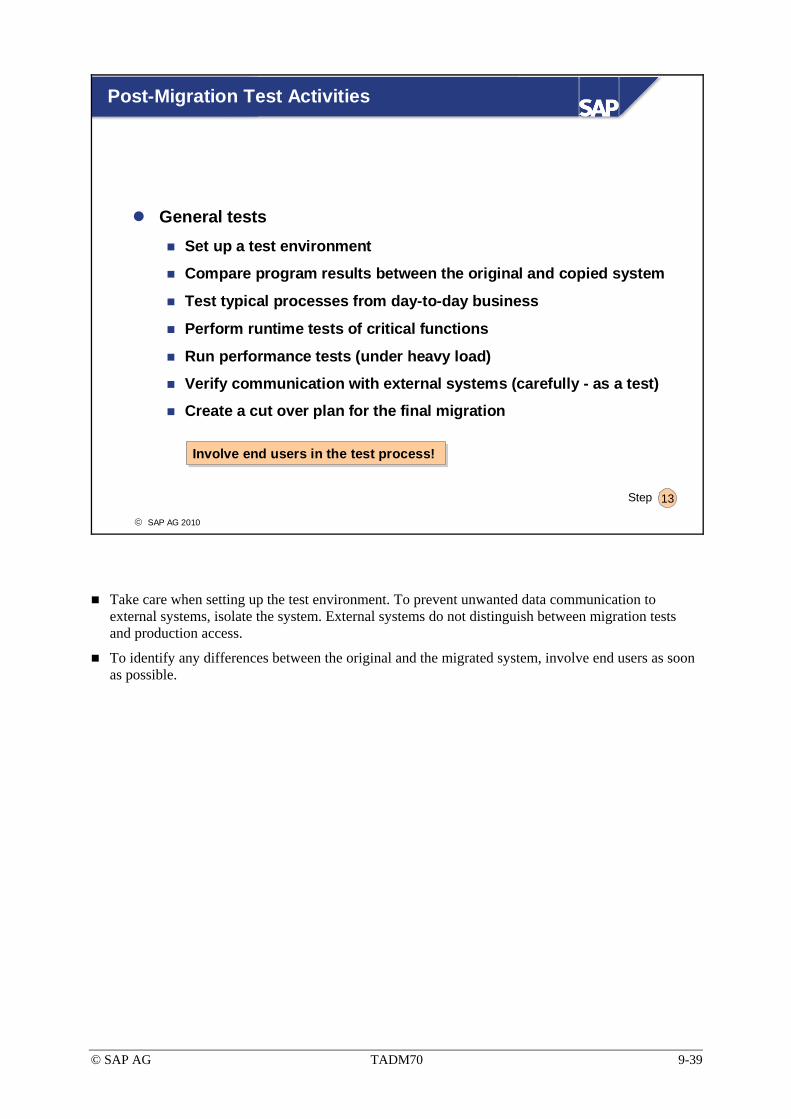
© SAP AG TADM70 9-39
© SAP AG 2010
13Step
Involve end users in the test process!Involve end users in the test process!
Post-Migration Test Activities
General testsSet up a test environment
Compare program results between the original and copied system
Test typical processes from day-to-day business
Perform runtime tests of critical functions
Run performance tests (under heavy load)
Verify communication with external systems (carefully - as a test)
Create a cut over plan for the final migration
Take care when setting up the test environment. To prevent unwanted data communication to external systems, isolate the system. External systems do not distinguish between migration tests and production access.
To identify any differences between the original and the migrated system, involve end users as soon as possible.

© SAP AG TADM70 9-40
© SAP AG 2010
Performing the Migration: Unit Summary
A migration may take a long time to perform. Some activities can be performed in parallel, but others can only be performed sequentially
The implementation of the final migration reflects the experience gained during the migration test runs

© SAP AG TADM70 9-41
Exercises
Unit 9: Performing the Migration
At the conclusion of this exercise, you will be able to:
• Prevent inconsistencies and dangers at export time or when starting the target system the first time.
• Provide the right values for generating the R3LOAD migration key.
9-1 In the preparation of a R3LOAD system copy, the customer was asked for scheduled backups, scheduled SAP System jobs, external programs or interfaces which are writing directly to the database and the planned SAP SID of the target system.
9-1-1 Why is it important to know which jobs are scheduled (SAP System or external jobs)?
9-1-2 In the case that the SAP SID will be changed during the system copy, which actions should be taken before the export?
9-2 The export of a heterogeneous system copy runs on the central instance SAP System with the following configuration:
Source system: Installation number: 012004711 Standalone database server hostname: “dbsrv01” Central instance server hostname: “cisrv01”
Target system: Installation number: 012000815 Central instance with database, hostname: “cidb001”
9-2-1 What would be the correct installation number to request the migration key?
9-2-2 Which hostnames must be provided when filling the migration key request form in the SAP Service Marketplace?
9-2-3 Where can information about the R3LOAD version and which hostnames were used for export/import (especially in environments where systems have a lot of network controllers and IP addresses or are even clustered) be found?

© SAP AG TADM70 9-42
© SAP AG TADM70 9-43
Solutions
Unit 9: Performing the Migration
9-1
9-1-1
a) While the export is running, only the SAP instance is shutdown.
External programs or interfaces that are directly writing into the
database, while the export is running, can cause inconsistencies!
b) Scheduled database backups can shutdown the database, or decreasethe export performance.
c) After starting the migration target system the first time, scheduled jobs
may be executed immediately; this can either be harmful or not
harmful, depending on their nature. In this stage, the target system has
not been properly configured. Jobs that need to be run for verification
purposes may only be capable of being executed once.
The BTCTRNS1 and BTCTRNS2 reports are available to set all scheduled jobs to “suspended” status on the source system, and to invoke them again on the target system. On earlier SAP System versions, critical jobs should be set to “planned” status before starting the export. If this is not possible, take suitable precautions in the target system.
9-1-2 In the case that the SAP SID is changed, all open Corrections and Repairs should be released in the source system. If not, the transport system initialization (SE06) will close them without releasing the transports to the file system.
© SAP AG TADM70 9-44
9-2
9-2-1 The installation number of the source system will always be used to generate the migration key. In this case, “012004711”.
9-2-2 The hostname of the system that R3LOAD is running on is of great importance. As the export has to be done on the central instance, the following combination of hostnames are needed to request the migration key:
Export system: “ciserv01”
Import system: “cidb001”
9-2-3 The R3LOAD export and import log files contain the used hostnames. In case of a migration key mismatch, always check these entries.
When requesting the migration key, make sure to enter the version of R3LOAD and not the version of the SAP (base) System. The R3LOAD version is mentioned in the log files. The versioning can be confusing on SAP releases running on a backward compatible kernel.

© SAP AG TADM70 10-1
© SAP AG 2010
Troubleshooting
1 Introduction 7 R3LOAD & JLOAD Files
2 The Migration Project 8 Advanced Migration Techniques
3 System Copy Methods 9 Performing the Migration
4 SAP Migration Tools 10 Troubleshooting
5 R3SETUP / SAPINST 11 Special Projects
6 Technical Background Knowledge

© SAP AG TADM70 10-2
© SAP AG 2010
ContentsR3LOAD / JLOAD - TerminationsR3LOAD / JLOAD - Restart Response
Troubleshooting
Objectives
At the end of this unit, you will be able to:Troubleshoot R3LDCTL, R3LOAD, JLOAD and R3SETUP/SAPINST problems
Recognize errorsAnalyze the causes of the errorsIntroduce measures for correcting the errorsPerform restarts

© SAP AG TADM70 10-3
© SAP AG 2010
R3LOAD - Unload Terminations
Most frequent causes of unload terminationsNo connection to database
Wrong or missing environment variables
Inconsistencies between ABAP Dictionary and database dictionary
Insufficient storage space in the export file system
The PACKAGE SPLITTER cannot be executed
Not enough temporary database space for sorting
The migration tools used are not compatible with the current SAP System or database version? Password problems? Changes to the root user or the environment necessary before starting R3SETUP/SAPINST?
The active object definition in the ABAP Dictionary differs from the object definition in the database, or the tables do not exist on DB at all. For some tables, this is intentional and is caught by a special handling routine in R3LDCTL. These tables are usually recorded in the exception table DBDIFF, and do not cause errors. Therefore, if an error occurs, it must involve a table whose data definition is unintentionally wrong. This situation must be corrected. Often QCM* tables are involved.
Not enough space to unload the data in the dump file system. As a rule of thumb, the export can be started to a file system which has about 10% - 15% of the database size. If no additional disk space is available, copy already finished dump files to a different location while the export is running.
For the Perl PACKAGE SPLITTER: Is at least Perl version 5 installed? Does the default search path point to the right Perl executable? Does the first line of the SPLITSTR.PL script contain the right name of Perl in your system? For the JAVA PACKAGE SPLITTER: Is the right JAVA version installed?
R3LOAD exports data in the primary key order. Depending on the database used, more temporary databases disk space may be required for sorting. Increase database storage units that are used for sorting (i.e. PSAPTEMP).
Related SAP Note: 9385 “What to do with QCM tables”

© SAP AG TADM70 10-4
© SAP AG 2010
R3LOAD - Load Terminations
Most frequent causes of load terminations:No connection to the database
Wrong or missing environment variables
Database size is not sufficient
Not enough temporary database space for sorting
Oracle: Problems with the rollback segments (Snapshot too old)
Insufficient permissions on import files and directories
Not enough temporary database disk space for index creation (sorting). Increase the database storage units that are used for sorting (i.e. PSAPTEMP), or reduce the number of parallel running R3LOAD processes.
Oracle rollback segment problems: Restart R3SETUP/SAPINST and try again. Alternatively, you can reduce the number of parallel running R3LOAD processes, or implement the necessary measures in the database (Oracle). Older installation software may not activate Oracle undo management.
The migration tools used are not compatible with the current SAP System or database version? Are changes to the root user environment necessary before starting R3SETUP/SAPINST?
Make sure that the database user can access the directories and files of the import file system.

© SAP AG TADM70 10-5
© SAP AG 2010
Useful R3LOAD Environment Variables (1)
R3LOAD warning levelR3LOAD_WL=1
Enhanced logging of R3LOAD activities
Includes list of environment variables of the started R3LOAD
R3LOAD trace levelR3LOAD_TL=1 ... 4
DBSL communication trace
Attention: Use the above environment variables for problem analysis only!The amount of log data can quickly fill up your install file system!
Attention: Use the above environment variables for problem analysis only!The amount of log data can quickly fill up your install file system!
The R3LOAD warning level can have any value, as long as something is set.
The R3LOAD trace level is forwarded to the DBSL interface only. Useful values are between 1 and 4. The higher the value, the more output that is written. Most of the output can only be interpreted from developers, but in the case of database connection problems, the trace can give valuable hints for troubleshooting.

© SAP AG TADM70 10-6
© SAP AG 2010
Useful R3LOAD Environment Variables (2)
Example: R3LOAD_WL=1 (R3LOAD 6.20)
...(TFH) INFO: Trying to open DDLMSS.TPL(TFH) INFO: DDLMSS.TPL opened(TSK) INFO: Trying to open ZZADDRESS.TSK(TSK) INFO: ZZADDRESS.TSK opened(TSK) INFO: Trying to close ZZADDRESS.TSK(TSK) INFO: ZZADDRESS.TSK closed(TSK) INFO: Trying to rename ZZADDRESS.TSK to ZZADDRESS.TSK.bck(TSK) INFO: ZZADDRESS.TSK renamed to ZZADDRESS.TSK.bck(TSK) INFO: Trying to open ZZADDRESS.TSK(TSK) INFO: ZZADDRESS.TSK opened...(TSK) INFO: Trying to close ZZADDRESS.TSK(TSK) INFO: ZZADDRESS.TSK closed(TFH) INFO: Trying to close .\ZZADDRESS.001(TFH) INFO: .\ZZADDRESS.001 closed(TFH) INFO: Trying to close ZZADDRESS.cmd(TFH) INFO: ZZADDRESS.cmd closed(DB) INFO: disconnected from DB...
...(TFH) INFO: Trying to open DDLMSS.TPL(TFH) INFO: DDLMSS.TPL opened(TSK) INFO: Trying to open ZZADDRESS.TSK(TSK) INFO: ZZADDRESS.TSK opened(TSK) INFO: Trying to close ZZADDRESS.TSK(TSK) INFO: ZZADDRESS.TSK closed(TSK) INFO: Trying to rename ZZADDRESS.TSK to ZZADDRESS.TSK.bck(TSK) INFO: ZZADDRESS.TSK renamed to ZZADDRESS.TSK.bck(TSK) INFO: Trying to open ZZADDRESS.TSK(TSK) INFO: ZZADDRESS.TSK opened...(TSK) INFO: Trying to close ZZADDRESS.TSK(TSK) INFO: ZZADDRESS.TSK closed(TFH) INFO: Trying to close .\ZZADDRESS.001(TFH) INFO: .\ZZADDRESS.001 closed(TFH) INFO: Trying to close ZZADDRESS.cmd(TFH) INFO: ZZADDRESS.cmd closed(DB) INFO: disconnected from DB...
The R3LOAD warning level is useful in cases where files cannot be found or opened without an obvious reason. The contained list of environment variables can assist you in the analysis of database connection problems, caused by wrong environment settings. In general, much more information is written then normal.

© SAP AG TADM70 10-7
© SAP AG 2010
R3LOAD - Load Termination Example
Example: SAPPOOL.LOG (R3LOAD 4.x)
TAB: ATABFIL:/migration/DATA/SAPPOOL.001#20090327204243(OLD) ERROR: DbSlPrepare: rc = 99, table "ATAB" (SQL error -551) error message returned by DbSl:SQLSTATE=42501FUNCTION=SQLPrepare MSG=[IBM][CLI Driver][DB2/6000] SQL0551N"SAPR3" does not have the privilege to perform operation"INSERT" on object "SAPR3.ATAB".SQLSTATE=42501
TAB: ATABFIL:/migration/DATA/SAPPOOL.001#20090327204243(OLD) ERROR: DbSlPrepare: rc = 99, table "ATAB" (SQL error -551) error message returned by DbSl:SQLSTATE=42501FUNCTION=SQLPrepare MSG=[IBM][CLI Driver][DB2/6000] SQL0551N"SAPR3" does not have the privilege to perform operation"INSERT" on object "SAPR3.ATAB".SQLSTATE=42501
2
3
1
Initial situation:
(1) Table ATAB has been created successfully.
(2) DB2 SQL error 551 occurs during an INSERT to table ATAB.
(3) Error text: Database user SAPR3 is not authorized to perform the INSERT.
R3LOAD response:
• The R3LOAD process that is processing file “SAPPOOL.CMD” cannot continue, due to the SQL error. A termination occurs. R3SETUP/SAPINST is given a negative return code and starts a new R3LOAD process for the next command file.
Correcting the problem:
• Grant access authorization for table ATAB to user SAPR3
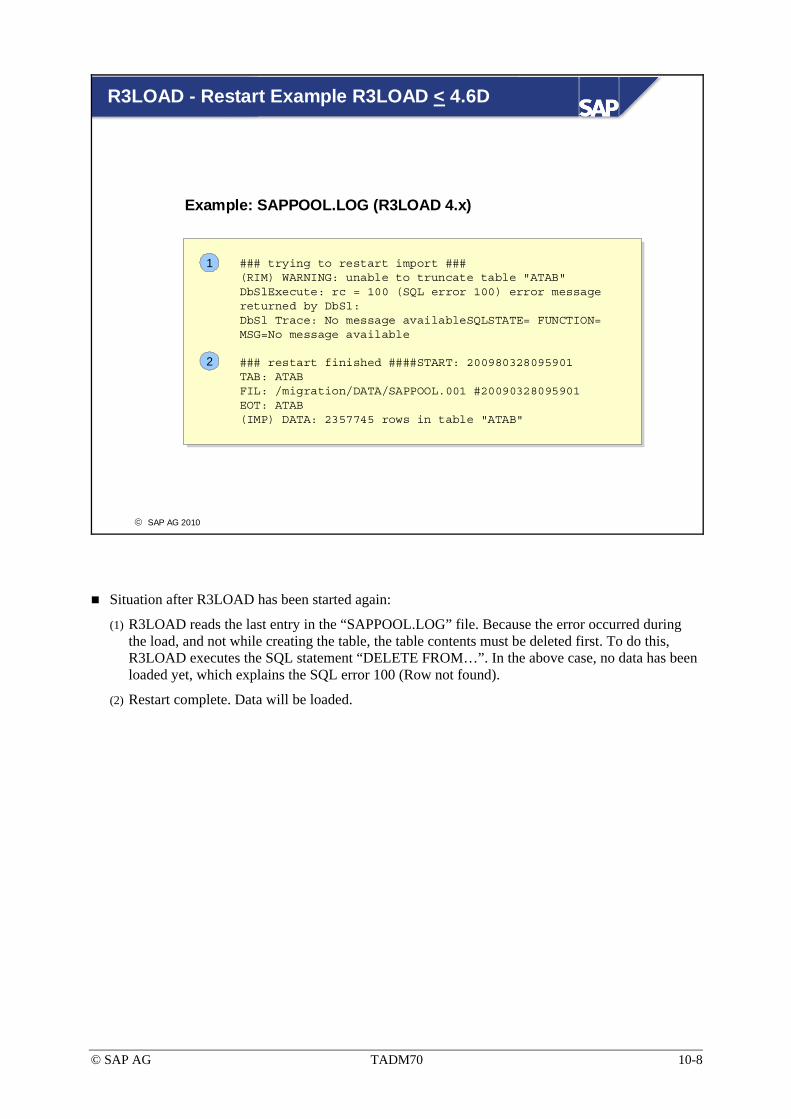
© SAP AG TADM70 10-8
© SAP AG 2010
R3LOAD - Restart Example R3LOAD < 4.6D
### trying to restart import ###(RIM) WARNING: unable to truncate table "ATAB"DbSlExecute: rc = 100 (SQL error 100) error message returned by DbSl:DbSl Trace: No message availableSQLSTATE= FUNCTION= MSG=No message available
### restart finished ####START: 200980328095901TAB: ATABFIL: /migration/DATA/SAPPOOL.001 #20090328095901EOT: ATAB(IMP) DATA: 2357745 rows in table "ATAB"
1
2
Example: SAPPOOL.LOG (R3LOAD 4.x)
Situation after R3LOAD has been started again:
(1) R3LOAD reads the last entry in the “SAPPOOL.LOG” file. Because the error occurred during the load, and not while creating the table, the table contents must be deleted first. To do this, R3LOAD executes the SQL statement “DELETE FROM…”. In the above case, no data has been loaded yet, which explains the SQL error 100 (Row not found).
(2) Restart complete. Data will be loaded.

© SAP AG TADM70 10-9
© SAP AG 2010
R3LOAD - Restart Example R3LOAD > 6.10
(DB) INFO: ATAB deleted/truncated(IMP) INFO: import of ATAB completed (2357745 rows)(DB) INFO: ATAB~0 created
(DB) INFO: ATAB deleted/truncated(IMP) INFO: import of ATAB completed (2357745 rows)(DB) INFO: ATAB~0 created
2
Example: SAPPOOL.LOG
T ATAB C okD ATAB I errP ATAB~0 C xeqT DBMAPS C xeqD DBMAPS I xeq
…
T ATAB C okD ATAB I errP ATAB~0 C xeqT DBMAPS C xeqD DBMAPS I xeq
…
1
Example: SAPPOOL.TSK
Situation after R3LOAD has been started again:
(1) R3LOAD reads the first task of status “err” or “xeq” from the “SAPPOOL.TSK” file. Because the error occurred during the load, and not while creating the table, the table contents must be deleted first. To do this, R3LOAD executes the truncate/delete SQL statement which is defined in the DDL<DBS>.TPL file.
(2) Restart complete. Data will be loaded.

© SAP AG TADM70 10-10
© SAP AG 2010
Duplicate Key at Import Time
Duplicate key errorThe database returns a duplicate key error while creating a primary key or unique index. R3LOAD stops on error.
Possible reasonsR3LOAD export/import restart problems
Table did not have a unique key on the source database
BW object involved
Corrupted primary key on the source database
External programs wrote data with trailing blanks into the table
In most cases, duplicate keys are caused by unexpected terminations at export or import time. The following pages will provide reasons and problem solutions.
Some tables might not have a primary key on the source database, but in the ABAP DDIC. This may or may not be intentional. Please ask the customer for reasons and/or check for SAP Notes.
No *.SQL file was found by R3LOAD, or SMIGR_CREATE_DDL was not called on the source system.
In the source database, silently corrupted primary keys can lead to double exported data records. In this case, the number of records in the *.TOC file will be larger than the number of rows which are reported by a SELECT COUNT(*) statement. Verify primary key/repair primary key and export the table again.
SAP ABAP Systems do not write data with trailing blanks into table fields. If external programs are directly writing into SAP System tables, trailing blanks can be inserted. R3LOAD always exports table data without trailing blanks! Similar data existing in the source database, with or without trailing blanks (because the data was modified by the SAP System), this will cause duplicate key errors at import time. Cleanup source table and export again.

© SAP AG TADM70 10-11
© SAP AG 2010
Power Failure / OS Crash at Export Time (1)
ProblemAfter a power failure, an operating system crash, or an abnormaltermination of running R3LOAD processes, the *.TOC [, *.TSK] and data dump files that were active at the time of the termination may be obsolete, since the operating system could not flush the file buffers in time.
Symptoms at load timeDuplicate key, decompression, or check sum error messages
Log file shows more rows loaded than recorded in the *.TOC file
Database data type violations because of unstructured data
Rare situation!
Rare situation!
In case of an OS crash or power failures, it is difficult to ascertain which OS buffers were flushed to the open files or what happened to the entire file. The slide above describes a rare situation, but it can happen.
Exports into a network mounted file systems can lead to similar symptoms if the network connections breaks.
Abnormal terminations are caused by external events. It is not a termination caused by a database error or file permission problems.
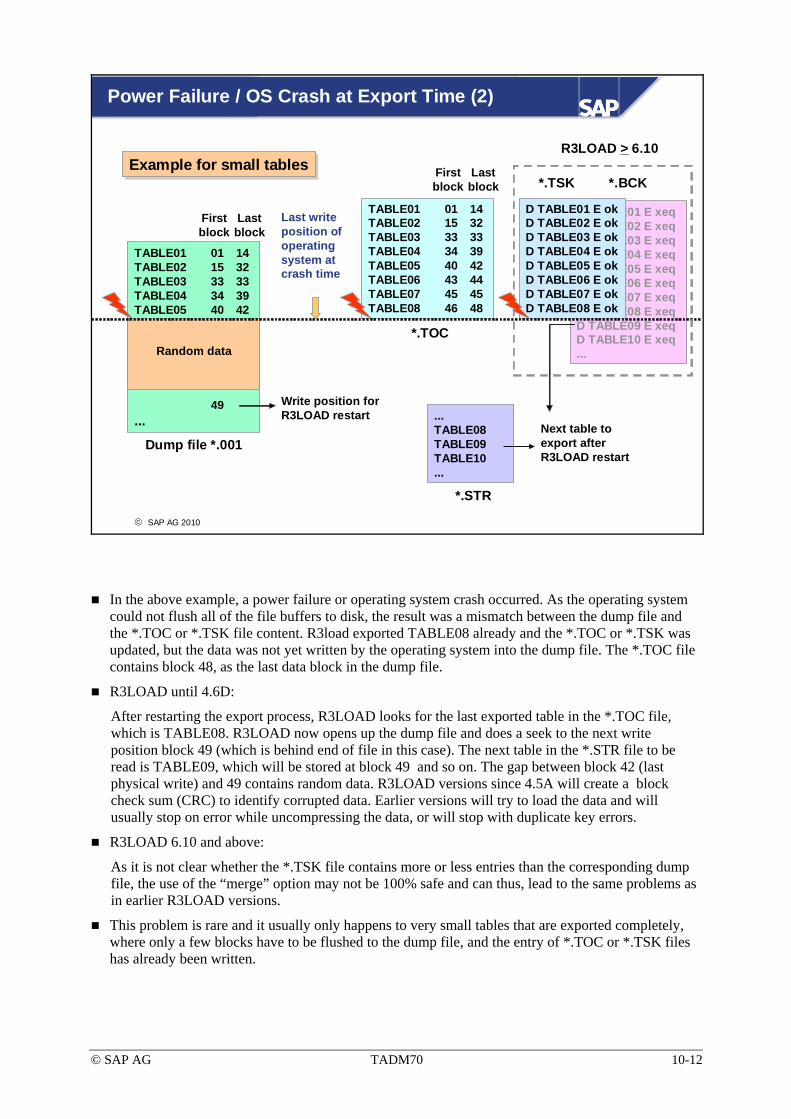
© SAP AG TADM70 10-12
© SAP AG 2010
D TABLE01 E xeqD TABLE02 E xeqD TABLE03 E xeqD TABLE04 E xeqD TABLE05 E xeqD TABLE06 E xeqD TABLE07 E xeqD TABLE08 E xeqD TABLE09 E xeqD TABLE10 E xeq...
D TABLE01 E okD TABLE02 E okD TABLE03 E okD TABLE04 E okD TABLE05 E okD TABLE06 E okD TABLE07 E okD TABLE08 E ok
Power Failure / OS Crash at Export Time (2)
TABLE01 01 14TABLE02 15 32TABLE03 33 33TABLE04 34 39TABLE05 40 42
49...
TABLE01 01 14 TABLE02 15 32TABLE03 33 33TABLE04 34 39TABLE05 40 42TABLE06 43 44TABLE07 45 45TABLE08 46 48
Random data
Last write position of operating system at crash time
First block
Last block
Write position for R3LOAD restart ...
TABLE08TABLE09TABLE10...
*.STR
Next table to export after R3LOAD restart
*.TOC
First block
Last block
Dump file *.001
*.TSK *.BCKExample for small tablesExample for small tables
R3LOAD > 6.10
In the above example, a power failure or operating system crash occurred. As the operating system could not flush all of the file buffers to disk, the result was a mismatch between the dump file and the *.TOC or *.TSK file content. R3load exported TABLE08 already and the *.TOC or *.TSK was updated, but the data was not yet written by the operating system into the dump file. The *.TOC file contains block 48, as the last data block in the dump file.
R3LOAD until 4.6D:
After restarting the export process, R3LOAD looks for the last exported table in the *.TOC file, which is TABLE08. R3LOAD now opens up the dump file and does a seek to the next write position block 49 (which is behind end of file in this case). The next table in the *.STR file to be read is TABLE09, which will be stored at block 49 and so on. The gap between block 42 (last physical write) and 49 contains random data. R3LOAD versions since 4.5A will create a block check sum (CRC) to identify corrupted data. Earlier versions will try to load the data and will usually stop on error while uncompressing the data, or will stop with duplicate key errors.
R3LOAD 6.10 and above:
As it is not clear whether the *.TSK file contains more or less entries than the corresponding dump file, the use of the “merge” option may not be 100% safe and can thus, lead to the same problems as in earlier R3LOAD versions.
This problem is rare and it usually only happens to very small tables that are exported completely, where only a few blocks have to be flushed to the dump file, and the entry of *.TOC or *.TSK files has already been written.
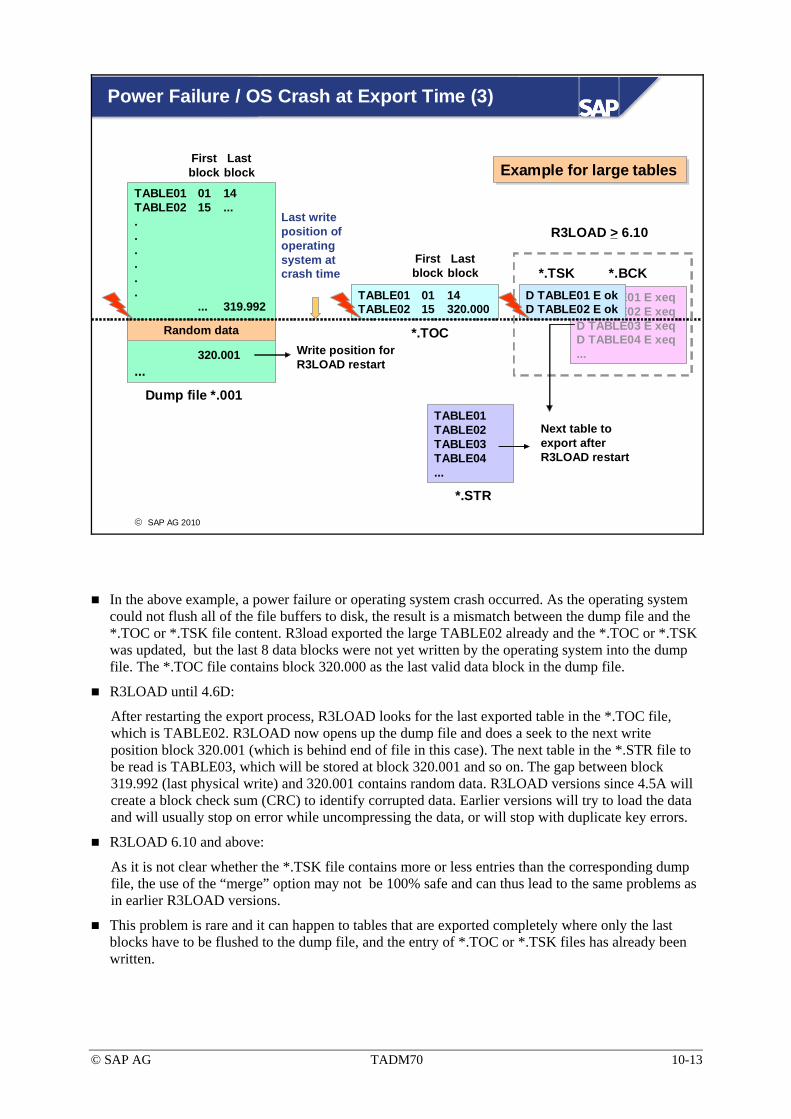
© SAP AG TADM70 10-13
© SAP AG 2010
D TABLE01 E xeqD TABLE02 E xeqD TABLE03 E xeqD TABLE04 E xeq...
D TABLE01 E okD TABLE02 E ok
Power Failure / OS Crash at Export Time (3)
TABLE01 01 14TABLE02 15 .........
... 319.992
320.001...
TABLE01 01 14 TABLE02 15 320.000
Random data
Last write position of operating system at crash time
First block
Last block
Write position for R3LOAD restart
TABLE01TABLE02TABLE03TABLE04...
*.STR
Next table to export after R3LOAD restart
*.TOC
First block
Last block
Dump file *.001
*.TSK *.BCK
Example for large tablesExample for large tables
R3LOAD > 6.10
In the above example, a power failure or operating system crash occurred. As the operating system could not flush all of the file buffers to disk, the result is a mismatch between the dump file and the *.TOC or *.TSK file content. R3load exported the large TABLE02 already and the *.TOC or *.TSK was updated, but the last 8 data blocks were not yet written by the operating system into the dump file. The *.TOC file contains block 320.000 as the last valid data block in the dump file.
R3LOAD until 4.6D:
After restarting the export process, R3LOAD looks for the last exported table in the *.TOC file, which is TABLE02. R3LOAD now opens up the dump file and does a seek to the next write position block 320.001 (which is behind end of file in this case). The next table in the *.STR file to be read is TABLE03, which will be stored at block 320.001 and so on. The gap between block 319.992 (last physical write) and 320.001 contains random data. R3LOAD versions since 4.5A will create a block check sum (CRC) to identify corrupted data. Earlier versions will try to load the data and will usually stop on error while uncompressing the data, or will stop with duplicate key errors.
R3LOAD 6.10 and above:
As it is not clear whether the *.TSK file contains more or less entries than the corresponding dump file, the use of the “merge” option may not be 100% safe and can thus lead to the same problems as in earlier R3LOAD versions.
This problem is rare and it can happen to tables that are exported completely where only the last blocks have to be flushed to the dump file, and the entry of *.TOC or *.TSK files has already been written.
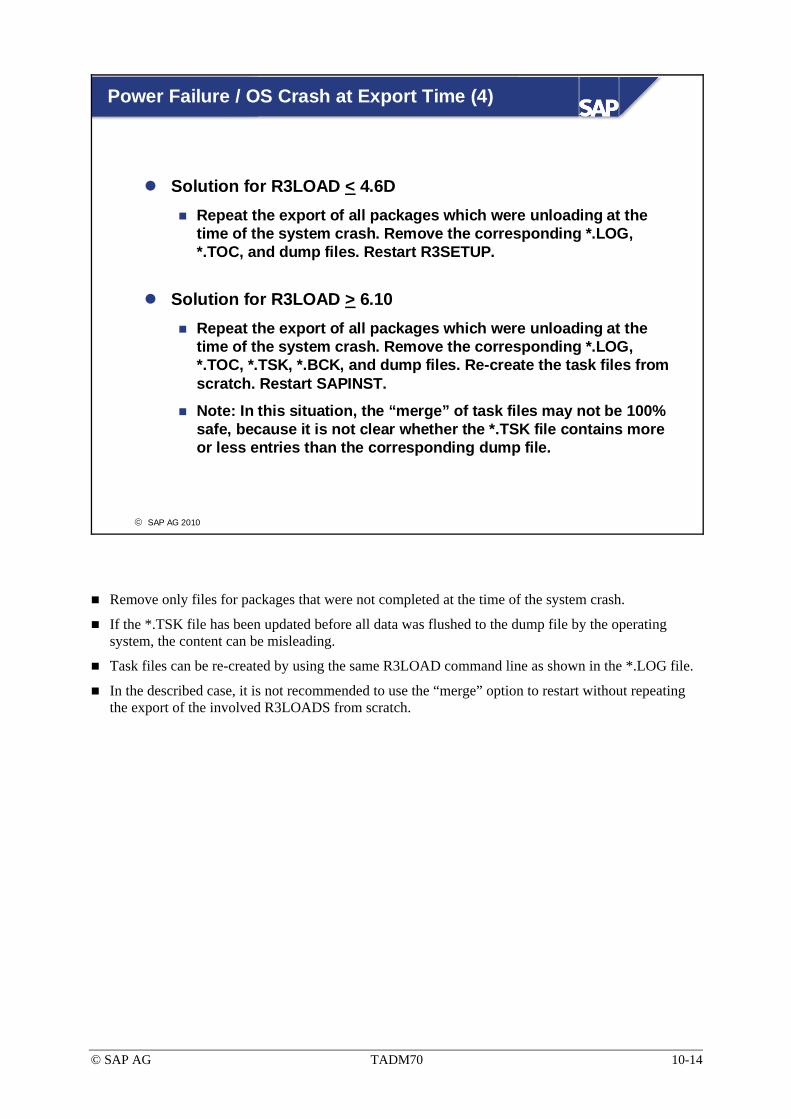
© SAP AG TADM70 10-14
© SAP AG 2010
Power Failure / OS Crash at Export Time (4)
Solution for R3LOAD < 4.6DRepeat the export of all packages which were unloading at the time of the system crash. Remove the corresponding *.LOG, *.TOC, and dump files. Restart R3SETUP.
Solution for R3LOAD > 6.10Repeat the export of all packages which were unloading at the time of the system crash. Remove the corresponding *.LOG, *.TOC, *.TSK, *.BCK, and dump files. Re-create the task files from scratch. Restart SAPINST.
Note: In this situation, the “merge” of task files may not be 100% safe, because it is not clear whether the *.TSK file contains more or less entries than the corresponding dump file.
Remove only files for packages that were not completed at the time of the system crash.
If the *.TSK file has been updated before all data was flushed to the dump file by the operating system, the content can be misleading.
Task files can be re-created by using the same R3LOAD command line as shown in the *.LOG file.
In the described case, it is not recommended to use the “merge” option to restart without repeating the export of the involved R3LOADS from scratch.

© SAP AG TADM70 10-15
© SAP AG 2010
R3LOAD – Export Error due to Space Shortage (1)
ProblemThe export stopped due to space shortage in the file systemAfter increasing the file system, the export restarts without problemsThe import stopped on “RFF”, “RFB”, “checksum”, or “cannot allocate buffer” errors
ReasonAt the first export termination, the *.TOC file was updated beforethe dump file could be writtenThe restarted export process got a dump file seek position from the *.TOC file behind end of file and continued writing from there
SolutionThe same procedure as for OS crashes or power failures during export
In the described case, it is not recommended to use the “merge” option to restart without repeating the export of the involved R3LOADS from scratch.
The same scenario can happen if an export process is writing to an NFS file system while a network error occurs.
RFF: Cannot read from file error.
RFB: Cannot read from buffer error.

© SAP AG TADM70 10-16
© SAP AG 2010
R3LOAD – Export Error due to Space Shortage (2)
...(WTF) ERROR: write to data file"/mig/DATA/SAPSSEXC.001" failedcurrent table was "DD03T"error message: No space left on device(EXP) ERROR: error writing to bufferDB independent control file : /mig/DATA/SAPSSEXC.STR...
...(WTF) ERROR: write to data file"/mig/DATA/SAPSSEXC.001" failedcurrent table was "DD03T"error message: No space left on device(EXP) ERROR: error writing to bufferDB independent control file : /mig/DATA/SAPSSEXC.STR...
Example: SAPSSEXC.LOG export log
...(RFB) ERROR: wrong checksum – invalid data...
...(RFB) ERROR: wrong checksum – invalid data...
Example: SAPSSEXC.LOG import log
SAP Note 769476
SAP Note: 769476 “Danger of inconsistencies”
The above export log shows unload terminations due to a shortage of space in the file system. After increasing the space of the file system, the export will restart and finish without further problems. At import time, R3LOAD will stop with a checksum error.

© SAP AG TADM70 10-17
© SAP AG 2010
Export Rules for R3SETUP / SAPINST / MIGMON
Make sure that there is enough disk space available for the data dump
Don’t use NFS file systems for export
If starting a terminal session from a PC, do not work with other applications that can hang-up the system
Put MIGMON in background (if possible)
If you are not sure whether to restart or repeat the export, then it is best to repeat the entire export process
The R3LOAD export process is very sensitive, so be sure to prevent any disturbance.
If the R3LOAD export was done by someone else and you are responsible for the import only, please make sure to receive the export logs along with the export dump files. In case of import errors, because of dump corruptions, the export logs should be examined for troubleshooting.

© SAP AG TADM70 10-18
© SAP AG 2010
Power Failure / OS Crash at Import Time (1)
Problem After a power failure or operating system crash, the *.LOG [, *.TSK] files that were active at the time of the termination may be obsolete, since the operating system could not flush the file buffers in time.
SymptomR3LOAD attempts to restart the import, but encounters another error as soon as it tries to process the next table.
Rare situation!
Rare situation!

© SAP AG TADM70 10-19
© SAP AG 2010
Power Failure / OS Crash at Import Time (2)
Database content
...TABLE04, P-Key, Index<n>TABLE05, P-Key
TABLE01, P-Key, Index<n>TABLE02, P-Key TABLE03, P-Key TABLE04, P-Key, Index<n> TABLE05, P-Key TABEL06, P-Key, Index<n> TABLE07, P-Key TABLE08, P-Key
Last write position of operating system at crash time
*.LOG or *.TSK file
...TABLE05, P-KeyTABLE06, P-Key, Index<n>TABLE07, P-Key...
*.STR file
Next table to import after R3load restart
In the case of an OS crash or power failures, it is difficult to ascertain which OS buffers were flushed to the open files or what happened to the entire file.
In the above example, a power failure or operating system crash occurred. As the operating system could not flush all of the file buffers to disk, the result is a mismatch between database content and the *.LOG or *.TSK file. R3load imported Table08 already, but the *.LOG or *.TSK file contained only the information that Table05 and its primary key were created.
R3LOAD until 4.6D:
The restart will try to create Table06, but it already exists. R3LOAD stops on error. A restart beginning with data load, can result in duplicate keys. Another scenario that could occur is that the first table will be treated right and the problem first arises with the second table. This depends on the *.LOG file content.
R3LOAD 6.10 and above:
The merge of *.TSK and *.BCK is necessary. All entries that are not marked as executed (“xeq”) will be set to error (“err”), R3LOAD will drop or delete objects and data first, before restarting a task.
This usually only happens to small tables. As databases are designed to write data in a safe way, the R3LOAD import is less critical in the case of power failures or operating system crashes as opposed to the export of data.

© SAP AG TADM70 10-20
© SAP AG 2010
Power Failure / OS Crash at Import Time (3)
Solution for R3LOAD < 4.6DUse file “<PACKAGE>.STR” to determine which tables had been created and loaded after the last entry in file “<PACKAGE>.LOG”, then delete them manually from the database (only a few tables should be involved). Restart R3SETUP / MIGMON.
Solution for R3LOAD > 6.10“Merge” the corresponding task files. Wait until the R3LOAD processes are finished. Restart SAPINST / MIGMON.The “-merge_only” option can be useful if not using MIGMON.

© SAP AG TADM70 10-21
© SAP AG 2010
Duplicate Key Problem after Restarting Import (1)
ProblemIn rare cases, an attempt to delete the data that has already been loaded fails during a restart.
SymptomThe creation of the primary key fails with database message “Duplicate key”.
The number of table rows is larger then recorded in the corresponding SAP<TABPART>.TOC file.
In a restart scenario where the import of a large table fails and the SQL command that deletes the entire table content has also failed with an error, R3LOAD assumes that the table has been emptied and thus, restarts the import. The creation of the primary key stops with a duplicate key error. This kind of problem has often been caused by Oracle “Snapshot too old” situations. As R3LOAD 6.x is using the Oracle “TRUNCATE” statement to delete data, the described error should not happen any more. Nevertheless other database errors can lead to a similar erroneous restart situations.

© SAP AG TADM70 10-22
© SAP AG 2010
Duplicate Key Problem after Restarting Import (2)
Solution for R3LOAD < 4.6DDelete the contents of the table by hand and edit the affected “<PACKAGE>.LOG” file.
Comment-out the last entries after:
(IMP) TABLE: <Table Name>
by inserting a “#” character in the first column of each line
If you do not perform this modification, the restart will alwaysstart at the Create Primary Key command.
Database-specific delete commands (for example, the Oracle command TRUNCATE) can work faster than the standard SQL command DELETE.
When manipulating the “<PACKAGE>.LOG” files, be very cautious and examine the completed results carefully. Do not modify the *.LOG files unless absolutely necessary. For verification, count the table rows after import.

© SAP AG TADM70 10-23
© SAP AG 2010
Duplicate Key Problem after Restarting Import (3)
Solution for R3LOAD > 6.10Change the contents of the task file by hand and edit the affected “<PACKAGE>.TSK” file.
Change:
D <Table Name> I okP <Key Name> C err
To:
D <Table Name> I errP <Key Name> C err
If you do not perform this modification, the restart will alwaysstart at the Create Primary Key command.
For verification, count the table rows after import.

© SAP AG TADM70 10-24
© SAP AG 2010
Corrupted R3LOAD Dump Files (1)
ProblemR3LOAD stops during import - various (RFF) and (RFB) error messages may appear
Symptoms (error messages)(RFF) ERROR: SAPxxx.TOC is not from same export as SAPxxx.001
Data block corrupted or files of different exports were mixed
(RFF) ERROR: buffer (... KB) too small
Data block corrupted, random buffer size read from dump file
(RFB) ERROR: CsDecompr rc = -11
Data block corrupted, block decompression error
(RFB) ERROR: wrong checksum – invalid data
Data block corrupted
RFF=Read from file
RFB=Read from buffer
(RFF) ERROR: SAPxxx.TOC is not from same export as SAPxxx.001
The dump file is corrupted, or files of different exports have been accidentally mixed.
(RFF) ERROR: buffer (... KB) too small (the figure is larger than 10.000)
R3LOAD read an invalid buffer size from the dump file. The buffer is used to load a certain number of data blocks to uncompress it. Typical buffer sizes range only a few MB.
(RFB) ERROR: CsDecompr rc = -11
Buffer data can not be decompressed.
(RFB) ERROR: wrong checksum – invalid data
The checksum of loaded data blocks is wrong.
See SAP Notes:
143272 R3LOAD: (RFF) ERROR: buffer (xxxxx kB) to small
438932 R3LOAD: Error during restart (export)

© SAP AG TADM70 10-25
© SAP AG 2010
Corrupted R3LOAD Dump Files (2)
ReasonsThe dump file was corrupted either during the export, or file transfer, or there were read errors when accessing dump file via NFS
SolutionsRe-transfer dump files (use a safe transfer method)
Don’t copy files via NFS
Compare original against copied files
Reload dump files from local disks
Export the source database again
Analysis: Check the export log files. Did something take place during the export? Was there a restart situation?
Use different checksum tools to compare original and copied files, or use different algorithms, if possible.
© SAP AG TADM70 10-26
© SAP AG 2010
SICK - System Installation Check Failed
Transaction SICK reports one or more errorsIncorrect SAP Basis installation
Required file systems/directories do not exist
Files missing and similar problems
Errors may be present in R3SETUP/SAPINST log files
Transaction SICK detects errors that generally indicate an incorrect SAP Basis installation.

© SAP AG TADM70 10-27
© SAP AG 2010
DB02 - ABAP DDIC / Database Consistency Check
Tables missing in the databaseDo the tables exist in the source system?
Are the tables contained in the R3LOAD control files?
Did something happen during the split of *.STR files?
Did something happen during the file transfer?
Did something unusual happen during the import?
Do error messages appear in the *.LOG files?
Were the tables added to a negative list?
Are the tables database-specific, and must be generated first?
Some required tables are created from external programs, such as SAPDBA/BRCONNECT.
Some database specific objects are created in the last step of the system copy via RFC programs. Did they really finish successfully?
If tables or indexes are missing, check to see if there are SAP Notes related to these issues.
The only 100% check whether a table in a package file is in the database or not, is to compare the database dictionary with the content of the *.STR files.

© SAP AG TADM70 10-28
© SAP AG 2010
R3LOAD - Load Termination due Space Shortage
All the values for the expected database size calculated by R3LDCTL/R3SZCHK are only estimates
Be prepared to make enlargements to the target database
In our experience, this is often necessary
Be generous with database space during the first test migration (Add, for instance, 20% space as a rule of thumb). Adjustments for the production migration can be determined from the results of the test migrations.

© SAP AG TADM70 10-29
© SAP AG 2010
Nametab Import Problem (Unicode Conversion)
After a Unicode conversion, the SAP System does not run correctly
Problems caused by wrong import order of Nametab tables DDNTF, DDNTF_CONV_UC, DDNTT, DDNTT_CONV_UC
If SAPSDIC.STR has been split, make sure that:DDNTF and DDNTF_CONV_UC are in the same *.STR file
DDNTT and DDNTT_CONV_UC are in the same *.STR file
The *.STR file containing the DDNTF* tables is imported before the one with the DDNTT* tables
SAP Note 833946
Problem: Executing “R3trans -d” returns “No TADIR in this system”, and the trans.log file contains the warning “The HEAD entry in TADIR is missing”.
When using the Perl- or JAVA-based Package Splitter (version 1), it can happen that the Active Nametab tables may be separated into different *.STR files. During the Unicode Conversion, the Active Nametab tables must be specially treated by R3LOAD. This will be possible, only if the tables were imported in a certain order in the same *.STR file. Normally, SAPSDIC.STR contains the tables in the right way. But after a split, SAPSDIC.STR does not necessarily contain all Active Nametab tables anymore.
In NetWeaver ’04S, the JAVA-based Package Splitter has been improved to write the ABAP Nametab tables into a single package called “SAPNTAB.STR”, making sure that the right import order is used. The revised JAVA package splitter is also available form SAP Marketplace.
For more information see SAP Note: 833946 “Splitting of STR files”.
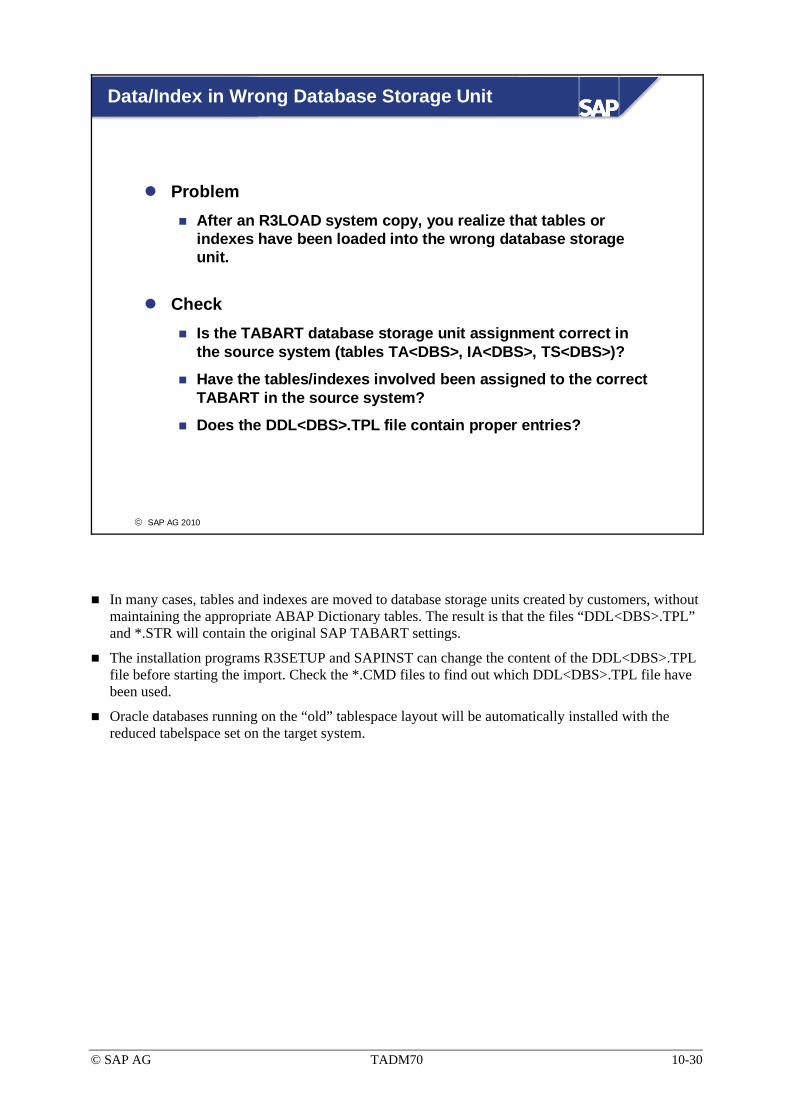
© SAP AG TADM70 10-30
© SAP AG 2010
Data/Index in Wrong Database Storage Unit
ProblemAfter an R3LOAD system copy, you realize that tables or indexes have been loaded into the wrong database storage unit.
CheckIs the TABART database storage unit assignment correct in the source system (tables TA<DBS>, IA<DBS>, TS<DBS>)?
Have the tables/indexes involved been assigned to the correct TABART in the source system?
Does the DDL<DBS>.TPL file contain proper entries?
In many cases, tables and indexes are moved to database storage units created by customers, without maintaining the appropriate ABAP Dictionary tables. The result is that the files “DDL<DBS>.TPL” and *.STR will contain the original SAP TABART settings.
The installation programs R3SETUP and SAPINST can change the content of the DDL<DBS>.TPL file before starting the import. Check the *.CMD files to find out which DDL<DBS>.TPL file have been used.
Oracle databases running on the “old” tablespace layout will be automatically installed with the reduced tabelspace set on the target system.

© SAP AG TADM70 10-31
© SAP AG 2010
JLOAD Export Restart Behavior
Export failureTerminate if data of a certain object cannot be exported.A “stop-on-error” strategy is used.
Export restartThe existence of an “EXPORT[ _<PACKAGE>].STA” file flags a restart situation.Items are read from “EXPORT[ _<PACKAGE>].STA”. Already exported objects with the status “OK” and their dump file entries are skipped. Export continues by writing the next header (for meta data or data).
Because it does not make sense to continue with another table if a previous table failed to export, JLOAD stops if an error occurs.
In NetWeaver ’04 SR1, the “EXPORT.STA” file can be found under: “/usr/sap/<SAP SID>/<Instance>/j2ee/sltools”. Check the SAPINST log file for the file location in other versions.
In NetWeaver '04 and NetWeaver 7.00, there is only a single EXPORT.STA file. Since NetWeaver 7.02 there can be multiple JLOAD job files (packages).

© SAP AG TADM70 10-32
© SAP AG 2010
JLOAD Import Restart Behavior
Import failureIf a database object can not be created or data can not be loaded, JLOAD will try to proceed with the next object.A “continue-on-error” strategy is used.
Import restartThe existence of an “IMPORT[ _<PACKAGE>].STA” file flags a restart situationItems are read from “IMPORT[ _<PACKAGE>].STA”. Already imported objects with the status “OK” are skipped. The first item with an error status is used to restart.In the database, the erroneous item is cleaned up by deleting already loaded data or dropping the database object. If no further error status exists or no error was found at all, JLOAD will proceed with the next item from “IMPORT[ _<PACKAGE>].XML” (if there is any).
Even if a table fails to import, it makes sense to proceed with other tables (thus, saving time). A later restart will only deal with the erroneous objects.
If the last unsuccessful action was load data, the restart action will be delete data.
If the last unsuccessful action was create object (table or index), the restart action will be drop table.
In NetWeaver '04 SR1, the “IMPORT.STA” file can be found under: “/usr/sap/<SAP SID>/<Instance>/j2ee/sltools”. Check the SAPINST log file for the file location in other versions.
In NetWeaver '04 and NetWeaver 7.00 there is only a single IMPORT.STA file. Since NetWeaver 7.02 there can be multiple JLOAD job files (packages).

© SAP AG TADM70 10-33
© SAP AG 2010
Troubleshooting: Unit Summary
All R3LOAD/JLOAD processes can be restarted
A detailed analysis of the cause of error enables more seamless processing of subsequent test or production migrations
The goal is to load/unload the database with as little manual intervention as possible

© SAP AG TADM70 10-34

© SAP AG TADM70 10-35
Exercises
Unit 10: Troubleshooting
At the conclusion of this exercise, you will be able to:
• Understand special restart aspects of R3LOAD and JLOAD
10-1 During the import of a table R3LOAD 6.x stopped, because the database returned an error. After the problem was fixed, R3LOAD was started again.
10-1-1 Which restart action will be automatically executed by R3LOAD?
10-1-2 What is the exact database statement that R3LOAD will use for the restart?
The first guess might be wrong! Think about which R3LOAD files are read.
10-2 R3LOAD provides restart functionality on export and import.
10-2-1 Why could it be dangerous to restart a terminated export, caused by “out of space” in the export file system?
10-2-2 Why isn’t it a problem to restart a terminated import, caused by “out of space” in the database?
10-3 JLOAD can restart a terminated export or import, which failed because of errors.
10-3-1 Which files are read to find the restart position in the dump file?
10-3-2 Which files are read to restart an import?

© SAP AG TADM70 10-36

© SAP AG TADM70 10-37
Solutions
Unit 10: Troubleshooting
10-1
10-1-1 R3LOAD will delete all table data from the table before loading it again.
10-1-2 R3LOAD will use the database command, which is defined as truncate table statement (section trcdat: ) in the DDL<DBS>.TPL file. If nothing is defined, DELETE will be used as default.
10-2
10-2-1 It is not certain which R3LOAD file was written last. If the dump file contains less blocks than recorded in the *.TOC file, a restart will start behind end-of-file. The blocks between end-of-file and the new write position contain random data.
10-2-2 In the case that R3LOAD were to stop, because of a database import error, it can still close all files properly (that means the files have a consistent state). Afterwards R3LOAD is able to perform the right restart activities.
10-3
10-3-1 JLOAD reads the content of the EXPORT[_<PACKAGE>].STA to identify already exported tables. The dump file is opened and blocks of already exported tables are skipped. JLOAD proceeds with writing from the position found. The next table to export is read from the export job file EXPORT[_<PACKAGE>].XML.
10-3-2 JLOAD reads the content of the IMPORT[_ <PACKAGE>].STA file for erroneous entries. As a “continue-on-error” strategy is used, error flagged tables of the IMPORT[_<PACKAGE>].STA file will be repeated, and remaining tables will be read from the job file IMPORT[_<PACKAGE>].XML.

© SAP AG TADM70 10-38

© SAP AG TADM70 11-1
© SAP AG 2010
1 Introduction 7 R3LOAD & JLOAD Files
2 The Migration Project 8 Advanced Migration Techniques
3 System Copy Methods 9 Performing the Migration
4 SAP Migration Tools 10 Troubleshooting
5 R3SETUP / SAPINST 11 Special Projects
6 Technical Background Knowledge
Special Projects

© SAP AG TADM70 11-2
© SAP AG 2010
ContentsSpecial considerations for MDS/IMIG system copies and Unicode ConversionsTechnical description of the MDS/IMIG method
ObjectivesAt the end of this unit, you will be able to:
Describe the MDS/IMIG method Understand the efforts of a Unicode conversion
Special Projects

© SAP AG TADM70 11-3
© SAP AG 2010
Minimized Downtime Service (MDS) using IMIG
For huge databases which can not be migrated by standard MIGMON/R3LOAD system copy methods in time
Useful where few tables contain the majority of data
Applicable since 4.6C 1)
Not available for SAP SCM (SAP APO)
Not available for SAP BI (SAP BW)
Projects can only be done by SAP consultants 2)
The “SAP OS/DB Migration Check” applies to MDS/IMIG projects as usual
1) The availability is database dependent, check with SAP!2) Check SAP Note 693168 for the current MDS project handling1) The availability is database dependent, check with SAP!2) Check SAP Note 693168 for the current MDS project handling
The Minimized Downtime Service (MDS) using the incremental migration (IMIG) method is a system copy procedure which has been developed to copy very large ABAP databases. Compared to the standard system copy, the IMIG reduces downtime during the system copy significantly. The procedure is based on new techniques and requires a lot of manual interventions. For this reason, the method can only be used in a customer project if SAP is directly involved.
The MDS/IMIG method can be used for heterogeneous system copies and for Unicode Conversions (or combination of both). SAP delivers this type of project for a fixed price usually.
Because of non-standard database objects inside SAP SCM and SAP BI systems, the IMIG method may be non-applicable. This must be discussed with SAP.
Normally the 100 – 200 largest tables should be selected for the IMIG process (the number of very large tables is often much less).
© SAP AG TADM70 11-4
© SAP AG 2010
Incremental Migration – IMIG Features
Online export of selected large tables
Trigger-based logging of table updates
Online table synchronization between the source and target system
Safe synchronization protocol to ensure data consistency
Final export of remaining tables in an acceptable time frame
The initial as well as the final export/import of the remaining tables should be done with the Migration Monitor.

© SAP AG TADM70 11-5
© SAP AG 2010
IMIG Flow Chart
Install a base system on the target platform and import the
IMIG transport(i.e. SAP Web AS 7.00)
Install a base system on the target platform and import the
IMIG transport(i.e. SAP Web AS 7.00)
Schedule data synchronization batch jobs for the IMIG tables
between source and target system
Schedule data synchronization batch jobs for the IMIG tables
between source and target system
Import the IMIG transport into source system
(i.e. SAP ERP 6.0)
Import the IMIG transport into source system
(i.e. SAP ERP 6.0)
Use transaction IMIG to prepare selected large tables for the
incremental migration
Use transaction IMIG to prepare selected large tables for the
incremental migration
Online export of the selected IMIG tables using R3LOAD
Online export of the selected IMIG tables using R3LOAD
Import tables into the target system
Import tables into the target system
Final data synchronization. IMIG cleanup of source system
Final data synchronization. IMIG cleanup of source system
Source and target system shutdown
Source and target system shutdown
Offline export of remaining tablesOffline export of remaining tables
Delete all SAP tables except the IMIG tables from the target
database
Delete all SAP tables except the IMIG tables from the target
database
Import remaining tablesImport remaining tables
1
2
3
4
5
7
6
8
9
10
11

© SAP AG TADM70 11-6
© SAP AG 2010
Preparing Source and Target System (Step 1- 5)
TAB01
TAB01'
TAB02
TAB02'
TAB01
TAB02
RFC connection
Online export Impo
rt
Database trigger
Database trigger
SAP Web AS 7.00SAP Web AS 7.00
IMIG IMIG
Logging table
SAP ERP 6.0SAP ERP 6.0
Other tables
MIGMON MIGMON
SAP provides a special IMIG transport for the source and target system. The transport is only available on project base!
Install SAP Web AS 7.00 on the target system and configure an RFC connection between the source and target system. Use the same base system version in the source and target system (or SAP released combinations). The same Support Package level is strongly recommended.
Import the IMIG transport into the source and target system.
The largest tables can now be prepared in the IMIG transaction. IMIG will automatically create the same tables in the target system and will implement trigger and logging tables for each IMIG candidate to record table updates in the source database. There must be enough space for the logging tables in the source database.
After all preparations are done and the triggers are active, the online export can be started. To avoid too much system load, the export can run with a small number of R3LOAD processes (possibly for a long period of time). The whole procedure can be improved by exporting the data from a system copy, which can be created after the IMIG tables were initialized.
The import can be started as soon as one of the R3LOAD export processes has finished. R3LOAD option “-o TIVP” is used. Even if the export and the import is not time-critical, the Migration Monitor will shorten the overall time, thus enabling the table synchronization to start earlier.

© SAP AG TADM70 11-7
© SAP AG 2010
Synchronize Table Data (Step 6 - 7)
TAB01
TAB02
TAB01
TAB01'
TAB02
TAB02'
SAP Web AS 7.00SAP Web AS 7.00SAP ERP 6.0SAP ERP 6.0
Scheduled table synchronization
The table data synchronization can be individually scheduled for each table, thus balancing the batch load on the source system. On heavily-used systems, it might be advisable to install a separate application server for running the IMIG synchronization batch processes.
The logging tables contain the primary key of the original table and an additional field to flag the status (insert, update, delete, processed). Every time a row is inserted, updated, or deleted in the original table, a database trigger will be fired to update the logging table. In Unicode systems, all fields of a table are in the logging table.
The synchronization jobs scan the logging tables (here TAB01‘ and TAB02‘) for updated records. Marked records will be transmitted to the target system. A safe protocol makes sure that only those records which have really been updated in the target database are marked as completed (processed).
It is possible to reset the IMIG tables configuration to start from the beginning (i.e. for a new test run). Tables and triggers will be removed. A new online export will be necessary for the next try.

© SAP AG TADM70 11-8
© SAP AG 2010
Export Remaining Tables (Step 8 - 10)
TAB01
TAB02
Drop tables
TAB01
TAB01'
TAB02
TAB02'
Intermediate statusIntermediate statusSAP ERP 6.0SAP ERP 6.0
SAP Systems are shutdown
After the data synchronization of the IMIG tables is finished, the source system will be locked, and IMIG triggers, and logging tables will be removed. The source and target system must be shutdown. All SAP tables, except for those migrated with IMIG, can be deleted from the target system.
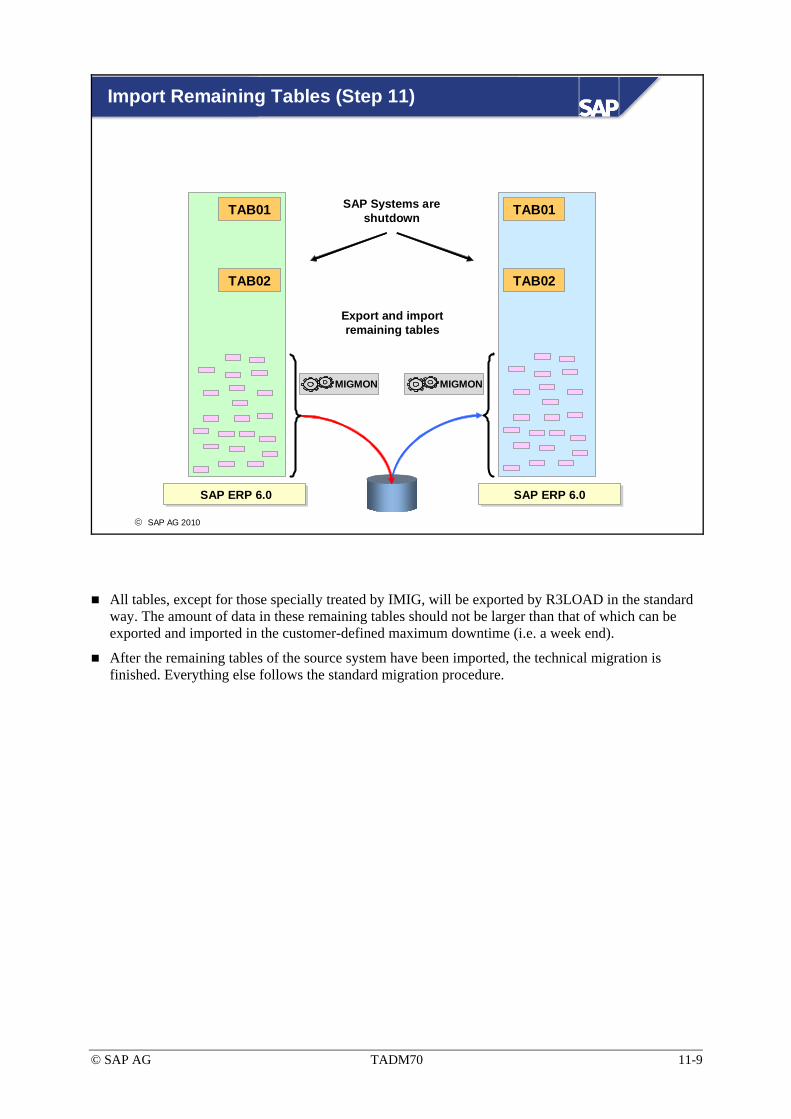
© SAP AG TADM70 11-9
© SAP AG 2010
Import Remaining Tables (Step 11)
MIGMON MIGMON
TAB01
TAB02
TAB01
TAB02
SAP ERP 6.0SAP ERP 6.0SAP ERP 6.0SAP ERP 6.0
SAP Systems are shutdown
Export and import remaining tables
All tables, except for those specially treated by IMIG, will be exported by R3LOAD in the standard way. The amount of data in these remaining tables should not be larger than that of which can be exported and imported in the customer-defined maximum downtime (i.e. a week end).
After the remaining tables of the source system have been imported, the technical migration is finished. Everything else follows the standard migration procedure.

© SAP AG TADM70 11-10
© SAP AG 2010
R3LOAD Unicode Conversions
The Unicode Conversion uses SAPINST and R3LOAD to export and import the source and target database
Special needs for preparations in the source system
Minimum Support Package Levels required
The code page conversion will always be done at export time
Increased CPU, memory, and disk storage consumption after conversion
Can be combined with a heterogeneous system copy
Check the current status and release strategy of the Unicode Conversion in SAP Service Marketplace. See quick link UNICODE, UNICODE@SAP, and appropriate SAP Notes.
Check the current status and release strategy of the Unicode Conversion in SAP Service Marketplace. See quick link UNICODE, UNICODE@SAP, and appropriate SAP Notes.
Unicode SAP Systems require SAP Web AS 6.20 and above.
The Unicode Conversion is only applicable if a minimum Support Package Level is installed. Check the Unicode Conversion SAP Notes for more information.
The “OS/DB Migration Check” applies to Unicode Conversions changing their target operating system or database system.
R3LOAD converts the data to Unicode while the export is running. As it is not sufficient for R3LOAD to read the raw data, additional features are implemented regarding the data context. Because the context is only available in the source system, a Unicode conversion at import time is not supported for customer systems. A reverse conversion from Unicode to non-Unicode is not possible.
During the Unicode export, R3LOAD writes *.XML files which are used for final data adjustments in the target system (transaction SUMG).
In MDMP systems, not all tables provide a language identifier for their data. For this data, a vocabulary must be created to allow an automated conversion. The creation of this vocabulary is a time consuming task. The involvement of experienced consultants will shorten the whole process significantly.
Related SAP Notes:
• 0548016 Conversion to Unicode
• 1319517 Unicode Collection Note

© SAP AG TADM70 11-11
© SAP AG 2010
Unicode Conversion Challenges
Very large databases
Strict downtime requirements
Slow hardware
ABAP Unicode enabling
MDMP Unicode Conversions
MDMP / Unicode Interfaces (between SAP Systems)
Non-SAP Interfaces
Third-party products / Add-On availability
Very large databases, small downtimes, and slow hardware might require the IMIG method.
ABAP coding must be reviewed using UCCHECK. Byte offset programming or dynamic programming (data types determined dynamically during program execution) can require lots of effort. UCCHECK is available as of Web AS 6.20.
Unicode Conversion of MDMP systems will require more effort (increasing with the number of installed code pages).
MDMP / Unicode Interfaces cause high efforts and the recommendation is to minimize the number of language specific interfaces, if possible. See SAP Note: 745030 MDMP - Unicode Interfaces: Solution Overview.
For Non-SAP Interfaces, a detailed analysis of all existing interfaces is necessary.
Third-party products that are “SAP certified” are not automatically also Unicode compliant. Therefore, the vendors need to be contacted. A specific Unicode-certification is available. Certified products will be listed on the SAP Marketplace.
© SAP AG TADM70 11-12
© SAP AG 2010
Special Projects: Unit Summary
Some SAP System copy types need the project involvement of SAP, because of method complexity. Nevertheless such a project is often set up as a collaboration between a certified migration consultant and a SAP consultant.

© SAP AG TADM70 11-13
Exercises
Unit 11: Special Projects
At the conclusion of this exercise, you will be able to:
• Understand the Incremental Migration.
• Know the difficulties of a MDMP Unicode conversion.
11-1 The Incremental Migration (IMIG) is used to export large customer tables while the source system is online. Database triggers are implemented to allow table synchronizations between the source and target system.
11-1-1 What is the task of the implemented IMIG database trigger during a table update?
11-1-2 How are the synchronization jobs able to recognize, which records to update in the target database, and how does the synchronization work?
11-2 Unicode conversions of SAP MDMP systems (using multiple code pages) are more difficult than for non-MDMP systems (using a single-code page only).
11-2-1 What is the reason?
11-2-2 Why is the Unicode conversion done at export time?

© SAP AG TADM70 11-14
© SAP AG TADM70 11-15
Solutions
Unit 11: Special Projects
11-1
11-1-1 As soon as the database has been inserted, deleted, or has updated a record, the trigger adds the primary key to the log table and appends the status (insert, update, delete). If the primary key is already in the log table, only the status will be changed.
11-1-2 The synchronization job scans the log table for records having the status “unprocessed”. The found primary key is used to read the table data that must be transferred to the target system. After the transfer has been successfully completed and the receiving system has signaled, “update successful”, the record status is changed to “processed” in the log table of the source system.
11-2
11-2-1 In a single code page system, every character has a unique related Unicode character. In an MDMP system, the meaning of a character depends on it language context. As this context is not always properly maintained or even not known, time consuming export preparation tasks are required to map data to the right language.
11-2-2 The table data in an R3LOAD dump file does not provide enough information for a customer system Unicode conversion. R3LOAD reads certain tables for additional Unicode conversion information during the export.

© SAP AG TADM70 11-16

HHSSoAA
D
S
I
AP NetWeaver ’04
omogeneous and eterogeneous ystem Copy for AP Systems Based n SAP Web pplication Server BAP 6.40 SR1
ocument Version 1.40 - March 29, 2005
nstallation Guide

SAP AG Neurottstraße 16 69190 Walldorf Germany T +49/18 05/34 34 24 F +49/18 05/34 34 20 www.sap.com
© Copyright 2004 SAP AG. All rights reserved. SAP, R/3, mySAP, mySAP.com, xApps, xApp, SAP NetWeaver, and other SAP products and services mentioned herein as well as their respective logos are trademarks or registered trademarks of SAP AG in Germany and in several other countries all over the world. All other product and service names mentioned are the trademarks of their respective companies. Data contained in this document serves informational purposes only. National product specifications may vary.
No part of this publication may be reproduced or transmitted in any form or for any purpose without the express permission of SAP AG. The information contained herein may be changed without prior notice. Some software products marketed by SAP AG and its distributors contain proprietary software components of other software vendors.
Microsoft, Windows, Outlook, and PowerPoint are registered trademarks of Microsoft Corporation. These materials are subject to change without notice. These materials
are provided by SAP AG and its affiliated companies ("SAP Group") for informational purposes only, without representation or warranty of any kind, and SAP Group shall not be liable for errors or omissions with respect to the materials. The only warranties for SAP Group products and services are those that are set forth in the express warranty statements accompanying such products and services, if any. Nothing herein should be construed as constituting an additional warranty.
IBM, DB2, DB2 Universal Database, OS/2, Parallel Sysplex, MVS/ESA, AIX, S/390, AS/400, OS/390, OS/400, iSeries, pSeries, xSeries, zSeries, z/OS, AFP, Intelligent Miner, WebSphere, Netfinity, Tivoli, and Informix are trademarks or registered trademarks of IBM Corporation in the United States and/or other countries. Oracle is a registered trademark of Oracle Corporation.
UNIX, X/Open, OSF/1, and Motif are registered trademarks of the
Open Group. Disclaimer Some components of this product are based on Java™. Any code change in these components may cause unpredictable and severe malfunctions and is therefore expressively prohibited, as is any decompilation of these components.
Citrix, ICA, Program Neighborhood, MetaFrame, WinFrame, VideoFrame, and MultiWin are trademarks or registered trademarks of Citrix Systems, Inc.
Any Java™ Source Code delivered with this product is only to be used by SAP’s Support Services and may not be modified or altered in any way.
HTML, XML, XHTML and W3C are trademarks or registered trademarks of W3C®, World Wide Web Consortium, Massachusetts Institute of Technology.
Java is a registered trademark of Sun Microsystems, Inc.
Documentation in the SAP Service Marketplace You can find this documentation at the following Internet address: JavaScript is a registered trademark of Sun Microsystems, Inc., used
under license for technology invented and implemented by Netscape. service.sap.com/instguides
MaxDB is a trademark of MySQL AB, Sweden.

Terms for Included Open Source Software This SAP software contains also the third party open source software products listed below. Please note that for these third party products the following special terms and conditions shall apply.
SAP License Agreement for STLport SAP License Agreement for STLport
between
SAP Aktiengesellschaft Systems, Applications, Products in Data Processing
Neurottstrasse 16 69190 Walldorf
Germany ( hereinafter: SAP )
and
you
( hereinafter: Customer ) 1. Subject Matter of the Agreement
a. SAP grants Customer a non-exclusive, non-transferable, royalty-free license to use the STLport.org C++ library (STLport) and its documentation without fee.
b. By downloading, using, or copying STLport or any portion thereof Customer agrees to abide by the intellectual property laws, and to all of the terms and conditions of this Agreement.
c. The Customer may distribute binaries compiled with STLport (whether original or modified) without any royalties or restrictions.
d. Customer shall maintain the following copyright and permission notices on STLport sources and its documentation unchanged: Copyright 2001 SAP AG
e. The Customer may distribute original or modified STLport sources, provided that: • The conditions indicated in the above permission notice
are met; • The following copyright notices are retained when
present, and conditions provided in accompanying permission notices are met:
Copyright 1994 Hewlett-Packard Company Copyright 1996,97 Silicon Graphics Computer Systems, Inc. Copyright 1997 Moscow Center for SPARC Technology. Copyright 1999,2000 Boris Fomitchev Copyright 2001 SAP AG Permission to use, copy, modify, distribute and sell this software and its documentation for any purpose is hereby granted without fee, provided that the above copyright notice appear in all copies and that both that copyright notice and this permission notice appear in supporting documentation. Hewlett-Packard Company makes no representations about the suitability of this software for any purpose. It is provided "as is" without express or implied warranty. Permission to use, copy, modify, distribute and sell this software and its documentation for any purpose is hereby granted without fee, provided that the above copyright notice appear in all copies and that both that copyright notice and this permission notice appear in supporting documentation. Silicon Graphics makes no representations about the suitability of this software for any purpose. It is provided "as is" without express or implied warranty. Permission to use, copy, modify, distribute and sell this software and its documentation for any purpose is hereby granted without fee, provided that the above copyright notice appear in all copies and that both that copyright notice and this permission notice appear in supporting documentation. Moscow Center for SPARC

Technology makes no representations about the suitability of this software for any purpose. It is provided "as is" without express or implied warranty. Boris Fomitchev makes no representations about the suitability of this software for any purpose. This material is provided "as is", with absolutely no warranty expressed or implied. Any use is at your own risk. Permission to use or copy this software for any purpose is hereby granted without fee, provided the above notices are retained on all copies. Permission to modify the code and to distribute modified code is granted, provided the above notices are retained, and a notice that the code was modified is included with the above copyright notice. Permission to use, copy, modify, distribute and sell this software and its documentation for any purpose is hereby granted without fee, provided that the above copyright notice appear in all copies and that both that copyright notice and this permission notice appear in supporting documentation. SAP makes no representations about the suitability of this software for any purpose. It is provided with a limited warranty and liability as set forth in the License Agreement distributed with this copy. SAP offers this liability and warranty obligations only towards its customers and only referring to its modifications.
2. Support and Maintenance
SAP does not provide software maintenance for the STLport. Software maintenance of the STLport therefore shall be not included. All other services shall be charged according to the rates for services quoted in the SAP List of Prices and Conditions and shall be subject to a separate contract.
3. Exclusion of warranty As the STLport is transferred to the Customer on a loan basis and free of charge, SAP cannot guarantee that the STLport is error-free, without material defects or suitable for a specific application under third-party rights. Technical data, sales brochures, advertising text and quality descriptions produced by SAP do not indicate any assurance of particular attributes.
4. Limited Liability a. Irrespective of the legal reasons, SAP shall only be liable for
damage, including unauthorized operation, if this (i) can be compensated under the Product Liability Act or (ii) if caused due to gross negligence or intent by SAP or (iii) if based on the failure of a guaranteed attribute.
b. If SAP is liable for gross negligence or intent caused by employees who are neither agents or managerial employees of SAP, the total liability for such damage and a maximum limit on the scope of any such damage shall depend on the extent to which its occurrence ought to have anticipated by SAP when concluding the contract, due to the circumstances known to it at that point in time representing a typical transfer of the software.
c. In the case of Art. 4.2 above, SAP shall not be liable for indirect damage, consequential damage caused by a defect or lost profit.
d. SAP and the Customer agree that the typical foreseeable extent of damage shall under no circumstances exceed EUR 5,000.
e. The Customer shall take adequate measures for the protection of data and programs, in particular by making backup copies at the minimum intervals recommended by SAP. SAP shall not be liable for the loss of data and its recovery, notwithstanding the other limitations of the present Art. 4 if this loss could have been avoided by observing this obligation.
f. The exclusion or the limitation of claims in accordance with the present Art. 4 includes claims against employees or agents of SAP.

Typographic Conventions Icons Type Style Description
Example Text Words or characters quoted from the screen. These include field names, screen titles, pushbuttons labels, menu names, menu paths, and menu options.
Cross-references to other documentation
Example text Emphasized words or phrases in body text, graphic titles, and table titles
EXAMPLE TEXT Technical names of system objects. These include report names, program names, transaction codes, table names, and key concepts of a programming language when they are surrounded by body text, for example, SELECT and INCLUDE.
Example text Output on the screen. This includes file and directory names and their paths, messages, names of variables and parameters, source text, and names of installation, upgrade and database tools.
Example text Exact user entry. These are words or characters that you enter in the system exactly as they appear in the documentation.
<Example text> Variable user entry. Angle brackets indicate that you replace these words and characters with appropriate entries to make entries in the system.
EXAMPLE TEXT Keys on the keyboard, for example, F2 or ENTER.
Icon Meaning
Caution
Example
Note
Recommendation
Syntax
Additional icons are used in SAP Library documentation to help you identify different types of information at a glance. For more information, see Help on Help → General Information Classes and Information Classes for Business Information Warehouse on the first page of any version of SAP Library.
6
Homogeneous and Heterogeneous System Copy for SAP Systems Based on SAP WAS 6.40 SR1 .............................................8
1 Planning .............................................................................................10 2 Preparations ......................................................................................14 3 Database-Specific Procedures ........................................................18
3.1 Oracle-Specific Procedure .................................................................. 18 3.1.1 Generating the Control File Structure .........................................................................20 3.1.2 Preparing the Target System......................................................................................24 3.1.3 Creating an Offline Backup.........................................................................................26 3.1.4 Restoring the Database Files on the Target System..................................................27 3.1.5 Restarting SAPinst......................................................................................................28
3.2 MS SQL Server-Specific Procedure.................................................... 28 3.3 IBM DB2 UDB for UNIX and Windows Specific Procedure ............... 28 3.4 IBM DB2 UDB for z/OS Specific Procedure........................................ 30 3.5 IBM DB2 UDB for iSeries Specific Procedure.................................... 31 3.6 Informix-Specific Procedure................................................................ 31 3.7 MaxDB-Specific Procedure ................................................................. 32
4 R3load Procedures ...........................................................................35 4.1 R3load Procedure on UNIX.................................................................. 36
4.1.1 Setting the Library Path Environment Variable...........................................................36 4.1.2 Generation of DDL statements ...................................................................................39 4.1.3 Running SAPinst to Export the Database...................................................................39
4.2 R3load Procedure on Windows........................................................... 42 4.2.1 Generation of DDL statements ...................................................................................44 4.2.2 Running SAPinst to Export the Database...................................................................44
4.3 R3load Procedure on IBM eServer iSeries......................................... 47 4.3.1 Preparing the Windows Host for the SAP System Installation ...................................47 4.3.2 Preparing a Windows User Account and iSeries User Profile....................................48 4.3.3 Installing TMKSVR and Creating an Installation Share..............................................49 4.3.4 Generation of DDL statements ...................................................................................51 4.3.5 Running SAPinst to Export the Database...................................................................52
4.4 Setting up the Target System.............................................................. 54 4.4.1 Transferring the Export Files to the Target Host ........................................................54 4.4.2 Installing the Target System .......................................................................................55 4.4.3 RELOAD Procedure....................................................................................................56
5 R3load Procedures using the Migration Monitor...........................57 5.1 R3load Procedure with Migration Monitor on UNIX .......................... 58 5.2 R3load Procedures with Migration Monitor on Windows ................. 59 5.3 Configuring the Import and Export Properties Files ......................... 59 5.4 Starting the Migration Monitor ............................................................ 68 5.5 Restarting R3load Processes.............................................................. 71

7
5.6 Output Files of the Migration Monitor ................................................ 71 5.7 Setting up the Target System using the Migration Monitor.............. 72
5.7.1 Installing the Target System Using the Migration Monitor ..........................................73 6 Final Activities...................................................................................74
6.1 Performing Follow-On Actions in the Source System ...................... 74 6.2 Performing Follow-On Actions in the Target System ....................... 74
7 Additional Information......................................................................78 7.1 Remote Installation with SAPinst ....................................................... 78
7.1.1 Starting SAPinst on the Remote Host.........................................................................79 7.1.2 Starting SAPinst GUI on the Local Host .....................................................................80
7.2 Interrupted Installation with SAPinst.................................................. 81
Homogeneous and Heterogeneous System Copy for SAP Systems Based on SAP WAS 6.40 SR1 Purpose When a homogeneous system copy is performed, the target SAP system is installed on the same operating system and the same database system as the source SAP system. The contents of the database are copied from the source to the target system.
During a heterogeneous system copy, the operating system or the database system is changed. Migration is a synonym for heterogeneous system copy. Familiarize yourself with the migration procedure. For detailed information, see:
• SAP System Copy & Migration page on SAP Service Marketplace at service.sap.com/systemcopy.
• SAP OS/DB Migration page on SAP Service Marketplace at service.sap.com/osdbmigration.
Additionally to the information contained on this page, check the SAP OS/DB Migration Planning Guide that is available in the Media Library.
• SAP Note 82478
A homogeneous system copy should only be done by a person with experience in copying systems and with knowledge of the operating system, the database, and the ABAP Dictionary. A heterogeneous system copy must be done by a certified system support consultant or an SAP Technical Consultant.
Create an SAPNet - R/3 Frontend message in the application area BC-INS-UNX (UNIX), BC-INS-NT (Windows), or BC-INS-AS4 (IBM eServer iSeries) if you experience problems during the homogeneous system copy. In the case of a heterogeneous system copy (OS/DB migration), create an SAPNet - R/3 Frontend message in the application area BC-INS-MIGR3 if you experience problems.
Terminology
• Homogeneous System Copy
The copy of the system is installed on the same operating system and database platform as the original system.
• Heterogeneous System Copy
During the copy, either the operating system or the database system is switched, or both. Heterogeneous system copy is a synonym for migration.
• Source System and Target System
The SAP system containing the original database is called the source system and the system to which the database copy is to be imported is called the target system. Their SAP system names are abbreviated to SOURCE_SAPSID and TARGET_SAPSID (IBM
8

eServer iSeries: source_<SID> and target_<SID>). The terms source database and target database are also used in this description.
• System Copy
Duplication of an SAP system. Certain SAP parameters may change in a copy. When a system copy is made, all the instances are newly installed, but the database is set up using a copy of the source system database.
• Database Copy
Database-dependent part of the system copy.
• Placeholders
Placeholders such as <SAPSID> are used in commands. They are used in the same way as in the SAP system installation documentation, and must be replaced with the values valid for your site.
The following additional placeholders are used:
Placeholder Meaning How to find out <S_HOST> System name of the source host Command hostname
<T_HOST> System name of the target host Command hostname
<S_SAPSID> SAP system ID of the source system <SAPSID> of the original system
<T_SAPSID> SAP system ID of the target system <SAPSID> of the target system
<S_DBSID> Database ID of the source system <DBSID> of the original system
<T_DBSID> Database ID of the target system <DBSID> of the target system
Constraints • A system copy should only be done by a person with experience in copying systems
and with knowledge of the operating system, the database, and the ABAP Dictionary.
• Client transport is not supported as a system copy method. Transporting production clients is not supported at all. You can use client transport for the initial set up of a SAP system infrastructure. The client copy procedure is not handled in this documentation.
• Export and import of a database with the installation tools for reorganization purposes is not described in this documentation, and is not supported by SAP. Use the appropriate tools for database reorganization.
• If you have made modifications in your development system, and want to copy your quality assurance or production system onto the development system, see SAP Note 130906.
• Copying data from SAP R/2 Systems to an SAP system based on SAP Web Application Server ABAP is not described in this documentation. Copying data from non-SAP systems to SAP systems is not described in this documentation either.
• If you want to convert a non-Unicode systems to a Unicode systems or perform system copy of a Unicode systems, see SAP Note 548016.
9

1 Planning Purpose Before you begin with the practical system copy tasks, it is essential to have a planning phase in which you make a number of fundamental decisions that influence the subsequent system copy procedure. Careful planning is a prerequisite for the successful system copy of the system.
SAP recommends that you make a system copy in order to set up a test, demo, training or standby system (Oracle and Informix: standby systems cannot be created with a system copy). You should perform upgrades in a test system first. This way you can identify customer-specific problems which might result from modifications.
The SAP system infrastructure (development, quality assurance and production system) can be set up without making a system copy as follows:
• Install all SAP systems (begin with the development system). Customize the development system as described in the implementation documentation.
• Transport the client-dependent and client-independent data to the quality assurance and production systems.
However, if you do not follow this concept, you can also install a system, customize it and then perform a system copy.
When copying a system which contains production data it is important to choose the right moment for the copy. This could be a month-end or year-end closing. Make sure that there is a well-defined starting point for the data in the new system.
Prerequisites
Read the following SAP Note before beginning the system copy. This note contains the most recent information regarding the system copy. SAP Note 784931 System Copy for SAP Systems Based on SAP Web AS 6.40 SR1 Make sure that you have the most recent version of the note. SAP Notes are located on SAP Service Marketplace at service.sap.com/notes.
A consistent system copy can only be ensured if you perform all steps described in this documentation.
The system copy is applicable for:
• Setting up system landscapes (where the SAP systems have different SAPSIDs).
• Creating systems for testing, demonstration, training and standby. Depending on the purpose of the system, it may be advisable to use the same SAP system name, even though the system cannot be included in a system group for transports in this case.
The SAP system release of the source and target systems must be the same.
Process Flow ...
1. Obtain the latest versions of the SAP Notes.
2. In the case of a major change in hardware configuration (for example, new machine type, new hard disk configuration, new file system type), consult your SAP-authorized hardware partner.
10
3. Create a plan for performing the system copy.
Take into account the downtime of the source system (for preparations and copying) when planning the system copy.
4. Decide which homogeneous system copy method you want to use:
With database-specific tools (tools provided by the database vendor):
Some database vendors offer specific tools for copying a database. These tools allow you to:
Restore a backup of one database (source DB) in another one (target DB) (backup method)
Unload the source DB and load the data into the target DB.
With SAP tools (R3load procedure):
The system copy is carried out with SAP tools. This method should be used if database-specific methods are either not available or not suitable.
Copying an SAP system with these tools is described in section R3load Procedures.
For a heterogeneous system copy, only the R3load procedure is available.
Neither of these methods is supported for all database systems. See the following table to check which copy methods are available for your database system:
Database OS Platform Available Methods
UNIX Use one of the following:
• The R3load method (see section R3load Procedure on UNIX).
• The MaxDB backup/restore method [Page 32]
MySQL MaxDB
In this documentation we refer to the MySQL MaxDB database as MaxDB from now on.
Windows Use one of the following:
• The R3load method (see section R3load Procedure on Windows).
• The MaxDB backup/restore method [Page 32]
IBM DB2 Universal Database for eServer iSeries
eServer iSeries Use the R3load method (see section R3load Procedure on eServer iSeries) or the Save/Restore Library method (see SAP Note 585277).
IBM DB2 Universal Database for UNIX and Windows
UNIX or Windows
Use one of the following:
• The R3load method (see the corresponding section R3load Procedure on UNIX or R3load Procedure on Windows)
• The backup method of IBM DB2 Universal Database for UNIX and Windows is supported for SAP systems based on SAP Web AS 6.40 SR1. For more information, see IBM DB2 UDB for UNIX and Windows Specific Procedure [Page 28].
11

IBM DB2 Universal Database for z/OS
eServer zSeries Use one of the following:
• The R3load method (see section R3load Procedure on UNIX or R3load Procedure on Windows).
• The IBM DB2 Universal Database for z/OS specific procedure as described in IBM DB2 UDB for z/OS Specific Procedure [Page 30].
UNIX Use one of the following:
• The R3load method (see section R3load Procedure on UNIX).
• The Informix backup/restore method [Page 31].
Informix
Windows Use one of the following:
• The R3load method (see section R3load Procedure on Windows).
• The Informix backup/restore method [Page 31].
UNIX Use one of the following:
• The R3load method (see section R3load Procedure on UNIX)
• The R3load method with Export/Import Monitors (see section R3load Procedure with Export/Import Monitors)
• The Oracle backup/restore method (see section Database-Specific Procedures → Oracle-Specific Procedure)
Oracle
Windows Use one of the following:
• The R3load method (see section R3load Procedure on Windows)
• The Oracle backup/restore method (see section Database-Specific Procedures → Oracle-Specific Procedure, and SAP Note 676468).
• The R3load method with Export/Import Monitors (see section R3load Procedure with Export/Import Monitors).
MS SQL Server Windows Use one of the following:
• The R3load method (see section R3load Procedure on Windows)
• The Backup/Restore or Detach/Attach Method (see section Database-Specific Procedures → MS SQL Server-Specific Procedure).
5. Order the right version of the installation kit before starting the system copy.
6. Choose an SAP system name. The new SAP system name <TARGET_SAPSID> can be chosen freely (during a new installation), but to meet the requirements of the
12
Workbench Organizer you must choose different SAP system names for different systems.
7. Make sure that the versions of the SAP system and the installation tools are the same on the target and source systems (exceptions are only allowed if they are described in an SAP Note).
Several SAP systems can be operated on a single host without encountering any problems. Nevertheless, SAP recommends that you use a separate host for each system because an SAP system upgrade may depend on an OS upgrade. If the SAP systems are on separate hosts, it is possible to upgrade them at different times.
The source system must be in a consistent state before it can be copied.
8. Heterogeneous System Copy: Get Migration Key
If you change the operating system or the database system during the copy (heterogeneous system copy), you need a migration key. You can generate the migration key via SAP Service Marketplace at service.sap.com/migrationkey. Enter the installation number of your source system when your are requesting the key.
13
2 Preparations Before you start the system copy, you must perform steps to prepare the procedure.
Organizational Preparations
• Required DVDs
Make sure that all required CDs / DVDs for the system copy are available. You do no longer require a special migration CD. The tools are located on the SAP Installation MasterDVD.
In case you want to perform a copy of a non-R/3 SAP system as a pilot project, see SAP Note 543715 (APO, BW), SAP Note 693168 (IMIG) and SAP Note 611232 (released CRM/EBP products).
• Tool Versions
Check that you have the appropriate tool versions for your SAP Kernel.
• SAP License
Once installation is complete and the SAP system copy has been imported, you will require a new license key for the target system. The license key of the source system is not valid for this system. You can order a new license key for the target system as follows:
SAP Service Marketplace at service.sap.com.
Remote Connection to SAP support to request help with these tasks. For more information see service.sap.com/remoteconnection.
Telefax
For more information, see SAP Note 94998.
• Archive Files
You must make data archived in the source system (data that does not reside in the database but was moved to a different storage location using SAP Archive Management) accessible in the target system. Adapt the file residence information in the target system. Refer to the SAP Online Documentation (SAP Library → Cross-Application Components → Archiving Application Data) for help.
Access to archive files is platform-independent.
• Configuration Analysis / Hardware Analysis
The following factors have to be determined:
The number of application servers
The expected size of the database
Additional disks or other hardware required
Required memory
See Hardware and Software Requirements Check in the SAP system installation documentation to determine the system requirements.
• Test Run / Schedule
14
Perform a test run of the system copy. The time taken by the test run is used to calculate the system downtime:
If your target system will replace your source system, try to perform a complete test run, meaning that the entire database is exported from the source system, transferred to the target system and imported there. Approximately system downtime will be equal to the total test time (that is, time for export, transport and import).
If you do not want to replace your source system, a partial test run (export of entire database or parts of it) may suffice to calculate the system downtime. The source system will only be down for the time of the export.
Calculating the system downtime is particularly important for very large databases (VLDB) or when tapes are being used. The test run is also done to determine the amount of export data. You should choose the best data transfer method (for example, FTP or tape). We recommend to perform read/write actions only on local file systems. Do not use NFS-mounted file systems, as:
Reading from NFS-mounted file systems may fail.
Writing to NFS-mounted file systems may cause corrupted dumps.
Define a schedule for the test migration and the final migration.
Technical Preparations
In order to make a consistent copy of the database, it is necessary to prepare the source system and to carry out some subsequent actions on the target system. This is not necessary when performing a test run.
The following list describes important preparatory actions. For further information on SAP system administration, see the SAP Online Documentation.
• Preparing the Source System
Before starting a system copy, check the minimal kernel patch level which is required by the support package level of the source system. It may be necessary to replace the SAP kernel which is delivered with the kernel CD of the installation kit and installed during the installation of the target system by a newer kernel patch level before starting the target system. If you have to replace the delivered SAP kernel, you can do that after the installation of the central instance.
No canceled or pending update requests should be in the system. Check this via: Tools → Administration → Monitor → Update (SM13). If canceled or pending updates exist, these must be updated again or deleted from all clients. You can see whether canceled or pending updates exist by checking if table VBDATA contains any entries. Proceed as follows in order to find the canceled or open updates:
i. Call transaction SM13.
ii. Delete the default values for the client, user, and time.
iii. Choose all update requests.
If canceled or pending records exist, then these must be updated again or deleted. Check whether this action was successful using transaction SE16 for table VBDATA.
15
Cancel all released jobs: Tools → CCMS → Jobs → Maintenance. This also applies to the jobs which must run periodically (see SAP Note 16083). Select all jobs (include start after event): Job → Schedule Job → Cancel.
Adapt the operation mode timetable to make sure that no switching of operating modes takes place while a system is being copied: Administration → CCMS → Configuration → Operation mode calendar.
Note the logical system names of all clients: ...
i. If you plan to overwrite an existing system with a system copy (i.e. the source and target systems will both exist after the system copy), make sure you note the logical system names of all clients in the system that will be overwritten (transaction SCC4). As the logical system names will be overwritten, in case of differences, they must be changed back to their original names (as they existed in the system that is overwritten) in the follow-on actions after the system copy.
ii. BW customers: When planning an SAP BW system copy, read SAP Note 325525.
iii. If you create a new system with a system copy (i.e., create an upgrade test system), the logical naming strategy for this new system should be consistent with your existing logical system naming convention. See OSS note 184447 if you are still planning your BW system landscape.
iv. If your system copy is used to replace hardware for the DB server, migrate to a different database system or operating system (i.e., source system for the copy is the same as the copy target), no changes to logical system names are required.
Before the export, delete QCM tables from your system. Proceed as follows: ...
i. Before deleting you must always check
that the tables are consistent (no restart log or conversion procedure termination must be displayed)
that the data of the original table is legible
If application programs do not run correctly which use the affected original table, do not delete the QCM table yet.
ii. Start transaction SE14.
iii. Choose Extras → Invalid temp. table
All QCM tables that can be deleted are displayed.
iv. Mark the tables and delete them.
FI customers: You can perform an additional consistency check by running the job SAPF190 before the system copy in the source system, as well as after the copy in the target system, and then comparing the results. No customer data may be changed in the meantime. (Accounting → Financial Accounting → General ledger → Periodic Processing → Closing → Check/count → Comparison)
FI customers: You can further check consistency by running the jobs RFUMSV00 (tax on sales/purchases), RAGITT01 (asset history sheet), RAZUGA01 (asset acquisitions), RAABGA01 (fixed asset retirements) before the system copy in the source system, as well as after the copy in the target system, and then comparing the results. No customer data may be changed in the meantime.
16

CO customers: You can perform an additional consistency check by running the report group 1SIP before the system copy in the source system, as well as after the copy in the target system, and then comparing the results. No customer data may be changed in the meantime.
Prerequisites for an export: Before performing an export, make sure that: - No upgrade-prepare is performed. - No incremental conversion is in progress. To test if an incremental conversion is in progress, start the transaction ICNV. If there are any table entries in the TICNV, an incremental conversion is in progress. In this case, you have the following options: 1. Defer the migration until the incremental conversion has finished. 2. Try to finish the incremental conversion by performing the following steps:
• If the tables are in state ‘For conversion’ or in state ‘Done’, delete the entries by choosing Control Delete Entry.
• If the tables are in any other state, you have to finish the incremental conversion. Choose the button Assistant and proceed according to the Online Documentation.
Only Heterogeneous System Copy: Before you start the export of your source system, make sure that the tables TATGPC and TATGPCA are empty. To do so, use your database utility and delete the contents of these tables with the following statements: DELETE from TATGPC DELETE from TATGPCANormally both tables are empty. If you do not delete the contents of these tables you will encounter problems while importing the data to your target system because of non NULL capable fields in these tables.
17

3 Database-Specific Procedures The following sections describe database-specific procedures for the homogeneous system copy. Database-specific methods are not available for all database systems. For information on the availability, see the section Planning [Page 10] in this documentation and check the SAP Service Marketplace for SAP Notes describing the homogeneous system copy for your database system.
3.1 Oracle-Specific Procedure Purpose In an SAP system environment, you can create a homogeneous copy of an Oracle database by copying database files. This method is suitable for creating an exact copy of an existing database. The source of the copy can be an offline backup or the file system of your source host.
SAPinst is used for the installation on the target system host as described in the installation documentation for your SAP component. Only the SAPinst steps for setting up and loading the database steps are modified.
As of SAP Web AS 6.40 SR 1, the new OraBRCopy Java tool replaces the former R3COPY shell script. It works on Unix and Windows as well. The tool generates a file CONTROL.SQL into the current working directory, which can be used without further adaptions on the target system..
The tool is located on the SAP Installation Master DVD:
• Unix:
(<DVD-DIR>:/IM_<xx>/SAPINST/UNIX/COMMON/INSTALL/ORA/ORABRCOPY.SAR)
• Windows:
(<DVD-DIR>:\IM_<xx>\SAPINST\NT\COMMON\INSTALL\ORA\ORABRCOPY.SAR)
For a detailed description of the OraBRCopy tool refer to the delivered documentation ORABRCopy.pdf which is part of the OraBRCOPY.SAR archive.
Advantages
• Existing offline backups can be used (provided redo logs were cleaned up with forced log switches).
• Procedure is faster than the R3load method.
Disadvantages
• Offline backup/copy of database files in a heterogeneous environment is not possible as hardware of the source and target systems must be binary compatible.
• Source system host and target system host must be different.
• SAP system and database must be shut down during offline backup/copy of database files.
• You cannot change the database schema and the tablespace names.
Prerequisites Make sure that the following requirements are met:
18

• You use the same Oracle release and patch level for your database in the source and target system.
• If you want to upgrade your database from 32-bit to 64-bit, add the following lines at the bottom of the control.sql file:
shutdown immediate;
startup restrict
spool utlirp.log
@?/rdbms/admin/utlirp.sql
spool off
alter system disable restricted session;
• You must have installed JRE version 1.4.1 or higher on your system
• The JAVA_HOME environment variable must point to the JRE directory.
• The classes12.jar must exist in the <ORACLE_HOME>/jdbc/lib directory (installed using a standard Oracle installation).
• The backup must be done offline.
• The source and target systems must run on different hosts for security reasons.
• The source and target systems must be binary compatible.
If you use Windows, note that the source or target system must be 32 or 64-bit systems (I386 or IA64). You can copy from 32-bit systems to 64-bit systems and vice versa.
• UNIX only: The hard disk type and the disk management system of the source and target systems must be the same.
• Make sure that all redo log groups are archived.
If your source system uses the US7ASCII character set, you must choose this character set when installing the target system. SAPinst prompts for the character set during the installation (key: Database Character Set). The installation default is WE8DEC or UTF8 for Unicode systems. To find out the character set used by the source system, connect to the source database as user sap<schemaid> or sapr3 with sqlplus and enter: SELECT * FROM V$NLS_PARAMETERS;
Process Flow ...
1. Generate the control file structure for the target database on the source system.
2. Prepare the target system.
3. If required, create an offline backup of the source database.
4. Restore the data files, log files, trace file and structure information file on the target system by using the offline backup or by copying the listed files directly from the source host.
5. Restart SAPinst.
Result You finished this part of the system copy. To complete the system copy, you have to perform the steps in section Final Activities [Page 74].
19
3.1.1 Generating the Control File Structure Prerequisites
We recommend that you shut down the SAP system before you perform the following steps. The database must still be running.
Procedure ...
1. Create an installation directory <INSTDIR> (UNIX: with permissions 777) on the source system.
2. Copy the ORABRCOPY.SAR archive from the SAP Installation Master DVD to the installation directory and extract it using SAPCAR:
You find the archive in the following directory:
For Unix:
(<DVD-DIR>:/IM_<xx>/SAPINST/<UNIX>/COMMON/INSTALL/ORA/ORABRCOPY.SAR)
Windows:
(<DVD-DIR>:\IM_<xx>\SAPINST\NT\COMMON\INSTALL\ORA\ORABRCOPY.SAR)
3. Start the OraBRCopy tool as an OS user with Oracle DBA privileges (user ora<dbsid> on UNIX, user <sapsid>adm on Windows):
On UNIX, enter the following commands: ./ora_br_copy.sh –targetSid <TARGET_DBSID> -password <system’s password> -listenerPort <listener port>
On Windows, enter the following commands: ora_br_copy.bat –targetSid <TARGET_DBSID> -password <system’s password> -listenerPort <listener port>
The tool will create the files CONTROL.SQL, CONTROL.TRC and init<targetSID>.ora in your installation directory, shutdown and restart the database and perform the required log switches.
If an error occurs, check the log file: <INSTDIR>/ora.brcopy.log
4. Verify the CONTROL.SQL control file using the CONTROL.TRC trace file.
Example for Windows In the following example for Windows, entries of CONTROL.SQL written in bold should be compared to the trace file:
REM ====================================================================
20
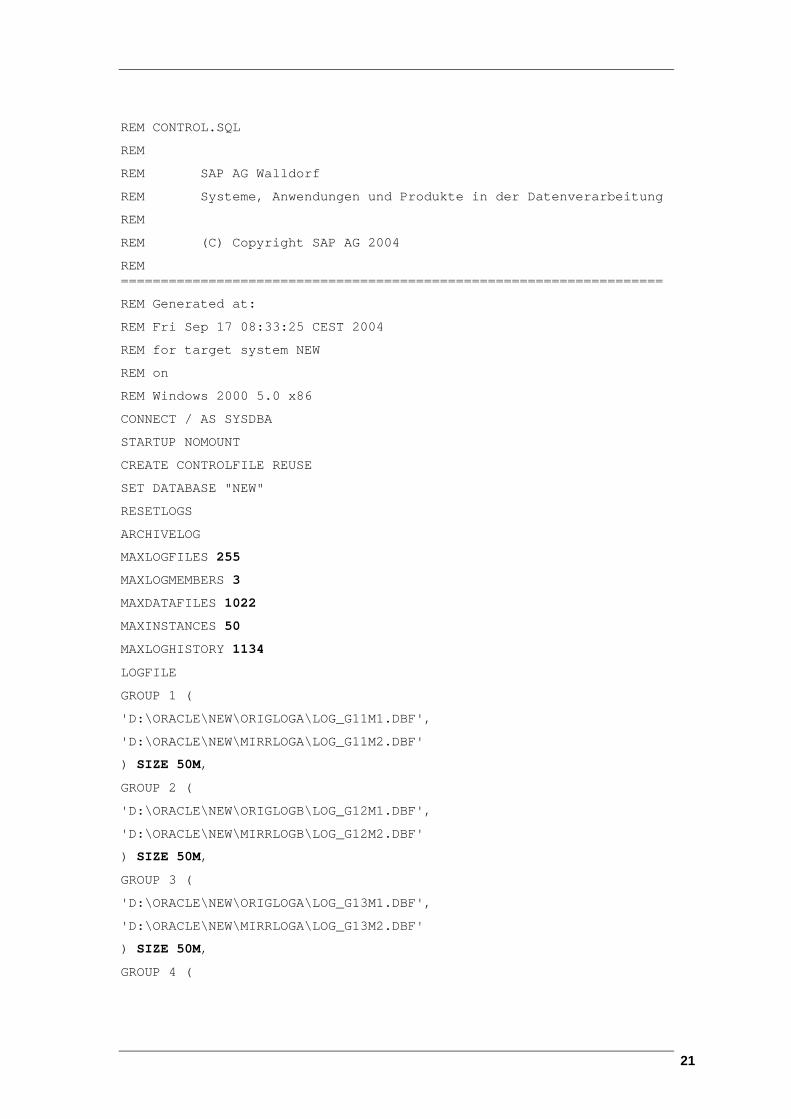
REM CONTROL.SQL
REM
REM SAP AG Walldorf
REM Systeme, Anwendungen und Produkte in der Datenverarbeitung
REM
REM (C) Copyright SAP AG 2004
REM ====================================================================
REM Generated at:
REM Fri Sep 17 08:33:25 CEST 2004
REM for target system NEW
REM on
REM Windows 2000 5.0 x86
CONNECT / AS SYSDBA
STARTUP NOMOUNT
CREATE CONTROLFILE REUSE
SET DATABASE "NEW"
RESETLOGS
ARCHIVELOG
MAXLOGFILES 255
MAXLOGMEMBERS 3
MAXDATAFILES 1022
MAXINSTANCES 50
MAXLOGHISTORY 1134
LOGFILE
GROUP 1 (
'D:\ORACLE\NEW\ORIGLOGA\LOG_G11M1.DBF',
'D:\ORACLE\NEW\MIRRLOGA\LOG_G11M2.DBF'
) SIZE 50M,
GROUP 2 (
'D:\ORACLE\NEW\ORIGLOGB\LOG_G12M1.DBF',
'D:\ORACLE\NEW\MIRRLOGB\LOG_G12M2.DBF'
) SIZE 50M,
GROUP 3 (
'D:\ORACLE\NEW\ORIGLOGA\LOG_G13M1.DBF',
'D:\ORACLE\NEW\MIRRLOGA\LOG_G13M2.DBF'
) SIZE 50M,
GROUP 4 (
21

'D:\ORACLE\NEW\ORIGLOGB\LOG_G14M1.DBF',
'D:\ORACLE\NEW\MIRRLOGB\LOG_G14M2.DBF'
) SIZE 50M
DATAFILE
'D:\ORACLE\NEW\SAPDATA1\SYSTEM_1\SYSTEM.DATA1',
'D:\ORACLE\NEW\SAPDATA3\IMS_1\IMS.DATA1',
'D:\ORACLE\NEW\SAPDATA3\IMS_2\IMS.DATA2',
'D:\ORACLE\NEW\SAPDATA3\IMS_3\IMS.DATA3',
'D:\ORACLE\NEW\SAPDATA3\IMS_4\IMS.DATA4',
'D:\ORACLE\NEW\SAPDATA4\IMS_5\IMS.DATA5',
'D:\ORACLE\NEW\SAPDATA4\IMS_6\IMS.DATA6',
'D:\ORACLE\NEW\SAPDATA4\IMS_7\IMS.DATA7',
'D:\ORACLE\NEW\SAPDATA4\IMS_8\IMS.DATA8',
'D:\ORACLE\NEW\SAPDATA4\IMS_9\IMS.DATA9',
'D:\ORACLE\NEW\SAPDATA1\IMS620_1\IMS620.DATA1',
'D:\ORACLE\NEW\SAPDATA1\IMS620_2\IMS620.DATA2',
'D:\ORACLE\NEW\SAPDATA1\IMS620_3\IMS620.DATA3',
'D:\ORACLE\NEW\SAPDATA1\IMS620_4\IMS620.DATA4',
'D:\ORACLE\NEW\SAPDATA2\IMS620_5\IMS620.DATA5',
'D:\ORACLE\NEW\SAPDATA2\IMS620_6\IMS620.DATA6',
'D:\ORACLE\NEW\SAPDATA2\IMS620_7\IMS620.DATA7',
'D:\ORACLE\NEW\SAPDATA2\IMS620_8\IMS620.DATA8',
'D:\ORACLE\NEW\SAPDATA2\IMS620_9\IMS620.DATA9',
'D:\ORACLE\NEW\SAPDATA3\IMS620_10\IMS620.DATA10',
'D:\ORACLE\NEW\SAPDATA4\IMS620_11\IMS620.DATA11',
'D:\ORACLE\NEW\SAPDATA1\IMSUSR_1\IMSUSR.DATA1',
'D:\ORACLE\NEW\SAPDATA2\ROLL_1\ROLL.DATA1'
;
ALTER DATABASE OPEN RESETLOGS;
ALTER TABLESPACE PSAPTEMP ADD TEMPFILE 'D:\ORACLE\NEW\SAPDATA3\TEMP_1\TEMP.DATA1'
SIZE 350M REUSE AUTOEXTEND OFF;
Comments on the example: MAXLOGFILES 255
…
The numbers must be greater or equal to the corresponding numbers in the trace file.
GROUP 1 (
'D:\ORACLE\NEW\ORIGLOGA\LOG_G11M1.DBF',
22

'D:\ORACLE\NEW\MIRRLOGA\LOG_G11M2.DBF'
) SIZE 50M,
Group 2 (
…
The sizes of the respective groups must be equal to the sizes of the corresponding groups in the trace file. 'D:\ORACLE\NEW\SAPDATA1\SYSTEM_1\SYSTEM.DATA1',
'D:\ORACLE\NEW\SAPDATA3\IMS_1\IMS.DATA1',
… 'D:\ORACLE\NEW\SAPDATA1\IMS620_1\IMS620.DATA1'
…
The count of the data files must be equal to the count of the corresponding data files in the trace file.
ALTER TABLESPACE PSAPTEMP ADD TEMPFILE 'D:\ORACLE\NEW\SAPDATA3\TEMP_1\TEMP.DATA1'
SIZE 350M REUSE AUTOEXTEND OFF;
…
The size must be equal to the corresponding size in the trace file.
The number of the rows with ALTER TABLESPACE must be equal to the number of the corresponding rows in the trace file.
23
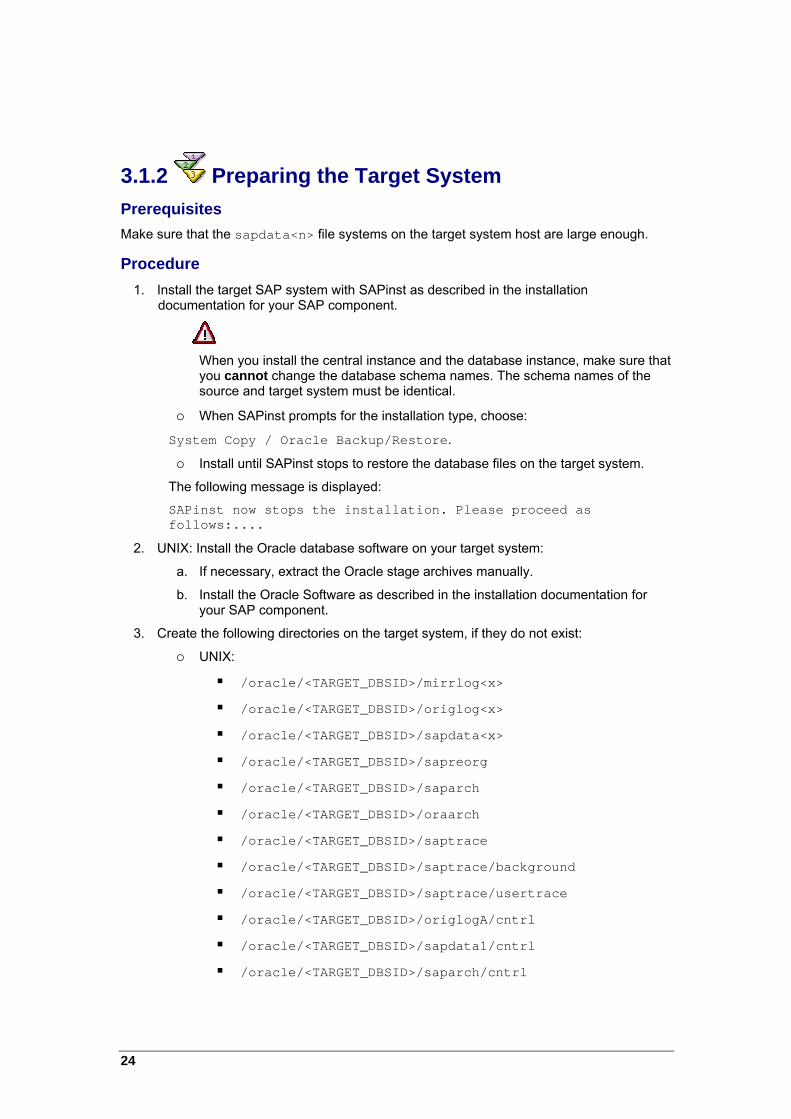
3.1.2 Preparing the Target System Prerequisites Make sure that the sapdata<n> file systems on the target system host are large enough.
Procedure ...
1. Install the target SAP system with SAPinst as described in the installation documentation for your SAP component.
When you install the central instance and the database instance, make sure that you cannot change the database schema names. The schema names of the source and target system must be identical.
...
When SAPinst prompts for the installation type, choose:
System Copy / Oracle Backup/Restore.
Install until SAPinst stops to restore the database files on the target system.
The following message is displayed:
SAPinst now stops the installation. Please proceed as follows:....
2. UNIX: Install the Oracle database software on your target system:
a. If necessary, extract the Oracle stage archives manually.
b. Install the Oracle Software as described in the installation documentation for your SAP component.
3. Create the following directories on the target system, if they do not exist:
UNIX:
/oracle/<TARGET_DBSID>/mirrlog<x>
/oracle/<TARGET_DBSID>/origlog<x>
/oracle/<TARGET_DBSID>/sapdata<x>
/oracle/<TARGET_DBSID>/sapreorg
/oracle/<TARGET_DBSID>/saparch
/oracle/<TARGET_DBSID>/oraarch
/oracle/<TARGET_DBSID>/saptrace
/oracle/<TARGET_DBSID>/saptrace/background
/oracle/<TARGET_DBSID>/saptrace/usertrace
/oracle/<TARGET_DBSID>/origlogA/cntrl
/oracle/<TARGET_DBSID>/sapdata1/cntrl
/oracle/<TARGET_DBSID>/saparch/cntrl
24

/oracle/<Target_DBSID>/sapcheck
Windows:
<drive>:\oracle\<TARGET_DBSID>\mirrlog<x>
<drive>:\oracle\<TARGET_DBSID>\origlog<x>
<drive>:\oracle\<TARGET_DBSID>\sapdata<x>
<drive>:\oracle\<TARGET_DBSID>\sapreorg
<drive>:\oracle\<TARGET_DBSID>\saparch
<drive>:\oracle\<TARGET_DBSID>\oraarch
<drive>:\oracle\<TARGET_DBSID>\saptrace
<drive>:\oracle\<TARGET_DBSID>\saptrace\background
<drive>:\oracle\<TARGET_DBSID>\saptrace\usertrace
<drive>:\oracle\<TARGET_DBSID>\origlogA\cntrl
<drive>:\oracle\<TARGET_DBSID>\sapdata1\cntrl
<drive>:\oracle\<TARGET_DBSID>\saparch\cntrl
<drive>:\oracle\<Target_DBSID>\sapcheck
Note that for Windows, one of the cntrl files can also be located in the directory <drive>:\oracle\<TARGET_DBSID>\sapdata1\system_1\cntrl
4. Make sure that the following directories are empty (except the subdirectory saparch/cntrl).
UNIX: /oracle/<TARGET_DBSID>/saparch and /oracle/<TARGET_DBSID>/oraarch
Windows: <drive>:\oracle\<TARGET_DBSID>\saparch and <drive>:\oracle\<TARGET_DBSID>\oraarch
5. UNIX: All directories must be owned by the user ora<target_dbsid>.
To achieve this enter the following command: chown ora<target_dbsid>:dba<directory>
6. Windows: For all Oracle directories set the security settings for the built-in accounts and groups SYSTEM, Administrators, SAP_<SAPSID>_GlobalAdmin (domain installation), and SAP_<SAPSID>_LocalAdmin (local installation) as follows:
a. In the Windows Explorer, right-click the Oracle root directory and choose Properties.
b. Under Security, choose Advanced.
c. Uncheck Allow inheritable permissions from the parent …. (Windows Server 2003), or Inherit from parent the permission entries that apply to child objects (Windows 2000).
d. In the upcoming dialog, choose Copy, to copy the permission entries that were previously applied from the parent to this object.
25

e. Choose OK.
f. Set the permissions for the above-mentioned accounts SYSTEM, Administrators, SAP_<DBSID>_GlobalAdmin, or SAP_<DBSID>_LocalAdmin to Full Control.
g. Delete all other accounts.
3.1.3 Creating an Offline Backup Create an offline backup if required. There are different possibilities to prepare the actual transfer of the database files:
• If you have an existing offline backup which is up-to-date, you can use it (provided redo logs were cleaned up with forced log switches).
• If you want to transport the database file (for example, on tape) or if you have to perform the database shut-down at a certain time, stop the database (normal shut-down) and perform a complete offline backup. You can use the trace file CONTROL.TRC created by OraBrCOPY to determine the file system trees that have to be saved.
• Otherwise, stop the database (normal shutdown) and copy the database files when the actual transfer to the target system takes place. You do not have to perform any preparations for the actual transfer now. Proceed with the next step.
26
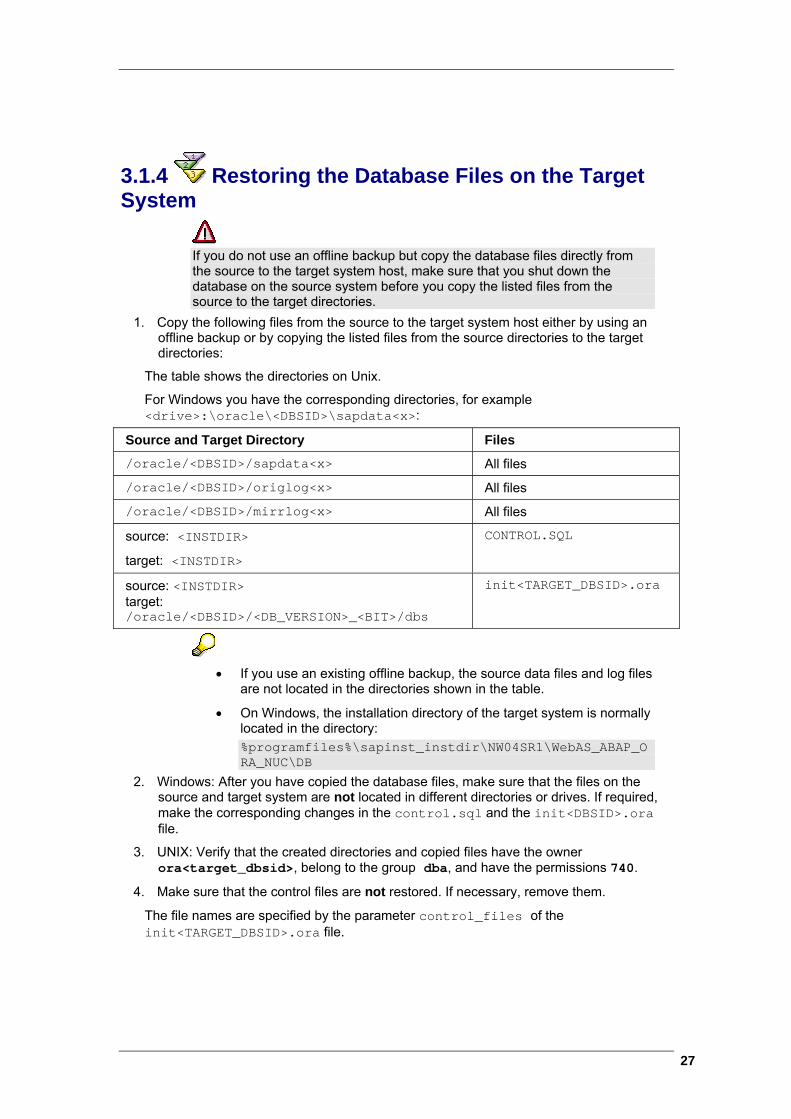
3.1.4 Restoring the Database Files on the Target System
If you do not use an offline backup but copy the database files directly from the source to the target system host, make sure that you shut down the database on the source system before you copy the listed files from the source to the target directories.
...
1. Copy the following files from the source to the target system host either by using an offline backup or by copying the listed files from the source directories to the target directories:
The table shows the directories on Unix.
For Windows you have the corresponding directories, for example <drive>:\oracle\<DBSID>\sapdata<x>:
Source and Target Directory Files /oracle/<DBSID>/sapdata<x> All files
/oracle/<DBSID>/origlog<x> All files
/oracle/<DBSID>/mirrlog<x> All files
source: <INSTDIR>
target: <INSTDIR>
CONTROL.SQL
source: <INSTDIR> target: /oracle/<DBSID>/<DB_VERSION>_<BIT>/dbs
init<TARGET_DBSID>.ora
• If you use an existing offline backup, the source data files and log files
are not located in the directories shown in the table.
• On Windows, the installation directory of the target system is normally located in the directory: %programfiles%\sapinst_instdir\NW04SR1\WebAS_ABAP_ORA_NUC\DB
2. Windows: After you have copied the database files, make sure that the files on the source and target system are not located in different directories or drives. If required, make the corresponding changes in the control.sql and the init<DBSID>.ora file.
3. UNIX: Verify that the created directories and copied files have the owner ora<target_dbsid>, belong to the group dba, and have the permissions 740.
4. Make sure that the control files are not restored. If necessary, remove them.
The file names are specified by the parameter control_files of the init<TARGET_DBSID>.ora file.
27

3.1.5 Restarting SAPinst Procedure ...
1. Restart SAPinst. Continue as described in the installation documentation for your SAP component.
2. Request a new license key from SAP. For more information, see the installation documentation for your SAP component, section Post-Installation Activities - Installing and Using the SAP License and SAP Note 94998.
3.2 MS SQL Server-Specific Procedure Purpose In an SAP system environment, you can create a homogeneous system copy of an MS SQL Server database by using the backup/restore method or the detach/attach method. For more information, see SAP Notes 193816 and 151603. The SAPinst installation tool supports both methods.
The backup/restore method and the detach/attach method have the following advantages compared to the R3load method:
• You can use an existing backup.
• These methods are much faster than the R3load method.
Process Flow 3. You run SAPinst to install the central instance.
4. You back up or detach the MS SQL Server database that you want to copy.
5. You restore or attach the database on the target database server instance.
6. You download the SAP Tools for MS SQL Server from SAP Service Marketplace at service.sap.com/msplatforms → Microsoft → SQL Server.
For more information, see SAP Note 683447.
7. You run SAP Tools for MS SQL Server, choose Migration setup in the root menu, and follow the dialogs.
Alternatively, you can perform the Postprocessing step of SAP Note 151603. However, this involves many manual steps. It is much easier to make a system copy with SAP Tools for MS SQL Server.
3.3 IBM DB2 UDB for UNIX and Windows Specific Procedure Purpose In an SAP system environment, you can create a homogeneous system copy of a DB2 database using the backup method or by relocating your database. The relocation of the database is usually used in conjunction with split mirror (for more information, see SAP Note 594301 and the DB2 documentation). This section provides information on the backup method.
28

SAPinst is used for the installation on the target system host as described in the installation documentation for your SAP component. Only the SAPinst steps for setting up and loading the database steps are replaced by a database restore.
Advantages of the Backup Method
• You can use existing offline backups.
• Using the backup method is faster than the R3load method.
Disadvantages of the Backup Method
An offline backup or copy of database files in a heterogeneous environment is not possible as the hardware of the source and target systems must be binary compatible.
With DB2 UDB for UNIX and Windows, it is possible to use backup images cross platform for AIX, Solaris and HP-UX.
Prerequisites • For security reasons, the source and target systems should run on different hosts.
If your source and target system reside on the same host, you have to use the redirected restore or relocate your database.
• The source and target systems should be binary compatible.
• If errors occur when restoring the backup on the target system, the complete restore must be repeated.
Process Flow ...
1. You perform an offline backup or restore an existing backup copy. For the restore of your database, you can choose between one of the following options:
Simple database restore
To perform a database restore, use the DB2 restore command. For more information see the IBM DB2 documentation DB2 Command Reference.
Redirected restore
To perform a redirected restore, use tool brdb6brt that retrieves a database backup and creates a CLP script for the restore of this backup image. For more detailed information on how to use tool brdb6brt, see the documentation Database Administration Guide: SAP on IBM DB2 Universal Database for UNIX and Windows section Usage of Tool brdb6brt and the IBM DB2 documentation DB2 Command Reference.
Be aware of the following constraints, when using the backup method for a homogeneous system copy:
• You cannot change the connect user. During the dialog phase you have to make sure, that you enter exactly the name of the connect user like you did on your source system.
• The tablespace names remain the same during the database restore. However, you may change them after the installation.
• If you want to change the container names on the target system, you have to adapt the container names in the redirected restore script and then perform a redirected restore. For more information, see the
29

documentation Database Administration Guide: SAP on IBM DB2 Universal Database for UNIX and Windows, section Usage of Tool brdb6brt.
2. You run SAPinst to install the central instance.
3. You run SAPinst to install the database instance.
During the installation phase you will be prompted to perform the database restore. For more information, see SAP Note 784931.
4. Perform the database restore and continue with the installation.
5. If required, you can modify the tablespace names after the installation using the following command:
db2 rename tablespace <old name> to <new name>
db2 rename tablespace <SAPSID_SOURCE>#STABD to <SAPSID_TARGET>#STABD
In addition, you have to update the tablespace names in tables TSDB6, IADB6 and TADB6 using the following commands:
For table TSDB6, enter the following SQL command: update <connect_user_name>.tsdb6 set tabspace = '<SAPSID_TARGET>#'||substr(tabspace,5,length(tabspace)-4), indspace='<SAPSID_TARGET>#'||substr(indspace,5,length(indspace)-4)
For table IADB6, enter the following SQL command: update <connect_user_name>.iadb6 set tabspace = '<SAPSID_TARGET>#'||substr(tabspace,5,length(tabspace)-4)
For table TADB6, enter the following SQL command: update <connect_user_name>.tadb6 set tabspace = '<SAPSID_TARGET>#'||substr(tabspace,5,length(tabspace)-4)
See also:
• Database Administration Guide: SAP on IBM DB2 Universal Database for UNIX and Windows
• IBM DB2 documentation → DB2 Command Reference
3.4 IBM DB2 UDB for z/OS Specific Procedure Purpose In an SAP system environment, you can create a homogeneous system copy of a DB2 database using the offline system copy method.
Advantage of the Offline System Copy Method This method is faster than the R3load method.
Restriction of the Offline System Copy Method
30

At the moment, you cannot copy an individual MCOD component to another system. You can only copy the complete system.
The offline system copy must be performed by an experienced database administrator.
For more information, see SAP Note 680746.
3.5 IBM DB2 UDB for iSeries Specific Procedure Purpose In an SAP system environment, you can create a homogeneous system copy of a DB2 database using the SAV/RSTLIB system copy method.
Advantage of the Offline System Copy Method This method is faster than the R3load method.
For more information, see SAP Note 585277.
3.6 Informix-Specific Procedure Purpose In an SAP system environment, you can create a homogeneous system copy of an Informix database using the backup and restore method. This is possible for databases running on UNIX or Windows operating systems. The SAP installation tool, SAPinst, supports the system copy.
Advantages of the Backup and Restore Method
• You can use an existing backup.
• This method is faster than the R3load method.
Disadvantages of the Backup and Restore Method
Source system host and target system host should be different.
Prerequisites You can find the documentation SAP Database Guide: Informix referred to below at:
help.sap.com → Documentation → SAPNetWeaver → English → SAP NetWeaver → Application Platform (SAP Web Application Server) → Databases → IBM Informix
Process Flow ...
1. You back up the Informix database that you want to copy.
For more information on database backup, see the Informix documentation or the SAP documentation SAP Database Guide: Informix.
2. You run SAPinst to install the central instance.
3. You run SAPinst to install the database instance.
During the installation phase SAPinst prompts you to select the database instance installation method in screen Selecting the Database Instance installation Method.
4. You choose System Copy / Restore of the database using a database specific method.
31

SAPinst displays the following message and waits for you to perform the restore.
Please restore your Informix database NOW. After you have completed this and the database is online again, press ‘OK’.
5. You restore your Informix database.
For more information on database restore, see the Informix documentation or the SAP documentation SAP Database Guide: Informix.
6. If required, you rename your target database system ID, T_DBSID.
7. You drop the table SAPUSER in the target database system.
8. You choose OK in SAPinst to continue.
3.7 MaxDB-Specific Procedure Purpose In an SAP system environment, you can create a homogeneous copy of a MaxDB database by using the backup and restore method. This method is suitable for creating an exact copy of an existing database. The source of the copy is a complete data backup of your source database.
The SAPinst tool is used for the installation on the target system host as described in the installation documentation for your SAP component. In SAPinst you select the backup and restore method as the database installation method. SAPinst stops before the database instance initialization and asks you to perform the recovery on the target database. After you have performed recovery and post-recovery activities you can continue the installation in SAPinst.
This description is not valid for the liveCache system copy.
Prerequisites • CPU architecture
You can use the backup and restore method to copy systems to the same CPU architecture. That is, you can copy a system based on a swap byte architecture to another system based on swap byte architecture. You can also copy a RISC-based system to another RISC-based system. For example, the following combinations are possible:
HP-UX <-> Sun Solaris
Sun Solaris <-> AIX
Windows <-> HP Tru64
Windows <-> Linux
Windows 32-bit <-> Windows 64-bit
However, you cannot copy between the following systems:
HP-UX <-> Windows NT
HP Tru64 <-> Sun Solaris
You can copy backups from 32-bit systems to 64-bit systems.
• Data backup
You perform the complete data backup of your source database.
• Recovery tool
32

You are using the MaxDB Database Manager (DBMGUI) version 7.5.0 Build 12 or above.
You can find more information on DBMGUI at either of the following:
dev.mysql.com/doc → MaxDB by MySQL → MaxDB Online Library → Tools
help.sap.com → Documentation → SAPNetWeaver → English → SAP NetWeaver → Application Platform (SAP Web Application Server) → Databases → MySQL MaxDB → Tools → Database Manager GUI
• Database software
The database software on the target host must have the same version as the software on the source host. The build number of the software version on the target host must be greater than or equal to the version on the source host.
• Size of the data on the target system
The size of the target system must be greater than the used space on the source system. You can find the size of the used pages on the source system as follows: dbmcli –d <database_name> -u <dbm_user>,<password> -n <database_server> -u SQL sap<sid>,<password> sql_execute 'SELECT USEDPERM FROM SERVERDBSTATISTICS'
The result of this query is the amount of used space, expressed as the number of 8 KB pages. By dividing this value by 128 you can get the used space expressed in MB. When SAPinst prompts you, configure the database data volumes according to this value.
Process Flow ...
1. You do the following on the source system:
a. You create a complete data backup using the DBMGUI tool:
DBMGUI → Backup → Backup Wizard → Complete
b. You make the backup medium available on the target host.
2. You do the following on the target system:
a. You start SAPinst to configure the database instance parameters.
SAPinst stops before database initialization and asks you to perform the data recovery.
b. You start the data recovery wizard from DBMGUI:
i. You register your database instance in the DBMGUI
ii. You check the database instance is in the admin state.
iii. You choose Recovery → Recovery with Initialization …
iv. In type of recovery you select Restore a medium.
v. You specify the backup medium.
vi. You start the restore procedure.
The recovery wizard does not start the recovery immediately. It initializes the database instance first. It takes some time for the database server to format the database volumes.
c. After the restore, you check the state of the target database instance. Change the database state to online if it is not already in online state.
33

d. You delete the entries from the following tables to make sure that information about the backup history for update statistics in the Computing Center Management System (CCMS) from the old system does not appear in the new system:
CNHIST, CNREPRT, CNMEDIA, DBSTATHADA, DBSTAIHADA, DBSTATIADA, DBSTATTADA, SDBAADAUPD
e. Reload the system tables in the target system as follows: dbmcli -d <NEW_DBSID> -u control,control load_systab -u superdba,admin -ud domain
f. You change the database user SAP<OLD_SID> to SAP<NEW_SID>. The name of the database user must be exactly SAP<SID>, where <SID> is the system ID of the SAP system to be installed. The password of the user must be sap. This is necessary for the post-installation steps executed by SAPinst.
You change the database user as follows: dbmcli -d <NEW_DBSID> -u control,control –u SQL superdba,admin sql_execute rename user SAP<OLD_SID> to SAP<NEW_SID>
You change the password of the SAP<SID> database user as follows:
dbmcli –d <NEW_DBSID> -u control,control –u SQL superdba,admin sql_execute alter password SAP<NEW_SID> sap
g. You continue with SAPinst or restart it if you stopped it during the recovery.
h. After installation is completed you maintain the database connection for CCMS. For more information, see SAP Note 588515.
34

4 R3load Procedures Purpose With the SAP installation tool SAPinst, you can export and import your database in a database-independent format. The procedure generates a database export of all SAP objects that are defined in the ABAP Dictionary.
Prerequisites
R3load Restrictions
Keep the following restrictions of R3load procedures in mind:
• SAPinst generates a database dump of all SAP objects that are defined in the ABAP Dictionary. Other objects are not exported by SAPinst.
• Changes to database objects that cannot be maintained in the ABAP Dictionary (transaction SE14), such as the distribution of tables over several tablespaces/dbspaces, are lost after the system copy.
• No indexes longer than 18 characters are allowed on the database to be exported.
• For a consistent database export, no transactions on export-relevant database objects are allowed during the export. Otherwise, the export has to be restarted. Therefore, it is recommended to shutdown the SAP system for the export. The database must still be running.
Considerations concerning the System Copy Tools
• Every installation service (dialog instance installation, for example) must have its own separate installation directory whenever you start SAPinst.
• If the target system is already existing and if you do NOT plan to perform a MCOD installation, delete the database on the target system before the import according to the corresponding description in section Additional Information of the installation documentation for your SAP component.
If the database configuration of your database is stored in the file system, it is advisable to backup these configuration files before deleting the database.
Splitting STR Files
• During the standard system copy process, all tables of the SAP system are grouped into packages, whereby all tables with the same ‘data class’ belong to the same package. The processing unit for one unload/load process is a package. The packages usually differ in number and size of contained tables, resulting in varying unload/load runtimes. The overall runtime can be reduced by creating packages of the same ‘size’, that is creating packages with a similar processing time. Splitting the default packages (one package per data class) into more and smaller pieces will help to reach this aim.
• There are several options of how to split packages. For a detailed description of the options, see the F1 help about the parameters prompted on the screen Split STR Files while running SAPinst to export the database. The options can be used separately or - when using the new Java based splitting tool - combined.
• 'Splitting of STR Files' is part of the 'Advanced Export Parameters' and is disabled by default. If you select the splitting option and unless you did not already perform some tests, using the splitting tool parameters selected by SAPinst is a good starting point.
35

If you want to split STR file, it is mandatory that EXT files for the target database system are created before. You will find the EXT files in your export dump directory, subdirectory DB/<DBTYPE>, for example DB/ORA.
Process Flow • On UNIX, see R3load on UNIX [Page 36].
• On Windows, see R3load on Windows [Page 42].
• On IBM eServer iSeries, see R3load on IBM eServer iSeries [Page 47]
4.1 R3load Procedure on UNIX Purpose This section describes the R3load system copy procedure for Oracle, Informix, IBM DB2 UDB for UNIX and Windows, IBM DB2 UDB for z/OS, and SAP DB on UNIX platforms.
Process Flow The R3load procedure consists of the following steps: ...
1. Heterogeneous system copy: Generate the migration key via SAP Service Marketplace.
You need a migration key for a heterogeneous system copy. You can generate the migration key required for the heterogeneous system copy via SAP Service Marketplace at service.sap.com/migrationkey.
2. Export the source database:
a. Make sure that the QCM tables are deleted from your system [Page 14].
b. IBM DB2 UDB for UNIX and Windows, Informix and Oracle only: Set the library path environment variable [Page 36].
c. Generate DDL statements [Page 51].
d. Run SAPinst to export the database [Page 39].
3. Set up the target system [Page 54].
Result You finished this part of the system copy. To complete the system copy, you have to perform the steps in section Final Activities [Page 74].
4.1.1 Setting the Library Path Environment Variable Use This section is only valid for IBM DB2 UDB for UNIX and Windows, Informix and Oracle.
You need to set the library path environment variable of user root before starting SAPinst.
36

Procedure As user root, set the library path environment variable on your installation host according to the following tables:
<ORACLE_HOME> is the home directory that you set up for the oracle instance <DBSID>: /oracle/<DBSID>/920_32 if your operating system is of 32 bit, or /oracle/<DBSID>/920_64 if your operating system is of 64 bit.
Value of Library Path Environment Variable
DB Version
Operating System
Variable Value
AIX /usr/sap/<SAPSID>/SYS/exe/run:.
Linux (32 Bit); Linux IA64 (64 Bit); Solaris
/usr/sap/<SAPSID>/SYS/exe/run:.
IBM DB2 UDB for UNIX and Windows
HP-UX: /usr/sap/<SAPSID>/SYS/exe/run:/opt/IBM/db2/V8.1/lib64:.
Informix All UNIX operating systems
/informix/<SAPSID>/lib:/ \ informix/<SAPSID>/lib/esql
HP Tru64 UNIX
<sapmnt>/<SAPSID>/exe: \ /<ORACLE_HOME>/lib:/oracle/client/ \ 92x_64/lib
Linux <sapmnt>/<SAPSID>/exe: \
/<ORACLE_HOME>/lib
Oracle 8.1.7
Oracle 9.2.0
All other UNIX operating systems
<sapmnt>/<SAPSID>/exe
Name of Library Path Environment Variable
Operating System Variable Name
AIX LIBPATH
All other UNIX operating systems
LD_LIBRARY_PATH
If you are using the Bourne shell (sh): <Variable Name>=<Variable Value> \ export <Variable Name>
37

That is, if your operating system is Linux and your database is Oracle: LD_LIBRARY_PATH=/sapmnt/<SAPSID>/exe: \ <ORACLE_HOME/lib
If you restart SAPinst at a later time, make sure the variable is still set.
38
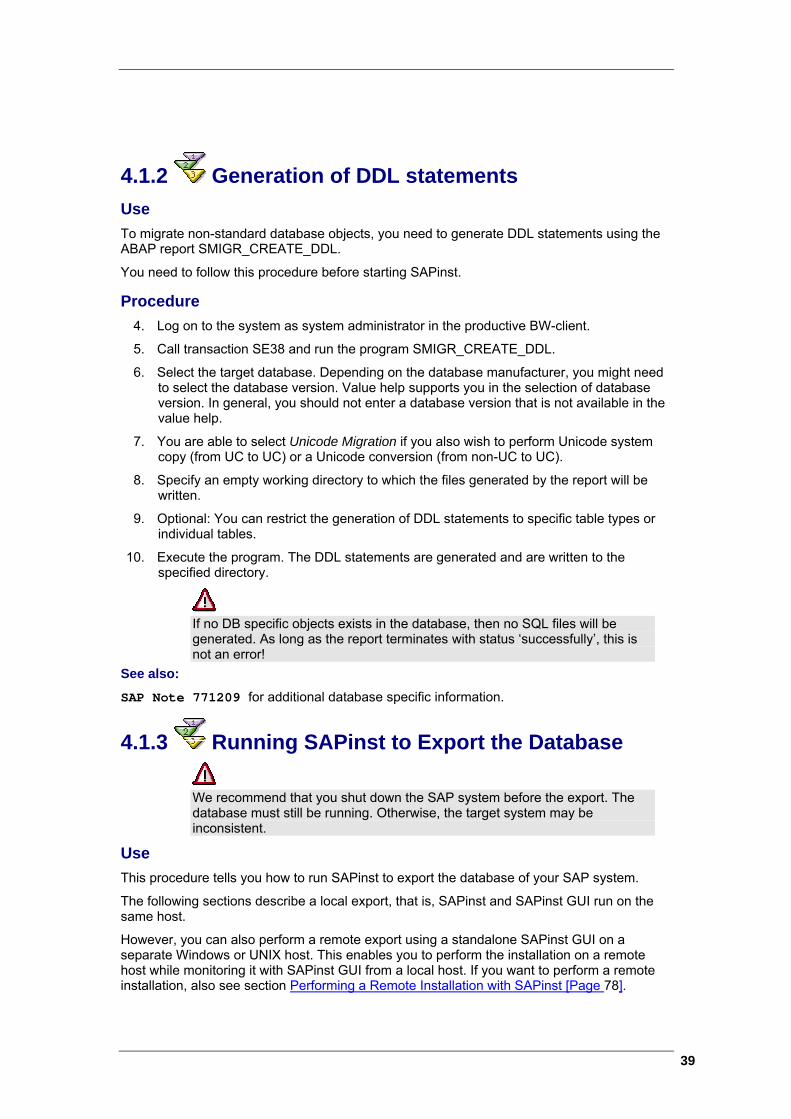
4.1.2 Generation of DDL statements Use To migrate non-standard database objects, you need to generate DDL statements using the ABAP report SMIGR_CREATE_DDL.
You need to follow this procedure before starting SAPinst.
Procedure 4. Log on to the system as system administrator in the productive BW-client.
5. Call transaction SE38 and run the program SMIGR_CREATE_DDL.
6. Select the target database. Depending on the database manufacturer, you might need to select the database version. Value help supports you in the selection of database version. In general, you should not enter a database version that is not available in the value help.
7. You are able to select Unicode Migration if you also wish to perform Unicode system copy (from UC to UC) or a Unicode conversion (from non-UC to UC).
8. Specify an empty working directory to which the files generated by the report will be written.
9. Optional: You can restrict the generation of DDL statements to specific table types or individual tables.
10. Execute the program. The DDL statements are generated and are written to the specified directory.
If no DB specific objects exists in the database, then no SQL files will be generated. As long as the report terminates with status ‘successfully’, this is not an error!
See also:
SAP Note 771209 for additional database specific information.
4.1.3 Running SAPinst to Export the Database
We recommend that you shut down the SAP system before the export. The database must still be running. Otherwise, the target system may be inconsistent.
Use This procedure tells you how to run SAPinst to export the database of your SAP system.
The following sections describe a local export, that is, SAPinst and SAPinst GUI run on the same host.
However, you can also perform a remote export using a standalone SAPinst GUI on a separate Windows or UNIX host. This enables you to perform the installation on a remote host while monitoring it with SAPinst GUI from a local host. If you want to perform a remote installation, also see section Performing a Remote Installation with SAPinst [Page 78].
39

Prerequisites ...
• Make sure that your operating system does not delete the temporary directory TEMP, TMP, TMPDIR or /tmp and its subdirectories when the system is rebooted.
SAPinst normally creates the installation directory sapinst_instdir directly below the temporary directory. SAPinst finds the temporary directory by checking the value of the environment variables TEMP, TMP, or TMPDIR. If no value is set for these variables, SAPinst uses /tmp as default installation directory. The SAPinst Self-Extractor extracts the SAPinst executables to the temporary directory, TEMP, TMP, TMPDIR or /tmp. These executables are deleted again after SAPinst has stopped running.
If SAPinst cannot find a temporary directory, the installation terminates with the error FCO-00058.
• Make sure that you have at least 50 MB of free space in the installation directory for each ABAP installation service. In addition, you need 60 ‒ 200 MB free space for the SAPinst executables. If you cannot provide 200MB free space in the temporary directory, you can set one of the environment variables TEMP,TMP, or TMPDIR to another directory with 200 MB free space for the SAPinst executables.
Each SAP instance requires a separate installation directory.
• Make sure that umask is set to 022 for user root. As user root, enter the following command: umask 022
• If you want to perform a standard, that is, a local installation with SAPinst, the DISPLAY environment variable to must be set to <host_name>:0.0, where <host_name> is the host on which the SAPinst GUI will be displayed.
• If required, you can terminate SAPinst and the SAPinst Self-Extractor by pressing Ctrl+C.
• If required, delete directories with the name sapinst_exe.xxxxxx.xxxx after SAPinst has finished. Sometimes these remain in the temporary directory.
If there are errors with SAPinst Self-Extractor, you can find the Self-Extractor log file dev_selfex.out in the temporary directory.
We recommend that you keep all installation directories until you are fully satisfied that the system is completely and correctly installed.
• Oracle only:
Make sure that the password for the database user SAP<SCHEMAID> or SAPR3 is SAP and that the password for the database user system is manager:
a. Log on as user ora<dbsid>.
b. If the password of user system is not manager, enter: brconnect -u system/<passwd> -c –f chpass –o system –p manager
40
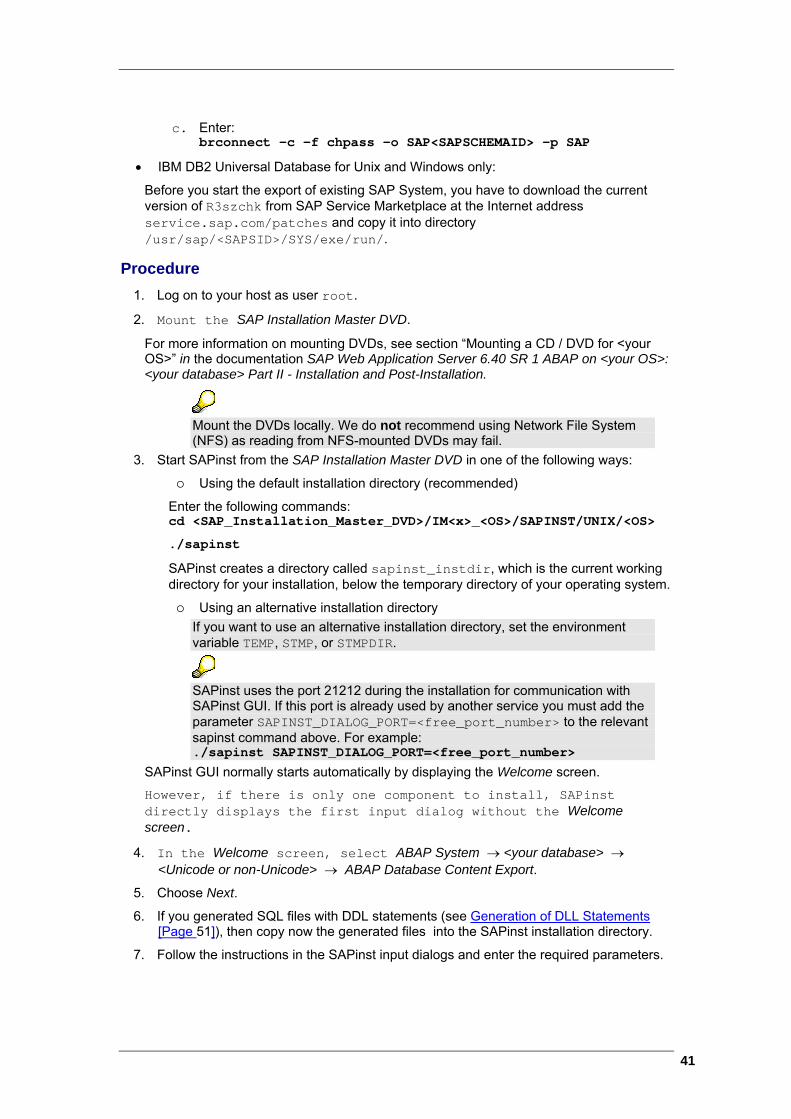
c. Enter: brconnect –c –f chpass -o SAP<SAPSCHEMAID> -p SAP
• IBM DB2 Universal Database for Unix and Windows only:
Before you start the export of existing SAP System, you have to download the current version of R3szchk from SAP Service Marketplace at the Internet address service.sap.com/patches and copy it into directory /usr/sap/<SAPSID>/SYS/exe/run/.
Procedure ...
1. Log on to your host as user root.
2. Mount the SAP Installation Master DVD.
For more information on mounting DVDs, see section “Mounting a CD / DVD for <your OS>” in the documentation SAP Web Application Server 6.40 SR 1 ABAP on <your OS>: <your database> Part II - Installation and Post-Installation.
Mount the DVDs locally. We do not recommend using Network File System (NFS) as reading from NFS-mounted DVDs may fail.
3. Start SAPinst from the SAP Installation Master DVD in one of the following ways:
Using the default installation directory (recommended)
Enter the following commands: cd <SAP_Installation_Master_DVD>/IM<x>_<OS>/SAPINST/UNIX/<OS>
./sapinst
SAPinst creates a directory called sapinst_instdir, which is the current working directory for your installation, below the temporary directory of your operating system.
Using an alternative installation directory If you want to use an alternative installation directory, set the environment variable TEMP, STMP, or STMPDIR.
SAPinst uses the port 21212 during the installation for communication with SAPinst GUI. If this port is already used by another service you must add the parameter SAPINST_DIALOG_PORT=<free_port_number> to the relevant sapinst command above. For example: ./sapinst SAPINST_DIALOG_PORT=<free_port_number>
SAPinst GUI normally starts automatically by displaying the Welcome screen.
However, if there is only one component to install, SAPinst directly displays the first input dialog without the Welcome screen.
4. In the Welcome screen, select ABAP System → <your database> → <Unicode or non-Unicode> → ABAP Database Content Export.
5. Choose Next.
6. If you generated SQL files with DDL statements (see Generation of DLL Statements [Page 51]), then copy now the generated files into the SAPinst installation directory.
7. Follow the instructions in the SAPinst input dialogs and enter the required parameters.
41
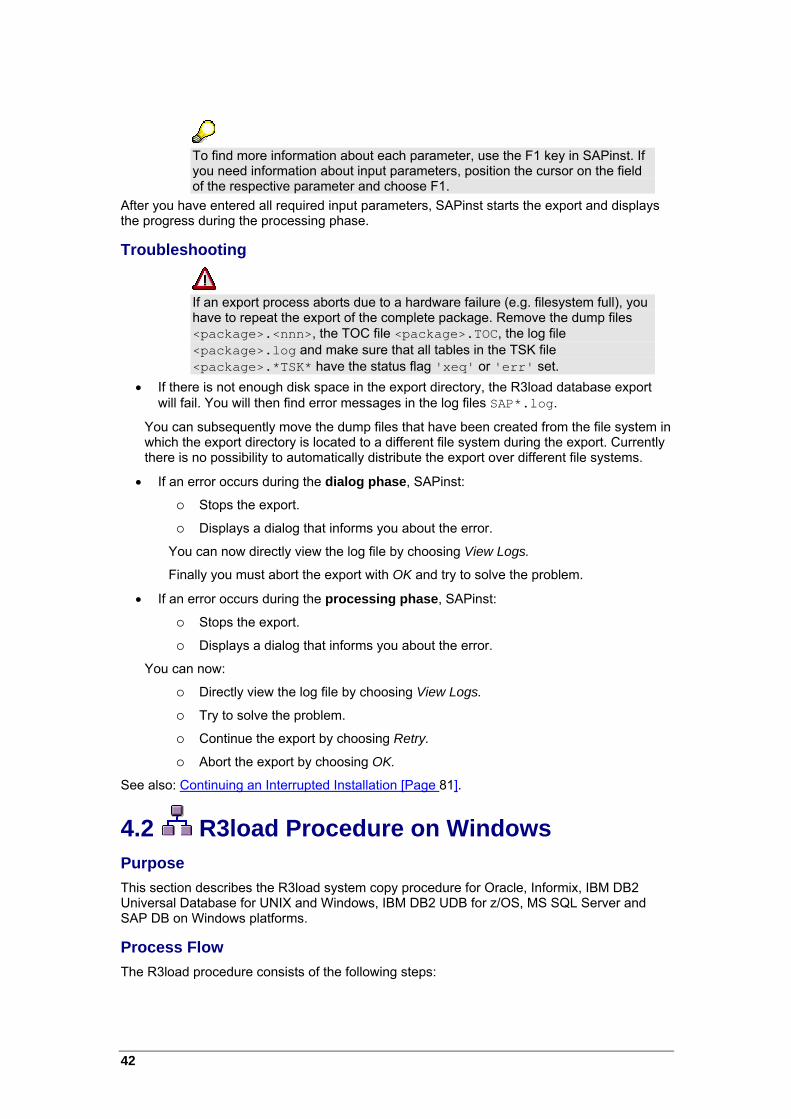
To find more information about each parameter, use the F1 key in SAPinst. If you need information about input parameters, position the cursor on the field of the respective parameter and choose F1.
After you have entered all required input parameters, SAPinst starts the export and displays the progress during the processing phase.
Troubleshooting
If an export process aborts due to a hardware failure (e.g. filesystem full), you have to repeat the export of the complete package. Remove the dump files <package>.<nnn>, the TOC file <package>.TOC, the log file <package>.log and make sure that all tables in the TSK file <package>.*TSK* have the status flag 'xeq' or 'err' set.
• If there is not enough disk space in the export directory, the R3load database export will fail. You will then find error messages in the log files SAP*.log.
You can subsequently move the dump files that have been created from the file system in which the export directory is located to a different file system during the export. Currently there is no possibility to automatically distribute the export over different file systems.
• If an error occurs during the dialog phase, SAPinst:
Stops the export.
Displays a dialog that informs you about the error.
You can now directly view the log file by choosing View Logs.
Finally you must abort the export with OK and try to solve the problem.
• If an error occurs during the processing phase, SAPinst:
Stops the export.
Displays a dialog that informs you about the error.
You can now:
Directly view the log file by choosing View Logs.
Try to solve the problem.
Continue the export by choosing Retry.
Abort the export by choosing OK.
See also: Continuing an Interrupted Installation [Page 81].
4.2 R3load Procedure on Windows Purpose This section describes the R3load system copy procedure for Oracle, Informix, IBM DB2 Universal Database for UNIX and Windows, IBM DB2 UDB for z/OS, MS SQL Server and SAP DB on Windows platforms.
Process Flow The R3load procedure consists of the following steps: ...
42

1. For a heterogeneous system copy, generate the migration key in the SAP Service Marketplace.
You need a migration key for a heterogeneous system copy. You can generate the migration key required for the heterogeneous system copy in SAP Service Marketplace at service.sap.com/migrationkey.
2. Export the source database: ...
a. Before the export, delete QCM tables from your system. Proceed as follows:
i. Before deleting you must check that
the tables are consistent (no restart log or conversion procedure termination must be displayed)
the data of the original table is legible
If application programs do not run correctly which use the affected original table, do not delete the QCM table yet.
ii. Start transaction SE14.
iii. Choose Extras → Invalid temp. table
All QCM tables that can be deleted are displayed.
iv. Mark the tables and delete them.
b. Generate DLL-statements [Page 51].
c. Run SAPinst to export the database [Page 44].
3. Set up the target system [Page 54].
Result You finished this part of the system copy. To complete the system copy, you have to perform the steps in section Final Activities [Page 74].
43

4.2.1 Generation of DDL statements Use To migrate non-standard database objects, you need to generate DDL statements using the ABAP report SMIGR_CREATE_DDL.
You need to follow this procedure before starting SAPinst.
Procedure 4. Log on to the system as system administrator in the productive BW-client.
5. Call transaction SE38 and run the program SMIGR_CREATE_DDL.
6. Select the target database. Depending on the database manufacturer, you might need to select the database version. Value help supports you in the selection of database version. In general, you should not enter a database version that is not available in the value help.
7. You are able to select Unicode Migration if you also wish to perform Unicode system copy (from UC to UC) or a Unicode conversion (from non-UC to UC).
8. Specify an empty working directory to which the files generated by the report will be written.
9. Optional: You can restrict the generation of DDL statements to specific table types or individual tables.
10. Execute the program. The DDL statements are generated and are written to the specified directory.
If no DB specific objects exists in the database, then no SQL files will be generated. As long as the report terminates with status ‘successfully’, this is not an error!
See also:
SAP Note 771209 for additional database specific information.
4.2.2 Running SAPinst to Export the Database
It is recommended to shutdown the SAP system before the export. The database must still be running. Otherwise, the target system may be inconsistent.
Use ...
You use this procedure to run SAPinst to export the database of your SAP system. The following describes a standard export, that is, SAPinst and SAPinst GUI run on the same host.
However, you can also perform a remote export using a standalone SAPinst GUI on a separate Windows or UNIX host. This enables you to perform the installation on a remote
44

host while monitoring it with SAPinst GUI from a local host. If you want to perform a remote installation, also see section Performing a Remote Installation with SAPinst [Page 78].
Prerequisites ...
• SAPinst normally creates the installation directory sapinst_instdir directly below the Program Files directory. If SAPinst is not able to create sapinst_instdir directly below the Program Files directory, SAPinst tries to create sapinst_instdir in the directory, to which the environment variable TEMP is set.
Each SAP instance requires a separate installation directory.
• The SAPinst Self-Extractor extracts the executables to a temporary directory (TEMP, TMP, TMPDIR, or SystemRoot). These executables are deleted after SAPinst has stopped running. Directories with the name sapinst_exe.xxxxxx.xxxx sometimes remain in the temporary directory. You can safely delete them.
In the temporary directory you can also find the SAPinst Self-Extractor log file dev_selfex.out, which might be useful if an error occurs.
• If you want to terminate SAPinst and the SAPinst Self-Extractor, do one of the following:
Right-click the icon for the SAPinst output window located in the Windows tray and choose Exit.
Click the icon for the SAPinst output window located in the Windows tray and chooseFile → Exit.
• You need at least 50 MB of free space in the installation directory for each ABAP installation service. In addition, you need 60-200 MB free space for the SAPinst executables.
We recommend that you keep all installation directories until the system is completely and correctly installed.
If SAPinst cannot find a temporary directory, the installation terminates with the error FCO-00058.
• Oracle, MS SQL Server, IBM DB2 UDB for UNIX and Windows, IBM DB2 UDB for z/OS:
Before you start the export of an existing SAP system, check if the current version of R3szchk and R3ldcdl (IBM DB2 UDB for z/OS) is available on your kernel DVD.
If not, download the current file from SAP Service Marketplace at:
service.sap.com/patches and copy it to directory \usr\sap\<SAPSID>\SYS\exe\run\.
Procedure ...
1. Log on to your host as a user who is a member of the local administration group.
2. Insert the SAP Installation Master DVD in your DVD drive.
3. Double-click sapinst.exe from the following path:
45

<DVD drive>:\IM<x>_<OS>\SAPinst\NT\<OS>
SAPinst uses the ports 21212 and 21213 during the installation for communication with SAPinst GUI. You get an error message if one of these ports is already in use. In this case, you must do the following:
• Open a command prompt. • Change to <DVD drive>:\IM<x>_<OS>\SAPINST\NT\<OS> and run
.\sapinst.exe SAPINST_DIALOG_PORT=<port> where <port> is an unused port on your host.
4. Select ABAP System → <your database> → <Unicode or Non-Unicode> → ABAP Database Content Export and choose Next.
5. If you generated SQL files with DDL statements (see Generation of DLL Statements [Page 51]), then copy now the generated files into the SAPinst installation directory.
6. Follow the instructions in the SAPinst input dialogs and enter the required parameters.
If you need more information about input parameters, position the cursor on the field of the respective parameter and press F1.
If SAPinst prompts you to log off, log off and log on again. The installation restarts automatically.
If you have entered all required information during the dialog phase, SAPinst starts the export and displays the export progress during the processing phase.
Troubleshooting
If an export process aborts due to a hardware failure (e.g. filesystem full), you have to repeat the export of the complete package. Remove the dump files <package>.<nnn>, the TOC file <package>.TOC, the log file <package>.log and make sure that all tables in the TSK file <package>.*TSK* have the status flag 'xeq' or 'err' set.
• If there is not enough disk space in the export directory, the R3load database export will fail. You will then find error messages in the log files SAP*.log.
You can subsequently move the dump files that have been created from the file system in which the export directory is located to a different file system during the export. Currently there is no possibility to automatically distribute the export over different file systems.
• If an error occurs during the input phase, SAPinst:
Stops the installation.
Displays a dialog that informs you about the error.
You can now directly view the log file by choosing View Logs.
You must abort the installation with OK and try to solve the problem.
• If an error occurs during the processing phase, SAPinst:
Stops the installation.
Displays a dialog that informs you about the error.
You can now:
46

Directly view the log file by choosing View Logs.
Try to solve the problem
Retry the installation by choosing Retry.
Abort the installation by choosing OK.
For more information, see Continuing an Interrupted Installation with SAPinst [Page 81].
4.3 R3load Procedure on IBM eServer iSeries Purpose This section describes the R3load system copy procedure for IBM DB2 UDB on iSeries.
Process Flow The R3load procedure consists of the following steps: ...
1. Heterogeneous system copy: Generate the migration key via SAP Service Marketplace.
You need a migration key for a heterogeneous system copy. You can generate the migration key required for the heterogeneous system copy via SAP Service Marketplace at service.sap.com/migrationkey.
2. Preparing the Windows Host for the SAP System Installation [Page 47].
3. Preparing a Windows User Account and iSeries User Profile [Page 48].
4. Installing TMKSVR and Creating an Installation Share [Page 49].
5. Generate DDL statements [Page 51].
6. Running SAPinst to Export the Database [Page 52].
7. Setting up the Target System [Page 54]. If you have installed your SAP system on SAP R/3 release prior to 3.0D, you have to delete QCM tables from your system as described in SAP Note 9385 before the export. Target database IBM DB2 UDB for OS/390 and z/OS only:
Result You finished this part of the system copy. To complete the system copy, you have to perform the steps in the section Final Activities [Page 74].
4.3.1 Preparing the Windows Host for the SAP System Installation Use The Java-based SAPinst graphical user interface (GUI) called SAPinst GUI requires a Java Development Kit (Java™ 2 SDK, Standard Edition) with graphical capabilities (AWT, Swing). Since IBM eServer iSeries does not provide a graphical user interface, you must install the JDK on a Windows host to perform the installation with SAPinst.
Prerequisites To prepare the system for SAPinst and SAPinst GUI you need to do the following:
• Necessary operating system versions: Windows NT/2000/2003/XP
47

• Check your Java Runtime Environment (JRE) on the host where SAPinst GUI runs, because the JRE cannot be integrated into the SAPinst GUI executable for all platforms due to licensing issues.
• Set the system path if you install on Windows.
Procedure The J2EE Engine requires a Java Development Kit (Java™ 2 SDK, Standard Edition). Therefore, make sure a valid JDK version is installed on every host on which you want to install an SAP instance including the J2EE Engine.
For more information on the JDK versions that are released for the SAP Web Application Server, SAP components based on SAP Web AS and the J2EE Engine, see SAP Service Marketplace at service.sap.com/platforms → Product Availability Matrix → SAP NetWeaver → SAP NetWeaver ’04 → JSE Platforms.
JDK is not part of the SAP shipment. If necessary, you need to download and install it. To check the version of an already installed JDK, enter: java -version If you have more than one Java Virtual Machine (JVM) installed on your system (for example, you have two JDKs with different versions installed), make sure that the JAVA_HOME environment variable is set to the valid <JAVA_HOME> directory. Make sure that %JAVA_HOME%\bin is included in your system path.
4.3.2 Preparing a Windows User Account and iSeries User Profile Use For the installation you need to create a user account on your Windows installation host and a user profile on the iSeries you want to install.
The following requirements apply:
• The iSeries user profile and the Windows user account must have the same name and password.
• The iSeries user profile must have user class *SECOFR and all special authorities that belong to user QSECOFR.
• The Windows user account must have administrator rights on the Windows installation host.
48
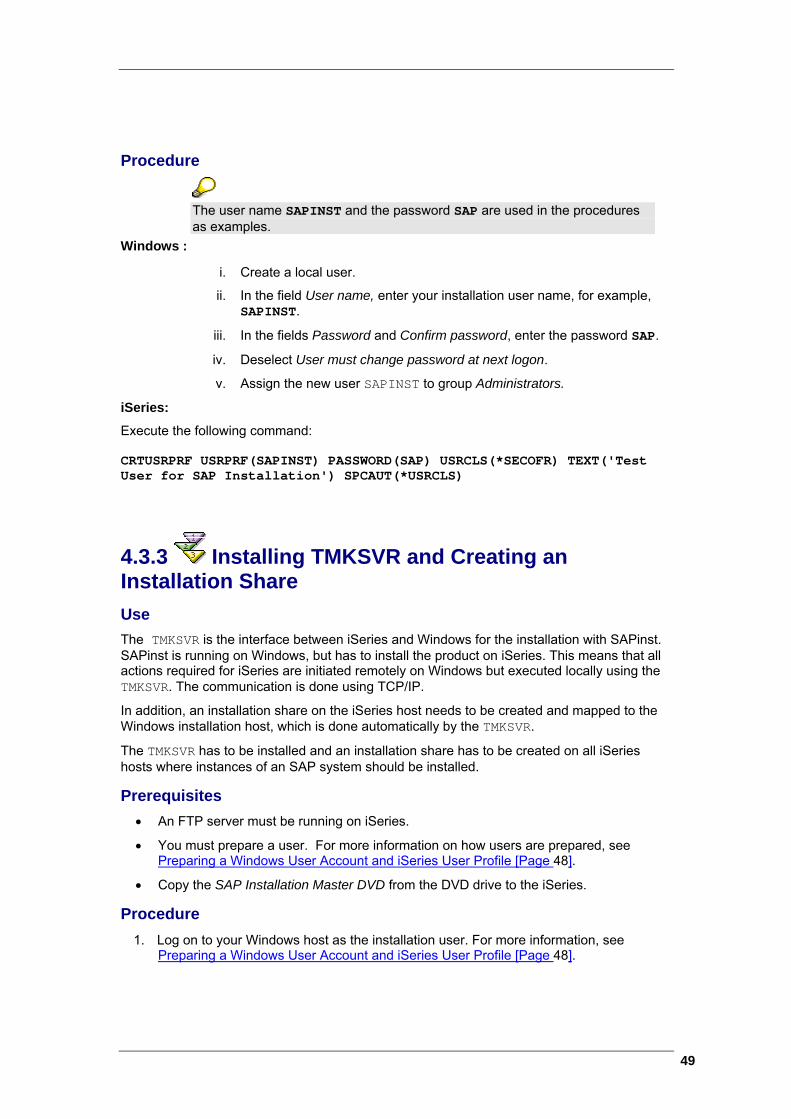
Procedure
The user name SAPINST and the password SAP are used in the procedures as examples.
Windows : ... Create a local user.
i. Create a local user.
ii. In the field User name, enter your installation user name, for example, SAPINST.
iii. In the fields Password and Confirm password, enter the password SAP.
iv. Deselect User must change password at next logon.
v. Assign the new user SAPINST to group Administrators.
iSeries:
Execute the following command: CRTUSRPRF USRPRF(SAPINST) PASSWORD(SAP) USRCLS(*SECOFR) TEXT('Test User for SAP Installation') SPCAUT(*USRCLS)
4.3.3 Installing TMKSVR and Creating an Installation Share Use The TMKSVR is the interface between iSeries and Windows for the installation with SAPinst. SAPinst is running on Windows, but has to install the product on iSeries. This means that all actions required for iSeries are initiated remotely on Windows but executed locally using the TMKSVR. The communication is done using TCP/IP.
In addition, an installation share on the iSeries host needs to be created and mapped to the Windows installation host, which is done automatically by the TMKSVR.
The TMKSVR has to be installed and an installation share has to be created on all iSeries hosts where instances of an SAP system should be installed.
Prerequisites • An FTP server must be running on iSeries.
• You must prepare a user. For more information on how users are prepared, see Preparing a Windows User Account and iSeries User Profile [Page 48].
• Copy the SAP Installation Master DVD from the DVD drive to the iSeries.
Procedure ...
1. Log on to your Windows host as the installation user. For more information, see Preparing a Windows User Account and iSeries User Profile [Page 48].
49

2. Run SETUP.EXE from the directory IM(x)_OS400_64\SAPINST\AS400\TMKSVR on the DVD containing the installation package. You can start the setup program by double-clicking it in the Windows Explorer.
To find the SAPinst executable in your platform-specific IM<x> directory, look in the README.TXT file on the SAP Installation Master DVD.
The following dialog box appears:
3. Enter the following values:
iSeries Hostname Enter the name of the iSeries host where you want to install TMKSVR.
iSeries Administrator (QSECOFR or similar) Enter iSeries user. For more information, see Preparing a Windows User Account and iSeries User Profile [Page 48].
Update existing TMKSVR instances Do not select this option.
Yes, create TMKSVR instance Select this option.
TMKSVR instance number Leave the value at 0.
TMKSVR Instance Port (also referred to as the Dispatcher Port) Leave the value at 59975, if possible. Only change this port number if you encounter problems during installation because the port is in use.
Result The installation uses FTP to install and start the TMKSVR on iSeries. During installation, the TMKSVR library is created on iSeries. If you want a TMKSVR instance to be created, a library named TMKSVR<nn> is also created, where <nn> is the instance number (for example, TMKSVR00).
50

A NetServer share named ROOTBIN will be created on the iSeries host. You can map it now to your Windows PC or let SAPinst do it during the installation.
For more information, see the documentation install.pdf on the DVD in directory IM<x>_OS400_64\SAPINST\AS400\TMKSVR.
4.3.4 Generation of DDL statements Use To migrate non-standard database objects, you need to generate DDL statements using the ABAP report SMIGR_CREATE_DDL.
You need to follow this procedure before starting SAPinst.
Procedure 4. Log on to the system as system administrator in the productive BW-client.
5. Call transaction SE38 and run the program SMIGR_CREATE_DDL.
6. Select the target database. Depending on the database manufacturer, you might need to select the database version. Value help supports you in the selection of database version. In general, you should not enter a database version that is not available in the value help.
7. You are able to select Unicode Migration if you also wish to perform Unicode system copy (from UC to UC) or a Unicode conversion (from non-UC to UC).
8. Specify an empty working directory to which the files generated by the report will be written.
9. Optional: You can restrict the generation of DDL statements to specific table types or individual tables.
10. Execute the program. The DDL statements are generated and are written to the specified directory.
If no DB specific objects exists in the database, then no SQL files will be generated. As long as the report terminates with status ‘successfully’, this is not an error!
See also:
SAP Note 771209 for additional database specific information.
51

4.3.5 Running SAPinst to Export the Database
This section refers to “installation of an instance”. This can be viewed as a synonym for “export an SAP system”.
Use This procedure tells you how to run SAPinst to install one or more SAP instances. It describes an installation where SAPinst GUI and SAPinst server are running on the same Windows host.
SAPinst creates the installation directory \usr\sap\sapinst on iSeries.
Prerequisites • TMKSVR is up and running: WRKACTJOB SBS (TMKSVR00) (there must be a DISPATCH
job). For more information, see Installing TMKSVR and Creating an Installation Share [Page 49].
• The Windows host is set up. For more information, see Preparing the Windows Host for the SAP System Installation.
• The users required for the installation are prepared. For more information, see Preparing a Windows User Account and iSeries User Profile [Page 48].
• Make sure that the JAVA_HOME environment variable is set correctly on your Windows host.
Procedure ...
1. Log on to the Windows host as the installation user. For more information, see Preparing a Windows User Account and iSeries User Profile [Page 48]:
2. Start SAPinst from the SAP Installation Master DVD in one of the following ways:
• Using the default installation directory sapinst.exe
• in the path <Mapped_Drive>:\<Copied SAP Installation Master DVD>\IM<x>_OS400_64\SAPINST\OS400\AS400.
SAPinst uses the port 21212 and 21213 during the installation for communication with the SAPinst GUI. If this port is already used by another service you must add the parameter SAPINST_DIALOG_PORT=<free_port_number> to the relevant sapinst command above.
For example: sapinst.exe SAPINST_DIALOG_PORT=<free_port_number>
• Using an alternative installation directory
Change to your installation directory.
Enter the following command to start SAPinst from the SAP Installation Master DVD: <Mapped_Drive>:\<Copied SAP Installation Master DVD>\IM<x>_OS400_64\SAPINST\OS400\AS400\sapinst.exe
52

3. The SAPinst/TMKSVR – Session Parameters dialog box appears and prompts you for the target iSeries parameters. Enter your values.
The SAPinst GUI now starts automatically by displaying the Welcome screen.
4. In the Welcome screen, select ABAP System <your database> <Unicode or Non-Unicode> ABAP Database Content Export and then choose Next.
5. If you generated SQL files with DDL statements (see Generation of DLL Statements [Page 51]), then copy now the generated files into the SAPinst installation directory.
6. Follow the instructions in the SAPinst input dialogs and enter the required parameters.
To find more information on each parameter, use the F1 key in SAPinst. If you need information about input parameters, position the cursor on the field of the respective parameter and press F1.
After you have entered all required input parameters, SAPinst starts the installation and displays the progress of the installation.
When the installation has successfully completed, the screen Finished installation is displayed.
Troubleshooting
If an export process aborts due to a hardware failure (e.g. filesystem full), you have to repeat the export of the complete package. Remove the dump files <package>.<nnn>, the TOC file <package>.TOC, the log file <package>.log and make sure that all tables in the TSK file <package>.*TSK* have the status flag 'xeq' or 'err' set.
• If an error occurs during the dialog phase, SAPinst:
Stops the installation.
Displays a dialog that informs you about the error.
You can now directly view the log file by choosing View Logs.
Finally you must abort the installation with OK and try to solve the problem.
53

• If an error occurs during the processing phase, SAPinst:
Stops the installation.
Displays a dialog that informs you about the error.
You can now directly view the log file by choosing View Logs.
Try to solve the problem.
Retry the installation by choosing Retry.
Abort the installation by choosing OK.
For more information, see Interrupted Installation with SAPinst [Page 81].
4.4 Setting up the Target System Purpose With the SAP installation tool SAPinst you can install the target system and import the database files that you have exported from the source system.
Process Flow Perform the following actions: ...
1. Transfer the export files to the target host. [Page 54]
2. Install the target system and use the database export to load the database during the installation process. [Page 55]
3. If you want to load data from a system into the existing database of another system, perform the RELOAD Procedure [Page 56]
4.4.1 Transferring the Export Files to the Target Host Procedure ...
1. On the target host, create a directory <EXPDIR> with sufficient space for the database export files available.
2. Copy all files and directories (recursively) that are located on the source host in the migration export directory from the source host to the target host.
If you transfer the files with ftp, make sure that you use binary mode for transferring the files <EXPDIR>/DATA/*.00<n> and use ASCII mode for transferring all other files.
3. Check the permissions of the transferred files on the target host. All files have to be accessible for user <sapsid>adm of the target system.
54
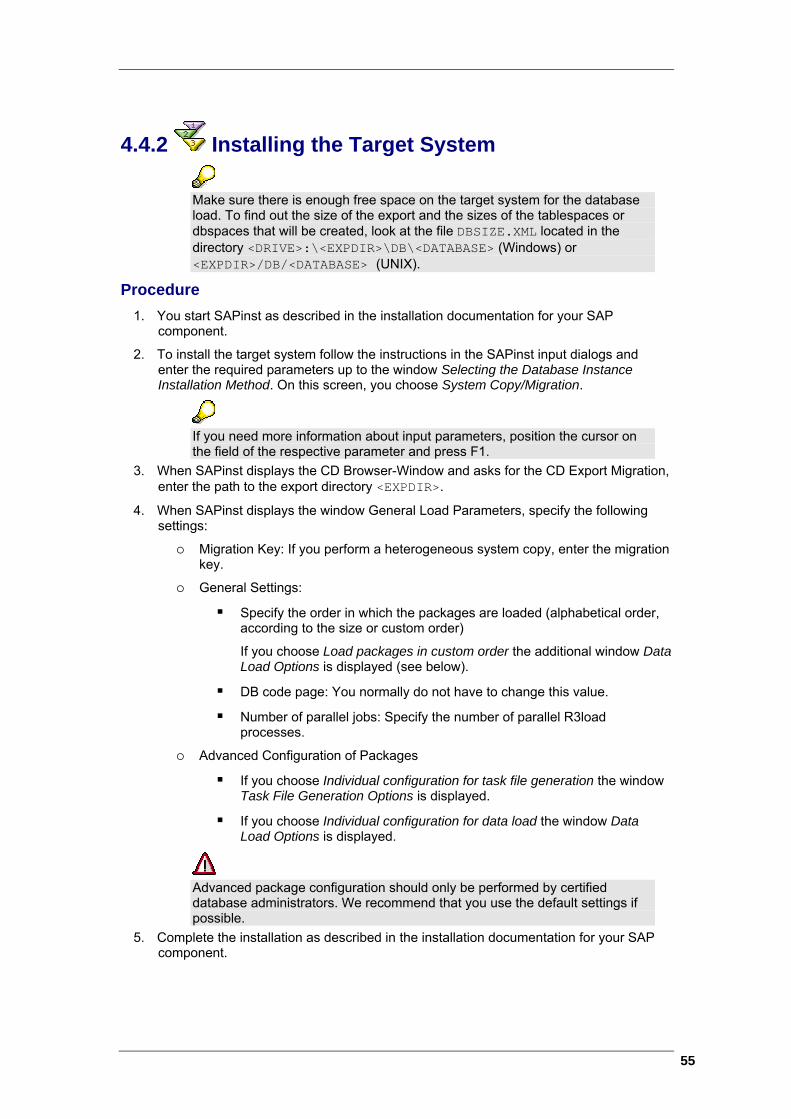
4.4.2 Installing the Target System
Make sure there is enough free space on the target system for the database load. To find out the size of the export and the sizes of the tablespaces or dbspaces that will be created, look at the file DBSIZE.XML located in the directory <DRIVE>:\<EXPDIR>\DB\<DATABASE> (Windows) or <EXPDIR>/DB/<DATABASE> (UNIX).
Procedure ...
1. You start SAPinst as described in the installation documentation for your SAP component.
2. To install the target system follow the instructions in the SAPinst input dialogs and enter the required parameters up to the window Selecting the Database Instance Installation Method. On this screen, you choose System Copy/Migration.
If you need more information about input parameters, position the cursor on the field of the respective parameter and press F1.
3. When SAPinst displays the CD Browser-Window and asks for the CD Export Migration, enter the path to the export directory <EXPDIR>.
4. When SAPinst displays the window General Load Parameters, specify the following settings:
Migration Key: If you perform a heterogeneous system copy, enter the migration key.
General Settings:
Specify the order in which the packages are loaded (alphabetical order, according to the size or custom order)
If you choose Load packages in custom order the additional window Data Load Options is displayed (see below).
DB code page: You normally do not have to change this value.
Number of parallel jobs: Specify the number of parallel R3load processes.
Advanced Configuration of Packages
If you choose Individual configuration for task file generation the window Task File Generation Options is displayed.
If you choose Individual configuration for data load the window Data Load Options is displayed.
Advanced package configuration should only be performed by certified database administrators. We recommend that you use the default settings if possible.
5. Complete the installation as described in the installation documentation for your SAP component.
55
If you have to restart the import after an error, just restart SAPinst. The import is continued with the table that was not imported successfully.
4.4.3 RELOAD Procedure Use You want to load data from a system (for example, your productive system) into the existing Oracle database of another system (for example, your test system).
The RELOAD service reinstalls the target database while keeping the SAP settings. Data stored in the target database is deleted. Then, data from the source database is reloaded.
RELOAD is not intended to add additional data (that is, merge data from two databases by keeping old data and adding new data). After the RELOAD procedure, only data from the source database is left.
The RELOAD service is not available for MCOD systems. During the RELOAD procedure the database is created again and therefore all data (and all database schemas) is lost.
At the moment, this RELOAD service is available for Oracle databases only. The RELOAD service cannot be used to refresh any database schema in an MCOD system.
Procedure ...
1. Dialog input:
On the screen ABAP System > Database Instance Installation Method, choose System Copy / Migration by Reload: Refresh the database content of a non-MCOD system (R3load).
2. Additional input for the procedure:
Before you start the installation of the target system,
To save any changes made to this file, make a backup of the file init<SID>.ora located in <ORACLE_HOME>/dbs.
Delete all entries of the directories saparch and oraarch in your target system.
From your old instance, delete all data files located in your sapdata directories and all control files.
3. To save your database configuration, proceed as follows after the installation of the new system has been finished successfully:
Make sure that the parameters of your old init<SID>.ora file (that you backed up in step 2) are also contained in the new init<SID>.ora file that was created by SAPinst.
56

5 R3load Procedures using the Migration Monitor Purpose The Migration Monitor is a tool which helps you to perform and control the unload and load process during the system copy procedure.
From SAP Web AS 6.40 on the Migration Monitor is integrated into the SAPinst system copy tool, but it is also possible to use the monitor for copying older releases by starting it manually.
The Migration Monitor will
• create R3load command files
• create R3load task files if required
• start the R3load processes to unload the data
• transfer packages from the source to the target host if required
• start the R3load processes to load the data as soon as a package is available
• inform the person performing the system copy in case of errors.
The Migration Monitor has to be started on the source database host (=> Export Monitor) and on the target database host (=> Import Monitor).
The advantage of using the Migration Monitor is, that R3load Procedures run faster.
The Migration Monitor is currently available for Oracle only.
Prerequisites You have to stick to the same restrictions and considerations that apply to the R3load procedures without using Migration Monitor (see Prerequisites of R3load Procedures [Page 35]).
In addition, you have to keep the following restrictions in mind:
• The version of your Java Runtime Environment (JRE) on both the export and the import host must be 1.4.1 or higher.
• The JAVA_HOME environment variable on both the export and the import host must point to the relative JRE directory.
• The correct directory structure for R3load dump files must exist on both the source and target host.
Process Flow • On UNIX, see R3load with Migration Monitor on UNIX.
• On Windows, see R3load with Migration Monitor on Windows.
57

5.1 R3load Procedure with Migration Monitor on UNIX Purpose This section describes the R3load system copy procedure with Migration Monitor for Oracle on UNIX platforms.
Process Flow The R3load procedure with Migration Monitor consists of the following steps: ...
1. Unpack the MIGMON.SAR SAPCAR archive:
The file is located in <SAP Installation Master DVD> /UNIX/COMMON/INSTALL.
2. Configure the export properties file [Page 59] export_monitor_cmd.properties.
3. Heterogeneous system copy: Generate the migration key on SAP Service Marketplace.
You need a migration key for a heterogeneous system copy. You can generate the migration key required for the heterogeneous system copy on SAP Service Marketplace at service.sap.com/migrationkey.
4. Set up the target system [Page 72].
5. Export the source database:
a. Make sure that the QCM tables are deleted from your system [Page 14].
b. Set the library path environment variable [Page 36].
c. Generate DDL statements [Page 51].
d. Run SAPinst to export the database [Page 39].
e. Start the Migration Monitor [Page 68].
f. Check the output files [Page 71] of the Migration Monitor.
Result You have finished this part of the system copy. To complete the system copy, you have to perform the steps in the Final Activities [Page 74] section.
58

5.2 R3load Procedures with Migration Monitor on Windows Purpose This section describes the R3load system copy procedure with Migration Monitor for Oracle on Windows.
Process Flow The R3load procedure with Migration Monitor consists of the following steps: ...
1. Unpack the MIGMON.SAR SAPCAR archive:
2. The file is located in <SAP Master CD> \NT\COMMON\INSTALL.
3. Configure the export properties file [Page 59] export_monitor_cmd.properties.
4. Heterogeneous system copy: Generate the migration key on SAP Service Marketplace.
You need a migration key for a heterogeneous system copy. You can generate the migration key required for the heterogeneous system copy on SAP Service Marketplace at service.sap.com/migrationkey.
5. Build up the target system [Page 54].
6. Export the source database:
a. Make sure that the QCM tables are deleted from your system [Page 14].
b. Generate DDL statements [Page 51].
c. Run SAPinst to export the database [Page 44].
d. Start the Migration Monitor [Page 68].
e. Check the output files [Page 71] for the Migration Monitor.
Result You have finished this part of the system copy. To complete the system copy, you have to perform the steps in the Final Activities [Page 74] section.
5.3 Configuring the Import and Export Properties Files Use You have to configure both the export properties file export_monitor_cmd.properties and the import properties file import_monitor_cmd.properties as specified in the tables below.
Options that refer to both scripts:
59

• Common options
• E-mail options
• Trace options
Options, which concern only the export property file export_monitor_cmd.properties :
• Export options
• Network exchange options
• FTP exchange options
• Export socket options
• FTP copy options
Some of these options are mandatory for the Export Monitor.
Options, which concern only the import property file import_monitor_cmd.properties :
• Import options
• Import exchange options
• Import socket options
Some of these options are mandatory for the Import Monitor.
Features
Help Options
Name Description Comments help Migration Monitor help
?
The Migration Monitor tool will display the help on the available parameters, if you call it with either –help or -?
Common Options
Name Description Comments monitorTimeout Migration Monitor timeout in
seconds During a timeout, the Migration Monitor thread sleeps and checks every x seconds whether there is work to do.
The normal sleep duration is 30 – 120 seconds.
Trace Options
Name Description Comments Trace Trace level Possible values:
All, off, 1 (error), 2 (warning), 3 (info), 4 (config,
60

default), 5, 6, 7 (trace)
Email Options
Name Description Comments
mailServer SMTP server Server name or IP address of the company SMTP server
mailFrom “From” email address
mailto “To” email address Can contain an address list separated by ‘;’ or spaces.
Export Options
Option Description Comments
exportDirs List of export directories Separator on Windows is “;”, on UNIX “:”.
The exportDirs parameter points to the directory where the R3load dump files will be written to. In the exportDirs directory, the subdirectories DATA, DB and DB/<target_DBTYPE> (e.g. DB/ORA) have to exist.
installDir SAPinst start directory The directory where the installation tool (SAPinst, R3SETUP) is started; if you run the Migration Monitor without using the installation tools, then the installation directory is the directory, where the R3load TSK and log files will be written.
omit R3load omit value (makes sense for import only)
All options below are for the server mode. The Import Monitor always runs in the server mode. If you want to run the Export Monitor in the server mode, specify the parameter ‘Server’ in the Export Monitors properties file.
server Server operating mode Running in server mode means, the Monitor will creates R3load TSK files (if necessary), R3load cmd files and start the R3load processes.
orderBy Package order Can be the 'name' or path of the file that contains package
61

names.
r3loadExe Path of the R3load executable Optional; the default is R3load.
If only the name of the R3load executable is available, then JVM looks for the R3load executable using OS-specific process search rules.
tskFiles 'yes' to create task files; 'no' to skip
Before version 4.6 must be set to ‘no’; starting from version 4.7 ‘yes’.
If the R3load task files ‘*.TSK’ already exist then the monitor will not overwrite them.
extFiles 'yes' to include EXT files;
'no' to skip
Add EXT file entries to cmd files;
If the EXT files cannot be found in /expDirs/DB/<target_DBTYPE> the package processing is aborted.
Always use ‘extFiles=no’ for the export!
dataCodepage Code page for data files See SAP Note 552464.
Possible values: 4102, 4103, 1100
taskArgs Additional R3load arguments for the TASK phase
Appended to the R3load command line.
Options already set by the monitor:
-ctf; -l; -o (if the omit argument is specified).
loadArgs Additional R3load arguments for the LOAD phase
Appended to the R3load command line.
Options already set by the monitor:
-e; -datacodepage; -l; -p;
-r; -socket (if the socket option is specified); -o (if the omit argument is specified and task files are not used, that is, the value of the tskFiles option is no).
expJobNum Number of parallel export jobs; the default is 1.
Any positive number; 0 for an unlimited number of jobs.
62

Network exchange options
Option Description Comments
net Network operating mode Exported dump files must be visible on the import host to use this mode.
netExchangeDir Network exchange directory Used for communication between the export and Import Monitors.
Must be writable for Export Monitor and readable for Import Monitor. The Export Monitor will write a file <package>.SGN to the netExchangeDir as a signal for the Import Monitor, that the package is exported successfully and the import could be started.
FTP exchange options
Option Description Comments
ftp FTP operating mode Exported dump files will be transferred automatically from the source host (directory exportDirs) to the target host (directory importDirs) using FTP.
ftpHost Remote FTP host Name or IP address of the import server
ftpUser Name of the remote FTP user The ftpUser specified here should be the <sapsid>adm to make sure, that the package files can be read by during the import (which is started as <sapsid>adm).
ftpPassword Password of the remote FTP user
Security risk ftpExportDirs List of remote FTP directories
for export dump Both ‘;’ or ‘:’ separators are valid.
This is the directory on the target host to which the dump will be transfered. The value will be the same as for ‘importDirs’ in the Import Monitors property file.
ftpExchangeDir Remote FTP exchange directory
Used for communication between the export and Import
63

Monitors. Must be writable for the Export Monitor and readable for the Import Monitor. The Export Monitor will write a file <package>.SGN to the ftpExchangeDir as a signal for the Import Monitor, that the package is exported successfully and the import could be started.
ftpJobNum Number of parallel FTP jobs; the default is 1.
Any positive number; 0 for an unlimited number of jobs.
Export socket options
Option Description Comments
socket Socket operating mode R3load will not write dump files to the file system but the export and import work through the socket connection.
host Remote import host Name or IP address of the import host.
port Host port number Must be the same as the port number on the import host. Any free port on the import host from 1024 to 65535.
FTP copy options
Option Description Comments
ftpCopy FTP copy operating mode Used as a separate program call for migration with sockets. All files produced by R3lctl and R3szchk will be transferred from the source to the target host using FTP.
exportDirs List of export directories Separator on Windows: ‘;’ Separator on UNIX: ‘:’ In the exportDirs directory, the subdirectories DATA, DB and DB/<target_DBTYPE> (for example DB/ORA) have to exist. The R3load STR files have to exist in the subdirectory DATA, the DDL*.TPL files in the subdirectory DB, and the R3load EXT files (if required) in the subdirectory
64
DB/<target_DBTYPE>.
ftpHost Remote FTP host Name or IP address of the import server.
ftpUser Name of the remote FTP user The ftpUser specified here should be the <sapsid>adm to make sure, that the package files can be read by during the import (which is started as <sapsid>adm).
ftpPassword Password of the remote FTP user
Security risk ftpExportDirs List of remote FTP directories
for export dump Both ‘;’ or ‘:’ separators are valid. This is the directory on the target host to which the dump will be transfered. The value will be the same as for ‘importDirs’ in the Import Monitors property file.
Mandatory options for the Export Monitor
Mode Options
Client mode: installDir, exportDirs,
one of the options ftp, nfs, socket (and their related parameters)
Server mode: installDir, exportDirs, tskFiles, extFiles,
one of the options ftp, nfs, socket (and their related parameters)
FTP copy exportDirs, ftpHost, ftpUser, ftpPassword, ftpExportDirs, ftpExchangeDir
The value of the dbType option is determined automatically in the shell script/batch files from the dbms_type environment variable.
Import Options
Option Description Comments
importDirs List of import directories Separator on Windows: ‘;’
Separator on UNIX: ‘:’
The importDirs parameter points to the directory with the R3load dump files. In the
65

importDirs directory, the subdirectories DATA, DB and DB/<target_DBTYPE> (e.g. DB/ORA) have to exist.
installDir Installation directory Directory where the installation tool (SAPinst, R3SETUP) is started; if you run the Migration Monitor without using the installation tools, then the installation directory is the directory, where the R3load TSK and log files will be written.
orderBy Package order This option is used only if the Import Monitor works without the Export Monitor in stand-alone mode, that is, all export dump files are available on the import host before the Import Monitor is started.
Values can be:
name : load packages in alphabetical order,
size : load packages starting with the largest one,
or a path of the file that contains package names.
r3loadExe Path of the R3load executable Optional; the default is R3load.
If only the name of the R3load executable is available then JVM looks for the R3load executable using OS-specific process search rules.
tskFiles 'yes' to create task files; 'no' to skip
Before version 4.6, must be set to ‘no’; starting from version 4.7 ‘yes’.
If task files already exist then the monitor does not overwrite them.
extFiles 'yes' to include EXT files; 'no' to skip them
Add EXT file entries to cmd files;
If the EXT files cannot be found in /importDirs/DB/<target_DBTYPE> the package processing is aborted.
dbCodepage Database code page for the target database
See SAP Note 552464.
66

Possible values: 4102, 4103, 1100
migrationKey Migration key
omit R3load omit value Can contain only 'DTIPV' letters.
-o D : omit data; do not load data
-o T: omit tables; do not create tables
-o I: omit indexes; do not create indexes
-o P: omit primary keys; do not create primary keys
-o V: omit views; do not create views
If you want to combine several omit options, list these options without blank (for example -o TV).
taskArgs Additional R3load arguments for the TASK phase
Appended to the R3load command line.
Options already used by the monitor:
-ctf; -l; -o (when the omit argument is specified).
loadArgs Additional R3load arguments for the LOAD phase
Appended to the R3load command line.
Options already used by the monitor:
-i; -dbcodepage; -l; -p;
-k; -r; -socket (if the socket option is specified); -o (if the omit argument is specified and task files are not used, that is, the value of tskFiles option is no).
impJobNum Number of parallel import jobs; the default is 1.
Any positive number; 0 for an unlimited number of jobs
Import exchange options
Option Description Comments exchangeDir Exchange directory If this option is not set, then
the monitor runs in stand-alone mode, that is without
67
the Export Monitor.
All the export dump files or the SAP export CDs from the installation kit must be available on the import host and be specified with the parameter importDirs (for example, in the properties file).
Import socket options
Option Description Comments
socket Socket operating mode
port Server port number Any free port from 1024 to 65535.
Mandatory options for the Import Monitor
Mode Options
Server mode (default) installDir, importDirs, tskFiles, extFiles,
one of the options exchangeDir or socket (and its related parameters)
Stand-alone mode installDir, importDirs, tskFiles, extFiles
The value of the dbType option is determined automatically in the shell script/batch files from the dbms_type environment variable.
5.4 Starting the Migration Monitor Use The Migration Monitor can be started using:
• UNIX shell scripts export_monitor.sh / import_monitor.sh
• Windows batch files export_monitor.bat / import_monitor.bat
• The JRE java tool (this way is preferable when the command line is generated in an external application such as SAPinst).
68

The application allows you to specify options in the command line or in the export or import property files [Page 59]. The names of the property files are export_monitor_cmd.properties and import_monitor_cmd.properties.
Templates for these files are included in the application archive and must be located in the current user’s working directory.
The options specified in the command line take precedence over the corresponding options in the application property file. Options are case sensitive; any options that are not recognized are ignored.
To specify an option in the command line, enter -optionName optionValue; in the application property file, insert a new line optionName=optionValue.
Example of a command line for a UNIX terminal: ./export_monitor.sh –ftp ./export_monitor.sh –ftpCopy ./export_monitor.sh –socket –host import_server –port 5000
Example of a command line for Windows cmd.exe: export_monitor.bat –net export_monitor.bat -socket
Procedure For the export with Migration Monitor, proceed as follows: ...
1. Run the export of the ABAP system.
2. Select the SAPinst option Export using Migration Monitor
3. To specify the correct monitor options, create or edit the export_monitor_cmd.properties file.
4. If you use FTP access, verify that the required directories exist on the import server before the Migration Monitor is started. The file import_dirs.sh or import_dirs.bat can be used to create a correct directory structure.
5. To specify the correct monitor options, create or edit the file export_monitor_cmd.properties.
6. If FTP access is used, verify that the required directories exist on the import server before the export files are copied to the import server. The script import_dirs.sh / the batch file import_dirs.bat can be used to create the correct directory structure.
7. Sockets only: If FTP access is used, transfer all export files to the import server using the –ftpCopy monitor option
8. Sockets only: Start the Import Monitor and wait until it starts listening at the specified port
9. Start the Migration Monitor as user <sapsid>adm after the export process has been started
10. If any export errors occur, restart the Migration Monitor as soon as the problem is fixed.
11. After all packages have been loaded successfully, continue/restart the installation tool and finish the installation.
69
Using the Export Monitor in parallel with SAPinst: The Export Monitor can be started as an additional tool for the SAPinst standard export process. In this case, the monitor transfers any completed export packages to the target host. The Export Monitor can be started in parallel with SAPinst, but only after the dump directories are created on both the export and import server.
For the import with Import Monitor, proceed as follows: ...
1. Install the Central Instance.
2. Run the installation of the Database Instance.
If you want to start the installation of the target system before the export of the source system has been started, make sure that at least the files <importDir>/LABEL.ASC and <importDir>/DB/<your database>/DBSIZE.{TPL|XML} <importDir>/DB/DDL<your database>.TPL exist and contain the correct data
3. Select the SAPinst option Installation using Migration Monitor
4. Create or edit the import_monitor_cmd.properties file to specify the correct monitor options.
5. After the exit step, stop SAPinst
6. Sockets only: Make sure that all files on the export server generated by SAPinst (with R3ldctl/R3szchk) are copied to or available on the import server (including all STR, EXT package-specific files).
7. Start the Migration Monitor as user <sapsid>adm.
8. If any import errors occur, restart the Migration Monitor as soon as the problem is fixed.
9. After all packages have been loaded successfully, restart or continue with the installation tool and finish the installation.
For more information, see the documentation Migration Monitor – User’s Guide on the SAP Installation Master DVD
70
5.5 Restarting R3load Processes Use The state file allows package states to be manually updated to restart failed R3load processes.
For example, if package processing failed and the package state has the value –, the state can be set to 0 and processing of the package will be started again.
Activities • To restart package processing, set the package state from – to 0.
• To skip package processing, set the package state from 0 or – to +. (This is not recommended, because it can cause inconsistent data files or database content.)
• If the package is currently being processed (the package state is ?), then any manual modifications of the package state are ignored.
• Sockets only: You cannot restart processes.
5.6 Output Files of the Migration Monitor Use During the system copy procedure, the Migration Monitor writes to the following log files:
• Export
export_monitor.log
export_state.properties
• Import
import_monitor.log
import_state.properties
Features The export state file contains package state lines such as:
SAPUSER=++
The format of the line is <PACKAGE>=<STATE>. Possible values for <STATE> are:
0 Package export/import has not started.
? Package export/import is in progress.
- Package export/import has finished with errors.
71

+ Package export/import has finished successfully.
If any ftp/net exchange options are used, then the export state file may contain a second <STATE> column, which refers to the state of the package transfer.
Then the export state file contains package state lines such as the following:
SAPUSER=++
The format of the line is <PACKAGE>=<STATE>. Possible values for <STATE> are:
0 Package export has not yet started.
? Package export is in progress
- Package export has finished with errors.
+0 Package export has finished successfully;
package transfer has not yet started.
+? Package transfer is in progress.
+- Package transfer has finished with errors.
++ Package transfer has finished successfully.
5.7 Setting up the Target System using the Migration Monitor Purpose With the SAP installation tool SAPinst you can install the target system and import the database files that you have exported from the source system.
In addition you have to configure the import scripts [Page 59] and to invoke the Migration Monitor [Page 68].
Process Flow Perform the following actions: ...
1. Configure the import properties file [Page 59].
2. Install the target system [Page 73] and use the database export to load the database during the installation process.
3. Invoke the Migration Monitor [Page 68].
4. Check the output files [Page 71] of the Migration Monitor.
72

5.7.1 Installing the Target System Using the Migration Monitor Prerequisites
Make sure there is enough free space in the target system for the database load. To find out the size of the export and the sizes of the tablespaces or dbspaces that are created, look at the file DBSIZE.XML located in the directory <DRIVE>:\<EXPDIR>\DB\<DATABASE> (Windows) or <EXPDIR>/DB/<DATABASE> (UNIX).
Procedure ...
1. You start SAPinst as described in the installation documentation for your SAP component.
2. To install the target system follow the instructions in the SAPinst input dialogs and enter the required parameters up to the window Selecting the Database Instance Installation Method. On this screen, you choose System Copy/Migration using Migration Monitor (R3load).
If you need more information about input parameters, position the cursor on the field of the respective parameter and press F1.
3. When SAPinst displays the CD browser-window and asks for the Export Migration CD, enter the path to the export directory <EXPDIR>.
4. Continue as described in the installation documentation for your SAP component until a dialog box appears that states: If the export has been started on the source system and the Export Monitor is running, you can now start the data load by starting the Import Monitor.
5. Check that the prerequisites in the dialog box are fulfilled by your system. If so, you can start the Migration Monitor.
6. Complete the installation as described in the installation documentation for your SAP component.
If you have to restart the import after an error, just restart SAPinst. The import is continues with the table that was not imported successfully.
73

6 Final Activities To finish the system copy of your SAP system: ...
1. Perform follow-on actions in the source system [Page 74].
2. Perform follow-on actions in the target system [Page 74].
6.1 Performing Follow-On Actions in the Source System ...
1. Reschedule your canceled jobs: Tools → CCMS → Jobs → Maintenance (SM37).
2. Using CCMS, adapt your operation mode timetable to the original status: Tools → CCMS → Configuration → Operation mode calendar (SM63).
6.2 Performing Follow-On Actions in the Target System Procedure
Actions on Operating System Level ...
1. Adapt the configuration files on operating system level to meet network and SAP requirements.
2. Adapt additional SAP software components (for example, RFC, CPIC, SAP ArchiveLink) if required.
3. Adapt additional non-SAP software components (for example, archiving systems, monitoring tools, job schedulers) if required.
4. Adapt backup programs (for example BRBACKUP, BRARCHIVE, BACKINT) if required.
5. Adapt non-SAP directories, file systems, NFS mounts, etc. if required.
6. Check the SAP parameters of the default and instance profiles.
7. Check your UNIX shell files for special entries.
8. Check crontab or AT jobs.
9. Check operating system files (for example, .netrc, .rhosts).
10. Check operating system printers.
11. Oracle: Adapt the database profiles init<SAPSID>.ora, init<SAPSID>.dba and init<SAPSID>.sap.
Actions on Database Level ...
1. Before starting the SAP system, make sure that the logging mechanism of the database is active.
2. Check the parameters in the database profiles.
74
3. Oracle: Delete all entries from the following tables: DBSTATHORA, DBSTAIHORA, DBSTATIORA, DBSTATTORA.
4. Oracle: Delete the user OPS$<SOURCE_SAPSID>ADM.
5. Oracle: If you changed the <DBSID> during the system copy, it is recommended to adapt the global_name parameter with the following SQL command: alter database rename global_name to <NEW_DBSID>;
If the parameter is not existing on your system, ignore this step.
Actions on SAP System Level ...
1. Run installation check: Administration → System administration → Administration → Installation Check (transaction SM28).
2. Configure the Workbench Organizer (SE06) with the option Database Copy. This releases all transport, repair, and customizing requests that have not been released in the source system.
3. Adapt the transport parameters and transport routes in the Transport Management System (TMS):
a. Choose transaction STMS → Overview → Systems.
b. Select the system and select the tab Transporttool.
To adapt the transport routes:
Choose transaction STMS → Overview → Transport routes.
4. Delete all entries from the following tables: ALCONSEG, ALSYSTEMS, DBSNP, MONI, OSMON, PAHI, SDBAD, SDBAH, SDBAP, SDBAR.
5. Delete canceled and finished jobs.
Execute ABAP program RSBTCDEL, marking the field delete with forced mode: Tools → ABAP Workbench → ABAP Editor (SE38).
6. Adapt all jobs needed in the target system:
a. Copy the old jobs.
b. Modify the new jobs.
c. Delete the old jobs.
7. Check the consistency of the Temporary Sequential Objects (TemSe) by searching for files of TemSe objects for which no TemSe objects exist: Administration → CCMS → Spool → TemSe administration (SP12). For more information, see SAP Note 16875.
8. Adapt the definition of the printers to meet the new system requirements:
Device types and character set definitions
Spool servers
Output management systems (OMS)
9. Delete entries in table DDLOG for buffer synchronization. Synchronize the buffers as described in SAP Note 36283. Adapt the client information for the logical system.
10. Adapt the RFC destination: Tools → Administration → Administration → Network → RFC destinations (SM59). Clean the transactional RFC: Tools → Administration → Monitor → Transactional RFC (SM58). See the relevant description in the SAP Online Documentation.
75

11. Create new operation modes and remove old ones: ...
a. Create new operation modes and instance definitions.
b. Maintain the timetable using the new operation modes.
c. Delete the old operation modes and old instance definitions.
12. Adapt the operation mode time tables (CCMS): Administration → CCMS → Configuration → Operation mode calendar (SM63).
13. Adapt the instances and profiles (CCMS): Administration → CCMS → Configuration → OP modes/instances (RZ04).
14. Define or remove the SAP system users: Tools → Administration → User maintenance → Users (SU01). Furthermore, revise the authorizations of the system users.
15. Delete all entries from tables TPFET and TPFHT. These contain information about changes made to the profile of your source system: Administration → CCMS → Configuration → Profile Maintenance (RZ10).
IBM DB2 UDB for iSeries: Use the commands CLRPFM R3<SID>DATA/TPFET and CLRPFM R3<SID>DATA/TPFHT.
16. Adapt other CCMS settings (for example, alert thresholds, reorganization parameters of CCMS table MONI) if required.
17. Delete all entries from table TLOCK which holds the repair requests from your source system.
18. Make data archived in the source system (data that does not reside in the database but was moved to a different storage location using SAP Archive Management) accessible in the target system. Adapt the file residence information in the target system. Refer to the SAP Online Documentation (SAP Web Application Server → System Administration → Application Data Archiving and Reorganization) for help.
19. Redefine database actions (backup, update statistics, etc.) if you have used the DBA calendar in the source system (DB13).
20. Check logon groups and assignment of application servers to logon groups (SMLG).
21. Check the connection to SAPNet - R/3 Frontend (OSS1).
22. Check self-defined external commands (SM69).
23. Check the thresholds (RZ06).
24. Check entries of the following tables in all involved systems:
TXCOM (SM54)
THOSTS (SM55)
25. Check the logical system names: Refer to the discussion of logical system names in the preparation section of this guide [Page 14]. If your circumstance is such that logical system names must be changed in the system that results from the copy, then perform this logical system name change at this time per OSS notes 103228 and 544509. Your corporate logical system naming strategy should be observed when making this change.
BW customers: If you have copied a BW system, read SAP Note 325525.
26. Check for every client in your SAP system the detail settings (client role, changes and transports for client-dependent objects, changes for client-independent objects, protection level, restrictions) (SCC4).
27. Check if you can delete clients that will no longer be used in the target system (SCC5).
76
28. Check the contexts and segments of remote application servers for the SAP Monitoring Infrastructure if required (RZ21).
29. Configure the domain controller in the Transport Management System (TMS) by using transaction code STMS.
30. Post-processing concerning customer objects: ...
If customer objects are not original in the new system, modify the corresponding entries in table TADIR.
If you encounter problems modifying a customer development class using transaction SMTS or SM31, try to use the option Validate (ENTER) instead of the option Save to save your changes.
31. ABAP Program Loads
The ABAP loads are platform-dependent programs which are generated during runtime and which are stored in database tables. They are not exported when you use the R3load procedure to copy your SAP system. The ABAP loads are generated in the target system when they are first used. This may, however, reduce production system performance. To avoid this, you can use transaction SGEN to generate the missing loads.
Load generation requires a large amount of system resources. You should schedule the generation job to run overnight.
For a detailed description of the features, see the online documentation in transaction SGEN by choosing Information on the SAP Load Generator, or in the Job Monitor by choosing Job Monitor.
32. If you did not change the database when copying the system, you have to start program RS_BW_POST_MIGRATION in the background with variant SAP&POSTMGR. Otherwise, if you changed the database when copying the system, you have to start program RS_BW_POST_MIGRATION in the background with variant SAP&POSTMGRDB. Program RS_BW_POST_MIGRATION performs necessary modifications on DB specific objects (mainly BW objects)..
Checking the Target System
The following actions are suitable for checking the consistency of the target system: ...
1. Perform initial consistency check (SM28).
2. Check the system log on all application servers (SM21).
3. Check the consistency of the database (DB02).
4. Perform server check (SM51).
5. Test transactions frequently used by the customer.
6. FI customers: Run the job SAPF190 (accounting reconciliation) and compare the results to those gained on the source system before the system copy (Accounting → Financial Accounting → General ledger → Periodic Processing → Closing → Check/count → Comparison).
7. FI customers: Run the jobs RFUMSV00 (tax on sales/purchases), RAGITT01 (asset history sheet), RAZUGA01 (asset acquisitions), RAABGA01 (fixed asset retirements) and compare the results to those gained on the source system before the system copy.
8. CO customers: Run the report group 1SIP and compare the results to those gained on the source system before the system copy.
77
7 Additional Information
7.1 Remote Installation with SAPinst Purpose You can run the SAPinst GUI in standalone mode to perform a remote installation.
This enables you to install an SAP system on another host (the remote host) while monitoring the installation with the SAPinst GUI on your local Windows or UNIX computer (the local host).
Prerequisites • Make sure that you have performed the preparation activities for your local host
(SAPinst GUI host) and your remote host.
For more information, see Installation Preparations in this documentation.
• Both computers are in the same network and can ping each other.
To test this:
Log on to your remote host and enter the command ping <local host>.
Log on to the local host and enter the command ping <remote host>.
• SAPinst ports
SAPinst uses the port 21212 during the installation for communication with the SAPinst GUI. If one of these ports is already used by another service, SAPinst aborts the installation with an appropriate error message.
In this case, you must start SAPinst or the SAPinst GUI from the command prompt as follows:
In the following commands, <free_port_number> defines an unused port number. Since SAPinst also uses <free_port_number> + 1, this must also be free. For example, if you enter 60000 as <free_port_number>, SAPinst uses the port 60000.
UNIX:
SAPinst: ./sapinst SAPINST_DIALOG_PORT=<free_port_number>
SAPinst GUI: ./sapinstgui.sh -port <free_port_number>
Windows:
SAPinst: sapinst SAPINST_DIALOG_PORT=<free_port_number>
SAPinst GUI: sapinstgui.bat -port <free_port_number>
Process Flow ...
1. You start the SAPinst server on your remote host.
2. You start the SAPinst GUI on your local host.
78
3. You perform the installation using the SAPinst GUI.
For more information, see:
• Starting SAPinst on the Remote Host [Page 79]
• Starting SAPinst GUI on the Local Host [Page 80]
7.1.1 Starting SAPinst on the Remote Host Use You use this procedure to run SAPinst on the remote host when you want to run SAPinst as a remote installation [Page 78]. The remote host is the host where you want to install the SAP system.
Prerequisites You have prepared your system for SAPinst, that is you must have set the DISPLAY environment variable to <host_name>:0.0, where <host_name> is the host on which the SAPinst GUI will be displayed.
Procedure
Your Remote Host Runs on a Windows Platform ...
1. Log on to your remote host as a user who is a member of the local administration group.
2. Insert the installation DVD in your DVD drive.
3. Start SAPinst from the SAP Installation Master DVD:
Enter the following commands: <DVD drive>:\IM<x>_<OS>\SAPinst\NT\<OS>\sapinst.exe SAPINST_START_GUI=false
4. SAPinst now gets started without the SAPinst GUI and waits for the connection to the SAPinst GUI. That is, you see the following at the command prompt:
guiengine: no GUI connected; waiting for a connection on host <host_name>, port <port_number> to continue with the installation
5. Start the SAPinst GUI on your local host, as described in Starting SAPinst GUI on the Local Host [Page 80].
Your Remote Host Runs on a UNIX Platform ...
1. Log on to your remote host as user root.
2. Mount the SAP Installation Master DVD.
3. Mount the DVD locally. We do not recommend using Network File System (NFS).
4. Start SAPinst from the SAP Installation Master DVD:
Using the default installation directory
79

Enter the following commands: cd <SAP_Installation_Master_DVD>/IM<x>_<OS>/SAPINST/UNIX/<OS>
./sapinst SAPINST_START_GUI=false
5. SAPinst now gets started without the SAPinst GUI and waits for the connection to the SAPinst GUI. That is, you see the following at the command prompt:
guiengine: no GUI connected; waiting for a connection on host <host_name>, port <port_number> to continue with the installation
6. Start the SAPinst GUI on your local host, as described in Starting SAPinst GUI on the Local Host [Page 80].
7.1.2 Starting SAPinst GUI on the Local Host Use You use this procedure to run SAPinst GUI on the local host when you want to run SAPinst as a remote installation [Page 78]. The local host is the host where you want to control the installation with the SAPinst GUI.
Prerequisites You have prepared your system for SAPinst, that is you must have set the DISPLAY environment variable to <host_name>:0.0, where <host_name> is the host on which the SAPinst GUI will be displayed.
Procedure Your Local Host Runs on a Windows Platform ...
1. Log on to your local Windows host.
2. Insert the installation DVD into your DVD drive.
3. Change to the following directory: cd <DVD drive>:\IM<x>_<OS>\SAPinst\NT\<OS>
4. Start the SAPinst GUI in one of the following ways:
With additional parameters:
Enter the following from the Windows command line: startinstgui.bat host -<host_name> -port <port_number>
<host_name> is the host name of the installation host
<port_number> is the same port as SAPinst uses on the remote host
Without additional parameters:
i. Enter the follwing from the Windows command line: startinstgui.bat
The SAPinst GUI starts and tries to connect to SAPinst on the local host. However, normally there is no SAPinst running on the local host.
Therefore, the SAPinst GUI cannot connect and the SAP Installation GUI Connection dialog appears.
80

ii. Enter the host name of the Installation Host and the same Port as SAPinst uses on the remote host and choose Log on.
5. Perform the installation from your local host.
Your Local Host Runs on a UNIX Platform ...
1. Log on to your local UNIX host as user root.
2. Mount your installation DVD
3. Mount the DVD locally. We do not recommend using Network File System (NFS).
4. Change to the following directory: cd <SAP_Installation_Master_DVD>/IM<x>_<OS>/SAPINST/UNIX/<OS>
5. Start the SAPinst Gui in one of the following ways:
With additional parameters:
Enter the following from the UNIX command line: ./startInstGui.sh –host <host_name> -port <port_number>
<host_name> is the host name of the installation host
port_number> is the same port as SAPinst uses on the remote host
Without additional parameters:
i. Enter the following from the UNIX command line: startinstgui.sh
The SAPinst GUI starts and tries to connect to SAPinst on the local host. However, normally there is no SAPinst running on the local host.
Therefore, the SAPinst GUI cannot connect and the SAP Installation GUI Connection dialog appears.
ii. Enter the host name of the Installation Host and the same Port as SAPinst uses on the remote host and choose Log on.
6. Perform the installation from your local host.
7.2 Interrupted Installation with SAPinst Use The SAP system installation might be interrupted for one of the following reasons:
• An error occurred during the processing phase:
SAPinst does not abort the installation in error situations. If an error occurs during the processing phase, the installation will hold and a dialog box appears. The dialog box contains a short description about the choices listed in the following table as well as a path to a log file that contains detailed information about the error.
• You interrupted the installation by choosing Cancel.
81

The following table describes the options in the dialog box:
If you choose...
Meaning
View Log A frame appears with history information (log files) about the steps that you performed last . These log files contain a short description of the error that has occurred. The dialog box will remain in the background, so you can choose one of the following two options (Retry or Stop) after viewing the log information.
Retry Since SAPinst records the installation progress in the keydb.xml file, you can continue the installation by choosing Retry.
The installation continues from the point of failure without repeating any
of the previous steps.
We recommend that you view the entries in the log files, try to solve the problem and then choose Retry.
If the same or a different error occurs again, the dialog box will appear again.
Stop The dialog box and the SAPinst GUI will be closed. The installation stops but SAPinst records the installation progress in the keydb.xml file. Thus, you can continue the installation from point of failure without repeating any of the previous steps. See the procedure below.
Reset You must restart from the beginning, that is, with the default keydb.xml file.
You must delete the previous installation before you restart SAPinst. For more information about deleting a SAP Web AS installation, see Deletion of an SAP System Installation in the documentation Component Installation Guide - SAP Web Application Server Java 6.40 SR 1 on <OS>: <DB>, Part II — Installation and Post-Installation.
UNIX only: You can also terminate SAPinst by choosing Ctrl+C. However, we do not recommend that you use Ctrl+C, because this kills the process immediately .
Procedure The following procedures describe the steps to restart an installation, which you stopped by choosing Stop, or to continue an interrupted installation after an error situation.
Log on to your remote host as a user who is a member of the local administration group. ...
1. Insert the installation DVD in your DVD drive.
2. Enter the following commands from the Windows command prompt:
cd <DVD drive>:\IM<x>_<OS>\SAPinst\NT\<OS>
sapinst.exe
3. From the tree structure in the Welcome screen, select the installation task that you want to continue and choose Next.
82

If there is only one component to install, SAPinst directly displays the dialog What do you want to do? without presenting the Welcome screen.
The What do you want to do? screen appears.
4. In the What do you want to do? screen, decide between the following alternatives and choose OK.
Alternative Behavior
Run a new Installation
The installation will not be continued.
Instead, SAPinst deletes the mentioned installation directory for the chosen installation service and starts the installation from the beginning.
The log files from the old installation are put into a backup directory with the following naming convention:
<log_day_month_year_hours_minutes_seconds> (for example, log_01_Oct_2003_13_47_56).
Continue old installation
The installation that was interrupted is continued from the point of failure.
UNIX
Log on to your local UNIX host as user root.
5. Mount your installation DVD.
Mount the DVD locally. We do not recommend using Network File System (NFS).
6. Enter the following commands:
cd <SAP_Installation_DVD>/IM<x>_<OS>/SAPINST/UNIX/<OS>
./sapinst
7. From the tree structure in the Welcome screen, select the installation task that you want to continue and choose Next.
If there is only one component to install, SAPinst directly displays the dialog What do you want to do? without presenting the Welcome screen.
The What do you want to do? screen appears.
8. In the What do you want to do? screen, decide between the following alternatives and choose OK.
83

Alternative Behavior
Run a new Installation
The installation will not be continued.
Instead, SAPinst deletes the mentioned installation directory for the chosen installation service and starts the installation from the beginning.
The log files from the old installation are put into a backup directory with the following naming convention:
<log_day_month_year_hours_minutes_seconds> (for example, log_01_Oct_2003_13_47_56).
Continue old installation
The installation that was interrupted is continued from the point of failure.
84

I
Doc
nstallation Guide
Homogeneous and Heterogeneous System Copy for SAP Systems Based on SAP Web Application Server Java 6.40 SR 1
ument Version 1.40 – April 19, 2005

SAP AG Neurottstraße 16 69190 Walldorf Germany T +49/18 05/34 34 24 F +49/18 05/34 34 20 www.sap.com
© Copyright 2004 SAP AG. All rights reserved. No part of this publication may be reproduced or transmitted in any form or for any purpose without the express permission of SAP AG. The information contained herein may be changed without prior notice. Some software products marketed by SAP AG and its distributors contain proprietary software components of other software vendors. Microsoft, Windows, Outlook, and PowerPoint are registered trademarks of Microsoft Corporation. IBM, DB2, DB2 Universal Database, OS/2, Parallel Sysplex, MVS/ESA, AIX, S/390, AS/400, OS/390, OS/400, iSeries, pSeries, xSeries, zSeries, z/OS, AFP, Intelligent Miner, WebSphere, Netfinity, Tivoli, and Informix are trademarks or registered trademarks of IBM Corporation in the United States and/or other countries. Oracle is a registered trademark of Oracle Corporation. UNIX, X/Open, OSF/1, and Motif are registered trademarks of the Open Group. Citrix, ICA, Program Neighborhood, MetaFrame, WinFrame, VideoFrame, and MultiWin are trademarks or registered trademarks of Citrix Systems, Inc. HTML, XML, XHTML and W3C are trademarks or registered trademarks of W3C®, World Wide Web Consortium, Massachusetts Institute of Technology. Java is a registered trademark of Sun Microsystems, Inc. JavaScript is a registered trademark of Sun Microsystems, Inc., used under license for technology invented and implemented by Netscape. MaxDB is a trademark of MySQL AB, Sweden.
SAP, R/3, mySAP, mySAP.com, xApps, xApp, SAP NetWeaver, and other SAP products and services mentioned herein as well as their respective logos are trademarks or registered trademarks of SAP AG in Germany and in several other countries all over the world. All other product and service names mentioned are the trademarks of their respective companies. Data contained in this document serves informational purposes only. National product specifications may vary. These materials are subject to change without notice. These materials are provided by SAP AG and its affiliated companies ("SAP Group") for informational purposes only, without representation or warranty of any kind, and SAP Group shall not be liable for errors or omissions with respect to the materials. The only warranties for SAP Group products and services are those that are set forth in the express warranty statements accompanying such products and services, if any. Nothing herein should be construed as constituting an additional warranty. SAP Library document classification: PUBLIC Disclaimer Some components of this product are based on Java™. Any code change in these components may cause unpredictable and severe malfunctions and is therefore expressively prohibited, as is any decompilation of these components. Any Java™ Source Code delivered with this product is only to be used by SAP’s Support Services and may not be modified or altered in any way. Documentation in the SAP Service Marketplace You can find this documentation at the following Internet address: service.sap.com/instguides
Terms for Included Open Source Software This SAP software contains also the third party open source software products listed below. Please note that for these third party products the following special terms and conditions shall apply.
SAP License Agreement for STLport SAP License Agreement for STLport
between
SAP Aktiengesellschaft Systems, Applications, Products in Data Processing
Neurottstrasse 16 69190 Walldorf
Germany ( hereinafter: SAP )
and
you
( hereinafter: Customer ) 1. Subject Matter of the Agreement
a. SAP grants Customer a non-exclusive, non-transferable, royalty-free license to use the STLport.org C++ library (STLport) and its documentation without fee.
b. By downloading, using, or copying STLport or any portion thereof Customer agrees to abide by the intellectual property laws, and to all of the terms and conditions of this Agreement.
c. The Customer may distribute binaries compiled with STLport (whether original or modified) without any royalties or restrictions.
d. Customer shall maintain the following copyright and permission notices on STLport sources and its documentation unchanged: Copyright 2001 SAP AG
e. The Customer may distribute original or modified STLport sources, provided that: • The conditions indicated in the above permission notice
are met; • The following copyright notices are retained when
present, and conditions provided in accompanying permission notices are met:
Copyright 1994 Hewlett-Packard Company Copyright 1996,97 Silicon Graphics Computer Systems, Inc. Copyright 1997 Moscow Center for SPARC Technology. Copyright 1999,2000 Boris Fomitchev Copyright 2001 SAP AG Permission to use, copy, modify, distribute and sell this software and its documentation for any purpose is hereby granted without fee, provided that the above copyright notice appear in all copies and that both that copyright notice and this permission notice appear in supporting documentation. Hewlett-Packard Company makes no representations about the suitability of this software for any purpose. It is provided "as is" without express or implied warranty. Permission to use, copy, modify, distribute and sell this software and its documentation for any purpose is hereby granted without fee, provided that the above copyright notice appear in all copies and that both that copyright notice and this permission notice appear in supporting documentation. Silicon Graphics makes no representations about the suitability of this software for any purpose. It is provided "as is" without express or implied warranty. Permission to use, copy, modify, distribute and sell this software and its documentation for any purpose is hereby granted without fee, provided that the above copyright notice appear in all copies and that both that copyright notice and this permission notice appear in supporting documentation. Moscow Center for SPARC

Technology makes no representations about the suitability of this software for any purpose. It is provided "as is" without express or implied warranty. Boris Fomitchev makes no representations about the suitability of this software for any purpose. This material is provided "as is", with absolutely no warranty expressed or implied. Any use is at your own risk. Permission to use or copy this software for any purpose is hereby granted without fee, provided the above notices are retained on all copies. Permission to modify the code and to distribute modified code is granted, provided the above notices are retained, and a notice that the code was modified is included with the above copyright notice. Permission to use, copy, modify, distribute and sell this software and its documentation for any purpose is hereby granted without fee, provided that the above copyright notice appear in all copies and that both that copyright notice and this permission notice appear in supporting documentation. SAP makes no representations about the suitability of this software for any purpose. It is provided with a limited warranty and liability as set forth in the License Agreement distributed with this copy. SAP offers this liability and warranty obligations only towards its customers and only referring to its modifications.
2. Support and Maintenance
SAP does not provide software maintenance for the STLport. Software maintenance of the STLport therefore shall be not included. All other services shall be charged according to the rates for services quoted in the SAP List of Prices and Conditions and shall be subject to a separate contract.
3. Exclusion of warranty As the STLport is transferred to the Customer on a loan basis and free of charge, SAP cannot guarantee that the STLport is error-free, without material defects or suitable for a specific application under third-party rights. Technical data, sales brochures, advertising text and quality descriptions produced by SAP do not indicate any assurance of particular attributes.
4. Limited Liability a. Irrespective of the legal reasons, SAP shall only be liable for
damage, including unauthorized operation, if this (i) can be compensated under the Product Liability Act or (ii) if caused due to gross negligence or intent by SAP or (iii) if based on the failure of a guaranteed attribute.
b. If SAP is liable for gross negligence or intent caused by employees who are neither agents or managerial employees of SAP, the total liability for such damage and a maximum limit on the scope of any such damage shall depend on the extent to which its occurrence ought to have anticipated by SAP when concluding the contract, due to the circumstances known to it at that point in time representing a typical transfer of the software.
c. In the case of Art. 4.2 above, SAP shall not be liable for indirect damage, consequential damage caused by a defect or lost profit.
d. SAP and the Customer agree that the typical foreseeable extent of damage shall under no circumstances exceed EUR 5,000.
e. The Customer shall take adequate measures for the protection of data and programs, in particular by making backup copies at the minimum intervals recommended by SAP. SAP shall not be liable for the loss of data and its recovery, notwithstanding the other limitations of the present Art. 4 if this loss could have been avoided by observing this obligation.
f. The exclusion or the limitation of claims in accordance with the present Art. 4 includes claims against employees or agents of SAP.

SAP Library document classification: PUBLIC
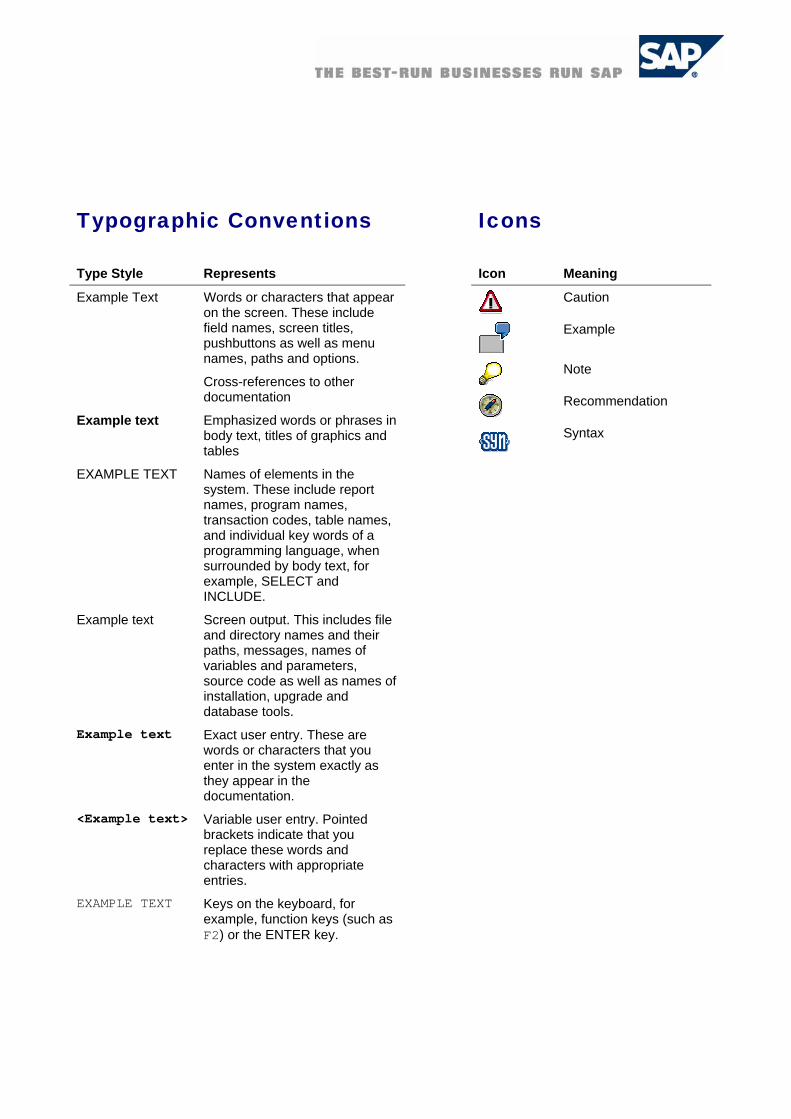
Typographic Conventions Icons
Type Style Represents
Example Text Words or characters that appear on the screen. These include field names, screen titles, pushbuttons as well as menu names, paths and options.
Cross-references to other documentation
Example text Emphasized words or phrases in body text, titles of graphics and tables
EXAMPLE TEXT Names of elements in the system. These include report names, program names, transaction codes, table names, and individual key words of a programming language, when surrounded by body text, for example, SELECT and INCLUDE.
Example text Screen output. This includes file and directory names and their paths, messages, names of variables and parameters, source code as well as names of installation, upgrade and database tools.
Example text Exact user entry. These are words or characters that you enter in the system exactly as they appear in the documentation.
<Example text> Variable user entry. Pointed brackets indicate that you replace these words and characters with appropriate entries.
EXAMPLE TEXT Keys on the keyboard, for example, function keys (such as F2) or the ENTER key.
Icon Meaning
Caution
Example
Note
Recommendation
Syntax

Installation Guide: System Copy for SAP Systems Based on WAS Java 6.40 SR 1
April 2005 7

Installation Guide: System Copy for SAP Systems Based on Web AS Java 6.40 SR 1
Contents
Homogeneous and Heterogeneous System Copy for SAP Systems Based on SAP Web Application Server Java 6.40 SR1 ........................... 10
1 Introduction.....................................................................................................10 1.1 Naming Conventions...........................................................................................15 1.2 New Features .......................................................................................................16
2 Planning...........................................................................................................16 2.1 Required Documentation....................................................................................18
2.1.1 SAP Notes.................................................................................................................................... 18 2.1.2 SAPinst Troubleshooting Guide ................................................................................................... 18 2.1.3 Information on SAP Service Marketplace .................................................................................... 19 2.1.4 Accessing the SAP Library........................................................................................................... 19
3 Preparation......................................................................................................20 3.1 Preparing a host for SAPinst..............................................................................21
3.1.1 Preparing the System for the J2EE Engine................................................................................. 22 3.1.2 Preparing the System for the SAPinst GUI ................................................................................. 23 3.1.3 iSeries: Preparing a Windows User Account and iSeries User Profile ........................................ 23 3.1.4 iSeries: Installing TMKSVR and Creating an Installation Share .................................................. 24
4 System Copy Process....................................................................................26 4.1 Preparing the Installation DVDs that are Required for the System Copy......31
4.1.1 iSeries: Copying the Installation DVDs to the IFS of the iSeries host.......................................... 34 4.2 Performing the System Copy on UNIX using SAPinst ....................................35
4.2.1 Prerequisites before Starting SAPinst......................................................................................... 35 4.2.1.1 Prerequisites for all instances................................................................................................................... 35 4.2.1. Prerequisites for Distributed Instances Only.............................................................................................. 36 4.2.2 Running SAPinst on UNIX............................................................................................................ 37
4.3 Performing the System Copy on Windows Using SAPinst.............................41 4.3.1 Running SAPinst on Windows .................................................................................................... 41
4.4 Performing the System Copy on IBM eServer iSeries Using SAPinst ...........46 4.4.1 Running SAPinst on IBM eServer iSeries .................................................................................... 46 4.4.2 Changing the SAPinst GUI host (Optional) ................................................................................. 50 4.4.2.1 Running SAPinst in standalone mode (Optional) ..................................................................................... 50 4.4.2.2 Starting SAPinst GUI on Another Host (Optional)................................................................................... 51
4.5 Handling SAPinst GUI ........................................................................................52 4.6 Interrupted Installation with SAPinst.................................................................53
4.6.1 Interrupted Installation with SAPinst ............................................................................................ 53 4.7 Remote Installation with SAPinst (Optional).....................................................57
4.7.1 Remote Installation with SAPinst on UNIX and Windows (Optional) ........................................... 57 4.7.1.1 Starting SAPinst on the Remote Host (Optional) ..................................................................................... 57 4.7.1.2 Starting SAPinst GUI on the Local Host (Optional)................................................................................. 58
4.8 Troubleshooting ..................................................................................................60 5 Follow-Up Activities .......................................................................................61
5.1 Follow-Up Activities on the Source System......................................................61 5.2 Follow-Up Activities on the Target System.......................................................61
5.2.1 General Follow-Up Activities ........................................................................................................ 62 5.2.1.1 Configuration Steps for the SAP Java Connector............................................................................ 62 5.2.1.2 Generate Public-Key Certificates ....................................................................................................... 62 5.2.2 Component-Specific Follow-Up Activities .................................................................................... 62 5.2.2.1 SAP Business Warehouse .................................................................................................................. 62
8 April 2005
Installation Guide: System Copy for SAP Systems Based on WAS Java 6.40 SR 1
5.2.2.2 Adobe Document Services .................................................................................................................. 63 5.2.2.3 Knowledge Management and Collaboration.......................................................................... 64 5.2.2.4 Configuration Steps for SAP Knowledge Warehouse............................................................... 64 5.2.2.5 Configuration Steps for mySAP ERP / mySAP CRM Java Components ................................. 64 5.2.2.5.1. Applications Using XCM Configuration ................................................................................. 64 5.2.2.5.2. SAP WebDynpro Applications............................................................................................... 65
April 2005 9

Installation Guide: System Copy for SAP Systems Based on Web AS Java 6.40 SR 1
Homogeneous and Heterogeneous System Copy for SAP Systems Based on SAP Web Application Server Java 6.40 SR1
1 Introduction As of SAP NetWeaver ’04 SR 1, you can copy SAP Systems based on SAP Web Application Server Java 6.40 SR1 (SAP Web AS 6.40 SR1).
SAP will deliver the Java System Copy feature in SAP NetWeaver `04 Support Release 1. Since this is a new feature, SAP has decided that these projects can only be performed under SAP’s control during the introductory phase. Before you start a Java System Copy, you must contact SAP to get more information. To do this, open an SAP Service Marketplace message.
Since the procedure is based on new technology, your first system copy has to be performed by a migration consultant who has detailed knowledge of both the J2EE Engine and the ABAP system copy procedure. SAP development will support these system copies in the introductory phase.
Organization and Process Flow 1. The customer or consultant opens a message under BC-INS-MIG on SAP Service Marketplace. A new
message must be opened for each system that needs to be copied.
1. Start the short text with: 'JSCNW04SR1: {hom het} / <SRCDB>/<SRCOS> to <TRGDB>/<TRGOS>' For example: JSCNW04SR1: het / INF/HPUX to ORA/HPUX 'hom' stands for homogeneous system copy. 'het' stands for heterogeneous system copy or migration. 2. Start the problem description with the following: Please forward this message directly to Development Support(SAP AG). 3. In addition, the message must contain the following information about the source and
target systems: - Version of the J2EE engine - Java version - Java components installed in the J2EE Engine - SAP NetWeaver `04 Support Package Stack Level - Add-in or standalone engine - Operating system and operating system version - Database and database version - Source database size
This ensures that SAP Service Marketplace messages about Java System Copy projects are sent directly to the development team, and not to other support organizations. You must record any problems that occur during the Java System Copy procedure in this message.
10 April 2005

Installation Guide: System Copy for SAP Systems Based on WAS Java 6.40 SR 1
2. SAP informs the customer about how to start the Java System Copy.
Contact and Support During the Introductory Phase Problems are processed in the usual way in SAP Service Marketplace messages. However, messages concerning Java System Copy go to the migration development team. To ensure this, ALL problems during the Java system copy procedure have to be reported in the message where you registered the Java System Copy. If necessary, the team will contact the application developers or inform you if you need to open additional messages.
Releasing the Copied System After the system copy, the migration consultant and the customer are responsible for performing tests to verify that the system copy was successful. Once the tests have been completed successfully, the customer 'releases' the system. For production systems, a heterogeneous system copy is followed by a migration check. For more details, see SAP Service Marketplace at service.sap.com/osdbmigration.
About Java System Copy The system copy is performed by SAPinst using the Jload tool and applies to all operating systems and all databases. For restrictions see SAP Note 785848. When a system copy is performed, the Java database content and the components in the file system are copied to the target system.
For example: You want to copy an SAP Enterprise Portal (SAP EP) installation based on Web Application Server ABAP + Java, that is Web AS ABAP + Java Addin. For the ABAP part of the system, you have to perform the ABAP system copy. SAPinst copies the SAP Web AS Java Add-in and the SAP EP residing on it with all their configurations and contents in one go.
Check SAP Note 785848 for Java components based on SAP Web AS 6.40 SR1 that have been released already for system copy.
April 2005 11

Installation Guide: System Copy for SAP Systems Based on Web AS Java 6.40 SR 1
Flow diagram for a typical Java Add-in / Java system copy:
PlanningSource System
Target System
Java Add-In
Java System
Export ABAP System
Export Java SystemExport Java System
Import Preparation
Import
Java Add-In
Import ABAP System
Import Java System Import Java System
Install Java System
Post System Copy Steps
Install Java System on CI Host
Install DB Schema on DB Instance
Host
Distributed SystemCentral System
Install DI(s)
Central System Distributed System
Install Java System Prepare CI Host
Install DB on DBInstance Host
Install Java System on CI Host
Java System
CI = Central Instance
DB = Database
DI = Dialog Instance
12 April 2005
Installation Guide: System Copy for SAP Systems Based on WAS Java 6.40 SR 1
There are two different situations for the system copy:
When a homogeneous system copy is performed, the target SAP system is installed on the same operating system and the same database system as the source SAP system. The contents of the database are copied from the source to the target system.
When a heterogeneous system copy is performed, the operating system or the database system is changed. Familiarize yourself with the migration procedure. For detailed information, see the SAP OS/DB Migration page on SAP Service Marketplace at service.sap.com/osdbmigration.
A homogeneous system copy should only be done by a person with experience in copying systems and with knowledge of the operating system, the database, and the Java Dictionary. A heterogeneous system copy must be done by a certified system support consultant or an SAP Technical Consultant.
Create a SAP Service Marketplace message in the application area BC-INS-UNX (UNIX), BC-INS-NT (Windows), or BC-INS-AS4 (IBM eServer iSeries) if you experience problems during the homogeneous system copy. In the case of a heterogeneous system copy (OS/DB migration), create an OSS message in the application area BC-INS-MIG if you experience problems.
SAP NetWeaver ’04 Masterguide If you want to copy your Sap Web AS Java system in the context of the implementation of SAP NetWeaver 04 SR1 or one of its technical scenarios, it is essential that you familiarize yourself with the contents of the corresponding Master Guide before starting the installation. The Master Guide is the central document for the implementation of mySAP Business Suite solutions and business scenarios. It lists the components and third-party applications required by each component of NetWeaver ’04 SR1, and refers to the required installation and upgrade guides. It also defines the installation sequence of the technical scenarios of SAP NetWeaver ’04 SR1.
How to use this guide This document describes how to copy an SAP Web AS Java system or the Java Add-In of an SAP Web AS ABAP+Java system.
In the context of a system copy you have to perform a lot of the activities, that are required for an installation as well (mainly when you are setting up the target system). Therefore, this document describes only the differences from the installation guide for SAP Web AS Java and refers to the content of the installation guide for all common contents.
Therefore, you must use the documentation Installation Guide – SAP Web AS Java 6.40 SR 1 on <OS> : <database> on SAP Service Marketplace at service.sap.com/instguidesNW04 Installation SAP Web AS as a supplement for the system copy guide.
April 2005 13

Installation Guide: System Copy for SAP Systems Based on Web AS Java 6.40 SR 1
This document does not describe how to copy an SAP Web AS ABAP system or the ABAP part of an SAP Web AS ABAP+Java System.
If you want to copy an ABAP system or the ABAP part of an SAP Web AS ABAP+Java system, you have to use the documentation Installation Guide - Homogeneous and Heterogeneous System Copy for SAP Systems Based on SAP Web Application Server ABAP 6.40 SR1 on SAP Service Marketplace at service.sap.com/instguidesNW04 Installation Sap Web AS.
Constraints • The export and import of a database with the installation tools for reorganization purposes is not
described in this documentation, and is not supported by SAP. Use the appropriate tools for database reorganization.
• This system copy guide is based on SAP Web AS Java 6.40 with patch level SP09. Some post-installation steps [page 61] may become obsolete when you apply the next patchlevels.
14 April 2005

Installation Guide: System Copy for SAP Systems Based on WAS Java 6.40 SR 1
1.1 Naming Conventions In this documentation, the following naming conventions apply:
Terminology • The term Java system is the same as SAP Web Application Server Java.
• The term Java Add-in is used for the Java part of the SAP Web Application Server ABAP+Java.
• The term installation is used in the context of migration.
• Migration is a synonym for heterogeneous system copy.
• Source System and Target System
The SAP system containing the original database is called the source system and the system to which the database copy is to be imported is called the target system.
• System Copy
Duplication of an SAP system. Certain SAP parameters may change when a system is copied. When a system copy is made, all the instances are newly installed, but the database is set up using a copy of the source system database.
• Java Export
Archives including the database content of the Java database schema and file system components created by SAPinst
• Placeholders
Placeholders such as <EXPORT_DIR> are used in commands. They are used in the same way as in the SAP system installation documentation, and must be replaced with the values valid for your site.
Variables Variables Description
<SAPSID> SAP system ID in uppercase letters
<sapsid> SAP system ID in lowercase letters
<DBSID> Database system ID in uppercase letters
<dbsid> Database system ID in lowercase letters
<INSTDIR> Installation directory for the SAP system
<DVD-DIR> Directory on which a DVD is mounted
<OS> Operating system name within a path
<EXPORT_DIR> Directory where the Java export is created.
The following examples show how the variables are used:
− Log on as user <sapsid>adm and change to the directory /usr/sap/<SAPSID>.
If your SAP system ID is C11, log on as user c11adm and change to the directory /usr/sap/C11.
April 2005 15

Installation Guide: System Copy for SAP Systems Based on Web AS Java 6.40 SR 1
− Change to the directory <DVD-DIR>/UNIX/<OS>.
If the DVD is mounted on /sapcd1 and your operating system is AIX, change to /sapcd1/UNIX/AIX_64.
1.2 New Features Area Description
For the export and import of database content, the new Jload installation tool is used.
SAPinst
As of SAP Web AS 6.40 SR 1 there is a new F1 field help displaying information about the input parameter fields of the SAPinst screens. This new field help replaces the former “What’s this” help on the SAPinst screens and the former input parameter tables in the Web AS installation guides.
2 Planning Before you begin with the practical system copy tasks, it is essential to have a planning phase in which you make a number of fundamental decisions that influence the subsequent system copy procedure. Careful planning is a prerequisite for the successful system copy of the system.
SAP recommends that you perform a system copy when you set up a test, demo, training or standby system. You should perform upgrades in a test system first. This way you can identify customer-specific problems that might result from modifications.
When copying a system that contains production data it is important to choose the right moment for the copy. This could be a month-end or year-end closing. Make sure that there is a well-defined starting point for the data in the new system.
Prerequisites
Read the following SAP Notes before beginning the system copy: The SAP Note 785848 System Copy for SAP Systems Based on SAP NetWeaver ’04 SR 1 Java contains the most recent information regarding Java system copy. Make sure that you have the most recent version of the note. SAP Notes are located on SAP Service Marketplace at service.sap.com/notes.
A consistent system copy can only be ensured if you perform all steps described in this documentation.
The system copy is applicable for:
• Setting up system landscapes (where the SAP systems have different SAPSIDs).
• Creating systems for testing, demonstration, training, and standby purposes. Depending on the purpose of the system, it may be advisable to use the same SAP system name, even though the system cannot be included in a system group for transports in this case.
Process Flow 1. Obtain the latest versions of the required documentation [page 18].
16 April 2005

Installation Guide: System Copy for SAP Systems Based on WAS Java 6.40 SR 1
2. In the case of a major change in hardware configuration (for example, new machine type, new
hard disk configuration, new file system type), consult your SAP-authorized hardware partner.
3. Create a plan for performing the system copy. If you want to perform the migration of an ABAP+Java system, keep in mind that you must perform the migration of the ABAP part of your system as described in the documentation Installation Guide - Homogeneous and Heterogeneous System Copy for SAP Systems Based on SAP Web Application Server ABAP 6.40 SR1 before you perform the migration of the Java Add-in.
4. Check the information on database and operating system release combinations for SAP components on SAP Service Marketplace at service.sap.com/pam.
5. Take into account the downtime of the source system (for preparations and copying) when planning the system copy.
6. Choose an SAP system ID for your target system as described in “Basic SAP system Parameters” in the documentation Installation Guide – SAP SAP Web Application Server Java on <OS>: <DB>, Part I – Planning and Preparation
Keep in mind that either the instance name, the instance number or the host name of the central instance on the target system must be different from that of the source system.
7. Heterogeneous System Copy for Java system: Get the Migration Key
If you change the operating system or the database system during the copy (heterogeneous system copy), you need a migration key. You will be asked for the migration key when you install the target system. For more information about how to request the migration key see SAP Note 785848. If you are performing a heterogeneous system copy of an ABAP+Java system, you need a migration key when copying the ABAP part of the system. You do not need an additional migration key for the Java Add-in. For information about how to get the migration key for a heterogeneous system copy of an ABAP system, see the documentation Homogeneous and Heterogeneous for SAP Systems based on Web AS ABAP 6.40 SR1.
8. Test run/schedule
Perform a test run of the system copy. The time taken by the test run is used to calculate the system downtime:
• If your target system will replace your source system, try to perform a complete test run, in which the entire database is exported from the source system, transferred to the target system and imported there. The approximate system downtime will be equal to the total test time (that is, time for export, transport, and import).
• If you do not want to replace your source system, a partial test run (export of entire database or parts of it) may suffice to calculate the system downtime. The source system will only be down for the time of the export.
Calculating the system downtime is particularly important for very large databases (VLDB) or when tapes are being used. The test run also determines the amount of export data. You should choose the best data transfer method (for example, FTP or tape). We recommend that you perform read/write actions only on local file systems.
Define a schedule for the test system copy and the final system copy.
April 2005 17

Installation Guide: System Copy for SAP Systems Based on Web AS Java 6.40 SR 1
2.1 Required Documentation The following sections describe the documentation that you require for the installation.
• SAP Installation Notes
• SAPinst Troubleshooting Guide
• Information on SAP Service Marketplace
2.1.1 SAP Notes You must read the following SAP Notes before you start the copy of your SAP system. These SAP Notes contain the most recent information, as well as corrections to the installation and system copy documentation.
Make sure that you have the up-to-date version of each SAP Note, which you can find on SAP Service Marketplace at:
service.sap.com/notes.
SAP Note Number
Title Description
785848 System Copy for SAP Systems Based on SAP Web AS Java 6.40 SR 1
General information about the system copy for SAP systems based on SAP Web AS Java
785850 Sap Web AS Java 6.40 SR 1 Installation on UNIX
Unix-specific information about the installation of SAP Web AS Java.
786608 Sap Web AS Java 6.40 SR 1 Installation on Windows
Windows-specific information about the installation of SAP Web AS Java.
789188 Sap Web AS Java 6.40 SR 1 Installation on iSeries
iSeries-specific information about the installation of SAP Web AS Java.
790224 SAP J2EE Engine 6.40 SP9 - malfunctioning jms
JMS transactions are malfunctioning in a system created from JLoad import in versions before SP10.
2.1.2 SAPinst Troubleshooting Guide The SAPinst Troubleshooting Guide for SAP Web AS Java Installation provides up-to-date information about how to avoid installation failure and what to do if a failure occurs.
For more information, see SAP Service Marketplace at service.sap.com/instguidesNW04 Installation SAP Web AS.
We recommend that you read this documentation before starting the installation.
18 April 2005
Installation Guide: System Copy for SAP Systems Based on WAS Java 6.40 SR 1
2.1.3 Information on SAP Service Marketplace Information on the following areas is available on SAP Service Marketplace.
Description Internet Address Title
SAP Notes service.sap.com/notes –
Released platforms service.sap.com/platforms –
Technical infrastructure –configuration scenarios and related aspects such as security, load balancing, availability, and caching
service.sap.com/ti –
Network infrastructure service.sap.com/network –
System sizing service.sap.com/sizing Quick Sizer tool
Front-end installation
service.sap.com/instguidesNW04 Installation SAP Web AS
Front End Installation Guide
Security service.sap.com/security –
Homogeneous and heterogeneous system copy for ABAP systems
service.sap.com/instguidesNW04 → Installation SAP Web AS
Homogeneous and Heterogeneous System Copy for SAP Systems based on SAP Web Application Server ABAP 6.40
Installation of an SAP system based on SAP Web AS (ABAP)
service.sap.com/instguidesNW04→ Installation SAP Web AS
Component Installation Guide – SAP SAP Web Application Server ABAP on <OS>: <DB>
Installation of an SAP system based on SAP Web AS (Java)
service.sap.com/instguidesNW04→ Installation SAP Web AS
Component Installation Guide – SAP SAP Web Application Server Java on <OS>: <DB>
2.1.4 Accessing the SAP Library For more information on the SAP Web Application Server, access the SAP Library from the SAP Help Portal at help.sap.com/nw4
2. Select the required language.
3. Choose SAP NetWeaver.
April 2005 19

Installation Guide: System Copy for SAP Systems Based on Web AS Java 6.40 SR 1
3 Preparation Before you start the system copy, you must perform steps to prepare the procedure.
To make a consistent copy of the database, it is necessary to prepare the source host for the export and to prepare the target host for the import.
It is not necessary to prepare the source and target system when performing a test run.
Preparations on your source host − You make sure that all required DVDs for the system copy are available.
− You prepare the DVDs required for the export [page 31]
− System copy of Java Add-in: You perform the export for the ABAP system as described in the documentation Installation Guide - Homogeneous and Heterogeneous System Copy for SAP Systems Based on SAP Web Application Server ABAP 6.40 SR1
System copy of Java Add-in: You cannot copy a Java Add-in to a newly installed ABAP system installation. You must have copied the ABAP system before, even if you performed no manual configuration in this system. Reason: Even a newly installed ABAP system is changed by the Java Add-in installation
o You make sure that there is enough disk space for the export of the content of the Java database (depending on the size of the database and on the components running on the Java system, at least 1.5 GB).
o You make sure that the source Java system or the source Java Add-in is running.
o You make sure that your source host complies with the requirements for running SAPinst for the export as described in “Prerequisites before Starting SAPinst” in the documentation Installation Guide – SAP Web AS Java 6.40 SR 1 on <OS> : <DB>, Part II – Installation and Post-Installation
Preparations on your target host o You make sure that all required DVDs for the system copy are available.
o You prepare the target system as described in the documentation Installation Guide – SAP Web AS Java 6.40 SR 1 on <OS> : <DB>, Part I – Planning and Preparation.
− You prepare the DVDs required for the import [page 31].
o You make sure that your target system complies with the requirements for running SAPinst for the import as described in “Prerequisites before Starting SAPinst” in the documentation Installation Guide – SAP Web AS Java 6.40 SR 1 on <OS> : <DB>, Part II – Installation and Post-Installation
20 April 2005

Installation Guide: System Copy for SAP Systems Based on WAS Java 6.40 SR 1
3.1 Preparing a host for SAPinst Use You need to prepare your system as follows:
UNIX • You prepare the host for the J2EE Engine [page 22].
• You prepare the host for the SAPinst GUI [page 23].
If required, you can perform a remote system copy using a standalone SAPinst GUI on a separate Windows or UNIX host. This enables you to perform the system copy on a remote host while monitoring it with the SAPinst GUI from a local host. If you want to perform a remote system copy, see Remote System Copy with SAPinst [page 57]. In this case, prepare both the local and the remote host for the SAPinst GUI.
Windows • You prepare the host for the J2EE Engine [page 22].
• You prepare the host for the SAPinst GUI [page 23].
If required, you can perform a remote system copy using a standalone SAPinst GUI on a separate Windows or UNIX host. This enables you to perform the system copy on a remote host while monitoring it with the SAPinst GUI from a local host. If you want to perform a remote system copy, see Remote System Copy with SAPinst [page 57]. In this case, prepare both the local and the remote host for the SAPinst GUI.
IBM Server iSeries • Since IBM eServer iSeries does not provide a graphical user interface, you must install the JRE on a
Windows host to perform the system copy with SAPinst. Proceed as described in Preparing the System for the SAPinst GUI [page 23].
• You prepare a Windows user account and an iSeries user profile [page 23].
• You install the TMKSVR server and create an installation share [page 24].
April 2005 21

Installation Guide: System Copy for SAP Systems Based on Web AS Java 6.40 SR 1
3.1.1 Preparing the System for the J2EE Engine Use The J2EE Engine requires a Java Development Kit (Java™ 2 SDK, Standard Edition = JDK) on the host where the J2EE Engine is to be installed. You need this for system variants with Java.
The JDK includes the Java runtime environment (JRE), which is required for the SAPinst GUI.
Procedure 1. Check the JDK versions that are released for SAP systems on SAP Service Marketplace at:
service.sap.com/platforms → Product Availability Matrix → SAP NetWeaver → SAP NetWeaver 04 → JSE Platforms
2. Make sure a valid JDK version is installed on every host on which you want to install an SAP instance with the J2EE Engine, as follows:
• JDK is not already installed
Since JDK is not part of the SAP shipment, you need to download and install it.
See SAP Note 709140 for recommended JDK versions for your platform and how to obtain them.
For Java system copy, you always need to apply the latest JDK version for your platform.
• JDK is already installed
Check the installed version of JDK by entering the following: java -version
SAPinst asks you to confirm which of the installed Java Virtual Machines (JVM) is to be used for the installation. UNIX: All Java executables found in the system path of user root as well as the value of the environment variable JAVA_HOME can be used. Windows: SAPinst additionally checks the registry for installed JVMs. If the environment variable JAVA_HOME points to a JVM with a valid version, it is used by default. If not, the JVM with the highest version in the required version range is used.
3. If you want to install the J2EE Engine with strong encryption:
a.
b.
c.
Download the required .SDA file from SAP Service Marketplace at service.sap.com/swdc SAP Software Distribution Center Download SAP Cryptographic Software.
Download the JCE policy files for your platform:
UNIX (except of AIX), Windows: java.sun.com/j2se/1.4.2/downloads
AIX, Linux for zSeries, iSeries, z/OS: www6.software.ibm.com/dl/jcesdk/jcesdk-p
Copy the JCE policy files to:
UNIX (except for AIX), Windows: SAPinst installs the files. You do not need to copy them to a special location.
AIX: /usr/java14_64/jre/lib/security
z/OS: JAVA_HOME/lib/security
22 April 2005
Installation Guide: System Copy for SAP Systems Based on WAS Java 6.40 SR 1
3.1.2 Preparing the System for the SAPinst GUI
Use The installation tool SAPinst uses the Java-based graphical user interface, SAPinst GUI, regardless of your system variant (ABAP, Java, or both). Therefore, you always need a Java runtime environment (JRE) on the host where SAPinst is to run. The JRE is included in the JDK..
Procedure 1. Check the JRE versions that are released for SAP Web AS and for SAP systems on SAP Service
Marketplace at:
service.sap.com/platforms → Product Availability Matrix → SAP NetWeaver → SAP NetWeaver 04 → JSE Platforms
2. Make sure a valid version of JRE is installed on the host where SAPinst is to run, as follows:
o JRE is not already installed:
See SAP Note 709140 for recommended JDK versions for your platform and how to obtain them.
o JRE is already installed:
Check the installed version of JRE by entering: java –version
3.1.3 iSeries: Preparing a Windows User Account and iSeries User Profile Use For the installation you need to create a user account on your Windows installation host and a user profile on the iSeries you want to install.
The following requirements apply:
• The iSeries user profile and the Windows user account must have the same name and password.
• The iSeries user profile must have user class *SECOFR and all special authorities that belong to user QSECOFR.
• The Windows user account must have administrator rights on the Windows installation host.
Procedure
The user name SAPINST and the password SAP are used in the procedures as examples.
Windows
1. Create a local user.
2. In the User name field, enter your installation user name, for example, SAPINST.
3. In the Password and Confirm password fields, enter the password SAP.
4. Deselect User must change password at next logon.
April 2005 23

Installation Guide: System Copy for SAP Systems Based on Web AS Java 6.40 SR 1
5. Assign the new user SAPINST to the group Administrators.
iSeries
Execute the following command: CRTUSRPRF USRPRF(SAPINST) PASSWORD(SAP) USRCLS(*SECOFR) TEXT('Test User for SAP Installation') SPCAUT(*USRCLS)
3.1.4 iSeries: Installing TMKSVR and Creating an Installation Share Use The TMKSVR is the interface between iSeries and Windows for the installation with SAPinst. SAPinst runs on Windows, but has to install the product on iSeries. This means that all actions required for iSeries are initiated remotely on Windows but executed locally using the TMKSVR. The communication is done using TCP/IP.
In addition, an installation share on the iSeries host needs to be created and mapped to the Windows installation host, which is done automatically by the TMKSVR.
The TMKSVR has to be installed and an installation share has to be created on all iSeries hosts where you want to installinstances of an SAP system.
Prerequisites • An FTP server must be running on iSeries.
• You must prepare a user. For more information on how users are prepared, see Preparing a Windows User Account and iSeries User Profile [Page 23].
• Copy the SAP Installation Master DVD from the DVD drive to the iSeries.
Procedure 1. Log on to your Windows host as the installation user. For more information, see Preparing a
Windows User Account and iSeries User Profile [Page 23].
2. Run SETUP.EXE from the directory IM(x)_OS400_64\SAPINST\AS400\TMKSVR on the DVD containing the installation package. You can start the setup program by double-clicking it in the Windows Explorer.
The following dialog box appears:
24 April 2005

Installation Guide: System Copy for SAP Systems Based on WAS Java 6.40 SR 1
3. Enter the following values:
3.2 iSeries Hostname Enter the name of the iSeries host where you want to install TMKSVR.
3.3 iSeries Administrator (QSECOFR or similar) Enter the iSeries user. For more information, see Preparing a Windows User Account and iSeries User Profile [Page 23].
3.4 Update existing TMKSVR instances Do not select this option.
3.5 Yes, create TMKSVR instance Select this option.
3.6 TMKSVR instance number Leave the value at 0.
3.7 TMKSVR Instance Port (also referred to as the Dispatcher Port) Leave the value at 59975, if possible. Only change this port number if you encounter problems during installation because the port is in use.
Result The installation uses FTP to install and start the TMKSVR on iSeries. During installation, the TMKSVR library is created on iSeries. If you want a TMKSVR instance to be created, a library named TMKSVR<nn> is also created, where <nn> is the instance number (for example, TMKSVR00).
A NetServer share named ROOTBIN will be created on the iSeries host. You can map it now to your Windows PC or let SAPinst do it during the installation.
For more information, see the documentation install.pdf on the DVD in directory IM<x>_OS400_64\SAPINST\AS400\TMKSVR.
April 2005 25
Installation Guide: System Copy for SAP Systems Based on Web AS Java 6.40 SR 1
4 System Copy Process Purpose You can use the SAP installation tool SAPinst to export and import your Java database content, file system, and all configuration in a database-independent format. The procedure generates a database export of all SAP objects that are defined in the Java Dictionary and archives the configuration and components int the file system.
For the process flow, see also the graphic Flow diagram for a typical Java Add-in / Java system copy in the Introduction [page 10].
Prerequisites You have prepared your source system and your target system as described in the section “Preparation”.
Process Flow for the Source System (Java Add-in) Unix
1. You run SAPinst to perform the ABAP export as described in the documentation Homogeneous and Heterogeneous System Copy for SAP Systems based on Web AS ABAP 6.40 SR1.
2. You mount the Installation DVDs that are necessary for the Java export. [page 31].
If you need information about how to mount a DVD, see “Mounting a CD / DVD for <your OS> in the documentation Installation Guide – SAP NetWeaver ’04 SR1 Java on <your OS> : <your database>.
3. You run SAPinst to perform the Java export [page 35]
We recommend that you perform the export as a test run before you perform a productive run. Deselect the option Stop J2EE cluster before export on the screen Java System > Database Export when running SAPinst for a test run.
4. If required, you can run the SAPinst GUI in standalone mode to perform a remote installation [page 57].
Windows
1. You run SAPinst to perform the ABAP export as described in the documentation Homogeneous and Heterogeneous System Copy for SAP Systems based on Web AS ABAP 6.40 SR1.
2. You prepare the Installation DVDs which are necessary for the Java export. [page 31].
3. You run SAPinst to perform the Java export [page 41].
We recommend that you perform the export as a test run before you perform a productive run. Deselect the option Stop J2EE cluster before export on the screen Java System > Database Export when running SAPinst for a test run.
4. If required, you can run the SAPinst GUI in standalone mode to perform a remote system copy [page 57].
26 April 2005
Installation Guide: System Copy for SAP Systems Based on WAS Java 6.40 SR 1
IBM Server iSeries
1. You run SAPinst to perform the ABAP export as described in the documentation Homogeneous and Heterogeneous System Copy for SAP Systems based on Web AS ABAP 6.40 SR1.
2. You prepare the Installation DVDs which are necessary for the Java export [page 31].
3. You run SAPinst to perform the Java export [page 46].
We recommend that you perform the export as a test run before you perform a productive run. Deselect the option Stop J2EE cluster before export on the screen Java System > Database Export when running SAPinst for a test run.
Process Flow for the Source System (Java system) Unix
1. You mount the Installation DVDs which are necessary for the Java export [page 31].
If you need information about how to mount a DVD, see “Mounting a CD / DVD for <your OS> in the documentation Installation Guide – SAP NetWeaver ’04 SR1 Java on <your OS> : <your database>.
2. You run SAPinst to perform the Java export [page 35].
We recommend that you perform the export as a test run before you perform a productive run. Deselect the option Stop J2EE cluster before export on the screen Java System > Database Export when running SAPinst for a test run. If required, you can run the SAPinst GUI in standalone mode to perform a remote system copy [page 57].
Windows
1. You prepare the Installation DVDs which are necessary for the Java export [page 31].
2. You run SAPinst to perform the Java export [page 41].
We recommend that you perform the export as a test run before you perform a productive run. Deselect the option Stop J2EE cluster before export on the screen Java System > Database Export when running SAPinst for a test run.
3. If required, you can run the SAPinst GUI in standalone mode to perform a remote system copy [page 57].
IBM Server iSeries
1. You prepare the Installation DVDs which are necessary for the Java export [page 31].
2. You run SAPinst to perform the Java export [page 46].
April 2005 27

Installation Guide: System Copy for SAP Systems Based on Web AS Java 6.40 SR 1
Wer recommend that you perform the export as a test run before you perform a productive run. Deselect the option Stop J2EE cluster before export on the screen Java System > Database Export when running SAPinst for a test run.
Process Flow for the Target System (Java Add-In) UNIX
1. You perform the ABAP import as described in the documentation Homogeneous and Heterogeneous System Copy for SAP Systems based on Web AS ABAP 6.40 SR1.
2. Informix only: If you want to copy a Java Add-In based on MySQL MaxDB or IBM DB2 Universal Database for Windows to go with a previously copied Informix-based ABAP engine, you need to first install the Java database and schema.
For more information, see Running SAPinst on UNIX [page 37].
3. You mount Installation DVDs that are necessary for the Java import [page 31].
If you need information about how to mount a DVD, see “Mounting a CD / DVD for <your OS> in the documentation Installation Guide – SAP NetWeaver ’04 SR1 Java on <your OS> : <your database>, Part II – Installation and Post-Installation.
4. Java import: You install the Java Add-In using the Java export.
You must check the documentation Installation Guide – SAP NetWeaver ’04 SR1 Java on <your OS> : <your database>, Part II – Installation and Post-Installation for any details concerning the installation of your database that cannot be covered by this documentation.
d. Central System: You run SAPinst to install the target system and perform the import. [page 35].
Distributed System: You run SAPinst [page 35] to do the following: e.
o Install the database schema on the database host
o Install the central instance and the SCS instance using the Java export.
If required, you can also control the import from a remote host [page 57].
5. If required, you run SAPinst to install dialog instances for your target system [page 37].
Windows
1. You perform the ABAP import as described in the documentation Homogeneous and Heterogeneous System Copy for SAP Systems based on Web AS ABAP 6.40 SR1.
2. Informix only: If you want to copy a Java Add-In based on MySQL MaxDB or IBM DB2 Universal Database for Windows to go with a previously copied Informix-based ABAP engine, you need to first install the Java database and schema.
For more information, see Running SAPinst on Windows [page 41].
3. You prepare the Installation DVDs that are necessary for the Java import [page 31].
28 April 2005

Installation Guide: System Copy for SAP Systems Based on WAS Java 6.40 SR 1
4. Java import: You install the Java Add-In using the Java export.
You must check the documentation Installation Guide – SAP NetWeaver ’04 SR1 Java on <your OS> : <your database>, Part II – Installation and Post-Installation for details concerning the installation of your database that cannot be covered by this documentation.
a. Central System: You run SAPinst to install the target system and perform the import [page 41].
b. Distributed System: You run SAPinst [page 41] to do the following:
o Install the database schema on the database host
o Install the central instance and the SCS instance using the Java export.
If required, you can also control the import from a remote host [page 57].
5. If required, you run SAPinst to install dialog instances for your target system [page 41].
IBM Server iSeries
1. You perform the ABAP import as described in the documentation Homogeneous and Heterogeneous System Copy for SAP Systems based on Web AS ABAP 6.40 SR1.
2. You prepare the Installation DVDs that are necessary for the Java import [page 31].
3. Java import: You install the Java Add-In using the Java export.
You must check the documentation Installation Guide – SAP NetWeaver ’04 SR1 Java on <your OS> : <your database>, Part II – Installation and Post-Installation for details concerning the installation of your database that cannot be covered by this documentation.
Java Central System: You run SAPinst to install the target system and perform the import. [page 46].
a.
Java Distributed System: You run SAPinst [page 46] to do the following: b.
o Install the database schema
o Install the central instance and the SCS instance using the Java export.
4. If required, you run SAPinst to install dialog instances for your target system [page 46].
April 2005 29

Installation Guide: System Copy for SAP Systems Based on Web AS Java 6.40 SR 1
Process Flow for the Target System (Java system) UNIX
1. You mount Installation DVDs that are necessary for the Java import [page 31].
If you need information about how to mount a DVD, see “Mounting a CD / DVD for <your OS> in the documentation Installation Guide – SAP NetWeaver ’04 SR1 Java on <your OS> : <your database>, Part II – Installation and Post-Installation.
2. Java import: You install the Java system:
You must check the documentation Installation Guide – SAP NetWeaver ’04 SR1 Java on <your OS> : <your database>, Part II – Installation and Post-Installation for details concerning the installation of your database that cannot be covered by this documentation.
a. Central System: You run SAPinst to install the target system using the Java export. [page 35]
b. Java Distributed System: You run SAPinst [page 35] to do the following:
o Prepare the installation of the Java system
o Install the database on the database host
o Install the central instance and the SCS instance using the Java export.
If required, you can also control the import from a remote host [page 57]
3. If required, you run SAPinst to install dialog instances for your target system [page 37].
Windows
1. You prepare the Installation DVDs that are necessary for the Java import. [page 31].
2. You install the Java system using the Java export.
You must check the documentation Installation Guide – SAP NetWeaver ’04 SR1 Java on <your OS> : <your database>, Part II – Installation and Post-Installation for details concerning the installation of your database that cannot be covered by this documentation.
a. Central system: You run SAPinst to install the target system and perform the import. [page 41].
Distributed system: You run SAPinst [page 41] to do the following: b.
o Prepare the installation of the Java system
o Install the database on the database host
o Install the central instance and the SCS instance using the Java export.
30 April 2005
Installation Guide: System Copy for SAP Systems Based on WAS Java 6.40 SR 1
If required, you can also control the import from a remote host [page 57].
3. If required, you run SAPinst to install dialog instances for your target system [page 41].
IBM Server iSeries
1. You prepare the Installation DVDs that are necessary for the Java import [page 31].
2. You install the Java system and perform the import:
You must check the documentation Installation Guide – SAP NetWeaver ’04 SR1 Java on <your OS> : <your database>, Part II – Installation and Post-Installation for details concerning the installation of your database that cannot be covered by this documentation.
a. Central system: You run SAPinst to install the target system using the Java export [page 41].
b. Java Distributed System: You run SAPinst [page 41] to:
o Prepare the installation of the Java system
o Install the database on the database host
o Install the central instance and the SCS instance using the Java export
3. If required, you run SAPinst to install dialog instances for your target system [page 46].
4.1 Preparing the Installation DVDs that are Required for the System Copy Use You use this procedure to prepare the installation DVDs that are required for the system copy.
Procedure 1. Using Media Information for SAPNetWeaver ’04 SR 1, identify the required CDs and DVDs for your
installation and keep them separate from the remaining CDs and DVDs. This avoids mistakes between CDs and DVDs with similar names, so that you use the correct CDs and DVDs for your installation.
The CD and DVD names in the table below are abbreviated.
You can find the full names in Media Information for SAPNetWeaver ’04 SR 1 on SAP Service Marketplace at: service.sap.com/instguidesNw04 Installation
April 2005 31

Installation Guide: System Copy for SAP Systems Based on Web AS Java 6.40 SR 1
The following table shows the required DVDs:
Installation Option
Installation Service Required DVDs / CDs
Migration – Database Export
SAP Installation Master DVD
SAP Installation Master DVD
SAP Java DVD
Export dump (has been created by the service Migration – Database Export)
Migration – Target System Installation
RDBMS DVD (not for iSeries)
SAP Installation Master DVD
Central Java System
Dialog Instance Installation
SAP Java DVD
Migration – Database Export
SAP Installation Master DVD
Migration – Target Central Instance Host Preparation
SAP Installation Master DVD
SAP Installation Master DVD Migration – Target Database Installation RDBMS DVD (not for iSeries)
SAP Installation Master DVD
SAP Java DVD
Migration – Target Central Instance Installation
Export dump (has been created by the service Migration – Database Export)
SAP Installation Master DVD
Distributed Java System
Dialog Instance Installation
SAP Java DVD
Migration – Java System Database Export
SAP Installation Master DVD
SAP Installation Master DVD
SAP Java DVD
Export dump (has been created by the service Migration – Database Export)
Migration – Java System Installation RDBMS DVD (not for iSeries)
Informix: For the Java Add-In based on MaxDB or IBM DB2 UDB for UNIX and Windows you need one of the following DVDs:
RDBMS DVD for MaxDB or IBM DB2 UDB
SAP Installation Master DVD
Java Add-In
Dialog Instance Installation SAP Java DVD
Migration – Database Export
SAP Installation Master DVD Distributed Java Add-in
Java Database Schema SAP Installation Master DVD
32 April 2005

Installation Guide: System Copy for SAP Systems Based on WAS Java 6.40 SR 1
SAP Java DVD Installation
Informix: For the Java Add-In based on MaxDB or IBM DB2 UDB for UNIX and Windows you need one of the following DVDs:
RDBMS DVD for MaxDB or IBM DB2 UDB
SAP Installation Master DVD
SAP Java DVD
Migration – Target Central Instance Installation
Export dump (has been created by the service Migration – Database Export)
SAP Installation Master DVD Dialog Instance Finalization
SAP Java DVD
2. Make sure that the required DVDs are available at the same time:
• Before the installation, make sure that you:
Have sufficient DVD drives
Copy the DVDs manually to local hard disks
• During the installation, use the SAPinst DVD / CD Browser dialog, that is, you can check the entered location and then copy the entire DVD to the path you entered in column Copy Package to.
Informix only: If you want to copy a Java Add-In based on MySQL MaxDB or IBM DB2 Universal Database for Windows to go with a previously copied Informix-based ABAP engine, make sure that you check the entry “Java System Copy” in the following SAP Notes:
o UNIX: SAP Note 790877 o Windows: SAP Note 790878
April 2005 33

Installation Guide: System Copy for SAP Systems Based on Web AS Java 6.40 SR 1
4.1.1 iSeries: Copying the Installation DVDs to the IFS of the iSeries host Use You need several DVDs during an SAP system installation. You have to copy all relevant DVDs for an instance installation to the IFS of the iSeries host before you can install that instance.
Prerequisites Make sure you have configured your TCP/IP as described in SAP Note 92589. Do not forget afterwards to perform an IPL to make the change effective. Otherwise, you will notice very poor copy performance from your local Windows drive to your IFS on your iSeries.
Procedure
The following procedure uses the user name SAPINST and the password SAP as examples.
1. To open the MS DOS screen under Windows, choose Start → Run.
2. Enter cmd.exe.
3. Choose OK.
The MS DOS screen appears.
4. In the command line of the MS DOS screen, enter net use.
All network connections to shared resources are displayed.
5. Check whether you have a connection to your iSeries.
If you find >\ROOTBIN in the column Remote and a drive directory letter in the column Local, you have already established the required connection to your iSeries.
\\<iSeries_Hostname
Otherwise, you have to establish this connection. To do this, enter: net use X: \\<iSeries Hostname>\ROOTBIN SAP /USER:SAPINST
X: is now your new network drive for sharing \\<iSeries Hostname>\ROOTBIN with your IFS on the iSeries. If X: is already in use, choose another drive letter that is free.
For more information, see Preparing a Windows User Account and iSeries User Profile [Page 23].
6. To change to the new network drive, enter X: in the command line of your MS DOS screen.
7. Create the subdirectories in your IFS where you want to copy the required DVDs.
3.2 For each DVD enter: mkdir \tmp\<sid>\<DVD_name>
8. Copy the installation DVDs from your Windows drive (for example D:\) to the IFS of your iSeries host. Insert the required installation DVDs and enter the following command:
3.3 For each DVD enter: xcopy D:\ X:\tmp\<sid>\<DVD_name>
xcopy D:\<DVD> X:\tmp\<sid>\<DVD_name> /E
You have to copy the root directory of the DVD and all required DVD subdirectories to the IFS of your iSeries.
9. Repeat steps 7and 8 for every required DVD.
34 April 2005
Installation Guide: System Copy for SAP Systems Based on WAS Java 6.40 SR 1
4.2 Performing the System Copy on UNIX using SAPinst Use The following sections tell you how to run SAPinst on UNIX to perform the migration of a Java system or a Java Add-in installation and provide useful background information about SAPinst itself.
They describe an installation where SAPinst GUI and SAPinst server are running on the same host as well as a remote installation, where SAPinst GUI is running on another host:
• Prerequisites before Starting SAPinst [Page 35]
• Running SAPinst on UNIX [Page 37]
• Handling SAPinst GUI [Page 52]
• Interrupted Installation with SAPinst [Page 53]
• Remote Installation with SAPinst [Page 57]
4.2.1 Prerequisites before Starting SAPinst
4.2.1.1 Prerequisites for all instances Use This section provides background information about running SAPinst that is valid for the installation of all instances.
Procedure 1. Make sure that your operating system does not delete the temporary directory – TEMP, TMP, TMPDIR,
or /tmp – and its subdirectories when the system is rebooted.
SAPinst normally creates the installation directory sapinst_instdir directly below the temporary directory. SAPinst finds the temporary directory by checking the value of the environment variables TEMP, TMP, or TMPDIR. If no value is set for these variables, SAPinst uses /tmp as default directory. The SAPinst Self-Extractor extracts the SAPinst executables to the temporary directory, TEMP, TMP, TMPDIR or /tmp. These executables are deleted again after SAPinst has stopped running.
If SAPinst cannot find a temporary directory, the installation terminates with the error FCO-00058.
2. Make sure that you have at least 130 MB of free space in the installation directory for each Java installation service. In addition, you need 60 – 200MB free space for the SAPinst executables.
If you cannot provide 200 MB free space in the temporary directory, you can set one of the environment variables TEMP, TMP, or TMPDIR to another directory with 200 MB free space for the SAPinst executables.
April 2005 35
Installation Guide: System Copy for SAP Systems Based on Web AS Java 6.40 SR 1
Each SAP instance requires a separate installation directory.
3. Make sure that umask is set to 022 for user root. As user root, enter the following command: umask 022
4. If you are installing a second or subsequent SAP system into an existing database, make sure that the database is up and running before starting the installation. For more information, see “Installation of Multiple Components in One Database” in the documentation Installation Guide - SAP Web Application Server Java 6.40 SR 1 on <your OS> : <your database> Part I – Planning and Preparation.
5. You must include the path to a valid <JAVA_HOME>/bin directory in the path for user root or set the SAPINST_JRE_HOME environment variable for the user root to the valid <JAVA_HOME> directory.
If you have more than one Java Virtual Machine (JVM) installed on your system (for example, you have two JREs with different versions installed), make sure that the SAPINST_JRE_HOME environment variable <UNIX: for user root> is set to the valid <JAVA_HOME> directory.
6. Make sure that your DISPLAY environment variable is set to <host_name>:0.0, where <host_name> is the host on which the SAPinst GUI will be displayed.
7. If required, you can terminate SAPinst and the SAPinst Self-Extractor by pressing Ctrl+C.
8. If there are errors with SAPinst, you can find the Self-Extractor log file dev_selfex.out in the temporary directory.
9. If required, delete any directories with the name sapinst_exe.xxxxxx.xxxx after SAPinst has finished. Sometimes these remain in the temporary directory.
We recommend that you keep all installation directories until you are fully satisfied that the system is completely and correctly installed.
4.2.1. Prerequisites for Distributed Instances Only Use If you install an instance on another host other than the central instance (for example, a database or a dialog instance), mount directories from the central instance.
− If you want to install the executables locally instead of sharing them, do not mount the exe
directory via NFS. Instead, create <sapmnt>/<SAPSID>/exe as a local directory (not a link) with a minimum of 240 MB free space.
− If you are installing a heterogeneous SAP system (that is, the instances are installed on different operating-system platforms), do not mount the exe directory.
36 April 2005

Installation Guide: System Copy for SAP Systems Based on WAS Java 6.40 SR 1
Procedure 1. Log on to the central instance host as user root and export the following directories with root access
(see the documentation Mounting Directories via NFS for <your OS> in the Planning and Preparation Guide) to the dialog instance host: <sapmnt>/<SAPSID>/exe <sapmnt>/<SAPSID>/profile <sapmnt>/<SAPSID>/global
2. Log on to the distributed instance host as user root.
3. Create the mount points: <sapmnt>/<SAPSID>/exe <sapmnt>/<SAPSID>/profile <sapmnt>/<SAPSID>/global
Mount these directories from the central instance host.
4. Make sure that the user root of the distributed instance host has write access to the directories exe, profile and global:
touch <sapmnt>/<SAPSID>/<directory>/nfs_test rm <sapmnt>/<SAPSID>/<directory>/nfs_test
4.2.2 Running SAPinst on UNIX Use This procedure tells you how to run SAPinst to install an SAP instance.
It describes an installation where SAPinst GUI and SAPinst server are running on the same host. If you want to perform a remote installation, where SAPinst GUI is running on another host, see Remote Installation with SAPinst [page 57].
Procedure 1. Log on to your host as user root.
2. If you want to install central instance, an SCS instance, a database instance, or a dialog instance, mount the SAP Installation Master DVD.
Mount DVDs locally. We do not recommend that you use Network File System (NFS), as reading from NFS-mounted DVDs might fail.
For more information on mounting DVDs, see section <Your OS>: Mounting a CD / DVD.”
Start SAPinst from the SAP Installation Master DVD .
SAP informs you about how to start the Java System Copy.
Follow the instructions in the Introduction [Page 10].
SAPinst GUI normally starts automatically by displaying the Welcome screen.
However, if there is only one component to install, SAPinst directly displays the first input dialog without the Welcome screen.
April 2005 37

Installation Guide: System Copy for SAP Systems Based on Web AS Java 6.40 SR 1
3. Select the corresponding installation service as shown in the tables below and then choose Next:
Choose the installation services for dialog instances (Dialog Instance Finalization and Dialog Instance Installation) only, if you copied an SAP system based on SAP Web AS 6.40 SR1 SP09.
Java Add-In Central System
Procedure Installation Task in SAPinst
Export the content of the Java part of the database on the source system and create the Java export.
Java Add-in for ABAP <your database> Migration – Database Export
Install the Java Add-in for the Central instance on the target host using the Java export.
Java Add-in for ABAP <your database> Migration – Target System Installation
Complete dialog instance(s) for the target system.
Java Add-in for ABAP <your database> Migration – Dialog Instance Finalization
Informix only:
If you want to copy a Java Add-in based on MaxDB or IBM DB2 UDB for UNIX and Windows to go with a previously copied Informix-based ABAP Engine, you use the following installation procedures:
Procedure Installation Task in SAPinst
Export the content of the Java part of the database on the source system and create the Java export.
Java Add-in for ABAP Informix <Java Add-In with MaxDB or Java Add-In with IBM DB2 UDB for UNIX and Windows> Migration – Database Export
Install the Java database and schema on the target host.
MaxDB:
Java Add-in for ABAP Informix Java Add-In with MaxDB Java Database Installation
IBM DB2 UDB for UNIX and Windows:
Java Add-in for ABAP Informix Java Add-In with IBM DB2 UDB for UNIX and Windows
Java Database with Schema Installation
Install the Java Add-in for the Central instance on the target host using the Java export.
Java Add-in for ABAP Informix <Java Add-In with MaxDB or Java Add-In with IBM DB2 UDB for UNIX and Windows> Migration – Target System Installation
Complete dialog instance(s) for the target system.
Java Add-in for ABAP Informix <Java Add-In with MaxDB or Java Add-In with IBM DB2 UDB for UNIX and Windows> Dialog Instance Finalization
38 April 2005
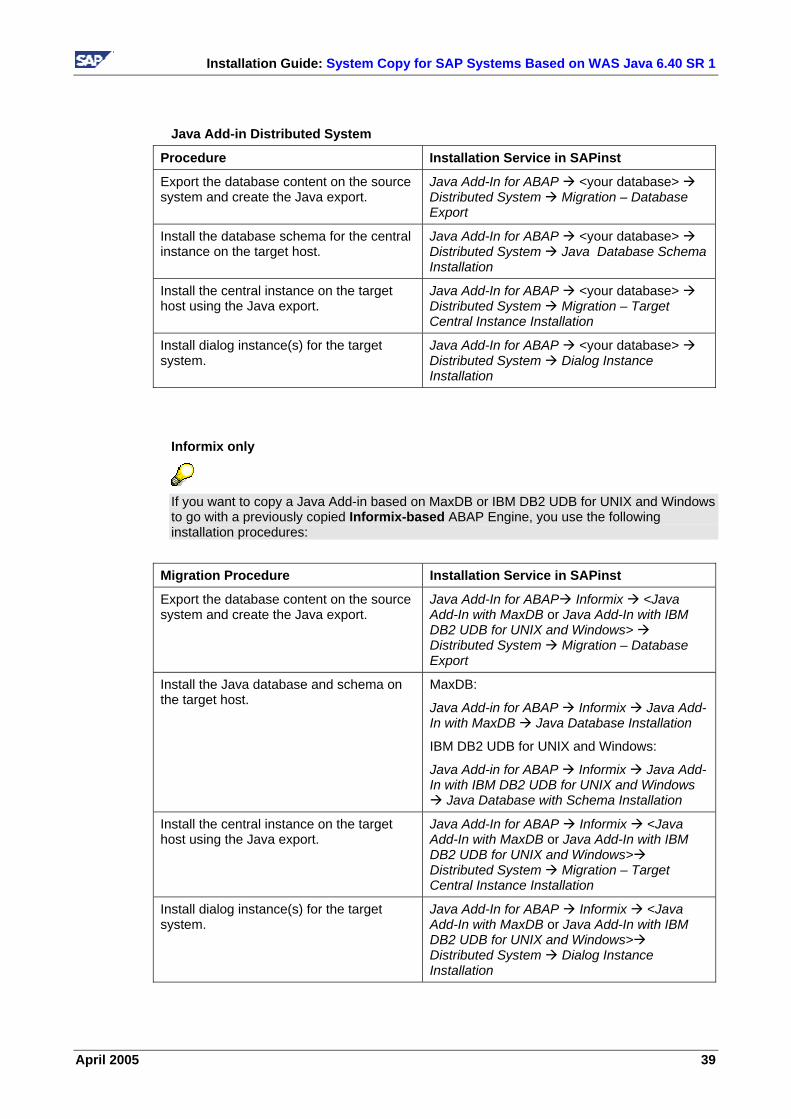
Installation Guide: System Copy for SAP Systems Based on WAS Java 6.40 SR 1
Java Add-in Distributed System
Procedure Installation Service in SAPinst
Export the database content on the source system and create the Java export.
Java Add-In for ABAP <your database> Distributed System Migration – Database Export
Install the database schema for the central instance on the target host.
Java Add-In for ABAP <your database> Distributed System Java Database Schema Installation
Install the central instance on the target host using the Java export.
Java Add-In for ABAP <your database> Distributed System Migration – Target Central Instance Installation
Install dialog instance(s) for the target system.
Java Add-In for ABAP <your database> Distributed System Dialog Instance Installation
Informix only
If you want to copy a Java Add-in based on MaxDB or IBM DB2 UDB for UNIX and Windows to go with a previously copied Informix-based ABAP Engine, you use the following installation procedures:
Migration Procedure Installation Service in SAPinst
Export the database content on the source system and create the Java export.
Java Add-In for ABAP Informix <Java Add-In with MaxDB or Java Add-In with IBM DB2 UDB for UNIX and Windows> Distributed System Migration – Database Export
Install the Java database and schema on the target host.
MaxDB:
Java Add-in for ABAP Informix Java Add-In with MaxDB Java Database Installation
IBM DB2 UDB for UNIX and Windows:
Java Add-in for ABAP Informix Java Add-In with IBM DB2 UDB for UNIX and Windows
Java Database with Schema Installation
Install the central instance on the target host using the Java export.
Java Add-In for ABAP Informix <Java Add-In with MaxDB or Java Add-In with IBM DB2 UDB for UNIX and Windows> Distributed System Migration – Target Central Instance Installation
Install dialog instance(s) for the target system.
Java Add-In for ABAP Informix <Java Add-In with MaxDB or Java Add-In with IBM DB2 UDB for UNIX and Windows> Distributed System Dialog Instance Installation
April 2005 39
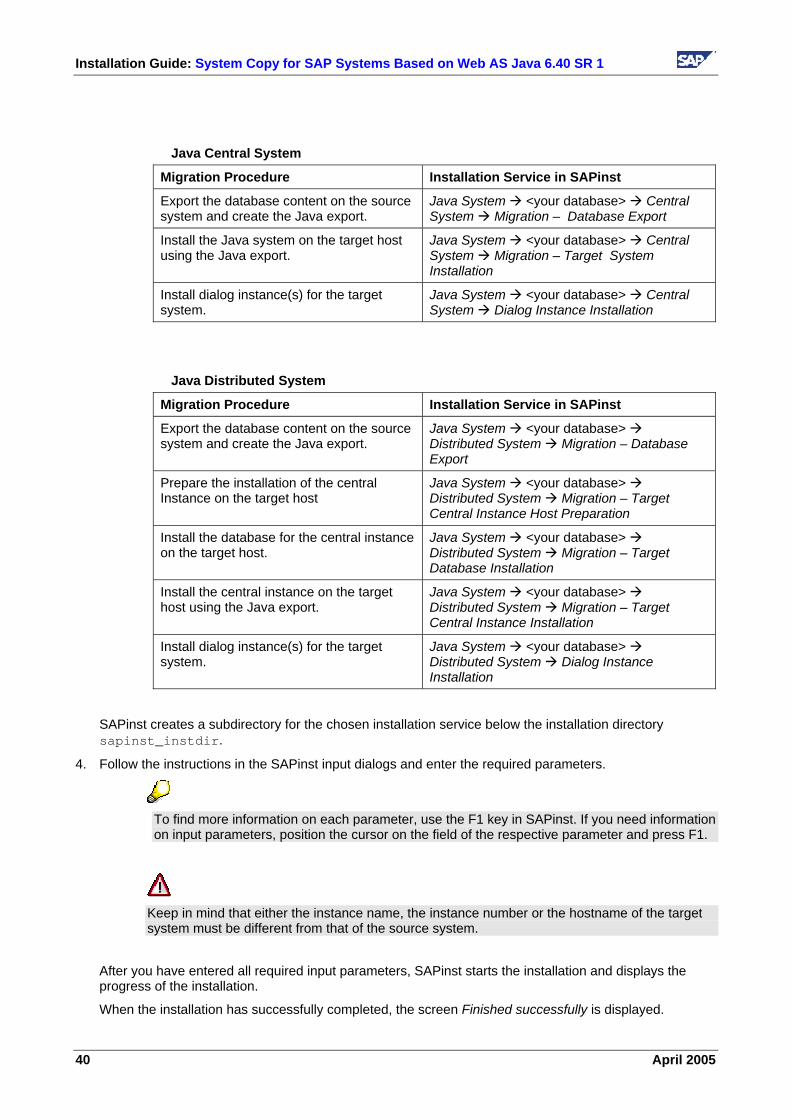
Installation Guide: System Copy for SAP Systems Based on Web AS Java 6.40 SR 1
Java Central System
Migration Procedure Installation Service in SAPinst
Export the database content on the source system and create the Java export.
Java System <your database> Central System Migration – Database Export
Install the Java system on the target host using the Java export.
Java System <your database> Central System Migration – Target System Installation
Install dialog instance(s) for the target system.
Java System <your database> Central System Dialog Instance Installation
Java Distributed System
Migration Procedure Installation Service in SAPinst
Export the database content on the source system and create the Java export.
Java System <your database> Distributed System Migration – Database Export
Prepare the installation of the central Instance on the target host
Java System <your database> Distributed System Migration – Target Central Instance Host Preparation
Install the database for the central instance on the target host.
Java System <your database> Distributed System Migration – Target Database Installation
Install the central instance on the target host using the Java export.
Java System <your database> Distributed System Migration – Target Central Instance Installation
Install dialog instance(s) for the target system.
Java System <your database> Distributed System Dialog Instance Installation
SAPinst creates a subdirectory for the chosen installation service below the installation directory sapinst_instdir.
4. Follow the instructions in the SAPinst input dialogs and enter the required parameters.
To find more information on each parameter, use the F1 key in SAPinst. If you need information on input parameters, position the cursor on the field of the respective parameter and press F1.
Keep in mind that either the instance name, the instance number or the hostname of the target system must be different from that of the source system.
After you have entered all required input parameters, SAPinst starts the installation and displays the progress of the installation.
When the installation has successfully completed, the screen Finished successfully is displayed.
40 April 2005

Installation Guide: System Copy for SAP Systems Based on WAS Java 6.40 SR 1
4.3 Performing the System Copy on Windows Using SAPinst Use The following sections tell you how to run SAPinst on Windows to perform the system copy of a Java system or of a Java Add-In and provide useful background information about of SAPinst itself.
They describe an installation where SAPinst GUI and SAPinst server are running on the same host as well as a remote installation, where SAPinst GUI is running on another host:
• Running SAPinst on Windows [Page 41]
• Handling SAPinst GUI [Page 52]
• Interrupted Installation with SAPinst [Page 53]
• Remote Installation with SAPinst [Page 57]
4.3.1 Running SAPinst on Windows Use This procedure tells you how to run SAPinst to install one or more SAP instances.
It describes an installation where SAPinst GUI and SAPinst server are running on the same host. If you want to perform a remote installation (SAPinst GUI is running on another host), see Remote Installation with SAPinst [Page 57].
SAPinst normally creates the installation directory sapinst_instdir directly below the Program Files directory. If SAPinst is not able to create sapinst_instdir directly below the Program Files directory, SAPinst tries to create sapinst_instdir in the directory, to which the environment variable TEMP is set.
Each SAP instance requires a separate installation directory.
The SAPinst Self-Extractor extracts the executables to a temporary directory (TEMP, TMP, TMPDIR, or SystemRoot). These executables are deleted after SAPinst has stopped running. Directories with the name sapinst_exe.xxxxxx.xxxx sometimes remain in the temporary directory. You can safely delete them.
In the temporary directory you can also find the SAPinst Self-Extractor log file dev_selfex.out, which might be useful if an error occurs.
If you want to terminate SAPinst and the SAPinst Self-Extractor, do one of the following:
• Right-click the icon for the SAPinst output window located in the Windows tray and choose Exit.
• Click the icon for the SAPinst output window located in the Windows tray and choose File → Exit.
Prerequisites • You need at least 50 MB of free space in the installation directory for each installation service. In
addition, you need 60-200 MB free space for the SAPinst executables.
April 2005 41

Installation Guide: System Copy for SAP Systems Based on Web AS Java 6.40 SR 1
We recommend that you keep all installation directories until the system is completely and correctly installed.
If SAPinst cannot find a temporary directory, the installation terminates with the error FCO-00058.
• If you are installing a second or subsequent SAP system into an existing database, make sure that the database is up and running before starting the installation. For more information about MCOD, see “Installation of Multiple Components in One Database (Optional)” in Installation Guide – SAP Web AS Java 6.40 SR 1 on <your operating system> : <your database>, Part I – Planning and Preparation.
Procedure 1. Log on to your host as a user who is a member of the local administration group.
2. Insert the SAP Installation Master DVD in your DVD drive.
3. Start SAPinst from the SAP Installation Master DVD.
SAP informs you about how to start the Java System Copy.
Follow the instructions in the Introduction [Page 10].
4. In the Welcome screen, select the corresponding installation service from the tree structure as listed in the table below and choose Next.
Choose the installation services for dialog instances (Dialog Instance Finalization and Dialog Instance Installation) only, if you copied an SAP system based on SAP Web AS 6.40 SR1 SP09.
Java Add-In Central System
Procedure Installation Task in SAPinst
Export the content of the Java part of the database on the source system and create the Java export.
Java Add-in for ABAP <your database> Migration – Database Export
Install the Java Add-in for the Central instance on the target host using the Java export.
Java Add-in for ABAP <your database> Migration – Target System Installation
Complete dialog instance(s) for the target system.
Java Add-in for ABAP <your database> Migration – Dialog Instance Finalization
42 April 2005

Installation Guide: System Copy for SAP Systems Based on WAS Java 6.40 SR 1
Informix only:
If you want to copy a Java Add-in based on MaxDB or IBM DB2 UDB for UNIX and Windows to go with a previously copied Informix-based ABAP Engine, you use the following installation procedures:
Procedure Installation Task in SAPinst
Export the content of the Java part of the database on the source system and create the Java export.
Java Add-in for ABAP Informix <Java Add-In with MaxDB or Java Add-In with IBM DB2 UDB for UNIX and Windows> Migration – Database Export
Install the Java database and schema on the target host.
MaxDB:
Java Add-in for ABAP Informix Java Add-In with MaxDB Java Database Installation
IBM DB2 UDB for UNIX and Windows:
Java Add-in for ABAP Informix Java Add-In with IBM DB2 UDB for UNIX and Windows
Java Database with Schema Installation
Install the Java Add-in for the Central instance on the target host using the Java export.
Java Add-in for ABAP Informix <Java Add-In with MaxDB or Java Add-In with IBM DB2 UDB for UNIX and Windows> Migration – Target System Installation
Complete dialog instance(s) for the target system.
Java Add-in for ABAP Informix <Java Add-In with MaxDB or Java Add-In with IBM DB2 UDB for UNIX and Windows> Dialog Instance Finalization
Java Add-in Distributed System
Procedure Installation Service in SAPinst
Export the database content on the source system and create the Java export.
Java Add-in for ABAP <your database> Distributed System Migration – Database Export
Install the database schema for the central instance on the target host.
Java Add-in for ABAP <your database> Distributed System Java Database Schema Installation
Install the central instance on the target host using the Java export.
Java Add-in for ABAP <your database> Distributed System Migration – Target Central Instance Installation
Install dialog instance(s) for the target system.
Java System <your database> Distributed System Dialog Instance Installation
April 2005 43

Installation Guide: System Copy for SAP Systems Based on Web AS Java 6.40 SR 1
Informix only:
If you want to copy a Java Add-in based on MaxDB or IBM DB2 UDB for UNIX and Windows to a previously copied Informix-based ABAP Engine, you use the following installation procedures:
Migration Procedure Installation Service in SAPinst
Export the database content on the source system and create the Java export.
Java Add-in for ABAP Informix <Java Add-In with MaxDB or Java Add-In with IBM DB2 UDB for UNIX and Windows> Distributed System Migration – Database Export
Install the Java database and schema on the target host.
MaxDB:
Java Add-in for ABAP Informix Java Add-In with MaxDB Java Database Installation
IBM DB2 UDB for UNIX and Windows:
Java Add-in for ABAP Informix Java Add-In with IBM DB2 UDB for UNIX and Windows
Java Database with Schema Installation
Install the database schema for the central instance on the target host.
Java Add-in for ABAP Informix <Java Add-In with MaxDB or Java Add-In with IBM DB2 UDB for UNIX and Windows> Distributed System Java Database Schema Installation
Install the central instance on the target host using the Java export.
Java Add-in for ABAP Informix <Java Add-In with MaxDB or Java Add-In with IBM DB2 UDB for UNIX and Windows> Distributed System Migration – Target Central Instance Installation
Install dialog instance(s) for the target system.
Java Add-in for ABAP Informix <Java Add-In with MaxDB or Java Add-In with IBM DB2 UDB for UNIX and Windows> Distributed System Dialog Instance Installation
Java Central System
Migration Procedure Installation Service in SAPinst
Export the database content on the source system and create the Java export.
Java System <your database> Central System Migration – Database Export
Install the Java system on the target host using the Java export.
Java System <your database> Central System Migration – Target System Installation
Install dialog instance(s) for the target system.
Java System <your database> Central System Dialog Instance Installation
44 April 2005

Installation Guide: System Copy for SAP Systems Based on WAS Java 6.40 SR 1
Java Distributed System
Migration Procedure Installation Service in SAPinst
Export the database content on the source system and create the Java export.
Java System <your database> Distributed System Migration – Database Export
Prepare the installation of the central Instance on the target host
Java System <your database> Distributed System Migration – Target Central Instance Host Preparation
Install the database for the central instance on the target host.
Java System <your database> Distributed System Migration – Target Database Installation
Install the central instance on the target host using the Java export.
Java System <your database> Distributed System Migration – Target Central Instance Installation
Install dialog instance(s) for the target system.
Java System <your database> Distributed System Dialog Instance Installation
SAPinst creates a subdirectory for the chosen installation service below the installation directory sapinst_instdir.
If SAPinst prompts you to log off from your system, log off and log on again.
SAPinst restarts automatically.
5. Follow the instructions in the SAPinst dialogs.
To find more information on each parameter, use the F1 key in SAPinst. If you need information on input parameters, position the cursor on the field of the respective parameter and press F1.
Keep in mind that either the instance name, the instance number or the hostname of the target system must be different from that of the source system.
After you have entered all required input information, SAPinst starts the installation and displays the progress of the installation. If the installation was successful, the Finished successfully screen is displayed.
April 2005 45

Installation Guide: System Copy for SAP Systems Based on Web AS Java 6.40 SR 1
4.4 Performing the System Copy on IBM eServer iSeries Using SAPinst Use The following sections tell you how to run SAPinst on iSeries to perform the system copy of a Java system or of a Java Add-in installation and provide useful background information about of SAPinst itself.
They describe an installation where SAPinst GUI and SAPinst server are running on the same host as well as a remote installation, where SAPinst GUI is running on another host:
• Running SAPinst on iSeries [Page 46]
• Handling SAPinst GUI [Page 52]
• Changing the SAPinst GUI Host [Page 50]
• Starting SAPinst GUI on Another Host [Page 57]
4.4.1 Running SAPinst on IBM eServer iSeries Use This procedure tells you how to run SAPinst to install one or more SAP instances. It describes an installation where SAPinst GUI and SAPinst server are running on the same Windows host.
SAPinst creates the installation directory \usr\sap\sapinst on iSeries.
The SAPinst Self-Extractor extracts the SAPinst executables to the temporary directory (TEMP, TMP, TMPDIR or /tmp) on your Windows PC. These executables are deleted again after SAPinst has stopped running. Directories with the name sapinst_exe.xxxxxx.xxxx sometimes remain in the temporary directory. You can safely delete them. You can terminate SAPinst and the SAPinst Self-Extractor by pressing Ctrl+C. In the temporary directory, you also find the Self Extractor log file dev_selfex.out, which might be useful if an error occurs.
Prerequisites You need at least 50 MB of free space in the installation directory for each installation service. In addition, you need 60-200 MB free space for the SAPinst executables.
We recommend that you keep all installation directories until you are fully satisfied that the system is completely and correctly installed.
If SAPinst cannot find a temporary directory, the installation terminates with the error FCO-00058.
46 April 2005

Installation Guide: System Copy for SAP Systems Based on WAS Java 6.40 SR 1
Procedure 1. Log on to the Windows host as the installation user. For more information, see Preparing a Windows
User Account and iSeries User Profile [Page 23].
2. Start SAPinst from the SAP Installation Master DVD.
SAP informs you about how to start the Java System Copy. Follow the instructions in the Introduction [Page 10]
3. The SAPinst/TMKSVR – Session Parameters dialog box appears and prompts you for the target iSeries parameters. Enter your values.
The SAPinst GUI now starts automatically by displaying the Welcome screen.
However, if there is only one component to install, SAPinst directly displays the first input dialog without the Welcome screen.
4. In the Welcome screen, select the corresponding installation service as shown in the table below and then choose Next:
April 2005 47

Installation Guide: System Copy for SAP Systems Based on Web AS Java 6.40 SR 1
Java Add-In Central System
Migration Procedure Installation Task in SAPinst
Export the content of the Java part of the database on the source system and create the Java export.
Java Add-in for ABAP IBM DB2 UDB for iSeries Migration – Database Export
Install the Java Add-in for the Central instance on the target host using the Java export.
Java Add-in for ABAP IBM DB2 UDB for iSeries Migration – Target System Installation
Complete dialog instance(s) for the target system.
Java Add-in for ABAP IBM DB2 UDB for iSeries Migration – Dialog Instance Finalization
Java Add-in Distributed System
Migration Procedure Installation Service in SAPinst
Export the database content on the source system and create the Java export.
Java Add-in for ABAP IBM DB2 UDB for iSeries Distributed System Migration – Database Export
Install the Database schema for the central instance on the target host.
Java Add-in for ABAP IBM DB2 UDB for iSeries Distributed System Migration – Java Database Schema Installation
Install the Central instance on the target host using the Java export.
Java Add-in for ABAP IBM DB2 UDB for iSeries Distributed System Migration – Target Central Instance Installation
Install dialog instance(s) for the target system.
Java Add-in for ABAP IBM DB2 UDB for iSeries Distributed System Dialog Instance Installation
Java Central System
Migration Procedure Installation Service in SAPinst
Export the database content on the source system and create the Java export.
Java System IBM DB2 UDB for iSeries Central System Migration – Database Export
Install the Java system on the target host using the Java export
Java System IBM DB2 UDB for iSeries Central System Migration – Target System Installation
Install dialog instance(s) for the target system.
Java System IBM DB2 UDB for iSeries Central System Dialog Instance Installation
48 April 2005

Installation Guide: System Copy for SAP Systems Based on WAS Java 6.40 SR 1
Java Distributed System
Migration Procedure Installation Service in SAPinst
Export the database content on the source system and create the Java export.
Java System IBM DB2 UDB for iSeries Distributed System Migration – Database Export
Prepare the installation of the Central Instance on the target host
Java System IBM DB2 UDB for iSeries Distributed System Migration – Target Central Instance Host Preparation
Install the Database for the central instance on the target host.
Java System IBM DB2 UDB for iSeries Distributed System Migration – Target Database Installation
Install the Central instance on the target host using the Java export.
Java System IBM DB2 UDB for iSeries Distributed System Migration – Target Central Instance Installation
Install dialog instance(s) for the target system.
Java System IBM DB2 UDB for iSeries Distributed System Dialog Instance Installation
SAPinst creates a subdirectory for the chosen installation service below the installation directory sapinst_instdir.
5. Follow the instructions in the SAPinst input dialogs and enter the required parameters.
To find more information on each parameter, use the F1 key in SAPinst. If you need information on input parameters, position the cursor on the field of the respective parameter and press F1.
Keep in mind that either the instance name, the instance number or the hostname of the target system must be different from that of the source system.
After you have entered all required input parameters, SAPinst starts the installation and displays the progress of the installation.
When the installation has successfully completed, the screen Finished successfully is displayed.
April 2005 49

Installation Guide: System Copy for SAP Systems Based on Web AS Java 6.40 SR 1
4.4.2 Changing the SAPinst GUI host (Optional) Purpose You can run the SAPinst GUI in standalone mode. This enables you to change the monitoring host the GUI runs on during installation.
The Windows host you started sapinst.exe from will be called <sapinst_exe_host>.
The Windows host where you want to run the SAPinst GUI in standalone mode will be called <sapinst_GUI_host>.
Prerequisites • You have prepared the <sapinst_GUI_host> for the SAP system installation.
• You have prepared a Windows user account on the <sapinst_GUI_host> as described in section Preparing a Windows user account and iSeries user profile [Page 23].
• Both computers are in the same network and can ping each other.
To test this:
3.4 Log on to the host where you started sapinst.exe and enter the command
ping <sapinst_GUI_host>.
3.5 Log on to the host where you want to run the SAPinst GUI in standalone mode and enter the command ping <sapinst_exe_host>.
Process Flow 1. You run SAPinst on the <sapinst_exe_host> [Page 46].
2. You log off from the SAPinst GUI by choosing the Logoff button.
3. You start SAPinst GUI on the <sapinst_GUI_host> [Page 51].
4. You continue the installation using the SAPinst GUI.
4.4.2.1 Running SAPinst in standalone mode (Optional) Purpose You can run the SAPinst GUI in standalone mode. This enables you to change the monitoring host the GUI runs on during installation.
The Windows host you started sapinst.exe from will be called <sapinst_exe_host>.
The Windows host where you want to run the SAPinst GUI in standalone mode will be called <sapinst_GUI_host>.
Prerequisites • You prepare the <sapinst_GUI_host> for the SAP system installation.
• You prepare a Windows user account on the <sapinst_GUI_host> as described in section Preparing a Windows User Account and iSeries User Profile [page 23].
• Both computers are in the same network and can ping each other.
50 April 2005

Installation Guide: System Copy for SAP Systems Based on WAS Java 6.40 SR 1
To test this:
3.6 Log on to the host where you started sapinst.exe and enter the command
ping <sapinst_GUI_host>.
3.7 Log on to the host where you want to run the SAPinst GUI in standalone mode and enter the command ping <sapinst_exe_host>.
Process Flow 1. You run SAPinst on the <sapinst_exe_host>.
2. You log off from the SAPinst GUI by pushing the Logoff button.
3. You start SAPinst GUI on the <sapinst_GUI_host>.
4. You continue the installation using the SAPinst GUI.
4.4.2.2 Starting SAPinst GUI on Another Host (Optional) Use You use this procedure to run SAPinst GUI on the <sapinst_GUI_host>. The <sapinst_GUI_host> is the host from which you want to control the installation with the SAPinst GUI.
Prerequisites • You started the installation on the <sapinst_exe_host>. • During installation you pressed the Logoff Button in the SAPinst GUI.
Procedure 1. Log on to the <sapinst_GUI_host> as a user who is a member of the local administration group.
2. Insert the installation CD into your drive.
3. To start the SAPinst GUI double click on:
SAP informs you about how to start the Java System Copy.
Follow the instructions in the Introduction [Page 10].
4. Enter the host name of the Installation Host (<sapinst_exe_host>) and the same Port as SAPinst uses on this host and choose OK.
SAPinst GUI now connects to the SAPinst server and the first dialog of the installation appears.
5. Continue the installation from the <sapinst_GUI_host>.
To connect the SAPinst GUI from another host, the SAPinst server must still be running on the <sapinst_exe_host>. If the SAPinst server is stopped, no GUI can connect to it.
April 2005 51

Installation Guide: System Copy for SAP Systems Based on Web AS Java 6.40 SR 1
4.5 Handling SAPinst GUI The following push buttons are available on the different SAPinst GUI dialogs (input screens, installation progress screen, message boxes):
Push Button / Function Key
Meaning
F1 Displays detailed information about each input parameter.
The new field help replaces the former “What’s this”-help on the SAPinst screens and the former input parameter tables in the installation guide.
Back Displays the previous dialog for editing.
Next Displays the next dialog for editing.
Cancel Cancels the installation with the following options:
− Stop Stops the installation without further changing the installation files. You can continue the installation later from this point.
− Reset Resets all installation input files. All files in the installation directory are removed from the system. No backup is available. You must restart the installation from the beginning.
Log Off Cancels the connection to the SAPinst GUI only. The SAPinst server keeps on running.
Typical case:
For some reason you need to log off during the installation from the host where you control the installation with SAPinst GUI. The installation continues while you are logged off. You can later connect with SAPinst GUI from another host to the same installation. For this you need the SAP Installation Master DVD.
For more information on running SAPinst GUI in standalone mode for a remote installation, see Starting SAPinst GUI on the Local Host [page 58].
View Log Displays the content of the sapinst.log file during the installation.
Retry Performs the installation step again (if an error has occurred).
Stop Stops the installation without further changing the installation files. You can continue the installation later from this point.
Reset Resets all installation input files. All files in the installation directory are removed from the system. No backup is available.
You must restart the installation from the beginning.
52 April 2005

Installation Guide: System Copy for SAP Systems Based on WAS Java 6.40 SR 1
Continue Continues with the option you have chosen before.
If a message box comes up and you choose Cancel, SAPinst then offers you the options Continue, Stop, Reset. Do not choose Continue, but choose Stop or Reset. If you choose Continue an error occurs.
4.6 Interrupted Installation with SAPinst 4.6.1 Interrupted Installation with SAPinst Use The SAP system installation might be interrupted for one of the following reasons:
• An error occurred during the processing phase:
SAPinst does not abort the installation in error situations. If an error occurs during the processing phase, the installation will hold and a dialog box appears . The dialog box contains a short description about the choices listed in the table following as well as a path to a log file that contains detailed information about the error.
• You interrupted the installation by choosing Cancel
The following table describes the options in the dialog box:
If you choose…
Description
View Log A frame with history information (log files) about the steps performed last appears. These log files contain a short description of the error that has occurred. The dialog box will remain in the background, so you can choose one of the following two options (Retry or Stop) after viewing the log information.
Retry Since SAPinst records the installation progress in the keydb.xml file, you can continue the installation by choosing Retry.
The installation continues from the point of failure without having to repeat any of the previous steps.
You can try to solve the problem by viewing the entries in the log files and then choosing Retry.
If the same or a different error occurs again, the dialog box will appear again.
Stop The dialog box and the SAPinst GUI will be closed. The installation stops but SAPinst records the installation progress in the keydb.xml file. Thus, you can continue the installation from point of failure without repeating any of the previous steps. See the procedure below.
April 2005 53

Installation Guide: System Copy for SAP Systems Based on Web AS Java 6.40 SR 1
Reset You must restart the installation from the beginning, that is, with the default keydb.xml file.
You must delete the previous installation before you restart SAPinst. For more information, see “Deletion of an SAP System Installation” in the documentation Installation Guide – SAP SAP Web Application Server Java on <OS>: <DB> , Part II – Installation and Post-Installation.
Continue You continue the installation
UNIX only: You can also terminate SAPinst by choosing Ctrl+C. However, we do not recommend that you use Ctrl+C, because this kills the process immediately .
Procedure The following procedures describe the steps to restart an installation, which you stopped by choosing Stop, or to continue an interrupted installation after an error situation.
Windows
1. Log on to your remote host as a user who is a member of the local administration group.
2. Insert the installation DVD in your DVD drive.
3. Enter the following commands from the Windows command prompt:
SAP informs you about how to start the Java System Copy.
Follow the instructions in the Introduction [Page 10].
4. From the tree structure in the Welcome screen, choose the installation task that you want to continue and choose Next.
.
If there is only one component to install, SAPinst directly displays the dialog What do you want to do? without presenting the Welcome screen.
The What do you want to do? screen appears.
5. In the What do you want to do? screen, choose one of the following options and confirm with OK.
54 April 2005

Installation Guide: System Copy for SAP Systems Based on WAS Java 6.40 SR 1
Option Description
Run a new Installation
The installation will not be continued.
Instead, SAPinst moves the content of the old installation directory and all installation-specific files to the backup directory. Afterwards, you can no longer continue the old installation.
The log files from the old installation are stored to a backup directory with the following naming convention: <log_day_month_year_hours_minutes_seconds> (for example, log_01_Oct_2003_13_47_56).
Continue old installation
The installation, which was stopped before, will be continued from the point of failure.
UNIX
1. Log on to your local UNIX host as user root.
2. Mount your installation DVD.
Mount the DVD locally. We do not recommend using Network File System (NFS).
3. Enter the following commands:
SAP informs you about how to start the Java System Copy.
Follow the instructions in the Introduction [Page 10].
4. From the tree structure in the Welcome screen, choose the installation task that you want to continue and choose Next.
.
If there is only one component to install, SAPinst directly displays the dialog What do you want to do? without presenting the Welcome screen.
The What do you want to do? screen appears.
5. In the What do you want to do? screen, choose one of the following options and confirm with OK.
Alternative Behavior
Run a new Installation
The installation will not be continued.
Instead, SAPinst moves the content of the old installation directory and all installation-specific files to the backup directory. Afterwards, you can no longer continue the old installation.
The log files from the old installation are put into a backup directory with the following naming convention: <log_day_month_year_hours_minutes_seconds> (for example, log_01_Oct_2003_13_47_56).
Continue old installation
The installation stopped before will be continued from the point of failure.
April 2005 55

Installation Guide: System Copy for SAP Systems Based on Web AS Java 6.40 SR 1
iSeries
1. Check if a SAPinst GUI Java process is still running.
If a process is still running, look for javaw.exe under Processes in your Task Manager and kill it.
Start the installation with the command:
SAP informs you about how to start the Java System Copy. Follow the instructions in the Introduction [Page 10].
2. From the tree structure in the Welcome screen, select the installation task that you want to continue and choose Next.
If there is only one component to install, SAPinst directly displays the dialog What do you want to do? without presenting the Welcome screen.
3. The What do you want to do? screen appears.
4. In the What do you want to do? screen, decide between the following alternatives and choose OK.
Alternative Behavior
Run a new Installation
The installation will not be continued.
Instead, SAPinst deletes the mentioned installation directory for the chosen installation service and starts the installation from the beginning.
The log files from the old installation are put into a backup directory with the following naming convention: <log_day_month_year_hours_minutes_seconds> (for example, log_01_Oct_2003_13_47_56).
Continue old installation
The installation of the mentioned installation service will be continued from the point of failure.
SAPinst uses the port 21212 and 21213 during the installation for communication with the SAPinst GUI. If this port is already used by another service you must add the parameter SAPINST_DIALOG_PORT=<free_port_number> to the relevant sapinst command above.
56 April 2005

Installation Guide: System Copy for SAP Systems Based on WAS Java 6.40 SR 1
4.7 Remote Installation with SAPinst (Optional) 4.7.1 Remote Installation with SAPinst on UNIX and Windows (Optional)
Purpose You can run the SAPinst GUI in standalone mode to perform a remote installation.
This enables you to install an SAP system on another host (the remote host) while monitoring the installation with the SAPinst GUI on your local Windows or UNIX computer (the local host).
Prerequisites • Make sure that you have performed the preparation activities for your local host (SAPinst GUI host)
and your remote host.
For more information, see “Installation Preparations” in this documentation.
• Both computers are in the same network and can ping each other.
To test this:
5.2 Log on to your remote host and enter the command ping <local host>.
5.3 Log on to the local host and enter the command ping <remote host>.
Process Flow 1. You start SAPinst on the remote host [page 57].
2. You start SAPinst GUI on the local host [page 58].
3. You perform the installation using the SAPinst GUI.
4.7.1.1 Starting SAPinst on the Remote Host (Optional) Use You use this procedure to run SAPinst on the remote host when you to perform a remote installation [page 57]. The remote host is the host where you want to install the SAP system.
Prerequisites You have prepared your system for SAPinst [page 21].
Concerning the Handling of the SAP Installation Master DVD see section Running SAPinst [page 31].
Procedure Your Remote Host Runs on a Windows Platform
1. Log on to your remote host as a user who is a member of the local administration group.
2. Insert the installation DVD in your DVD drive.
3. Enter the following commands from the Windows command prompt:
April 2005 57

Installation Guide: System Copy for SAP Systems Based on Web AS Java 6.40 SR 1
SAP informs you about how to start the Java System Copy.
Follow the instructions in the Introduction [Page 10].
4. Start the SAPinst GUI on your local host, as described in Starting SAPinst GUI on the Local Host [page 58].
Your Remote Host Runs on a UNIX Platform
1. Log on to your remote host as user root.
2. Mount the installation DVD.
Mount the DVD locally. We do not recommend using Network File System (NFS).
3. Enter the following commands:
SAP informs you about how to start the Java System Copy.
Follow the instructions in the Introduction [Page 10].
SAPinst now starts and waits for the connection to the SAPinst GUI. That is, you see the following at the command prompt:
guiengine: no GUI connected; waiting for a connection on host <host_name>, port <port_number> to continue with the installation
4. Start the SAPinst GUI on your local host, as described in Starting SAPinst GUI on the Local Host [page 58].
4.7.1.2 Starting SAPinst GUI on the Local Host (Optional) Use You use this procedure to run SAPinst GUI on the local host when you want to perform a remote installation [page 57]. The local host is the host where you want to control the installation with the SAPinst GUI.
Prerequisites You have prepared your system for SAPinst [page 21].
For more information about the handling of the SAP Installation Master DVD see Running SAPinst on UNIX [page 37] or Running SAPinst on Windows [page 41].
Procedure Your Local Host Runs on a Windows Platform
1. Insert the installation CD into your CD drive.
2. Change to the following directory: cd <CD drive>:\IM<x>_<OS>\SAPinst\NT\<OS>
3. Start the SAPinst GUI in one of the following ways:
58 April 2005

Installation Guide: System Copy for SAP Systems Based on WAS Java 6.40 SR 1
• With additional parameters
Enter the following from the Windows command line: startinstgui.bat host -<host_name> -port <port_number>
<host_name> is the host name of the installation host
<port_number> is the same port as SAPinst uses on the remote host
• Without additional parameters
a.
b.
Enter the following from the Windows command line: startinstgui.bat
The SAPinst GUI starts and tries to connect to SAPinst on the local host. However, normally there is no SAPinst running on the local host.
Therefore, the SAPinst GUI cannot connect and the SAP Installation GUI Connection dialog appears.
Enter the host name of the Installation Host and the same Port as SAPinst uses on the remote host and choose Log on.
SAPinst GUI connects to the SAPinst server and the first dialog of the installation appears.
4. Perform the installation from your local host.
Your Local Host Runs on a UNIX Platform
1. Mount your installation DVD.
Mount the DVD locally. We do not recommend using Network File System (NFS).
2. Change to the following directory: cd <SAP_Installation_DVD>/IM<x>_<OS>/SAPINST/UNIX/<OS>
3. Start the SAPinst GUI in one of the following ways:
• With additional parameters
Enter the following from the UNIX command line: startinstgui.sh -host <host_name> -port <port_number>
<host_name> is the host name of the installation host
<port_number> is the same port as SAPinst uses on the remote host
• Without additional parameters
a.
b.
Enter the following from the UNIX command line: startinstgui.sh
The SAPinst GUI starts and tries to connect to SAPinst on the local host. However, normally there is no SAPinst running on the local host.
Therefore, the SAPinst GUI cannot connect and the SAP Installation GUI Connection dialog appears.
Enter the host name of the Installation Host and the same Port as SAPinst uses on the remote host and choose Log on.
April 2005 59

Installation Guide: System Copy for SAP Systems Based on Web AS Java 6.40 SR 1
SAPinst GUI connects to the SAPinst server and the first dialog of the installation appears.
4. Perform the installation from your local host.
4.8 Troubleshooting • If an error occurs during the input phase, SAPinst:
Stops the installation
Displays a dialog informing you about the error
• You can now directly view the log file by choosing View Logs
• You must abort the installation with O.K. and try to solve the problem.
• If an error occurs during the processing phase, SAPinst:
Stops the installation
Displays a dialog informing you about the error
You can now:
• Directly view the log file by choosing View Logs
• Try to solve the problem
For more information, see the SAPinst Troubleshooting Guide for SAP Web AS Java Installation on SAP Service Marketplace at:
service.sap.com/instguidesNW04 Installation Web AS
• Retry the installation by choosing Retry.
• Abort the installation by choosing O.K.
For more information, see Interrupted Installation with SAPinst [Page 53].
60 April 2005

Installation Guide: System Copy for SAP Systems Based on WAS Java 6.40 SR 1
5 Follow-Up Activities SAPinst has copied the Java system to your target system. It has also copied all the configurations of your Java system and of the components running in it. Generally, there is no need for further configuration steps, either in the source system or in the target system.
However, we recommend that you perform at least the post-installation checks in the target system as described in the post-installation section of the installation guide for the the SAP Web AS Java (Installation Guide – SAP SAP Web Application Server Java on <OS>: <DB> , Part II – Installation and Post-Installation) and for the Java component(s) running in it.
To check and if necessary to reconfigure the copied functionalities and configuration, you may have to perform some post-installation activities:
1. Perform follow-up activities on the source system [page 61].
2. Perform follow-up activities on the target system [page 61].
5.1 Follow-Up Activities on the Source System You do not need to perform post-installation steps in the source system for any of the Java components that are released for system copy at present.
5.2 Follow-Up Activities on the Target System You have to perform general and component-specific configuration steps:
• General follow-up activities [page 62]:
• Request a SAP license key:
Once installation is complete and the SAP system copy has been imported, you will require a new license key for the target system. The license key of the source system is not valid for this system. For more information, see “Installing the SAP License” in the documentation Installation Guide – SAP SAP Web Application Server Java on <OS>: <DB> , Part II – Installation and Post-Installation
• Perform configuration steps for the SAP Java Connector [page 62]
• Generate public-key certificates [page 62]
• Component-specific follow-up activities [page 62]:
• SAP Business Warehouse [page 62]
• Adobe Document Services [page 63]
• Configuration Steps for SAP Knowledge Warehouse - Internet Knowledge Servlet 1.0 [page 64]
• Knowledge Management and Collaboration [page 64]
• SAP Knowledge Warehouse [page 64]
• mySAP ERP / mySAP CRM Java Components [page 64].
April 2005 61

Installation Guide: System Copy for SAP Systems Based on Web AS Java 6.40 SR 1
5.2.1 General Follow-Up Activities 5.2.1.1 Configuration Steps for the SAP Java Connector Use You need to perform these post-installation steps for a copied Java system that includes a component that has to connect to an ABAP backend using the SAP Java Connector (SAP JCo), for example SAP Business Warehouse or SAP Enterprise Portal.
Procedure 1. Log on to the Visual Administrator as an administrator.
6. On the launch path on the left choose Cluster Server <server name> Services JCo RFC Provider.
7. On the right, choose Runtime and select the RFC destination that you use for the connection to the back end.
8. Maintain the required parameters for the RFC destination and repository.
9. Restart the Java server and the component.
5.2.1.2 Generate Public-Key Certificates Use After system copy, the public key certificates are wrong on the target system. You need to reconfigure them as described in the SAP Library [page 19] Security User Authentification and Single Sign-On Authentification on the J2EE Engine Configuring Authentification Mechanism Using Logon Tickets for Single Sign-On Configuring the Use of Logon Tickets Replacing the Public-Key Certificate to Use for Logon Tickets.
Additional information can be found in SAP Note 701205.
5.2.2 Component-Specific Follow-Up Activities
5.2.2.1 SAP Business Warehouse Use Follow the instructions in this section if the entries for source system connection have not been copied to the services file of your target system.
Prerequisites You have performed a system copy that includes SAP Business Warehouse (SAP BW).
Procedure You have to do the following to add the entries to the services file:
62 April 2005

Installation Guide: System Copy for SAP Systems Based on WAS Java 6.40 SR 1
Your target host runs on a UNIX platform
1. Log on to your target system as user root.
2. Edit the file /etc/services.
3. Add the entries for your source system connection, for example sapgw47 3347.
Your target host runs on a Windows platform or on iSeries
1. Log on to your target system as a member of the local administration group.
2. Edit the file <WindowsDirectory>\system32\drivers\etc\services.
3. Add the entries for your source system connection, for example sapgw47 3347.
5.2.2.2 Adobe Document Services Use Follow the instructions in this section if the driver files have not been copied to the target system.
Prerequisites You have performed a system copy that includes Adobe Document Services (ADS).
Procedure You have to do the following to make the drivers files available in the target system:
Your target system host runs on a UNIX platform
1. Log on to the target system as user <sapsid>adm.
2. Create a directoy 'lib' under /usr/sap/<SID>/SYS/global/AdobeDocumentsServices.
3. Change to the newly created directory 'lib'.
4. Execute the command SAPCAR -xvf <EXPORT_DIR>/APPS/ADS/DRIVERS.ADS.SAR.
5. If needed, change the permissions of user <sid>adm for these files and this directory.
Your target system host runs on a Windows platform
1. Log on to the target system as user <sapsid>adm.
2. Create a directoy 'lib' under <Drive>\usr\sap\<SID>\SYS\global\AdobeDocumentsServices.
3. Change to the newly created directory 'lib' .
4. Execute the command SAPCAR -xvf <EXPORT_DIR>\APPS\ADS\DRIVERS.ADS.SAR from the Windows command prompt.
5. If needed, change the permissions of user <sid>adm for these files and this directory.
Your target system host runs on iSeries:
1. Log on to the target system as user <SID>OFR.
April 2005 63

Installation Guide: System Copy for SAP Systems Based on Web AS Java 6.40 SR 1
2. Create a directoy 'lib' under <Drive>\usr\sap\<SID>\SYS\global\AdobeDocumentsServices.
3. Change to the newly created directory 'lib'.
4. Execute the command SAPCAR -xvf <EXPORT_DIR>/APPS/ADS/DRIVERS.ADS.SAR from the Windows command prompt.
5. If needed, change the permissions of user <SID>OFR for these files and this directory.
5.2.2.3 Knowledge Management and Collaboration Use Follow the instructions in this section to maintain the new server name and port number for Knowledge Management and Collaboration (KMC).
Procedure 1. Log on to the portal as a user who has been assigned the content administrator role.
2. Navigate to Content Administration Collaboration Content Collaboration Launch Pad Configuration.
3. Under Related Links, navigate to Configure Real-Time Collaboration Application Sharing.
4. Enter the new server name and port number in the sections ServerName and ServerPort.
5. Restart the Java server and the component.
5.2.2.4 Configuration Steps for SAP Knowledge Warehouse Use After the system copy, you have to configure the Internet Knowledge Servlet (IKS) to connect to the new ABAP backend as described in "Post installation - Configuration on the SAP IKS" in the documentation Installation Guide - SAP Knowldge Warehouse 7.0 on SAP Service Marketplace at service.sap.com/instguidesNW04 Installation SAP KW Installation Guide SAP Knowledge Warehouse.
5.2.2.5 Configuration Steps for mySAP ERP / mySAP CRM Java Components 5.2.2.5.1. Applications Using XCM Configuration Use You have performed a system copy of a SAP Web AS 6.40 Java system with applications that have been configured with the XCM Administrator, for example SAP CRM 4.0 SR1 Java Applications, Biller Direct.
After the system copy, the XCM settings are not available on the target system.
The XCM files are located in the subfolder xcm in sys.global.dir. You need to copy this directory and its contents from the source system to the target system.
64 April 2005
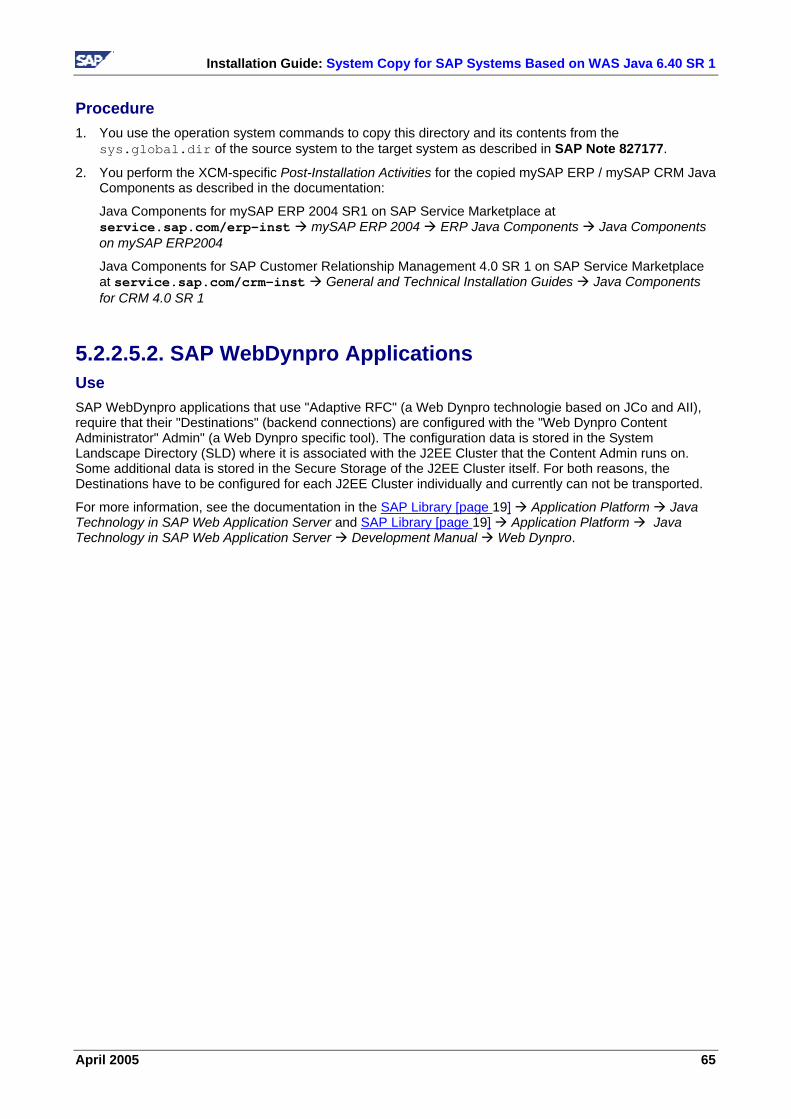
Installation Guide: System Copy for SAP Systems Based on WAS Java 6.40 SR 1
Procedure 1. You use the operation system commands to copy this directory and its contents from the
sys.global.dir of the source system to the target system as described in SAP Note 827177.
2. You perform the XCM-specific Post-Installation Activities for the copied mySAP ERP / mySAP CRM Java Components as described in the documentation:
Java Components for mySAP ERP 2004 SR1 on SAP Service Marketplace at service.sap.com/erp-inst mySAP ERP 2004 ERP Java Components Java Components on mySAP ERP2004
Java Components for SAP Customer Relationship Management 4.0 SR 1 on SAP Service Marketplace at service.sap.com/crm-inst General and Technical Installation Guides Java Components for CRM 4.0 SR 1
5.2.2.5.2. SAP WebDynpro Applications Use SAP WebDynpro applications that use "Adaptive RFC" (a Web Dynpro technologie based on JCo and AII), require that their "Destinations" (backend connections) are configured with the "Web Dynpro Content Administrator" Admin" (a Web Dynpro specific tool). The configuration data is stored in the System Landscape Directory (SLD) where it is associated with the J2EE Cluster that the Content Admin runs on. Some additional data is stored in the Secure Storage of the J2EE Cluster itself. For both reasons, the Destinations have to be configured for each J2EE Cluster individually and currently can not be transported.
For more information, see the documentation in the SAP Library [page 19] Application Platform Java Technology in SAP Web Application Server and SAP Library [page 19] Application Platform Java Technology in SAP Web Application Server Development Manual Web Dynpro.
April 2005 65

Migration Monitor
Users’ Guide The Migration Monitor is a tool which helps you to perform and control the unload and load process during the system copy procedure. From NetWeaver 04 SR1 the Migration Monitor is integrated into the SAPinst system copy tool, but it is also possible to use the monitor for copying older releases by starting it manually. The Migration Monitor will
• create R3load command files • create R3load task files if required • start the R3load processes to unload the data • transfer packages from the source to the target host if required • start the R3load processes to load the data as soon as a package is available • inform the person performing the system copy in case of errors
The Migration Monitor has to be started on the source database host (=> Export Monitor) and on the target database host (=> Import Monitor).
Attention: Socket option for System Copy can be used from NW04 SR1 and only for non-Unicode systems.
1. Prerequisites
• JRE version 1.4.1 or higher • JAVA_HOME environment variable must point to the JRE directory. • The correct directory structure for R3load dump files must exist on both the
source and target hosts
1

2. Tool The tool is located in the MIGMON.SAR SAPCAR archive. Content of the archive file:
• migmon.jar; rescheck.jar; activation.jar; mail.jar • export_monitor.sh / export_monitor.bat • import_monitor.sh / import_monitor.bat • res_check.sh / res_check.bat • export_monitor_cmd.properties • import_monitor_cmd.properties • import_dirs.sh / import_dirs.bat • MigrationMonitor.pdf
2

3. Configuration
Help The tool will display the available parameters, if you call it with one of the following command line options:
• -help • -?
Version The tool will display the version information (release branch and build date), if you call it with the following command line option:
• -version
General Options Name Description Comments
monitorTimeout Monitor timeout in seconds
During a timeout, the monitor thread sleeps and does not analyze any files or analyze its processing state. The default timeout value is 30 seconds.
E-Mail Options Name Description Comments
mailServer SMTP server Server name or IP address of the company SMTP server
mailFrom "From" e-mail address
mailTo "To" e-mail address Can contain an address list separated by ‘;’ or blanks.
3

Additional Options Name Description Comments bg Enables background
mode Take effect only as command line option. If the tool is running in the background mode, the UNIX shell window or Windows command prompt can be closed after startup.
secure Enables secure mode Take effect only as command line option. If the tool is running in the secure mode, command line parameters (e.g. passwords) will be hidden for java process. The secure mode implicitly enables background mode.
trace Trace level Possible values: all, off, 1 (error), 2 (warning), 3 (info), 4 (config, default), 5, 6, 7 (trace)
4

Export Options Option Description Comments
installDir Installation directory Directory where the installation tool (SAPinst, R3SETUP) is started; if you run the Migration Monitor without using the installation tools, then the installation directory is the directory, where the R3load TSK and log files will be written.
exportDirs List of export directories
Separator on Windows: ‘;’ Separator on UNIX: ‘:’ The ‘exportDirs’ parameter points to the directory where the R3load dump files will be written to. In the ‘exportDirs’ directory, the subdirectories DATA, DB and DB/<TARGET_DBTYPE> (e.g. DB/ORA) have to exist.
client Client operating mode
Running in client mode means, the Monitor will run parallel with standard SAPinst export process and transfer the exported dump files onto the import server.
server Server operating mode
Running in server mode means, the Monitor will create R3load TSK files (if necessary). R3load cmd files and start the R3load processes.
All options below are for the server mode. The Import Monitor always runs in the server mode. If you want to run the Export Monitor in the server mode, specify the parameter ‘server’ in the Export Monitors properties file. orderBy Package order Can be the ‘name’ or path of the file
that contains package names. If the option value is omitted then package order is not determined.
ddlFile DDL control file Path or filename of DDL control file. The default is DDL<DBTYPE>.TPL. If the filename is used without path, then the DDL control file from the export DB subdirectory is used.
ddlMap DDL mapping file File with mapping between DDL files and package names.
r3loadExe Path of the R3load executable
Optional; the default is R3load. If only the name of the R3load executable is available, then JVM looks for the R3load executable using OS-specific process search rules.
5

tskFiles ‘yes’ to create task files; ‘no’ to skip
Before version 4.6 must be set to ‘no’; starting from version 4.7 ‘yes’. If the R3load task files ‘*.TSK’ already exist then the monitor will not overwrite them.
dataCodepage Code page for data files
See SAP Note 552464. Possible values: 4102, 4103, 1100
taskArgs Additional R3load arguments for the TASK phase
Appended to the R3load command line. Options already set by the monitor: -ctf; -l; -o (if the omit argument is specified).
loadArgs Additional R3load arguments for the LOAD phase
Appended to the R3load command line. Options already set by the monitor: -e; -datacodepage; -l; -p; -r; -socket (if the socket option is specified); -o (if the omit argument is specified and task files are not used, that is, the value of the ‘tskFiles’ option is ‘no’).
jobNum Number of parallel export jobs; the default is 1.
Any positive number; 0 for an unlimited number of jobs. The value can be changed dynamically during runtime.
6
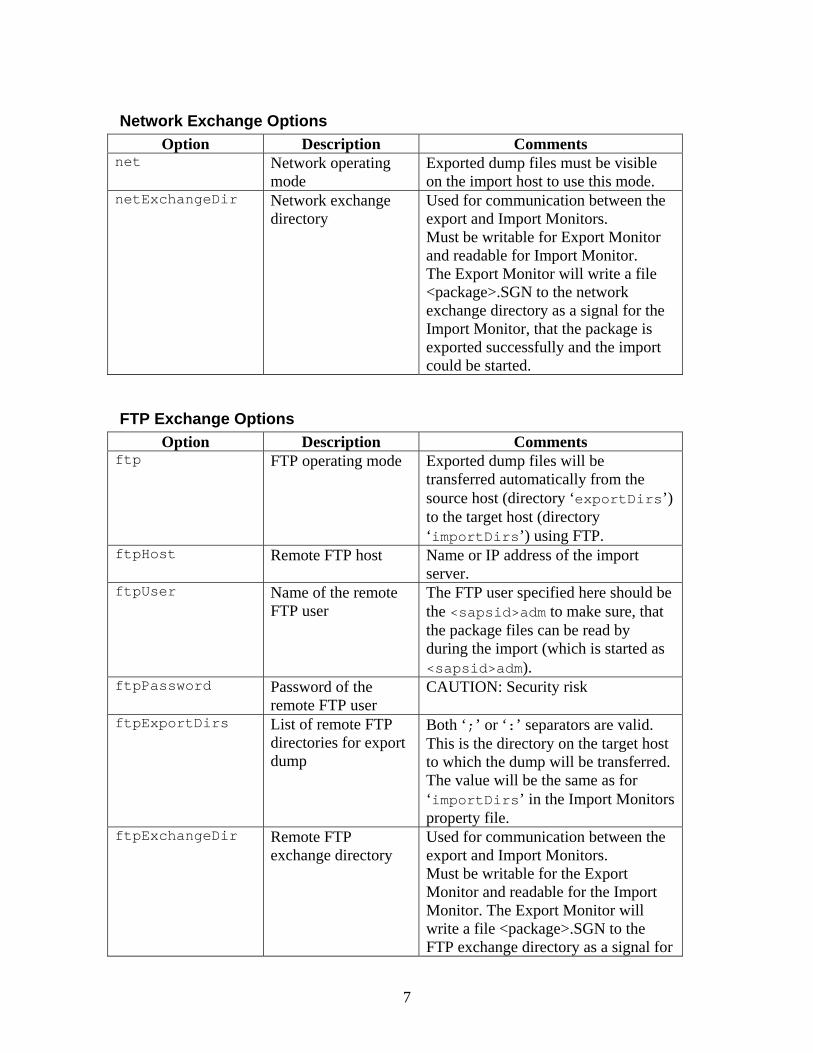
Network Exchange Options Option Description Comments
net Network operating mode
Exported dump files must be visible on the import host to use this mode.
netExchangeDir Network exchange directory
Used for communication between the export and Import Monitors. Must be writable for Export Monitor and readable for Import Monitor. The Export Monitor will write a file <package>.SGN to the network exchange directory as a signal for the Import Monitor, that the package is exported successfully and the import could be started.
FTP Exchange Options Option Description Comments
ftp FTP operating mode Exported dump files will be transferred automatically from the source host (directory ‘exportDirs’) to the target host (directory ‘importDirs’) using FTP.
ftpHost Remote FTP host Name or IP address of the import server.
ftpUser Name of the remote FTP user
The FTP user specified here should be the <sapsid>adm to make sure, that the package files can be read by during the import (which is started as <sapsid>adm).
ftpPassword Password of the remote FTP user
CAUTION: Security risk
ftpExportDirs List of remote FTP directories for export dump
Both ‘;’ or ‘:’ separators are valid. This is the directory on the target host to which the dump will be transferred. The value will be the same as for ‘importDirs’ in the Import Monitors property file.
ftpExchangeDir Remote FTP exchange directory
Used for communication between the export and Import Monitors. Must be writable for the Export Monitor and readable for the Import Monitor. The Export Monitor will write a file <package>.SGN to the FTP exchange directory as a signal for
7

the Import Monitor, that the package is exported successfully and the import could be started.
ftpJobNum Number of parallel FTP jobs; the default is 1.
Any positive number; 0 for an unlimited number of jobs. The value can be changed dynamically during runtime.
Export Socket Options Option Description Comments
socket Socket operating mode
R3load will not write dump files to the file system but the export and import work through the socket connection.
host Remote import host Name or IP address of the import host. port Host port number Must be the same as the port number
on the import host. Any free port on the import host from 1024 to 65535.
FTP Copy Options Option Description Comments
ftpCopy FTP copy operating mode
Used as a separate program call for migration with sockets. All files produced by R3lctl and R3szchk will be transferred from the source to the target host using FTP.
exportDirs List of export directories
Separator on Windows: ‘;’ Separator on UNIX: ‘:’ In the ‘exportDirs’ directory, the subdirectories DATA, DB and DB/<TARGET_DBTYPE> (e.g. DB/ORA) have to exist. The R3load STR files have to exist in the subdirectory DATA, the DDL*.TPL files in the subdirectory DB, and the R3load EXT files (if required) in the subdirectory DB/<TARGET_DBTYPE>.
ftpHost Remote FTP host Name or IP address of the import server.
ftpUser Name of the remote FTP user
The FTP user specified here should be the <sapsid>adm to make sure, that the package files can be read by during the import (which is started as
8

<sapsid>adm). ftpPassword Password of the
remote FTP user CAUTION: Security risk
ftpExportDirs List of remote FTP directories for export dump
Both ‘;’ or ‘:’ separators are valid. This is the directory on the target host to which the dump will be transferred. The value will be the same as for ‘importDirs’ in the Import Monitors property file.
Any other option is ignored by Export Monitor.
Mandatory Options for Export Monitor Client mode: installDir, exportDirs,
one of the options ftp, net (and their related parameters) Server mode: installDir, exportDirs, tskFiles,
one of the options ftp, net, socket (and their related parameters) FTP copy: exportDirs, ftpHost, ftpUser, ftpExportDirs,
ftpExchangeDir Note: The value of the dbType option is determined automatically in the shell script/batch files from the dbms_type environment variable.
9

Import Options Option Description Comments
installDir Installation directory Directory where the installation tool (SAPinst, R3SETUP) is started; if you run the Migration Monitor without using the installation tools, then the installation directory is the directory, where the R3load TSK and log files will be written.
importDirs List of import directories
Separator on Windows: ‘;’ Separator on UNIX: ‘:’ The ‘importDirs’ parameter points to the directory where the R3load dump files will be written to. In the ‘importDirs’ directory, the subdirectories DATA, DB and DB/<TARGET_DBTYPE> (e.g. DB/ORA) have to exist.
orderBy Package order This option is used only if the Import Monitor works without the Export Monitor in stand-alone mode, that is, all export dump files are available on the import host before the Import Monitor is started. Values can be: name: load packages in alphabetical order, size: load packages starting with the largest one, or a path of the file that contains package names. If the option is omitted then package order is not defined.
ddlFile DDL control file Path or filename of DDL control file. The default is DDL<DBTYPE>.TPL. If the filename is used without path, then the DDL control file from the export DB subdirectory is used.
ddlMap DDL mapping file File with mapping between DDL files and package names.
r3loadExe Path of the R3load executable
Optional; the default is R3load. If only the name of the R3load executable is available then JVM looks for the R3load executable using OS-specific process search rules.
tskFiles ‘yes’ to create task Before version 4.6 must be set to ‘no’;
10
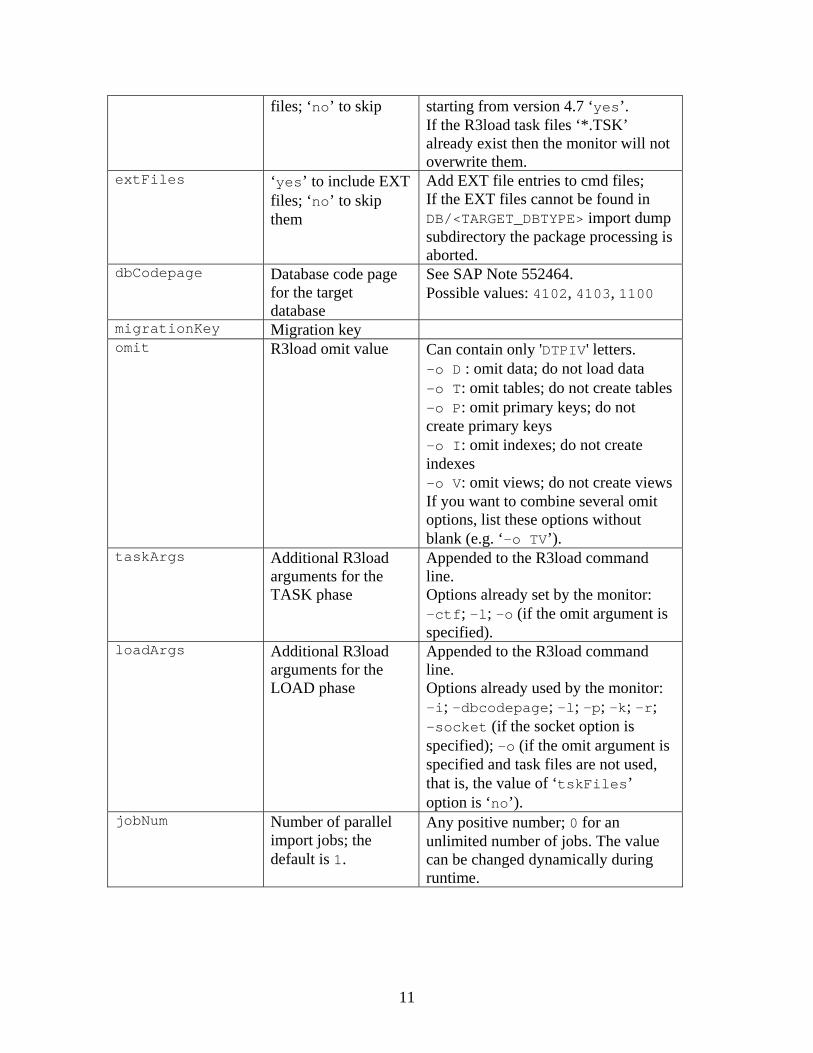
files; ‘no’ to skip starting from version 4.7 ‘yes’. If the R3load task files ‘*.TSK’ already exist then the monitor will not overwrite them.
extFiles ‘yes’ to include EXT files; ‘no’ to skip them
Add EXT file entries to cmd files; If the EXT files cannot be found in DB/<TARGET_DBTYPE> import dump subdirectory the package processing is aborted.
dbCodepage Database code page for the target database
See SAP Note 552464. Possible values: 4102, 4103, 1100
migrationKey Migration key omit R3load omit value Can contain only 'DTPIV' letters.
-o D : omit data; do not load data -o T: omit tables; do not create tables-o P: omit primary keys; do not create primary keys -o I: omit indexes; do not create indexes -o V: omit views; do not create viewsIf you want to combine several omit options, list these options without blank (e.g. ‘-o TV’).
taskArgs Additional R3load arguments for the TASK phase
Appended to the R3load command line. Options already set by the monitor: -ctf; -l; -o (if the omit argument is specified).
loadArgs Additional R3load arguments for the LOAD phase
Appended to the R3load command line. Options already used by the monitor: -i; -dbcodepage; -l; -p; -k; -r; -socket (if the socket option is specified); -o (if the omit argument is specified and task files are not used, that is, the value of ‘tskFiles’ option is ‘no’).
jobNum Number of parallel import jobs; the default is 1.
Any positive number; 0 for an unlimited number of jobs. The value can be changed dynamically during runtime.
11

Import Exchange Options Option Description Comments
exchangeDir Exchange directory If this option is not set, then the monitor runs in stand-alone mode, that is without the Export Monitor. All the export dump files or the SAP export CDs from the installation kit must be available on the import host and be specified with the parameter ‘importDirs’ (e.g. in the properties file). If there is an old file export_statistics.properties (e.g. from a previous export run), remove this file.
Import Socket Options Option Description Comments
socket Socket operating mode
port Server port number Any free port from 1024 to 65535. Any other option is ignored by Import Monitor.
Mandatory Options for Import Monitor Server mode (default):installDir, importDirs, tskFiles, extFiles,
one of the options exchangeDir or socket (and their related parameters)
Stand-alone mode: installDir, importDirs, tskFiles, extFiles Note: The value of the dbType option is determined automatically in the shell script/batch files from the dbms_type environment variable.
4. Assigning DDL Files to Packages It is possible to use several different DDL*.TPL templates during the export respectively during the import. The assignment of a specific DDL file to a single package is done within a simple text file, which then has to be specified via the ddlMap option within the migration monitor’s properties file. Packages no listed in the DDL mapping file will use the default DDL control file.
12

Example of a DDL mapping file:
# DDL mapping file ddl_mapping.txt # !!! line with [GROUP_NAME] can be skipped # used for documentation purposes only [ SORTED UNLOAD ] # DDL file for sorted unload ddlFile = /export_dump/ABAP/DB/ORA/DDLORA.TPL # package names SAPAPPL0 SAPAPPL1 SAPSDIC [ UNSORTED UNLOAD ] # DDL file for unsorted unload ddlFile = ./DDLORA_LRG.TPL # table names TABLE_A TABLE_B TABLE_C
5. Defining Groups of Packages The ‘package group’ feature is an enhancement of defining a package order. By defining groups you can e.g. prevent parallel execution of certain packages and you can define how many large tables are exported or imported at the same time. In addition you can specify different values for the parameter jobNum and taskArgs / loadArgs per package. Package groups can be defined in the same text file in which the package order can be defined as well (see parameter ‘orderBy’). The old package order format is also fully supported. If package groups are defined, the maximal number of parallel R3load jobs is the sum of jobNum of all packages. All packages without package group will be assigned to a ‘default group’ with the number of jobs which was defined in the migration monitor’s properties file.
13

Example of package order file with group:
# custom package order # package names SAPAPPL0 SAPAPPL1 SAPAPPL2 # package group [ SEQUENTIAL GROUP ] jobNum = 1 # table names TABLE_A TABLE_B TABLE_C
6. Processing Split Tables If tables have been split during the export, it has to be ensured for the import, that the table is created (only once!) before any process tries to import data and that the primary key and the indexes are created (only once!) before/after (as defined in the DDL template) the table data have been imported (if the index should be created after loading data). These single tasks will be synchronized by the migration monitor automatically. WHR files are part of the package and have to be copied to DATA export subdirectory to make sure, that the same WHR file is used for the export as well as for the import of the corresponding package.
14

7. Starting the Migration Monitor The tool can be started using one of the following:
• The UNIX shell scripts export_monitor.sh / import_monitor.sh
• The Windows batch files export_monitor.bat / import_monitor.bat
• As part of the SAPinst export / import procedure The application allows you to specify options in the command line and/or in the application property file. The names of the property files are export_monitor_cmd.properties and import_monitor_cmd.properties. Templates for these files are included in the application archive and must be located in the current user’s working directory. Any options specified in the command line take precedence over the corresponding options in the application property file. Options are case-sensitive; any options that are not recognized are ignored. To specify an option:
• in the command line, enter ‘-optionName optionValue’
• in the application property file, insert the new line ‘optionName=optionValue’
Example of a command line for a UNIX terminal: ./export_monitor.sh –ftp ./export_monitor.sh –ftpCopy ./export_monitor.sh –socket –host <import server> –port 5000 Example of a command line for Windows cmd.exe: export_monitor.bat –net export_monitor.bat –socket If FTP access is used and security is required, start the monitor in the secure mode to prevent seeing FTP password in the command line parameter string / property file. Example of a command line for a UNIX terminal: ./export_monitor.sh –secure –ftpPassword <password> Start the monitor and close the shell window / command processor. The monitor process will run in background. Use monitor *.log and *.console.log files to check monitor processing state.
15

Example of an export_monitor_cmd.properties file with export options:
# Export Monitor options # Operating mode: ftp | net #net ftp # # Common options # # List of export directories, separator on Windows ; on UNIX : exportDirs=C:\TEMP\export_dump # SAPinst start directory installDir=C:\install\start # Monitor timeout in seconds monitorTimeout=30 # # FTP options # # Remote FTP host ftpHost=server # Name of remote FTP user ftpUser=sysadm # Password of remote FTP user ftpPassword=password # List of remote FTP directories for export dump, separator : or ; ftpExportDirs=/install_dir/export_dump # Remote FTP exchange directory ftpExchangeDir=/install_dir/exchange # Number of parallel FTP jobs ftpJobNum=3 # # E-mail options # # SMTP server mailServer=sap-ag.de # "From" email address [email protected] # "To" email address [email protected] [email protected]
16
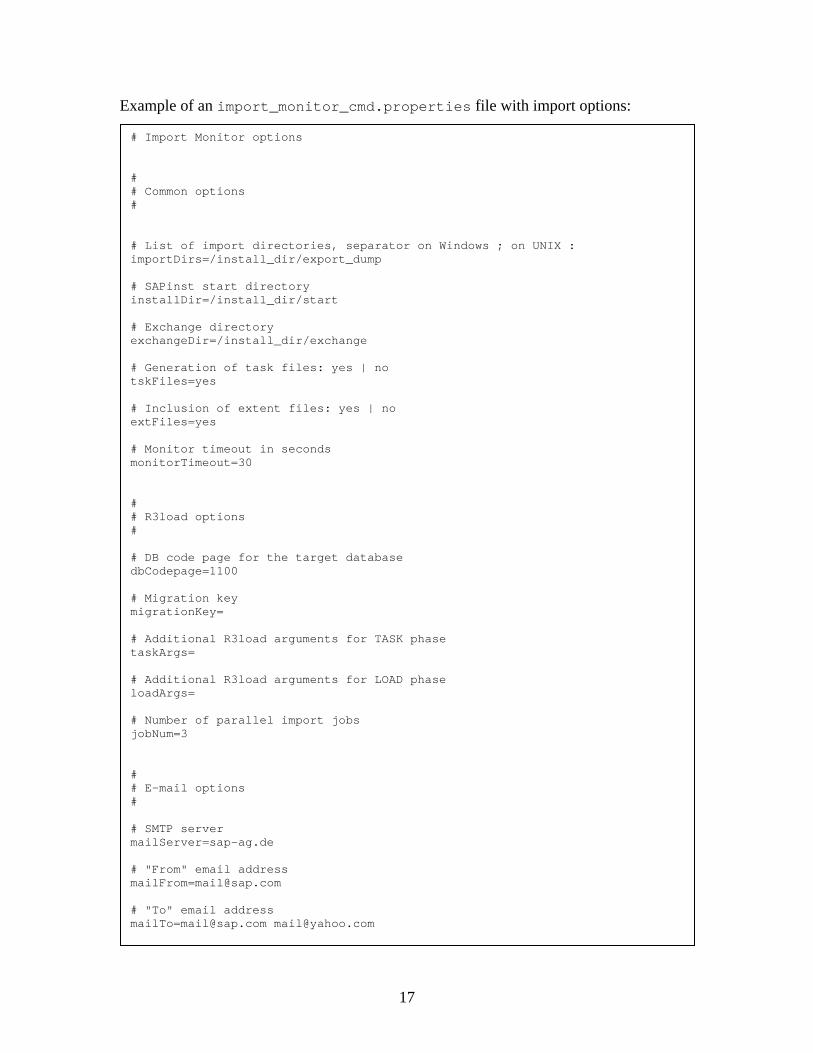
Example of an import_monitor_cmd.properties file with import options:
# Import Monitor options # # Common options # # List of import directories, separator on Windows ; on UNIX : importDirs=/install_dir/export_dump # SAPinst start directory installDir=/install_dir/start # Exchange directory exchangeDir=/install_dir/exchange # Generation of task files: yes | no tskFiles=yes # Inclusion of extent files: yes | no extFiles=yes # Monitor timeout in seconds monitorTimeout=30 # # R3load options # # DB code page for the target database dbCodepage=1100 # Migration key migrationKey= # Additional R3load arguments for TASK phase taskArgs= # Additional R3load arguments for LOAD phase loadArgs= # Number of parallel import jobs jobNum=3 # # E-mail options # # SMTP server mailServer=sap-ag.de # "From" email address [email protected] # "To" email address [email protected] [email protected]
17
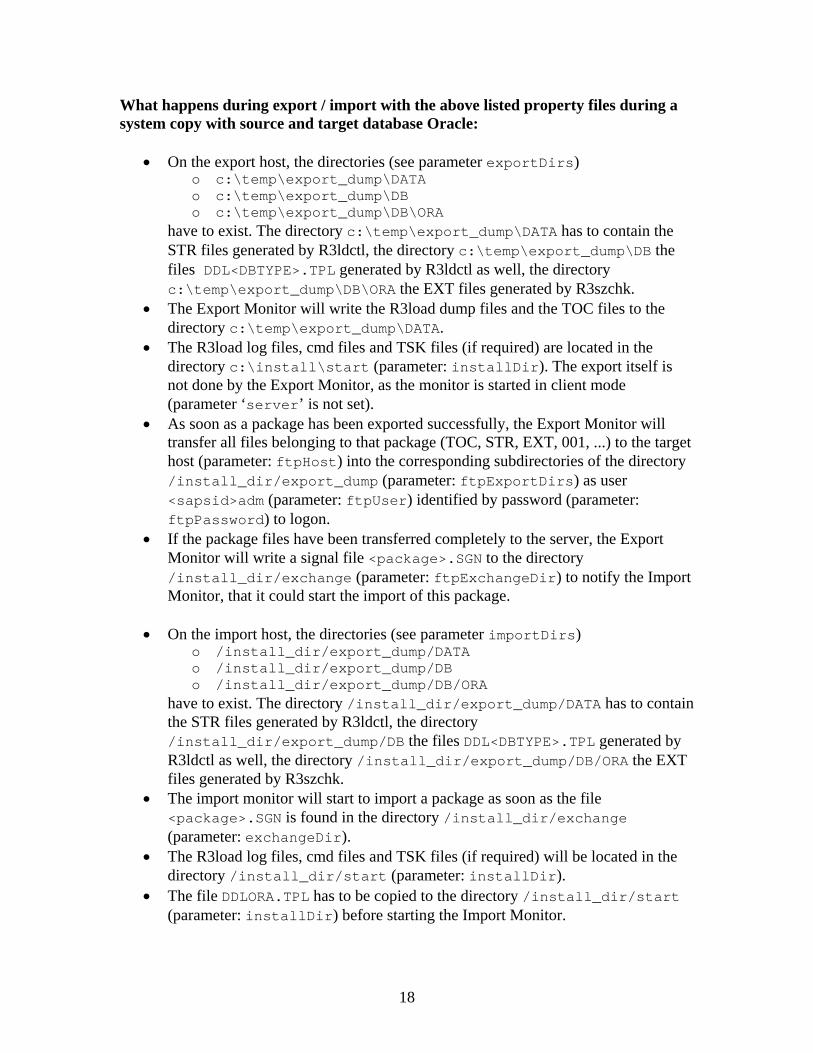
What happens during export / import with the above listed property files during a system copy with source and target database Oracle:
• On the export host, the directories (see parameter exportDirs) o c:\temp\export_dump\DATA o c:\temp\export_dump\DB o c:\temp\export_dump\DB\ORA
have to exist. The directory c:\temp\export_dump\DATA has to contain the STR files generated by R3ldctl, the directory c:\temp\export_dump\DB the files DDL<DBTYPE>.TPL generated by R3ldctl as well, the directory c:\temp\export_dump\DB\ORA the EXT files generated by R3szchk.
• The Export Monitor will write the R3load dump files and the TOC files to the directory c:\temp\export_dump\DATA.
• The R3load log files, cmd files and TSK files (if required) are located in the directory c:\install\start (parameter: installDir). The export itself is not done by the Export Monitor, as the monitor is started in client mode (parameter ‘server’ is not set).
• As soon as a package has been exported successfully, the Export Monitor will transfer all files belonging to that package (TOC, STR, EXT, 001, ...) to the target host (parameter: ftpHost) into the corresponding subdirectories of the directory /install_dir/export_dump (parameter: ftpExportDirs) as user <sapsid>adm (parameter: ftpUser) identified by password (parameter: ftpPassword) to logon.
• If the package files have been transferred completely to the server, the Export Monitor will write a signal file <package>.SGN to the directory /install_dir/exchange (parameter: ftpExchangeDir) to notify the Import Monitor, that it could start the import of this package.
• On the import host, the directories (see parameter importDirs)
o /install_dir/export_dump/DATA o /install_dir/export_dump/DB o /install_dir/export_dump/DB/ORA
have to exist. The directory /install_dir/export_dump/DATA has to contain the STR files generated by R3ldctl, the directory /install_dir/export_dump/DB the files DDL<DBTYPE>.TPL generated by R3ldctl as well, the directory /install_dir/export_dump/DB/ORA the EXT files generated by R3szchk.
• The import monitor will start to import a package as soon as the file <package>.SGN is found in the directory /install_dir/exchange (parameter: exchangeDir).
• The R3load log files, cmd files and TSK files (if required) will be located in the directory /install_dir/start (parameter: installDir).
• The file DDLORA.TPL has to be copied to the directory /install_dir/start (parameter: installDir) before starting the Import Monitor.
18

8. Output Files
Export • export_monitor.log • export_state.properties • ExportMonitor.console.log
Import • import_monitor.log • import_state.properties • ImportMonitor.console.log
Both the export and import state files contain package state lines such as the following: SAPUSER=+ Format of lines is <PACKAGE>=<STATE>. Possible values for state are: 0 Package export/import not yet started. ? Package export/import in progress. - Package export/import finished with errors.
+ Package export/import finished successfully.
If any ftp/net exchange options are used, then the export state file may contain a second <STATE> column, which refers to the state of the package transfer. Then the export state file contains package state lines such as the following: SAPUSER=++ Format of lines is <PACKAGE>=<STATE>. Possible values for state are: 0 Package export not yet started. ? Package export in progress. - Package export finished with errors. +0 Package export finished successfully; package
transfer not yet started. +? Package transfer in progress. +- Package transfer finished with errors. ++ Package transfer finished successfully.
19
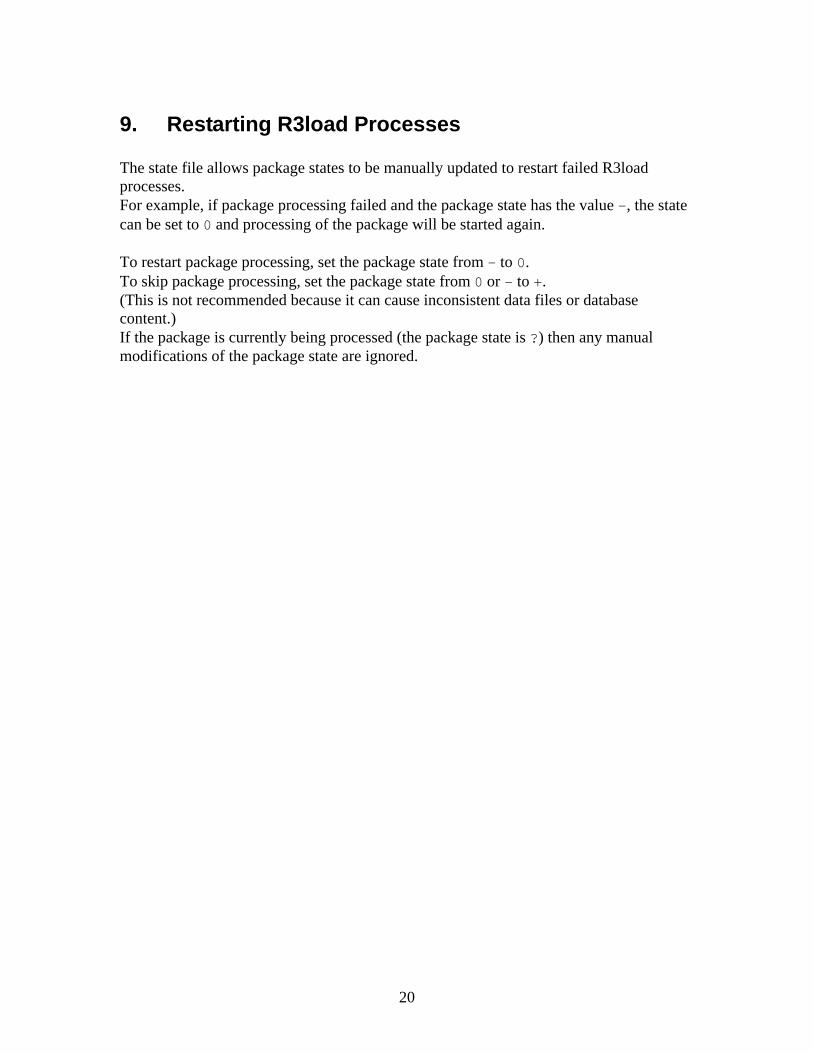
9. Restarting R3load Processes The state file allows package states to be manually updated to restart failed R3load processes. For example, if package processing failed and the package state has the value –, the state can be set to 0 and processing of the package will be started again. To restart package processing, set the package state from - to 0. To skip package processing, set the package state from 0 or - to +. (This is not recommended because it can cause inconsistent data files or database content.) If the package is currently being processed (the package state is ?) then any manual modifications of the package state are ignored.
20

10. Integration into the SAPinst Copy Procedure
NW2004s The tool is fully integrated into SAPinst system copy procedure, for details see the standard system copy guide.
NW04 SR1 The integration will be part of the standard system copy guide. Note: Using the Export Monitor in Parallel with SAPinst The Export Monitor can be started as an additional tool for the SAPinst standard export process. In this case, the monitor transfers any completed export packages to the target host. The Export Monitor can be started in parallel with SAPinst, but only after the dump directories are created on both the export and import server.
NW 04 / WebAS 6.40 The integration is described in the following guide: “Homogeneous and Heterogeneous System Copy for SAP Systems Based on SAP® Web Application Server 6.40”
Versions before WebAS 6.40 (R3E 4.7 SR1 and Previous)
Export Monitor 1. If FTP access is used, verify that the required directories exist on the import
server before the monitor is started. The import_dirs.sh shell script or the import_dirs.bat batch file can be used to create the correct directory structure.
2. Create or edit the export_monitor_cmd.properties file to specify the correct monitor options.
3. Start the Export Monitor as the <sapsid>adm user. 4. If any export errors occur, restart the monitor after the problem has been fixed.
CAUTION: If you do not use the system copy tools R3SETUP/SAPinst to perform the export, then make sure, that the STR files are located in the DATA subdirectory and the EXT files in the DB/<TARGET_DBTYPE> subdirectory of the ‘exportDirs’ parameter.
21

Import Monitor 1. Install the Central Instance. 2. Run the installation of the Database Instance.
Attention: If you want to start the installation of the target system before the export of the source system has been started, make sure that at least the files <importDir>/LABEL.ASC <importDir>/DB/<your database>/DBSIZE.{TPL|XML} <importDir>/DB/DDL<your database>.TPL exist and contain the correct data.
3. Interrupt the installation after all files are copied to the installation directory. 4. Modify the file control.xml / *.R3S.
R3SETUP a) Add an exit step to the EXE section right before the section
DBR3LOADEXECDUMMY*. b) Remove the sections DBR3LOADEXECDUMMY* and
DB3LOADEXEC_* from the EXE section. SAPinst
a) Add an exit step as a follow-on step to the component that is processed immediately before the database load.
a) Remove the subcomponent call of DatabaseLoad from the CSAPComponent.
5. Restart the installation from the installation directory. 6. Create or edit the import_monitor_cmd.properties file to specify the
correct monitor options. 7. After the exit step, start Import Monitor as the <sapsid>adm user. 8. If there are any import errors, restart the monitor after the problems have been
fixed. 9. After all packages have been loaded successfully, restart the installation tool and
finish the installation. CAUTION: If you do not use the system copy tools R3SETUP/SAPinst to perform the import, then make sure, that the DDL<TARGET_DBTYPE>.TPL files are located in the ‘installDir’ directory.
22

11. Release Notes
New Features in NW2004s SR2 • Maximum Java heap size is increased to 1GB (via -Xmx1024m java option). • Fix: unnamed groups (without [GROUP_NAME] header) are supported in DDL
mapping file. • Tables split into separate packages but which should be copied empty (like DDLOG)
are processed correctly during the import.
New Features in NW2004s SR1 • The number of R3load jobs and the number of parallel FTP jobs can be changed
during runtime. • Only one instance of the Migration Monitor can be started simultaneously in the same
working directory (file locking is used). • Background and secure execution via -bg and –secure command line options. • Automatic synchronization of tasks for splitted tables. • New option ddlFile will allow using non default DDL control file. • If R3load generates for package empty TSK file the processing of such package is
skipped. • Export statistics file export_statistics.properties in exchange directory is
removed by restart of Export Monitor. • Package load / unload order is predefined if –orderBy option is not used.
Default package unload order by export is by name, by import by size. In socket mode only package export order plays role, package order specified by import is ignored.
• Package order file with package names can contain comment lines like # some text …
23

Package Splitter
Users’ Guide
1. Prerequisites
• JRE version 1.4.1 or higher • JAVA_HOME environment variable must point to the JRE directory.
2. Tool The Package Splitter tool can be used for splitting the following:
STR/EXT files STR files WHR files
The tool is located in the SPLIT.SAR SAPCAR archive. Content of the archive file:
• split.jar • str_splitter.sh / str_splitter.bat • where_splitter.sh / where_splitter.bat • PackageSplitter.pdf
1

3. Configuration
Help The tool will display the available parameters, if you call it with one of the following command line options:
• -help • -?
Version The tool will display the version information (release branch and build date), if you call it with the following command line option:
• -version
STR Splitter Options Option Description Comments
strDirs List of STR file directories
Separator on Windows: ‘;’ Separator on UNIX: ‘:’
extDirs List of EXT file directories
Separator on Windows: ‘;’ Separator on UNIX: ‘:’
outputDir Output directory If missing, then the directories that contain the corresponding STR/EXT files are used.
top Maximum number of tables
Largest N tables are extracted from packages.
tableLimit Table size limit in MB All tables larger than tableLimit are extracted from packages.
packageLimit Package size limit in MB
All packages larger than packageLimit are split into packages smaller than this limit.
tableFile File with the table names that are to be extracted
All tables from the file are extracted from the packages. This file must contain the table names on separate lines (one name on each line).
2

WHERE Splitter Options Option Description Comments
whereDir WHERE file directory Directory with WHR files. strDirs List of STR file
directories Separator on Windows: ‘;’ Separator on UNIX: ‘:’
outputDir Output directory If missing, then the directory that contains the corresponding WHR files is used.
whereLimit Maximum number of WHERE clauses
All WHR files that have more than whereLimit WHERE clauses are split into WHR files with whereLimit WHERE clauses.
whereFiles Whitespace separated list of WHR files
Names of WHR files to be split.
WHR files should exist in WHERE file directory.
Trace Option Name Description Comments trace Trace level Possible values:
all, off, 1 (error), 2 (warning), 3 (info), 4 (config, default), 5, 6, 7 (trace)
Mandatory Options Splitting STR and EXT files: strDirs,
extDirs, top and/or tableLimit and/or packageLimit and/or tableFile
Splitting STR files: strDirs, tableFile
Splitting WHR files: whereDir, whereLimit
3

4. Starting the Package Splitter The tool can be started using one of the following:
• UNIX shell script str_splitter.sh / where_splitter.sh • Windows batch file str_splitter.bat / where_splitter.bat • As part of the SAPinst export procedure (STR Splitter)
The application allows you to specify options in the command line and/or in the application property file. The name of the property file is package_splitter_cmd.properties. Any options specified in the command line take precedence over the corresponding options in the application property file. Options are case-sensitive; any options that are not recognized are ignored. To specify an option:
• in the command line, enter ‘-optionName optionValue’
• in the application property file, insert the new line ‘optionName=optionValue’
STR Splitter Example of a command line for a UNIX terminal: ./str_splitter.sh -strDirs /export_dump/DATA –extDirs /export_dump/DB/ORA -outputDir /split_output -top 20 –tableLimit 50 –packageLimit 200 –trace all
Example of a command line for Windows cmd.exe: str_splitter.bat -strDirs C:\export_dump\DATA –extDirs C:\export_dump\DB\ORA -outputDir C:\split_output -top 20 –tableLimit 50 –packageLimit 200 –trace all
4

WHERE Splitter The tool can be started using one of the following:
• UNIX shell script where_splitter.sh • Windows batch file where_splitter.bat
Example of a command line for a UNIX terminal: ./where_splitter.sh -whereDir /r3a_dir -strDirs /export_dump/DATA -outputDir /split_output –whereLimit 5 –trace all
Example of a command line for Windows cmd.exe: where_splitter.bat -whereDir C:\r3a_dir -strDirs C:\export_dump\DATA -outputDir C:\split_output –whereLimit 5 –whereFiles "DD03L.WHR TODIR.WHR" –trace all
5
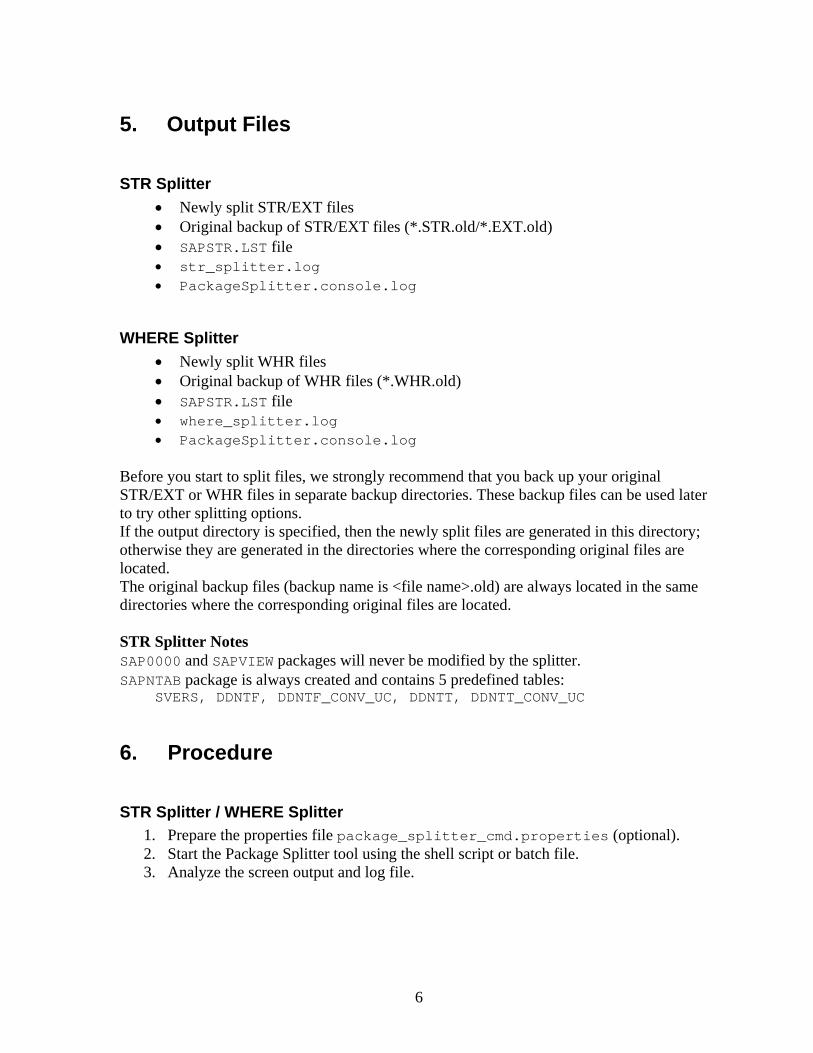
5. Output Files
STR Splitter • Newly split STR/EXT files • Original backup of STR/EXT files (*.STR.old/*.EXT.old) • SAPSTR.LST file • str_splitter.log • PackageSplitter.console.log
WHERE Splitter • Newly split WHR files • Original backup of WHR files (*.WHR.old) • SAPSTR.LST file • where_splitter.log • PackageSplitter.console.log
Before you start to split files, we strongly recommend that you back up your original STR/EXT or WHR files in separate backup directories. These backup files can be used later to try other splitting options. If the output directory is specified, then the newly split files are generated in this directory; otherwise they are generated in the directories where the corresponding original files are located. The original backup files (backup name is <file name>.old) are always located in the same directories where the corresponding original files are located. STR Splitter Notes SAP0000 and SAPVIEW packages will never be modified by the splitter. SAPNTAB package is always created and contains 5 predefined tables: SVERS, DDNTF, DDNTF_CONV_UC, DDNTT, DDNTT_CONV_UC
6. Procedure
STR Splitter / WHERE Splitter 1. Prepare the properties file package_splitter_cmd.properties (optional). 2. Start the Package Splitter tool using the shell script or batch file. 3. Analyze the screen output and log file.
6

7. Release Notes
New Features in NW2004s SR1 • WHERE Splitter tool • STR Splitter: table SVERS is always added to SAPNTAB package. • STR Splitter: input file with table names can contain comment lines like
# some text …
7

Time Analyzer
Users’ Guide The Time Analyzer tool is used to analyze unload/load times for packages and individual tables. The Time Join tool is used to merge export and import data created by the Time Analyzer. Both tools generate output files in text and HTML format.
1. Prerequisites
• JRE version 1.4.1 or higher • JAVA_HOME environment variable must point to the JRE directory.
2. Tool The tool is located in the MIGTIME.SAR SAPCAR archive. Content of the archive file:
• migtime.jar • export_time.sh / export_time.bat • import_time.sh / import_time.bat • time_join.sh / time_join.bat • TimeAnalyzer.pdf
1

3. Configuration
Help The tool will display the available parameters, if you call it with one of the following command line options:
• -help • -?
Version The tool will display the version information (release branch and build date), if you call it with the following command line option:
• -version
Time Analyzer Options Option Description Comments
installDir Installation directory Directory where the R3load log files are located. If missing, then the current working directory is used.
dataDirs List of data directories with binary data files and TOC files
Separator on Windows: ‘;’ Separator on UNIX: ‘:’ TOC files relevant only for export analysis.
top Number of tables to be reported
Reports N tables with the longest runtime. Can be combined with h or m option.
h Time limit for tables in hours
Tables with an export/import time above this limit will be reported. Mutually exclusive with m option. Can be combined with top option.
m Time limit for tables in minutes
Tables with an export/import time above this limit will be reported. Mutually exclusive with h option. Can be combined with top option.
xml Create additional XML output file
XML output file contains all collected time information. Can be processed using XSLT. Used as input file for Time Join tool.
html Create additional HTML output file
HTML output file contains package time diagram. For output on printer enable ‘Print
2

background colours and images’ option in IE / Netscape.
timePoints Number of time stamps in HTML output file
Default is 5. Example: if your export is started at 1pm and finished at 5pm you will find the following time stamps in the title bar: 01:00, 02:00, 03:00, 04:00, 05:00. You can increase the number of time stamps if you print using landscape format.
Time Join Options Name Description Comments exportFile Export XML time file Export XML time file created
beforehand by Time Analyzer. importFile Import XML time file Import XML time file created
beforehand by Time Analyzer. xml Create additional
XML output file XML output file contains all collected time information. Can be processed using XSLT.
html Create additional HTML output file
HTML output file contains package time diagram. For output on printer enable ‘Print background colours and images’ option in IE / Netscape.
timePoints Number of time stamps in HTML output file
Default is 5. Example: if your system copy is started at 1pm and finished at 5pm you will find the following time stamps in the title bar: 01:00, 02:00, 03:00, 04:00, 05:00. You can increase the number of time stamps if you print using landscape format.
Trace Option Name Description Comments trace Trace level Possible values:
all, off, 1 (error), 2 (warning), 3 (info), 4 (config, default), 5, 6, 7 (trace)
3
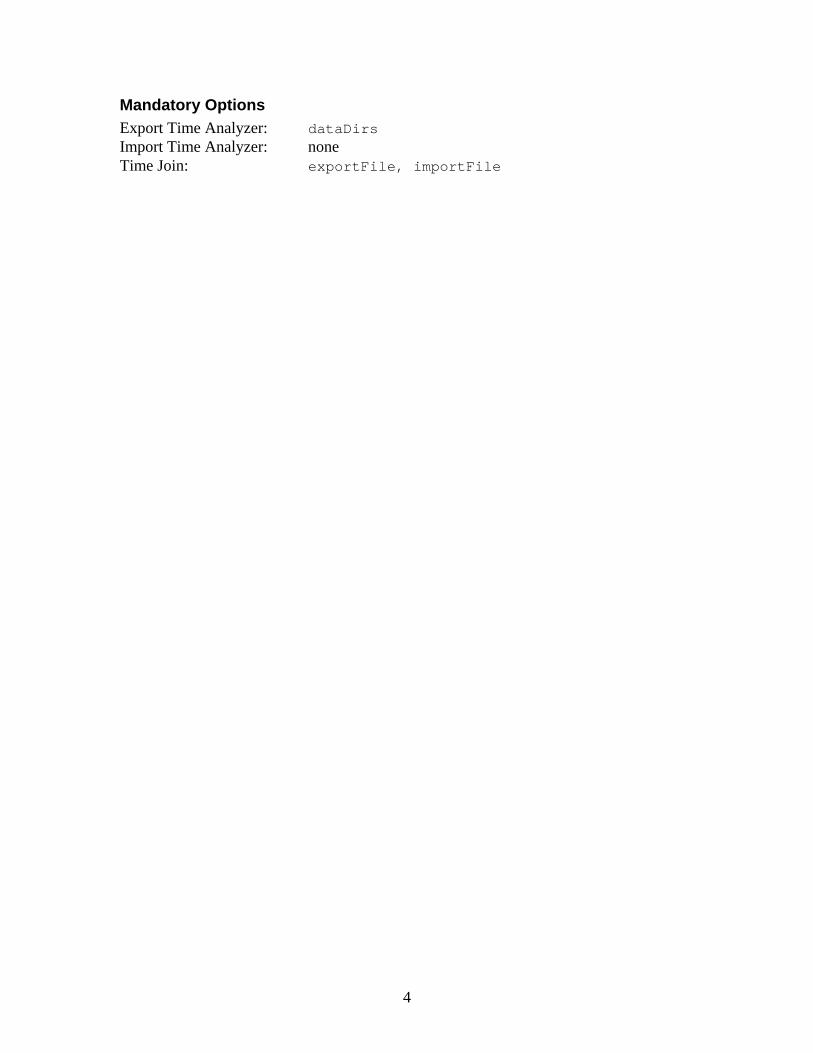
Mandatory Options Export Time Analyzer: dataDirs Import Time Analyzer: none Time Join: exportFile, importFile
4

4. Starting Tools Time Analyzer The tool can be started using one of the following:
• The UNIX shell script export_time.sh / import_time.sh • The Windows batch file export_time.bat / import_time.bat
To s Exam./e Examimp Tim The
••
To s Exam./t Examtim
Note An R3load version that supports table timestamps is required to produce table times during import time analyses (check the R3load log files). Starting with release 640 R3load writes time stamps per object. This feature isnot available for all databases. If your database does not support table time stamps then you will get a warning in the Time Analyzer log file like: No table timestamps found for import package 'SAPUSER' in the package LOG file 'SAPUSER.log'. The options top, h, m will have no effect.
pecify an option in the command line, enter ‘-optionName optionValue’.
ple of a command line for a UNIX terminal: xport_time.sh –installDir /sapinst_dir –dataDirs /export_dump/DATA –top 50
ple of a command line for Windows cmd.exe: ort_time.bat –installDir C:\sapinst_dir –h 1 –html
e Join
tool can be started using one of the following: The UNIX shell script time_join.sh The Windows batch file time_join.bat
pecify an option in the command line, enter ‘-optionName optionValue’.
ple of a command line for a UNIX terminal: ime_join.sh –exportFile ./export_time.xml –importFile ./import_time.xml
ple of a command line for Windows cmd.exe: e_join.bat –exportFile export_time.xml –importFile import_time.xml -html
5

5. Output Files
Export Time Analyzer • export_time.txt • export_time.html • export_time.xml • export_time.log • TimeAnalyzer.console.log
Import Time Analyzer • import_time.txt • import_time.html • import_time.xml • import_time.log • TimeAnalyzer.console.log
Time Join • time_join.txt • time_join.html • time_join.xml • time_join.log • TimeJoin.console.log
6
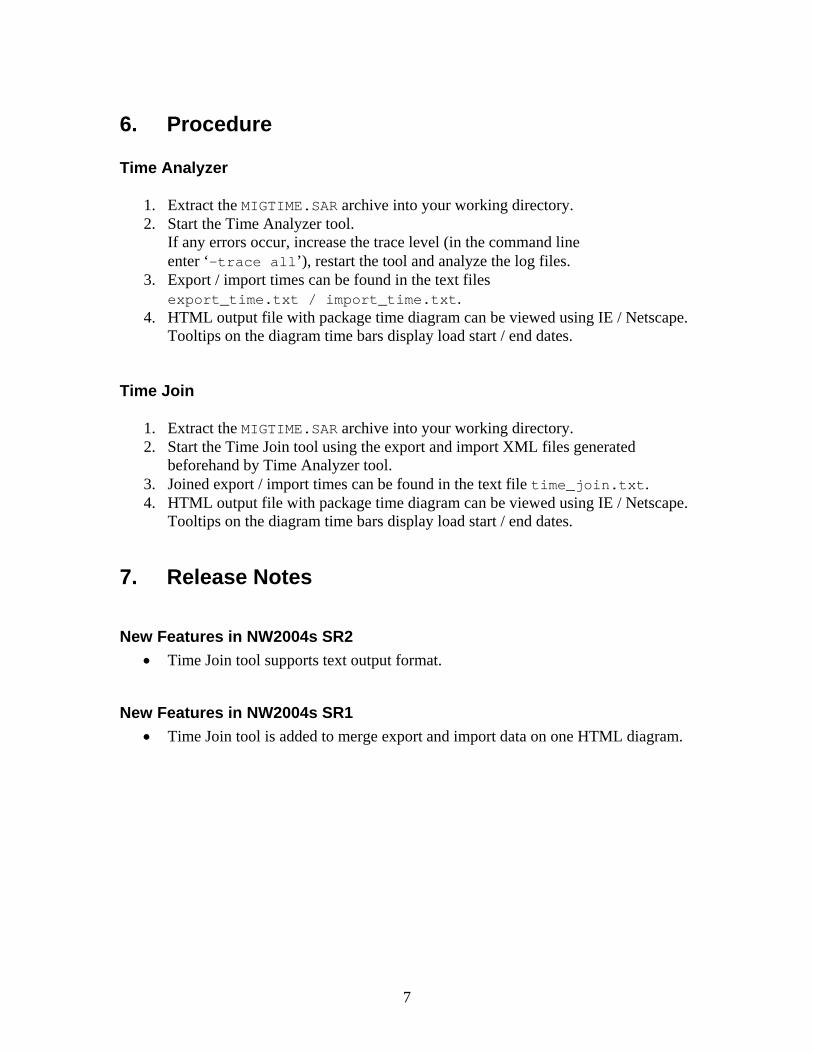
6. Procedure Time Analyzer
1. Extract the MIGTIME.SAR archive into your working directory. 2. Start the Time Analyzer tool.
If any errors occur, increase the trace level (in the command line enter ‘–trace all’), restart the tool and analyze the log files.
3. Export / import times can be found in the text files export_time.txt / import_time.txt.
4. HTML output file with package time diagram can be viewed using IE / Netscape. Tooltips on the diagram time bars display load start / end dates.
Time Join
1. Extract the MIGTIME.SAR archive into your working directory. 2. Start the Time Join tool using the export and import XML files generated
beforehand by Time Analyzer tool. 3. Joined export / import times can be found in the text file time_join.txt. 4. HTML output file with package time diagram can be viewed using IE / Netscape.
Tooltips on the diagram time bars display load start / end dates.
7. Release Notes
New Features in NW2004s SR2 • Time Join tool supports text output format.
New Features in NW2004s SR1 • Time Join tool is added to merge export and import data on one HTML diagram.
7