CA940 - SAP R/3 Application Security Concept - hservers.org
314
SAP AG 2001 CA940 - SAP R/3 Authorization Concept SAP AG CA940 CA940 SAP R/3 Application Security Concept SAP R/3 Application SAP R/3 Application Security Concept Security Concept n System R/3 n Release 4.6C n March 2001 n Material Number: 5004 4565
-
Upload
khangminh22 -
Category
Documents
-
view
1 -
download
0
Transcript of CA940 - SAP R/3 Application Security Concept - hservers.org

SAP AG 2001
CA940 - SAP R/3 Authorization Concept
SAP AG
CA940CA940SAP R/3 ApplicationSecurity ConceptSAP R/3 ApplicationSAP R/3 ApplicationSecurity ConceptSecurity Concept
n System R/3
n Release 4.6C
n March 2001
n Material Number: 5004 4565

SAP AG 2001
Copyright 2001 SAP AG. All rights reserved.
No part of this publication may be reproduced or transmitted inany form or for any purpose without the express permission ofSAP AG. The information contained herein may be changedwithout prior notice.
All rights reserved.
Copyright
Trademarks:
n Some software products marketed by SAP AG and its distributors contain proprietary software components of other software vendors.
n Microsoft® , WINDOWS®, NT®, EXCEL®, Word®, PowerPoint® and SQL Server® are registered trademarks of Microsoft Corporation.
n IBM®, DB2®, OS/2®, DB2/6000® , Parallel Sysplex®, MVS/ESA®, RS/6000® , AIX® , S/390®, AS/400® , OS/390® , and OS/400® are registered trademarks of IBM Corporation.
n ORACLE® is a registered trademark of ORACLE Corporation.
n INFORMIX®-OnLine for SAP and INFORMIX® Dynamic ServerTM are registered trademarks of Informix Software Incorporated.
n UNIX®, X/Open®, OSF/1® , and Motif® are registered trademarks of the Open Group.
n HTML, DHTML, XML, XHTML are trademarks or registered trademarks of W3C®, World Wide Web Consortium, Massachusetts Institute of Technology.
n JAVA® is a registered trademark of Sun Microsystems, Inc.
n JAVASCRIPT® is a registered trademark of Sun Microsystems, Inc., used under license for technology invented and implemented by Netscape.
n SAP, SAP Logo, R/2, RIVA, R/3, ABAP, SAP ArchiveLink, SAP Business Workflow, WebFlow, SAP EarlyWatch, BAPI, SAPPHIRE, Management Cockpit, mySAP.com Logo and mySAP.com are trademarks or registered trademarks of SAP AG in Germany and in several other countries all over the world. All other products mentioned are trademarks or registered trademarks of their respective companies.

SAP AG 2001
Workplace
MY301 2 daysR/3 Security Concepts
CA940 3 days
Level 2 Level 3
mySAP.com Workplace
ALL
User Administrator/Application Consultant
Employee Self Service
HR250 3 days
Security and Auditing
BC940 3 days
TCC Workplace
BC350 3 days
Mini - Applikations
MY305 1 day
Drag & Relate
MY310 2 days
Employee/Application Consultant
System Administrator/Technology Consultant
System Administrator/Technology Consultant
Application Consultant
Technology Consultant/ Application Consultant

SAP AG 2001
Course Prerequisites
l SAP 20 (mySAP Application Fundamentals)or equivalent knowledge
l SAP 50 (mySAP Technical Fundamentals)
l Knowledge of at least one R/3 application area gained in Level 2 and/or Level 3 courses

SAP AG 2001
l Participant
n Project Team Members
n Authorization Administrators
n User Administrators
l Duration: 3 Days
Target group
Notes to the user
n The training materials are not self-teach programs. They complement the course instructor's explanations. On the sheets, there is space for you to write down additional information.

SAP AG 2001
Course Content
Unit 8 Access Control and UserAdministration
Unit 9 Analysis and MonitoringFunctions
Unit 10 Special Authorization Components
Unit 11 Transporting AuthorizationComponents
Unit 12 Central User Administration
Unit 13 mySAP.com and the mySAP Workplace
Unit 1 Introduction
Unit 2 Conception withASAP Methodology
Unit 3 Elements of the R/3Authorization Concept
Unit 4 The User Master
Unit 5 Working with the ProfileGenerator
Unit 6 Profile Generator: Installation and Upgrade
Unit 7 Integration intoOrganizational Management
Preface
Exercises and Solutions
Appendix

SAP AG 2001
l Security Requirements
l SAP Security Levels
l SAP Access Control
l Users, Roles and Authorizations
l Technical Implementation of Roles
Contents:
Introduction

SAP AG 2001
l Describe the SAP authorization concept as part ofa comprehensive security concept
l Explain the access control mechanisms
l Explain how users, roles and authorizations arerelated
l Describe the technical implementation of a role-based authorization concept
At the conclusion of this unit, you will be able to:
Introduction Unit Objectives

SAP AG 2001
Analysis and Monitoring Functions
Overview Diagram (1)
Conception withASAP Methodology
Elements of the R/3 Authorization Concept
The User Master Record
Central User Administration
Access Control and User Administration
Working with the Profile Generator
Special Authorization Components
Integration into Organizational Management
Profile Generator:Installation/Upgrade
Transporting AuthorizationComponents
Introduction 111
mySAP.com and the Workplace

SAP AG 2001
l Authorizations are used to control access at theapplication level. The system must additionally beprotected at the operating system, database,network and frontend levels in order to implementa comprehensive security concept. These conceptsare dealt with in the training course BC940. At theapplication level, roles are at the heart of teh SAPR/3 authorization concept.
Introduction: Business Scenario

SAP AG 2001
Security Expectations
l Protection of sensitive business data according to
n Laws
n Agreements
n Policies
l Advantageous cost-benefit relation
l Should not obstruct business processes
n Protection of sensitive data:
� A company must meet certain legal requirements based on their country of operation. Specific laws (such as protection of employees) must be observed.
� A company must be able to protect and adhere to agreements made with partners and vendors
� A company must publish and enforce security policies, so that a secure environment can be established and maintained.
n Cost-Benefit Relation
� A company should concentrate security costs on areas in which a clear benefit can be realized. Protecting company assets that can be replaced at a lower cost in the event of a loss is an unnecessary investment of time and money.
� It is impossible to ensure complete security against all potential threats. Therefore, a company must be able to weigh up the extraordinary risks of a threat against the costs of a security system.
n Obstruction of Business Process
� A secure environment should be transparent enough to avoid obstructing a company's business processes.

SAP AG 2001
l Technologyn Hardware Routern DB Backup
n Password Rulesn Authorizations
n ...
l Organisationn Proceduresn Training
l Environmentn Fire Alarmsn Water Detection
l Technologyn Disk Crashn Power Supply
InterruptionThreats
Measures
Assets
l Personsn Incorrect Operation
n Hackers
l Environmentn Floods
n Earthquakes
Security - Overview
l Hardwarel Softwarel Datal Persons
n When developing a security concept, you must first determine WHAT you want to make safe. Which assets must be protected? To which categories do these assets belong (for example: hardware, software, data, persons)? When assigning assets to categories, consider the consequences of losing these assets. When calculating the value of fixed assets, for example, you should take into account the loss of value due to depreciation, damage or theft.
n You must also determine AGAINST WHAT you want to protect your assets. What are potential dangers? Sources of danger could be, for example, technology, the environment, or persons.
� Technology: Processing errors (caused by applications or operating systems), viruses, power supply interruption, hardware failure.
� Persons: Important employees leaving the company, dissatisfied or inexperienced employees.
� Environment: Fire, flood, dust, earthquakes.
n Once you have identified your assets and the potential sources of danger, you can develop security mechanisms. You must set up an appropriate protective measure for each source of danger. Thses measure should also be assigned to different categories (for example: organizational, technical, environmental).
� Organizational Measures: Training, internal security policy, procedures, roles, responsibilities.
� Environmental measures protect physical system components against natural sources of danger.

SAP AG 2001
Security Considerations
Access control, virus scanners, encryption
Access control, packetfiltering, encryption
Layer Components
GUI,Browser,PC
SAProuter,Network,SNC
Presentation
Communication
SAP users, passwordrules, authorizations
Access to SAP tables, backup, consistency
Access to SAP files, OS services
Application modules, work processes, interfaces
Relational database
UNIX,Windows NT,OS/ 400, OS 390
Application
Database
Operating System
Encryption, certificates, Single Sign-OnITSWeb Connection
SAP Course
CA940
BC
940
BC
940
SAP Security Levels
n SAP systems are made safe at a variety of levels. Each level has its own protection mechanisms.
n To avoid unathoirzed system access, for example, system and data access control mechanisms are provided at the application level.
n When protecting an SAP system, you must consider the following:
� Security must be implemented at all levels, since the overall security depends on the weakest part.
� A complex authorization concept is therfore only one aspect of an overall security concept.
n This course deals only with the security mechanisms at application level. All other levels are covered in the SAP training course BC940.

SAP AG 2001
DataData
FunctionsFunctions
l System Access Control
n Users must identify themselvesin the system
n Configuration of system accesscontrol (e.g. password rules)
l Access Control
n Access rights for functions anddata must be granted explicityusing authorizations
n Authorization checks for
w Transaction/report calls
w Program execution
SAP Access Control
n In order to work with an SAP system, users require unique user IDs. A user master record must be created in the system for each user. This user master record also contains the password that the system prompts the user to enter when logging on.
n There are numerous mechanisms for preventing unauthorized access to an SAP system that can raise the security level of a system if configured appropriately. These configurable settings include, for example, the minimum length and the expiry date of passwords.
n To protect business data and functions against unauthorized access, SAP programs utilize authorization checks. In order to pass an authorization check of this type, a user needs the appropriate authorization.
n Authorizations are assigned in the form of roles, which are entered into the user master record.

SAP AG 2001
CreatePurchaseRequisition(ME51)
OrderPurchaseRequisition(ME58)
ReleasePurchaseRequisition(ME54)
Employees have roles with specific functions and need authorizations for these functions Employees Employees have roles roles with specific functions functions and need authorizations authorizations for these functions
Users, Roles, and Authorizations
KarenKaren
SusanSusan
JohnJohn
Pro
curem
ent
l Employeel Service
Representative
l Employeel Service
RepresentativelManager
l Employeel Purchaser
Authorization to createpurchase requisitions
Authorization to releasepurchase requisitions
Authorization to createpurchase orders
n People perform roles that belong to business scenarios. In the example above, KAREN performs the EMPLOYEE role in the PROCUREMENT business scenario.
n A person can have more than one role. SUSAN, for example, performs the roles EMPLOYEE, SERVICE REPRESENTATIVE, AND MANAGER.
n A role is a group of activities performed within business scenarios. For example, the activity CREATE PURCHASE REQUISITION belongs to the EMPLOYEE role.
n A role generally includes all activities that may occur in the respective scenario. For example, the activity CREATE PURCHASE REQUISITION is sufficient to allow the EMPLOYEE to take part in the PROCUREMENT scenario.
n A single role can be involved in several scenarios . The EMPLOYEE, for example, participates in the SELF-SERVICES and the REPORTING scenarios, among others.
n A single scenario may require the participation of multiple roles. For example, the EMPLOYEE, MANAGAER, and the PURCHASER are all involved in the PROCUREMENT scenario.
n Business scenarios are groups of activities performed by one or more employees in their respective roles. the PROCUREMENT scenario, for example, comprises the activities CREATE PURCHASE REQUISITION, RELEASE PURCHASE REQUISITION and CREATE PURCHASE ORDER.
n Activities are associated with specific system functions that can only be accessed with the proper authorization.

SAP AG 2001
RoleProfessional Purchaser
RoleProfessional Purchaser
Technical Implementation of Roles
l Role Menu
n Accessible Transctions, Reports,Web Links
n Structure of the Menus/AccessPaths
l Authorizations
n Selective Access to BusinessFunctions and Data
l User
n To implement roles technically, you must create (composite) roles using the Profile Generator.
n A role consists of the folowing components:
� Role Menu The role menu contains the transactions and reports to which the users of the role should have access.
� Authorizations The authorizations define the access rights for business functions and data.
� Users To grant the access rights of a role to a user, you must assign the user to the role. You can assign users using either the Profile Generator or user administration.
n SAP delivers a large number of predefined roles with SAP systems. Customers can use these roles as templates and customize them to meet their individual requirements. Über den Report RSUSR070 können Sie sich alle von SAP ausgelieferten Rollenvorlagen anzeigen lassen.

SAP AG 2001
SAP Easy Access - User-Specific Menus
Menu Edit Favorites Extras System Help
Other menu Create menu Assign users
Role BC_USER_ADMIN
Favorites
SM51 List of SAP Systems
User Administration
SU01 - User Maintenance
PFCG - Role Maintenance
SU01D - Display User
SU05 - Internet User Maintenance
SU10 - User Mass Maintenance
SUGR - Maintain User Groups
n SAP systems support the setup of user-friendly personal user menus.
n When creating the roles, the system administrator specifies the required functions including their descriptions. Both can be chosen as required.
n Once a user has been assigned a particular role, the appropriate personal menu for that user is automatically displayed when the user log on to the system. The menu is based on the assigned activities.
n In addition to the functions preset by the administrator, users can choose tehir own "Favorites". There are two ways to do this: Users can drag the desired function with the mouse into the relevant menu area, or they can select the transaction and then choose Add to Favorites to add the function to their list of favorites.
n If the user calls a transaction, the personal menu is hidden so that the entire screen can be used for transaction processing. If the user quits the transaction or opens a new session, the menu is shown again in the foreground.

SAP AG 2001
l Describe the SAP authorization concept as part ofa comprehensive security concept
l Explain the access control mechanisms
l Explain how users, roles and authorizations arerelated
l Describe the technical implementation of a role-based authorization concept
You are now able to:
Introduction: Unit Summary

SAP AG 2001
l ASAP methodology for creating an authorization concept
l Project preparation
l Analysis and design of the authorization concept
l Implementation of the authorization concept
l Testing and quality assurance
l Cutover
Contents:
Conception with ASAP Methodology

SAP AG 2001
l List the steps necessary to implement anauthorization concept
l Describe the activities to be performed in eachstep
l Assign responsible persons to each activity
l Use the ASAP procedure model for implementingan authorization concept for your own projects
At the conclusion of this unit, you will be able to:
Conception with ASAP Methodology: Unit Objectives

SAP AG 2001
mySAP.com and the Workplace
Overview Diagram (2)
Elements of the R/3 Authorization Concept
The User Master Record
Analysis and Monitoring Functions
Central User Administration
Access Control and User Administration
Working with the Profile Generator
Special Authorization Components
Integration into Organizational Management
Profile Generator:Installation/Upgrade
Transporting AuthorizationComponents
Introduction
222Conception with ASAP Methodology

SAP AG 2001
l Before going live, your company wants toimplement an authorization concept.
l The steps required to realize the authorizationconcept must be planned in the context of theentire implementation process.
l During the planning phase you want to estimatethe time and personnel resources needed.
Conception with ASAP Methodology: BusinessScenario

SAP AG 2001
ProjectPreparation
BusinessBlueprint
Implementation
FinalPreparation Go Live &
Support
ContinuousImprovement
Authorizations and ASAP
l ASAP: SAP R/3 Project Implementation Procedure
l ASAP Components:
n Project Plan ("Roadmap")
n Additional Information ("Knowledge Corner")
n Question and Answer Database
l Integration of Authorization Assignment and UserAdministration in the Business Blueprint and ImplementationPhases.
n AcceleratedSAP (ASAP) is a comprehensive method for accelerating SAP R/3 implementation projects. The combination of the set of ASAP components ensure quick and efficient implementation of the SAP R/3 System.
n The ASAP Roadmap, a process-oriented, comprehensible, compressed project plan, leads the implementation process step by step. ASAP describes how to implement an authorization concept.
n At the highest level the ASAP Roadmap comprises five phases:
� Project Preparation Inclusion of all relevant decision-makers for the SAP R/3 implementation and selection of the internal and external members of the project team.
� Business Blueprint Determine the business requirements of the implementing company. The Business Blueprint is a visual representation of the status of the company which is to be realized in the SAP R/3 implementation.
� Implementation Configuration and fine-tuning of the SAP R/3 System.
� Final Preparation Test all interfaces, train users, migrate business data into the SAP R/3 System.
� Go Live & Support Start SAP R/3 production operation, specify procedures and benchmarks to permanently monitor the gains of the investment in SAP R/3.

SAP AG 2001
Role and Authorization Concept: Steps
PreparationPreparation AnalysisAnalysis
& & Conception Conception
l A Role and Authorization Concept is Implemented in 5 Steps
l Each Step Comprises Different Activities
l Each Activity is Associated with a Responsible Person
l User Administration and Authorization ManagementOrganization is Parallel to User and Authorization ConceptImplementation
Implement-Implement- ationation
QualityQuality Assurance Assurance
& Tests& Tests CutoverCutover
Determine User andDetermine User and Authorization Administration StrategyAuthorization Administration Strategy
n To fulfill a certain task, the employee responsible must normally use several applications. The transactions and reports used for a business activity can be combined into roles.
n It is important that users can only process those tasks that they are authorized to perform, and are prevented from making unintentional or incorrect changes in system areas which are outside their competence. As all SAP components use authorizations to control access to their functions, administrators only assign those authorizations to each role that are are necessary to perform the role-specific tasks.
n Besides authorizations, a role comprises the user menu specifications. When a user logs on to an SAP system, the system displays a user-specific menu, with selected transactions, reports, and Internet links in the form of a tree structure. This menu is based on the assigned role. Users can only access transactions and reports that they are authorized to use. This eliminates unnecessary functions from the navigation structure.
n When developing the role and authorization concept, the challenge is to coordinate business requirements at a cross-department level and protect sensitive data against potential dangers.
n This is why we recommend that you develop the role and authorization concept as a separate project. You should folow the procedure explained in thsi training course and use the ASAP Roadmap as orientation.

SAP AG 2001
Measures:
l Set Up a Team for User Roles and Authorizations
l Clarify Prerequisites for Authorization Assignment
l Train the Team for User Roles and Authorizations
l Trigger Role and Authorization Project
Step 1: Preparation
PreparationPreparation Implement- ation
Analysis &
Conception
Quality Assurance
& Tests Cutover
n Set up a team responsible for the specification and implementation of the user roles and the authorization concept.
n Identify the business areas affected and their special security requirements. Like the control mechanisms selected, these can vary from area to area. Normally, the security requirements of the Human Resources department are more demanding than those of other departments. Therefore you must first determine the desired security level.
n Note: Consider the differente security requirements for production, test and development environments. Also bear in mind that user roles often need to access multiple systems and may therefore require different functions and authorizations depending on the system.
n Train the team for roles and authorizations with regard to specification and implementation topics.
n The team members must be familiar with the basic principles of the SAP authorization concept and the available control and administration tools (central user administration, Global User Manager, and so on). The members responsible for implementation must be able to use the Profile Generator.
n Since the role and authorization project requires the cooperation of various business areas and departments, SAP recommends that you inform the responsible employees of the project targets set and establish communication channels at an early stage to ensure efficient handling.

SAP AG 2001
BASISPP
HRSD/ MM
FI/ CO KUKU
BCBC
KUKUKUKU
KUKU
BCBC
KUKU
Team for User Roles and Authorizations
KU = Key User BC = Basis User (technical
authorization management)
n When developing the role and authorization concept, the challenge is to coordinate business requirements at a cross-department level and protect sensitive data against potential dangers.
n While user roles and the authorization concept are specified with the cooperation of the individual business areas, they are normally implemented by the IT department. This is why you must set up a cross-area and cross-department project team.
n The team members have the following tasks:
� Create SAP R/3-dependent role descriptions in teh "Analysis & Conception" step.
� Cooperate with the IT department during implementation.
� Set up and run through test scenarios.
n To ensure that both the authorization concept and the procedures for user administration and authorization management comply with the control regulations of the company, the internal invoice verification department must be involved in the authorization project at an early stage.

SAP AG 2001
Step 2: Analysis & Conception
Preparation Implement- ation
Quality Assurance
& Tests Cutover
AnalysisAnalysis & &
Conception Conception
Measures:
l Determine User Roles
l Complete Roles
l Determine Framework for Implementing the Roles
l Check Framework for Implementing the Roles
n Specifiaction of the role and authorization concept:
� Identify required roles. Determine task profiles based on the organization chart and a business process analysis. Check if SAP role templates can be used.
� Specify relevant applications functions (transactions, reports, Web links) to the roles. Make any required adjustments if role templates are used.
� Specify if the roles are higher-level roles or specific roles; that is, if they are subject to any restrictions resulting from organizational or application-specific control mechanisms.
� Identify required composite and individual roles for implementing the roles and the authorization concept.
n Check the role and authorization concept. To detect any shortcomings in conception before actual implementation, SAP recommends that you create a prototype of the concept.

SAP AG 2001
Authorization List - Role Design
Business Processes Financial Accounting General Ledger Processing Closing Operations
Profit and Loss Adjustment General ledger: Profit and Loss Adjustment
General ledger: Update Balance Sheet Adj. General ledger: Post Balance Sheet Readj. General ledger: Balance Sheet Readj., Log General ledger: B/S Readj., Spec. Functions
Accounts Payable Accounting Invoices and Credit Memos Parked Document Posting [Vendors] Post Parked Document
Change Parked Document
Display Parked Document Change Parked Doc. (Header) Document Changes: Parked Documents
Reject Parked Document Vendor Account Analysis
Balance Analysis Customer Account Analysis Vendor Account Balance Display Vendor Balances
Vendor Line Items
Correspondence with Vendors Correspondence with Vendors Correspondence: Print Requests Correspondence: Print Internal Docs.
Correspondence: Delete Requests Correspondence: Maintain Requests
Instruction...
Enterprise area Role name
Scope Scope Scope
Analysis: Determine User Roles
F.50
F.5DF.5EF.5FF.5G
FBV0FBV2FBV3FBV4
FBV5FBV6
FD11FK10FK10NFBL1N
F.61F.62F.63
F.64
n The Question and Answer database (Q&Adb) is used in the Business Blueprint phase of the ASAP project to analyze and determine the implementation scope. This database displays all business processes that can be modeled in SAP R/3 as a tree structure (reference structure). When creating the Business Blueprint, you determine which processes are to be implemented in SAP R/3.
n Starting with ASAP Release 4.6B, user roles can also be created in the Q&Adb and linked with the associated business processes. The relevant link information is passed to the authorization list, which is used to complete the role specifications.
n Using the authorization list, the user roles created in the Q&Adb are completed. When this list is created, the processes and roles specified are adopted.
n SAP systems are delivered with a number of role templates in which the associated application functions (transactions and reports), teh user menu and the authorization data are predefined. These templates can be used as a basis for analyzing and developing the company-specific roles and the authorization concept.

SAP AG 2001
FI_Manag AP_Manag AP_ AccAuthorization List - Role Design
Business Processes Financial Accounting General Ledger Processing Closing Operations
Profit and Loss Adjustment General ledger: Profit and Loss Adjustment
General ledger: Update Balance Sheet Adj. General ledger: Post Balance Sheet Readj. General ledger: Balance Sheet Readj., Log General ledger: B/S Readj., Spec. Functions
Accounts Payable Accounting Invoices and Credit Memos Parked Document Posting [Vendors] Post Parked Document
Change Parked Document
Display Parked Document Change Parked Doc. (Header) Document Changes: Parked Documents
Reject Parked Document Vendor Account Analysis
Balance Analysis Customer Account Analysis Vendor Account Balance Display Vendor Balances
Vendor Line Items
Correspondence with Vendors Correspondence with Vendors Correspondence: Print Requests Correspondence: Print Internal Docs.
Correspondence: Delete Requests Correspondence: Maintain Requests
Instruction...
Enterprise area Rollenname
Scope Scope Scope
FI FI FI
xxxx
x
x x xx x xx x xx x xx x xx x x
x x x x
x x x x
Conception: Complete User Roles (1)
F.50
F.5DF.5EF.5FF.5G
FBV0FBV2FBV3FBV4
FBV5FBV6
FD11FK10FK10NFBL1N
F.61F.62F.63
F.64
n The authorization list is a Microsoft Excel table helping the project team to model the user roles before they are implemented in SAP R/3. Using this list, the roles can be developed before the system is installed.
n In the authorization list, you create user roles and specify the associated transactions. It consists of two views:
� Process View (Role Design - Q&Adb scope)The process view is generated from the Q&Adb. This view shows the processes that were selected when the Business Blueprint was created. The process hierarchy displayed corresponds to the reference structure of the Q&Adb. In this view, you can speficy user roles and link them with processes.
� Transaction Overview per Role (T-Codes per Role)In the transaction overview, you can generate an overview of the transactions assigned to each role (according to the modeling).

SAP AG 2001
Balance Analysis
Vendor LineItems
DisplayVendor
Balances
MaintainAccountBalances
G/L DocumentMaintenance
Accounts PayableAccounting Manager
PostDocuments
ChangeDocuments
........
Activity Block(Group of RelatedActivities)Role
ActivitiesTransactions,Reports
User RoleComposite Role
Accounts Payable Accountant
UserUser Master Record
Technical Conception: Role Implementation (1)
n User roles are technically implemented using individual, composite, and dervied roles. Based on the transactions and reports selected for each role, the Profile Generator automatically determines all authorizations required for performing the functions specified, and creates the corresponding authorization profile.
n Using individual, composite, and derived roles, you can model the role structure in two ways:
� You can model each role as an individual role that contains all required functions. If some functions are used unchanged in multiple roles, the associated transactions and reports are contained in several individual roles. If general function modifications are required, this consequently affects several individual roles.
� Alternatively, you can model each role as a composite role consisting of individual and derived roles. In this case, the individual and derived roles represent activity blocks, that is, groups of interrelated functions (for example: all functions needed for a specific business scenario). Since individual and derived roles contain encapsulated functions, they can be used in multiple or composite roles. The advantage of this approach is that multiple access to transactions used in several individual roles is avoided. Therefore, organizational or process-related modifications that affect several user roles can be applied by adjusting a single role.

SAP AG 2001
FI_Manag AP_Manag AP_ AccAuthorization List - Role Design
Business Processes Financial Accounting General Ledger Processing Closing Operations
Profit and Loss Adjustment General ledger: Profit and Loss Adjustment
General ledger: Update Balance Sheet Adj. General ledger: Post Balance Sheet Readj. General ledger: Balance Sheet Readj., Log General ledger: B/S Readj., Spec. Functions
Accounts Payable Accounting Invoices and Credit Memos Parked Document Posting [Vendors] Post Parked Document
Change Parked Document
Display Parked Document Change Parked Doc. (Header) Document Changes: Parked Documents
Reject Parked Document Vendor Account Analysis
Balance Analysis Customer Account Analysis Vendor Account Balance Display Vendor Balances
Vendor Line Items
Correspondence with Vendors Correspondence with Vendors Correspondence: Print Requests Correspondence: Print Internal Docs.
Correspondence: Delete Requests Correspondence: Maintain Requests
Instruction...
Enterprise Area Role Name
Scope Scope Scope
FI FI FI
xxxx
x
x x xx x xx x xx x xx x xx x x
x x x x
x x x x
Conception: Complete User Roles (2)
F.50
F.5DF.5EF.5FF.5G
FBV0FBV2FBV3FBV4
FBV5FBV6
FD11FK10FK10NFBL1N
F.61F.62F.63
F.64
n Modeling the role structure: Analyze the authorization list and determine the areas in which access to several roles is needed. Solche Tätigkeitsblöcke können als Rollen realisiert werden.
n To simplify implementaion, you can subsequently modify roles during the technical conception phase, for example, by choosing additional functions to use activity blocks already defined.
n Note that access to the same transactions and reports is not a sufficient criterion for the existence of an activity block. Since authorizations may even vary at field level, you must implement the different variants of acitivity blocks as separate or derived roles.
n Even if you implement each role as a separate role, certain functions are encapsulated in separate foles (for example, the basis authorizations of the end-users).

SAP AG 2001
BalanceAnalysis
Correspondence
Accounts Payable Accounting Manager
Accounts Payable Accountant
MaintainDocuments
MaintainDocuments
MaintainDocuments
ClosingOperations
BalanceAnalysis
Correspondence
MaintainDocuments
ClosingOperations
Financial Accounting Manager
Technical Conception: Role Implementation (2)
n During the first conception and implementation approach, individual functions are encapsulated in separate roles (for example, the Basis authorizations of the end-users).
n From a technical point of view, all elements of the authorization concept must be assigned a unique identifier. This is why you must define individual naming conventions for all role types.
n You can define naming conventions based on different criteria, for example, country, business area (FI, CO, ...), or application component (FI-AP, CO-PA, ...).
n If you want to decentralize user and authorization management, the naming conventions are also required for administrative purposes. In this case, the access rights of the decentral administrators should be limited to those (composite) roles that belong to a specific business area and thus apply only to a restricted namespace.
n Since roles are divided into individual and derived roles, the user roles created in this step may be different from the original specification defined during the development phase. For example, the roles may contain more or fewer activities (transactions and reports). This is why you must check that the roles have been properly defined before implementation.
n SAP recommends that you carry out a test implementation of the user roles and authorization concept in order to check the technical conception.

SAP AG 2001
Step 3: Implementation
Preparation Quality
Assurance & Tests
Cutover Analysis
& Conception
Implement-Implement- ationation
Measures:
l Create Roles
l Create Derived Roles
l Create Composite Roles
n From a technical point of view, user roles are implemented as composite roles using the Profile Generator. Composite roles consist of individual and composite roles that each contain the relevant authorizations and menu data. Authorizations specify the scope of access to data and functions. User menus use hierarchical structures to specify the access path to the transactions, reports and Internet pages released for a specific user.
n You create user roles in the following way:
� Create individual roles: Individual roles either describe higher-level functions that are independent of organizational or application-specific restrictions or are used as templates for creating derived roles that are not subject to any restrictions.
� Having checked the individual roles used as the derivation basis, you create the derived roles. These contain the desired organizational or application-specific restrictions. For each responsibility area, you create a derived role from an existing individual role.
� Finally, the composite roles are created from the implemented individual and derived roles as the technical counterparts of the user roles.

SAP AG 2001
Step 4: Quality Assurance & Tests
Preparation Implement- ation
Cutover Analysis
& Conception
QualityQuality Assurance Assurance
& Tests& Tests
Measures:
l Test User Roles and Authorization Concept
l Release Roles and Authorization Concept
n To ensure that productive operation is not affected, it is important to thoroughly test the user roles in connection with the authorizations before you switch over to production. In addition, the responsible area manager must approve of the role and authorization concept implemented.
n To standardize the test, the relevant process flows must be determined and published. You should use predefined test scenarios that cover all business processes implemented.
n The test scenarios should include both positive and negative checks of the authorizations of the individual roles. The positive test checks whether the functions are executed as desired, while the negative test must confirm that all restrictions defined are observed. For example, a human resources administrator can display the users for a specific work center, but not the records for other work centers. The test scenarios must cover all functions that are to be performed by a user role.
n If a function cannot be called during the test, you must correct the user roles and the authorization concept. Note that changes may affect several (derived) roles. In extreme cases, you must revise the entire role and authorization concept.
n You may also be required to modify the user menus in order to simplify access to the functions. To ensure that the system becomes more user-friendly, the project team responsible should closely cooperate with the representatives of the relevant business areas.
n After fine-tuning the user roles, you must repeat the tests as often as necessary until the user roles implemented completely comply with the security and usability requirements.

SAP AG 2001
Step 5: Cutover
Preparation Implement- ation
Quality Assurance
& Tests
Analysis &
Conception CutoverCutover
Measures:
l Set Up Productive Environment
l Create User Master Records for Productive Users
l Accept Role and Authorization Project
n Before you create the productive users, you must configure central user management and create the master records for user management in your production environment.
n To simplify the creation of the individual user master records, you first create model records. These model records are used as copy templates for the records of the productive users. In the central system, create a user master record for each role specified in the company-wide role matrix (authorization list). If a role is subdivided into several responsibility areas that are subject to organizational restrictions (company code, cost center, plant, and so on) or application-specific control mechanisms (for example, FI authorization groups), you must create a separate record for each responsibility area. Be sure to maintain the additional data (parameters, printers, and so on).
n After consulting the area managers (data owners), define the roles for each user. Consider that some users may have several roles or different roles in various logical systems (clients). Enter the assignments in a user and role matrix.
n To create a master record for a user, you copy the model record for the relevant role and customize this record as required.
n Get the final approval of the area managers with regard to the users created and communicate all access-relevant data (system, client, ID, and password) to the end-users.

SAP AG 2001
User and Authorization Administration Strategy
Preparation Implement- ation
Quality Assurance
& Tests Cutover
Analysis &
Conception
Determine User andDetermine User and Authorization Administration StrategyAuthorization Administration Strategy
Measures:
l Specify Technical User and Authorization Administration
Strategy
l Specify User and Authorization Administration Procedure
l Train Users and Authorization Administrators
n The SAP environment offers various possibilities for managing users. Users distributed in a far-reaching system landscape can be managed from within a central system: All users are initially created in a central logical system (client) and then distributed to the other clients of the entire installation.
n Before you set up a central user management, you must determine which processes (for example, assigning or locking roles) can be run locally, and if modifications made in local systems (for example, address changes) should be passed on to the central system. A consistent central user management can be set up for such different SAP systems as SAP R/3, APO, and CRM.
n After the role and authorization concept is implemented, the members of the project team are normally no longer responsible for managing users and authorizations. Depending on how the tasks are distributed in the company, the users are managed either centrally (for example, using a help desk) or decentrally (by local location or department administrators). You must assign and train employees for this purpose.
SAP AG 2001
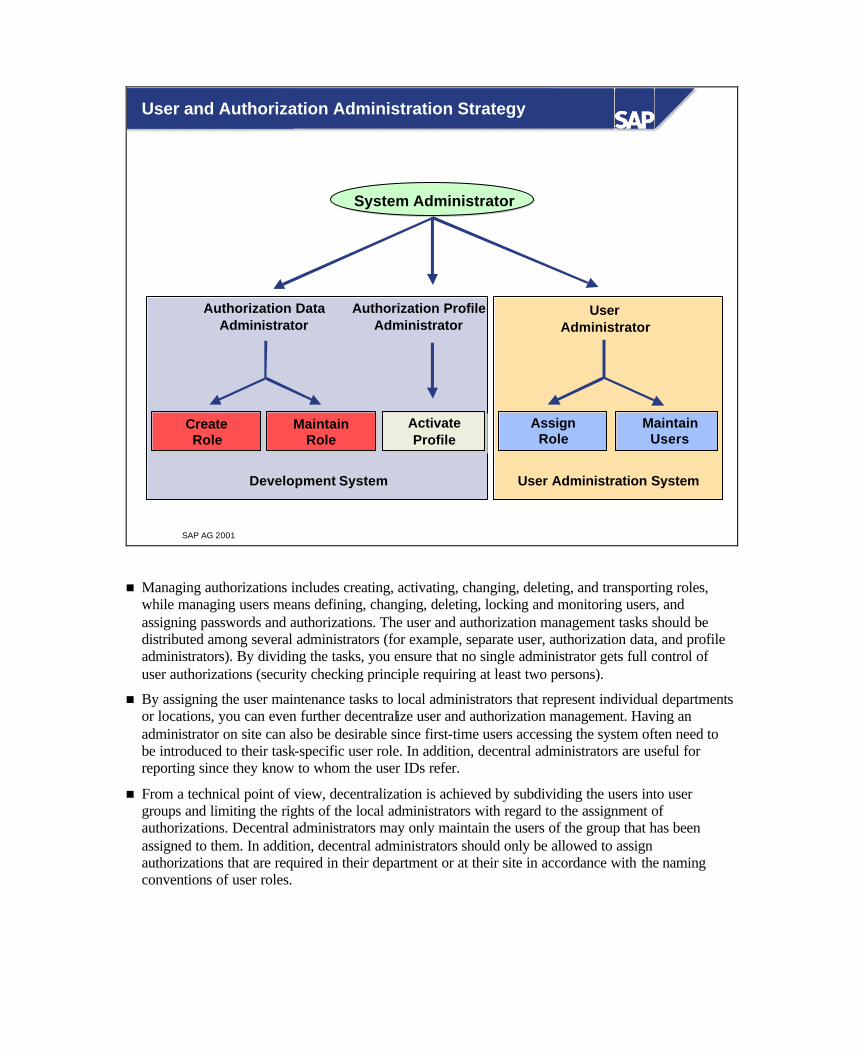
Development System User Administration System
User and Authorization Administration Strategy
System Administrator
Authorization DataAdministrator
CreateRole
ActivateProfile
MaintainRole
Authorization ProfileAdministrator
UserAdministrator
MaintainUsers
AssignRole
n Managing authorizations includes creating, activating, changing, deleting, and transporting roles, while managing users means defining, changing, deleting, locking and monitoring users, and assigning passwords and authorizations. The user and authorization management tasks should be distributed among several administrators (for example, separate user, authorization data, and profile administrators). By dividing the tasks, you ensure that no single administrator gets full control of user authorizations (security checking principle requiring at least two persons).
n By assigning the user maintenance tasks to local administrators that represent individual departments or locations, you can even further decentralize user and authorization management. Having an administrator on site can also be desirable since first-time users accessing the system often need to be introduced to their task-specific user role. In addition, decentral administrators are useful for reporting since they know to whom the user IDs refer.
n From a technical point of view, decentralization is achieved by subdividing the users into user groups and limiting the rights of the local administrators with regard to the assignment of authorizations. Decentral administrators may only maintain the users of the group that has been assigned to them. In addition, decentral administrators should only be allowed to assign authorizations that are required in their department or at their site in accordance with the naming conventions of user roles.
SAP AG 2001
l List the steps necessary to implement anauthorization concept
l Describe the activities to be performed in eachstep
l Assign responsible persons to each activity
l Use the ASAP procedure model for implementingan authorization concept for your own projects
You are now able to:
Conception with ASAP Methodology: Unit Summary
Exercises
Unit: Conception with ASAP Methodology
At the conclusion of these exercises you will be able to
• Describe the individual worksheets of the authorization list
• Define roles in the authorization list
• Assign transactions to these roles
• Group transactions
• Generate an overview of the roles with the relevant transactions
Open the Excel file AL-CA940.XLS which you can find in the shared folders and answer the following questions.
The general repository is in the Business Workplace.
Menu Path: Menu → Office → Workplace → General repository → CA940
Double-click the Excel file to open it. On the dialog box that appears choose Enable Macros.
Save the Excel file on your hard disk under the name AL-CA940-##.
1-1-1 Which master data was copied from ASAP Q&Adb level 3? Master data for _________________________ and _________________________

1-1-2 Which business processes were copied from ASAP Q&Adb level 5? ______________________________________________________ ______________________________________________________
1-1-3 Which transaction codes were copied for the sales order processing business process? ______________________________________________________
1-2 Define roles for the enterprise areas:
• Financial Accounting (FI)
• Sales and Distribution (SD) and
• Materials Management (MM)
and assign transactions to these roles.
1-2-1 a) Create the role for an Accounts receivable accountant (AccRec). To do this, enter FI in the column header for Enterprise area and AccRec as role name on the Roles Design – Q&Adb Scope worksheet.
b) Assign all transactions of the Manual Incoming Payments business process to the accounts receivable accountant by placing an 'x' for these transactions in the AccRec column. The accounts receivable accountant should also be able to maintain the accounting views of the accounts receivable master.
1-2-2 Define a role SDClerk for a Sales and Distribution clerk, and assign all transactions of the Sales Order Processing (Standard) business process as well as transactions for maintaining the SD views of the accounts receivable master records to this role.
1-2-3 Define a role SDMan for the Sales and Distribution manager, and assign all transactions of the Sales Order Processing (Standard) business process as well as transactions for maintaining all (accounting and sales and distribution) views of the accounts receivable master to this role.

1-2-4 Define a role for a warehouse supervisor (Whouse) for the MM enterprise area. Assign the transactions of the Goods Receipt Processing business process to this role.
1-2-5 Add transactions MM03, MM04, and MM19 for displaying material master data to all roles.
1-3 Go to the second worksheet, T-Codes per Role. Generate an overview of the transactions and roles by pressing the appropriate button.
How many transactions were chosen for the individual roles: AccRec _____________ Transactions SDClerk _____________ Transactions SDMan _____________ Transactions Whouse _____________ transactions

1-4 Combine these transactions into meaningful roles to ensure that these single roles can be reused in composite roles.
There are several ways to do this.
Go back to the first worksheet Roles Design – Q&Adb scope.
1-4-1 Combine several transactions into roles so that these single roles can be reused in composite roles. To do this, you can color-code or draw a border around the roles on a cross-role basis.
1-4-2 Assign a name to the roles, and enter the relevant transactions into the following table.
Role Name Transactions for this Role
Solutions
Unit: Conception with ASAP Methodology
1-1 Open Excel file AL-CA940.XLS, which is in the general Business Workplace repository of your SAP R/3 System, and answer the following questions.
The general repository is in the Business Workplace.
Menu Path: Menu → Office → Workplace → General repository → CA940
1-1-1 General master data for Material master and Accounts receivable master record
1-1-2 Customer quotation processing Sales order processing Goods receipt processing Manual incoming payments
1-1-3 VA01 VA02 VA03 VA05 V.01

1-2 Excel authoriation list on the Roles Design – Q&Adb worksheet
Enterprise area>>> FI SD SD MM
Role name >>> AccRec SDClerk SDMan Whouse
R/3 Links:
T Code
Responsibilities:
Owner
Scope Scope Scope Scope
MM01
MM02 MM03 x x x x
MM19 x x x x
MM04 x x x x
FD01 x x FD02 x x
FD03 x x
VD01 x x VD02 x x
VD03 x x
VA21 x x
VA22 x x
VA23 x x VA25 x x
VA01 x x
VA02 x x
VA03 x x VA05 x x
V.01 x x
MB1C x MB90 x
VL21 x
F-18 x
F-26 x F-28 x

1-3 The button for generating the transaction and role overview is located in cell A4.
1-4 Go back to the first worksheet Roles Design – Q&Adb scope.
1-4-1 Several solutions are possible. Model solution as sample authorization concept: See next page or exercise 1 for unit Working with the Profile Generator 1
1-4-2 In the following table, the role names are presented in accordance with the example authorization concept. The example authorization concept is presented graphically on the next page.
Role Name Transactions for this Role
GR##_MM_MAT_DISP MM03, MM04, MM19
GR##_FI_ACCRECI_MAINT FD01, FD02, FD03
GR##_SD_CUST_MAINT VD01, VD02, VD03
GR##_SD_SALES VA21, VA22, VA23, VA25, VA01, VA01, VA03, V.01
GR##_MM_WE_POST MB1C, MB90, VL21
GR##_FI_IP_POST F-18, F-26, F-28
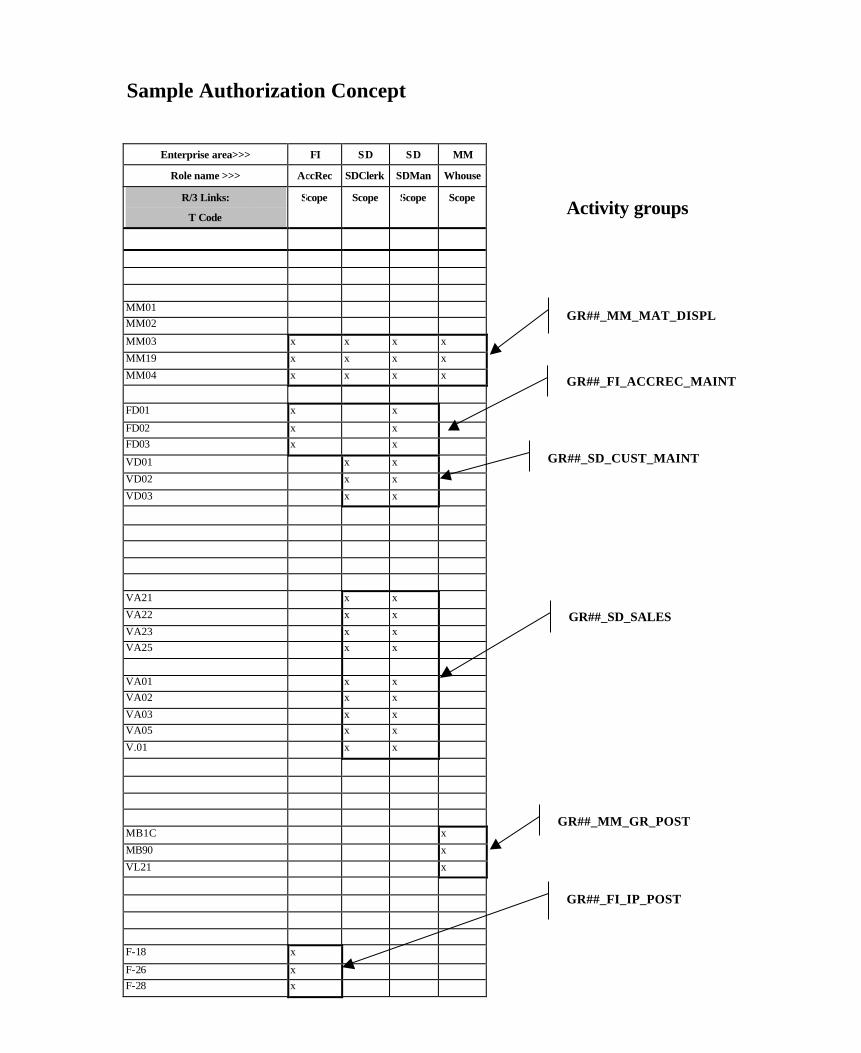
Sample Authorization Concept
Enterprise area>>> FI SD SD MM
Role name >>> AccRec SDClerk SDMan Whouse
R/3 Links:
T Code
Scope Scope Scope Scope
MM01 MM02
MM03 x x x x
MM19 x x x x
MM04 x x x x
FD01 x x
FD02 x x FD03 x x
VD01 x x
VD02 x x
VD03 x x
VA21 x x
VA22 x x
VA23 x x VA25 x x
VA01 x x VA02 x x
VA03 x x VA05 x x
V.01 x x
MB1C x
MB90 x
VL21 x
F-18 x
F-26 x F-28 x
GR##_MM_MAT_DISPL
GR##_MM_GR_POST
GR##_FI_IP_POST
Activity groups
GR##_FI_ACCREC_MAINT
GR##_SD_CUST_MAINT
GR##_SD_SALES
SAP AG 2001
l Overview of the elements of the SAP R/3 authorizationconcept
l Authorization fields, objects, and object classes
l Authorizations and authorization profiles
l Authorization check in the program
l Security Checks during Transaction Start
l Roles and authorization profiles
l Roles and the Easy Access menu
Contents:
Elements of the SAP R/3 Authorization Concept

SAP AG 2001
l List the elements of the authorization conceptsand know the differences between them
l Describe the authorization concept as a whole
l Know how and when authorization checks areperformed
l Explain the meaning of an authorization object.
At the conclusion of this unit, you will be able to:
Elements of the SAP R/3 Authorization Concept:Unit Objectives

SAP AG 2001
Overview Diagram (3)
Conception with ASAP Methodology
Elements of the SAP R/3 Authorization Concept
The User Master Record
Introduction
Central User Administration
Access Control and User Administration
mySAP.com and the Workplace
Working with the Profile Generator
Special Authorization Components
Integration into Organizational Management
Profile Generator:Installation/Upgrade
33
Transporting AuthorizationComponents
Analysis and Monitoring Functions

SAP AG 2001
l The SAP R/3 authorization concept preventsunauthorized access to the system and to data andobjects within the system. Users that are toperform specific functions in the SAP R/3 Systemneed a user master record with the relevantauthorizations.
Elements of the SAP R/3 Authorization Concept:Business Scenario

SAP AG 2001
Authorizationobject class
Authorizationobject
Authorization Berechtigungs-profil
Role
User
Authorization field:
Overview of the elements of the SAP R/3authorization concept
n Authorization field: Smallest unit against which the check should be run (ACTVT, BUKRS).
n Authorization Object: Groups 1 to 10 authorization fields together. These fields are then checked simultaneously (example: F_LFA1_APP Creditor: Application authorization).
n Authorization object class: Logical grouping of authorization objects (for example, all authorization objects for object class FI).
n Authorization: An instance of an authorization object, that is, a combination of allowed values for each authorization field of an authorization object.
n Authorization profile: Contains instances (authorizations) for different authorization objects.
n Role: Is generated using the Profile Generator (Transaction PFCG), and allows the automatic generation of an authorization profile. A role describes the activities of an SAP R/3 user.
n User Master Record: Used for logging on to SAP systems and grants restricted access to functions and objects of SAP systems based on authorization profiles.
n Naming conventions for custom developments (see SAP Notes 20643 and 16466):
� Authorizations and authorization profiles are Customizing objects and must therefore not be in the customer namespace (Y, Z). They must not contain an underscore in the second position.
� Authorization classes, objects, and fields are development objects and must begin with Y or Z (customer namespace).

SAP AG 2001
Authorization Fields, Objects, Object Classes
Authorization Fields Authorization Objects AuthorizationObject Classes
BUKRS
ACTVT
WERKS
BEGRU
M_RECH_BUK
F_BKPF_BUK
F_KNA1_BUK
C_KAPA_PLA
C_ARPL_WRK
M_MSEG_WWA
V_KNA1_BRG
C_DRAW_BGR
MM_R
FI
PP
MM_B
SD
CV
n Example:
The authorization fields BUKRS (company code) and ACTVT (activity) are used in the following authorization objects, among others:
� M_RECH_BUK: Authorizaiton to release blocked invoices for specific company codes
� F_BKPF_BUK: Authorization to edit documents for specific company codes.
� F_KNA1_BUK: Authorization to maintain the accounts receivable master for specific company codes.
In the authorizations for each authorization object, you can specify which activities (such as create, change, display, and so on) may be performed in which company code. Each object has a specific number of allowed activities, which are described in the object documentation.
n All possible activitie s (ACTVT) are stored in table TACT (transaction SM30).
n The valid activities for each authorization object can be found in table TACTZ (transaction SE16).

SAP AG 2001
Authorization
BUKRS 1000, 2000ACTVT 01, 02, 03 1000 2000 3000 2000 3000
Authorization AAuthorization A
BUKRS
ACTVT
CreateChangeDisplay
BUKRS 1000, 2000, 3000ACTVT 03 1000 2000 3000 2000 3000
Authorization BAuthorization B
BUKRS
ACTVT
CreateChangeDisplay
n Example:
� Authorization A allows the user to perform create, change and display activitites in company codes 1000 and 2000.
� Authorization B allows the user to perform only the display activity in company codes 1000, 2000, and 3000.
n If the user has authorization A and authorization B, they work together. This means that the user can perform create, change and display activities in company codes 1000 and 2000, can only perform the display activity in company code 3000.

SAP AG 2001
Authorizations and Authorization Profiles
AuthorizationObjects
WorkCenter 1
WorkCenter 2
WorkCenter 3
F-22, F-27FB02, FB03
F-43, F-41FB02, FB03
01, 02, 031000
01, 02, 031000, 2000
01, 02, 03A, D, S
01, 02, 03K
....... .......
S_TCODETCD
F_BKPF_BUK
ACTVTBUKRS
F_BKPF_GSPACTVTGSBER
F_BKPF_KOAACTVTKOART.......
01, 02, 032000
Authorization
AuthorizationProfile
F-22, F-27FB02, FB03
01, 02, 031000
01, 02, 032000
01, 02, 03D.......
031000
n You can define several different authorizations for an authorization object. This means that an authorization object has various instances.
n Example: Authorization object F_BKPF_BUK has the following authorizations:
� Work center 1: Authorized to create, change and display documents in company code 2000.
� Work center 2: Authorized to create, change and display documents in company code 1000.
� Work center 3: Authorized to display documents in company code 1000.
n You can assign multiple authorizations to a work center. Grouped together, these authorizations are called an authorization profile.
n Example: Work center 2 has the following authorization profile:
� Authorization to perform transaction codes F-22, F-27, FB02, and FB03.
� Authorization to create, change and display documents in company code 1000.
� Authorization to create, change and display documents in business area 2000.
� Authorization to create, change and display document items for the accounts receivable account type.

SAP AG 2001
Authorization Check in the Program
ChangeAccountingDocument
Transaction FB02Program SAPMF05L
....
AUTHORITY-CHECKOBJECT ´F_BKPF_BUK´ID ́ ACTVT´ FIELD ´02´ID ́ BUKRS´ FIELD BUK.
IF SY-SUBRC NE 0.MESSAGE E083 WITH BUK.
ENDIF......
UserAuthorizations
Object F_BKPF_BUKAuthorization BUK
1000
Check
Result
Field ValueACTVT 02, 03BUKRS 1000
Authorization BUK 1000Authorization BUK 1000
n Authorization checks in programs are performed using the ABAP command AUTHORITY-CHECK.
n A program may contain any number of authorization checks.
n Example: The user wants to call transaction FB02. An AUTHORITY-CHECK is coded in the ABAP program SAPMF05L which calls transaction FB02. The following authorization is checked:
� Authorization object F_BKPF_BUK
� Authorization field ACTVT (activity) on value 02 (change).
� Authorization field BUKRS (company code) on value 1000.
n Only if the user has the authorization object F_BKPF_BUK with the authorization fields ACTVT (02) and BUKRS (1000) as authorization is he allowed to perform the transaction.
n After the authorization check, the system gives back a return code. The valid return codes for the AUTHORITY-CHECK statement are:
� 0: The user has the authorization for the authorization object with the correct field values
� 4: The user has an authorization for the the authorization object, but the values checked are not assigned to the user.
� 12: The user does not have any authorization for the authorization object in the user buffer

SAP AG 2001
Security Checks during Transaction Start
ChangeAccountingDocument
System Program
Authorization for transaction (Authorization ObjectS_TCODE)?
Authorization for authorization object in table TSTCA?
NoNo
NoNo
ABAP ProgramAuthorization Checks
STOPSTOP
YYEESS
Initial Screen
Next Screen
n When startinga transaction, a system program executes a series of checks to ensure the user has the appropriate authorizations.
n Step 1: Check if the user has the authority to start the transaction. Authorization object S_TCODE (transaction start) contains the authorization field TCD (transaction code). The user must have the authorization for the transaction code to be started (e.g. FK01, Create Vendor).
n Step 2: Check if an authorization object is assigned to the transaction code. If this is the case, the system checks if the user has an authorization for this authorization object. The transaction code / authorization object assignment is stored in table TSTCA.
n If any of the above steps fail, the transaction will not begin, and the user will receive a message.
n NOTE: The ABAP statement AUTHORITY-CHECK is used to check the authorization object assigned to the transaction. The check is performed during transaction start by the ABAP programm called by the transaction.

SAP AG 2001
Roles and Authorization Profiles
Create Roles Using the Profile Generator (PFCG)
Choose Activities(Transactions, Reports, Web links)
Maintain AuthorizationData (Define Authorization Objects) Generation
User Menu
Authorization Profile
Authorization forAuthorization Object xxx....
n To provide users with user-specific menus after they have logged on to an SAP R/3 System, you use roles. These are defined using the Profile Generator.
n A role is a set of functions describing a specific work area. The 'Accounts Receivable Accountant' role, for example, contains transactions, reports, and/or Internet/Intranet links that an accountant needs for his or her daily work. In the role, you also assign the authorizations that users need to access the transactions, reports, and so on contained in the menu.
n A role can be assigned to any number of users.
n A large number of roles are delivered with the standard SAP R/3 System. Before you define your own roles, check if one of the user roles delivered as part of the standard SAP R/3 System can be used. The predefined roles are delivered as templates, and begin with the prefix SAP_.
n To automatically generate an authorization prof ile, you must first create a role. In the role, you organize transactions, reports, or Web addresses in a user menu. This user menu appears when the user to which the authorization profile is assigned logs on to the SAP R/3 System. A user menu contains activities that are required by a group of users for their work area.

SAP AG 2001
Roles and the Easy Access Menu
Menu Edit Favorites Extras System Help
Other menu Create menu Assign users
Role SAP_BC_USER_ADMIN_AG
Favorites
SU01 User Maintenance
User Administration
SU01 - User Maintenance
PFCG - Role Maintenance
SU01D - Display User
SU05 - Internet User Maintenance
SU10 - User Mass Maintenace
SUGR - Maintain User Groups
n The new user menu SAP Easy Access provides a user-specific point of entry into the SAP R/3 System.
n The user menu contains only those transactions, reports and Web addressses needed by the users for their daily work processes.
n The user menus are created using the Profile Generator.
n For users with system administrator authorization, the SAP Easy Access menu provides some additional functions for:
� Creating Roles
� Calling menus for roles and assigning them to users
n In order to be able to use these extended functions, you need authorizations for the following authorization objects: Authorization Object Value
S_USER_TCD PFCG S_USER_PRO * S_USER_AUT * S_USER_GRP *

SAP AG 2001
l Describe the elements of the authorizationconcept
l Describe the process flow of an authorizationcheck in the program
l Describe the authorization checks duringtransaction start
l Describe the differences between roles andauthorization profiles
l Explain what the relationship between roles andthe Easy Access menu
You are now able to:
Elements of the SAP R/3 Authorization Concept: UnitSummary

Exercises
Unit: Elements of the SAP R/3 Authorization Concept
At the conclusion of these exercises you will be able to
• Distinguish between the elements of the authorization concept
• Display a user master record and find out the authorizations of a specific user
• Find out the meaning of an authorization object
1-1 Display the master record of user CA940-##.
1-1-1 Are roles assigned to the user? If yes, which ones? ______________________ _____________________________________________
1-1-2 Is an authorization profile assigned to the user? If yes, which one/s? _____________________ ____________________________________________
1-1-3 Display the details for the authorization profile CA940_PLUS.
Double-click the profile name to go to the detail screen of the authorization profile.
Expand the tree structure of the authorization profile.

Do you have authorizations for the following authorization objects? - F_BKPF_BUK? _____ - PLOG? _____ - S_TCODE? _____ - S_USER_GRP? _____ What is the name of your authorization(s) for the object S_USER_GRP? ______________________________________________________ Which authorization fields does the object S_USER_GRP consist of? _______________________________________________________ Which authorization values do you have for the authorization object S_USER_GRP? _________________________________________________________ From the detail screen of the authorization profile, go back to the display of the user master record.
1-1-4 Navigate to the Information System using the SAP menu (Tools → Administration → User Maintenance → Information System). Expand the structure for the node Authorization Objects, and select the report List Authorization Objects by object name, text by double-clicking it. Select the authorization object S_USER_GRP. To which authorization object class is the authorization object S_USER_GRP assigned? ____________________ Display the documentation for this authorization object. In which transactions is the authorization object checked? _________________________________________________________ Which activities are possible? _________________________________________________________ Exit the report List Authorization Objects by object name, text.

1-1-5 In the information system, double-click the report Authorization Objects by object class from the node Authorization objects. Choose the All Selections icon. Select the authorization object class from exercise 1-1-4. How many authorization objects have a name beginning with S_USER? ____________________ Get information about the authorization object S_USER_TCD by displaying the documentation. What is controlled with this authorization object? _________________________________________________________ _________________________________________________________ _________________________________________________________ Which authorization fields does the object consist of? ____________________ How many authorization objects are assigned to the selected authorization object class? (Note: The number of authorization objects is indicated at the end of the list.) ____________________ Exit the report Authorization objects by object class.
1-1-6 Expand the structure for the node Roles, and select the report Roles by role name by double-clicking it. Select the role CA940_SD_SALES. Display the transaction assignment of the role. How many transactions are assigned to the role? (Note: The number of transactions is indicated at the end of the list.) ____________________ Does this role authorize a user to call transaction VA03? ____________________ Does this role authorize a user to call transaction MM03? ____________________

The following exercise is optional.
1-2 Display the definition of transaction FB03.
Menu Path: Menü → ABAP Workbench à Development à Other Tools à Transactions.
1-2-1 Which authorization object is checked when the transaction is called? ____________________
1-2-2 Which authorization values must exist for the authorization check to be positive and the transaction to be started? ____________________

Solutions
Unit: Elements of the SAP R/3 Authorization Concept
1-1 Menu: Tools → Administration → User Maintenance → SU01 - Users Enter CA940-## and choose the Display (F7) icon.
1-1-1 Choose the Roles tab. Yes: CA940_DISPLAY CA940_PLUS CA940_USER
1-1-2 Choose the Profiles tab. Yes: CA940_DISP CA940_DISP1 CA940_DISP2 CA940_DISP3 CA940_DISP4 CA940_PLUS CA940_TRAI
1-1-3 Double-click the profile name to go to the detail screen of the authorization profile. Expand the tree structure of the authorization profile. Authorization for authorization object: - F_BKPF_BUK? Nein - PLOG? No - S_TCODE? Yes - S_USER_GRP? Yes Name of the authorizations for object S_USER_GRP: CA940_PLUS00 CA940_PLUS01

Authorization fields for authorization object S_USER_GRP: ACTVT Activity CLASS User group in user master maintenance Authorization values for authorization object S_USER_GRP: Authorization CA940_PLUS00: ACTVT 05 CLASS Z* Authorization CA940_PLUS01 ACTVT 03, 08 CLASS * From the detail screen of the authorization profile, go back to the display of the user master record.
Exit the transaction.
1-1-4 Navigate to the Information System using the SAP menu: Tools → Administration → User Maintenance → Information System. Expand the structure for the node Authorization Objects, and select the report List Authorization Objects by object name, text by double-clicking it. Select the authorization object S_USER_GRP. Authorization object class for authorization object S_USER_GRP: BC_A Select the authorization object and choose the Documentation pushbutton. Transactions with integrated check of S_USER_GRP: SU01, SU10, SU12, PFCG, SUUM, SUUMD Possible activities: 01: Create 02: Change 03: Display 05: Lock, unlock 06: Delete 08: Display change documents 22: Add users to roles 24: Archive 78: Assign 68: Model Exit the report List Authorization Objects by object name, text.

1-1-5 In the information system, double-click the report Authorization Objects by object class from the node Authorization objects. Choose the All Selections icon. Select the authorization object class BC_A and the authorization object S_USER*. Number of authorization objects beginning with S_USER: 8 authorization objects Select the authorization object and choose the Documentation pushbutton. Documentation for authorization object S_USER_TCD: The authorization object determines which transactions administrators may assign to a role and for which transactions they may grant the transaction code authorization (object S_TCODE). Please note that you may maintain transaction intervals for authorization object S_TCODE in the Profile Generator only if you have complete S_USER_TCD authorization. Otherwise, you may only maintain single values for the object S_TCODE. Which authorization fields does the object consist of? TCD: Transactions which administrators may assign to the role and for which they may grant the authorization to start the transaction in the Profile Generator. Number of authorization objects in object class BC_A: (The number of authorization objects is indicated at the end of the list.) 62 authorization objects Exit the report Authorization objects by object class.

1-1-6 Expand the structure for the Roles node, and select the report Roles by role name by double-clicking it. Select the role CA940_SD_SALES. Display the transaction assignment of the role (by choosing the corresponding pushbutton). Number of transactions: (The number of transactions is indicated at the end of the list.) 28 transactions Does this role authorize a user to call transaction VA03? Yes Does this role authorize a user to call transaction MM03? No

The following exercise is optional.
1-2 Display the definition of transaction FB03.
Menu Path: Menu → Tools à ABAP Workbench à Development à Other tools à Transactions (or transaction SE93)
1-2-1 Which authorization object is checked when the transaction is called? F_BKPF_BUK
1-2-2 Which authorization values must exist for the authorization check to be positive and the transaction to be started? Activity 03 Company code is not checked here, and it is therefore irrelevant which values appear here in the user master.

SAP AG 2001
l Identifying users by means of the user master record
l SAP R/3 user types
l Components of the user master record
l User buffer
l Change documentation
Contents:
The User Master Record

SAP AG 2001
l List the different SAP R/3 user types
l Distinguish between the components of the usermaster record
l Create and change user master records
l Evaluate change documents
l Display and archive change documents
l Analyze the user buffer
l Understand the function of the user buffer andevaluate the buffered user authorizations
At the conclusion of this unit, you will be able to:
The User Master Record: Unit Objectives

SAP AG 2001
Overview Diagram (4)
Conception with ASAP Methodology
Elements of the SAP R/3 Authorization Concept
The User Master Record
Analysis and Monitoring Functions
Introduction
Central User Administration
Access Control and User Administration
Working with the Profile Generator
Special Authorization Components
Integration into Organisational Management
Profile Generator:Installation/Upgrade
44Transporting AuthorizationComponents
mySAP.com and the Workplace
SAP AG 2001
l To access the SAP R/3 System and work with thedata in the system, a user master record withappropriate authorizations is required. Otherelements of the user master record make it easierto work with the SAP R/3 System.
The User Master Record: Business Scenario

SAP AG 2001
User Master Record Components
Personal Personal DataData ,,CommunicationCommunicationDataData, , CompanyCompany
AddressAddress
User GroupUser Group,,User User Type,Type,
Validity PeriodValidity Period
Start Start MenuMenu,,LogonLogon LanguageLanguage ,,Standard PrinterStandard Printer
Default Default Parameter Parameter IDsIDs
Assignment of Assignment of RolesRoles
Assignment of Assignment of ProfilesProfiles
Address Logon Data Defaults Parameters Roles Profiles Groups
Display Display UserUser
Saved
User
Last changed by
Assignment ofAssignment ofUser GroupsUser Groups
n A user can only logon to an SAP system if a user master record with a password exists. The user master determines the actions individual users are allowed to perform in the SAP system.
n User master records are client-specific. You must maintain user master records for each client in an SAP system.
n The following authorization objects are required to create and maintain user master records:
� S_USER_GRP: User Master Maintenance: Assign user groups
� S_USER_PRO: User Master Maintenance: Assign authorization profile
� S_USER_AUT: User Master Maintenance: Create and maintain authorizations
n By choosing System -> User profile -> Own data (transaction SU3), users can themselves maintain the Address, Defaults, and Parameters tabs.
SAP AG 2001
The User Master Record: Logon data
Display Display UserUser
Address Logon Data Defaults Parameters Roles Profiles Groups
User Group for Authorization Check
Validity Period
Other data
Dialog
Service
Referenz
System
User Type
Valid from
Valid until
Accounting Number
Cost Center
User
Last changed by Status
References
Saved
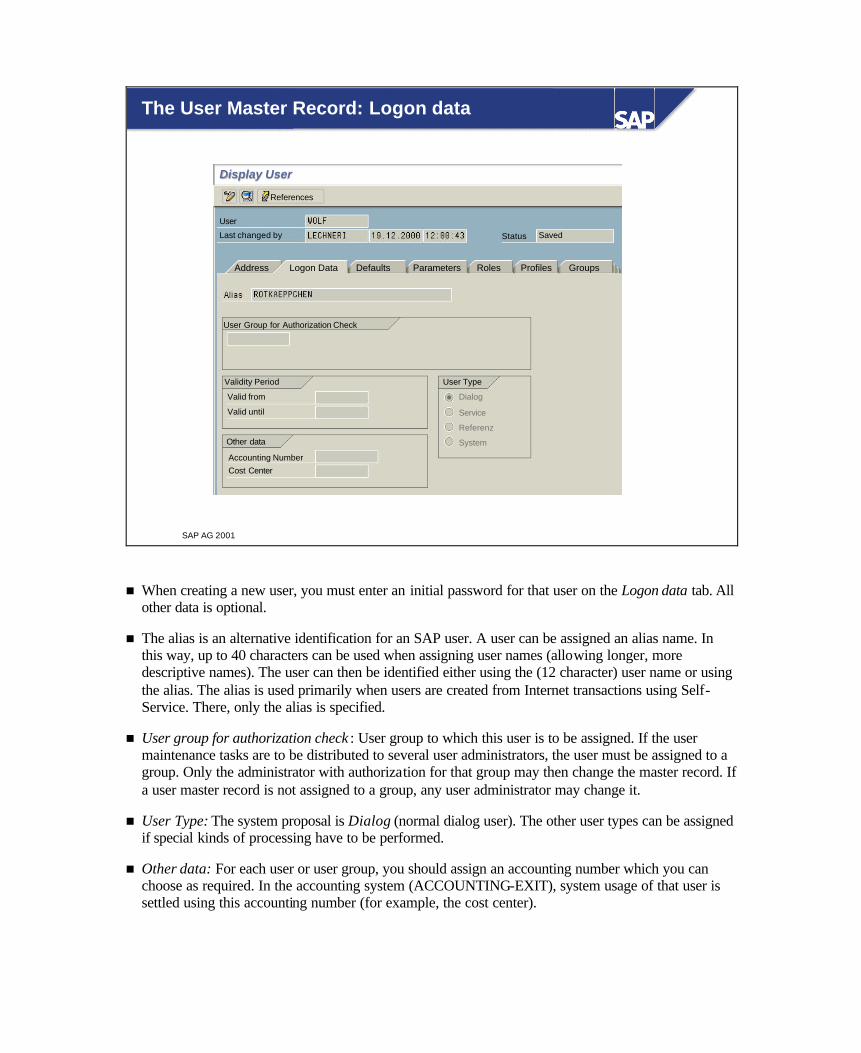
n When creating a new user, you must enter an initial password for that user on the Logon data tab. All other data is optional.
n The alias is an alternative identification for an SAP user. A user can be assigned an alias name. In this way, up to 40 characters can be used when assigning user names (allowing longer, more descriptive names). The user can then be identified either using the (12 character) user name or using the alias. The alias is used primarily when users are created from Internet transactions using Self-Service. There, only the alias is specified.
n User group for authorization check : User group to which this user is to be assigned. If the user maintenance tasks are to be distributed to several user administrators, the user must be assigned to a group. Only the administrator with authorization for that group may then change the master record. If a user master record is not assigned to a group, any user administrator may change it.
n User Type: The system proposal is Dialog (normal dialog user). The other user types can be assigned if special kinds of processing have to be performed.
n Other data: For each user or user group, you should assign an accounting number which you can choose as required. In the accounting system (ACCOUNTING-EXIT), system usage of that user is settled using this accounting number (for example, the cost center).

SAP AG 2001
SAP R/3 User Types
n Dialog users are used for individual, interactive sessions in the SAP R/3 System.
� Check for expired/initial passwords
� Possible to change your own password
� Check for multiple dialog logon
n A Service user is available to an larger, anonymous user group and allows interactive access to the system.
� No check for expired/initial passwords
� Only user administrators can change the password
� Multiple logon permitted
n System users are not capable of interaction and are used to perform certain system activities, such as background processing, ALE, Workflow, and so on.
n A Reference user is, like a System user, a general, non-personally related, user. Additional authorizations can be assigned within the system using a reference user. A reference user for additional rights can be assigned for every user in the Roles tab.
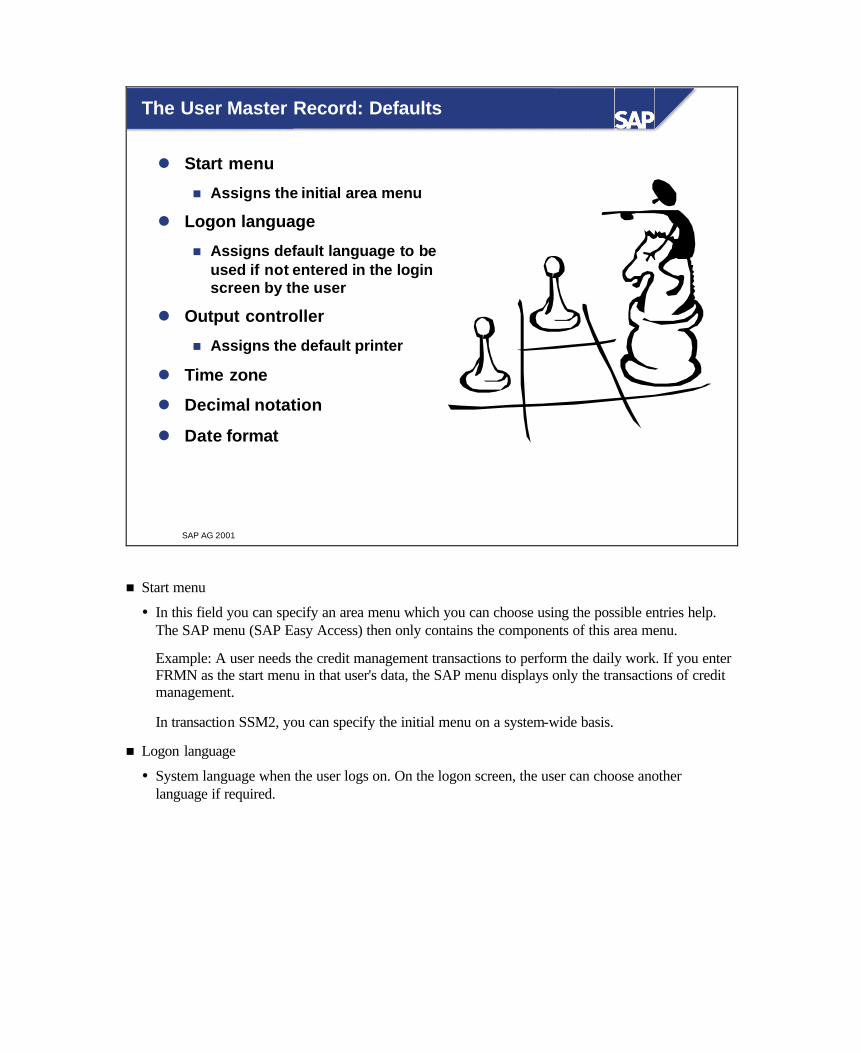
SAP AG 2001
l Start menu
n Assigns the initial area menu
l Logon language
n Assigns default language to beused if not entered in the loginscreen by the user
l Output controller
n Assigns the default printer
l Time zone
l Decimal notation
l Date format
The User Master Record: Defaults
n Start menu
� In this field you can specify an area menu which you can choose using the possible entries help. The SAP menu (SAP Easy Access) then only contains the components of this area menu.
Example: A user needs the credit management transactions to perform the daily work. If you enter FRMN as the start menu in that user's data, the SAP menu displays only the transactions of credit management.
In transaction SSM2, you can specify the initial menu on a system-wide basis.
n Logon language
� System language when the user logs on. On the logon screen, the user can choose another language if required.

SAP AG 2001
The User Master Record: Parameters
Parameters Value Text
Company Code
Transaction FK03 (Display Vendor)
Vendor:Company Code: 1000
Display Display UserUser
References
User
Last changed by
Address Logon Data Defaults Parameters Roles Profiles Groups
Saved
n Using a parameter ID, a field can be filled with default values from the SAP memory.
n Example: A user has only the authorization for company code 1000. When a transaction starts, this company code is saved to the memory using the corresponding parameter ID. On all subsequent screens, all fields referencing the company code data element are then automatically filled with the value 1000.
n A field on a screen is only filled automatically with the value saved under the parameter ID of the data element, if you have explicitly allowed this in the Screen Painter.

SAP AG 2001
The User Master Record: Roles
Display Display UserUser
Single Role
User
Last changed by
Address Logon Data Defaults Parameters Roles Profiles Groups
References
Role Type Valid from Valid until Text
Reference user for additional rights
Saved
n A role is a set of functions describing a specific work area. In the role, you organize transactions, reports or Web addresses in a user menu. A role can be assigned to any number of users.
n On the Roles tab, you can use the possible entries help (F4 help) to display all available roles and then choose one from that list.
n You can define a link to the user master record for a specific validity period that you have to enter.

SAP AG 2001
The User Master Record: Profiles
Display Display UserUser
References
User
Last changed by Saved
Address Logon Data Defaults Parameters Roles Profiles Groups
Profile for Role MY_FI_AR_DISPLAY_MASTERDATA
n On the Profiles tab, you assign authorization profiles to a user.
n You can assign a large number of authorization profiles (approximately 150) to a user.
n Each profile grants the user a number of authorizations.
n Basically, you should maintain all profiles with the Profile Generator, except if you have to postprocess profiles that were created manually.
n Profiles that were generated using the Profile Generator should never be added directly to the user master record. After a user comparison in the Profile Generator, the profiles are automatically added to the user master record.
n The SAP R/3 System contains predefined profiles.
� SAP_ALL: All authorizations in the SAP System (superuser authorizations).
� SAP_NEW: Authorizations for new authorization objects in existing functions.
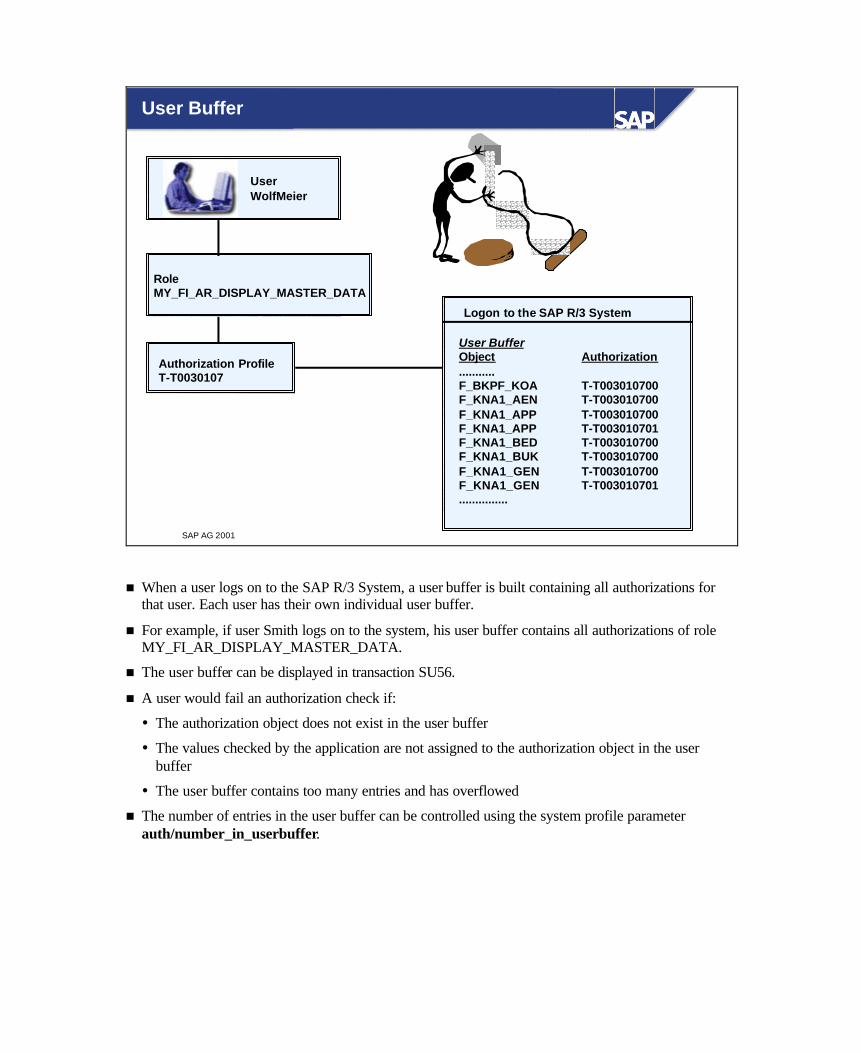
SAP AG 2001
User Buffer
UserWolfMeier
RoleMY_FI_AR_DISPLAY_MASTER_DATA
Authorization ProfileT-T0030107
Logon to the SAP R/3 System
User BufferObject Authorization...........F_BKPF_KOA T-T003010700F_KNA1_AEN T-T003010700F_KNA1_APP T-T003010700F_KNA1_APP T-T003010701F_KNA1_BED T-T003010700F_KNA1_BUK T-T003010700F_KNA1_GEN T-T003010700F_KNA1_GEN T-T003010701...............
n When a user logs on to the SAP R/3 System, a user buffer is built containing all authorizations for that user. Each user has their own individual user buffer.
n For example, if user Smith logs on to the system, his user buffer contains all authorizations of role MY_FI_AR_DISPLAY_MASTER_DATA.
n The user buffer can be displayed in transaction SU56.
n A user would fail an authorization check if:
� The authorization object does not exist in the user buffer
� The values checked by the application are not assigned to the authorization object in the user buffer
� The user buffer contains too many entries and has overflowed
n The number of entries in the user buffer can be controlled using the system profile parameter auth/number_in_userbuffer.

SAP AG 2001
Mass Changes
n Most changes that can be made for individual users in the context of user administration can also be made for a selected number of users.
n Logon data, defaults, parameters, roles and profiles can be changed for a specific groups of users.
n By choosing Environment → Mass Changes (Transaction SU10) in user maintenance, you can make changes to a selected group.
n After every mass change, the system asks in a dialog window if you want a log. The log shows who made which changes in which system, and when.
n The log contains multiple message levels that you can, if you wish, expand using the appropriate pushbuttons. If there is a long text for a particular message, this can also be displayed by choosing the pushbutton that appears next to the message.
n You can make certain settings for the log display under Settings and the Color legend expla ins the colors used in the display.
n You can print the log, or save it to a file on your PC.

SAP AG 2001
Change Documentation and Archiving
online offline
Archive files TapeRelevant tables for change documentsRelevant tables for change documents
Change history for logon data
Change history for authorizationsChange history for authorization profiles
Change history for authorization values
USH02
USH04
USH10
USH12
Archiving procedure
n Displaying change documents: Choose Information -> Information system and then Change documents on the overview screen that appears to display a list of changes made to user master records, authorization profiles or authorizations.
n Archiving change documents: User master records and authorizations are saved in USR* tables. Using the archiving function, you can reduce the memory space occupied by the USR* tables in the database. Change documents are saved in USH* tables. The archiving function deletes change documents from the USH* tables that are no longer needed.
n You can archive the following change documents or change records relating to user master records and authorizations from the USH* tables:
� Changes to authorizations (archiving object US_AUTH)
� Changes to authorization profiles (archiving object US_PROF)
� Changes to the authorizations assigned to a user (archiving object US_USER)
� Changes to a user's password or to defaults stored in the user master record (archiving object US_PASS)

SAP AG 2001
l List the different SAP R/3 user types
l Distinguish between the components of the usermaster record
l Create and change user master records
l Evaluate change documents
l Display and archive change documents
l Analyze the user buffer
l Understand the function of the user buffer andevaluate the buffered user authorizations
You are now able to:
The User Master Record: Unit Summary

Exercises
Unit: The User Master Record
At the conclusion of this exercise, you will be able to:
• Create and change user master records as well as evaluate changes
• Know the components of the user master record
• Use predefined work center examples
• Create multiple users in one step
• Understand the principle of the user buffer and evaluate the buffered user authorizations
1-1 Create a new user group ZGR## with a description of your choice.
1-2 Create a user master record for a dialog user GR##-ADM.
1-2-1 Enter address data of your choice.
1-2-2 Enter an initial password of your choice and assign the user to user group ZSUPER. Initial Password: _____________________________________
1-2-3 Assign the logon language that you have used yourself for logging on.
1-2-4 Save your user master record.

1-3 Assign a predefined work center example to your new user master record. To do this, choose Other menu on the SAP Easy Access initial screen.
1-3-1 Choose the role CA940_BC_ADMIN.
1-3-2 Assign your new user GR##-ADM to the role. Enter the user ID and choose Add users. Ensure that the user master record is automatically compared.
1-4 Go from the Other menus display to the SAP menu display. Change the user master record of your user GR##-ADM.
1-4-1 Check the following points: Is a role assigned to the user? Which role is it? ____________________
1-4-2 Link your user with another role. Choose the role CA940_PLUS.
1-4-3 Are authorization profiles assigned to your user? Which authorization profile(s)? ____________________
1-5 Display the change documents for your user GR##-ADM by calling up the information system for users and authorizations and selecting the report Change documents for user. Display the changes made to the authorizations. Does the list tell you that creating the user master record and assigning the user to roles were separate steps? __________________________________________________________________

1-6 Log on to the system as user GR##-ADM.
1-6-1 Do you need to enter a logon language? ____________________
1-6-2 Set your own password.
1-6-3 Check the user menu: Which functions does it contain? List some examples. ____________________________________________________________
1-6-4 Check the user buffer by calling the function Analyze user buffer in your user menu. How many authorizations are available? ____________________ For which authorization objects? List some examples. ____________________________________________________________
1-7 Log off as user GR## and log on again as user CA940-##.
1-8 Create additional master records using the User Mass Maintenance transaction.
1-8-1 In the User column, enter the following user names and choose Create.
User name
GR##-FI1
GR##-FI2
GR##-SD1
GR##-SD2
GR##-MM1
GR##-MM2
1-8-2 Enter the user group ZGR## and the logon language that you use into the corresponding fields.

1-8-3 Save the users with log. Expand the log completely and enter the initial passwords generated into the following tables beside the user names.
User name Password generated
GR##-FI1
GR##-FI2
GR##-SD1
GR##-SD2
GR##-MM1
GR##-MM2

Solutions
Unit: The User Master Record
1-1 Menu: Tools → Administration → User Maintenance → Maintain User Groups (SUGR) Enter ZGR## and choose the Create user group (F8) icon.
1-2 Menu: Tools → Administration → User Maintenance → SU01 - Users Enter GR##-ADM and choose the Create (F8) icon.
1-2-1 On the Address tab
1-2-2 On the Logon data tab
1-2-3 On the Defaults tab
1-2-4 Save your user master record.
1-3 Assign a predefined work center example to your new user master record. To do this, choose Other menu on the SAP Easy Access initial screen.
1-3-1 Choose the role CA940_BC_ADMIN.
1-3-2 Assign the new user GR##-ADM to this role. To do this, choose Assign users on the SAP Easy Access initial screen. Enter the user ID and choose Add users. Ensure that the user master records are compared automatically by choosing Yes on the system prompt that appears next.

1-4 Swich from the other menu display to the SAP standard menu display by choosing Menu→ SAP Menu. Change the user master record of your user GR##-ADM.
1-4-1 Menu: Tools → Administration → Benutzerpflege → Users (SU01) Role CA940_BC_ADMIN
1-4-2 Enter CA940_PLUS on the Roles tab.
1-4-3 Authorization profiles assigned: CA940_BC_A CA940_PLUS
1-5 Menu: Tools → Administration → User Maintenance → Information system Change documents For user Choose the Change documents for user report. Display the changes made to the authorizations. The different time stamps tell you that the changes were made one after another.
1-6 Log on to the system as user GR##-ADM.
1-6-1 No, the logon language is set in the user master.
1-6-2 Set a new user password
1-6-3 Users Display Users User Mass Maintenance Maintain User Groups Analyze User Buffer Information System ....

1-6-4 Check the user buffer by calling the function Analyze user buffer in your user menu. Menu: User Maintenance → Analyze user buffer (SU56) Number of authorizations 13 For which authorization objects? List some examples. S_TCODE S_USER_AGR S_USER_GRP S_USER_PRO
1-7 Menu: System → Log off
1-8 Menu: Tools → Administration → User Maintenance → SU010 - User Mass Maintenance
1-8-1 In the User column, enter the following user names and choose the Create - F8 icon.
User name
GR##-FI1
GR##-FI2
GR##-SD1
GR##-SD2
GR##-MM1
GR##-MM2
1-8-2 Logon data tab: Enter ZGR## Constants tab: Enter DE
1-8-3 Save the users with log. Expand the log completely and enter the initial passwords generated into the tables contained in the exercise part.

SAP AG 2001
l This unit describes how to design SAP Easy Accessuser menus for the various work centers (or roles) inyour company and how to automatically generateauthorization profiles for those menus.
l The first part of this unit deals with simpler basicmaintenance. The focus is placed on the creation ofmenus and the associated authorizations, profiles, anduser assignments.
l The second part deals with more advanced topics:The focus here is placed on derived and compositeroles.
Contents:
Working with the Profile Generator
SAP AG 2001
l Perform the steps involved in assigningauthorizations with the Profile Generator
l Copy, change, and create roles and determinetheir activities
l Display and maintain authorizations that weregenerated automatically
At the conclusion of this unit, you will be able to:
Working with the Profile Generator: Unit Objectives

SAP AG 2001
Overview Diagram (5)
Conception with ASAPMethodology
Elements of the SAP R/3Authorization Concept
The User Master Record
Analysis and Monitoring Functions
Introduction
Access Control and User Administration
Working with the ProfileGenerator
Special Authorization Components
Integration into Organizational Management
Profile Generator: Installation/Upgrade
555
mySAP.com and the Workplace
Central User Administration
Transporting AuthorizationComponents

SAP AG 2001
l When you create authorizations and authorizationprofiles for groups of users, you should use theProfile Generator. Based on selected menufunctions, the Profile Generator automaticallygenerates authorization data and offers it forpostprocessing.
Working with the Profile Generator:Business Scenario

SAP AG 2001
The Profile Generator
What is the Profile Generator?
n The Profile Generator is a central tool for generating authorizations and authorization profiles and assigning them to users.
n In the Profile Generator, system administrators choose transactions, menu branches (from the SAP menu) or area menus. The functions chosen correspond to the field of activity of a user or a group of users. The Profile Generator offers various maintenance views:
� A Simple view (Menu maintenance for the Workplace)
� Basic maintenance (menus, profiles, and other objects)
� Overview (Organizational Management and workflow)
n The menu tree set up by system administrators for users with a specific role within the company corresponds to the user menu that appears if a user (to which the corresponding role is assigned) logs on to an SAP system.
n The Profile Generator automatically provides the corresponding authorizations for the functions chosen. Some of these authorizations have default values. Traffic light symbols tell you which values you need to maintain.
n In the final step, the Profile Generator generates an authorization profile and assigns the role to the users.

SAP AG 2001
Roles
Weblink
ReportReportzzzzzz
TransactionTA3
Weblink
ReportReportXYZXYZ
TransactionTA4
TransactionTA5
Weblink
TransactionTA1
TransactionTA2
RoleXYZ
RoleXYZ
What are roles?
n A role is a set of functions describing a specific work area. The 'Accounts Receivable Accountant' role, for example, contains transactions, reports, and/or Internet/Intranet links needed by accountants for their daily work. In the role, you also assign the authorizations that users - such as Accounts Receivable Accountants - need to access the transactions, reports, and so on contained in the menu.
n Roles are used to implement the menus that users can work with after they have logged on to an SAP system. You can use roles predefined by SAP and custom roles. You can find the predefined roles by choosing Tools -> Administration -> User Maintenance -> Roles, or alternatively by choosing Menu -> Display menu of a role, or by clicking the Other menu pushbutton.
n You can display the role templates delivered by SAP using report RSUSR070.
n Besides the normal logon users, you can also assign object types such as jobs, organizational units or positions to roles (see unit 'Integration into Organizational Management').

SAP AG 2001
The Profile Generator: Steps
Role
ProfileGenerator
Work centre
description:
- Activity 1
- Activity 2
- ...
Description Menu Authorizations User
Define Role Names
• Define Activities• Design User Menus
• MaintainAuthorization Data• GenerateAuthorization Profile
• Assign Users• Adjust User Master Records
n To call the Profile Generator, choose Create menu on the SAP Easy Access initial screen, or choose the following menu path: Tools -> Administration -> User Maintenance -> Roles. The transaction code is PFCG.
n In the first step, you define the activities for the user role. The result of this definition process is a role (or several roles) that collects all activities of the role - represented by transactions, reports, and Web addresses.
n Simultaneously you determine how the menu tree for the new user role should look like.
n Afterwards, the authorizations for the activities selected are generated. This step normally involves the highest administrative maintenance effort.
n Subsequently, the users are assigned to the roles.
n Finally, the user masters of the users assigned to the roles are adjusted.

SAP AG 2001
Profile Generator: Views
Basic Maintenance: • Menu• Authorizations• Agents
Overview:• Menu• Authorizations• Tasks• Agents• Organisational Management
Role SAP_FI_AR_MASTER_DATA
Description Accounts Payable Clerk
Display Change Create Create Composite Role
Simple Maintenance (Workplace Menu Maintenance)
Basic Maintenance (Menus, Profiles, Other Objects)
Overview (Organisational Management and Workflow)
Information
Simple Maintenance: • Menu• Agents
Simple Maintenance: • Menu• Agents
n Using the simple maintenance, you can definte role for the Workplace
n Basic maintenance allows you to
� Access all the functions for role maintenance
� Assign roles only to SAP R/3 users
n The Overview (Organizational Management) displays all assignments and data for a role.
n This view is useful for users in Personnel Planning and Development, particularly for Organizational Management and workflow. The Overview allows you to:
� Access all the functions for role maintenance
� Change the validity period of the role
� Link tasks with an role
� Assign roles to objects in the organizational plan and delimit the validity dates for each assignment
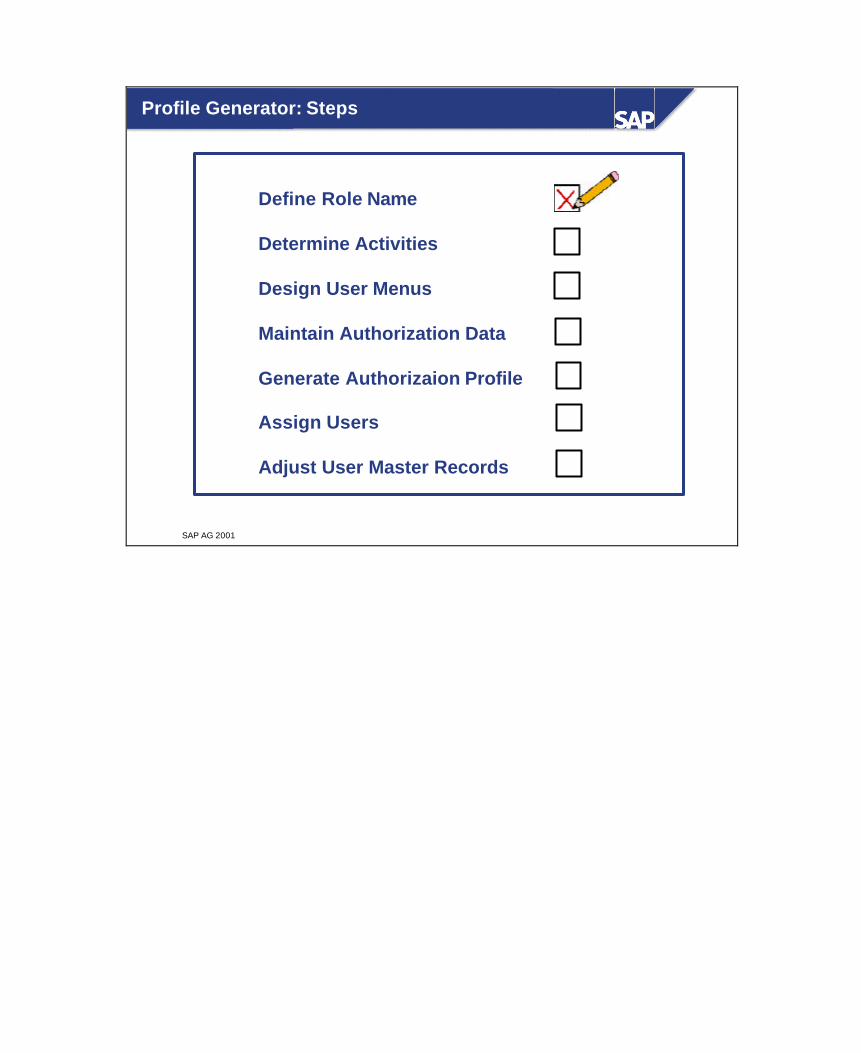
SAP AG 2001
Profile Generator: Steps
Define Role Name
Determine Activities
Design User Menus
Maintain Authorization Data
Generate Authorizaion Profile
Assign Users
Adjust User Master Records

SAP AG 2001
Role
Description
MY_ROLEFI: Accounts Payable Accountant
Display Change Create Create Composite Role
Information
Role
Descrption FI: AccountsPayable Accountant
Description Menu Authorizations User Pers ...
Information Other Role
Beschreibung Menü Berechtigungen Benutzer
Define Role Name and Description
n Note that the roles delivered by SAP begin with the prefix ‘SAP_’. If you want to create your own user roles, do not use the SAP namespace.
n Individual and composite roles are not differentiated by name by SAP. When creating your own roles, you should develop a naming concept that differentiates between individual and composite roles.

SAP AG 2001
Define Role Name
Determine Activities
Design User Menus
Maintain Authorization Data
Generate Authorizaion Profile
Assign Users
Adjust User Master Records
Profilgenerator: Arbeitsschritte

SAP AG 2001
Determine Activities
WebLink
TransactionTA1
Role 1
Role 2
TransactionTA1
???
TransactionTA2
ReportReportxyzxyz
TransactionTA1 Web
LinkReportReport
xyzxyz
ReportReportxyzxyz
TransactionTA1
WebLinkTransaction
TA3
TransactionTA1
TransactionTA1
ReportReportxyzxyz
Description Menu Authorizations User
n Defining the roles: Using roles, you define which activities are assigned to a specific role in the company. The authorization administrator chooses those transactions in the Profile Generator that users with a specific role in the company must perform regularly. The administrator also chooses any Web addresses if these are useful for the daily work of a role holder (for example, a weather forecast service would be of interest to field service personnel). In addition, frequently needed reports can also be added to the user menu.
n You can create completely new roles if required. In most cases, however, it is easier to use the roles (roles) delivered by SAP as a copy template and then change them to meet your requirements. In the following example, an SAP role was copied as the role MY_ROLE (to copy a role, choose Copy role on the initial screen and Copy selectively on the dialog box that appears next). This new role was then slightly modified. You can choose any name for roles. However, names must not begin with "SAP_".

SAP AG 2001
Profile Generator: Steps
Define Role Name
Determine Activities
Design User Menus
Maintain Authorization Data
Generate Authorizaion Profile
Assign Users
Adjust User Master Records

SAP AG 2001
Design Menus
TransactionTA3
Define Functions
ReportReportxxxxxx
ReportReportzabzab
ReportReportxyzxyz
WebLink
WebLink
WebLink
CustomizeMenuStructure
TransactionTA2
TransactionTA1
CorrespondenceClosingReportingWithholding TaxInformation SystemOtherAddresses
From the SAP Menu
From Other Role
From Area Menu
Import From File
Translate Node
Display Documentation
Find in Docu.
Role MY_ROLE
Description FI: Accounts Payable Accountant - (Template Copy)
Description Menu Authoirzations Users Pers ..
URL - www.mysap.comURL - Route PlannerSM04 - User ListSE16 - Data BroswerAccount Master Data
FK01 - Create VendorFK02 - Change VendorFK03 - Display VendorFK04 - Display ChangesFK05 - Lock VendorFK06 - Set Deletion FlagConfirmation of ChangeCompare
Transaction Report Other All
T70CLNT400
Distributedrag&drop
Role Menu
Description Menu Authorizations User
n Changing the functions: You can adjust the transactions listed in the menu tree of a role to meet your individual requirements:
� You can delete transactions that you do not need, or add new ones (by choosing the Transaction pushbutton or by copying transactions from other menus or roles).
� You can add reports (by choosing the Report pushbutton). The Profile Generator generates a transaction code (which is either created automatically or which you define yourself) that can be used to start the report from the menu.
� You can also add Internet pages (by choosing the Other pushbutton). Similarly, you can add links to documents (such as Excel files). You add links to documents in the same way as you add links to Internet pages. Instead of the URL, you then enter the path of the required file.
n Changing the menus: You can create, delete, move or rename directories. The principle of operation is similar to that of common graphical file managers.
n If you want to distribute the role to a particular target system, enter the target system (it must be an SAP R/3 Release 4.6C System) and choose the Distribute pushbutton. This function is primarily of importance when used with the Workplace.
n Role menus can, from SAP R/3 Release 4.6C, also be compared and customized using transaction ROLE_CMP.

SAP AG 2001
Profile Generator: Steps
Define Role Name
Determine Activities
Design User Menus
Maintain Authorization Data
Generate Authorizaion Profile
Assign Users
Adjust User Master Records

SAP AG 2001
Profile Generator: Create Authorization Profiles
Role MY_ROLE
Description FI: Accounts Payable Accountant - created from SAP template
Description Menu Authorizations User
Angelegt Letzte Änderung
Informationen zum Berechtigungsprofil
Maintain Authorization Data and Generate Profiles
User MEYERS
Date 16.01.2000
Time 13:22:12
Benutzer BENZ
Datum 18.01.2000
Uhrzeit 17:50:59
Profile name T-K6840005
Profile text Profile for Role MY_ROLE
Status Current Version Not Generated
Change Authorization Data
Expert Mode for Profile Generation
MY_ROLE FI: Accounts Payable Accountant
Maint: 0 Unmaint . Org levels, 7 Open Fields , Status: Saved
Gepflegt Old Cross-Application Authorization ObjectsGepflegt Old Asset ManagementGepflegt New Basis - Administration
Standard New Authorization for File Access
Standard New Authorization for File Access
Maintained Old SAPscript: Standard text
Standard Old Basis - Development EnvironmentMaintained New Basis - Central FunctionsStandard Old Materials Management - Procurement
AktivityPhysical File NameABAP Program Name
Description Menu Authorizations User
n Creating the authorizations and authorization profiles: The Profile Generator automatically generates authorizations based on the menu functions that you have chosen before. Of course, the Profile Generator cannot propose values for all authorizations that would fit any company. Therefore, the authorization administrator must normally postprocess the authorizations manually in cooperation with the user departments and the audit division. By using organizational levels, you can simultaneously maintain a large number of authorization fields. This greatly simplifies the manual postprocessing work.
n In the example, transaction SO01 (SAP Office) was added to role MY_ROLE (which was created by copying the SAP template). As a result, the yellow traffic lights appear in the menu tree in the above example. The authorization for file access is a good example to show why manual postprocessing is necessary: The Profile Generator cannot "know" if the users should have only read access or also write access to the files.
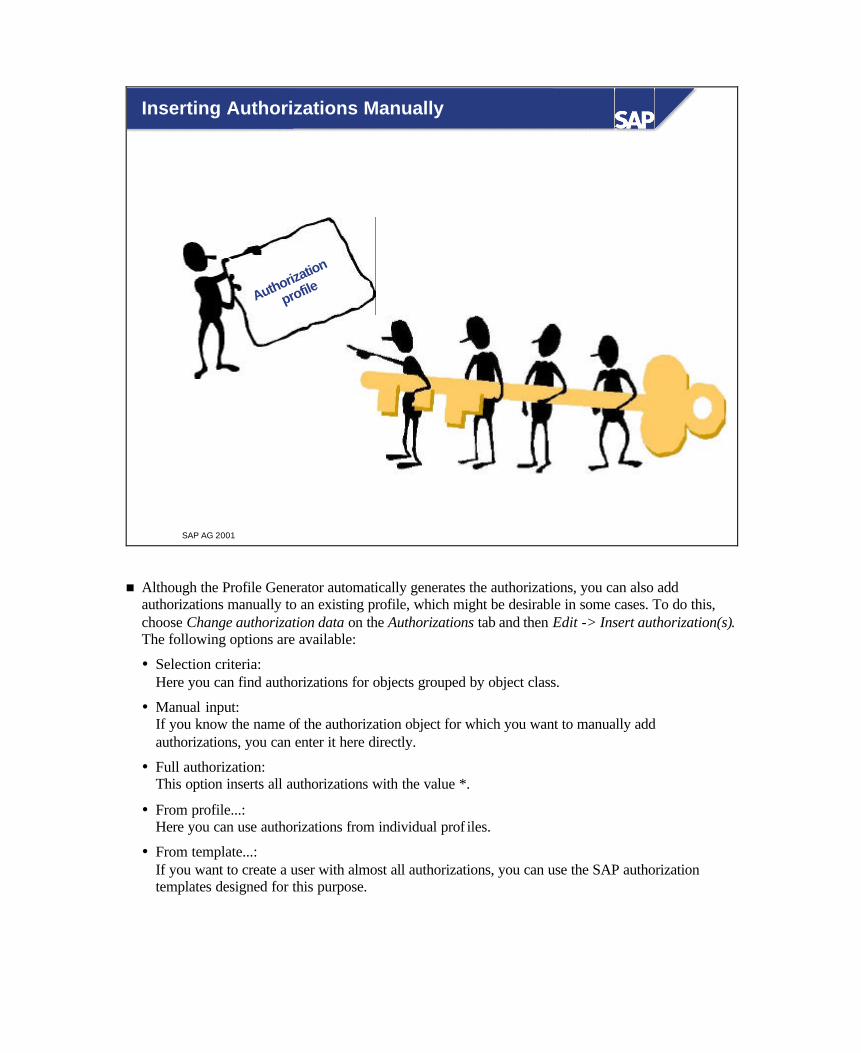
SAP AG 2001
Inserting Authorizations Manually
Authorization
profile
n Although the Profile Generator automatically generates the authorizations, you can also add authorizations manually to an existing profile, which might be desirable in some cases. To do this, choose Change authorization data on the Authorizations tab and then Edit -> Insert authorization(s). The following options are available:
� Selection criteria: Here you can find authorizations for objects grouped by object class.
� Manual input: If you know the name of the authorization object for which you want to manually add authorizations, you can enter it here directly.
� Full authorization: This option inserts all authorizations with the value *.
� From profile...: Here you can use authorizations from individual prof iles.
� From template...: If you want to create a user with almost all authorizations, you can use the SAP authorization templates designed for this purpose.

SAP AG 2001
Authorization Maintenance: Icon Legend
Traffic lights refer to authorization fields in lower-level branchesTraffic lights refer to authorization fields in lower-level branches
All Authorization Fields Have Values Assigned
Some Authorization Fields Have Missing Values
Unmaintained Organizational Level
/ Inactive / Reactivate: For Authorization Objects or Authorizations
Display Transactions for an Authorization Object
Assign Complete Authorization
Important Browser IconsImportant Browser Icons
Maintain Field Contents
n The current maintenance status of the authorizations at the various levels is shown by traffic lights:
� Green: All fields below this level have been supplied with values. Check whether the values given are appropriate.
� Yellow: Below this level, there is at least one field (but not an organizational level) for which no data has been entered.
� Red: Below this level, there is at least one field for which no organizational level has been maintained.
� If you single-click a red or yellow traffic light, the system displays all unmaintained fileds, except organizational levels with complete authorization (*).
n Inactive: Double-clicking on this icon has the following effects:
� At authorization object level: All subordinate authorizations are marked as inactive.
� At authorization level: This authorization is marked as inactive.
n Reactivate authorization: Clicking this icon has the effect that the authorization, and all subordinate authorizations, of an authorization object are set back to active.
n Delete: This can mean deletion of a field’s contents, or deletion of an inactive authorization or deletion of all inactive authorizations.

SAP AG 2001
Authorization Maintenance: Status Texts
Status Text for AuthorizationsStatus Text for Authorizations
Status Texts After a Comparison (such as Change in Menu Selection) Status Texts After a Comparison (such as Change in Menu Selection)
l Standard: Field Values Were Not Changed
l Maintained: Value Was Entered in Field Delivered Empty
l Changed: Field Delivered with Content Was Changed
l Manual: Authorization Object Was Added Manually
l Old: No field values were changed + no new authorizations added
l New: At least one new authorization added
n Standard: All field values in the subordinate levels of the hierarchy are unchanged from the SAP defaults.
n Maintained: At least one field in the subordinate levels of the hierarchy was empty by default and has since been filled with a value.
n Changed: The value of at least one field in the subordinate levels of the hierarchy has been changed from the SAP default value. The status also changes to Changed if you change an organizational level which was previously set globally. (The exception to this is if you make the change in the Maintain organizational levels dialog box).
n Manually: There is at least one authorization on the subordinate hierarchy levels which you have added.
n Old: The comparison found that all field values in the subordinate levels of the hierarchy are still current and that no new authorizations have been added.
n New: The comparison found that at least one new authorization has been added to the subordinate levels of the hierarchy. If you now click on New, all new authorizations in the subordinate levels will be expanded.

SAP AG 2001
Profile Generator: Steps
Define Role Name
Determine Activities
Design User Menus
Maintain Authorization Data
Generate Authorizaion Profile
Assign Users
Adjust User Master Records

SAP AG 2001
MY_ROLE FI: Accounts Payable Accountant
Maint.: 0 Unmaint. Org Levels, 7 Open Fields, Status: Saved
Maintained Old Cross-Application Authorization ObjectsMaintained Old Asset ManagementMaintained New Basis - Administration
Standard Old Basis - Development EnvironmentMaintained New Basis - Central FunctionsStandard Old Materials Management - Procurement
ActivityPhysical FilenameABAP Program Name
Standard New Authorization for File Access
Standard New Authorization for File Access
Maintained Old SAPscript: Standardtext
Generate
Description Menu Authorizations User
You can change the default profile name here
Profie lname MY_ROLE_PF
You will not be able to change this profile name laterText Profile for role MY_ROLE
Assign Profile Name for Generated Authorization Profile
Generate Authorization Profile
n If the authorizations for the company concepts are appropriately maintained, you can generate an authorization profile. Only then do the authorizations contained in the profile take effect. A maximum of 150 authorizations can be contained in a profile. If there is a greater number of authorizations, the Profile Generator automatically creates additional profiles for the role. The name of the profile consists of 12 characters (see SAP Note 16466), of which the first 10 can be changed when the profile is first generated; the other two characters act as a counter. The second character must not be an underscore (_)

SAP AG 2001
Define Role Name
Determine Activities
Design User Menus
Maintain Authorization Data
Generate Authorization Profile
Assign Users
Adjust User Master Records
Profilgenerator: Arbeitsschritte

SAP AG 2001
Role 4Role 3
Assigning Users to Roles
Role 1
Role 2
n Assigning users: So that users are provided with the menu tree for their role when they log on to the system, you must assign roles to them.
n You assign roles to users by adding the corresponding names to the list on the User tab of the Profile Generator. Users can be assigned to more than one role. It makes sense to define roles for specific cross-role activities. An example is the activity "Print". Regardless of their function, all users (who are authorized to print) can be assigned to a role with the activity "Print". This eliminates the need to add the "Print" transaction to a large number of roles which is a cumbersome task.
n It is also possible to assign roles to users for a limited time only. This makes sense, for example, for year-end closing. Physical inventory activities should only be allowed for a limited time. So that a time-dependent assignment of an activity profile to a user master record becomes effective, you must perform a comparison (see next page). You are recommended to schedule the background job pfcg_time_dependency in such cases. Alternatively, you can perform the comparison in dialog mode using transaction PFUD.

SAP AG 2001
Profile Generator: Steps
Define Role Name
Determine Activities
Design User Menus
Maintain Authorization Data
Generate Authorizaion Profile
Assign Users
Adjust User Master Records
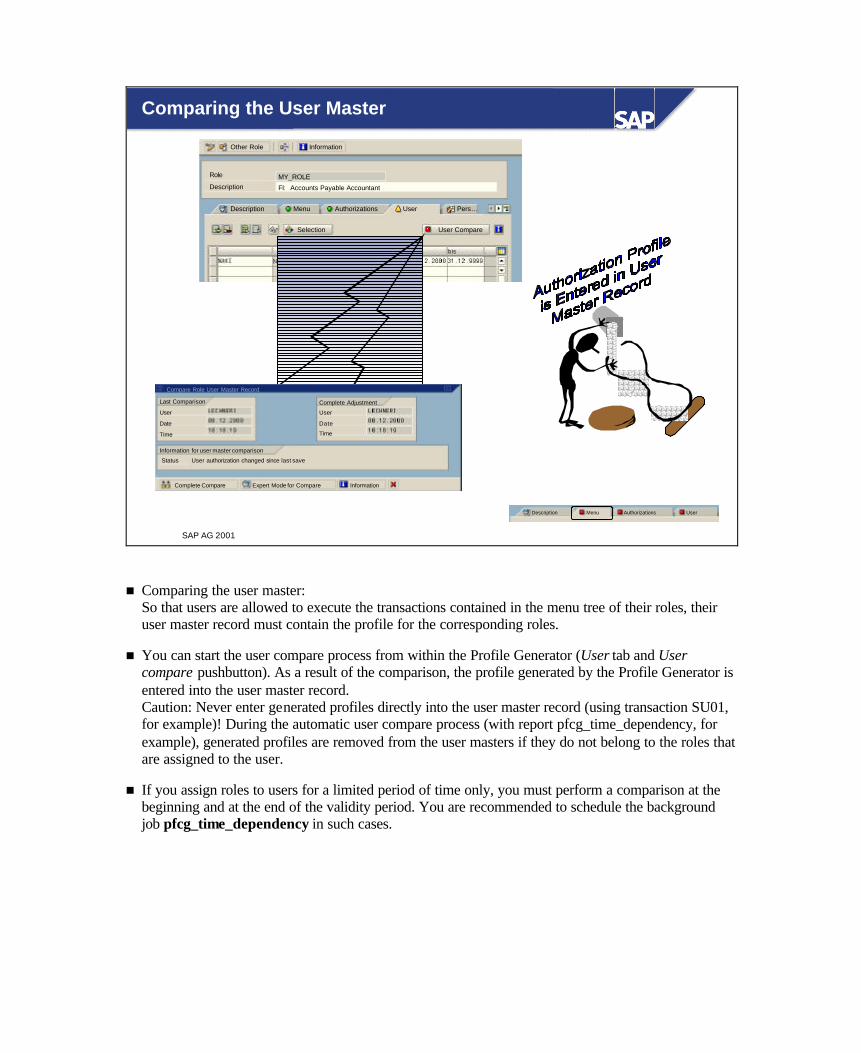
SAP AG 2001
Comparing the User Master
Description Menu Authorizations User Pers ...
Selection User Compare
Role
DescriptionMY_ROLE
FI: Accounts Payable Accountant
Other Role Information
Last Comparison
User
Date
Time
Complete Adjustment
User
Date
Time
Information for user master comparison
Status User authorization changed since last save
Complete Compare Expert Mode for Compare Information
Compare Role User Master Record
Description Menu Authorizations User
n Comparing the user master: So that users are allowed to execute the transactions contained in the menu tree of their roles, their user master record must contain the profile for the corresponding roles.
n You can start the user compare process from within the Profile Generator (User tab and User compare pushbutton). As a result of the comparison, the profile generated by the Profile Generator is entered into the user master record. Caution: Never enter generated profiles directly into the user master record (using transaction SU01, for example)! During the automatic user compare process (with report pfcg_time_dependency, for example), generated profiles are removed from the user masters if they do not belong to the roles that are assigned to the user.
n If you assign roles to users for a limited period of time only, you must perform a comparison at the beginning and at the end of the validity period. You are recommended to schedule the background job pfcg_time_dependency in such cases.

SAP AG 2001
Derived Roles
(Reference)Role
Authorizations for:• Plant 1• Company Code 0020• Business Area 110•...
Authorizations for:• Plant 1• Company Code 0020• Business Area *•...
OrganisationalStructure
OrganisationalStructure
OrganisationalStructure
DerivedRole 3
Authorizations for:• Plant 2• Company Code 0001• Business Area 100• ...
DerivedRole 1
DerivedRole 2
n Derived roles refer to roles that already exist. The derived roles inherit the menu structure and the functions included (transactions, reports, Web links, and so on) from the role referenced. A role can only inherit menus and functions if no transaction codes have been assigned to it before.
n The higher-level role passes on its authorizations to the derived role as default values which can be changed afterwards. Organizational level definitions are not passed on. They must be created anew in the inheriting role. User assignments are not passed on either.
n Derived roles are an elegant way of maintaining roles that do not differ in their functionality (identical menus and identical transactions) but have different characteristics with regard to the organizational level.

SAP AG 2001
Menus of Derived Roles
ReferenceRole
DerivedRole 1
Changes to the menuare only possible here
DerivedRole 2
DerivedRole 3
n The menus passed on cannot be changed in the derived roles. Menu maintenance takes place exclusively in the role that passes on its values. Any changes immediately affect all inheriting roles.
n You can remove the inheritance relationship, but afterwards the inheriting role is treated like any other normal role. Once a relationship is removed, it cannot be established again.

SAP AG 2001
Composite Roles
Role 1
Role 2
Role 3Role 4 Role 6
Role 5
CompositeRole A
CompositeRole B
Role 7
n A composite role is a container which can collect several different roles. For reasons of clarity, it does not make sense and is therefore not allowed to add composite roles to composite roles. Composite roles are also called roles.
n Composite roles do not contain authorization data. If you want to change the authorizations (that are represented by a composite role), you must maintain the data for each role of the composite role.
n Creating composite roles makes sense if some of your employees need authorizations from several roles. Instead of adding each user separately to each role required, you can set up a composite role and assign the users to that group.
n The users assigned to a composite role are automatically assigned to the corresponding (elementary) roles during comparison.

SAP AG 2001
Menus of Composite Roles
Role 1MenuRole 1
MenuRole 2
Role 2
MenuRole 1
MenuRole 2
Composite Role
Changes to the Entire Menu ArePossible!
n The menu tree of a composite role is, in the simplest case, a combination of the menus of the roles contained. When you create a new composite role, the initial menu tree is empty at first. You can set up the menu tree by choosing Read menu to add the menus of all roles included. This merging may lead to certain menu items being listed more than once. For example, a transaction or path contained in role 1 and role 2 would appear twice.
n If the set of roles contained in a composite role changes, the menu tree is also affected. In such a case, you can completely rebuild the menu tree or process only the changes. If you choose the latter option, the Profile Generator removes all items from the menu which are not contained in any of the roles referenced.
n It is possible (and often necessary) to change the menu of a composite role at any time. You adjust these menus in the same way as the menus for roles (see above).

SAP AG 2001
Customizing Roles
Set countriesCurrenciesCheck units of measurementMaintain calendarMaintain calendar for JapanTime zonesField Display Characteristics
Enterprise StructureCross-Application ComponentsFinancial AccountingTreasuryControlling
General SettingsImplementation Guide for R/3 Customizing
CustomizingRole
ProjectProject
IMGIMG
n You can assign projects or project views of the Implementation Guide (IMG) to a role. The purpose of such an assignment is to specifically generate the authorization for certain IMG activities and assign it to users. When the profile is generated, the system creates the authorization which is necessary to perform all activities of the IMG projects/project views assigned.
n If a project or project view has been assigned to a role, it is no longer possible to manually assign transactions to this role. This means that such a role can only be used for generating and assigning Customizing authorizations. Vice versa, a role with transactions assigned manually cannot be used for Customizing authorizations.
n The transactions of the project or project view are not displayed in the Session Manager and the SAP Easy Access menu. If the Enterprise IMG or Project IMG is changed, the authorization data of this role must be regenerated.
n Since Customizing activities are performed on a project-related basis and for a limited period, you should maintain the end date for the users in the user assignment. This ensures that the users assigned to the role lose the authorization for the projects/project views assigned upon completion of the project.
SAP AG 2001
l Perform the steps involved in assigningauthorizations with the Profile Generator
l Copy, change, and create roles and determinetheir activities
l Display and maintain authorizations that weregenerated automatically
You are now able to:
Working with the Profile Generator: Unit Summary

Exercises
Unit: Working with the Profile Generator Part 1
At the conclusion of these exercises you will be able to
• Create roles using the Profile Generator and determine their activities
• Check and maintain authorizations that were generated automatically
• Derive and copy roles
• Explain the difference between derived and copied roles
• Assign users and perform a user comparison
1 You will now implement an authorization concept in the SAP R/3 System similar to the one you created in the Conception with ASAP Methodology exercise. The model solution on the next page will serve you as a template for your sample authorization concept. Important! To ensure that you have a consistent basis for all other exercises, you should not use the authorization concept that you created yourself.

Sample Authorization Concept
Enterprise area>>> FI SD SD MM
Role name >>> AccRec SDClerk SDMan Whouse
R/3 Links:
T Code
Scope Scope Scope Scope
MM01
MM02
MM03 x x x x
MM19 x x x x
MM04 x x x x
FD01 x x
FD02 x x
FD03 x x
VD01 x x
VD02 x x
VD03 x x
VA21 x x
VA22 x x
VA23 x x
VA25 x x
VA01 x x
VA02 x x
VA03 x x
VA05 x x
V.01 x x
MB1C x
MB90 x
VL21 x
F-18 x
F-26 x
F-28 x
GR##_MM_MAT_DIS PL
GR##_FI_IP_POST
Roles
GR##_FI_ACCREC_MAINT
GR##_SD_CUST_MAINT
GR##_SD_SALES
GR##_FI_MM_GR_POST

1-1 Create a role GR##_MM_MAT_ANZ to display a material master.
Enter a short description, and save your role.
1-1-1 Go to the Menu tab and select the transactions that are listed in the sample authorization concept. Create a folder with the name WWW Links. In this folder, create a Web address with the name SAP and the URL http://www.sap.com. Check that the Web address is correct by double clicking it. Create another Web address with a link to your own company’s homepage. Save your role.
1-1-2 Go to the Authorizations tab. Select the normal mode (Change authorization data). Define the organizational levels: - Company code: 1000 - Warehouse number/complex: * - Sales organization: 1000 - Distribution channel: * - Plant: 1000, 1100, 1200 Display the technical names for the authorizations (Utilities menu).
1-1-3 Check the traffic light symbol status: For which authorization object class are all authorization field contents maintained? Authorization object class: ____________________________________ For which authorization objects of the object class MM_G do you have to supply authorization values? Authorization Objects: ________________________________________

1-1-4 Set the authorization for the maintenance status in the authorization object M_MATE_STA to full authorization. What is the status of the authorization after your change? ____________________ Set all open authorization values to full authorization. What happens to the traffic light symbol for object class MM_G after you have assigned values to all open fields? __________________________________________________________
1-1-5 Generate the authorization profile for your role. Assign the following profile name: GR##_MM_01
1-1-6 Exit the authorization maintenance screen and check the status of your authorization profile in the information section of the Authorizations tab. What is the status of your authorization profile? ______________________
1-2 Create a role GR##_WM_GR_POST with authorizations for a warehouse supervisor.
Enter a short description, and save your role.
1-2-1 Go to the Menu tab. and select the transactions listed in the example authorization concept. Create a folder and place all of the appropriate transactions in this folder using Drag&Drop. Save your role.
1-2-2 Go to the Authorizations tab. Select the normal mode (Change authorization data). Define the organizational levels: - Plant: 1000, 1100, 1200 Display the technical names for the authorizations (Utilities menu).

1-2-3 Make the following adjustments: Enter 561 and 562 as the authorization values for the Movement type field of the authorization object M_MSEG_BWA. Set full authorization for all open authorization values.
1-2-4 Generate the authorization profile for your role. Accept the default profile name.
1-3 Create a derived role GR##_WM_GR_POST1000 with authorizations for a warehouse supervisor in plant 1000.
Enter a short description, and save your role.
1-3-1 Assign the imparting role GR##_MM_GR_POST. Display the inheritance hierarchy of the roles.
1-3-2 Go to the Menu tab. Are you allowed to select additional activities or delete existing activities? ____________________
1-3-3 Go to the Authorizations tab. Select the normal mode (Change authorization data). Define the organizational levels: - Plant: 1000 Did the system copy the authorizations of the imparting role? ____________________

1-3-4 Save the authorizations and accept the default profile name. Copy the authorization data from the imparting role. Did the system copy settings for organizational levels? ____________ Make sure that users assigned to this derived role are only allowed to post data in plant 1000.
1-3-5 Generate the authorization profile for your role.
1-4 Create the role GR##_MM_GR_POST1200 by copying the role GR##_MM_GR_POST. Choose Copy all.
1-4-1 Go to the Menu tab. Are you allowed to select additional activities or delete existing activities? ____________________
1-4-2 Go to the Authorizations tab. Check the status of the authorization profile in the information section of the tab. What is the status of the authorization profile? ______________________ Select the normal mode (Change authorization data). Did the system copy the authorizations of the copy template? ____________________ Assign the value 1200 to the organizational level Plant. Generate the authorization profile for your role, and accept the default profile name.
Exit the authorization maintenance screen and check the status of your authorization profile in the information section of the Authorizations tab. What is the status of your authorization profile? ______________________

1-5 Create an role GR##_BC_WORKPLACE. This role is to be assigned to all SAP R/3 users and contain functions of general interest.
Enter a short description, and save your role.
1-5-1 Go to the Menu tab and copy the menu of the predefined role SAP_BC_SRV_USER by selecting all transactions. Save the menu.
1-5-2 Go to the Authorizations tab. Set full authorization for all open authorization field values. Generate the roles and accept the default profile name

1-5-3 Go to the User tab. What is the traffic light symbol status of the tab? __________________________________________________________ Assign all users that you created in exercise 1-8-1 of the unit The User Master to your role. Check the User Comparison settings (Menu: Utilities → Settings). Confirm that a user comparison is automatically performed when you save. Save your user assignment. What happens to the traffic light symbol status of the User tab after you have saved the data? __________________________________________________________ What happens during the user compare process? ________________________________________________________
1-6 Assign the role CA940_PLUS to all users that you created in exercise 1-8-1. Save you user assignment.
1-7 Display the user master record of user GR##_MM1. Is the user linked to roles? If yes, to which ones? ________________________________________________________________ Are authorization profiles assigned to the user? _____________________________

Solutions
Unit: Working with the Profile Generator Part 1
1-1 Menu: Tools → Administration → User Maintenance → Roles (PFCG) Choose the Basic Maintenance view, create a short description and save your role.
1-1-1 Choose the following transactions with the Transaction pushbutton. MM03 MM04 MM19 To create a folder, choose the Create Folder icon. To create a Web address, choose Enter Other, enter a description in the Text field and the URL in the form http://www.sap.com in the Web Address or File field. Save your role.
1-1-2 You can enter multiple plants by choosing the Add. values pushbutton. Display the technical names for the authorizations. Menu: Utilities → Technical names on
1-1-3 Check the traffic light symbol status: For which authorization object class are all authorization field contents maintained? Authorization object class: Cross-application Authorization Objects AAAB For which authorization objects of the object class MM_G do you have to supply authorization values? Authorization objects whose authorization field values are not completely maintained are flagged with a yellow traffic light.

The following authorization objects are not completely maintained: M_MATE_MAR M_MATE_MAT M_MATE_STA M_MATE_WGR
1-1-4 Set the authorization for the maintenance status in the authorization object M_MATE_STA to full authorization. To do this, double-click the asterisk before the open field value. What is the status of the authorization after your change? Status: Maintained Set all open authorization values to full authorization. To do this, click the traffic light symbol at the top hierarchy level, and confirm the assignment of full authorization. What happens to the traffic light symbol for object class MM_G after you have assigned values to all open fields? The traffic light symbol turns to Green.
1-1-5 Choose the Generate icon.
1-1-6 What is the status of your authorization profile? Status: Authorization profile is generated
1-2 Menu: Tools → Administration → User Maintenance → Roles (PFCG)
Choose the Basic Maintenance view, create a short description and save your role.
1-2-1 Choose the following transactions with From SAP Menu or Transaction: MB1C MB90 VL21
1-2-2 You can enter multiple plants by choosing the Add. values pushbutton. Display the technical names for the authorizations. Menu: Utilities → Technical names on

1-2-3 You can enter the field values for the authorization object M_MSEG_BWA by clicking the pencil. You can find this authorization object in object class MM_B. Assign Full Authorization: Click the traffic light symbol at the top hierarchy level, and confirm the assignment of full authorization.
1-2-4 Choose the Generate icon.
1-3 Menu: Tools → Administration → User Maintenance → Roles (PFCG) Choose the Basic Maintenance view, create a short description and save your role.
1-3-1 Enter GR##_MM_GR_POST into the field Derive from role. Display the inheritance hierarchy of the roles. Menu: Role → Where-used list
1-3-2 Are you allowed to select additional activities or delete existing activities? No, because the menu is inherited by the role GR##_MM_GR_POST1000 from role GR##_MM_GR_POST.
1-3-3 Did the system copy the authorizations of the imparting role? No, they must either be maintained here or copied as in 1-3-4.
1-3-4 Copy the authorization data from the imparting role by choosing the pushbutton Copy data or the menu path Edit → Copy data. Did the system copy settings for organizational levels? Choose Organizational levels. Plants 1000, 1100, and 1200 have been copied. Delete the entries for plant 1100 and 1200.
1-3-5 You do not need to enter a name since the system prompted you for one when you saved the data.
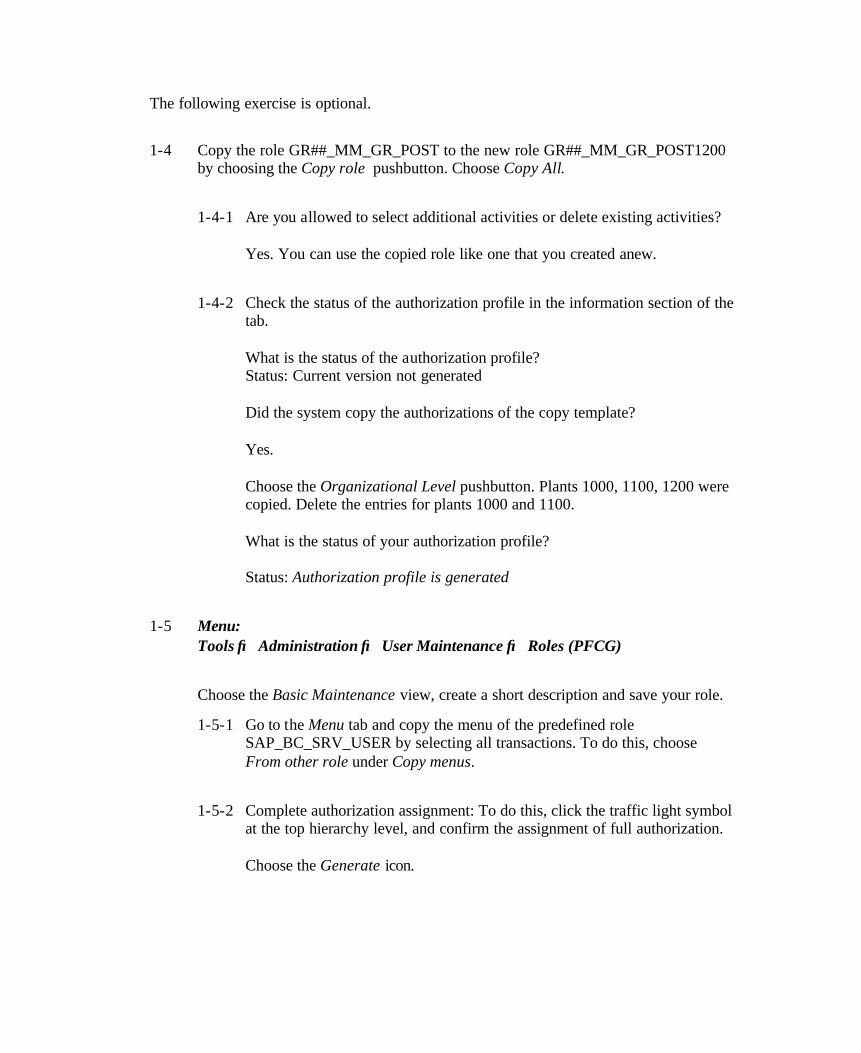
The following exercise is optional.
1-4 Copy the role GR##_MM_GR_POST to the new role GR##_MM_GR_POST1200 by choosing the Copy role pushbutton. Choose Copy All.
1-4-1 Are you allowed to select additional activities or delete existing activities? Yes. You can use the copied role like one that you created anew.
1-4-2 Check the status of the authorization profile in the information section of the tab. What is the status of the authorization profile? Status: Current version not generated Did the system copy the authorizations of the copy template? Yes. Choose the Organizational Level pushbutton. Plants 1000, 1100, 1200 were copied. Delete the entries for plants 1000 and 1100. What is the status of your authorization profile? Status: Authorization profile is generated
1-5 Menu: Tools → Administration → User Maintenance → Roles (PFCG)
Choose the Basic Maintenance view, create a short description and save your role.
1-5-1 Go to the Menu tab and copy the menu of the predefined role SAP_BC_SRV_USER by selecting all transactions. To do this, choose From other role under Copy menus.
1-5-2 Complete authorization assignment: To do this, click the traffic light symbol at the top hierarchy level, and confirm the assignment of full authorization. Choose the Generate icon.

1-5-3 What is the traffic light symbol status of the tab? The traffic light is red. This means that no users are assigned to this role. Assign the following users by entering the names into the User ID column.
User name
GR##-FI1
GR##-FI2
GR##-SD1
GR##-SD2
GR##-MM1
GR##-MM2
1-5-4 What happens to the traffic light symbol status of the User tab after you have saved the data? The status display is green. What happens during the user compare process? During the user compare process, the generated profiles for a role are entered into the user master record.
1-6 Tools → Administration → User Maintenance → Roles (PFCG) Choose the Basic Maintenance view for role CA940_PLUS, and choose the Change pushbutton. Go to the User tab, and assign the role to the following users by entering them in the User ID column. Remember to save the user assignment.
User name
GR##-FI1
GR##-FI2
GR##-SD1
GR##-SD2
GR##-MM1
GR##-MM2

1-7 Display the user master record of user GR##_MM1. Tools → Administration → User Maintenance → User (SU01) Is the user linked to activity groups? If yes, to which ones? Yes, to: CA940_PLUS GR##_BC_WORKPLACE Are authorization profiles assigned to the users? Yes.

Exercises
Unit: Working with the Profile Generator Part 2
At the conclusion of these exercises you will be able to
• Work with composite roles and predefined work center examples
• Design user menus
1-1 Create the composite role GR##_MM_WHOUSE.
Make sure that the Composite role indicator is set on the initial screen of the Profile Generator.
1-1-1 Create a short description and save your composite role.
If you look at the tabs, what do you notice? ___________________________________________________________
1-1-2 Go to the Roles tab. Your composite role should consist of both roles in the role definition in the sample authorization concept. That means the roles: – GR##_MM_MAT_DISPL – GR##_MM_GR_POST. Enter these in the appropriate field.
1-1-3 Go to the Menu tab and read the menus of the inserted roles into your composite role. Optionally, you can further customize the menu of the composite role. Save your composite role.

1-1-4 Change the composite role GR##_MM_WHOUSE. Go to the User tab and assign user GR##-MM1 and save your user assignment.

1-2 Display the user master record of user GR##-MM1. To which roles is the user assigned? ____________________ Display the authorization profiles. How many profiles are assigned? ______________ authorization profiles Why are there fewer profiles than roles? __________________________________________________________________
1-3 Log on to the system as user GR##-MM1. Use the initial password that was generated automatically in the User Master exercise or assign a new initial password in user maintenance.
Change the password when you logon: _________________
You can show the transaction codes by choosing Extras → Settings (Display Technical Names)
1-3-1 Set up a user-specific favorites list by defining the transactions MM03 and MB1C as favorites and adding a Web address of your choice.
1-3-2 Try to start some of the transactions, for example, MM03, and display the accounting view of material P-100 in plant 1000. Can you also display the accounting view of material P-100 in plant 3000? If not, why? ___________________________

1-3-3 Display the failed authorization check. If necessary, assign the role CA940_PLUS to your user GR##-MM1.
Menu path à System à Utilities à Display authorization check (or transaction SU53)
Why were you not able to display material P-100 in plant 3000? ________________________________________________________ Log off as GR##-MM1.
The following exercise is optional.
1-4 Create a new single role GR##_SD_SALES by copying the predefined work area example CA940_SD_SALES without user assignment.
1-5 Change the copied role GR##_SD_SALES.
1-5-1 Change the group-specific description.
Go to the Menu tab.
Show the technical names.
Expand all of the menu nodes, deleting all transactions and nodes that do not appear in this role in the example authorization concept (see exercise Working with the Profile Generator Part 1), for example the Master Datanode. Save the altered user menu.
1-5-2 Go to the Authorization tab.
Choose the normal mode. (Change Authorization Data).
Restrict the organizational levels as follows: - Sales Organization 1000 Use the default values for all other organizational levels.
1-5-3 Generate the authorization profile for your role. Use the default profile name.

1-6 Create the three missing single roles from the example authorization concept. (See the exercises for Working with the Profile Generator, Part 1). Restrict the organizational levels with the specified values: - Company Code 1000 - Business Area 1000 - Account Type D - Controlling Area 1000 - Division * - Sales Organization 1000 - Distribution Channel* Assign full authorization for all open authorization fields. Generate the profiles.
1-7 Create the three composite roles that correspond o the example authorization concept. Use the names from the following table. Follow the instructions in steps 1-1-1 to 1-1-3 when create the roles.
Make sure that the Composite role indicator is set on the initial screen of the Profile Generator.
Composite Role Corresponds to ASAP Role
GR##_FI_ACCREC Accounts receivable accountant (AccRec)
GR##_SD_SALCLK Sales clerk (SClerk)
GR##_MM_WHOUSE Warehouse supervisor (Whouse)
Create a short description and save your composite role.
1-7-1 Go to the Roles tab. Your composite role should bring together the roles form the role definitions in the example authorization concept.
Select the corresponding roles and copy them into your composite role.
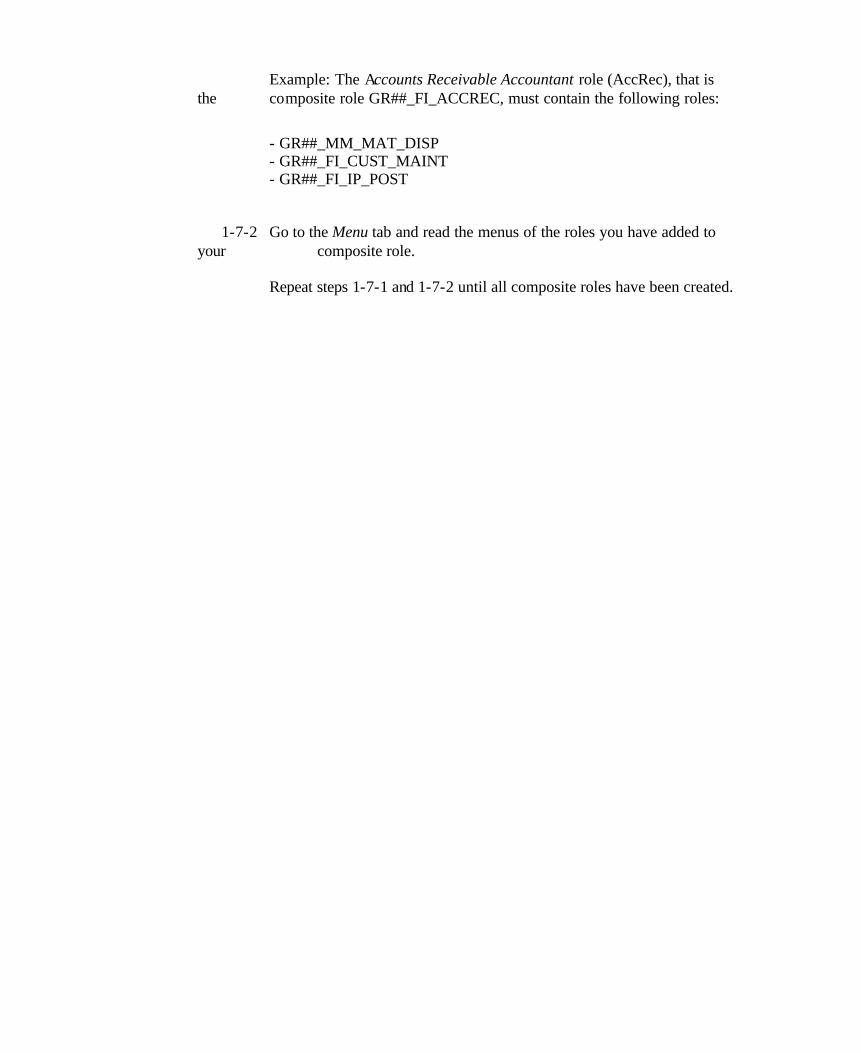
Example: The Accounts Receivable Accountant role (AccRec), that is the composite role GR##_FI_ACCREC, must contain the following roles:
- GR##_MM_MAT_DISP - GR##_FI_CUST_MAINT - GR##_FI_IP_POST
1-7-2 Go to the Menu tab and read the menus of the roles you have added to your composite role. Repeat steps 1-7-1 and 1-7-2 until all composite roles have been created.

Working with the Profile Generator Part 2 - Solutions
Unit: Working with the Profile Generator Part 2
1-1 Menu: Tools → Administration → User Maintenance → Roles (PFCG)
Remember to use the Create composite role button on the initial screen of the Profile Generator.
1-1-1 Create a short description and save your composite role. If you look at the tabs, what do you notice? The Roles tab has been added. The Authorizations tab has disappeared
1-1-2 Go to the Roles tab. Enter the two roles from the example authorization concept: - GR##_MM_MAT_DISPL - GR##_MM_WE_POST You can do this using the possible entries (F4) help, or by entering the transactions manually.
1-1-3 Go to the Menu tab and choose the pushbutton Read Menu. You can further adjust the menu of the composite role as you wish. Save your composite role.
1-1-4 Go to the User tab, assign the user GR##-MM1 and save the user assignment.

1-2 Menu: Tools → Administration → User Maintenance → SU01 - Users To which roles is the user assigned? GR##_MM_WHOUSE GR##_MM_MAT_DISP GR##_MM_GR_POST (GR##_BC_WORKPLACE optional) (CA940_PLUS optional) 42 (4) authorization profiles, since the composite role does not have a profile of its own.
1-3 Log on to the system as user GR##-MM1. Use the initial password that was generated automatically in the User Master exercise or assign a new initial password in user maintenance.
1-3-1 You can add favorites to the favorites list by dragging transactions with the mouse from the user menu to the list, or enter them directly using the context menu (right mouse button).
1-3-2 Choose the transaction MM03. Enter the material ID P-100 in the Material field. Choose View selection, Accounting 1 and. Continue. Can you also display the accounting view of material P-100 in plant 1000? Yes. Can you also display the accounting view of material P-100 in plant 3000? No, because you do not have authorization for plant 3000.
1-3-3 Display the failed authorization check: Menu: → System → Utilities → Display authorization check (or transaction SU53) Why were you not allowed to display material P-100 in plant 3000? The program required activity 03 and plant 3000 for authorization object M_MATE_WRK. Although the user master contained the authorization for activities 03 and 08, it did not contain the authorization for plant 3000. Log off from the system as user GR##-MM1.
The following exercises are optional.

1-4 Menu: Tools → Administration → User Maintenance → Roles (PFCG) Copy the role CA940_SD_SALES to the new role GR##_SD_SALES by clicking the Copy Role icon. Choose Copy selectively and do not check the User Assignment box. This means that the assigned users are not copied along with the role.
1-5 Choose the Change pushbutton.
1-5-1 On the menu tab, the technical name (transaction code) can be displayed by choosing the Magnifying Glass icon (next to the Delete icon – the waste basket). Delete the nodes: - Master Data - Delivery - Billing by selecting the nodes and choosing the Delete icon.
1-5-2 Overwrite the asterisk for sales organization with the value 1000. The other organizational levels (company code, controlling area, division, distribution channel, and so on) should retain their default values.
1-5-3 Choose the menu path: Authorizations → Generate or the corresponding pushbutton.
1-6 Create the three missing single roles from the example authorization concept (see Working with the Profile Generator Part 1 exercises). Menu: Tools → Administration → User Maintenance → Roles (PFCG)
Role Name Transactions for this Role
GR##_FI_ACCRECI_MAINT FD01, FD02, FD03
GR##_FI_IP_POST F-18, F-26. F-28
GR##_SD_CUST_MAINT VD01, VD02, VD03
Restrict the organizational levels of the roles with the values given below: Role GR##_FI_ACCREC_MAINT - Company Code 1000 Role GR##_FI_IP_POST - Company Code 1000 - Business Area 1000 - Account Type D – Controlling Area 1000
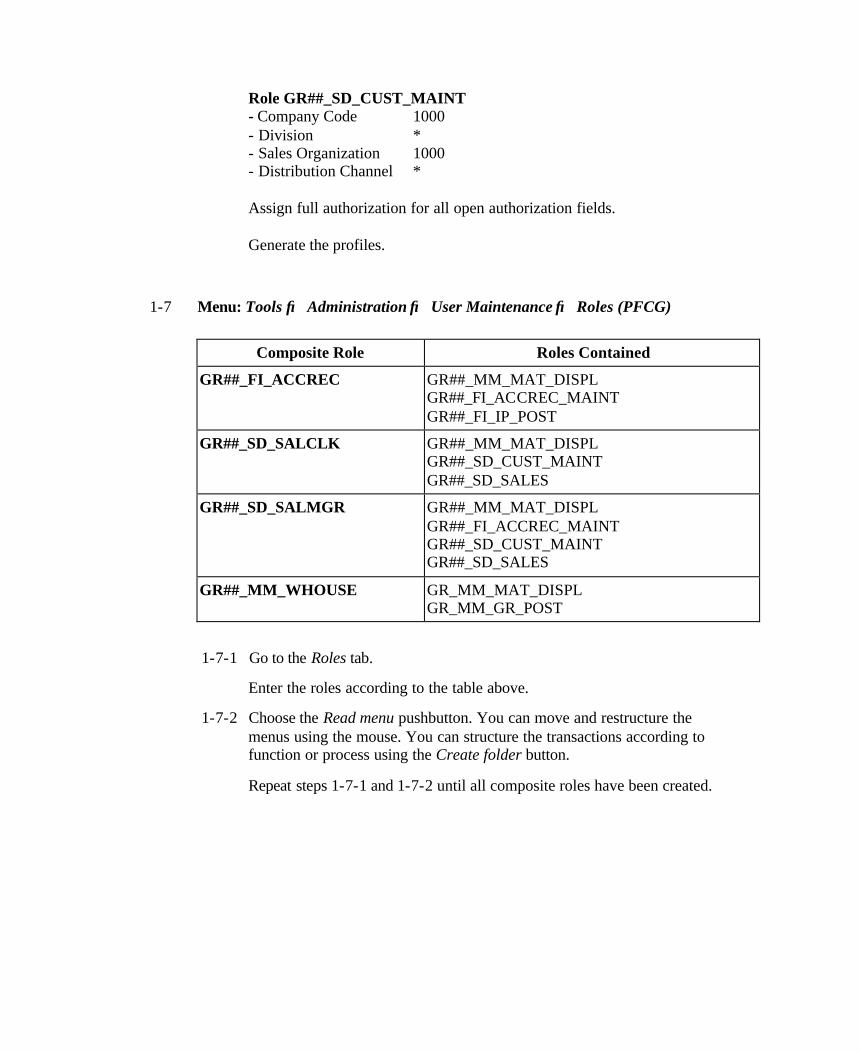
Role GR##_SD_CUST_MAINT - Company Code 1000 - Division * - Sales Organization 1000 - Distribution Channel * Assign full authorization for all open authorization fields. Generate the profiles.
1-7 Menu: Tools → Administration → User Maintenance → Roles (PFCG)
Composite Role Roles Contained
GR##_FI_ACCREC GR##_MM_MAT_DISPL GR##_FI_ACCREC_MAINT GR##_FI_IP_POST
GR##_SD_SALCLK GR##_MM_MAT_DISPL GR##_SD_CUST_MAINT GR##_SD_SALES
GR##_SD_SALMGR GR##_MM_MAT_DISPL GR##_FI_ACCREC_MAINT GR##_SD_CUST_MAINT GR##_SD_SALES
GR##_MM_WHOUSE GR_MM_MAT_DISPL GR_MM_GR_POST
1-7-1 Go to the Roles tab.
Enter the roles according to the table above.
1-7-2 Choose the Read menu pushbutton. You can move and restructure the menus using the mouse. You can structure the transactions according to function or process using the Create folder button.
Repeat steps 1-7-1 and 1-7-2 until all composite roles have been created.

SAP AG 2001
Profile Generator: Installation and Upgrade
l Steps Required to Install the Profile Generator
l Checking Profile Parameters
l Copy Default Values for the Profile Generator
l Use Check Indicators
l Subsequent Processing after an Upgrade
Contents:

SAP AG 2001
l Perform the Steps Necessary to Install the ProfileGenerator
l Adjust the Default Values of the Profile Generatorif Required
l Differentiate the Check Indicators
l Perform Required Subsequent Processing afteran Upgrade
l Migrate Manually Created Profiles to Roles
At the conclusion of this unit, you will be able to:
Profile Generator: Installation and UpgradeUnit Objectives

SAP AG 2001
Overview Diagram (6)
Conception with ASAP Methodology
Elements of the SAP R/3 Authorization Concept
The User Master Record
Introduction
Central User Administration
Access Control and User Administration
Working with the Profile Generator
Special Authorization Components
Integration ins Organisationsmanagement
666
Transporting AuthorizationComponents
Profile Generator:Installation/Upgrade
Analysis and Monitoring Functions
mySAP.com and the Workplace

SAP AG 2001
l Before you can use the Profile Generator, you mustfirst install it.
l Depending on the source release, differentsubsequent activities are necessary in connectionwith the profile generator and existing roles afteran upgrade. For example, after the upgrade youmight want to work with the profile generator forthe first time and migrate an authorization conceptthat was created manually.
Profile Generator: Installation and UpgradeBusiness Scenario

SAP AG 2001
Using the Profile Generator requires that
l the profile parameter auth/no_check_in_some_cases has the value 'Y'
l the customer tables for the default values ofthe Profile Generator are filled
Necessary Steps
n Activating the Profile Generator after a new installation requires that:
� the SAP R/3 System profile parameter auth/no_check_in_some_cases has the value Y
� the default tables are filled which control the behaviour of the Profile Generator when a transaction in a role is started.
n Both steps are described in detail in this unit.

SAP AG 2001
Checking Profile Parameters
Parameter Name
auth/no_check_in_some_cases
Short Description (Engl)
Appl. area
ParameterTyp
Changes allowed
Valid for oper. system
DynamicallySwitchable
Same on all servers
Special char. string
Separator
Dflt value
ProfileVal
Current value
Y
Y
Y
Special authorization checks switched off by customer
Authentication
Special char. string
Change permitted
All operating systems
Y
Documentation
Display Profile Parameter Attributes
n After a reinstallation, the SAP R/3 System profile parameter auth/no_check_in_some_cases should be set to its default value Y. This activates the Profile Generator.
n To check this, use transaction RZ11. The above slide shows transaction RZ11 after you have entered the parameter name. For Current value, Y must be entered. You can find more details on the currently selected parameter by choosing Documentation.
n Alternatively, you can select and check the parameter setting using report RSPFPAR.
n If the parameter has the value N, it must have been set to this value in the default profile or in the instance profiles of the SAP R/3 System. Transaction RZ10 is used to maintain and manage this profiles. The transaction can be accessed by choosing Tools -> CCMS -> Configuration -> Profile Maintenance. You should use this transaction to delete the parameter from both the default and the instance profiles. The parameter is then set to its default value Y.

SAP AG 2001
What is the Origin of the Default Values?
Copy Menus
from the SAP Menu
from Role
From area menu
Target System (trusting)
Role MY_ROLE
Description FI: Accounts Payable Clerk - Created from SAP tem.
Description Menu Authorizations Users Pers. .
URL - www.mysap.comURL - Route PlannerSM04 - User ListSO01 - SAP OfficeAccount Master Data
FK01 - Create vendorFK02 - Change vendorFK03 - Display vendorFK04 - Display changesFK05 - Block/UnblockFK06 - Set deletion flagConfirmation of changeCompare
Transaction Report Other All
T70CLNT400
Distribute
Role Menu
From the SAP Menu
From another role
From area menu
Import from File
Translate Node
Display documentation
Find in docu.
CorrespondenceClosingReportingWithholding TaxInformation SystemOtherAddresses
MY_ROLE FI: Accounts Payable Clerk - Created from SAP tem.
Maint. : 0 Unmaint. org. levels, 7 open fields, Status: Saved
Maintained Old Cross-Application Authorization ObjectsMaintained Old Asset AccountingMaintained New Basis - Administration
Standard Old Basis - Development EnvironmentMaintained New Basis - Central FunctionsStandard Old Materials Management - Purchasing
ActivityPhysical file nameABAP Program name
Standard New Authorization for File Access
Standard New Authorization for File Access
Maintained Old SAPscript : Standard text
?
USOBX_C
USOBT_C
n If an administrator selects a transaction while creating an role, the Profile Generator selects the authorization objects that are checked in this transaction and maintained in the Profile Generator. Three cases can occur:
� For an authorization object against which the check is performed in the transaction selected, the Profile Generator has default values for the authorization content so that full authorization can be provided. The traffic light beside the authorization is green.
� For an authorization object against which the check is performed in the transaction selected, the Profile Generator does not have default values for the authorization content. On the above slide, the SAPOffice transaction SO01 has been selected from within which you can access files at operating system level. No specifications are made as to which files can be accessed in read-only or in write mode. The traffic light beside the authorization is yellow.
� It may be the case that some authorization checks during transaction processing are not maintained in the Profile Generator. The corresponding authorization objects do not appear in the profile overview.
n Tables USOBX_C and USOBT_C control the behavior of the Profile Generator after the transaction has been selected. After a reinstallation, these tables are empty and must be filled with values before the Profile Generator is used for the first time.

SAP AG 2001
Initial Filling of the Default Tables
USOBX
SAP defaults
USOBT
Per transaction:- Which checks exist?- Which checks are performed?- What is maintained in the Profile Generator?- What does the Profile Generator propose?
USOBX_C
Customer values
USOBT_C
Per transaction:- Which checks exist?- Which checks are performed?- What is maintained in the Profile Generator?- What does the Profile Generator propose?
Copy
SU25
n SAP delivers the tables USOBX and USOBT. These tables are filled with default values and are used to fill the customer tables USOBX_C and USOBT_C initially. After the initial fill, you can adjust the customer tables and consequently the behavior of the Profile Generator.
n The table USOBX defines which authorization checks are to be performed within a transaction and which not (despite authority-check command programmed ). This table also determines which authorization checks are maintained in the Profile Generator.
n The table USOBT defines for each transaction and for each authorization object which default values an authorization created from the authorization object should have in the Profile Generator.
n Under menu item 1, Initially fill the customer tables, transaction SU25 copies the SAP defaults of USOBX and USOBT into customer tables USOBX_C und USOBT_C. From this point, the Profile Generator can be used.
n For a full description of the functions of SU25, choose the Information about this transaction pushbutton.

SAP AG 2001
Optional: Adjust Check Indicators
USOBX_C
Customer values
USOBT_C
Per transaction:
- Which checks are performed?
- What is maintained in the Profile Generator?
- What does the Profile Generator propose?
SU24
N: No check
U: Unmaintained
C: Check
CM: Check/maintain
Field values
Check indicators
n After the tables USOBX_C and USOBT_C have been filled, you can maintain them to adjust the behavior of the Profile Generator and the authorization checks to be performed for each transaction. Tables are maintained in transaction SU24. This transaction displays the check indicators of a transaction. Check indicators determine if an authorization check will run within the transaction or not. The following check indicators are supported:
� N: No check. No check is performed against the corresponding authorization object in this transaction (despite authority-check command programmed). This indicator cannot be set for HR and Basis authorization objects.
� U: Unmaintained. No check is performed against the corresponding authorization object in this transaction.
� C: Check. A check is performed against the corresponding authorization object in this transaction. Maintenance in the Profile Generator is not supported. An example of this check indicator is the authorization object S_SPO_DEV against which a check is run in almost all SAP transactions in connection with list printing (printer icon). In the Profile Generator, however, it is cumbersome to handle print authorizations for each transaction anew.
� CM: Check/maintain. A check is performed against the corresponding authorization object in this transaction. For objects with this check indicator, you can display and change the defaults of the Profile Generator by choosing Edit -> Field values -> Display. If some SAP default values are missing, security is most often the reason. These missing values cause the administrator to postprocess the authorization profile (yellow traffic lights).
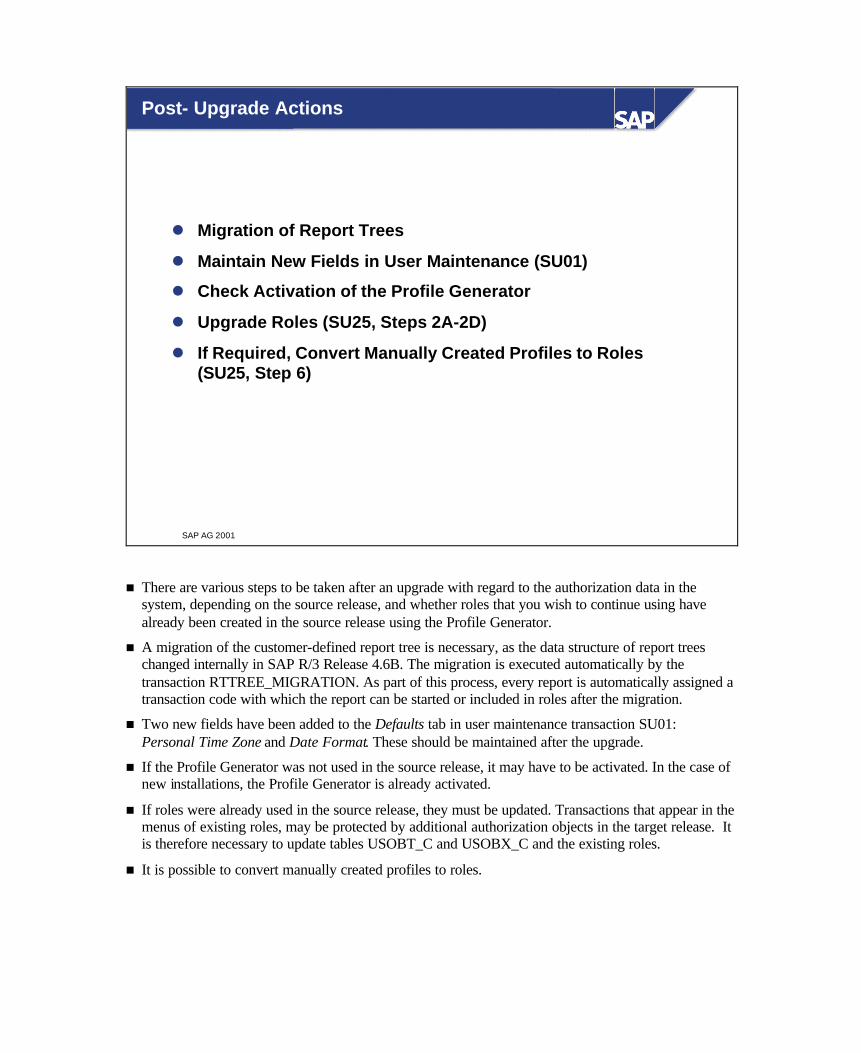
SAP AG 2001
l Migration of Report Trees
l Maintain New Fields in User Maintenance (SU01)
l Check Activation of the Profile Generator
l Upgrade Roles (SU25, Steps 2A-2D)
l If Required, Convert Manually Created Profiles to Roles(SU25, Step 6)
Post- Upgrade Actions
n There are various steps to be taken after an upgrade with regard to the authorization data in the system, depending on the source release, and whether roles that you wish to continue using have already been created in the source release using the Profile Generator.
n A migration of the customer-defined report tree is necessary, as the data structure of report trees changed internally in SAP R/3 Release 4.6B. The migration is executed automatically by the transaction RTTREE_MIGRATION. As part of this process, every report is automatically assigned a transaction code with which the report can be started or included in roles after the migration.
n Two new fields have been added to the Defaults tab in user maintenance transaction SU01: Personal Time Zone and Date Format. These should be maintained after the upgrade.
n If the Profile Generator was not used in the source release, it may have to be activated. In the case of new installations, the Profile Generator is already activated.
n If roles were already used in the source release, they must be updated. Transactions that appear in the menus of existing roles, may be protected by additional authorization objects in the target release. It is therefore necessary to update tables USOBT_C and USOBX_C and the existing roles.
n It is possible to convert manually created profiles to roles.

SAP AG 2001
Source ReleaseSource Release Did Did Not Not Use Use PGPG
Source ReleaseSource Release ( (fromfrom 3.1G 3.1G UsesUses PG) PG)
Upgrade Considerations (1)

SAP AG 2001
l Option 1:
n Review your authorization concept and create the authorizationsagain using the Profile Generator.
l Option 2:
n Convert existing manually created profiles and authorizations inroles.To do this, use transaction SU25 (Point 6)
Upgrade Scenario:Source Release Did Not Use PG
n Option 1
� Advantages:
Authorizations have a new structure based on the new authorization concept. You can fully utilize the configuration tables USOBX_C and USOBT_C
You can use the user-friendly user menus
Opportunity to create a clearly structured, transparent authorization concept with a consistent naming convention and to reorganize authorization administration
� Disadvantage:
Can take a long time (New security implementation)
n Option 2
� Advantages:
Allows the administrator to assign all existing and carefully checked profiles to the appropriate roles
If the profiles contain authorizations for authorization object S_TCODE, the user menu can be automatically created
� Disadvantage:
An authorization profile in a role has no relationship to the menu assignments. The menu can only be automatically created if authorizations for S_TCODE are contained in the profile. The administrator cannot use configuration tables USOBX_C and USOBT_C.

SAP AG 2001
Upgrade Considerations(2)
Source ReleaseSource Release Did Did Not Not Use Use PGPG
Source ReleaseSource Release ( (fromfrom 3.1G 3.1G UsesUses PG) PG)

SAP AG 2001
l Perform the Following Steps in Transaction SU25:
n 2A: Execute the Profile Generator Comparison Program.
w Compare the new tables USOBT and USOBX with USOBT_Cand USOBX_C.
n 2B: Using SU25, add the new Transactions/Updates to tables USOBX_C and USOBT_C.
n 2C: Update the existing roles.
n 2D: Display changed transaction codes.
Upgrade Scenario:Previous System (>3.0F) Uses PG
n Due to authorization checks newly introduced in the target release, the tables USOBT_C and USOBX_C, and the roles that have been created in the source release must be updated. Use transaction SU25 to do this.
n When executing transaction SU25, note that tables USOBT_C and USOBX_C could have been changed by the customer in the source release. For this reason, step 1 must not be executed in transaction SU25, as this would completely overwrite the tables. A comparison procedure is required. This is performed by steps 2A and 2B.
n Step 2C runs through all roles that are affected by the newly introduced authorization checks and must therefore be correspondingly extended.
n Transactions in the SAP R/3 System are occasionally replaced by one or more other transactions. In step 2D, you create a list of all roles that contain transactions replaced by other transactions. The old and new transaction codes are specified. If necessary, you can replace the transactions in the roles. By double clicking the list, you can jump to the corresponding role.
n If you are upgrading from SAP R/3 Release 4.0B to SAP R/3 Release 4.6B, and have used responsibilities in Release 4.0B, these are automatically converted to derived roles, which replace responsibilities from Release 4.5A (see SAP Note 156250).
n If you are upgrading to SAP R/3 Release 4.6B from an SAP R/3 Release lower than 4.5A, the existing roles are automatically renamed. The 10 character identifier used in the source release is used in the target release as a prefix for the technical name from the source release. If you do not want these changes to be made, follow the procedure in SAP Note 156196.

SAP AG 2001
l Perform the Steps Necessary to Install the ProfileGenerator
l Adjust the Default Values of the Profile Generatorif Required
l Differentiate the Check Indicators
l Perform Required Subsequent Processing after anUpgrade
l Migrate Manually Created Profiles to Roles
You are now able to:
Profile Generator: Installation and Upgrade:Unit Summary
Exercises
Unit: Profile Generator: Installation and Upgrade
At the conclusion of this exercise, you will be able to:
• Explain the meaning of the authorization check indicators and know their difference
• Describe how authorization checks and default values for authorization fields are determined
1-1 In Customizing for Basis Components, choose Work on SAP Check Indicators and Field Values and then Change Check Indicators. (Transaction SU24)
Select Maintain check indicators for transaction codes and enter transaction PA30.
1-1-1 Display the check indicators for the authorization objects of this transaction and check the following: Do authorization objects with check indicator U or N exist? ____________________ To which authorization objects is the check indicator CM assigned? __________________________________________________________

1-1-2 Go to the field value display. Which default values are assigned to which authorization fields of the authorization object PLOG? Fill in the following table.
Object Field Value (Interval)

1-2 Create the role GR##_HR_PA30.
Enter a short description, and save your role.
1-2-1 Go to the Menu tab and select the following activities: - PA30 - Maintain HR Master Data Save the activities of your role.
1-2-2 Go to the Authorizations tab. Select the normal mode (Change authorization data). Define the organizational levels: - Plan version: 01 Why do you have to enter an authorization value for the plan version? __________________________________________________________ For which authorization objects did the system automatically generate authorizations? __________________________________________________________ Why is the status of the authorization objects PLOG and P_PCLX set to Standard and why is the traffic light symbol status set to green? __________________________________________________________
1-2-3 Assign full authorization for all open authorization values, and generate the profile. Use the default profile name.

Solutions
Unit: Profile Generator: Installation and Upgrade
1-1 Menu: Tools → AcceleratedSAP → Customizing → Edit Project (SPRO) Choose SAP Reference IMG. IMG path: Basis Components → System Administration → Users and Authorizations → Maintain Authorizations and Profiles Using Profile Generator → Work on SAP Check Indicators and Field Values. Choose Change Check Indicators.
1-1-1 Choose Display check ID. Do authorization objects with check indicator U or N exist? There are authorization objects with check indicator N. To which authorization objects is the check indicator CM assigned? PLOG P_ORGIN P_PCLX P_PERNR

1-1-2 Go to the field value display.
Object Field Value (Interval)
PLOG INFOTYP 1001
ISTAT *
OTYPE C, O, P, Q, S
PLVAR $PLVAR
PPFCODE *
SYBTYP *
1-2 Menu: Tools → Administration → User Maintenance → Roles (PFCG) Choose the Basic Maintenance view, create a short description and save your role.
1-2-1 Select transaction PA30 in the Menu tab by choosing the Transaction pushbutton or the From the SAP menu pushbutton.
1-2-2 Why do you have to enter an authorization value for the plan version? Because the plan version is defined as an organizational level in the default values of the Profile Generator (indicated by the dollar ($) sign). For which authorization objects did the system automatically generate authorizations? S_TCODE PLOG P_ORGIN P_PCLX P_PERNR Why is the status of the authorization objects PLOG and P_PCLX set to Standard and why is the traffic light symbol status set to green? Because all fields of these authorization objects could be filled with default values.
1-2-3 Click the traffic light on the highest hierarchy level and confirm the assignment of full authorization.

SAP AG 2001
l Roles in Organizational Management
l Objects and relationships of the organizational plan
l Simple Maintenance of an organizational plan
l Creating an organizational plan (simple maintenance)
l Positions
l Indirect user assignment
l Indirect user assignment reconciliation
l User master record comparison
Contents:
Integration into Organizational Management

SAP AG 2001
l Create organizational units in HR OrganizationalManagement
l Link roles with the organizational plan objects
l Assign roles for a specific period of time
l List the components of an organizational plan
l Create organizational plans in simplemaintenance
l Assign organizational units, jobs and positions toroles
l Reconcile indirect user assignments
l Compare user masters
At the conclusion of this unit, you will be able to:
Integration into Organizational Management:Unit Objectives

SAP AG 2001
Overview Diagram (7)
Conception with ASAP Methodology
Elements of the SAP R/3 Authorization Concept
The User Master Record
Introduction
Central User Administration
Access Control and User Administration
Working with the Profile Generator
Special Authorization Components
Integration into Organizational Management
Profile Generator:Installation/Upgrade
Transporting AuthorizationComponents
Analysis and Monitoring Functions
mySAP.com and the Workplace
777

SAP AG 2001
l Authorization management can be greatlysimplified by linking it to organizational units of HROrganizational Management.
Integration into Organizational Management:Business Scenario

SAP AG 2001
Authorizations in Organizational Management
l Problem:
n Managing role assignments directly to users can becomecumbersome in large implementations.
n As users move or change jobs in your organization, theirauthorizations must be reviewed.
l Solution:
n Create roles based on organizational objects, such as positions inyour organization. For example: Sales manager, A/P clerk,secretary, and so on.
n Assign roles to your organizational plan. Users will inherit theauthorizations based on their position in your organizational plan.
Advantages:
n Substitution and Transfers
� If roles were assigned directly to specific employees, then each time the user's responsibilities change, the corresponding assignment of roles would have to be changed
� If, however, the assignments are based on the notion of positions, then no adjustments will have to be made within the agent assignments of roles.
n Time-Dependent Planning in Reorganization Processes
� SAP Organizational Management allows both the validity and the assignment of organizational objects to be planned and activated according to the time available. You must schedule the User Master Record Update program so that profiles can be added or removed based on changes to the organizational plan.

SAP AG 2001
Organizational Plans
Organizational UnitPositionJobPersonUserTask
Organizational Structure Code
Board Board Production Production
Sales Sales European Sales EU Sales
USA Sales US Sales Australia Sales AU Sales
Human Resources HR Personnel Development Development
Payroll Payroll Recruitment Recruitment
Financial Accounting Accounting
Organization and Staffing DisplayOrganization and Staffing Display
Name Code
Board Board
Search area
SelectionArea
OverviewArea
n As of SAP R/3 Release 4.5, SAP R/3 comes with a new maintenance interface for editing organizational plans. You can call up this interface by choosing SAP standard menu -> Human Resources -> Organizational Management -> Organizational plan -> Organization and Staffing -> Create (PPOCE), Change (PPOME), or Display (PPOSE).
n You can, however, still use the simple maintenance mode to edit organizational plans (as in previous releases). To go from the new maintenance interface to the simple maintenance mode , choose the following menu path: Settings -> Maintenance Interface.
n The new user interface consists of several screen areas:
� In the search area, you look for one or more objects that you want to display or edit (for example, a complete organizational structure, or all objects of a specific object type, such as all positions).
� The selection area lists the objects found. You can select one of these objects
by double-clicking it to display the object and its environment in the overview area and its properties in the detail area
by clicking it once to assign it to another object through Drag&Drop, for example, a position to an organizational unit.
n The overview area displays the selected object and its environment.

SAP AG 2001
Organizational Plan User Interface
Organizational unitPositionJobPersonUserTask
Organizational structure Code
Executive Board Board Production Production
Sales Sales Europe Sales EU Sales
US Sales US Sales Australia Sales AU Sales
Human Resources HR Personnel Development Development
Payroll Payroll Recruitment Recruitment
Financial Accounting Accounting
OrganizationOrganization and Staffing and Staffing DisplayDisplay
Name Code
Board Board
Search area
Selection area
Overviewarea
n As of Release 4.5, R/3 comes with a new maintenance interface for editing organizational plans. You can call up this interface by choosing SAP standard menu -> Human Resources -> Organizational Management -> Organizational plan -> Organization and Staffing -> Create (PPOCE), Change (PPOME) or Display (PPOSE).
n You can, however, still use simple maintenance to edit organizational plans (as in previous releases). To go from the new maintenance interface to simple maintenance , choose Settings -> Maintenance interface, or enter transaction code PPOC_OLD.
n The new user interface consists of several screen areas:
� In the search area, you look for one or more objects that you want to display or edit (for example, a complete organizational structure, or all objects of a specific object type such as all positions).
� The selection area lists the objects found. You can select one of these objects
by double-clicking it to display the object and its environment in the overview area and its properties in the detail area
by clicking it once to assign it to another object through Drag & Drop, for example, a position to an organizational unit.
n The overview area displays the selected object and its environment.
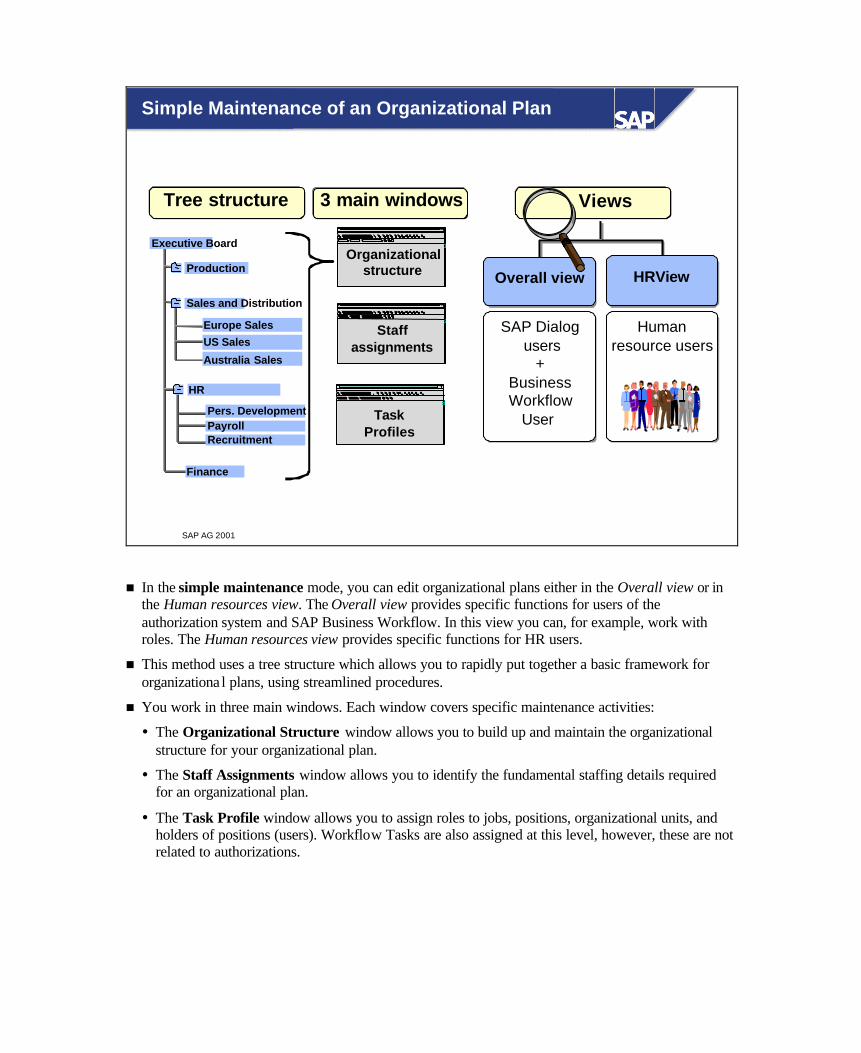
SAP AG 2001
Simple Maintenance of an Organizational Plan
Tree structure 3 main windows
SAP Dialog users
+BusinessWorkflow
User
SAP Dialog users
+BusinessWorkflow
User
Views
Overall viewOverall view
Humanresource users
Humanresource users
HRViewHRViewOrganizational
structure
Staffassignments
Executive Board
Production
Sales and Distribution
Europe Sales
US Sales
Australia Sales
HR
Pers. Development TaskProfiles
Finance
PayrollRecruitment
n In the simple maintenance mode, you can edit organizational plans either in the Overall view or in the Human resources view. The Overall view provides specific functions for users of the authorization system and SAP Business Workflow. In this view you can, for example, work with roles. The Human resources view provides specific functions for HR users.
n This method uses a tree structure which allows you to rapidly put together a basic framework for organizationa l plans, using streamlined procedures.
n You work in three main windows. Each window covers specific maintenance activities:
� The Organizational Structure window allows you to build up and maintain the organizational structure for your organizational plan.
� The Staff Assignments window allows you to identify the fundamental staffing details required for an organizational plan.
� The Task Profile window allows you to assign roles to jobs, positions, organizational units, and holders of positions (users). Workflow Tasks are also assigned at this level, however, these are not related to authorizations.

SAP AG 2001
Creating an Organizational Plan in SimpleMaintenance
Step 1: Create rootorganizational unit Step 2: Create other
organizational units
Step 4: Createpositions
Step 3: Createjobs
Step 5: Assign tasks
Step 6: Assign occupant
Thor Nielsen
SalesManager
Production US SalesExecutive Board
Sales and Distribution
Sales ManagerUSA
Role
- Top-down sales planning- New product decisions- Market segment success contribution analysis- etc.
n The above diagram illustrates that the first step in Simple Maintenance is to create a root organizational unit. All other organizational units are then defined in the organizational structure.
n You can define organizational units and jobs in any order you like. However, they should be defined before you define the relevant positions.
n Positions are created after the appropriate job(s) are created in the job index.
n Holders, are assigned to positions, not to jobs.
n Having set up the organizational plan, you can assign roles to organizational units, jobs, positions, and holders of positions (users).

SAP AG 2001
Abbr.Organizational unit
ExecutiveBoard
Board
Description Executive Board
Validity period 01.02.2000 to 31.12.9999
Step 1: Create Root Organizational Unit
n When you want to build a new organizational plan, you must first create a root organizational unit. The root organizational unit is the top-level unit of an organizational structure. An example would be the executive board. The root organizational unit is also your starting-point for enhancing the organizational structure by adding lower-level units.
n The date specified on the initial screen is used as the default for the validity periods of all objects and relationships to be defined.

SAP AG 2001
Step 2: Create Additional Organizational Units
Production Sales HR Accounting
ExecutiveBoard
Validity period
Organizational unit
01.02.2000 - 31.12.9999
Relationship
01.02.2000 31.12.9999-
Board Executive Board
Production ProductionSales SalesHR Human ResourcesAccounting Financial Accounting
Further entries Period...
Create organizational units
n Using the root organizational unit as your starting-point, you create additional lower-level organizational units. In the above example, the Executive Board constitutes the higher-level object, while the organizational units Production, Sales, HR and Accounting are lower-level objects.
n To create organizational units in simple maintenance, you select the organizational unit below which you want to add new organizational units. The relevant relationship records (A/B 002) between the lower-level and the higher-level organizational unit are automatically created by the system.

SAP AG 2001
Step 2: Edit Organizational Structure
Production Sales HR Accounting
ExecutiveBoard
Pers. Develop.
Payroll
Recruitment
EU Sales
US Sales
AU Sales
n To change the hierarchical position of an organizational unit in the organizational structure, you can reassign the relevant unit. If you reassign a unit, the relationships between the organizational units are changed. This means that the current relationship records are automatically delimited and new relationship records are created based on the reassignment process.
n To change the short or long text, you use the Rename function.
n Other functions include:
� Delete objects and relationships
� Delimit objects and relationships
� Determine the order of the organizational units
n If required, you can show or hide other information, for example, the abbreviation, the object period, and the object key.

SAP AG 2001
Step 3: Create Jobs
Abbr.
Description
Sales Mgr
Sales Manager
Validity period
01.02.2000 - 31.12.9999
SalesManager
Staff assignments
Organizational Structure Organizational Structure / / ChangeChange
n To create jobs, go to the Staff assignments screen and choose Edit -> Create -> Jobs from that screen.

SAP AG 2001
Step 4: Create Positions
SalesManager Europe
Create Positions
Organizational unit Europe Sales
Choose describing job
Abbr. Sales Mgr
Description Sales Manager
Position
Abbr. SalesMgr_EU
Name Sales Manager Europe
Number of requested positions 1
Validity of positions 01.02.2000 31.12.9999
Create jobs
Job: Sales Manager
Position: Sales Manager Europe
Position:Sales Manager US
Position:Sales Manager Australia
n To create a position in simple maintenance, you select the organizational unit in the staff assignments below which you want to add the new position. The relevant relationship record (A/B 003) between the position and the higher-level organizational unit is automatically created by the system.
n As part of the basic concept, you should link each position with a job. As a result, the position automatically inherits the tasks and properties assigned to the describing job, considerably reducing the maintenance effort.
n When you create a position in simple maintenance, you can choose a describing job from the job index or directly create a new one. The relevant relationship record (A/B 007) between the describing job and the position is automatically created by the system. By default, the job description is used as the description of the position.
n You can create several positions simultaneously.

SAP AG 2001
Step 5: Assign Tasks
SalesManager
Postion: Sales Manager Europe
Role: SALESMANAGER_EUROPE
Job: Sales Manager
Organizational unit:Europe Sales
Sales Manager Europe
Role: SALESMANAGER
Role: SALES_EUROPE
n A position (such as Sales Manager Europe) can be assigned directly to a role. You can also assign roles using the job (for example, sales manager) and/or the organizational unit (for example, Europe Sales). The user assigned to this position then inherits all authorization profiles of these roles.
n The user assigned inherits the authorization profiles related to the following:
� Role: SALESMANAGER_EUROPE
Through relationship: Position -> Holder of position
� Role: SALESMANAGER
Through relationship: Job -> Position -> Holder of position
� Role: SALES_EUROPE
Through relationship: Organizational unit -> Position -> Holder of position
n You can also assign roles directly to a user. However, you are not recommended to do this since you loose the benefits of an assignment using an organizational plan.
n NOTE: Roles cannot be inherited across organizational units. Positions belonging to an organizational unit cannot inherit the roles assigned to a higher-level organizational unit.

SAP AG 2001
Step 6: Assign Holder
Position Sales ManagerEurope
Holder
Type
Name
US
LOPEZ Elena LOPEZ
User
Assignment
Staffing percentage
Time period
100,00
01.02.2000
%
- 31.12.9999
Assignmentl Person (P)l User (US)
n Positions can be occupied either by persons or by users.
� Information on the Person object type is maintained in the HR master data. Persons are employees of the company.
� R/3 users, however, are not necessarily employees. Users have authorizations to access the SAP R/3 System. They can occupy positions without being registered as an employee. This assignment is of importance in the workflow context.

SAP AG 2001
User Assignment View (Role)
Description Menu Workflow Authorizations User
Selection Organizational Mgmt User compare
AG SAP_CO_SALESMANAGER_AG Controlling: Sales Manager
C 50000039 Sales Manager
S 50000040 Sales Manager Europe
S 50000042 Sales Manager US
S 50000043 Sales Manager Australia
O 50000029 Sales deparment
Indirect user assignment reconciliation necessary
Color legend
Role (AG)Job (C)Position (S)User (US)Organizational unit (O)
US LOPEZ Elena LOPEZ
US NIELSEN Thor NIELSEN
US NAKE Christoph NAKE
Createassignment
Role Maintenance (PFCG)View
Simple Maintenance (Menu Maintenance for the Workplace)
Basic Maintenance (Menus, Profiles, Other Objects)
Overview (Organizational Management and Workflow)
n In order to assign roles to users, you can also use the role maintenance transaction. You can call this transaction by choosing SAP standard menu -> Tools -> Administration -> User Maintenance -> Roles or by entering transaction code PFCG.
n To be capable of assigning components of your organizational plan, you must select Overview when entering the role maintenance transaction (PFCG).
n By choosing Organizational Mgmt you go to the maintenance screen Role: Maintain Agent Assignment. The ‘indirect user assignments’ that have already been maintained are displayed here.
n You can also assign users to an role (SALESMANAGER, for example) based on positions.
n By choosing Create assignment, you can define the following relationships:
� Role / organizational unit
� Role / position
� Role / user

SAP AG 2001
Indirect User Assignment Reconciliation
AG SAP_CO_SALESMANAGER_AG Controlling : Sales Manager
C 50000039 Sales Manager
S 50000040 Sales Manager Europe
S 50000043 Sales Manager Australia
US BENZ Berta BENZ
US MEIER Michael MEIER
US NAKE Christoph NAKE
S 50000042 Sales Manager US
O 50000029 Sales department
Indirect user assignments ok
Indirect user assignment reconciliation
n If you choose Indirect user assignment reconciliation, the system reconciles the positions and the users assigned. Users that were added newly are entered, and user assignments that are no longer current are deleted.
n During the reconciliation process, the users assigned on the basis of positions are entered as 'indirect user assignments' for the role.
n Since assignments in Organizational Management are time-dependent, you must take this restricted validity into account when you assign users. During the reconciliation process, the relationship period from Organizational Management is copied for the indirect user assignments.
n If a user master compare is peformed (see next slide), the indirect user assignment is automatically reconciled. The same applies if report PFCG_TIME_DEPENDENCY is run.

SAP AG 2001
Compare User Master
Role
Description Controlling : Vertriebsleiter
Compare userCompare usermastermaster
Description Menu Workflow Authorizations User
Selection Organizational Mgmt User compare
n If you change the users assigned to the role or generate an authorization profile, you must compare the user masters (User compare button). The system compares the authorization profiles with the user master records. This means that profiles that are no longer current are removed from the user master records, and the current profiles are entered in the user master records.

SAP AG 2001
l Create organizational units in HR OrganizationalManagement
l Link roles with the organizational plan objects
l Assign roles for a specific period of time
l List the components of an organizational plan
l Create organizational plans in simple maintenance
l Assign organizational units, jobs and positions toroles
l Reconcile indirect user assignments
l Compare user masters
You are now able to:
Integration into Organizational Management:Unit Summary

Exercises
Unit: Integration into Organizational Management
At the conclusion of these exercises you will be able to
• Display organizational units in HR Organizational Management
• Link roles and users with HR organizational units
• Compare the relationships
1-1 Assign a composite role and a user to the existing organizational structure CA940. Then display and compare the indirect relationships, so that the user receives the corresponding authorizations.
1-1-1 Navigate to organizational management in the SAP menu, and there to Expert Mode and then Simple Maintenance. Display the organizational structure CA940.
Menu path: Human Resources → Organizational Management → Expert Mode → Simple Maintenance → Change (PPOM_OLD)
1-1-2 Go to the staff assignments window.
Select the root node and display the Structural Graphics by clicking the appropriate pushbutton.
1-1-3 Expand everything under the Materials Management node. Place your cursor on the position Group ## (under the Store node) and assign the holder GR##-MM2, of type US to the position (choose the Assign Holder pushbutton).

1-1-4 Select the position Group## and choose the Task Profile pushbutton. Link the position with the composite role GR##_MM_WHOUSE (that you created in the exercise of the unit Working with the Profile Generator Part 2).
1-2 Change your composite role GR##_MM_WHOUSE.
Caution: Choose Overview on the initial screen that appears.
1-2-1 Go to the User tab. Is the user from exercise 1-1-3 assigned to your role? ________________________________________________________
1-2-2 Go to Organizational Management by choosing Goto → Organizational Management (or clicking the appropriate pushbutton). Compare the indirect user assignments of the role.
1-2-3 Go back. Is the user from exercise 1-1-3 assigned to your role? ________________________________________________________ What is the traffic light symbol status of the Organizational Management area?
____________________ Display the user master for the user GR##_MM2. Go to the Roles tab. How many roles are there? _________ How many profiles are entered? _________________________________________________

1-2-4 Change your composite role GR##_MM_WHOUSE again. Perform a complete user compare. Display the user master again. How many roles are there now? __________ How many profiles are entered now? _________________________________________________

Solutions
Unit: Integration into Organizational Management
1-1 Assign a composite role and a user to the existing organizational structure CA940. Then display and compare the indirect relationships so that the user receives the corresponding authorizations.
1-1-1 Navigate to organizational management in the SAP menu, and there to Expert Mode and then Simple Maintenance. Display the organizational structure CA940.
Menu path: Human Resources → Organizational Management → Expert Mode → Simple Maintenance → Change (PPOM_OLD)
1-1-2 Go to the staff assignments by choosing the appropriate pushbutton.
Select the root node and display the Structural Graphics by clicking the appropriate pushbutton.
1-1-3 Expand everything under the Materials Management node. Place your cursor on the position Group ## (under the Store node) and assign the holder GR##-MM2, of type US to the position (choose the Assign Holder pushbutton).
1-1-4 Select the position Group## and choose the Task Profile pushbutton. Link the position with the composite role GR##_MM_WHOUSE (that you created in the exercise of the unit Working with the Profile Generator Part 2) by placing the cursor on the position Group## and choosing the Role pushbutton.

1-2 Change your composite role GR##_MM_WHOUSE. Menu: Tools → Administration → User Maintenance → Roles (PFCG)
Caution: Choose Overview on the initial screen that appears.
1-2-1 Go to the User tab. Is the user from exercise 1-1-3 assigned to your role? No.
1-2-2 Go to Organizational Management by choosing Goto → Organizational Management (or clicking the appropriate pushbutton). Compare the indirect user assignments of the role by choosing the Indirect user assignment reconciliation icon.
1-2-3 Go back. Is the user from exercise 1-1-3 assigned to your role? Yes. What is the traffic light symbol status of the Organizational Management area? Green Display the user master record. Menu: Tools → Administration → User Maintenance → Users (SU01) Go to the Roles tab. How many roles are there? 1 (3) Roles (*)
How many profiles are there? 0 (2) Profiles (*)

1-2-4 Change your composite role GR##_MM_WHOUSE again. Menu: Tools → Administration → User maintenance → Activity groups (PFCG) Perform a complete user compare. Display the user master record again.
Menu: Tools → Administration → User Maintenance → SU01 - Users How many roles are there? 3 (5) Roles (*) How many profiles are entered? 2 (4) Profiles (*) (*) Number in brackets:
Roles GR##_BC_WORKPLACE and CA940_PLUS were assigned in the optional exercises.

SAP AG 2001
Access Control and User Administration
l Access Control by Password Check
l Password Rules
l Password Control with System Profile Parameters
l Special Users
l Administration Tasks in User and AuthorizationAdministration
l SAP Authorization Objects for Protection from Accessto Administration Functions
l Scenarios for Distributing Administration Tasks in theSystem Infrastructure
Contents:

SAP AG 2001
Access Control and User Administration:Unit Objectives
l Define rules for passwords.
l Protect special users in SAP R/3.
l Describe tasks in user and authorizationadministration
l List options for separating functions of user andauthorization administration.
l Describe options for decentralization of useradministration.
l Create user and authorization administrators withlimited rights
At the conclusion of this unit, you will be able to:

SAP AG 2001
Overview Diagram (10)
Special Authorization Components
Conception with ASAP Methodology
Elements of the SAP R/3 Authorization Concept
The User Master Record
Introduction
Central User Administration
Working with the Profile Generator
Integration into Organizational Management
Profile Generator:Installation/Upgrade
Transporting AuthorizationComponents
Access Control and User Administration
mySAP.com and the Workplace
Analysis and Monitoring Functions
888

SAP AG 2001
Access Control and User Administration:Business Scenario
l In order to protect your SAP R/3 System againstunauthorized access, you must define passwordrules, set the relevant profile parameters andprotect special users.
l You must also define areas of responsibility foruser and authorization administration.
l The organizational areas of responsibility must beclearly defined technically using authorizations.

SAP AG 2001
Password Rules
DEFINED BY THE
CUSTOMER:
Minimum length: 3 characters
Validity
Password may not be set to a
value contained in a "lock list"
(table USR40)
Pre-defined in SAP systemsThe first character cannot be ! or ?.
The first three characters of the passwordmay not be identical to the first threecharacters of the user ID.
The first three characters may not beidentical.
The first three characters may not be spaces.
The password cannot be PASS or SAP*.
All characters that can be entered from thekeyboard may be used in the password.
The password is not case-sensitive.
Users may not change their passwords moreoften than once a day. This restriction is notvalid for the user administrator.
The password may not be identical to the user'slast five passwords.
n There are two ways in which you can define your choice of user passwords:
� You can use the system profile parameters to assign a minimum length for passwords and define how often the user has to set new passwords.
� Invalid passwords can be entered in the table of reserved passwords USR40. This table is maintained with Transaction SM30. The entries can also be made generically:
? denotes a single character
* denotes a character string
n The SAP R/3 System also has pre-defined password rules.

SAP AG 2001
Password Control with System Profile Parameters
Minimum length of the logon passwordlogin/min_password_lng
Password Validity Periodlogin/password_expiration_time
Lock user with incorrect logonlogin/fails_to_user_lock
Automatic unlock at midnightlogin/failed_user_auto_unlock
Allowed number of incorrect logonslogin/fails_to_session_end
Deactivation of multiple dialog logonslogin/disable_multiple_gui_login
Applicable ValuesDefault Allowed
3 3-8
12 1-99
1 0
3 1-99
0 1
System Profile Parameters
0 999
n login/min_password_lng: The parameter defines the minimum length of the logon password. The password must have at least 3 characters, but the administrator can force a longer length.
n login/fails_to_session_end: Number of incorrect logons allowed with a user master record before the logon is terminated.
n login/fails_to_user_lock: Number of incorrect logons allowed with a user master record before the user master record is locked. An entry is written in the system log at the same time. The lock is removed at midnight.
n login/failed_user_auto_unlock: Controls unlocking of the users locked due to an incorrect logon. If the parameter is set to 1 (default), user locks caused by incorrect logons during the previous days are not taken into consideration. If the value is set to 0, the lock is not removed.
n login/password_expiration_time: Value 0 means that the user is not forced to change the password. Value > 0 specifies the number of days after which the user must change the logon password.
n login/disable_multi_gui_login: If this parameter is set to value 1, the system blocks multiple SAP R/3 dialog logons (in the same client and with the same user name). When a multiple logon is detected, there is a warning permitting the user either to "End the existing sessions" or "End this logon". This parameter is effective in SAPGUI logons.
n login/multi_login_users: A list containing the users who may log onto the system more than once is stored.

SAP AG 2001
Special Users
Initial Logon Procedure in SAP Clients
Client 000 001 066 Client (new)
User SAP* DDIC EarlyWatch SAP*
Initialpassword 06071992 19920706 support pass
! Since these users are generally known, they must beprotected against unauthorized access.
n To protect SAP* and DDIC against unauthorized access, you have to change the initial passwords for these users in all clients of your SAP R/3 System. SAP recommends that you assign these users to user group SUPER. This user group is only assigned to superusers.
n Superuser SAP* was pre-defined in clients 000 and 001 in the SAP R/3 System. A user master record is created for SAP* during installation, but this user master record is not really necessary since SAP* is programmed in the system code. If you delete user master record SAP* and log on again with initial password PASS, SAP* has the following characteristics:
� The user has all authorizations since no authorization checks are made.
� Standard password PASS cannot be changed.
n Since SAP* is a known superuser, you should deactivate it (system profile parameter login/no_automatic_user_sapstar - Note 68048) and replace it with your own superuser.
n The DDIC user is responsible for maintaining the ABAP Dictionary and the software logistics.
n The EarlyWatch user is used for the monitoring and performance analysis.

SAP AG 2001
User and Authorization Administration: Activities
l Create, maintain, lock and unlockusers, and change passwords
l Create and Maintain Roles
l Maintain Transaction Selections andAuthorization Data in Roles
l Generate Authorization Profiles
l Assign Roles and Profiles
l Transport Roles
l Monitor Using the Information System
l Archive Change Documents

SAP AG 2001
Authorization Objects: Users
Authorization Object
ACTVT ActivityCLASS User Group
S_USER_GRP
BC_A Basis:BC_A Basis: AdministrationAdministration
Applicable Activities
01 Create02 Change03 Display05 Lock06 Delete
08 Change Documents22 Include User in Role....
ACTVT ActivitySUBSYSTEM Log. system
S_USER_SYS 02 Change03 Display68 Model78 Assign90 Copy
n The object User Master Record Maintenance: User Groups (S_USER_GRP) defines the user groups for which an administrator has authorization and the activities that are allowed.
n The object S_USER_GRP can be used to grant administration rights for only a certain user group in decentralized administration.
n The object User Master Record Maintenance: System for central user maintenance (S_USER_SYS) defines which system a user administrator can access from the central user administration and the activities that are allowed.
n The object S_USER_SYS can be used in decentralized administration to grant administration rights for only users in a certain system from the central user administration.

SAP AG 2001
Authorization Objects: Roles
Authorization Object
ACT_GROUP Role NameACTVT Activity
S_USER_AGR
BC_A Basis:BC_A Basis: AdministrationAdministration
Applicable Activities
01 Create Roles02 Change Roles03 Display Roles06 Delete Roles21 Transport Roles22 Compare User Masters of Roles....
OBJECT Auth.objectAUTH_FIELD Field nameAUTH_VALUE Auth.value
S_USER_VAL
TCD T-Code
S_USER_TCD
n The object Authorization: Check for roles (S_USER_AGR) defines the role names for which an administrator is authorized and the activities that are allowed.
n The object S_USER_AGR can be used in decentralized administration to grant an administrator authorization to access only certain roles (e.g. for a module or an organizational unit).
n The object Authorization: Transactions in roles (S_USER_TCD) defines the transactions that an administrator may include in a role.
n The object S_USER_TCD can be used to grant an administrator authorization to include only certain transactions in roles and thus prevent critical transactions from being included in roles.
n The object Authorization: Field Values for roles (S_USER_VAL) defines which field values an administrator may enter in roles for which authorization object and which fields.
n The object S_USER_VAL can be used to grant an administrator authorization to assign only certain authorizations in roles and thus prevent critical authorizations from being included in roles.

SAP AG 2001
Authorization Objects: Profiles & Authorizations
Authorization Object
PROFILE Profile NameACTVT Activity
S_USER_PRO
BC_A Basis: Administration BC_A Basis: Administration
Applicable Activities
01 Create02 Change03 Display06 Delete07 Activate
08 Change Documents22 Assign Users24 Archive
OBJECT Authorization Object
AUTH AuthorizationName
ACTVT Activity
S_USER_AUT 01 Create02 Change03 Display06 Delete07 Activate
08 Change Documents22 Assign Profiles24 Archive
n The object User Master Record Maintenance: Authorization Profile (S_USER_PRO) defines the profile names for which an administrator has authorization and the activities that are allowed.
n The object S_USER_PRO can be used to grant an administrator author ization to assign only certain profiles in decentralized administration (e.g. for a module or an organizational unit).
n The object User Master Record Maintenance: Authorizations (S_USER_AUT) specifies the authorization object names and the authorization names for which an administrator is authorized.
n The object S_USER_AUT can be used to grant an administrator authorization to create only certain authorizations in roles and thus prevent critical authorizations from being created in roles.

SAP AG 2001
l An administrator may not
n Administer users and
n Maintain authorizations and
n Generate authorization profiles
l Separation of functions
n Principle of dual control
w User administration
w Authorization maintenance and generation
n Principle of triple control
w User administration
w Authorization maintenance
w Authorization generation
Security Requirements
n The authorization system can be used to flexibly organize maintenance of the user master records, profiles and authorizations.
� If your company is small and is organized centrally, all the tasks connected with maintaining the user master records and the authorization components can be handled by a single user called the superuser.
� If you want to ensure that your system maintains a higher level of security, you can share the responsibility for maintaining the user master records and the authorizations amongst a user administrator and an authorization administrator, each having limited responsibility (principle of dual control).
� For a maximum in system security you can share the responsibility for maintaining the user master records and the authorizations amongst a user admin istrator, an authorization data administrator and an authorization profile administrator, each having limited responsibility.
� Since you can assign specific authorizations for the user and administrator maintenance, the administrators need not be privileged users in your IT department. Normal users can be responsible for maintaining the user master records and authorizations.

SAP AG 2001
Separation of Functions
User Administrator
Authorization DataAdministrator
Authorization ProfileAdministratorl Maintain user master records
l Assign roles to usersl Assign profiles to users (only T...)l Display authorizations and profilesl Call "Information System Authorizations"
Superuser
l Maintain rolesn Change transaction selectionn Change authorization data
l Call "Information System Authorizations"
l Maintain rolesn Create authorizations (only T-...)n Create profiles (only T-...)
l Execute Transaction SUPCl Call "Information System Authorizations"
n Sharing the administrative tasks amongst three administrators is called the principle of triple control.
n The superuser sets up all the user master records, profiles and authorizations for the administrator.
n The authorization data administrator creates a role, selects transactions and maintains the authorization data. He only saves the data in the profile generator since he does not have the necessary authorization for creating the profile. He uses the proposed profile name T-...The authorization data administrator may not change users or create profiles.
n The authorization profile administrator starts Transaction SUPC and chooses All roles. He then restricts his selection, for example by entering the ID of the role to be edited. In the next screen, he chooses Display profile to check the data. If all the data is correct, he creates the authorization profile.The authorization profile administrator may not change users, change the data for roles or create profiles containing authorization objects beginning with S_USER.
n The user administrator then assigns this role to a user (from the user maintenance transaction SU01). The profile is entered for the user. The user administrator may not change data for roles or change or create profiles.
n The principle of dual control combines the tasks and authorizations of the authorization data administrator and those of the authorization profile administrator.
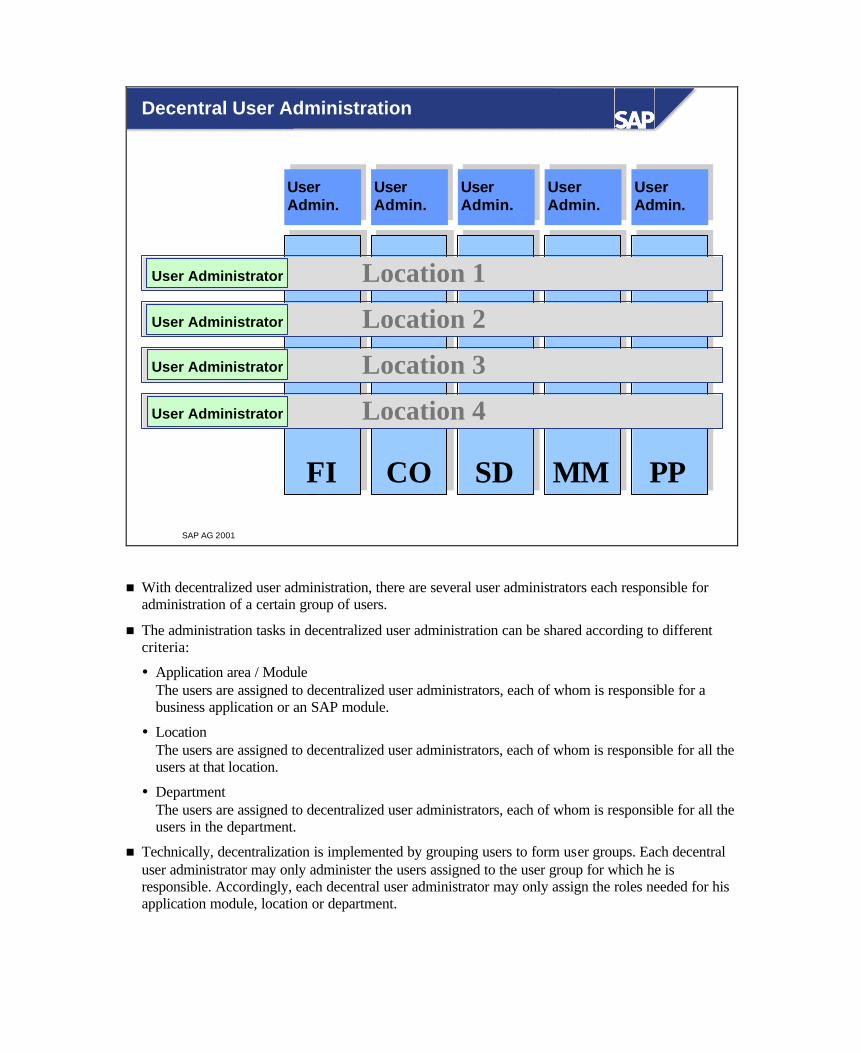
SAP AG 2001
PP
UserAdmin.
MM
UserAdmin.
SD
UserAdmin.
CO
UserAdmin.
FI
UserAdmin.
Location 1
Location 2
Location 3
Location 4
User Administrator
User Administrator
User Administrator
User Administrator
Decentral User Administration
n With decentralized user administration, there are several user administrators each responsible for administration of a certain group of users.
n The administration tasks in decentralized user administration can be shared according to different criteria:
� Application area / Module The users are assigned to decentralized user administrators, each of whom is responsible for a business application or an SAP module.
� Location The users are assigned to decentralized user administrators, each of whom is responsible for all the users at that location.
� Department The users are assigned to decentralized user administrators, each of whom is responsible for all the users in the department.
n Technically, decentralization is implemented by grouping users to form user groups. Each decentral user administrator may only administer the users assigned to the user group for which he is responsible. Accordingly, each decentral user administrator may only assign the roles needed for his application module, location or department.

SAP AG 2001
l Central user administration
n One user administrator for all users
n Unlimited authorizations for all user administration tasks of theuser administrator
l Central maintenance of roles and profiles
n One administrator takes on both roles
w Authorization data administrator
w Authorization profile administrator
n All authorizations for maintaining the roles and profiles
l Principle of dual control
Scenario 1

SAP AG 2001
Scenario 1: Authorizations
PRODUCTION
Useradministrator
Authorizationdata admin.
andauthorizationprofile admin.
Useradministrator
S_USER_GRPACTVT * 03, 08 *CLASS * * *S_USER_AGRACTVT 03 * 03ACT_GROUP * * *S_USER_TCDTCD *S_USER_VALOBJECT *AUTH_FIELD *AUTH_VALUE *S_USER_PROACTVT 03, 08, 22 * 03, 08, 22PROFILE * * *S_USER_AUTACTVT 03, 08 * 03, 08NAME * * *
DEVELOPMENT
n In this scenario there is one central user administrator for the development system and one for the production system.
n The development system also has a central administrator responsible for authorization data administration and authorization profile administration.
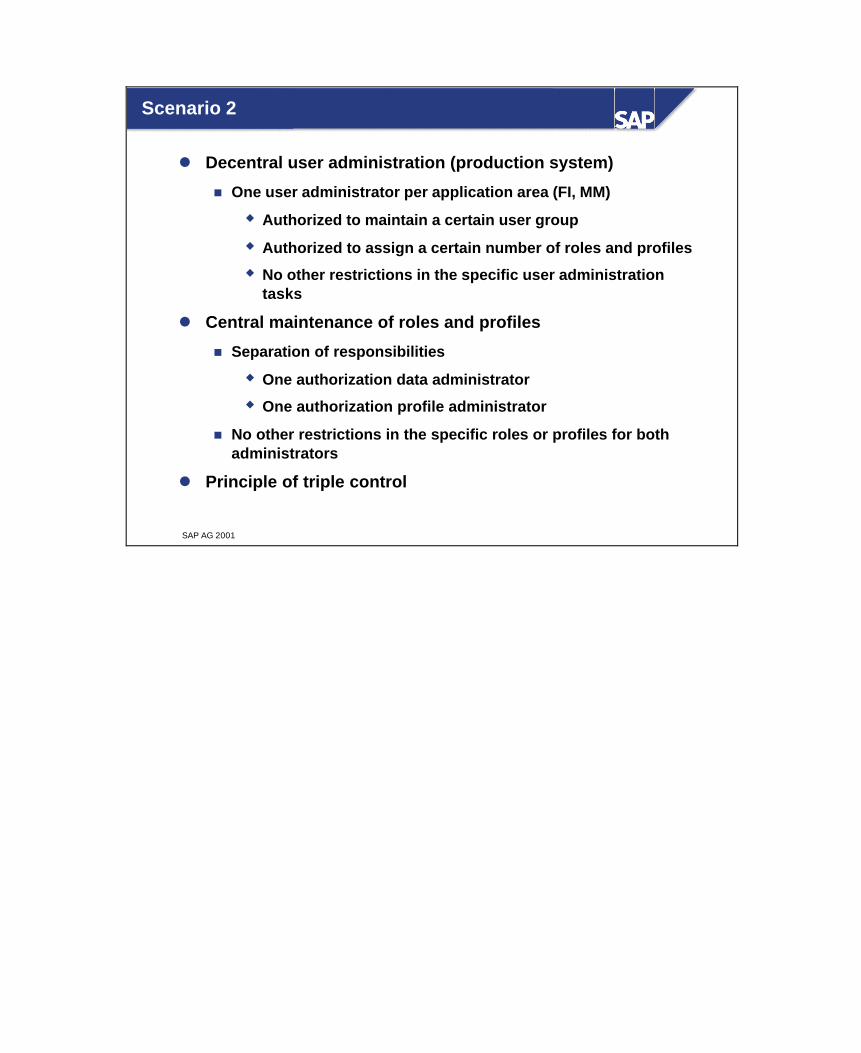
SAP AG 2001
l Decentral user administration (production system)
n One user administrator per application area (FI, MM)
w Authorized to maintain a certain user group
w Authorized to assign a certain number of roles and profiles
w No other restrictions in the specific user administrationtasks
l Central maintenance of roles and profiles
n Separation of responsibilities
w One authorization data administrator
w One authorization profile administrator
n No other restrictions in the specific roles or profiles for bothadministrators
l Principle of triple control
Scenario 2
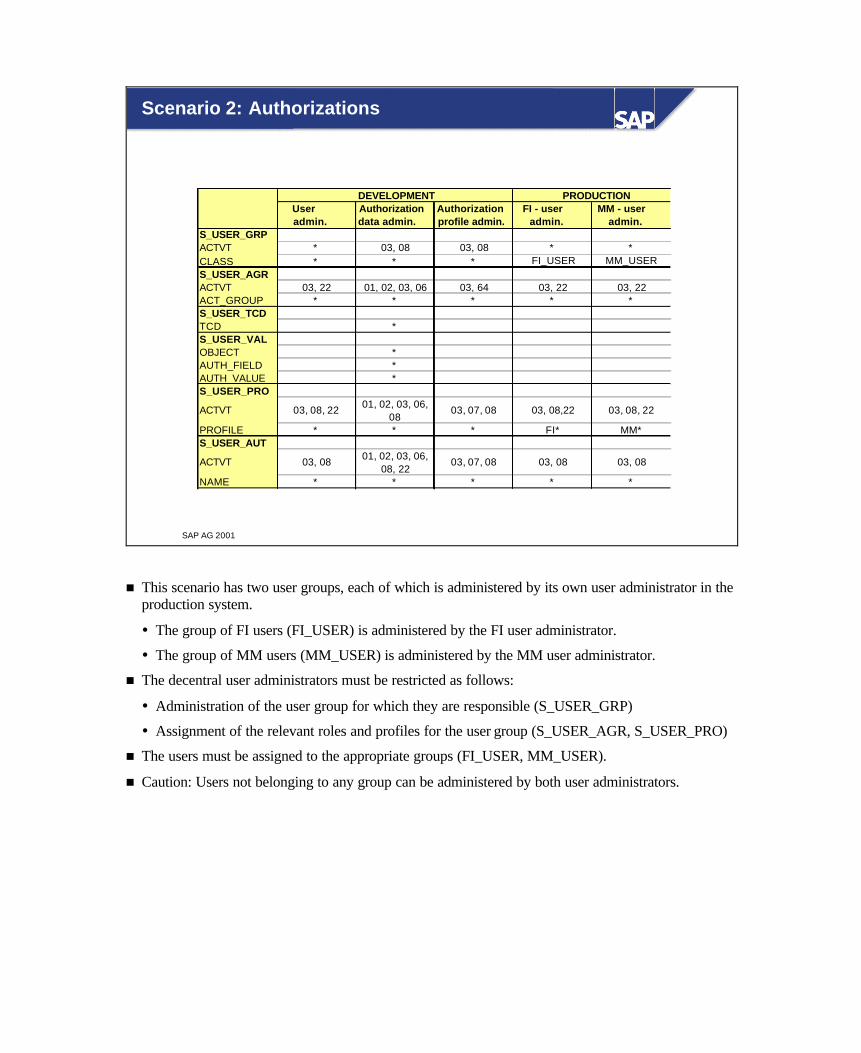
SAP AG 2001
Scenario 2: Authorizations
Useradmin.
Authorizationdata admin.
Authorizationprofile admin.
FI - useradmin.
MM - useradmin.
S_USER_GRPACTVT * 03, 08 03, 08 * *CLASS * * * FI_USER MM_USERS_USER_AGRACTVT 03, 22 01, 02, 03, 06 03, 64 03, 22 03, 22ACT_GROUP * * * * *S_USER_TCDTCD *S_USER_VALOBJECT *AUTH_FIELD *AUTH_VALUE *S_USER_PRO
ACTVT 03, 08, 22 01, 02, 03, 06, 08
03, 07, 08 03, 08,22 03, 08, 22
PROFILE * * * FI* MM*S_USER_AUT
ACTVT 03, 08 01, 02, 03, 06, 08, 22
03, 07, 08 03, 08 03, 08
NAME * * * * *
PRODUCTIONDEVELOPMENT
n This scenario has two user groups, each of which is administered by its own user administrator in the production system.
� The group of FI users (FI_USER) is administered by the FI user administrator.
� The group of MM users (MM_USER) is administered by the MM user administrator.
n The decentral user administrators must be restricted as follows:
� Administration of the user group for which they are responsible (S_USER_GRP)
� Assignment of the relevant roles and profiles for the user group (S_USER_AGR, S_USER_PRO)
n The users must be assigned to the appropriate groups (FI_USER, MM_USER).
n Caution: Users not belonging to any group can be administered by both user administrators.

SAP AG 2001
l Central creation and deletion for all users (prod.)
l Decentral user administration (production system)
n One user administrator per application area (FI, MM)
w Authorized to maintain a certain user group
w Authorized to assign a certain number of roles and profiles
w Authorized for only certain user administration tasks(change, lock/unlock, reset password)
l Central maintenance of roles and profiles
n Separation of responsibilities
w One authorization data administrator
w One authorization profile administrator
n No other restrictions in the specific roles or profiles for bothadministrators
l Principle of triple control
Scenario 3
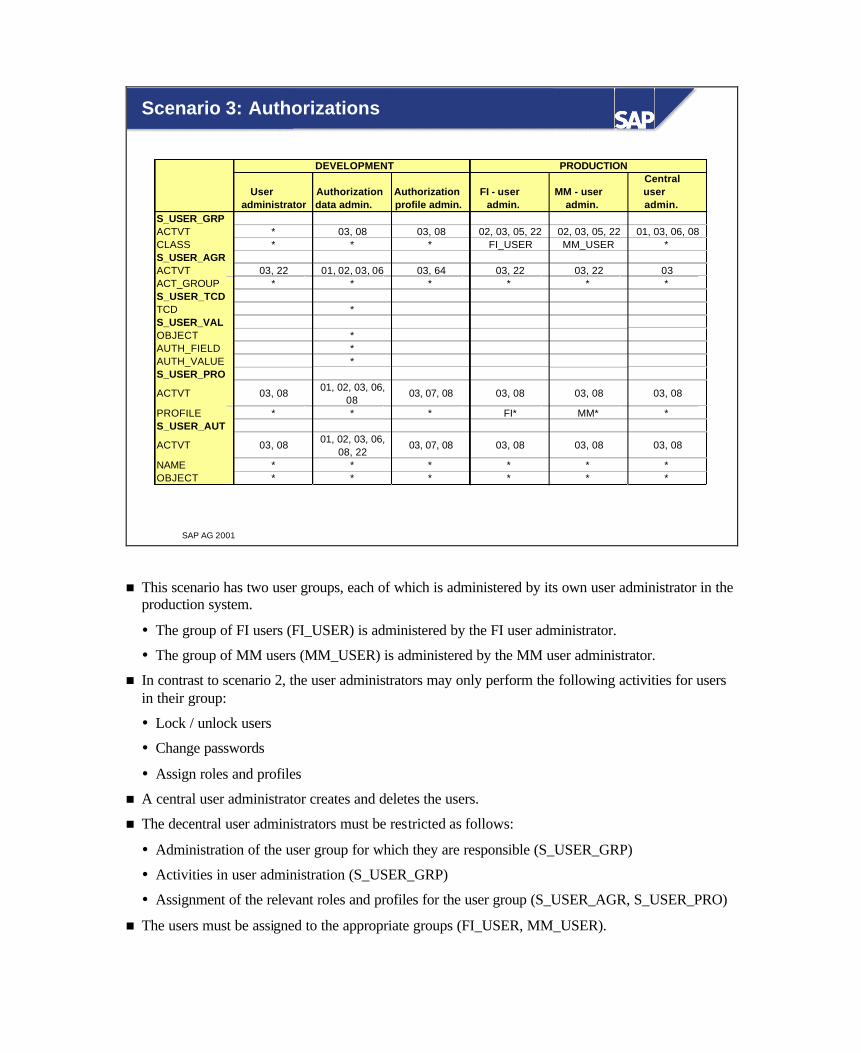
SAP AG 2001
Scenario 3: Authorizations
Useradministrator
Authorizationdata admin.
Authorizationprofile admin.
FI - useradmin.
MM - useradmin.
Centraluseradmin.
S_USER_GRPACTVT * 03, 08 03, 08 02, 03, 05, 22 02, 03, 05, 22 01, 03, 06, 08CLASS * * * FI_USER MM_USER *S_USER_AGRACTVT 03, 22 01, 02, 03, 06 03, 64 03, 22 03, 22 03ACT_GROUP * * * * * *S_USER_TCDTCD *S_USER_VALOBJECT *AUTH_FIELD *AUTH_VALUE *S_USER_PRO
ACTVT 03, 08 01, 02, 03, 06, 08
03, 07, 08 03, 08 03, 08 03, 08
PROFILE * * * FI* MM* *S_USER_AUT
ACTVT 03, 08 01, 02, 03, 06, 08, 22
03, 07, 08 03, 08 03, 08 03, 08
NAME * * * * * *OBJECT * * * * * *
DEVELOPMENT PRODUCTION
n This scenario has two user groups, each of which is administered by its own user administrator in the production system.
� The group of FI users (FI_USER) is administered by the FI user administrator.
� The group of MM users (MM_USER) is administered by the MM user administrator.
n In contrast to scenario 2, the user administrators may only perform the following activities for users in their group:
� Lock / unlock users
� Change passwords
� Assign roles and profiles
n A central user administrator creates and deletes the users.
n The decentral user administrators must be restricted as follows:
� Administration of the user group for which they are responsible (S_USER_GRP)
� Activities in user administration (S_USER_GRP)
� Assignment of the relevant roles and profiles for the user group (S_USER_AGR, S_USER_PRO)
n The users must be assigned to the appropriate groups (FI_USER, MM_USER).

SAP AG 2001
l Change password rules with system profileparameters
l Protect special users in the R/3 System.
l Describe tasks in user and authorizationadministration
l List options for separating functions of user andauthorization administration
l Describe options for decentralization of useradministration
l Create user and authorization administrators withlimited rights
You are now able to:
Access Control and User Administration:Unit Summary
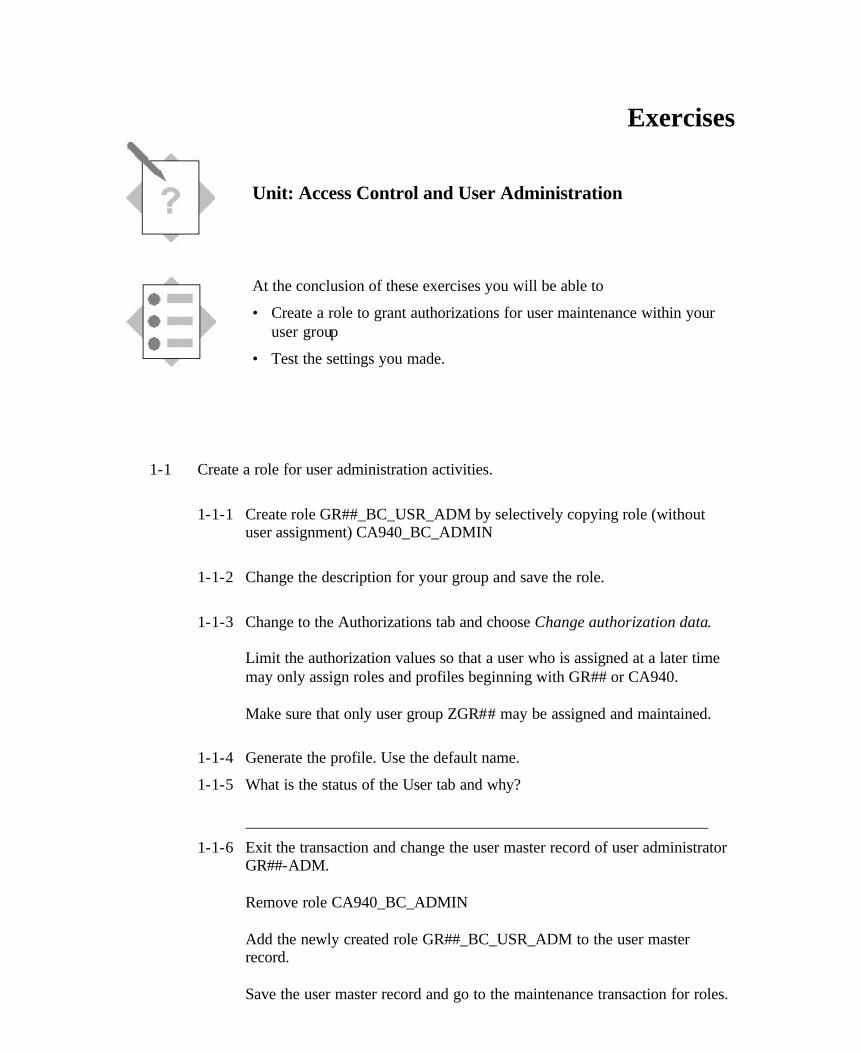
Exercises
Unit: Access Control and User Administration
At the conclusion of these exercises you will be able to
• Create a role to grant authorizations for user maintenance within your user group
• Test the settings you made.
1-1 Create a role for user administration activities.
1-1-1 Create role GR##_BC_USR_ADM by selectively copying role (without user assignment) CA940_BC_ADMIN
1-1-2 Change the description for your group and save the role.
1-1-3 Change to the Authorizations tab and choose Change authorization data. Limit the authorization values so that a user who is assigned at a later time may only assign roles and profiles beginning with GR## or CA940. Make sure that only user group ZGR## may be assigned and maintained.
1-1-4 Generate the profile. Use the default name.
1-1-5 What is the status of the User tab and why? __________________________________________________________
1-1-6 Exit the transaction and change the user master record of user administrator GR##-ADM. Remove role CA940_BC_ADMIN Add the newly created role GR##_BC_USR_ADM to the user master record. Save the user master record and go to the maintenance transaction for roles.

1-2 Log onto the system with user GR##-ADM.
1-2-1 Create a test user GR##-TEST and try to assign this user your neighbor's user group. Can you store the user master record? ________________________________ If not, what is the reason why it fails? _______________________________________________________
1-2-2 What can be implemented by assigning user groups? _______________________________________________________
1-2-3 Assign test user GR##-TEST role CA940_PLUS. Can you assign a role delivered by SAP? (For example: SAP_HR_...) ________________________________ If not, what is the reason why it fails? _______________________________________________________

Solutions
Unit: Access Control and User Administration
1-1 Menu: Tools → Administration → User Maintenance → Roles (PFCG)
1-1-1 Copy with the appropriate icon. On the next screen, choose Copy Selectively.
1-1-2 Specify a description of your role.
1-1-3 The field values have to be changed for the following authorization objects (by clicking on the pencil icon) S_USER_PRO ACTVT stays the same PROFILE change GR* to GR##* S_USER_GRP ACTVT stays the same CLASS change Z* to ZGR##* S_USER_AGR ACTVT * (stays the same) ACT_GROUP change GR* to GR##*
1-1-4 Choose Generate or the menu path: Authorizations à Generate
1-1-5 What is the status of the User tab and why? The status display is red, because the user assignment is not copied when you choose Copy Selectively.

1-1-6 Menu Path: Tools → Administration → User maintenance → User (SU01) Save the user master record and go to role maintenance. Menu: Tools → Administration → User Maintenance → Roles (PFCG)
1-2 Menu path: Tools → Administration → User Maintenance → User (SU01) Log onto the system with user GR##-ADM.
Create a test user GR##-TEST and try to assign this user your neighbor's user group. Can you store the user master record? No, because the authorization for your own user group was restricted, resulting in an error in the authorization check.
1-2-2 What can be implemented by assigning user groups? A decentral user administration because each administrator may only maintain the users of "his own" user group.
1-2-3 Assign test user GR##-TEST activity group CA940_PLUS. Can you assign an role delivered by SAP? No because it begins with SAP… and no authoriza tion was assigned for this activity group (authorization object S_USER_AGR).

SAP AG 2001
l Analyze the authorization checks
l Authorization Error Analysis SU53
l Authorization Trace ST01
l Information System
l Audit Information System
Contents:
Analysis and Monitoring Functions

SAP AG 2001
l Use different analysis and information functions.
l Use Transaction SU53 and analyze the results.
l Apply the features of the information system anduse them for different tasks.
l Use the Audit Information System.
At the conclusion of this unit, you will be able to:
Analysis and Monitoring Functions:Unit Objectives

SAP AG 2001
Overview Diagram (10)
Conception with ASAP Methodology
Elements of the SAP R/3 Authorization Concept
The User Master Record
Analysis and Monitoring Functions
Introduction
Central User Administration
Access Control and User Administration
mySAP.com and the Workplace
Working with the Profile Generator
Special Authorization Components
Integration into Organizational Management
Profile Generator:Installation/Upgrade
Transporting AuthorizationComponents
999

SAP AG 2001
l Missing authorizations can be found with theanalysis functions.
l An overview of the users and authorizations can beobtained with various analysis functions of theInformation System.
Analysis and Monitoring Functions: BusinessScenario

SAP AG 2001
AuthorizationTrace ST01
Analyze the authorization checks
No authorization?No authorization?
Which authorization is missing?Which authorization is missing?
Authorizationerror analysisSU53
FindFindAuthorizationAuthorizationauthorizationauthorization
n There are two ways to analyze authorization checks.

SAP AG 2001
Authorization Error Analysis SU53
User ID: BLITZSystem : T20 Client : 400
Object Customer: Application authorization (F_KNA1_APP)Object class Financial accounting ( FI )
The following authorization object was checked:
Field Value
Activity02
Application authorization customer and vendor master dataF
Activity03
Application authorization customer and vendor master dataF
Available authorizations for the object in the master record:
Object Customer: Application authorization (F_KNA1_APP)Object class Financial accounting ( FI )
Field Value
No authorization?No authorization?
What youWhat youshouldshouldnotnot do! do!
What youWhat youshould do!should do!
Analyze which authorizations are missing and pass thisAnalyze which authorizations are missing and pass thisinformation on to the authorization administrator.information on to the authorization administrator.
n Choose the menu path System -> Utilities -> Display Authorization Check or transaction code SU53. You now can analyze an error in your system that just occurred because of a missing authorization.
n You can call Transaction SU53 in all sessions, not just in the session in which the error occurred. Authorization errors in other users' sessions, however, cannot be analyzed from your own session.
n Example: In the above example, user BLITZ calls Transaction FD02 (change customer). The message "You do not have authorization for Transaction FD02" appears. User BLITZ now chooses transaction code /nSU53 and the system displays the authorization object that was just checked and, for comparison purposes, the values of the object that user BLITZ has in its user master record. In this case the authorization object F_KNA1_APP exists, but instead of the required activity 02 (change), user BLITZ is only authorized for activity 01 (display).
n Transaction SU56 allows the user to see what current authorizations are in his buffer

SAP AG 2001
Authorization Trace ST01
System traceSystem trace
Trace on Trace off Current status File list
Trace status Trace switched off (main switch off)
11
System traceSystem trace
Trace on Trace off Current status File list
Trace status Trace switched on (main switch on)33
Trace is switched offTrace is switched off
Authorization checkAuthorization check 22 Switch on authorization checkSwitch on authorization check
Switch on traceSwitch on trace
44Display + analyzeDisplay + analyzefile listfile list
<Authorization object>:<Field>=<Tested value>
Return code0: Authorization check successful1: Missing authorizations
n You can analyze authorizations as follows:
1. Choose Tools -> Administration -> Monitor -> Traces -> SAP System Trace or Transaction ST01.
2. Choose trace component Authorization check and pushbutton Trace on. The trace is automatically written to the hard disk.
3. To limit the trace function to your own sessions, choose Edit -> Filter -> Shared. Enter your user ID in field Trace for user only in the displayed dialog box.
4. Once the analysis is completed, choose Trace off.
5. To display the results of the analysis, choose Goto -> Files/Analysis or the pushbutton File list. Select the required file and choose Analyze.
n The results of the authorization check are displayed in the following format: <Authorization object>:<Field>=<Tested value>.
n The return code shows whether or not the authorization code was successful.

SAP AG 2001
Information System
Tools
ABAP Workbench Administration
Monitor User maintenance
Users Display Users
User Mass Maintenance Maintain User Groups
Roles Information System
Users Profiles
Authorization Objects Authorizations
Roles Transactions
Comparisons Where-used list
Change documents
Roles By Complex Search Criteria
Roles by Complex Search Criteria By Role Name
By User Assignment By Transaction Assignment
By Profile Assignment By Authorization Object
By Authorization Values By Change Data
Users by Address Data
Users by Complex Search Criteria By Complex Search Criteria
By User ID By Profiles
By Authorizations By Authorization Values
By Transaction Authorization By Roles
By Critical Combinations of Authorizations for Transaction StartWith Incorrect Logons
With Critical Authorizations
n To go to the Information System in the SAP menu, choose Tools -> Administration -> User Maintenance -> Information System
n You can also go to the Information System authorizations in the User Maintenance transaction (SU01) by choosing the menu path Information -> Infosystem.
n You can find elements of the authorization system using different selection criteria.
n The Information System (RSUSR998) and parts of the Information System can be called as executable reports: RSUSR002 Users by Complex Search Criteria RSUSR005 List of User with Critical Authorizations RSUSR020 Profiles By Complex Search Criteria RSUSR030 Authorizations by Complex Selection Criteria RSUSR040 Authorization Objects by Complex Selection Criteria RSUSR070 Roles by Complex Selection Criteria RSUSR100 For Users RSUSR101 For Profiles ............
n More detailed analyses can also be started using Reports: RSUSR003 Check the passwords of users SAP* and DDIC in all clients RSUSR200 List of users By Log on Date and Password Change RSUSR405 Reset All User Buffers in All Clients .............

SAP AG 2001
SAP -SAP - DB DB
Audit Information System
Externa
l Aud
iting
Intern
al Aud
iting
System
Check
Data Prot
ectio
n
n The Audit Information System (AIS) is a checking tool for
� External Auditing
� Internal Auditing
� System Check
� Data Protection
n AIS improves the flow and quality of the check. It consists of the Audit area menu and collects and structures SAP standard programs as well as defining initial values for them. You can call AIS with the menu path Information Systems -> Audit Info System or Transaction SECR.
� NOTE: AIS becomes a component of the SAP Basis functions as of Releases 3.1I and 4.6A. For previous maintenance levels from 3.0D, you can import AIS according to the instructions in Note 100609.
n The Audit area menu is structured according to the flow of the check. There are analysis programs with preset control data for each check field.
n AIS is an integrated component of the SAP R/3 System. The internal auditor works at his screen in his production environment. He needs a user master record with full display authorization.

SAP AG 2001
Audit Information System Reporting Tree
Audit Information System (AIS)
System ConfigurationTransport GroupRepository / TablesDevelopment / CustomizingBackground ProcessingSystem Logs and Status DisplaysUser AdministrationCheck List According to SAP Security GuideCheck List According to Data ProtectionGuideHuman Resources Audit / Data Protection Audit
Business Audit
System Audit -
++
+
++++++
+
+
AuthenticationInfo System Users & AuthorizationsAuthorizationsProfile GeneratorUser OverviewWhich User May ...Internet UsersCentral User Administration
++++++
+
+
n To display a list of reports on any object, expand the node.
n The reporting tree has two components:
� System auditing functions
� Business auditing functions
n Reports that are executed may be saved to the reporting tree for evaluation at a later time, without having to rerun intensive reports. As with any report, the output can be saved locally, sent as an SAP office mail attachment, or saved to a shared or private folder.
n SAP developed AIS by request of and in collaboration with members of the REVISION SAP User Group. Individual themes are worked on by separate user groups. The results have a direct effect on AIS. In this way, the members of the User Groups make their experience available. The collaboration is continuing. You can find information about the Revision User Group at: http://www.sap.com/germany/discsap/revis/index.htm.
SAP AG 2001
l Analyze the authorization checks
l Use Transaction SU53 to find missingauthorizations
l Run the authorization trace (ST01)
l Analyze information using the Information System
l Understand and apply the AIS (Audit InformationSystem) functions
You are now able to:
Analysis and Monitoring Functions: Unit Summary


Exercises
Unit: Analysis and Monitoring Functions
At the conclusion of these exercises you will be able to
• Use the Audit Information System (AIS)
• Use reports in the authorization information system
• Analyze the created authorization concept
• Answer practical questions.
1-1 You are the data protection officer and want to check the R/3 System's assignment of authorizations and security.
1-1-1 Display all the users with incorrect logons (AIS). How often did your users (GR##... or CA940-##) log on incorrectly? __________________________________________________
1-1-2 Check the passwords of the special users in AIS. Are there unprotected special users? If yes, name two cases. __________________________________________________
1-1-3 Check the logon rules in AIS. How many places are set for the minimum password length? ____________ After how many incorrect logons is the user locked? ____________ Is the user automatically unlocked? If yes, when? ____________________________________ Exit the Audit Information System (AIS).
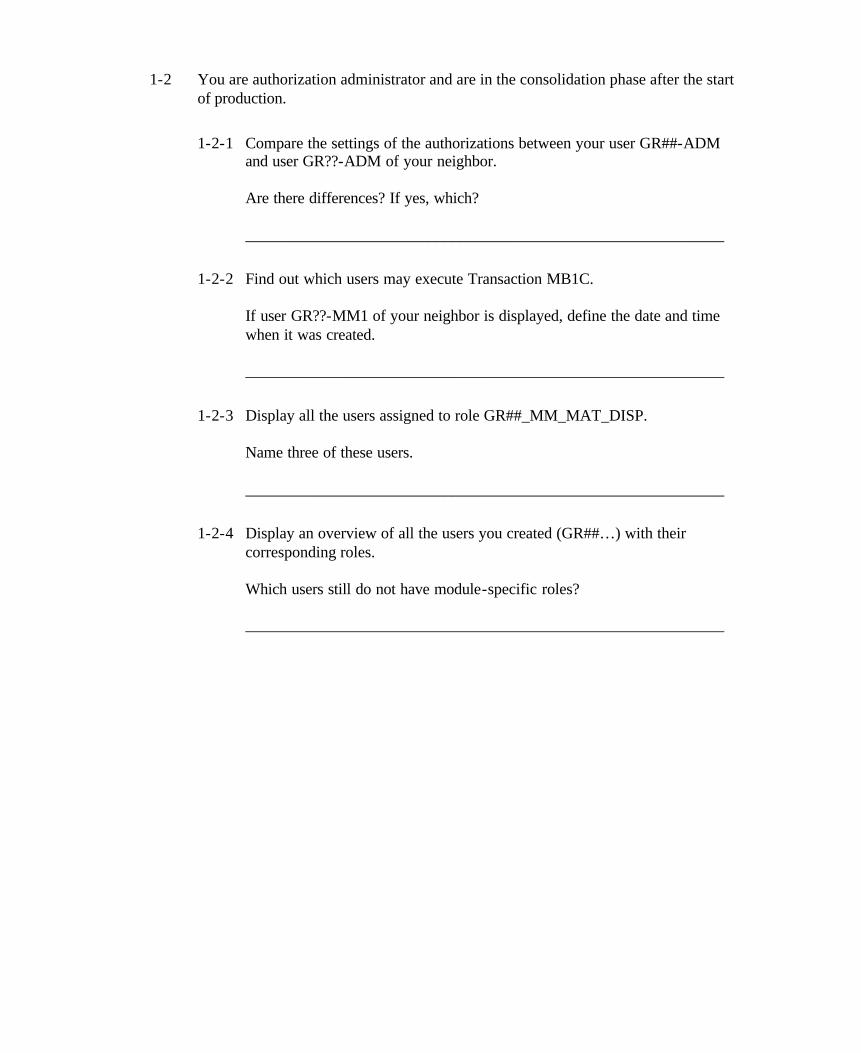
1-2 You are authorization administrator and are in the consolidation phase after the start of production.
1-2-1 Compare the settings of the authorizations between your user GR##-ADM and user GR??-ADM of your neighbor. Are there differences? If yes, which? ____________________________________________________________
1-2-2 Find out which users may execute Transaction MB1C. If user GR??-MM1 of your neighbor is displayed, define the date and time when it was created. ____________________________________________________________
1-2-3 Display all the users assigned to role GR##_MM_MAT_DISP. Name three of these users. ____________________________________________________________
1-2-4 Display an overview of all the users you created (GR##…) with their corresponding roles. Which users still do not have module-specific roles? ____________________________________________________________

The following exercise is optional.
1-3 You are still authorization administrator and are in the consolidation phase after the start of production.
1-3-1 The sales manager with user ID GR##-SD1 calls you. He tells you that he cannot execute any SD transaction. His SAP Easy Access Menu only contains general transactions. Look at this problem. Then make a small test and tell the sales manager his new initial password, which you set up after the test.
1-3-2 You get a mail from the production manager immediately thereafter. He has employed a new senior storeperson who should only be able to post in plant 1000. Look at this problem. Then make a small test and tell the new senior storeperson his new initial password, which you set up after the test.
Use existing master data to solve this problem.

Solutions
Unit: Analysis and Monitoring Functions
1-1 You are the data protection officer and want to check the R/3 System's assignment of authorizations and security.
1-1-1 Menu: Information Systems → Audit Info System Choose Complete audit and Start Audit. Path: System Audit → User Administration → Information System Users and Authorizations → User → with incorrect logons The number of incorrect logons appears in the last column.
1-1-2 Menu: Information Systems → Audit Info System Choose Complete audit and Start Audit. Path: System Audit → User Administration → Authentification → Special User → Check Passwords of Special Users Unprotected special users are marked in red.

1-1-3 Menu: Information Systems → Audit Info System Choose Complete audit and Start Audit. Path: System Audit → User Administration → Authentification → Logon Rule Parameters How many places are set for the minimum password length? System parameter login/min_password_lng 3 After how many incorrect logons is the user locked? System parameter login/fails_to_user_lock 12 Is the user automatically unlocked? If yes, when? System parameter login/failed_user_auto_unlock Double-click on system parameter The user is automatically unlocked at midnight.
1-2 You are authorization administrator and are in the consolidation phase after the start of production.
1-2-1 Menu: Tools → Administration → User Maintenance → Information Systems → Comparisons → Comparisons → From users Emter GR##-ADM as your user and GR??-ADM as your neighbor's user and choose Execute. Authorization values that are not the same are marked in bright red. Navigate in the detail view by double-clicking and look at the different authorization values. Are there differences? If yes, which? S_USER_PRO ACTVT identical PROFILE not identical (GR##* < > GR??*) S_USER_GRP ACTVT identical CLASS not identical (ZGR##* < > ZGR??*) S_USER_AGR ACTVT identical ACT_GROUP not identical (GR##* < > GR??*)

1-2-2 Menu: Tools → Administration → User Maintenance → Information Systems → Where-used list → Where-used lists → For authorization values Enter authorization object S_TCODE and choose Execute. Enter transaction code MB1C (in uppercase) and choose Execute. Choose Use in User masters. If user GR??-MM1 of your neighbor is displayed, define the date and time when it was created. Select user GR??-MM1 and choose Change documents. You can find the date of creation at the top of the right column.
1-2-3 Menu: Tools → Administration → User Maintenance → Information System → User → Users by complex selection criteria → by roles Enter role GR##_MM_MAT_DISP and choose Execute.
1-2-4 Menu: Tools → Administration → User Maintenance → Information System → User → Users by complex selection criteria → by user name Enter GR##* and execute the report. Choose the Roles or Activity Groups pushbutton. Which users still do not have module-specific roles? GR##-FI1 GR##-FI2 GR##-SD1 GR-SD2 The users may differ depending on completion of the optional exercises.

The following exercise is optional.
1-3 You are still authorization administrator and are in the consolidation phase after the start of production. Menu: Tools → Administration → User Maintenance → User (SU01) 1-3-1 Display the user master record of user GR##-SD1 and check the assigned
roles. The roles for the menu entries requested by the sales manager are missing. Assign the composite role GR##_SD_SALMGR to user GR##-SD1 (in the Roles tab) and save the user master record. Logon with the user and check whether the user menu has the required functionality. Then set a new initial password, e.g. init, and mail it to the sales manager in the Business Workplace (SBWP).
1-3-2 In the exercise Working with the Profile Generator Part 1 you created the role GR##_MM_GR_POST1000 that exactly satisfies the requirements. Path: Tools à Administration à User maintenance à User (SU01) Assign role GR##_MM_MAT_DISP. Log on and test Transaction MB1C (Good receipt - Other). To test the transaction, try to make a posting both in plant 1000 and in plant 1200. If everything was set correctly, the system only permits the posting in plant 1000. Use the following data for testing MB1C: Transaction type 561 Plant 1000 or 1200 Storage location 0001 Press ENTER Material P-100 Amount 10 Choose Post (Save). Then set a new initial password, e.g. init, and mail it to the new warehouse supervisor in the Business Workplace (SBWP).

SAP AG 2001
l Table Maintenance Authorization S_TABU_DIS
l Maintaining Cross-Client Tables S_TABU_CLI
l Maintaining the Area Menu
l Checking Transaction Code S_TCODE
l Program Run Checks using S_PROGRAM
Contents:
Special Authorization Components

SAP AG 2001
l Protect tables/views with authorization groups
l Create and maintain area menus
l Automatically create or manually assigntransaction codes to reports
l Protect SAP R/3 functions with authorizationobject S_TCODE
l Protect Programs with authorization groups
At the conclusion of this unit, you will be able to:
Special Authorization Components:Unit Objectives

SAP AG 2001
Overview Diagram (12)
Conception with ASAPMethodology
Elements of the SAP R/3Authorization Concept
The User Master Record
Analysis and Monitoring Functions
Introduction
Access Control and User Administration
Working with the ProfileGenerator
Integration into Organizational Management
Profile Generator: Installation/Upgrade
mySAP.com and the Workplace
Central User Administration
Transporting AuthorizationComponents
Special Authorization Components 101010

SAP AG 2001
l Some authorization objects are of importance forall applications and need to be given specialattention.
Special Authorization Components:Business Scenario
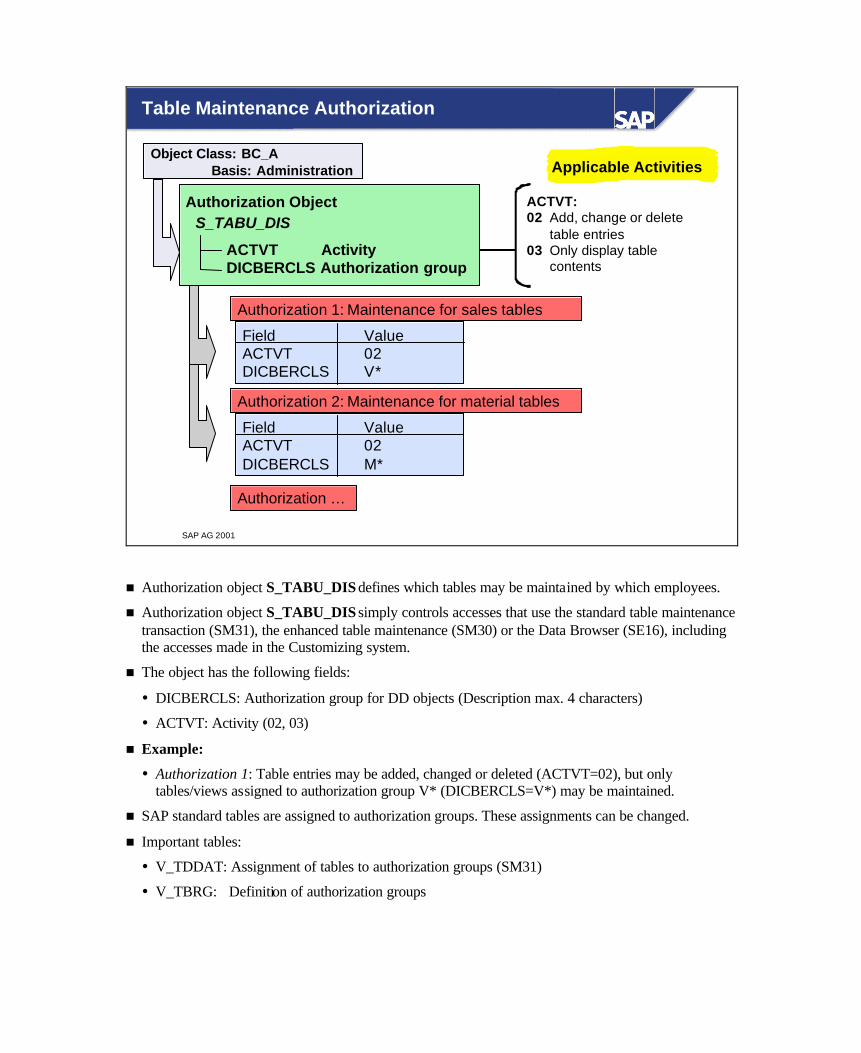
SAP AG 2001
Table Maintenance Authorization
Field ValueACTVT 02DICBERCLS V*
Authorization 1: Maintenance for sales tables
Authorization Object
ACTVT ActivityDICBERCLS Authorization group
S_TABU_DIS
Object Class: BC_ABasis: Administration
Field ValueACTVT 02DICBERCLS M*
Authorization 2: Maintenance for material tables
Authorization …
Applicable Activities
ACTVT:02 Add, change or delete table entries03 Only display table contents
n Authorization object S_TABU_DIS defines which tables may be maintained by which employees.
n Authorization object S_TABU_DIS simply controls accesses that use the standard table maintenance transaction (SM31), the enhanced table maintenance (SM30) or the Data Browser (SE16), including the accesses made in the Customizing system.
n The object has the following fields:
� DICBERCLS: Authorization group for DD objects (Description max. 4 characters)
� ACTVT: Activity (02, 03)
n Example:
� Authorization 1: Table entries may be added, changed or deleted (ACTVT=02), but only tables/views assigned to authorization group V* (DICBERCLS=V*) may be maintained.
n SAP standard tables are assigned to authorization groups. These assignments can be changed.
n Important tables:
� V_TDDAT: Assignment of tables to authorization groups (SM31)
� V_TBRG: Definition of authorization groups

SAP AG 2001
Table Maintenance Authorization (Cross-Client)
Field ValueCLIIDMAINT X
Authorization 1: Maintenance for sales tables (cross-client)
Authorization Object
CLIIDMAINT Identifier for cross- client maintenance
S_TABU_CLI
Object Class: BC_ABasis: Administration
Field ValueCLIIDMAINT
Authorization 2: Maintenance for material tables (cross-client)
Authorization …
Applicable Values
CLIIDMAINTX: Authorized to maintain
cross-client tables
n Authorization object S_TABU_CLI: Grants authorization to maintain cross-client tables with the standard table maintenance transaction (SM31), enhanced table maintenance transaction (SM30) and the Data Browser, also in the Customizing system. Also acts as a further security measure for cross-client tables and enhances the general table maintenance authorization S_TABU_DIS.
n The object has the following field:
� CLIIMAINT: If identifier X is set, cross-client tables can be maintained.
n Normally each client has his table environment in the Customizing area in which he can edit his Customizing parameters. The table design of the Customizing tables permits two different clients to each have and maintain their own data without disturbing the other clients. However, this is not the case for cross-client tables, since their contents are available for all clients. You therefore should assign these tables a special authorization that is only granted to especially competent maintenance persons to avoid unintentional side-effects in multi-client systems. There are only very few cross-client tables in Customizing. Additional security measures in production systems are nevertheless strongly recommended.

SAP AG 2001
Creating the Area Menu
Area menu ZCA940_DEMO Favorite
Area menu for CA940 demo
Favorites management
My favorites
Name + short text of the area menuName + short text of the area menu
FDMN Customers
FIAR Reports for accounts receivable accounting
Include the areaInclude the areamenu in themenu in the
list of favoriteslist of favorites
List ofList offavoritesfavorites
n With Release 4.6A, the previous CUA area menus were converted to tree navigation. The menu contents are automatically copied to a new data structure when you upgrade to Release 4.6A or higher. You can edit the area menus with a new maintenance interface (area menu maintenance transaction: SE43 or menu path: Tools -> Development -> Other tools -> Area menues ).
n In the past you could only link transactions into the area menues. With Release 4.6A, you can also insert all types of reports found in the report trees directly into area menues. The system automatically assigns the report a transaction code used to start the report from the menu. If you already integrated a report into another area menu, the previously assigned unique transaction code is used and a new transaction code is not generated
n You can use migration transaction RTTREE_MIGRATION to create the corresponding area menues from complete report trees. The necessary transaction codes for the reports are generated automatically.
n Report trees can only be displayed. They cannot be maintained any longer. To modify the old contents of the report trees they must first be converted using the migration transaction. The area menu maintenance transaction is then available for modifying the contents.

SAP AG 2001
Maintaining the Area Menu
Area menu for demo for course CA940
Information System: Roles
Search by user assignment Search for change data Search by role name Roles by complex search criteria
Profile generator
Roles (user roles)
User administration
Analyses
Users with incorrect logons Users with critical authorizations Users currently active in the system Users Create Maintain
InsertionInsertionofof
reportsreports
InsertionInsertionofof
transactionstransactions
Automatic creation Automatic creation of transaction codes of transaction codes
for the reportsfor the reports
Transaction codes:Transaction codes:Customer namespaceCustomer namespace
n You want to create a new area menu to be assigned to a user or user group as a new menu or sub-menu.
n Choose the menu path: Tools -> ABAP Workbench -> Development -> Other tools -> Area menues or Transaction SE43 to create an area menu.
n Inserting transactions: If you want to add transactions to the menu, you have to enter the desired transaction code as well as a text that is to appear as entry in the menu. If you define a transaction code without a text, the name of the transaction is used as text. If the transaction code does not exist in the current system, the transaction code is used as text.
n Inserting reports: To insert reports in the area menu, choose Insert report.
n Automatic creation of transaction codes: A transaction code is automatically created for the selected report when you end the dialog. If there is already a transaction code for the selected report, it is used.
n Manual assignment of a transaction code: If you want to define the transaction code for the report yourself, choose Display other options.
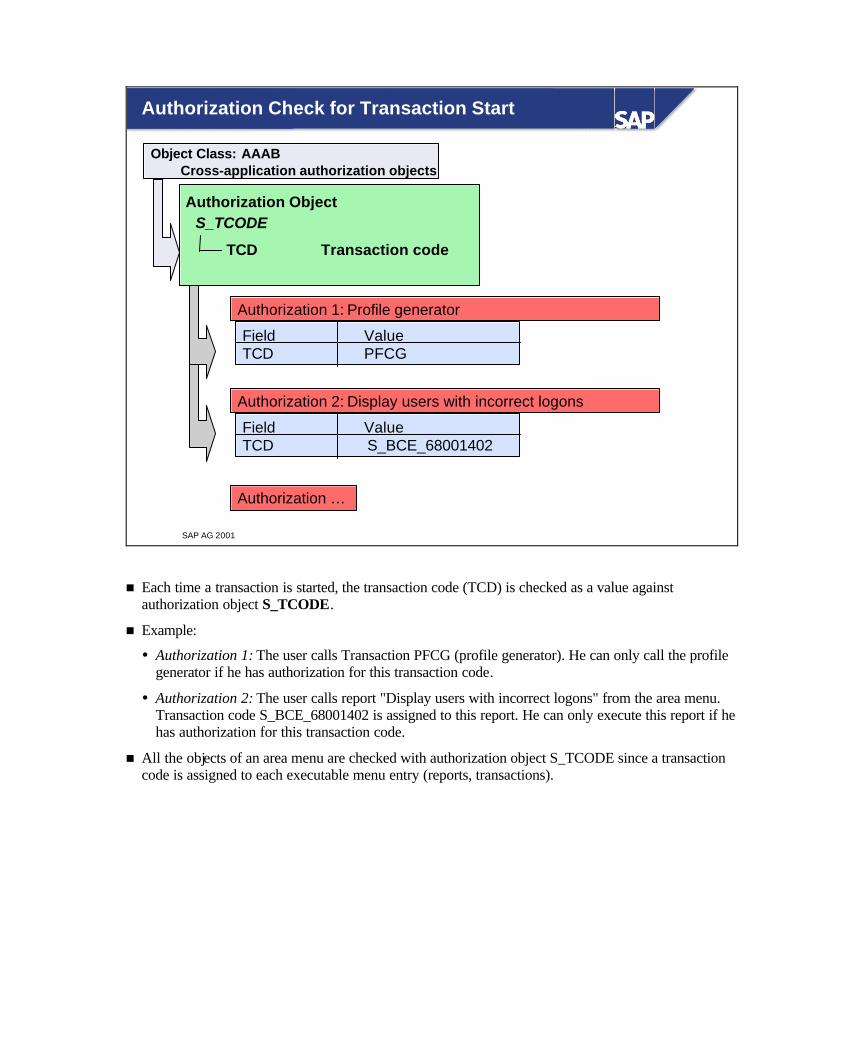
SAP AG 2001
Authorization Check for Transaction Start
Field ValueTCD PFCG
Authorization 1: Profile generator
Authorization Object
TCD Transaction code
S_TCODE
Object Class: AAAB Cross-application authorization objects
Field ValueTCD S_BCE_68001402
Authorization 2: Display users with incorrect logons
Authorization …
n Each time a transaction is started, the transaction code (TCD) is checked as a value against authorization object S_TCODE.
n Example:
� Authorization 1: The user calls Transaction PFCG (profile generator). He can only call the profile generator if he has authorization for this transaction code.
� Authorization 2: The user calls report "Display users with incorrect logons" from the area menu. Transaction code S_BCE_68001402 is assigned to this report. He can only execute this report if he has authorization for this transaction code.
n All the objects of an area menu are checked with authorization object S_TCODE since a transaction code is assigned to each executable menu entry (reports, transactions).

SAP AG 2001
Authorization …
Field ValueP_ACTION SUBMITP_GROUP CA940
Authorization 1: Profile Generator
Authorization Object
P_GROUP Authorization Group ABAP ProgramP_ACTION User Action ABAP Program
S_PROGRAM
Object Class: BC_C Basis - Development Environment
ABAP: Programmablaufprüfungen
n As in previous releases, you can check programs using the authorization object S_PROGRAM.
n The programs (Reports) are grouped in program authorization groups and,using the groups, can be protected against unauthorized access. The authorization groups is stored in the program attributes.
n You can create your own authorization groups (without modification) using SAP Programs:
� Start the program RSCSAUTH.
It creates a list of reports (Type 1) ("Program“ column), the authorization groups delivered by SAP ("SAP“ column), and the authorization groups maintained by the customer (“Customer“ column). You can enter your authorization groups in the “Customer" column. When you choose Save, the customer authorization groups for all SELECTED reports are copied to table TRDIR. This is equivalent to changing the authorization group in the program attributes, and existing SAP authorization groups are overwritten. The authorization groups are also entered in table SREPOATH by report, so that the customer’s authorization groups can be restored after an upgrade by running RSCSAUTH.
� Now start program RSABAUTH. The new authorization groups are written to the table TPGP.
SAP AG 2001
l Protect tables/views with authorization objects
l Create and maintain area menus
l Automatically create or manually assigntransaction codes to reports
l Protect SAP R/3 functions with authorizationobject S_TCODE
l Protect Programs with authorization objects
You are now able to:
Special Authorization Components: Unit Summary

Exercises
Unit: Special Authorization Components
At the conclusion of these exercises you will be able to
• Determine authorization groups for protecting tables,
• Restrict table accesses.
Create authorizations so that a user can view specific tables in Transaction SM30. The user must be able to display two tables: the company code table and the business area table. Those table names are V_T001 (company code) and V_TGSB (business area).
1-1 Find out about authorization object S_TABU_DIS.
1-1-1 Display the documentation for the authorization object S_TABU_DIS. What is the main function of these authorization objects? ___________________________________________________ ___________________________________________________
1-1-2 What activities are allowed? ___________________________________________________
1-1-3 What is stored in table V_DDAT? ___________________________________________________
1-1-4 What is stored in table V_BRG? ___________________________________________________
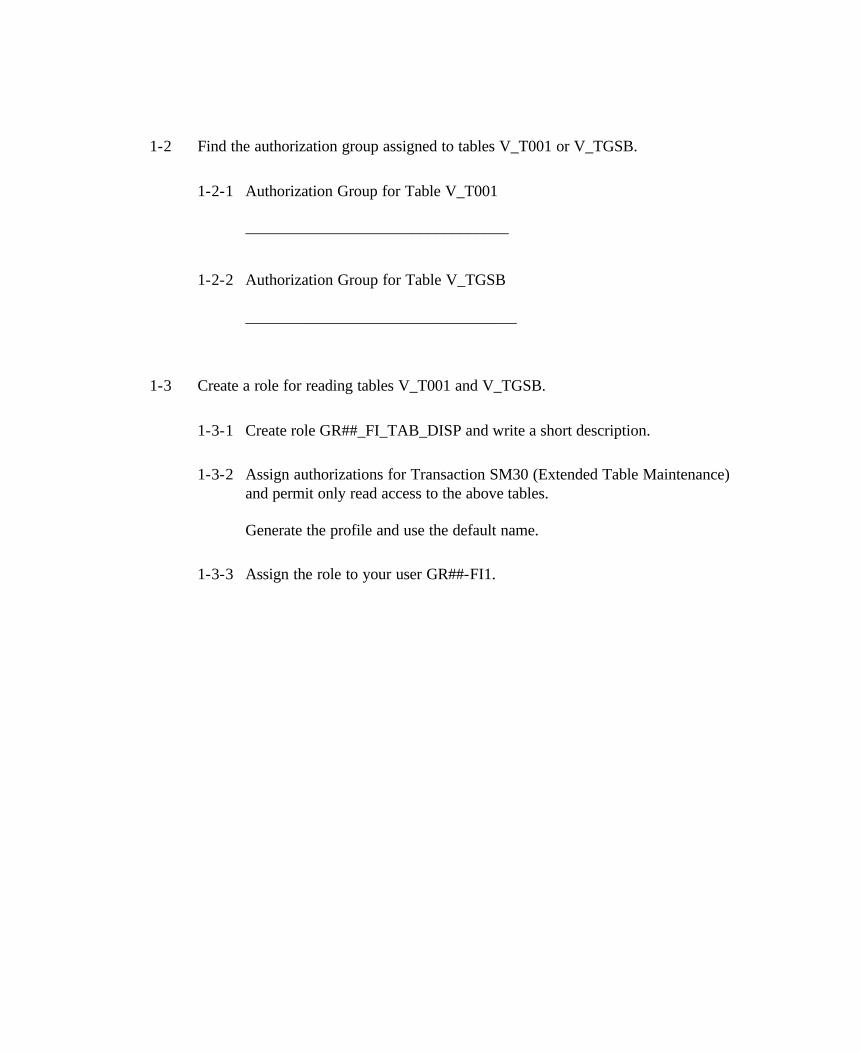
1-2 Find the authorization group assigned to tables V_T001 or V_TGSB.
1-2-1 Authorization Group for Table V_T001 _________________________________
1-2-2 Authorization Group for Table V_TGSB __________________________________
1-3 Create a role for reading tables V_T001 and V_TGSB.
1-3-1 Create role GR##_FI_TAB_DISP and write a short description.
1-3-2 Assign authorizations for Transaction SM30 (Extended Table Maintenance) and permit only read access to the above tables. Generate the profile and use the default name.
1-3-3 Assign the role to your user GR##-FI1.
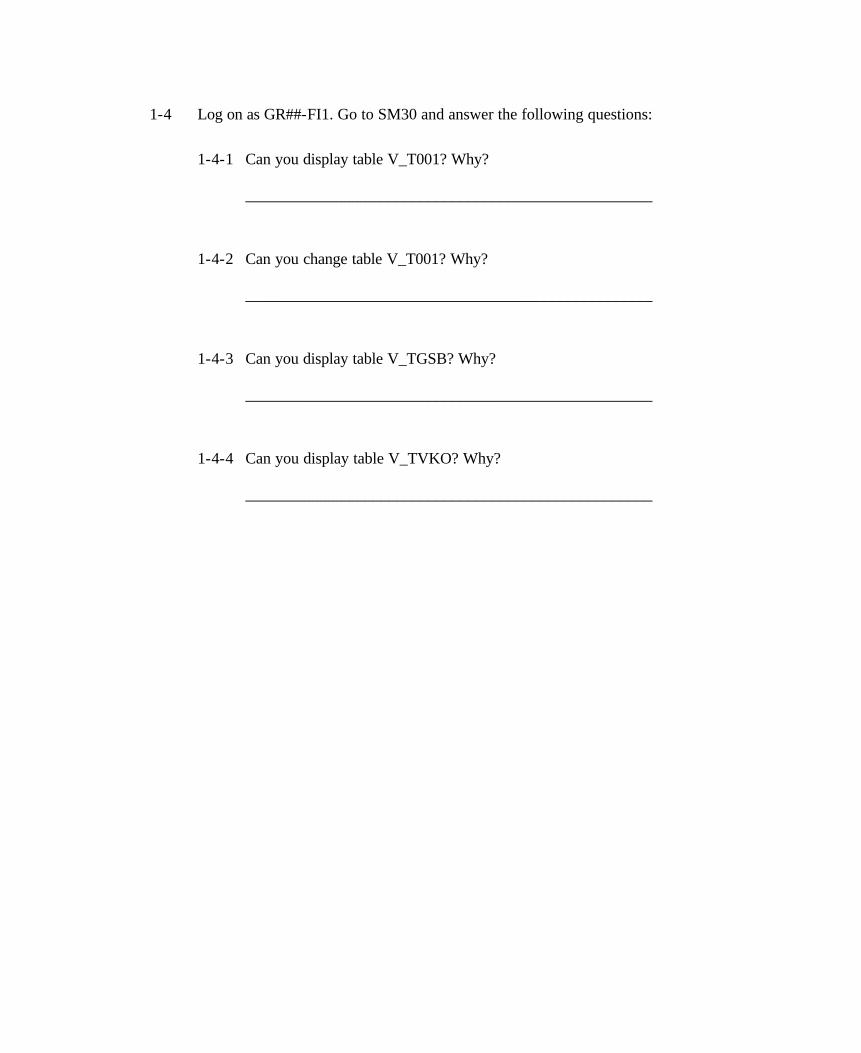
1-4 Log on as GR##-FI1. Go to SM30 and answer the following questions:
1-4-1 Can you display table V_T001? Why? ___________________________________________________
1-4-2 Can you change table V_T001? Why? ___________________________________________________
1-4-3 Can you display table V_TGSB? Why? ___________________________________________________
1-4-4 Can you display table V_TVKO? Why? ___________________________________________________

Solutions
Unit: Special Authorization Components
1-1 Menu: Tools → Administration → User Maintenance → Roles (PFCG) Environment → Author. Objects → Display
1-1-1 Choose Search and enter the authorization object S_TABU_DIS. The result is the object class BC_A (Basis - Administration). Search for the authorization object S_TABU_DIS in the object class BC_A. To display the documentation, press the I button following the technical name of the authorization object. What is the main function of this authorization object? S_TABU_DIS: Authorizations for displaying or maintaining table contents.
1-1-2 What activities are allowed? S_TABU_DIS: - 02: Add, change or delete table entries - 03: Only display table contents.
1-1-3 Assignment of Tables/Views to Authorization Groups.
1-1-4 Definition of the Authorization Groups.
1-2 Find the authorization group assigned to tables V_T001 or V_TGSB.
Menu:
System → Services → Table Maintenance → Extended Table Maintenance (SM30)
Enter tabel V_DDAT and choose Display.
1-2-1 Choose table V_T001. Note the authorization group. FCOR

1-3 Menu: Tools → Administration → User Maintenance → Roles (PFCG)
1-3-1 Create the role GR##_FI_TAB_DISP and a short description (Description tab).
1-3-2 Go to the menu tab and enter the transaction SM30 with Transaction. Go to the Authorizations tab and choose Change authorization data. Enter the value FCOR in the open field for the authorization group in the authorization object S_TABU_DIS and change the field Activity (ACTVT) to 03. Set the authorization object S_TRANSLAT to Inactive. Choose the menu path: Authorizations à Generate or the corresponding pushbutton.
1-3-3 Enter the user GR##-FI1 in the User tab and execute a user comparison (User Comparison pushbutton).
1-4 Log on as GR##-FI1. Go to SM30 and answer the following questions:
1-4-1 Can you display table V_T001? Why? Yes because when this table is displayed authorization group FCOR, which is in the user master record, is checked.
1-4-2 Can you change table V_T001? Why? No because authorization to change (ACTVT = 02) was not granted.
1-4-3 Can you display table V_TGSB? Yes.
1-4-4 Can you display table V_TVKO? Why? No. Authorization for authorization group VCOR is missing.

SAP AG 2001
l Transporting user master records
l Transporting roles with and withoutCentral User Authorization (CUA)
l Transporting the test status
Contents:
Transporting Authorization Components
SAP AG 2001
l Copy user master records to other clients
l Transport roles with user assignments (withoutCUA)
l Transport roles without user assignments (withCUA)
l Transport the test status using Transaction SU25
At the conclusion of this unit, you will be able to:
Transporting Authorization Components: UnitObjectives
SAP AG 2001
Overview Diagram (12)
Conception with ASAP Methodology
Elements of the SAP R/3 Authorization Concept
The User Master Record
Introduction
Central User Administration
Access Control and User Administration
Working with the Profile Generator
Special Authorization Components
Integration into Organizational Management
Profile Generator:Installation/Upgrade
Transporting AuthorizationComponents
Analysis and Monitoring Functions
mySAP.com and the Workplace
111111

SAP AG 2001
l Authorization components such as roles should becreated and tested in development systems, andnot in production systems. At the end of the testphase they are transported from the developmentsystems to the production system.
Transporting Authorization Components:Business Scenario

SAP AG 2001
Which Authorization Components can beTransported?
Transport of
l User Master Records
l Roles
l Authorization Profiles
l Test Status
n User data and authorization data must be exchanged in system landscapes with multiple SAP R/3 Systems. The data is either exchanged between different clients of an SAP R/3 System or between clients of different SAP R/3 Systems.
n There is a basic difference between transporting
� User Master Records
� Roles
� Test Status
in the SAP R/3 authorization concept.
n Authorization profiles can be transported together with their roles. Working with authorization profiles without an assigned role should remain the exception. The transport connection of Transaction SU02 for maintaining authorization profiles is only mentioned here for completeness and is not further discussed.

SAP AG 2001
SAP R/3 Repository
Cross-Client CustomizingU
sers
Appl.Data
Customizing
Use
rs
Appl.Data
Customizing
Transporting User Master Records
SAP R/3 Repository
Cross-Client Customizing
Use
rs
Appl.Data
Customizing
Use
rs
Appl.Data
Customizing
Client Transport orRemote Client CopyLocal Client Copy
n User master records can be maintained centrally in one client of a system. If a new client is built, it can initially be filled with the user master records of the maintenance client. The transactions of the client management can be found under the menu path Tools -> Administration -> Administration -> Client management.
n If a new client is filled with data from another client of the same SAP R/3 System, this copy process is called a local client copy. Since the data of both clients is stored in the same database, it is not necessary to transport the data using the network or the operating system. The local client copy is started with Transaction SCCL or in the client management with Client copy -> Local copy.
n If a new client is filled with data from another SAP R/3 System, it can be copied with a client transport or as a remote client copy. The client transport exchanges its data with a data export at operating system level. Transaction SCC8 can be started in the client management with Client transport -> Client export. In a remote client copy, the data is copied over the network and not as a file. Transaction SCC9 can be found in the client management with Client copy -> Remote copy.
n Prior to each client copy, the data areas to be copied are deleted in the target client. Only the complete user master record, and not individual users, can be copied. Roles are also copied when you copy Customizing data.

SAP AG 2001
Transporting Roles Without Central UserAuthorization
DEV
Role
User Assignment
Authorization Profile
QAS
Role
User Assignment
Authorization Profile
n SAP roles are available in all systems and are not transported. If roles that you developed yourself are to be transported between clients or SAP R/3 Systems, you must decide whether or not to use the Central User Administration.
n If you do not use the Central User Administration, roles can be transported with user assignments. The transport is started with a Customizing request, which you can create in the Profile Generator with Environment -> Mass transport. The transport request is either imported into another SAP R/3 System with the Transport Management System or into another client of the same SAP R/3 System with SCC1. The user master records of the target client must be compared after the import. You can do this manually from the Profile Generator with Environment -> Mass compare or periodically in the background. You can also create the background job there.
n Authorization profiles can be transported together with their roles. If you do not want to do so, you must prevent the data export in the source system with the control entry (PROFILE_TRANSPORT,NO) in table PRGN_CUST. The table entry can be made using maintenance transaction SM30. Before comparing the user master records in the target system, you must create the profiles by mass generation. You can start the mass generation in the Profile Generator with Environment -> Mass generation.
n If you do not want to transport the user assignments to roles, you can protect the target system with an import lock. In this case, control table PRGN_CUST must contain the entry (USER_REL_IMPORT,NO).
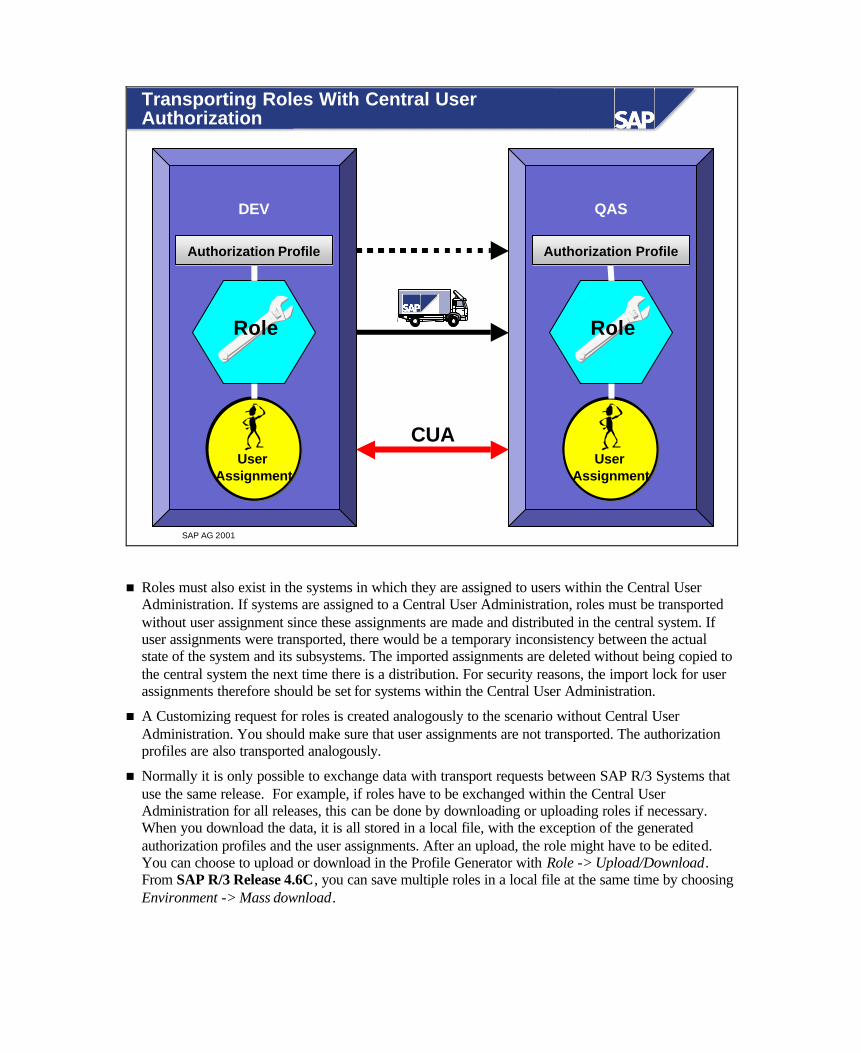
SAP AG 2001
Transporting Roles With Central UserAuthorization
DEV
Role
User Assignment
Authorization Profile
QAS
Role
User Assignment
Authorization Profile
CUA
n Roles must also exist in the systems in which they are assigned to users within the Central User Administration. If systems are assigned to a Central User Administration, roles must be transported without user assignment since these assignments are made and distributed in the central system. If user assignments were transported, there would be a temporary inconsistency between the actual state of the system and its subsystems. The imported assignments are deleted without being copied to the central system the next time there is a distribution. For security reasons, the import lock for user assignments therefore should be set for systems within the Central User Administration.
n A Customizing request for roles is created analogously to the scenario without Central User Administration. You should make sure that user assignments are not transported. The authorization profiles are also transported analogously.
n Normally it is only possible to exchange data with transport requests between SAP R/3 Systems that use the same release. For example, if roles have to be exchanged within the Central User Administration for all releases, this can be done by downloading or uploading roles if necessary. When you download the data, it is all stored in a local file, with the exception of the generated authorization profiles and the user assignments. After an upload, the role might have to be edited. You can choose to upload or download in the Profile Generator with Role -> Upload/Download. From SAP R/3 Release 4.6C, you can save multiple roles in a local file at the same time by choosing Environment -> Mass download.

SAP AG 2001
DEV
Transporting the Test Status
USOBX_C
CustomerValues
USOBT_C
QAS
USOBX_C
CustomerValues
USOBT_C
n Customer tables USOBX_C and USOBT_C, which control the behavior of the Profile Generator, must be filled in each system in which the Profile Generator is used.
n If these tables are adjusted to the customer's needs, they can then be transported as a whole. This means that you transport all the settings for the authorization checks, test status and the corresponding field values.
n The transport link can be found under step 3 of Transaction SU25, which must be executed when you activate the Profile Generator. A transport request that can be transported to other SAP R/3 Systems in the Transport Management System is created.

SAP AG 2001
l Copy user master records to other clients
l Transport roles to other systems with or withoutCentral User Administration (CUA)
l Transport the test status and field values
You are now able to:
Transporting Authorization Components: UnitSummary

SAP AG 2001
l How the central user administration (CUA) functions
l Setup of the CUA
l User management with the CUA
l Logs
l Error display
l Change documents
l Global User Manager
Contents:
Central User Administration

SAP AG 2001
l Explain how the central user administrationfunctions
l Specify the most important steps for setting upthe central user administration
l Create, maintain and distribute users centrally
l Use the Global User Manager
At the conclusion of this unit, you will be able to:
Central User Administration: Unit Objectives

SAP AG 2001
Overview Diagram (8)
Conception with ASAPMethodology
Elements of the SAP R/3Authorization Concept
The User Master Record
Analysis and Monitoring Functions
Introduction
Access Control and User Administration
Working with the ProfileGenerator
Integration into Organizational Management
Profile Generator: Installation/Upgrade
mySAP.com and the Workplace
Transporting AuthorizationComponents
Central User Administration
121212
Special Authorization Components

SAP AG 2001
l In complex system infrastructures, users inmultiple systems must be managed locally. Theseusers work in different systems with differentauthorizations. In the central user administration,the required management functions can be carriedout centrally on one system.
Central User Administration: Business Scenario

SAP AG 2001
Decentral User Administration
SAP R/3 System Infrastructure
Development QualityAssurance
Production
UserMaint.
UserMaint.
UserMaint.
UserMaint.
n In complex system landscapes with multiple systems and clients, the administration cost for keeping the user master records in the systems consistent and up-to-date is very high. Employees join the company, resign, or change jobs within the company. Users must usually access several systems and clients in order to perform their business tasks, and therefore require multiple users.
n Since user master records are client-specific, they must be maintained in each client of each and every system. For example, if you want to create a new user, you must create it manually in all the clients of all of the SAP R/3 Systems in which it should be valid.
n User master records can be maintained centrally in one client of a system. If a new client is built as a copy of a maintenance client, the new client can initially be filled with the user master records of the maintenance client. During this copy, the roles of the maintenance client are copied together with the user master records. However, you cannot select which users should be copied and which should not. The user master records also cannot be automatically synchronized sequentially

SAP AG 2001
Central User Administration
ALE
Centralsystem
Sub-system
Sub-system
Sub-system
Distribution of information
R/3 System InfrastructureUser
Maint.
n The essential feature of the central user administration is the definition of a central maintenance client in a selected system. It can be used to maintain the user master records for all the clients of the system infrastructure. For example, you can define which roles should be assigned to which users in which systems. This greatly reduces the administrative cost for authorization administration.
n You can decide which systems each user should be able to log on in. Central user administration does not mean that each user must exist in each system of the system infrastructure.
n You can individually set the user master record data to be maintained centrally and distributed or to be maintained locally. Local maintenance by the user himself or by an administrator could be recommended for certain data of the user master record.
n The authorization data is exchanged based on the ALE concept. ALE means Application Link Enabling and permits you to build and operate distributed SAP links. It includes a business-controlled message exchange between loosely linked SAP R/3 Systems. The application is integrated with asynchronous communication.
n The central user maintenance client is called the central system. The sub-system is a client of an SAP R/3 System used in the central user maintenance.
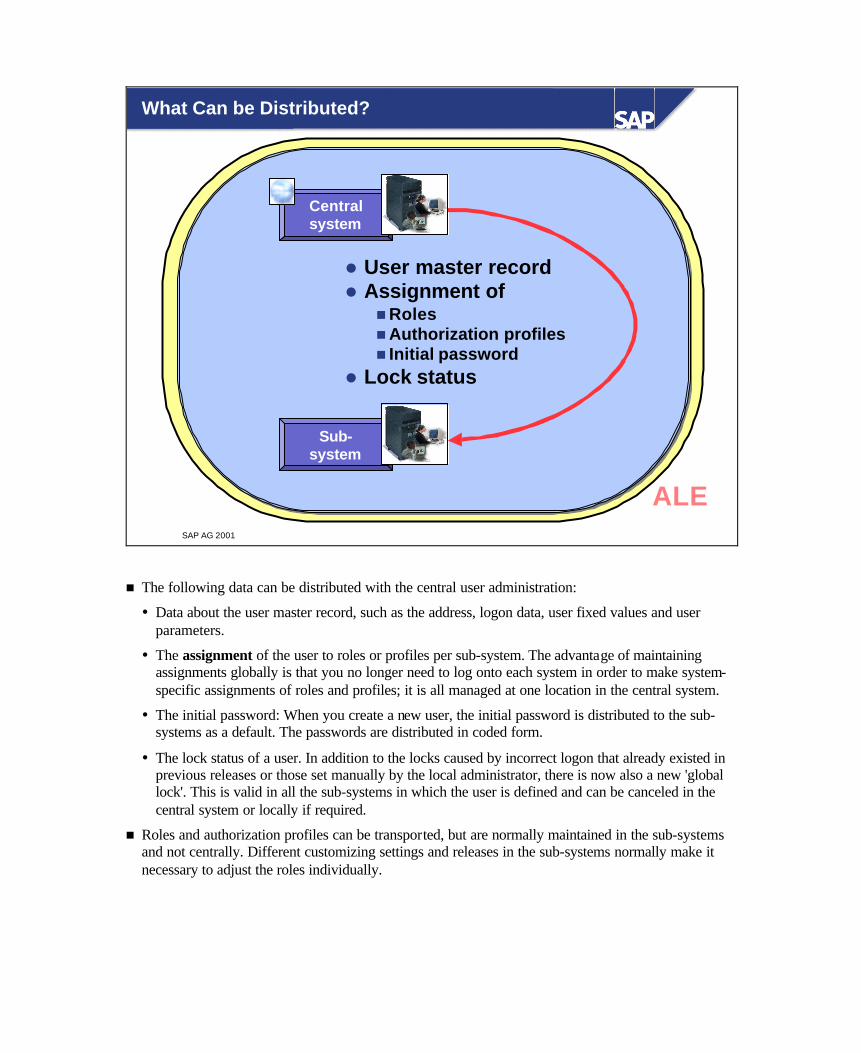
SAP AG 2001
What Can be Distributed?
ALE
Centralsystem
Sub-system
l User master recordl Assignment of
nRolesnAuthorization profilesn Initial password
l Lock status
n The following data can be distributed with the central user administration:
� Data about the user master record, such as the address, logon data, user fixed values and user parameters.
� The assignment of the user to roles or profiles per sub-system. The advantage of maintaining assignments globally is that you no longer need to log onto each system in order to make system-specific assignments of roles and profiles; it is all managed at one location in the central system.
� The initial password: When you create a new user, the initial password is distributed to the sub-systems as a default. The passwords are distributed in coded form.
� The lock status of a user. In addition to the locks caused by incorrect logon that already existed in previous releases or those set manually by the local administrator, there is now also a new 'global lock'. This is valid in all the sub-systems in which the user is defined and can be canceled in the central system or locally if required.
n Roles and authorization profiles can be transported, but are normally maintained in the sub-systems and not centrally. Different customizing settings and releases in the sub-systems normally make it necessary to adjust the roles individually.

SAP AG 2001
ALE Setup
l Definition of logical systemsl Assignment to clients
l Definition of logical systemsl Assignment to clients
DEVCLNT200
QASCLNT300
PRDCLNT100
PRDCLNT200
DefineRFC links
DefineRFC links
Define ALE distribution model
Define ALE distribution model
Centralsystem
Sub-system
Sub-system
Sub-system
n Communications partners are addressed in the ALE scenario with aliases, which are called logical systems. The central system itself and every sub-system is defined by name in the central system in Transaction SALE -> Specify logical system. The sub-system itself and the central system are defined in the sub-systems. The logical system names are assigned to the client definitions in the corresponding systems in Transaction SCC4 Each logical system also identifies a certain client of an SAP R/3 System.
n Communications between the central system and the sub-systems uses the network with an RFC (Remote Function Call). The technical definition of the link is maintained in Transaction SM59. All the links to the sub-systems must be maintained in the central system, and the link to the central system must be maintained in the sub-systems. The RFC link names must be the same as the names of the logical systems. Communications must be based on users with SAP_ALL authorization in the target system.
n What data is sent from where to where is defined in the ALE distribution model. User and company data is exchanged within the central user administration. The distribution model is maintained, generated and distributed in the central system in Transaction BD64. It only has to be generated in all the sub-systems.
n The central user administration is then activated centrally in Transaction SCUA:
n You can find a detailed description of the central user administration in Units 10 and 11 of Authorizations Made Easy 4.6 in the SAP online documentation for Release 4.6. Course BC305 Advanced R/3 System Administration handles the technical implementation.

SAP AG 2001
Setup of the Central User Administration
Address
Logon data
Fixed values
Parameters
Profiles
Roles
Locks
Address
Logon data
Fixed values
Parameters
Profiles
Roles
Locks
Global
Default
Returned
Local
Everywhere
SCUM: Field attributes
n You can define whether each individual component of a user master record should be maintained in the central system or locally in the sub-systems. This is defined within Transaction SCUM in the central system. A field attribute can be defined for each input field of user maintenance transaction SU01.
n If a field of the user maintenance transaction has field attribute "global", data for this field can only be maintained in the central system. The data is automatically distributed to the sub-systems when it is saved. Such fields are in display mode in the user maintenance transaction of the sub-systems, i.e. you cannot maintain these fields.
n If you use field attribute "default", a default value that is automatically distributed to the sub-systems when it is saved can be maintained when you create a user in the central system. After distribution, the data is only maintained locally in the sub-systems and cannot be returned.
n If you use field attribute "Return", the data can be maintained in both the central system and the sub-systems. If a change is made to the sub-system, the data is returned to the central system and passed on to other existing sub-systems from there.
n Field attribute "local" means that the data for the corresponding field can only be maintained locally in the sub-systems. No data is distributed.
n Field attribute "everywhere" is used if the data should be maintained everywhere, but not returned.

SAP AG 2001
Integration of Existing Systems
Centralsystem
Sub-system
Sub-system
Creation of a NewUser Infrastructure
UserMaint.
New
New
NewCentralsystem
Sub-system
Sub-system
Integration in aUser Infrastructure
UserMaint.
Old
Old
New UserMaint.
UserMaint.
n The integration of existing systems in the central user administration depends on whether there is a complete new installation of the system infrastructure or the user master records are built completely anew in all existing systems, or whether the central user administration is set up at a time at which there are already users in the relevant systems that must be migrated to the central user administration.
n For a new installation, all the uses are newly created in the central system and distributed by the central user administration. Distribution ensures that the user data is consistent in all systems.
n If the central user administration is installed at a later time, the existing users of the system infrastructure must be copied to the central system. This procedure is called migration. The user identifications copied from the sub-systems must be compared and adjusted in the central system.
n Roles that were already developed and assigned to users in the old systems must be identified by name in the central system. Only then can the users be assigned centrally to roles. The old assignment between users and roles can be copied if required.
n The authorization-specific contents of the roles remain in the old systems and are still maintained there.

SAP AG 2001
Copying User Master Records
Centralsystem
Sub-system
Transfer Usersn New usersn Identical usersn Different usersn Already central users
SCUG
n Existing user master records are migrated to the central system with Transaction SCUG in the central system. This procedure can only be performed once for each sub-system. User identification is the SAP R/3 logon name to which a combination of the first and last names is assigned.
n If the user identification to be copied is not yet in the central user administration, it is entered as New user. New users including their user master records can be copied to the central system and then maintained there.
n If the user identification to be copied is already in the central user administration with the identical first and last names, it is entered as Identical user. Identical users can be copied to the central system. The old system assignment including the valid roles and profile assignment are recorded there.
n If the user identification to be copied is already in the central user administration with a different first or last name, it is entered as Different user. If the name given in the central system is correct, the user can be copied. If the name given in the sub-system is correct, the first or last name must be corrected in the central system using Transaction SU01. If they are two different persons, the user identification must be changed either in the central system or in the sub-system using Transaction SU01.
n Transaction SCUG shows the copied users under Already central users.

SAP AG 2001
Central User Administration
... Systems Roles Profiles Groups
DEVCLNT100
PRDCLNT200
DEVCLNT100
PRDCLNT200
Superuser
Operator
AdministratorT-...........
SU01
Text Comparison
n After activating the central user administration, the appearance of user maintenance transaction SU01 changes.
n An additional tab Systems, under which the logical systems in which the user is distributed are entered, appears in the central system The user is only known in these sub-systems and in the central system. The Systems column also appears in the tabs Roles and Profiles. You can thus define the assignment of users to roles and profiles individually for each sub-system. The data is distributed to the appropriate sub-systems when it is saved.
n Existing roles are still maintained and new roles are still built in the sub-systems. In order to be able to assign users in the central system the roles and profiles defined in the sub-system, there is the Text comparison pushbutton in the Roles and Profiles tabs in the central system. The names of the roles and profiles defined in the sub-systems are stored in the central system together with their short text. The names of the roles and profiles are thus available in the central system in the value help (F4 help). Since the information in the sub-systems might change, you should occasionally repeat the text comparison.
n Only the fields of SU01 for which the field attributes were not defined as global are input fields in the sub-systems. It is not possible to create new users in the sub-systems.

SAP AG 2001
The Magic Triangle
System
System Types
Users
Usergroups Composite
role
SingleRole
n The magic triangle explains how the central user administration works, where the central user administration is a tool for managing complex user and system infrastructures.
n A user can be assigned to a system. It is then created in this system. A role can also be assigned to this system. Only then can it be assigned to a user there.
n A role can be assigned to a user. The user then has the authorizations specified in the role for the systems to which the user and the role are assigned. One should keep in mind that roles are only assigned by name and are maintained locally in the systems. A 'Bookkeeper' role can contain full maintenance authorization for all company codes in one system, but the role with the same name only has display authorization for one company code in another system.
n To obtain a compete assignment of users to roles in different systems, the magic triangle must be fully defined!
n Central user administration permits you to group users into user groups. Instead of assigning individual users roles or systems, you can do this for complete user groups. You can assign a user to more than one user group. It takes on the assignments for all groups. Systems can be grouped into system types. If users or roles are assigned to a system type, all the systems are assigned to this type. Roles can also be grouped to form composite roles.

SAP AG 2001
Preparations for the Global User Manager
1. ALE setup (already done)
2. Copy user master records (already done)
3. System comparison (in Global User Manager)
1. Migration of roles (in Global User Manager)
2. Migration of users (in Global User Manager)+
System
n If the user master records are newly built in the system infrastructure, no further preparations are required for using the optional tool Global User Manager (Transaction SUUM).
n If the central user administration is integrated into an existing user infrastructure, however, the existing relationships between systems, users and roles must be copied to the Global User Manager in the form of the magic triangle.
n All the systems involved in the central user administration are already known within the ALE setup. All existing users were already copied to the central system in the user migration of SCUG. The roles defined in the sub-systems must be specified by name in the central system. You can do this in the Global User Manager with Extras -> System comparison or in SU01 with the Text comparison pushbutton on the Roles tab. This defines all the corners of the triangle.
n The existing relationships between roles and systems can be copied in the Global User Manager with Extras -> Migration -> Roles. All the roles existing in the sub-systems are then assigned to the systems in which they exist. This defines the first corner of the triangle.
n The existing relationships between users and systems can be copied in the Global User Manager with Extras -> Migration -> Users. The current relationships between users and roles are also copied directly. This defines the other two corners of the triangle. After these actions, the Global User Manager shows the individual assignment of the current user infrastructure, which should be converted to an assignment on the level of user groups.

SAP AG 2001
Global User Manager
Assignment to user Naknak
User Groups Admin Super Accounting ...
Users Dern Esch Heepmann Hermsen Lechneri
Niemann Turbo Wienecke ...
Naknak
System Types Development Quality Assurance Production
Systems DEV QAS PRD PRQ
Systems DEV QAS PRD
Composite Roles SAP_BC_DWB_... ...
Roles... Admin ....
Role Admin
Drag &Drop
Drag &Drop
Drag &Drop
Assignment to user Naknak
n The Global User Manager is based on the central user administration and provides a graphic interface in the central system with which you can maintain the relationships between users (user groups), systems (system types) and (composite) roles. Its three columns correspond to the three corners of the magic triangle.
n Whereas the user maintenance transaction SU01 only permits individual users to be assigned to individual systems and roles, the Global User Manager groups users into user groups and systems into system types. Users working on the same systems to whom the same roles are assigned should be assigned to one user group. This permits a large number of system-specific assignments between users and roles, implemented with a much smaller number of assignments between user groups, system types and roles. The Global User Manager automatically maps assignments between these groups on assignments between individual users and systems.
n Users can be grouped into user groups and systems into system types within the columns with Drag&Drop. If you choose an object by double -clicking, the assignments to this object are displayed in the other two columns. In the magic triangle you therefore always see the two links going from the selected object. You can change the assignments with Drag&Drop. Once modeling has been completed, you can distribute the data from the Global User Manager.
n You can find more information about the Global User Manager in Authorizations Made Easy 4.6 A/B.

SAP AG 2001
Logs of the Central User Administration
Centralsystem
Sub-system
Change to
user data
LogsComplete list� Messages of
success� Warnings� Errors
Return message
Changedocuments
Changedocuments
n The central system asynchronously distributes each change in user data to the sub-systems The sub-systems report each change action back to the central system in the form of messages of success, warnings or error messages.
n Transaction SCUL organizes access to the logs. The logs can be output sorted by system, user name, error status or user-defined criteria. If there are unconfirmed changes, no log was yet sent back to the central system, for example because the corresponding sub-system cannot be reached at the moment. When users are distributed, up to three logs are sent back to the central system from the sub-system for each user. The assignments of roles and profiles are reported back separately from the rest of the user data. Log transaction SCUL provides initial information about correcting errors. It can be used to trigger a new distribution of the user data.
n You can also get information about the data that would be copied in the next distribution process from the Global User Manager with the Display distribution data button. You can load this data to the frontend with Word or Excel.
n Change documents are also written in all systems. Each system logs the name of the local changer if maintenance is local. The change documents are not distributed to the central system. However, if the user master records were changed in the central system, change documents are created in the sub-system in which the name of the ALE user appears for the RFC links when the data is distributed.

SAP AG 2001
l Explain how the central user administrationfunctions
l Specify the most important steps for setting upthe central user administration
l Create, maintain and distribute users centrally
l Use the Global User Manager
You are now able to:
Central User Administration: Unit Summary

Exercises
Unit: Central User Administration
At the conclusion of this exercise, you will be able to:
• Set up new users
• Check the Central User Administration (CUA) settings
1-1 Create new users using CUA
1-1-1 Central System (SAPGUI for Windows, User CUA_CA940-##): Create the new user CUA-##, using the last name “Test” and the initial password "init". Assign the role MY301_BASICS_WP on the Workplace Server, and the role MY301_BASICS_R3 in the SAP R/3 System to the user. Save your settings, so that the user is created in both systems.
1-1-2 Child System (SAPGUI for Windows, User CUA_CA940-##): Using the logs, check that the new user was correctly created in the SAP R/3 System (Assignment of the role and the authorization profile).
1-2 First Logon of the New User
1-2-1 Child System (SAPGUI for Windows, User CUA-##): Logon to the SAP R/3 System with your new user CUA-##. Note your new password. Call the maintenance screen for your user data. Change the first and last names. Save your settings.
1-2-2 Central System (SAPGUI for Windows, User CUA-##): Logon to the central system with your new user and change the password to the same one you used in the SAP R/3 System. Check the user name that is displayed on the initial screen. Was the new name distributed?

1-3 Additional Exercise (Optional): Check the CUA Settings on the Central System
1-3-1 Central System (SAPGUI for Windows, User CUA_CA940-##): Check if both logical systems <WPServer>CLNT<client> and <R/3>CLNT<client> are entered.
1-3-2 Central System (SAP GUI for Windows, User CUA_CA940-##): Check if the logical system <WPServer>CLNT<client> is assigned to the current client.
1-3-3 Central System (SAP GUI for Windows, User CUA_CA940-##): Compare the RFC Destinations of the central and subordinate systems. The RFC Destination has the same name as the logical system.
1-3-4 Central System (SAP GUI for Windows, User CUA_CA940-##): Check the ALE distribution system. Which model is used for CUA? Which objects specified in the distribution model are distributed along with the model?
1-3-5 Central System (SAP GUI for Windows, User CUA_CA940-##): Check the distribution parameters for the fields. Which fields can be maintained in systems other than the central system?
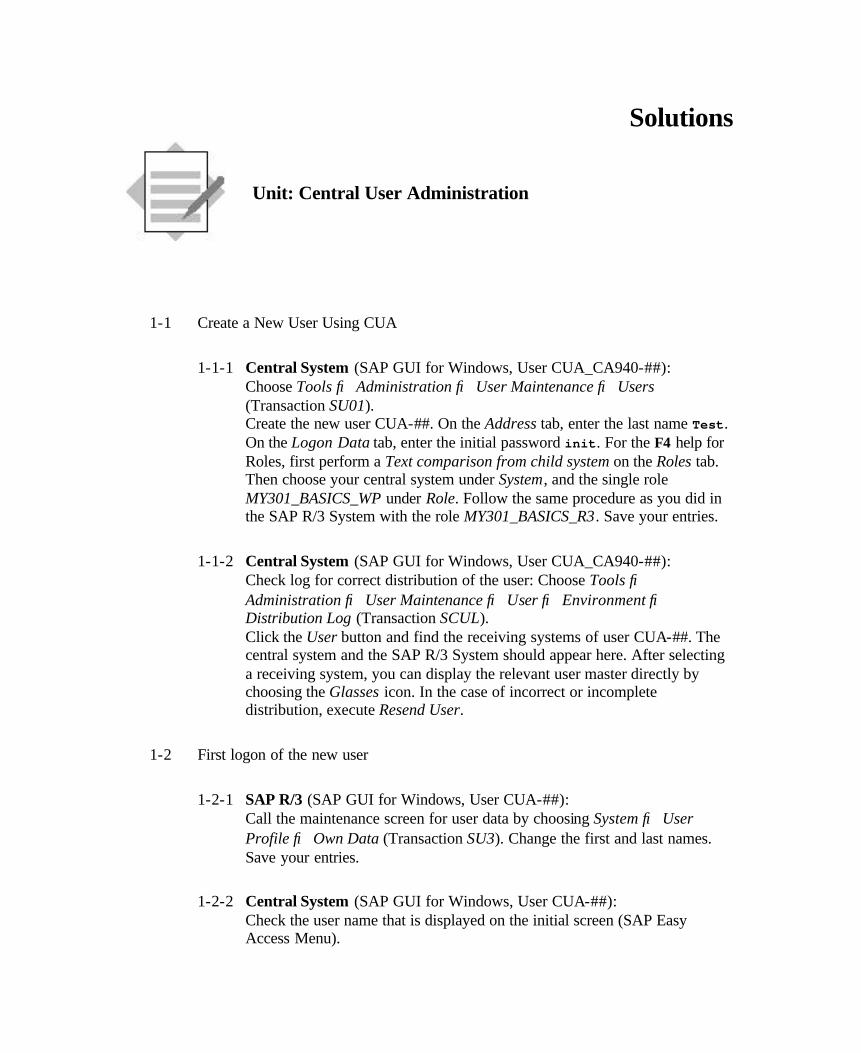
Solutions
Unit: Central User Administration
1-1 Create a New User Using CUA
1-1-1 Central System (SAP GUI for Windows, User CUA_CA940-##): Choose Tools → Administration → User Maintenance → Users (Transaction SU01). Create the new user CUA-##. On the Address tab, enter the last name Test. On the Logon Data tab, enter the initial password init. For the F4 help for Roles, first perform a Text comparison from child system on the Roles tab. Then choose your central system under System, and the single role MY301_BASICS_WP under Role. Follow the same procedure as you did in the SAP R/3 System with the role MY301_BASICS_R3. Save your entries.
1-1-2 Central System (SAP GUI for Windows, User CUA_CA940-##): Check log for correct distribution of the user: Choose Tools → Administration → User Maintenance → User → Environment → Distribution Log (Transaction SCUL). Click the User button and find the receiving systems of user CUA-##. The central system and the SAP R/3 System should appear here. After selecting a receiving system, you can display the relevant user master directly by choosing the Glasses icon. In the case of incorrect or incomplete distribution, execute Resend User.
1-2 First logon of the new user
1-2-1 SAP R/3 (SAP GUI for Windows, User CUA-##): Call the maintenance screen for user data by choosing System → User Profile → Own Data (Transaction SU3). Change the first and last names. Save your entries.
1-2-2 Central System (SAP GUI for Windows, User CUA-##): Check the user name that is displayed on the initial screen (SAP Easy Access Menu).

1-3 Additional Exercise: Check the CUA settings on the Central System
1-3-1 Central System (SAP GUI for Windows, User CUA_CA940-##): To set up the logical system, run the transaction SALE. Choose Sending and Receiving Systems → Logical Systems → Define Logical Systems. Check if both logical systems <WPServer>CLNT<client>, and <R/3>CLNT<client> are available.
1-3-2 Central System (SAP GUI for Windows, User CUA_CA940-##): To set up the logical system, run the transaction SALE. Choose Sending and Receiving Systems→ Logical Systems→ Assign Client to Logical System. Check if the logical system <WPServer>CLNT<client> is assigned to the referencing client.
1-3-3 Central System (SAP GUI for Windows, User CUA_CA940-##): Call the transaction SALE, and choose Sending and Receiving Systems→ Define Target Systems for RFC Calls. Compare the RFC Destinations of the central systems and the subordinate systems. The RFC destination has the same name as the logical system.
1-3-4 Central System (SAP GUI for Windows, User CUA_CA940-##): Call transaction SALE, and choose Modeling and Implementing Business Processes → Predefined ALE Business Processes → Cross-Application Business Processes → Central User Administration→ Select Model View for Central Administration. Here you can see which ALE distribution model is used for CUA. Call the transaction SALE, and choose Modeling and Implementing Business Processes → Maintain Distribution Model and Distribute Views. The objects USER and UserCompany are distributed using the Clone method.
1-3-5 Central System (SAP GUI for Windows, User CUA_CA940-##): Call transaction SALE, and choose Modeling and Implementing Business Processes → Predefined ALE Business Processes→ Cross-Application Business Processes → Central user Administration → Set Distribution Parameters for Fields. Fields are globally maintained. Only the fields First Name and Last Name are set to Redistribution.
Note: Transaction SALE is part of the IMG. (Transaction SPRO; SAP Reference IMG: IMG → Path Basis→ Application Link Enabling (ALE)).

SAP AG 2001
l Principles of mySAP.com
l Workplace Architecture
l Role Definition and the Workplace
l Logging on to the Workplace
Contents:
mySAP.com and the Workplace

SAP AG 2001
l Describe the basic elements of mySAP.com
l Describe the architecture of the Workplace
l Create roles using the profile generator
At the conclusion of this unit, you will be able to:
mySAP.com and the Workplace:Unit Objectives

SAP AG 2001
Overview Diagram (9)
Conception with ASAPMethodology
Elements of the SAP R/3Authorization Concept
The User Master Record
Analysis and Monitoring Functions
Introduction
Access Control and User Administration
Working with the ProfileGenerator
Integration into Organizational Management
Profile Generator: Installation/Upgrade
Transporting AuthorizationComponents
Central User Administration
Special Authorization Components
mySAP.com and the Workplace 131313

SAP AG 2001
l The Workplace permits several SAP R/3 Systems,New Dimension products, web links and externalapplications to be integrated in a browser-supported interface. The LaunchPad provides theuser with a menu that corresponds to hisworkplace or role in the enterprise and which hecan use to navigate in all the components of thesystem.The user menu is set up with the profile generatorby creating roles.
mySAP.com and the Workplace:Business Scenario

SAP AG 2001
Principles of mySAP.com
IntegratedPersonal
Partnership platformIndustry-focusedIntegrated business processes
Build relationships (communities)Integrate external services (content)
One-step business (collaboration)Application hosting
Internet Business Framework
Can be individually tailoredRole-specific
Uniform access to allinternal and external
services
Cooperative
n The mySAP.com initiative includes the following areas:
� my emphasizes the focus on user requirements. EnjoySAP provides a user interface that is easy to use. The Workplace provides simple, role -based access to all mySAP.com components.
� SAP represents business solutions for a number of industries.
� .com represents SAP's clear orientation to the business world in the Internet age. Business relationships can be set up and enhanced using the Internet.

SAP AG 2001
Workplace
Enterprise boundary
WorkplaceIndustry-specific
Role-basedPersonalizedDrag&Relate
Market-place
3.1H
R/3 4.6FIFI LOLO
HRHR
CRMCRMKWKW
SEMSEM
APOAPO
BWBW
CFMCFM
mySAP.com components
OpenInternet
standards
R/2R/2
not mySAP.com3rdparty
Partner
SAPSAP
inside
outside
mySAP.com Internet services
different Internet services
diff. ERP
Systems
SingleSign On BBPBBP
Presentation by Hasso Plattner at SAPPHIRE Nice99
n The Workplace is an Enterprise Portal, and provides simple access any time and from any place (mobile devices) to all required applicatons, information and services. The portal can be used by employees and external interest groups (suppliers, investors, and so on).
n You can access to the Workplace and to the applications accessed through it using one single logon (Single Sign On).
n The user can configure the Workplace individually. To meet customer’s requirements, it is already delivered in various industry- and role-specific versions. By adding frequently used links and transactions, the Workplace can be changed to match the requirements of the individual users. The Drag&Relate function is implemented throughout.
n The Workplace allows access to a range of mySAP.com and external components. SAP R/3 Systems are Internet and intranet-compatible from Release 3.1H onwards. Important mySAP.com components are:
� Knowledge Warehouse (KW)
� Business Information Warehouse (BW)
� Customer Relationship Management (CRM)
� Advanced Planner & Optimizer (APO)
� Business-to-Business Procurement (BBP)
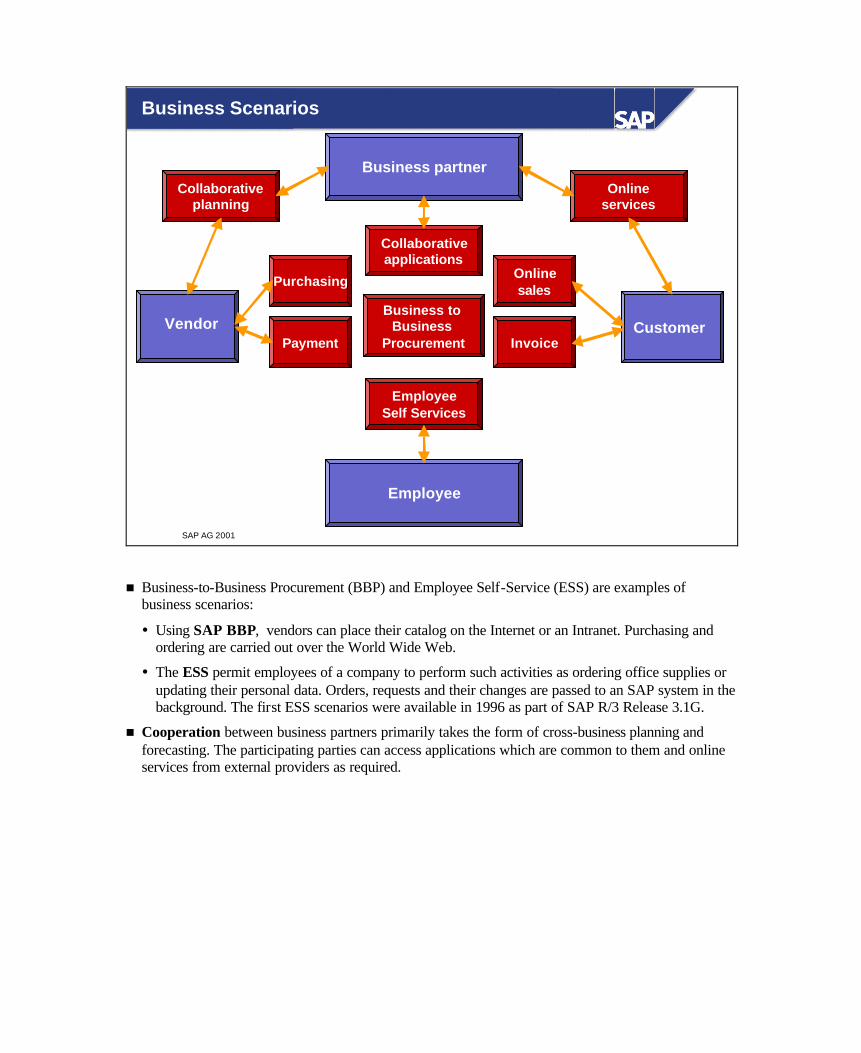
SAP AG 2001
Business Scenarios
supplier
Business partner
CustomerVendor
EmployeeSelf Services
Business to Business
Procurement
Collaborativeapplications
Purchasing Onlinesales
InvoicePayment
Collaborativeplanning
Onlineservices
Employee
n Business-to-Business Procurement (BBP) and Employee Self-Service (ESS) are examples of business scenarios:
� Using SAP BBP, vendors can place their catalog on the Internet or an Intranet. Purchasing and ordering are carried out over the World Wide Web.
� The ESS permit employees of a company to perform such activities as ordering office supplies or updating their personal data. Orders, requests and their changes are passed to an SAP system in the background. The first ESS scenarios were available in 1996 as part of SAP R/3 Release 3.1G.
n Cooperation between business partners primarily takes the form of cross-business planning and forecasting. The participating parties can access applications which are common to them and online services from external providers as required.

SAP AG 2001
Elements of the Workplace
LaunchPad WorkSpace (MiniApps, Transactions, WebPages, ...)
Welcome Julie Armstrong
mySAP.com Markrtplace Update Personalize Getting Started Info
Reuters News
Web Search Calculator
Search
In Use
Home
Create Order
User Overview
Replenishment Planning
Workplace Favorites
Meyer Inc.Display OrderCreate Order
RolesSales and Distribution
SalesCreate QuotationDisplay QuotationCreate OrderDisplay OrderReplnishmnt Planning
Credit Management
Drag&Relate
n You call the mySAP.com Workplace by entering the relevant URL (Internet address) in a Web Browser. Usually this is done by clicking a link (instead of being entered manually). The syntax for the URL of the Workplace is typically <protocol>://<webserver>[:<port>]/scripts/wgate/sapwp/!, for example: https://workplace.wdf.sap-ag.de:1042/scripts/wgate/sapwp/!
n The Workplace has two main components: the LaunchPad on the left side and the Workspace on the right side of the Workplace window.
� The LauchPad depends on the user's role. It contains the relevant activities, including the functions from the mySAP.com components, external components and the Web. Simply clicking on an entry starts it. The LaunchPad can include multiple roles. The user can include his own URLs in his LaunchPad.
� When you logon to the Workplace, a list of MiniApps (such as Stock ticker, news, overview lists, reports) that are assigned to your role appears in the WorkSpace . represents SAP transactions or MiniApps , as well as MiniApps that you have added yourself. When you start an application in the LaunchPad (for example, the transaction for Post Invoice), this is executed in the WorkSpace
n Another feature of the Workplace is Drag&Relate . It permits you to connect one application with another simply by clicking on an object and pulling it to a target, for example an SAP R/3 application or an Internet link.

SAP AG 2001
In Use
Start Page
Create Order
User Overview
Replenishment Planning
Workplace Favorites
Meyer Inc.Display OrderCreate Order
RolesSales and Distribution
SalesCreate QuoteDisplay QuoteCreate OrderDisplay OrderReplenish. Planning
Credit Management
Options
Allow More Than One Application in the Area “In Use“
Workplace Favorites Start Page General
Close Applications Without Confirmation
Display Dialog for Drag&Relate
Running Applications(Assigned Channels)
Running Applications(Assigned Channels)
Expand and CollapseLaunchPad
Expand and CollapseLaunchPad Initial Screen
(to the MiniApps)Initial Screen
(to the MiniApps)
PersonalizationWindow
PersonalizationWindow
Log off from WorkplaceLog off from Workplace
Expand and Collapse Folders
Expand and Collapse Folders
Session Handling in the LaunchPad
n The Workplace supports holding and switching between several applications. This function is called Session Handling. The use of this function has been simplified for the user in mySAP Workplace Release 2.11:
� Start an application, either a favorite from the LaunchPad folder Workplace Favorites or an entry from the Roles folder(by clicking on entries at the lowest level, next to which there are icons).
� The first available Channel is assigned this application. The application appears in the WorkSpace and automatically appears as a new entry in the folder In Use. Every application that you start is added to the existing list as a new entry.
� By clicking on the entries in the In Use list, you can switch between the various applications. The application running in the WorkSpace is Die gerade im WorkSpace is shown with a blue background.
� If you have opened the maximum number of applications (set by the System Administrator) and call another application, the standard setting is that you are asked which of the running applications you want to close. With the option Close applications without confirmation in the personalization window, you can suppress this prompt.

SAP AG 2001
In Use
Start Page
Create Order
User Overview
Replenishment Planning
Workplace Favorites
Meyer Inc.Display OrderCreate Order
RolesSales and Distribution
SalesCreate QuoteDisplay QuoteCreate OrderDisplay OrderReplenish. Planning
Credit Management
Delete
Copy
OK Cancel
Test
New FolderNew Web Address
Display in a separate browser window
Web Address http://marketplace.mysap.com
Name mySAP.com Marketplace
Propertíes Available in Roles
mySAP.com Marketplace
Workplace Favorites Start Page General
Workplace Favorites
Display OrderReplenishment Planning
Add Applications UsingDrag&Drop
Add Applications UsingDrag&Drop
Test and Add Web AddressesTest and Add
Web Addresses
Working with Favorites
n The Workplace Favorites folder in the LaunchPad contains entries that can be individually set by each Workplace user.
n By choosing Personalize (or using the Personalize icon), you open a new window. You can create and (re)name your own folders in the left-hand part of the tab page Workplace Favorites, as well as moving them and changing their grouping.
n You can enter Web addresses (URLs) in the right-hand part. These are then available in the Favorites folder in the LaunchPad. You should test your favorites by choosing the Test button before you add them to your favorites list. A favorite that requires a complete browser window is not suitable for displaying in the WorkSpace of the mySAP Workplace. In this case, a dialog window containing a warning appears. Choose Cancel in this window. Afterwards, the indicator Display in a separate Browser Window is automatically checked.
n You can see the entries in your LaunchPad that were assigned to you by your system administrator on the Available in Roles tab page on the right-hand side. This contains, for example, transactions. If you use a transaction frequently, you can define this as a favorite. To do so, click the relevant entry and choose Add.
n You can also add to and edit your favorites directly from the LaunchPad. Using Drag&Drop, you can add frequently used entries to the Workplace Favorites folder.

SAP AG 2001
Personalizing the Start Page
In Use
Start Page
Create Order
User Overview
Replenishment Planning
Workplace Favorites
Meyer Inc.Display OrderCreate Order
RollenSales and Distribution
SalesCreate QuoteDisplay QuoteCreate OrderDisplay OrderReplenish. Planning
Credit Management
Welcome Julie Armstrong
mySAP.com Marketplace Update Personalize Getting Started Info
New MiniApp
LinesHeight
Test
Web Address http://www.sap.com/MiniApps
Name MiniApp-Community
Properties Available MiniApps
10 minimized
OK Cancel
Add
List View Layout Preview
Web Search
News
Calculator
Delete
Workplace Favorites Start Page General
Displayed in Workspace
n You have a quick overview and easy access to your most important information, applications and services on the Start Page through MiniApps , which are simple and intuitive to operate.
n There are two ways in which MiniApps can appear on the Start Page of your Workplace:
� MiniApps can be assigned by your system administration
� You can define your own MiniApps.
n By choosing Personalize (or by choosing the Personalize icon), you open the personalization window. You can add your own MiniApps on the right-hand side of the tabe page Start Page using New MiniApp. Also enter the Web address (URL), a name for the MiniApp, and the height in lines. MiniApps should (like Favorites) also be tested before they are added. You can easily rename and reassign them later.
n You can adjust and personalize the format of MiniApps. In the left-hand work area, you can change the order in which the MiniApps are displayed, or choose your desired display format (minimized or expanded). You can see and change the layout of your MiniApps in the Layout Preview. By using this function, you can see which MiniApps are displayed at half width.
n In order to improve system performance, your system administration may have configured your Workplace so that no MiniApps at all are displayed the first time you logon to the Workplace. You can then select self-defined MiniApps using the personalization functions and MiniApps from your roles in order to create an individual Start Page.

SAP AG 2001
Workplace Architecture
Desktop Backendsystems
Workplace Middleware
R/3 APO
BW KW
BBP CRM
for example
Web Server ITS
Web BrowserWorkplace
ServerInstance 0 PortalBuilder
Instance 1
Instance n
Instance 1
Instance n
Drag&RelateServlets SAP DCOM
Compon.system 1
Compon.system n
n Technically the Workplace architecture can be divided into 3 layers:
n On his desktop the user only needs a Web Browser.
n The communications partner of the Web Browsers is a Web Server, which is part of the Workplace Middleware. Another important component is the SAP Internet Transaction Server (ITS), which implements the connection between the Web Server and a backend system. A special ITS instance is the PortalBuilder, which communicates with a special backend system called the Workplace Server. If the Workplace was installed with the Drag&Relate option, this function is copied by other elements, the Drag&Relate Servlets and the SAP DCOM CC.
n Different backend systems can be integrated in the Workplace. Each Workplace installation always has a Workplace Server, an independent SAP System (SAP Basis with special Add Ons) with the following functions:
� Storage of roles and favorites of all users
� Generation of the correct URLs for the entries in the user's LaunchPad
� Central system of the CUA (if required)
All other systems (such as SAP R/3, APO, BW, KW, BBP, CRM) are called component systems. Their integration in the Workplace assumes that the Workplace has an Add On.

SAP AG 2001
Role Definition and the Workplace
BackendSystems
R/3 APO
BW KW
BBP CRM
For example
WorkplaceServer
ComponentSystem 1
ComponentSystem n
Role Definition(for the user menu)
+CUA (if desired)
Role Definition(for authorizations)
Where is What Information?
Transfer of Roles
n What does implementation of the Workplace mean for the authorization administrator?
n Nothing is changed in the authorization concept of the different component systems. The authorization profiles in the user master record still define what the user may do in the particular component system, no matter how these profiles were created.
n The role-based structure of the Launchpad in the Web Browser requires that each user be assigned a role on the Workplace Server. Except for RFC calls, a user does not need any special authorization profiles on the Workplace Server; only the role definition is of importance. The user's favorites are also managed on the Workplace Server.
n To avoid unnecessary work and consistency problems, there are mechanisms for transporting role definitions from the component system to the Workplace Server. These will be introduced at a later time.
n You are not required to use CUA in connection with the Workplace. If you use the CUA, however, it makes sense to use the Workplace Server as central system.
n Roles can be transferred by using Central Role Maintenance (Workplace Server -> Component Systems), by Up-/Download, or by Import using RFC (Component Systems -> Workplace Server).

SAP AG 2001
Role Definition: Overview
Rolleanlegen
Legend:Central Role MaintenanceDecentralized Role Maint.
Component System Workplace Server
Generate Authorizations
CreateRole
Assign UsersReconcile Users
Assign Users toComposite Role
Create Composite Role
DistributeRole
Create Role
CUAno yes
TransferRole
n The slide shows an Overview of the Creation of User Roles. If the component system has SAP R/3 Release 4.6A or higher, central role maintenance can be selected (broken black arrows). Component systems with lower releases work with decentralized role maintenance (solid orange arrows).
n With central role maintenance , the menu definitions of the single roles are initially created on the Workplace Server. A single role is assigned to only one component system. The role is then distributed and its authorization content is maintained there. If Central User Administration (CUA) is not in use, the users are assigned the role directly in the component systems and their user master records are adjusted.
n With decentralized role maintenance , the single roles are initially created,and their authorization content is maintained on the component system. If CUA is not in use, the users are assigned the role directly in the component systems and their user master records are adjusted.
n Single roles are grouped together into composite roles on the Workplace Server. Users are assigned these composite roles on the Workplace Server. If CUA is activated, users automatically have the corresponding roles in the component systems as a result of this assignment. If CUA is not activated, the assignment must first be made manually.
n Composite roles are only created on the Workplace Server. They group together single roles from the component systems.

SAP AG 2001
Defining Roles on the Workplace Server
RoleRole MaintenanceMaintenance
Favorites Description Target System
Role
Description
Transactions
Create Role Create Composite Role
Show DocumentationViews
n Single roles can be created either in the component system or on the Workplace Server, depending on the Release used on the component system. ‘Created’ here means the definition of the role’s activity. The technical authorizations content of a role is usually maintained in component systems because of different Customizing.
n If a user calls a transaction in the Workplace using the LaunchPad, this transaction is executed in the corresponding component system. Therefore, the single roles on the Workplace Server must point to the appropriate component systems . Single roles that are created in the context of the central role maintenance on the Workplace Server and distributed to component systems, are already assigned to “their” component systems. Single roles, created in the context of decentralized role maintenance, and copied to the Workplace Server using RFC, are also assigned to ”their" component systems. Only if single roles were transferred by Download/Upload, must you assign them manually.
n Composite Roles bundle Single Roles. Composite roles can contain single roles that access different systems within the Workplace architecture. It is not possible to group composite roles together in superordinate composite roles.
n Composite roles determine the appearance of the LaunchPad in the Workplace.
n Composite Roles are only maintained on the Workplace Server and contain no authorizations.

SAP AG 2001
Transfer of Roles
ComponentSystems
WorkplaceServer
Individ. Role 6
Individ. Role 3
Individ. Role 5
Individ. Role 2 Individ.
Role 1
Individ. Role 3 Individ.
Role 4
Individ. Role 6
Individ. Role 2 Individ.
Role 3
Individ. Role 5 Individ.Role 1
Individ. Role 3 Individ.
Role 4
n After creating the roles in the individual component systems, the role definitions (menus) must be transported to the Workplace Server. There are the following scenarios:
n SAP R/3 Systems from 3.1H after importing the Workplace Plug Ins : Transaction WPST provided by the plug-in permits you to download roles and the enterprise menu in the file system. The role definitions can also be transferred to the Workplace Server using RFC. To do this, choose Role -> Read from other system by RFC in Transaction PFCG.
n SAP R/3 Systems 3.1H to 4.0B: There are reports for downloading and uploading role using the file system (see SAP Note 181368).
n SAP R/3 Systems 4.5A to 4.5B: In addition to the mechanisms for downloading and uploading, you can transport roles with the CTS.
n SAP R/3 Systems from 4.6B: There are functions in the profile generator with the menu definition for downloading and uploading. The reports mentioned above are therefore no longer needed.
n SAP R/3 Systems from 4.6: The roles can be distributed from the Workplace Server (Central Role Maintenance) or read from the component systems using RFC.

SAP AG 2001
Authorizations to Logon to the Workplace
(Workplace Server)
n In principle, no special authorizations are required by the user for the Workplace server. For access to the Web, authorization for the object S_RFC is required. You can set a full authorization here (all fields set to *).
n The Workplace Administrator can assign this authorization to the users using the transaction PFCG, by adding it manually.
n If users want to personalize their Workplaces, SAP recommends that you additionally assign the SAP role SAP_WPS_USER to them. This allows the user to personalize MiniApps and to specify the SAP GUI to be started.

SAP AG 2001
Single Sign-On - Overview
Logon with user ID andpassword
1. Single Sign-On Cookie
2. mySAP.comLogon Ticket
3. ZertifikatLogon
The Cookie is stored inthe Browser‘s mainmemory
The Ticket is stored inthe Browser‘s mainmemory
The X.509 UserCertificate and privatekey are stored on theFrontend
Decryption of theCookie
Ticket checked andlogon using "Ticketdata"
The X.509 ServerCertificate and privatekey are stored on theserver
Verification of the UserCertificate
Authentication of theAGates and mappingto SAP users using amapping table
The AGate provides asecure connection tothe WGate and SAPsystems
Creation of the Cookie
Logon with user IDand password
Logon with user IDand password, Ticketcreated
from Workplace 2.10
WebBrowser
WebServer
ITSAGate
Comp.system
n Single Sign-On (SSO) means that the user must only log on to the Workplace Infrastructure once, and can then use all component systems without being prompted for a password again.
n The Single Sign-On (SSO) function can be realized in two ways in the Workplace Infrastructure :
� By checking user ID and password
through logon with the logon data encrypted in the Cookie
through logon using the SAP Logon Ticket, which does not contain a password; the component system ”believes" the Ticket, that the user is authorized, and allows the named user access according to his/her authorizations.
� By checking identity and authorization using digital certificates
n With these procedures, the user logs on only once. Thereafter, the user’s logon data is passed to all systems with which he/she wants to work.
n The single logon to the Workplace using certificates requires using the HTTPS protocol. SAP also recommends using this protocol for systems where identity is proved using user Ids and passwords or where the SAP Logon Ticket is used.

SAP AG 2001
Further Information
l WWW Addresses
n www.sap.com (SAP Homepage)
n service.sap.com (SAP Service Marketplace)
n marketplace.mysap.com (mySAP.com Marketplace)
n www.sapmarkets.com (SAPMarkets Homepage)
l SAPNet Aliases
n mysapcom
n workplace, marketplace, scenarios
l Training
n MY301 Workplace

SAP AG 2001
l Describe the basic elements of mySAP.com
l Describe the architecture of the Workplace
You are now able to:
mySAP.com and the Workplace:Unit Summary

Exercises
Unit: mySAP.com and the Workplace
At the conclusion of this exercise, you will be able to
• Call the Workplace
• Work with the Workplace
1-1 Logon
1-1-1 Web Browser: Logon to the Workplace with the Demo User. To do this, start your Web Browser and enter the Homepage for your course. To logon to the Workplace, enter “sapwp”. Your instructor will give you the address of the Homepage and the logon data.
1-2 Working with the Workplace
1-2-1 Web Browser: Gain an overview of your Workplace. Which setting is necessary in order to be able to use Session Handling (multiple active applications in the area In Use)? Change your settings appropriately.
1-2-2 Add to the Workplace Favorites area. Add your own folder “Group ##”, where ## is your group number. Place two Favorites in this folder: One Favorite to a Web Address (URL) of your choice and an entry from the Role that has been assigned to you. Then check if your folder and the Favorites are visible and usable.
1-2-3 Optional: Extend the MiniApps provided for your role with a MiniApp that points to a Web address of your choice. Test your entry before you add it. Then change the order in which the MiniApps are displayed on the Workplace and test the various display possibilities (minimized/expanded) for MiniApps.

Solutions
Unit: mySAP.com and the Workplace
1-1 Logon
1-1-1 See exercise text
1-2 Working with the Workplace
1-2-1 Session Handling is initially not activated for new users. In order to check and change the appropriate setting, call the personalization window by clicking the Personalize icon (or by clicking the Personalize button on the Start Page). Check the setting for Allow More Than One Application in the Area "In Use” under Options on the General tab. After a change to the settings, you must log off the Workplace and log back on.
1-2-2 You also create new folders in the personalization window. Choose the New Folder function on the Workplace Favorites tab. Enter the name “Group ##” and click Add. It is also here that you enter URLs (beginning with “http“) and a description of your Web address. Test your entries (some addresses require their own browser window), before you Add them. When you have done this, leave the personalization window by clicking “OK”. Choose an entry under Roles in the LaunchPad (it can also be a complete menu tree), and add it to your folder “Group ##” using Drag&Drop.
1-2-3 MiniApps are also managed in the personalization window, on the Start Page tab. You can test new MiniApps and add them to your existing MiniApps – in exactly the same way as Favorites - under Attributes. You can determine which MiniApps should be displayed under Available MiniApps. You can see and change the layout of your MiniApps in the Layout Preview.

SAP AG 2001
Appendix

Transaction Codes
The following are transaction code links for SAP R/3 Release 4.6C. The transaction codes and menu paths are categorized by function.
End User Functions
Transaction Code
Menu Path Purpose
SU3 System → User Profile→ Own Data Set address/defaults/parameters
SU53 System → Utilities → Display Authorization Check
Display last authority check that failed
SU56 Tools → Administration → Monitor → User Buffer
Display user buffer
Role Administration Functions
Transaction Code
Menu Path Purpose
PFCG Tools → Administration → User Maintenance → Roles
Maintain roles using the Profile Generator
PFUD <none> Compare user master in dialog.
This function can also be called in the Profile Generator: Environment → Mass compare
The Job for user master comparison is: PFCG_TIME_DEPENDENCY (to Release 4.0 RHAUTUP1)
SUPC Tools → Administration → User Maintenance → Roles → Environment → Mass Generation
Mass Generation of Profiles
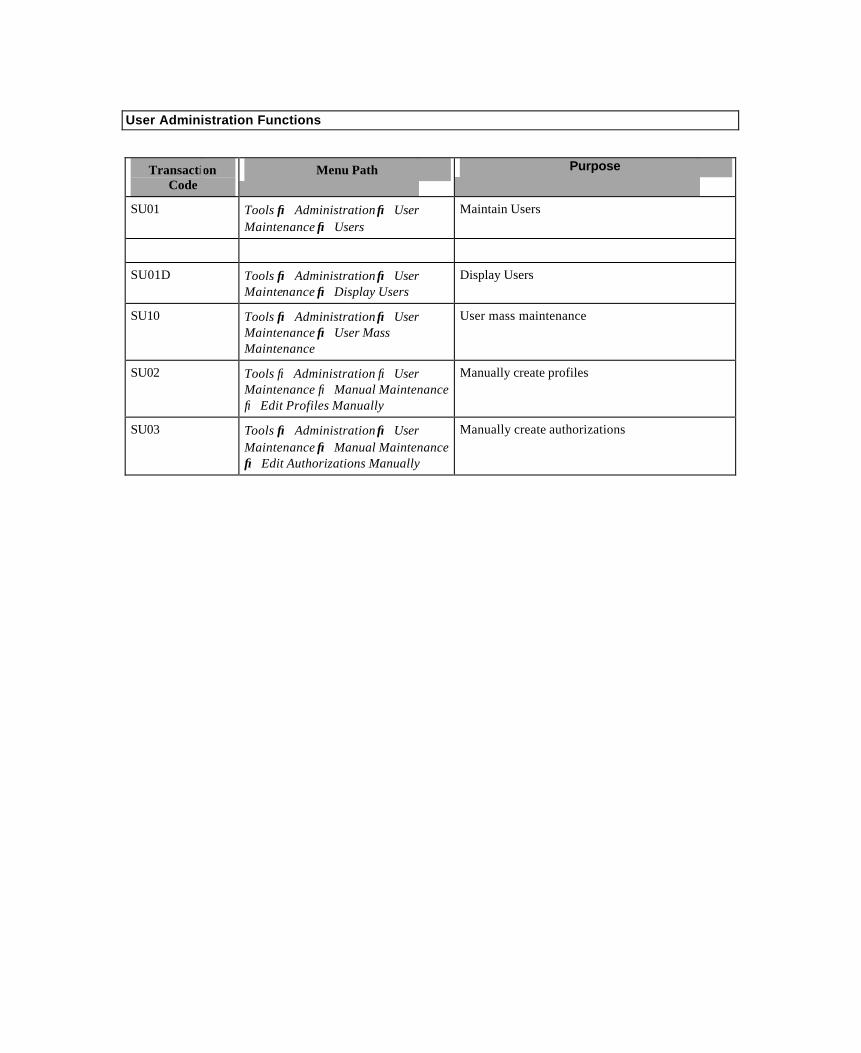
User Administration Functions
Transaction Code
Menu Path Purpose
SU01 Tools → Administration → User Maintenance → Users
Maintain Users
SU01D Tools → Administration → User Maintenance → Display Users
Display Users
SU10 Tools → Administration → User Maintenance → User Mass Maintenance
User mass maintenance
SU02 Tools → Administration → User Maintenance → Manual Maintenance → Edit Profiles Manually
Manually create profiles
SU03 Tools → Administration → User Maintenance → Manual Maintenance → Edit Authorizations Manually
Manually create authorizations
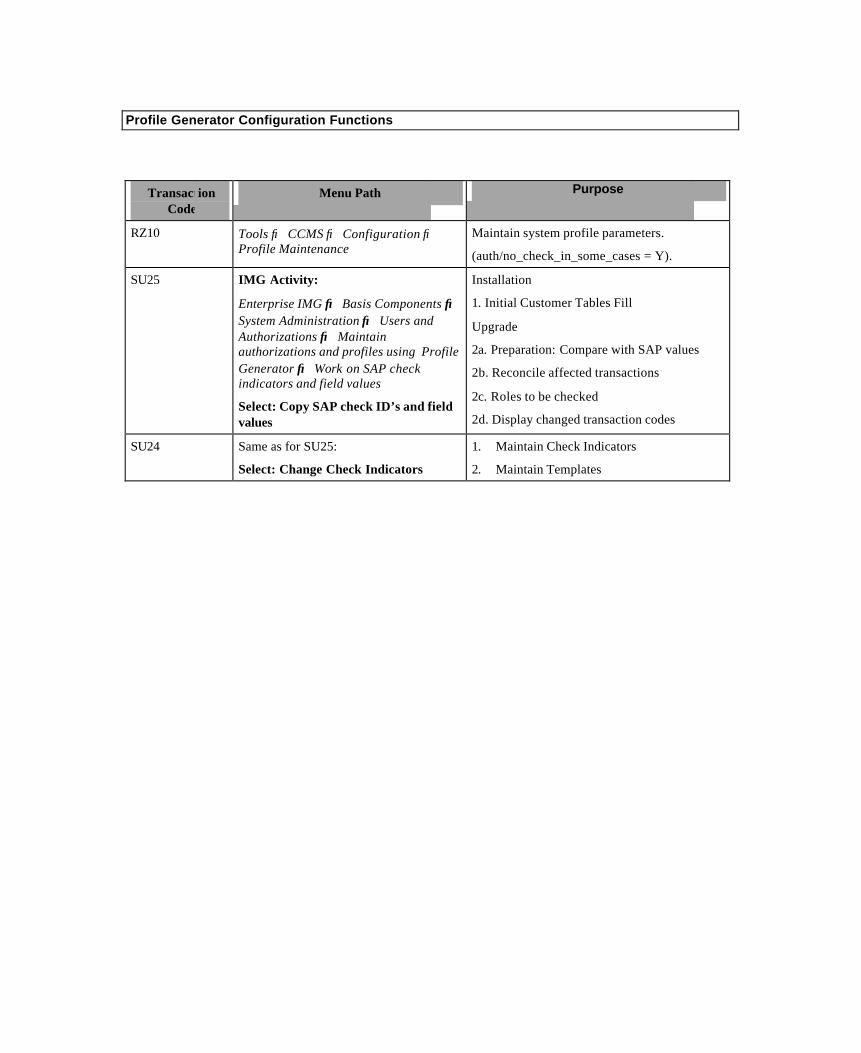
Profile Generator Configuration Functions
Transaction Code
Menu Path Purpose
RZ10 Tools → CCMS → Configuration → Profile Maintenance
Maintain system profile parameters.
(auth/no_check_in_some_cases = Y).
SU25 IMG Activity:
Enterprise IMG → Basis Components → System Administration → Users and Authorizations → Maintain authorizations and profiles using Profile Generator → Work on SAP check indicators and field values
Select: Copy SAP check ID’s and field values
Installation
1. Initial Customer Tables Fill
Upgrade
2a. Preparation: Compare with SAP values
2b. Reconcile affected transactions
2c. Roles to be checked
2d. Display changed transaction codes
SU24 Same as for SU25:
Select: Change Check Indicators
1. Maintain Check Indicators
2. Maintain Templates

Transport Functions
Transaction Code
Menu Path Purpose
SCCL Tools → Administration → Administration → Client Administration → Client Copy → Local Copy
Local client copy (within one system, between different clients)
SCC9 Tools → Administration → Administration → Client Administration → Client Copy → Remote Copy
Remote Client Copy (between clients in different systems) Data exchange over a network (not files).
SCC8 Tools → Administration → Administration → Client Administration → Client Transport → Client Export
Client transport (between clients in different systems) Data exchange using a data export at operating system level.
<none> Tools → Administration → User Maintenance → Roles → Environment → Mass Transport
Mass transport of roles
<none> Tools → Administration → User Maintenance → Roles → Role → Upload/Download
Upload/Download of Roles
SU25 Point 3. Transport of Check indicators
STMS Tools → Administration → Transports → Transport Management System
Transport Management System

System Configuration Functions
Transaction Code
Menu Path Purpose
RZ10 Tools → CCMS → Configuration → Profile Maintenance
Maintain system profile parameters.
(auth/no_check_in_some_cases = Y). .
RZ11 Description of system profile parameters
SM01 Tools → Administration → Administration → Transaction Code Administration
Lock transaction codes from execution
Authorization Object Maintenance
Transaction Code
Menu Path Purpose
SU20 Tools → ABAP Workbench → Development → Other Tools → Authorization Objects → Fields
List of authorization fields
SU21 Tools → ABAP Workbench → Development → Other Tools → Authorization Objects → Objects
List of authorization objects (Initial screen lists by object class)
Information System, Audit Information System
Transaction Code
Menu Path Purpose
SE84 Tools → Administration → User Maintenance → Information System
Information System for SAP R/3 Authorizations
SECR*
<none> Audit Information System

Table Group Maintenance Functions
Transaction Code
Menu Path Purpose
SM30
(Tables
V_BRG,
V_DDAT)
System → Services → Table Maintenance → Extended Table Maintenance
Create table authorization groups (V_BRG)
Maintain assignments to tables (V_DDAT)
Table Group Maintenance Functions
Transaction Code
Menu Path Purpose
SE43 ABAP Workbench → Development → Other Tools → Area Menus
Maintain (Display) Area Menus

SAP Notes: CA940
SAP Note Description Release
31395 System Parameters: Defined Where? Displayed How? Docu? Release Independent
39267 Availability of SAP Security Guide Release Independent
30724 Data protection and Security in R/3 Release Independent
23611 Collective Note: Security in SAP Products Release Independent
66687 Use of Network Security Products
20534 Authorization Check – A Short Introduction Release Independent
20643 Naming Conventions for Authorizations Release Independent
16466 Customer Namespace for SAP Objects
28175 Questions Regarding the Authorization Concept Release Independent
2467 Password Rules and Preventing Unauthorized Logons Release Independent
12466 Logon Restrictions in R/3 Release Independent
28186 What Does the Profile SAP_NEW Do? Release Independent
82390 Generating Profile SAP_ALL 45A - 45B
40A -40B
310 - 31I
29276 SAPCPIC: At which points are passwords visible? Release Independent
2383 Documentation: Description of “super user” SAP* Release Independent
68048 Deactivating the Automatic User SAP* 4.5A - 4.5B
4.0A - 4.0B
3.0x - 3.1I
93769 Additional Documentation Regarding the Authorization Concept – Documentation on Profile Generator (Authorization made easy for Releases 3.0F, 3.1G and 3.1H, 4.0B)
4.6A - 4.6B
4.5A - 4.5B
4.0A - 4.0B
3.0x - 3.1I
SAP Note Description Release
156250 Responsibilities Replaced as of Release 4.5A 4.6A - 4.6B
4.5A - 4.5B
198598 Profiles and References in Roles as of Release 4.6B 46C - 46C
46B - 46B
156196 Activity Groups Renamed as of Release 4.5A 46A - 46B
45A - 45B
80210 Profile Generator: Documentation 45A - 45B
40A -40B
31G - 31I
91721 Problem with org. levels in Profile Generator 40A -40A
30F - 31I

323817 Creating organizational level fields for Profile Generator 46C - 46D
46A -46B
45A - 45B
314513 Org. level in Profile Generator 46C - 46D
46A -46B
85234 Missing authorization when using Profile Generator 46A - 46B
45A - 45B
40A - 40B
30F - 31I
113290 PFCG: Merg. process with authorization data: Explanation Release Independent
313587 Mass deletion of Activity Groups 46A - 46B
45A - 45B
203994 Changed behavior: User menus in 4.6 46A - 46C
301344 Performance problems during menu editing in PFCG 46C - 46D
46B -46B
169469 List of all activity groups with a manual S_TCODE
Install source code
4.0B
167466 IMG authorizations with Profile Generator in 4.5 46A -46B
45A - 45B
SAP Note Description Release
184906 Renaming users: Activity groups are missing 4.6A - 4.6B
4.5A - 4.5B
355364 SU01 Role assignm.: Chaning validity period impossible 46C - 46D
203617 High memory consumption with Easy Access Menu 46C - 46C
46A -46B
66056 Authorization trace with Transaction ST01 45A -45B
40A -40B
300 - 31I
205771 Migration of report trees in area menus 46C - 46C
46A -46B
193251
Customer enhancements in area menus 46A -46B
77503 Audit Information System (AIS) Release Independent
Integrated into Basis from 3.1I and integral part of Basis functions as of 4.6; Import released in 3.0D, 3.0F, 3.1H, 4.0B
139418 Logging user actions Release Independent

179145 Authorization checks for numeric values Release Independent
65968 ABAP/4 Debugging authorizations as of Release 3.1G 45A -45B
40A - 40B,31G - 31I
314843 Authorization object S_TABU_LIN 46C - 46C
23342 You are not authorized to ... → Analysis Release Independent
15253 Authorization check during transaction start (Tab. TSTCA) Release Independent
67766 S_TCODE: Authorization check on transaction start 45A -45B
40A -40B
30E - 31I
SAP Note Description Release
171316 PFCG/SU03: F4 Help for Authorization Values 46A -46B
45A -45B
7642 Authorization protection of ABAP/4 programs
142724 Prevention of multiple dialog logons 45A -45B
40A -40B
30D - 31I
159885 CUA: Collective Note for Central User Administration 46A -46B
45A -45B
303468 Global User Manager: Frequently Asked Questions Release Independent