SAP Navigation
69
SAP AG SAP Navigation LAB SESSION-1
-
Upload
independent -
Category
Documents
-
view
4 -
download
0
Transcript of SAP Navigation

SAP AG
SAP Navigation LAB SESSION-1

Course Goals
Understand how SAP GUI works (SAP GUI is the secured access to SAP system)
Understand how to Navigate through SAP.
This course will enable you to:

Course Objectives
Log On and Off SAP
Use SAP Basic Functions
Navigate SAP Transactions
Use Application Work Areas
Use Search Helps
At the conclusion of this course, you will be able to:

Chapter 1 Goals
After completing this chapter, you will be able to:
Log on to the SAP system
Change your Password
Create multiple sessions of SAP
Log off the system

SAP Logon from Start Menu
Logging On

Two Tabs:
Shortcuts **Use this one!
System (gives you options to change clients and change password)
4 Shortcut Buttons
Log On
New-Item
Change-Item
Delete-Item
SAP System selection window
Logging On
Don’t use
these.


A new window appears
Enter your user-ID
Enter your Password The first time you use SAP you need to reset your password.
The client number as well as language are entered by your administrator and defaulted
Press Enter on your keyboard
Logging On

Passwords
Password Basic
You can use upper case letters or lower case letters in your password (SAP does not distinguish between upper and lower case letters).
You can use any combination of characters (a ....... z, 0.....9, or punctuation marks)
Password restrictions
You cannot begin a password with:
?, !, or a blank space
three identical characters (fffce).
any sequence of three characters that are contained in your user name (for example, using “bill," if your user name is 99biller)
Other bad ideas:
Do not use pass as your password
Do not use any of your last five passwords

The initial password is given by the administrator
The system automatically displays a dialog box
Enter your new password in the New password field
Enter exactly the same password in the Repeat password field
Select confirm
Logging On

The main menu screen is displayed (standard SAP)
Main Menu Screen

Various Keys
Exit Keys
Create New Session icon
Back Cancel
Exit Transaction Or Log Off

Sessions Running Multiple Sessions When you sign onto SAP, you create a „session‟. You are allowed
to have more than one session active at the same time. You can „open‟ a new session any time and from any SAP screen without losing data in the existing sessions.
Example-While creating a req. you need to look up acct balances.
Multiple ways to create a new session Like most other functions in SAP, many ways exist to execute the
same command. For this procedure, you will be given every way possible to create a new session in order to demonstrate this capability. In general, people will find the way that best suits them.
1st Way To open a session by menu path, click System Create Session.
2nd Way To open a session using the icon toolbar, click the Create New Session icon.
3rd Way Right click on the SAP icon in the Taskbar, (not the Log On icon) and select Create session

Viewing current sessions
To view a listing of all sessions by command prompt, type “/o” in the command field and press Enter.
Switching between sessions
Windows allows you to use the Alt + Tab Method to move from session to session. Do the following to switch between sessions:
Hold down the Alt key with one finger.
While holding Alt, press and release Tab.
Generate will create a new blank session.

Logging Off
Log Off System

Exercise
1. Log Off all Sessions
2. Log In
3. Open a Transaction
4. Create a New Session
int: See page 3.

Chapter 2 Goals
Locate and describe the basic functions of the SAP screen elements
Locate and explain the functions of the menu items on the SAP menu bar
Locate and describe the functions of the buttons on the standard toolbar
Locate the buttons on the application toolbar
Locate and describe the various fields on the status bar
Describe the purpose of the function keys
After completing this chapter, you will be able to:

Window Functions in SAP
Pull-Down Menu Bar [ Standard Tool Bar [
Title Bar [ Application Tool Bar [
Status Bar [
(Bottom Right) [
SAP Window Functions
Command Field
Messages (Errors, Document #‟s …)

Status Bar
Options
Push Buttons
Checkboxes
Tabs
Window Functions in SAP (ME51N)

Enter
Confirms entered data Does not save work
Command field
Used to enter command, transaction code. To display
it, click the arrow
Save
Saves the work
Back
Returns to previous screen without saving data
Exit
Returns to initial screen without saving data
Cancel
Exit current task without saving data
Print current screen
Scroll buttons
First page, previous page, next page and last page
Find and Find next
Search for data in current screen; extend research
Create session
Create a new session
Create shortcut
Create a shortcut to any report, transaction
F1 Help
Provides help on the field where the cursor is positioned
Layout menu
Customizes the
•Display options
•Printout the screen (Hard Copy)
Typical Icons

Function Function Key
Help F1
Back F3
Possible entries F4
Select view(s) F5
Organizational Levels F6
Data F7
Cancel F12
Exit SHIFT+F3
Other material SHIFT+F5
Function Keys

Chapter 3 Goals
avigate in SAP Easy Access
Navigate in SAP using the menu paths
Navigate in SAP using transaction codes
After completing this chapter, you will be able to:

SAP Easy Access is new front end-user interface implemented from SAP Easy Access allows the definition of user-specific menus
It can contain transactions, reports, web addresses the user needs to perform his daily tasks
It appears when the user logs on in SAP
The user can also define his favorites list
Easy Access
Select Extras>Settings in the menu bar. The window comes up. Click one or many options. Click Enter.
Each user can specify whether:
Her/His favorites appear before or after the menu
Only the favorites appear
Technical transaction names appear in the tree menu
The graphic on the right side of the screen appears
Easy Access

User Menu
User Menu display
SAP Menu User Specific Menu
This screen shot is “To be Announced”.
You will have access to display all screens, however, you will be limited by your security as to what you can change.

Each user can create her/his favorites
Favorites can contain
SAP transactions
Files or Web addresses
Favorites can be organized in folders
Select Insert folder in menu/ name your folder and press the check mark.
Favorites can be moved or renamed (changed)
Select Move or Change
Creating Favorites

To insert an SAP transaction in favorites
select a transaction then Favorites > Add on the menu bar This will show the menu path in your favorites. OR
select Favorites > Insert transaction. Enter the transaction technical name, then press enter OR
select a transaction, keep the mouse button pressed and drag the item to the desired position. Release the button OR
Right Click Favorites
Creating Favorite SAP Transactions

Favorites
(Click and Drag) This will give you the name and T-code only in your Favorites list.
Favorites

To insert a web address or a file in favorites
Select Favorites> Add other object.
Select web address or file.
Fill in the Text field (with a name) and fill in the Web address or file (www.xxx.com OR click the field box to show the Browse button . Find and double click on your file. ) Press Enter.
Creating Favorite Files and Web Links

Transaction Codes
What is a Transaction Code?
A transaction code is a 4 or 5-character code that identifies a transaction screen in SAP. For example, the transaction code associated with creating requisitions is ME51N. If you know the transaction code for a screen, you can jump directly to that screen without using the menu path.
Why Use a Transaction Code Instead of the Menu Path?
Using transaction codes instead of menu paths in most cases is a matter of personal preference. You may find that transaction codes are quicker to use than menu paths.

Transaction Codes
It is important to note that even if you choose to frequently use transaction codes, you should still have a clear understanding of how to use menu paths. While you may not always know the transaction code for a screen, you can always use the menu path to locate the transactions in the system.
To go to a screen in the current session, type the transaction code in the Command field then press Enter..
To open a new session, type “/n” before the transaction code.
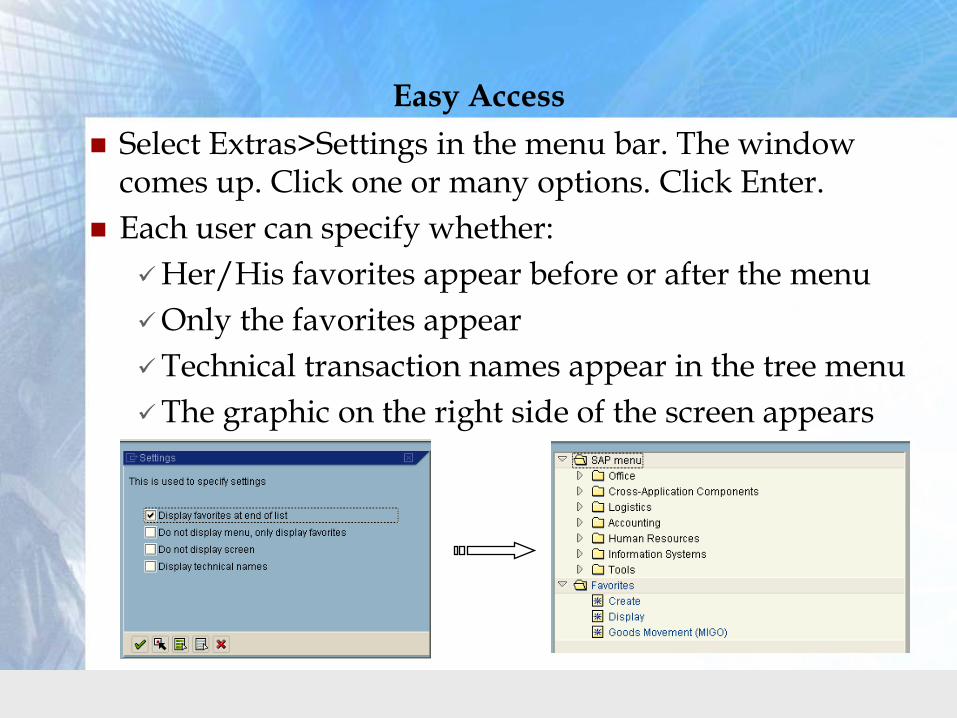
T-Codes from the History List
In the Transaction Code field, click the document icon.
The History list displays. This is a list of all transaction codes recently used.
Highlight a displayed item or scroll down the list to display desired transaction and click.
Selected transaction code appears highlighted in the transaction code field.
Press Enter.

Open Transaction in a New Session
To open a new session containing a specific transaction, type “/oXXXX” (XXXX = Transaction code) into the command field and press Enter.
A new session displays with the entered transaction.
Remember, you can have 3 sessions of SAP open at a time.
**Delete everything in your Favorites folder by highlighting each item and pressing the Delete key on your keyboard.

Chapter 4 Goals
After completing this chapter, you will be able to:
Identify the components in the application work area
Enter data into SAP fields
Insert data using list boxes
Know how to customize their local display of SAP
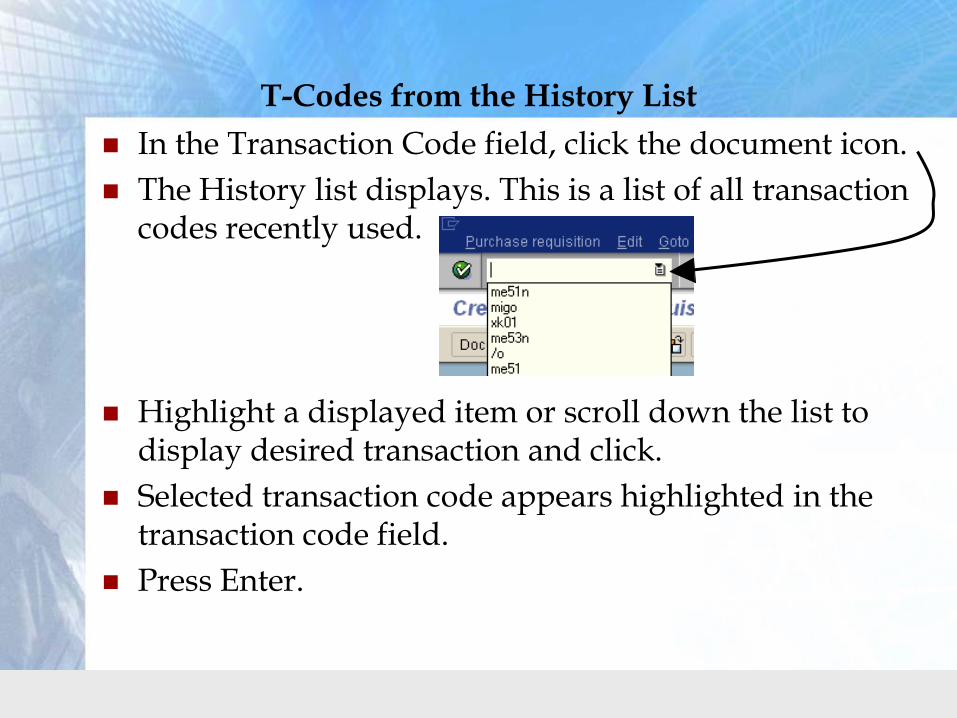
Application Work Area
Application Work Area
Here, data is entered and/or displayed. The work area of the screen contains many different types of fields and display objects. This section describes the common objects found in the application work area.

Data entry fields allow you to enter new data or change existing displayed data. Their white background identifies them. All data entry fields have a name or a label, which refers to the data that can be entered into the field. You enter data in a field by putting the cursor in the field and typing the data you want. Data entry fields may contain default data (which you can change).
Required Data Field
A special type of data entry field is called a required field. This field must have data entered in it in order for the screen to be completed. Required fields are sometimes identified by checked box in the field.
Data Entry Fields
If you are not sure what type of data to put in a field you can click in the field and press the Help button | to get information about the field. (MIGO Screen)
(Display MIGO)

Simple Drop Down (MIGO Screen)
If a field has a list icon in the field it contains a simple drop down list. This is a short, limited list from which you must chose a field value (that is, no typing).
Input Fields (MIGO Screen)
SAP Input Fields are similar to Windows programs:
The active field has the flashing cursor.
Most of the time, the limit to the length of data allowed in the field is indicated by the size of the box.
To move to the next field, press Tab. Pressing Enter will Execute the transaction.
Types of Data Entry Fields

List Display
On the ME51N transaction, click in the Material Group field and click the Search icon.
A dialog displays with a listing of all possible selections for this field. Double click to select an item.
Date Fields
Date fields in SAP have a feature that works like a hidden list box. You can display a calendar for a date field and select any date without having to enter it manually. To display the calendar:
In the ME51N transaction, click in the Delivery Date field then click the Search icon.
A calendar displays. The system displays the current month; today‟s date has a box around it. Double click to select a date.
Types of Data Entry Fields
(Short cut press F4 then F2 for current date.)

Buttons and Check Boxes
Buttons and Check Boxes
(ME51N) Customizing Local Layout (on most screens).
Radio Buttons
Check Boxes

Printing a Hard Copy
Print a screen shot.
Press the Customizing Local Layout button and click on Hard Copy.

Chapter 5 Goals
After completing this chapter, all students will be able to:
Select a key from a list of valid entries
Perform a search help inquiry
Use a wildcard character in a search popup box
Change the search category
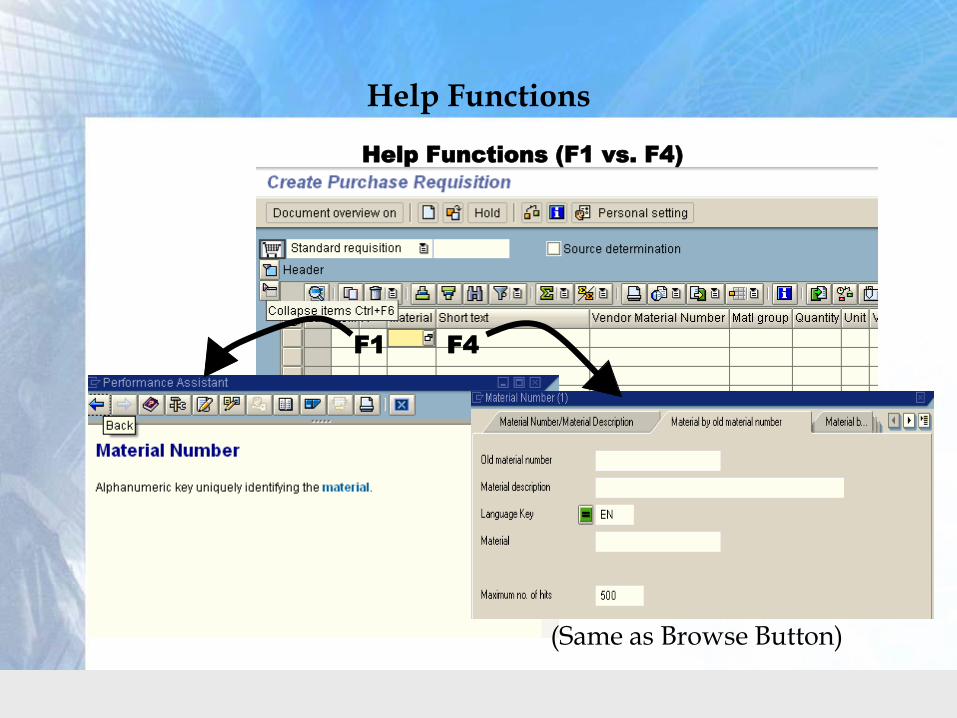
Help Functions (F1 vs. F4)
Help Functions
F1 F4
(Same as Browse Button)

You can get help on fields and field input by clicking on the field then:
pressing F1 on the keyboard, or
clicking on
A dialog box with the definition of the field appears
Field Help

Searches In the dialog box to the left, you can search by material description, material number, or both. Example “d*”.
Results The results of the search will appear in the form to the right. These results may also be sorted.
Searches

Search Help Box
Search Help dialog
From the ME51N screen to search Vendors, press the Green Checkmark to show a list of vendors. Or type the first letter and an * in the Name column and press the Green Checkmark to Start Search.
Use the tabs, arrows or quick find box to change the search category.

Exercise
1. Find the Vendor # for BALLOON EXPRESS.
2. On the ME51n screen find the definition of the “A” field. (3rd from left).

Chapter 6 Goals
After completing this chapter, you will be able to:
Access field-specific Help
Access Application Help
Access SAP Help Library
Access terms in the SAP glossary

Field Level Help
Field-specific help displays information for a field when the cursor is currently in that field. To demonstrate this process, access any transaction.
In order to use field-level help you must have the cursor in the field you want. To access help on the desired field, do the following:
1.Click once in the desired field. 2.Press F1.
The appropriate help window displays help information for that field.
3.To exit the help window, click or in the pop-up window.

Choose menu path Help Application help.
The system identifies where you are and displays the appropriate help area.
The current displayed topic is part of a larger set of online documentation for SAP. You can read the information in the current window, and move forward or backward in the area by clicking the buttons at the top of the window.
To return to the SAP screen, click .
Application Help

SAP Library
Select the following menu path: Help SAP Library. The SAP Website screen displays.
A list of functional topics displays.
Select a topic by clicking on it.
Another list of sub-topics displays for the topic you selected.
Click on the appropriate sub-topic to reach a table of contents for the functional sub-topic you want.

SAP Glossary
Select the following menu path: Help Glossary. The “Glossary List” popup box appears.
The list displays in alphabetical order.
Use the scroll bar on the left side of the window to view the entire list or click on the appropriate letter.
When you find the term you want, click on it.
To close SAP Library-Glossary click

Exercise
1. Using the appropriate Help, find the Definition of Business Workplace.

Chapter 7 Goals
After completing this chapter, you will be able to:
Navigate in the Business Workplace
Send a message to another SAP user
View your messages
Delete your messages
Use the Appointment Calendar

Accessing the Business Workplace
Click on the Business Workplace button.

Navigating the Business Workplace
View contents by clicking on the triangles.

Composing a New Message
Click on the New Message button to compose a message to a SAP user.

Composing a Message
Same as Subject Line
Message area
SAP User ID, choose SAP Logon Name, check the Express Mail, CC or BCC check box.

Sending a Message
Send
Attach
Cut, Copy, Paste Undo, Redo, Find, Find Next

Prompt to Check Messages
Check brings you back to BW.
Choose doesn‟t do anything.
Inbox brings you to your Inbox and displays a list of messages.

Checking Messages
Click on a category to see its contents.
Click on a Title to view the message in the bottom section.

Viewing an Individual Message
Double click on a Title to view the message in a full screen. Click the back button to back to Business Workplace.

Deleting Messages
Delete a message by clicking on the Title and dragging it to your Trash Can, OR click on the Title to highlight the message and press Delete on your keyboard.

Viewing Messages in the Trash
Click on your Trash can to view the contents.

Emptying the Trash
Empty Trash by highlighting a message and pressing the Delete button on the toolbar. Press “Yes” on the Confirmation message.
Delete Button

Trash and Shared Trash
Documents, distribution lists, and folders that were deleted from the shared folders are stored in the shared trash. Only the administrator can access the shared trash.

Appointment Calendar
From the BW main screen press the Appointment Calendar button.
Press the Create Appointment button to schedule an appointment.
Click on the date to view a day.
Click on a week number to view the week.

Create Appointment
Fill in…
Title (name)
Date and Time (Military Time)
Room
Description
Press Check to Create Appt.