Synergy Control Installation and Configuration Guide
34
Synergy Control Installation and Configuration Guide Synergy CONTROL v2.2 February 2020 © Synergy SKY 2019
-
Upload
khangminh22 -
Category
Documents
-
view
5 -
download
0
Transcript of Synergy Control Installation and Configuration Guide
Synergy Control Installation andConfiguration Guide
Synergy CONTROL v2.2
February 2020
©SynergySKY2019

Synergy Control Installation and Configuration Guide
Page 2 of 34
Contents
Introduction 3
How Synergy CONTROL Works 4
Installation Prerequisites 5
WindowsServer Software 5
WindowsServer hardware 5
Device Support 5
Supported Internet Browsers 5
Limitations 6
Installing Synergy CONTROL 7
Configuring Synergy CONTROL 8
Licensing 8
Software Updates 9
Hosting and Authentication 10
Hosting 10
Authentication 11
JOIN API Configuration 17
Synergy JOIN database access 18
MCU / Bridge Configuration 19
Cisco CMSMCU 19
PexipMCU 20
Ongoing Meetings 21
Upcoming Meetings 23
Custom Views 25
Creating CustomViews 25
Edit CustomView 26
Synergy of Things 28
Tab Controls 29
Auto Update 29
Favorites 29
Search 29
Meeting Controls 31
Group Controls 31
Participant Controls 32
Synergy Control Installation and Configuration Guide
Page 3 of 34
Introduction
About Synergy CONTROL
Videomeetings&Video conferenceshavemanyadvantagesover standard “face-to-face” meetingshowever theygenerallyrequire extra attention from IT or technical staff.
One of many repeating scenarioswhen administrators need to help employees iswhen a participant is having problems joining avideomeeting. Another good example iswhen all participants shouldmute their microphoneswhile watching a presentation butsome of them forget to do so.
These are just two examplesof many situations that can occur while videomeetingsare taking place. Sometimes it is necessaryto invite participants to an upcomingmeeting before it starts, or youmayneed to compare a list of all connected participants in anongoingmeeting with a list of participantswho have been invited to a specificmeeting.
We think that it is convenient, efficient andmore so necessary for large organizations to have a toolwhere videomeetingadministrators have the ability to have full control of allmeetingswhether theyare ad-hocor scheduled (both active and inactive)and can react promptly on any required actionsor changes.
We present SynergyControl, the toolwhich supports both Pexip Infinity and Cisco CMS technologieswhere you can havecontrol over all of your meetings in a very simple and effectivemanner.

Synergy Control Installation and Configuration Guide
Page 4 of 34
How Synergy CONTROL WorksThis section explains how the software worksand givesa short overview of the implemented features.
Feature OverviewSynergyControl supports the following feature set:
n View all activemeetings, both ad-hocand scheduled, on Pexip Infinity and Cisco CMSmulti-conference units.n View all inactive pre-scheduledmeetings. (onlywith Synergy JOIN integration)n Search for scheduled and ad-hocmeetingswith meeting name, participant name, email or meeting start date. For active
meetings it is possible to searchmeetings that have already started within the given time framen Create a list of 'Favorite' meetings to follow. This includesboth 'ad-hoc' and 'scheduled' meetings (active and inactive).n Adding participant(s) to an activemeeting by initiating a dial-out from theMCUn Send or resend dial-in info to participants in a scheduledmeeting byusing their email address (onlywith Synergy JOIN
integration)n Control participant’s sound, microphone and video, including group controls for all participants.n Disconnect participants.n View videomeeting start time & durationn View total number of participants attending themeeting in a videomeeting room (this feature onlyworks if the endpoint
haspeople counter technology).n Get information about packet loss, jitter and bandwidth for every participant.n Meeting locking. Thismakes it possible to lockameeting and prevent unwanted parties attending themeeting (there are
some differences in functionality between Cisco CMSand Pexip Infinity )

Synergy Control Installation and Configuration Guide
Page 5 of 34
Installation PrerequisitesThe application supportsWindowsplatforms.
Windows Server SoftwareOperating System Additional Features Required
Operating System: Windows Server 2008 r2 64bit (or newer)
Microsoft .NET Core 2.x
Windows Server hardwareCPU RAM HDD
4Cores 8GB 20GB
Device SupportSoftware Version
CiscoMeeting Server 2.4
Pexip Infinity 19
Synergy JOIN 3.0
Supported Internet BrowsersSoftware Version
Google Chrome 65.0.3325
Mozilla Firefox 61.01
For the best experience with CONTROL, we recommend usingGoogle Chrome or Mozilla Firefoxbrowsers. All newer versionsof internet browsers should also work.

Synergy Control Installation and Configuration Guide
Page 6 of 34
LimitationsThere are some limitations in Pexip Infinity and CiscoMeeting Server itself when it comes to activemeeting controls. Some ofthese limitationsare overcome by the integration of Synergy JOIN (if integration is conducted) but direct controls related toparticipants are still dependent on API possibilities of the supported technologies.
Technology Mute/UnmuteMicrophone
Mute/ UnmuteVideo
Mute/ UnmuteSound
Disconnect Participant MeetingLocking
Pexip Infinity Yes No No Yes Yes
CiscoMeeting Server Yes Yes Yes Yes Yes (1.)
(1.) In order to get Meeting Locking working properly on CISCOsystems it necessary to distinguish between host and guest callsto a VMR (or co-space). It is important to setup “guest” and “host” accountswhere for a guest the 'needsActivation' parameterhas to be set. Refer to the Cisco CMSdocumentation for more information on how to set this
(2.) If you are going to be using Synergy CONTROL alongside Synergy JOIN, the server that hasgot Synergy JOIN installedshould not have the IIS service running or installed. Bydefault, the Synergy JOIN API runson port 443 and if your IIS server isusing port 443 for another website, the Synergy JOIN API will not be able to communicate with SynergyCONTROL.

Synergy Control Installation and Configuration Guide
Page 7 of 34
Installing Synergy CONTROLYouwill be provided with an installer: SynergyControl_Setup.exe
1. Double click to run the installer.
2. Follow the installwizard. Click next to accept the license agreement, select the install location, and choose whether to launchCONTROLwhen the installation completes.
3. Once the install has completed, you will see a shortcut to the SynergyCONTROL application on the desktop.
Synergy Control Installation and Configuration Guide
Page 8 of 34
Configuring Synergy CONTROLAll configuration of SynergyCONTROL is done from the server the application is hosted on. Access to the configuration page isprohibited, unless you are logged on to the host server. The server will only listen to “localhost” by default. If you would like tochange the configuration, you can click on the configuration button in the top right corner of the application or browse tohttp://localhost:(port)/Config
Above is the button you will have to click on to access configuration the configuration page (when you are logged on to the hostserver)
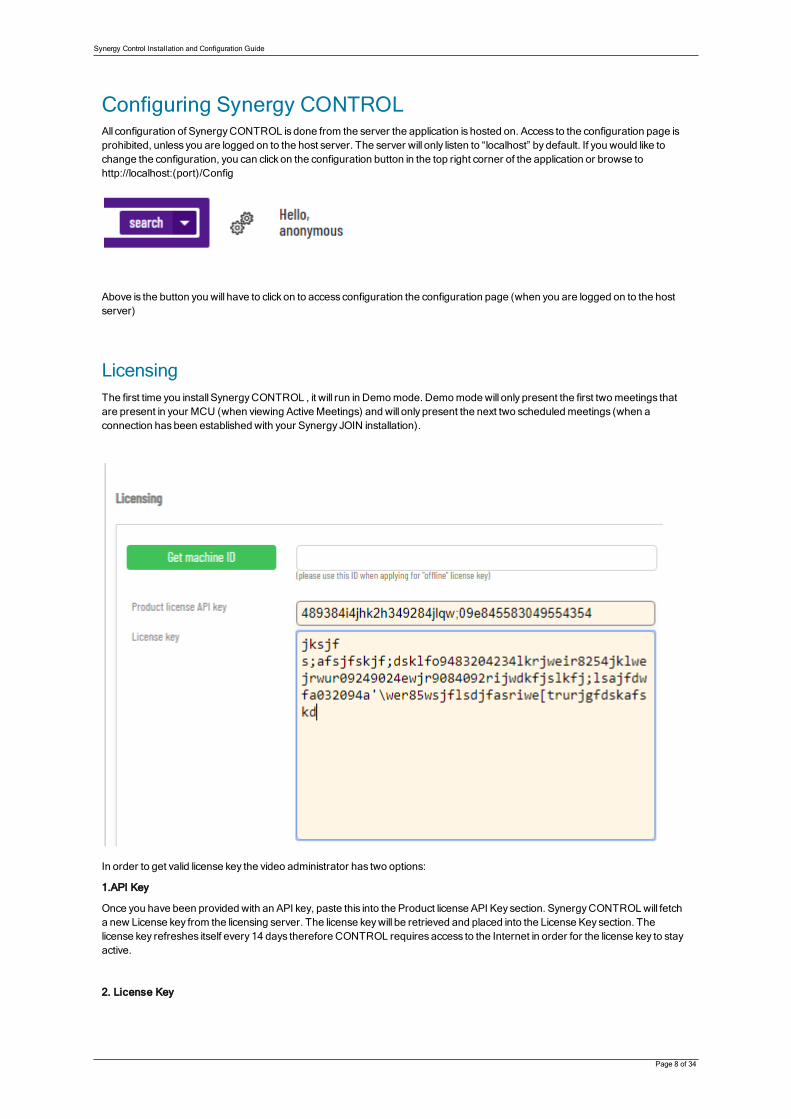
LicensingThe first time you install SynergyCONTROL , it will run in Demomode. Demomodewill only present the first twomeetings thatare present in your MCU (when viewing ActiveMeetings) and will only present the next two scheduledmeetings (when aconnection hasbeen established with your Synergy JOIN installation).
In order to get valid license key the video administrator has two options:
1.API Key
Once you have been provided with an API key, paste this into the Product license API Key section. SynergyCONTROLwill fetcha new License key from the licensing server. The license keywill be retrieved and placed into the License Keysection. Thelicense key refreshes itself every 14 days therefore CONTROL requiresaccess to the Internet in order for the license key to stayactive.
2. License Key
Synergy Control Installation and Configuration Guide
Page 9 of 34
To obtain an offline license key you will have to get in touch with your SynergySKY representative or send a request SynergySkySupport ([email protected]).
You will have to provide theMachine ID of the hosting server. This can be found within the configuration page bypressing the'Get machine ID' button. Once we have themachine ID, we will provide you with a License Keyyou can paste in to the Licensingtool.
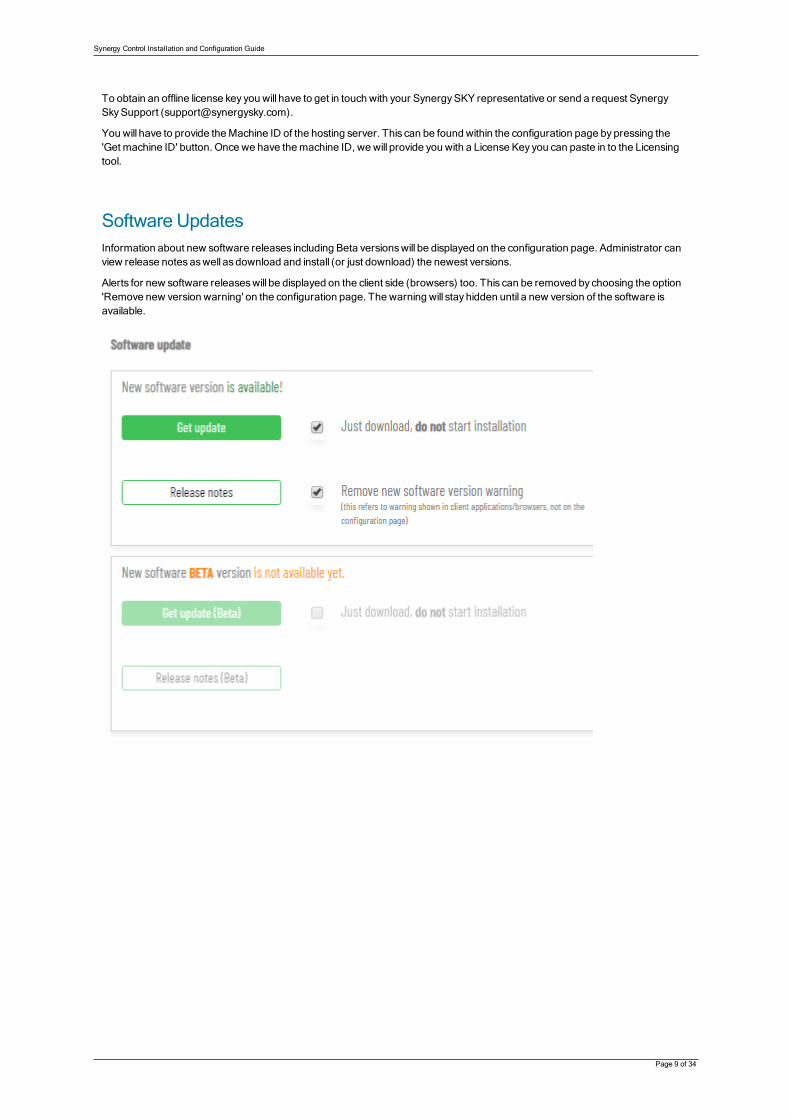
Software UpdatesInformation about new software releases including Beta versionswill be displayed on the configuration page. Administrator canview release notesaswell as download and install (or just download) the newest versions.
Alerts for new software releaseswill be displayed on the client side (browsers) too. This can be removed by choosing the option'Remove new version warning' on the configuration page. The warning will stay hidden until a new version of the software isavailable.
Synergy Control Installation and Configuration Guide
Page 10 of 34
Hosting and Authentication
Hosting
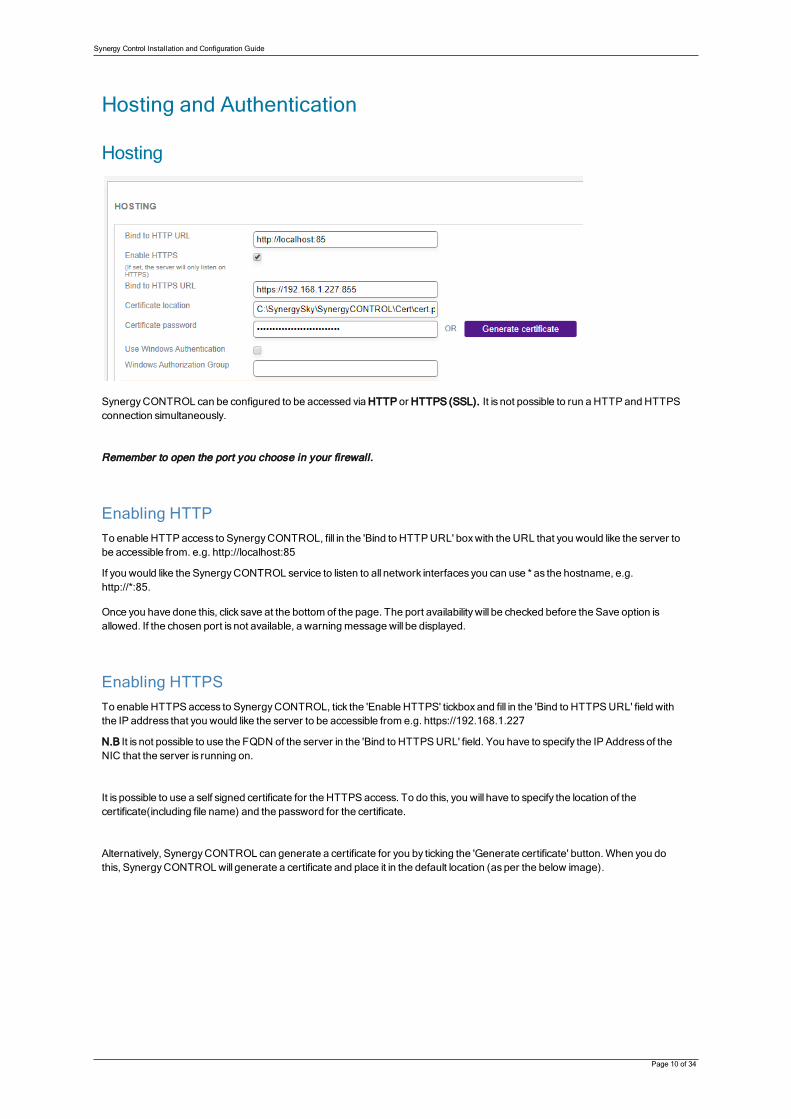
SynergyCONTROL can be configured to be accessed via HTTPor HTTPS (SSL). It is not possible to run a HTTPand HTTPSconnection simultaneously.
Remember to open the port you choose in your firewall.
Enabling HTTPTo enable HTTPaccess to SynergyCONTROL, fill in the 'Bind to HTTP URL' boxwith the URL that you would like the server tobe accessible from. e.g. http://localhost:85
If you would like the SynergyCONTROL service to listen to all network interfaces you can use * as the hostname, e.g.http://*:85.
Once you have done this, click save at the bottom of the page. The port availabilitywill be checked before the Save option isallowed. If the chosen port is not available, a warningmessage will be displayed.
Enabling HTTPSTo enable HTTPSaccess to SynergyCONTROL, tick the 'Enable HTTPS' tickboxand fill in the 'Bind to HTTPS URL' field withthe IP address that you would like the server to be accessible from e.g. https://192.168.1.227
N.B It is not possible to use the FQDN of the server in the 'Bind to HTTPS URL' field. You have to specify the IPAddressof theNIC that the server is running on.
It is possible to use a self signed certificate for the HTTPSaccess. To do this, you will have to specify the location of thecertificate(including file name) and the password for the certificate.
Alternatively, SynergyCONTROL can generate a certificate for you by ticking the 'Generate certificate' button.When you dothis, SynergyCONTROLwill generate a certificate and place it in the default location (asper the below image).

Synergy Control Installation and Configuration Guide
Page 11 of 34
Youwill have to paste the location where certificate hasbeen placed into the 'certificate location' field. The password for thecertificate generate bySynergyCONTROLwill be prepopulated.
Once you have done this, click save at the bottom of the page. The port availabilitywill be checked before the Save option isallowed. If the chosen port is not available, a warningmessage will be displayed.
N.BWindowsauthentication can not be used simultaneouslywith HTTPS. For security reasonswe are not recommendingusing theGenerated certificate in production.
AuthenticationAuthentication to the SynergyCONTROL application is now possible via twomethods. StandardWindowsauthentication andMicrosoft Azure AD OAuth. It is not possible to run the two authenticationmethods simultaneously. StandardWindowsauthentication can be used with http. Microsoft Azure AD OAuth can only be enabled with https.
Windows Authentication
If you want to setup access restrictions in SynergyCONTROL, tick the checkbox "Use Windows Authentication". Thiswill allowaccess to anyone with a localWindowsuser or Active Directory user authentication.
If you would like to includemore restrictions, please enter a group name in "Authorization Group" in the form“DOMAIN\GroupName” or “SERVER\GroupName”. This can be either a local group or a group in Active Directory. Only usersin this group will be allowed access to SynergyCONTROL.
Microsoft Azure AD OAuth configuration

Synergy Control Installation and Configuration Guide
Page 12 of 34
To enable Azure OAuth type of user authentication tick the 'UseOAuth' tick box.
Following this, you will also have to configure the OAuth Configuration settings.
Field Description
Domain The company domain as detailed in the Azure environment
Instance The URL for where AzureAD connects to for authentication. By default this value is https://login.microsoftonline.com
Tenant ID The Tenant ID for where the Synergy CONTROL application exists in AzureAD. This is detailed in the Azure Portal Application page
User Group The ID for the user group that have access to Synergy CONTROL. Not required if user group authentication is not being used
Client ID This is detailed as the 'Application (Client) ID' in the Azure Portal application page
Client Secret Should be generated specifically for the Synergy CONTROL application registration on Azure AD portal and should not be publicly available as itwill be used for API authentication
Redirect URI after userLogin
We recommend settings this to be the Synergy CONTROL server (HTTP or HTTPS URI). Please note that in the case where reverse proxy isused, this URLwill be different.
1. Log In to https://portal.azure.com
2. Click on Azure Active Directory
3. Select App Registrations
Synergy Control Installation and Configuration Guide
Page 13 of 34
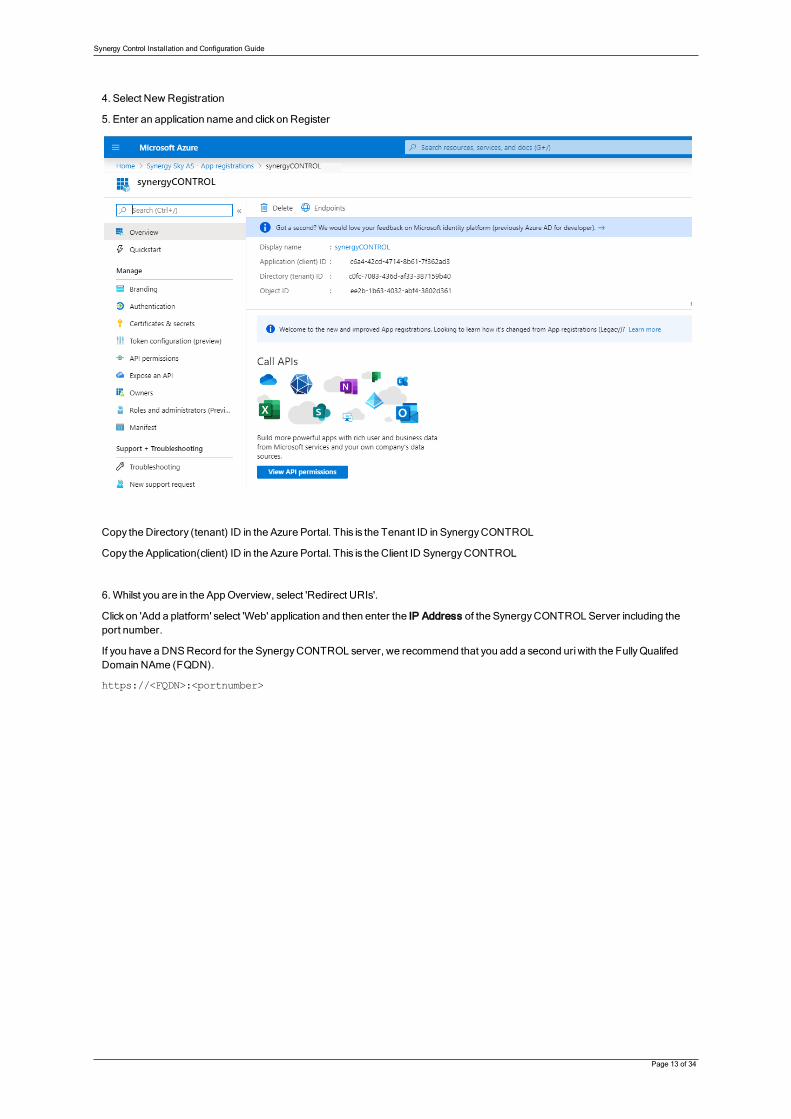
4. Select New Registration
5. Enter an application name and click on Register
Copy the Directory (tenant) ID in the Azure Portal. This is the Tenant ID in SynergyCONTROL
Copy the Application(client) ID in the Azure Portal. This is the Client ID SynergyCONTROL
6.Whilst you are in the AppOverview, select 'Redirect URIs'.
Click on 'Add a platform' select 'Web' application and then enter the IP Address of the SynergyCONTROLServer including theport number.
If you have a DNSRecord for the SynergyCONTROL server, we recommend that you add a second uriwith the FullyQualifedDomain NAme (FQDN).
https://<FQDN>:<portnumber>

Synergy Control Installation and Configuration Guide
Page 14 of 34
7. Select 'Certificates&Secrets'
8. Click 'New Client Secret' and give it a name and set it to never expire. Click on Add
Copy the Client Secret to the SynergyCONTROL 'Client Secret' field

Synergy Control Installation and Configuration Guide
Page 15 of 34
The following section is only necessary if you are going to be configuring Group based access to Synergy CONTROL.
9. Select API Permissions
Click on Add a Permission, chooseMicrosoft Graph, Application Permissions and create the following permissionDirectory>Directory.Read.All
Click on Add a Permission, chooseMicrosoft Graph, Delegated Permissions and create the following permissionUser >User.Read
The permission levelDirectory.Read.All is used to find out which group each user exists in
Once you have configured all of the settings, click on
To enable Group Access to SynergyCONTROL a security group has to be created. This security group should contain the usersthat have permission to access the application.
10.Whilst you are in App Registrations, select 'Manifest' and change the following values:
"groupMembershipClaims": "SecurityGroup"
"oauth2AllowIdTokenImplicitFlow": true,
"oauth2AllowImplicitFlow": true,
11. Browse to Groups, select the SecurityGroup that has the users that have permission to the SynergyCONTROL application
Copy theObject ID and paste this into the 'User Group' field in SynergyCONTROL

Synergy Control Installation and Configuration Guide
Page 16 of 34
Hit Save at the bottom of the page. The SynergyCONTROL service will restart and any logged in userswill loose their sessionand theywill have to log in using their Office365 credentials to regain access to the application.
Synergy Control Installation and Configuration Guide
Page 17 of 34
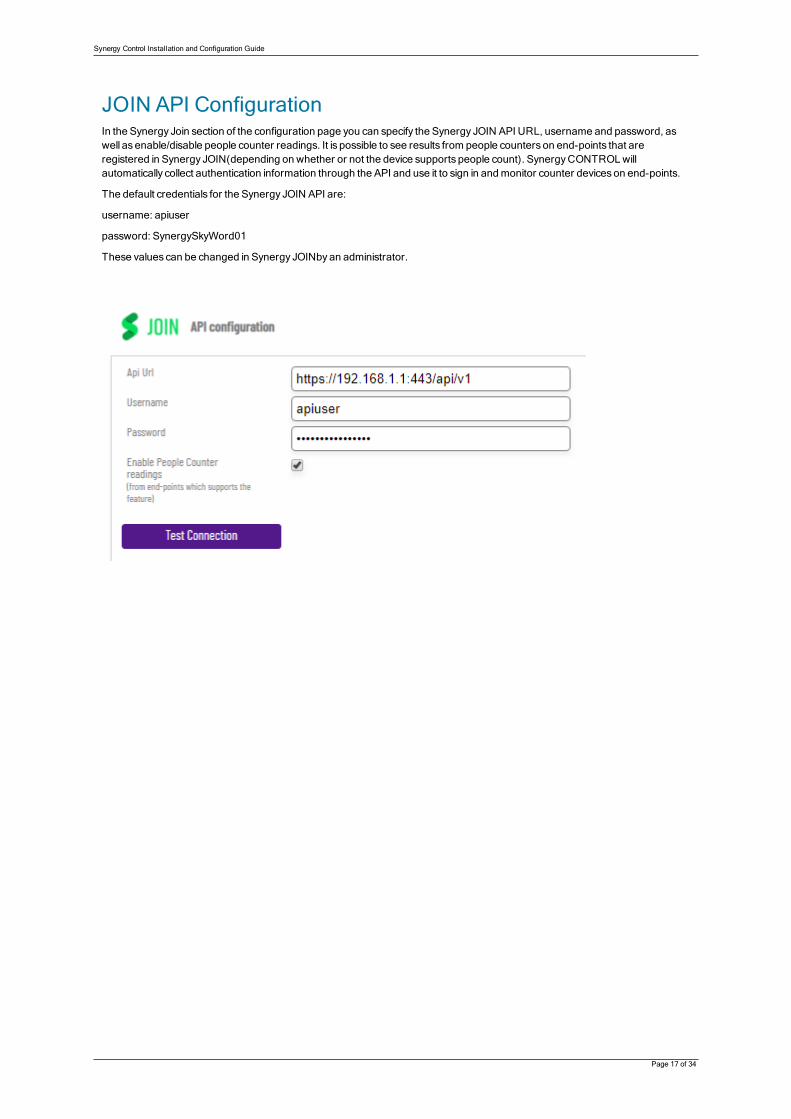
JOIN API ConfigurationIn the Synergy Join section of the configuration page you can specify the Synergy JOIN API URL, username and password, aswell as enable/disable people counter readings. It is possible to see results from people counters on end-points that areregistered in Synergy JOIN(depending on whether or not the device supports people count). SynergyCONTROLwillautomatically collect authentication information through the API and use it to sign in andmonitor counter deviceson end-points.
The default credentials for the Synergy JOIN API are:
username: apiuser
password: SynergySkyWord01
These values can be changed in Synergy JOINbyan administrator.
Synergy Control Installation and Configuration Guide
Page 18 of 34
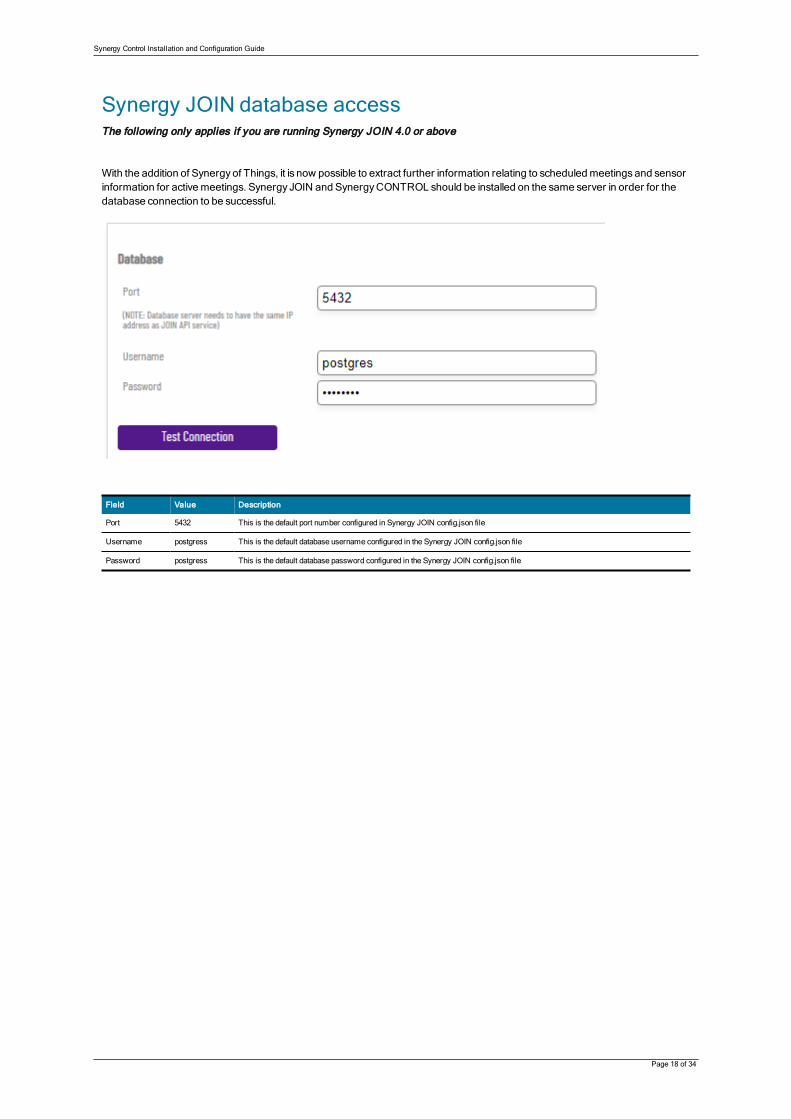
Synergy JOIN database accessThe following only applies if you are running Synergy JOIN 4.0 or above
With the addition of Synergyof Things, it is now possible to extract further information relating to scheduledmeetingsand sensorinformation for activemeetings. Synergy JOIN and SynergyCONTROL should be installed on the same server in order for thedatabase connection to be successful.
Field Value Description
Port 5432 This is the default port number configured in Synergy JOIN config.json file
Username postgress This is the default database username configured in the Synergy JOIN config.json file
Password postgress This is the default database password configured in the Synergy JOIN config.json file

Synergy Control Installation and Configuration Guide
Page 19 of 34
MCU / Bridge ConfigurationIn the “Bridge Configuration” section, you can configure whichMCUsSynergyCONTROL should gather data from. Select theMCU type and click 'Add Bridge', then fill out the Name (name of the bridge for your internal use), Hostname, Username andPassword
Cisco CMSMCU
If a bridge needs to be deactivated, tick the 'Disabled' checkbox.
The Test Connection button can be used to verify that the correct username and password hasbeen entered.For Cisco CMS the Discover Nodes button is available. Thiswill attempt to detect whether thisMCU is part of a cluster, and willadd the other cluster nodes to the system. If the password for the other cluster nodes is different from this node the passwordsmust be filled out.
For Cisco CMS systems to get meeting locking to work it is important to setup “guest” and “host” accountswhere for a guest the'needsActivation' parameter has to be set. Refer to the Cisco CMSdocumentation for more information on how to set this.

Synergy Control Installation and Configuration Guide
Page 20 of 34
PexipMCU
In the PexipMCU configuration a new field hasbeen added which represents the “Reverse proxy/Conference node”. InSynergyCONTROL this node will be used to apply changeson a conference layout.
Synergy Control Installation and Configuration Guide
Page 21 of 34
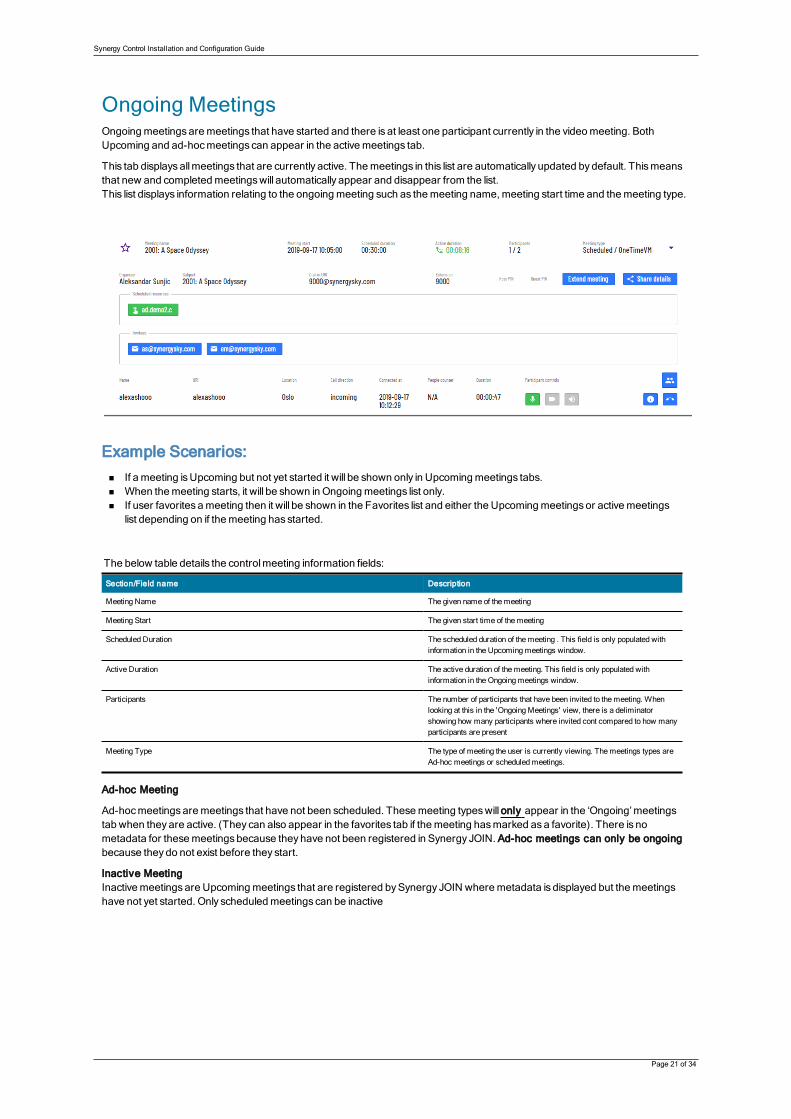
Ongoing MeetingsOngoingmeetingsaremeetings that have started and there is at least one participant currently in the videomeeting. BothUpcoming and ad-hocmeetings can appear in the activemeetings tab.
This tab displaysallmeetings that are currently active. Themeetings in this list are automatically updated bydefault. Thismeansthat new and completedmeetingswill automatically appear and disappear from the list.This list displays information relating to the ongoingmeeting such as themeeting name,meeting start time and themeeting type.
Example Scenarios:n If a meeting isUpcoming but not yet started it will be shown only in Upcomingmeetings tabs.n When themeeting starts, it will be shown in Ongoingmeetings list only.n If user favorites ameeting then it will be shown in the Favorites list and either the Upcomingmeetingsor activemeetings
list depending on if themeeting has started.
The below table details the controlmeeting information fields:
Section/Field name Description
Meeting Name The given name of themeeting
Meeting Start The given start time of themeeting
Scheduled Duration The scheduled duration of themeeting . This field is only populated withinformation in the Upcomingmeetings window.
Active Duration The active duration of themeeting. This field is only populated withinformation in the Ongoingmeetings window.
Participants The number of participants that have been invited to themeeting. Whenlooking at this in the 'OngoingMeetings' view, there is a deliminatorshowing how many participants where invited cont compared to how manyparticipants are present
Meeting Type The type of meeting the user is currently viewing. Themeetings types areAd-hoc meetings or scheduledmeetings.
Ad-hoc Meeting
Ad-hocmeetingsaremeetings that have not been scheduled. Thesemeeting typeswill only appear in the ‘Ongoing’meetingstab when theyare active. (They can also appear in the favorites tab if themeeting hasmarked asa favorite). There is nometadata for thesemeetingsbecause theyhave not been registered in Synergy JOIN. Ad-hoc meetings can only be ongoingbecause theydo not exist before they start.
Inactive MeetingInactivemeetingsare Upcomingmeetings that are registered bySynergy JOIN wheremetadata is displayed but themeetingshave not yet started. Only scheduledmeetings can be inactive
Synergy Control Installation and Configuration Guide
Page 22 of 34
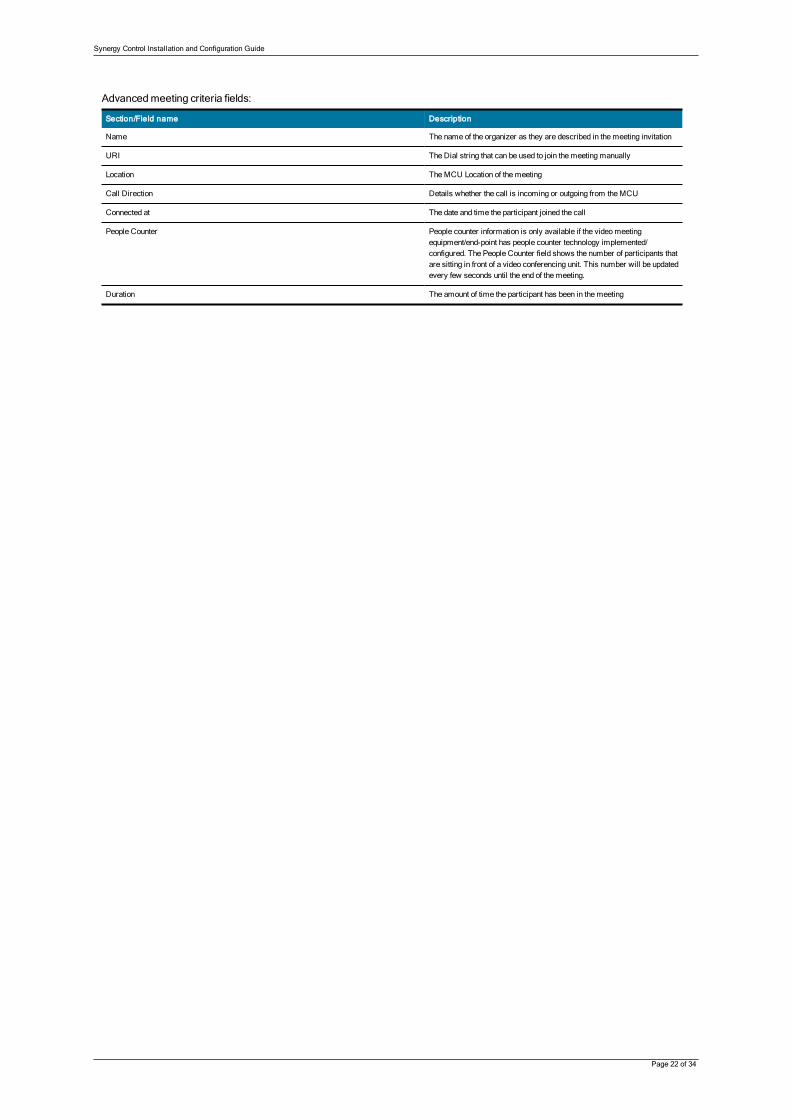
Advancedmeeting criteria fields:
Section/Field name Description
Name The name of the organizer as they are described in themeeting invitation
URI The Dial string that can be used to join themeetingmanually
Location TheMCU Location of themeeting
Call Direction Details whether the call is incoming or outgoing from theMCU
Connected at The date and time the participant joined the call
People Counter People counter information is only available if the videomeetingequipment/end-point has people counter technology implemented/configured. The People Counter field shows the number of participants thatare sitting in front of a video conferencing unit. This number will be updatedevery few seconds until the end of themeeting.
Duration The amount of time the participant has been in themeeting
Synergy Control Installation and Configuration Guide
Page 23 of 34
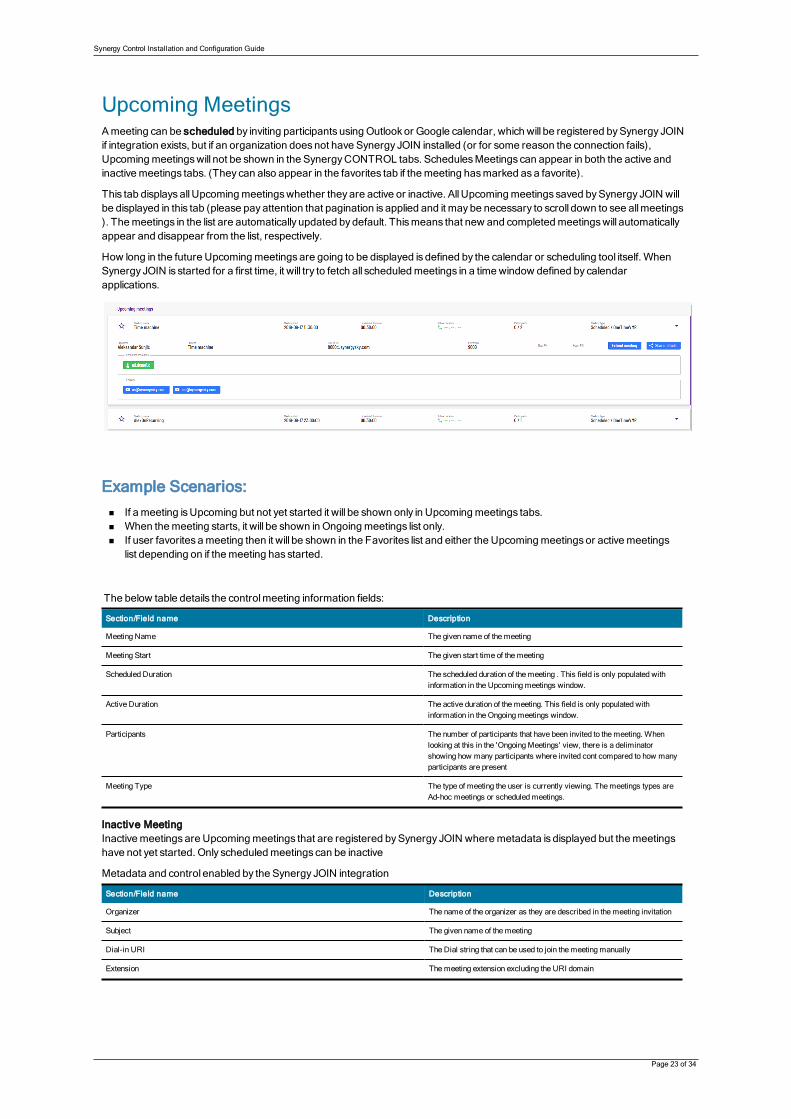
Upcoming MeetingsAmeeting can be scheduled by inviting participants using Outlookor Google calendar, which will be registered bySynergy JOINif integration exists, but if an organization doesnot have Synergy JOIN installed (or for some reason the connection fails),Upcomingmeetingswill not be shown in the SynergyCONTROL tabs. SchedulesMeetings can appear in both the active andinactivemeetings tabs. (They can also appear in the favorites tab if themeeting hasmarked asa favorite).
This tab displaysallUpcomingmeetingswhether theyare active or inactive. AllUpcomingmeetings saved bySynergy JOIN willbe displayed in this tab (please payattention that pagination is applied and it maybe necessary to scroll down to see allmeetings). Themeetings in the list are automatically updated bydefault. Thismeans that new and completedmeetingswill automaticallyappear and disappear from the list, respectively.
How long in the future Upcomingmeetingsare going to be displayed is defined by the calendar or scheduling tool itself. WhenSynergy JOIN is started for a first time, it will try to fetch all scheduledmeetings in a time window defined by calendarapplications.
Example Scenarios:n If a meeting isUpcoming but not yet started it will be shown only in Upcomingmeetings tabs.n When themeeting starts, it will be shown in Ongoingmeetings list only.n If user favorites ameeting then it will be shown in the Favorites list and either the Upcomingmeetingsor activemeetings
list depending on if themeeting has started.
The below table details the controlmeeting information fields:
Section/Field name Description
Meeting Name The given name of themeeting
Meeting Start The given start time of themeeting
Scheduled Duration The scheduled duration of themeeting . This field is only populated withinformation in the Upcomingmeetings window.
Active Duration The active duration of themeeting. This field is only populated withinformation in the Ongoingmeetings window.
Participants The number of participants that have been invited to themeeting. Whenlooking at this in the 'OngoingMeetings' view, there is a deliminatorshowing how many participants where invited cont compared to how manyparticipants are present
Meeting Type The type of meeting the user is currently viewing. Themeetings types areAd-hoc meetings or scheduledmeetings.
Inactive MeetingInactivemeetingsare Upcomingmeetings that are registered bySynergy JOIN wheremetadata is displayed but themeetingshave not yet started. Only scheduledmeetings can be inactive
Metadata and control enabled by the Synergy JOIN integration
Section/Field name Description
Organizer The name of the organizer as they are described in themeeting invitation
Subject The given name of themeeting
Dial-in URI The Dial string that can be used to join themeetingmanually
Extension Themeeting extension excluding the URI domain

Synergy Control Installation and Configuration Guide
Page 24 of 34
Section/Field name Description
Host PIN The specified pin host/organiser should use to join themeeting
Guest PIN The specified pin guests can use to join themeeting
Extendmeeting Allows the administrator to extend themeeting by x number of minutes
Share details Allows the administrator to share themeeting information with additionalparticipants.
Synergy Control Installation and Configuration Guide
Page 25 of 34
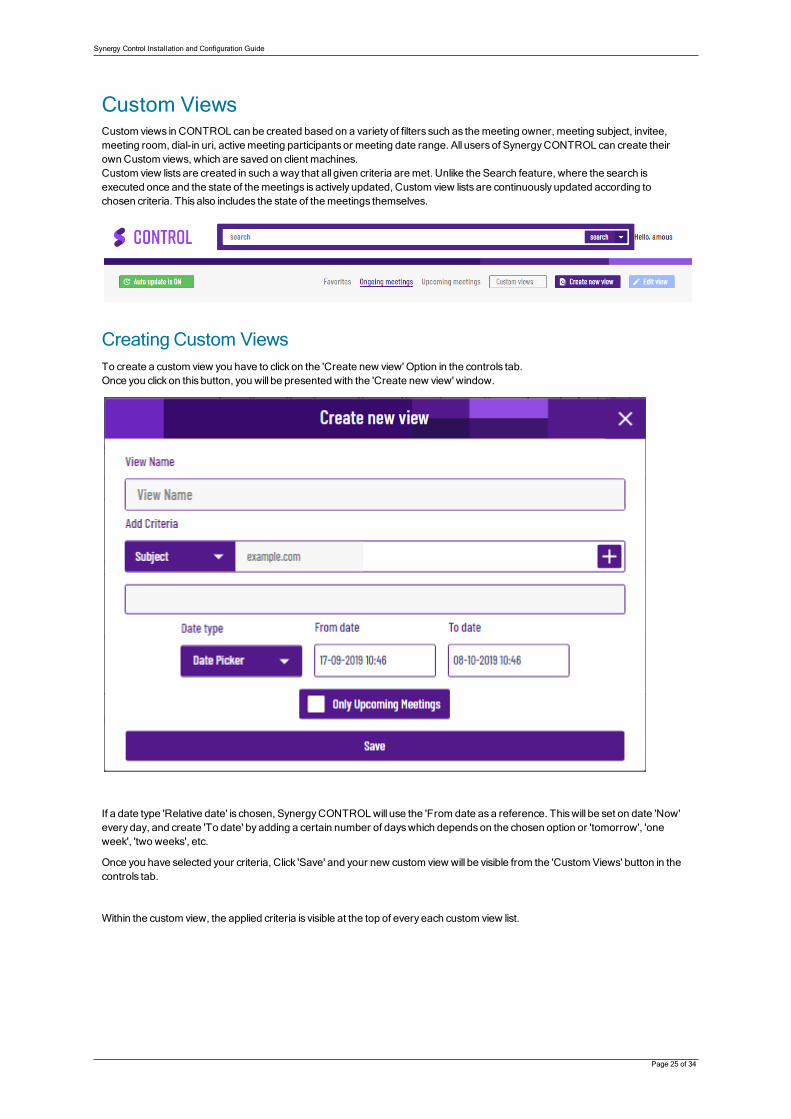
Custom ViewsCustom views in CONTROL can be created based on a variety of filters such as themeeting owner, meeting subject, invitee,meeting room, dial-in uri, activemeeting participants or meeting date range. All users of SynergyCONTROL can create theirownCustom views, which are saved on client machines.Custom view lists are created in such a way that all given criteria aremet. Unlike the Search feature, where the search isexecuted once and the state of themeetings is actively updated, Custom view lists are continuously updated according tochosen criteria. This also includes the state of themeetings themselves.
Creating Custom ViewsTo create a custom view you have to click on the 'Create new view' Option in the controls tab.Once you click on this button, you will be presented with the 'Create new view' window.
If a date type 'Relative date' is chosen, SynergyCONTROLwill use the 'From date asa reference. Thiswill be set on date 'Now'every day, and create 'To date' by adding a certain number of dayswhich dependson the chosen option or 'tomorrow', 'oneweek', 'two weeks', etc.
Once you have selected your criteria, Click 'Save' and your new custom view will be visible from the 'CustomViews' button in thecontrols tab.
Within the custom view, the applied criteria is visible at the top of every each custom view list.

Synergy Control Installation and Configuration Guide
Page 26 of 34
Edit Custom ViewTo edit a custom view, click on the 'Edit view' button in the controls tab.
When you Edit a view, you are not able to change the view name, however you can change the criteria that the view ispopulating with.
To delete a custom view, click on the red 'bin' icon next to the Save button.
Create New View Window
Section/Field name Description
View Name Free text field to type in the given name of the view
AddCriteria The defined criteria that you would like the view to be created with
Date Type The date field can be defined as a Relative Date (Date Range) or you can define a date range use the 'Date Picker'
Only Upcomingmeetings This will only include Upcomingmeetings in this view
Save This will save the entered options and create the custom view
TheCustom view 'Add Criteria' section controls themajority of filters for your custom view. Below you will find the list of thesecriteria along with how they can be used.
Custom View Criteria
Synergy Control Installation and Configuration Guide
Page 27 of 34
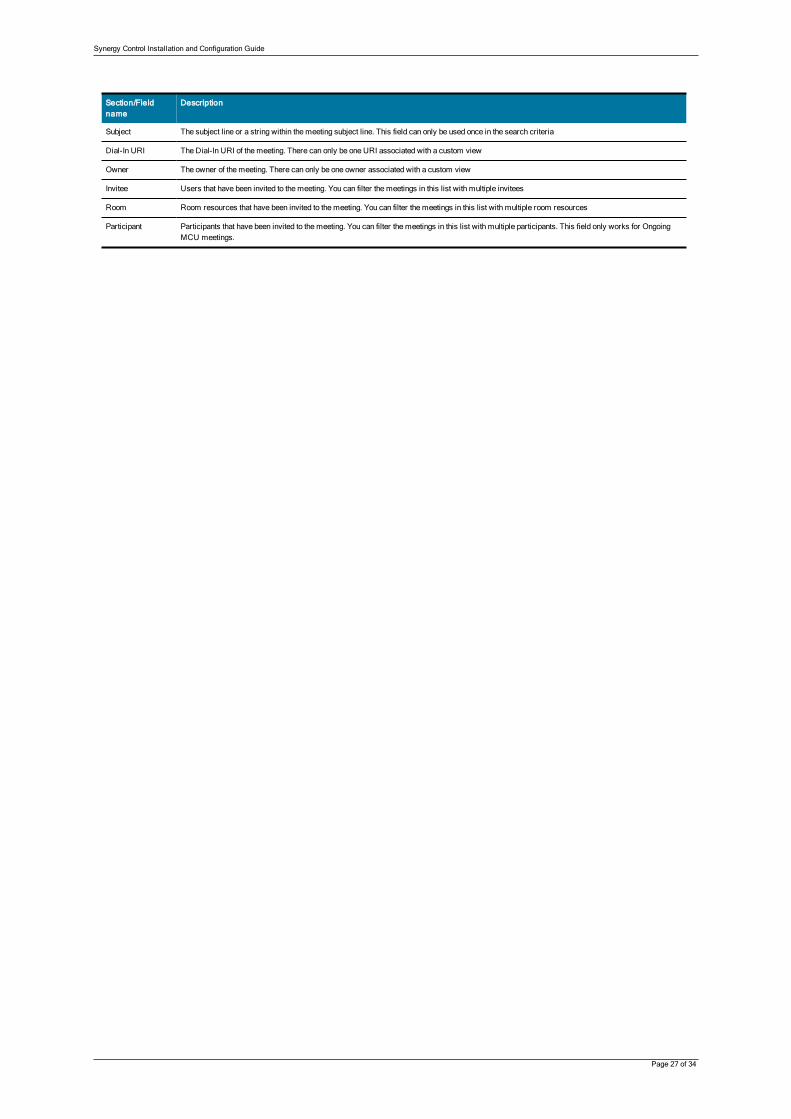
Section/Fieldname
Description
Subject The subject line or a string within themeeting subject line. This field can only be used once in the search criteria
Dial-In URI The Dial-In URI of themeeting. There can only be one URI associated with a custom view
Owner The owner of themeeting. There can only be one owner associated with a custom view
Invitee Users that have been invited to themeeting. You can filter themeetings in this list with multiple invitees
Room Room resources that have been invited to themeeting. You can filter themeetings in this list with multiple room resources
Participant Participants that have been invited to themeeting. You can filter themeetings in this list with multiple participants. This field only works for OngoingMCU meetings.

Synergy Control Installation and Configuration Guide
Page 28 of 34
Synergy of Things
SynergyControl can show booking and occupancy status’s for allmeeting room resources involved in a Scheduledmeeting.This is depended on the roomsand/or video systemsbeing equipped with sensors that can provide information about the roomoccupancyor people count.
There are four typesof flagswhich can be displayed depending on the room statusand information received from the sensor.
Room is Empty When a room camera or other type of sensor does not detect any presence in a room, this flag will be shown. The resource willthen transition into the state 'Canceling candidate', when configured “buffer time” expires and the room is still empty.
Canceling Candidate If a meeting resource is shownwith this type of flag, it means that it will be “unbooked” or “freed” to be booked again. How longthe resource will stay in this state depends on how the unbook function has been configured in Synergy JOIN
Rejected by Organizer When a resource is in the 'Canceling Candidate state', an email will be sent to themeeting organizer to inform them that theroom will be released soon. If the organizer does not click on a specific link in the email, the resource will be unbooked. On theother hand, if the organizer chooses to keep all resources (or the bookedmeeting), Rejected by Organizer flag will be displayed.
Room is canceled This is another transition from Canceling Candidate state and it happens when themeeting organizer does not react to the emailthey will have received about releasing a resource (the organizer did not reject the cancellation).
Synergy Control Installation and Configuration Guide
Page 29 of 34
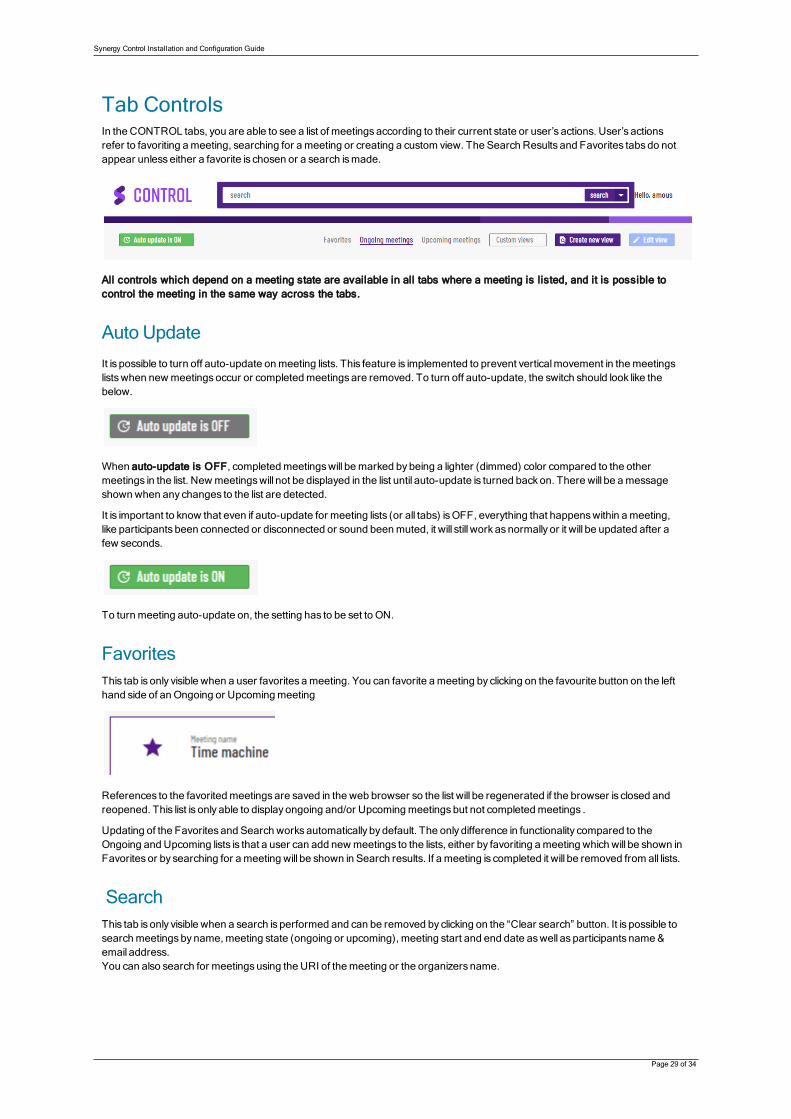
Tab ControlsIn the CONTROL tabs, you are able to see a list of meetingsaccording to their current state or user’s actions. User’s actionsrefer to favoriting ameeting, searching for ameeting or creating a custom view. The Search Results and Favorites tabsdo notappear unlesseither a favorite is chosen or a search ismade.
All controls which depend on a meeting state are available in all tabs where a meeting is listed, and it is possible tocontrol the meeting in the same way across the tabs.
Auto UpdateIt is possible to turn off auto-update onmeeting lists. This feature is implemented to prevent verticalmovement in themeetingslistswhen newmeetingsoccur or completedmeetingsare removed. To turn off auto-update, the switch should look like thebelow.
When auto-update is OFF, completedmeetingswill bemarked bybeing a lighter (dimmed) color compared to the othermeetings in the list. Newmeetingswill not be displayed in the list until auto-update is turned backon. There will be amessageshownwhen any changes to the list are detected.
It is important to know that even if auto-update for meeting lists (or all tabs) isOFF, everything that happenswithin ameeting,like participants been connected or disconnected or sound beenmuted, it will still work asnormally or it will be updated after afew seconds.
To turnmeeting auto-update on, the setting has to be set to ON.
FavoritesThis tab is only visible when a user favorites ameeting. You can favorite ameeting by clicking on the favourite button on the lefthand side of anOngoing or Upcomingmeeting
References to the favoritedmeetingsare saved in the web browser so the list will be regenerated if the browser is closed andreopened. This list is only able to displayongoing and/or Upcomingmeetingsbut not completedmeetings .
Updating of the Favorites and Search worksautomatically bydefault. The only difference in functionality compared to theOngoing and Upcoming lists is that a user can add newmeetings to the lists, either by favoriting ameeting which will be shown inFavorites or by searching for ameeting will be shown in Search results. If a meeting is completed it will be removed from all lists.
SearchThis tab is only visible when a search is performed and can be removed by clicking on the “Clear search” button. It is possible tosearchmeetingsbyname,meeting state (ongoing or upcoming), meeting start and end date aswell as participants name &email address.You can also search for meetingsusing the URI of themeeting or the organizers name.

Synergy Control Installation and Configuration Guide
Page 30 of 34

Synergy Control Installation and Configuration Guide
Page 31 of 34
Meeting Controls
Group ControlsGroup controls are only available from the ActiveMeetings tab. Group controls give the administrator control over sound, videoandmicrophone for all participantswith a click of a button. Group control also allows the administrator to invite participants to themeeting using a URI.
Group controls (from left to right)
Dial-Out to Participant, Meeting Layout, Mute allMicrophones, Turn Off AllCameras, Turn Off Sound for all, Meeting Lock,Show/Hide group controls.
Communication with the server happensasynchronously and it mayhappen that a commandwill not be applied immediately butshortly after a click. Some controls are not available on both Cisco CMSand Pexip Infinity, please check limitation section. If anycontrols are not available for ameeting type, these controlswill be grayed out asper the above image.
It is possible to apply group controls to turn off sound, video andmicrophone on all participants but it is not possible to turn onsound and video for all participants.
Dial-out to participantDial-out to a participant is accomplished usingMCU capabilities depending on where themeetings is being hosted.
Administratorswill have to choose the location (based on whichMCU ishosting themeeting) and the protocol to dial out to aparticipant. The available protocols are SIP, H323, Lync/MS-SIP, RTMPandGoogle HangoutsMeet. Once all of theinformation hasbeen entered, theywill have to click on the 'Connect All' button to connect the participants to themeeting.
The callwill placed to the video room or user’s end-point.
Meeting LayoutThere are several different layouts available for allmeetingsdepending on theMCU that is being used for themeeting.
The applied layout will affect all participants in themeeting. A layout is set on a Virtualmeeting room or Co-Space level.

Synergy Control Installation and Configuration Guide
Page 32 of 34
You can hover over eachmeeting layout for a description of the layout style before applying it to all participants in themeeting.
Participant ControlsParticipant controls refer to a specific participantsmeeting configuration. It is possible to turn on or off a participant’s video,sound andmicrophone, disconnect a participant and also checknetwork data and connection quality for the participant. Somecontrols are not available on CMSand Pexip Infinity. Further information can be found in the limitations section.
Participant controls (from left to right)
Mute/UnmuteMicrophone, Turn Camera on/off, Turn Sound on/off, Show Participant’sNetworkStatus, Disconnect theParticipant.
Unlike Group controls, Participant Controls are bidirectional. It is possible to turn on and off a participant’s assets.
The above image showsa participants network status.
Synergy Control Installation and Configuration Guide
Page 33 of 34
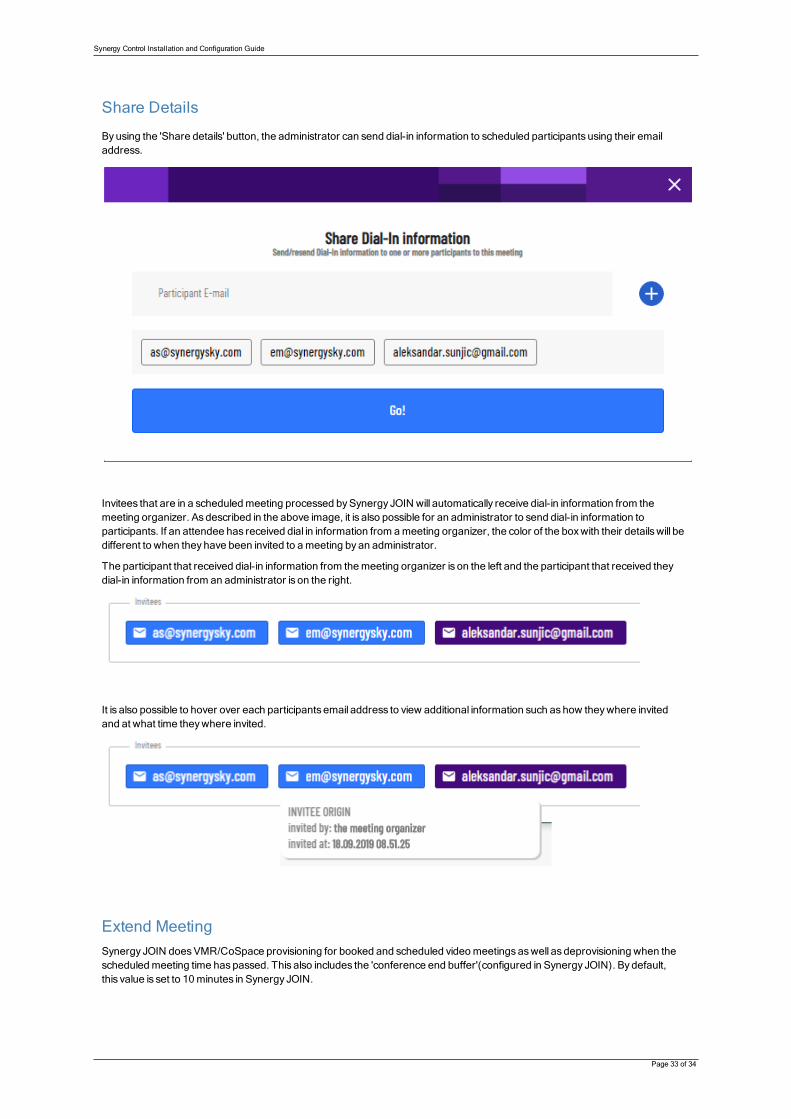
Share Details
Byusing the 'Share details' button, the administrator can send dial-in information to scheduled participants using their emailaddress.
Invitees that are in a scheduledmeeting processed bySynergy JOIN will automatically receive dial-in information from themeeting organizer. Asdescribed in the above image, it is also possible for an administrator to send dial-in information toparticipants. If an attendee has received dial in information from ameeting organizer, the color of the boxwith their detailswill bedifferent to when theyhave been invited to ameeting byan administrator.
The participant that received dial-in information from themeeting organizer is on the left and the participant that received theydial-in information from an administrator is on the right.
It is also possible to hover over each participants email address to view additional information such ashow theywhere invitedand at what time theywhere invited.
Extend MeetingSynergy JOIN doesVMR/CoSpace provisioning for booked and scheduled videomeetingsaswell as deprovisioning when thescheduledmeeting time haspassed. This also includes the 'conference end buffer'(configured in Synergy JOIN). Bydefault,this value is set to 10minutes in Synergy JOIN.
Synergy Control Installation and Configuration Guide
Page 34 of 34
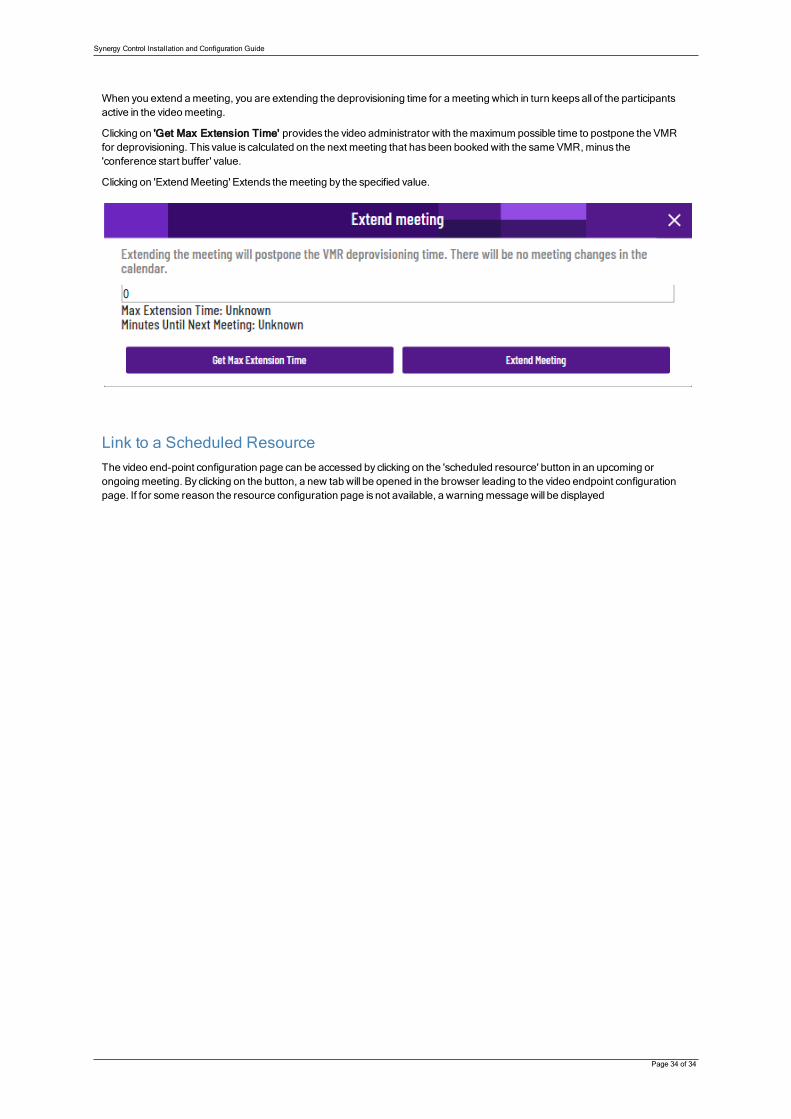
When you extend ameeting, you are extending the deprovisioning time for ameeting which in turn keepsall of the participantsactive in the videomeeting.
Clicking on 'Get Max Extension Time' provides the video administrator with themaximum possible time to postpone the VMRfor deprovisioning. This value is calculated on the next meeting that hasbeen booked with the same VMR,minus the'conference start buffer' value.
Clicking on 'ExtendMeeting' Extends themeeting by the specified value.
Link to a Scheduled ResourceThe video end-point configuration page can be accessed by clicking on the 'scheduled resource' button in an upcoming orongoingmeeting. By clicking on the button, a new tab will be opened in the browser leading to the video endpoint configurationpage. If for some reason the resource configuration page is not available, a warningmessage will be displayed