
SpeedStar Configuration 2.1 Installation
11
SSC 2.1 Installation © 2011 Own-X. All rights reserved. This document is not to be reproduced or distributed without permission of Page 1 SpeedStar Configuration 2.1 Installation Last saved: 28/10/2011 Updated by: Daniel Muhi
-
Upload
khangminh22 -
Category
Documents
-
view
1 -
download
0
Transcript of SpeedStar Configuration 2.1 Installation

SSC 2.1 Installation
© 2011 Own-X. All rights reserved. This document is not to be reproduced or distributed without permission of
Page 1
SpeedStar Configuration 2.1 Installation
Last saved: 28/10/2011
Updated by: Daniel Muhi

SSC 2.1 Installation
© 2011 Own-X. All rights reserved. This document is not to be reproduced or distributed without permission of
Page 2
LIBERTY INSTALLATION The Liberty 1.2.6.26364 version is included in the Liberty_v1.2.6.zip file. The ZIP file contains the Liberty controller directory.
1. Directory structure
The system uses two partitions. The C: drive is for the program, the D: drive is for data. The C:\SpeedStar directory holds the SpeedStar related files. The Controller executable file is located in the Versions subdirectory. You will need to copy the Liberty_v1.2.6 directory into the Version subdirectory after completing the steps listed below.
2. Preparing for installation
To avoid system failures, the C: drive is write-protected. This provides protection against system file corruptions, etc. Before installation, the write protection system needs to be switched off using the C:\SpeedStar\EWF\ewf_off_immediately.bat
command. When you have finished the installation, switch the write protection filter back with the C:\SpeedStar\EWF\ewf_on.bat
command.
3. Upgrading Print Engine Firmware
For the current Liberty version, you need to have the print engine to run a firmware version 110727_e. If you have an older firmware, you need to upgrade to this version to make Liberty v1.2.6 installation complete. To burn the firmware please read: How_to_upgrade_the_firmware_110727_e.pdf. (available on ftp.own-x.hu in SpeedStar/SSC_2.1 folder) Also make sure that your print engine is using static IP address settings and its address is 125.240.90.2. Plug in the internal USB cable to the print engine and run the following command: usbcmd –c net_myIP
It should return 125.240.90.2

SSC 2.1 Installation
© 2011 Own-X. All rights reserved. This document is not to be reproduced or distributed without permission of
Page 3
If your firmware is the correct version, continue with the next step.
4. Installing Liberty v1.2.6
1. Copy the Liberty_v1.2.6 directory and its contents from the ZIP file to the C:\SpeedStar\Versions directory.
2. Create a shortcut to the executable ‘Liberty.exe’ and place it on the desktop 3. If you want Liberty to start automatically when the printer starts, copy the shortcut
into the C:\Documents and Settings\Administrator\Start Menu\Programs\Startup
directory. This is recommended for most users. 4. As an additional step, we recommend that you change the Internet Firewall settings
for the external LAN interface on the printer, so that it blocks traffic from the printer and only allows traffic into the printer on port 80 (reserved for future web server) and port 9100 (Printer port).
5. Setting the configuration files
Liberty v1.2.6 uses a different configuration file from the one used in previous versions. The new config file is called LibertyConfig.ini and is located in the same directory as Liberty.exe. You need to change one line in the config file depending on whether you have an installed and working paper position sensor (a CIS sensor). If you have a printer that is working with an old (B4) CIS paper sensor, set the
CIS_sensor_enabled value to 1 and the CIS_IO_panel_version value to 1. If you do not have a CIS sensor installed, set the CIS_sensor_enabled value to 0. If you have a printer that is working with a new CIS paper sensor (A4), set the
CIS_sensor_enabled value to 1 and the CIS_IO_panel_version value to 3. The CIS_sensor_enabled and CIS_IO_panel_version lines are highlighted by yellow in the sample configuration file below. WorkingDirectory = D:\SpeedStar
DatabaseDirectory = D:\database
LabelDirectory = Labels
PrnDirectory = PRNs
left_adjustment = 50
tof_adjustment = 0
cutter_adjustment = 0

SSC 2.1 Installation
© 2011 Own-X. All rights reserved. This document is not to be reproduced or distributed without permission of
Page 4
hasControlledUnwind = 0
hasQA = 1
hideMouse = 0
PrinterQueue = SpeedStar Printer Series Driver (Copy 1)
hasExternalLamp = 0
useCIS_IO = 1
CIS_sensor_enabled = 1
connectToEngine = 1
NS_IP_Address = 125.240.90.2
engineType = Z2i
enableJobRecovery = 0
roll2roll_mode = 0
CIS_IO_panel_version = 3
CIS_LinerLowerThreshold = 100
CIS_LabelLowerThreshold = 210
lang = en-US
Once the modifications are made, save the configuration file. As the final step, switch the write protection filter back with the C:\SpeedStar\EWF\ewf_on.bat
command. Once this is complete, restart the entire printer and you are ready to start printing.
DRIVER INSTALLATION 1.) Connect SpeedStar 3000 printer to the network. Check the connection state with 'ping <IP address of printer>’ command from your PC or Laptop to check that it sees the printer. 2.) Install the following SLP program on printer. This software has to be installed only on the printer. You never have to install it on a user PC. 2.a.) Turn OFF electronic file protecting system (EWF) Run: c:\SpeedStar\EWF\ewf_off_immediately.bat 2.b.) Create new directory: C:\SpeedStar\SLP
SSC 2.1 Installation
© 2011 Own-X. All rights reserved. This document is not to be reproduced or distributed without permission of
Page 5
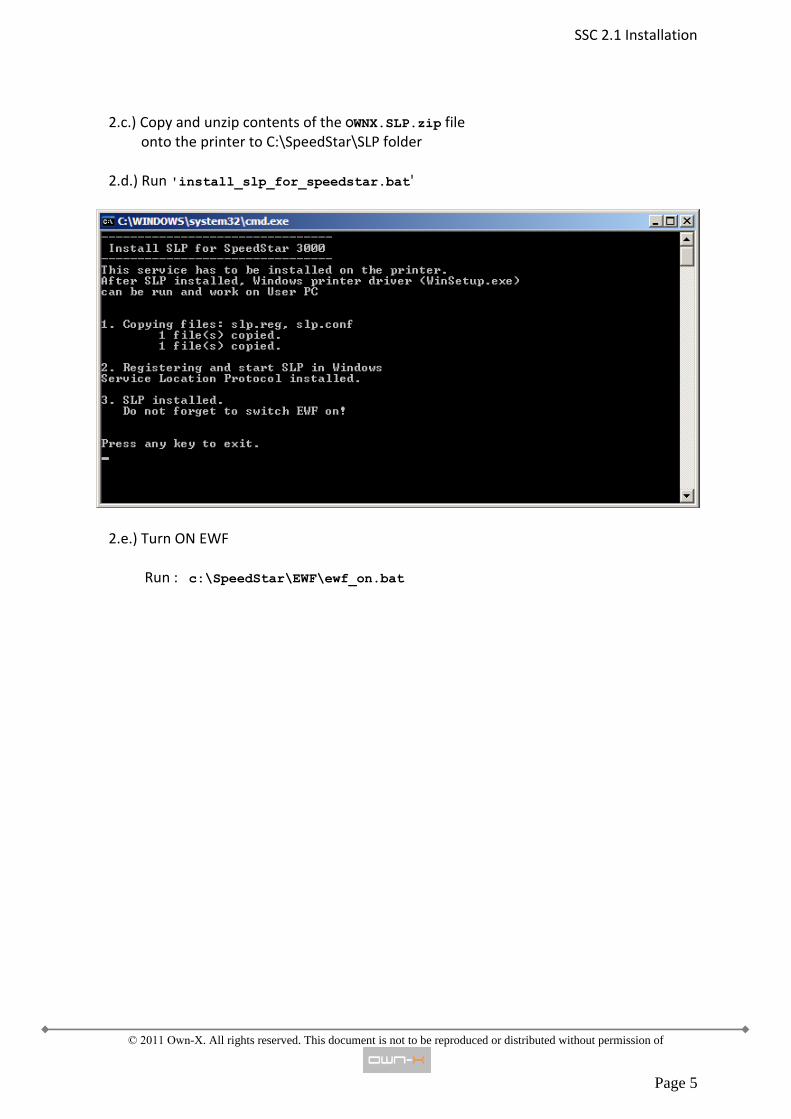
2.c.) Copy and unzip contents of the OWNX.SLP.zip file onto the printer to C:\SpeedStar\SLP folder 2.d.) Run 'install_slp_for_speedstar.bat'
2.e.) Turn ON EWF Run : c:\SpeedStar\EWF\ewf_on.bat

SSC 2.1 Installation
© 2011 Own-X. All rights reserved. This document is not to be reproduced or distributed without permission of
Page 6
3.) On the user PC or laptop, start Memjet's Windows installer: 3.a.) Unzip SpeedStar3000_Driver_R7.zip to anywhere on the user PC 3.b.) Run SpeedStar3000_Driver_R7\WinSetup.exe and follow the instructions:

SSC 2.1 Installation
© 2011 Own-X. All rights reserved. This document is not to be reproduced or distributed without permission of
Page 7
When asked, select 'network printer'.
Installation begins:
SSC 2.1 Installation
© 2011 Own-X. All rights reserved. This document is not to be reproduced or distributed without permission of
Page 8
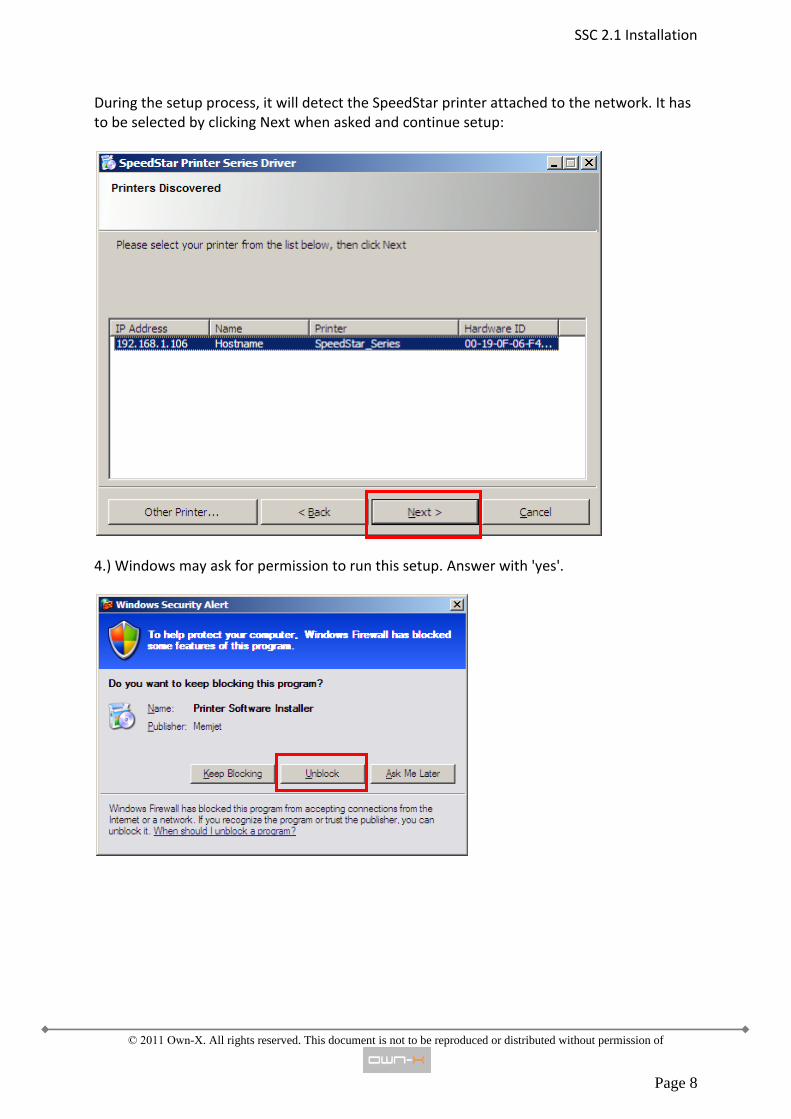
During the setup process, it will detect the SpeedStar printer attached to the network. It has to be selected by clicking Next when asked and continue setup:
4.) Windows may ask for permission to run this setup. Answer with 'yes'.

SSC 2.1 Installation
© 2011 Own-X. All rights reserved. This document is not to be reproduced or distributed without permission of
Page 9
5.) Setup may ask for 'Run firmware update'. Answer with 'No'.
Wait until the progress bar finishes the installation
When it’s finished you will need to Restart your PC or Laptop! 6.) It is necessary to unselect 'Bidirectional Printing' at printer’s property page.
SSC 2.1 Installation
© 2011 Own-X. All rights reserved. This document is not to be reproduced or distributed without permission of
Page 10
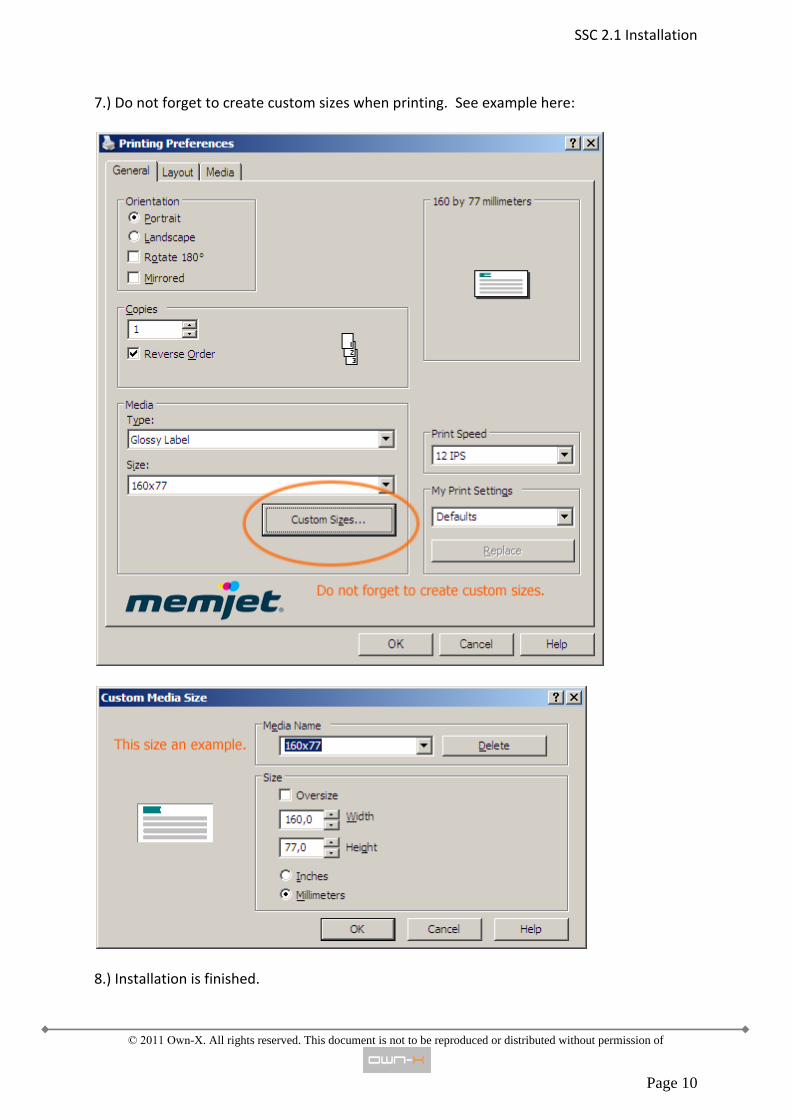
7.) Do not forget to create custom sizes when printing. See example here:
8.) Installation is finished.

SSC 2.1 Installation
© 2011 Own-X. All rights reserved. This document is not to be reproduced or distributed without permission of
Page 11
END OF INSTRUCTIONS